
OPERATOR'S MANUAL
MODEL #201371
1100 LB. (500 KG) PORTABLE WINCH
or visit championpowerequipment.com
READ AND SAVE THIS MANUAL. This manual contains important safety precautions which should be read
and understood before operating the product. Failure to do so could result in serious injury. This manual should
remain with the product.
Specifications, descriptions and illustrations in this manual are as accurate as known at the time of publication,
but are subject to change without notice.
at championpowerequipment.com
SERIAL NO. LABEL
Champion Power Equipment, Inc.
4870-M-OP REV 20240409
EN
ACTIVATE YOUR WARRANTY
by registering your product:
championpowerequipment.com
SERIAL NO.

201371 - 1100 LB. (500 KG) PORTABLE WINCH
TABLE OF CONTENTS
2
TABLE OF CONTENTS
Introduction
................................. 3
Safety Definitions .......................... 3
Important Safety Instructions ........... 4
Operation Symbols .............................. 5
Controls and Features .....................6
Winch ......................................... 6
Parts Included .................................. 7
Assembly .................................... 8
Assembling the Winch ........................... 8
Operation ....................................8
General Tips for Safe Operation .................. 10
Self Recovery ................................. 10
Cable/Rope Abrasion Sleeve .................... 11
Winching Techniques A-Y ....................... 11
Suggested Accessories.................. 12
Maintenance .............................. 12
Cable/Rope Replacement ....................... 12
System Reset ................................. 14
Specifications ............................. 16
Performance Specifications ..................... 16
Duty Cycle Ratings ............................. 16
Troubleshooting .......................... 17
FOR PARTS BREAKDOWN
Search by model number at
championpowerequipment.com

201371 - 1100 LB. (500 KG) PORTABLE WINCH
INTRODUCTION
3
INTRODUCTION
Congratulations on your purchase of a Champion Power
Equipment (CPE) product. CPE designs, builds, and
supports all of our products to strict specifications and
guidelines. With proper product knowledge, safe use, and
regular maintenance, this product should bring years of
satisfying service.
Every effort has been made to ensure the accuracy and
completeness of the information in this manual at the
time of publication, and we reserve the right to change,
alter and/or improve the product and this document at
any time without prior notice.
Since CPE highly values how our products are designed,
manufactured, operated and are serviced, and also highly
value your safety and the safety of others, we would
like you to take the time to review this product manual
and other product materials thoroughly and be fully
aware and knowledgeable of the assembly, operation,
dangers and maintenance of the product before use. Fully
familiarize yourself, and make sure others who plan on
operating the product fully familiarize themselves too,
with the proper safety and operation procedures before
each use. Please always exercise common sense and
always err on the side of caution when operating the
product to ensure no accident, property damage, or injury
occurs. We want you to continue to use and be satisfied
with your CPE product for years to come.
When contacting CPE about parts and/or service, you will
need to supply the complete model and serial numbers
of your product. Transcribe the information found on your
product’s nameplate label to the table below
CPE TECHNICAL SUPPORT TEAM
1-877-338-0999
MODEL NUMBER
201371
SERIAL NUMBER
DATE OF PURCHASE
PURCHASE LOCATION
SAFETY DEFINITIONS
The purpose of safety symbols is to attract your
attention to possible dangers. The safety symbols, and
their explanations, deserve your careful attention and
understanding. The safety warnings do not by themselves
eliminate any danger. The instructions or warnings they
give are not substitutes for proper accident prevention
measures.
DANGER
DANGER indicates a hazardous situation which,if not
avoided, will result in death or serious injury.
WARNING
WARNING indicates a hazardous situation which, if not
avoided, could result in death or serious injury.
CAUTION
CAUTION indicates a hazardous situation which, if not
avoided, could result in minor or moderate injury.
NOTICE
NOTICE indicates information considered important,
but not hazard-related (e.g., messages relating to
property damage).

201371 - 1100 LB. (500 KG) PORTABLE WINCH
IMPORTANT SAFETY INSTRUCTIONS
4
CAUTION
Always use a winch hook strap when handling the
hook for spooling or unspooling the cable/rope.
CAUTION
Always use gloves to protect hands when handling
the cable/rope. Never let the cable/rope slide through
your hands.
WARNING
When re-spooling the cable/rope, ensure that it
spools in the under-wind position with the cable/rope
entering the drum from the bottom, not the top.
To re-spool correctly, and while wearing gloves, keep
a slight load on the cable/rope while pushing the IN
button to draw in the cable/rope. Walk toward the
winch not allowing the cable to slide through your
hands. Do not let your hands get within 12 inches
(30 cm) of the winch while re-spooling. Turn off the
winch and repeat the procedure until a few feet of
cable/rope are left. Keep hands clear of the fairlead
and drum while the winch is under power.
CAUTION
Never wrap the cable/rope around any object and hook
it back onto itself.
CAUTION
Operating duration of winching pulls should be kept as
short as possible.
If the motor becomes excessively hot to the touch,
stop winching immediately and let it cool down for a
few minutes. Do not pull for more than one minute at
or near the rated load.
CAUTION
Never maintain power to the winch if the motor stalls.
This electric winch is designed and made for short
duty use and should not be used in constant duty
applications. See Duty Cycle Ratings section in the
back of this manual for more information.
IMPORTANT SAFETY
INSTRUCTIONS
WARNING
Cancer and Reproductive Harm –
www.P65Warnings.ca.gov
WARNING
Never use this winch for lifting or moving people or
animals.
Never step over the cable/rope when operating under
load.
Always maintain a safe distance to the opposite side
of the cable/rope when operating under load.
WARNING
Never exceed the rated capacity.
Always be aware that the cable/rope under load may
break before the motor stalls.
Always use a snatch block to reduce the load on the
cable/rope for heavy loads at or near rated capacity.
WARNING
Never use the winch to secure or hold a vehicle for an
extended period of time.
Always apply stop blocks to the wheels of the vehicle
when on an incline.
Do not use the winch to secure a vehicle for
transporting purposes.
Never move the vehicle to pull a load (towing) when
operating the winch cable/rope.
WARNING
Disconnect the power supply cord when not in use.
WARNING
Avoid “shock loads” by using the control switch
intermittently to take up the slack in the cable/rope.
“Shock loads” can exceed the rated capacity of the
cable/rope and drum.
201371 - 1100 LB. (500 KG) PORTABLE WINCH
IMPORTANT SAFETY INSTRUCTIONS
5
GROUND FAULT CIRCUIT INTERRUPTER PROTECTION
This winch is provided with a ground fault circuit
interrupter (GFCI) built into the plug of the power supply
cord. This device provides additional protection from the
risk of electric shock. Should replacement of the plug or
cord become necessary, use only identical replacement
parts that include GFCI protection.
EXTENSION CORDS
Use only extension cords that are intended for outdoor
use. These extension cords are identified by a marking
“Acceptable for use with outdoor appliances; store
indoors while not in use.” Use only extension cords
having an electrical rating not less than the rating of the
product. Do not use damaged extension cords. Examine
extension cord before using and replace if damaged. Do
not abuse extension cord and do not yank on any cord
to disconnect. Keep cord away from heat and sharp
edges. Always disconnect the extension cord from the
receptacle before disconnecting the product from the
extension cord. Always plug the extension cord into a
GFCI protected outlet. To avoid the possibility of the
plug getting wet when using an extension cord, arrange
a “drip loop” in the cord connecting the winch to the
extension cord. The “drip loop” is that part of the cord
below the level of the connector which prevents water
travelling along the cord and coming in contact with the
connection. If the plug does get wet, DO NOT unplug the
cord. Disconnect the fuse or circuit breaker that supplies
power to the tool, then unplug and examine for presence
of water in the connection.
WARNING
To reduce the risk of electrocution, keep all
connections dry and off the ground. Never touch plug
with wet hands.
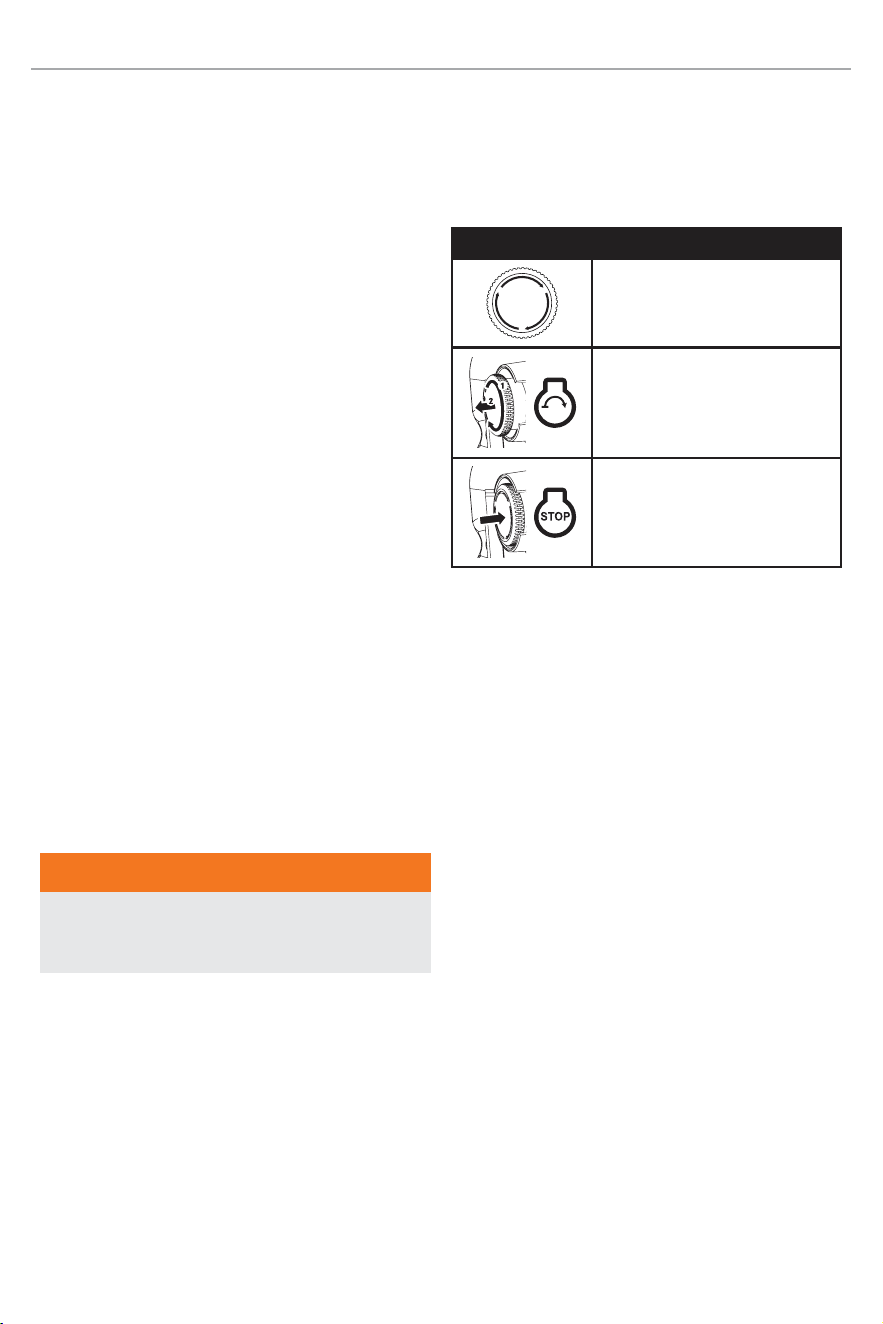
Operation Symbols
Some of the following symbols may be used on this
product. Please study them and learn their meaning.
Proper interpretation of these symbols will allow you to
safely operate the product.
Symbol Meaning
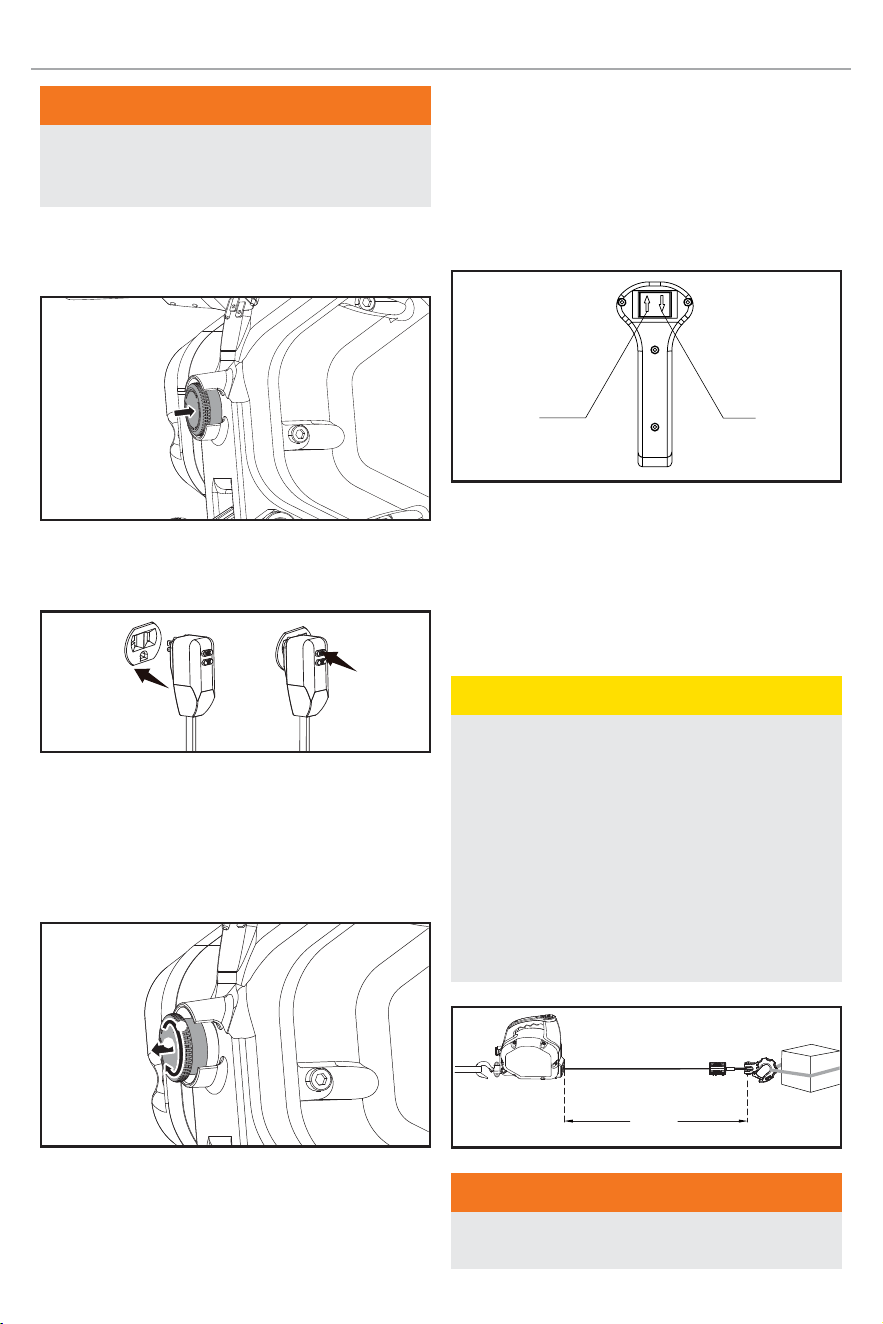
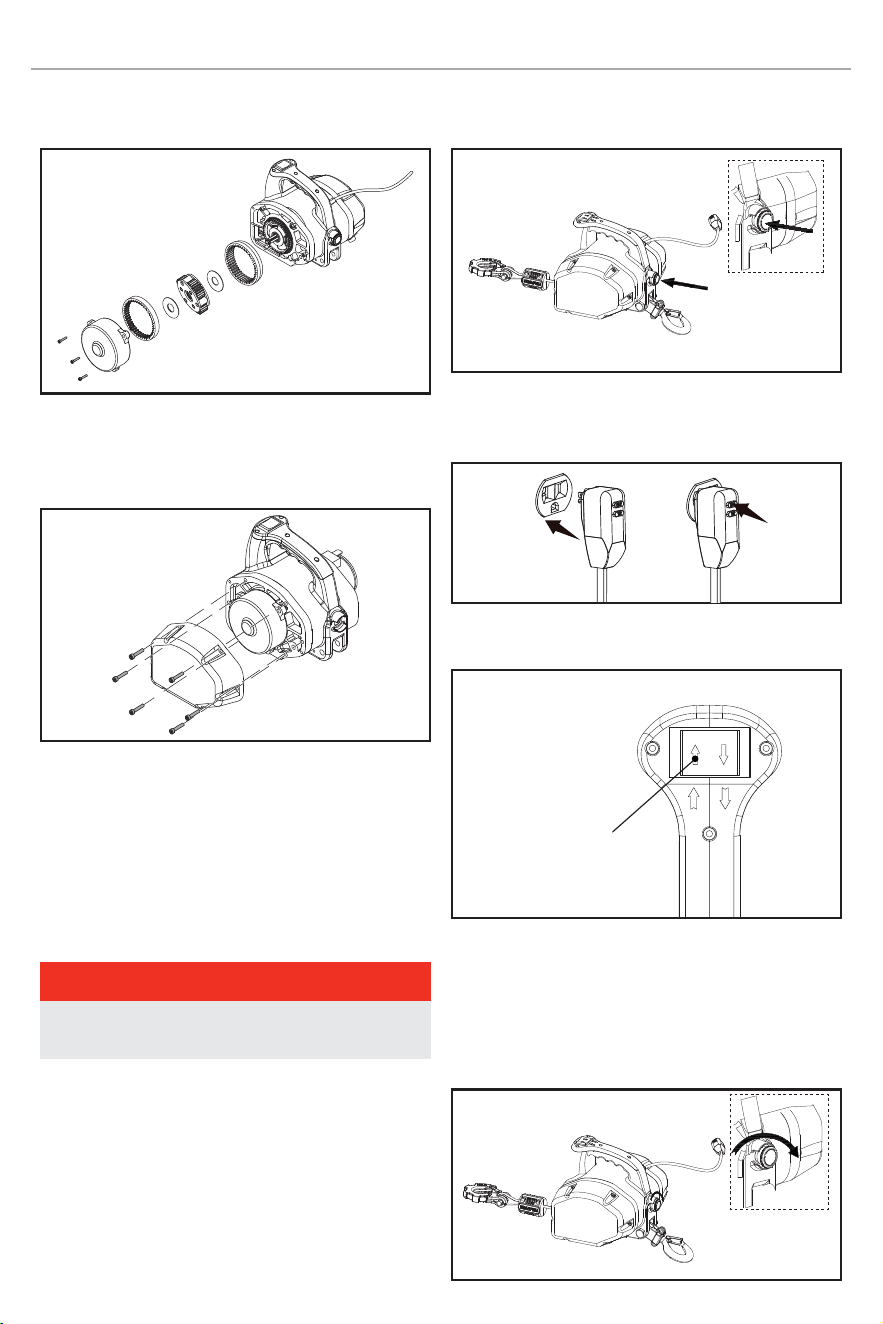
Emergency Stop button
Emergency Stop button “ON”:
Rotate clockwise until the button
pops out to activate or start the
winch.
Emergency Stop button “OFF”:
Press in to deactivate or stop the
winch.
201371 - 1100 LB. (500 KG) PORTABLE WINCH
CONTROLS AND FEATURES
6
CONTROLS AND FEATURES
Read this operator’s manual before operating your winch. Familiarize yourself with the location and function of the
controls and features. Save this manual for future reference.
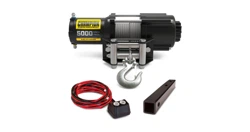
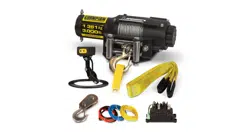
Winch
1. IN/OUT – Used to retract or extend wire cable.
2. Carrying Handle – used to grip winch during
operation or carry for storage.
3. GFCI – This winch is provided with a ground fault
circuit interrupter (GFCI) built into the plug of the
power supply cord. This device provides additional
protection from the risk of electric shock.
4. Power Cord – 3 ft. 3 in. (1 m) with built in GFCI.
5. Emergency Stop Button – Activates or deactivates
the winch operation.
6. Carrying Case – Used to store and transport the
winch and accessories.
7. Hand Saver/Strap – Used to assist cable/rope
feed.
8. Clevis Hook – Provides a means for connecting the
cable/rope to an intended pull load.
9. D-shackles – A pair (2) of 7/16” shackles rated
to 1.4 tons - Provides a means for connecting the
looped ends of winch cable or rope, straps and
snatch blocks.
10. Cable Hook Stopper – Prevents the clevis hook
from completely going into the winch.
11. Cable/Rope – 3/16 in. × 15 ft. (4.8 mm × 4.6 m)
galvanized aircraft cable designed specifically for
load capacity of 1,100 lb. (500 kg).
12. Roller + Hawse Combo – When using the winch
at an angle the hawse acts to guide the cable onto
the drum and minimizes damage to the cable from
abrasion on the winch mount or bumper.
13. Tree anchor or tow straps – A pair (2) of 2” X 8’
straps rated to 8,800 lbs. Use along with a clevis
or D-shackle to secure the winch cable/rope to
a wide variety of anchor points and objects. This
strap is designed to help protect living trees from
the kind of damage a choker chain or wire rope
might cause.
14. Motor – 1.0 HP / 0.75 kW 120V AC motor provides
power to the gear mechanism.
15. Anchor Clevis Hook – Provides a means for
anchoring the winch during operation.
16. Utility gloves – A pair (2) of utility gloves.
3
6 9 13 16
42
11 121087 14 15
1 5
201371 - 1100 LB. (500 KG) PORTABLE WINCH
CONTROLS AND FEATURES
7
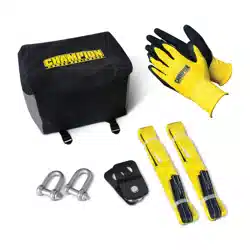
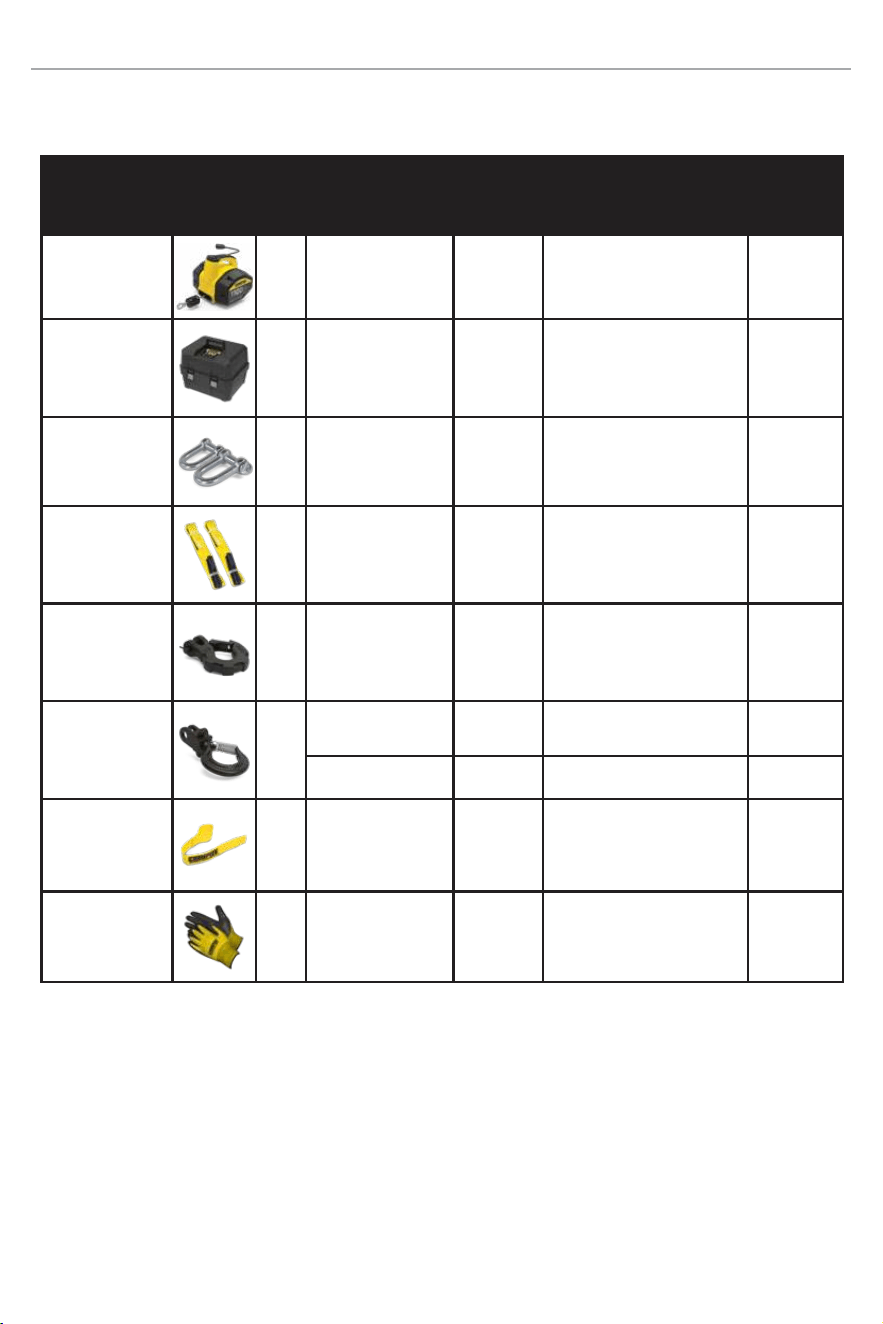
Parts Included
Assembly Parts
Part
Part
Qty
Hardware
Hardware
Qty
Tool(s) Needed
Torque
lbf-ft
(N.m)
Winch
1
Carrying Case
1
D-Shackles
2
Tree Savers
2
Clevis Hook 1 Needle nose pliers
Anchor Clevis
Hook
1
Hexagon Head Bolt
M12 x 65
1 1x 19mm wrench or socket
57.5-76.7
(78-104)
Lock Nut M12 1 1x 19mm wrench or socket
Hand Saver/
Strap
1
Gloves (Pair)
2
201371 - 1100 LB. (500 KG) PORTABLE WINCH
ASSEMBLY
8
ASSEMBLY
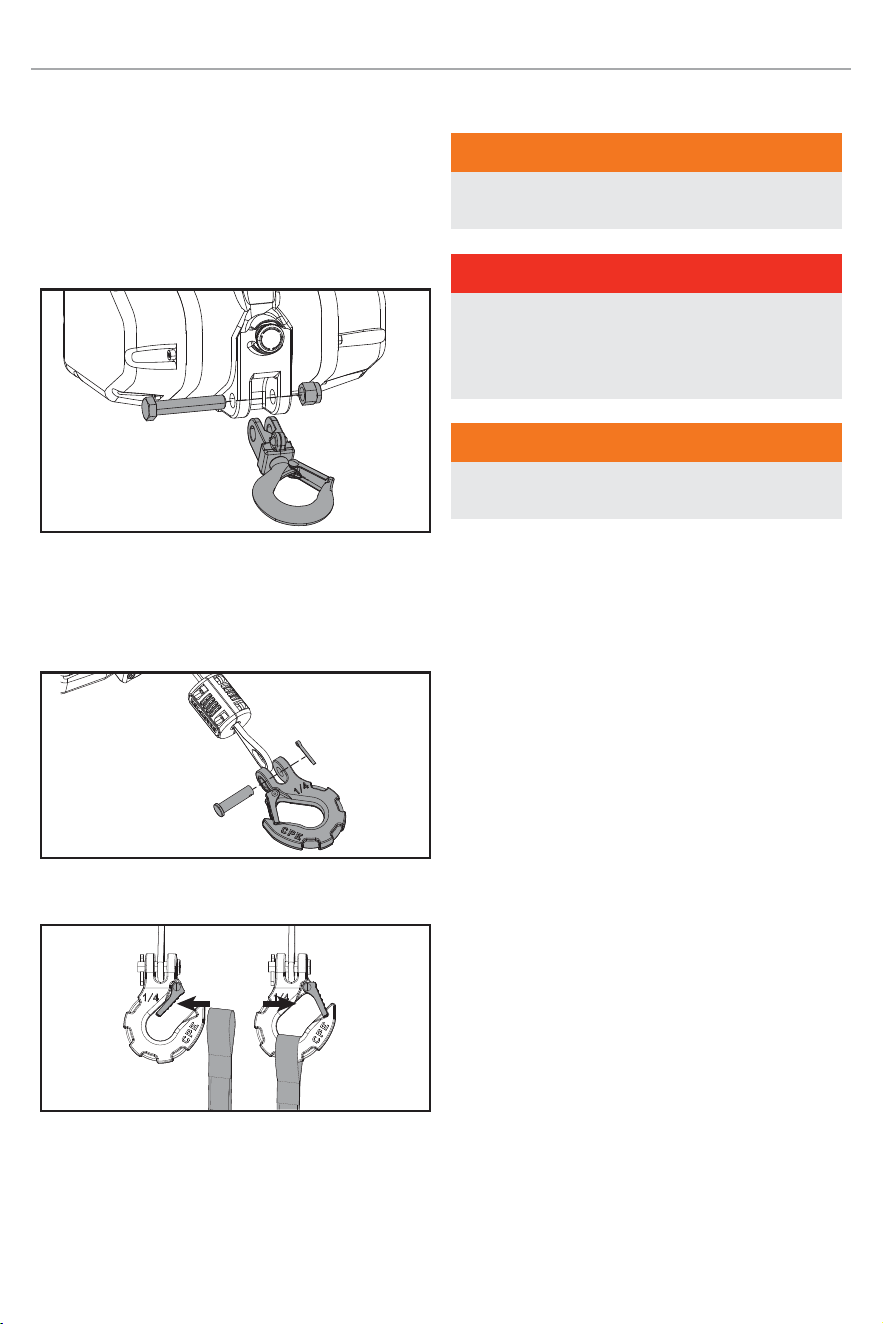
Assembling the Winch
1. Insert M12×65 bolt through the channel hole below
the EMERGENCY STOP button and assemble with
the M12 lock nut provided. Tighten the bolt and nut.
DO NOT over tighten.
2. Assemble clevis hook to cable/rope with the bolt
and cotter pin. After cotter pin is inserted, bend
the two arms of the cotter pin with a pair of needle
nose pliers to ensure a secure fit.
3. Attach the hand strap to the clevis hook.
OPERATION
WARNING
Read and understand this operator’s manual before
operating your winch.
DANGER
Always use this product in a safe location and clear
bystanders away from cable/rope and winch before
use. Always ensure a competent winch handler is at
the controls.
WARNING
Always wear gloves and eye protection when
operating winch.
GROUND FAULT CIRCUIT INTERRUPTER PROTECTION
This winch is provided with a ground fault circuit
interrupter (GFCI) built into the plug of the power supply
cord. This device provides additional protection from the
risk of electric shock. Should replacement of the plug or
cord become necessary, use only identical replacement
parts that include GFCI protection.
EXTENSION CORDS
Use only extension cords that are intended for outdoor
use. These extension cords are identified by a marking
“Acceptable for use with outdoor appliances; store
indoors while not in use.” Use only extension cords
having an electrical rating not less than the rating of the
winch. Do not use damaged extension cords. Examine
extension cord before using and replace if damaged. Do
not abuse extension cord and do not yank on any cord
to disconnect. Keep cord away from heat and sharp
edges. Always disconnect the extension cord from the
receptacle before disconnecting the product from the
extension cord. Always plug the extension cord into a
GFCI protected outlet. To avoid the possibility of the
plug getting wet when using an extension cord, arrange
a “drip loop” in the cord connecting the winch to the
extension cord. The “drip loop” is that part of the cord
below the level of the connector which prevents water
travelling along the cord and coming in contact with the
connection. If the plug does get wet, DO NOT unplug
the cord. Disconnect the fuse or circuit breaker that
supplies power to the winch, then unplug and examine for
presence of water in the connection.
201371 - 1100 LB. (500 KG) PORTABLE WINCH
OPERATION
9
WARNING
To reduce the risk of electrocution, keep all
connections dry and off the ground. Never touch plug
with wet hands.
1. Press “IN” to deactivate or “STOP” the winch
operation.
2. Plug in the GFCI power supply cord and press the
RESET button.
3. Securely connect the anchor clevis hook and clevis
hook. Always use a suitable anchor point capable
of withstanding your intended load.
4. Rotate clockwise until the EMERGENCY STOP
button pops “OUT” to activate or start the winch.
2
1
5. Operate winch by pressing “OUT” for at least 5
seconds to release cable (or 3 ft. (1 m) of cable/
rope has extended from drum). Unspool cable/
rope as needed, but only until you see red paint
indicating a minimum wrap on the drum. Do not
unspool past this point. 5 wraps of cable/rope must
be kept on the drum at all times.
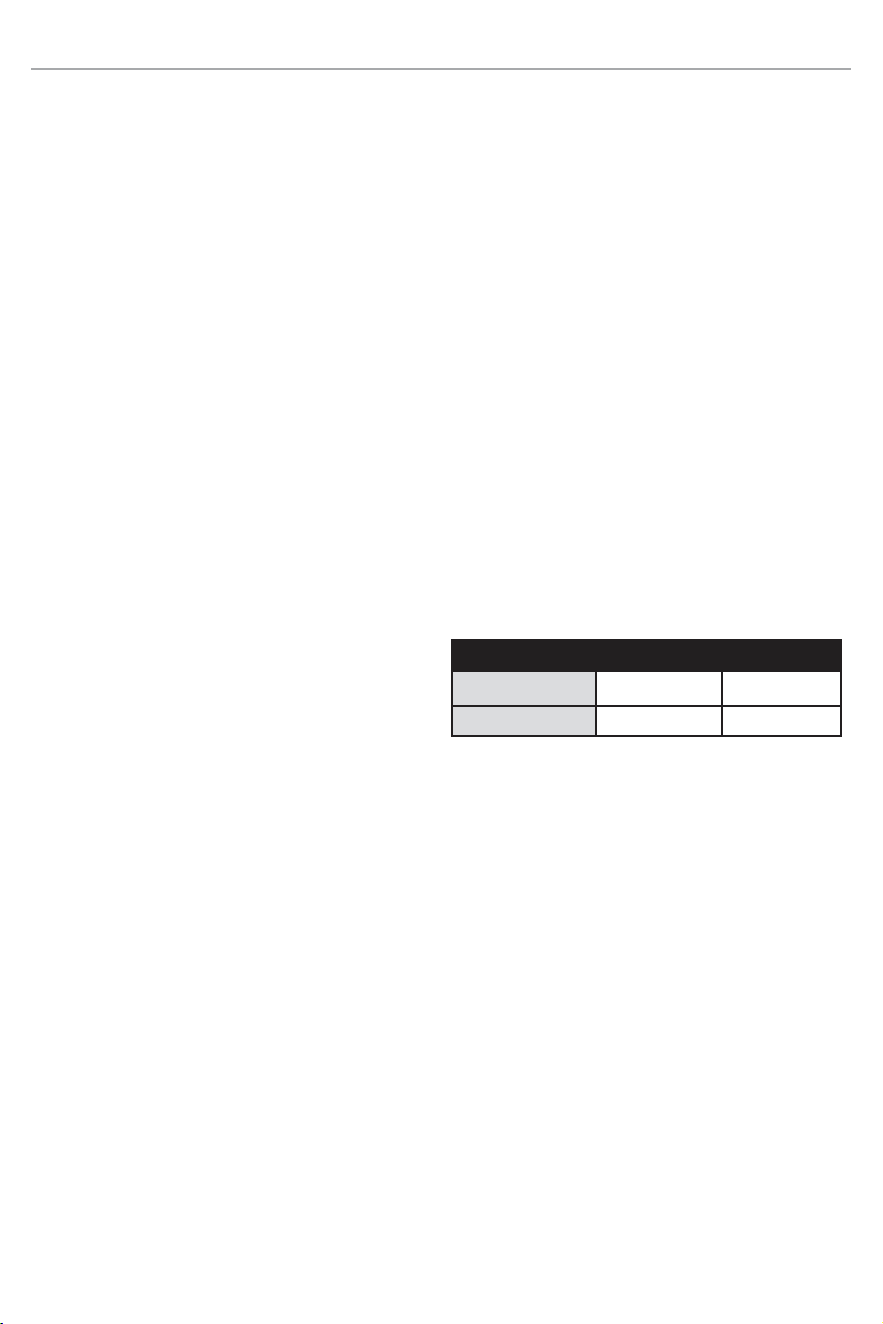
IN
OUT
6. When winching, ensure the cable/rope is wrapping
the drum in an orderly fashion. If mis-wrapped,
unspool, adjust unit so that it is perpendicular to
load, and spool again.
7. When winching is complete, push the red
EMERGENCY STOP button and unplug unit.
CAUTION
This winch features an automatic stoppage of cable/
rope in or out when the limit of safe operation is
detected.
– During cable-in, the winch will automatically stop
when reaching maximum safe cable wrap on the
drum, allowing only winch-out operation.
– During cable-out operation, the winch will
automatically stop spooling out cable/rope when
it reaches maximum safe extension. At this point,
only IN will be possible.
1-9.7 ft.
(0.3 - 3 m)
1100 lb.
500 kg
WARNING
Always keep the winch and pulling load in sight during
pulling operation.
201371 - 1100 LB. (500 KG) PORTABLE WINCH
OPERATION
10
RED
+11.7 ft.
(3.6 m)
ANY
LOAD
WARNING
Never spool out past the red paint on wire rope.
General Tips for Safe Operation
Your winch is rated at a 1100 lb. (500 kg) capacity.
Overloads can damage the winch, motor and/or cable/
rope. For loads over 550 lb. (250 kg) we recommend the
use of the pulley block/snatch block to double the cable/
rope line. This will aid in two ways:
– reduce the number or cable/rope layers on the drum,
as well as,
– reduce the load on the cable/rope by as much as
50%.
When doubling the line back to the vehicle, attach to the
tow hook, frame or other load bearing part.
Get to know your winch before you actually need to use
it. We recommend that you set up a few test runs to
familiarize yourself with rigging techniques, the sounds
your winch makes under various loads, the way the
cable/rope spools on the drum, etc.
Inspect the cable/rope and equipment before each
use. A frayed or damaged cable/rope shall be replaced
immediately. Use only manufacturer’s identical
replacement cable/rope with the exact specifications.
Inspect the winch installation and bolts to ensure that all
bolts are tight before each operation. Store the remote
control inside your vehicle in a place that it will not be
damaged.
Any winch that appears to be damaged in any way,
is found to be worn, or operates abnormally MUST
BE REMOVED FROM SERVICE UNTIL REPAIRED. It is
recommended that the necessary repairs be made by a
manufacturer’s authorized repair facility.
Pull only on areas of the vehicle as specified by the
vehicle manufacturer. Only attachments and/or adapters
supplied by the manufacturer are to be used.
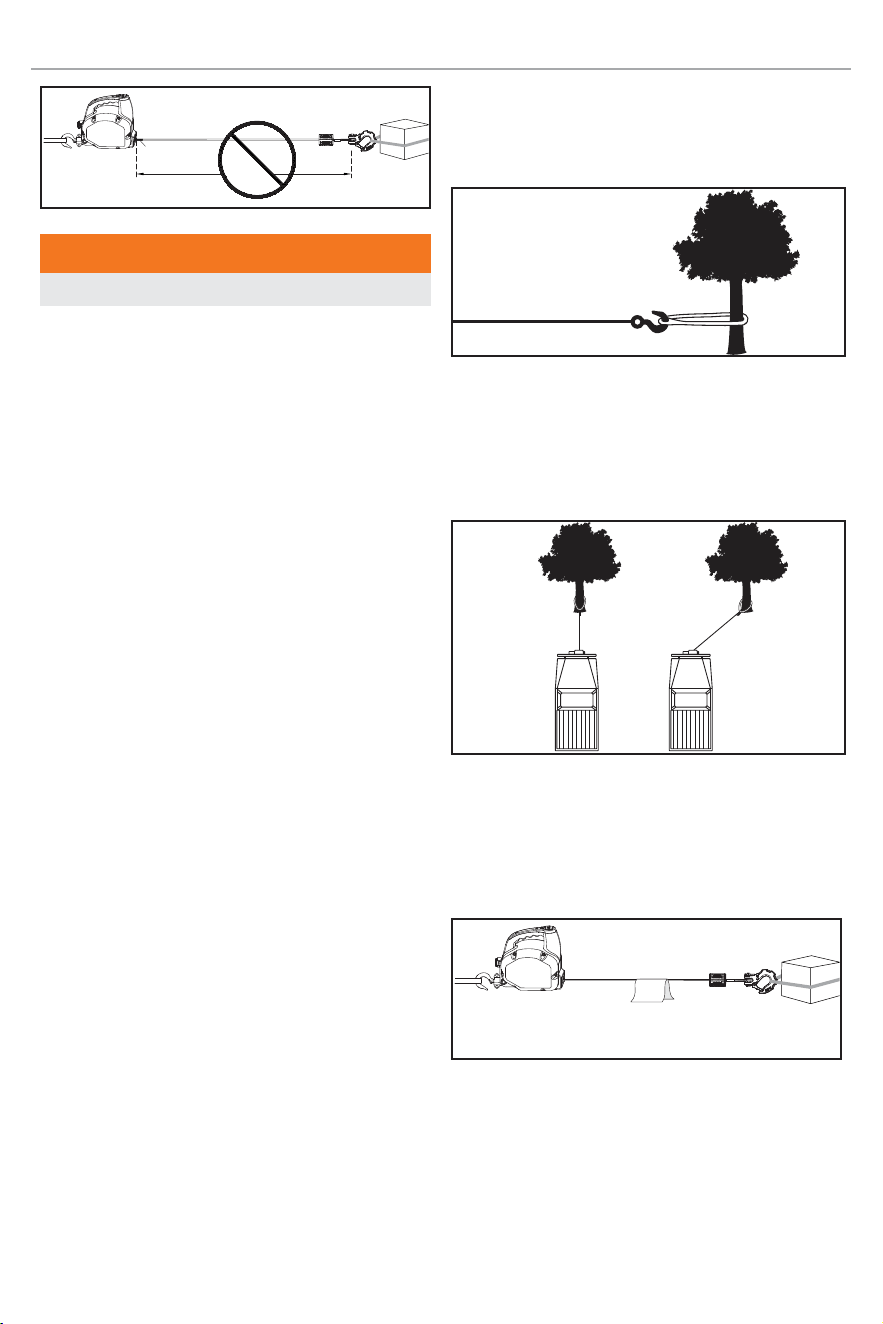
Self Recovery
Locate a suitable anchor such as a strong tree trunk or
boulder. Always use a sling as an anchor point.
Your winch is equipped with a combination roller hawse
to help guide the cable/rope and to reduce binding on
short side pulls. Do not winch from an acute angle as the
cable/rope will pile up on one side of the drum causing
damage to cable/rope and the winch.
Correct Incorrect
Short pulls from an angle can be used to straighten the
vehicle. Long pulls should be done with the cable/rope at
a 90° angle to the winch/vehicle. When pulling a heavy
load, place a blanket or jacket over the cable/rope five or
six feet from the hook.
1100 lb.
500 kg
In the event of a broken cable, it will dampen the snap
back. For additional protection open the hood of the
vehicle. For pulls over 550 lb. (250 kg), we recommend
the use of the snatch block/pulley block to double line the
cable/rope.

201371 - 1100 LB. (500 KG) PORTABLE WINCH
OPERATION
11
Single Line
Double Line
This reduces the load on the winch and the strain on the
cable/rope by approximately 50%.
Cable/Rope Abrasion Sleeve
The winch should be set up to avoid any rough surface
from contacting the cable/rope. If that is not possible, the
abrasion sleeve can be used to help protect the cable/
rope.
Winching Techniques A-X
A. Take time to assess your situation and plan your
pull.
B. Put on gloves to protect your hands.
C. Attach the hook strap to the clevis hook.
D. Power OUT the cable/rope to your desired anchor
point using the hook strap.
E. Secure the clevis hook to the anchor point: sling,
chain or snatch block. Do not attach the clevis hook
back onto the cable/rope.
F. Use tree saver to attach the anchor clevis hook to a
suitable point, like trailer head or tree base.
G. This winch is provided with a ground fault circuit
interrupter (GFCI) built into the plug of the power
supply cord. This device provides additional
protection from the risk of electric shock. Plug into
a 120V AC circuit and press RESET.
H. Drape a blanket or jacket over the cable/rope
approximately 5 to 6 feet from the hook. Open the
hood for added protection.
I. Power in the cable/rope guiding the cable/rope
under tension to draw up the slack in the cable/
rope. Once the cable/rope is under tension, stand
clear. Never step over the cable/rope.
J. Double check your anchors and make sure all
connections are secure.
K. Inspect the cable/rope.
L. Clear the area. Make sure all spectators stand clear
and that no one is directly in front or behind the
vehicle, load or anchor point.
M. Begin winching. Be sure that the cable/rope is
winding evenly and tightly around the drum. Avoid
shock loads; keep the cable/rope under tension.
N. The vehicle to be winched should be placed in
neutral and the emergency brake released. Only
release the brake pedal when under full tension,
if applicable. Avoid shock loads to the winch. This
can damage the winch, cable/rope and vehicle.
O. The winch is meant for short duty use. Under full
load with a single line do not power on for more
than a minute without letting the motor cool down
for 20 minutes and then resume the winching
operation. See Duty Cycle Ratings section in the
back of this manual for more information.
P. The winching operation is complete once the load
is on stable ground and is able to drive under its
own power.
Q. Secure the load. Be sure to set the brakes and
place the vehicle in park, if applicable.
R. Release the tension on the cable/rope. The winch is
not meant to hold the load for long periods of time.
S. Disconnect the cable/rope from the anchor.
Disconnect the clevis hook from the load being
pulled.
T. Rewind the cable/rope. Make sure that any cable/
rope already on the drum has spooled tightly and
neatly. If not, draw out the cable/rope and re-spool
from the point where the rope is tight.

201371 - 1100 LB. (500 KG) PORTABLE WINCH
SUGGESTED ACCESSORIES
12
U. Keep your hands clear of the winch and hawse as
the cable/rope is being drawn in.
V. Secure the clevis hook and hook strap.
W. Disconnect the winch by disconnecting the anchor
clevis hook, clevis hook, unplug power supplier
cord and store in a clean, dry place.
X. Clean and inspect connections for next winching
operation.
SUGGESTED ACCESSORIES
CAUTION
Any accessories to be used with your winch should be
properly sized and rated. Always inspect these tools
before each use for damage that could reduce their
strength.
Snatch Block (not included)
Useful to redirect loads, it’s secret power lies in creating
a mechanical advantage of a winch. When a winch line
is run out to a block and back to a vehicle’s anchor point,
the pull force becomes 2x (while speed of recovery is
halved).
Tree Savers (included)
A tree saver is essential for connecting a cable/rope
to almost any anchor point but is primarily designed to
prevent damage to trees used as anchor points. The
tree saver should be wrapped around the chosen tree or
anchor point as low to the ground as possible and the
two ends brought together and joined with a shackle. The
shackle then becomes the recovery point to where the
cable or extension strap or anchor clevis hook is joined.
D-Shackles (included)
Only bow shackles or soft shackles that are load-rated
should be used for vehicle recovery. Load ratings are
visible on the shackle and will be in the form of WLL
(working load limit) or SWL (safe working load). The
shackles, or any other recovery equipment, used should
be sized correctly for the winching task. Pack more than
you need.
Gloves (included)
A good pair of gloves are essential for working with steel
cable and helpful for handling cable/rope. You never
know who or what you’ll run into on the trail and having a
pair of gloves at the ready is ideal hand protection.
MAINTENANCE
The owner/operator is responsible for all periodic
maintenance.
WARNING
Never operate a damaged or defective winch.
WARNING
Improper maintenance will void your warranty.
Complete all scheduled maintenance in a timely manner.
Correct any issue before operating the winch.
NOTICE
For service or parts assistance, contact our technical
support team at 1-877-338-0999
Cable/Rope Replacement
NOTICE
Always inspect cable/rope before and after each use. If
the cable/rope becomes frayed, it must be replaced.
If your winch requires cable/rope replacement, it is
critical to obtain factory-supplied replacement of exact
size and length. This operation should only be performed
by an experienced service technician.
201371 - 1100 LB. (500 KG) PORTABLE WINCH
MAINTENANCE
13
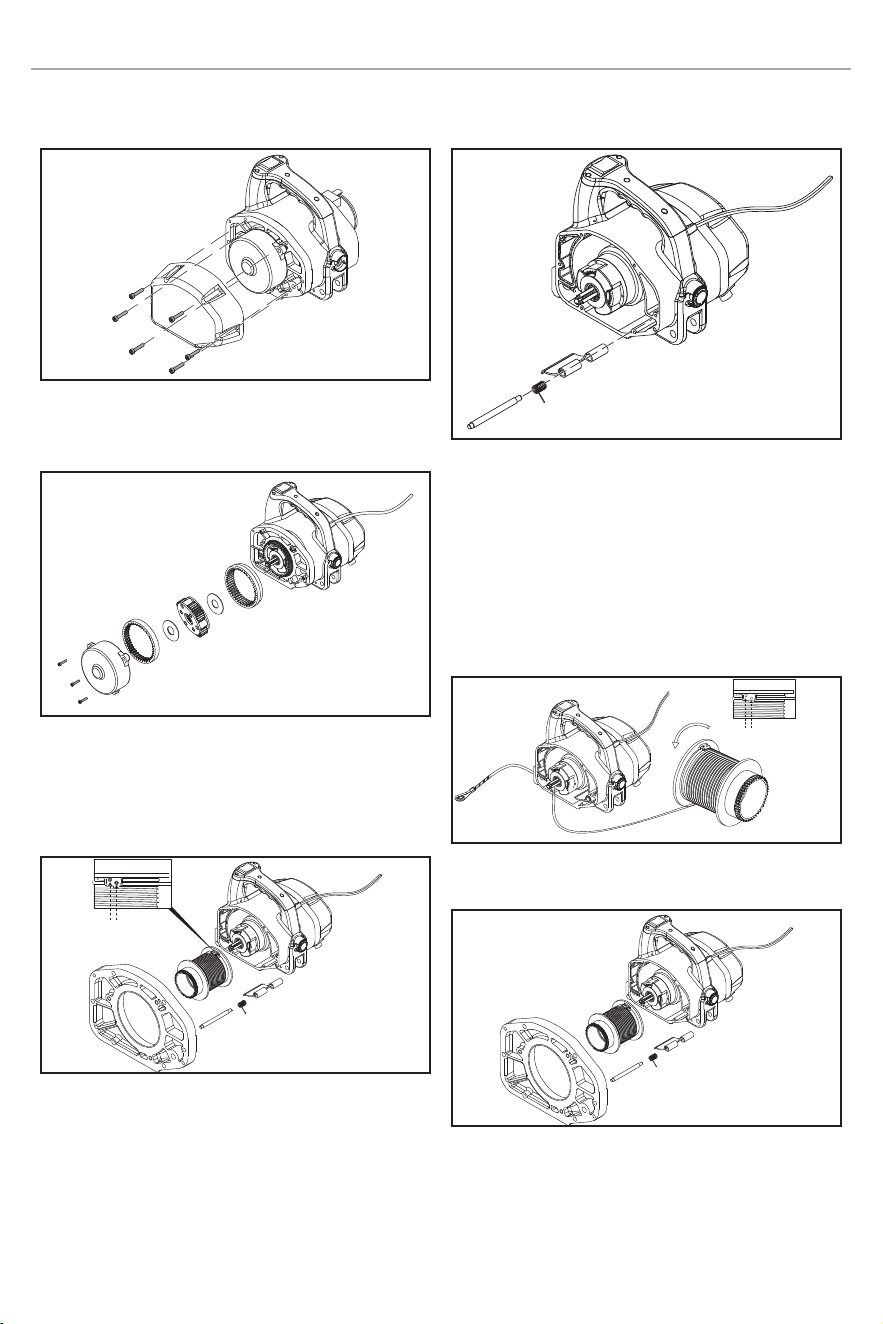
1. Disassemble the gearbox cover with hex key by
removing M5 x 30 hex head bolts (6).
2. Remove the gearbox M6 x 25 screws (3) and
remove gears from the gearbox.
3. Remove the drum support plate, cable/rope
tensioner and drum. Use a hex key to loosen the
wire cable M5 x 8 screws (2) and remove cable/
rope.
M5 × 8 Screws
4. Reinstall the cable/rope tensioner to the main body,
note the direction of the tensioner.
5. Install new cable/rope onto drum, noting direction
of wrap. Feed the cable/rope end through the
roller fairlead opening. The cable/rope beginning
should be carefully secured with M5 x 8 screws
(2) after a tight-close winding. Open the cable/
rope tensioner and insert drum into the assembly.
Ensure installation is correct by rotating drum and
tensioner is pressing against cable.
Drum rotation
M5 × 8 Screws
2 holes
on drum
6. Remount the drum support plate to the main body.
201371 - 1100 LB. (500 KG) PORTABLE WINCH
MAINTENANCE
14
7. Reassemble gear box assembly and cover with the
gearbox M6 x 25 screws (3).
8. Reassemble the gearbox cover with M5 x 30 hex
head bolts (6). Torque to 34 lbf-ft (46 N.m). DO NOT
over tighten.
9. Once complete, perform a System Reset.
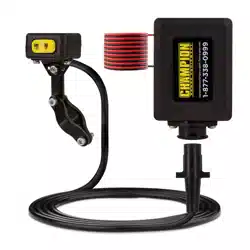
System Reset
A system reset is required after replacing the wire
cable or if troubleshooting has eliminated other issues.
Performing these steps will reset the winch’s ability to
monitor cable extension for safety.
DANGER
The following procedure will cause the winch to
retract cable/rope in automatically.
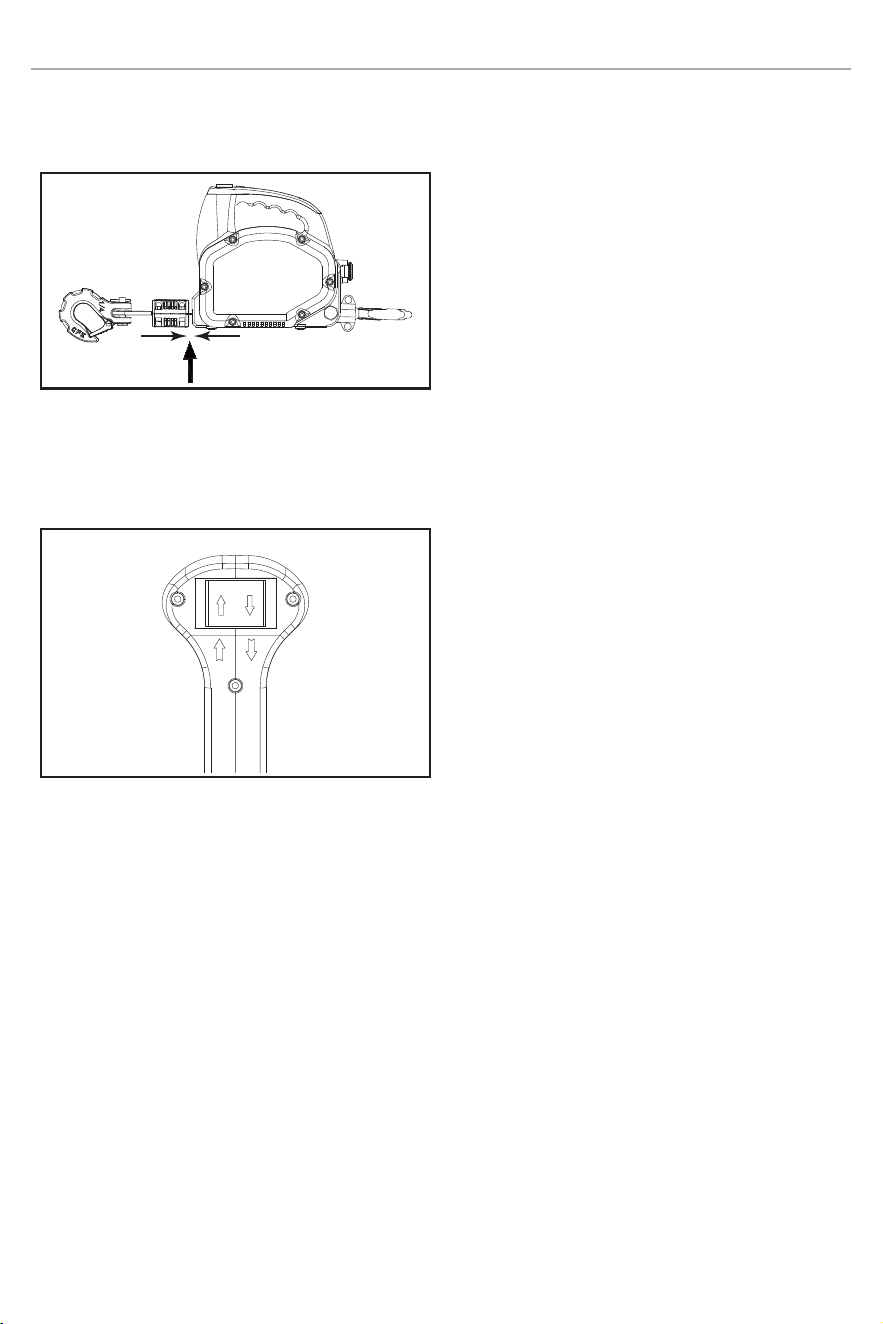
1. Make sure the red EMERGENCY STOP is in the
“STOP” position or pressed in.
Press
2. Plug in the GFCI power supply cord and press the
RESET button.
3. Press the OUT button 5 times within 5 seconds.
INOUT
Press 5 times
within 5 seconds
4. THIS STEP WILL ENGAGE WINCH IN
AUTOMATICALLY.
4a. Count 5 seconds, then turn the EMERGENCY
STOP button until the button pops out. Keep
hands away from hooks and cable.
Turn
201371 - 1100 LB. (500 KG) PORTABLE WINCH
MAINTENANCE
15
4b. Winch will retract cable/rope until the cable
hook stopper contacts the hawse. Once winch
has stopped, the system reset is complete.
5. Confirm operation by pressing “OUT” for 10
seconds, then bringing the cable/rope back in with
“IN”. Confirm operation is normal by testing “IN”
and “OUT” a few times.
INOUT
201371 - 1100 LB. (500 KG) PORTABLE WINCH
SPECIFICATIONS
16
SPECIFICATIONS
Performance Specifications
Model
.................................... 201371
Power ......................... AC 110V-120V 60Hz
Rated Pull ......................... 1100 lb. (500 kg)
Gear Reduction Ratio ........................1636:1
Motor.......... Series wound motor 1.0 HP / 0.75 kW
Duty Cycle ............................. Short Duty
Cable/Rope Type ................... Galvanized Steel
Cable/Rope Dimensions .......15 ft. (L) × 3/16 in. (D)
[4.6 m (L) × 4.8 mm (D)]
Speed (Minimum)
...................... 6.6 ft (2 m)
Net Weight ........................34.4 lb. (15.6 kg)
Height .............................. 8.3 in. (21 cm)
Width ............................. 8.1 in. (20.6 cm)
Length .............................. 9.4 in. (24 cm)
Duty Cycle Ratings
Duty Cycle Ratings typically specify continuous,
intermittent, or special duty (typically expressed
in minutes). The IEC (International Electrotechnical
Commission) lists the following ratings:
S1 - Continuous duty
The motor works at a constant load for enough time to
reach temperature equilibrium.
S2 - Short-time duty
The motor works at a constant load, but not long
enough to reach temperature equilibrium, and the rest
periods are long enough for the motor to reach ambient
temperature.
S3 - Intermittent periodic duty
Sequential, identical run and rest cycles with constant
load. Temperature equilibrium is never reached. Starting
current has little effect on temperature rise.
This winch is considered S2, short-time duty. Please
review this table showing how load affects run time.
RUN TIME/DUTY CYCLE TABLE
LOAD POWER ON POWER OFF
550 lb.(250 kg)
2 minutes 20 minutes
1100 lb. (500 kg) 1 minute 20 minutes

201371 - 1100 LB. (500 KG) PORTABLE WINCH
TROUBLESHOOTING
17
TROUBLESHOOTING
Problem Cause Solution
Winch will not operate.
Power not connected. Plug in power supply.
Emergency Stop Button is OFF.
Rotate the Emergency Stop Button
clockwise until the button pops OUT to
activate or start the winch.
GFCI has tripped. Reset GFCI.
Motor too hot, needs cooling. Wait 20 minutes and retry.
Too heavy/overload. Reduce load or use different tool.
Winch not engaged. Hold down the OUT button for 5 seconds.
Cable/rope fully extended/
spooled.
Red paint is max cable-out /cable stop is
max cable-in.
Wire cable is tangled.
If cable is pulled in at an angle,
a tangle may occur. To prevent,
always pull perpendicular to the
unit.
To resolve, slowly feed out cable and
rewind a better angle.
Wire cable damage.
Damaged cable/rope. Replace cable/rope.
Fairlead worn. Replace fairlead.
Cable/rope won’t extend, but will
retract.
Cable/rope is at max extension or
onboard computer needs reset.
Verify extension or perform System Reset.
For further technical support:
Technical Support Team
Toll Free 1-877-338-0999
support@championpowerequipment.com

WARRANTY*
CHAMPION POWER EQUIPMENT
2 YEAR LIMITED WARRANTY
Warranty Qualifications
To register your product for warranty and FREE lifetime
call center technical support please visit:
https://www.championpowerequipment.com/register
To complete registration you will need to include a copy
of the purchase receipt as proof of original purchase.
Proof of purchase is required for warranty service.
Please register within ten (10) days from date of
purchase.
Repair/Replacement Warranty
CPE warrants to the original purchaser that the
mechanical and electrical components will be free of
defects in material and workmanship for a period of
two years (parts and labor) from the original date of
purchase and 180 days (parts and labor) for commercial
and industrial use. Transportation charges on product
submitted for repair or replacement under this warranty
are the sole responsibility of the purchaser. This
warranty only applies to the original purchaser and is not
transferable.
Do Not Return The Unit To The Place
Of Purchase
Contact CPE’s Technical Service and CPE will
troubleshoot any issue via phone or e-mail. If the
problem is not corrected by this method, CPE may,
at its option, authorize other means of repair and/or
replacement.
Warranty Exclusions
This warranty does not cover the following repairs and
equipment:
Normal Wear
Products with mechanical and electrical components
need periodic parts and service to perform well. This
warranty does not cover repair when normal use has
exhausted the life of a part or the equipment as a whole.
Installation, Use and Maintenance
This warranty will not apply to parts and/or labor if the
product is deemed to have been misused, neglected,
involved in an accident, abused, loaded beyond the
product’s limits, modified, installed improperly or
connected incorrectly to any electrical component.
Normal maintenance is not covered by this warranty
and is not required to be performed at a facility or by a
person authorized by CPE.
Other Exclusions
This warranty excludes:
– Cosmetic defects such as paint, decals, etc.
– Wear items such as winch cable, etc.
– Accessory parts such as storage covers.
– Failures due to acts of God and other force majeure
events beyond the manufacturer’s control.
– Problems caused by parts that are not original
Champion Power Equipment parts.
Limits of Implied Warranty and
Consequential Damage
Champion Power Equipment disclaims any obligation to
cover any loss of time, use of this product, freight, or any
incidental or consequential claim by anyone from using
this product. THIS WARRANTY IS IN LIEU OF ALL OTHER
WARRANTIES, EXPRESS OR IMPLIED, INCLUDING
WARRANTIES OF MERCHANTABILITY OR FITNESS FOR
A PARTICULAR PURPOSE.
A unit provided as an exchange will be subject to the
warranty of the original unit. The length of the warranty
governing the exchanged unit will remain calculated by
reference to the purchase date of the original unit.
This warranty gives you certain legal rights which may
change from state to state or province to province. Your
state or province may also have other rights you may be
entitled to that are not listed within this warranty.
Contact Information
Address
Champion Power Equipment, Inc.
6370 S Pioneer Way, Unit 101
Las Vegas, NV 89113 USA
www.championpowerequipment.com
Customer Service
Toll Free: 1-877-338-0999
info@championpowerequipment.com
Fax no.: 1-562-236-9429
Technical Service
Toll Free: 1-877-338-0999
tech@championpowerequipment.com
EMERGENCY 24 HOUR SUPPORT: 1-562-204-1188