INcsb064_UK_DE_IT
800-124V70_800-124V90
IMPORTANT, RETAIN FOR FUTURE REFERENCE: READ CAREFULLY
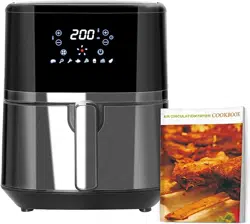
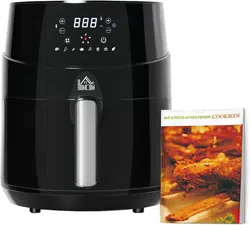
Hot-Air Fryer
Heißluftfritteuse
Friggitrice ad Aria Calda
- FOR INDOOR HOUSEHOLD USE ONLY-
-FÜR DEN HAUSGEBRAUCH IM INNENBEREICH-
- SOLO PER USO DOMESTICO INTERNO -
USING INSTRUCTION

INTRODUCTION
This all now Hot-air fryer provides an easy and healthy way of preparing your favorite
ingredients. By using hot rapid air circulation and a top grill, it is able to make numerous
dishes. The best part is that the Hot-air fryer heats food at all directions and most of the
ingredients do not need any oil.
SAVE THESE INSTRUCTIONS
This appliance is intended to be used in household and similar applications such as:
- staff kitchen areas in shops, offices and other working environments;
- farm houses;
- by clients in hotels, motels and other residential type environments;
- bed and breakfast type environments.
IMPORTANT SAFEGUARDS
When using electrical appliances, basic safety precautions should always be followed
including the following:
1. Read all instructions.
2. Do not touch hot surfaces.
3. To protect against electric shock do not immerse cord, plugs, or base in water or other
liquid.
4. WARNING: This electrical appliance contains a heating function. Surfaces, also
different than the functional surfaces, can develop high temperatures. Since
temperatures are differently perceived by different persons, this equipment shall be used
with CAUTION. The equipment shall be touch only at intended handles and gripping
surfaces, and use heat protection like gloves or similar. Surfaces other than intended
gripping surfaces shall get sufficiently time to the cool down before getting touched.
5. Unplug from outlet when not in use and before cleaning. Allow to cool before putting
on or taking off parts.
6. Type Y: If the supply cord is damaged, it must be replaced by the manufacturer, its
service agent or similarly qualified persons in order to avoid a hazard.
7. The use of accessory attachments not recommended by the appliance manufacturer
may cause injuries.
8. Do not use outdoors
9. Do not let cord hang over edge of table or counter, or touch hot surfaces.
10. Do not place on or near a hot gas or electric burner, or in a heated oven.
11. Extreme caution must be used when moving an appliance containing hot oil or other
hot liquids.
12. Always attach plug to appliance first, then plug cord in the wall outlet. To disconnect,
turn any control to "off," then remove plug from wall outlet.
13. Do not use appliance for other than intended use.
14. This appliance can be used by children aged from 8 years and above and persons
with reduced physical, sensory or mental capabilities or lack of experience and
knowledge if they have been given supervision or instruction concerning use of the
appliance in a safe way and understand the hazards involved. Children shall not play
with the appliance. Cleaning and user maintenance shall not be made by children unless
they are old than 8 and supervised.
15. Keep the appliance and its cord out of reach of children less than 8 years.
16. The appliances are not intended to be operated by means of an external timer or
separate remote-control system.
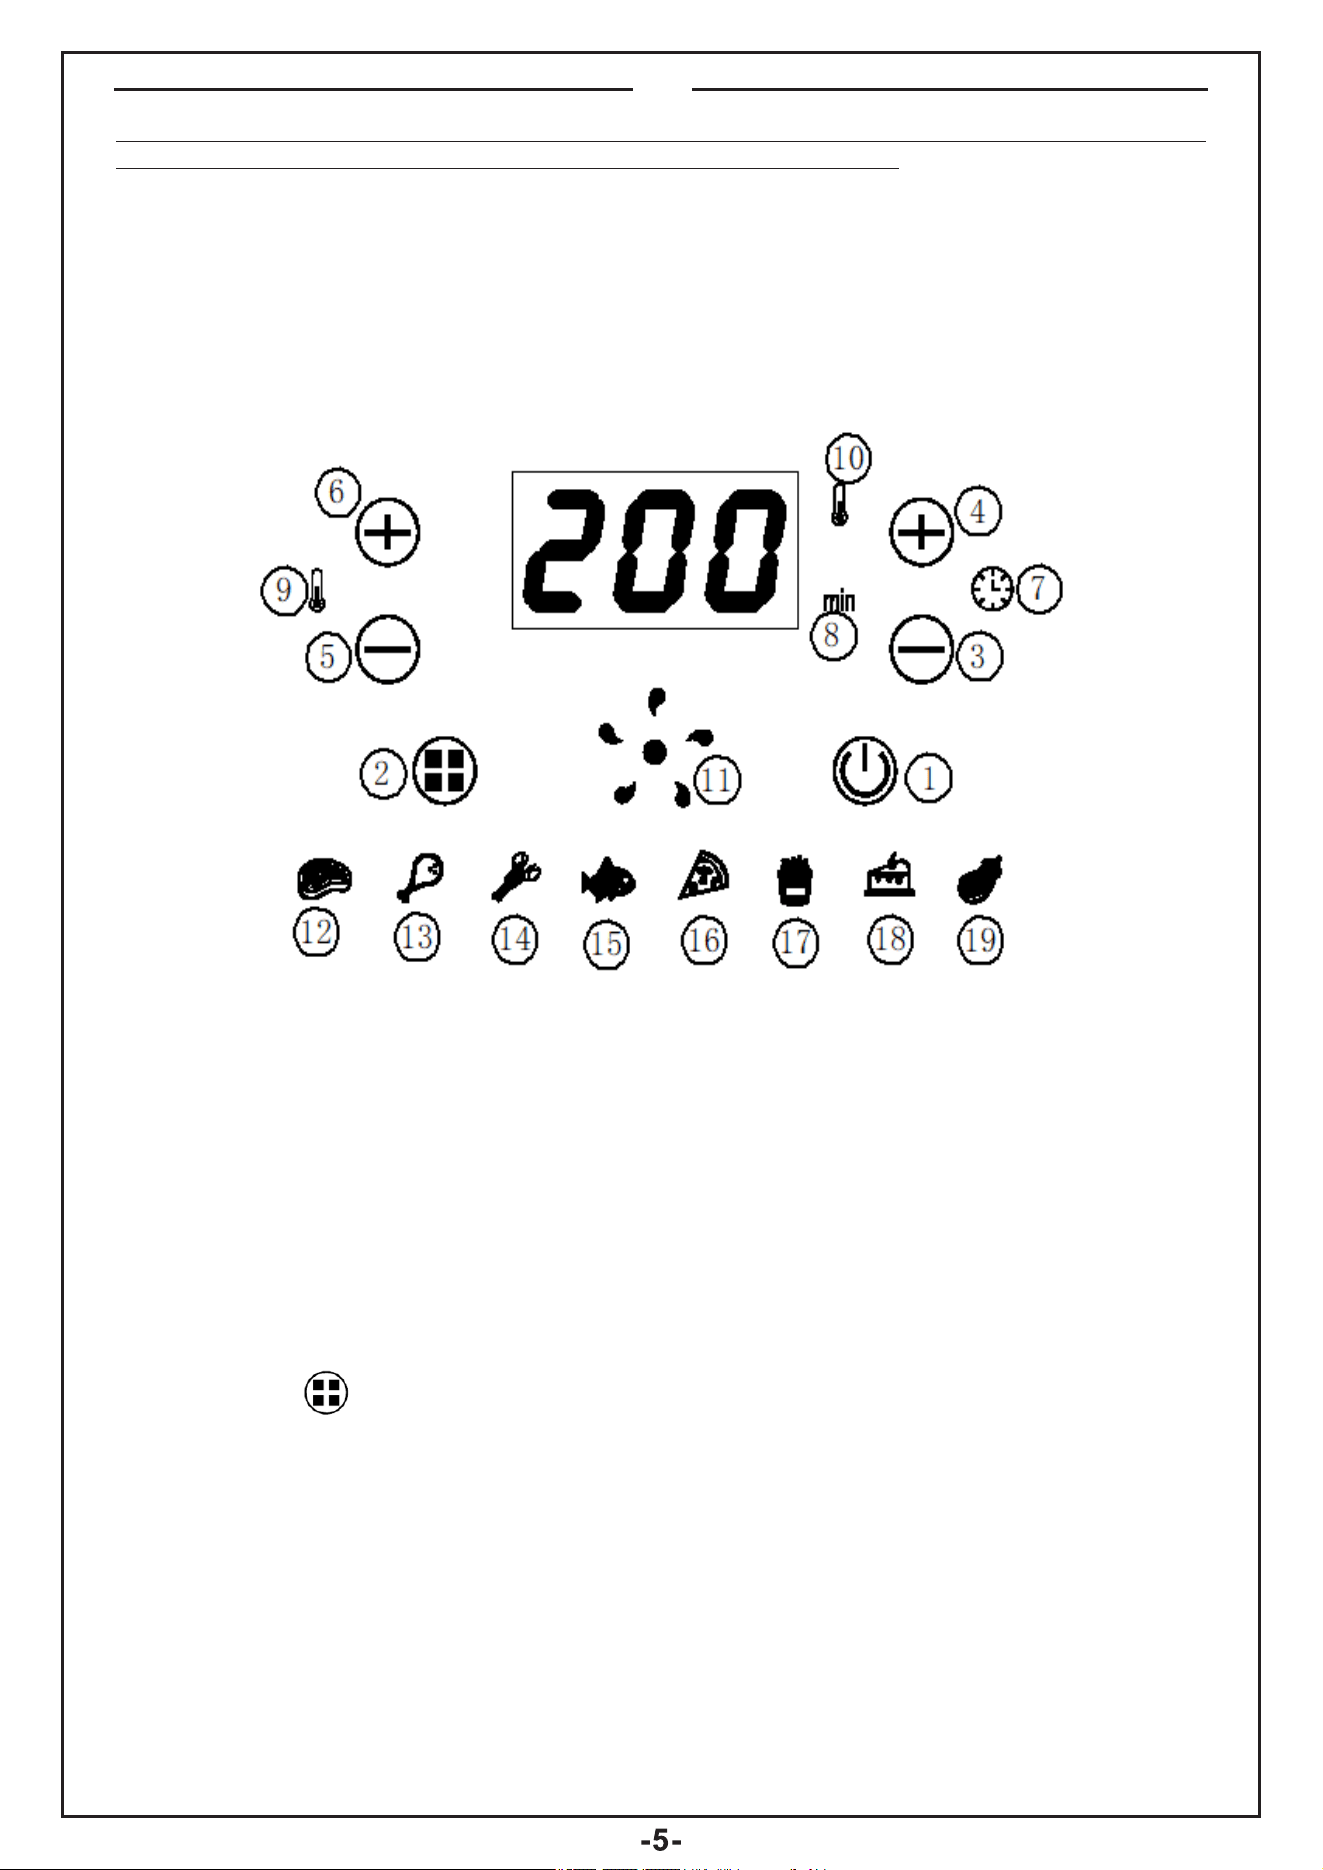
EN
1
2
4
5
6
7
3
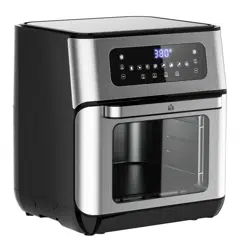
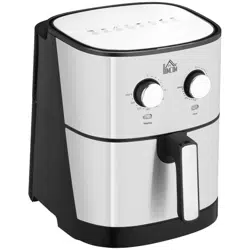
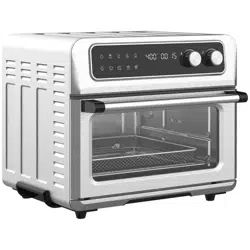
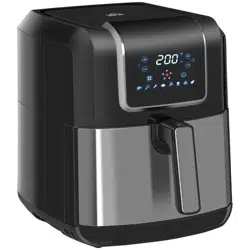
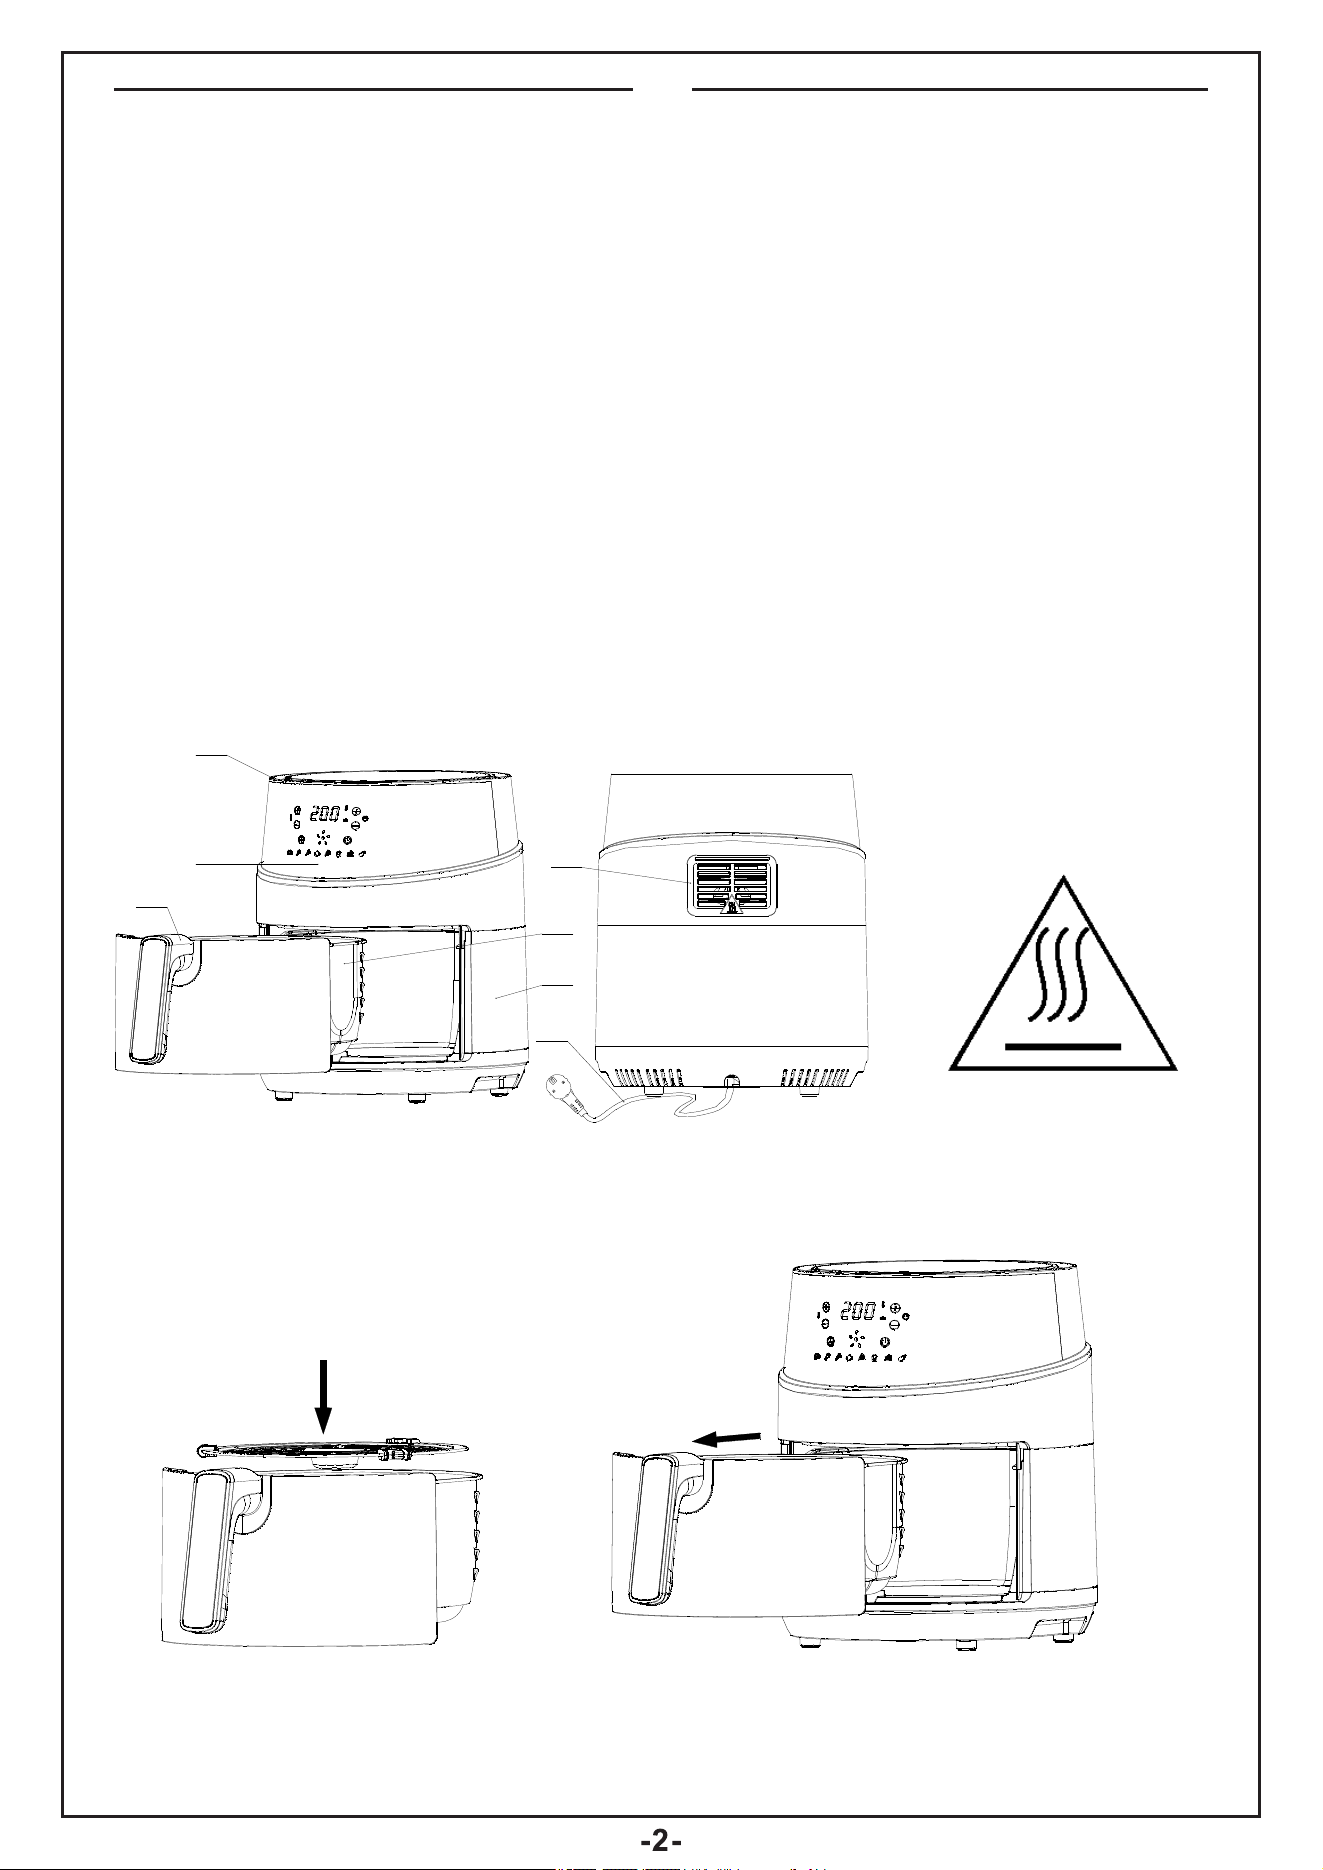
Fig.1 Fig.2
Fig.3 Fig.4
Specification & Feature:
-----Voltage:220-240V ~50/60Hz
-----Wattage: 1500 W
-----Capacity of basket:4.5 L
-----Adjustable temperature:80℃- 200℃
----- Timer (0-60 min)
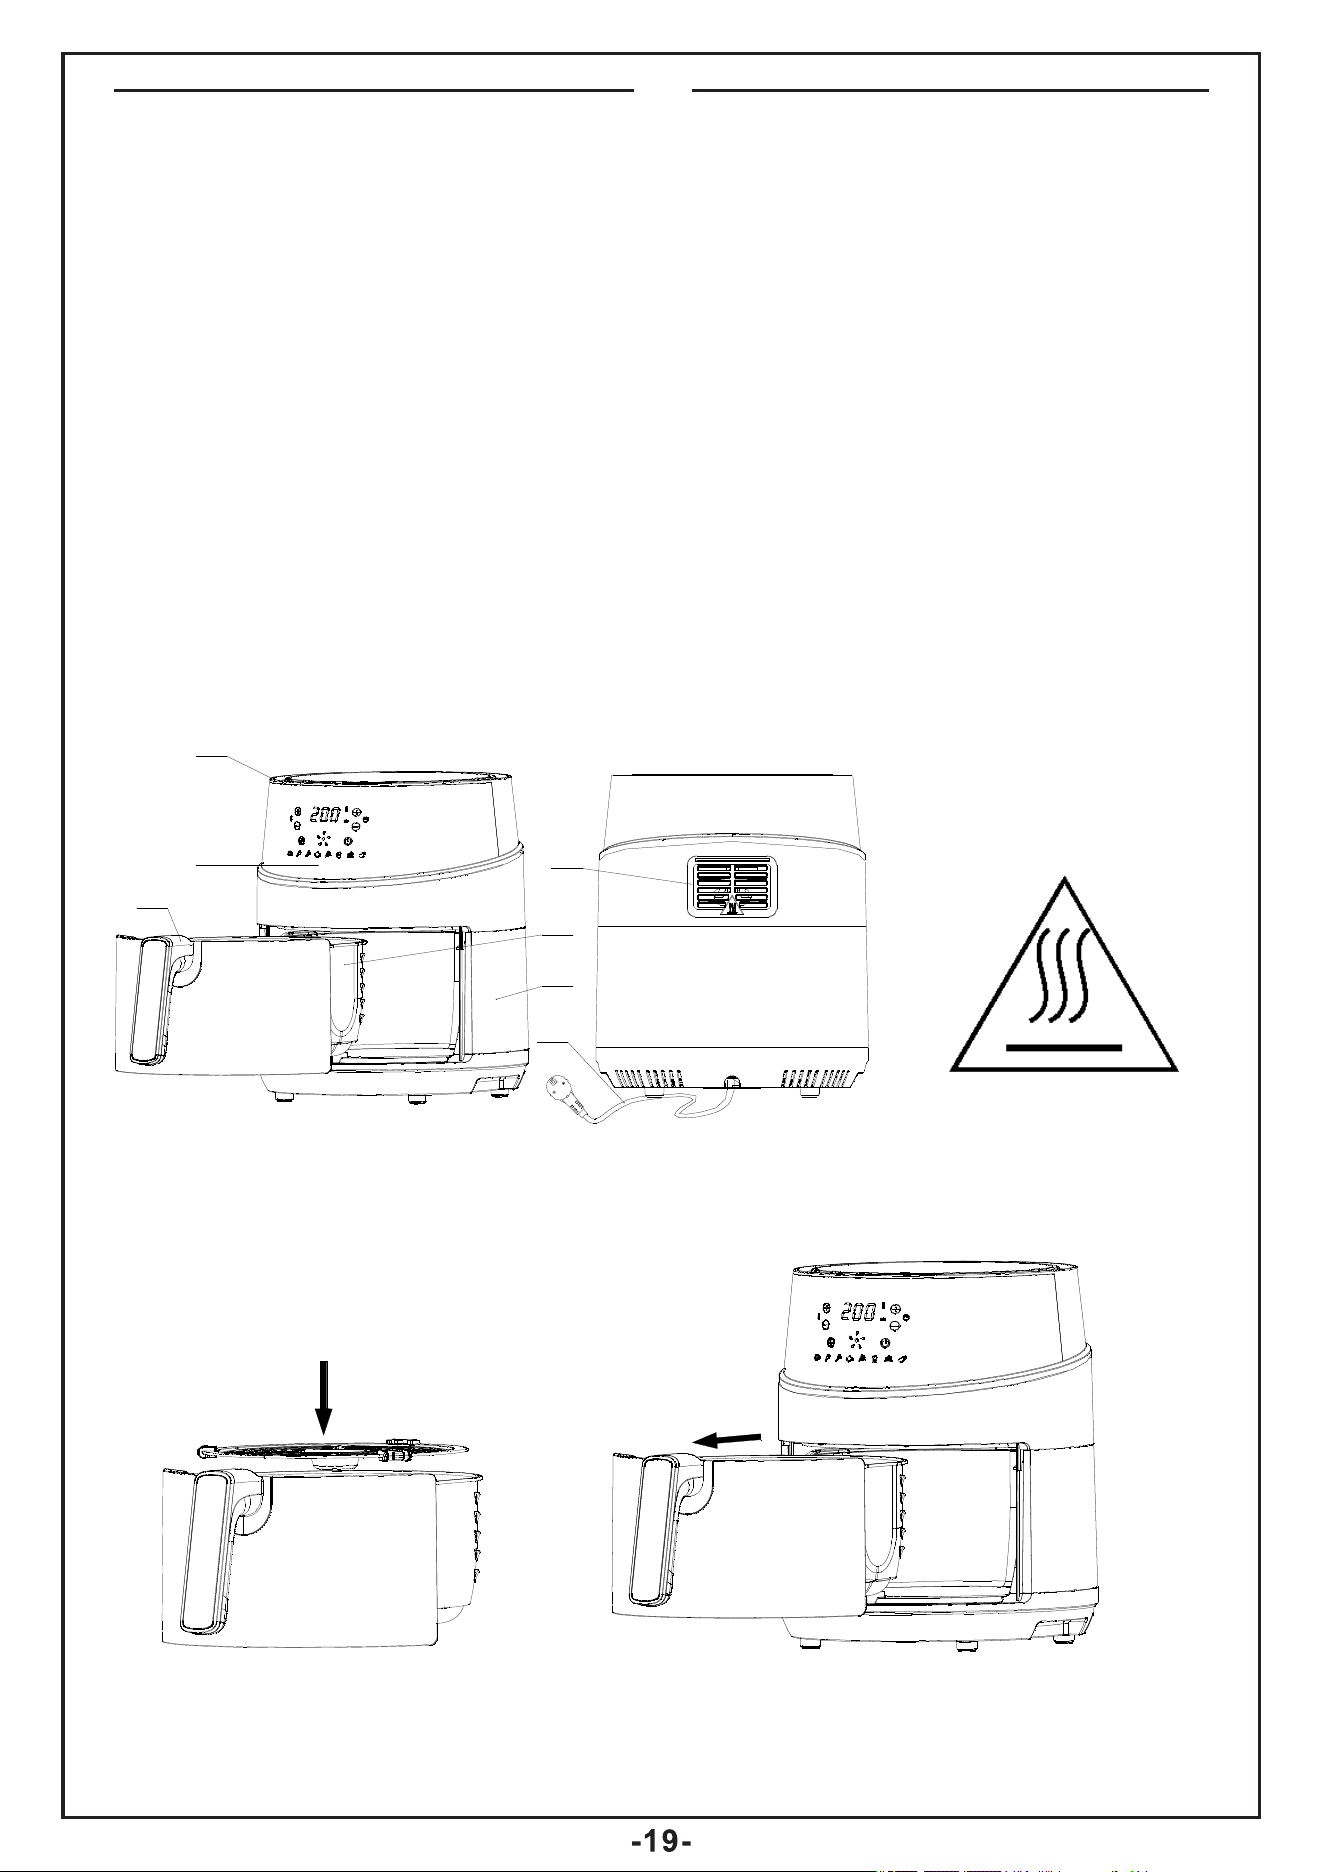
General description (Fig.1)
1. On the shell
2. Control panel
3. Pan handle
4. Pan
5. Air outlet
6. Main cord (Electrical cord)
7. Main housing
EN

Fig.6
Fig.5
Important!
Danger
-This appliance can be used by children aged from 8 years and above and persons with
reduced physical, sensory or mental capabilities or lack of experience and knowledge if
they have been given supervision or instruction concerning use of the appliance in a safe
way and understand the hazards involved. Children shall not play with the appliance.
Cleaning and user maintenance shall not be made by children unless they are older than
8 and supervised.
-Keep the appliance and its cord out of reach of children less than 8 years.
-Never immerse the housing, which contains electrical components and the heating
elements, in water nor rinse it under the tap.
-Do not let any water or other liquid enter the appliance to prevent electric shock.
-Always put the ingredients to be fried in the basket, to prevent it from coming into
contact with the heating elements.
-Do not cover the air inlet and the air outer openings while the appliance is operating.
-Do not fill the pan with oil as this may cause a fire hazard.
-Never touch the inside of the appliance while it is operating.
The temperature of accessible surfaces may be high when the appliance is operating
Warning
- Check if the voltage indicated on the appliance fits the local mains voltage.
- Do not use the appliance if there is any damage on plug, mains cord or other parts.
- Do not go to any unauthorized person to replace or fix damaged main cord.
- Keep the mains cord away from hot surfaces.
- Do not plug in the appliance or operate the control panel with wet hands.
- Do not place the appliance against a wall or against other appliances. Leave at least
10cm free space on the back and sides and 10cm free space above the appliance.
Do not place anything on top of the appliance.
- Do not use the appliance for any other purpose than described in this manual.
- Do not let the appliance operate unattended.
- During hot air frying, hot steam is released through the air outlet openings, Keep your
hands and face at a safe distance from the steam and from the air outlet openings.
Also be careful of hot steam and air when you remove the pan from the appliance.
-Any accessible surfaces may become hot during use (Fig.2)
- Immediately unplug the appliance if you see dark smoke coming out of the appliance.
Wait for the smoke emission to stop before you remove the pan from the appliance.
EN

Caution
- Ensure the appliance in placed on a horizontal, even and stable surface.
- This appliance is designed for household use only. It may not suitable to be safely used
in environments such as staff kitchens, farms, motels, and other non-residential
environments. Nor is it intended to be used by clients in hotels, motels, bed and
breakfasts and other residential environments.
- If the appliance is used improperly or for professional or semi-professional purposes or
if it is not used improperly or for professional or semi-professional purposes or it is not
used according to the instructions in the user manual, the guarantee becomes invalid and
we could refuse any liability for damage caused.
-Always unplug the appliance while not using.
-The appliance needs approximately 30 minutes to cool down for handle or cleaning
safely.
Before first use
1. Remove all packaging materials.
2. Remove any stickers or labels from the appliance.
3. thoroughly clean the basket and pan with hot water, some washing-up liquid and a
non-abrasive sponge.
4.Wipe inside and outside of the appliance with a moist cloth.
This is an oil-free fryer that works on hot air, do not fill the pan with oil or frying fat.
Preparing for use
1. Place the appliance on a stable, horizontal and even surface.
Do not place the appliance on non-heart-resistant surface.
2. Place the shelf in the pan (Fig.3).
Do not fill the pan with oil or any other liquid.
Do not put anything on top of the appliance, the airflow will be disrupted and affects the
hot air frying result.
Using the appliance
The oil-free can prepare a large range of ingredients. The recipe booklet included helps
you get to know the appliance.
Hot air frying
1. Connect the mains plug into an earthed wall socket.
2. Carefully pull the pan out of the Hot-air fryer (Fig.4)
3. Put the ingredients on the shelf. (Fig.5)
4. Slide the pan back into the Hot-air fryer (Fig 6)
Noting to carefully align with the guides in the body of the fryer.
Never use the pan without the shelf in it.
Caution: Do not touch the pan during and sometime after use, as it gets very hot.
Only hold the pan by the handle.
5.Determine the required preparation time for the ingredient (see section 'Settings' in this
chapter).
6.Some ingredients require shaking halfway through the preparation time (see section
“Settings” in this chapter). To shake the ingredients, pull the pan out of the appliance by
the handle and shake it. Then slide the pan back into the I fryer
7. To remove ingredients (e.g. fries), pull the pan out of the Hot-air fryer and place it on
trial framework, and lift the shelf out of the pan.
EN
the pan and the ingredients are hot and hot fryer. Depending on the type of the
ingredients in the air fryer, steam may escape from the pan.
8. Empty the shelf into a bowl or onto a plate.
Tip: To remove large or fragile ingredients, lift the ingredients out of the shelf by a pair of
tongs
9. When a batch of ingredients is ready, the Hot-air fryer is instantly ready for preparing
another batch.
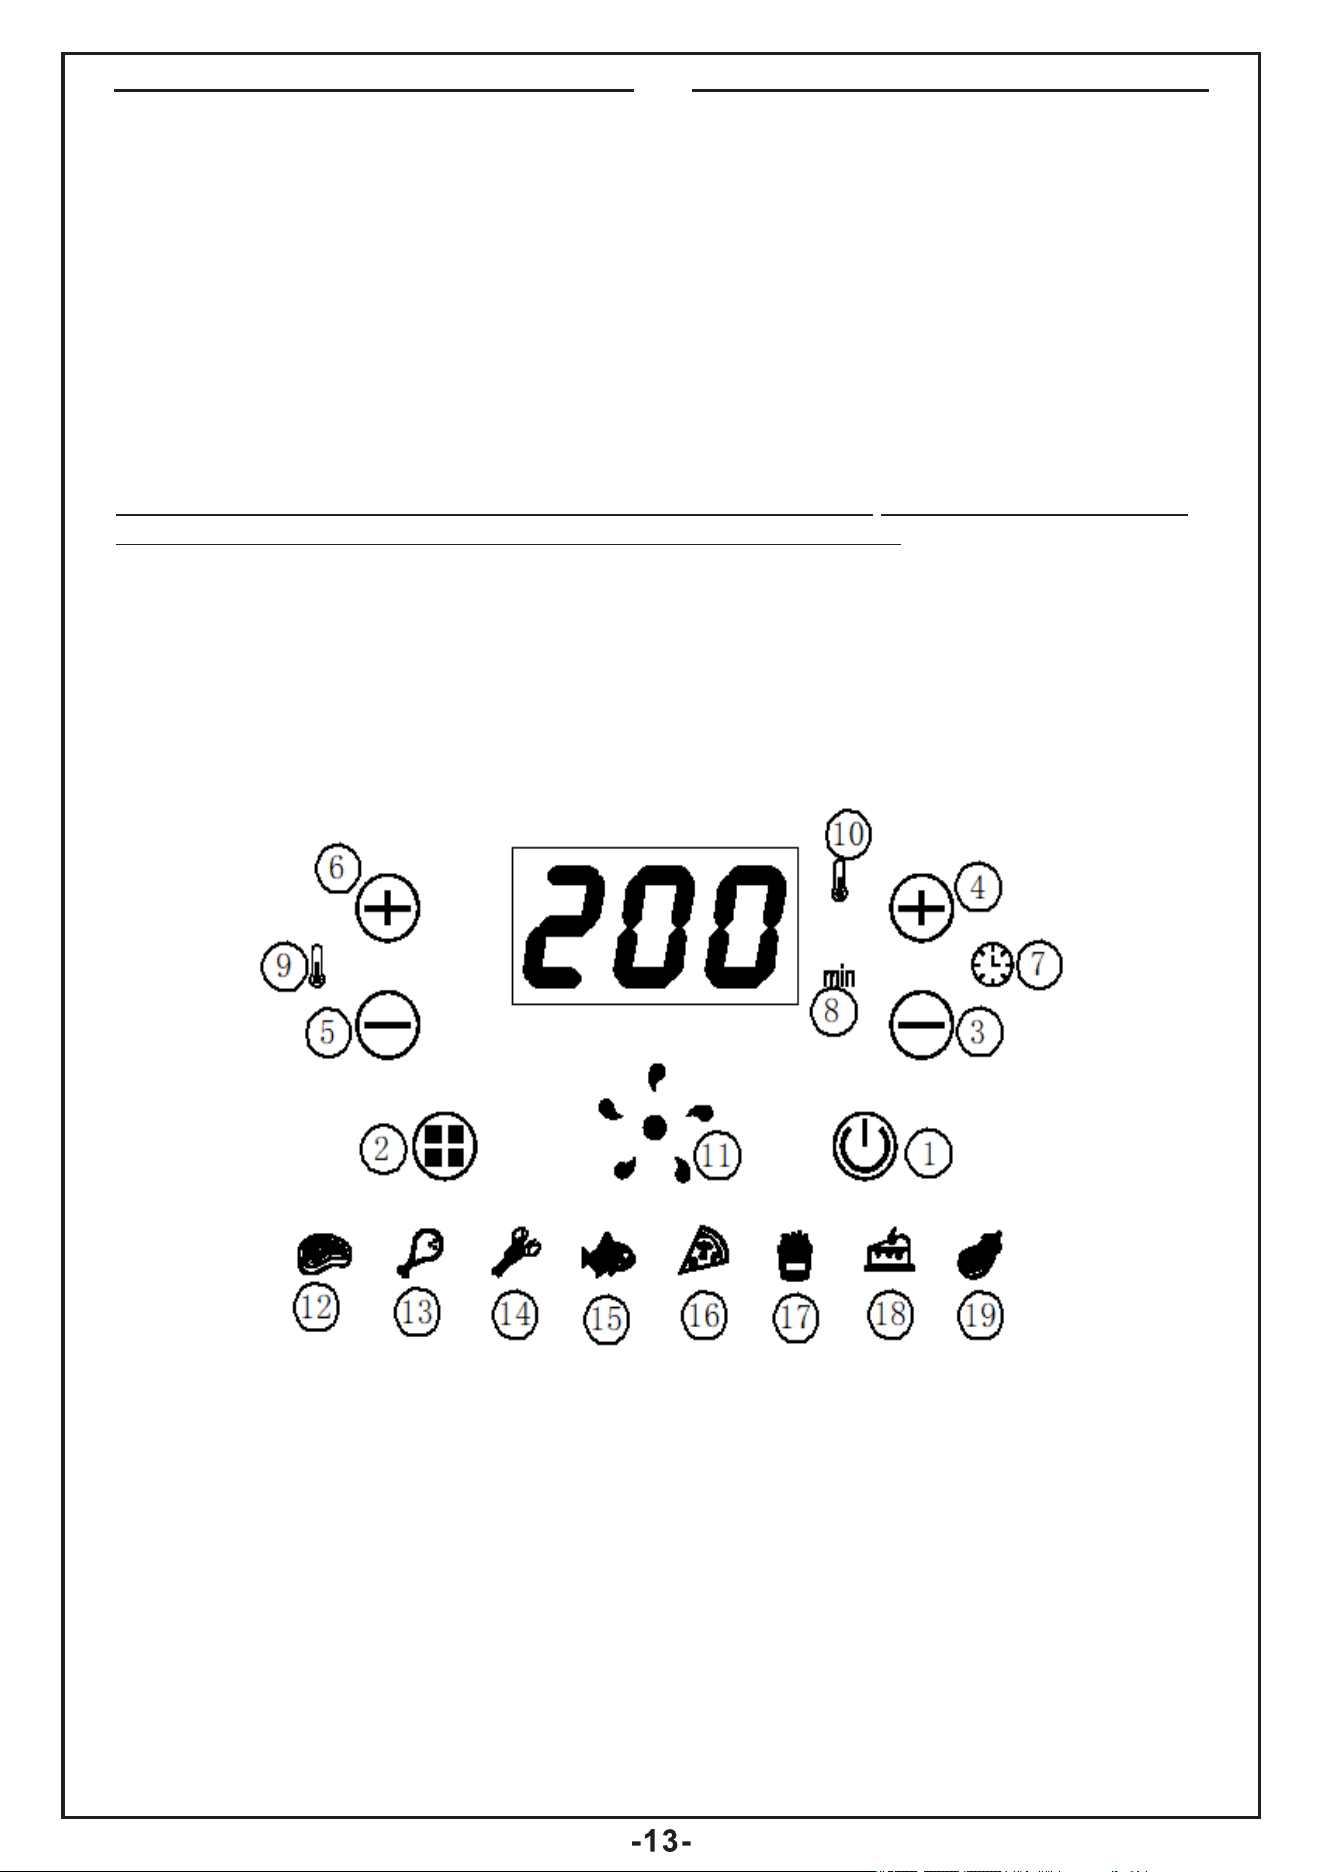
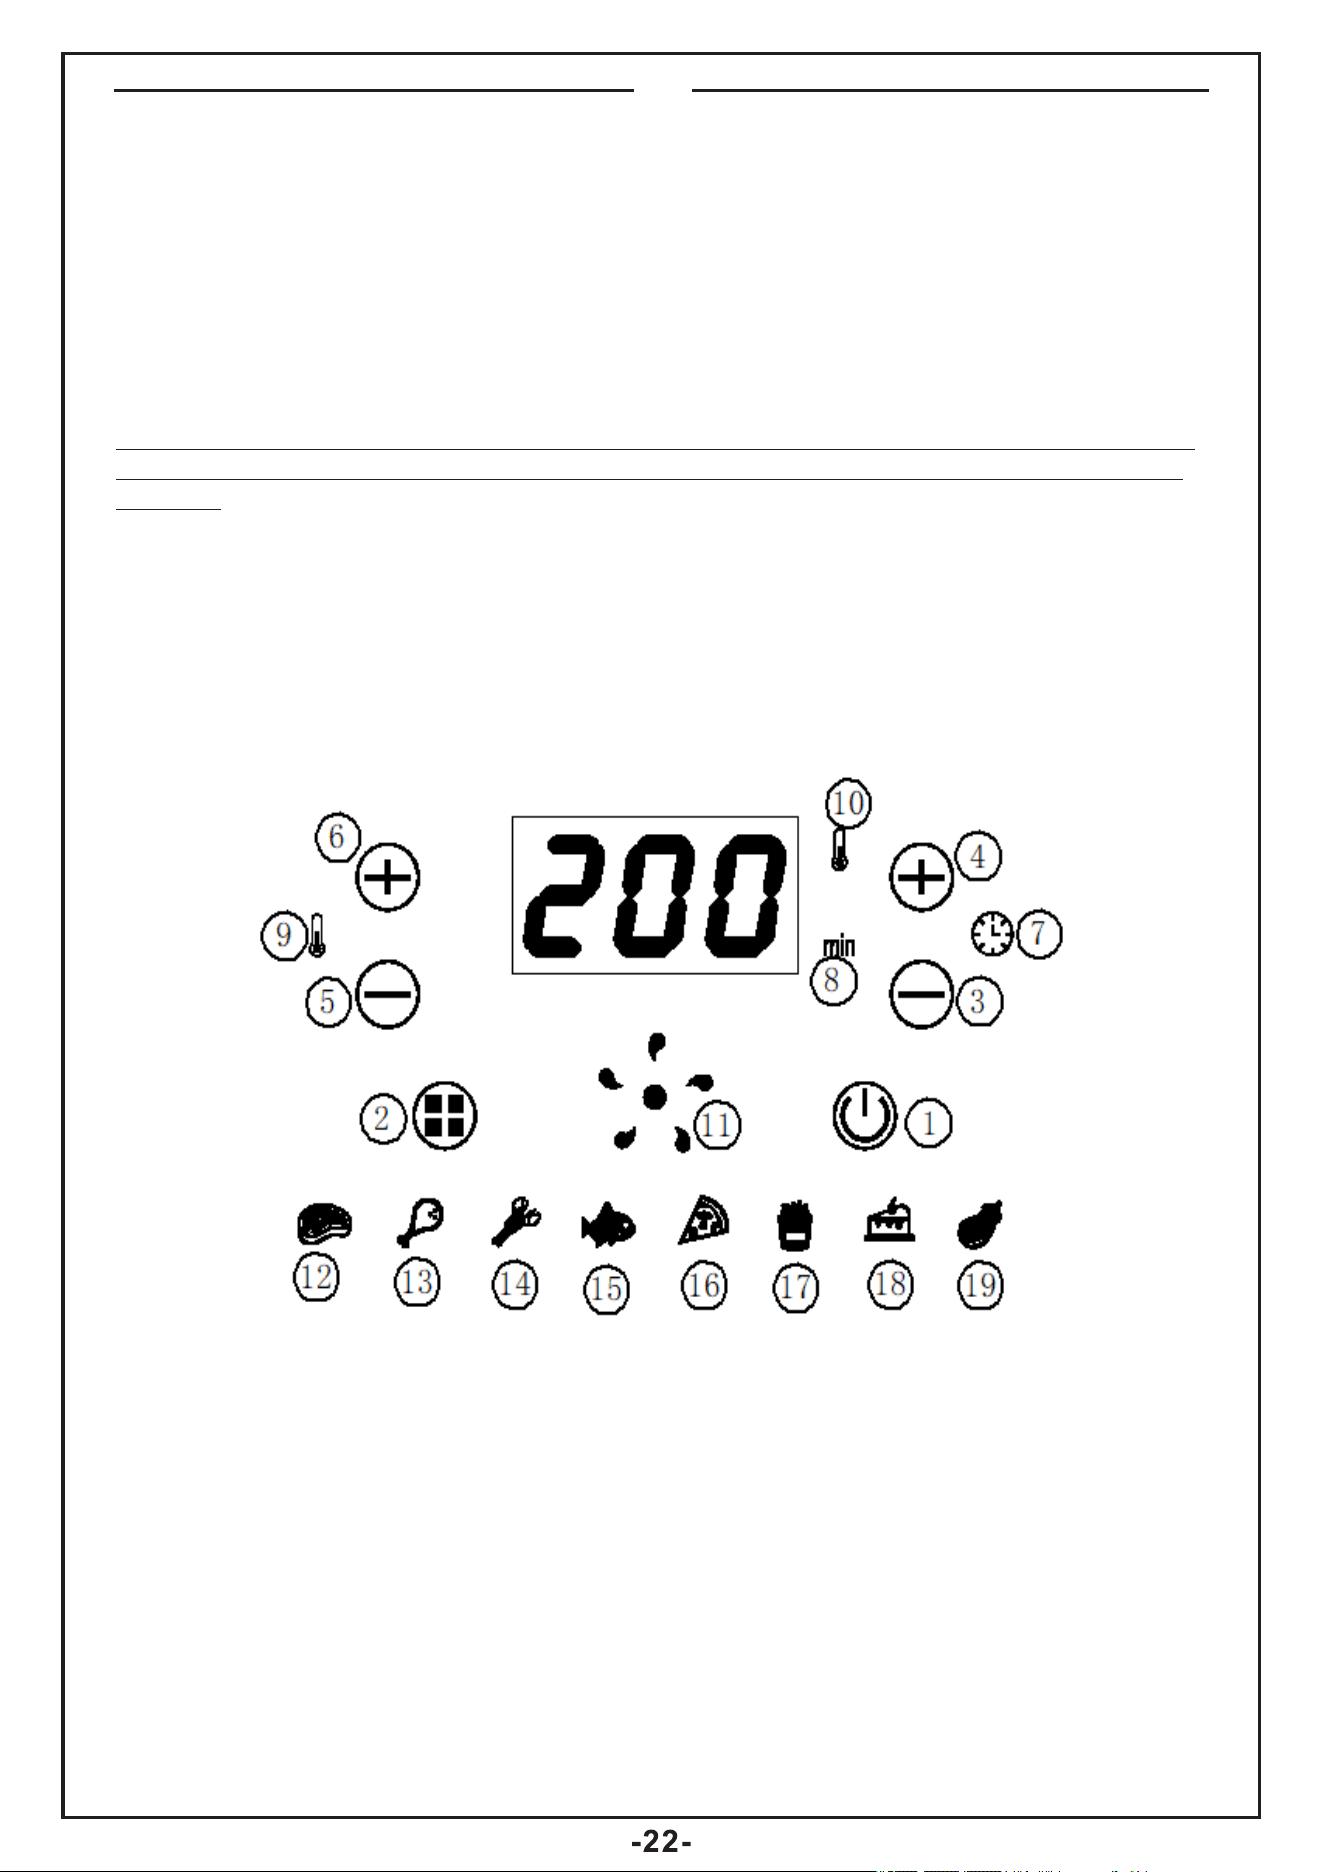
Control panel instructions
Operation Instructions:
Button 1 –Power Button
Once the pan is properly placed in the main Unit housing, the Power Button will be
illuminated. Selecting the power button for 3 seconds will make the unit's default
temperature 200, while the cooking time will be set to 15 minutes. Selecting the
Power Button a second time will start the cooking process. Pressing the power button
for 3 seconds to close the entire device during cooking. All the lights go out, the fan
stops working.
Note: During cooking, you can touch the button to control the pause and start of
cooking.
Button 2 –Preset Button
Selecting the “ ” Preset Button enables you to scroll through the 8 popular food
choices. Once selected, the predetermined time and cooking temperature function
begins.
Button 3&4 –Timer Control Buttons
The + and – symbols enable you to add or decrease cooking time, one minute at a time.
Keeping the button held down will rapidly change the time.
Button 5&6 –Temperature Control Buttons
The + and – symbols enable you to add or decrease cooking temperature 5℃ at a time.
Keeping the button held down will rapidly change the temperature. Temperature Control
range: 80℃-200℃.
EN
Indicator light “7&8”
Timer indicator
Indicator light “9&10”
Temperature indicator
Indicator light “11”
The center circle is heating lamp, Around 5 lamp lights for motor work
Indicator light “12-19”
Recipe indicator
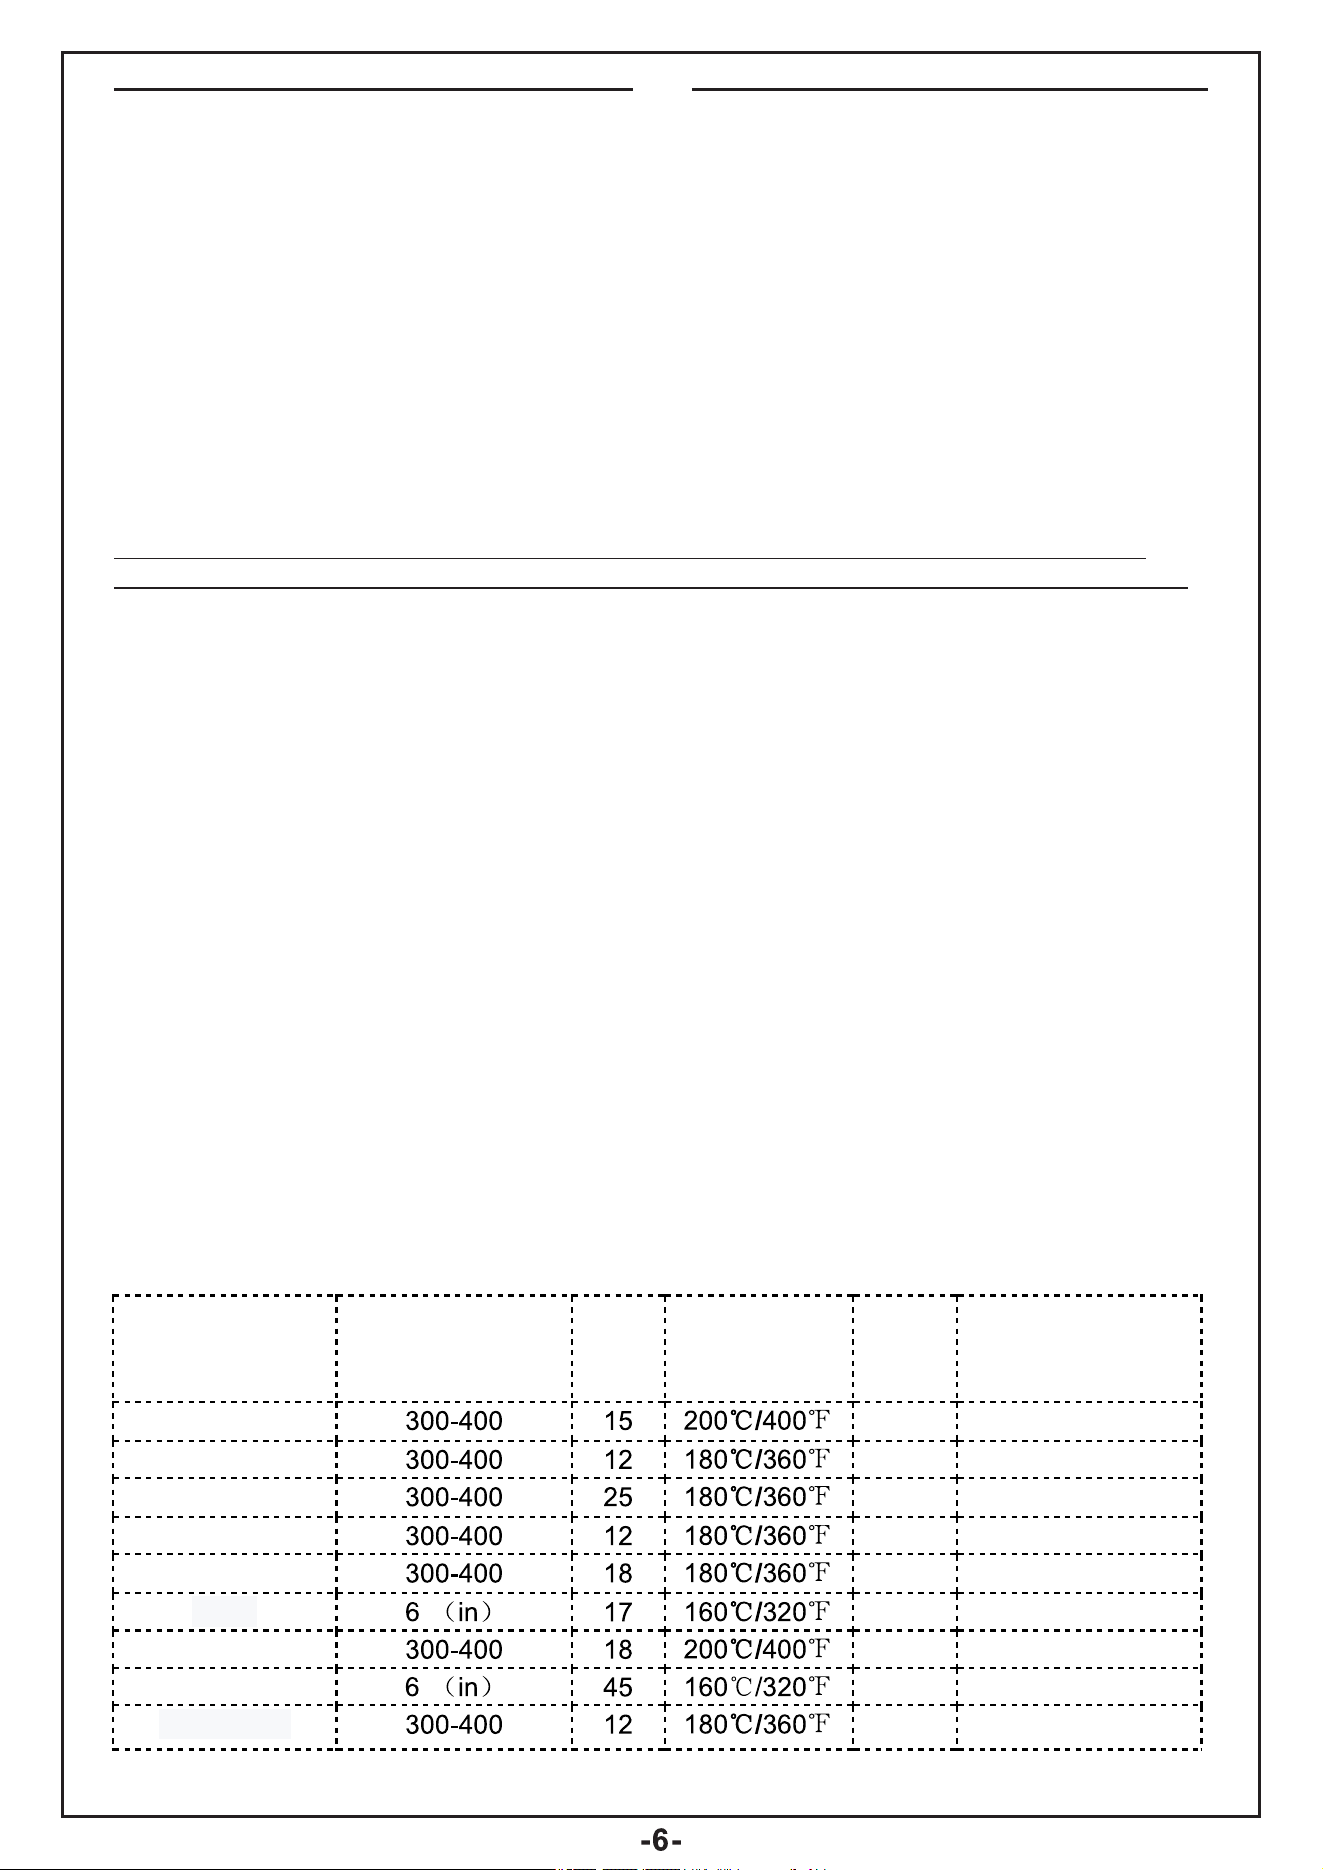
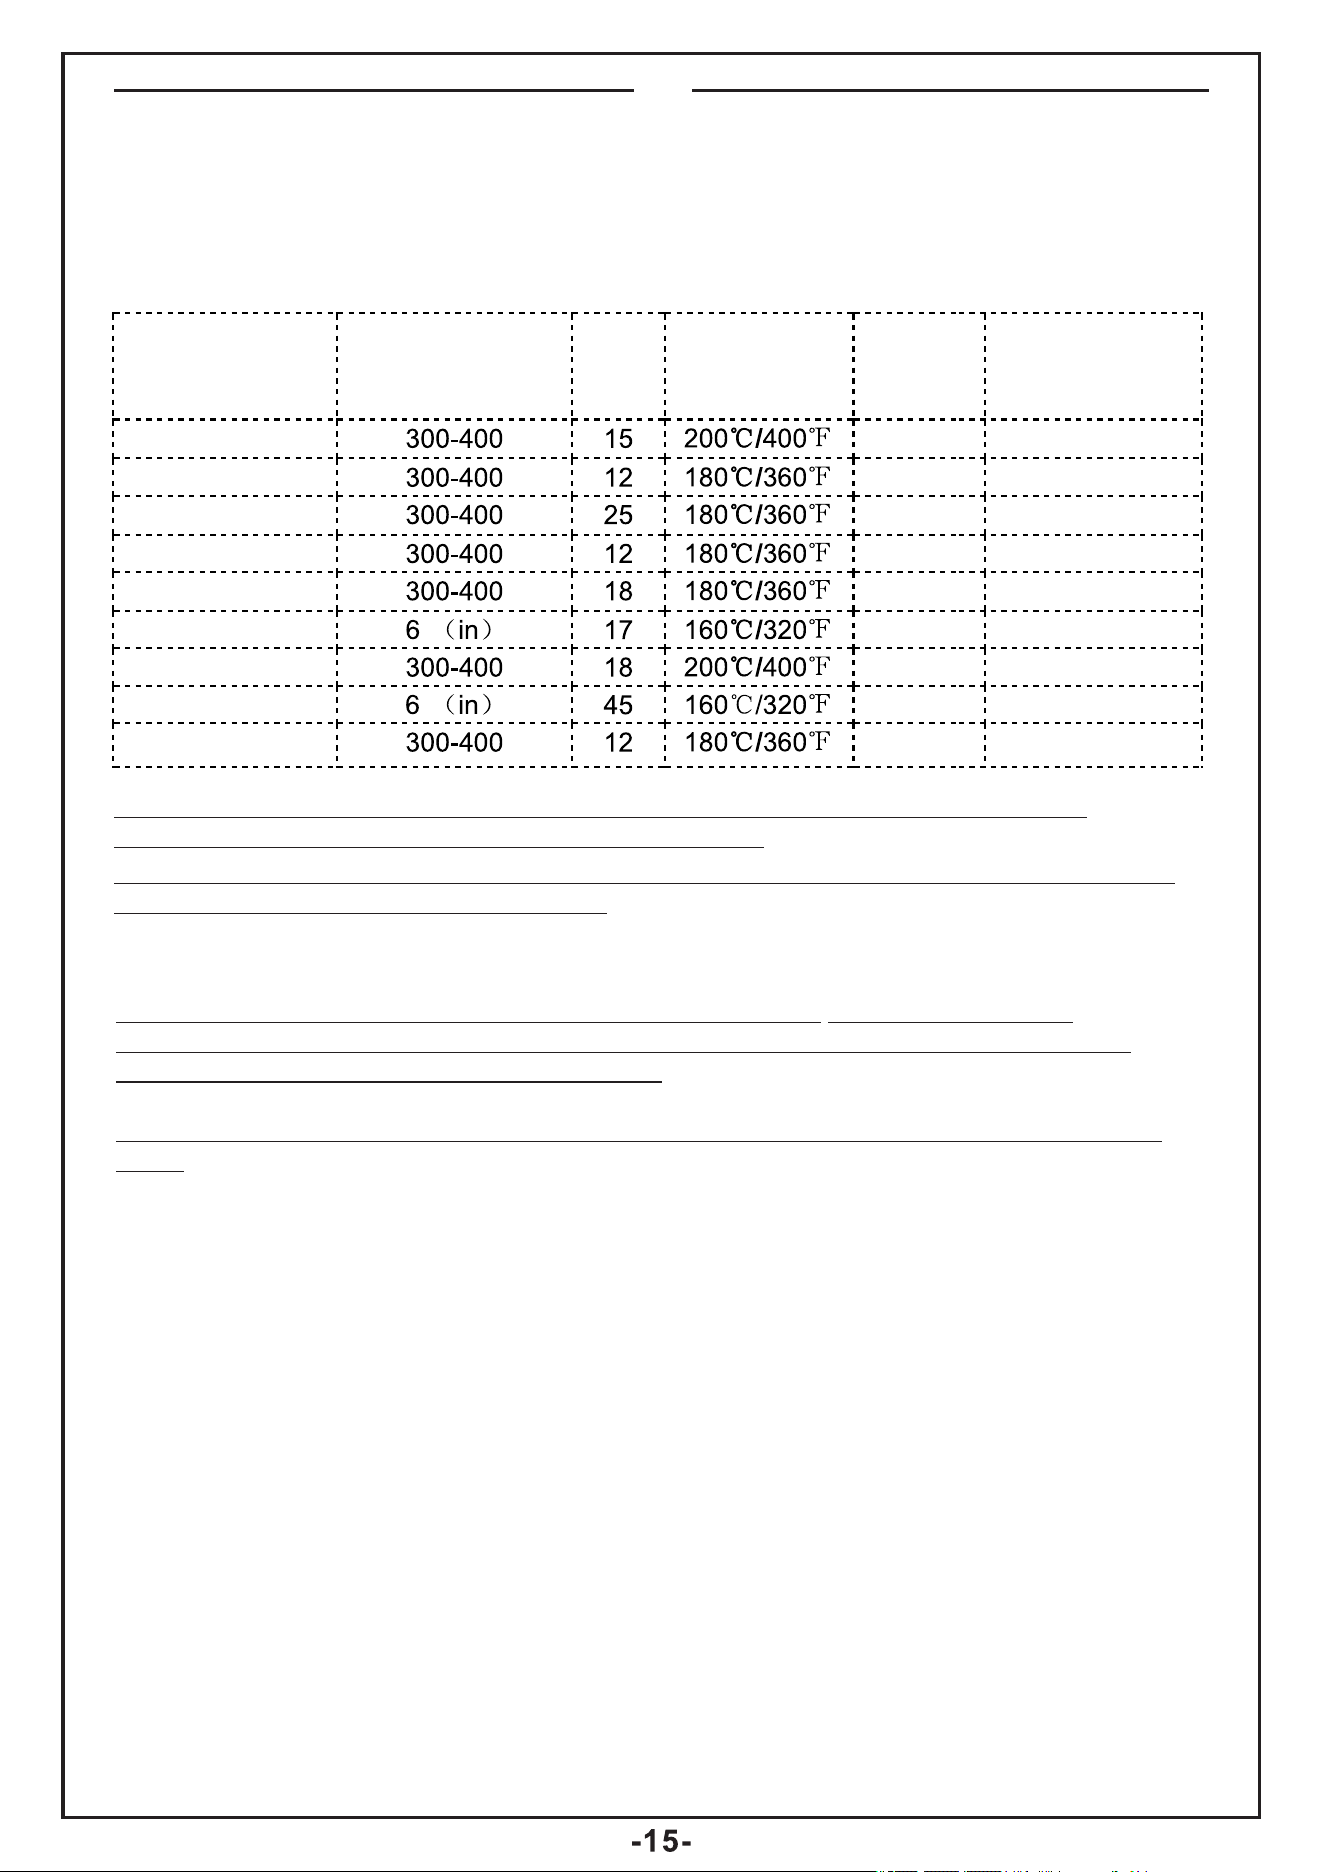
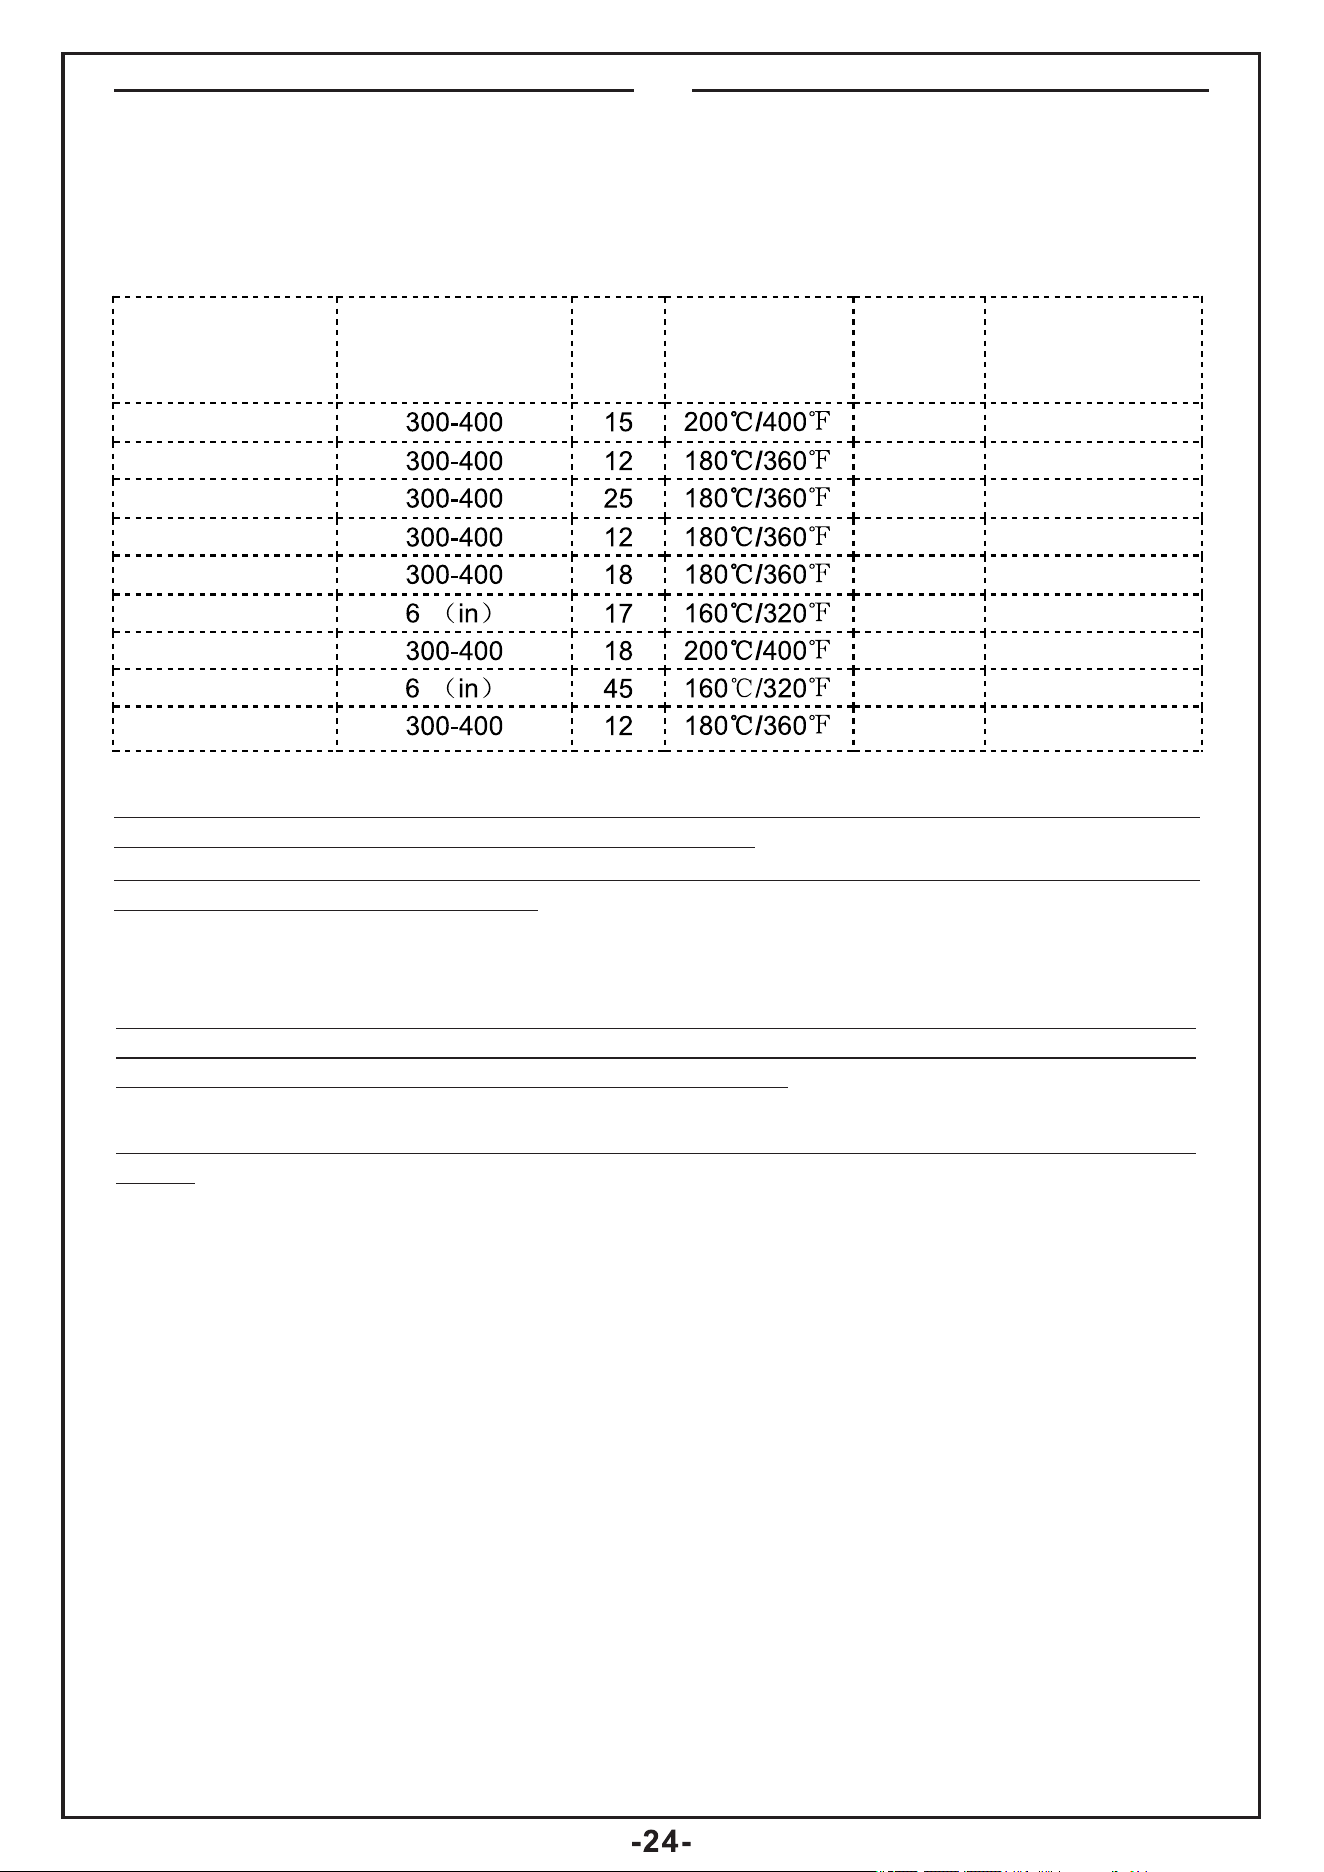
Settings
This table below will help you to select the basic settings for the ingredients.
Note: Keep in mind that these settings are indications. As ingredients differ in origin,
size, shape as well as brand, we cannot guarantee the best setting for your ingredients.
Because the Rapid Air technology instantly reheats the air inside the appliance instantly
Pull the pan briefly out of the appliance during hot air frying barely disturbs the process.
Tips
- Smaller ingredients usually require a slightly shorter preparation time than larger
ingredients.
- A larger amount of ingredients only requires a slightly longer preparation time, a
smaller amount of ingredients only requires a slightly shorter preparation time.
- Shaking smaller ingredients halfway through the preparation time optimizes the end
result and can help prevent unevenly fried ingredients.
- Add some oil to fresh potatoes for a crispy result. Fry your ingredients in the Hot-air
fryer within a few minutes after you added the oil.
- Do not prepare extremely greasy ingredients such as sausages in the Hot-air fryer.
- Snacks that can be prepared in an oven can also be prepared in the Hot-air fryer
- The optimal amount for preparing crispy fries is 400 grams.
- Use pre-made dough to prepare filled snacks quickly and easily. Pre-made dough also
requires a shorter preparation time than home-made dough.
- Place a baking tin or oven dish in the Hot-air fryer basket if you want to bake a cake or
quiche or if you want to fry fragile ingredients or filled ingredients
- You can also use the Hot-air fryer to reheat ingredients. To reheat ingredients, set the
temperature to 150℃ for up to 10 minutes.
Min -max Amount
(g)
Time
(min.)
Temperature
(℃)
Shake
Extra information
None shake
Steak shake
Chicken shake
Shrimp shake
Fish shake
P izza shake
Fries shake
Baked Goods shake
Vegetables
ICON
EN
Note: Add 3 minutes to the preparation time when you start frying while the Hot-air fryer
is still cold.
The first time to use, there will be a slight smoke and odor, belongs to the normal
phenomenon
Cleaning
Clean the appliance after every use.
The pan and the non-stick coating shelf. Do not use metal kitchen utensils or
abrasive cleaning materials to clean them, as this may damage the non-stick
coating.
1. Remove the mains plug from the wall socket and let the appliance cool down.
Note: Remove the pan to let the Hot-air fryer cool down more quickly.
2. Wipe the outside of the appliance with a moist cloth.
3. Clean the pan and shelf with hot water, some washing-up liquid and a non-abrasive
sponge.
You can use degreasing liquid to remove any remaining dirt.
Tip: If dirt is stuck to the shelf or the bottom of the pan, fill the pan with hot water with
some washing-up liquid. Put the shelf in the pan and let the pan and the shelf soak for
approximately 10 minutes.
4. Clean the inside of the appliance with hot water and non-abrasive sponge.
5. Clean the heating element with a cleaning brush to remove any food residues.
Storage
1. Unplug the appliance and let it cool down.
2. Make sure all parts are clean and dry.
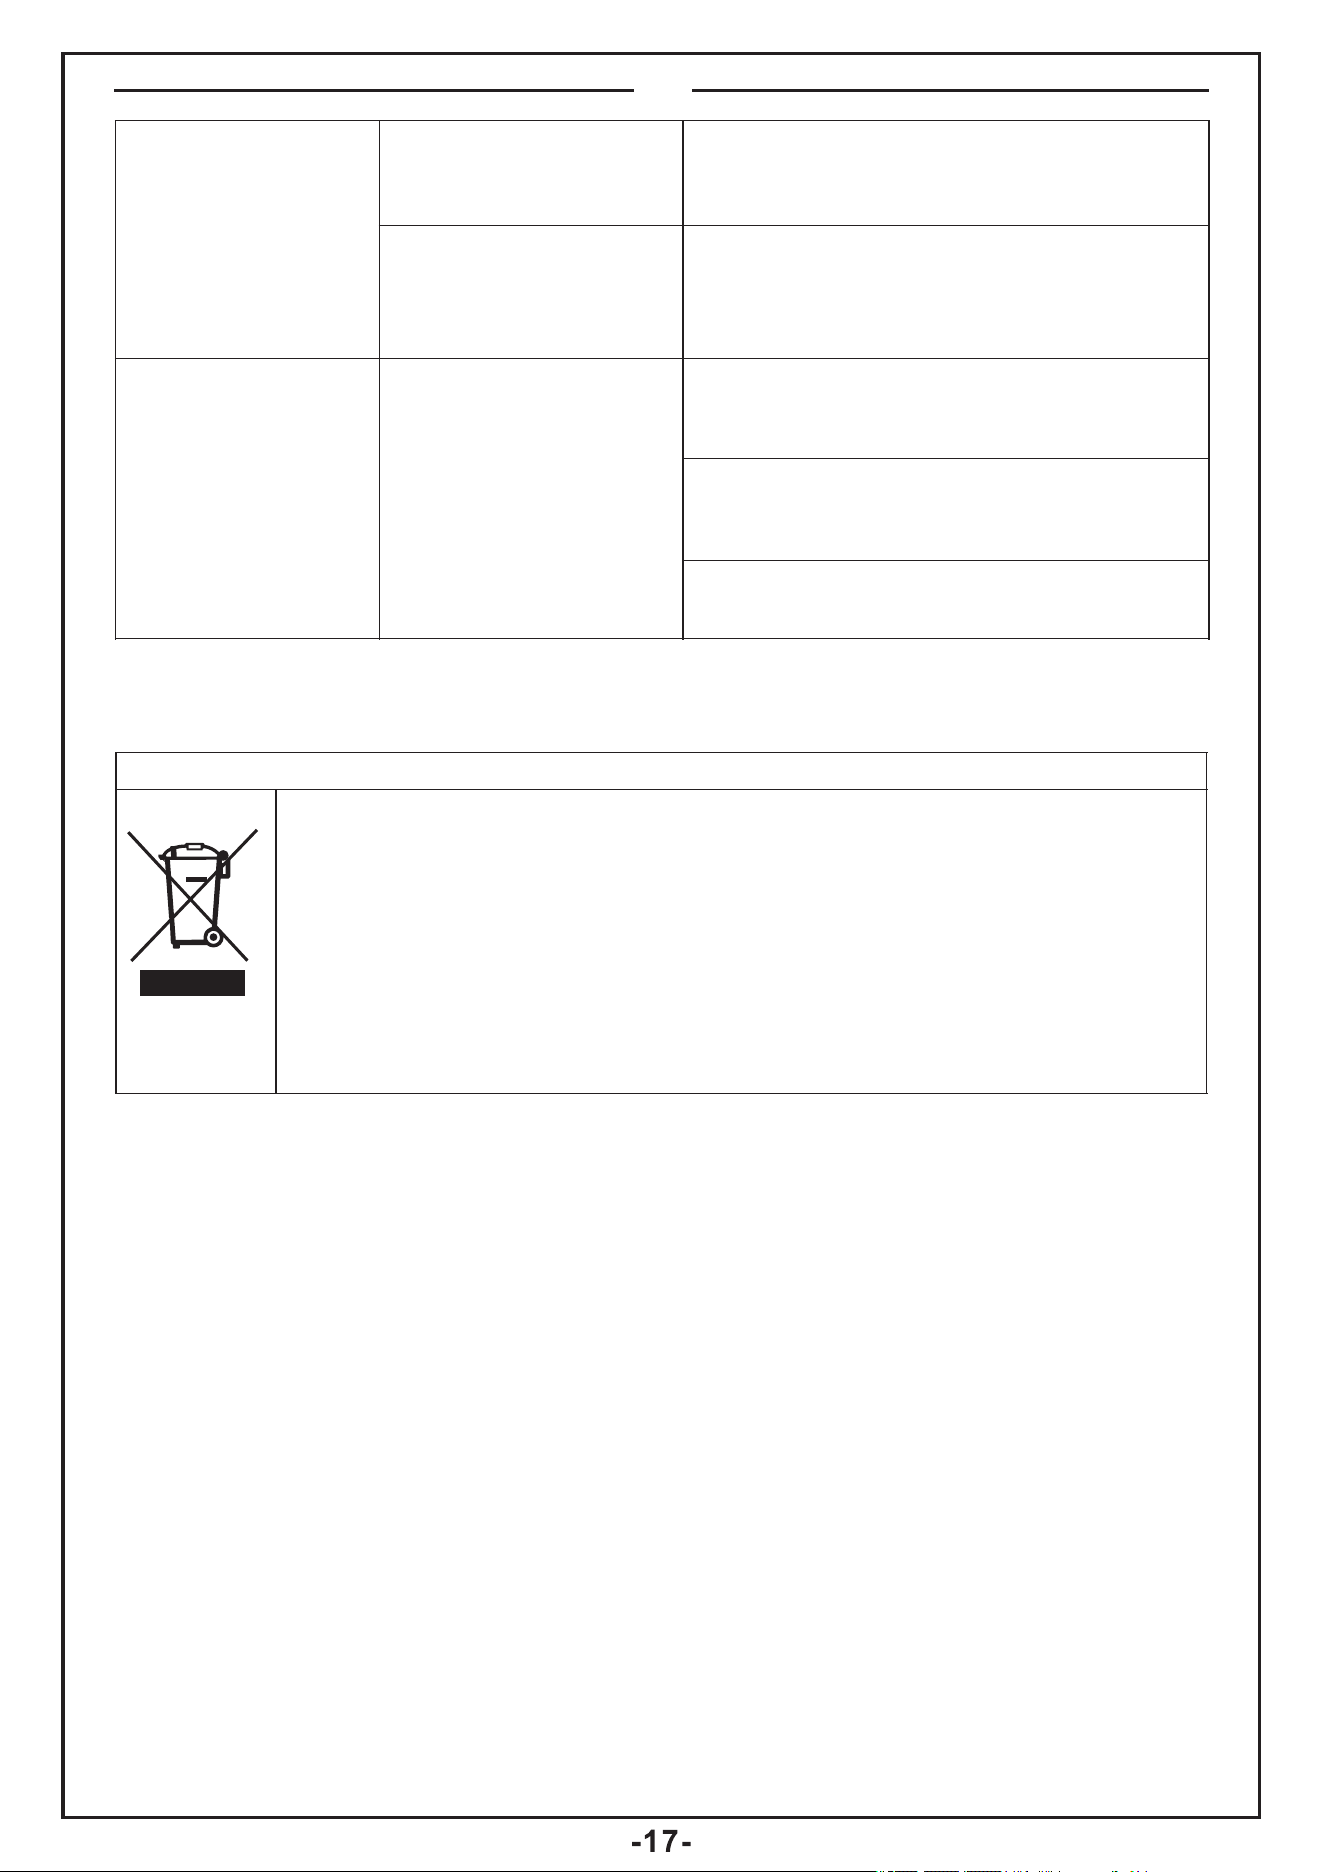
Environment
Do not throw away the appliance with the normal household waste when it is
exhausted, but hand it in at an official collection point for recycling. By doing this, you
help to preserve the environment.
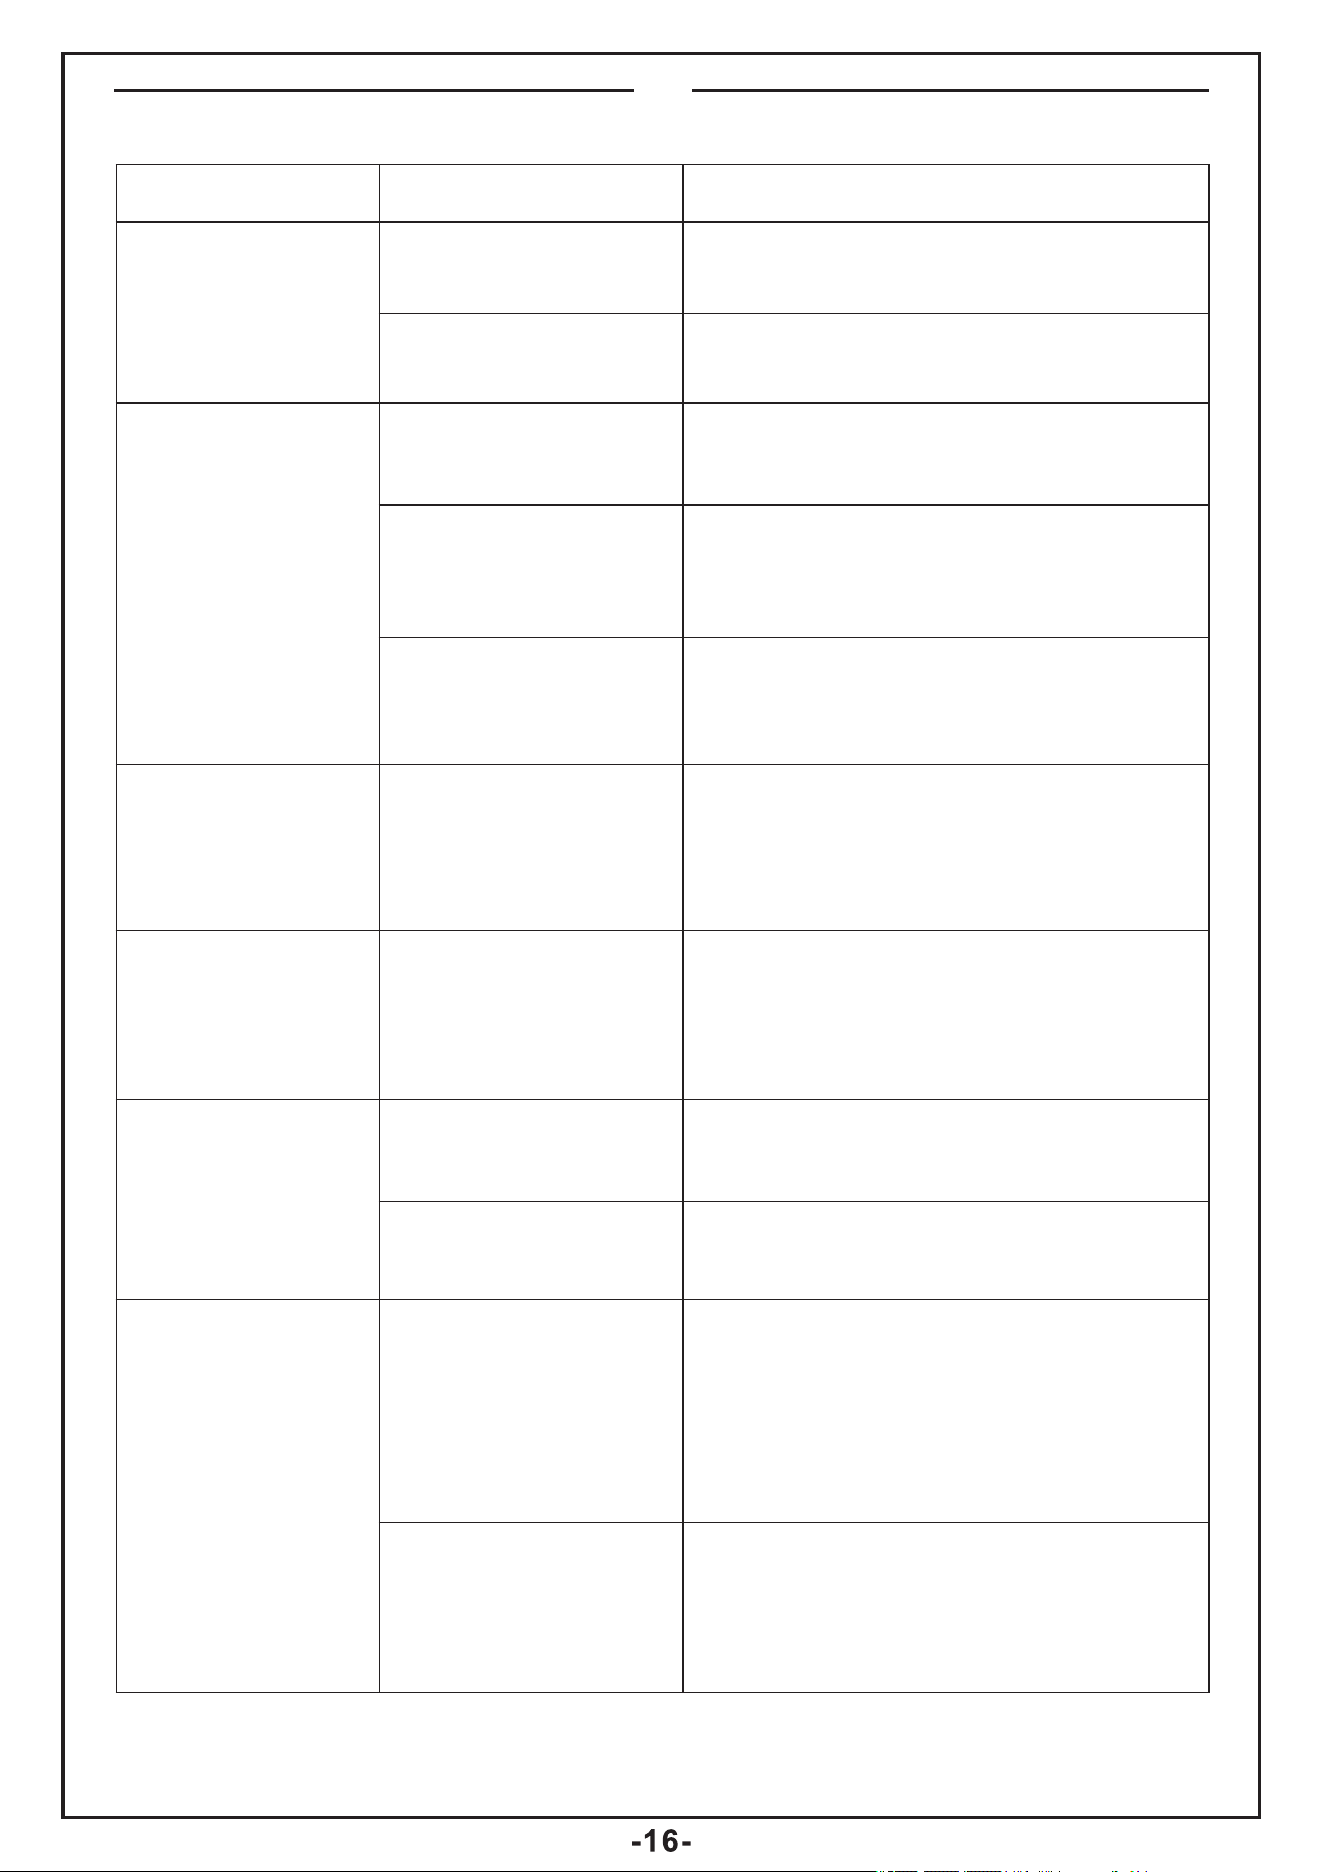
Troubleshooting
problem
Possible cause
Solution
The Hot-air fryer
does not work
The appliance is not
plugged in.
The appliance is not
plugged in.
Put the mains plug in an earthed wall
socket.
Set the timer key to the required
preparation time to switch on the
appliance.
The ingredients
fried with the air
fryer are not done.
The amount of
ingredients in the
basket is too big.
The set temperature
is too low.
The preparation time
is too short.
Put smaller batches of ingredients in
the basket. Smaller batches are fried
more evenly.
Set the temperature key to the
required temperature setting (see
section 'settings' in chapter 'Using the
appliance').
Set the timer to the required preparation
time (see section 'Settings' in chapter'
Using the appliance').
EN
White smoke
comes out of the
appliance.
You are preparing
greasy ingredients.
When you fry greasy ingredients in the
air fryer, a large amount of oil will leak
into the pot. The oil produces white
smoke and the pot may heat up more
than usual. This does not affect the
appliance or the end result.
The pot still contains
grease residues
from previous use.
White smoke is caused by grease
heating up in the pan. make sure you
clean the pan properly after each use.
Fresh fries are
fried unevenly in
the air fryer.
You did not use the
right potato type.
You did not rinse the
potato sticks properly
before you fried them.
Use fresh potatoes and make sure
they stay firm during frying.
Rinse the potato sticks properly to
remove starch from the outside of the
sticks.
Fresh fries are not
crispy when they
come out of the air
fryer.
The crispiness of the
fries depends on the
amount of oil and
water in the fries.
Add slightly more oil for a crispier
result.
Make sure you dry the potato sticks
properly before you add the oil.
Cut the potato sticks smaller for a
crispier result.
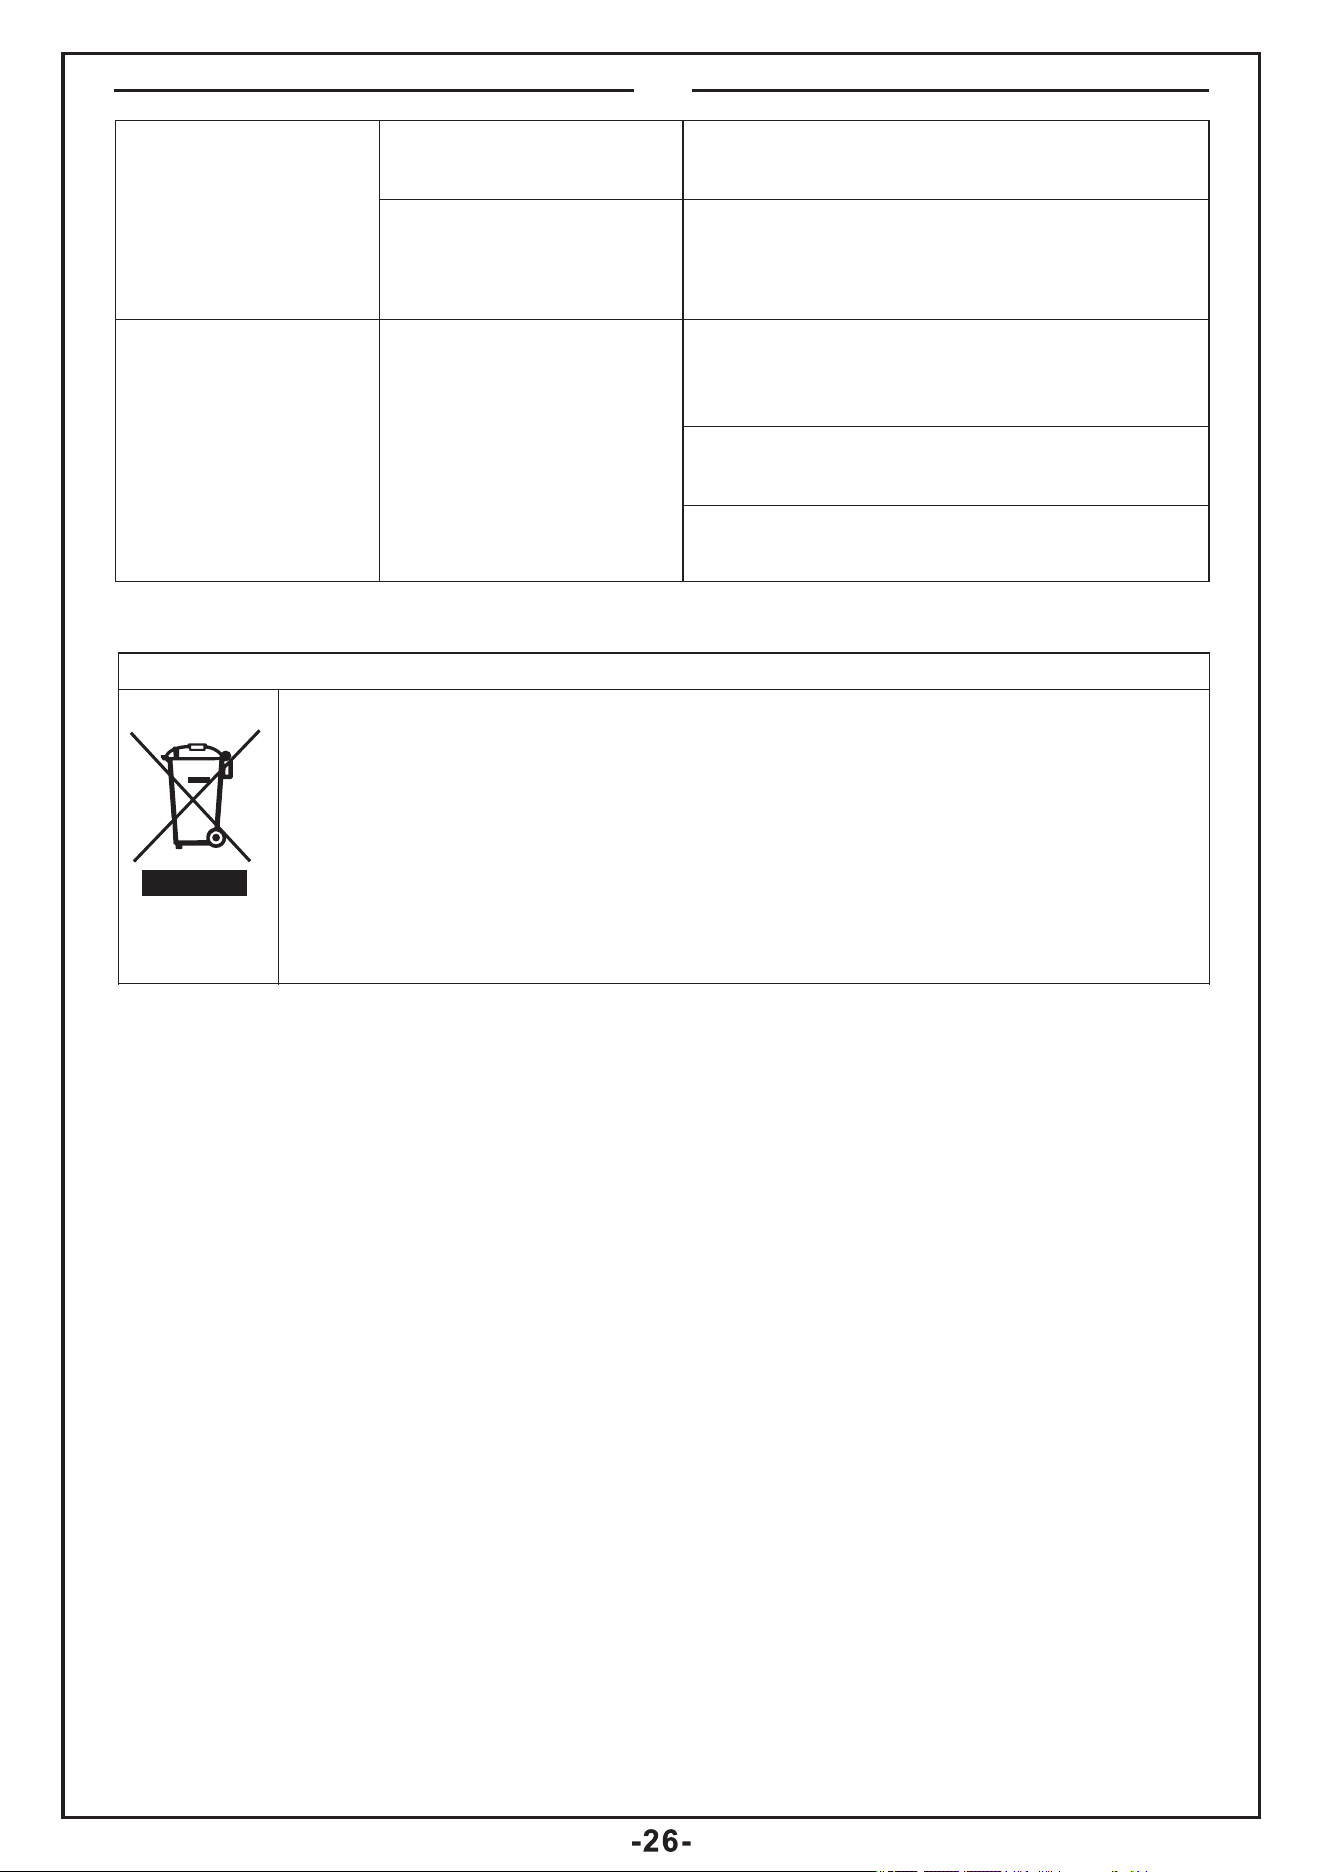
Correct Disposal of this product
This marking indicates that this product should not be disposed with other
household wastes throughout the EU. To prevent possible harm to the
environment or human health from uncontrolled waste disposal, recycle it
responsibly to promote the sustainable reuse of material resources. To
return your used device, please use the return and collection systems or
contact the retailer where the product was purchased. They can take this
product for environmental safe recycling.
EN
Fried snacks are
not crispy when
they come out of
the air fryer.
You used a type of
snacks meant to be
prepared in a
traditional deep fryer.
Use oven snacks or lightly brush some
oil onto the snacks for a crispier result.
I cannot slide the
pan into the
appliance
properly.
There are too much
ingredients in the Pan.
Do not fill the Pan beyond the MAX
indication.
The Pan is not placed
in the pot correctly.
Push the Pan again in the correct
direction.
Certain types of
ingredients need to be
shaken halfway
through the
preparation time.
Ingredients that lie on top of or across
each other (e.g. fries) need to be
shaken halfway through the
preparation time. See section 'Settings'
in chapter 'Using the appliance'.
The ingredients
are fried unevenly
in the air fryer.

INTRODUCTION
This all now Hot-air fryer provides an easy and healthy way of preparing your favorite
ingredients. By using hot rapid air circulation and a top grill, it is able to make numerous
dishes. The best part is that the Hot-air fryer heats food at all directions and most of the
ingredients do not need any oil.
SAVE THESE INSTRUCTIONS
This appliance is intended to be used in household and similar applications such as:
- staff kitchen areas in shops, offices and other working environments;
- farm houses;
- by clients in hotels, motels and other residential type environments;
- bed and breakfast type environments.
IMPORTANT SAFEGUARDS
When using electrical appliances, basic safety precautions should always be followed
including the following:
1. Read all instructions.
2. Do not touch hot surfaces.
3. To protect against electric shock do not immerse cord, plugs, or base in water or other
liquid.
4. WARNING: This electrical appliance contains a heating function. Surfaces, also
different than the functional surfaces, can develop high temperatures. Since
temperatures are differently perceived by different persons, this equipment shall be used
with CAUTION. The equipment shall be touch only at intended handles and gripping
surfaces, and use heat protection like gloves or similar. Surfaces other than intended
gripping surfaces shall get sufficiently time to the cool down before getting touched.
5. Unplug from outlet when not in use and before cleaning. Allow to cool before putting
on or taking off parts.
6. Type Y: If the supply cord is damaged, it must be replaced by the manufacturer, its
service agent or similarly qualified persons in order to avoid a hazard.
7. The use of accessory attachments not recommended by the appliance manufacturer
may cause injuries.
8. Do not use outdoors
9. Do not let cord hang over edge of table or counter, or touch hot surfaces.
10. Do not place on or near a hot gas or electric burner, or in a heated oven.
11. Extreme caution must be used when moving an appliance containing hot oil or other
hot liquids.
12. Always attach plug to appliance first, then plug cord in the wall outlet. To disconnect,
turn any control to "off," then remove plug from wall outlet.
13. Do not use appliance for other than intended use.
14. This appliance can be used by children aged from 8 years and above and persons
with reduced physical, sensory or mental capabilities or lack of experience and
knowledge if they have been given supervision or instruction concerning use of the
appliance in a safe way and understand the hazards involved. Children shall not play
with the appliance. Cleaning and user maintenance shall not be made by children unless
they are old than 8 and supervised.
15. Keep the appliance and its cord out of reach of children less than 8 years.
16. The appliances are not intended to be operated by means of an external timer or
separate remote-control system.
DE

1
2
4
5
6
7
3
Abb.1 Abb.2
Abb.3 Abb.4
Spezifikation & Funktion:
-----Spannung: 220-240 V ~50/60 Hz
-----Wattleistung: 1500 W
-----Kapazität des Korbes: 4,5 L
-----Einstellbare Temperatur: 80 °C – 200 °C
----- Zeitschaltuhr (0-60 Minuten)
Allgemeine Beschreibung (Abb. 1)
1. Auf dem Gehäuse
2. Bedienfeld
3. Pfannengriff
4. Pfanne
5. Luftauslass
6. Hauptkabel (Stromkabel)
7. Haupteinheit
DE
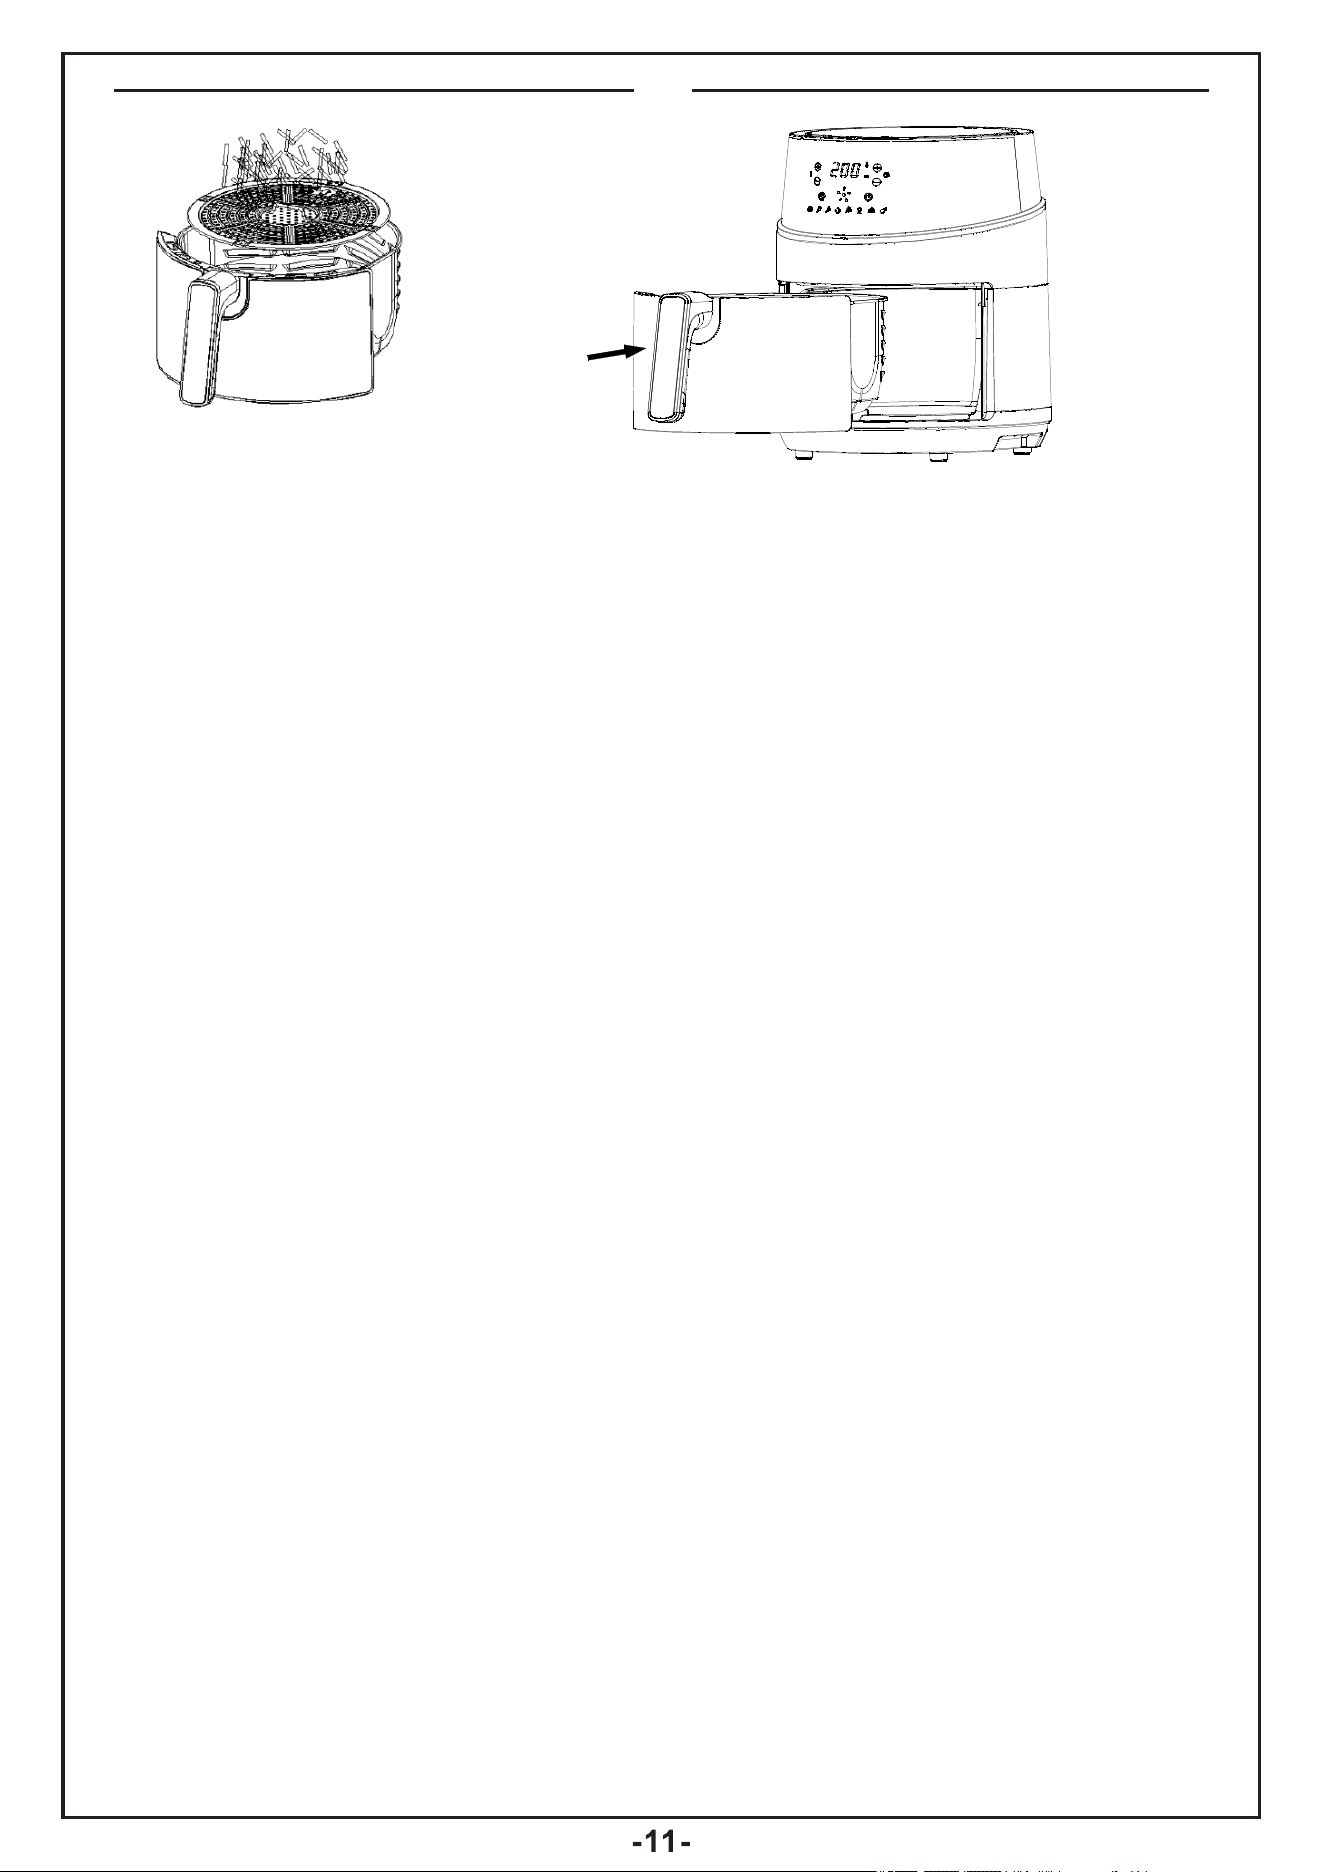
Abb.6
Abb.5
Wichtig!
Gefahr
- Dieses Gerät kann von Kindern ab 8 Jahren und darüber, sowie von Personen mit
verringerten physischen, sensorischen oder mentalen Fähigkeiten oder Mangel an
Erfahrung und Wissen benutzt werden, wenn sie beaufsichtigt oder bezüglich des
sicheren Gebrauchs des Geräts unterwiesen wurden und die daraus entstehenden
Gefahren verstehen. Kinder dürfen nicht mit dem Gerät spielen. Die Reinigung und
Benutzerwartung dürfen nicht von Kindern durchgeführt werden, es sei denn, sie sind
älter als 8 Jahre und werden beaufsichtigt.
- Bewahren Sie das Gerät und sein Kabel außerhalb der Reichweite von Kindern unter 8
Jahren auf.
- Tauchen Sie das Gehäuse, in dem sich die elektrischen Bauteile und die Heizelemente
befinden, niemals in Wasser ein und spülen Sie es nicht unter dem Wasserhahn ab.
- Lassen Sie kein Wasser oder andere Flüssigkeiten in das Gerät eindringen, um einen
elektrischen Schlag zu vermeiden.
- Legen Sie die zu frittierenden Zutaten immer in den Korb, damit sie nicht mit den
Heizelementen in Berührung kommen.
- Decken Sie die Lufteinlass- und Luftauslassöffnungen nicht ab, während das Gerät in
Betrieb ist.
- Füllen Sie den Topf nicht mit Öl, da dies eine Brandgefahr darstellt.
- Berühren Sie niemals das Innere des Geräts, während es in Betrieb ist.
Die Temperatur der zugänglichen Oberflächen kann hoch sein, wenn das Gerät in
Betrieb ist.
WARNUNG
- Prüfen Sie, ob die auf dem Gerät angegebene Spannung mit der örtlichen
Netzspannung übereinstimmt.
- Benutzen Sie das Gerät nicht, wenn der Stecker, das Stromkabel oder andere Teile
beschädigt sind.
- Wenden Sie sich nicht an Unbefugte, um ein beschädigtes Stromkabel zu ersetzen
oder zu reparieren.
- Halten Sie das Netzkabel von heißen Oberflächen fern.
- Schließen Sie das Gerät nicht mit nassen Händen an und bedienen Sie das Bedienfeld
nicht mit nassen Händen.
- Stellen Sie das Gerät nicht gegen eine Wand oder gegen andere Geräte. Lassen Sie
mindestens 10 cm Freiraum an der Rückseite und den Seiten und 10 cm Freiraum über
dem Gerät.
Stellen Sie keine Gegenstände auf das Gerät.
- Verwenden Sie das Gerät nicht für einen anderen Zweck als in dieser Anleitung
beschrieben.
DE

- Lassen Sie das Gerät nicht unbeaufsichtigt laufen.
- Beim Heißluftfritieren wird heißer Dampf durch die Luftaustrittsöffnungen freigesetzt.
Halten Sie Ihre Hände und Ihr Gesicht in einem sicheren Abstand zum Dampf und zu den
Luftaustrittsöffnungen.
Achten Sie auch auf den heißen Dampf und die Luft, wenn Sie den Topf aus dem Gerät
nehmen.
- Alle zugänglichen Oberflächen können während des Gebrauchs heiß werden (Abb. 2).
- Trennen Sie sofort den Netzstecker, wenn Sie dunklen Rauch aus dem Gerät kommen
sehen. Warten Sie, bis die Rauchentwicklung aufhört, bevor Sie den Topf aus dem Gerät
nehmen.
Vorsicht
- Achten Sie darauf, dass das Gerät auf einer horizontalen, ebenen und stabilen Fläche
steht.
- Dieses Gerät ist nur für den Hausgebrauch bestimmt. Es ist möglicherweise nicht
geeignet, um in Umgebungen wie Personalküchen, Bauernhöfen, Motels und anderen
Nicht-Wohnumgebungen sicher verwendet zu werden. Es ist auch nicht für die
Verwendung durch Kunden in Hotels, Motels, Pensionen und anderen Wohnumgebungen
vorgesehen.
- Wenn das Gerät unsachgemäß oder für gewerbliche oder semi-gewerbliche Zwecke
verwendet wird oder wenn es nicht gemäß den Anweisungen in der Bedienungsanleitung
benutzt wird, erlischt die Garantie und wir können jegliche Haftung für verursachte
Schäden ablehnen.
- Ziehen Sie immer den Netzstecker, wenn Sie das Gerät nicht benutzen.
- Das Gerät muss ca. 30 Minuten abkühlen, damit es sicher gehandhabt oder gereinigt
werden kann.
Vor der ersten Verwendung
1. Entfernen Sie alle Verpackungsmaterialien.
2. Entfernen Sie alle Aufkleber oder Etiketten vom Gerät.
3. Reinigen Sie den Korb und den Topf gründlich mit heißem Wasser, etwas Spülmittel
und einem nicht scheuernden Schwamm.
4. Wischen Sie das Gerät innen und außen mit einem feuchten Tuch ab.
Dies ist eine ölfreie Fritteuse, die mit Heißluft arbeitet. Füllen Sie kein Öl oder
Frittierfett direkt in den Topf.
Vorbereitung für die Verwendung
1. Stellen Sie das Gerät auf eine stabile, horizontale und ebene Fläche.
Stellen Sie das Gerät nicht auf eine nicht hitzebeständige Oberfläche.
2. Setzen Sie den Rost in den Topf ein (Abb. 3).
Füllen Sie kein Öl oder eine andere Flüssigkeit in den Topf.
Legen Sie keine Gegenstände auf das Gerät, da sonst der Luftstrom unterbrochen wird
und das Ergebnis des Heißluftfrittierens beeinträchtigt wird.
Verwendung des Geräts
Das ölfreie Gerät kann eine große Anzahl von Zutaten zubereiten. Das mitgelieferte
Rezeptheft hilft Ihnen, das Gerät kennen zu lernen.
Heißluftfrittieren
1. Stecken Sie den Netzstecker in eine geerdete Wandsteckdose.
2. Ziehen Sie den Topf vorsichtig aus der Heißluftfritteuse (Abb. 4)
3. Legen Sie die Zutaten in den Korb. (Abb. 5)
4. Schieben Sie den Topf zurück in die Heißluftfritteuse (Abb. 6)
Achten Sie darauf, dass Sie ihn sorgfältig an den Führungen im Gehäuse der Fritteuse
ausrichten.
DE
Verwenden Sie den Topf niemals ohne den Korb darin befestigt zu haben.
Vorsicht! Berühren Sie den Topf während und nach dem Gebrauch nicht, da er
sehr heiß wird. Halten Sie den Topf nur am Griff fest.
5. Bestimmen Sie die erforderliche Zubereitungszeit für die Zutat (siehe Abschnitt
„Einstellungen“ in diesem Kapitel).
6. Einige Zutaten müssen nach der Hälfte der Garzeit geschüttelt werden (siehe
Abschnitt „Einstellungen“ in diesem Kapitel). Um die Zutaten zu schütteln, ziehen Sie
den Topf am Griff aus dem Gerät und schütteln ihn. Schieben Sie den Topf dann zurück
in die Fritteuse.
7. Zum Entnehmen von Zutaten (z. B. Pommes frites) ziehen Sie den Topf aus der
Heißluftfritteuse und stellen ihn auf eine hitzebeständige Unterlage, dann heben Sie den
Korb aus dem Topf.
Der Topf und die Zutaten sind heiß und die Fritteuse heiß. Je nach Art der Zutaten
in der Luftfritteuse kann Dampf aus der Pfanne entweichen.
8. Leeren Sie den Korb in eine Schüssel oder auf einen Teller.
Tipp: Um große oder empfindliche Zutaten zu entnehmen, heben Sie die Zutaten mit
einer Zange aus dem Korb.
9. Wenn eine Charge von Zutaten fertig ist, ist die Heißluftfritteuse sofort für die
Zubereitung einer weiteren Charge bereit.
DE
Anweisungen für das Bedienfeld
Betriebsanweisungen:
Taste 1 –Einschalttaste
Sobald der Topf richtig in das Gehäuse des Hauptgeräts eingesetzt ist, leuchtet die
Einschalttaste auf. Wenn Sie die Einschalttaste 3 Sekunden lang gedrückt halten, wird
die Standardtemperatur des Geräts auf 200 und die Garzeit auf 15 Minuten eingestellt.
Wenn Sie die Einschalttaste ein zweites Mal drücken, wird der Garvorgang gestartet.
Wenn Sie die Einschalttaste 3 Sekunden lang gedrückt halten, wird das Gerät während
des Garvorgangs vollständig abgeschaltet. Alle Leuchten erlöschen, das Gebläse hört
auf zu arbeiten.
Hinweis: Während des Garvorgangs können Sie die Taste berühren, um die Pause und
den Start des Garvorgangs zu steuern.

Taste 2 –Vorwahltaste
Durch Auswahl der „ “ Vorwahltaste können Sie durch die 8 beliebtesten Gerichte
blättern. Nach der Auswahl beginnt die vorgegebene Zeit- und Gartemperaturfunktion.
Taste 3 & 4 –Timer-Regeltasten
Mit den Symbolen + und – können Sie die Garzeit um jeweils eine Minute verlängern
oder verkürzen. Wenn Sie die Taste gedrückt halten, ändert sich die Zeit schnell.
Taste 5 & 6 –Temperaturregeltasten
Mit den Symbolen + und – können Sie die Gartemperatur jeweils um 5 °C erhöhen oder
verringern. Wenn Sie die Taste gedrückt halten, ändert sich die Temperatur schnell.
Temperaturregelbereich: 80 °C -200 °C.
Anzeigeleuchte „7 & 8“
Timer-Anzeiger
Anzeigeleuchte „9 & 10“
Temperatur-Anzeige
Anzeigeleuchte „11“
Der mittlere Kreis ist die Heizleuchte, rundherum leuchten 5 Leuchten für den
Motorbetrieb
Anzeigeleuchte „12-19“
Rezeptur-Anzeige
Einstellungen
Die nachstehende Tabelle hilft Ihnen bei der Auswahl der Grundeinstellungen für die
Zutaten.
Hinweis: Beachten Sie, dass es sich bei diesen Einstellungen um Empfehlungen
handelt. Da sich die Zutaten in Bezug auf Herkunft, Größe, Form sowie Marke
unterscheiden, können wir nicht die beste Einstellung für Ihre Zutaten garantieren.
Da die Rapid Air Technologie die Luft im Gerät sofort wieder aufheizt,
stört das kurze Herausziehen des Topfes aus dem Gerät während des Heißluftfritierens
kaum den Ablauf.
Tipps
- Kleinere Zutaten benötigen in der Regel eine etwas kürzere Zubereitungszeit als
größere Zutaten.
- Eine größere Menge an Zutaten erfordert nur eine etwas längere Garzeit, eine
kleinere Menge an Zutaten erfordert nur eine etwas kürzere Garzeit.
- Das Schütteln kleinerer Zutaten nach der Hälfte der Zubereitungszeit optimiert das
Endergebnis und kann helfen, ungleichmäßig gebratene Zutaten zu vermeiden.
- Fügen Sie etwas Öl zu frischen Kartoffeln hinzu für ein knuspriges Ergebnis.
Frittieren Sie Ihre Zutaten in der Heißluftfritteuse innerhalb weniger Minuten, nachdem
Sie das Öl hinzugefügt haben.
- Bereiten Sie keine extrem fettigen Zutaten wie Würstchen in der Heißluftfritteuse zu.
- Snacks, die im Backofen zubereitet werden können, können auch in der
Heißluftfritteuse zubereitet werden
- Die optimale Menge für die Zubereitung von knusprigen Pommes frites beträgt 500
Gramm.
- Verwenden Sie vorgefertigten Teig, um gefüllte Snacks schnell und einfach
zuzubereiten. Vorgefertigter Teig benötigt auch eine kürzere Zubereitungszeit als
selbstgemachter Teig.
DE
SYMBOL
- Legen Sie ein Backblech oder eine Auflaufform in den Korb der Heißluftfritteuse,
wenn Sie einen Kuchen oder eine Quiche backen möchten oder wenn Sie zerbrechliche
oder gefüllte Zutaten frittieren möchten
Sie können die Heißluftfritteuse auch zum Aufwärmen von Zutaten verwenden. Zum
Aufwärmen von Zutaten stellen Sie die Temperatur auf 150 ℃ (300 °F) für bis zu 10
Minuten ein.
Keine
Steak
Hähnchen
Garnelen
Fisch
Pizza
Pommes frites
Backwaren
Gemüse
Min-Max-Menge
(G)
Zeit
(Min.)
Temperatur
(℃)
Schütteln
Zusätzliche
Informationen
Hinweis: Rechnen Sie 3 Minuten zur Garzeit hinzu, wenn Sie mit dem Frittieren
beginnen, während die Heißluftfritteuse noch kalt ist.
Bei der ersten Benutzung entsteht eine leichte Rauch- und Geruchsentwicklung,
die ein normales Phänomen darstellt.
Reinigung
Reinigen Sie das Gerät nach jedem Gebrauch.
Den Topf und den Korb mit der Antihaftbeschichtung. Verwenden Sie zur
Reinigung keine Küchenutensilien aus Metall oder Scheuermittel, da dies die
Antihaftbeschichtung beschädigen kann.
1. Trennen Sie den Netzstecker von der Steckdose und lassen Sie das Gerät abkühlen.
Hinweis: Nehmen Sie den Topf heraus, damit die Heißluftfritteuse schneller abkühlen
kann.
2. Wischen Sie die Außenseite des Geräts mit einem feuchten Tuch ab.
3. Reinigen Sie den Topf und den Korb mit heißem Wasser, etwas Spülmittel und einem
nicht scheuernden Schwamm.
Sie können Entfettungsflüssigkeit verwenden, um restliche Verschmutzungen zu
entfernen.
Tipp: Wenn Schmutz am Korb oder am Topfboden festsitzt, füllen Sie den Topf mit
heißem Wasser und etwas Spülmittel. Setzen Sie den Korb in den Topf und lassen Sie
den Topf und den Korb etwa 10 Minuten lang einweichen.
4. Reinigen Sie das Innere des Geräts mit heißem Wasser und einem nicht
scheuerndem Schwamm.
5. Reinigen Sie das Heizelement mit einer Reinigungsbürste, um Essensreste zu
entfernen.
Lagerung
1. Trennen Sie den Netzstecker des Geräts und lassen Sie es abkühlen.
2. Stellen Sie sicher, dass alle Teile sauber und trocken sind.
Umwelt
Entsorgen Sie das Gerät nicht mit dem normalen Hausmüll, wenn es nicht mehr
funktioniert, sondern geben Sie es bei einer offiziellen Sammelstelle zum Recycling ab.
Auf diese Weise helfen Sie, die Umwelt zu schonen.
DE
Schütteln
Schütteln
Schütteln
Schütteln
Schütteln
Schütteln
Schütteln
Schütteln
Fehlersuche
Problem
Mögliche Ursache
Lösung
Die
Heißluftfritteuse
funktioniert nicht
Das Gerät ist nicht am
Stromnetz
angeschlossen.
Sie haben den Timer
nicht eingestellt.
Stecken Sie den Netzstecker in eine
geerdete Wandsteckdose.
Stellen Sie die Timer-Taste auf die
gewünschte Garzeit, um das Gerät
einzuschalten.
Die mit der
Heißluftfritteuse
frittierten Zutaten
sind nicht gar.
Die Menge der Zutaten
im Korb ist zu groß.
Die eingestellte
Temperatur ist zu
niedrig.
Die Vorbereitungszeit
ist zu kurz.
Geben Sie kleinere Chargen von Zutaten in
den Korb. Kleinere Chargen werden
gleichmäßiger gebraten.
Stellen Sie die Temperaturtaste auf die
gewünschte Temperatureinstellung
(siehe Abschnitt 'Einstellungen' im Kapitel
'Benutzung des Geräts').
Stellen Sie den Timer auf die gewünschte
Zubereitungszeit ein (siehe Abschnitt
'Einstellungen' im Kapitel 'Benutzung des
Geräts').
Die Zutaten werden
in der
Heißluftfritteuse
ungleichmäßig
frittiert.
Bestimmte Arten von
Zutaten müssen nach
der Hälfte der
Zubereitungszeit
geschüttelt werden.
Zutaten, die übereinander oder quer liegen
(z. B. Pommes frites), müssen nach der
Hälfte der Zubereitungszeit geschüttelt
werden. Siehe Abschnitt 'Einstellungen' im
Kapitel 'Benutzung des Geräts'.
Verwenden Sie Backofensnacks oder
bestreichen Sie die Snacks leicht mit Öl für
ein knusprigeres Ergebnis.
Frittierte Snacks
sind nicht knusprig,
wenn sie der
Heißluftfritteuse
entnommen
werden.
Sie haben eine Art von
Snacks verwendet, die
für die Zubereitung in
einer traditionellen
Fritteuse vorgesehe n
sind.
Aus dem Gerät tritt
weißer Rauch aus.
Sie bereiten fettige
Zutaten zu.
Wenn Sie fettige Zutaten in der
Heißluftfritteuse frittieren, läuft eine große
Menge Öl in den Topf. Das Öl erzeugt
weißen Rauch und der Topf kann sich
stärker erhitzen als gewöhnlich. Dies hat
keinen Einfluss auf das Gerät oder das
Endergebnis.
Der Topf enthält noch
Fettreste vom
vorherigen Gebrauch.
Der weiße Rauch wird durch die
Erhitzung des Fetts im Topf Pfanne
verursacht. Achten Sie darauf, dass Sie
den Topf nach jedem Gebrauch richtig
reinigen.
Ich kann die Pfanne
nicht richtig in das
Gerät einschieben.
Es befinden sich zu viele
Zutaten im Pfanne.
Füllen Sie den Pfanne nicht über die
MAX-Anzeige hinaus.
Der Korb ist nicht richtig
in den Pfanne
eingesetzt.
Drücken Sie die Pfanne erneut in die
richtige Richtung.
DE
Korrekte Entsorgung dieses Produkts
Diese Kennzeichnung weist darauf hin, dass dieses Produkt in der
gesamten EU nicht zusammen mit anderen Haushaltsabfällen entsorgt
werden darf. Um mögliche Schäden für die Umwelt oder die menschliche
Gesundheit durch unkontrollierte Abfallentsorgung zu vermeiden,
recyceln Sie es verantwortungsbewusst, um die nachhaltige
Wiederverwendung von Materialressourcen zu fördern. Um Ihr Altgerät
zurückzugeben, nutzen Sie bitte die Rückgabe- und Sammelsysteme
oder wenden Sie sich an den Händler, bei dem das Produkt gekauft
wurde. Diese können das Produkt einem umweltgerechten Recycling
zuführen.
DE
Frische Pommes
frites sind nicht
knusprig, wenn sie
der Luftfritteuse
entnommen
werden.
Die Knusprigkeit der
Pommes frites hängt
von der Menge an Öl
und Wasser in den
Pommes ab.
Geben Sie etwas mehr Öl hinzu, um ein
knusprigeres Ergebnis zu erzielen.
A c h t e n S i e d a r a u f , d a s s S i e d i e
Kartoffelstäbchen gut trocknen, bevor
Sie das Öl hinzufügen.
Schneiden Sie die Kartoffelstäbchen
kleiner, um ein knusprigeres Ergebnis zu
erzielen.
Frische Pommes
frites werden in
der Luftfritteuse
ungleichmäßig
frittiert.
Sie haben nicht den
richtigen Kartoffeltyp
verwendet.
Sie haben die
Kartoffelstäbchen vor
dem Braten nicht richtig
abgespült.
Verwenden Sie frische Kartoffeln und
achten Sie darauf, dass sie beim
Frittieren beständig bleiben.
Spülen Sie die Kartoffelstäbchen gut ab,
um die Stärke an der Außenseite der
Stäbchen zu entfernen.

INTRODUZIONE
Questa friggitrice ad aria calda offre un modo semplice e salutare di preparare i vostri
ingredienti preferiti. Grazie alla rapida circolazione d'aria calda e una griglia superiore, è
in grado di preparare numerose ricette. Il miglior vantaggio della friggitrice ad aria calda
è che essa riscalda il cibo in tutte le direzioni e la maggior parte degli ingredienti non ha
bisogno di aggiungere olio.
CONSERVARE QUESTE ISTRUZIONI
Questo apparecchio è destinato all'uso domestico o simile come:
- aree cucina del personale in negozi, uffici e altri ambienti di lavoro;
- case in affitto;
- da clienti in hotel, motel e altri ambienti di tipo residenziale;
- ambienti come bed and breakfast.
IMPORTANTI PRECAUZIONI
Quando si utilizzano apparecchi elettrici, è necessario seguire sempre le precauzioni di
sicurezza di base, tra le quali:
1. Leggere tutte le istruzioni.
2. Non toccare direttamente le superfici roventi.
3. Per proteggersi dalle scosse elettriche, non immergere il cavo, le spine o la base in
acqua o altri liquidi.
4. AVVERTENZA: questo apparecchio elettrico è dotato di una funzione di
riscaldamento. Le superfici, anche diverse dalle superfici di cottura, possono arrivare a
temperature elevate. Poiché le temperature sono percepite in modo diverso da persone
diverse, questo apparecchio deve essere utilizzato con ATTENZIONE. L'apparecchio
deve essere maneggiato solo dalle maniglie e dalle superfici di presa previste e
utilizzare protezioni dal calore come guanti o simili. Le superfici diverse dalle superfici di
presa devono essere lasciate raffreddare per un tempo sufficiente prima di essere
toccate.
5. Scollegare dalla presa di corrente quando non è in uso e prima della pulizia. Lasciare
raffreddare prima di aggiungere o rimuovere delle parti.
6. Se il cavo di alimentazione è danneggiato, deve essere sostituito dal produttore, dal
suo agente di servizio o da personale qualificato per evitare pericoli.
7. L'uso di accessori non consigliati dal produttore dell'apparecchio può causare lesioni
personali.
8. Non utilizzare all'aperto.
9. Non lasciare che il cavo penda dal bordo del tavolo o del bancone o che venga a
contatto con superfici calde.
10. Non posizionare sopra o vicino a fornelli a gas o elettrici caldi, o in un forno
riscaldato.
11. Prestare estrema cautela quando si sposta un apparecchio che contiene olio caldo o
altri liquidi caldi.
12. Collegare sempre prima la spina all'apparecchio, quindi collegare il cavo alla presa
di corrente a muro. Per scollegare, portare qualsiasi manopola su "off", quindi rimuovere
la spina dalla presa.
13. Non utilizzare l'apparecchio per un uso diverso da quello previsto.
14. Questo apparecchio può essere utilizzato da bambini di età pari o superiore a 8 anni
e da persone con capacità fisiche, sensoriali o mentali ridotte o prive di esperienza e
conoscenza tecnica se sono supervisionati o istruiti sull'uso dell'apparecchio in modo
sicuro e ne comprendono i pericoli coinvolti. I bambini non devono giocare con
l'apparecchio. La pulizia e la manutenzione non devono essere eseguite da bambini a
meno che non abbiano compiuto gli 8 anni e non siano sorvegliati.
15. Tenere l'apparecchio e il suo cavo fuori dalla portata dei bambini sotto gli 8 anni.
16. L'apparecchio non è destinato ad essere azionato mediante un timer esterno o un
sistema di controllo remoto separato.
IT
1
2
4
5
6
7
3
Fig.1 Fig.2
Fig.3 Fig.4
Specifiche & Caratteristiche:
-----Tensione:220-240V ~50/60Hz
-----Wattaggio: 1500 W
-----Capacità del cestello:4,5 L
-----Temperatura regolabile:80 °C – 200 °C
----- Timer (0-60 min)
Descrizione Generale (Fig.1)
1. Involucro
2. Pannello di controllo
3. Manico della pentola
4. Pentola
5. Presa dell'aria in uscita
6. Cavo principale (cavo di alimentazione)
7. Alloggiamento principale
IT

Fig.6
Fig.5
Importante!
Pericolo
-Questo apparecchio può essere utilizzato da bambini di età pari o superiore a 8 anni e
da persone con capacità fisiche, sensoriali o mentali ridotte o prive di esperienza e
conoscenza tecnica, se sono supervisionati o istruiti sull'uso dell'apparecchio in modo
sicuro e ne hanno compreso le pericoli coinvolti. I bambini non devono giocare con
l'apparecchio. La pulizia e la manutenzione non devono essere eseguite da bambini
sotto gli 8 anni e senza essere sorvegliati.
-Tenere l'apparecchio e il suo cavo fuori dalla portata dei bambini di età inferiore a 8
anni.
-Non immergere mai l'alloggiamento, che contiene i componenti elettrici e i componenti
riscaldanti, in acqua né sciacquarlo sotto il rubinetto.
-Non lasciare che acqua o altri liquidi penetrino nell'apparecchio per evitare scosse
elettriche.
-Versare sempre gli ingredienti da friggere nel cestello, per evitare che entrino in
contatto con i componenti riscaldanti.
-Non coprire la presa d'aria in ingresso e in uscita mentre l'apparecchio è in funzione.
-Non riempire il cestello con olio in quanto ciò potrebbe causare un incendio.
-Non toccare mai l'interno dell'apparecchio mentre è in funzione.
La temperatura delle superfici accessibili può essere molto elevata quando l'apparecchio
è in funzione
AVVERTENZA
- Verificare che la tensione indicata sull'apparecchio corrisponda alla tensione della rete
elettrica locale.
- Non utilizzare l'apparecchio se la spina, il cavo di alimentazione o altre parti sono
danneggiate.
- Non rivolgersi a personale non autorizzato per sostituire o riparare il cavo di
alimentazione danneggiato.
- Tenere il cavo di alimentazione lontano da superfici roventi.
- Non collegare l'apparecchio o azionare il pannello di controllo con le mani bagnate.
- Non posizionare l'apparecchio contro una parete o contro altri apparecchi elettrici.
Lasciare almeno 10 cm di spazio libero sul retro e sui lati e 10 cm di spazio libero sopra
l'apparecchio.
Non appoggiare alcun oggetto sopra l'apparecchio.
- Non utilizzare l'apparecchio per scopi diversi da quelli indicati in questo manuale.
- Non mettere in funzione l'apparecchio se è incustodito.
- Durante la frittura ad aria calda, il vapore caldo verrà rilasciato attraverso le prese di
uscita dell'aria. Tenere le mani e il viso a distanza di sicurezza dal vapore e dalle prese.
Fare attenzione anche al vapore e all'aria caldi quando si rimuove la pentola
dall'apparecchio.
IT
- Qualsiasi superficie accessibile può surriscaldarsi durante l'uso (Fig.2)
- Scollegare immediatamente l'apparecchio del fumo scuro fuoriesce dall'apparecchio.
Attendere l'arresto dell'emissione di fumo prima di rimuovere la pentola dall'apparecchio.
Attenzione
- Assicurarsi che l'apparecchio sia posizionato su una superficie orizzontale, in piano e
stabile.
- Questo apparecchio è progettato esclusivamente per uso domestico. Non è adatto per
essere utilizzato in sicurezza in ambienti come cucine del personale lavorativo, fattorie,
motel e altri ambienti non residenziali. Non è inoltre destinato all'uso da parte dei clienti in
hotel, motel, bed and breakfast e altri ambienti residenziali.
- Se l'apparecchio viene utilizzato in modo incorretto o per scopi professionali o
semiprofessionali o non viene utilizzato secondo le istruzioni contenute nel manuale
d'uso, la garanzia decade e si declina ogni responsabilità per eventuali danni causati.
-Scollegare sempre l'apparecchio dalla corrente quando non è in uso.
-L'apparecchio necessita di circa 30 minuti per raffreddarsi prima di essere maneggiato o
pulito in sicurezza.
Usare l'apparecchio
Si puo' preparare una vasta gamma di ingredienti senza olio. Il ricettario incluso vi
aiuterà a conoscere meglio l'apparecchio.
Preparazione per l'uso
1. Posizionare l'apparecchio su una superficie stabile, orizzontale e in piano.
Non posizionare l'apparecchio su una superficie non resistente al calore.
2. Inserire la griglia nella pentola (Fig.3).
Non versare nella pentola olio o altri liquidi.
Non collocare alcun oggetto sopra l'apparecchio, il flusso d'aria sarà interrotto e ciò
influenzerà il risultato della frittura ad aria calda.
UTILIZZO DELL'APPARECCHIO
È possibile preparare una vasta gamma di ingredienti senza utilizzare olio.
Frittura ad aria calda
1. Collegare la spina a una presa di corrente a muro con collegamento a terra.
2. Estrarre con cautela la pentola dalla friggitrice (Fig.4)
3. Versare gli ingredienti nel cestello. (Fig.5)
4. Rimettere la pentola nella friggitrice ad aria calda (Fig 6)
Fare in modo che si allinea ai binari guida della friggitrice.
Non usare mai la pentola senza il cestello.
Attenzione: non toccare la pentola durante e dopo l'uso, poiché si scalda molto.
Afferrare la pentola solo per il manico.
5. Determinare il tempo di cottura richiesto per l'ingrediente scelto (fare riferimento alla
sezione "Impostazioni" in questo capitolo).
6. Alcuni ingredienti richiedono di essere agitati a metà del tempo di cottura (fare
riferimento alla sezione "Impostazioni" in questo capitolo). Per agitare gli ingredienti,
estrarre la pentola dall'apparecchio afferrandola per la maniglia e scuoterla. Quindi
rimettere la pentola nella friggitrice ad aria.
Attenzione: non premere il pulsante sull'impugnatura durante lo scuotimento. (Fig.
1)
IT
Suggerimento: per ridurre il peso, è possibile rimuovere il cestello dalla pentola e
scuotere solo il cestello. Per fare ciò, estrarre la pentola dall'apparecchio, posizionarla
su una superficie resistente al calore e premere il pulsante sulla maniglia. Quindi,
estrarre il cestello dalla pentola.
Suggerimento: se si imposta il timer a metà del tempo di cottura, si sentirà il suono di
allarme del timer quando bisogna scuotere gli ingredienti. Tuttavia, ciò significa che è
necessario impostare nuovamente il timer sul tempo di cottura rimanente dopo lo
scuotimento.
7. Per estrarre gli ingredienti (ad es. patatine fritte), rimuovere la padella dalla friggitrice
ad aria calda e posizionarla sul bancone, quindi sollevare il ripiano dalla padella.
La padella e gli ingredienti sono molto caldi all'interno della friggitrice. A seconda
del tipo di ingredienti nella friggitrice ad aria, il vapore potrebbe fuoriuscire dalla
padella.
8. Svuotare il contenuto in una ciotola o su un piatto.
Suggerimento: per rimuovere ingredienti grandi o fragili, sollevarli dalla padella con un
paio di pinze.
9. Quando un gruppo di ingredienti è pronto, la friggitrice ad aria calda è
immediatamente pronta per prepararne un altro.
Istruzioni del pannello di controllo
Istruzioni d'uso:
Pulsante 1 – Pulsante di accensione
Una volta che la padella è posizionata correttamente nell'alloggiamento dell'unità
principale, il pulsante di accensione si illuminerà. Tenere premuto il pulsante di
accensione per 3 secondi, la temperatura predefinita dell'unità verrà impostata a 200
gradi, e il tempo di cottura sarà impostato a 15 minuti. Premere nuovamente il pulsante
di accensione per avviare il processo di cottura. Tenere premuto il pulsante di
accensione per 3 secondi per spegnere il dispositivo durante la cottura. Tutte le spie
luminose si spegneranno, la ventola smetterà di funzionare.
Nota: durante la cottura, è possibile premere il pulsante per controllare la pausa e l'inizio
della cottura.
IT
Pulsante 2 – Pulsante delle Preimpostazioni
Premere il pulsante “ ” consente di scorrere tra le 8 scelte più popolari. Una volta
selezionata una, inizieranno il tempo e la temperatura di cottura prestabiliti.
Pulsante 3&4 –Pulsante di Controllo del Tempo
I simboli + e – consentono di aumentare o diminuire il tempo di cottura, un minuto alla
volta. Tenere premuto il pulsante per cambia rapidamente il tempo di cottura.
Pulsante 5 e 6 – Pulsanti di Controllo della Temperatura
I simboli + e – consentono di aumentare o diminuire la temperatura di cottura di 5 alla
volta. Tenere premuto il pulsante per modificare rapidamente la temperatura. Intervallo
di controllo della temperatura: 80°C-200°C.
Spia luminosa “7&8”
Indicatore del tempo di cottura
Spia luminosa “9&10”
Indicatore della temperatura
Spia luminosa “11”
Il cerchio centrale indica lo stadio di riscaldamento (5 spie illuminate indicano il
funzionamento del motore)
Spia luminosa “12-19”
Indicatore della ricetta
Impostazioni
La seguente tabella vi aiuterà a selezionare le impostazioni di base per gli ingredienti
scelti.
Nota: queste impostazioni sono solo delle indicazioni. Poiché gli ingredienti
differiscono per origine, dimensione, forma e marca, non è possibile garantire la
migliore impostazione per gli ingredienti da voi selezionati.
Poiché' la tecnologia Rapid Air riscalda istantaneamente l'aria all'interno
dell'apparecchio, estrarre anche brevemente la pentola dall'apparecchio durante la
frittura ad aria calda ne comprometterà il processo.
Suggerimenti
- Gli ingredienti più piccoli di solito richiedono un tempo di cottura leggermente più
breve rispetto a quelli più grandi.
- Una quantità maggiore di ingredienti richiede un tempo di preparazione leggermente
più lungo, una quantità minore di ingredienti richiede un tempo di preparazione
leggermente più breve.
- Agitare gli ingredienti più piccoli una volta raggiunta la metà del tempo di cottura per
ottimizzare il risultato finale e prevenire che gli ingredienti siano fritti in modo non
uniforme.
- Aggiungere un filo d'olio alle patate fresche per ottenere un risultato croccante.
Friggere gli ingredienti nella friggitrice ad aria calda entro pochi minuti dall'aggiunta
dell'olio.
- Non friggere ingredienti estremamente grassi come salsicce nella friggitrice ad aria
calda.
- Gli spuntini che possono essere preparati in forno possono essere preparati anche
nella friggitrice ad aria calda.
- La quantità ottimale per la preparazione di patatine croccanti è di 500 grammi.
- Usare un impasto già pronto per preparare spuntini ripieni in modo rapido e semplice.
Un impasto preconfezionato richiede un tempo di preparazione più breve rispetto ad
uno fatto in casa.
IT
ICONA
- Mettere una teglia nel cestello della friggitrice ad aria calda per cuocere una torta o
una quiche o per friggere ingredienti fragili o ingredienti ripieni.
- È possibile anche usare la friggitrice ad aria calda per riscaldare gli ingredienti. Per
riscaldare gli ingredienti, impostare la temperatura su 150 ℃ (300 oF) fino ad un
massimo di 10 minuti.
Nessuna
Bistecca
Pollo
Gamberi
Pesce
Pizza
Patatine
Sfornati
Vegetali
Quantità'
min-max
(g)
Tempo
(min.)
Temperatura
(℃)
Scuotere
Informazioni
extra
Nota: aggiungere 3 minuti al tempo di preparazione quando si inizia a friggere
mentre la friggitrice ad aria calda è ancora fredda.
Se è prima volta che si usa il prodotto, ci saranno un leggero fumo e odore,
questo è un fenomeno normale
Pulizia
Pulire l'apparecchio dopo ogni utilizzo.
La pentola e il cestello sono dotati di rivestimento antiaderente. Non utilizzare
utensili da cucina in metallo o materiali di pulizia abrasivi per pulirli, poiché ciò
potrebbe danneggiare il rivestimento antiaderente.
1. Rimuovere la spina dalla presa di corrente e lasciare raffreddare l'apparecchio.
Nota: estrarre la pentola per far raffreddare più rapidamente la friggitrice ad aria
calda.
2. Pulire l'esterno dell'apparecchio con un panno umido.
3. Pulire la pentola e il cestello con acqua calda, del detersivo per piatti e una spugna
non abrasiva.
È possibile usare un liquido sgrassante per rimuovere lo sporco residuo.
Suggerimento: se lo sporco si è depositato sul cestello o sul fondo della pentola,
riempire la pentola con acqua calda e del detersivo per piatti. Mettere il cestello nella
pentola e lasciarli in ammollo per circa 10 minuti.
4. Pulire l'interno dell'apparecchio con acqua calda e spugna non abrasiva.
5. Pulire i componenti riscaldanti con una spazzola per la pulizia per rimuovere
eventuali residui di cibo.
Conservazione
1. Scollegare l'apparecchio dalla presa e lasciarlo raffreddare.
2. Assicurarsi che tutte le parti siano pulite e asciutte.
Ambiente
Non smaltire l'apparecchio con i normali rifiuti domestici quando è usurato, ma portarlo
a un punto di raccolta adibito al riciclaggio. In questo modo, contribuirete a preservare
l'ambiente.
Scuotere
Scuotere
Scuotere
Scuotere
Scuotere
Scuotere
Scuotere
Scuotere
IT
Risoluzione dei Problemi
Problema
Possibile causa
Soluzione
La friggitrice ad aria
non funziona
L'apparecchio non è
collegato alla corrente.
Non avete impostato il
timer.
Inserire la spina in una presa di corrente a
muro con collegamento a terra.
Impostare il timer sul tempo di cottura
richiesto per accendere l'apparecchio.
Gli ingredienti fritti
con la friggitrice ad
aria non sono cotti.
La quantità di
ingredienti nel cestello
è eccessiva.
La temperatura
impostata è troppo
bassa.
Il tempo di cottura è
troppo breve.
Versare quantità minori di ingredienti nel
cestello. I lotti più piccoli vengono fritti in
modo più uniforme.
Usare il tasto della temperatura per
impostarla come richiesto (fare
riferimento alla sezione "Impostazioni"
nel capitolo "Utilizzo dell'apparecchio").
Usare il tasto del timer per impostarlo
come richiesto (fare riferimento alla
sezione "Impostazioni" nel capitolo
"Utilizzo dell'apparecchio").
Gli ingredienti
vengono fritti in
modo non uniforme
nella friggitrice ad
aria.
Alcuni tipi di ingredienti
devono essere agitati a
metà del tempo di
cottura.
Gli ingredienti che si trovano a contatto
uno sull'altro o uno di fronte all'altro (ad
esempio le patatine fritte) devono essere
agitati a metà del tempo di cottura. Fare
riferimento alla sezione "Impostazioni" nel
capitolo "Utilizzo dell'apparecchio".
Usare degli snack da forno o passare
leggermente dell'olio sugli snack per
ottenere un risultato più croccante.
Gli snack fritti non
sono croccanti
quando escono
dalla friggitrice ad
aria.
È stato usato un tipo di
snack che deve essere
preparato in una
friggitrice tradizionale.
Dall'apparecchio
fuoriesce del fumo
bianco.
State preparando
degli ingredienti
grassi.
Quando si friggono ingredienti grassi nella
friggitrice ad aria, una grande quantità di
olio colerà nella pentola. L'olio produce
fumo bianco e la pentola potrebbe
surriscaldarsi più del solito. Ciò non
influisce sull'apparecchio o sul risultato
finale.
La pentola contiene
ancora residui di
grasso da una cottura
precedente.
Il fumo bianco è causato dal
riscaldamento del grasso nella padella.
Assicurarsi di pulire sempre
correttamente la padella dopo ogni
utilizzo.
Non si riesce a far
scorrere
correttamente la
pentola
nell'apparecchio.
Ci sono troppi
ingredienti nel pentola.
Non riempire il pentola oltre l'indicatore
MAX.
Il cestello non è
posizionato
correttamente nella
pentola.
Spingere di nuovo la Pentola nella
direzione corretta.
IT
Smaltimento corretto di questo prodotto
Questo simbolo indica che questo prodotto non deve essere smaltito
con altri rifiuti domestici in tutta l'UE. Per prevenire possibili danni
all'ambiente o alla salute umana derivanti dallo smaltimento
incontrollato dei rifiuti, essi devono essere riciclati in modo
responsabile per promuovere il riutilizzo sostenibile delle risorse
materiali. Per restituire il dispositivo usato, utilizzare i sistemi di
restituzione e raccolta o contattare il rivenditore presso il quale è stato
acquistato il prodotto. Il rivenditore potrà ritirare questo prodotto per
un riciclaggio sicuro per l'ambiente.
Le patatine fresche
non sono croccanti
quando escono
dalla friggitrice ad
aria.
La croccantezza delle
patatine dipende dalla
quantità di olio e acqua
nelle patatine.
Aggiungere un filo d'olio per ottenere un
risultato più croccante.
Assicurarsi di asciugare bene i
bastoncini di patate prima di versare
l'olio.
Tagliare i bastoncini di patate più fini per
un risultato più croccante.
Le patatine
vengono fritte in
modo non
uniforme nella
friggitrice ad aria.
Non avete usato il tipo
di patata corretto.
Non avete sciacquato
bene i bastoncini di
patate prima di friggerli.
Usare patate fresche e assicurarsi che
rimangano sode durante la frittura.
Sciacquare bene i bastoncini di patate
per rimuovere l'amido dall'esterno dei
bastoncini.
IT
IMPORTATO DA:
AOSOM Italy srl
Centro Direzionale Milanofiori
Strada 1 Palazzo F1
20057 Assago (MI)
P.I.: 08567220960
FATTO IN CINA