the Barista Pro
™
Instruction Book – BES878

2
BREVILLE
®
RECOMMENDS
SAFETY FIRST
At Breville
®
we are very
safety conscious. We design
and manufacture consumer
products with the safety of you,
our valued customer, foremost
in mind. In addition we ask
that you exercise a degree of
care when using any electrical
appliance and adhere to the
following precautions.
IMPORTANT
SAFEGUARDS
READ ALL
INSTRUCTIONS BEFORE
USE AND SAVE FOR
FUTURE REFERENCE
• Carefully read all
instructions before
operating and save for
future reference.
• Remove any packaging
material and promotional
labels or stickers before
using the Barista Pro™
forthe first time.
• To eliminate a choking
hazard for young children,
remove and safely discard
the protective cover fitted
to the power plug of this
appliance.
• Do not place the product
near the edge of a bench
or table during operation.
Ensure the surface is level,
clean and free of water
and other substances.
• Do not use the product
ona sink drain board.
2 Breville
®
Recommends
Safety First
7 Components
9 Barista Pro™ Features
10 Assembly
12 Functions
19 Care & Cleaning
23 Troubleshooting
27 Warranty
Contents

3
• Do not operate the
appliance if it is in an
enclosed space, or within
a cupboard.
• Do not let the cord hang
over the edge of a bench
or table, or become
knotted. Keep away from
hot gas or electric burner,
or where it could touch
aheated oven.
• This appliance can
be used by children
aged from 8 years and
above if they have been
given supervision or
instruction concerning
use of the appliance in a
safe way and understand
the hazards involved.
Cleaning and user
maintenance shall not be
carried out by children
unless they are aged
from 8 years and above
and supervised. Keep the
appliance and its cord out
of reach of children aged
less than 8 years.
• Children shall not play
with the appliance.
• Appliances can be used
by persons with reduced
physical, sensory or
mental capabilities or
lack of experience and
knowledge if they have
been given supervision
or instruction concerning
use of the appliance in a
safe way and understand
the hazards involved.
• Children shall not play
with the appliance.
• Regularly inspect the
supply cord, plug and
actual appliance for
any damage. If found
damaged in any way,
immediately cease use of
the appliance and return
the entire appliance to
the nearest authorised
Breville
®
Service Centre
for examination,
replacement or repair.
• Keep the appliance and
accessories clean. Follow
the cleaning instructions
provided in this book.
Any procedure not listed
in this instruction booklet
should be performed at

4
an authorised Breville
®
Service Centre.
The installation of
a residual current
device (safety switch)
is recommended to
provide additional safety
protection when using
electrical appliances.
It is advisable that a
safety switch with a rated
residual operating
current not exceeding
30mA be installed in
the electrical circuit
supplying the appliance.
See your electrician for
professional advice.
• Potential injury from
misuse.
• Heating element surface
is subject to residual heat
after use.
NOTICE TO CUSTOMERS
REGARDING MEMORY
STORAGE
Please note that in order to
better serve our customers,
internal memory storage
has been imbedded into
your appliance.
This memory storage
consists of a small chip to
collect certain information
about your appliance
including the frequency
ofuse of the appliance and
the manner in which your
appliance is being used.
Inthe event your appliance
is returned for service,
the information collected
from the chip enables us
to quickly and eciently
service your appliance.
The information collected
also serves as a valuable
resource in developing
future appliances to better
serve the needs of our
consumers. The chip does
not collect any information
regarding the individuals
who use the product or
the household where the

5
product is used. If you have
any questions regarding
the memory storage
chip please contact us
atprivacy@breville.com
SPECIFIC
INSTRUCTIONS
FOR BES878
• This appliance is
recommended for
household use only.
Do not use this appliance
for any purpose other
than its intended use.
Do not use in moving
vehicles or boats.
Donotuse outdoors.
• If the appliance is to be:
− left unattended
− cleaned
− moved
− assembled; or
− stored;
always switch o the
espresso machine by
pressing the Power button
to OFF, switch o at the
power outlet and unplug.
• Ensure the product is
properly assembled
before first use.
• Do not use any other
liquid apart from cold
mains/town water.
Wedonot recommend
the use of highly filtered,
de-mineralised or distilled
water as this may aect
the taste of the coee and
how the espresso machine
is designed to function.
• Ensure the portafilter
is firmly inserted and
secured into the group
head before starting an
extraction. Never remove
the portafilter during the
extraction process.
• Do not touch hot surfaces.
Allow the product to cool
down before moving or
cleaning any parts.
• Use caution after milk
texturing as the ‘Auto
Purge’ function may
purge hot steam when the
steam wand is lowered.

6
• Use caution when
operating machine as
metal surfaces are liable
toget hot during use.
• Use caution when using
the descale feature as hot
steam may be released.
Before descaling, ensure
drip tray is empty and
inserted. Refer to the
‘Care & Cleaning’ section
for future instructions.
WARNING
Do not immerse power
cord, power plug
orappliance in water
orany other liquid.
SPECIFIC
INSTRUCTIONS
FOR WATER
FILTER
• Filter cartridge should
be kept out of reach
ofchildren.
• Store filter cartridges in
adry place in the original
packaging.
• Protect cartridges from
heat and direct sunlight.
• Do not use damaged
filter cartridges.
• Do not open filter
cartridges.
• If you are absent for a
prolonged period of time,
empty the water tank and
replace the cartridge.
FOR HOUSEHOLD USE ONLY
SAVE THESE INSTRUCTIONS
7
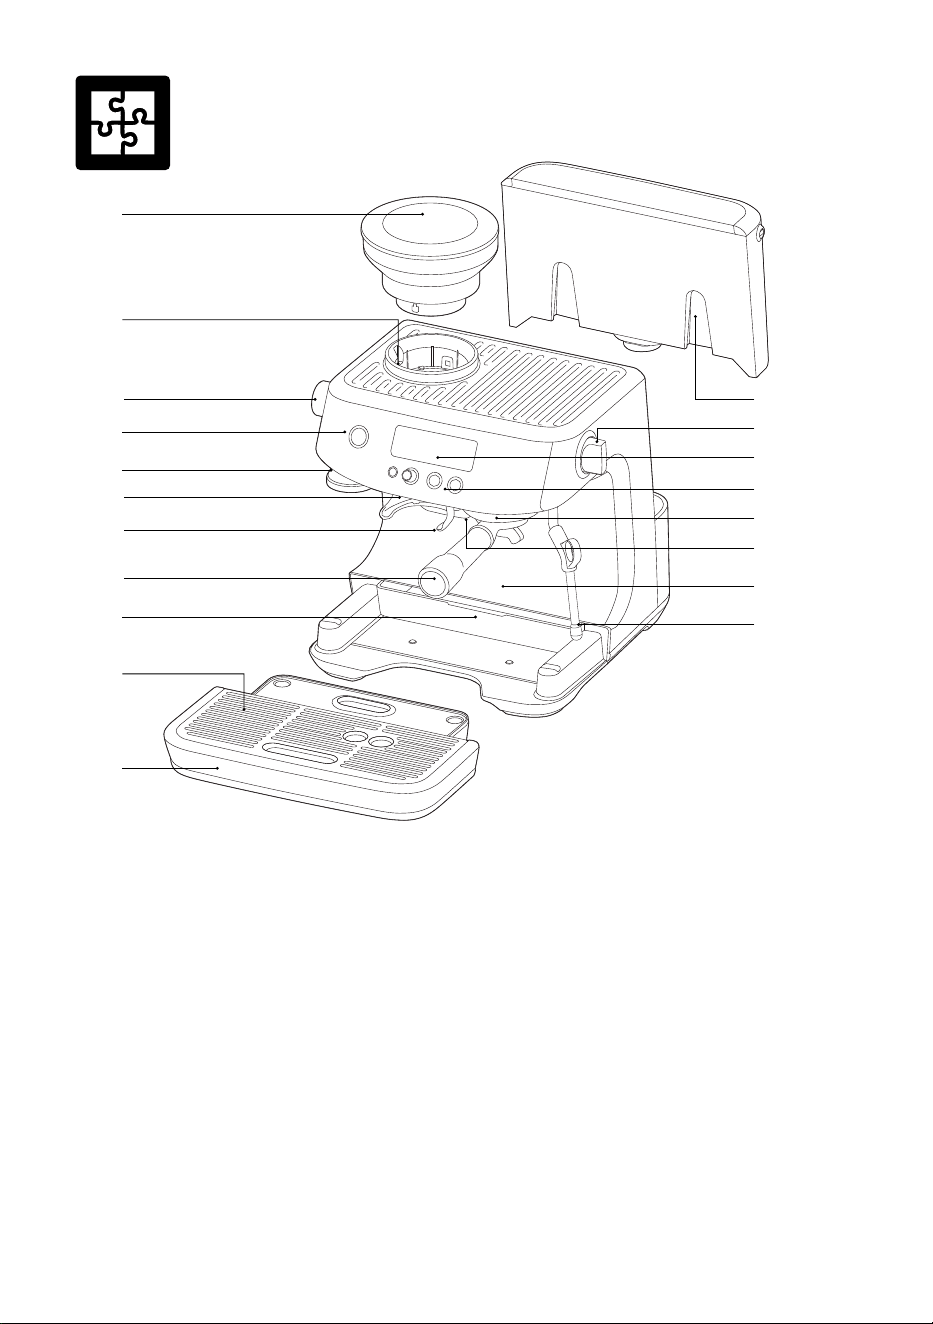
Components
A. 250g bean hopper
With locking system for easy removal,
storageand transfer of coee beans.
B. Integrated conical burr grinder
C. GRIND SIZE selector
30 espresso grind settings from fine
to coarse.
D. POWER button
E. Integrated removable 54mm tamper
F. Grinder outlet
G. Grinding cradle
H. 54mm stainless steel portafilter
With commercial style spouts.
I. Storage tray (located behind drip tray)
For storage of accessories.
J. Removable drip tray grid
K. Removable drip tray
With tray full indicator.
L. 2L removable water tank
With replaceable water filters
to reduce scale and impurities.
M. Steam dial
Selector control for steam and hot water.
N. LCD display
With grinding and extracting
progress animations.
O. Control panel
With MENU, GRIND AMOUNT/ FILTER
SIZE, 1 CUP and 2 CUP buttons.
P. Group head
Q. Dedicated hot water outlet
For making long blacks and
pre-heating cups.
R. Extra-tall cup clearance
S. 360° swivel steam wand
Easily adjusts to the perfect position
for texturing milk.
A
B
J
E
O
P
Q
L
M
N
R
S
D
I
K
C
F
G
H
8
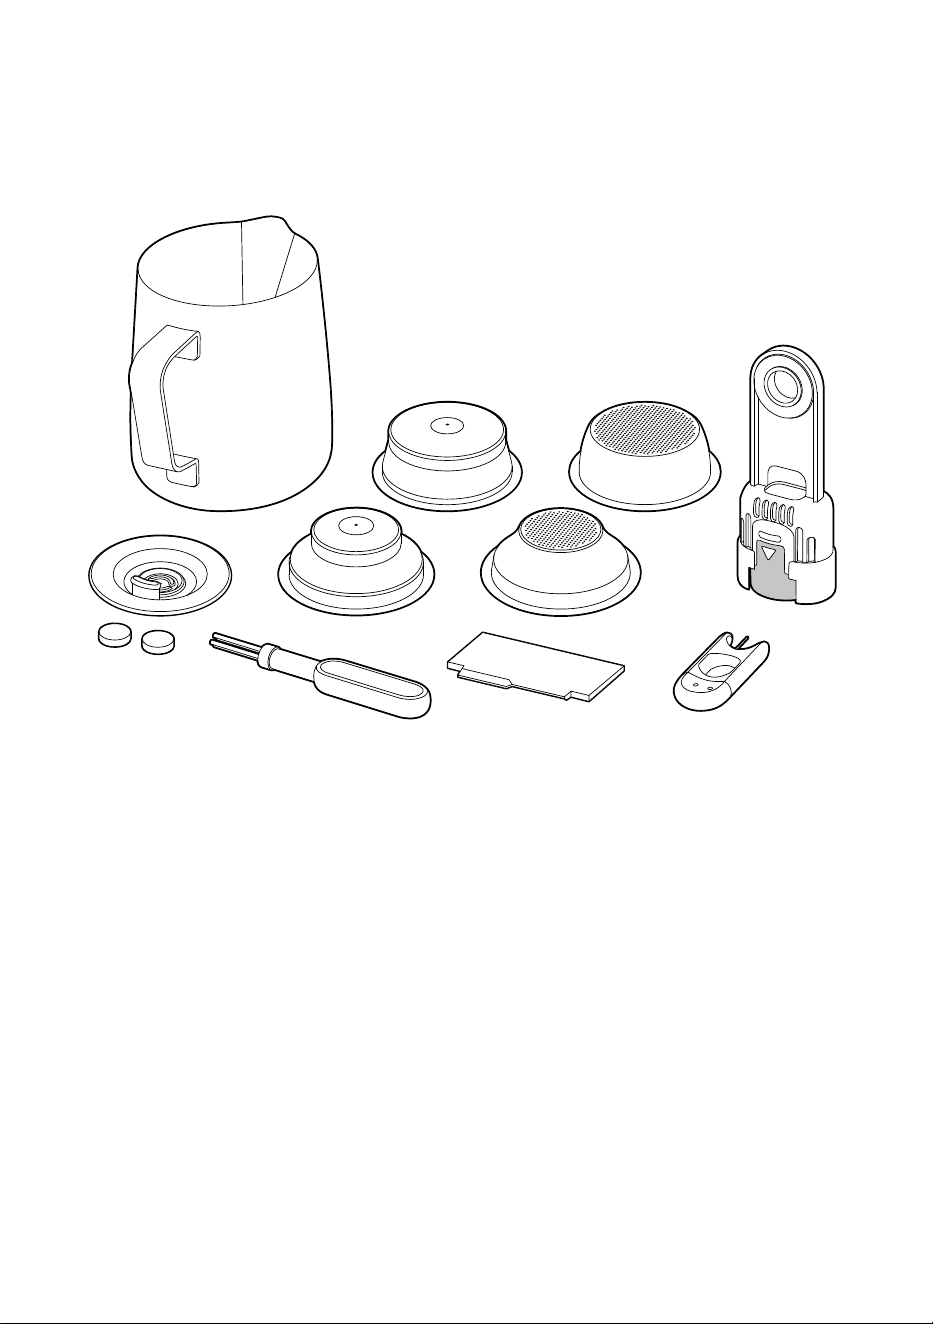
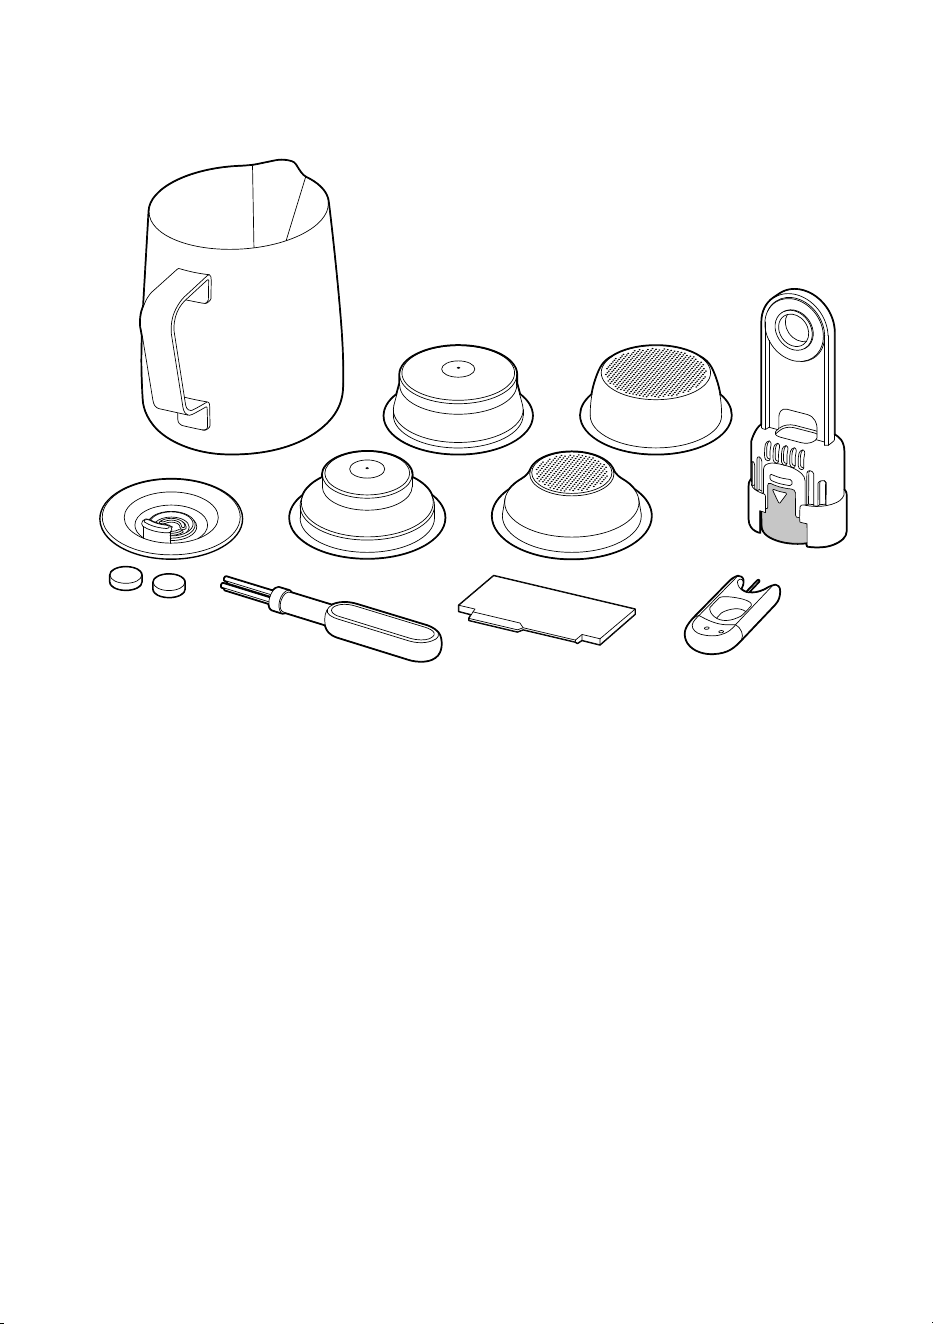
ACCESSORIES
1. Stainless steel milk jug
With MIN and MAX markings.
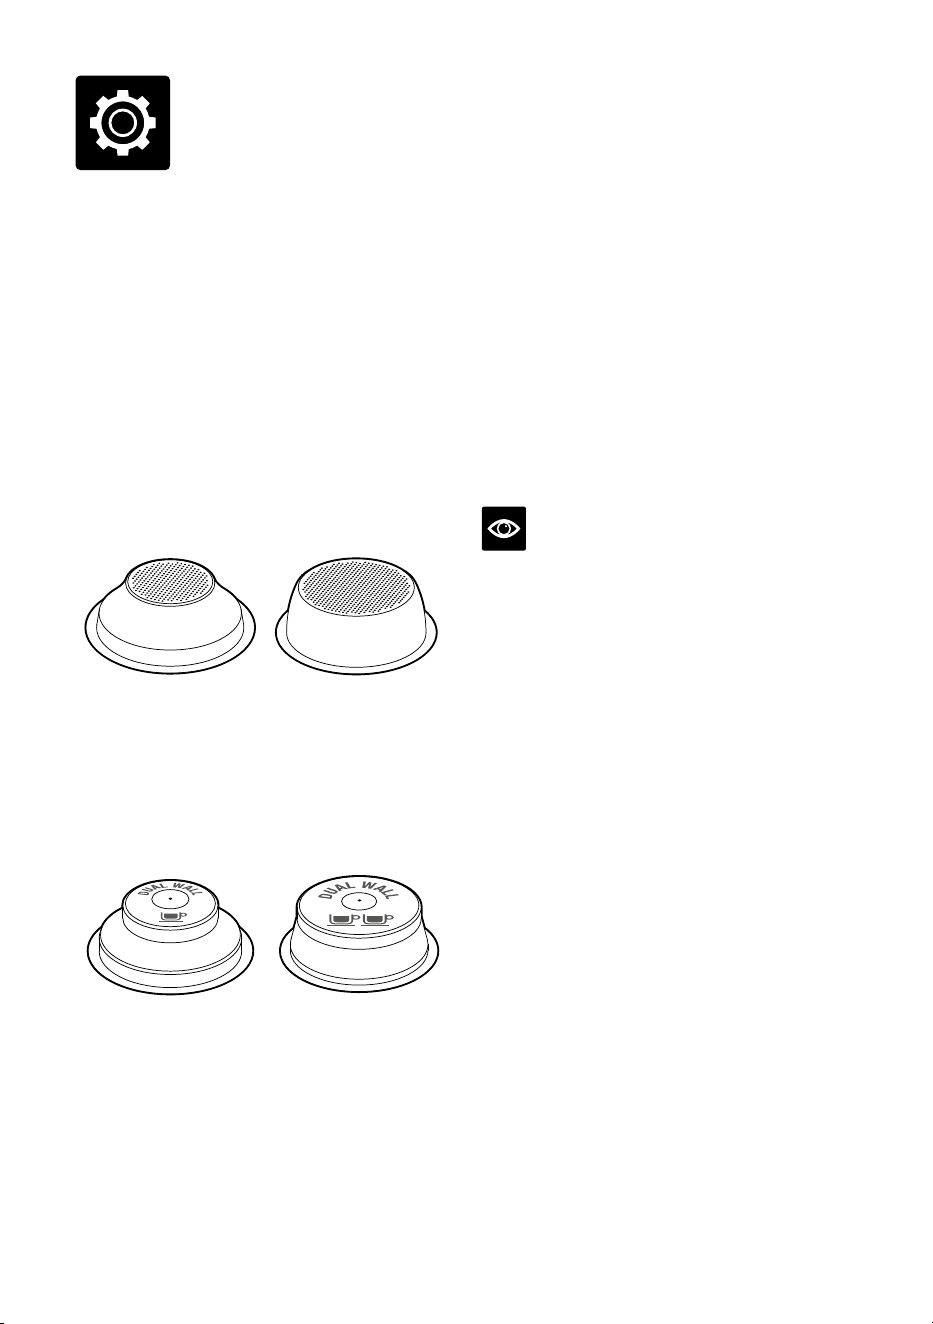
2. Dual wall filter baskets (1 cup & 2 cup)
Use with pre-ground coee.
3. Single wall filter baskets (1 cup & 2 cup)
Use when grinding fresh whole coee beans.
4. Water filter and filter holder
5. Cleaning disc
6. Cleaning tablets
7. Cleaning brush
8. The Razor™ precision dose trimming tool
9. Steam wand and filter basket cleaning tool
All parts of the Barista Pro™
that come into contact with coee,
water and milk are BPA Free.
1
6
5
7 8
9
2 3
4

9
THERMOJET™ HEATING SYSTEM
Innovative heating system achieves ideal
extraction temperature in 3 seconds.
INTEGRATED CONICAL BURR
GRINDER
Precision conical burrs maximise ground
coee surface area for a full espresso flavour.
ADJUSTABLE GRIND SIZE
30 espresso grind settings from fine to coarse
for optimal extraction.
ADJUSTABLE GRIND AMOUNT
Adjust the amount of fresh ground coee
dosed into the filter basket to suit the fineness
or coarseness of the grind.
AUTOMATIC DOSING
The grinder will dispense the required
amount of ground coee for a single or double
cup dose.
HANDS FREE GRINDING
Auto stop for hands free grinding directly into
the portafilter.
THE RAZOR™ DOSE TRIMMING TOOL
Patented twist blade trims down the puck
to the right level for precision dosing and
aconsistent extraction.
ADJUSTABLE SHOT TEMPERATURE
CONTROL
For optimum coee flavour.
PID TEMPERATURE CONTROL
Electronic PID temperature control for
increased temperature stability.
INSTANT HOT WATER
Dedicated hot water outlet for making
Long Blacks and pre-heating cups.
LOW PRESSURE PRE-INFUSION
Applies low water pressure at the start
of the extraction to gently expand grinds
for an even extraction.
VOLUMETRIC CONTROL
Pre-set 1 & 2 cup volumes, manual over-ride
or programmable shot volumes.
DRY PUCK FEATURE
Removes excess water from the ground coee
in the filter basket after extraction for easy
disposal of the coee puck.
LARGE DRIP TRAY
With more usable workspace.
Barista Pro
™
Features
10
BEFORE FIRST USE
Machine Preparation
Remove and discard all labels and packaging
materials attached to your espresso machine.
Ensure you have removed all parts and
accessories before discarding the packaging.
Remove the packaging and the plastics
bags containing the water filter and water
filter holder.
Clean the water tank, portafilter, filter baskets,
milk jug and drip tray using warm water
and agentle dish washing liquid. Rinse well,
thendry thoroughly before reassembling.
INSTALLING THE WATER FILTER
• Remove the water filter and water filter holder
from the plastic bag.
• Soak the filter in cold water for 5 minutes.
• Wash the filter holder with cold water.
• Insert the filter into the filter holder.
• Set Date Dial 2 months ahead
• Install the assembled filter holder in the water
tank, ensuring it is clicked into place.
• Fill the water tank with cold water before
sliding back into position on the back of the
machine and locking into place.
• Refer to Care & Cleaning on page 18 for
further instruction on installing the filter.
NOTE
DO NOT use highly filtered, demineralised or
distilled water in this machine. This may aect
the taste of the coee.
NOTE
For replacement water filters, visit the Breville
®
webpage or contact Breville
®
Customer Service.
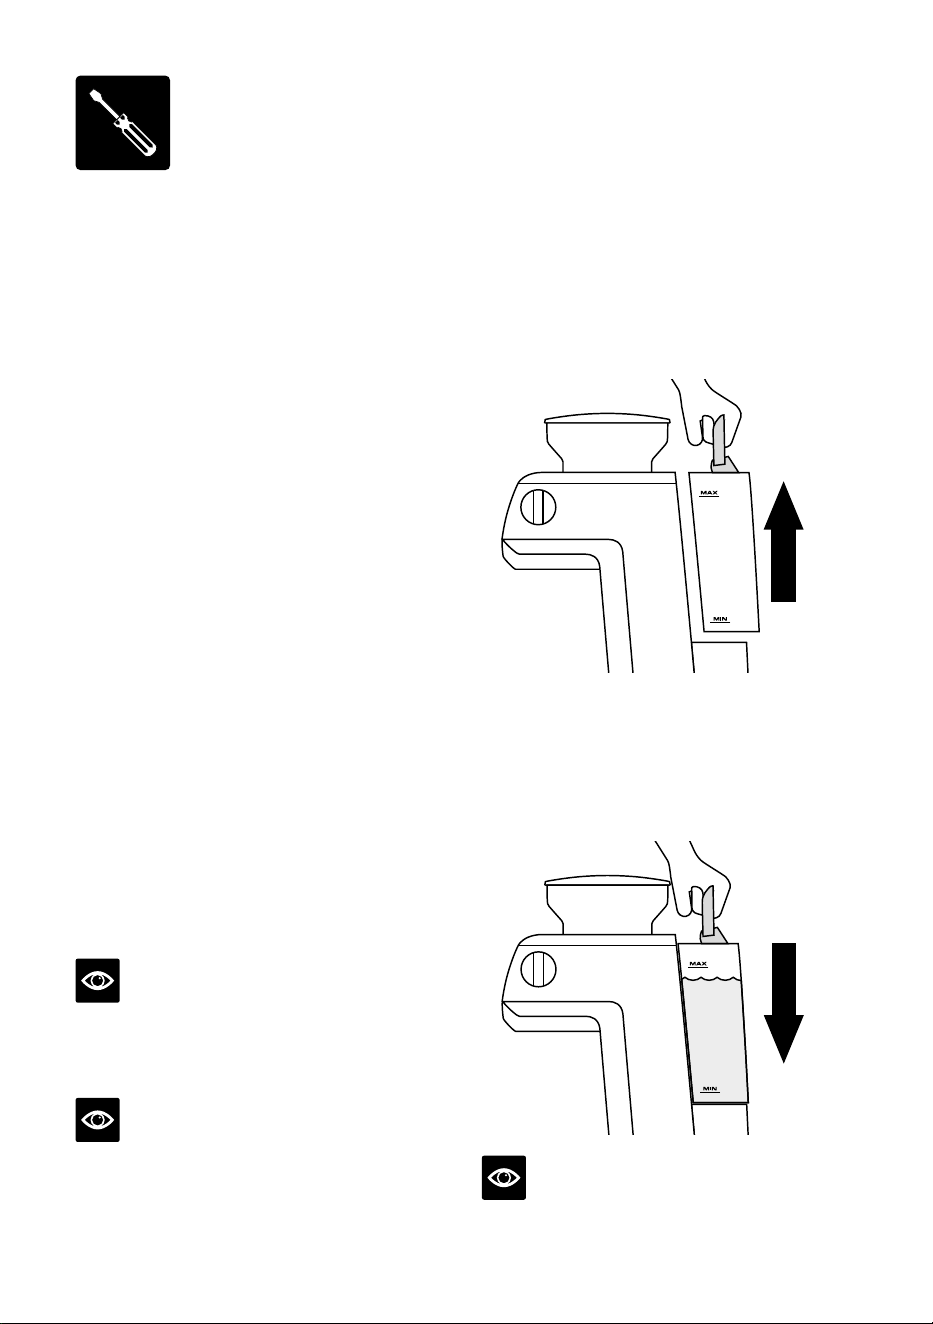
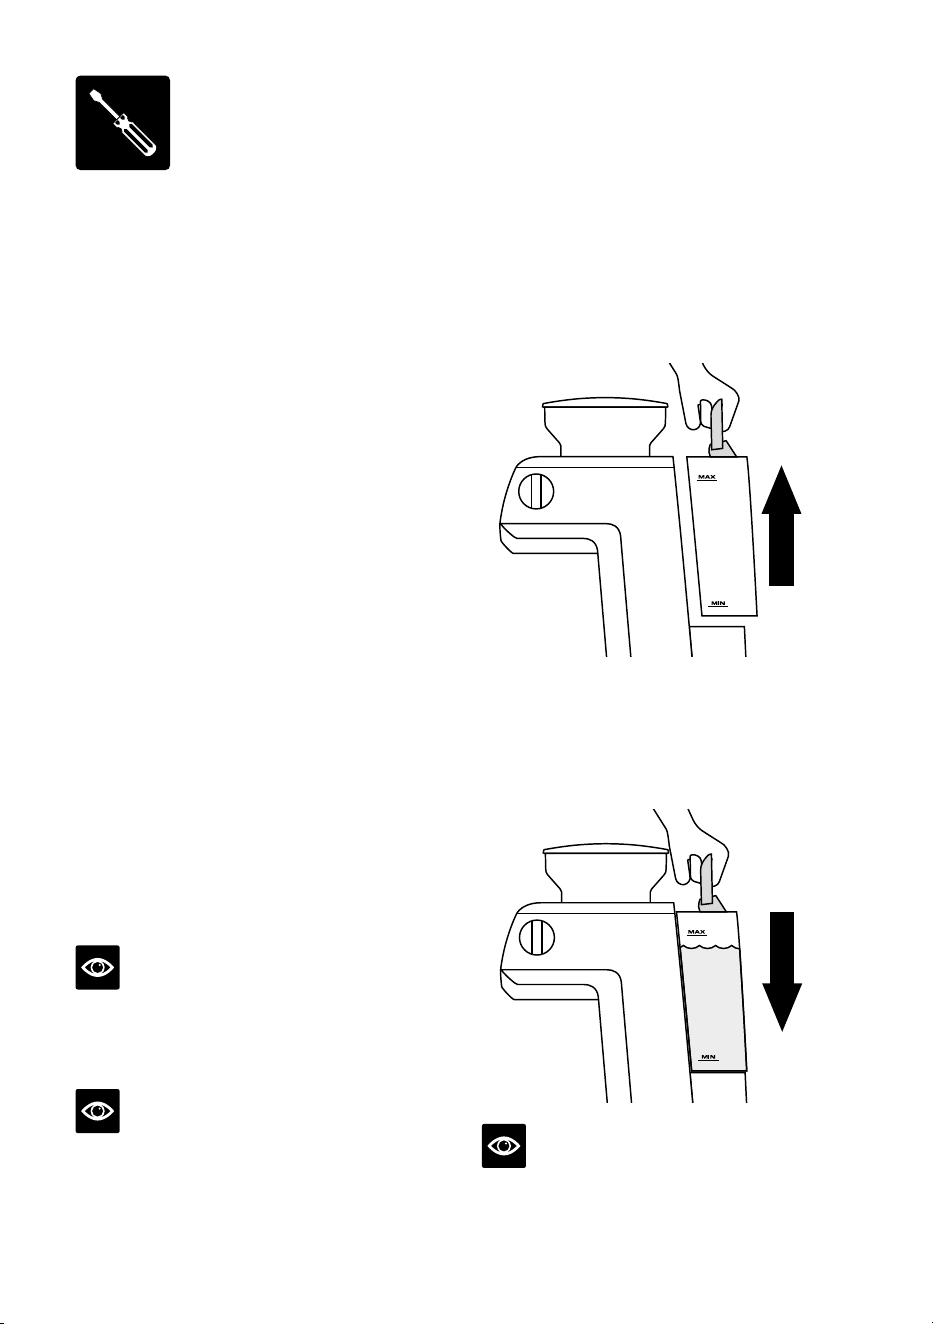
FILLING THE WATER TANK
• Ensure the water filter is securely fitted
inside the water tank.
• Use the handle at the top of the water
tank to assist in lifting it up and away
from the machine.
• Fill the water tank with cold potable tap
water to below the MAX marking indicated
on the side of the water tank.
• Replace the water tank back on the machine,
pressing down to ensure that it is properly
positioned and attached to the machine.
NOTE
Replace the water daily. The water tank should
be filled with fresh, cold tap water before each use.
Assembly
11
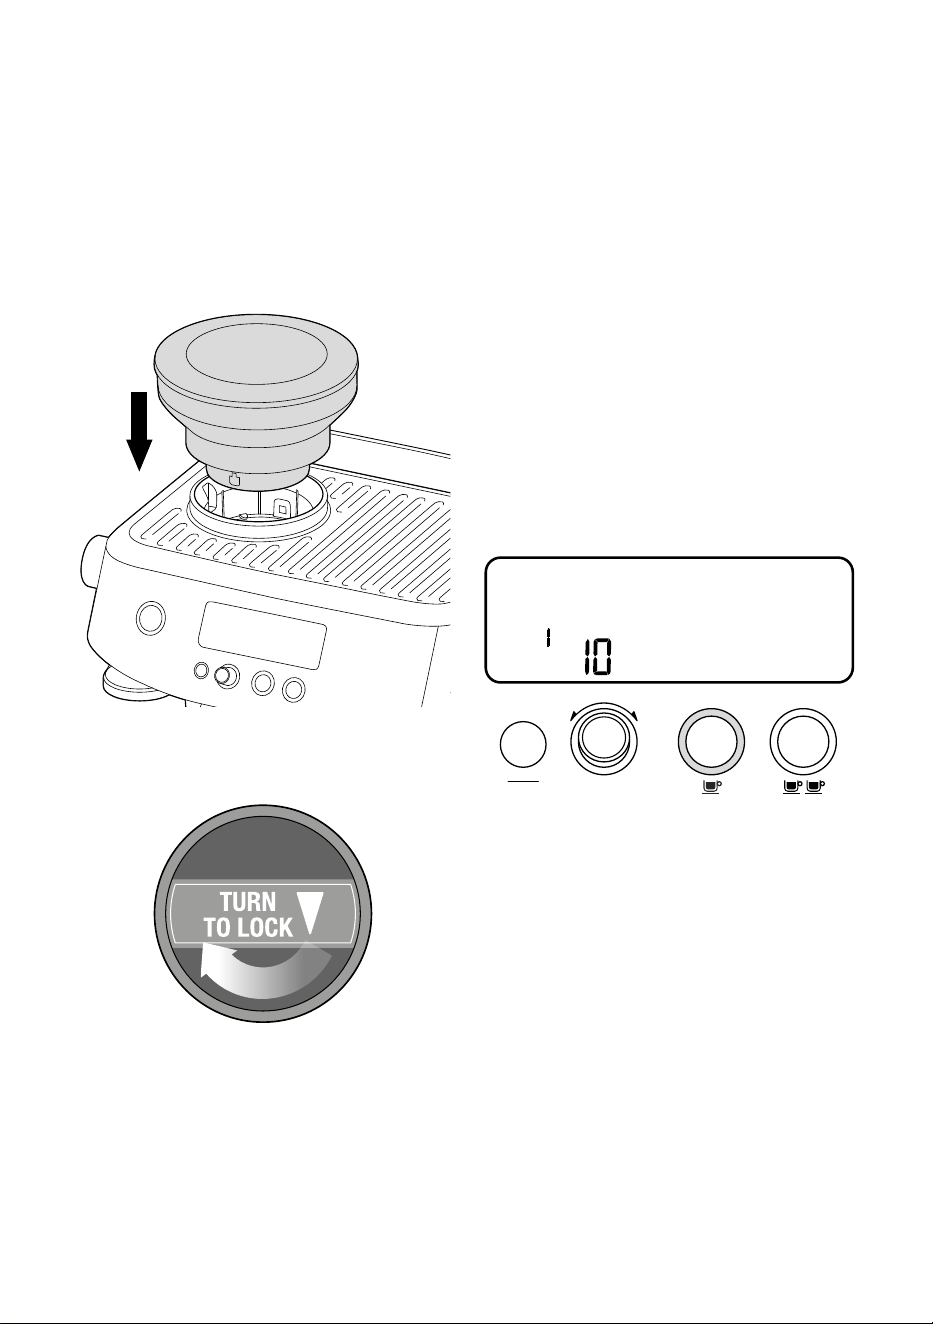
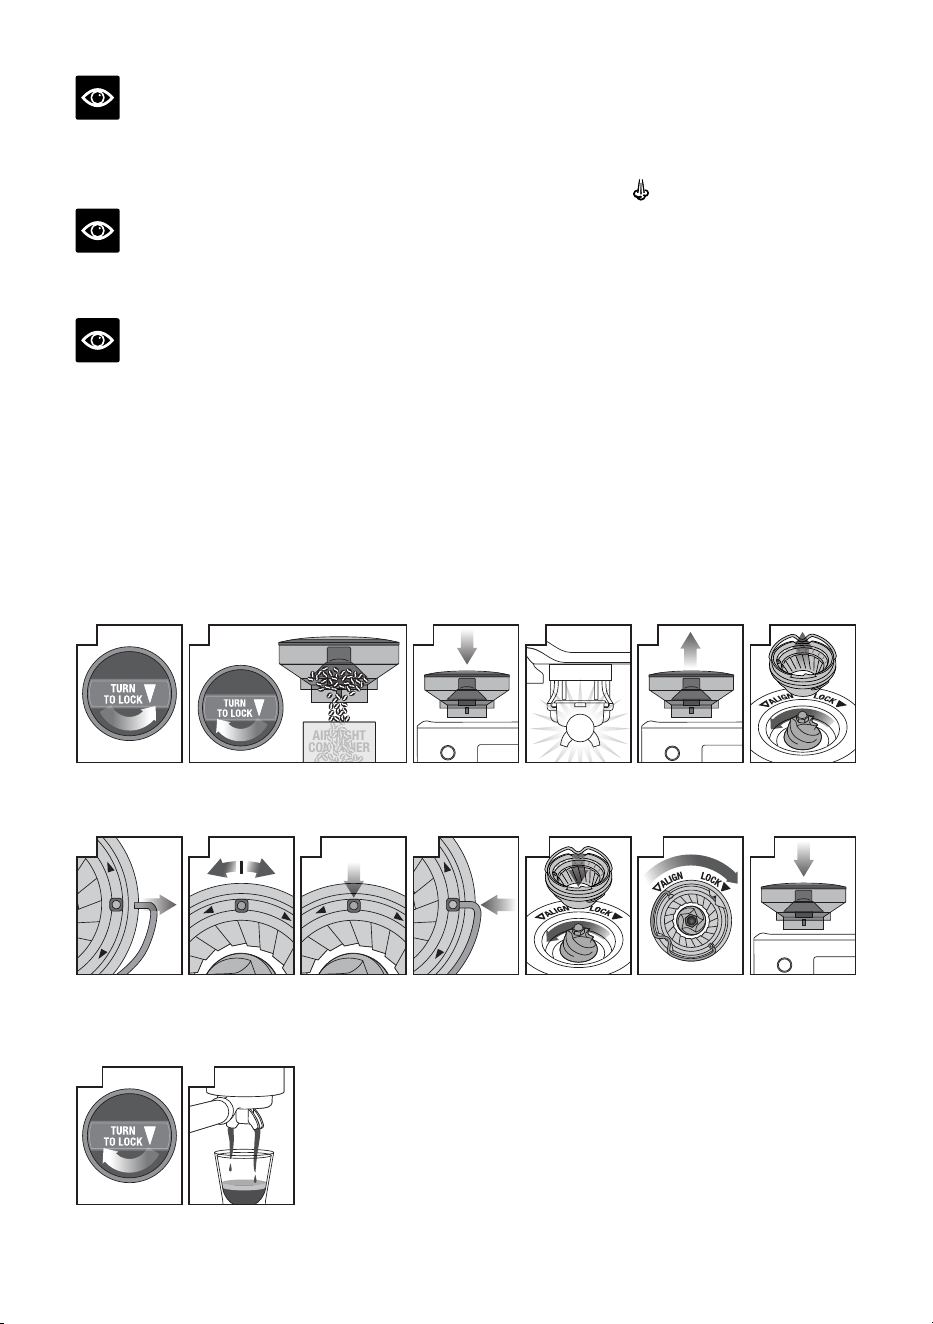
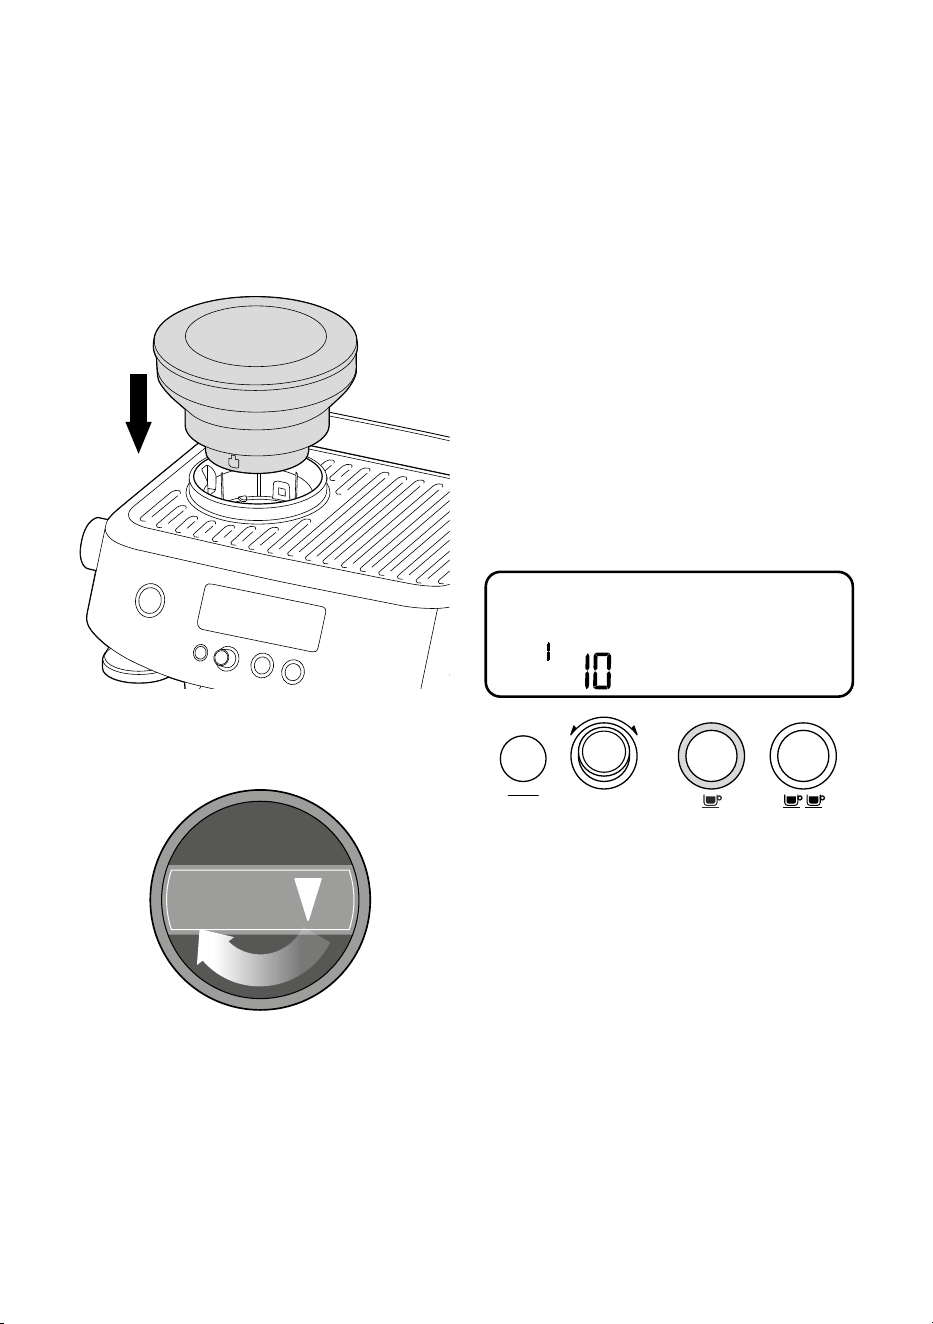
ATTACHING THE HOPPER
Insert the bean hopper into position on top
of the machine.
Turn the dial to lock the hopper into place.
Fill with fresh coee beans.
FIRST USE CYCLE
A first use cycle must be completed before
the initial use of the machine. The first use
cycle rinses the machine and primes the
heating system.
1. Fill the water tank.
2. Ensure machine is fully assembled with
the bean hopper, drip tray and water tank
securely attached to the machine.
3. Press the POWER button. The machine will
beep and go into FIRST CYCLE mode.
4. The LCD will display 헹굼세척 and the
1CUP button will be illuminated.
PRE-INFUSE
SHOT
STEAM
AMOUNT
MANUAL
PAUSED
HOT
WATER
헹굼세척
RESET
DEFAULTS
DESCALE
FILL
TANK
GRIND
DOUBLE
SINGLE
LOCK
HOPPER
GRIND
SIZE
SHOT TEMP
FASTER
POUR
SLOWER
POUR
CUSTOM
HOTTER
COOLER
CUSTOM
FILTER SIZE
MENU
EXIT
G
R
I
N
D
A
M
O
U
N
T
초
진행중
5. Press the 1 CUP button. The LCD will show
a count down for the remaining time of the
first use cycle.
6. Once complete, the machine will go into
READY mode.
12
Functions
TURNING OFF THE MACHINE
To turn the machine o, press the POWER
button. Alternatively, the machine has auto-o,
if it is not used for 30 minutes.
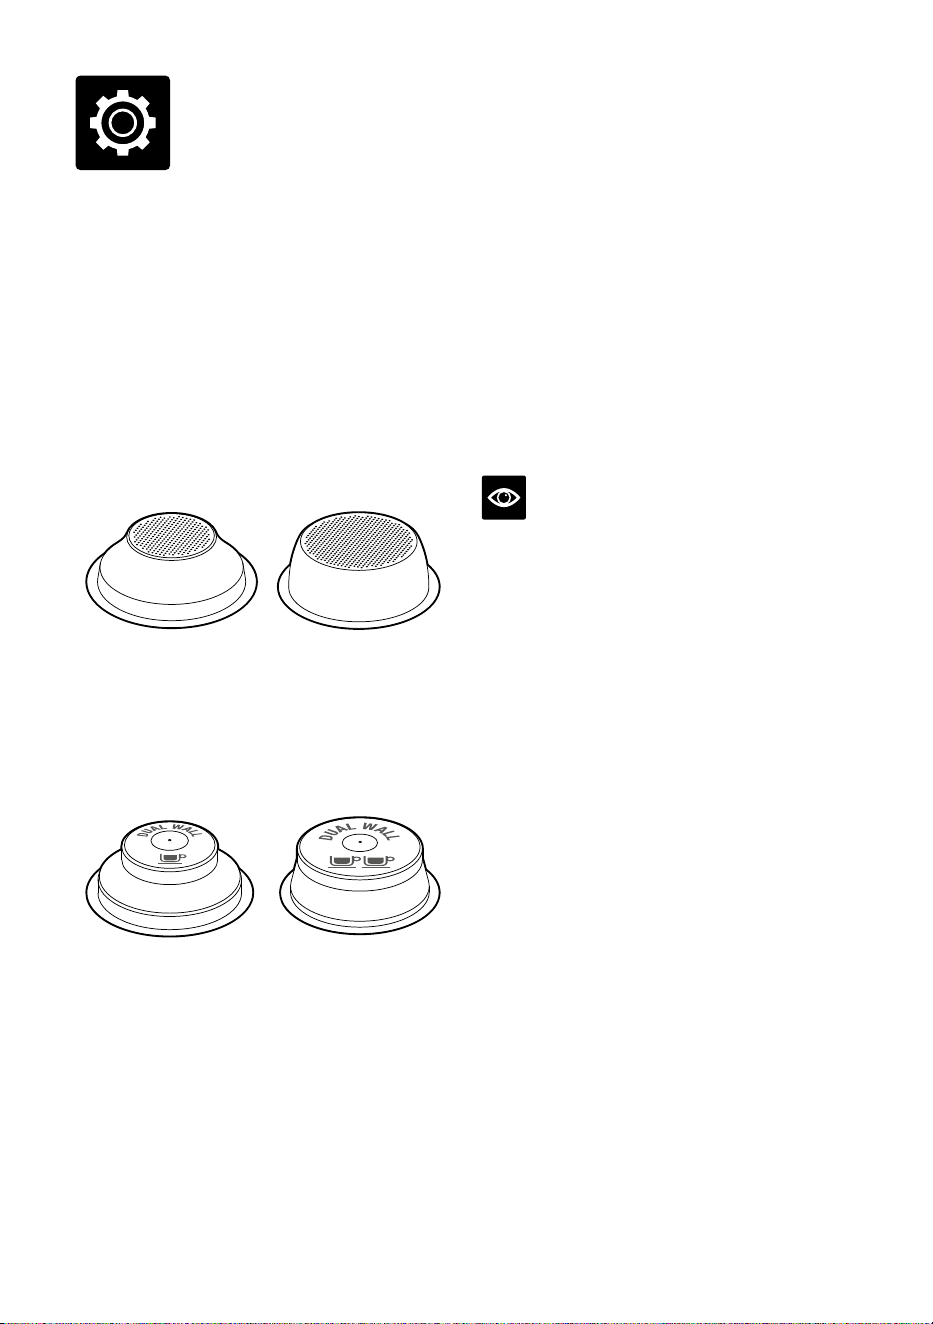
FILTER BASKETS
This machine includes 4 filter baskets;
2xSingle Wall and 2 x Dual Wall.
Single Wall filter baskets should be used when
grinding fresh whole coee beans. They allow
you to experiment with grind, dose and tamp
to create a more balanced espresso.
1 CUP 2 CUP
Dual Wall filter baskets should be used when
using pre-ground coee. They regulate the
pressure and help to optimise the extraction
regardless of the grind, dose and tamp pressure
or freshness.
1 CUP 2 CUP
Regardless of whether you use Single Wall or
Dual Wall filters baskets, use the 1 CUP basket
when brewing a single cup and the 2 CUP
basket when brewing two cups or a stronger
single cup or mug.
You will need to adjust the grind amount and
size if switching from a single to a double
basket, or vice versa.
The provided filter baskets are designed for:
1 CUP basket = approx. 8 – 11g
2 CUP basket = approx. 16 – 19g
NOTE
You may need to experiment with how much
coee is dosed into the filter basket or how long
the grinder needs to run to achieve the correct
dose. For example; when using a finer espresso
grind with the Single Wall filter baskets, you
may need to increase the grind amount to
ensure the filter basket is correctly dosed.
13
THE GRIND
When grinding coee beans, the grind size
should be fine, but not too fine. The grind size
will aect the rate at which water flows through
the ground coee in the filter basket and the
taste of the espresso.
If the grind is too fine (looks like powder
and feels like flour when rubbed between
the fingers), the water will not flow through
the coee, even when under pressure. The
resulting espresso will be OVER EXTRACTED,
dark in colour and bitter in flavour.
If the grind is too coarse, the water will flow
through the ground coee in the filter basket
too quickly. The resulting espresso will be
UNDER EXTRACTED and lacking in colour
and flavour.
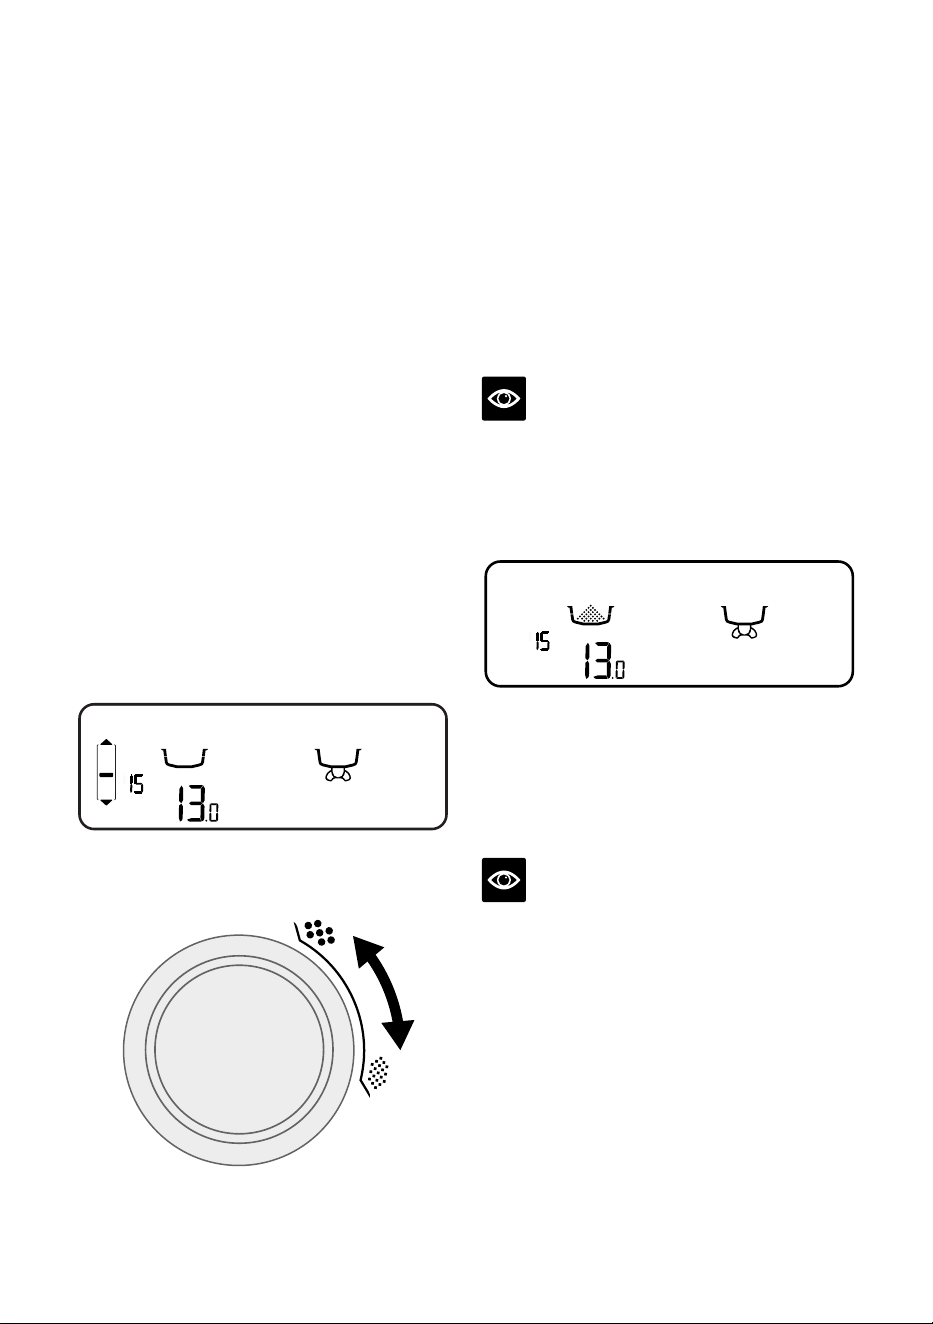
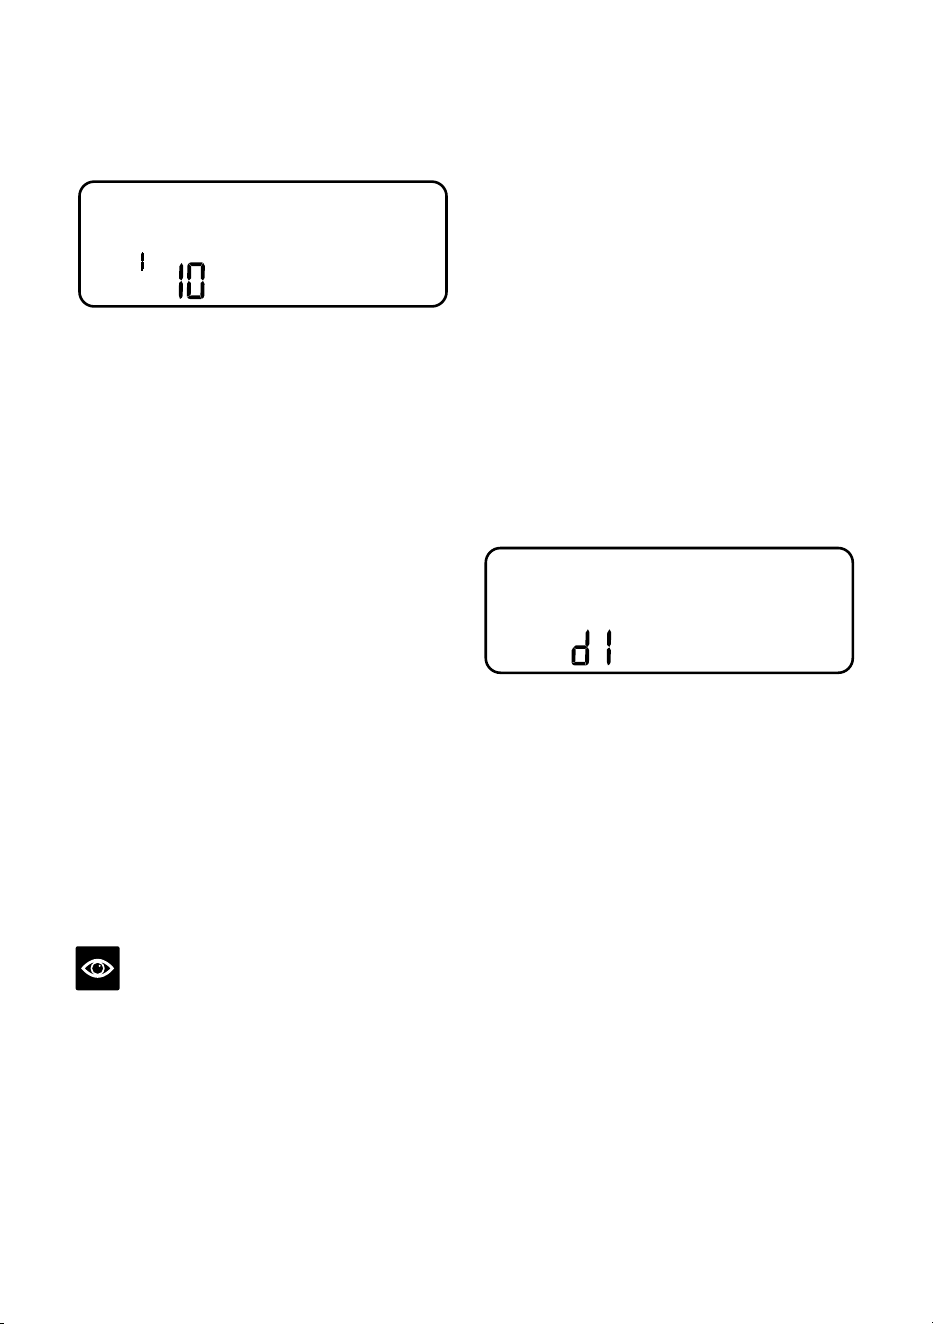
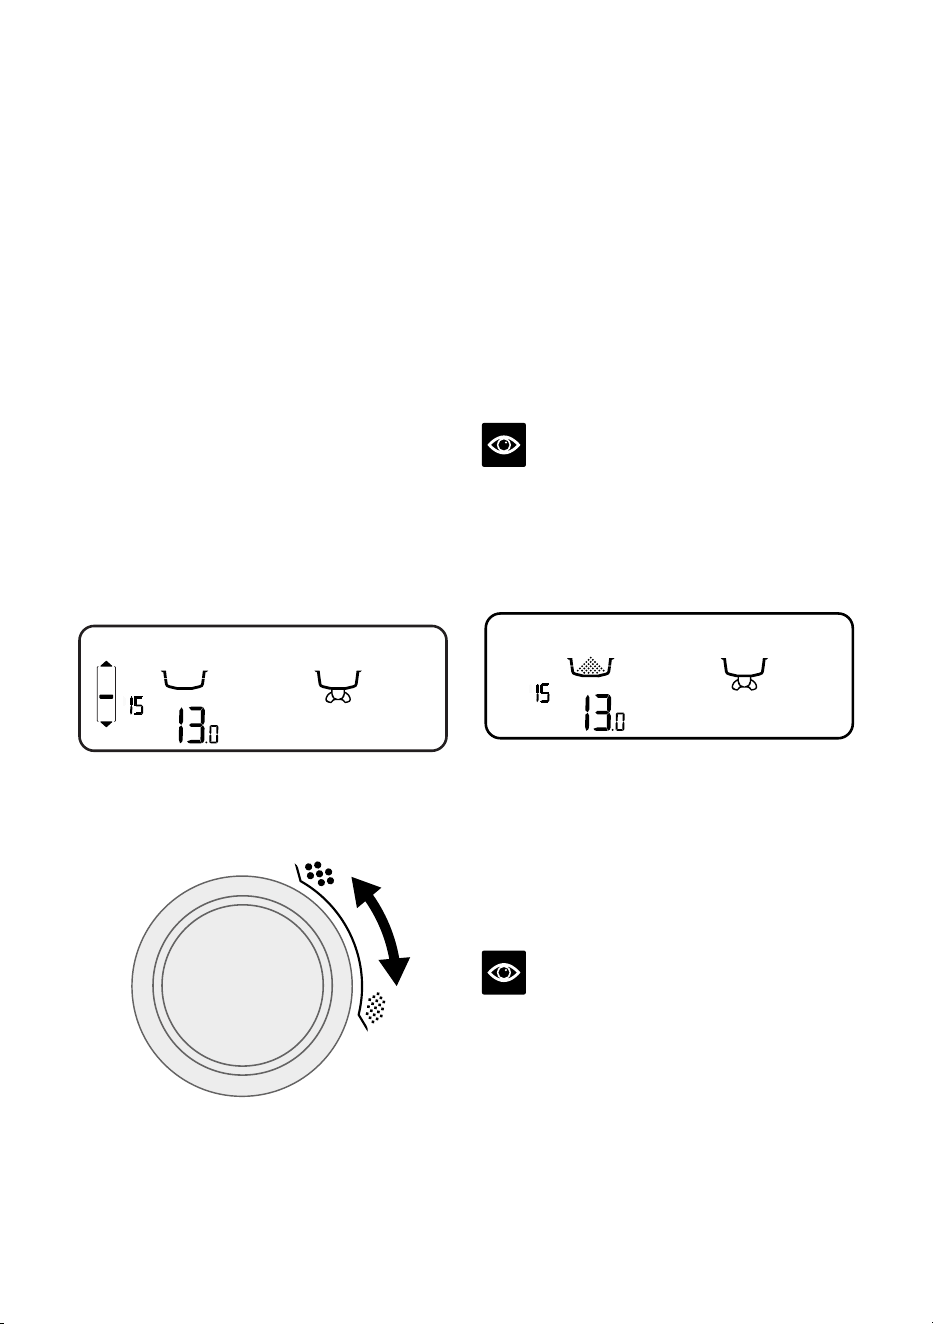
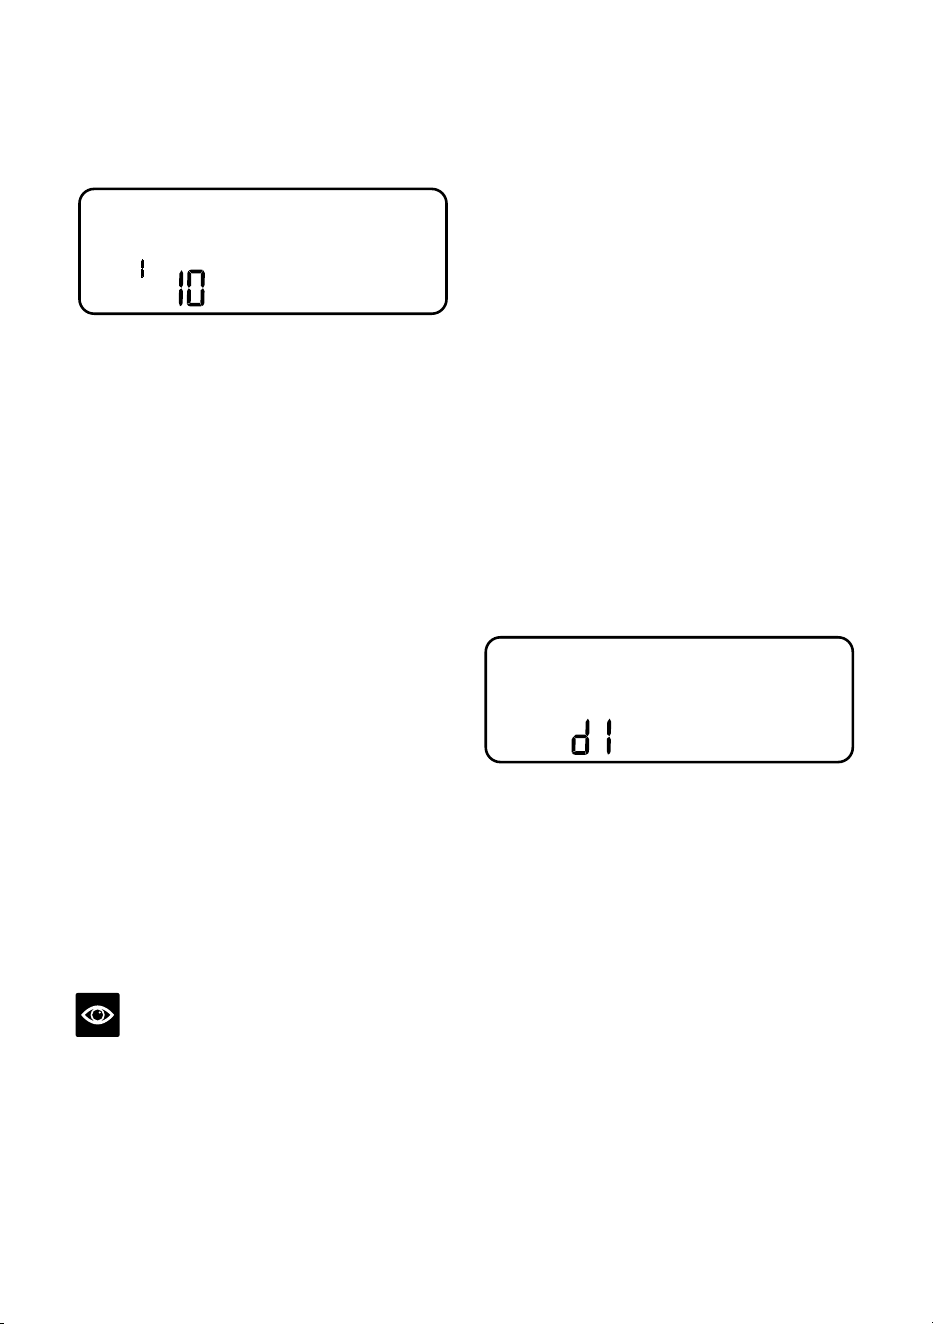
SETTING THE GRIND SIZE
This machine has 30 grind settings to select
from, with the size selected displayed on the
LCD screen. The default grind size is 15.
When adjusting the grind size, a bar will
display on the LCD indicating a faster or
slower pour.
PRE-INFUSE
추출
STEAM
AMOUNT
MANUAL
PAUSED
HOT
WATER
FLUSH
RESET
DEFAULTS
DESCALE
IN
PROGRESS
FILL
TANK
SINGLE
LOCK
HOPPER
SHOT TEMP
CUSTOM
HOTTER
COOLER
CUSTOM
분쇄
굵게
곱게
분쇄
굵기
투샷
초
Use the GRIND SIZE selector on the left side
of the machine to adjust the grind size.
FINER
COARSER
DOSING THE COFFEE
• Fill the hopper with fresh coee beans.
• Insert the required filter basket into the
portafilter.
• Insert the portafilter into the grinding cradle.
• If required, press the FILTER SIZE button to
select the filter basket size; Single or Double.
• If required, turn the GRIND AMOUNT dial
to change the grind time; clockwise
to increase the time and anti-clockwise
to decrease.
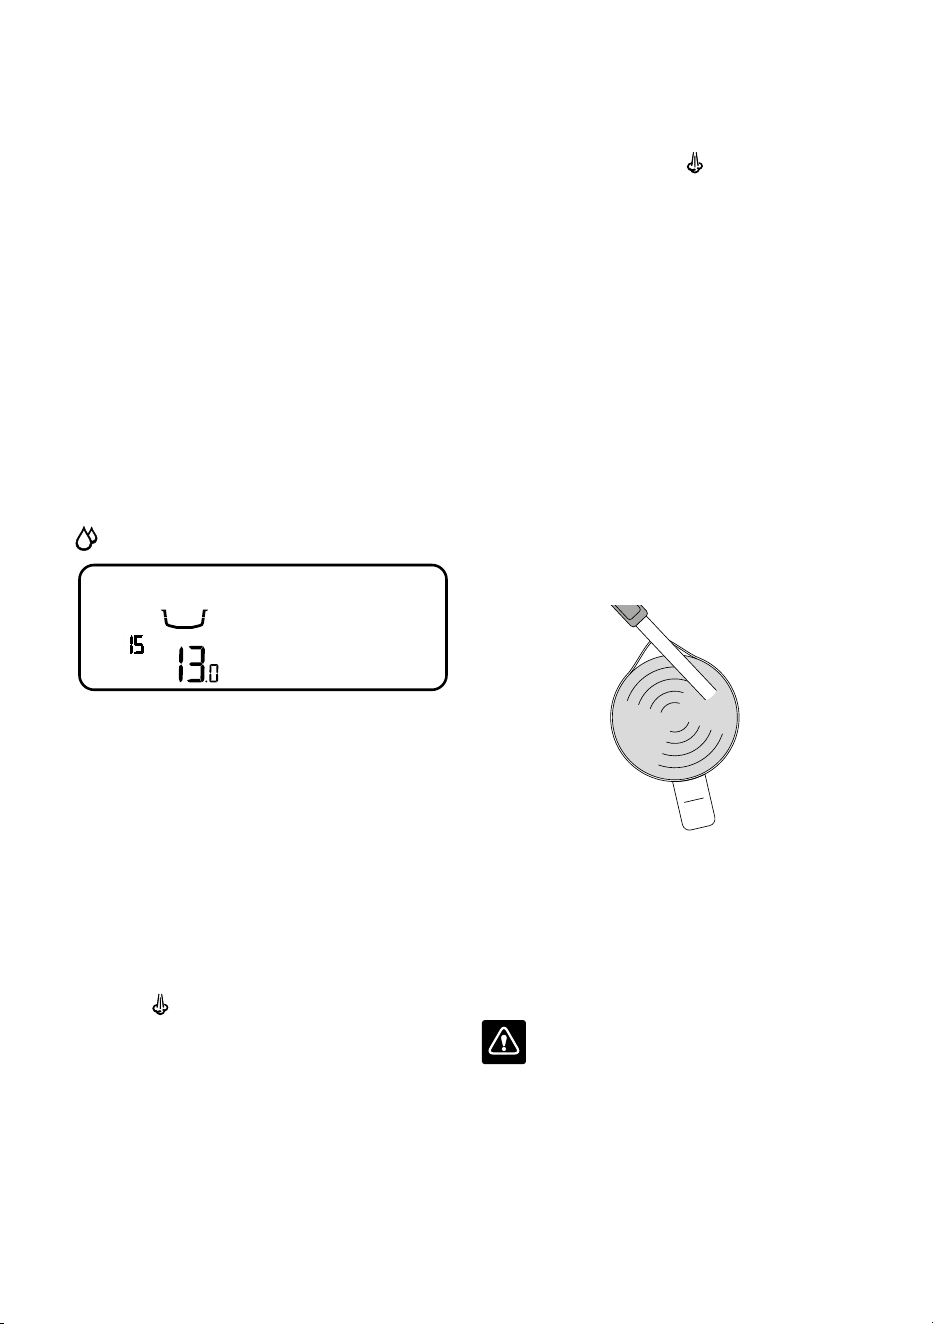
NOTE
The default grind times are 9.5 seconds for
a1cup filter and 13 seconds for a 2 cup filter.
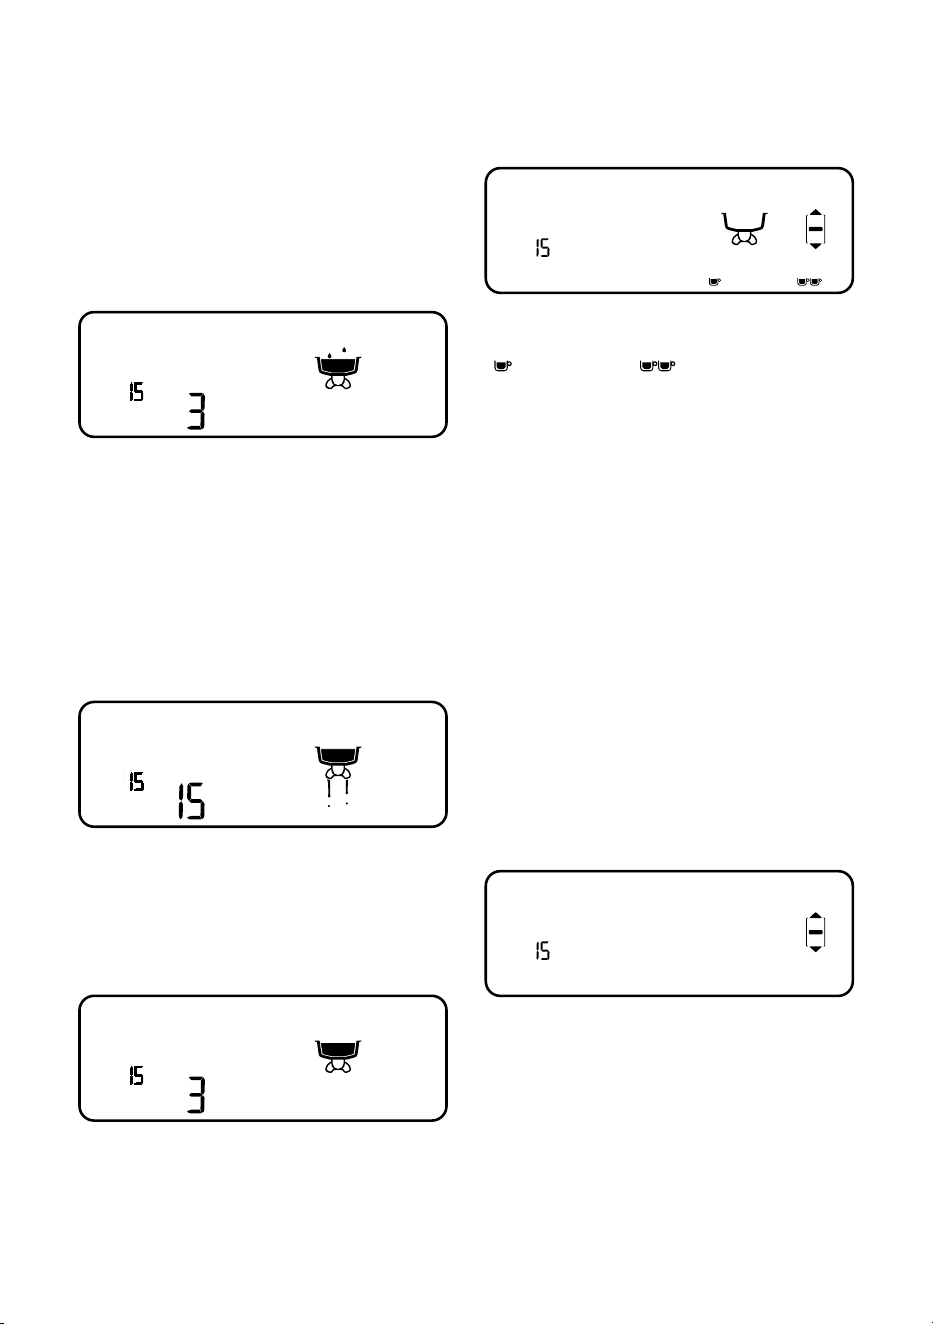
• Press and release the portafilter to activate
the automatic dosing. The LCD will show the
filter basket filling.
PRE-INFUSE
STEAM
AMOUNT
MANUAL
PAUSED
HOT
WATER
FLUSH
RESET
DEFAULTS
DESCALE
IN
PROGRESS
FILL
TANK
SINGLE
LOCK
HOPPER
SHOT TEMP
FASTER
POUR
SLOWER
POUR
CUSTOM
HOTTER
COOLER
CUSTOM
추출분쇄
분쇄
굵기
투샷
초
• If you need to pause the grinding function,
press and release the portafilter. The LCD
will show 중지, it will remain paused for
10seconds before returning to READY mode.
• Press and release the portafilter to resume
grinding.
NOTE
It is normal for the portafilter to appear
overfilled with ground coee.
MANUAL DOSING
To manually dose the coee, press and hold
the portafilter in the grinding cradle until the
desired amount of ground coee has been
dosed. To stop grinding, release the portafilter.
The timer will count up, displaying the grind time.
14
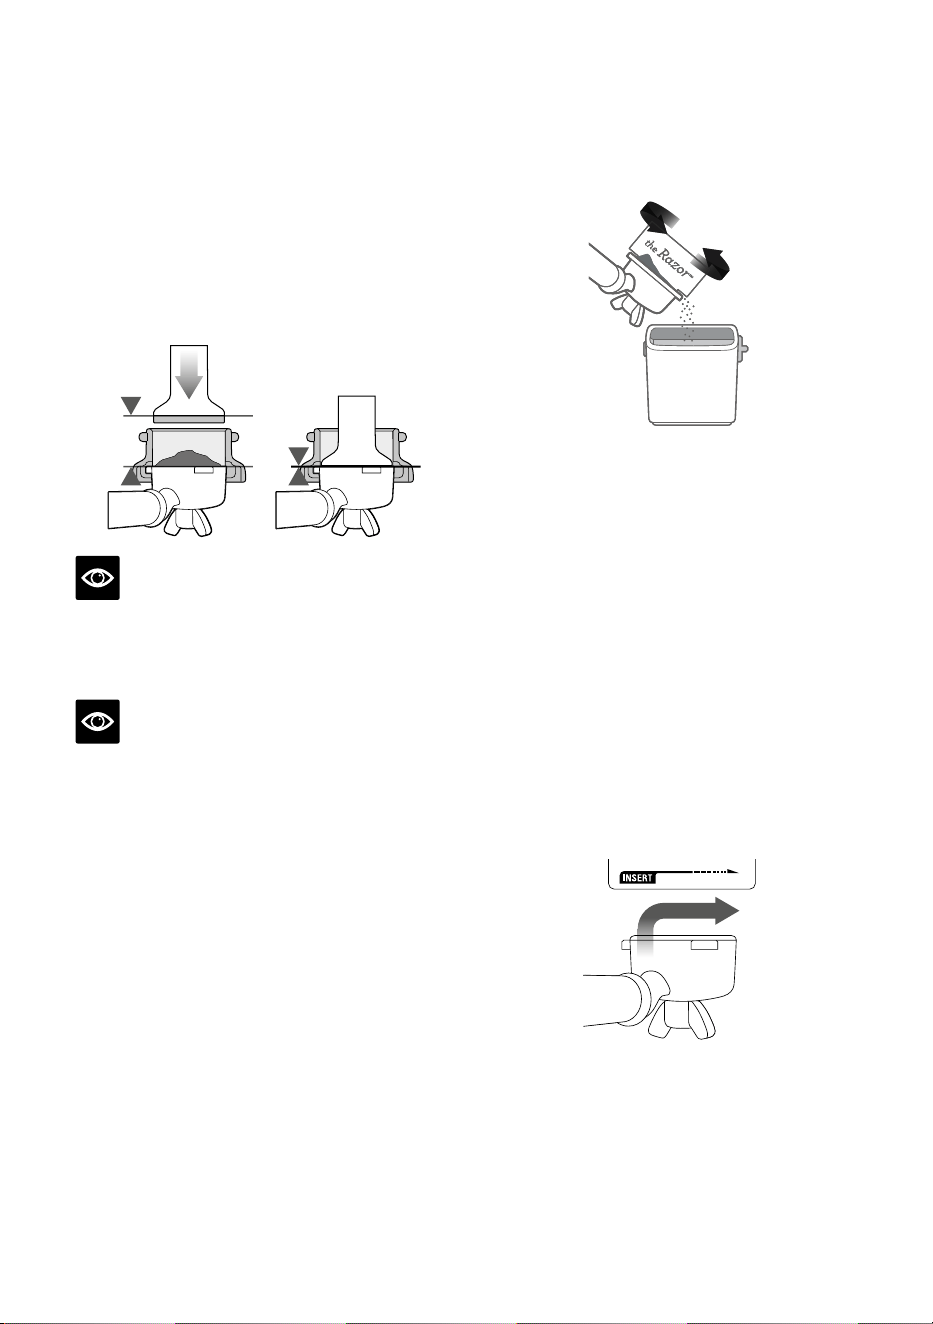
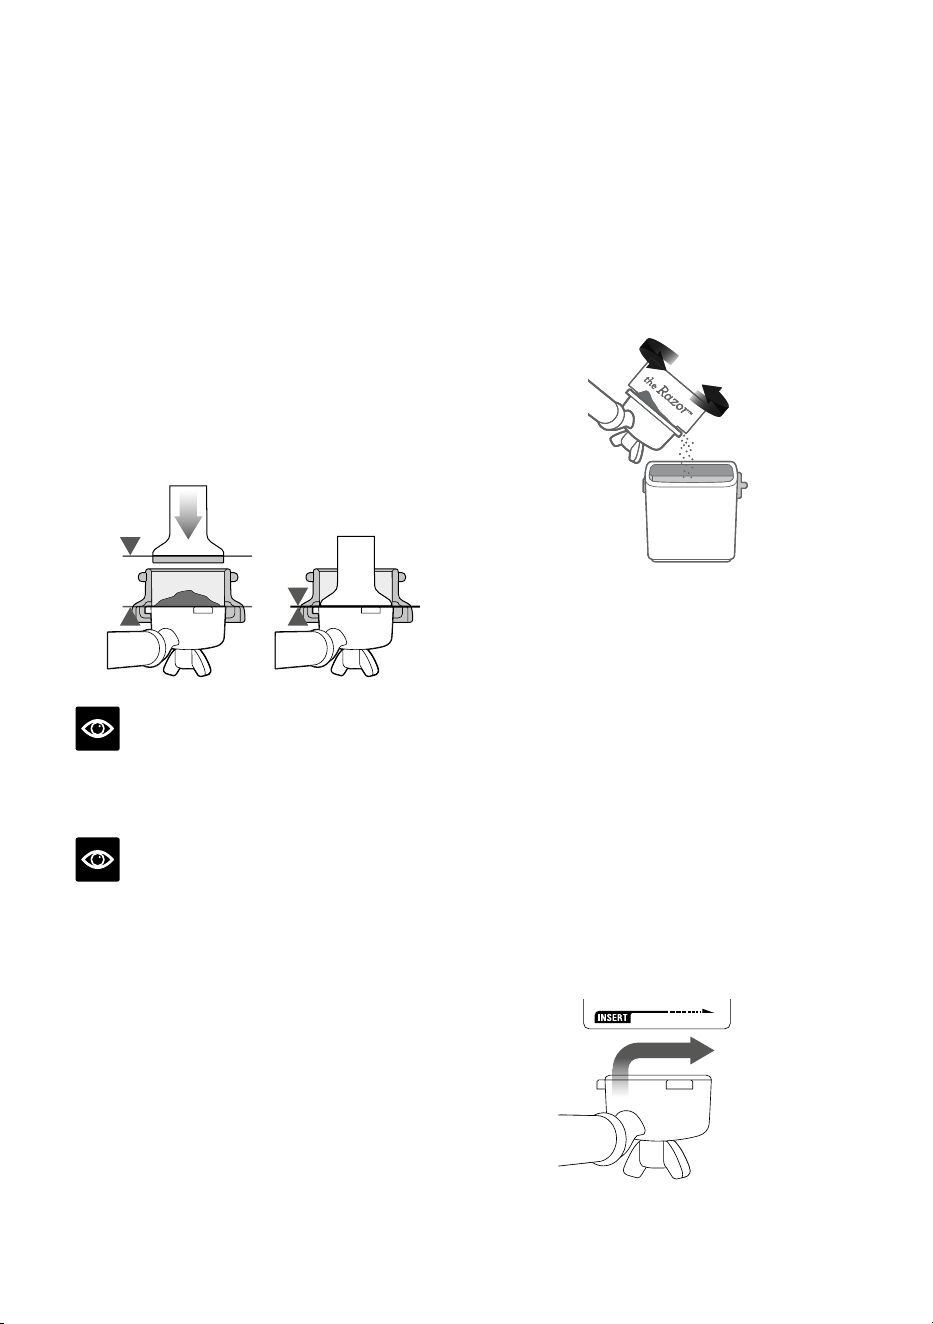
TAMPING THE GROUND COFFEE
• Remove the portafilter from the
grinding cradle.
• Tap the portafilter several times
tocollapseand distribute the coee
evenlyinthe filterbasket.
• Using the tamper, tamp down firmly
(approx. 10-15kgs of pressure). The amount
of pressure is not as important as consistent
pressure every time.
NOTE
As a guide, the top edge of the cap on the
tamper should be level with the top of the filter
basket AFTER the coee has been tamped.
NOTE
We recommend quality 100% Arabica beans
witha ‘Roasted On’ date stamped on the bags,
not a ‘Best Before’ or ‘Use By’ date. Coee
beans are best consumed between 5–20 days
after the ‘Roasted On’ date. Stale coee may
pour tooquickly from the portafilter and taste
bitter and watery.
TRIMMING THE DOSE
The Razor™ precision dose trimming tool
allows you to trim the puck to the right level
fora consistent extraction.
• Insert the Razor™ dose trimming tool into the
filter basket until the shoulders of the tool rest
on the rim of the basket. The blade of the dose
trimming tool should penetrate thesurface
ofthe tamped coee.
• Rotate the Razor™ dose trimming tool back
and forth while holding the portafilter on
an angle over a knock box to trim o excess
coee grinds. Your filter basket is now dosed
with the correct amount of coee.
• Wipe excess coee from the rim of the filter
basket to ensure a proper seal is achieved
inthe group head.
PURGING THE GROUP HEAD
Before placing the portafilter into the group
head, run a short flow of water through the
group head by pressing the 1 CUP button.
This will stabilise the temperature prior to
extraction and preheat the portafilter for
aconsistent shot temperature.
INSERTING THE PORTAFILTER
Place the portafilter underneath the group head
so that the handle is aligned with the INSERT
position. Insert the portafilter into the group
head and rotate the handle towards the centre
until firm resistance is felt.
LOCK TIGHT
15
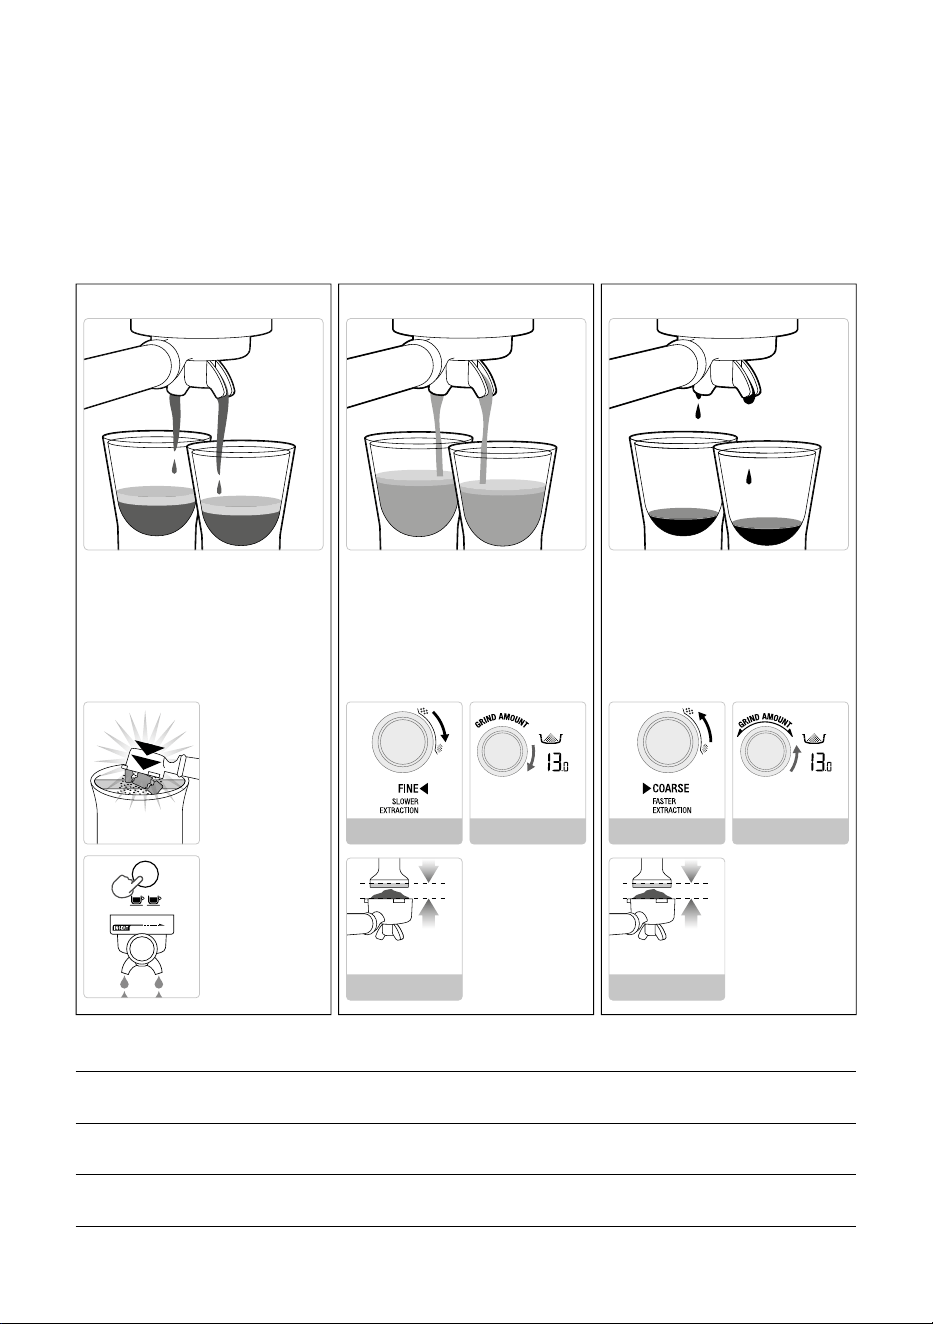
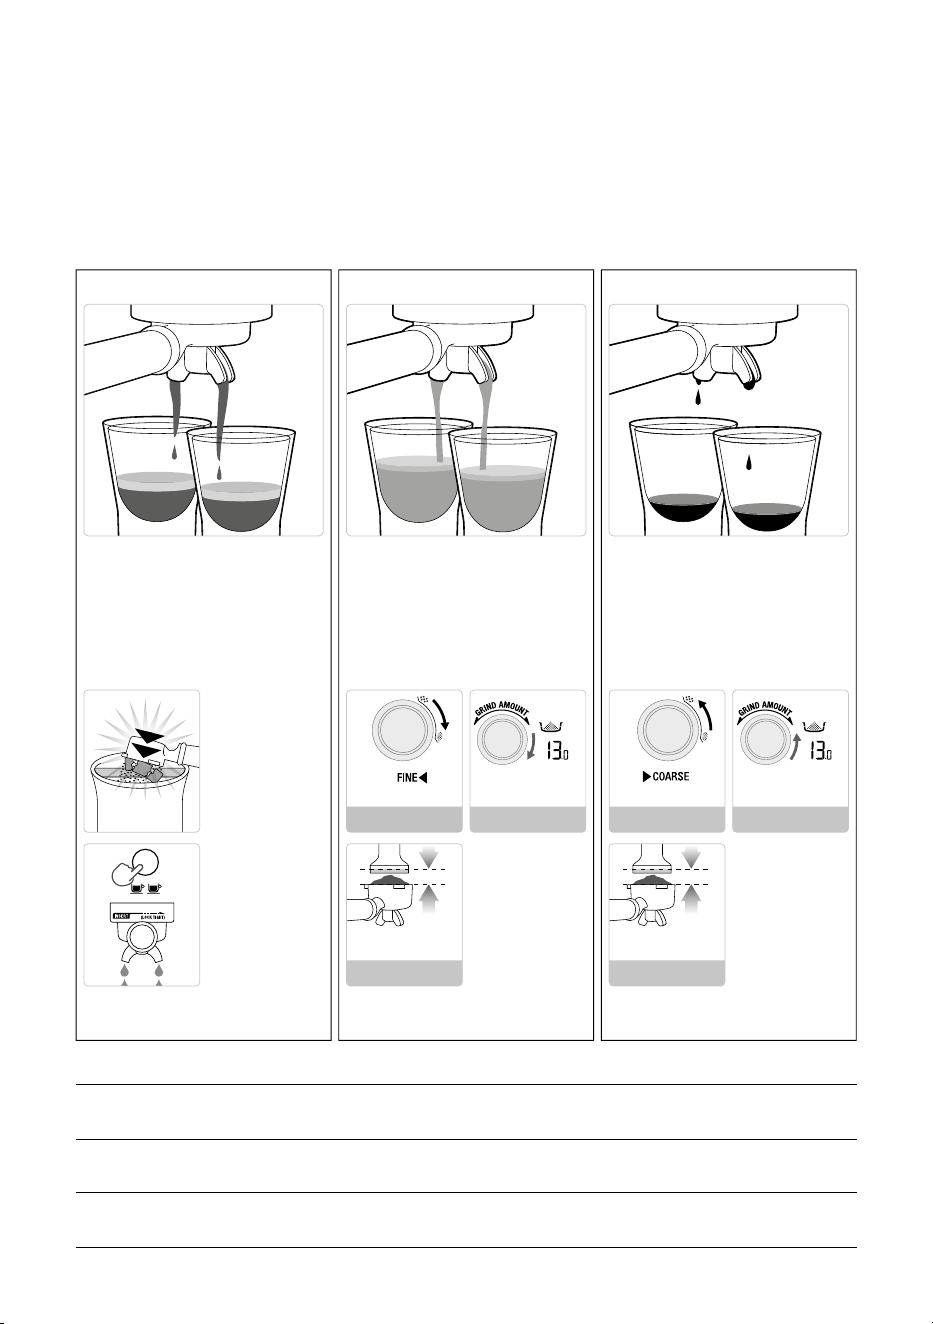
EXTRACTING ESPRESSO
• As a guide the espresso will start to flow after 8–12 seconds (infusion time) and should be the
consistency of dripping honey.
• If the espresso starts to flow after less than 7 seconds, you have either under dosed the filter
basket and /or the grind is too coarse. This is an UNDER EXTRACTED shot.
• If the espresso starts to drip but doesn’t flow after 13 seconds, the grind is too fine.
ThisisanOVER EXTRACTED shot.
GRIND GRIND DOSE TAMP
OVER EXTRACTED
BITTER • ASTRINGENT
Too fine
Too much
Use razor to trim
Too heavy
BALANCED
Optimum
8–11g (1 cup)
16–19g (2 cup)
10-15kgs
UNDER EXTRACTED
UNDERDEVELOPED • SOUR
Too coarse
Too little
Increase dose & use razor to trim
Too light
• Flow starts after 8–12 secs
• Flow slow like warm honey
• Crema is golden brown with a ne
mousse texture
• Espresso is dark brown
SOLUTIONS SOLUTIONS
Tamp using 10-15kgs
of pressure. The top edge
of metal cap on the
tamper should be level
with the top of the lter
basket AFTER tamping.
Trim the puck to the
right level using the
Razor
™
precision dose
trimming tool.
• Flow starts after 1–7 secs
• Flow fast like water
• Crema is thin and pale
• Espresso is pale brown
• Tastes bitter/sharp, weak and watery
• Flow starts after 13 secs
• Flow drips or not at all
• Crema is dark and spotty
• Espresso is very dark brown
• Tastes bitter and burnt
REMOVE USED
GRINDS
Used grinds will form
a coffee 'puck'. If the
puck is wet, refer to
the 'Under Extraction'
section.
RINSE FILTER
BASKET
Keep the lter basket
clean to prevent
blockages. Without
ground coffee in the
lter basket, lock the
portalter into the
machine and run hot
water through.
AFTER EXTRACTION
CORRECT EXTRACTION UNDER EXTRACTION OVER EXTRACTION
Tamp using 10-15kgs
of pressure. The top edge
of metal cap on the
tamper should be level
with the top of the lter
basket AFTER tamping.
Trim the puck to the
right level using the
Razor
™
precision dose
trimming tool.
Adjust & re-test
DECREASE
GRIND AMOUNT
Adjust & re-test
INCREASE
GRIND AMOUNT
Adjust & re-testAdjust & re-test
LOCK TIGHT
분쇄 분쇄
투샷투샷
초 초
ALWAYS TAMP TO LINE
Adjust & re-test
ALWAYS TAMP TO LINE
Adjust & re-test
16
PRE-PROGRAMMED SHOT VOLUME –
1 CUP
Press the 1 CUP button once, the button will
flash, indicating that it has been selected.
TheLCD will display 프리인퓨전 and the shot
clock will start counting up. Once pre-infusion
is complete, the shot will start extracting.
Apre-set single espresso volume of approx.
30ml will be extracted. The machine will
automatically stop once the pre-set volume
hasbeen extracted.
STEAM
AMOUNT
MANUAL
PAUSED
HOT
WATER
FLUSH
RESET
DEFAULTS
DESCALE
IN
PROGRESS
FILL
TANK
GRIND
DOUBLE
SINGLE
LOCK
HOPPER
SHOT TEMP
FASTER
POUR
SLOWER
POUR
CUSTOM
HOTTER
COOLER
CUSTOM
분쇄
굵기
초
추출
프리인퓨전
PRE-PROGRAMMED SHOT VOLUME –
2 CUP
Press the 2 CUP button once, the button will
flash, indicating that it has been selected and
the LCD will display 프리인퓨전 and the shot
clock will start counting up. Once pre-infusion
is complete, the shot will start extracting.
Apre-set double espresso volume of approx.
60ml will be extracted. The machine will
automatically stop once the pre-set volume
has been extracted.
PRE-INFUSE
STEAM
AMOUNT
MANUAL
PAUSED
HOT
WATER
FLUSH
RESET
DEFAULTS
DESCALE
IN
PROGRESS
FILL
TANK
GRIND
DOUBLE
SINGLE
LOCK
HOPPER
SHOT TEMP
FASTER
POUR
SLOWER
POUR
CUSTOM
HOTTER
COOLER
CUSTOM
분쇄
굵기
초
추출
MANUAL PRE-INFUSION &
EXTRACTION
Press and hold the 1 CUP or 2 CUP button
for the desired pre-infusion time. Release the
button to commence the extraction. Press the
flashing button to stop the extraction.
STEAM
AMOUNT
MANUAL
PAUSED
HOT
WATER
FLUSH
RESET
DEFAULTS
DESCALE
IN
PROGRESS
FILL
TANK
GRIND
DOUBLE
SINGLE
LOCK
HOPPER
SHOT TEMP
FASTER
POUR
SLOWER
POUR
CUSTOM
HOTTER
COOLER
CUSTOM
분쇄
굵기
초
추출
프리인퓨전
수동추출
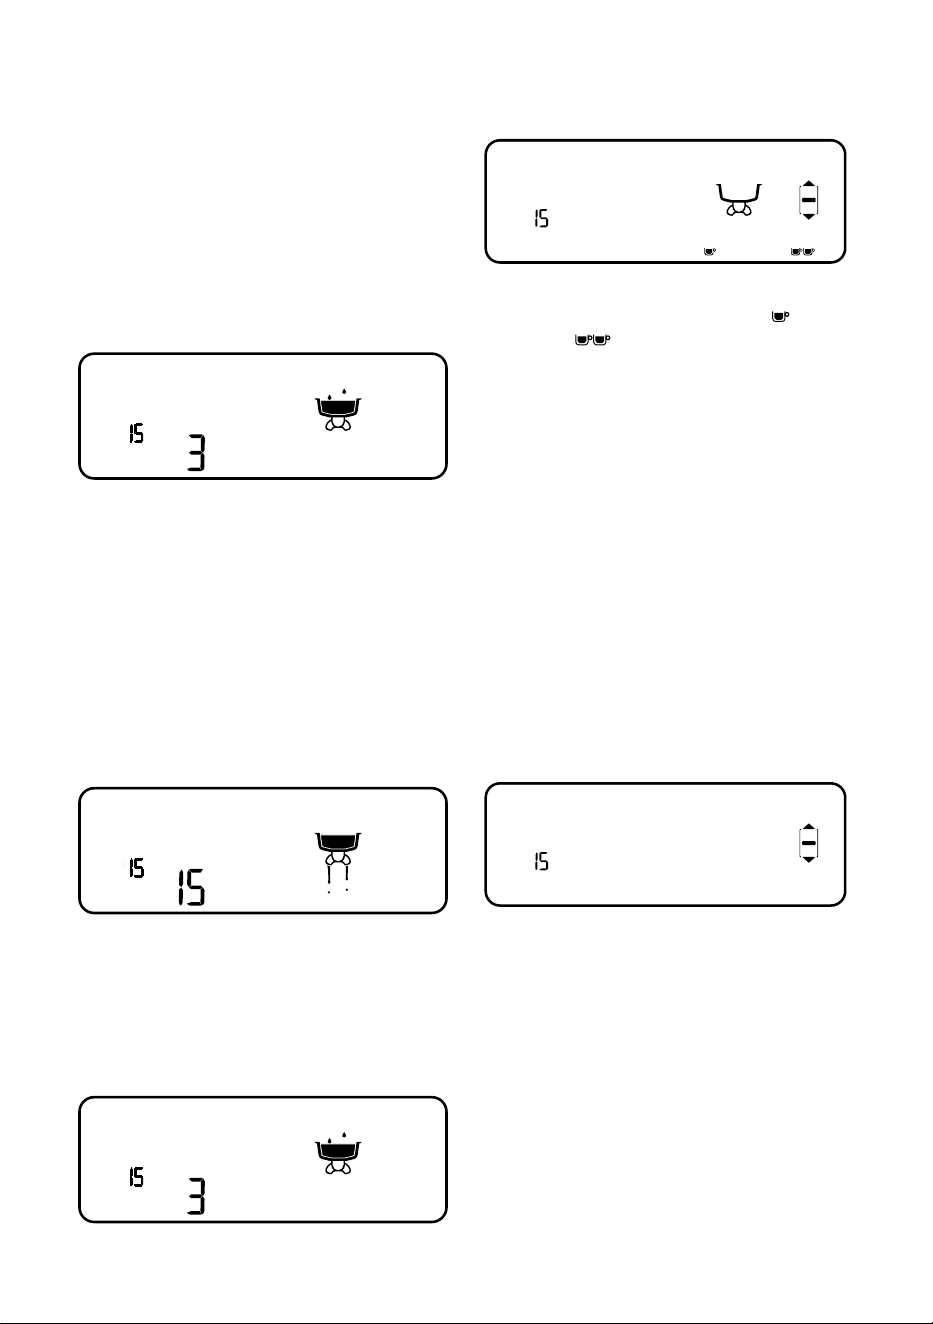
PROGRAMMING ESPRESSO SHOT
• Press the MENU button to enter the main menu.
PRE-INFUSE
STEAM
SEC
AMOUNT
MANUAL
PAUSED
HOT
WATER
IN
PROGRESS
FILL
TANK
GRIND
DOUBLE
SINGLE
LOCK
HOPPER
FASTER
POUR
SLOWER
POUR
헹굼세척
석회질제거
초기화
분쇄
굵기
추출 추출온도
높음
낮음
한잔�설정 한잔�설정
• Use the GRIND AMOUNT dial to navigate
through the menu to the 한잔 설정
or
한잔 설정
. To select, press the dial.
• Press the desired CUP button to start the
default pre-infusion. To customise the
pre-infusion, press and hold the same CUP
button for the desired pre-infusion time.
Release the button to commence
the extraction.
• To stop the extraction at the desired level,
press the CUP button. The LCD and CUP
button will stop flashing. The machine will
then return to READY mode. The custom
setting can now be activated by pressing the
desired CUP button selected.
ADJUSTING SHOT TEMPERATURE
• Press the MENU button to enter the main menu.
• Use the GRIND AMOUNT dial to navigate
the menu and press to select 추출온도.
PRE-INFUSE
STEAM
SEC
AMOUNT
MANUAL
PAUSED
HOT
WATER
IN
PROGRESS
FILL
TANK
GRIND
DOUBLE
SINGLE
LOCK
HOPPER
FASTER
POUR
SLOWER
POUR
헹굼세척
석회질제거
초기화
분쇄
굵기
추출 추출온도
높음
낮음
한잔�설정 한잔�설정
• Use the GRIND AMOUNT dial to increase
ordecrease the shot temperature as displayed
on the LCD.
• Press the dial to confirm the desired
temperature. The machine will return
toREADY mode.

17
RESETTING TO DEFAULTS
• Press the MENU button to enter the main menu.
• Use the GRIND AMOUNT dial to navigate
the menu and select 초기화.
• The machine will beep.
• The GRIND AMOUNT, FILTER SIZE, SHOT
TEMP, 1 CUP and 2 CUP SHOT settings will
all return to the default settings. The machine
will return to READY mode.
USING HOT WATER OUTLET
The hot water function can be used to pre-heat
cups or to add hot water manually.
To activate the hot water, turn the STEAM
dial to
.
PRE-INFUSE
SHOT
STEAM
AMOUNT
MANUAL
PAUSED
FLUSH
RESET
DEFAULTS
DESCALE
IN
PROGRESS
FILL
TANK
투샷
SINGLE
LOCK
HOPPER
SHOT TEMP
FASTER
POUR
SLOWER
POUR
CUSTOM
HOTTER
COOLER
CUSTOM
분쇄
굵기
분쇄
온수
초
• The LCD will show that 온수 has been
activated.
• To stop the hot water, turn the dial back to the
centre, vertical position.
• The hot water will stop after 60 seconds, but
the dial must be turned back manually to the
standby position.
TEXTURING MILK
It is recommended to momentarily purge
thesteam wand prior to texturing milk.
Position the steam wand over the drip tray
andturn the STEAM dial to the
. TheLCD
will display 스팀 when activated. Turn the
STEAM dial back to a vertical position
tostopsteaming.
Dierent brands and types of milk and milk
alternatives will texture dierently.
• Start with fresh cold milk.
• Fill the milk jug to between the MIN and
MAX markings.
• Lift the steam wand and insert into the milk
jug with the steam wand tip 1-2cm below the
surface of the milk, close to the right-hand
side of the jug at a 3 o’clock position.
• Turn the STEAM dial to the
.
• Keep the steam wand tip just under the
surface of the milk until the milk is
spinning clockwise, producing a vortex
(whirlpool eect).
• With the milk spinning, slowly lower the jug.
This will bring the steam wand tip to the
surface of the milk and start to introduce
air into the milk.
• Gently break the surface of the milk with the
tip to get the milk spinning fast enough.
• Keep the steam wand tip at or slightly
below the surface, continuing to maintain
the vortex. Texture the milk until sucient
volume is obtained.
• Lift the jug to lower the tip beneath the
surface but keep the vortex spinning.
The milk is at the correct temperature
(60-65°C) when the jug is hot to touch.
• Once the desired temperature has been
achieved, turn the STEAM dial back to the
vertical position.
• Remove the steam wand from the milk jug.
• Wipe the steam wand with a clean, damp
cloth. Then return to lowered position
over the drip tray.
CAUTION: BURN HAZARD
Pressurised steam can still be released,
even after machine has been switched o.
Children must always be supervised.
18
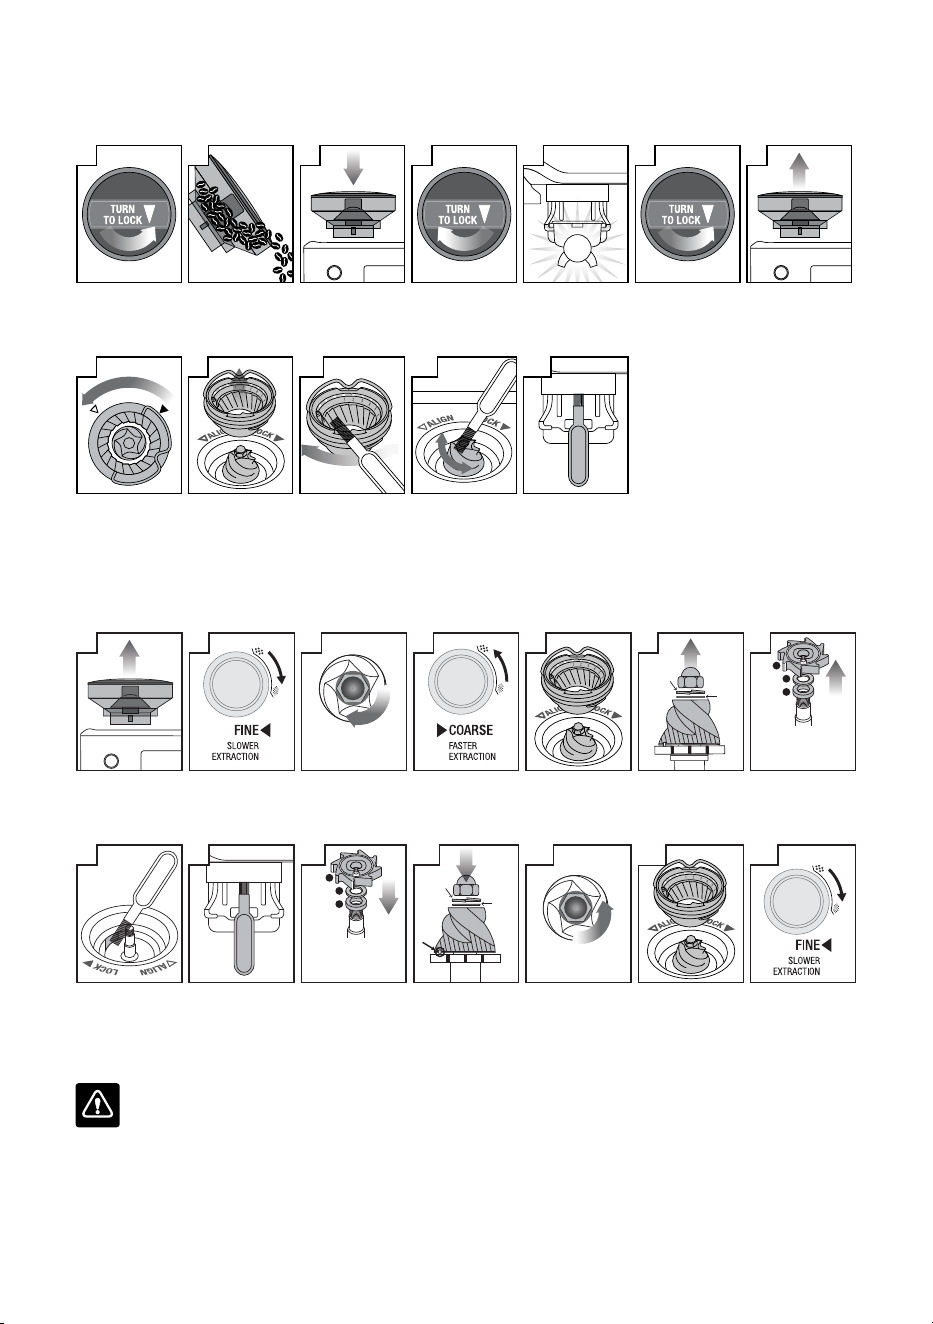
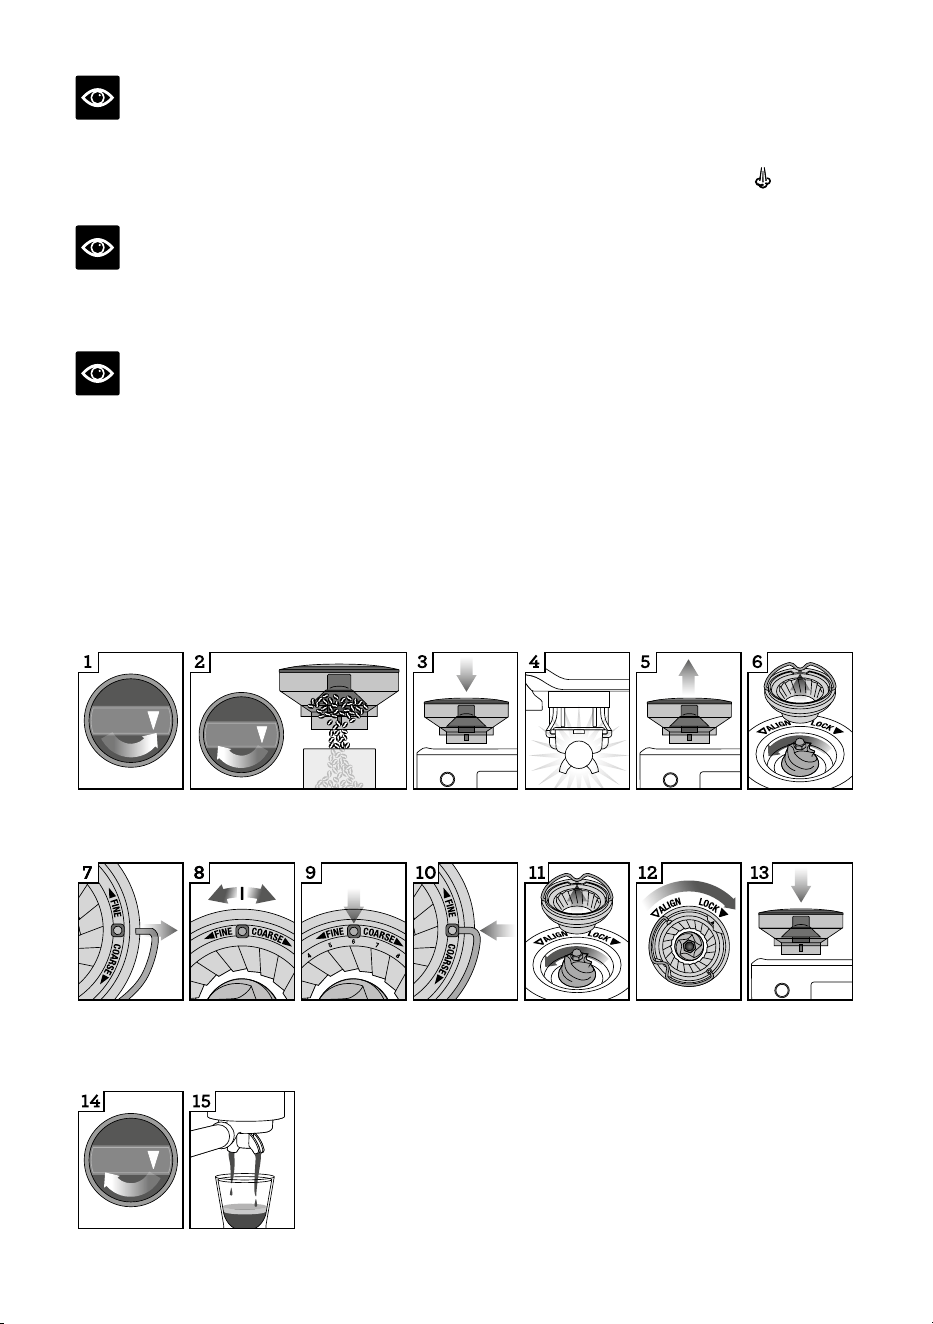
ADJUSTING CONICAL BURRS
Some types of coee may require a wider grind range to achieve an ideal extraction or brew.
A feature of your Barista Pro™ is the ability to extend this range with an adjustable upper burr.
Werecommend making only one adjustment at a time.
77
F
I
N
E
C
O
A
R
S
E
4
PUSH
2
AIR TIGHT
CONTAINER
53
13
15
88
F
I
N
E
C
O
A
R
S
E
9
F
I
N
E
C
O
A
R
S
E
4
5
6
7
8
10
F
I
N
E
C
O
A
R
S
E
12
Lock upper burr
Hold hopper over container & turn
dial to release beans into container
Align hopper
into position
Run grinder
until empty
Remove hopperUnlock hopper
Move adjustable
top burr, 1 number,
coarser or finer
Remove wire
handle from both
sides of the burr
Align the number
with the handle
opening
Remove upper
burr
Insert wire
handle from both
sides of the burr
Push upper burr
firmly into
position
Align hopper
into position
Lock hopper Check your
extraction
14
1
6
11
NOTE
Ensure the STEAM dial is in the vertical
position before removing the steam wand from
the milk jug.
NOTE
When the machine creates steam, a pumping
noise can be heard. This is normal operation.
NOTE
Use only the supplied stainless steel milk jug to
froth milk using this machine. The use of other
containers may lead to dangerous conditions.
STEAM WAND PURGING
After texturing milk, it is recommended to
purge the steam wand. With the steam wand
positioned over the drip tray and turn the
STEAM dial to the
, and allow the machine
topurge. Turn the STEAM dial back to
avertical position to stop steaming.
19
Care & Cleaning
CAUTION:
To prevent damage to the appliance, do not use alkaline cleaning agents when cleaning,
useasoft cloth and mild detergent.
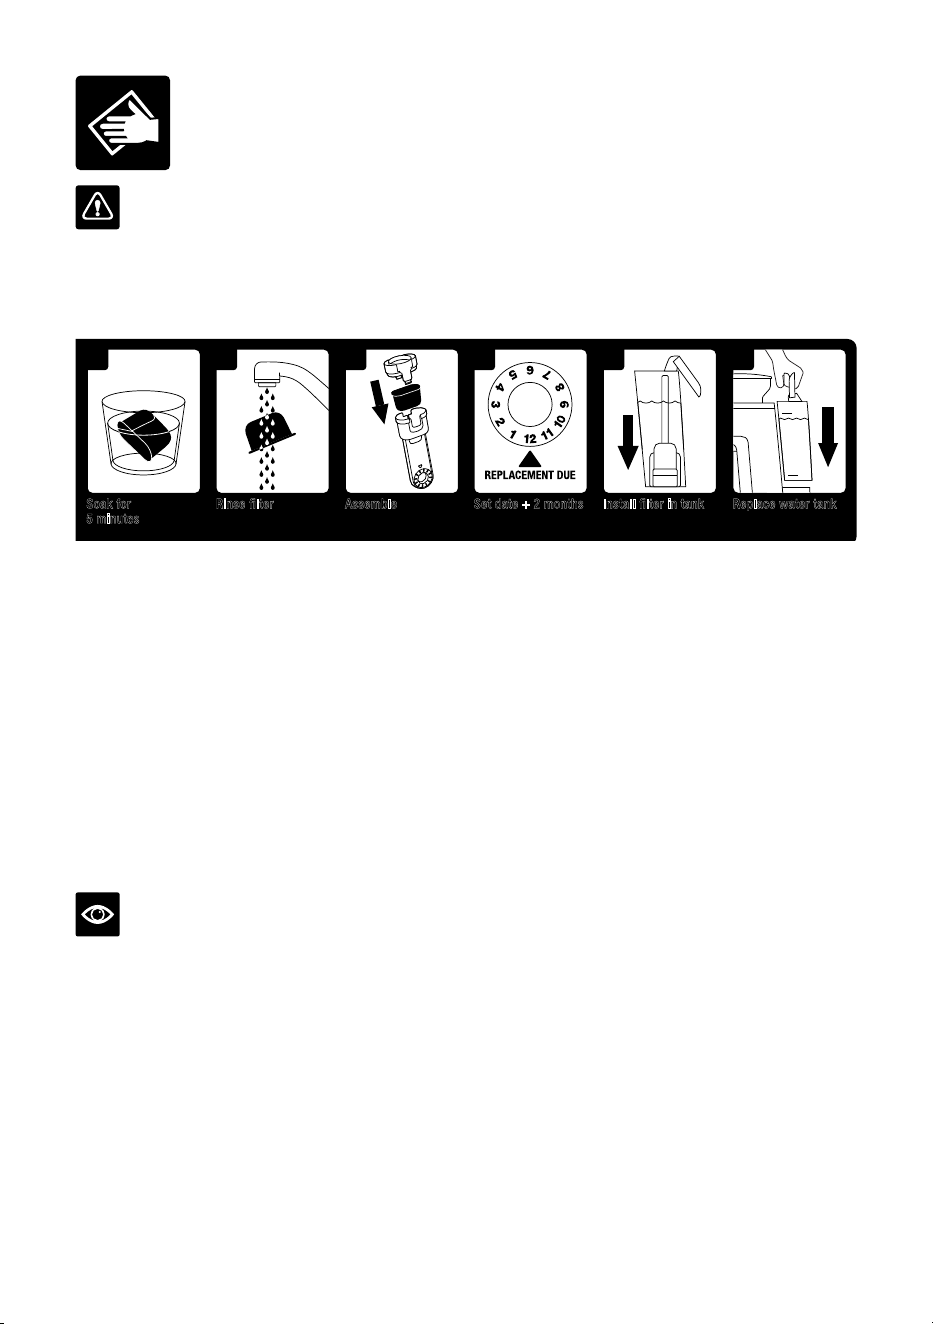
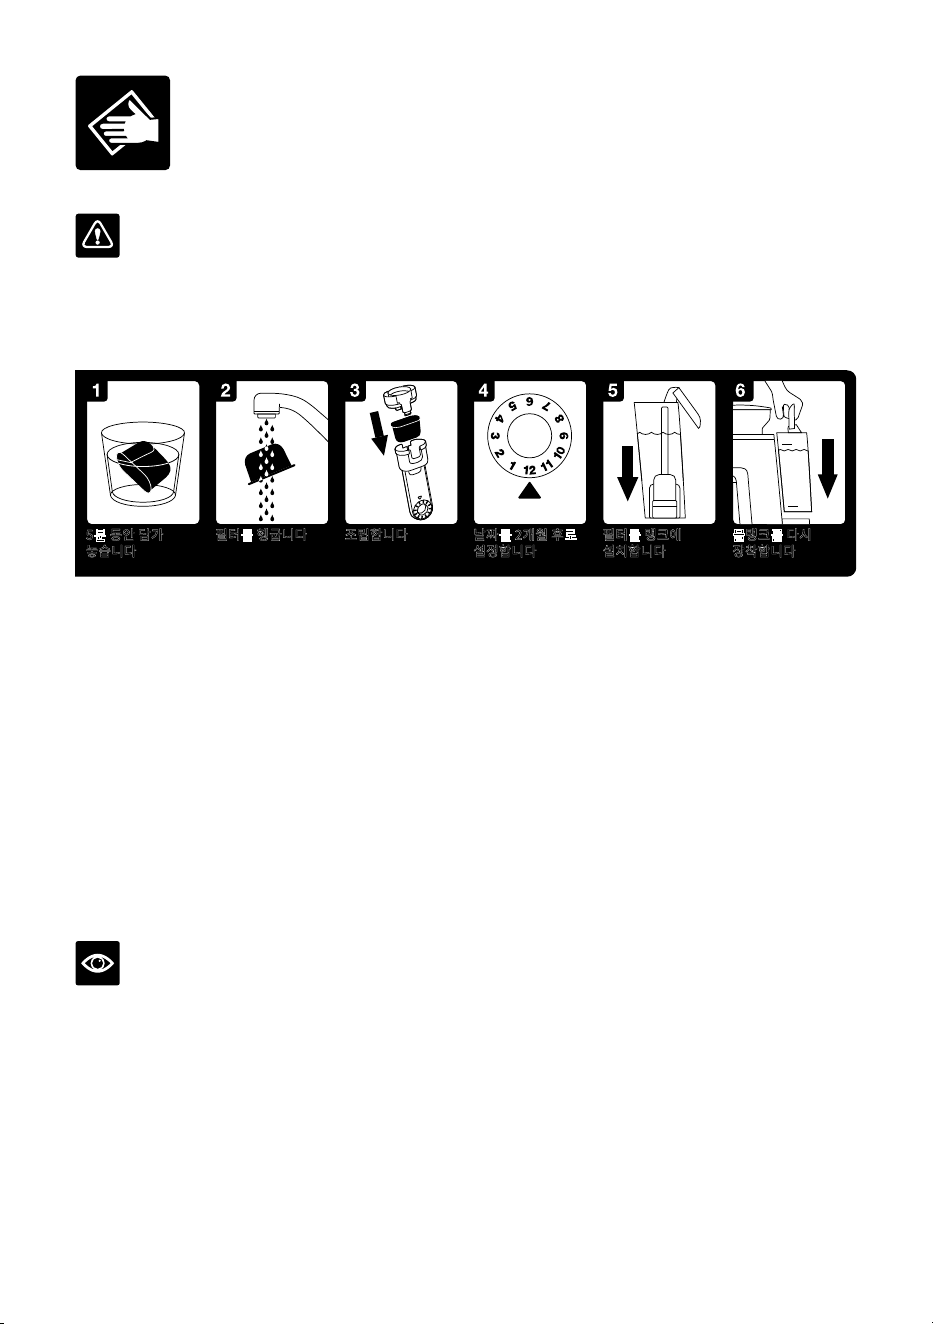
REPLACING THE WATER FILTER
INSTALL
WATER
FILTER
2
Rinse lter
2 43 6
Replace water tankAssemble Set date + 2 months Install lter in tank
5
Soak for
5 minutes
Replace water lter
every 2 months or
60 tank rells
1
MAX
MIN
The water filter provided helps to prevent scale build up which over time can aect the
performance ofyour machine. Replacing the water filter every 2 months will reduce the need
to de-scale the machine.
If you live in a hard water area, we recommend changing the water filter more frequently.
• Remove the water filter from the plastic bag.
• Soak the filter in cold water for 5 minutes.
• Rinse the filter under cold running water.
• Insert the filter into the filter holder.
• Set Date Dial 2 months ahead
• Install the assembled filter holder in the water tank, ensuring it is locked into place.
• Fill the water tank with cold water before sliding back into position on the back
of the machine and locking into place.
NOTE
Replacement water filters can be purchased from the Breville
®
website
or by contacting Breville
®
Customer Service.
20
FLUSH CLEANING CYCLE
The LCD will display a 헹굼세척 alert when
acleaning cycle is required. The cleaning cycle
is separate from descaling.
PRE-INFUSE
SHOT
STEAM
AMOUNT
MANUAL
PAUSED
HOT
WATER
헹굼세척
RESET
DEFAULTS
DESCALE
FILL
TANK
GRIND
DOUBLE
SINGLE
LOCK
HOPPER
GRIND
SIZE
SHOT TEMP
FASTER
POUR
SLOWER
POUR
CUSTOM
HOTTER
COOLER
CUSTOM
FILTER SIZE
MENU
EXIT
G
R
I
N
D
A
M
O
U
N
T
초
진행중
1. Insert the cleaning disc into the filter basket
in the portafilter.
2. Place a cleaning tablet on top of the
cleaning disc.
3. Lock the portafilter into the group head.
4. Empty the drip tray and replace onto the
machine.
5. Fill the water tank to the MAX line then
reattach to the machine.
6. Press the MENU button to enter the
main menu.
7. Use the GRIND AMOUNT dial to navigate
the menu to 헹굼세척, then press to select.
The 1 CUP button will illuminate.
8. Press the 1 CUP button to start the cleaning
cycle. The remaining time for the cleaning
cycle will be displayed on the LCD.
9. Once the cleaning cycle is complete, the
machine will beep and return to READY
mode. If any of the cleaning tablet remains
in the cleaning disc, repeat the cycle.
10. Empty and rinse the portafilter, cleaning
disc and drip tray.
DESCALING
NOTE
Ensure that the water filter is removed from the
water tank before adding the descaling powder
when descaling the machine.
After regular use, hard water can cause
mineral build up in and on many of the inner
functioning components, reducing the brewing
flow, brewing temperature, power of the
machine, and the taste of the espresso.
The LCD will display a 석회질제거 alert,
whena descaling cycle is required.
1. Empty the drip tray and reattach to the
machine. Remove the water tank from the
machine and remove the filter from the
water tank.
2. Fill the water tank to the DESCALE line
indicated and add the descaling agent
to the water. Reattach the water tank to
the machine.
3. Press the MENU button to enter the main
menu. Use the GRIND AMOUNT dial
tonavigate the menu to 석회질제거, then
press to select. The 1 CUP button will
illuminate.
4. Press the 1 CUP button to start the
descaling cycle. The descale cycle cleans in
3 stages; coee, hot water and steam. After
each stage is complete, the machine will
beep . The STEAM DIAL must be manually
turned to the 온수 and 스팀 position when
indicated on the LCD.
PRE-INFUSE
SHOT
SEC
AMOUNT
MANUAL
PAUSED
HOT
WATER
FLUSH
RESET
DEFAULTS
FILL
TANK
GRIND
DOUBLE
SINGLE
LOCK
HOPPER
GRIND
SIZE
SHOT TEMP
FASTER
POUR
SLOWER
POUR
CUSTOM
HOTTER
COOLER
CUSTOM
스팀
진행중석회질제거
5. Once the descale cycle is complete, the
machine needs to complete a rinse cycle.
The 1 CUP button will illuminate. As with
the descale cycle, the STEAM DIAL must
be manually turned to correct position
when indicated on the LCD.
6. Remove and empty the drip tray then
replace onto the machine. Empty any
remaining descaling liquid from the water
tank, then fill the water tank to the MAX
line and reattached to the machine.
7. Press the 1 CUP button to commence the
rinse cycle. The rinse cycle is also 3 stages.
The LCD will show which stage it is up to.
After each stage, the machine will beep.
8. Once the rinse cycle is complete,
the machine will beep and return to
READY mode.
9. Remove and rinse the drip tray and
water tank. Dry thoroughly before
replacing them on the machine.
21
CLEANING THE CONICAL BURR GRINDER
This grinder cleaning cycle removes oil build-up on the burrs which can impede performance.
Unlock hopper
Empty hopper Replace hopper Lock hopper Run grinder
empty
Unlock hopper Remove hopper
Remove top burr
Unlock top burr
Clean top burr
with brush
Clean lower
burr with brush
Clean chute
with brush
12
3
75
PUSH
2
11109988
L
O
C
K
A
L
I
G
N
41 6
ADVANCED CLEANING FOR THE CONICAL BURR GRINDER
This step is only required if there is a blockage between the grinding burrs and the grinder outlet.
Remove hopper
Set GRIND SIZE
to 1 (finest)
Use 10mm socket.
Rotate clockwise to
loosen the nut only
Set GRIND SIZE
to 30 (coarsest)
Unlock & remove
top burr
Remove nut, spring
& flat washer.
Carefully remove
lower burr
Remove grind fan
& washers
using long-nose
pliers
Insert & lock top
burr
Set GRIND SIZE
to 15. Replace &
lock hopper
Clean chute
with brush
Unblock the grinds
exit chute using the
brush or a pipe
cleaner
Insert washers &
grind fan using
long-nose pliers
Insert lower burr
(drive pin &
cavity to align).
Insert flat washer
& spring washer
Rotate counter-
clockwise to
tighten nut
12
TIGHTEN NUT
5
13 14
1 3
LOOSEN NUT
6
SPRING
WASHER
FLAT
WASHER
7
1. GRIND FAN
2. METAL WASHER
3. FELT WASHER
3
2
1
88 99 10
1.
FELT WASHER
2. METAL WASHER
3.
GRIND FAN
1
2
3
11
SPRING
WASHER
FLAT
WASHER
42
WARNING
Care should be taken as the grinder burrs are extremely sharp.

22
CLEANING THE STEAM WAND
• The steam wand should always be cleaned
after texturing milk. Wipe the steam wand
with a damp cloth.
• After use, it is recommended to purge the
steam wand for a couple of seconds, to
clear any remaining milk. With the steam
wand positioned down over the drip tray,
turn the STEAM dial to
for a couple of
seconds allow the machine to create steam
for acouple of seconds before turning it back
tothe vertical position.
• If the steam tip hole becomes blocked,
itwill reduce frothing performance. Use the
provided steam wand cleaning tool to clear
the opening.
• If the steam wand is still blocked, use the
spanner in the middle of the steam wand
cleaning tool to unscrew the tip. Soak the tip
in hot water before using the cleaning tool
to unblock again. Replace the tip back on the
steam wand, using the tool.
CLEANING THE FILTER BASKETS
AND PORTAFILTER
• The filter baskets and portafilter should be
rinsed under hot water immediately after use
to remove all residual coee oils.
• If any of the holes in the filter basket become
blocked, use the pin on the end of the
provided cleaning tool to unblock the holes.
• If the holes remain blocked, dissolve a
cleaning tablet in hot water and soak filter
basket and portafilter in solution for approx.
20 minutes. Rinse thoroughly.
CLEANING THE GROUP HEAD
• The group head interior and shower screen
should be wiped with a damp cloth after use
to remove any ground coee particles.
• Periodically purge the machine. Place an
empty filter basket and portafilter into the
group head. Press the 1 CUP button and run
a short flow of water to rinse out any residual
coee. Press the 1 CUP button again to stop
the hot water. Remove the portafilter and
rinse thoroughly.
CLEANING THE DRIP TRAY
• The drip tray should be removed, emptied
and cleaned at regular intervals, particularly
when the drip tray full indicator is showing
EMPTY ME!
• Remove the drip tray from the machine and
separate the parts. The EMPTY ME! indicator
can also be removed from the drip tray by
pulling upwards to release the side latches.
Wash all parts in warm soapy water with a
soft cloth. Rinse and dry thoroughly before
reassembling and attaching to the machine.
• The storage tray (located behind the drip
tray) can be removed and cleaned with a soft,
damp cloth.
NOTE
All parts should be cleaned by hand using
warm water and a gentle dish washing liquid.
Do not use abrasive cleansers, pads or cloths
which can scratch the surface. Do not clean any
of the parts or accessories in the dishwasher.
WARNING
Do not immerse the power cord, power plug
orappliance in water or any other liquid.
CLEANING THE OUTER HOUSING
Wipe the outer housing with a soft, damp cloth
and then polish with a soft, dry cloth.
STORING YOUR MACHINE
Before storing, press the POWER button to
turn the machine o then turn o and remove
the plug from the power outlet. Remove unused
beans from the hopper, clean the grinder (see
page 18), empty the water tank and the drip
tray. Ensure the machine is cool, clean and dry.
Place accessories in the storage tray.
Store the machine upright and do not store
anything on top.
ERROR MODE
If your machine displays on the LCD,
contact Breville
®
Customer Service.
23
Troubleshooting
PROBLEM POSSIBLE CAUSES EASY SOLUTION
Water does not flow
from the group head.
No hot water.
Water tank is empty. Fill tank.
Water tank is not fully inserted and
locked into position.
Push water tank down completely to
lock into place.
Machine needs to be descaled. Perform descale cycle.
Coee is ground too finely and/
or too much coee in filter basket
and/or over tamping and/or filter
basket is blocked.
See below, ‘Espresso only drips from the
portafilter spouts or not at all’.
Espresso only drips
from the portafilter
spouts or not at all.
Coee is ground too finely. Use slightly coarser grind.
Refer to ‘Setting the Grind Size’, page 12
and ‘Over Extraction’, page 14.
Too much coee in the filter basket. Lower dose of coee.
Refer to ‘Dosing’, page 12 and
‘Over Extraction’, page 14.
After tamping, trim the coee dose
using the Razor™ dose trimming tool.
Coee tamped too firmly. Tamp between or 10-15kgs of pressure.
Water tank is empty. Fill tank.
Water tank is not fully inserted and
locked into position.
Push water tank down completely to
lock into place.
The filter basket may be blocked. Use the pin on the end of the provided
cleaning tool to unblock the hole(s).
If the hole(s) remain blocked, dissolve
a cleaning tablet in hot water and
soak filter basket and portafilter in
solution for approx. 20 minutes.
Rinse thoroughly.
Machine needs to be descaled. Perform descale cycle.
Water doesn't come
through (the machine
makes loud noise).
Water tank is empty or water level
is below MIN.
Fill tank.

24
PROBLEM POSSIBLE CAUSES EASY SOLUTION
Espresso runs out
too quickly.
Coee is ground too coarsely. Use slightly finer grind.
Refer to ‘Setting the Grind Size’, page 12
and ‘Under Extraction’, page 14.
Not enough coee in the filter
basket.
Increase dose of coee.
Refer to ‘Dosing’, page 12 and ‘Under
Extraction’, page 14. Tamp then use the
Razor™ dose trimming tool to trim o
excess coee.
Coee tamped too lightly. Tamp between or 10-15kgs of pressure.
Espresso runs out around
the edge of the portafilter.
Portafilter not inserted
in the group head correctly.
Ensure portafilter is completely inserted
and rotated until resistance is felt.
There are coee grounds around
the filter basket rim.
Clean excess coee from the rim of the
filter basket to ensure a proper seal in
group head.
Too much coee in the filter basket. Lower dose of coee.
Refer to ‘Dosing’, page 14.
After tamping, trim the coee dose
using the Razor™ dose trimming tool.
No steam. Machine has not reached operating
temperature.
Allow time for the machine to reach
operating temperature.
Water tank is empty. Fill tank.
Water tank is not fully inserted and
locked into position.
Push water tank down completely
to lock into place.
Machine needs to be descaled. Perform descale cycle.
Steam wand is blocked. Refer to ‘Cleaning the Steam Wand’,
page 21.
Pulsing/pumping sound
while extracting espresso
or steaming milk.
The machine is carrying out the
normal operation of the pump.
No action required as this is the normal
operation of the machine.
Water tank is empty. Fill tank.
Water tank is not fully inserted and
locked into position.
Push water tank down completely
tolock into place.

25
PROBLEM POSSIBLE CAUSES EASY SOLUTION
Coee not hot enough. Cups not pre-heated. Rinse cups under hot water outlet.
Portafilter not pre-heated. Rinse portafilter under hot water outlet.
Dry thoroughly.
Milk not hot enough
(if making a cappuccino
or latté etc).
Texture milk for a longer period of time.
Water temperature needs
to be adjusted.
Increase the brew temperature refer to
'Adjusting Shot Temperature' page 15.
No crema. Coee tamped too lightly. Tamp betweens or 10-15kgs of pressure.
Coee is ground too coarsely. Use slightly finer grind.
Refer to ‘Setting the Grind Size’, page 12
and ‘Under Extraction’, page 14.
Coee beans or pre-ground coee
are not fresh.
If grinding fresh whole coee beans,
use freshly roasted coee beans with
a ‘Roasted On’ date and consume
between 5–20 days after that date.
If using pre-ground coee, use within
a week of grinding.
The filter basket may
be blocked.
Use the pin on the end of the provided
cleaning tool to unblock the hole(s).
If the hole(s) remain blocked, dissolve
a cleaning tablet in hot water and
soak filter basket and portafilter in
solution for approx. 20 minutes.
Rinse thoroughly.
Single Wall filter baskets are being
used with pre-ground coee.
Ensure you use Dual Wall filter baskets
with pre-ground coee.
Water leaking Water tank is not fully inserted and
locked into position.
Push water tank down completely
tolock into place.

26
PROBLEM POSSIBLE CAUSES EASY SOLUTION
Machine is on but
ceases to operate.
The safety thermal-cut out may
have activated due to the pump or
grinder overheating.
Press the POWER button to switch the
machine o and unplug from the power
outlet. Allow to cool for about
30–60 minutes.
If problem persists, call Breville
®
Support.
No ground coee
coming from grinder.
No coee beans in hopper. Filler hopper with fresh coee beans.
Blocked grinder chamber or chute. Clean and clear grinder chamber
and chute. Refer to ‘Advanced Cleaning
for the Conical Burr Grinder’, page 20.
Water / moisture in grinder
chamber and chute.
Clean and clear grinder chamber and
chute. Refer to ‘Advanced Cleaning
for the Conical Burr Grinder’, page 20.
Ensure burrs are thoroughly dry before
re-assembling. It is possible to use a
hair dryer to blow air into the grinder
chamber.
Too much/too little
ground coee is
being delivered to
the filter basket.
Grind amount settings are incorrect
for particular grind size.
Use the grind duration button to
increase or decrease the grind
amount. Refer to ‘Dosing’, page 12 and
‘Extraction Guide’, page 14.
Too much/too little
espresso is being
delivered to the cup.
Grind amount and/or grind size
settings and/or shot volumes
require adjustment.
Adjust the grind amount and/or grind
size settings. Refer to ‘Setting the Grind
Size’, page 12, ‘Dosing’, page 12 and
‘Extraction Guide’, page 14.
Grinder is making
a loud noise.
Blockage or foreign object
in grinder.
Remove hopper, check for debris or
blockage. If necessary, clean and clear
grinder chamber and chute. Refer to
‘Cleaning the Conical Burr Grinder’,
page 20.

27
Warranty
2 YEAR WARRANTY
Breville provides product warranty
fordomestic use in specifi ed territories
for2year from date of purchase by faulty
workmanship and materials. During this
warranty period, Breville will provide repairs
and replacement for any defective product
(based on Breville’s Warranty Policy).
Also, all legal warranty rights under
Korea’slegislation will be protected and
willnot be impaired by our warranty. For
fullterms and conditions on the warranty,
aswell as instructions on how to make
aclaim, please visit www.breville.com/kr

Notes

the Barista Pro
™
설명서
– BES878

2
BREVILLE®은
안전을 최우선으로
합니다
Breville®은 안전을 매우
중요하게 생각합니다.
우리는 소중한 고객의 안전을
최우선으로 생각하여 상품을
설계하고 제조합니다. 아울러
전기 제품을 사용할 때는 각별한
주의를 기울이고 다음의 예방
조치를 준수해 주시기 바랍니다.
중요 안전 지침
사용하기 전에 모든 지침을
읽고 나중에 참조할 수
있도록 잘 보관하시기
바랍니다
•작동하기전에모든
지침을꼼꼼하게읽고
나중에참조할수있도록
잘보관하시기바랍니다.
•BaristaPro™를처음
사용하기전에모든
포장재와판촉라벨
또는스티커를제거해야
합니다.
•어린이의질식위험을
방지하기위해이기기의
전원플러그에장착된
보호커버를제거하고
안전하게폐기해야
합니다.
•작동중제품을조리대나
테이블가장자리근처에
두면안됩니다.표면이
평평하고깨끗하며물과
기타물질이없는지
확인하시기바랍니다.
목차
2 Breville®은 안전을
최우선으로 합니다
7 제품 구조
9 Barista Pro™ 특성
10 조립
12 기능
19 관리 및 청소
23 문제 해결
27 보증

3
•본제품을싱크대의식기
건조대에놓고사용하면
안됩니다.
•밀폐된공간이나찬장
안에서이제품을
사용하면안됩니다.
•전원코드가조리대나
테이블가장자리에
걸리거나매듭이생기지
않도록해야합니다.고압
가스나전기버너또는
가열된오븐에닿을수
있는곳은피해야합니다.
•8세이상의어린이도
안전한방법으로제품을
사용하는방법에관해
보호자의감독을받거나
지침이주어지고관련된
위험을이해하는경우
제품을사용할수
있습니다.8세미만
어린이가보호자의감독
없이청소및사용자유지
보수를하면안됩니다.
제품과코드를8세미만
어린이의손이닿지
않는곳에보관하시기
바랍니다.
•어린이가제품을가지고
놀면안됩니다.
•신체적,감각적,정신적
능력이떨어지거나
경험과지식이부족한
사람도안전한방법으로
제품을사용하는방법에
관해보호자의감독을
받거나지침이주어지고
관련된위험을이해하는
경우제품을사용할수
있습니다.
•어린이가제품을가지고
놀면안됩니다.
•전원코드,플러그및실제
제품에손상이있는지
정기적으로검사하시기
바랍니다.어떤식으로든
손상된것으로판명되면
즉시제품사용을중단하고
전체제품을가장가까운
공인Breville®서비스
센터에맡겨서검사,교체
또는수리해야합니다.

4
•제품과액세서리를
깨끗하게유지해야
합니다.이설명서에
명시된청소지침을
따라주시기바랍니다.
이설명서에명시되지
않은모든절차는공인
Breville®서비스센터에서
수행해야합니다.전기
제품을사용할때는
추가적인안전보호를
위해누전차단기(안전
스위치)를설치하는것이
좋습니다.제품에전기를
공급하는전기회로에
정격잔류작동전류가
30mA이하인안전
스위치를설치하는것을
권장합니다.전문적인
조언은전기기술자에게
문의하시기바랍니다.
•잘못사용하면부상을
입을수있습니다.
•발열체표면에는사용후
잔열이있을수있습니다.
메모리 저장소에 관한 고객
공지 사항
고객에게더나은서비스를
제공하기위해내부메모리
저장소가제품에내장되어
있습니다.
이메모리저장소는제품
사용빈도및제품사용
방식을포함해서제품에
관한특정한정보를
수집하는작은칩으로
구성됩니다.서비스를위해
제품을맡기는경우칩에
수집된정보를이용해서
제품을빠르고효율적으로
서비스할수있습니다.
수집된정보는향후고객의
요구에더잘부응할수있는
제품을개발하기위한
귀중한자료로사용됩니다.
칩에는제품을사용하는
개인이나제품이사용되는
가정에관한정보는수집되지
않습니다.메모리저장칩에
관하여궁금한점이있으면
priv[email protected]으로
문의해주시기바랍니다.

5
BES878에 대한
구체적인 지침
•이제품은가정용으로만
사용할것을권장합니다.
이제품을원래용도
이외의목적으로사용하면
안됩니다.움직이는
차량,선박또는야외에서
사용하면안됩니다.
•다음과같은경우전원을
차단하시기바랍니다.
− 자리를비우는경우
− 청소할경우
− 옮길경우
− 조립할경우
− 보관할경우
에스프레소머신의
전원(POWER)버튼을
눌러전원을끄고전원
콘센트를끈다음
플러그를뽑아야합니다.
•처음사용하기전에
제품이올바르게
조립되었는지확인하시기
바랍니다.
•차가운수돗물이외의
다른물을사용하는것은
바람직하지않습니다.
고도로여과된물,탈염수,
증류수는커피맛과
에스프레소머신의작동
방식에영향을줄수
있으므로사용하지않는
것이좋습니다.
•추출을시작하기
전에포터필터가그룹
헤드에단단히삽입되고
고정되었는지확인해야
합니다.추출하는
동안에는포터필터를
분리하면안됩니다.
•뜨거운표면을만지면
안됩니다.이동시키거나
부품을청소하기전에
제품을식혀야합니다.
•스팀봉을내리면'자동
퍼지'기능으로뜨거운
스팀이뿜어져나올수
있으므로우유텍스처링한
다음에는항상주의하셔야
합니다.

6
가정용
이 지침을 잘 보관하시기 바랍니다
•금속표면은사용중에
뜨거워지기쉬우므로
머신을작동할때
주의해야합니다.
•뜨거운스팀이방출될
수있으므로디스케일링
기능을사용할때
주의해야합니다.
디스케일링전에드립
트레이가비어있고
삽입되어있는지확인해야
합니다.향후지침은
'관리및청소'섹션을
참조하시기바랍니다.
경고
전원코드,전원플러그,
기기의부품또는기기를
물등의액체에담그면안
됩니다.
정수 필터에 대한
구체적인 지침
•필터카트리지는어린이의
손이닿지않는곳에
보관해야합니다.
•필터카트리지는원래
포장상태로건조한곳에
보관해야합니다.
•열과직사광선으로부터
카트리지를보호해야
합니다.
•손상된필터카트리지를
사용하면안됩니다.
•필터카트리지를열면
안됩니다.
•장기간자리를비울
때는물탱크를비우고
카트리지를교체하시기
바랍니다.

7
제품 구조
A. 250g 원두 호퍼
커피원두를쉽게제거하고보관하며옮길수
있는잠금시스템포함.
B. 통합형 코니컬 버 그라인더
C. 분쇄도 선택기
고운것에서굵은것까지30가지에스프레소
분쇄설정.
D. 전원(POWER) 버튼
E. 통합형 착탈식 54mm 탬퍼
F. 그라인더 추출구
G. 분쇄 크레이들
H.54mm 스테인리스 스틸 포터필터
영업용스타일의주둥이포함.
I. 보관 트레이(드립 트레이 뒤에 있음)
액세서리보관용.
J. 착탈식 드립 트레이 그리드
K. 착탈식 드립 트레이
트레이가득참표시등포함.
L. 2L 착탈식 물탱크
스케일과불순물을줄이기위한교체가능한
정수필터포함.
M.스팀(Steam) 다이얼
스팀및온수선택기제어.
N. LCD 디스플레이
분쇄및추출진행애니메이션포함.
O.제어판
메뉴,분쇄량(GRINDAMOUNT)/필터
크기(FILTERSIZE),1잔(1CUP)및2잔(2
CUP)버튼포함.
P. 그룹 헤드
Q.전용 온수 추출구
롱블랙및예열잔을마련하기위한용도.
R. 아주 높은 잔 간격
S. 360° 회전 동작 스팀 완드
우유텍스처링을위한완벽한위치로쉽게
조정할수있음.
A
B
J
E
O
P
Q
L
M
N
R
S
D
I
K
C
F
G
H
8
액세서리
1. 스테인리스 우유 용기
최소(MIN)및최대(MAX)표시포함.
2. 듀얼 월 필터 바스켓(1잔 및 2잔)
미리분쇄한커피용.
3. 싱글 월 필터 바스켓(1잔 및 2잔)
신선한커피원두를분쇄하는경우사용.
4. 정수 필터 및 필터 홀더
커피,물,우유와접촉하는BaristaPro™의
모든부품에는BPA가함유되어있지
않습니다.
1
6
5
7 8
9
2 3
4
5. 청소용 디스크
6. 청소용 세제
7. 청소용 브러시
8. Razor™ Precision Dose Trimming Tool
9. 스팀 봉 및 필터 바스켓 청소용 툴

9
THERMOJET™ 가열 시스템
혁신적인가열시스템으로3초만에이상적인
추출온도에도달합니다.
통합형 코니컬 버 그라인더
정밀한코니컬버는분쇄된커피의표면적을
최대화해서완전한에스프레소풍미를냅니다.
조정 가능한 분쇄도
고운것에서굵은것까지30가지에스프레소
분쇄설정으로최적의추출이가능합니다.
조정 가능한 분쇄량
곱거나굵은분쇄정도에맞추어필터바스켓에
투입되는신선한분쇄커피의양을조정합니다.
자동 도징
그라인더는1잔또는2잔에필요한분량의분쇄
커피를내려줍니다.
핸즈프리 분쇄
바로포터필터에넣는핸즈프리분쇄를위해
자동으로정지합니다.
RAZOR™ DOSE TRIMMING TOOL
특허받은트위스트블레이드로정밀한도징과
일관된추출을위해퍽을알맞은수준으로
트리밍합니다.
조절 가능한 원액 온도 제어
최적의커피풍미를냅니다.
PID 온도 제어
전자식PID온도제어로온도안정성을높여
줍니다.
순간 온수
롱블랙및예열잔을마련하기위한전용온수
추출구가있습니다.
저압 프리 인퓨전
추출을시작할때낮은수압을가하여균일하게
추출되도록분쇄된커피를부드럽게늘립니다.
용량 제어
사전설정된1잔및2잔의양,수동오버라이드
또는프로그래밍가능한원액양.
퍽 건조 기능
커피퍽을쉽게처리할수있도록추출후필터
바스켓에있는분쇄된커피에서과다한물을
제거합니다.
대형 드립 트레이
사용가능한작업공간이더넓어졌습니다.
Barista Pro
™
특성
10
조립
처음 사용하기 전에
머신 준비
에스프레소머신에부착된모든라벨및
포장재를제거하고폐기합니다.포장을
폐기하기전에모든부품과액세서리를
꺼냈는지확인합니다.정수필터와정수필터
홀더가들어있는포장과비닐백을꺼냅니다.
물탱크,포터필터,필터바스켓,우유용기,
드립트레이를따뜻한물과부드러운식기
세척액으로씻어줍니다.잘헹군다음완전히
말리고다시조립합니다.
정수 필터 설치
•비닐백에서정수필터와정수필터홀더를
꺼냅니다.
•정수필터를찬물에5분동안담가둡니다.
•필터홀더를찬물로씻어줍니다.
•필터를필터홀더에넣습니다.
•날짜다이얼을2개월후로설정합니다
•조립된필터홀더를물탱크에설치하고
딸깍소리를내며제자리에고정되는지
확인합니다.
•물탱크에찬물을채우고물탱크를머신뒤쪽
위치로다시밀어넣어제자리에고정합니다.
•필터설치에대한추가지침은19페이지에
있는관리및청소를참조합니다.
참고
이머신에고도로여과된물,탈염수,증류수는
사용하지않는것이좋습니다.커피맛에
영향을미칠수있습니다.
참고
정수필터를교체하려면Breville®웹페이지를
방문하거나Breville®고객서비스에
문의하시기바랍니다.
물탱크 채우기
•정수필터가물탱크내부에단단히
장착되었는지확인합니다.
•물탱크상단에있는손잡이를사용해서
물탱크를들어올려머신에서분리합니다.
•물탱크에차가운음용수돗물을물탱크
측면에있는최대표시아래까지채웁니다.
•물탱크를머신에다시끼우고아래로
눌러물탱크가올바른위치에있고머신에
부착되었는지확인합니다.
참고
물을매일갈아주시기바랍니다.물탱크는
매번사용하기전에차가운새수돗물로채워야
합니다.
11
호퍼 부착
원두호퍼를머신상단의제자리에삽입합니다.
다이얼을돌려서호퍼를제자리에고정하고
신선한커피원두를채웁니다.
돌려서
고정합니다
첫 사용 사이클
머신을처음사용하기전에첫사용사이클을
완료해야합니다.첫사용사이클에서는머신을
헹구고가열시스템을프라이밍합니다.
1. 물탱크를채웁니다.
2. 원두호퍼,드립트레이,물탱크가머신에
단단히부착된상태로머신이완전히
조립되었는지확인합니다.
3. 전원(POWER)버튼을누릅니다.머신에서
신호음이울리고첫사이클(FIRSTCYCLE)
모드로들어갑니다.
4. LCD에세척헹굼세척이표시되고1잔
(1CUP)버튼에불이들어옵니다.
PRE-INFUSE
SHOT
STEAM
AMOUNT
MANUAL
PAUSED
HOT
WATER
헹굼세척
RESET
DEFAULTS
DESCALE
FILL
TANK
GRIND
DOUBLE
SINGLE
LOCK
HOPPER
GRIND
SIZE
SHOT TEMP
FASTER
POUR
SLOWER
POUR
CUSTOM
HOTTER
COOLER
CUSTOM
FILTER SIZE
MENU
EXIT
G
R
I
N
D
A
M
O
U
N
T
초
진행중
5. 1잔(1CUP)버튼을누릅니다.LCD에는
첫사용사이클의남은시간에대한
카운트다운이표시됩니다.
6. 완료되면머신이준비(READY)모드로
들어갑니다.
12
머신 끄기
머신을끄려면전원(POWER)버튼을누릅니다.
또는30분동안사용하지않으면머신이
자동으로꺼집니다.
필터 바스켓
이머신에는필터바스켓4개가포함되어
있습니다(싱글월2개및듀얼월2개).
신선한커피원두를분쇄하는경우싱글월
필터바스켓을사용해야합니다.싱글월
필터바스켓을사용하면분쇄,도징,탬핑을
시도해서더균형잡힌에스프레소를만들수
있습니다.
�잔(� CUP) �잔(� CUP)
미리분쇄한커피를사용할경우듀얼월
필터바스켓을사용해야합니다.듀얼월
필터바스켓은압력을조절하고분쇄,도징,
탬핑압력또는신선도와관계없이추출을
최적화하는데도움이됩니다.
�잔(� CUP) �잔(� CUP)
싱글월또는듀얼월필터바스켓을
사용하는지에관계없이한잔을추출할때는
1잔(1CUP)바스켓을사용하고두잔또는
더강한한잔이나머그잔에추출할때는
2잔(2CUP)바스켓을사용합니다.
싱글바스켓에서더블바스켓으로또는그
반대로전환하는경우분쇄량과분쇄도를
조정해야합니다.
필터바스켓설계용량은다음과같습니다.
1잔(1CUP)바스켓=약8~11g
2잔(2CUP)바스켓=약16~19g
참고
필터바스켓에커피를얼마나도징하는지또는
정확한도징양을얻으려면그라인더를얼마나
오래작동해야하는지는실제로해봐야알수
있습니다.예를들어,싱글월필터바스켓으로
더곱게분쇄된에스프레소를사용할때는
필터바스켓에정확하게도징되도록분쇄량을
늘려야할수도있습니다.
기능
13
분쇄
원두를분쇄할때분쇄도는고와야하지만
너무곱지는않아야합니다.분쇄도는필터
바스켓에서분쇄된커피를통과하는물의
속도와에스프레소의맛에영향을미칩니다.
분쇄도가너무고우면(가루처럼보이고
손가락으로비벼보면밀가루처럼느껴짐)
압력을가해도물이커피를통과해흐르지
않습니다.그결과에스프레소가과다추출되고
색깔이진하며풍미가씁쓸해집니다.
분쇄도가너무굵으면물이필터바스켓에서
분쇄된커피를너무빨리통과합니다.그결과
에스프레소가과소추출되고색깔과풍미가
떨어집니다.
분쇄도 설정
이머신에는30가지분쇄도설정이있으며
선택한크기는LCD화면에표시됩니다.
기본분쇄도는15입니다.
분쇄도를조정할때LCD에바가표시되어더
빠르거나더느린붓기속도를나타냅니다.
PRE-INFUSE
추출
STEAM
AMOUNT
MANUAL
PAUSED
HOT
WATER
FLUSH
RESET
DEFAULTS
DESCALE
IN
PROGRESS
FILL
TANK
SINGLE
LOCK
HOPPER
SHOT TEMP
CUSTOM
HOTTER
COOLER
CUSTOM
분쇄
굵게
곱게
분쇄
굵기
투샷
초
머신왼쪽에있는분쇄도(GRINDSIZE)
선택기를사용해서분쇄도를조정합니다.
더�고움
(FINER)
더�굵음
(COARSER)
커피 도징
•호퍼에신선한커피원두를채웁니다.
•필요한필터바스켓을포터필터에
삽입합니다.
•포터필터를분쇄크레이들에넣습니다.
•필요한경우필터크기(FILTERSIZE)버튼을
눌러필터바스켓크기(싱글또는더블)를
선택합니다.
•필요한경우분쇄량(GRINDAMOUNT)
다이얼을돌려분쇄시간을변경합니다.
시계방향으로돌리면시간이늘어나고시계
반대방향으로돌리면줄어듭니다.
참고
기본분쇄시간은1잔필터의경우9.5초,
2잔필터의경우13초입니다.
•포터필터를눌렀다놓아서자동도징을
활성화합니다.LCD에필터바스켓을채우고
있음이표시됩니다.
PRE-INFUSE
STEAM
AMOUNT
MANUAL
PAUSED
HOT
WATER
FLUSH
RESET
DEFAULTS
DESCALE
IN
PROGRESS
FILL
TANK
SINGLE
LOCK
HOPPER
SHOT TEMP
FASTER
POUR
SLOWER
POUR
CUSTOM
HOTTER
COOLER
CUSTOM
추출분쇄
분쇄
굵기
투샷
초
•분쇄기능을일시중지해야하는경우
포터필터를눌렀다놓습니다.LCD에일시
중지됨중지이표시되고10초동안일시
중지된상태로유지된다음준비(READY)
모드로돌아갑니다.
•포터필터를눌렀다놓아서분쇄를다시
시작합니다.
참고
분쇄된커피가포터필터에과다하게채워진
것처럼보이는것은정상입니다.
14
수동 도징
커피를수동으로도징하려면원하는양의
분쇄된커피가도징될때까지분쇄크레이들에
있는포터필터를길게누릅니다.분쇄를
멈추려면포터필터에서손을뗍니다.
타이머가시간을세면서분쇄시간이
표시됩니다.
분쇄된 커피 탬핑
•분쇄크레이들에서포터필터를제거합니다.
•포터필터를여러번두드려커피를눌러주고
필터바스켓에고르게분배합니다.
•탬퍼를이용해서강하게탬핑합니다(약
15~20kg의압력).압력의세기보다는매번
일정하게압력을가하는것이더중요합니다.
참고
참고사항으로,커피를탬핑한후에는탬퍼에
있는캡의상단가장자리가필터바스켓상단과
수평이되어야합니다.
참고
'유통기한'이나'사용기한'날짜가아닌
'로스팅한날짜'가포장에표시된고품질
100%아라비카원두를권장합니다.커피
원두는'로스팅한날짜'로부터5~20일사이에
소비하는것이가장좋습니다.묵은커피는
포터필터에서너무빨리부어지고쓴맛이나고
묽어질수도있습니다.
도즈 트리밍
Razor™PrecisionDoseTrimmingTool을
사용하면일관된추출을위해퍽을알맞은
수준으로트리밍할수있습니다.
•툴의어깨부분이바스켓의테두리에닿을
때까지Razor™DoseTrimmingTool을
필터바스켓에삽입합니다.DoseTrimming
Tool의날이탬핑된커피의표면을관통해야
합니다.
•포터필터를넉박스위에비스듬히잡은채로
Razor™DoseTrimmingTool을앞뒤로
회전시켜과다한분쇄커피를제거합니다.
이제필터바스켓에정확한양의커피가
도징됩니다.
•필터바스켓테두리에남은커피를닦아
내어그룹헤드가제대로밀봉되는것을
확인합니다.
그룹 헤드 퍼징
포터필터를그룹헤드에넣기전에1잔
(1CUP)버튼을눌러그룹헤드를통해물이
잠깐흐르게합니다.그러면추출전에온도가
안정되고일관된원액온도를위해포터필터가
예열됩니다.
포터필터 삽입
핸들이삽입(INSERT)위치에일치하도록
포터필터를그룹헤드아래에놓습니다.
포터필터를그룹헤드에삽입하고저항감이
확실하게느껴질때까지핸들을중앙쪽으로
돌립니다.
LOCK TIGHT
15
에스프레소 추출
• 참고로에스프레소는8~12초(인퓨전시간)후에추출되기시작하며꿀이떨어지는농도여야합니다.
•에스프레소가7초이내에추출되기시작하면필터바스켓에부족하게도징했거나너무굵게
분쇄된것입니다.이것은과소추출된원액입니다.
•에스프레소를내리기시작하지만,12초후에도추출되지않으면너무곱게분쇄된것입니다.
이것은과다하게추출된원액입니다.
분쇄 분쇄 도징 양 탬핑
과다 추출
쓴맛•떫은맛
너무고움
너무많음
Razor를사용하여트리밍
너무셈
균형 잡힘
최적
8~11g(1잔)
16~19g(2잔)
15~20kg
과소 추출
미숙성•신맛
너무굵음
너무적음
도징양을늘리고Razor를사용하여트리밍
너무약함
• 흐름이 �~��초 후에 시작됩니다
• 흐름이 따뜻한 꿀처럼 느립니다
• 크레마가 황갈색이며 고운 무스
질감입니다
• 에스프레소가 암갈색입니다
• 흐름이 �~�초 후에 시작됩니다
• 흐름이 물처럼 빠릅니다
• 크레마가 얇고 연합니다
• 에스프레소가 연갈색입니다
• 쓰거나 자극적이며 연하고 묽습니다
• 흐름이 ��초 후에 시작됩니다
• 방울져 떨어지거나 전혀 흐르지 않습니다
• 크레마가 어둡고 얼룩집니다
• 에스프레소가 진한 암갈색입니다
• 쓴맛과 탄맛이 납니다
사용하고 남은
찌꺼기를 제거합니다
사용하고 남은 찌꺼기는
커피 '퍽'을 형성합니다.
퍽이 젖은 경우 '과소
추출' 섹션을
참조합니다.
필터 바스켓을
헹굽니다
막힘을 방지하기 위해
필터 바스켓을
깨끗하게 유지해야
합니다. 필터 바스켓에
분쇄된 커피가 없는
채로 포터필터를
머신에 고정하고
온수를 통과시킵니다.
��~��kg의 압력을
사용하여 탬핑합니다.
탬핑한 후에는 탬퍼에
있는 금속 캡의 상단
가장자리가 필터 바스켓
상단과 수평이 되어야
합니다.
Razor™ Precision
Dose Trimming Tool
을 사용해서 퍽을
알맞은 수준으로
트리밍합니다.
조정 및 다시 테스트
분쇄량을 줄입니다
조정 및 다시 테스트 조정 및 다시 테스트조정 및 다시 테스트
항상 라인에 맞춰
탬핑합니다
조정 및 다시 테스트
항상 라인에 맞춰
탬핑합니다
조정 및 다시 테스트
분쇄량을
늘립니다
과다 추출과소 추출정확한 추출
추출 후
해결책해결책
더 느린 추출 더 빠른 추출
��~��kg의 압력을
사용하여 탬핑합니다.
탬핑한 후에는 탬퍼에
있는 금속 캡의 상단
가장자리가 필터 바스켓
상단과 수평이 되어야
합니다.
Razor™ Precision
Dose Trimming Tool
을 사용해서 퍽을
알맞은 수준으로
트리밍합니다.
분쇄 분쇄
투샷투샷
초 초
16
사전 프로그래밍된 원액 양 - 1잔
1잔(1CUP)버튼을한번누르면버튼이
깜박이면서선택되었음을표시합니다.LCD에
프리인퓨전프리인퓨전이표시되고원액
시계가시간측정을시작합니다.프리인퓨전이
완료되면원액이추출되기시작합니다.사전
설정된싱글에스프레소양(약30mL)이
추출됩니다.사전설정된양이추출되면머신이
자동으로중지됩니다.
STEAM
AMOUNT
MANUAL
PAUSED
HOT
WATER
FLUSH
RESET
DEFAULTS
DESCALE
IN
PROGRESS
FILL
TANK
GRIND
DOUBLE
SINGLE
LOCK
HOPPER
SHOT TEMP
FASTER
POUR
SLOWER
POUR
CUSTOM
HOTTER
COOLER
CUSTOM
분쇄
굵기
초
추출
프리인퓨전
사전 프로그래밍된 원액 양 - 2잔
2잔(2CUP)버튼을한번누르면버튼이
깜박이면서선택되었음을표시하고LCD에
프리인퓨전프리인퓨전이표시되고원액
시계가시간측정을시작합니다.프리인퓨전이
완료되면원액이추출되기시작합니다.사전
설정된더블에스프레소양(약60mL)이
추출됩니다.사전설정된양이추출되면머신이
자동으로중지됩니다.
PRE-INFUSE
STEAM
AMOUNT
MANUAL
PAUSED
HOT
WATER
FLUSH
RESET
DEFAULTS
DESCALE
IN
PROGRESS
FILL
TANK
GRIND
DOUBLE
SINGLE
LOCK
HOPPER
SHOT TEMP
FASTER
POUR
SLOWER
POUR
CUSTOM
HOTTER
COOLER
CUSTOM
분쇄
굵기
초
추출
수동 프리 인퓨전 및 추출
1잔(1CUP)또는2잔(2CUP)버튼을길게
눌러원하는프리인퓨전시간을설정합니다.
버튼에서손을떼고추출을시작합니다.
깜박이는버튼을눌러추출을멈춥니다.
STEAM
AMOUNT
MANUAL
PAUSED
HOT
WATER
FLUSH
RESET
DEFAULTS
DESCALE
IN
PROGRESS
FILL
TANK
GRIND
DOUBLE
SINGLE
LOCK
HOPPER
SHOT TEMP
FASTER
POUR
SLOWER
POUR
CUSTOM
HOTTER
COOLER
CUSTOM
분쇄
굵기
초
추출
프리인퓨전
수동추출
에스프레소 원액 프로그래밍
•메뉴(MENU)버튼을눌러메인메뉴로
이동합니다.
PRE-INFUSE
STEAM
SEC
AMOUNT
MANUAL
PAUSED
HOT
WATER
IN
PROGRESS
FILL
TANK
GRIND
DOUBLE
SINGLE
LOCK
HOPPER
FASTER
POUR
SLOWER
POUR
헹굼세척
석회질제거
초기화
분쇄
굵기
추출 추출온도
높음
낮음
한잔�설정 한잔�설정
•분쇄량(GRINDAMOUNT)다이얼을
사용해서메뉴를통해사용자한잔설정
또는한잔설정 을탐색합니다.
다이얼을눌러선택합니다.
•원하는잔(CUP)버튼을눌러기본프리
인퓨전을시작합니다.프리인퓨전을맞춤
설정하려면동일한잔(CUP)버튼을길게
눌러원하는프리인퓨전시간을설정합니다.
버튼에서손을떼고추출을시작합니다.
•원하는수준에서추출을중지하려면
잔(CUP)버튼을누릅니다.LCD및CUP
버튼이깜박임을멈춥니다.그러면머신이
준비(READY)모드로돌아갑니다.이제
선택된원하는잔(CUP)버튼을눌러맞춤
설정을활성화할수있습니다.
원액 온도 조정
•메뉴(MENU)버튼을눌러메인메뉴로
이동합니다.
•분쇄량(GRINDAMOUNT)다이얼을
사용해서메뉴를탐색하고원액온도
추출온도를눌러서선택합니다.
PRE-INFUSE
STEAM
SEC
AMOUNT
MANUAL
PAUSED
HOT
WATER
IN
PROGRESS
FILL
TANK
GRIND
DOUBLE
SINGLE
LOCK
HOPPER
FASTER
POUR
SLOWER
POUR
헹굼세척
석회질제거
초기화
분쇄
굵기
추출 추출온도
높음
낮음
한잔�설정 한잔�설정
•분쇄량(GRINDAMOUNT)다이얼을
사용해서LCD에표시되는원액온도를
올리거나내립니다.
•다이얼을눌러원하는온도를확인합니다.
머신이준비(READY)모드로돌아갑니다.
17
기본값으로 재설정
•메뉴(MENU)버튼을눌러메인메뉴로
이동합니다.
•분쇄량(GRINDAMOUNT)다이얼을
사용해서메뉴를탐색하고기본값재설정
초기화을선택합니다.
•머신에서신호음이울립니다.
•분쇄량(GRINDAMOUNT),필터크기(FILTER
SIZE),원액온도(SHOTTEMP),1잔(1CUP),
2잔원액(2CUPSHOT)설정이모두기본
설정으로돌아갑니다.머신이준비(READY)
모드로돌아갑니다.
온수 추출구 사용
온수기능은잔을예열하거나온수를수동으로
추가하는데사용할수있습니다.
온수를활성화하려면스팀(STEAM)다이얼을
위치로돌립니다.
PRE-INFUSE
SHOT
STEAM
AMOUNT
MANUAL
PAUSED
FLUSH
RESET
DEFAULTS
DESCALE
IN
PROGRESS
FILL
TANK
투샷
SINGLE
LOCK
HOPPER
SHOT TEMP
FASTER
POUR
SLOWER
POUR
CUSTOM
HOTTER
COOLER
CUSTOM
분쇄
굵기
분쇄
온수
초
•LCD에는온수온수가활성화되었음이
표시됩니다.
•온수를멈추려면다이얼을다시중앙의수직
위치로돌립니다.
•온수는60초후에멈추지만,다이얼을
수동으로대기위치로돌려야합니다.
우유 텍스처링
우유를텍스처링하기전에스팀봉을잠시
퍼지하는것을권장합니다.
스팀봉을드립트레이위에놓고스팀(STEAM)
다이얼을
로돌립니다.활성화되면LCD에
스팀이표시됩니다.스팀(STEAM)다이얼을
다시수직위치로돌리면스티밍이중지됩니다.
우유브랜드와종류,우유대체품사용여부에
따라우유의질감이달라집니다.
•신선하고찬우유를사용합니다.
•우유용기를최소(MIN)와최대(MAX)표시
사이로채웁니다.
•스팀봉을들어올리고3시위치에서용기의
오른쪽에가까운우유표면아래1~2cm
깊이로스팀봉팁을우유용기에넣습니다.
•스팀(STEAM)다이얼을
로돌립니다.
•우유가시계방향으로회전하여
소용돌이(소용돌이효과)가생성될때까지
스팀봉팁을우유표면바로아래에둡니다.
•우유가회전하는상태에서용기를천천히
내립니다.그러면스팀봉팁이우유
표면으로이동하고우유에공기가들어가기
시작합니다.
•우유가충분히빨리회전하도록하려면
팁으로우유표면을부드럽게저어줍니다.
•소용돌이를계속유지하면서스팀봉팁을
표면에또는표면약간아래에둡니다.충분한
양을얻을때까지우유를텍스처링합니다.
•용기를들어올려서팁을표면아래로
낮추되소용돌이는계속회전하도록합니다.
용기를만지기에뜨거우면우유가정확한
온도(60~65°C)에있는상태입니다.
•원하는온도에도달하면스팀(STEAM)
다이얼을다시수직위치로돌립니다.
•우유용기에서스팀봉을분리합니다.
•깨끗하고젖은천으로스팀봉을닦아줍니다.
그런다음드립트레이위의위치로다시
내립니다.
주의: 화상 위험
머신이꺼진후에도가압된스팀이여전히
방출될수있습니다.
어린이를항상감독해야합니다.
18
코니컬 버 조정
일부종류의커피는이상적인추출을위해더넓은분쇄범위가필요할수있습니다.BaristaPro™의
기능중하나는조절가능한상부버로이분쇄범위를확장하는것입니다.한번에하나의조절만
수행하는것을권장합니다.
밀폐 용기
미십시오
돌려서
고정합니다
돌려서
고정합니다
돌려서
고정합니다
추출을 확인합니다호퍼를 고정합니다
호퍼를 제자리에
정렬합니다
상부 버를
제자리에 단단히
밀어 넣습니다
버의 양쪽에서
와이어 핸들을
삽입합니다
상부 버를
분리합니다
핸들 구멍에 숫자를
정렬합니다
버의 양쪽에서
와이어 핸들을
분리합니다
조정 가능한 상단
버를 �씩 움직여,
입자를 더 굵거나 더
곱게 조정합니다
호퍼를 잠금
해제합니다
호퍼를 분리합니다호퍼가 비워질
때까지 그라인더를
작동합니다
호퍼를 제자리에
정렬합니다
용기 위에서 호퍼를 잡고 다이얼을
돌려 원두를 용기에 넣습니다
상부 버를
고정합니다
참고
우유저그에서스팀봉을제거하기전에
스팀(STEAM)다이얼이수직위치에있는지
확인합니다.
참고
머신에서스팀이만들어지면펌핑소음이들릴
수있습니다.이는정상적인작동입니다.
참고
이머신을사용해서우유거품을만들때는
제공된스테인리스스틸우유용기만사용해야
합니다.다른용기를사용하면위험한상황이
발생할수도있습니다.
스팀 봉 퍼징
우유를텍스처링한다음스팀봉을퍼지하는
것을권장합니다.스팀봉이드립트레이위에
있는채로스팀(STEAM)다이얼을
로돌리고
머신을퍼지합니다.스팀(STEAM)다이얼을
다시수직위치로돌리면스티밍이중지됩니다.
19
관리 및 청소
주의
제품의손상을방지하려면청소할때알칼리성세척제를사용하지말아야합니다.부드러운천과
순한세척제를사용해야합니다.
정수 필터 교체
2
필터를 헹굽니다
물탱크를 다시
장착합니다
조립합니다 날짜를 �개월 후로
설정합니다
필터를 탱크에
설치합니다
�분 동안 담가
놓습니다
최대(MAX)
최소(MIN)
�개월마다 또는 탱크
��회 재충전마다
정수 필터를
교체하십시오
정수 필터를
설치하십시오
교체�기한
제공된정수필터는시간이지나면서머신성능에영향을미칠수있는스케일이쌓이는것을
방지하는데도움이됩니다.2개월마다정수필터를교체하면머신을디스케일링해야할필요성이
줄어듭니다.
경수지역에거주하는경우정수필터를더자주교체하는것이좋습니다.
•비닐백에서정수필터를꺼냅니다.
•정수필터를찬물에5분동안담가둡니다.
•흐르는찬물로필터를헹굽니다.
•필터를필터홀더에넣습니다.
•날짜다이얼을2개월후로설정합니다
•조립된필터홀더를물탱크에설치하고제자리에고정되었는지확인합니다.
•물탱크에찬물을채우고물탱크를머신뒤쪽위치로다시밀어넣어제자리에고정합니다.
참고
교체용정수필터는Breville®웹사이트를방문하거나Breville®고객서비스에문의해서구매할
수있습니다.
20
세척 청소 사이클
청소사이클이도래한경우LCD에세척
헹굼세척경고가표시됩니다.청소사이클은
디스케일링과는별도입니다.
PRE-INFUSE
SHOT
STEAM
AMOUNT
MANUAL
PAUSED
HOT
WATER
헹굼세척
RESET
DEFAULTS
DESCALE
FILL
TANK
GRIND
DOUBLE
SINGLE
LOCK
HOPPER
GRIND
SIZE
SHOT TEMP
FASTER
POUR
SLOWER
POUR
CUSTOM
HOTTER
COOLER
CUSTOM
FILTER SIZE
MENU
EXIT
G
R
I
N
D
A
M
O
U
N
T
초
진행중
1. 청소용디스크를포터필터의필터바스켓에
넣습니다.
2. 청소용디스크위에청소용세제를놓습니다.
3. 포터필터를그룹헤드에고정합니다.
4. 드립트레이를비우고머신에다시
장착합니다.
5. 물탱크를최대(MAX)선까지채운다음
머신에다시부착합니다.
6. 메뉴(MENU)버튼을눌러메인메뉴로
이동합니다.
7. 분쇄량(GRINDAMOUNT)다이얼을
사용해서메뉴에서세척헹굼세척을
탐색하고눌러서선택합니다.1잔(1CUP)
버튼에불이들어옵니다.
8. 1잔(1CUP)버튼을눌러서청소사이클을
시작합니다.청소사이클의남은시간이
LCD에표시됩니다.
9. 청소사이클이완료되면머신에서신호음이
울리고준비(READY)모드로돌아갑니다.
청소용디스크에청소용세제가남아있으면
청소사이클을반복합니다.
10.포터필터,청소용디스크,드립트레이를
비우고헹굽니다.
디스케일링
참고
머신을디스케일링할때디스케일링파우더를
추가하기전에물탱크에서정수필터를
제거했는지확인합니다.
정기적으로사용하면경수때문에많은내부
기능구성품에미네랄이축적되어브루잉
흐름,브루잉온도,머신성능,에스프레소의
맛을감소시킬수있습니다.디스케일링
사이클이도래하면LCD에석회질제거경고가
표시됩니다.
1. 드립트레이를비우고머신에다시
장착합니다.머신에서물탱크를분리하고
물탱크에서필터를제거합니다.
2. 물탱크에표시된디스케일링(DESCALE)
선까지물을채운다음디스케일링제를물에
넣습니다.물탱크를머신에다시장착합니다.
3. 메뉴(MENU)버튼을눌러메인메뉴로
이동합니다.분쇄량(GRINDAMOUNT)
다이얼을사용해서메뉴에서디스케일링
석회질제거을탐색하고눌러서
선택합니다.1잔(1CUP)버튼에불이
들어옵니다.
4. 1잔(1CUP)버튼을눌러서디스케일링
사이클을시작합니다.디스케일링
사이클에서는3단계로청소됩니다(커피,
온수,스팀).각단계가완료된후에
머신에서신호음이울립니다.스팀
다이얼(STEAMDIAL)이LCD에표시되면
이를수동으로온수온수및스팀스팀
위치로돌려야합니다.
PRE-INFUSE
SHOT
SEC
AMOUNT
MANUAL
PAUSED
HOT
WATER
FLUSH
RESET
DEFAULTS
FILL
TANK
GRIND
DOUBLE
SINGLE
LOCK
HOPPER
GRIND
SIZE
SHOT TEMP
FASTER
POUR
SLOWER
POUR
CUSTOM
HOTTER
COOLER
CUSTOM
스팀
진행중석회질제거
5. 디스케일링사이클이완료되면머신은
헹굼사이클을완료해야합니다.1잔(1
CUP)버튼에불이들어옵니다.디스케일링
사이클과마찬가지로스팀다이얼(STEAM
DIAL)이LCD에표시되면이를수동으로
올바른위치로돌려야합니다.
6. 드립트레이를제거해서비운다음머신에
다시장착합니다.물탱크에남아있는
디스케일링액을모두비우고물탱크를
최대(MAX)선까지채운다음머신에다시
장착합니다.
7. 1잔(1CUP)버튼을눌러서헹굼사이클을
시작합니다.헹굼사이클도3단계입니다.
LCD에진행중인단계가표시됩니다.매
단계후에머신에서신호음이울립니다.
8. 헹굼사이클이완료되면머신에서신호음이
울리고준비(READY)모드로돌아갑니다.
9. 드립트레이와물탱크를비우고헹굽니다.
완전히말린다음머신에다시장착합니다.
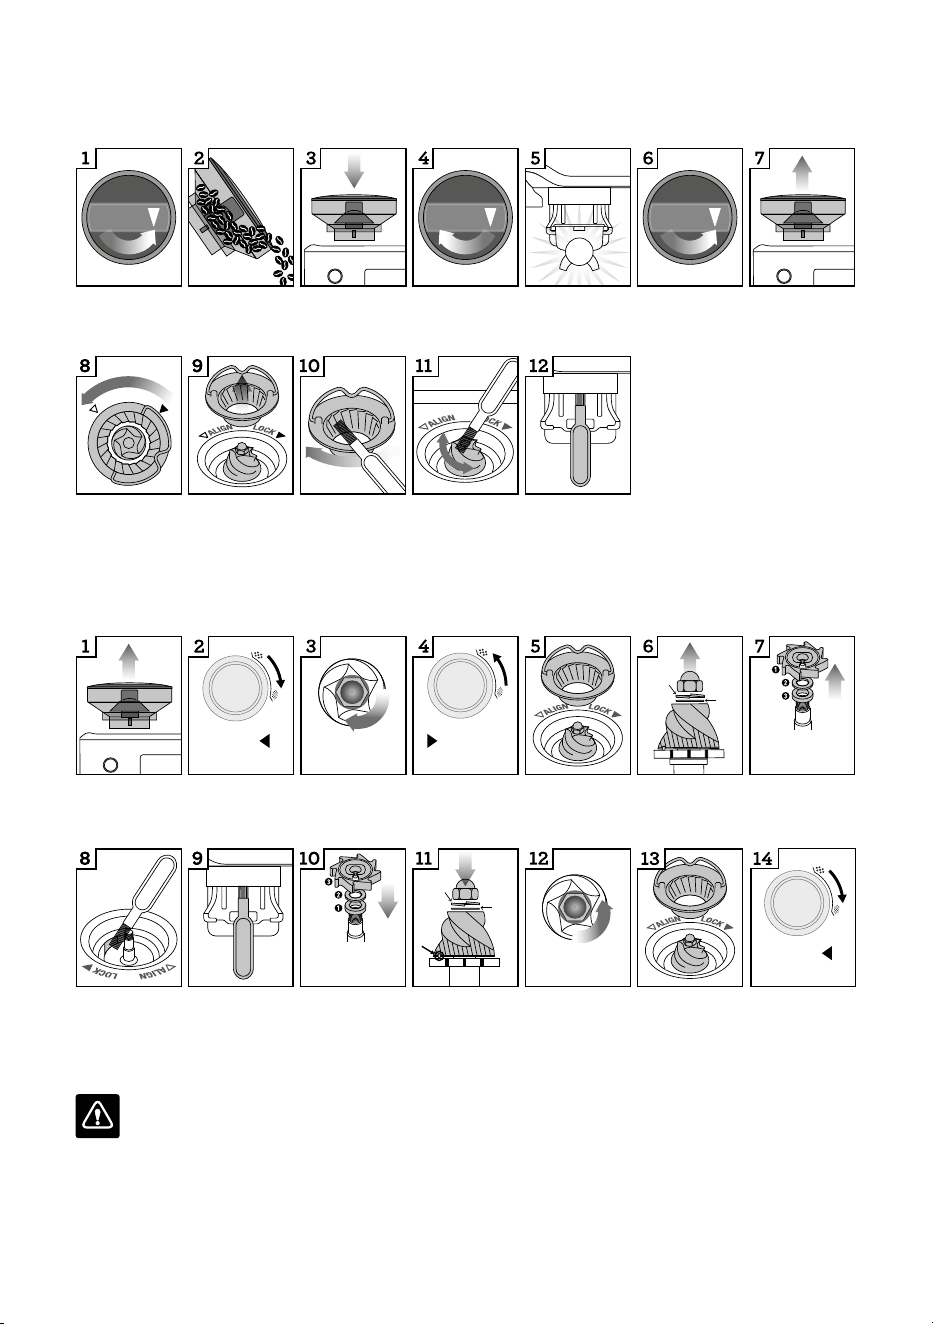
21
코니컬 버 그라인더 청소
이그라인더청소사이클에서는성능을저해할수있는,버에쌓인오일을제거합니다.
호퍼가 비워지면
분쇄를 시작합니다
상부 버를 브러시로
청소합니다
하부 버를 브러시로
청소합니다
슈트를 브러시로
청소합니다
미십시오
L
O
C
K
A
L
I
G
N
돌려서
고정합니다
돌려서
고정합니다
돌려서
고정합니다
상부 버를 잠금
해제합니다
상부 버를
분리합니다
호퍼를
분리합니다
호퍼를 잠금
해제합니다
호퍼를
고정합니다
호퍼를 다시
장착합니다
호퍼를 비웁니다호퍼를 잠금
해제합니다
코니컬 버 그라인더에 대한 고급 청소
이단계는분쇄버와그라인더추출구사이가막힌경우에만필요합니다.
분쇄도(GRIND
SIZE)를 �(가장
고움)로 설정합니다
��mm 소켓을
사용합니다. 시계
방향으로 돌려 너트만
풀어 줍니다
분쇄도(GRIND
SIZE)를 ��(가장
굵음)으로
설정합니다
상부 버를 잠금
해제하고 분리합니다
너트, 스프링, 플랫
와셔를 제거합니다.
하단 버를 조심스럽게
분리합니다
롱 노즈 플라이어를
사용해서 그라인드
팬 및 와셔를
제거합니다
상부 바를 삽입하고
고정합니다
분쇄도(GRIND
SIZE)를 ��로
설정합니다. 호퍼를
다시 장착하고
고정합니다
슈트를 브러시로
청소합니다
브러시 또는 파이프
클리너를 사용하여
분쇄 커피 배출 슈트가
막힌 곳을 뚫어 줍니다
롱 노즈 플라이어를
사용해서 와셔 및
그라인드 팬을
삽입합니다
하부 버를
삽입합니다(드라이브
핀 및 캐비티 정렬).
플랫 와셔 및 스프링
와셔를 삽입합니다
시계 반대 방향으로
돌려 너트를 조여
줍니다
너트를
조이십시오
너트를
푸십시오
플랫
와셔
스프링
와셔
�. 그라인드 팬
�. 금속 와셔
�. 펠트 와셔
플랫
와셔
스프링
와셔
고움
(FINE)
더 느린 추출
호퍼를
분리합니다
고움
(FINE)
더 느린 추출 더 빠른 추출
굵음
(COARSE)
�. 펠트 와셔
�. 금속 와셔
�. 그라인드 팬
경고
그라인더버는아주날카로우므로주의해야합니다.
22
스팀 봉 청소
•우유를텍스처링한뒤에는항상스팀봉을
청소해야합니다.젖은천으로스팀봉을닦아
줍니다.
•사용후에는스팀완드를몇초동안퍼지해서
남은우유를모두제거하는것이좋습니다.
스팀봉이드립트레이위에있는채로
스팀(STEAM)다이얼을몇초동안
로
돌려서스팀을몇초동안발생하게한다음
다이얼을다시수직위치로돌립니다.
•스팀팁구멍이막히면거품만들기성능이
저하됩니다.제공되는스팀봉청소툴을
사용해서구멍을뚫어줍니다.
•스팀봉이그래도막혀있으면청소툴중간에
있는스패너를사용해서스팀봉의팁을
분리합니다.팁을온수에담가둔다음청소
툴을사용해서막힌곳을다시뚫어줍니다.
툴을사용해서팁을다시스팀봉에끼웁니다.
필터 바스켓 및 포터필터 청소
•필터바스켓과포터필터는사용직후온수로
헹구어남아있는커피오일을모두제거해야
합니다.
•필터바스켓의어느구멍이라도막힌경우
제공된청소용툴끝에있는핀을사용해서
구멍을뚫어줘야합니다.
•구멍이계속막혀있으면온수에청소용
용제를녹이고필터바스켓과포터필터를
용액에약20분동안담갔다가꺼내서
잘헹궈야합니다.
그룹 헤드 청소
•그룹헤드내부와샤워스크린은사용후
젖은천으로닦아서분쇄된커피입자를모두
제거해야합니다.
•머신을주기적으로퍼지해야합니다.빈필터
바스켓과포터필터를그룹헤드에놓습니다.
1잔(1CUP)버튼을누르고물을잠시흐르게
해서남은커피를모두헹굽니다.1잔(1CUP)
버튼을다시눌러서온수를멈춘다음
포터필터를제거하고완전히헹굽니다.
드립 트레이 청소
•드립트레이는특히드립트레이가득참
표시등에비워주세요(EMPTYME)!가
표시되면정기적으로드립트레이를분리하고
비운다음청소해야합니다.
•머신에서드립트레이를제거하고부품을
분리합니다.측면걸쇠를풀기위해위쪽으로
당겨드립트레이에서비워주세요(EMPTY
ME)!표시등도분리할수있습니다.모든
부품을따뜻한비눗물에담가서부드러운
천으로씻어줍니다.완전히헹구고말린다음
다시조립해서머신에장착합니다.
•보관트레이(드립트레이뒤에있음)는
분리해서부드럽고젖은천으로청소할수
있습니다.
참고
모든부품은온수와순한식기세척액을
사용해서손으로세척해야합니다.표면에
흠집을낼수있는연마성세제,패드,천을
사용하면안됩니다.어떤부품이나액세서리도
식기세척기로세척하면안됩니다.
경고
전원코드,전원플러그,제품을물이나다른
액체에담그면안됩니다.
외부 하우징 청소
외부하우징을부드럽고젖은천으로닦은다음
부드럽고마른천으로닦아줍니다.
머신 보관
보관하기전에전원(POWER)버튼을눌러
머신을끈다음전원콘센트에서플러그를
뽑습니다.호퍼에서사용하지않은원두를
제거하고그라인더를청소하며(21페이지
참조)물탱크와드립트레이를비웁니다.
머신이식었고깨끗하며건조한지확인합니다.
액세서리를보관트레이에넣습니다.
머신을똑바로세워서보관하고위에아무것도
올려놓지말아야합니다.
오류 모드
머신의LCD에 이표시되는경우Breville®
고객서비스에문의하시기바랍니다.

23
문제 가능한 원인 손쉬운 해결책
그룹 헤드에서 물이
흐르지 않습니다.
온수가 나오지 않습니다.
물탱크가비어있습니다. 탱크에물을채웁니다.
물탱크가완전히삽입되지않고
제자리에고정되지않았습니다.
물탱크를완전히아래로눌러제자리에
고정합니다.
머신을디스케일링해야합니다. 디스케일링사이클을수행합니다.
커피가너무곱게분쇄되거나필터
바스켓에커피가너무많거나
탬핑이과하거나필터바스켓이
막혔습니다.
아래의'에스프레소가포터필터
주둥이에서만내려지거나전혀
내려지지않습니다'를참조합니다.
에스프레소가 포터필터
주둥이에서만 내려지거나
전혀 내려지지 않습니다.
커피가너무곱게분쇄되었습니다. 약간더굵게분쇄된커피를사용합니다.
13페이지'분쇄도설정'및
15페이지'과다추출'을참조합니다.
필터바스켓에커피가너무
많습니다.
커피도징양을줄입니다.
13페이지'도징'및15페이지
'과다추출'을참조합니다.탬핑후
Razor™DoseTrimmingTool을
사용해서커피도징양을트리밍합니다.
커피를너무강하게탬핑합니다. 10~15kg의압력으로탬핑합니다.
물탱크가비어있습니다. 탱크에물을채웁니다.
물탱크가완전히삽입되지않고
제자리에고정되지않았습니다.
물탱크를완전히아래로눌러제자리에
고정합니다.
필터바스켓이막혔을수있습니다. 제공된청소용툴끝에있는핀을
사용해서구멍을뚫어줍니다.구멍이
계속막혀있으면온수에청소용세제를
녹여필터바스켓과포터필터를용액에
약20분동안담갔다꺼내서완전히
헹굽니다.
머신을디스케일링해야합니다. 디스케일링사이클을수행합니다.
물이 흘러나오지
않습니다(머신에서
큰 소음이 납니다).
물탱크가비어있거나수위가
최소(MIN)미만입니다.
탱크에물을채웁니다.
문제 해결

24
문제 가능한 원인 손쉬운 해결책
에스프레소가 너무
빨리 흘러나옵니다.
커피가너무굵게분쇄되었습니다. 약간더곱게분쇄된커피를사용합니다.
13페이지'분쇄도설정'및
15페이지'과소추출'을참조합니다.
필터바스켓에커피가충분하지
않습니다.
커피도징양을늘립니다.
13페이지'도징'및15페이지
'과소추출'을참조합니다.탬핑한다음
Razor™DoseTrimmingTool을
사용해서과다한커피를트리밍합니다.
커피를너무약하게탬핑합니다. 15~20kg의압력으로탬핑합니다.
포터필터 가장자리
주변에서 에스프레소가
흘러나옵니다.
포터필터가그룹헤드에올바르게
삽입되지않았습니다.
포터필터를완전히삽입하고저항감이
느껴질때까지돌렸는지확인합니다.
필터바스켓테두리주변에커피
찌꺼기가있습니다.
필터바스켓테두리에서과다한커피를
청소해서그룹헤드에제대로밀봉되는
것을확인합니다.
필터바스켓에커피가너무
많습니다.
커피도징양을줄입니다.
13페이지'도징'을참조합니다.탬핑
후Razor™DoseTrimmingTool을
사용해서커피도징양을트리밍합니다.
스팀이 나오지 않습니다.
머신이작동온도에도달하지
않았습니다.
머신이작동온도에도달할때까지
기다립니다.
물탱크가비어있습니다. 탱크에물을채웁니다.
물탱크가완전히삽입되지않고
제자리에고정되지않았습니다.
물탱크를완전히아래로눌러제자리에
고정합니다.
머신을디스케일링해야합니다. 디스케일링사이클을수행합니다.
스팀봉이막혔습니다. 22페이지'스팀봉청소'를
참조합니다.
에스프레소를 추출하거나
우유를 스티밍할 때
고동/펌핑 소리가 납니다.
머신에서펌프를정상적으로
작동하는중입니다.
이는머신의정상적인작동이므로
어떠한조치도필요하지않습니다.
물탱크가비어있습니다. 탱크에물을채웁니다.
물탱크가완전히삽입되지않고
제자리에고정되지않았습니다.
물탱크를완전히아래로눌러제자리에
고정합니다.

25
문제 가능한 원인 손쉬운 해결책
커피가 충분히
뜨겁지 않습니다.
잔이예열되지않았습니다. 온수추출구아래에서잔을헹굽니다.
포터필터가예열되지않았습니다. 온수추출구아래에서포터필터를헹군
다음완전히말립니다.
우유가충분히뜨겁지
않습니다(카푸치노,라테등을
만드는경우).
더오랜시간동안우유를
텍스처링합니다.
물온도를조정해야합니다. 16페이지'원액온도조정'을
참조하여브루잉온도를높입니다.
크레마가 없습니다.
커피를너무약하게탬핑합니다. 15~20kg의압력으로탬핑합니다.
커피가너무굵게분쇄되었습니다. 약간더곱게분쇄된커피를
사용합니다.
13페이지'분쇄도설정'및
15페이지'과소추출'을참조합니다.
커피원두또는미리분쇄한커피가
신선하지않습니다.
신선한커피원두를분쇄하는경우
'로스팅한날짜'가표시된갓로스팅한
원두를사용하고그날짜로부터5~20일
사이에소비합니다.
미리분쇄한커피를사용하는경우분쇄
후일주일이내에사용합니다.
필터바스켓이막혔을수있습니다. 제공된청소용툴끝에있는핀을
사용해서구멍을뚫어줍니다.구멍이
계속막혀있으면온수에청소용세제를
녹여필터바스켓과포터필터를용액에
약20분동안담갔다꺼내서완전히
헹궈줍니다.
싱글월필터바스켓이미리분쇄한
커피와함께사용됩니다.
듀얼월필터바스켓을미리분쇄한
커피와함께사용하는지확인합니다.
물이 샙니다.
물탱크가완전히삽입되지않고
제자리에고정되지않았습니다.
물탱크를완전히아래로눌러제자리에
고정합니다.

26
문제 가능한 원인 손쉬운 해결책
머신이 켜져 있지만,
작동이 중단되었습니다.
펌프또는그라인더과열로인해
안전열차단이활성화되었을수도
있습니다.
전원(POWER)버튼을눌러머신을
끈다음전원콘센트에서플러그를
뽑습니다.약30~60분동안식힙니다.
문제가지속되면Breville®지원센터에
문의하시기바랍니다.
그라인더에서 분쇄된
커피가 나오지 않습니다.
호퍼에커피원두가없습니다. 호퍼에신선한커피원두를채웁니다.
그라인더챔버또는슈트가
막혔습니다.
그라인더챔버와슈트를깨끗하고
깔끔하게청소합니다.21페이지
'코니컬버그라인더고급청소'를
참조합니다.
그라인더챔버와슈트에물/수분이
있습니다.
그라인더챔버와슈트를깨끗하고
깔끔하게청소합니다.21페이지
'코니컬버그라인더고급청소'를
참조합니다.재조립하기전에버가
완전히말랐는지확인합니다.헤어
드라이어를사용해서그라인더챔버를
건조시킬수도있습니다.
필터 바스켓에 분쇄된
커피가 너무 많거나 너무
적게 공급됩니다.
특정분쇄도에대한분쇄량설정이
올바르지않습니다.
분쇄시간버튼을사용해서분쇄량을
늘리거나줄입니다.13페이지
'도징'및15페이지'과다추출'을
참조합니다.
잔에 공급되는
에스프레소가 너무
많거나 너무 적습니다.
분쇄량및/또는분쇄도설정
및/또는원액양을조정해야
합니다.
분쇄량및/또는분쇄도설정을
조정합니다.13페이지'분쇄도설정',
13페이지'도징',15페이지'추출
가이드'를참조합니다.
그라인더에서 큰
소음이 납니다.
그라인더가막혔거나그라인더에
이물질이있습니다.
호퍼를분리하고이물질이있거나
막혔는지확인합니다.필요하면
그라인더챔버와슈트를깨끗하고
깔끔하게청소합니다.21페이지
'코니컬버그라인더청소'를
참조합니다.
2년 품질 보증
Breville은구입일로부터2년동안대한민국
내에서가정용으로사용되는제품의잘못된
제조공정및자재로인한결함에대하여보증
서비스를제공합니다.보증기간동안Breville
은결함이있는제품에대해수리또는교체를
제공합니다(Breville의보증정책에따름).
또한,고객이대한민국의법률에따라제품의
하자에관하여행사할수있는법적권리는
보호되며Breville의보증정책으로인하여
이러한법적권리가훼손되는것은아닙니다.
Breville의보증서비스에관한자세한내용과
고객센터에대한문의방법을살펴보시려면
www.breville.com/kr을방문해주시기
바랍니다.
보증

27
2년 품질 보증
Breville은구입일로부터2년동안대한민국
내에서가정용으로사용되는제품의잘못된
제조공정및자재로인한결함에대하여보증
서비스를제공합니다.보증기간동안Breville
은결함이있는제품에대해수리또는교체를
제공합니다(Breville의보증정책에따름).
또한,고객이대한민국의법률에따라제품의
하자에관하여행사할수있는법적권리는
보호되며Breville의보증정책으로인하여
이러한법적권리가훼손되는것은아닙니다.
Breville의보증서비스에관한자세한내용과
고객센터에대한문의방법을살펴보시려면
www.breville.com/kr을방문해주시기
바랍니다.
보증

지속적인제품개선으로인해,본책자에담긴제품삽화및사진은실제제품과약간다를수있습니다.
XXX KOR � A22
Copyright Breville Pty. Ltd. 2022.
브레빌코리아 유한회사
서울특별시 강남구 테헤란로 ���, ��층 ���호 (대치동)
고객 서비스 센터:���-���-����
BES878 KOR – D22