
Technical Support and E-Warranty Certificate
www.vevor.com/support
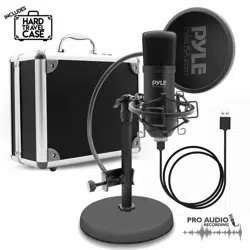
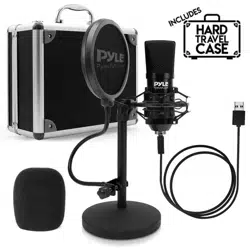
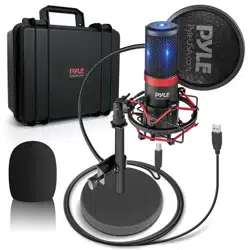
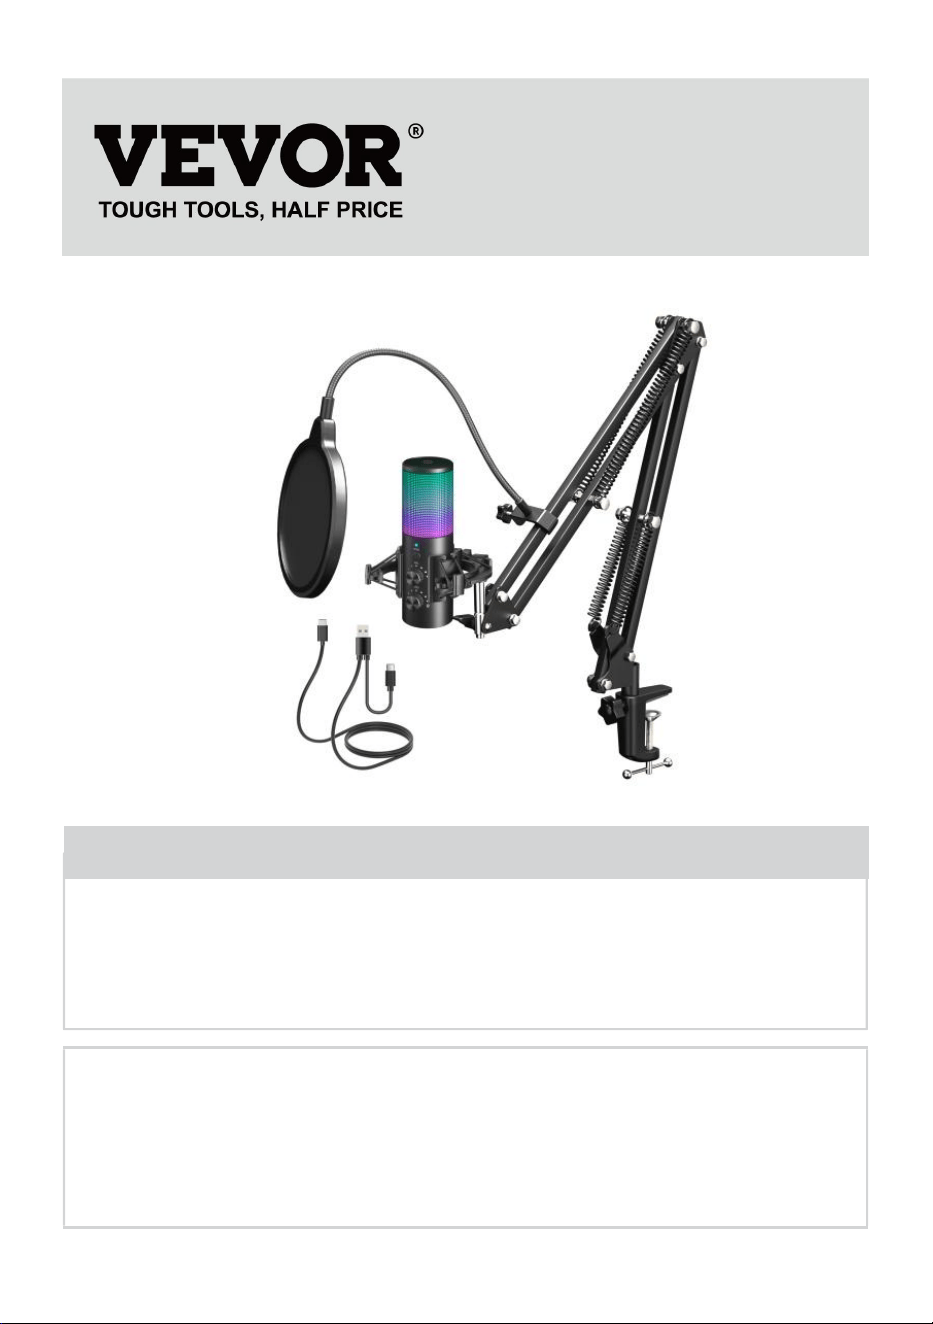
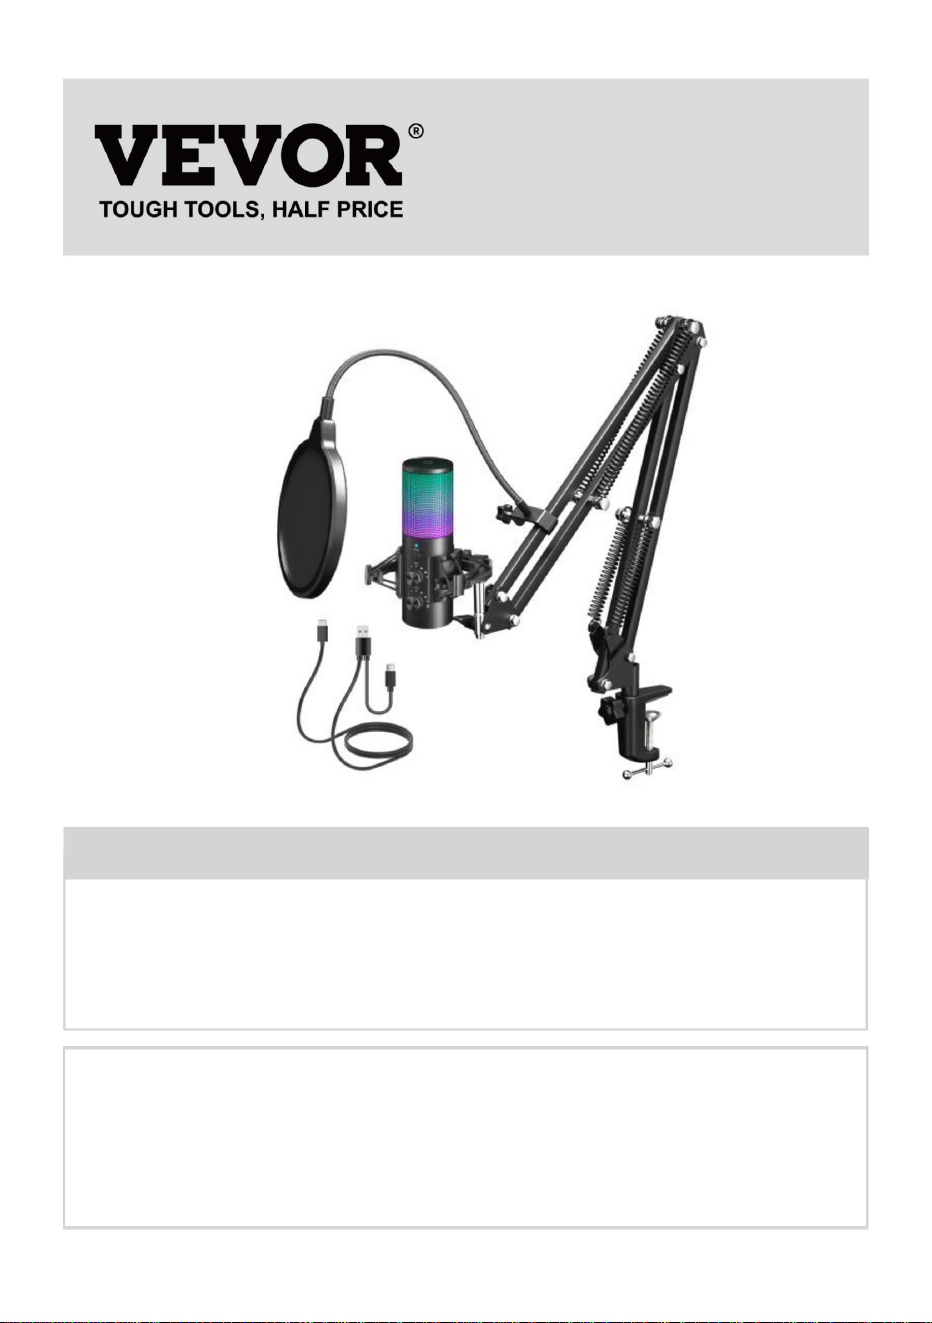
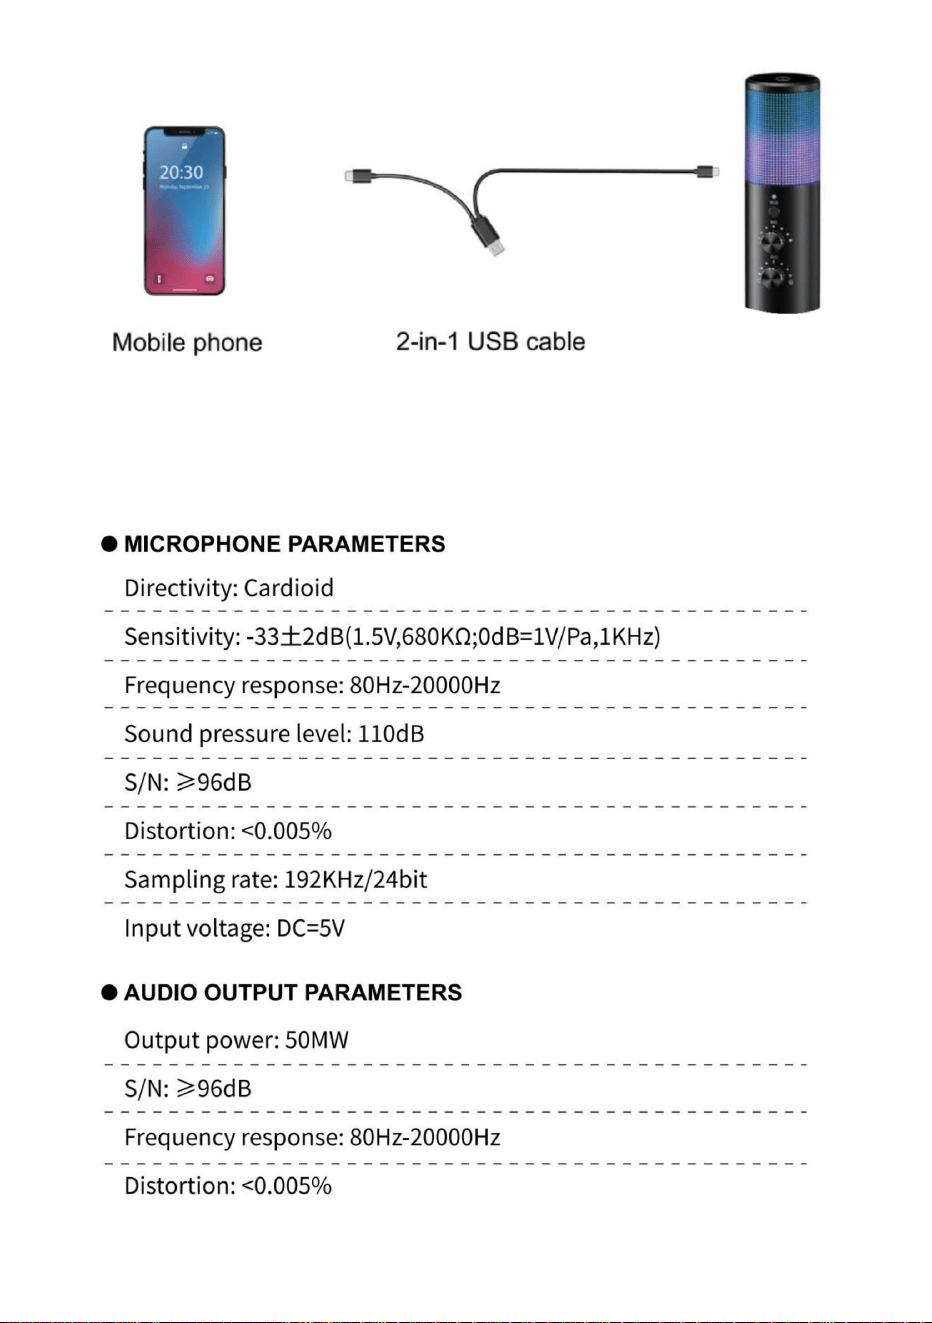
Recording Microphone
Instructions
MODEL:AK-9
We continue to be committed to provide you tools with competitive price.
"Save Half", "Half Price" or any other similar expressions used by us only represents an
estimate of savings you might benefit from buying certain tools with us compared to the major
top brands and does not necessarily mean to cover all categories of tools offered by us. You
are kindly reminded to verify carefully when you are placing an order with us if you are
actually saving half in comparison with the top major brands.
- 1 -
MODEL: AK-9
AK-9
Have product questions? Need technical support? Please feel free to
contact us:
Technical Support and E-Warranty Certificate
www.vevor.com/support
NEED HELP? CONTACT US!
This is the original instruction, please read all manual instructions
carefully before operating. VEVOR reserves a clear interpretation of our
user manual. The appearance of the product shall be subject to the
product you received. Please forgive us that we won't inform you again if
there are any technology or software updates on our product.
Recording Microphone
- 2 -
Warning-To reduce the risk of injury, user must read
instructions manual caref ully.
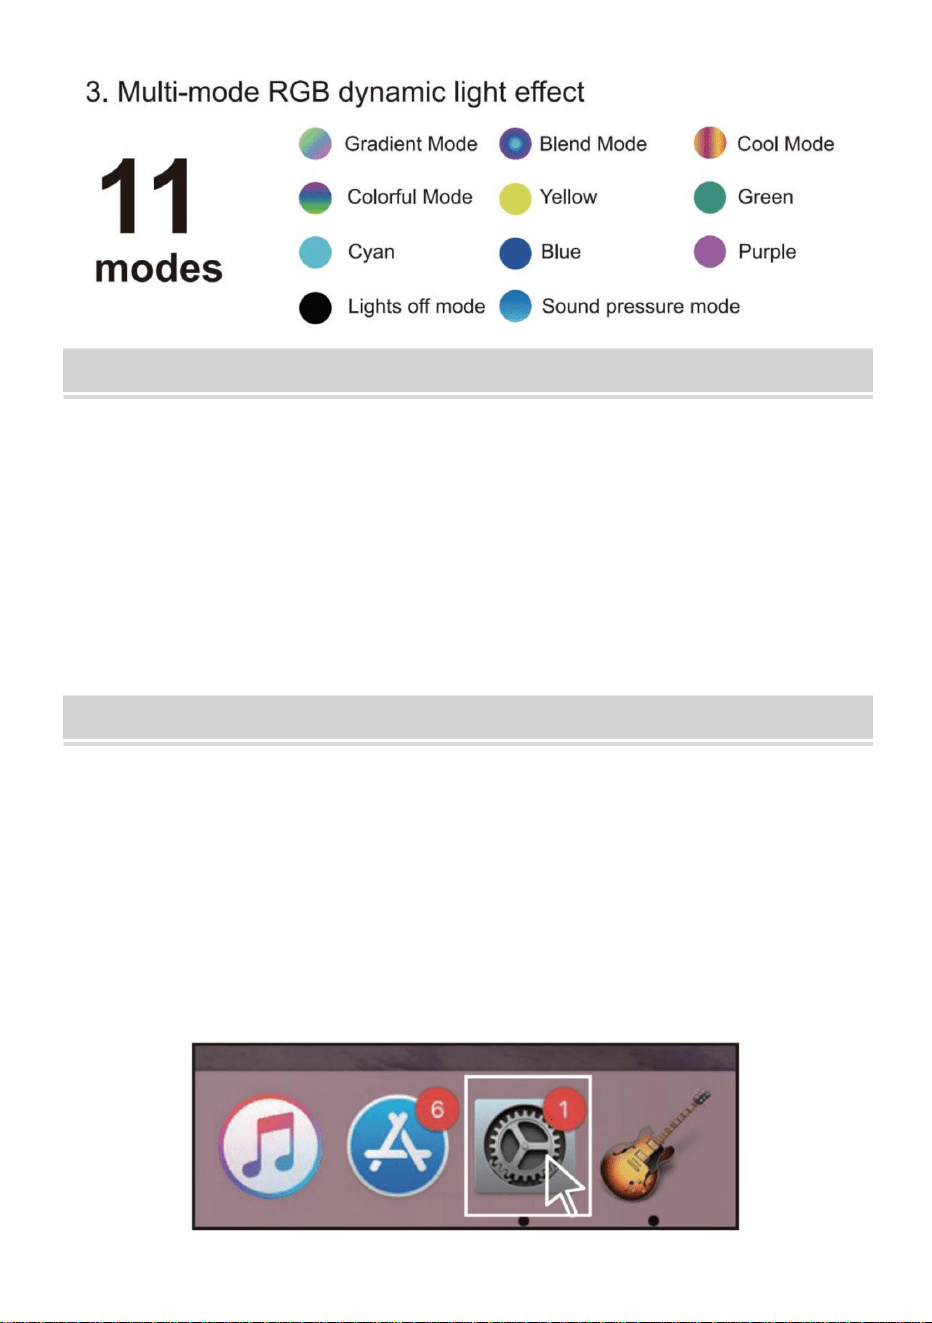
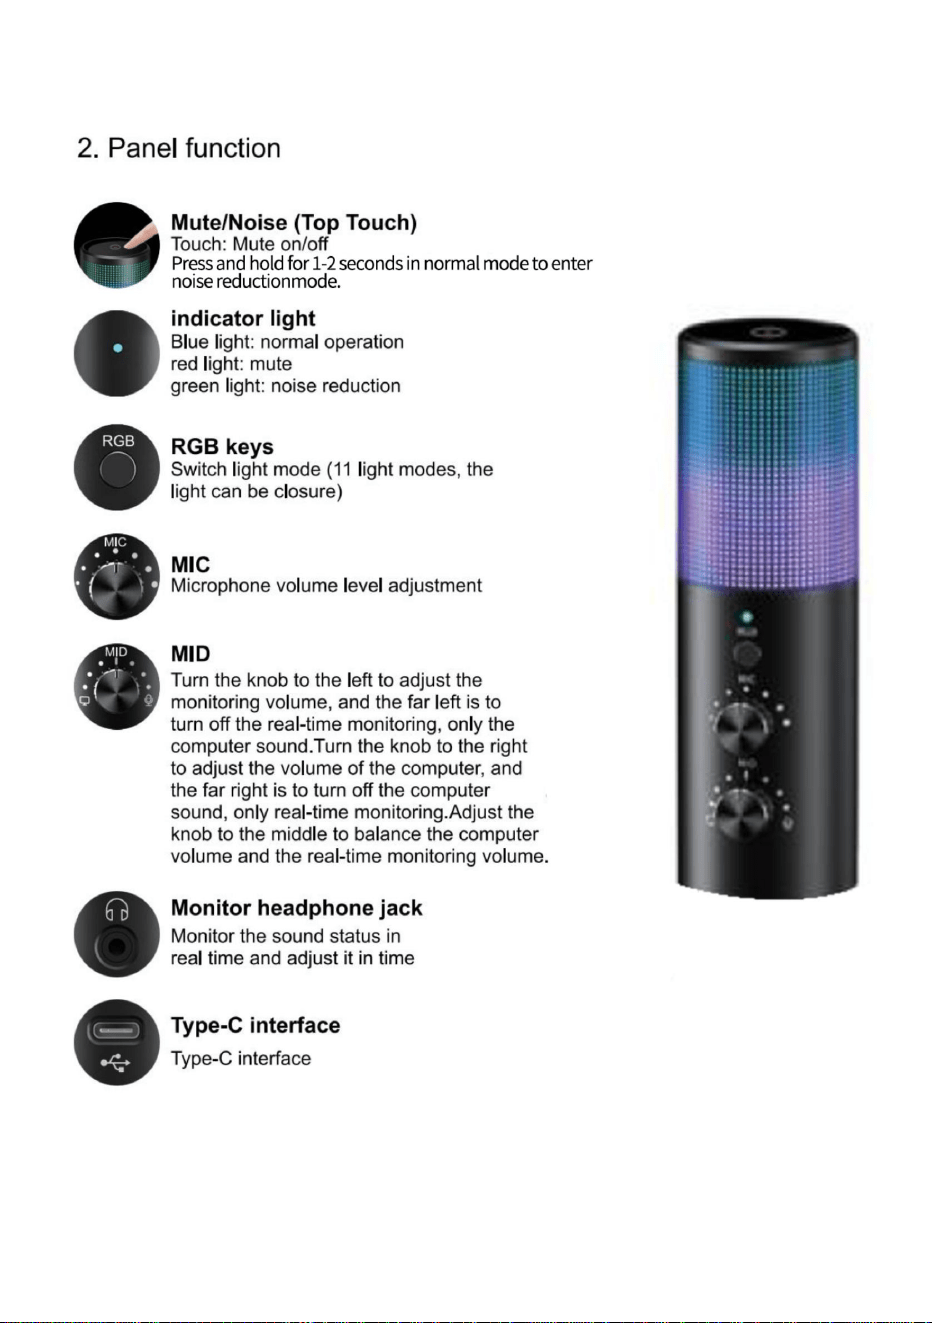
SPECIFICATIONS AND PARAMETERS
Model AK-9
Input DC5V
LED Light
Yes
Switch 11 RGB lighting modes
(including lights off mode)
Microphone gain Yes
Sampling frequency 192kHz/24-bit
Microphone blowout
prevention function
Yes
Shock absorber Yes
One-click mute Yes
Headphone port size 3.5mm
Compatible device
PS4, PS5, PC, desktop, laptop, most
Type-C interface phones
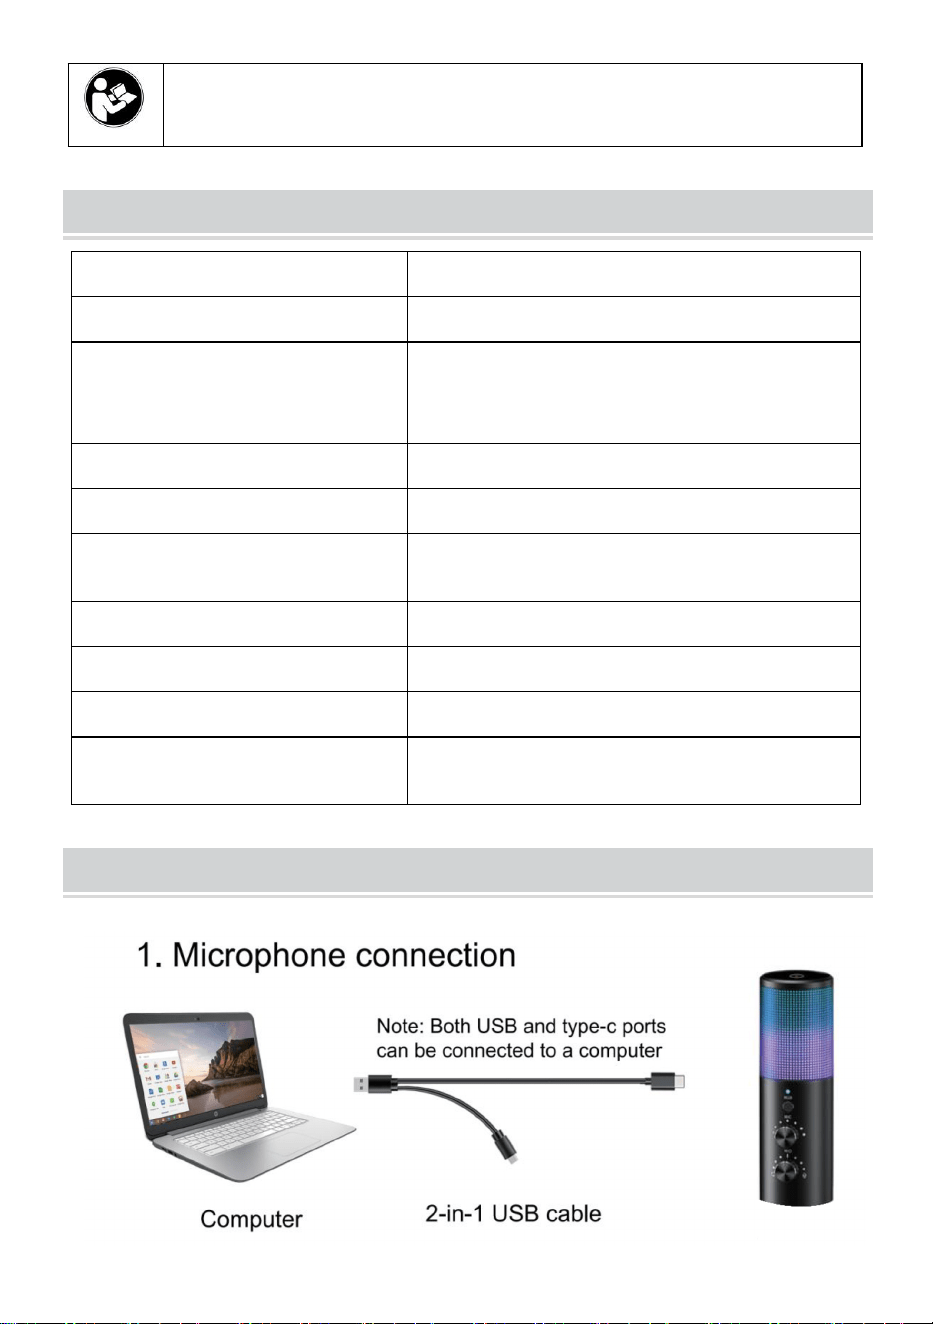
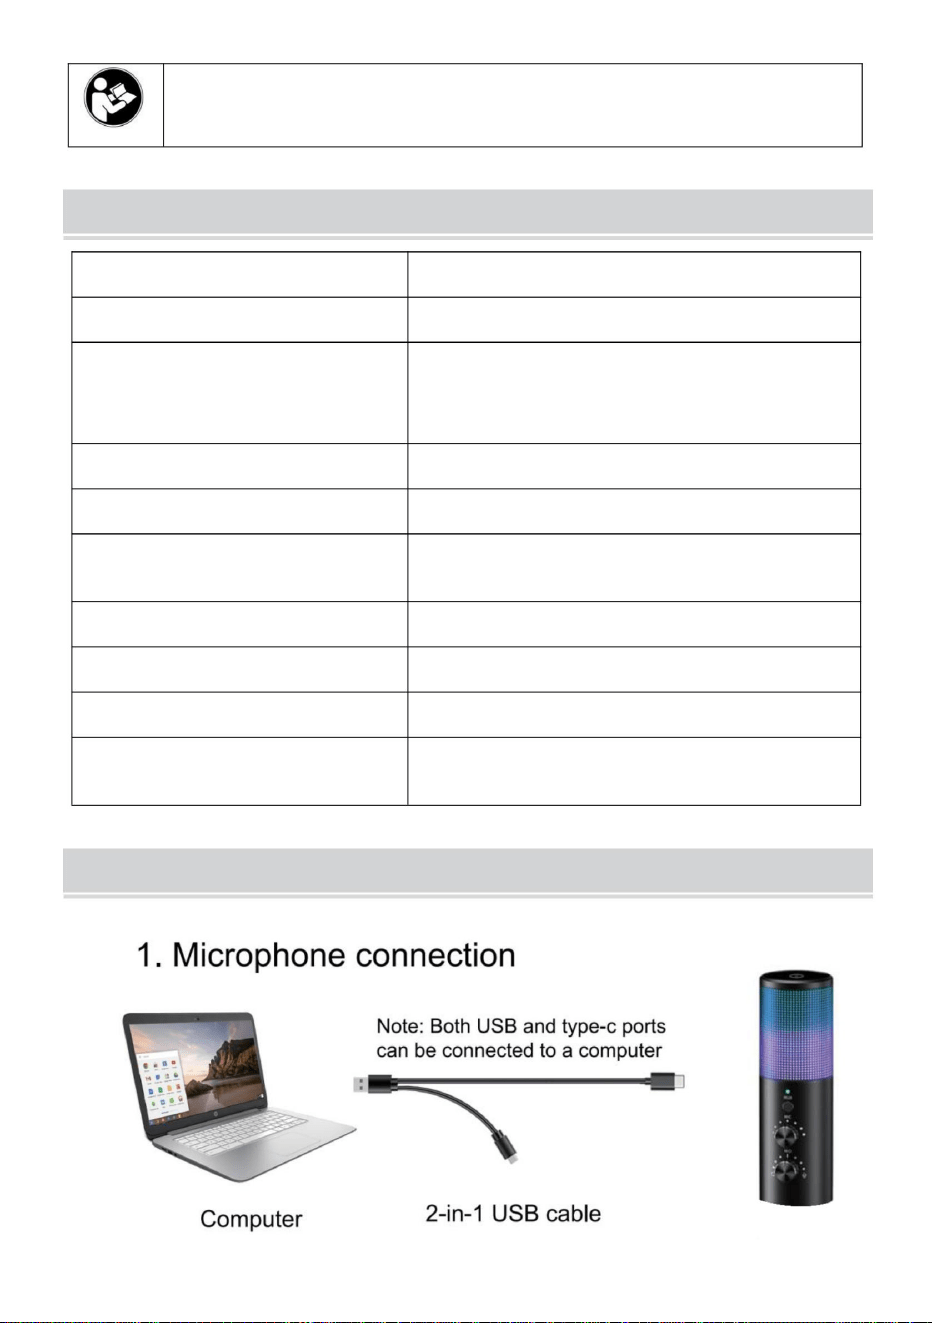
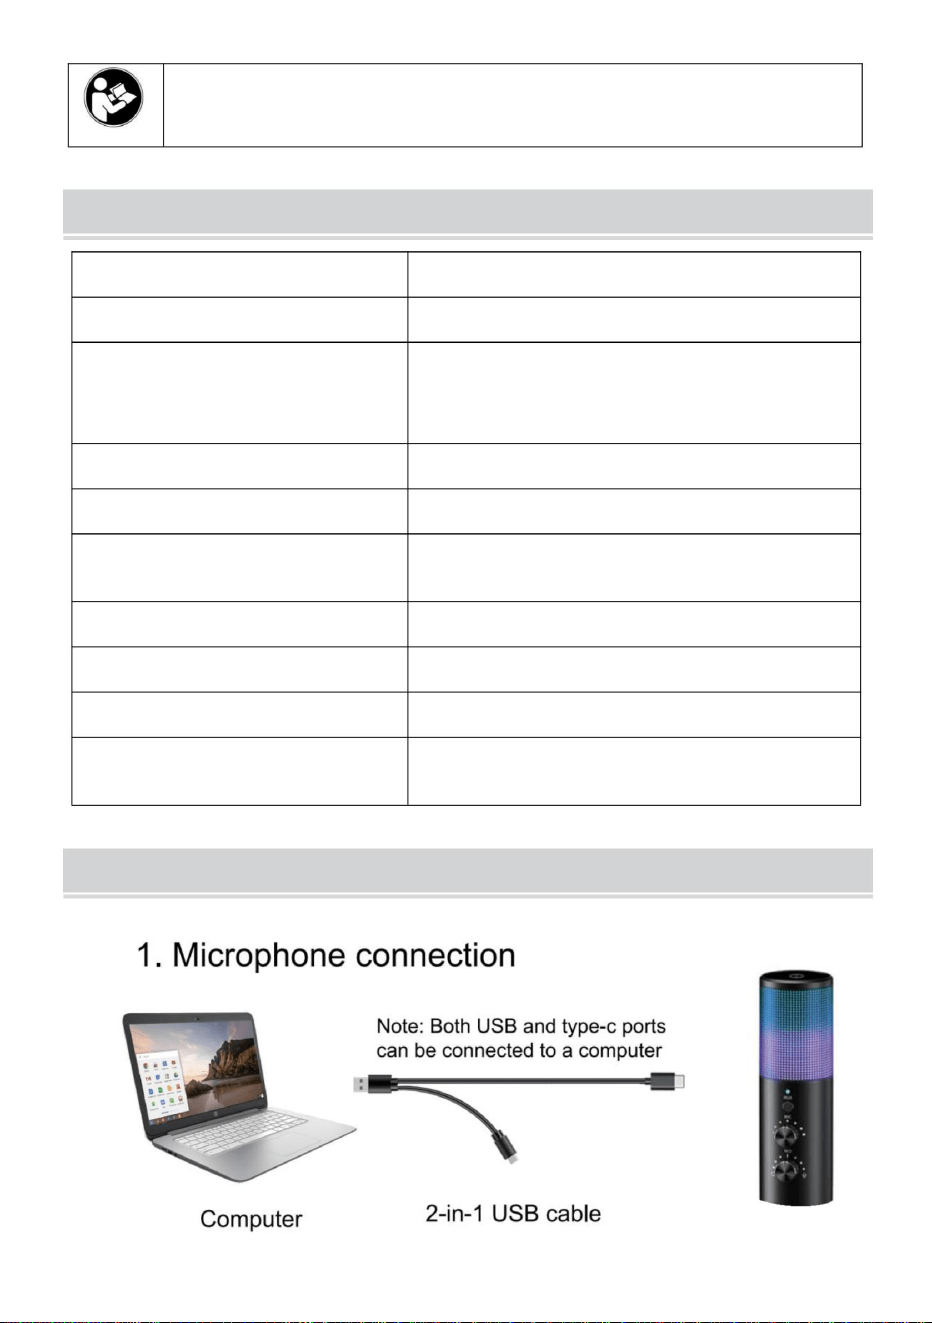
MICROPHONE FUNCTION DESCRIPTION

- 3 -
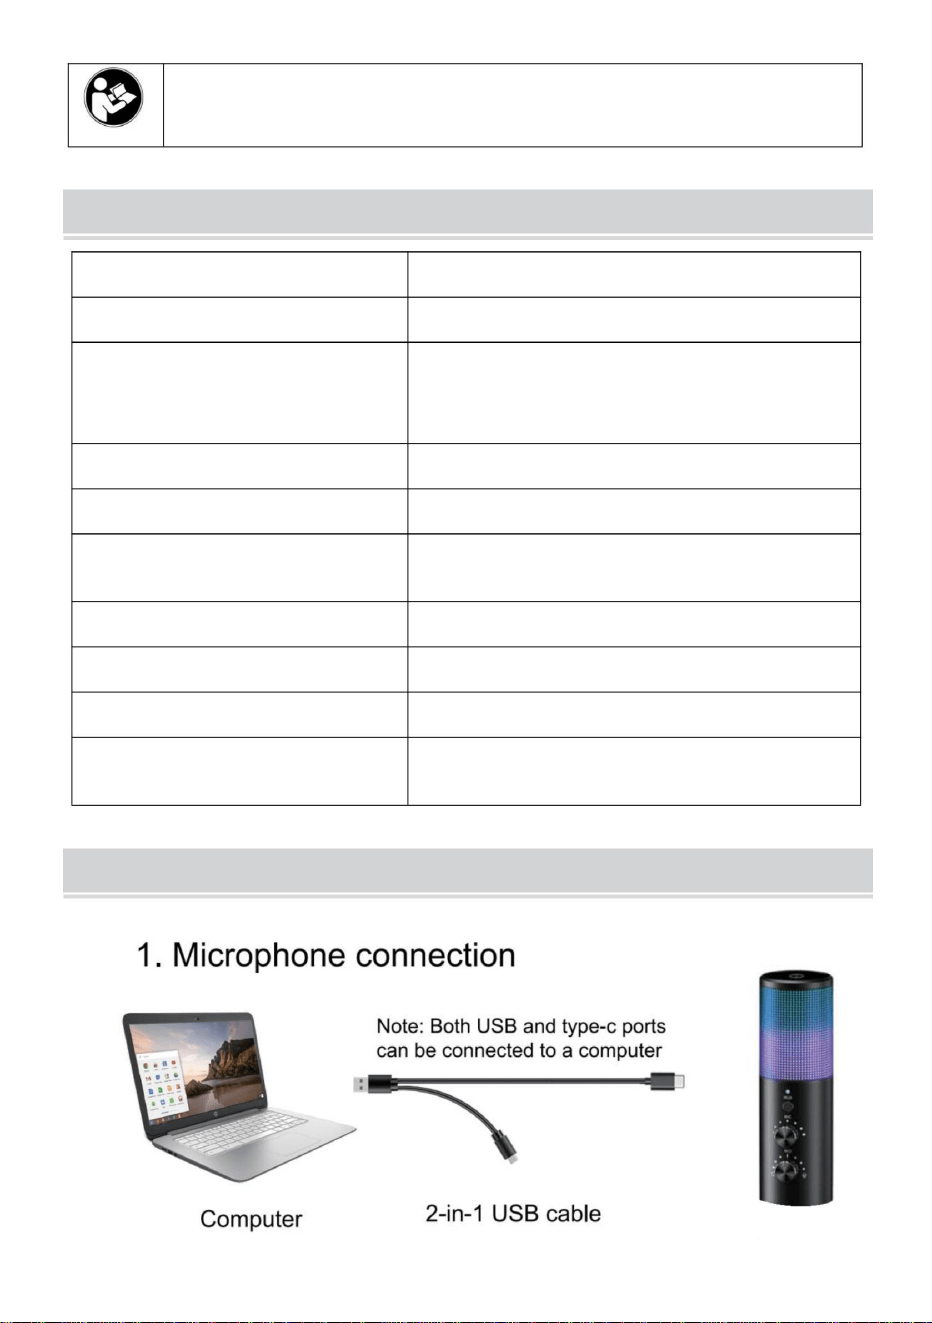
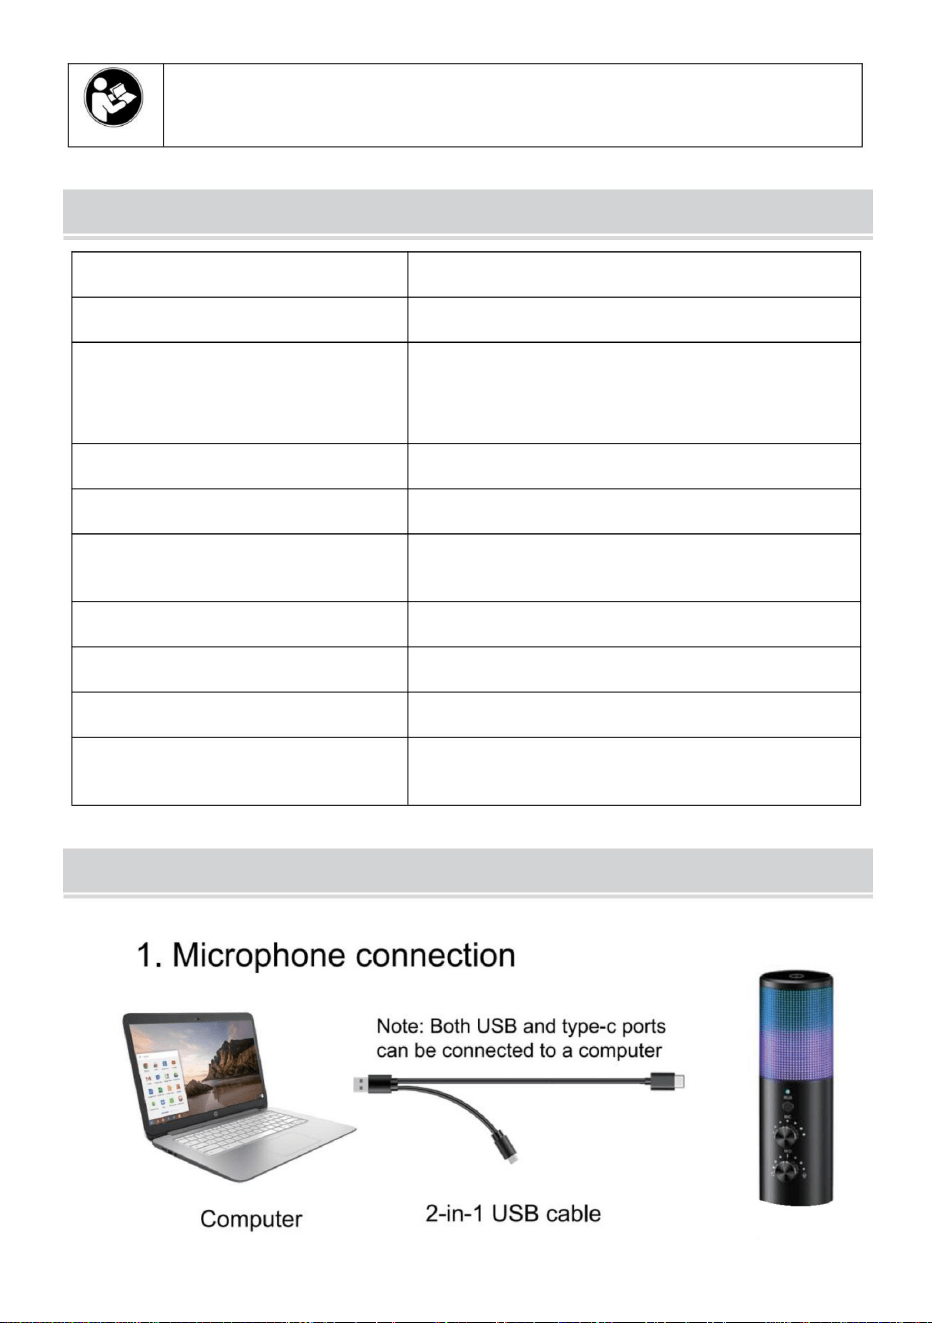
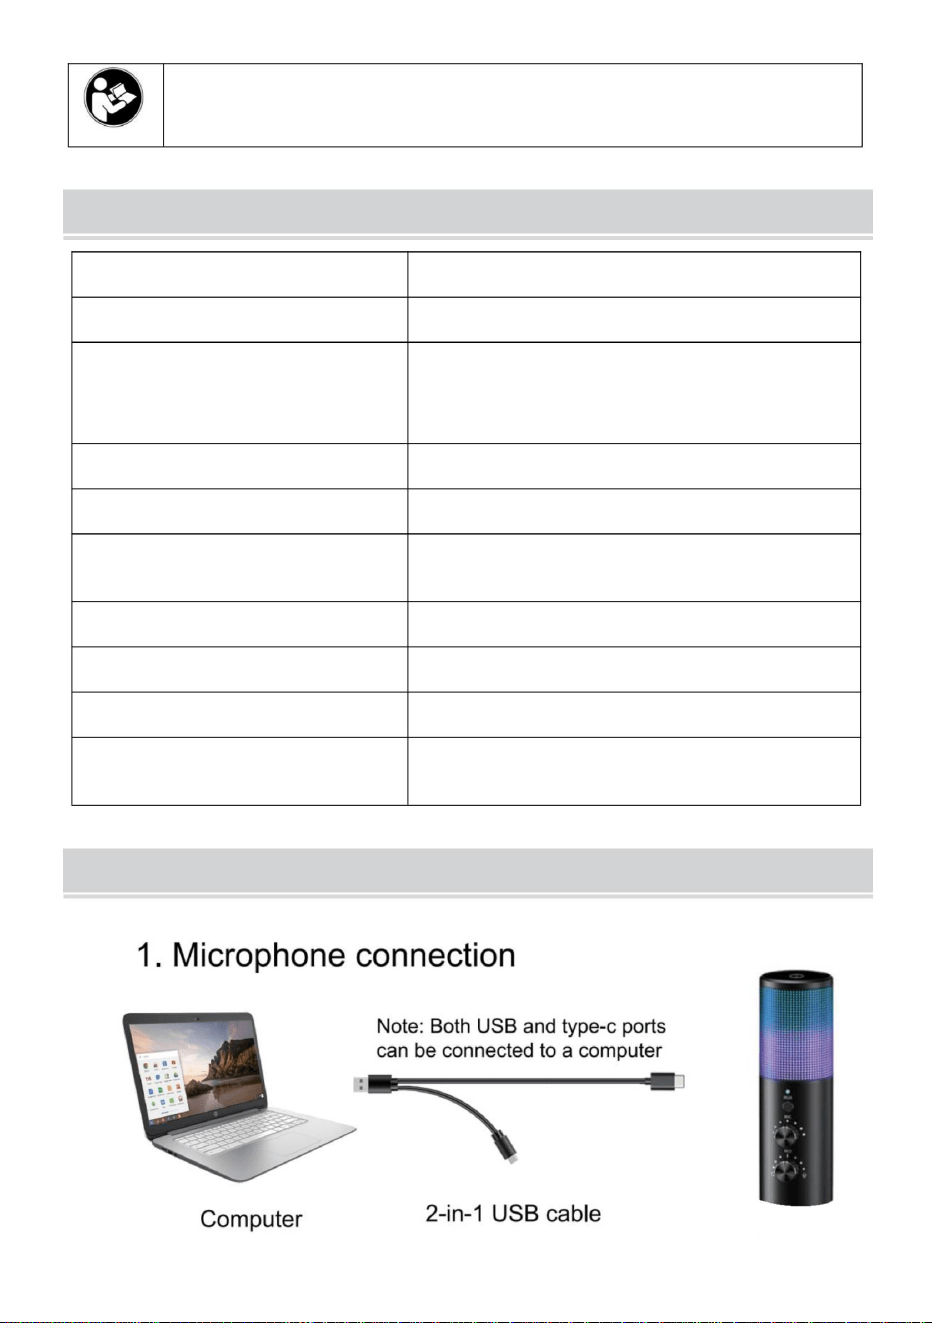
Note: Two connecting lines are configured, and different connecting
lines can be used to connect the mobile phone (TYPE-C interface) or
computer according to requirements.

- 4 -

- 5 -
POWER REQUIREMENTS
1.The microphone is powered by your device’s USB port, meaning that in
most instances you can just plug the microphone in and get started right
away. For non-standard USB ports, a powered USB hub may be required.
2.IT is a “Plug & Play” USB device, compatible with both Windows and Mac
computers .Placement of the microphone and relative to the vocalist may
be varied on several factors including room acoustics, the vocal
performance, and whether the vocalist has a high or deep voice.
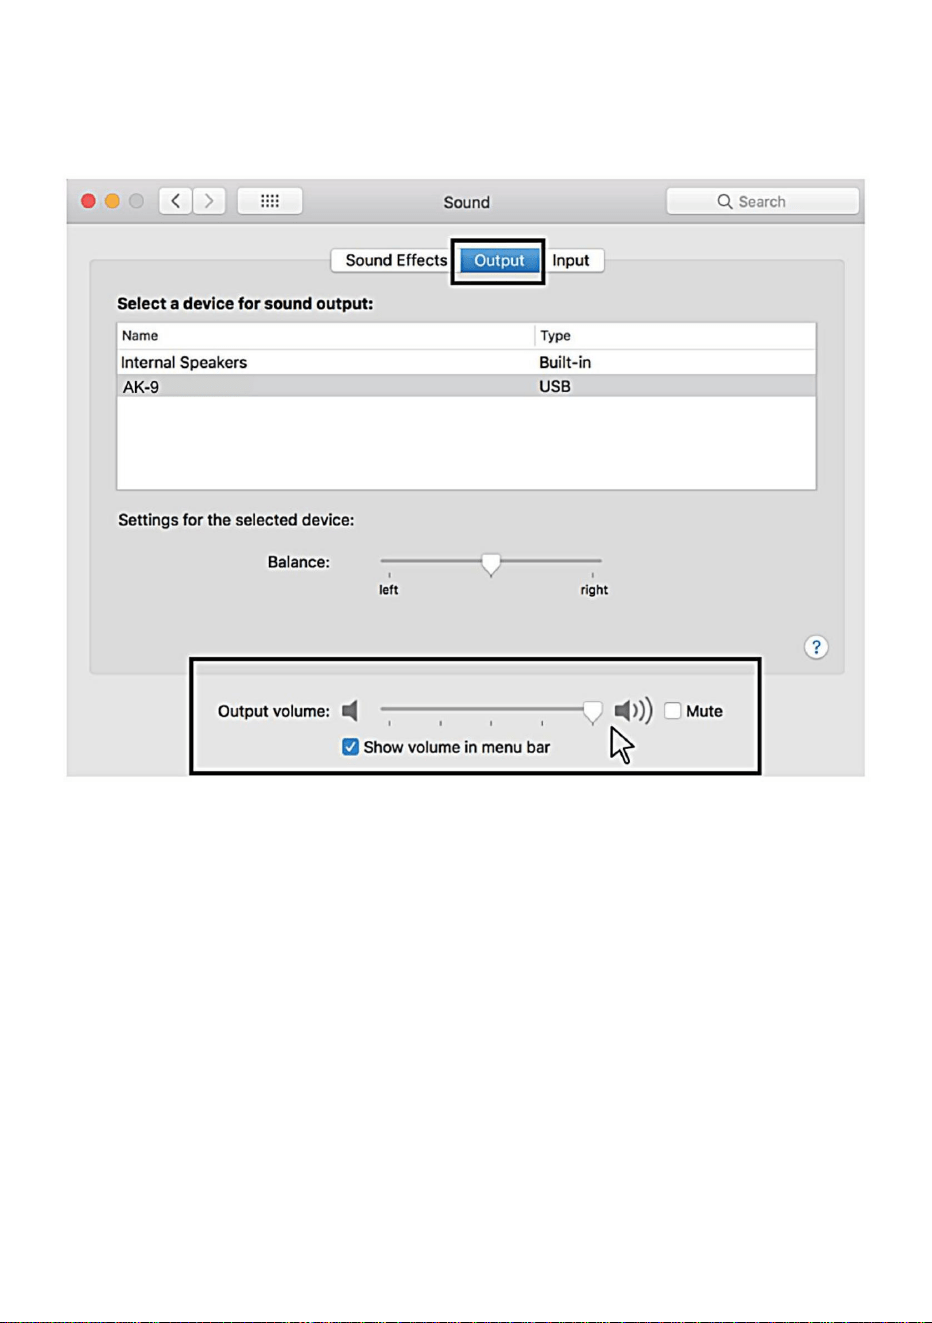
SETTING INSTRUCTIONS
MAC OS
1.Insert the free end of the included USB cable into the USB port on the
computer.The LED light of the microphone will light up, indicating that the
microphone is working. Your computer will automatically recognize the
USB device and install the driver. But there may be no pop-up windows or
messages.
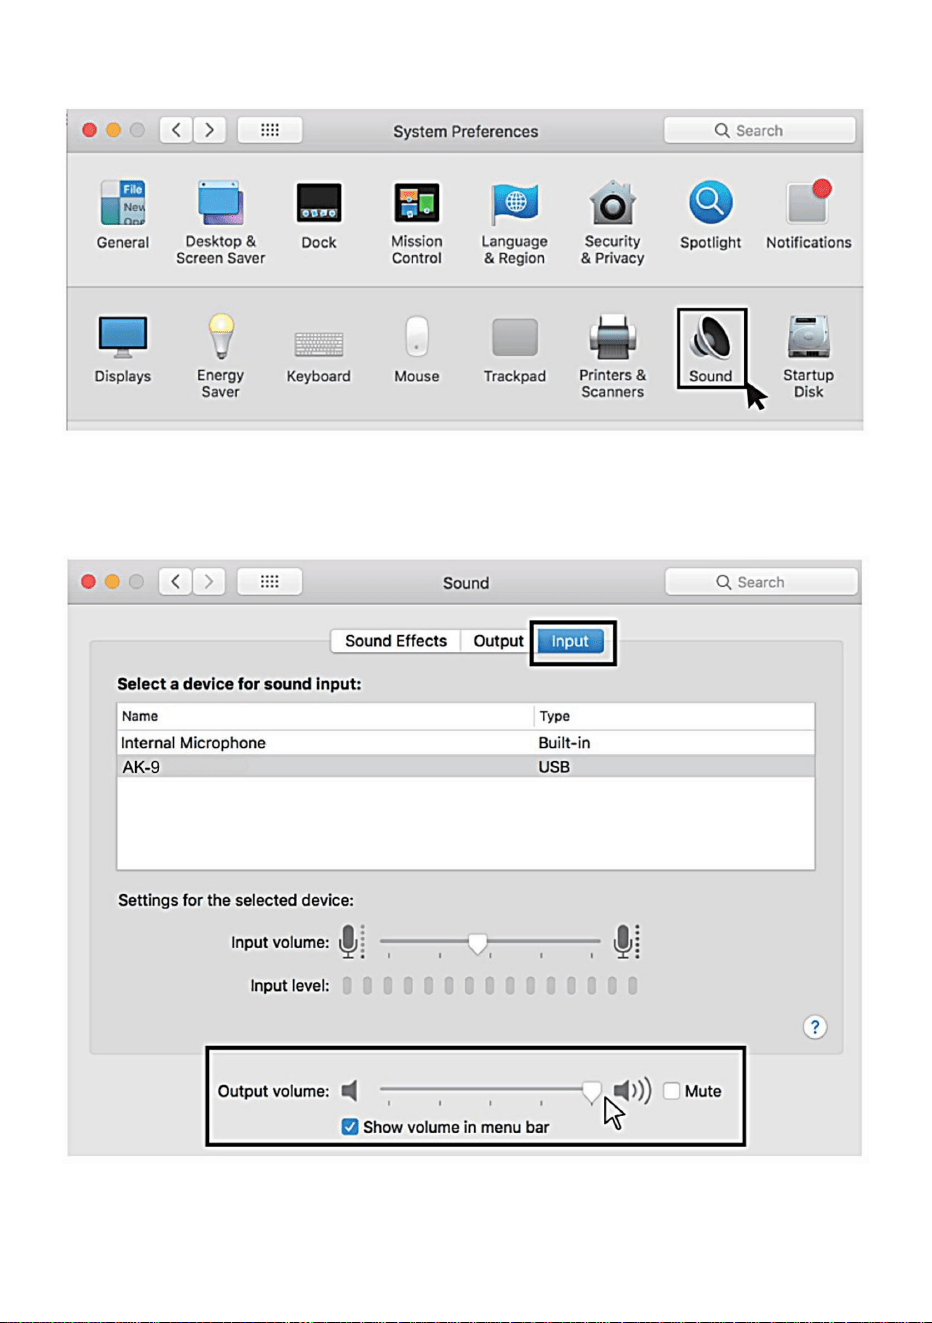
2. Click on the Apple symbol at the top left of your screen, and select
System Preferences.

- 6 -
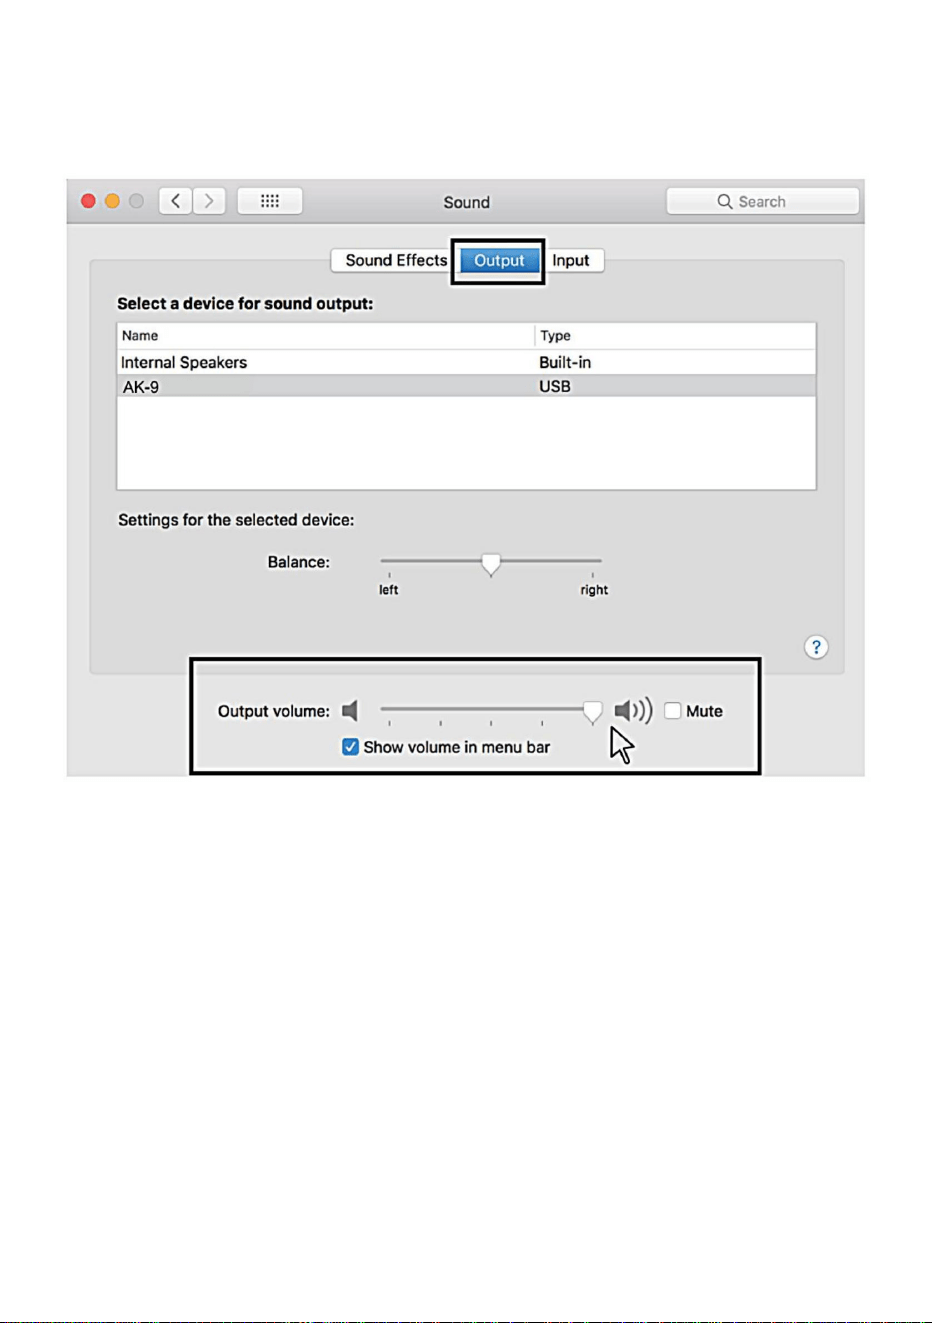
3.Next, click Sound to display the Sound preference pane.
4.Click the Input tab and select the "Ak-9" as the device for sound
input,and adjust the input volume.

- 7 -
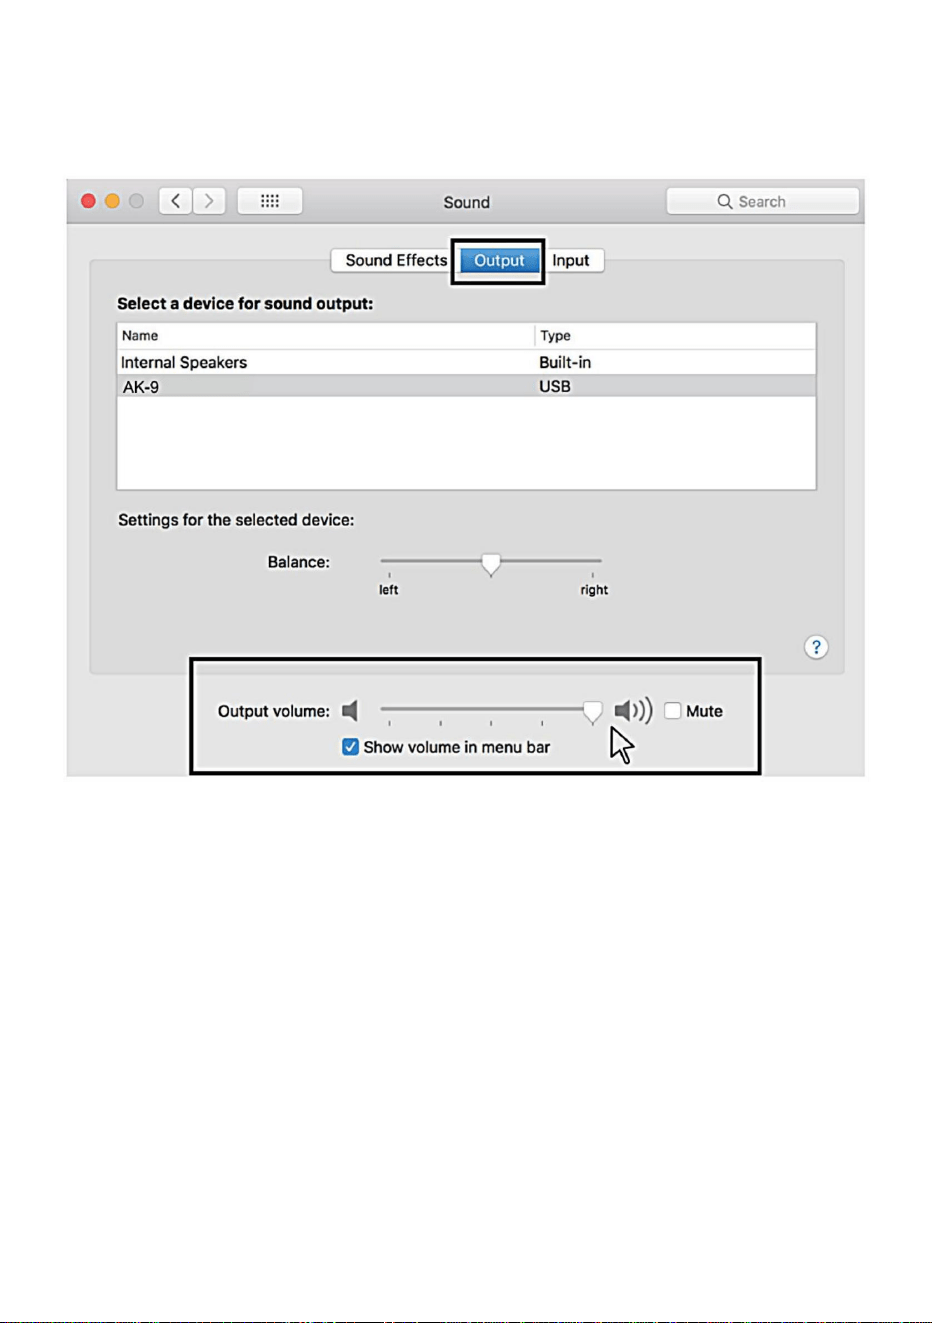
5. Click the output tab and make certain "AK-g" is selected as the default
output device.(This should have happened automatically.),Then adjust the
output volume.
Windows
1.Input settings
Plug the USB cable into your computer.The mic's LED will
illuminate,mic come to the working status.
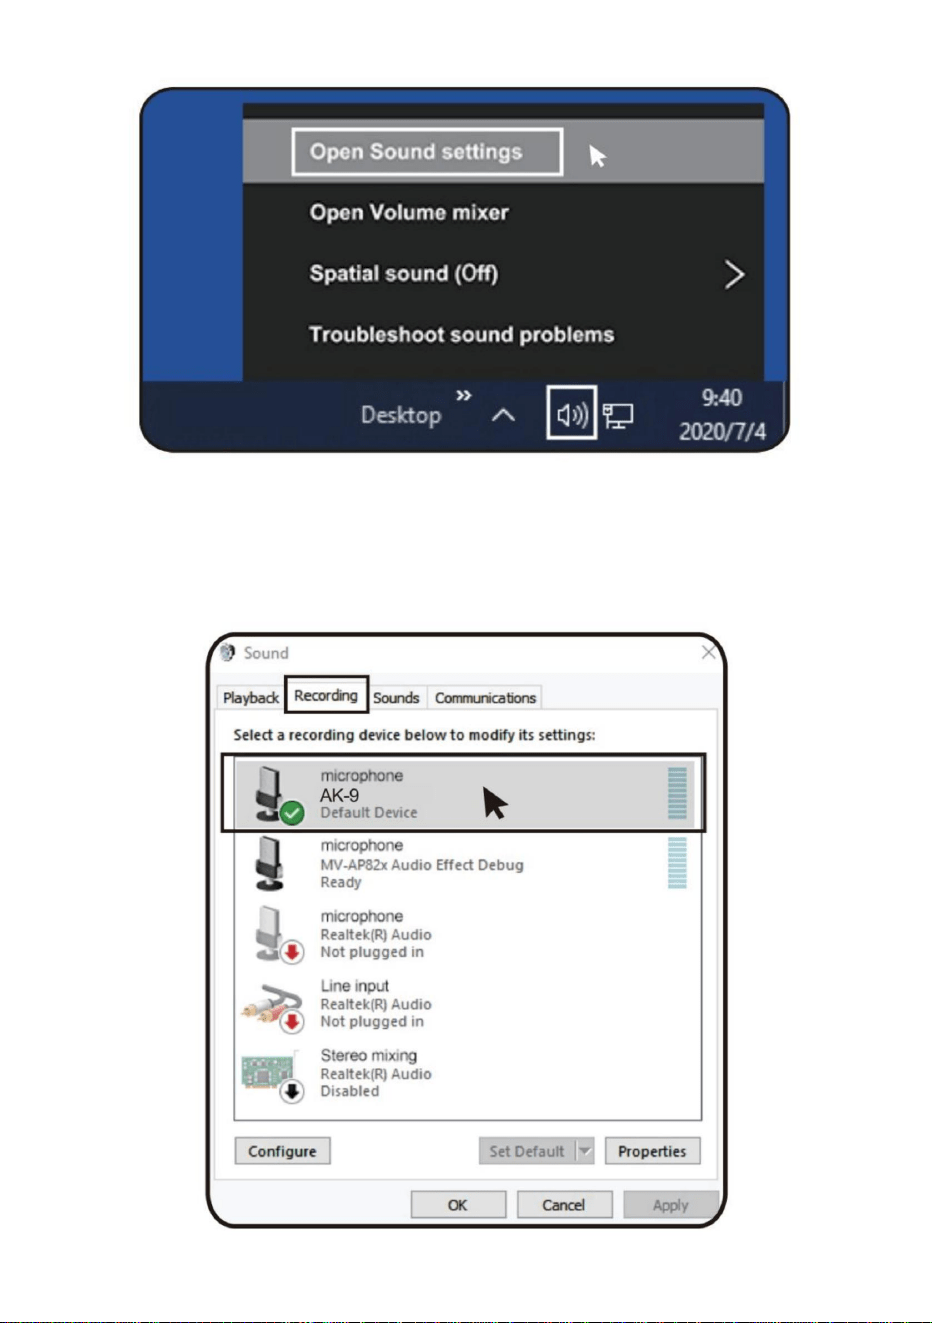
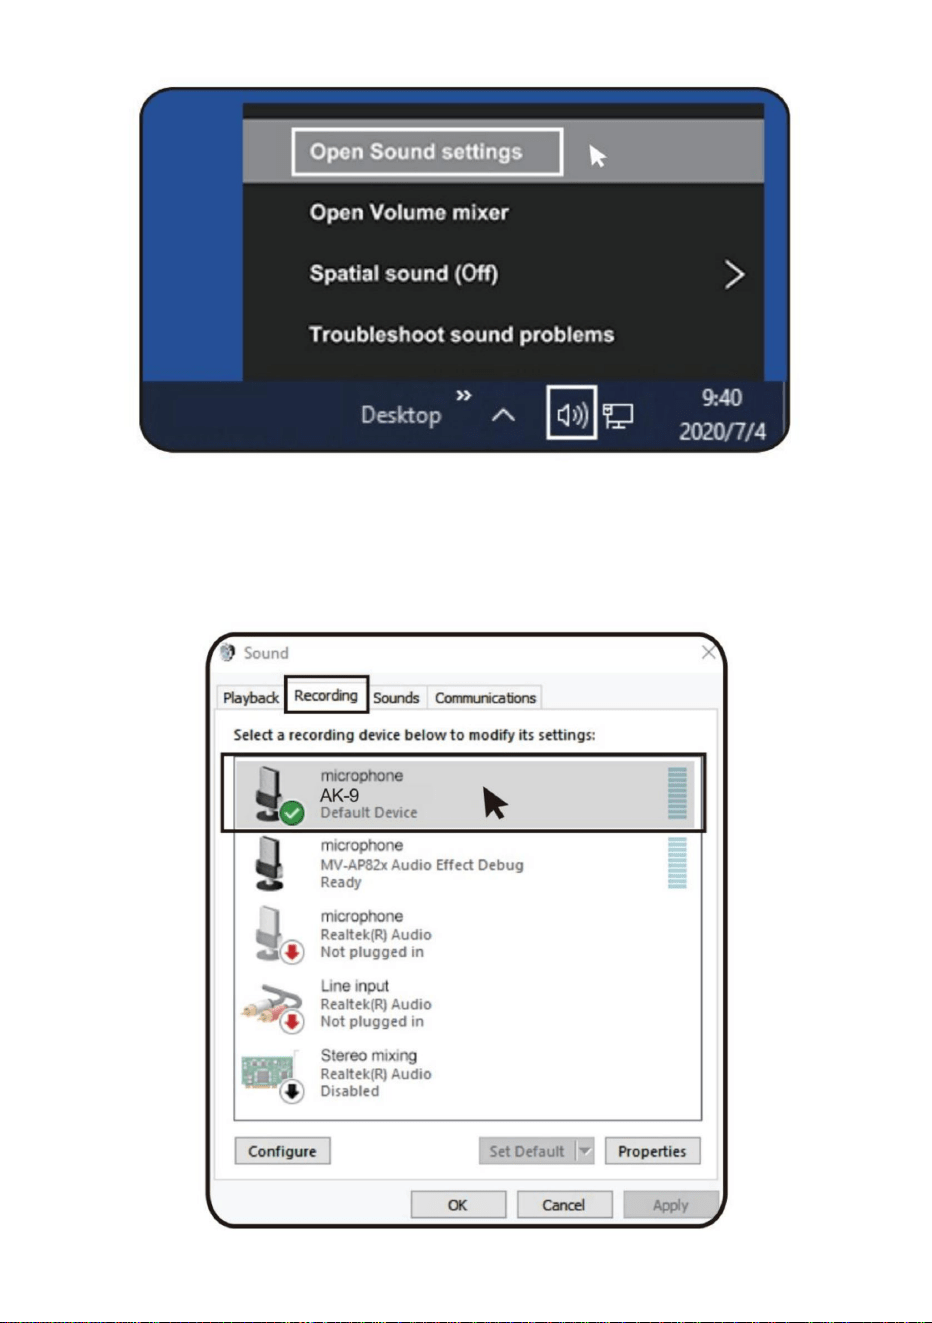
(1)Right-click the speaker icon at the bottom right of the screen and
Click"Open sound settings".

- 8 -
(2) Select the recording tab, and then select "AK-9" As the default
device. If thereis no change, please reset the computer and reinsert
the USB port.
- 9 -
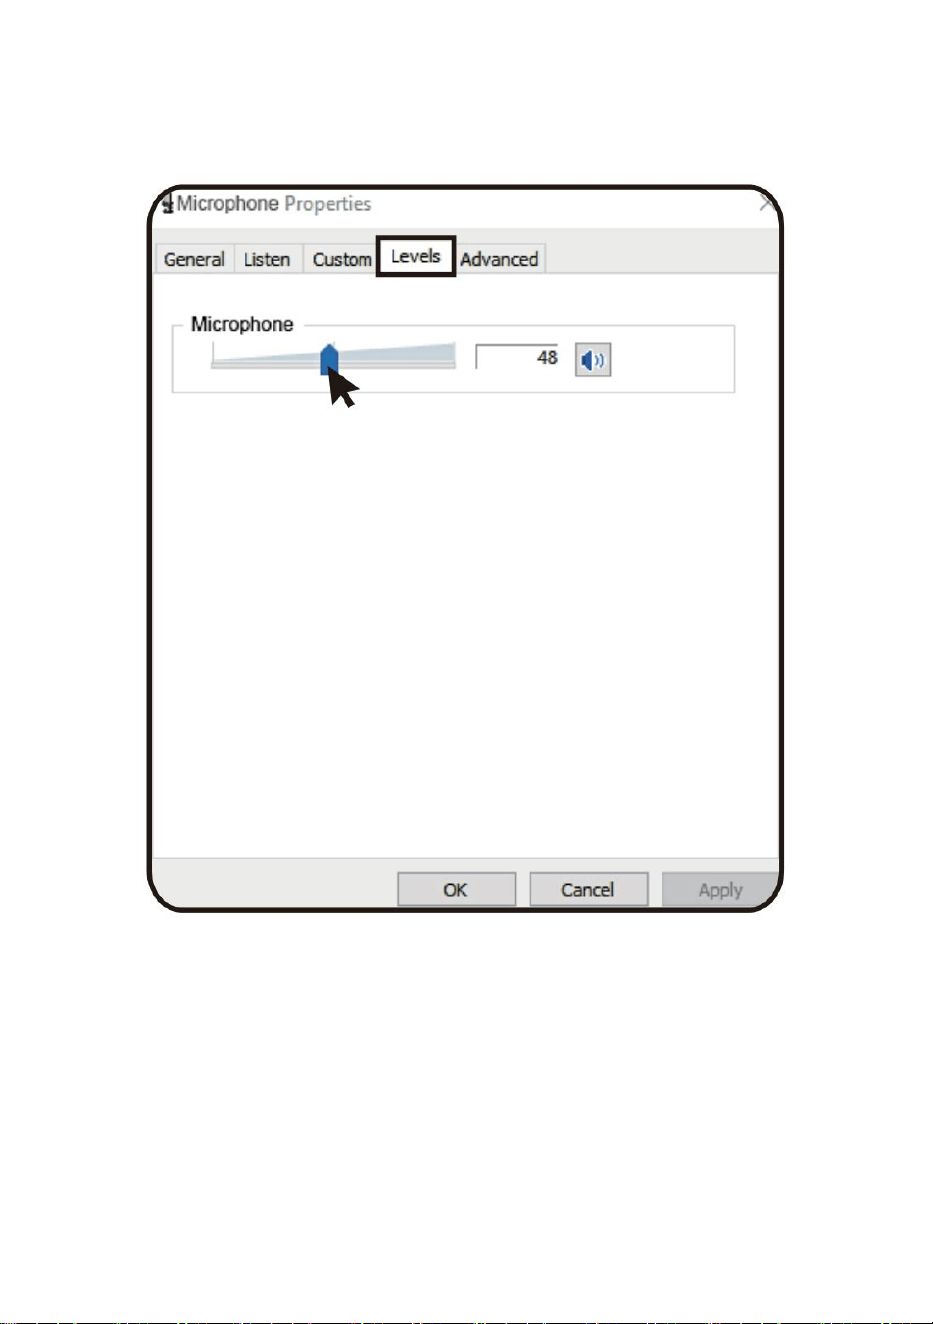
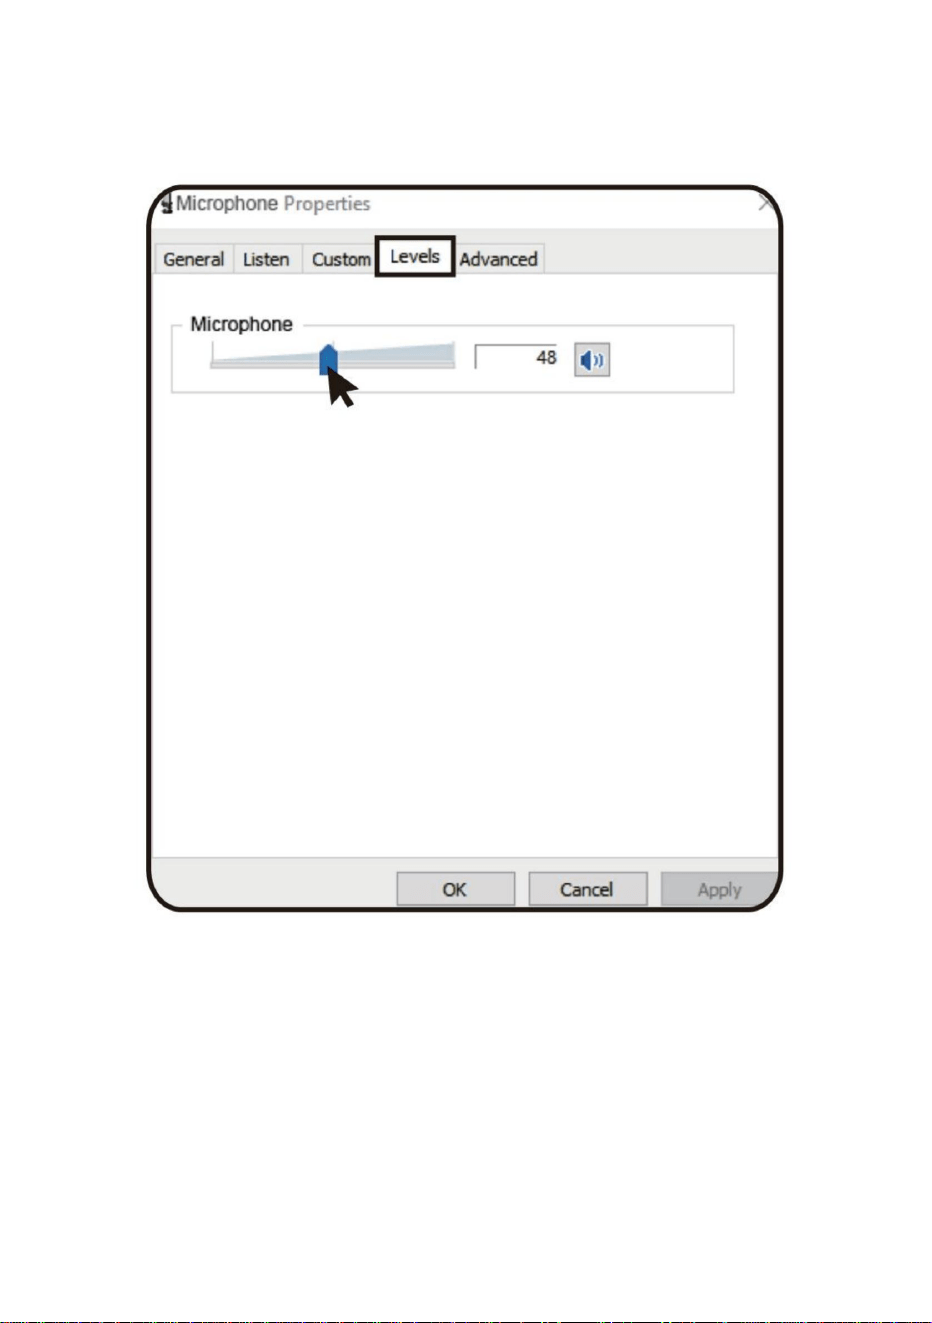
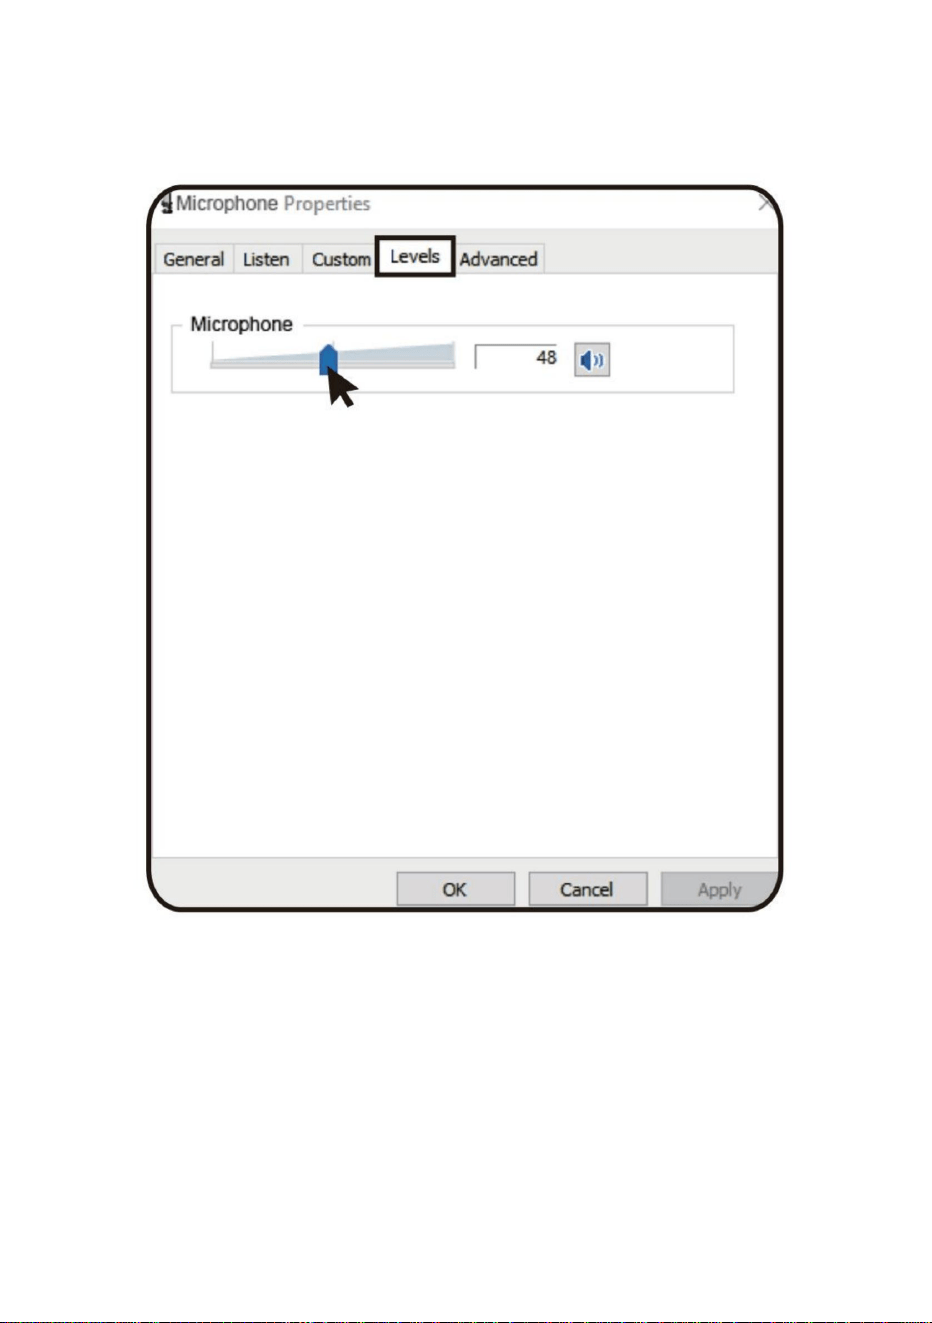
(3)Adjust input volume-Double click the "AK-9”to open the Microphone
Properties window.(Note:Make sure that the microphone gain and
headphone volume knob is not on the zero position.)
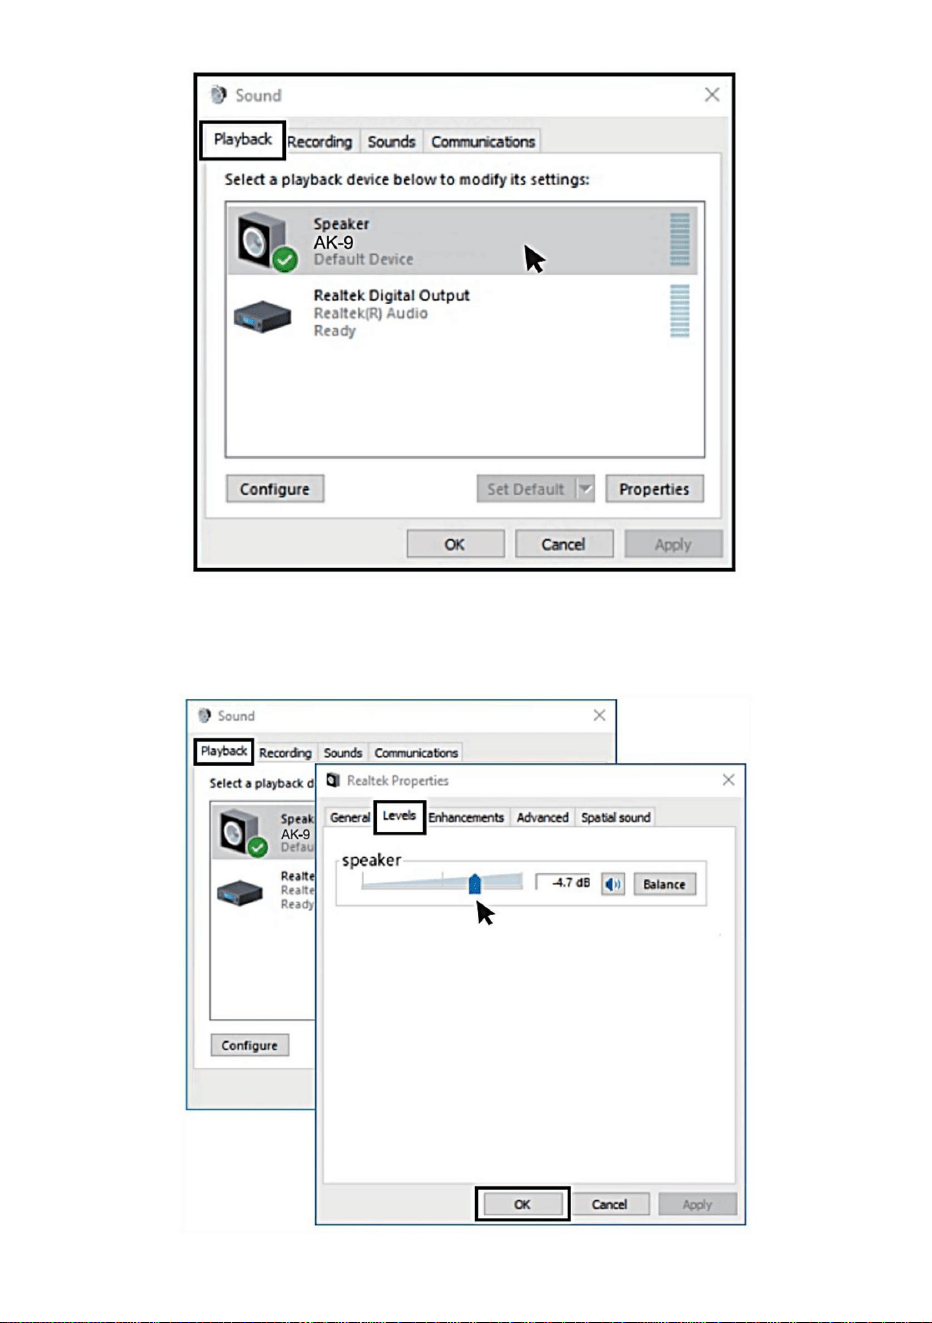
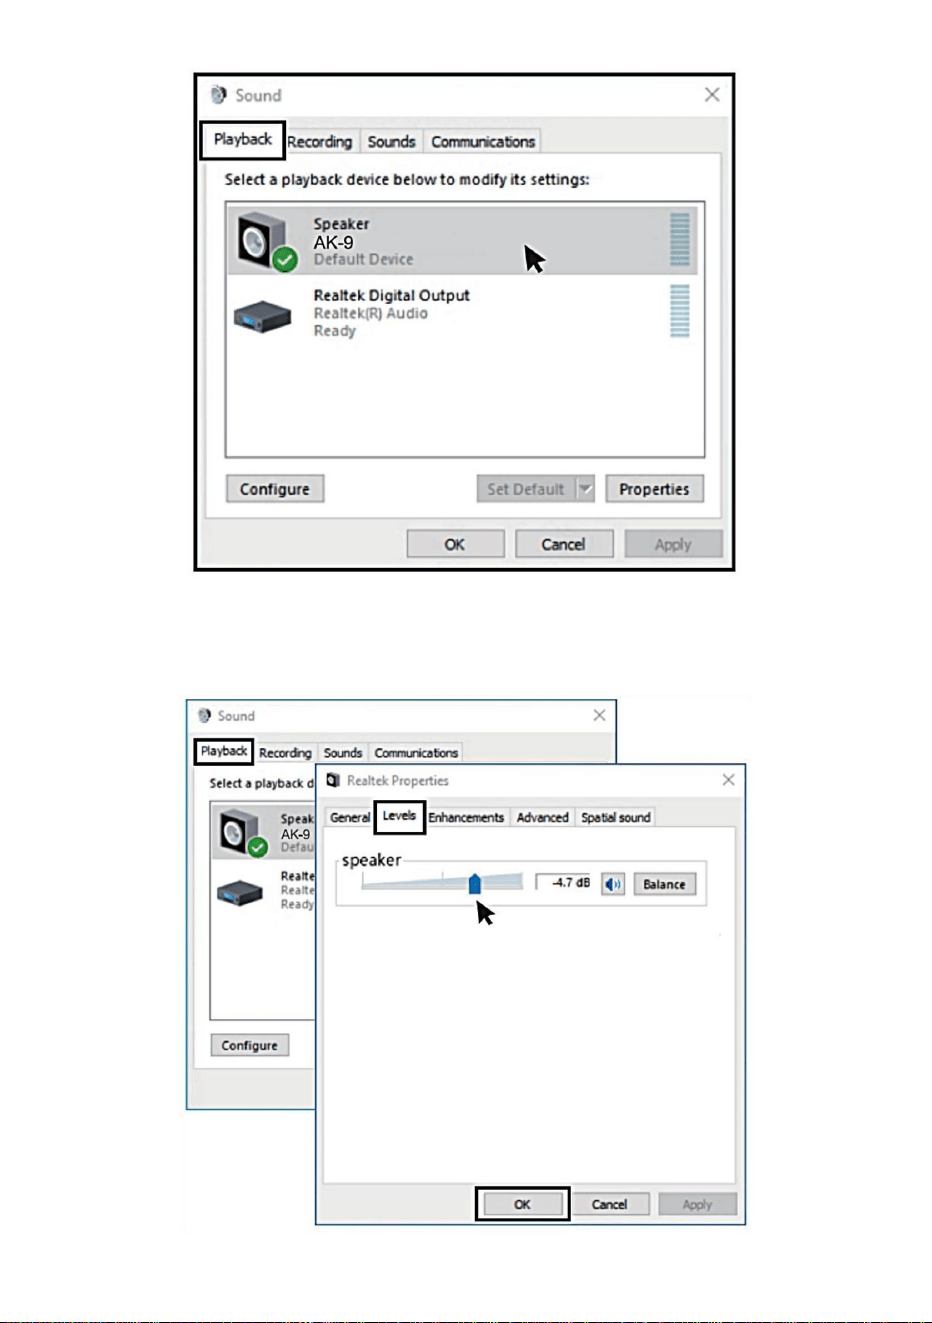
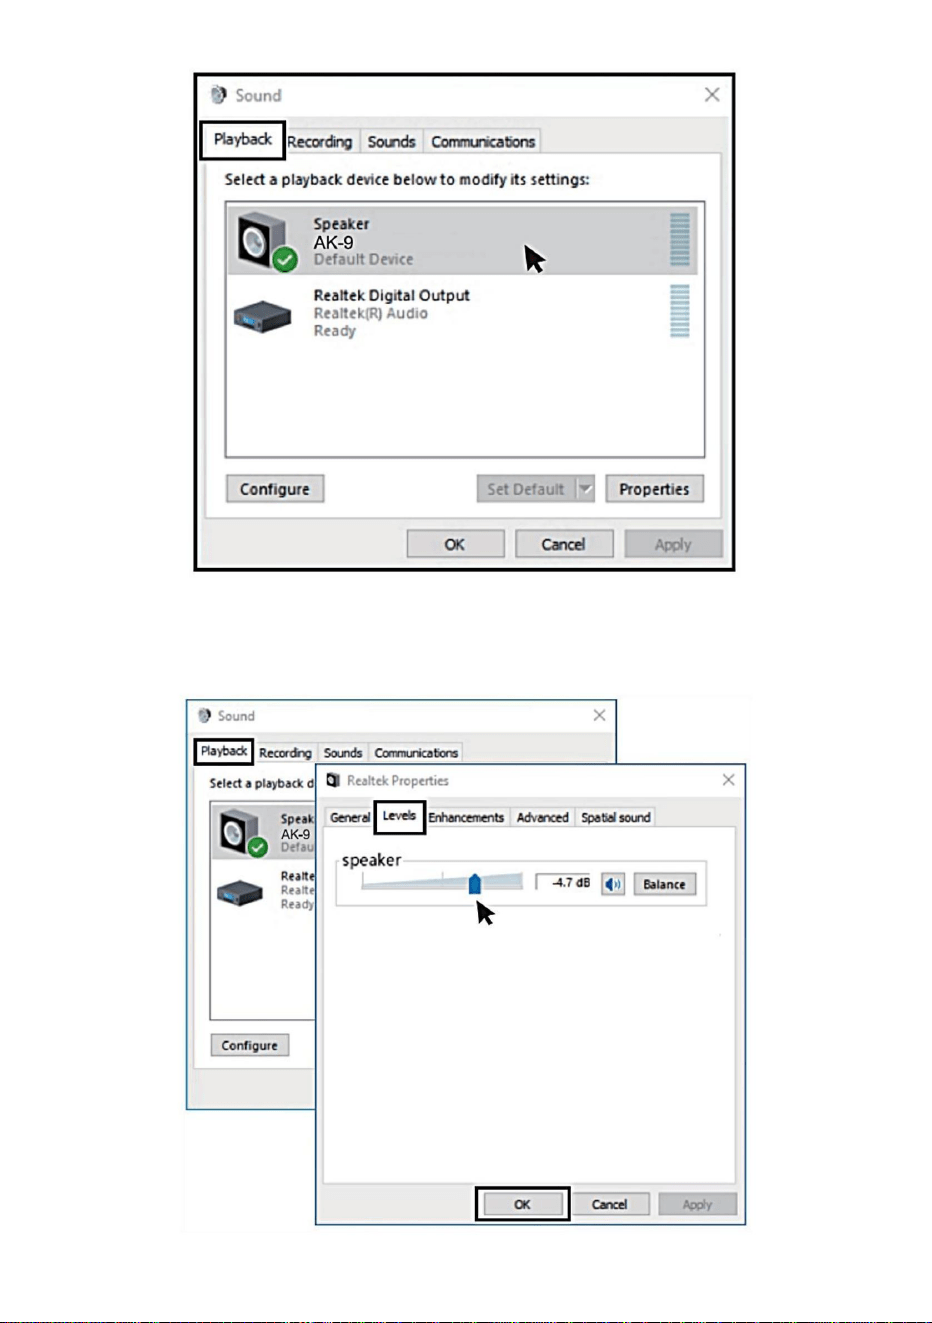
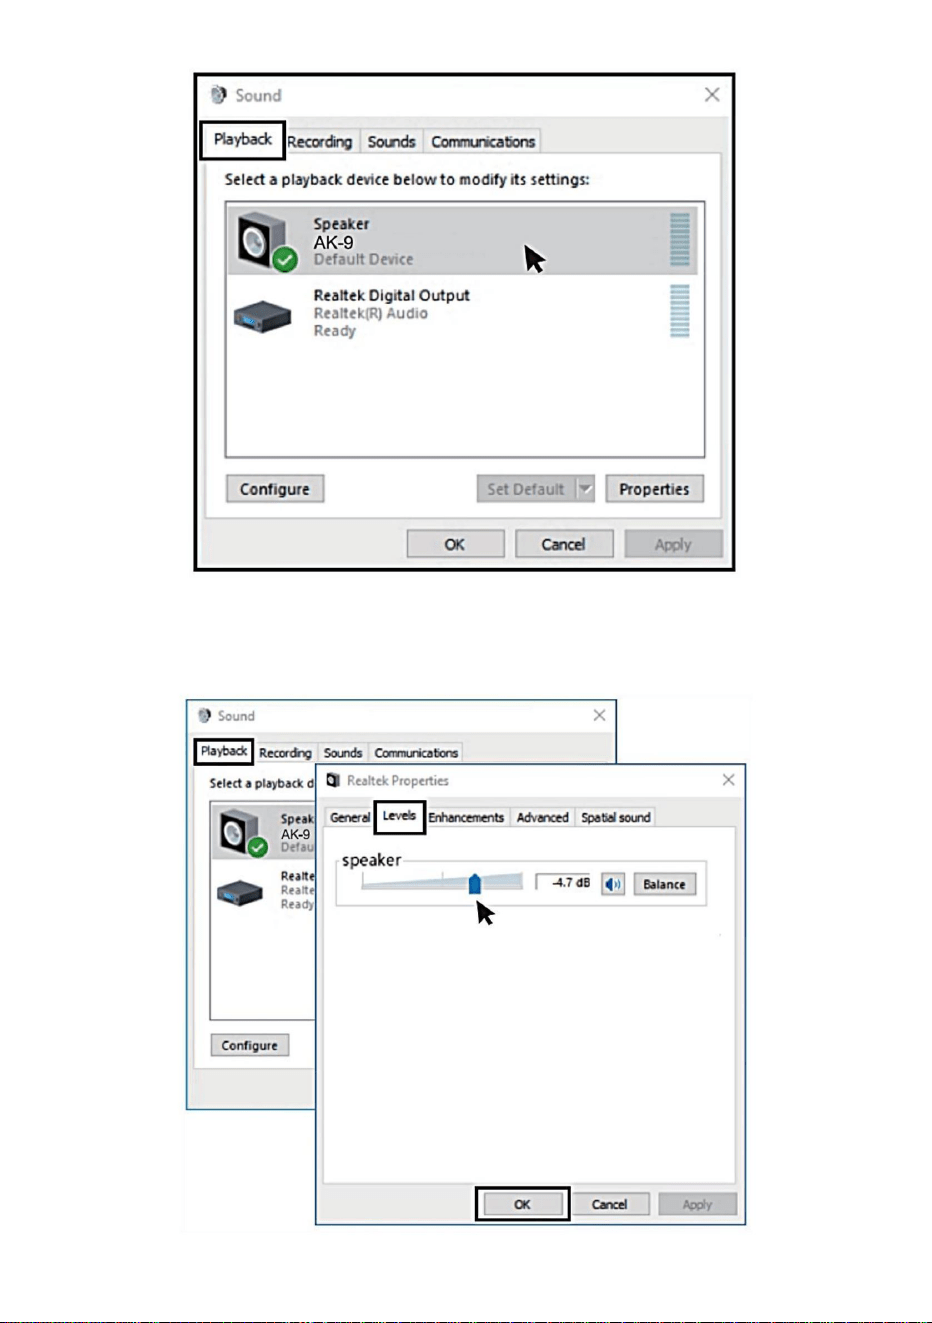
2. Output settings Output computer audio from the microphone headphone
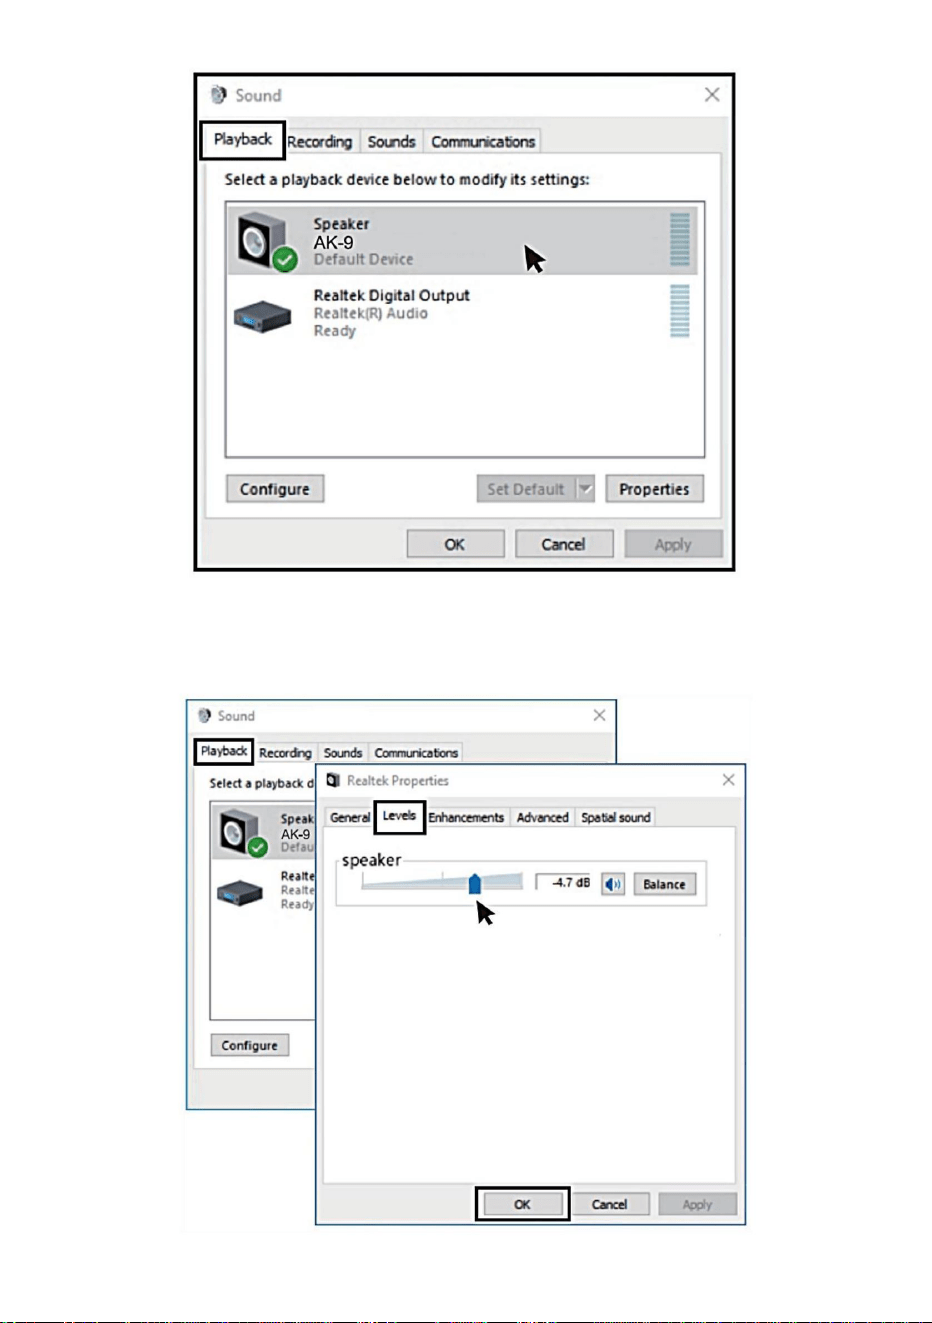
jack(1) Please insert the earphone into the earphone jack on the base, in
the "Sound' menu,Select the "Playback" tab and set "AK-g" as the default
device.
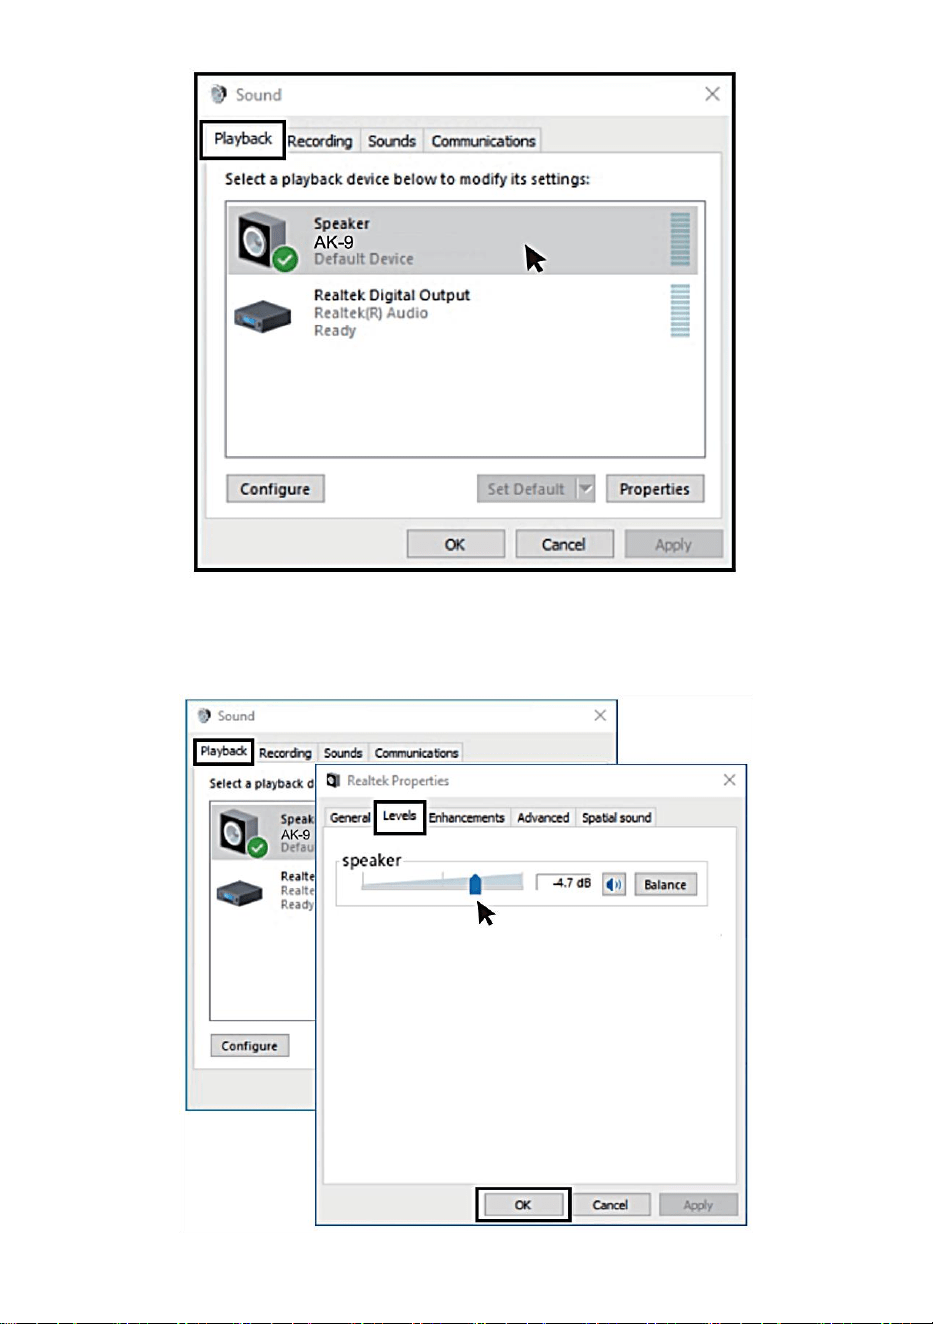
- 10 -
(2)Double click the speaker ("AK-9") is being
used>>Properties>>levels>>drag progress bar to adjust volume of output.
- 11 -
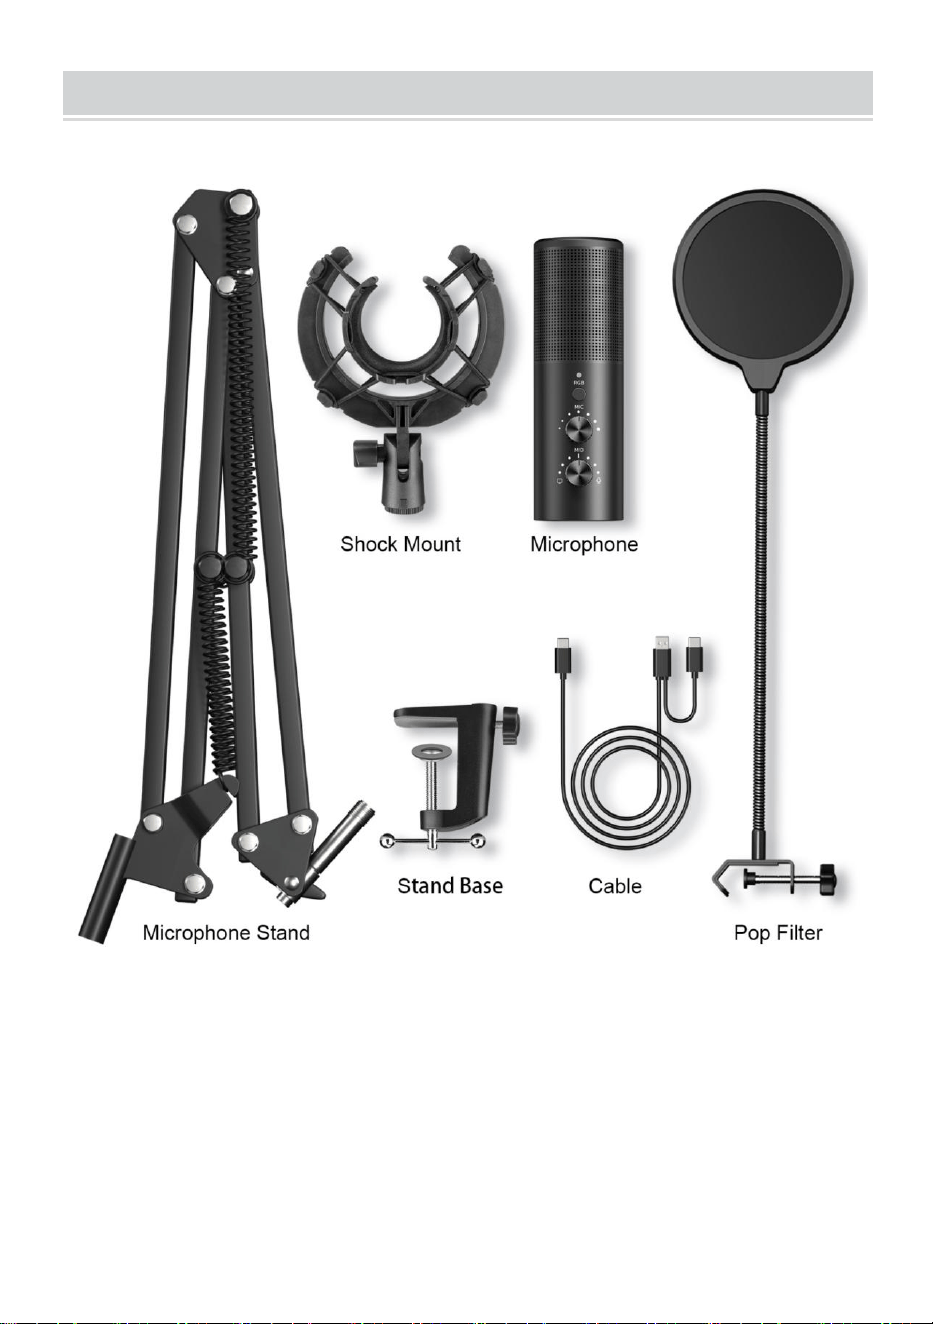
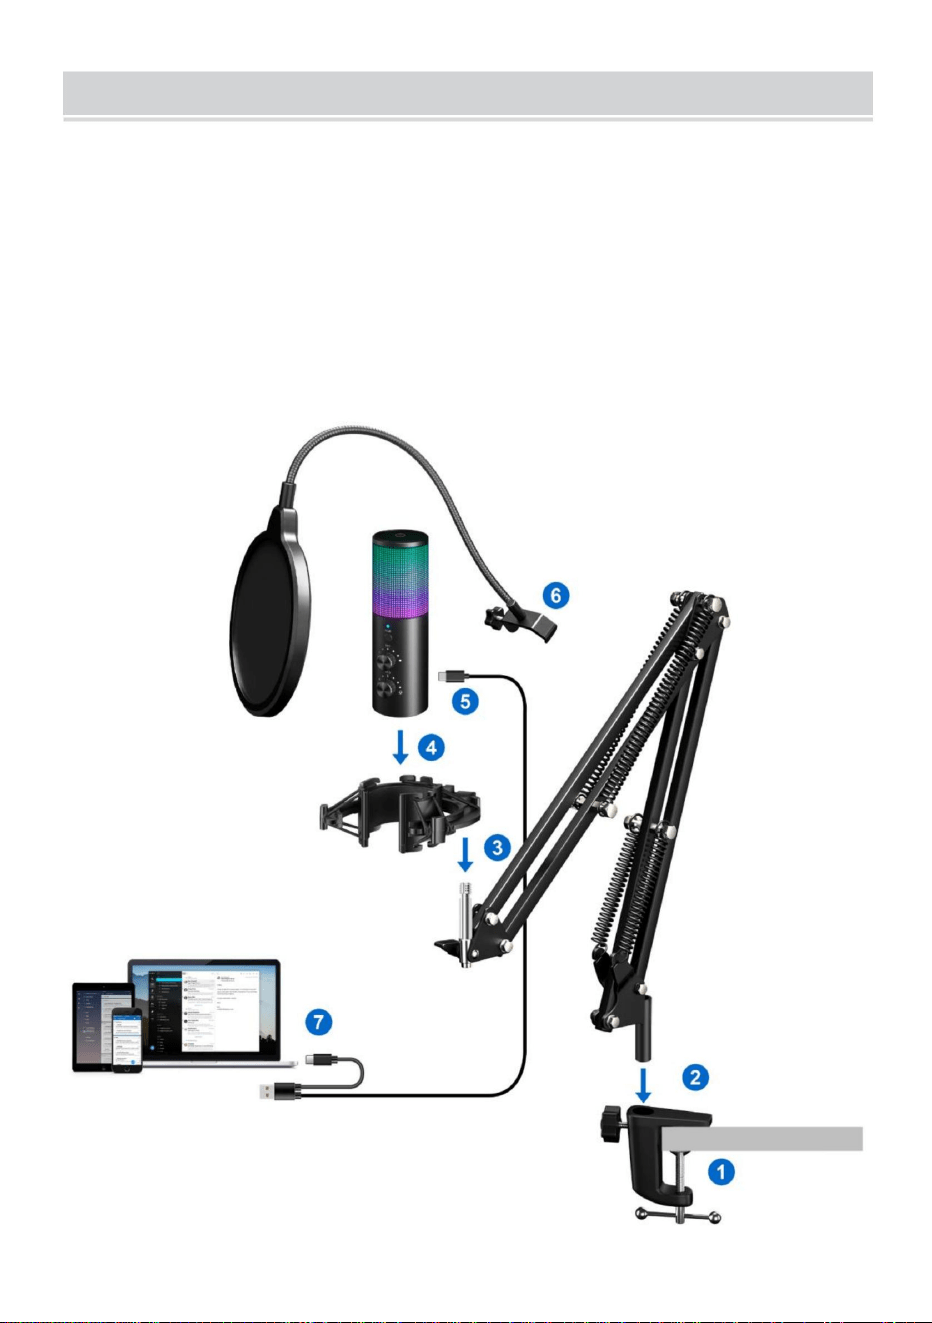
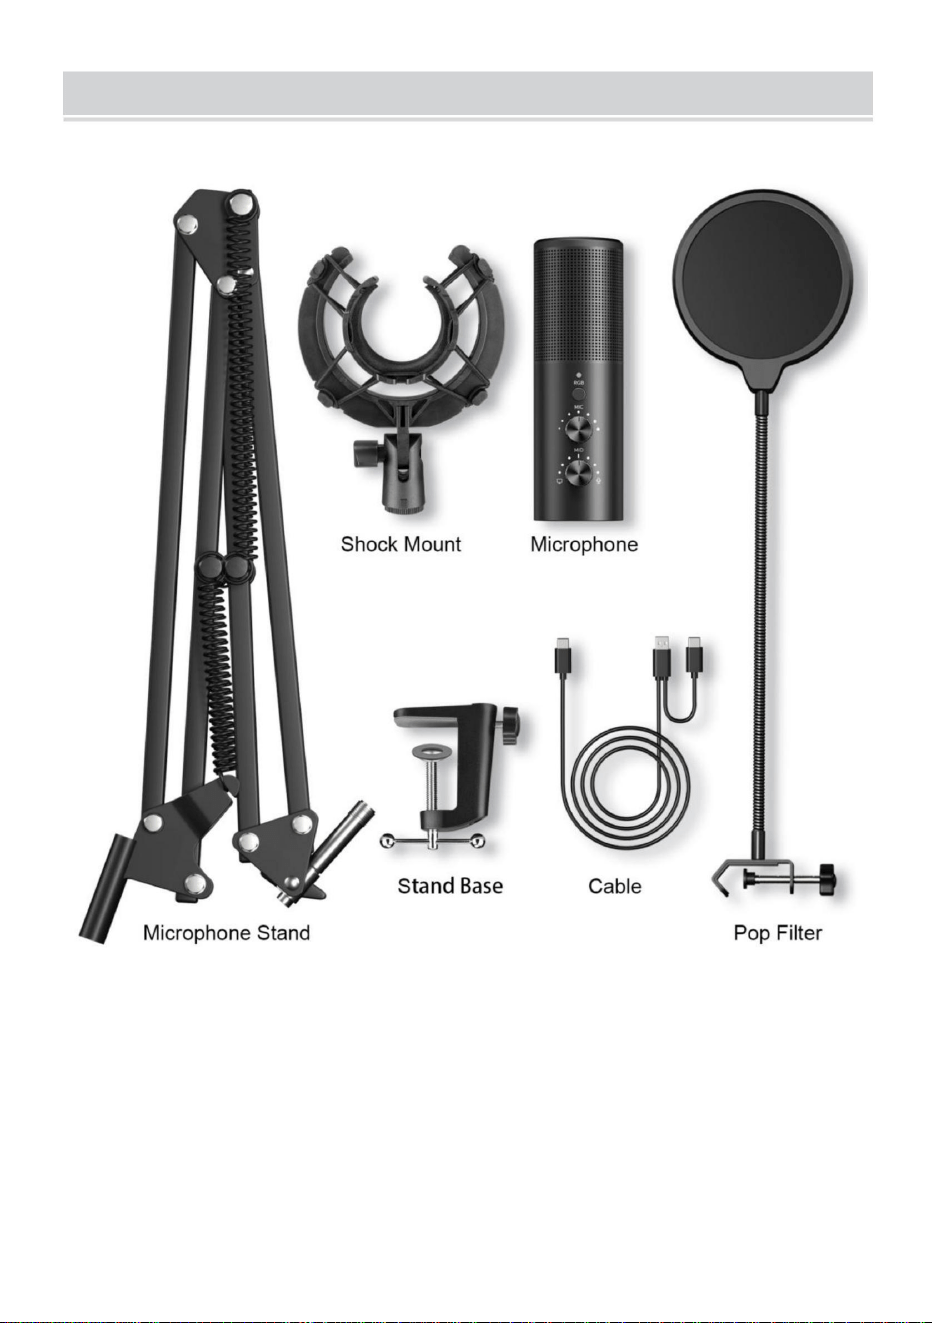
COMPONENTS INFORMATION
- 12 -
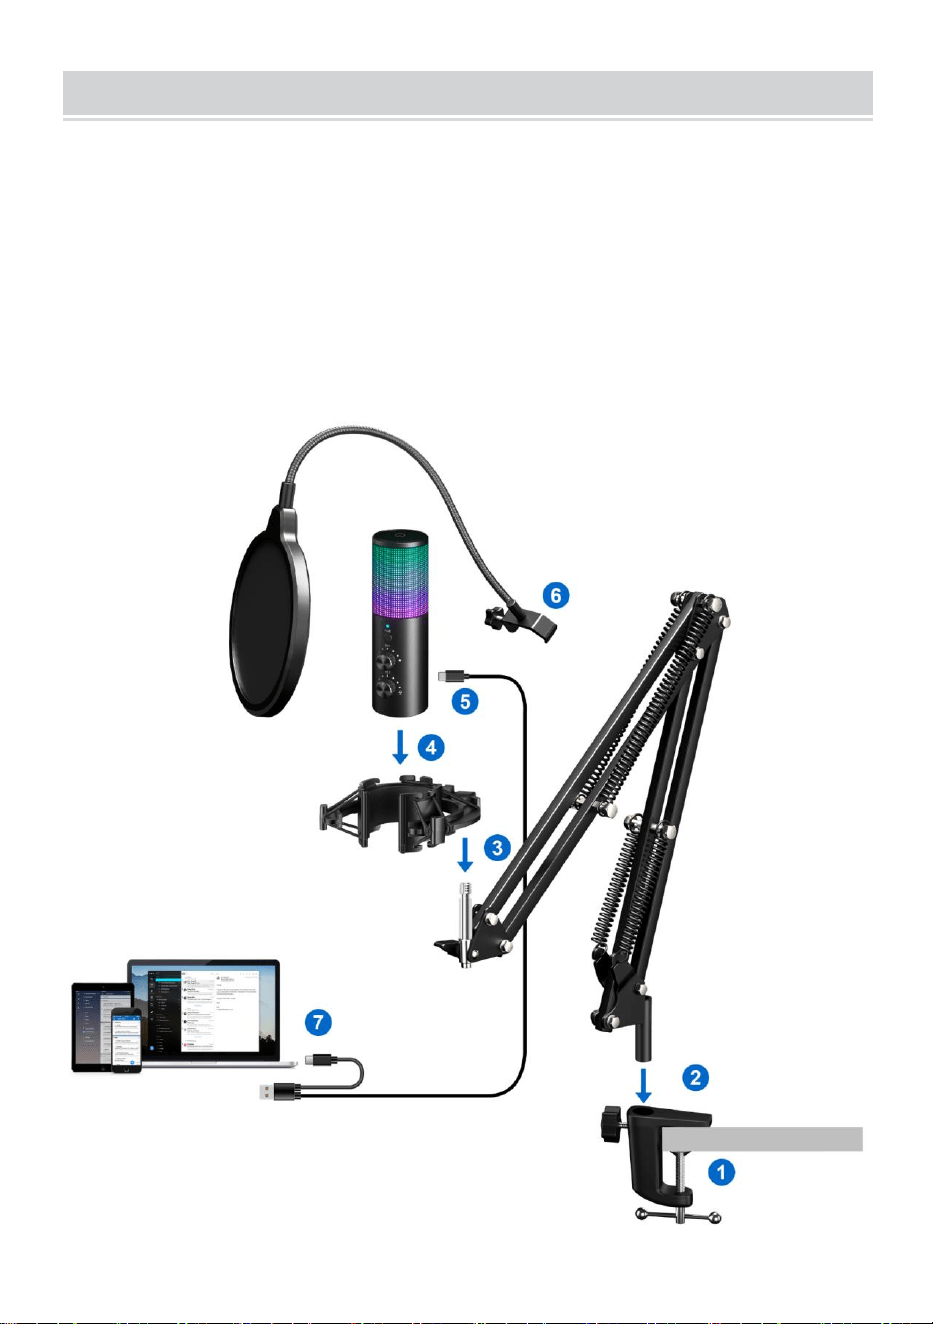
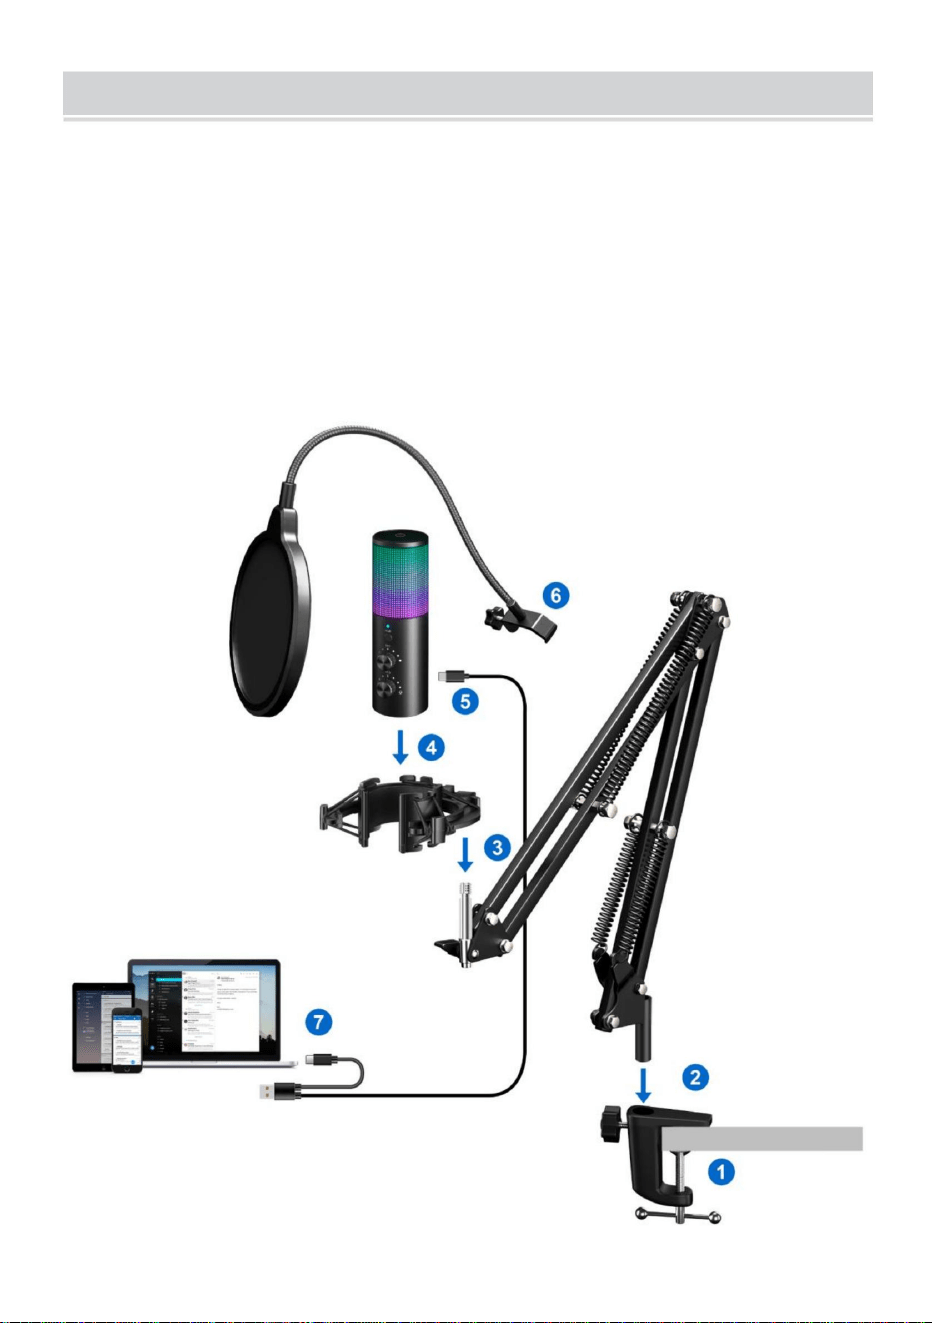
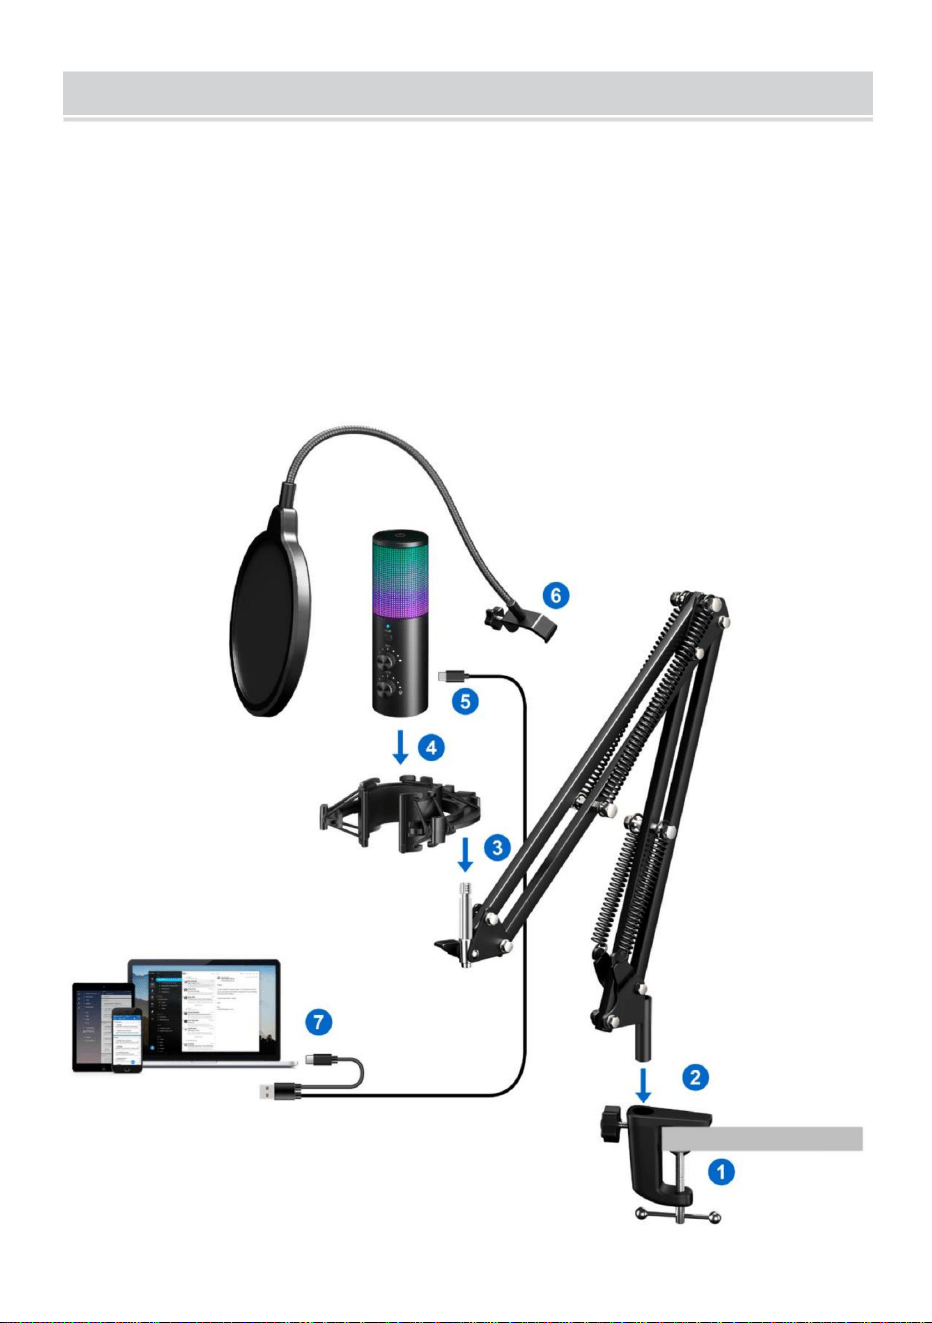
METHOD OF ERECTION
As shown in the picture:
1. Install the base on the table.
2. Install the microphone support on the base.
3. Install the shock-proof rack on the microphone support.
4. Insert the microphone into the shock-proof rack.
5. Connect the TYPE-C plug of the cable to the microphone.
6. Install the blowout preventer net on the microphone stand.
7. Connect the other end of the cable to your computer/mobile phone.

- 13 -
FAILURE RECOVERY
Problem Causes Quomodo
Product shaking.
1. The base nut is not
tightened.
2. The tripod is not flat.
Adjust the nut tightness at
the base and the tripod
development Angle.
Unable to connect
electronic devices.
1.The data cable is not
connected correctly.
2.The software
operation is incorrect.
1.Reconnect the data
cable.
2.Follow the instructions
to operate the software,
or consult the after-sales
personnel.
SAFETY WARNING
1. Do not disassemble the machine without permission.
2. It is strictly forbidden to use in water, exposure to sunlight or over
heated environment; keep away from danger sources such as open
flame and corrosion.
3. Using in a high temperature environment and cold weather will
reduce the performance of the product.
4. Please use a charger that complies with safety regulations to
charge
This device complies with Part 15 of the FCC Rules. Operation is subject to
the following two conditions:(1)This device may not cause harmful
interference, and (2)this device must accept any interference received,
including interference that may cause undesired operation.
Imported to USA: Sanven Technology Ltd, Suite 250. 9166 Anaheim
Place, Rancho Cucamonga, CA 91730


Microphoned'enregistrement
Instructions
MODÈLE:AK9
Assistancetechniqueetcertificatdegarantie
électroniquewww.vevor.com/support
«Économisezlamoitié»,«Moitiéprix»outouteautreexpressionsimilaireutiliséeparnousnereprésente
qu'uneestimationdeséconomiesquevouspourriezréaliserenachetantcertainsoutilscheznousparrapport
auxgrandesmarquesetnecouvrepasnécessairementtouteslescatégoriesd'outilsquenousproposons.
Nousvousrappelonsdebienvouloirvérifiersoigneusementlorsquevouspassezunecommandechez
noussivouséconomisezréellementlamoitiéparrapportauxgrandesmarques.
Nouscontinuonsànousengageràvousfournirdesoutilsàdesprixcompétitifs.
Machine Translated by Google

BESOIND'AIDE?CONTACTEZNOUS!
Vousavezdesquestionssurnosproduits?Vousavezbesoind'assistancetechnique?
N'hésitezpas
ànouscontacter:Assistancetechniqueetcertificatdegarantie
électroniquewww.vevor.com/support
Ils'agitdelanoticed'utilisationd'origine.Veuillezlireattentivementtoutesles
instructionsdumanuelavantdel'utiliser.VEVORseréserveledroitd'interpréterclairement
notremanueld'utilisation.L'apparenceduproduitdépendduproduitquevousavez
reçu.Veuilleznousexcuser,nousnevousinformeronsplusencasdemiseàjourtechnologique
oulogicielledenotreproduit.
AK9
MODÈLE:AK9
Microphoned'enregistrement
1
Machine Translated by Google
DESCRIPTIONDELAFONCTIONDUMICROPHONE
CARACTÉRISTIQUESETPARAMÈTRES
Gaindumicrophone
Oui
Oui
Oui
3,5mm
Modèle
Oui
TéléphonesàinterfaceTypeC
192kHz/24bits
Saisir
Coupuredusonenunclic
Tailleduportpourcasque
AK9
Fréquenced'échantillonnage
DC5V
Pannedumicrophone
Appareilcompatible
fonctiondeprévention
Oui
AvertissementPourréduirelerisquedeblessure,l'utilisateurdoitlire
(ycomprislemodelumièreséteintes)
PS4,PS5,PC,ordinateurdebureau,ordinateurportable,laplupart
Commutez11modesd'éclairageRVB
Lisezattentivementlemanueld'instructions.
LumièreLED
Amortisseur
2
Machine Translated by Google

3
Remarque:deuxlignesdeconnexionsontconfiguréesetdifférenteslignesde
connexionpeuventêtreutiliséespourconnecterletéléphonemobile(interface
TYPEC)oul'ordinateurselonlesbesoins.
Machine Translated by Google

4
Machine Translated by Google
MACOS1.
Insérezl'extrémitélibreducâbleUSBfournidansleportUSBdel'ordinateur.LevoyantLED
dumicrophones'allume,indiquantquelemicrophonefonctionne.Votreordinateurreconnaît
automatiquementlepériphériqueUSBetinstallelepilote.Maisilsepeutqu'aucunefenêtre
contextuelleoumessagenes'affiche.
2.CliquezsurlesymboleAppleenhautàgauchedevotreécranetsélectionnezPréférences
Système.
2.Ils'agitd'unpériphériqueUSB«Plug&Play»,compatibleaveclesordinateursWindowset
Mac.Leplacementdumicrophoneparrapportauchanteurpeutvarierenfonctionde
plusieursfacteurs,notammentl'acoustiquedelapièce,laperformancevocale
etlefaitquelechanteuraitunevoixaiguëougrave.
1.LemicrophoneestalimentéparleportUSBdevotreappareil,cequisignifiequedansla
plupartdescas,vouspouvezsimplementbrancherlemicrophoneetcommencer
immédiatement.PourlesportsUSBnonstandard,unconcentrateurUSBalimentépeutêtrenécessaire.
INSTRUCTIONSDERÉGLAGE
EXIGENCESENTERMESD'ÉNERGIE
5
Machine Translated by Google

6
4.Cliquezsurl'ongletEntréeetsélectionnez«Ak9»commepériphérique
d'entréeaudioetréglezlevolumed'entrée.
3.Ensuite,cliquezsurSonpourafficherlevoletdespréférencesSon.
Machine Translated by Google

(1)Cliquezavecleboutondroitsurl'icôneduhautparleurenbasàdroitedel'écranetcliquez
sur«Ouvrirlesparamètressonores».
Windows1.
Paramètresd'entrée
BranchezlecâbleUSBsurvotreordinateur.LaLEDdumicros'allumera,le
micropasseenétatdefonctionnement.
5.Cliquezsurl'ongletdesortieetassurezvousque«AKg»estsélectionnécomme
périphériquedesortiepardéfaut(celaauraitdûseproduireautomatiquement),puis
ajustezlevolumedesortie.
7
Machine Translated by Google

8
(2)Sélectionnezl'ongletd'enregistrement,puissélectionnez«AK9»comme
périphériquepardéfaut.S'iln'yaaucunchangement,veuillezréinitialiserl'ordinateur
etréinsérerleportUSB.
Machine Translated by Google
9
(3)Réglezlevolumed'entréeDoublecliquezsur«AK9»pourouvrirlafenêtre
Propriétésdumicrophone.(Remarque:assurezvousqueleboutondegaindu
microphoneetdevolumeducasqueneestpassurlapositionzéro.)
2.ParamètresdesortieSortieaudiodel'ordinateurdepuislaprisecasquedumicrophone(1)
Veuillezinsérerl'écouteurdanslaprisecasquedelabase,danslemenu«Son»,
sélectionnezl'onglet«Lecture»etdéfinissez«AKg»commepériphériquepardéfaut.
Machine Translated by Google
10
(2)Doublecliquezsurlehautparleur(«AK9»)encours
d'utilisation>>Propriétés>>Niveaux>>Faitesglisserlabarredeprogressionpourréglerlevolumedesortie.
Machine Translated by Google

11
INFORMATIONSSURLESCOMPOSANTS
Machine Translated by Google
6.Installezlefiletantiexplosionsurlepieddumicrophone.
3.Installezlesupportantichocsurlesupportdumicrophone.
5.ConnectezlaficheTYPECducâbleaumicrophone.
7.Connectezl’autreextrémitéducâbleàvotreordinateur/téléphoneportable.
1.Installezlabasesurlatable.
4.Insérezlemicrophonedanslesupportantichoc.
2.Installezlesupportdumicrophonesurlabase.
Commelemontrel'image:
METHODED'ERECTION
12
Machine Translated by Google

interférence,et(2)cetappareildoitacceptertouteinterférencereçue,
labaseetletrépied
Impossibledeseconnecter
2.Suivezlesinstructions
2.Ileststrictementinterditdel'utiliserdansl'eau,del'exposerausoleilouausoleil.
Problème
1.Lecâblededonnéesn'estpas
flammeetcorrosion.
resserré.
1.Reconnectezlesdonnées
ImportéauxÉtatsUnis:SanvenTechnologyLtd,Suite250.9166Anaheim
connectécorrectement.
Causes
pourutiliserlelogiciel,ou
consulterleserviceaprèsvente
4.Veuillezutiliserunchargeurconformeauxrèglesdesécuritépour
Cetappareilestconformeàlapartie15desrèglesdelaFCC.Sonfonctionnementestsoumisà
l'opérationestincorrecte.
Comment
appareilsélectroniques.
Anglededéveloppement.
environnementchauffé;teniràl'écartdessourcesdedangertellesqueles
ycomprislesinterférencessusceptiblesdeprovoquerunfonctionnementindésirable.
Lieu,RanchoCucamonga,CA91730
câble.
3.L'utilisationdansunenvironnementàhautetempératureetpartempsfroid
2.Letrépiedn'estpasplat.
personnel.
1.L'écroudebasen'estpas
2.Lelogiciel
charge
réduirelesperformancesduproduit.
1.Nedémontezpaslamachinesansautorisation.
Réglezleserragedel'écrouà
Agitationduproduit.
lesdeuxconditionssuivantes:(1)Cetappareilnedoitpascauserdedommages
AVERTISSEMENTDESÉCURITÉ
RÉCUPÉRATIONAPRÈSÉCHEC
13
Machine Translated by Google

Machine Translated by Google


Aufnahmemikrofon
Anweisungen
MODELL: AK-9
Technischer Support und E-Garantie-Zertifikat
www.vevor.com/support
„Sparen Sie die Hälfte“, „Halber Preis“ oder andere ähnliche Ausdrücke, die wir verwenden, stellen nur eine
Schätzung der Ersparnis dar, die Sie beim Kauf bestimmter Werkzeuge bei uns im Vergleich zu den großen
Topmarken erzielen können, und decken nicht notwendigerweise alle von uns angebotenen Werkzeugkategorien
ab. Wir möchten Sie freundlich daran erinnern, bei Ihrer Bestellung bei uns sorgfältig zu prüfen, ob Sie im
Vergleich zu den großen Topmarken tatsächlich die Hälfte sparen.
Wir sind weiterhin bestrebt, Ihnen Werkzeuge zu wettbewerbsfähigen Preisen anzubieten.
Machine Translated by Google

Brauchen Sie Hilfe? Kontaktieren Sie uns!
Haben Sie Fragen zum Produkt? Benötigen Sie technischen Support? Bitte kontaktieren Sie
uns:
Technischer Support und E-Garantie-Zertifikat www.vevor.com/
support
Dies ist die Originalanleitung. Bitte lesen Sie alle Anweisungen sorgfältig durch, bevor
Sie das Gerät in Betrieb nehmen. VEVOR behält sich eine klare Auslegung unserer
Bedienungsanleitung vor. Das Erscheinungsbild des Produkts richtet sich nach dem
Produkt, das Sie erhalten haben. Bitte verzeihen Sie uns, dass wir Sie nicht erneut informieren,
wenn es Technologie- oder Software-Updates für unser Produkt gibt.
AK-9
MODELL: AK-9
Aufnahmemikrofon
- 1 -
Machine Translated by Google

SPEZIFIKATIONEN UND PARAMETER
MIKROFONFUNKTIONSBESCHREIBUNG
Ja
192 kHz/24 Bit
Eingang
Stummschalten mit einem Klick
PS4, PS5, PC, Desktop, Laptop, die meisten
Größe des Kopfhöreranschlusses
AK-9
Abtastfrequenz
Mikrofonverstärkung
Ja
3,5 mm
Modell
Ja
(einschließlich Licht-Aus-Modus)
Warnung-Um das Verletzungsrisiko zu verringern, muss der Benutzer
Telefone mit Typ-C-Schnittstelle
Schalten Sie 11 RGB-Beleuchtungsmodi um
Lesen Sie die Bedienungsanleitung sorgfältig durch.
LED-Licht
Stoßdämpfer
Ja
Ja
Gleichstrom 5 V
Mikrofon defekt
Kompatibles Gerät
Präventionsfunktion
- 2 -
Machine Translated by Google

- 3 -
Hinweis: Es sind zwei Anschlussleitungen konfiguriert, über welche je nach
Bedarf unterschiedliche Anschlussleitungen zum Anschluss des Mobiltelefons
(TYPE-C-Schnittstelle) oder Computers genutzt werden können.
Machine Translated by Google

- 4 -
Machine Translated by Google

- 5 -
EINSTELLANLEITUNG
LEISTUNGSBEDARF
MAC OS 1.
Stecken Sie das freie Ende des mitgelieferten USB-Kabels in den USB-Anschluss des Computers.
Die LED des Mikrofons leuchtet auf und zeigt damit an, dass das Mikrofon funktioniert. Ihr
Computer erkennt das USB-Gerät automatisch und installiert den Treiber. Es werden jedoch
möglicherweise keine Popup-Fenster oder Meldungen angezeigt.
2. Klicken Sie oben links auf Ihrem Bildschirm auf das Apple-Symbol und wählen Sie
„Systemeinstellungen“.
2. Es handelt sich um ein „Plug & Play“-USB-Gerät, das sowohl mit Windows- als auch mit Mac-
Computern kompatibel ist. Die Platzierung des Mikrofons im Verhältnis zum Sänger kann von
verschiedenen Faktoren abhängen, unter anderem von der Raumakustik, der
Gesangsleistung und davon, ob der Sänger eine hohe oder tiefe Stimme hat.
1. Das Mikrofon wird über den USB-Anschluss Ihres Geräts mit Strom versorgt. In den meisten
Fällen können Sie das Mikrofon also einfach anschließen und sofort loslegen. Für nicht
standardmäßige USB-Anschlüsse ist möglicherweise ein USB-Hub mit Stromversorgung erforderlich.
Machine Translated by Google

3. Klicken Sie anschließend auf „Sound“, um den Sound-Einstellungsbereich anzuzeigen.
4. Klicken Sie auf die Registerkarte „Eingabe“, wählen Sie „Ak-9“ als Gerät für die Toneingabe und
passen Sie die Eingangslautstärke an.
- 6 -
Machine Translated by Google

Windows 1.
Eingabeeinstellungen
Stecken Sie das USB-Kabel in Ihren Computer. Die LED des Mikrofons leuchtet auf und das
Mikrofon ist betriebsbereit.
(1) Klicken Sie mit der rechten Maustaste auf das Lautsprechersymbol unten rechts auf dem Bildschirm und
klicken Sie auf „Soundeinstellungen öffnen“.
5. Klicken Sie auf die Registerkarte „Ausgabe“ und stellen Sie sicher, dass „AK-g“ als
Standardausgabegerät ausgewählt ist. (Dies sollte automatisch geschehen sein.) Passen Sie
dann die Ausgabelautstärke an.
- 7 -
Machine Translated by Google
- 8 -
(2) Wählen Sie die Registerkarte „Aufnahme“ und dann „AK-9“ als Standardgerät. Wenn
sich nichts ändert, setzen Sie den Computer zurück und stecken Sie das Gerät erneut in
den USB-Anschluss.
Machine Translated by Google

- 9 -
2. Ausgabeeinstellungen Geben Sie Computer-Audio über die Mikrofon-Kopfhörerbuchse aus (1).
Stecken Sie den Ohrhörer in die Ohrhörerbuchse an der Basis, wählen Sie im Menü „Ton“ die
Registerkarte „Wiedergabe“ und stellen Sie „AK-g“ als Standardgerät ein.
(3) Passen Sie die Eingangslautstärke an. Doppelklicken Sie auf „AK-9“, um das Fenster
„Mikrofoneigenschaften“ zu öffnen. (Hinweis: Stellen Sie sicher, dass sich der Knopf für
Mikrofonverstärkung und Kopfhörerlautstärke nicht auf der Nullposition befindet.)
Machine Translated by Google
- 10 -
(2) Doppelklicken Sie auf den verwendeten Lautsprecher („AK-9“)
>> Eigenschaften >> Pegel >> ziehen Sie den Fortschrittsbalken, um die Ausgabelautstärke anzupassen.
Machine Translated by Google

- 11 -
KOMPONENTENINFORMATIONEN
Machine Translated by Google

6. Montieren Sie das Blowout-Preventer-Netz am Mikrofonständer.
3. Montieren Sie das stoßfeste Gestell auf der Mikrofonhalterung.
5. Verbinden Sie den TYPE-C-Stecker des Kabels mit dem Mikrofon.
7. Verbinden Sie das andere Ende des Kabels mit Ihrem Computer/Mobiltelefon.
2. Montieren Sie die Mikrofonhalterung an der Basis.
4. Setzen Sie das Mikrofon in das stoßfeste Gestell ein.
1. Installieren Sie die Basis auf dem Tisch.
Wie im Bild gezeigt:
Methode der Erektion
- 12 -
Machine Translated by Google

die Leistung des Produkts verringern.
Problem
1.Das Datenkabel ist nicht
2.Folgen Sie den Anweisungen
Flammen und Korrosion.
festgezogen.
1.Daten erneut verbinden
Importiert in die USA: Sanven Technology Ltd, Suite 250. 9166 Anaheim
Störungen, und (2)das Gerät muss alle empfangenen Störungen akzeptieren,
die Basis und das Stativ
Verbindung kann nicht hergestellt werden
2. Es ist strengstens verboten, in Wasser, Sonneneinstrahlung oder über
Dieses Gerät entspricht Teil 15 der FCC-Bestimmungen. Der Betrieb unterliegt
Der Vorgang ist falsch.
Wie
richtig angeschlossen.
Ursachen
zur Bedienung der Software oder
wenden Sie sich an den Kundendienst
4. Bitte verwenden Sie ein Ladegerät, das den Sicherheitsvorschriften entspricht, um
Ort, Rancho Cucamonga, CA 91730
Kabel.
2. Das Stativ ist nicht flach.
3. Die Verwendung in einer Umgebung mit hohen Temperaturen und kaltem Wetter wird
beheizten Umgebung; halten Sie sich von Gefahrenquellen wie offenen
Entwicklungswinkel.
elektronische Geräte.
einschließlich Störungen, die einen unerwünschten Betrieb verursachen können.
1. Zerlegen Sie die Maschine nicht ohne Erlaubnis.
Passen Sie die Mutternspannung an
Produkt schütteln.
die folgenden beiden Bedingungen:(1) Dieses Gerät darf keine schädlichen
Personal.
1. Die Basismutter ist nicht
2.Die Software
Aufladung
SICHERHEITSHINWEIS
FEHLERBEHEBUNG
- 13 -
Machine Translated by Google

Machine Translated by Google


Microfono di registrazione
Istruzioni
MODELLO: AK-9
Supporto tecnico e certificato di garanzia
elettronica www.vevor.com/support
"Risparmia la metà", "Metà prezzo" o qualsiasi altra espressione simile da noi utilizzata rappresenta
solo una stima del risparmio che potresti ottenere acquistando determinati utensili con noi rispetto ai
principali marchi principali e non significa necessariamente coprire tutte le categorie di utensili da noi
offerti. Ti ricordiamo gentilmente di verificare attentamente quando effettui un ordine con noi se
stai effettivamente risparmiando la metà rispetto ai principali marchi principali.
Continuiamo a impegnarci per fornirvi strumenti a prezzi competitivi.
Machine Translated by Google

HAI BISOGNO DI AIUTO? CONTATTACI!
AK-9
Questa è l'istruzione originale, si prega di leggere attentamente tutte le istruzioni del
manuale prima di utilizzare. VEVOR si riserva una chiara interpretazione del nostro manuale
utente. L'aspetto del prodotto sarà soggetto al prodotto ricevuto. Vi preghiamo di
perdonarci se non vi informeremo di nuovo se ci sono aggiornamenti tecnologici o software sul
nostro prodotto.
Hai domande sul prodotto? Hai bisogno di supporto tecnico? Non esitare a contattarci:
Supporto
tecnico e certificato di garanzia elettronica www.vevor.com/
support
MODELLO: AK-9
Microfono di registrazione
- 1 -
Machine Translated by Google
DESCRIZIONE DELLA FUNZIONE DEL MICROFONO
SPECIFICHE E PARAMETRI
SÌ
192 kHz/24 bit
Ingresso
Disattivazione dell'audio con un clic
PS4, PS5, PC, desktop, laptop, la maggior parte
Dimensioni della porta per le cuffie
AK-9
Frequenza di campionamento
Guadagno del microfono
SÌ
3,5 mm
Modello
SÌ
(inclusa la modalità luci spente)
Attenzione: per ridurre il rischio di lesioni, l'utente deve leggere
Telefoni con interfaccia Type-C
Cambia 11 modalità di illuminazione RGB
attentamente il manuale di istruzioni.
Luce LED
Ammortizzatore
SÌ
SÌ
DC5V
Microfono rotto
Dispositivo compatibile
funzione di prevenzione
- 2 -
Machine Translated by Google

- 3 -
Nota: sono configurate due linee di collegamento e, a seconda delle
esigenze, è possibile utilizzare linee di collegamento diverse per
collegare il telefono cellulare (interfaccia TYPE-C) o il computer.
Machine Translated by Google

- 4 -
Machine Translated by Google

MAC OS
1.Inserisci l'estremità libera del cavo USB incluso nella porta USB del computer.La luce LED
del microfono si accenderà, indicando che il microfono funziona. Il computer riconoscerà
automaticamente il dispositivo USB e installerà il driver. Tuttavia, potrebbero non comparire
finestre pop-up o messaggi.
2. Fare clic sul simbolo Apple in alto a sinistra dello schermo e selezionare Preferenze di
Sistema.
2. È un dispositivo USB "Plug & Play", compatibile sia con computer Windows che Mac. Il
posizionamento del microfono rispetto al cantante può variare in base a diversi fattori, tra cui
l'acustica della stanza, l'esecuzione vocale e la voce acuta o profonda del
cantante.
1. Il microfono è alimentato dalla porta USB del tuo dispositivo, il che significa che nella
maggior parte dei casi puoi semplicemente collegare il microfono e iniziare subito. Per porte
USB non standard, potrebbe essere necessario un hub USB alimentato.
ISTRUZIONI PER L'IMPOSTAZIONE
REQUISITI DI ALIMENTAZIONE
- 5 -
Machine Translated by Google
- 6 -
4. Fare clic sulla scheda Input e selezionare "Ak-9" come dispositivo per l'input audio,
quindi regolare il volume di input.
3. Quindi, fare clic su Suono per visualizzare il riquadro delle preferenze Suono.
Machine Translated by Google
Windows 1.
Impostazioni di input
Collega il cavo USB al computer. Il LED del microfono si illuminerà e il microfono
entrerà in modalità di funzionamento.
(1)Fare clic con il pulsante destro del mouse sull'icona dell'altoparlante in basso a destra dello
schermo e fare clic su "Apri impostazioni audio".
5. Fare clic sulla scheda Output e assicurarsi che "AK-g" sia selezionato come
dispositivo di output predefinito (ciò dovrebbe avvenire automaticamente), quindi
regolare il volume di output.
- 7 -
Machine Translated by Google

- 8 -
(2) Selezionare la scheda di registrazione, quindi selezionare "AK-9" come
dispositivo predefinito. Se non ci sono cambiamenti, reimpostare il computer e
reinserire la porta USB.
Machine Translated by Google
- 9 -
(3) Regola il volume di ingresso: fai doppio clic su "AK-9" per aprire la finestra Proprietà
microfono. (Nota: assicurati che la manopola del guadagno del microfono e del
volume delle cuffie non sia in posizione zero.)
2. Impostazioni di output Emetti l'audio del computer dal jack delle cuffie del microfono (1)
Inserisci l'auricolare nel jack per auricolari sulla base, nel menu "Suono", seleziona la scheda
"Riproduzione" e imposta "AK-g" come dispositivo predefinito.
Machine Translated by Google
- 10 -
(2)Fare doppio clic sull'altoparlante ("AK-9") utilizzato
>>Proprietà >>Livelli >>trascinare la barra di avanzamento per regolare il volume di uscita.
Machine Translated by Google

- 11 -
INFORMAZIONI SUI COMPONENTI
Machine Translated by Google
3. Installare il supporto antiurto sul supporto del microfono.
5. Collegare la spina TYPE-C del cavo al microfono.
6. Installare la rete anti-esplosione sul supporto del microfono.
1. Installare la base sul tavolo.
4. Inserire il microfono nel rack antiurto.
2. Installare il supporto del microfono sulla base.
Come mostrato nell'immagine:
7. Collegare l'altra estremità del cavo al computer/telefono cellulare.
METODO DI EREZIONE
- 12 -
Machine Translated by Google

- 13 -
AVVERTENZA DI SICUREZZA
RIPRISTINO DEI GUASTI
la base e il treppiede
Impossibile connettersi
2. È severamente vietato l'uso in acqua, l'esposizione alla luce solare o sopra
interferenze, e (2) questo dispositivo deve accettare qualsiasi interferenza ricevuta,
Problema
1.Il cavo dati non è
fiamma e corrosione.
serrato.
1. Ricollegare i dati
2. Seguire le istruzioni
Importato negli USA: Sanven Technology Ltd, Suite 250. 9166 Anaheim
collegato correttamente.
Cause
per utilizzare il software o
consultare il servizio post-vendita
4. Utilizzare un caricabatterie conforme alle norme di sicurezza per
Come
Questo dispositivo è conforme alla Parte 15 delle Norme FCC. Il funzionamento è soggetto a
l'operazione non è corretta.
ambiente riscaldato; tenere lontano da fonti di pericolo come luce aperta
Angolo di sviluppo.
dispositivi elettronici.
comprese le interferenze che potrebbero causare un funzionamento indesiderato.
Luogo, Rancho Cucamonga, CA 91730
cavo.
3. L'utilizzo in un ambiente ad alta temperatura e con tempo freddo
2. Il treppiede non è piatto.
personale.
1. Il dado di base non è
2.Il software
ridurre le prestazioni del prodotto.
carica
Regolare la tensione del dado a
Agitazione del prodotto.
1. Non smontare la macchina senza autorizzazione.
le due condizioni seguenti: (1) Questo dispositivo non può causare effetti dannosi
Machine Translated by Google

Machine Translated by Google


MODELO:AK9
"Ahorrelamitad","mitaddeprecio"ocualquierotraexpresiónsimilarqueutilicemossolorepresenta
unaestimacióndelahorroquepodríaobteneralcomprarciertasherramientasconnosotrosencomparación
conlasprincipalesmarcasynonecesariamentesignificaquecubratodaslascategoríasdeherramientas
queofrecemos.Lerecordamosque,alrealizarunpedidoconnosotros,verifiquecuidadosamentesi
realmenteestáahorrandolamitadencomparaciónconlasprincipalesmarcas.
Seguimoscomprometidosabrindarleherramientasaprecioscompetitivos.
Instrucciones
Micrófonodegrabación
Soportetécnicoycertificadodegarantía
electrónicawww.vevor.com/support
Machine Translated by Google
¿NECESITAAYUDA?¡CONTÁCTENOS!
1
¿Tienepreguntassobreelproducto?¿Necesitaasistenciatécnica?Nodudeenponerseen
contactocon
nosotros:Asistenciatécnicaycertificadodegarantíaelectrónica
www.vevor.com/support
AK9
MODELO:AK9
Estassonlasinstruccionesoriginales,leaatentamentetodaslasinstruccionesdel
manualantesdeutilizarelproducto.VEVORsereservaunainterpretaciónclaradenuestro
manualdeusuario.Laaparienciadelproductoestarásujetaalproductoquerecibió.
Perdónenospornoinformarlenuevamentesihayactualizacionesdetecnologíaosoftwareen
nuestroproducto.
Micrófonodegrabación
Machine Translated by Google

2
Aporte
Sí
Funcióndeprevención
PS4,PS5,PC,computadoradeescritorio,computadoraportátil,lamayoría
5VCC
Explosióndemicrófono
Leaatentamenteelmanualdeinstrucciones.
LuzLED
Sí
Sí
Advertencia:Parareducirelriesgodelesiones,elusuariodebeleer
Cambiaentre11modosdeiluminaciónRGB
(incluidoelmododelucesapagadas)
Modelo
Sí
Amortiguador
3,5mm
Dispositivocompatible
Gananciadelmicrófono
Sí
TeléfonosconinterfaztipoC
Tamañodelpuertodeauriculares
AK9
192kHz/24bits
Frecuenciademuestreo
Silencioconunclic
DESCRIPCIÓNDELAFUNCIÓNDELMICRÓFONO
ESPECIFICACIONESYPARÁMETROS
Machine Translated by Google

Nota:Seconfigurandoslíneasdeconexiónysepuedenusardiferentes
líneasdeconexiónparaconectarelteléfonomóvil(interfazTIPOC)ola
computadorasegúnlosrequisitos.
3
Machine Translated by Google
4
Machine Translated by Google

2.EsundispositivoUSB“Plug&Play”,compatibleconcomputadorasWindowsyMac.Laubicación
delmicrófonoysurelaciónconelvocalistapuedevariarsegúnvariosfactores,incluidalaacústica
delasala,eldesempeñovocalysielvocalistatieneunavozagudaoprofunda.
MACOS1.
InserteelextremolibredelcableUSBincluidoenelpuertoUSBdelacomputadora.LaluzLEDdel
micrófonoseencenderá,loqueindicaqueelmicrófonoestáfuncionando.Sucomputadora
reconoceráautomáticamenteeldispositivoUSBeinstalaráelcontrolador.Peroesposiblequeno
aparezcanventanasemergentesnimensajes.
1.ElmicrófonosealimentaatravésdelpuertoUSBdesudispositivo,loquesignificaqueenla
mayoríadeloscasospuedesimplementeenchufarelmicrófonoycomenzarausarlode
inmediato.ParapuertosUSBnoestándar,esposiblequeserequieraunconcentradorUSBconalimentación.
2.HagaclicenelsímbolodeAppleenlapartesuperiorizquierdadelapantallayseleccione
PreferenciasdelSistema.
INSTRUCCIONESDECONFIGURACIÓN
REQUISITOSDEENERGÍA
5
Machine Translated by Google

6
4.HagaclicenlapestañaEntradayseleccione"Ak9"comodispositivoparalaentradadesonido
yajusteelvolumendeentrada.
3.Acontinuación,hagaclicenSonidoparamostrarelpaneldepreferenciasdeSonido.
Machine Translated by Google

Windows1.
Configuraciónde
entradaConecteelcableUSBasucomputadora.ElLEDdelmicrófonose
iluminaráyelmicrófonopasaráalestadodefuncionamiento.
(1)Hagaclicderechoenelíconodelaltavozenlaparteinferiorderechadelapantallayhaga
clicen"Abrirconfiguracióndesonido".
5.Hagaclicenlapestañadesalidayasegúresedeque"AKg"estéseleccionadocomoel
dispositivodesalidapredeterminado(estodeberíahabersucedidoautomáticamente).Luego,
ajusteelvolumendesalida.
7
Machine Translated by Google

8
(2)Seleccionelapestañadegrabacióny,acontinuación,seleccione"AK9"como
dispositivopredeterminado.Sinohaycambios,reinicielacomputadorayvuelvaa
insertarelpuertoUSB.
Machine Translated by Google

9
(3)Ajusteelvolumendeentrada:hagadobleclicen"AK9"paraabrirlaventana
Propiedadesdelmicrófono.(Nota:asegúresedequelagananciadelmicrófonoy
laperilladelvolumendelosauricularesnoesténenlaposicióncero).
2.ConfiguracióndesalidaSalidadeaudiodecomputadoradesdeelconectordeauriculares
delmicrófono(1)Inserteelauricularenelconectordeauricularesenlabase,enelmenú
"Sonido",seleccionelapestaña"Reproducción"yconfigure"AKg"comoeldispositivo
predeterminado.
Machine Translated by Google
10
(2)Hagadobleclicenelaltavoz("AK9")queseesté
utilizando>>Propiedades>>Niveles>>Arrastrelabarradeprogresoparaajustarelvolumendesalida.
Machine Translated by Google

11
INFORMACIÓNDECOMPONENTES
Machine Translated by Google

4.Inserteelmicrófonoenelsoporteapruebadegolpes.
5.ConecteelenchufeTIPOCdelcablealmicrófono.
6.Instalelaredantiexplosionesenelsoportedelmicrófono.
7.Conecteelotroextremodelcableasucomputadora/teléfonomóvil.
2.Instaleelsoportedelmicrófonoenlabase.
3.Instaleelsoporteapruebadegolpesenelsoportedelmicrófono.
1.Instalelabaseenlamesa.
Comosemuestraenlaimagen:
MÉTODODEERECCIÓN
12
Machine Translated by Google

Causas
conectadocorrectamente
Paraoperarelsoftware,o
consultaralservicioposventa.
3.Elusoenunentornodealtatemperaturayclimafrío
4.Utiliceuncargadorquecumplaconlasnormasdeseguridad.
Lugar,RanchoCucamonga,CA91730
Laoperaciónesincorrecta.
EstedispositivocumpleconlaParte15delasNormasdelaFCC.Sufuncionamientoestásujetoa
Cómo
interferencia,y(2)estedispositivodebeaceptarcualquierinterferenciarecibida,
Labaseyeltrípode
Nosepuedeconectar
2.Estáestrictamenteprohibidosuusoenagua,exposiciónalaluzsolarosobre
apretado.
1.Vuelvaaconectarlosdatos
llamaycorrosión.
Problema
1.Elcablededatosnoestá
2.Sigalasinstrucciones
ImportadoaEE.UU.:SanvenTechnologyLtd,Suite250.9166Anaheim
reducirelrendimientodelproducto.
1.Latuercadebasenoestá
2.Elsoftware
personal.
cargar
1.Nodesmontelamáquinasinautorización.
lasdoscondicionessiguientes:(1)Estedispositivonopuedecausardaños
Ajustelatensióndelatuercaen
Agitacióndelproducto.
Ángulodedesarrollo.
dispositivoselectronicos.
ambientecalentado;manteneralejadodefuentesdepeligrocomofuegoabierto
2.Eltrípodenoesplano.
incluyendointerferenciasquepuedancausarunfuncionamientonodeseado.
cable.
RECUPERACIÓNDEFALLAS
ADVERTENCIADESEGURIDAD
13
Machine Translated by Google

Machine Translated by Google


Instrukcje
Mikrofon nagrywający
MODEL: AK-9
Wsparcie techniczne i certyfikat gwarancji
elektronicznej www.vevor.com/support
„Oszczędź połowę”, „Połowa ceny” lub inne podobne wyrażenia używane przez nas stanowią
jedynie szacunkowe oszczędności, jakie możesz uzyskać, kupując u nas określone narzędzia w
porównaniu z głównymi markami i niekoniecznie oznaczają one objęcie wszystkich kategorii narzędzi
oferowanych przez nas. Uprzejmie przypominamy, aby dokładnie sprawdzić, czy składając u nas
zamówienie faktycznie oszczędzasz połowę w porównaniu z głównymi markami.
Nadal staramy się oferować Państwu narzędzia w konkurencyjnych cenach.
Machine Translated by Google

POTRZEBUJESZ POMOCY? SKONTAKTUJ SIĘ Z NAMI!
Masz pytania dotyczące produktu? Potrzebujesz wsparcia technicznego? Skontaktuj się z
nami: Wsparcie
techniczne i certyfikat E-Gwarancji www.vevor.com/support
To jest oryginalna instrukcja, przed użyciem należy uważnie przeczytać
wszystkie instrukcje. VEVOR zastrzega sobie jasną interpretację naszej instrukcji
obsługi. Wygląd produktu będzie zależał od produktu, który otrzymałeś.
Prosimy o wybaczenie, że nie poinformujemy Cię ponownie, jeśli w naszym
produkcie pojawią się jakiekolwiek aktualizacje technologiczne lub oprogramowania.
AK-9
MODEL: AK-9
Mikrofon nagrywający
- 1 -
Machine Translated by Google
SPECYFIKACJE I PARAMETRY
OPIS FUNKCJI MIKROFONU
Tak
192 kHz/24 bity
Wejście
Wyciszenie jednym kliknięciem
PS4, PS5, PC, komputer stacjonarny, laptop, większość
Rozmiar portu słuchawkowego
AK-9
Częstotliwość pobierania próbek
Wzmocnienie mikrofonu
Tak
3,5 mm
Model
Tak
Ostrzeżenie – aby zmniejszyć ryzyko obrażeń, użytkownik musi przeczytać
(w tym tryb wyłączonego światła)
Telefony z interfejsem typu C
Przełączaj 11 trybów oświetlenia RGB
Przeczytaj uważnie instrukcję obsługi.
Światło LED
Amortyzator
Tak
Tak
Prąd stały 5V
Wybuch mikrofonu
Zgodne urządzenie
funkcja zapobiegawcza
- 2 -
Machine Translated by Google

- 3 -
Uwaga: Skonfigurowano dwie linie połączeniowe. Do podłączenia telefonu
komórkowego (interfejs TYPE-C) lub komputera można użyć różnych linii,
zależnie od wymagań.
Machine Translated by Google

- 4 -
Machine Translated by Google

MAC OS 1.
Włóż wolny koniec dołączonego kabla USB do portu USB w komputerze. Dioda LED mikrofonu
zaświeci się, wskazując, że mikrofon działa. Komputer automatycznie rozpozna urządzenie USB
i zainstaluje sterownik. Mogą jednak nie pojawić się żadne wyskakujące okienka ani komunikaty.
2. Kliknij symbol Apple w lewym górnym rogu ekranu i wybierz Preferencje systemowe.
2. Jest to urządzenie USB typu „Plug & Play”, kompatybilne zarówno z komputerami Windows,
jak i Mac. Umiejscowienie mikrofonu i jego położenie względem wokalisty może zależeć od
kilku czynników, w tym akustyki pomieszczenia, sposobu śpiewania oraz tego,
czy wokalista ma wysoki, czy niski głos.
1. Mikrofon jest zasilany przez port USB urządzenia, co oznacza, że w większości przypadków
możesz po prostu podłączyć mikrofon i od razu zacząć. W przypadku niestandardowych
portów USB może być wymagany zasilany koncentrator USB.
INSTRUKCJE USTAWIEŃ
WYMAGANIA DOTYCZĄCE ZASILANIA
- 5 -
Machine Translated by Google

- 6 -
4. Kliknij kartę Wejście i wybierz „Ak-9” jako urządzenie wejściowe dźwięku, a
następnie dostosuj głośność wejściową.
3. Następnie kliknij Dźwięk, aby wyświetlić panel preferencji Dźwięk.
Machine Translated by Google

(1) Kliknij prawym przyciskiem myszy ikonę głośnika w prawym dolnym rogu ekranu i
kliknij „Otwórz ustawienia dźwięku”.
Windows 1.
Ustawienia
wejściowe Podłącz kabel USB do komputera. Dioda LED mikrofonu zaświeci
się, a mikrofon powróci do trybu roboczego.
5. Kliknij kartę wyjścia i upewnij się, że „AK-g” jest wybrane jako domyślne
urządzenie wyjściowe. (Powinno to nastąpić automatycznie.) Następnie dostosuj
głośność wyjściową.
- 7 -
Machine Translated by Google

- 8 -
(2) Wybierz kartę nagrywania, a następnie wybierz „AK-9” jako urządzenie
domyślne. Jeśli nie ma żadnych zmian, zresetuj komputer i ponownie
podłącz port USB.
Machine Translated by Google

- 9 -
2. Ustawienia wyjściowe Wyjście dźwięku komputerowego z gniazda słuchawkowego mikrofonu
(1) Włóż słuchawkę do gniazda słuchawkowego w podstawie, w menu „Dźwięk”, wybierz
zakładkę „Odtwarzanie” i ustaw „AK-g” jako urządzenie domyślne.
(3) Dostosuj głośność wejściową — kliknij dwukrotnie „AK-9”, aby otworzyć okno Właściwości
mikrofonu. (Uwaga: Upewnij się, że pokrętło wzmocnienia mikrofonu i głośności
słuchawek nie znajduje się w pozycji zerowej.)
Machine Translated by Google
- 10 -
(2) Kliknij dwukrotnie głośnik („AK-9”), którego używasz
>>Właściwości >>poziomy >> przeciągnij pasek postępu, aby dostosować głośność wyjścia.
Machine Translated by Google

- 11 -
INFORMACJE O SKŁADNIKACH
Machine Translated by Google
6. Zamontuj siatkę zabezpieczającą przed wydmuchaniem mikrofonu na statywie mikrofonowym.
3. Zamontuj stojak odporny na wstrząsy na uchwycie mikrofonu.
5. Podłącz wtyczkę TYPE-C kabla do mikrofonu.
7. Podłącz drugi koniec kabla do komputera/telefonu komórkowego.
2. Zainstaluj uchwyt mikrofonu na podstawie.
4. Umieść mikrofon w stojaku odpornym na wstrząsy.
1. Zamontuj podstawę na stole.
Jak pokazano na rysunku:
METODA WZNIESIENIA
- 12 -
Machine Translated by Google

obniżyć wydajność produktu.
1.Kabel danych nie jest
Problem
2. Postępuj zgodnie z instrukcjami
płomień i korozja.
zaciśnięte.
1. Ponowne połączenie danych
Importowane do USA: Sanven Technology Ltd, Suite 250. 9166 Anaheim
zakłócenia, a (2) urządzenie to musi akceptować wszelkie odbierane zakłócenia,
podstawa i statyw
Nie można połączyć
2. Zabrania się używania w wodzie, wystawiania na działanie promieni słonecznych lub nadmiernego nasłonecznienia.
To urządzenie jest zgodne z częścią 15 przepisów FCC. Eksploatacja podlega
operacja jest nieprawidłowa.
Jak
podłączony prawidłowo.
Powoduje
aby obsługiwać oprogramowanie lub
skonsultować się z działem obsługi posprzedażowej
4. Używaj ładowarki zgodnej z przepisami bezpieczeństwa.
Miejsce, Rancho Cucamonga, CA 91730
kabel.
2. Statyw nie jest płaski.
3. Stosowanie w środowisku o wysokiej temperaturze i zimnej pogodzie spowoduje
w środowisku o wysokiej temperaturze; trzymać z dala od źródeł zagrożenia, takich jak otwarte przestrzenie
Kąt rozwoju.
urządzenia elektroniczne.
w tym zakłócenia mogące powodować niepożądane działanie.
1. Nie rozmontowuj urządzenia bez zezwolenia.
Wyreguluj dokręcenie nakrętki
Wstrząsanie produktem.
następujące dwa warunki: (1) Urządzenie to nie może powodować szkodliwych skutków
personel.
1. Nakrętka bazowa nie jest
2. Oprogramowanie
opłata
OSTRZEŻENIE DOTYCZĄCE BEZPIECZEŃSTWA
ODZYSKIWANIE PO AWARII
- 13 -
Machine Translated by Google

Machine Translated by Google


MODEL: AK-9
"Save Half", "Half Price" of andere soortgelijke uitdrukkingen die wij gebruiken, geven alleen een schatting van de
besparingen die u kunt behalen door bepaalde gereedschappen bij ons te kopen in vergelijking met de grote topmerken
en betekent niet noodzakelijkerwijs dat alle categorieën gereedschappen die wij aanbieden, worden gedekt. Wij
herinneren u eraan om zorgvuldig te controleren of u daadwerkelijk de helft bespaart in vergelijking met de grote
topmerken wanneer u een bestelling bij ons plaatst.
Wij streven er voortdurend naar om u gereedschappen tegen concurrerende prijzen te leveren.
Instructies
Opnamemicrofoon
Technische ondersteuning en e-garantiecertificaat
www.vevor.com/support
Machine Translated by Google

HULP NODIG? NEEM CONTACT MET ONS OP!
- 1 -
Heeft u vragen over het product? Heeft u technische ondersteuning nodig? Neem dan gerust
contact met
ons op: Technische ondersteuning en E-garantiecertificaat
www.vevor.com/support
Dit is de originele instructie, lees alle handleidingen zorgvuldig door voordat u het
product gebruikt. VEVOR behoudt zich een duidelijke interpretatie van onze gebruikershandleiding
voor. Het uiterlijk van het product is afhankelijk van het product dat u hebt ontvangen.
Vergeef ons dat we u niet opnieuw zullen informeren als er technologie- of software-updates
voor ons product zijn.
AK-9
MODEL: AK-9
Opnamemicrofoon
Machine Translated by Google
MICROFOONFUNCTIEBESCHRIJVING
SPECIFICATIES EN PARAMETERS
Ja
Model
Waarschuwing - Om het risico op letsel te verminderen, moet de gebruiker de volgende informatie lezen:
(inclusief licht-uit-modus)
Schakel 11 RGB-verlichtingsmodi
Schokdemper
Lees de gebruiksaanwijzing zorgvuldig door.
LED-licht
DC5V
Microfoon kapot
Ja
Ja
preventiefunctie
Ja
Compatibel apparaat
PS4, PS5, PC, desktop, laptop, de meeste
Invoer
Telefoons met type-C-interface
192 kHz/24-bits
AK-9
Bemonsteringsfrequentie
Dempen met één klik
Grootte van de hoofdtelefoonaansluiting
Microfoonversterking
Ja
3,5 mm
- 2 -
Machine Translated by Google

- 3 -
Let op: Er zijn twee verbindingslijnen geconfigureerd en er kunnen
verschillende verbindingslijnen worden gebruikt om de mobiele telefoon (TYPE-
C-interface) of computer aan te sluiten, afhankelijk van de vereisten.
Machine Translated by Google

- 4 -
Machine Translated by Google

MAC OS 1.
Steek het vrije uiteinde van de meegeleverde USB-kabel in de USB-poort op de computer. Het
LED-lampje van de microfoon gaat branden, wat aangeeft dat de microfoon werkt. Uw computer
herkent het USB-apparaat automatisch en installeert de driver. Maar er zijn mogelijk geen pop-
upvensters of berichten.
2. Klik op het Apple-symbool linksboven in het scherm en selecteer Systeemvoorkeuren.
2.IT is een “Plug & Play” USB-apparaat, compatibel met zowel Windows- als Mac-computers.
De plaatsing van de microfoon en ten opzichte van de zanger kan variëren op basis van
verschillende factoren, waaronder de akoestiek van de ruimte, de vocale
prestaties en of de zanger een hoge of diepe stem heeft.
1. De microfoon wordt gevoed door de USB-poort van uw apparaat, wat betekent dat u in de
meeste gevallen de microfoon gewoon kunt aansluiten en direct aan de slag kunt. Voor niet-
standaard USB-poorten is mogelijk een USB-hub met voeding vereist.
INSTELLINGSINSTRUCTIES
VERMOGENSVEREISTEN
- 5 -
Machine Translated by Google

- 6 -
4. Klik op het tabblad Invoer en selecteer de "Ak-9" als apparaat voor geluidsinvoer en
pas het invoervolume aan.
3. Klik vervolgens op Geluid om het voorkeurenpaneel Geluid weer te geven.
Machine Translated by Google
(1)Klik met de rechtermuisknop op het luidsprekerpictogram rechtsonder in het scherm
en klik op 'Geluidsinstellingen openen'.
Windows 1.
Invoerinstellingen
Sluit de USB-kabel aan op uw computer. De LED van de microfoon gaat
branden en de microfoon staat in de werkstatus.
5. Klik op het tabblad Uitvoer en zorg ervoor dat "AK-g" is geselecteerd als het
standaarduitvoerapparaat. (Dit zou automatisch moeten gebeuren.) Pas vervolgens
het uitvoervolume aan.
- 7 -
Machine Translated by Google
- 8 -
(2) Selecteer het tabblad Opname en selecteer vervolgens "AK-9" als
standaardapparaat. Als er geen verandering is, reset dan de computer en plaats
de USB-poort opnieuw.
Machine Translated by Google

- 9 -
(3) Pas het invoervolume aan: dubbelklik op de "AK-9" om het venster
Microfooneigenschappen te openen. (Let op: zorg ervoor dat de
microfoonversterkingsknop en de volumeknop van de hoofdtelefoon niet op de nulpositie staan.)
2. Uitvoerinstellingen Geef computeraudio weer via de hoofdtelefoonaansluiting van de microfoon
(1) Sluit de oortelefoon aan op de hoofdtelefoonaansluiting op het basisstation. Selecteer in
het menu 'Geluid' het tabblad 'Afspelen' en stel 'AK-g' in als standaardapparaat.
Machine Translated by Google

- 10 -
(2) Dubbelklik op de luidspreker ("AK-9") die wordt
gebruikt>>Eigenschappen>>Niveaus>>sleep de voortgangsbalk om het volume van de uitvoer aan te passen.
Machine Translated by Google
- 11 -
COMPONENTEN INFORMATIE
Machine Translated by Google

4. Plaats de microfoon in het schokbestendige rek.
5. Sluit de TYPE-C-stekker van de kabel aan op de microfoon.
6. Installeer het blaasnet op de microfoonstandaard.
2. Plaats de microfoonhouder op de basis.
3. Plaats het schokbestendige rek op de microfoonhouder.
1. Plaats de basis op de tafel.
Zoals te zien op de afbeelding:
7. Sluit het andere uiteinde van de kabel aan op uw computer/mobiele telefoon.
METHODE VAN ERECTIE
- 12 -
Machine Translated by Google

Stel de moervastheid af op
Product schudden.
1. Demonteer het apparaat niet zonder toestemming.
de volgende twee voorwaarden: (1) Dit apparaat mag geen schadelijke
de prestaties van het product verminderen.
personeel.
1. De basismoer is niet
2.De software
aanval
2. Het statief is niet plat.
Plaats, Rancho Cucamonga, CA 91730
kabel.
3. Gebruik in een omgeving met hoge temperaturen en koud weer zal
elektronische apparaten.
Ontwikkelingshoek.
verwarmde omgeving; uit de buurt houden van gevaarlijke bronnen zoals open
inclusief storingen die een ongewenste werking kunnen veroorzaken.
Hoe
Dit apparaat voldoet aan Deel 15 van de FCC-regels. De werking is onderworpen aan
De bewerking is onjuist.
correct aangesloten.
Oorzaken
om de software te bedienen of
de aftersales-afdeling te raadplegen
4. Gebruik een oplader die voldoet aan de veiligheidsvoorschriften om
vlam en corrosie.
aangescherpt.
1. Verbind de gegevens opnieuw
Geïmporteerd naar de VS: Sanven Technology Ltd, Suite 250. 9166 Anaheim
Probleem
1.De datakabel is niet
de basis en het statief
Kan geen verbinding maken
2. Volg de instructies
2. Het is ten strengste verboden om het in water te gebruiken, bloot te stellen aan zonlicht of over
interferentie, en (2) dit apparaat moet alle ontvangen interferentie accepteren,
VEILIGHEIDSWAARSCHUWING
HERSTEL VAN FOUTEN
- 13 -
Machine Translated by Google

Machine Translated by Google


MODELL: AK-9
"Spara hälften", "halva priset" eller andra liknande uttryck som används av oss representerar
bara en uppskattning av besparingar du kan dra nytta av att köpa vissa verktyg hos oss jämfört med
de stora toppmärkena och betyder inte nödvändigtvis att täcka alla kategorier av verktyg som erbjuds
av oss. Du påminns vänligen om att noggrant kontrollera när du gör en beställning hos oss om
du faktiskt sparar hälften i jämförelse med de främsta stora varumärkena.
Vi fortsätter att vara engagerade i att ge dig verktyg till konkurrenskraftiga priser.
Inspelningsmikrofon
Instruktioner
Teknisk support och e-garanticertifikat
www.vevor.com/support
Machine Translated by Google

BEHÖVER HJÄLP? KONTAKTA OSS!
- 1 -
Har du produktfrågor? Behöver du teknisk support? Kontakta oss gärna: Teknisk support och
e-
garanticertifikat www.vevor.com/support
Detta är den ursprungliga instruktionen, läs alla instruktioner noggrant
innan du använder den. VEVOR reserverar sig för en tydlig tolkning av vår
användarmanual. Utseendet på produkten är beroende av den produkt
du fått. Ursäkta oss att vi inte kommer att informera dig igen om det finns
någon teknik eller mjukvaruuppdateringar på vår produkt.
AK-9
MODELL: AK-9
Inspelningsmikrofon
Machine Translated by Google
MIKROFON FUNKTIONSBESKRIVNING
SPECIFIKATIONER OCH PARAMETRAR
Modell
Byt 11 RGB-ljuslägen
Varning - För att minska risken för skada måste användaren läsa
Ja
(inklusive ljus avstängt läge)
Stötdämpare
bruksanvisningen noggrant.
LED-ljus
DC5V
Mikrofonutblåsning
Ja
Ja
förebyggande funktion
Ja
Kompatibel enhet
PS4, PS5, PC, stationära, bärbara, de flesta
Input
Typ-C-gränssnittstelefoner
192kHz/24-bitars
AK-9
Samplingsfrekvens
Ett klick tyst
Hörlursportstorlek
Mikrofonförstärkning
Ja
3,5 mm
- 2 -
Machine Translated by Google
- 3 -
Obs: Två anslutningslinjer är konfigurerade och olika anslutningslinjer
kan användas för att ansluta mobiltelefonen (TYPE-C-gränssnitt) eller
dator enligt kraven.
Machine Translated by Google

- 4 -
Machine Translated by Google

MAC OS 1.
Sätt i den fria änden av den medföljande USB-kabeln i USB-porten på datorn. Mikrofonens LED-
lampa tänds, vilket indikerar att mikrofonen fungerar. Din dator kommer automatiskt att känna
igen USB-enheten och installera drivrutinen. Men det kanske inte finns några popup-fönster eller
meddelanden.
2. Klicka på Apple-symbolen längst upp till vänster på skärmen och välj Systeminställningar.
2.IT är en "Plug & Play" USB-enhet, kompatibel med både Windows- och Mac-datorer.
Placeringen av mikrofonen och i förhållande till sångaren kan variera beroende på flera
faktorer, inklusive rumsakustik, sångprestanda och om sångaren har en hög eller
djup röst.
1. Mikrofonen drivs av enhetens USB-port, vilket innebär att du i de flesta fall bara kan koppla
in mikrofonen och sätta igång direkt. För icke-standardiserade USB-portar kan en strömförsörjd
USB-hubb behövas.
INSTÄLLNINGSINSTRUKTIONER
KRAFTKRAV
- 5 -
Machine Translated by Google

- 6 -
4. Klicka på fliken Input och välj "Ak-9" som enhet för ljudinmatning
och justera ingångsvolymen.
3. Klicka sedan på Ljud för att visa inställningsfönstret Ljud.
Machine Translated by Google
Windows 1.
Ingångsinställningar
Anslut USB-kabeln till din dator. Mikrofonens LED kommer att lysa,
mikrofonen kommer till fungerande status.
(1)Högerklicka på högtalarikonen längst ner till höger på skärmen och klicka på "Öppna
ljudinställningar".
5. Klicka på utgångsfliken och se till att "AK-g" är vald som
standardutgångsenhet. (Detta borde ha skett automatiskt.), Justera sedan
utgångsvolymen.
- 7 -
Machine Translated by Google

- 8 -
(2) Välj inspelningsfliken och välj sedan "AK-9" som standardenhet.
Om det inte görs någon ändring, återställ datorn och sätt tillbaka USB-
porten.
Machine Translated by Google

- 9 -
2. Utgångsinställningar Mata ut datorljud från mikrofonens hörlursuttag(1) Sätt i hörlurarna i
hörlursuttaget på basen, i menyn "Ljud", välj fliken "Uppspelning" och ställ in "AK-g" som
standard anordning.
(3)Justera ingångsvolymen - Dubbelklicka på "AK-9" för att öppna fönstret Mikrofonegenskaper.
(Obs: Se till att mikrofonens förstärknings- och hörlursvolymratten inte är i nollläge.)
Machine Translated by Google
- 10 -
(2)Dubbelklicka på högtalaren ("AK-9")
används>>Egenskaper>>nivåer>>dra förloppsindikatorn för att justera ljudvolymen.
Machine Translated by Google

- 11 -
INFORMATION OM KOMPONENTER
Machine Translated by Google

4. Sätt in mikrofonen i det stötsäkra racket.
5. Anslut kabelns TYPE-C-kontakt till mikrofonen.
6. Installera utblåsningsskyddsnätet på mikrofonstativet.
7. Anslut den andra änden av kabeln till din dator/mobiltelefon.
2. Installera mikrofonstödet på basen.
3. Installera det stötsäkra stället på mikrofonstödet.
1. Installera basen på bordet.
Som visas på bilden:
RESNINGSMETOD
- 12 -
Machine Translated by Google

Justera mutterns åtdragning vid
Produkten skakar.
störningar, och (2)denna enhet måste acceptera alla mottagna störningar,
1. Ta inte isär maskinen utan tillstånd.
följande två villkor:(1)Denna enhet får inte orsaka skadlig
personal.
1. Basmuttern är det inte
2. Programvaran
minska produktens prestanda.
avgift
Place, Rancho Cucamonga, CA 91730
kabel.
3. Användning i en miljö med hög temperatur och kallt väder kommer
2. Stativet är inte plant.
elektroniska apparater.
utvecklingsvinkel.
uppvärmd miljö; håll dig borta från riskkällor såsom öppna
inklusive störningar som kan orsaka oönskad funktion.
Hur
Denna enhet uppfyller del 15 av FCC-reglerna. Driften är föremål för
operationen är felaktig.
korrekt ansluten.
Orsaker
för att använda programvaran
eller konsultera efterförsäljningen
4. Använd en laddare som uppfyller säkerhetsföreskrifterna
Problem
1. Datakabeln är det inte
2. Följ instruktionerna
åtdragna.
1. Återanslut data
låga och korrosion.
Importerad till USA: Sanven Technology Ltd, Suite 250. 9166 Anaheim
basen och stativet
Det går inte att ansluta
2. Det är strängt förbjudet att använda i vatten, exponering för solljus eller över
SÄKERHETSVARNING
FELÅTERHÄLLNING
- 13 -
Machine Translated by Google

Machine Translated by Google