
Version: V1.00.000
Revised date: 05-11-2021
Statement:
We reserve the rights to make any change to product designs and specifications without notice. The actual
object may differ a little from the descriptions in the manual in physical appearance, color and configuration.
We have tried our best to make the descriptions and illustrations in the manual as accurate as possible, and
defects are inevitable, if you have any question, please contact local dealer or after-sale service center, we
shall not bear any responsibility arising from misunderstandings.

SAFETY PRECAUTION
INITIAL USE
START CALIBRATION
TARGET PATTERN KIT
PRODUCT PROFILE
II
WARNING
Study, understand and follow all instructions provided with this product. Read these instructions carefully
before installing, operating, servicing or repairing this tool. Keep these instructions in a safe, accessible
place.
Caution: To help prevent personal injury,
• To operate the THINKCAR ADAS calibration tool properly, user must have knowledge of
automotive technology and is therefore aware of the sources of danger and risks in the repair
shop and on vehicles.
• Never use this tool for any application other than for which it was designed.
• Never alter or modify this tool in any way. Improper operation and/or maintenance of the tool, or
modification of the tool could result in serious injury or death.
• Keep a fire extinguisher suitable for gasoline/chemical/ electrical fires nearby.
• Do not use a damaged battery charger. The built-in Lithium battery is factory replaceable only. Incorrect
replacement or tampering with the battery pack may cause a explosion.
On Using THINKCAR ADAS Calibration Tool
In order to avoid incorrect handling and injury to the user or destruction of the THINKCAR ADAS
calibration tool arising from this, pay attention to the following:
• Only assemble the THINKCAR ADAS calibration tool according to the operating instructions.
• Protect the THINKCAR ADAS calibration tool from water and strong impacts.
• Protect the THINKCAR ADAS calibration tool from long periods of exposure to solar radiation.
• The light source should ensure that there is no reflected spot on the calibration panel.
• In the field of view of the camera, there should be no direct light source into the camera, otherwise
the camera will reduce the exposure so that the captured calibration pattern becomes darker,
adversely affecting the calibration.
• The light source should ensure uniform illumination distribution in the calibration workstation.
• Do a regular check and service for the THINKCAR ADAS calibration tool.
• Keep this tool dry, clean, free from oil/water or grease. Use a mild detergent on a clean cloth to clean
the outside of the tool, when necessary.
On Using Vehicle
When working on the vehicle, please carefully read the following information:
• Always perform automotive testing in a safe environment.
• Wear safety eye protection that meets ANSI standards.
• Operate the vehicle in a well-ventilated work area: Exhaust gases are poisonous.
• Put the transmission in P (for A/T) or N (for M/T) and make sure the parking brake is engaged.
• Put blocks in front of the drive wheels and never leave the vehicle unattended while running tests.
• Don’t connect or disconnect any test equipment while the ignition is on or the engine is running.
• Make sure the vehicle is parked with all wheels on an even floor surface.
• Keep clothing, hair, hands, tools, test equipment, etc. away from all moving or hot engine parts.
• Do not attempt to operate or observe the tool while driving a vehicle. Operating or observing the tool
will cause driver distraction and could cause a fatal accident.
• Before calibrating, mak
e sure the vehicle system is working properly and no trouble codes are stored
in ECU memories.
• After a calibration is completely performed, remember to unplug the VCI device from the vehicle’s
diagnostic socket.
THINKCAR ADAS Calibration Tool
SAFETY PRECAUTION
INITIAL USE
START CALIBRATION
TARGET PATTERN KIT
PRODUCT PROFILE
III
On Using Laser Devices
• The laser radiation can cause serious eye injury.
• Do not stare into the laser beam.
• Never look directly into the laser beam because it may cause damage to / destruction of the retina.
• Do not position the laser beam so that it unintentionally blinds you or others.
• Do not operate the laser level near children or let children operate the laser level.
• Do not look into a laser beam using magnifying optical devices such as binoculars or a telescope, as
this will increase the level of eye injury.
• Do not remove or deface warning labels on the laser device.
• Do not disassemble the laser level, laser radiation can cause serious eye injury.
• Do not operate the laser in explosive atmospheres such as flammable liquids, gases or dust. Sparks
from the tool can cause ignition.
• Do not use solvents to clean the laser unit.
• Do not drop the unit.
• Remove the batteries if the laser / laser range finder will not be in use for a long period.
• Do not allow children to use the laser device as a toy.
• While installing a laser module, please make sure it is firmly and securely attached.
• The included goggles are intended to enhance the visibility of the Laser beam. They will not protect
your eyes against laser radiation.
.
INTENDED USE OF THE TOOL
The THINKCAR ADAS calibration tool is exclusively intended for use on a vehicle.
Do not use this tool outside of the designed intent. Never modify the tool for any other purpose or use.
PRODUCT INFORMATION
• As a flexible and portable ADAS calibration tool, it enables you to effectively and accurately calibrate a
wide range of camera-based driving assistance systems.
• Simple to fold/unfold and easy to operate.
THINKCAR ADAS Calibration Tool
Designed by
Thinkcar in California

SAFETY PRECAUTION
INITIAL USE
START CALIBRATION
TARGET PATTERN KIT
PRODUCT PROFILE
VII
Table of Contents
1 Product Profile............................................................................................................................................1
1.1 About ADAS ..............................................................................................................................................1
1.2 About THINKCAR ADAS ...........................................................................................................................1
1.2.1 Product Introduction .........................................................................................................................1
1.2.2 Packing List .......................................................................................................................................3
1.3 Components & Controls ..........................................................................................................................9
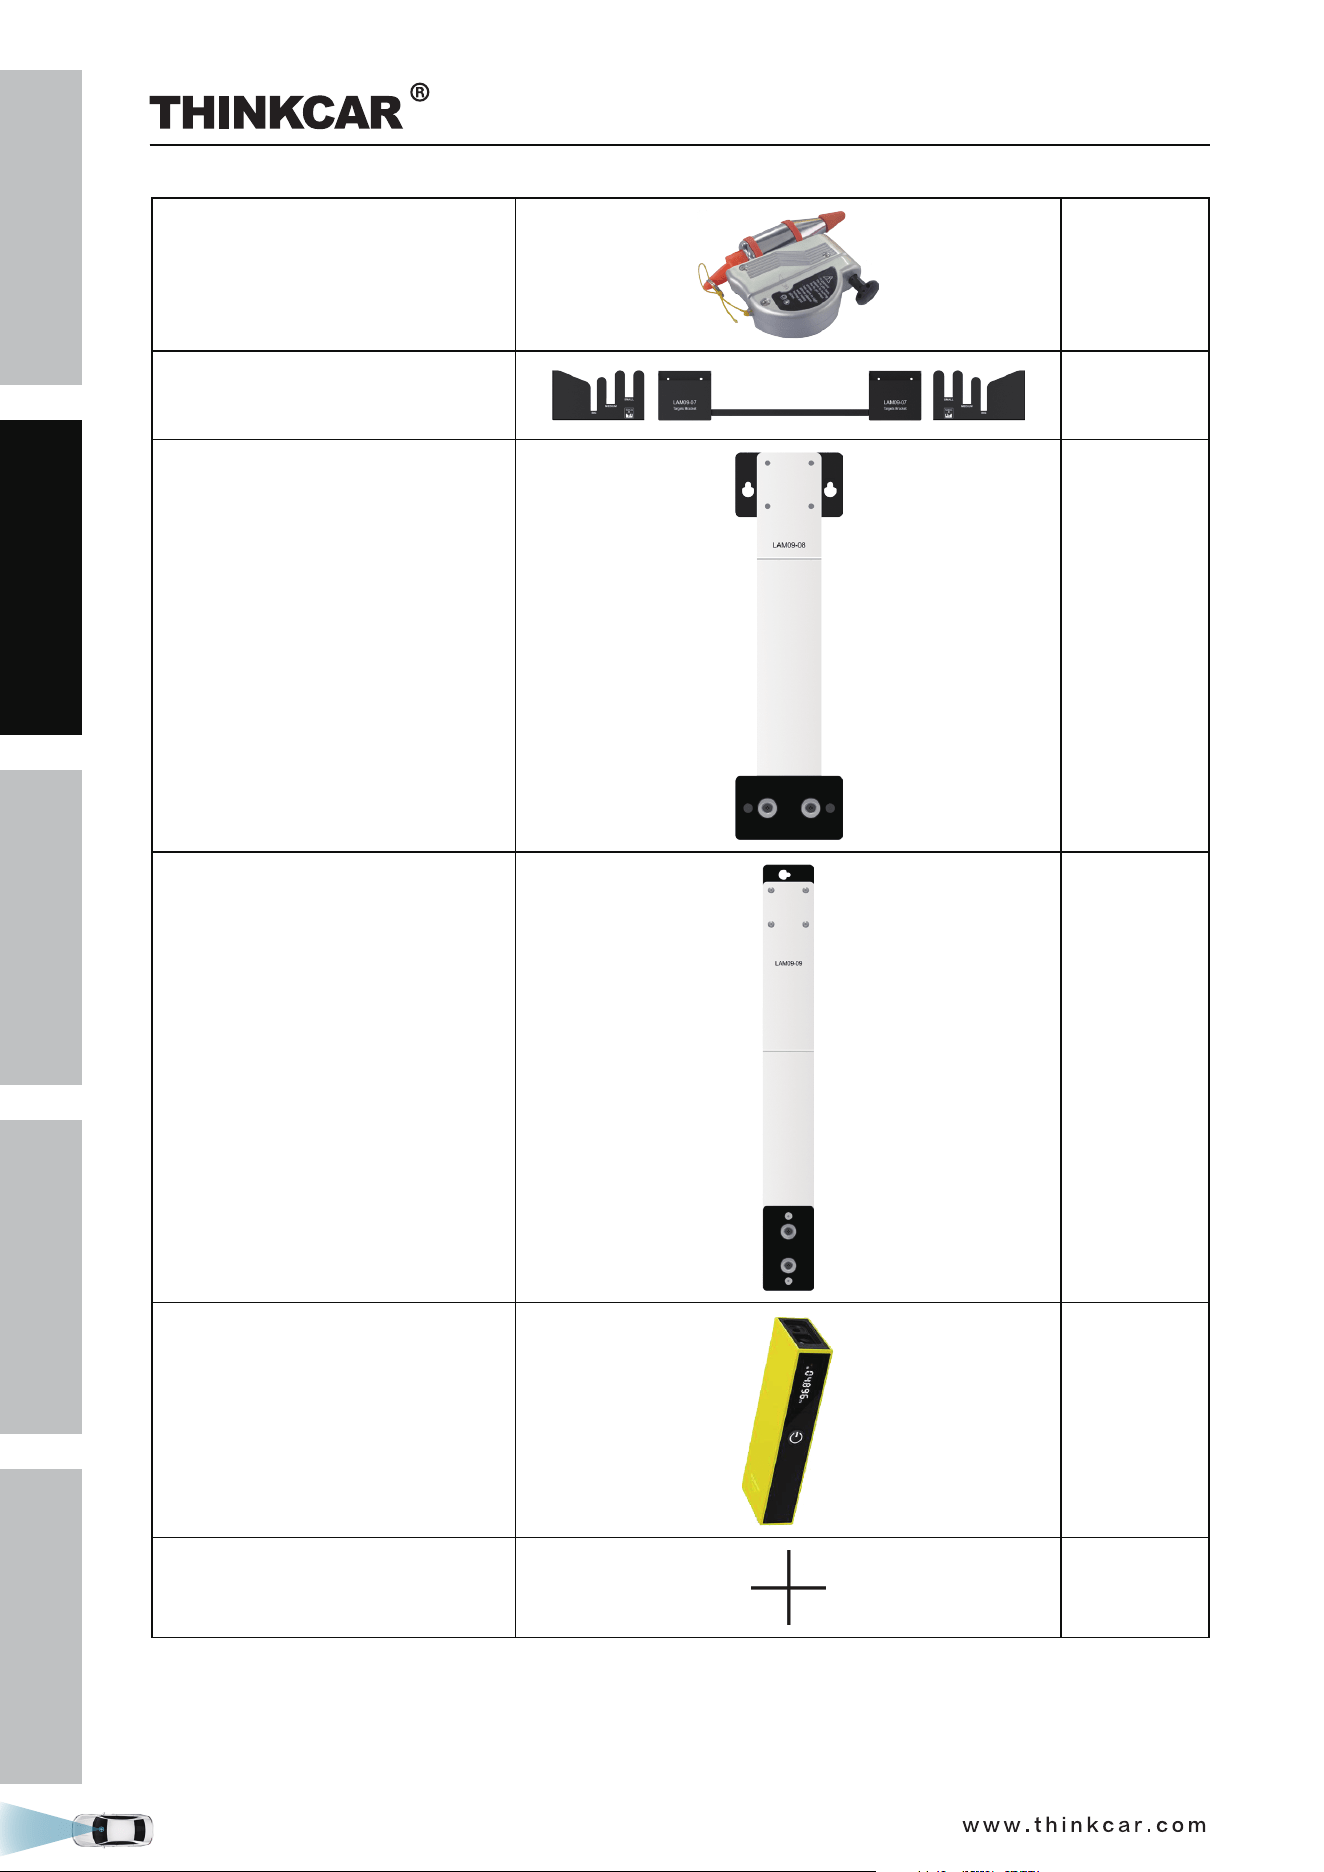
1.3.1 Calibration frame ...............................................................................................................................9
1.3.2 Five-line laser device (LAM09-01) ...................................................................................................12
1.3.3 Cross laser module (LAM09-02) .....................................................................................................15
1.3.4 Laser reflector (LAM09-03) .............................................................................................................15
1.3.5 Auxiliary laser mirror (LAM09-04) ....................................................................................................16
1.3.6 L-shaped positioning bracket (LAM09-05) .......................................................................................16
1.3.7 Plumb line (LAM09-06) ...................................................................................................................16
1.3.8 Target board storage bracket (LAM09-07) .......................................................................................16
1.3.9 Target extension rod for Toyota (LAM09-08) ....................................................................................17
1.3.10 Target extension rod for Honda (LAM09-09) ..................................................................................17
1.3.11 Laser range finder .........................................................................................................................18
2 Initial Use ..................................................................................................................................................20
2.1 Place the calibration frame .....................................................................................................................20
2.2 Activate ADAS function ...........................................................................................................................22
2.3 General Calibration Operations for LDW System ..................................................................................23
2.3.1 Precondition for the Use of the THINKCAR ADAS ........................................................................23
2.3.1.1 Workstation size .......................................................................................................................23
2.3.1.2 Workstation ground ..................................................................................................................24
2.3.1.3 Workstation lighting .................................................................................................................25
2.3.2 Calibration Operation ......................................................................................................................25
2.3.2.1 Determine the center line of the vehicle .................................................................................25
2.3.2.2 Determine the placement location of the THINKCAR ADAS ..................................................27
2.3.2.3 Place the THINKCAR ADAS ....................................................................................................28
2.3.2.4 Adjust the THINKCAR ADAS in parallel with the vehicle ........................................................28
2.3.2.5 Select the desired target / pattern board .................................................................................29
2.3.2.6 Set the height ..........................................................................................................................33
3 Start Calibration .......................................................................................................................................34
3.1 Calibrating the front camera ...................................................................................................................34
3.1.1 When to calibrate? ..........................................................................................................................34
3.1.2 Operation Notes ..............................................................................................................................34
3.1.3 Start calibration ...............................................................................................................................36
3.2 Calibrating the rear camera .....................................................................................................................45
3.2.1 When to calibrate? ..........................................................................................................................45
3.2.2 Operation Notes .............................................................................................................................46
THINKCAR ADAS Calibration Tool

SAFETY PRECAUTION
INITIAL USE
START CALIBRATION
TARGET PATTERN KIT
PRODUCT PROFILE
VIII
3.2.2 Operation Notes .............................................................................................................................46
3.2.3 Start calibration ...............................................................................................................................48
4 Target Pattern Kit (Optional) ....................................................................................................................54
5 Care & Maintenance ................................................................................................................................56
THINKCAR ADAS Calibration Tool

SAFETY PRECAUTION
INITIAL USE
START CALIBRATION
TARGET PATTERN KIT
PRODUCT PROFILE
1
1
1.1 About ADAS
Advanced Driver Assistance Systems (ADAS) are electronic components in vehicles, which include a wide
range of safety features for vehicles such as autonomous emergency braking (AEB), lane departure warning
(LDW), lane keep assist, blind spot elimination, night vision cameras and adaptive lighting.
Most road accidents occurr due to the human error. Advanced Driver Assist Systems are developed
to automate, adapt and enhance vehicle systems for safety and better driving. The automated system
provided by ADAS to the vehicle is proven to reduce road fatalities, by offering technologies that alert the
driver to potential problems or by implementing safeguards and taking over control of the vehicle.
Initially only found on premium vehicles, the number of modern mid-class and compact vehicles equipped
with Advanced Driver Assist Systems is growing at a rapid rate.
The cameras and sensors used by these systems have to be precisely calibrated and
adjusted.
Incorrect calibration resulting from windscreen replacement or wheel alignment can cause the
system to deliver incorrect results or even fail completely, resulting in a serious accident or even a
fatality.
1.2 About THINKCAR ADAS
1.2.1 Product Introduction
As a flexible and portable ADAS calibration tool, the THINKCAR ADAS enables you to effectively and accurately
calibrate a wide range of camera-based driving assistance systems, e.g. the front camera for the lane
departure warning system. Repair and service shops do not require a fully equipped wheel alignment
station or a leveled workshop ground or platform lift in order to work with THINKCAR ADAS calibration tool.
It features the following key functions and advantages:
• Convenient to carry designed with the foldable base and crossbars, supporting outdoor calibration.
• Five-line & cross laser instrument available for precise centering positioning.
• Simple to fold/unfold and easy to operate.
• Manual rocker for adjusting the height freely.
• Dedicated storage bracket for storing small target boards and big pattern boards.
• Covering a wide range of car makes.
• Excellent user experien
ce for providing vehicle-specific, step-by-step instructions and detailed
illustrations.
To perform the ADAS calibration, the following two components are required:
• THINKCAR ADAS Calibration Tool – It is designed to calibrate the position of the vehicle sensor and target.
It consists of a calibration frame (with cross member), five-line laser device, cross laser module, laser
reflector, auxiliary mirror, L -shaped positioning bracket, leader hammer and calibration panel (available in
packages or individual) etc.
THINKCAR ADAS Calibration Tool
SAFETY PRECAUTION
INITIAL USE
START CALIBRATION
TARGET PATTERN KIT
PRODUCT PROFILE
2
• Diagnostic Tool (sold separately) – The calibration tool is exclusively operated in conjunction with a
specific diagnostic tool. Diagnostic tools from other manufacturers will not be supported.
THINKCAR ADAS Calibration Tool
SAFETY PRECAUTION
INITIAL USE
START CALIBRATION
TARGET PATTERN KIT
PRODUCT PROFILE
3
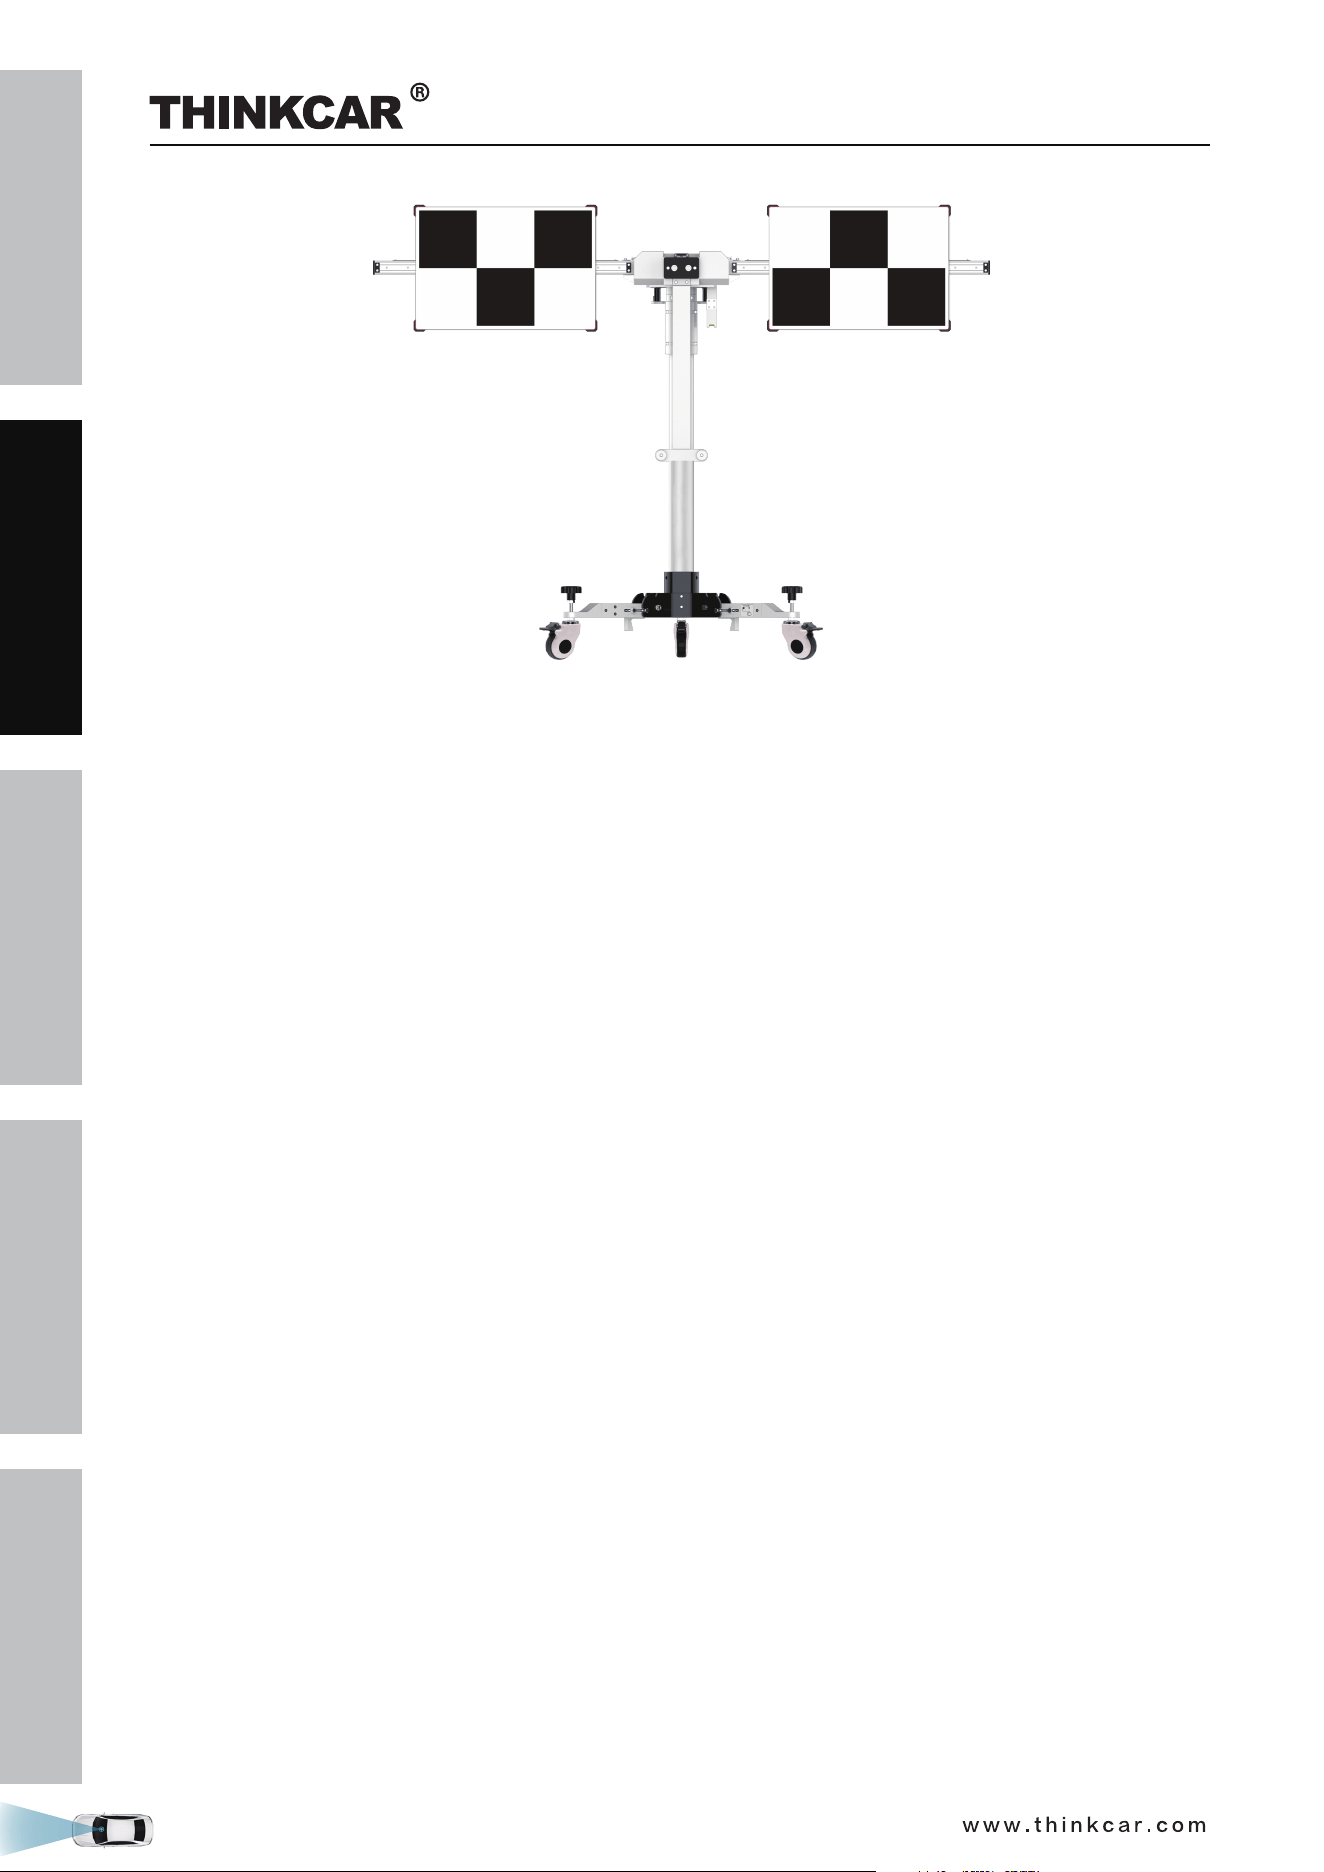
1.2.2 Packing List
Please check the packing list upon receiving your tool so that potential complaints can be issued
immediately regarding potential damage or missing parts. For different destinations, the accessories may
vary. For details, please consult from the local dealers or check the included packing list.
While unloading, please note: The heavy tool may drop down and cause injuries, remember to
always unload the tool with the aid of a second person or use suitable aid as necessary.
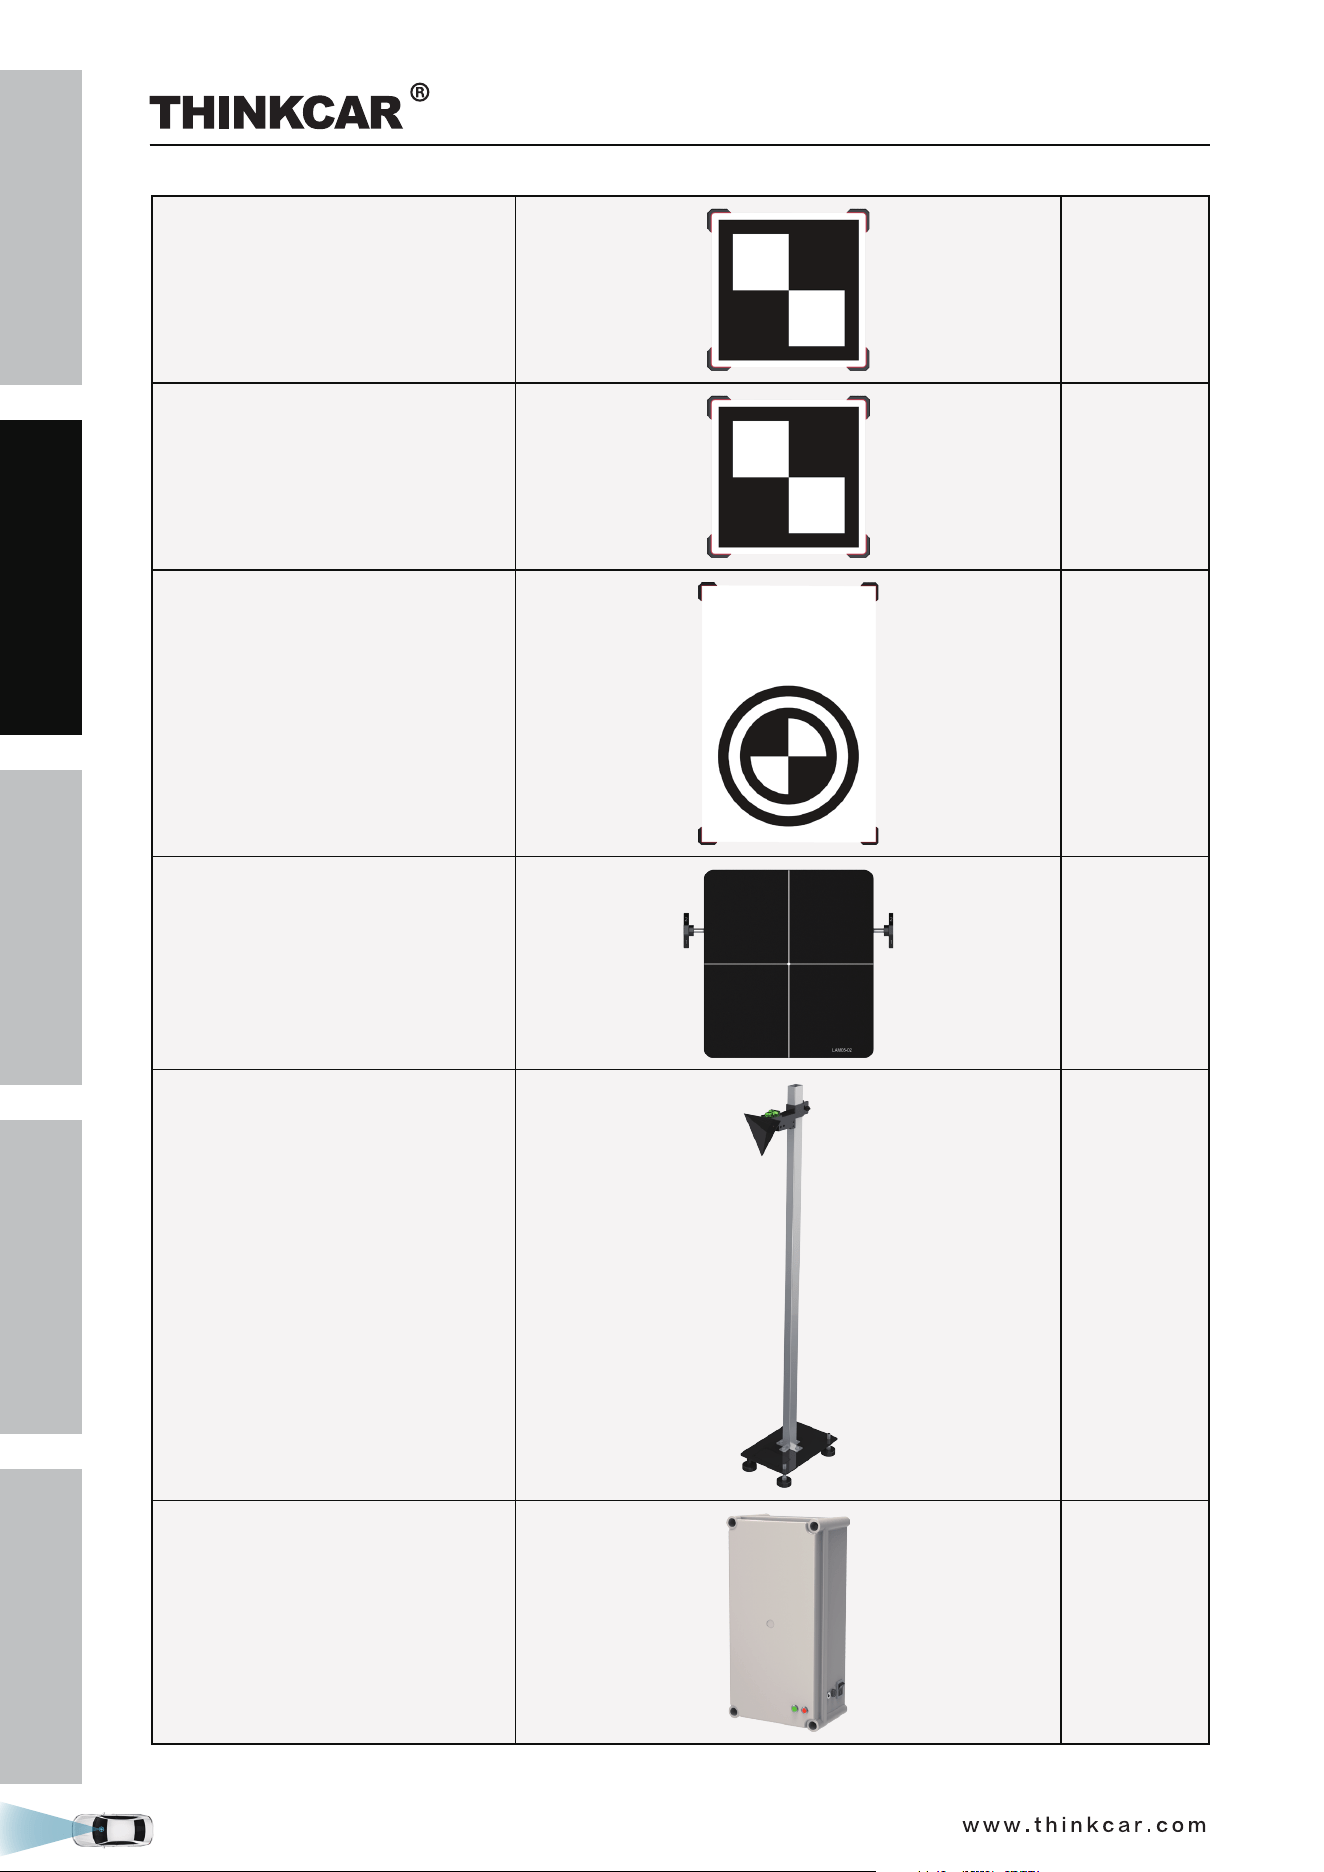
Items Picture Quantity
Calibration frame 1
Five-line laser device
(LAM09-01)
1
Cross laser module
(LAM09-02)
1
Laser reflector
(LAM09-03)
1
Auxiliary mirror
(LAM09-04)
1
L-shaped positioning bracket
(LAM09-05)
1
THINKCAR ADAS Calibration Tool
SAFETY PRECAUTION
INITIAL USE
START CALIBRATION
TARGET PATTERN KIT
PRODUCT PROFILE
4
Plumb line
(LAM09-06)
1
Target storage bracket
(LAM09-07)
1
Target extension rod for Toyota
(LAM09-08)
1
Target extension rod for Honda
(LAM09-09)
1
Laser range finder
1
Cross sticker
1
THINKCAR ADAS Calibration Tool
SAFETY PRECAUTION
INITIAL USE
START CALIBRATION
TARGET PATTERN KIT
PRODUCT PROFILE
5
ADAS Activation Card 1
User Manual 1
Calibration target / pattern boards
(Available in different product configuration packages.
Target boards and patterns for Lane Departure
Warning System are included with this tool. Other
boards and patterns for other ADAS systems need
to be purchased separately. For detailed packages,
refer to Chapter Target Pattern Kit.)
LAM01-01
Benz-LDW
1
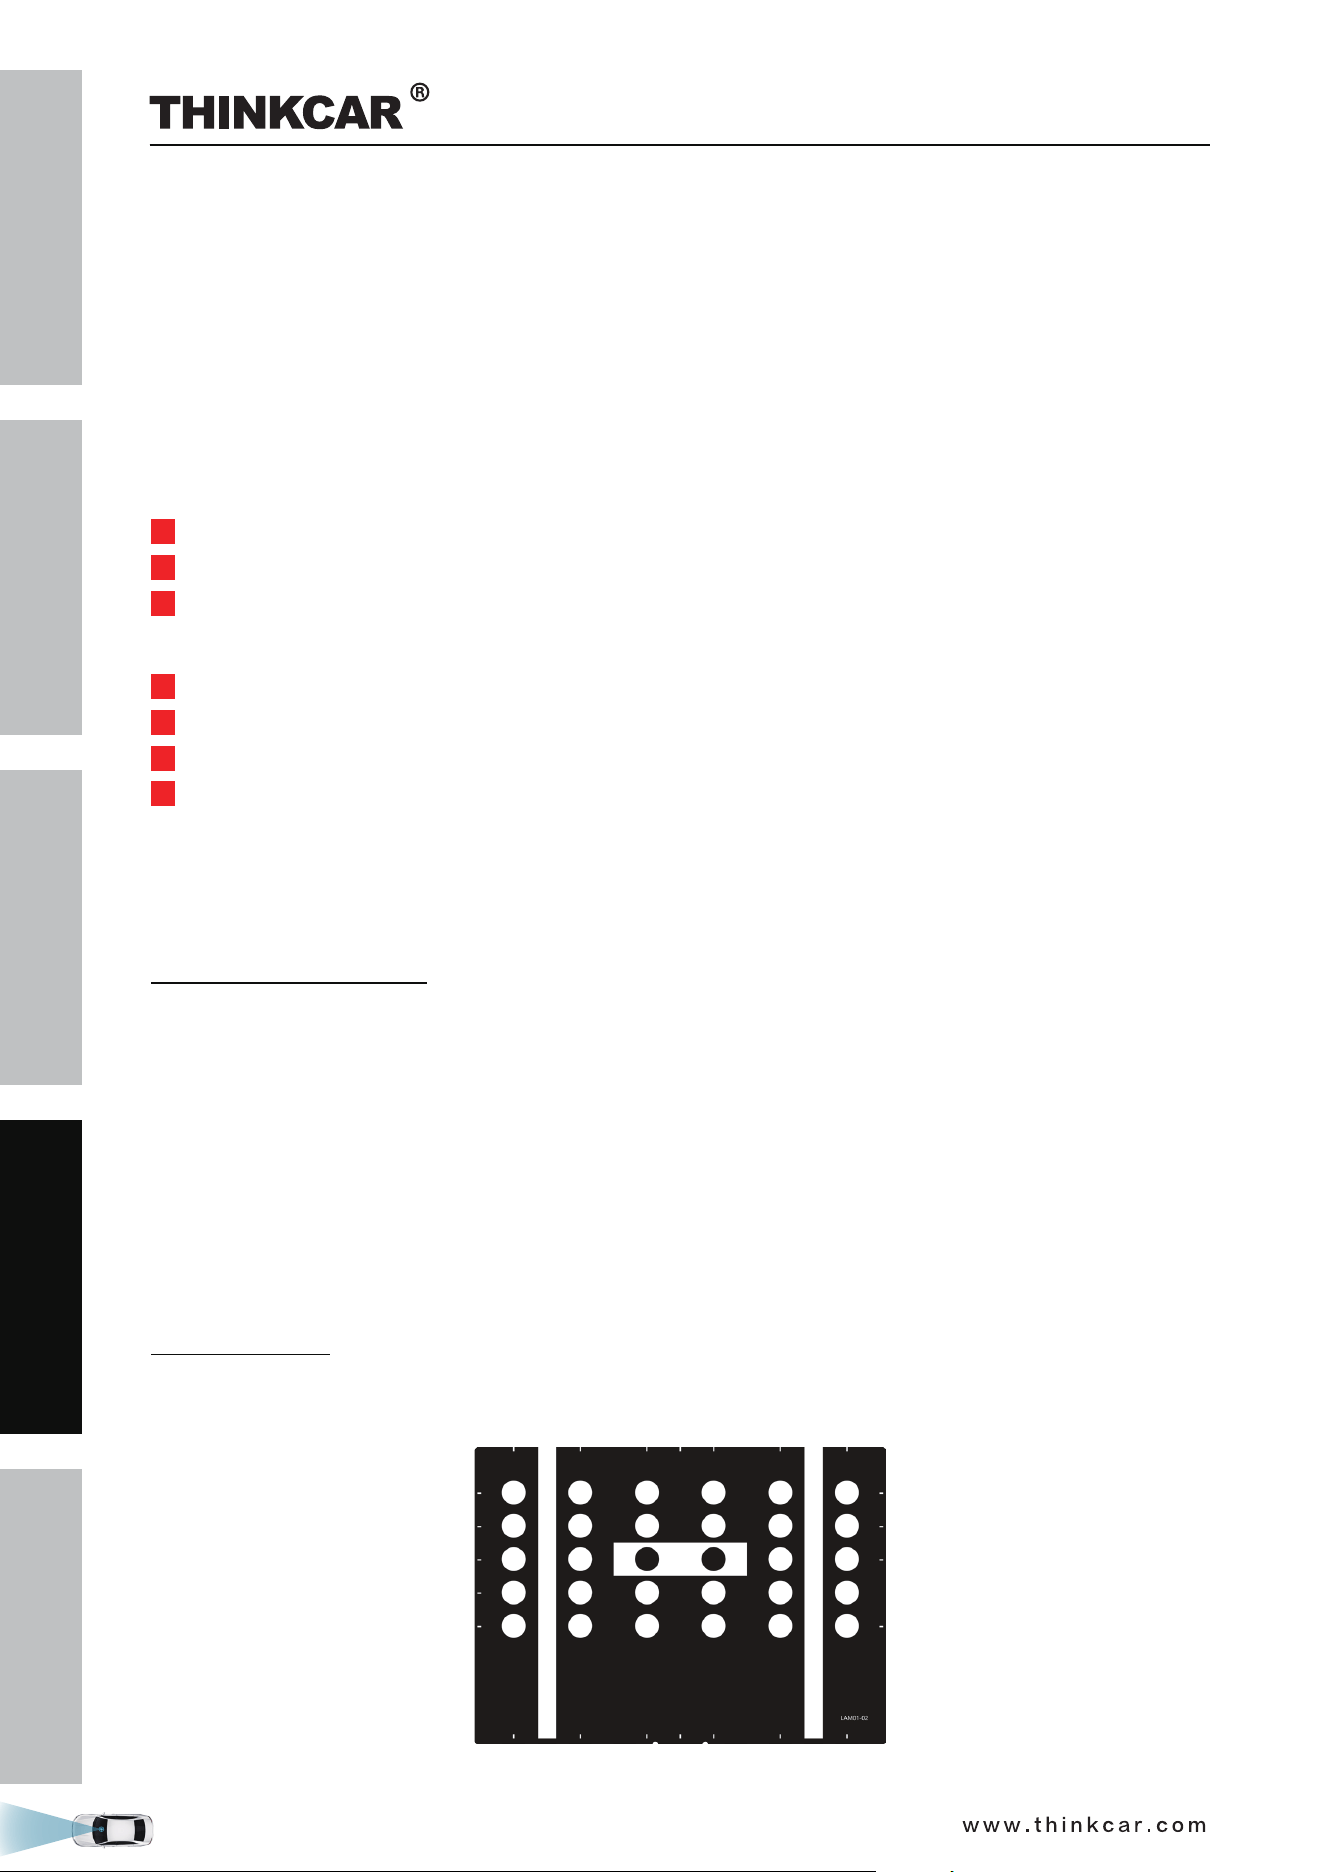
LAM01-02
VW-LDW
1
LAM01-04-L
Honda-LDW
1
LAM01-04-R
Honda-LDW
1
LAM01-06-1
Toyota-LDW
1
THINKCAR ADAS Calibration Tool
SAFETY PRECAUTION
INITIAL USE
START CALIBRATION
TARGET PATTERN KIT
PRODUCT PROFILE
6
LAM01-06-2
Toyota-LDW
1
LAM01-06-3
Toyota-LDW
1
LAM01-07-L
Nissan-LDW
1
LAM01-07-R
Nissan-LDW
1
LAM01-09
Hyundai/Kia-LDW
1
LAM01-10
Mazda-LDW
1
LAM01-12-L
Nissan/Renault-LDW
1
LAM01-12-R
Nissan/Renault-LDW
1
THINKCAR ADAS Calibration Tool
SAFETY PRECAUTION
INITIAL USE
START CALIBRATION
TARGET PATTERN KIT
PRODUCT PROFILE
7
LAC01-13
Hyundai-LDW
1
LAM01-15
Subaru-LDW
1
LAM01-16-L
Mazda-LDW
1
LAM01-16-R
Mazda-LDW
1
LAM01-17
Honda-LDW
1
LAM01-18-L
Suzuki-LDW
1
LAM01-18-R
Suzuki-LDW
1
THINKCAR ADAS Calibration Tool
SAFETY PRECAUTION
INITIAL USE
START CALIBRATION
TARGET PATTERN KIT
PRODUCT PROFILE
8
LAM01-19-L
Mitsubishi-LDW
1
LAM01-19-R
Mitsubishi-LDW
1
LAM01-20
Honda-LDW
1
LAM05-02
ACC Reflector
1
LAC05-03
CORNER REFLECTOR
1
LAC05-04
Doppler Simulator
1
THINKCAR ADAS Calibration Tool
SAFETY PRECAUTION
INITIAL USE
START CALIBRATION
TARGET PATTERN KIT
PRODUCT PROFILE
9
1.3 Components & Controls
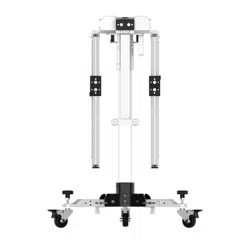
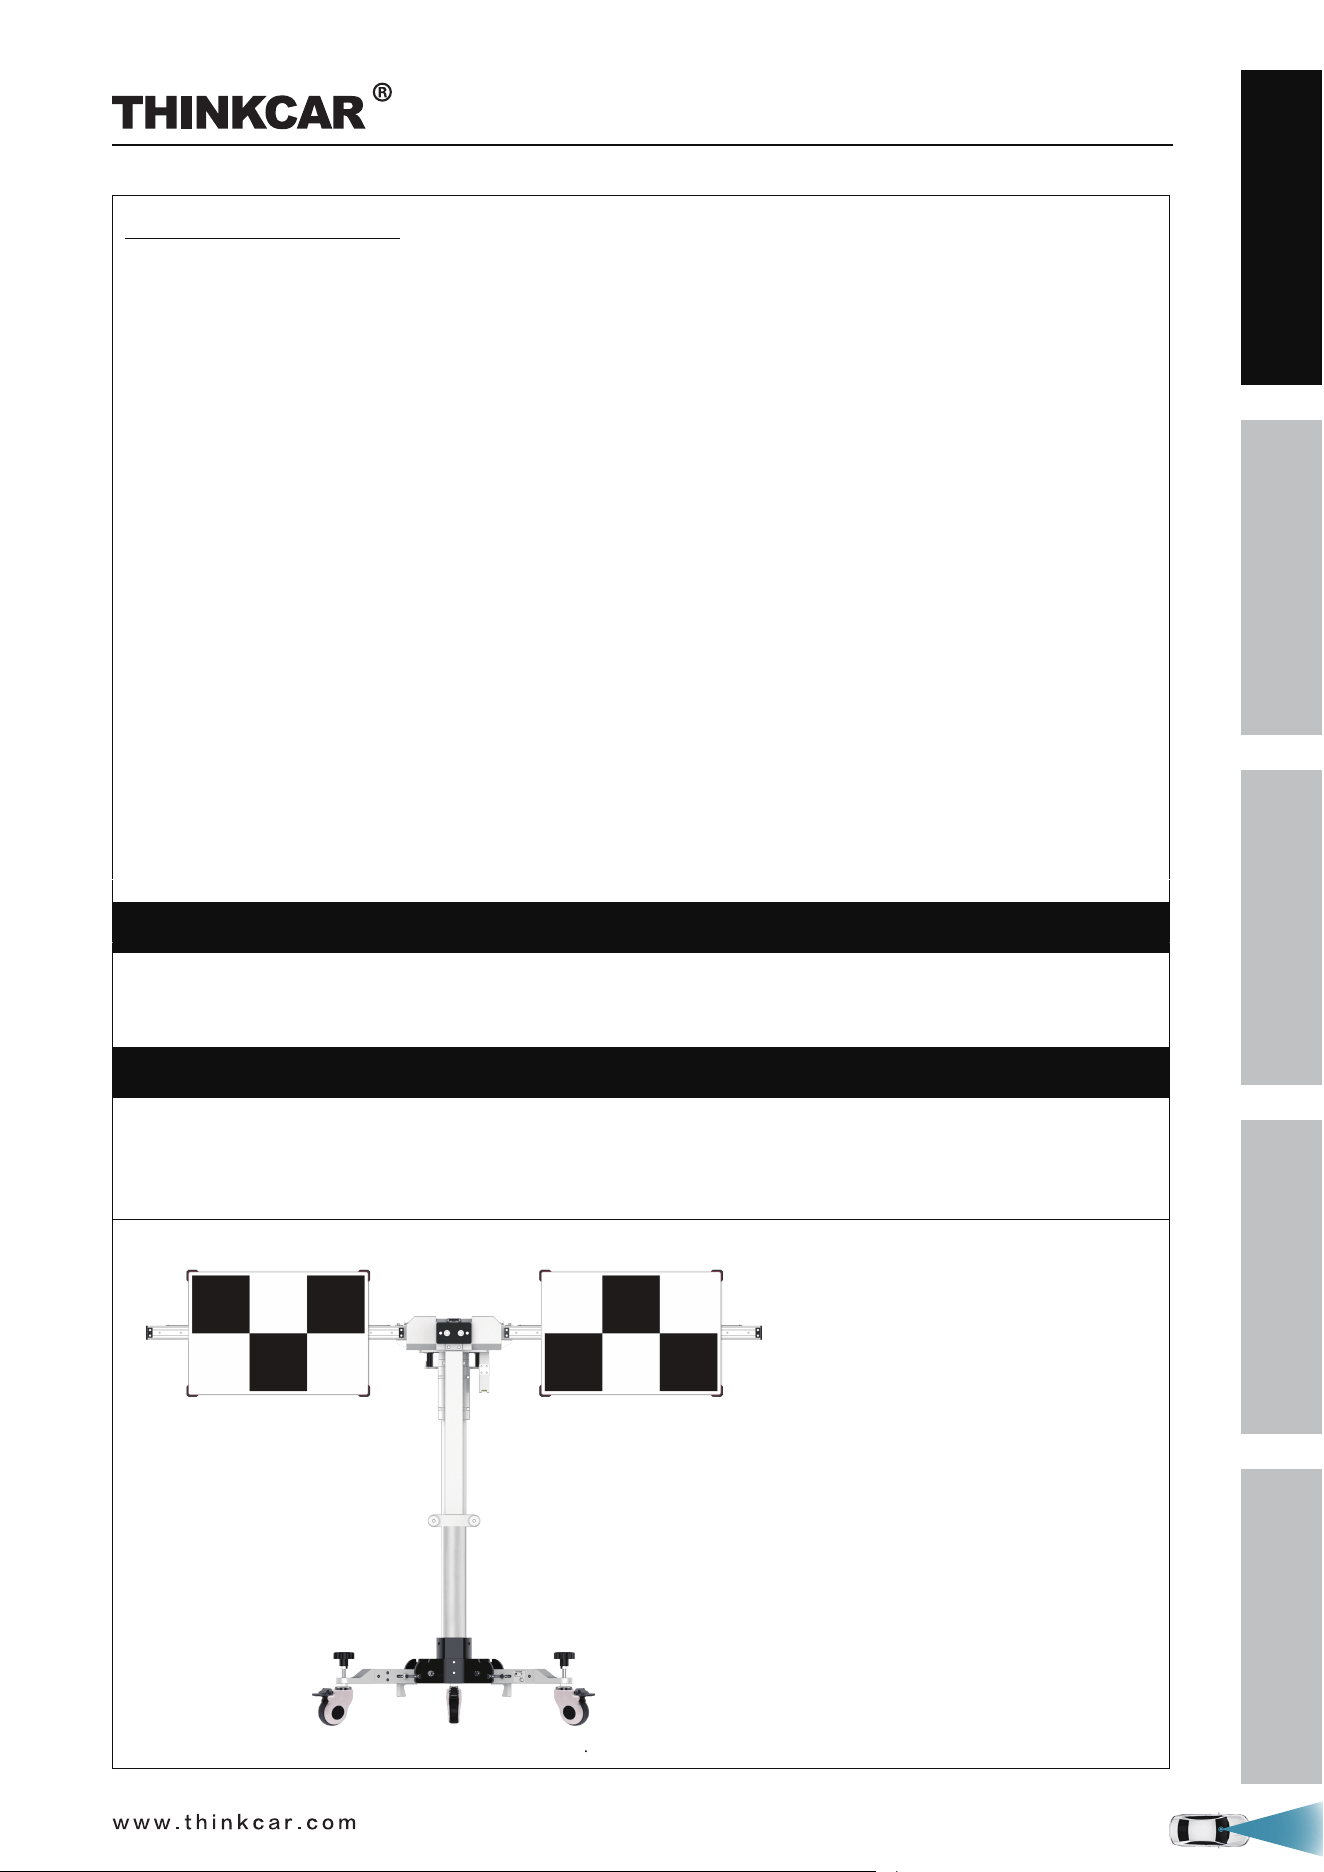
The THINKCAR ADAS calibration tool mainly includes the following items and components:
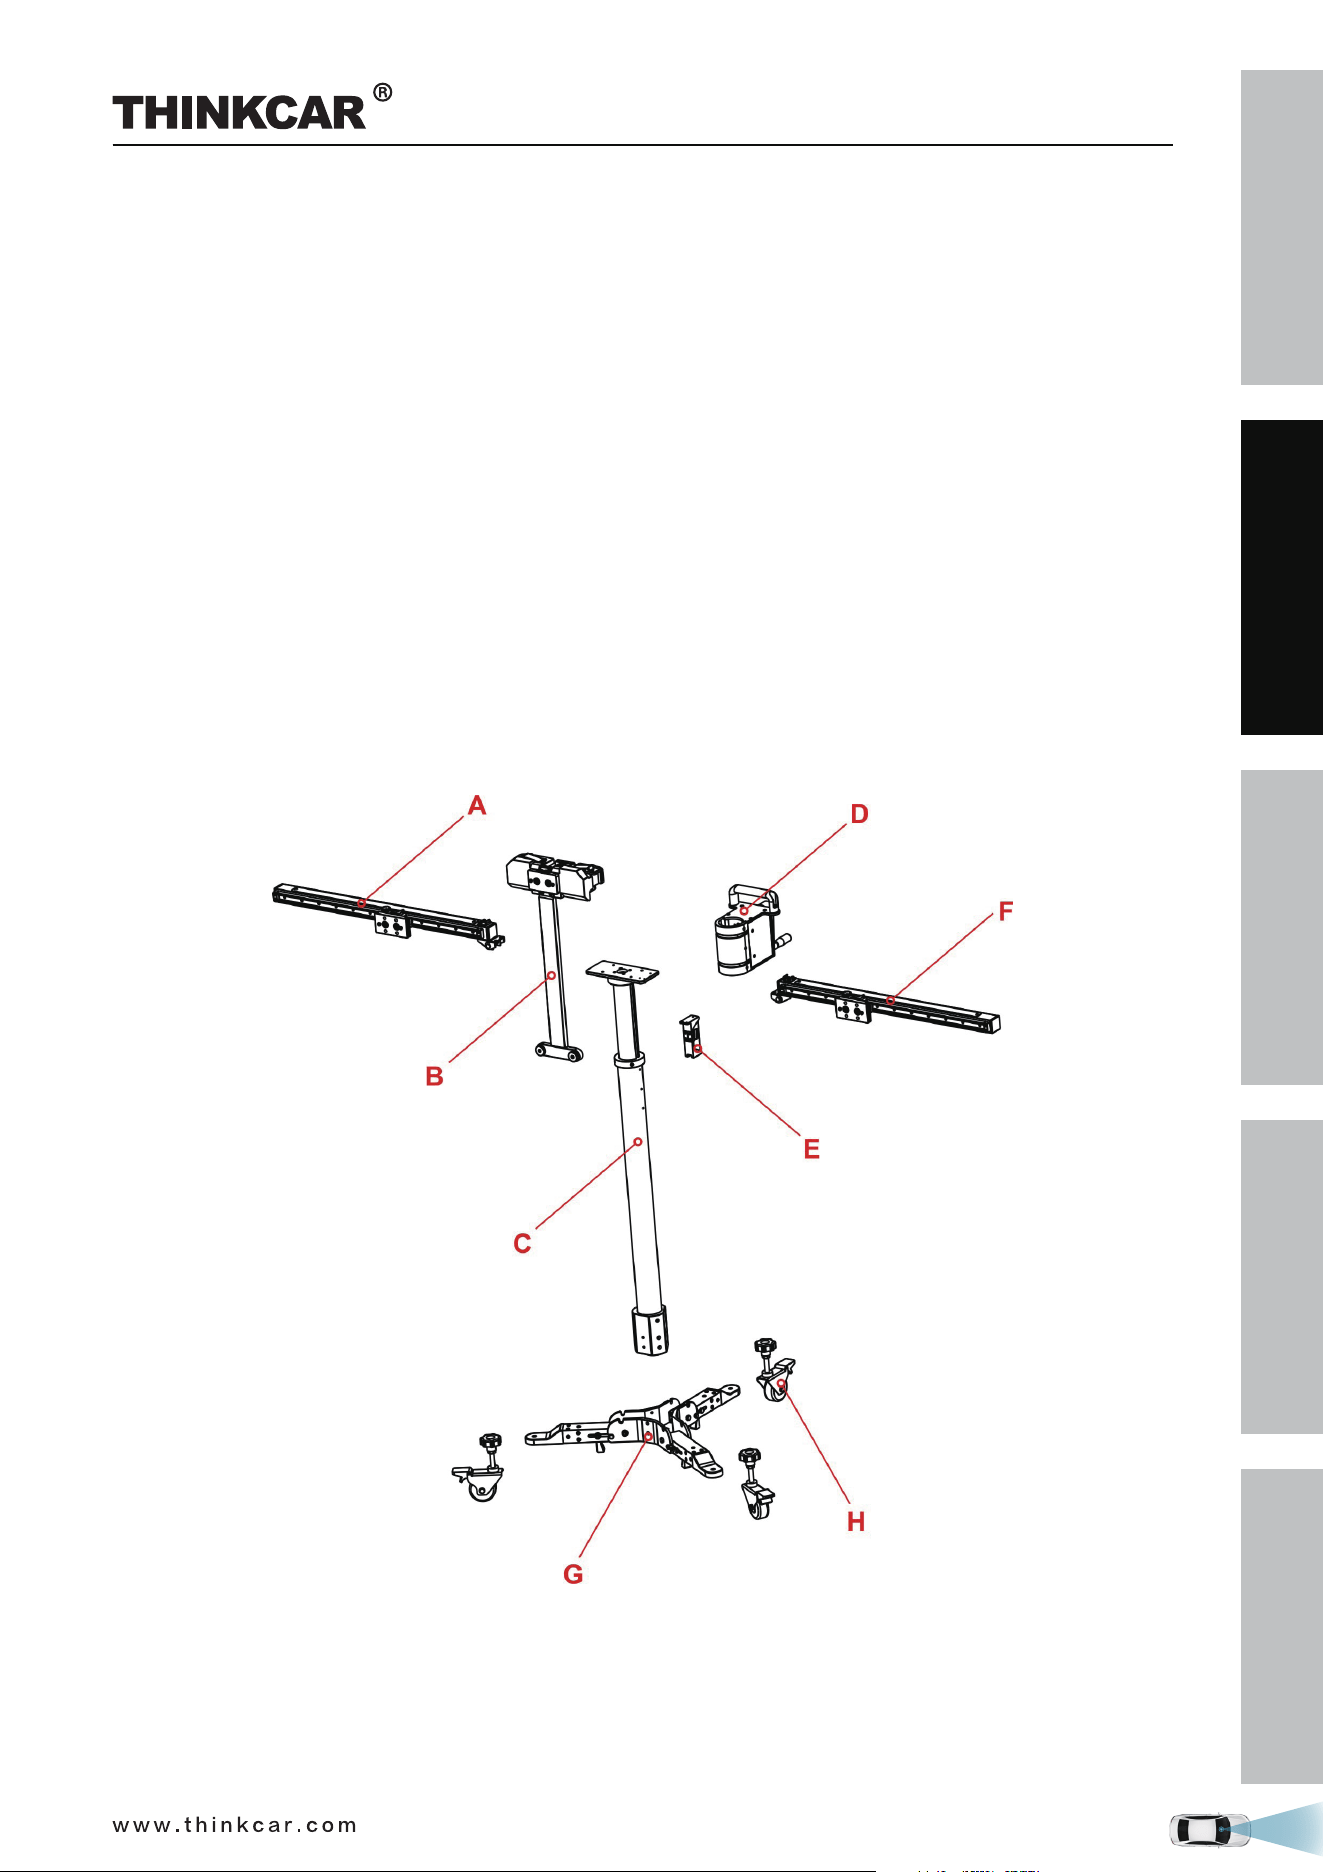
1.3.1 Calibration frame
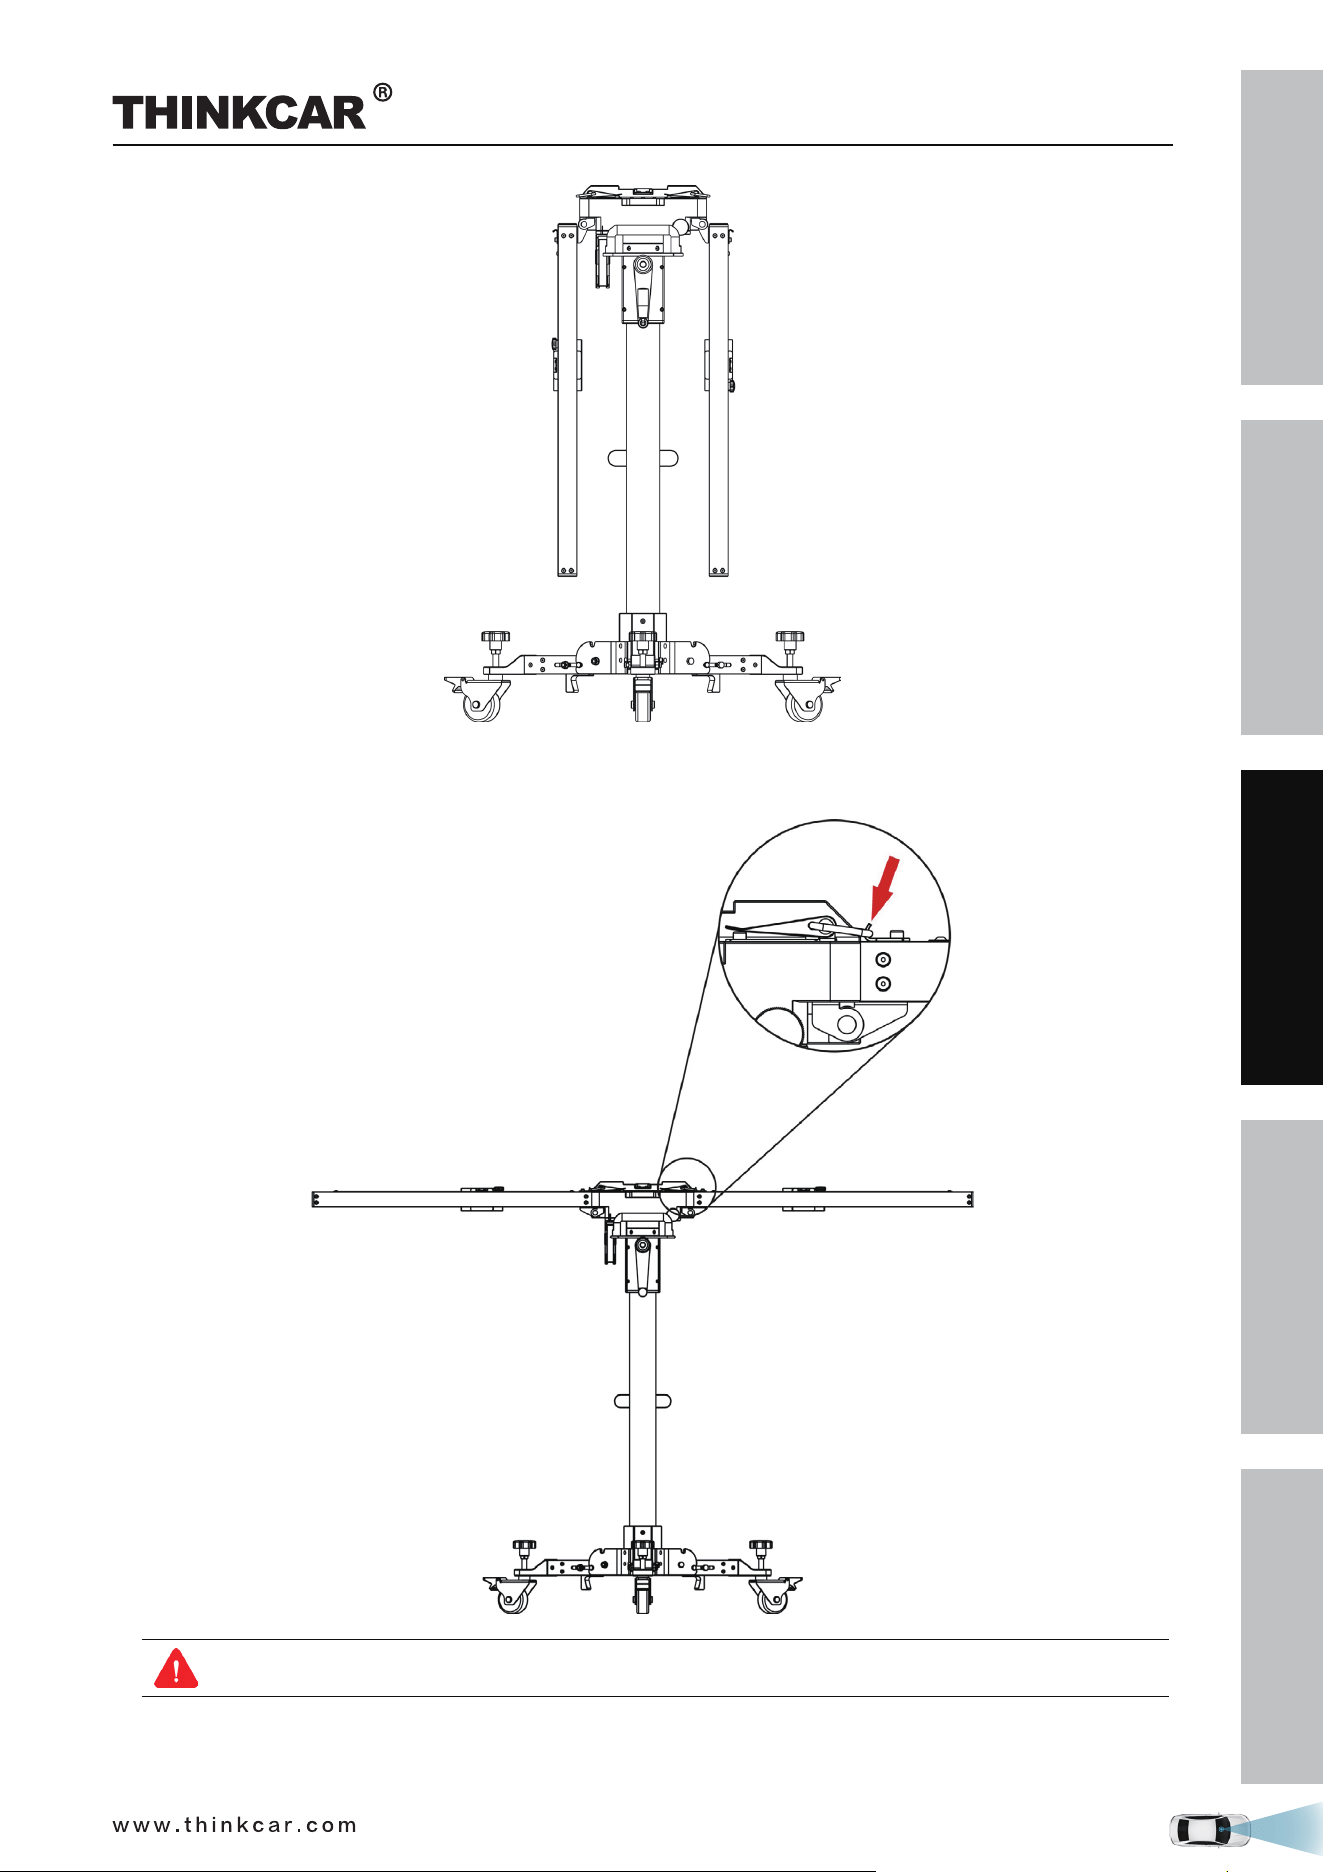
The calibration frame consists of the following components:
A - Right crossbar
Loaded with a scale ruler, a positioning plate for securing the target boards.
B - Positioning bracket for pattern boards
Loaded with a level gauge, two safety snap hooks for locking the crossbars and a fix-holder for cross
laser module.
C - Lifter
D - Gear box and hand crank
For adjusting the height of the lifter.
E - Laser range finder
F - Left crossbar (same as Right crossbar)
G - Base holder
H - Universal rolling casters
THINKCAR ADAS Calibration Tool
SAFETY PRECAUTION
INITIAL USE
START CALIBRATION
TARGET PATTERN KIT
PRODUCT PROFILE
10
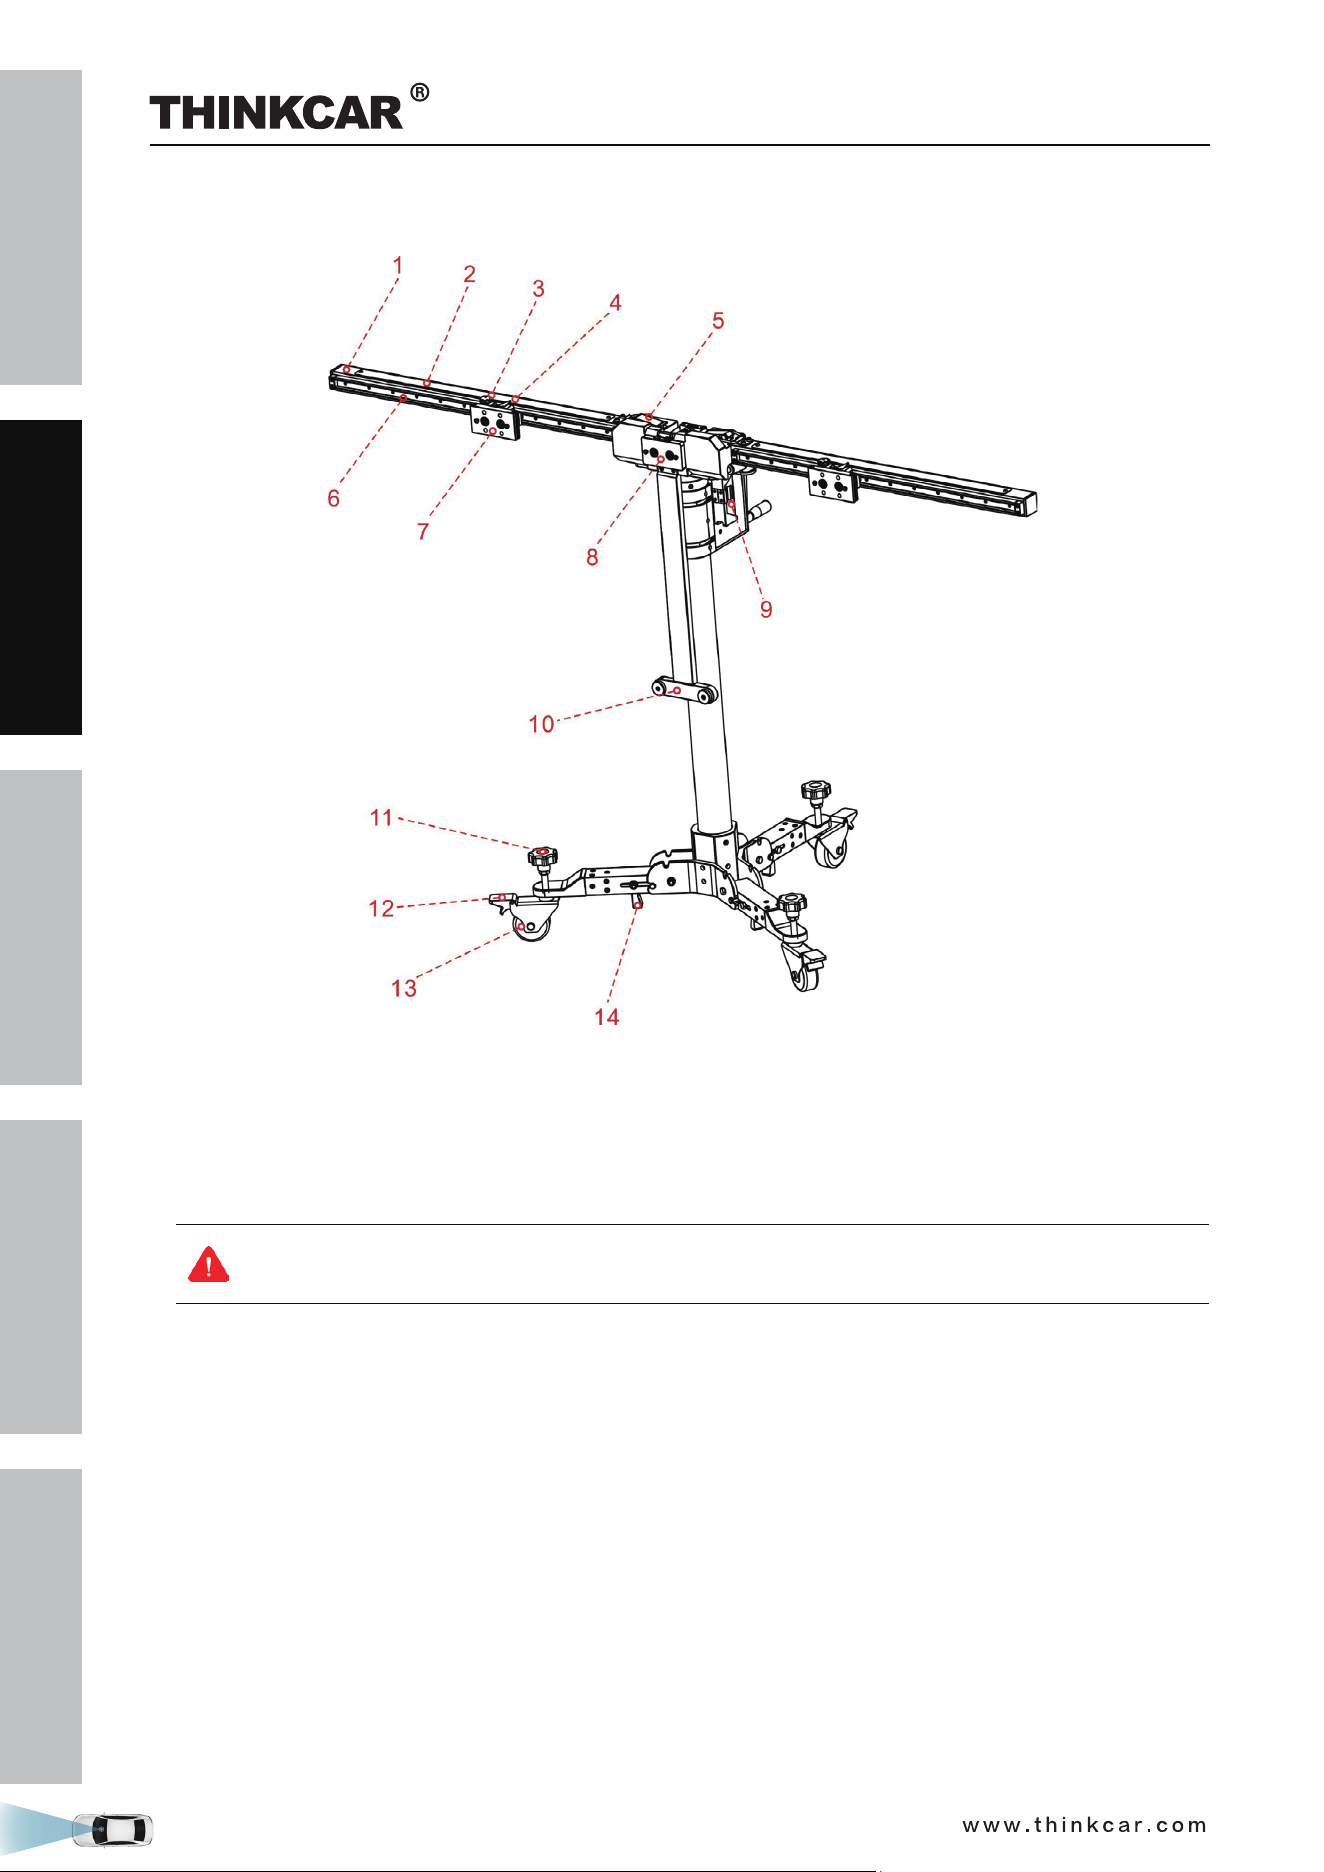
Front View
1. Right crossbar
2. Scale ruler*
3. Set screw*
For securing the positioning plate.
When released, the positioning plate (7) can be moved along the sliding rail freely.
When unfolding the right / left crossbar, please tighten the set screw to prevent the positioning
plate (7) from sliding, as this could result in injury.
4. Scale indicator*
5. Safety snap lock*
Locks / unlocks the crossbar. When unlocked, the crossbar can be folded for easy-to-carry.
6. Sliding rail for positioning plate*
7. Positioning plate*
For securing the target boards / target board extension rod.
There are two BIG holes and two SMALL holes available on the positioning plate. Before shipment, each
BIG hole is pre-installed with one magnet for attaching the metal plate on the target board and each
SMALL hole is preset with one hanging nail for securing the target board or the target board extension
rod. When installing the target board or extension rod, align the mounting holes with the two small holes
and attach it onto the hanging nails.
8. Positioning plate / Magnetic laser fix-plate
For securing the pattern boards / attaching the cross laser module. When installing the big pattern board,
THINKCAR ADAS Calibration Tool
SAFETY PRECAUTION
INITIAL USE
START CALIBRATION
TARGET PATTERN KIT
PRODUCT PROFILE
11
it should be lifted up to ensure a proper installation of the pattern board.
9. Laser range finder
For measuring the height of the center of the pattern board from the ground.
A right tolerance is adjusted for the calibration height of every vehicle on the diagnostic tool.
Keep the value displayed on the screen same as the value displayed on the diagnostic tool
when performing calibration.
10. Pattern board holder
Supports the bottom of the pattern board.
11. Adjustment screw
Rotate it until the bubbles of the level gauge (16) on calibration frame are centered.
12. Parking safety mechanism
Step it down to lock the rolling caster (13) to prevent it from moving.
13. Universal rolling caster
14. Push-pull lever
Controls the folding/unfolding of the base holder.
All items marked with * are same as those on the left crossbar.
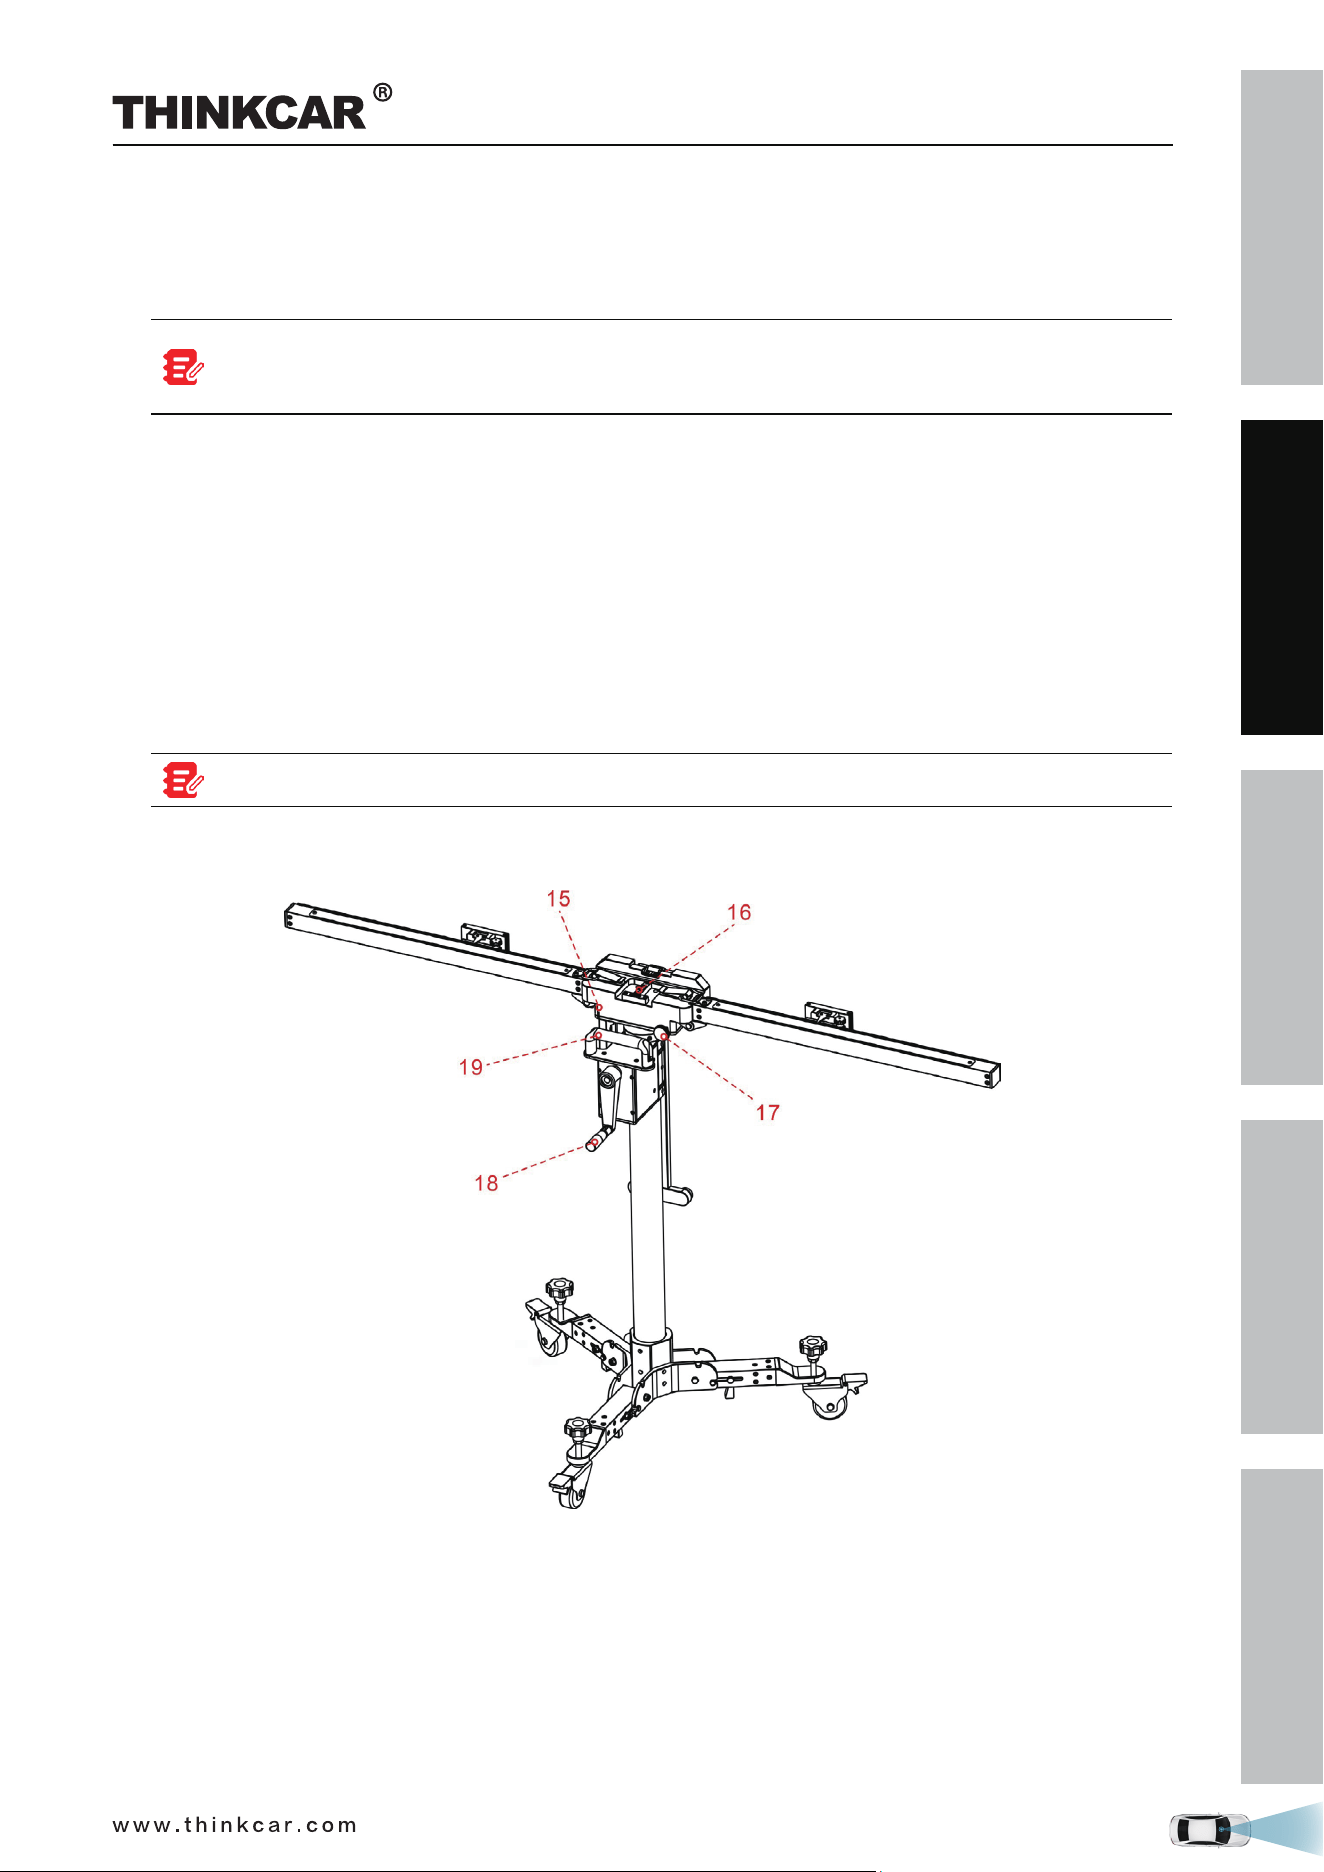
Rear View
15. Marked red lines
The upper line should be aligned with the lower line when the calibration frame is completely unfolded.
If these lines are not aligned, rotate the fine-tuning bolt (17) to adjust it.
16. Level gauge
For checking if the calibration frame is standing on an even surface.
17. Fine-tuning bolt
Rotate the bolt to turn the crossbar axially.
THINKCAR ADAS Calibration Tool
SAFETY PRECAUTION
INITIAL USE
START CALIBRATION
TARGET PATTERN KIT
PRODUCT PROFILE
12
18. Hand crank
For adjusting the height of the lifter.
19. Handle
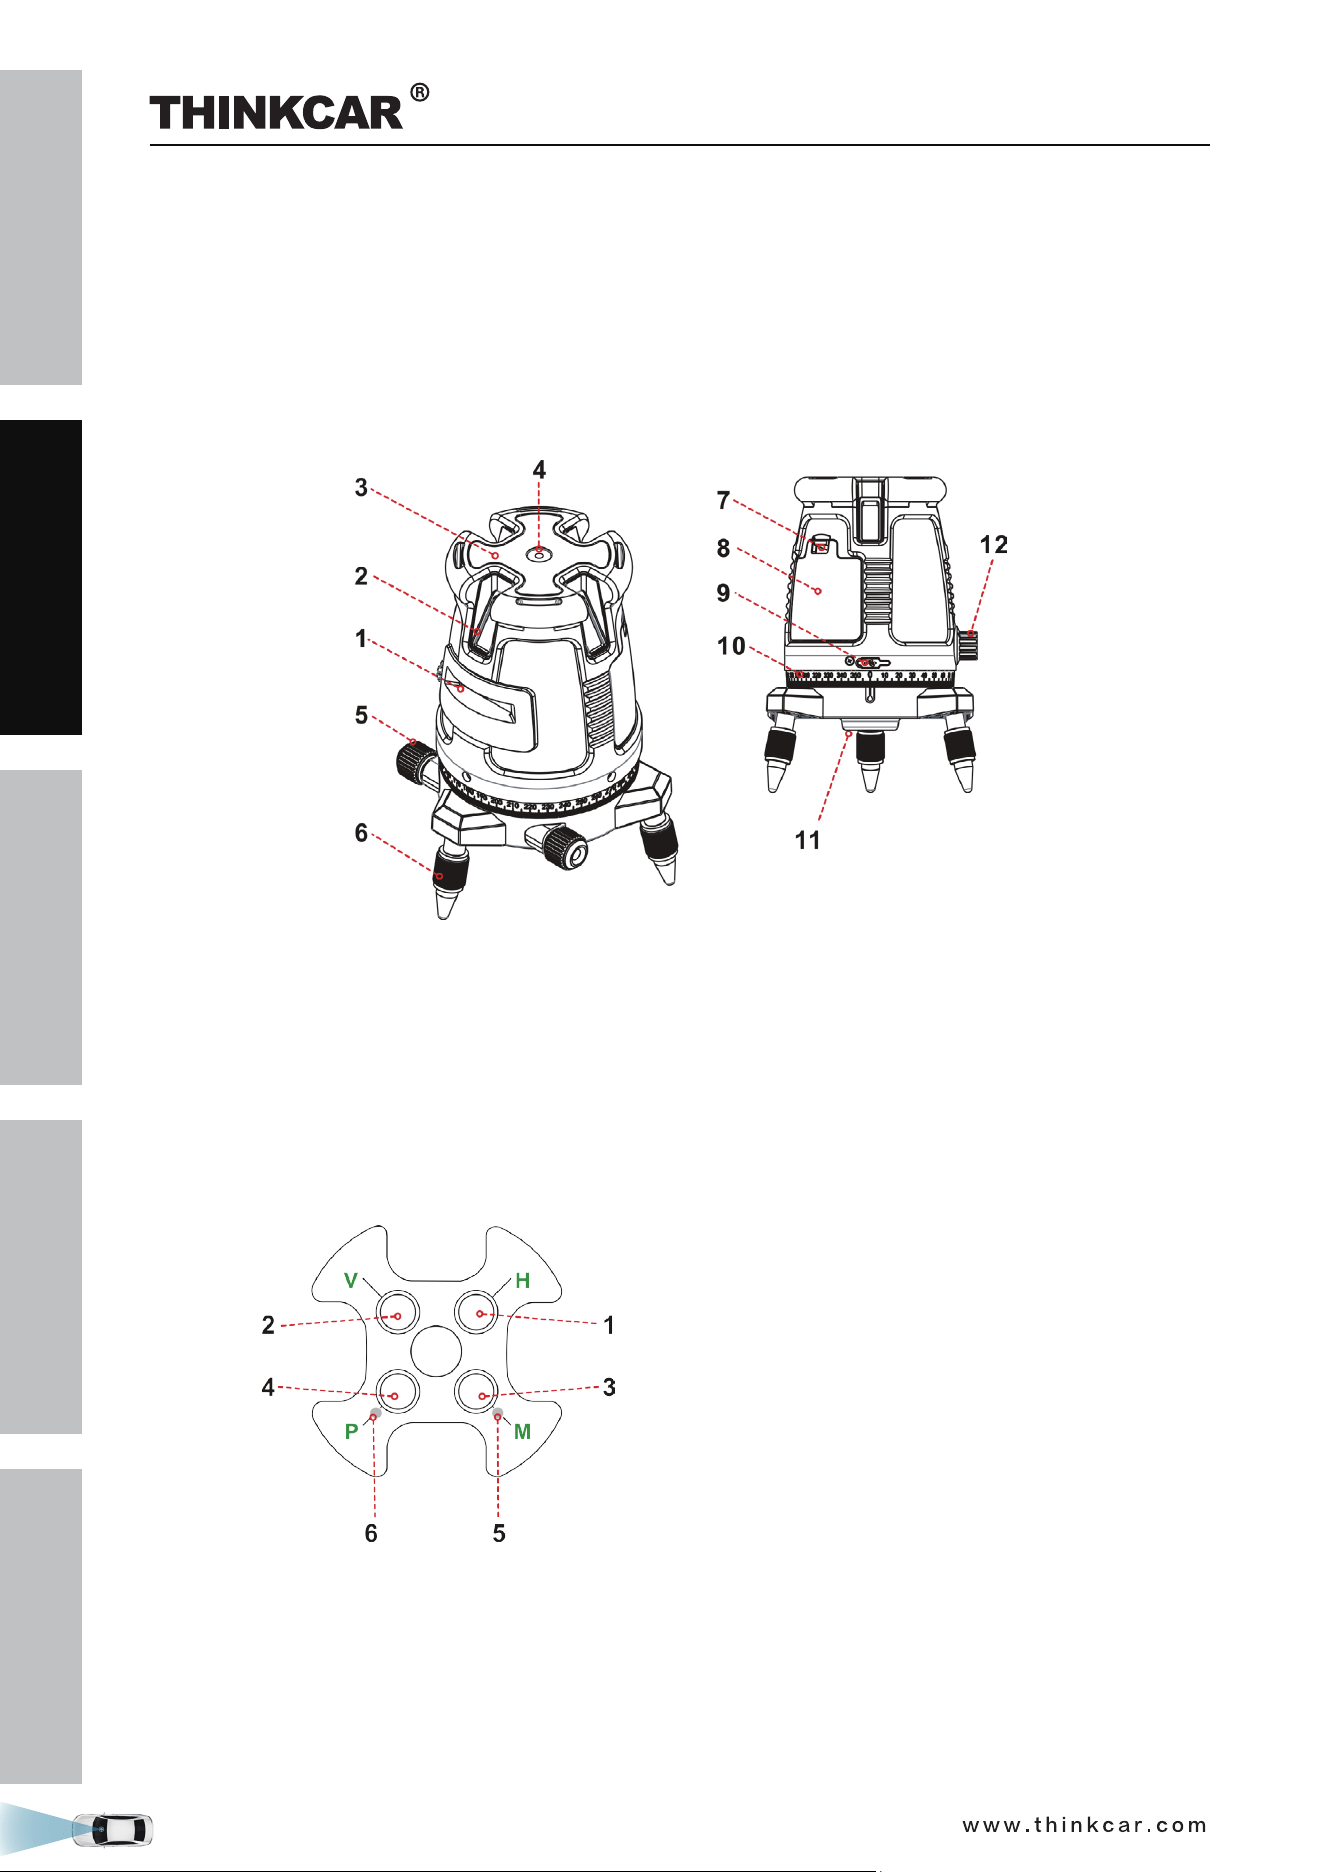
1.3.2 Five-line laser device (LAM09-01)
The five-line laser device is used for aiming laser beams in five directions to position the calibration frame
and vehicle.
1. Horizontal laser output window
2. Vertical laser output window
3. Keypad*
4. Surface level
5. Fine adjustment knob
6. Adjustable support legs
7. Battery cover
8. Battery compartment
9. Charging port
10. Graduated scale
11. 5/8” Tripod threaded adaptor
12. Pendulum safety lock
*Keypad
1. Horizontal line button
2. Vertical lines button
3. Manual mode button
4. Pulse mode button
5. Manual mode red LED indicator
6. Pulse mode green LED indicator
This tool can be operated either by designated lithium-ion battery pack, or 4 AA alkaline batteries.
THINKCAR ADAS Calibration Tool
SAFETY PRECAUTION
INITIAL USE
START CALIBRATION
TARGET PATTERN KIT
PRODUCT PROFILE
13
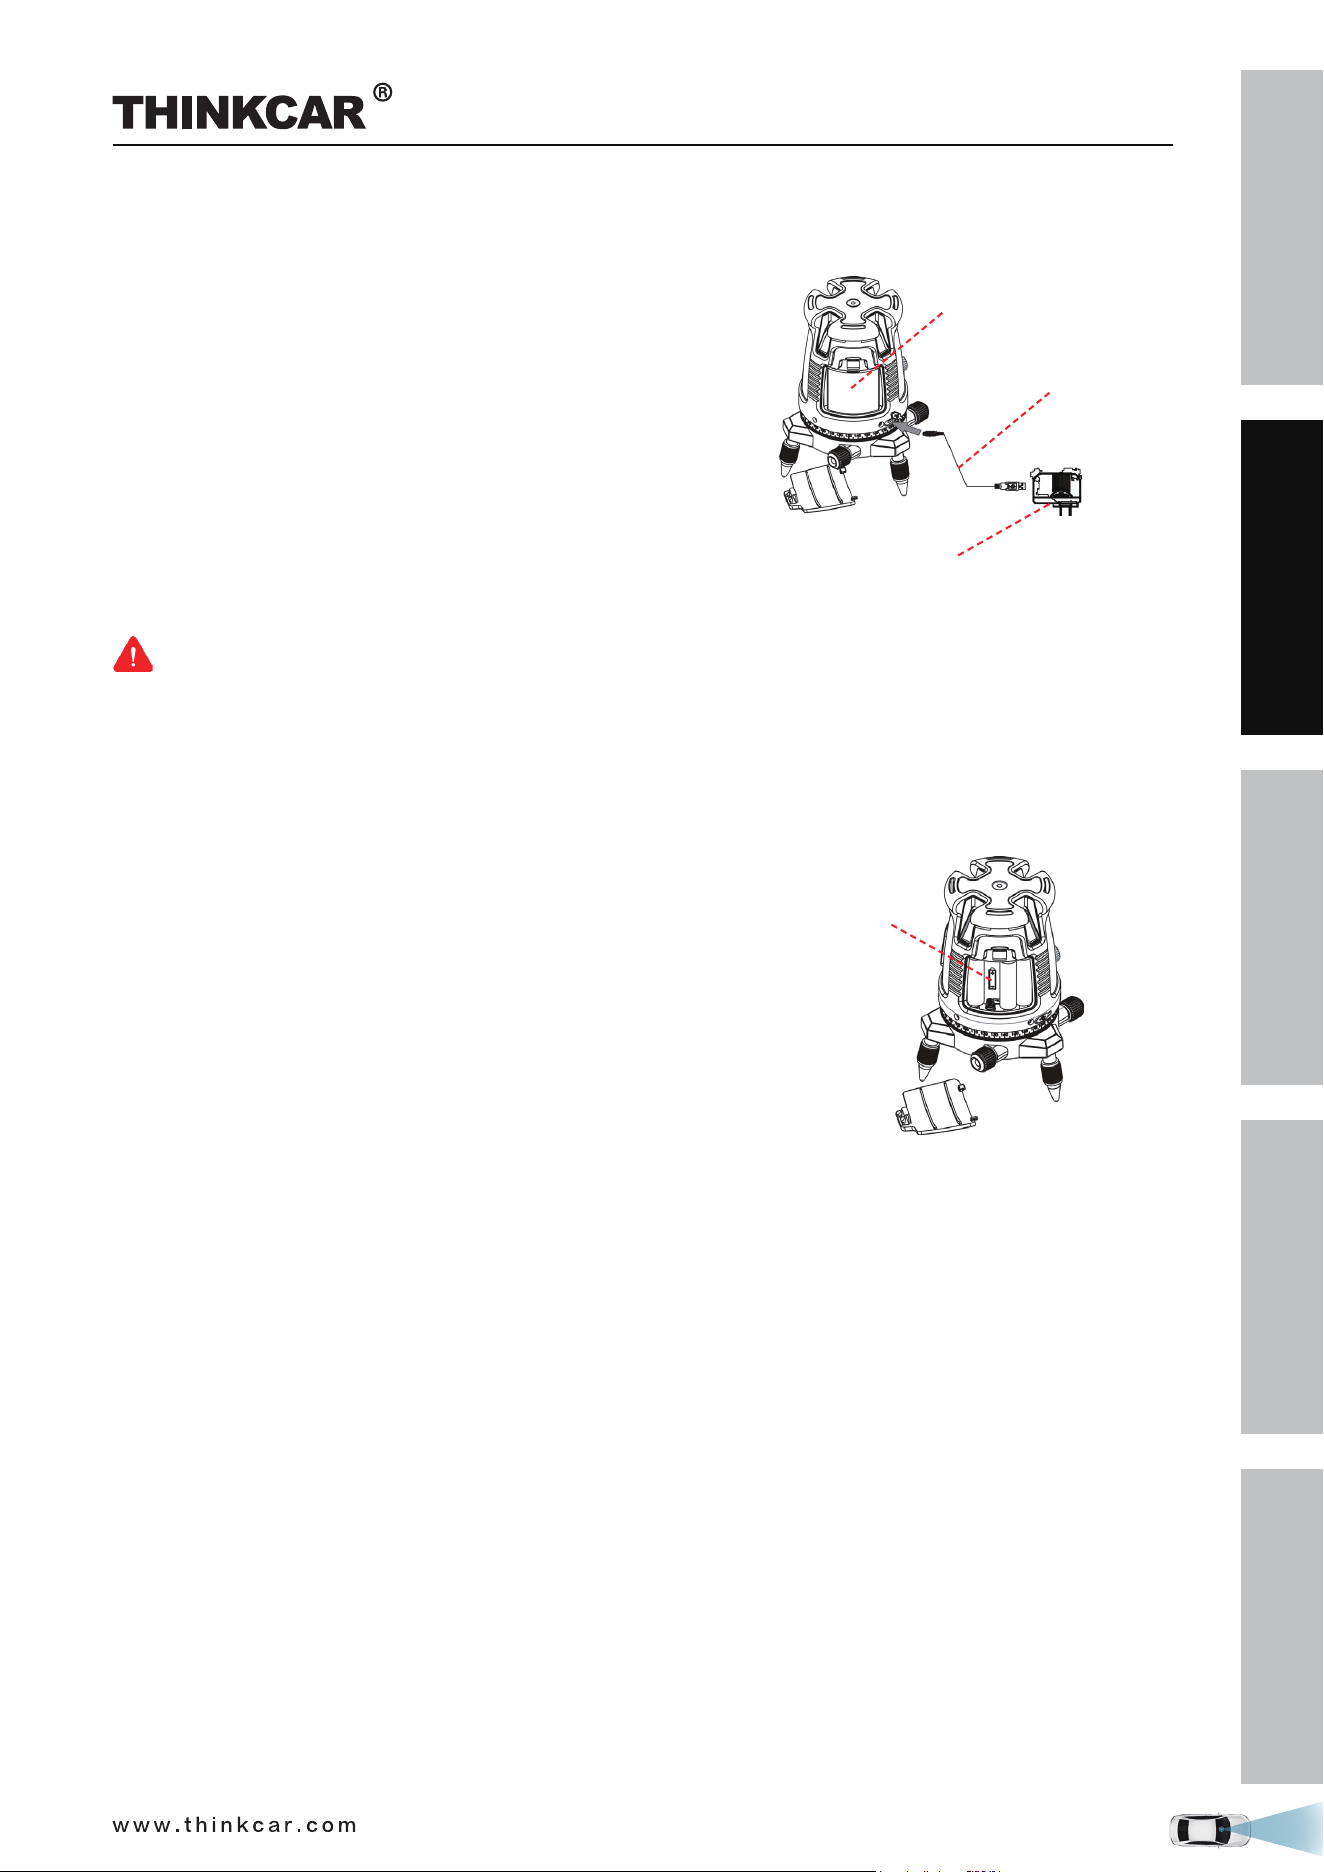
Installation of the lithium-ion battery pack
1. Press down the latch of the cover and pull the battery
cover.
2. Insert the lithium-ion battery pack with the contact
terminal towards the 2 small pins in the battery
compartment.
3. Reclose the battery cover.
4. Use a standard 5 V ± 5% charger (1A-2A), with micro
USB connector to charge the Li-Polymer battery pack.
5. The rechargeable battery pack can be charged outside or
inside the laser battery compartment.
6. Charge the battery pack at least 2 hours before using the
laser tool for the first time.
Lithium battery
Charging cable
Charger
Warning:
• Do not use a damaged battery charger.
• The built-in Lithium battery is factory replaceable only. Incorrect replacement or tampering with the
battery pack may cause a explosion.
Installation of the 4 AA Batteries
1. Press down the latch of the cover and pull the battery
cover.
2. Insert 4 new AA batteries of the same brand, according
to the polarity diagram indicated on the inside of the
battery compartment.
3. Reclose the battery cover.
4 AA
battery
THINKCAR ADAS Calibration Tool
SAFETY PRECAUTION
INITIAL USE
START CALIBRATION
TARGET PATTERN KIT
PRODUCT PROFILE
14
Warning:
Batteries can deteriorate, leak or explode, and can cause injury or fire.
1. Do not shorten the battery terminals.
2. Do not charge Alkaline batteries.
3. Do not mix old and new batteries.
4. Do not dispose of batteries into household waste.
5. Do not dispose batteries in fire.
6. Defective or dead batteries must be disposed according to local regulations.
7. Keep the batteries out of reach from children.
If the laser level will not be used for a long period, remove the batteries from the battery
compartment. This will prevent batteries from leaking and corrosion damage.
Technical parameters:
Laser beams output pattern
• Horizontal and forward vertical cross beams
• Horizontal, forward and backward vertical beams
• Horizontal and 4 orthogonal vertical beams
Plumb down dot appears while vertical beam is ON
• Horizontal beam
Laser range
• Indoor - 30m (100ft)
• Outdoor with detector 60m (200ft)
Accuracy
Accuracy (plumb Dot)
±0.2mm/m (±0.0002in/in)
±1mm/1.2m
Fan angle 120°±5°
Self-leveling Range ±2.5°
Laser line width
2 mm±0.5mm/5m
(0.10” ±0.02” at 20’ )
Wavelength 520 ±10nm - Laser Class II
Power supply
Li-Polymer battery pack or
4 AA Alkaline batteries (not included)
Battery life
2.5 hours continuous operation with Li-Polymer
5 hours with 4AA Alkaline batteries
Operating temp. -10° C + 45° C (14°F +113°F)
Storage temp. -20° C +60° C ( -4°F +140°F)
Water & dust proof IP54
Dimensions ø150mmx195mm (ø 6” x8”)
Weight without batteries 1250gr ±10gr (2.75lbs± 0.35±oz )
THINKCAR ADAS Calibration Tool
SAFETY PRECAUTION
INITIAL USE
START CALIBRATION
TARGET PATTERN KIT
PRODUCT PROFILE
15
1.3.3 Cross laser module (LAM09-02)
While adjusting the calibration frame in parallel with the vehicle, the laser module can be used.
Generally it should be attracted onto the magnetic laser fix-plate (8) of the calibration frame.
1. Battery cover
2. Switch
3. Laser gap
Installation of the 2 AAA Batteries
1. Open battery cover.
2. Insert 2 new AAA batteries of the same brand, according to the polarity diagram indicated on the inside
of the battery compartment.
3. Reclose the battery cover.
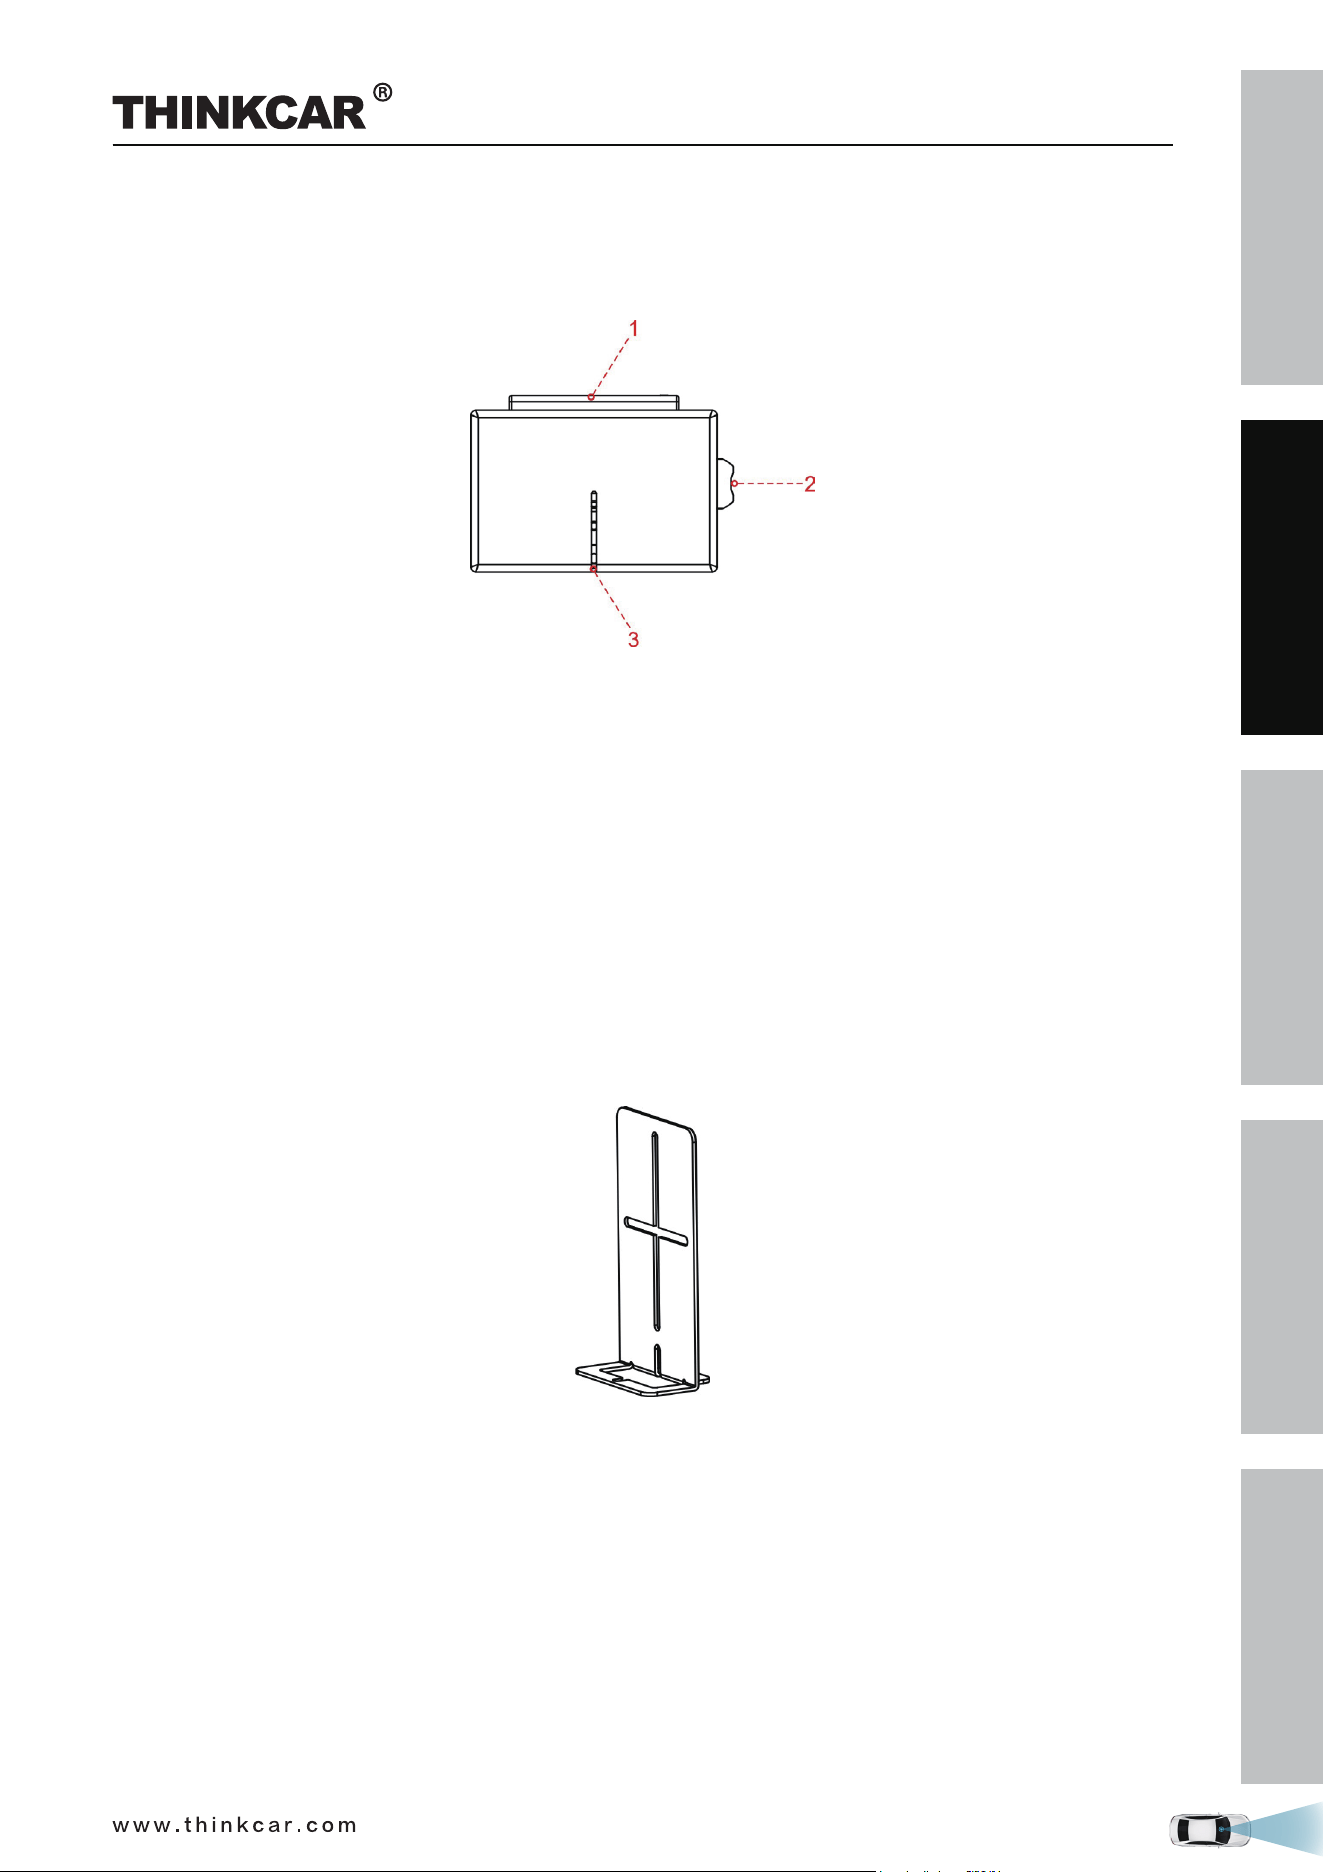
1.3.4 Laser reflector (LAM09-03)
The laser reflector is used to position the center line by confirming front and rear center points of the
vehicle are on the same line.
THINKCAR ADAS Calibration Tool
SAFETY PRECAUTION
INITIAL USE
START CALIBRATION
TARGET PATTERN KIT
PRODUCT PROFILE
16
MDADASADAPT
1.3.5 Auxiliary laser mirror (LAM09-04)
The auxiliary laser mirror is used to position the center line by ensuring the front and rear center points of
the vehicle are on the same line.
1.3.6 L -shaped positioning bracket (LAM09-05)
The L-shaped positioning bracket aids in locating the center of the front wheels to correctly position the
calibration frame.
1.3.7 Plumb line (LAM09-06)
The plumb line is used to position the front and rear center points of the vehicle which helps to correctly
position the five-line laser device and the laser reflector.
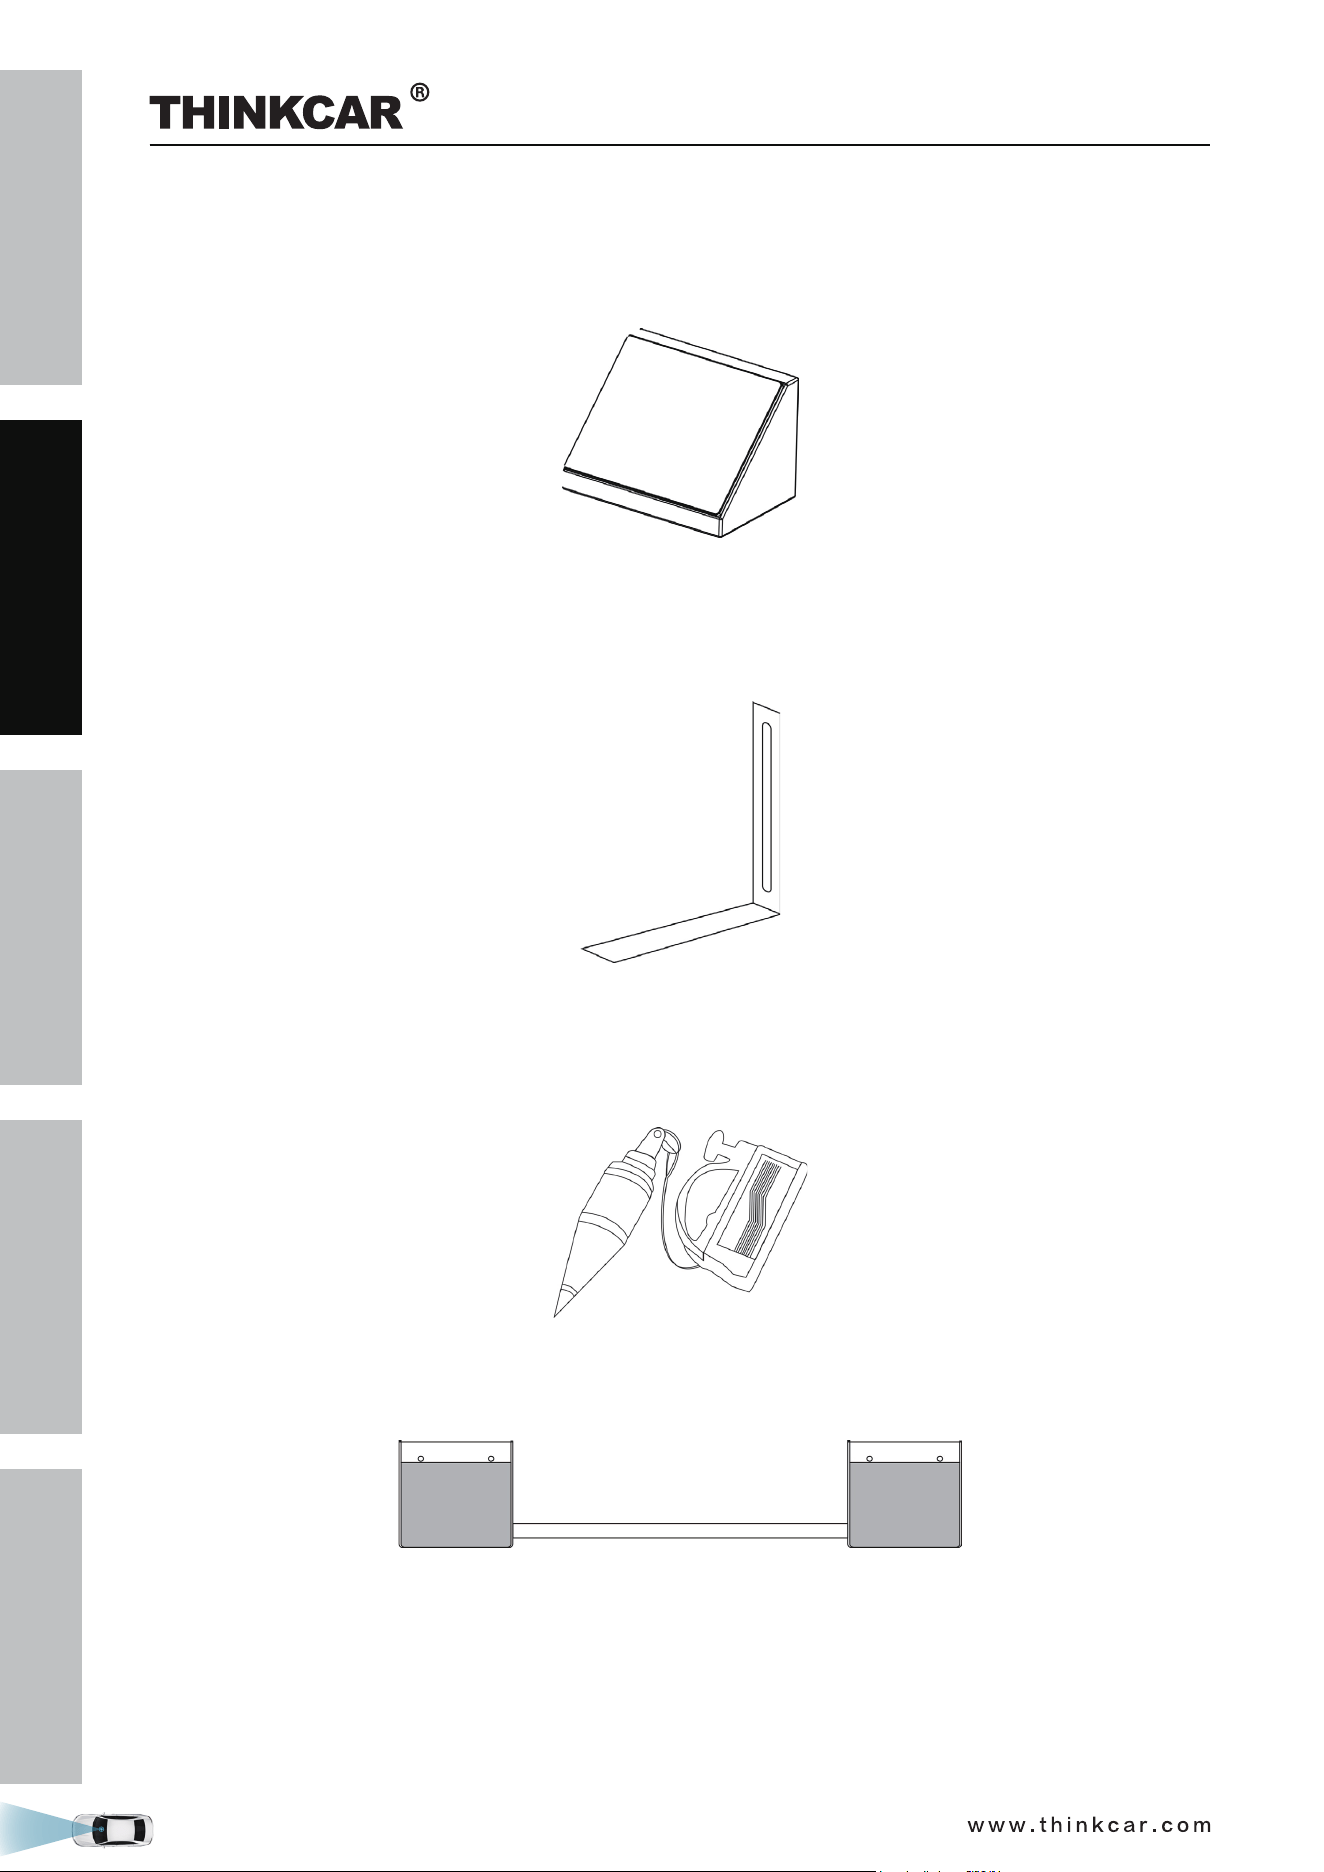
1.3.8 Target board storage bracket (LAM09-07)
The storage bracket is designed to store small target boards and larger pattern boards while not in use.
It is composed of two storage brackets and two connecting bearings. Before using it, please make sure to
fasten the connecting bearings between the storage baskets.
To make the most of the storage bracket, it is suggested to place the frequently used target board in right
position according to the indication as marked on the side of the bracket. Other target boards that are not
frequently used can be stored into the aluminum tool box.
THINKCAR ADAS Calibration Tool
SAFETY PRECAUTION
INITIAL USE
START CALIBRATION
TARGET PATTERN KIT
PRODUCT PROFILE
17
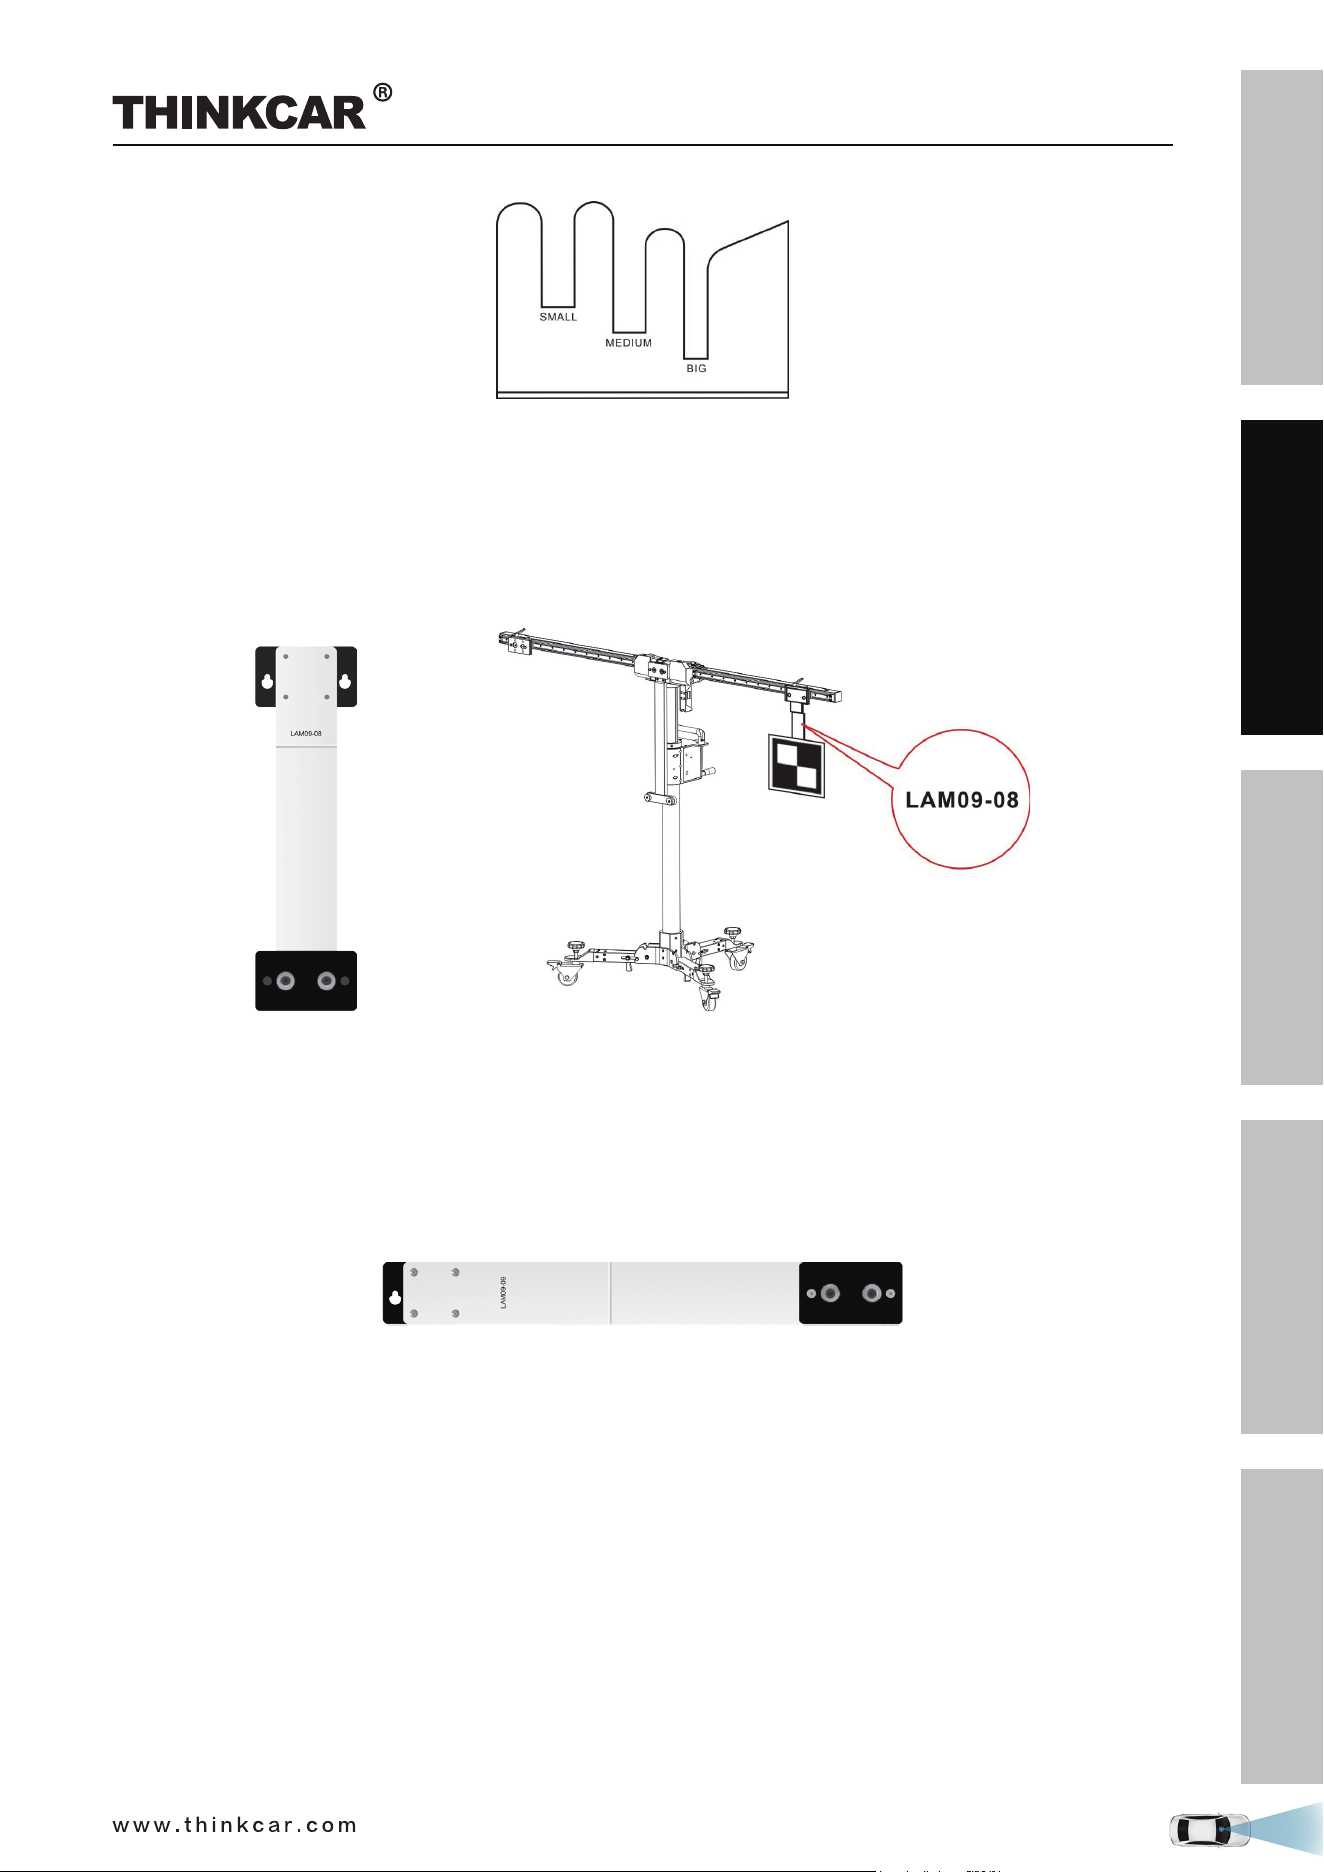
1.3.9 Target extension rod for Toyota (LAM09-08)
Generally the height of the calibration frame is specially designed to meet the calibration requirement of
most vehicles, but for some vehicles with lower calibration height, the target extension rod is required.
The target extension rod is used for LDW system calibration on some Toyota vehicles. It needs to be
secured onto the positioning plate (7) and then the target board attaches onto it.
1.3.10 Target extension rod for Honda (LAM09-09)
Generally the width of the calibration frame is specially designed to meet the calibration requirement of
most vehicles, but for some vehicles with wider calibration distance, the target extension rod is required.
The target extension rod is used for LDW system calibration on some Honda vehicles. It needs to be se-
cured onto the positioning plate (7) and then the target board attaches onto it.
THINKCAR ADAS Calibration Tool
SAFETY PRECAUTION
INITIAL USE
START CALIBRATION
TARGET PATTERN KIT
PRODUCT PROFILE
18
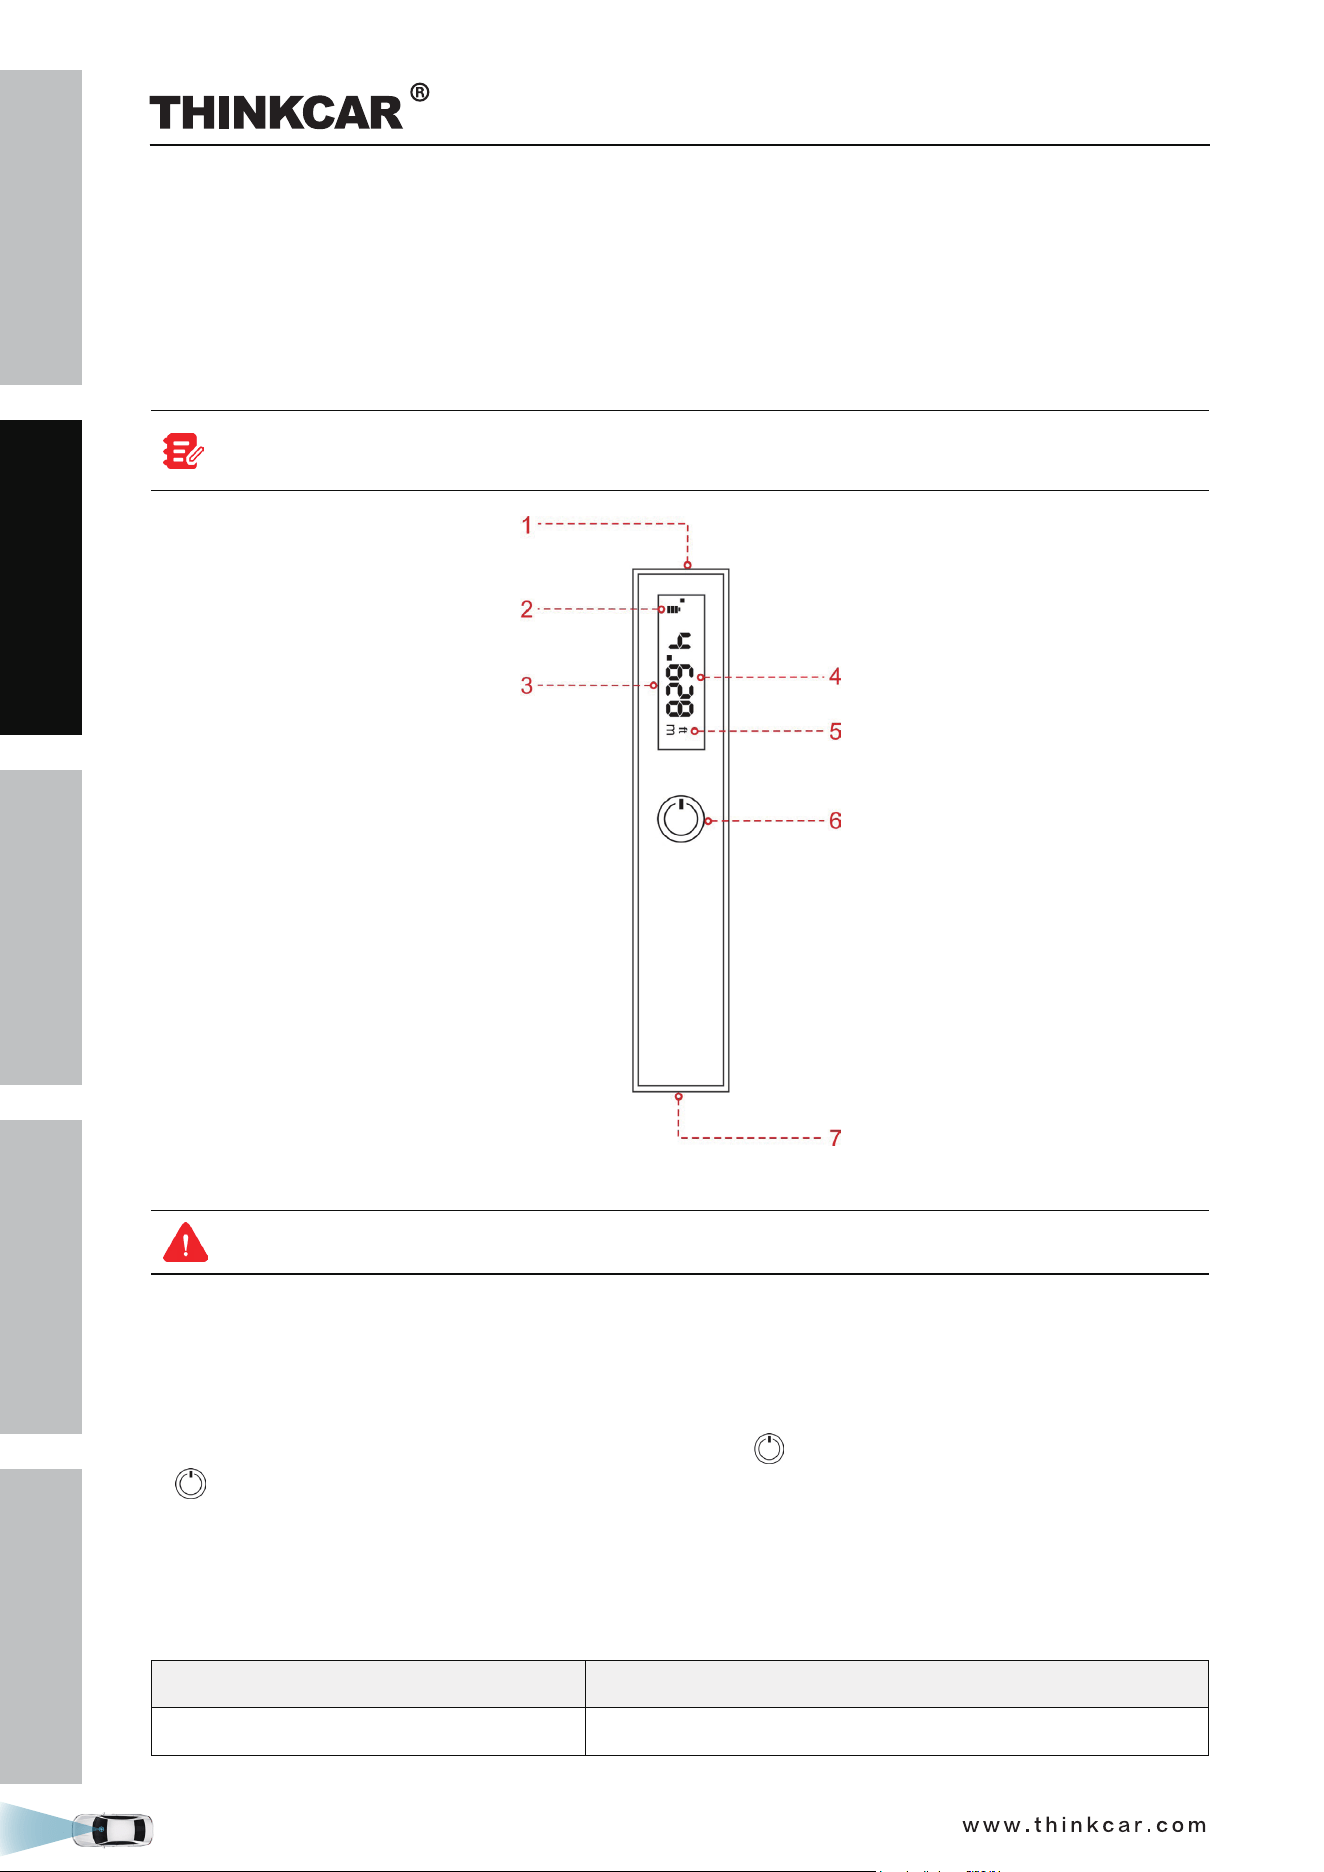
1.3.11 Laser range finder
The laser range finder is used to measure the height from the target / pattern board to the ground.
Since the laser range finder is not on the same level as the target board/pattern board, a precise tolerance
value is preset in the ADAS calibration software for all vehicles and no more settings and calculations are
required by users. When measuring the height, just follow the onscreen prompt height value to perform the
calibration.
It is a Class 2 laser product in accordance with IEC 60825-1:2014. The product and batteries must
not be disposed of with household waste.
1. Laser
Warning: Do not stare into the laser beam or direct it towards other people.
2. Battery power indicator
3. Display screen
4. Measured result
5. Measurement unit
To switch between the measurement units, triple click the
POWER button.
6.
POWER button
Long press - turn the meter on / off.
Short press - Start / pause measuring.
7. Battery compartment
Technical parameters:
Range 0.1 ~ 25m (0.33~82ft)
Accuracy ± 1/152ft
THINKCAR ADAS Calibration Tool

SAFETY PRECAUTION
INITIAL USE
START CALIBRATION
TARGET PATTERN KIT
PRODUCT PROFILE
19
Laser class 2
Laser type 635-650mm, power < 1mW
Battery 2 AAA batteries or Lithium battery
Dimensions 4 x 1.4 x 0.7 inch (100 x 35 x 18mm)
Operating Temperature 14°F ~ 104°F / -10
℃
~ 40
℃
THINKCAR ADAS Calibration Tool
SAFETY PRECAUTION
INITIAL USE
START CALIBRATION
TARGET PATTERN KIT
PRODUCT PROFILE
20
2 Initial Use
2.1 Place the calibration frame
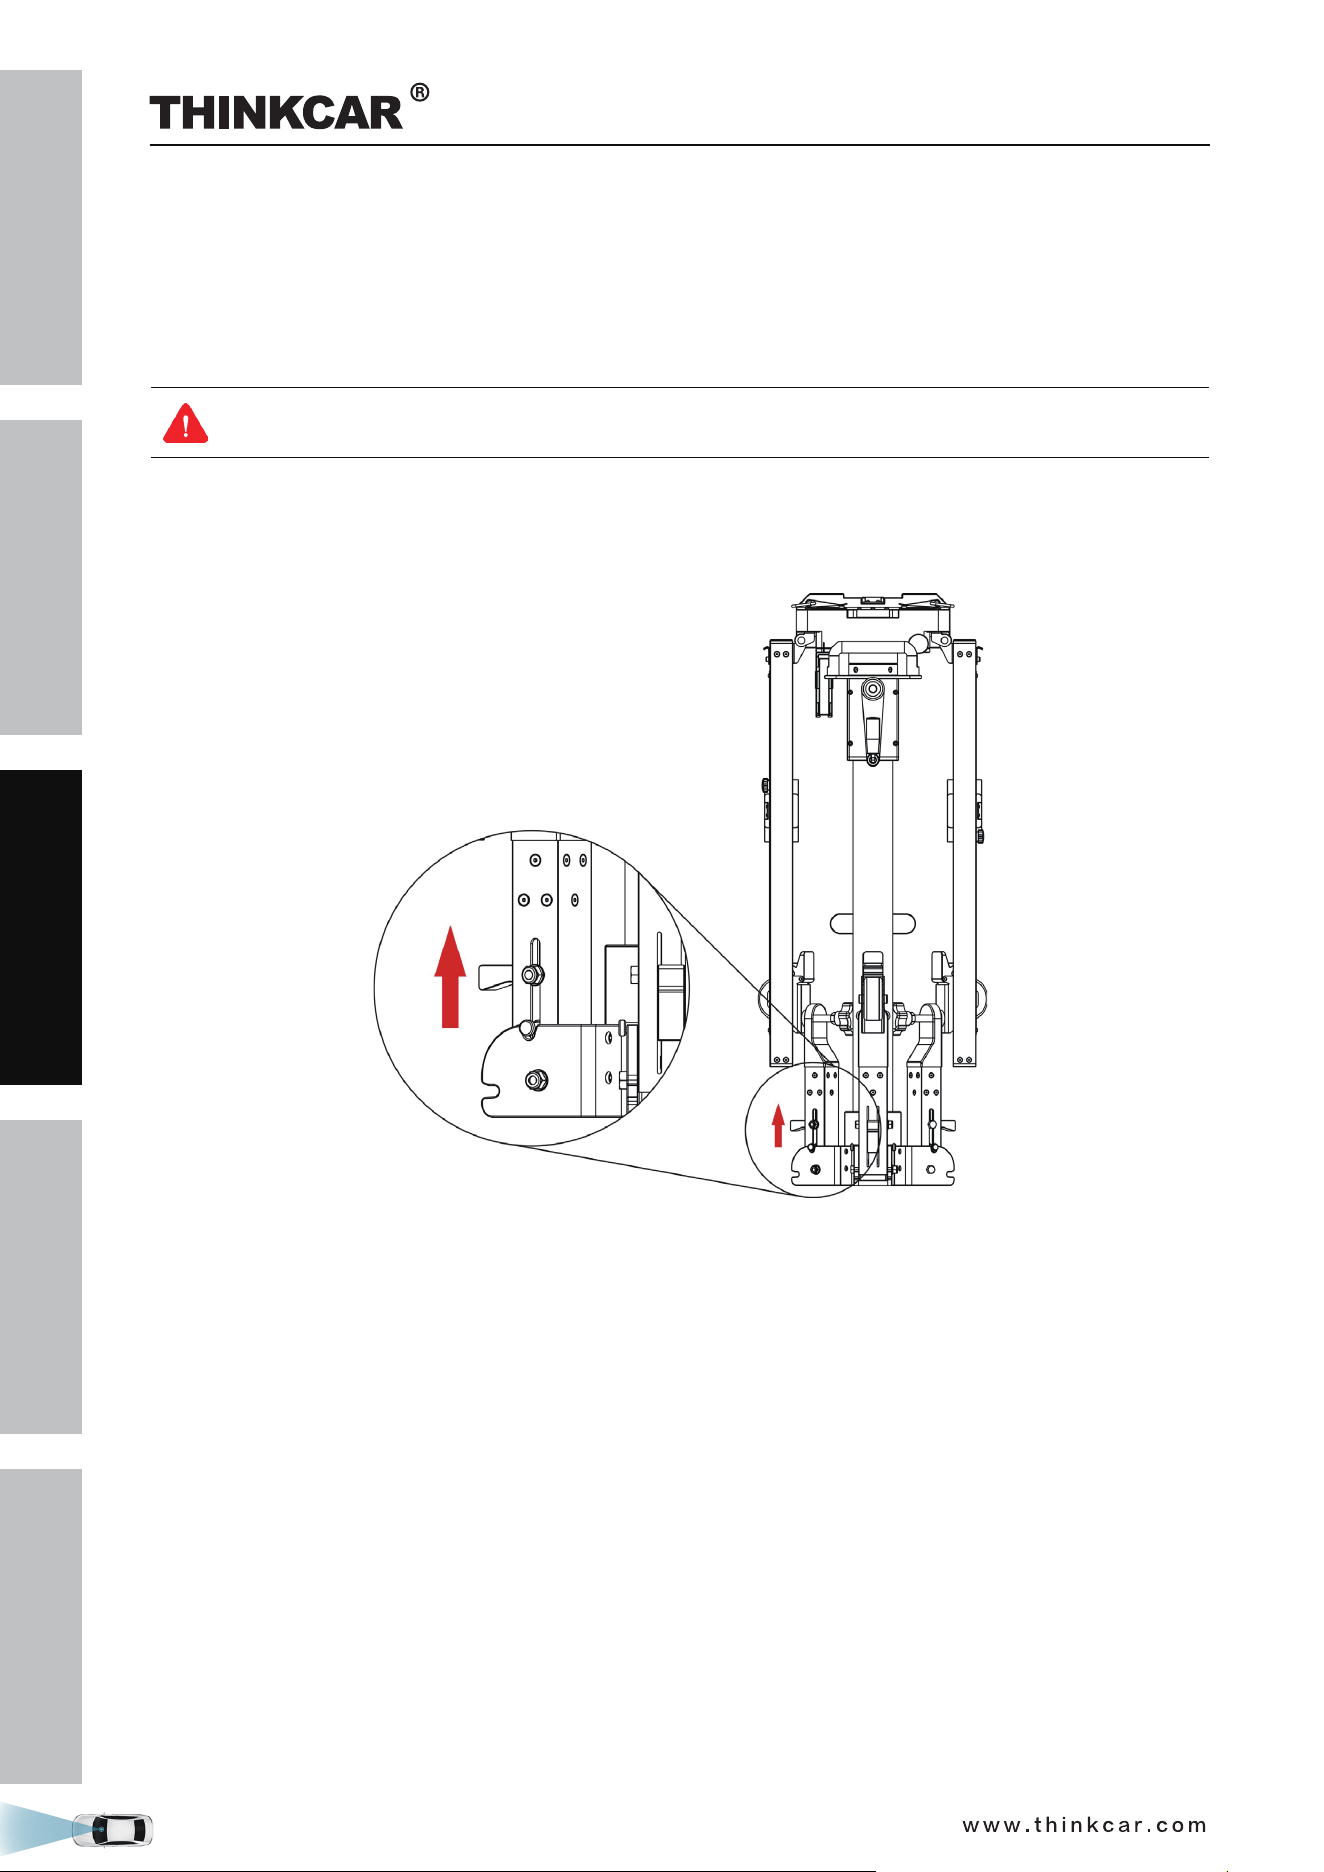
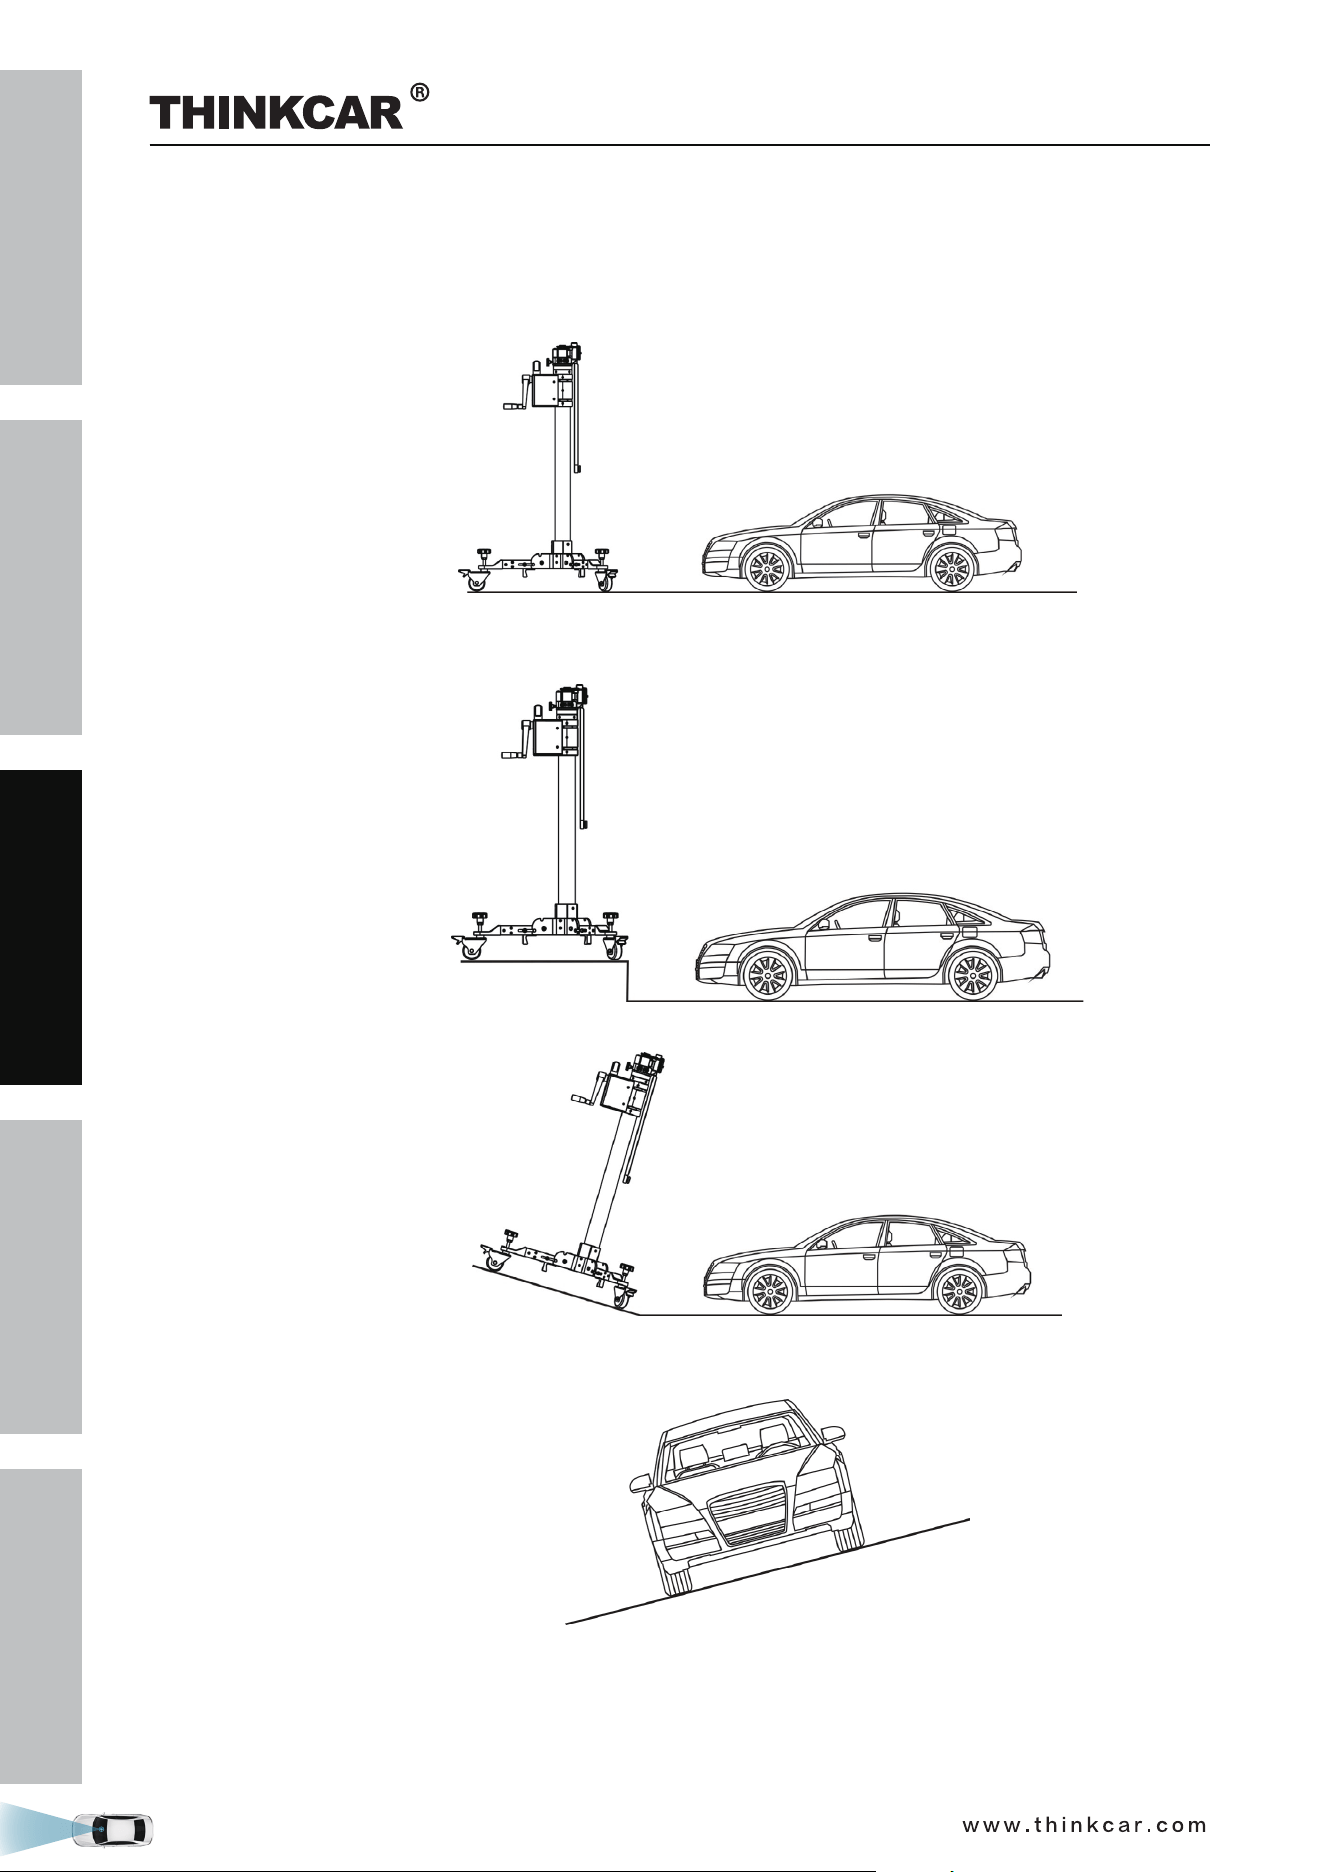
By default, it is folded for easier shipment. Follow the steps below to unfold it.
The heavy tool may tilt down and cause injuries, remember to always unfold the tool with the aid
of a second person.
1. Take out the calibration frame and place it on a flat ground.
2. Push the lever (14) upwards as indicated in the following figure, and then pull the rolling caster (13) down
on the ground.
3. Repeat step 2 for other two rolling casters.
4. Hold the handle (19) and raise the lifter up slightly off the ground, these rolling casters will be fully
unfolded and firmly sit on the ground automatically. Then lay the lifter down.
THINKCAR ADAS Calibration Tool
SAFETY PRECAUTION
INITIAL USE
START CALIBRATION
TARGET PATTERN KIT
PRODUCT PROFILE
21
5. Pull the right crossbar (1) up until it fully attaches to the positioning bracket (B), then use the safety snap
hook (5) to fix it.
Beware of pinching hands while performing this step.
6. Repeat step 5 to unfold the left crossbar.
THINKCAR ADAS Calibration Tool
SAFETY PRECAUTION
INITIAL USE
START CALIBRATION
TARGET PATTERN KIT
PRODUCT PROFILE
22
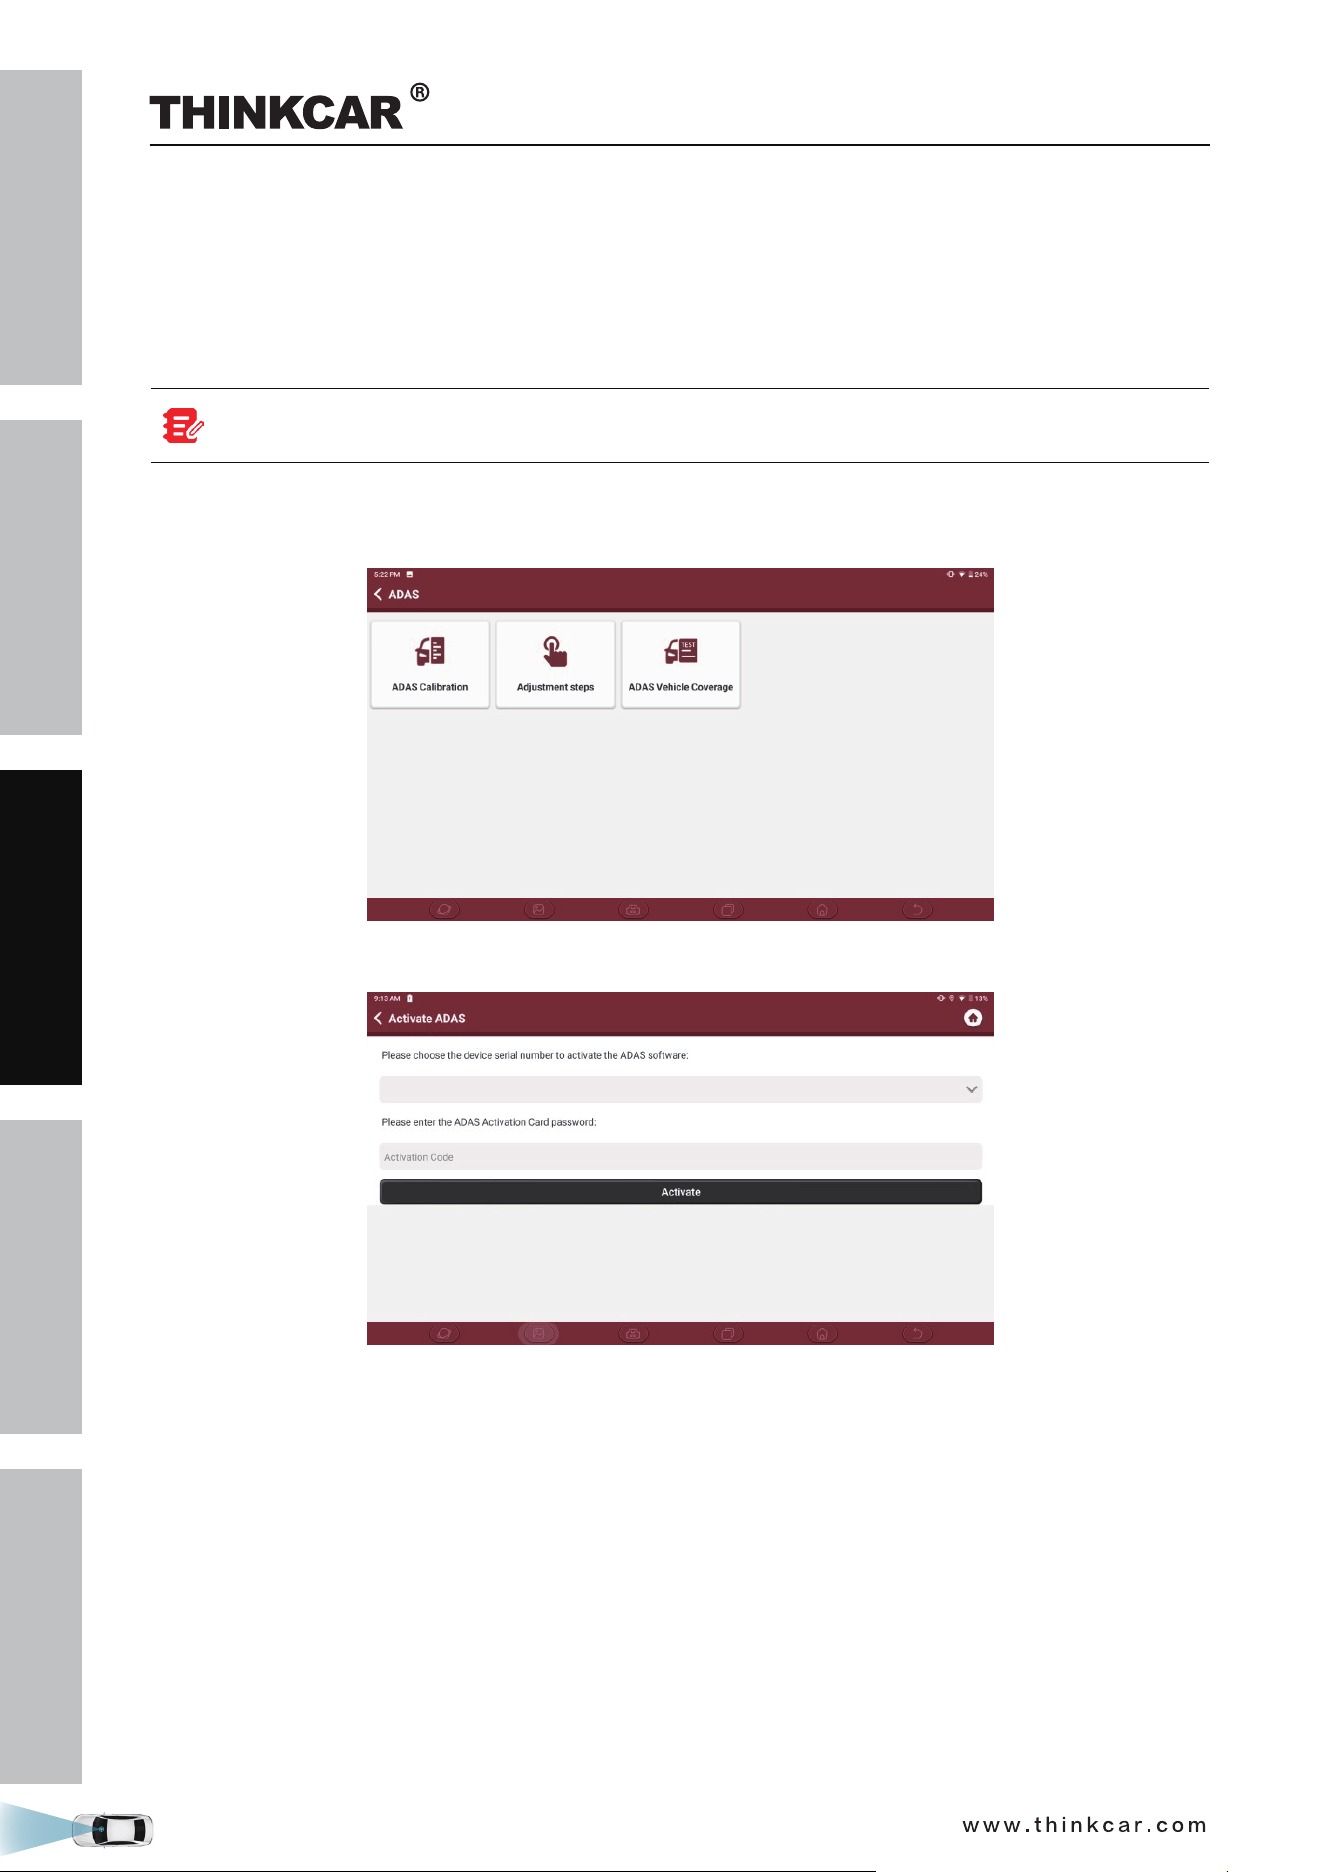
2.2 Activate ADAS function
By default, the calibration feature of the pre-installed diagnostic software of diagnostic tool is disabled. To
ensure normal use of the calibration function of the diagnostic software, you need to activate the pin card
to unlock the calibration function on the diagnostic tool (sold separately) first.
Follow the steps below to activate it.
Different diagnostic tools have different accesses to the ADAS function. For details, please refer to
the user manual of individual scanner.
1. Press the [POWER] button on the diagnostic tool to turn it on.
2. Tap “ADAS” to enter the following screen:
4. Tap ADAS Calibration to enter the ADAS activation screen.
5. Scratch or scrap the designated area on the included Activation Card to reveal the password, and input
the 24-digit password to activate it.
6. Now the ADAS function becomes accessible and is ready for use.
THINKCAR ADAS Calibration Tool
SAFETY PRECAUTION
INITIAL USE
START CALIBRATION
TARGET PATTERN KIT
PRODUCT PROFILE
23
2.3 General Calibration Operations for LDW System
2.3.1 Precondition for the Use of the THINKCAR ADAS
Regard the following in order to use the THINKCAR ADAS:
• Vehicle system is working properly.
• No trouble codes stored in ECU memories.
• Prepare
calibration reference pattern.
• A diagnostic tool supporting ADAS system calibrating is required (sold separately).
• Front & rear axle track is properly adjusted.
• To calibrate accurately, please make sure the following workstation requirements are met (See Chapter
2.4.1.1 ~ Chapter 2.4.1.3).
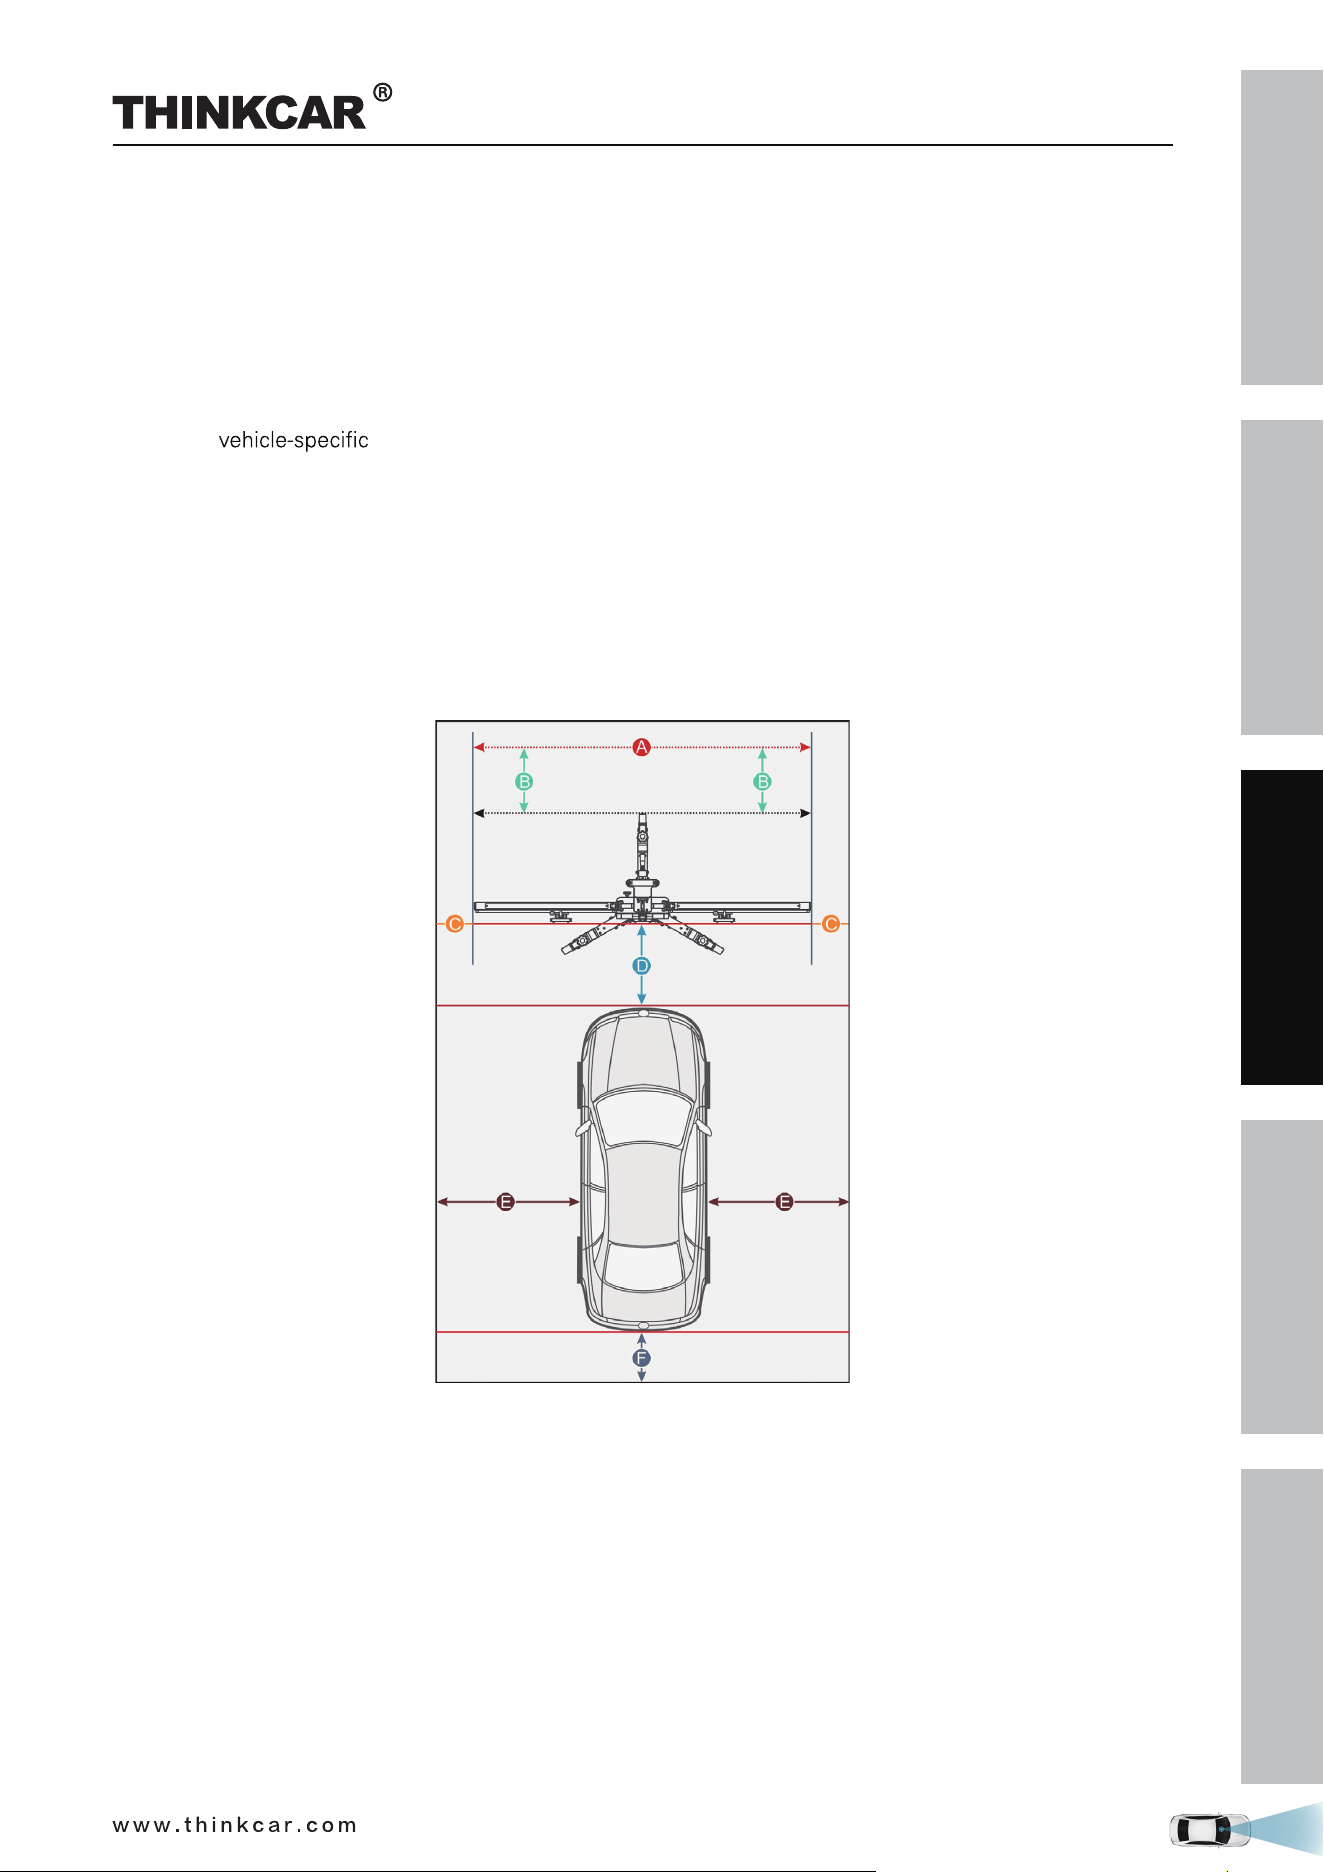
2.3.1.1 Workstation size
A. For front cameras
Distance A = the width of the cross member
Distance B = about 1m / 39.4inch (from the cross member to the wall)
Distance C = at least 0.5m / 19.7inch (from the edge of the cross member to other obstacles)
Distance D = varies from vehicle to vehicle, about 1.5m / 59inch is strongly recommended (from the
calibration panel to the vehicle)
Distance E = reserved for about 1m / 39.4inch (from the vehicle to other obstacles)
Distance F = at least 0.5m / 19.7inch (a lane for technician to walk through)
THINKCAR ADAS Calibration Tool
SAFETY PRECAUTION
INITIAL USE
START CALIBRATION
TARGET PATTERN KIT
PRODUCT PROFILE
24
2.3.1.2 Workstation ground
Make sure the vehicle is parked with all wheels on an even floor surface.
Correct:
Wrong:
THINKCAR ADAS Calibration Tool

SAFETY PRECAUTION
INITIAL USE
START CALIBRATION
TARGET PATTERN KIT
PRODUCT PROFILE
25
2.3.1.3 Workstation lighting
• The lighting system around the calibration workstation should be a non-frequency flash source, including
but not limited to: LED light source, industrial lighting complying with international standards, dual light
source in opposite phase.
• In the field of view of the camera, there should be no direct light source into the camera, otherwise
the camera will reduce the exposure so that the captured calibration pattern becomes darker, adversely
affecting the calibration.
• The light source should ensure that there is no reflected spot on the calibration panel.
• The light source should ensure uniform illumination distribution in the calibration workstation.
• thgil gnignahc rehto on eb lliw ereht taht erusne dna ,degnahc eb ton dluohs thgil eht fo ssenthgirb ehT
source around the workstation, such as a driving vehicle with lights ON, etc.
2.3.2 Calibration Operation
The calibration operation should be performed strictly following the on-screen instructions on the diagnostic
tool. For some vehicle models, calibration pattern and calibration tool are not mandatory. But for some
camera-based ADAS, the calibration cannot be done without the help of calibration tool and calibration
pattern. In this case, for the positioning of the calibration tool and vehicle, it is necessary for the user to
manually finish it.
The following steps are needed when working with the THINKCAR ADAS:
1. Determine the center line of the vehicle.
2. Determine the placement location of the THINKCAR ADAS.
3. Place the THINKCAR ADAS.
4. Adjust THINKCAR ADAS in parallel with the vehicle.
5. Select and install the target/pattern board on the THINKCAR ADAS.
6. Adjust the height of the target/pattern board.
Required accessories:
• Five-line laser device LAM09-01
• Cross laser module LAM09-02
• Laser reflector LAM09-03
• Auxiliary mirror LAM09-04
• L-shaped positioning bracket LAM09-05
• Plumb line LAM09-06
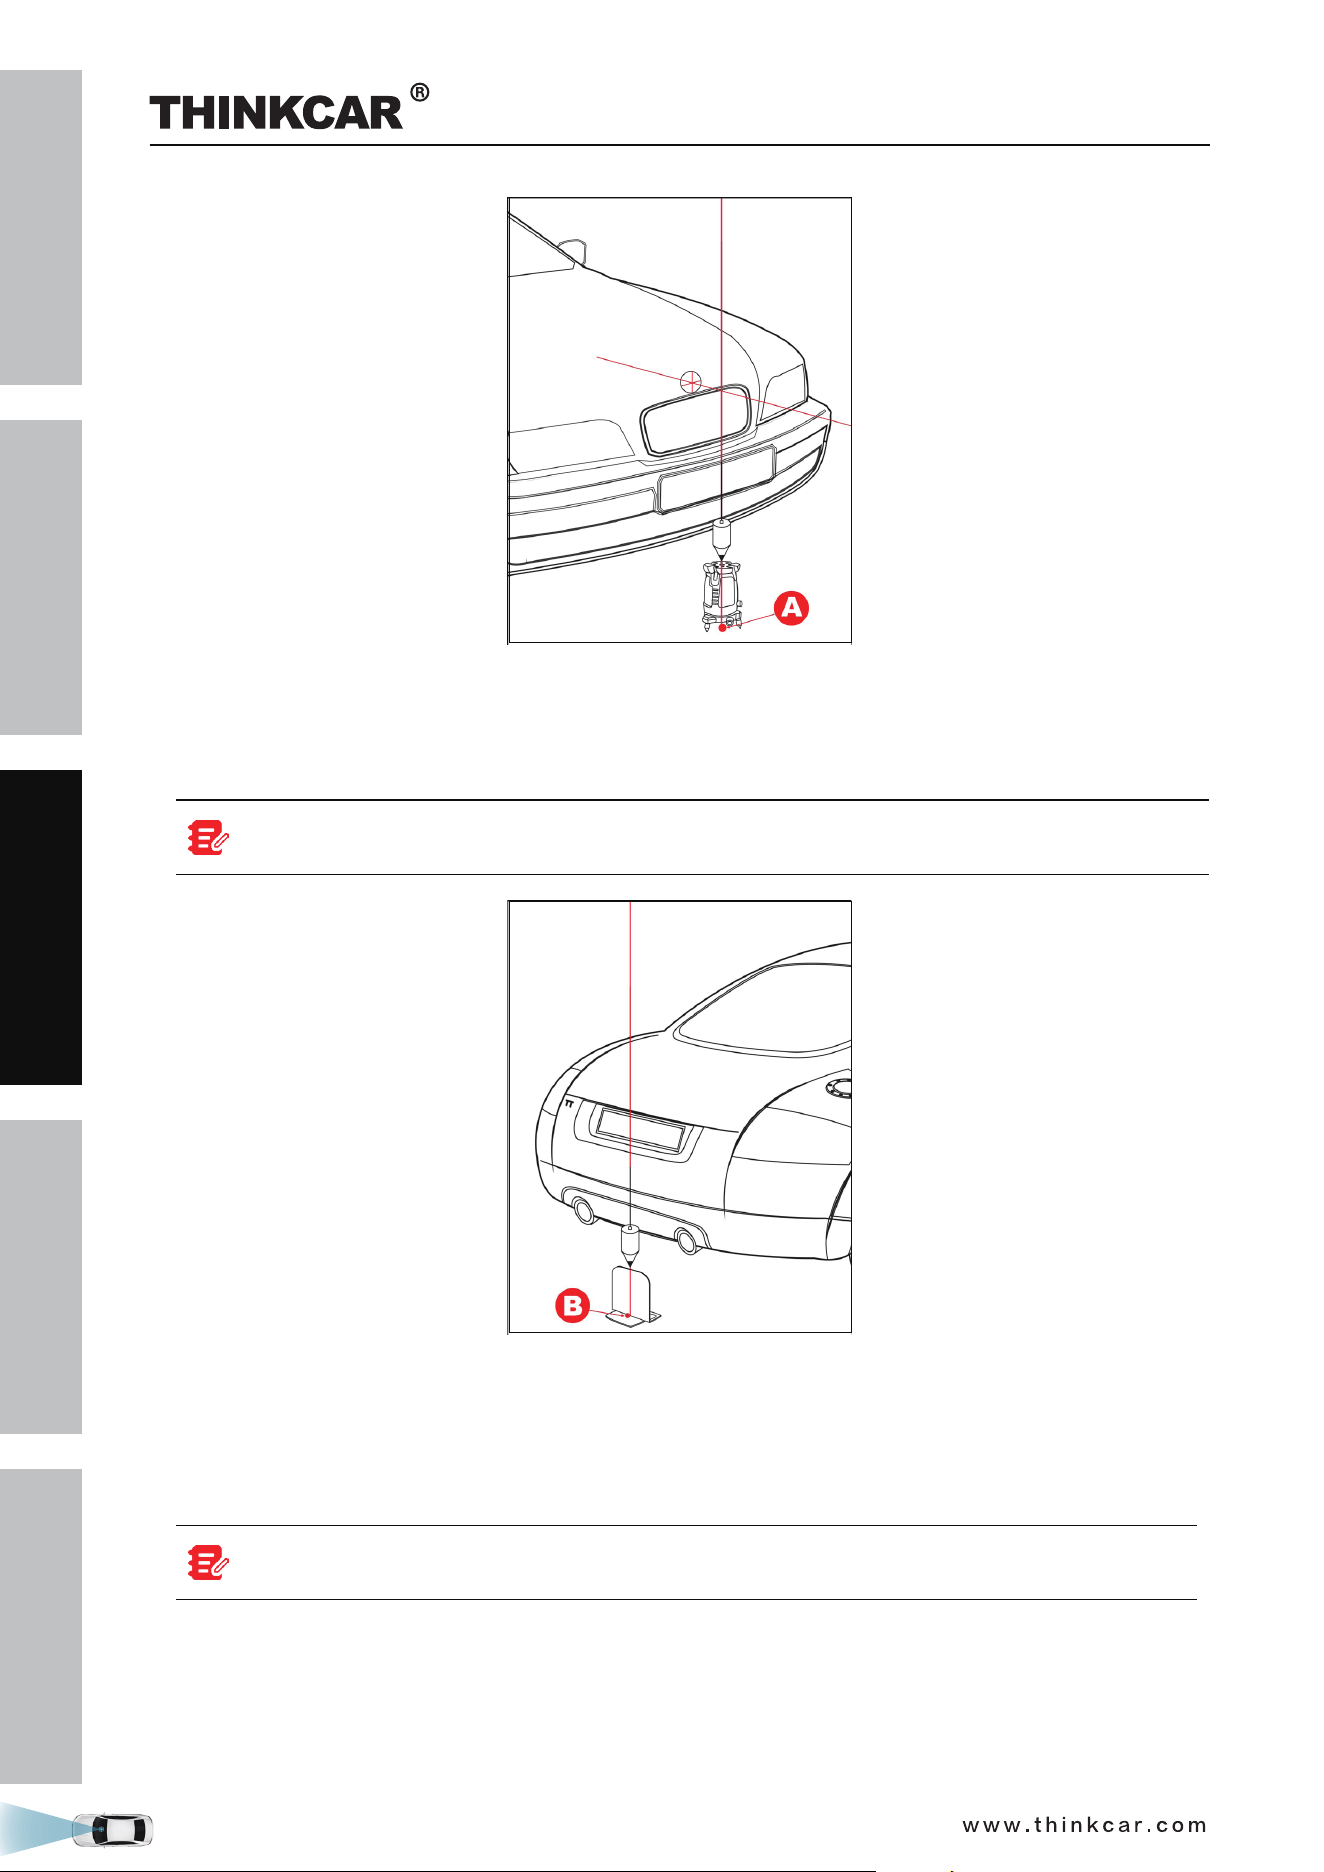
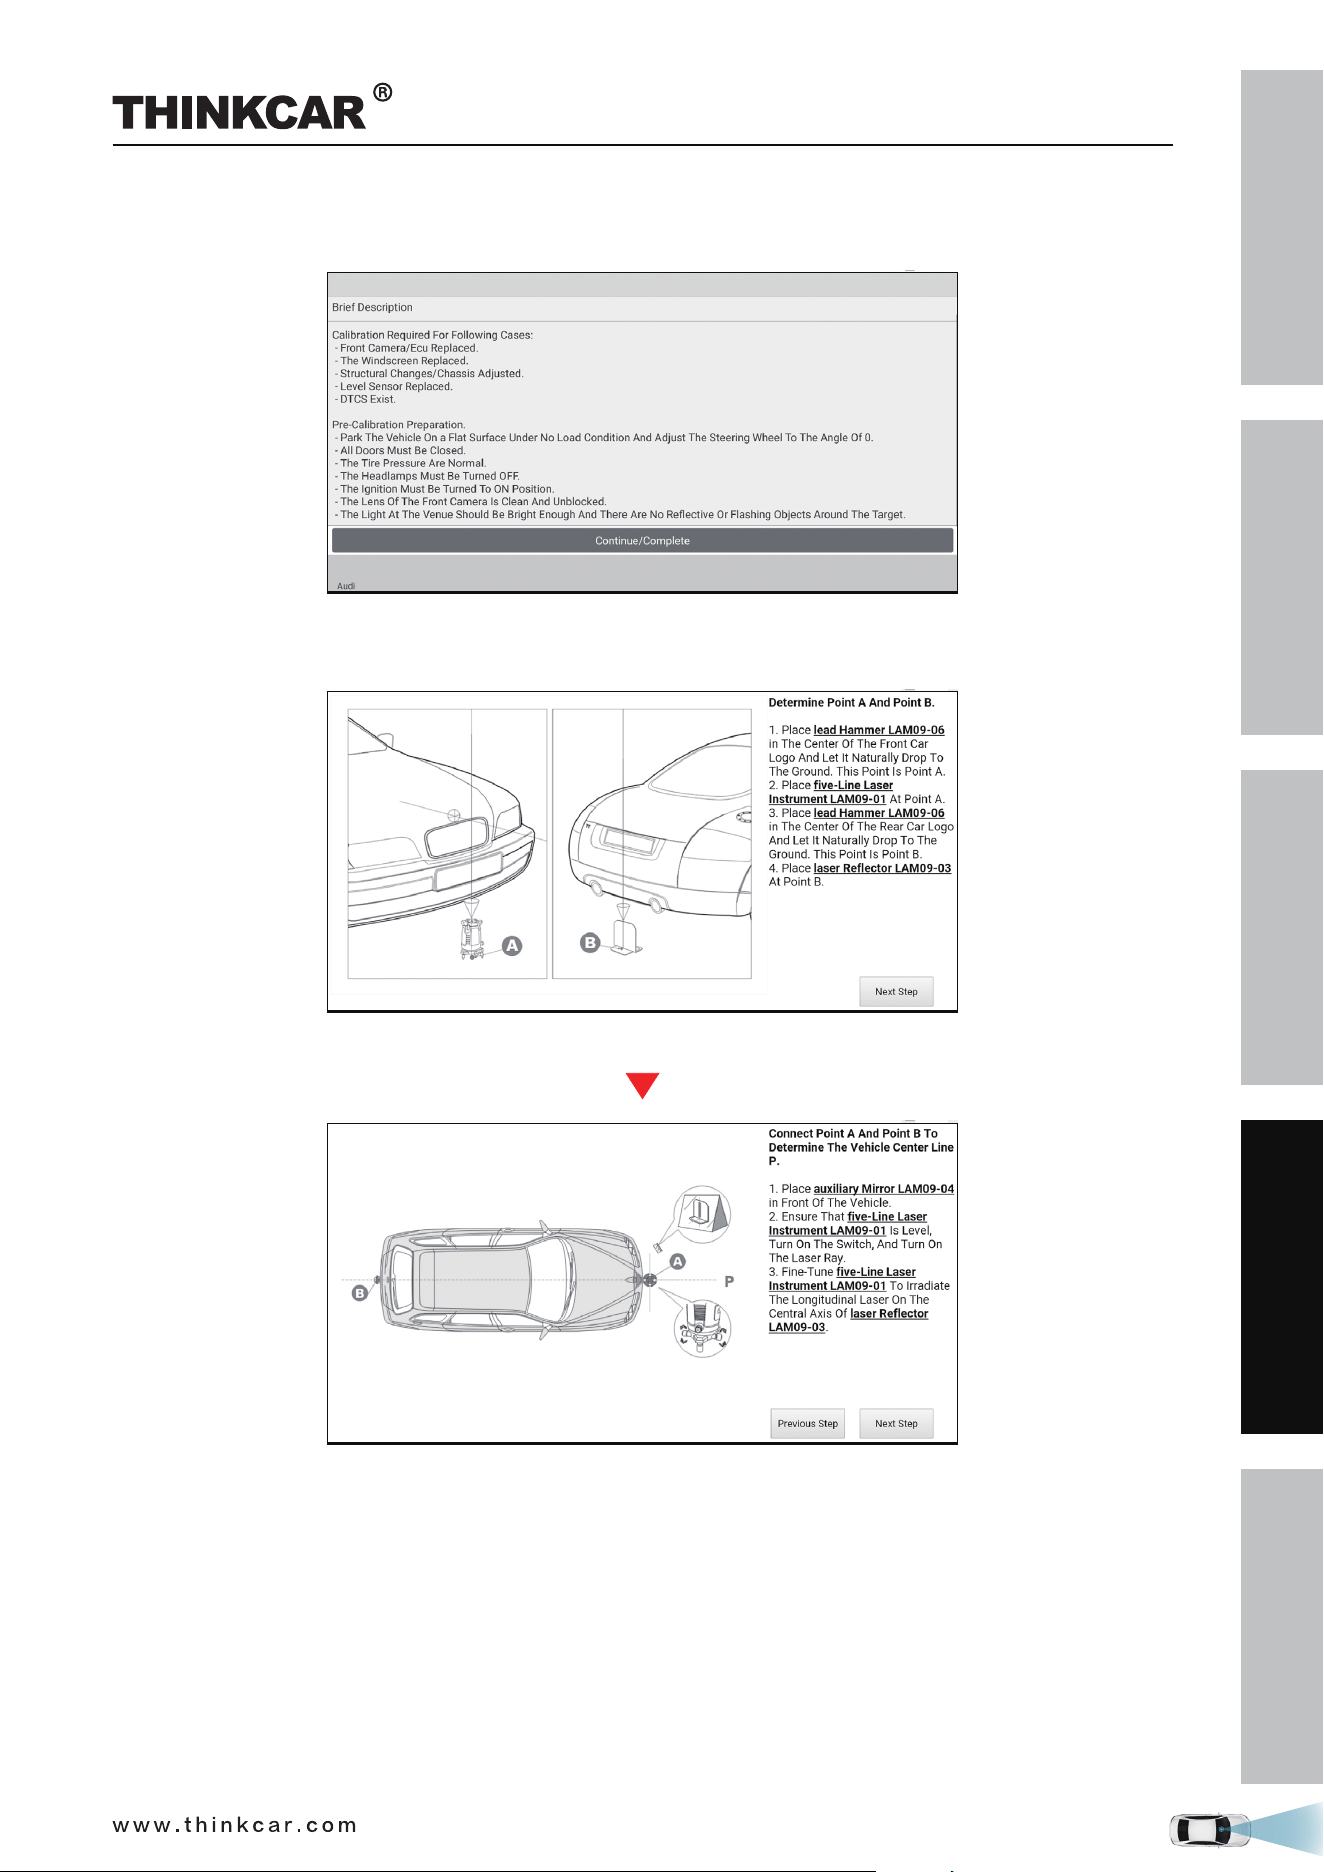
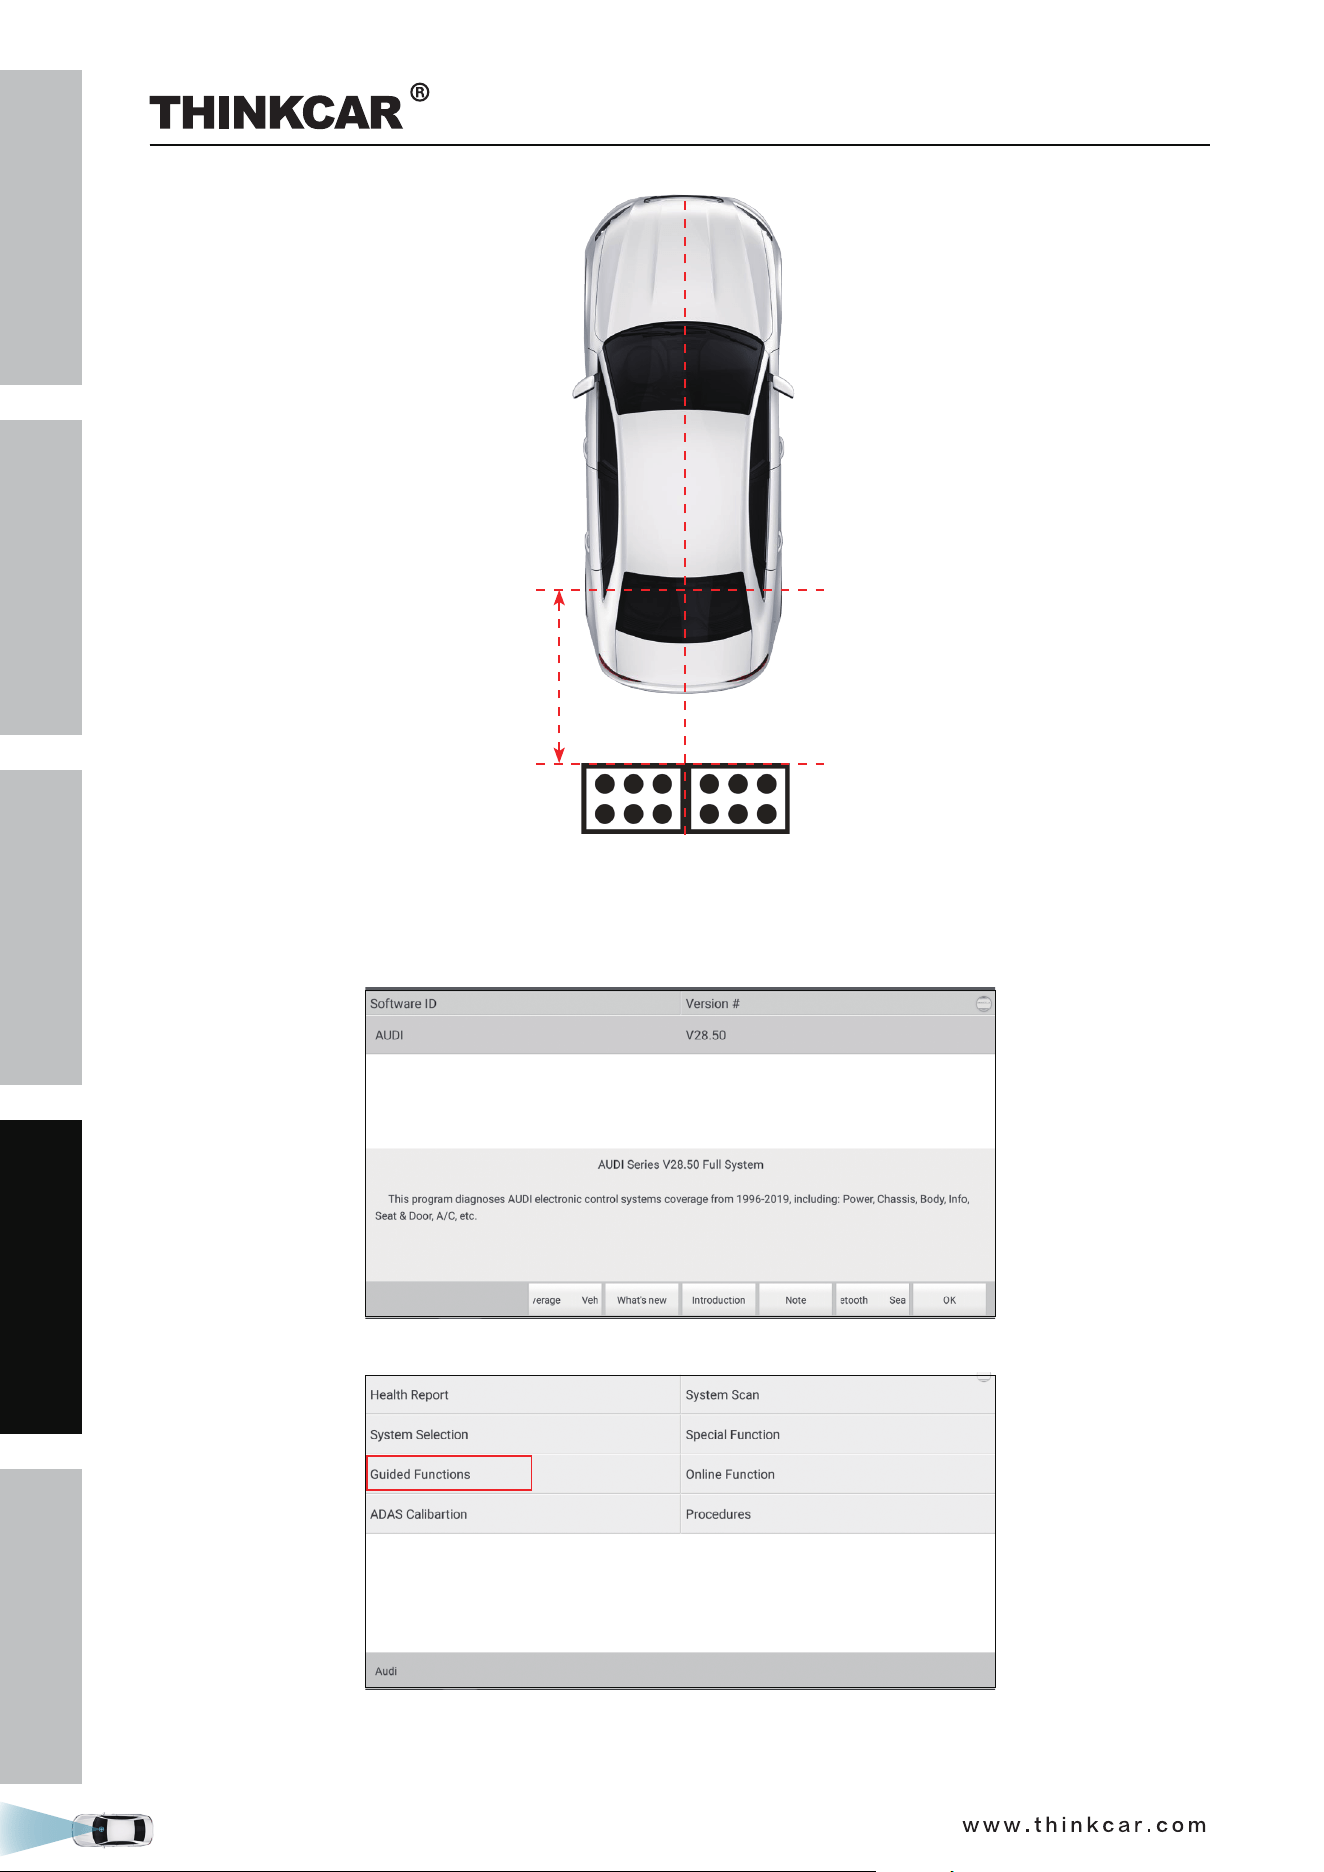
2.3.2.1 Determine the center line of the vehicle
1. Suspend a plumb line LAM09-06 against the center of the front vehicle emblem and let it naturally drop
to the ground. Mark the front center point of the vehicle (Point A) on the ground directly under the
plumb.
Lightly flick the string with your fingers several times to confirm that the string is perpendicular
to the ground.
THINKCAR ADAS Calibration Tool
SAFETY PRECAUTION
INITIAL USE
START CALIBRATION
TARGET PATTERN KIT
PRODUCT PROFILE
26
2. Place five-line laser instrument LAM09-01 at point A (the side of the laser instrument embedded with the
logo opposite to the driving direction) to ensure that the red dot on the case aligns with the point A.
3. Suspend a plumb line LAM09-06 against the center of the rear vehicle emblem and let it naturally drop to
the ground. Mark the front center point of the vehicle (Point B) on the ground directly under the plumb.
Lightly flick the string with your fingers several times to confirm that the string is perpendicular
to the ground.
4. Place the laser reflector LAM09-03 parallel to the vehicle and ensure that the reflective stripe is aligned
with point B.
5. Place the auxiliary mirror LAM09-04 in front of the vehicle.
6. Ensure that five-line laser instrument LAM09-01 is level, turn on the laser beams of the five-line laser
instrument LAM09-01.
If the vehicle chassis is too low, the five-line laser instrument LAM09-01 cannot be placed
under it, just move it a bit far away from the vehicle emblem.
7. Observe the position of the laser beam with the auxiliary mirror LAM09-04. Rotate the fine-tuning knob
(5) of five-line laser instrument LAM09-01 to ensure the longitudinal laser beam aligns with the reflective
stripe of the laser reflector LAM09-03.
THINKCAR ADAS Calibration Tool
SAFETY PRECAUTION
INITIAL USE
START CALIBRATION
TARGET PATTERN KIT
PRODUCT PROFILE
27
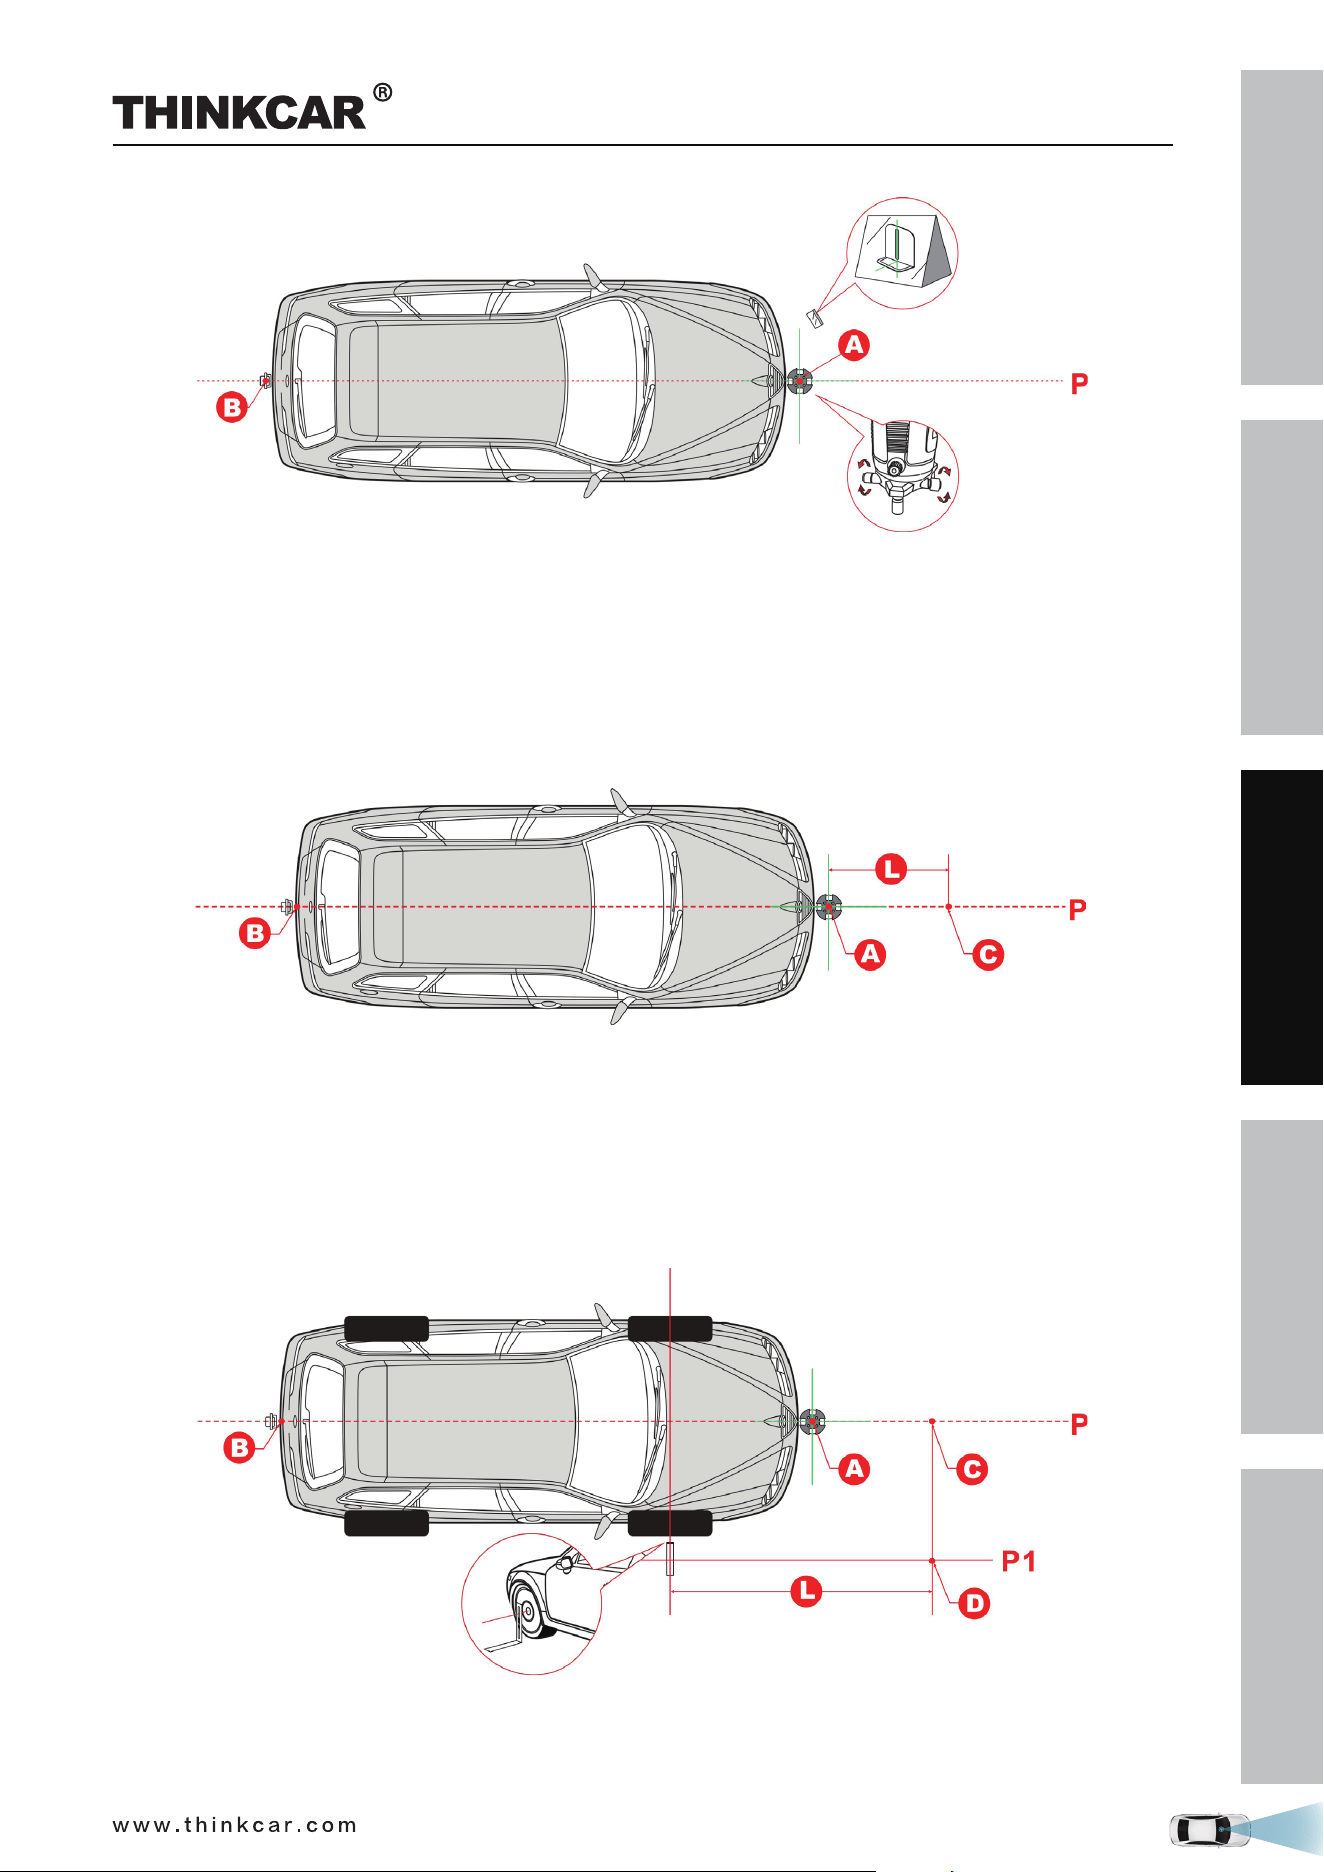
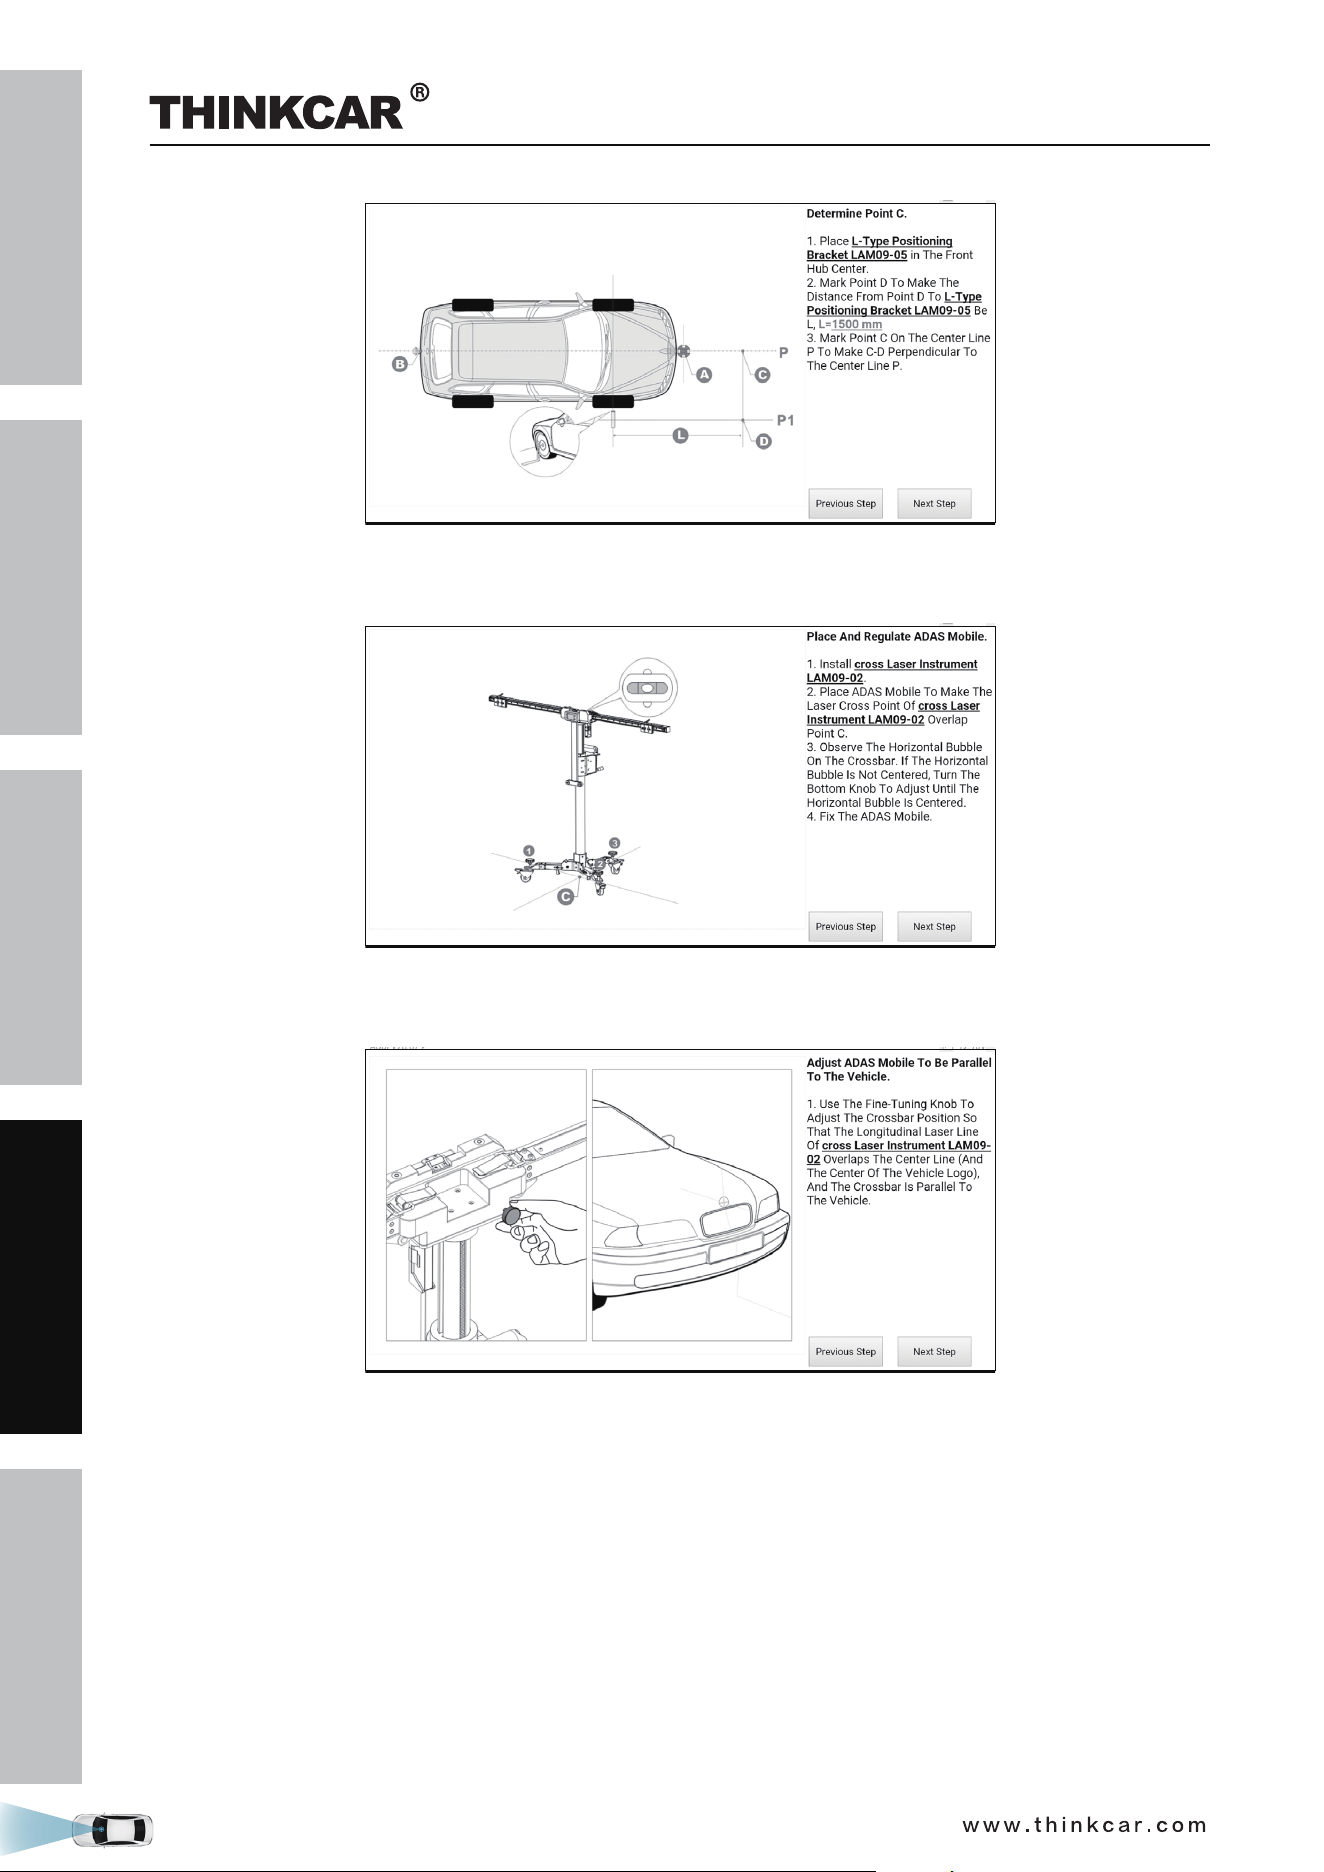
2.3.2.2 Determine the placement location of the THINKCAR ADAS
The placement location of the THINKCAR ADAS varies with the vehicles being serviced. Please strictly
follow the on-screen prompts to determine it. In general, it includes the following possible options:
A. Measuring target/pattern board to front bumper
Mark point C in front of point A on the center line P, making sure that the distance (L) between point A and
point C is the value specified in the on-screen app instructions.
B. Measuring target/pattern board to front hub center
1. Place L-shaped positioning bracket LAM09-05 in the front hub center.
2. Mark point D in front of the L-shaped positioning bracket, making sure that the distance (L) between
point D and L-shaped positioning bracket is the value specified in the on-screen app instructions.
3. Mark point C on the center line P to make the line from point C to point D is perpendicular to the center
line P.
C. Measuring target/pattern board to front camera
1. Place L-shaped positioning bracket LAM09-05 on the side of the vehicle to align it with the camera.
THINKCAR ADAS Calibration Tool
SAFETY PRECAUTION
INITIAL USE
START CALIBRATION
TARGET PATTERN KIT
PRODUCT PROFILE
28
2. Mark point D in front of the L -shaped positioning bracket, making sure that the distance (L) between
point D and L -shaped positioning bracket is the value specified in the on-screen app instructions.
3. Mark point C on the center line P to make the line from point C to point D is perpendicular to the center
line P.
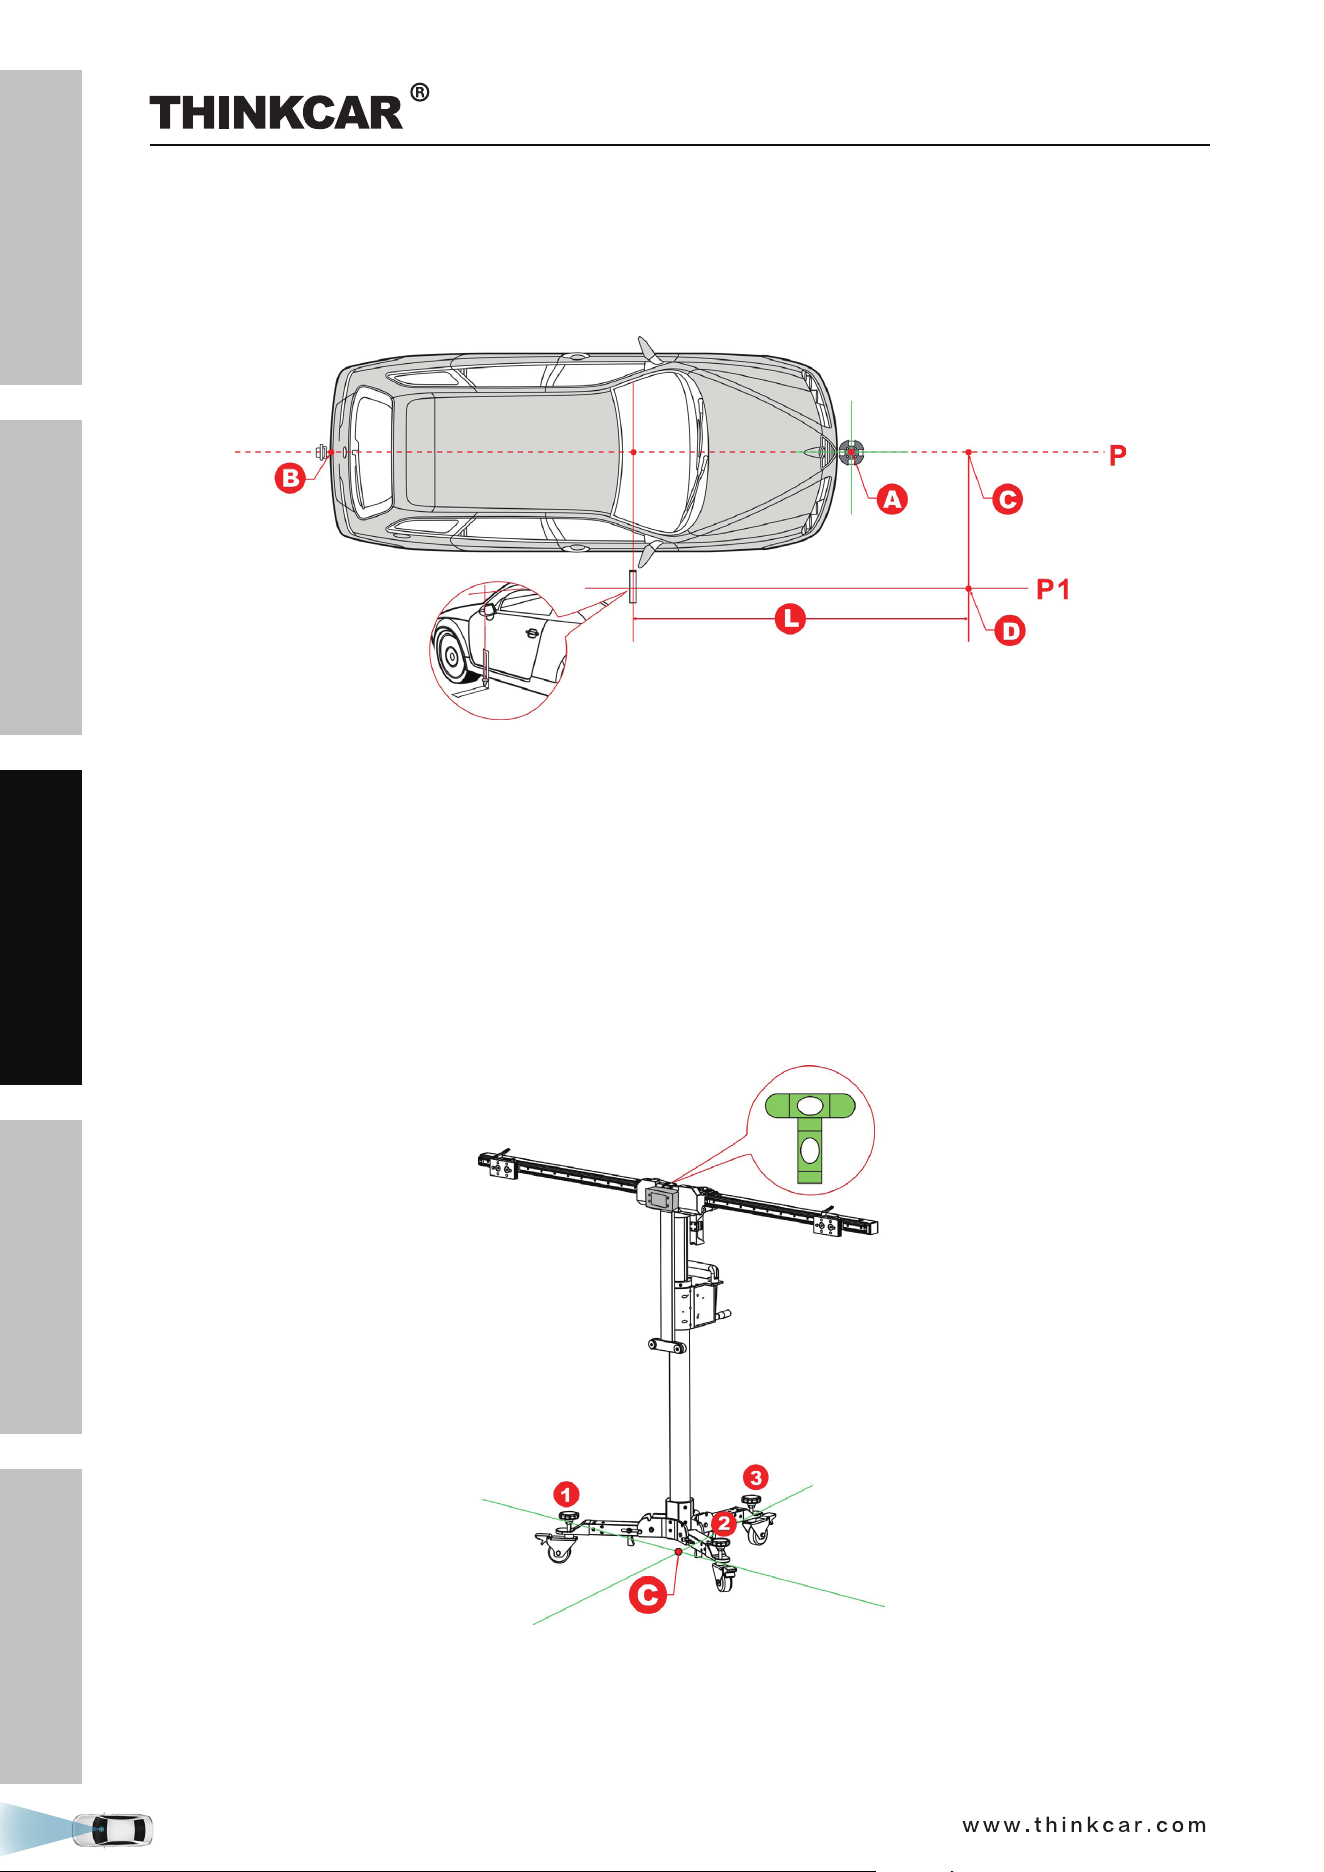
2.3.2.3 Place the THINKCAR ADAS
1. Place the cross laser instrument LAM09-02 close to the magnetic center positioning plate of the
calibration frame with the beam output aiming at the vehicle front and it will be automatically attached
onto the plate.
2. Turn the cross laser instrument LAM09-02 on, and then place the THINKCAR ADAS to make the laser
cross point of cross laser instrument LAM09-02 overlap point C.
3. Observe the level gauge bubbles on the crossbar. If the bubbles are not centered, turn the adjustment
screws to adjust until the bubbles are centered.
4. Fix the THINKCAR ADAS in place.
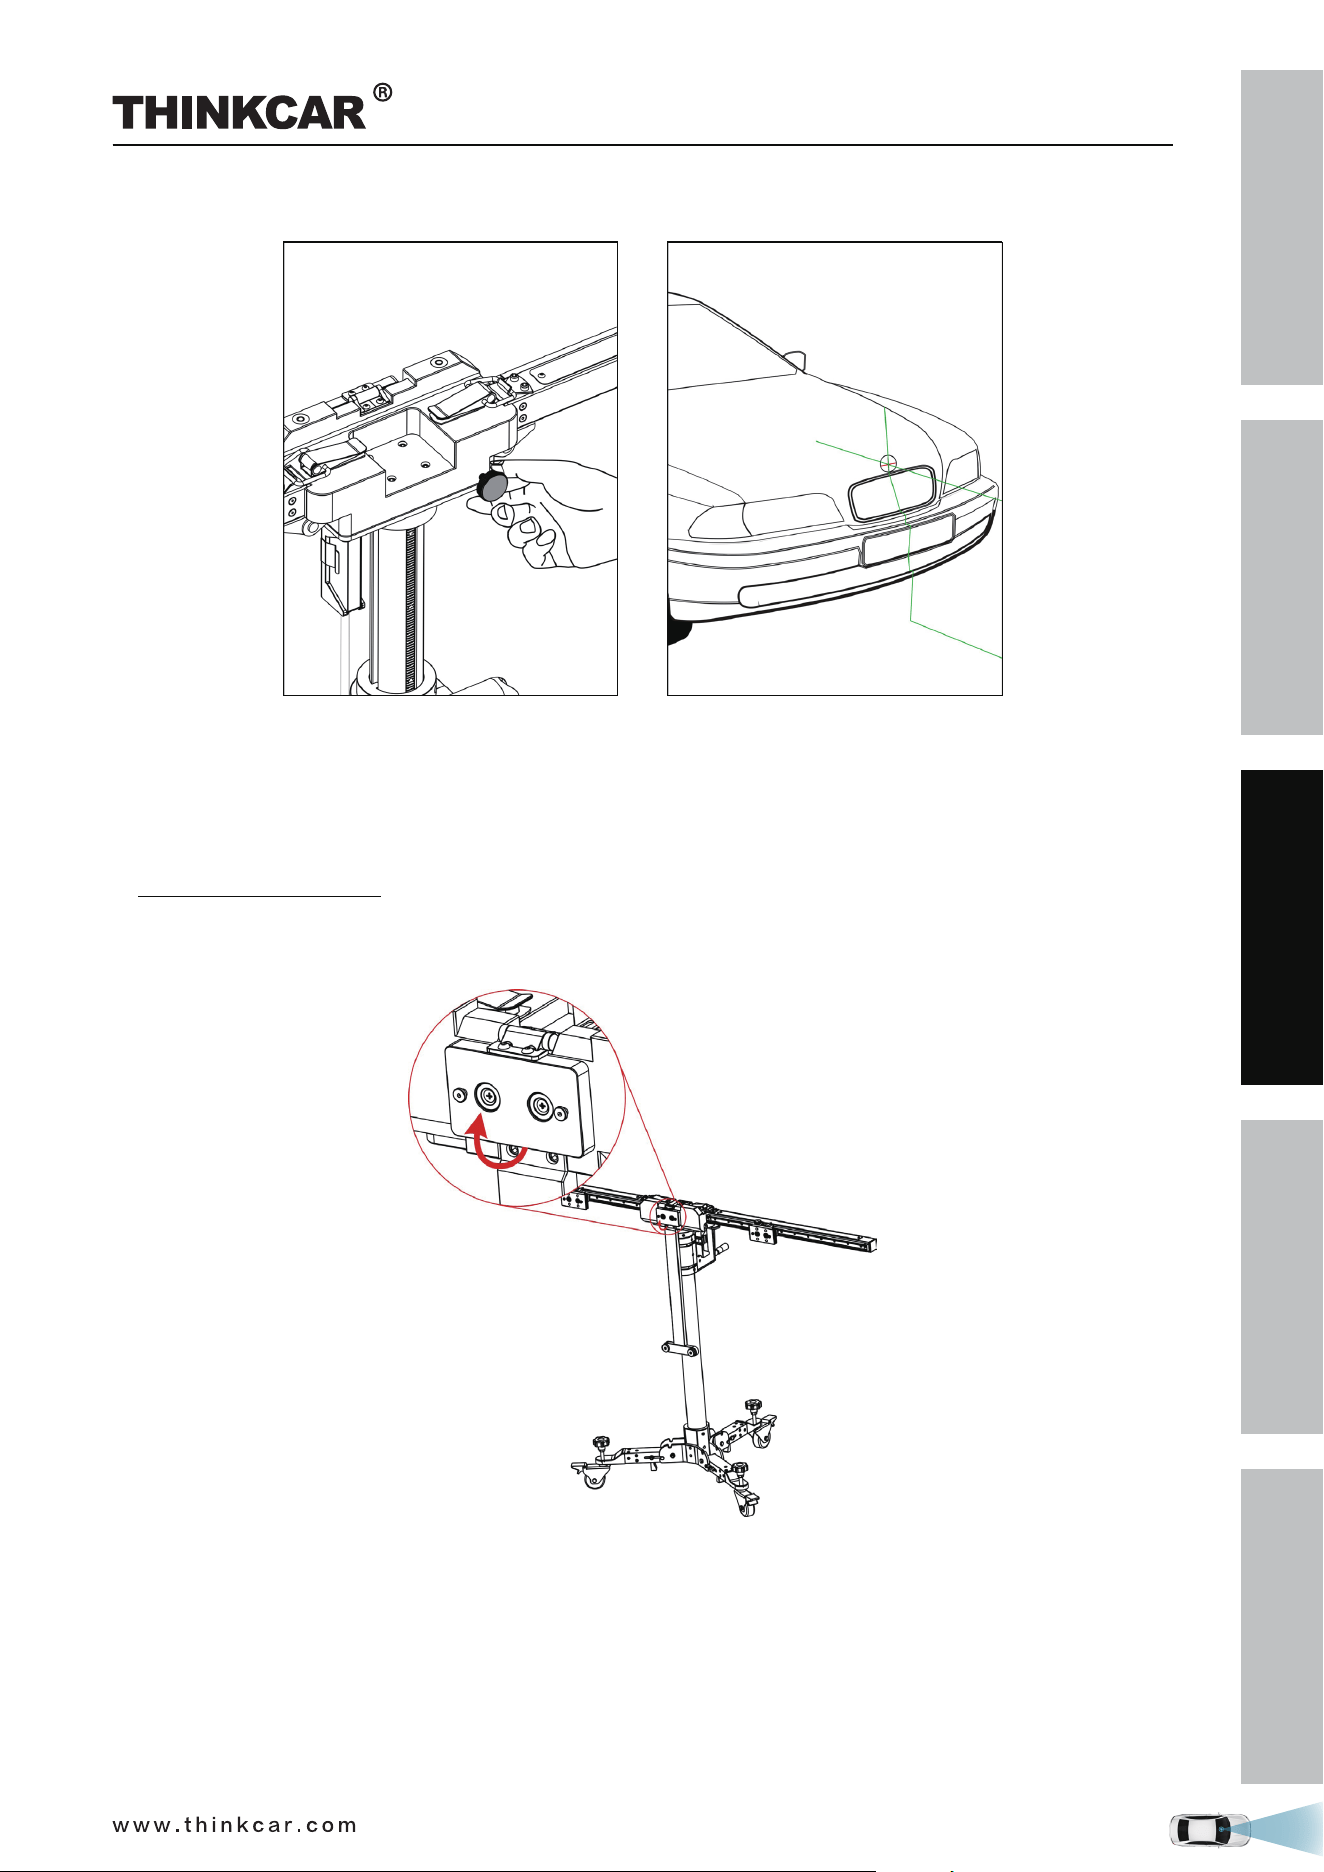
2.3.2.4 Adjust the THINKCAR ADAS in parallel with the vehicle
1. Use the fine-tuning knob to adjust the crossbar position so that the longitudinal laser beam of cross laser
instrument LAM09-02 overlaps the center line (and the center of the vehicle emblem), and then the
THINKCAR ADAS Calibration Tool
SAFETY PRECAUTION
INITIAL USE
START CALIBRATION
TARGET PATTERN KIT
PRODUCT PROFILE
29
crossbar is parallel to the vehicle.
2. Turn off the cross laser instrument LAM09-02 and detach it from the center positioning plate.
3. Step the parking safety mechanism (12) down to fix the calibration frame to prevent it from moving.
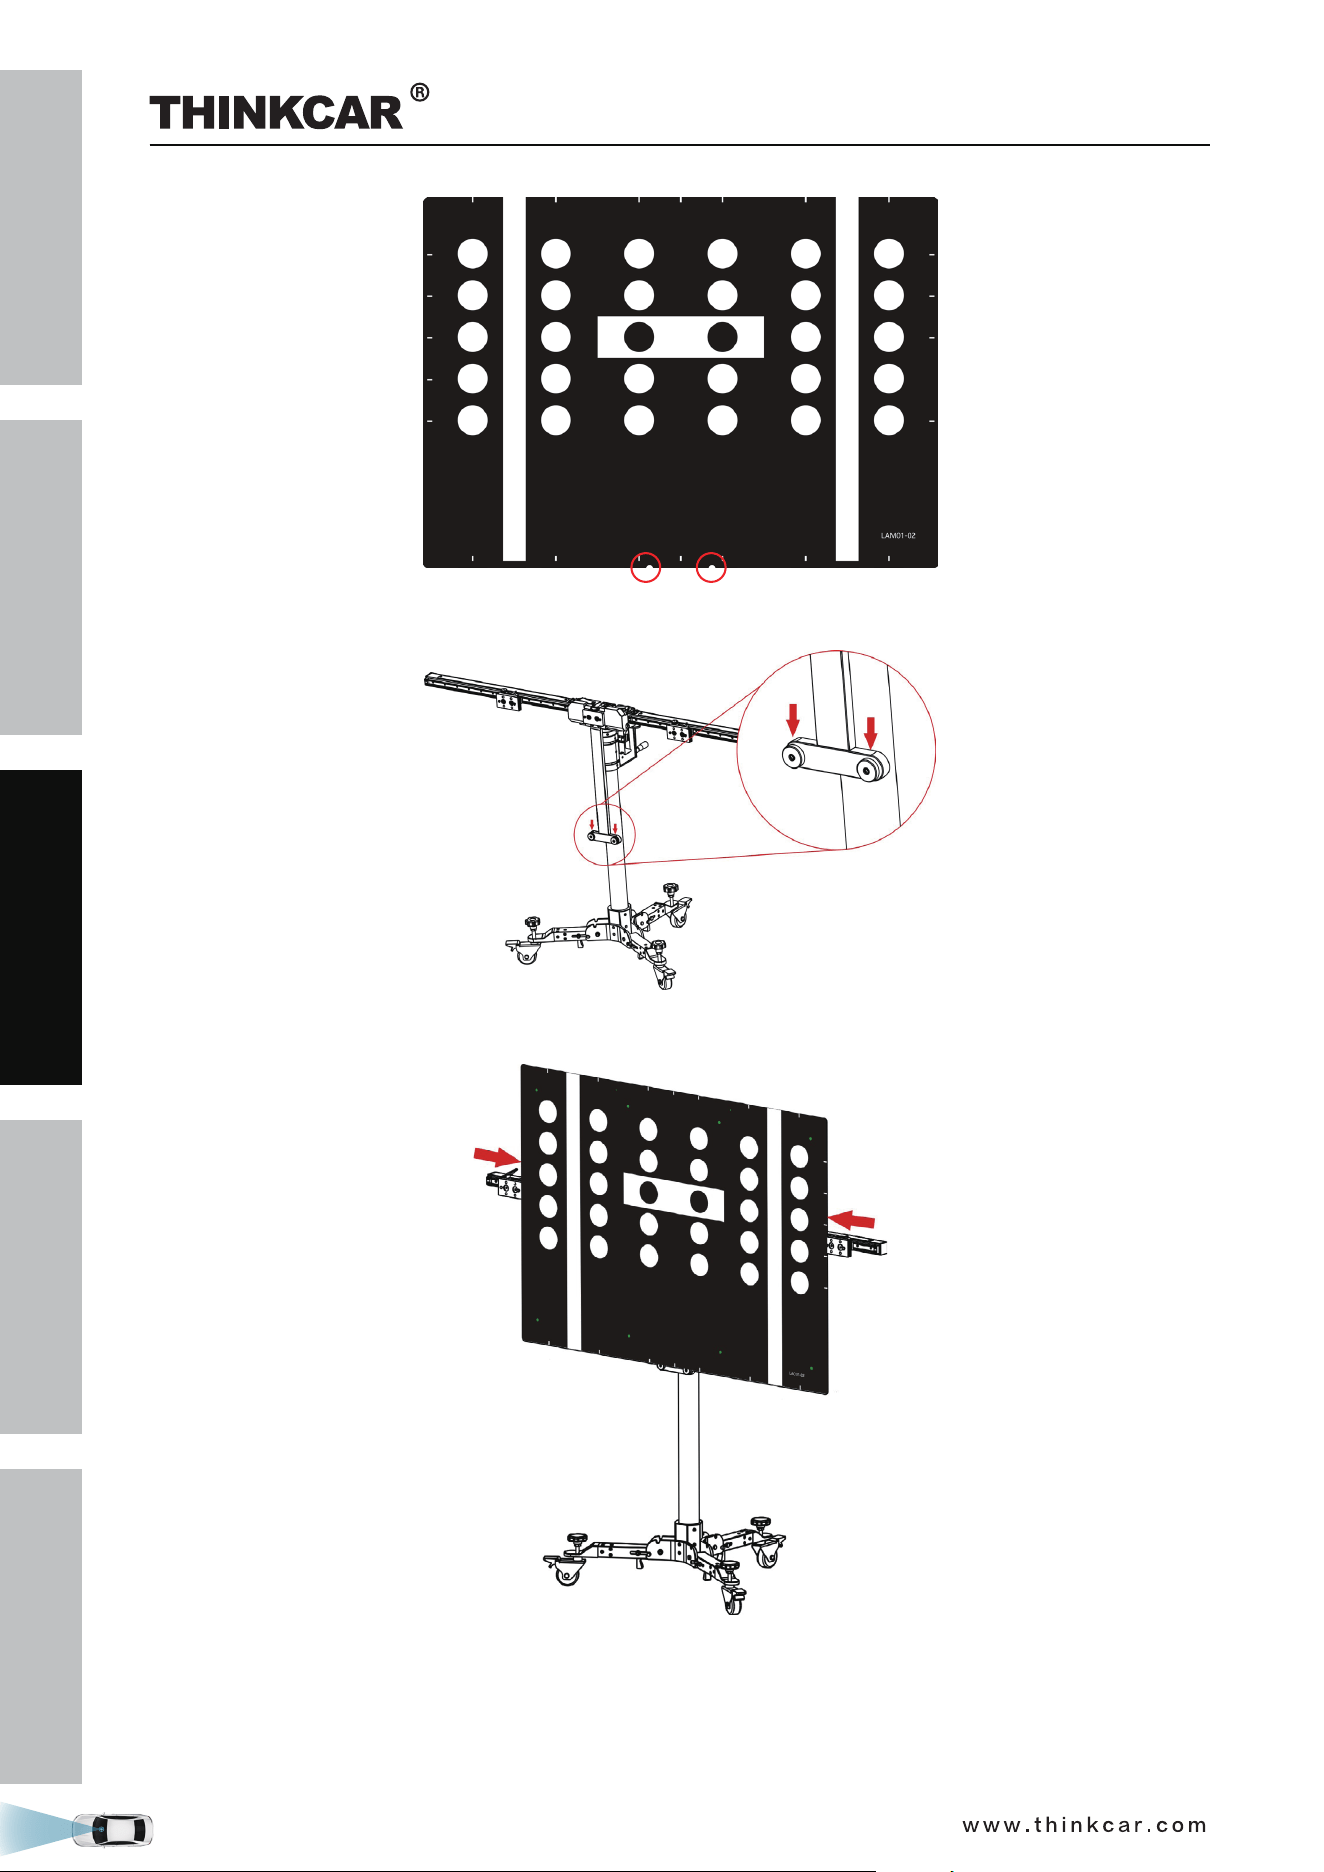
2.3.2.5 Select the desired target / pattern board
1. According to the vehicle being serviced, choose the corresponding target /pattern board.
2. For pattern board (larger), follow the steps below to install it.
1). Pull the center positioning plate outwards and rotate it until it vertically stands on the calibration
frame.
2). Locate the mounting holes on the calibration pattern board. Please note that there are two preset
installation holes on the center of the bottom of each big pattern board.
THINKCAR ADAS Calibration Tool
SAFETY PRECAUTION
INITIAL USE
START CALIBRATION
TARGET PATTERN KIT
PRODUCT PROFILE
30
3). Place the mounting holes on the pattern board holder.
4). Slide the positioning plates at both ends until they firmly secure the pattern board.
THINKCAR ADAS Calibration Tool
SAFETY PRECAUTION
INITIAL USE
START CALIBRATION
TARGET PATTERN KIT
PRODUCT PROFILE
31
2. For target board (smaller), follow the steps below to install it.
1). Please note that there are two preset mounting holes on the back of each small target board. Align
the holes with the mounting hook on the positioning plate and insert them into the plate, then gently
press the board down until it is firmly secured on the plate.
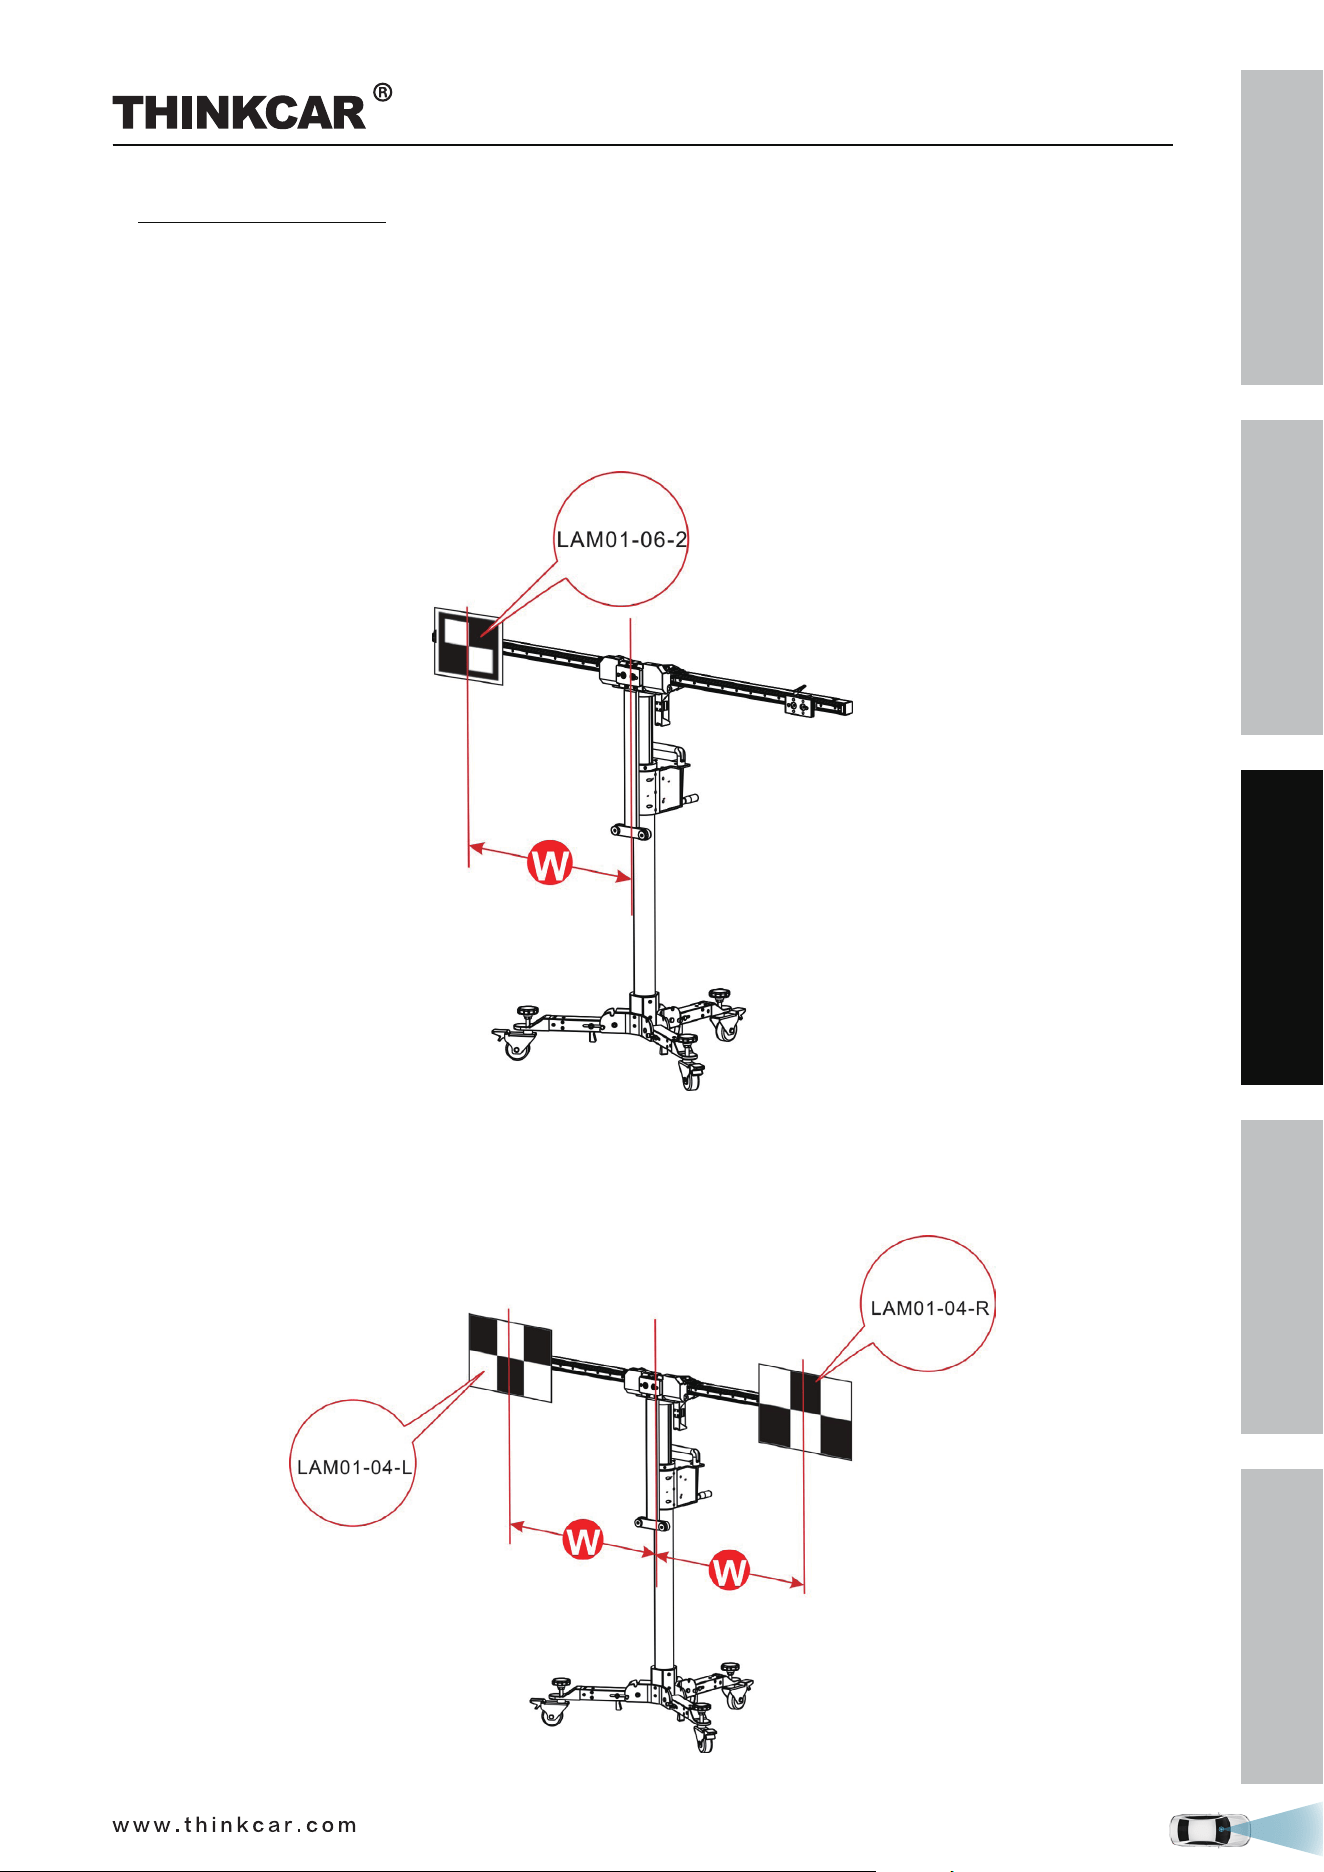
2). According to the on-screen ADAS calibration instructions on the diagnostic tool,
• If the target board (e.g. LAM01-06-2) is installed on the left or right positioning plate, slide the
positioning plate along the crossbar to the desired position (a red scale indicator (4) on the top of the
bracket points at the scale ruler (2) on the crossbar).
• If the target board mats (e.g. LAM01-04-L&LAM01-04-R) are installed, slide the positioning plate
along the crossbar to the desired position (a red scale indicator (4) on the top of the bracket points at
the scale ruler (2) on the crossbar). In this case, they should be installed in the same position on the
crossbars.
THINKCAR ADAS Calibration Tool
SAFETY PRECAUTION
INITIAL USE
START CALIBRATION
TARGET PATTERN KIT
PRODUCT PROFILE
32
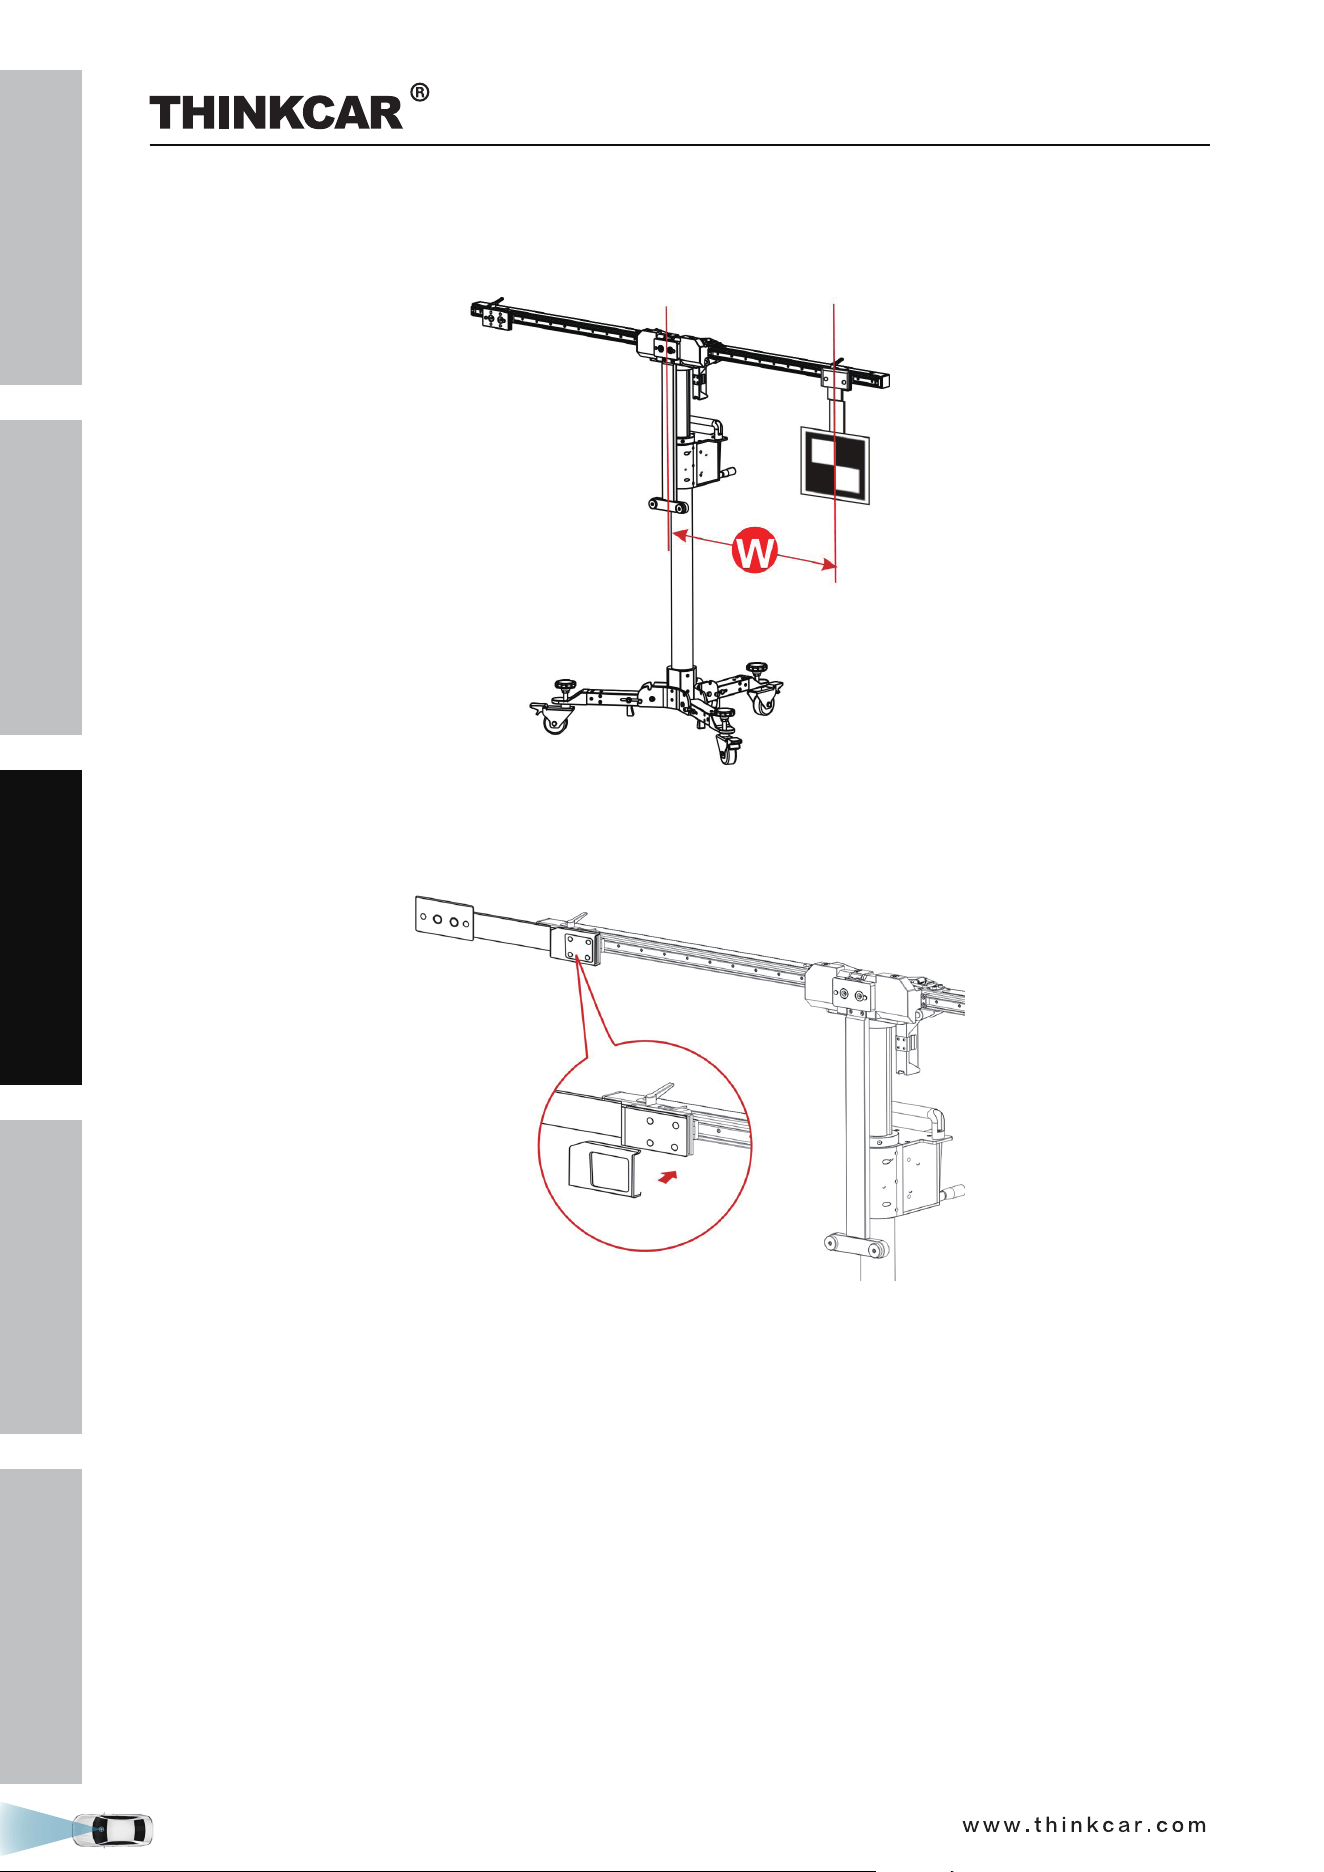
• If the target board extension rod (e.g. LAM09-08 / LAM09-09) is required (in the condition that the
height or width of the THINKCAR ADAS cannot meet the specified value), first attach the extension
rod on the positioning plate, and then install the target board on the extension rod.
For LAM09-08 horizontal extension rod, you are recommended to use the included lock cover to lock
the extension rod to prevent it from being displaced due to the installed heavy target board. Hold it
and cover it on the extension rod (See the following figure).
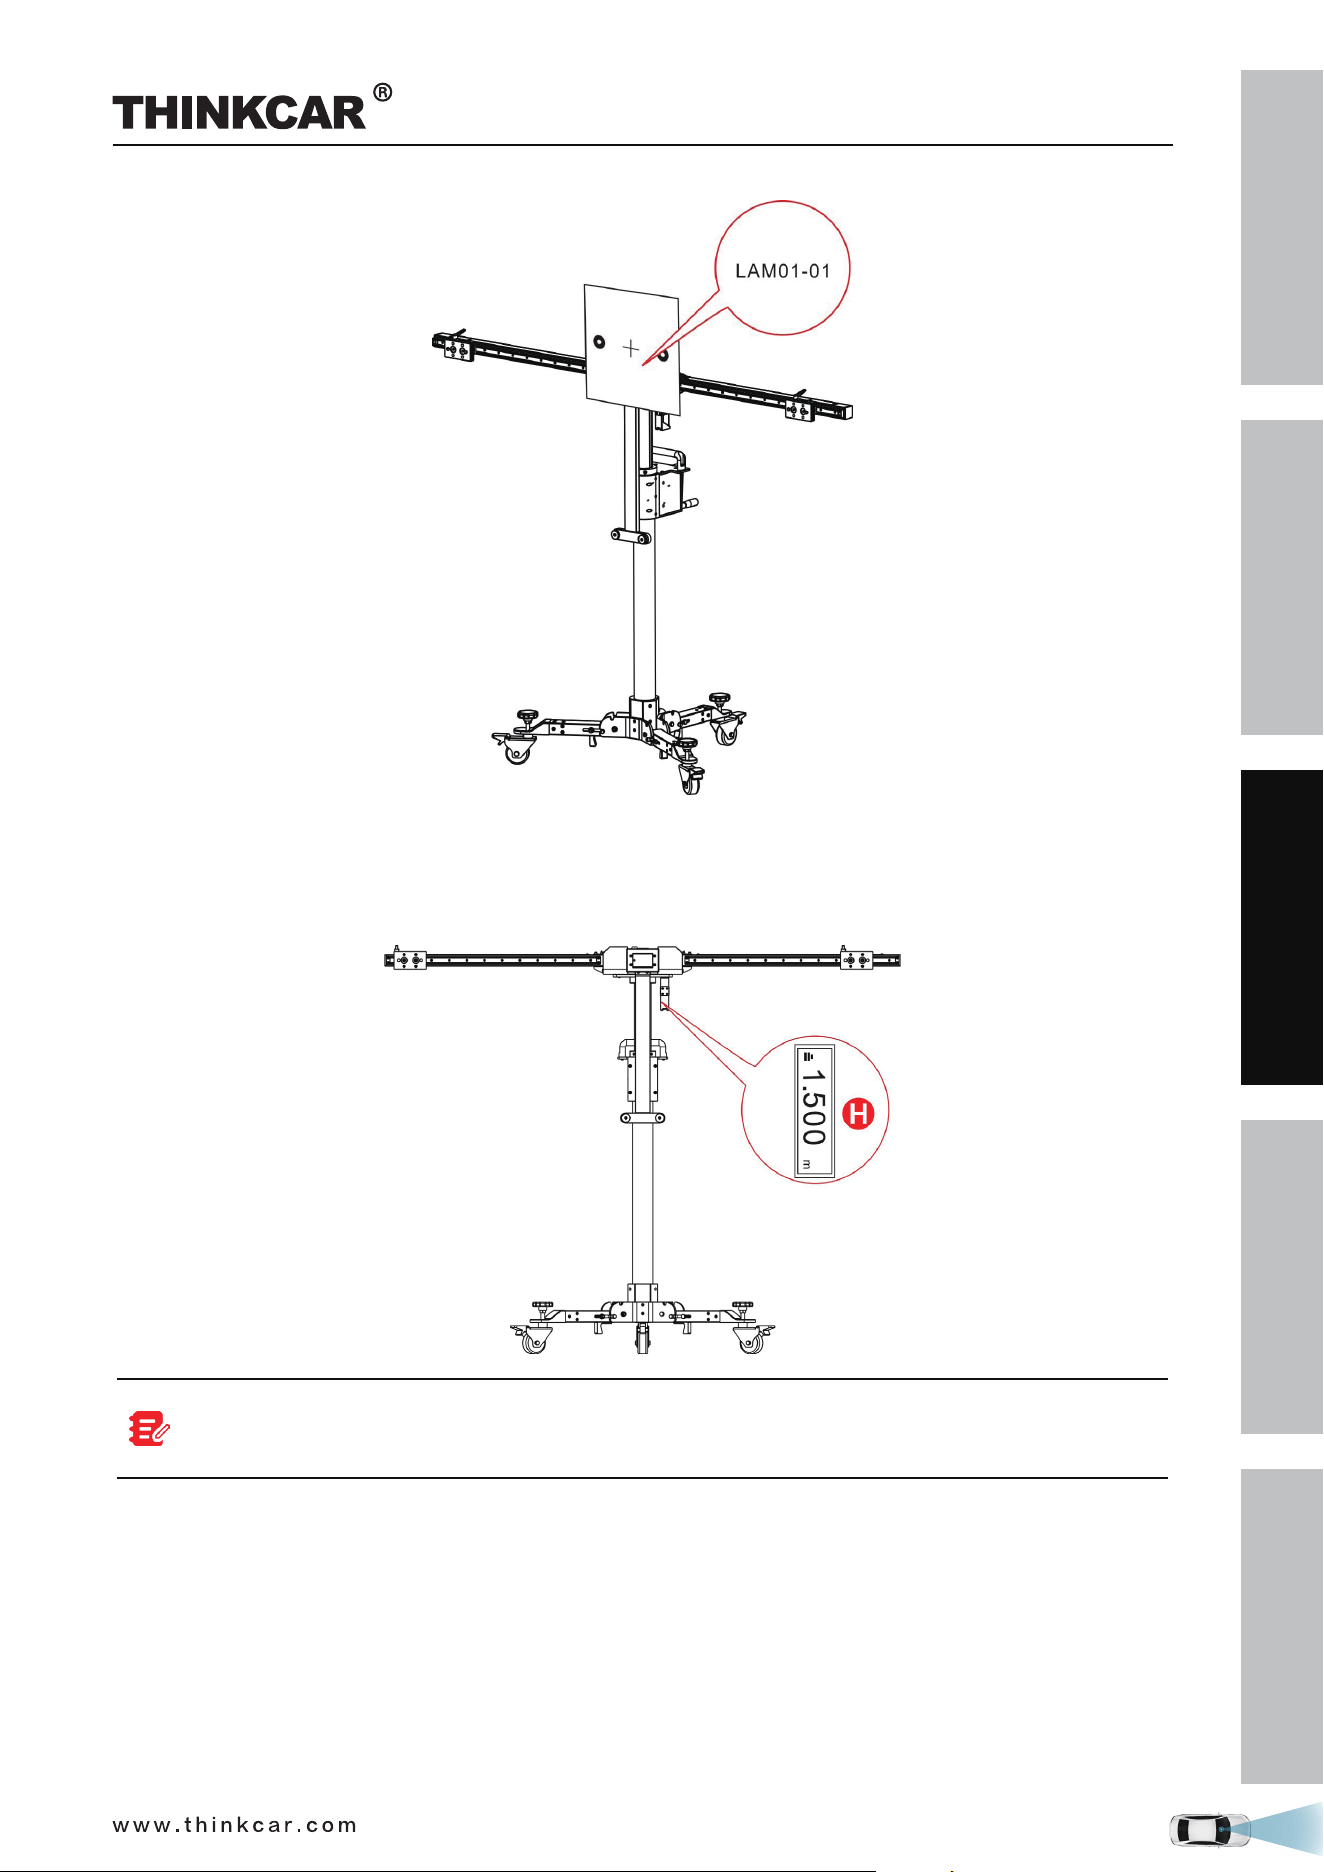
• If the target board (e.g. LAM01-01) is installed on the center positioning plate, go to the next step.
THINKCAR ADAS Calibration Tool
SAFETY PRECAUTION
INITIAL USE
START CALIBRATION
TARGET PATTERN KIT
PRODUCT PROFILE
33
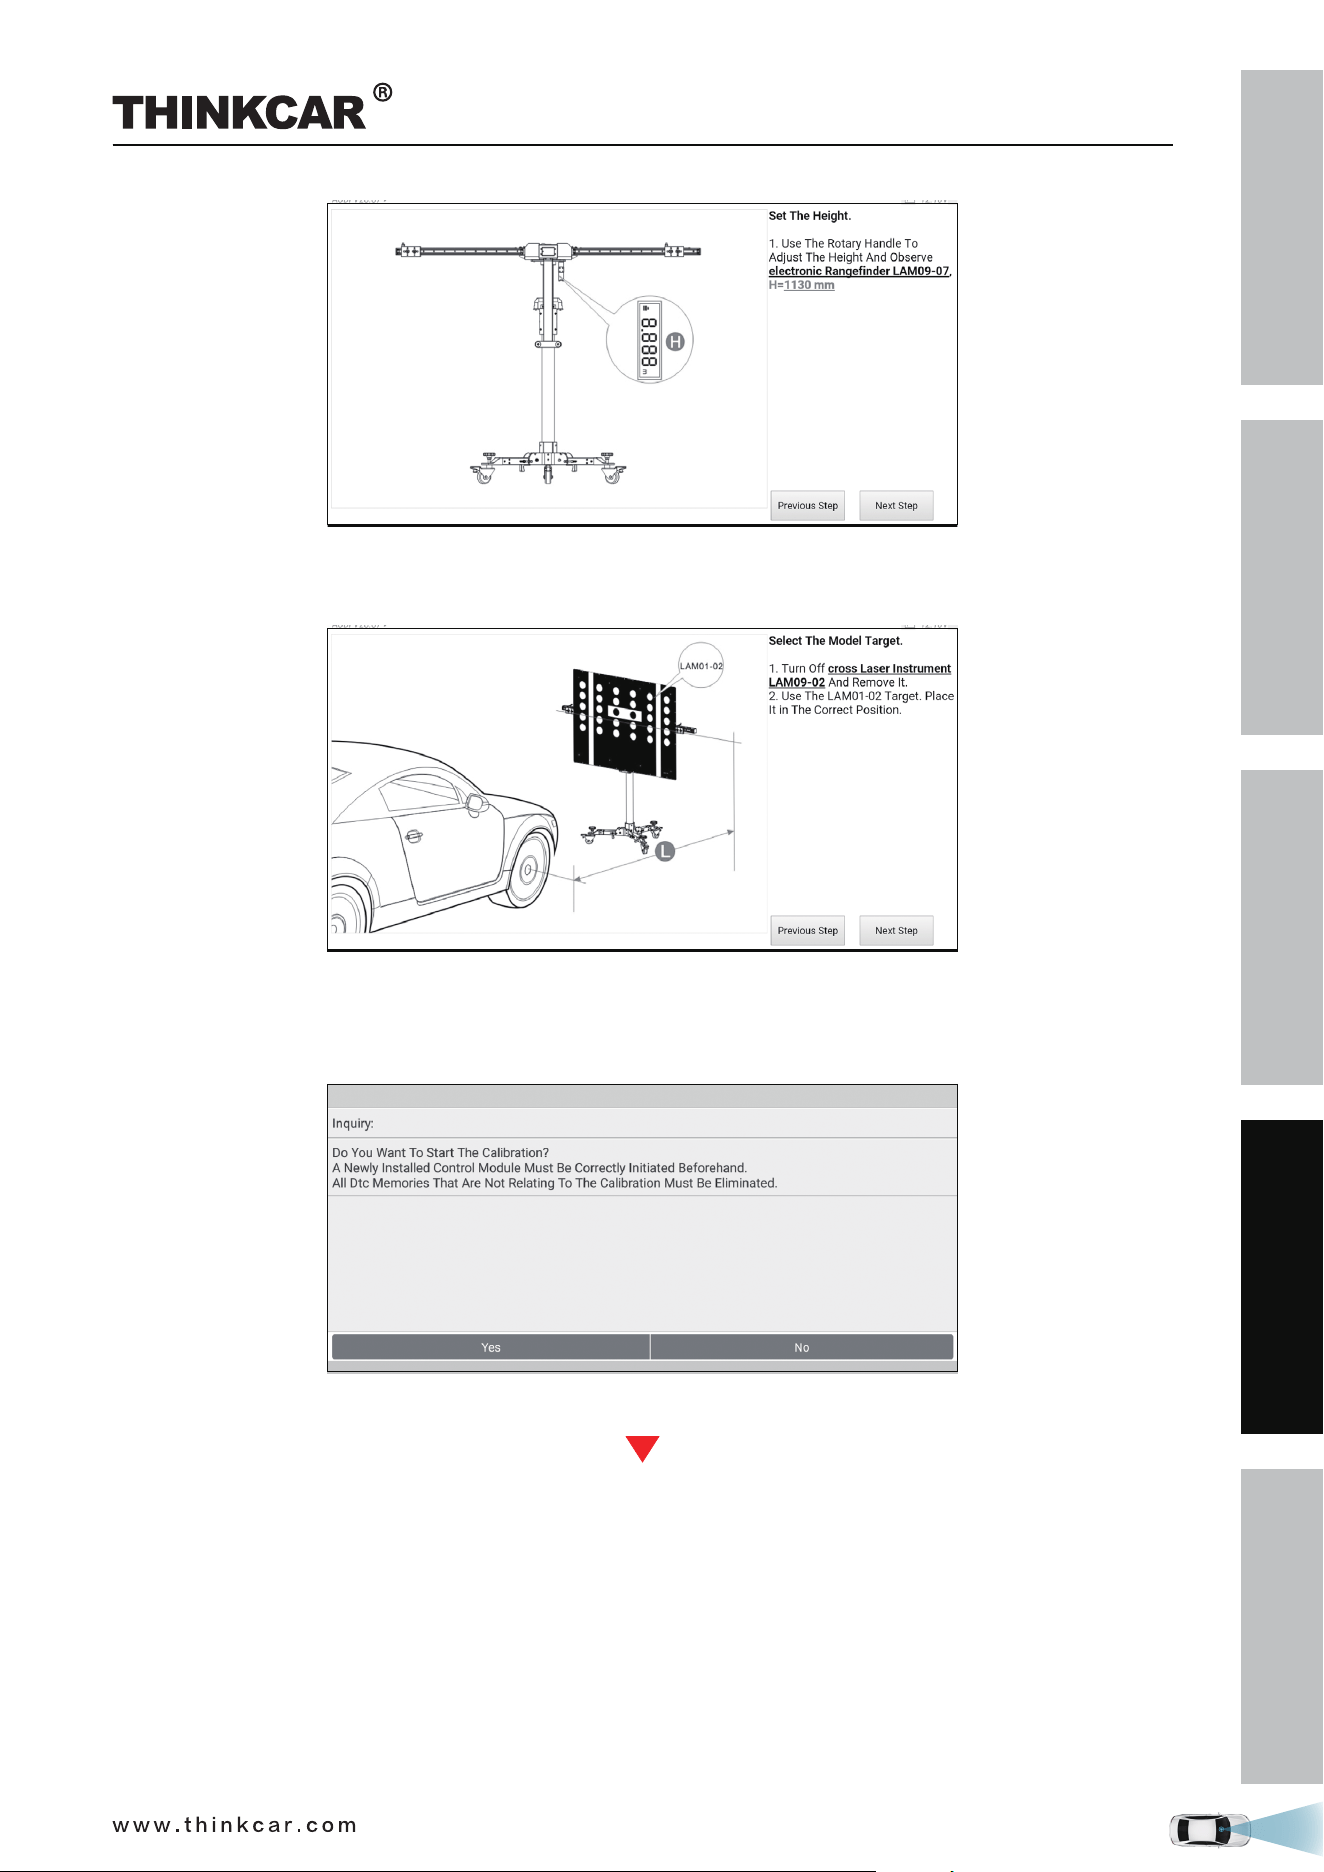
2.3.2.6 Set the height
Use the hand crank (18) to adjust the height until the value displayed on the laser range finder matches the
value specified in the on-screen instructions.
Since the laser range finder is not on the same level as the target board/pattern board, a precise
tolerance value is adjusted for the calibration height of each vehicle on the diagnostic tool and no
more settings and calculations are required by users.
THINKCAR ADAS Calibration Tool
SAFETY PRECAUTION
INITIAL USE
START CALIBRATION
TARGET PATTERN KIT
PRODUCT PROFILE
34
3 Start Calibration
3.1 Calibrating the front camera
This chapter describes a general operation procedure of front camera calibration. For example, here we
take the 2017 Audi Q5 USA/Canada to demonstrate how to make calibration.
3.1.1 When to calibrate?
1). The following diagnostic trouble codes are found on the vehicle (No or incorrect basic setting/adaption):
B201000 - No basic setting
C110A54 - No basic setting
B201100 - Wrong basic setting
2). The following repairs and replacements are made on the vehicle:
Front camera has been replaced.
The windshield has been removed, installed or replaced.
Chassis structure has been changed/adjusted.
One of the vehicle level sensors of the wheel damping electronics or the level control has been
replaced.
3.1.2 Operation Notes
Make sure the following conditions are met:
On vehicle & diagnostic tool
• Use the AUDI diagnostic software version 28.50 or above to perform the calibration.
• Only the calibration-related fault trouble codes are found on the vehicle, all other fault memory records
must have been cleared.
• Make sure that the VCI device has been plugged into the vehicle’s DLC.
• Turn on the ignition.
• Park the unloaded vehicle along with the four wheels on a horizontal surface.
• All vehicle doors must be closed.
• Wheel pressure is set to the standard value.
• Turn off the headlamp.
• Camera view is free and clean.
On calibration tool
• The front wheel is at straight ahead position, and the steering angle sensor is set to zero.
• Use the LAM01-02 calibration pattern.
THINKCAR ADAS Calibration Tool
SAFETY PRECAUTION
INITIAL USE
START CALIBRATION
TARGET PATTERN KIT
PRODUCT PROFILE
35
• ADAS calibration pattern is placed in parallel in front of the vehicle.
• ADAS calibration pattern is placed in the center of the front of the vehicle.
• The distance from calibration pattern to the center point of the front wheel hub is 1.5m (59inch).
The following table formulates the reference distance range for other Audi models when performing front
camera calibration.
1.5m (59inch) 1.7m (67inch)
AUDI A3 2013> 2013~2018 AUDI Q2 2017> 2017~2018
AUDI A3 USA /CANADA 2013> 2014~2018 AUDI Q3 2012> 2012~2018
AUDI A4 2016> 2016~2018 AUDI Q3 USA /CANADA 2012> 2014~2018
AUDI A4 USA /CANADA 2016> 2016~2018 AUDI Q5 2017> 2017~2018
AUDI A5 2017> 2017~2018 AUDI Q5 USA /CANADA 2017> 2017~2018
AUDI A6 2011> 2011~2018 AUDI Q7 2016> 2016~2018
AUDI A6 USA /CANADA 2011> 2011~2018 AUDI Q7 USA /CANADA 2016> 2015~2018
AUDI A7 2011> 2011~2018
AUDI A7 USA /CANADA 2011> 2011~2018
AUDI A8 2010> 2010~2018
AUDI A8 USA /CANADA 2010> 2010~2018
AUDI A5 USA /CANADA 2016> 2017~2018
AUDI TT 2015> 2015~2018
AUDI TT USA /CANADA 2015> 2015~2018
• Make sure the value displayed on the laser range finder screen is 1.13m or
44.5inch (the height from the
center of the calibration pattern to the ground).
THINKCAR ADAS Calibration Tool
SAFETY PRECAUTION
INITIAL USE
START CALIBRATION
TARGET PATTERN KIT
PRODUCT PROFILE
36
3.1.3 Start calibration
Follow the steps below to proceed:
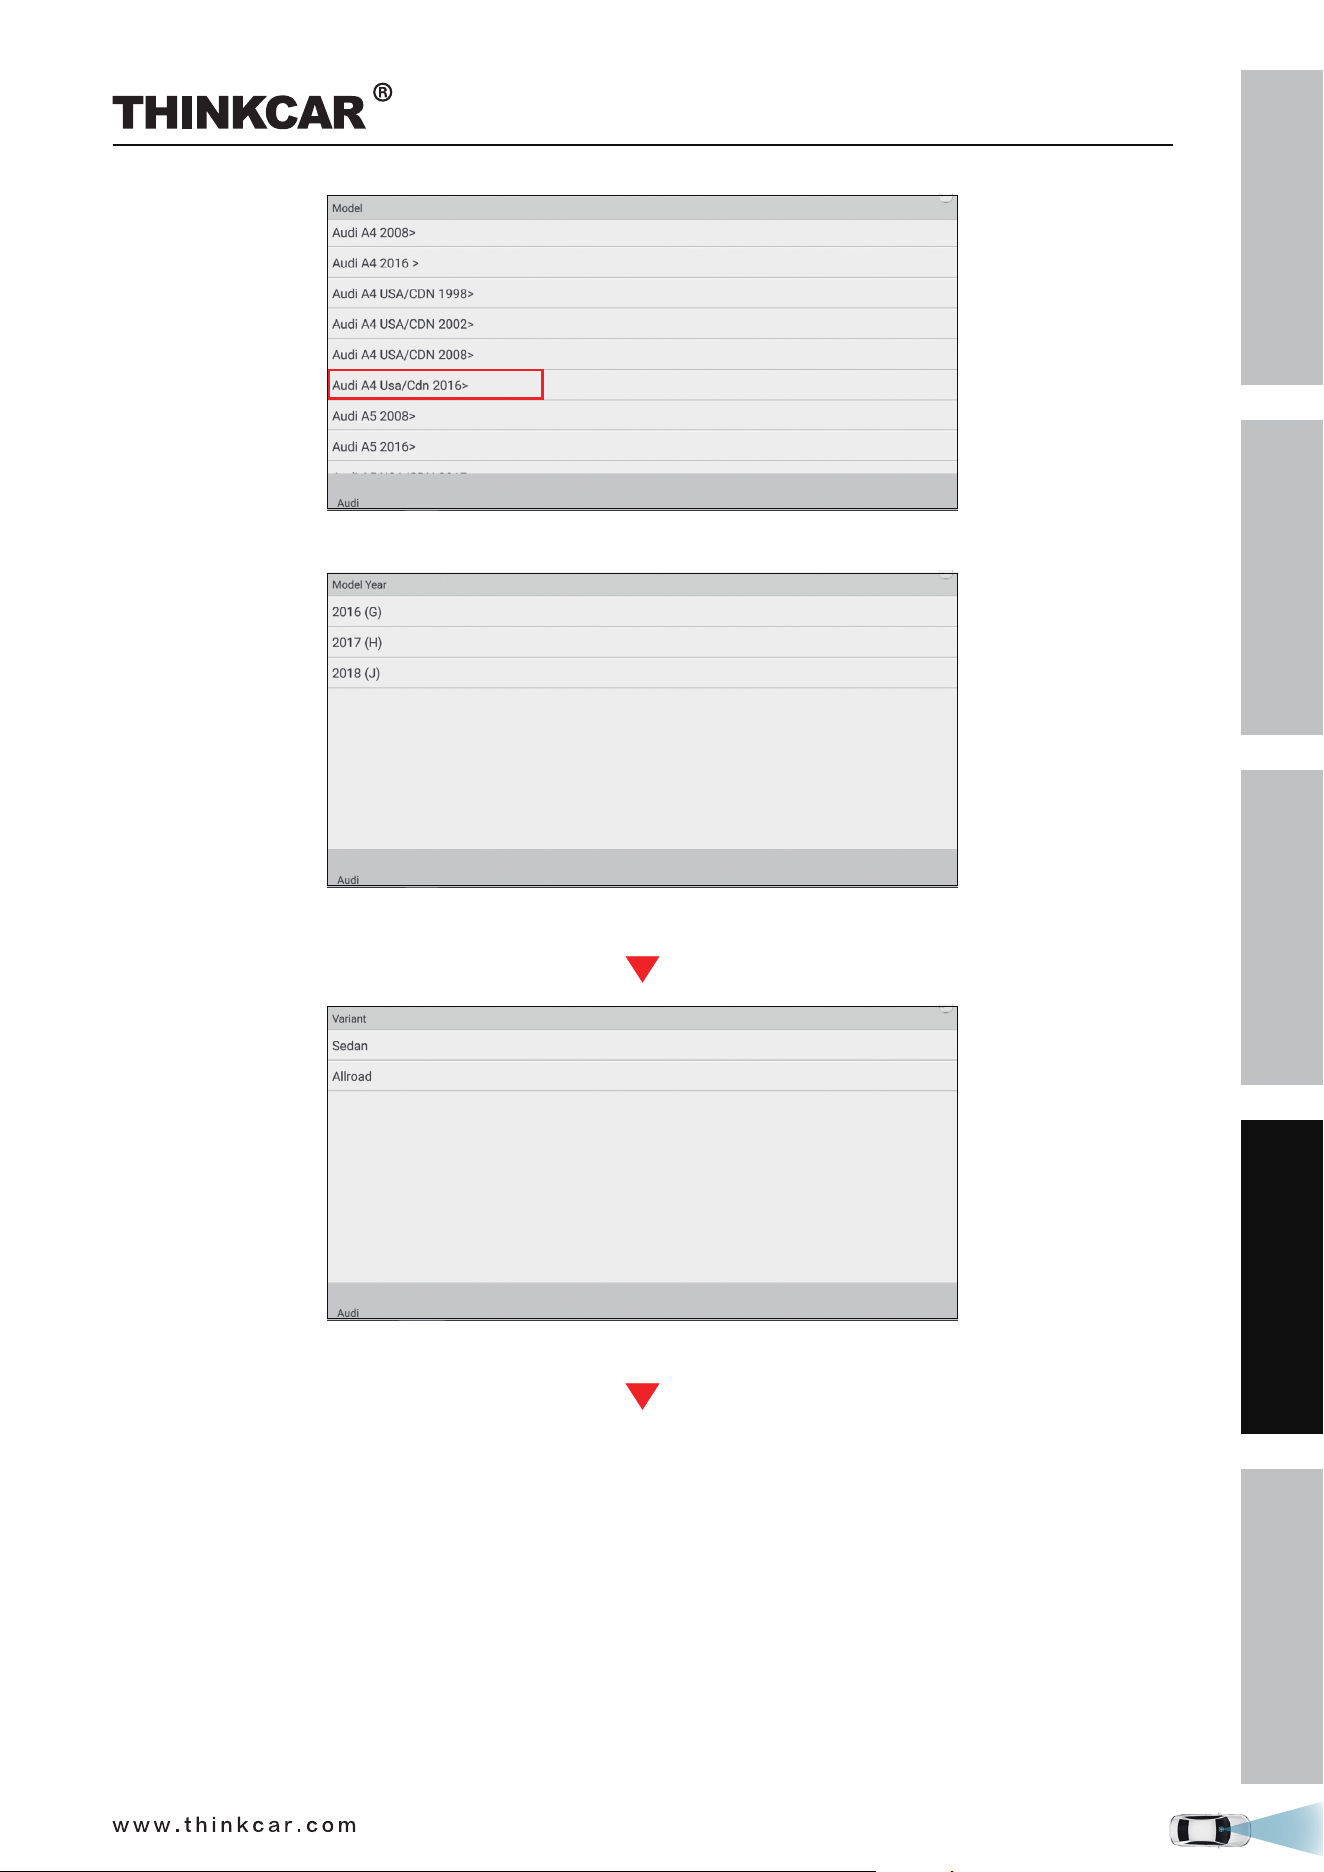
1. Tap “Toolbox” -> “ADAS” on the diagnostic tool.
2. The diagnostic tool starts communicating with the VCI and reading VIN. After the VIN is successfully
decoded, a screen similar to the following appears:
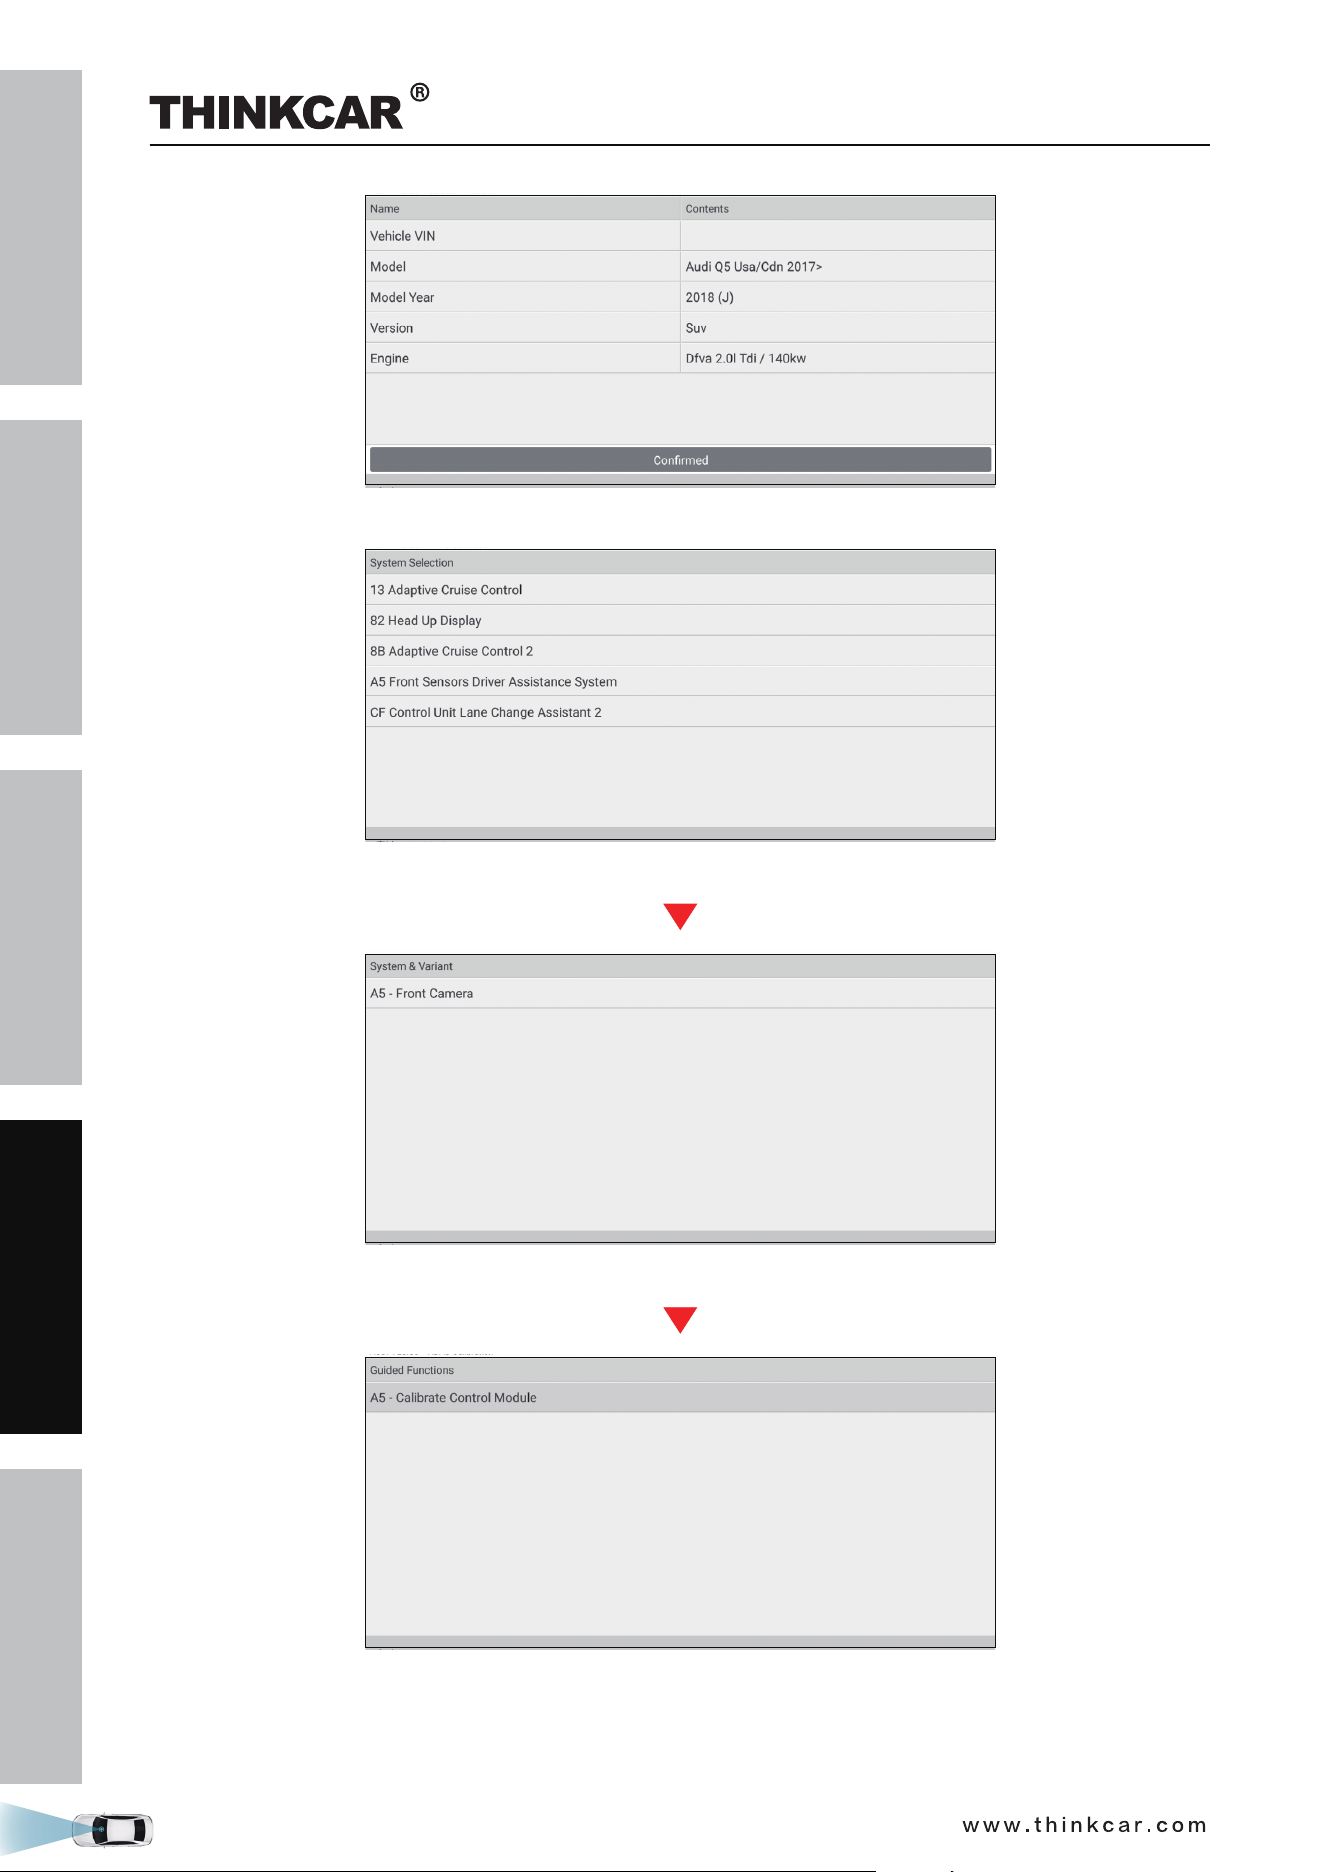
3. Select Audi Q5 Usa/Cdn 2017>.
THINKCAR ADAS Calibration Tool
SAFETY PRECAUTION
INITIAL USE
START CALIBRATION
TARGET PATTERN KIT
PRODUCT PROFILE
37
(Select 2018 (J))
(Select SUV)
(Select Engine - Dfva 2.0l Tdi/140kw)
4. Double check your selections and tap Confirm to go to the next step.
THINKCAR ADAS Calibration Tool
SAFETY PRECAUTION
INITIAL USE
START CALIBRATION
TARGET PATTERN KIT
PRODUCT PROFILE
38
5. Select the system to be calibrated.
(Select A5 Front Sensors Driver Assistance System)
(Select A5 - Front Camera)
(Select A5 - Calibrate Control Module)
6. Select A5 - Calibrate Control Module to continue.
THINKCAR ADAS Calibration Tool
SAFETY PRECAUTION
INITIAL USE
START CALIBRATION
TARGET PATTERN KIT
PRODUCT PROFILE
39
7. Swipe the screen to carefully read all calibration conditions and tips and double check all pre-calibration
preparations are well made or not. If yes, tap Complete/Continue.
8. Check if the following steps have been done or not.
1). Determine the center line of the vehicle being tested.
(Tap Next Step)
(Tap Next Step)
2). Determine the placement location of the THINKCAR ADAS.
THINKCAR ADAS Calibration Tool
SAFETY PRECAUTION
INITIAL USE
START CALIBRATION
TARGET PATTERN KIT
PRODUCT PROFILE
40
(Tap Next Step)
3). Place the THINKCAR ADAS.
(Tap Next Step)
4). Adjust the THINKCAR ADAS in parallel with the vehicle.
(Tap Next Step)
5). Set the height.
THINKCAR ADAS Calibration Tool
SAFETY PRECAUTION
INITIAL USE
START CALIBRATION
TARGET PATTERN KIT
PRODUCT PROFILE
41
(Tap Next Step)
6). Select the LAM01-02 pattern board.
(Tap Next Step)
9. The following dialog box displays on the screen. Before calibrating, make sure that all DTCs that are not
related to the calibration have been erased. If yes, tap Yes to go to the next step.
(Tap Yes)
THINKCAR ADAS Calibration Tool
SAFETY PRECAUTION
INITIAL USE
START CALIBRATION
TARGET PATTERN KIT
PRODUCT PROFILE
42
(Tap Yes)
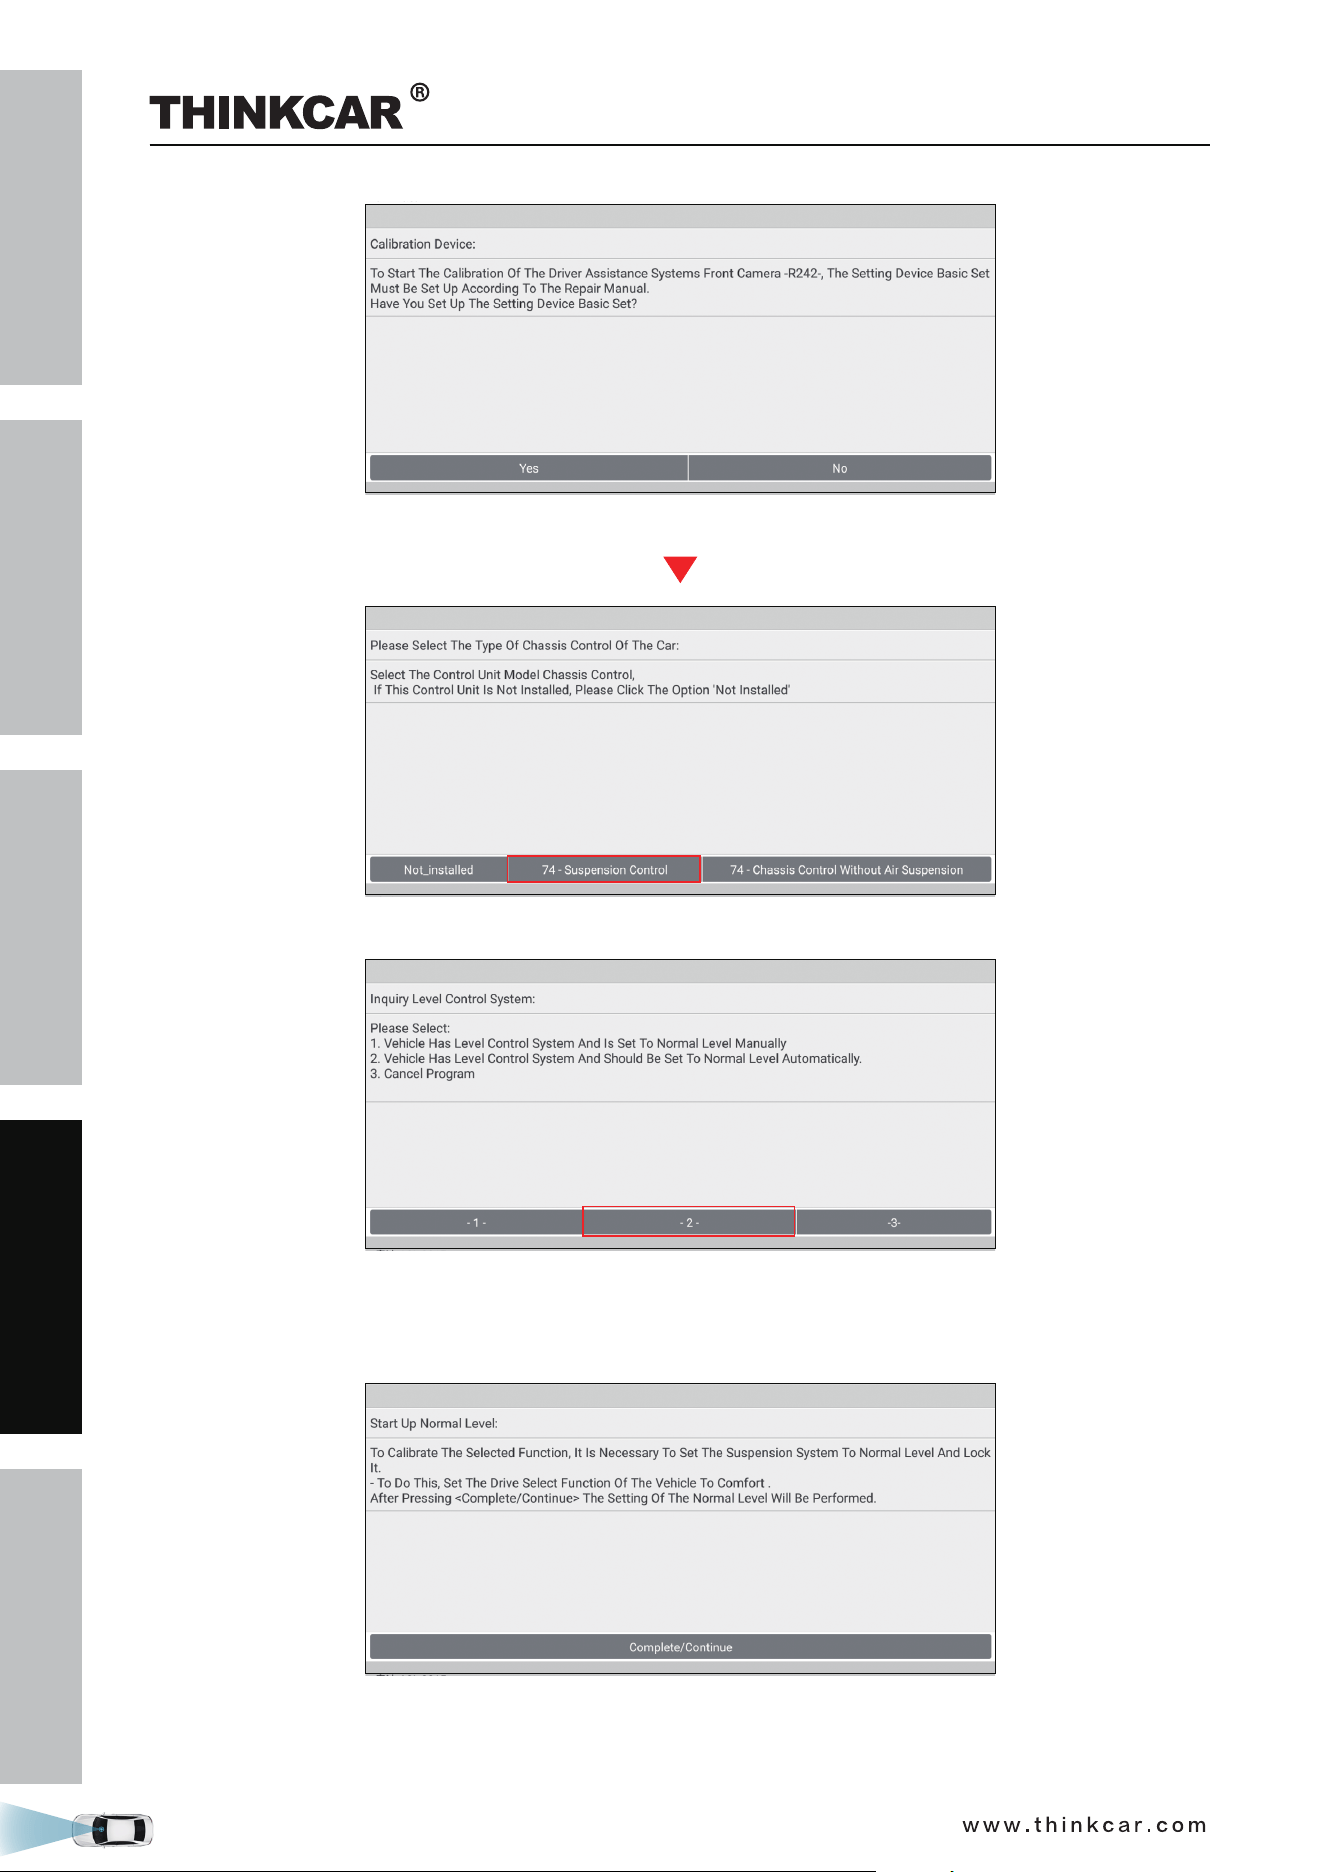
10. Select 74 - Suspension Control to choose how to set the vehicle level system to normal level.
(Select -2-)
11. Tap -2- (Vehicle has level control system and should be set to normal level automatically). Set the drive
select function of the vehicle to COMFORT to set the suspension system to normal level and lock it.
12. Tap Complete/Continue, follow the on-screen instruction to finish the startup, evaluate chassis status
and level control system, and enter the wheel housing edge values (*please enter the values in
THINKCAR ADAS Calibration Tool
SAFETY PRECAUTION
INITIAL USE
START CALIBRATION
TARGET PATTERN KIT
PRODUCT PROFILE
43
millimeter).
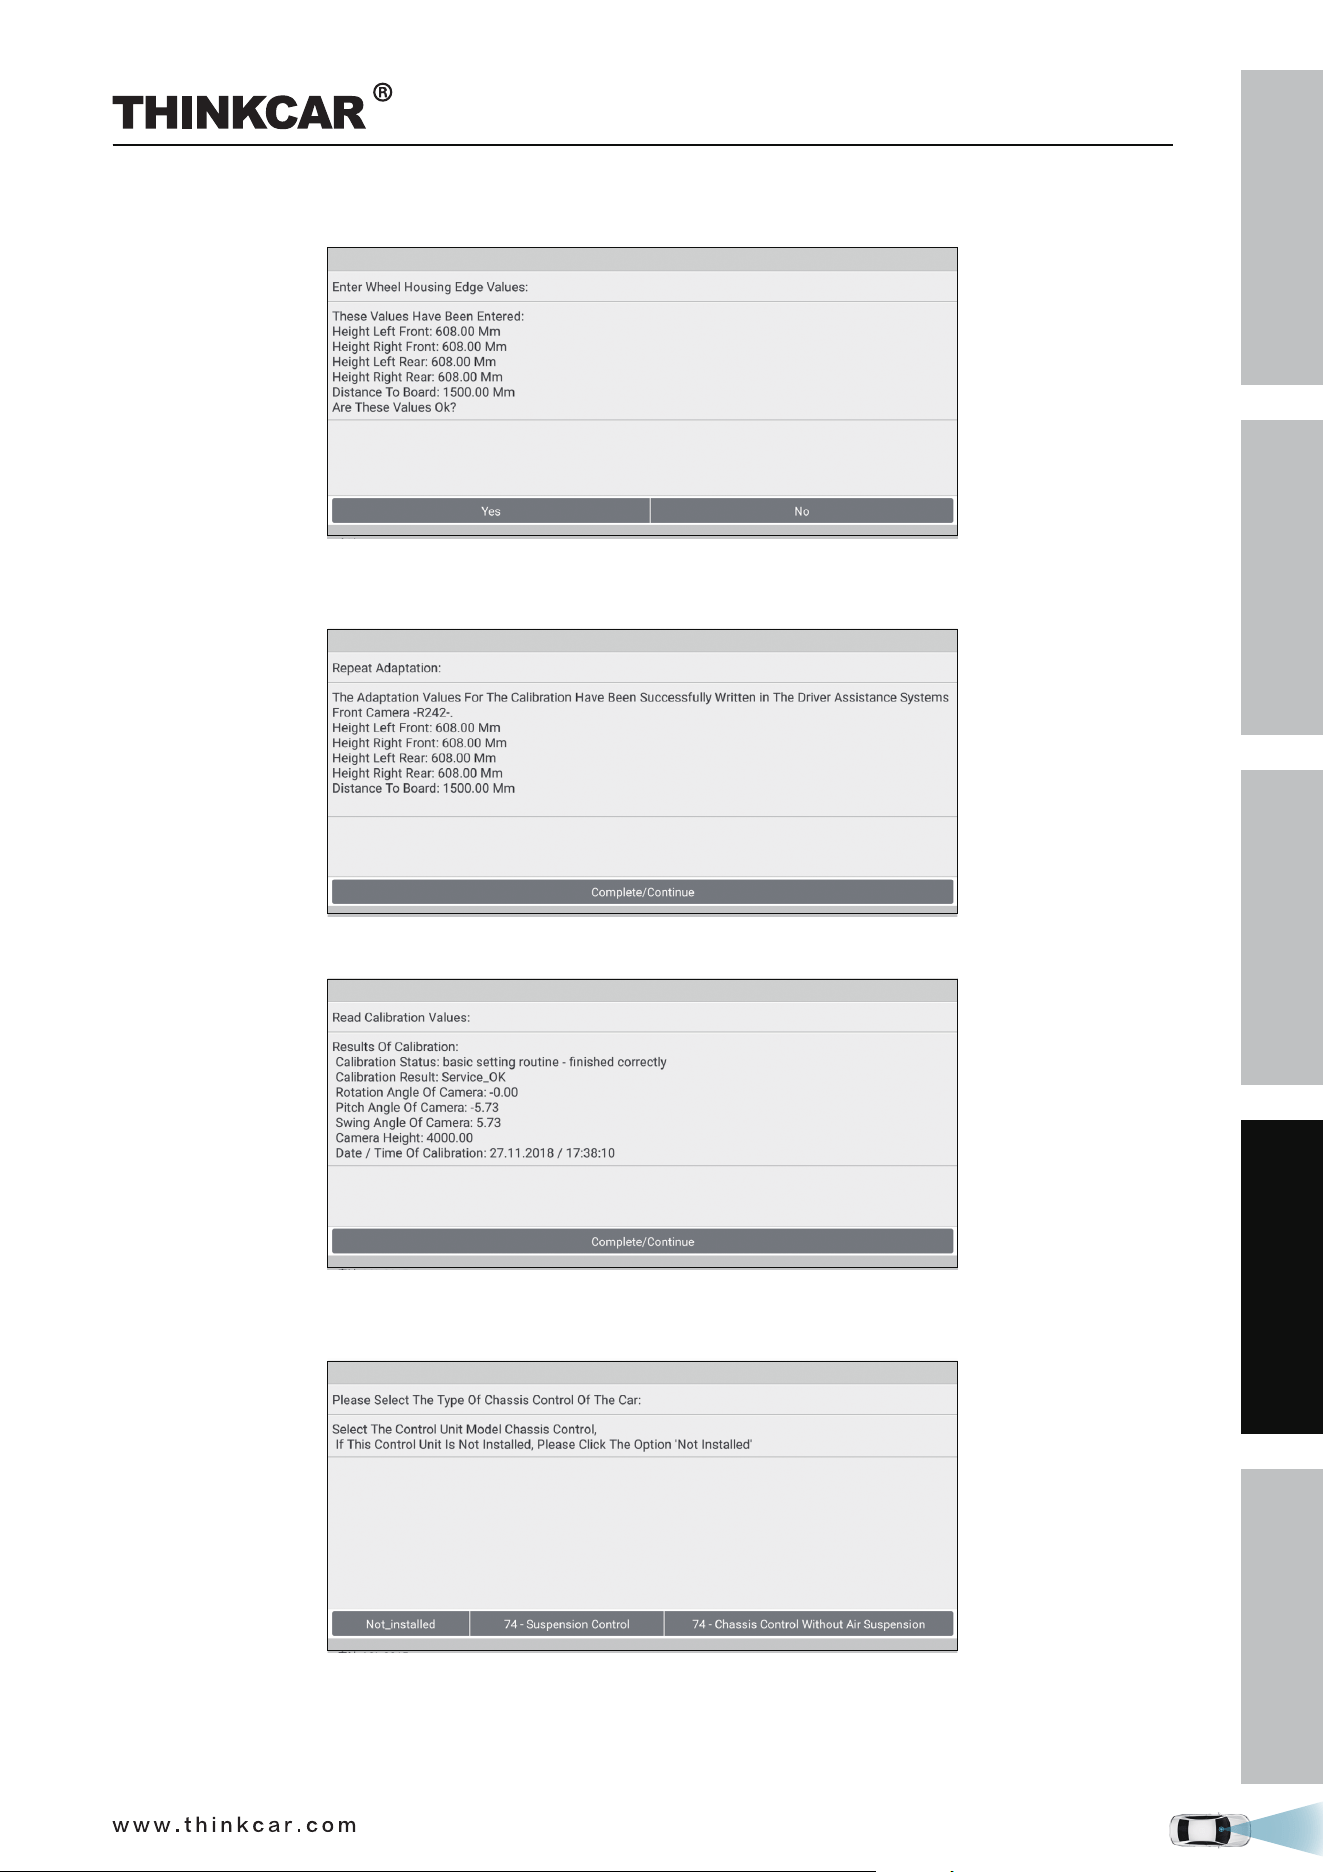
13. Double check whether all values are correct or not. Tap Yes to write the adaption values into the driver
assistance systems.
14. Tap Complete/Continue to set the calibration mode, start calibration and read calibration values.
15. Tap Complete/Continue to inquire the level control system and select the type of chassis control of the
vehicle.
16. Select 74 - Suspension Control to reset the level control system to normal control mode and activate
the level control system of the suspension system.
THINKCAR ADAS Calibration Tool
SAFETY PRECAUTION
INITIAL USE
START CALIBRATION
TARGET PATTERN KIT
PRODUCT PROFILE
44
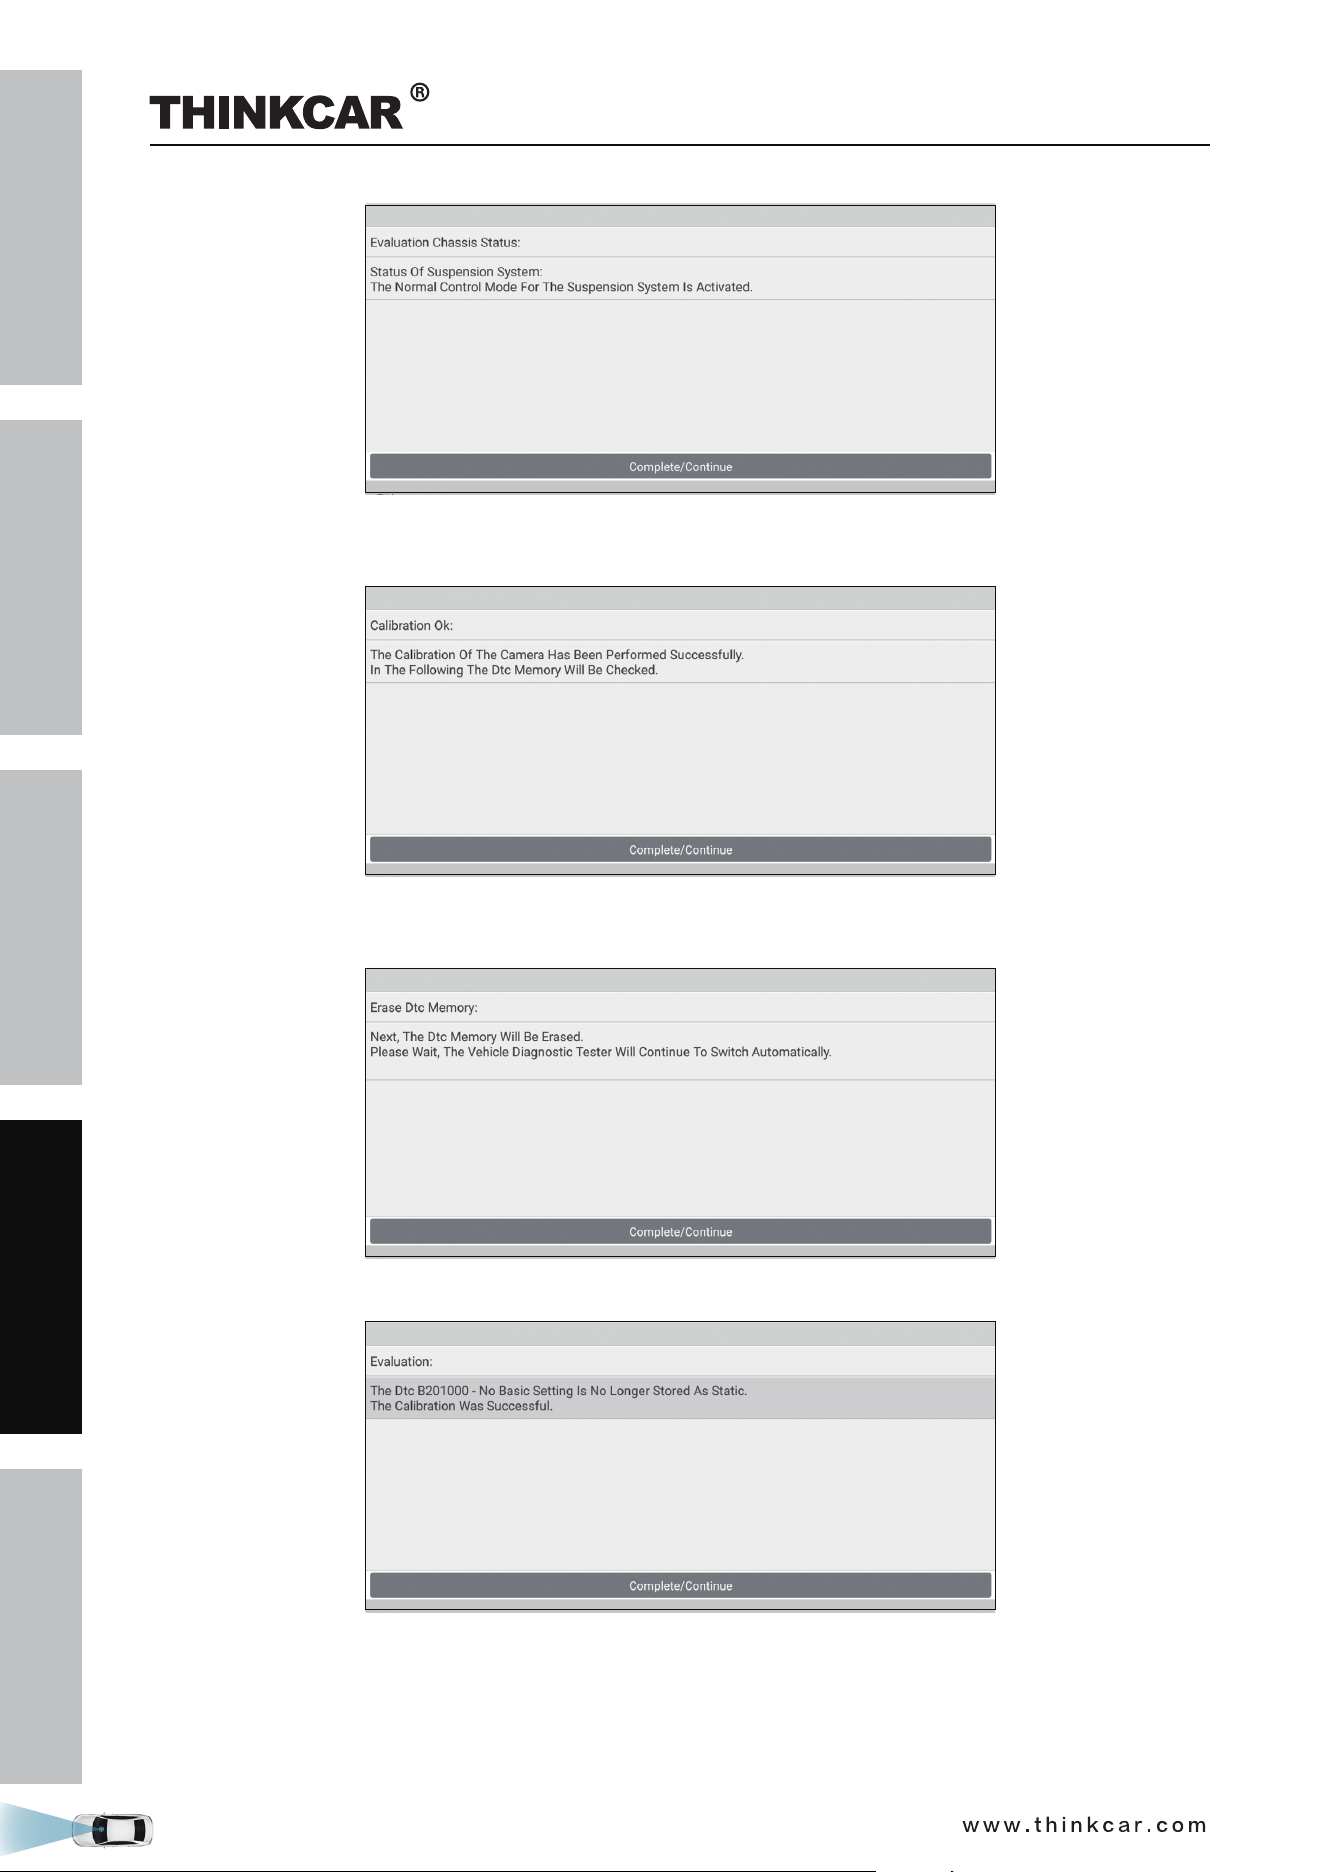
17. Tap Complete/Continue to finish the calibration of front camera. Next the diagnostic tool will clear the
previously existed diagnostic trouble codes.
18. Tap Complete/Continue to wait the diagnostic tool to automatically erase the DTCs related to the
calibration.
19. Tap Complete/Continue to confirm whether the DTCs have been erased or not.
20. Tap Complete/Continue to confirm and end the whole calibration session.
THINKCAR ADAS Calibration Tool

SAFETY PRECAUTION
INITIAL USE
START CALIBRATION
TARGET PATTERN KIT
PRODUCT PROFILE
45
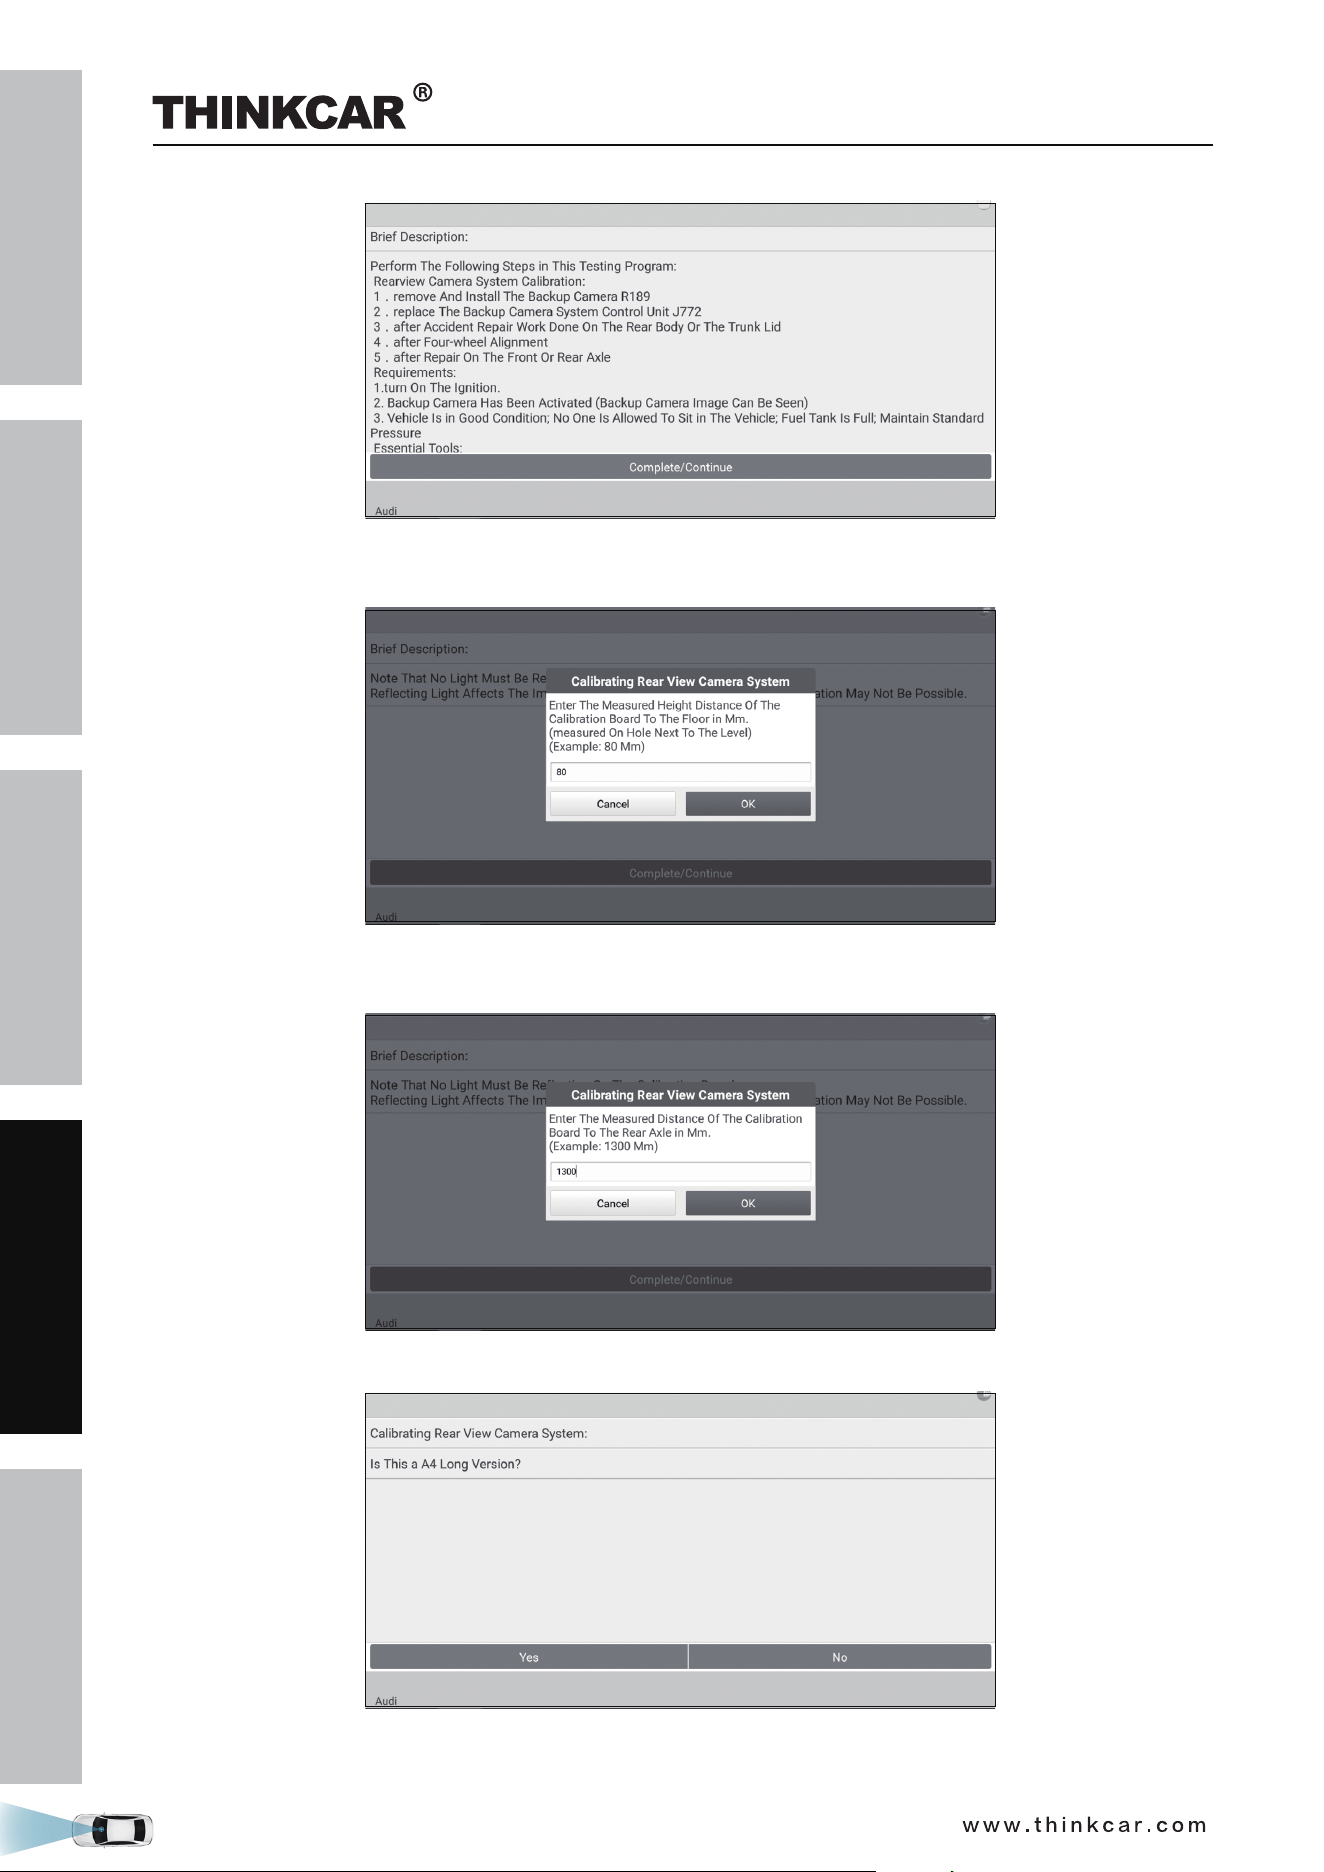
3.2 Calibrating the rear camera
This chapter describes a general operation procedure of rear camera calibration on AUDI A4 USA/Canada
2016 (Model Year 2018).
3.2.1 When to calibrate?
1). The following diagnostic trouble code is found on the vehicle:
B201000 - Rear view system has not been calibrated.
2). The following repairs and replacements are made on the vehicle:
The backup camera R189 has been removed and installed.
The backup camera system control unit J772 has been replaced.
After the accident repair has been done on the rear body or the trunk lid.
After four-wheel alignment.
After repair work has been made on the front or rear axle.
THINKCAR ADAS Calibration Tool
SAFETY PRECAUTION
INITIAL USE
START CALIBRATION
TARGET PATTERN KIT
PRODUCT PROFILE
46
3.2.2 Operation Notes
Make sure the following conditions are met:
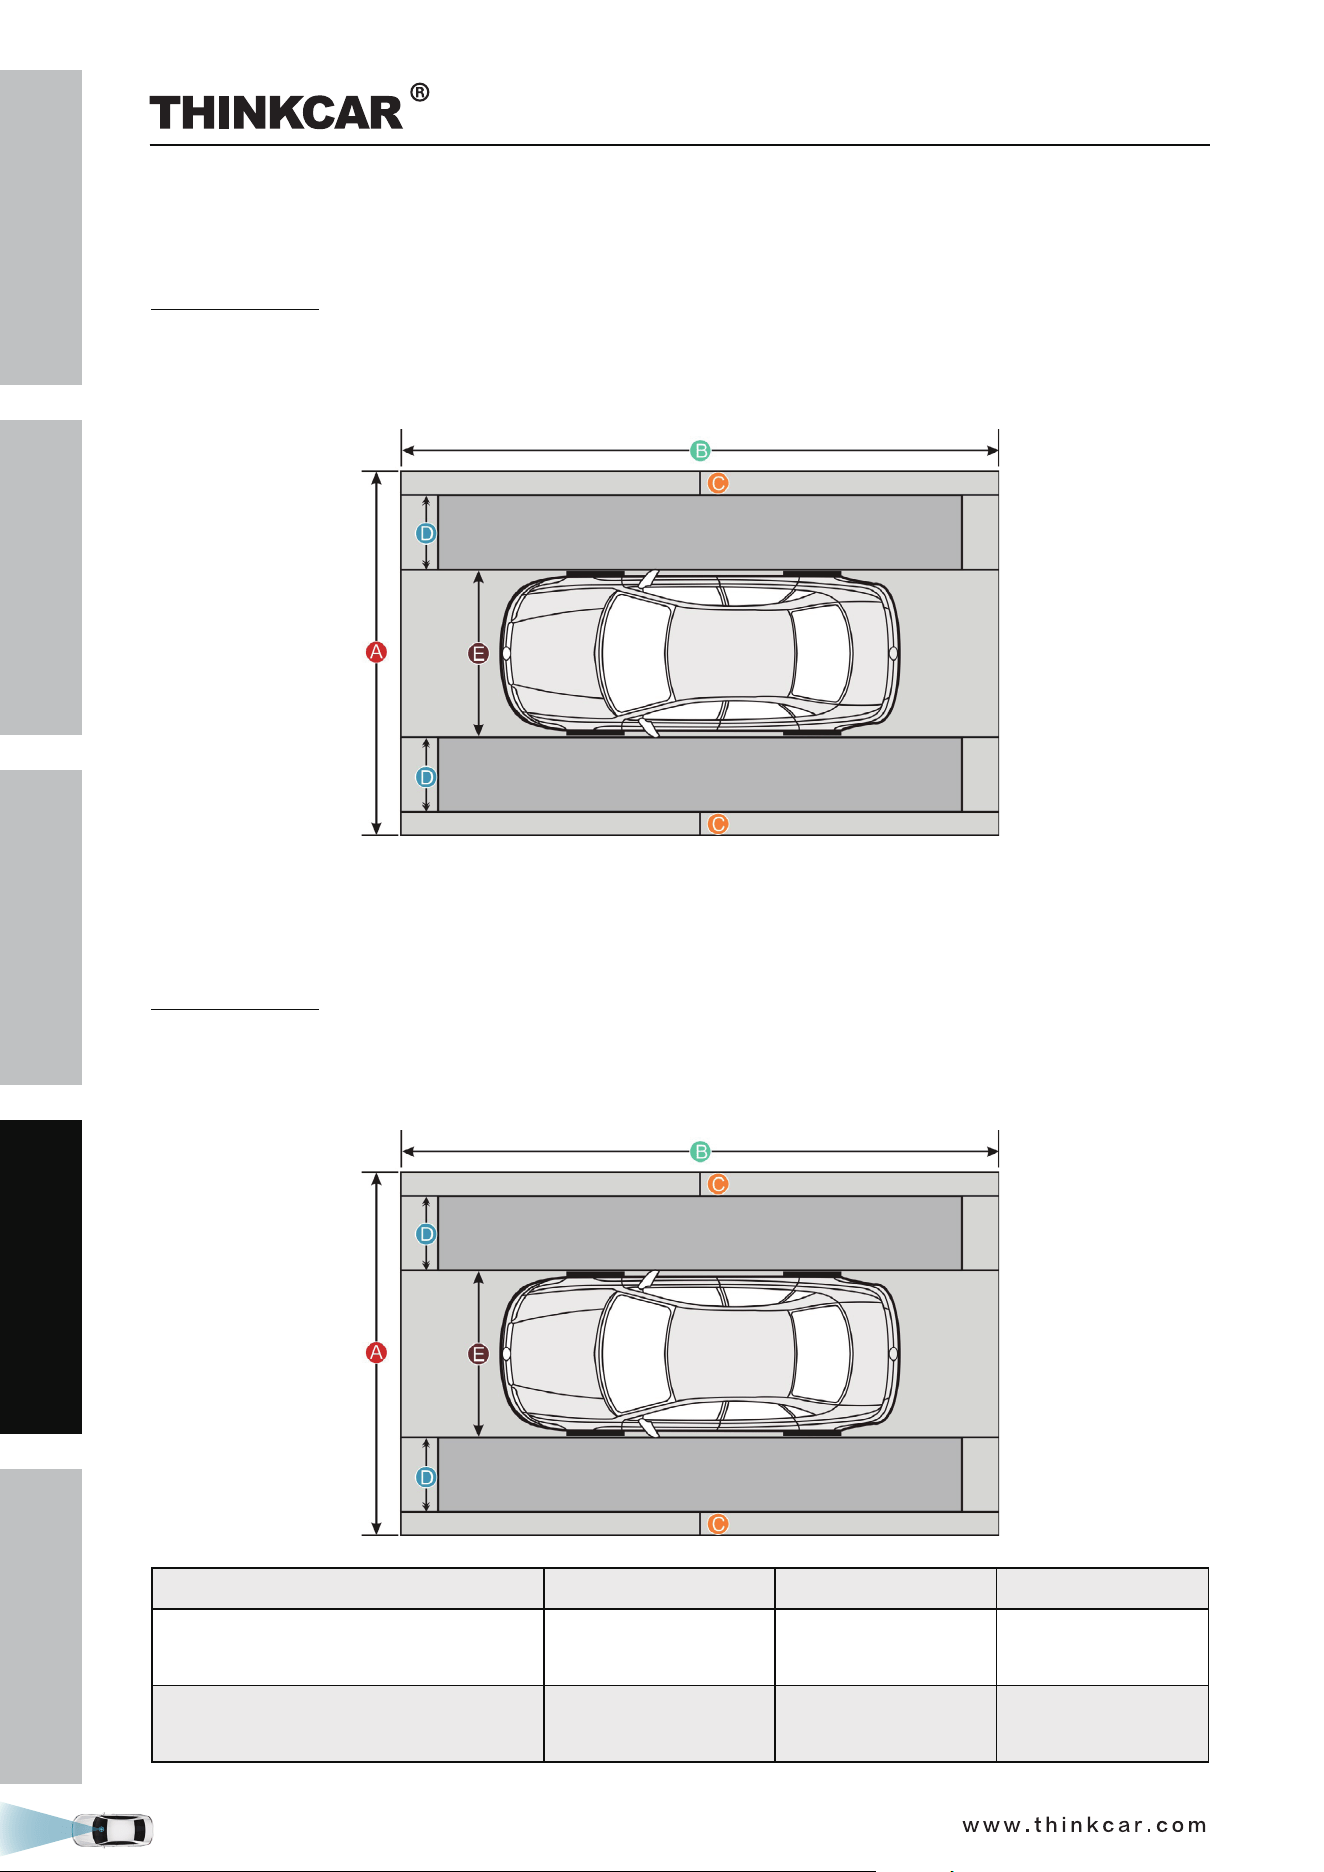
WorkStation Size
For calibrating the rear & AVM camera, the whole workstation size depends on the vehicle size and
the calibration reference pattern. The following illustration describes the maximum workstation size for
reference only.
3.2.2 Operation Notes
Make sure the following conditions are met:
WorkStation Size
For calibrating the rear & AVM camera, the whole workstation size depends on the vehicle size and
the calibration reference pattern. The following illustration describes the maximum workstation size for
reference only.
American vehicles European vehicles Asian vehicles
Distance A
(the width of the whole workstation)
about 7.3m
(287.4inch)
about 4.5m
(117.2inch)
about 6.1m
(240inch)
Distance B
(the width of the whole workstation)
about 12m (472inch)
about 7m
(275.6inch)
about 9.5m
(374inch)
THINKCAR ADAS Calibration Tool

SAFETY PRECAUTION
INITIAL USE
START CALIBRATION
TARGET PATTERN KIT
PRODUCT PROFILE
47
Distance C
(a lane for technician to walk through)
at least 0.5m
(19.7inch)
at least 0.5m
(19.7inch)
at least 0.5m
(19.7inch)
Distance D
(the width of the calibration reference
pattern. It varies from vehicle to
vehicle)
about 1.7m (67inch)
about 0.8m
(31.5inch)
about 1.6m (63inch)
Distance E
(the width of the vehicle, varies from
vehicle to vehicle)
about 2.9m (114inch)
about 1.9m
(74.8inch)
about 1.9m
(74.8inch)
On vehicle & diagnostic tool
• Use the AUDI diagnostic software version 28.50 or above to perform the calibration.
• Make sure that there should be no direct light reflecting on the calibration pattern. Reflecting light affects
the image recognition of the camera and calibration failure becomes possible.
• Make sure that the VCI device has been plugged into the vehicle’s DLC.
• Turn on the ignition.
• The backup camera has been activated (Backup camera image can be seen).
• The vehicle is in good condition and no one is allowed to sit in the vehicle.
• Fuel tank is full.
• Maintain the standard wheel pressure.
On calibration tool
• Use the LAC02-03 calibration pattern.
LAC02-03
• Ruler or tape measure is necessary.
• Calibration tool setting: The calibration pattern is parallel to the axis of the rear wheel of the vehicle and is
centred. The distance from the edge of the LAC02-03 to the center of the rear wheel is 1500 ± 10 mm or
59.055 ± 0.394 inch. For Phaeton, it is 1700±10 mm or 66.929 ± 0.394 inch.
THINKCAR ADAS Calibration Tool
SAFETY PRECAUTION
INITIAL USE
START CALIBRATION
TARGET PATTERN KIT
PRODUCT PROFILE
48
3.2.3 Start calibration
Follow the steps below to proceed:
1. Choose AUDI on the diagnostic software selection screen.
2. Tap OK to enter the following diagnostic menu screen.
3. Choose Guided Functions to enter vehicle model selection screen.
THINKCAR ADAS Calibration Tool
SAFETY PRECAUTION
INITIAL USE
START CALIBRATION
TARGET PATTERN KIT
PRODUCT PROFILE
49
3. Select Audi A4 Usa/Cdn 2016>.
(Select 2018 (J))
(Select Sedan)
THINKCAR ADAS Calibration Tool
SAFETY PRECAUTION
INITIAL USE
START CALIBRATION
TARGET PATTERN KIT
PRODUCT PROFILE
50
(Select Engine - Dfva 2.0l/140kw)
4. Double check your selections and tap Confirm to go to the next step.
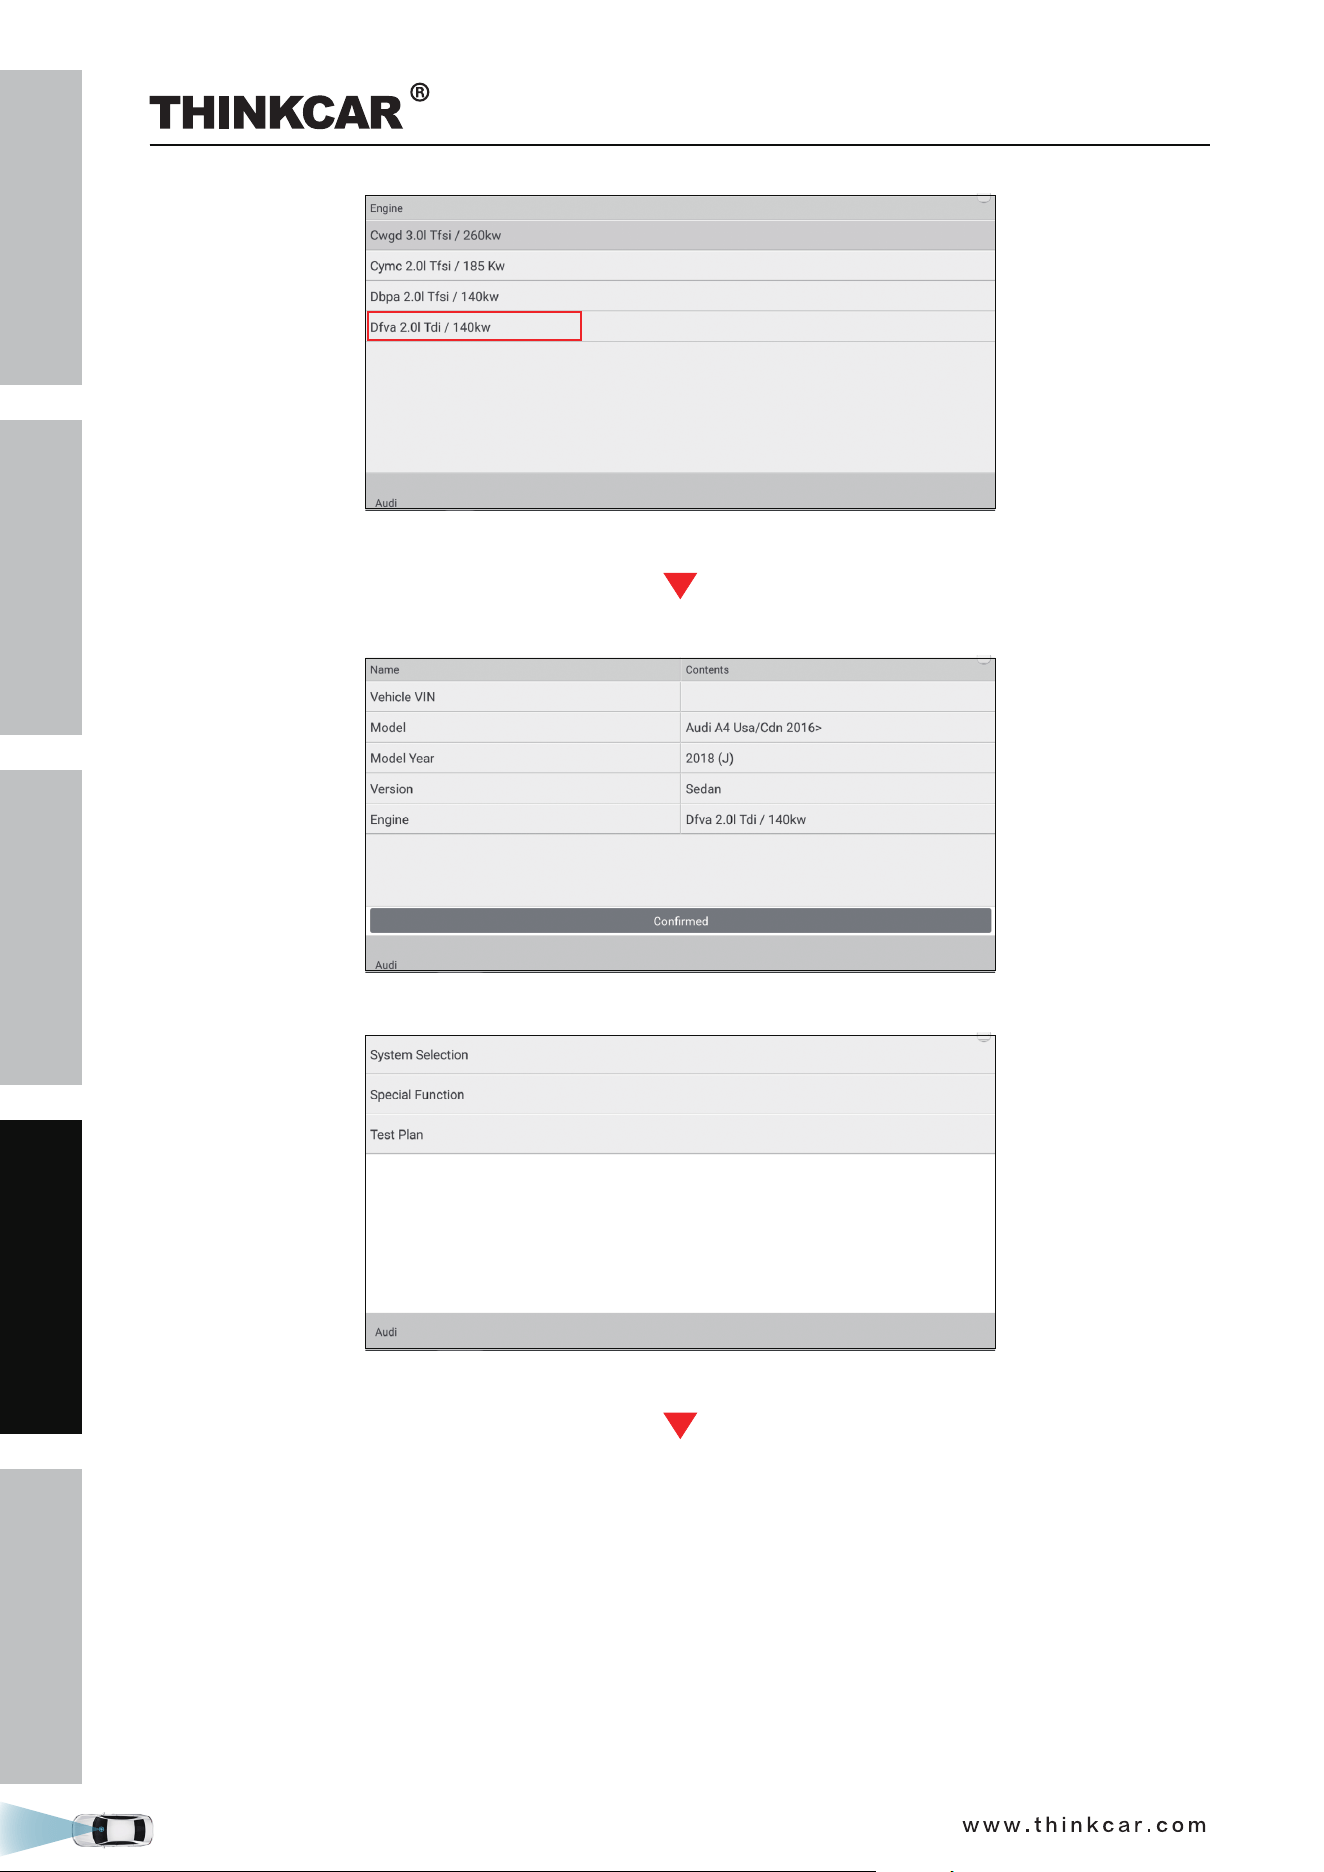
5. Select System Selection from the Guided functions list.
(Select System Selection)
THINKCAR ADAS Calibration Tool
SAFETY PRECAUTION
INITIAL USE
START CALIBRATION
TARGET PATTERN KIT
PRODUCT PROFILE
51
(Select 6C Camera System Rear View)
(Select 6c - Rear View Camera System)
(Select 6c - Calibration)
6. Swipe the screen from the bottom to scroll and carefully read all instructions and notes on calibration
operation. Tap Complete/Continue to continue.
THINKCAR ADAS Calibration Tool
SAFETY PRECAUTION
INITIAL USE
START CALIBRATION
TARGET PATTERN KIT
PRODUCT PROFILE
52
7. Input the measured height distance of the calibration pattern to the floor in millimeter (for example:
80mm), and tap OK to confirm.
8. Input the measured distance of the calibration pattern to the rear axle in millimeter (for example:
1300mm), and tap OK to confirm.
9. Double check whether it is a A4 long version or not. If yes, tap Yes.
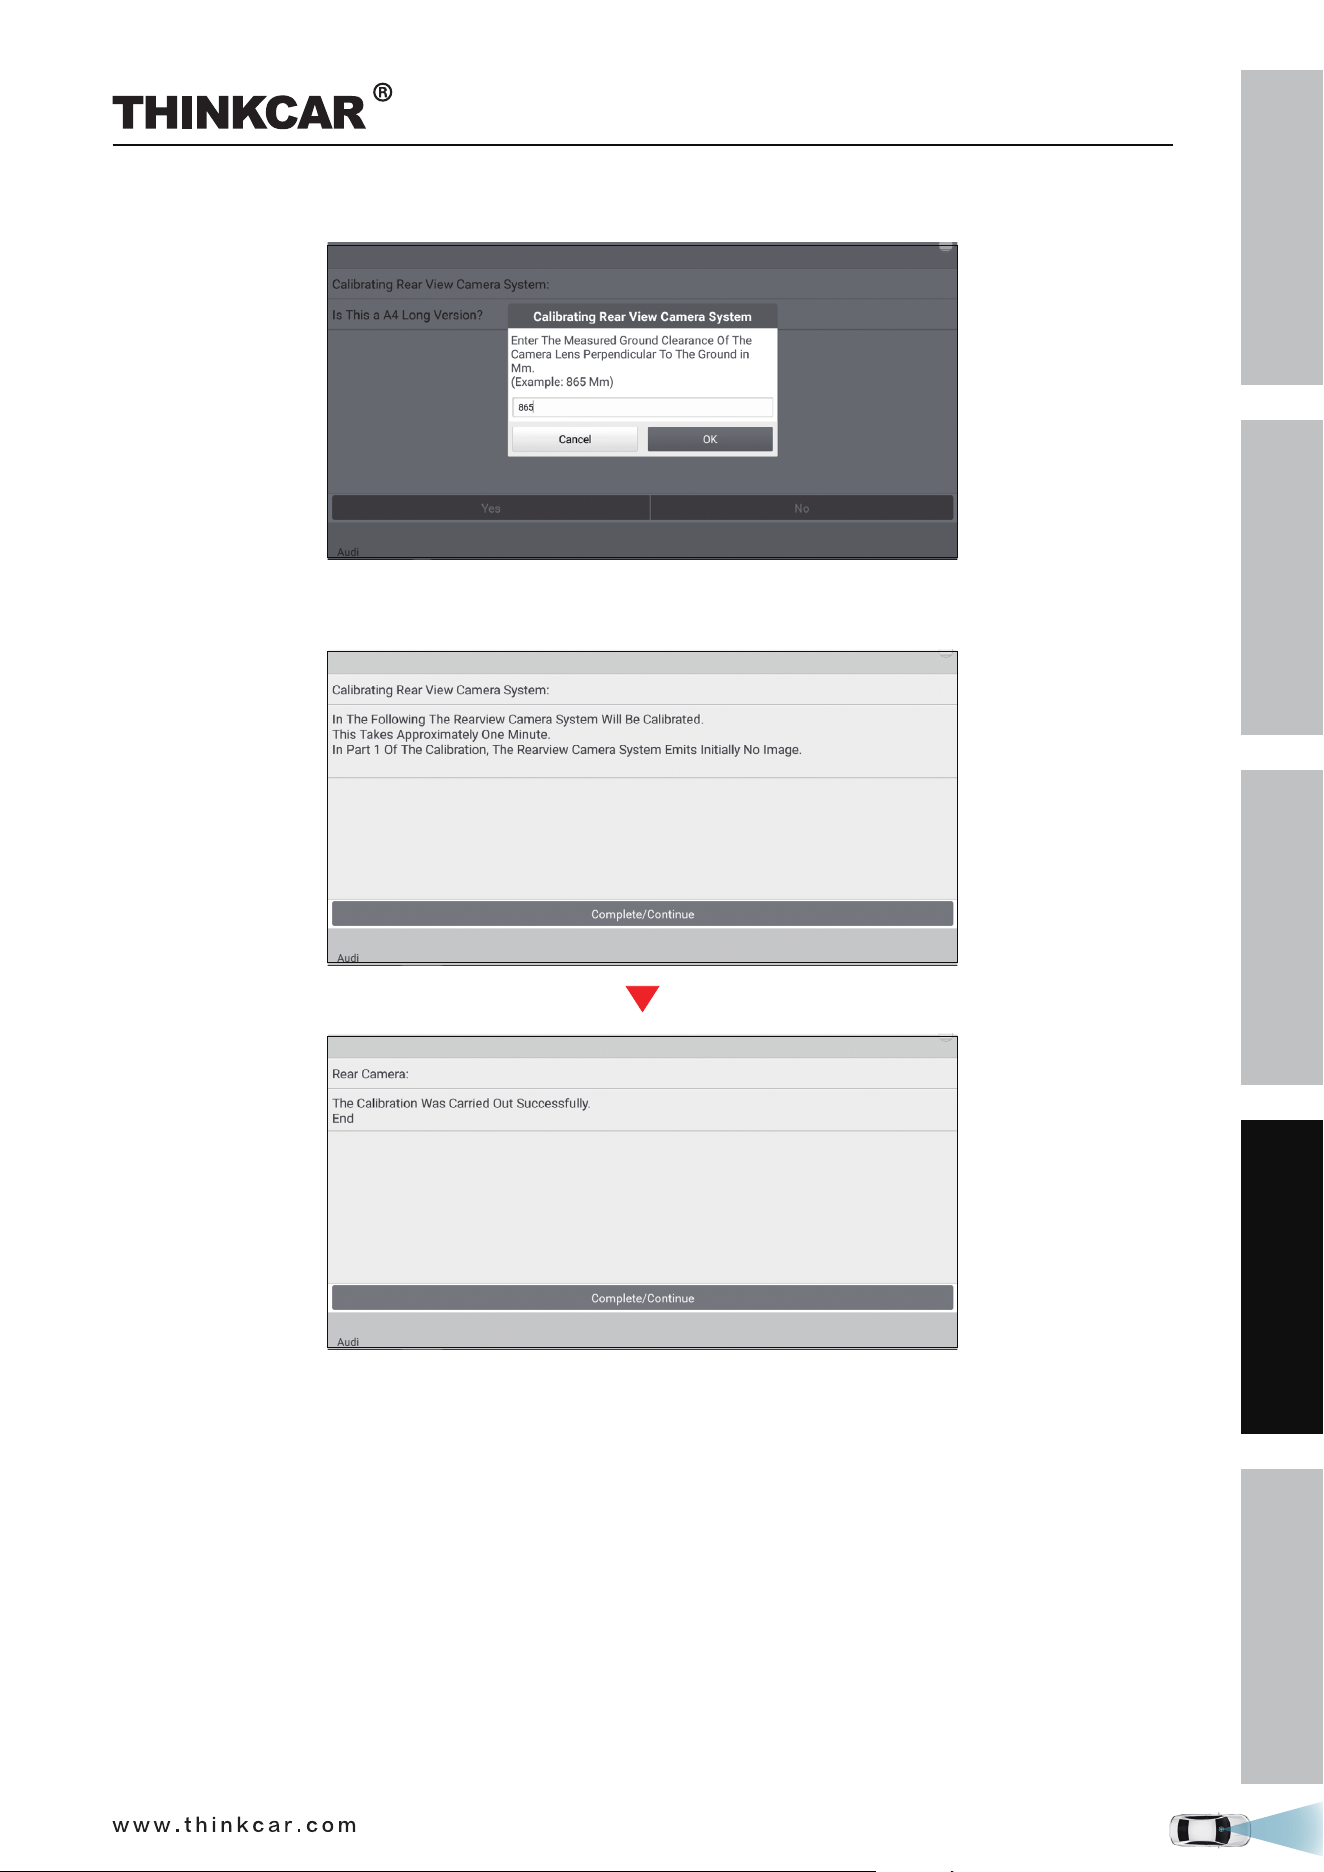
10. Enter the measured ground clearance of the camera lens perpendicular to the ground in millimeter (for
THINKCAR ADAS Calibration Tool
SAFETY PRECAUTION
INITIAL USE
START CALIBRATION
TARGET PATTERN KIT
PRODUCT PROFILE
53
example: 865mm), and tap OK to confirm.
11. The rear view camera system starts calibrating. Follow the on-screen instructions until the calibration is
successfully finished.
THINKCAR ADAS Calibration Tool
SAFETY PRECAUTION
INITIAL USE
START CALIBRATION
TARGET PATTERN KIT
PRODUCT PROFILE
54
4 Target Pattern Kit (Optional)
Due to continuous development, more vehicle manufacturer-specific calibration panels will be individually
available for the THINKCAR ADAS, further extending its coverage.
Please check the packing list upon receiving your tool so that complaints can be issued immediately
regarding potential damage or missing parts. For different destinations, the accessories may vary. Various
calibration panel packages and kits are available individually or as a package to meet different workshop
requirements. For details, please consult from the local dealers or check the included packing list.
1.
RCW&AVM TARGET KIT - AMERICAN
RCW&AVM TARGET KIT - EUROPEAN
HONDA-AVM
(LAC04-01)
(LAC04-02)
NISSAN-AVM
(LAC04-11)
HYUNDAI-AVM
(LAC04-12-01) (LAC04-12-02)
MITSUBISHI AVM
(LAC04-13)
NISSAN RCM
(LAC04-15)
2.
CADILAC-AVM
(LAC04-06)
FORD-AVM
(LAC04-07)
3.
THINKCAR ADAS Calibration Tool
SAFETY PRECAUTION
INITIAL USE
START CALIBRATION
TARGET PATTERN KIT
PRODUCT PROFILE
55
MERCEDES-RC
(LAC02-02)
VW-RC
(LAC02-03)
MERCEDES-RFK
(LAC04-08-01)
(LAC04-08-02)
RENAULT-AVM
(LAC04-10-01) (LAC04-10-02)
VW-AVM
(LAC04-04)
VW-AVM
(LAC04-14)
Romeo-LDW
(LAM01-11)
THINKCAR ADAS Calibration Tool

SAFETY PRECAUTION
INITIAL USE
START CALIBRATION
TARGET PATTERN KIT
PRODUCT PROFILE
56
5 Care & Maintenance
• The calibration tool, spare parts and accessories should be handled with care.
• Keep the calibration tool clean at all times.
• Do not immerse the calibration tool in water or other fluids.
• Maintain the calibration tool in dry conditions and operate within normal operating temperatures.
• Do not store the calibration tool in humid or dirty areas.
• Regularly lubricate moving parts with acid-free and resin-free grease or oil.
• Clean the ADAS calibration tool with non-aggressive cleaning agents on a regular basis.
• Use commercial household cleaning detergents and a moistened, soft cleaning cloth.
• Always use original spare parts to replace damaged accessories immediately.
• Always have the calibration tool serviced by authorized after-sales service center.
THINKCAR ADAS Calibration Tool
