


Symbol Convenons
The symbols that may be found in this document are dened as follows.
Symbol Descripon
Danger
Indicates a hazardous situaon which, if not avoided, will or could
result in death or serious injury.
Cauon
Indicates a potenally hazardous situaon which, if not avoided, could
result in equipment damage, data loss, performance degradaon, or
unexpected results.
Note
Provides addional informaon to emphasize or supplement
important points of the main text.
HikCentral Lite V1.1.1 User Manual
i

Legal Informaon
About this Document
●
This Document includes instrucons for using and managing the Product. Pictures, charts,
images and all other
informaon hereinaer are for descripon and explanaon only.
●
The
informaon contained in the Document is subject to change, without noce, due to
rmware updates or other reasons. Please nd the latest version of the Document at the
Hikvision website ( hps://www.hikvision.com ). Unless otherwise agreed, Hangzhou Hikvision
Digital Technology Co., Ltd. or its aliates (hereinaer referred to as "Hikvision") makes no
warranes, express or implied.
●
Please use the Document with the guidance and assistance of professionals trained in
supporng the Product.
About this Product
This product can only enjoy the aer-sales service support in the country or region where the
purchase is made.
Acknowledgment of Intellectual Property Rights
●
Hikvision owns the copyrights and/or patents related to the technology embodied in the
Products described in this Document, which may include licenses obtained from third pares.
●
Any part of the Document, including text, pictures, graphics, etc., belongs to Hikvision. No part
of this Document may be excerpted, copied, translated, or modied in whole or in part by any
means without
wrien permission.
●
and other Hikvision's trademarks and logos are the properes of Hikvision in
various
jurisdicons.
●
Other trademarks and logos menoned are the properes of their respecve owners.
LEGAL DISCLAIMER
●
TO THE MAXIMUM EXTENT PERMITTED BY APPLICABLE LAW, THIS DOCUMENT AND THE
PRODUCT DESCRIBED, WITH ITS HARDWARE, SOFTWARE AND FIRMWARE, ARE PROVIDED "AS
IS" AND "WITH ALL FAULTS AND ERRORS". HIKVISION MAKES NO WARRANTIES, EXPRESS OR
IMPLIED, INCLUDING WITHOUT LIMITATION, MERCHANTABILITY, SATISFACTORY QUALITY, OR
FITNESS FOR A PARTICULAR PURPOSE. THE USE OF THE PRODUCT BY YOU IS AT YOUR OWN RISK.
IN NO EVENT WILL HIKVISION BE LIABLE TO YOU FOR ANY SPECIAL, CONSEQUENTIAL,
INCIDENTAL, OR INDIRECT DAMAGES, INCLUDING, AMONG OTHERS, DAMAGES FOR LOSS OF
BUSINESS PROFITS, BUSINESS INTERRUPTION, OR LOSS OF DATA, CORRUPTION OF SYSTEMS, OR
LOSS OF DOCUMENTATION, WHETHER BASED ON BREACH OF CONTRACT, TORT (INCLUDING
NEGLIGENCE), PRODUCT LIABILITY, OR OTHERWISE, IN CONNECTION WITH THE USE OF THE
HikCentral Lite V1.1.1 User Manual
ii

PRODUCT, EVEN IF HIKVISION HAS BEEN ADVISED OF THE POSSIBILITY OF SUCH DAMAGES OR
LOSS.
●
YOU ACKNOWLEDGE THAT THE NATURE OF THE INTERNET PROVIDES FOR INHERENT SECURITY
RISKS, AND HIKVISION SHALL NOT TAKE ANY RESPONSIBILITIES FOR ABNORMAL OPERATION,
PRIVACY LEAKAGE OR OTHER DAMAGES RESULTING FROM CYBER-ATTACK, HACKER ATTACK,
VIRUS INFECTION, OR OTHER INTERNET SECURITY RISKS; HOWEVER, HIKVISION WILL PROVIDE
TIMELY TECHNICAL SUPPORT IF REQUIRED.
●
YOU AGREE TO USE THIS PRODUCT IN COMPLIANCE WITH ALL APPLICABLE LAWS, AND YOU ARE
SOLELY RESPONSIBLE FOR ENSURING THAT YOUR USE CONFORMS TO THE APPLICABLE LAW.
ESPECIALLY, YOU ARE RESPONSIBLE, FOR USING THIS PRODUCT IN A MANNER THAT DOES NOT
INFRINGE ON THE RIGHTS OF THIRD PARTIES, INCLUDING WITHOUT LIMITATION, RIGHTS OF
PUBLICITY, INTELLECTUAL PROPERTY RIGHTS, OR DATA PROTECTION AND OTHER PRIVACY
RIGHTS. YOU SHALL NOT USE THIS PRODUCT FOR ANY PROHIBITED END-USES, INCLUDING THE
DEVELOPMENT OR PRODUCTION OF WEAPONS OF MASS DESTRUCTION, THE DEVELOPMENT OR
PRODUCTION OF CHEMICAL OR BIOLOGICAL WEAPONS, ANY ACTIVITIES IN THE CONTEXT
RELATED TO ANY NUCLEAR EXPLOSIVE OR UNSAFE NUCLEAR FUEL-CYCLE, OR IN SUPPORT OF
HUMAN RIGHTS ABUSES.
●
IN THE EVENT OF ANY CONFLICTS BETWEEN THIS DOCUMENT AND THE APPLICABLE LAW, THE
LATTER PREVAILS.
© Hangzhou Hikvision Digital Technology Co., Ltd. All rights reserved.
HikCentral Lite V1.1.1 User Manual
iii

Contents
Chapter 1 Learn About HikCentral Lite ........................................................................................ 1
1.1 Recommended Running Environment ................................................................................... 2
1.2 Comparison Between Free and Full Version .......................................................................... 3
1.3 System Conguraons and Performance ............................................................................. 10
1.3.1 Detailed Performance ................................................................................................. 11
1.4 Decoding Performance of Desktop ...................................................................................... 13
1.4.1 Detailed Performance ................................................................................................. 14
1.5 Document Guide .................................................................................................................. 15
Chapter 2 Get Started ............................................................................................................... 16
2.1
Congure the System Capability .......................................................................................... 16
2.2 Acvate License ................................................................................................................... 17
2.2.1
Acvate the License Online ......................................................................................... 17
2.2.2 Acvate the License Oine ........................................................................................ 18
2.3 Add Devices ......................................................................................................................... 19
2.4 Add a Server and View Server Details .................................................................................. 22
2.5
Congure User Preference ................................................................................................... 23
Chapter 3 Video Monitoring ..................................................................................................... 28
3.1
Preparaons ......................................................................................................................... 28
3.1.1 Add Encoding Devices ................................................................................................. 28
3.1.2 View and Congure Details of Encoding Devices ........................................................ 29
3.1.3 Add an Alarm for an Encoding Device ......................................................................... 32
3.2 Basic
Funcons Related to Video Monitoring ...................................................................... 32
3.2.1 Start Live View / Playback of Camera .......................................................................... 32
3.2.2 PTZ Control During Live View ...................................................................................... 37
3.2.3 Monitor via Cameras on the Map ............................................................................... 38
3.3 Face Picture Comparison and Human Body
Detecon ........................................................ 41
HikCentral Lite V1.1.1 User Manual
iv

3.3.1 Add Face Picture Libraries and Face Pictures .............................................................. 42
3.3.2 View Videos Related to Face and Human Body Recognion ....................................... 43
3.3.3 Search for Recognized Face Pictures and Human Body Pictures ................................. 44
3.3.4 Search Targets by a Picture ......................................................................................... 45
3.4 Vehicle Monitoring ............................................................................................................... 46
3.4.1 Add Vehicle Lists and Vehicles .................................................................................... 46
3.4.2 View Video Related to Vehicle Monitoring ................................................................. 47
3.4.3 Search and Export ANPR Events .................................................................................. 48
3.5 Smart Search / VCA .............................................................................................................. 49
3.5.1
Compable NVR Series for Smart Search .................................................................... 50
3.5.2 Conguraon for NVR and Network Camera .............................................................. 50
3.6 AcuSearch / Object Search ................................................................................................... 53
3.7 AcuSeek ............................................................................................................................... 58
3.8 Generate and View People Counng Report ....................................................................... 61
3.9 (Oponal) Local Conguraons Related to Video Monitoring ............................................. 64
Chapter 4 Access Control and Video Intercom ........................................................................... 65
4.1
Preparaons ......................................................................................................................... 66
4.1.1 Add Devices ................................................................................................................. 66
4.1.2 View Details of a Device .............................................................................................. 67
4.1.3 View Details of a Door ................................................................................................ 68
4.2 Add Departments and Persons ............................................................................................ 69
4.2.1
Congure Credenal-Related Parameters ................................................................... 72
4.2.2 Protect
Prole Pictures ............................................................................................... 72
4.3 Add and Assign Access Levels .............................................................................................. 74
4.4 Add an Alarm ....................................................................................................................... 77
4.5 Real-Time Monitoring of Doors ........................................................................................... 79
4.5.1 Monitor Doors and Control Door Status ..................................................................... 80
4.5.2 Display and Control Doors on the Map ....................................................................... 81
HikCentral Lite V1.1.1 User Manual
v

4.6 Video Intercom .................................................................................................................... 84
4.7 Import Person Authencaon Events from Devices to the Client ....................................... 85
4.8 Search for Access Events ...................................................................................................... 87
4.9 Display
Stascs of Person&Credenals, Access Levels, and Access Events ....................... 89
Chapter 5 Storage ..................................................................................................................... 92
5.1 Preparaons ......................................................................................................................... 93
5.2 Congure Storage Locaon and Storage Space ................................................................... 93
5.3 Congure Storage Schedule ................................................................................................. 94
5.4 Playback & VCA Search ........................................................................................................ 96
5.5 Specify Data Retenon Time ................................................................................................ 97
5.6 Advanced Conguraons ..................................................................................................... 97
5.6.1 System Storage NIC ..................................................................................................... 97
5.6.2 Rebuild Index .............................................................................................................. 98
5.6.3 Maintenance ............................................................................................................... 98
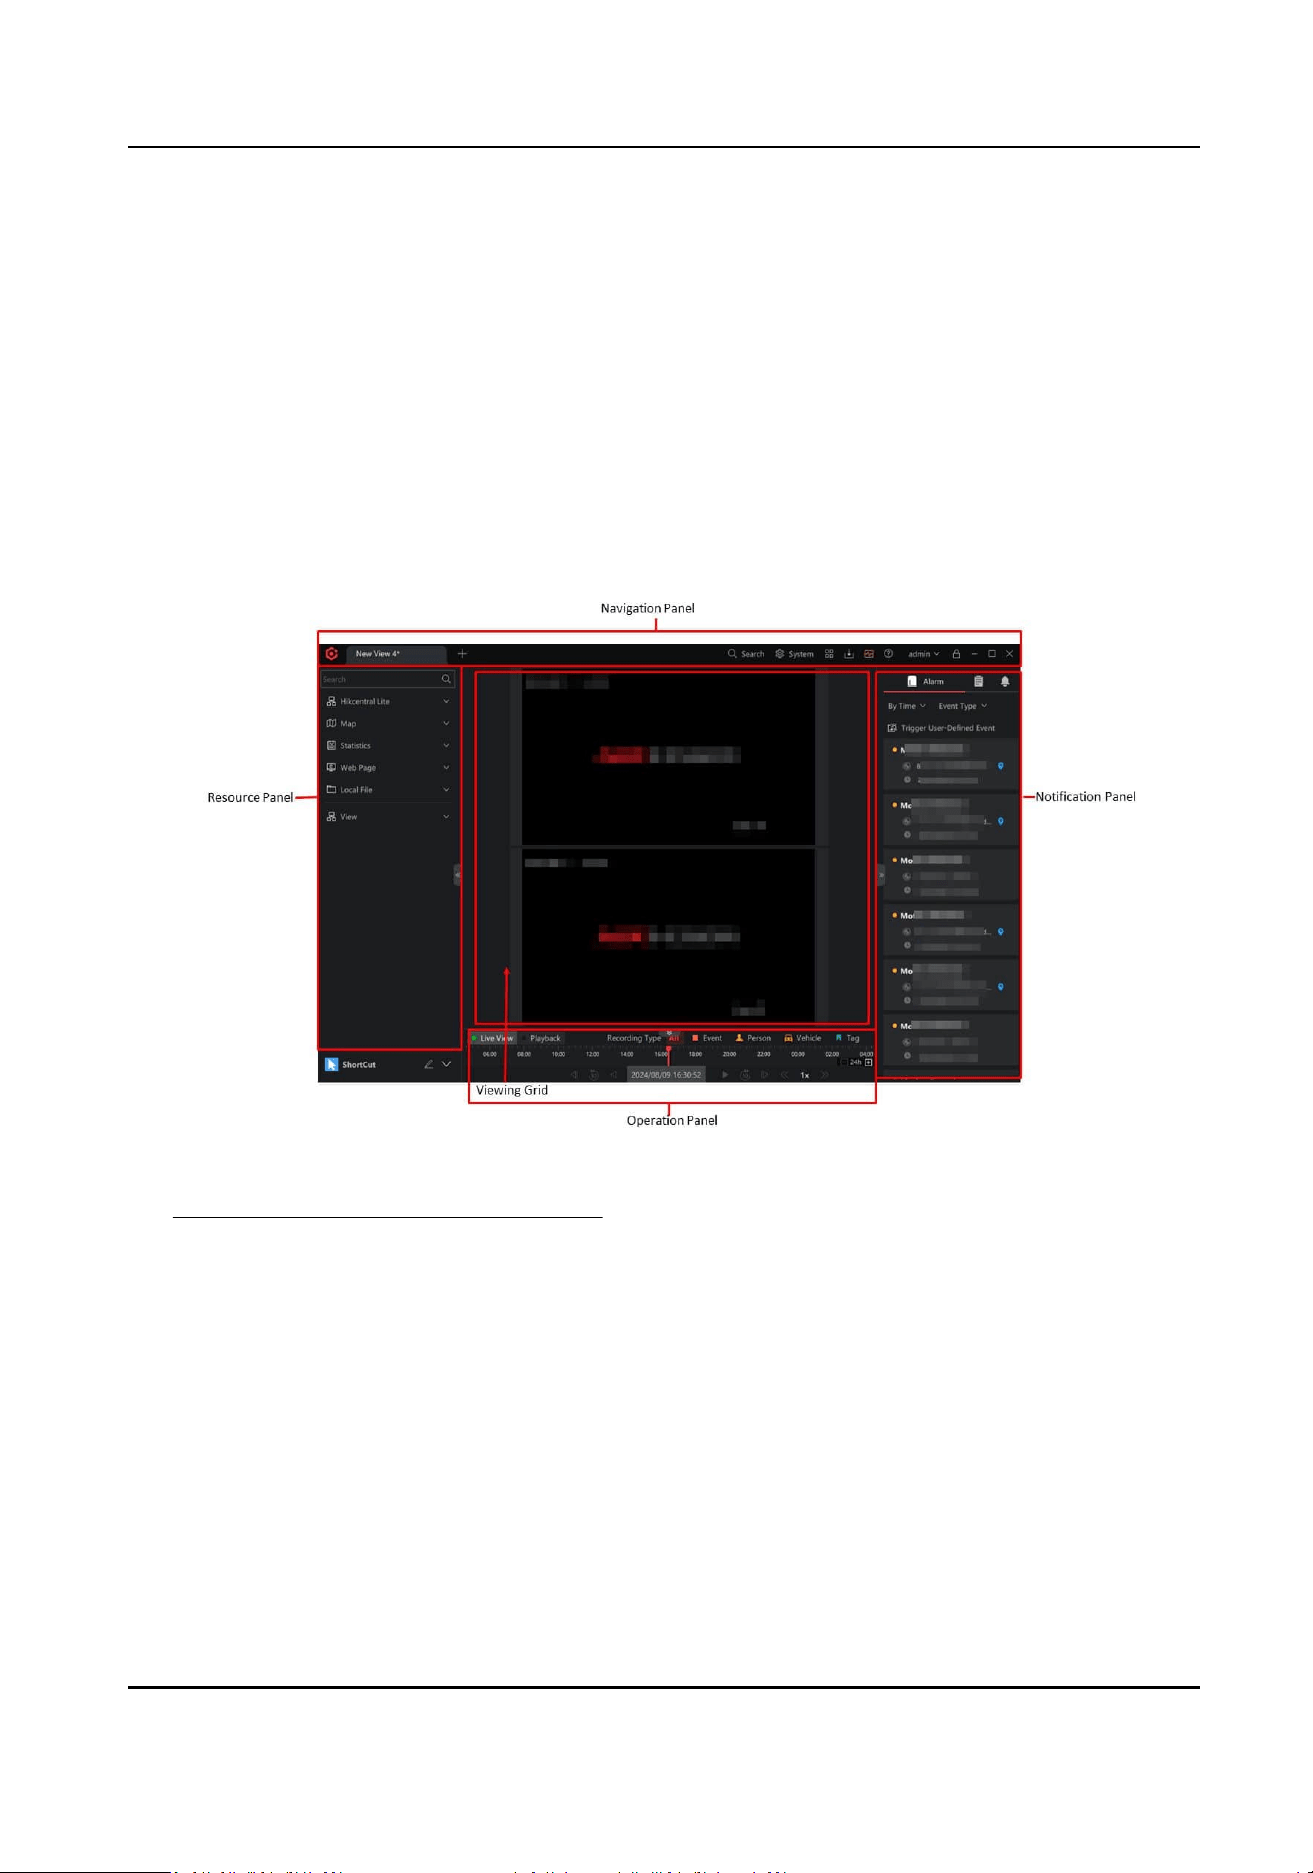
Chapter 6 Main Panel for Monitoring and Control ................................................................... 100
Chapter 7 Search .................................................................................................................... 102
7.1 Search for Detected Vehicles or Persons by Cameras/Doors ............................................. 103
7.2 Search for Detected Persons or Vehicles in VCA Areas ...................................................... 106
7.3 Search for Detected Persons/Vehicles by Features ............................................................ 106
Chapter 8 Event and Alarm ..................................................................................................... 108
8.1 Supported Triggering Events .............................................................................................. 108
8.2 Event
Subscripon ............................................................................................................. 119
8.3 Add an Alarm ..................................................................................................................... 120
8.4 Supported Linkage
Acons ................................................................................................ 121
8.5 Alarm List ........................................................................................................................... 122
8.6 Search for and Export Alarms ............................................................................................ 123
8.7 Local
Conguraon About Event and Alarm ...................................................................... 123
Chapter 9 Management of Users and Roles ............................................................................. 124
HikCentral Lite V1.1.1 User Manual
vi

9.1 Add a User ......................................................................................................................... 124
9.2 Supported Operaons on the User List .............................................................................. 125
9.3 Add a Role .......................................................................................................................... 125
9.4
Congure Account Security Rules ...................................................................................... 128
9.5 Reset Login Password ......................................................................................................... 129
Chapter 10 System Conguraon ............................................................................................ 130
10.1 Congure Email Parameters ............................................................................................. 130
10.2 Add or Edit a Holiday ....................................................................................................... 130
10.3 Congure NTP Synchronizaon / Device Access Protocol / WAN Access / NIC, and Reset
Network Info ............................................................................................................................ 131
10.4 Use SSL/TLS
Cercate for HTTPS Connecons ............................................................... 134
10.5 Congure Service Component Cercate ........................................................................ 137
Chapter 11 Maintenance ........................................................................................................ 138
11.1 Generate and Display Maintenance Report ..................................................................... 138
11.2 Search for
Nocaons ................................................................................................... 143
11.3 Search for System Logs .................................................................................................... 143
Appendix A. Other System
Conguraons and Performance ................................................... 146
Appendix B. Product Usage Restricons: Scenarios & Guidelines ............................................ 147
Appendix C. Past User Manuals .............................................................................................. 150
HikCentral Lite V1.1.1 User Manual
vii
Chapter 1 Learn About HikCentral Lite
The HikCentral Lite is a Video Management Soware product which requires limited system
resources providing an enhanced user experience. It integrates
conguraon and applicaon
funcons relang to monitoring of video, access control and video intercoms.
The system has a simple and clear interacve design and guidance that allows users to quickly get
started. It supports quickly
imporng the conguraon le downloaded from the iVMS-4200. The
product is compable with third-party devices.
The Mobile Client is provided with features of live view, playback, alarm checking, etc.
Figure 1-1 Main Page
See Main Panel for Monitoring and Control for details about the main page.
HikCentral Lite V1.1.1 User Manual
1
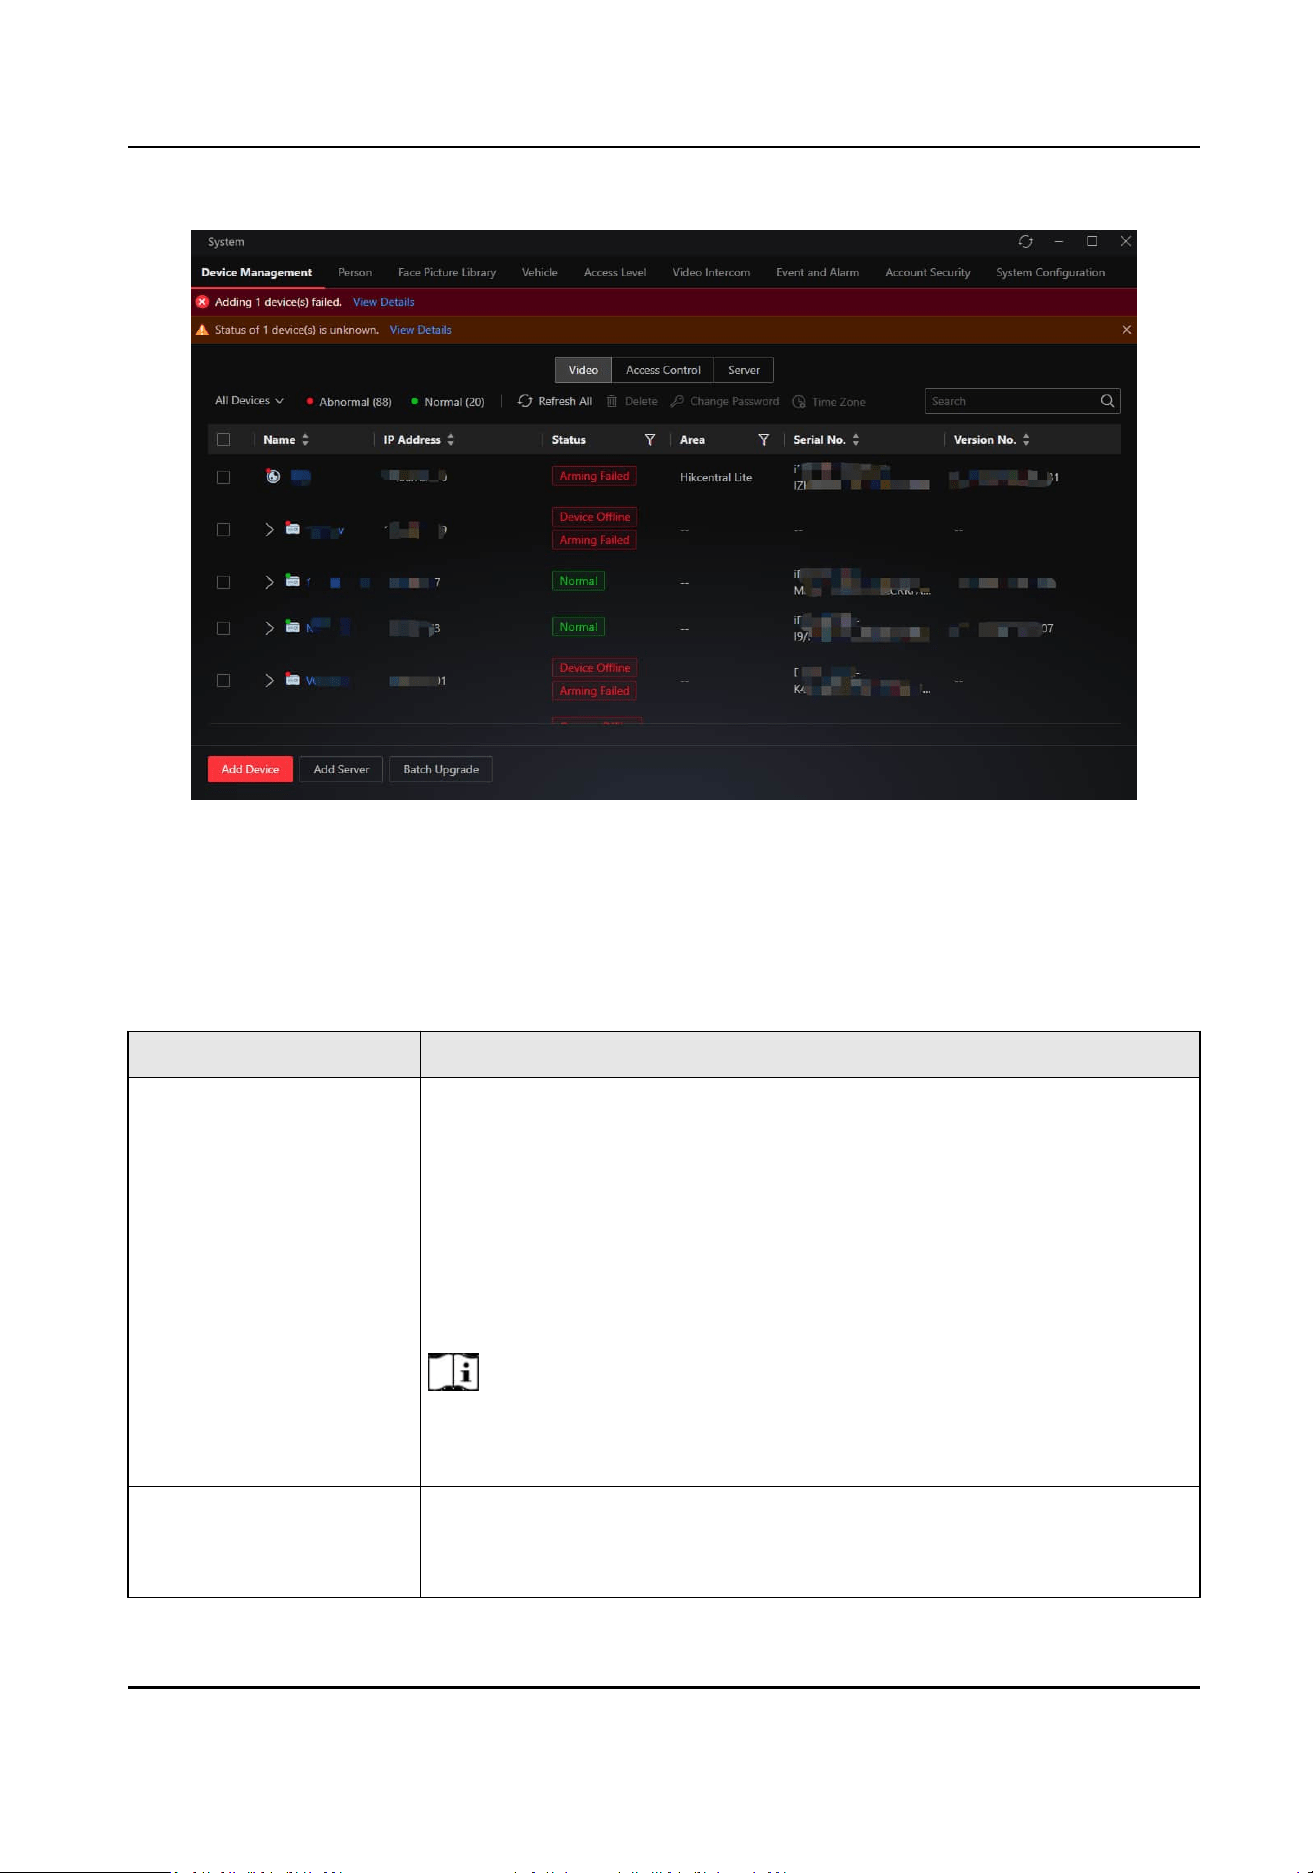
Figure 1-2 System Window
1.1 Recommended Running Environment
Table 1-1 Recommended Running Environment
Plaorm OS
Server
●
Microso® Windows 11 64-bit
●
Microso® Windows 10 64-bit
●
Microso® Windows Server 2019 64-bit
●
Microso® Windows Server 2016 64-bit
●
Microso® Windows Server 2012 R2 64-bit
●
Microso® Windows Server 2012 64-bit
●
Microso® Windows Server 2022
●
Microso® Windows Server 2025
Note
For Windows Server 2012 R2, make sure it is installed with the rollup
(KB2919355) updated in April, 2014.
Desktop
●
Microso® Windows 11 64-bit
●
Microso® Windows 10 64-bit
●
Microso® Windows Server 2019 64-bit
HikCentral Lite V1.1.1 User Manual
2

Plaorm OS
●
Microso® Windows Server 2016 64-bit
●
Microso® Windows Server 2012 R2 64-bit
●
Microso® Windows Server 2012 64-bit
●
Microso® Windows Server 2022
Note
For Windows Server 2012 R2, make sure it is installed with the rollup
(KB2919355) updated in April, 2014.
Mobile Client
●
iOS 12.0+
●
Android 15.0+
1.2 Comparison Between Free and Full Version
This topic shows the dierences of HikCentral Lite maximum performance and core features of the
full version.
Maximum Performance
Table 1-2 Manageable Resources
Performance Full Version Free Version
Total Camera Channels 128
*Includes numbers of AcuSearch
cameras, AcuSeek cameras, ANPR
cameras, people
counng cameras,
cameras for face picture comparison
& body recognion, and third-party
cameras
16
People Counng Cameras 128 0
AcuSearch Cameras 128 0
AcuSeek Cameras 128 0
ANPR Cameras 8 0
Cameras for Face Picture
Comparison and Body
Recognion
16 0
Third-Party Cameras 128 0
HikCentral Lite V1.1.1 User Manual
3

Performance Full Version Free Version
Doors 32 2
External Streaming Servers 64 64
Table 1-3 Others
Performance Full Version Free Version
Vehicles 2,000 0
Table 1-4 Access Control
Performance Full Version Free Version
Persons 500 500
Credenals Cards: 1,000
Face Pictures: 500
Fingerprints: 1,000
Irises: 1,000
Cards: 1,000
Face Pictures: 500
Fingerprints: 1,000
Irises: 1,000
Table 1-5 Users
Performance Full Version Free Version
Users 128 128
Roles 64 64
Users Logged In Simultaneously
via Desktop
64 3
Users Logged In Simultaneously
via Mobile Client
64 3
Core Features
The following features are available only in the full version.
AcuSearch / Object Search
HikCentral Lite V1.1.1 User Manual
4

Figure 1-3 AcuSearch / Object Search
AcuSeek
Figure 1-4 AcuSeek Entry
People Counng Report
HikCentral Lite V1.1.1 User Manual
5
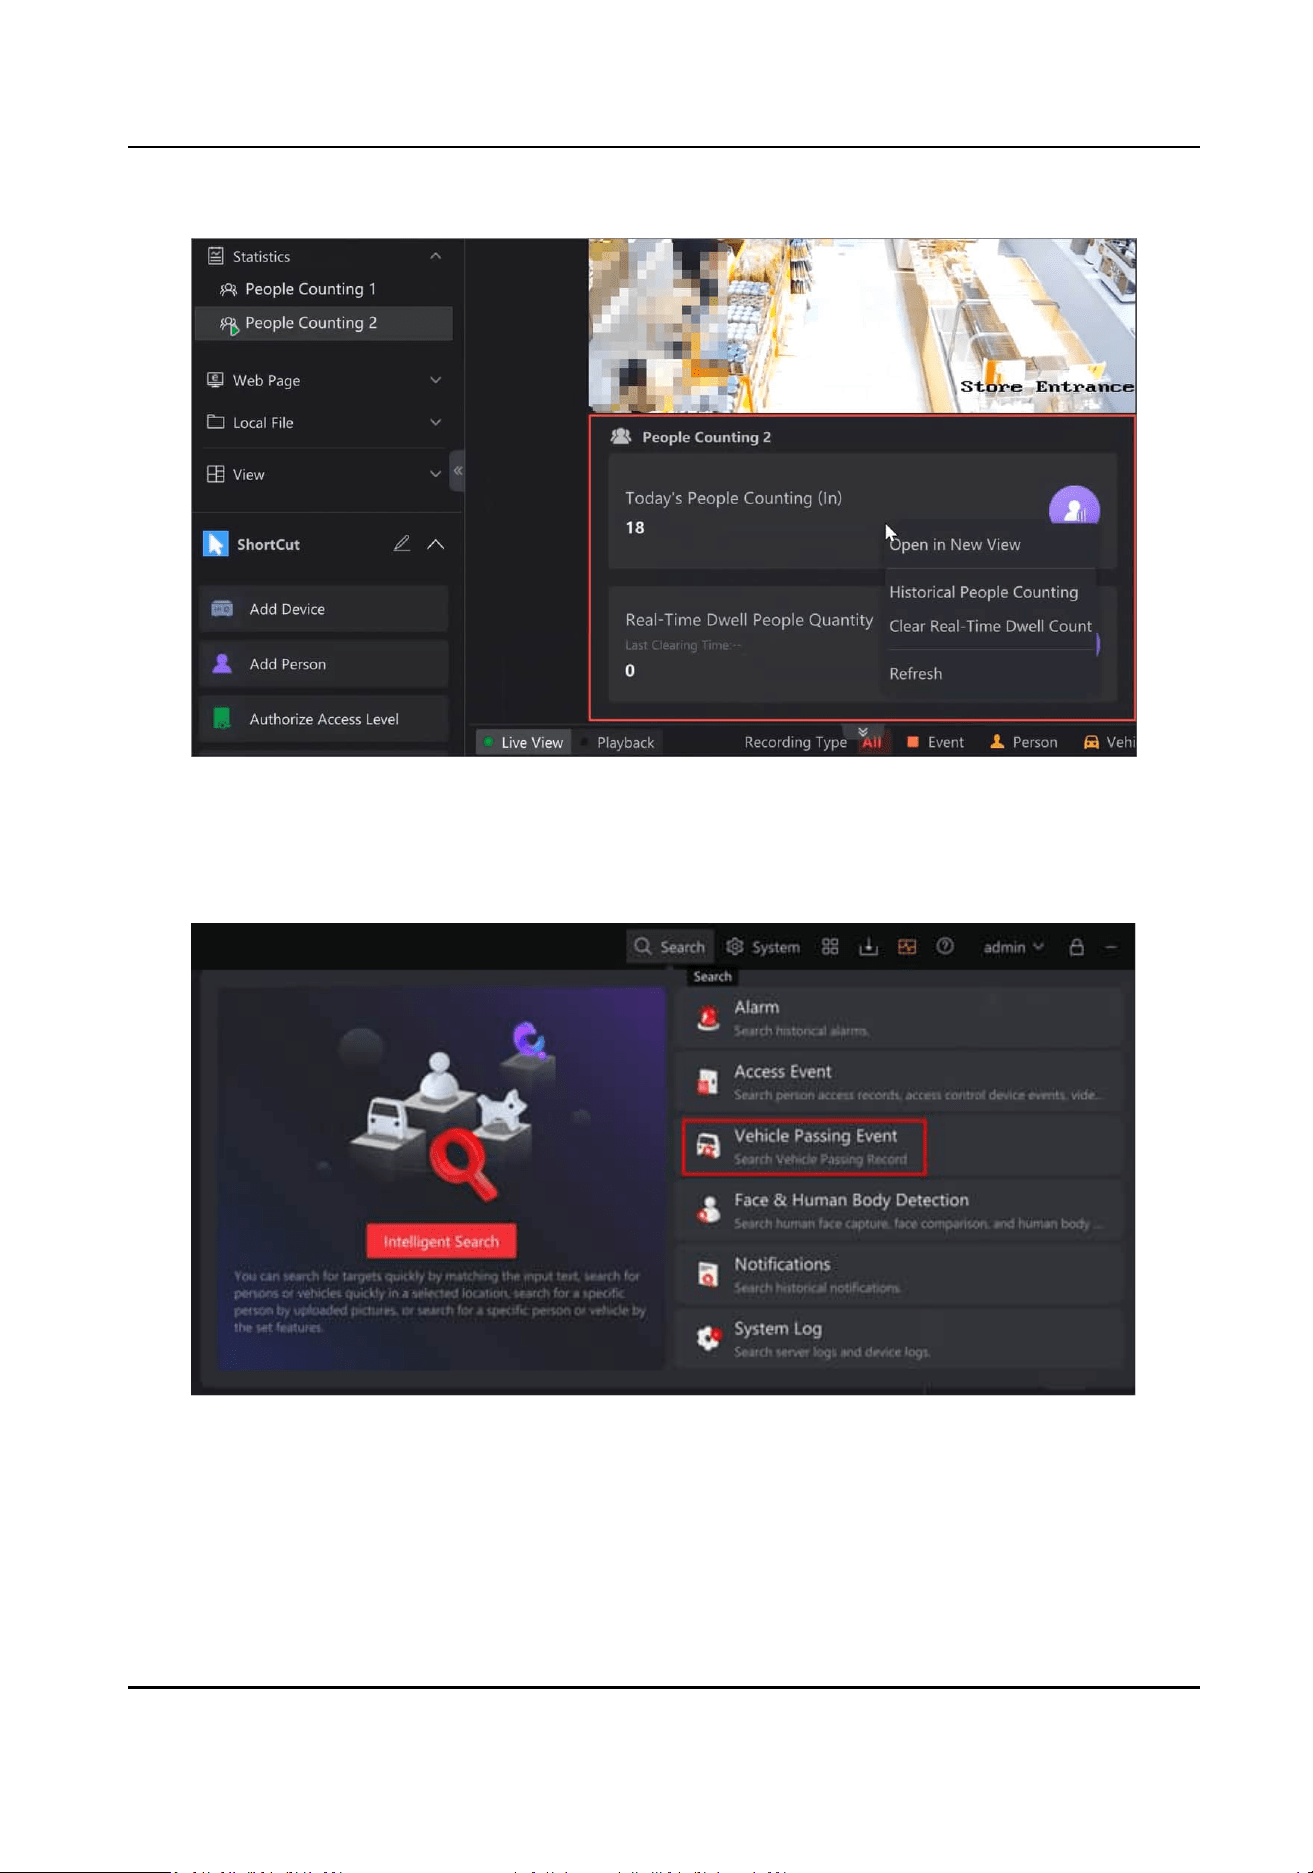
Figure 1-5 People Counng Report
Vehicle Search
●
Search for vehicles by features. Go to Search → Vehicle Passing Event .
Figure 1-6 Vehicle Passing Event
●
Search for vehicles by features. Go to Search → Intelligent Search .
HikCentral Lite V1.1.1 User Manual
6
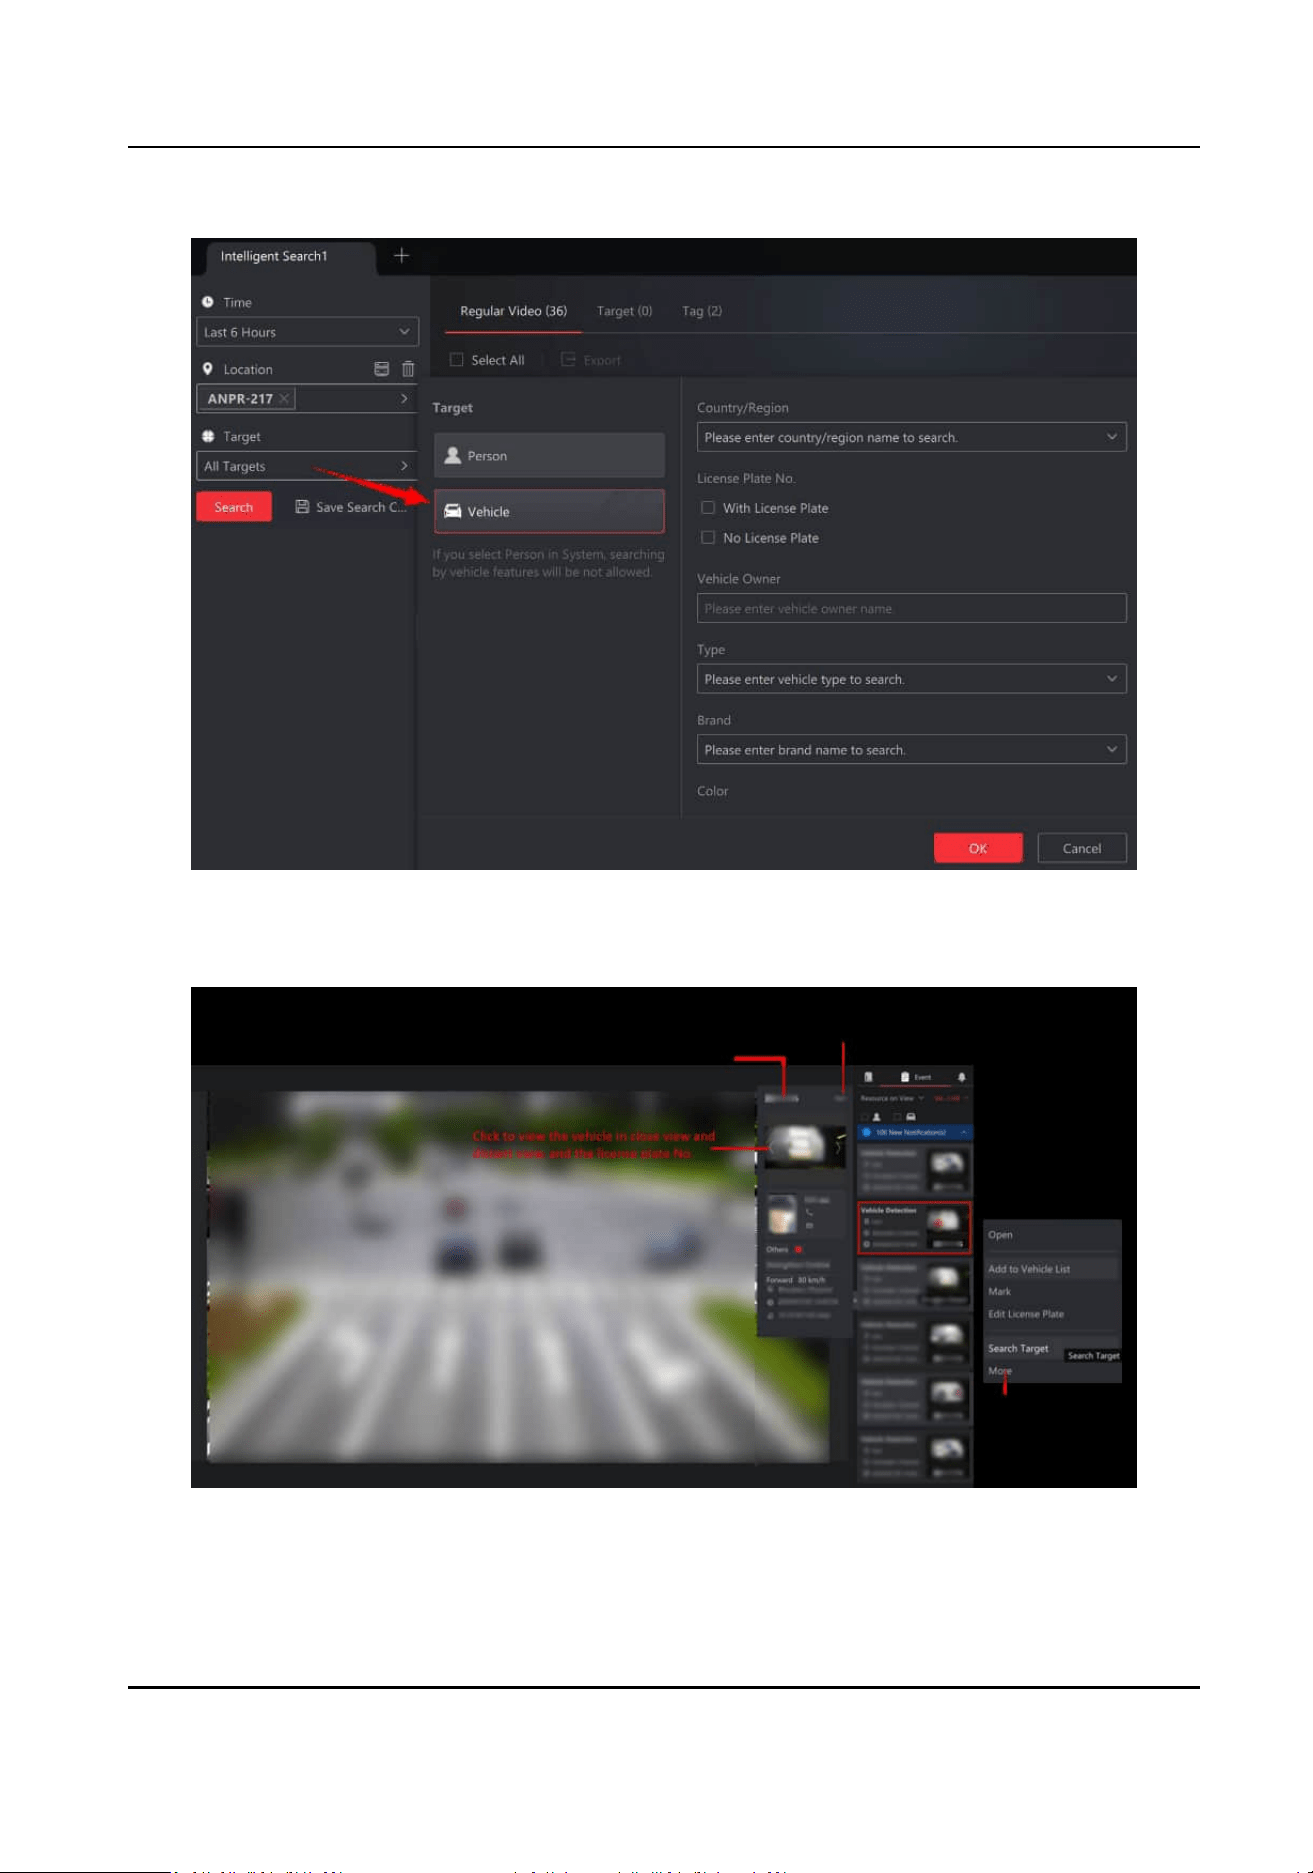
Figure 1-7 Search for Vehicles by Features
●
Supports license plate No. and vehicle list management if ANPR cameras are added.
Figure 1-8 ANPR Camera
Face Picture Comparison
HikCentral Lite V1.1.1 User Manual
7

●
Supports searching for persons by features. Go to Search → Face & Human Body Detecon .
Figure 1-9 Face & Human Body Detecon
●
Supports searching for persons by features. Go to Search → Intelligent Search .
HikCentral Lite V1.1.1 User Manual
8
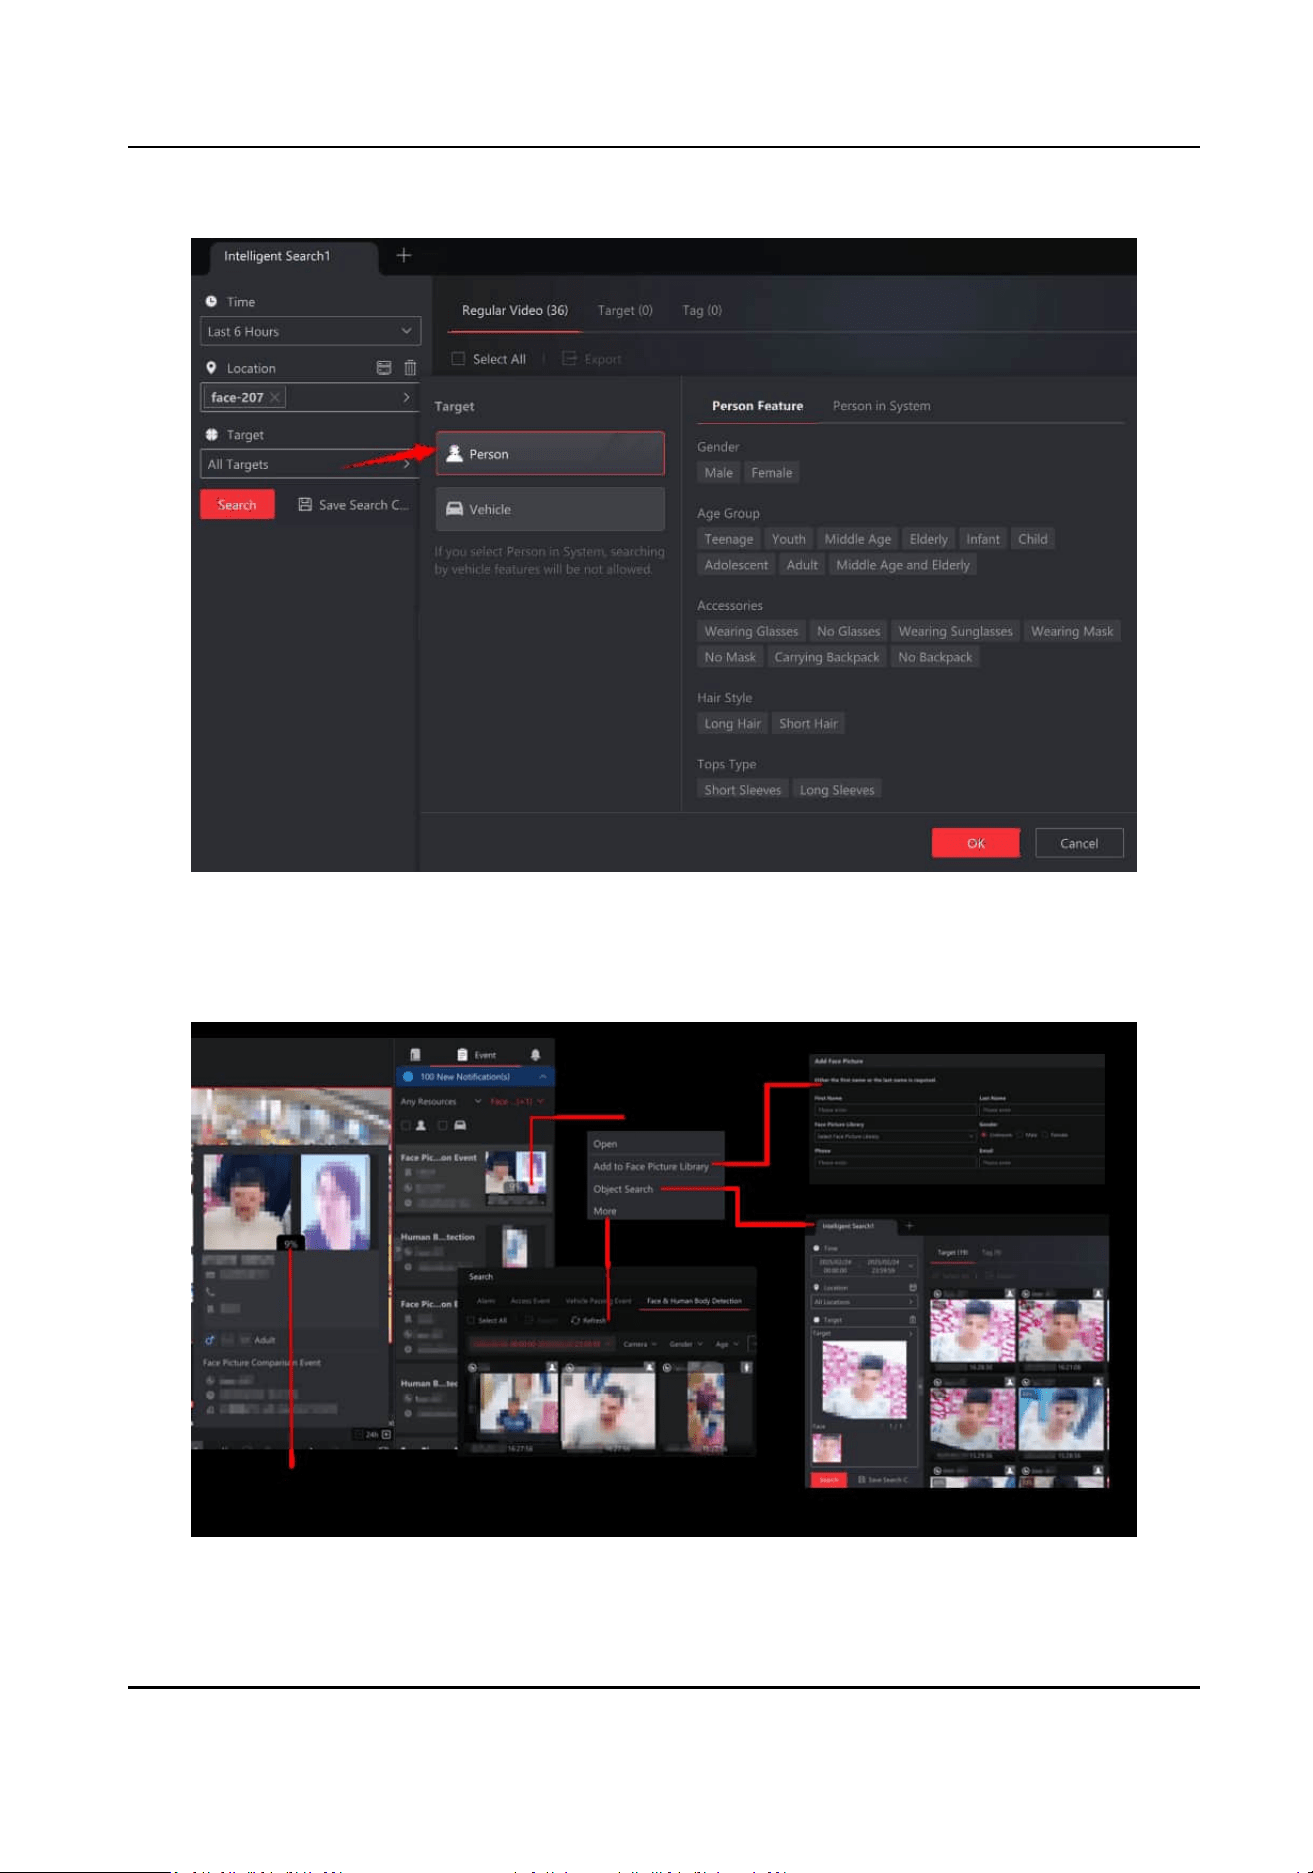
Figure 1-10 Search for Persons by Features
●
Supports face picture comparison if cameras for face picture comparison are added and
AcuSearch.
Figure 1-11 Camera for Face Picture Comparison
HikCentral Lite V1.1.1 User Manual
9

Search by Face/Body Pictures
Supports uploading a picture and seng other condions to search for the corresponding
pictures. You can also right-click on searched pictures to
nd similar ones.
Server Disk Storage
Supports storing videos on server disks.
Note
The free version supports only pictures and les.
Third-party Cameras
Supports cameras accessed via ONVIF, Dahua, Hanwha, and Axis protocol.
Upgrade to HikCentral Professional
Supports upgrading from HikCentral Lite to HikCentral Professional.
Mobile Client / Desktop
Supports up to 64 concurrent client logins.
Note
The free version supports up to 3 concurrent client logins.
1.3 System Conguraons and Performance
The system performance is tested based on the following conguraons.
System
Conguraons
Table 1-6 System Conguraons
Feature Conguraon 1 Conguraon 2
CPU Intel
®
Core™ i5-12500 Intel
®
Core™ i7-12700
RAM 2*8 GB 2*8 GB
NIC 1 GbE Network Interface Card 1 GbE Network Interface Card
SSD for OS Enterprise Class SSD Enterprise Class SSD
HDD for Video
Storage
Enterprise-class HDD or high
performance network HDD. It should
support wring or reading of 10 MB/
s.
Enterprise-class HDD or high
performance network HDD. It should
support wring or reading of 20 MB/
s.
HikCentral Lite V1.1.1 User Manual
10

Feature Conguraon 1 Conguraon 2
SSD Capacity for
Database
At least 500 GB At least 500 GB
OS Microso
®
Windows 10 64-bit or later Microso
®
Windows 10 64-bit or later
1.3.1 Detailed Performance
Here shows the maximum system performance.
Manageable Resources
Table 1-7 Manageable Resources
Resource Type Conguraon 1 Conguraon 2
Cameras
(Including cameras accessed by
ONVIF protocol and third-party
cameras)
128
(No more than 8 ANPR cameras
and 16 cameras for face picture
comparison are allowed.)
128
(No more than 8 ANPR cameras
and 16 cameras for face picture
comparison are allowed.)
Doors 32 32
External Streaming Servers 64
Video
Max. performance of internal streaming server: up to 200 channels, and no more than 400 Mbps
for input/output bandwidth.
For channels that can be viewed simultaneously, see
Decoding Performance of Desktop .
Access Control
Table 1-8 Access Control Related Performance
Parameter Conguraon 1 Conguraon 2
Persons 500 500
Cards 1,500 1,500
Prole Pictures 500 500
Fingerprints 1,000 1,000
Irises 1,000 1,000
HikCentral Lite V1.1.1 User Manual
11

Performance of Main Panel for Monitoring and Control
Table 1-9 Performance of Main Panel for Monitoring and Control
Parameter Conguraon 1 Conguraon 2
Resources in One View 64 64
Resources in Mulple Views 256 256
Areas 256 256
Map
●
Total E-Maps: 16
●
Maps in One View: 4
●
Total E-Maps: 16
●
Maps in One View: 4
Table 1-10 Performance Not Limited by Conguraons
Parameter Performance
New Windows 4
Views 64
Area Levels 5
Resources on GIS Map or Each E-Map 256
Users, Roles, and Permissions
Table 1-11 Performance of Users, Roles, and Permissions
Parameter Conguraon 1 Conguraon 2
Users 128 128
Roles 64 64
Online Users on Desktop 64 64
Online Users on Mobile Clients 64 64
HikCentral Lite V1.1.1 User Manual
12

Event and Alarm
Table 1-12 Performance of Event and Alarm
Parameter Conguraon 1 Conguraon 2
Events Receiving 20/s 20/s
Number of Alarm Rules 1000 1000
Speed of Pushing Alarms/
Events/Nocaons from
Server to One Client
20/s 20/s
Performance of Data Storage
Table 1-13 Performance of Data Storage
Parameter Conguraon 1 Conguraon 2
Video Storage Throughput 480 Mbps 600 Mbps
Retenon Period of Captured
Faces, ANPR Records, Events,
Intelligent Analysis Data,
Access Records, and System
Logs
3 Years 3 Years
Storage Capacity (including
captured faces, ANPR records,
events, intelligent analysis
data, access records, and
system logs)
10 million 10 million
1.4 Decoding Performance of Desktop
The performance is tested in the following conguraon.
Table 1-14
Conguraon
Feature Conguraon
Recommended Model DS-VP41D-C/HW5
CPU Intel
®
Core™ i5-12500 3.0.0 GHz
RAM 16 (8+8) GB
HikCentral Lite V1.1.1 User Manual
13

Feature Conguraon
NIC Intel
®
Ethernet Connecon (17) I219-LM
Graphics Card Intel
®
UHD Graphics 770
OS Microso
®
Windows 10 (64-bit)
1.4.1 Detailed Performance
This topic introduces the hardware and soware decoding performance of dierent encoding
formats including H.264 and H.265.
H.264
Table 1-15 Performance of H.264 with Hardware Decoding
Frame Rate (fps) Bit Rate (Mbps) Resoluon Max. Live View Channels
30 6 1080p 35
30 12 8 MP 10
25 6 1080p 42
25 12 8 MP 12
Table 1-16 Performance of H.264 with Soware Decoding
Frame Rate (fps) Bit Rate (Mbps) Resoluon Max. Live View Channels
30 6 1080p 15
30 12 8 MP 5
25 6 1080p 17
25 12 8 MP 6
H.265
Table 1-17 Performance of H.265 with Hardware Decoding
Frame Rate (fps) Bit Rate (Mbps) Resoluon Max. Live View Channels
30 3 1080p 41
30 6 8 MP 11
HikCentral Lite V1.1.1 User Manual
14

Frame Rate (fps) Bit Rate (Mbps) Resoluon Max. Live View Channels
25 3 1080p 45
25 6 8 MP 15
Table 1-18 Performance of H.265 with Soware Decoding
Frame Rate (fps) Bit Rate (Mbps) Resoluon Max. Live View Channels
30 3 1080p 13
30 6 8 MP 4
25 3 1080p 15
25 6 8 MP 5
For environments where the iVMS-4200 is running, with a CPU earlier than Intel® Core™i3-8100, 4
GB of RAM, and a SATA 7200 RPM Enterprise Class HDD, see
recommendaons in Other System
Conguraons and Performance for migrang from iVMS-4200 to HikCentral Lite.
1.5 Document Guide
●
Release Notes (What's new about the current version and history versions)
●
Data Sheet (Helps make a buying decision about the product by providing technical
specicaons)
●
Compability List of Devices (Provides supported Hikvision devices and third-party devices)
●
Hardening Guide (Informs users of the factors aecng the system security and provides
security
suggesons for users in terms of system overall security)
●
User Manual (Gives you detailed guidance of how to use the product)
●
Quick Start Guide of Mobile Client ( Provides simple introducon of funcons on dierent pages
for beginners)
HikCentral Lite V1.1.1 User Manual
15

Chapter 2 Get Started
This chapter is designed to help you quickly understand and deploy the product as a guideline for
seng up and inial use.
2.1 Congure the System Capability
The system supports the conguraon of two major service capabilies: Access Control and Video.
Each service capability, once acvated, corresponds to a set of features as outlined below.
You can congure the service capability via two opons:
●
During the inial deployment and setup process.
●
On the Home page, go to System → System
Conguraon → Service Capability .
By default, both
capabilies are enabled. At least one business capability will remain operaonal. If
the only acve capability is disabled, another capability will automacally acvate to maintain
system funconality.
If access control and/or video device type in the service capability has been added in the system,
disabling the corresponding service capability is not allowed. Once the corresponding devices are
removed from the system, the service capability can then be disabled.
Only enable Video
When only enabling Video, the following features are disabled:
●
Access control and video intercom devices are not allowed to add when adding devices.
●
Access Control on the device management page, and Video Intercom.
●
The
pre-dened ShortCut for access control in the main panel for monitoring and control.
●
On the Home page, access control-related records in Alarm, Event, and Nocaons in the right
navigaon bar.
●
Access control
operaon in Permission Item when adding roles in Account Security.
●
On the Home page, the corresponding device type lter condions in Map in the le navigaon
bar.
●
The access control events and linkage acon in Event and Alarm.
●
The ISAPI protocol type when manually adding devices.
●
The Save Model Data of
Prole Picture Only feature (person prole picture will be converted to
unreadable modeling data for saving) in
Prole Picture.
Only enable Access Control
When only enabling Access Control, the following features are disabled:
●
Encoding devices and streaming servers are not allowed to add when adding devices.
●
On the system page, hide the entry of Face Picture Library and Vehicle.
●
Video-related
operaon in Permission Item when adding roles in Account Security.
HikCentral Lite V1.1.1 User Manual
16

●
The retrieval of Vehicle Passing Record, Face Capture, and video-related events in Alarm and
Nocaons.
●
Person and Vehicle on the right side of the Main Panel.
●
Video-related events and linkage
acon in Event and Alarm.
●
On the Home page, the corresponding device type
lter condions in Map in the le navigaon
bar.
●
The
pre-dened ShortCut for video in the Main Panel.
2.2 Acvate License
Aer installing the client, you will have a temporary License for a specied number of devices and
limited funcons. To ensure the proper use of the client, you can acvate the Server to access
more funcons and manage more devices. If you do not want to acvate the Server now, you can
skip this chapter and
acvate it later.
Note
●
Only the admin user can perform the acvaon, update, and deacvaon operaon.
●
If you encounter any problems during acvaon, update, and deacvaon, please send the
server logs to our technical support engineers.
On the License Overview page, you can click to select available resources to congure Facial and
Human Body Recognion cameras or ANPR cameras.
On the Home page, click the user name in the top-right corner, then select License Management
to open the license management panel. Click the
Acvate License buon in the lower le corner
to proceed.
2.2.1
Acvate the License Online
If your computer can connect to the Internet, you can acvate the Server in online mode.
Steps
1.
Select Online Acvate as the acvaon type to acvate the license in online mode.
2.
Enter the
acvaon code received when you purchased your License.
If you have purchased more than one Licenses, you can click Add and enter other acvaon
codes.
Note
The acvaon code should contain 32 characters (except dashes).
3.
Check I accept the terms of the agreement Hikvision Soware User License Agreement and I
accept the terms of the agreement Data Protecon Statement to open the License Agreement
panel and click OK.
4.
Click
Acvate.
HikCentral Lite V1.1.1 User Manual
17
2.2.2 Acvate the License Oine
If your computer cannot connect to the Internet, you can acvate the License in oine mode.
Steps
1.
Select Oine Acvate as the acvaon type to acvate the license in oine mode.
2.
Enter the
acvaon code received when you purchased your License.
If you have purchased more than one Licenses, you can click Add and enter other acvaon
codes.
Note
The acvaon code should contain 32 characters (except dashes).
3.
Check I accept the terms of the agreement Hikvision Soware User License Agreement and I
accept the terms of the agreement Data
Protecon Statement to open the License Agreement
pane and click OK.
4.
Click Generate Request File.
A request
le named "AcvaonRequestFile.bin" will be downloaded. Click View File to save the
request le to the proper directory or the removable storage medium (e.g., USB ash disk) or
click on the home page to view downloading records.
5.
Copy the request le to the computer that can connect to the Internet.
6.
On the computer which can connect to the Internet, enter the following website:
hps://
kms.hikvision.com/#/acve .
7.
Click and then select the downloaded request le.
8.
Click Submit.
A respond le named "AcvaonResponseFile.bin" will be downloaded. Save the respond le to
the proper directory or the removable storage medium (e.g., USB
ash disk).
HikCentral Lite V1.1.1 User Manual
18

9.
Go back to the Acvate License panel and click to select the downloaded respond le or drag
the le.
10.
Click Acvate.
2.3 Add Devices
You can add encoding devices, access control devices, and video intercom devices by auto detect,
batch import, manually add, as well as data migraon from iVMS-4200.
Add Device
On the Home page, go to System → Device Management → Add Device to select supported
adding modes: Auto Detect, Batch Import, and Manually Add.
You can also add device(s) by right-clicking an area or through a shortcut.
HikCentral Lite V1.1.1 User Manual
19
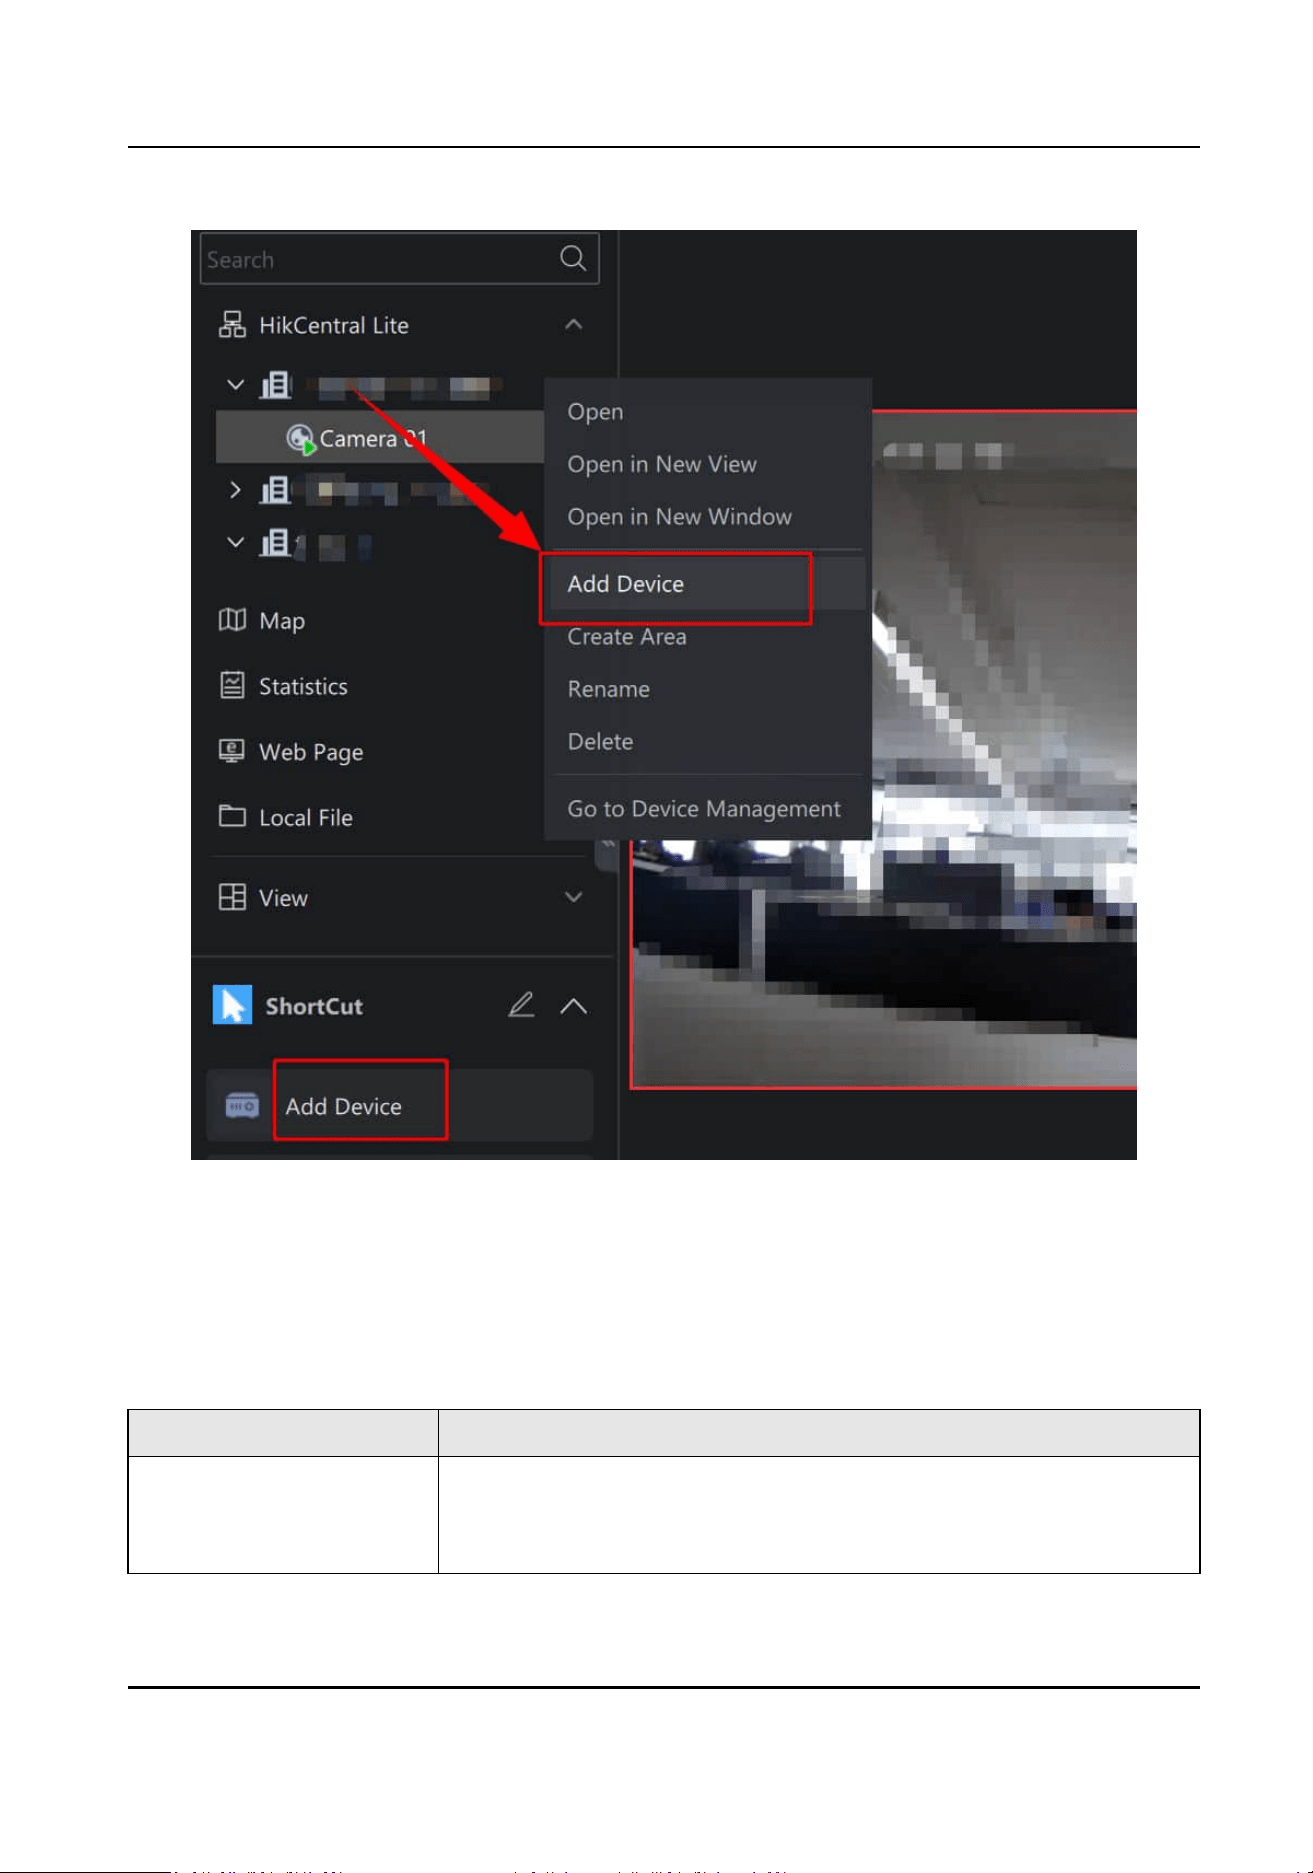
Figure 2-1 Other Entries for Adding Devices
Data Migraon
●
On the Home page, go to System → Device Management → Move Now .
●
(Only supported on the Server) On the Home page, go to Username → Data
Migraon .
Table 2-1 Add Device
Mode Descripon
Auto Detect Select this one to detect devices that are on the same LAN as the
server or client.
You can perform the following operaons.
HikCentral Lite V1.1.1 User Manual
20
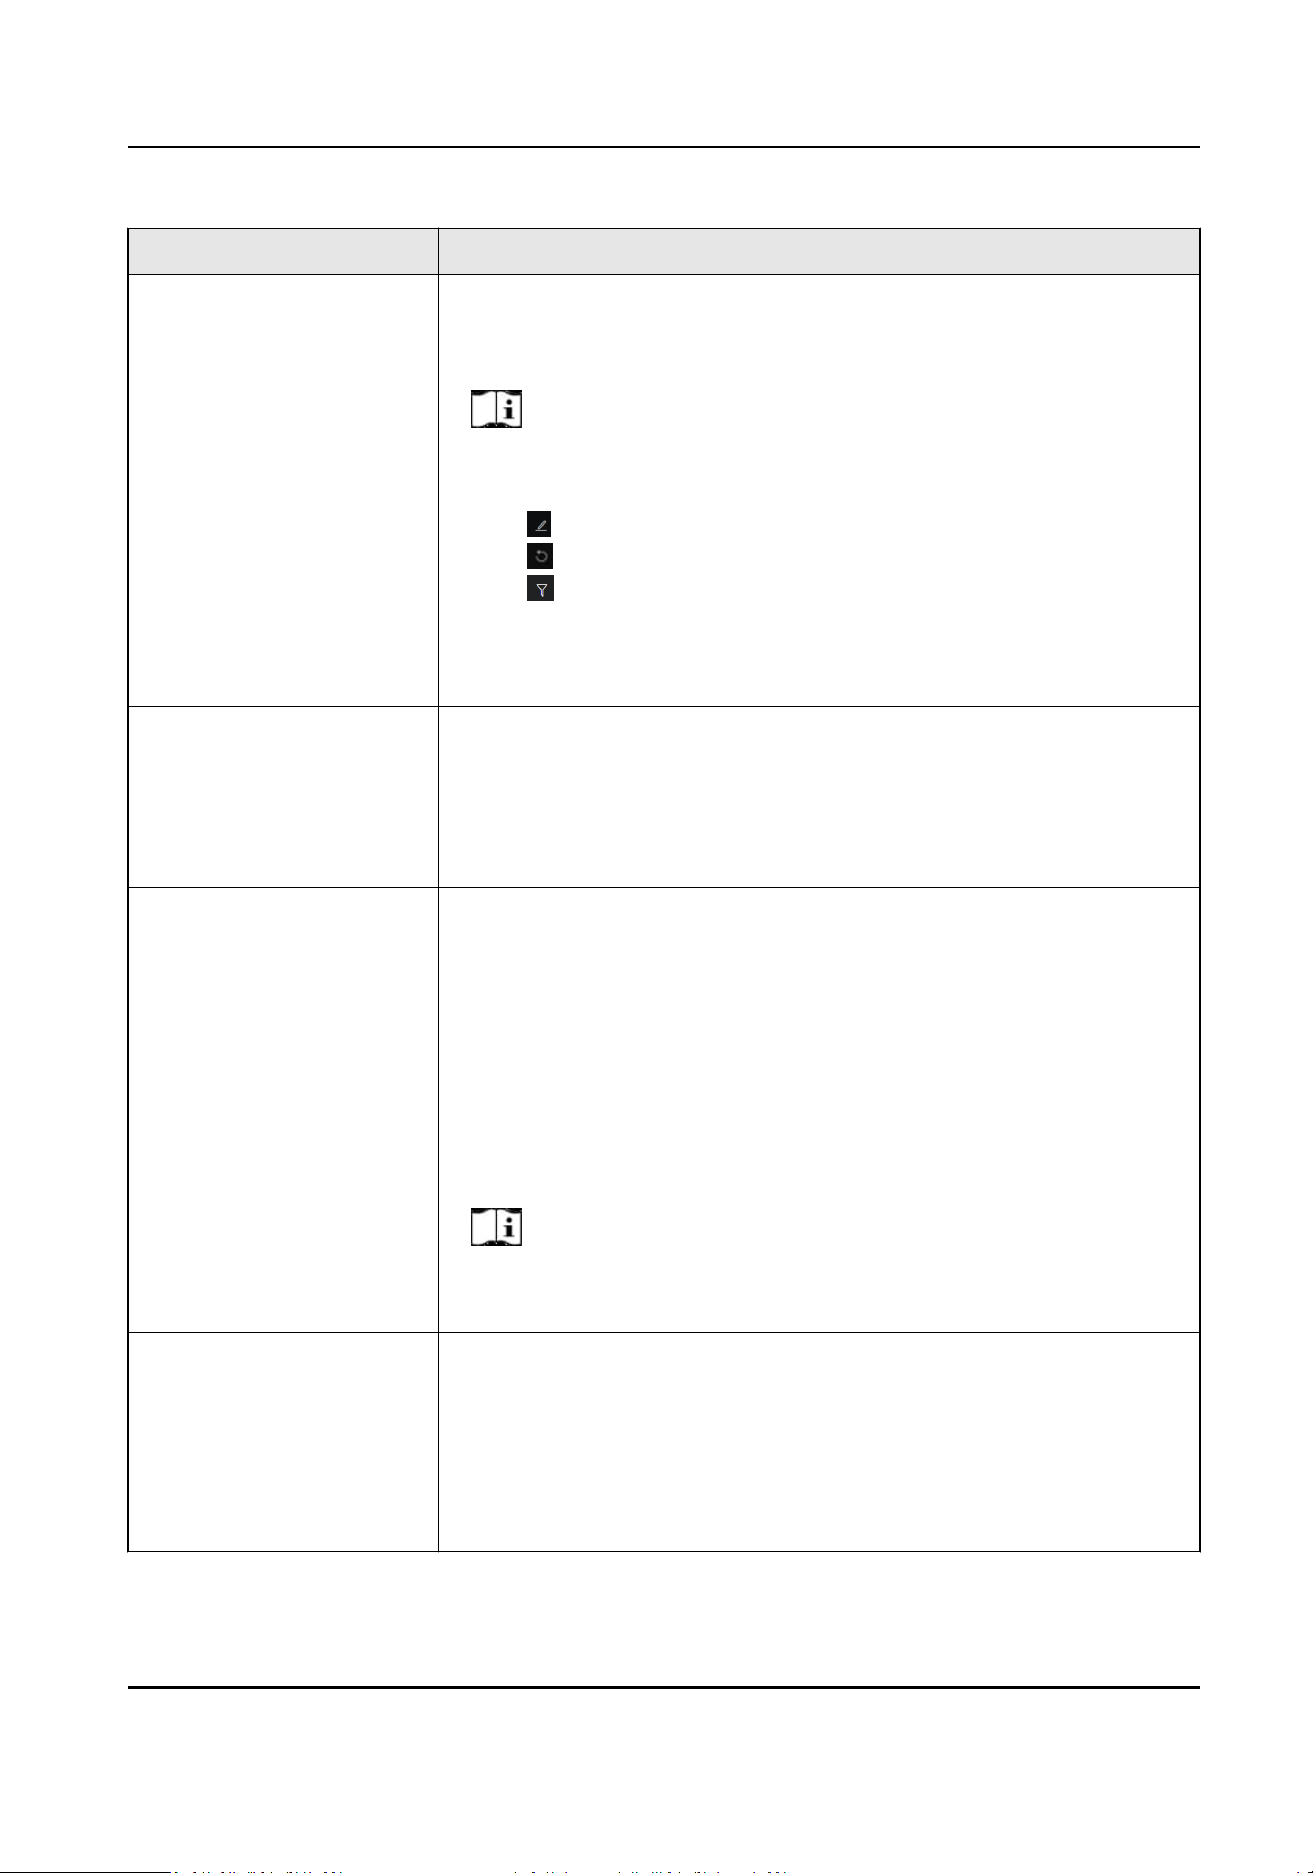
Mode Descripon
●
Specify IP Range supports discovering all accessible networks by
the current client, regardless of whether these networks are on
the same network as the client or server.
Note
The feature is only eecve when the device supports the ONVIF
protocol.
●
Click
to edit Device IP Address and Port number.
●
Click to reset the password.
●
Click
to lter by Acvated or Unacvated, as well as device
type.
●
If the device status is unacvated, click Acvate to acvate the
device before adding it.
Batch Import Select this one if the IP address, port No., ID, and secret key of
mulple devices are known.You can quickly add a batch of devices
without verifying their validity.
Select this one if the device is
oine or the device and the server or
the client are not on the same LAN.
Manually Add Select this one if the IP address, port No., ID, and secret key of single
device are known.
You can choose from the following access protocols and enter the
required device
informaon. If you have installed addons, you can
select protocols
specic to those addons.
●
Hikvision Private Protocol
●
Hikvision ISUP Protocol
●
Hikvision ISAPI Protocol
●
ONVIF Protocol
Note
You need enable ONVIF before using this feature for security
reasons.
Data Migraon from
iVMS-4200
Only supported on the server when an admin performs the
operaon.
You can import the following informaon from iVMS-4200:
●
Devices and resources (encoding devices and access control
devices)
●
Recording schedules
HikCentral Lite V1.1.1 User Manual
21

Mode Descripon
●
Person informaon, credenals, and access level permissions
●
Access control event records
Aer adding devices, right-click the device to perform further operaons on the device list.
Viewing the serial number and version number of cameras under NVRs is supported.
Set Time Zone
Select one or more device(s), click Time Zone to set / edit the
me zone.
Note
You can only set me zone for online devices.
Remote Conguraon
Hover on one device, then right-click and select Device Remote Conguraon.
Apply Sengs Manually to Access Control Devices
For oine device(s), parameters are stored on the plaorm. Aer the device(s) goes online, the
stored parameter
conguraons need to be manually pushed to the device.
●
You need to apply plaorm access control sengs (including mul-factor authencaon,
mul-door
interlocking, rst person in, and remaining unlocked/locked) to device manually,
aer you restore device parameters to default values, restore database, or set doors to
remain locked/unlocked.
●
On the Access Control panel, click Apply Manually.
See
System Conguraons and Performance for the number of devices supported by the client.
Note
For devices congured with the linkage acon of capturing, and devices added by Hikvision ISUP
Protocol, the pictures from the devices may be transmied to the Server via HTTP.
2.4 Add a Server and View Server Details
You can add an external streaming server to the system for distribung and streaming the media
content in
real-me to mulple clients or devices. This setup allows for ecient management of
video data, ensuring immediate accessibility as needed.
Add a Server
On the Home page, go to System → Device Management → Add Server .
The server is for the live view, playback, video intercom, etc. Max. Streaming Channel refers to the
max. channel of streams that the streaming server can support.
Aer adding servers, you can perform further operaons on the server list.
HikCentral Lite V1.1.1 User Manual
22
View Alarm Conguraon
Hover on one server, then right-click and select View Alarm Conguraon to view and edit the
alarm
conguraons of the corresponding server.
Remote Conguraon
Hover on one server, then right-click and select Congure on Device to open the device's web
conguraon page.
View Server Details
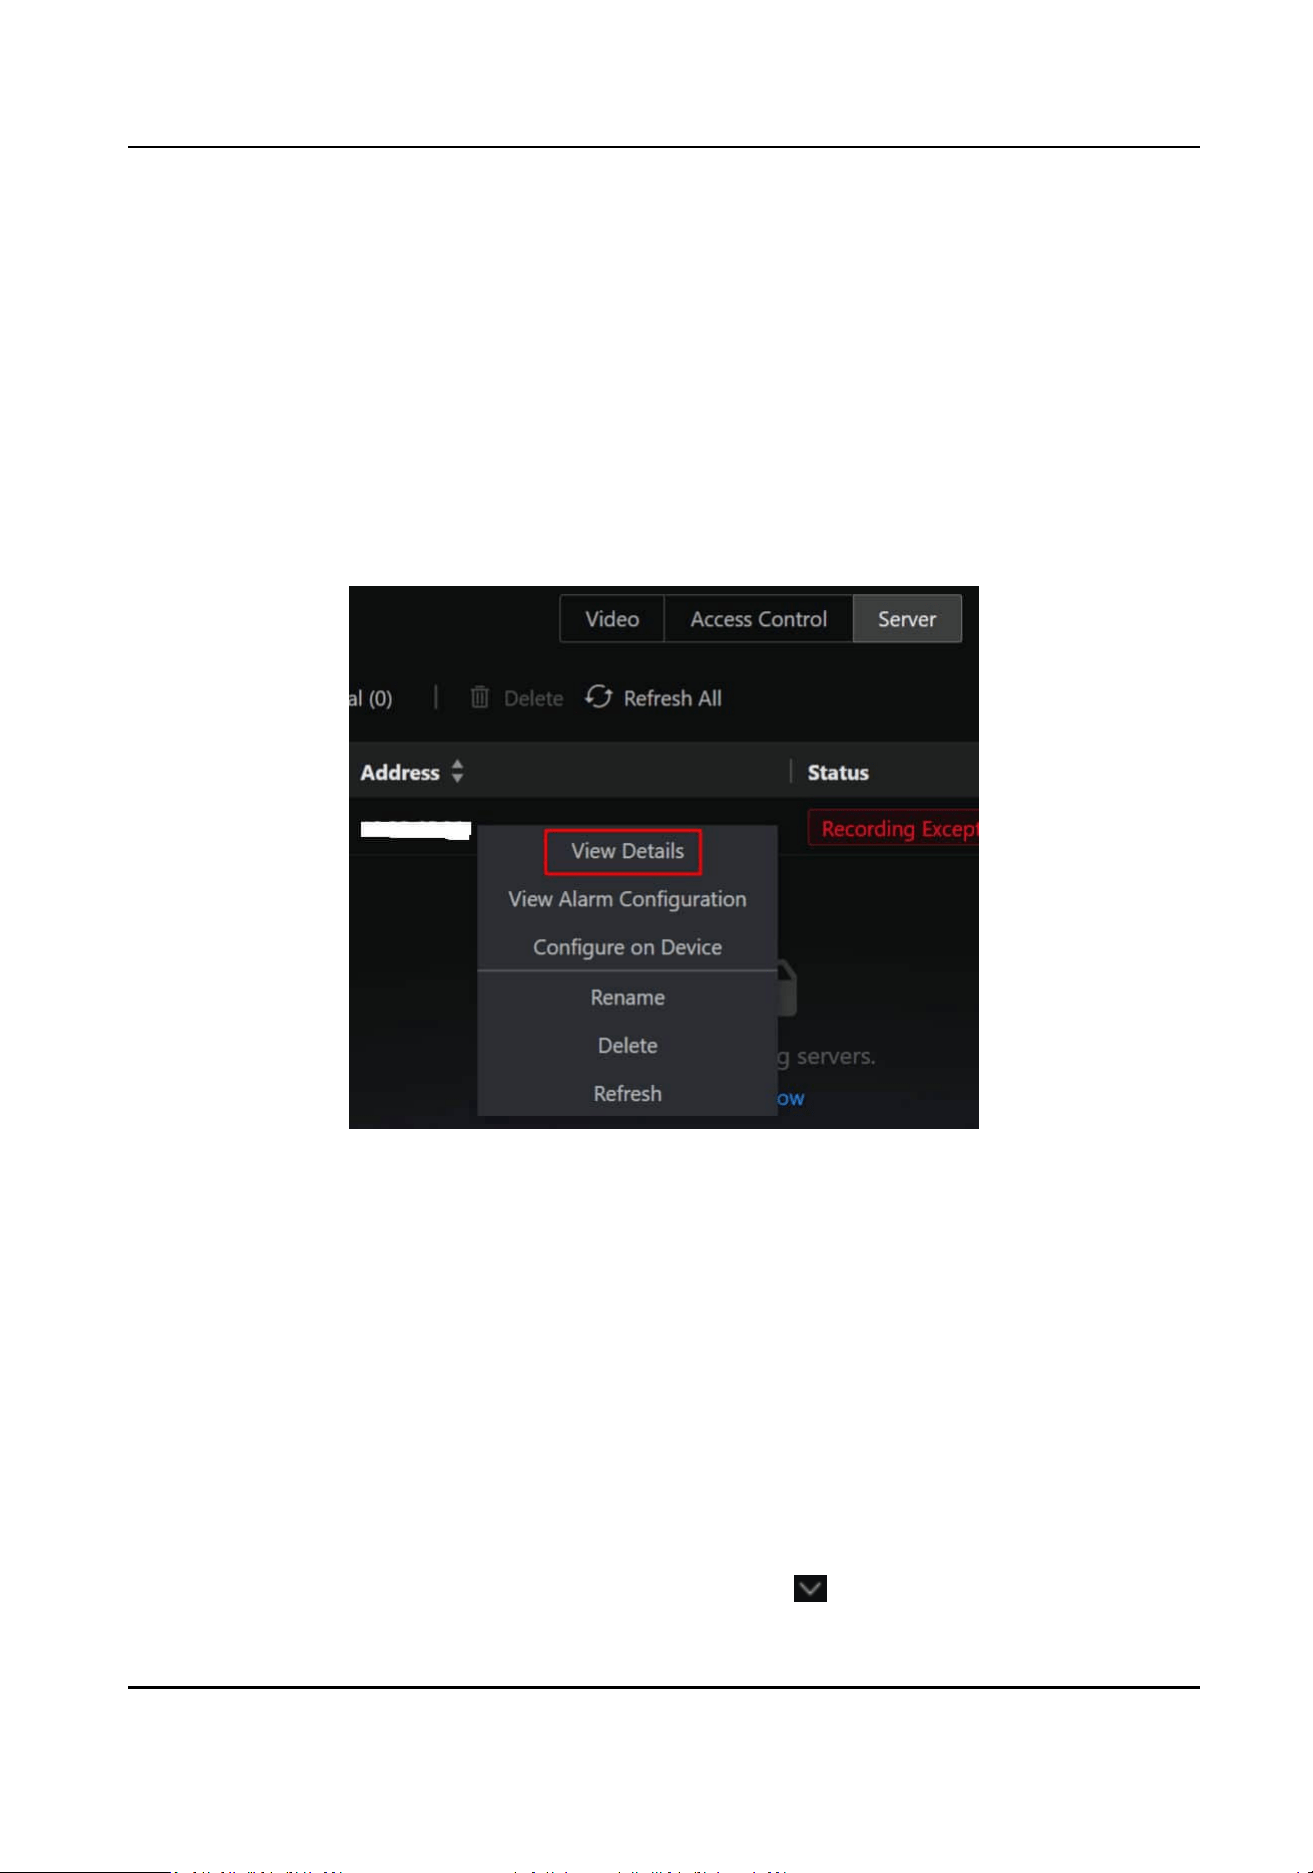
Hover on the server, then right-click and select View Details to view the specic informaon of the
corresponding server.
Figure 2-2 View Server Details
You can perform the following operaons.
●
View the normal and abnormal status under the server name. The abnormal status is displayed
by default. Click More to view all status informaon.
●
Edit the Basic Conguraon of the server.
2.5
Congure User Preference
You can congure desktop-specic preferences from dierent aspects (video playing, alarm
nocaon, and login).
Event and Alarm
In the upper-right corner of the Desktop, go to User Name → → Local Conguraon .
HikCentral Lite V1.1.1 User Manual
23
Display
●
Audio: Enable/disable all alarm-related audio (audible alarm, alarm sound, etc.) for the
current client.
●
Pop-Up Window: Enable/disable all pop-up windows for the current client. The pop-up
window will be displayed in the center by default. If you moved it, the new
posion will be
remembered for the next
me.
Note
When Audio or Pop-Up Window is disabled, you can sll add relevant linkage acons but they
will not come into eect.
Alarm Sound
●
Voice Engine (Requires the Operang System's Support): Play the voice text congured (the
audible alarm in Supported Linkage Acons ), by the voice engine supported by the computer
system.
●
Local Audio Files: Play the uploaded local les. The congured voice text will be irrelevant.
Advanced
Sengs
In the upper-right corner of the Desktop, go to User Name → → Local Conguraon .
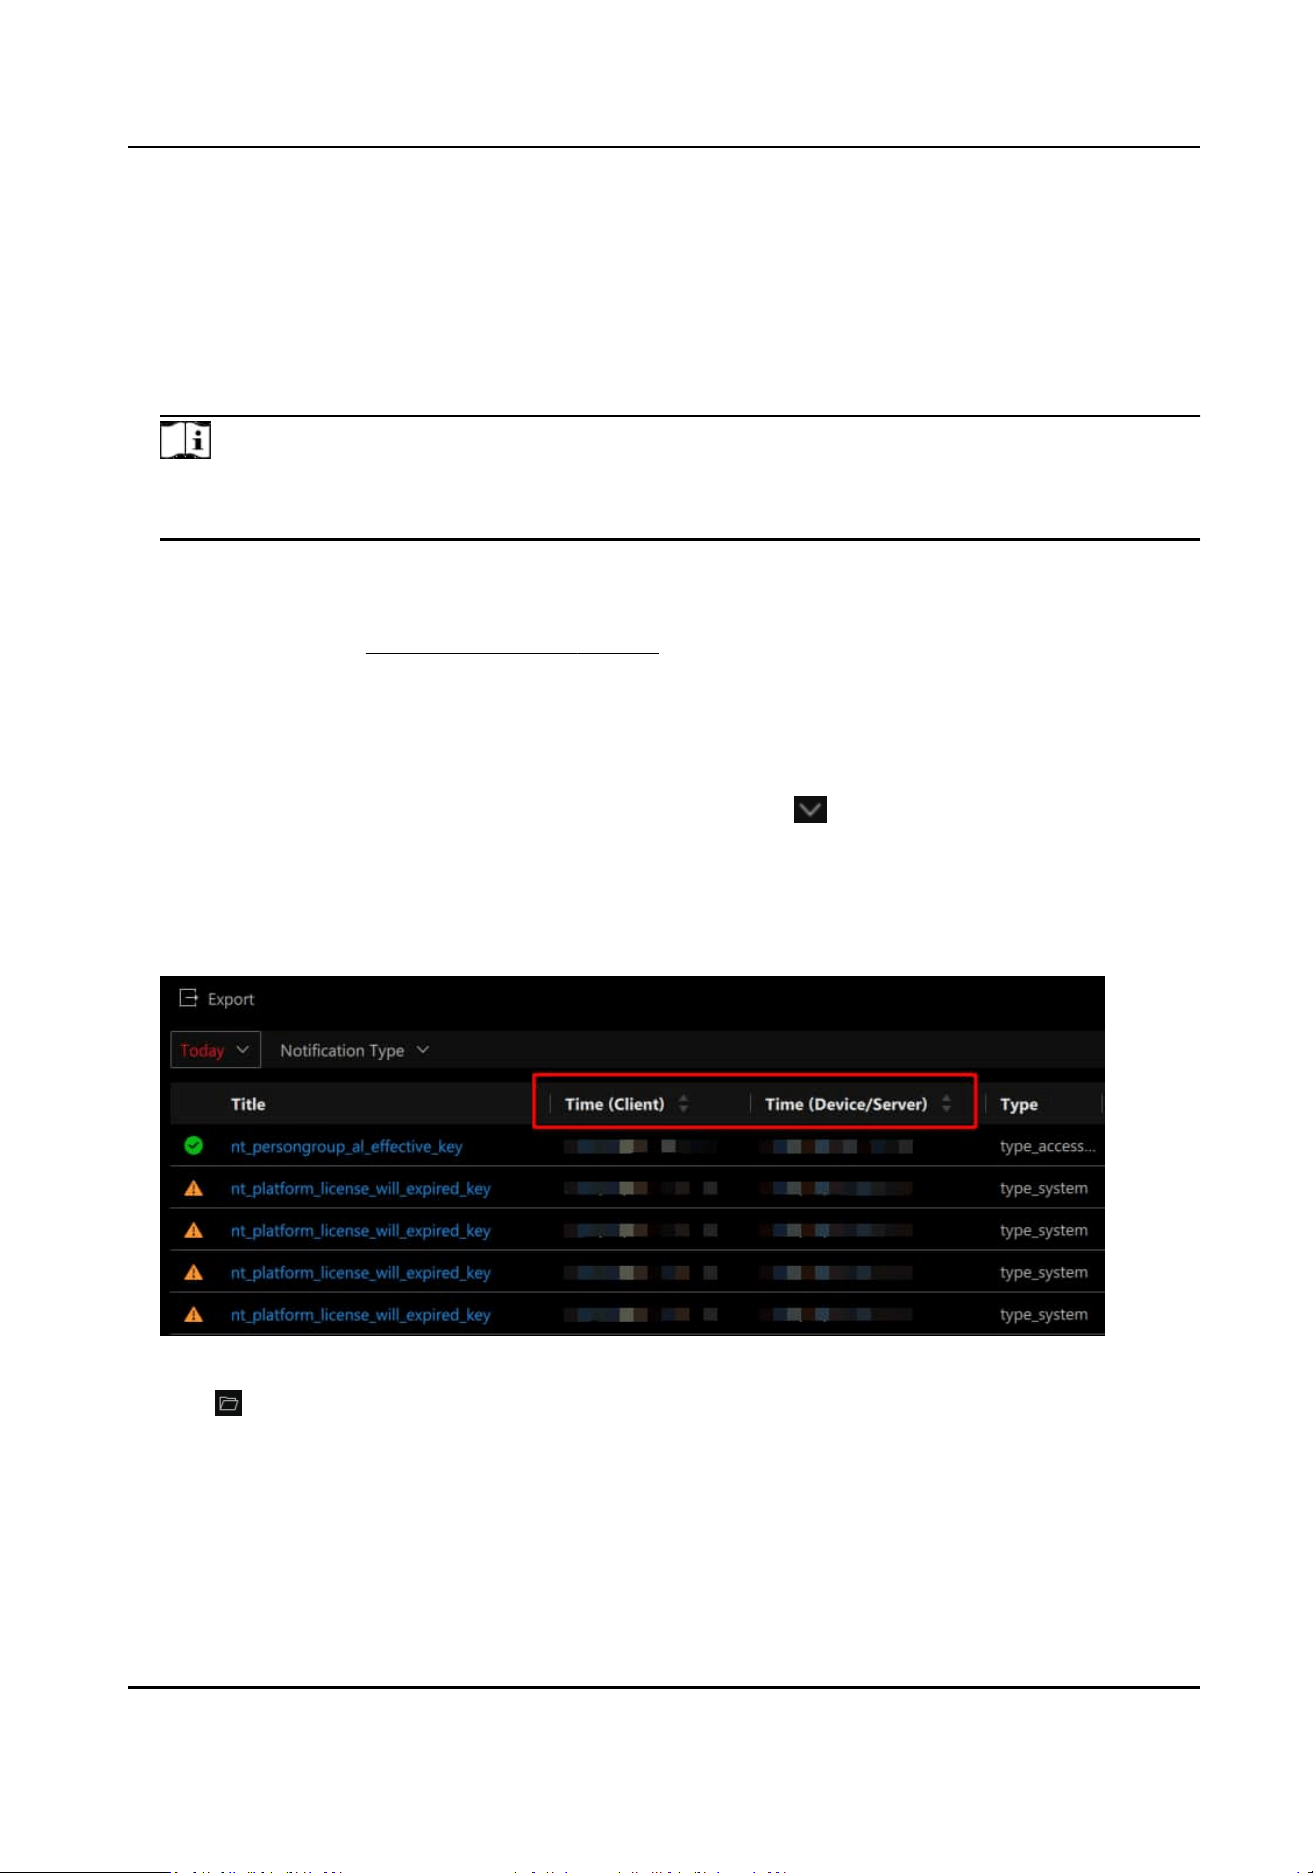
Time Zone
Enable Display
Mulple Time Zones to display the client and device/server me zone in the list
at the same me. You can view mulple me zones when searching for events such as Alarm,
Access Control, Vehicle Passing Event, etc., in the
Invesgaon page.
File Saving Path
Click and then select a folder as the saving path for les such as images, downloads, manual
recordings, etc.
Ringtone
You can customize and preview call ringtones for your device. An audio le, restricted to WAV
format, will play as the ringing tone when the device is called.
HikCentral Lite V1.1.1 User Manual
24

Note
The feature is available only aer access control devices or video intercom devices have been
added to the system.
Streaming Access Mode
Dene how to access all the added encoding devices and decoding devices.
●
Automacally Judge: Automacally adjust the access mode according to the domain of
devices. If the Desktop is in the same domain as devices, it will get streams directly from
devices, otherwise, it will get steams via streaming server.
●
Via Streaming Server: The Desktop will access devices via streaming severs, which can lower
the load of devices. When there are
mulple Desktops to get streams from the same device,
you can use this mode.
Version Update
Nocaon
Enable this to receive nocaons of version updates. Updated version will provide you with
latest features with beer experience. The cloud server will automacally push updates. If
mulple clients are connected, it will nofy them to automacally update.
Figure 2-3 Version Update
Basic Video Preference
Right-click on any blank area of the main panel for monitoring and control.
HikCentral Lite V1.1.1 User Manual
25
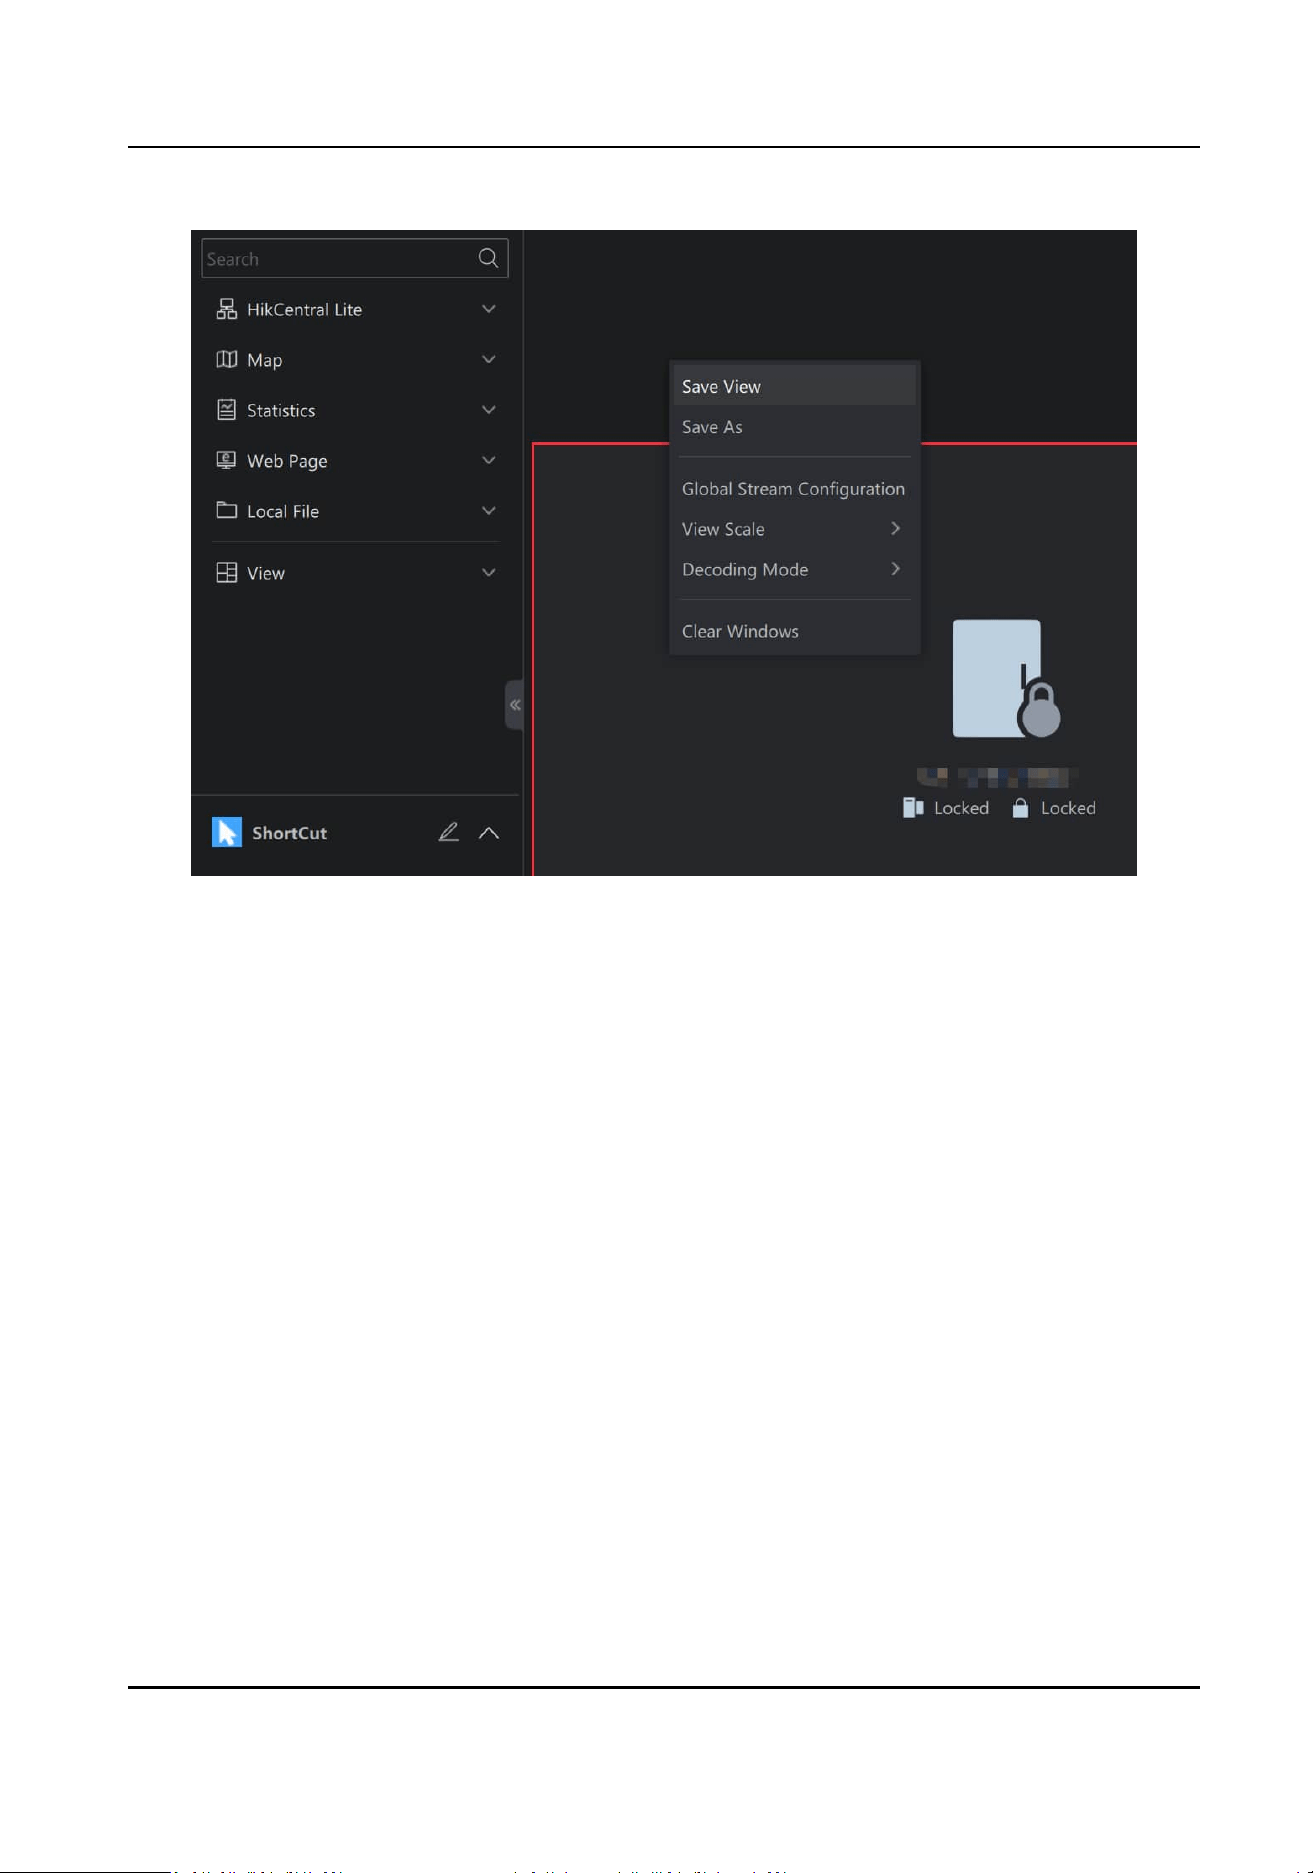
Figure 2-4 Access to Basic Video Preference
Global Stream Conguraon
●
If you check Stream Adapon, the system will automacally switch between the main and
sub-stream according to the window
resoluon when playing video.
Select the appropriate video resoluon based on device and network condions. When the
playback window size is smaller than the selected
resoluon, the video will automacally
switch to a lower sub-stream to ensure performance:
○
Extra Large (1920*1080)
○
Large (704*576)
○
Medium (640*360)
○
Small (320*180)
●
If you do not check Stream
Adapon, videos in the window will be played according to the
selected mode Main Stream or Sub-Stream. If the device does not support the mode, the
system will switch to the supported mode
automacally.
View Scale
Original Resoluon indicates to play a video in original size, and the image may not ll the live
view / playback window. Full Screen indicates that the image is
lled the enre live view /
playback window.
Decoding Mode
HikCentral Lite V1.1.1 User Manual
26

Hardware decoding is to decode based on GPU, while soware decoding is on CPU. Choose the
decoding mode according to your GPU/CPU performance.
HikCentral Lite V1.1.1 User Manual
27

Chapter 3 Video Monitoring
Video monitoring centers on the security based on video-related funcons. You can perform real-
me
monitoring to view the real-me status of monitored places, get the nocaon of events/
alarms, and know the trend of dierent targets.
Preparaons
●
Add Encoding Devices
●
View and Congure Details of Encoding Devices
●
Add an Alarm for an Encoding Device
Basic Funcons Related to Video Monitoring
●
Start Live View / Playback of Camera
●
PTZ Control During Live View
●
Monitor via Cameras on the Map
Face Picture Comparison and Human Body Detecon
●
Add Face Picture Libraries and Face Pictures
●
View Videos Related to Face and Human Body Recognion
●
Search for Recognized Face Pictures and Human Body Pictures
●
Search Targets by a Picture
Vehicle Monitoring
●
Add Vehicle Lists and Vehicles
●
View Video Related to Vehicle Monitoring
●
Search and Export ANPR Events
Smart Search / VCA
AcuSearch / Object Search
AcuSeek
Generate and View People Counng Report
(Oponal) Local Conguraons Related to Video Monitoring
3.1
Preparaons
3.1.1 Add Encoding Devices
Before starng live view, video recording, and event/alarm conguraons, you should add
encoding devices (e.g., cameras, NVRs, DVRs).
On the top of the Desktop, click System → Device Management → Add Device . Refer to
Add
Devices for details.
HikCentral Lite V1.1.1 User Manual
28
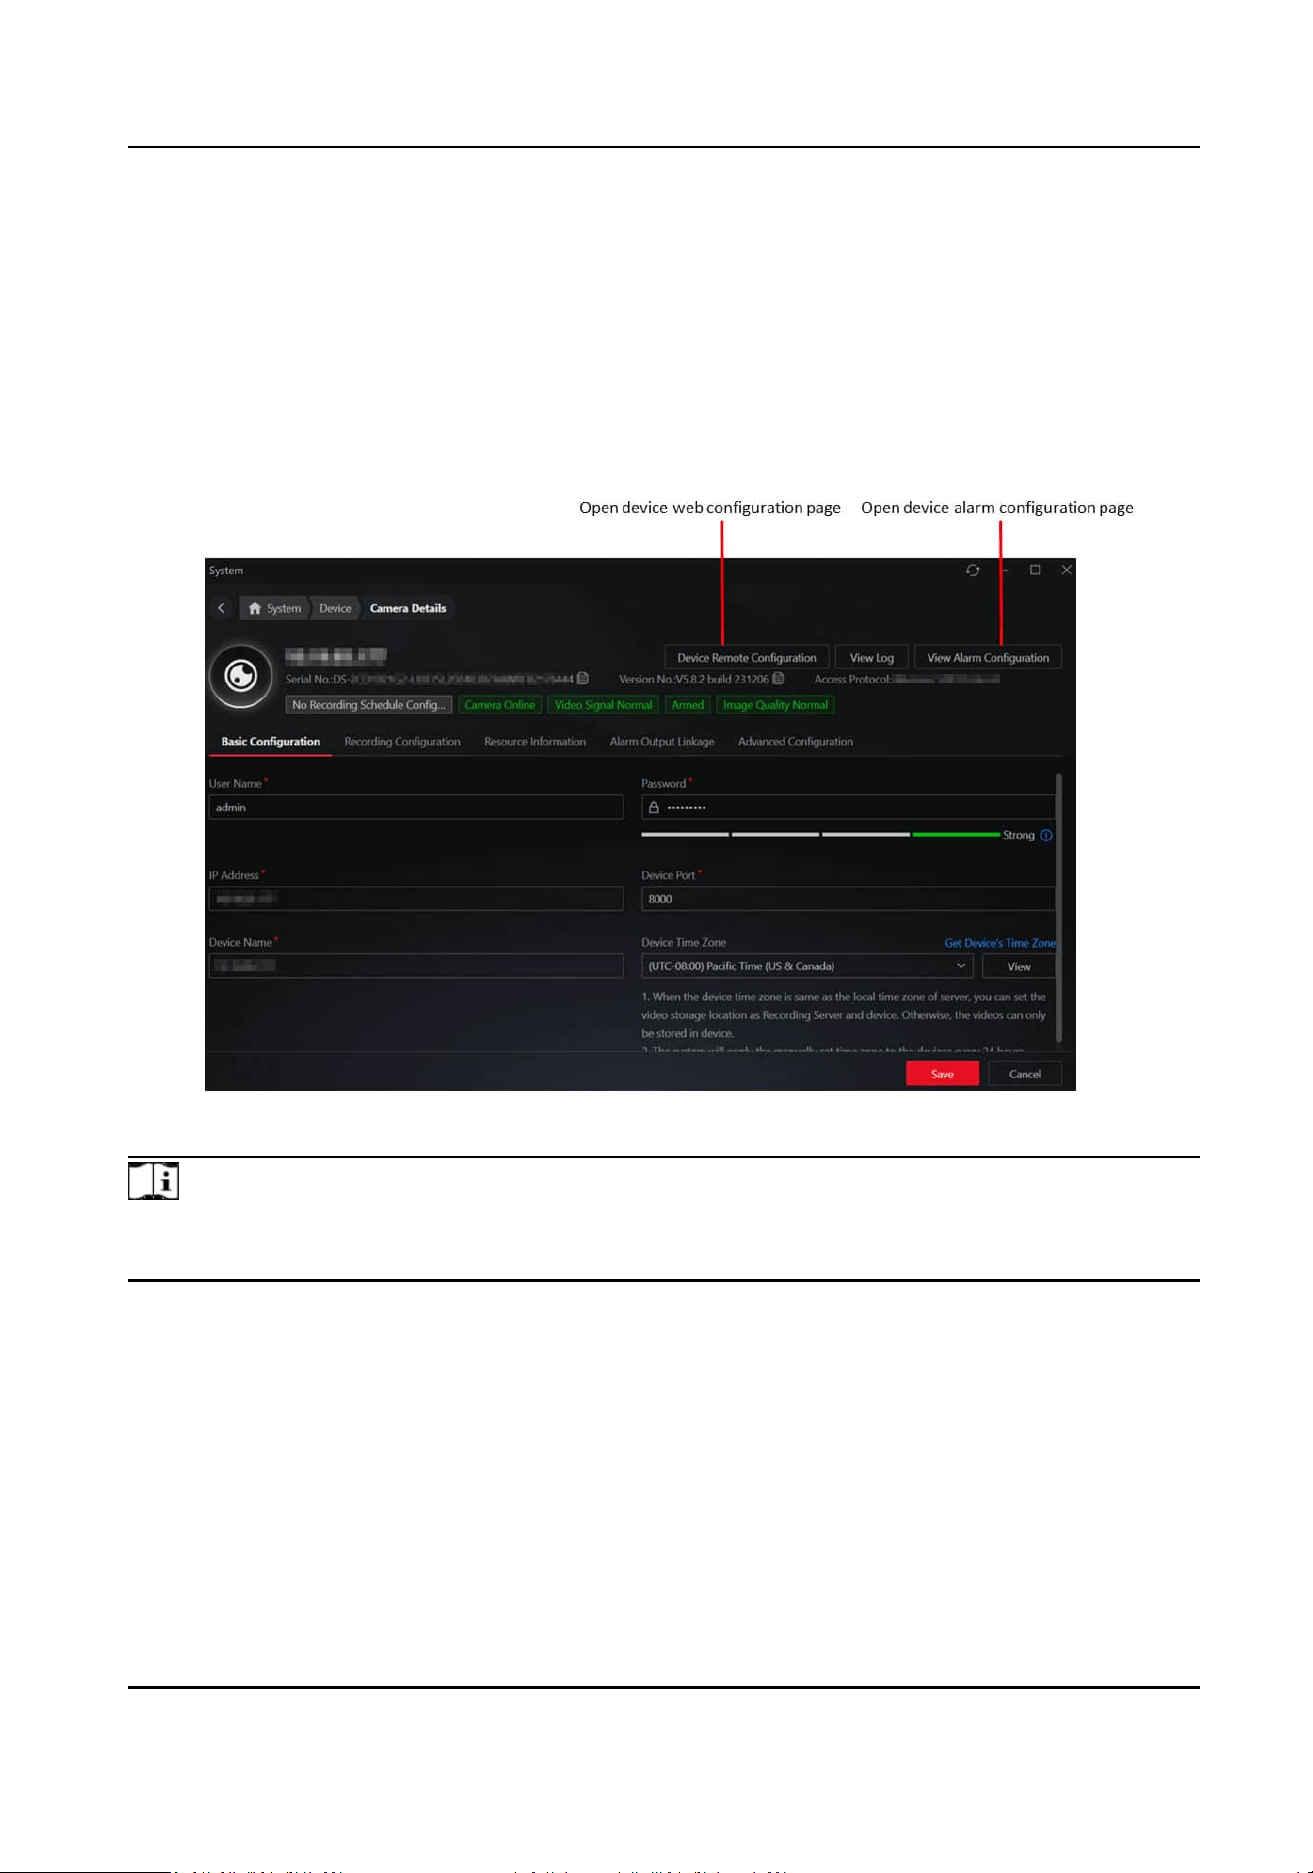
3.1.2 View and Congure Details of Encoding Devices
The device basic conguraon, recording schedule, connected resource (alarm input and alarm
output), intelligent capability, alarm output linkage, and advanced
conguraons (such as transfer
protocol and PTZ sengs) are displayed according to the device type and capability.
On the top of the Desktop, click System → Device Management to show the added device list.
Click a device name to open the device details page.
Figure 3-1 Camera Details
Note
The device details vary according to the device type, access protocol, and device adding method.
Conguraons should be subject to the actual situaon.
HikCentral Lite V1.1.1 User Manual
29
Device Details Tab Page Introducon
Tab Name Descripon
Recording Conguraon It is valid for cameras only.
Resource Informaon
●
Display resources (such as cameras, alarm inputs, and alarm
outputs) that are connected to the device.
●
Right-click a resource for further operaons, that depend on the
resource type. For example, if the resource is a camera, you can
open the device web conguraon page, device log search page,
and device alarm
conguraon page, rename the device, and
delete it from the resource list.
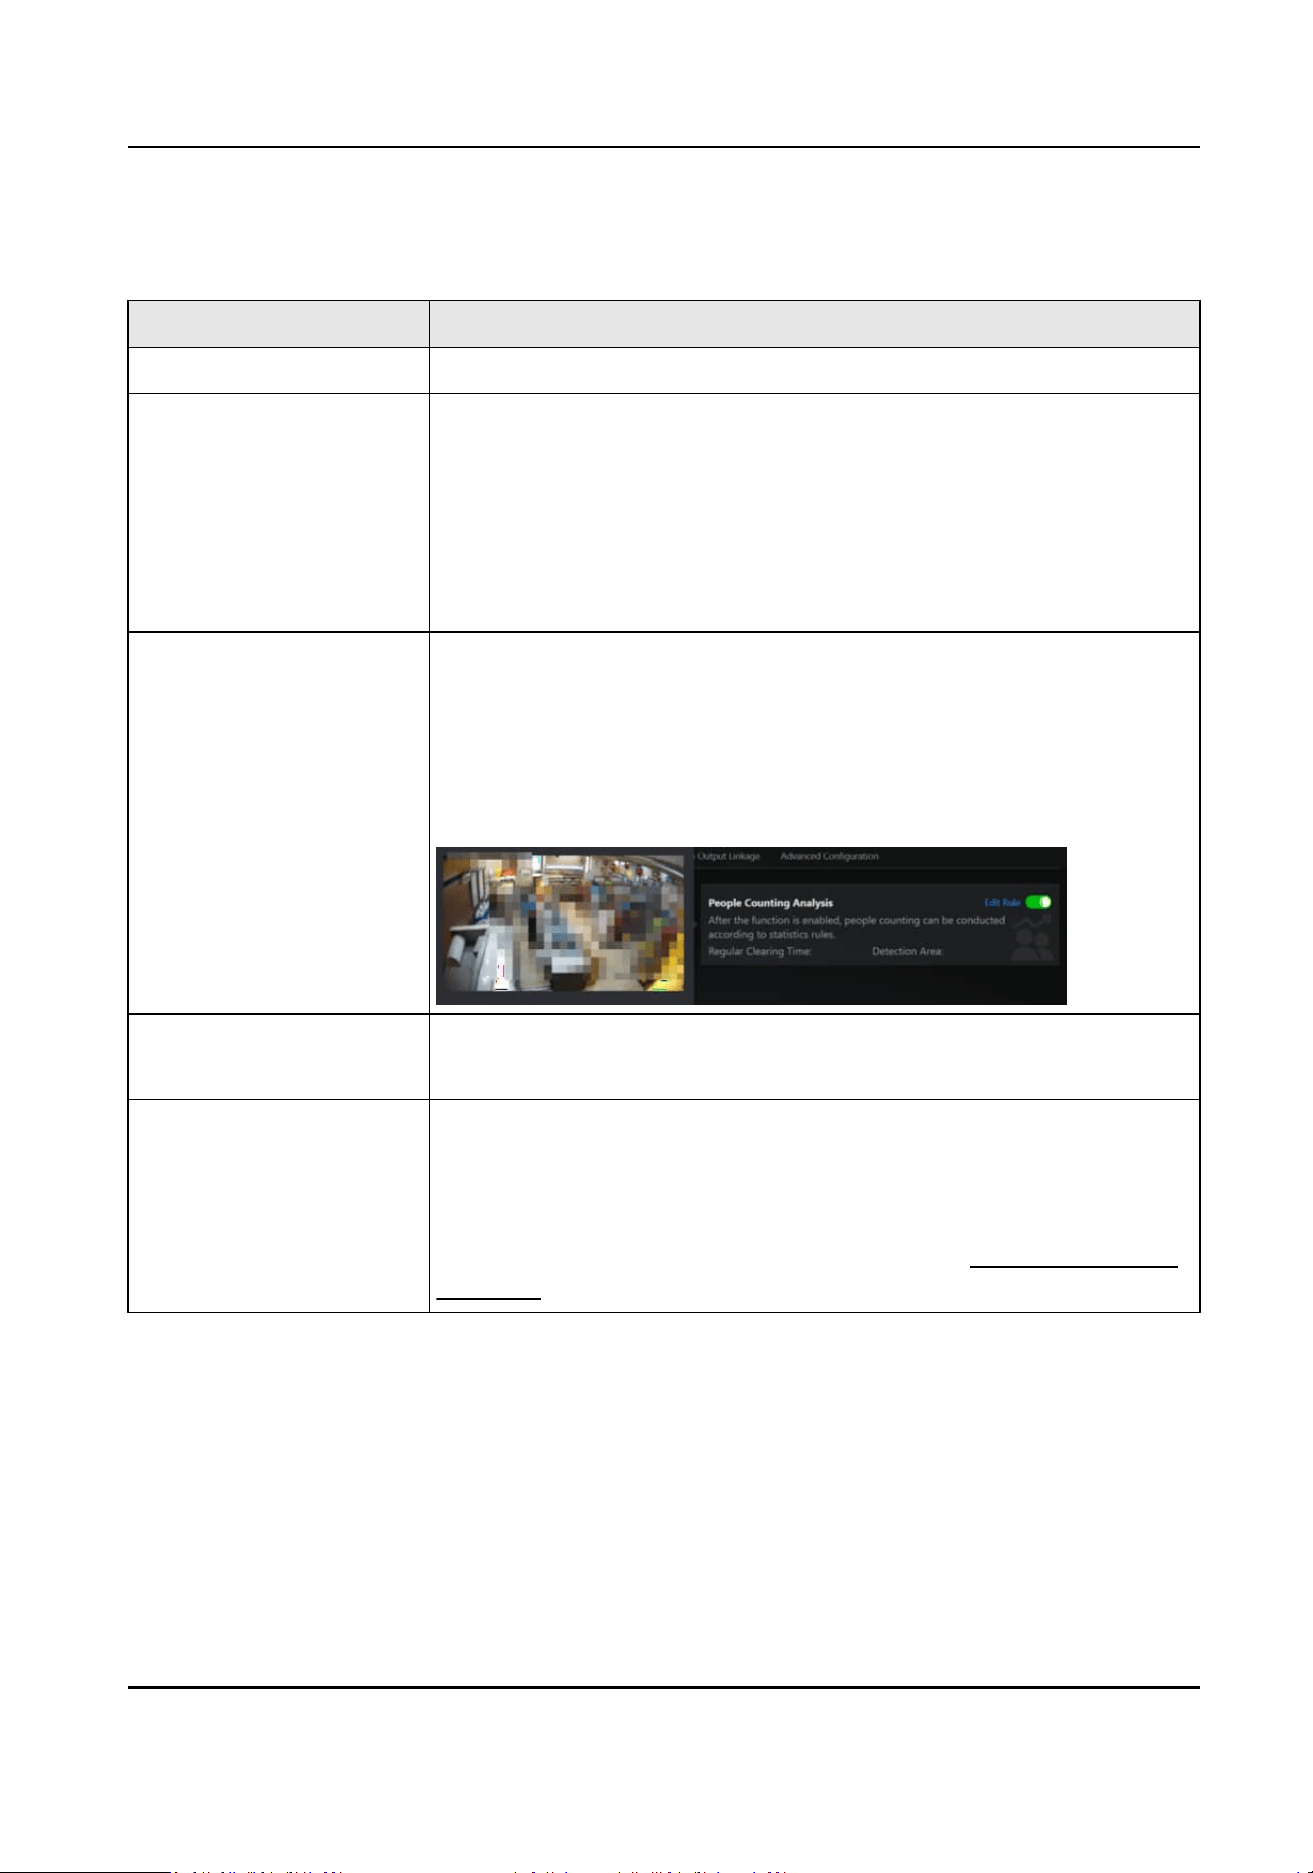
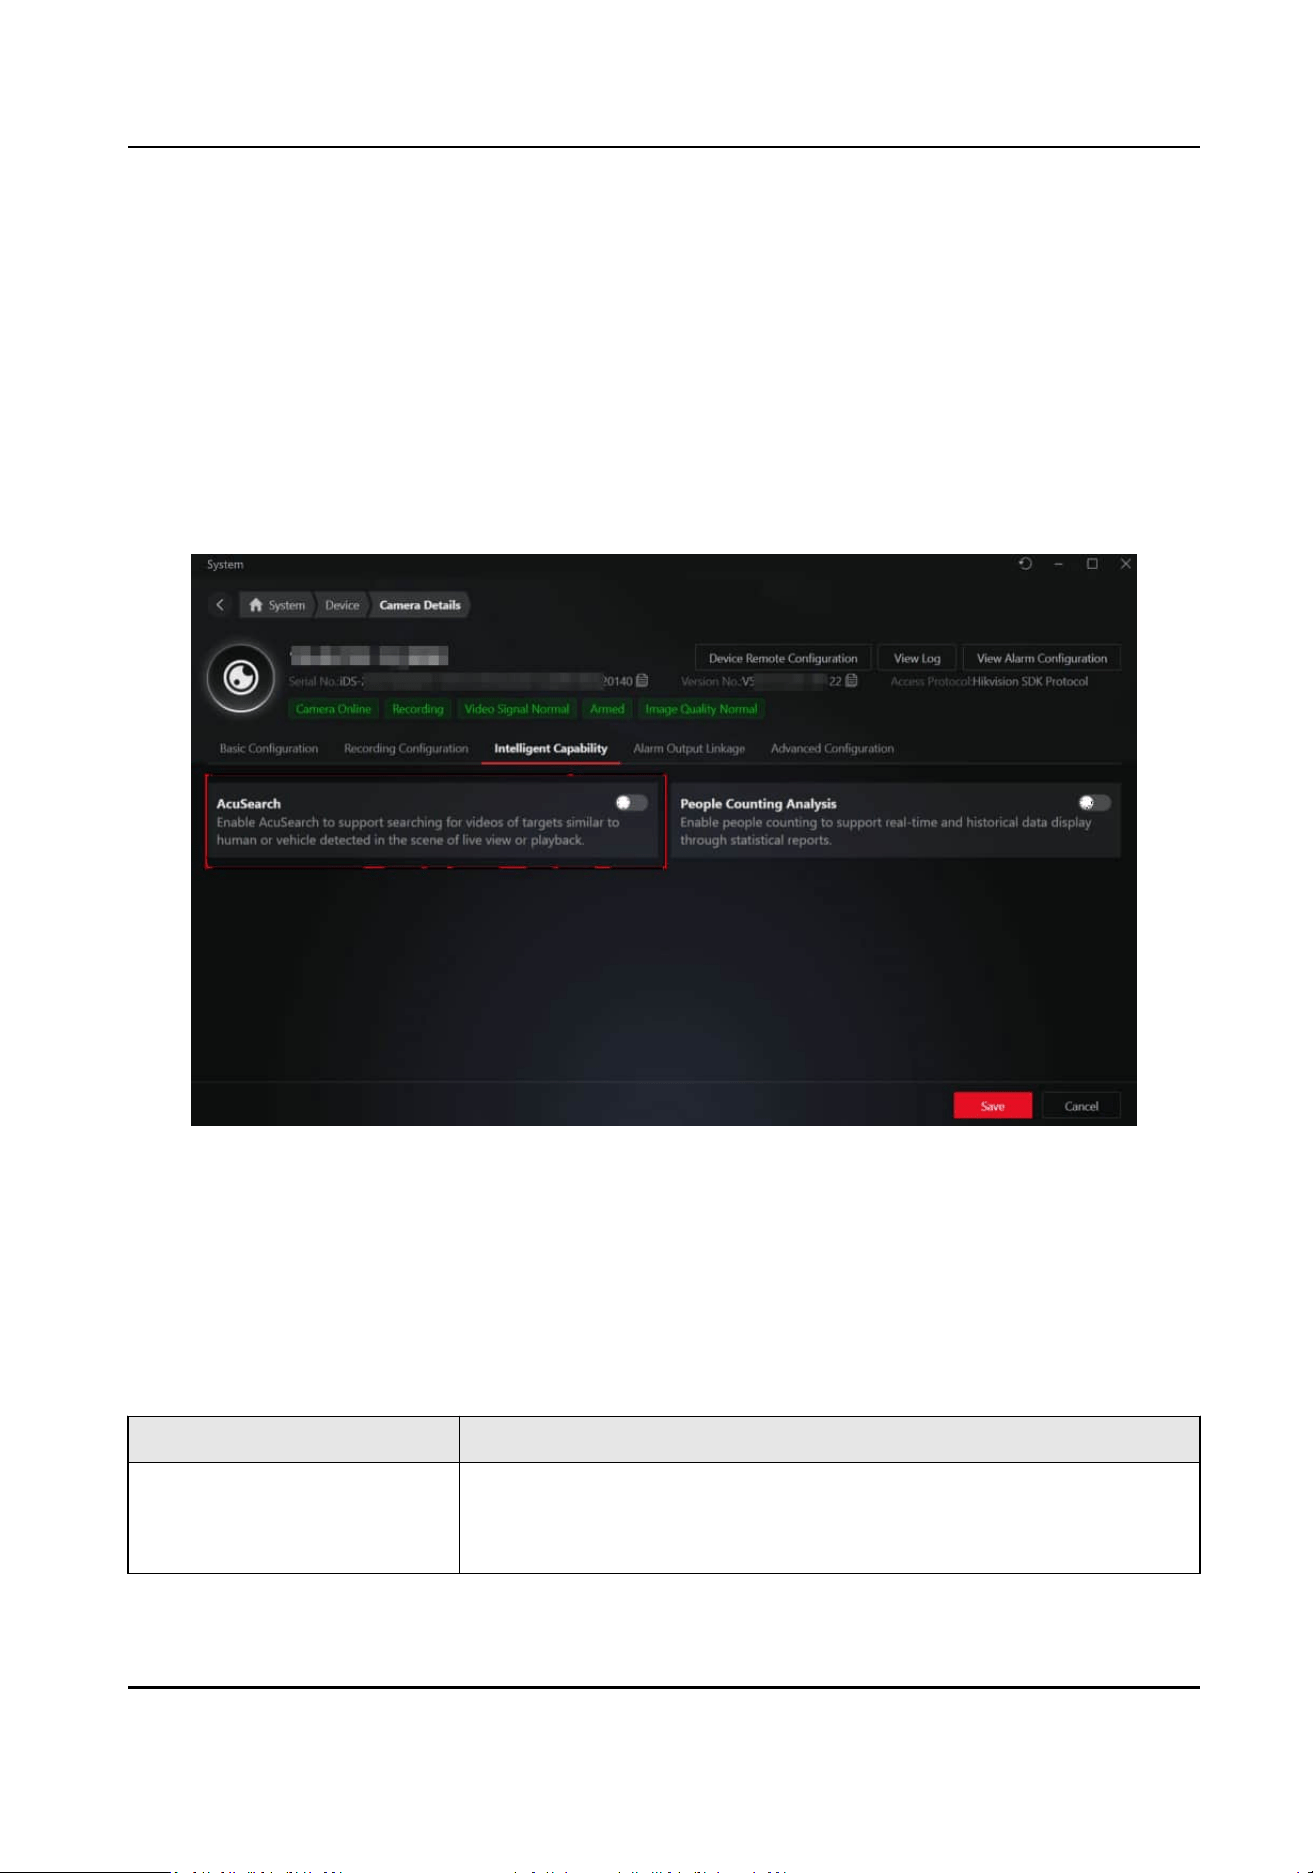
Intelligent Capability Intelligent funcons such as face picture comparison, AcuSearch,
AcuSeek, Smart Search, people counng, and ANPR of the camera are
displayed according to the camera capability and License.
Before applying the intelligent
funcons of cameras, you need to
enable them. In
addion, eding intelligent funcon rules and
copying rules to other cameras are supported on the current page.
Alarm Output Linkage It is valid for cameras only.
Add or edit the alarm outputs of cameras on the live view image.
Advanced Conguraon Set Transfer Protocol, or select media prole of main/sub stream for
the camera.
You can manually set the camera type to PTZ camera in case the PTZ
capability
recognion is incorrect. For a PTZ camera, you can perform
the PTZ control directly on current page. Refer to
PTZ Control During
Live View for details.
HikCentral Lite V1.1.1 User Manual
30
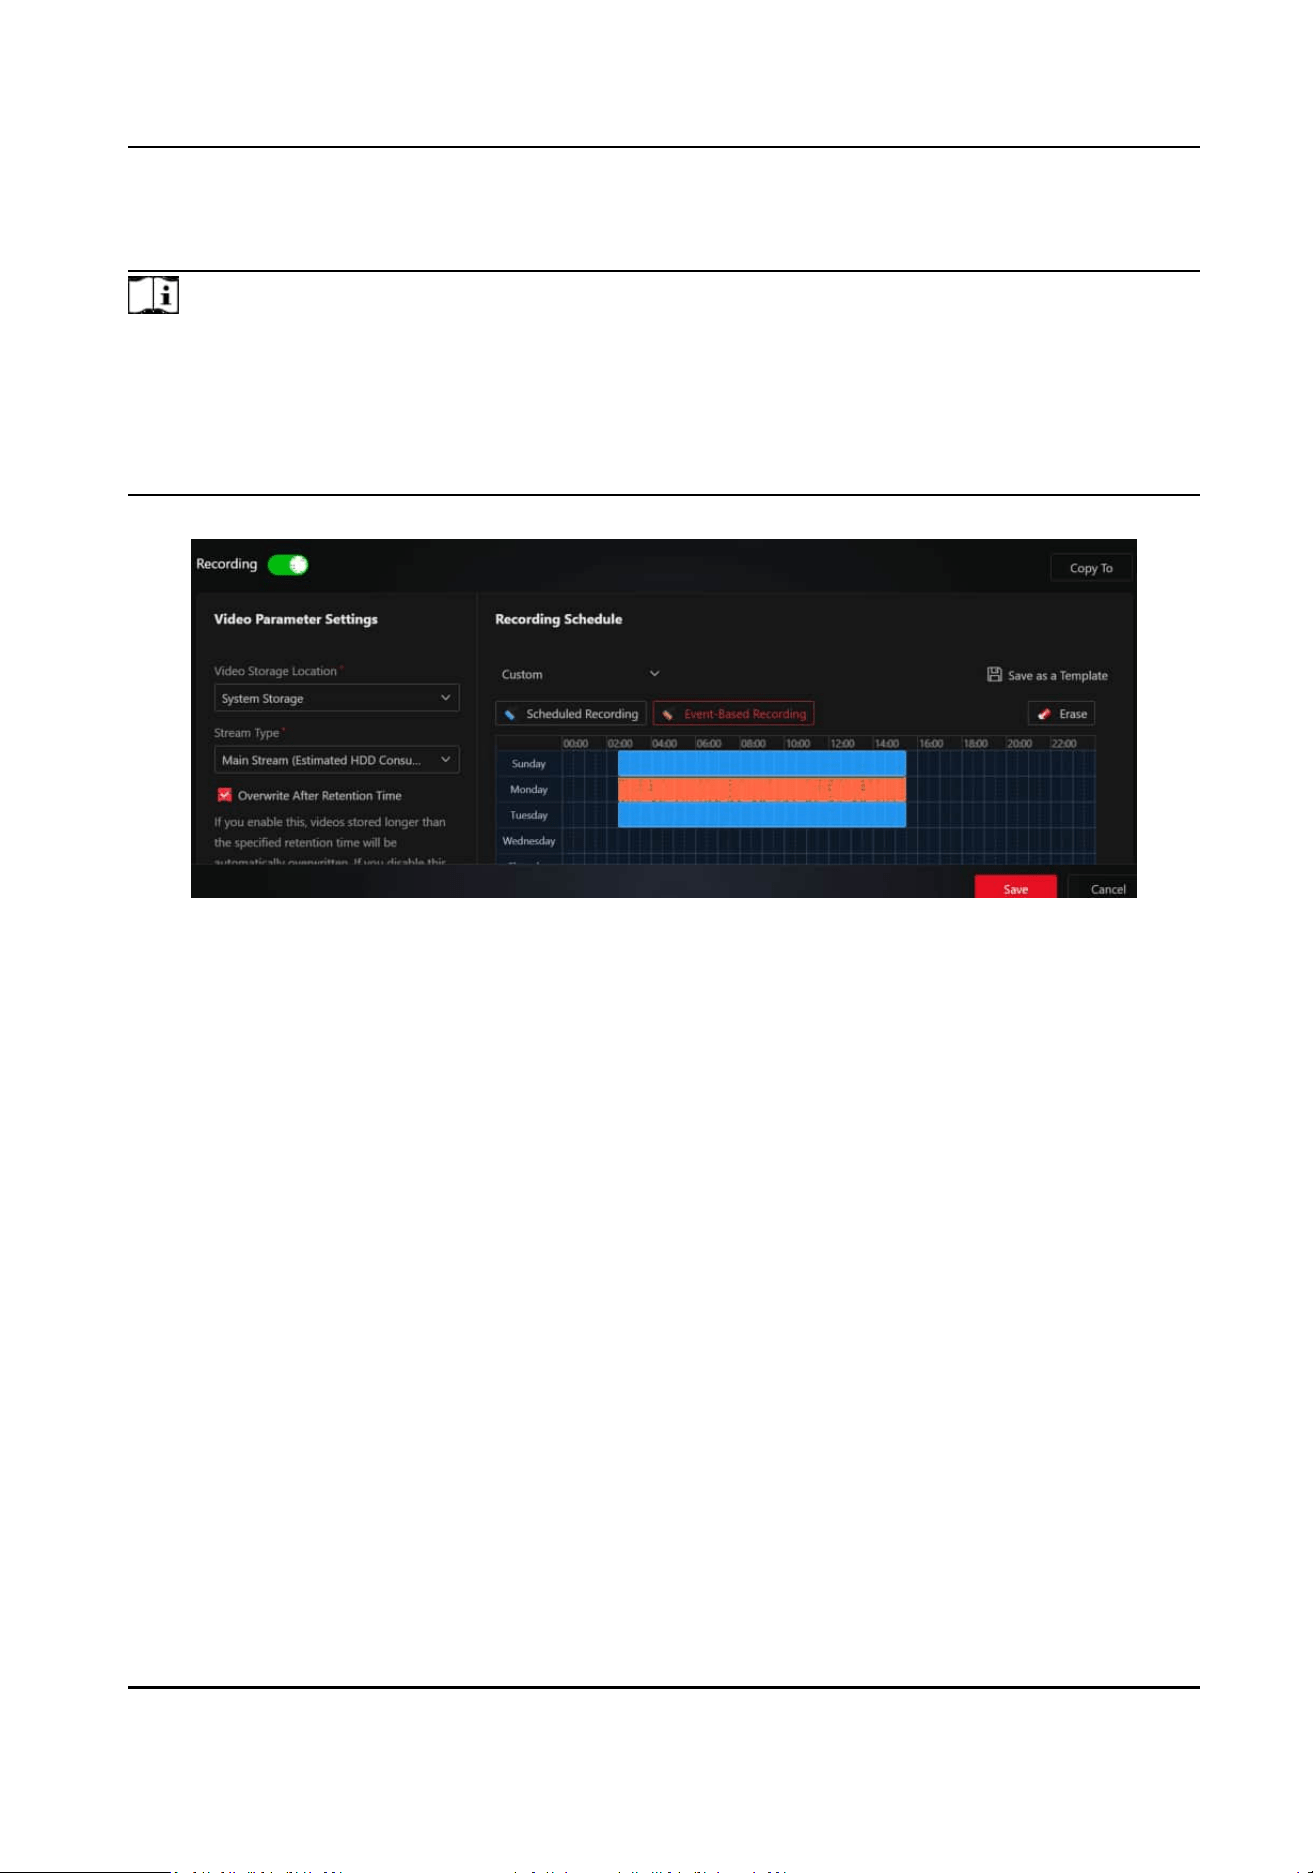
Congure Recording Parameters
Note
●
The recording schedule of added encoding devices will be automacally synchronized to the
system. That is, if a camera already has recording schedule congured, the system will
automacally enable recording according to the congured schedule when the camera is added.
●
The stream type for video storage is set to dual-stream by default if the camera supports. You
can switch the stream during playback.
Figure 3-2 Recording Conguraon
Switch on Recording, and set the video recording parameters.
Video Storage Locaon
The storage locaon of recorded video les. You can store these les in the system or local
device.
Stream Type
Choose the Main Stream, Sub-Stream, or Dual-Stream based on your actual needs for playback
quality, power
consumpon, etc.
Overwrite Aer Retenon Time / Retenon Time
If you enable Overwrite Aer Retenon Time, videos stored longer than the specied
Retenon
Time will be automacally overwrien. If you disable this, stored videos will be
overwrien in the order of their storage me (earliest rst) when the storage space is not
enough.
Auto Copy-Back
Enable this to temporarily store the video in the device when network fails, and transport the
video to storage device when network recovers.
HikCentral Lite V1.1.1 User Manual
31

Note
The feature is only eecve when the Stream Type is set to Main Stream and is supported only
by Hikvision cameras.
Recording Schedule
You can use the schedule template or dene a custom schedule. The scheduled recording is to
record
connuously within the me duraon, while the event triggered recording is to record
when alarm occurs.
Back up Video
Enable this to back up videos on the backup device. You can search and play the videos on the
backup device when the original videos are damaged, lost, or deleted.
Copy To
Click this to copy the recording
conguraons to other devices.
3.1.3 Add an Alarm for an Encoding Device
Before receiving the event/alarm detailed informaon which helps handle the situaon promptly,
you need to
congure the alarm rule in advance.
On the top of the Desktop, click System → Event and Alarm → Alarm Conguraon → Add Alarm .
Refer to
Add an Alarm for details.
Supported triggering events and sources for encoding devices are categorized according to their
properes. For the complete event list supported by encoding devices, refer to Supported
Triggering Events .
3.2 Basic
Funcons Related to Video Monitoring
The video monitoring basic funcons include live view, playback, PTZ control, and monitoring on
the map.
3.2.1 Start Live View / Playback of Camera
You can start live view or playback of one or mulple cameras.
Start Live View / Playback of One Camera
●
Start Live View of One Camera: Double click a camera, or drag a camera from the camera list to
the viewing grid, or right click a camera and click Open to start live view of the camera.
●
Start Playback of One Camera:
Aer starng live view of a camera, draw the meline backwards,
or click Playback on the lower le corner to start playback of the camera.
During playback,
HikCentral Lite V1.1.1 User Manual
32
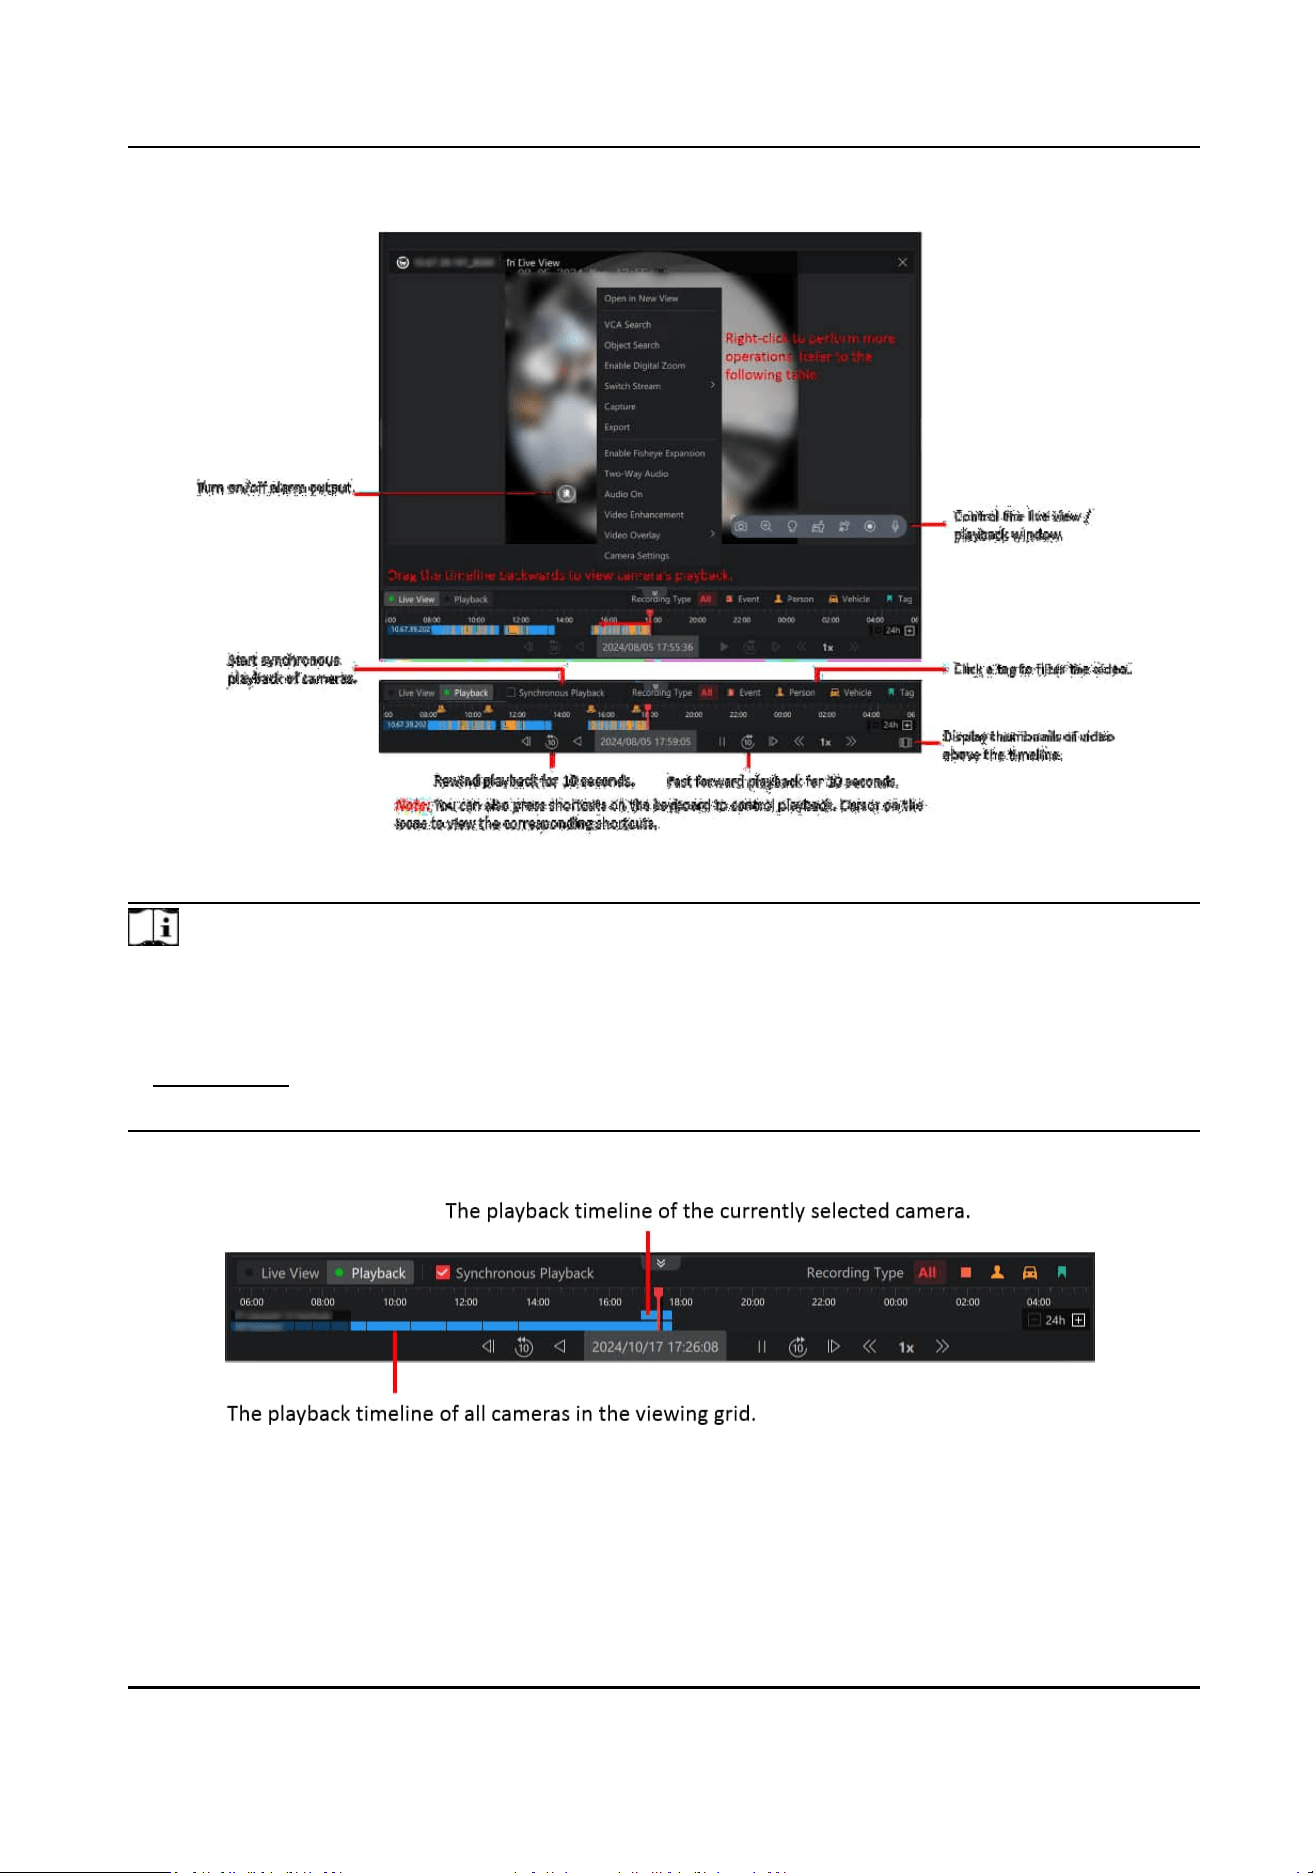
Figure 3-3 Start Live View / Playback of One Camera
Note
For videos tagged with Person or Vehicle, you should noce the following:
●
To enable the tags, make sure that at least one VCA event, such as intrusion or line crossing, is
congured on the device. Human or/and vehicle target detecon should be enabled.
●
Subscripon of the corresponding event on HikCentral Lite should be enabled.
●
Videos recorded before the device is added to the
plaorm will not be tagged.
Figure 3-4 Synchronous Playback
HikCentral Lite V1.1.1 User Manual
33
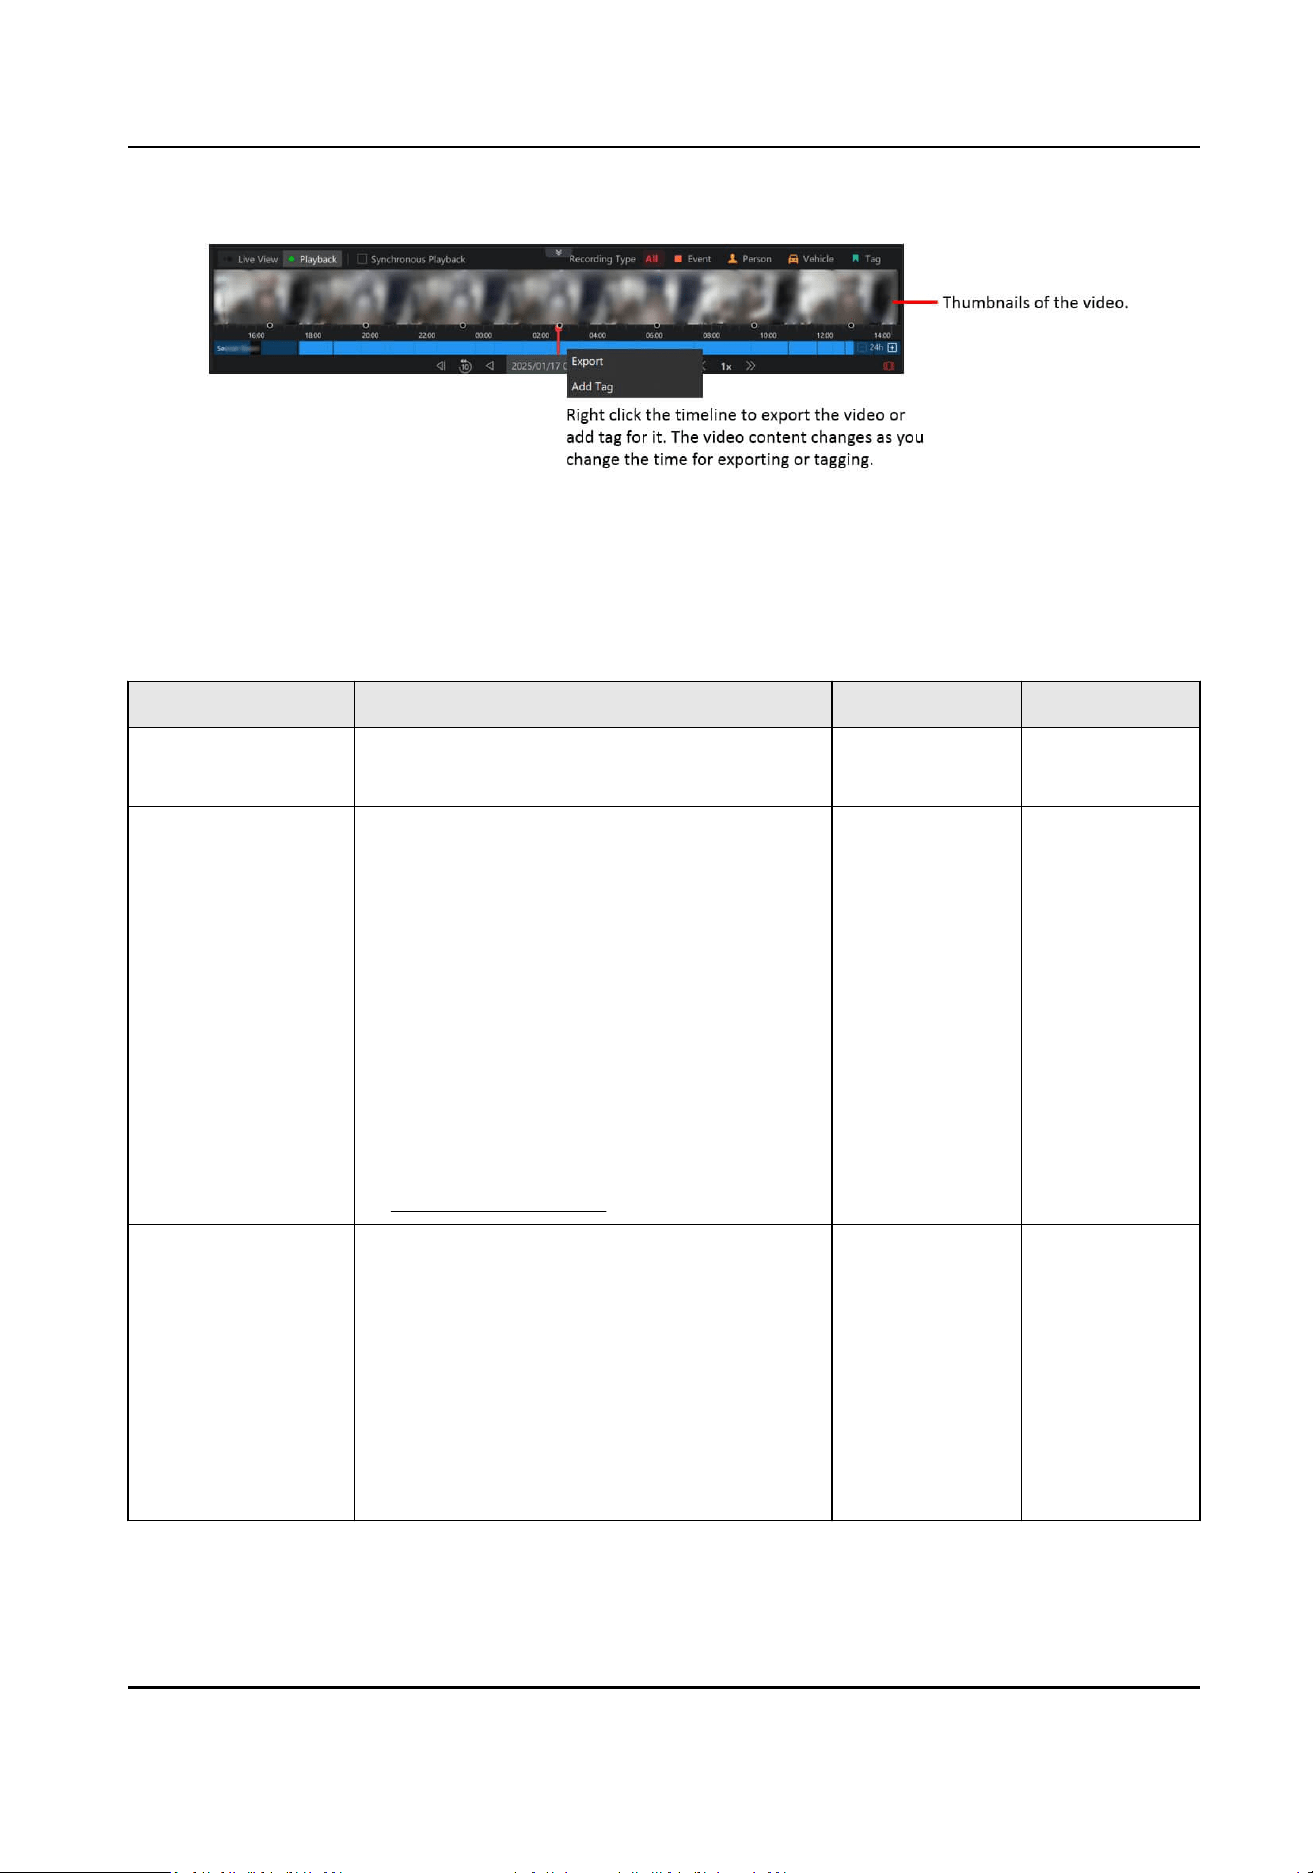
Figure 3-5 Video Thumbnails
During live view or playback, you can right click the window or click the icons in the lower right
corner of the window to control the live view or playback window. Refer to the following table for
the supported
operaons.
Funcon Explanaon Live View Playback
Open in New View Open the live view / playback window in a
new view.
√ √
Smart Search / VCA
Search
Smart Search: draw an area on the video
to detect whether there are persons and/
or vehicles entering this area.
VCA Search: draw an area on the video to
detect whether there are moving objects
in this area or objects entering this area.
You can view the detected results on the
right side of the page. Click a result to
view the related video or right click a
result to enter the Intelligent Search page.
For details about VCA
conguraon, refer
to Smart Search / VCA .
√ √
AcuSearch / Object
Search
AcuSearch
Detects human bodies and vehicles and
search for objects similar to them in
captured pictures.
Object Search
Detects faces and human bodies and
search for objects similar to them in
captured pictures.
√ √
HikCentral Lite V1.1.1 User Manual
34

Funcon Explanaon Live View Playback
Enable Digital
Zoom
●
Click and then click on the video
image to zoom in.
●
Draw a frame from le side to right side
on the video image to zoom in the
selected area; and draw a frame in the
opposite
direcon to zoom out.
●
Scroll the mouse wheel forwards or
backwards to zoom in or out the video
image.
√ √
Stream Switch Switch streams to main stream, sub
stream, fourth stream, or smooth stream.
√ √
Capture Take a snapshot of the current video
image.
√ √
Export Export the video. × √
Start Recording Record a video for the desired me
period.
√ ×
Enable PTZ Control Refer to PTZ Control During Live View for
details.
√ ×
Enable Target
Tracking
Connuously track the selected target
(person/vehicle) in the video.
√ ×
Enable Smart
Linkage
Locate the target appeared in the video. √ ×
Enable Fisheye
Expansion
The wide-angle view of the camera is
displayed. In this mode, the perspecve
and angles of objects in the video image
will be distorted.
√ √
Two-Way Audio Start two-way audio with the camera or
NVR device.
√ √
Audio On/O Turn on/o the audio of the video. √ √
Light On/O Turn on/o the light of the camera. √ ×
Video
Enhancement
Adjust the video image such as brightness
and saturaon.
√ √
HikCentral Lite V1.1.1 User Manual
35

Funcon Explanaon Live View Playback
Video Overlay Display the needed informaon on the live
view / playback image.
√ √
Camera Sengs Set camera parameters such as recording
parameters. Refer to View and Congure
Details of Encoding Devices .
√ √
During playback, you can control the image via shortcuts on the keyboard.
Table 3-1 Shortcuts
Key Funconality
↑ Fast Forward
↓ Fast Rewind
← Single-Frame Reverse Playback
→ Single-Frame Fast Forward
[ Reverse Playback
] Normal Playback
Space Pause/Play
Note
These funcons should be supported by the device: PTZ control, smart linkage, target tracking,
two-way audio, audio on/o and light on/o.
Start Live View / Playback of Mulple Cameras
●
Start Live View of
Mulple Cameras:
○
Press the ctrl key, select cameras, and drag them from the camera list to the right window to
start live view of mulple cameras.
○
Press the ctrl key, select cameras, right click the cameras and click Open to start live view of
mulple cameras.
●
Start Playback of
Mulple Cameras: Select a live view window, and drag the meline on the
playback panel backwards to start playback of the camera. Repeat the above operaons to view
playback of
mulple cameras.
During live view or playback, you can select mulple live view or playback windows and right click
to batch control them. Refer to the following table for the supported
operaons.
HikCentral Lite V1.1.1 User Manual
36

Funcon Explanaon
Export Video File Export the video le within the selected me range.
Audio On/O Turn on/o the audio of the video.
Close Window Close the live view / playback windows.
Congure Parameters for Video Monitoring
Right click the blank area in the viewing grid, and congure the following parameters.
View Scale
Original Resoluon indicates to play a video in its original size, and the image may not ll the
live view / playback window. Full Screen indicates that the image will
ll the enre live view /
playback window.
Decoding Mode
Hardware decoding is to decode based on GPU, while soware decoding is on CPU. Choose the
decoding mode according to your GPU/CPU performance.
3.2.2 PTZ Control During Live View
You can control cameras with pan/lt/zoom funconality during live view. You can set the preset
and patrol for the cameras on the PTZ control pane.
Double click a PTZ camera, or drag a PTZ camera to the right window, or right click a PTZ camera
and click Open to start live view of the camera.
Click
in the lower right corner to pop up the PTZ control icons on the right side. See the
following
gure for the supported operaons.
HikCentral Lite V1.1.1 User Manual
37
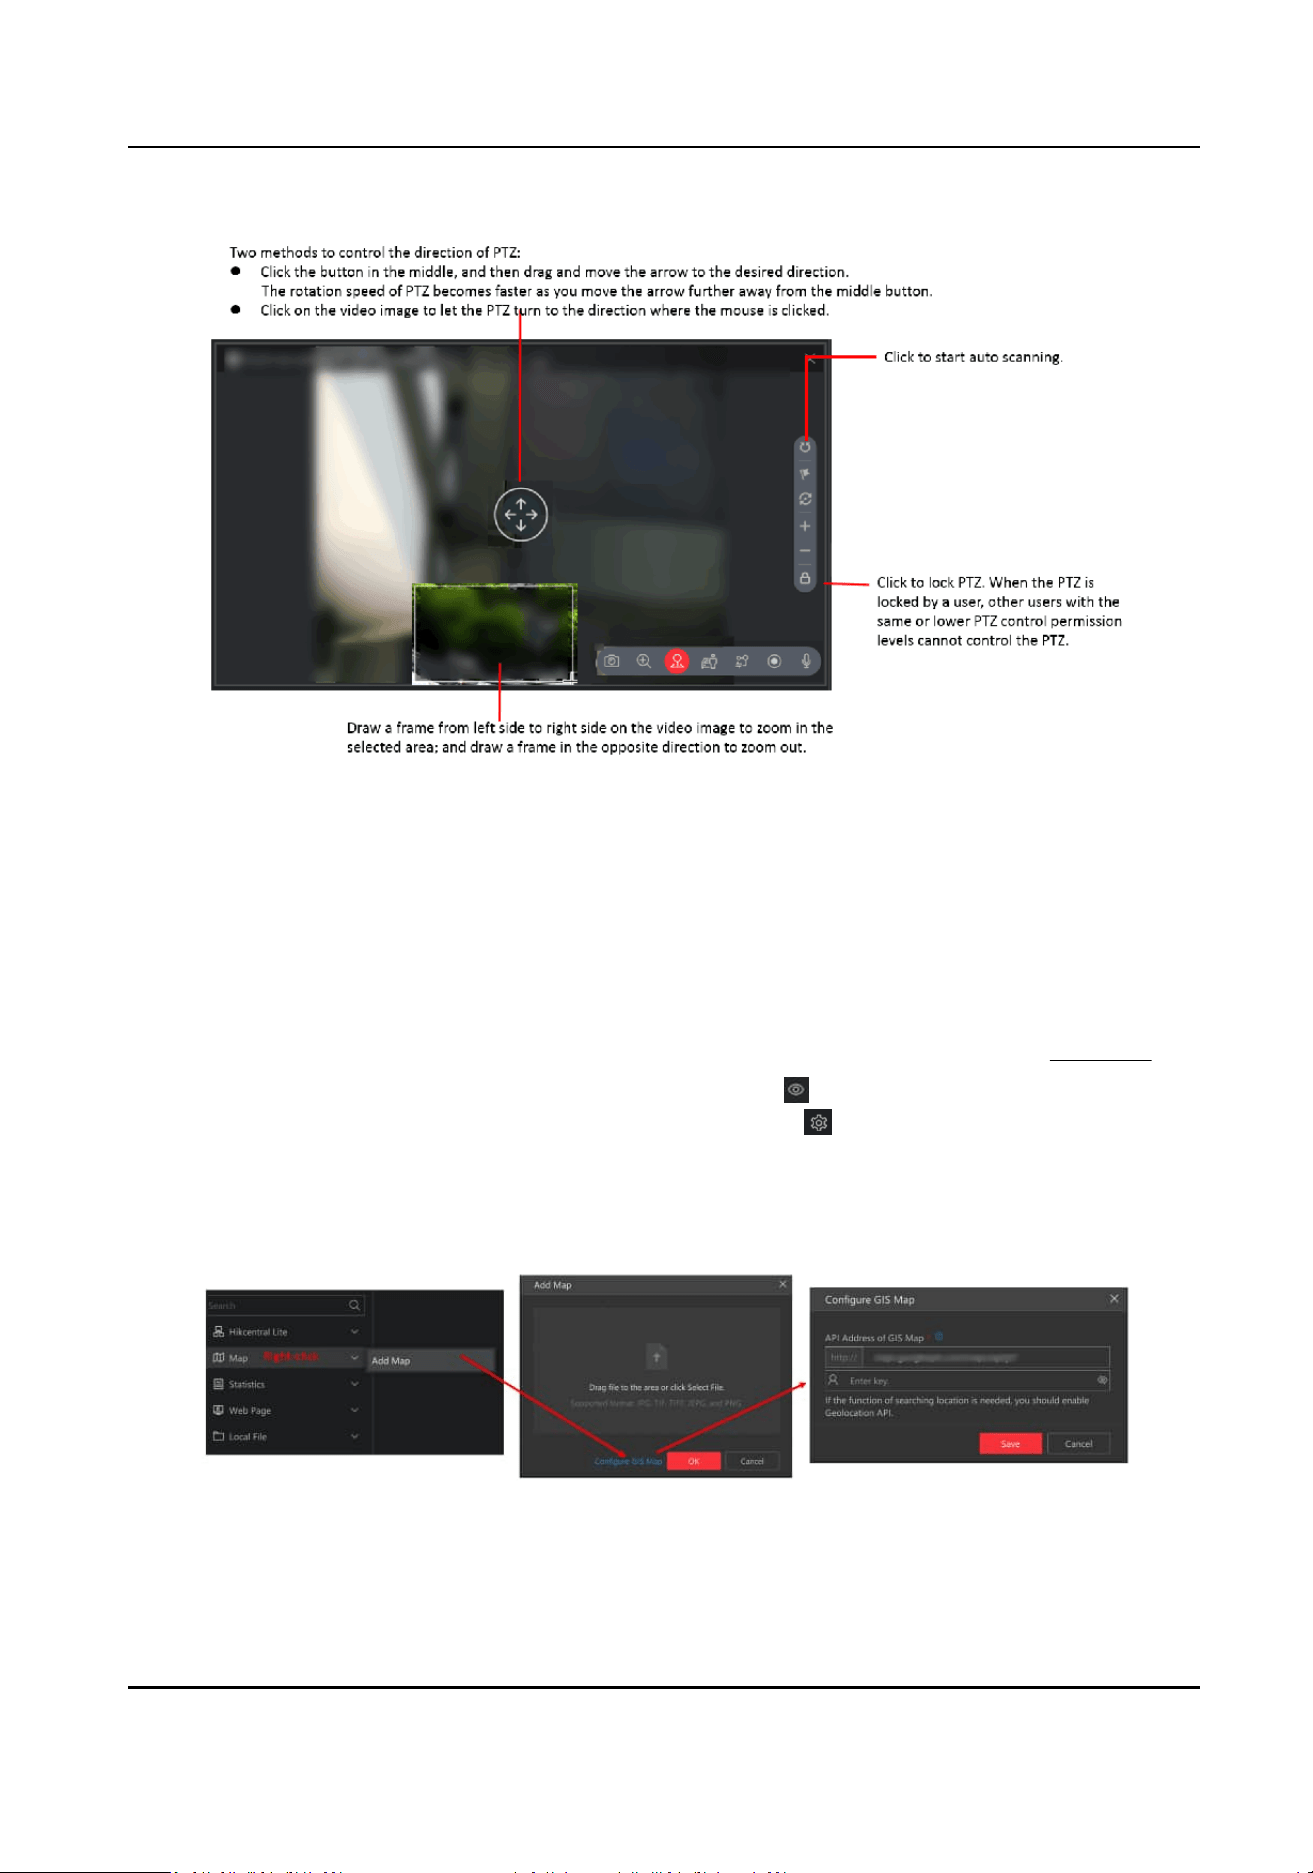
Figure 3-6 PTZ Control
3.2.3 Monitor via Cameras on the Map
Aer adding cameras to the map, you can view live view and playback of cameras and camera
status on the map.
In the Map module, double click a map, or drag a map to the right window, or right click a map and
click Open to view the map and its resources. For details about adding maps, refer to
Add Map .
There are two modes for the map. In the Monitoring mode (
), you can view live view and
playback via cameras on the map. In the Conguraon mode ( ), you can add cameras, marks,
and hot regions to the map, set the types of resources to be displayed on the map, etc.
Add Map
Figure 3-7 Add GIS Map
HikCentral Lite V1.1.1 User Manual
38
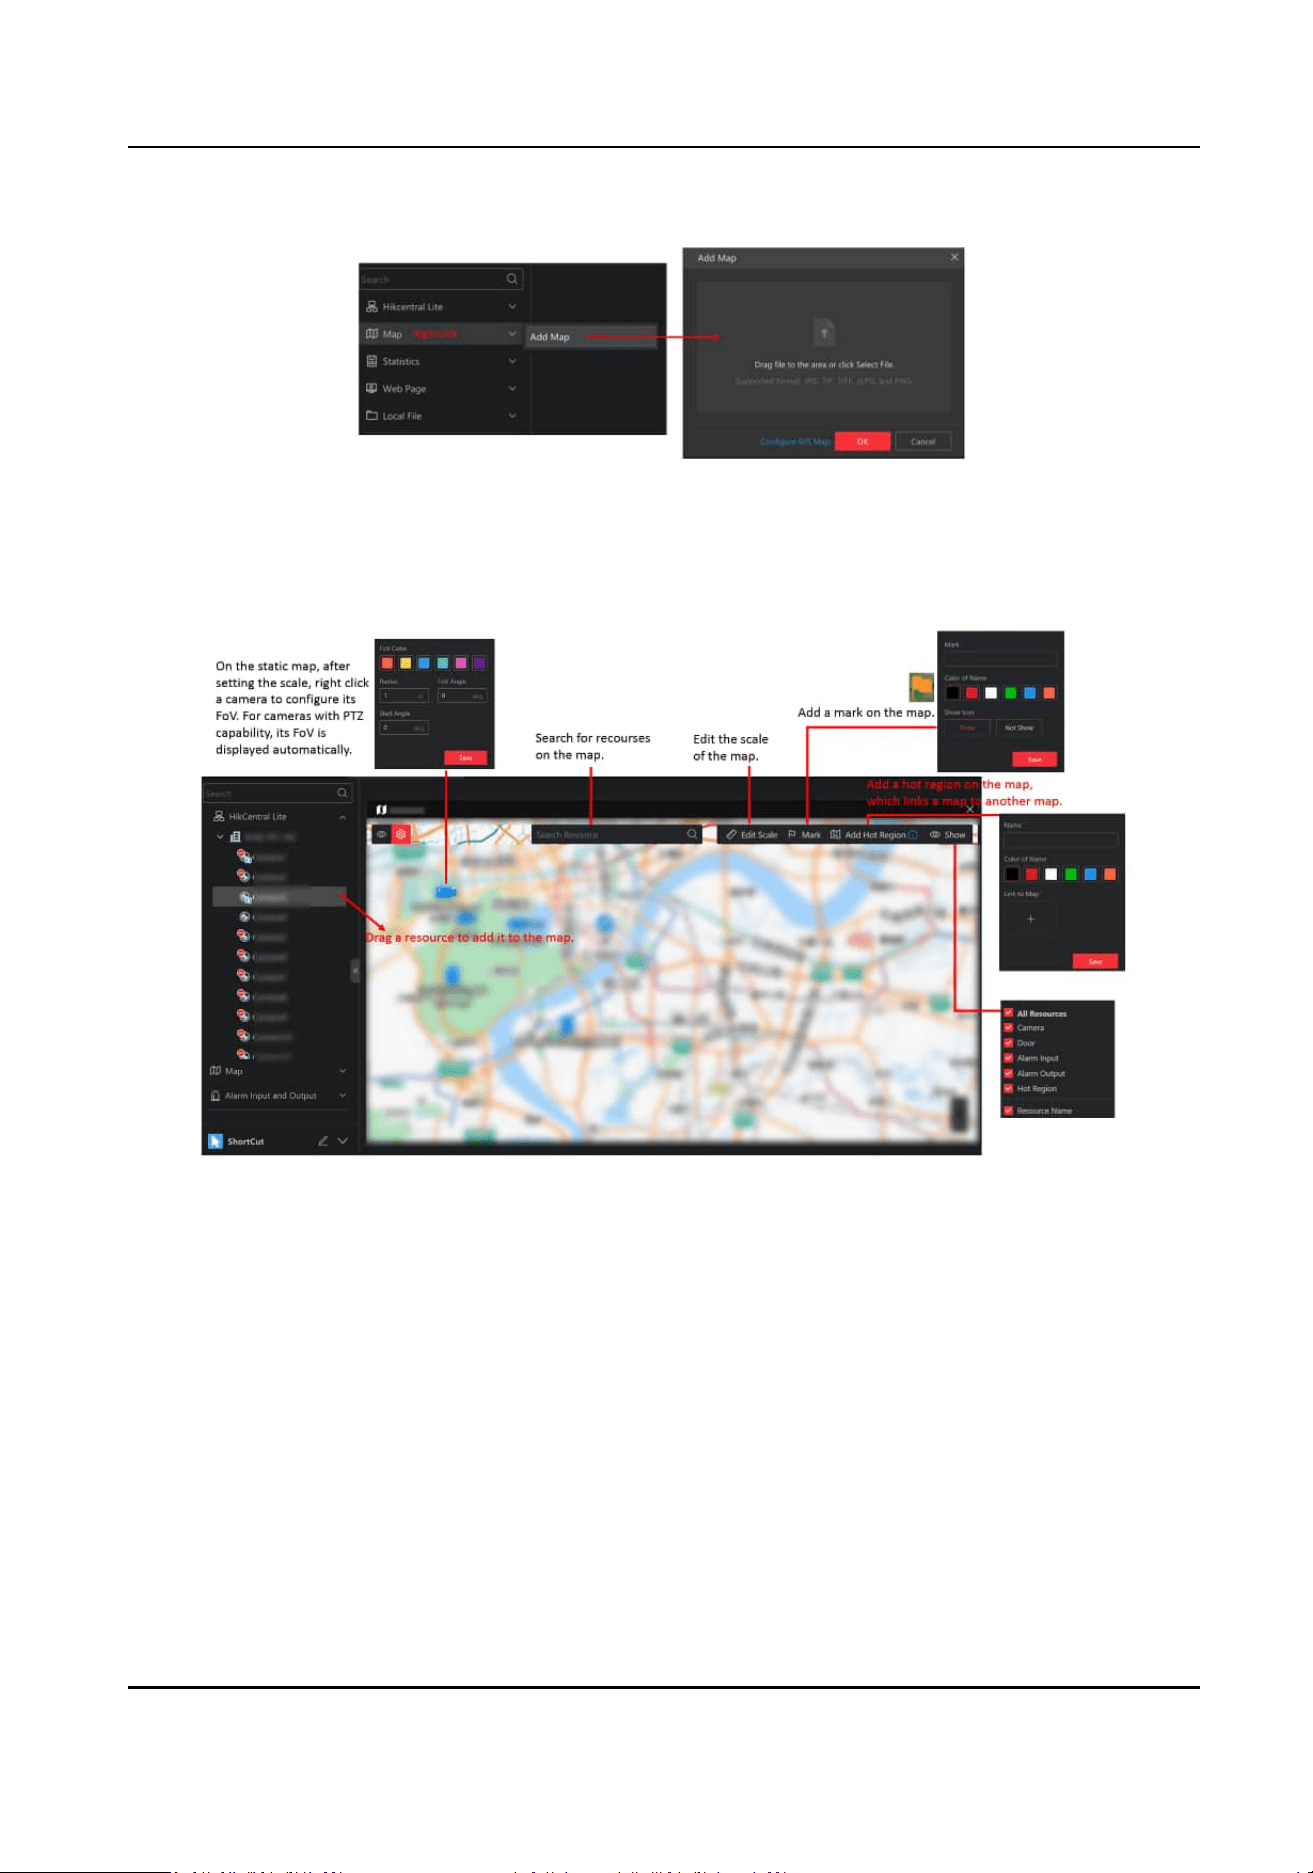
Figure 3-8 Add E-Map
Conguraon Mode
Figure 3-9 Supported Operaons in Conguraon Mode
Monitoring Mode
You can monitor via cameras on the map.
●
Click a camera to view the live view of the camera on the map.
HikCentral Lite V1.1.1 User Manual
39
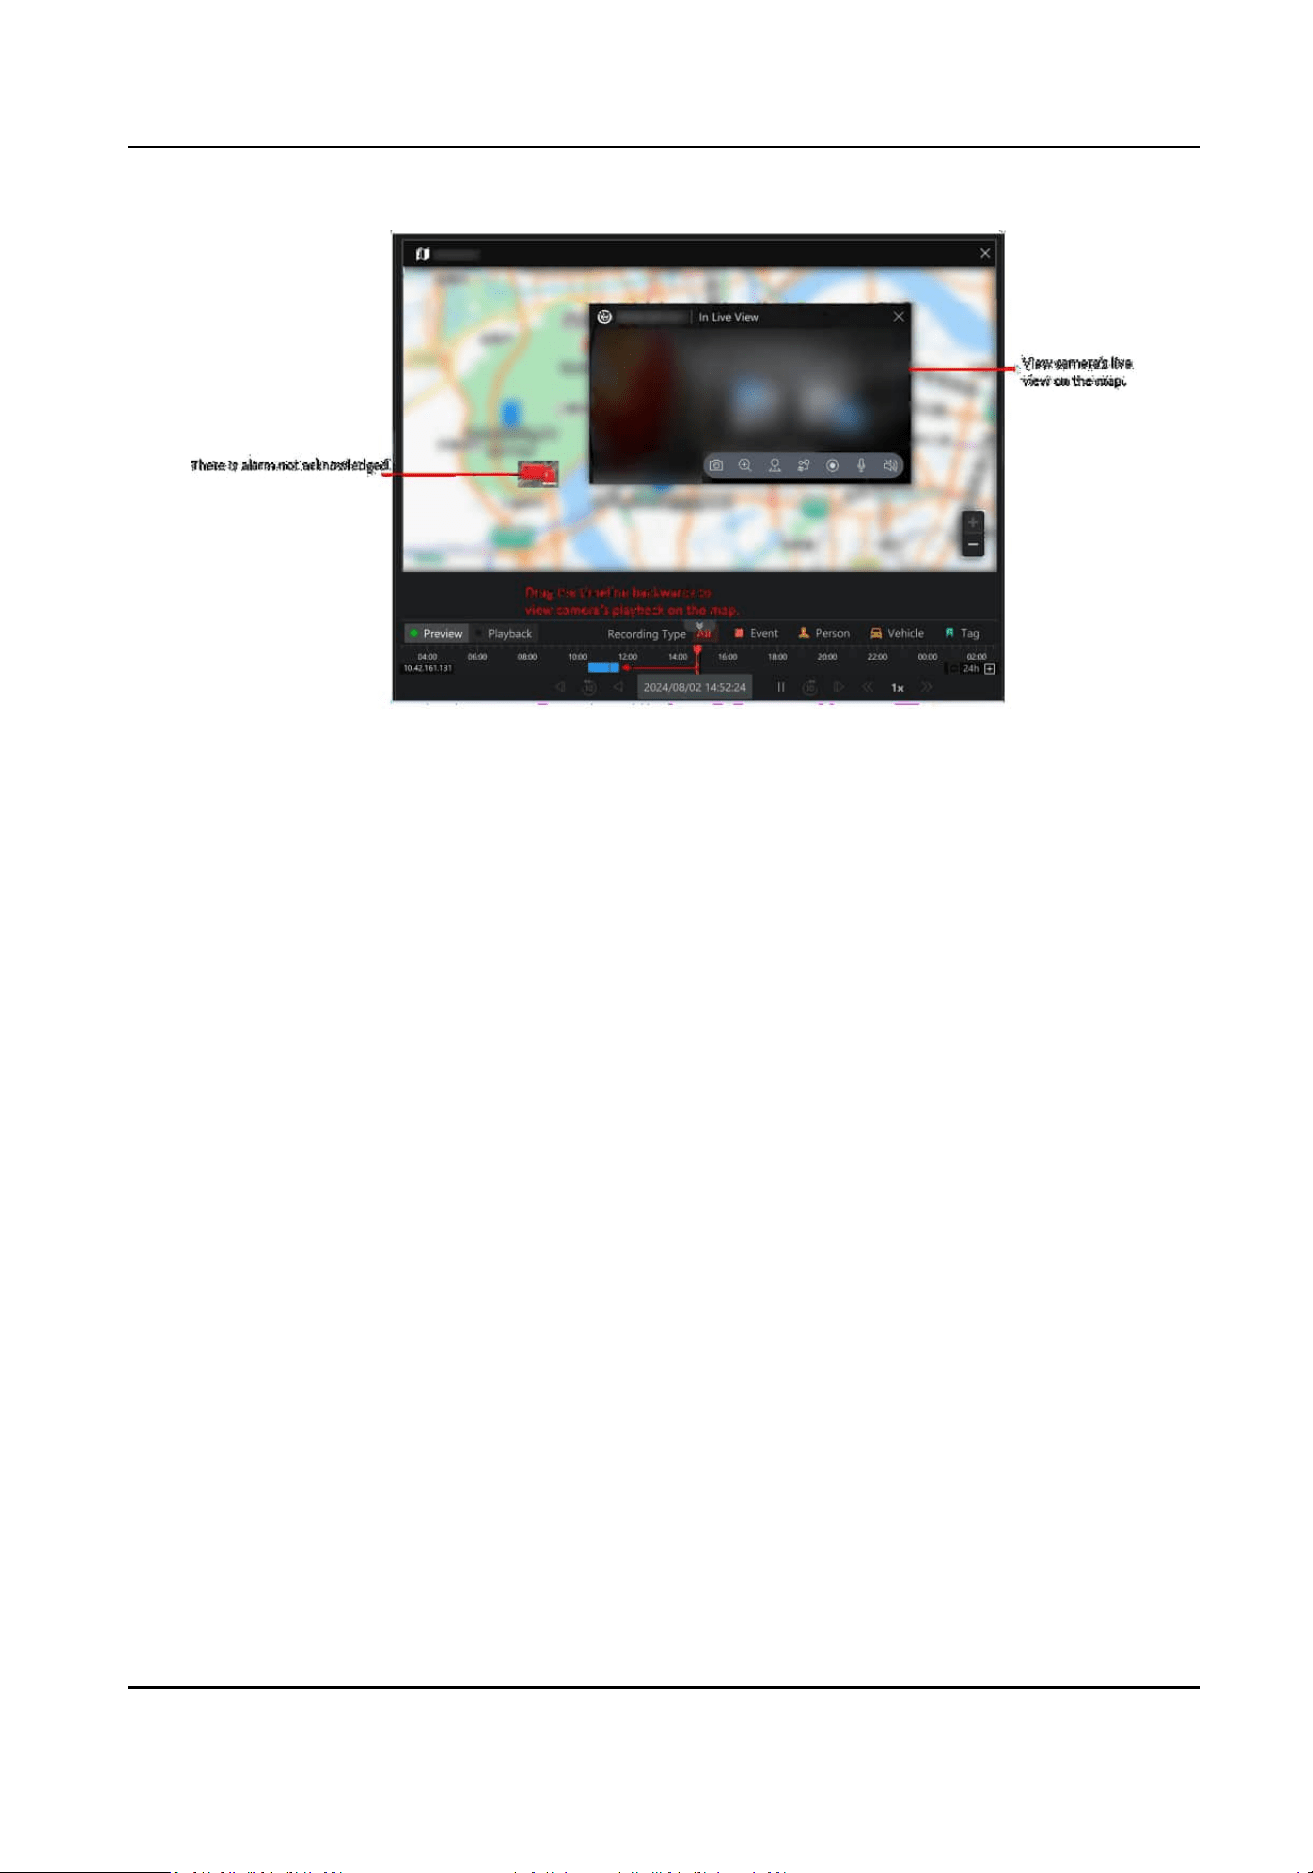
Figure 3-10 View Camera's Live View and Playback on the Map
●
Click Batch Select, draw an area to select mulple cameras, and click Batch Play to view the live
view of cameras in a batch.
Press the Ctrl key, select mulple cameras, and drag them to the windows outside of the map to
view the live view of cameras in a batch.
HikCentral Lite V1.1.1 User Manual
40
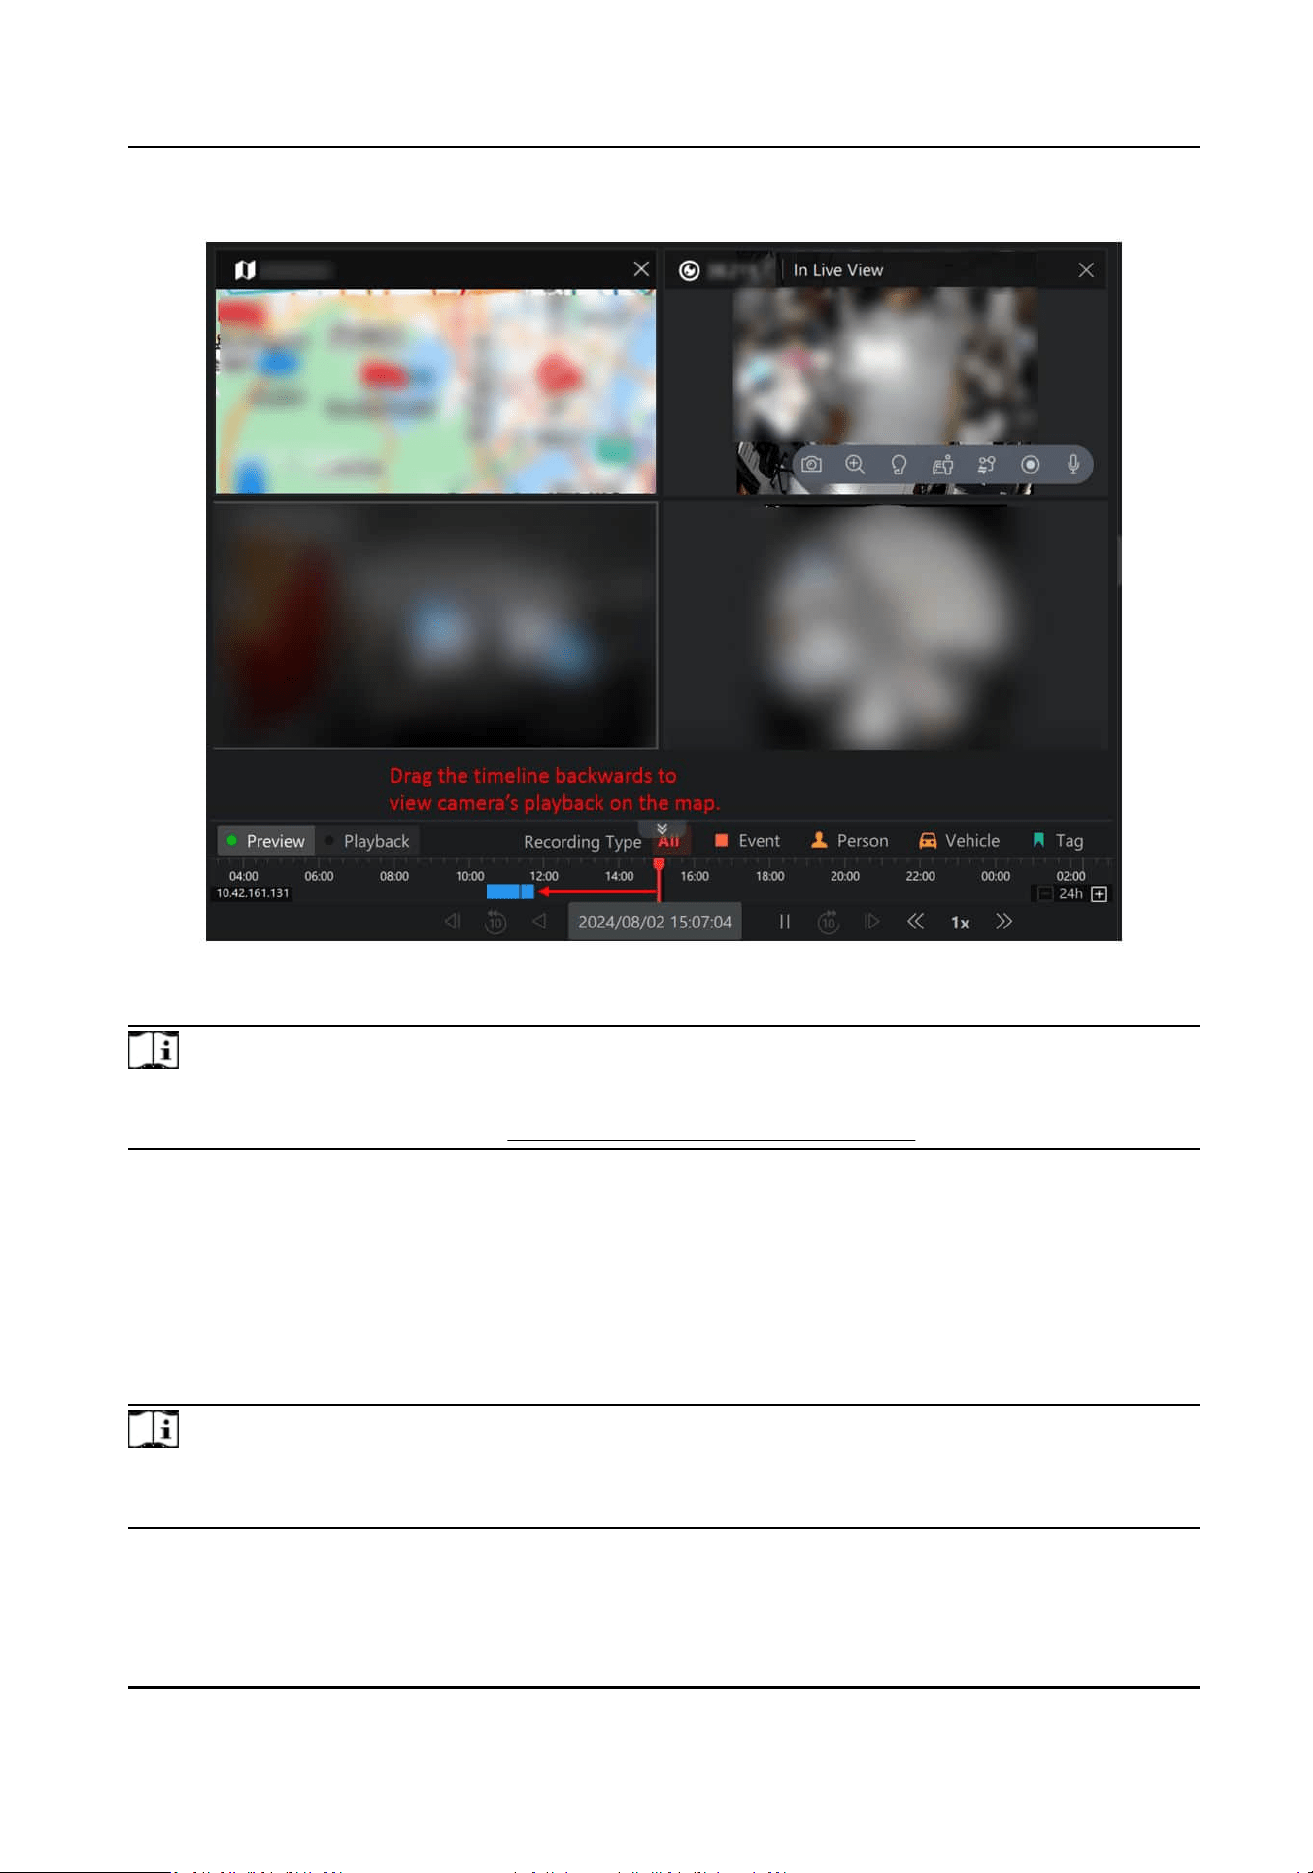
Figure 3-11 Batch View Cameras' Live View and Playback
Note
When viewing the live view or playback of the camera, right click the live view or playback image to
perform more operaons. Refer to Start Live View / Playback of Camera for details.
3.3 Face Picture Comparison and Human Body Detecon
Face picture comparison refers to comparing two face pictures to determine if they are the same
person. Human body detecon focuses on detecng human bodies in dierent environments.
These two
funcons are crucial for security purposes and are widely used in various sectors such as
retail stores and enterprises.
Note
Make sure the cameras or DeepinMind NVRs have the compability of face picture comparison.
You can contact our technical supports for detailed models.
HikCentral Lite V1.1.1 User Manual
41
3.3.1 Add Face Picture Libraries and Face Pictures
Face pictures are used to compare with the face pictures of the capture persons. Face picture
libraries are used to manage or group face pictures, for example, you can add the face pictures of
VIP customers in to a
specic face picture library named "VIP Customer".
Click System → Face Picture Library to enter the managing face picture libraries and face pictures
page.
●
Add Face Picture Library:
Click Add Face Picture Library in the down
le corner to add face picture libraries.
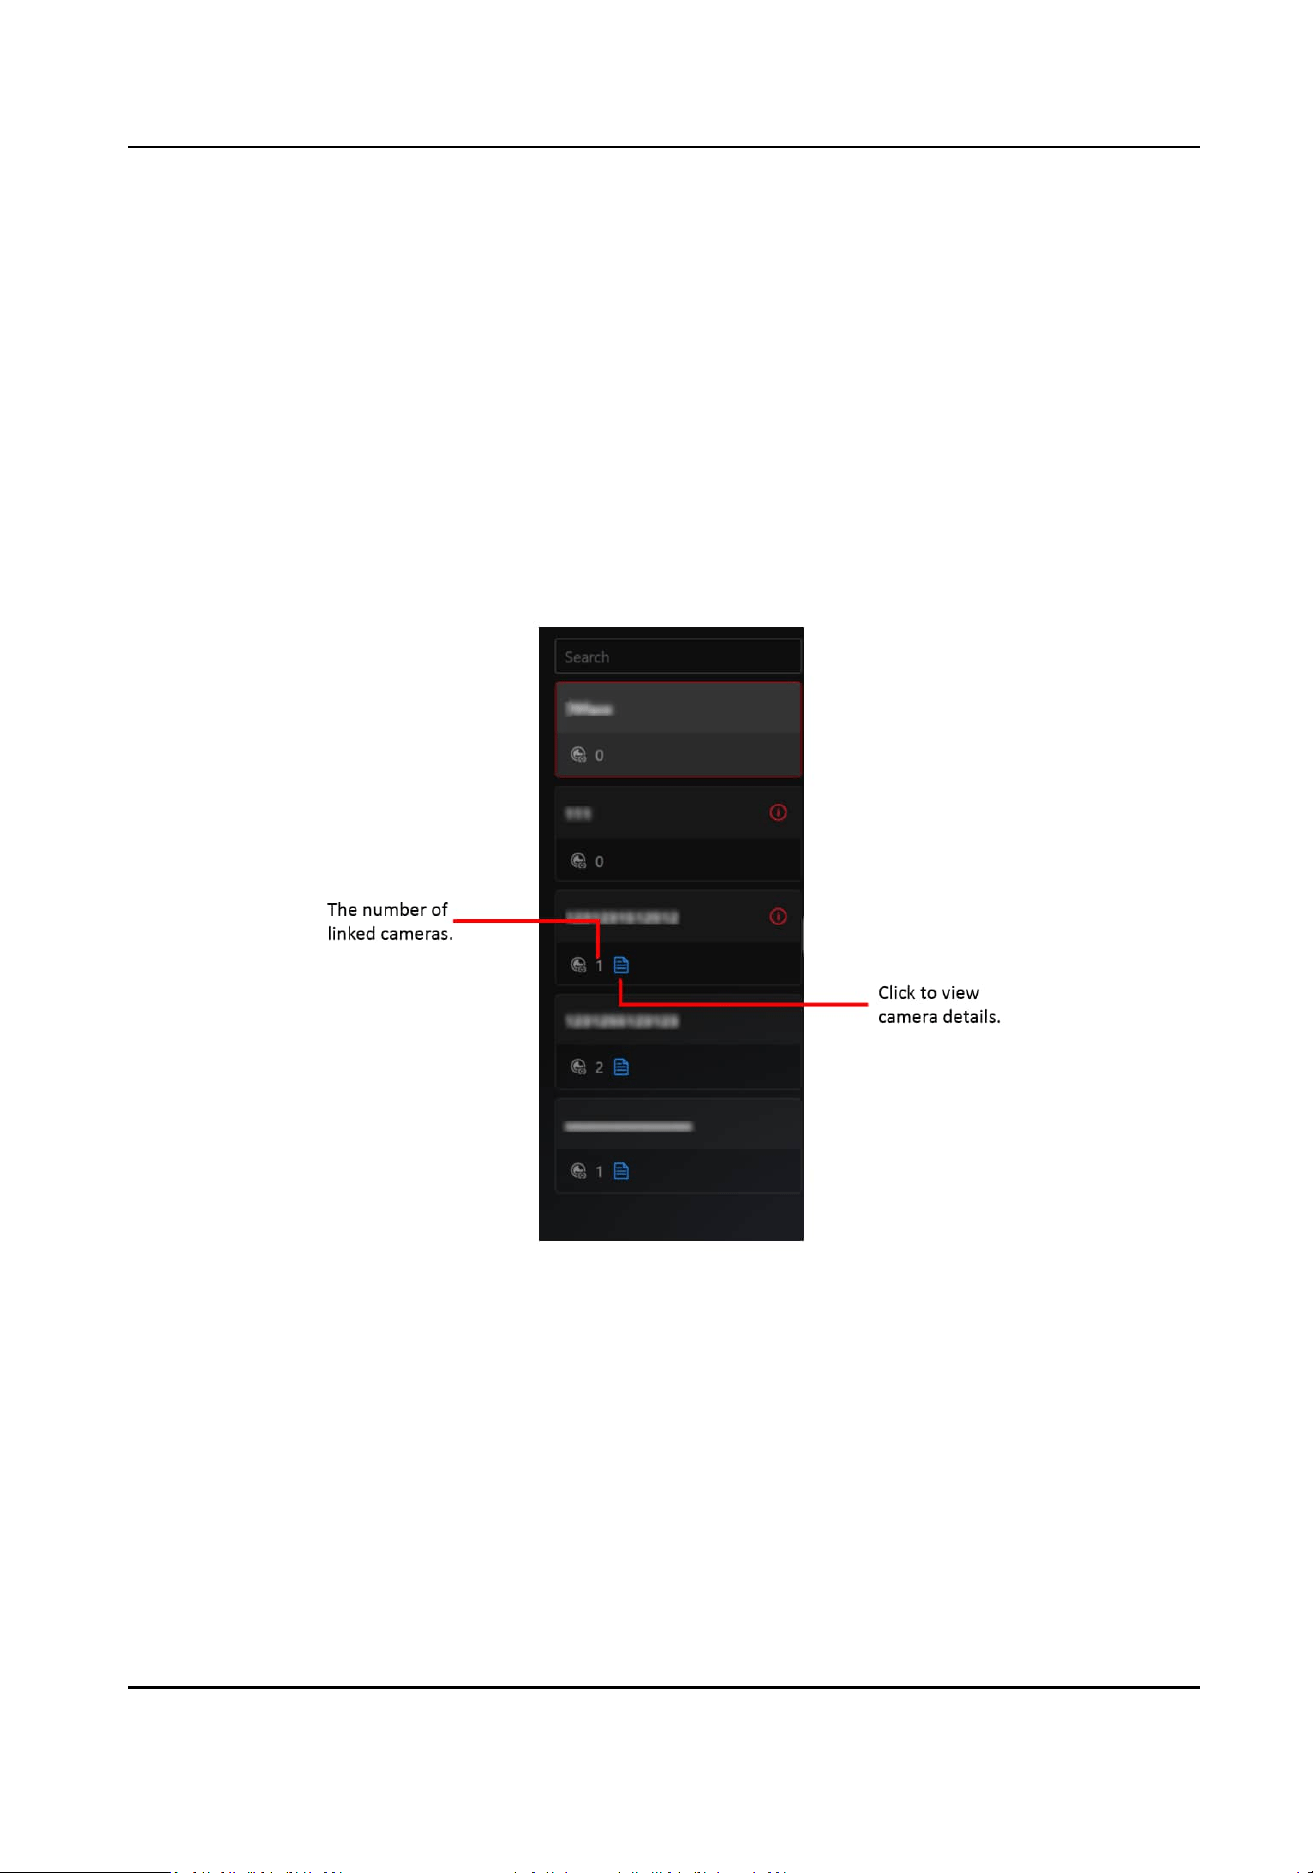
If you link cameras with the face picture library, you can view the number of cameras and the
corresponding camera names below the name of face picture library.
Figure 3-12 Cameras Linked with Face Picture Libraries
●
Add Face Picture:
○
Click Add Face Picture in the down le corner to add a single face picture.
○
Click Import → Add from
Exisng Person to add face picture(s) of the added person(s).
○
Click Import → Import Face Picture Informaon via Excel to batch import face pictures by a
template
le.
○
Click Import → Import Face Pictures to batch import face pictures aer manually packing
them.
○
Click Import Device Face Picture Library to batch import face pictures from the device face
picture libraries.
HikCentral Lite V1.1.1 User Manual
42
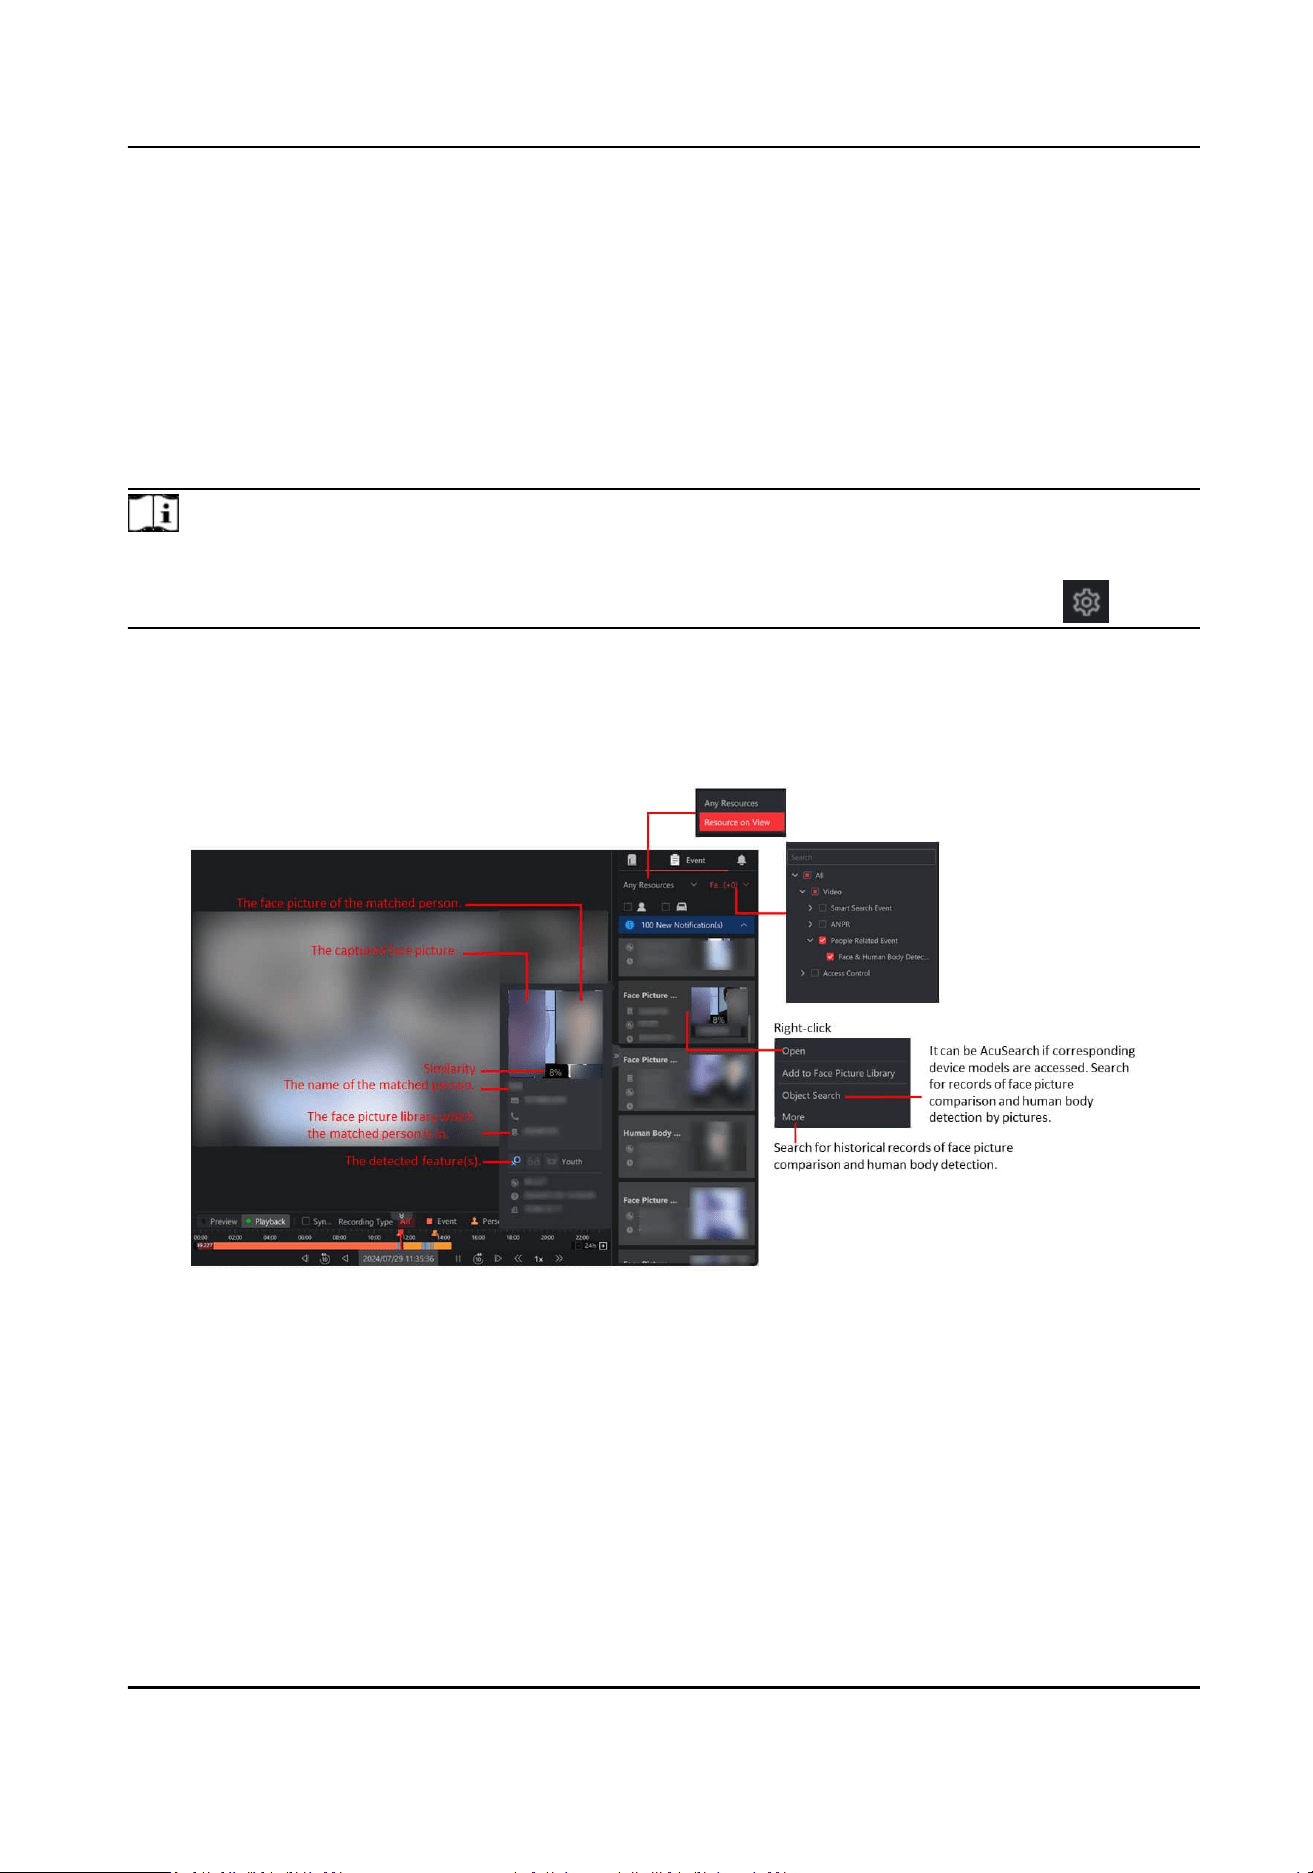
3.3.2 View Videos Related to Face and Human Body Recognion
Aer adding face and human body recognion cameras, you can view videos related to face
picture comparison and human body
detecon. At the same me, events related to the current
videos will be displayed in real-me. You can view the similarity between the captured face picture
and the face picture in the specic library, the name of the matched face picture library, etc. And
you can perform more
operaons such as searching for the related face pictures and human body
pictures if needed.
Note
To use this funcon, make sure you have added face and human body recognion cameras and
have added channels for the cameras in License Management → License Overview → .
During live view, the events of face and human body recognion camera(s) on the current view are
displayed in real me. Hover on the event to view its details or right-click the event to perform
more operaons. Refer to the following gure.
Figure 3-13 Face Picture Comparison Details
Due to the UI similarity of face picture comparison and human body detecon, the above only
takes face picture comparison as an example.
HikCentral Lite V1.1.1 User Manual
43

3.3.3 Search for Recognized Face Pictures and Human Body Pictures
You can set condions to search for capture records including face capture records, face picture
comparison records, and human body
detecon records. For the searched records, you can view
record details, export records, etc.
Note
This funcon should be supported by device.
Click Search → Face & Human Body Detecon to view the capture records.
Figure 3-14 Face & Human Body Detecon
Figure 3-15 Export Capture Records
HikCentral Lite V1.1.1 User Manual
44
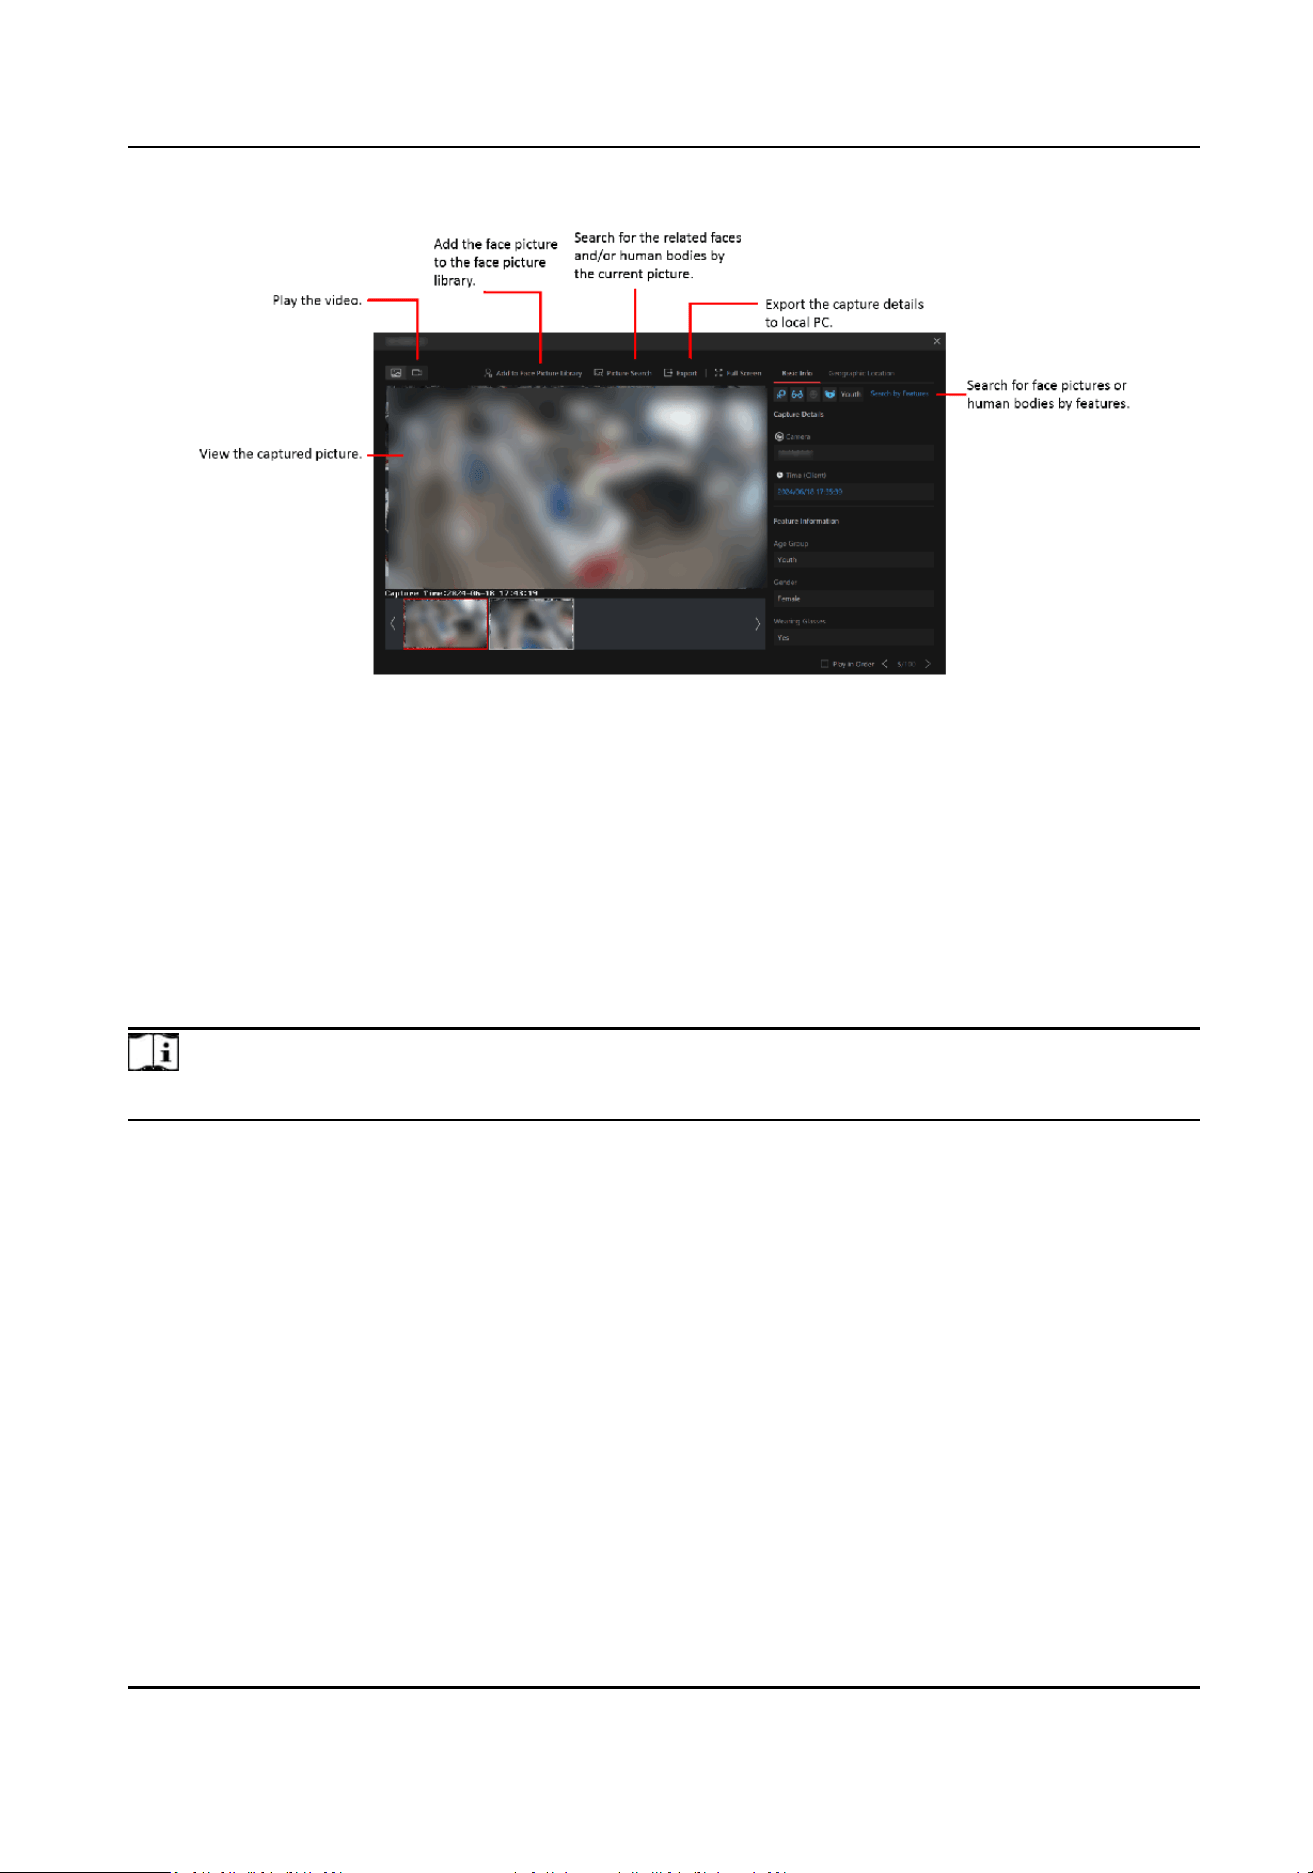
Figure 3-16 Supported Operaons on Face Capture Details Page
Due to the UI similarity of face capture / face picture comparison / human body detecon details
page, the following only explains the face capture details page for an example.
3.3.4 Search Targets by a Picture
You can upload a picture and seng other condions to search for the corresponding faces and/or
human bodies. For the searched results, you can view the capture details, play the related video
les, etc.
Note
Make sure you have added DeepinMind series NVR.
Click Search → Intelligent Search → Upload Picture and select a picture from local PC, or drag a
picture to the window to start searching.
If there is only one face / human body in the picture, the search results will be
automacally
displayed. Otherwise, you should select a face and/or a human body and/or a vehicle in the picture
for searching.
HikCentral Lite V1.1.1 User Manual
45
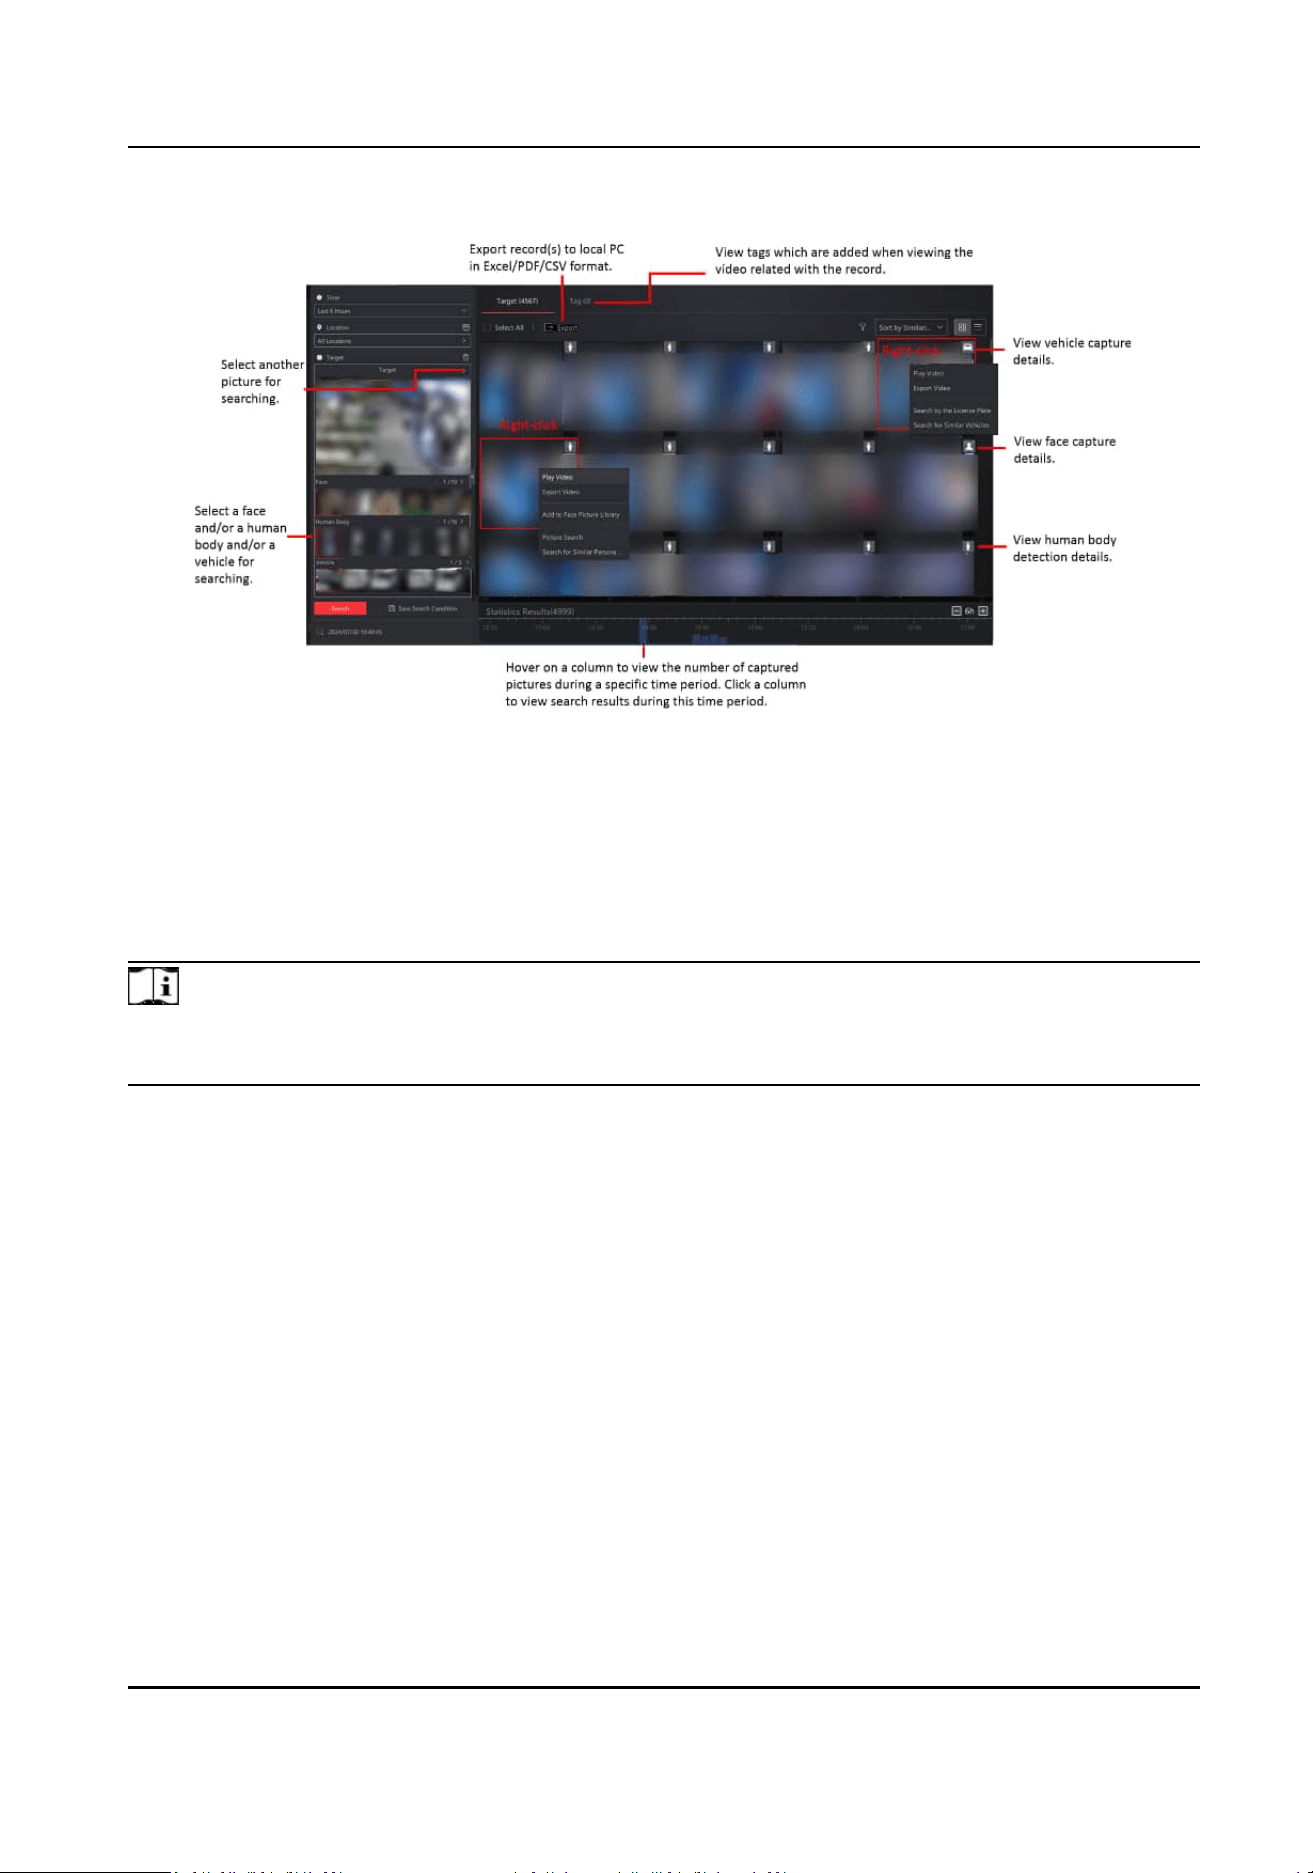
Figure 3-17 Search Condions and Supported Operaons on Search Results Page
3.4 Vehicle Monitoring
You can add vehicle lists and vehicles, and then monitor vehicles by viewing the related videos on
ANPR cameras and searching for vehicle passing records.
Note
Make sure the devices have the compability of ANPR. You can contact our technical supports for
detailed models.
3.4.1 Add Vehicle Lists and Vehicles
You can manage vehicles in the vehicle lists, including exporng vehicle informaon in a list,
moving vehicles in one list to the other list, and so on.
Click System → Vehicle .
HikCentral Lite V1.1.1 User Manual
46
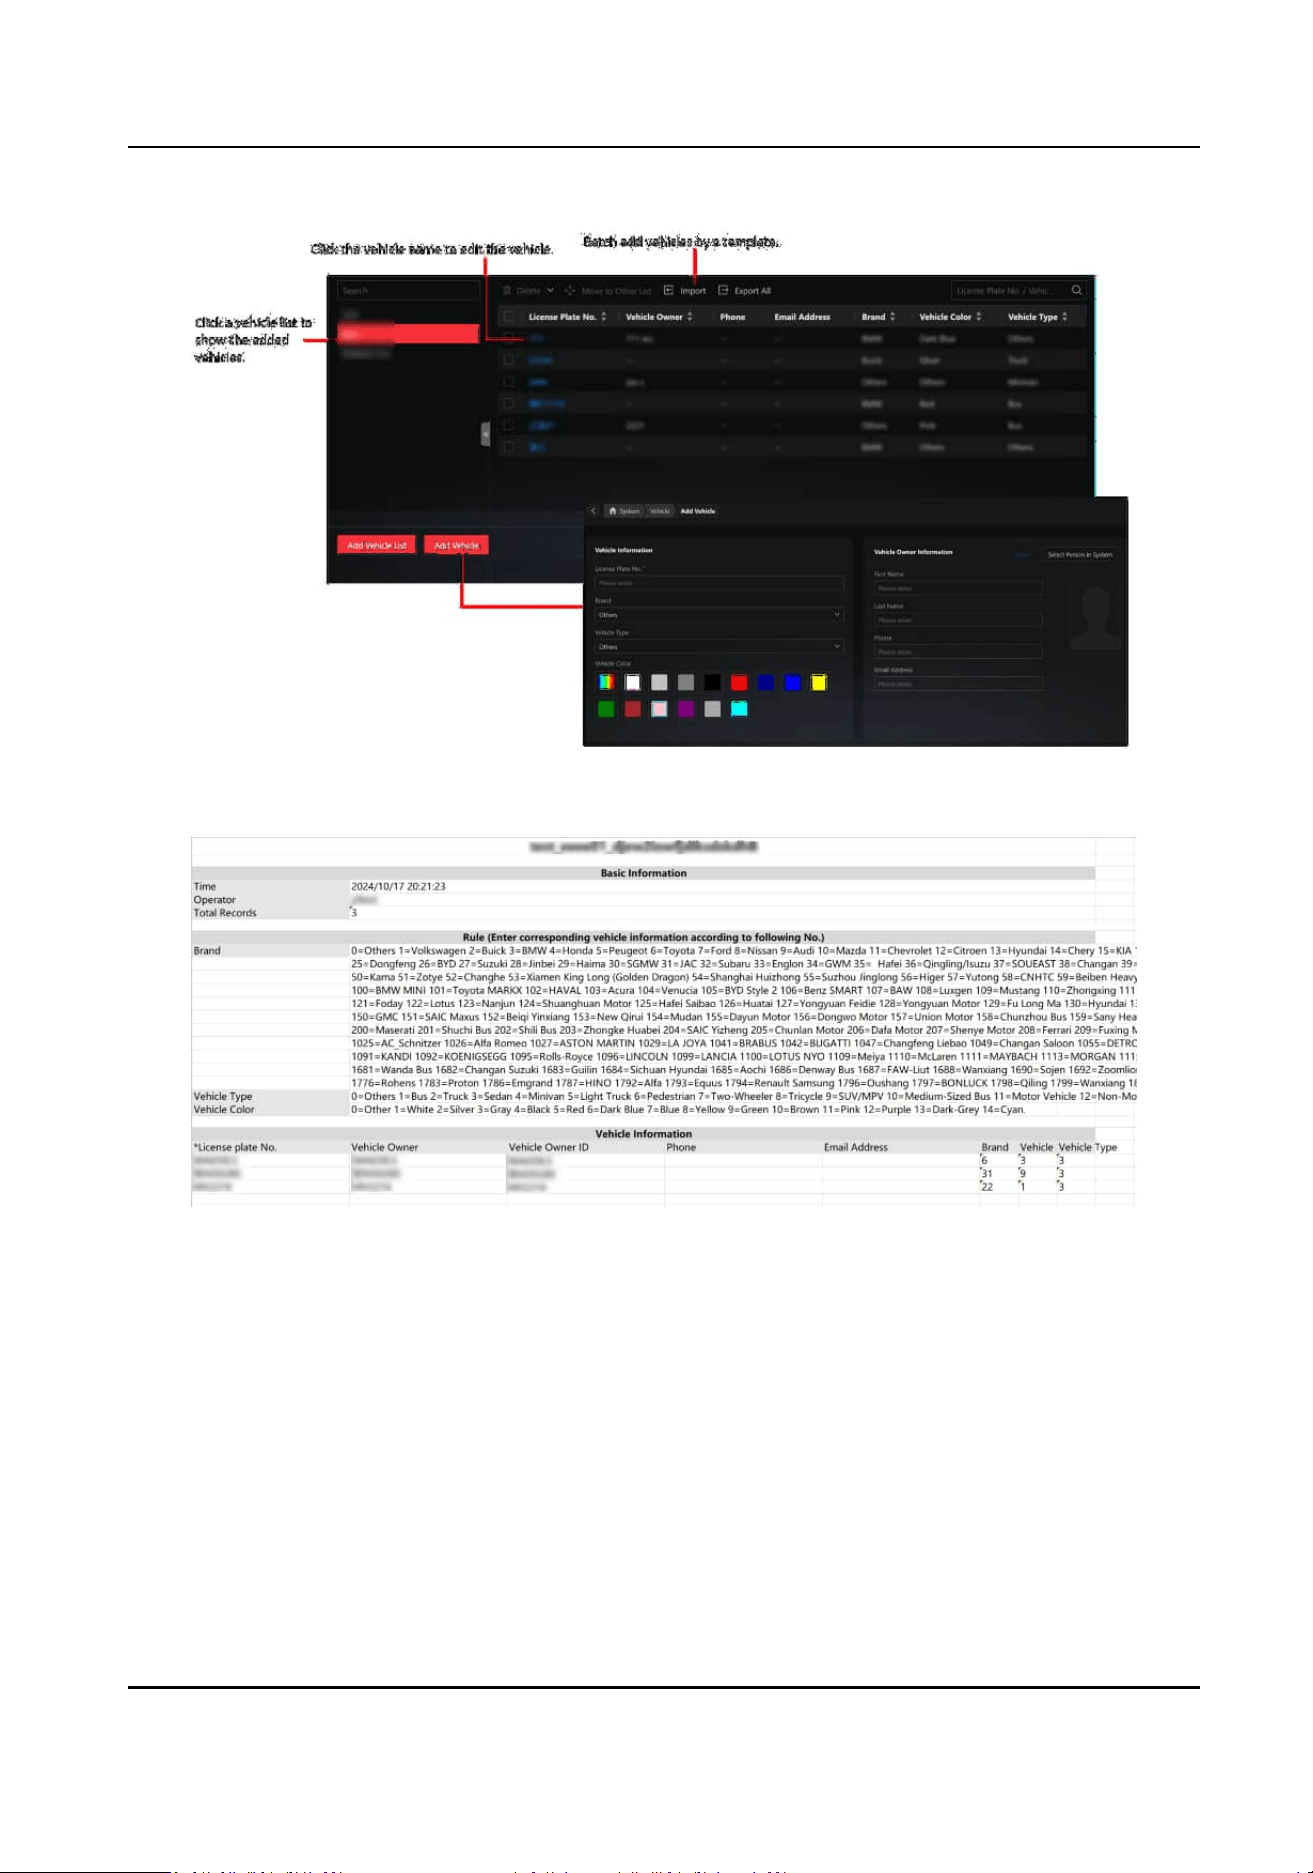
Figure 3-18 Vehicle Page
Figure 3-19 Export Vehicle Informaon
3.4.2 View Video Related to Vehicle Monitoring
When you view videos related to passing vehicles, events related to the current videos will be
displayed in
real-me. You can view the name of the matched vehicle list, the vehicle owner
informaon, etc. And you can perform more operaons such as eding the license plate and
adding the vehicle to the vehicle list.
HikCentral Lite V1.1.1 User Manual
47
Note
To use this funcon, make sure you have added ANPR cameras and have added channels for the
cameras in License Management → License Overview → .
During live view, the events of ANPR camera(s) on the current view are displayed in real me. You
can hover on the event to view more details, or right click the event to perform more
operaons.
Figure 3-20 ANPR Event Details
3.4.3 Search and Export ANPR Events
You can search for the historic vehicle passing events and export the events to local PC.
Click Search → Vehicle Passing Event to view the historic vehicle passing events.
The following
operaons are supported on this page.
●
Filter vehicle passing events by dierent condions such as me, camera, vehicle list, and license
plate number.
●
Click Export to export all the events in the needed format (Excel, PDF, or CSV).
HikCentral Lite V1.1.1 User Manual
48

Figure 3-21 Export Vehicle Passing Events in Excel Format
●
Click a license plate number in the License Plate No., column to view the capture details.
Figure 3-22 Capture Details
3.5 Smart Search / VCA
You can use smart search or VCA search funcon based on whether your device supports the
corresponding funcon. To use smart search funcon, make sure you have used the compable
HikCentral Lite V1.1.1 User Manual
49
NVRs that support smart search. To use VCA search funcon, make sure you have completed the
conguraons for NVR and network camera.
●
Before using smart search or VCA search funcon, make sure you have congured recording
schedules for the network cameras. For details, refer to
View and Congure Details of Encoding
Devices .
3.5.1 Compable NVR Series for Smart Search
The supported series of NVRs that support smart search include: K Series NVR with AcuSense
(V4.83.006), I Series NVR with AcuSense (V5.03.020), M-VPro Series (V5.03.020), DeepinMind M
Series (V5.03.020), and DeepinMind Super H Series (V5.03.020). For the detailed
compable
rmware
versions of NVRs, refer to Compability List.
3.5.2
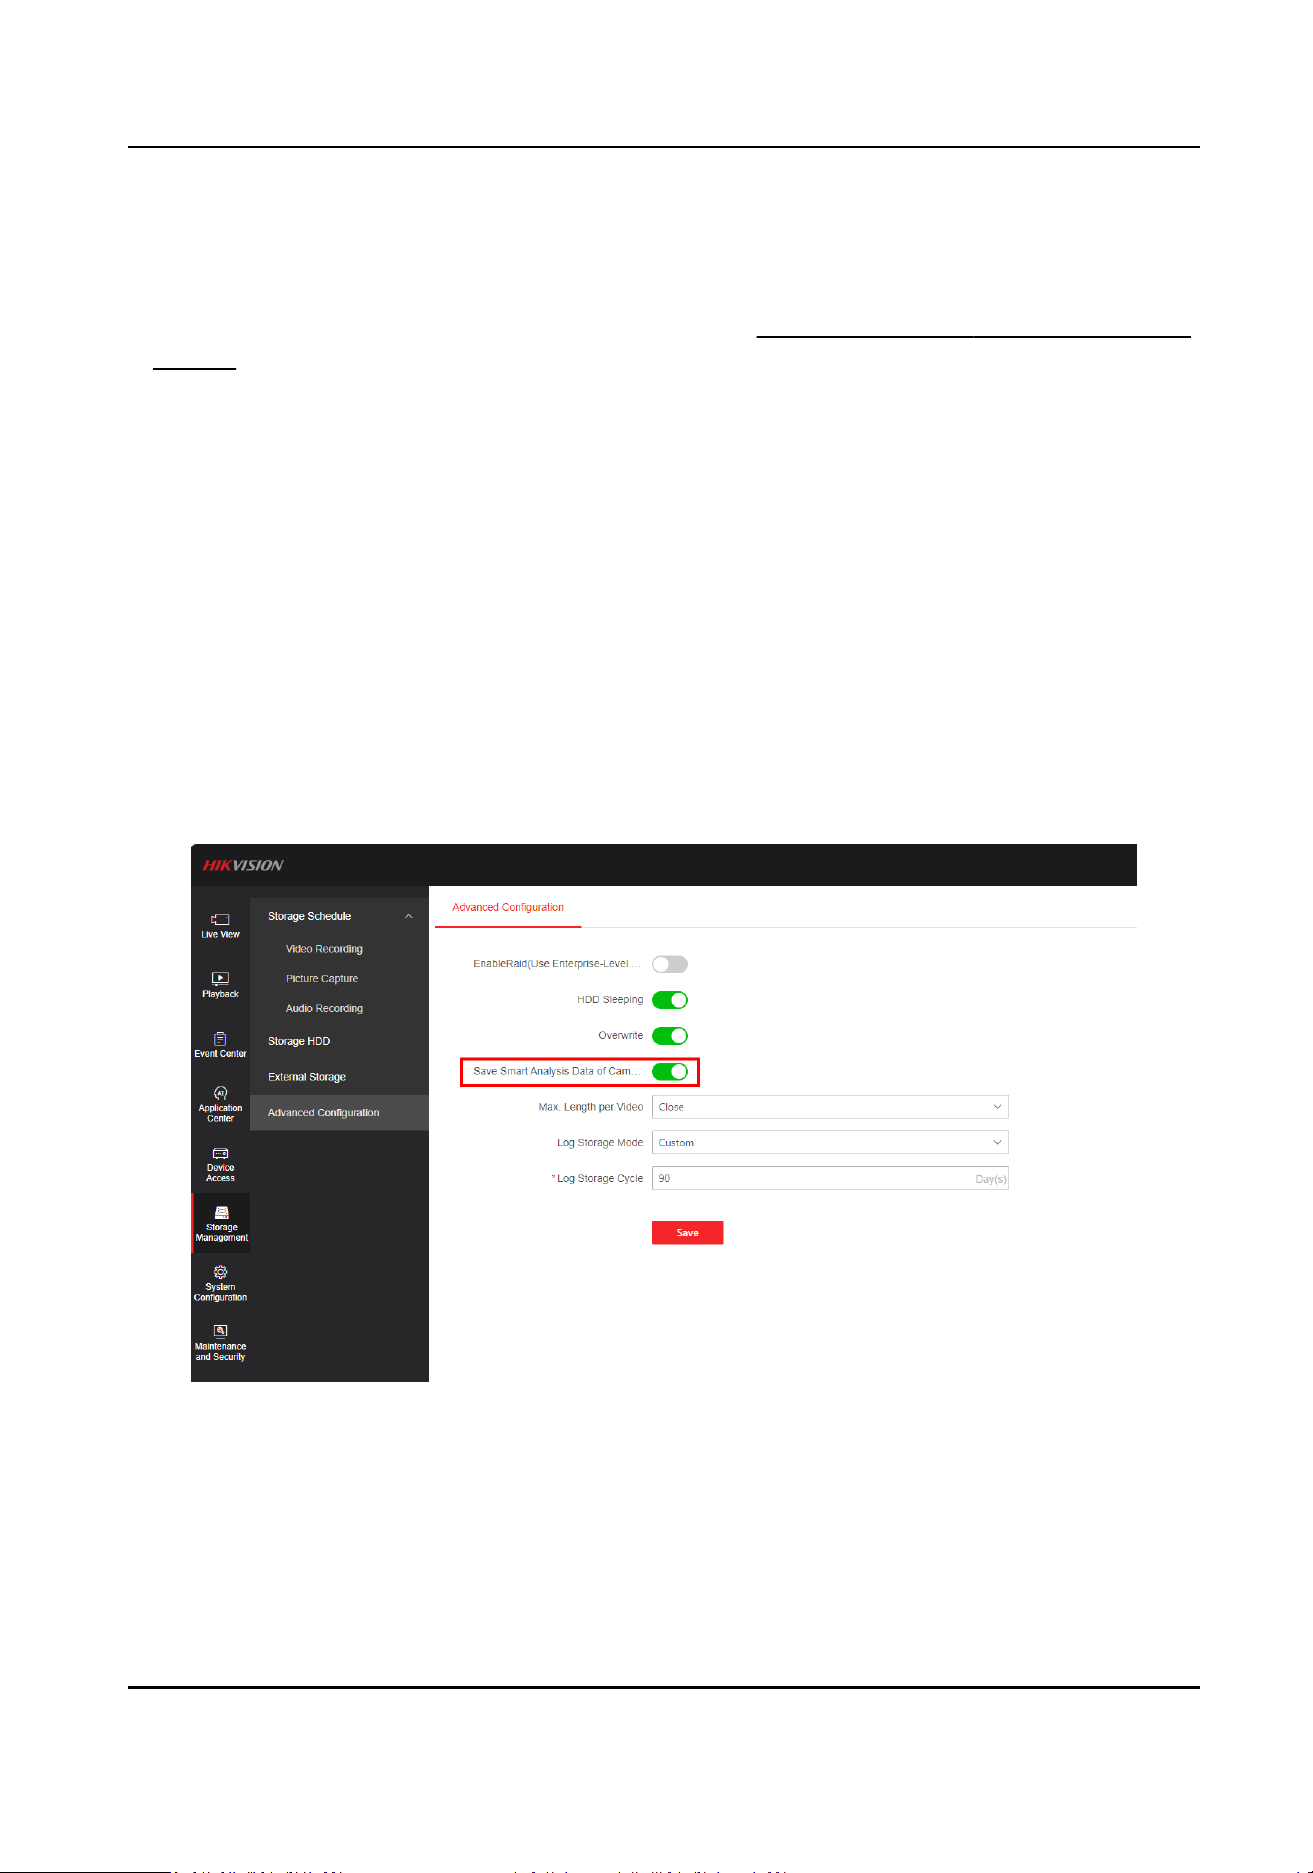
Conguraon for NVR and Network Camera
For NVR With Firmware Versions Higher Than V5.01
On the web page of NVR, enable Save Smart Analysis Data of Camera.
Figure 3-23 Save Smart Analysis Data of Camera
For NVR With Firmware Versions Lower Than V5.01
Perform the following on the web page of NVR.
1. Enable Dual-VCA for the network camera.
2. Check Enable Line Crossing Detecon and Enable Intrusion.
HikCentral Lite V1.1.1 User Manual
50
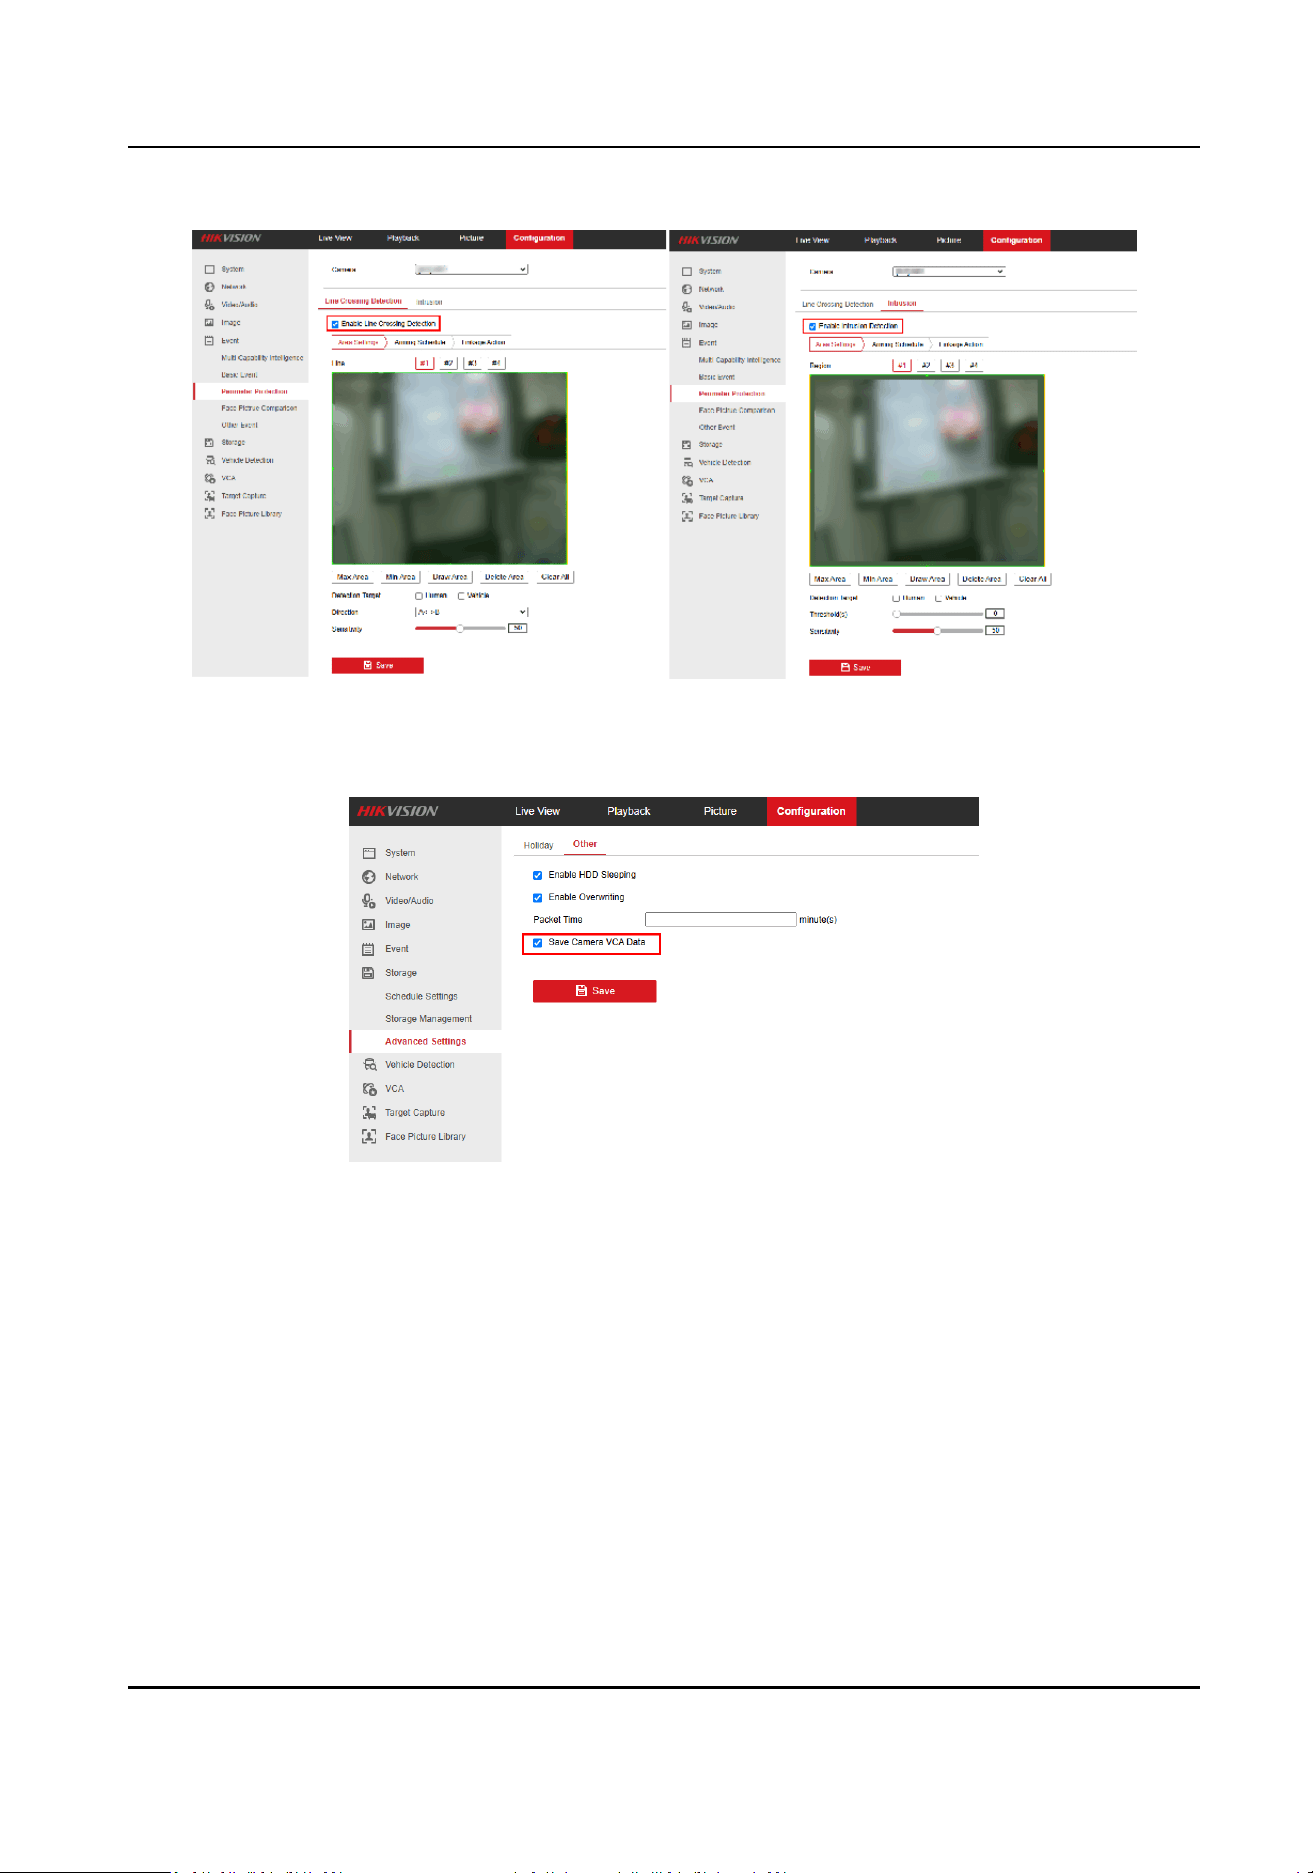
Figure 3-24 Enable Line Crossing Detecon & Enable Intrusion Detecon
3. Check Save Camera VCA Data.
Figure 3-25 Save Camera VCA Data
When Network Camera Added to HikCentral Lite Directly or Via NVR/DVR That Do
Not Support VCA
1. Enable Dual-VCA for the network camera on the web page of the camera.
HikCentral Lite V1.1.1 User Manual
51

Figure 3-26 Enable Dual-VCA
2. Congure the video storage locaon as System Storage on the Camera details page.
Figure 3-27 Congure Video Storage Locaon
HikCentral Lite V1.1.1 User Manual
52
3.6 AcuSearch / Object Search
The AcuSearch / Object Search funcon rstly extracts pictures of human bodies or vehicles during
live view or playback, then compares the extracted targets with captured human bodies or
vehicles, and eventually nds out videos that contains the target.
Before You Start
Before using this funcon, make sure you have acvated at least one channel of video monitoring
license and have enabled it on the Camera Details page.
Figure 3-28 Camera Details
Supported Device Series
The following is supported device series for using AcuSearch or smart search. You are suggested to
upgrade the devices to the latest
rmware versions. You can contact our technical supports for
detailed models.
Table 3-2 Recommended Devices for AcuSearch
Device Types Series
NVR/DVR
●
DeepinMind M
●
I series with AcuSense(E)
●
K series with AcuSense (Except version B)
HikCentral Lite V1.1.1 User Manual
53

Device Types Series
●
I/Vpro
●
K series with AcuSense(E)
●
M/VPro
●
PowerX DVR
Network Cameras
●
2 series
●
3 series
●
DeepinView series
●
PTZ series
Table 3-3 Recommended Devices for Object Search
Device Types Series
NVR/DVR
●
M series
●
DeepinMind M
●
I series with AcuSense(E)
●
K series with AcuSense (Except version B)
●
I/Vpro
●
K series with AcuSense(E)
●
M/VPro
●
PowerX DVR
Network Cameras
●
2 series
●
3 series
●
DeepinView series
●
PTZ series
How to Start AcuSearch / Object Search
For the similarity between Acusearch and Object Search, the two funcons share the same buon.
The buon name changes according to models of added devices. If there is no devices supporng
object search in the system, the buon will be named as AcuSearch; if there is any devices
supporng object search in the system, the buon will be named as Object Search.
HikCentral Lite V1.1.1 User Manual
54
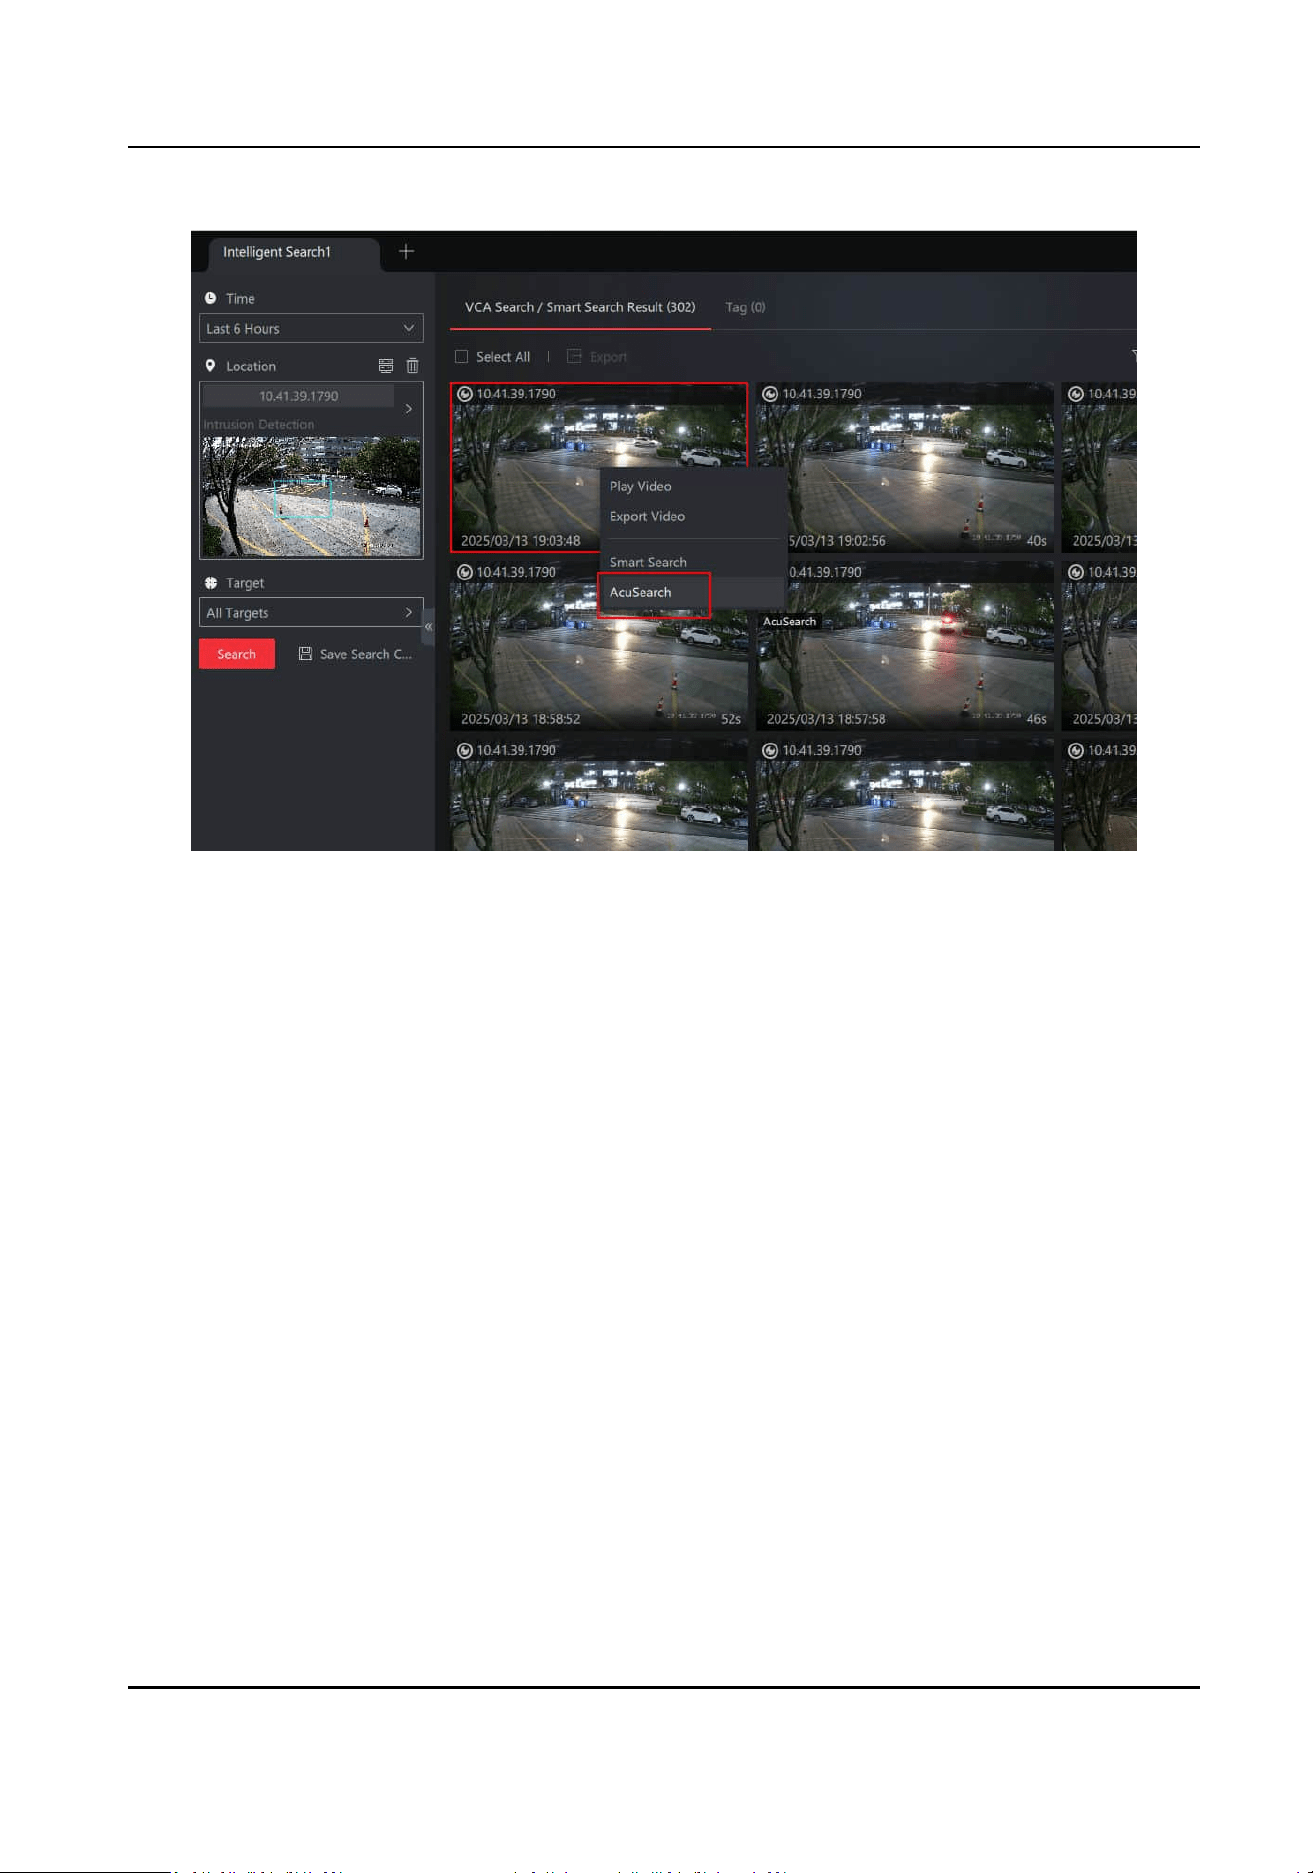
Figure 3-29 AcuSearch
HikCentral Lite V1.1.1 User Manual
55
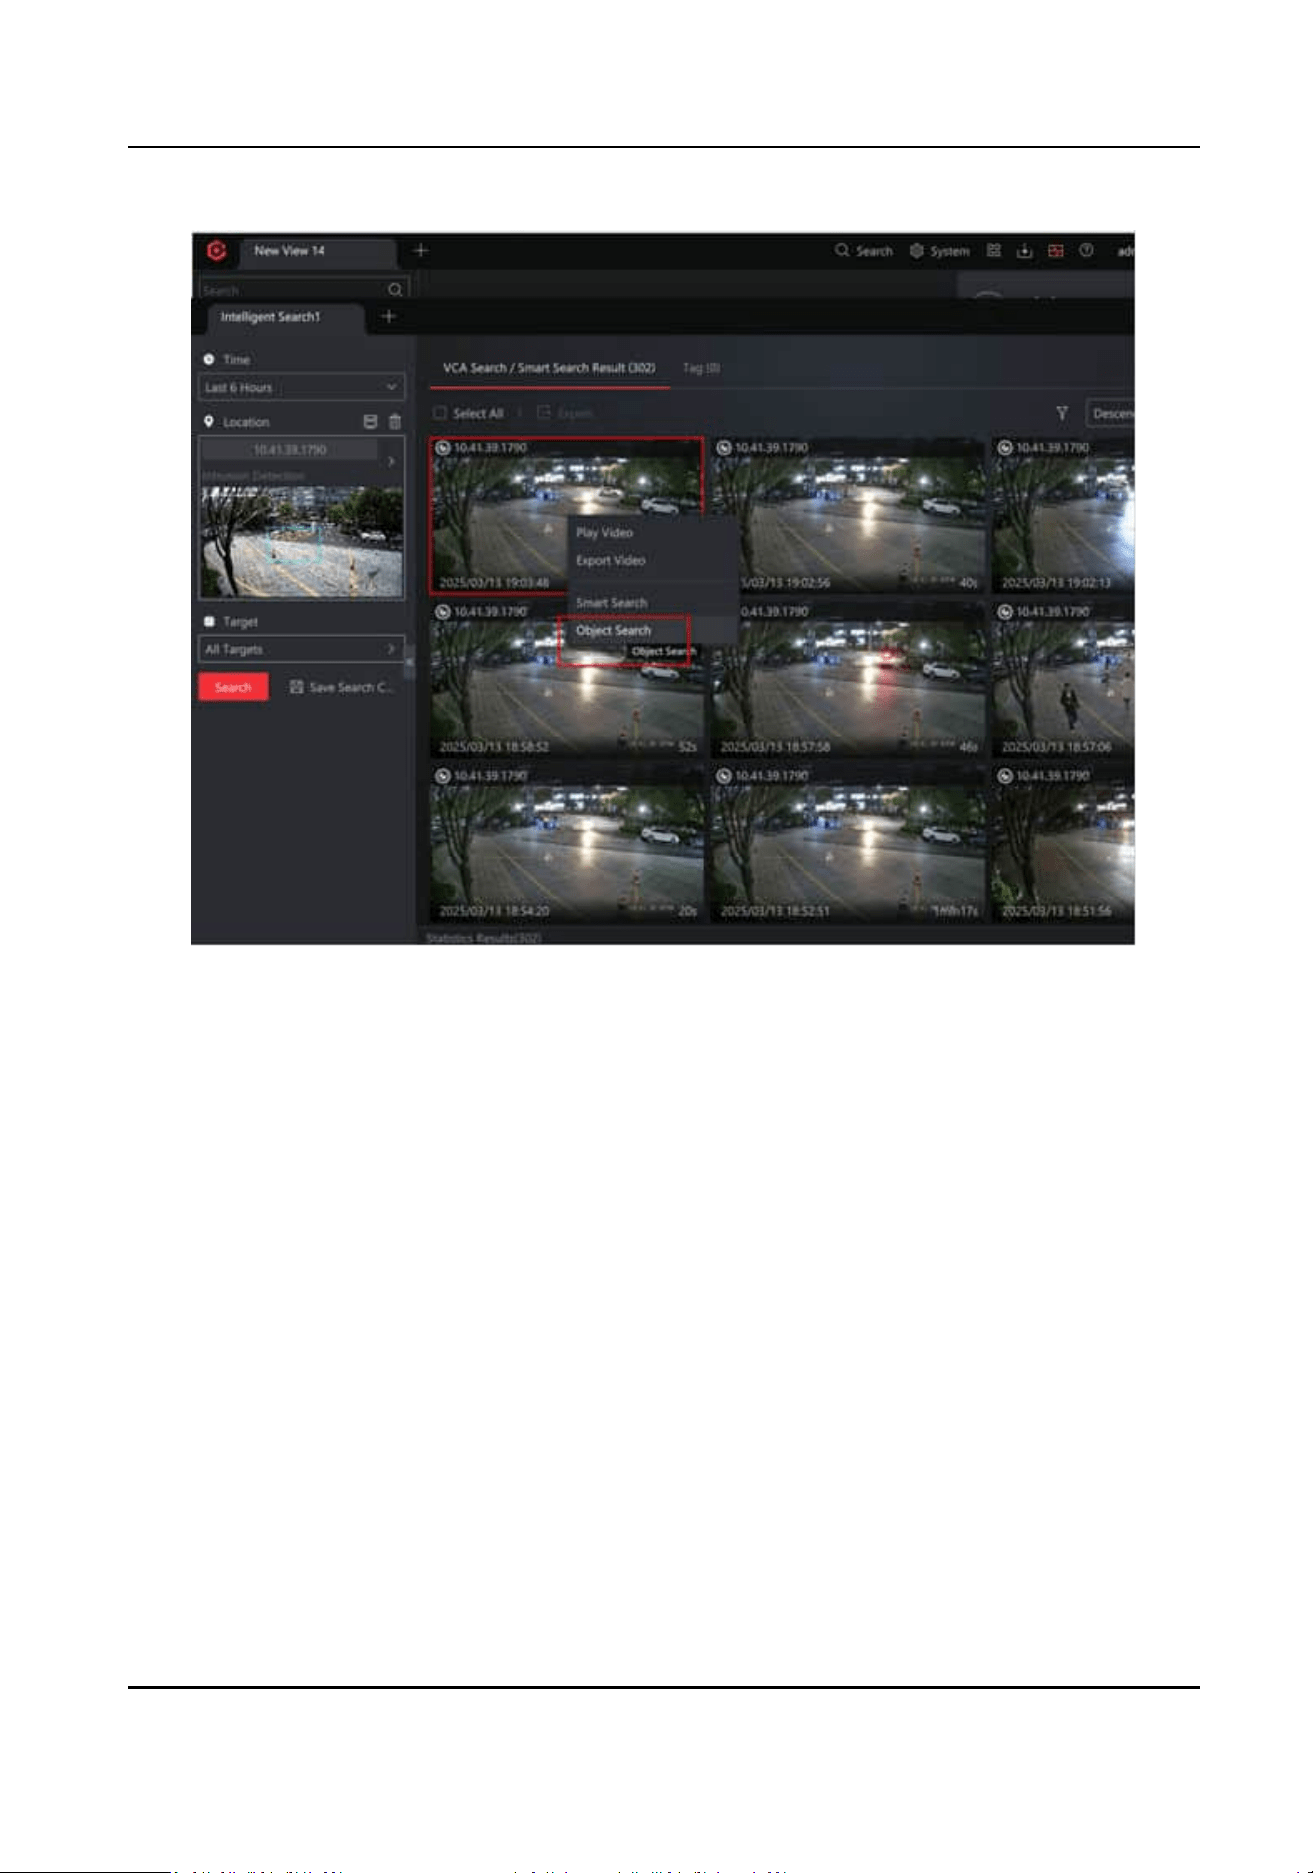
Figure 3-30 Object Search
On the searched result page of Intelligent Search, right click a video thumbnail and select
AcuSearch / Object Search. The system will start searching for targets similar to the selected
object in recorded videos
HikCentral Lite V1.1.1 User Manual
56
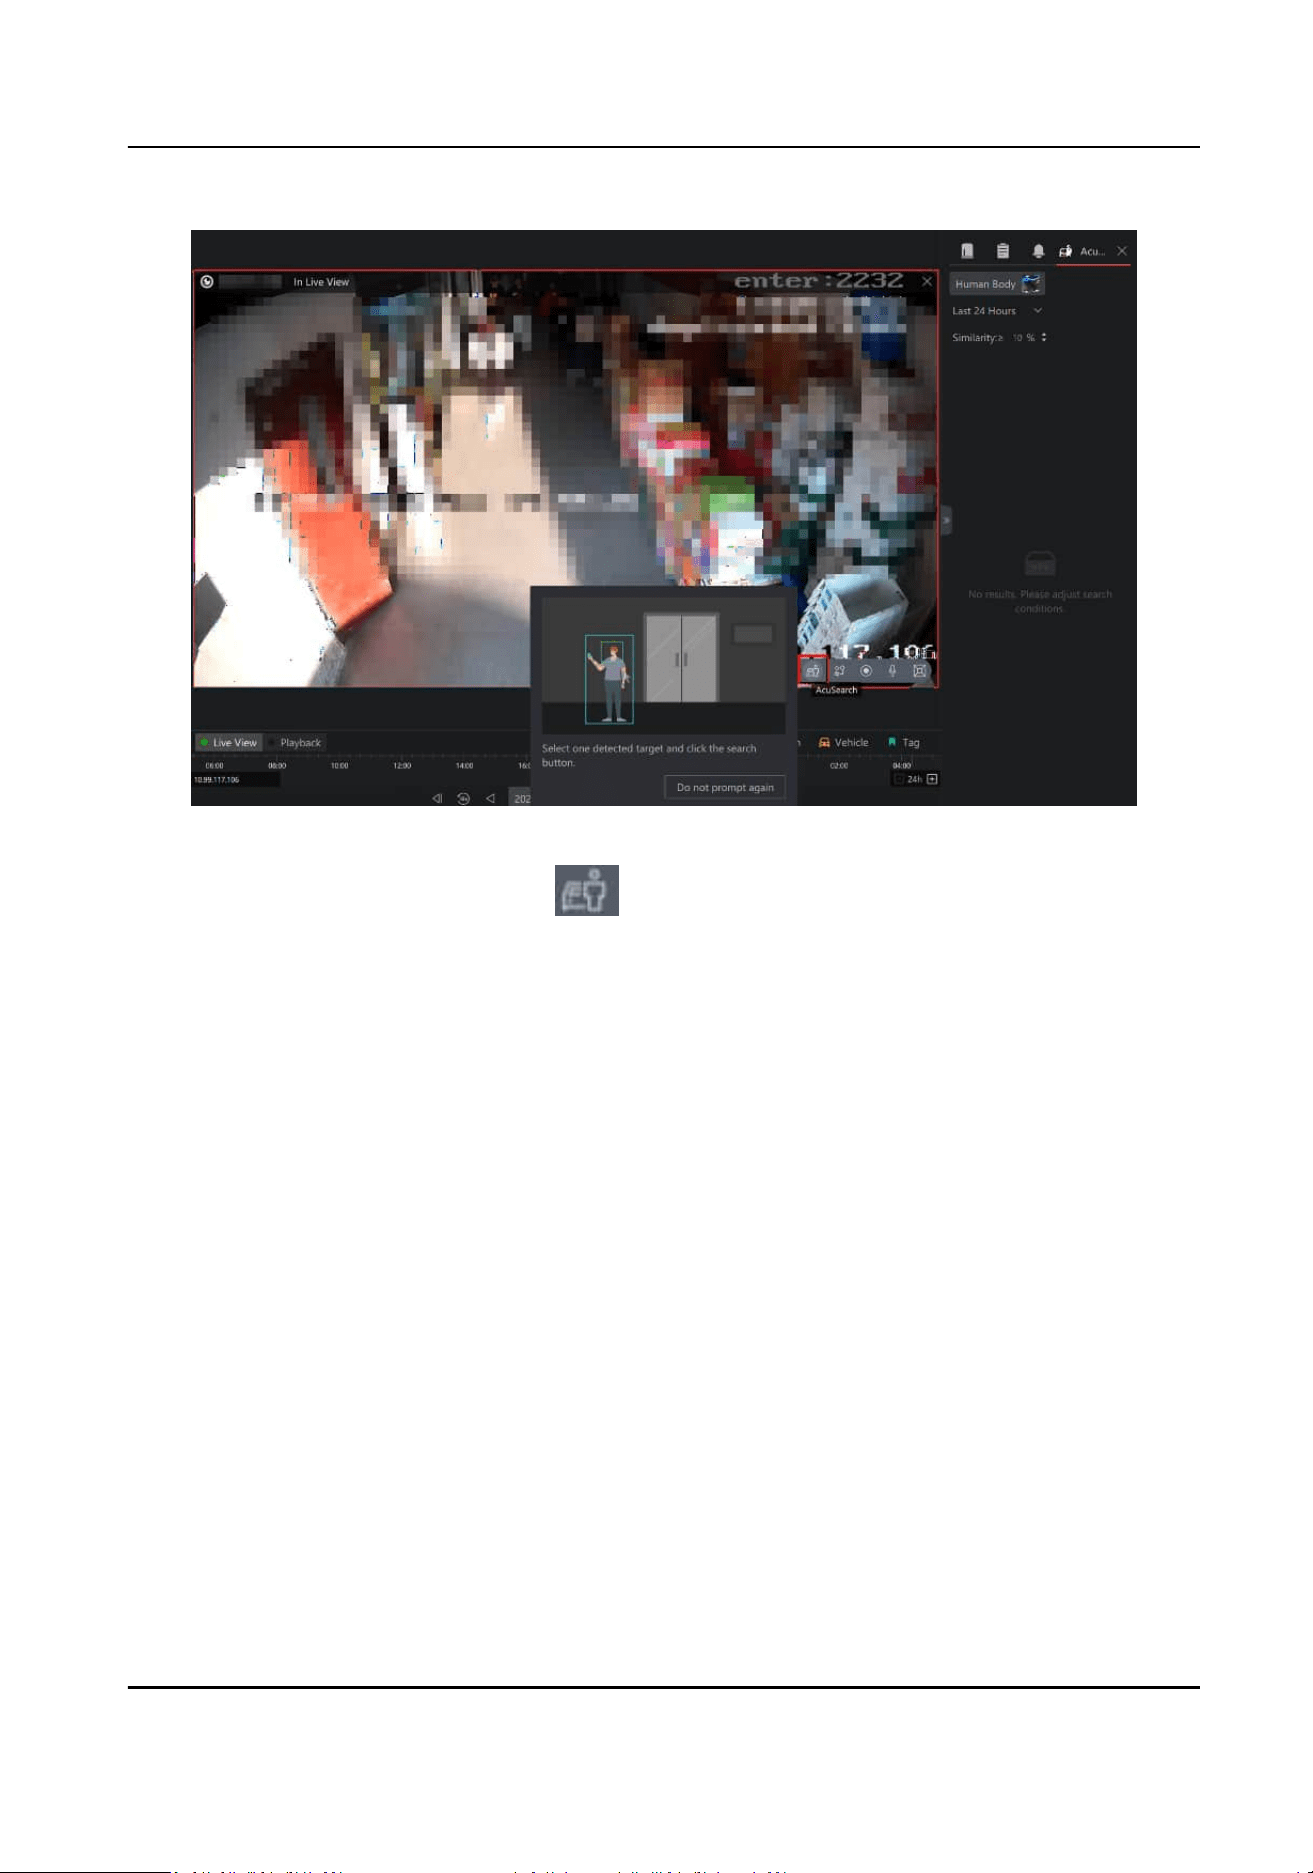
Figure 3-31 Live View Window
On the live view or playback page, click
to start AcuSearch / Object Search. The search
results will be displayed on the right panel.
HikCentral Lite V1.1.1 User Manual
57

Figure 3-32 Object Search
3.7 AcuSeek
The AcuSeek's key features include:
●
Natural language search: Enables open-ended queries (e.g., "a person in red clothing") to
pinpoint targets instantly via text input.
●
Rapid target search: Quick lookup of people, vehicles, or objects.
●
Advanced
lters: Filters results by cameras, me range, or similarity; supports playback,
AcuSearch, and exporng target images.
Before using this funcon, make sure you have acvated at least one channel of video monitoring
license and have enabled it on the Camera Details page.
HikCentral Lite V1.1.1 User Manual
58

Figure 3-33 Enable AcuSeek
On the Welcome page of Intelligent Search, click AcuSeek on the top right.
Figure 3-34 AcuSeek Entry
Search
The AcuSeek supports instant searches for people/vehicles/objects or text-based queries, boosted
by smart
recommendaons and favorites for faster retrieval.
HikCentral Lite V1.1.1 User Manual
59
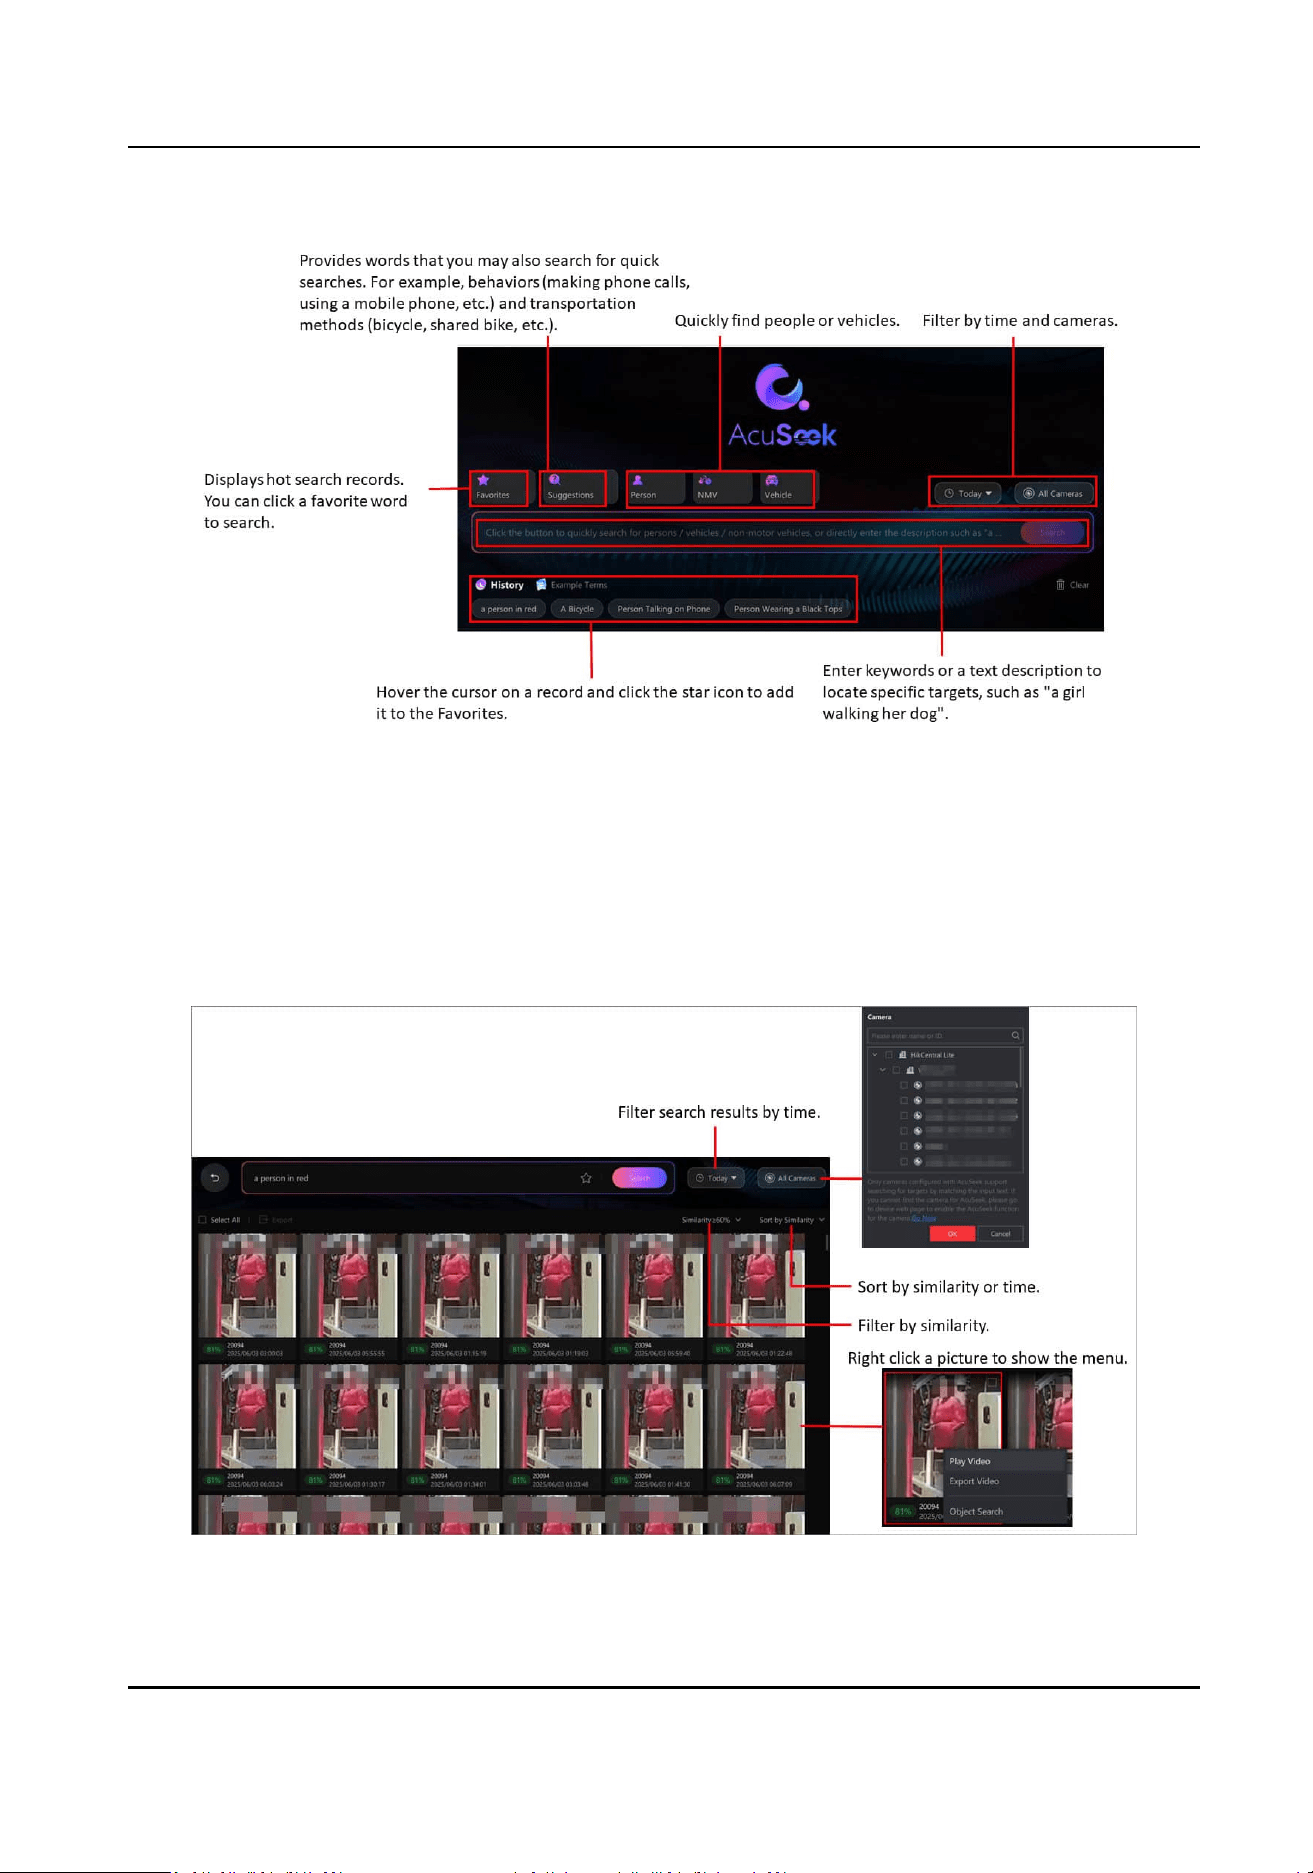
Figure 3-35 Search Page
View Search Results
Aer retrieving search results, you can lter them by similarity or me, view or export video clips
containing the targets, or perform an image-based search. Using the query "Person in Red", you
can perform the following
operaons:
Figure 3-36 Search Results
HikCentral Lite V1.1.1 User Manual
60
Export Images
Select one or more images, then click Export to save the selected images.
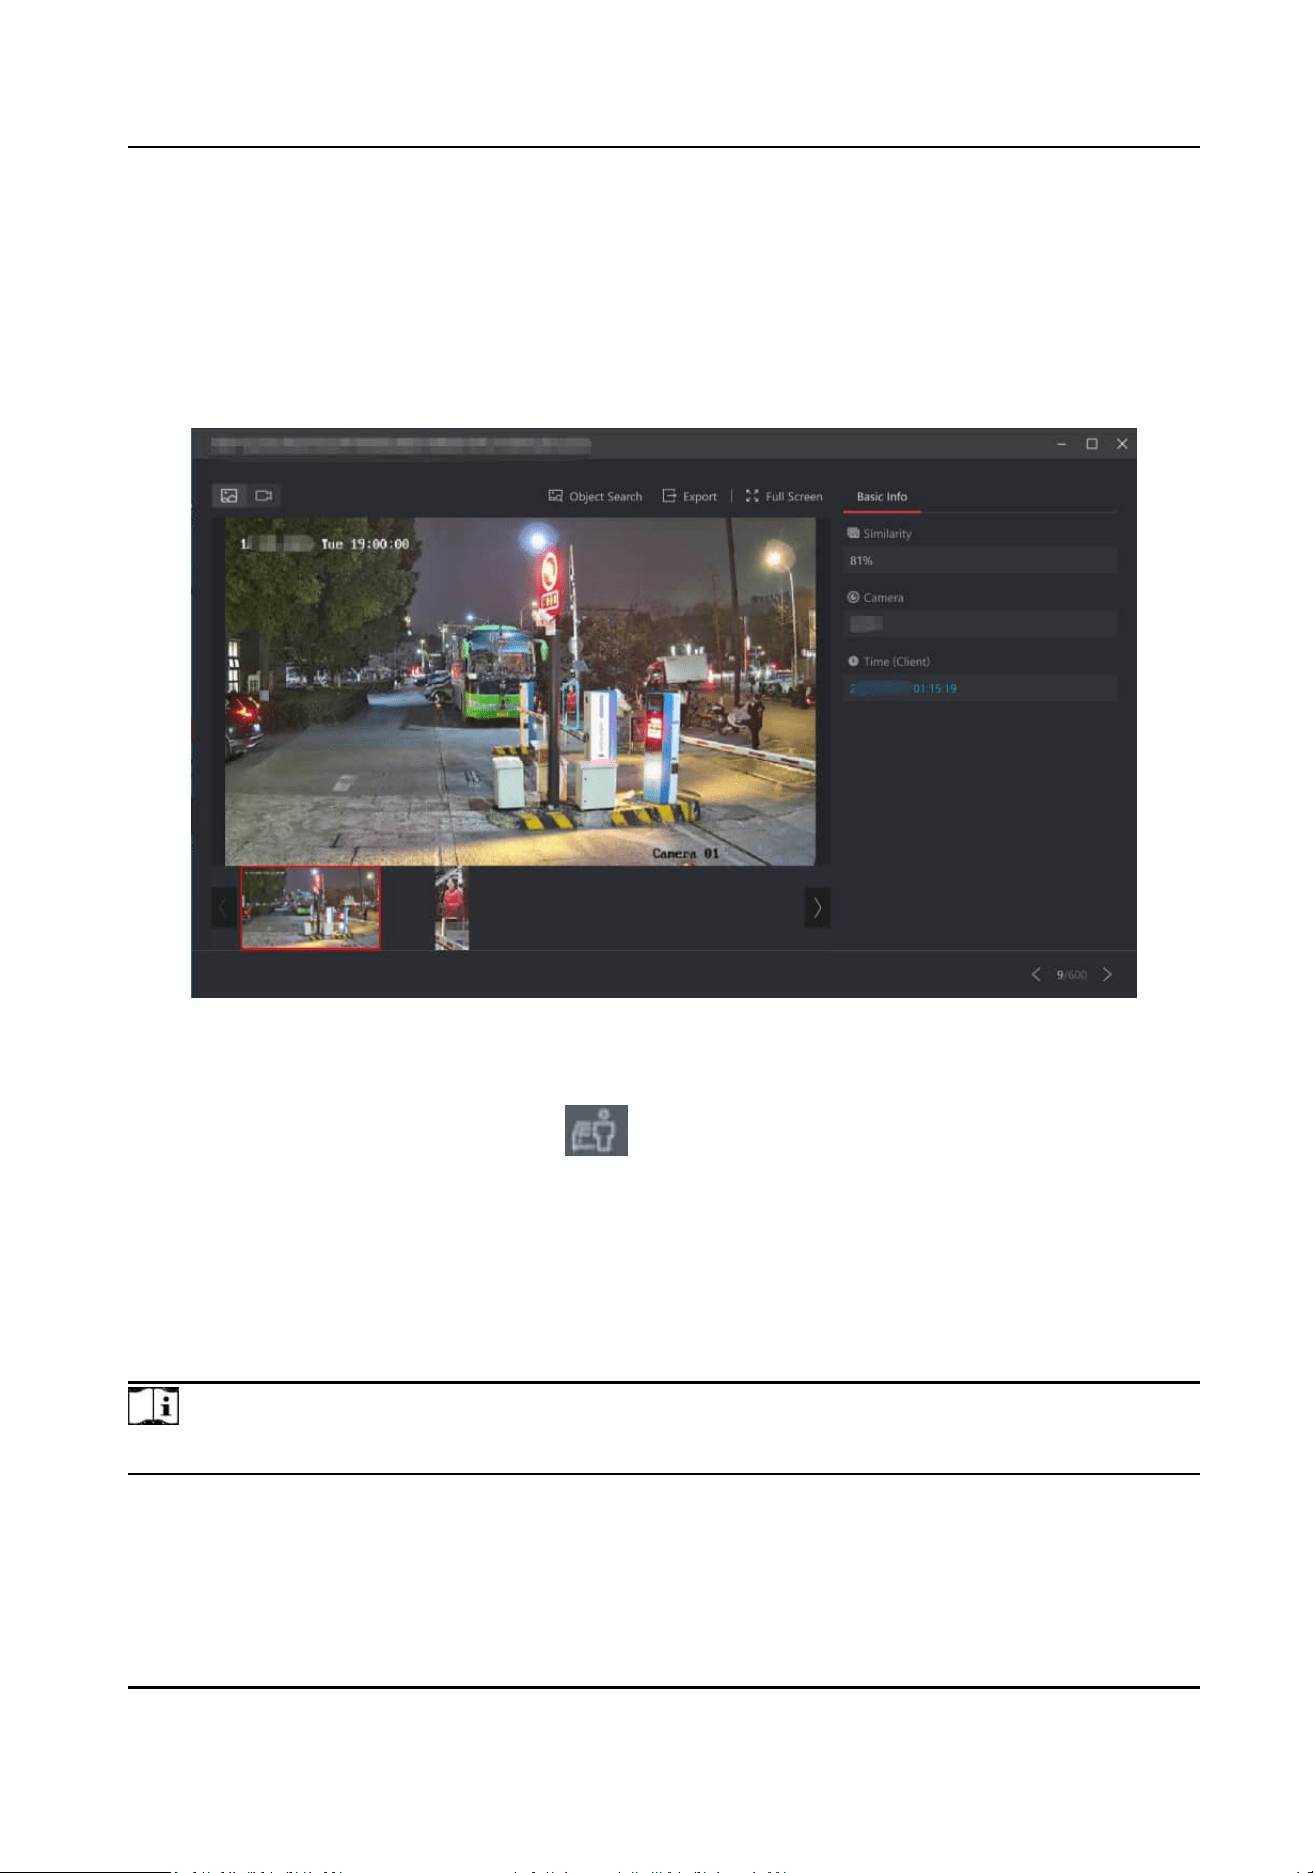
View Details
Click an image to open the video or captured pictures, which pauses at the target's posion by
default. Playback can be resumed manually.
Figure 3-37 Search Result Details
AcuSearch / Object Search
Hover the cursor on a video and click
to perform an image-based search.
3.8 Generate and View People
Counng Report
The people counng report of specied cameras provides a visual view of real-me people
counng, real-me dwell people quanty, and history people counng in specied locaons. And
downloading the historical people counng report to the local PC is supported.
Note
Make sure the License for people counng report is purchased before generang the report.
HikCentral Lite V1.1.1 User Manual
61
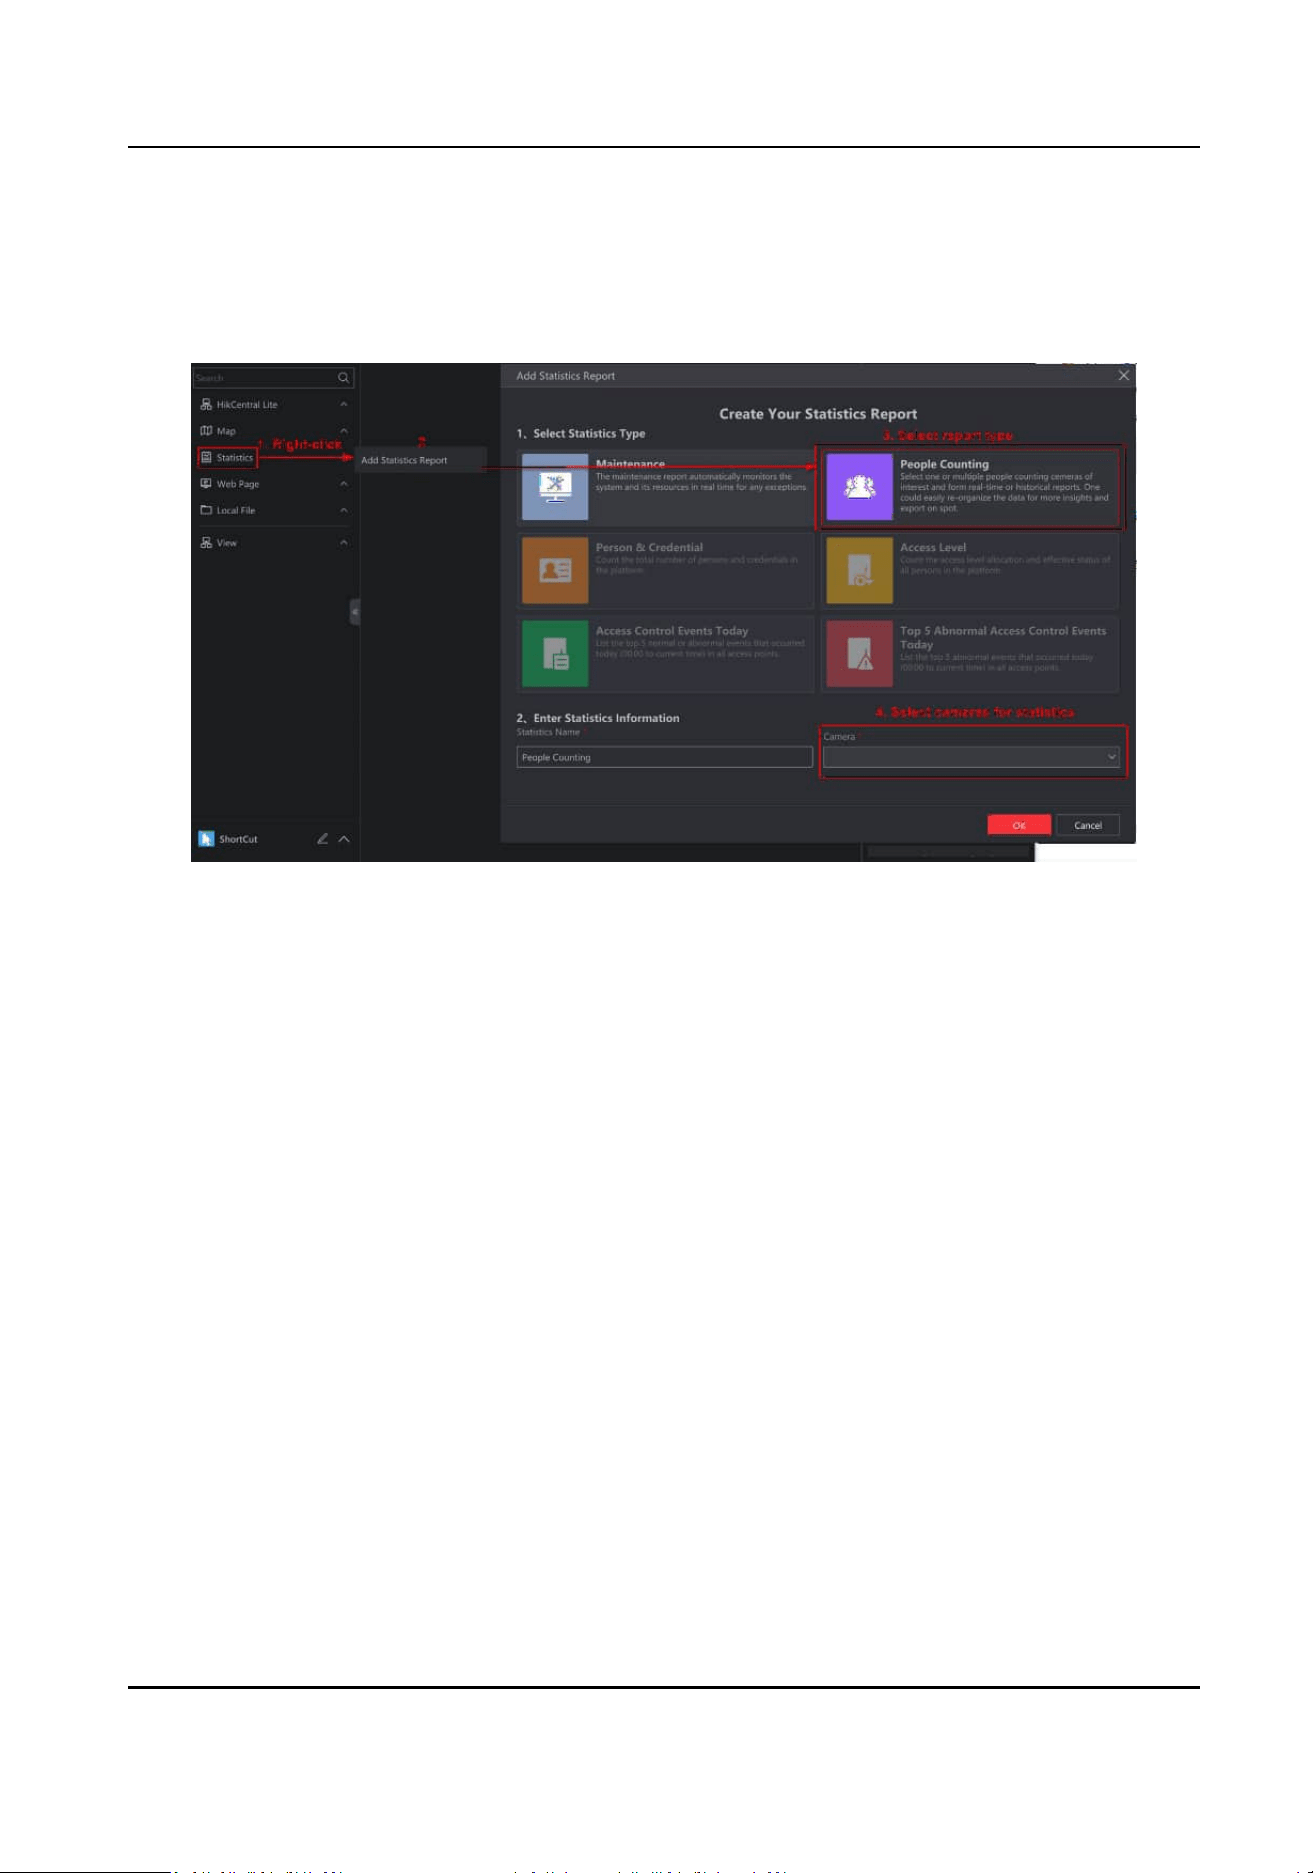
●
On Real-Time People Counng pane, today's people counng (in) / visits and real-me dwell
people quanty are displayed.
●
On Historical People Counng pane, people counng (in) / visits and people counng (out) /
visits are displayed.
Figure 3-38 Generate People Counng Report
HikCentral Lite V1.1.1 User Manual
62
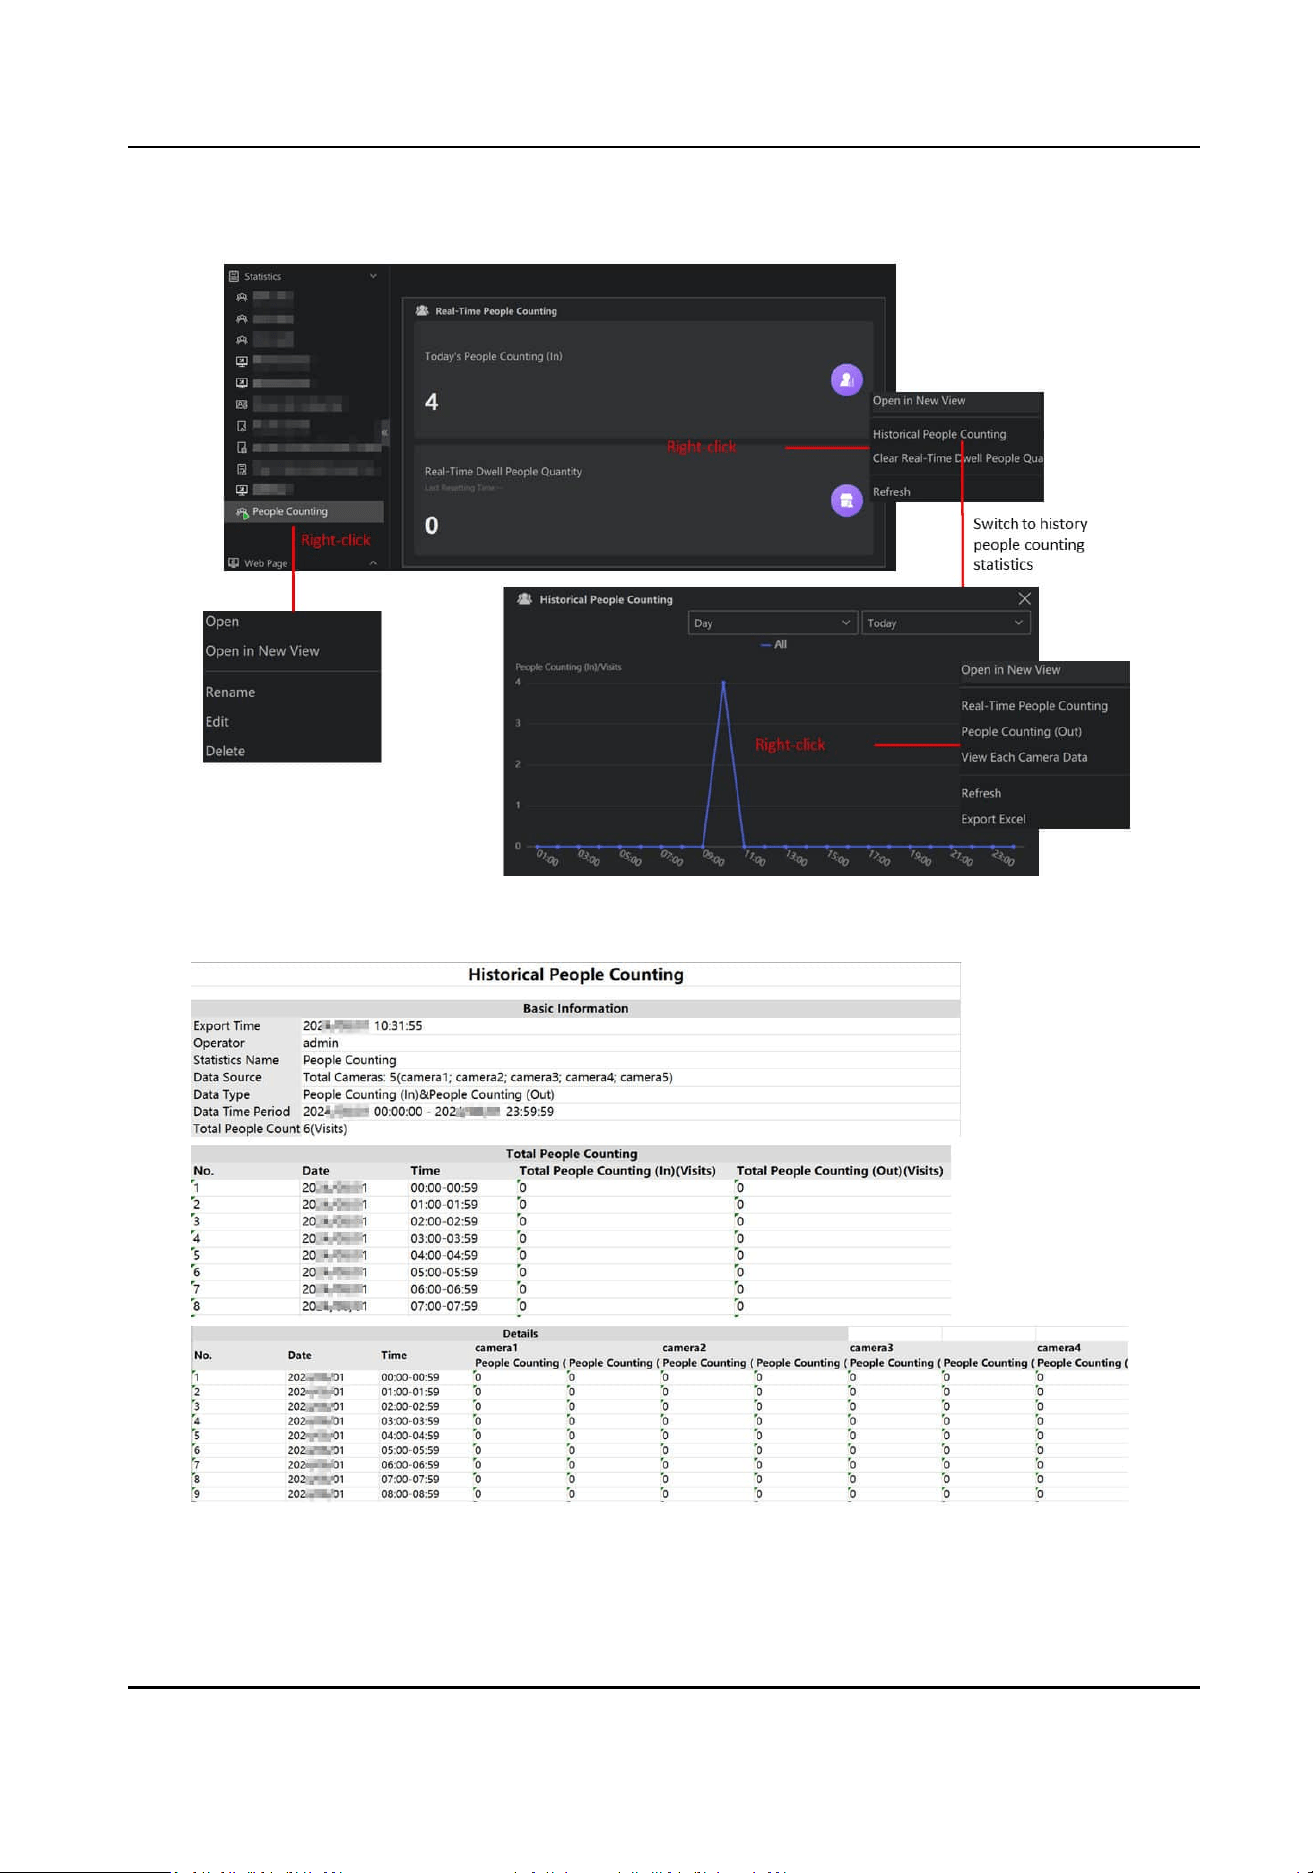
Figure 3-39 View Generated People Counng Report
Figure 3-40 Downloaded Reports
HikCentral Lite V1.1.1 User Manual
63

3.9 (Oponal) Local Conguraons Related to Video Monitoring
Before starng the live view / playback, you can dene whether to play video in full screen, the
monitoring window size, decoding mode, and streaming access mode.
Refer to Basic Video Preference and Congure User Preference for details.
HikCentral Lite V1.1.1 User Manual
64

Chapter 4 Access Control and Video Intercom
In this module, includes funcons including the management of devices and persons, door
monitoring, and
stascs of persons, credenals, and events, helping you monitor devices and
persons via mulple tools.
The following is supported funcons:
Device Management
You can add devices and view details of a device or details of a door .
●
On the device details page, the following tasks can be performed.
○
Conguring basic parameters, including the device's user name, password, IP address, port,
name, and me zone.
○
Viewing resources (doors or cameras) linked with the device, or
imporng the resources
linked to the device.
○
Conguring Wiegand parameters and parameters of serial port number.
○
Conguring card reader protocols, readable card types, and M1 card encrypon reading
sengs.
○
Conguring the uploading and storage of prole pictures.
○
Jumping to the Web page of the device.
○
Conguring mul-factor authencaon.
●
On the Door Details page, the following tasks can be performed.
○
Conguring basic parameters of the door, including name, door unlocking duraon and
alarm, auto-locking, duress code, super password, and dismiss code.
○
Linking cameras to the door, and viewing live view of the linked cameras.
○
Enabling the
funcon of automacally capturing pictures for the door.
○
Enabling card readers for the door and conguring parameters of card readers, including
name, buzzing
duraon, card swiping interval, tampering detecon, failed card template
alarm, and card reader authencaon mode.
○
Conguring Remain Unlocked & Remain Locked, mul-door interlocking, and Unlock Doors
with First Person.
Manage Departments And Persons
Add/edit/delete departments and persons. On the Person page, you can go to the Credenal
Conguraon page to select collecng mode of credenals and congure the collecng devices.
For collected prole pictures, if you need to protect the persons' privacy , you can disable the
funcon of exporng prole pictures or convert the prole pictures to unreadable models.
Add and Assign Access Levels
Persons with assigned access levels can access to specic doors during dened me periods.
Real-Time Monitoring of Doors
HikCentral Lite V1.1.1 User Manual
65

You can view the live view of cameras linked to a door. During the live view, you can change
door status in real me if necessary. You can also drag doors to a map and monitor them via
the map so as to know situaon of mulple doors quickly. The map supports viewing live view
of doors and changing door statuses.
Video Intercom
●
View records of missed calls from devices, and call the device back
●
Start two-way audio with a device.
●
Congure parameters of two-way audio for the current client.
Import Person Authencaon Events from Devices to the Client
Person authencaon events include normal and abnormal authencaon records. When the
system misses events, you can import events stored in devices to the system.
Search for Access Events
Access events include person authencaon events, access control device events, and video
intercom call records.
View Stascs
The stascs show an overview of persons, person credenals, access levels of persons, and
access events. When viewing the stascs, users can go to corresponding page to congure
these items in real me.
4.1
Preparaons
4.1.1 Add Devices
The system supports adding access control devices, door staons, and barrier gates.
HikCentral Lite V1.1.1 User Manual
66

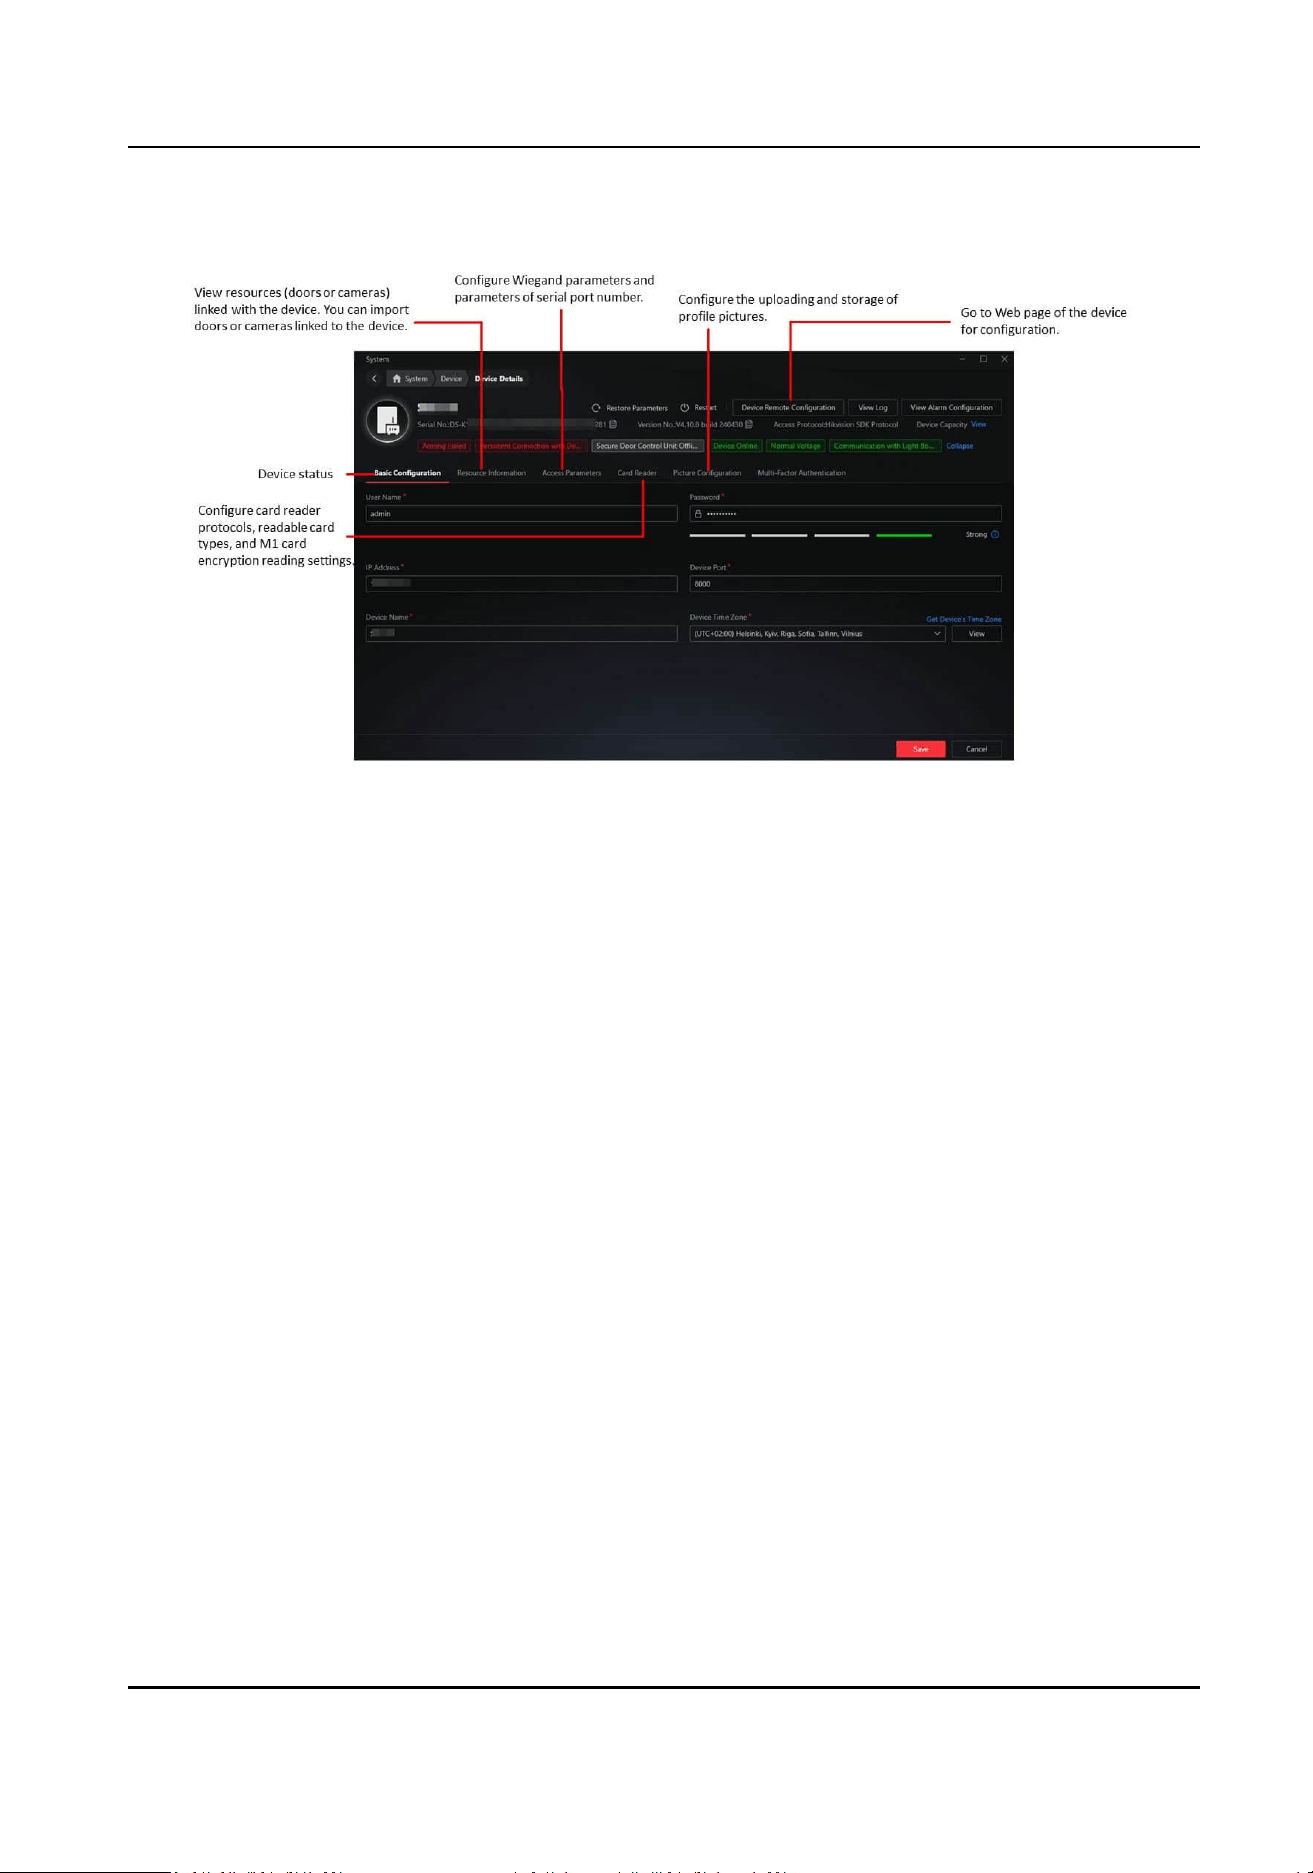
Figure 4-2 Details of an Access Control Device
Mul-Factor Authencaon
Authencaon Interval
Make sure the interval between two authencaons is within this value. For example, when
you set the interval as 5s, if the interval between two
authencaons is longer than 5s, the
mul-factor authencaon will be invalid, and you should authencate again from the
beginning.
4.1.3 View Details of a Door
In the device list, click the name of a door, or right-click a door, and then select View Details.
HikCentral Lite V1.1.1 User Manual
68
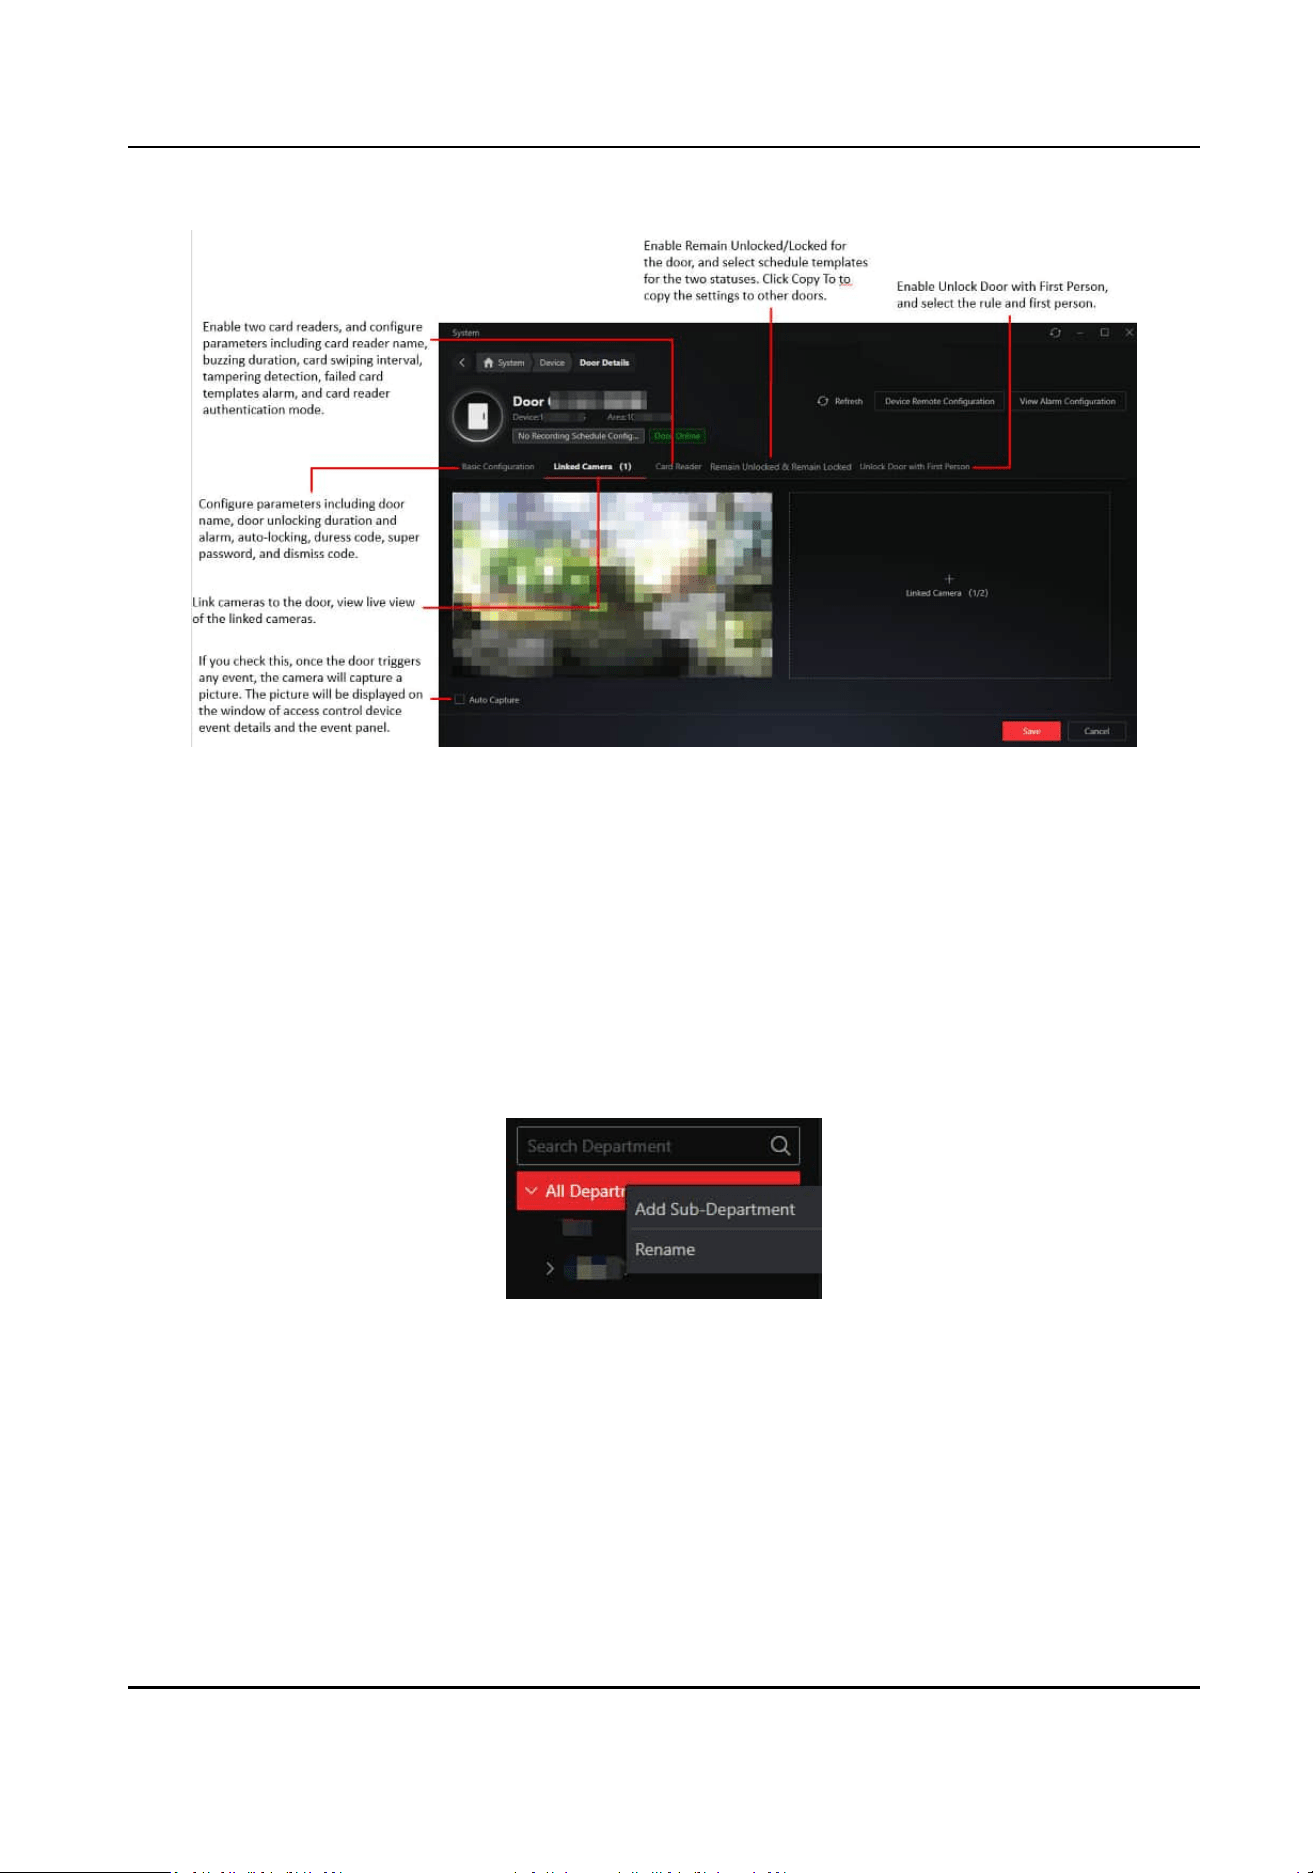
Figure 4-3 Door Details
4.2 Add Departments and Persons
On the Person page, you can add persons via dierent methods, export person informaon or
prole pictures to the PC, or manage exisng persons.
Add a Department
Right-click the root node of department, and select Add Sub-Department to add a department.
Figure 4-4 Department Tree
Right-click an added department, and select Add Same-Level Department or Add Sub-
Department.
HikCentral Lite V1.1.1 User Manual
69
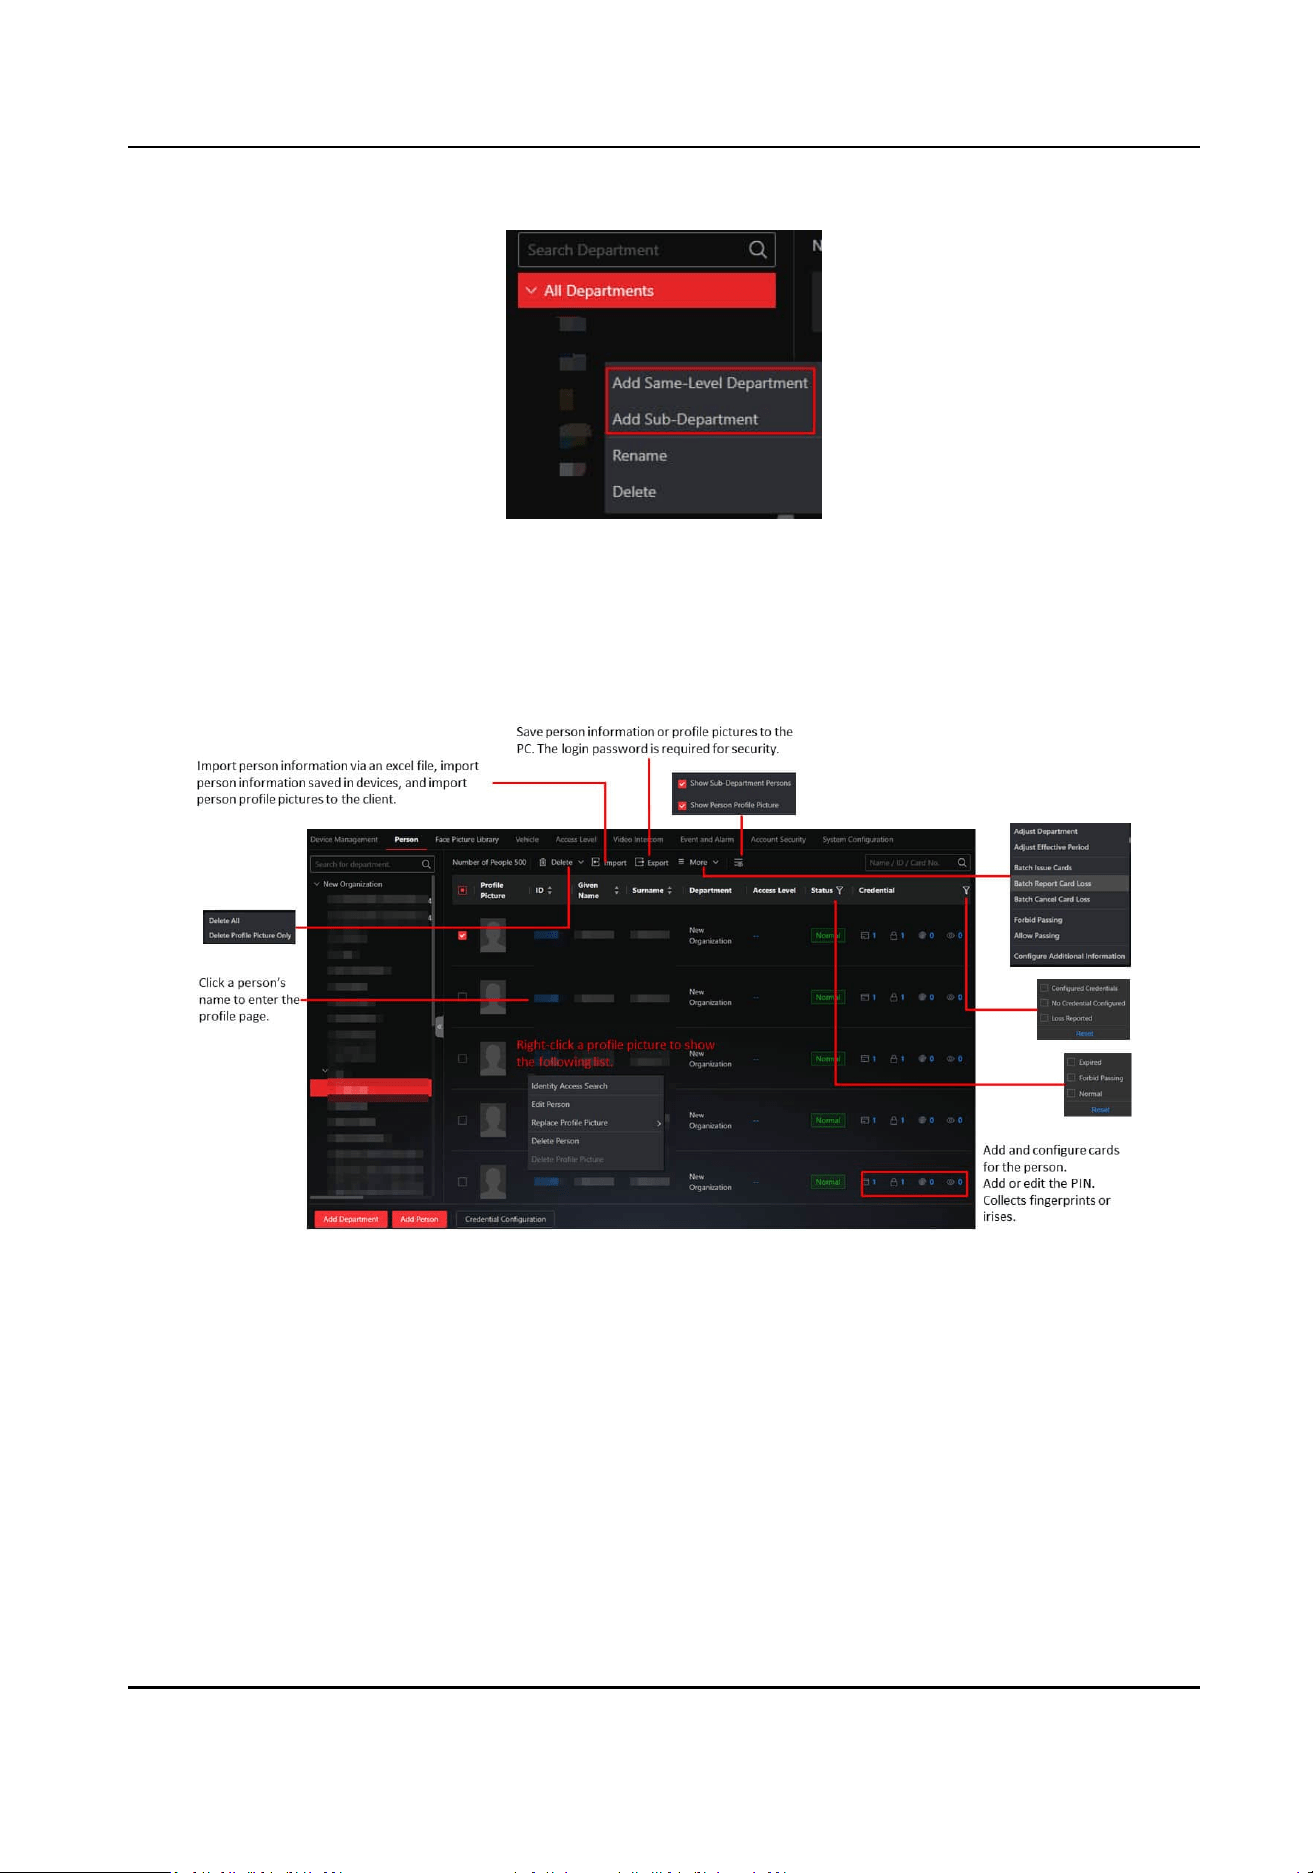
Figure 4-5 Department Tree
In the department tree, drag a department to change its level.
Add Persons
Figure 4-6 Person List
HikCentral Lite V1.1.1 User Manual
70
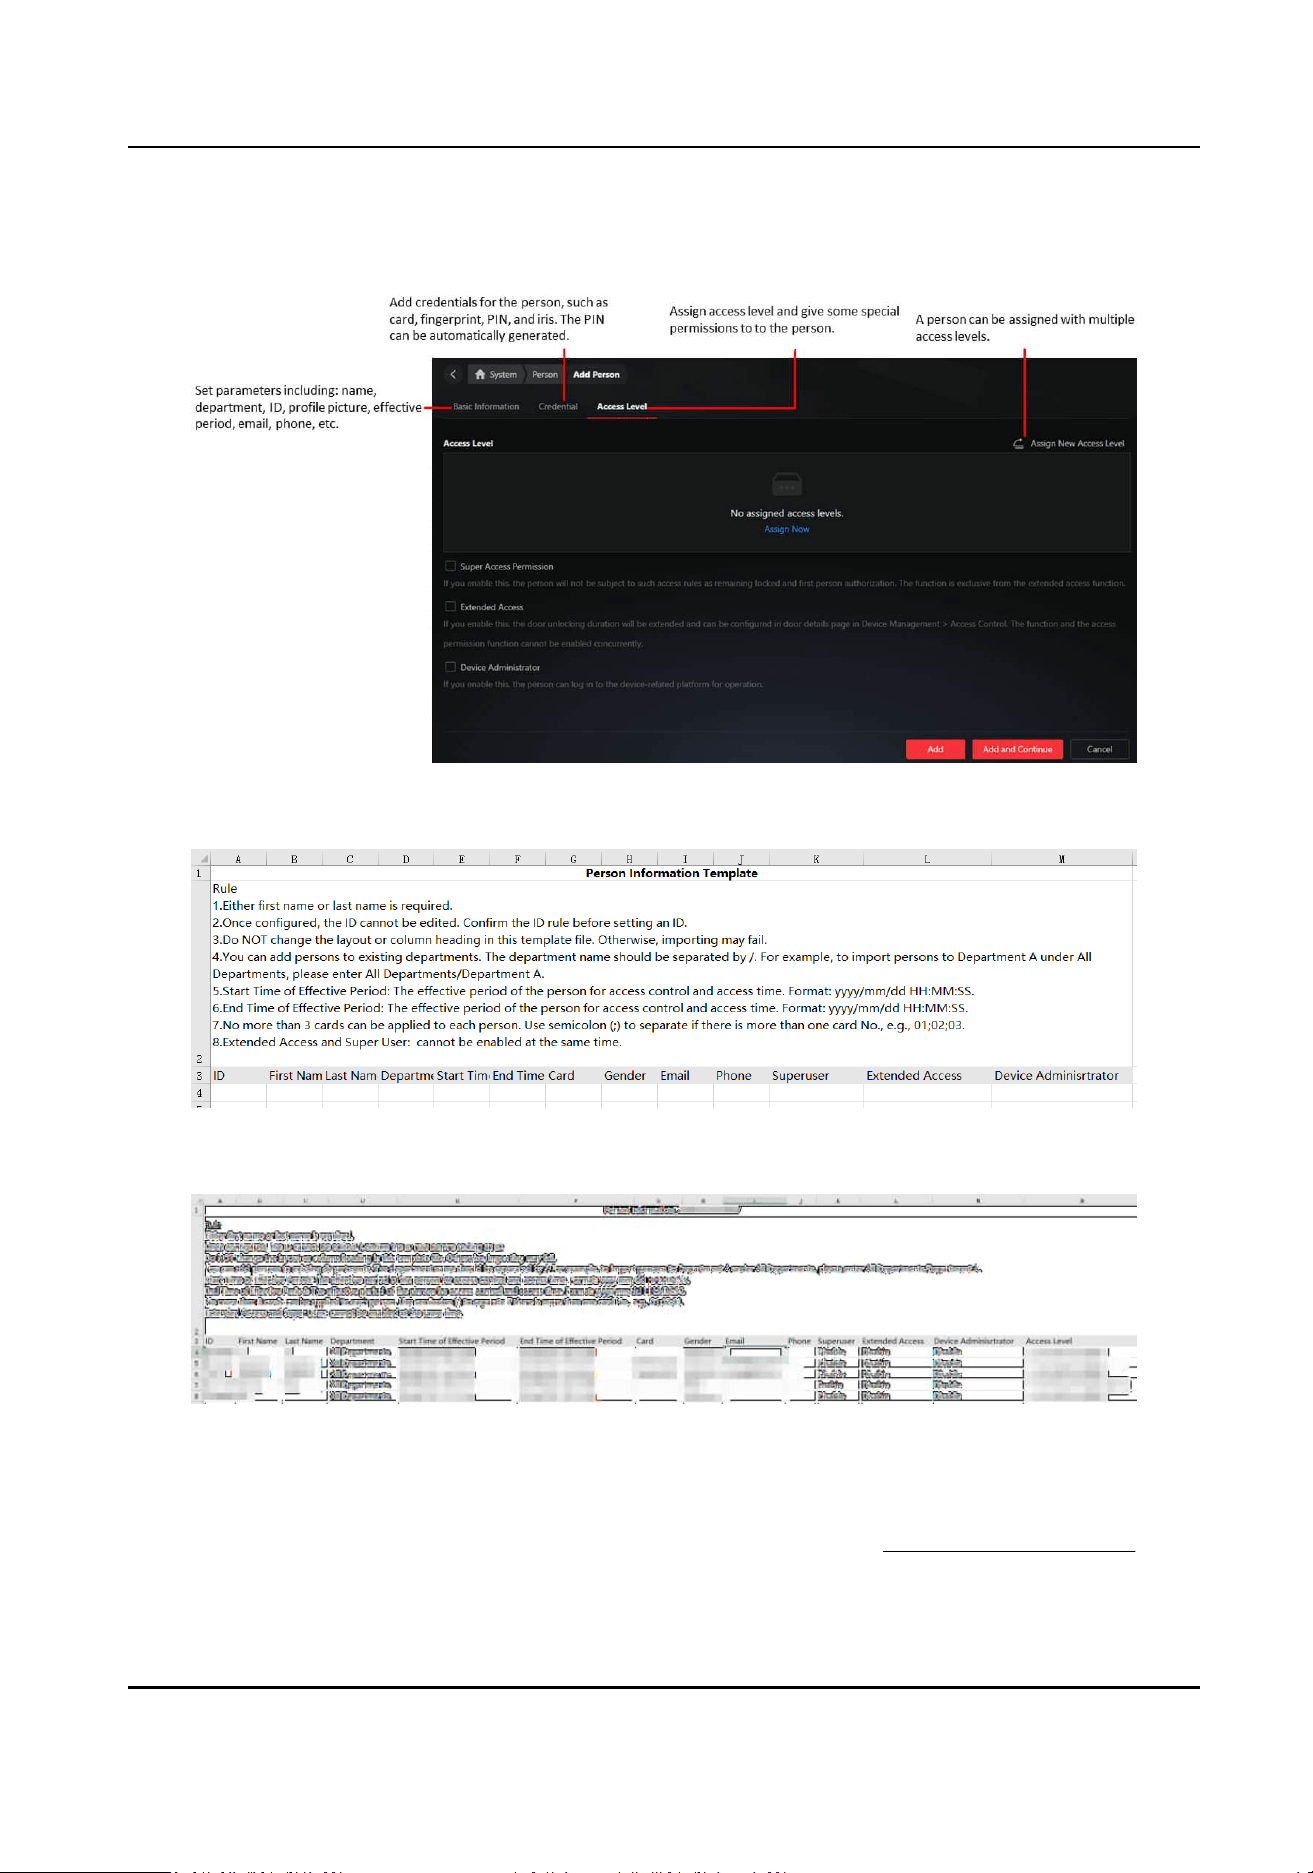
Figure 4-7 Add Person Page
Figure 4-8 Template for Imporng Persons
Figure 4-9 Exported Person Informaon
Addional informaon will be included in the downloaded template if any.
To export person prole pictures, you should enable this funcon rst on the Prole Picture page
( System → System
Conguraon → Security → Prole Picture ). See Protect Prole Pictures .
HikCentral Lite V1.1.1 User Manual
71

For deleted persons, their informaon (including name, ID, validity period, credenals, etc.) will
sll be kept (Go to System → Storage → Data Retenon Time → Deleted Person Data to congure
data retenon me for them.) During the retenon me, the data of deleted persons can sll be
found; otherwise the data will be deleted.
4.2.1 Congure Credenal-Related Parameters
Make sure you select the right collecng mode and congure the collecng device properly.
On the Person page, click Credenal Conguraon. Select a collecon mode according to the
following table.
Table 4-1 Scenarios Applicable for Dierent Collecon Mode
Collecon Device Scenario
●
Card Enroller
●
Fingerprint Enroller
●
USB Camera
Credenals of persons in dierent places are needed to collect (so that
you should take the devices to dierent places). You can collect cards
anywhere, and persons can come up and sit beside you for collecng
ngerprints
and taking face pictures.
Access Control Device The collecon device is already installed and cannot be moved. So you
should add the device to the system rst, and then collect credenals
remotely. This funcon should be supported by devices.
If you fail to collect the card No., go to the Door Details page and
check whether the door is armed.
Enrollment Staon The enrollment staon can be used for collecng credenals via USB
or network. It supports collecng cards, face pictures, and ngerprints.
You can take it to anywhere, and the collected credenals can be
stored in the device.
4.2.2 Protect Prole Pictures
Read this topic if you have requirement for protecng prole picture.
HikCentral Lite V1.1.1 User Manual
72
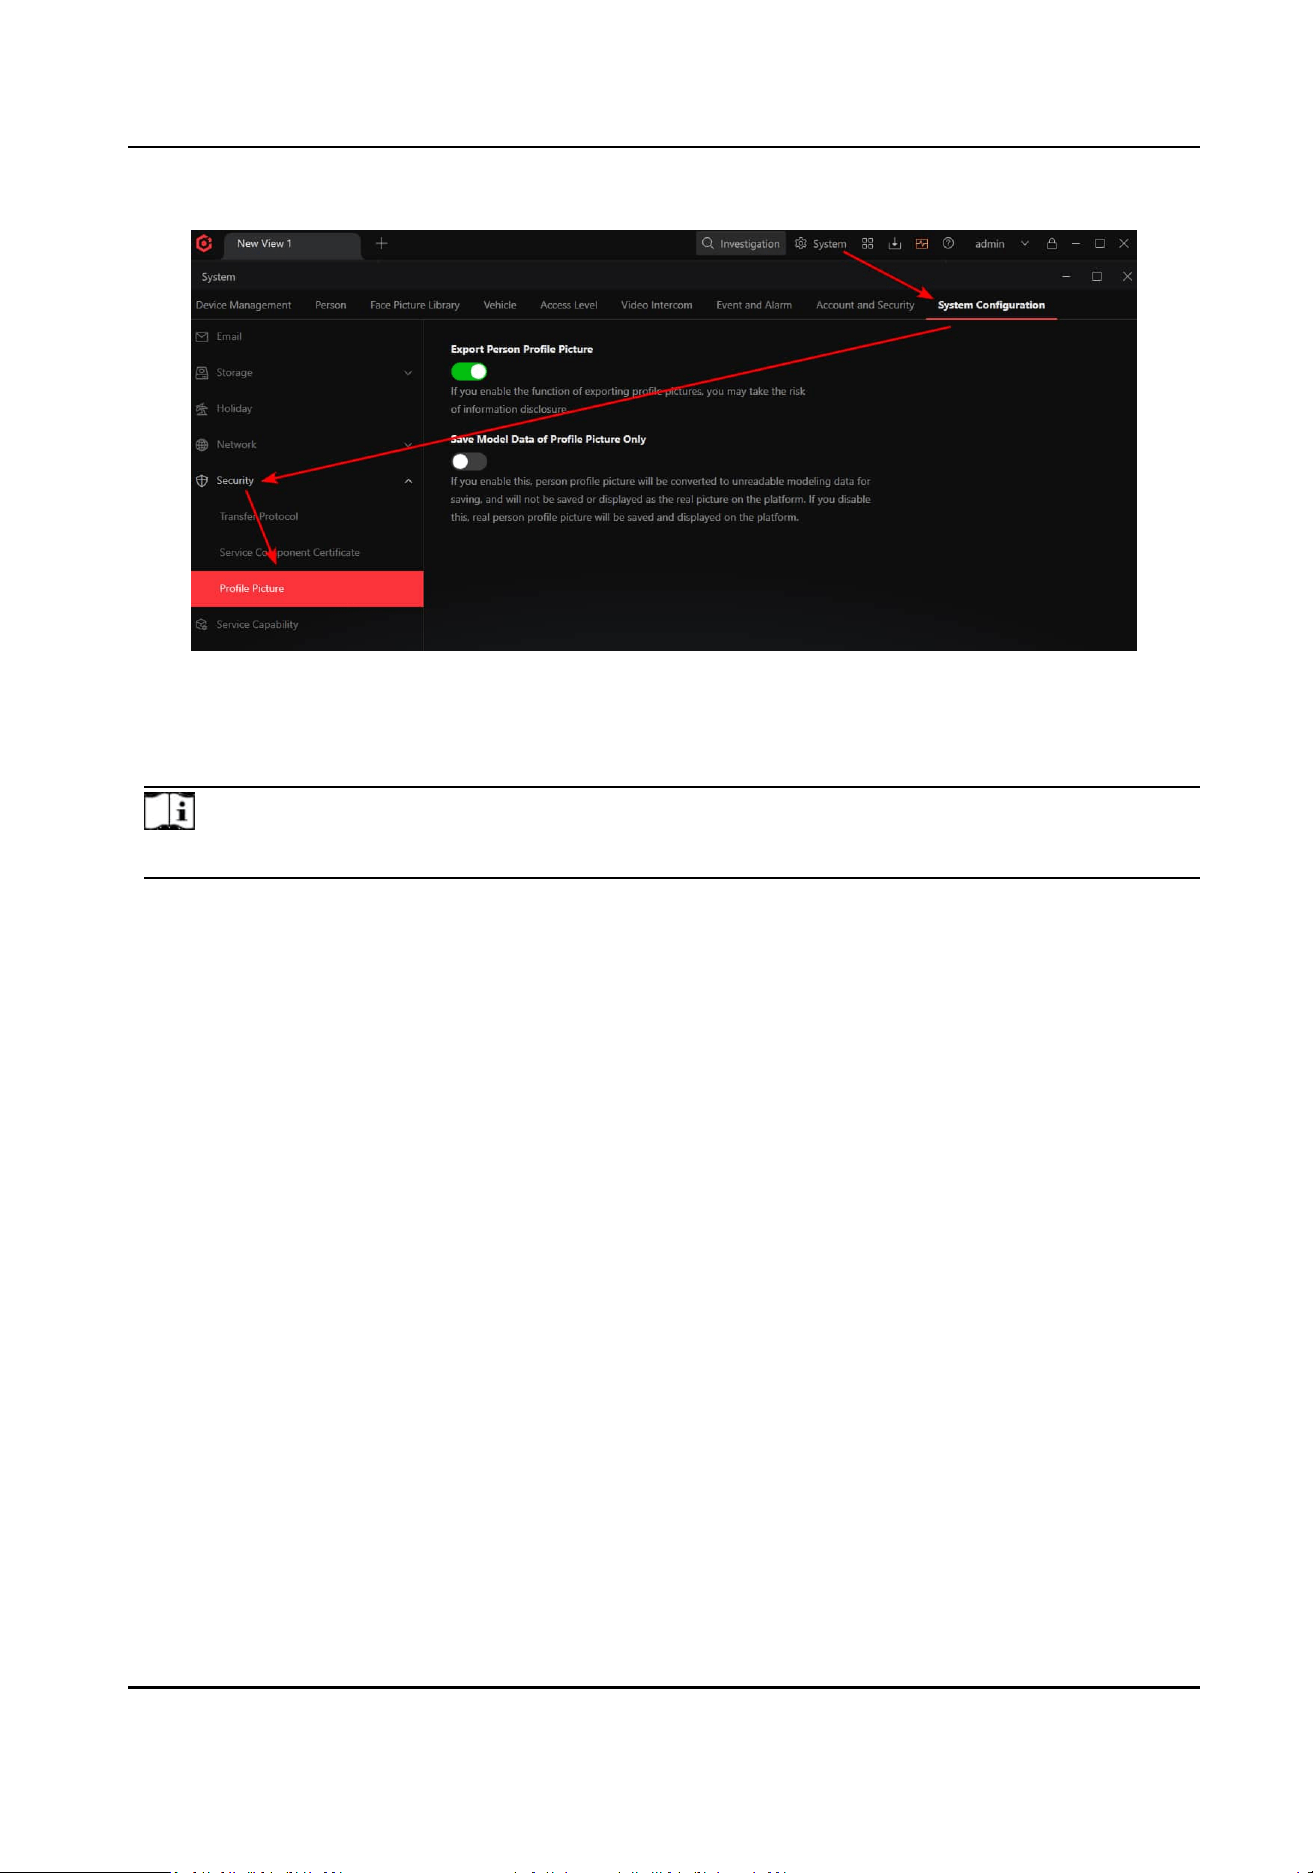
Figure 4-10 Entry of Protect Prole Pictures
Export Person Prole Picture
If you enable this
funcon, you will be able to export persons' prole pictures to the PC.
Note
Only the admin user can enable this funcon.
HikCentral Lite V1.1.1 User Manual
73
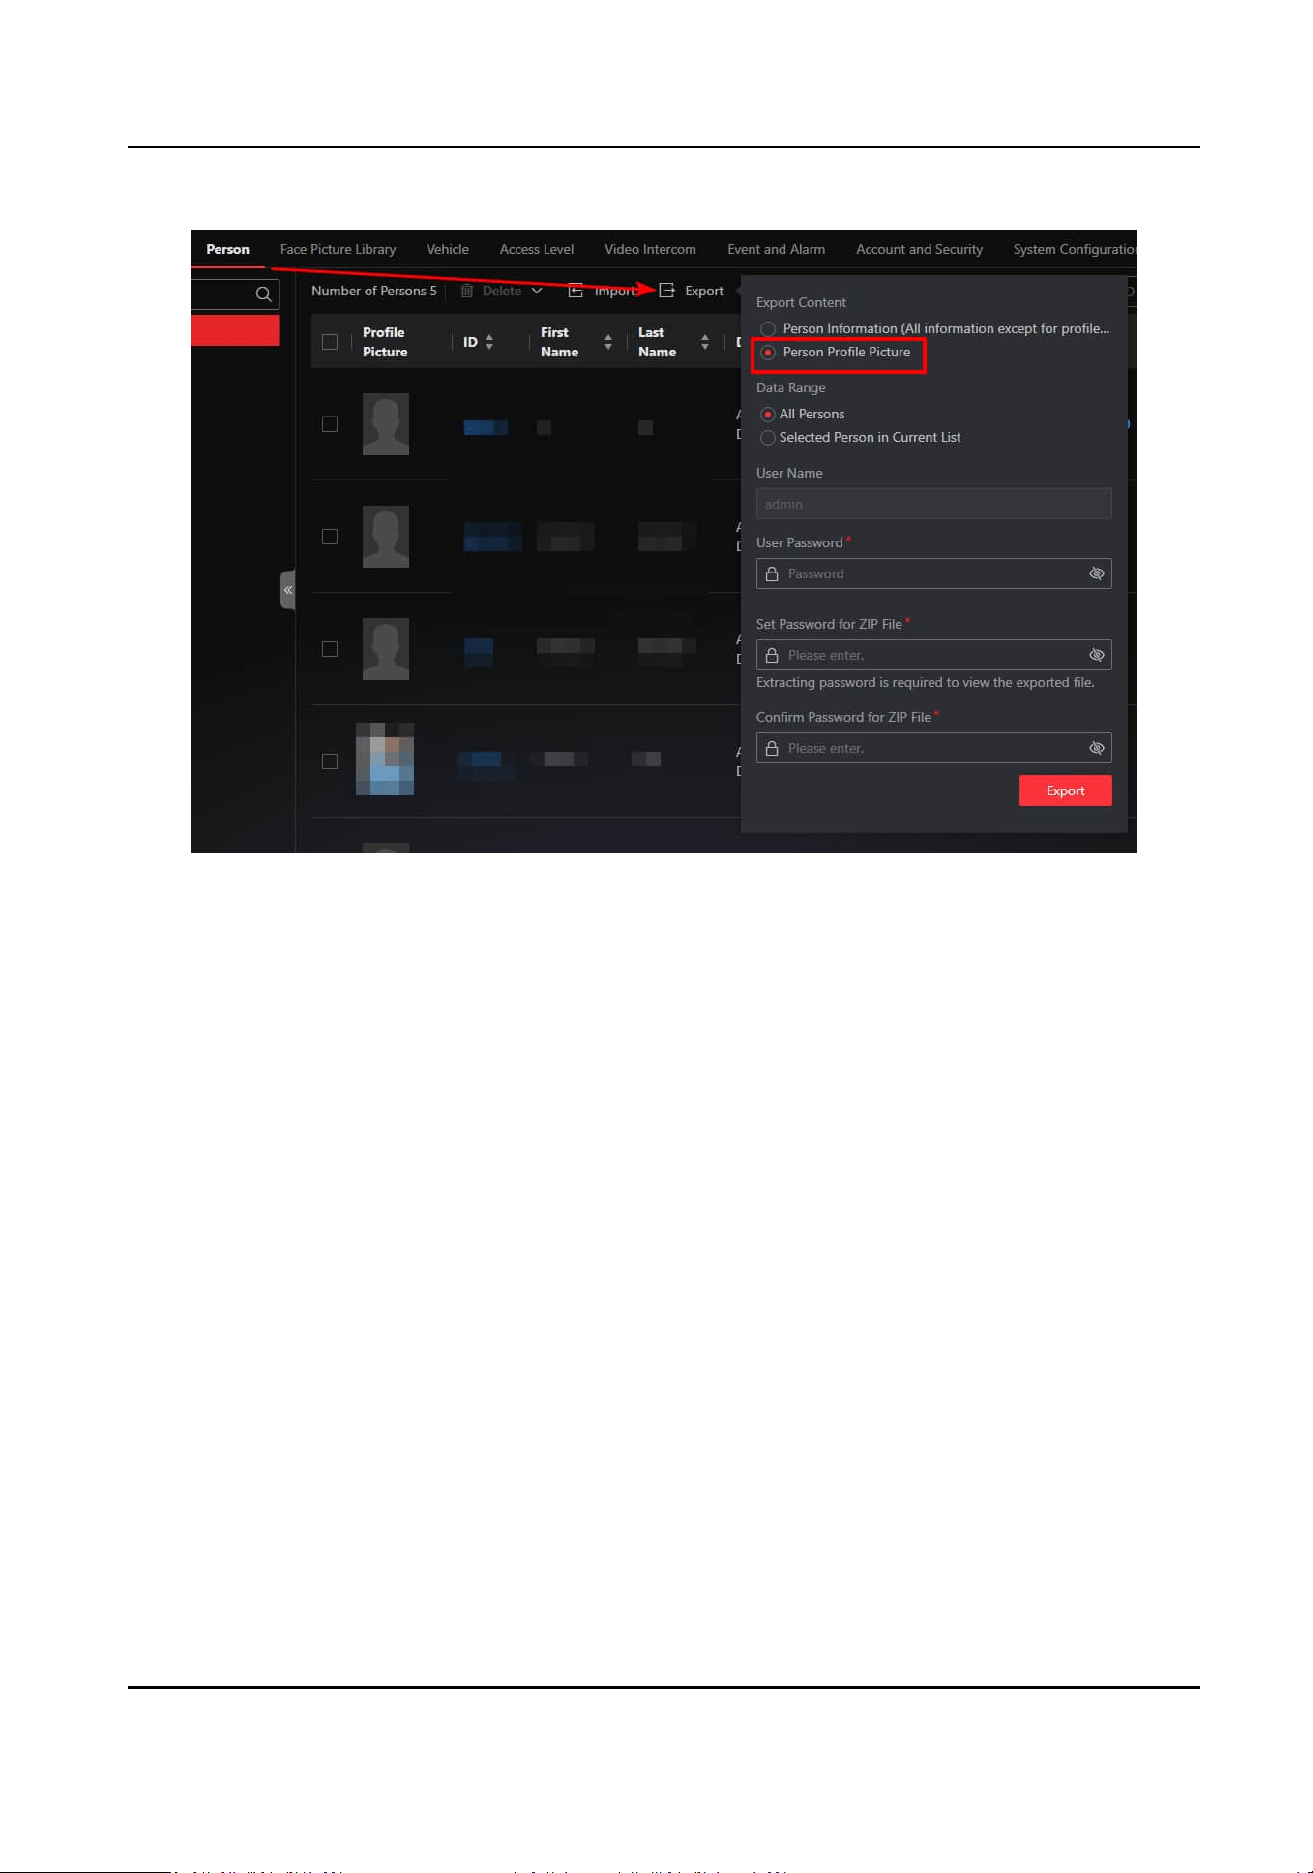
Figure 4-11 Entry of Exporng Prole Pictures
4.3 Add and Assign Access Levels
By selecng doors and an access schedule, you can add an access level. Aer this, you can assign
the access level to persons or departments. In this way, the persons can authencate and open the
selected doors during the
dened me periods.
What is the Access Level?
The access level is a group of doors sharing the same access schedule. Assigning access level to
persons or departments can dene the access permission that which persons can get access to
which doors during the authorized
me period.
HikCentral Lite V1.1.1 User Manual
74
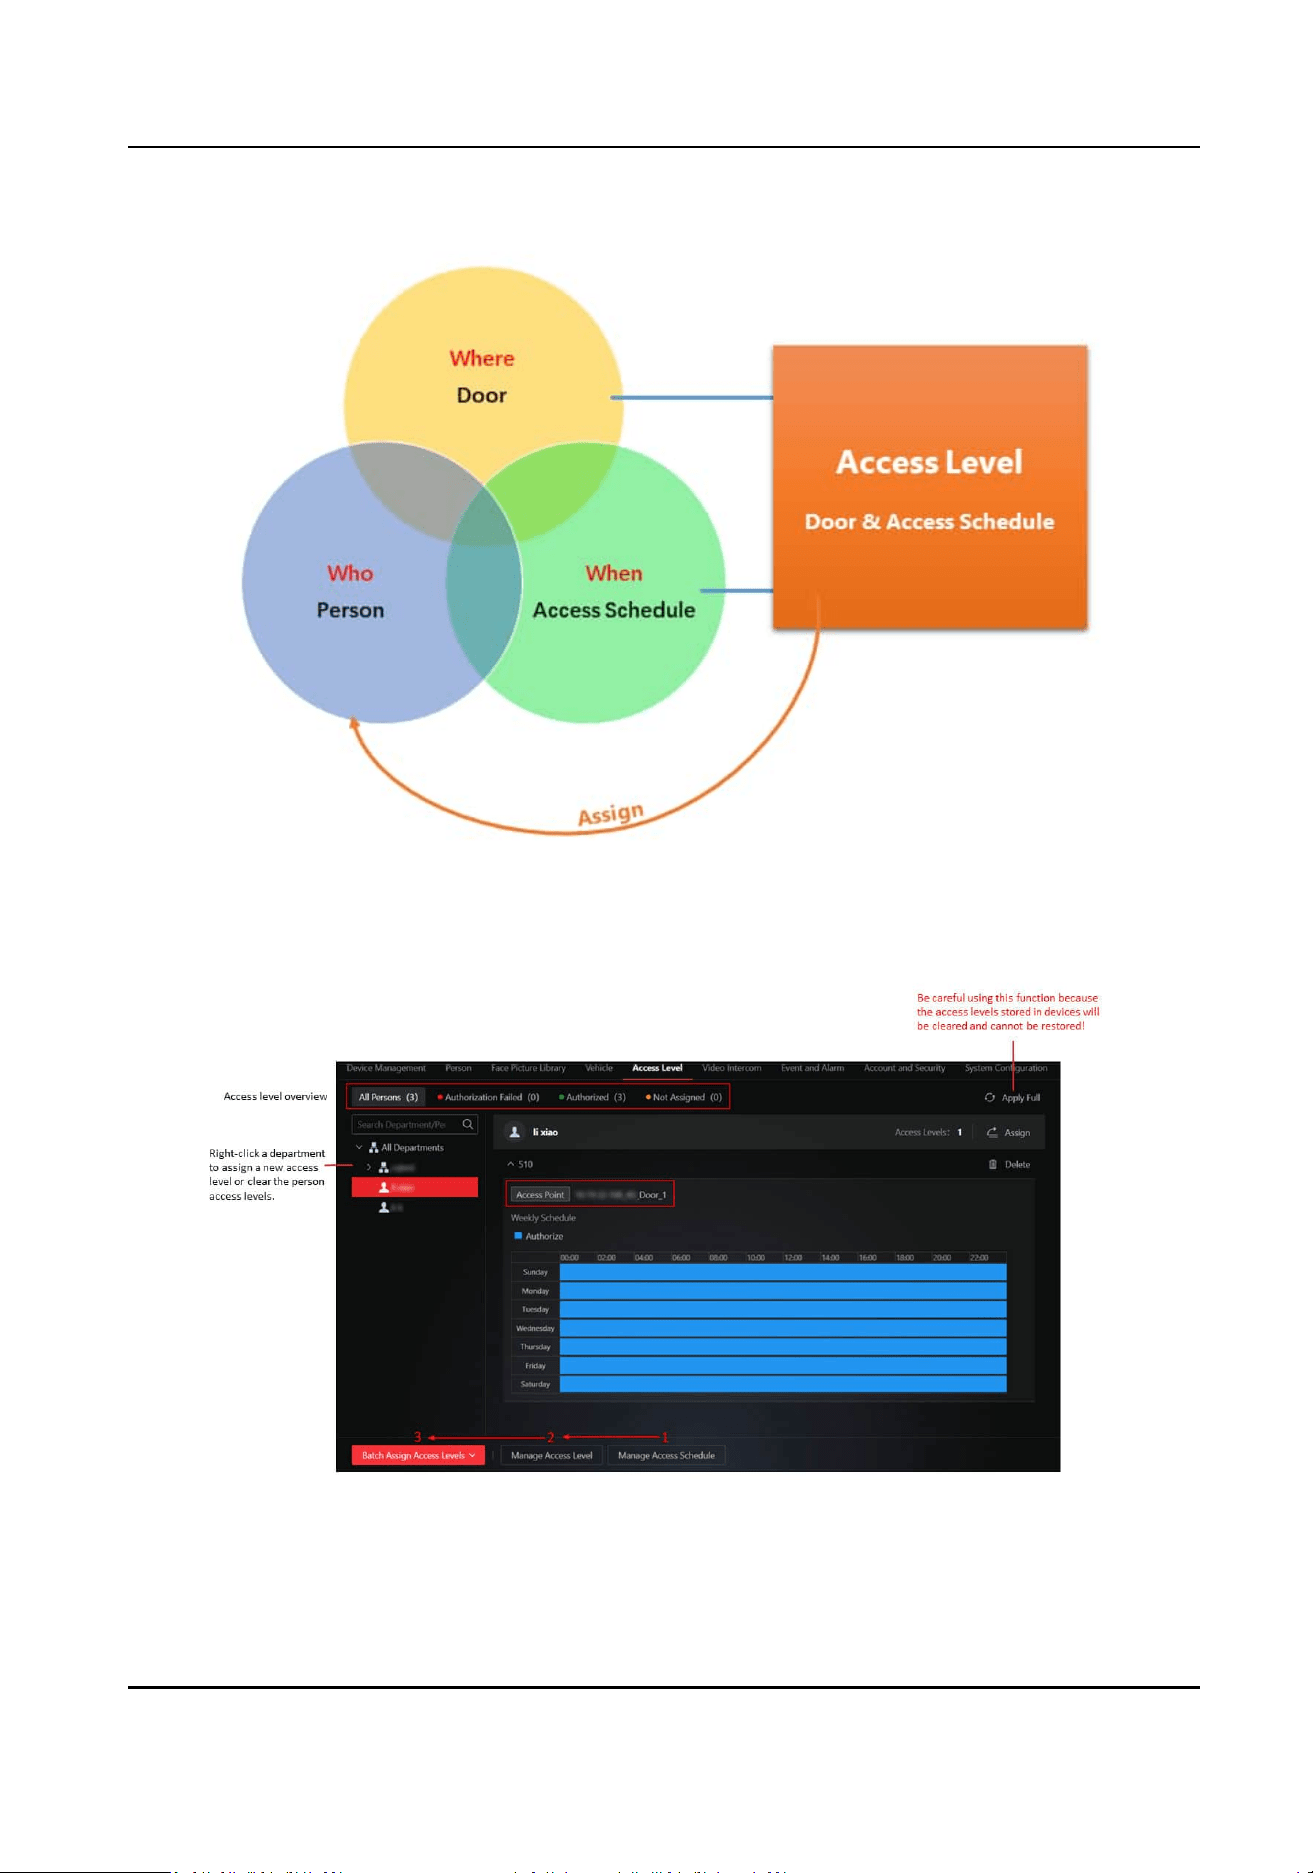
Figure 4-12 Access Level
Figure 4-13 Access Level Page
HikCentral Lite V1.1.1 User Manual
75
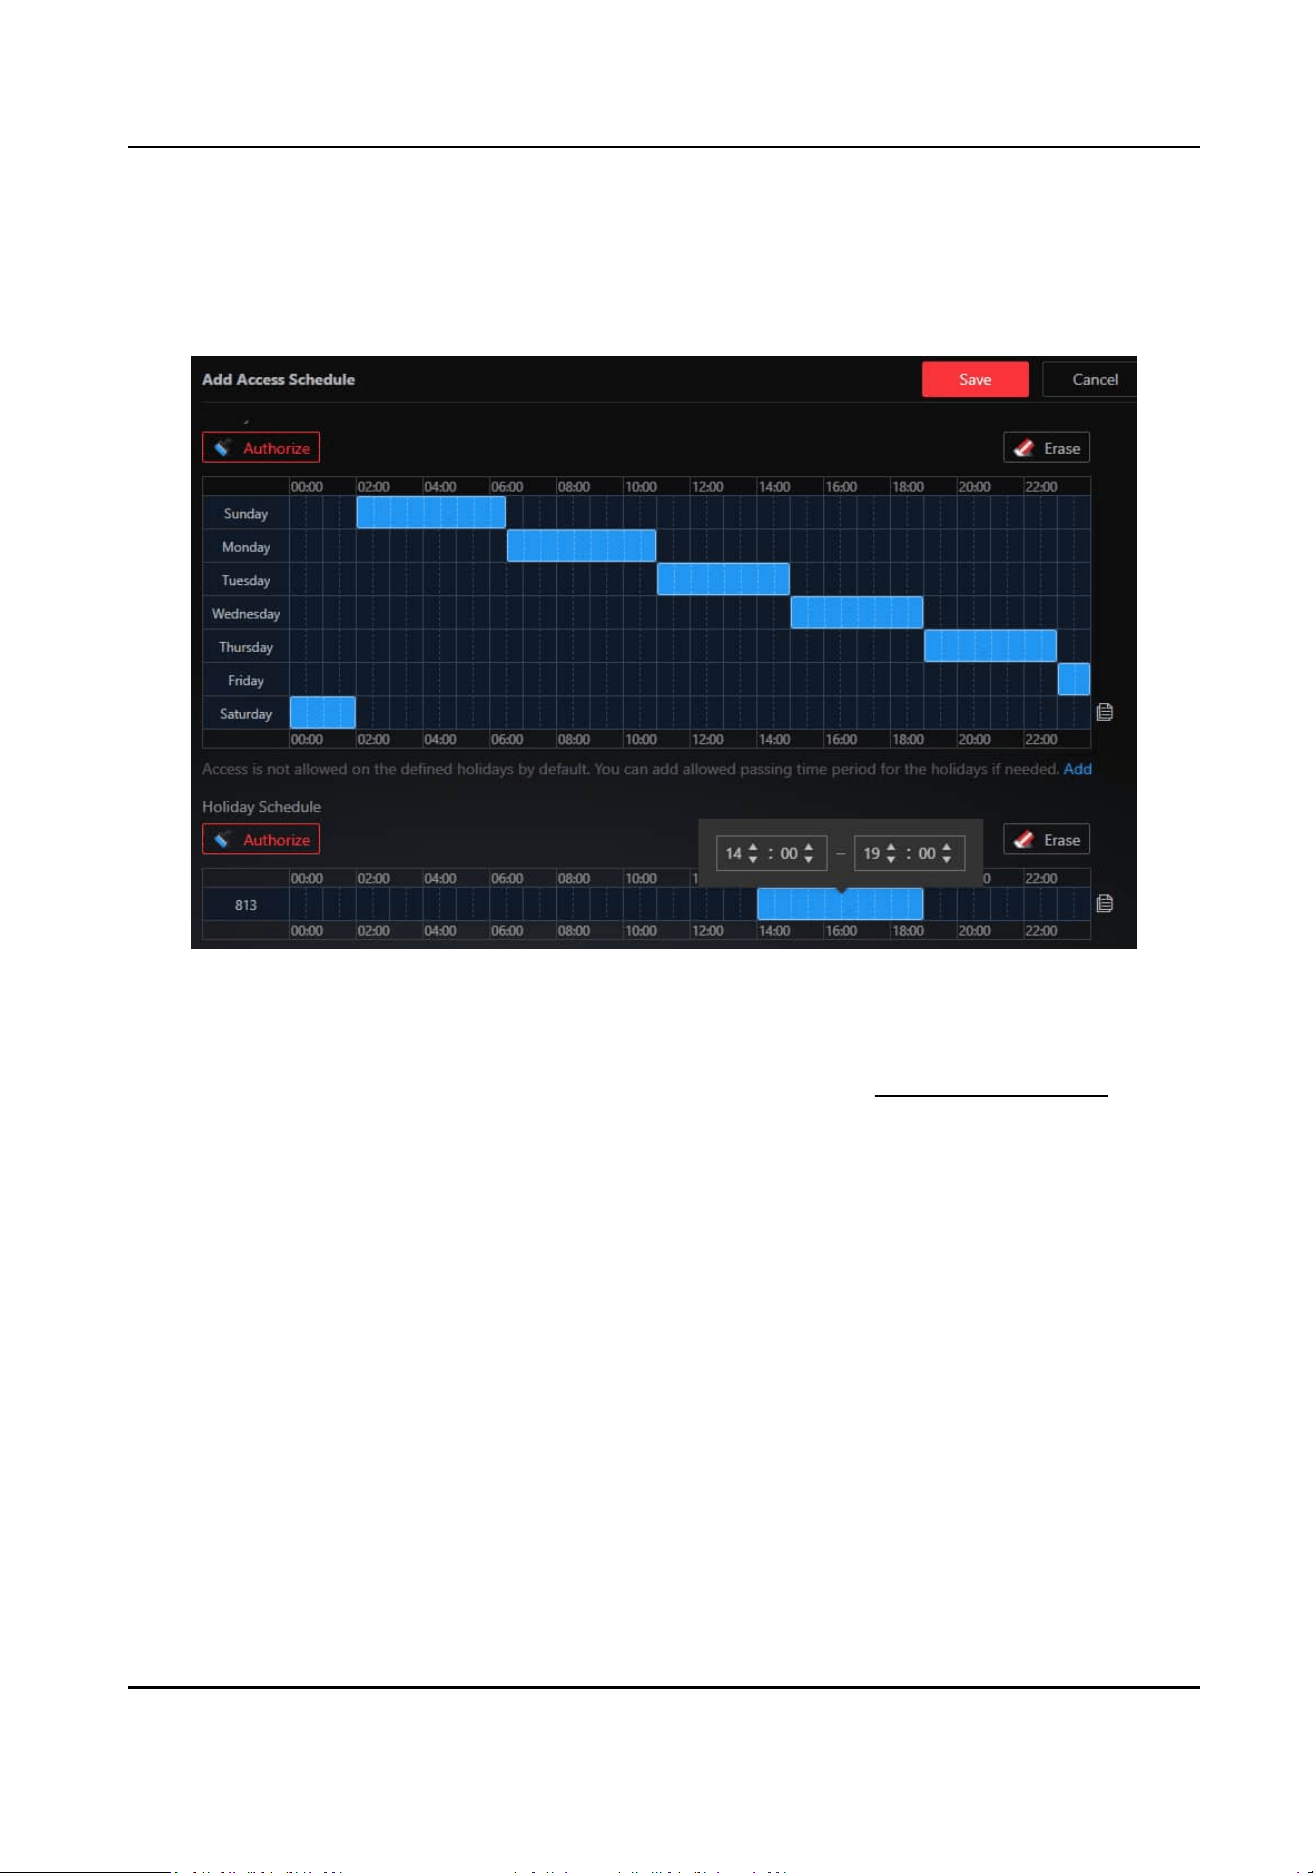
Add an Access Schedule
An access schedule denes when people can open the door. Three default access schedule
templates are provided: all-day template, workday template, and weekend template.
Figure 4-14 Add an Access Schedule
Click Authorize, and then drag on the me bar to draw authorized me periods. Aer drawing, you
can hover the cursor on the blue area and enter a
me or adjust the me by clicking the arrows in
the box popped up. For details about adding or eding a holiday, see Add or Edit a Holiday .
Add an Access Level
When creang an access level, users can select mulple doors. A door can be added to dierent
access levels.
About the Assignment of Access Levels
Assign Access Level by Department
Used for scenarios where persons need to authencate for entering xed places (such as
oces). Aer assigning an access level to a department, newly-added persons will be
automacally assigned with the same access level.
HikCentral Lite V1.1.1 User Manual
76
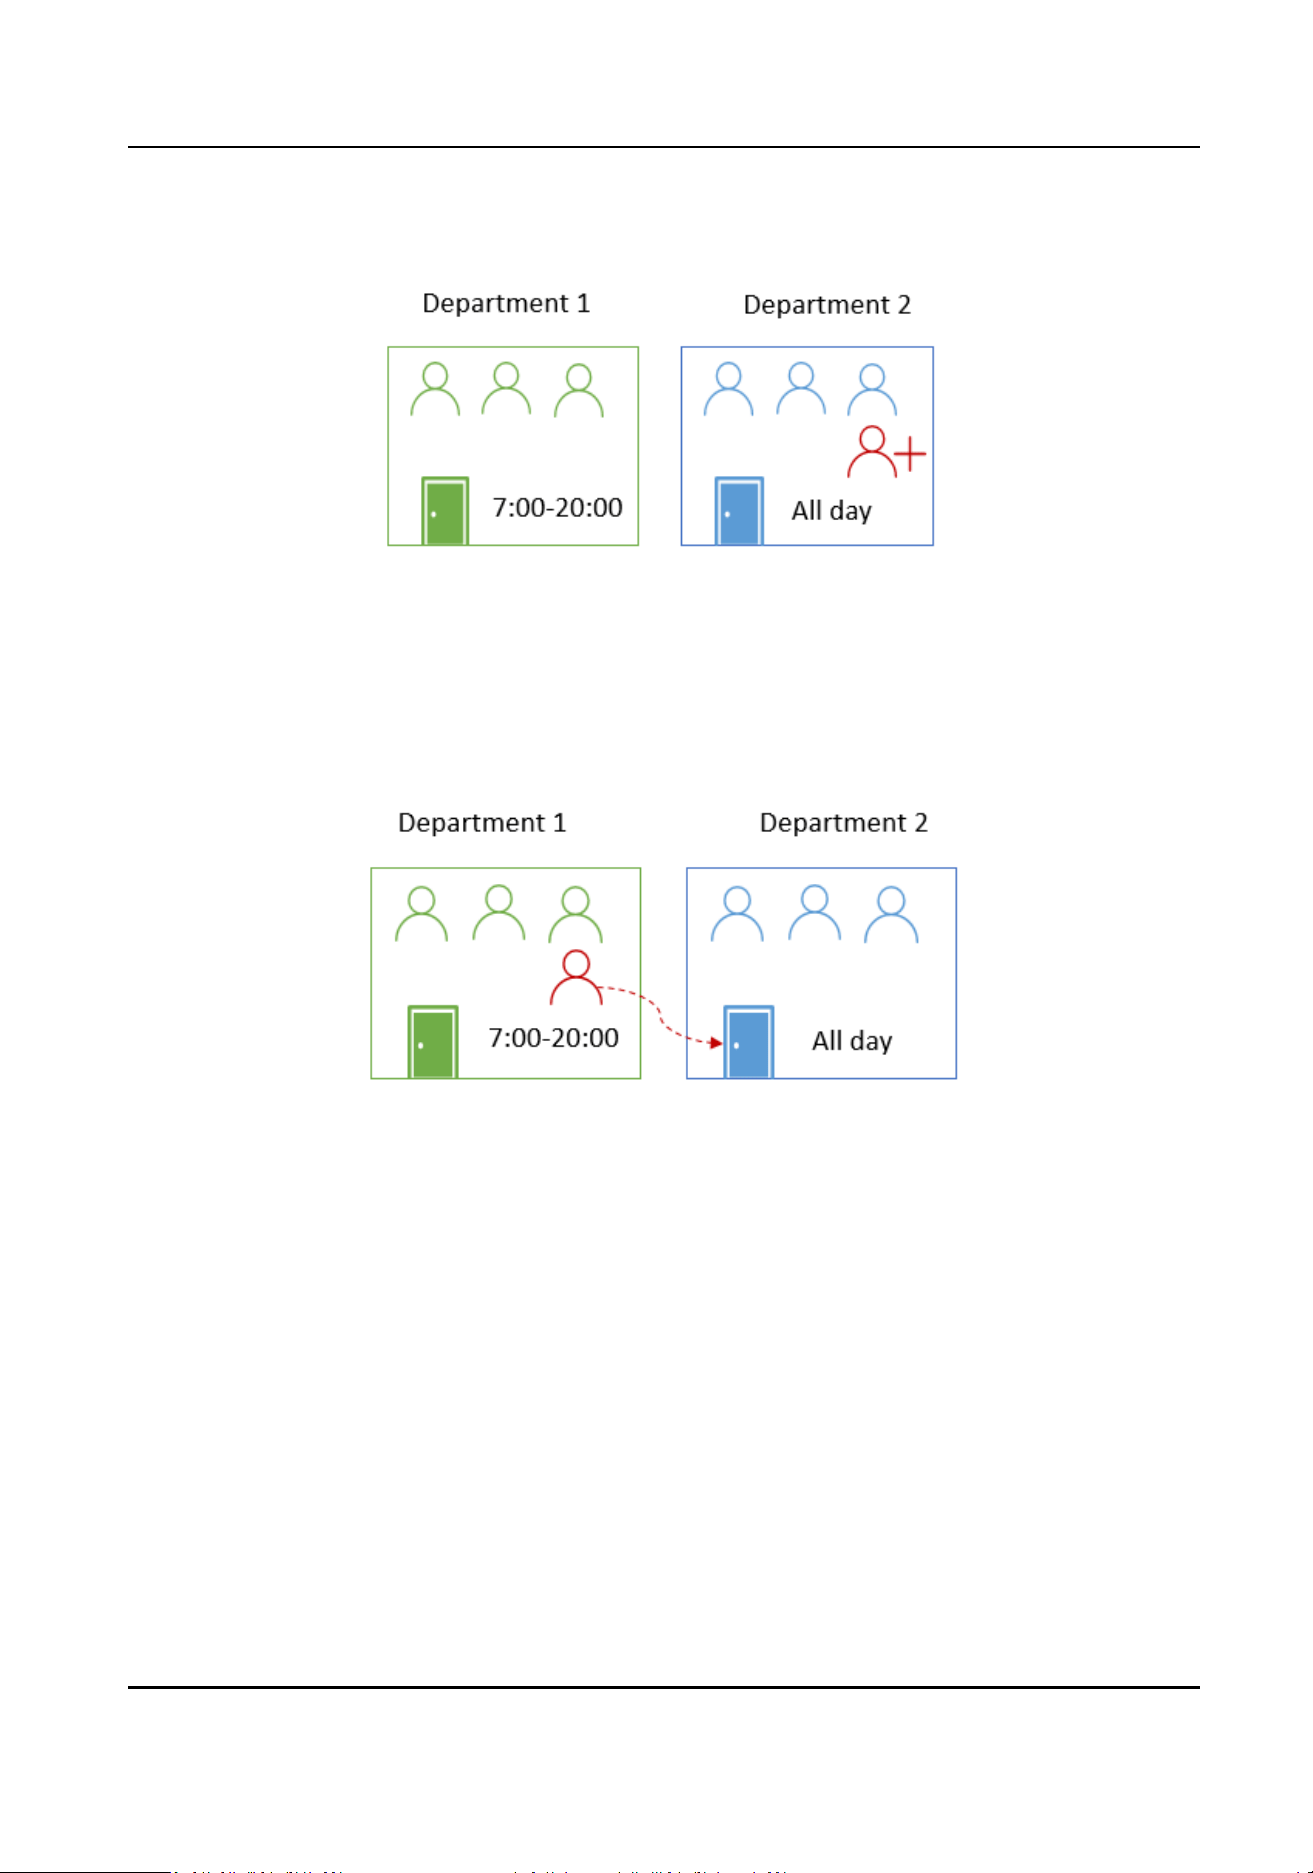
Figure 4-15 Assign Access Level by Department
Assign Access Level by Person
Used for scenarios where a person needs the access level of a special door, or a person needs a
temporary access level of a door.
Figure 4-16 Assign Access Level by Person
Apply Assigned Access Levels to Devices
Aer assigning access levels to persons via the client, the assignment will be automacally applied
to devices. The following reasons may cause the failure of access level assignment:
1. The device to which the access level is applied is
oine.
2. The network connecon is unstable.
4.4 Add an Alarm
You can add an alarm for a specied device, or all resources in the system.
HikCentral Lite V1.1.1 User Manual
77
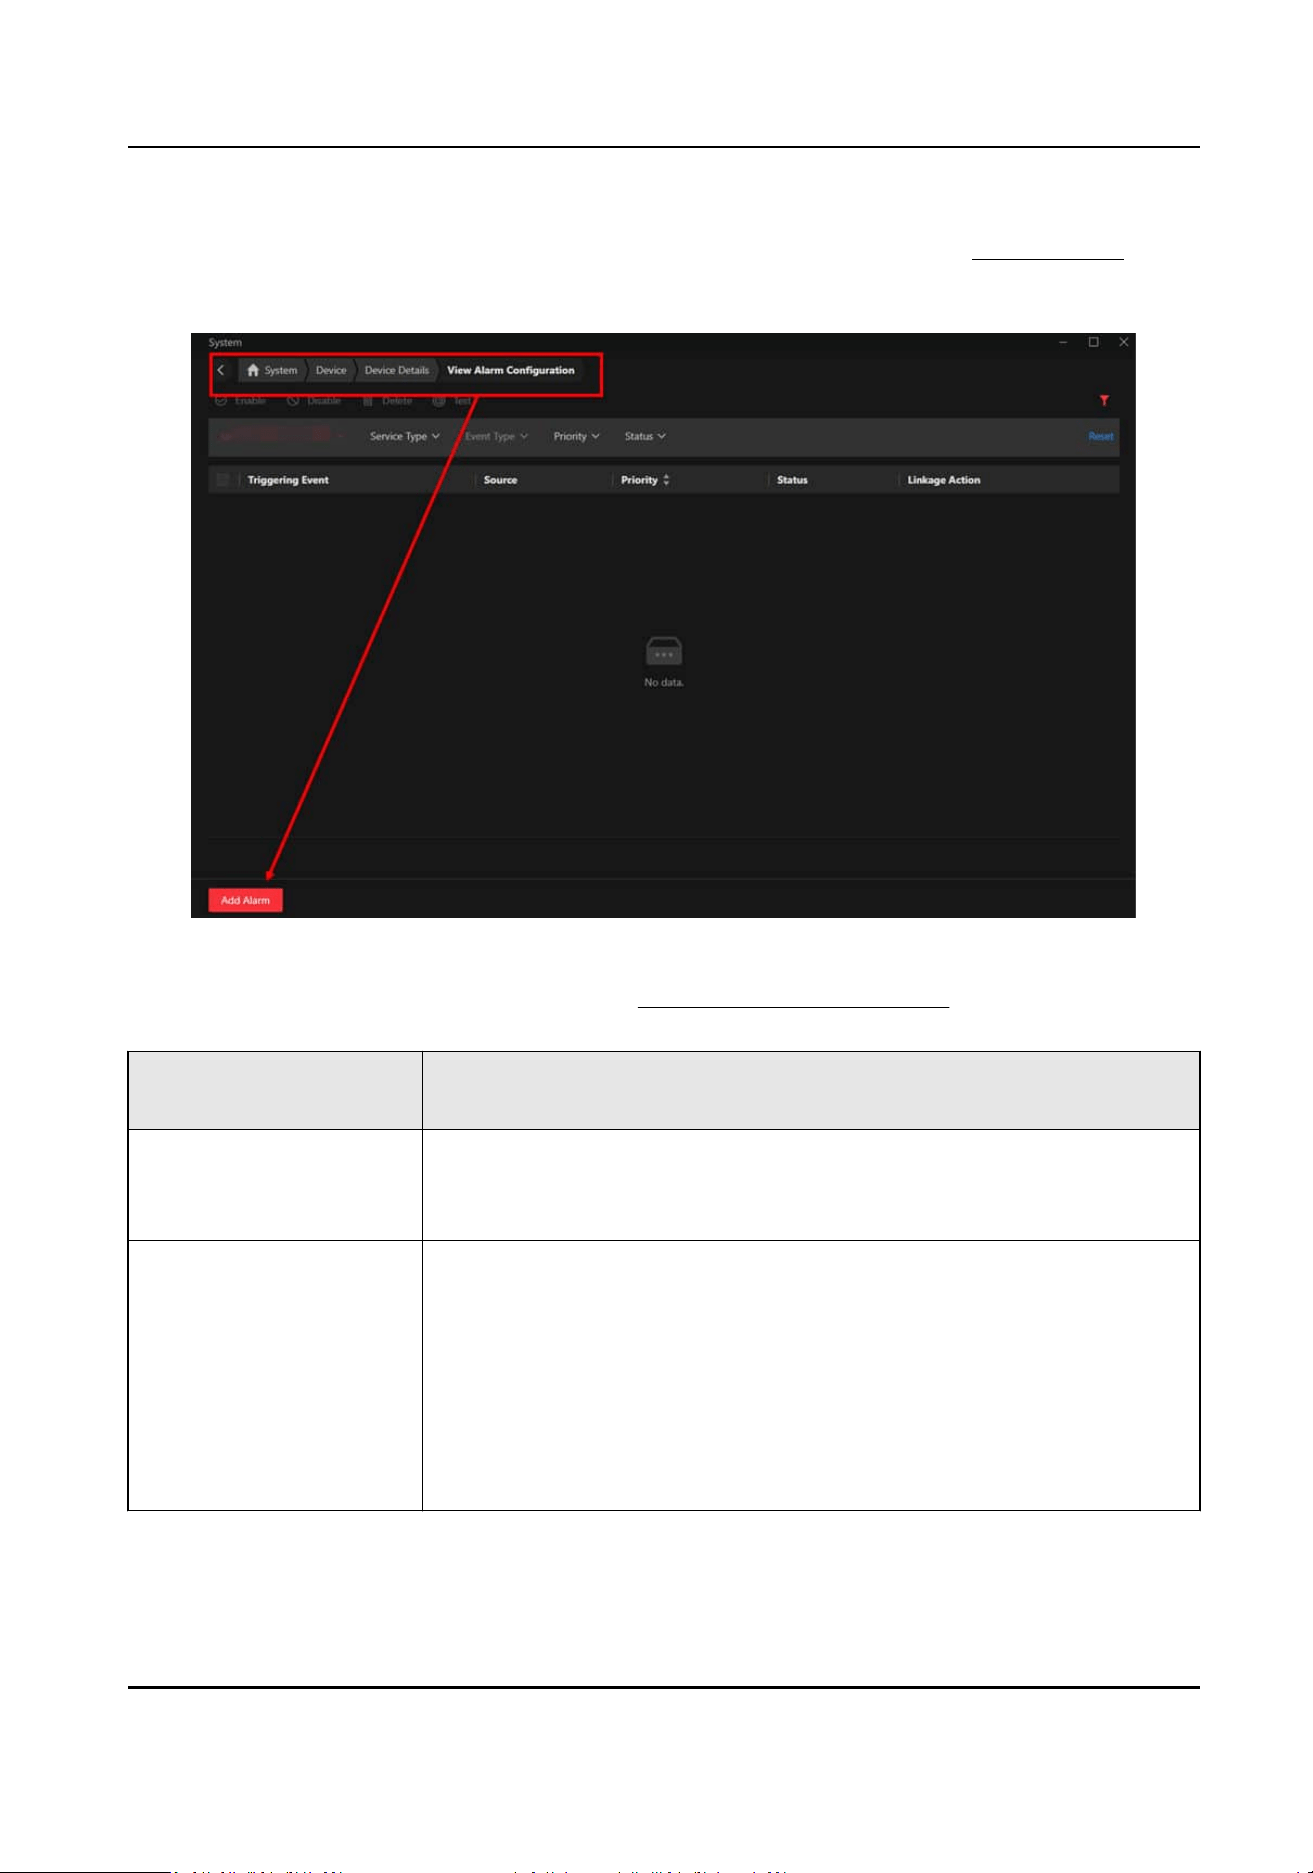
Both doors and access control / video intercom devices can trigger alarms. You can go to the Add
Alarm page from the device details page, or the Event and Alarm module. See Add an Alarm for
details about adding an alarm.
Figure 4-17 Alarm Conguraon Page
Supported alarm categories are as follows. See Supported Triggering Events for details.
Resources that Can
Trigger Alarms
Alarm Category
Door
●
Normal Card Swiping
●
Abnormal Card Swiping
●
Other Door Events
Access Control / Video
Intercom Device
●
Device Security
●
Device Network
●
Device Baery
●
Device Record
Reporng
●
Device Disk/HDD
●
Device Component
Communicaon
●
Local Operaon on Device
●
Remote
Operaon on Plaorm
HikCentral Lite V1.1.1 User Manual
78
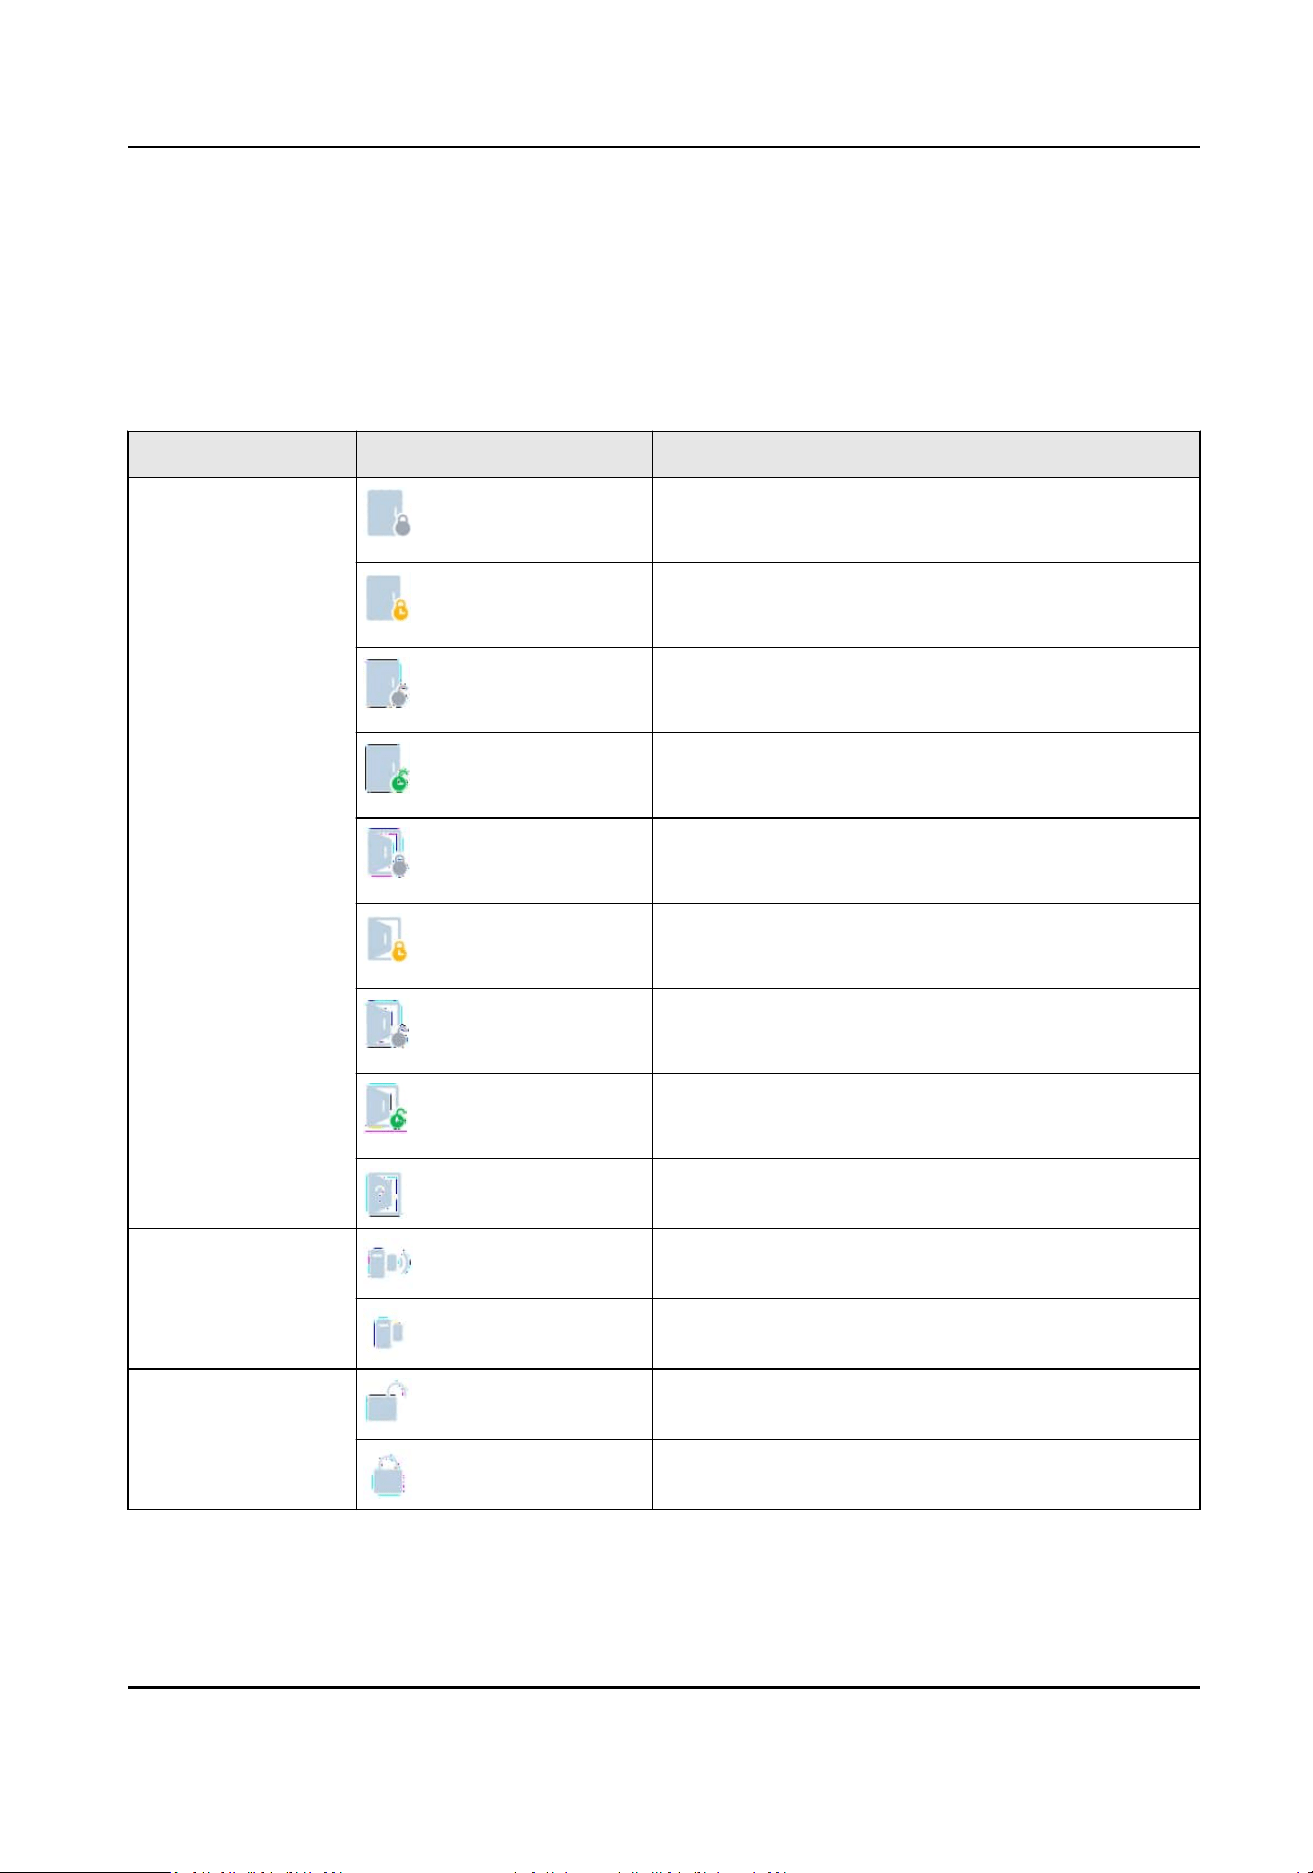
4.5 Real-Time Monitoring of Doors
You can monitor doors and control door status in real me. Refer to the following table for the
explanaons of door status.
Table 4-2 Explanaons of Door Status, Door Contact Status, and Door Lock Status
Status Icon Explanaon
Door Status Door Locked
Door Lock Locked
Door Locked
Door Lock Remain Locked
Door Locked
Door Lock Unlocked
Door Locked
Door Lock Remain Unlocked
Door Unlocked
Door Lock Locked
Door Unlocked
Door Lock Remain Locked
Door Unlocked
Door Lock Unlocked
Door Unlocked
Door Lock Remain Unlocked
Unknown
Door Contact
Status
Door Contact Unlocked
Door Contact Locked
Door Lock Status Door Lock Unlocked
Door Lock Locked
HikCentral Lite V1.1.1 User Manual
79
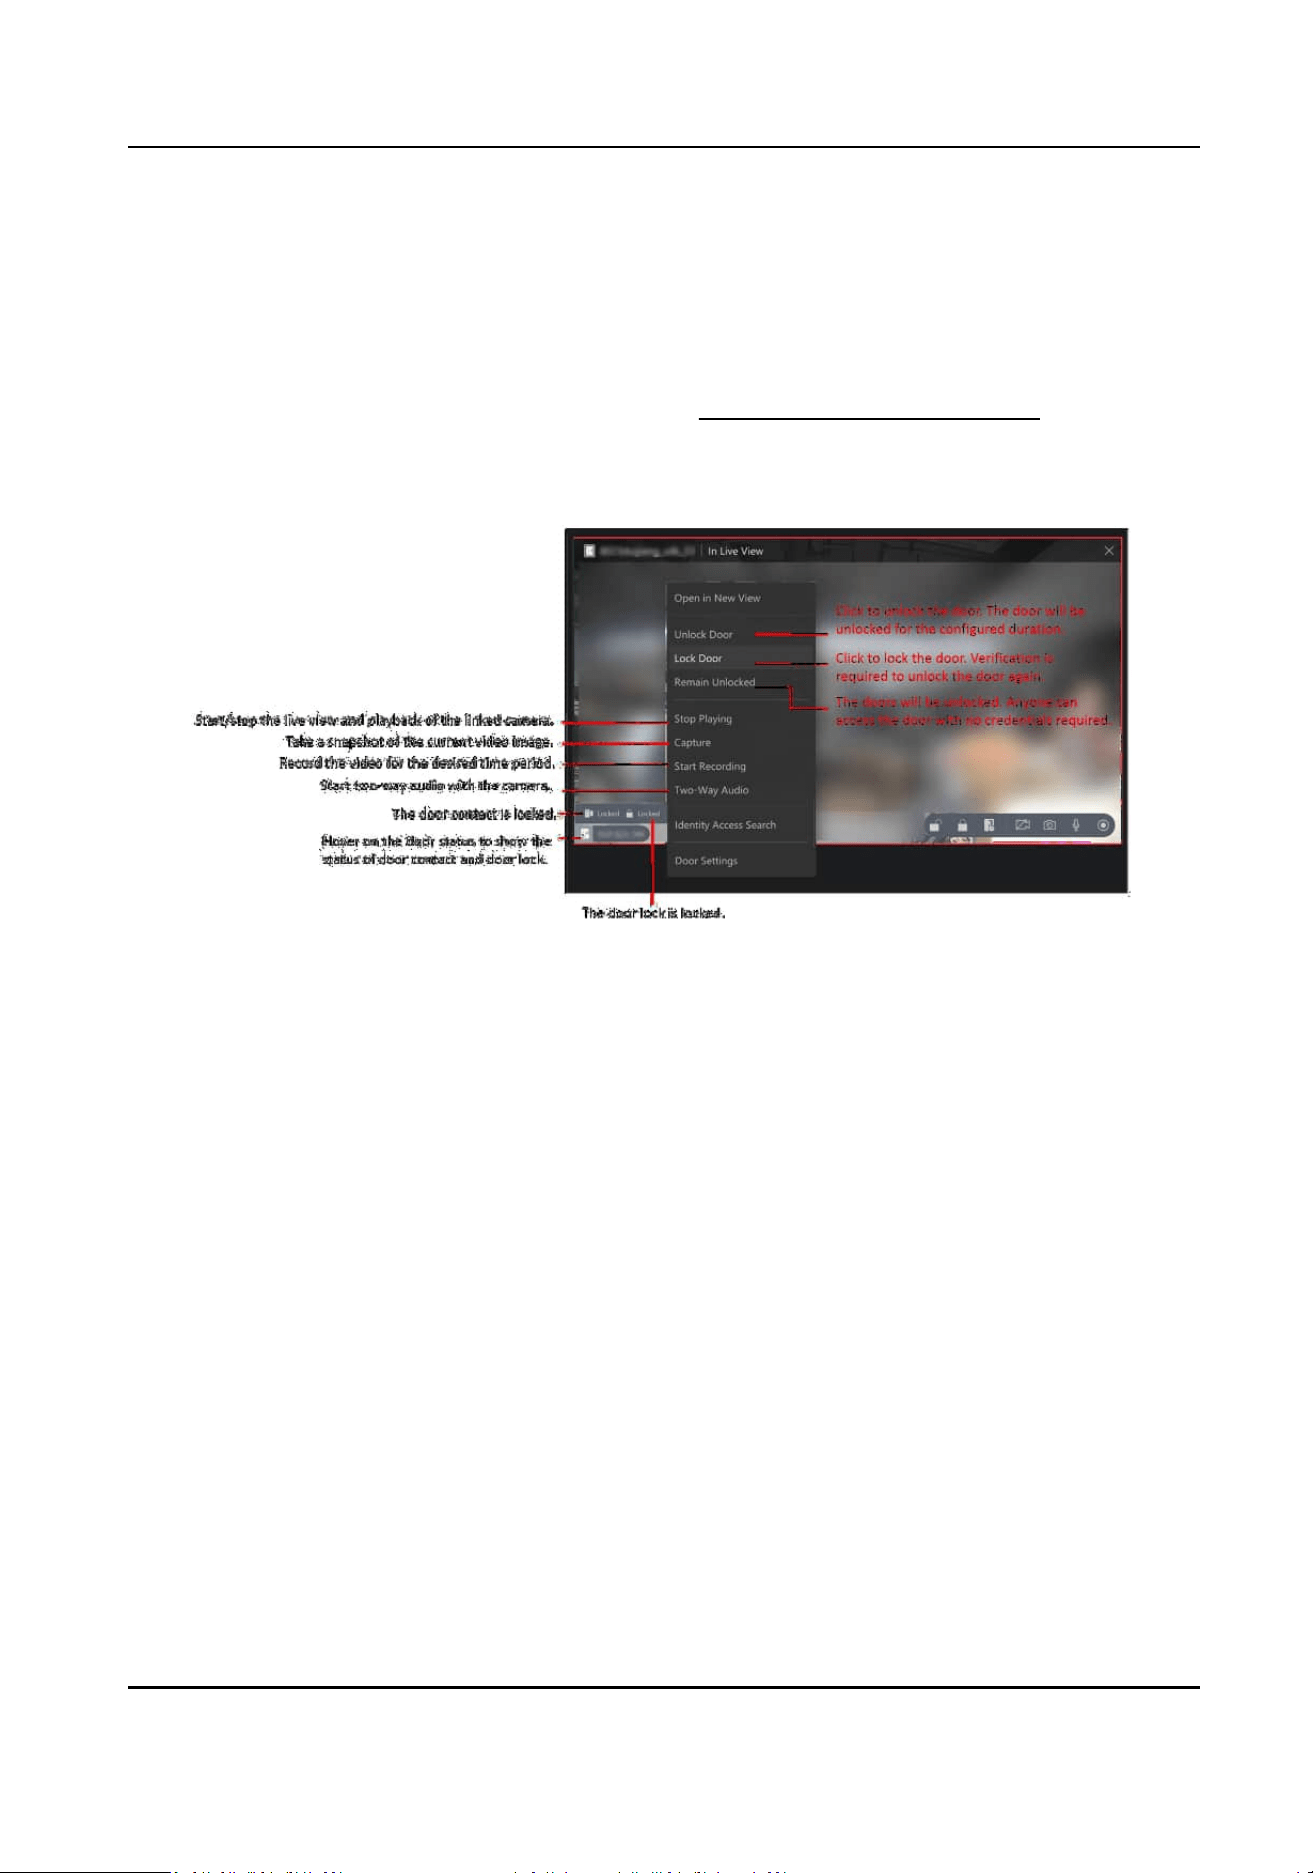
4.5.1 Monitor Doors and Control Door Status
Aer adding doors, you can control door status such as locking and unlocking doors. For the doors
with build-in cameras or doors linked with cameras, you can also monitor doors and perform more
operaons during monitoring such as capturing and recording.
For the detailed explanaons of door status, refer to Real-Time Monitoring of Doors .
●
Control one door: double click a door or drag a door to the viewing grid, and then right click a
door or click the icons in the lower right corner to control the door.
Figure 4-18 Supported Operaons to Control One Door
These operaons are only available for the doors with build-in cameras or doors linked with
cameras: playing / stop playing video, capturing, recording, and two-way audio.
●
Control doors on the current view: draw a frame to select doors and then right click the window
to control the selected doors, or click the door status on the top of the viewing grid to batch
control door status.
HikCentral Lite V1.1.1 User Manual
80
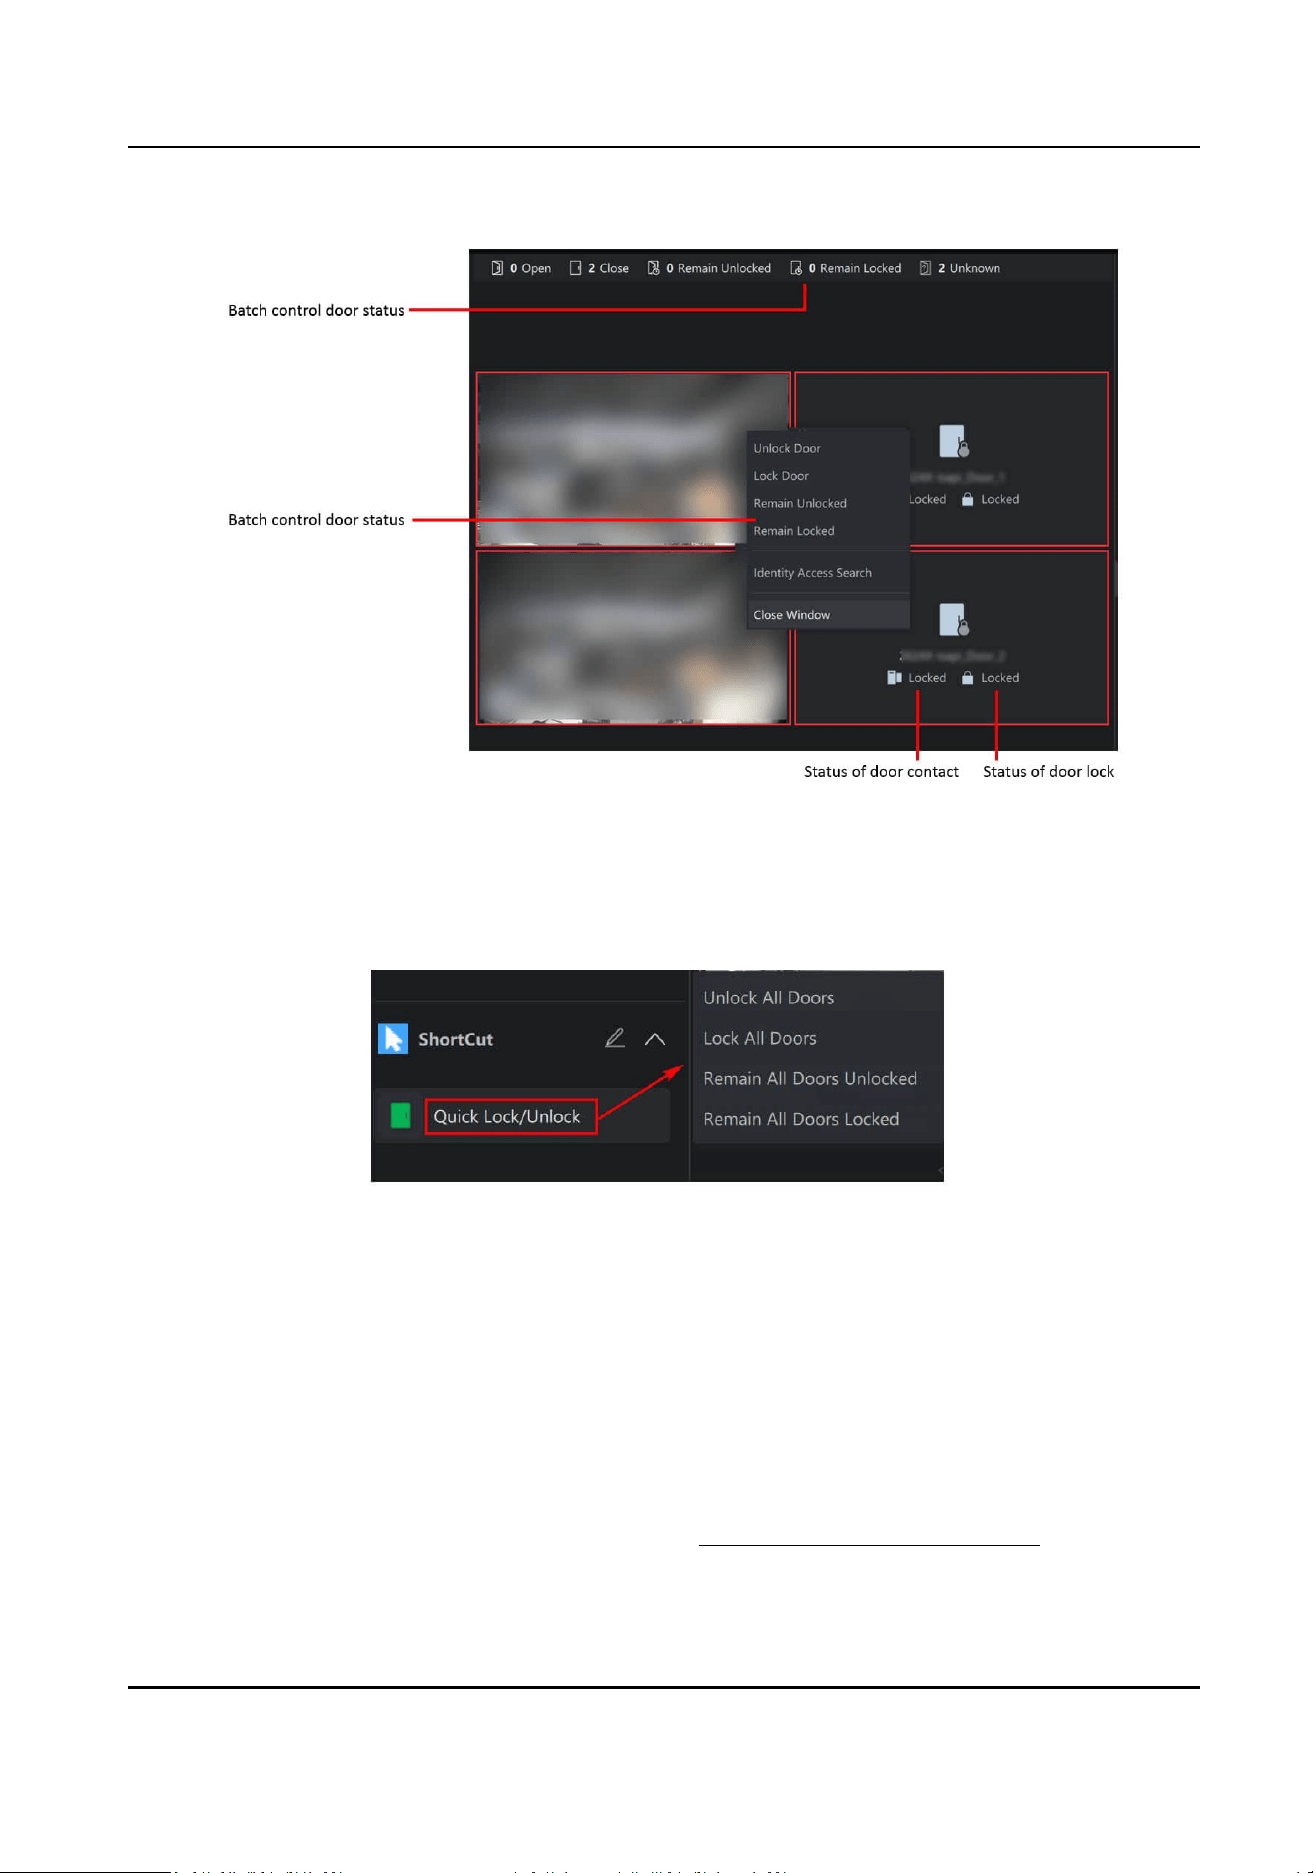
Figure 4-19 Select a Way to Control Doors on The Current View
●
Control all the doors: in the Shortcut area, click Quick Lock/Unlock, and then you can batch
unlock/lock all doors, or remain all doors unlocked/locked.
Figure 4-20 The Entry to Control All Doors
4.5.2 Display and Control Doors on the Map
Aer adding doors to the map, you can control door status such as locking and unlocking doors.
For the doors of MinMoe face
recognion terminal or doors linked with cameras, you can also
monitor doors and perform more operaons during monitoring such as capturing and recording.
For the detailed
explanaons of door status, refer to Real-Time Monitoring of Doors .
HikCentral Lite V1.1.1 User Manual
81
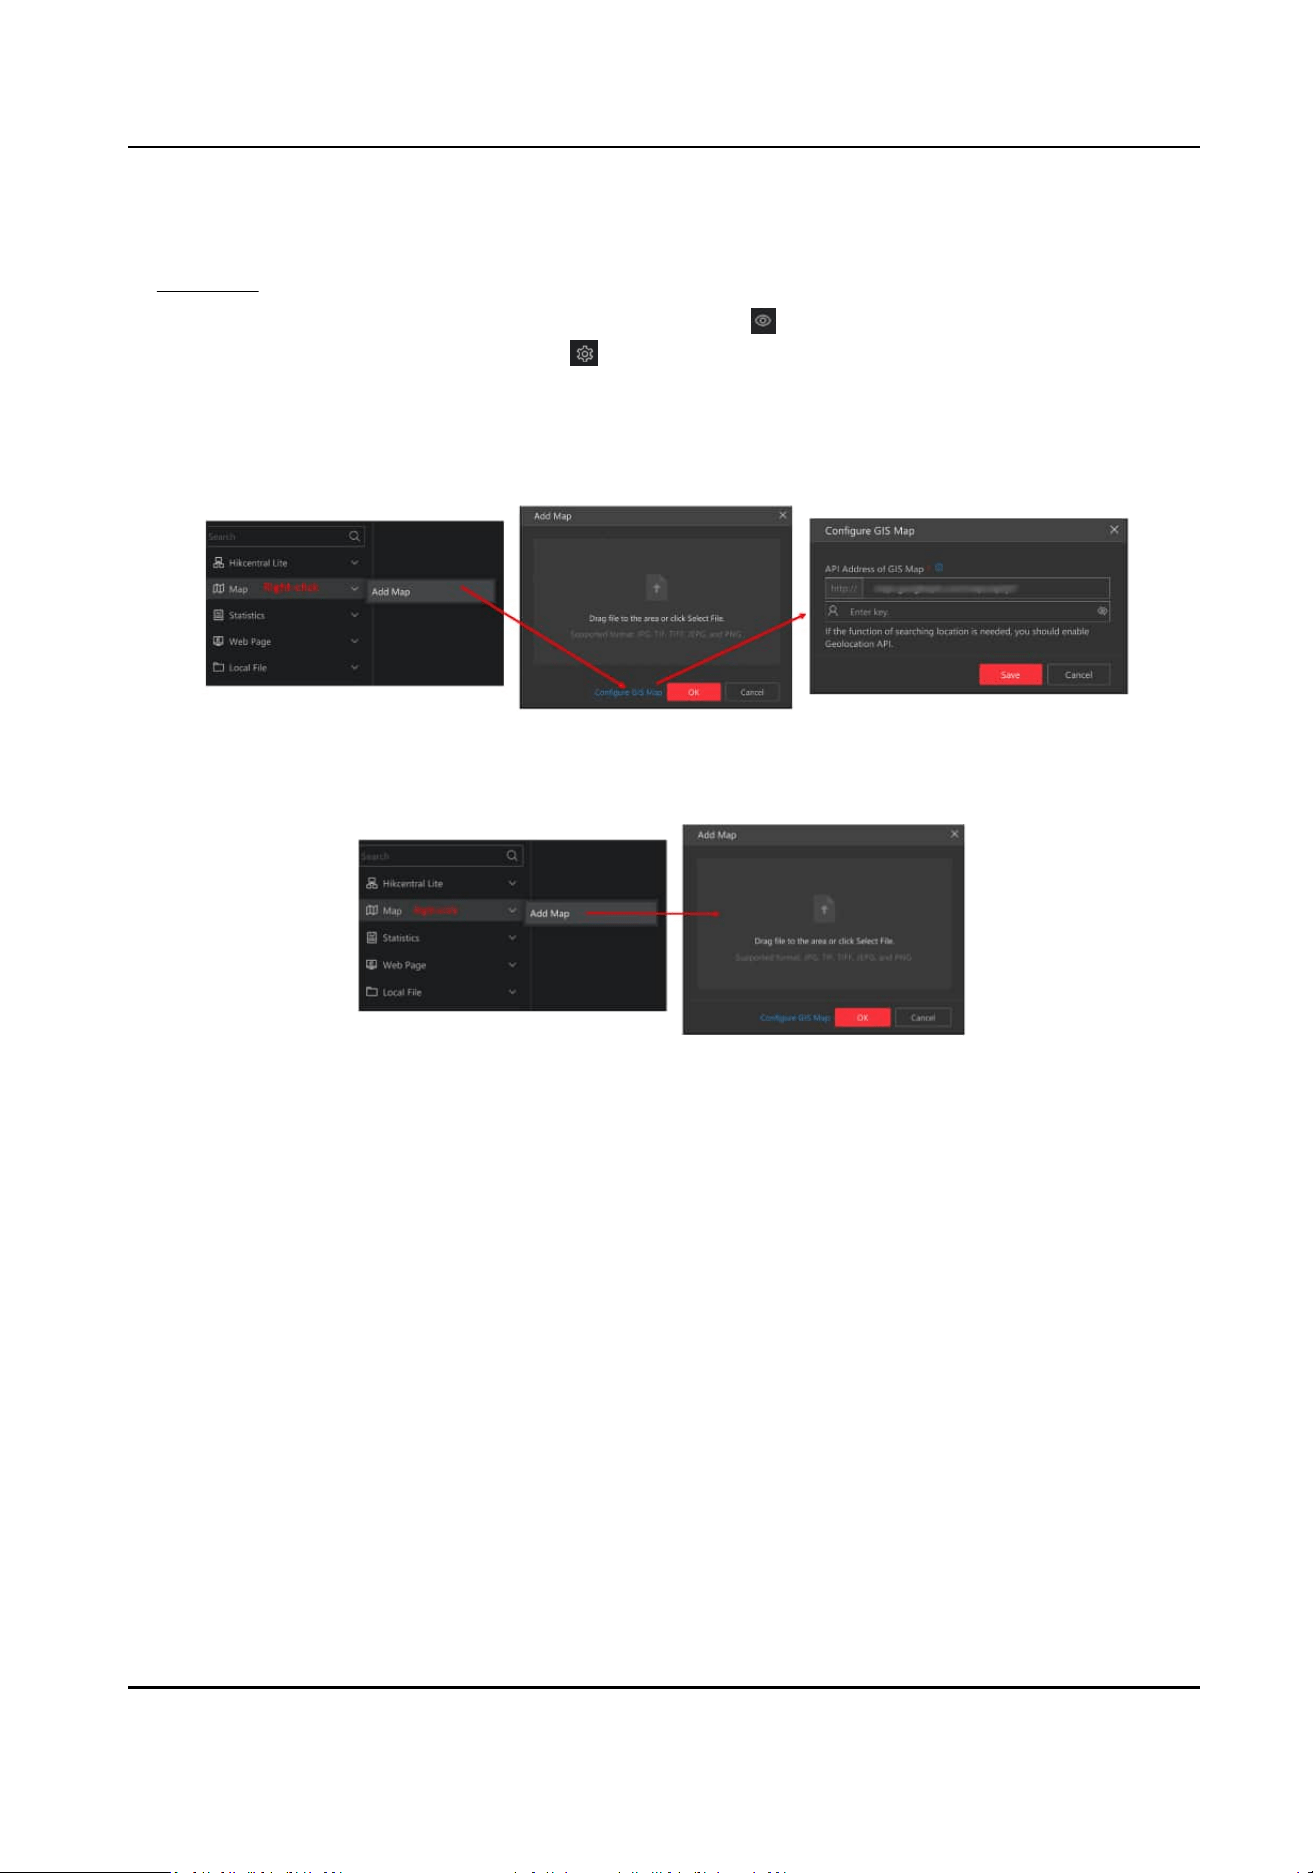
In the Map module, double click a map, or drag a map to the right window, or right click a map and
click Open to view the map and the doors added to the map. For details about adding maps, refer
to Add Map .
There are two modes for the map. In the Monitor mode (
), you can monitor and control doors
on the map. In the
Conguraon mode ( ), you can add doors, marks and hot regions to the
map, set the types of resources to be displayed on the map, etc.
Add Map
Figure 4-21 Add GIS Map
Figure 4-22 Add E-Map
HikCentral Lite V1.1.1 User Manual
82
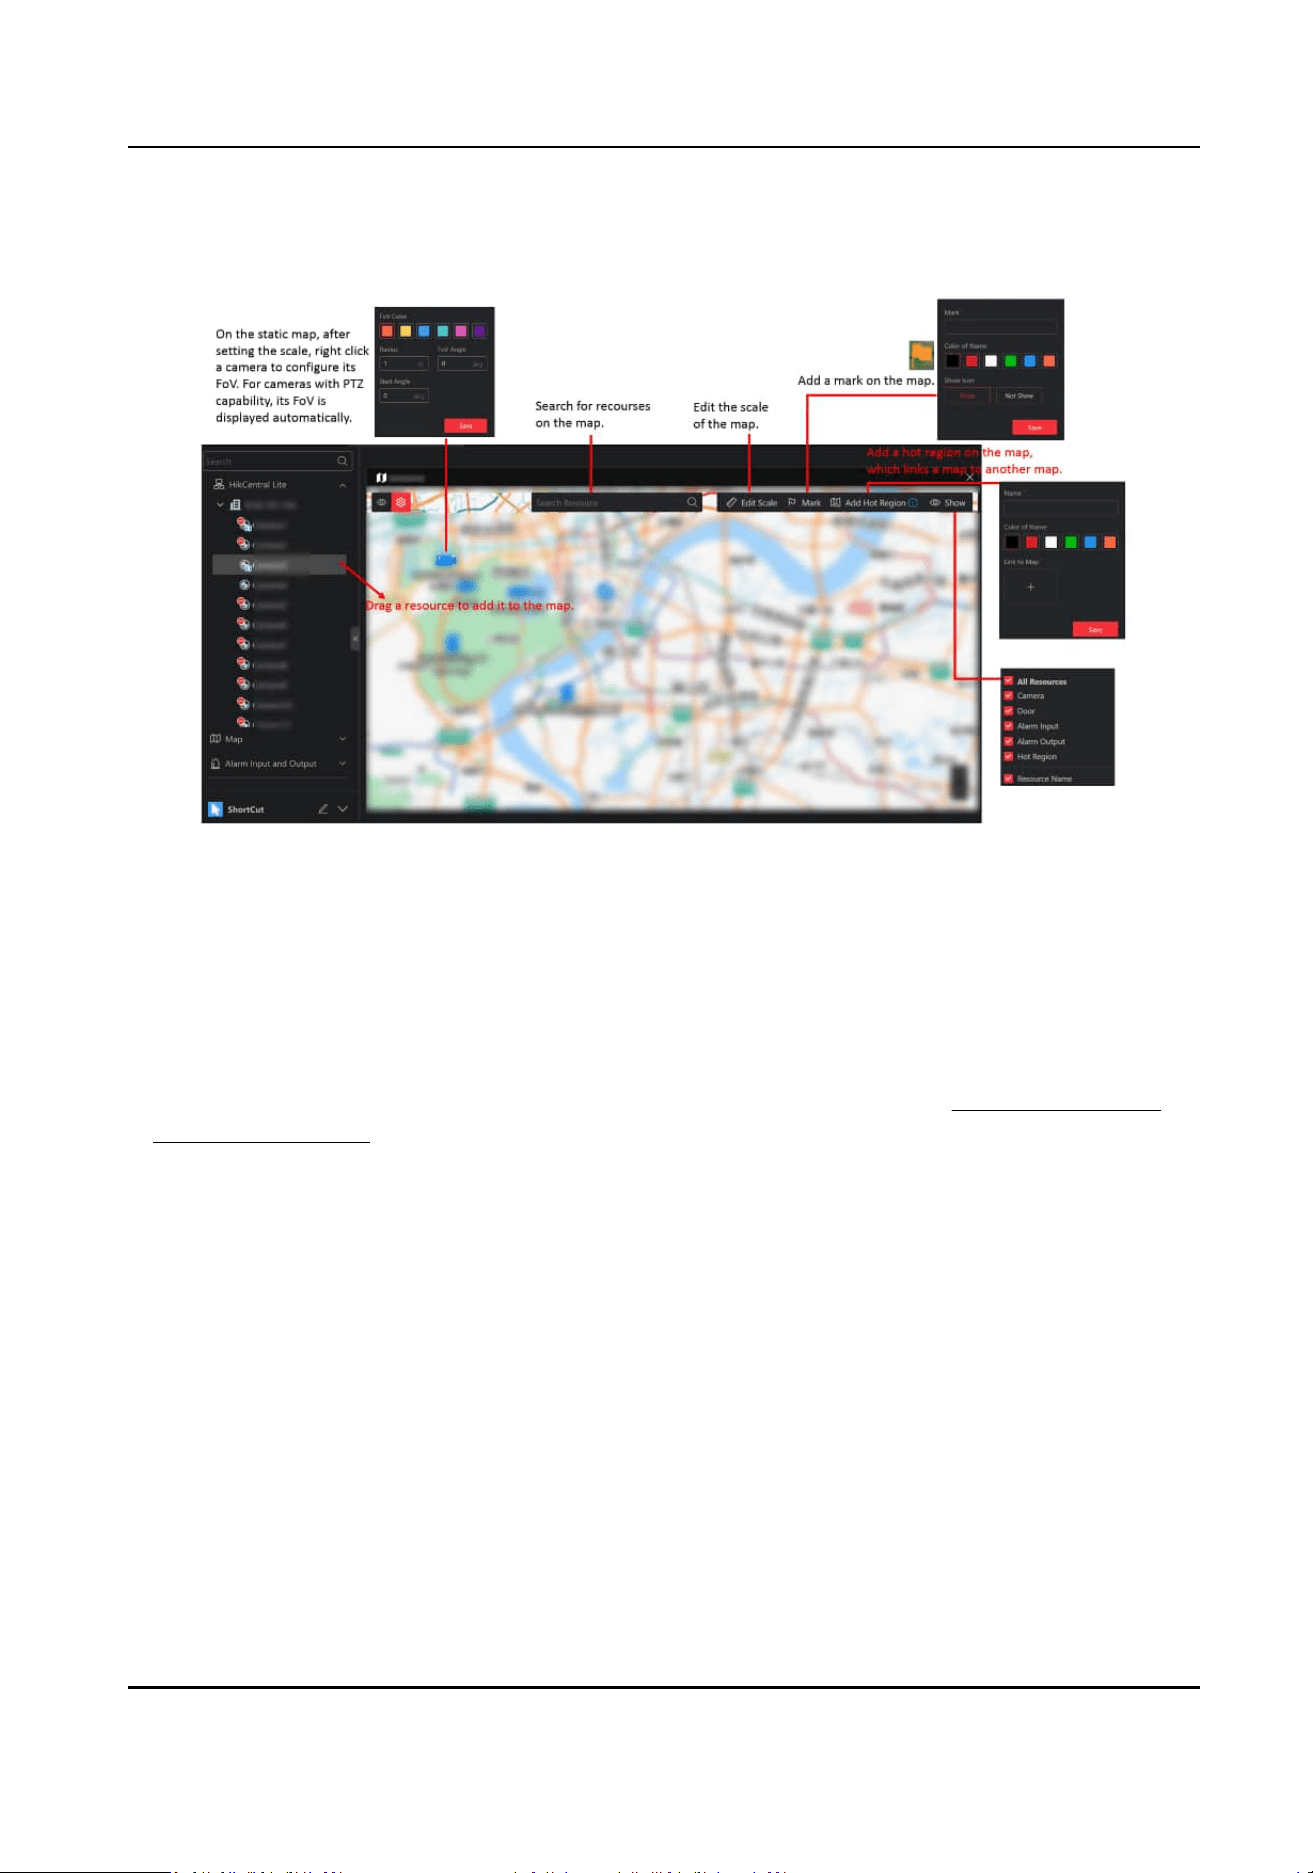
Conguraon Mode
Figure 4-23 Supported Operaons in Conguraon Mode
Monitoring Mode
You can perform the following to monitor and control doors on the map.
●
Monitor One Door: click a door to view the live view of its linked camera.
Monitor Doors: click Batch Select, draw an area to select
mulple doors, and click Batch Play to
view the live view of its linked cameras in a batch.
For details about supported
operaons when monitoring door(s), refer to Monitor Doors and
Control Door Status .
●
Control One Door: click the door or right click the door.
HikCentral Lite V1.1.1 User Manual
83
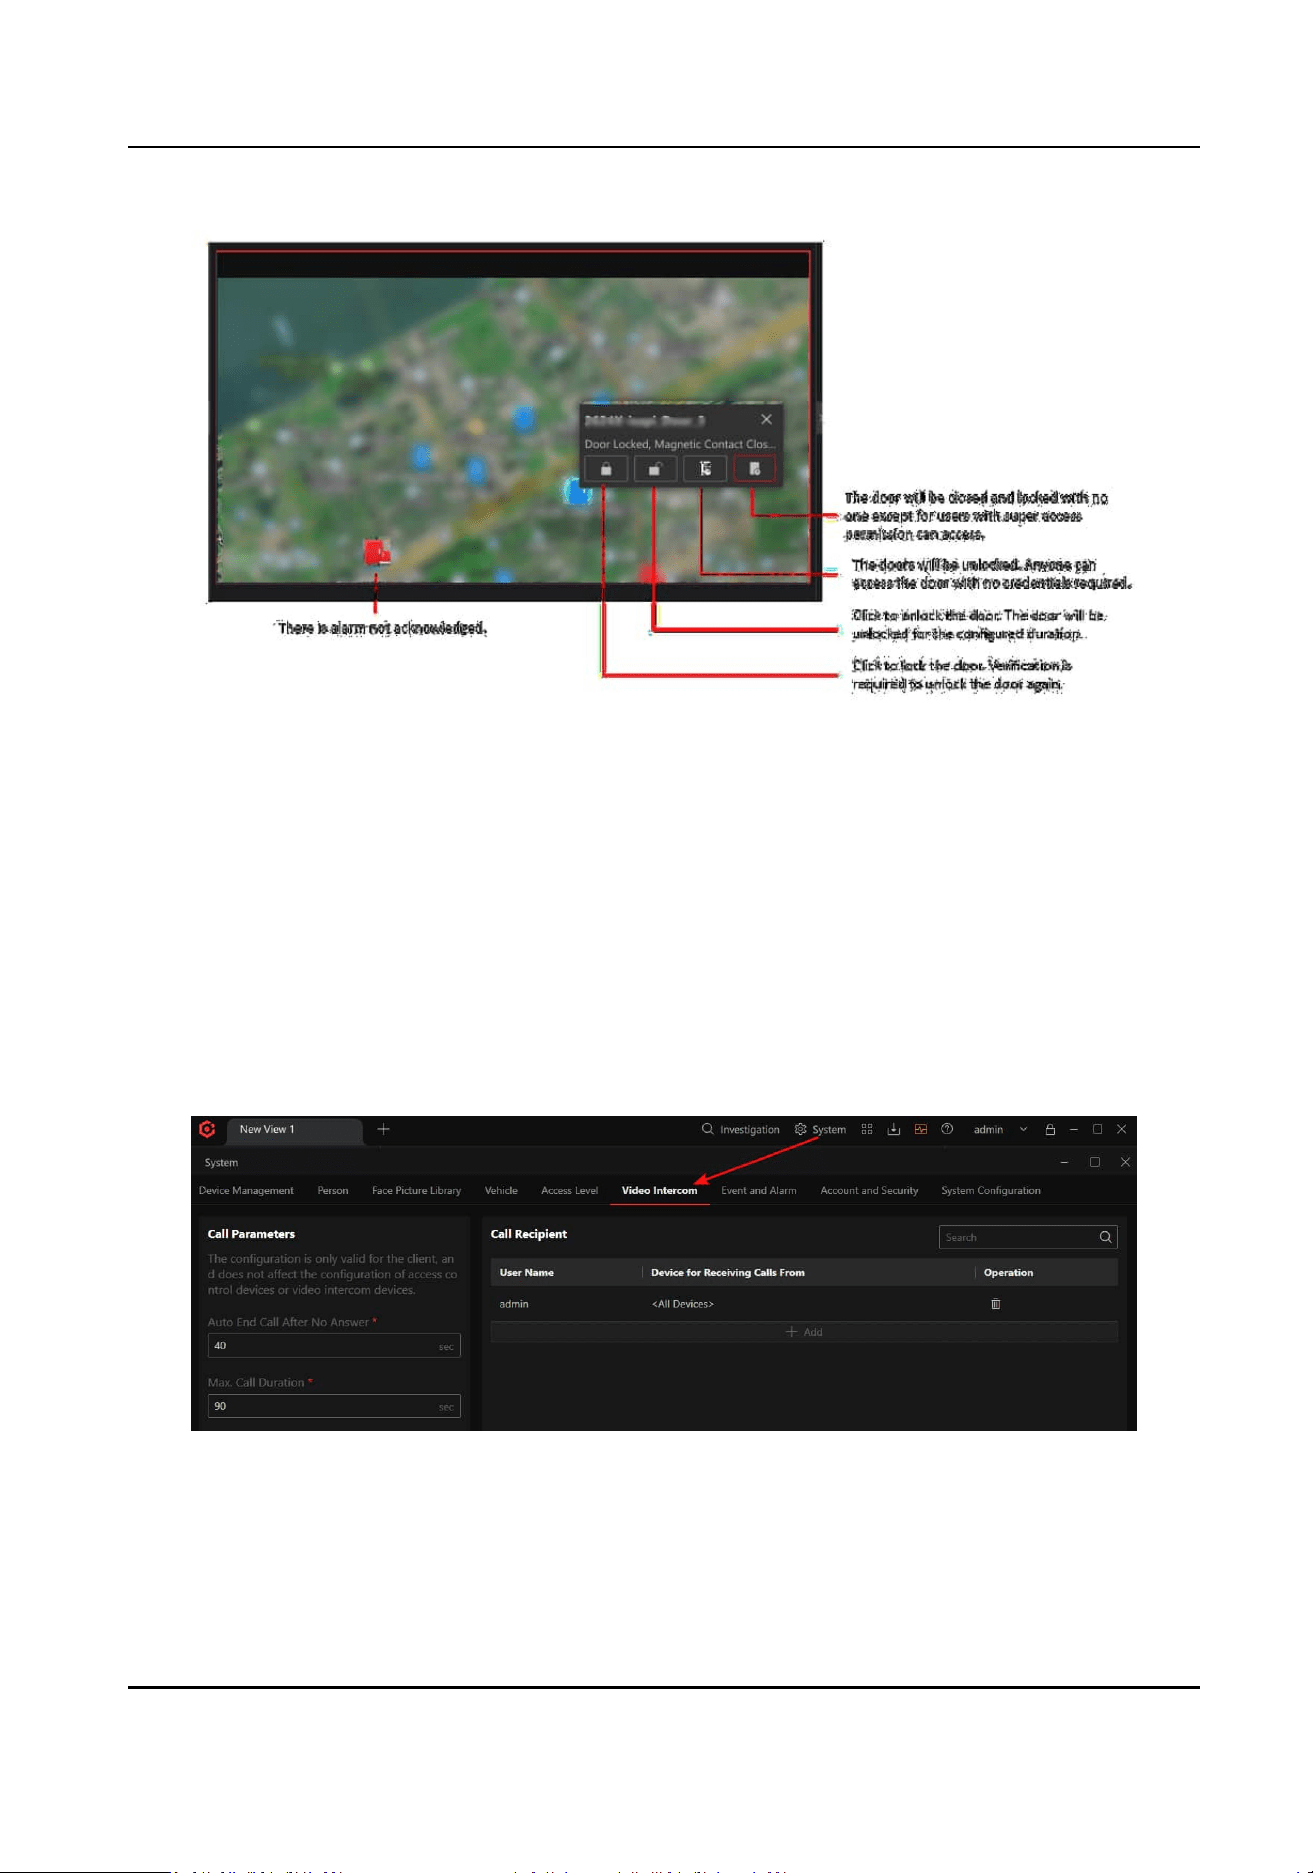
Figure 4-24 Control One Door
4.6 Video Intercom
People can call the system users via access control devices (including MinMoe face recognion
terminals) and video intercom devices, and users can also call the device via the client.
Congure
Parameters
Before two-way audio, you can congure parameters of calls from devices to the current client,
and congure call recipients for dierent devices.
Figure 4-25 Entry of Video Intercom
Automac Call End Time Aer No Answer
If a device calls the client and no one answers the call, the call will be ended automacally aer
the duraon you set.
HikCentral Lite V1.1.1 User Manual
84
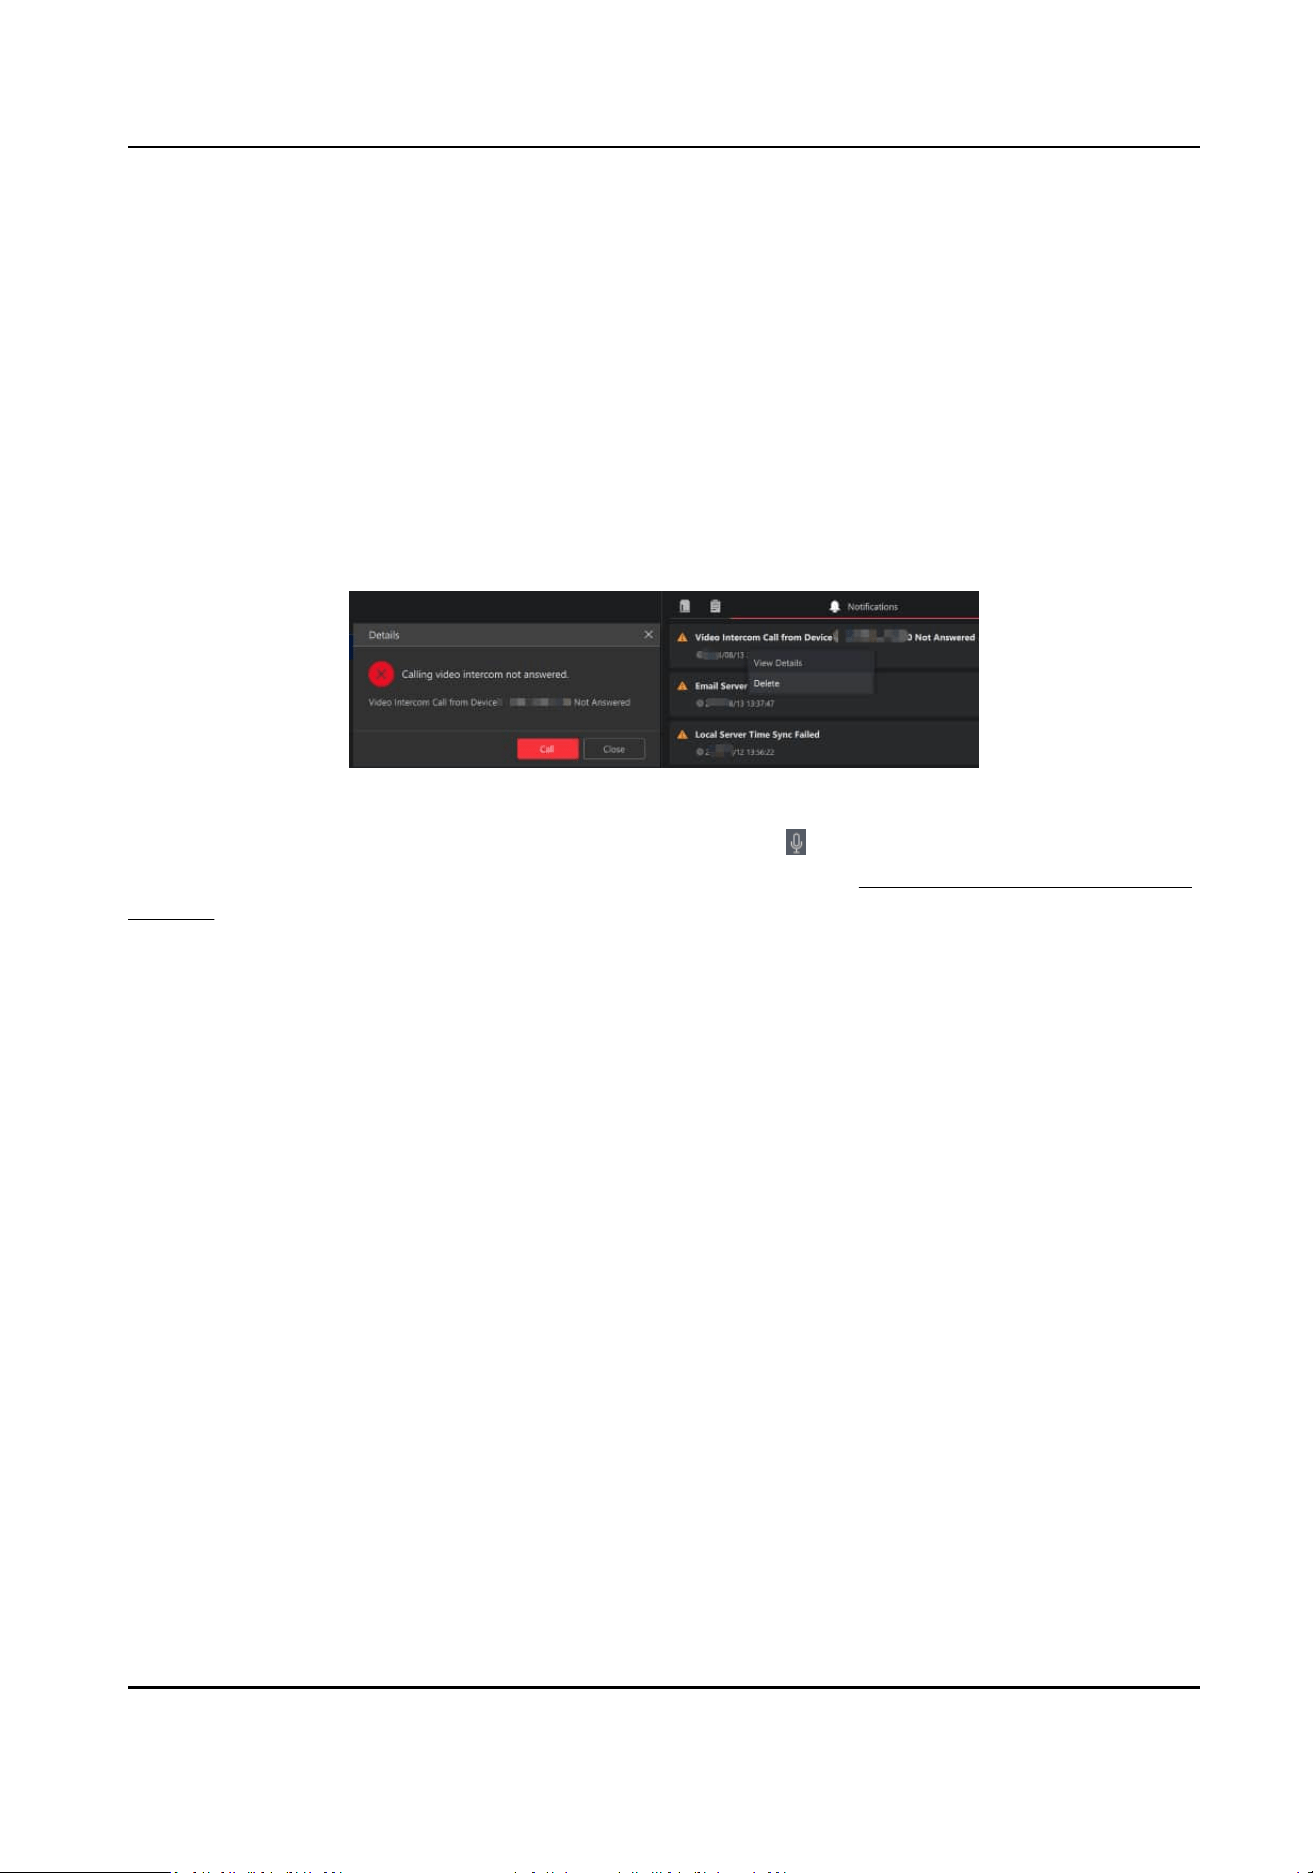
Max. Call Duraon
The Max. duraon of a talk between the client and a device.
Call Recipient
Select dierent devices for dierent users so that they can receive calls from dierent devices.
Video Intercom Call
You can call the device by the following two ways:
1. If a person called the client and the call was not answered, a
nocaon will be displayed on
the
nocaon panel. Right-click the nocaon and select View Details → Call Again to call
the device.
Figure 4-26 Call Device
2. In the live view window of a camera linked to a door, click
For details about how to search for video intercom call records, see Search for Video Intercom Call
Records .
4.7 Import Person
Authencaon Events from Devices to the Client
Person authencaon events include normal and abnormal authencaon records. When the
system misses events, you can import events stored in devices to the system.
Click System → Access Event → Person
Authencaon Event .
For online devices, you can import events by selecng devices. Specifying the me range of
generang events is supported.
HikCentral Lite V1.1.1 User Manual
85
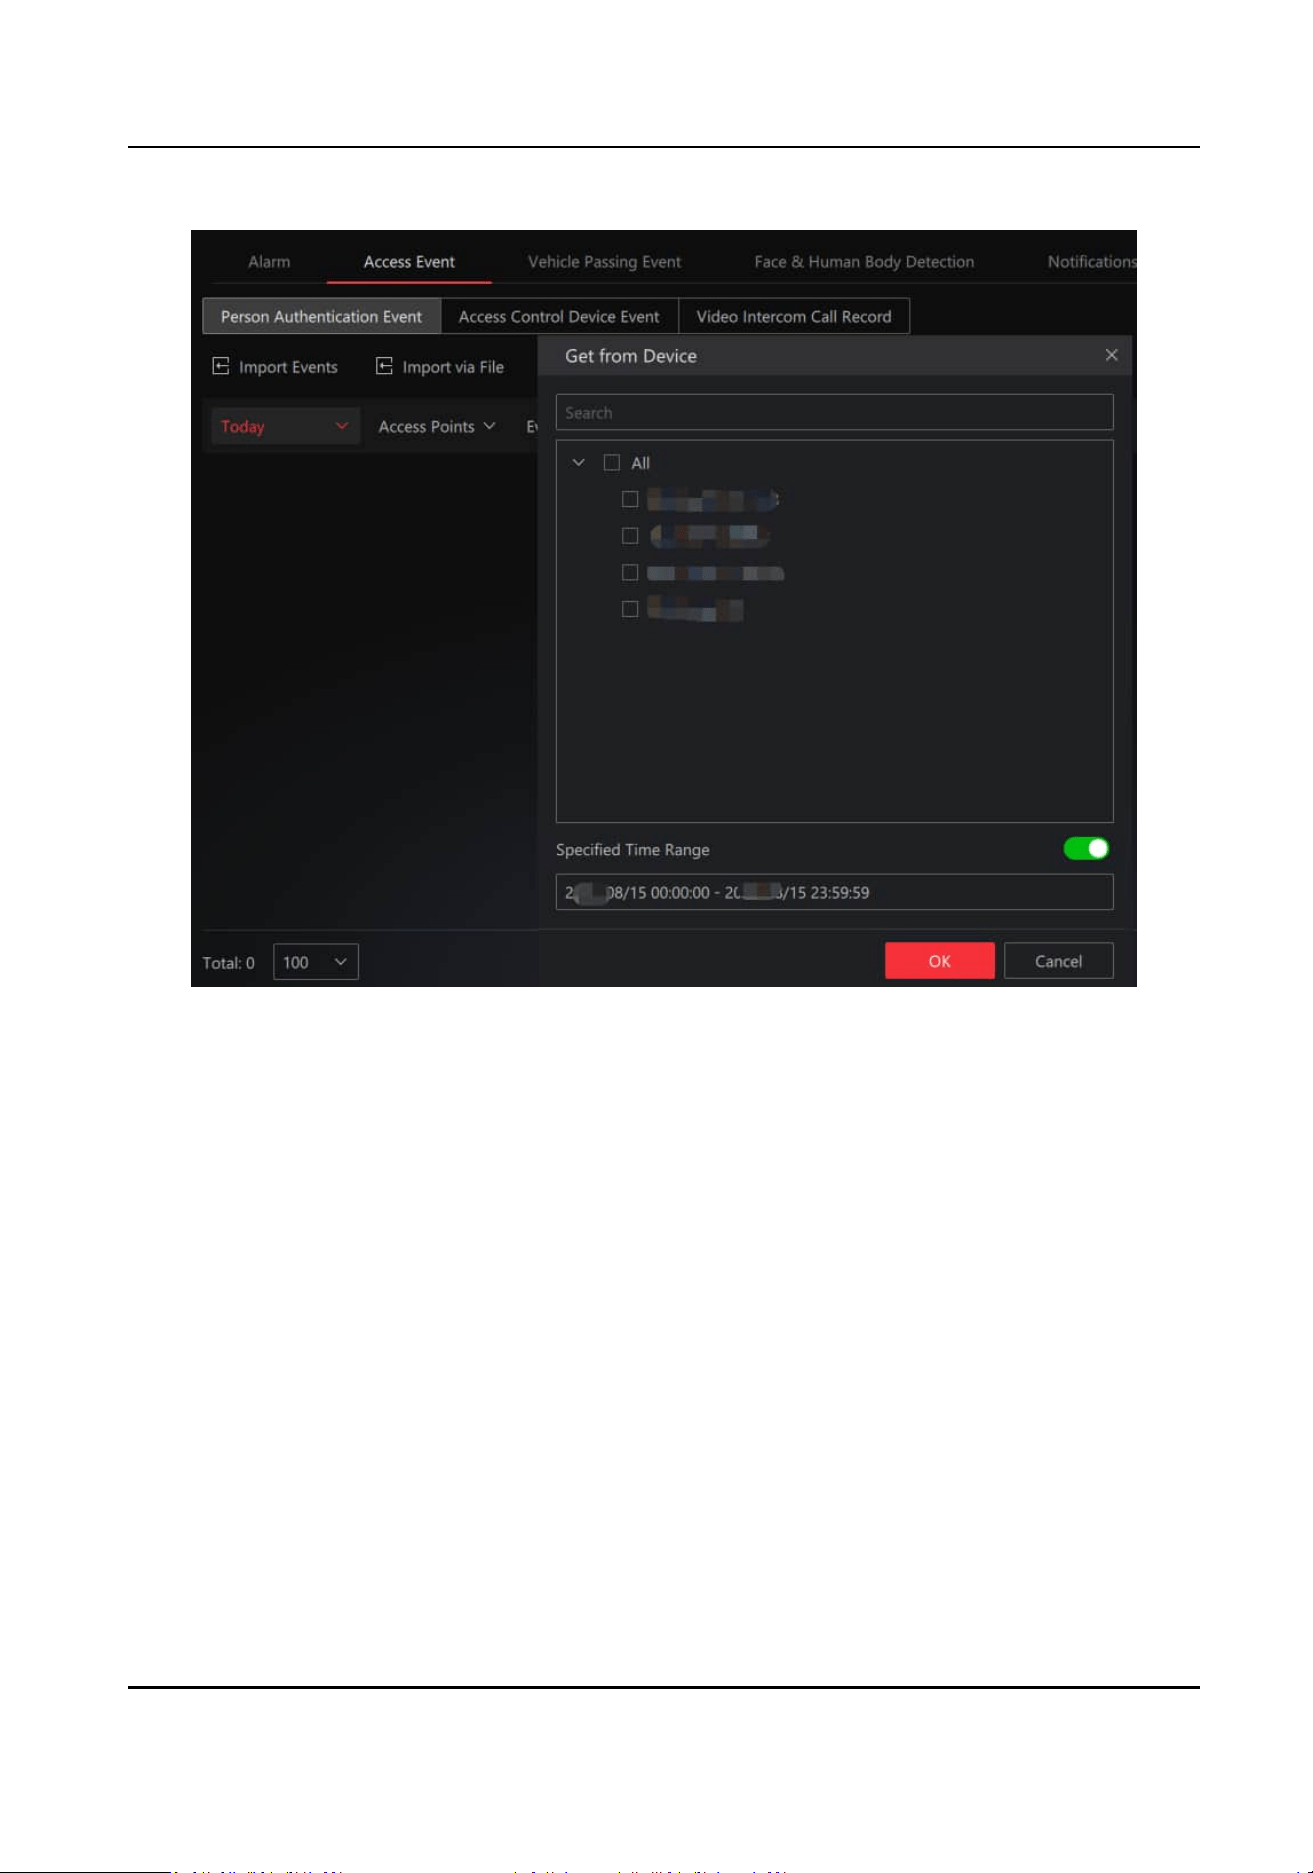
Figure 4-27 Get Events from Device
For devices that are unable to connect to the network, or devices are disconnected from the
network which cannot restore for a long
me, events can be imported via a CSV le. Plug a ash
drive in the device, and start exporng events to the ash drive from the device. When the
exporng nishes, plug the ash drive to the PC, and start imporng the le.
HikCentral Lite V1.1.1 User Manual
86
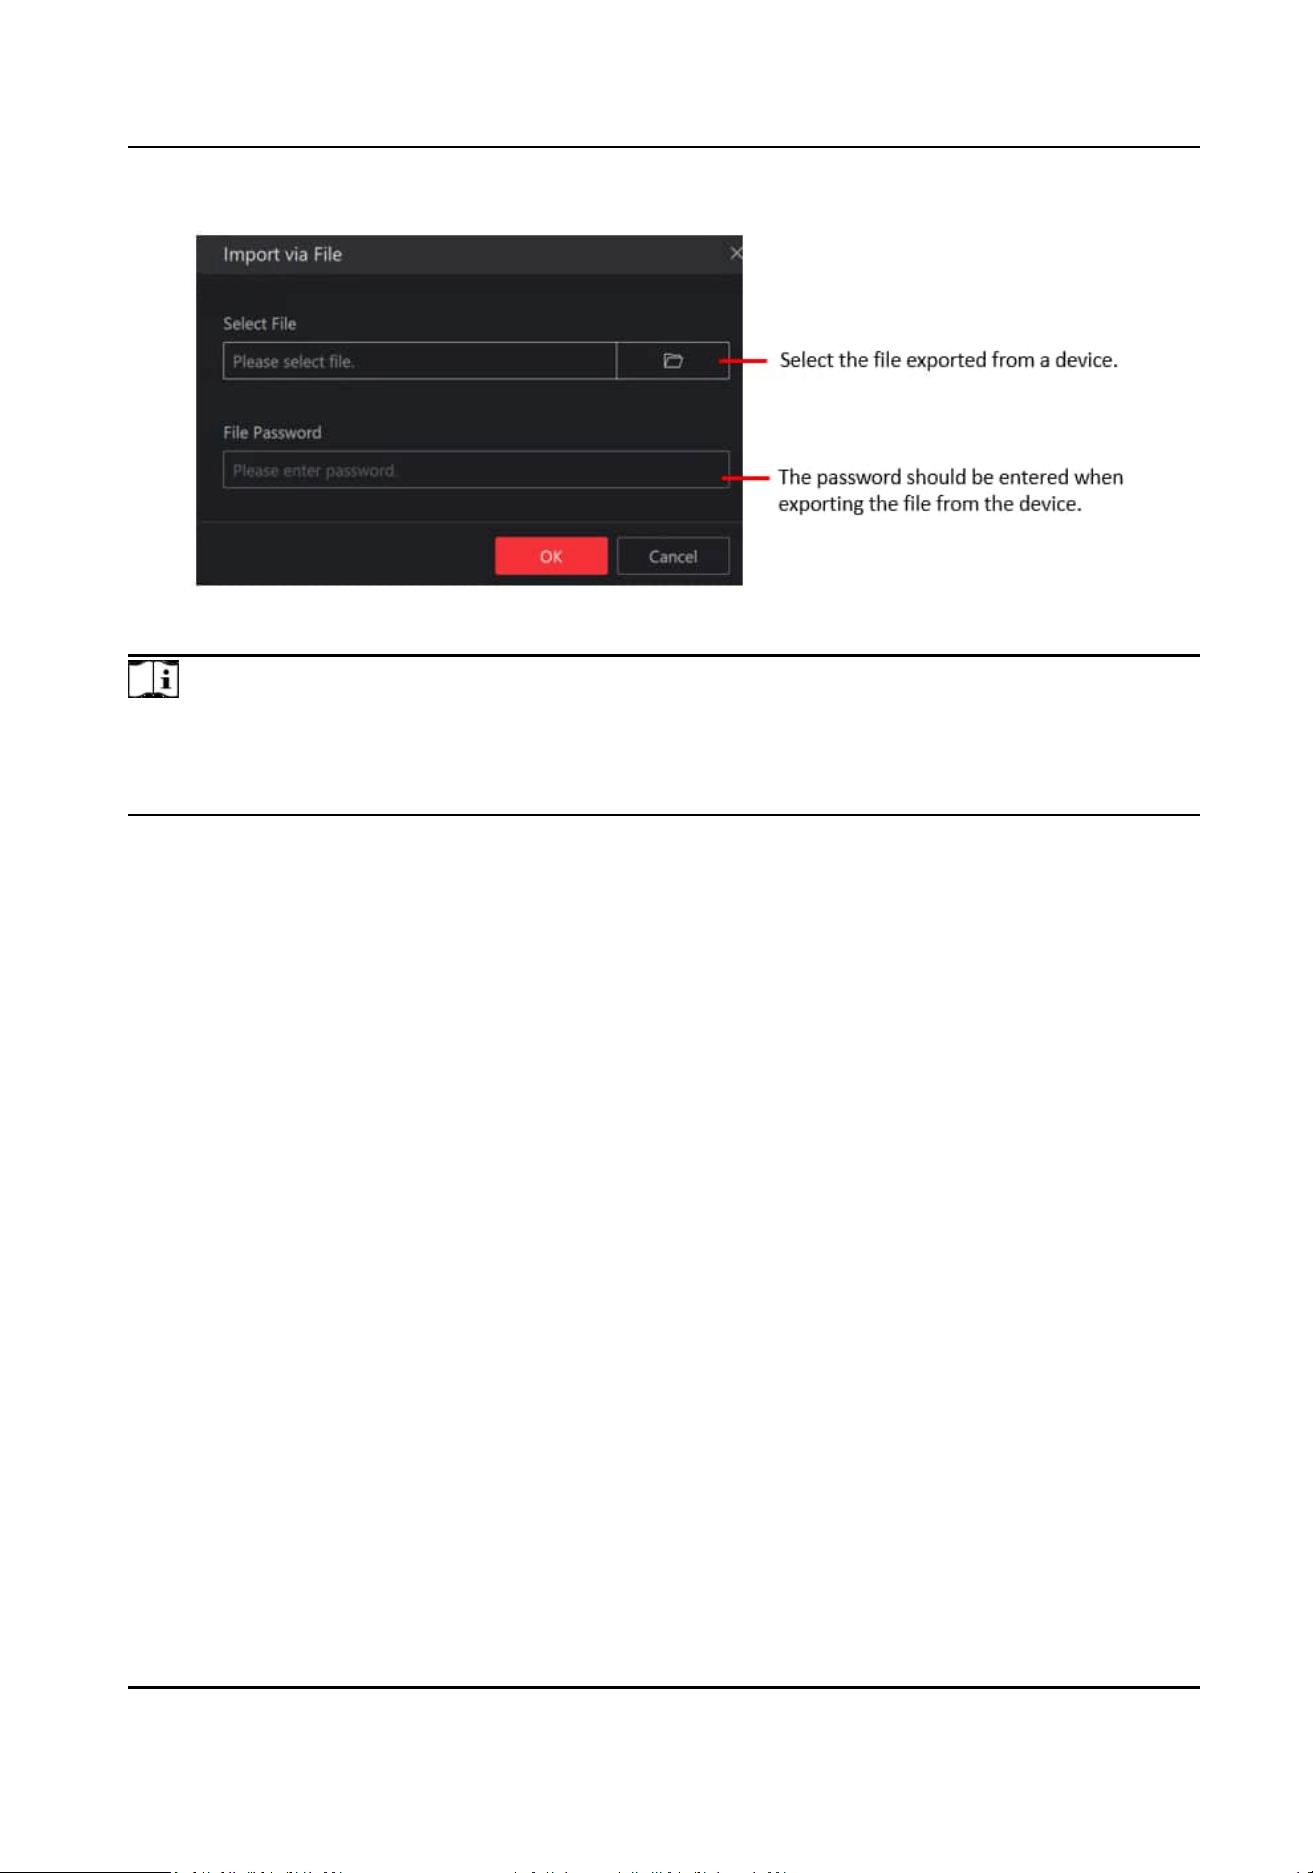
Figure 4-28 Import Events via File
Note
●
Only encrypted les can be imported.
●
The le name should meet the format requirement, e.g. recordlist_ device serial No. For
example, recordlist_FC2922753.
4.8 Search for Access Events
Access events include person authencaon events, access control device events, and video
intercom call records.
Click System → Access Event .
Search for Person
Authencaon Event
Person authencaon events include normal and abnormal authencaon records.
HikCentral Lite V1.1.1 User Manual
87
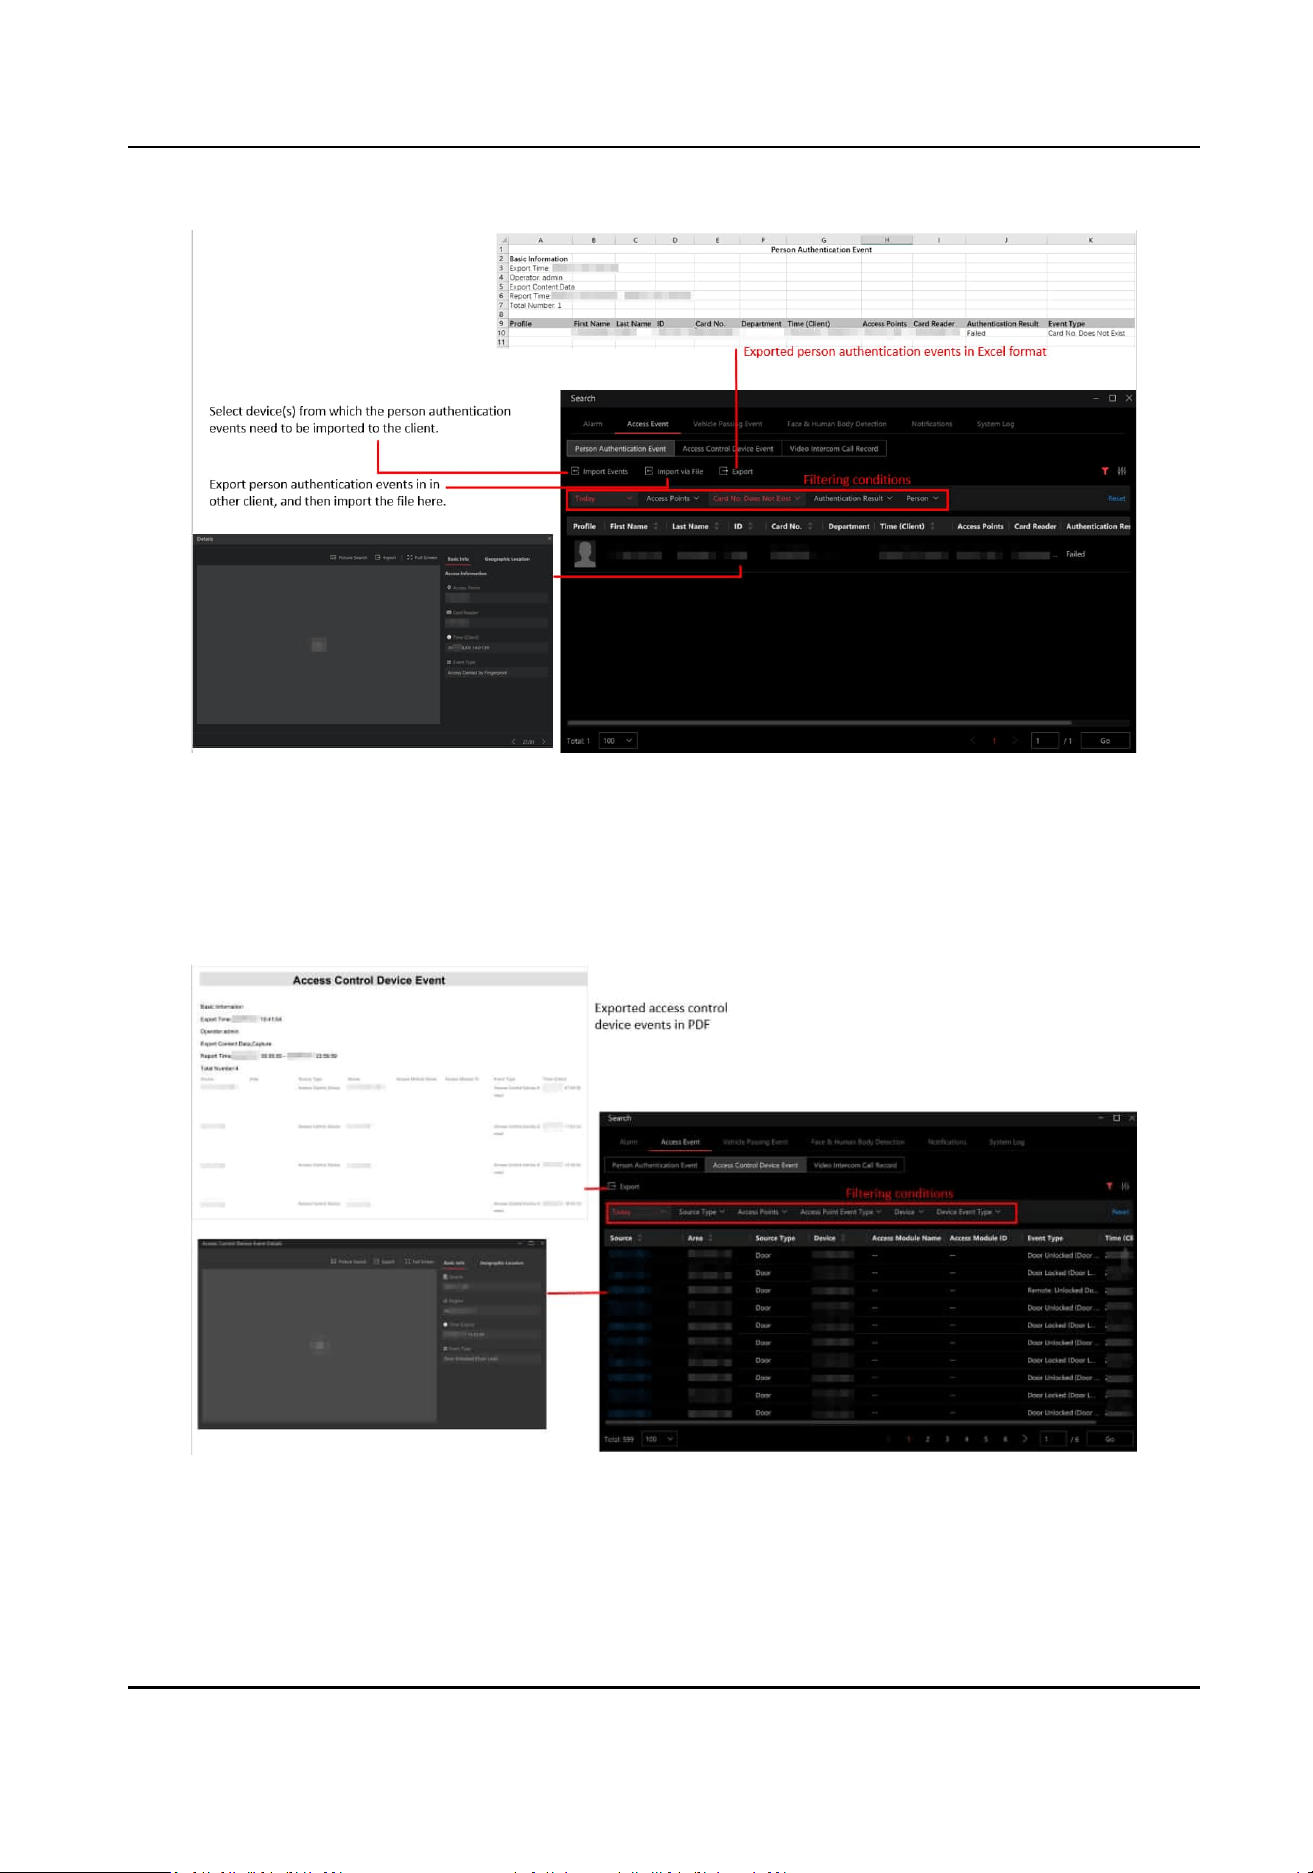
Figure 4-29 Person Authencaon Event
Search for Access Control Device Event
Access control device events are events triggered when there is something happens to doors,
access control devices, or video intercom devices, such as low
baery voltage, door unlocked.
Figure 4-30 Access Control Device Event
HikCentral Lite V1.1.1 User Manual
88
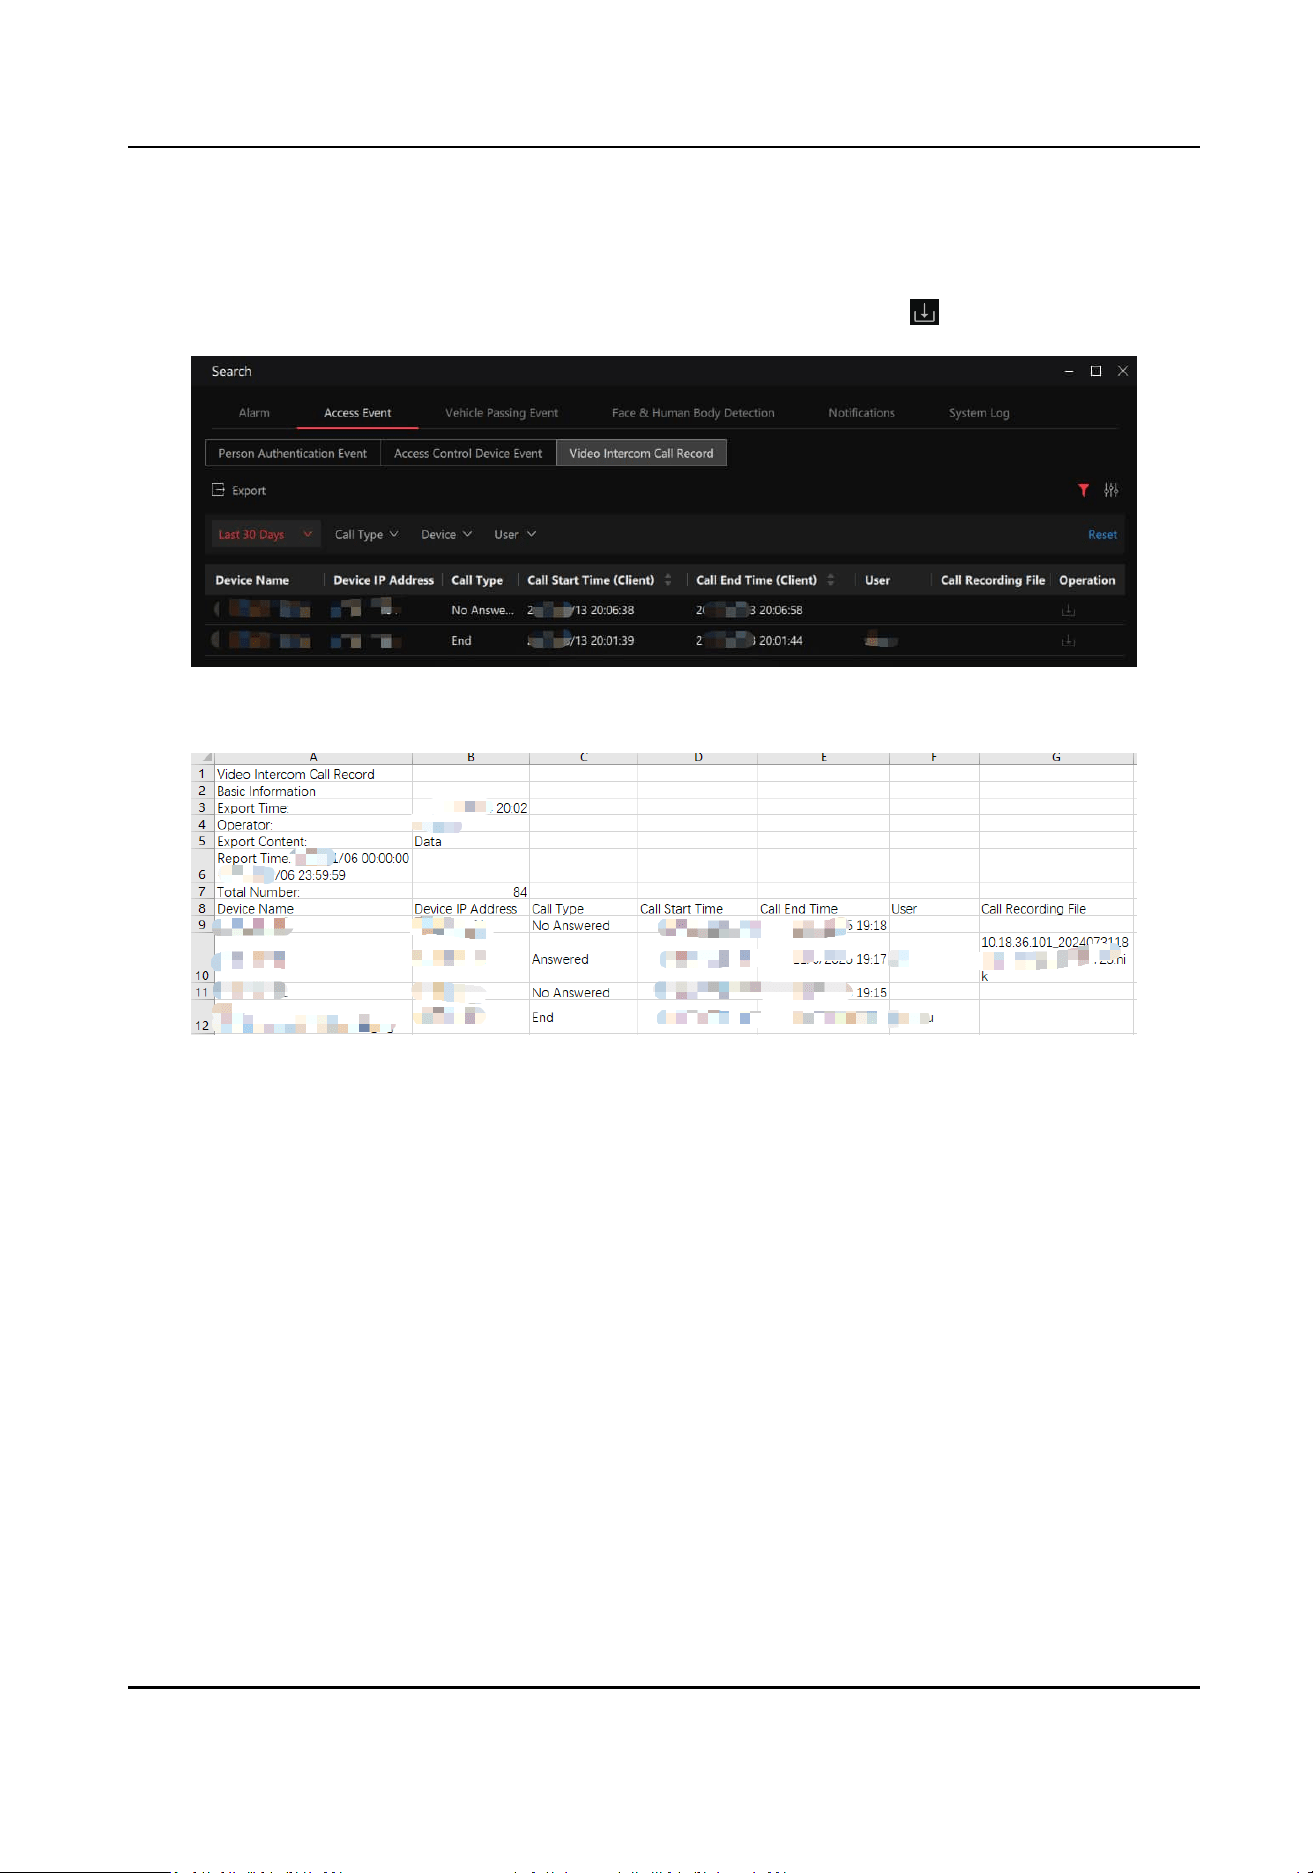
Search for Video Intercom Call Records
The video intercom call record refers to the record of devices calling the client. Click Export to save
all of the searched records to the PC, or select one record and then click to download it.
Figure 4-31 Video Intercom Call Records
Figure 4-32 Exported Video Intercom Call Records
4.9 Display
Stascs of Person&Credenals, Access Levels, and Access
Events
The stascs show an overview of persons, person credenals, access levels of persons, and access
events. When viewing the
stascs, users can go to corresponding page to congure these items in
real me.
HikCentral Lite V1.1.1 User Manual
89
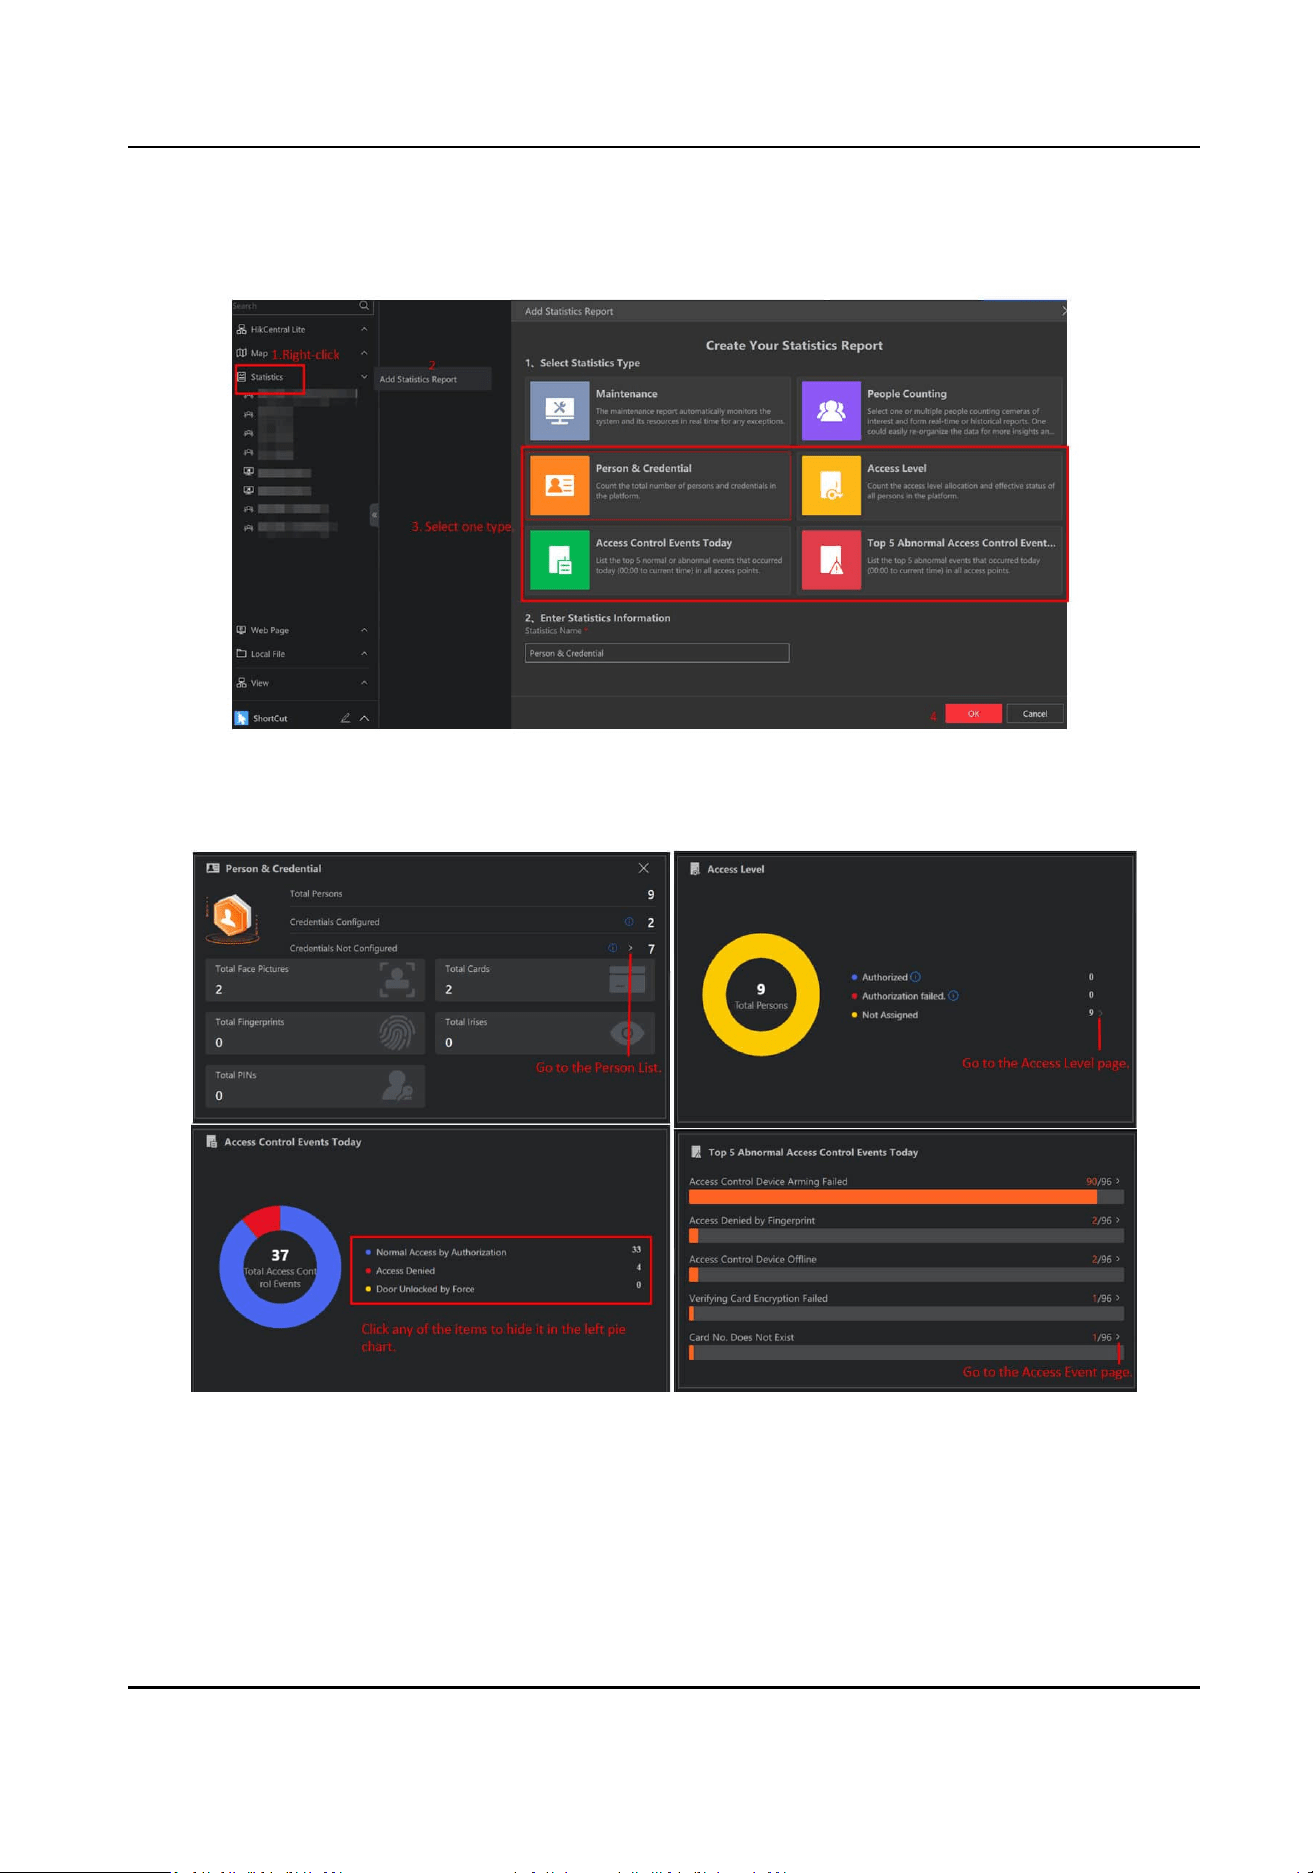
Figure 4-33 Add Stascs Report
Figure 4-34 Stascs
Access Control Events Today
Normal Access by Authencaon
Persons successfully unlocked doors via authencaon of dierent credenals.
HikCentral Lite V1.1.1 User Manual
90

Access Denied
Persons' authencaons failed, and doors were not unlocked.
Right-click a report to display the report in a new view, refresh the report, or export the report as a
PDF le.
HikCentral Lite V1.1.1 User Manual
91
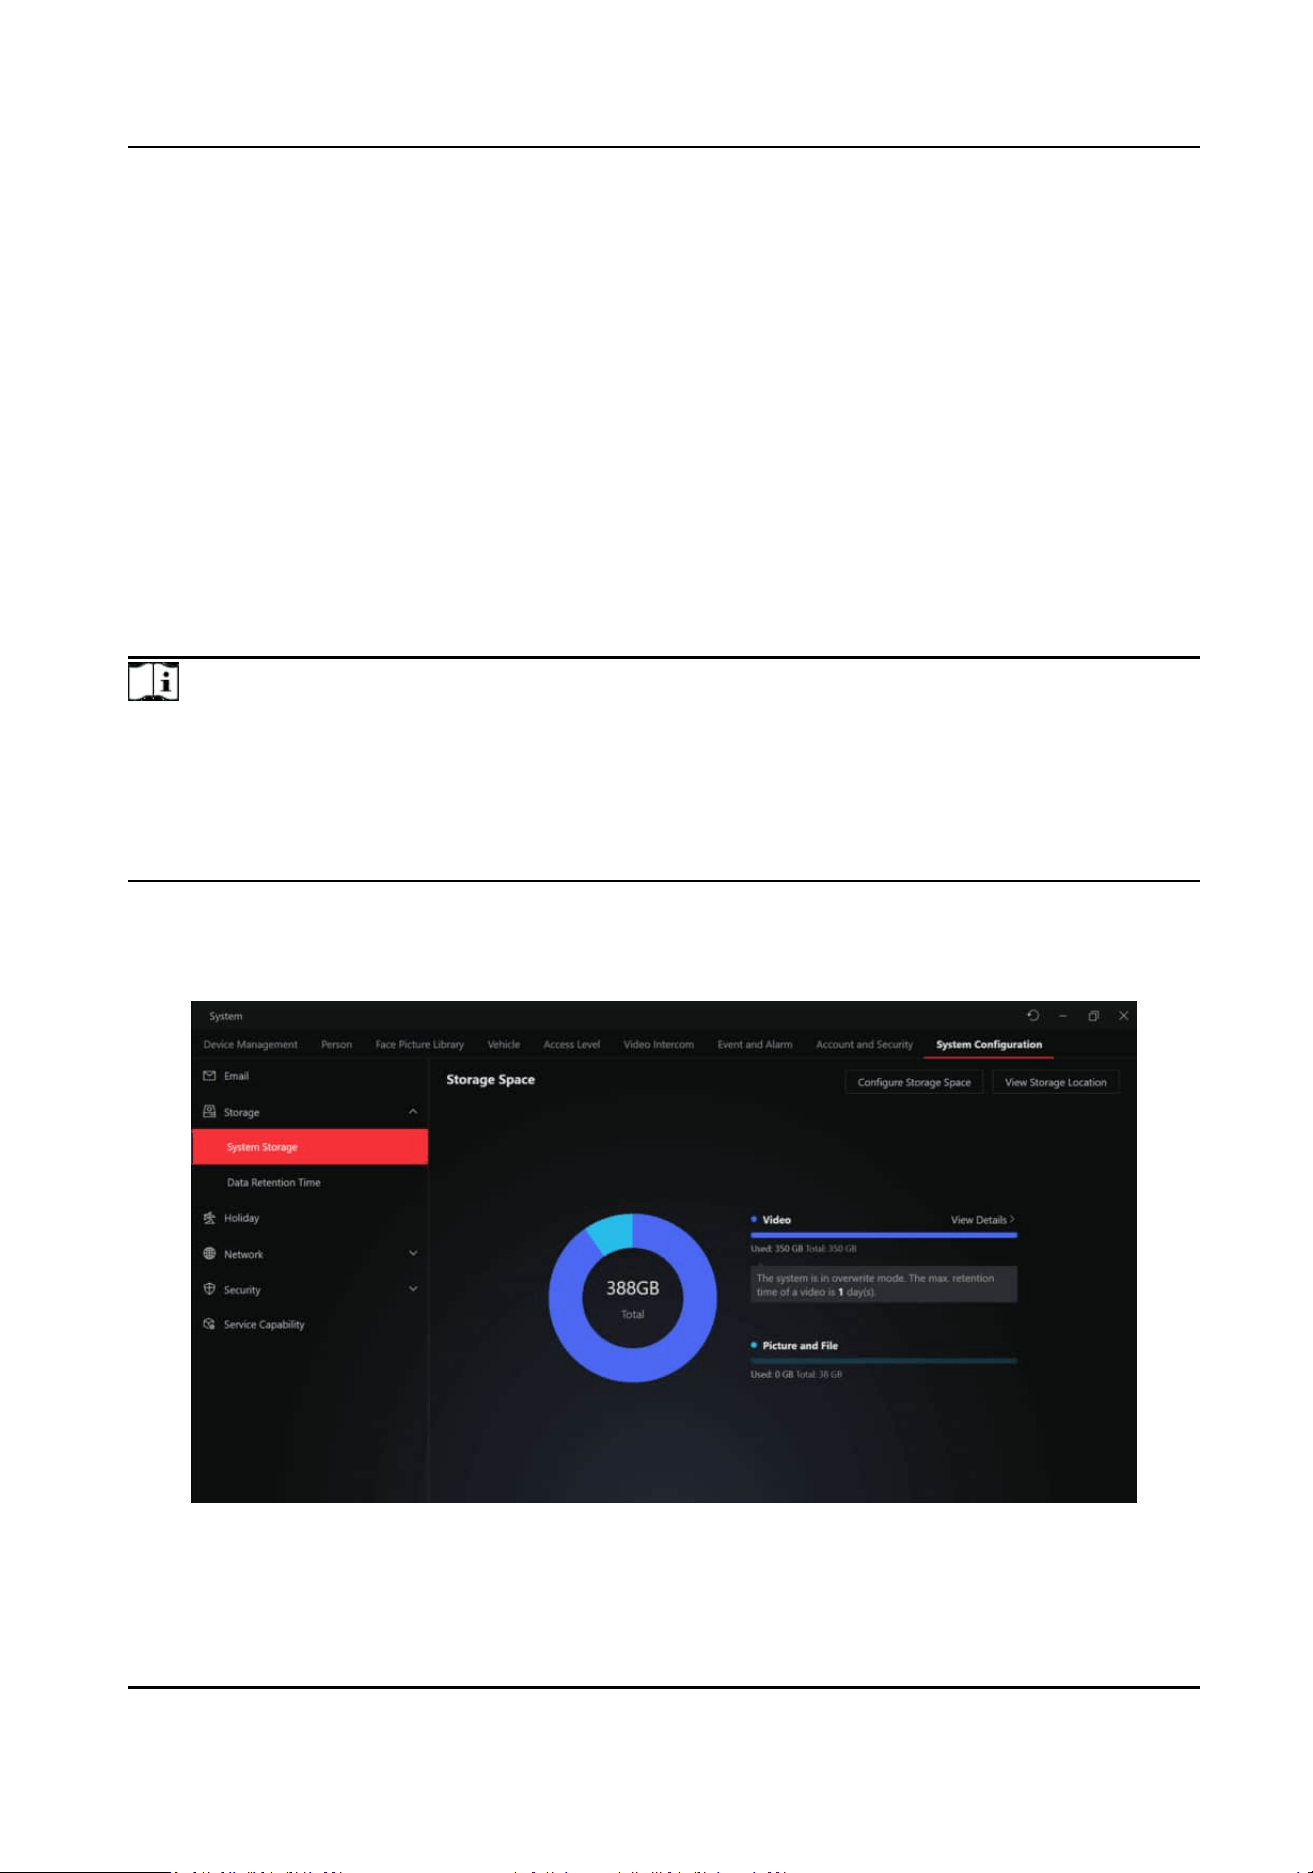
Chapter 5 Storage
System storage oers a comprehensive soluon for storing videos, pictures, and les on server
disks. It allows you to allocate storage space for videos and
pictures/les and congure recording
schedules for cameras, ensuring ecient and eecve storage management. In addion, you can
specify the period of keeping data (such as logs, events, records, and analysis data) on the system.
●
Video: Aer adding storage schedule of cameras, me-based and event-based recordings of
cameras will be stored in the video resource pool.
●
Picture and File: Pictures include those captured during event reporng, manual capture, alarm
linkages, etc. Files refer to audio les from video intercom.
If you are new to system storage, you can now try 30 days of free video storage for up to 4
channels. Videos, pictures, and
les will be directly stored on the HikCentral Lite server.
Note
●
The trial opportunity is only available to new users who have never used the system storage
feature (users who have already started a trial or acvated a formal license cannot start a trial
again).
●
If a trial has already been started,
acvang a formal license will keep the trial features available
unl the trial expires.
In the upper-right corner of the Desktop, click System → System Conguraon → Storage →
System Storage / Data Retenon Time .
Figure 5-1 Storage Conguraon
HikCentral Lite V1.1.1 User Manual
92
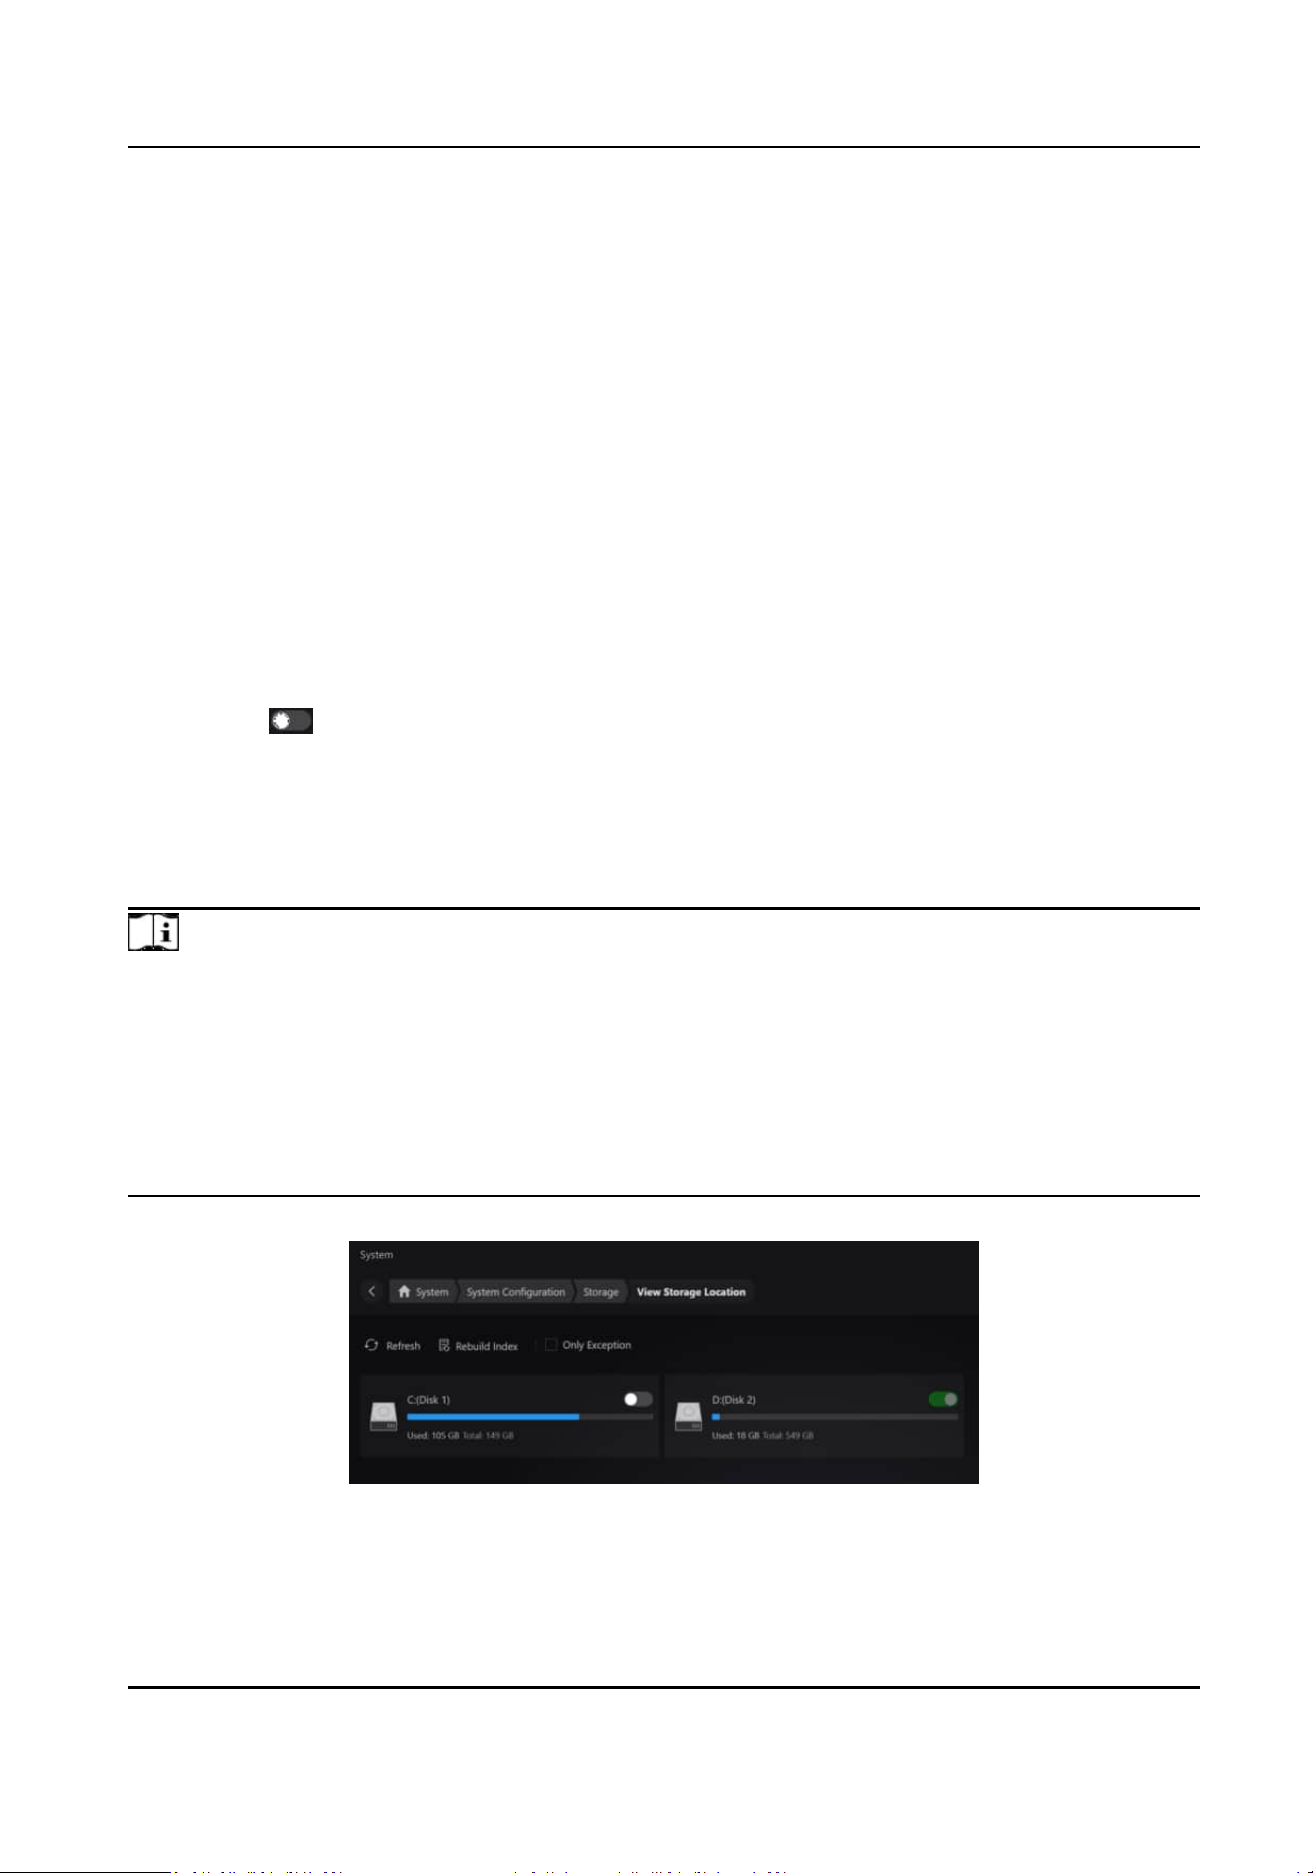
5.1 Preparaons
The video storage feature becomes available aer purchasing and acvang a formal video storage
license. You can also acvate a trial license to try this feature before purchasing a formal one.
5.2 Congure Storage Locaon and Storage Space
You should congure the storage locaon and allocate the storage space rao for video and
picture/le according to your needs.
Congure Storage Locaon
Click View Storage Locaon in the upper-right corner.
The default storage locaon is the disk with the largest space. Disk circular overwrite is enabled by
default. When the space is full, the system will overwrite the oldest les.
You can click to add and inialize addional disks.
The recommended hard drive model is as follows. If the hard drive you use is not on the
recommended list, it is strongly recommended to use an enterprise hard drive with similar
performance to ensure storage quality.
●
SSD: 1TB M.2 2230 PCIe NVMe Class 35
●
HDD: 20TB 7.2K SATA 6Gbps 3.5'', Hot-swappable
Note
●
Manually deleng les already stored on the disk or the disk going oine can result in the loss of
key informaon, such as recordings, though you will receive a system nocaon.
●
When replacing the current disk with a new one, back up your data rst. Ensure the new hard
drive has at least the same capacity as the original.
You need to disable the current logical disk and delete its associated les. Create a new drive
leer for the storage locaon and verify that it works normally.
●
Do not modify the drive
leer in the operang system, as it may cause anomalies.
Figure 5-2 Storage Locaon
HikCentral Lite V1.1.1 User Manual
93

Congure Storage Space
Click Congure Storage Space in the upper-right corner.
Drag on the pie chart to allocate the storage space rao for video and picture/le, or manually
enter one value to
automacally ll in the other.
Note
If you upgrade from HikCentral Lite V1.0.1:
●
The processing logic for the storage space of pictures and les aer the upgrade is the same as
before the upgrade. For example, if the quota for pictures and les in HikCentral Lite is 120 GB,
there will be a total of 120 GB storage space for pictures and
les aer the upgrade.
●
When space is
insucient, the space for pictures and les, as well as the total space is calculated
based on the remaining disk capacity, not the actual used capacity.
5.3 Congure Storage Schedule
You can congure storage schedules for a single camera or mulple cameras.
Click View Details to enter the Video Storage Details page.
To add a recording schedule, click Add to set the recording parameters of cameras(s). Schedules
added can be edited in the list. You can
congure the recording schedule for a single camera or
batch congure mulple cameras.
Note
When conguring storage schedules, make sure there is sucient storage space.
Recording Schedule
You can use the schedule template or dene a custom schedule. The scheduled recording is to
record
connuously within the me duraon, while the event triggered recording is to record
when alarm occurs.
Stream Type
Choose the Main Stream, Sub-Stream, or Dual-Stream based on your actual needs for playback
quality, power
consumpon, etc. When choosing Sub-Stream as the stream type, you can check
Use Main Stream to Record Event Triggered Video to automacally record event-triggered
videos using the main stream, ensuring the clarity of the recordings when the event is triggered.
During event playback, the system will
priorize the main stream.
Overwrite Aer Retenon Time / Retenon Time
If you enable Overwrite Aer Retenon Time, videos stored longer than the specied
Retenon
Time will be automacally overwrien. If you disable this, stored videos will be
overwrien in the order of their storage me (earliest rst) when the storage space is not
enough.
Auto Copy-Back
HikCentral Lite V1.1.1 User Manual
94
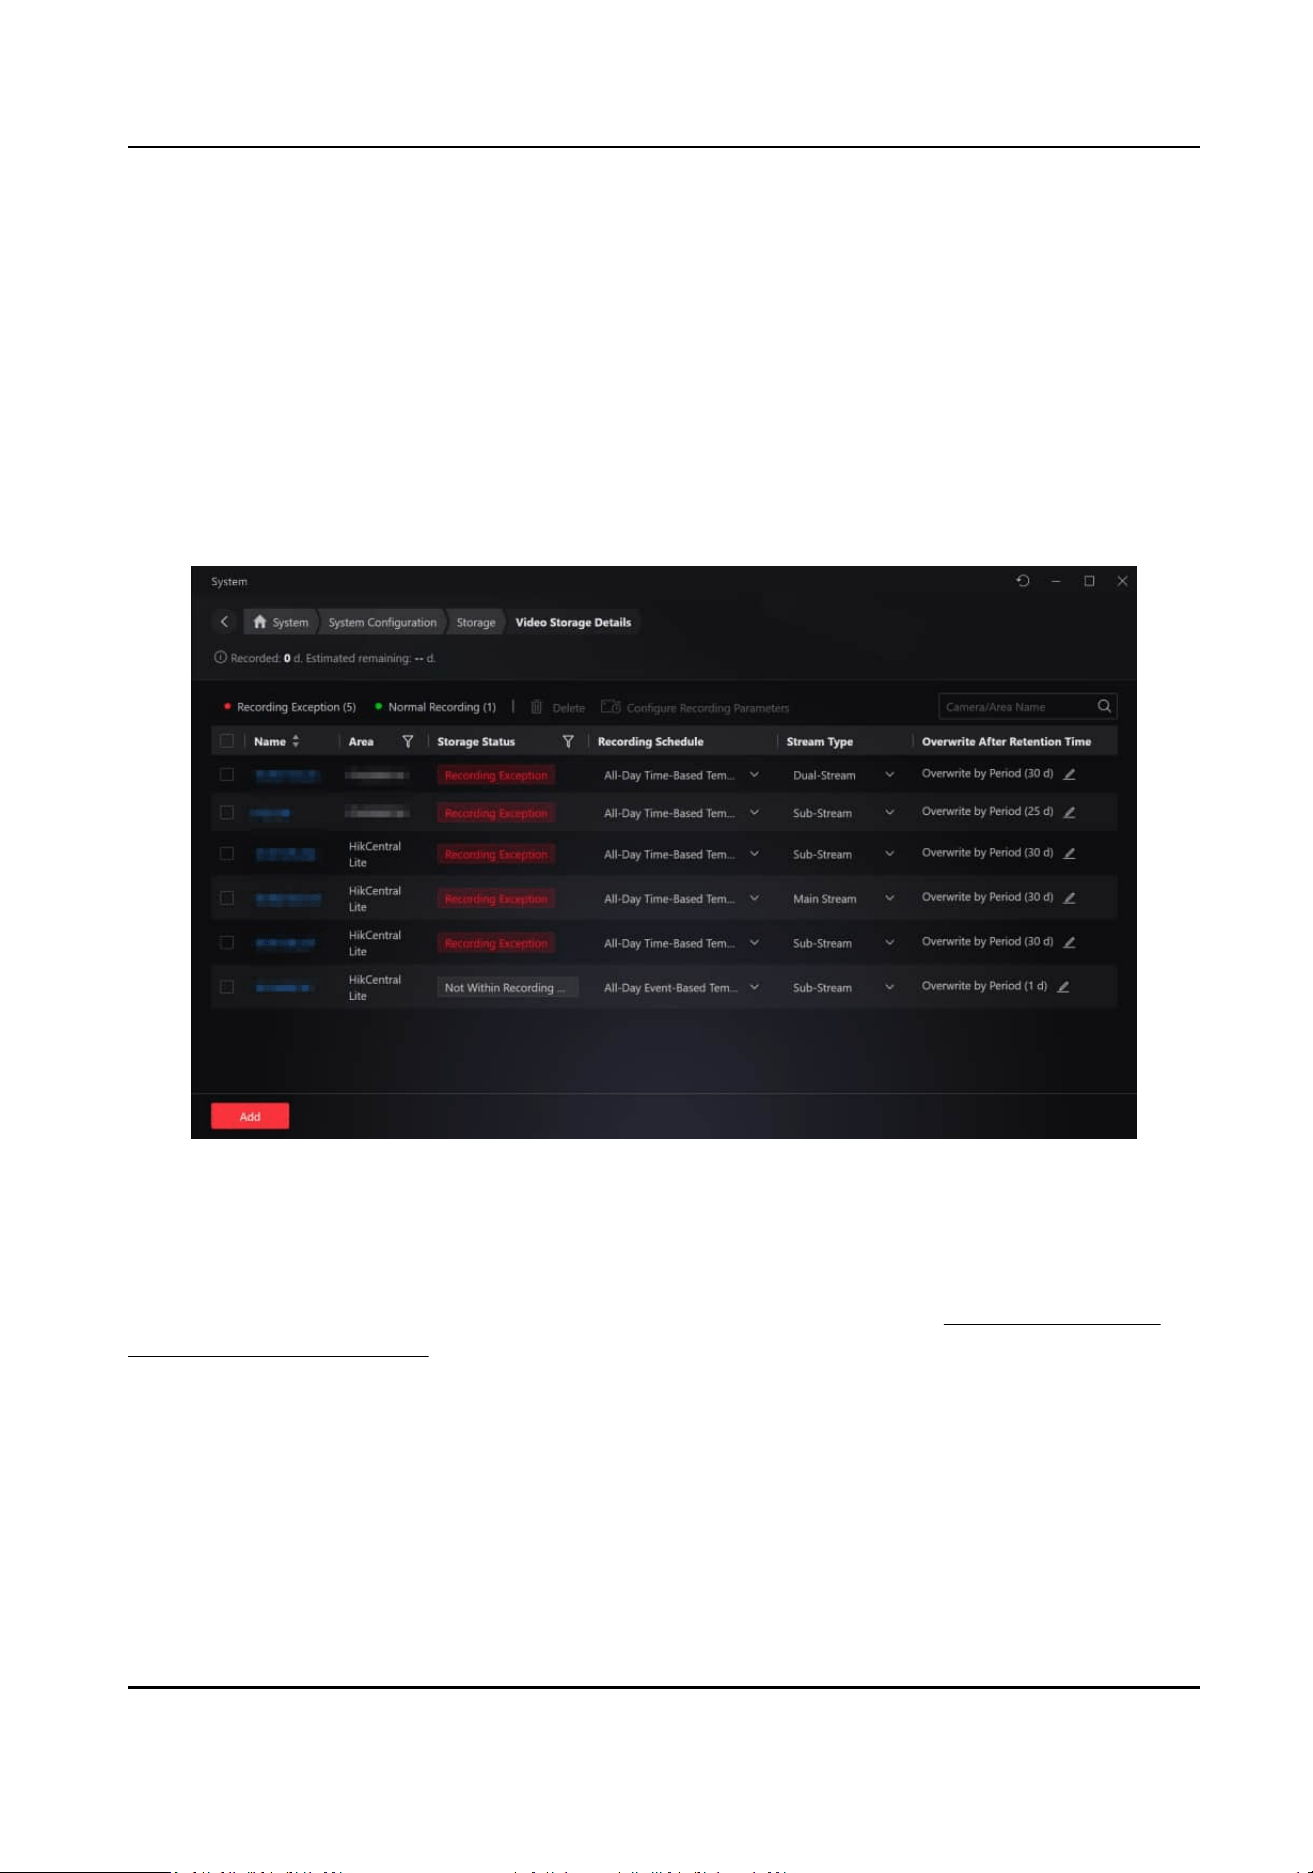
Enable this to temporarily store the video in the device when network fails, and transport the
video to storage device when network recovers.
Streaming Server
Choose a streaming server for streaming will save more bandwidth, not applicable to devices
accessed via the Hikvision SDK protocol.
Batch Congure Recording Parameters
Aer adding storage schedules, cameras with storage schedules will be displayed in the list. You
can select mulple cameras and click Congure Recording Parameters to edit recording
parameters.
Figure 5-3 Storage Schedule
In the camera's recording conguraon, the system checks the overall storage space to ensure the
retenon me for stored videos is appropriate. If the retenon me is too long, it may aect other
cameras' storage conguraons or fail to meet the current camera's storage requirements. You
need to assess and set an appropriate
retenon me. For more details, see View and Congure
Details of Encoding Devices .
HikCentral Lite V1.1.1 User Manual
95
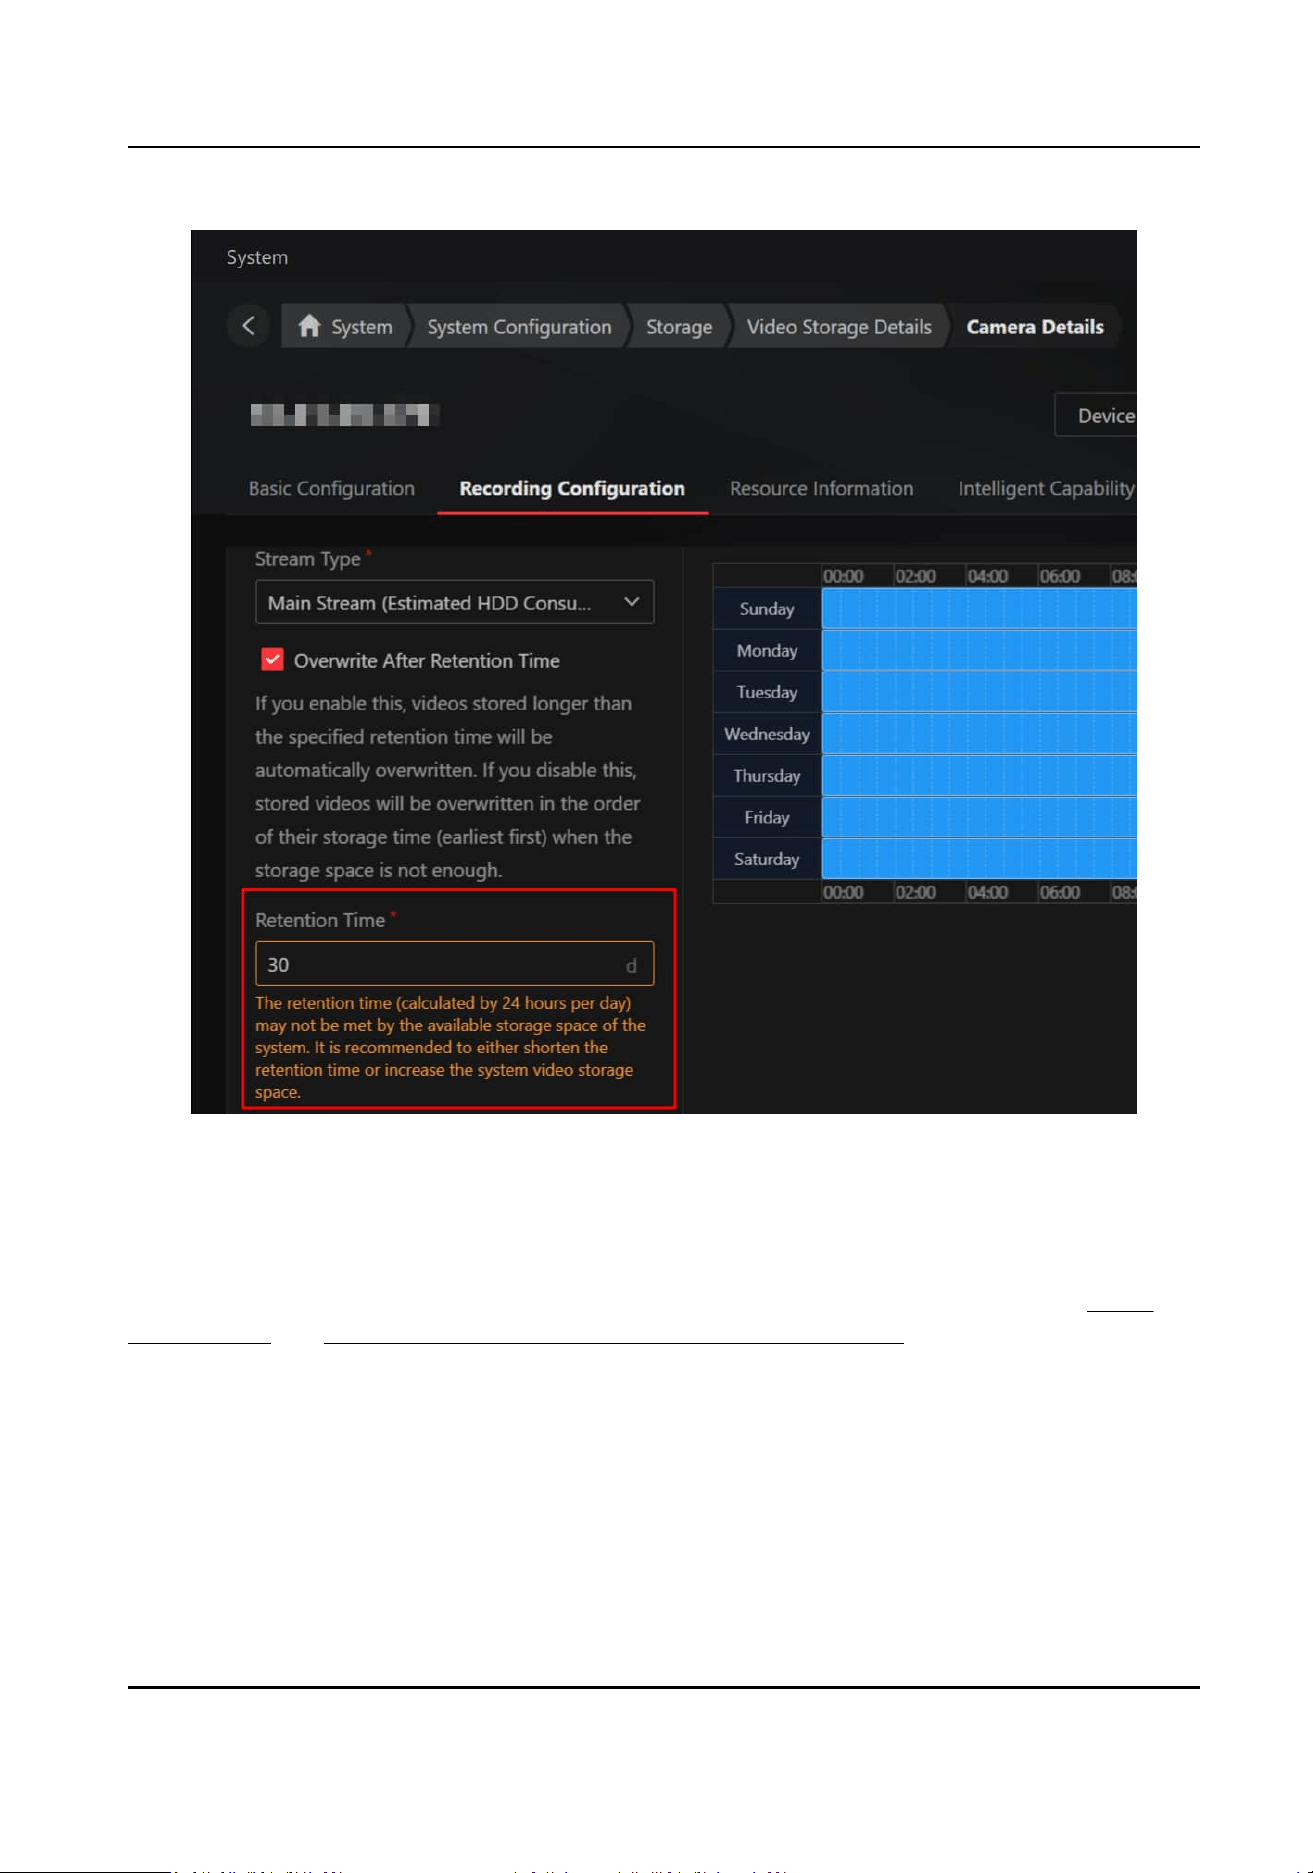
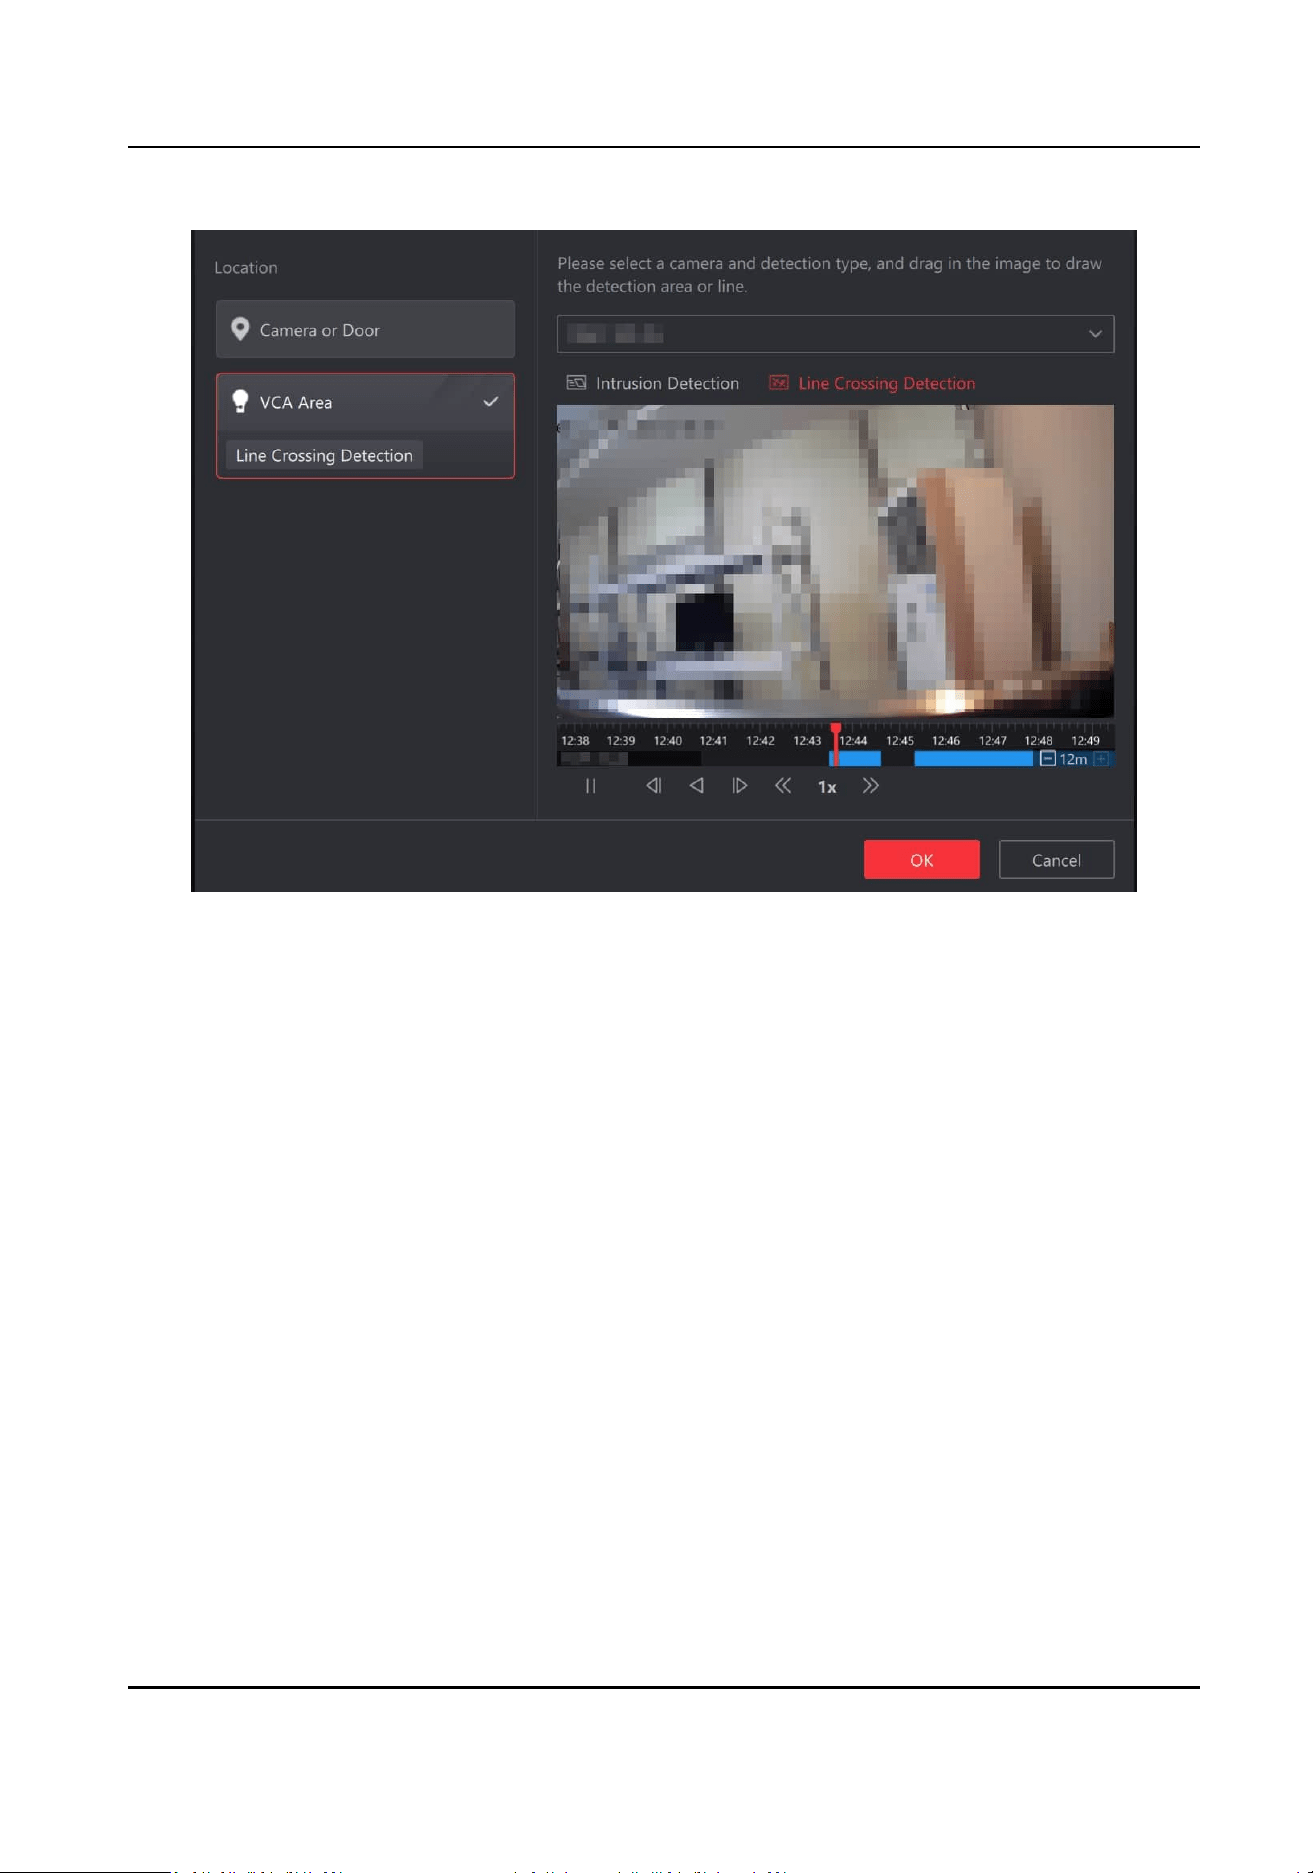
Figure 5-5 VCA Search
5.5 Specify Data
Retenon Time
Click Storage → Data Retenon Time .
Dene the retenon period to keep the data as desired according to the data type. The general
data, video data, and access control data will be automacally cleared once the set retenon
period is exceeded.
5.6 Advanced
Conguraons
In addion to basic conguraon, you can congure a dedicated NIC for system storage, rebuild
disk index if index les are damaged or other issues occur, and view the maintenance report of
storage.
5.6.1 System Storage NIC
The system storage service can use a dedicated NIC. You can congure a separate NIC for system
storage or use the same NIC for both SYS and system storage. For WAN access, you can assign the
HikCentral Lite V1.1.1 User Manual
97
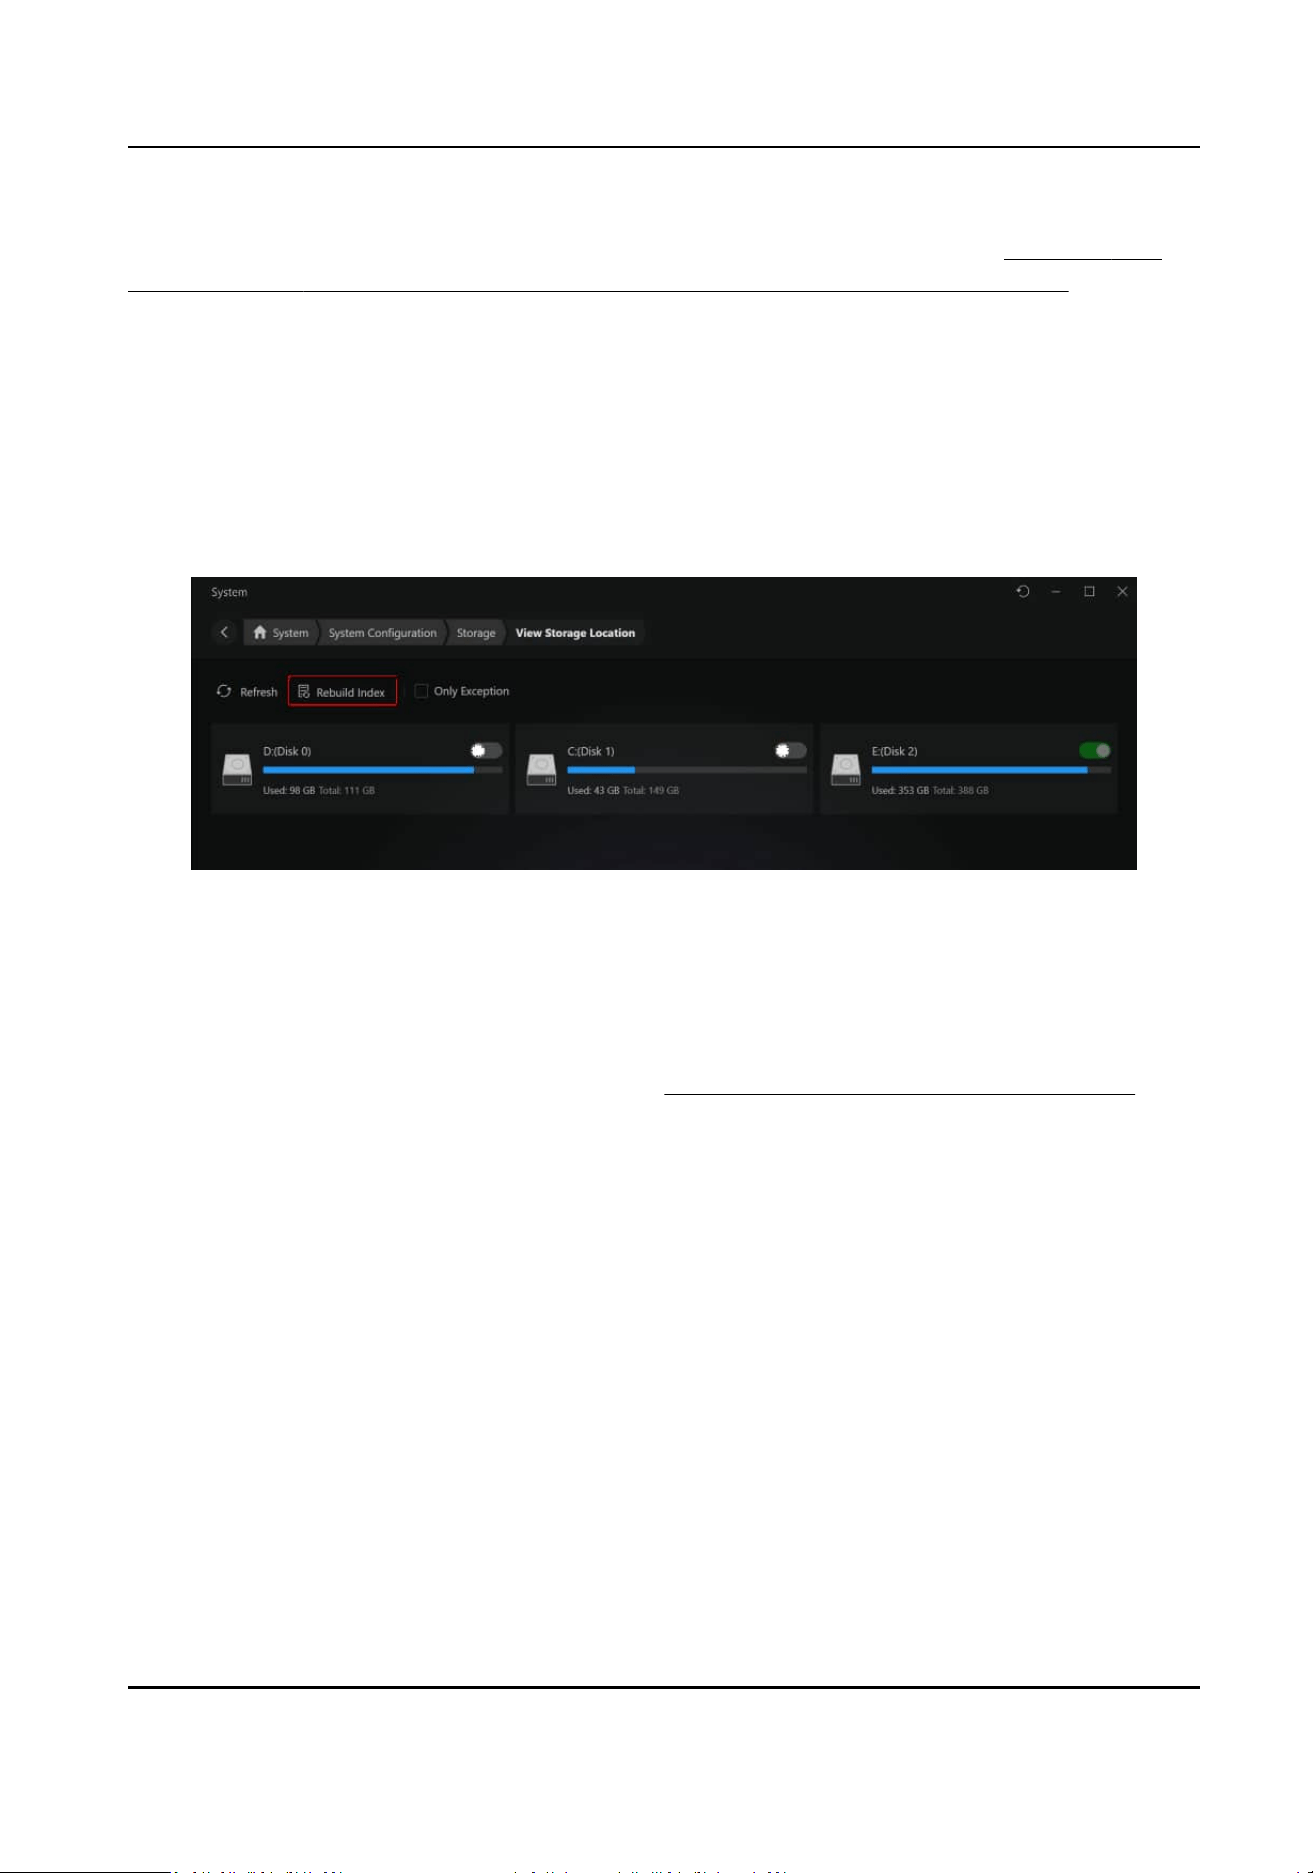
same IP address for SYS and system storage, or use dierent IP addresses for each. For more
details, see the secons Congure WAN Access and Congure Server Address in Congure NTP
Synchronizaon / Device Access Protocol / WAN Access / NIC, and Reset Network Info .
5.6.2 Rebuild Index
When index corrupon, storage excepons, or other issues occur, making it dicult to search
stored content or leading to a decrease in search eciency, you can rebuild the index to restore
search funconality. Please do not shut down the system during this period.
Go to System Storage → View Storage
Locaon → Rebuild Index .
Figure 5-6 Rebuild Index
5.6.3 Maintenance
On the Maintenance Report page, supports stascs for Recording Server NIC, disk status, storage
locaon, and video storage. For more details, see Generate and Display Maintenance Report .
HikCentral Lite V1.1.1 User Manual
98
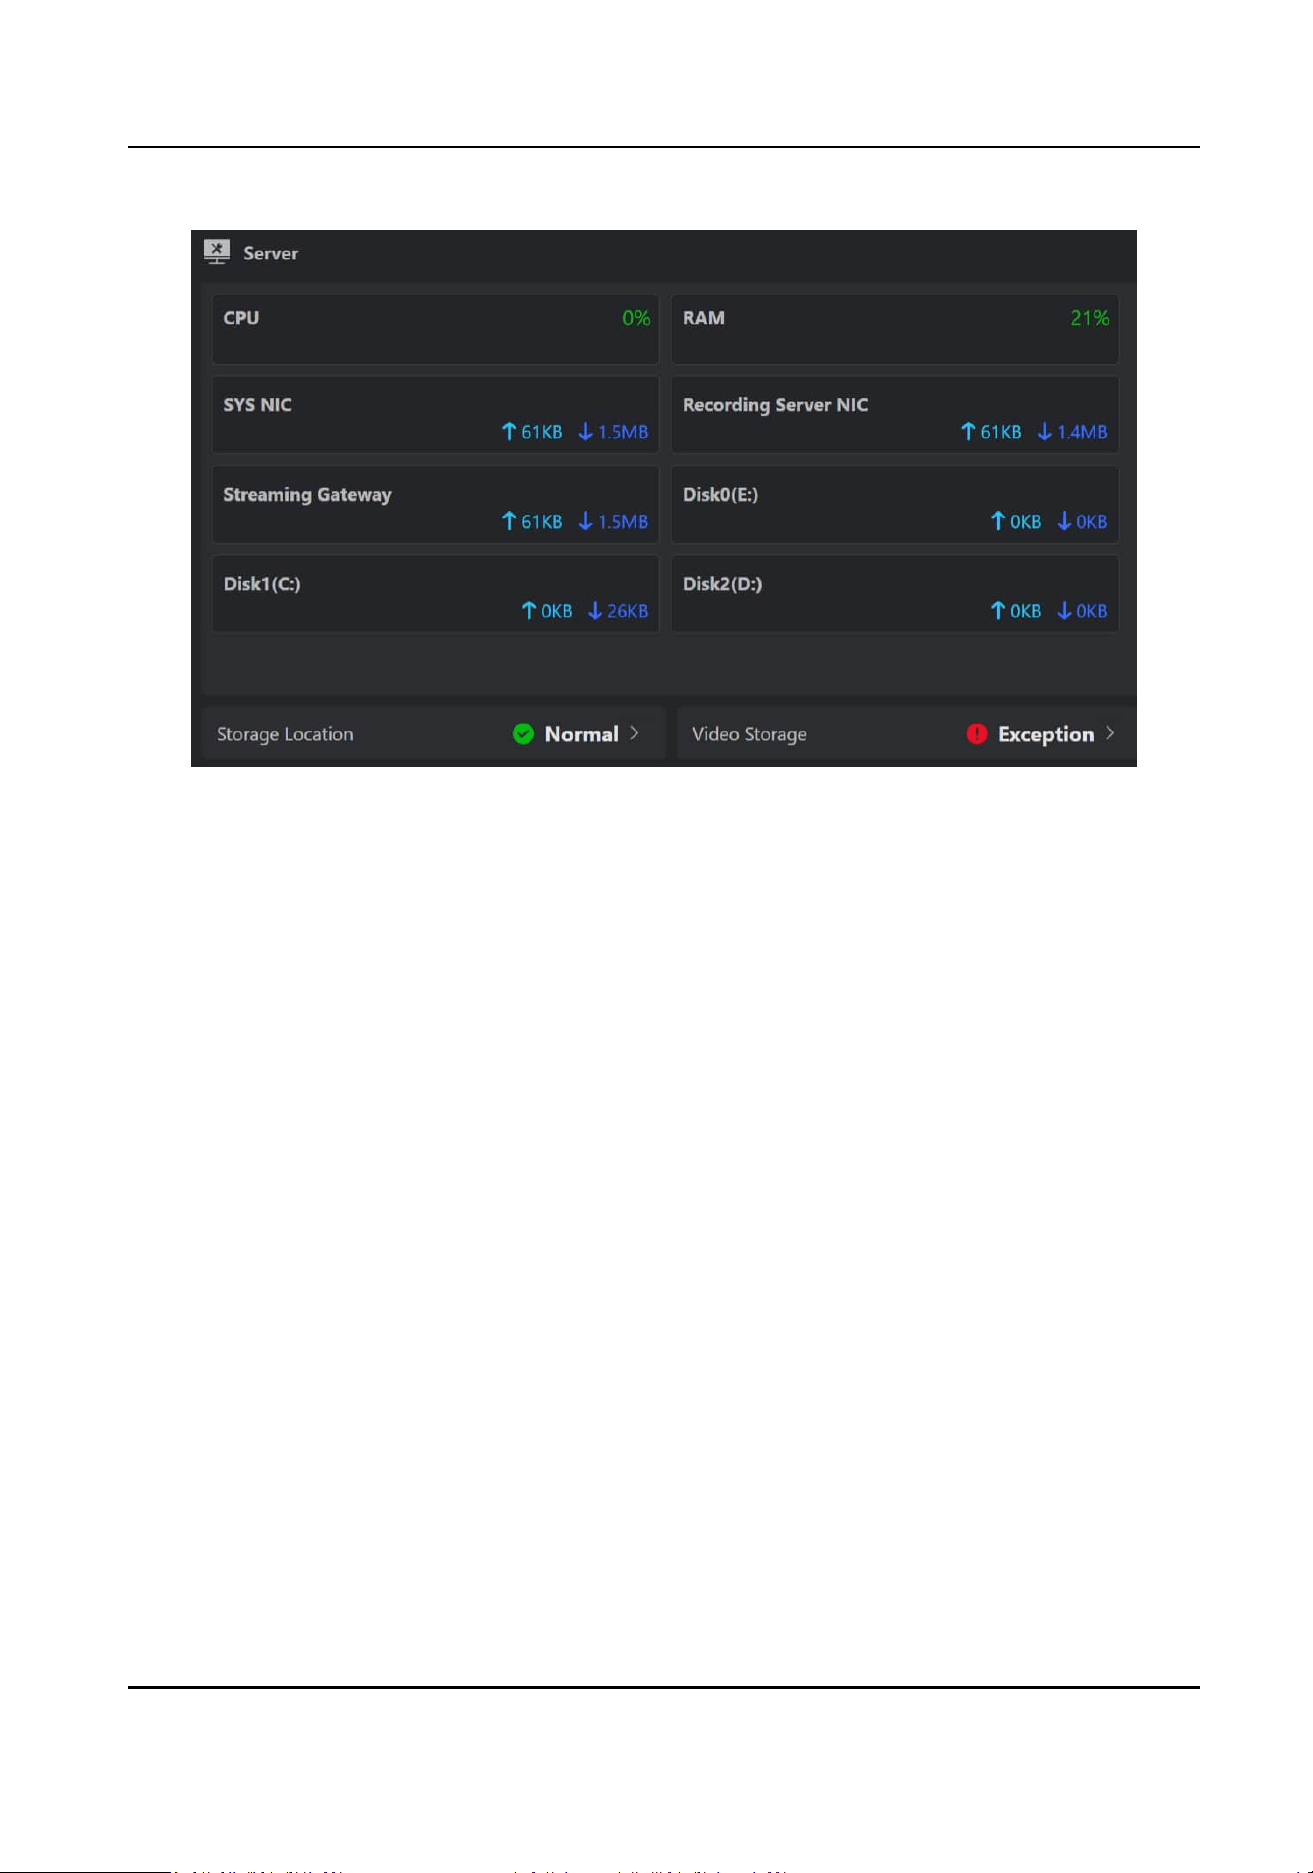
Figure 5-7 Server Stascs
HikCentral Lite V1.1.1 User Manual
99
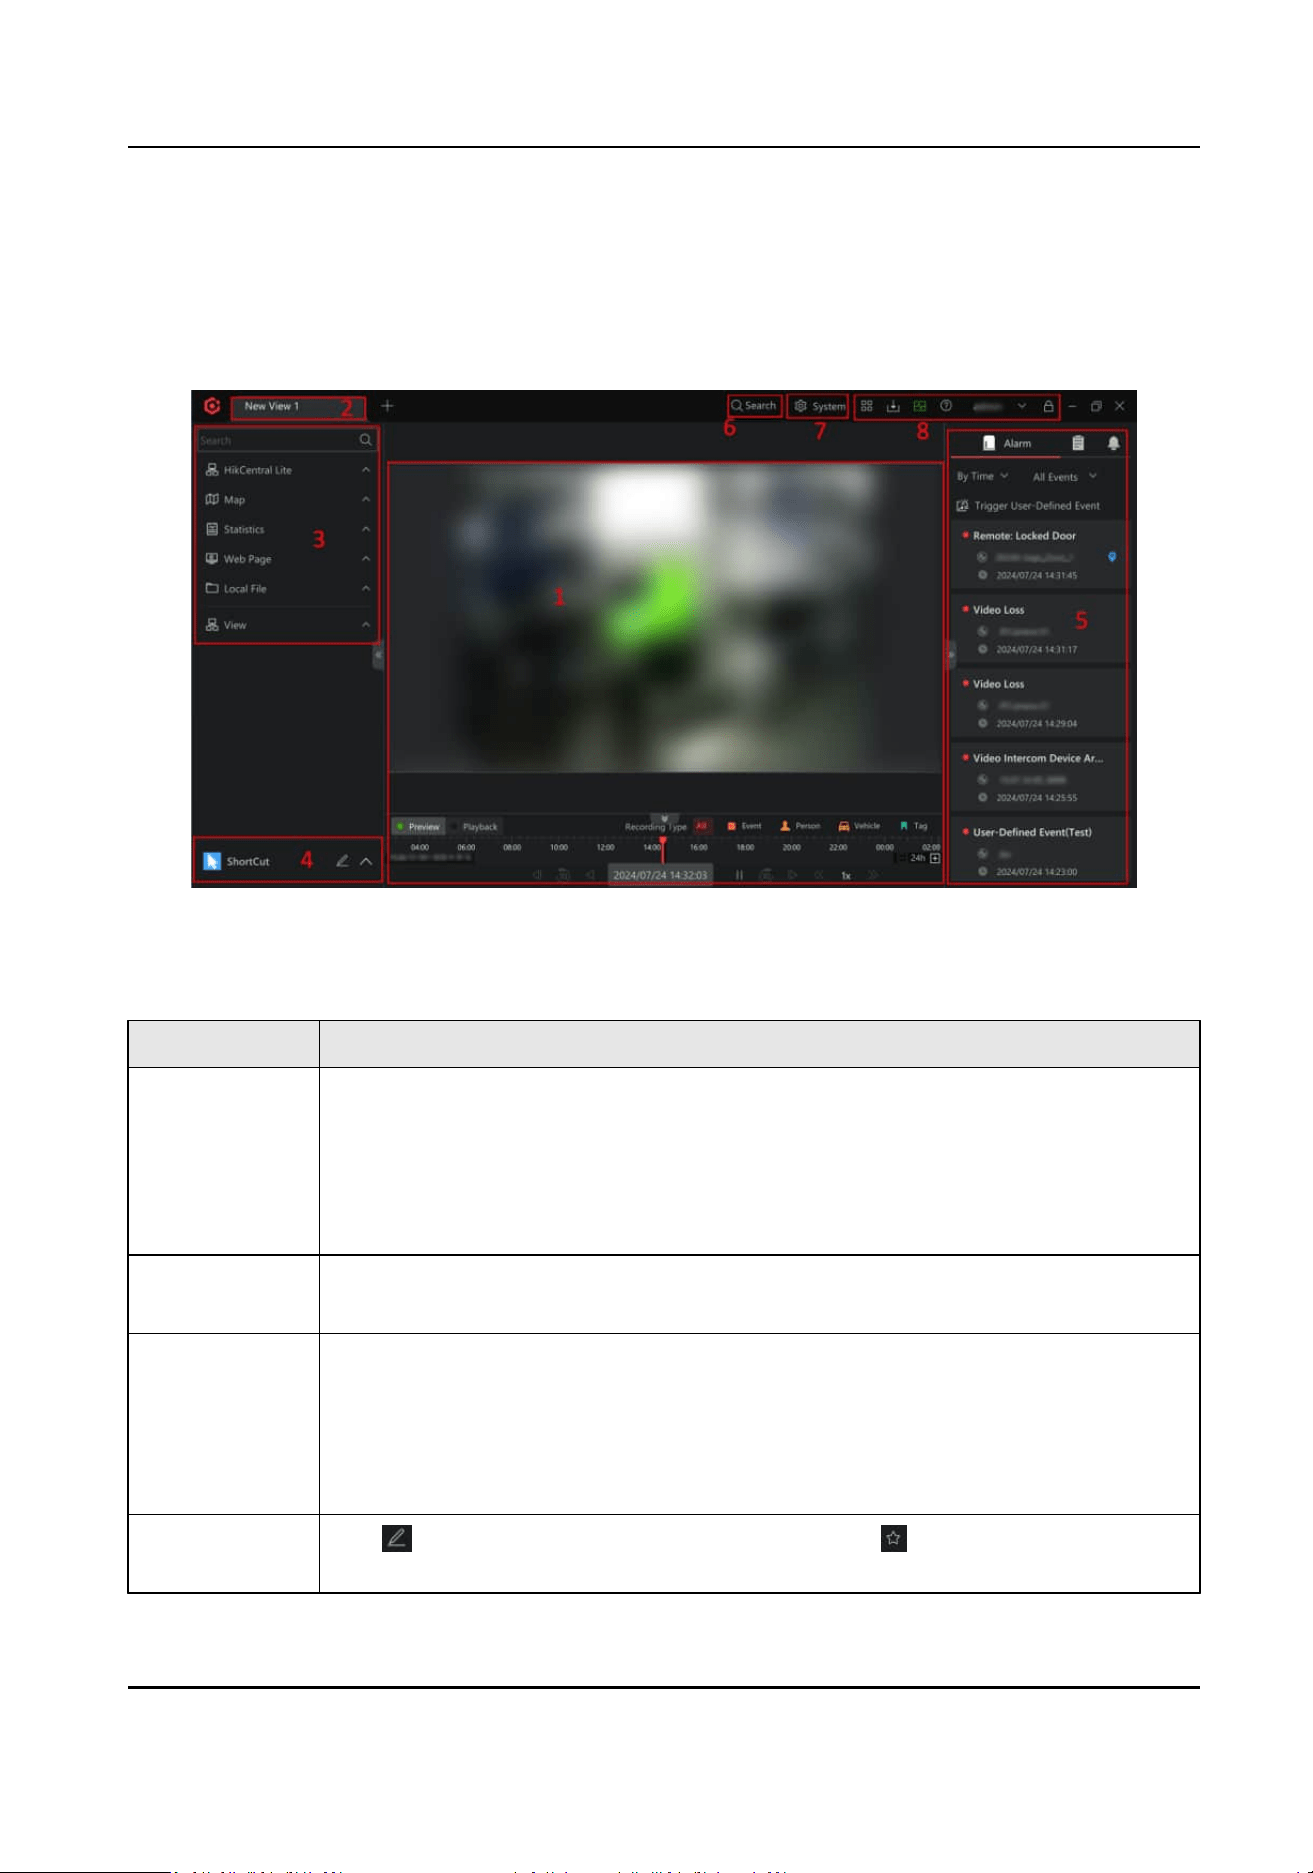
Chapter 6 Main Panel for Monitoring and Control
The following is the introducon of main panel for monitoring and control.
Figure 6-1 Main Panel for Monitoring and Control
Table 6-1 Main Panel Introducon
No. Funcon
1 Display resources, maps, stascs reports, web pages, local les, and views in
the viewing grid.
Local les include captured pictures and recorded videos during live view and
playback.
You can also drag a picture or video from local PC to the viewing grid.
2 Drag a view upwards or downwards, or right-click a view and click Open in New
Window to open the current view in a new window.
3 Right-click to add areas, resources, maps, stascs reports, web pages, local
les, and views.
You can double-click an area, a resource, a map, a stascs report, a web page,
a local
le or a view for display, or drag them one by one to the viewing grid for
display.
4 Click to pop up the menu of the client, and click to add a module to the
Shortcut, which provides a quick access to the corresponding module.
HikCentral Lite V1.1.1 User Manual
100
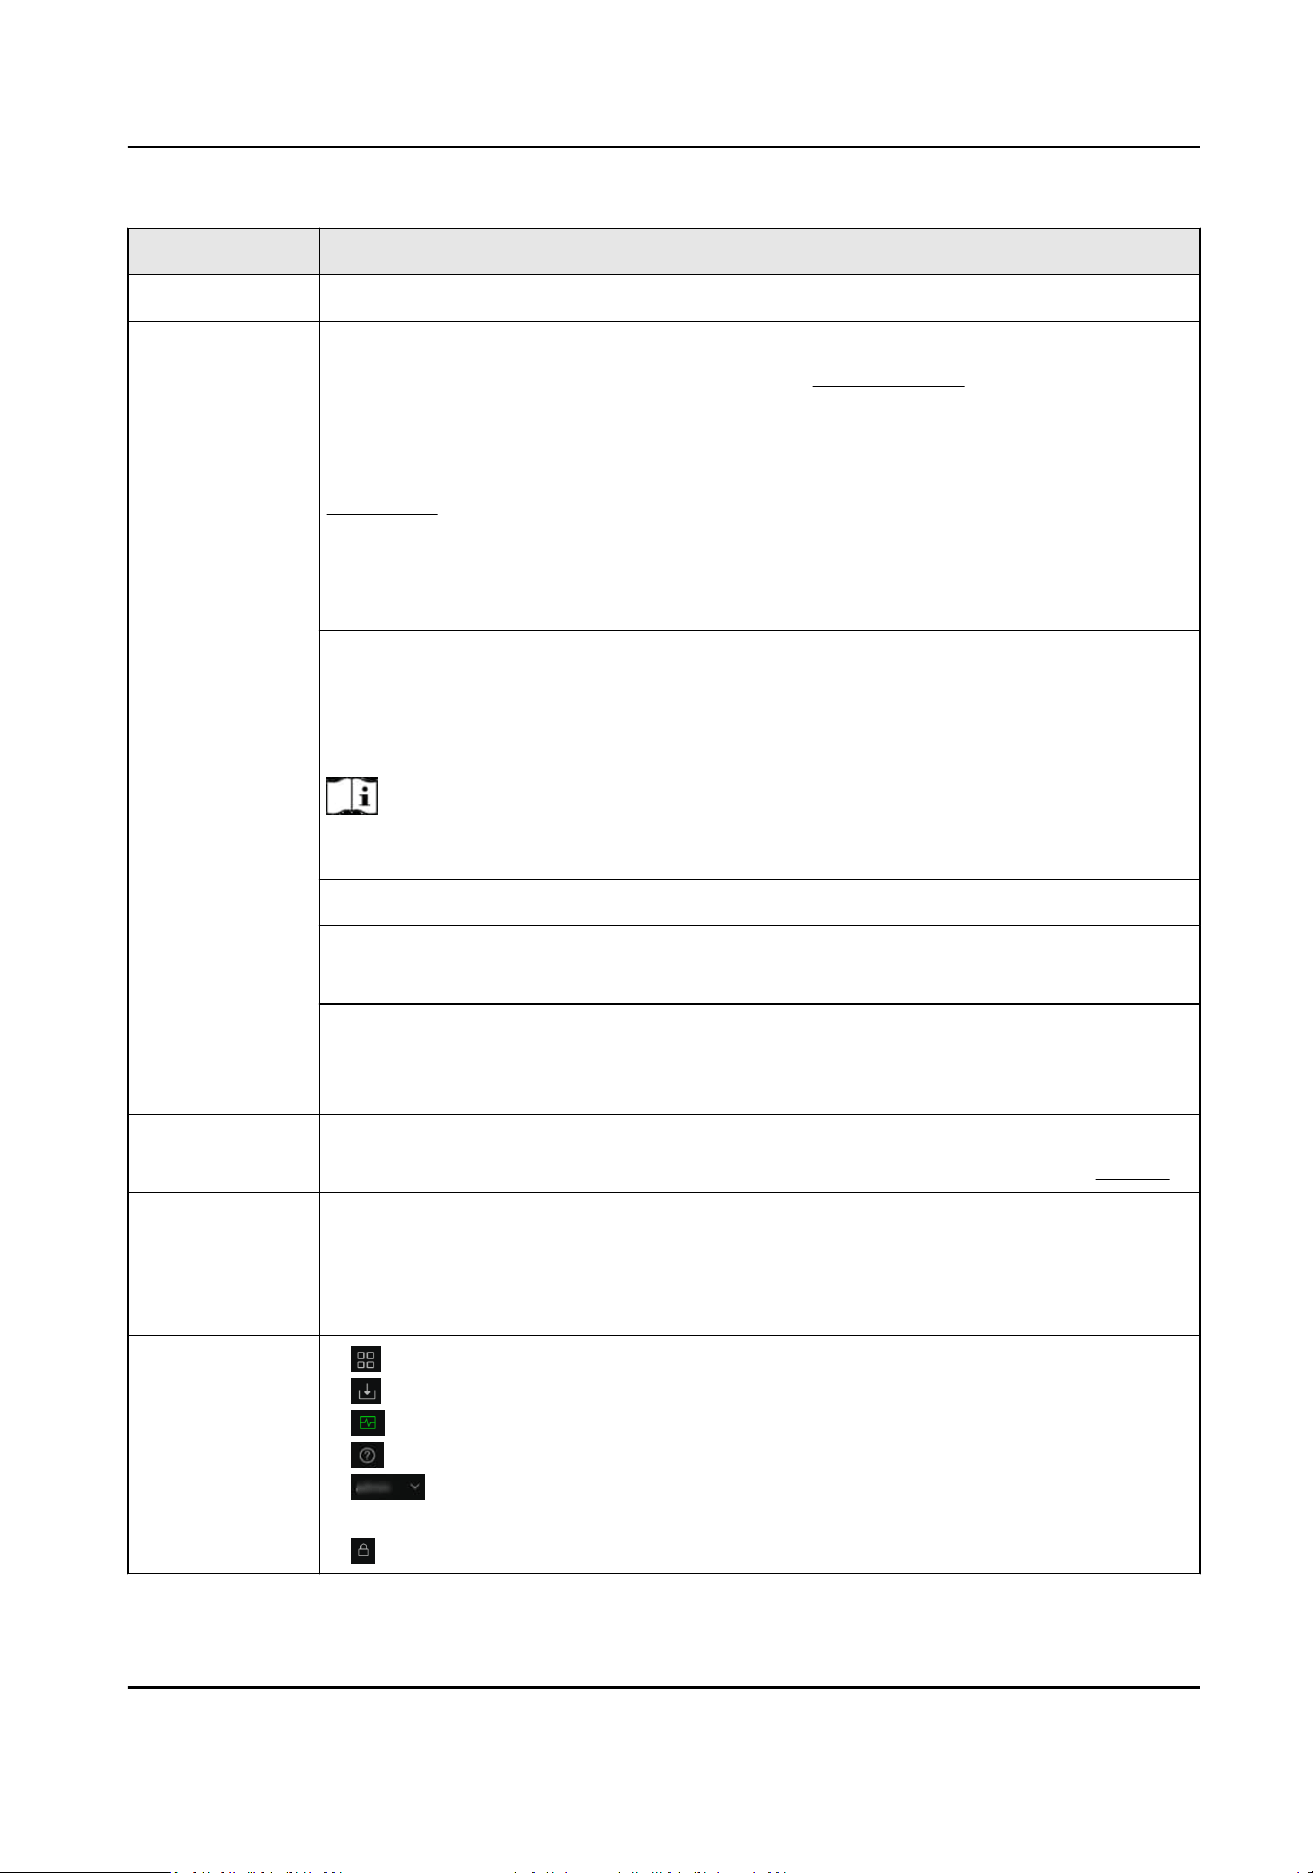
No. Funcon
You can drag the added modules to adjust their sequences.
5 Alarm: View the alarm list in real me. If there is no alarm added, click
Congure to add alarms. For details, refer to Add an Alarm . At most 100
alarms can be displayed in the list. You can hover on an alarm to view alarm
details, drag an alarm to view the related video. Also, you can enable/disable
certain alarm types. The enabled types of alarm will be displayed here. Refer to
Alarm List .
You can display alarms by me or priority order, and lter alarms by event
types. You can right-click an alarm to view the alarm details, acknowledge the
alarm, mark the alarm, export the alarm, view alarm
conguraon, etc.
Event: View all the events congured in the client. You can view events related
with the resources on the current view or events related with all resources. You
can hover on an event to view event details, drag an event to view the related
video, and right-click an event to perform more
operaons.
Note
Operaons aer right clicking are dierent according to dierent event types.
Nocaon: View the system nocaons which indicate status or operaons.
VCA / Smart Search: View the VCA / smart search results. You can lter by me
and click a picture to view the corresponding video at the specic me.
Object Search / AcuSearch: View object search / AcuSearch results. You can
lter by me and similarity, view the similarity between objects detected in the
image and that in other captured pictures and view the comparison details.
6 The entry to the Search module, where you can search for historical alarms,
person access records, vehicle passing records, etc. For details, refer to Search .
7 The entry to the System module, where you can add and manage devices,
persons, face picture libraries, vehicles, access levels, events and alarms. Also,
you can set parameters related with account and security, and congure system
parameters.
8
●
: Install and manage third-party integraon applicaons.
●
: Enter the Download Center.
●
: View the performance of PC on which the client is installed.
●
: Get the User Manual of the client.
●
: View the informaon of the login user, manage Licenses, back up
data, change password, etc.
●
: Lock the client.
HikCentral Lite V1.1.1 User Manual
101

Chapter 7 Search
The Search module allows to search for alarms, access events, ANPR events, detected face &
human body pictures, system
nocaons, and system logs. In addion, it provides an intelligent
search funcon, which combines video search, person search, vehicle search, and VCA search.
On the top of the Desktop, click Search.
General Search
Table 7-1 General Search Content
Search Type Descripon
Alarm Search for historical alarms by me, area, source type (i.e., event
category), event name, priority, and source name (device name). Refer
to Search for and Export Alarms for details.
Access Event Access Event: Search for person authencaon events, access control
device events, and video intercom call records. Refer to Search for
Access Events for details.
Vehicle Passing Event Refer to Search and Export ANPR Events .
Face & Human Body
Detecon
Refer to Search for Recognized Face Pictures and Human Body
Pictures .
Nocaons Refer to Search for Nocaons .
System Log Refer to Search for System Logs .
Intelligent Search
To implement the quick search of targets, the supported search condions can be used in a exible
combinaon according to actual needs.
HikCentral Lite V1.1.1 User Manual
102

Table 7-2 Intelligent Search Condion
Search Condion Scenario
Locaon
●
Search for persons/vehicles captured by specied cameras or
accessed doors. Refer to Search for Detected Vehicles or Persons
by Cameras/Doors .
●
Search for
specic targets related to line-crossing / intrusion event
by drawing a VCA area on the video. Refer to
Search for Detected
Persons or Vehicles in VCA Areas for details.
Target Upload a picture to search for persons. Refer to Search Targets by a
Picture and AcuSearch / Object Search , and AcuSeek .
Features Search for persons/vehicles by specic features (such as face picture
library or vehicle license plate number). Refer to Search for Detected
Persons/Vehicles by Features .
7.1 Search for Detected Vehicles or Persons by Cameras/Doors
Search for videos captured by specied devices, detected vehicles/persons, and access records
within specied me period.
Locaon
Search Result
Camera
●
Regular videos captured by the camera.
●
Passing vehicles.
●
Captured face pictures.
●
Video tags that are
congured during playback or the event/alarm
linkage tags.
Door
●
Regular videos.
●
Captured face pictures.
●
Card-swiping records.
HikCentral Lite V1.1.1 User Manual
103
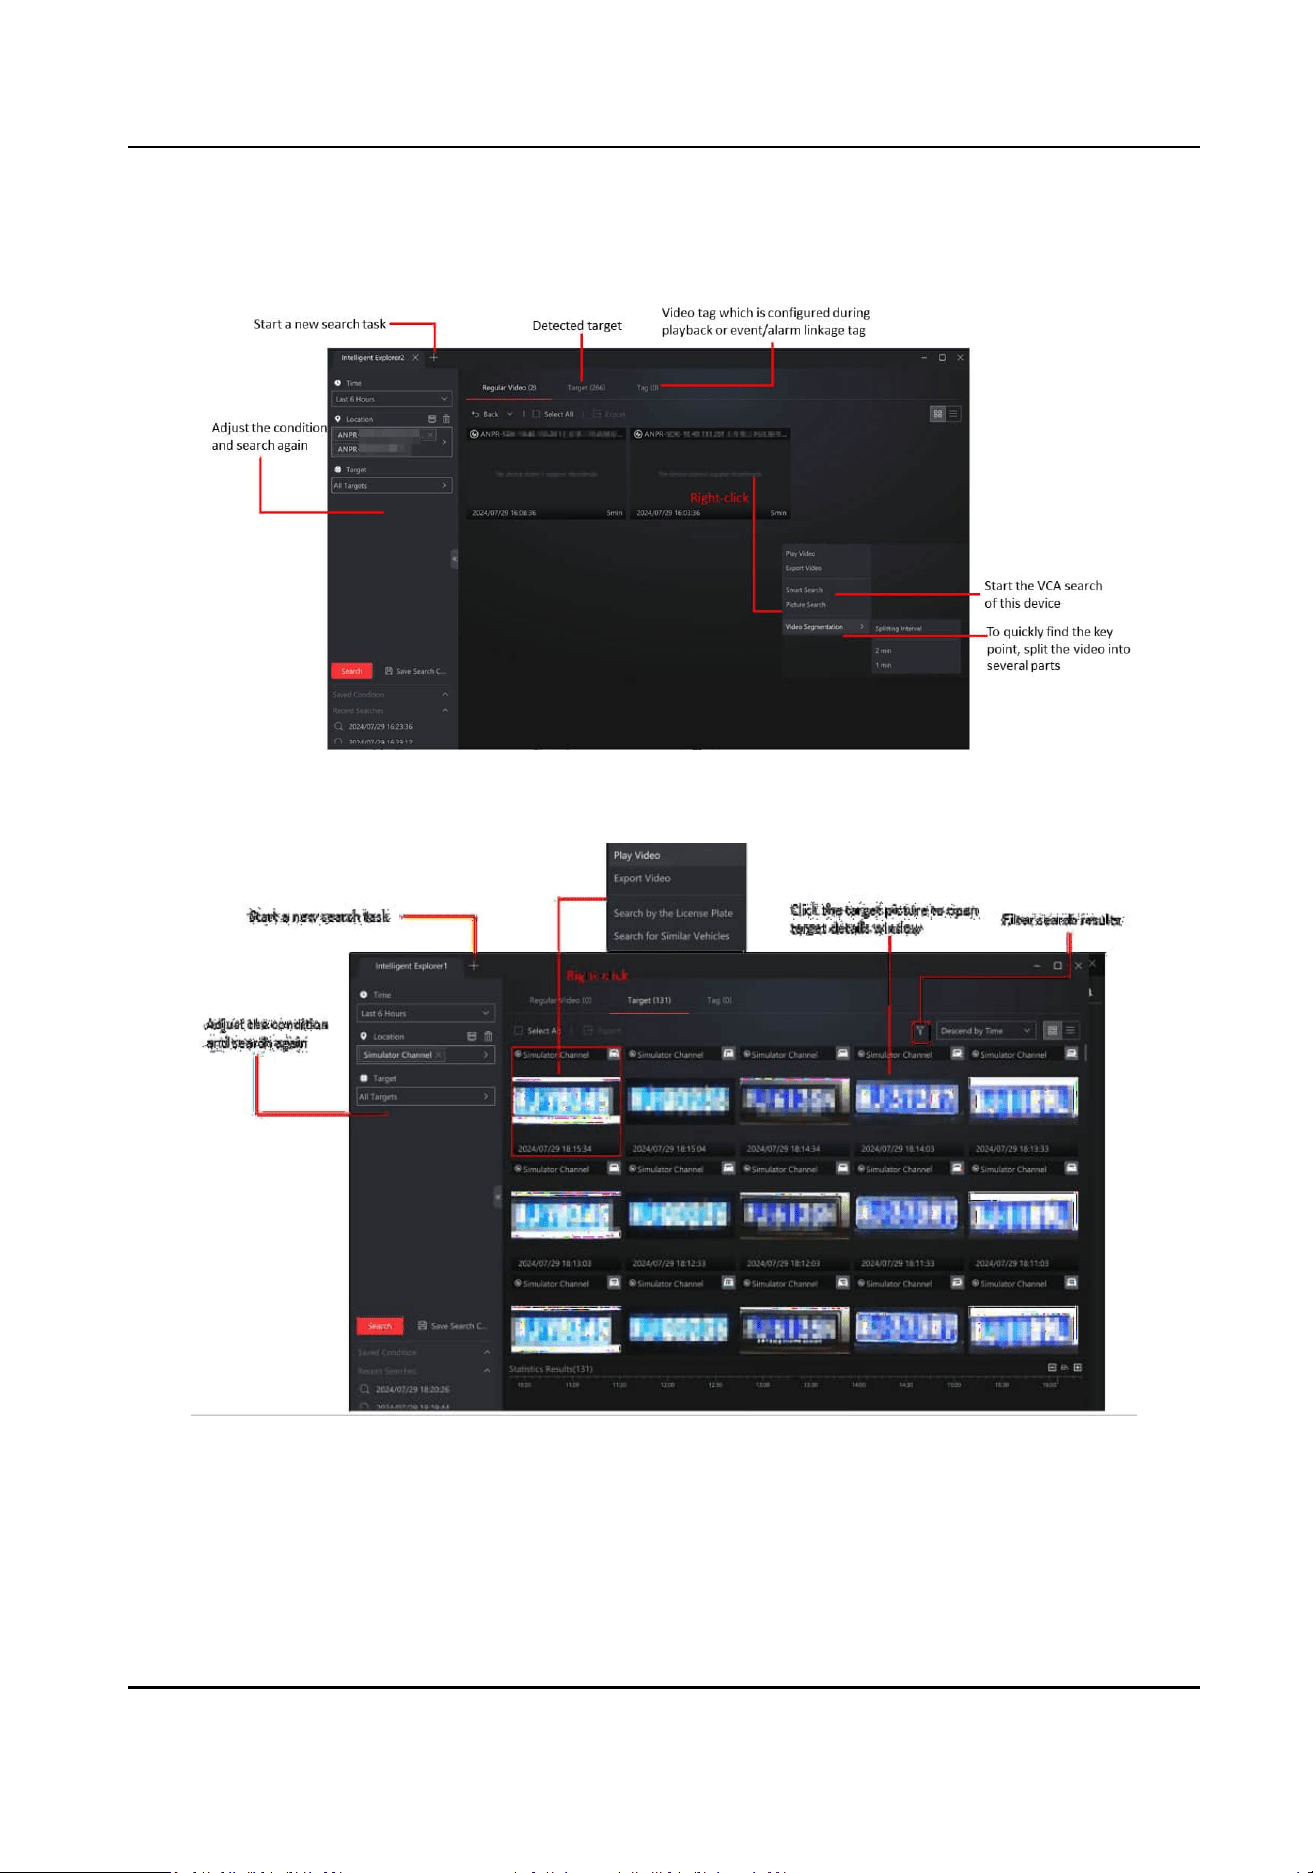
Search for Vehicles by Cameras
Figure 7-1 Result of Searched Videos
Figure 7-2 Result of Searched Vehicles
HikCentral Lite V1.1.1 User Manual
104
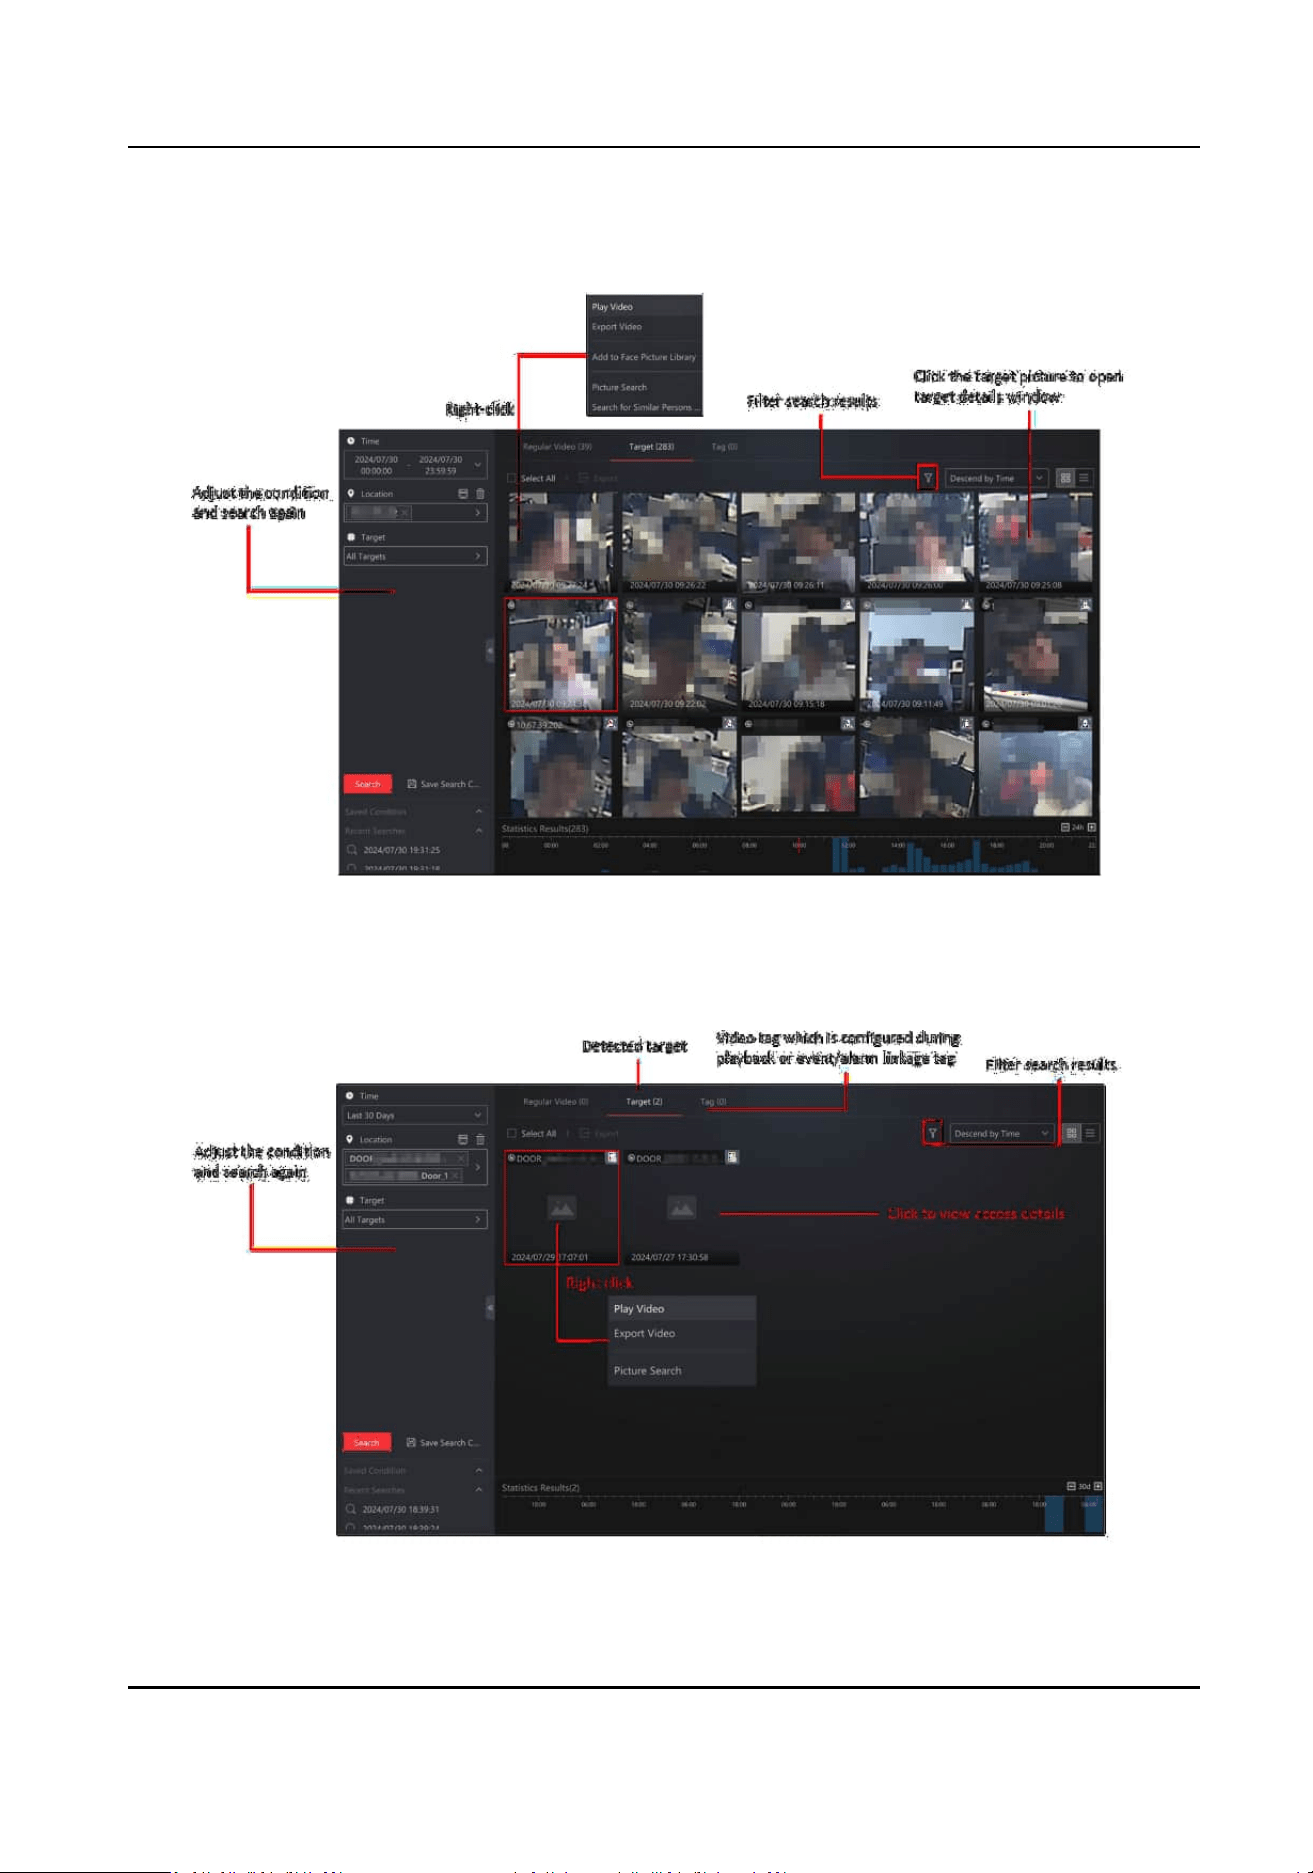
Search for Persons by Cameras
Figure 7-3 Search for Persons by Cameras
Search for Persons by Doors
Figure 7-4 Search for Persons by Doors
HikCentral Lite V1.1.1 User Manual
105
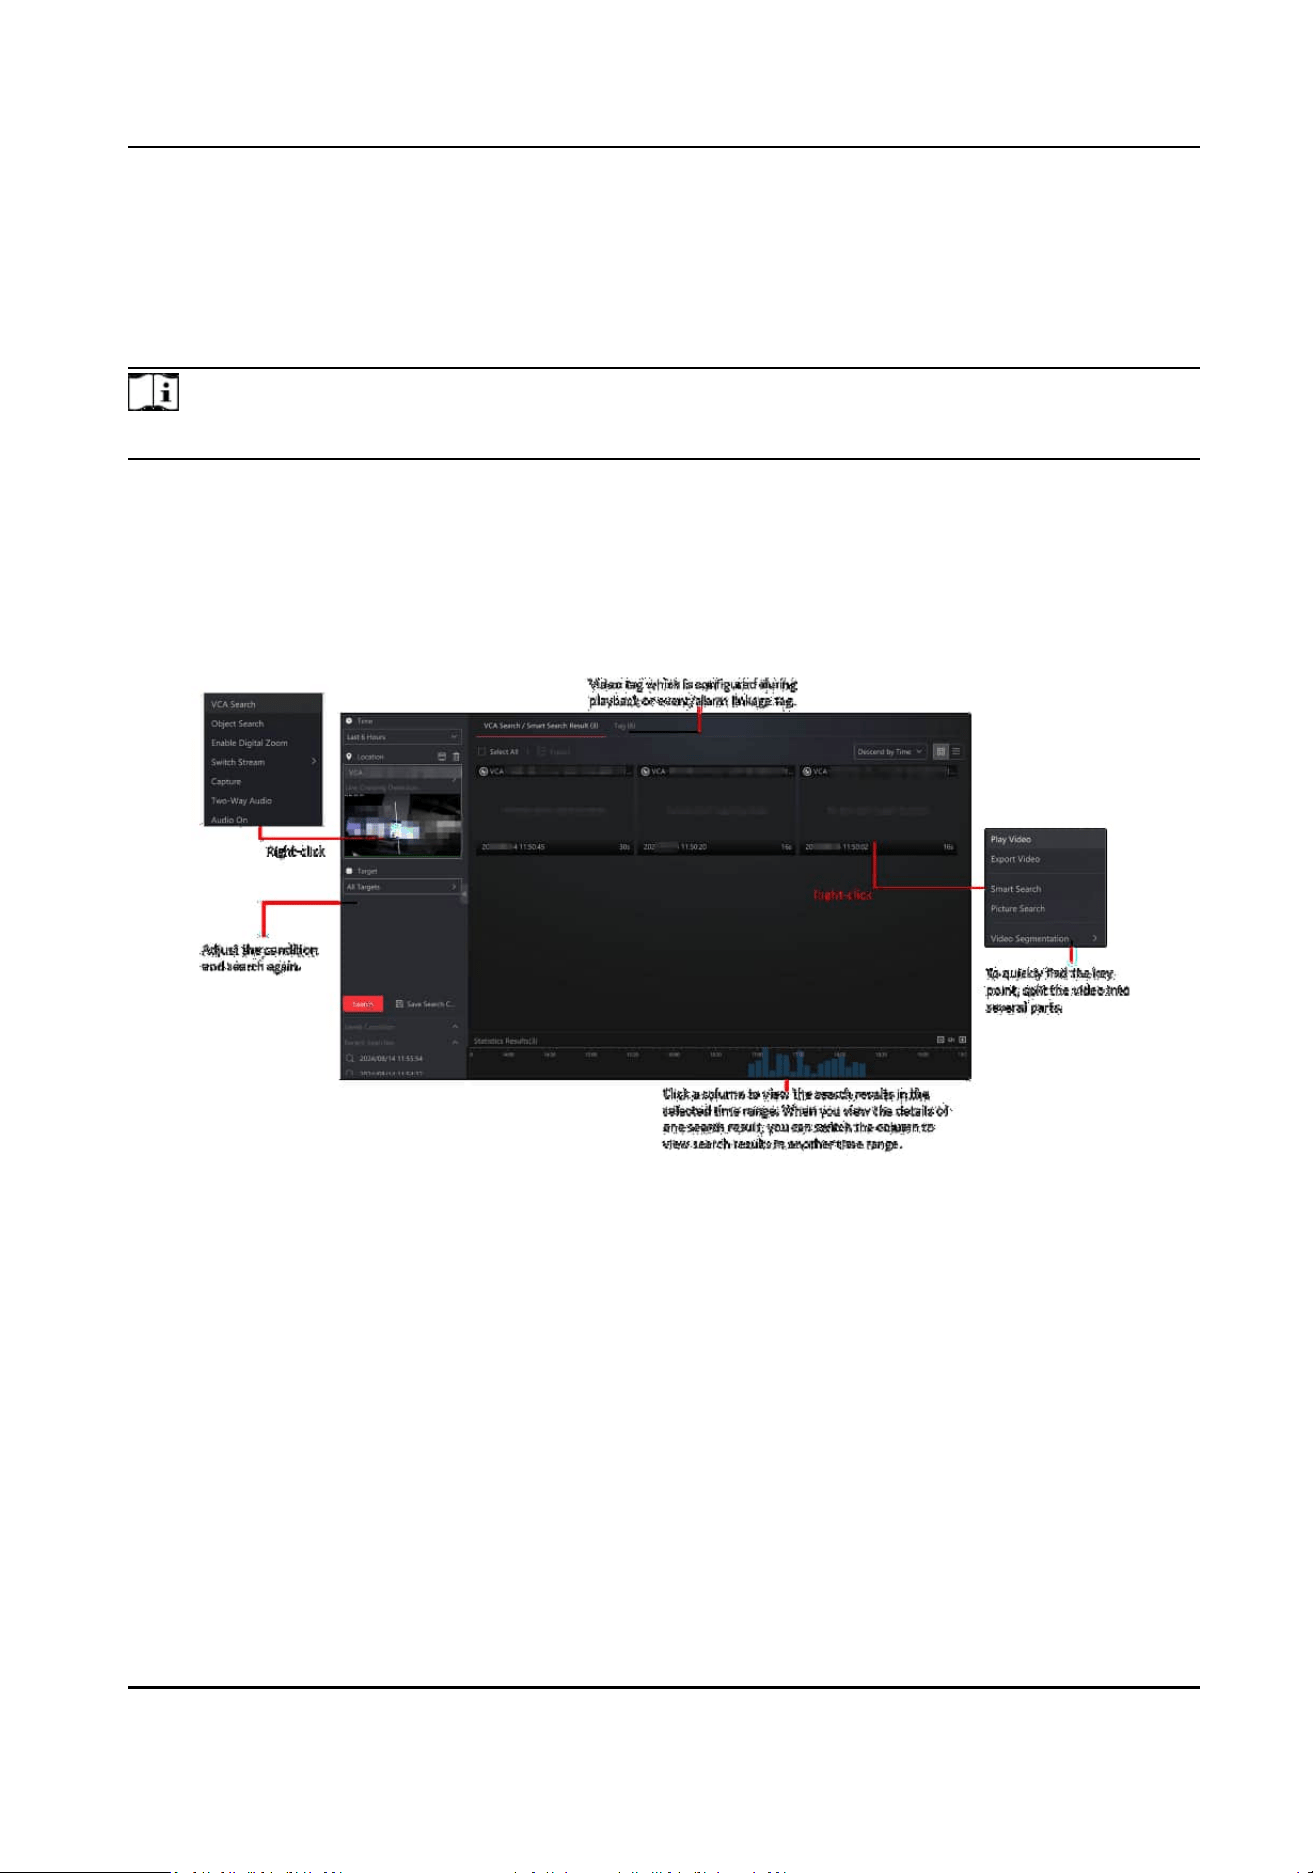
7.2 Search for Detected Persons or Vehicles in VCA Areas
You can search for VCA events related videos, and lter them by targets (persons/vehicles). The
VCA events include intrusion detecon and line crossing detecon.
Note
Make sure that the VCA funcons are already enabled on the device.
1. On the Intelligent Search page, set the me period and set the Locaon to VCA Area.
2. Select a camera to search for the VCA event related videos.
3. Select the VCA event type (Intrusion
Detecon or Line Crossing Detecon), and draw a
detecon area/line for search.
4. Click Search.
Figure 7-5 VCA Search
7.3 Search for Detected Persons/Vehicles by Features
On the Intelligent Search page, set the me and target features for search.
HikCentral Lite V1.1.1 User Manual
106
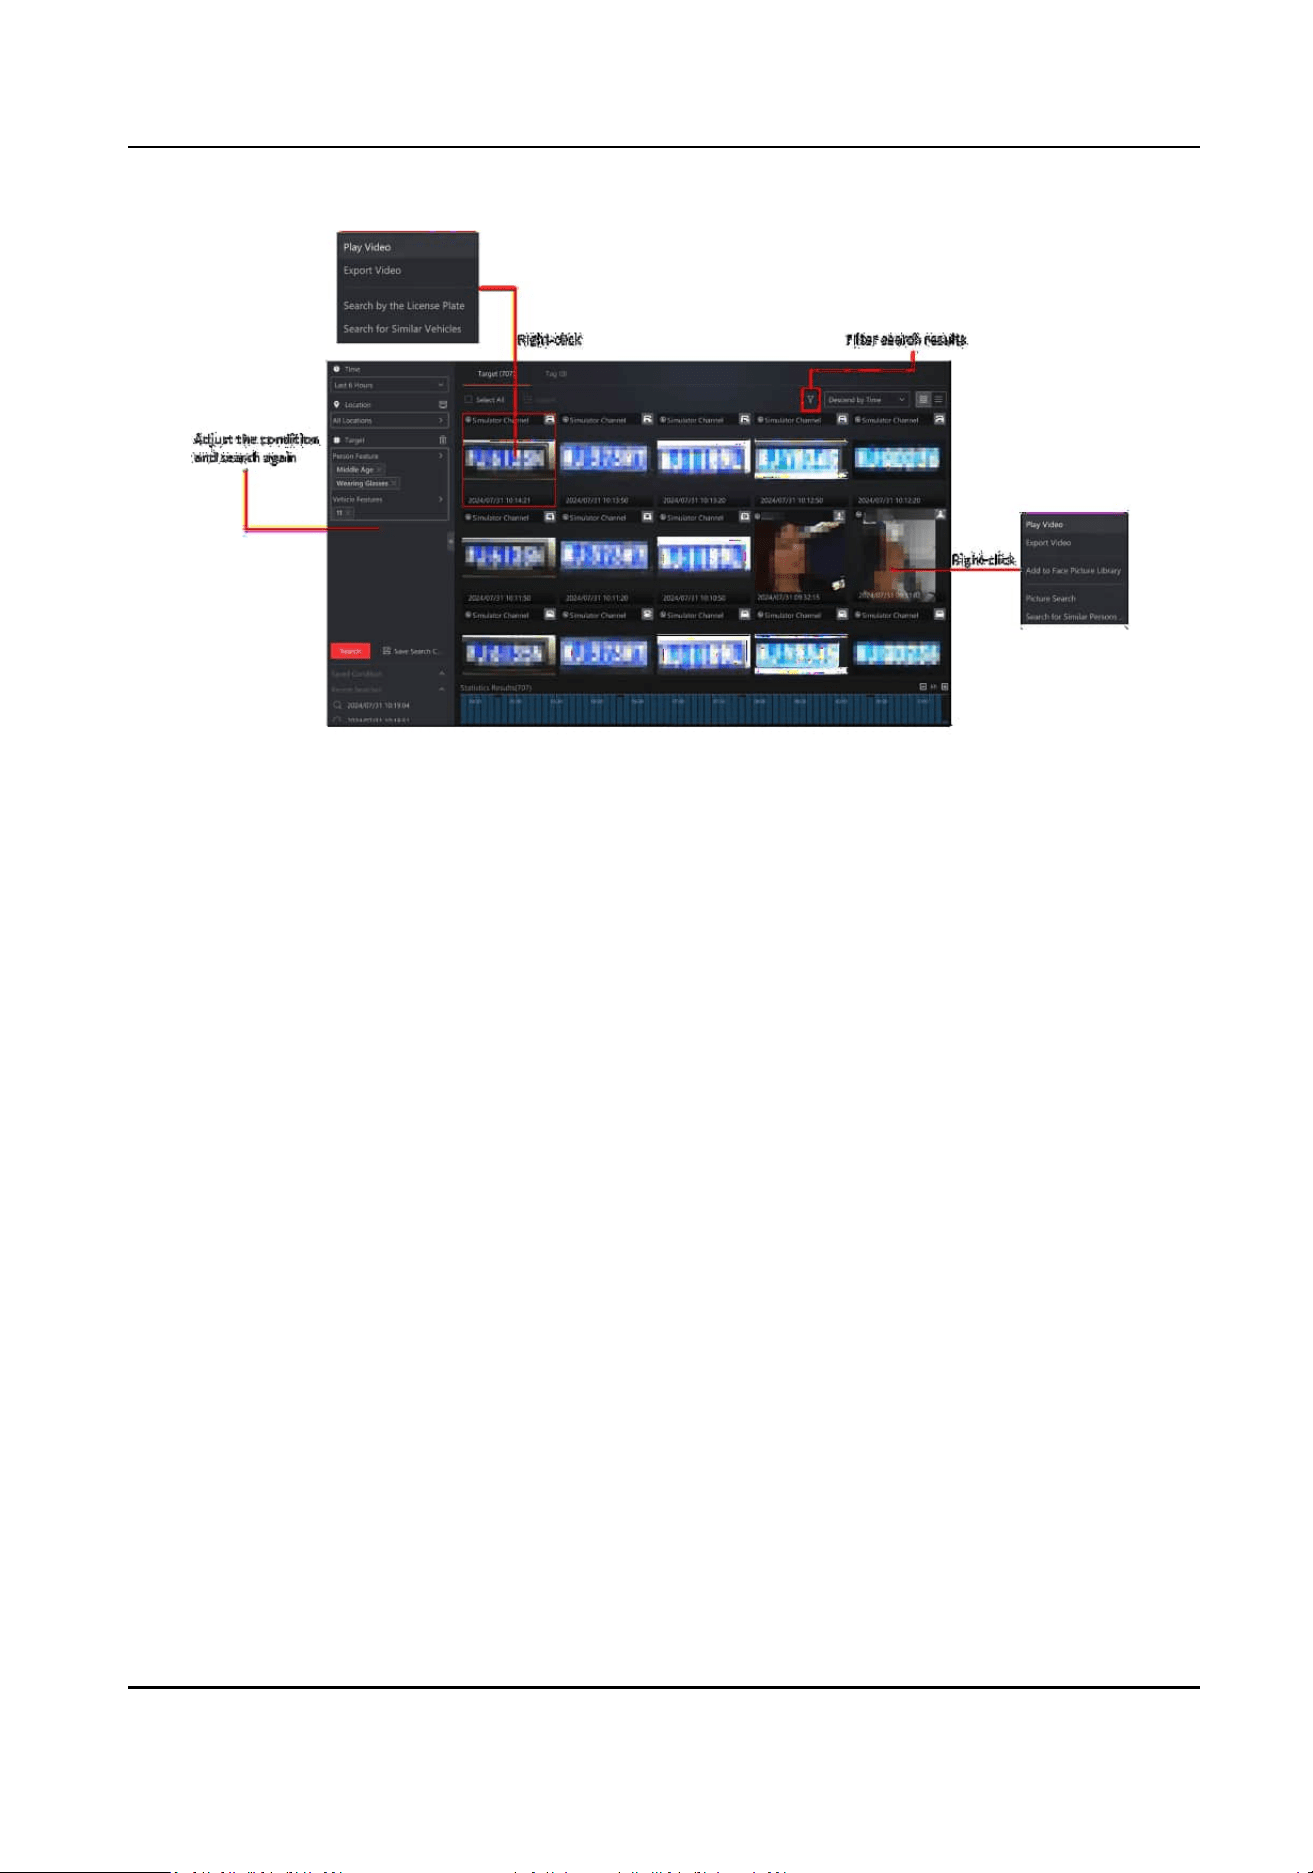
Figure 7-6 Search for Persons/Vehicles by Features
HikCentral Lite V1.1.1 User Manual
107

Chapter 8 Event and Alarm
In the Event and Alarm module, you can add and congure alarms, view the list of triggered
alarms, searching for and export alarms, subscribe to events, etc.
Event is the signal that resource (e.g., device, camera, server) sends when something occurs. Some
events can be subscribed directly for records.
Alarm is used to
nofy security personnel of the parcular situaon which helps handle the
situaon promptly. The triggering event should be congured for an alarm for further nocaon
and linkage acons. You can check the received real-me alarm informaon and search for history
alarms.
Go to System → Event and Alarm to enter the Event and Alarm module.
8.1 Supported Triggering Events
Go to Alarm Conguraon → Add Alarm . In the Add Alarm window, you can view all supported
triggering events in the Triggering Event list:
Alarms of Video
Table 8-1 Video
Category Specic Event
VCA Event Fast Moving
Intrusion
Line Crossing
Moon Detecon
Object Removal
Object Thrown from building
Region Entrance
Region Exing
Reverse Entering Alarm
Unaended Baggage
ANPR Vehicle Type Matched Event
Vehicle Matched Event
Vehicle Mismatched Event
HikCentral Lite V1.1.1 User Manual
108

Category Specic Event
No License Plate
People Related Event Face Matched Event
Face Mismatched Event
Mul-Target-Type Detecon
Frequently Appeared Person
Loitering
Face Detecon
Face Capture
People Queuing-Up Alarm
Waing Time Detecon Alarm
People Gathering
People Density
Thermal-Related Event PIR
Ship Detecon
Temperature Dierence Alarm
Temperature Alarm
Temperature Pre-Alarm
Fire and Smoke Detecon
Alarm Input Alarm Input Triggered
Maintenance (Service) Storage Excepon
Alarms of Access Control
Table 8-2 Door
Category Specic Event
Normal Card Swiping Access Granted by Card and Fingerprint
Access Granted by Card, Fingerprint, and PIN
Access Granted by Valid Card
Access Granted by Card and PIN
HikCentral Lite V1.1.1 User Manual
109

Category Specic Event
Access Granted by Fingerprint
Access Granted by Fingerprint and PIN
Duress Alarm
Access Granted by Face and Fingerprint
Access Granted by Face and PIN
Access Granted by Face and Card
Access Granted by Face, PIN, and Fingerprint
Access Granted by Face, Card, and Fingerprint
Access Granted by Face
Access Granted by Employee ID and Fingerprint
Access Granted by Employee ID, Fingerprint, and PIN
Access Granted by Employee ID and Face
Access Granted by Employee ID and PIN
Access Granted via Combined Authencaon Modes
Skin-Surface Temperature Measured
Access Granted by PIN
Access Granted by Iris
Abnormal Card Swiping Verifying Card Encrypon Failed
Max. Card Access Failed Aempts
Card No. Expired
Authencaon via Card + PIN Timed Out
Access Denied (Door Remained Locked or Inacve)
Access Denied (First Person Not Authorized)
Access Denied by Card and PIN
Authencaon via Card + Fingerprint + PIN Timed Out
Access Denied by Card, Fingerprint, and PIN
Access Denied by Card and Fingerprint
Authencaon via Card + Fingerprint Timed Out
HikCentral Lite V1.1.1 User Manual
110

Category Specic Event
No Access Level Assigned
Card No. Does Not Exist
Invalid Time Period
Fingerprint Does Not Exist
Access Denied by Fingerprint
Access Denied by Fingerprint and PIN
Authencaon via Fingerprint + PIN Timed Out
Access Denied by Face and Fingerprint
Authencaon via Face + Fingerprint Timed Out
Access Denied by Face and PIN
Authencaon via Face + PIN Timed Out
Access Denied by Face and Card
Authencaon via Face + Card Timed Out
Access Denied by Face, PIN, and Fingerprint
Authencaon via Face + PIN + Fingerprint Timed Out
Access Denied by Face, Card, and Fingerprint
Authencaon via Face + Card + Fingerprint Timed Out
Access Denied by Face
Face Capture Failed
Interlocking Door Not Closed
Access Denied by Employee ID and Fingerprint
Authencaon via Employee ID + Fingerprint Timed Out
Access Denied by Employee ID, Fingerprint, and PIN
Authencaon via Employee ID + Fingerprint + PIN Timed Out
Access Denied by Employee ID and Face
Authencaon via Employee ID + Face Timed Out
Access Denied by Employee ID and PIN
Authencaon via Employee ID + PIN Timed Out
HikCentral Lite V1.1.1 User Manual
111

Category Specic Event
Person Not in Mul-Factor Authencaon Group
Person Not in Mul-Factor Authencaon Time Period
Combined Authencaon Timed Out
Access Denied by Invalid M1 card
Verifying CPU Card Encrypon Failed
Access Denied (NFC Card Reading Disabled)
EM Card Reading Not Enabled
M1 Card Reading Not Enabled
CPU Card Reading Disabled
Authencaon Mode Mismatch
Lost Card Authencated
Authencaon Aempts via Card + PIN Exceeded Limit
Password Mismatch
Employee ID Does Not Exist
Failed Password Aempts Alarm
Verifying DESFire Card Encrypon Failed
DESFire Card Recognion Disabled
Authencaon Failed Due to Abnormal Features
Access Denied via Iris
Iris An-Spoong Detecon Failed
Other Door Events Door Unlocked (Door Lock)
Door Locked (Door Lock)
Exit Buon Pressed
Exit Buon Released
Card Reader Tampering Alarm
Door Abnormally Open (Door Contact)
Remote: Unlocked Door
Remote: Locked Door
HikCentral Lite V1.1.1 User Manual
112

Category Specic Event
Door Bell Rang
Remote: Remained Unlocked (Free Access)
Remote: Remained Locked (Credenal Failed)
Remaining Unlocked Status Started
Remaining Unlocked Status Ended
Remaining Locked Status Started
Remaining Locked Status Ended
First Person In Started
First Person In Ended
First Person Authorizaon Started
First Person Authorizaon Stopped
Door Open (Door Contact)
Door Closed (Door Contact)
Unlocking Timed Out
Face Recognion Terminal Online
Face Recognion Terminal Oine
Tailgang
Reverse Passing
Force Access
Climbing Over Barrier
Passing Timed Out
Intrusion
Access Denied When Free Passing
Barrier Blocked
Barrier Restored
Mul-Factor Authencaon: Access Denied by Super Password
Mul-Factor Authencaon: Access Denied by Remote
Authencaon
HikCentral Lite V1.1.1 User Manual
113

Category Specic Event
Mul-Factor Authencaon: Access Granted
Mul-Factor Authencaon: Remotely Open Door
Mul-Factor Authencaon: Super Password Access Granted
Mul-Factor Authencaon: Repeated Authencaon
Mul-Factor Authencaon: Timed Out
Card Reader Lid Closed
Secure Door Control Unit Lid Opened
Enter Dismiss Code
Fire Alarm Relay Triggers Door Remain Open
Fire Alarm Relay Recovered and Door Recovered
Blocklist Event
Opening Door via Exit Buon Failed When Door Remaining
Closed or in Sleep Mode
Opening Door by Linkage Failed When Door Remaining Closed
or in Sleep Mode
Overstay
Unlock by Center
Door Not Open
Door Not Closed
Secure Door Control Unit Disconnected
Secure Door Control Unit Connected
Moon Detecon
Table 8-3 Access Control Device
Category Specic Event
Device Security Device Tampering Alarm Restored
Secure Door Control Unit Tampering Alarm
Local Operaon on Device Local: Login Locked
Local: Login Unlocked
HikCentral Lite V1.1.1 User Manual
114

Category Specic Event
Local: Login
Local: Logout
Local: Upgrade
NTP Auto Time Synchronizaon
Local: Restored Default Parameters
Edit Network Center Conguraon
Edit GPRS Parameters
Edit Central Group Conguraon
Import Normal Conguraon File
Export Normal Conguraon File
Import Card Permission Parameters
Export Card Permission Parameters
Local: Upgrade Device Firmware via USB Flash Drive
Local: Upgrading Failed
Device Component
Communicaon
Lane Controller Fire Input Alarm
Pedestal Temperature Too High
Communicaon with Light Board Excepon
Indicator Turned O
Lane Controller Disconnected
Lane Controller Connected
CAN BUS Recovered
Lane Controller Fire Input Recovered
Communicaon with IR Adaptor Recovered
Acve Infrared Intrusion Detector Recovered
Extension Module Oine
Device Disk/HDD No Memory Alarm for Unreported Events
No Memory for Unreported and Access Granted Events
Device Baery AC Power On
HikCentral Lite V1.1.1 User Manual
115

Category Specic Event
Baery Voltage Recovered
Baery Voltage Restored
Device Power On
Device Record Reporng Access Control Device Armed
Video Intercom Device Armed
Device Network Access Control Device Online
Video Intercom Device Online
Remote Operaon on Plaorm Remote: Login
Remote: Logout
Remote: Arming
Remote: Disarming
Remote: Restart
Remote: Upgrade
Remote: Export Conguraon File
Remote: Import Conguraon File
Alarm Output On
Alarm Output O
Remote: Manual Time Synchronizaon
Remote: Clear Card No.
Remote: Restored Default Parameters
Remote: Capture
Remote: Upgrading Failed
Remote: Extension Module Upgraded
Remote: Extension Module Upgrading Failed
Remote: Fingerprint Module Upgraded
Remote: Fingerprint Module Upgrading Failed
SOS
HikCentral Lite V1.1.1 User Manual
116

Alarms of Maintenance
Table 8-4 Service
Category Specic Event
Streaming Server Streaming Server Oine
Storage Server Storage Excepon
System Management Service CPU Excepon
CPU Warning
RAM Excepon
RAM Warning
System Service Abnormally Stopped
Table 8-5 Access Control Device
Specic Event
Device Tampered
Lane Controller Tampering Alarm
Secure Door Control Unit Tampering Alarm
Access Control Device Oine
Video Intercom Device Oine
AC Power O
Device Power O
Low Storage Baery Voltage
Baery Voltage Restored
Low Baery Voltage
Arming Device failed
Video Intercom Device Arming Failed
Memory Card Full
Flash Wring/Reading Excepon
Motor or Sensor Excepon
CAN BUS Excepon
HikCentral Lite V1.1.1 User Manual
117

Specic Event
Acve Infrared Intrusion Detector Excepon
Communicaon with IR Adaptor Excepon
Indicator Turned On
Lane Controller Disconnected
Lane Controller Connected
Extension Module Oine
Access Control Device Call Center
Video Intercom Device Call Center
Table 8-6 Camera
Specic Event
Camera Online
Camera Oine
Channel Armed
Channel Arming Failed
Defocus Detecon
Video Loss
Camera Recording Excepon
Camera Recording Recovered
Image Excepon Event
Video Tampering Detecon
Scene Change Detecon
Vibraon Detecon Alarm
Audio Excepon Detecon
Video Stream Transcoding Excepon
HikCentral Lite V1.1.1 User Manual
118

Table 8-7 Encoding Device
Specic Event
Device Reconnected
Device Oine
HDD Full
HDD High Temperature
HDD Impact Detecon
HDD Server Failure
R/W HDD Failure
Array Excepon
Illegal Login
Device Armed
Arming Device Failed
Alarms of Custom Event
Table 8-8 Custom Event
Category Specic Event
User-Dened Event User-Dened Event
Generic Event Generic Event
8.2 Event Subscripon
You can subscribe to some events to receive them for records on the plaorm. Batch subscripon
or unsubscripon is supported.
HikCentral Lite V1.1.1 User Manual
119
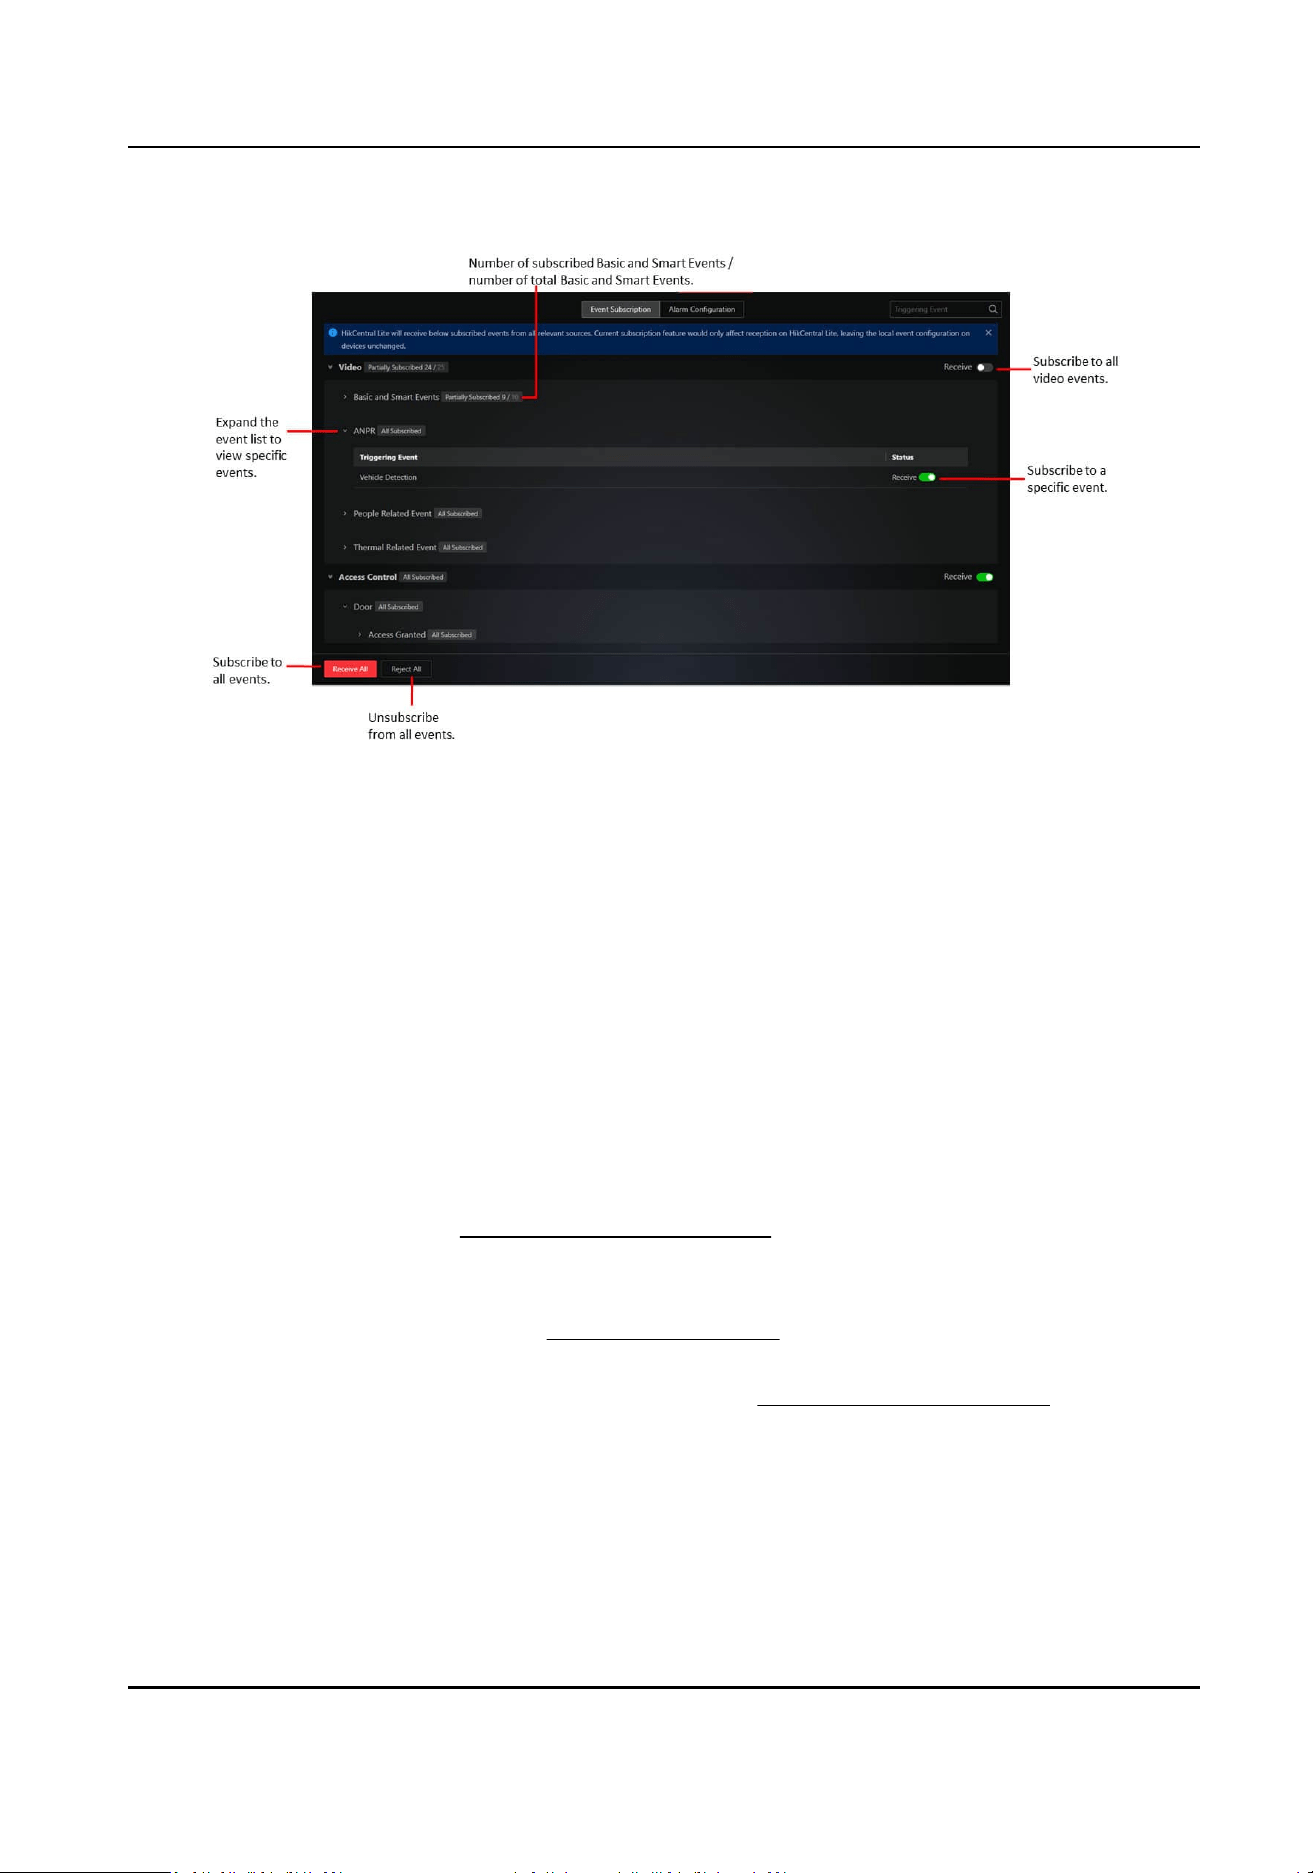
Figure 8-1 Event Subscripon
●
You can receive alarms without subscribing to events.
●
If an event is unsubscribed, you will not be able to
nd the event in the Search module, or
receive the event on the main panel for monitoring and control.
8.3 Add an Alarm
The plaorm provides mulple triggering event types for you to congure rules for detecon or
triggering alarms.
Steps
1.
In the Event and Alarm module, click Alarm
Conguraon → Add Alarm to open the Enter the
Add Alarm window.
2.
Select the triggering event (
Supported Triggering Events ) and source(s), and set the alarm
priority. Click Next.
3.
Congure the receiving schedule. Click Next.
For holiday schedules, see details in
Add or Edit a Holiday .
4.
Select the alarm recipient(s). Click Next.
5.
Oponal: Add linkage acon(s) as needed. See detail in Supported Linkage Acons .
6.
Click Complete.
HikCentral Lite V1.1.1 User Manual
120

8.4 Supported Linkage Acons
The supported linkage acons are Trigger Recording, Trigger Pop-up Window, Trigger Audible
Alarm, Capture Picture, Create Tag, Trigger PTZ, Link Access Point, Link Alarm Output, Send Email,
and Trigger User-Dened Event.
For Trigger Recording, Capture Picture, and Create Tag:
If you have selected Source Camera and the source is a door without a linked camera, the linkage
acon can sll be added but will not come into eect.
Trigger Recording
Select the camera to record the alarm video when the alarm is triggered.
●
Source Camera: Record videos by the camera that triggered the alarm and storing the video
les in the selected storage locaon (i.e., Store in Main Storage, Store in Auxiliary Storage,
and Not Store).
●
Specied Camera: Record videos by other cameras and storing the video les in the selected
storage
locaon(s) for specied camera(s) respecvely.
Note
●
The recording will start from 3 seconds before to 15 seconds aer the alarm triggering.
●
The recording will be kept for 7 days at least and then will be processed following the
overwring mechanism of device.
Create Tag
To add this linkage acon, Trigger Recording should be congured as well. The tag will be added
to the event-triggered video footage for convenient search.
You can customize the tag name as desired or select
exisng ones ($Event Name / $Event Time /
$Event Source).
Note
●
The tag will be placed from 3 seconds before to 15 seconds aer the alarm triggering.
●
Aer tags are created, you can perform playback by tag, and search for triggered alarms by
tag ( Search for and Export Alarms ).
Capture Picture
Select cameras to capture pictures during the alarm.
●
Source Camera: Capture picture by the camera that triggered the alarm.
●
Specied Camera: Capture picture by other cameras.
Note
Only one picture will be captured by each camera.
Trigger PTZ
HikCentral Lite V1.1.1 User Manual
121
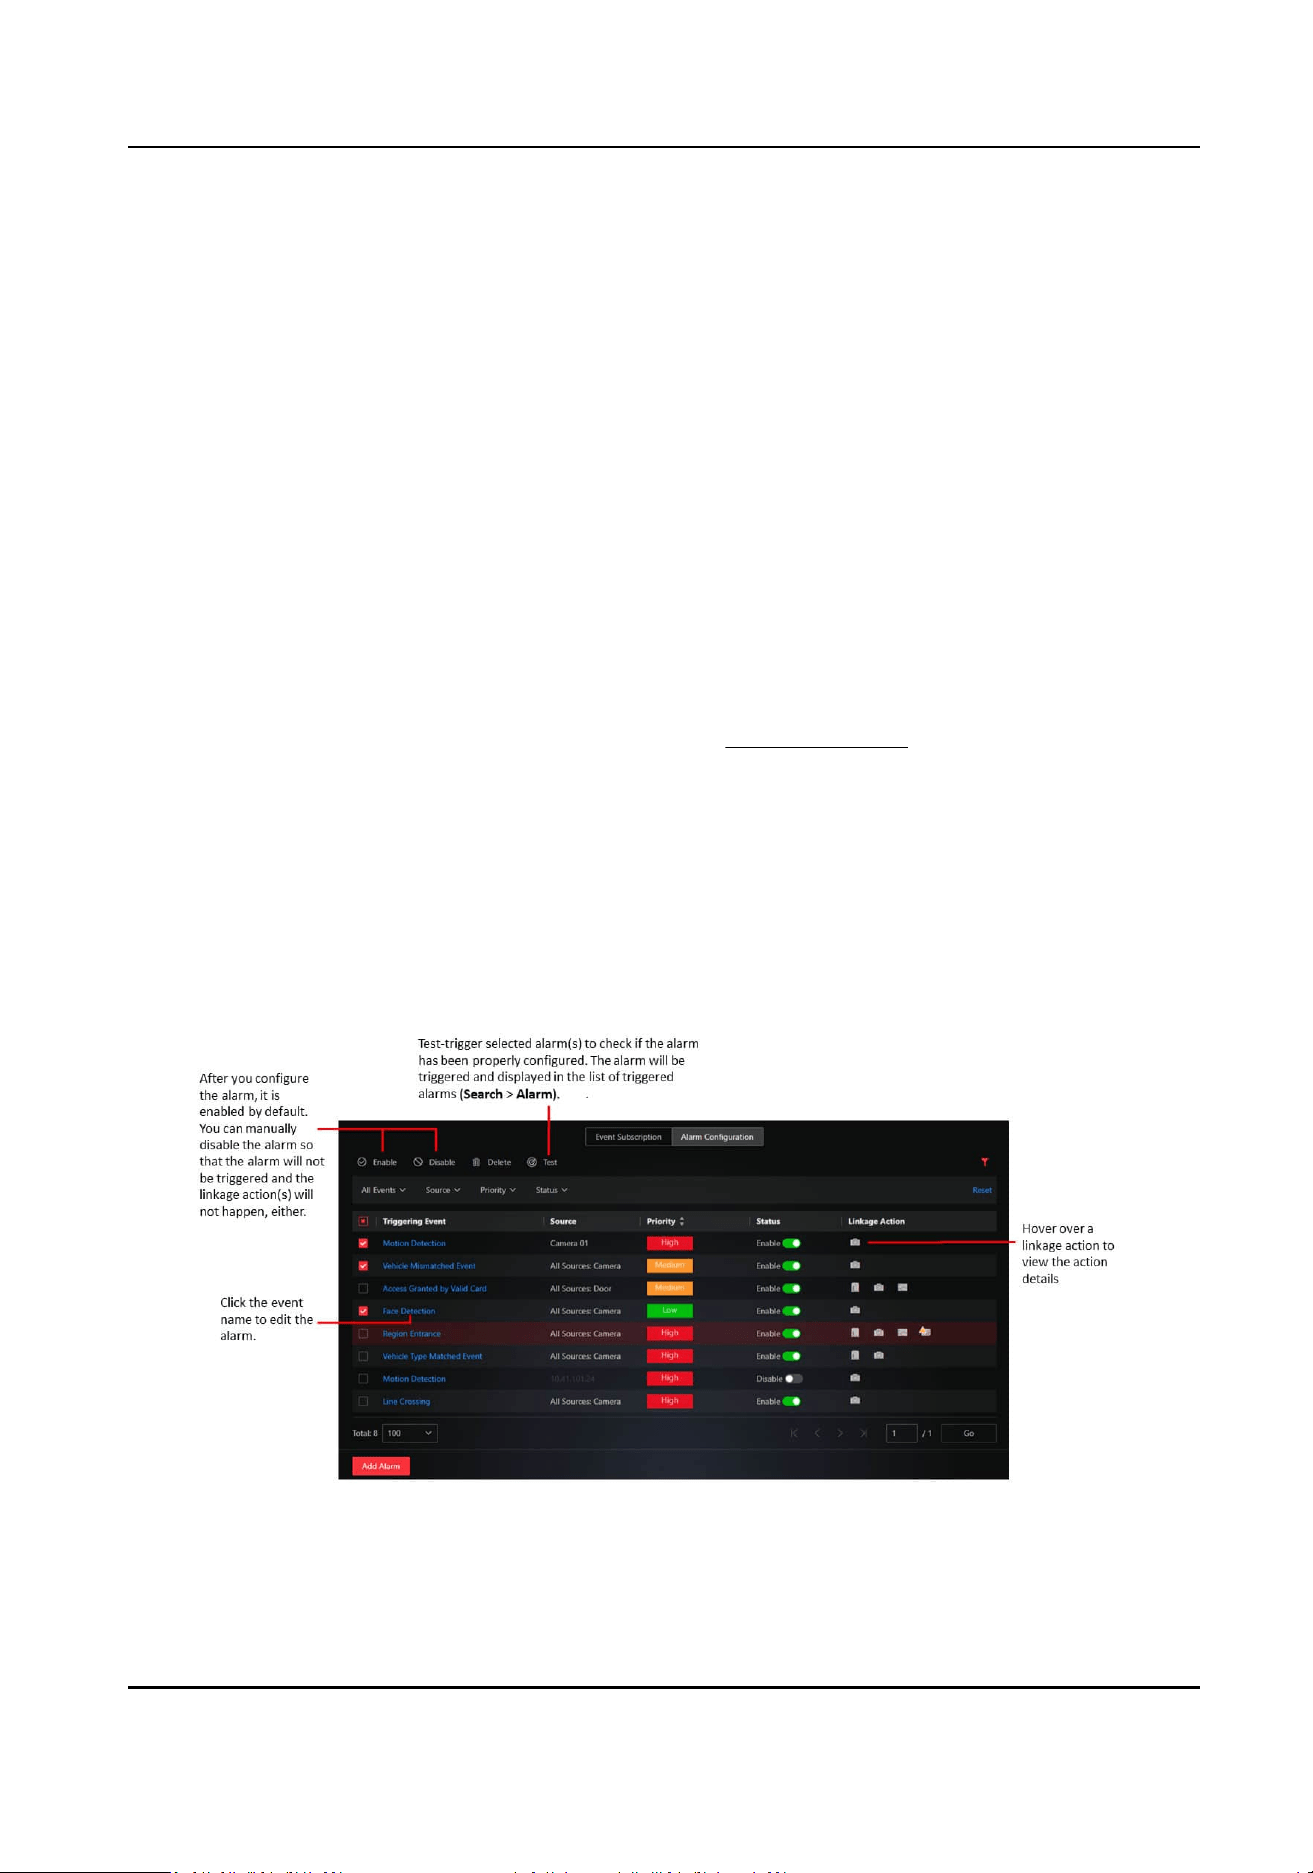
Call the preset, patrol, or paern of the selected cameras when the alarm is triggered.
Link Access Point
The selected door(s) will be locked, be unlocked, remain locked, or remain unlocked as
congured when the alarm is triggered.
Link Alarm Output
Link alarm output device(s) (peripherals such as speaker).
Trigger
User-Dened Event
Before adding this linkage acon, you should congure alarm(s) for user-dened event(s) rst.
As the user-dened event(s) cannot be automacally detected, it needs to be manually
triggered by clicking Trigger User-Dened Event on the nocaon panel of the main page, or
added as a linkage acon for another alarm.
Trigger Audible Alarm
Play the voice text on the PC in case the monitoring personnel is not looking at the screen. The
voice text will come into
eect only when the audio funcon is enabled and the system voice
engine is selected as the alarm sound. See details in Event and Alarm .
Trigger Pop-up Window
Display the alarm window to show the alarm details, alarm linked cameras' live videos and
playback, etc. when the alarm is triggered.
8.5 Alarm List
Figure 8-2 List of Congured Alarms
HikCentral Lite V1.1.1 User Manual
122
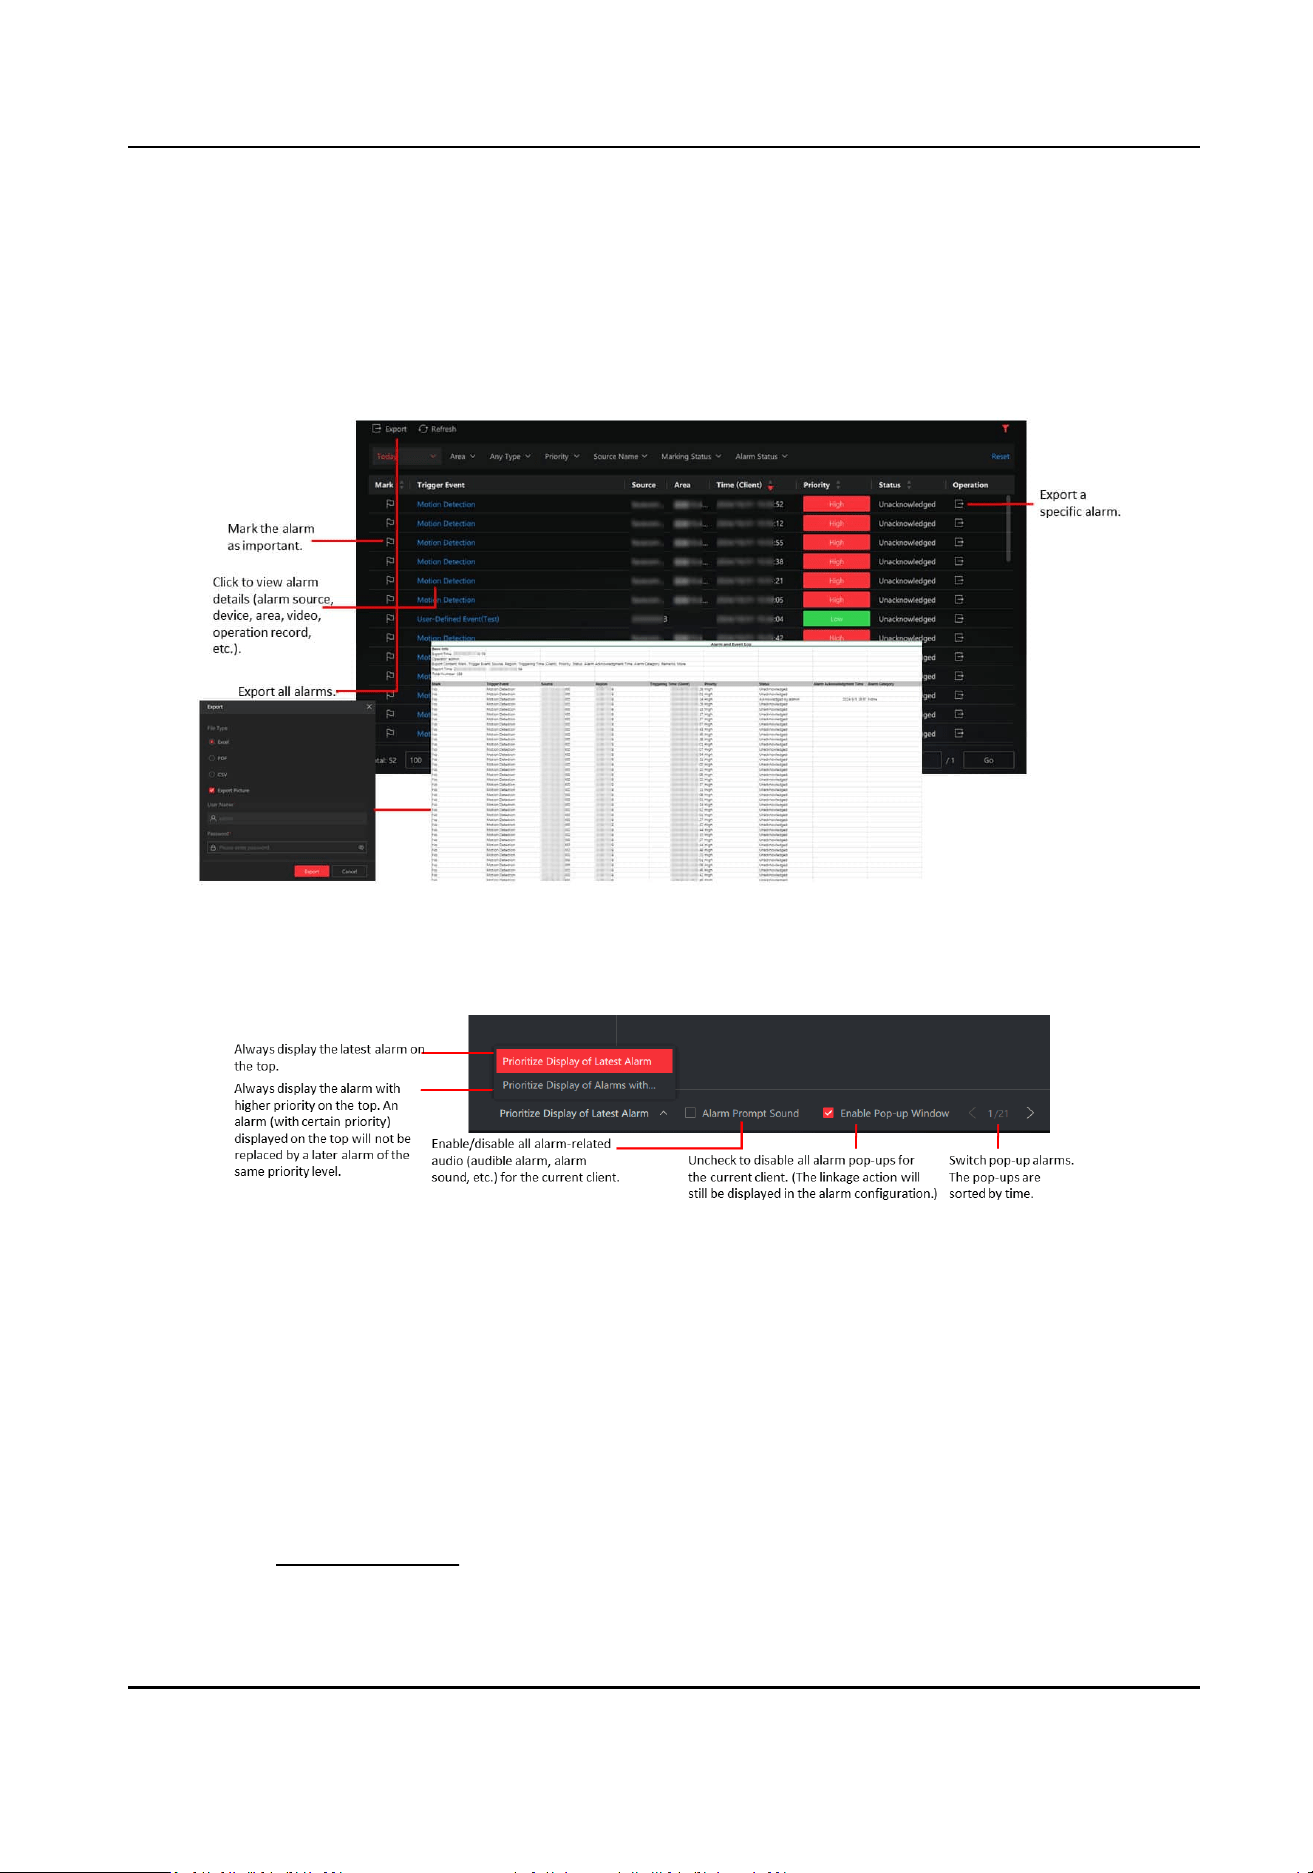
8.6 Search for and Export Alarms
Go to Search → Alarm to view the list of triggered alarms.
Figure 8-3 Triggered Alarm List
Figure 8-4 Alarm Pop-up Window
You can also enable/disable the alarm prompt sound by enabling/disabling the audio in
Local
Conguraon → Event and Alarm → Display .
8.7 Local
Conguraon About Event and Alarm
You can congure event and alarm related parameters including display type, alarm sound,
whether to play the audio repeatedly, and
mes of playing.
See details in Event and Alarm .
HikCentral Lite V1.1.1 User Manual
123

Chapter 9 Management of Users and Roles
In the Account and Security module, you can manage users and roles, congure account security
rules,
reseng login password, etc.
Go to System → Account and Security .
9.1 Add a User
You can add normal users and assign roles to them for accessing the system. Normal users refer to
all users except the super user.
Enter the Add User page and set the basic informaon.
Status and Login
User Status
If you select Inacve, you will not be able to log in with the user account.
Congure permission sengs for the user.
PTZ Control Permission
Enter a number that stands for the permission level. Operaon from a user with lower
permission level can be interrupted by that from another user with higher permission level.
During PTZ control for live view, you can also lock the PTZ so that other users with the same or
lower PTZ control permission levels cannot perform PTZ control at all.
Assign Role
Select the roles that you want to assign to the user.
You can hover over a role on the list and then click View Role Details to view the basic
informaon and permission sengs of the role.
HikCentral Lite V1.1.1 User Manual
124
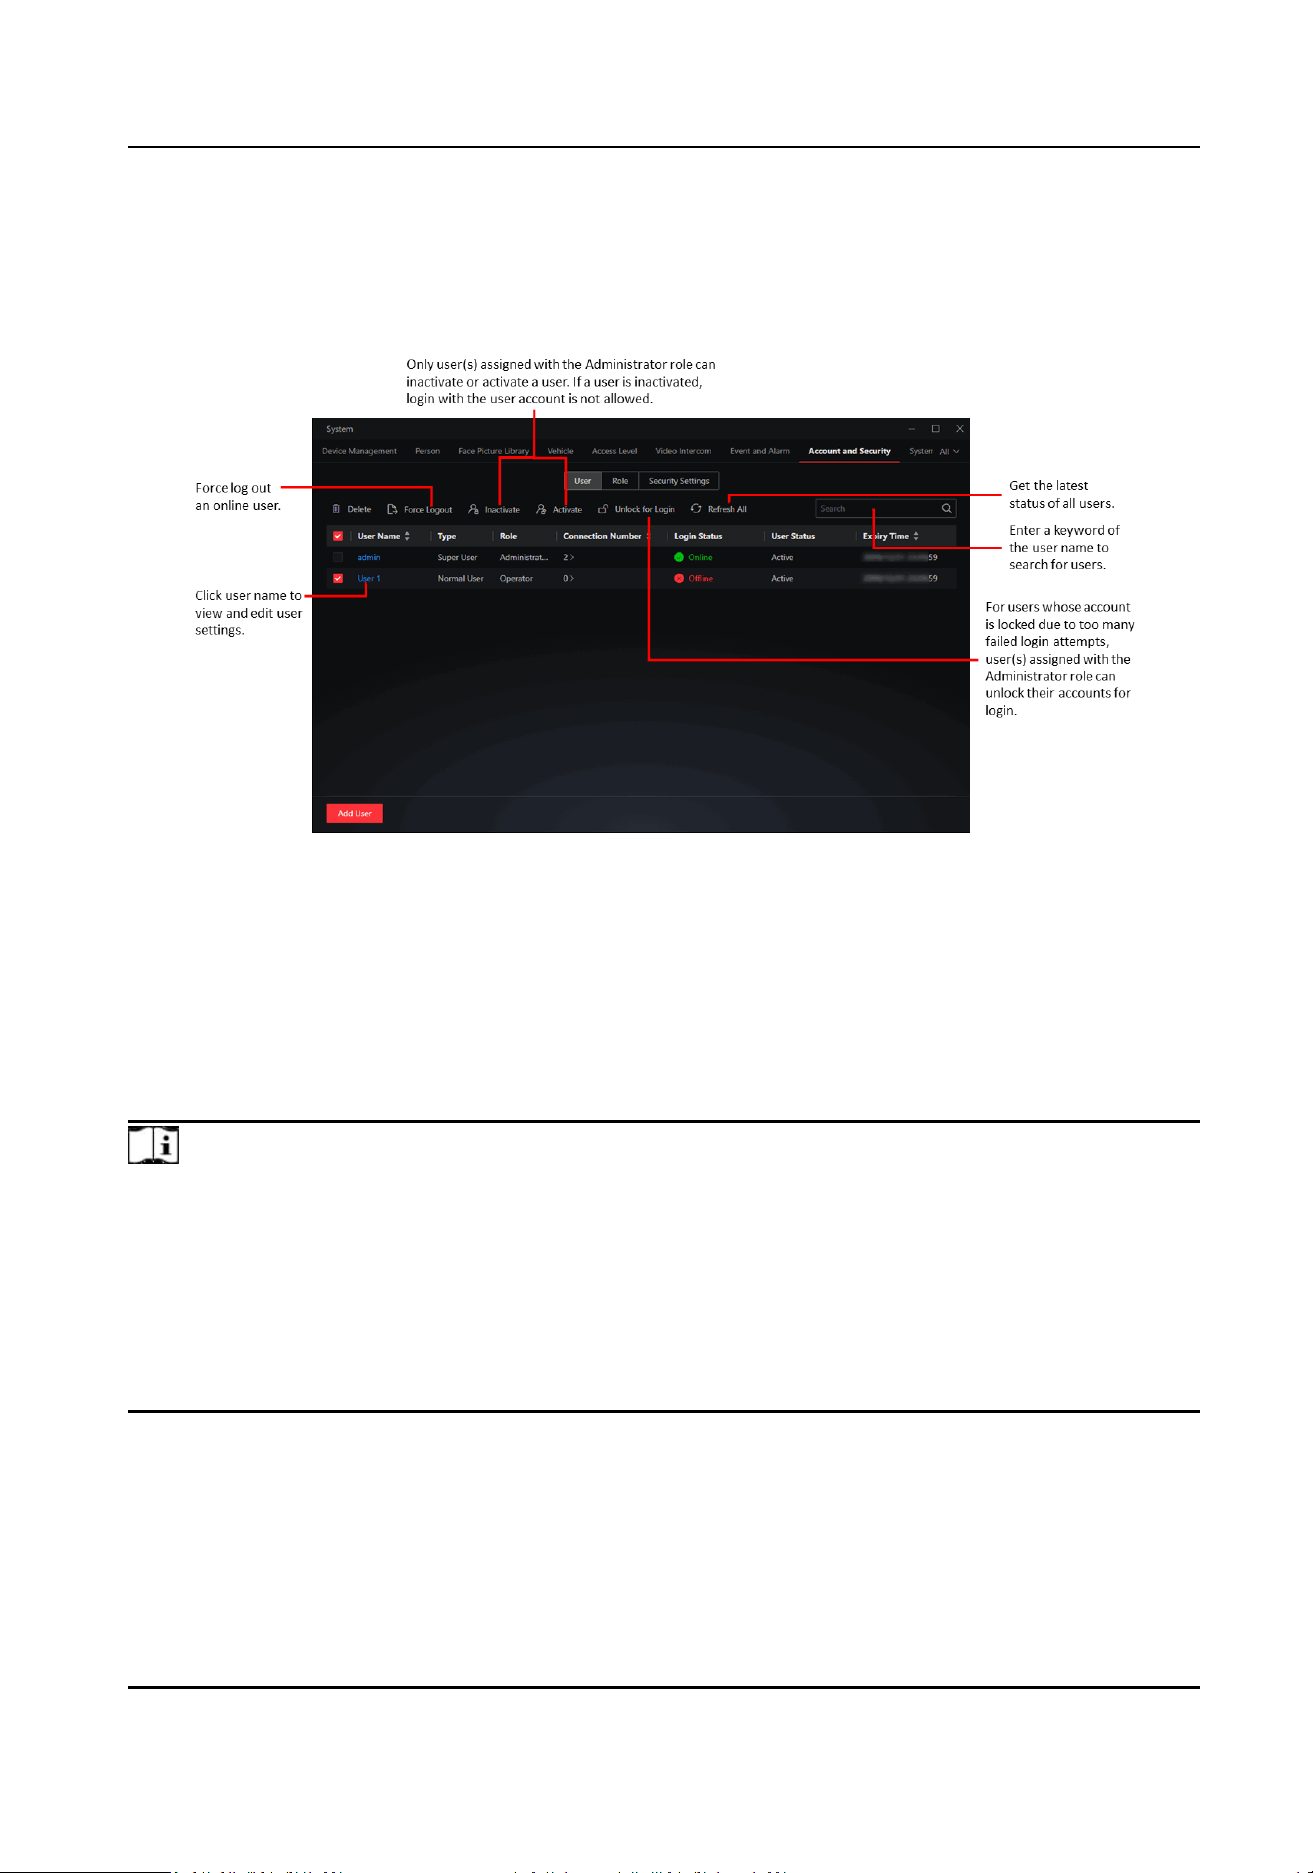
9.2 Supported Operaons on the User List
Figure 9-1 User List
9.3 Add a Role
Role is a group of plaorm permissions. You can add roles and assign permissions to roles, so that
users can be assigned with dierent roles to get dierent permissions.
Note
The plaorm has predened two default roles: Administrator and Operator. You can click the role
name to view details. The two default roles cannot be edited or deleted.
Administrator
Role that has all permissions of the plaorm.
Operator
Role that has all permissions for accessing resources and operang the applicaons.
HikCentral Lite V1.1.1 User Manual
125
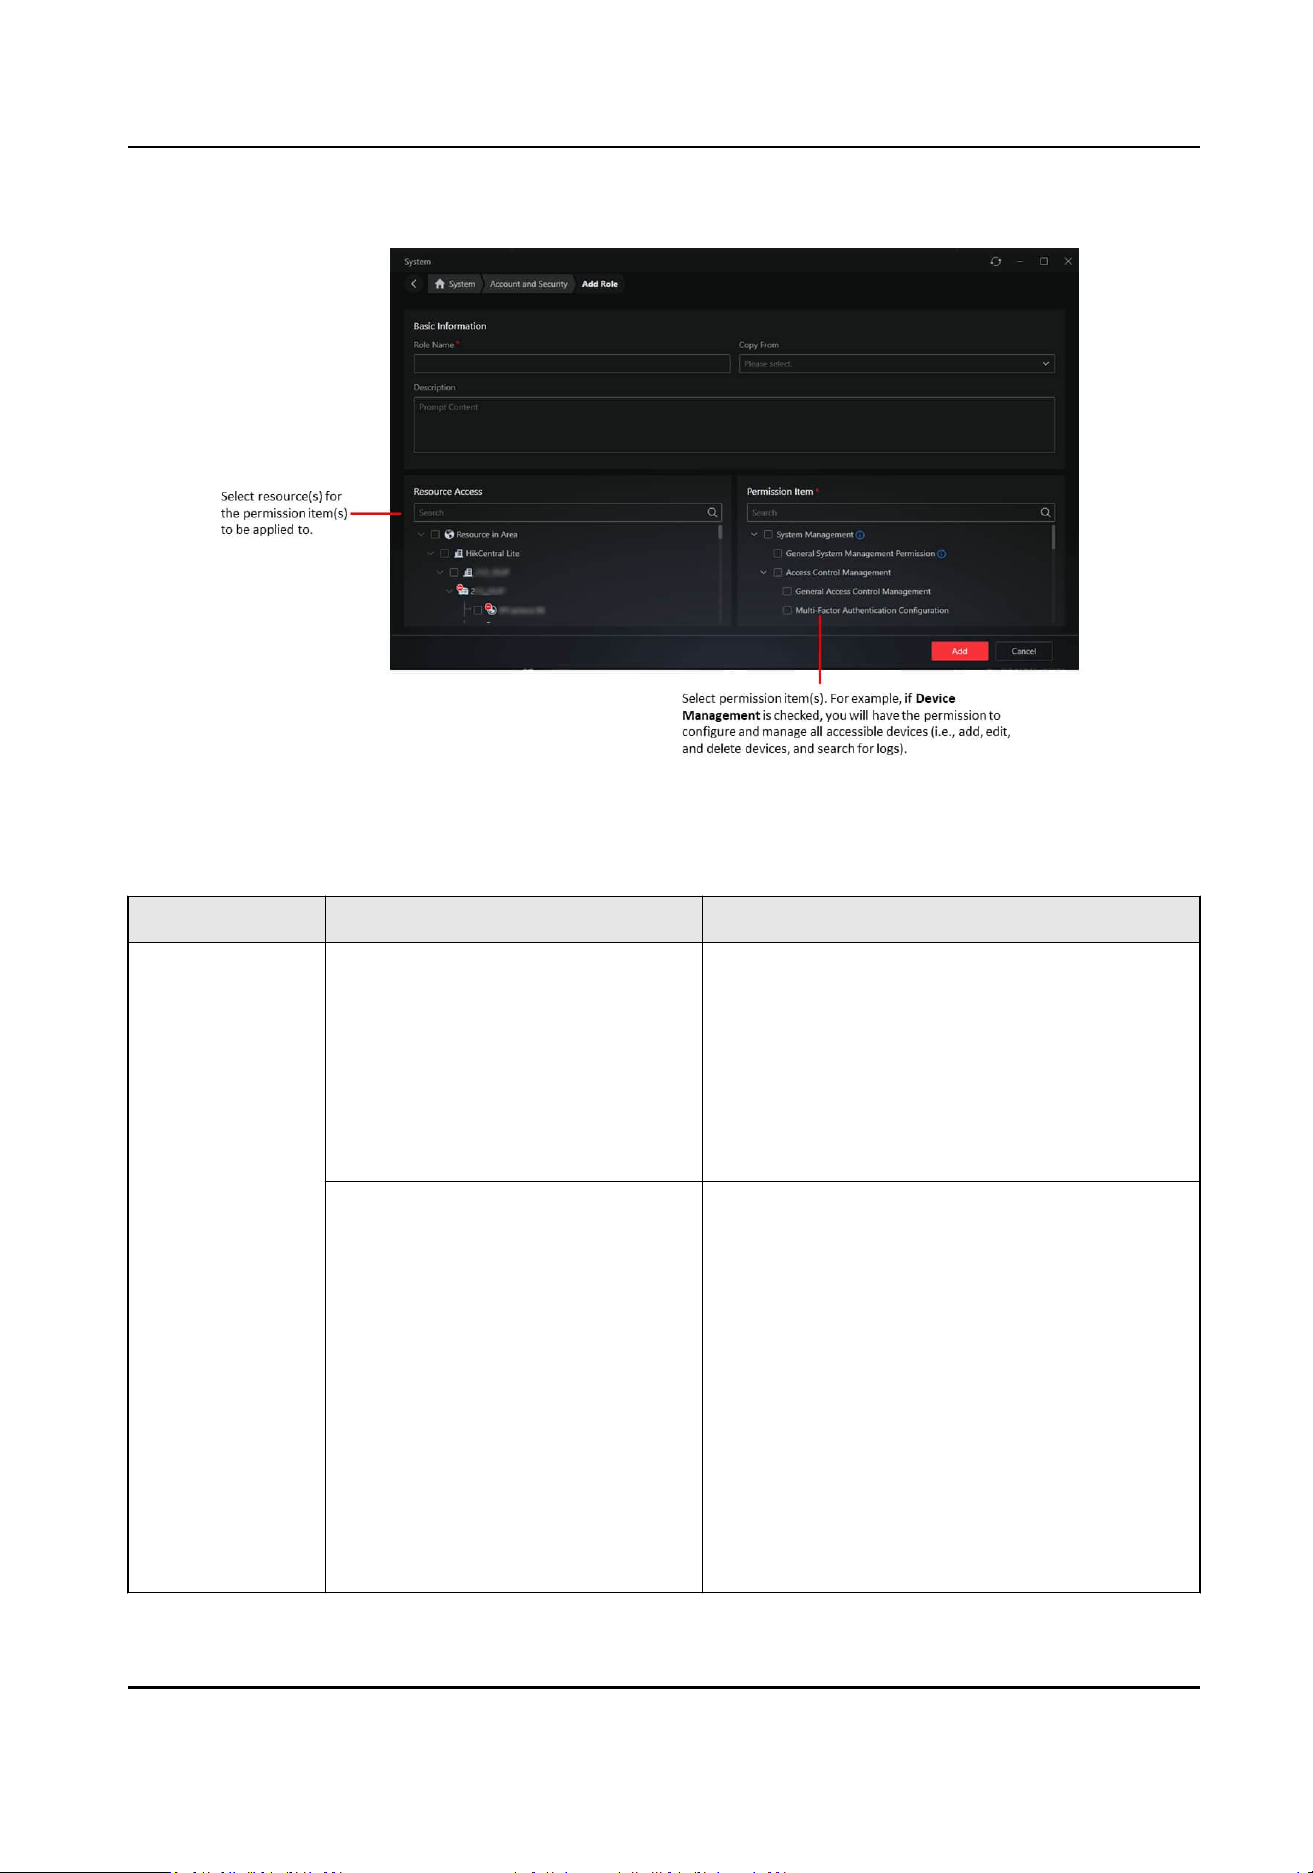
Figure 9-2 Add a Role
Table 9-1 Permission Items
Category Sub-Category Specic Permission
System
Management
General System Management
Permission
Permission for system conguraon,
management of face pictures and human
bodies, ANPR, persons, managing events
and alarms, managing users and roles,
viewing permissions, conguring security
sengs, and adding/deleng/eding
permission for maps.
Access Control Management General Access Control Management:
Entry to the Access Level module in System:
applying access levels by department/
person; entry to access schedule
management and conguring schedules;
entry to access level management and
conguring access levels; re-applying access
level when applying failed; stascs and
details by access level status.
For this permission, the resource permission
for department(s) and persons within the
department is required, and the
specic
HikCentral Lite V1.1.1 User Manual
126

Category Sub-Category Specic Permission
permission items are assigned according to
the resource.
Mul-Factor Authencaon Conguraon:
Entry to the mul-factor authencaon
conguraon and conguring mul-factor
authencaon.
For this permission, the resource permission
for door(s) is required, and the
specic
permission items are assigned according to
the resource.
Mul-Door Interlocking Conguraon:
Entry to the mul-door interlocking
conguraon and conguring mul-door
interlocking.
For this permission, the resource permission
for door(s) is required, and the specic
permission items are assigned according to
the resource.
Conguraon of First Person In:
Entry to the rst person in conguraon and
conguring rst person in.
For this permission, the resource permission
for door(s) is required, and the specic
permission items are assigned according to
the resource.
View Sharing Permission for sharing views with other
persons and viewing the list of sharees.
Device
Management
Permission for adding/deleng/eding all accessible access control and video
intercom devices, monitoring the resources' status in real me, checking the
maximum capacity and current number of persons, cards, ngerprints, face
pictures, irises, and events under the device,
eding the device conguraon,
imporng
alarm output/input resources, managing areas and resources under
areas,
adjusng the hierarchy of areas and belonged resources, and searching
for device logs.
Operaon
Permission
General Surveillance Permission
●
Permission for controlling alarm outputs:
The resource permission for relevant
devices is required, and the specic
HikCentral Lite V1.1.1 User Manual
127

Category Sub-Category Specic Permission
permission items are assigned according
to the resource.
●
Permission for accessing and controlling
all maps.
●
Permission for creang/viewing/exporng
stascs
and reports of access control
and video intercom service: The resource
permission for relevant reports is
required, and the
specic permission
items are assigned according to the
resource.
●
Permission for receiving and handling
events and alarms: The permission for
relevant resources and alarms is required,
and the
specic permission items are
assigned according to the resource.
Search Permission
Video Operaon Playback
Export Video
Tag Management
Access Control Operaon Remote: Unlock Door
Remote: Lock Door
Remote: Remain Unlocked
Remote: Remain Locked
Quick Control All Doors: This permission
item only exists in the Administrator role,
therefore only available to users assigned
with the Administrator role.
9.4 Congure Account Security Rules
Account security is crucial for your system and property. You can lock IP address to prevent
malicious
aacks, enable auto lock the Client, and set other security sengs to increase the
system security.
In the Account and Security module, click Security
Sengs.
HikCentral Lite V1.1.1 User Manual
128

Login and Lock
Allowed Consecuve Login Aempts
Failed login aempts only refer to failed password aempts (failed vericaon code aempts
excluded).
Lock
Duraon
When the number of allowed failed login aempts is reached, the current account on the
current IP address will be locked. Set the lock duraon.
Security Queson Sengs
Security quesons are valid to the super user (admin user) only. They are used to verify the identy
when the super user forgets the password. The answers to security quesons are case-insensive.
9.5 Reset Login Password
You can reset the password when you forget your password, or change the password of your
currently logged-in user account.
●
On the login page, click Forget Password to reset your password.
○
The admin user can reset password by answering security
quesons or verifying via acvaon
code (license code): when the license is acvated, you can nd the license code in the license
le, and enter the code to retrieve password; when the license is not acvated, the password
can be retrieved by vericaon code sent to the congured email.
○
Non-admin users can reset password by entering
vericaon code sent to the congured
email, or asking users with higher-level role (users with administrator role can ask the admin
user; users without administrator role can ask users with administrator role) to retrieve their
password.
●
Click the logged-in account name on the top right corner, and select Change Password.
HikCentral Lite V1.1.1 User Manual
129

Chapter 10 System Conguraon
In the upper-right corner of the Desktop, click System → System Conguraon .
●
Email account conguraon: Congure Email Parameters .
●
Congure the storage locaon and quota of pictures and les, and the data retenon me:
Storage .
●
Congure holidays: Add or Edit a Holiday .
●
Congure network related conguraons such as the me synchronizaon, device access
protocol, and WAN access:
Congure NTP Synchronizaon / Device Access Protocol / WAN
Access / NIC, and Reset Network Info .
●
Congure account security parameters: Congure Service Component Cercate , Use SSL/TLS
Cercate for HTTPS Connecons , and Protect Prole Pictures .
●
Congure the System Capability
10.1
Congure Email Parameters
The email account is used to receive a vericaon code when you forgot your account password
and send the message to the designated email account(s) as the email linkage.
1. In the upper-right corner of the Desktop, click System → System
Conguraon → Email .
2. Congure the parameters according to actual needs.
SMTP Server Address
The SMTP server's IP address or host name (e.g., smtp.gmail.com).
Cryptographic Protocol
It is used to protect the email content if required by the SMTP server.
Server
Authencaon
If your mail server requires authencaon, check this checkbox to use authencaon to log
in to this server.
Note
For users of Google email, you should log in to your Google account, enable the 2-step
vericaon funcon, generate the APP password, and enter here.
3. Click Test to verify whether the email sengs take eect.
4. Click Save.
10.2 Add or Edit a Holiday
The Holiday templates are mainly used for access control and event and alarm service. You can add
holidays to
dene the special days.
HikCentral Lite V1.1.1 User Manual
130
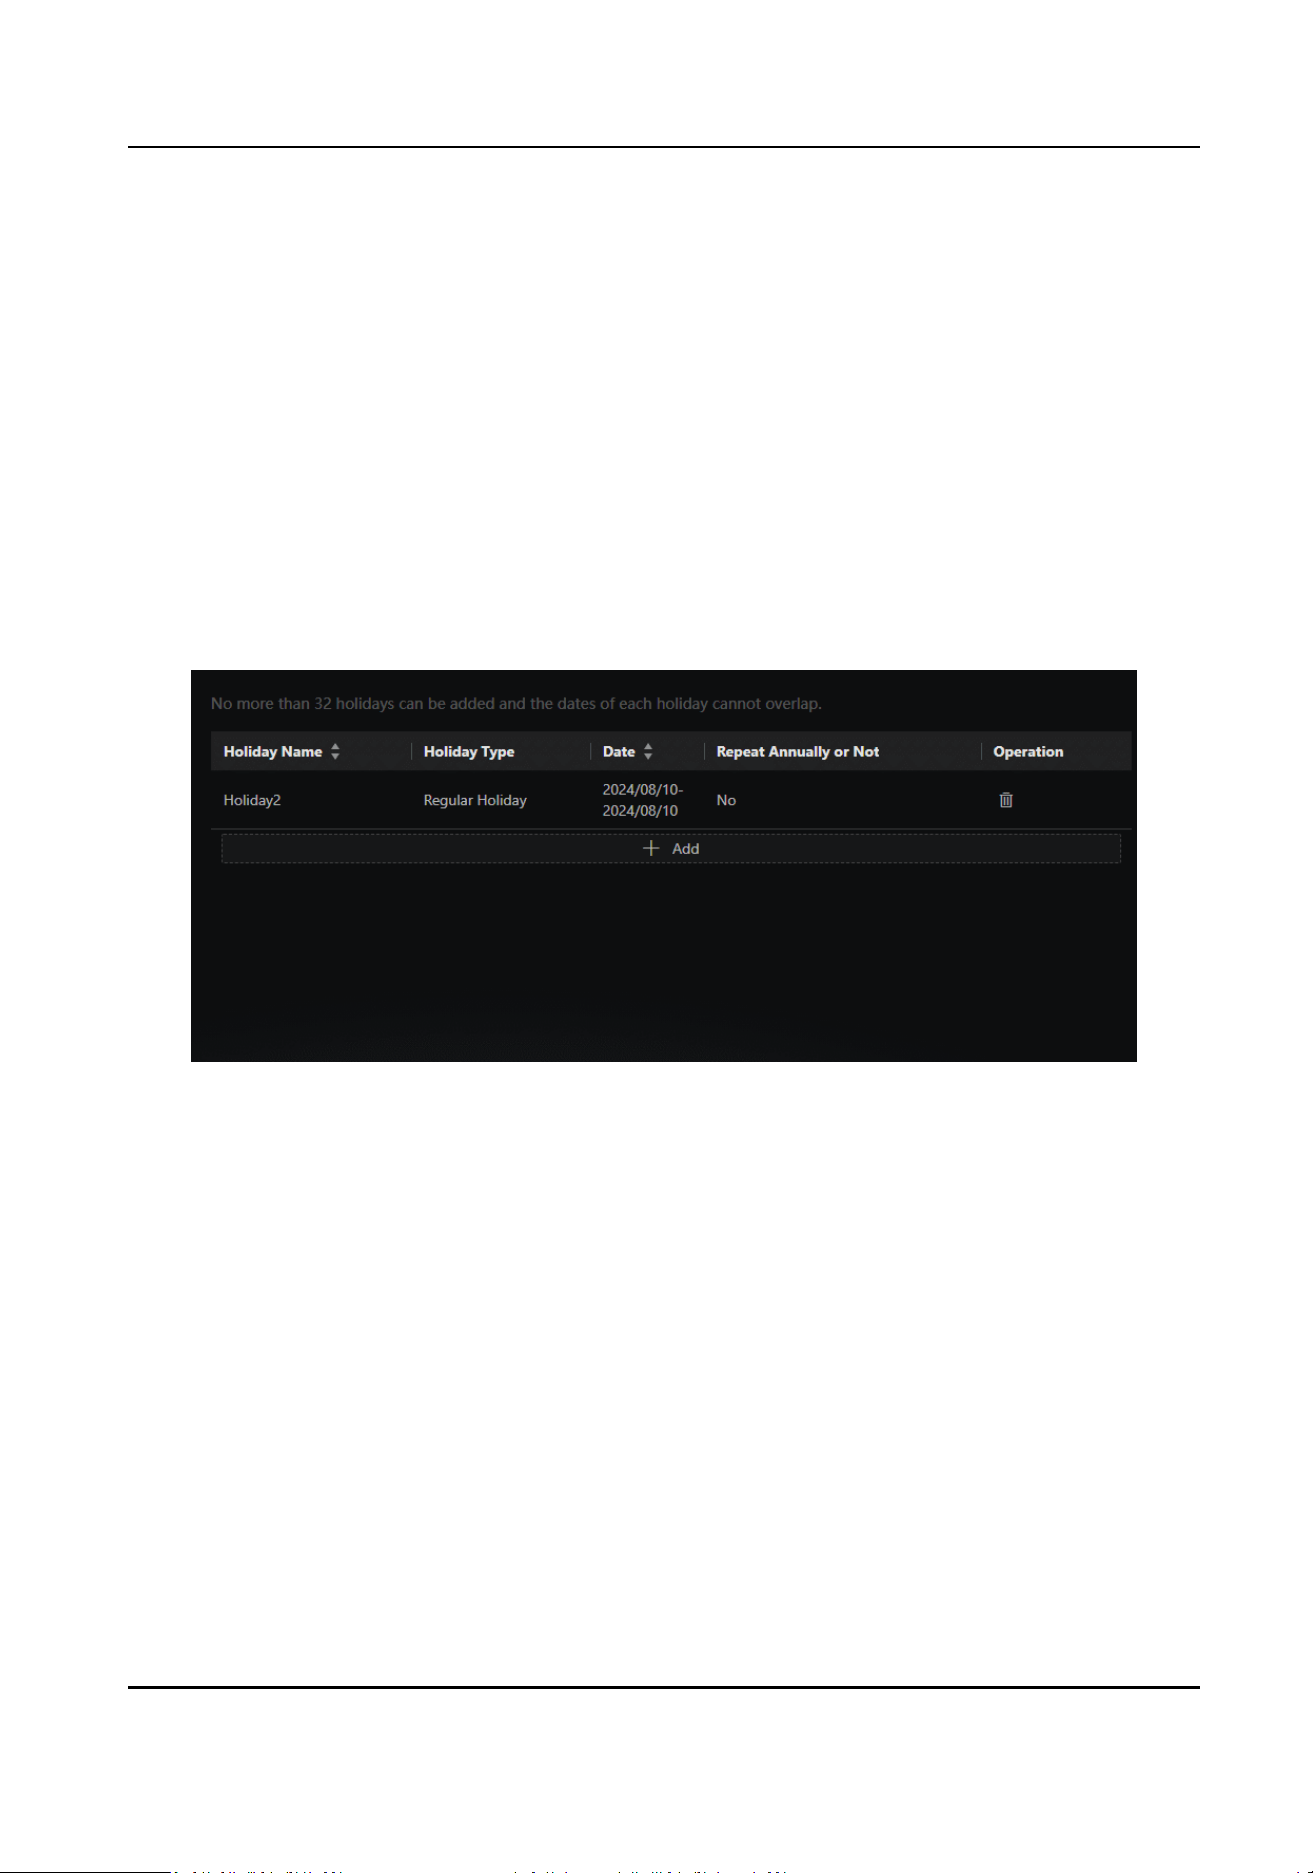
In the System Conguraon module, select Holiday.
Add Holiday
Click Add, enter the holiday name, and set the following parameters.
Holiday Type
Select Regular Holiday or Irregular Holiday according to the actual scene. The regular holiday is
suitable for the holiday that has a xed date. For example, Christmas is on December 25th of
each year; the irregular holiday is suitable for the holiday that is calculated by the weekdays,
and the
specied date might be dierent in a dierent year. For example, Mother's Day is on the
second Sunday of each May.
Edit Holiday
In the holiday list, select a holiday and directly click a parameter of the holiday to edit it as needed.
Figure 10-1 Edit Holiday Parameters (.gif)
10.3
Congure NTP Synchronizaon / Device Access Protocol / WAN
Access / NIC, and Reset Network Info
The network
sengs provided by the client encompass conguring NTP synchronizaon, device
access protocols, WAN access, server addresses, and reseng network informaon. These sengs
are essenal for ensuring devices operate correctly within network environments.
On the Home page, go to System → System
Conguraon → Network .
Congure
NTP Synchronizaon
You can set NTP parameters for synchronizing the me between resources managed on the
plaorm and the NTP server. Three system me sync modes are supported. See the table below for
details.
HikCentral Lite V1.1.1 User Manual
131
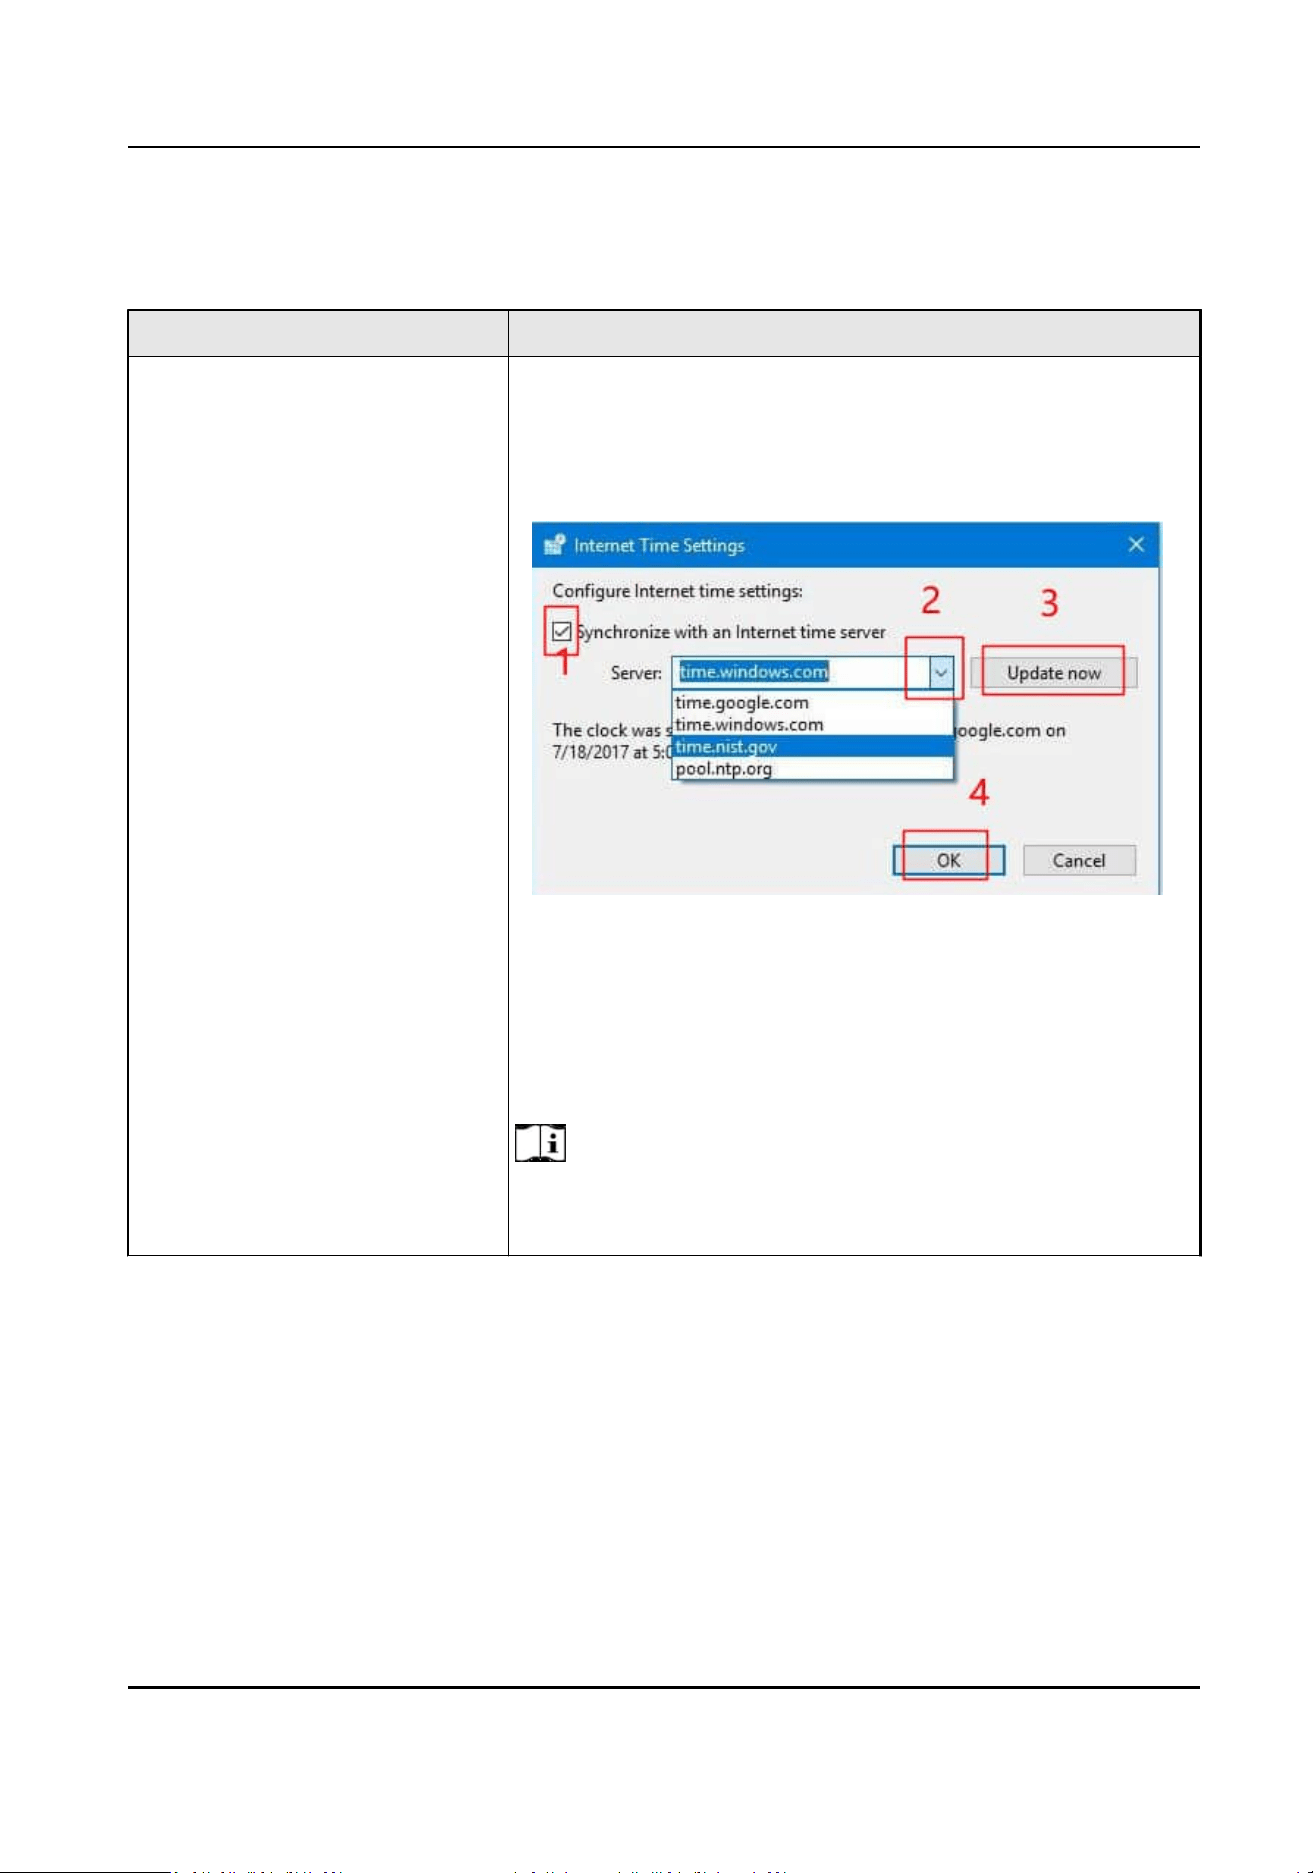
Select Internet Time Sync.
Table 10-1 System Time Sync Mode
Mode Descripon
Operang System Time Sync 1. You need to congure Internet me sengs before
conguring Operang System Time Sync.
Go to Control Panel → Clock and Region → Data and Time
→ Internet Time → Change
sengs .
Figure 10-2 Internet Time Sengs
2.
-
Select Operang System Time Sync and enter the
synchronizaon Interval, which is set to 60 minutes by
default.
-
Click Test to test the
communicaon between resources
and the NTP server.
Note
During the inial deployment, if the operang system has an
NTP server congured and the NTP client is running, the
HikCentral Lite V1.1.1 User Manual
132

Mode Descripon
system will choose the Operang System Time Sync mode by
default.
Local Server Time Sync
●
Select Local Server Time Sync, and enter the
synchronizaon Interval, which is set to 60 minutes by
default.
●
There will be a server providing
me synchronizaon for
devices, which only supports Hikvision devices.
NTP Time Sync
●
Select NTP Time Sync and enter the synchronizaon NTP
Server Address, NTP Port, and Interval
●
For the local NTP server, you can enable Congure WAN
Mapping to synchronize
me and enter the IP address and
port No. for WAN mapping.
●
Click Test to test the
communicaon between resources and
the NTP server.
Congure Device Access Protocol
Before adding devices supporng ISUP and/or ONVIF protocol to the plaorm, you need to set the
related
conguraon to allow these devices to access the plaorm.
Go to Device Access Protocol → Access via ONVIF Protocol / Allow ISUP Registraon to allow
devices to access the plaorm via the ONVIF protocol or ISUP.
Note
●
Aer enabling or disabling Allow ISUP Registraon, the Server will be restarted.
●
Only ISUP protocol 5.0 is supported.
Congure WAN Access
In some complicated network environments, you need to set a stac IP address or a domain name
and ports for the client to access WAN (Wide Area Network).
Go to WAN Access and enable the
buon.
1. Fill in SYS and/or System Storage Network Addresses
-
For single NIC environment: You can only
congure one network address, which is used for
both system network access and storage services. The interface will display this as SYS /
System Storage Network Address.
-
For dual NIC environment: You can
congure dierent network addresses for system services
and storage services. The interface will display this as SYS Network Address and System
Storage Network Address.
HikCentral Lite V1.1.1 User Manual
133

Note
In a dual NIC environment, ensure that both the SYS network address and the Recording
Server network address are on the same network domain, and that the SYS NIC and the
Recording Server NIC are also on the same network domain.
2. Select Applicaon Scenarios
You can select one or more applicaon scenario(s).
3. Congure Mapping Port
Congure the mapping port No. for data transmission.
4. Click Save or click Export to export an Excel le about the port informaon for WAN
conguraon, including port name, LAN port, WAN port, protocol, etc.
Note
When changes to the LAN port occur, it is necessary to adjust the port mapping conguraon on
the router correspondingly.
Congure NIC Sengs
You can select the NIC of the current Server (SYS NIC) for receiving the alarm informaon of the
device connected via ONVIF protocol, and performing live view and playback for the devices
connected via ISUP, as well as the system storage NIC for the data transmission for the storage of
video, pictures, and
les.
Reset Network Info
When system network domain changes (such as server migraon), you must reset the network
informaon of the added device to adapt to the new network environment. Otherwise the live
view or playback will be
aected.
Go to Reset Network Informaon → Reset .
10.4 Use SSL/TLS
Cercate for HTTPS Connecons
As a digital cercate issued by the Cercate Authority (CA), the SSL/TLS cercate secures all
types of
informaon transferred to and from the server and proves the identy of the server
owner. Compared with the plaorm provided cercate, the SSL/TLS cercate has a higher
security level.
Get Your SSL/TLS
Cercate
Note
The SSL/TLS cercate is purchased from a cercate authority.
1. Choose a CA that you trust.
2. Generate a
cercate signing request (CSR) and a private key.
HikCentral Lite V1.1.1 User Manual
134
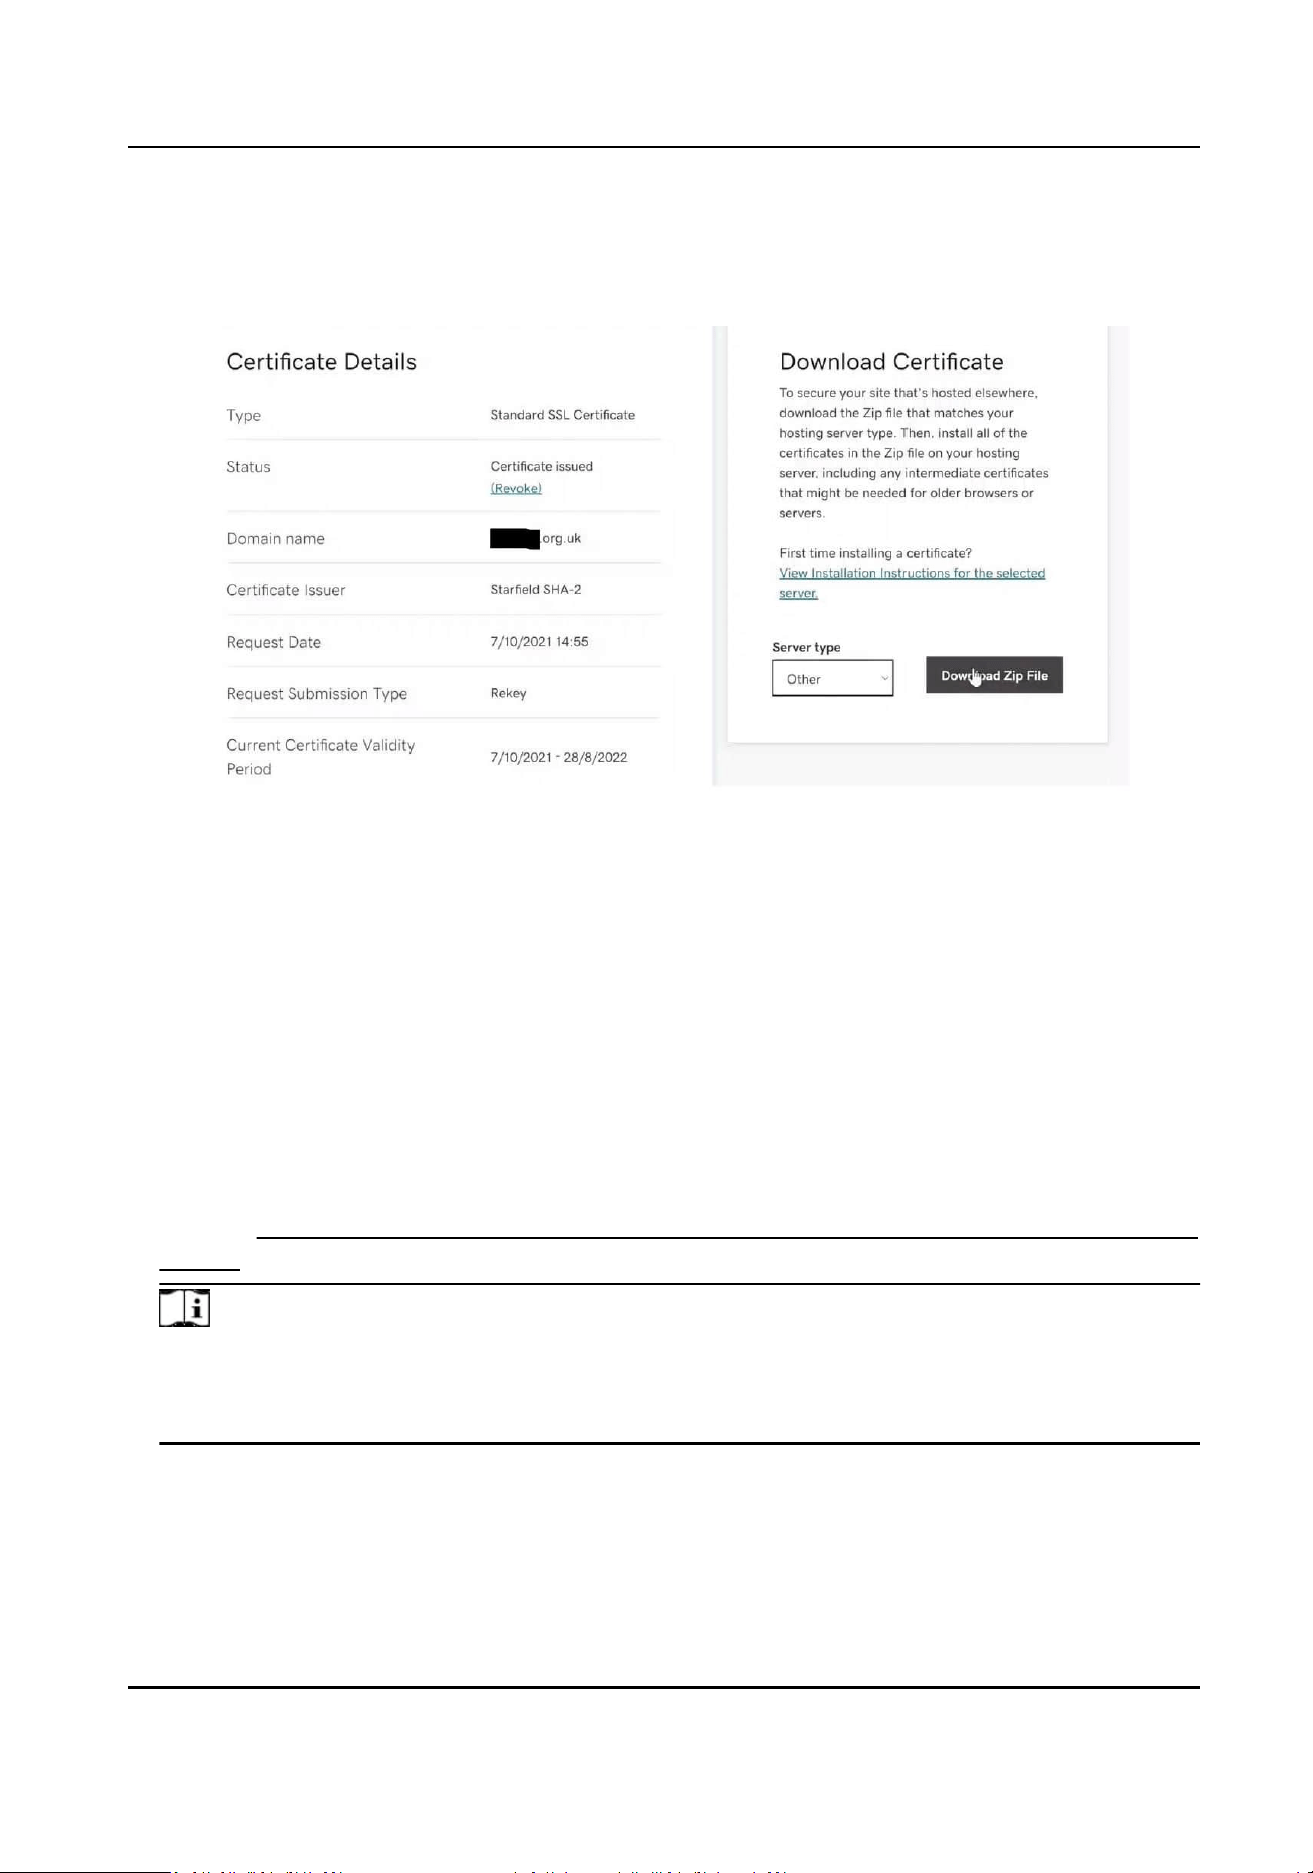
There are mulple methods to generate a CSR and a private key: via Microso IIS, OpenSSL, or a
trusted website.
3. Send the generated CSR to the CA to get the authorized SSL/TLS cercate.
Figure 10-3 SSL/TLS Cercate Example
4. Download your SSL/TLS cercate to your local PC.
Make sure that the cercate is in PEM format. You can try to edit the le extension to .pem or
use a tool to convert its format to PEM.
Upload Your SSL/TLS
Cercate to the System
1. Check your SSL/TLS cercate.
Generally, the issued SSL/TLS cercate contains the cercate le in PEM format, cercate
chain in PEM format, and cercate le in other formats (such as CRT and PLCS-7).
2. Get the cercate le in PEM format, the private key which is generated together with the CSR,
and the
cercate chain in PEM format. And concatenate them into one PEM le in order.
You can use the CertTool provided by Hikvision to concatenate a cercate. (Tool download
address: hps://www.hikvision.com/en/support/download/soware/hikcentral-professional-
v2-6-0/ .)
Note
-
The PEM le encoding method should be UTF-8.
-
The order of contents in the PEM le should be cercate le -> private key -> cercate
chain.
HikCentral Lite V1.1.1 User Manual
135
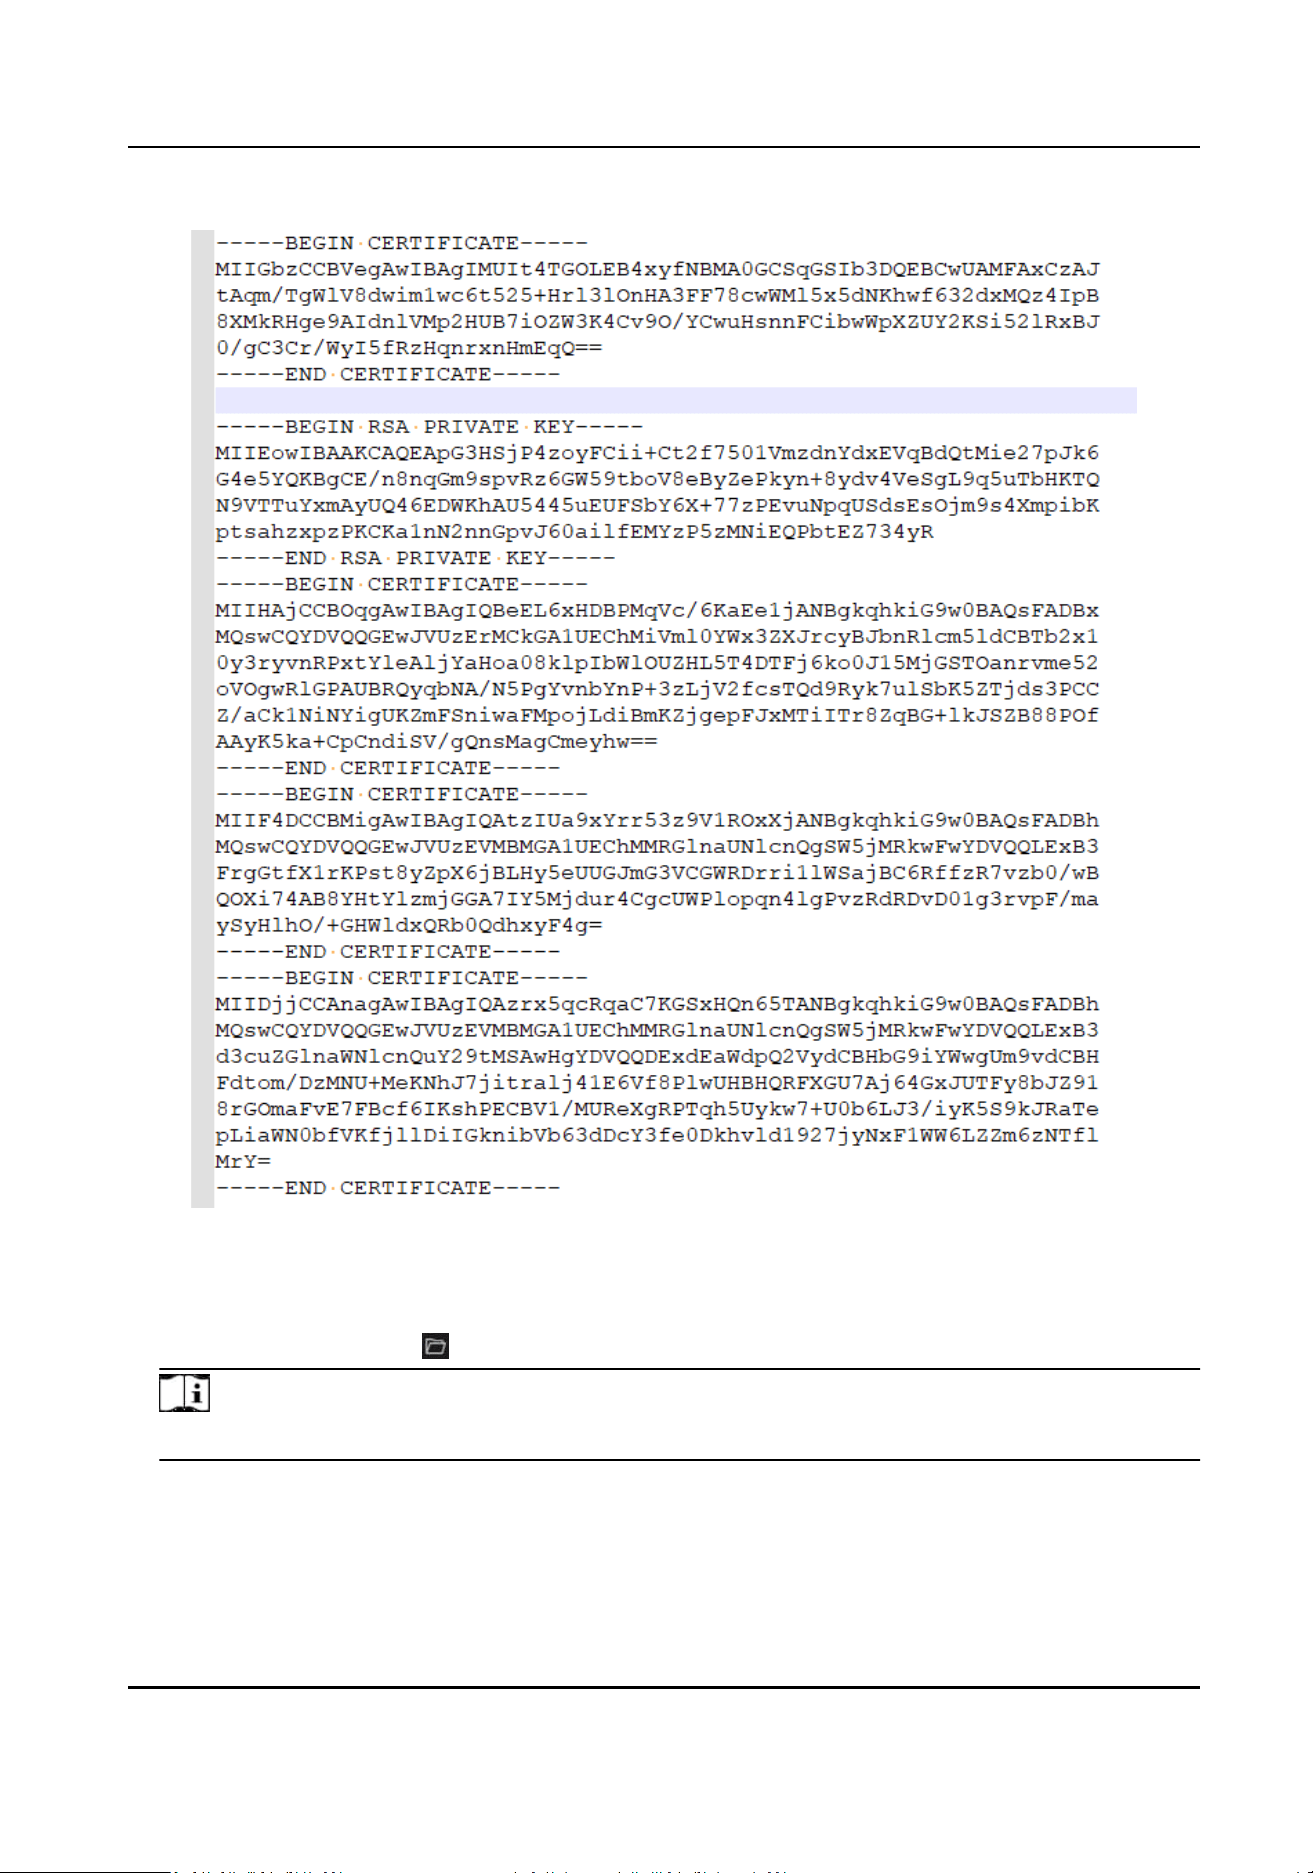
Figure 10-4 Example of Concatenated Cercate
3. On the top of the Desktop, click System → System Conguraon → Security → Cercate
Management .
4. Click New Cercate → to upload the concatenated cercate.
Note
The Desktop will restart automacally when the cercate is uploaded.
5. (Oponal) In the Upper-Level Cercate secon, you can click Add to upload the cercate
chain to the server.
HikCentral Lite V1.1.1 User Manual
136

The invalid or incomplete cercate chain of operang system will result in SSL/TLS cercate
vericaon failure. In this case, users can download the cercate chain, convert it to CRT
format, and double-click to install it on their PCs.
10.5 Congure Service Component Cercate
For data security, before adding the Streaming Server, you should generate the service component
cercate stored in the Server and input the cercate informaon to the Streaming Server you
want to add, so that the
cercates of the Streaming Server and the Server are the same.
On the Home page, go to System → System Conguraon → Security → Service Component
Cercate .
Cercate between Services in System
Required cercate when adding the streaming server.
Click to follow the specic instrucons.
Aer
compleng the service component cercate, see Add a Server and View Server Details
for further operaons on adding the streaming server.
HikCentral Lite V1.1.1 User Manual
137
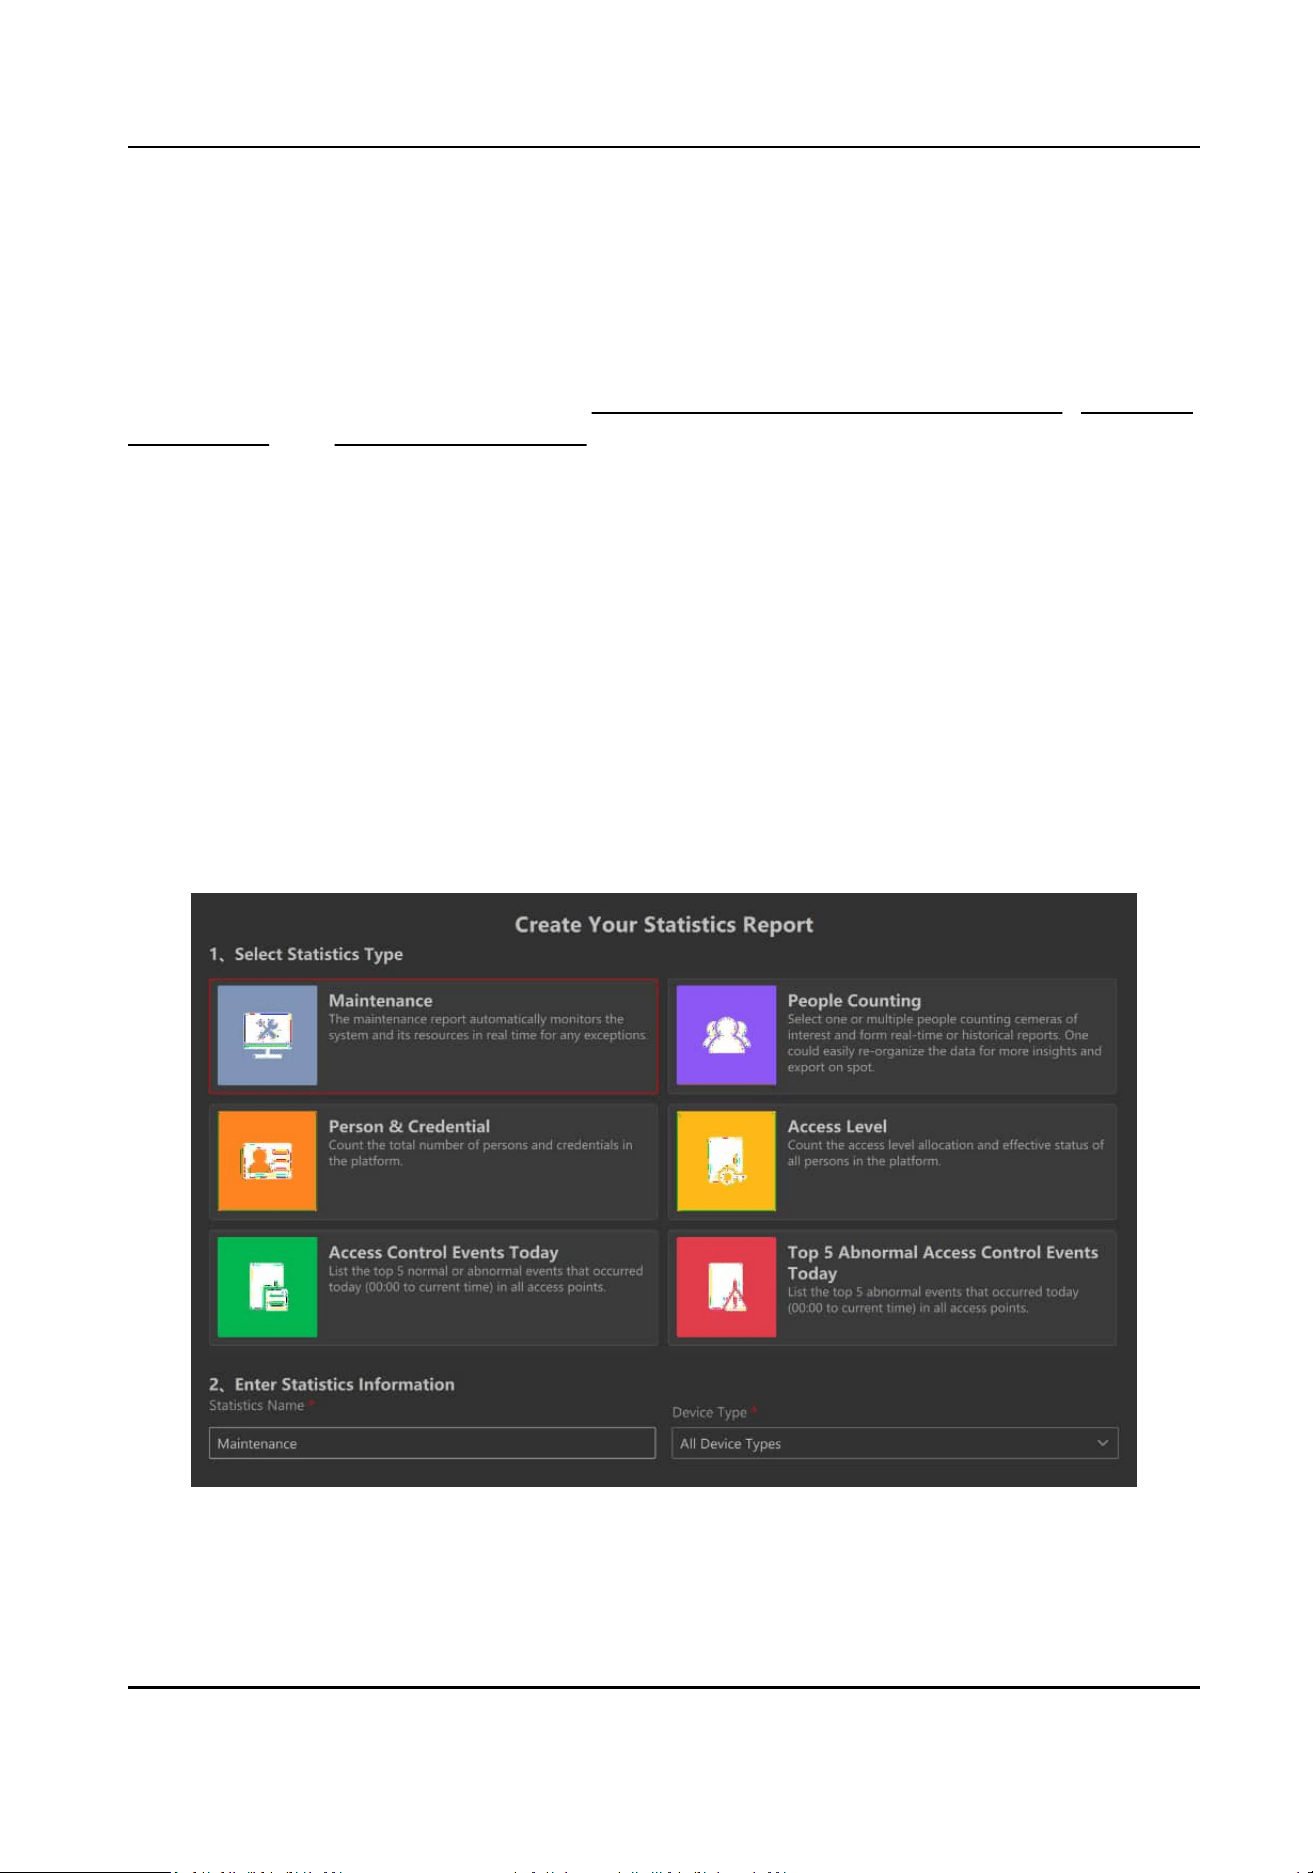
Chapter 11 Maintenance
Maintenance is responsible for the real-me monitoring of devices and servers. This ensures swi
response to alerts and ecient issue resoluon for enhanced security and operaons.
In this chapter, detailed informaon about Generate and Display Maintenance Report , Search for
Nocaons , and Search for System Logs is provided.
11.1 Generate and Display Maintenance Report
The maintenance report
automacally monitors the system and its resources in real me for any
excepons. You can add and display the maintenance report for all device types, video devices,
access control devices, and servers.
Generate Maintenance Report
Navigate to the Home page, right-click Stascs in the Resource Panel and click Add Stascs
Report.
Select
stascs type as Maintenance and customize the Stascs Name for the selected Device
Type.
Figure 11-1 Generate Maintenance Report
HikCentral Lite V1.1.1 User Manual
138
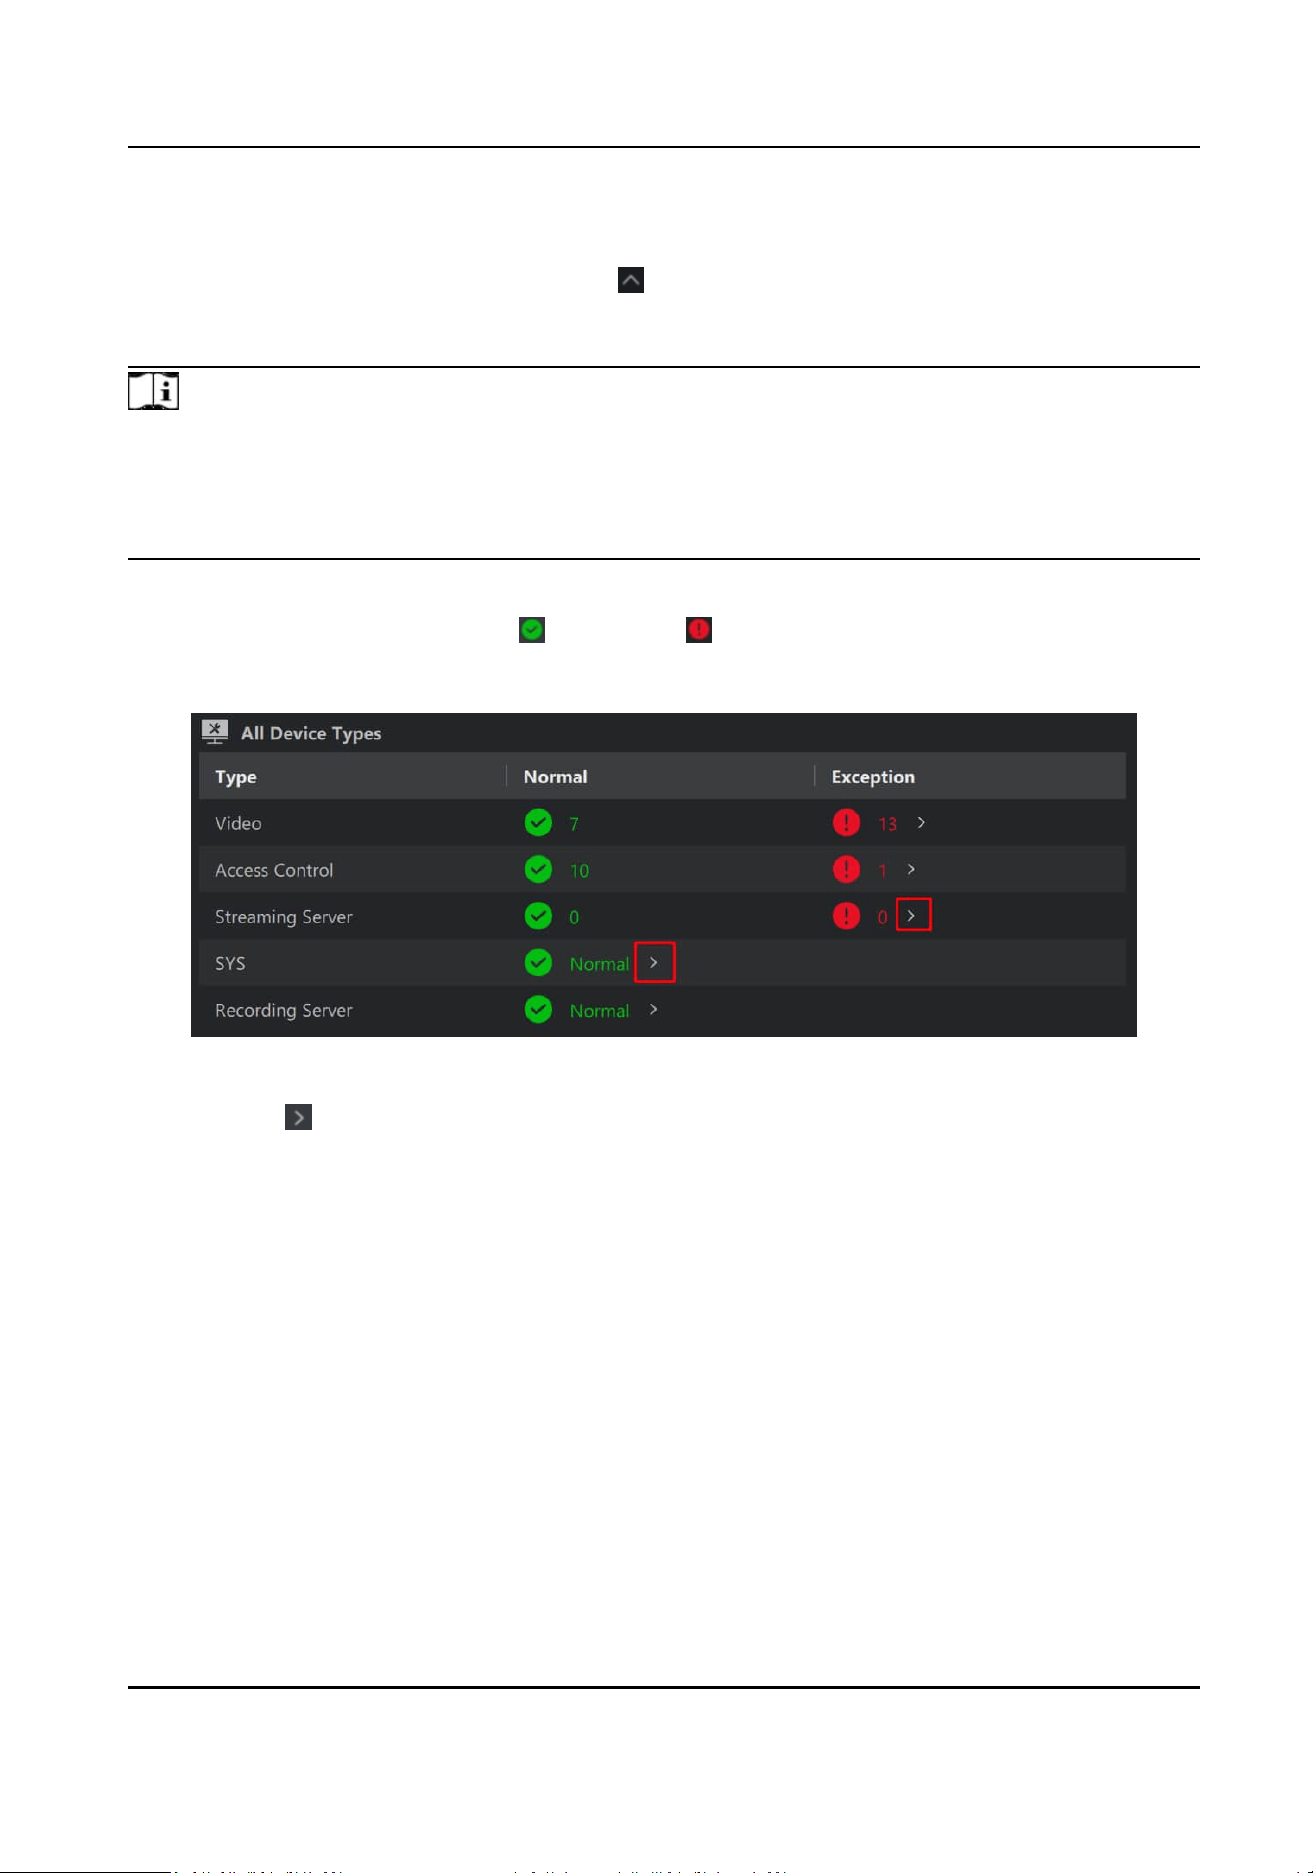
Display Maintenance Report
Aer adding the maintenance report(s), click to see the stascs report list and double-click the
maintenance report to view details.
The styles of reports displayed can vary across
dierent device types. See below for details.
Note
●
You need to restart the SYS before the stascs for the NIC, disk, storage locaon, and video
storage are displayed.
●
In the virtual machine environment, the report does not support displaying data for drive C.
●
If reports fail to show,
rst check system logs for disk-related error messages.
All Device Types
The page provides counts for both Normal and Excepon statuses, encompassing all device
types, including video devices, access control devices, and servers.
Figure 11-2 All Device Types
You can click to view sever and device details in a normal or an excepon status.
●
For SYS, you can check CPU usage, RAM usage, NIC trac, streaming gateway data transfer.
HikCentral Lite V1.1.1 User Manual
139
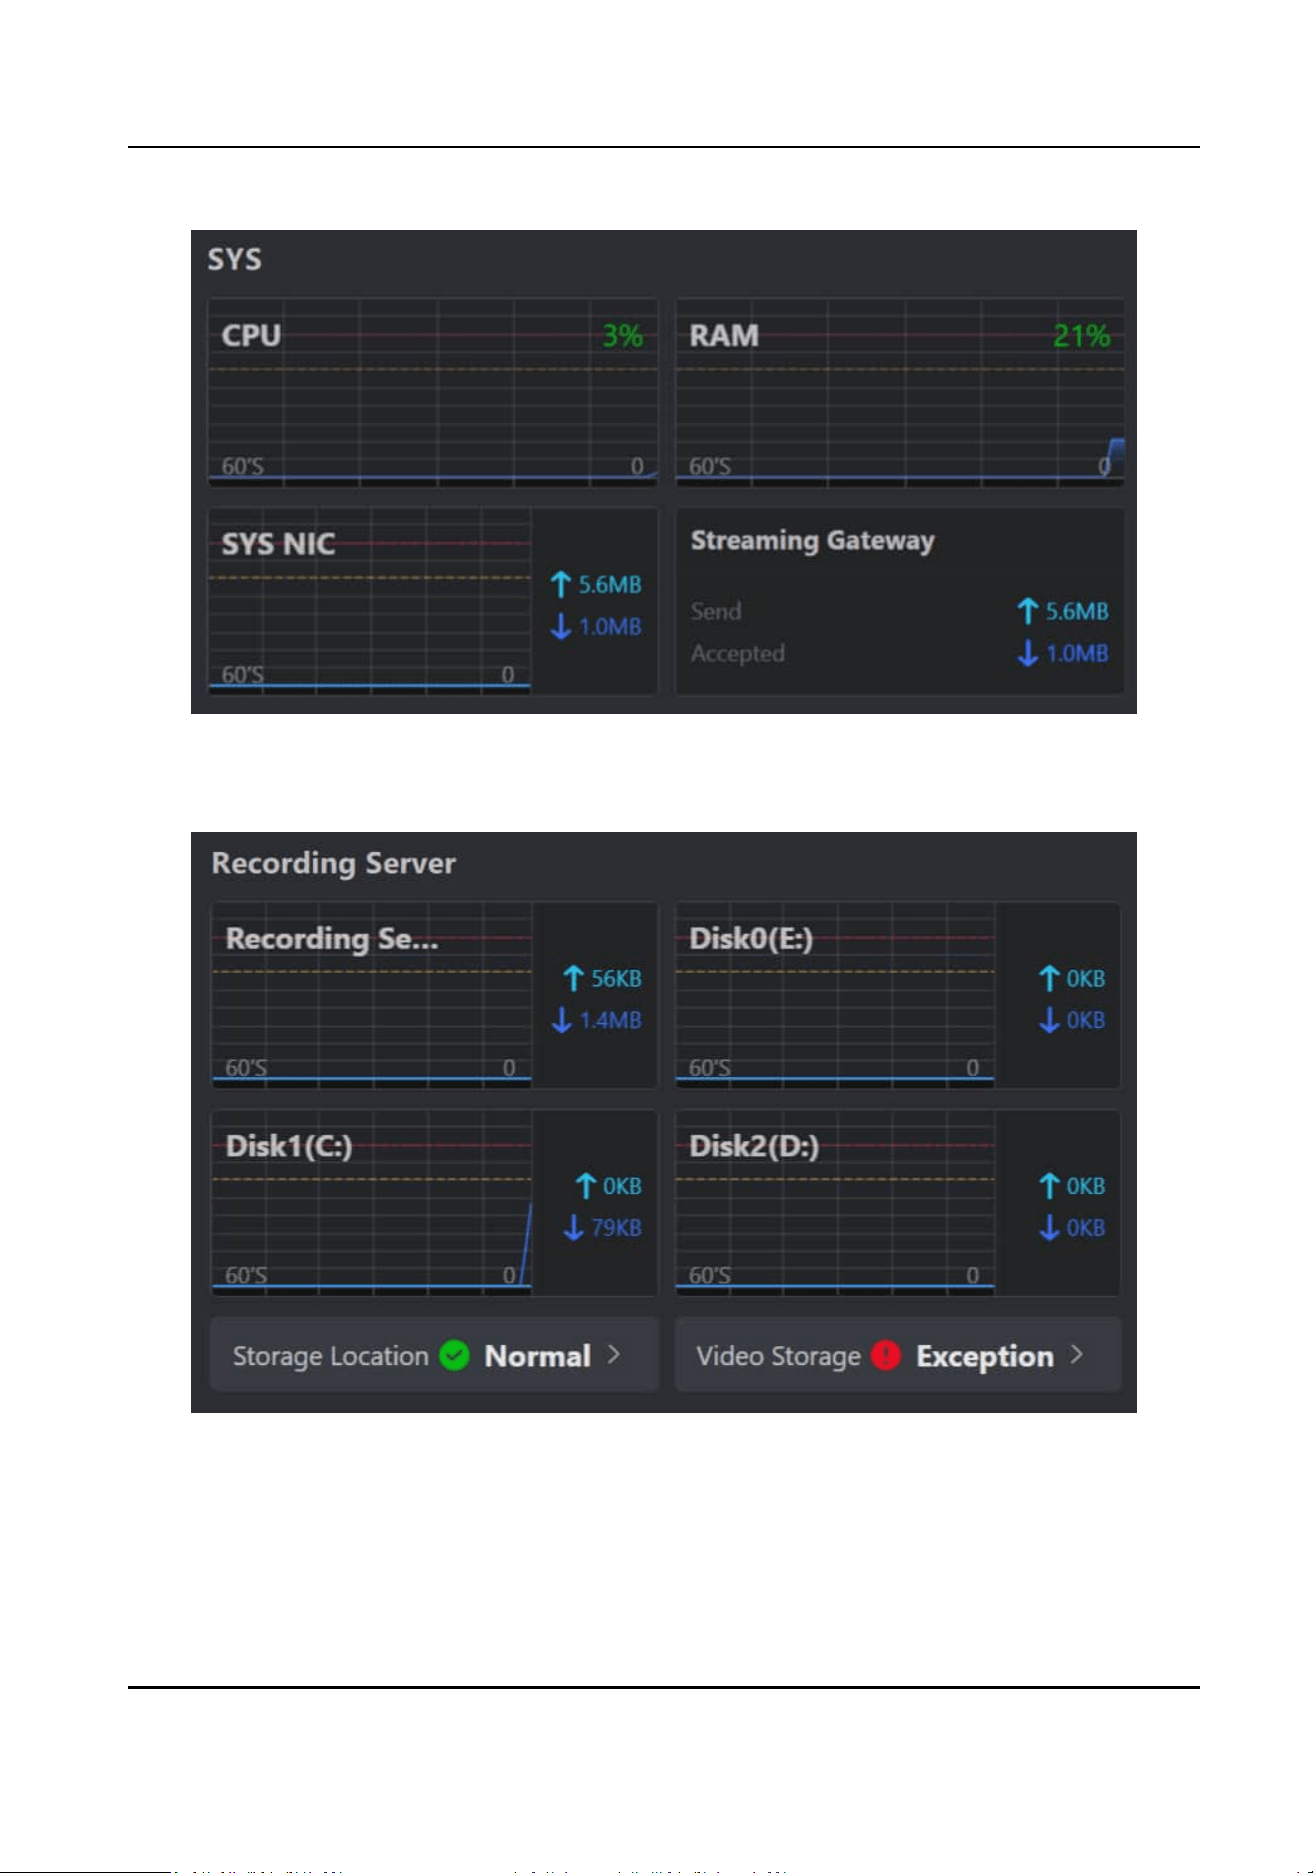
Figure 11-3 SYS
●
For Recording Server, you can check NIC
trac, disk I/O, storage locaon, and video storage.
Figure 11-4 Recording Server
●
For devices, you will be navigated to the Device management page to view excepon details.
Video
HikCentral Lite V1.1.1 User Manual
140

●
Click beside the number to navigate to the device management page. Here, you can inspect
detailed informaon about video devices that are in video loss/recording excepon/image
excepon state.
●
Hover on the pie chart to view the number of normal or
excepon devices.
Figure 11-5 Video Stascs
Access Control
●
Click beside the number to navigate to the device management page. Here, you can inspect
detailed
informaon about access control devices that are in device security excepon/device
network excepon/device record reporng excepon/device power baery excepon state.
●
Hover on the pie chart to view the number of normal or
excepon devices.
HikCentral Lite V1.1.1 User Manual
141
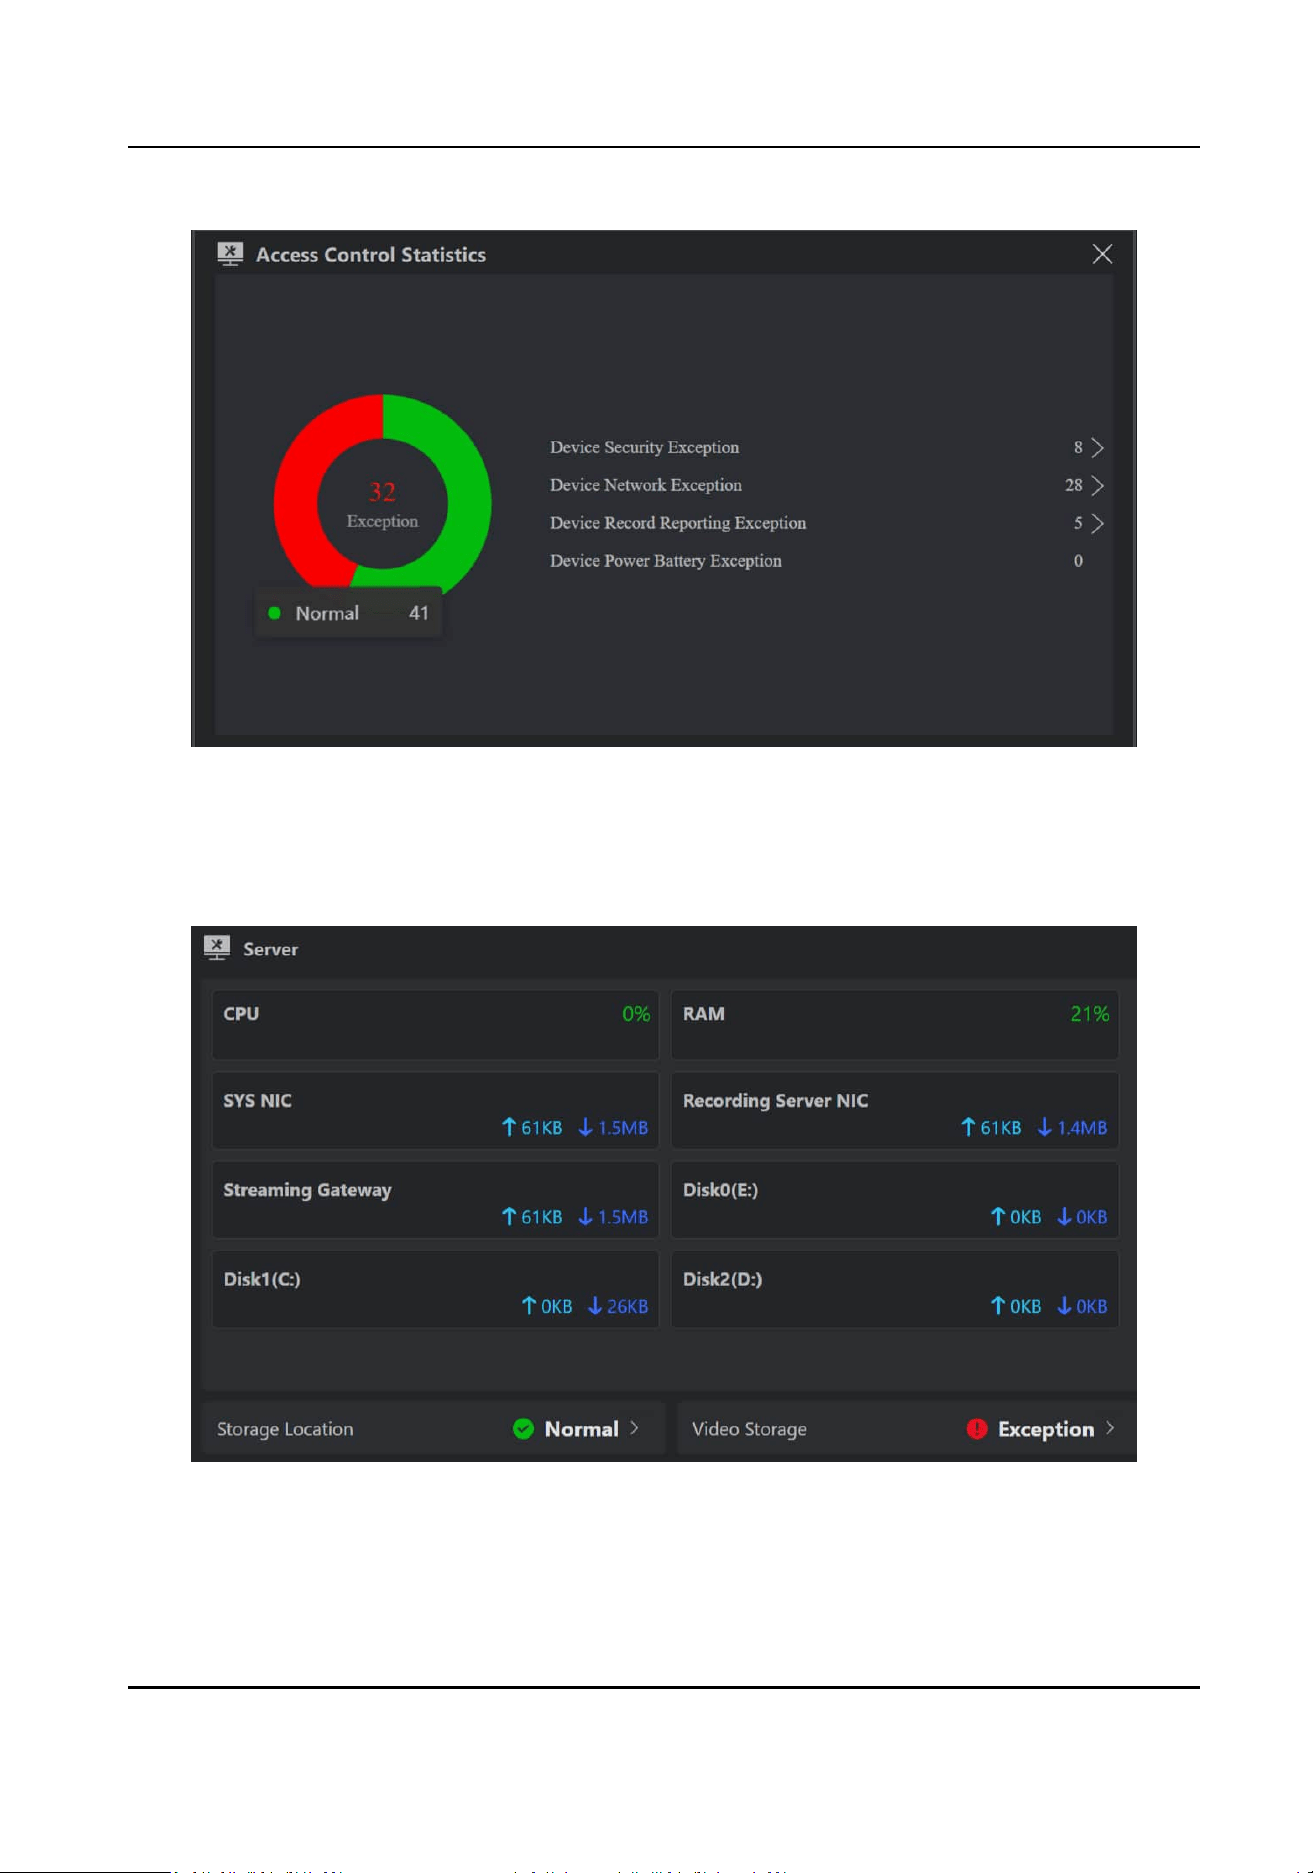
Figure 11-6 Access Control Stascs
Server
Provides an overview of SYS and Recording Server, including CPU usage, NIC trac, disk I/O, etc.
Figure 11-7 Server Stascs
HikCentral Lite V1.1.1 User Manual
142
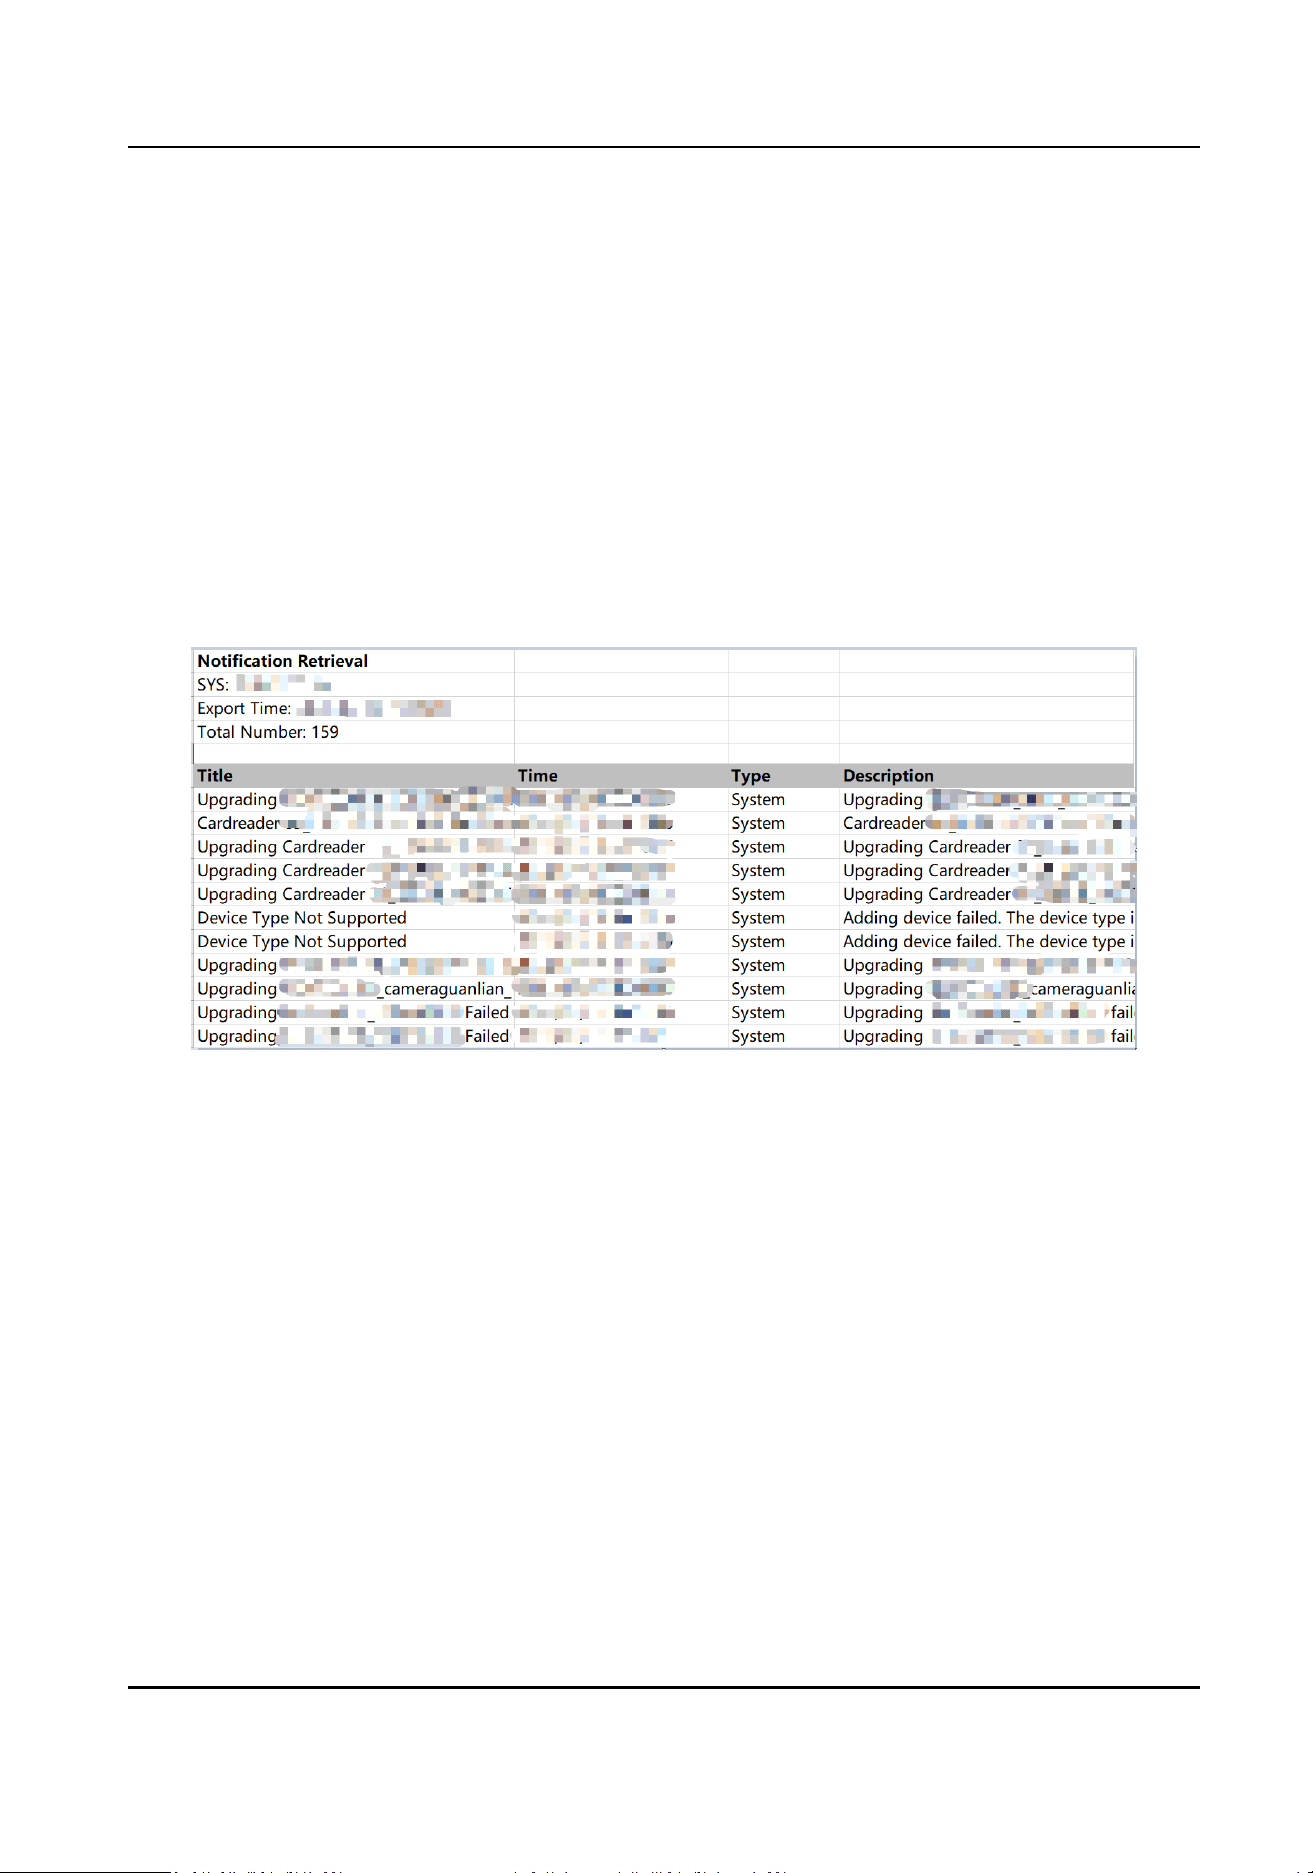
11.2 Search for Nocaons
You can search for nocaon informaon to promptly detect and respond to alerts or updates,
ensuring swi acon on security incidents.
On the Home page, go to Invesgaon → Nocaons .
You can
lter the informaon by selecng Date and Nocaon Type. These nocaons primarily
consist of:
●
System-related alerts, such as "device type not supported".
●
User
operaon prompts, such as "calling video intercom not answered".
Based on the lter criteria you set, click Export in the upper-le corner to export nocaon les
to Excel, PDF, or CSV formats.
Figure 11-8 Nocaon Retrieval Excel Template
11.3 Search for System Logs
You can search for server and/or device logs to promptly idenfy and address issues, enhancing
the eciency of incident response. Server logs and device logs respecvely refer to the logs
generated by the server that are stored on the server and the logs stored on the device.
Access is available via two
opons:
To search server logs and device logs
On the Home page, go to Invesgaon → System Log .
To search local device logs
1. On the Home page, go to System → Device Management .
2. Hover on one device then right-click and select View Log to search local device logs.
HikCentral Lite V1.1.1 User Manual
143
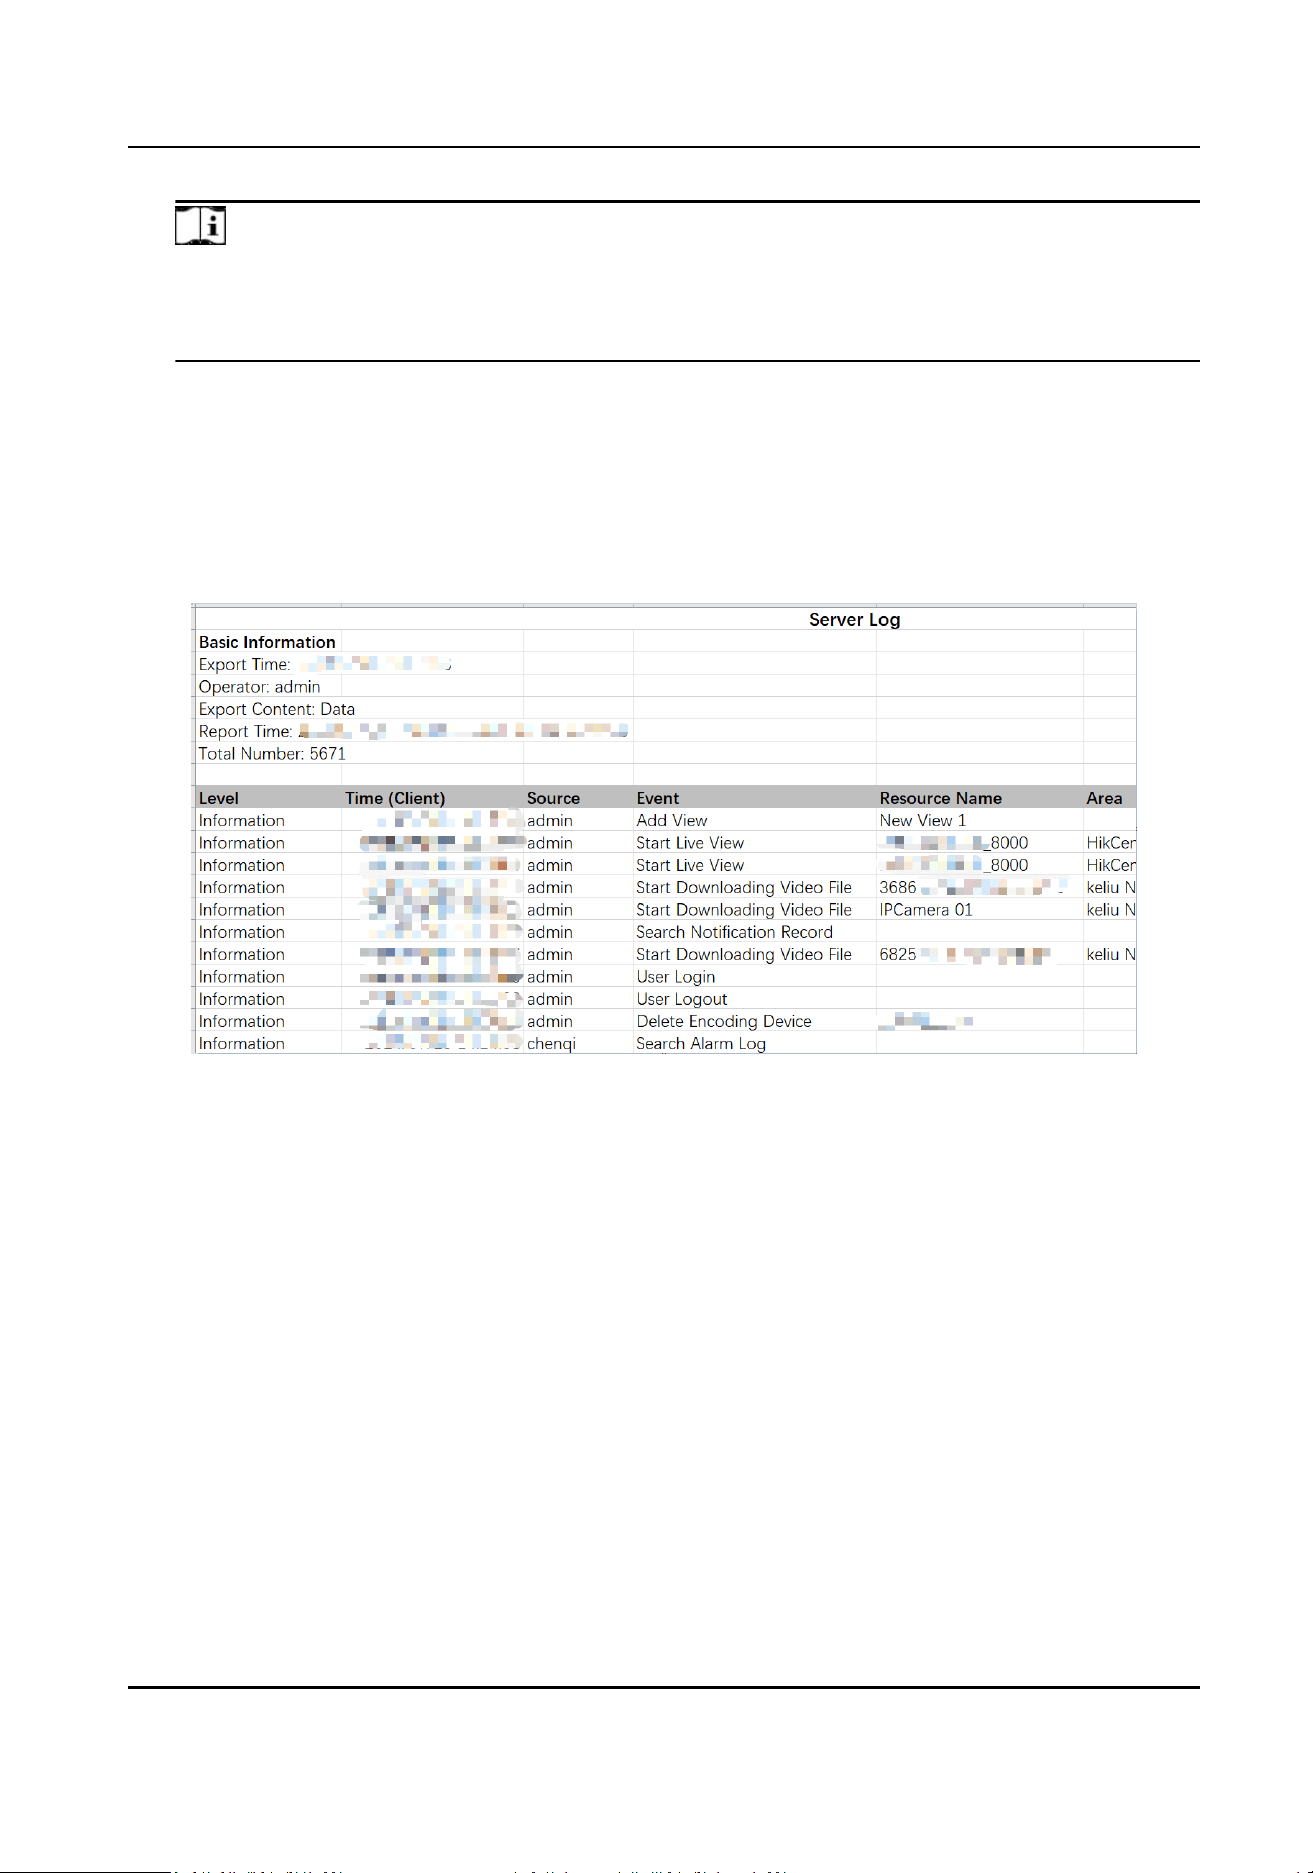
Note
-
This feature should be supported by the device.
-
You can also view logs when viewing device details. On the Device Details page, hover on
one device then right-click and select View Details. Click View Log in the upper-right corner.
For Server Log
●
You can lter the event type by Informaon, Warning and Error. For instance, an Informaon
event could be an Add Generic Event nocaon, a Warning could indicate a License
Expiraon, and an Error could signify a Door Lock Failure.
●
Click Resource Name to quickly search the resource.
●
Click Export in the
upper-le corner to export server log in Excel or CSV le.
Figure 11-9 Server Log Excel Template
For Device Log
Click Export in the upper-le corner to export device log in Excel or CSV le.
HikCentral Lite V1.1.1 User Manual
144
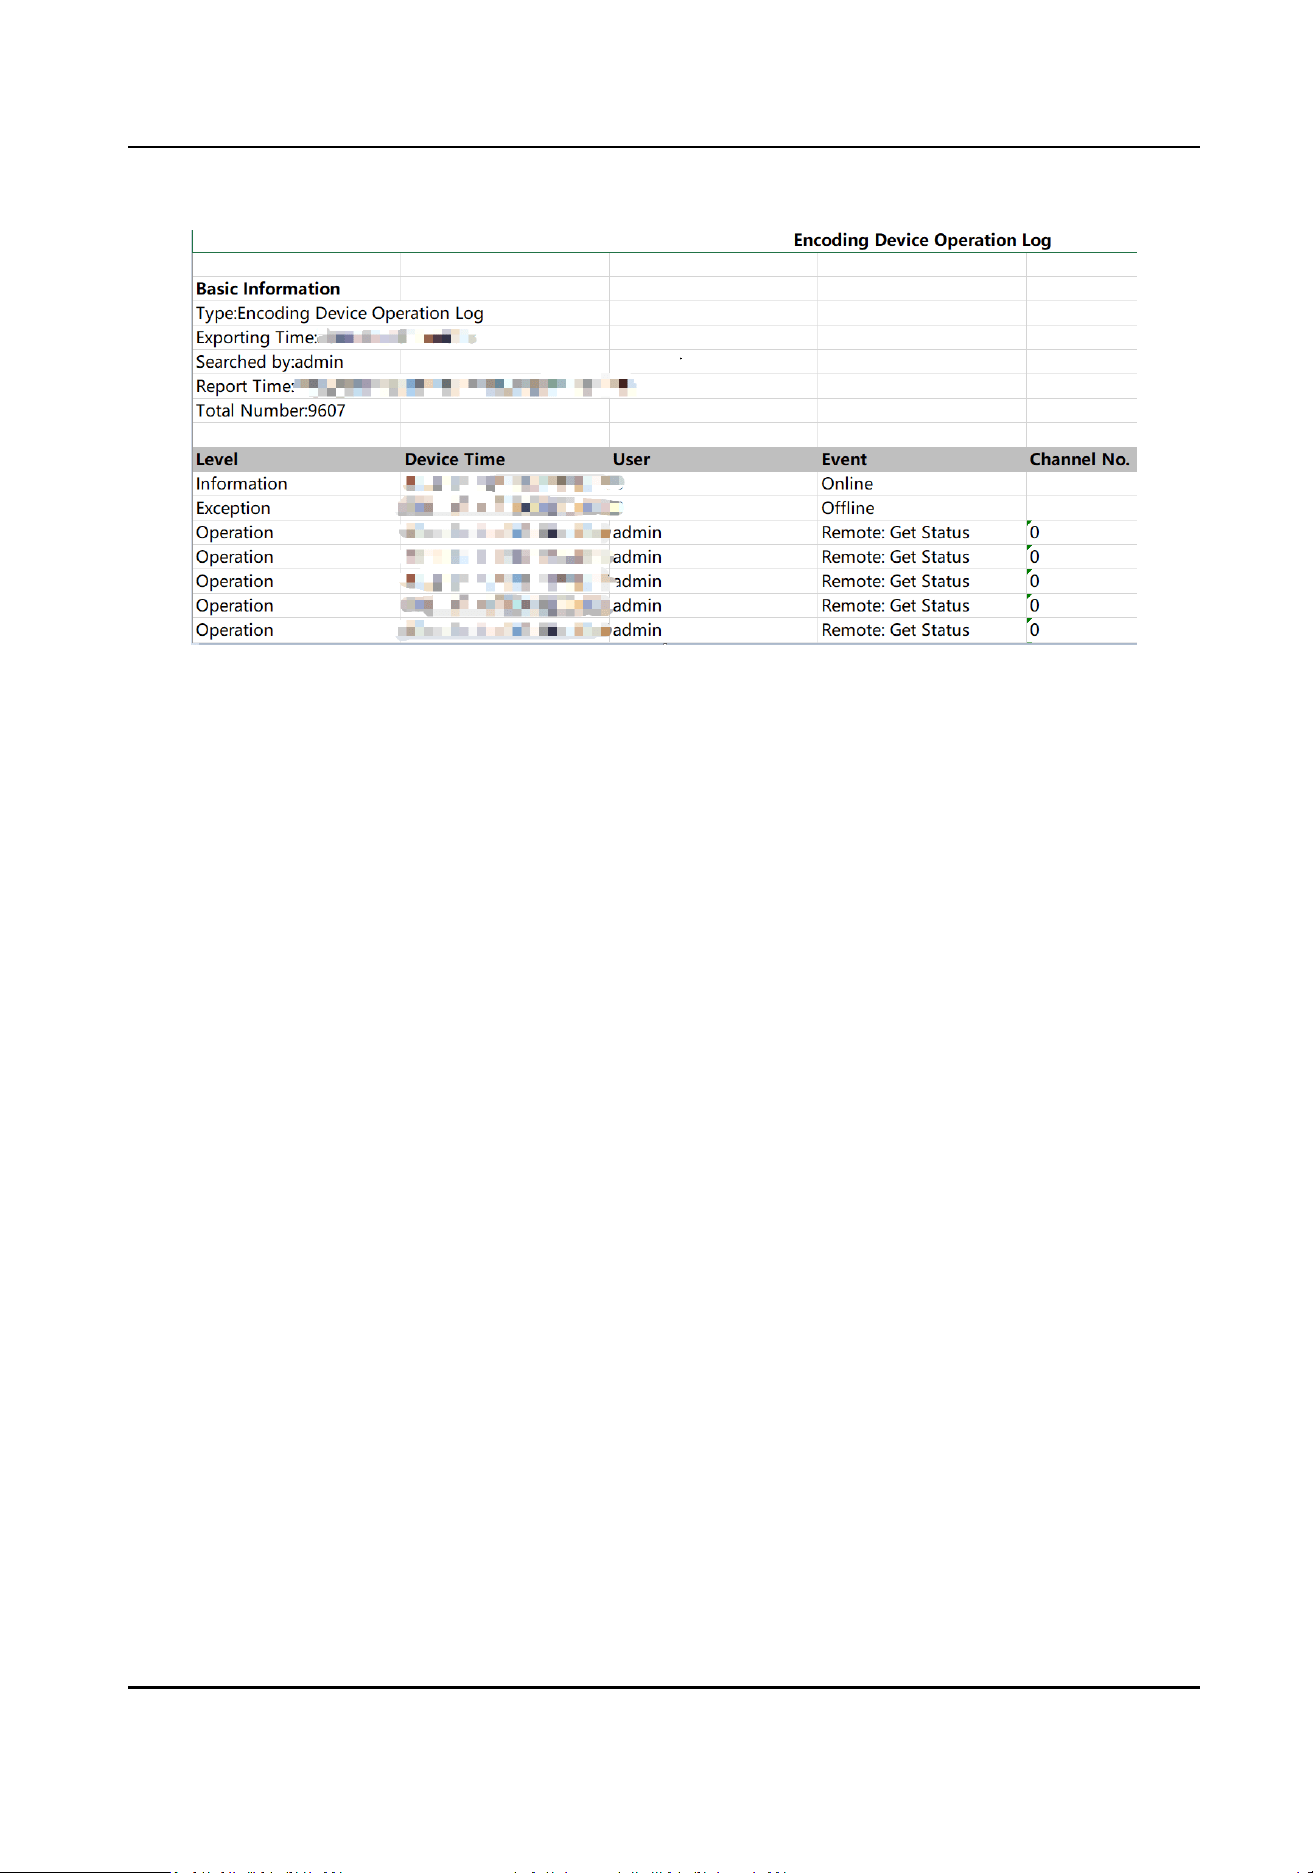
Figure 11-10 Device Log Excel Template
HikCentral Lite V1.1.1 User Manual
145

Appendix A. Other System Conguraons and
Performance
For environments where iVMS-4200 is running, with a CPU earlier than i3-8100, 4 GB of RAM, and
a SATA 7200 RPM Enterprise Class HDD, the following
conguraons are recommended for
migrang from iVMS-4200 to HikCentral Lite.
It is recommended that the
conguraon be no less than the following:
Table A-1 System Conguraons
Feature Conguraon
CPU 8
th
Generaon of Intel
®
Core™ i3-8100
RAM 4 GB
NIC GbE Network Interface Card
HDD SATA 7200 RRM Enterprise Class HDD
HDD Capacity for Database At least 500 GB
OS Microso
®
Windows 10 64-bit or later
Under this conguraon, the performance is as follows:
Table A-2 System Performance
Feature Performance
Cameras 64
Events Receiving 1/s
Storage Capacity of
Captured Faces / ANPR
Records / Events /
Intelligent Analysis
Data / Access Records /
System Logs
2 million
Table A-3 Performance of H.264 with Soware Decoding
Frame Rate (fps) Bit Rate (Mbps) Resoluon Max. Live View Channels
30 2 1080p 2
HikCentral Lite V1.1.1 User Manual
146

Appendix B. Product Usage Restricons: Scenarios &
Guidelines
This topic provides restricted scenarios for the system to help users avoid unintended misuse. It
serves as a quick reference for verifying
permied acvies across specic use cases.
System
●
When you run the client as Administrator, imporng data into the system may fail.
●
Microso Oce shall be installed in order to view exported excel les.
●
Do not drag the client across screens with varying DPI sengs, as this may result in unintended
UI scaling issues.
●
Make sure the available disk space is no less than 10 GB to avoid the installaon failure of the
Server.
Device Management
●
Cameras containing special characters including \ / : * ? " < > | in their names cannot be
imported.
●
For ISUP devices performing FTP-based
rmware upgrades, the maximum supported path length
for upgrade packages is limited to 32 bytes.
●
Be careful to remove
informaon imported from iVMS-4200, because informaon removed from
the system cannot be imported again.
●
When
imporng conguraon les from iVMS-4200, device oine events cannot be imported.
●
When
eding device password on the Web page, stop live view and playback on all clients, and
change the password on the device list as quickly as possible. Try to change device password via
the system instead of the Web page.
Video Monitoring
●
When using acusearch / object search, if an incorrect prompt pops up, you can check whether
this
funcon is enabled on the device conguraon page.
●
Do not arbitrarily modify whether the device's stream is encrypted or the specic encrypon
keys.
●
Do not use smooth stream and stream encrypon simultaneously.
●
For devices
congured with dual-stream recording schedule, main stream will be used when
playing videos.
●
Starng recording manually is not supported during live view via smooth stream.
●
Live view via smooth stream is not supported for devices added by Hikvision ISUP Protocol.
●
Live view is not supported on the remote
conguraon page of Bi-spectrum Thermography
Speed Dome Series cameras.
●
When DS-7616NXI-K2/16P series NVRs is connected to the plaorm with DST enabled, recording
retrieval inaccuracies may occur during DST
transion periods (when entering/exing DST), and
HikCentral Lite V1.1.1 User Manual
147

meline jumps might appear during playback due to local me adjustments (e.g., clock shis
forward/backward by 1 hour).
●
If connected devices do not support UTC me, when using search funconalies (AcuSeek/
video retrieval / Smart Search / all searches via NVR) during Daylight Saving Time (DST)
transions, the system cannot disnguish duplicate me periods (e.g., 01:30 appearing twice
when DST ends). All search results will display local device
me without UTC oset adjustments.
For real-me events & alarms (Alarm Log Retrieval) based on devices without UTC support,
duplicate mestamps may appear during DST exit periods (e.g., two entries showing "01:30").
●
For live view and playback via Axis and Hanwha devices, make sure you have selected H.264 as
the encoding format.
●
Reverse playback of videos stored in Axis, Dahua, or Hanwha devices is not supported.
●
No more than 12 views supports synchronized playback simultaneously.
●
To enlarge a
sheye-expanded image, double-click the image before enabling Fisheye Expansion.
●
Two-way audio via channels of DVR is not supported.
●
When drawing people
counng detecon areas, only rectangular area is supported.
●
Devices added by Hikvision ISUP Protocol does not support live view, playback, or two-way audio
via IPV6.
●
For cameras managed via an NVR/DVR, the system cannot get their presets.
●
Videos in AVI format may fail to be played by Windows-provided players, so free-charged players
that support all video formats is recommended.
Access Control and Video Intercom
●
When imporng the zip le of prole pictures, make sure the system language of the PC
compressing prole pictures is the same with the system language of the Server.
●
Two-way audio is not supported by access control devices or video intercom devices added by
Hikvision ISUP Protocol even if the devices have the capability of two-way audio.
System Storage
●
Up to 128 cameras are supported for video storage.
●
Only pictures and
les can be stored in the system if the video storage license is not acvated.
●
Ensure that each disk has at least 34 GB of available space; otherwise, it will not be usable for
system storage.
●
Inializaon of the disk uses 90% of the remaining disk space.
●
Since videos, pictures, and les are stored on the system disk, system hibernaon or sleep can
result in the disk losing power,
potenally causing storage excepons. It is recommended to turn
o hibernaon or sleep mode.
●
The minimum space required for each
le type is 4 GB (for example, 4 GB for videos, 4 GB for
pictures, and 4 GB for les), which includes necessary les for storage management.
●
Auto-Copyback is
eecve only when the stream type is set to main stream and is supported
only by Hikvision cameras.
●
Rebuilding the index may temporarily
aect search and playback funconality, but it will not
cause data loss.
HikCentral Lite V1.1.1 User Manual
148


UD12345B
