

© 2016 Gourmia
www.Gourmia.com
The Steelstone Group
Brooklyn, NY
All rights reserved. No portion of this manual may be reproduced by any means whatsoever
without written permission from The Steelstone Group, except for the inclusion of quotations in a
media review.
Although every precaution has been taken in the preparation of this manual, The Steelstone
Group assumes no responsibility for errors or omissions. Nor is any liability assumed for damages
resulting from the use of the information contained herein. Although every eort has been made
to ensure that the information contained in this manual is complete and accurate, The Steelstone
Group is not engaged in rendering professional advice or services to the individual consumer;
further, The Steelstone Group shall not be held responsible for any loss or damage allegedly
arising from any information or suggestion in this manual.
10 9 8 7 6 5 4 3 2 1
Printed in China

Welcome to Delicious Entreés, Snacks, Desserts
& More from Gourmia!
With the purchase of the Super Turbo XP Free Fry Cook Center, you’ve opened the door
to amazingly avor-packed foods without the heavy fat of typical deep-fried foods. In
fact, you won’t need to add oil to this versatile Super Turbo XP Cook Center unless you
choose to add avor!
Consider all the foods you can easily prepare using the features of the truly hands-free
Super Turbo XP Cook Center: golden roast chicken; thick, juicy beef steaks; delicate
sh llets; luscious desserts and tender-crisp fresh vegetables. And, as a handy
bonus feature, many of your favorite prepared frozen foods can be easily cooked in
mere minutes for your convenience. We are sure you and your family will love all the
delicious one-dish dinners, snacks, vegetables, desserts and more that come from
inside the new, easy and innovative Super Turbo XP Cook Center.
The following pages of this manual give you full and complete instructions for all the
functions and features of the Super Turbo XP Cook Center. Inside these pages, you’ll
nd cooking guides, information on Cooking Modes, and complete step-by-step
instructions for assembly, operating and maintenance of your Super Turbo XP Cook
Center. Please read all safety instructions and complete directions carefully for safe
usage at all times.
Thank you for your purchase! We hope you will enjoy all the innovative products
brought to you by our family at Gourmia.
DOWNLOAD the APP and instructions at:
http://www.gourmia.com/apps

5
SAFETY FIRST! p. 6
FEATURES & FUNCTIONS p. 8
PRE-PROGRAMMED CONTROL PANEL p. 12
BEFORE FIRST USE & ASSEMBLY p. 18
QUICK & EASY ACCESSORY ASSEMBLY p. 20
QUICK & EASY MODE COOKING GUIDE p. 28
MAINTENANCE & SERVICE p. 40
TABLE OF CONTENTS

SAFETY FIRST
6
IMPORTANT SAFEGUARDS
When operating this electric appliance, basic safety instructions should always be
followed. Refer to the following for these instructions.
1. READ ALL SAFETY & USAGE INSTRUCTIONS BEFORE USING SUPER TURBO
XP COOK CENTER.
2. EXERCISE EXTREME CAUTION: Do not allow liquids of any kind to touch the
interior of Super Turbo XP Cook Center. Use extreme caution when moving
Removable Cooking Pot into or o of the Cooking Base to ensure that liquids
or foods DO NOT spill into the Base. Spills may cause electrical shock or severe
injury.
3. Before using, ALWAYS place the Super Turbo XP Cook Center on a heat-
resistant glass, wood or stone surface. Do not place on any counter or table
that may be aected by high heat.
4. AVOID ELECTRICAL SHOCK. DO NOT immerse cord, plugs or the Super Turbo
XP Cook Center Base in water or other liquid.
5. DO NOT touch the surface of the Super Turbo XP Cook Center Base or
Removable Cooking Pot when HOT. Use pot holders or oven mitts when
handling the Cooking Pot, Base or Lid.
6. Allow sucient space around the Super Turbo XP Cook Center for proper air
ow and opening of the Lid when cooking.
7. UNPLUG Super Turbo XP Cook Center from outlet when not in use or before
cleaning. Do not let cord hang over edge of table or counter or touch hot
surfaces, including the Super Turbo XP Cook Center.
8. DO NOT add or remove parts or accessories while HOT.
9. Children should never use Super Turbo XP Cook Center; close supervision is
required when appliance is used near children.
10. Do not obstruct the Heat Release Vents on the EasyView Lid during operation.
Hot steam may escape while cooking.
11. Operate the Super Turbo XP Cook Center on a level surface well away from any
hot gas or electrical burner, heat source, combustible spray cans or
pressurized items.
12. Do not operate the Super Turbo XP Cook Center outdoors.

SAFETY FIRST
7
FOR HOUSEHOLD USE ONLY
3-conductor Cord Set: This Super
Turbo XP Cook Center is equipped with
a 3-conductor cord set that has a 3
prong grounding-type plug. It should be
properly connected to a grounding-type
outlet. The plug is designed to t ONLY
a 3-grounding outlet unit, and as such,
the grounding prong should never be
removed. If needed, purchase a 2-prong
adaptor and ground it to the outlet.
Consult a qualied electrician if in doubt.
Do not use an adaptor unless you are
condent it is grounded. Do not modify
this plug. If the plug does not t the
outlet securely, call a qualied electrician
for assistance.
13. Never operate the Super Turbo XP Cook Center with a damaged cord or plug
or one that has malfunctioned or been damaged in any way. Immediately
contact Customer Service for analysis.
14. DO NOT add unauthorized accessory attachments. Such use may result in
electric shock, injury or re.
15. Use only factory cord supplied; NEVER add extension cords. When done
using, switch control to OFF then pull plug from outlet.
16. DO NOT operate the Super Turbo XP Cook Center when empty.
17. Do not use the Super Turbo XP Cook Center for any use other than intended.
Do not attempt to deep fry in the Removable Cooking Pot. Do not use
Removable Cooking Pot on a stovetop or other heat source.
SAVE THESE INSTRUCTIONS

FEATURES & FUNCTIONS
A. Removable Cooking Pot- The Removable Cooking Pot has a nonstick interior and
EasyLift Handles to assist with movement and clean-up. The Cooking Pot must always
be used when frying, roasting, baking or cooking in any Mode in the Super Turbo XP
Cook Center.
To place the Removable Cooking Pot into the Cook Center Base correctly,
align the EasyLift Handles on the Pot with the two handle grooves on the Base. When
in the correct position, the opening for the Rotisserie Spit in the Removable Cooking
Pot will be aligned to the opening in the Base of the Cook Center.
The Cooking Pot is designed to hold solid foods and small amounts of
liquids, however, the Super Turbo XP Cook Center is not designed to slow cook, braise,
or cook foods in a long-low heat method. Add only small amounts of liquid, as needed,
for roasting or frying.
The Removable Cooking Pot will accommodate all the Accessories that are
provided in the Accessory Pack. Always check before cooking to ensure foods placed
on the Rotisserie Spit, such as whole chickens or roasts, will turn freely and t within
the closed Super Turbo XP Cook Center.
Always use pot holders or oven mitts when handling or removing the hot
Removable Cooking Pot from the Super Turbo XP Cook Center.
A
9
FEATURES & FUNCTIONS
B. The Super Turbo XP Cook Center- The Cook Center Base holds the Removable
Cooking Pot and contains the following features:
1. EasyView Lid with RadiVection Cooking System
2. Pre-programmed LED Control Panel with Mode, Preset and Rotation options
3. Secure-Hold Suction Plates on the bottom of the Base to add non-slip
protection
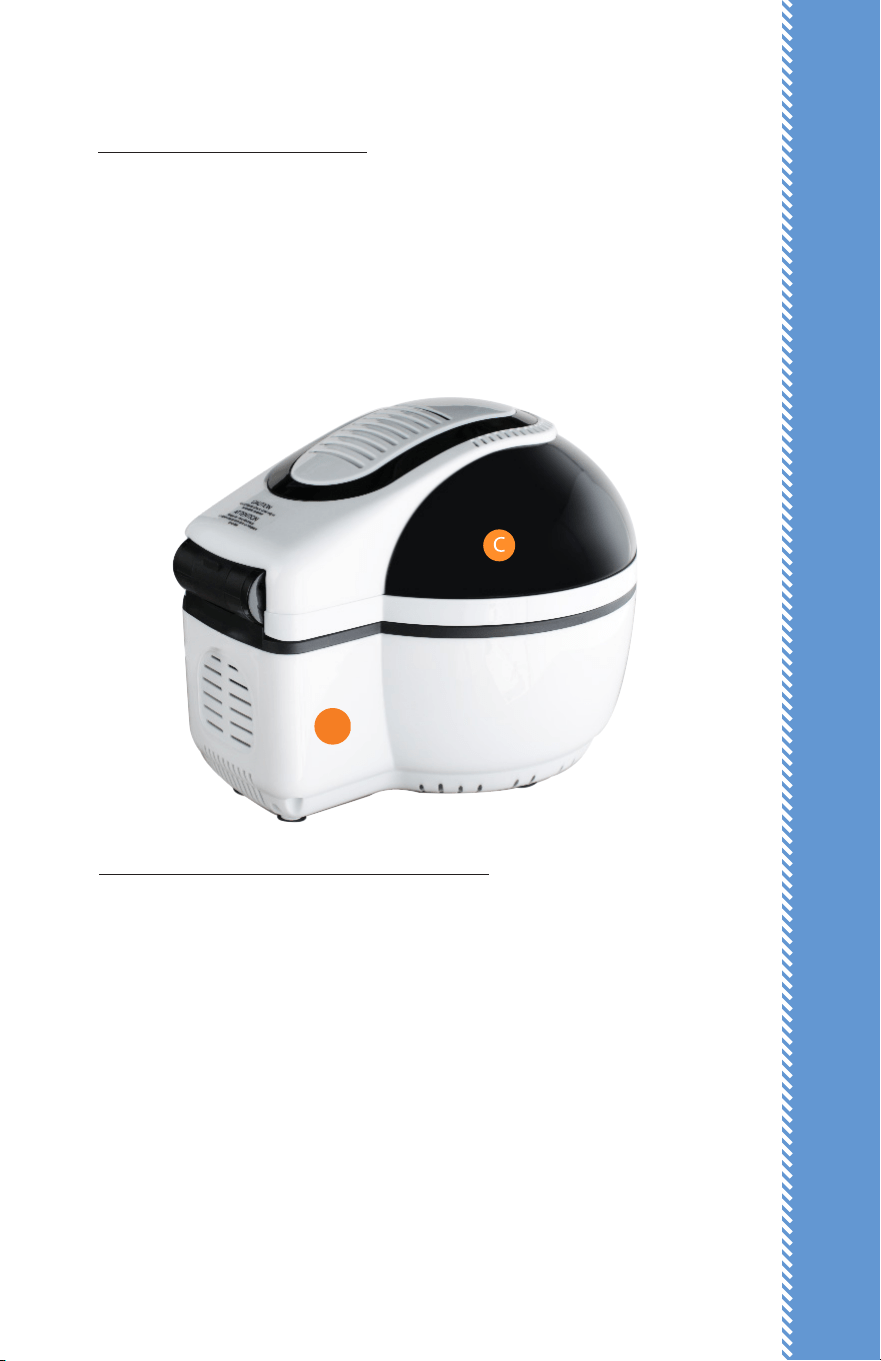
C. EasyView Lid with RadiVection Cooking System- The EasyView Lid has a unique
heating system built right inside – a combination of turbo-charged convection heat
and a powerful halogen light. These two powerhouse heating elements use super-
turbo air circulation to fry, roast, bake, and stir-fry foods quickly and eciently without
using oil. Your results? Fresh avors, lower fat content, tender and moist interiors,
super crispy exteriors and compliments all around from your family and friends.
-Keep the EasyView Lid closed while cooking to optimize cooking times and
ensure fully-cooked foods.
-If needed, open the EasyView Lid while cooking to add ingredients. Use a
pot holder or oven mitt and fully extend the Lid until it “clicks” in full open position. Use
caution: Hot air and/or steam may be released when the Lid is opened.
-Although the heating system will stop temporarily when the Lid is opened,
B
FEATURES & FUNCTIONS
10
any rotation accessory in use will continue to turn. Close the Lid securely; the Control
Panel will continue the timer countdown and frying/cooking.
-Heat Release Vents – The large vents on top of the Lid may release hot air
and/or steam as foods are fried. Avoid standing close or placing your face or hands
near the Vents.
D. Accessories (see p. 20 for Assembly instructions)- With the accessories included in
your package, you have a wealth of options for rotisserie, stir-frying, roasting, cooking
and baking at your ngertips! Check the Assembly Section to nd full instructions for
using each of these accessories.
- Classic Rotisserie Spit and Spit Forks. Forget about buying rotisserie
chicken from your local grocery store! You can now rotisserie-cook tender chicken and
beef roasts to perfection in your own kitchen. The classic Rotisserie Spit and two Spit
Forks hold large cuts of meat or poultry for golden, tender and superior results.
B
C
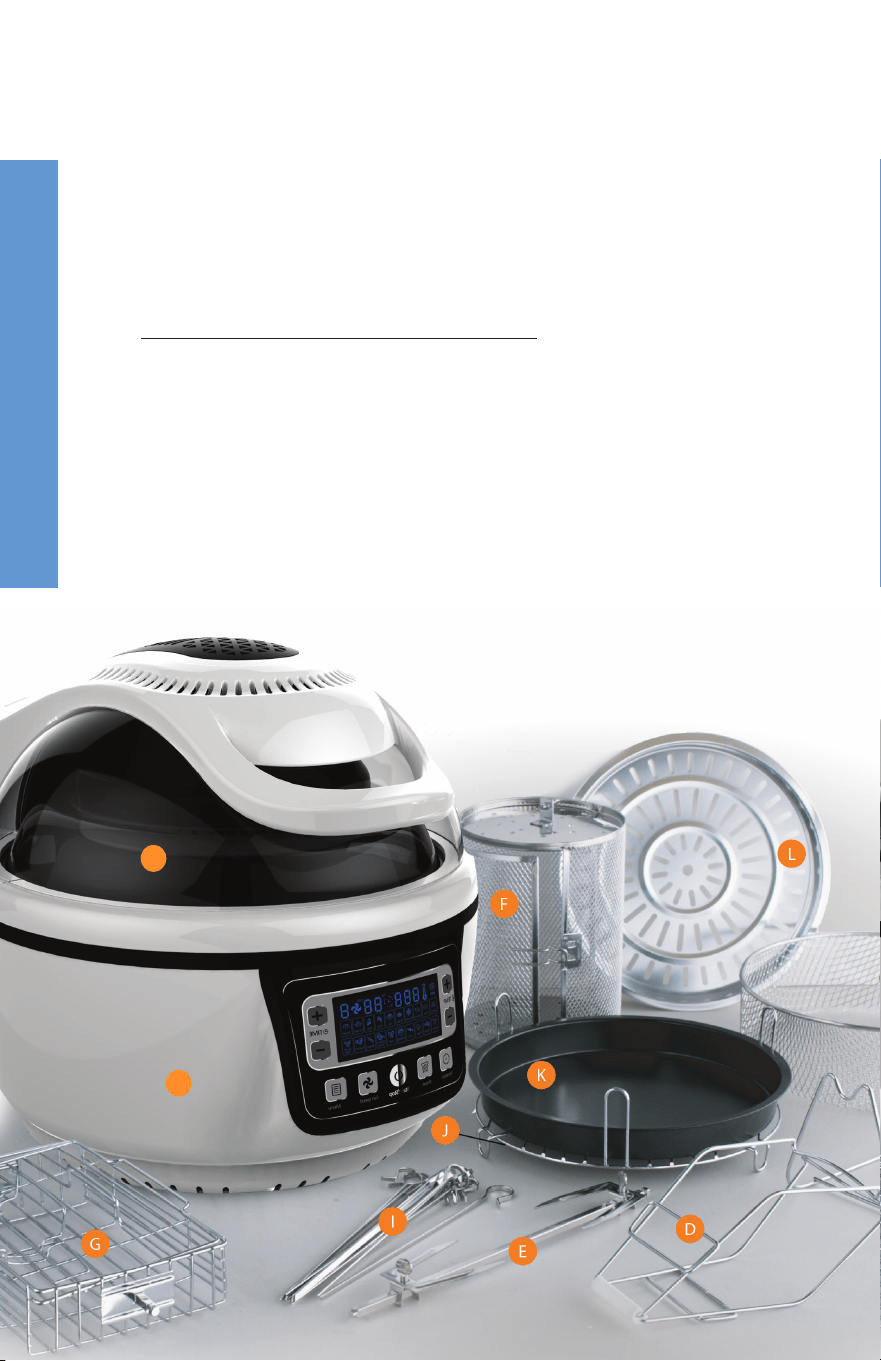
FEATURES & FUNCTIONS
11
A. Removable Cooking Pot
B. The Turbo XP Free Fry Cook Center Base
C. EasyView Lid with RadiVection 360° Cooking System
D. Turbo Lifter
E. Classic Rotisserie Spit and Spit Forks
F. Frying Tumbler
G. Grill Basket.
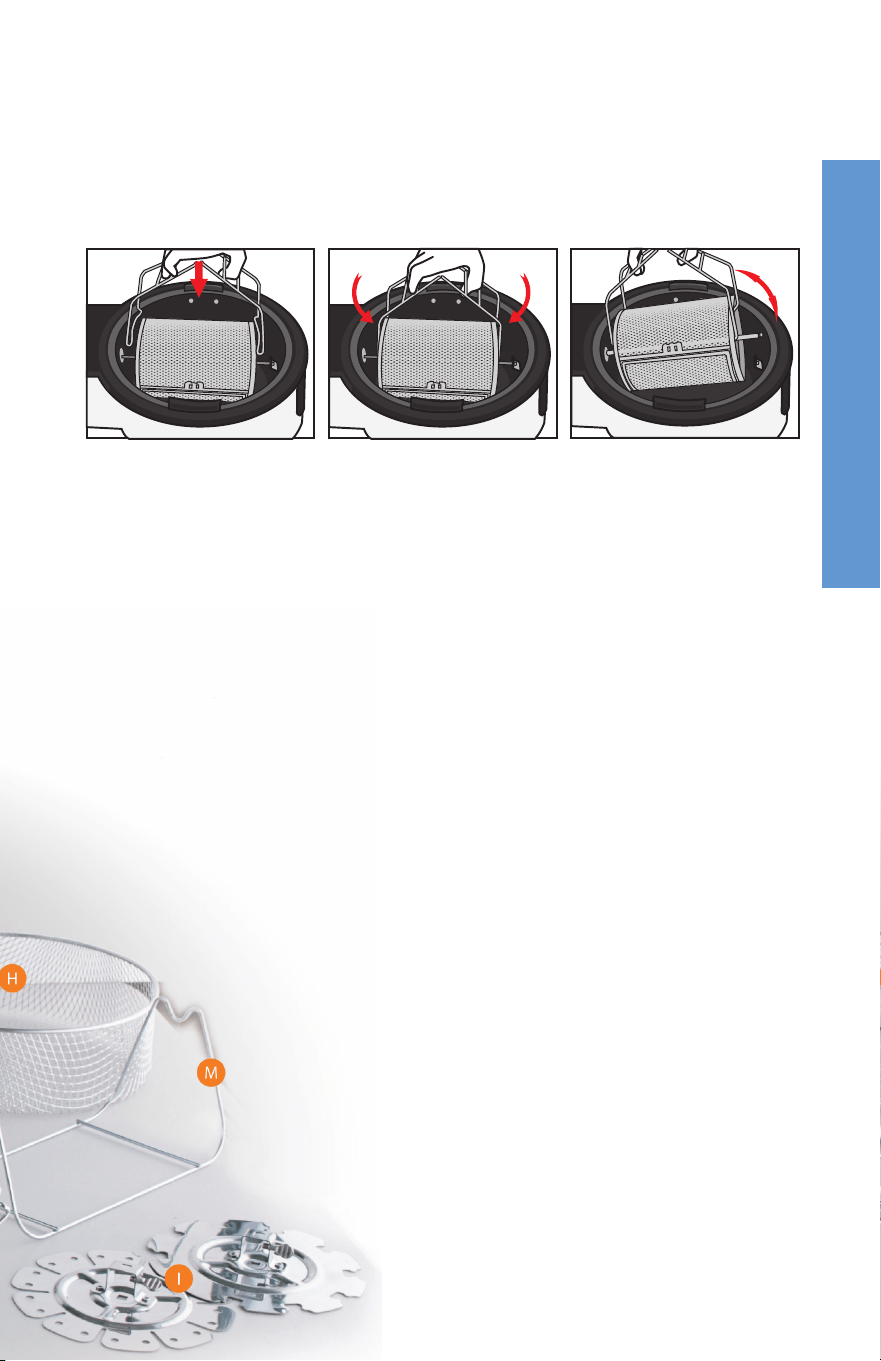
H. Mesh Frying Basket
I. Kebab Rotisserie and 10 Skewers
J. High/Low Rack
K. Baking Pan
L. Grilling Pan
M. Stainless Steel Rotisserie Stand
- Turbo Lifter. The single piece Turbo Lifter acts as a pair of easy-to-use tongs. Slip
the ngers of your hand into the rectangular openings and rest the palm of your hand on
the plastic protector at the joint. Open the Lifter and securely hold or pick up heated foods
in the Frying Tumbler as well as foods on the Rotisserie Spit.
- Frying Tumbler. The Tumbler is your go-to accessory when you want to stir-fry
foods, make French-fries or cook other foods that need turning while frying. The end result?
Hands-free frying and guilt-free favorite foods.
- Baking Pan. Designed to t onto the High/Low Rack, this 9-inch Baking Pan
holds a piping hot homemade pizza, a fresh fruit crisp, a blueberry coee cake and much,
much more. The nonstick interior is a super-handy plus.
- High/Low Rack. Flip this Rack to the High position for even air-ow turbo
baking or place it in the Low position for steaming. The Rack sits easily in the Removable
Cooking Pot in either position.
12

13
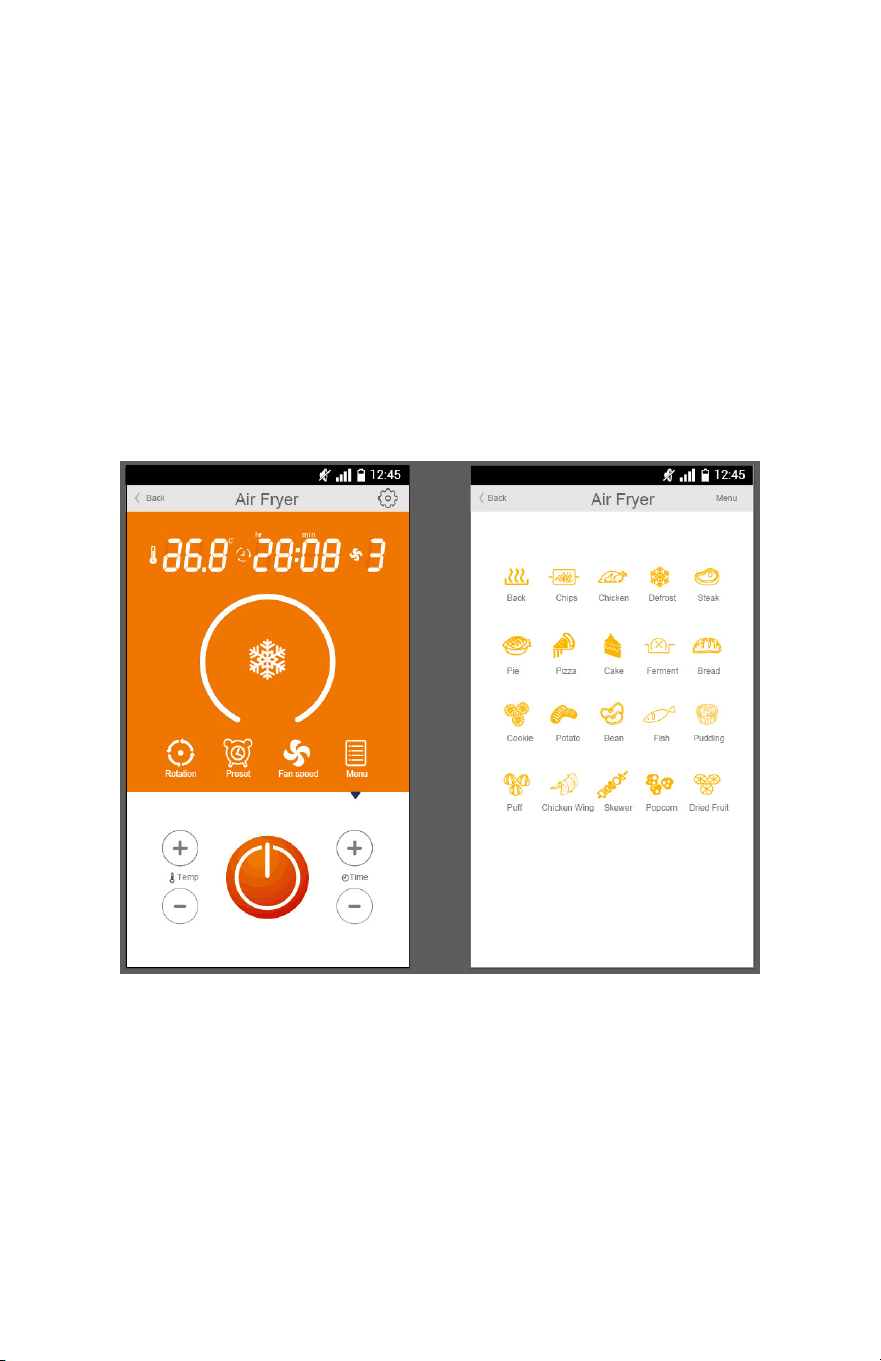
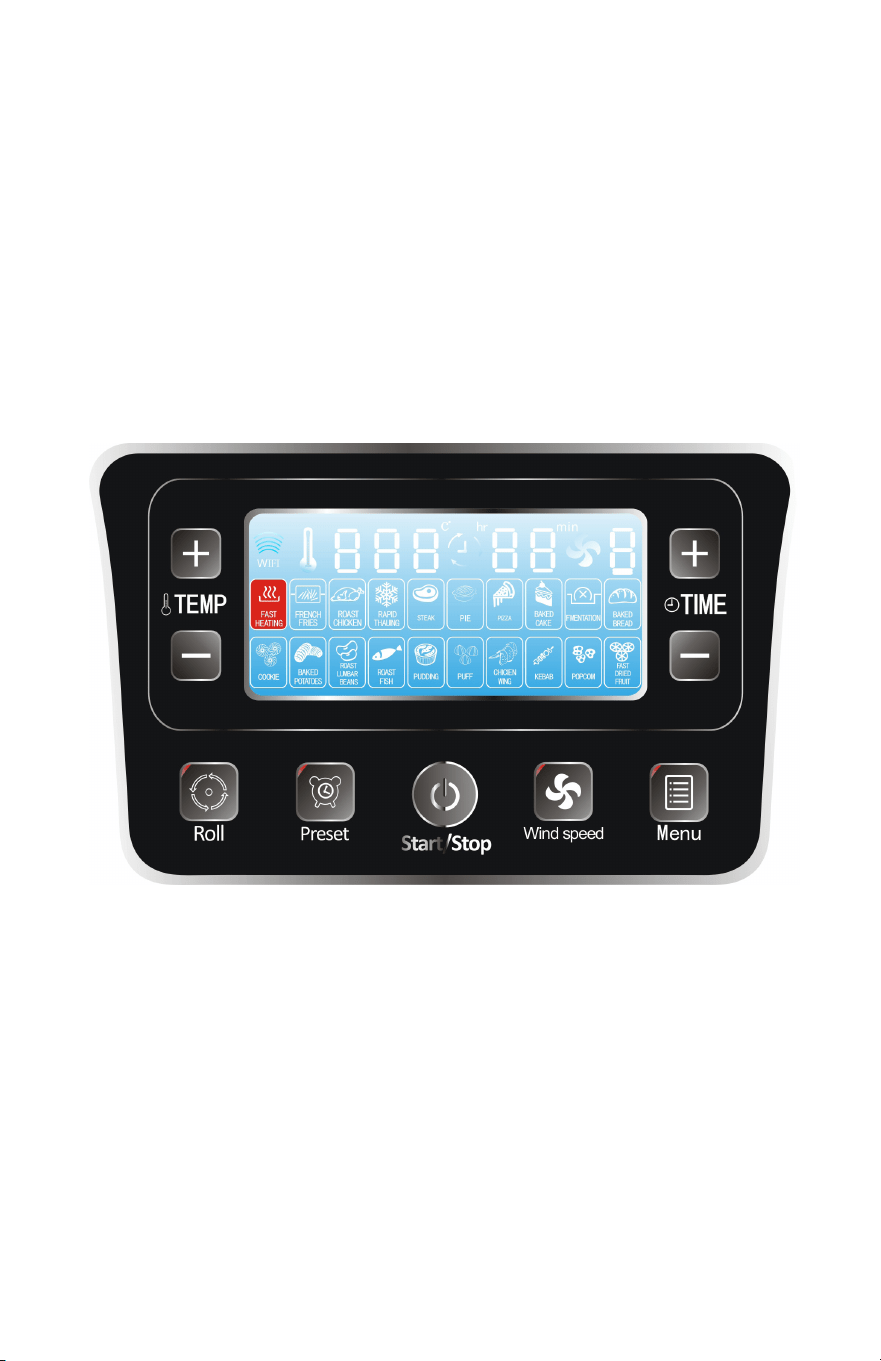
Before use, plug Cook Center Base into the wall outlet. The LED
Display will show “000” as the temperature, “0:00” as the time, and “0” as the fan
speed. The LED will also display 20 icons for pre-programmed cooking modes.
1. Press the Menu Button until desired Cooking Mode is selected.
2. Press the Start/Stop Button to begin cooking or wait 5 seconds, as the
Super Turbo XP Cook Center will automatically start the cooking process
and the Rotisserie rotation. If rotation is not required, press the Rotation
Button to stop the action.
3. Control Panel will display the pre-programmed temperature, time and
fan speed.
4. The Timer will countdown until nished, the Cook Center will beep 3
times, and then automatically turn OFF.
5. The LED Display will display temperature at “0:00,” time at “00” minutes,
and fan speed at “0” when done.
6. The Fan will continue to run until cooled and then automatically turn OFF.
13
PRE-PROGRAMMED CONTROL PANEL
THE PRE-PROGRAMMED CONTROL PANEL houses the LED Display and
electronic platform for pre-programmed Cooking Modes and Manual
Cooking options, including the manual Rotisserie Rotation and Preset
(Delay Start) features. Within the pre-programmed Modes, there are also
options to increase or decrease the cooking times and temperatures:
I. COOKING WITH AUTO COOKING MODES
II. COOKING WITH MANUAL TEMP, TIME & FAN SPEED
III. MAKING ADJUSTMENTS & CHANGING MODE CYCLES
IV. ADDING PRESET (DELAY START)

14
Pre-programmed Auto Cooking Mode Temp & Time Chart
PRE-PROGRAMMED CONTROL PANEL
Auto Mode Temp Time Fan Speed
Turbo 475 05 3
Chips 476 25 3
Chicken 465 30 2
Defrost 140 20 3
Steak 450 12 3
Pie 350 25 3
Pizza 400 12 3
Cake 350 45 1
Ferment (Proof) 85 50 1
Bread 375 23 2
Cookies 375 10 3
Potato 325 45 3
Bean 450 10 3
Fish 450 15 3
Pudding 350 25 1
Pu (Pastry) 400 25 2
Chicken Wing 465 15 3
Skewer (Kebabs) 450 15 2
Popcorn 475 08 3
Dried Fruit 212 60 3
II. Cooking with Manual Temp, Time & Fan Speed
Before use, plug Cook Center Base into the wall outlet. The Control Panel will
beep once. The LED Display will show “000” as the temperature, “0:00” as the
time, and “0” as the fan speed. The Display will also indicate 20 icons for cooking
modes.

1515
PRE-PROGRAMMED CONTROL PANEL
To choose a custom-cooking process, set the Super Turbo XP Cook Center
manually as follows:
1. Press the Temp +/– Button. Increase or decrease the Temp by pressing the
Button until the desired Temp is displayed.
2. Press the Time +/– Button. Increase or decrease the Time by pressing the
Button until the desired Time is displayed.
3. Press the Fan +/– Button. Select fan speed 1, 2 or 3.
4. Press the Start/Stop Button to begin the cooking process.
5. Rotation will automatically begin when cooking starts; press the Rotation
Button to stop rotation, if desired.
6. When done, the LED Display will display temperature at “0:00,” time at
“00” minutes, and fan speed at “0.” The Cook Center will beep 3 times to
indicate cooking process is complete and will automatically turn OFF.
7. The Fan will continue to run until cooled and then automatically turn
OFF.
III. Making Adjustments & Changing Mode Cycles
To Interrupt the Cooking Process:
1. Open the Lid until the audible “click” is heard. Stand back to avoid any hot
air or steam.
2. If using the Rotisserie option, the rotation will continue, although the
cooking cycle will not continue. Press the Rotation Button to stop rotation,
if desired.
3. Add ingredients or make adjustments as needed, close the Lid and the
cooking process will continue. Press the Rotation Button to restart the
Rotisserie.

16
PRE-PROGRAMMED CONTROL PANEL
To Adjust the Temp/Time/Fan Speed during the Cooking Process:
1. Press the Temp Button +/– to increase or decrease the temperature. The
temperature range is 85°F to 475°F.
2. Press the Time Button +/– to increase or decrease the time. The time
range is 0:01 minute to 1:00 hour.
3. Press the Fan Speed Button to change as desired.
IV. Adding Preset (Delay Start)
The Super Turbo XP Cook Center oers a Preset (Delay Start) feature for your
convenience. To cook adding a Preset (Delay Start) time on the Control Panel,
follow these instructions.
Please note the following for your safety:
• Do not use Preset (Delay Start) for meat, poultry, sh or shellsh. Do
not allow these foods to sit at room temperature in the Cook Center. Cook
these foods immediately to prevent the unwanted growth of potentially
harmful bacteria.
• Do not use Preset (Delay Start) for dairy foods such as milk, cream
and yogurt and other foods such as eggs or cheese. Cook these foods
immediately to prevent the unwanted growth of potentially harmful
bacteria.
Adding Preset/Delay Start with Auto Cooking Mode:
1. Press the Preset Button. The LED Display will indicate “0:30” (thirty)
minutes.
2. Press the Time Button +/– to increase or decrease the desired Delay Time.
The time range for Delay Start is 0:01 minute to 12:00 hours.
3. Immediately press the Cooking Mode of your choice. The cooking Mode
icon will ash 6 times.
4. The timer will display the delayed start time and begin to countdown
to “00” minutes. At that time, the Auto Cooking Mode process will
automatically start.

1717
PRE-PROGRAMMED CONTROL PANEL
Adding Preset/Delay Start with Custom Cooking Process:
1. Press Prestart (Delay Start) Button. Press the Time Button +/– to increase or
decrease the Delayed Start time. The time range is 00:01 minute to 12:00
hours.
2. Press the Menu Button to select any Auto Mode icon. Immediately, press the
Temp Button +/– to increase or decrease the temperature.
4. Press the Time Button +/– to increase or decrease the time.
5. Press the Fan speed to 1, 2 or 3.
6. Press the Start/Stop Button to begin the delayed start time, or wait 5
seconds as the Cook Center will automatically start. The Display delayed
start time will countdown to “0:00” minutes. The custom cooking process
will then automatically start.
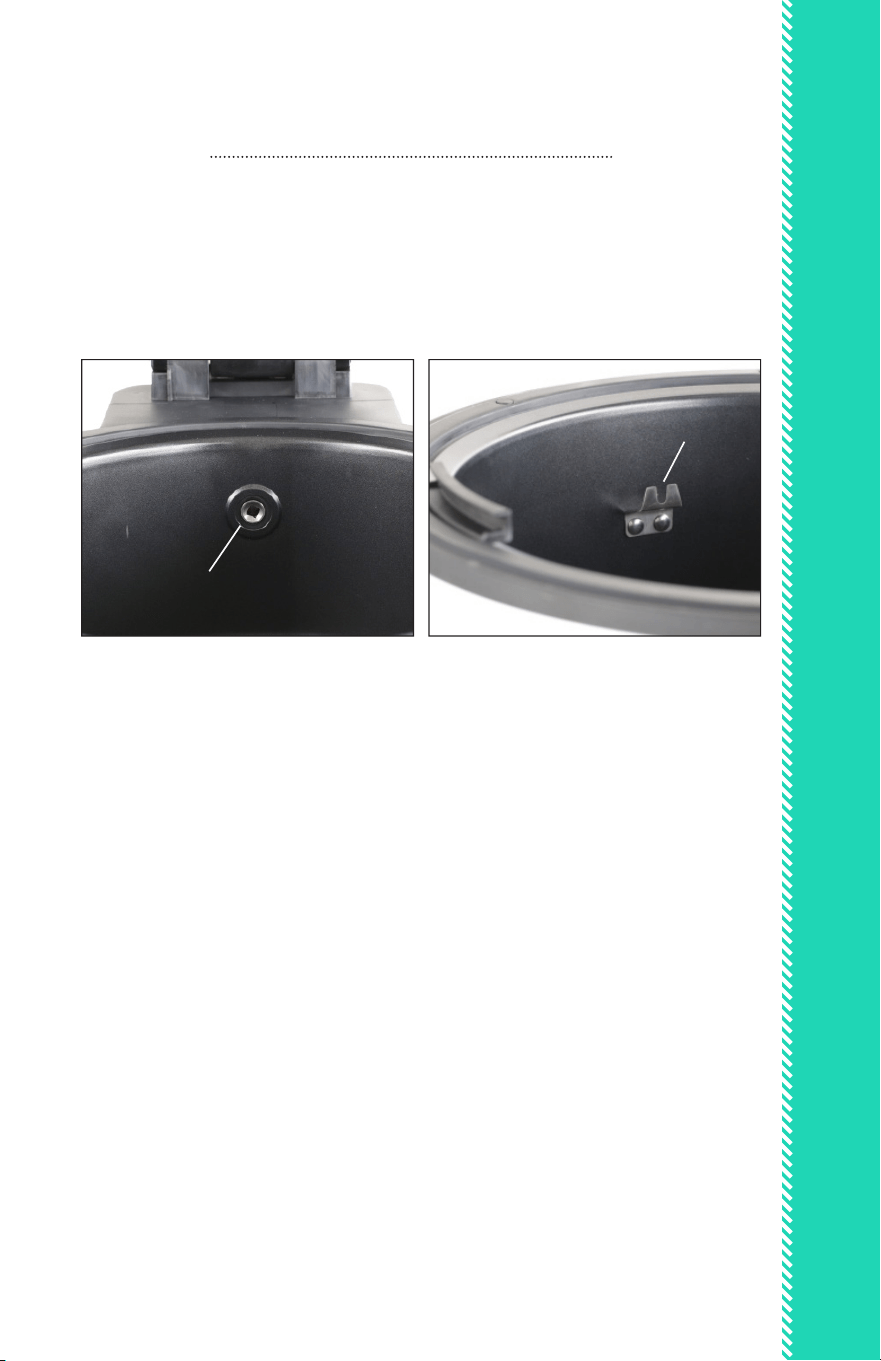
Filter Tabs
g.4
g.6
g.3
g.2
g.1

1919
BEFORE FIRST USE & ASSEMBLY
BEFORE FIRST USE & ASSEMBLY
Before First Use:
1. Place the Super Turbo XP Cook Center on a level, at surface that is heat-
resistant.
2. Ensure that the Super Turbo XP Cook Center is several inches away from
obstructions, such as walls, cabinets, doors, and other appliances. Allow
enough room above the Cook Center so the lid can be fully opened.
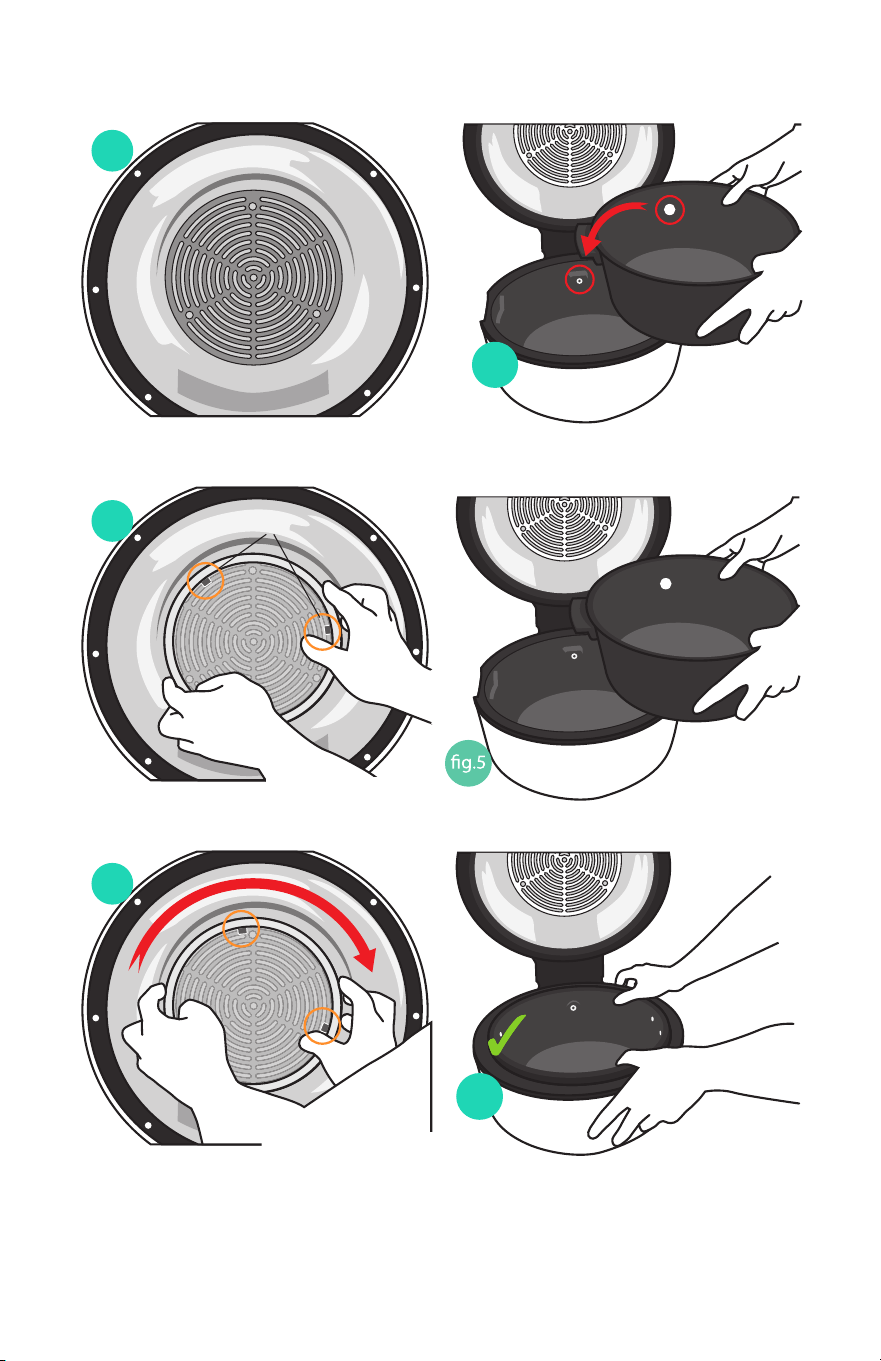
3. Open the EasyView Lid until it audibly “clicks.” Install the Filter over the
heating element in the EasyView Lid (g. 1). Center the Filter over the
element with the locking tabs facing inward (g. 2). Rotate the Filter
clockwise until the Filter tabs lock into place on the heating element (g.
3).
4. Wipe the interior and exterior of the Cook Center and Pot with soft soap
and a damp cloth. Dry thoroughly.
5. When ready to cook, insert the lled Removable Cooking Pot into the
Base and add accessories as indicated. The round opening in the Pot
should align with the Rotisserie opening in the Cook Center Base and the
Pot EasyLift Handles should align with the two handle grooves in the Base
(see g. 4, 5, 6). Follow instructions on the Pre-programmed Control Panel
to start cooking.
6. When correctly positioned, the Pot EasyLift Handles should align with the
two handle grooves in the Base.
7. Follow instructions for the Pre-programmed Control Panel to start
cooking.

20
g.1
g.4
g.2
g.6
g.3
g.5
pin indentation
21
QUICK & EASY ACCESSORY ASSEMBLY
QUICK & EASY ACCESSORY ASSEMBLY
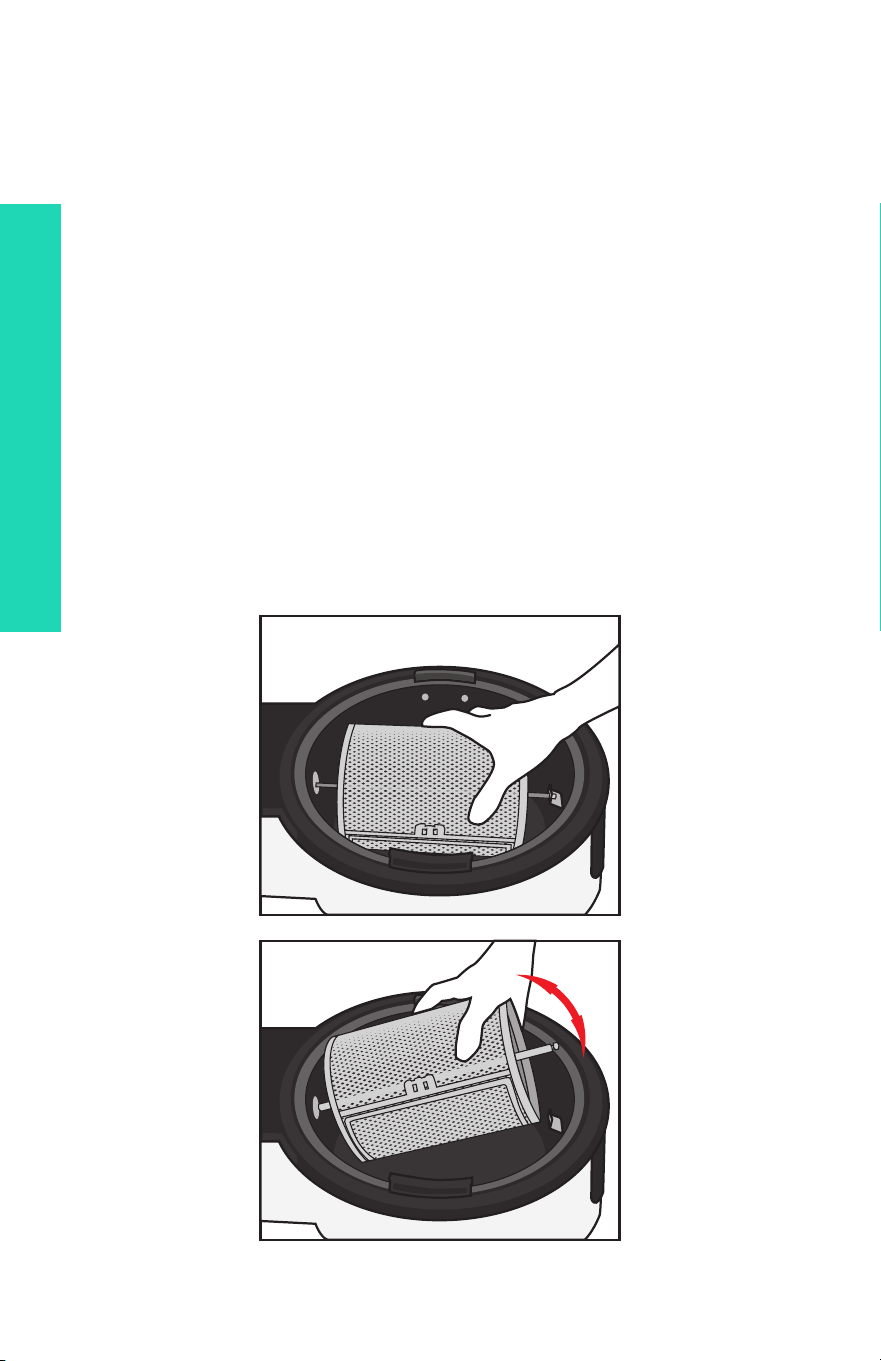
Accessory Assembly Note: When using the Classic Rotisserie Spit, Frying Tumbler,
Grill Basket and Kebab Rotisserie, be sure to insert the pointed end of the Spit onto
the round opening and place the other end of the Spit onto the Spit holder on the
other side of the Pot as indicated below::
CLASSIC ROTISSERIE SPIT & SPIT FORKS
Turbo/Roast Modes
1. Holding the square end of the Spit in one hand, place a Fork on the Spit
with the fork tines facing toward the center of the Spit. Slide the Fork on
the Spit until the screw is over the small pin indentation on the Spit. Hand
tighten the screw (g.1-3).
2. Insert the pointed tip of the Spit into middle of a roast or poultry and press
meat until the tines of the Fork pierce the meat. The meat should sit rmly
in the middle on the Spit (g.4).
3. Slide the remaining Fork onto the Spit with the tines facing the center and
press tines into the meat until it pierces the meat and holds rmly. Hand
tighten the screw of the Fork. Check and adjust if needed to ensure the
meat is balanced on the Spit (g.5 and 6).
4. Slide the pointed end of the Spit into the round opening in the Removable
Cooking Pot and place the square end of the Spit on the Spit holder (see
images above). If the Spit does not lie at, turn the Spit and re-adjust until
the Spit lies at on the Spit holder. Close the Lid and set the Mode desired.
round opening
Spit holder
22
Frying Tumble
Turbo/Roast Modes
1. Insert the pointed end of the Rotisserie Spit into the square opening on
one end of the Tumbler and thread through to the other side. Slide the
Fork until the screw by the square opening is aligned with the small pin
indentation on the Spit. Hand tighten the screw.
2. Open the Tumbler door and spray the interior with cooking spray to aid
release after cooking. Fill with foods to be fried. Do not ll the Tumbler
more than one-half full (allow room for foods to tumble). Close and lock
the door.
3. Insert the Tumbler into the Cook Center by placing the pointed end of
the Spit into the round opening in the Removable Cooking Pot. Place the
other end of the Spit onto the Spit holder on the other side of the Pot.
Close the Lid and set the Mode desired.
QUICK & EASY ACCESSORY ASSEMBLY
23
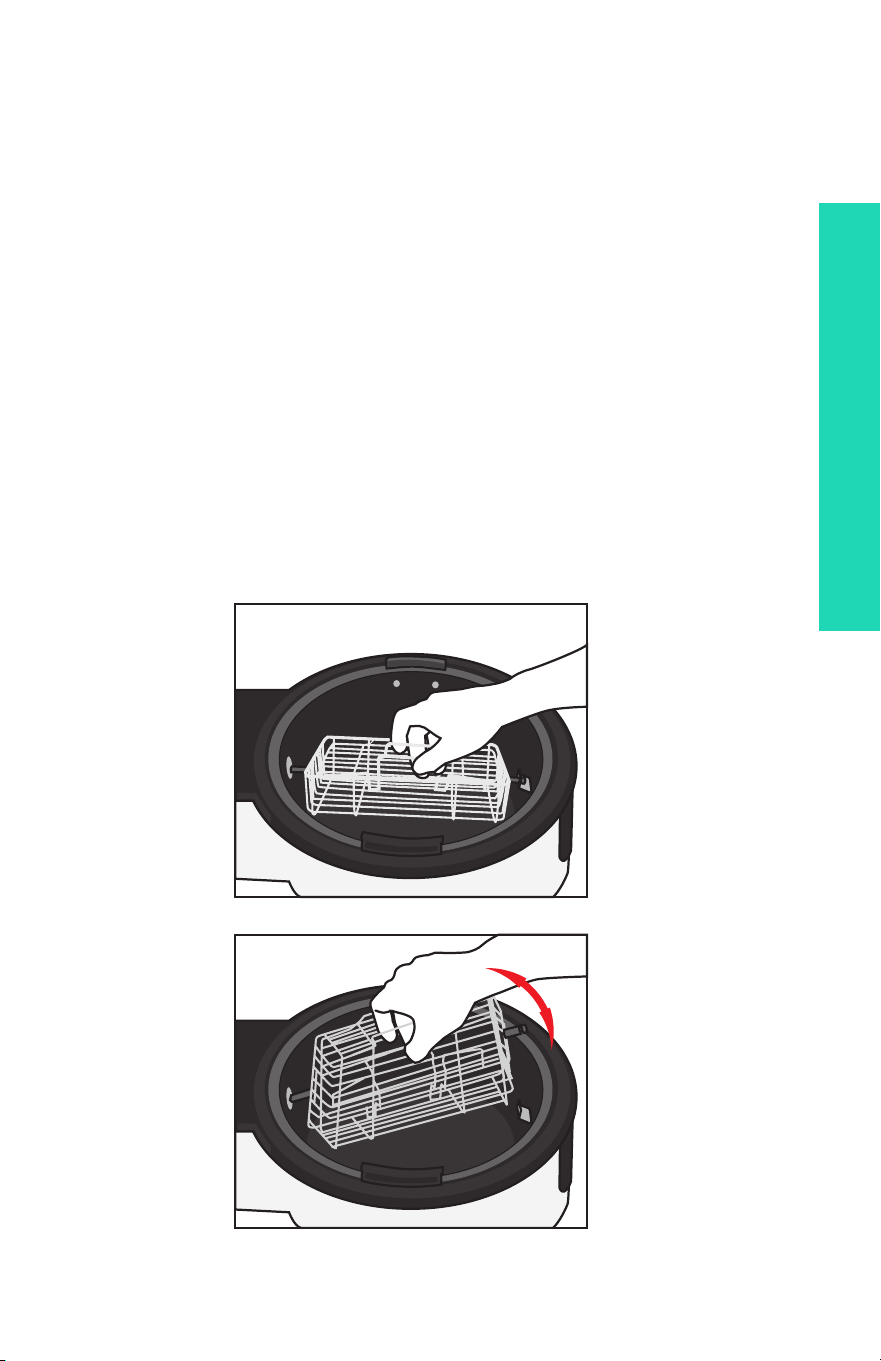
Grill Basket:
Turbo/Roast/Fry Modes
1. Open the Basket by squeezing the two stainless steel Basket wires
together until the Basket is released. Remove the Lid.
2. Spray the interior of the Basket lightly with cooking spray to aid release
after cooking. Place meat, poultry or seafood into Basket without over-
crowding. Replace the Lid.
3. Insert the pointed end of the Spit into the round opening in the
Removable Cooking Pot. Place the square end of the Spit onto the Spit
holder on the other side of the Pot. Ensure that the Spit is resting rmly
and the Basket is balanced. If not, remove and re-align. Close the Lid and
set the Mode desired.
QUICK & EASY ACCESSORY ASSEMBLY
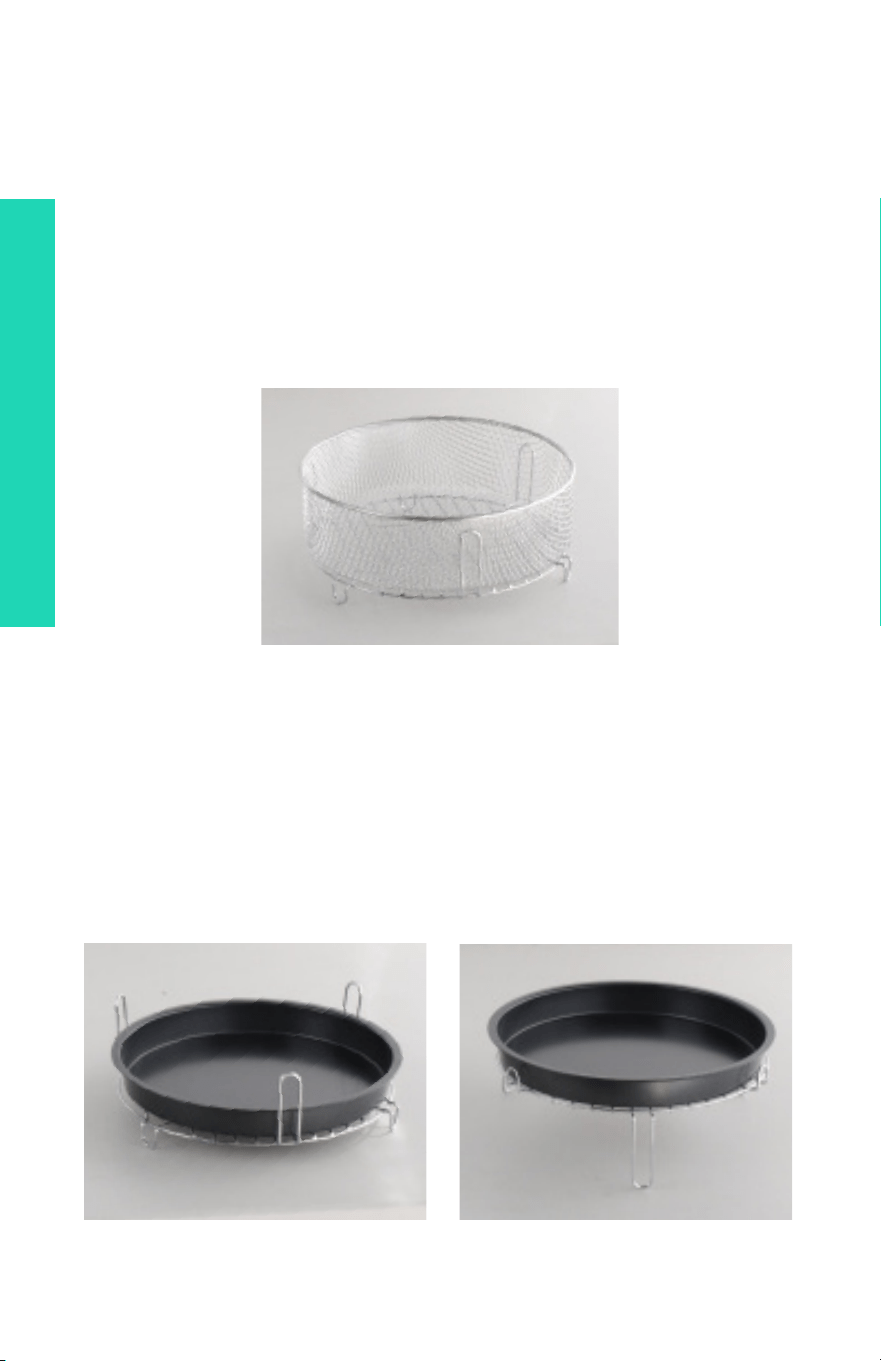
MESH FRYING BASKET + HIGH/LOW RACK
Turbo/Roast/Fry Modes
1. Before adding ingredients to the Mesh Frying Basket, lightly coat with
cooking spray or a small amount of oil to prevent sticking and aid release
after cooking.
2. Use the Basket with the Rack in High position for best frying results, as the air
will circulate freely through the Rack and Basket.
BAKING PAN WITH HIGH/LOW RACK
Turbo/Bake/Pizza/Defrost Modes
1. Place the High/Low Rack in the High position in the Removable Cooking Pot.
2. Place the Pot in the Cook Center Base. Add food ingredients into Baking Pan
and arrange on the Rack. Set to Mode as desired.
QUICK & EASY ACCESSORY ASSEMBLY
25
QUICK & EASY ACCESSORY ASSEMBLY
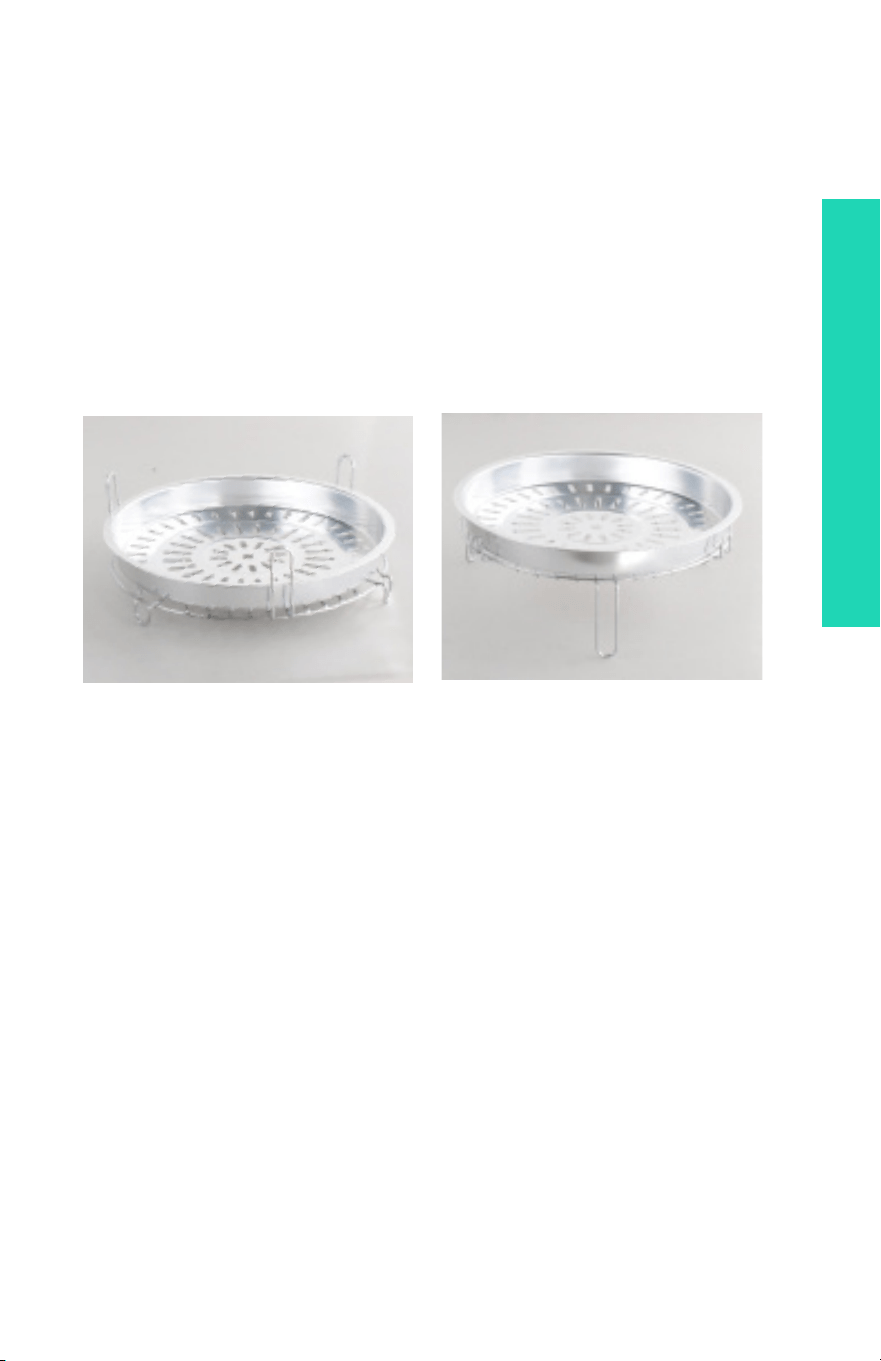
GRILLING PAN WITH HIGH/LOW RACK
Turbo/Bake/Pizza Modes
1. If grilling steak or chops less than 1/2-inch thick, turn the Rack to the High
position. If grilling thicker cuts of meat, turn the Rack to the Low position.
2. Place the Rack in the Removable Cooking Pot. Place the Pot in the Cook
Center Base.
3. Set to Mode as desired. Turn meat or poultry while grilling, if desired.

26
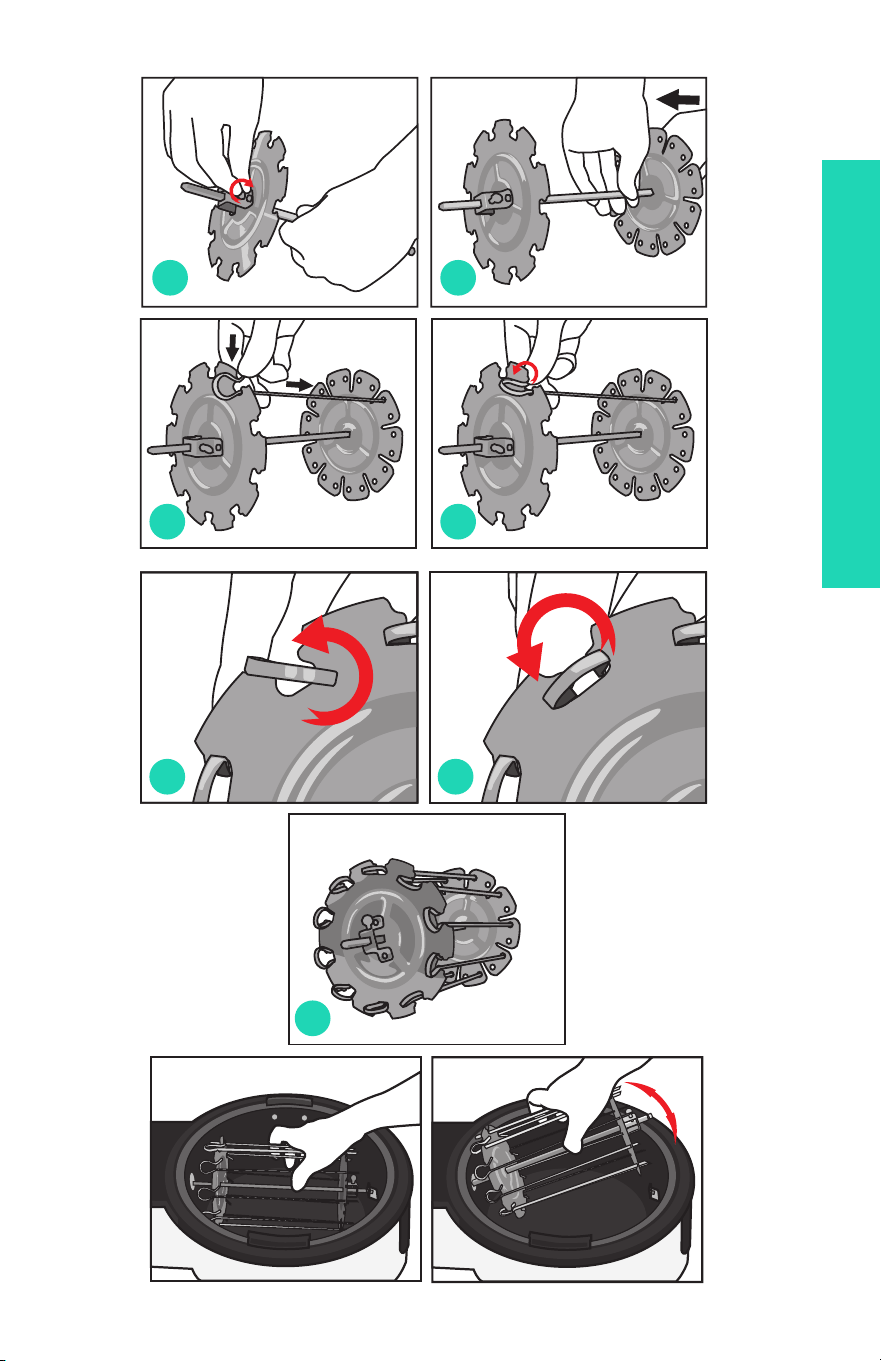
Kebab Rotisserie and Skewers:
Turbo/Roast/Fry Modes
1. Assemble the Spit and Kebab Rotisserie. Holding the Spit with one hand, slide
one kebab wheel (with the screw assembly facing out) over the pointed tip of
the Spit until the screw is over the small pin indentation on the square end of the
Spit. Hand tighten the screw (g. 1). Slide the other wheel over the pointed end
of the Spit (with the screw assembly facing out) until the screw is over the small
pin indentation on the Spit. Hand tighten the screw (g. 2).
2. Arrange the kebab ingredients on the Skewers. Use caution when sliding food
over the pointed tips of the Skewers, as the tips are very sharp! Do not over-
crowd the food on the Skewers. Food ingredients should be touching, but not
crammed together.
3. To place the lled Skewers onto the Kebab Rotisserie, thread the pointed end
of one Kebab Skewer into a round hole on the wheel (g. 3). Turn and “lock” the
round top of the Skewer into place in the other wheel (g. 4, 5, 6). Repeat with
remaining Skewers. Ensure that the Rotisserie is balanced and turning freely
(g. 7). If not, re-position the Kebab Skewers until the Rotisserie is balanced.
4. Insert the pointed end of the Spit into the round opening in the Removable
Cooking Pot and place the square end of the Spit onto the Spit holder on the
other end of the Pot. Close the Lid.
QUICK & EASY ACCESSORY ASSEMBLY
27
g.1
g.3
g.2
g.4
g.5
g.7
g.6
QUICK & EASY ACCESSORY ASSEMBLY

28

29
QUICK & EASY MODE COOKING GUIDE
QUICK & EASY MODE COOKING GUIDE
The 20 Cooking Modes in your Super Turbo XP Cook Center are
only the starting place to create deliciously easy dishes! With various times
and temperatures already preset by the factory, you can choose any of the
Cooking Modes and alter the times/temperatures, or you can choose to set
a custom cooking process for your favorite recipes.
This Cooking Guide will help you choose accessories for Cooking Modes
and nd the best Mode for frying, roasting, grilling, baking or cooking your
favorite foods.
Pre-Programmed: 5 minutes @ 475˚F
WHY
CHOOSE
TURBO
MODE?
TURBO MODE
• quick, high-heat for searing and sautéing
• add time for thicker cuts; custom fry to preferred doneness
• super-fast grilling for beef steaks, chops, boneless chicken
breasts
• super-fast frying for fragile foods (sh llets, fruit)
TURBO MODE & ACCESSORIES
Frying Tumbler: chopped vegetables (peppers, onions, celery,
carrots); seasoned bread cubes for croutons, small cippolini onions,
quartered pears or apples.
Grill Basket: thin beef steaks, pork chops, boneless chicken breasts,
shrimp, sh llets, portobello mushrooms, tofu steaks
Mesh Basket: frozen prepared snacks, appetizers and entrées.
Kebab Rotisserie: thin-sliced steak or chicken satay, fruit kebabs

QUICK & EASY MODE COOKING GUIDE
30
Pre-Programmed: 25 minutes @ 475˚F
WHY
CHOOSE
CHIPS
MODE?
CHIPS MODE
• eliminates the need for oil or butter
• produces crisp potato chips; thin-slice for best results
• make carrot chips, kale chips + other thin-sliced veggies
CHIPS MODE & ACCESSORIES
Frying Tumbler: ll halfway with thin-sliced potatoes. When done,
toss with kosher salt and pepper or other spicy mix.
Grill Basket: slice horizontally; create long thin-crispy chips
Pre-Programmed: 30 minutes @ 465˚F
WHY
CHOOSE
CHICKEN
MODE?
CHICKEN MODE
• create crispy fried chicken without added fat
• interior is moist; exterior is crunchy and crisp
• never buy rotisserie chicken again!
• increase Timer as needed to cook chicken to 180°F
internally
CHICKEN MODE & ACCESSORIES
Classic Rotisserie: 3-4 lb whole chicken
Frying Tumbler: chicken nuggets, homestyle chicken tenders
Grill Basket: boneless, skinless chicken breasts
Mesh Basket: cut up fryer chicken pieces
Kebab Rotisserie: chicken + vegetable kebabs

QUICK & EASY MODE COOKING GUIDE
31
Pre-Programmed: 12 minutes @ 450˚F
WHY
CHOOSE
STEAK
MODE?
STEAK MODE
• fries thick steaks and chops perfectly
• turn meat only once while frying
• uses no additional oil or butter
• sears and seals in juices for avor
STEAK MODE & ACCESSORIES
Fryer Tumbler: cubed boneless beef, pork or poultry
Grill Basket: bone-in steaks or chops
Mesh Basket: beef, pork or poultry with vegetable combinations
Kebab Rotisserie: beef, pork or poultry kebabs with fruit or
vegetables
Pre-Programmed: 20 minutes @ 140˚F
WHY
CHOOSE
DEFROST
MODE?
DEFROST MODE
DEFROST MODE & ACCESSORIES
Baking Pan + High/Low Rack: thaw frozen meat,
poultry, seafood, soften butter, refresh breads
and rolls.

32
QUICK & EASY MODE COOKING GUIDE
Pre-Programmed: 25 minutes @ 350˚F
WHY
CHOOSE
PIE
MODE?
PIE MODE
• moderate heat provides excellent results
• pie crust is aky; interior fruit is tender
• increase time for large pies
• use baking pan for tarts and galette
PIE MODE & ACCESSORIES
Baking Pan + High/Low Rack: pies, fruit crisp and cobblers, galette,
tarts
Pre-Programmed: 12 minutes @ 400˚F
WHY
CHOOSE
PIZZA
MODE?
PIZZA MODE
• high heat + fast cook time
• crisps thin crust
• re-heat frozen 8-inch pizza, garlic twists, breads
PIZZA MODE & ACCESSORIES
Baking Pan + High/Low Rack: homemade pizza cooks quickly or bake
bread twists, rolls, focaccia bread.
Pre-Programmed: 50 minutes @ 85˚F
WHY
CHOOSE
FERMENT
MODE?
FERMENT (PROOFING) MODE
• gentle heat provides the perfect environment for
development of yeast.
• mix bread dough and place in Removable Cooking Pot;
when ready, punch down and shape.
FERMENT MODE & ACCESSORIES
Baking Pan + High/Low Rack: rolls, pan breads, quick-rise breads.

33
QUICK & EASY MODE COOKING GUIDE
Pre-Programmed: 45 minutes @ 350˚F
WHY
CHOOSE
CAKE
MODE?
CAKE MODE
• moderate temp + hot air = faster cooking
• bake muns, cupcakes, quick breads
CAKE MODE & ACCESSORIES
Baking Pan + High/Low Rack: baked goods, quick breads.
Removable Cooking Pot: bake single-layer cheesecake, fruit cake,
bread puddings and more directly in the Pot.
Pre-Programmed: 23 minutes @ 375˚F
WHY
CHOOSE
BREAD
MODE?
BREAD MODE
• bakes bread to a golden nish; increase time for
large loaves
• air circulation provides steady heat for crisp bread crust
BREAD MODE & ACCESSORIES
Baking Pan + High/Low Rack: yeast breads, rolls, pan breads, quick-
rise breads
Removable Cooking Pot: large sourdough bread rounds

QUICK & EASY MODE COOKING GUIDE
34
Pre-Programmed: 10 minutes @ 375˚F
WHY
CHOOSE
COOKIES
MODE?
COOKIES MODE
• evenly distributed heat results in golden cookies, cooked
through
• cook faster than traditional oven
• set and forget; no need to check and re-check while baking
COOKIES MODE & ACCESSORIES
Baking Pan + High/Low Rack: small-batch cookies, bars, wedges
Removable Cooking Pot: giant cookie baking, shaped cookies
Pre-Programmed: 45 minutes @ 325˚F
WHY
CHOOSE
POTATO
MODE?
POTATO MODE
• simple, easy-to-prep baked potato
• bake root vegetables without oil or butter
• roast beets, carrots and other seasonal veggies
POTATO MODE & ACCESSORIES
Baking Pan + High/Low Rack: place scrubbed russet, Yukon or
ngerling potatoes in pan – set and forget (pierce with fork before
baking). Bake scalloped potatoes, potatoes au gratin using low,
constant heat in this Mode.
Mesh Basket: Bake twice-baked potatoes, loaded potato skins

QUICK & EASY MODE COOKING GUIDE
35
Pre-Programmed: 10 minutes @ 450˚F
WHY
CHOOSE
BEAN
MODE?
BEAN MODE
• eciently heats canned beans or pre-cooked beans
• high heat and quick cook time refreshes avors
BEAN MODE & ACCESSORIES
Baking Pan + High/Low Rack: Spoon beans into pan and
quickly re-heat.
Combine beans with other ingredients for fast cooking.
Pre-Programmed: 15 minutes @ 450˚F
WHY
CHOOSE
FISH
MODE?
FISH MODE
• quickly fries sh at high heat
• uses no added oil or butter
• even heat is distributed by rotation
FISH MODE & ACCESSORIES
Grill Basket: whole trout or small sh; sh llets
Mesh Basket: sh and vegetable combinations
Kebab Rotisserie: sh kebabs with vegetable or fruit

QUICK & EASY MODE COOKING GUIDE
36
Pre-Programmed: 25 minutes @ 350˚F
WHY
CHOOSE
PUDDING
MODE?
PUDDING MODE
• moderate heat and long bake time = tender, moist results
• make bread puddings, fruit puddings and avored
pudding
PUDDING MODE & ACCESSORIES
Baking Pan + High/Low Rack: make favorite puddings.
Pre-Programmed: 25 minutes @ 400˚F
WHY
CHOOSE
PUFF
MODE?
PUFF (PASTRY) MODE
• perfect temp/time for golden pastry
• cook hot, even and reheat perfectly
• try sweet or savory pastries; no need to turn
PUFF MODE & ACCESSORIES
Baking Pan + High/Low Rack: Use the Rack in the pan or the Rack
alone to hold lled pastries or homemade appetizers
Mesh Basket: bake pu pastry squares; stack and ll after baking

QUICK & EASY MODE COOKING GUIDE
37
Pre-Programmed: 15 minutes @ 465˚F
WHY
CHOOSE
CHICKEN
WING
MODE?
CHICKEN WING MODE
• make perfect bualo wings for snacks; game time
• check internal temp at 180°F to ensure doneness
CHICKEN WING MODE & ACCESSORIES
Fryer Tumbler: cubed boneless poultry
Grill Basket: single-layer chicken wings
Mesh Basket: battered or breaded wings
Pre-Programmed: 15 minutes @ 450˚F
WHY
CHOOSE
SKEWER
MODE?
SKEWER (KEBAB) MODE
• set and forget the frying time
• use no oil or butter
• high, intense heat produces seared exterior
SKEWER MODE & ACCESSORIES
Kebab Rotisserie: thread cubed meat or poultry with vegetables onto
skewers. Add spices or rubs. Alternate with vegetables cubes or other
foods that are compatible. Use even, small cubes of meat for uniform
cooking.

QUICK & EASY MODE COOKING GUIDE
38
Pre-Programmed: 08 minutes @ 475˚F
WHY
CHOOSE
POPCORN
MODE?
POPCORN MODE
• no more messes on the stove with oil, kernels and
greasy pots
• short, high heat oers best avor for kernels
POPCORN MODE & ACCESSORIES
Mesh Basket: add a single layer of popcorn kernels to the bottom of
the Basket; no oil or butter added!
Removable Cooking Pot: lightly coat the bottom with cooking spray
and add a single layer of popcorn kernels. When done, toss popcorn
with kosher salt, garlic salt, onion salt or other spice avors.
Pre-Programmed: 60 minutes @ 212˚F
WHY
CHOOSE
DRIED FRUIT
MODE?
DRIED FRUIT MODE
• low, even heat dehydrates fruit
• moisture evaporates faster with air drying and rotation
DRIED FRUIT MODE & ACCESSORIES
Frying Tumbler: ll Tumbler halfway with uniformly-sized fruit or
nuts to be dried. Use rotation.
Mesh Basket: add a single layer of uniformly-sized fruit to be dried.
Do not use rotation.
QUICK & EASY COOKING GUIDE
39

40

41
MAINTENANCE & SERVICE
MAINTENANCE & SERVICE
Maintenance
ALWAYS allow the Super Turbo XP Cook Center to cool completely before
cleaning.
Unplug the Super Turbo XP Cook Center before cleaning.
After each use, clean and dry the Super Turbo XP Cook Center. Use a damp,
soapy cloth to clean the Cook Center Base and EasyView Lid. DO NOT immerse
the Base or Lid in water. Use non-abrasive soap only.
After each use, the Removable Cooking Pot may be placed in the dishwasher or
washed by hand with the other accessories.
Service
This Limited Warranty is for one full year from the date of purchase. It is
applicable to the original purchaser only and is not transferable to a third party
user. Repair or replacement of defective parts is solely at the seller’s discretion.
In the event that repair isn’t possible, the seller will replace the product/part. If
product repair/replacement won’t suce, the seller has the option of refunding
the cash value of the product or component returned.
Product defects not covered under the Warranty provisions include normal wear
and damage incurred from use or accidental negligence, misuse of instruction
specications or repair by unauthorized parties. The manufacturing company
is not liable for any incidental or consequential damages incurred by such
circumstances.
For Customer Service or Questions, Please call: 888-552-0033
www.gourmia.com
www.gourmia.com

www.gourmia.com