GAF588
4.7 L / 5 QT STAINLESS STEEL DIGITAL AIR FRYER
ENGLISH ESPAÑOL

2
Model: GAF588
© 2021 Gourmia
www.gourmia.com
The Steelstone Group
Brooklyn, NY
All rights reserved. No portion of this manual may be reproduced by any means
whatsoever without written permission from The Steelstone Group, except for
the inclusion of quotations in a media review.
Although every precaution has been taken in the preparation of this manual,
The Steelstone Group assumes no responsibility for errors or omissions. Nor
is any liability assumed for damages resulting from the use of the information
contained herein. Although every eort has been made to ensure that the
information contained in this manual is complete and accurate, The Steelstone
Group is not engaged in rendering professional advice or services to the
individual consumer; further, The Steelstone Group shall not be held responsible
for any loss or damage allegedly arising from any information or suggestions in
this manual.
IMPORTANT,
RETAIN FOR FUTURE REFERENCE:
READ CAREFULLY
FOR CUSTOMER SERVICE
QUESTIONS OR COMMENTS
VISIT WWW.GOURMIA.COM
OR EMAIL [email protected]
LANGUAGES SUPPORTED: ENGLISH, FRENCH, SPANISH
3
Congratulations on the purchase of your
Digital Air Fryer from Gourmia!
Here at Gourmia, we’re all about helping cooks make easy, healthy, and delicious
meals an everyday possibility. We know how fast-paced life is and that sometimes
a home cooked meal doesn’t make the top of the priority list, no matter how bad
you want it. Our dependable, easy-to-use units are here to help you change that.
We’re giving you the tools to eat better and healthier without spending hours in
the kitchen prepping and cooking.
We want you to get the most out of your air fryer, which is why our team is available
to help with any questions you may have. Whether you have a question with setup
or need some guidance on which preset to use, we’re happy to walk you through
it. Welcome to the ease of cooking with Gourmia.
This manual provides instructions for all of the air fryer’s functions and features
along with directions for assembling, operating, cleaning, and maintaining the
appliance. Please read all safety instructions and directions for safe usage at all
times. Keep this manual for future use.
Thank you for choosing Gourmia!
We love hearing from you! Share your thoughts, recipes, and photos with us.
@gourmia
IMPORTANT,
RETAIN FOR FUTURE REFERENCE:
READ CAREFULLY
4

5
TABLE OF CONTENTS
TABLE OF CONTENTS
Important Safeguards..................................6
Know Your Air Fryer......................................8
Display and Control Panel................................9
Preheat......................................................................9
Turn Reminder........................................................9
Display & Sound..................................................10
Presets Chart.........................................................11
Using Your Air Fryer.....................................12
Before First Use...................................................12
Adjusting Temperature and Time................15
Stop / Cancel Cooking......................................15
Cooking Tips.................................................16
Cleaning & Maintenance............................17
Troubleshooting...........................................18
Warranty & Service......................................19

6
1. This appliance shall not be used
by children from 0 to 8 years.
This appliance can be used by
children aged from 8 years and
above if they are continuously
supervised. This appliance
can be used by people with
reduced physical, sensory or
mental capabilities or lack of
experience and knowledge if they
have been given supervision or
instruction concerning the use of
the appliance in a safe way and
understand the hazards involved.
Keep the appliance and it’s cord
out of reach of children aged less
than 8 years. Cleaning and user
maintenance shall not be made by
children.
2. Cooking appliances should be
positioned in a stable situation
with the handles (if any) positioned
to avoid spillage of the hot liquid.
3. Check if the voltage indicated
on the appliance corresponds to
the local main voltage before you
connect the appliance.
4. Do not use the appliance if
the plug, the main cord or the
appliance itself is damaged.
Always make sure that the plug is
inserted properly into a wall outlet.
5. Do not operate any appliance with
a damaged cord or plug, after the
appliance malfunctions, or has
been damaged in any manner.
If the supply cord is damaged,
it must be replaced by the
manufacturer, its service agent or
similarly qualified persons in order
to avoid a hazard.
6. Close supervision is necessary
when any appliance is used near
children. Children should be
supervised to ensure that they do
not play with the appliance.
7. Do not let the cord hang over the
edge of the table or counter or
touch hot surfaces.
8. To protect against electric shock,
do not immerse cord, plugs, or
appliance in water or other liquid.
Do not plug in the appliance or
operate the control panel with wet
hands.
9. Never connect this appliance to an
external timer switch or separate
remote-control system in order to
avoid a hazardous situation. To
disconnect, turn o the appliance,
then remove plug from wall outlet.
10. Do not place the appliance on or
near combustible materials such
as a tablecloth or curtain. The
accessible surfaces may become
hot during use. Do not place on or
near a hot gas or electric burner,
or in a heated oven.
11. Do not place the appliance against
a wall or against other appliances.
Leave at least 10 cm / 3.9 in of
free space on the back and sides
and 10 cm / 3.9 in of free space
above the appliance. Do not place
anything on top of the appliance.
IMPORTANT SAFEGUARDS
Read all instructions before using the electric appliance. The following
basic precautions should always be followed:
IMPORTANT SAFEGUARDS

7
IMPORTANT SAFEGUARDS
• A short power-supply cord is provided to reduce risk of becoming
entangled in or tripping over a longer cord.
• Extension cords may be used if care is exercised in their use.
• If an extension cord is used:
a. The marked electrical rating of the extension cord should be at least
equal to the electrical rating of the appliance; and
b. The longer cord should be arranged so that it will not drape over
the countertop or tabletop where it can be pulled on by children or
tripped over.
SAVE THESE INSTRUCTIONS
CORD AND PLUG SAFETY
12. Do not use the appliance for any
other purpose than described in
this manual. The use of accessory
attachments not recommended by
the appliance manufacturer may
cause injuries.
13. Do not let the appliance operate
unattended. Extreme caution
must be used when moving an
appliance containing hot oil or
other hot liquids.
14. Do not use outdoors.
15. Do not touch the hot surfaces;
use handle. During air frying, hot
steam is released through the air
outlet openings. Keep your hands
and face at a safe distance from
the steam and from the air outlet
openings. Also be careful of hot
steam and air when you remove
the basket from the appliance.
16. After using the appliance, avoid
contact with the hot metal inside.
Unplug from outlet when not in
use and before cleaning. Allow the
appliance to cool before cleaning.
17. Immediately unplug the appliance
if you see dark smoke coming
out of the appliance. Wait for the
smoke emission to stop before
you remove the basket from the
appliance.
18. For household use only.

8
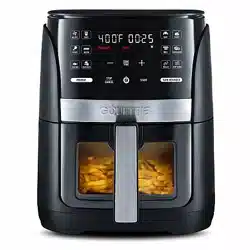
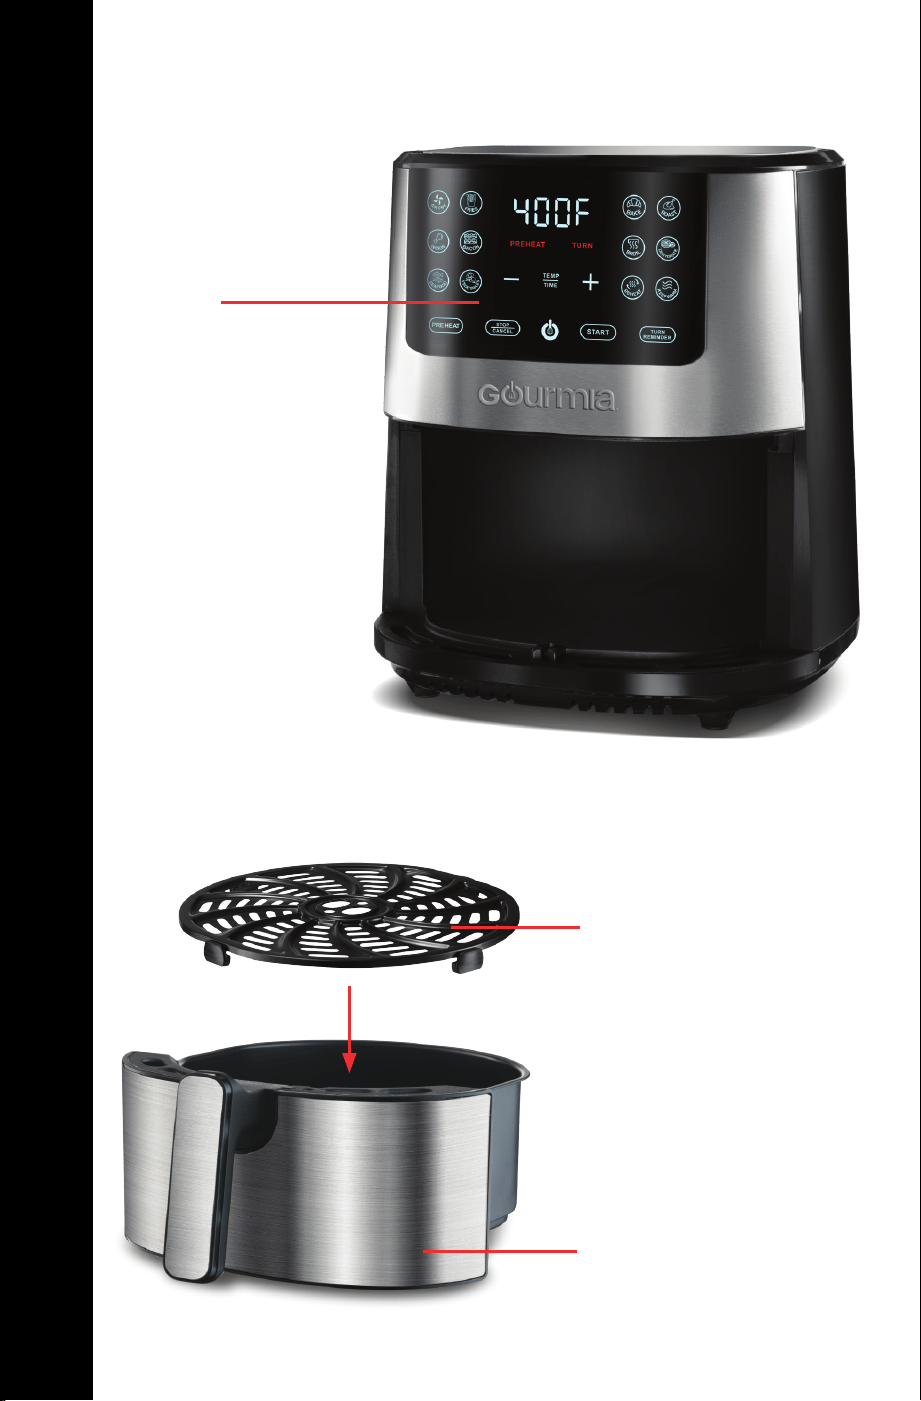
Basket
KNOW YOUR AIR FRYER
KNOW YOUR AIR FRYER
Crisper Tray
Place the Crisper Tray into the Basket.
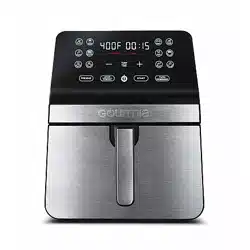
Display / Control Panel
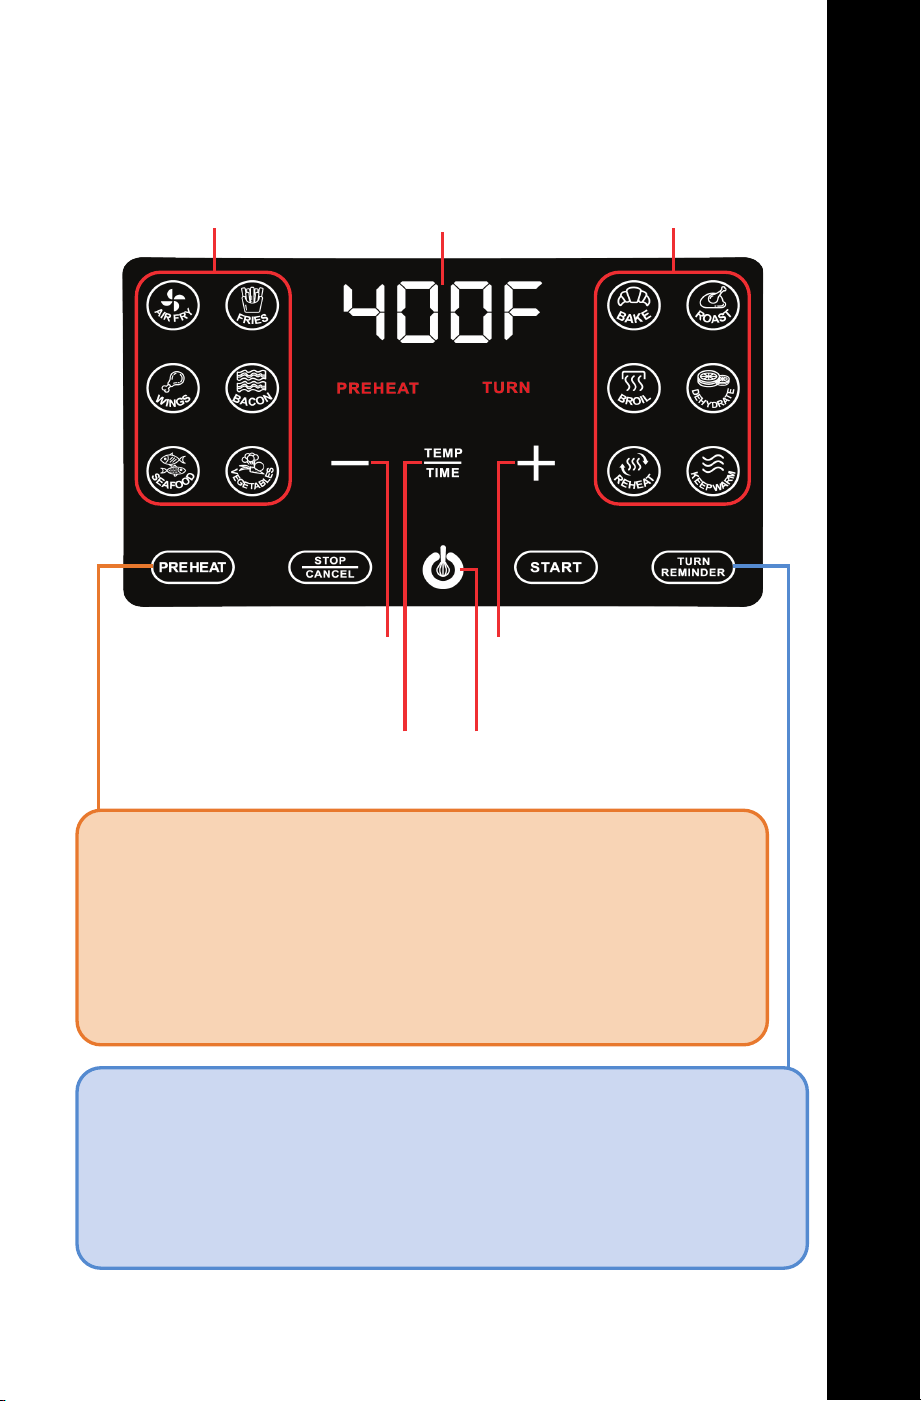
9
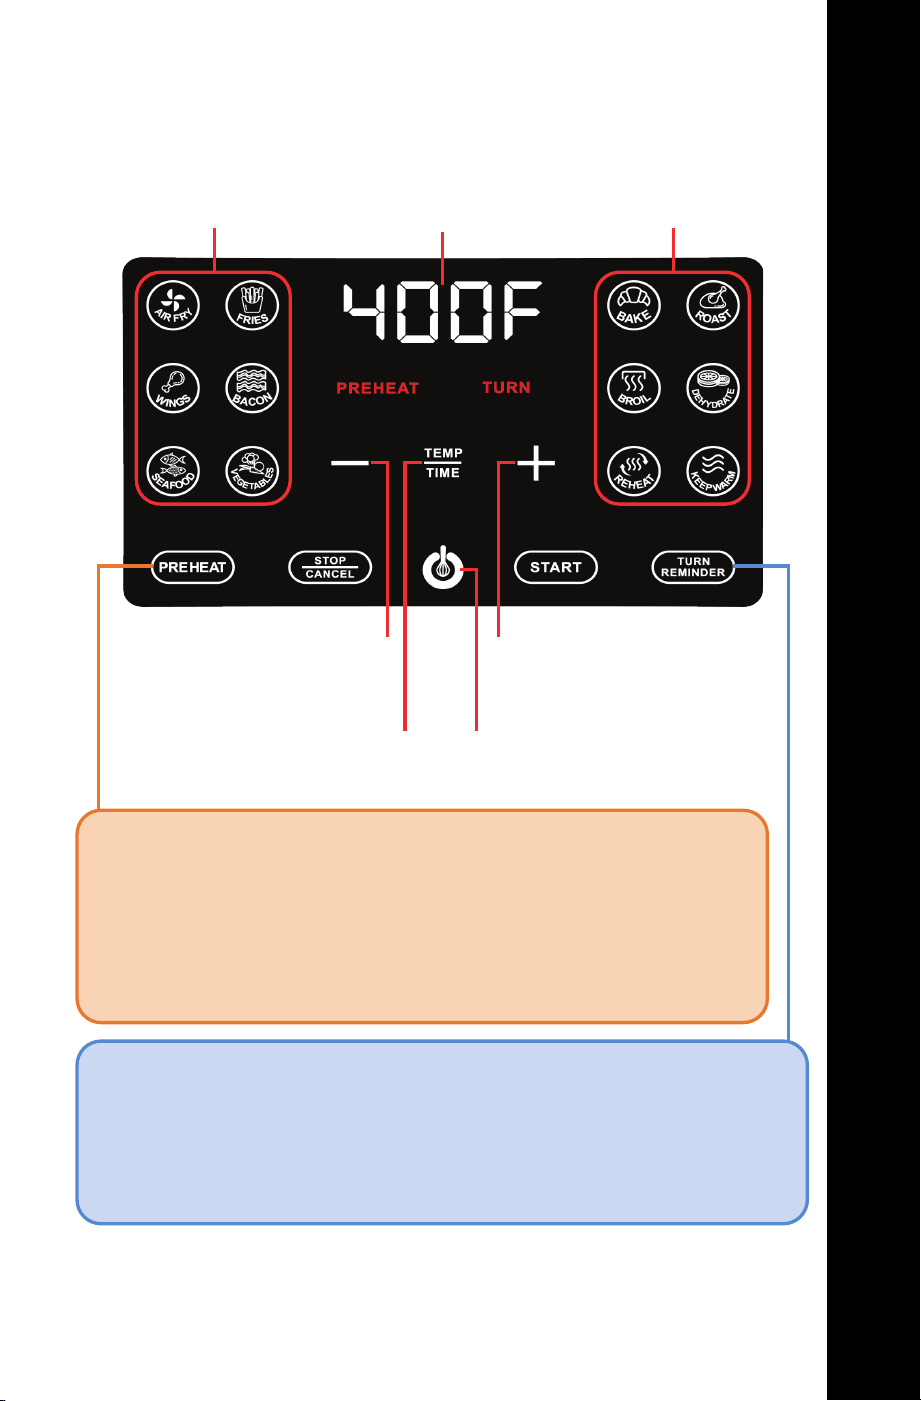
KNOW YOUR AIR FRYER
DISPLAY AND CONTROL PANEL
KNOW YOUR AIR FRYER
Temperature / Time
Air Fry
Presets
Cooking
Presets
Decrease
Temperature / Time
Increase
Temperature / Time
Toggle between adjusting
Temperature / Time
Power Icon
PREHEAT
Preheating the air fryer before adding food will generally deliver the
best results. When cooking multiple batches in a row, only preheat
before the first batch.
Tap PREHEAT before START to enable or disable preheating. When
preheating is enabled, PREHEAT appears in red on the Display.
TURN REMINDER
Turning or tossing food halfway through cook time will deliver evenly
browned and crispy results.
Tap TURN REMINDER before START to enable or disable Turn Reminder.
When Turn Reminder is enabled, TURN appears in red on the Display.
See the chart on page 11 for Presets that have Preheat and Turn Reminder on
by default and those that have the option to toggle the settings on and o.

10
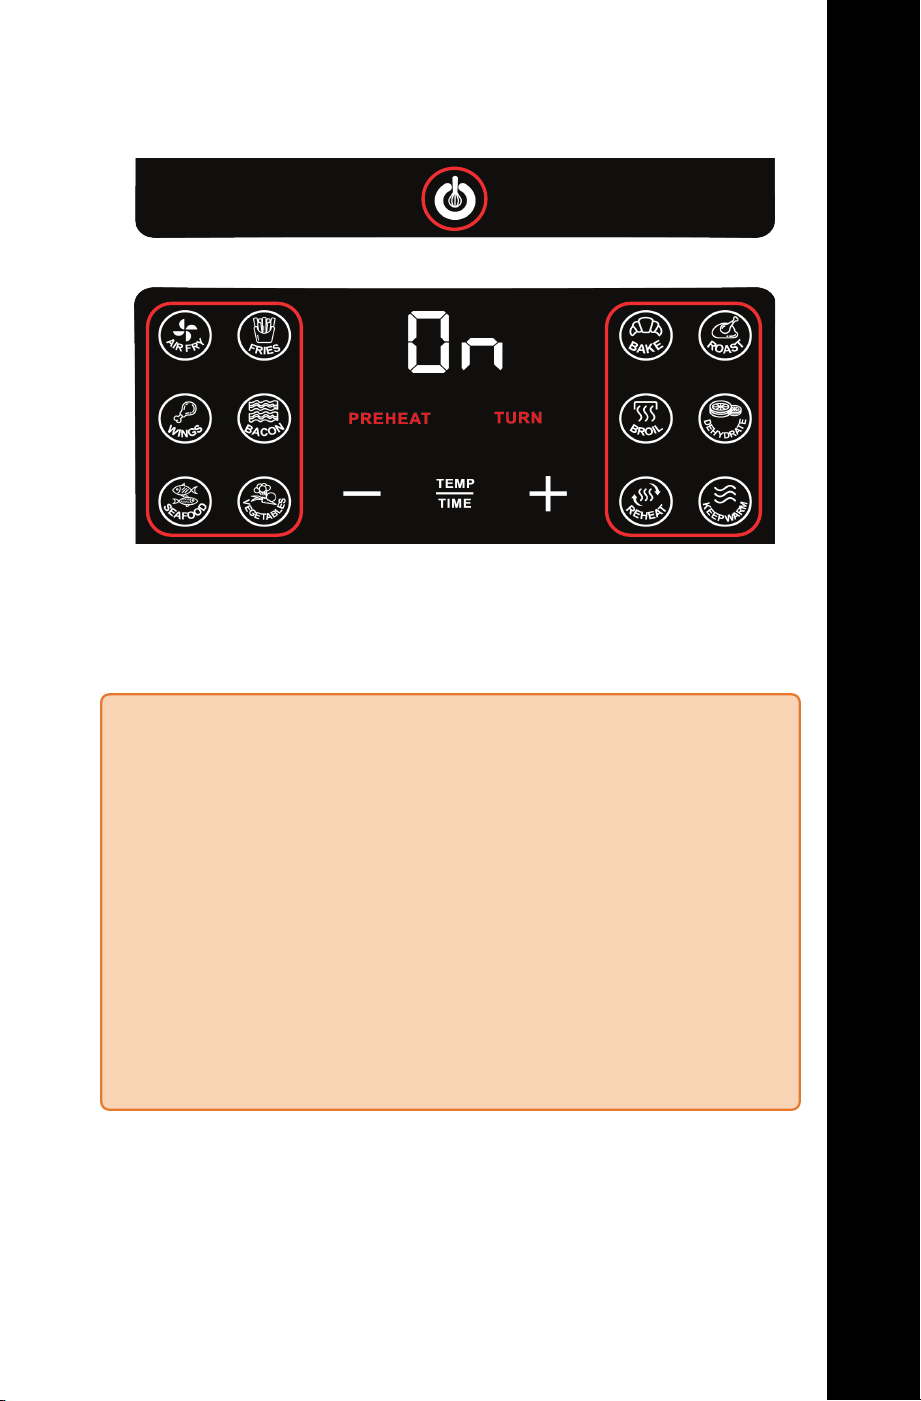
DISPLAY & SOUND
DISPLAY & SOUND
PrE xeat
The air fryer is preheating.
Add Food
The air fryer is preheated.
turn Food
Reminder to turn or toss food.
End
The cook time has elapsed.
Preheat is enabled. Turn Reminder is enabled.
SWITCH TEMPERATURE READ-OUT
To toggle between displaying temperature in Fahrenheit and Celsius,
press and hold TEMP / TIME.
MUTE AIR FRYER
To silence the air fryer’s beeping sound, press and hold STOP / CANCEL.
Press and hold STOP / CANCEL again to turn the sound on.
NOTE: When muted, there will be quicker and fewer beeps for guided
cooking prompts and when the cook time has elapsed.
11
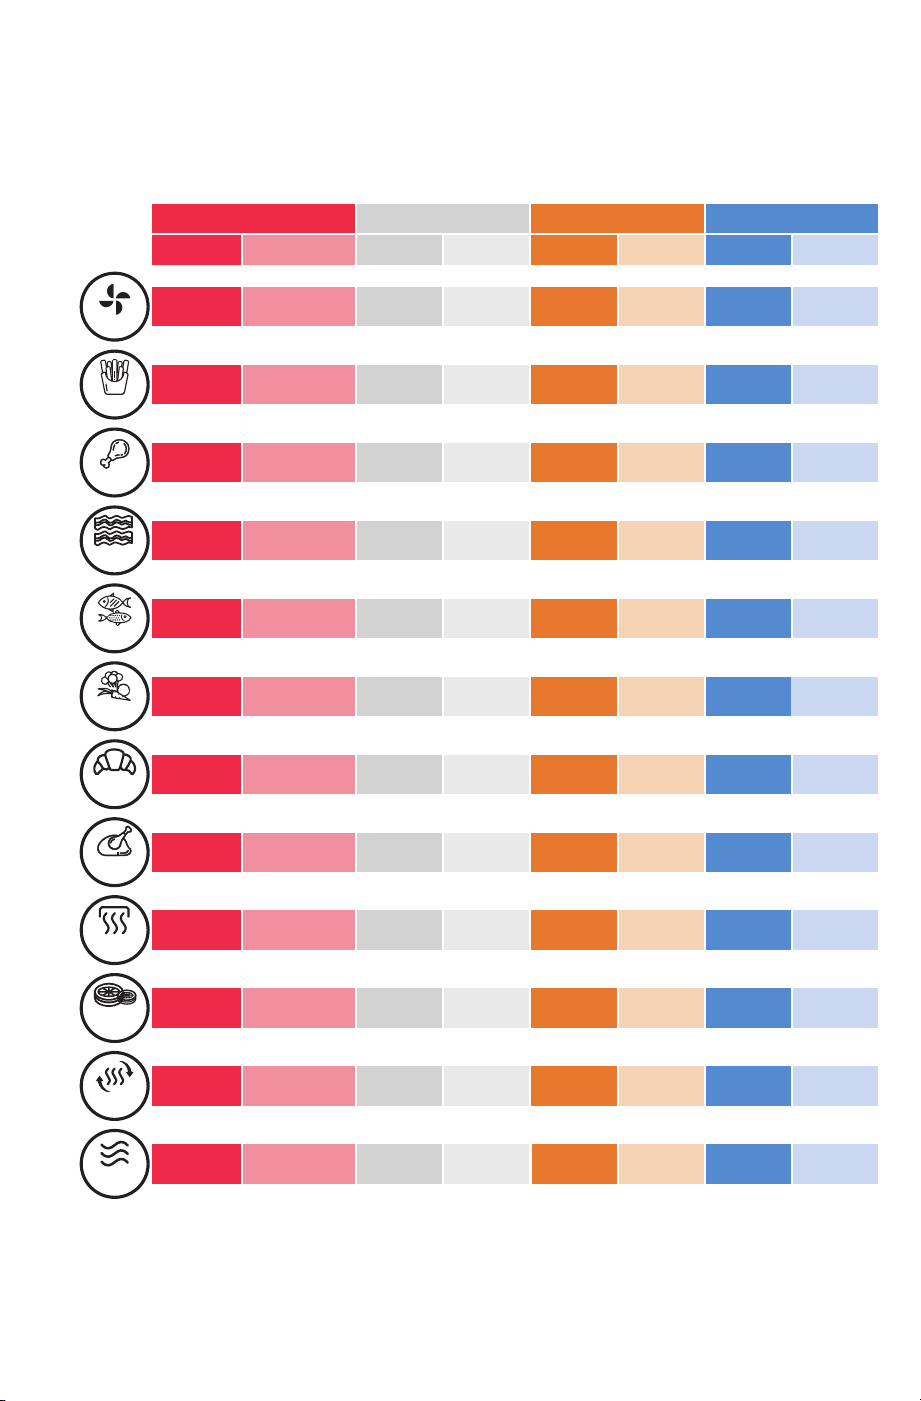
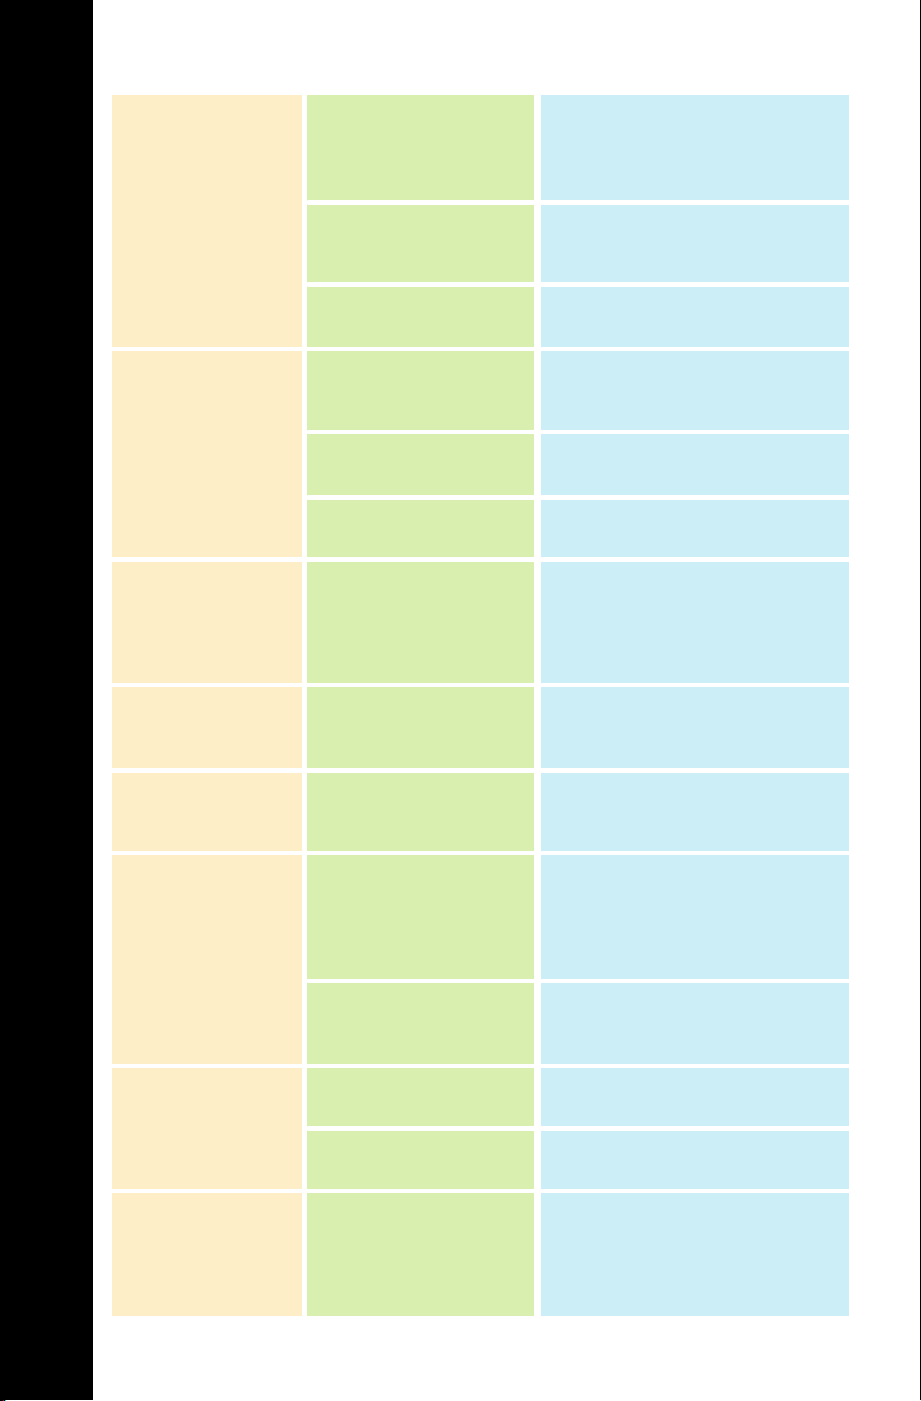
PRESETS CHART
Note: A check mark indicates Preheat and Turn Reminder can be enabled
or disabled by tapping PREHEAT / TURN REMINDER before tapping START.
TEMPERATURE
DEFAULT RANGE
TIME
DEFAULT RANGE
PREHEAT
DEFAULT TOGGLE
TURN REMINDER
DEFAULT TOGGLE
200 °C /
400 °F
76 °C-200 °C /
170 °F-400 °F
20 min 1-60 min on
190 °C /
375 °F
6 min 1-60 min
160 °C /
325 °F
25 min 1 min-2 h on
56 °C /
135 °F
34 °C-76 °C /
90 °F-170 °F
8 h n/a
200 °C / 400 °F 12 min 1-60 min on
on
150 °C /
300 °F
76 °C-200 °C /
170 °F-400 °F
15 min 1-60 min
25 min 1-60 min on
on
20 min 1-60 min on
on
10 min 1-60 min on
on
15 min 1-60 min on
on
25 min 1 min-2 h on
on
94 °C /
200 °F
66 °C-94 °C /
150 °F-200 °F
30 min n/a1 min-8 h
30 min-24 h
200 °C /
400 °F
200 °C /
400 °F
200 °C /
400 °F
200 °C /
400 °F
200 °C /
400 °F
190 °C /
375 °F
76 °C-200 °C /
170 °F-400 °F
76 °C-200 °C /
170 °F-400 °F
76 °C-200 °C /
170 °F-400 °F
76 °C-200 °C /
170 °F-400 °F
76 °C-200 °C /
170 °F-400 °F
76 °C-200 °C /
170 °F-400 °F
76 °C-200 °C /
170 °F-400 °F
n/a
o
o
o
o
o
o
on
o
o
o
A
I
R
F
R
Y
F
R
I
E
S
W
I
N
G
S
B
A
C
O
N
S
E
A
F
O
O
D
B
A
K
E
R
O
A
S
T
B
R
O
I
L
R
E
H
E
A
T
D
E
H
Y
D
R
A
T
E
K
E
E
P
W
A
R
M
V
E
G
E
T
A
B
L
E
S
Turn Reminder is enabled.

12
USING YOUR AIR FRYER
USING YOUR AIR FRYER
Note: During the first few uses, there might be a “hot plastic” smell.
This is perfectly normal in new air fryers as the material is heated
for the first time. It will go away after the first few uses.
BEFORE FIRST USE
1. Remove all packaging stickers and labels from the air fryer,
including the tape securing the Pan to the unit.
2. To pull out the Basket for cleaning, remove the tape securing
it into place. Secure the unit with one hand and pull the
handle straight back with the other hand.
3. Thoroughly clean the Basket and Crisper Tray with hot water,
some dishwashing liquid, and a non-abrasive sponge.
4. Wipe the inside and outside of the air fryer with a moist cloth.
WARNING
Do not fill the Basket with oil, frying fat, or any other liquid - this
appliance works by circulating hot air.
Do not put anything on top of the air fryer.
Do not place the air fryer against a wall or against other appliances.
It is important to leave at least 10 cm / 3.9 in of free space around
the back and sides, and 10 cm / 3.9 in of free space above the air
fryer to allow for proper ventilation.
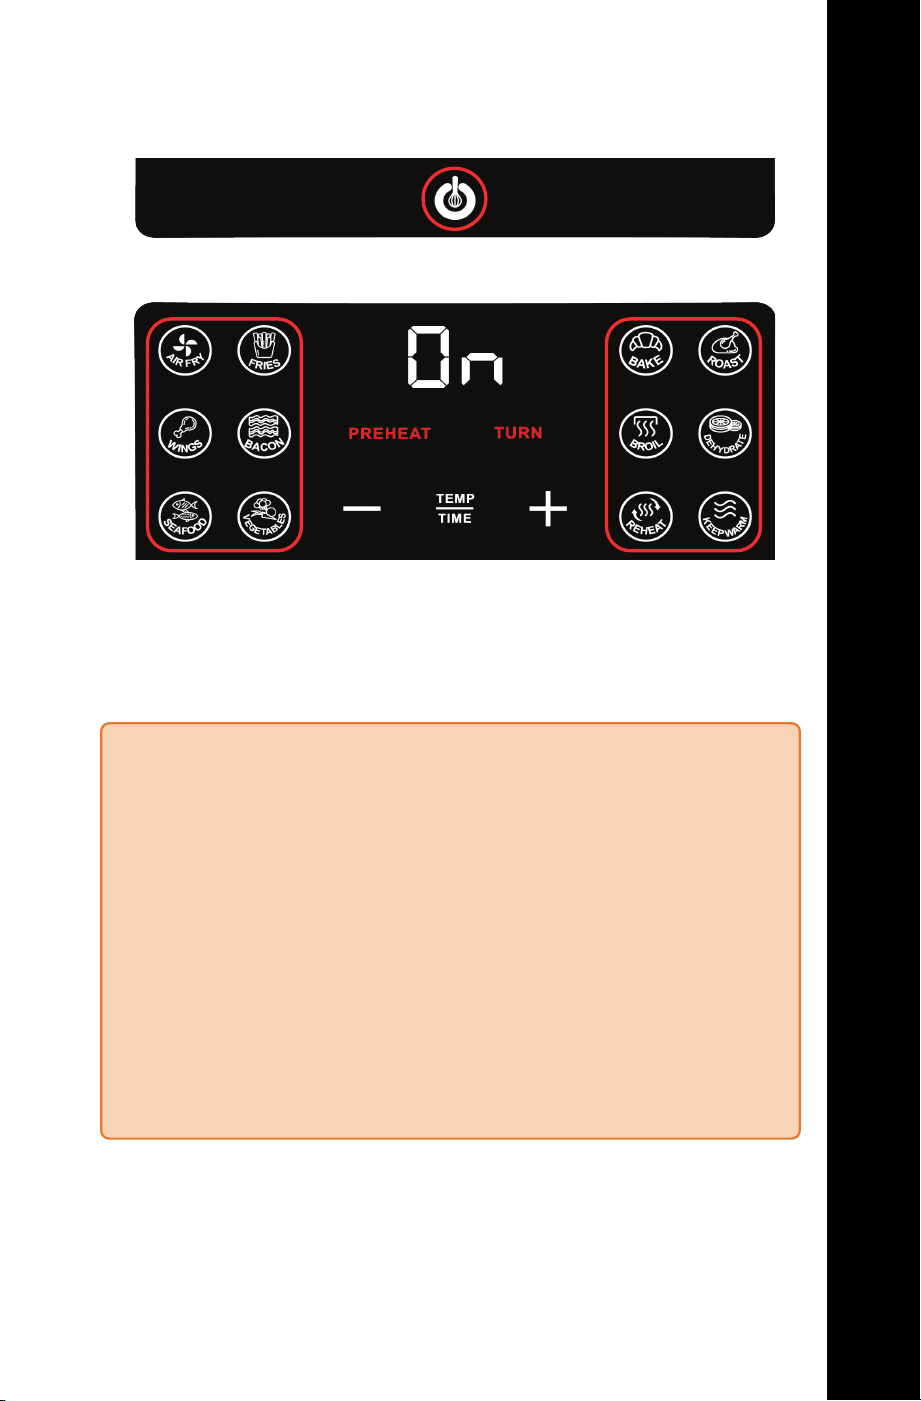
USING YOUR AIR FRYER
1. Place the air fryer on a stable, horizontal, heat-resistant, and
level surface.
2. Insert the Crisper Tray into the Basket and slide it into the air
fryer.
3. Plug the air fryer into an outlet.
13
USING YOUR AIR FRYER
USING YOUR AIR FRYER
With PREHEAT Enabled (enable before tapping START.)
6. Tap START.
The Display will show “Preheat” (PrE xeat) and the air fryer will
begin preheating. Once preheated, it will beep 5 times and the
Display will show “Add Food” (Add Food).
Caution: Basket will be hot!
7. Remove the Basket carefully, place food inside, and return it
to the air fryer to automatically begin cooking.
Continue on page 14.
6. Remove the Basket, place food inside, and return it to the air
fryer.
7. Ensure Preheat is disabled and Tap START.
Cooking Tip: Spray food with cooking oil for a crispier finish.
5. Tap the desired Preset.
The Display will show the preset temperature and time.
To adjust temperature and time follow instructions on page 15.
4. Tap the Power Icon to turn on.

14
USING YOUR AIR FRYER
USING YOUR AIR FRYER
With TURN REMINDER Enabled (enable before tapping START.)
• Halfway through the cook time, the air fryer will beep 5 times
and the Display will show “Turn Food” (turn Food).
• Remove the Basket carefully and place it on a heat-resistant
surface.
• Turn or toss the food using tongs.
• Return the Basket to the air fryer to automatically resume
cooking.
Note: If the Basket is not removed, cooking will resume.
When your selected cook time has elapsed, the air fryer will beep 5
times and the Display will show “End” (End).
8. Remove the Basket carefully and place it on a heat-resistant
surface.
9. Remove food from the Basket using tongs.
Always use caution when removing the Basket during / after cooking.
Caution: Carefully remove Basket - hot steam may escape!
WARNING: The Basket and food will be hot! Do not touch hot
surfaces.
Do not use sharp or metal utensils to avoid scratching the nonstick
surface.
Do not turn the Basket upside down, as any excess oil that has
collected on the bottom of the Basket will leak onto the food.
15
USING YOUR AIR FRYER
USING YOUR AIR FRYER
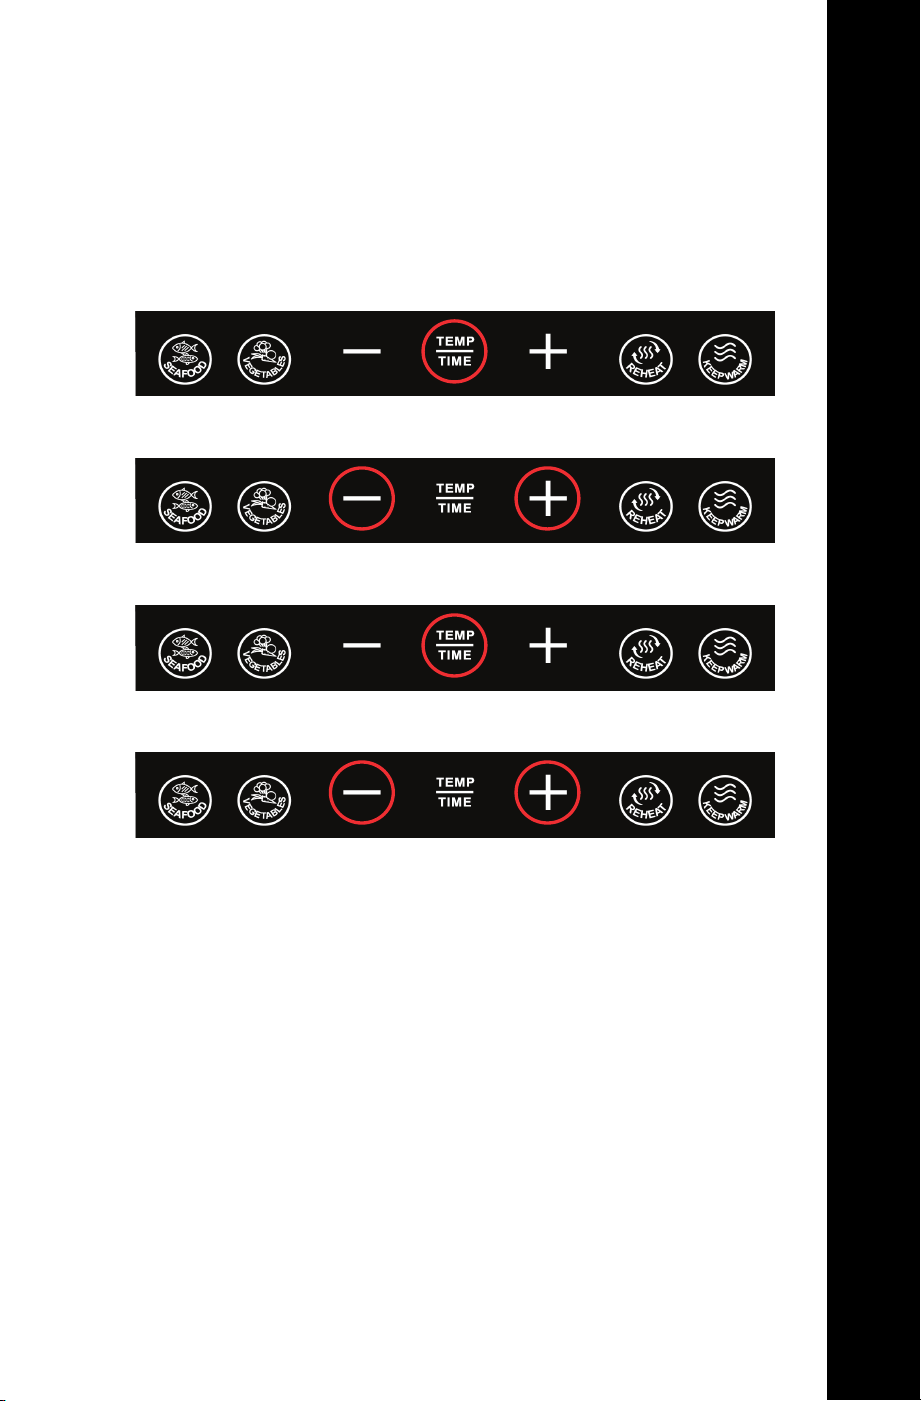
2. Tap + and - icons to increase and decrease temperature.
3. Tap TEMP / TIME again to adjust time.
4. Tap + and - icons to increase and decrease time.
Tip: Press and hold + and - icons to increase and decrease
temperature and time rapidly.
STOP / CANCEL COOKING
Tap STOP / CANCEL once to stop cooking. Tap START to resume
cooking.
Removing the Basket from the air fryer during cooking will stop
cooking. Returning the Basket to the air fryer will automatically
resume cooking.
Tap STOP / CANCEL twice to cancel cooking.
ADJUSTING TEMPERATURE AND TIME
1. Tap TEMP / TIME to adjust temperature.
Cooking Tip: For ideal temperature and time settings for various
foods, see the Air Fry Cooking Chart and Dehydrate Chart on
pages 64 through 67 of the Gourmia Recipe Book.

16
COOKING TIPS
COOKING TIPS
• For an extensive list of foods and their ideal amounts,
temperature and time settings, along with preparation notes,
see the Air Fry Cooking Chart and Dehydrate Chart on
pages 64 through 67 of the Gourmia Recipe Book.
• Air fryers perform similar to ovens, refer to oven instructions
on item packaging or recipe.
• Snacks that can be prepared in an oven can also be prepared
in the air fryer.
• Smaller ingredients usually require a slightly shorter cook
time than larger ingredients.
• Turning or tossing food halfway through cook time will deliver
evenly browned and crispy results. (See Turn Reminder on
page 9.)
• Add 1 tablespoon of oil to fresh potatoes for a crispy result.
Air fry the ingredients within a few minutes after adding the
oil.
• Do not prepare foods that will produce a large amount of
grease in the air fryer.
• Place a baking pan or an oven-safe dish or pan in the
Basket to bake a cake or quiche or to air fry fragile or filled
ingredients.

17
CLEANING & MAINTENANCE
CLEANING & MAINTENANCE
STORAGE
• Unplug the appliance and let it cool down.
• Make sure all parts are clean and dry.
• Store the appliance in a clean and dry place.
ENVIRONMENT
Do not throw away the appliance with the normal household waste
at the end of its life, but hand it in at an ocial collection point for
recycling. By doing this, you help to preserve the environment.
GUARANTEE AND SERVICE
If you need service or information or if you have a problem, please
visit www.Gourmia.com or contact your distributor.
WARNING
NEVER immerse cord, plug, or air fryer in water or any other liquid.
Do not use metal kitchen utensils or abrasive cleaning material to
clean the Basket and Crisper Tray, as this may damage the non-stick
coating.
1. Clean the air fryer after every use.
2. Remove the plug from the outlet.
3. Let the air fryer cool down completely. Remove the Basket
from the air fryer to cool it down quicker.
4. Clean the Basket and Crisper Tray in the dishwasher’s top rack
only or with hot water, dish soap, and a non-abrasive sponge.
5. If residue is stuck to the bottom of the Basket, fill it with hot
water and dish soap and let it soak.
6. Wipe the outside of the air fryer with a moist cloth.
7. Clean the inside of the air fryer with hot water, dish soap and a
cleaning brush to remove any food residue.
8. Ensure the air fryer is completely dry before using.
18
TROUBLESHOOTING
Plug the main plug into a grounded wall socket.
Tap the timer icon to set the required cook time to
turn on the air fryer.
Slide the Basket into the air fryer properly.
Put smaller batches of ingredients in the pan.
Smaller batches are fried more evenly.
Tap + and - Icons to set the required temperature
setting.
Tap + and - Icons to set the required cook time.
Ingredients that lie on top of or across each other
(e.g. fries) need to be shaken halfway through the
cook time. (See Turn Reminder on page 9.)
Use oven snacks or lightly brush some oil onto the
snacks for a crispier result.
Do not ll the Basket beyond max line.
When you fry greasy ingredients in the air fryer, a
large amount of oil will leak into the Basket. The oil
produces white smoke and the Basket may heat up
more than usual. This does not aect the air fryer
or the end result.
White smoke is caused by grease heating up in
the pan. Make sure you clean the Basket properly
after each use.
Use fresh potatoes and make sure they stay rm
during frying.
Rinse the potato sticks properly and dry to remove
starch from the outside of the sticks.
Make sure you dry the potato sticks properly
before you add the oil.
Cut the potato sticks smaller for a crispier result.
Add slightly more oil for a crispier result.
The air fryer does not work.
The ingredients did not cook.
The ingredients are fried
unevenly in the air fryer.
Fried snacks are not crispy
when they come out of the
air fryer.
I cannot slide the Basket into
the air fryer properly.
White smoke comes out
of the air fryer.
Fresh fries are fried unevenly
in the air fryer.
Fresh fries are not crispy when
they come out of the air fryer.
The air fryer is not plugged in.
The timer has not been set.
The Basket is not put into the air fryer
properly.
There are too many ingredients in the
Basket.
The set temperature is too low.
The cook time is too short.
Certain types of ingredients need to
be shaken halfway through the cook
time.
You used a type of snack meant to be
cooked in a traditional deep fryer.
The Basket is overlled.
You are preparing greasy ingredients.
The Basket still contains grease residue
from previous use.
Quality potatoes will give an even
cook.
Potatoes are too starchy.
The crispiness of the fries depends on
the amount of oil and water in the
fries.
PROBLEM POSSIBLE CAUSE SOLUTION

19
WARRANTY & SERVICE
Get cooking with Gourmia
WARRANTY & SERVICE
This Limited Warranty is for one full year from the date of
purchase and requires proof of purchase. It is applicable
to the original purchaser only and is not transferable to a
third party user. Repair or replacement of defective parts is
solely at the seller’s discretion. In the event that repair isn’t
possible, the seller will replace the product/part. If product
repair/replacement won’t suce, the seller has the option
of refunding the cash value of the product or component
returned.
Product defects not covered under the Warranty provisions
include normal wear and damage incurred from use or
accidental negligence, misuse of instruction specifications
or repair by unauthorized parties.
The manufacturing company is not liable for any incidental
or consequential damages incurred by such circumstances.
Only valid within the United States.
Register your product at www.Gourmia.com/warranty

FOR CUSTOMER SERVICE
QUESTIONS OR COMMENTS
VISIT WWW.GOURMIA.COM
EMAIL [email protected]
OR CALL 888.552.0033
PHONE SUPPORT NOT AVAILABLE OUTSIDE THE U.S.
MON-THU 9:00AM TO 6:00PM ET
AND FRI 9:00AM TO 3:00PM ET
LANGUAGES SUPPORTED:
ENGLISH, FRENCH, SPANISH
GAF588
MANUAL DEL USUARIO
ENGLISH ESPAÑOL
4.7 L / 5 QT FREIDORA DE AIRE DIGITAL DE ACERO INOXIDABLE

22
Modelo: GAF588
© 2021 Gourmia
www.gourmia.com
The Steelstone Group
Brooklyn, NY
Todos los derechos reservados. Ninguna parte de este manual podrá ser
reproducida por ningún medio sin la autorización por escrito de Steelstone
Group, con excepción del uso de las citas en las reseñas en los medios de
comunicación.
Aunque se tomaron todas las precauciones necesarias durante la elaboración
de este manual, Steelstone Group no asume ninguna responsabilidad por
cualquier error u omisión en el mismo. Asimismo, no se asumirá ninguna
responsabilidad derivada de los daños causados por el uso de la información
aquí contenida. Aunque se han tomado todas las precauciones necesarias para
asegurar que la información contenida en este manual sea completa y precisa,
Steelstone Group no se dedica a la prestación de asesoramiento profesional a
consumidores particulares; de ahí que Steelstone Group no será responsable
de ninguna pérdida o daño supuestamente derivados de la información o de
las sugerencias en este manual.
IMPORTANTE: CONSERVE PARA
FUTURA REFERENCIA.
LEA CUIDADOSAMENTE
PARA SERVICIO AL CLIENTE,
PREGUNTAS O COMENTARIOS,
VISITE WWW.GOURMIA.COM
O MANDE UN CORREO ELECTRÓNICO A [email protected]
IDIOMAS DISPONIBLES DE ATENCIÓN: INGLÉS, FRANCÉS,
ESPAÑOL
23
¡Felicitaciones por adquirir la
Freidora de Aire Digital de Gourmia!
En Gourmia, nos dedicamos a ayudar a los cocineros a preparar platillos sencillos,
saludables y deliciosos todos los días. Sabemos lo acelerada que es la vida y
que a veces, preparar una comida casera no es la máxima prioridad, por mucho
que le gustaría. Nuestros productos son confiables, fáciles de usar e ideales para
ayudarle a cambiar esta situación. Le ofrecemos herramientas para comer mejor y
más sano sin tener que pasar horas en la cocina preparando y cocinando.
Queremos que aproveche su producto al máximo, por ello nuestro equipo
está disponible para ayudarle con cualquier pregunta que le pueda surgir. Si
su pregunta está relacionada con el funcionamiento del producto o si necesita
orientación sobre el programa a utilizar, con mucho gusto le asesoraremos.
Bienvenido a la cocina fácil con Gourmia.
Este manual proporciona instrucciones para todas las funciones y características
del producto junto con las indicaciones de ensamblaje, funcionamiento, limpieza
y mantenimiento de su electrodoméstico. Por favor, lea todas las instrucciones e
indicaciones de seguridad para un uso seguro en todo momento. Conserve este
manual para uso posterior.
¡Gracias por elegir Gourmia!
¡Nos encantaría escucharlo! Comparta con nosotros sus ideas, recetas y fotos.
@gourmia
IMPORTANTE: CONSERVE PARA
FUTURA REFERENCIA.
LEA CUIDADOSAMENTE

24

25
ÍNDICE
ÍNDICE
Medidas de seguridad importantes........26
Conozca su freidora de aire......................28
Pantalla y panel de control............................29
Precalentamiento...............................................29
Recordatorio para voltear los alimentos..29
Pantalla y Sonido................................................30
Tabla de preajustes...........................................31
Uso de la freidora de aire..........................32
Antes del primer uso........................................32
Ajuste del tiempo y la temperatura...........35
Detener / Cancelar la cocción.....................35
Consejos para cocinar...............................36
Limpieza y mantenimiento.......................37
Solución de problemas.............................38
Garantía y servicio.....................................39

26
1. Este aparato no debe ser utilizado
por niños de 0 meses a 8 años.
Este aparato puede ser utilizado
por niños de 8 años o más si se
les supervisa continuamente.
Este aparato no es apto para
utilizarse por personas (incluyendo
niños) cuyas capacidades físicas
sensoriales o mentales sean
diferentes o estén reducidas,
o que carezcan de experiencia
o conocimiento, a menos que
dichas personas reciban una
supervisión o capacitación para
el funcionamiento del aparato
por parte de una persona
responsable de su seguridad.
Mantenga el aparato y su cable
fuera del alcance de los niños
menores de 8 años. La limpieza y
el mantenimiento del aparato no
deben ser realizados por niños.
2. Los aparatos de cocina deben
colocarse en una superficie
estable con las asas colocadas (si
las hay) para evitar derrames de
líquido caliente.
3. Antes de conectar el aparato,
compruebe que el voltaje indicado
en el mismo corresponda al voltaje
de suministro local.
4. No utilice el aparato si el enchufe,
el cable principal o el propio
aparato están dañados. Asegúrese
siempre de que el enchufe esté
correctamente insertado en un
tomacorriente de pared.
5. Nunca utilice un aparato con un
cable o enchufe dañado, si el
aparato ha funcionado mal o si
se ha dañado de alguna forma.
Si el cable de alimentación
está dañado, este debe ser
reemplazado por el fabricante, su
agente de servicio o una persona
similar calificada para evitar un
riesgo.
6. Se requiere supervisión
constante cuando cualquier
electrodoméstico sea usado por
o cerca de los niños. Es necesario
supervisar que los niños no
jueguen con el aparato.
7. No permita que el cable de
alimentación cuelgue sobre el
borde la mesa o entre en contacto
con superficies calientes.
8. Para evitar una descarga eléctrica,
no sumerja el cable, los enchufes
o el electrodoméstico en agua
u otros líquidos. No enchufe el
electrodoméstico ni toque el panel
de control con las manos mojadas.
9. Para evitar situaciones
peligrosas, nunca conecte
este electrodoméstico a un
temporizador externo o a un
sistema de control remoto.
Para desconectarlo, apague el
electrodoméstico y después retire
el enchufe del tomacorriente de
pared.
10. No coloque el aparato sobre o
cerca de materiales inflamables
como manteles o cortinas. Las
MEDIDAS DE SEGURIDAD IMPORTANTES
Lea todas las instrucciones antes de usar el producto. Siga las siguientes
instrucciones básicas de seguridad en todo momento:
MEDIDAS DE SEGURIDAD
IMPORTANTES

27
MEDIDAS DE SEGURIDAD IMPORTANTES
• El cable provisto con este aparato es corto para reducir el peligro de
que alguien se enganche o tropiece con un cable más largo.
• Se podrán utilizar extensiones eléctricas, siempre y cuando se tomen
precauciones al usarlas.
• Si utiliza un cable de extensión:
a. La clasificación eléctrica marcada en el cable de extensión debe ser
al menos igual a la clasificación eléctrica del aparato; y
b. El cable más largo debe disponerse de manera que no cuelgue de la
encimera o la mesa donde pueda ser jalado por niños o tropezarse
con él.
CONSERVE ESTAS INSTRUCCIONES
SEGURIDAD DEL CABLE Y DEL ENCHUFE
superficies cercanas podrían
calentarse durante el uso. No
coloque el aparato sobre o cerca
de un quemador a gas, una
hornilla eléctrica o en un horno
caliente.
11. No coloque el electrodoméstico
contra la pared o contra otros
aparatos. Deje al menos 10 cm de
espacio libre en la parte posterior
y los laterales y 10 cm de espacio
libre sobre el electrodoméstico.
No coloque nada encima del
electrodoméstico.
12. No utilice el aparato para ningún
otro propósito que no sea el
descrito en este manual. El uso de
accesorios no recomendados por
el fabricante del podría provocar
lesiones.
13. No deje el electrodoméstico
funcionando sin supervisión. Se
debe tener extrema precaución al
mover un electrodoméstico que
contenga aceite caliente u otros
líquidos calientes.
14. No utilice el aparato en exteriores.
15. No toque las superficies calientes:
use el asa. Durante el proceso de
freír saldrá vapor caliente a través
de salidas de aire. Mantenga las
manos y la cara a una distancia
segura del vapor y de las salidas
de aire. Asimismo, tenga cuidado
con el vapor y el aire caliente
a la hora de retirar la cesta del
aparato.
16. Evite el contacto con la parte
metálica interior después de usar
el electrodoméstico. Desenchufe
el aparto del tomacorriente
cuando no esté en uso y antes de
limpiarlo. Deje que se enfríe antes
de limpiarlo.
17. Desenchufe el electrodoméstico
de inmediato si ve que está
saliendo humo negro de su
interior. Espere a que el humo
deje de salir antes de retirar la
cesta del electrodoméstico.
18. Para uso doméstico solamente.
28
Cesta
CONOZCA SU FREIDORA DE AIRE
CONOZCA SU FREIDORA DE AIRE
Bandeja para
Verduras
Coloque la bandeja para
verduras en la cesta.
Pantalla
/ Panel de Control
29
CONOZCA SU FREIDORA DE AIRE
PANTALLA Y PANEL DE CONTROL
CONOZCA SU FREIDORA DE AIRE
Temperatura /
Tiempo
Preajustes para
Freír con Aire
Preajustes
para Cocinar
Disminución de
Temperatura / Tiempo
Aumento de
Temperatura / Tiempo
Alternar Entre el Ajuste de
Temperatura / Tiempo
Icono de Encendido
PRECALENTAMIENTO
Precalentar la freidora de aire antes de añadir los alimentos generalmente
dará mejores resultados. Cuando cocine varias tandas seguidas de
alimento, solo tiene que precalentar la freidora antes de la primera tanda.
Pulse PREHEAT (precalentar) antes de START (iniciar) para activar o
desactivar el precalentamiento. Cuando se habilita el precalentamiento, la
palabra PREHEAT aparecerá en rojo en la pantalla.
RECORDATORIO PARA VOLTEAR LOS ALIMENTOS
El voltear o revolver los alimentos a la mitad del tiempo de cocción ayudará a
obtener alimentos uniformemente dorados y crujientes. Pulse TURN REMINDER
(recordatorio para voltear) antes de START (iniciar) para activar o desactivar el
recordatorio para voltear los alimentos. Cuando se activa el recordatorio para
voltear los alimentos, la palabra TURN aparecerá en rojo en la pantalla.
Consulte la tabla de la página 31 para conocer los preajustes que tienen el
precalentamiento y el recordatorio para voltear activados de forma predeterminada
y aquellos que tienen la opción de activar y desactivar los ajustes.

30
PANTALLA Y SONIDO
PANTALLA Y SONIDO
PrE xeat
La freidora de aire se está precalentando.
Add Food
La freidora de aire está precalentada.
turn Food
Recordatorio para voltear o revolver los alimentos.
End
El tiempo de cocción ha transcurrido.
(precalentamiento)
El precalentamiento está activado.
(voltear)
El recordatorio para voltear lo
alimentos está activado.
CAMBIAR LA VISUALIZACIÓN DE LA TEMPERATURA
Para alternar entre la visualización de la temperatura en Fahrenheit y
Celsius, mantenga pulsado TEMP / TIME.
SILENCIAR LA FREIDORA DE AIRE
Para silenciar el pitido que emite la freidora, mantenga pulsado STOP
/ CANCEL. Mantenga pulsado STOP / CANCEL de nuevo para activar
el pitido.
NOTA: Cuando esté silenciada, habrá menos pitidos y más rápidos
para las indicaciones de cocción guiada y cuando haya transcurrido el
tiempo de cocción.

31
TABLA DE PREAJUSTES
Nota: La marca de verificación indica que el precalentamiento y el recordatorio
para voltear puede ser activado o desactivado pulsando PREHEAT/TURN
REMINDER (precalentamiento/recordatorio para voltear) antes de pulsar START
(iniciar).
TEMPERATURA
PREDETER-
MINADO
RANGO
TIEMPO
PREDETER-
MINADO
RANGO
PRECALENTAMIENTO
PREDETER-
MINADO
ALTERNAR
RECORDATORIO PARA
VOLTEAR LOS ALIMENTOS
PREDETER-
MINADO
ALTERNAR
200 °C /
400 °F
76 °C-200 °C /
170 °F-400 °F
20 min
1 min -
60 min
encendido
190 °C /
375 °F
6 min
1 min -
60 min
160 °C /
325 °F
25 min 1 min - 2 h encendido
56 °C /
135 °F
34 °C-76 °C /
90 °F-170 °F
8 h n/a
200 °C / 400 °F 12 min
1 min -
60 min
encendido
encendido
150 °C /
300 °F
76 °C-200 °C /
170 °F-400 °F
15 min
1 min -
60 min
25 min
1 min -
60 min
encendido
encendido
20 min
1 min -
60 min
encendido
encendido
10 min
1 min -
60 min
encendido
encendido
15 min
1 min -
60 min
encendido
encendido
25 min 1 min - 2 h encendido
encendido
94 °C /
200 °F
66 °C-94 °C /
150 °F-200 °F
30 min n/a1 min - 8 h
30 min - 24 h
200 °C /
400 °F
200 °C /
400 °F
200 °C /
400 °F
200 °C /
400 °F
200 °C /
400 °F
190 °C /
375 °F
76 °C-200 °C /
170 °F-400 °F
76 °C-200 °C /
170 °F-400 °F
76 °C-200 °C /
170 °F-400 °F
76 °C-200 °C /
170 °F-400 °F
76 °C-200 °C /
170 °F-400 °F
76 °C-200 °C /
170 °F-400 °F
76 °C-200 °C /
170 °F-400 °F
n/a
apagado
apagado
apagado
apagado
apagado
apagado
encendido
apagado
apagado
apagado
A
I
R
F
R
Y
F
R
I
E
S
W
I
N
G
S
B
A
C
O
N
S
E
A
F
O
O
D
B
A
K
E
R
O
A
S
T
B
R
O
I
L
R
E
H
E
A
T
D
E
H
Y
D
R
A
T
E
K
E
E
P
W
A
R
M
V
E
G
E
T
A
B
L
E
S

32
USO DE LA FREIDORA DE AIRE
USO DE LA FREIDORA DE AIRE
Nota: Es probable que, durante los primeros usos, se produzca
un olor a “plástico caliente”. Esto es totalmente normal en
modelos nuevos dado que el material se calienta por primera vez.
Desaparecerá después de algunos usos.
ANTES DEL PRIMER USO
1. Elimine todas las calcomanías de embalaje o las etiquetas del
aparato, incluyendo la cinta adhesiva que sujeta la cacerola
al aparato.
2. Para retirar la cesta para su limpieza, elimine la cinta
adhesiva que la mantiene en su lugar. Sujete el aparato con
una mano y jale del asa con la otra mano.
3. Limpie a fondo la cesta y la bandeja para verduras con agua
caliente, un poco de jabón para trastes líquido y una esponja
no abrasiva.
4. Limpie el interior y exterior de la freidora de aire con un paño
húmedo.
ADVERTENCIA
No llene la cesta con aceite, grasa para freír o cualquier otro
líquido; este aparato funciona haciendo circular aire caliente.
No coloque nada encima de la freidora de aire.
No coloque la freidora de aire contra la pared o contra otros
aparatos. Es importante dejar al menos 10 cm de espacio libre en
la parte posterior y a los lados y 10 cm de espacio libre encima del
aparato para una adecuada ventilación.
USO DE LA FREIDORA DE AIRE
1. Coloque la freidora sobre una superficie estable, horizontal,
plana y resistente al calor.
2. Inserte la bandeja para verduras dentro de la canasta y
deslícela dentro de la freidora de aire.
3. Enchufe la freidora en un tomacorriente.
33
USO DE LA FREIDORA DE AIRE
USO DE LA FREIDORA DE AIRE
Con la función de precalentamiento habilitada (PREHEAT)
(habilitar antes de pulsar START (iniciar)).
6. Pulse START (iniciar).
La pantalla mostrará la palabra para precalentamiento (PrE
xeat) y la freidora de aire comenzará a precalentar. Una vez
precalentado, emitirá 5 pitidos y la pantalla mostrará la indicación
para añadir los alimentos (Add Food).
Precaución: ¡La cesta estará caliente!
7. Retire la cesta con cuidado, coloque los alimentos dentro
y vuelva a colocarla en la freidora de aire para comenzar a
cocinar automáticamente.
Continúa en la página 34.
6. Retire la cesta, coloque los alimentos dentro y vuelva a
colocarla en la freidora de aire.
7. Asegúrese de que el precalentamiento esté desactivado y
pulse START (iniciar) para iniciar.
Consejo para cocinar: rocíe los alimentos con aceite de cocina
para que queden más crujiente.
5. Pulse el preajuste deseado.
La pantalla mostrará la temperatura y el tiempo preestablecidos.
Para ajustar la temperatura y el tiempo siga las instrucciones de
la página 35.
4. Pulse el ícono de encendido, para encender el aparato.

34
USO DE LA FREIDORA DE AIRE
USO DE LA FREIDORA DE AIRE
Con la función de recordatorio para voltear habilitada (TURN
REMINDER) (habilitar antes de pulsar START (iniciar)).
• A la mitad del tiempo de cocción, la freidora emitirá 5 pitidos
y la pantalla mostrará la indicación para voltear los alimentos
(turn Food).
• Retire la cesta con cuidado y colóquela sobre una superficie
resistente al calor.
• Voltee o revuelva los alimentos utilizando unas pinzas.
• Regrese la cesta a la freidora de aire para reanudar
automáticamente la cocción.
Nota: si no retira la cesta, la cocción se reanudará.
Cuando haya transcurrido el tiempo de cocción seleccionado, la
freidora de aire emitirá 5 pitidos y la pantalla mostrará la indicación
de finalizar (End).
8. Retire la cesta con cuidado y colóquela sobre una superficie
resistente al calor.
9. Retire los alimentos de la cesta con unas pinzas.
Siempre tenga cuidado al remover la cesta durante o después de la
cocción.
Precaución: Remueva cuidadosamente la cesta, ¡podría salir vapor
caliente!
ADVERTENCIA: ¡La cesta y los alimentos estarán calientes!
No toque las superficies calientes.
No utilice utensilios afilados o de metal para evitar rayar la
superficie antiadherente.
No voltee la cesta boca abajo para evitar que el exceso de aceite
recolectado en el fondo de la cesta se derrame sobre los alimentos.

35
USO DE LA FREIDORA DE AIRE
USO DE LA FREIDORA DE AIRE
2. Pulse los íconos + y - para aumentar y disminuir la temperatura.
3. Vuelva a pulsar TEMP/TIME (tiempo/temperatura) para ajustar
el tiempo.
4. Pulse los íconos + y - para aumentar y disminuir el tiempo.
Consejo: mantenga pulsados los íconos + y - para aumentar y
disminuir la temperatura y el tiempo rápidamente.
DETENER / CANCELAR LA COCCIÓN
Pulse STOP/CANCEL (detener/cancelar la cocción) una vez para
detener la cocción. Pulse START (iniciar) para reanudar la cocción.
Si retira la cesta de la freidora durante la cocción, esta se detendrá.
Cuando coloque nuevamente la cesta a la freidora de aire se
reanudará automáticamente la cocción.
Pulse dos veces STOP/CANCEL (detener/cancelar la cocción) para
cancelar la cocción.
AJUSTE DEL TIEMPO Y LA TEMPERATURA
1. Pulse TEMP/TIME (tiempo/temperatura) para ajustar la
temperatura
Consejo para cocinar: Para los ajustes de temperatura y del tiempo
ideales para varios alimentos, consulte la Tabla para cocinar con la
freidora de aire y la Tabla para deshidratar de las páginas 132 a 135
del Recetario de Gourmia.

36
CONSEJOS PARA COCINAR
CONSEJOS PARA COCINAR
• Para una lista extensa de alimentos, sus cantidades,
temperaturas y tiempos ideales, junto con notas sobre su
preparación, consulte la Tabla para cocinar con la freidora
de aire y la Tabla para deshidratar de las páginas 132 a 135
del Recetario de Gourmia.
• Las freidoras de aire funcionan de manera similar a los
hornos, consulte las instrucciones para cocinar en horno
descritas en el envase del producto o en la receta.
• Aquellos bocadillos que se pueden preparar en un horno
también se pueden preparar en la freidora de aire.
• Los ingredientes más pequeños suelen requerir un tiempo
de cocción ligeramente más corto que los ingredientes más
grandes.
• El voltear o revolver los alimentos a la mitad del tiempo de
cocción ayudará a obtener alimentos uniformemente dorados
y crujientes. (Vea el Recordatorio para voltear los alimentos
en la página 29).
• Añada 1 cucharada de aceite a las papas frescas para
obtener un resultado crujiente.
Fría los ingredientes algunos minutos después de añadir el
aceite.
• No prepare alimentos que produzcan una gran cantidad de
grasa en la freidora de aire.
• Coloque un molde para hornear o un plato o bandeja apta
para hornear para hacer una pastel o un quiche, o para freír
ingredientes delicados o rellenos.

37
LIMPIEZA Y MANTENIMIENTO
LIMPIEZA Y MANTENIMIENTO
ALMACENAMIENTO
• Desconecte el aparato y deje que se enfríe.
• Asegúrese de que todas las piezas estén limpias y secas.
• Almacene el aparato en un lugar limpio y seco.
MEDIO AMBIENTE
Al finalizar la vida útil del producto, no lo deseche con la basura
doméstica normal, en su lugar, entréguelo en un punto de
recolección oficial para su reciclaje. Al hacer esto, usted ayudará
a preservar el medio ambiente.
GARANTÍA Y SERVICIO
Si necesita servicio o información o tiene algún problema, por
favor, visite nuestro sitio web o contacte a su distribuidor. (Garantía
del fabricante no válida en México. Vea garantía ofrecida por el
importador)
ADVERTENCIA
NUNCA sumerja el cable, el enchufe o la freidora en agua o
cualquier otro líquido.
No utilice utensilios de cocina metálicos o material de limpieza
abrasivo para limpiar la cesta o la bandeja de verduras, ya que esto
podría dañar el recubrimiento antiadherente.
1. Limpie la freidora de aire después de cada uso.
2. Desconecte el enchufe del tomacorriente.
3. Permita que la freidora de aire se enfríe por completo. Retire
la cesta de la freidora de aire para que se enfríe más rápido.
4. Limpie la cesta y la bandeja para verduras en la rejilla superior
del lavavajillas solamente o lávelas con agua caliente, jabón y
una esponja no abrasiva.
5. Si hay residuos pegados en el fondo de la cesta, llénela con
agua caliente y detergente para platos y déjela en remojo.
6. Limpie el interior y exterior de la freidora de aire con un paño
húmedo.
7. Limpie el interior de la freidora con agua caliente, detergente
para platos y un cepillo de limpieza para eliminar cualquier
residuo de comida.
8. Asegúrese de que la freidora de aire esté completamente
seca antes de usarla.
38
SOLUCIÓN DE PROBLEMAS
Inserte el enchufe principal en un tomacorriente
con conexión a tierra.
Pulse el icono del temporizador para ajustar el
tiempo necesario para la cocción y encender la
freidora.
Deslice la cesta dentro de la freidora de aire
correctamente.
Coloque cantidades más pequeñas de ingredientes
en la cacerola. Las tandas más pequeñas se fríen de
forma más uniforme.
Pulse los íconos + y - para congurar la
temperatura requerida.
Pulse los íconos + y - para congurar el tiempo de
cocción requerido.
Los ingredientes que se colocan uno encima
de otro (por ejemplo, las papas fritas) deben
revolverse a la mitad del tiempo de cocción.
(Vea el recordatorio para voltear los alimentos en
la página 29).
Utilice aperitivos que se horneen o cúbralos
ligeramente con aceite para un resultado más
crujiente.
No llene la cesta por encima de la línea de
capacidad máxima.
Cuando fríe ingredientes grasos en la freidora de
aire, una gran cantidad de aceite goteará a la cesta.
El aceite produce humo blanco y la cesta puede
calentarse más de lo habitual. Esto no afecta al
aparato ni el resultado nal
El humo blanco es causado por la grasa que se
calienta en la cacerola. Asegúrese de limpiar la
cesta después de cada uso.
Utilice papas frescas y asegúrese de que se
mantengan rmes mientras se fríen.
Enjuague bien los palitos de papa y séquelos para
eliminar el almidón de la parte exterior.
Asegúrese de que los palitos de papa estén secos
antes de añadir el aceite.
Corte trozos más pequeños de papa para un
resultado más crujiente. Añada un poco más de
aceite para un resultado más crujiente.
La freidora de aire no funciona.
Los ingredientes no se han
cocido.
Algunos alimentos no
se frieron de manera
homogénea.
Los bocadillos fritos no están
crujientes al salir de la freidora
de aire.
No puedo introducir
correctamente la cesta en el
aparato.
La freidora de aire expide
humo blanco.
Algunas papas frescas
no se frieron de manera
homogénea.
Las papas a la francesa no
están crujientes al salir de la
freidora de aire.
La freidora no está enchufada.
El temporizador no está congurado.
La cesta no está colocada
correctamente en la freidora.
Hay demasiados ingredientes en la
cesta.
La temperatura establecida es
demasiado baja.
El tiempo de cocción es demasiado
corto.
Algunos alimentos necesitarán
revolverse a mitad del tiempo de
cocción.
El tipo de bocadillo que utilizó
necesita ser cocinado en una freidora
tradicional.
La cesta está sobresaturada.
Está preparando ingredientes con
mucha grasa.
La cesta aún contiene residuos grasos
del uso anterior.
Las papas de calidad se cocerán de
forma uniforme.
Las papas tienen demasiado almidón.
La textura crujiente de los alimentos
depende de la cantidad de aceite y del
agua que contengan.
PROBLEMA CAUSA PROBABLE SOLUCIÓN

39
GARANTÍA Y SERVICIO
Cocine con Gourmia
GARANTÍA Y SERVICIO
Esta garantía limitada tiene validez por un
año a partir de la fecha de factura de compra y requiere
prueba de compra. Aplica únicamente al comprador
original y no es transferible terceros. La reparación o
sustitución de las piezas defectuosas queda a discreción
del vendedor. En caso de que la reparación no sea
posible, el vendedor reemplazará el producto o la pieza
defectuosa. Si la reparación o sustitución del producto no
es satisfactoria, el vendedor tiene la opción de reembolsar
el valor en efectivo del producto o componente devuelto.
Los defectos del producto que no están cubiertos por las
disposiciones de la garantía incluyen el desgaste normal
y los daños ocasionados por el uso o la negligencia
accidental, el seguimiento indebido de las especificaciones
de las instrucciones o la reparación por parte de terceros
no autorizados. El fabricante no es responsable de ningún
daño accidental o derivado de tales circunstancias.
La garantía únicamente es válida dentro de los Estados
Unidos. Vea garantía ofrecida por el importador.
Registre su producto en www.Gourmia.com/warranty

PARA SERVICIO AL CLIENTE,
PREGUNTAS O COMENTARIOS,
VISITE WWW.GOURMIA.COM
CORREO ELECTRÓNICO:
O LLAME AL 888.552.0033
LA ASISTENCIA TELEFÓNICA NO ESTÁ DISPONIBLE FUERA
DE LOS EE.UU.
LUNES A JUEVES, DE 9 am a 6 pm,
HORA DEL ESTE DE E.U.A.,
Y VIERNES DE 9:00 am A 3:00 pm,
HORA DEL ESTE DE E.U.A.
IDIOMAS DISPONIBLES DE ATENCIÓN:
INGLÉS, FRANCÉS, ESPAÑOL