Technical Support and E-Warranty Certificate www.vevor.com/support
INSTRUCTION MANUAL FOOD STEAMER
MODEL:HY-4401N
We continue to be committed to provide you tools with competitive price.
"Save Half", "Half Price" or any other similar expressions used by us only represents an
estimate of savings you might benefit from buying certain tools with us compared to the major
top brands and does not necessarily mean to cover all categories of tools offered by us. You
are kindly reminded to verify carefully when you are placing an order with us if you are
actually saving half in comparison with the top major brands.

- 1 -
MODEL:HY-4401N
PLEASE READ THE MANUAL CAREFULLY BEFORE OPERATINGYOUR
PRODUCT AND RETAIN IT FOR FUTURE USE
Have product questions? Need technical support? Please feel free to
contact us:
Technical Support and E-Warranty Certificate
www.vevor.com/support
NEED HELP? CONTACT US!
This is the original instruction, please read all manual instructions
carefully before operating. VEVOR reserves a clear interpretation of our
user manual. The appearance of the product shall be subject to the
product you received. Please forgive us that we won't inform you again if
there are any technology or software updates on our product.
INSTRUCTION MANUAL
FOOD STEAMER
- 2 -
Warning-To reduce the risk of injury, user must read
instructions manual carefully.
This device complies with Part 15 of the FCC Rules.
Operation is subject to the following two conditions:(1)This
device may not cause harmful interference, and (2)this device
must accept any interference received, including interference
that may cause undesired operation.
This product is subject to the provision of European Directive
2012/19/EC. The symbol showing a wheelie bin crossed
through indicates that the product requires separate refuse
collection in the European Union. This applies to the product
and all accessories marked with this symbol. Products
marked as such may not be discarded with normal domestic
waste, but must be taken to a collection point for recycling
electrical and electronic devices
IMPORTANTSAFEGUARDS
When using electrical appliances, basic safety precautions should always
befollowed, including the following:
1. Read all instructions before using.
2.Do not touch the hot surtaces. Use handies or knobs.
3.Close supervision is necessary when any appliance is used by or
nearchildren.
4.Unplug from outlet when not in use and before cleaning. Allow to
coolbefore putting on or taking off parts, and before cleaning the appliance.
5.To protect against a fire, electric shock or personal injury, do not
immersecord, electric plugs or kettle in water or other liquids.
6.Do not operate any appliance with a damaged cord or plug or after
theappliance malfunctions, or has been damaged in any manner.
Returnappliance to the nearest authorized service facility for examination,

- 3 -
repair oradjustment.
7.The use of accessories, which are not recommended by the
appliancemanufacturer, may result in fire, electric shock or personal injury.
8.Do not use outdoors, household use only
9.Do not let the cord hang over the edge of a table or counter or touch a
hotsurface.
10.Do not place on or near a hot gas or electric burner or in a heated oven.
11.Always attach plug to appliance first, then plug cord into the wall outlet.
Todisconnect, turn any control to "off," then remove plug from wall outlet.
12.Do not use appliance for other than intended use.
13.The appliance must not be immersed
14.Only the appropriate connector must be used.
15. If the kettle is overfilled, boiling water may be ejected.
16.The appliance is only to be used with the stand provided
17. Do not spillage on the connector
18.The appliance can only be used to boil water.
19.The heating element surtace is subject to residual heat after use, be
careof scald.
20.This appliance is not intended for use by persons (including children)
with
reduced physical, sensory or mental capabilities, or lack of experience and
knowledge, unless they have been given supervision or
instructionconcerning use of the appliance by a person responsible for their
safety.
21.Children should be supervised to ensure that they do not play with
theappliance.
22. If the supply cord is damaged, it must be replaced by the manufacturer
orts service agent or a similarly qualified person in order to avoid a hazard.
23.Scalding may occur if the lid is removed during the heating.
24.This appliance has a polarized plug (one blade is wider than the other).
Toreduce the risk of electric shock, this plug is intended to fit into a
polarizedoutlet only one way. If the plug does not fit fully into the outlet,
reverse theplug. If it still does not fit, contact a qualified electrician. Do not
- 4 -
attempt tomodity the plug in any way.
SAVE THESE INSTRUCTIONS
INSTRUCTIONS
Thank you very much for choosing this product. Please read all instructions
before use. This information will help you get the best results.

- 5 -
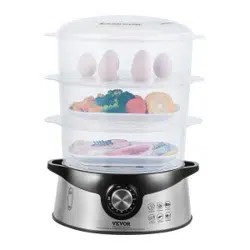
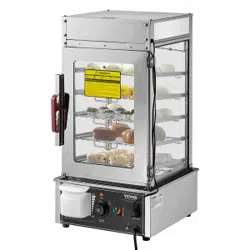
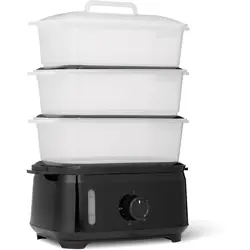
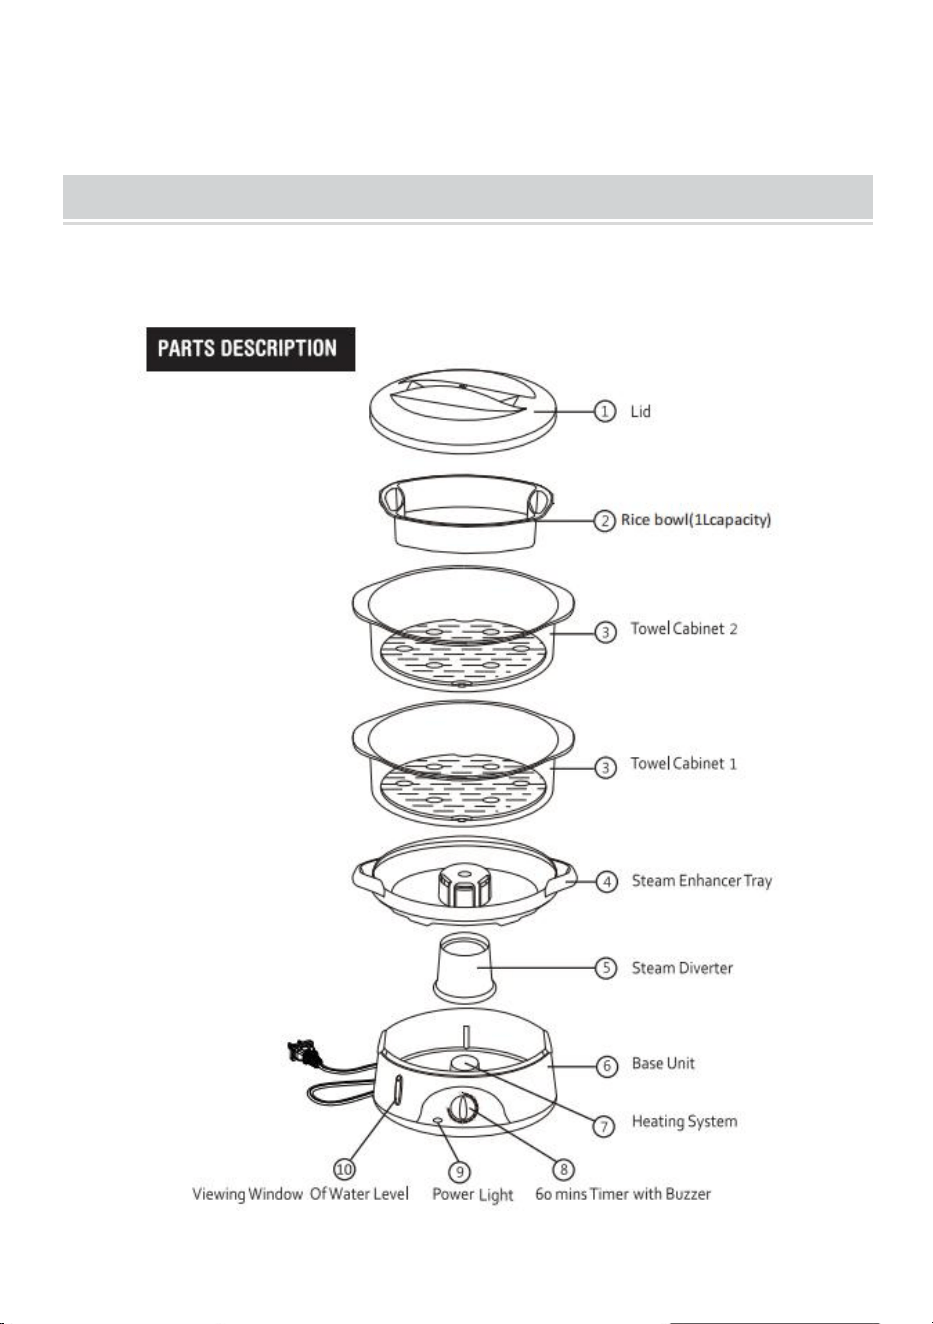
PRODUCT FEATURES
This moist towel warmer uses steam to create hot, moist towels and it
issuitable for spa salon, barbershop or facial treatment
Large Steaming Cabinet
lt can hold up to 14 standard 12"x12" facial towels
60 Minutes Timer with buzzer
You can set up the heating time from 0 - 6o minutes and it is
equippedwith a buzzer to remind user when a heating process is
compeleted.
Auto Shut OFF function
The steamer switches off automatically as the timer rings
Steam Enhancer design
This warmer is equipped with a "Steam Diverter" and "Steam
EnhancerTray", so steam can spread out evenly to the "Towel
Cabinet" in a veryshort oftime This will boost the heating time and 14
faicaltowels can beready in just o minutes.
Viewing Window for water level
VIEWING window lets you see how much water remains.
SPECIFICATION
Product overall dimension
W125 * H10 * D9.4inch
Plug type
US plug
Cable length
39.4inch
Intput
AC 110-120V 60Hz
Power consumption
800W
Product material
PP
Timer
0-60 Minute (with buzzer)Automatic
Shut-Off
Steam cabinet capacity
7 litre
Specifications and design are subject to change without notice

- 6 -
IMPORTANT INFORMATION
1. This warmer is for household use only.
2. Always place the warmer on a firm and flat surface. and securely store
thepower cord to prevent accidental tipping or spilling.
3. Do not put heavy object on top of warmer.
4. Do not cover it with blanket or any type of insulation materials.
5. Never leave the appliance in operation unattached. Keep away
fromchildren.
6. This warmer is designed for warming towels and massage stones so
donot intend to use it to warm anything else.
7. Do not place the appliance near the hot source or in a hot oven, as
seriousdamage could result.
8. Operate the warmer in normal room temperature approx
50F~86F(10°C~30°C).
Avoid operating it in chilly environment to avoid damage to the warmer.If
there is freezing inside, do not start unit until the ice has melted.
9. Place a tray underneath the warmer to avoid the risk of water stain
onthe surface of furniture
PRECAUTION WHEN USING ELECTRICAL APPLIANCES
When using electrical appliance, please follow the precautions below
toreduce the risk offre, electric shock, or injury:

- 7 -
1. To protect against electrical shock, do not immerse power cord, plug
or"Base Unit" in water or other liquid.
2. Do not use the cord as a handle. Never pull on the power cord.
3. Any modification or reftting to the warmer may cause hazard to the user
4. Do not use the warmer if any signs of damage appear on the unit or
thepower cord.
5. When warmer is working, do not wrap the power cord around the
warmerto avoid short circuit and overheat.
6. Clean the dust on the power plug frequently with dry cloth.
7. When the warmer is not in contant operation, unplug the power cord.
8. Check that the power supply voltage corresponds to that shown on the
appliance.
AWARNING
1. Do not move the appliance when it is full ofliquid or hot towels.
2. Do not touch the appliance when it is steaming and use oven gloves
toremove the lid or any parts of the warmer and tong for the hot towels.
3. Always unplug the appliance immediately after use , when moving it
orprior to any cleaning or maintenance.
USE INSTRUCTION
1. Using water and washing up liquid,wash all the removable parts andthe
inside of the water tank, rinseand dry.
2. Place the base unit on a stable surfacethen put the turbo ring around
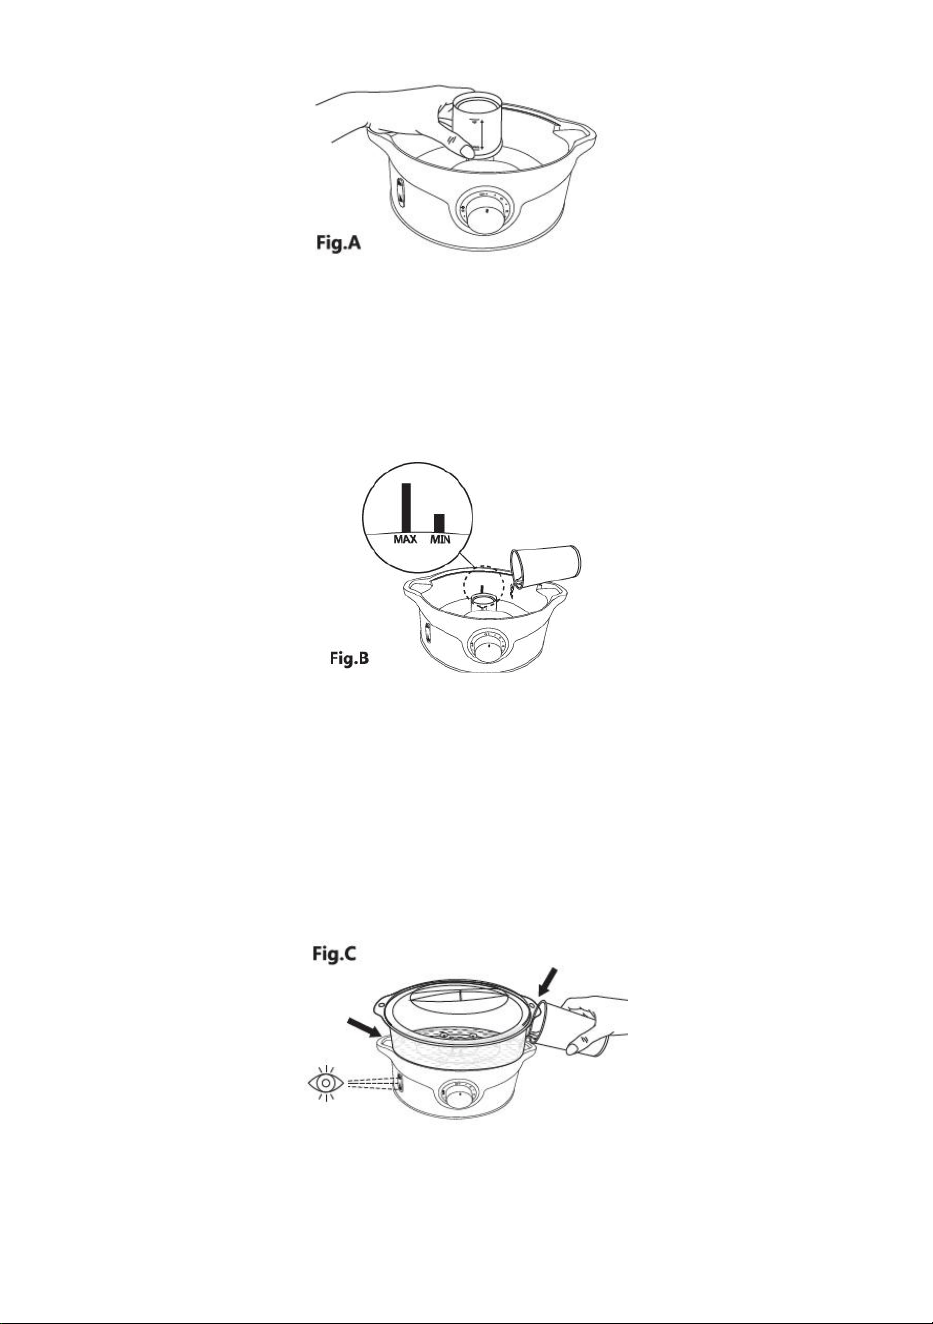
theheating element (the larger sidetoward the bottom).(Fig. A)
- 8 -
3. Pour the fresh water directly into thewater tank untilit reaches
themaximum level.This product isequipped with dry-boilingprotection.This
means that whenthe water runs out the power will becut off automatically
and theindicator light will turn off. (Fig.B).
4. Place the baskets on the top of thewater tray and put the lid on.
5. Plug in the device and set therecommended cooking times (seetable of
cooking times); theindicator light will then come onand the steam cooking
begins.
6. Check the water level by observing the exterior water-level indicator
-ifnecessary, add water from the sidesof the water tray
duringcooking.(Fig.C)
7. When the cooking process is finished, the steamer switches off
automatically and both the timer knob andthe indicator light will turn off.
- 9 -
8. You can reheat the food but be careful if you need to add more water.
9. Remove the lid and place the basket(s) on the plate.
10. Unplug the appliance and allow it to cool completely before cleaning.
Caution:
Avoid spillage on the connector.
The heating element surface is subject to residual heat after use.
COOKING EGGS IN YOUR STEAMER:
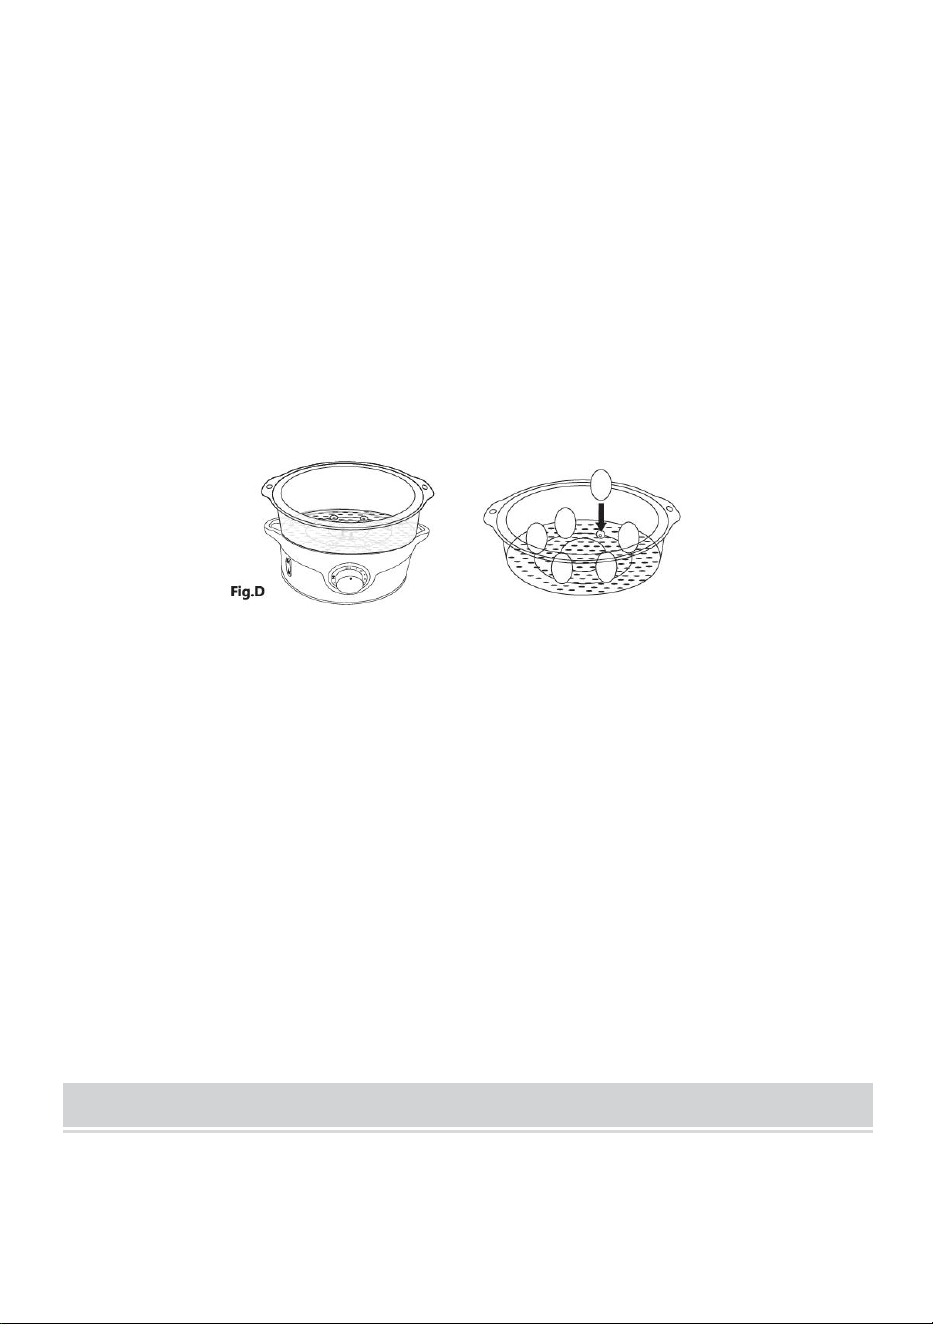
Each steaming basket has six egg holders in its base. To cook eggs
in the shellsimply place one egg into each holder positioned so that the
smaller end pointsdown.(Fig.D)
Cooking rice in your steamer:
A specially designed rice bowl is included, allowing you to cook rice in
yourfood steamer.
Do not fill up more than half of the rice bowl.
Add water to the rice bowl, the ratio of water to food is 11 to 4 (the rice
willabsorb some of the water).
Place the rice bowl in the upper steam bowl. When you place rice
beneathother food items, the juices of those foods will change the
taste of the riceand extra moisture can cause the rice to stick.
Steaming the rice takes about 15-20 minutes depending on the type,
amount,and personal preference.
Taste a sample after 15 minutes and cook for longer if necessary.
COOKING TIME TIPS
The times provided are applicable for one single food layer. Extend the
time ifyou have two or three more layers as the steam needs to heat more
- 10 -
food.
1. lf multiple layers are placed in the steamer, you can determine the
optimaltime for your favorite foods by experiment.
2. Cooking times should only be used as guidelines.
3. Check if the food items are sufficiently cooked before serving them. lf
indoubt, steam for longer.
4. Steam meat, poultry, and similar products (minced meat, hamburgers,
etc.)until the juices have all run out and become colorless. Steam fish
unticompletely opaque.
5. Steam leafy vegetables for as short a time as possible to keep them
green andcrispy.
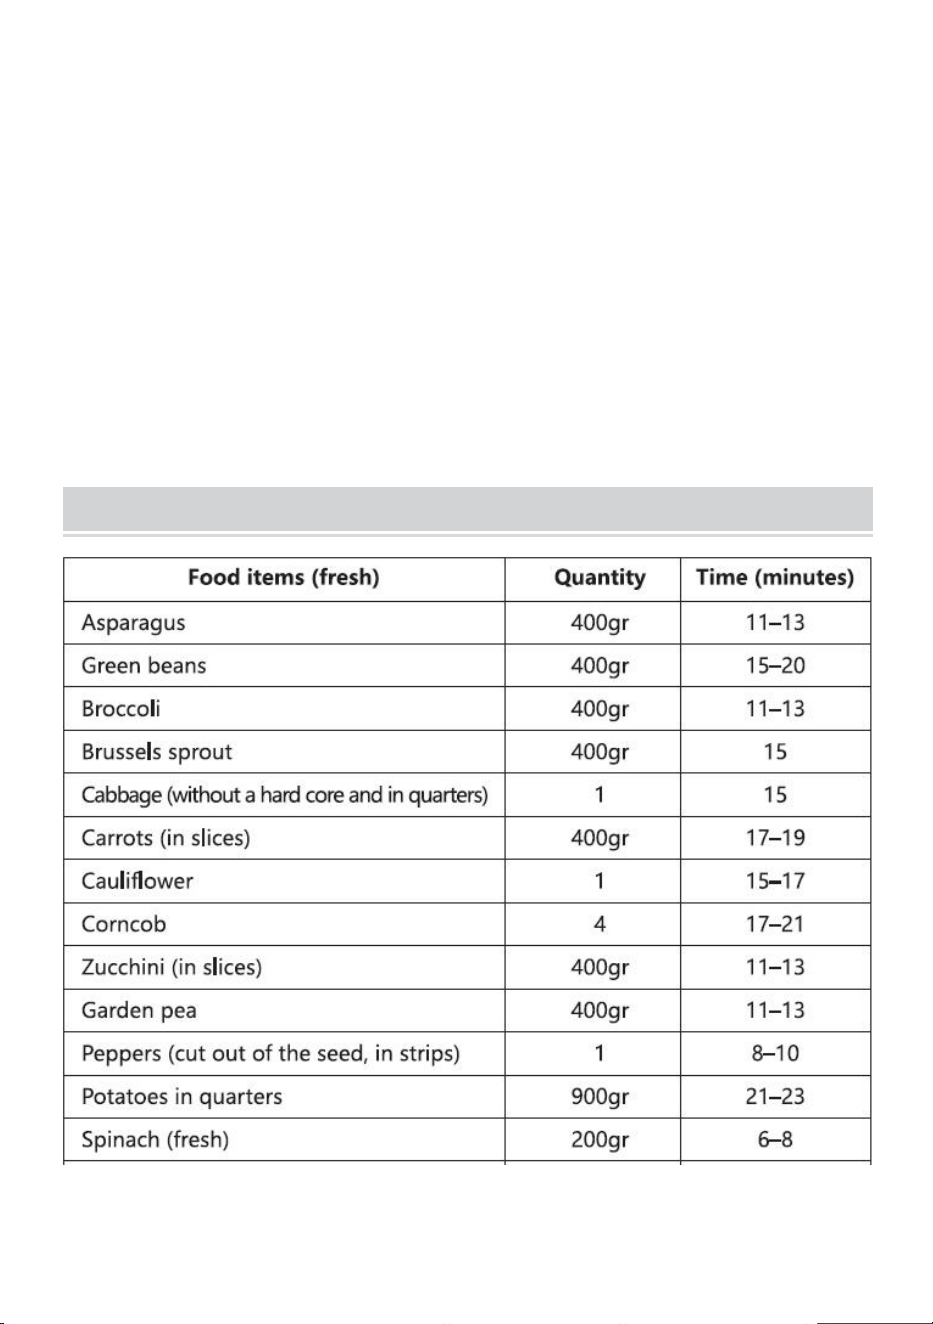
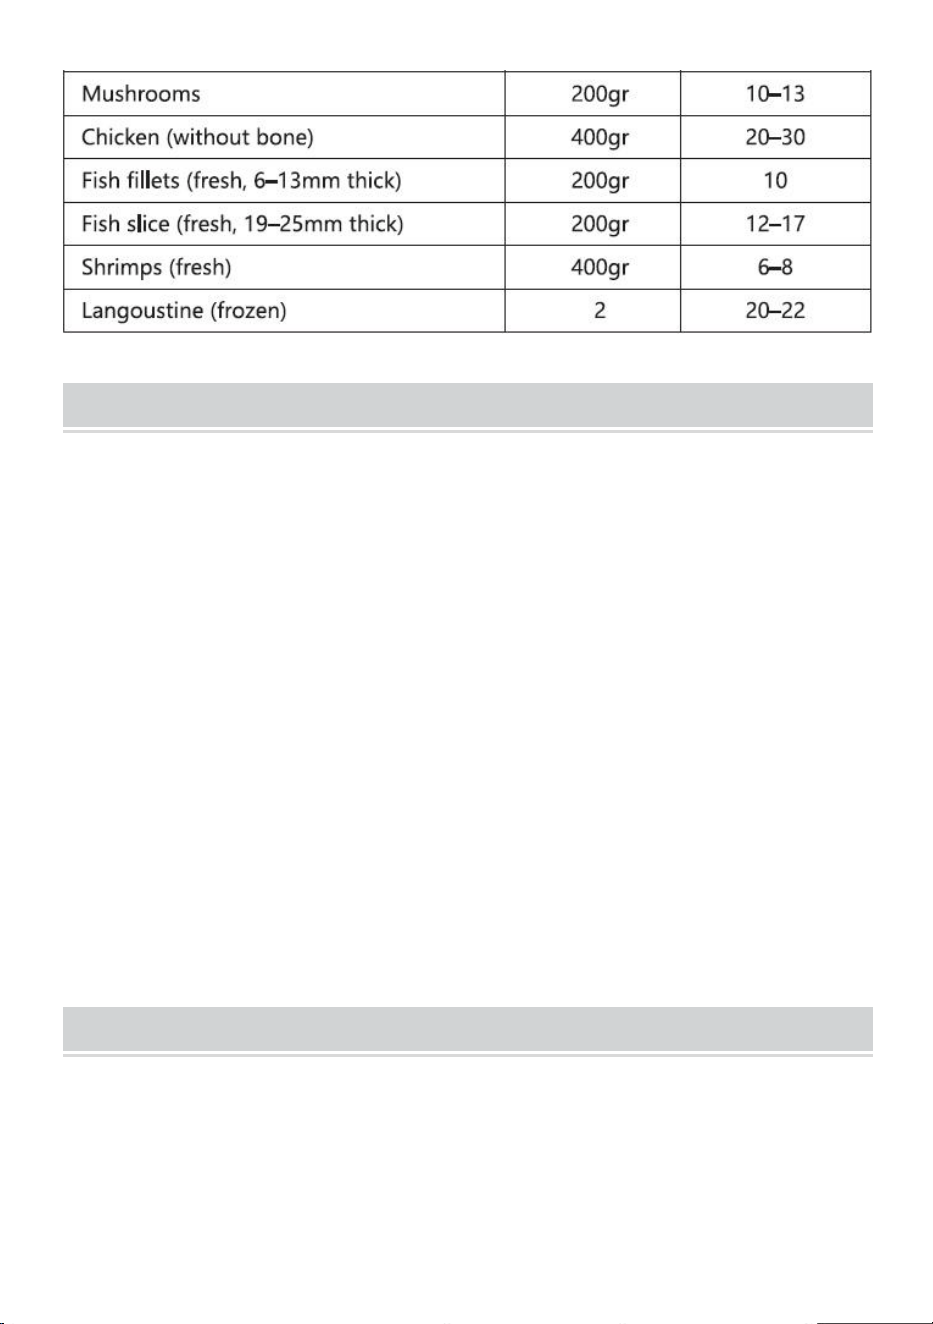
TABLE OF COOKING TIME
- 11 -
CLEANING AND STORAGE
lt is advised to clean your food steamer and all of the used accessories
aftereach use. Ensure that the steamer is unplugged before cleaning.
1. Always empty the water tank and drip tray after each use.
2. Do not use harsh or abrasive cleansers on any part of the food steamer.
Toclean the base of the steamer, rinse the water tank with clean, warm
waterand wipe the exterior with a clean, damp cloth.
3. All other removable parts can be ceaned in the dishwasher.
4. Never immerse any part of the steamer base, cord, or plug in water or
otherliquid.
5. Stack the baskets on top of each other by placing No. 1 into No. 2,
thentogether into No. 3.Place the rice bowl into the No. 1 Steamer
Baskets.Finally, place the baskets onto the drip tray and fix the lid on top.
6. Your steamer is now ready for storage in a clean, dry place and in its
uprightposition.
DESCALING YOUR FOOD STEAMER
Depending on the hardness of your water supply and how often you use
thesteamer we recommend descaling the heating element every eight
uses tominimize lime-scale build-up.
To descale the heating element, place theturbo ring around it and
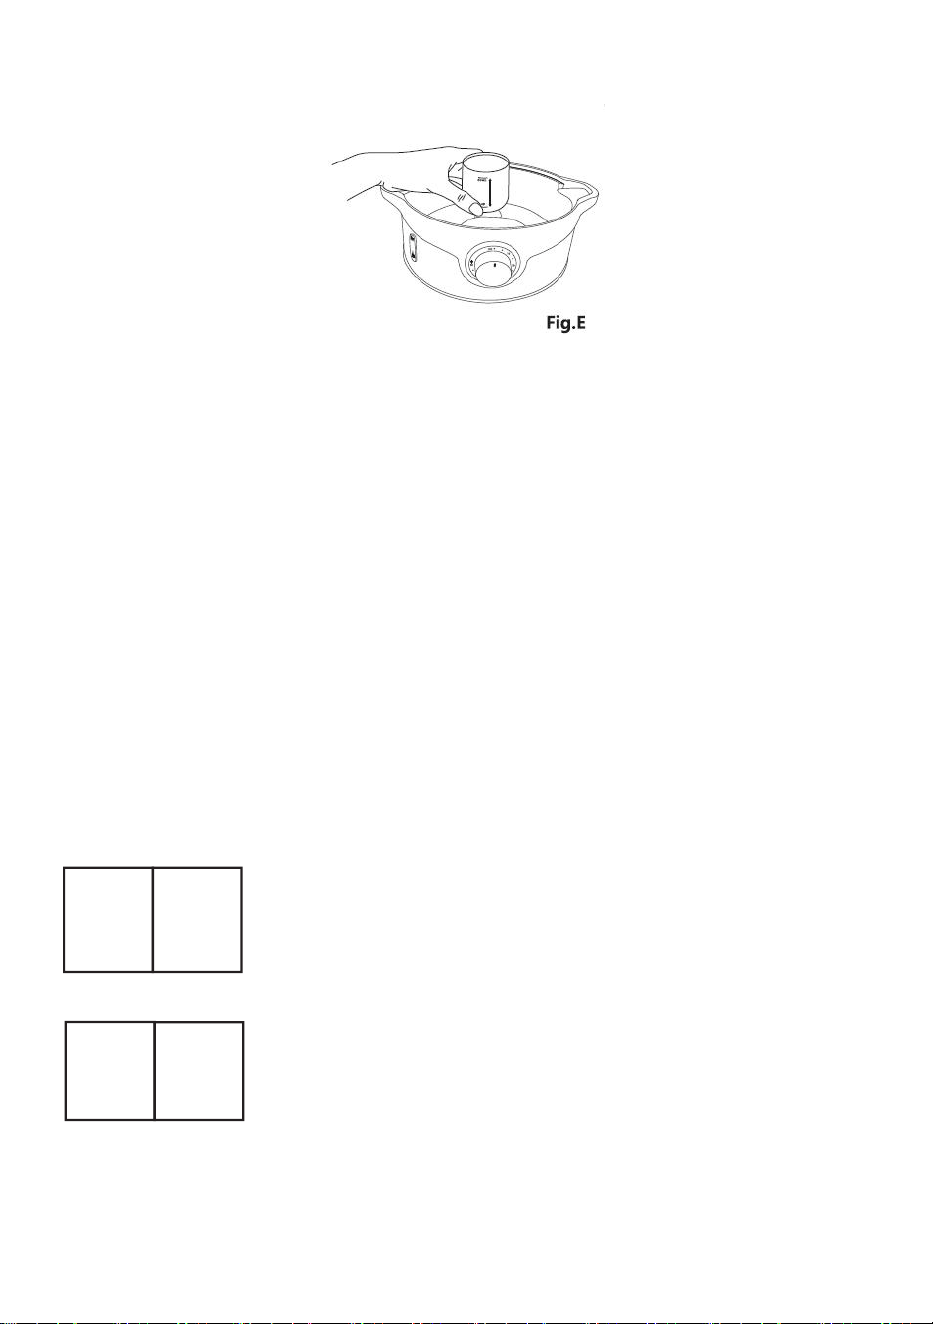
- 12 -
upside down - thelarger end should be facing upward. (Fig.E)
Ensure that the steamer is turned off andunplugged. Fill the water tank
with coldwater up toMAX level, then fill the turboring with white vinegar
to the same level.Leave overnight to descale. Do not heat up(to avoid
the descaling odor). The nextmorning you can discard the water
andvinegar, then wash the turbo ring in warmand soapy water and
thoroughly rinse thewater tank with warm water.
Address:Baoshanqu Shuangchenglu 803long 11hao 1602A-1609shi
Shanghai
Imported to AUS: SIHAO PTY LTD, 1 ROKEVA STREETEASTWOOD
NSW 2122 Australia
Imported to USA: Sanven Technology Ltd., Suite 250, 9166 Anaheim
Place, Rancho Cucamonga, CA 91730
REP
UK
Pooledas Group Ltd
Unit 5 Albert Edward House, The Pavilions
Preston, United Kingdom
REP
EC
SHUNSHUN GmbH
Römeräcker 9 Z2021, 76351
Linkenheim-Hochstetten, Germany
Made In China