
I
USER MANUAL
ZKParking
Version: 1.2
Date: Jan, 2018
So
ft
ware Version: ZKParking 2.2.0 or above version

i
About This Manual
The pictures in this manual may not be exactly consistent with those of your product; the actual
product's display shall prevail.
The items marked with an asterisk (*) are mandatory.
i
Important Claim
Firstly thank you for purchasing our product, before use, please read this manual carefully to avoid the
unnecessary damage! The company reminds you that the proper user will improve the use affect and
authentication speed.
No written consent by ZKTeco Inc., any unit or individual isn’t allowed to excerpt, copy the content of
this manual in part or in full, also spread in any form.
The product described in the manual maybe includes the software which copyrights are shared by the
licensors including ZKTeco Inc. Except for the permission of the relevant holder, any person can’t copy,
distribute, revise, modify, extract, decompile, disassemble, decrypt, reverse engineering, leasing,
transfer, sub-license the software, other acts of copyright infringement, but the limitations applied to
the law is excluded.
Due to the constant renewal of products, the company cannot undertake the actual
product in consistence with the information in the document, also any dispute caused by the
difference between the actual technical parameters and the information in this document. Please
forgive any change without notice.

I
Contents
1. Installation & Uninstallation ....................................................................................................................................................................... 1
1.1 Installation ............................................................................................................................................................................................... 1
1.2 Uninstallation ........................................................................................................................................................................................ 5
2. Database Settings ............................................................................................................................................................................................. 8
2.1 Create a new database ................................................................................................................................................................... 9
2.2 Database Connection ...................................................................................................................................................................... 10
3. Login ........................................................................................................................................................................................................................... 12
4. Personnel Management ............................................................................................................................................................................... 15
4.1 Department Management .......................................................................................................................................................... 15
4.1.1 Adding a department ...................................................................................................................................................... 15
4.1.2 Editing a department ....................................................................................................................................................... 16
4.1.3 Deleting a department ................................................................................................................................................... 16
4.2 Employees Management .............................................................................................................................................................. 16
4.2.1 Adding an employee........................................................................................................................................................ 18
4.2.2 Editing an employee ........................................................................................................................................................ 18
4.2.3 Deleting an employee ..................................................................................................................................................... 18
4.2.4 Importing & Exporting employees ......................................................................................................................... 19
5. System Management ..................................................................................................................................................................................... 21
5.1 System Settings ................................................................................................................................................................................... 21
5.2 User Management ............................................................................................................................................................................. 22
5.2.1 Adding/Editing/Deleting a user ............................................................................................................................... 23
5.3 Role Management ............................................................................................................................................................................. 23
5.3.1 Adding a role ......................................................................................................................................................................... 23
5.3.2 Editing/Deleting a role .................................................................................................................................................... 24
5.4 Black And White Lists Management ...................................................................................................................................... 24
5.4.1 Adding/Editing/Deleting a Black or White list ................................................................................................ 24
5.4.2 Importing & Exporting Black or White lists ....................................................................................................... 24
6. Terminal Management .................................................................................................................................................................................. 25
6.1 Equipment Settings .......................................................................................................................................................................... 25
6.1.1 Adding a device ................................................................................................................................................................... 25
6.1.2 Editing/Deleting a device ............................................................................................................................................. 26
6.2 Parking Area Settings ....................................................................................................................................................................... 26
6.2.1 Adding/Editing/Deleting a parking area ............................................................................................................ 26
6.3 Workstation Settings ........................................................................................................................................................................ 27
6.3.1 Adding a workstation....................................................................................................................................................... 28
6.3.2 Editing/Deleting a workstation ................................................................................................................................. 30
6.4 Region Linkage Settings ................................................................................................................................................................ 30
6.5 Real-time Monitoring ....................................................................................................................................................................... 32
7. Authorization Management ...................................................................................................................................................................... 35
7.1 Fixed Authorization ........................................................................................................................................................................... 35
7.1.1 Adding a fixed car ............................................................................................................................................................... 36
7.1.2 Finding a fixed car .............................................................................................................................................................. 36

II
7.1.3 Editing/Deleting a fixed car ......................................................................................................................................... 37
7.2 Provisional Authorization .............................................................................................................................................................. 37
7.3 Fixed Extension .................................................................................................................................................................................... 38
8. Financial ................................................................................................................................................................................................................... 39
8.1 Provisional Rules .................................................................................................................................................................................. 39
8.2 Fixed Rules ............................................................................................................................................................................................... 41
8.2.1 Adding/Editing/Deleting fixed rules ..................................................................................................................... 42
8.3 Extra Rules ................................................................................................................................................................................................ 42
8.4 Discount Policy ..................................................................................................................................................................................... 42
8.4.1 Adding/Editing/Deleting a discount policy ..................................................................................................... 43
8.5 Discount Store ...................................................................................................................................................................................... 43
8.5.1 Adding/Editing/Deleting a discount store ....................................................................................................... 44
8.6 Shift............................................................................................................................................................................................................... 44
8.6.1 Adding/Editing/Deleting shift ................................................................................................................................... 45
8.7 Financial Confirmed .......................................................................................................................................................................... 45
9. Reports ...................................................................................................................................................................................................................... 46
Appendix ...................................................................................................................................................................................................................... 47
Appendix 1 Date Setting ....................................................................................................................................................................... 47
Appendix 2 Licence .................................................................................................................................................................................. 49
ZKParking User Manual 1
1. Installation & Uninstallation
1.1 Installation
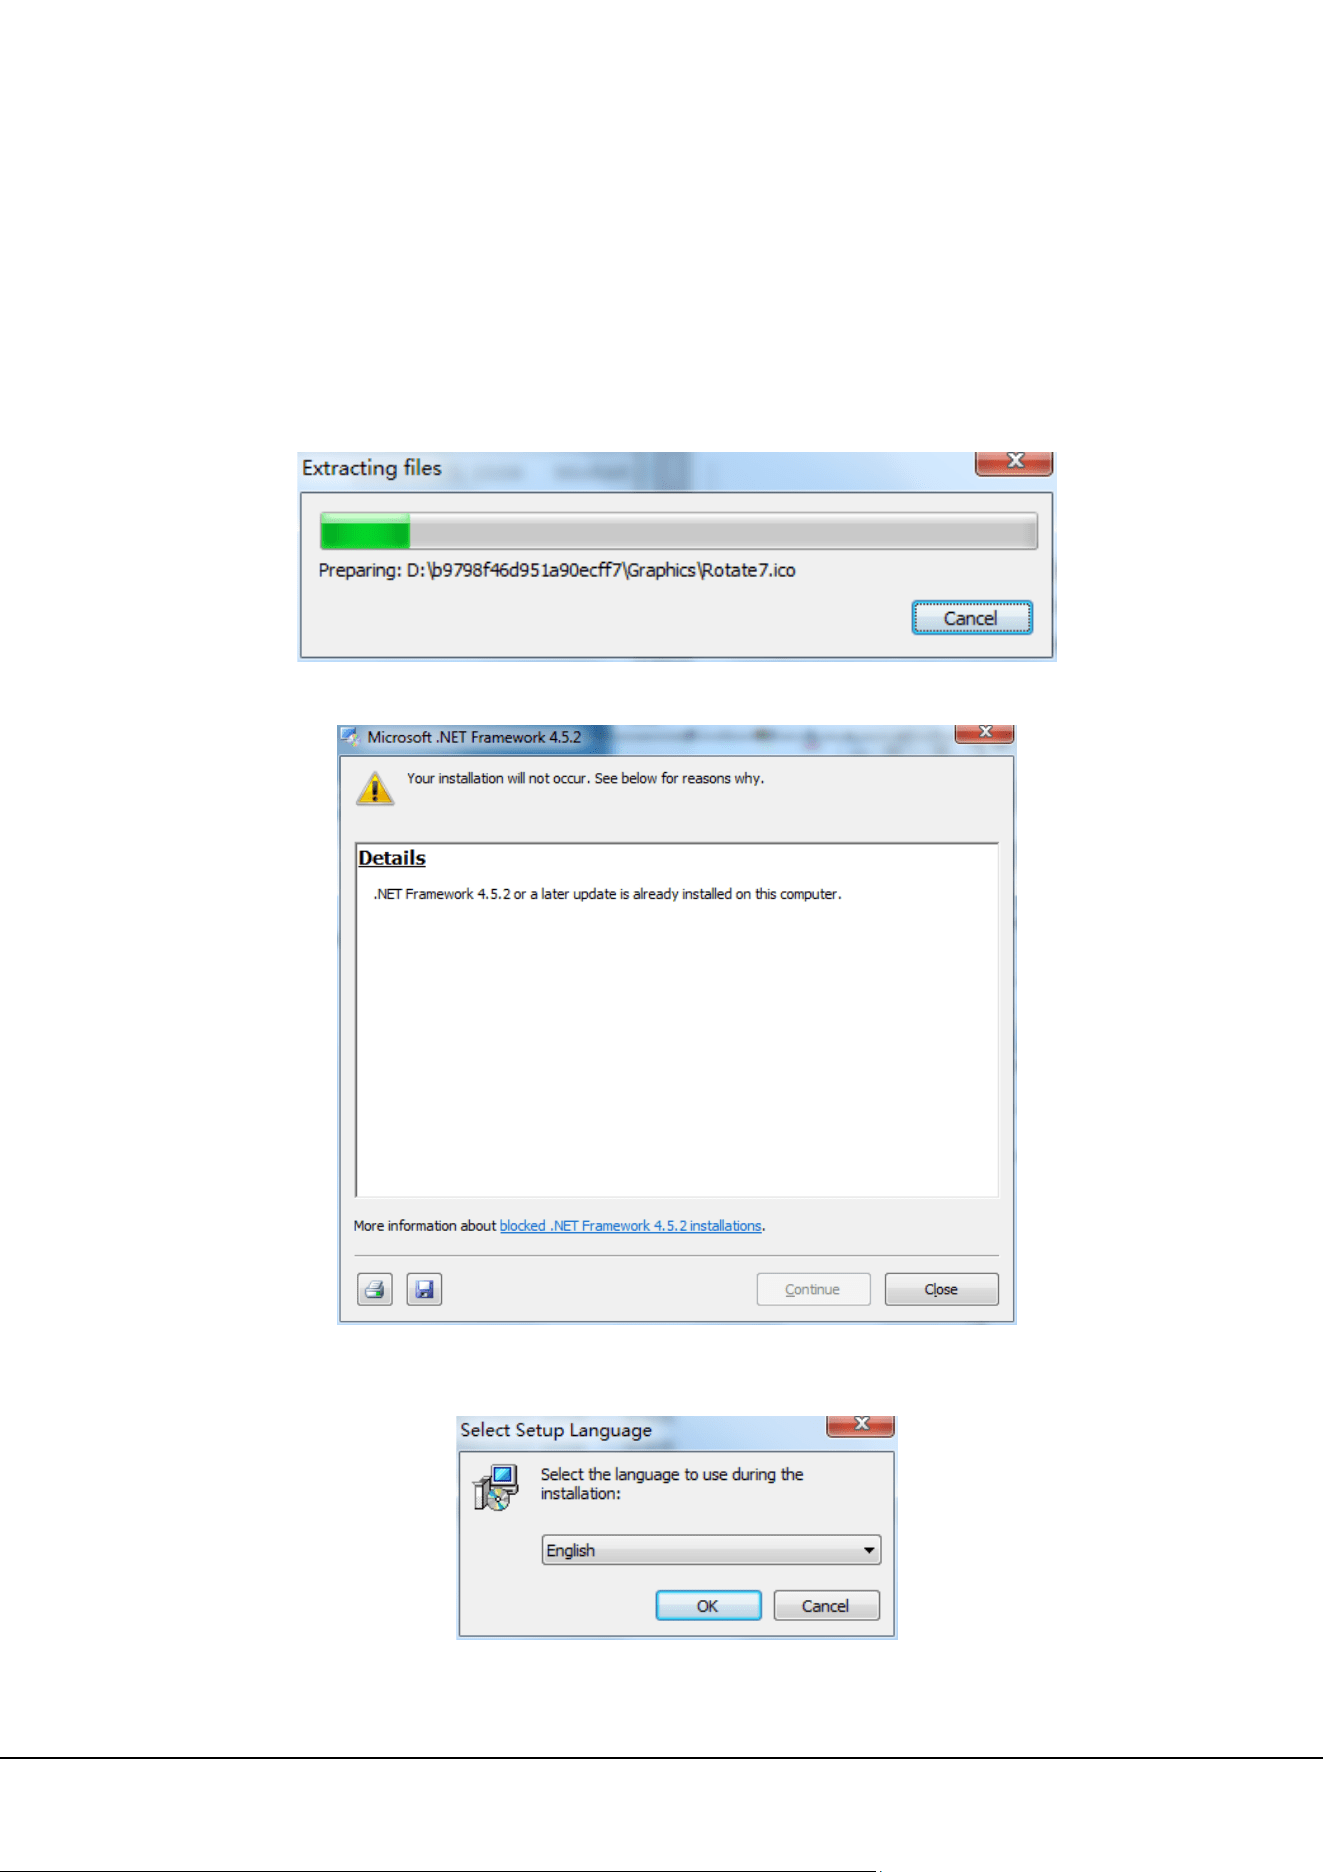
1) Firstly, decompress the software package [ZKParking Setup Install.rar].
2) The ZKParking system runs in the .NetFramework4.5 environment. Find the [Microsoft .NET Framework
4.5.2-x86-x64.exe] file in the [tools] folder and double-click it to start installation.
If this file has been installed on the computer, the message shown in the figure below is displayed:
3) Find the [Setup.exe] file in the installation package and start installation.
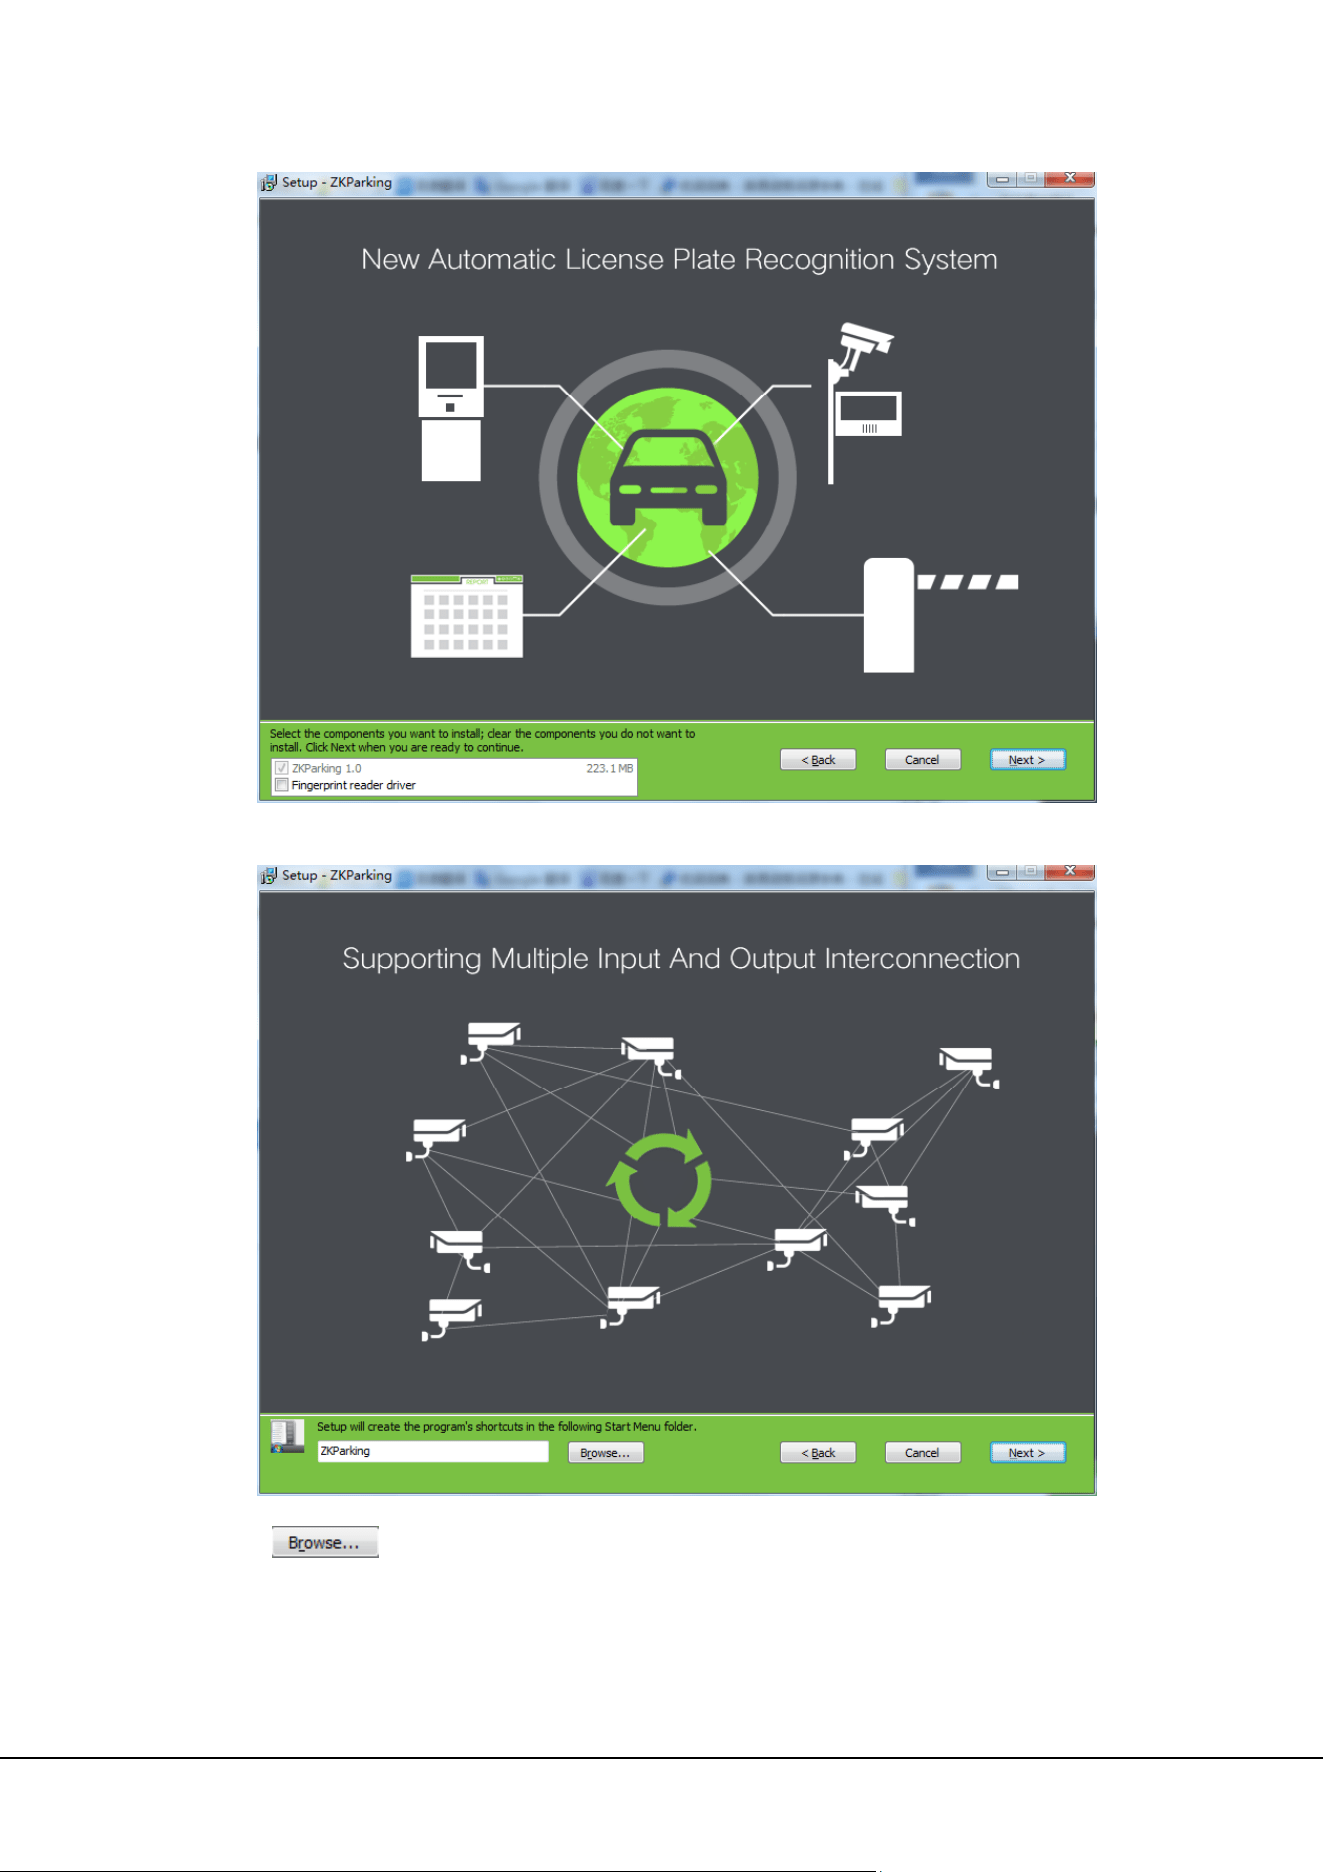
Select a setup language;
Click [OK];
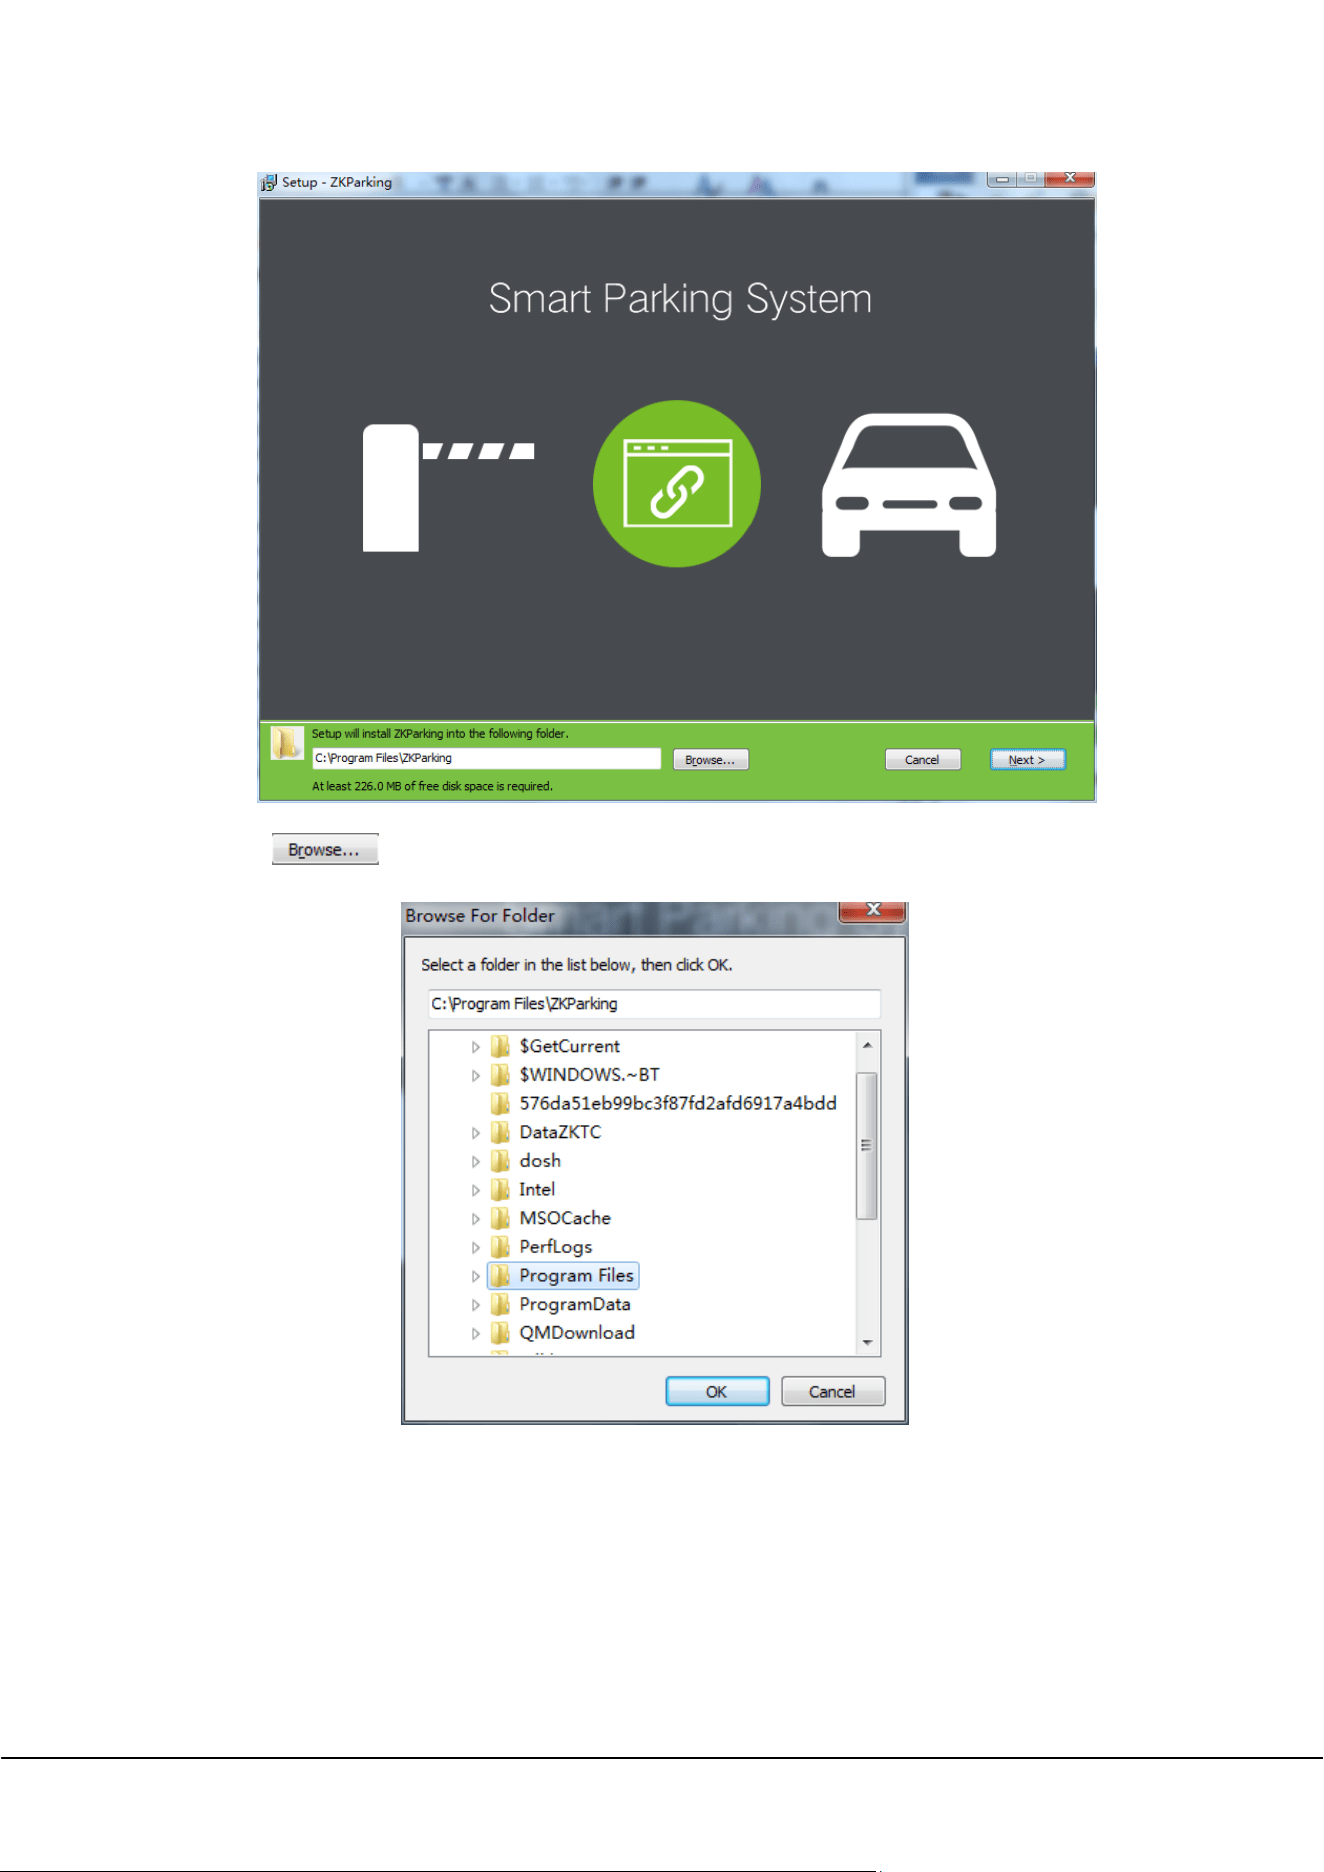
2 ZKParking User Manual
Click to select a folder;
And then, click [Next];
ZKParking User Manual 3
There is no need to select [Fingerprint reader driver], click [Next];
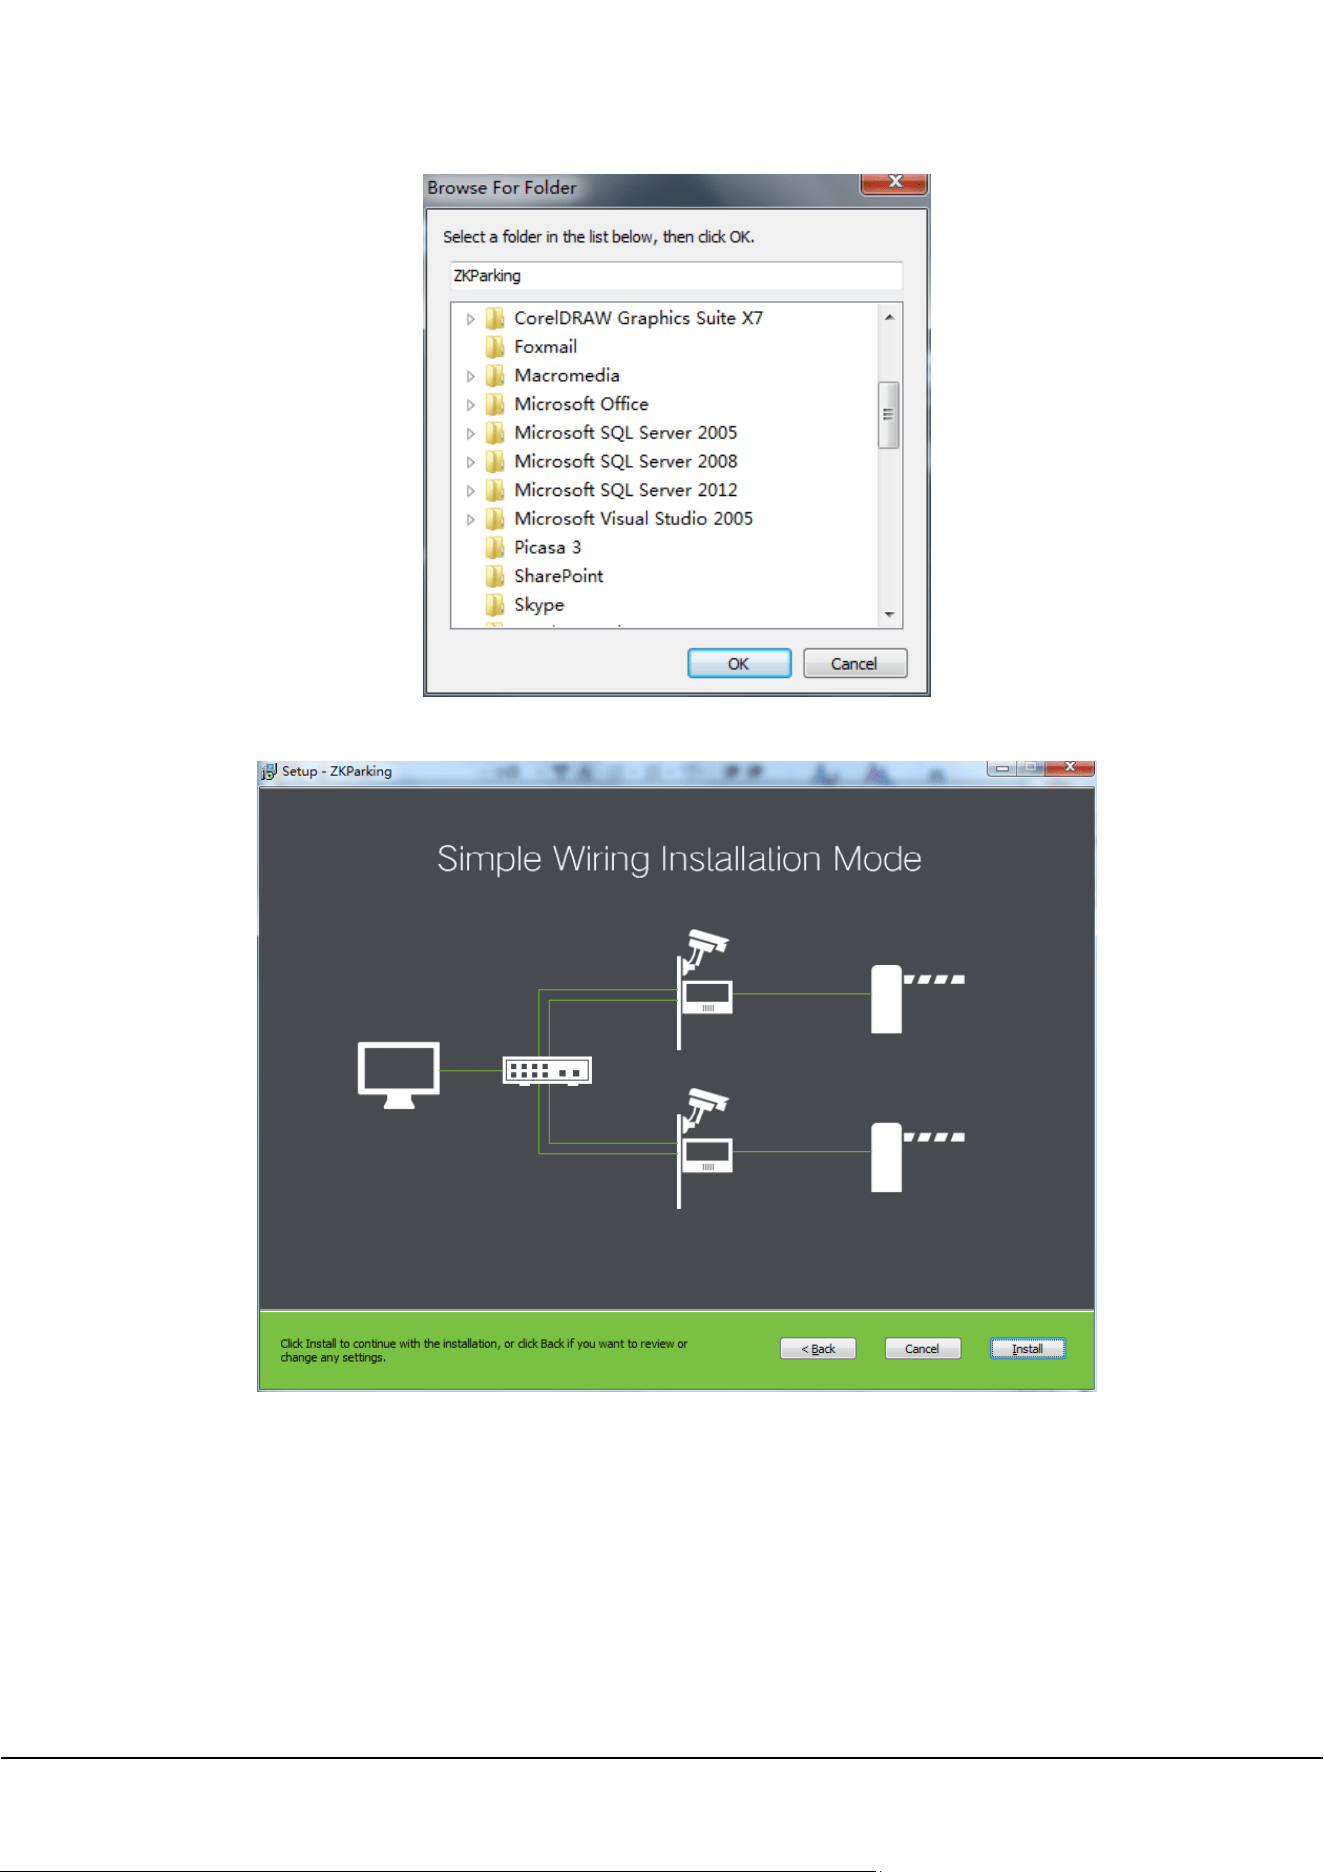
Click to select a folder, setup will create the program’s shortcuts in the following Start
Menu folder;
4 ZKParking User Manual
Click [Next];
Click [Install] to continue with the installation, or click [Back] if you want to review or change any
settings. If a firewall is configured, click [Allow the operation] in the displayed message box.
ZKParking User Manual 5
Finish.
1.2 Uninstallation
If you want to uninstall ZKParking, there are two methods:
1) Click [Start]→[Control Panel]→[Uninstall a program], right-click [ZKParking 1.0],then click [Uninstall]:
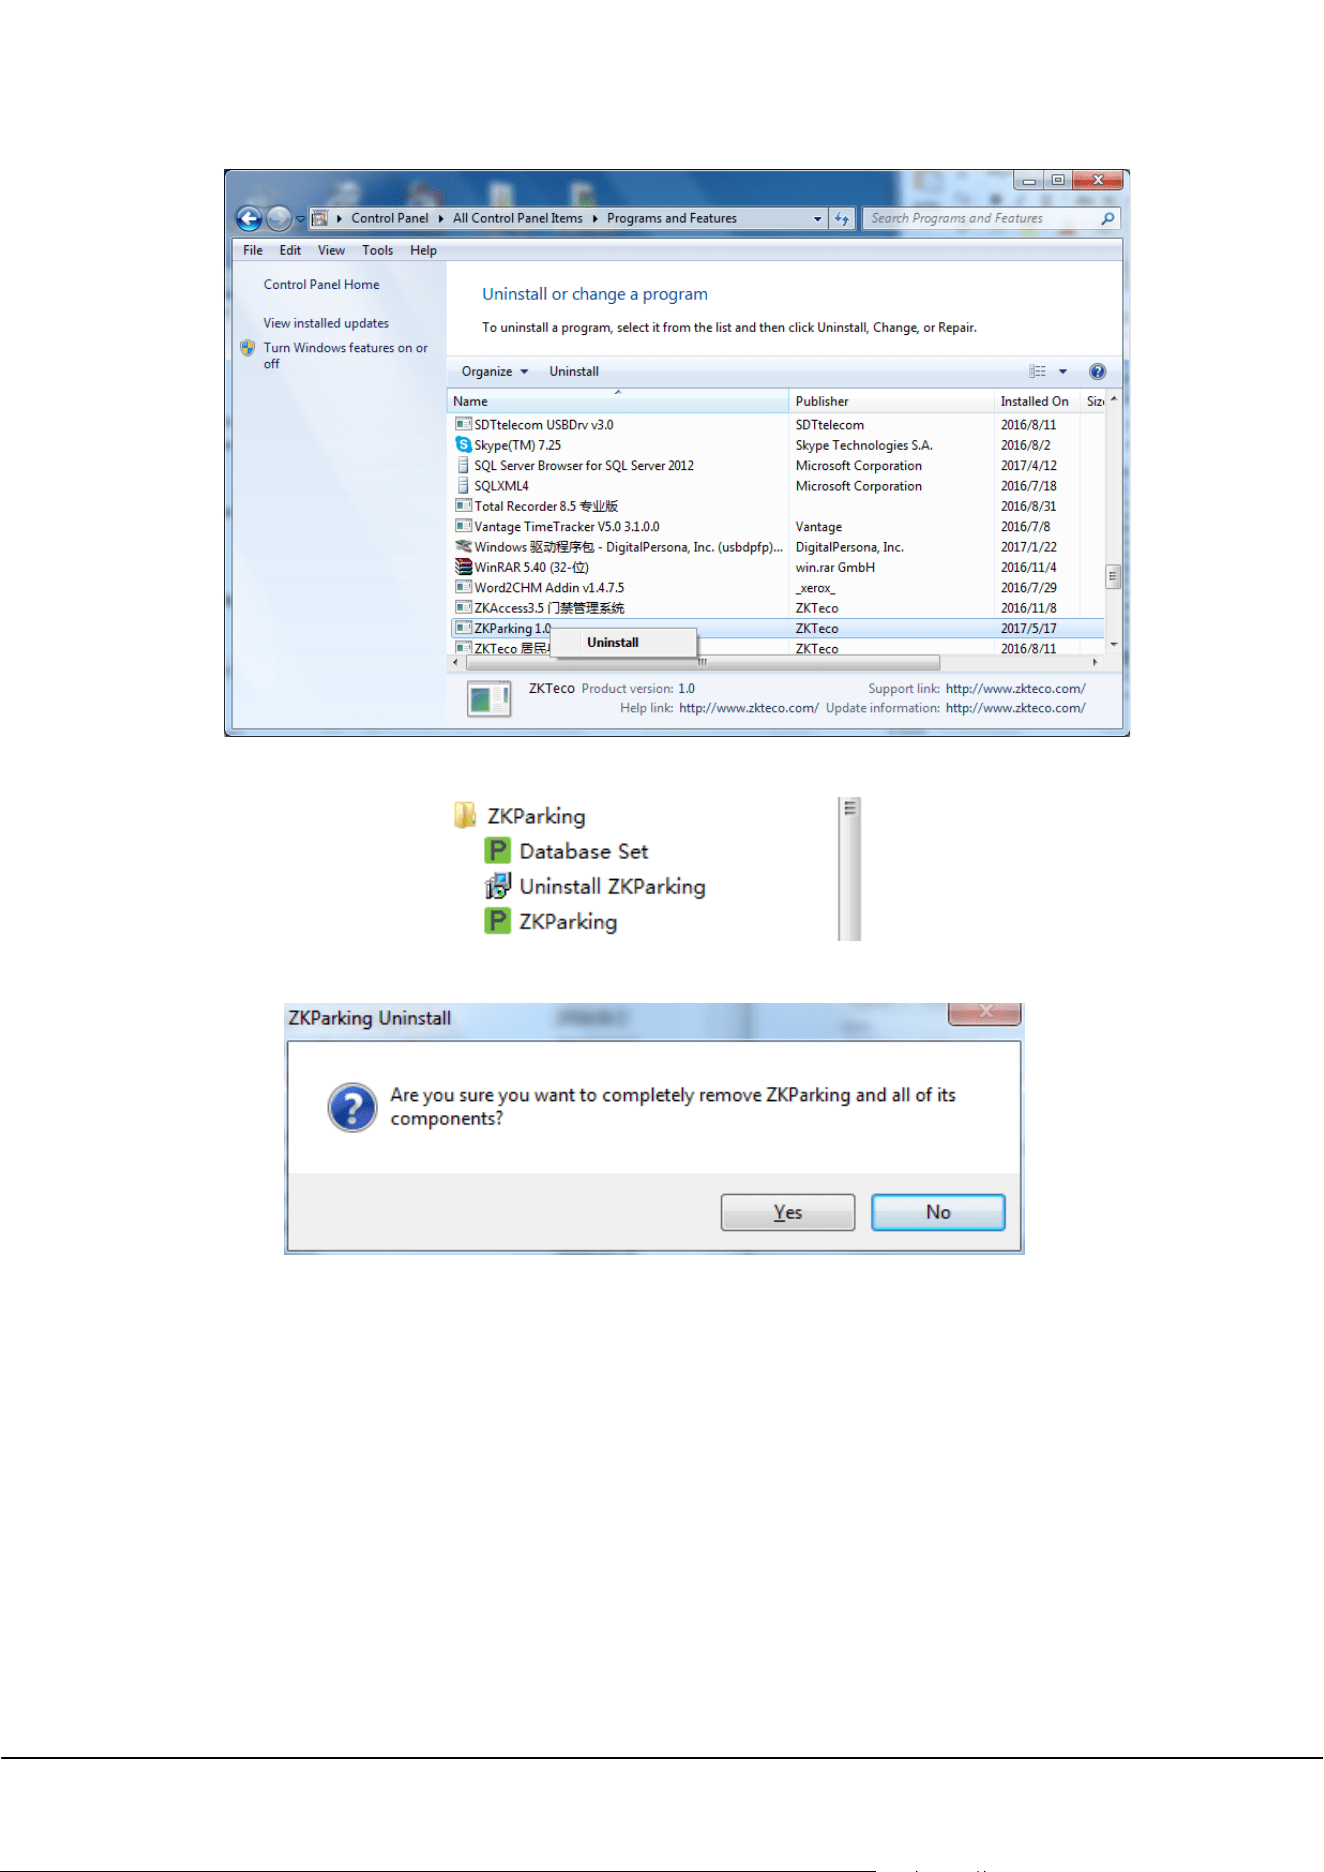
6 ZKParking User Manual
2) Click [Start]→[All Programs]→[ZKParking]→[Uninstall ZKParking]:
The following message box is displayed in both methods:
Click [ Yes] to confirm the uninstallation operation or [No] to cancel the operation.
ZKParking User Manual 7
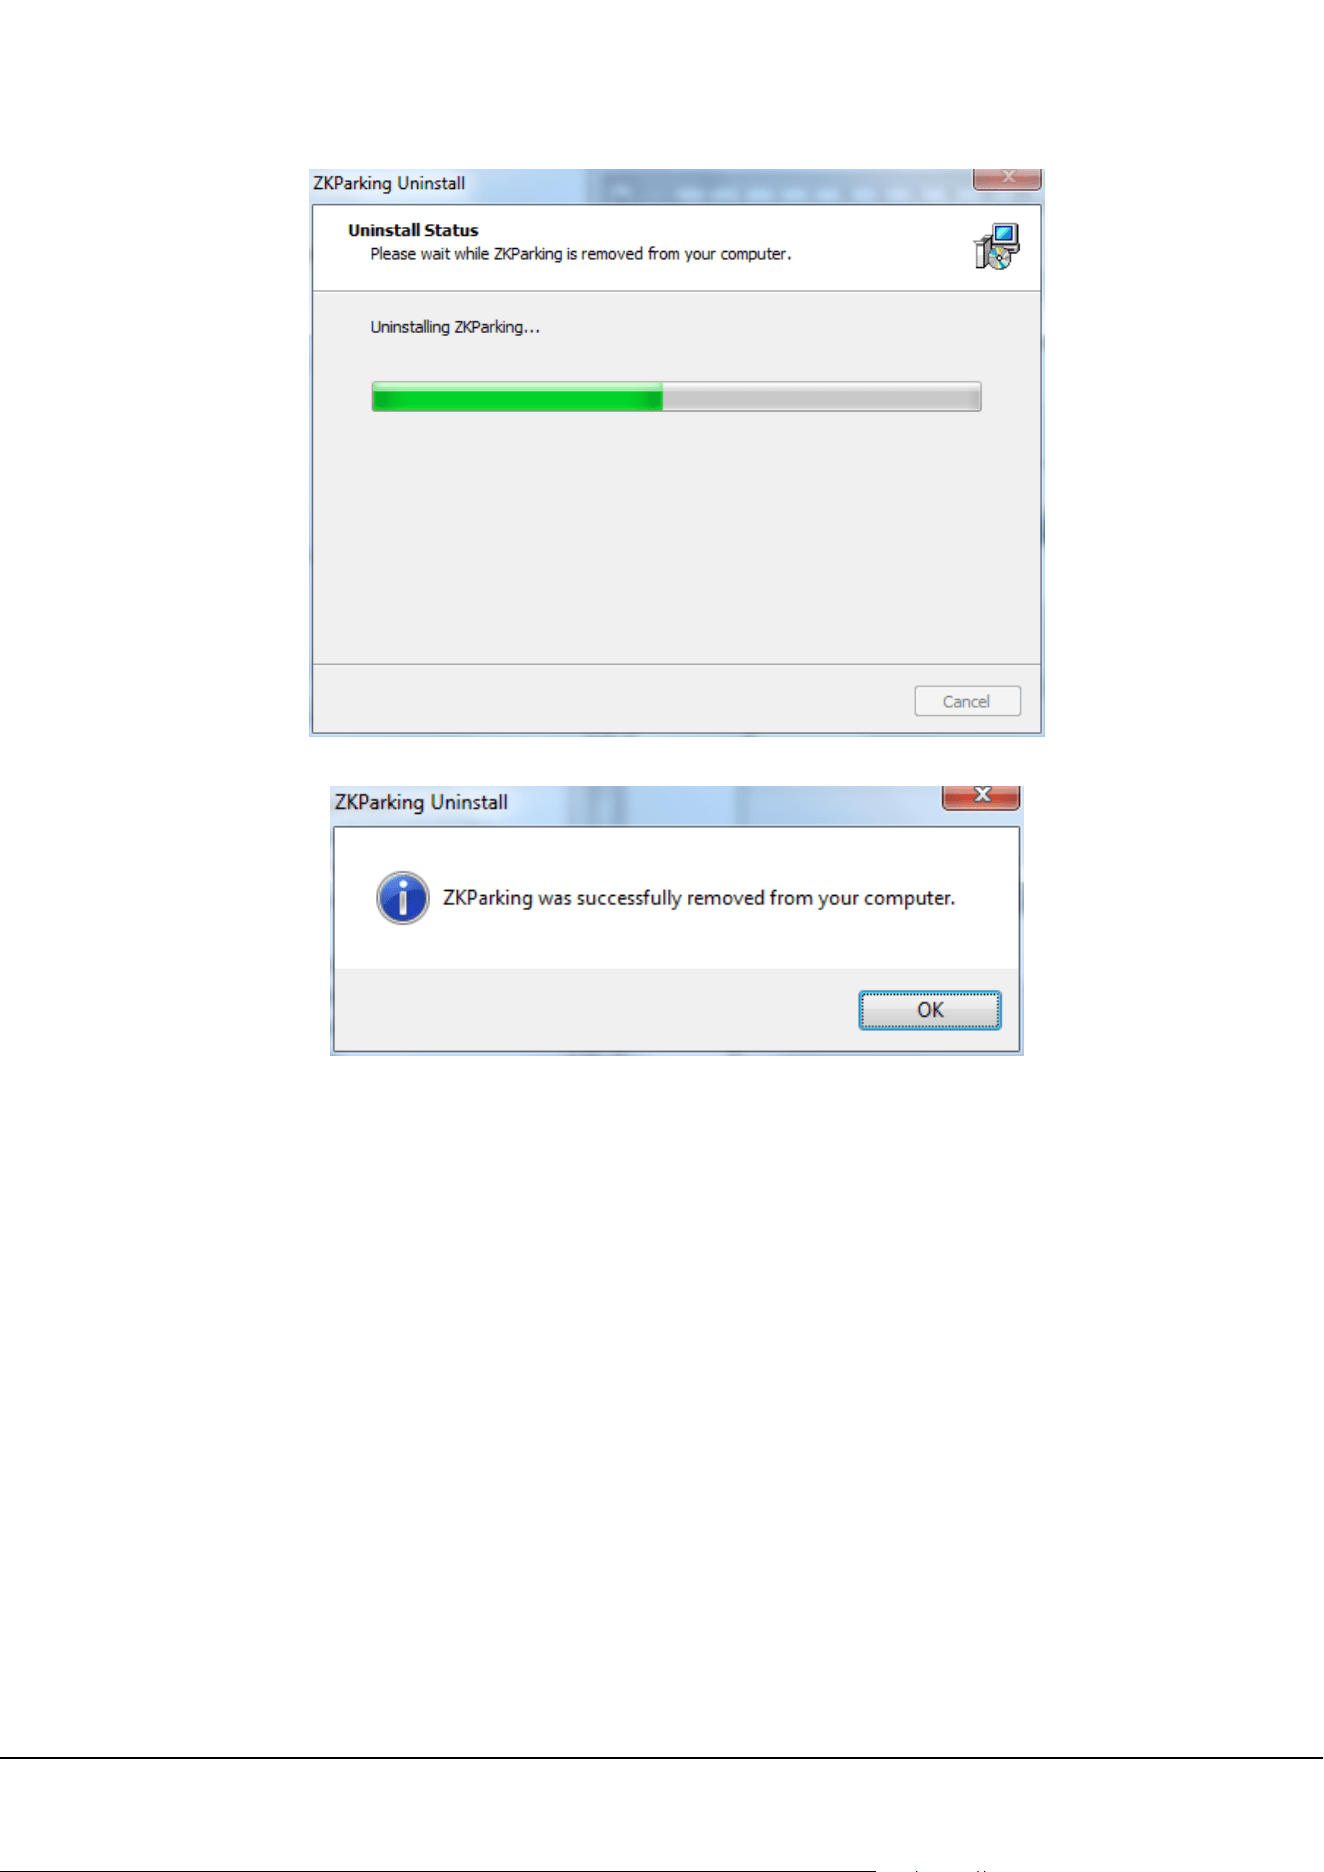
The following prompt will pop up when uninstallation is complete:
Note: If any software errors occur, you do not need to uninstall the software. Instead, you can directly
install it again.
8 ZKParking User Manual
2. Database Settings
After installation, you need to connect to the database to log in to the software. This chapter introduces the
creation and connection of the database.
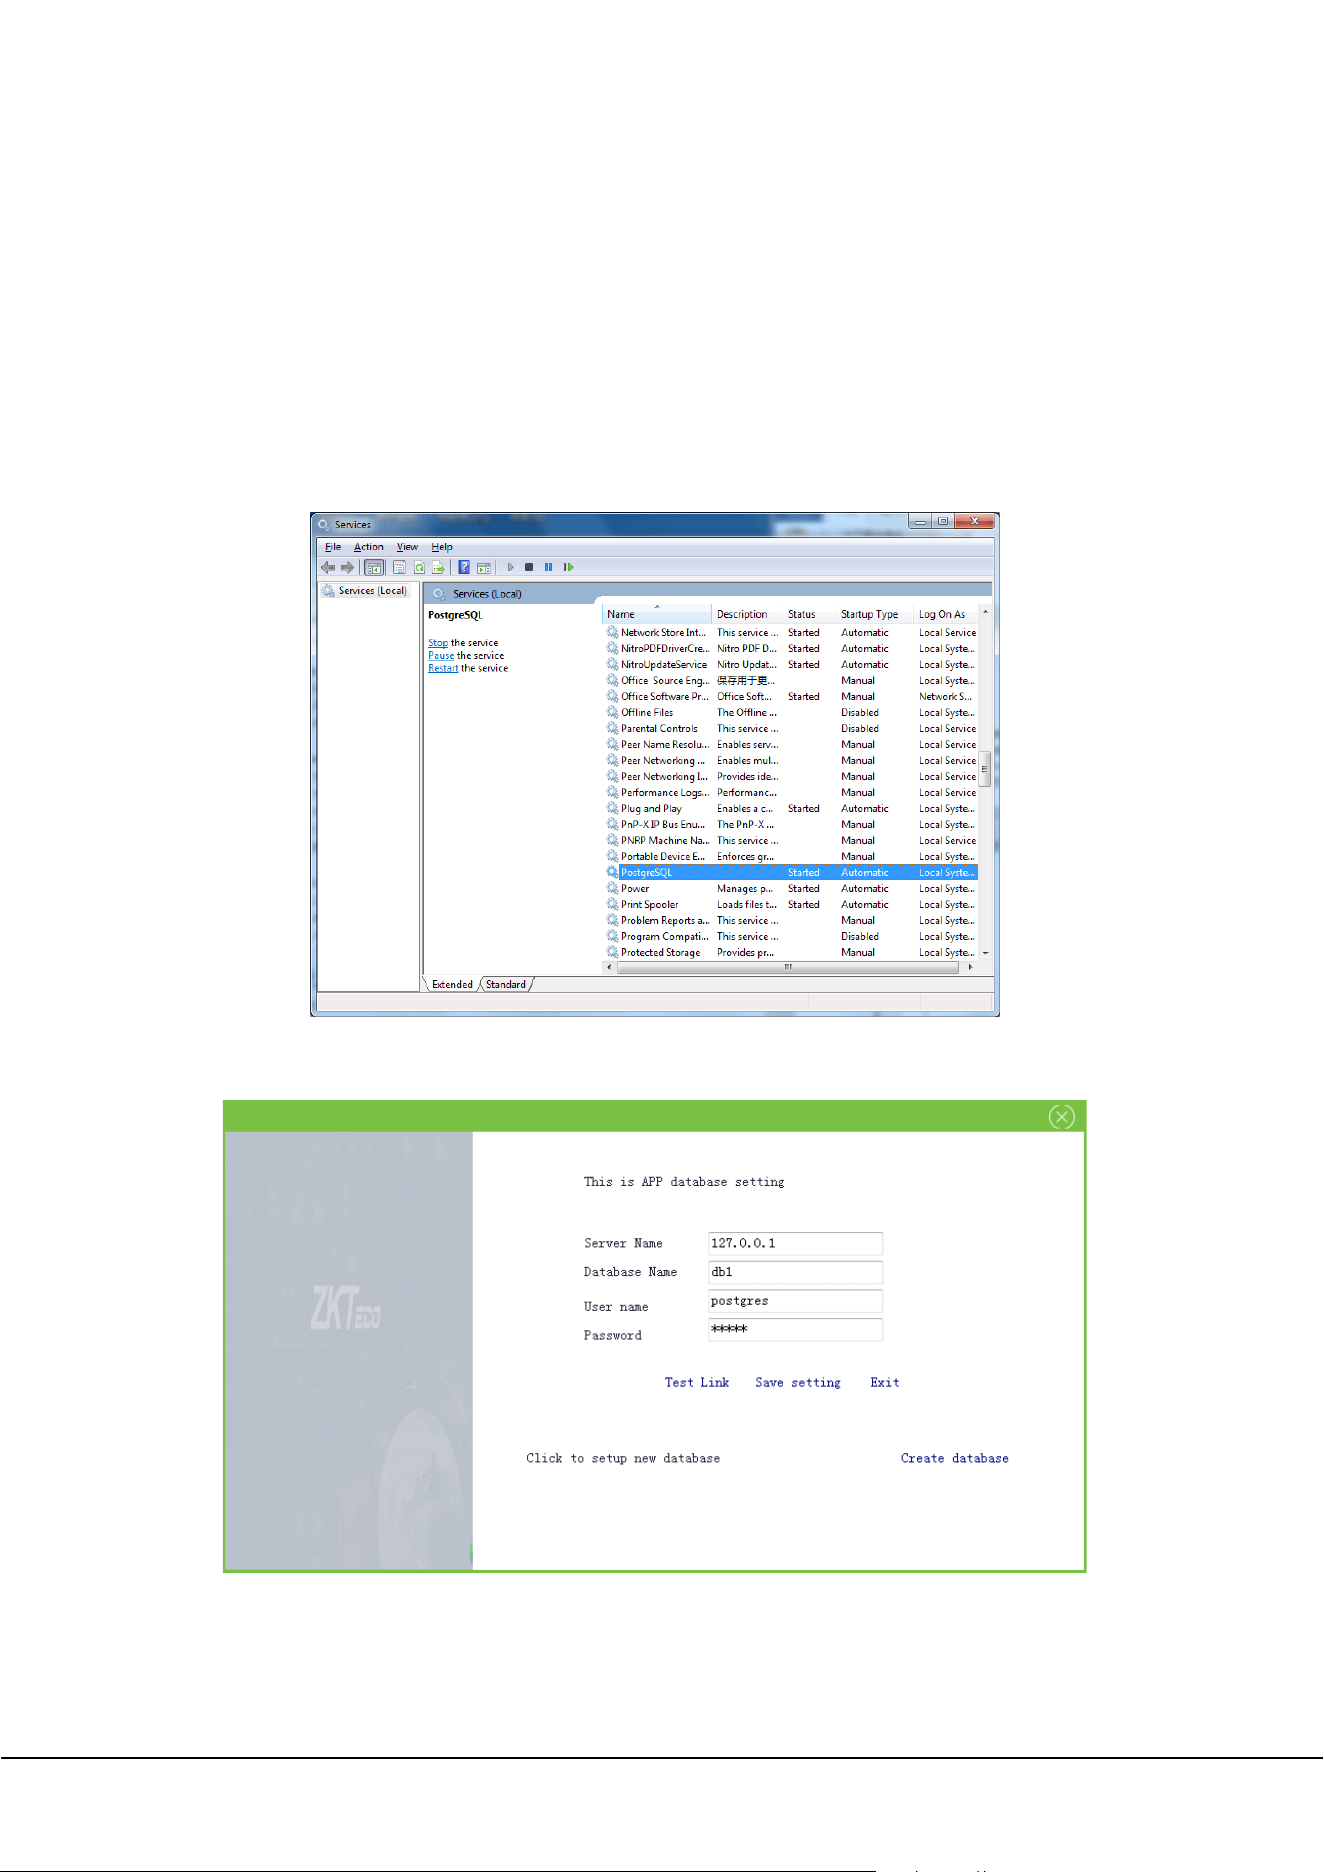
This software is compatible only with the PostgreSQL database. The database environment is automatically
installed and the PostgreSQL database service is installed in the OS services. (You can click [Start]→[Control
Panel]→[All Control Panel Items]→[Administrative Tools]→[Services], to check whether the PostgreSQL
database service is generated. If not, right-click it and choose [Start] ). If you cannot find the PostSQL in the
[services], open the file C:\DataZKTC\postgresql\startserver(Run as Administrator ).
Database Setting: Click [Start]→[All Programs]→[ZKParking]→[Database Set] to open the database setup
interface:
Server Name: Name of the server, that is, IP address or name of the computer where the database is
installed. If the database and software are installed on the same computer, the IP address 127.0.0.1 can
be used as the server name.
ZKParking User Manual 9
Database Name: The initial database name is postgres.
User name: The default user name is postgres.
Password: The default password is sa123. The port 5432 is used.
Note: If the database environment already exists in the OS, initialization is not performed.
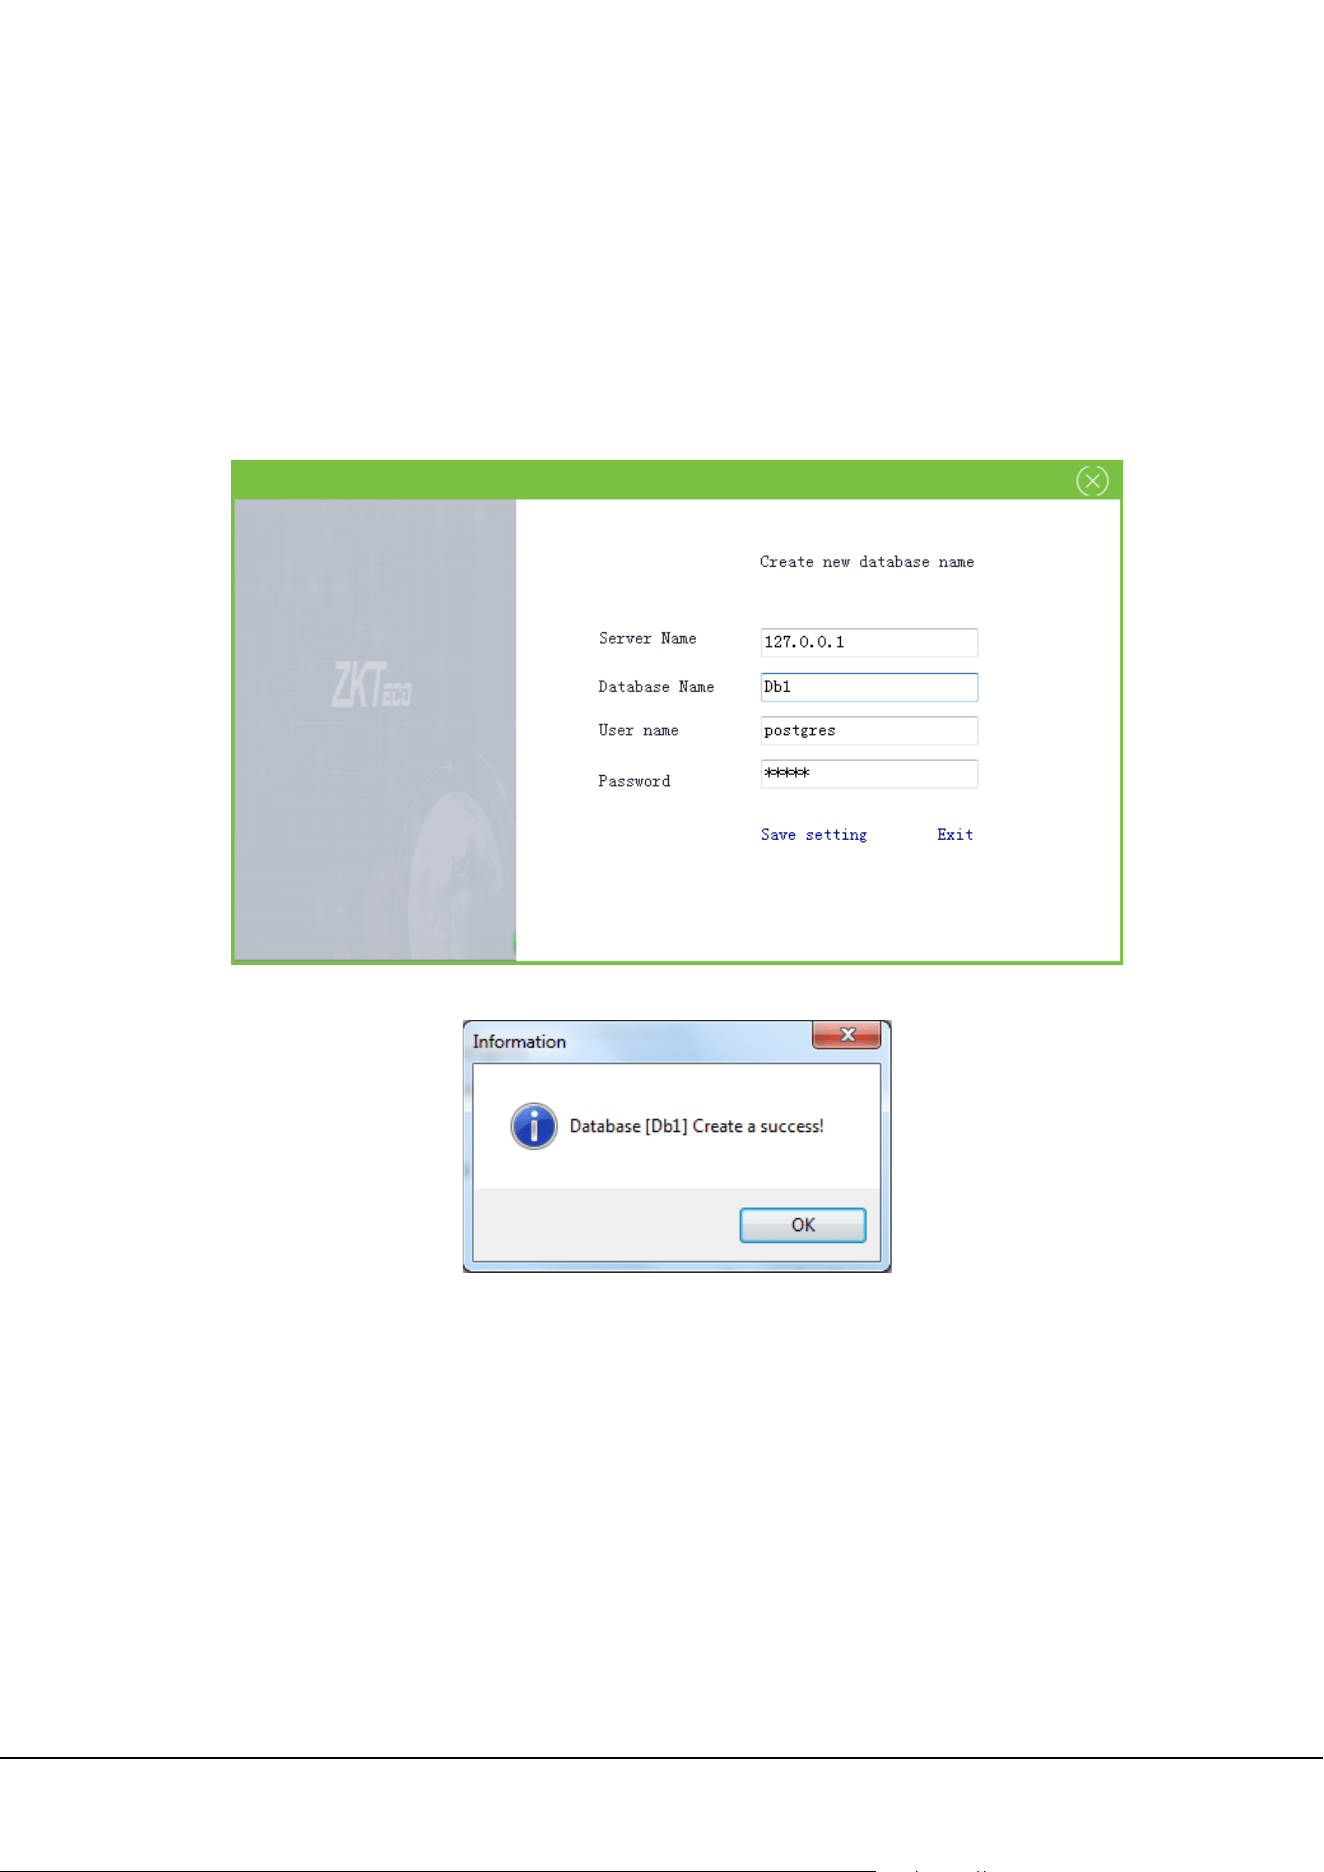
2.1 Create a new database
On the database setting interface, click [Create database]:
Enter the server name, database name, user name and password, then click [Save setting]:
A database cannot be created repeatedly. That is, creating a database that already exists will fail:
10 ZKParking User Manual
2.2 Database Connection
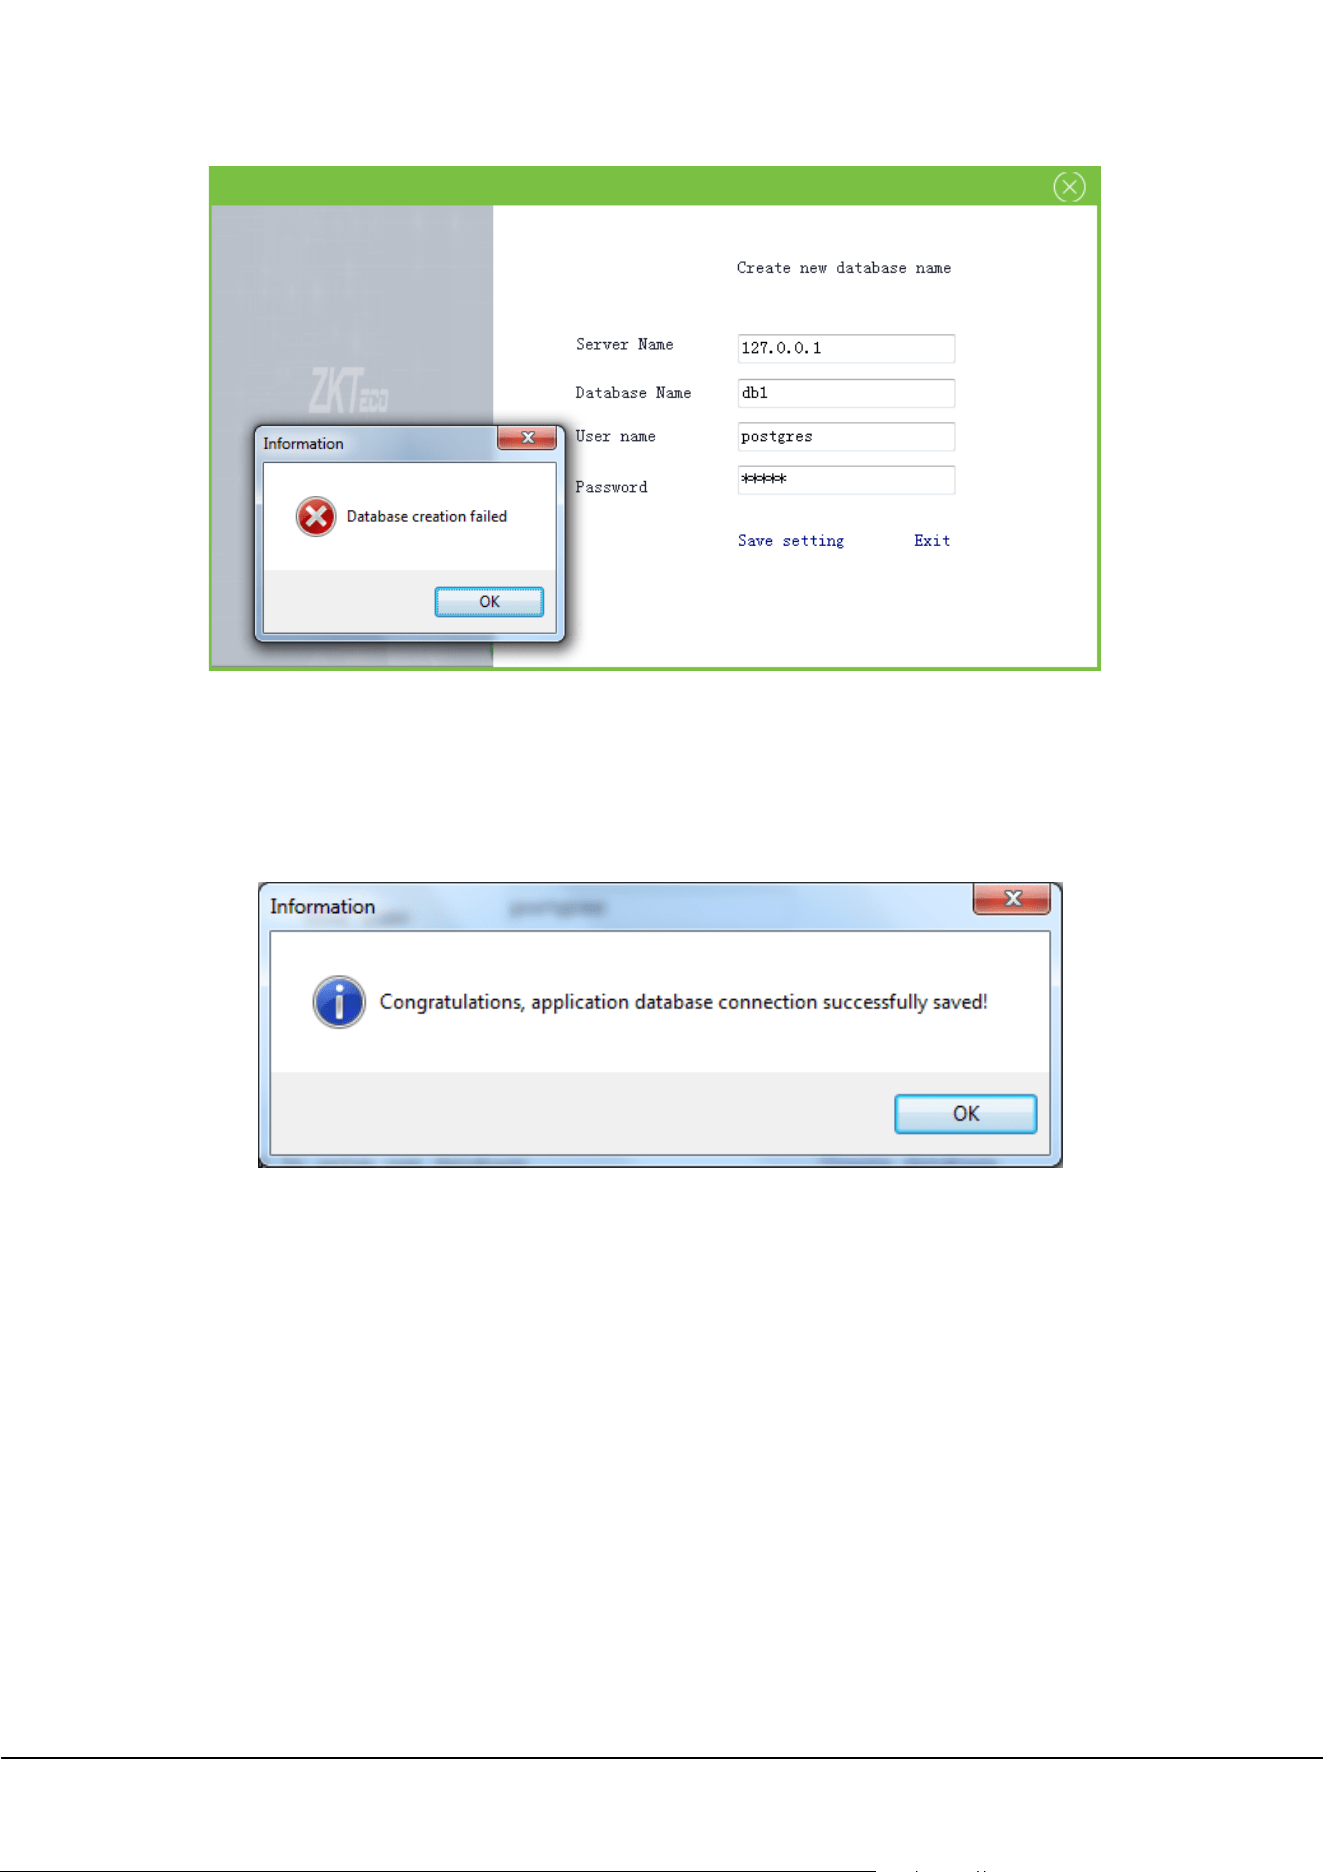
On the database setting interface, enter the server name, database name, user name and password, then
click [Test Link] to test whether the current database connection is normal. After connection success, click
[Save setting] to apply the current configuration to the software.
Note: To remotely connect to the database, perform setting as follows:
Open the pg_hba.conf file in C:\DataZKTC\postgresql\data. In the configuration file, modify the access
IP network segment, as shown in the figure below: (To ensure that all IP addresses on the entire
network segment 192.168.100.* are accessible, add [host all all 192.168.100.0/24 trust] ).
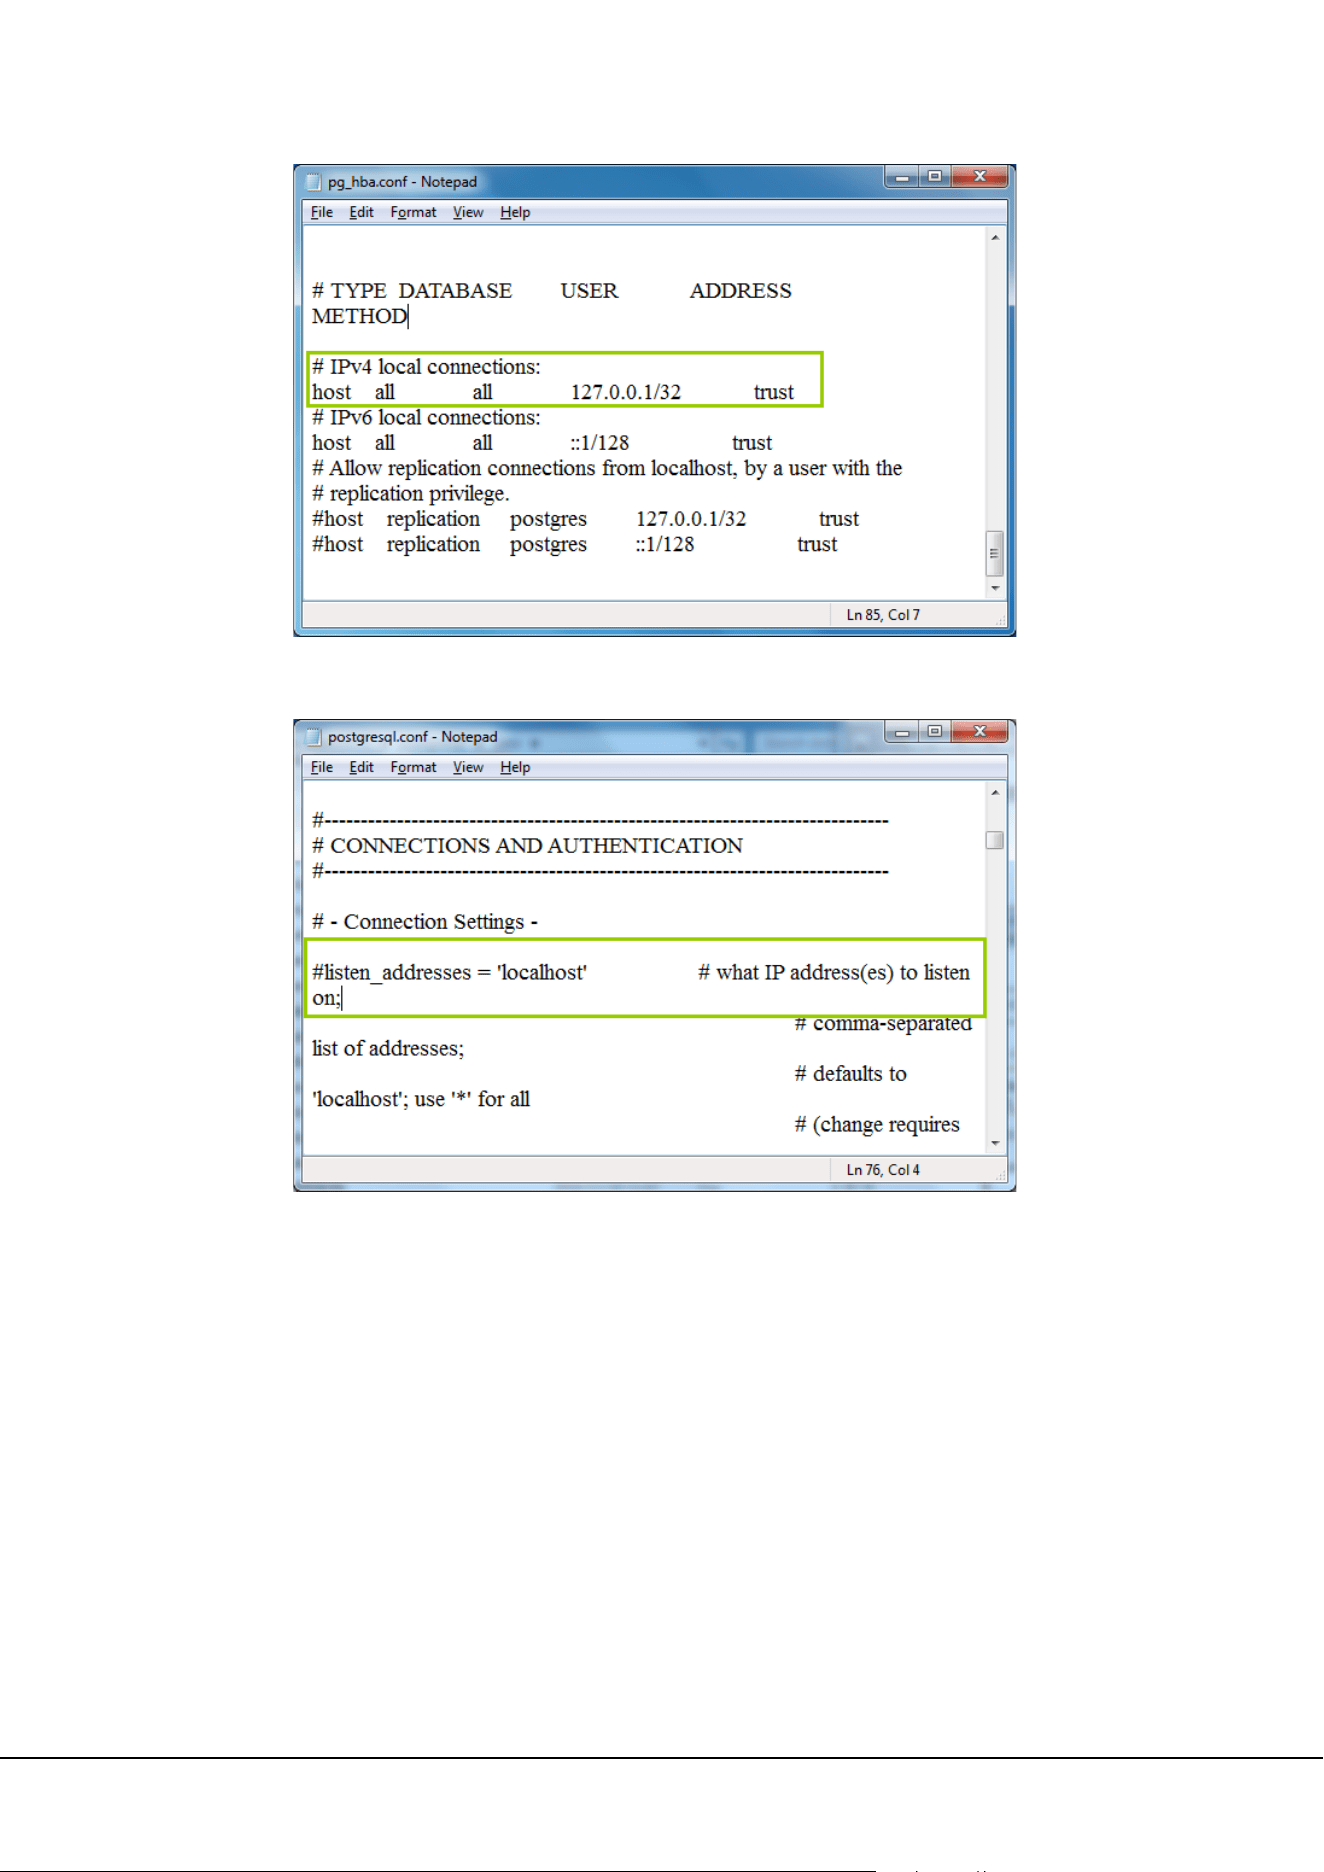
ZKParking User Manual 11
Open the postgresql.conf file in C:\DataZKTC\postgresql\data. In the configuration file, modify the
listening address to ”*”, as shown in the figure below:
12 ZKParking User Manual
3. Login
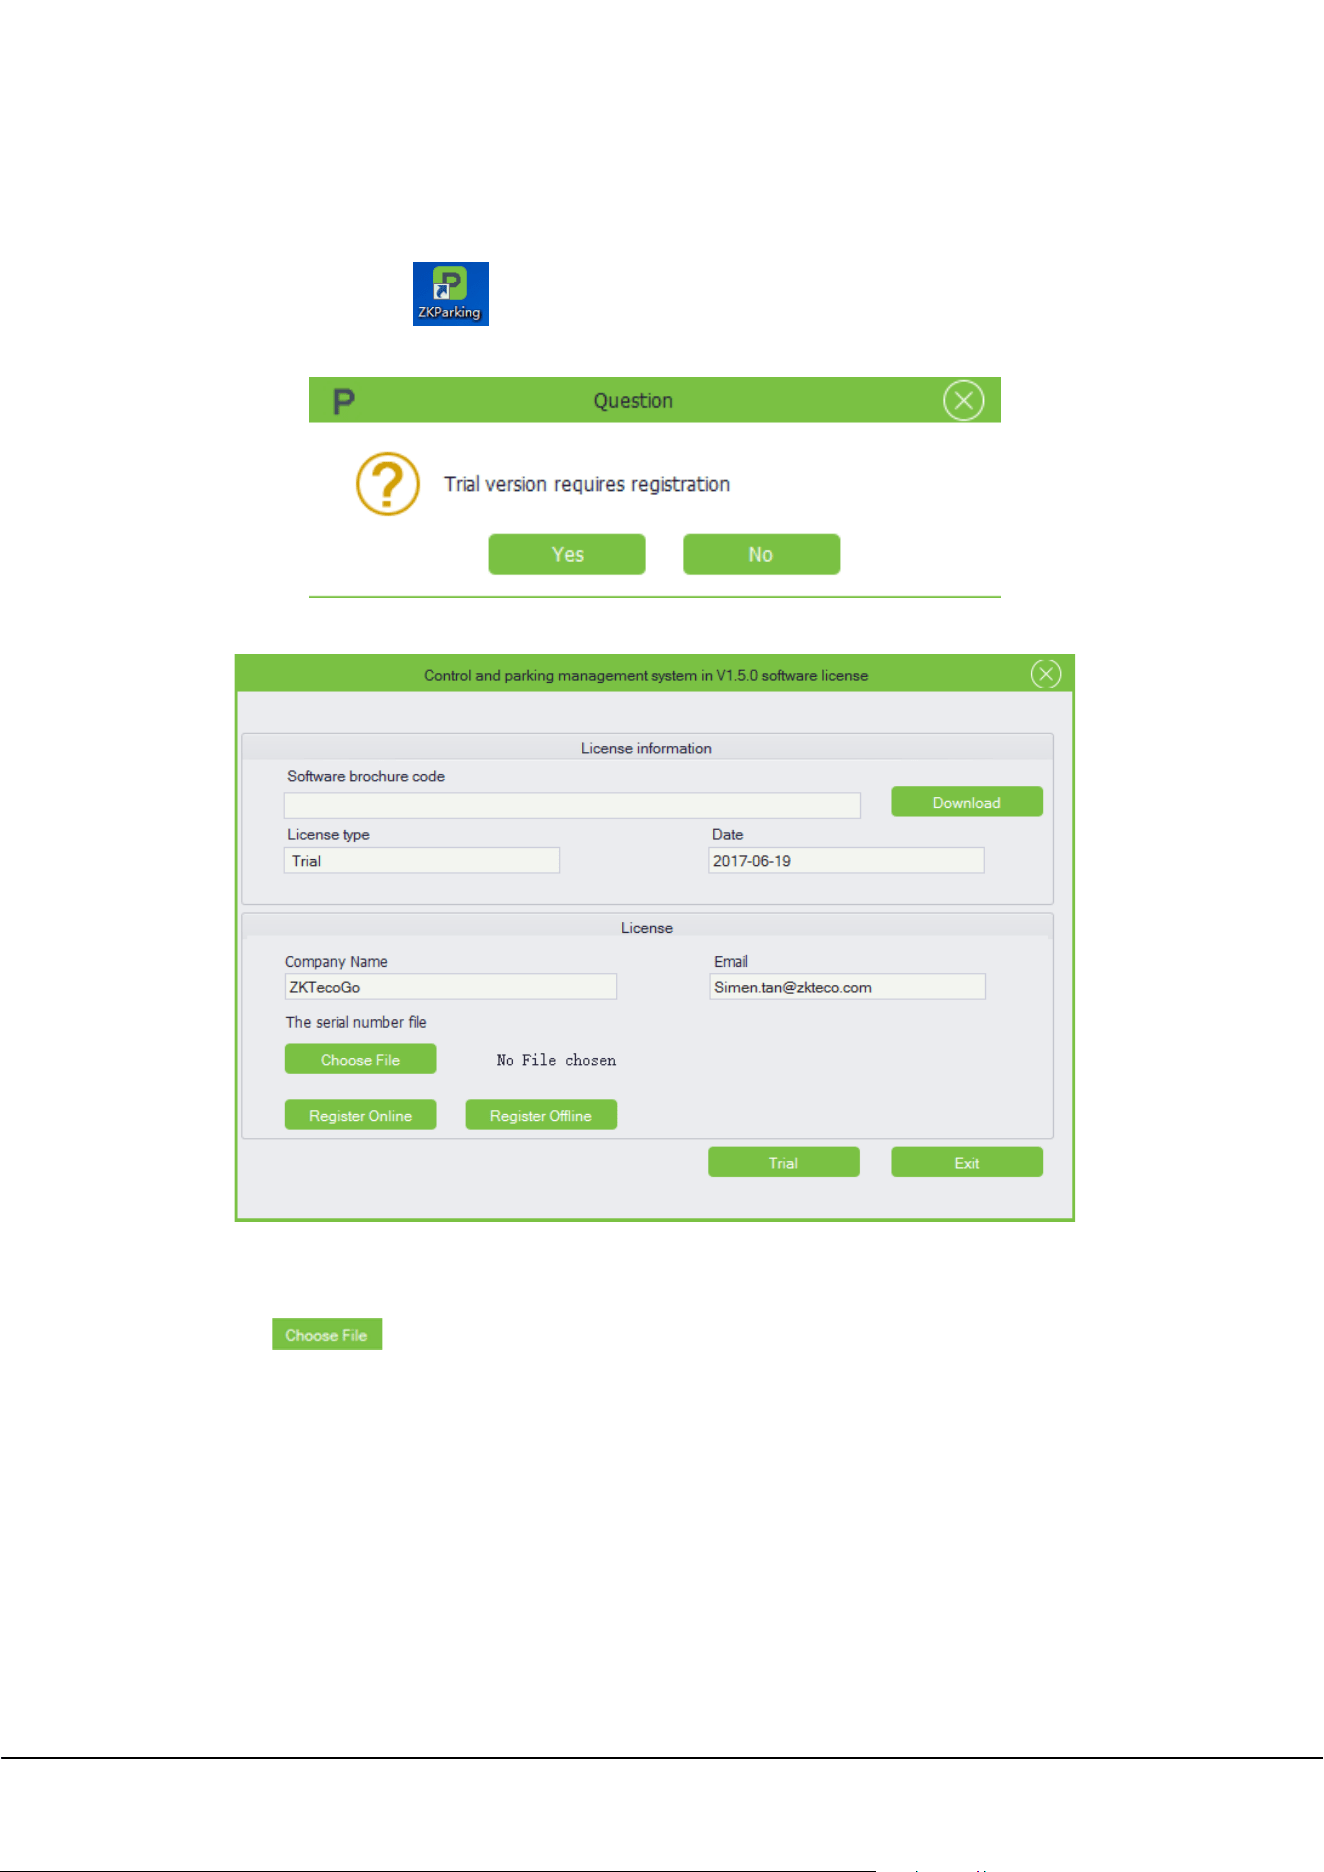
Double-click the shortcut on the desktop. If you use the software for the first time, the software
requires registration, as shown in the figure below:
Click [Yes] to access the License information interface or [No] to cancel the operation.
Registration: you can choose register online or register offline.
Register Online
1) Click , select the SN.xml file, and then fill in the company name and email address on the
License information interface.
ZKParking User Manual 13
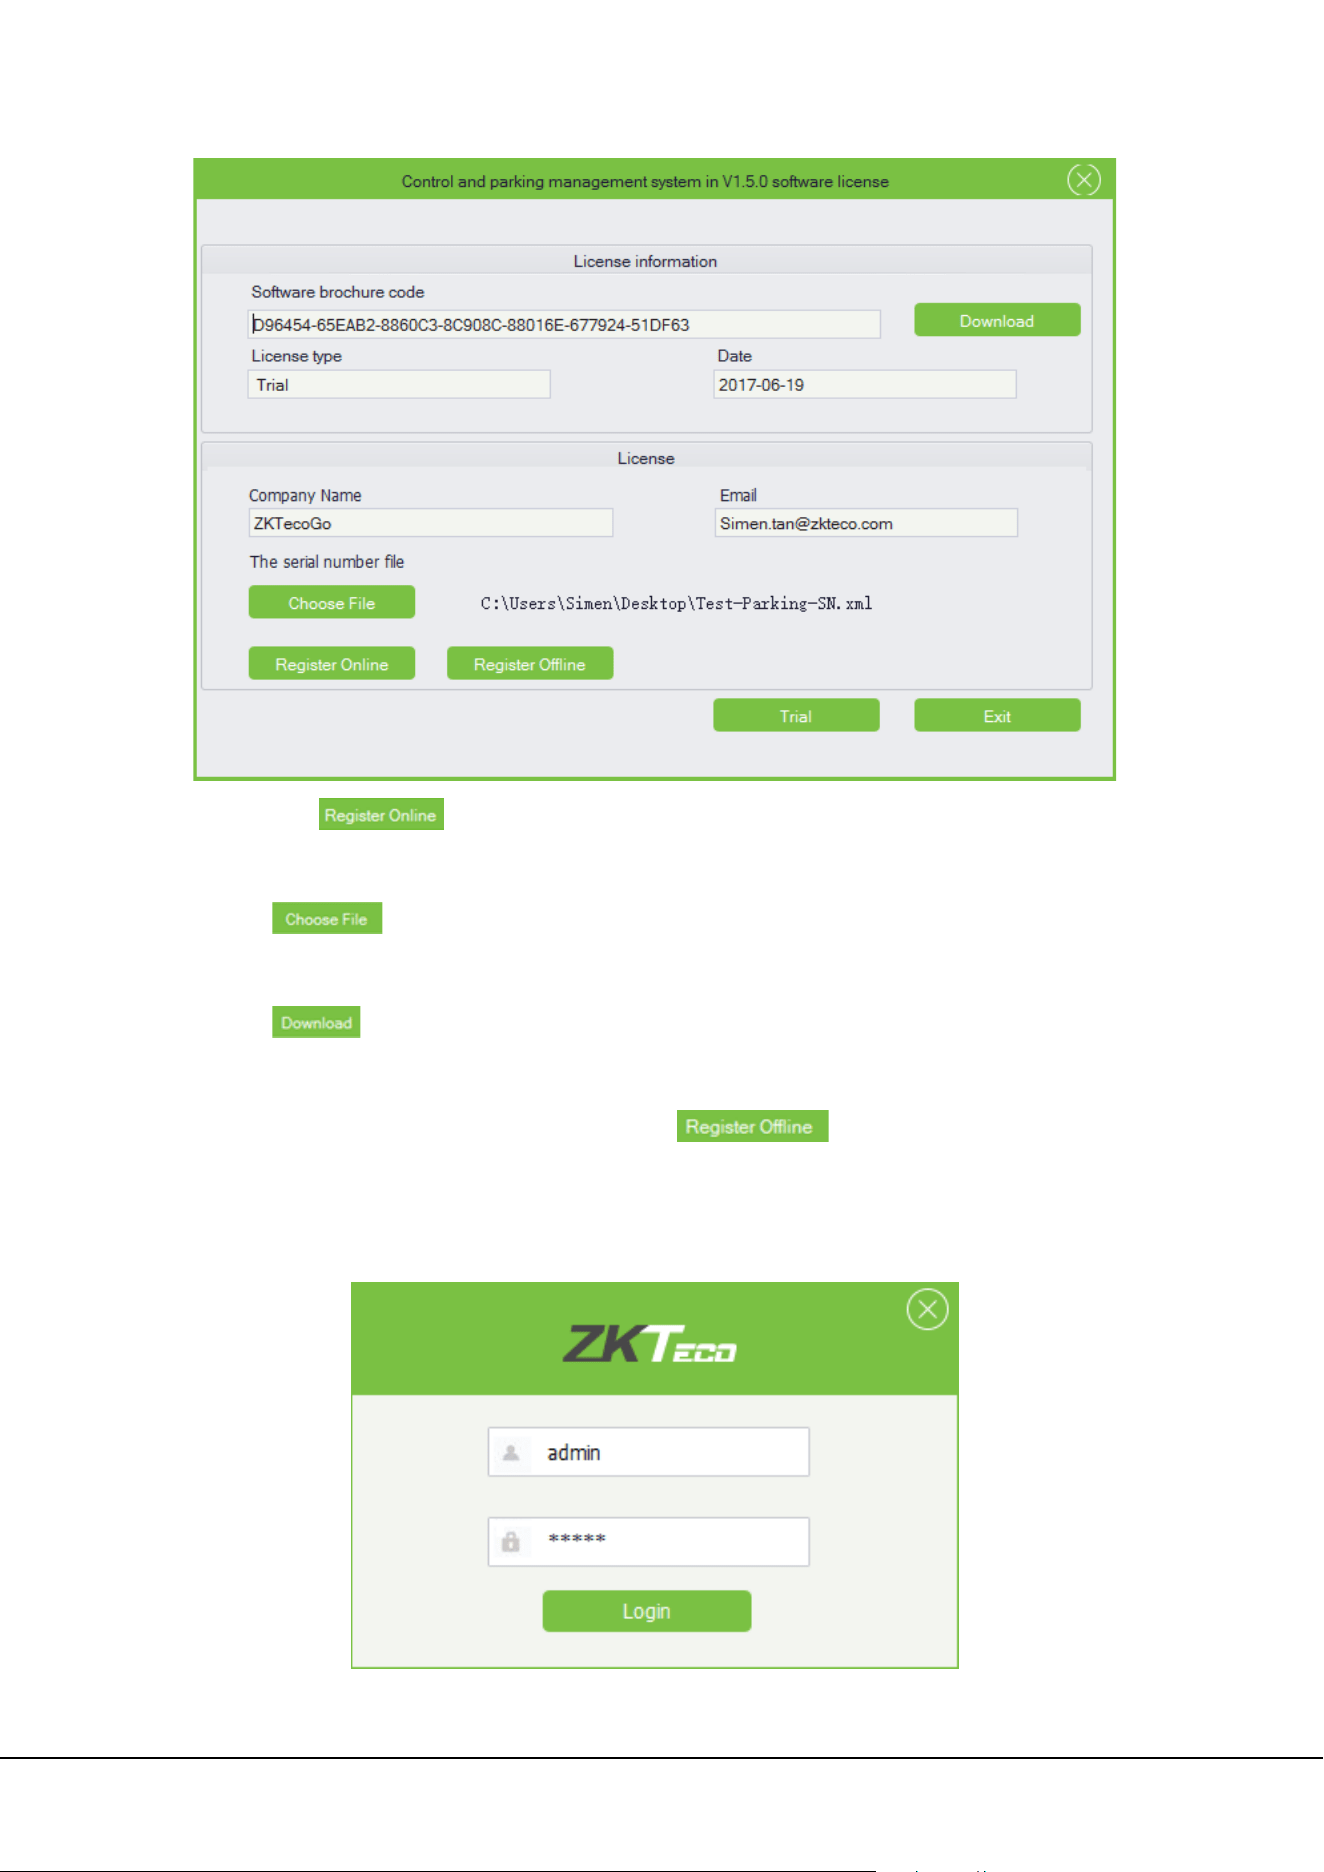
2) Then click to finish the registration.
Register Offline.
1) Click , select the SN.xml file, and then fill in the company name and email address on the
License information interface.
2) Click to download the UPK.xml file, and then send it to our technical support staff, who will
send the License.xml file to you.
3) On the License information interface, you can click , open the License.xml file to
finish the registration.
When the registration is complete, the login interface will pop up, as shown in the figure below, the default
user name and password are both admin:
14 ZKParking User Manual
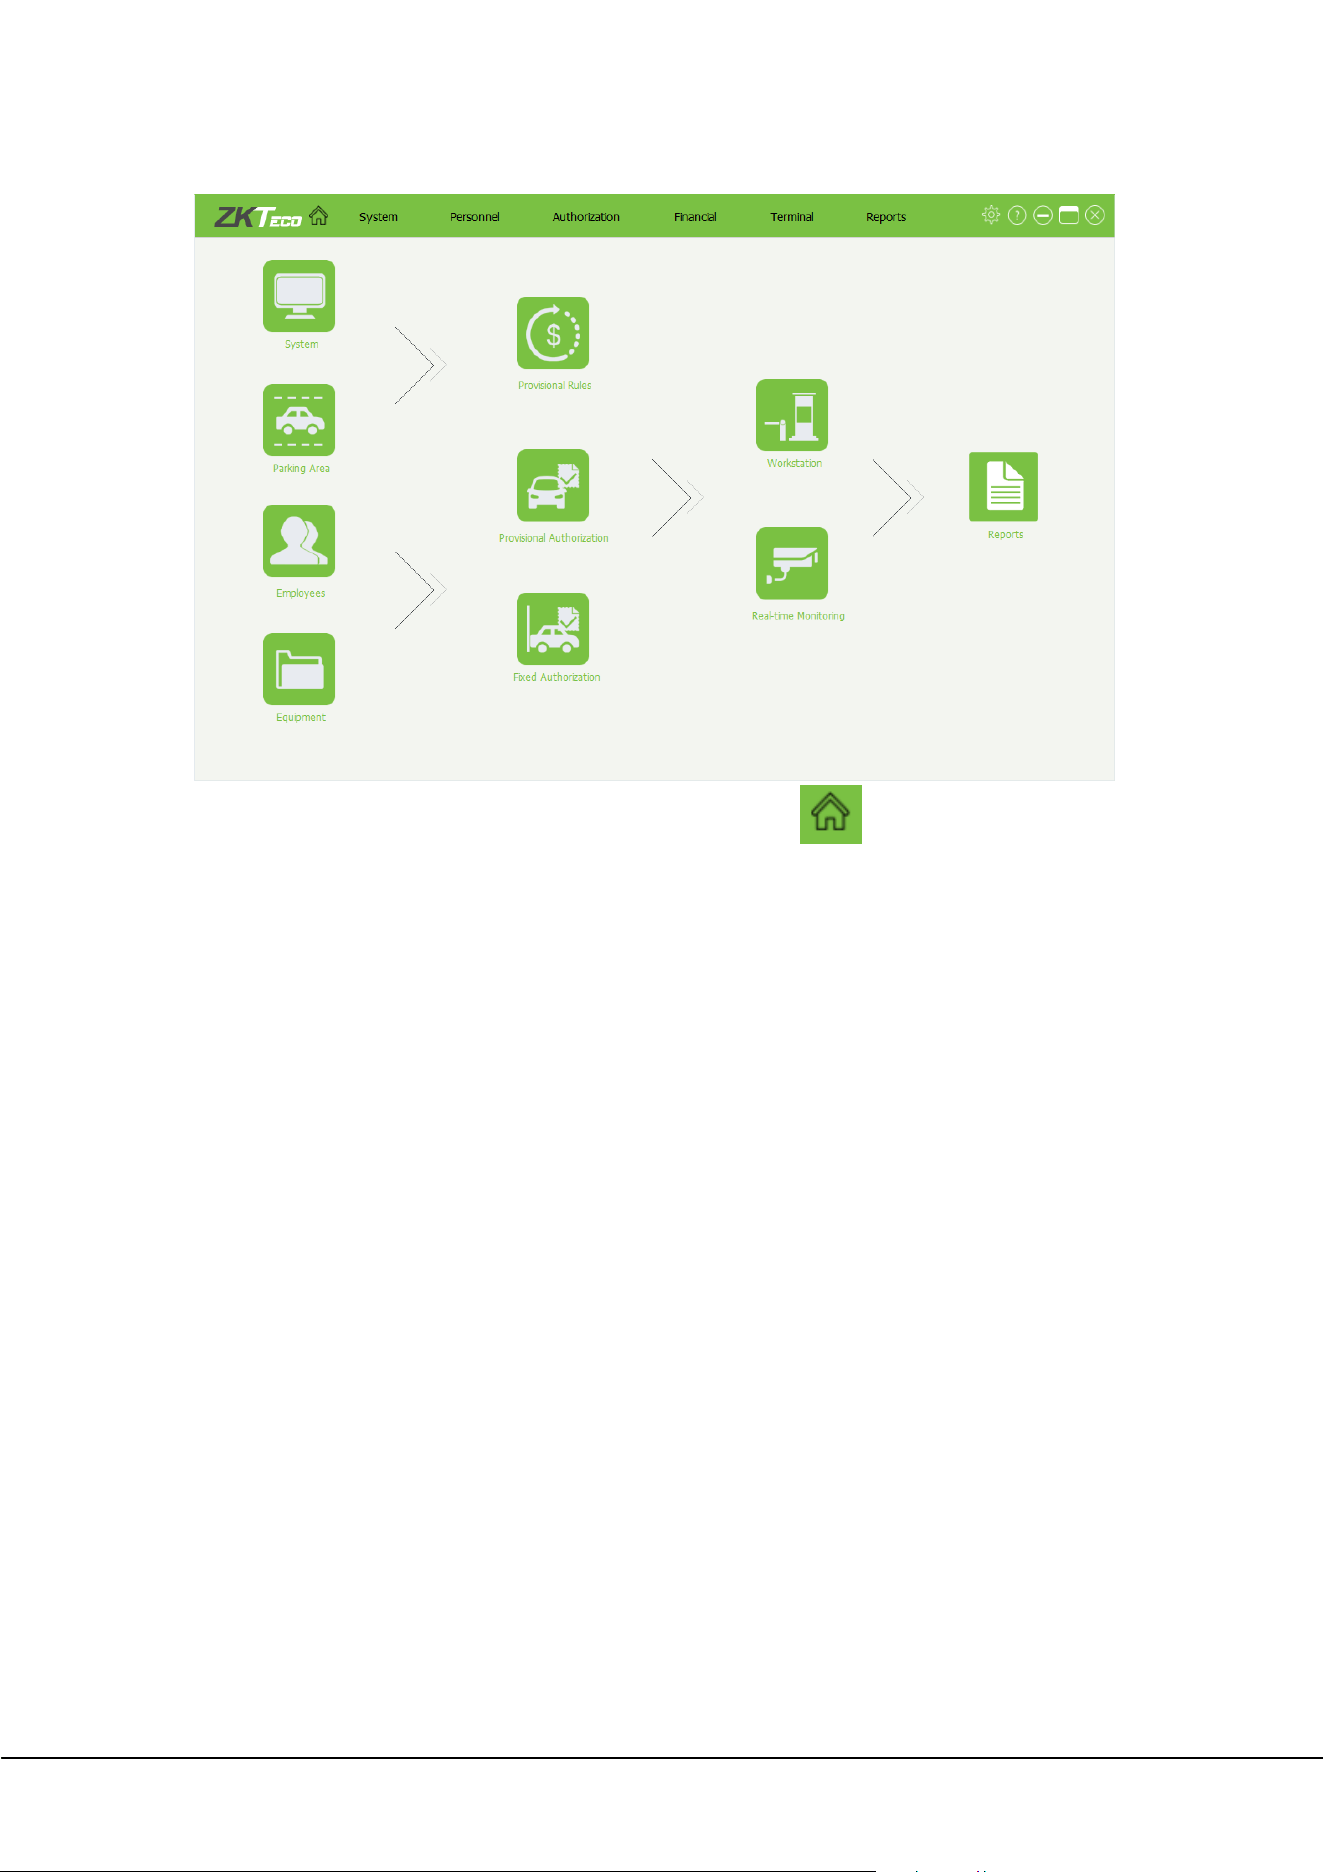
After login, the system navigation interface pops up:
You can also quickly open the system navigation interface by clicking .
ZKParking User Manual 15
4. Personnel Management
4.1 Department Management
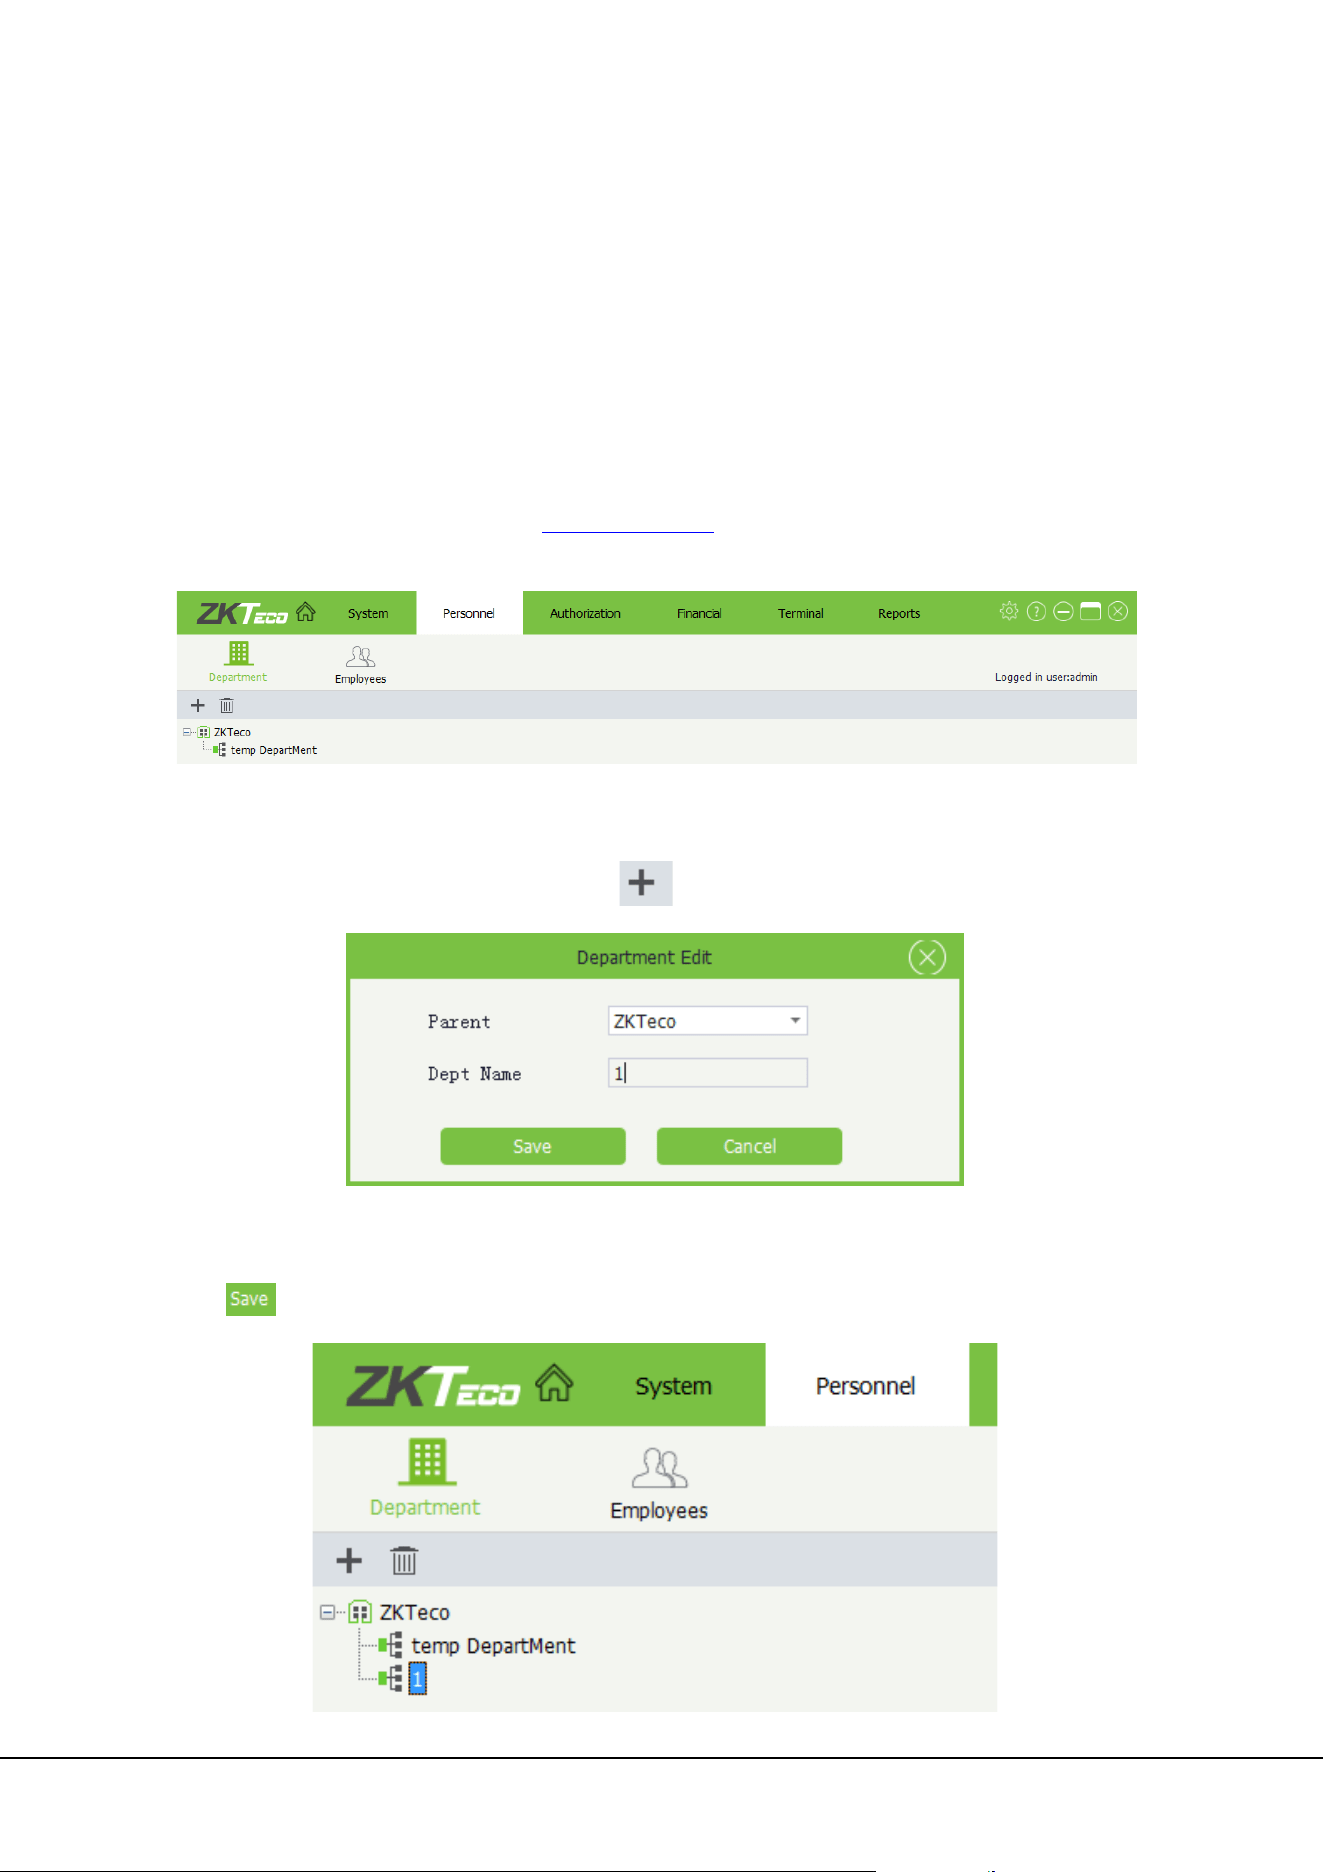
Click [Personnel]→[Department] to access the Department management interface, on which you can add,
edit, and delete departments.
Note: By default, a company named ZK Teco and a department named temp DepartMent exist in the
system. The default company name can be modified on the page displayed after you choose [System]→
[Basic Settings], for details, please refer to 5.1 System
Settings. The default department name can be directly
modified. However, the default values cannot be deleted; otherwise, software errors may occur.
4.1.1 Adding a department
On the Department management interface, click to access the Department Edit interface:
Parent: Upper-level department. It is an important parameter that defines the organizational structure of
the company. Click and select parent in the displayed drop-down list. Enter the department name and
click . The company's organizational structure is displayed in a tree structure.
16 ZKParking User Manual
Note: It is not allowed to enter the existed department name.
4.1.2 Editing a department
On the Department management interface, double-click the department you want to edit.
Modify the department name on the input box, and then press [Enter] on the keyboard, the following
prompt will pop up:
Click [Yes]:
4.1.3 Deleting a department
On the Department management interface, select the department you want to delete, and then click ,
the selected department will be deleted directly.
4.2 Employees Management
Click [Personnel]→[Employees] to access Employees management interface, on which you can add, edit,
delete, import, and export employee information.
ZKParking User Manual 17
1) Basic Settings: Basic information about the employee.
Emp Number: By default, the employee number is a string of a maximum of nine digits. The value
range is 1 to 999999999. Set the employee number based on the actual situation. Employee numbers
must be unique.
First Name/Last Name: The value is a string of a maximum of 24 characters.
Emp Department/Gender: Select the department/gender of the employee from the corresponding
drop-down list.
Password: The value is a string of a maximum of eight digits. The password must be unique.
Phone Number: The maximum length is 11 digits.
Email: Enter a valid email address of the employee.
Birthday: Select the birthday of the employee from the drop-down list.About how to choose a date,
please refer to Appendix 1 Date Setting
.
Image: The optimal size is 200 x 200 pixels. The image capacity must be less than 2 MB. Picture formats
including jpg, jpeg, bmp, png and gif are supported. Click to browse the selected image and
click to delete it.
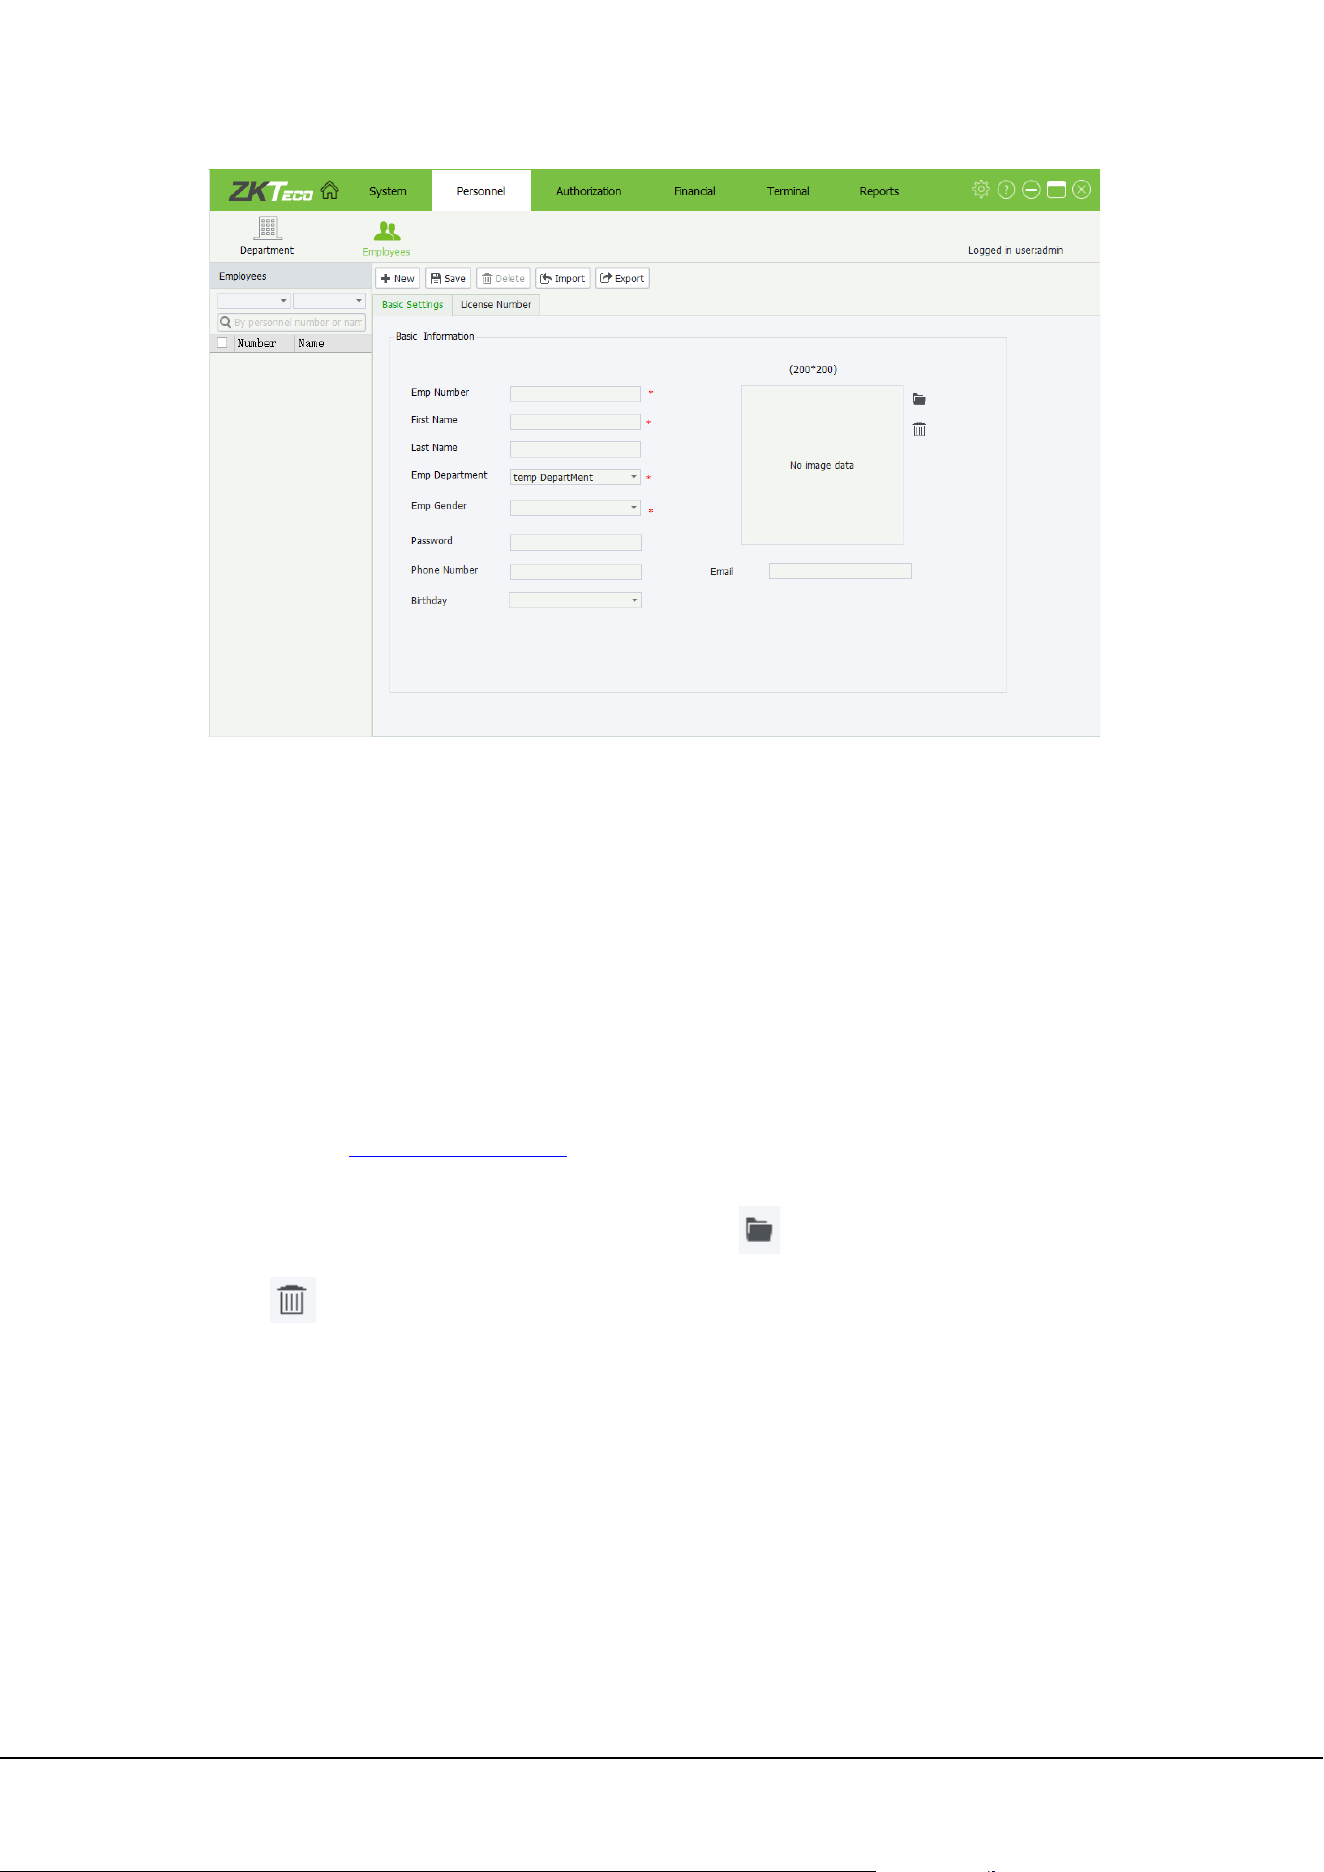
2) License Number: license plate number of the employee.
18 ZKParking User Manual
Car number: Input an effective car number on the input box. If an invalid license plate number is input,
the following prompt will pop up:
Click to add a license plate number. Multiple license plate numbers can be added for an employee.
click to delete a license plate number.
4.2.1 Adding an employee
On the Employees management interface, click , fill in the basic information and license number of
the employee, then click to save the settings or click to cancel the operation.
4.2.2 Editing an employee
On the Employees management interface, select an employee whose information is to be edited. On the
right of the interface, modify the basic information and license plate number and then click .
4.2.3 Deleting an employee
On the Employees management interface, select an employee and click . The following prompt
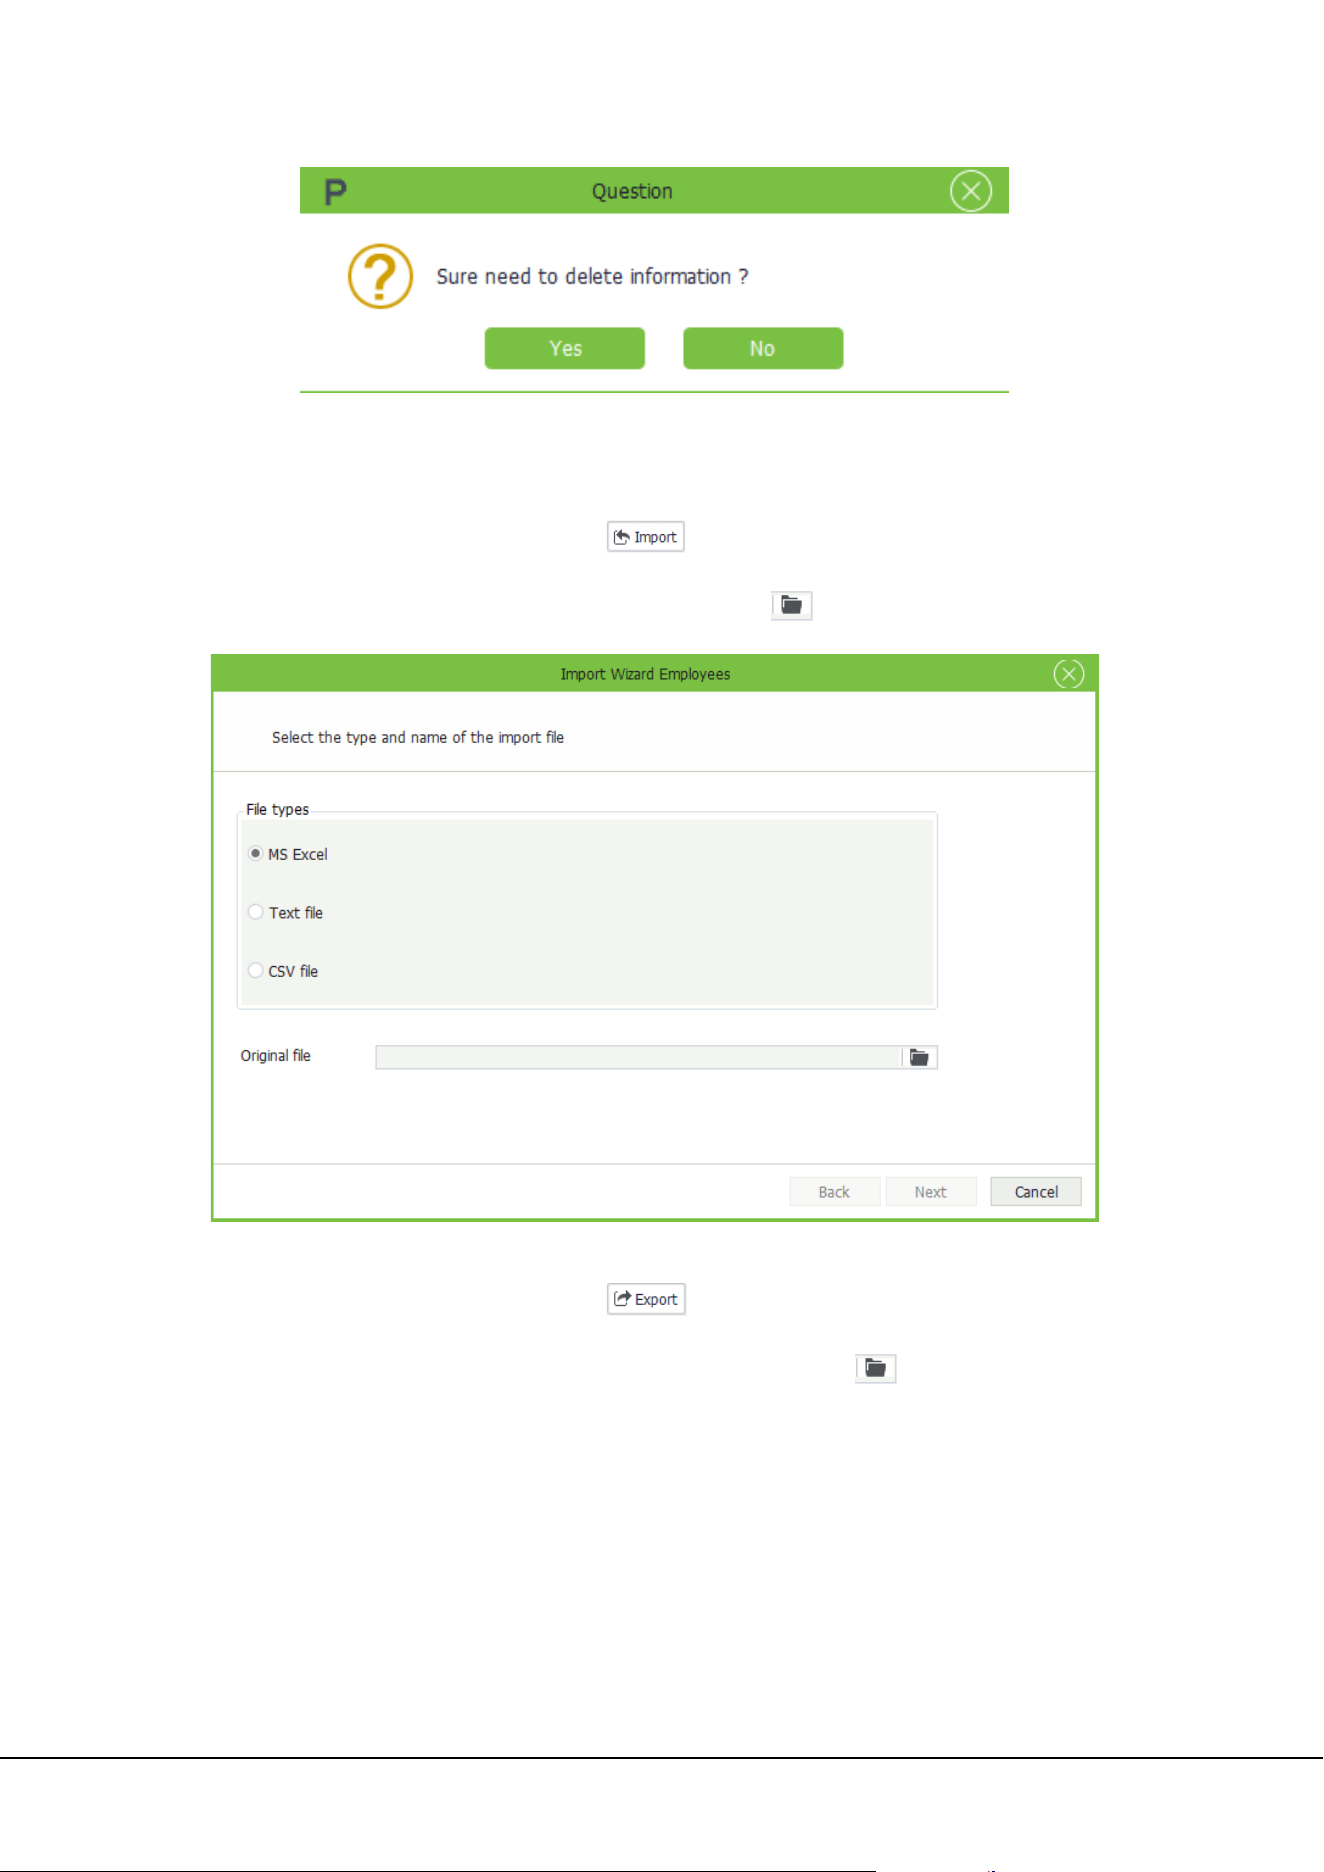
will pop up. Click to delete the employee or clcik to cancel the operation.
ZKParking User Manual 19
4.2.4 Importing & Exporting employees
1) Import
On the Employees management interface, click to import employee information to the software.
Three file types are supported: MS Excel, Text file and CSV file. Click to select the file path.
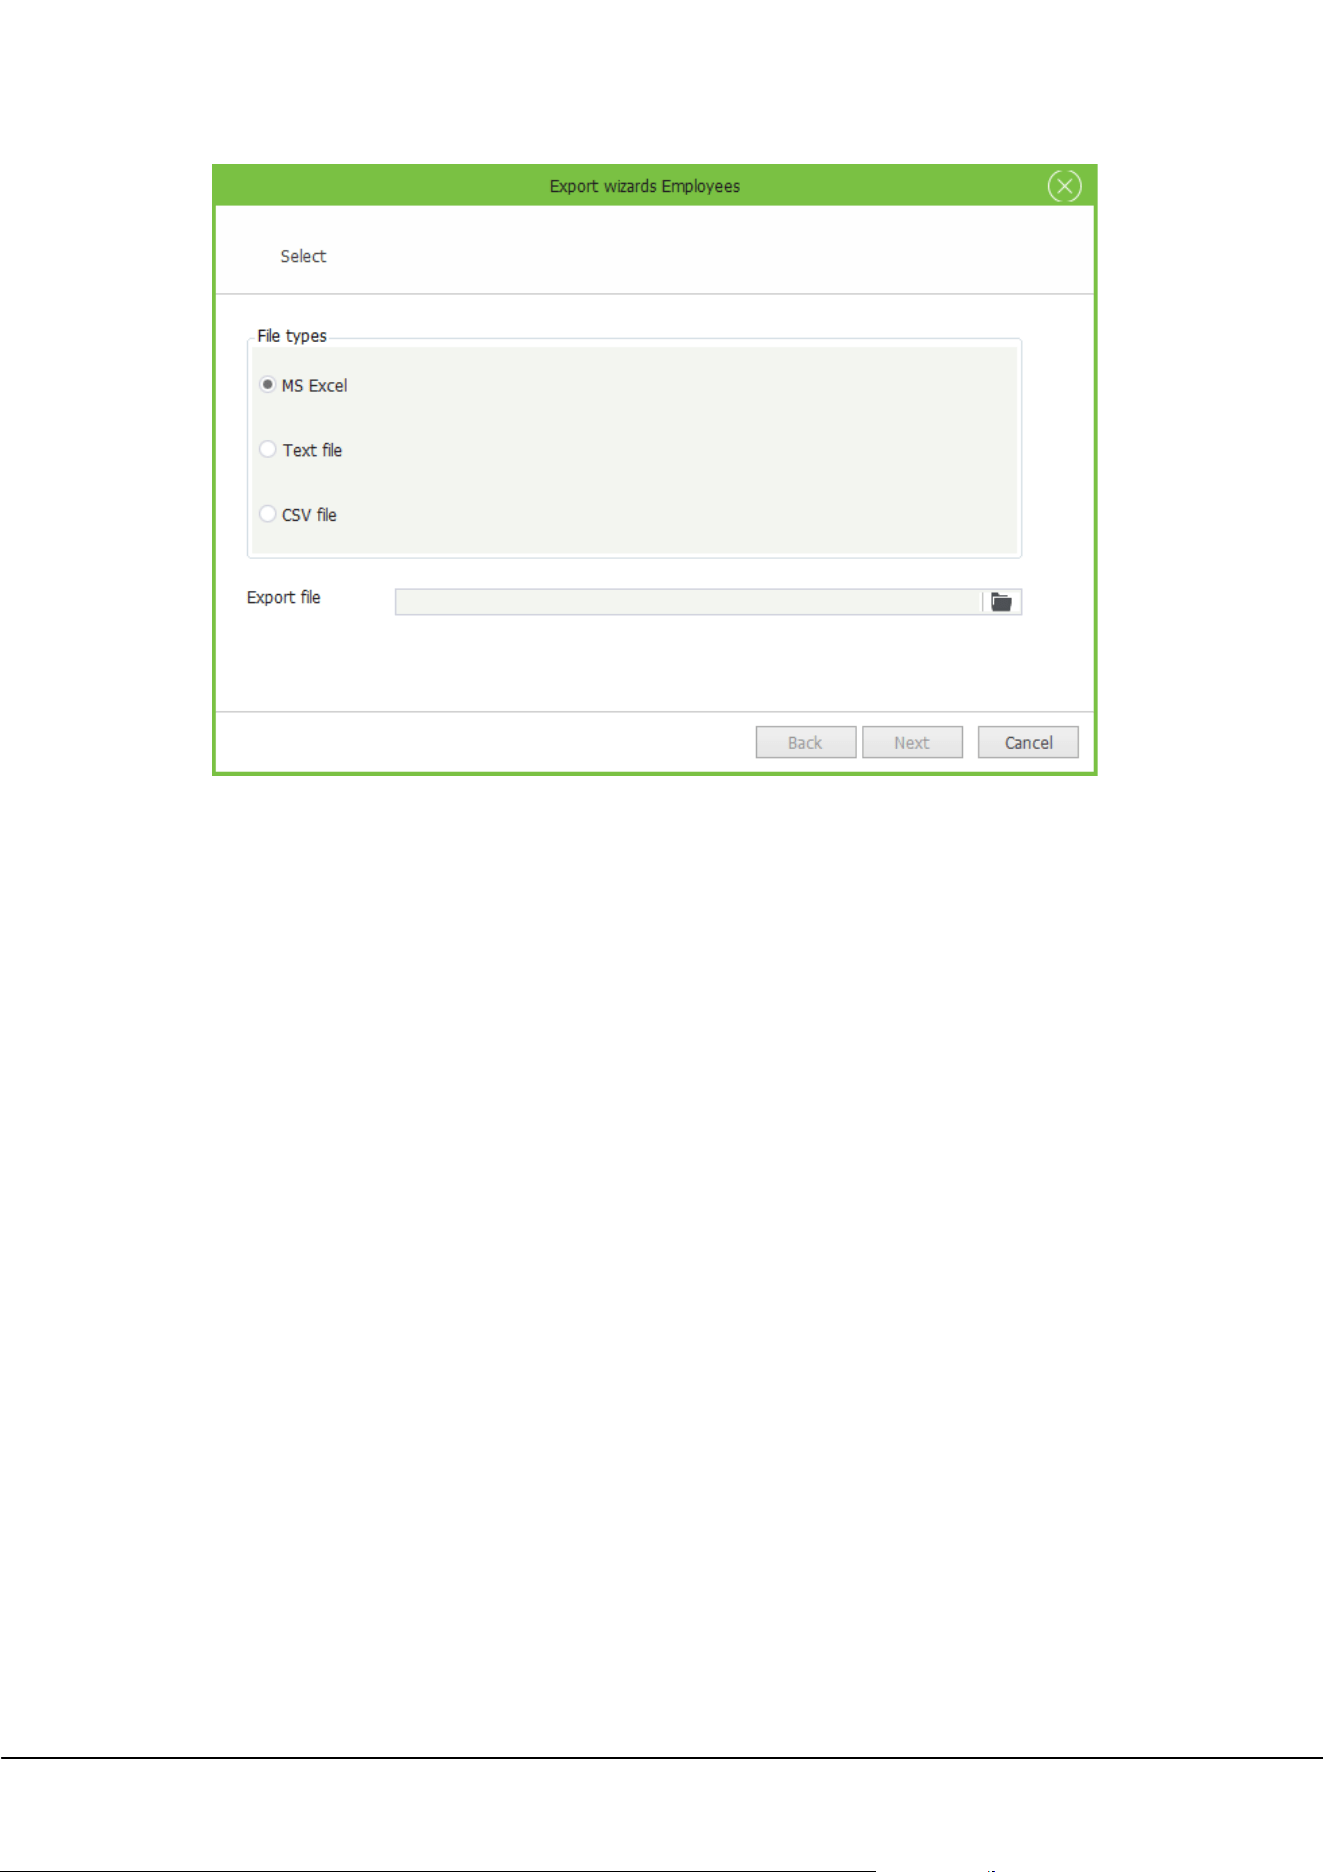
2) Export
On the Employees management interface, click to export employee information from the
software. Three file types are supported: MS Excel, Text file and CSV file. Click to select the save path of
the exported file.
20 ZKParking User Manual
ZKParking User Manual 21
5. System Management
System management includes System, User, Role and Black and White Lists.
5.1 System Settings
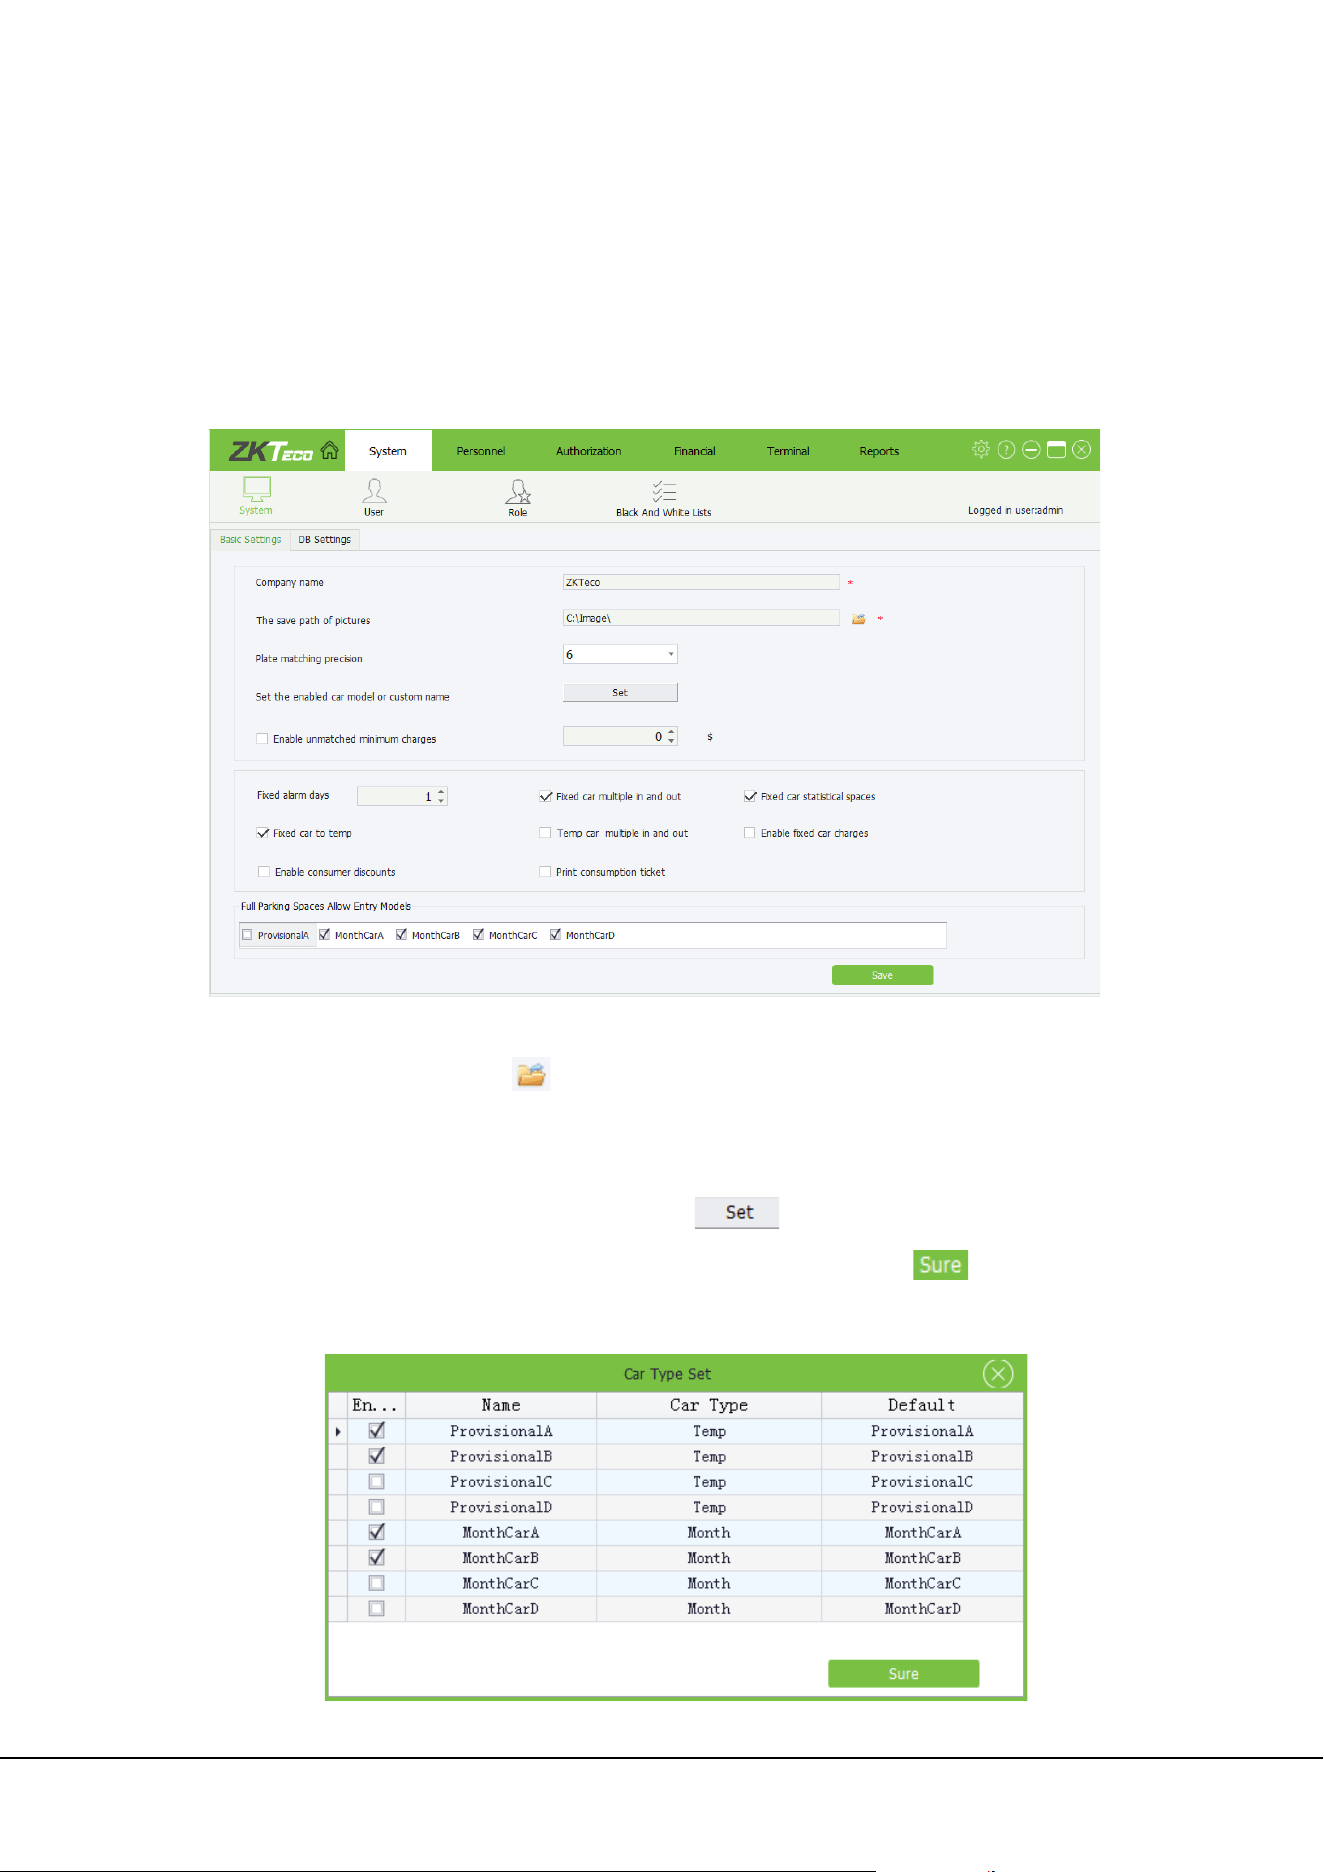
Click [System]→[System]→[Basic Settings] to access System setting interface:
Company name: Name of the company. This field is mandatory.
The save path of pictures: Click to select the save path of pictures. This field is mandatory.
Plate matching precision: Match precision for identifying license plates. The default value is exact
match. Other two value options are available: 6 and 5.
Set the enabled car model or a custom name: Click , the following prompt will pop up,
select the enabled car model. You can modify the car model name. Then click to save the
settings. When the car model name is modified, it is synchronized to [Yards allowed entry model] on
the interface.
22 ZKParking User Manual
Enable unmatched minimum charges: If no record is matched when a car exits the parking lot, the
preset minimum charge prevails.
Fixed alarm days: If the validity period of a fixed car is shorter than the specified value, the number of
remaining days is displayed on the LED screen when the car enters and exits the parking lot.
Fixed car multiple in and out: A fixed car can enter and exit the parking lot with no matched
record required.
Fixed car statistical spaces: A fixed car occupies a parking space after entering the parking lot.
Fixed car to temp: After the validity period expires, a fixed car is treated as a provisional car.
Temp car multiple in and out: A provisional car can enter and exit the parking lot with no matched
record required.
Enable fixed car charges: Specified rules must be followed during the authorization and renewal of
a fixed car.
Enable consumer discounts: If this item is selected, a discount is applied when a car exits the
parking lot; otherwise, the parking expense is charged based on the original price.
Print consumption ticket: If this item is selected, the receipt is printed when a car exits the parking
lot; otherwise, the receipt is not printed.
Full Parking Space Allow Entry Models: Car models that are allowed to enter the parking lot when the
parking spaces are used up. Multiple car models can be selected.
Set the parameters based on the actual situation and then click . To modify any parameter, directly
modify it and save the modification.
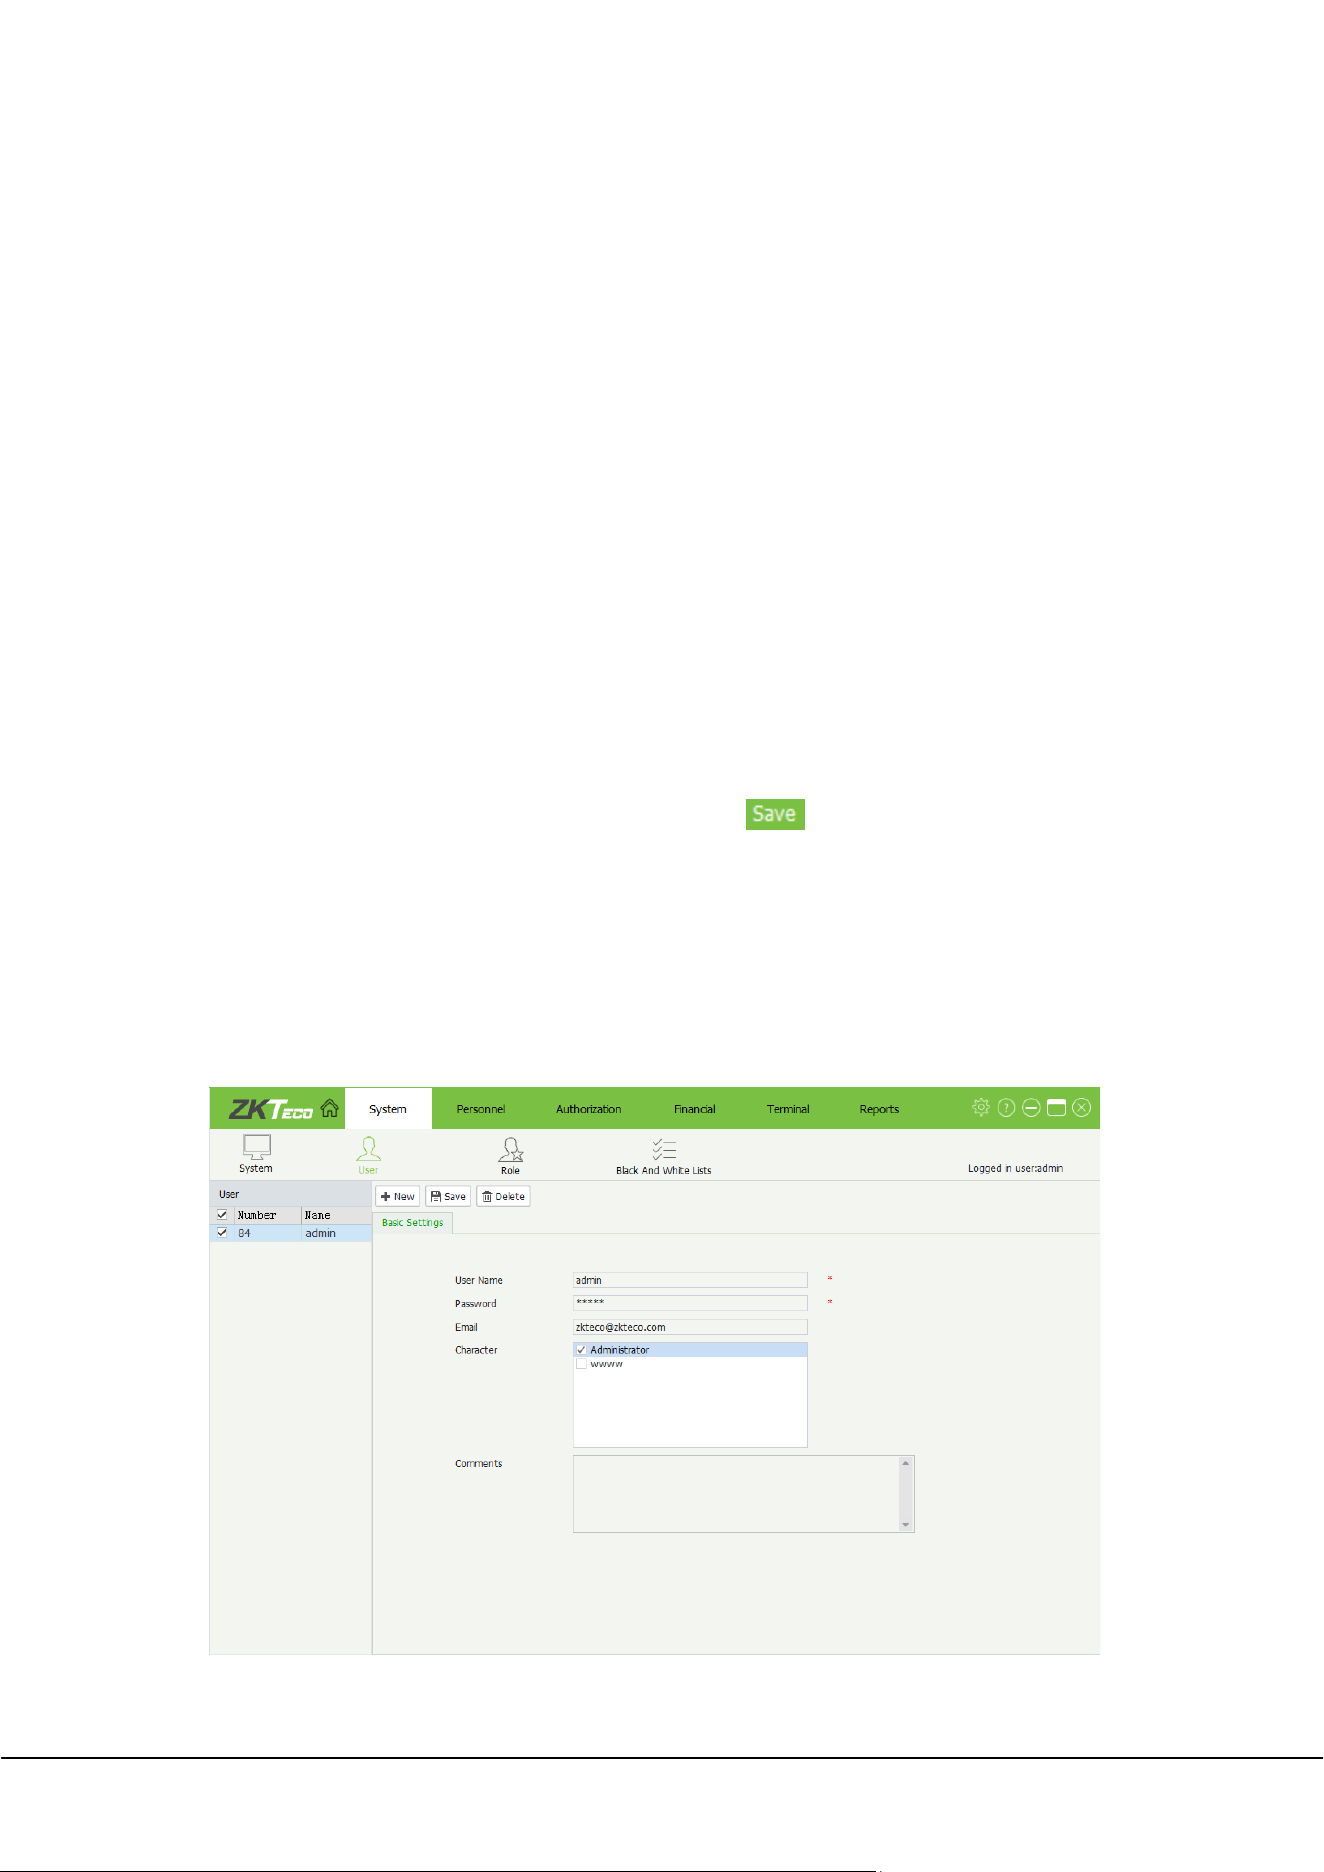
5.2 User Management
User management involves system operator management. Click [System]→[User] to access User
management interface, on which you can add, edit, and delete users. The system has a default administrator
user whose default user name and password are both admin.
User Name: Name of the operator. This field is mandatory.
ZKParking User Manual 23
Password: Password of the operator. This field is mandatory.
Email: valid email address of the operator. This field is mandatory.
Character: Select the role that is set in section 5.3 Role
Management.
Comments: Description of the operator. This field is optional.
5.2.1 Adding/Editing/Deleting a user
The method of Adding/Editing/Deleting a user is similar to the method of Adding/Editing/Deleting an
employee. For details, please refer to 4.2.1 Adding an employee, 4.2.2 Editing an employee,
4.2.3 Deleting an
employee.
Note: When deleting users, reserve at least one administrator user; otherwise, login to the system will
fail.
5.3 Role Management
During operation, the super user must grant different operation rights to new users. Operation rights can be
set for users in batches. Specifically, set roles with certain operation rights in role management and assign
an appropriate role when creating a user.
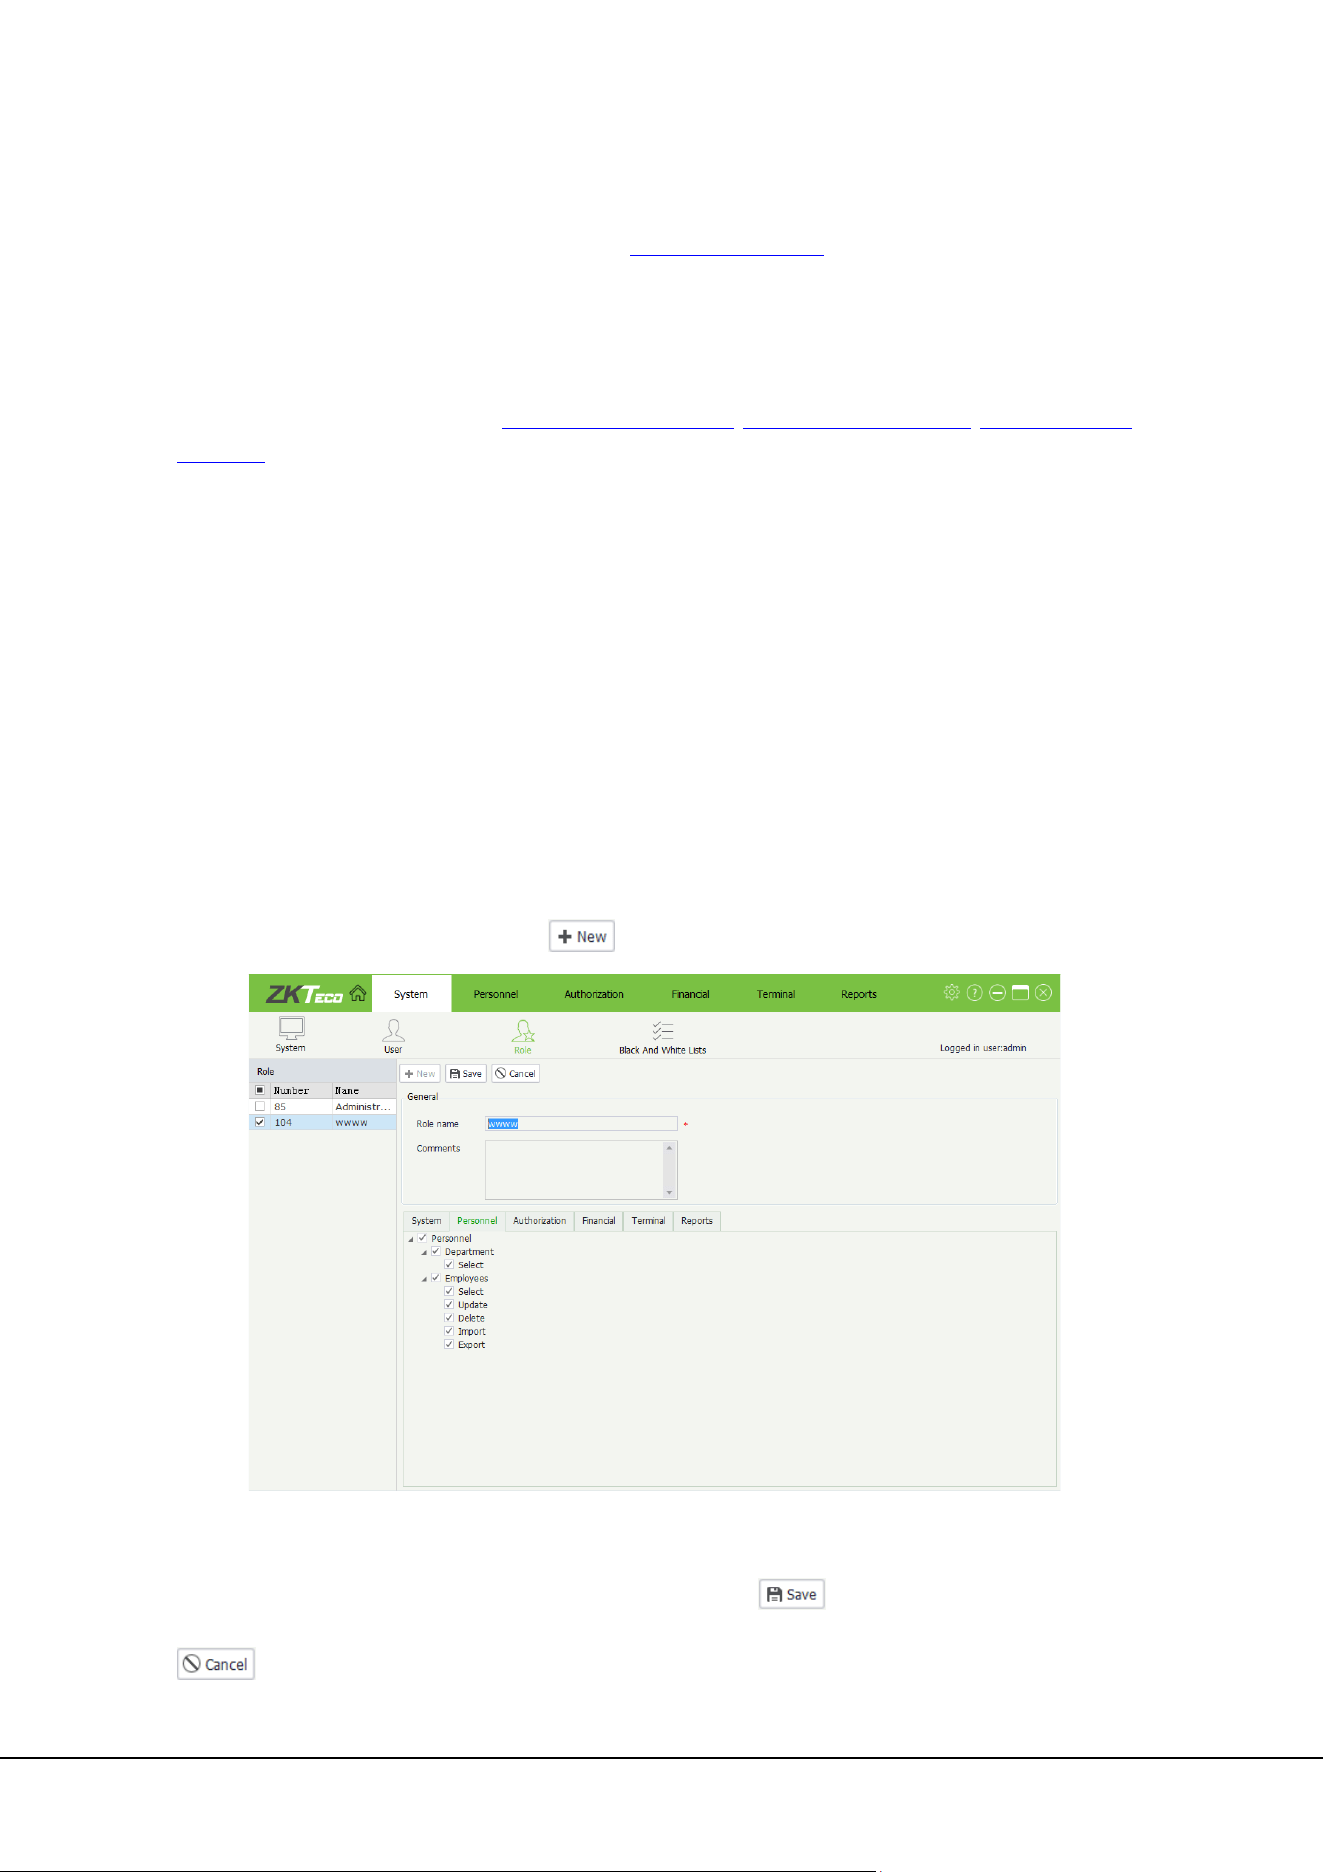
Click [System]→[Role] to access Role management interface, on which you can add, edit, and delete roles.
The system has a default role named admin.
5.3.1 Adding a role
On the Role management interface, click to access the role addition interface:
Set the role name and select the operation rights of the role in the rights list. Or select the highest-level
rights to select all the lower-level rights. Specifically, select the root node Personnel and all lower-level
rights, including Department and Employees, are selected. Click to save the settings or click
to cancel the operation.
24 ZKParking User Manual
5.3.2 Editing/Deleting a role
The method of Editing/Deleting a role is similar to the method of Editing/Deleting an employee. For details,
please refer to 4.2.2 Editing an employee, 4.2.3 Deleting an employee.
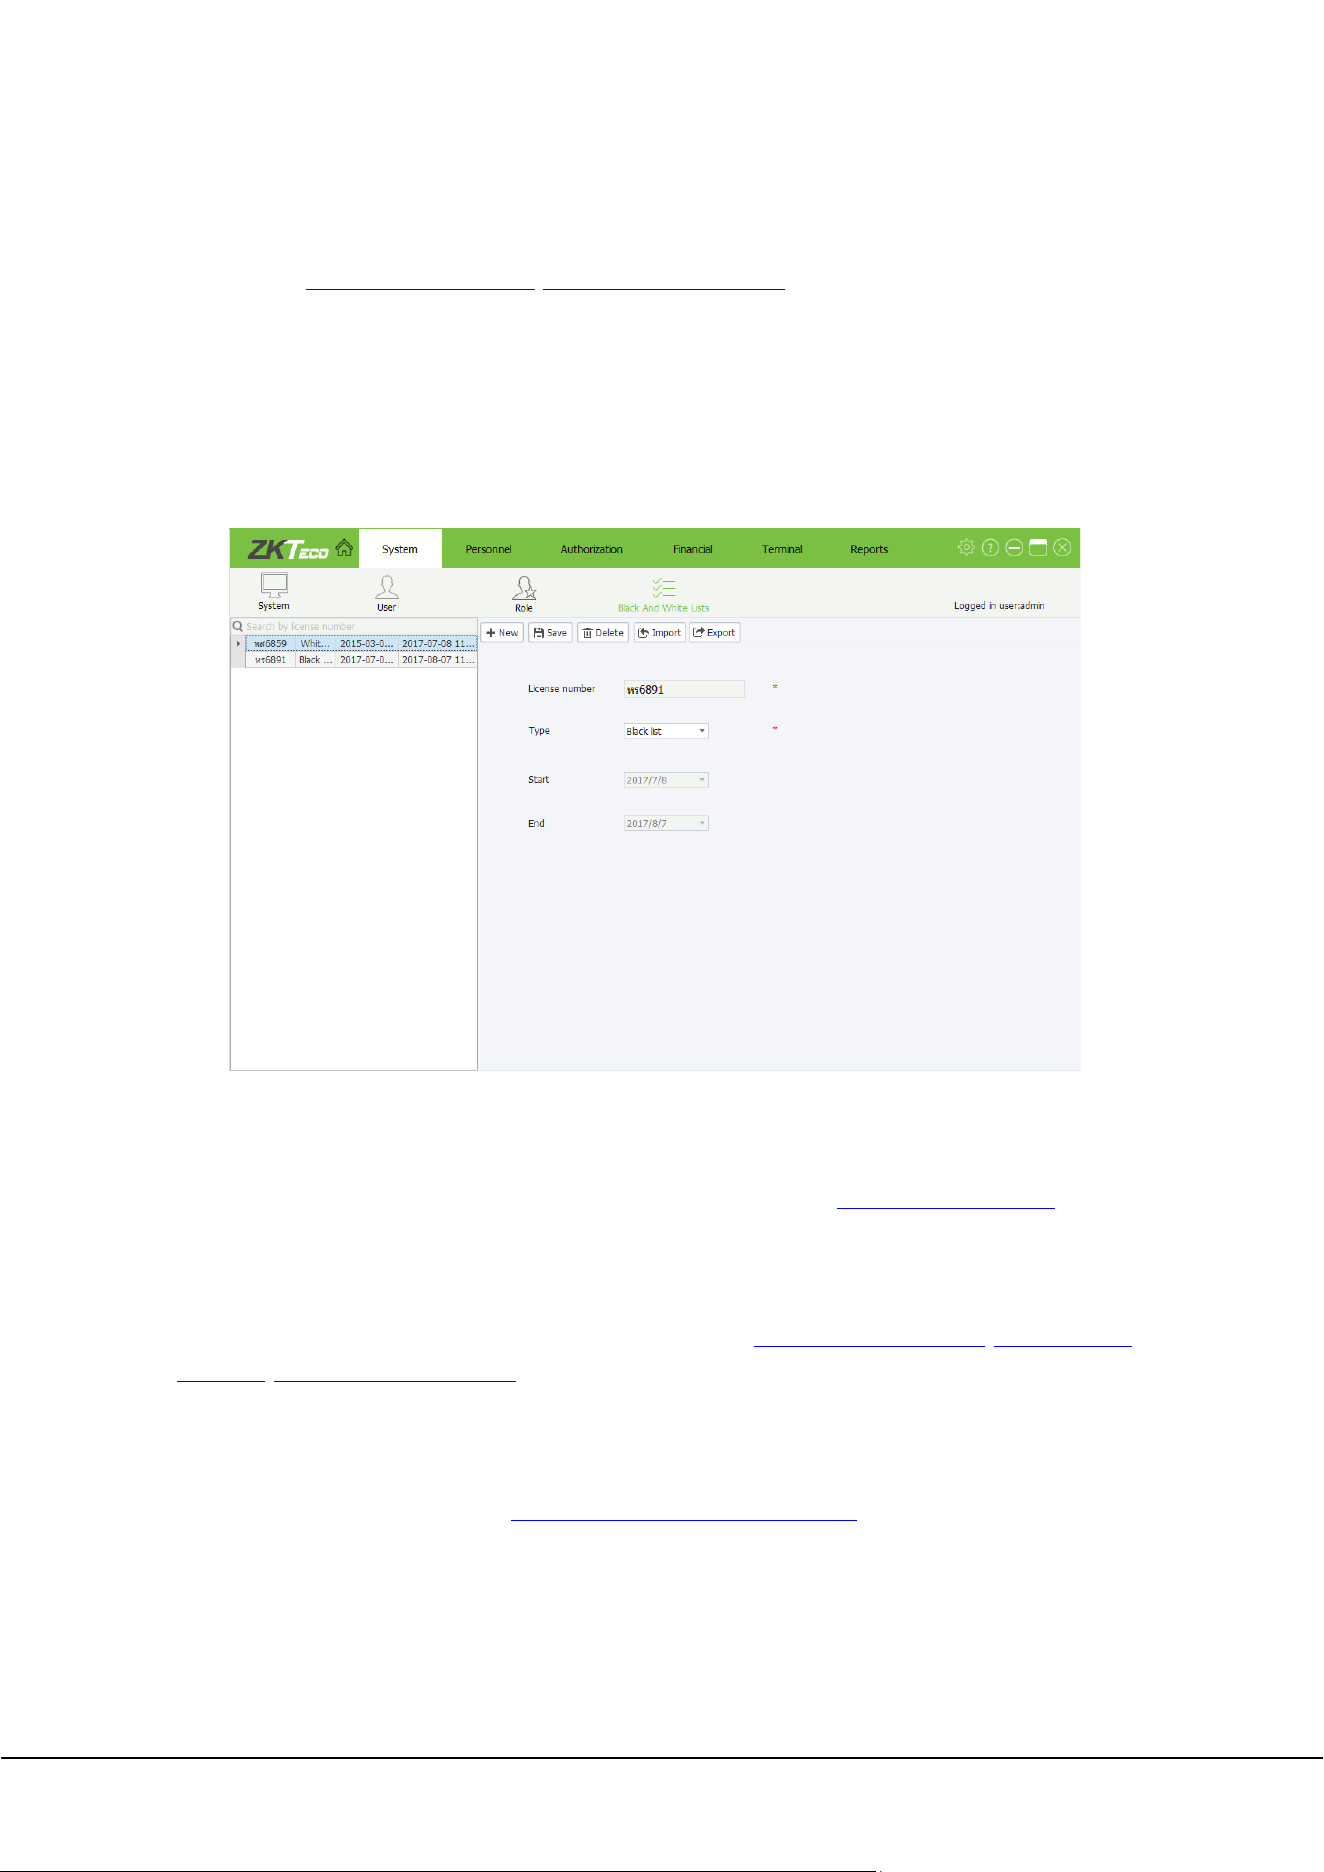
5.4 Black And White Lists Management
Cars on the white list, including fire trucks, police cars, and privileged cars, can enter and exit the parking lot
free of charge. Cars on the black list are not allowed to enter or exit the parking lot.
Click [System]→[Black And White Lists] to access Black And White Lists management interface, on which
you can add, edit, and delete information.
License number: Input an effective car number on the input box.
Type: Choose White list or Black list.
Start/End: The Start and End fields are unavailable for cars on the black list. The start date must be
earlier than the end date. About how to choose a date, please refer to Appendix 1 Date Setting
.
5.4.1 Adding/Editing/Deleting a Black or White list
The method of Adding/Editing/Deleting a Black or White list is similar to the method of
Adding/Editing/Deleting an employee. For details, please refer to 4.2.1 Adding an employee, 4.2.2 Editing
an
employee, 4.2.3 Deleting an employee.
5.4.2 Importing & Exporting Black or White lists
The method of Importing/Exporting Black or White lists is similar to the method of Importing/Exporting
employees. For details, please refer to 4.2.4 Importing & Exporting employees
.
ZKParking User Manual 25
6. Terminal Management
Terminal management includes Equipment, Parking Area, Workstation, Region Linkage and Real-time
Monitoring.
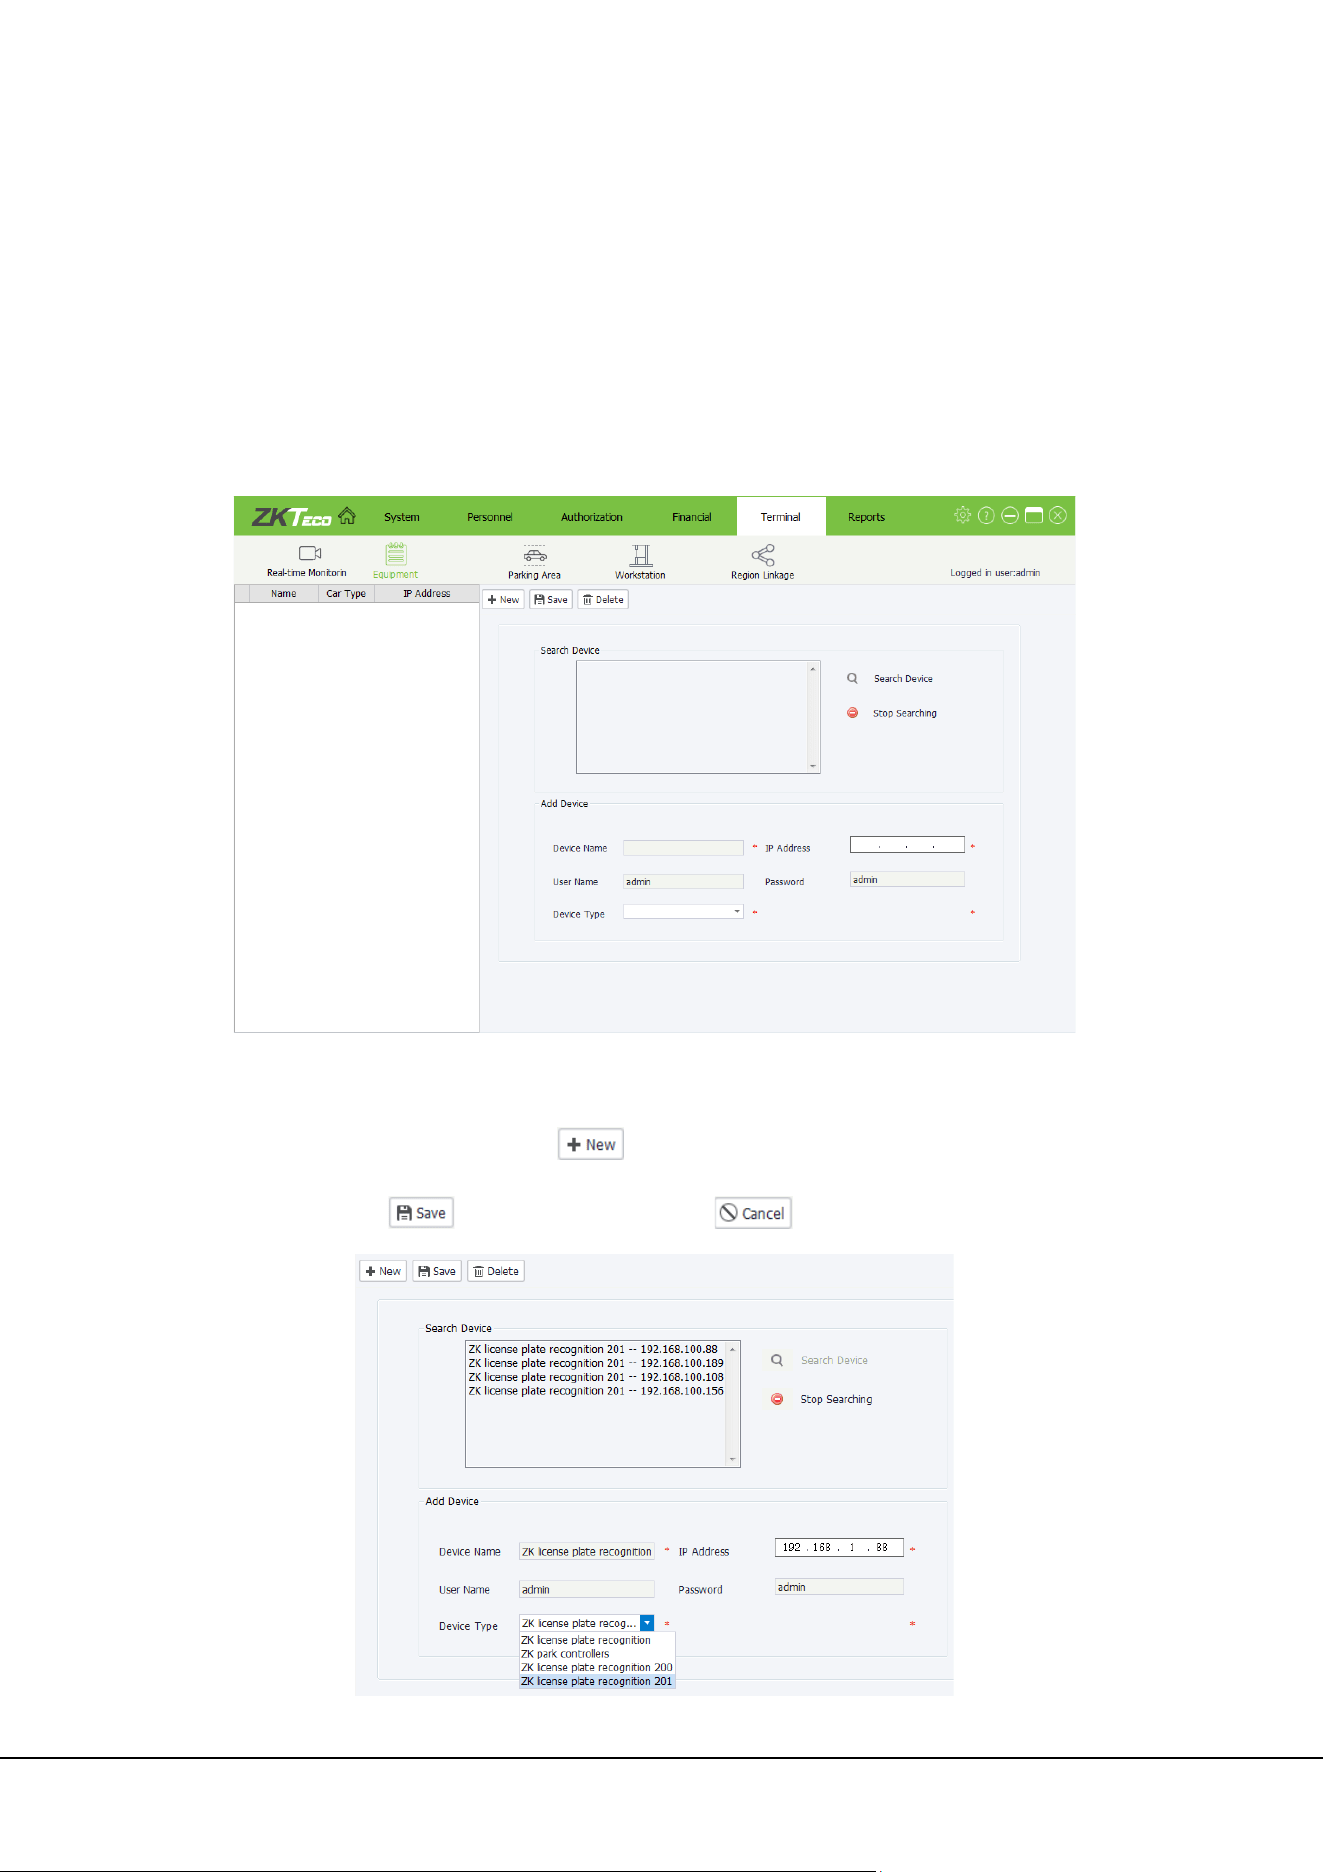
6.1 Equipment Settings
Click [Terminal]→[Equipment] to access Equipment settings interface, on which you can add, edit, and
delete devices.
6.1.1 Adding a device
On the Equipment settings interface, click to access the device addition interface and set relevant
information. Then click to save the settings or click to cancel the operation.
26 ZKParking User Manual
Device Name/IP Address: Click to search for devices and select a device. Then the device name
and IP address are displayed in Add Device. The device information is mandatory and can also be
manually entered.
User Name/Password: Name/password of the camera.
Device Type: Four value options are available: ZK license plate recognition, ZK park controllers, ZK
license plate recognition 200 and ZK license plate recognition 201.
6.1.2 Editing/Deleting a device
The method of Editing/Deleting a device is similar to the method of Editing/Deleting an employee. For
details, please refer to 4.2.2 Editing an employee, 4.2.3 Deleting an employee.
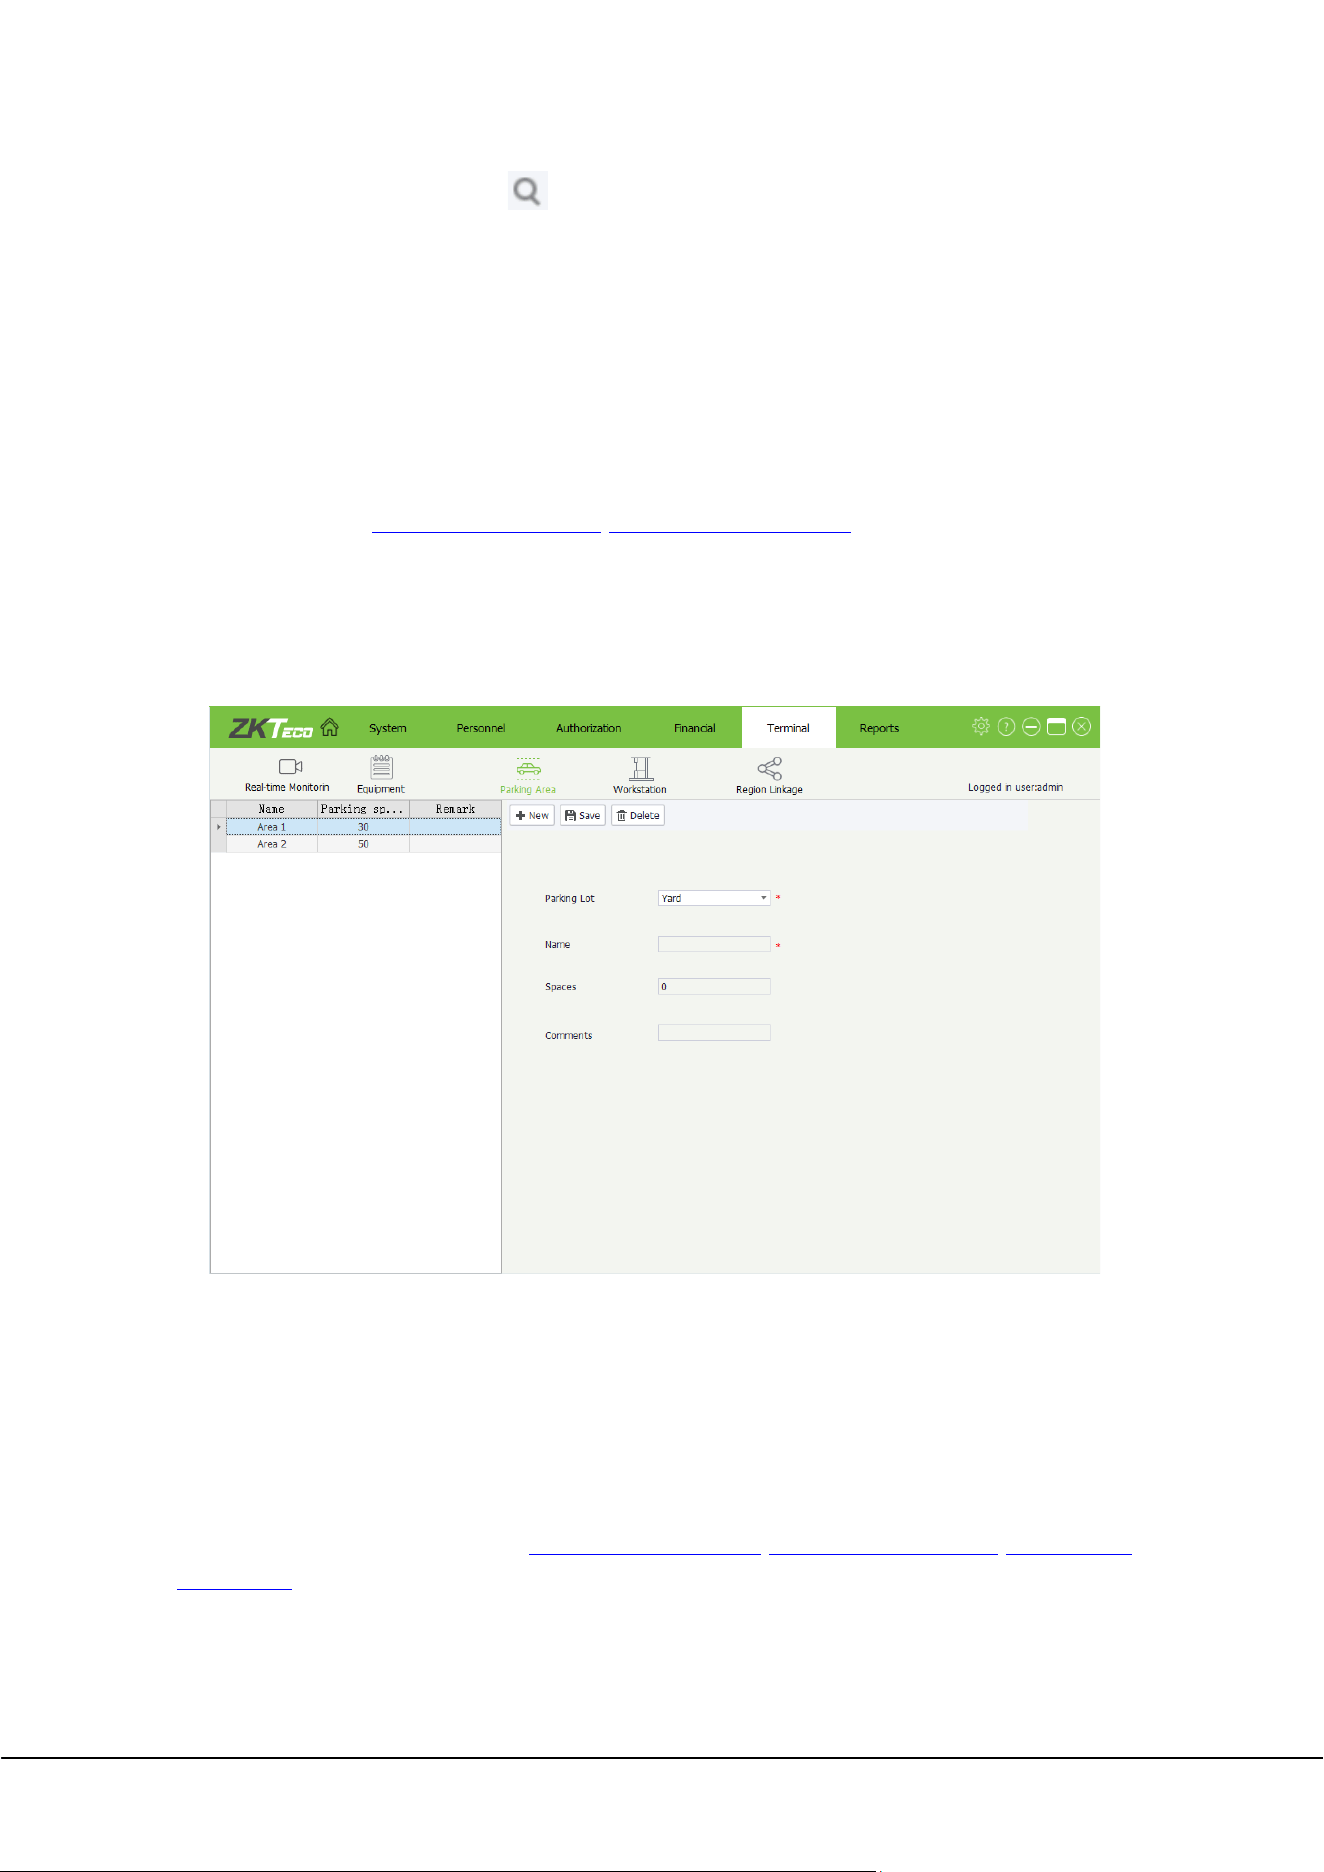
6.2 Parking Area Settings
A parking lot has multiple parking areas. Click [Terminal]→[Parking Area] to enter Parking Area settings
interface, on which you can add, edit, and delete parking areas.
Parking Lot: Parking lot of the parking area. The default value is Yard, which is the only value.
Name: Name of the parking area. This field is mandatory.
Spaces: Total number of parking spaces of this parking area.
Comments: Description of the parking area. This field is optional.
6.2.1 Adding/Editing/Deleting a parking area
The method of Adding/Editing/Deleting a parking area is similar to the method of Adding/Editing/Deleting
an employee. For details, please refer to 4.2.1 Adding an employee, 4.2.2 Editing an employee,
4.2.3 Deleting
an employee.

ZKParking User Manual 27
6.3 Workstation Settings
Click [ Terminal]→[Workstation] to access Workstation settings interface:
Workstation name: Name of the workstation. This field is mandatory. The workstation name can be
duplicate with other workstation names.
Workstation IP: IP address of the workstation. This field is mandatory. You cannot specify multiple
workstations for a single IP address.
Channel name: You can click the channel name to modify it. The default name is Entrance.
Entrance and exit types: Select an access type from the drop-down list. The value options include
Largest car entrance, Largest car exit, Small car entrance, Small car exit, Central charging point and
Central change exit.
Automatic opening of temporary: After this item is selected, the boom barrier is automatically raised
when a car is identified as a provisional car.
Automatic opening of fixed: After this item is selected, the boom barrier is automatically raised when
a car is identified as a fixed car.
Equipment: It refers to ZK park controllers. Select a value from the drop-down list. Park controllers must
be added to Equipment in advance. For details, please refer to 6.1.1 Adding
an device.
Camera IP: Select a value from the drop-down list. Devices must be added to Equipment in advance.
For details, please refer to 6.1.1 Adding an device
.
Camera: Position that the main camera is displayed on the monitoring interface. After an IP address is
set for the main camera, the default position of the main camera is 0, which means no position is
selected. You can select a position from the drop-down list. The value options include 1, 2, 3, and 4.
Auxiliary camera IP: Select a value from the drop-down list. Devices must be added to Equipment in
advance. For details, please refer to 6.1.1 Adding an device
.
Note: A device cannot be set to the main camera and auxiliary camera concurrently. The two values
are mutually exclusive.
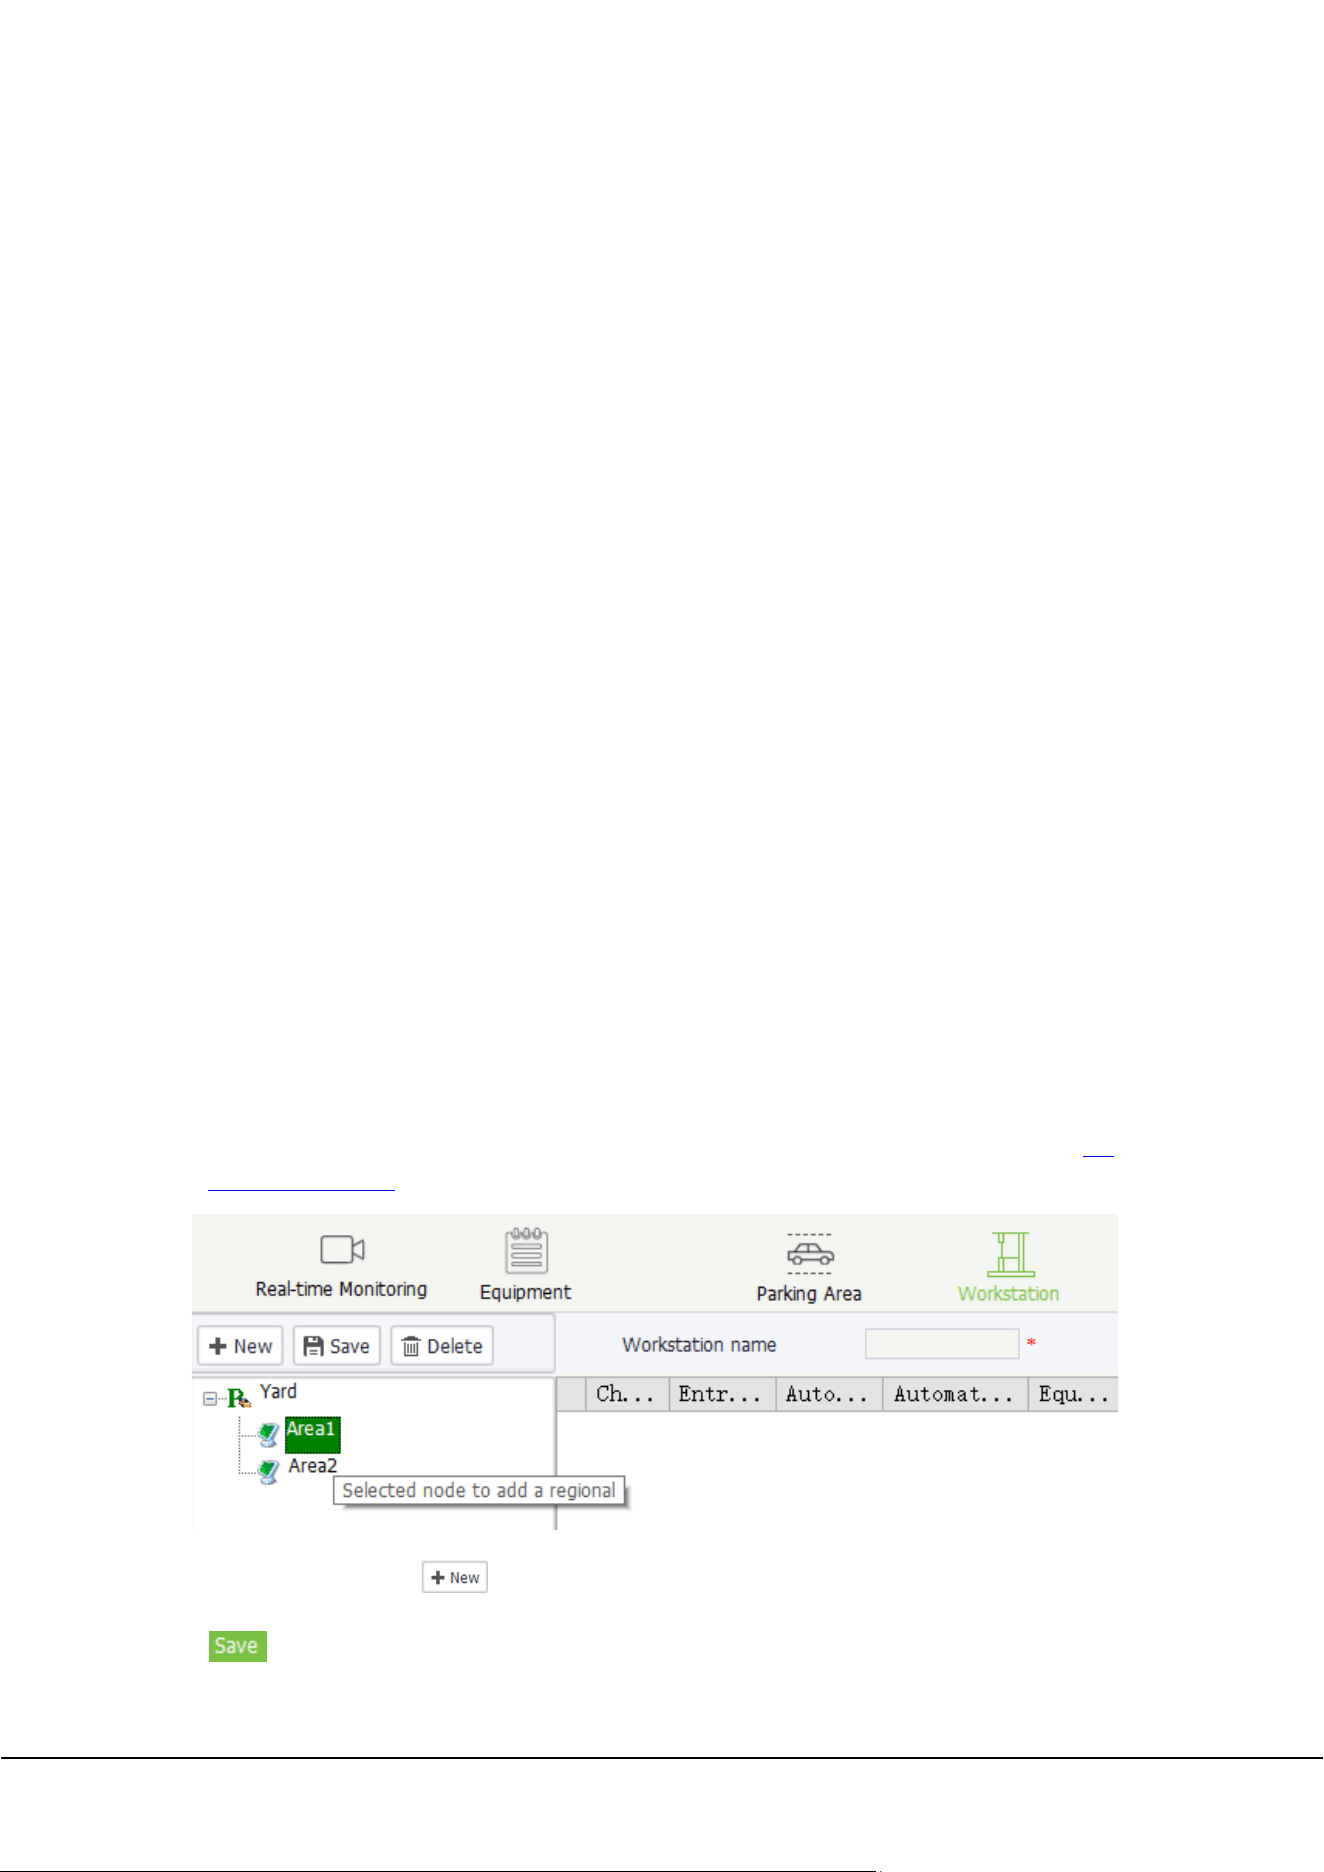
28 ZKParking User Manual
Auxiliary camera: Position that the auxiliary camera is displayed on the monitoring interface. After an
IP address is set for the auxiliary camera, the default position of the auxiliary camera is 0, which means
no position is selected. You can select a position from the drop-down list. The value options include 1,
2, 3, and 4.
Enables manual release: If this item is selected, the boom barrier can be manually raised to allow cars
to pass.
Temporary card quickly out: If a provisional car does not involve parking expenses, the charging
confirmation interface is not displayed and the boom barrier is raised to allow the car to pass.
Temporary car charges allow replacement models: The car type can be changed for a provisional car
on the provisional car charging interface. Different charging rules are applied for different car types and
therefore the charging result changes accordingly.
Allows temporary car free: If this item is selected, the Free button is available on the provisional car
charging interface to exempt the parking expenses of provisional cars.
Single channel mode: If this item is selected, a channel is physically used as both the entrance and the
exit. However, it is recommended that different logical channels be bound to different cameras.
Wide-mouth mode: Application mode of the parking lot, which refers to a T-shape or Y-shape crossing.
When a crossing is excessively large, a single camera is incompetent to effectively identify cars from
different directions. In this case, two cameras are required to identify cars and upload data to the
software. It is recommended that the identification areas of the two cameras do not overlap in
wide-mouth mode. Select this item to enable the wide-mouth mode.
Entrance check license plates: If this item is selected, a car can enter the parking lot after its license
plate is checked.
Exit check license plates: If this item is selected, a car can exit the parking lot after its license plate is
checked.
6.3.1 Adding a workstation
The process for adding a workstation:
1) Select a parking area: On the left of the booth setup interface, select a parking area as the workstation
of the device. A parking area must be added to Parking Area in advance. For details, please refer to
6.2
Parking Area Settings;
2) Device added to: Click to enter Device added to interface, input device name, and then click
.
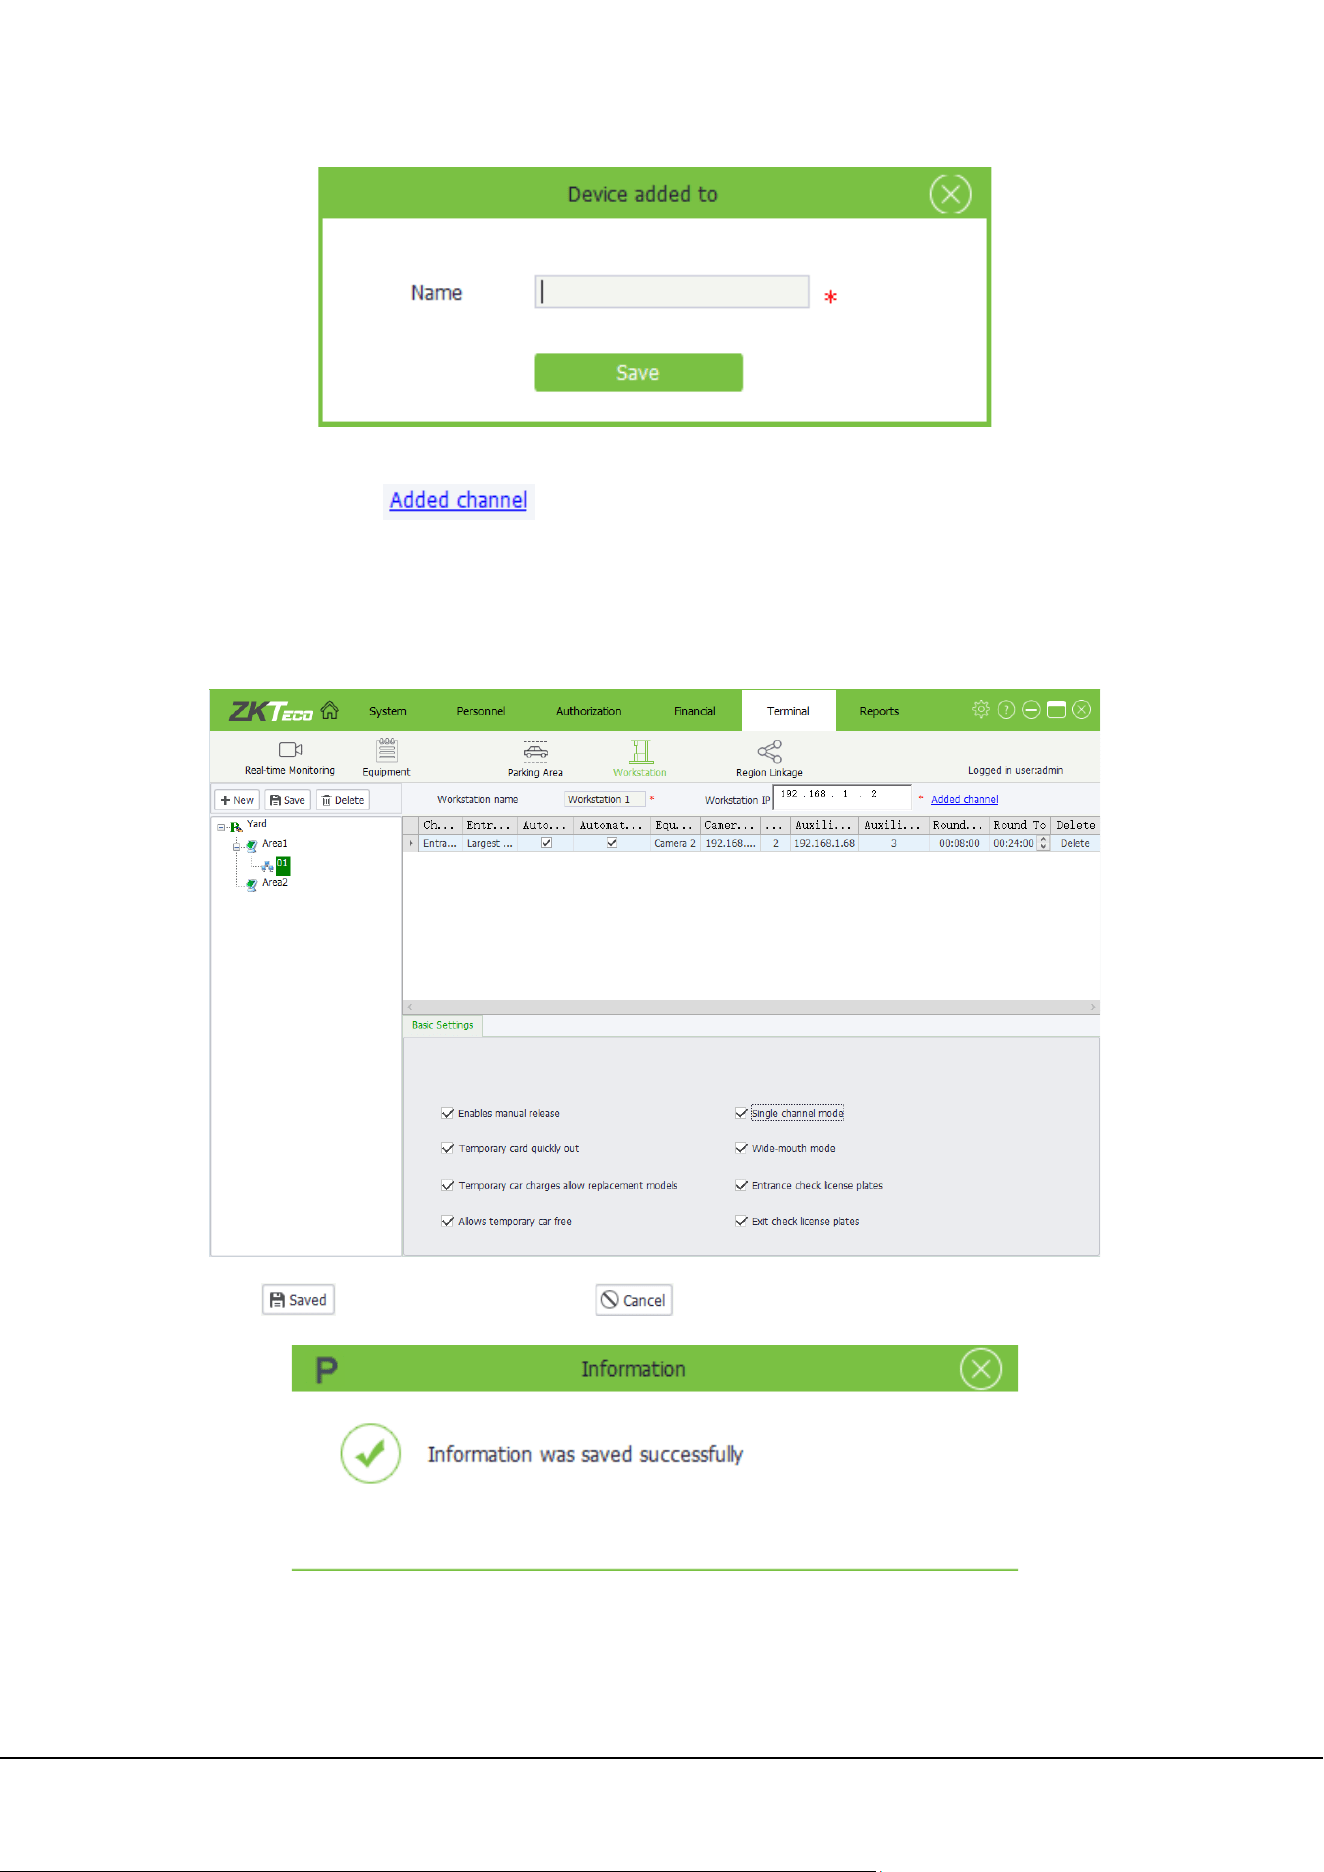
ZKParking User Manual 29
3) Adding a workstation: On the left of the interface, select an area and enter the workstation name and IP
address. Then click and set relevant information. Select items as required in Basic
Settings.
Note: If the computer at the workstation has multiple IP addresses, set its first IP address as the
workstation IP address.
4) Click to save the settings or click to cancel the operation.
30 ZKParking User Manual
6.3.2 Editing/Deleting a workstation
The method of Editing/Deleting a workstation is similar to the method of Editing/Deleting an employee. For
details, please refer to 4.2.2 Editing an employee, 4.2.3 Deletingan employee.
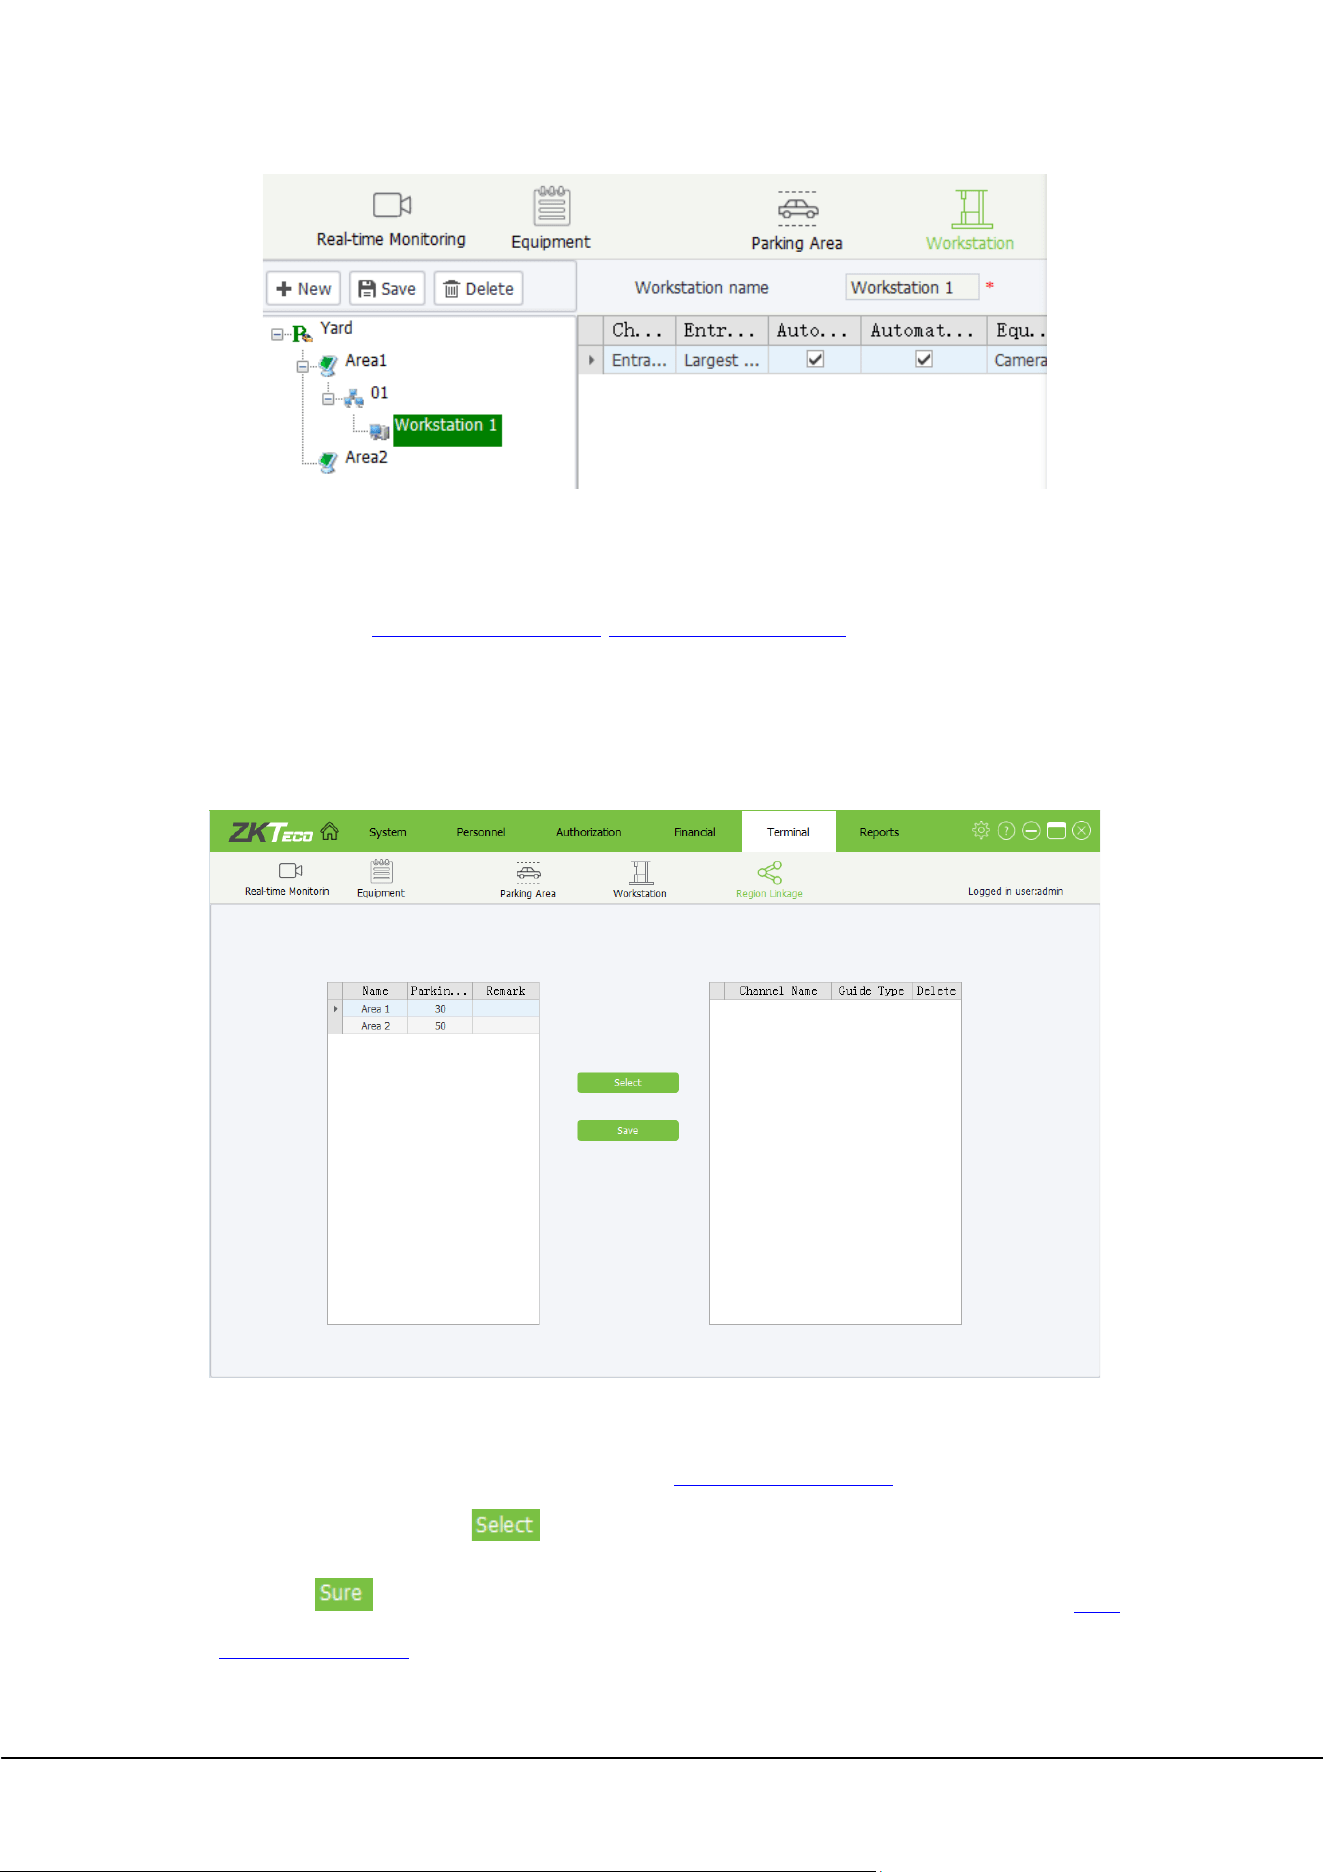
6.4 Region Linkage Settings
Region linkage setting involves setting the impact of car entry and exit on the number of parking spaces of
the parking area. Click [Terminal]→[Region Linkage] to access Region Linkage settings interface:
1) The process for adding a region linkage:
(1) Select a parking area: On the left of the interface, select an area. A parking area must be added to
Parking Area in advance. For details, please refer to 6.2 Parking
Area Settings;
(2) Select a channel: Then, click , select the required channel from the displayed channel list, and
then click . Channels must be added to Workstation in advance. For details, please refer to
6.3.1
Adding a workstation.
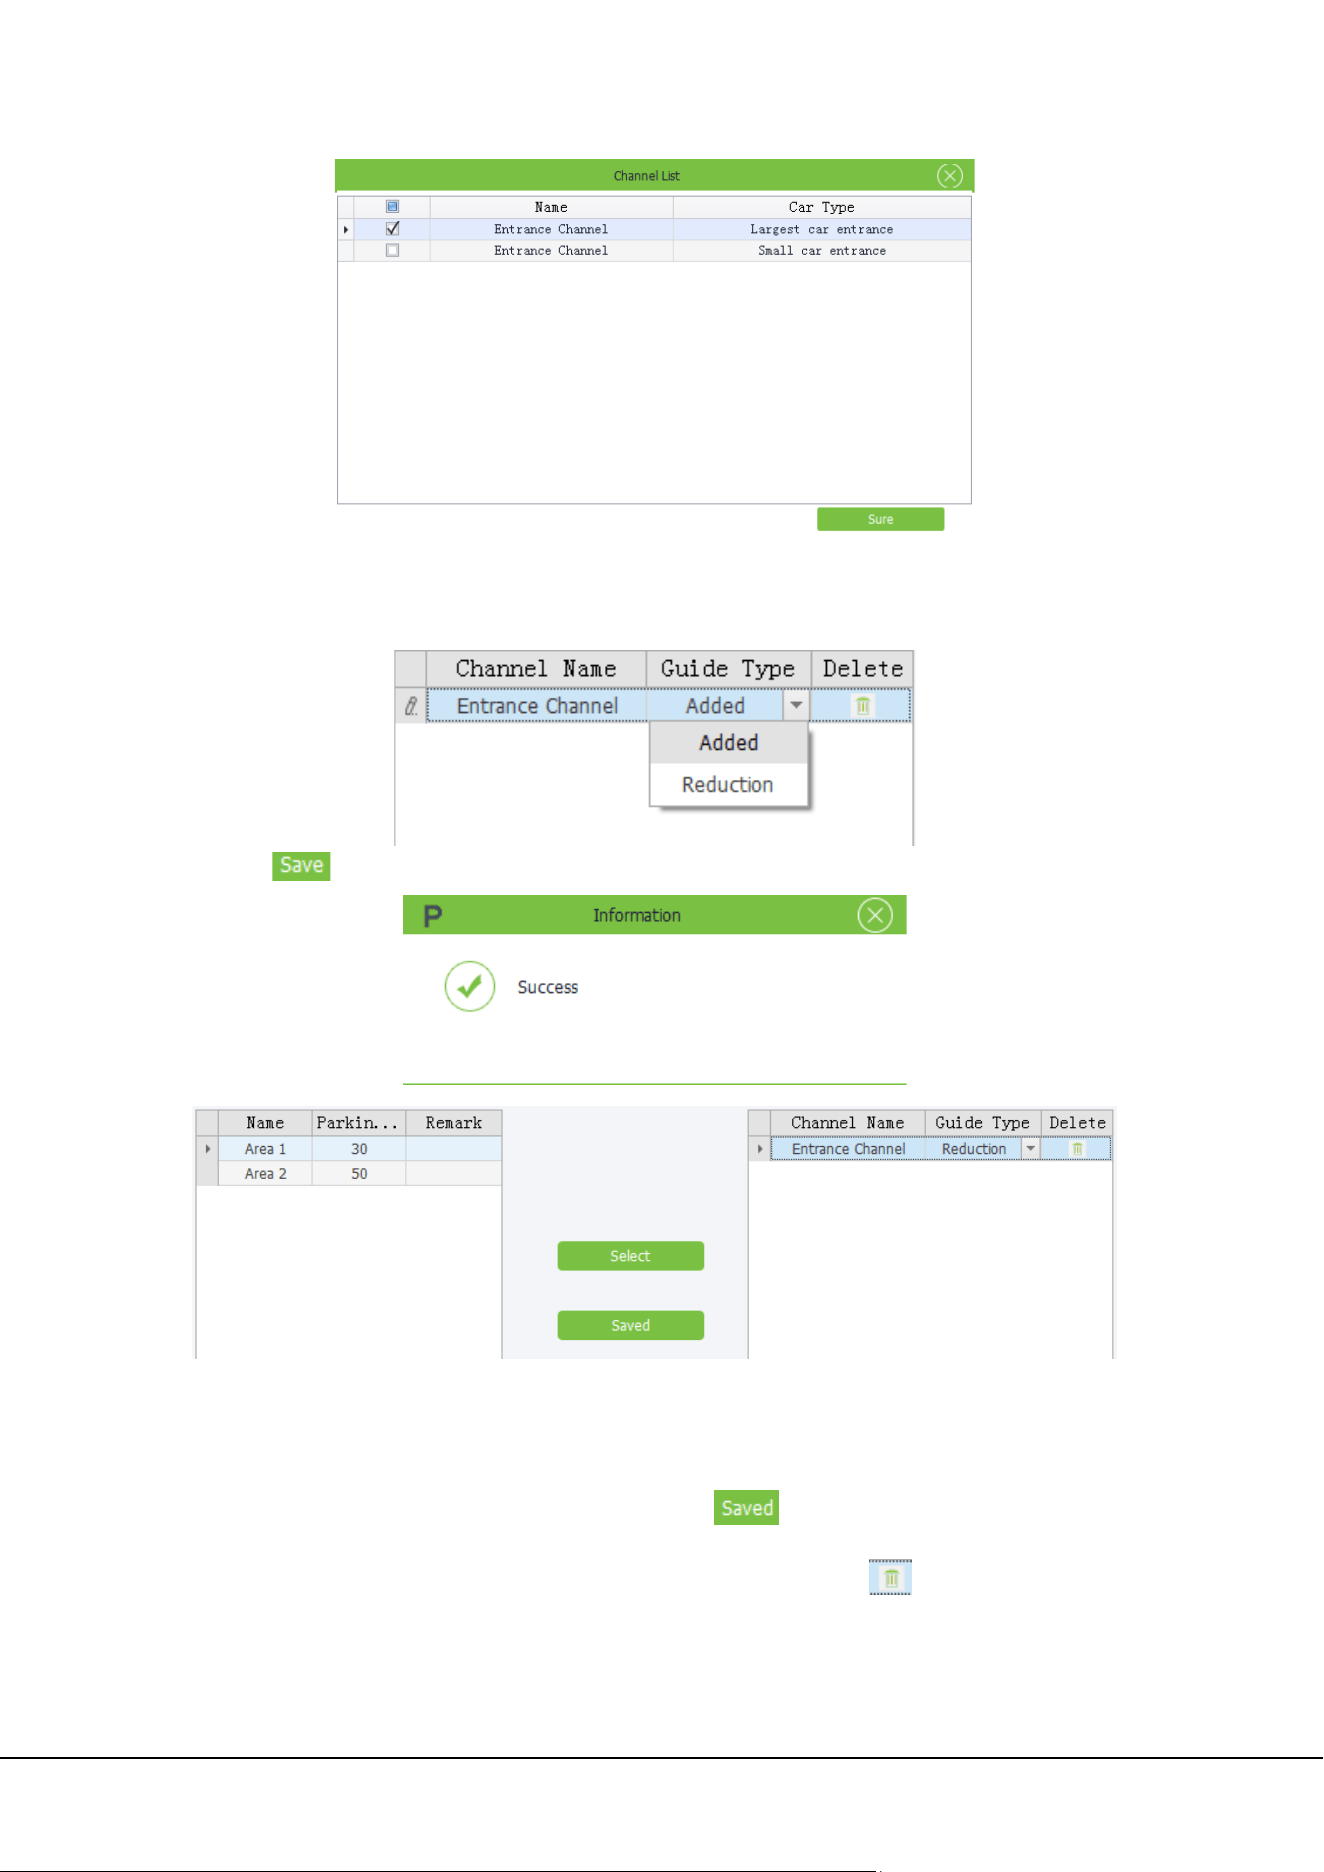
ZKParking User Manual 31
(3) Set the guide type: The selected channel will be displayed on the right of the interface. Click Guide
Type and select an impact type from the drop-down list. The value options include Added and
Reduction.
(4) Click to save the setting.
Note: Multiple region linkages can be added for a parking area.
2) Editing a region linkage: Select a region linkage to be edited, modify the guide type set in step(3)
of ”The process for adding a region linkage:”, then click .
3) Deleting a region linkage: Select a region linkage to be deleted and click .
32 ZKParking User Manual
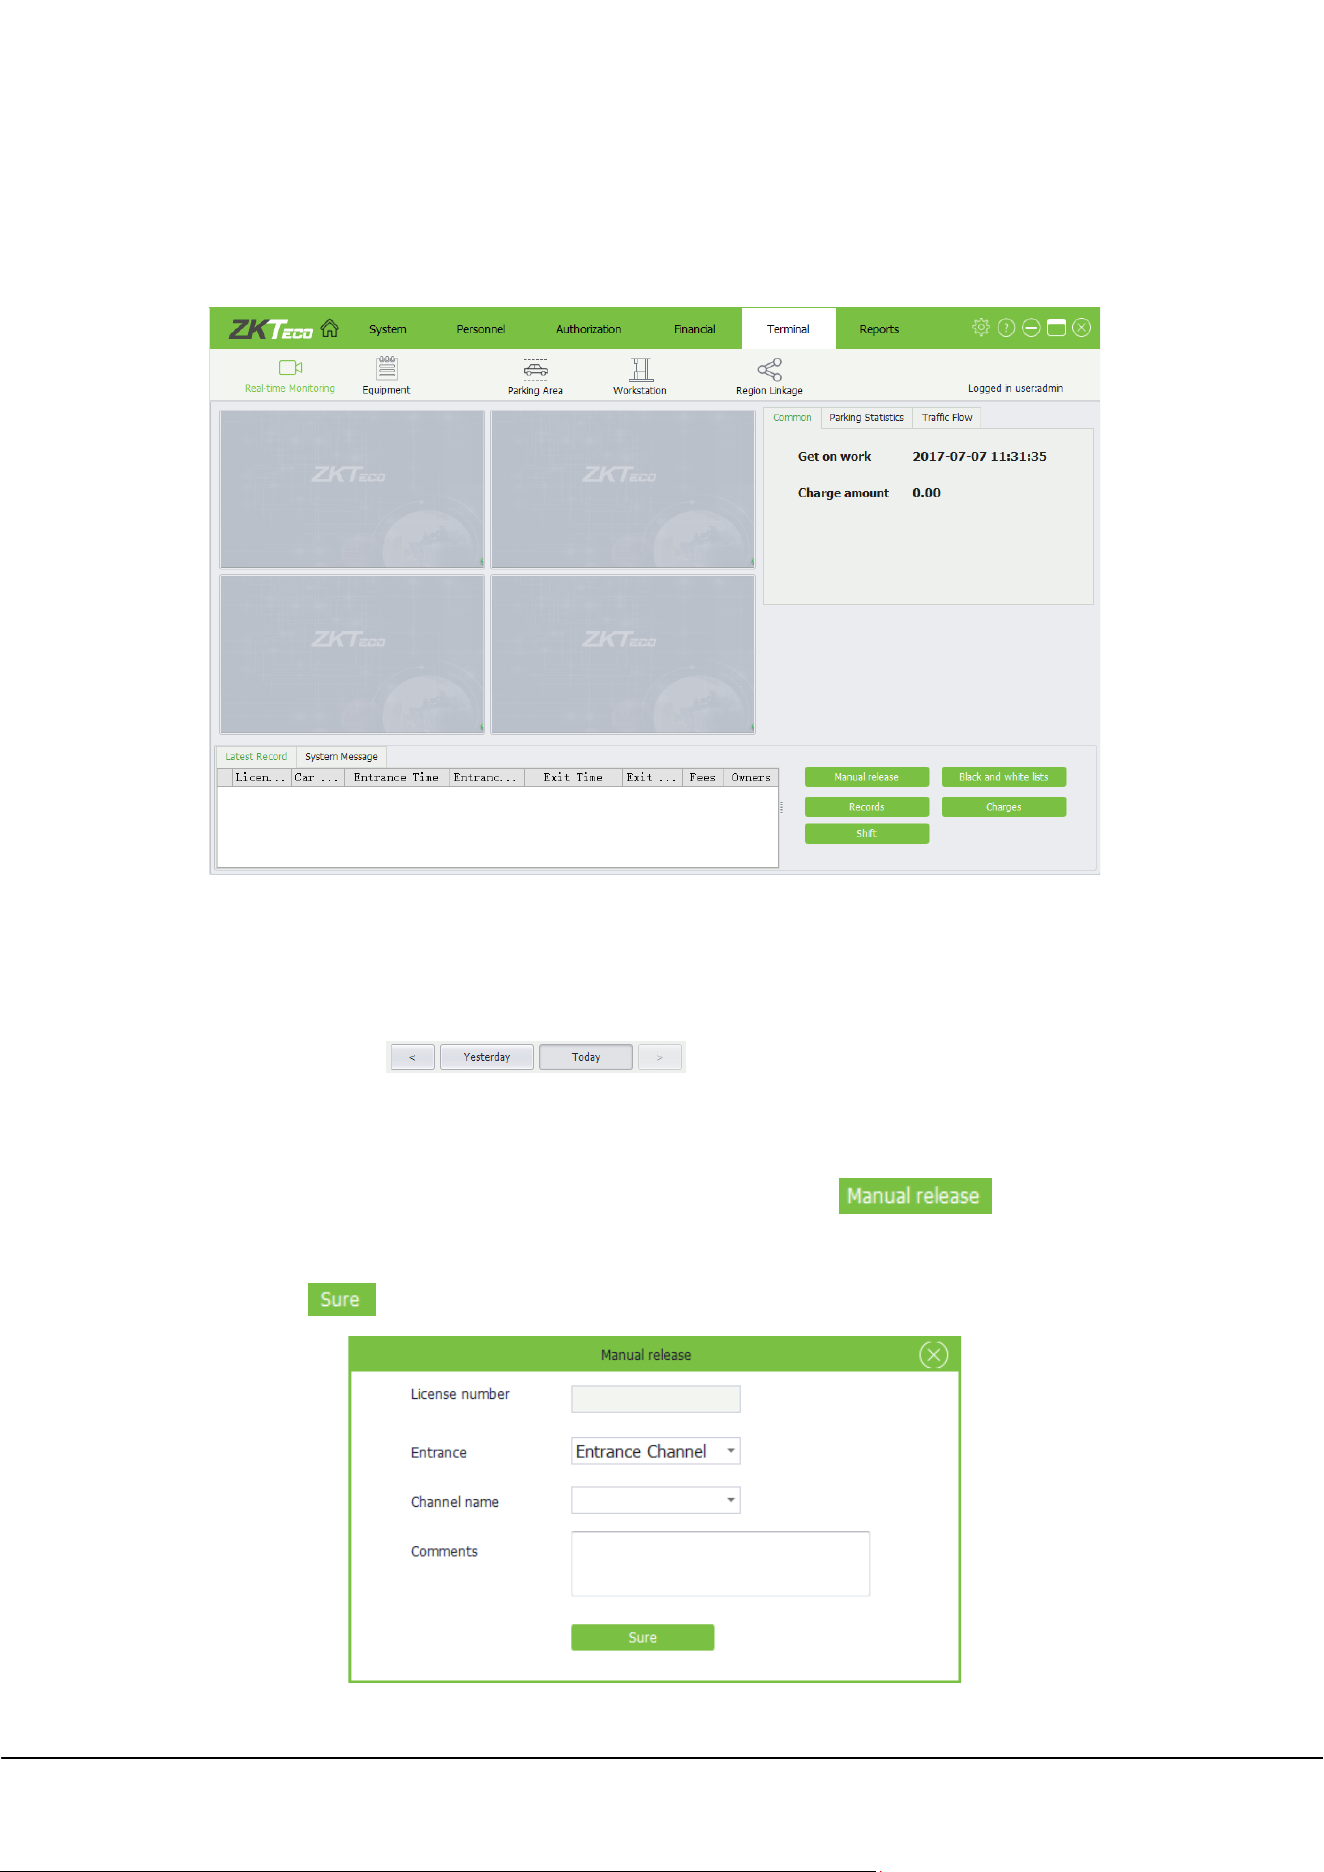
6.5 Real-time Monitoring
There are totally four monitoring screens. You can view the entry/exit messages of all cars as well as system
messages of the parking lot.
Common:
Get on work: Time when the operator logs in to the software for the first time.
Charge amount: Total parking expenses of the parking lot after the current operator gets to work.
Parking Statistics: Parking space data.
Traffic Flow: Click to view the traffic flow of different dates.
Latest Record: Latest car entry/exit message of the parking lot.
System Message: System messages.
Manual release: You can set manual release for cars. Specifically, click . In the
displayed dialog box, enter the license plate number and channel name, select the entrance channel,
and click to save the settings.
ZKParking User Manual 33
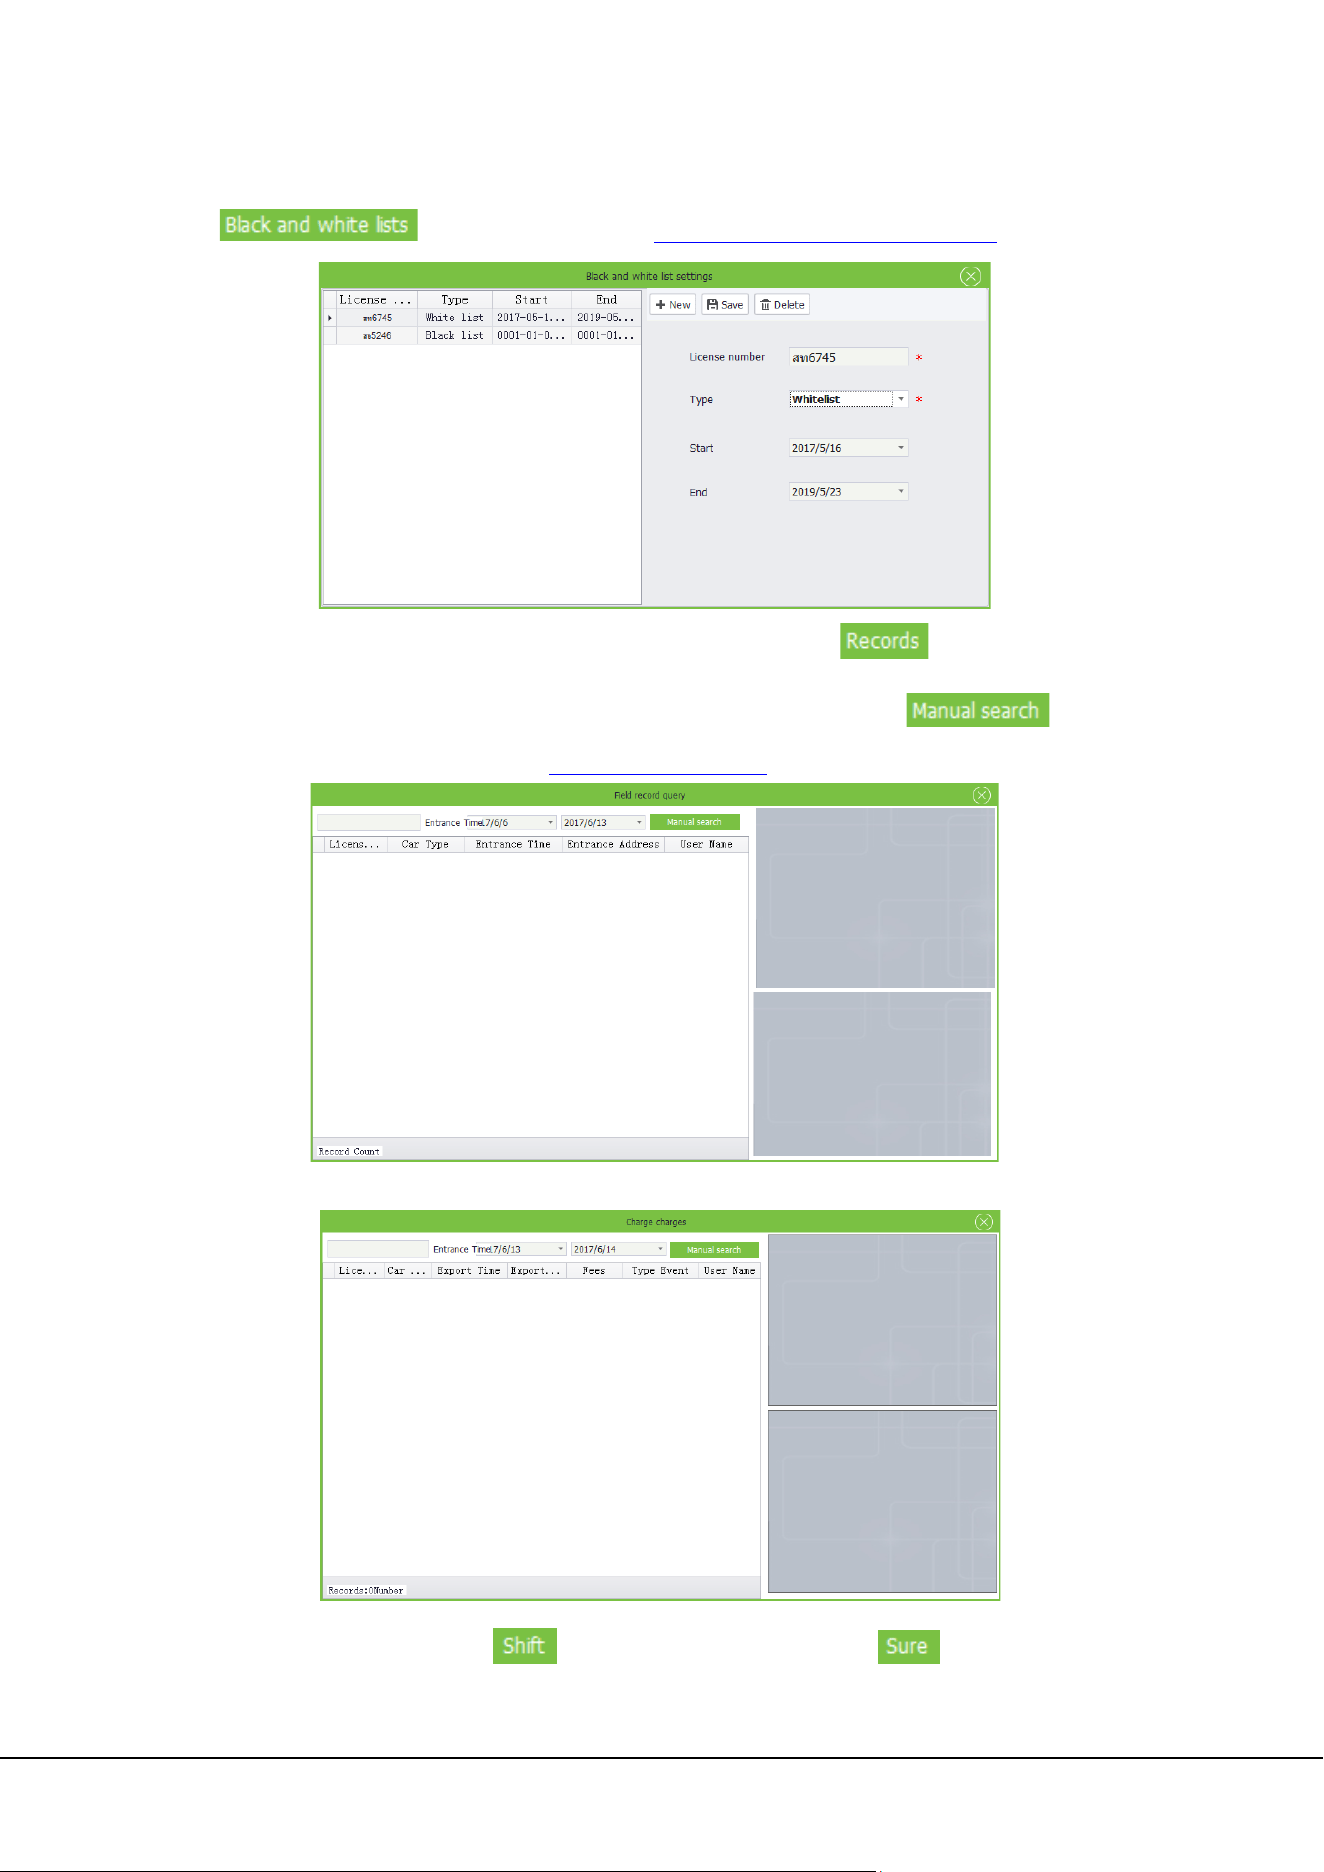
Black and white lists: In addition to System, you can set black and white lists here. Click
. For details, please refer to 5.4 Black And White Lists Management
.
Records: Query entry/exit records of the parking lot. Specifically, click . In the displayed
dialog box, enter a license plate number and set the query period. Then click . About
how to choose a date, please refer to Appendix 1 Date Setting
.
Charges: Query personal charging records. The query method is the same as that of query records.
Shift: Set operator shifts. Click , set the information, and then click to save the settings
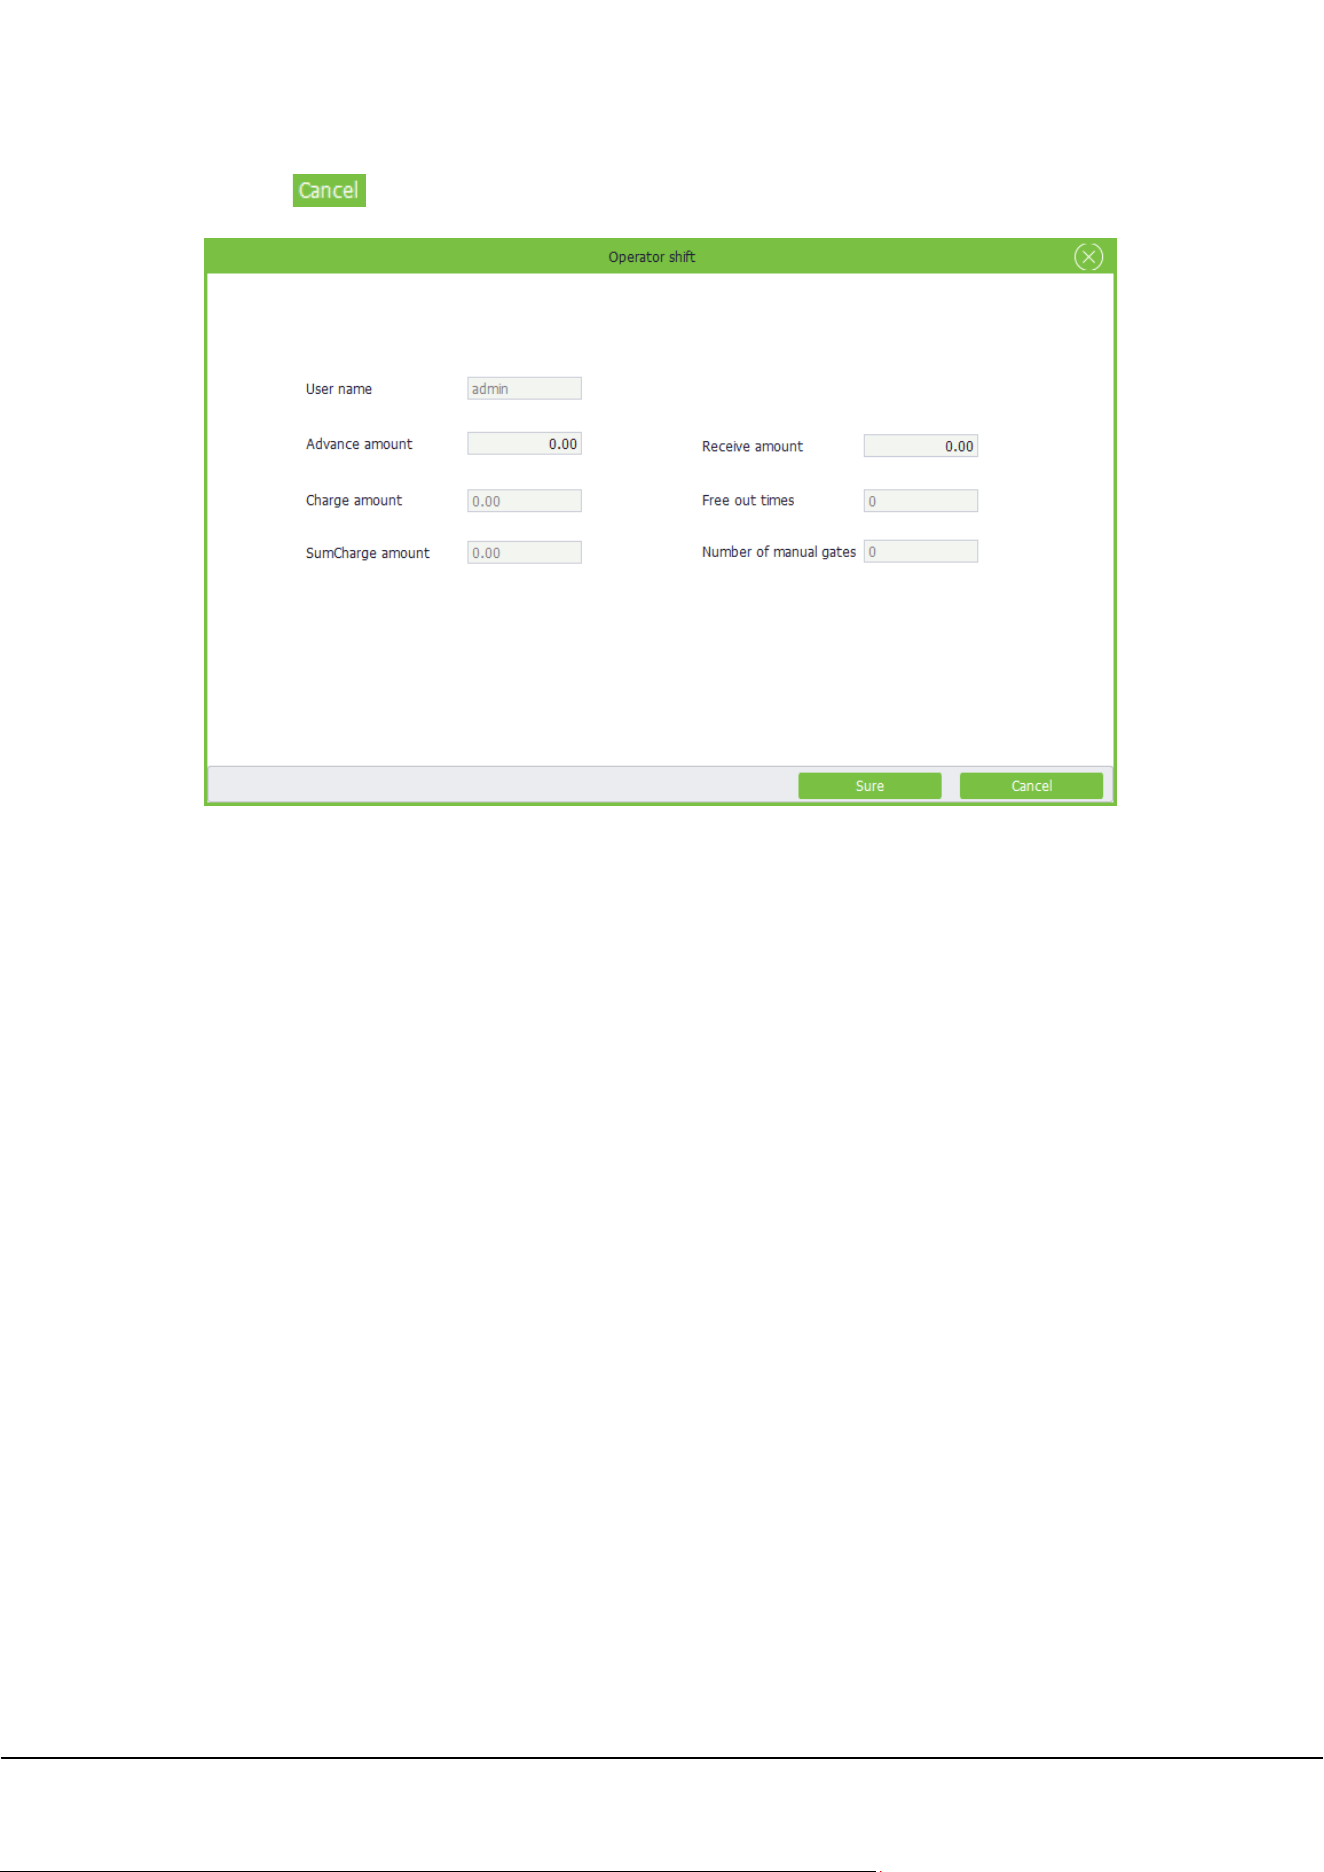
34 ZKParking User Manual
or click to cancel the operation.
ZKParking User Manual 35
7. Authorization Management
Authorization management includes Fixed Authorization, Provisional Authorization and Fixed Extension.
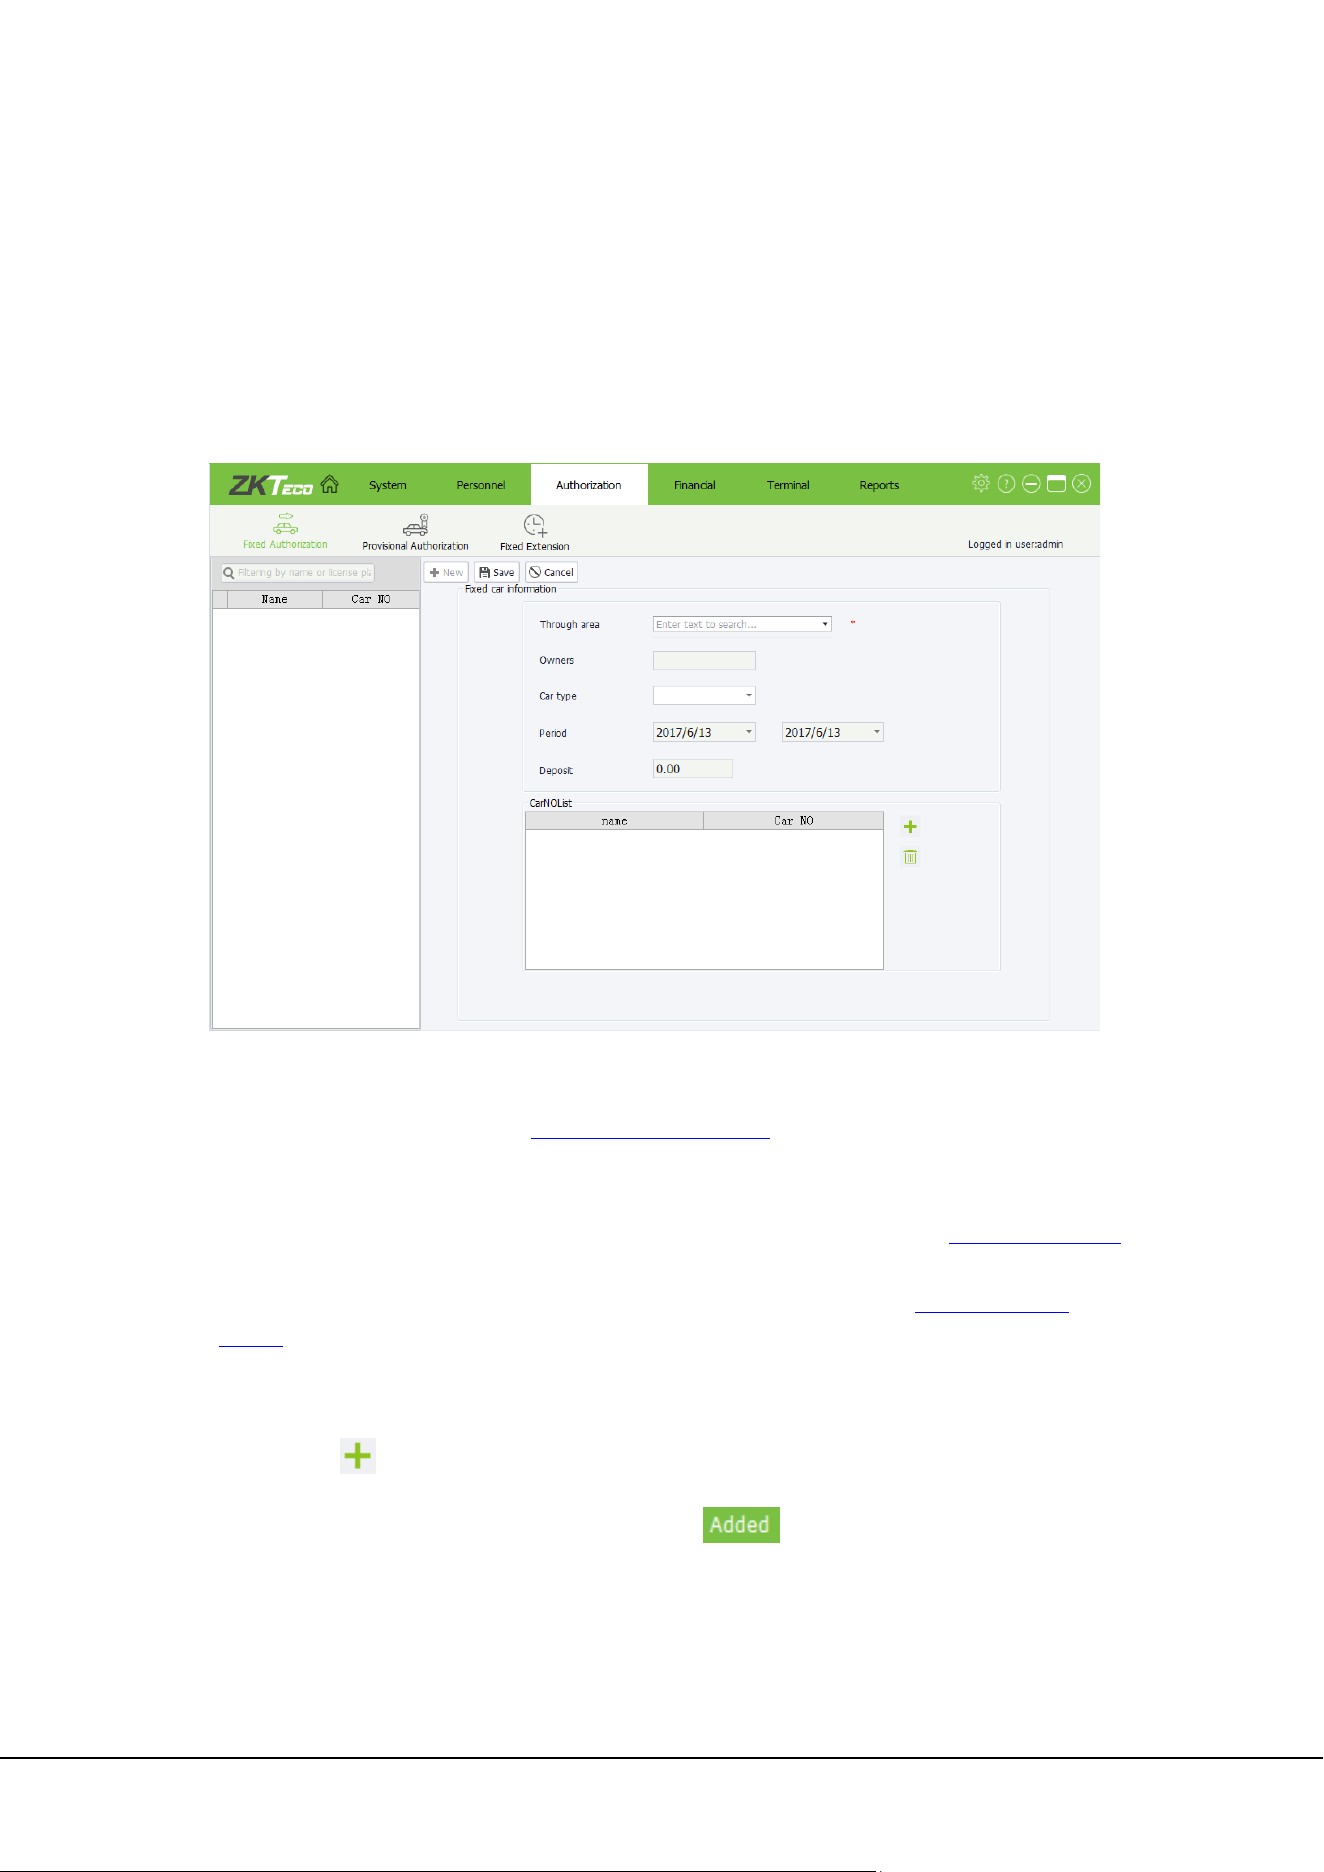
7.1 Fixed Authorization
Click [Authorization]→[Fixed Authorization] to access Fixed Authorization interface, on which you can add,
search for, edit, and delete authorization information.
Through area: Set the areas that the license plate number is allowed to pass through. Specifically, click
, select areas from the drop down list, and then click Sure. Workstations must be set in Terminal in
advance. For details, please refer to 6.3.1 Adding
a workstation.
Owners: Name of the car owner, which is not editable.
Car type: Type of the car. Only car types that are enabled in Basic Settings of System are displayed
here. For details, please refer to ”Set the enabled car model or a custom name” in 5.1 System
Settings.
Period: Validity period during which the license plate number is authorized as a fixed car. The start date
must be earlier than the end date. About how to choose a date, please refer to
Appendix 1 Date
Setting.
Deposit: Deposit to be paid for the car that is authorized as a fixed car.
CarNOList:
Add: Click , in the license plate number list (with the license plate numbers of all personnel in
the system), select a license plate number and click to add the license plate number to
CarNOList.
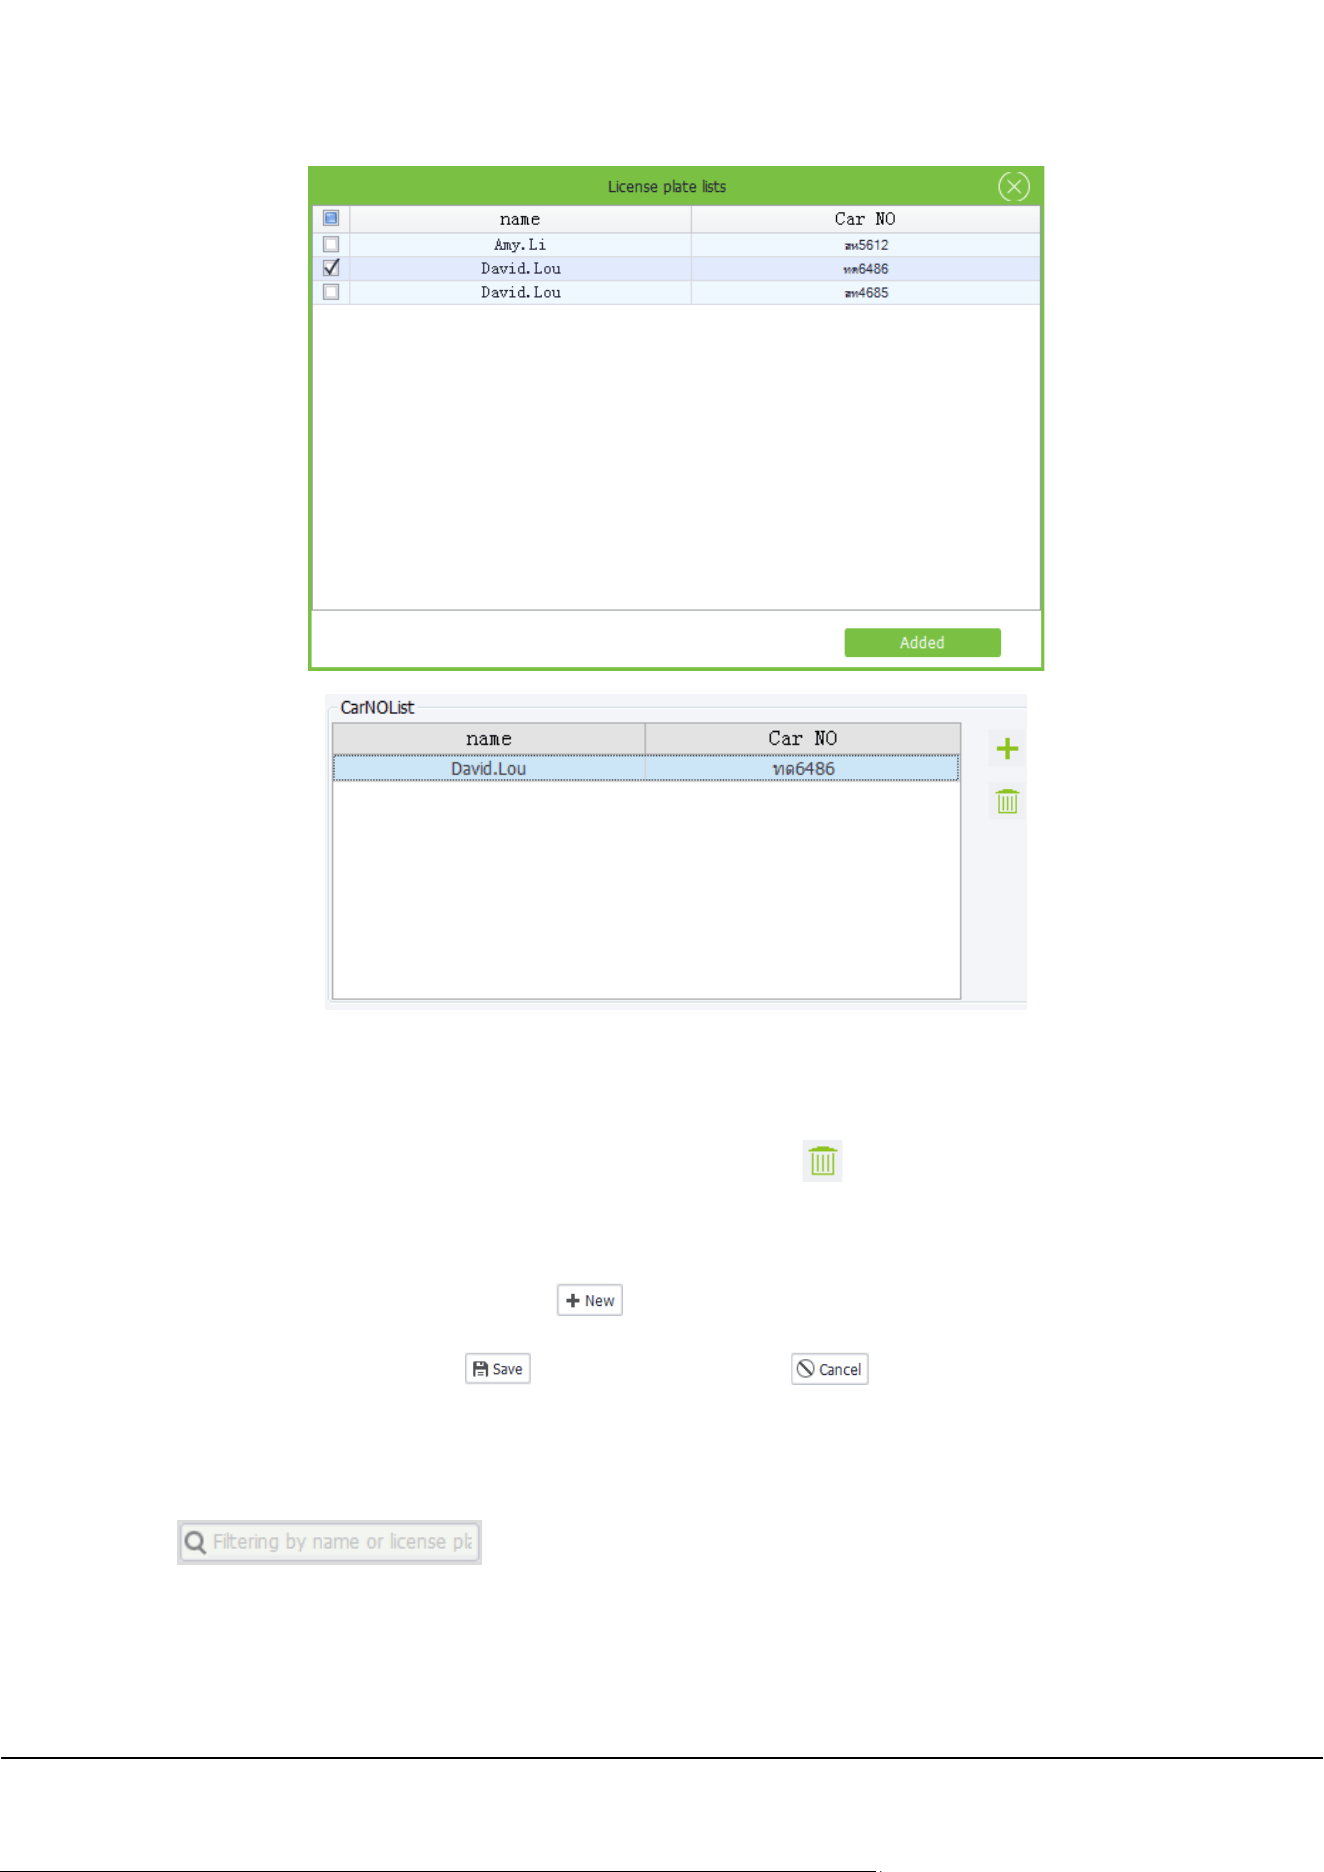
36 ZKParking User Manual
Note: Only one license plate number is included in CarNOList. To replace it, repeat the preceding
steps.
Delete: Select the license plate number in CarNOList and click to delete it.
7.1.1 Adding a fixed car
On the Fixed Authorization interface, click to access the fixed car authorization interface and set
relevant information. Then click to save the settings or click to cancel the operation.
7.1.2 Finding a fixed car
On the Fixed Authorization interface, input the owner name or license plate number in the search box
, and then press [Enter] on the keyboard. Information about the fixed car
is displayed on the right of the interface.
ZKParking User Manual 37
7.1.3 Editing/Deleting a fixed car
1) Edit:
On the left of the Fixed Authorization interface, click a fixed car or search for a fixed car and select it. Only
the areas that the car is allowed to pass through can be edited and other information cannot be edited.
2) Delete:
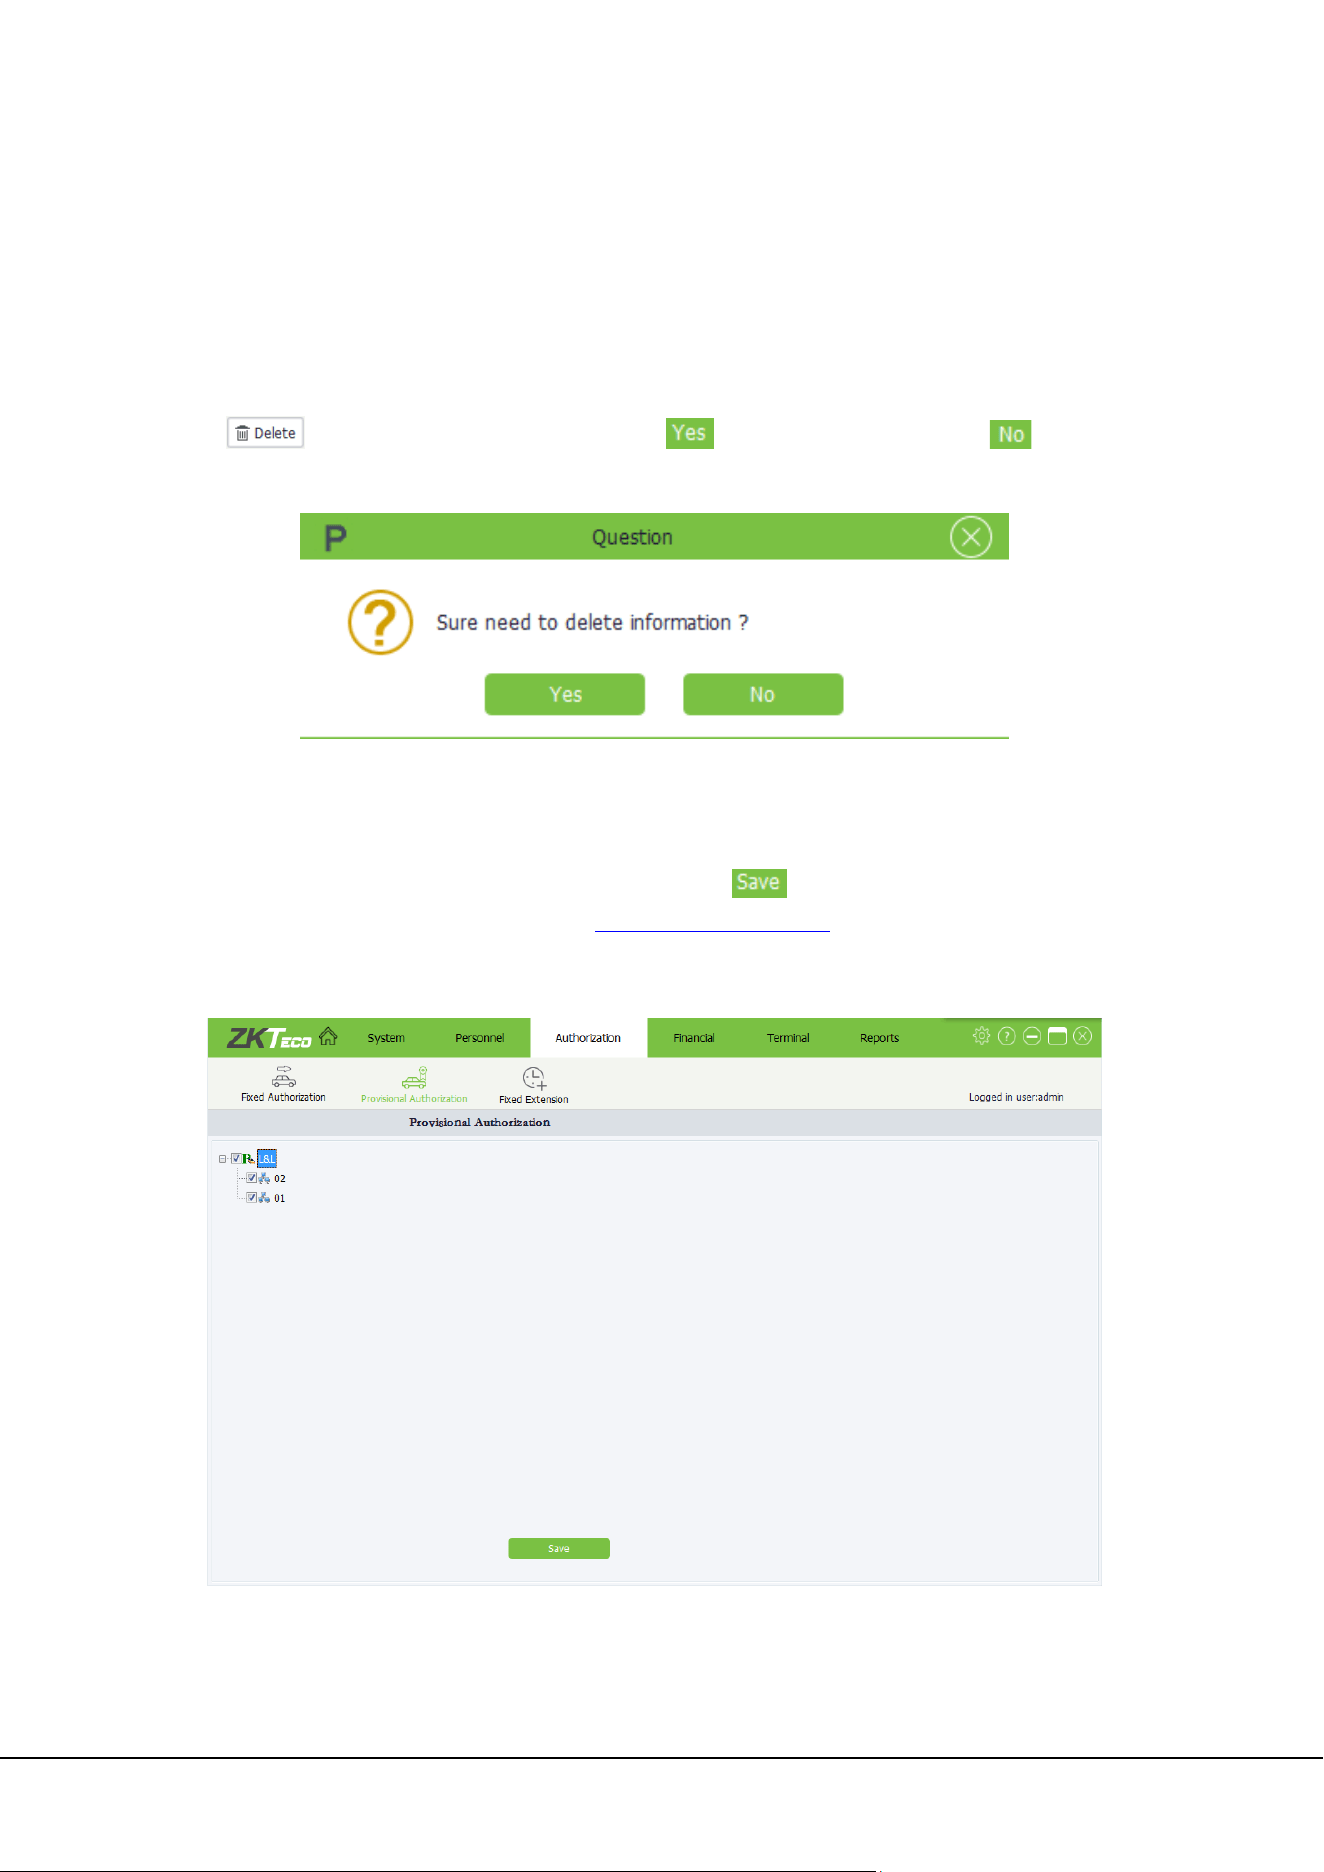
On the left of the Fixed Authorization interface, click a fixed car or search for a fixed car and select it. Then
click , the following prompt will pop up: click to delete information,or click to cancel
the operation.
7.2 Provisional Authorization
Click [Authorization]→[Provisional Authorization] to enter Provisional Authorization interface, select the
areas that the car is authorized to pass through and then click . Workstations must be added in
Terminal in advance. For details, please refer to 6.3.1 Adding
a workstation.
Note: If no area is selected, provisional cars are not allowed to enter the parking lot.
38 ZKParking User Manual
7.3 Fixed Extension
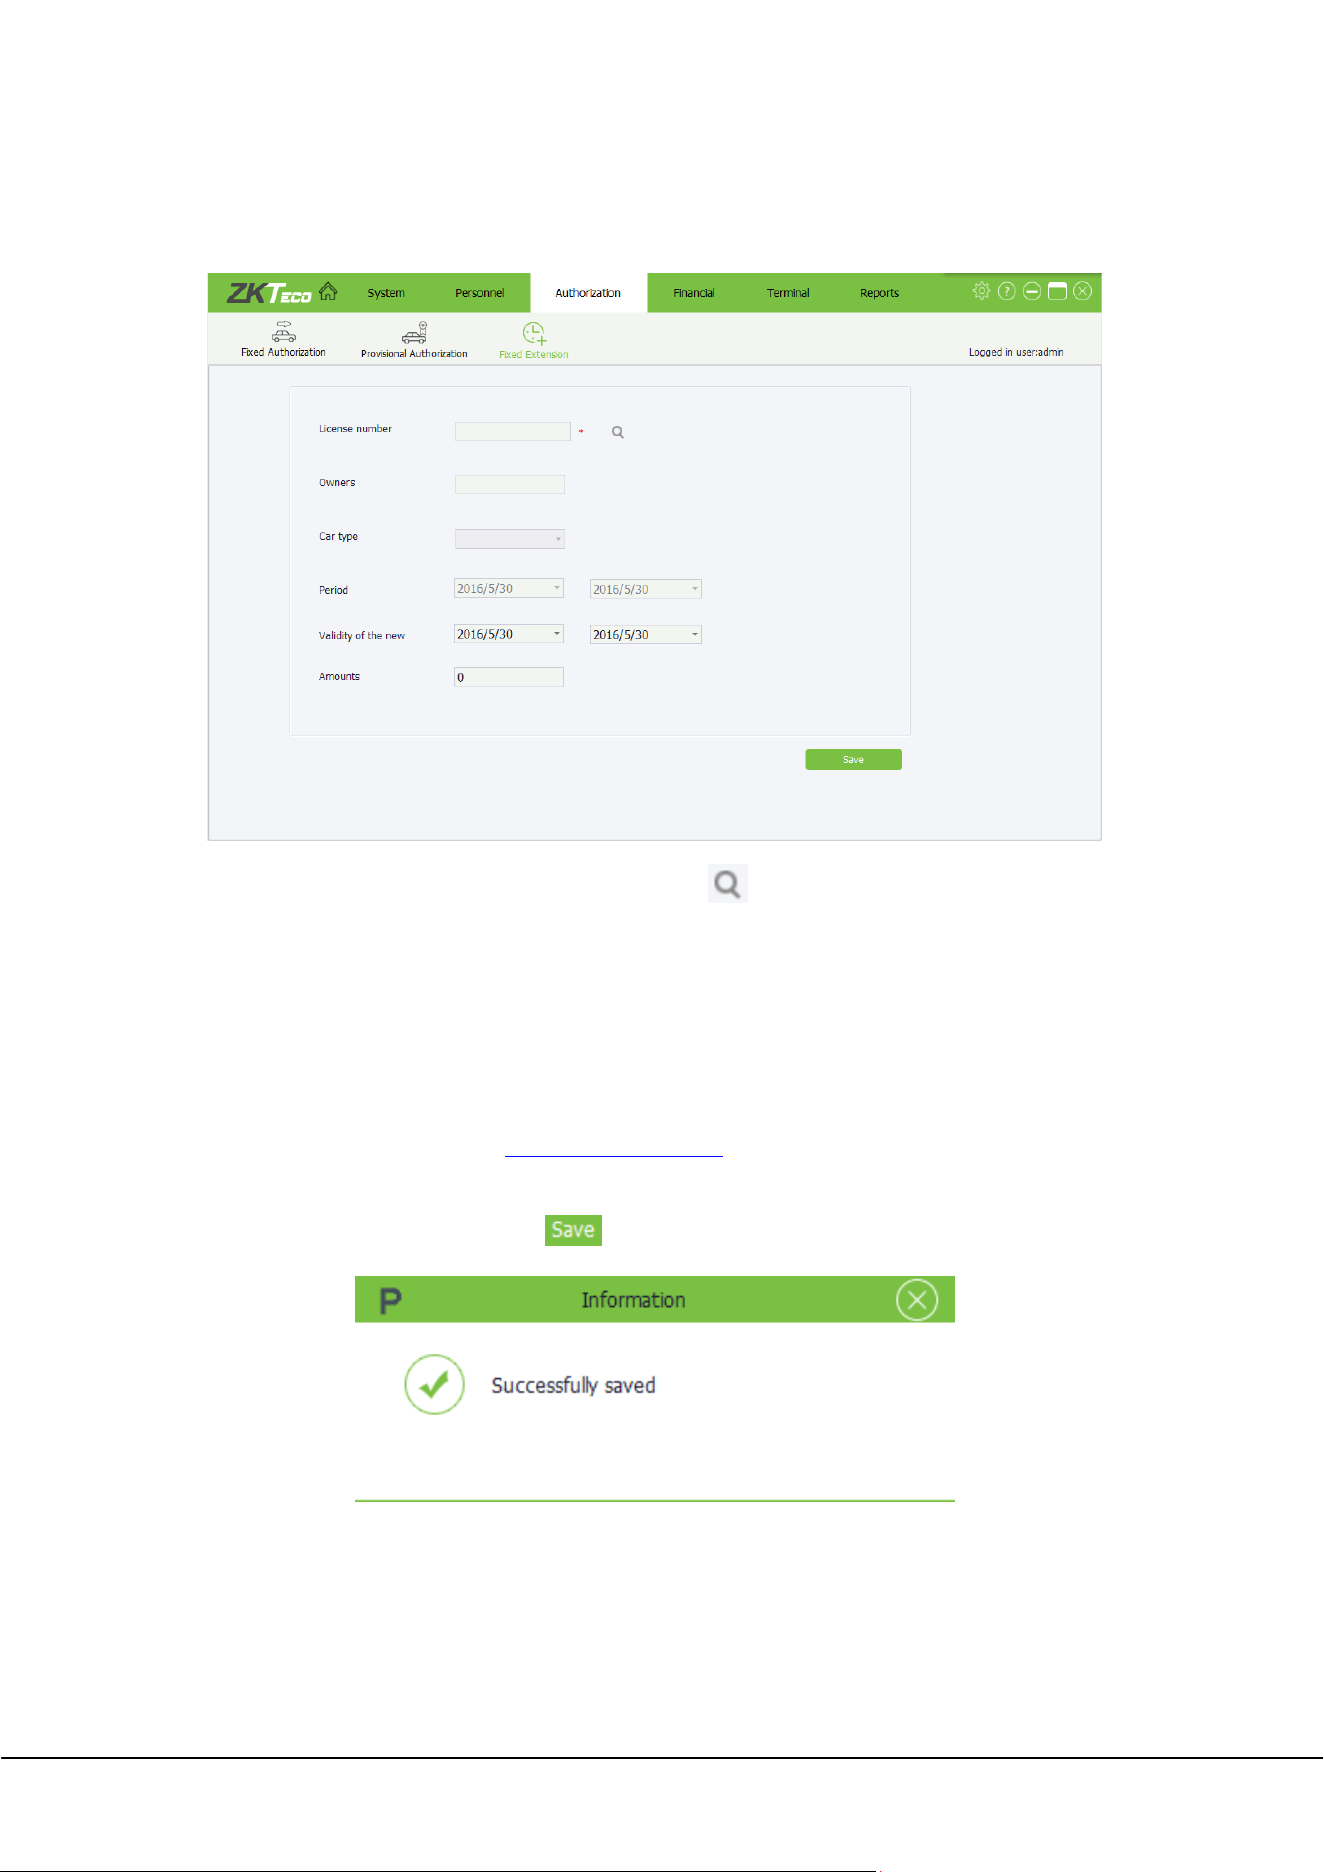
Click [Authorization]→[Fixed Extension] to enter Fixed Extension interface:
License number: Enter a license plate number or click to select a fixed car whose authorization
period is to be extended.
Owners/Car type: After a fixed car is selected, the owner name and car type are automatically
displayed and cannot be edited.
Period: Validity period during which the car is authorized as a fixed car. The specified validity period
cannot be edited.
Validity of the new: New validity period. The start date must be earlier than the end date. About how
to choose a date, please refer to Appendix 1 Date Setting
.
Amounts: Amount of money to be paid for the extension.
Set the information as required and click to save the settings.

ZKParking User Manual 39
8. Financial
Financial includes Provisional Rules, Fixed Rules, Extra Rules, Discount Policy, Discount Store, Shift and
Financial Confirmed.
8.1 Provisional Rules
On the Provisional Rules interface, you can set the charging rules for provisional cars. Only one charging rule
can be created for a type of provisional cars in the same parking lot. Click [Financial]→[ Provisional Rules]:
Parking Lot: Parking lot to which the charging rule is applied.
Car type: provisional car type to which the charging rule is applied. Only car types enabled on the
interface displayed after you choose [System]→[System]→[Basic Settings] are displayed here. For
details, please refer to ”Set the enabled car model or a custom name” in 5.1 System
Settings.
The maximum amount of the day: Upper limit of the charged amount per day. For example, if the
charged amount is $ 10 per hour, totally $ 240 is charged for a whole day. However, if the maximum
charged amount is set to 100 $, only $ 100 is charged.
Free time(Minutes): A car is not charged if its parking duration does not exceed the specified value.
Charging time includes free minutes: Assume that the free parking duration is 30 minutes and the
actual parking duration is 31 minutes. If this item is selected, the car is charged based on the actual
parking duration 31 minutes. If this item is not selected, the car is charged based on the excess parking
duration, which is 1 minute.
MRT: Set the time point for the overtime charge and the amount of the penalty. For example, set the
time point of the time-out fee as 12:00, and the penalty amount as $ 50; there will be three kinds of
charges:
When the vehicle enters the parking lot before 12 o'clock on the same day and leaves the parking
lot before 12 o'clock on the same day, only the parking fee will be charged without additional
penalty of $ 50.
40 ZKParking User Manual
When the vehicle enters the parking lot before 12 o'clock on the same day, but leaves the parking
lot after 12 o'clock on that day, an additional overtime penalty of $ 50 is required in addition to
the parking fee.
When the vehicle enters the parking lot after 12 o'clock on the day and leaves the yard before 12
o'clock on the second day, only the parking fee will be charged without additional penalty of 50.
Whether split time period: Assume that the charged amount is set to $ 1 per 15 minutes from 9:00 to
10:00 in period 1 and to $ 10 per 15 minutes from 10:00 to 11:00 in period 2, and the parking duration
is from 9:43 to 10:30. If this item is not selected, $ 1 is charged from 9:43 to 9:58. The charging cycle
from 9:58 to 10:00 is shorter than 15 minutes and therefore the duration from 10:00 to 10:13 is added to
this charging cycle. The duration from 10:13 to 10:28 is charged based on period 2. If this item is
selected, $ 1 is charged for the duration from 9:43 to 9:58 and the duration from 9:58 to 10:00 though it
is less than 15 minutes. The duration from 10:00 to 10:15 is charged based on period 2.
Enable the same license plate(Natural or 24 hours)Multiple access has the highest charge: If the
accumulated expenses of a car entering and exiting the parking lot for multiple times exceeds the
specified value, no more expenses are charged within the specified period. The period can be set to
Natural or 24 hours, in which Natural refers to the period from 0:00 to 24:00 and 24 hours refers to the
duration from the entry time point to the same time point on the second day.
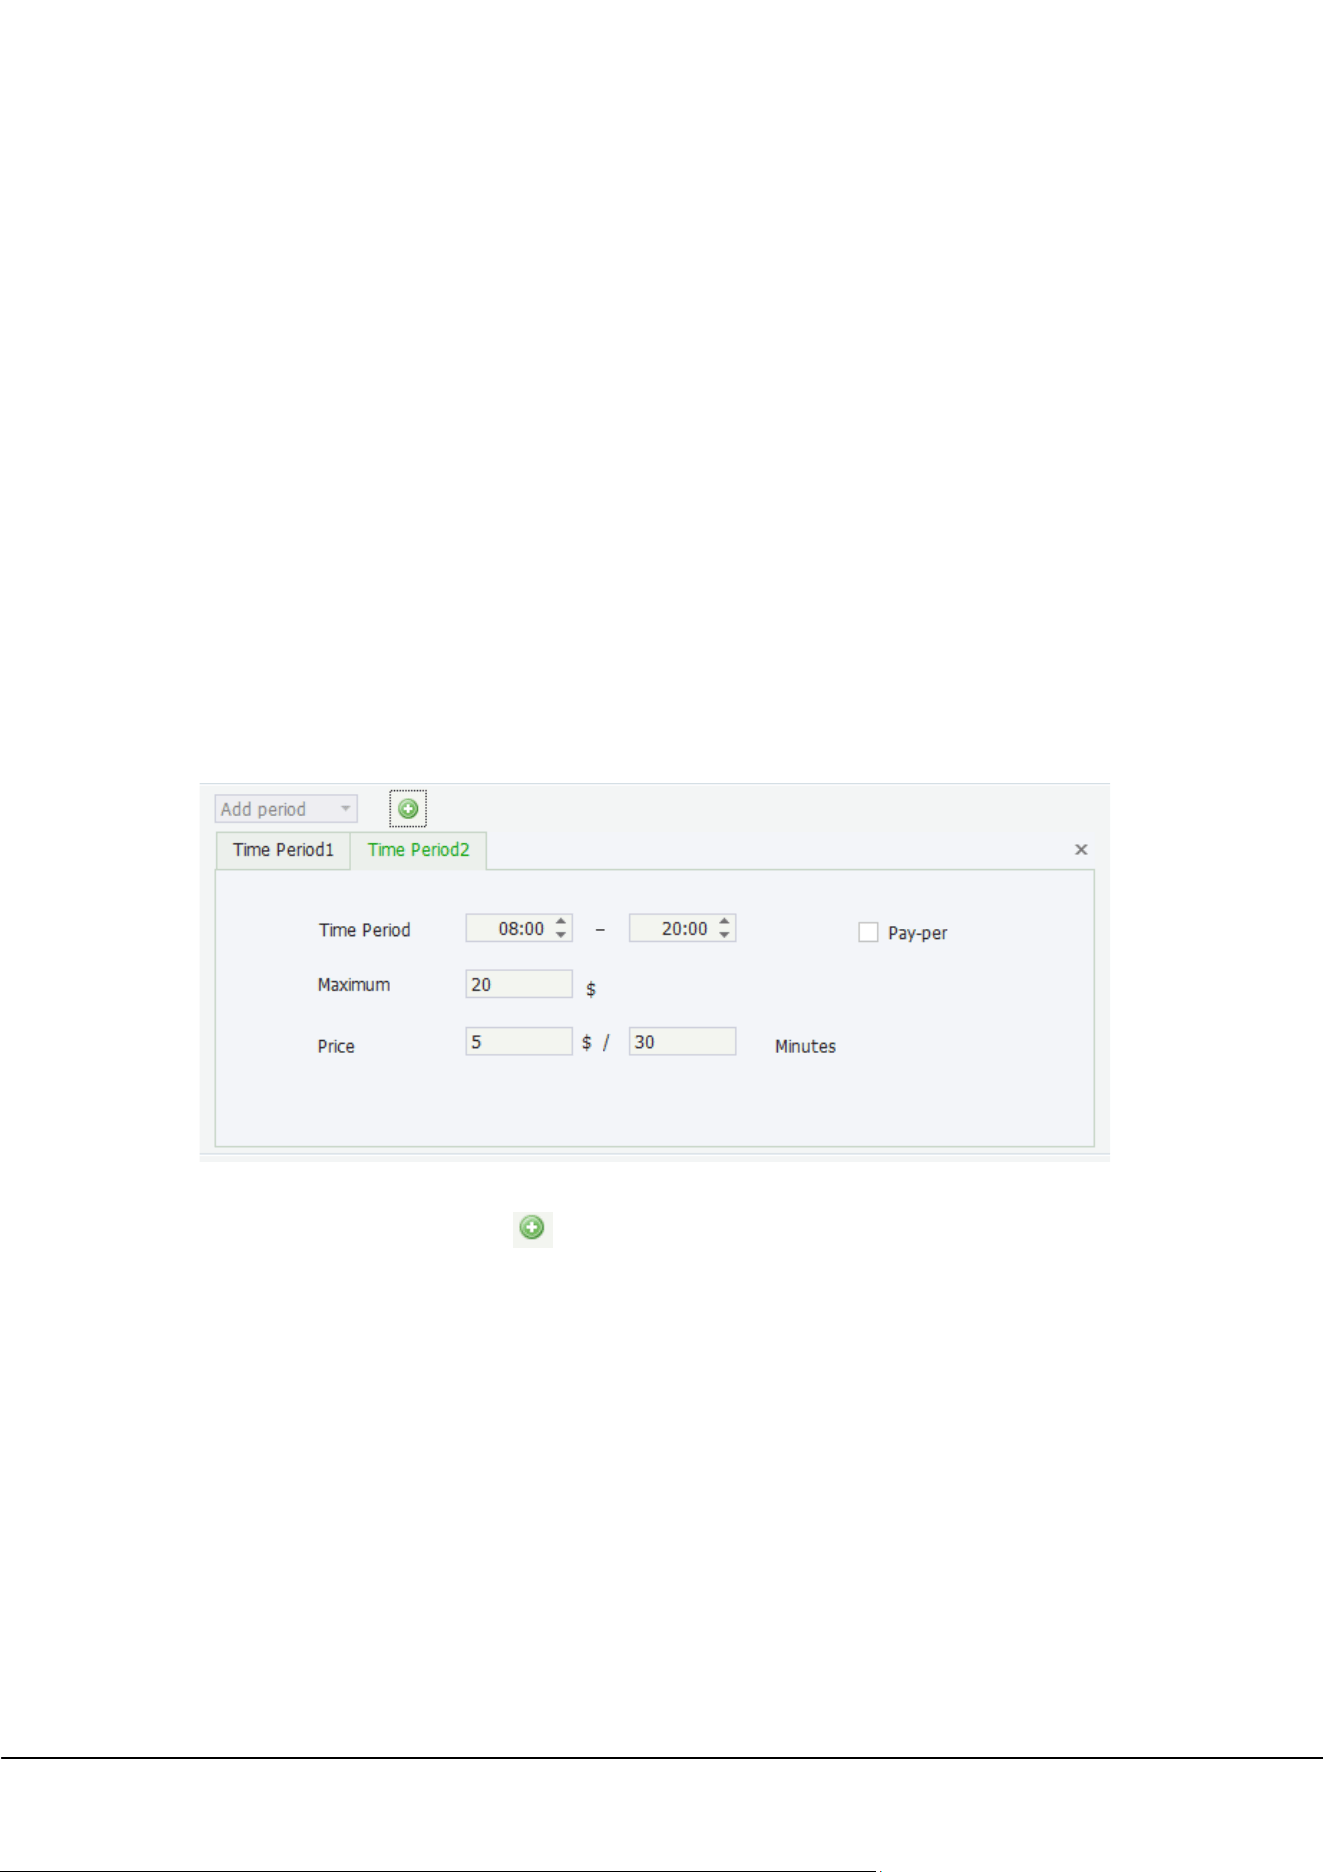
1) Add period:
When setting charging rules for different periods, ensure that the sum of all periods is 24 hours and that the
periods are continuous. You can click to add multiple periods.
Pay-per: If this item is selected, the maximum charged amount prevails. That is, the amount specified
by Maximum is charged. If this item is not selected, the parking expense is charged based on the unit
price and the unit duration is a multiple of 15. If the parking expense exceeds the value specified by
Maximum, the value specified by Maximum prevails.
2) Add cycles:
ZKParking User Manual 41
When setting charging rules for different cycles, ensure that the sum of all cycles since the entry time is
1440 minutes (24 hours). You can click to add multiple cycles.
Note: If cycle-based charging is enabled, the split time period function becomes invalid.
Set the parameters based on the actual situation and then click . To modify any parameter, directly
modify it and save the modification.
8.2 Fixed Rules
Click [Financial]→[ Fixed Rules] to access Fixed Rules interface, on which you can add, edit, and delete fixed
rules.
Name: Name of the fixed car charging rule.
Car type: Fixed car type to which the charging rule is applied.
Type: Charging cycle type, which can be set to by monthly or by day.
Period: Charging period. The unit depends on the charging cycle type. For example, if Type is set to
monthly basis and Period is set to 1, the charging period of this fixed car type is 1 month.
42 ZKParking User Manual
Amounts: Charged amount of the fixed car type during the charging period.
8.2.1 Adding/Editing/Deleting fixed rules
The method of Adding/Editing/Deleting fixed rules is similar to the method of Adding/Editing/Deleting an
employee. For details, please refer to 4.2.1 Adding an employee, 4.2.2 Editing an employee,
4.2.3 Deleting an
employee.
8.3 Extra Rules
Only one timeout charging rule can be created for a type of provisional cars in the same parking lot. Click
[Financial]→[ Extra Rules]:
Time-out fee setting: Charging rule applied when the allowed residence time is exceeded.
Parking Lot: Parking lot to which the timeout charging rule is applied.
Allowable retention time: Duration that a provisional car is allowed to remain in the parking lot
temporarily after payment. If the specified time is exceeded, the car is charged again and the charged
amount can be customized.
Include retention time: Assume that the allowed residence time is 30 minutes and a car parks in the
parking lot for 31 minutes after payment. If this item is selected, the excess parking duration is 31
minutes. If this item is not selected, the excess parking duration is 1 minute.
Set the parameters based on the actual situation and then click . To modify any parameter, directly
modify it and save the modification.
8.4 Discount Policy
Click [Financial]→[Discount Policy] to access Discount Policy interface:
ZKParking User Manual 43
Name: Name of the discount policy.
Type of policy: There are four types: a. Free Charge (not charged); b. Policy Amount (deducted by a
fixed amount); c. Hours (parking duration minus a fixed number of hours); d. Policy Percent (deducted
by a fixed percentage of the amount).
Value: Preferential amount. When Type of policy is set to Free Charge, this item is invalid. When Type
of policy is set to other values, the corresponding unit prevails.
8.4.1 Adding/Editing/Deleting a discount policy
The method of Adding/Editing/Deleting a discount policy is similar to the method of
Adding/Editing/Deleting an employee. For details, please refer to 4.2.1 Adding an employee, 4.2.2 Editing
an
employee, 4.2.3 Deleting an employee.
8.5 Discount Store
In Discount Store, you can specify certain places for enjoying discount policies, that is, units and shops. For
example, a user can use the receipt to reimburse the parking expense after shopping in the specified
supermarket. Click [Financial]→[Discount Store] to access Discount Store interface:
Shop Name: Name of the shop.
Discount Policy: Select a discount policy specified in 8.4 Discount Policy.
44 ZKParking User Manual
Contact: Contact of the shop.
Address: Contact address of the shop.
Phone Number: Phone number of the shop.
8.5.1 Adding/Editing/Deleting a discount store
The method of Adding/Editing/Deleting a discount store is similar to the method of
Adding/Editing/Deleting an employee. For details, please refer to 4.2.1 Adding an employee, 4.2.2 Editing
an
employee, 4.2.3 Deleting an employee.
8.6 Shift
Click [Financial]→[Shift] to access Shift interface:
Name: Shift name.
Parking Lot: Parking lot of the shift.
Start/End Time: Start time and end time of the shift. You can directly enter the time or click and
select the time.
Note: The periods of different shifts cannot overlap; otherwise, a message indicating shift time conflict
is displayed.
ZKParking User Manual 45
8.6.1 Adding/Editing/Deleting shift
The method of Adding/Editing/Deleting shift is similar to the method of Adding/Editing/Deleting an
employee. For details, please refer to 4.2.1 Adding an employee, 4.2.2 Editing an employee,
4.2.3 Deleting an
employee.
8.7 Financial Confirmed
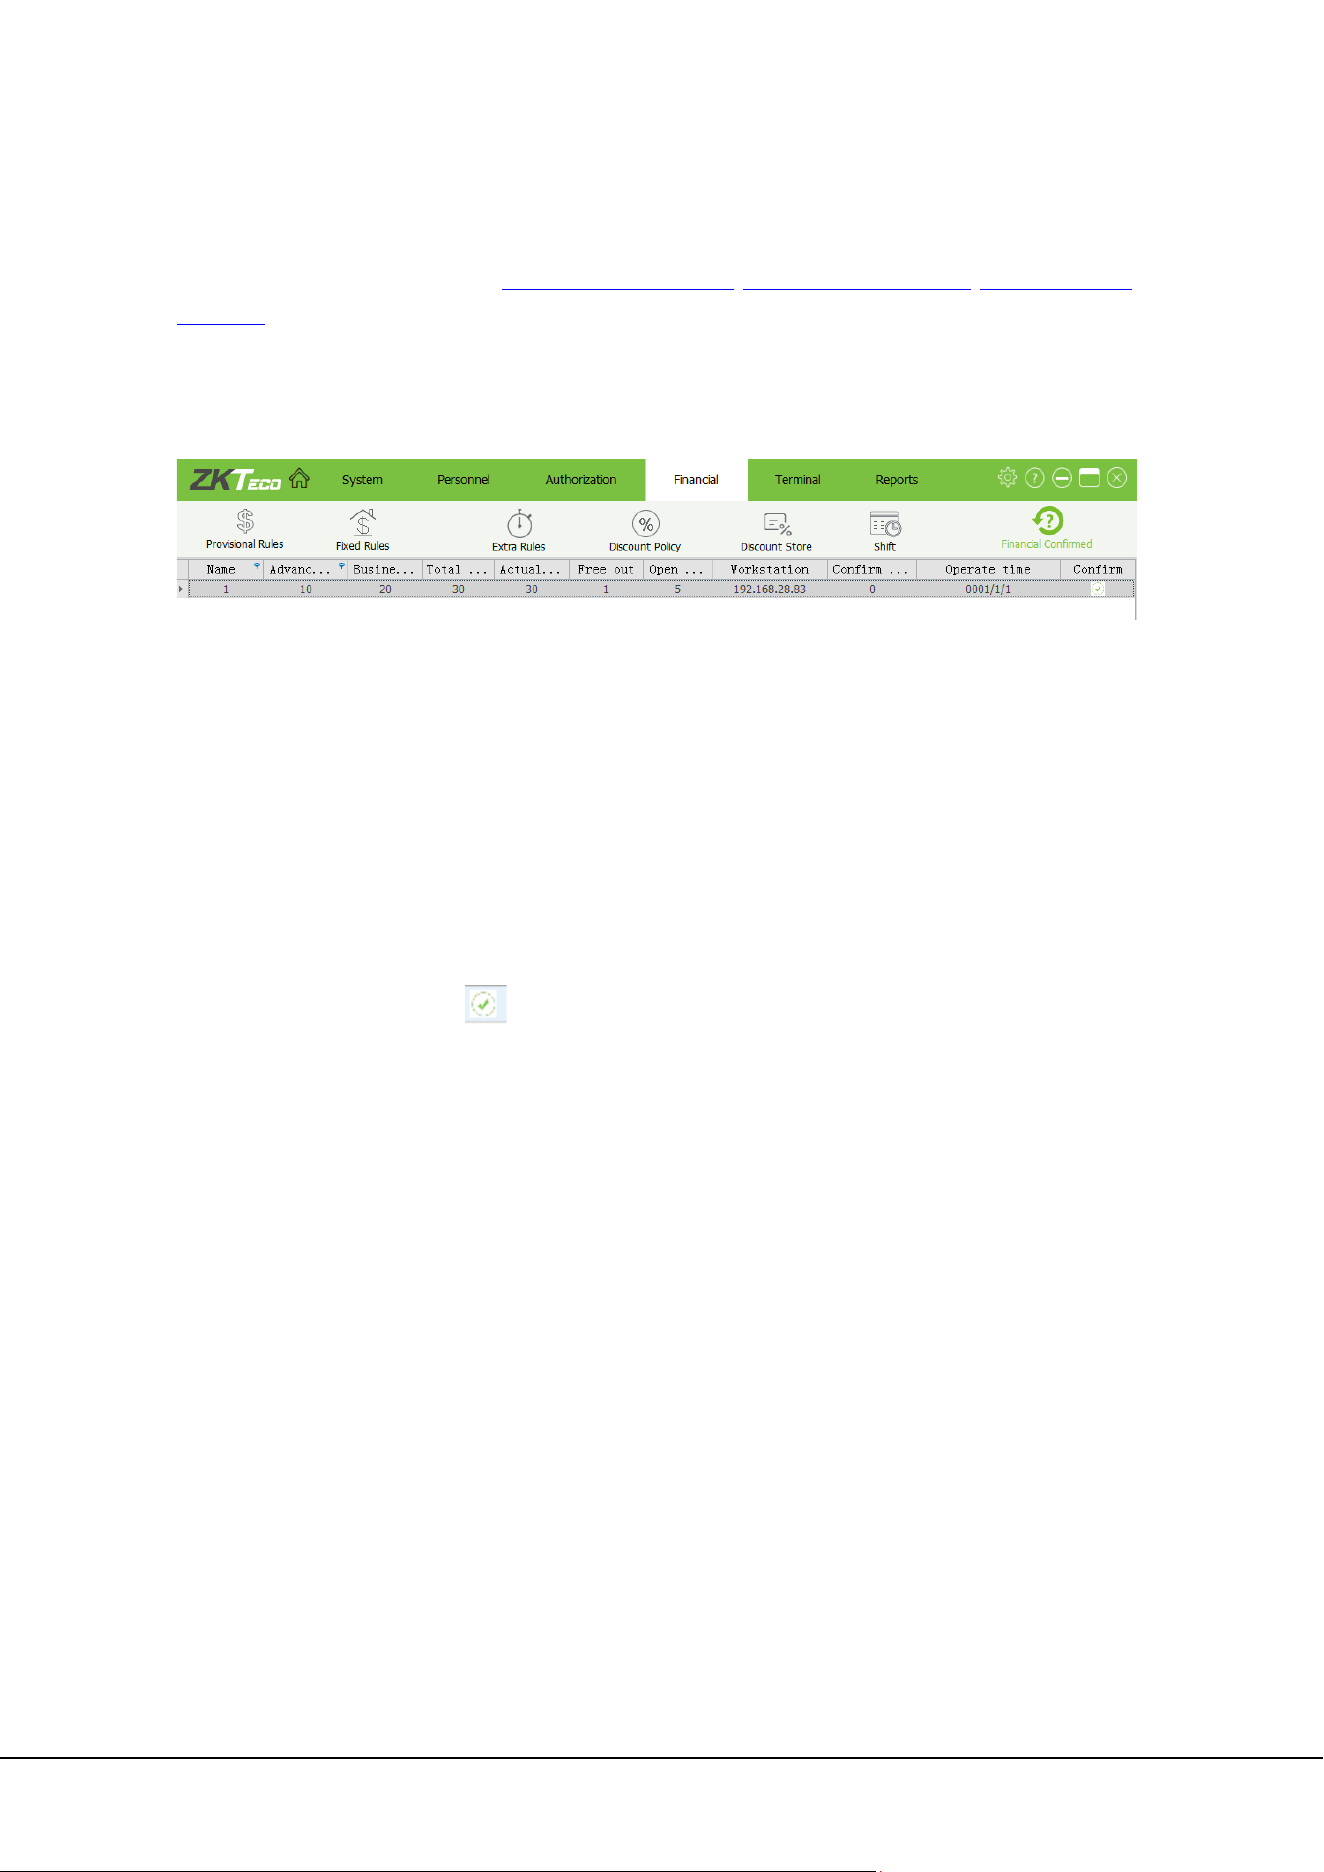
Click [Financial]→[Financial Confirmed] to access Financial Confirmed interface:
Name: Name of the operator.
Advance amount: Amount of money placed at the booth in advance (for change).
Business amount: Charged amount.
Total amount: Prepaid amount + business volume.
Actual amount: Amount input by the operator when changing the shift.
Open by hand: Number of times that the boom barrier is raised manually.
Free out: Number of manual release times
Workstation: Workstation IP address.
Confirm amount: Amount confirmed by the financial staff.
Operate time: Confirmation time.
If all information is correct, click below the Confirm column.
46 ZKParking User Manual
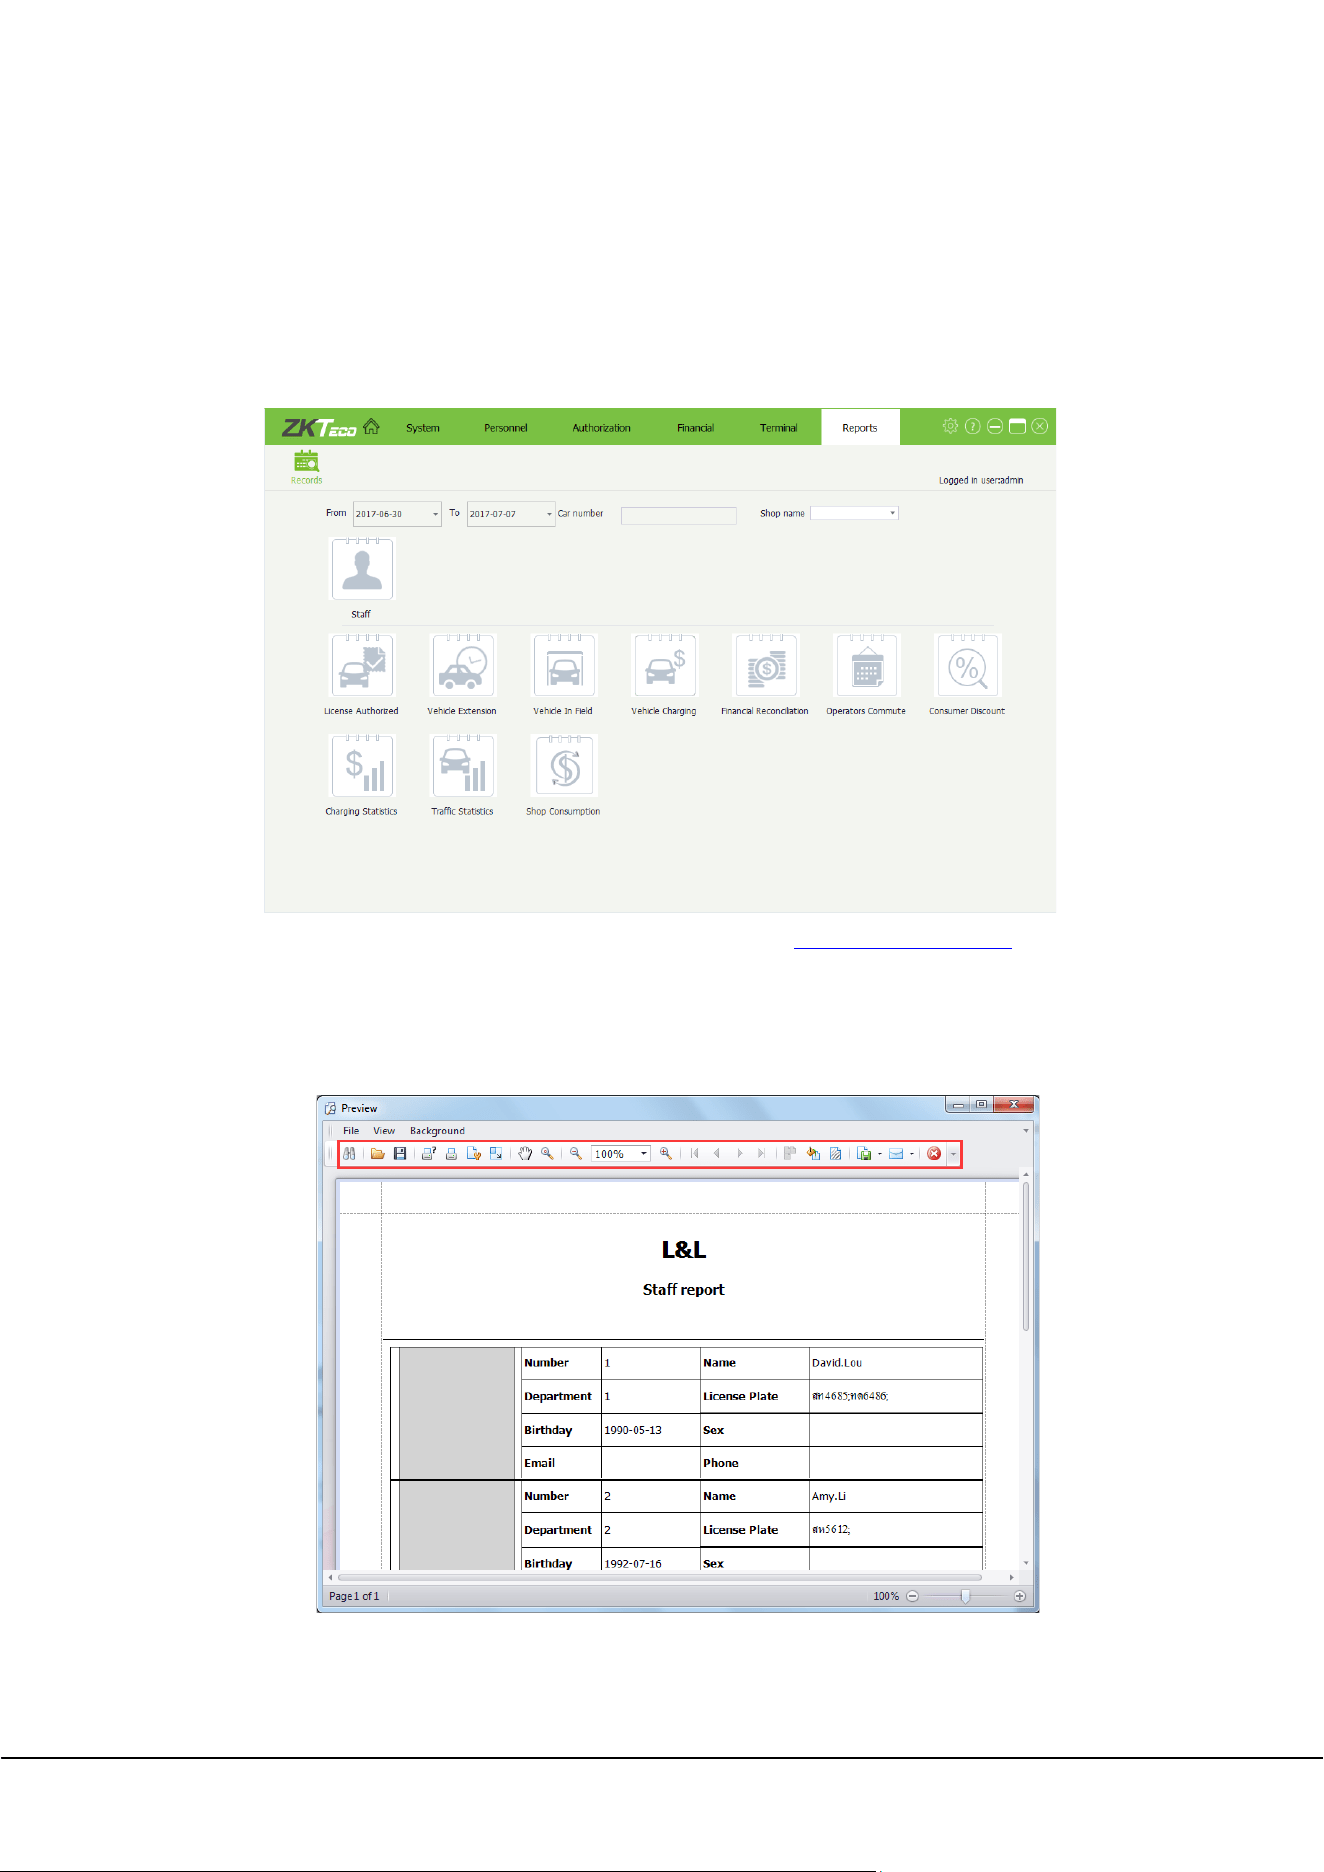
9. Reports
With the reports function, you can perform statistical analysis for data of the parking lot to implement
overall control of the parking lot information. Report types includes Staff, License Authorized, Vehicle
Extension, Vehicle In Field, Vehicle Charging, Financial Reconciliation, Operators Commute, Consumer
Discount, Charging Statistics, Traffic Statistics and Shop Consumption.
1) Set the report period., about how to choose a date, please refer to Appendix 1 Date Setting
.
2) Enter license plate numbers as required. If no license plate number is entered, the report contains all
license plate numbers in the system.
3) Click the corresponding icon to obtain reports as required, such as the staff report. The preview interface
is displayed. The operation method is the same for other types of reports.
4) Perform various operations such as saving and printing by clicking corresponding icons on the toolbar
of the preview window.
ZKParking User Manual 47
Appendix
Appendix 1 Date Setting
The following is an example of setting the birthday of an added employee.
Click next to Birthday. The date panel is displayed, as shown in the figure below.
Note: The current date is selected by default.
Click / to select the month, or double-click the month column and select the month.
Click / to select the year, or double-click the year column and select the year.
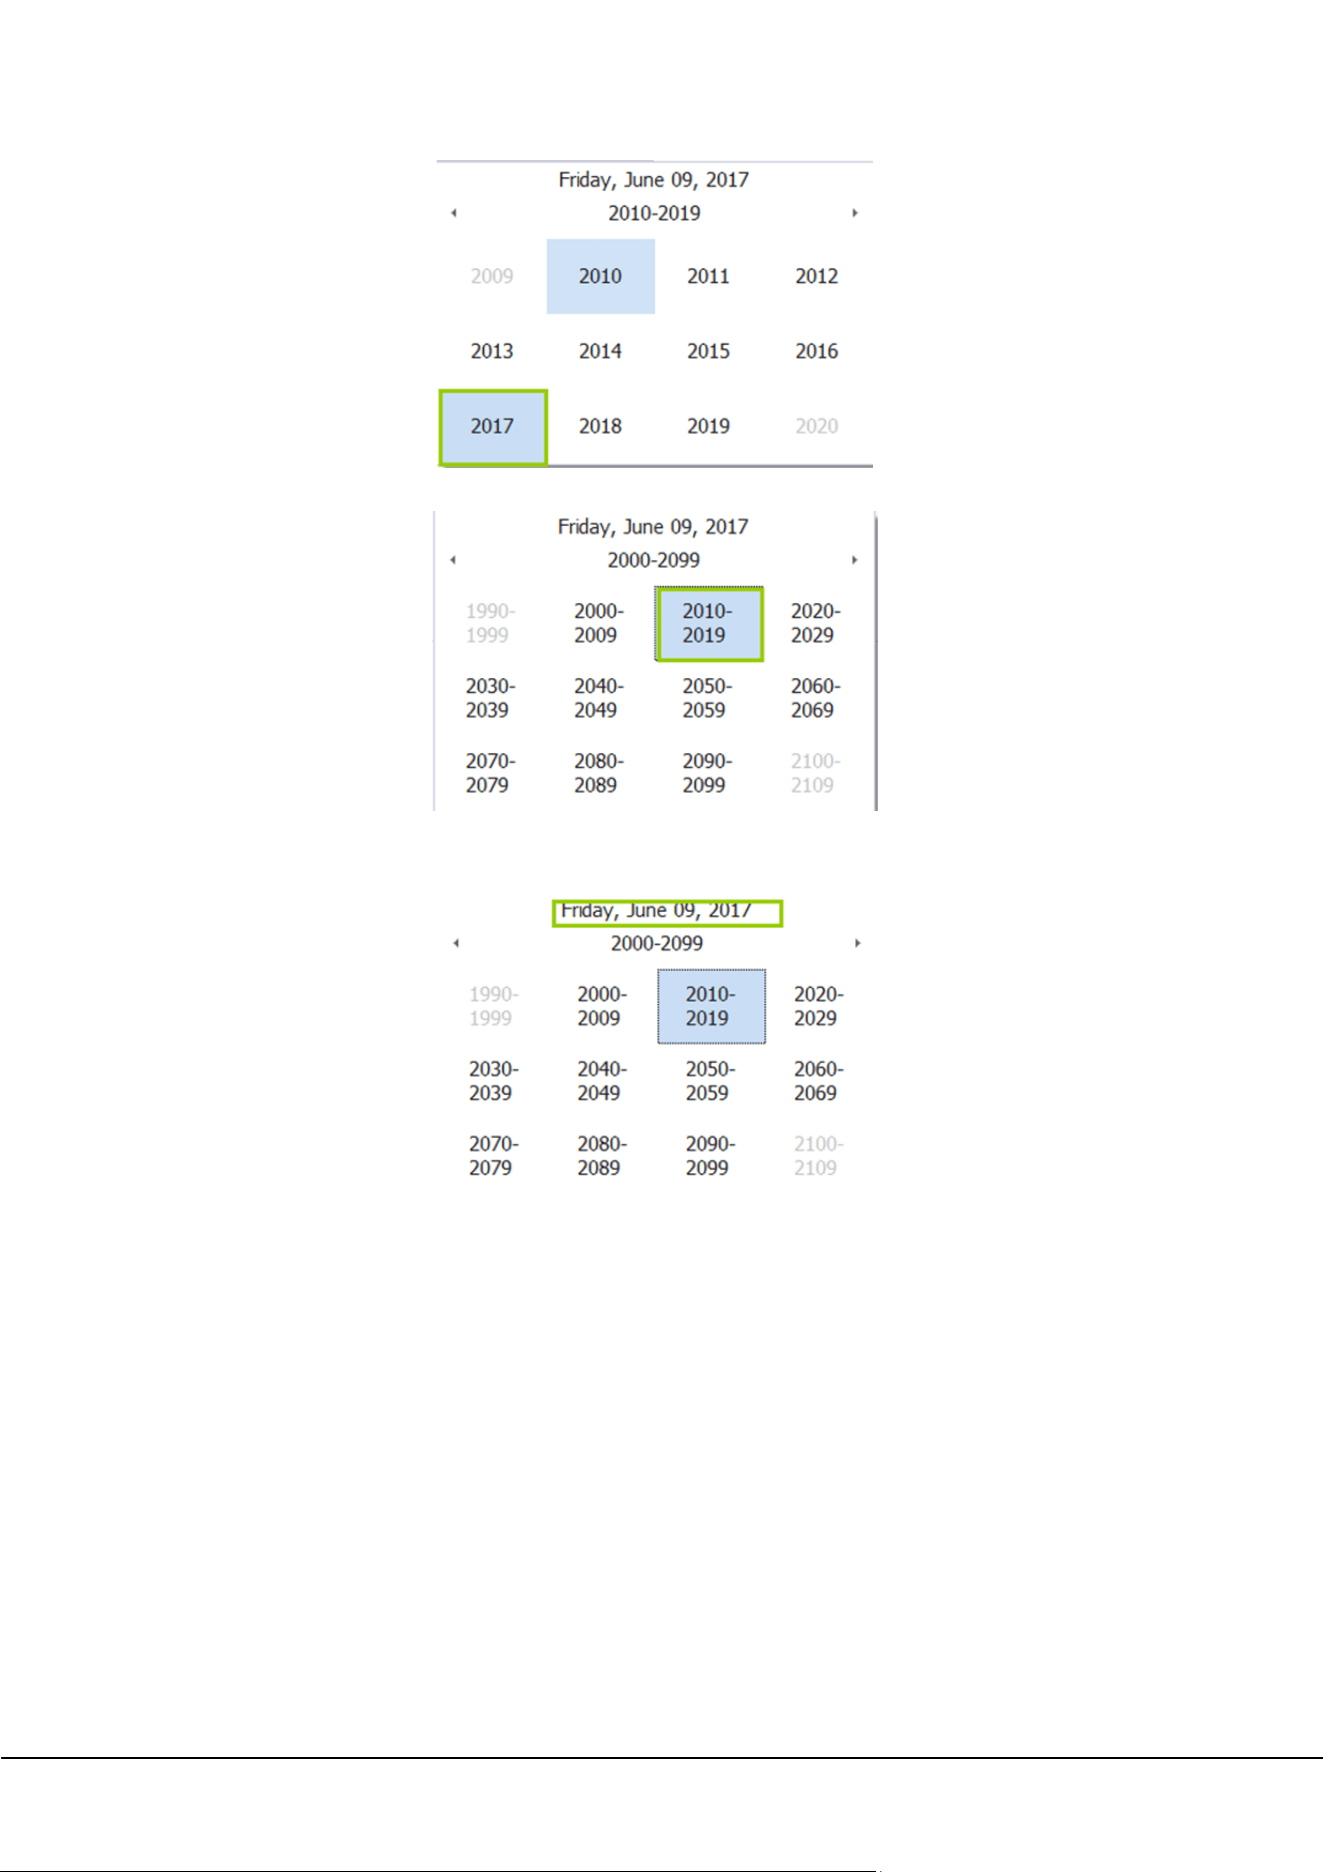
48 ZKParking User Manual
Click / to select the year range, or double-click the year range column and select the year range.
Note: Click the date on the top to return to the current date.

ZKParking User Manual 49
Appendix 2 Licence
<END-USER LICENSE AGREEMENT>
This End-User License Agreement ("EULA") is a legal agreement between you (either an individual or a
single entity) and the mentioned author of this Software for the software product identified above,
which includes computer software and may include associated media, printed materials, and "online"
or electronic documentation ("SOFTWARE PRODUCT"). By installing, copying, or otherwise using the
SOFTWARE PRODUCT, you agree to be bound by the terms of this EULA. If you do not agree to the
terms of this EULA, do not install or use the SOFTWARE PRODUCT.
SOFTWARE PRODUCT LICENSE
The SOFTWARE PRODUCT is protected by copyright laws and international copyright treaties, as well
as other intellectual property laws and treaties. The SOFTWARE PRODUCT is licensed, not sold.
1. GRANT OF LICENSE. This EULA grants you the following rights: Installation and Use. You may install
and use an unlimited number of copies of the SOFTWARE PRODUCT.
Reproduction and Distribution. You may reproduce and distribute an unlimited number of copies of
the SOFTWARE PRODUCT; provided that each copy shall be a true and complete copy, including all
copyright and trademark notices, and shall be accompanied by a copy of this EULA. Copies of the
SOFTWARE PRODUCT may be distributed as a standalone product or included with your own product.
2. DESCRIPTION OF OTHER RIGHTS AND LIMITATIONS.
Limitations on Reverse Engineering, Recompilation, and Disassembly. You may not reverse engineer,
decompile, or disassemble the SOFTWARE PRODUCT, except and only to the extent that such activity is
expressly permitted by applicable law notwithstanding this limitation.
Separation of Components.
The SOFTWARE PRODUCT is licensed as a single product. Its component parts may not be separated
for use on more than one computer.
Software Transfer.
You may permanently transfer all of your rights under this EULA, provided the recipient agrees to the
terms of this EULA.
Termination.
Without prejudice to any other rights, the Author of this Software may terminate this EULA if you fail to
comply with the terms and conditions of this EULA. In such event, you must destroy all copies of the
SOFTWARE PRODUCT and all of its component parts.
Distribution.
The SOFTWARE PRODUCT may not be sold or be included in a product or package which intends to
receive benefits through the inclusion of the SOFTWARE PRODUCT. The SOFTWARE PRODUCT may be
included in any free or non-profit packages or products.
3. COPYRIGHT.
All title and copyrights in and to the SOFTWARE PRODUCT(including but not limited to any images,
photographs, animations, video, audio, music, text, and "applets" incorporated into the SOFTWARE
PRODUCT), the accompanying printed materials, and any copies of the SOFTWARE PRODUCT are
owned by the Author of this Software. The SOFTWARE PRODUCT is protected by copyright laws and
international treaty provisions. Therefore, you must treat the SOFTWARE PRODUCT like any other
copyrighted material except that you may install the SOFTWARE PRODUCT on a single computer
provided you keep the original solely for backup or archival purposes.

50 ZKParking User Manual
LIMITED WARRANTY
NO WARRANTIES.
The Author of this Software expressly disclaims any warranty for the SOFTWARE PRODUCT. The
SOFTWARE PRODUCT and any related documentation is provided "as is" without warranty of any kind,
either express or implied, including, without limitation, the implied warranties or merchantability,
fitness for a particular purpose, or no infringement. The entire risk arising out of use or performance of
the SOFTWARE PRODUCT remains with you.
NO LIABILITY FOR DAMAGES.
In no event shall the author of this Software be liable for any damages whatsoever (including, without
limitation, damages for loss of business profits, business interruption, loss of business information, or
any other pecuniary loss) arising out of the use of or inability to use this product, even if the Author of
this Software has been advised of the possibility of such damages.
Acknowledgment of Agreement.
I have carefully read and understand this Agreement, ZKTeco, Inc.’s Privacy Policy Statement.
If YOU ACCEPT the terms of this Agreement:
I acknowledge and understand that by ACCEPTING the terms of this Agreement.
IF YOU DO NOT ACCEPT the terms of this Agreement.
I acknowledge and understand that by refusing to accept these terms, I have rejected this license
agreement and therefore have no legal right to install, use, or copy this Product or the Licensed
Software that it incorporates.

ZK Building, Wuhe Road, Gangtou, Bantian, Buji Town,
Longgang District, Shenzhen China 518129
Tel: +86 755-89602345
Fax: +86 755-89602394
www.zkteco.com
© Copyright 2017. ZKTeco CO., LTD. ZKTeco Logo is a registered trademark of ZKTeco or a related company. All other product and
company names mentioned are used for.

