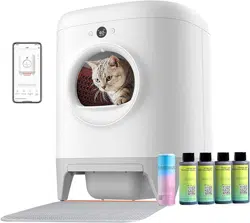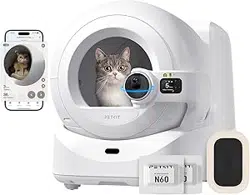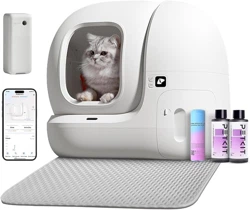
USER MANUAL
PETKIT PURA MAX 2 SELF-CLEANING CAT LITTER BOX
* The user manual applies to both the basic
package and the premium package.
* Please read through this user manual before
using the product and keep it properly.

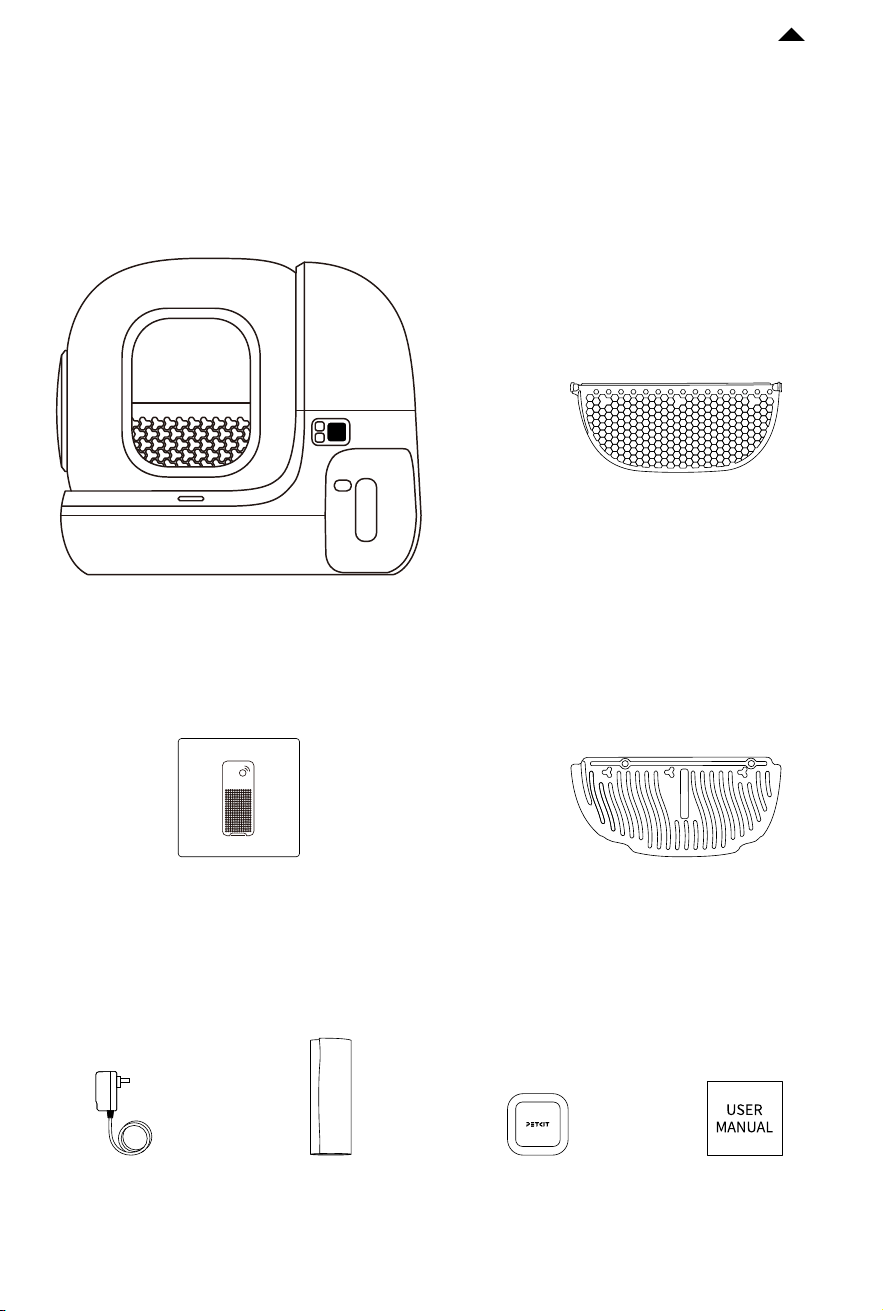
PACKAGE LIST
01
-3-
RETURN TO
CONTENTS
Main Unit
*Please ensure that all accessories are present before installation and use.
Power
Adapter
Pet Odor
Eliminator N50 2.0
User
Manual
Magnetic Cat Litter
Remover
Honeycomb
Fine Litter Sier
* The installation and disassembly
method is the same as the
standard litter sier. See 5.2-❶❷
and 5.5-❹❺❻ for details.
Trash
Bag
PETKIT Air Purifier Smart Spray
* Only included in the
premium package.
-4-
RETURN TO
CONTENTS
* Note: In order to provide better products, we will regularly improve the product. If the product picture is
slightly dierent from the actual product, the actual product shall prevail.
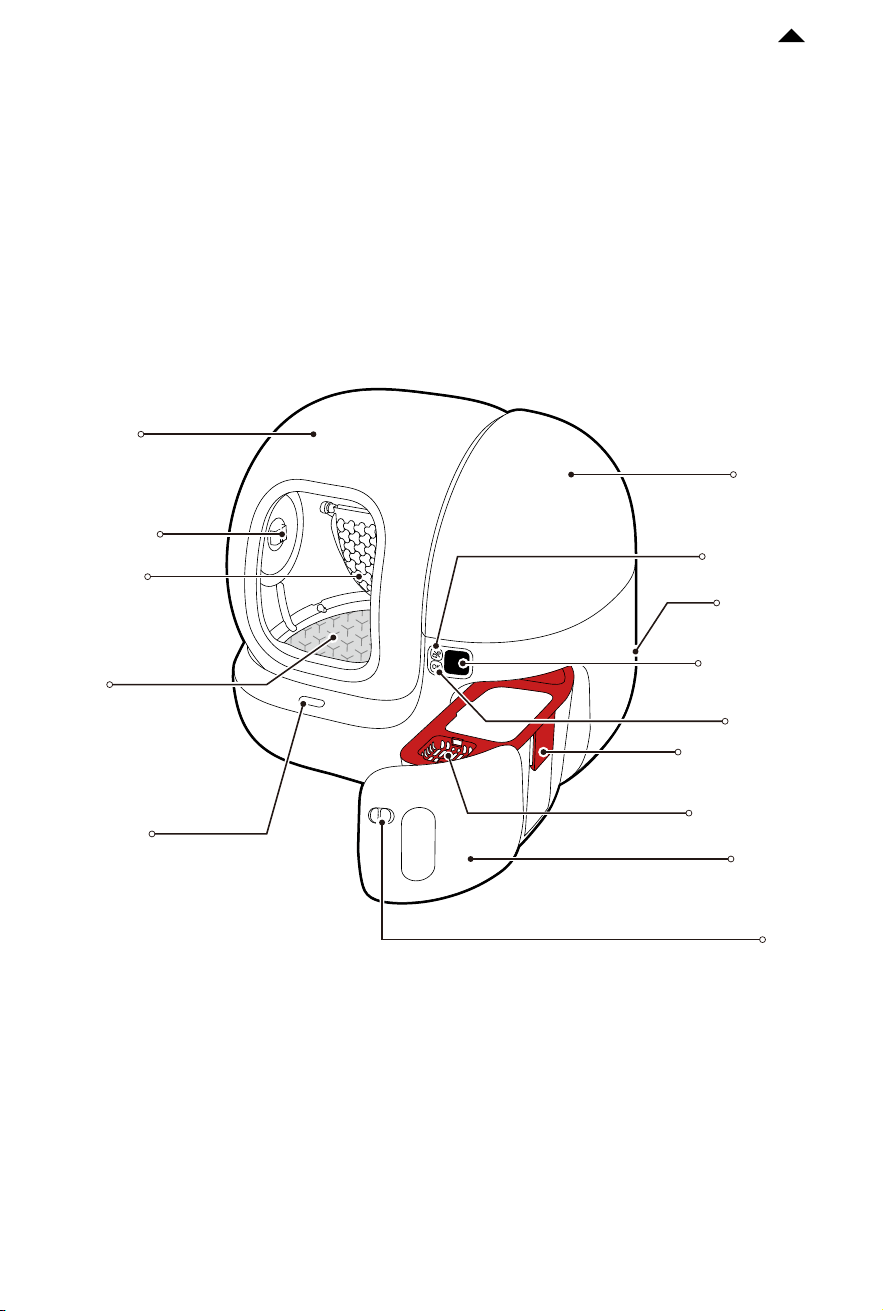
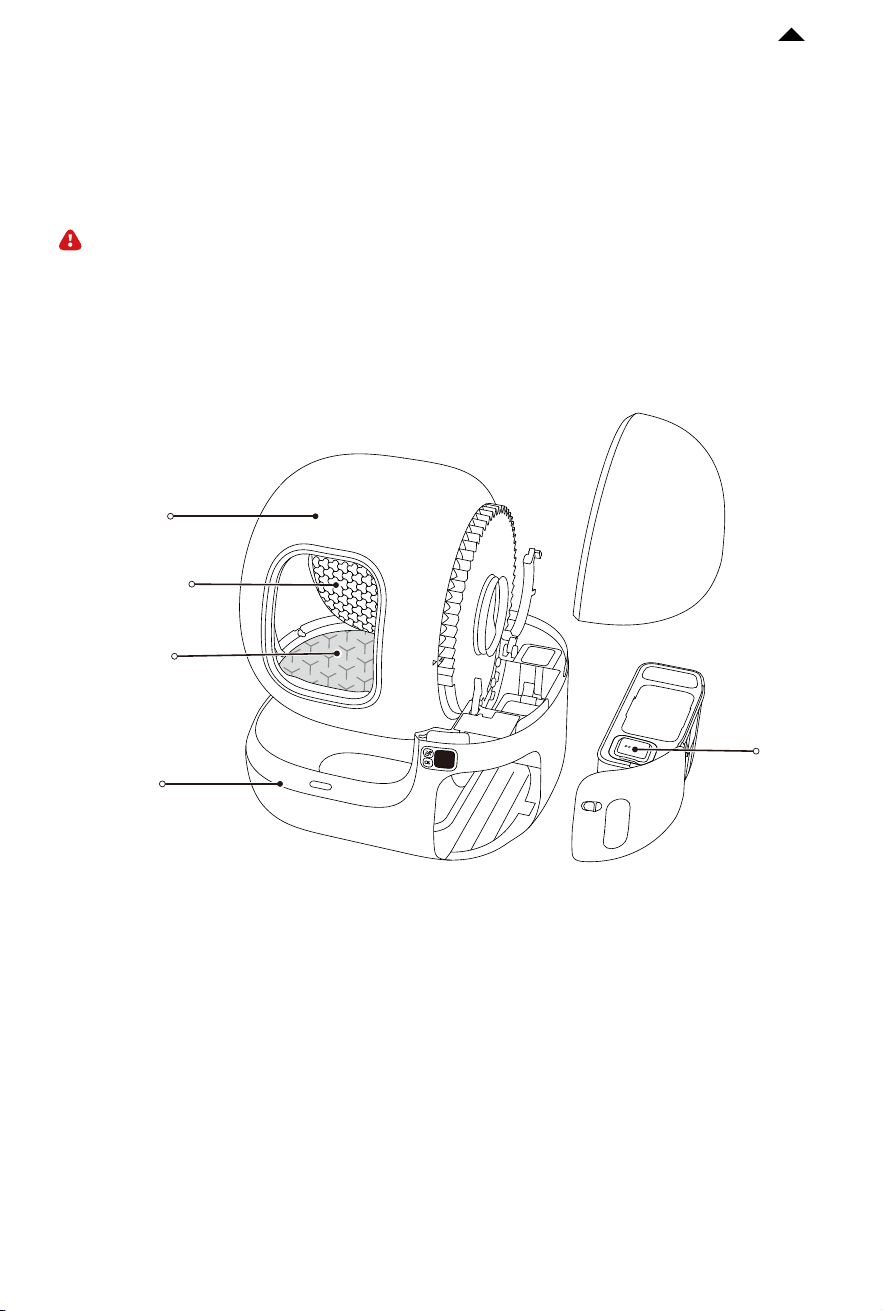
PRODUCT DESCRIPTION
02
Side Cover
Proximity
Sensor
Magnetic
Side Cover
Cylinder
Standard
Litter Sier
High
Performance
Cat Litter
Pad MAX
Waste Bin
Basket for N50
Latch
OLED Display
Screen
Power Port
OK Button
Menu Button
Lid of Waste Bin
PRODUCT INSTALLATION
03
-5-
RETURN TO
CONTENTS
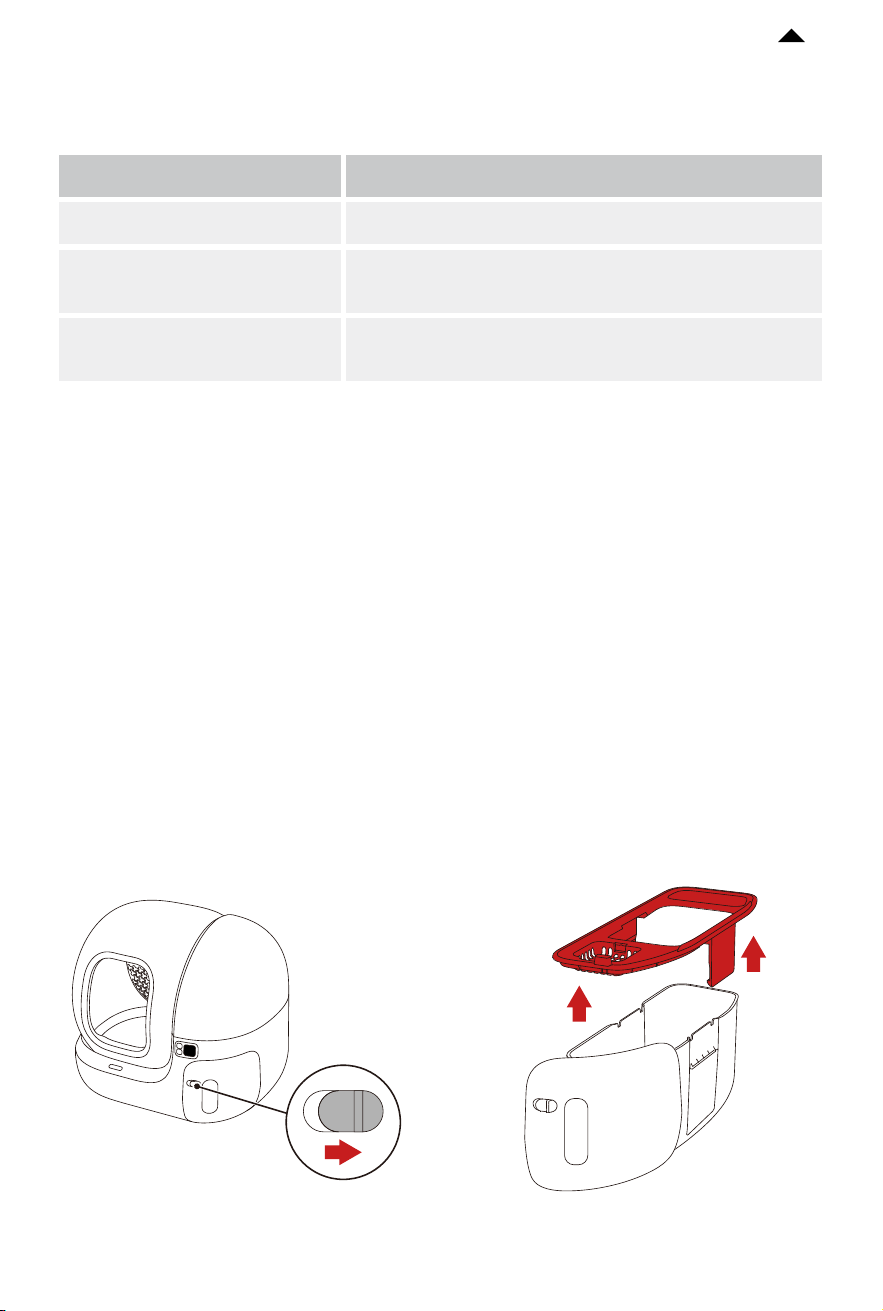
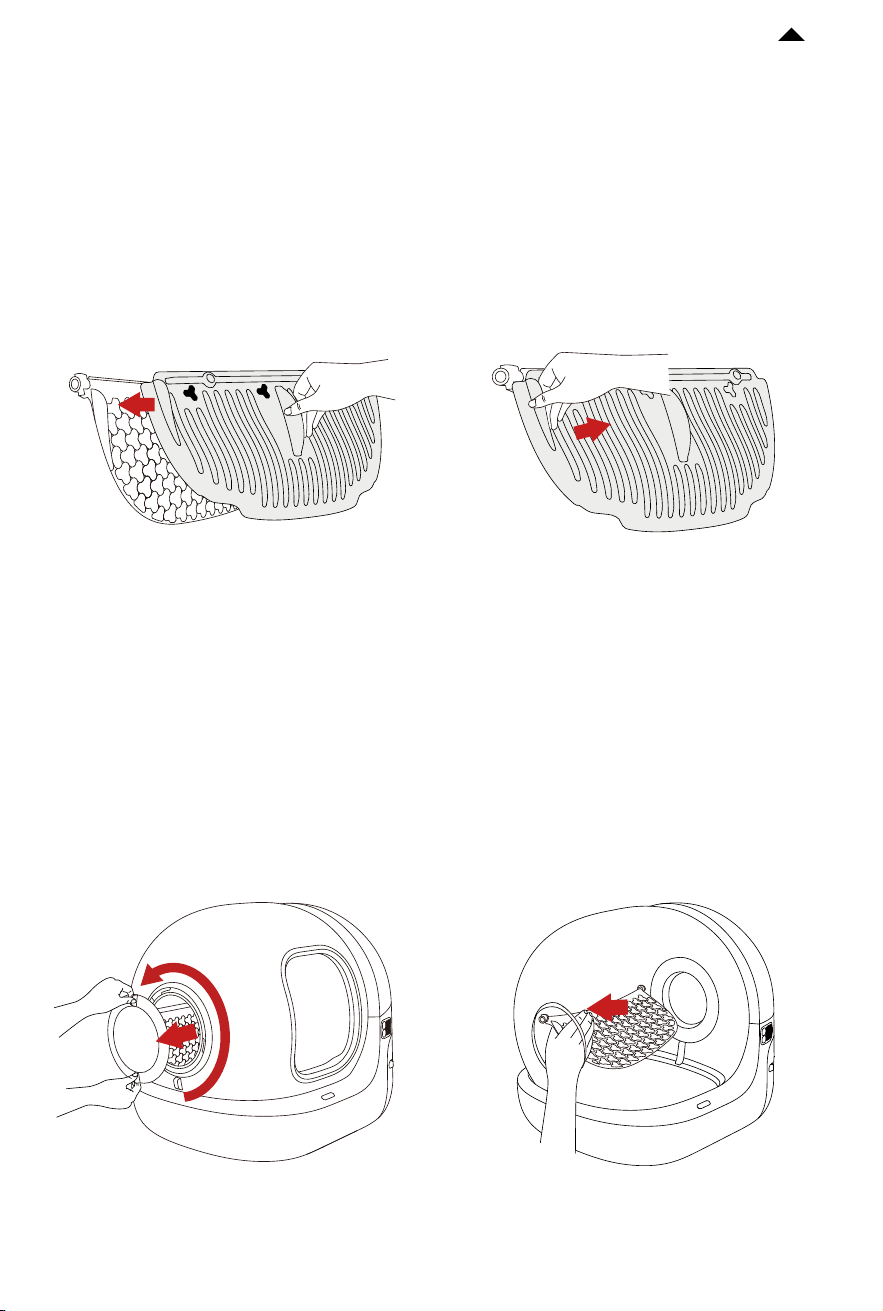
❶ Slide the latch to the right and pull out the waste bin. Remove the lid of the waste bin
to take out all accessories.
Unlocked
Introduction of Accessories
Name
Litter Sier
High Performance Cat Litter
Pad MAX
Functional Description
Eectively filter clumps without clogging or leakage.
Anti-stick, scratch-resistant, and easy to clean.
Pet Odor Eliminator N50 2.0
Prevent odor spreading by decomposing odors in
the waste bin.
* Pet odor eliminator N50 2.0 below is referred to as N50.
* High performance cat litter pad MAX below is referred to as cat litter pad.
* The standard litter sier is suitable for tofu cat litter and mixed cat litter;
The honeycomb fine litter sier is suitable for mineral cat litter.
-6-
RETURN TO
CONTENTS
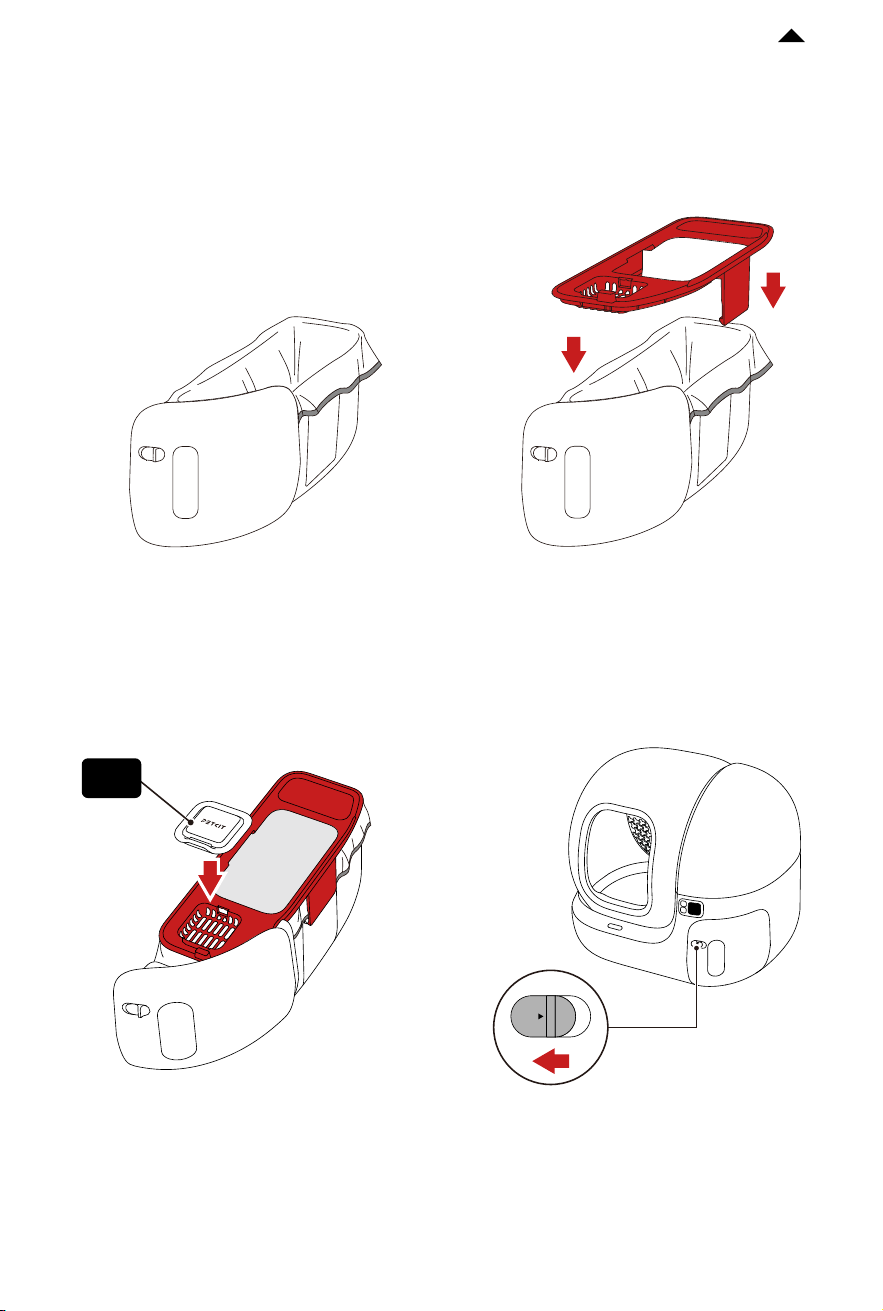
❸ Put the N50 in and press firmly. ❹ Install the waste bin back into the main
unit and lock the latch.
Locked
OPEN
❷ Install the trash bag in the waste bin, ensuring that the trash bag lies flat at the bottom,
then put the lid on.
Note: The two sides of the lid need to clamp the trash bag. (as shown in Fig. 1)
Fig. 1
N50
HOW TO USE
04
-7-
RETURN TO
CONTENTS
4.1 Add Cat Litter
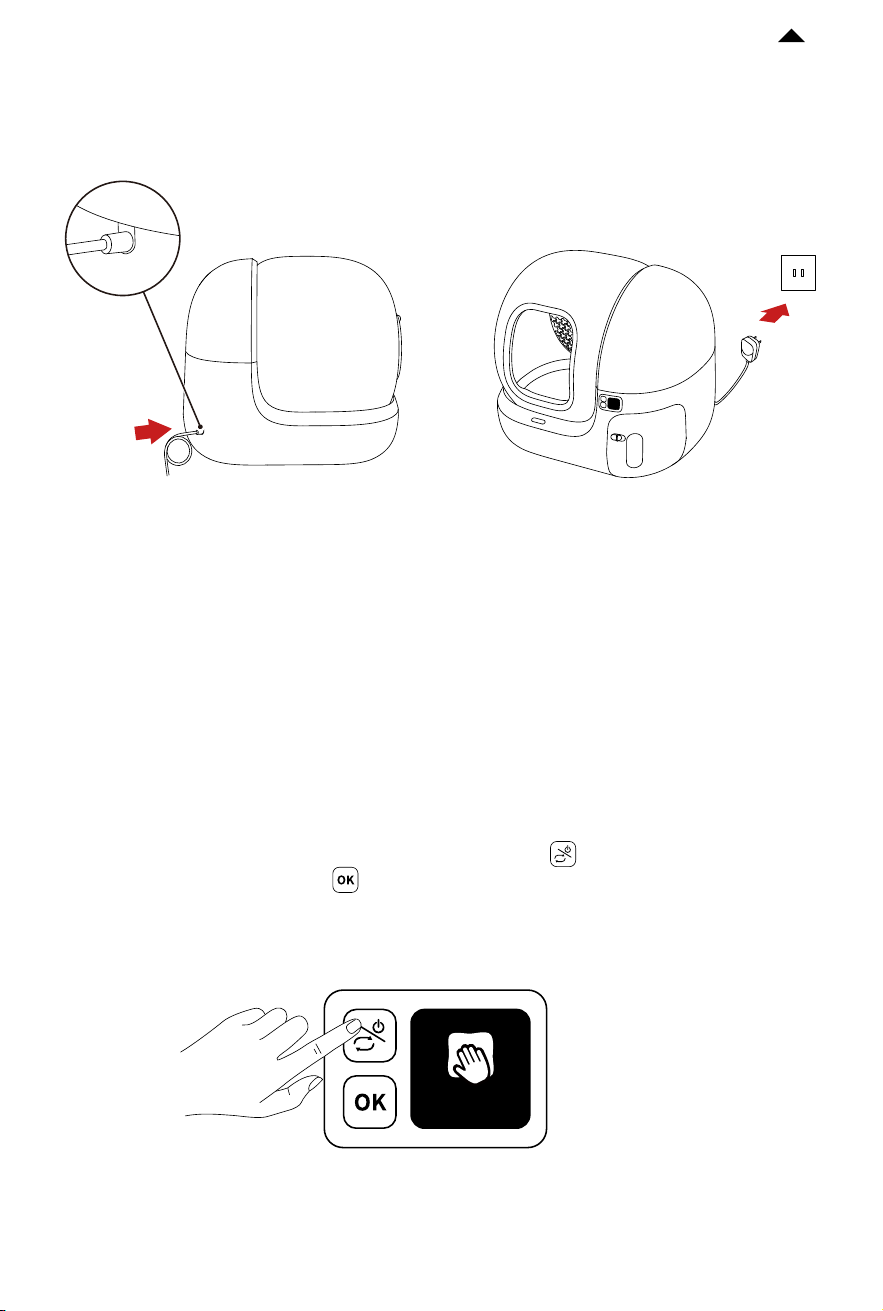
❺ Take out the power adapter, insert it into the power port on the back of the main unit,
then plug it in.
Maintenance M
❶ Aer the device is powered on, press the menu button to switch to “Maintenance
Mode” and press the OK button to execute, and then the cylinder begins to rotate.
Note: Do not use large particles of cat litter larger than 1.2cm in length and 3mm in diameter.
-8-
RETURN TO
CONTENTS
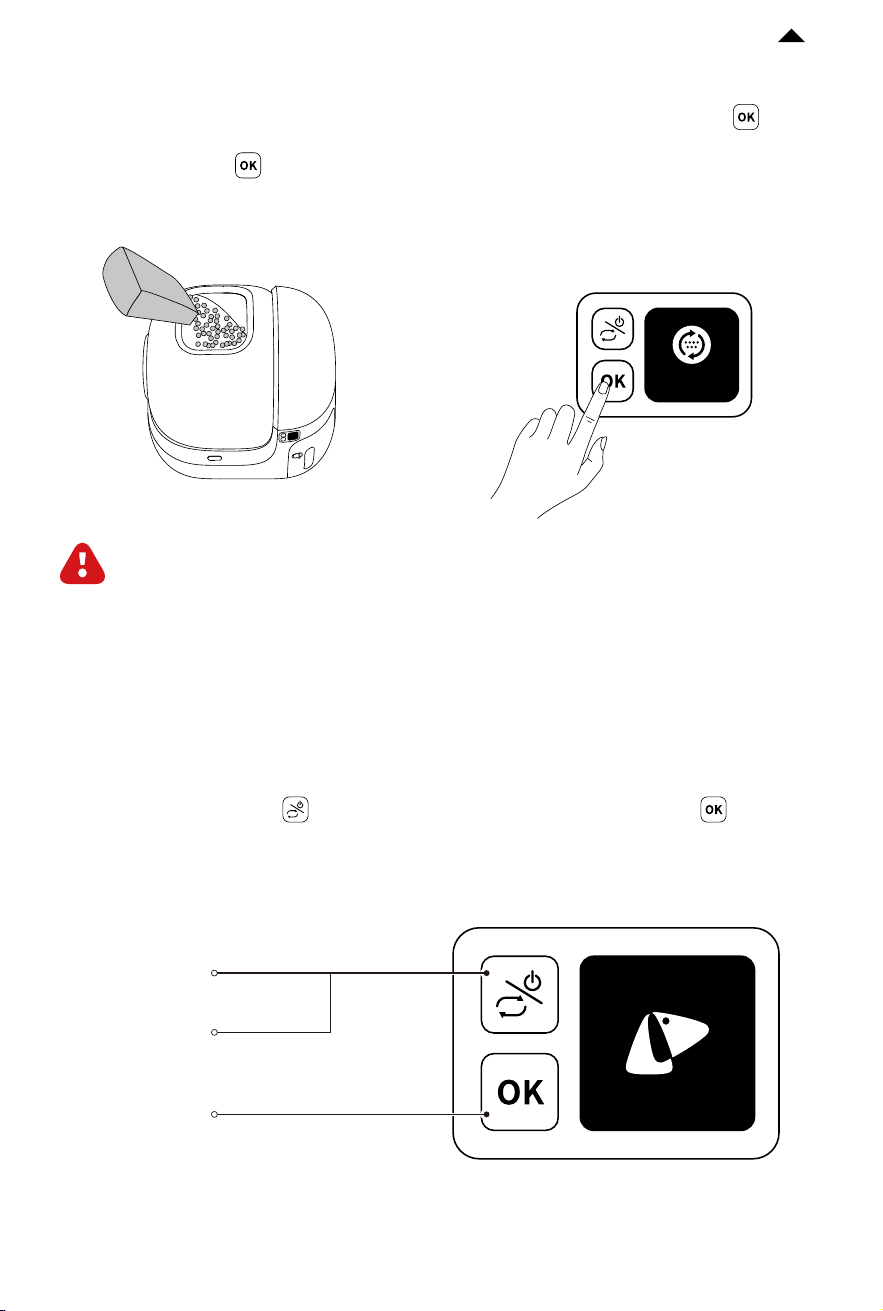
❸ Double-press the OK button and
the device will automatically level o the
cat litter.
Level cat litter
❷ When the cylinder stops with the
opening facing up, pour in the cat litter.
Press the OK button to exit
“Maintenance Mode”.
Caution: The amount of cat litter
doesn’t exceed the MAX line of the
cat litter pad.
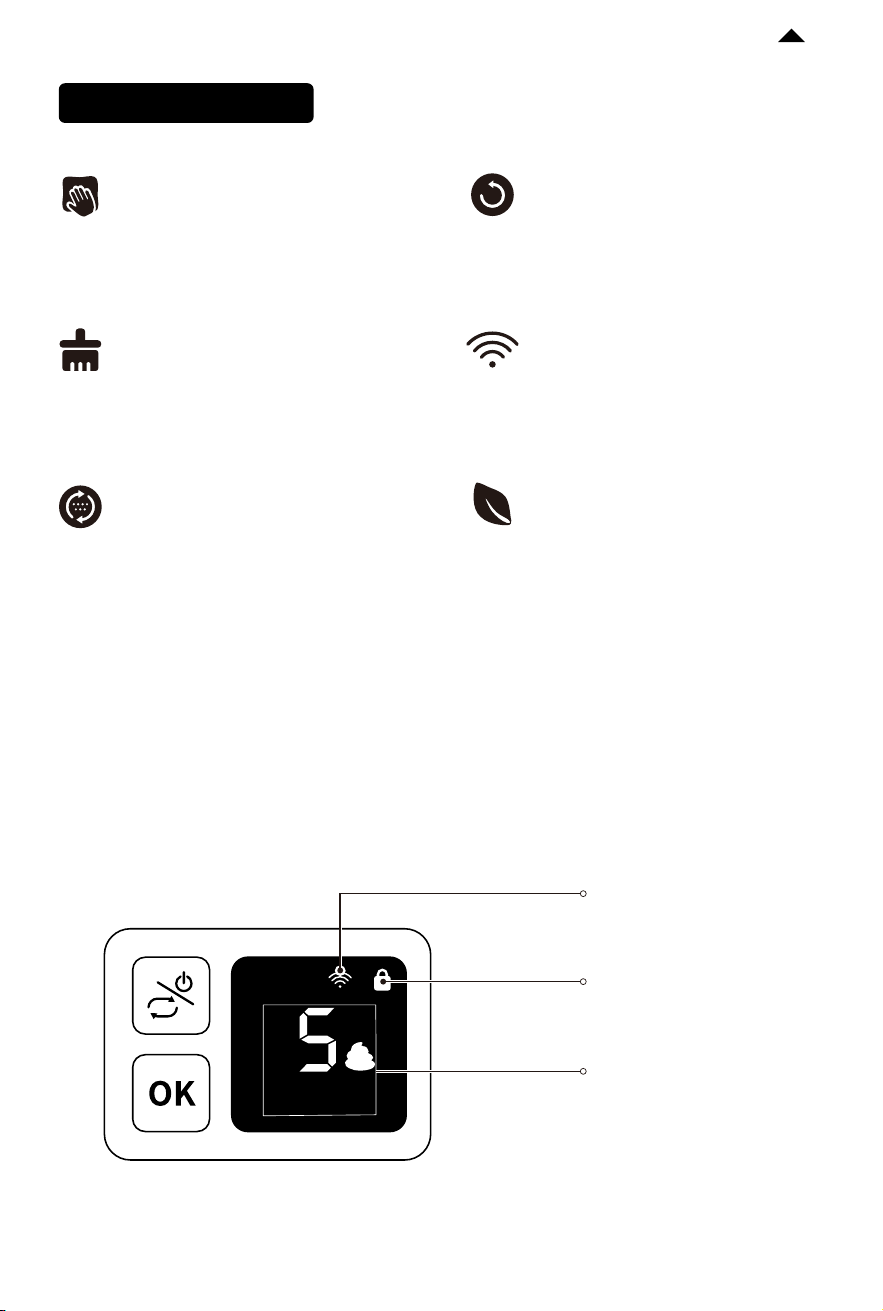
4.2 Description of Control Panel
❶ Press the menu button to switch functions, and press the OK button to execute.
Long press
Turn on or turn o
Short press
Switch functions,
and the screen will show the function.
Short press
Execute the selected function.
-9-
RETURN TO
CONTENTS
Clean Now
Deodorize
Level Cat Litter
Reset
Configure Network
Maintenance Mode
Start automatic scooping.
The air purifier begins to deodorize.
* To perform this function, the
installation of PETKIT air purifier
is required.
Level the cat litter in the cylinder
(use it aer adding cat litter).
Reset the cylinder to the
initial position.
The device is connecting to the Wi-Fi
(use it when binding the app).
Use it when adding cat litter or
cleaning the device.
Description of Functions
❷ Displayed Status Description
Total toilet
Network connected
Total toilet times
Child lock on
-10-
RETURN TO
CONTENTS
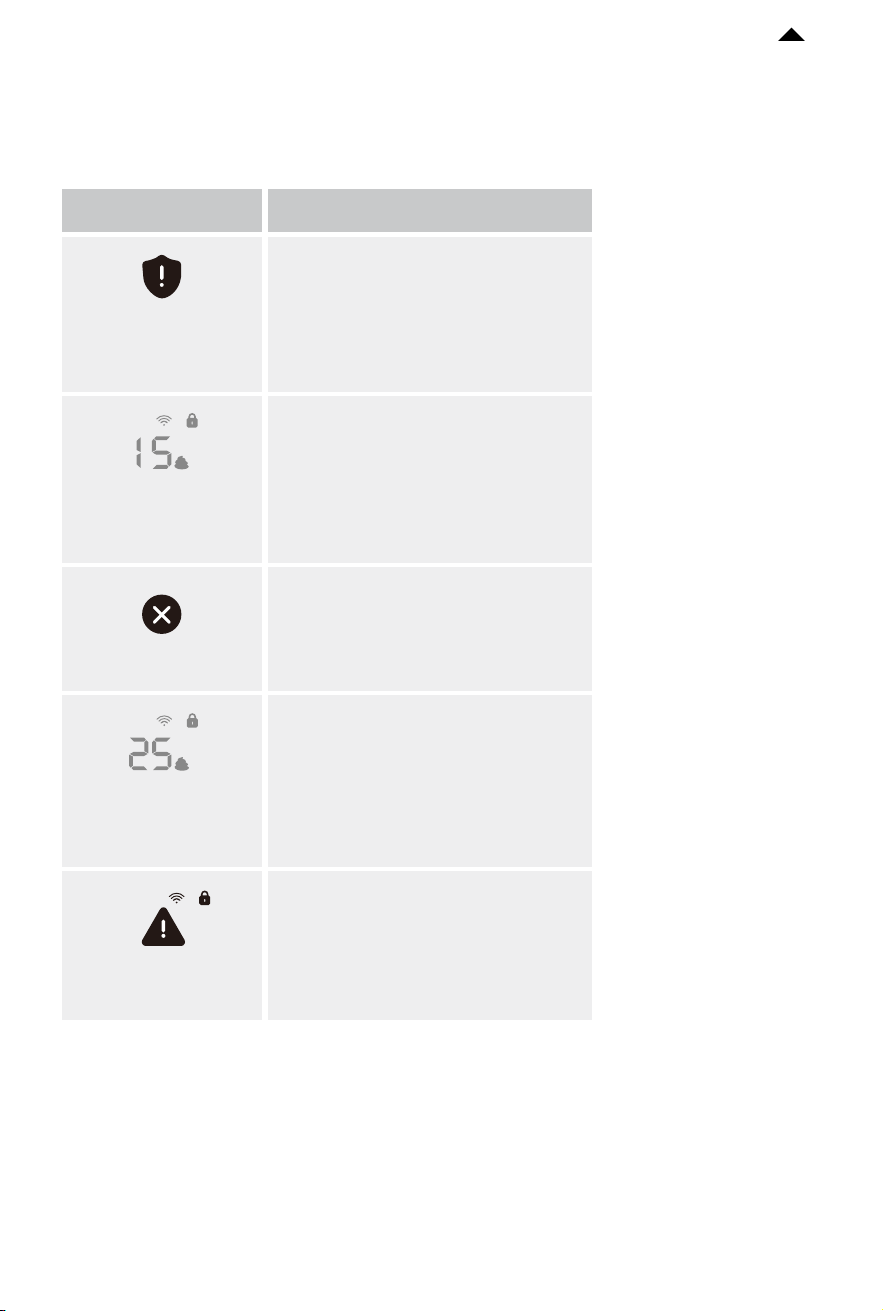
The cat enters while the device
is in operation (the device will
automatically pause and alert).
The magnetic side cover is not
closed. Please check if it is
installed properly.
The cat has
approached the
detection zone
Device failure, please check
the details in the app.
Device failure
Upper cover
not closed!
The cat litter is insuicient.
Please add it in time.
Insuicient cat
litter, please add
more
The waste bin is full.
Please clean it in time.
Waste collection
bin is full, please
empty
Prompts
Description
❸ Other Prompts Description
There will be scrolling text at the bottom of the screen.
-11-
RETURN TO
CONTENTS
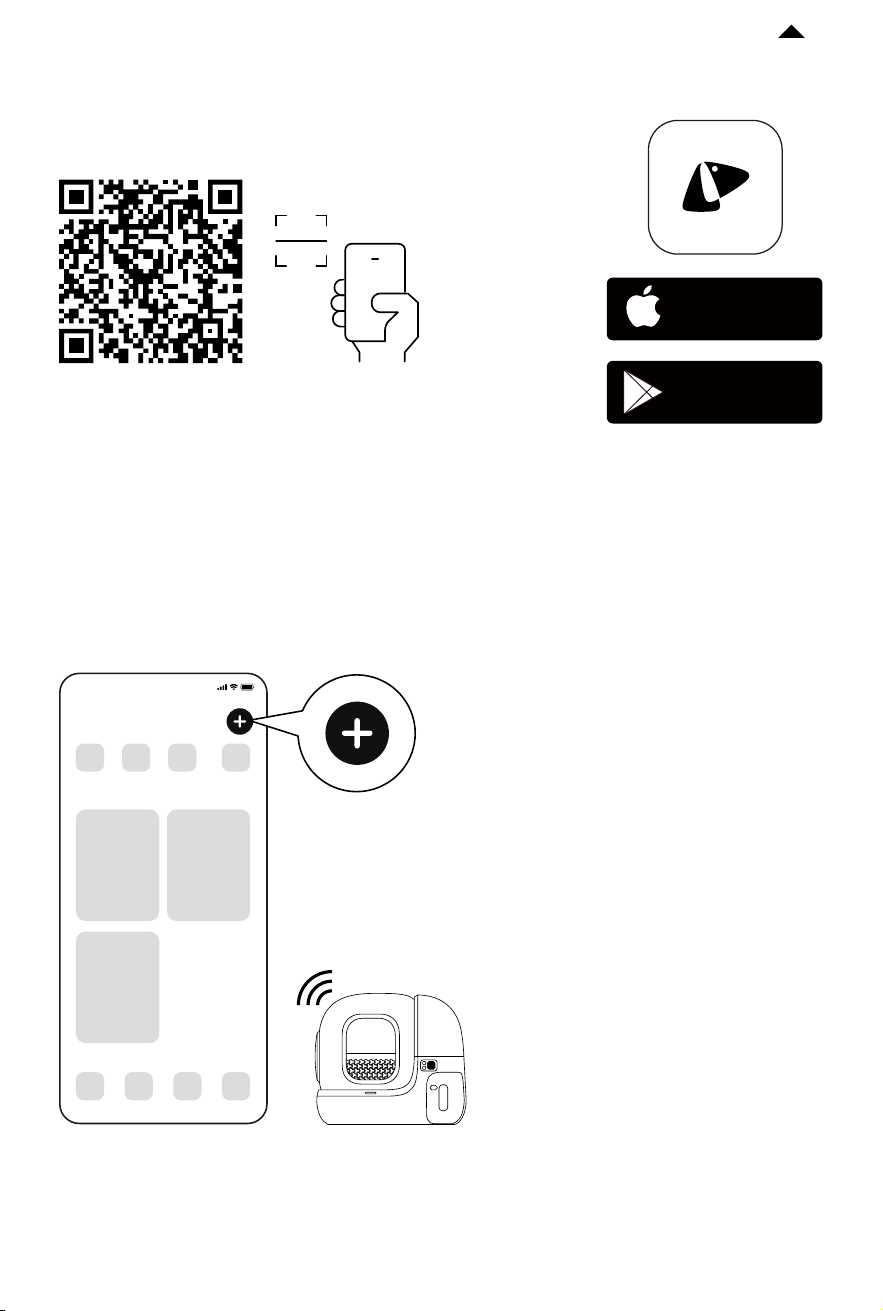
4.3 Device Binding
❶ Download and install the PETKIT App
❷ Add the device
Open the app, click “+” in the top right corner and choose
“PETKIT PURA MAX 2 SELF-CLEANING CAT LITTER BOX”.
Download the PETKIT App from the App Store
or Google Play.
Note: The actual app interfacemay dier from the image
shown due to continuous soware upgrades; the actual
interface shall prevail.
9:41
PETKIT
Available on the
App Store
Get it on
Google play
-12-
RETURN TO
CONTENTS
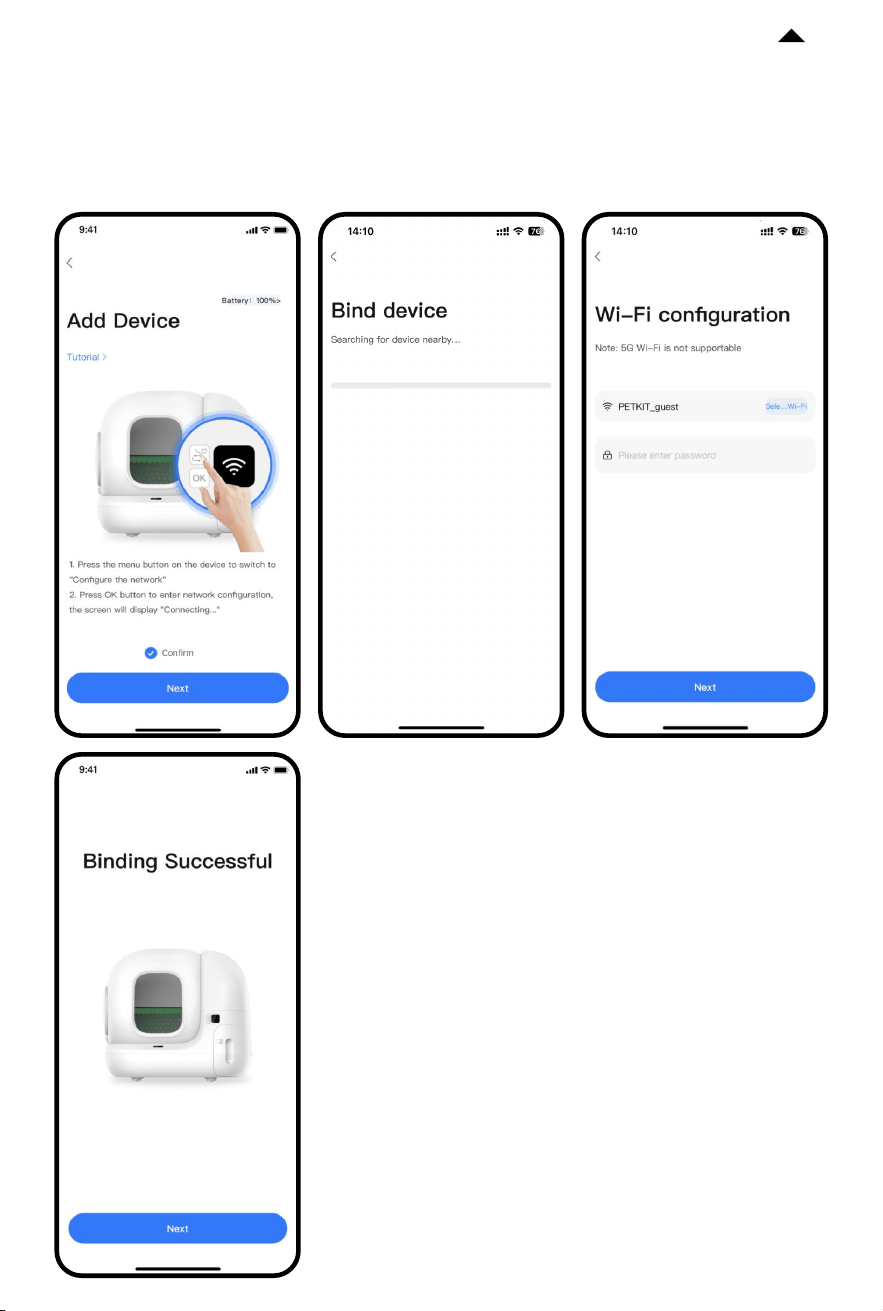
❸ Start connection
Press the menu button on the device to switch to “Configure network”, then press the OK
button to execute this function. The screen will display “Connecting...”, and the app will
start connecting to the device. Please wait until the configuration is successful.
Note: The actual app interfacemay dier from the image
shown due to continuous soware upgrades; the actual
interface shall prevail.
-13-
RETURN TO
CONTENTS
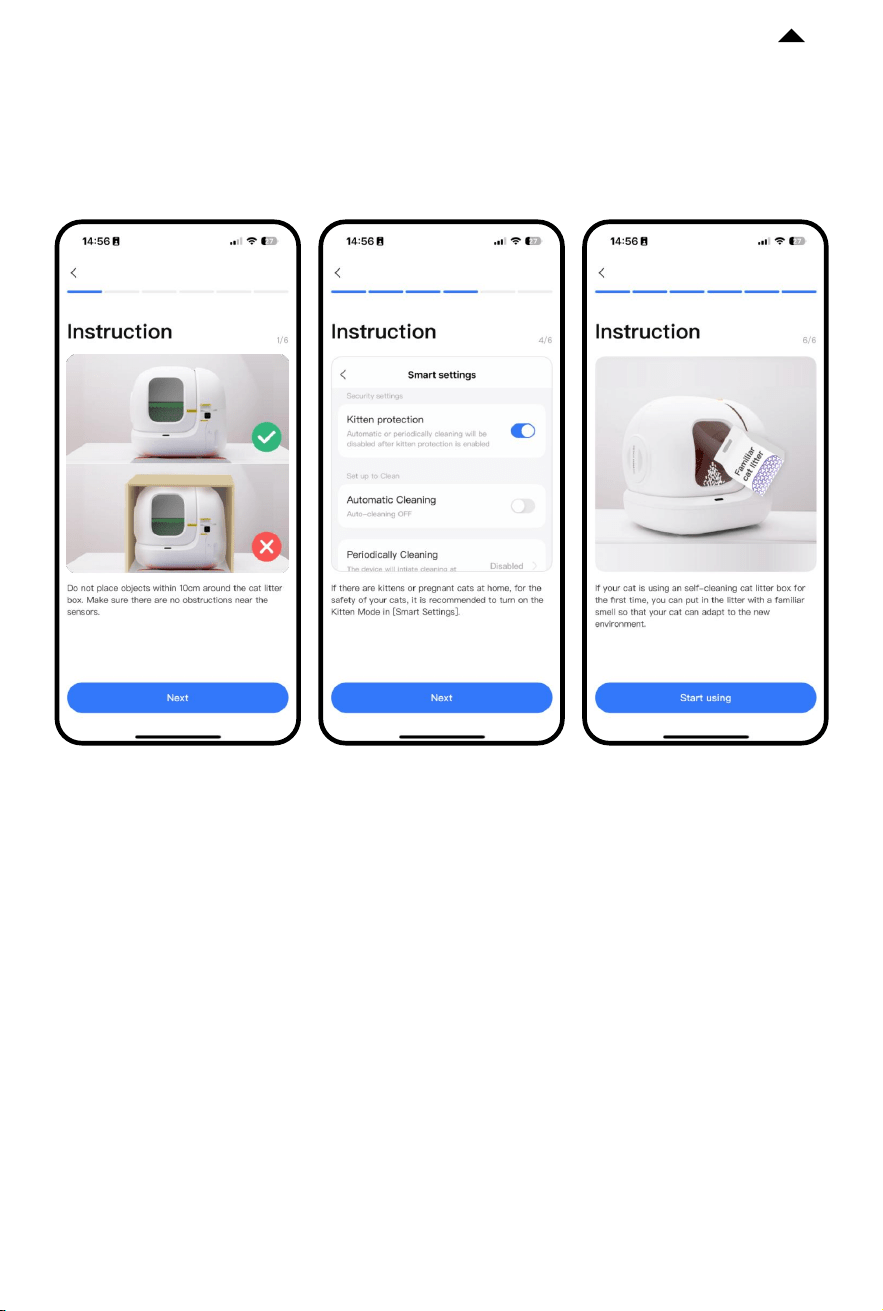
❹ Read instructions
To ensure your pet’s safety and use this product properly, please read the instructions
carefully aer connecting to the app for the first time.
Note: The actual app interfacemay dier from the image
shown due to continuous soware upgrades; the actual
interface shall prevail.
-14-
RETURN TO
CONTENTS
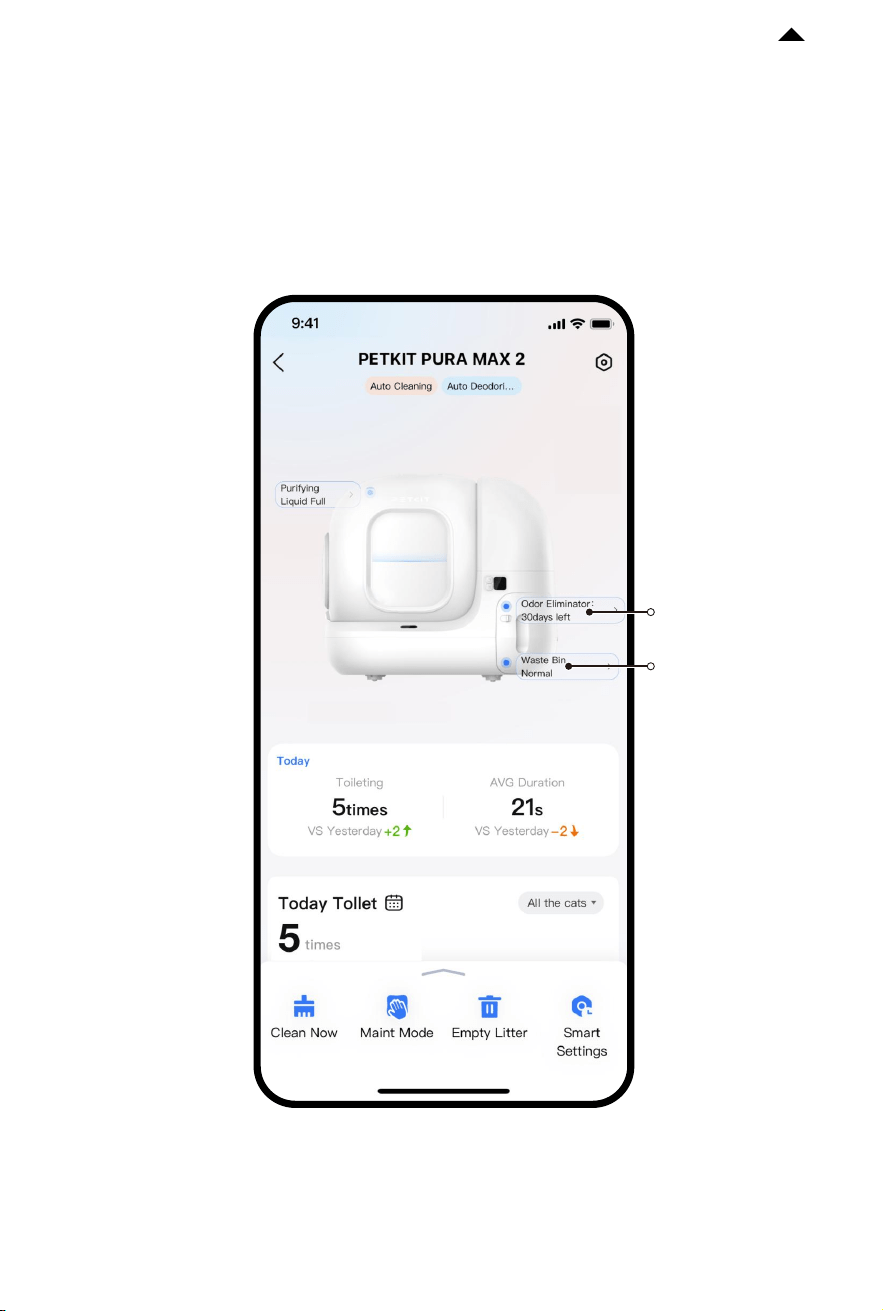
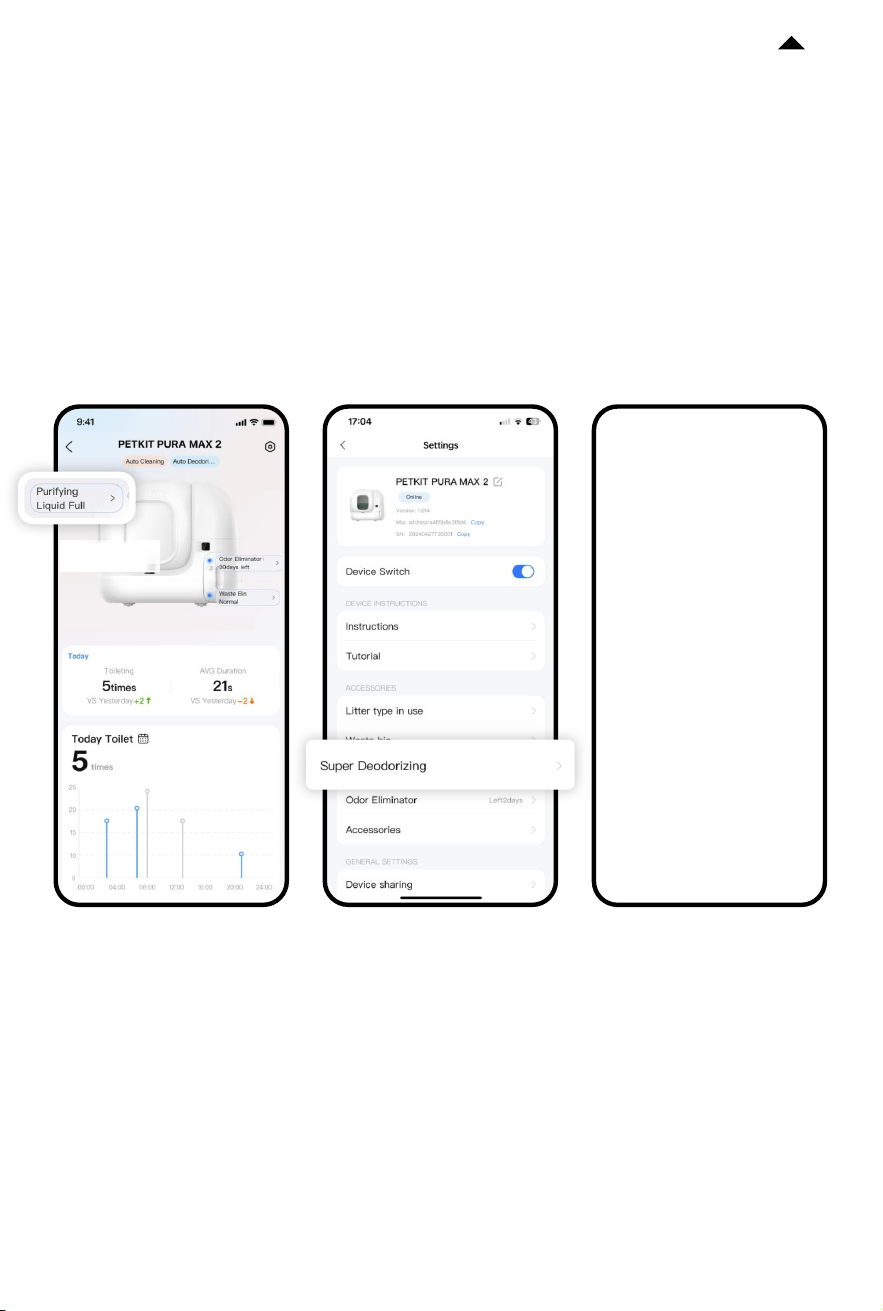
4.4 Smart App Control
❶ Check device’s status
Enter the device’s home page and check its working status, pet toilet times,
waste bin status, etc.
Reminder of the
odor eliminator’s
service life
Reminder of
waste bin status
Note: The actual app interfacemay dier from the image
shown due to continuous soware upgrades; the actual
interface shall prevail.
-15-
RETURN TO
CONTENTS
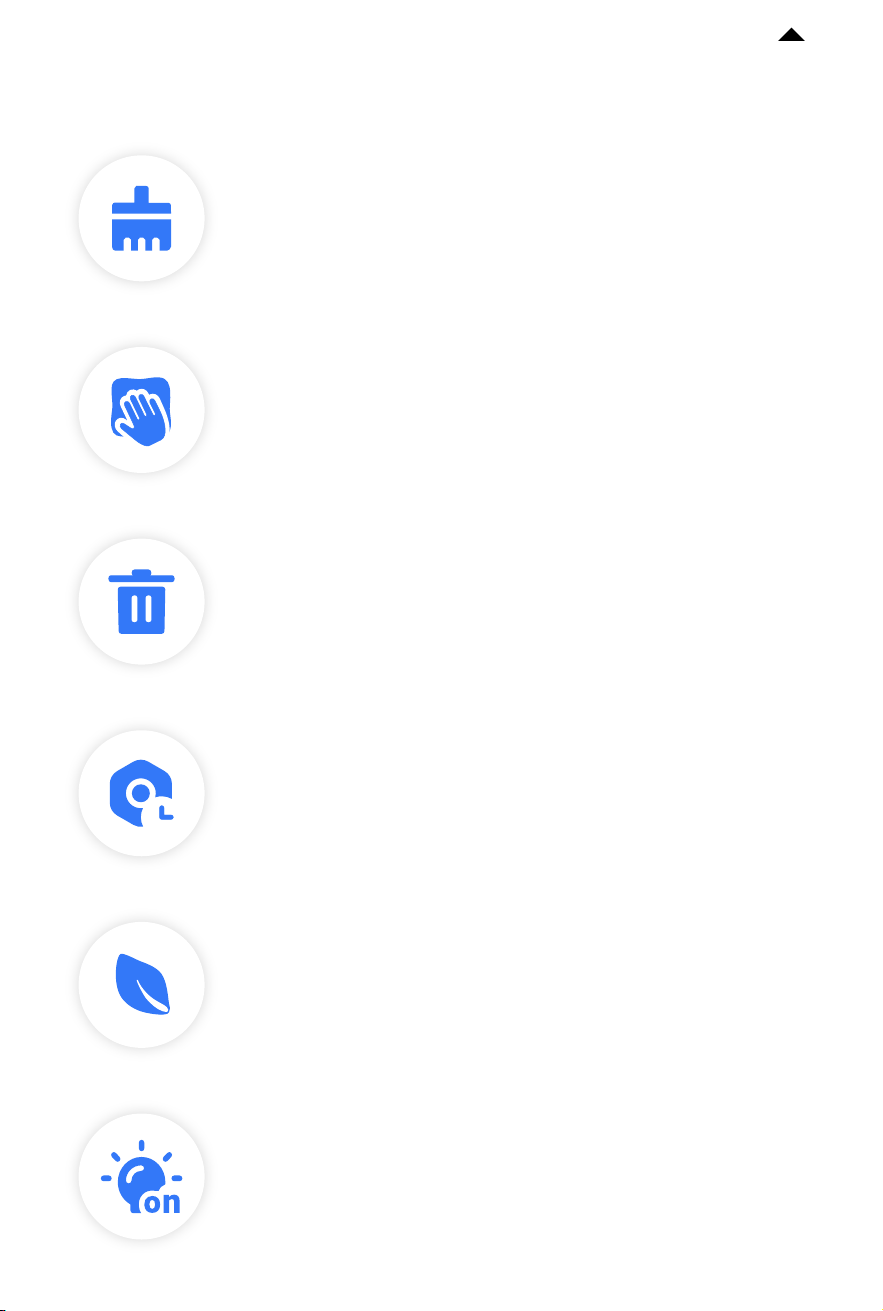
❷ Basic functional description
Smart settings: Set up cleaning mode and safety mode.
Deodorize: Click it to deodorize.
* To perform this function, it is required to install PETKIT AIR PURIFIER
SMART SPRAY.
Light on: Click it to turn on the light in order to check the internal
condition of the cylinder.
* To perform this function, it is required to install PETKIT AIR PURIFIER
SMART SPRAY.
Clean now: Click it to clean the cat litter.
Maintenance mode: Click it and the cylinder will rotate until its
opening faces up, making it convenient to add cat litter or clean
the device.
Empty cat litter: Aer installing the magnetic cat litter remover,
click it to empty the remaining cat litter in the cylinder.
4.5 How to use PETKIT AIR PURIFIER SMART SPRAY
Click “Binding AIR PURIFIER” on the device’s home page.
-16-
RETURN TO
CONTENTS
❶ Deodorize: Aer the pet leaves the litter box, the AIR PURIFIER will automatically
spray to keep air fresh.
❷ Light on: Turn on the light in the app to check the internal condition of the cylinder.
Note: The actual app interfacemay dier from the image
shown due to continuous soware upgrades; the actual
interface shall prevail.
4.6 Other functions
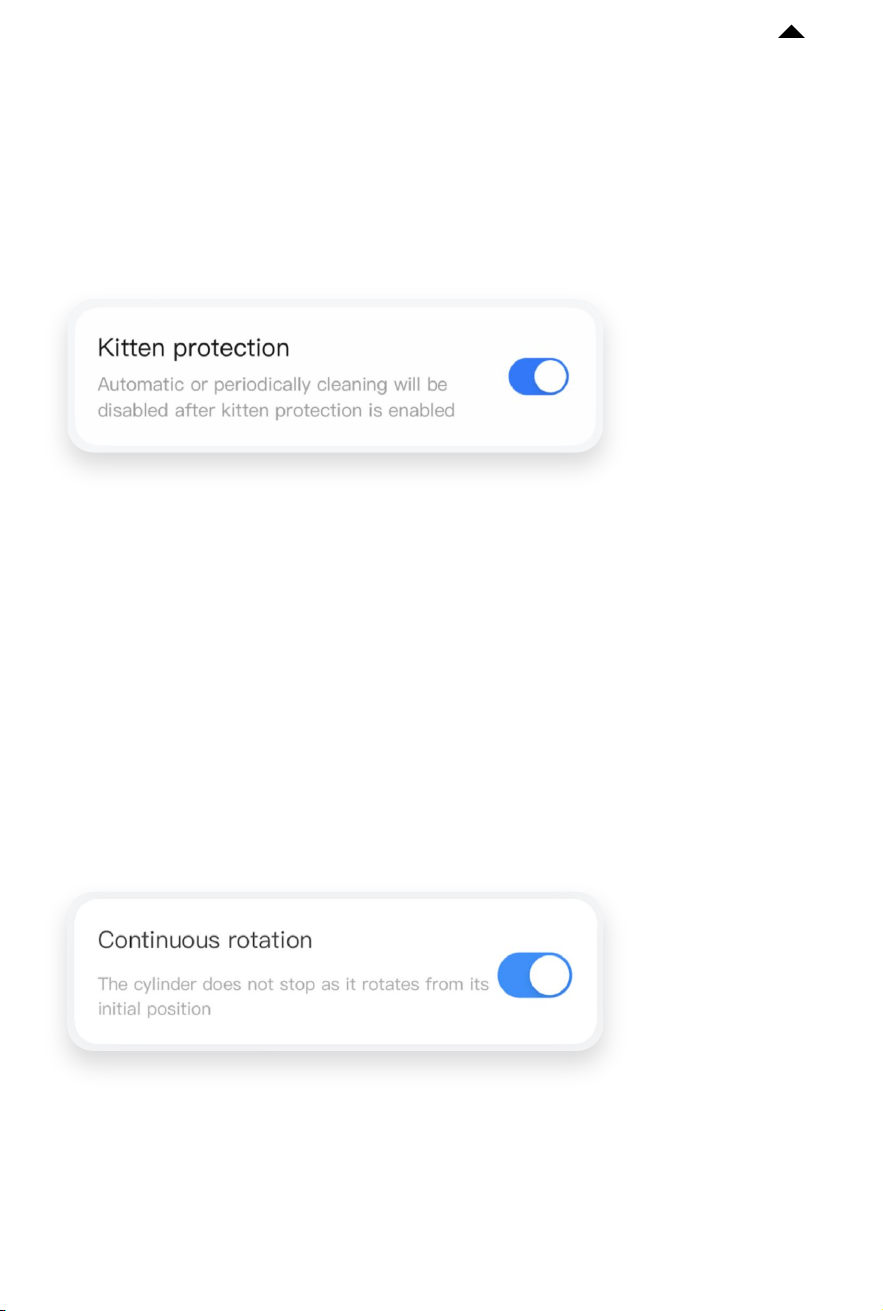
❶ Kitten Mode
Turn on this mode if you have kittens or pregnant cats at home. When this mode is on,
auto-cleaning and periodical cleaning will be disabled. You can click “Clean now” to clean
the cat litter.
-17-
RETURN TO
CONTENTS
❷ Continuous Rotation
When this function is turned on, the device will not stop working even if it detects a cat
approaching, which can reduce the possibility of a cat entering and its secretions leaking
into the bottom of the device.
* When this function is turned o, the device will stop working if it detects a cat approaching.
If the cylinder opening is facing downwards at the moment, there is a possibility of a cat
entering and the leakage of toilet secretions into the bottom of the device, making it hard
to clean.
Note: The actual app interfacemay dier from the image
shown due to continuous soware upgrades; the actual
interface shall prevail.

-19-
Name of
Parts
Cylinder
Litter
Sier
Cat Litter
Pad
Base of
Main Unit
N50
When to Clean
When the inner
surface is dirty.
Clean it in time
when pets have
loose stools.
When it is dirty.
Aer
disassembling
the cylinder.
/
How to Clean
Clean it with a
brush and dry it.
Clean it with a
brush and dry it.
Wipe with a so
cloth or paper
towel and clean
water.
Do not scrub.*
Wipe with a
damp
paper towel.
/
When to
Replace
/
When it is
bent and
damaged.
When it sticks
to the cat
litter severely
or is broken.
/
About one
month
How to
Disassemble
Refer to 5.3
Refer to 5.2
Refer to 5.2
/
Take it out
Proximity
Sensor
When the
surface of the
sensor is dirty.
Wipe with a
so cloth.
/ /
* Avoid cleaning with alcohol, disinfectant, bleach, non-neutral detergent, etc.
RETURN TO
CONTENTS
-20-
RETURN TO
CONTENTS
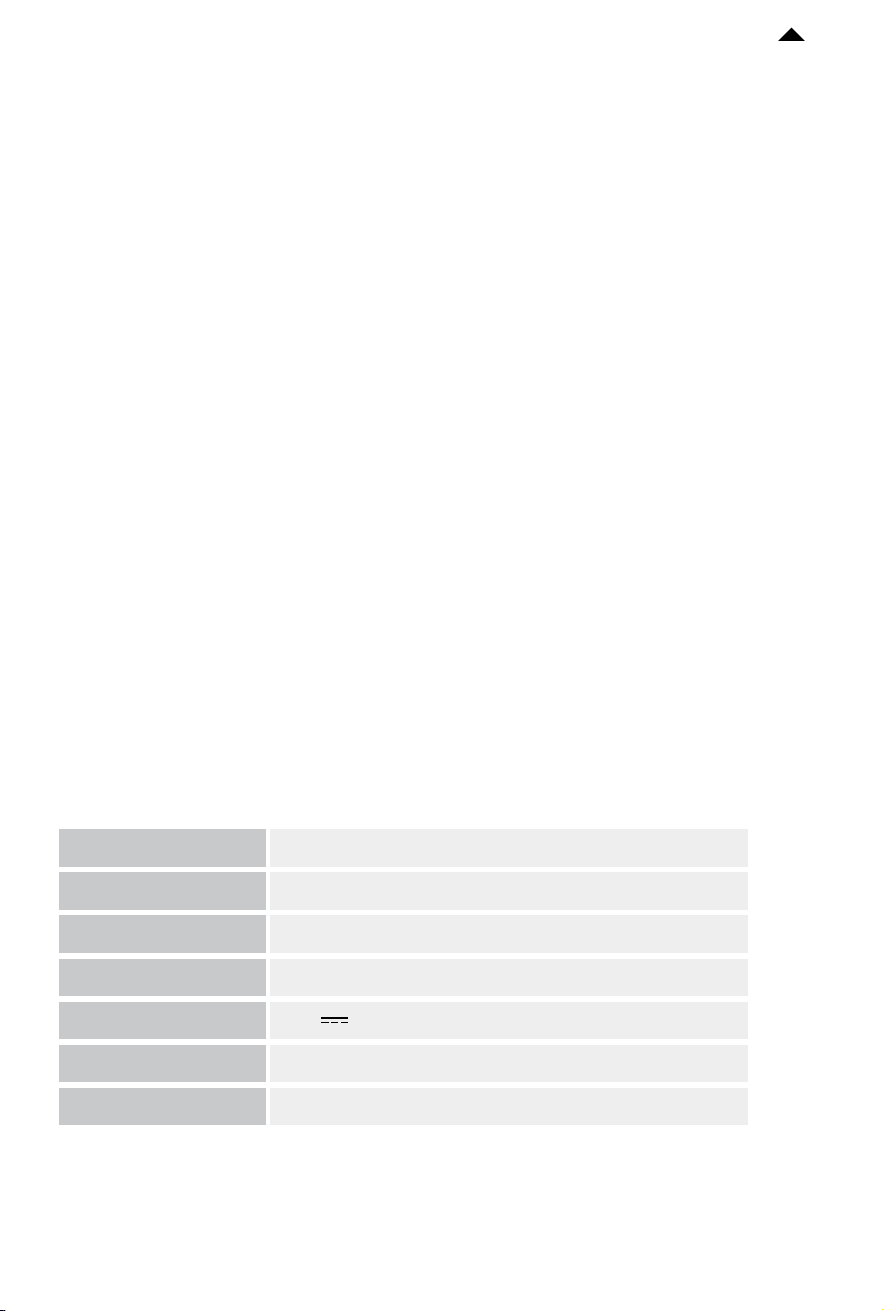
5.1 Empty Cat litter Before Cleaning
❶ Pinch the raised part in the middle of
the magnetic cat litter remover and align
the three grooves on it with the
corresponding holes on the litter sier.
Once you hear a "click" sound, the
installation is successful.
❷ Click “Empty litter” on the app, and
then empty the cat litter in the cylinder
according to the guide.
❸ Aer use, pinch the raised part on the
le and pull out the magnetic cat litter
remover.
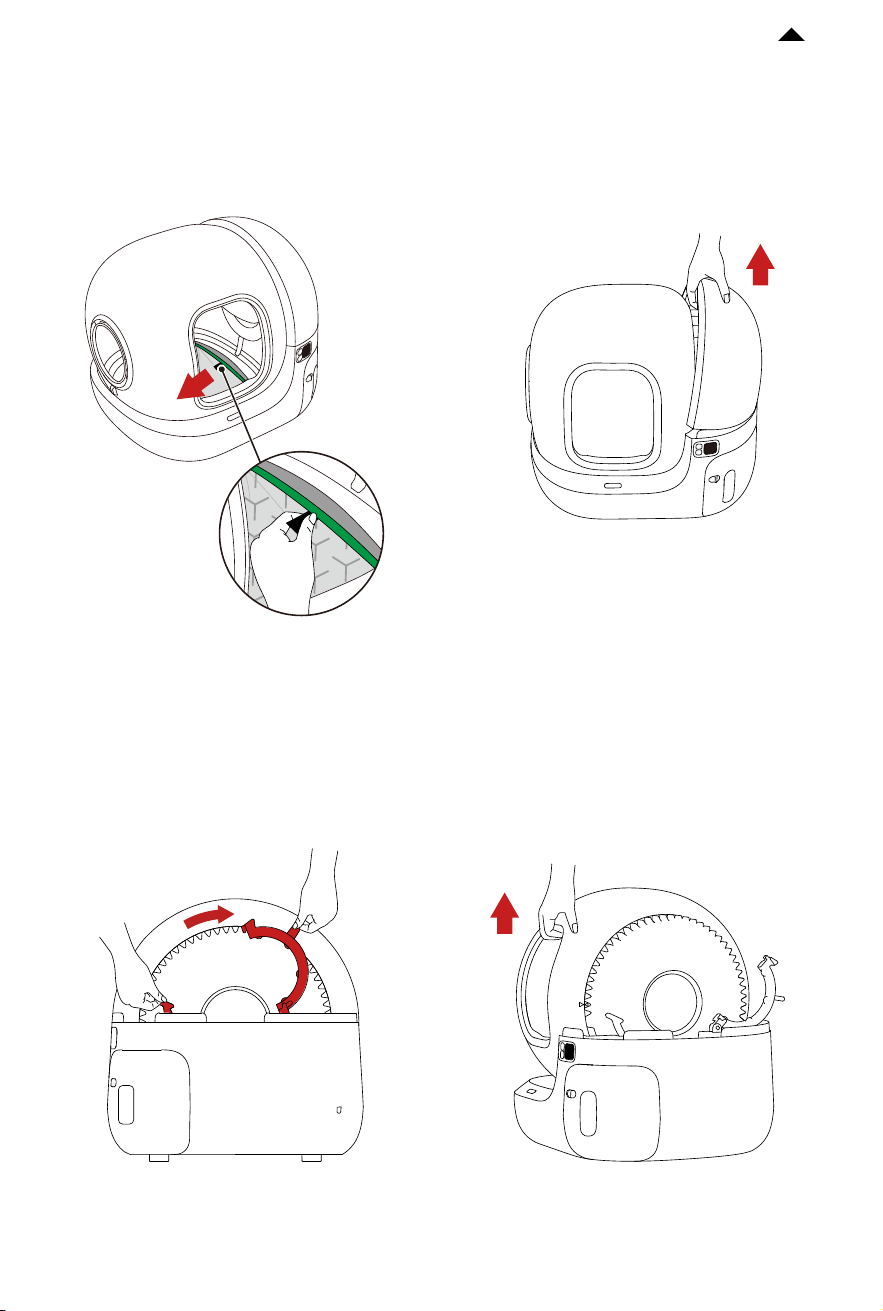
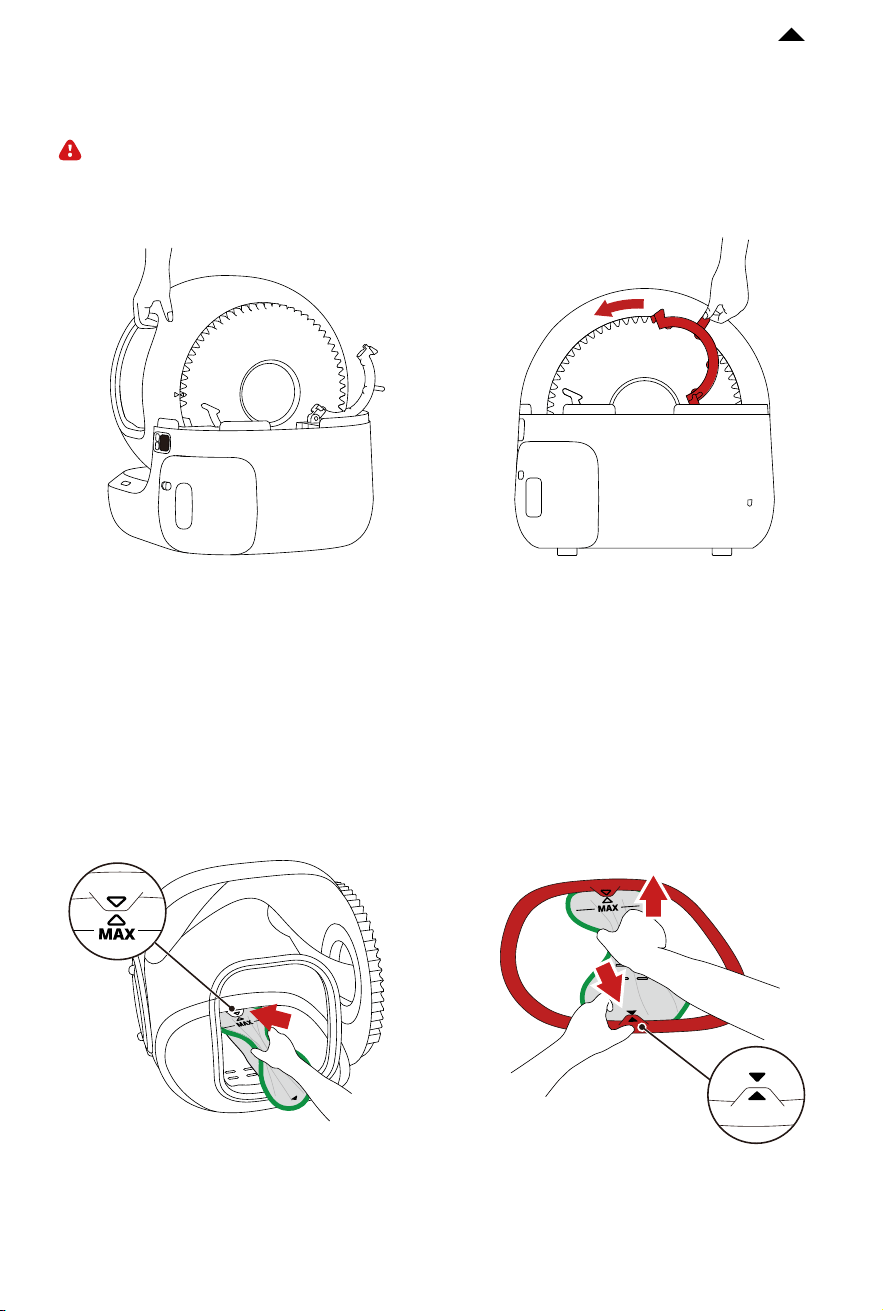
5.2 Disassemble Litter Sier and Cat Litter Pad
❶ Rotate counterclockwise to remove the
side cover.
❷ Press the middle of the litter sier
until it is bent and separates from the le
buckle, then remove the litter sier.
-22-
RETURN TO
CONTENTS
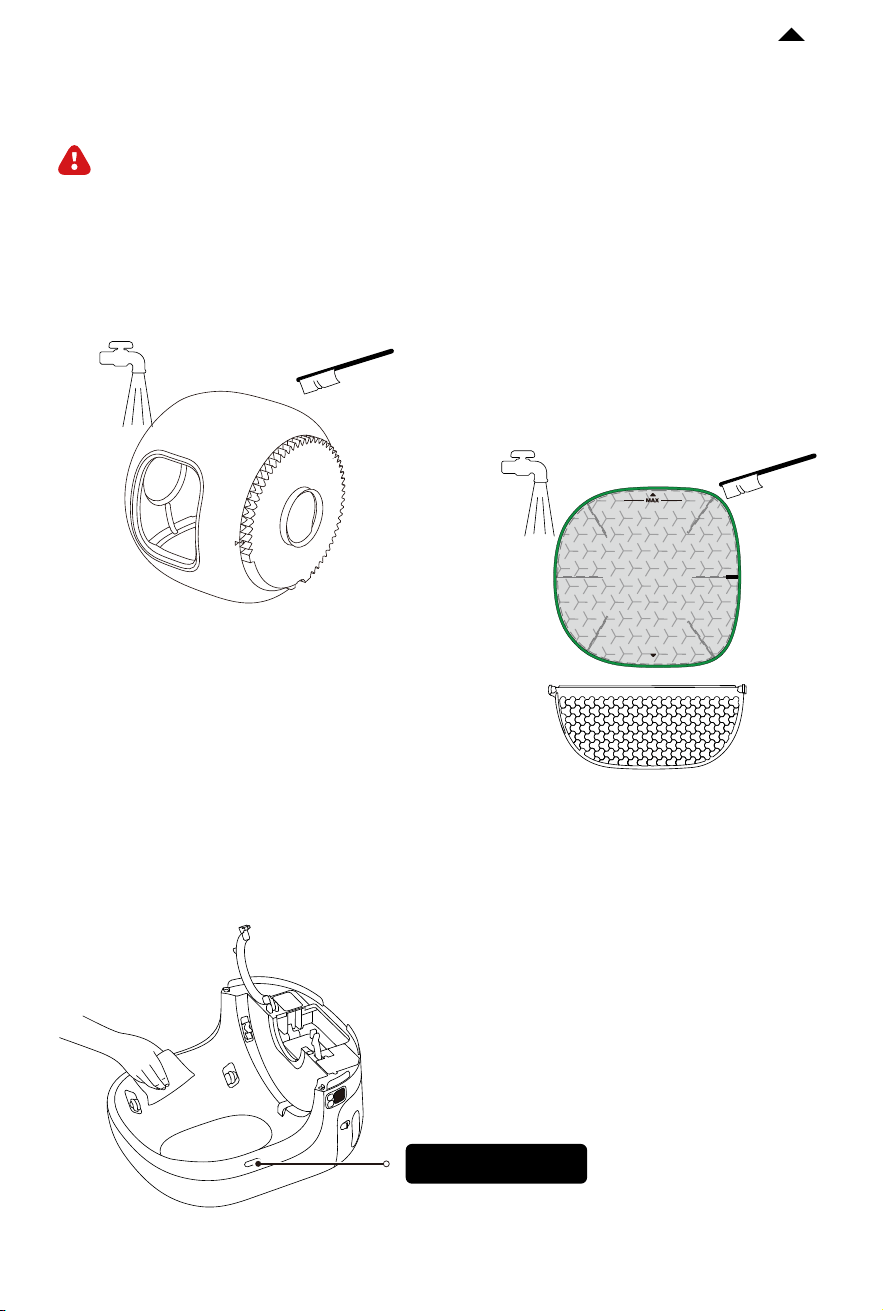
❶ Clean every corner of the cylinder with
a brush and rinse it.
❸ Wipe the base with a damp paper towel to keep the sensor clean.
❷ Scrub the litter sier with a brush and
rinse it o. Wipe the cat litter pad with a
wet cloth.
5.4 Clean All Parts
Caution: The main unit is strictly prohibited from rinsing and soaking. It can only be
wiped, otherwise, the device will be damaged.
Caution: Do not scrub vigorously to avoid
damaging the coating of the cat litter pad.
Avoid cleaning with non-neutral detergents
such as alcohol, disinfectant, zbleach, etc.
proximity sensor
-23-
RETURN TO
CONTENTS
❶ Put the cylinder on the base, lock the buckle, and make sure the buckle is fastened.
❷ Hold the cat litter pad, insert the upper part of it into the groove, and then insert the
bottom of it into the groove (align with the arrows).
5.5 Install All Parts
Caution: Install all parts only when they are completely dry.
-24-
RETURN TO
CONTENTS
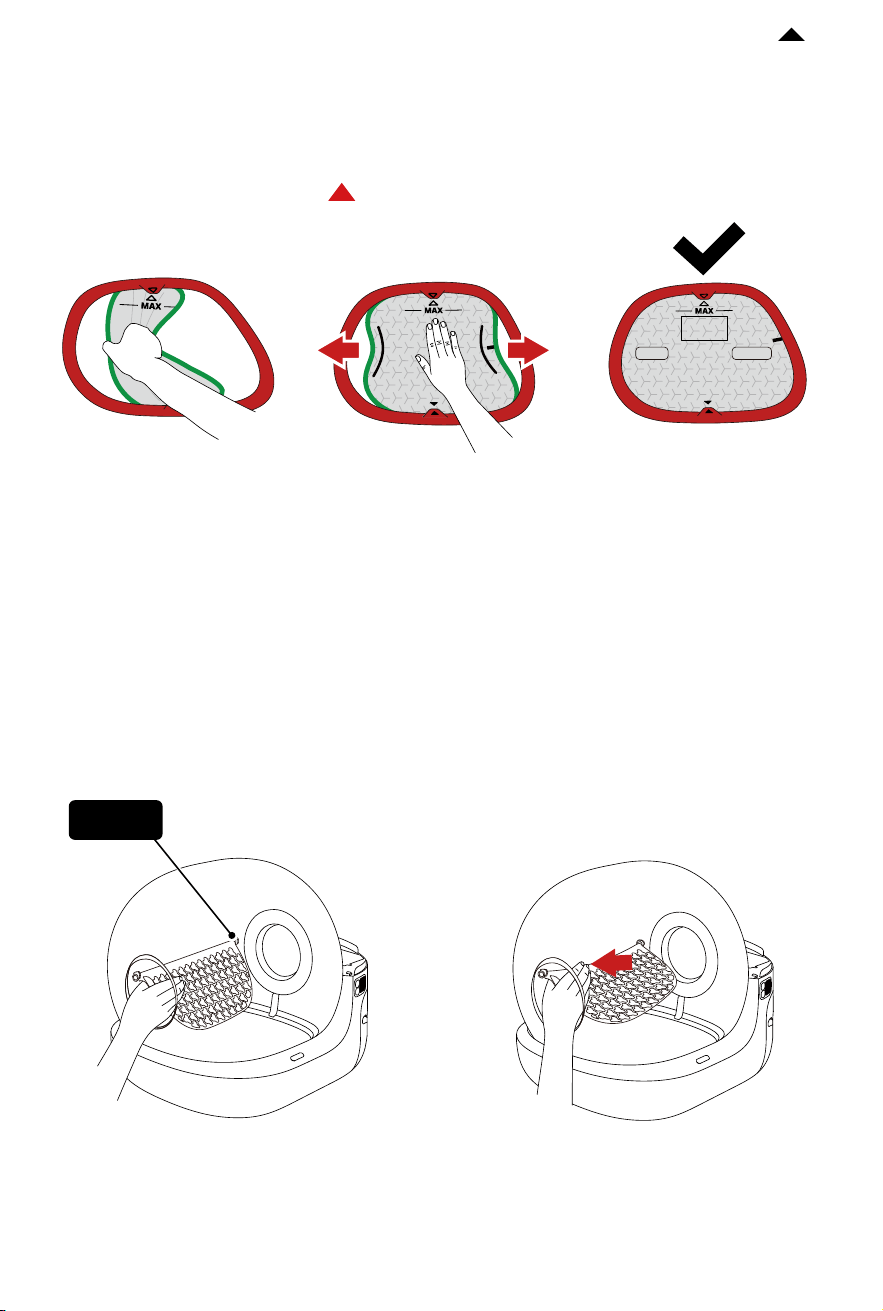
❸ Press gently and release the litter pad; its two sides will be automatically inserted into
the groove.
Caution: Before use, make sure that the green edge of the cat litter pad is fully stuck into
the groove and that the arrows on both ends are aligned with the direction indicated.
If the green edge is not
visible, the installation
is successful.
❹ Insert one side of the litter sier into
point A in the cylinder.
❺ Grasp the litter sier and press it until
it is bent.
point A
LEFT RIGHT

-26-
RETURN TO
CONTENTS
VIDEO GUIDE
06
6.1 Video of Installation and Usage
Please copy the video URL and open it in your browser to view the video.
https://m.youtube.com/watch?v=1zmqlw2fiho
6.2 Video of Cleaning and Maintenance
Please copy the video URL and open it in your browser to view the video.
https://m.youtube.com/watch?v=3hx0biUujkM&feature=youtu.be
BASIC SPECIFICATIONS
07
Product Name
Product Model
Dimensions
Weight
Rated Input
Connection
Scope of Application
PETKIT PURA MAX 2 SELF-CLEANING CAT LITTER BOX
P9902
620 x 538 x 552 mm (24.41 x 21.18 x 21.73 in)
about 10 kg (22 lb)
12V 2A
Wi-Fi, BLE
Cats older than 6 months
-27-
RETURN TO
CONTENTS
A MESSAGE TO OUR VALUED
CUSTOMERS
08
· Thank you for choosing the PETKIT PURA MAX 2 SELF-CLEANING CAT LITTER BOX.
·
Please read the user manual carefully before installing and using the product. Any
installation or usage indicates that you have read and accepted the safety guide below.
·
PETKIT is not responsible for or legally liable for any accidents or injuries resulting from
the improper use of the product.
·
PETKIT reserves the right to interpretation and revision.
SAFETY GUIDE
09
* Failure to follow the safety guides below may result in product malfunction or other
unforeseen losses.
·
Please install and use the product according to the user manual.
·
Cats younger than six months are not recommended to use this product. Cats weighing
less than 1.5 kg are not recommended to use this product.
·
Do not place the device in a high-temperature or high-humidity environment.
·
The product is for indoor use only. Please avoid direct sunlight exposure and keep it
away from the source of flame.
·
Although the device is powered by a low voltage, electric leakage may occur if the pet
bites the power cord. Please guide your pets to use the product properly.
·
Only use the original adapter to avoid device damage or safety hazards.
·
Place the device on a hard, flat surface and avoid touching the wall.
·
Do not tilt the device to avoid security risks.
·
Do not immerse or soak the bottom of the device in water.
·
There are weight sensors at the bottom of the device. Please handle it gently.
·
Please unplug it if the device is not used for an extended period.
·
Children should use this product under the supervision and guidance of adults.
·
Repairs should only be performed with professionals’ guidance to avoid accidental damage.
·
It is prohibited to place objects on the top of the device or press the device’s top to avoid
aecting the normal operation of the device.
·
Before leaving for an extended period, please ensure that there is suicient cat litter in
the litter box and space in the waste drawer.
·
If you have any problems with the product, please contact our customer service for
assistance.

-28-
RETURN TO
CONTENTS
Disposal
The European directive 2012 / 19 / CE on Waste Electrical and Electronic Equipment(WEEE), requires that old household electrical appliances
must not be disposed in the normal unsorted municipal waste stream. Old appliances must be collected separately in order to optimize the
recovery and recycling of the materials theycontain and reduce the impact on human health and the environment. The crossed out "wheeled
bin" symbol on the product reminds you of your obligation,that when you dispose of the appliance it must be separately collected.
Consumers should contact their local authority or retailer for information concerning the correct disposal of their old appliance.
This device complies with part 15 of the FCC Rules. Operation is subject to the following two conditions:
(1) This device may not cause harmful interference, and ;
(2) this device must accept any interference received, including interference that may cause undesired operation.
FCC warning:
Any Changes or modifications not expressly approved by the party responsible for compliance could void the user's authority to operate the
equipment. Note: This equipment has been tested and found to comply with the limits for a Class B digital device, pursuant to part 15 of the
FCC Rules.These limits are designed to provide reasonable protection against harmful interference in a residential installation. This
equipment generates uses and can radiate radio frequency energy and, if not installed and used in accordance with the instructions, may
cause harmful interference to radio communications. However, there is no guarantee that interference will not occur in a particular
installation. If this equipment does cause harmful interference to radio or television reception, which can be determined by turning the
equipment o and on, the user is encouraged to try to correct the interference by one or more of the following measures:
-Reorient or relocate the receiving antenna.
-Increase the separation between the equipment and receiver.
-Connect the equipment into an outlet on a circuit dierent from that to which the receiver is connected.
-Consult the dealer or an experienced radio/TV technician for help.
ThedevicehasbeenevaluatedtomeetgeneralRFexposurerequirement.
This equipment complies with FCC radiation exposure limits set forth for an uncontrolled environment. This equipment should be installed
and operated with minimum distance 20cm between the radiator & your body.
IC warning
- English:
This device complies with Industry Canada licence-exempt RSS standard(s). Operation is subject to the following two conditions:
(1) This device may not cause interference, and
(2) This device must accept any interference, including interference that may cause undesired operation of the device.
- French:
Le présentappareilestconforme aux CNR d'Industrie Canada applicables aux appareils radio exempts de licence.
L'exploitationestautorisée aux deux conditions suivantes:
(1) l'appareil ne doit pas produire de brouillage, et
(2) l'utilisateur de l'appareildoit accepter tout brouillageradioélectriquesubi, mêmesi le brouillageest susceptible d'encompromettre le
fonctionnement.