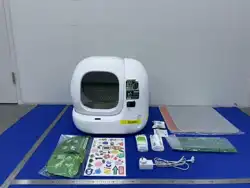
USER MANUAL
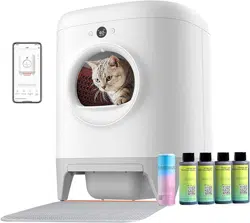
PETKIT PURAX SELF-CLEANING CAT LITTER BOX
V1.0-2023.06
Please read the User Manual carefully before
using the product and keep it properly.


-4-
RETURN TO
CONTENT
*Note: In order to enhance the user experience, periodic product improvements may be implemented.
The product images shown are for illustrative purposes only. The actual product may vary from the image
displayed on the packaging. For any inconsistencies, please refer to the actual product.
Short press: choose
menu item
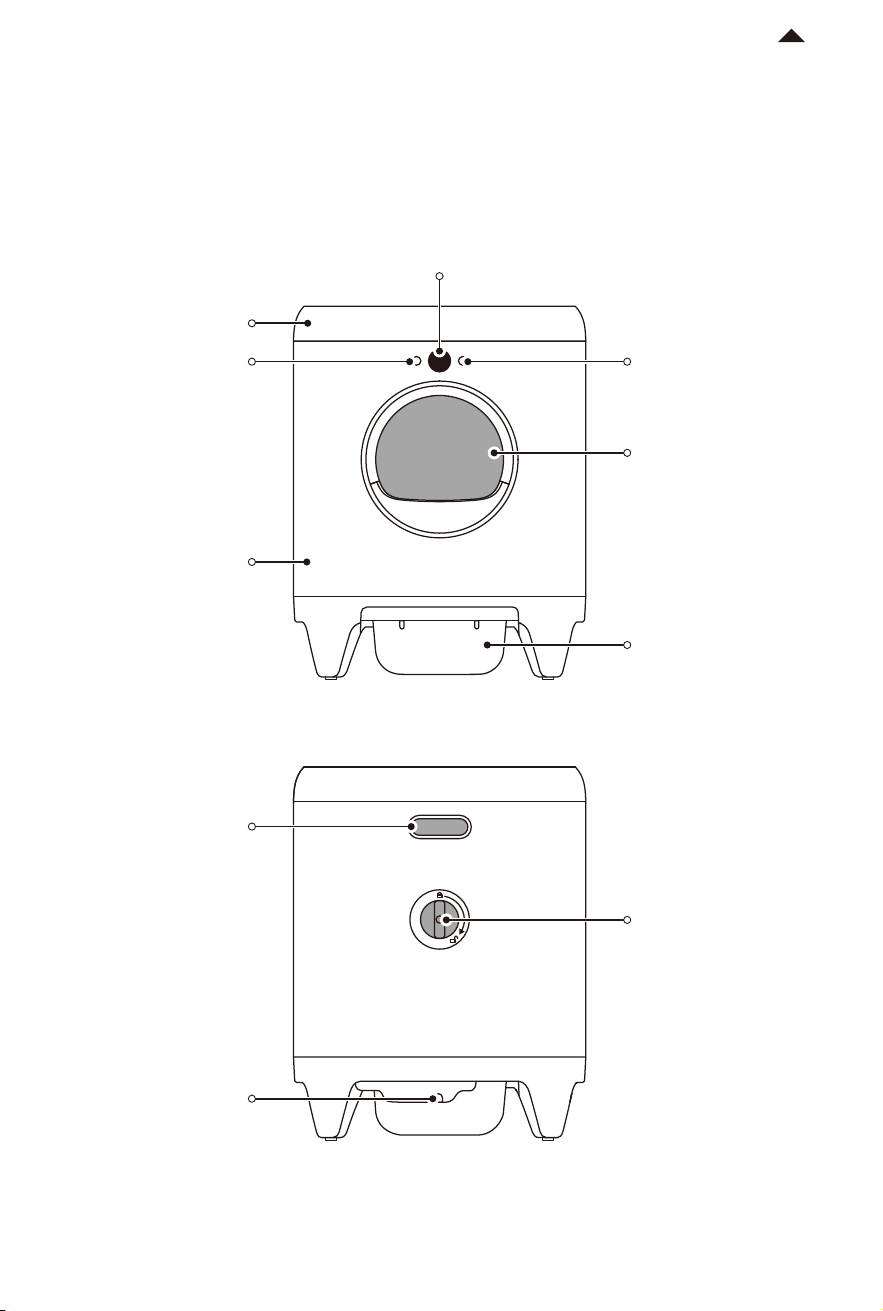
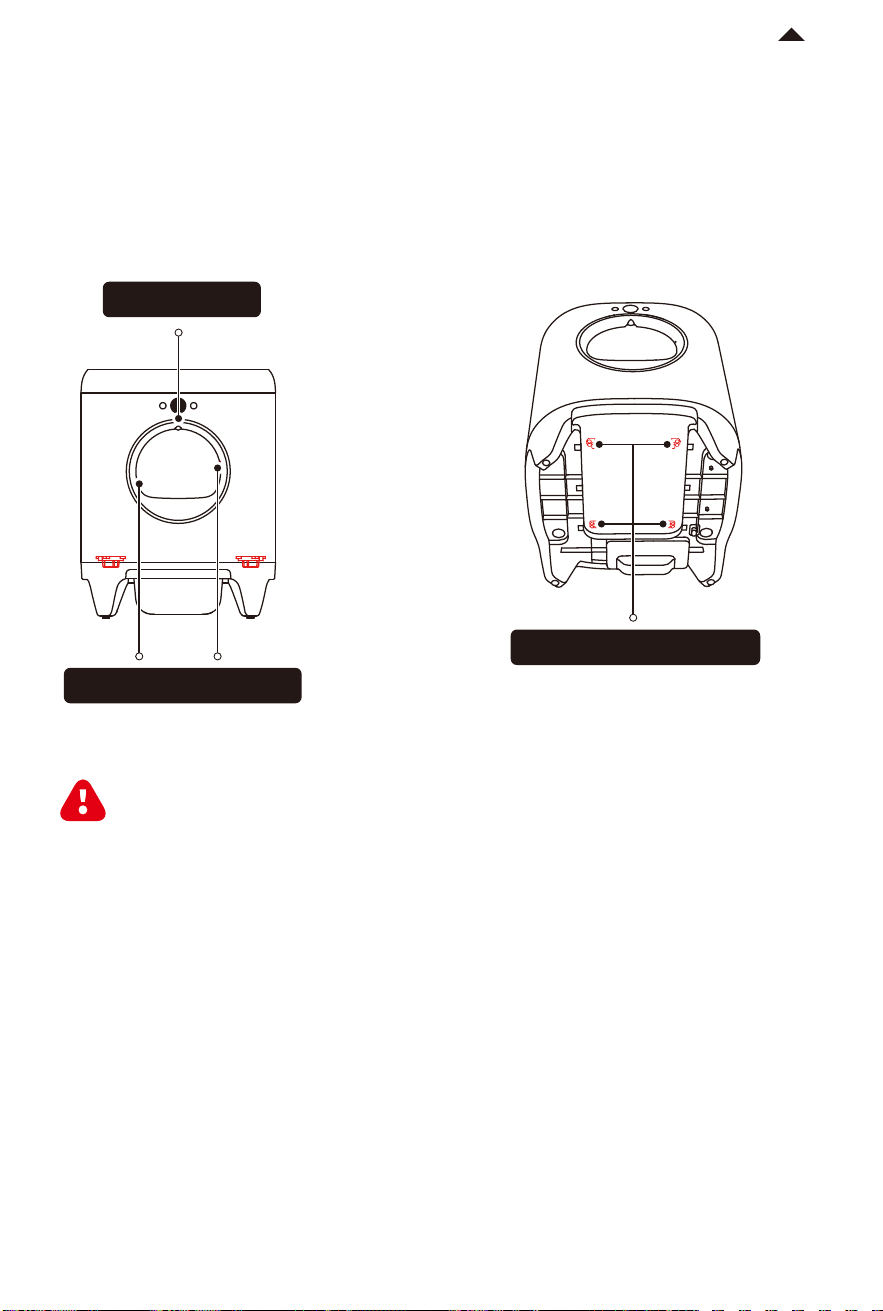
Cylinder Knob
Waste Container
Entrance
OK Button
OLED Display
Lid
Main Unit
Handle
Power Port
Menu Button
PRODUCT DESCRIPTION
02
PRODUCT INSTALLATION
03
-6-
RETURN TO
CONTENT
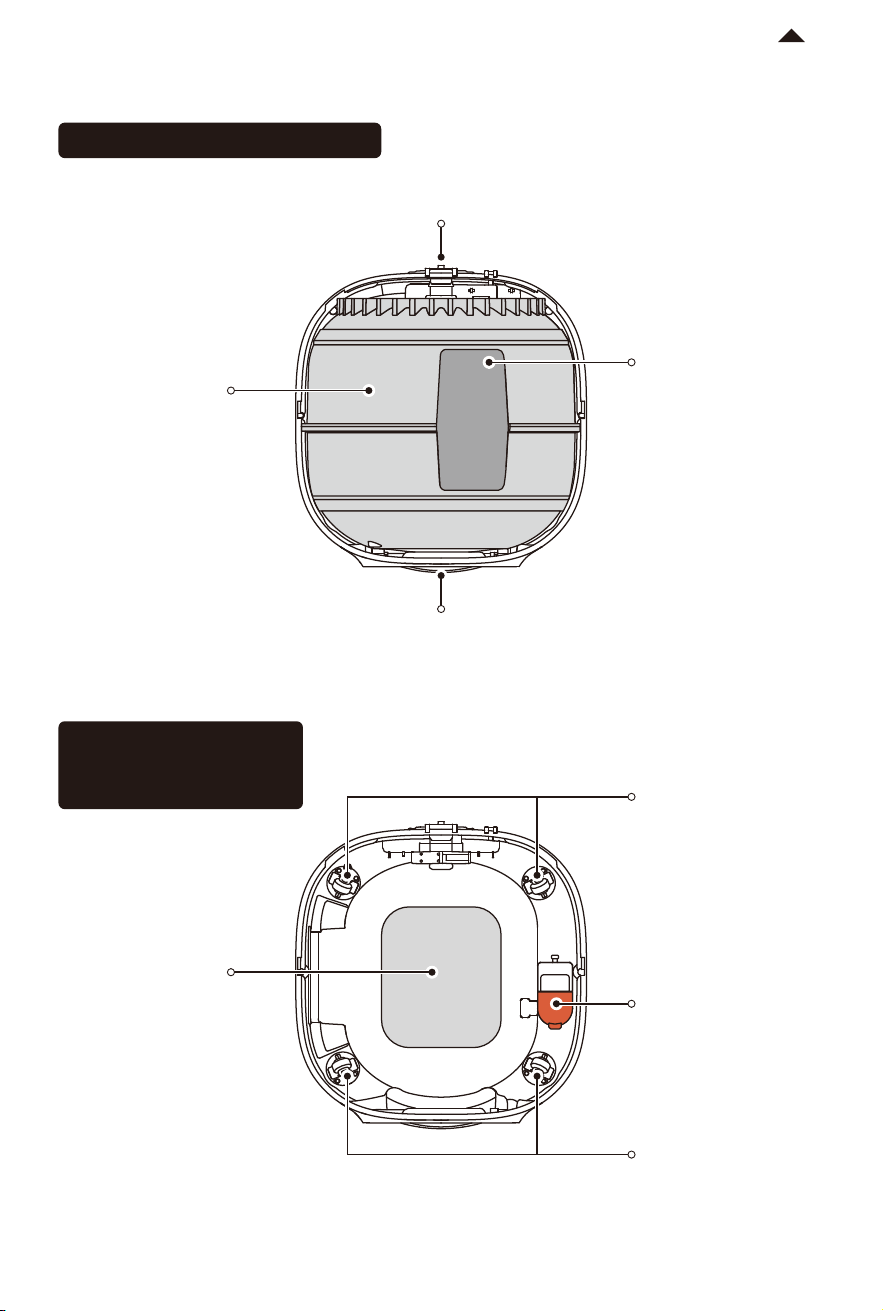
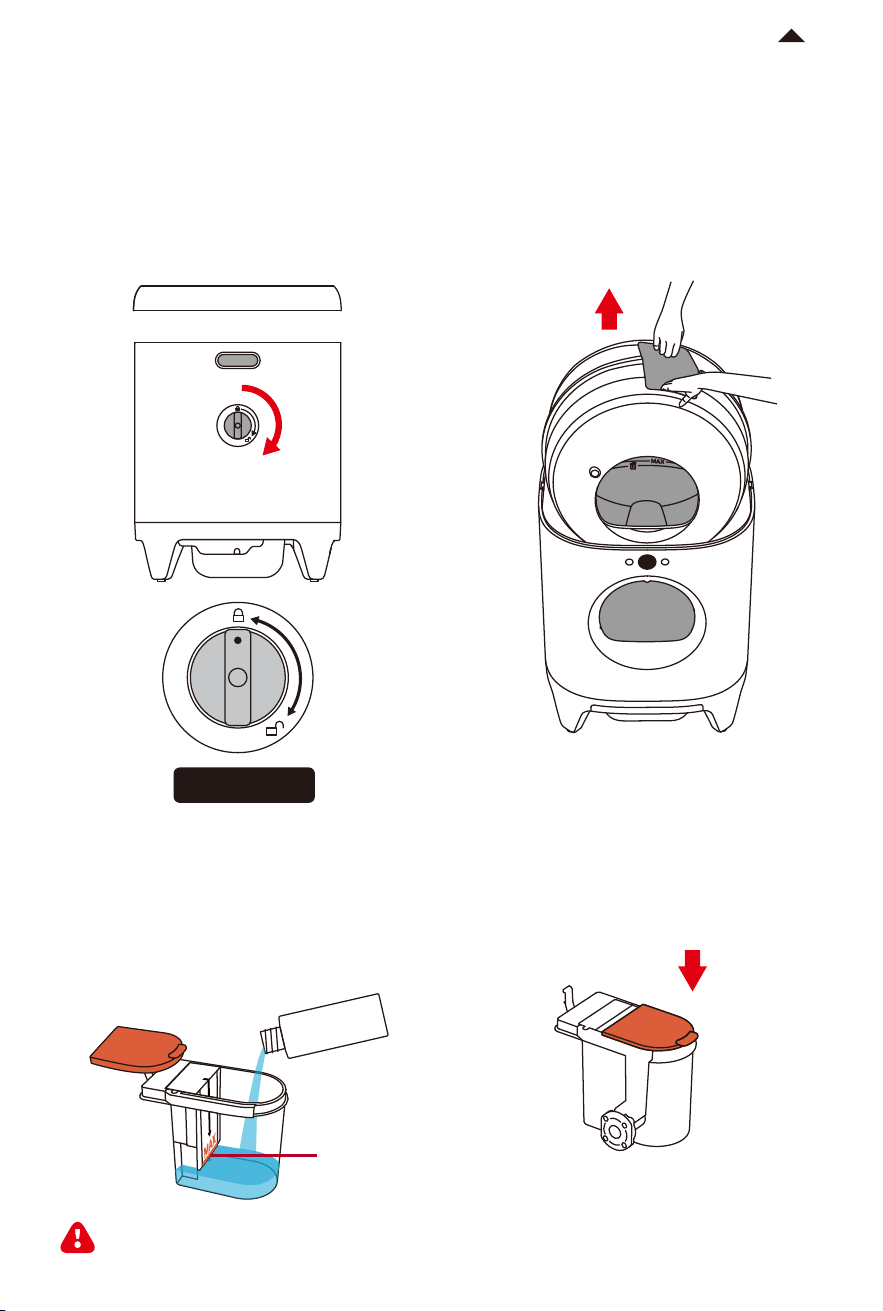
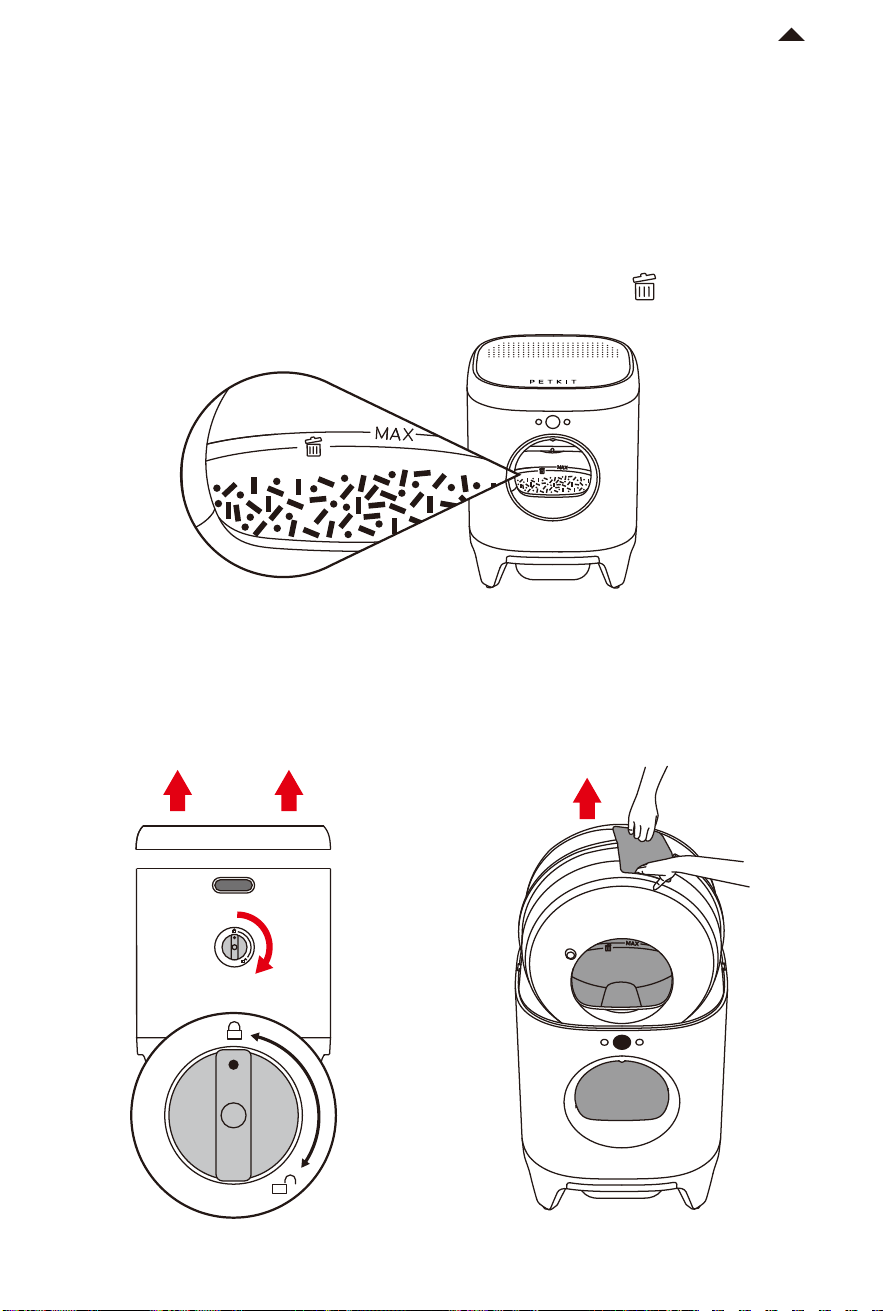
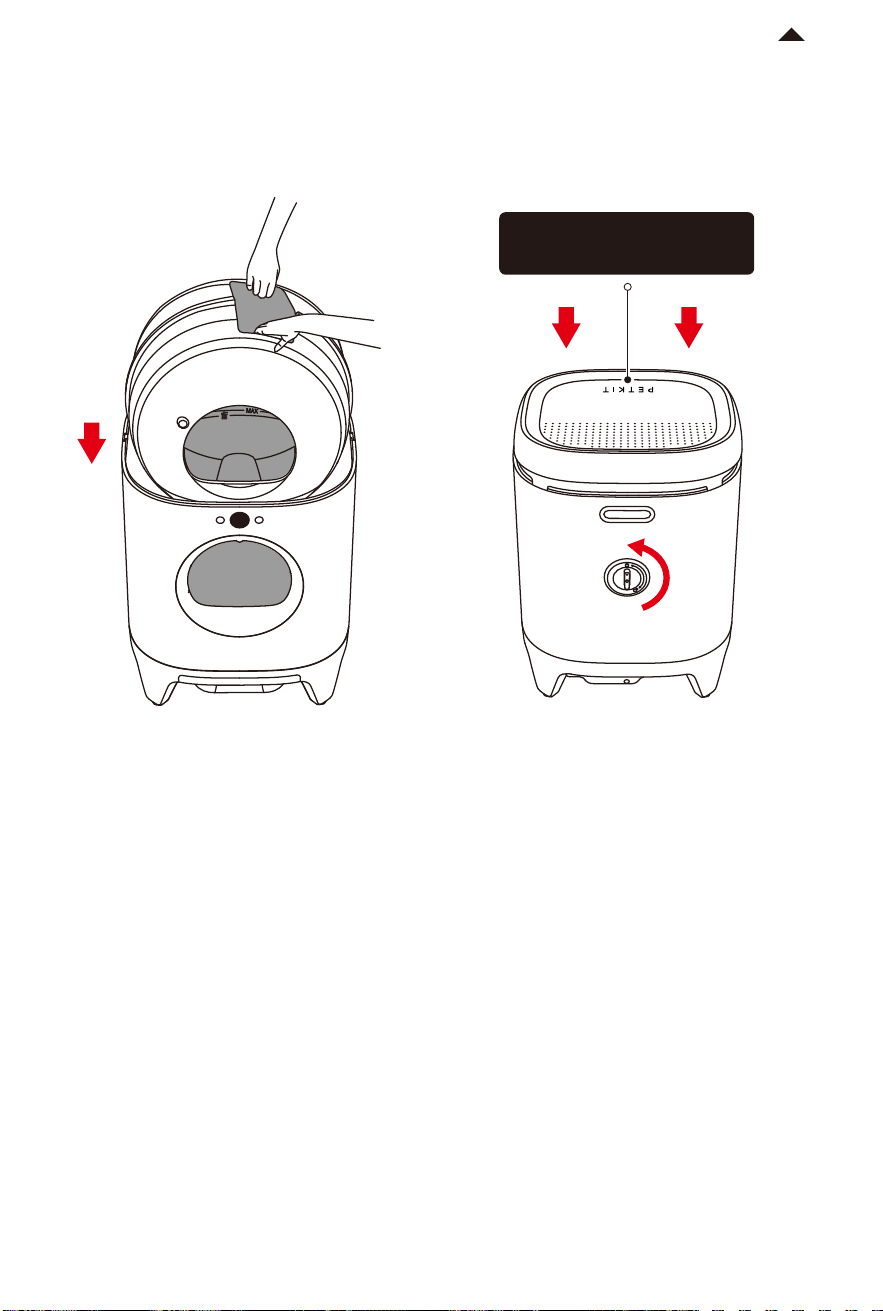
3.1 Installing Deodorization Module
① Turn the cylinder knob clockwise on the
back of the main unit to unlock it.
② Hold the dump port with your hands
and li the cylinder upward.
③ Open the so rubber cover of the
deodorization module and pour PETKIT
purifying liquid (50ml) into it.
④ Cover the so rubber cover and press it
tightly to prevent the liquid from
evaporating.
Unlock
Cylinder Knob
* Note: When the app reminds you that there is
insuicient liquid, pour in an entire bottle of
PETKIT purifying liquid. Ensure that the liquid
does not exceed the MAX line.
MAX Line
Please only use authentic PETKIT purifying liquid to prevent potential malfunctions caused by
other deodorant liquids.
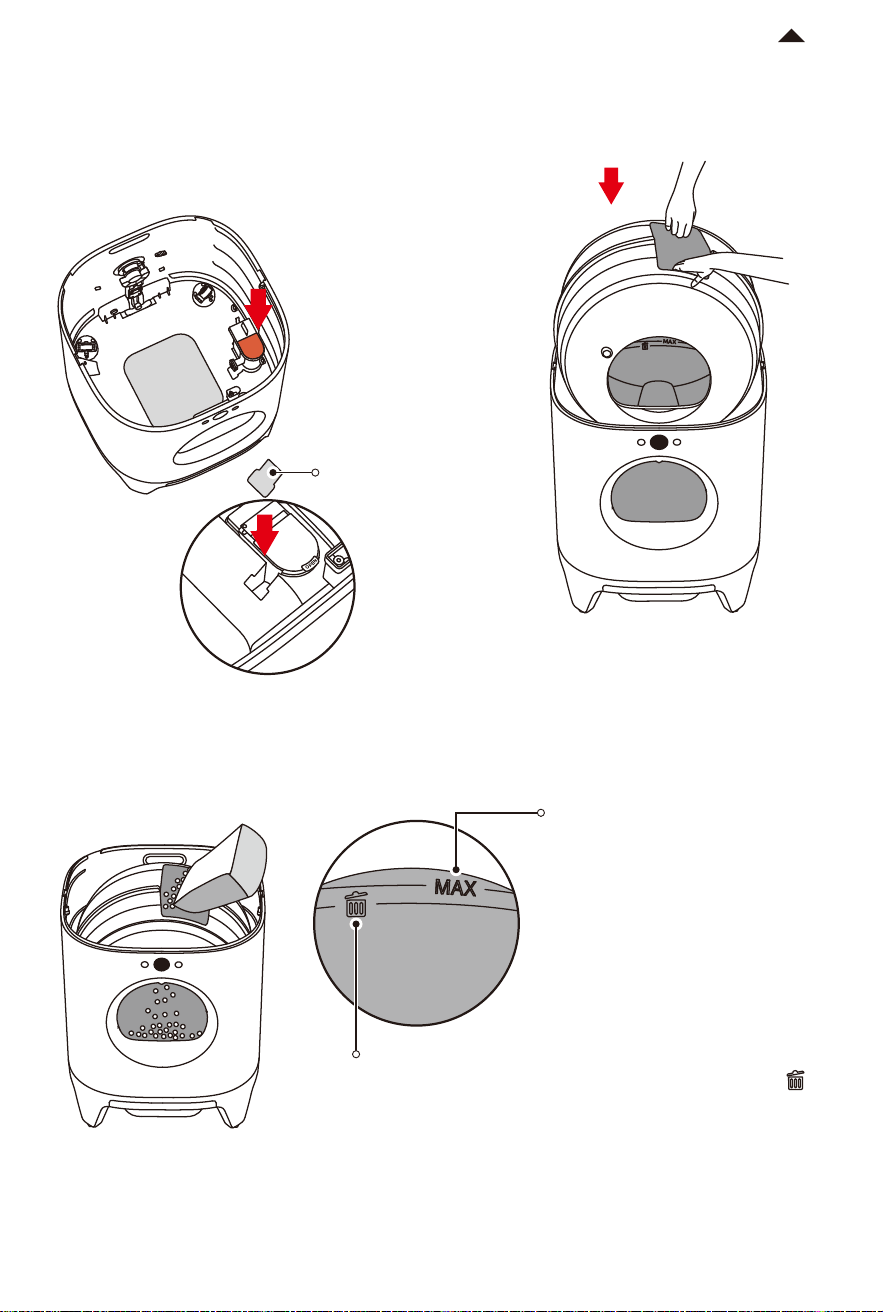
⑤ Put the deodorization module into the
main unit. Once you hear a "Click," it is
properly installed. Then, cover it with the
dust-proof cover.
-7-
RETURN TO
CONTENT
⑥ Hold the dump port with both hands
and put the cylinder into the main unit.
Litter MAX line
* Ensure that the amount of cat litter
does not exceed the MAX line.
3.2 Pouring Cat Litter
Pour the cat litter through the dump port.
“Emptying Litter” line
When the remaining amount of cat litter is below this line ,
you can use the "Emptying Litter" function to remove the
remaining litter from the cylinder at once.
* Note: Before emptying the litter, please ensure that there is
enough space in the waste container; Do not allow cats to
enter the cylinder during the emptying process to avoid
interrupting the operation; Do not disconnect the power
during the emptying process.
Dust-Proof
Cover
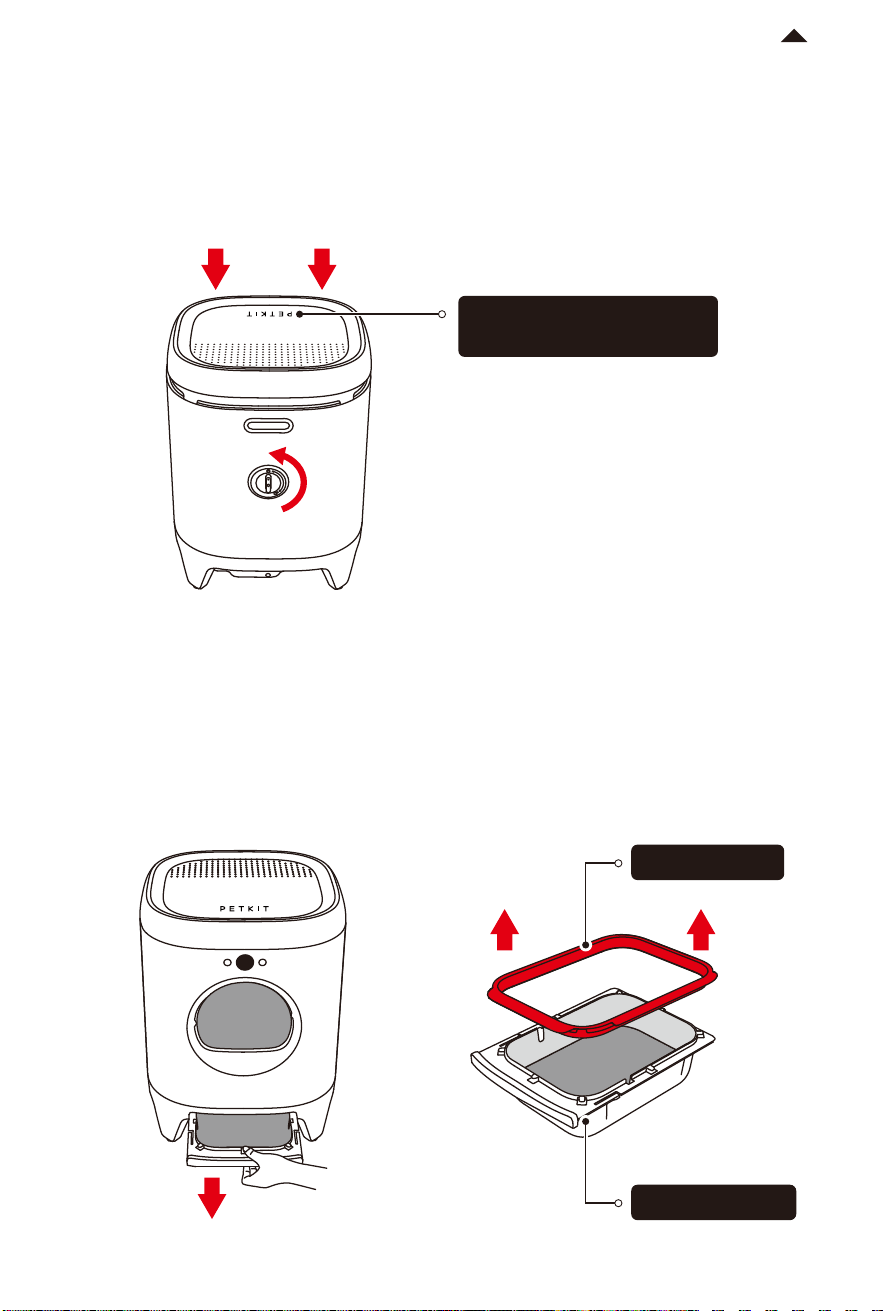
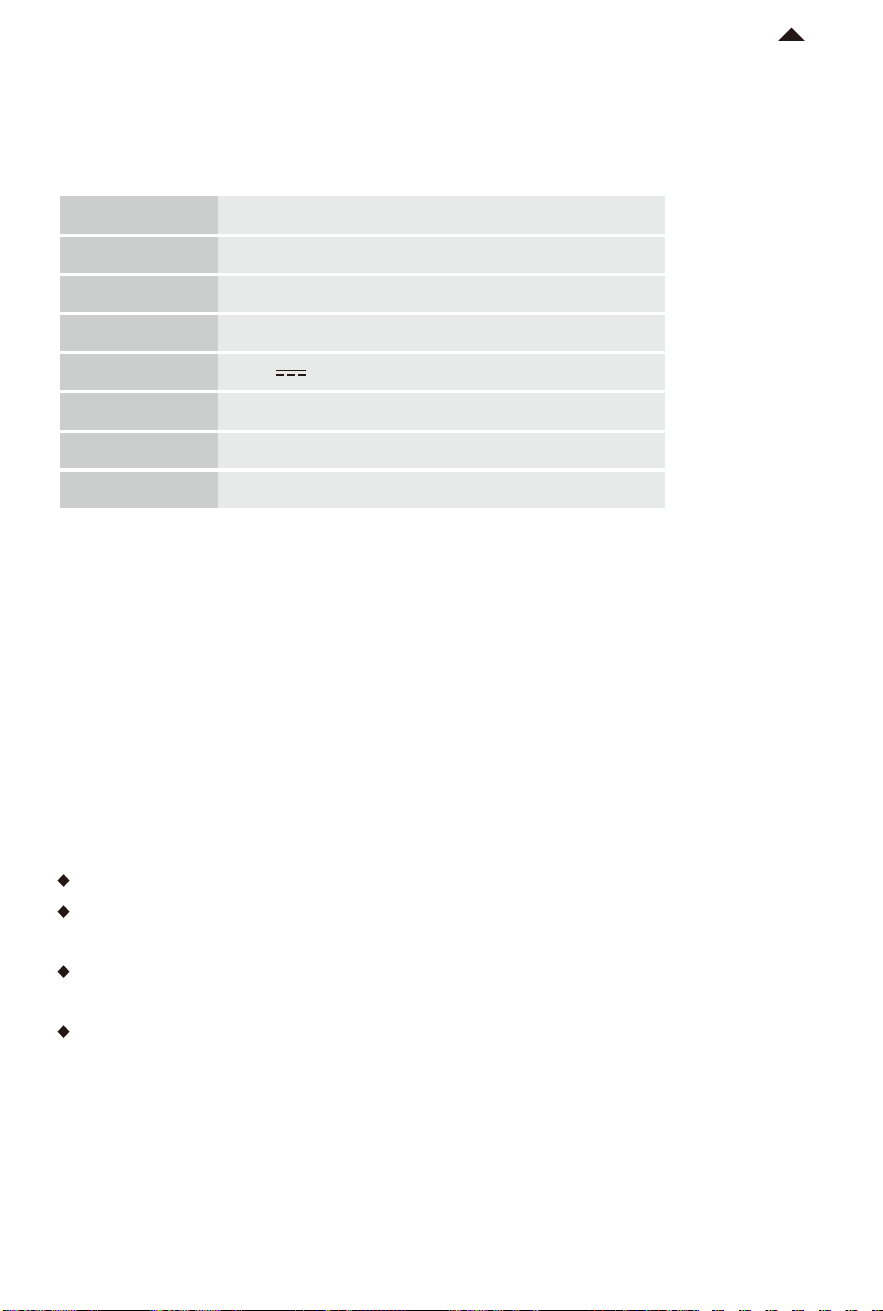
3.3 Covering Lid of Main Unit
① Turn the cylinder knob counterclockwise on the back of the main unit, and make sure
the cylinder is fixed.
② Cover the lid of the main unit.
* Note: The "PETKIT" logo should be positioned above the entrance of the main unit.
3.4 Installing Trash Bag
① Pull out the waste container and remove the trash bag ring.
-8-
RETURN TO
CONTENT
Locked
The "PETKIT" logo should
always face forward.
Trash Bag Ring
Waste Container
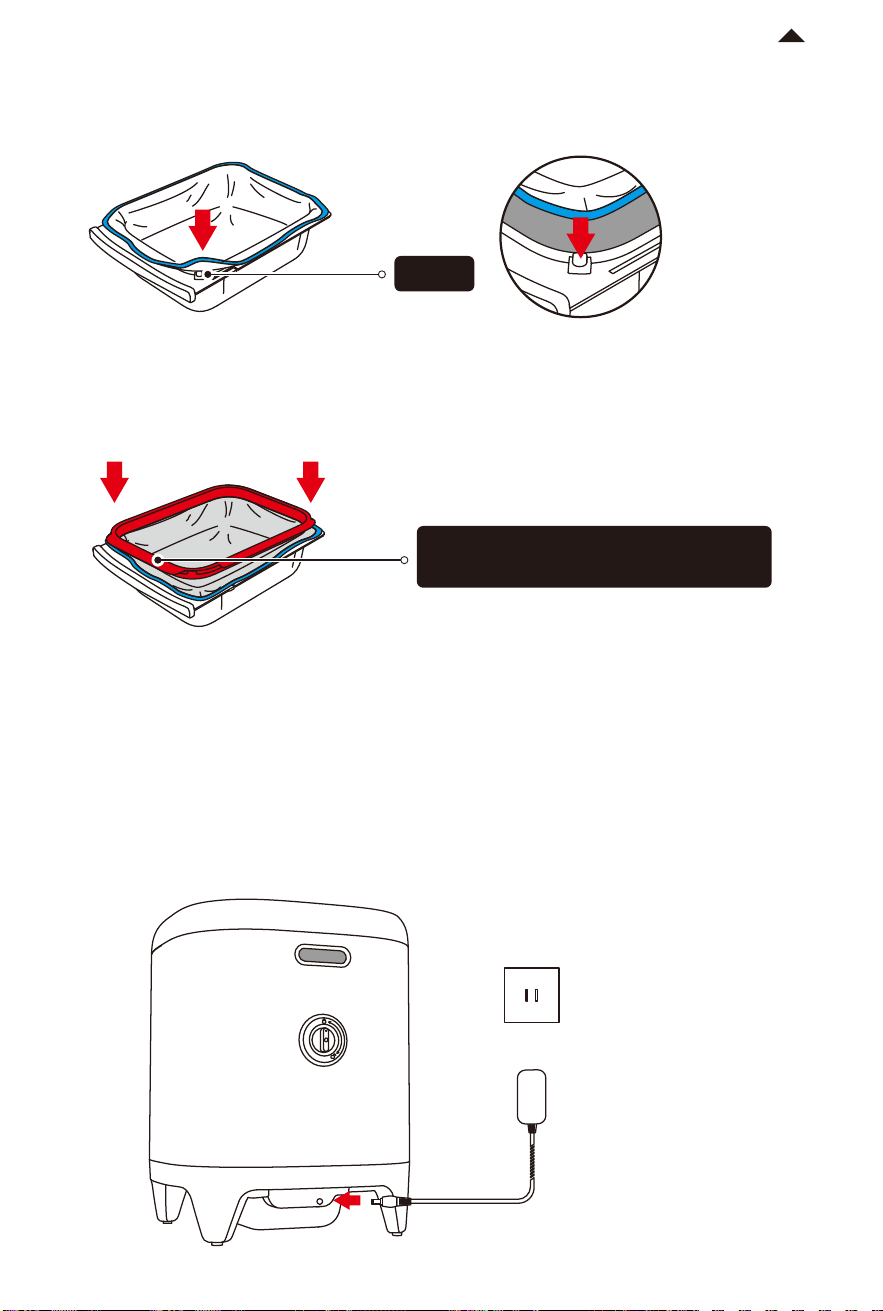
② Spread the trash bag evenly and fasten the four corners onto the four fixtures of the
waste container.
RETURN TO
CONTENT
Take out the power adapter, insert it into the power port on the back of the main unit, and
then insert the plug into the power socket.
3.5 Plugging in
③ Put on the trash bag ring and press it tightly. Smooth the trash bag and put it back into
the bottom of the main unit.
* Note: Please ensure that the trash bag is correctly positioned and that the edges of the bag
are smooth. Incorrect placement may aect the sensing of the amount of cat litter in the
waste container.
Fixture
The wide side of the ring should face
the front side of the waste container.
-9-
HOW TO USE
04
-10-
RETURN TO
CONTENT
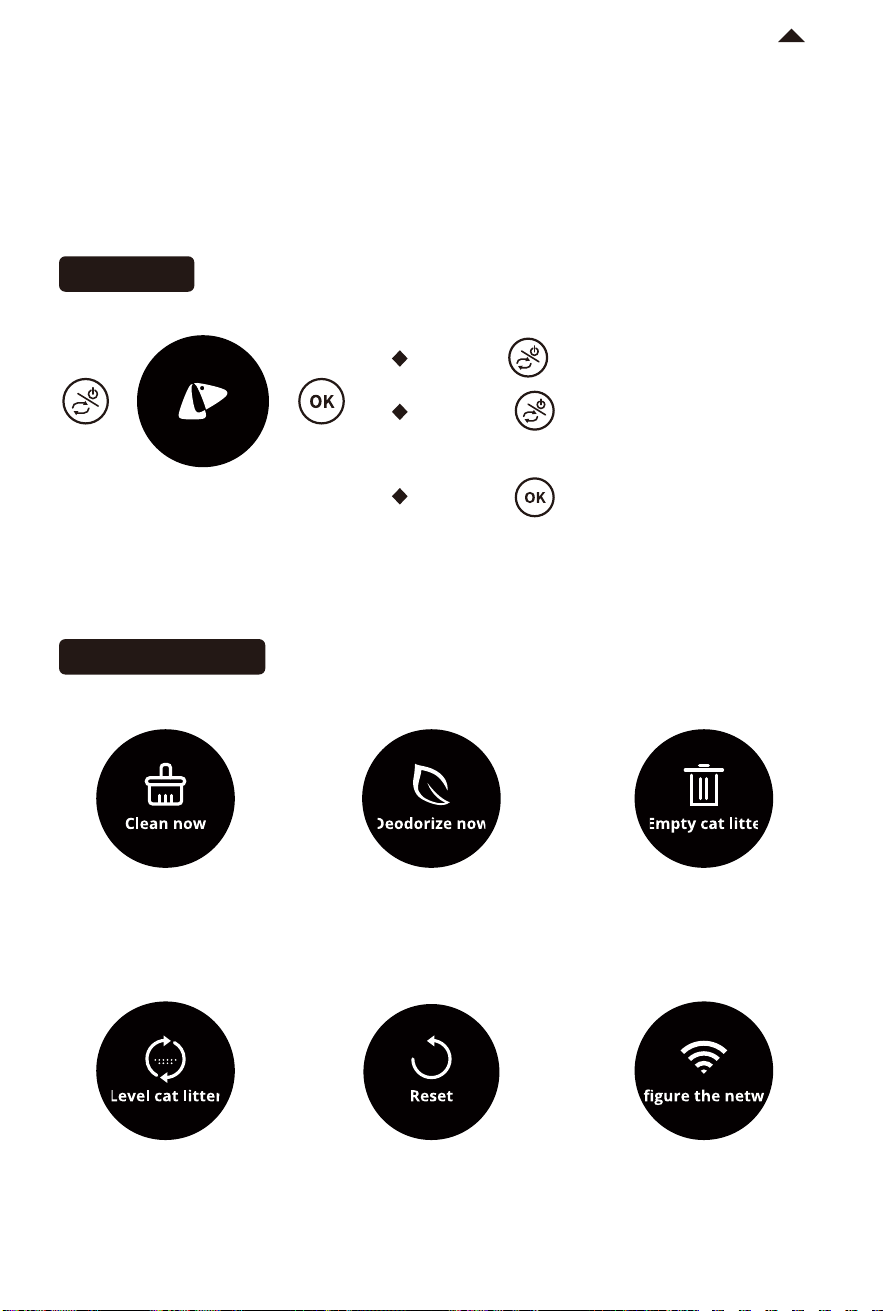
4.1 Operating Main Unit
OLED display
· Long press : Turn on/Turn o
· Short press : Switch functions and the
screen will display the selected function.
· Short press : Execute the selected function.
Begin self-cleaning
Spray deodorization Dump all litter to the
waste container (use
when cleaning the litter box)
Evenly distribute litter
(use aer refilling litter)
Rotate cylinder back
to original position
Connect to Wi-Fi
(use when binding the
litter box to the app)
Button usage
Function Description
猫在厕所内
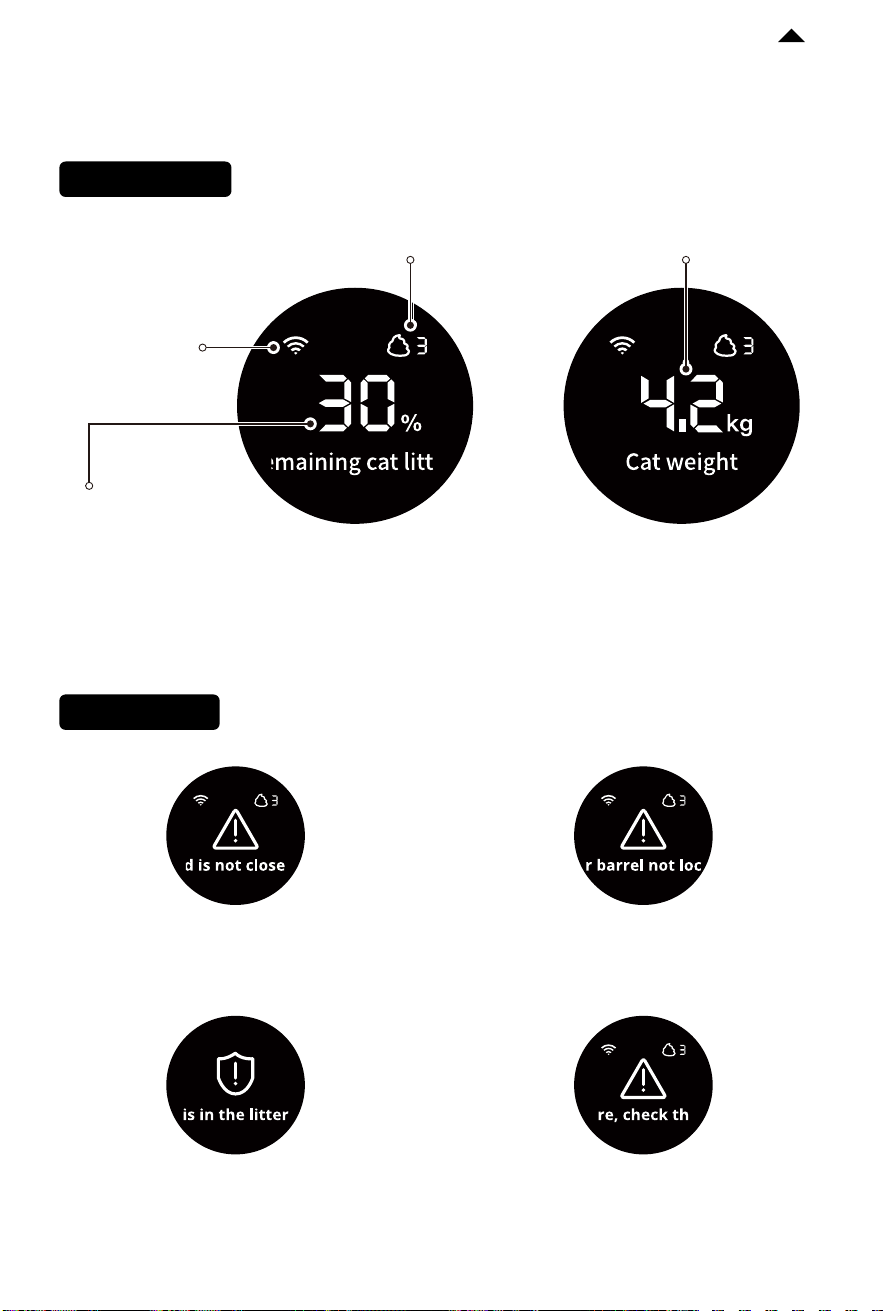
4.2 Display Indication
-11-
RETURN TO
CONTENT
Status Indication
Fault Indication
Network status
Usage frequency
of the day
Please check the direction
of the lid and ensure it is in
the correct position.
Please turn the cylinder knob
on the back of the main unit to
the locked position.
The device will automatically pause
and remind when the pet approaches
or enters the litter box during operation.
Remaining amount
of cat litter
Real-time weight of
the cat in the litter box
Check detailed fault
information in the app.
Please record the type of litter in the app. As the density
of dierent cat litters may vary, the displayed remaining
amount of cat litter may vary slightly.
-12-
RETURN TO
CONTENT
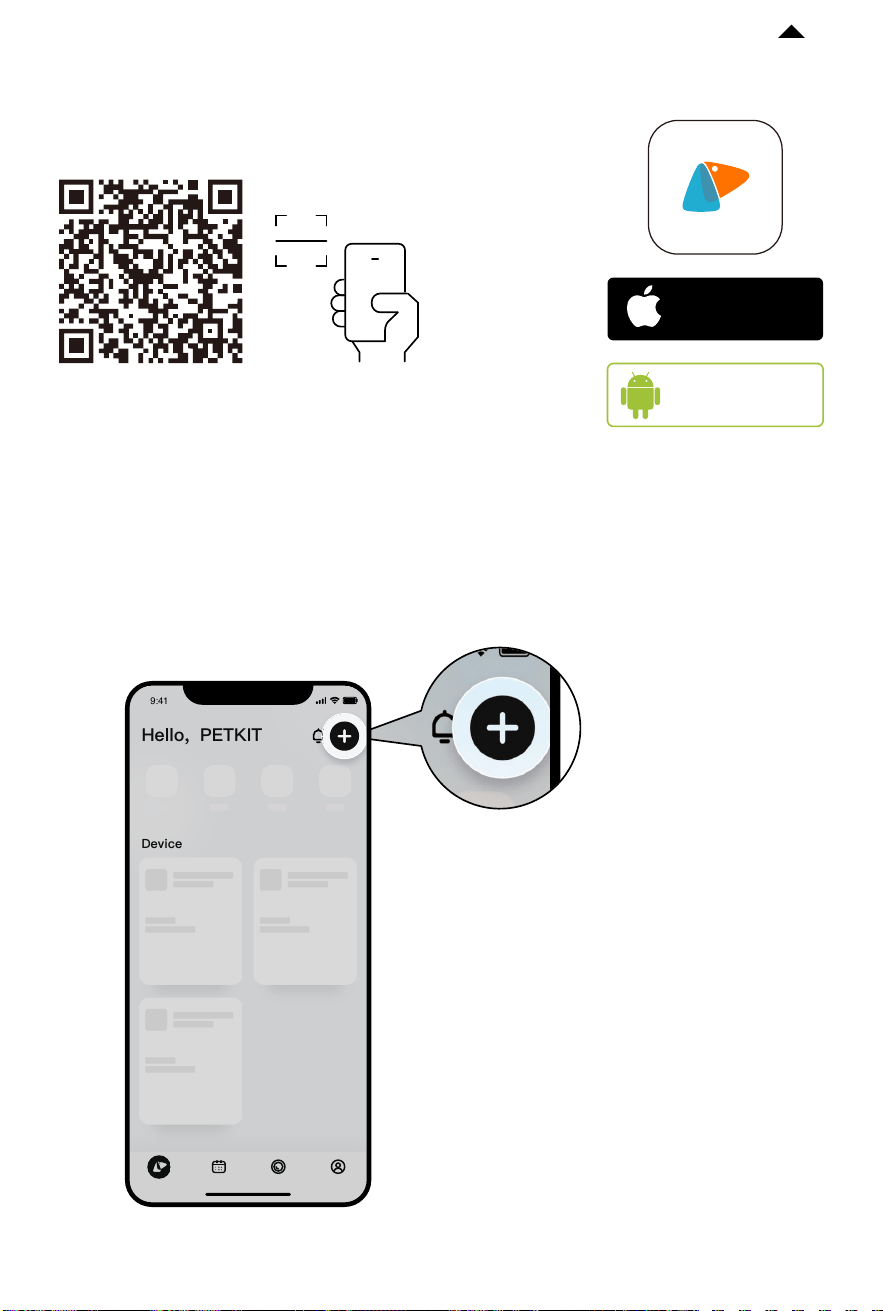
4.3 App Control
① Download and install the app:
② Add the device
Open the PETKIT App and navigate to the home page. Tap the "+" button in the top right
corner to add the device. Select "PETKIT PURAX SELF-CLEANING CAT LITTER BOX".
Download the PETKIT App from App Store
or Android Stores
Available on
Android
stores
TM
Download on the
App Store
* Note: To enhance the user experience, occasional
firmware upgrades may occur. The app interface may
vary based on the actual situation. Please ensure that
you update the firmware version in the app promptly.
Device
电量:100%
0h 8h 16h 24h
小佩智能猫牌
进食次数
5
下次出粮时间:19:30
智能双子星喂食
器
0h 8h 16h 24h
9:41
Hello, PETKIT
-13-
RETURN TO
CONTENT
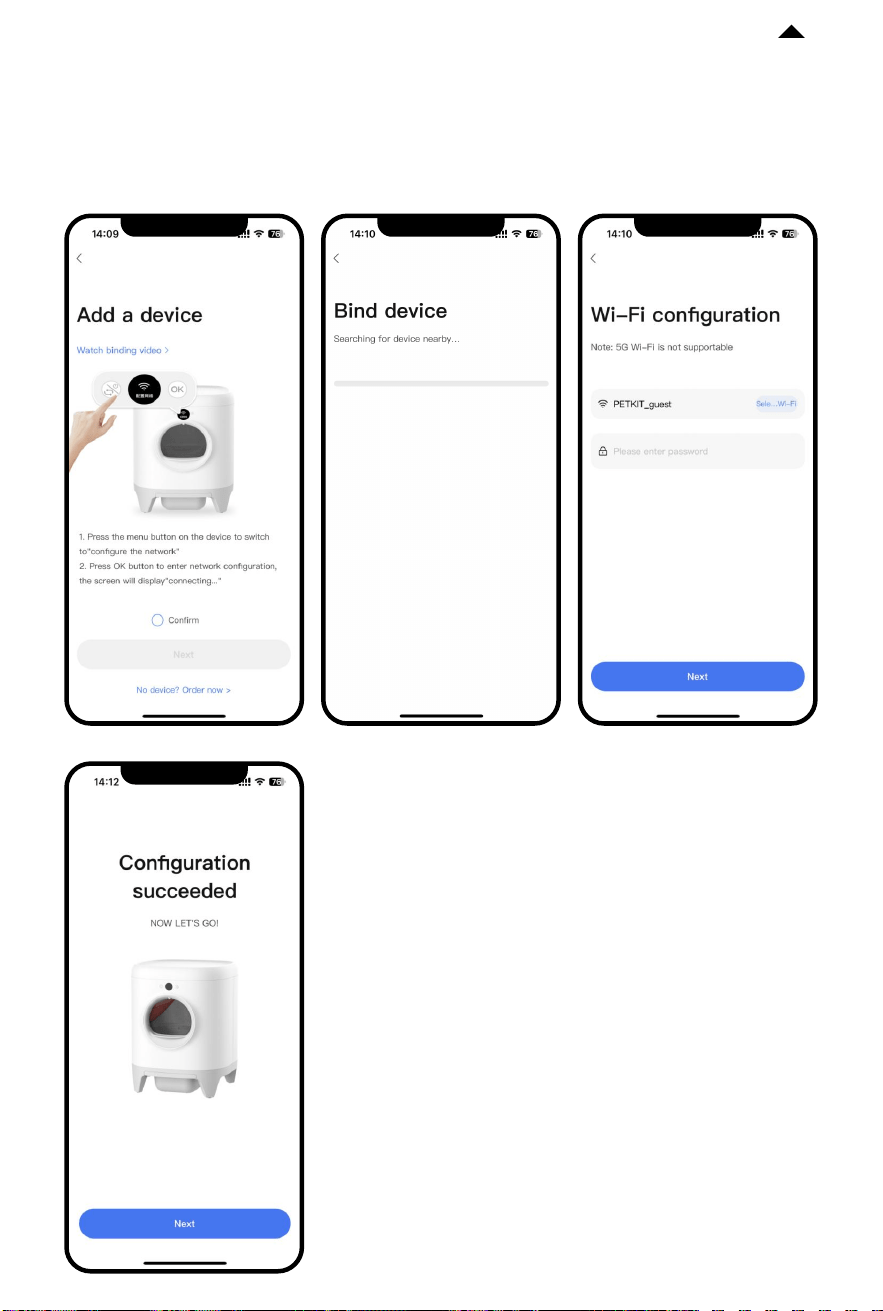
③ Start the connection
Tap the device menu and switch to "Configure the network". Tap the OK button to initiate
the connection. The screen will display "Connecting...". The app will start connecting to the
device. Please wait until the configuration is successful.
* Note: To enhance the user experience, occasional
firmware upgrades may occur. The app interface may
vary based on the actual situation. Please ensure that
you update the firmware version in the app promptly.

-14-
RETURN TO
CONTENT
④ Read replacement guide
To ensure the safety of your pet and the correct usage of this product, please carefully read
the Replacement Guide. Use the product properly aer successfully connecting the device
for the first time.
* Note: To enhance the user experience, occasional
firmware upgrades may occur. The app interface may
vary based on the actual situation. Please ensure that
you update the firmware version in the app promptly.
CLEANING AND MAINTENANCE
05
5.1 Emptying Cat Litter
To ensure the health of your cat, it is important to regularly disassemble and clean the
cylinder.
-15-
When the remaining amount of cat litter is below the specified line , you can use the
"Emptying Litter" function to remove the remaining litter at once.
5.2 Disassembling Cylinder
First, remove the lid of the main unit. Then, turn the cylinder knob on the back of the main
unit clockwise and li the cylinder upward.
RETURN TO
CONTENT
Unlock
-17-
RETURN TO
CONTENT
① Wash the cylinder and litter sier. It is recommended to add an appropriate amount of
detergent and rinse them thoroughly.
② Use a wet towel to wipe the surface and interior of the main unit, ensuring that the
sensors remain clean.
* Note: Aer cleaning, all parts should be reassembled only when they are completely dry.
5.4 Cleaning Main Unit
Infrared Sensor
Anti-pinch Safety Sensors
Entrance Safety Sensors
The main unit should only be wiped clean. It is prohibited to rinse or immerse it in
water as it may cause damage to the product!
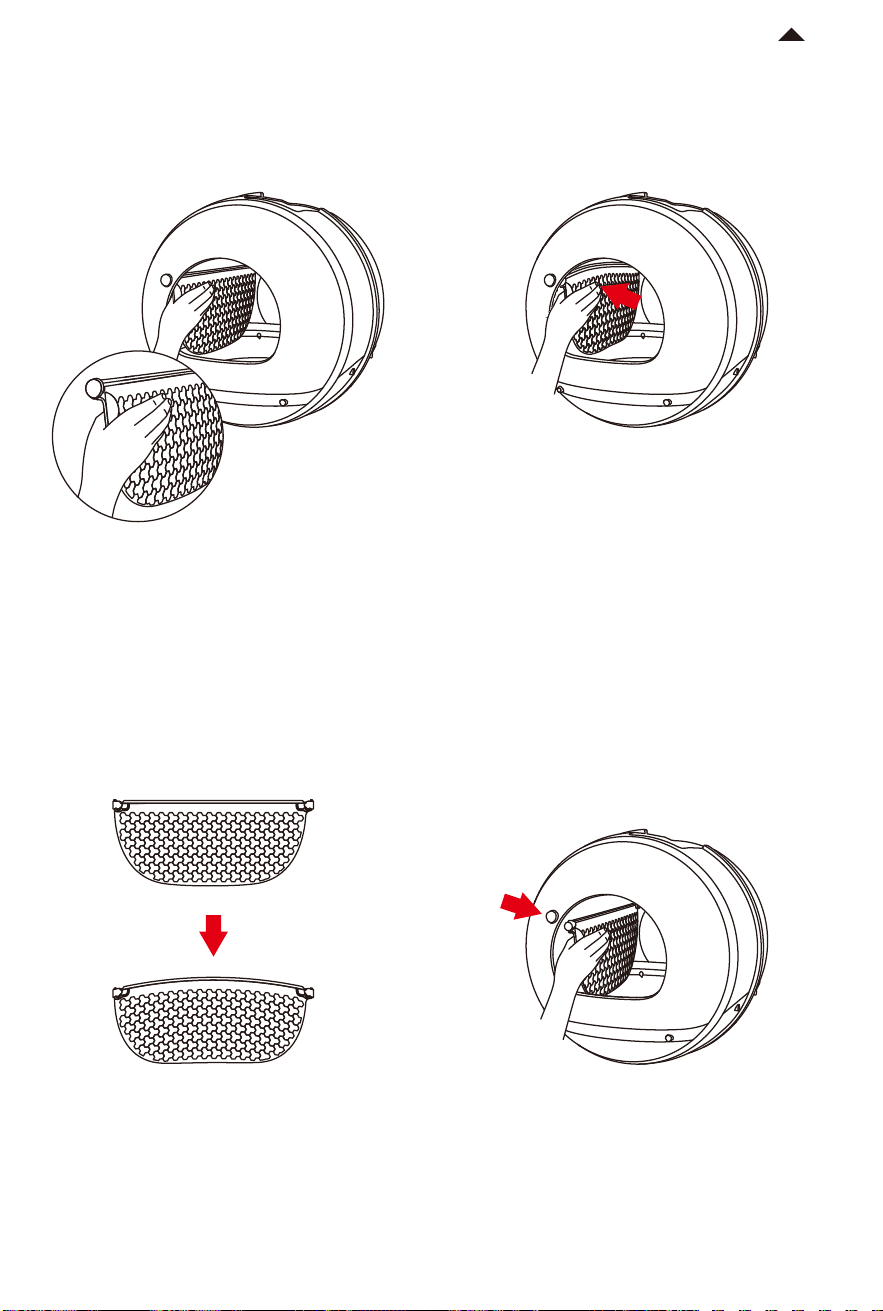
5.5 Installing Litter Sier
-18-
RETURN TO
CONTENT
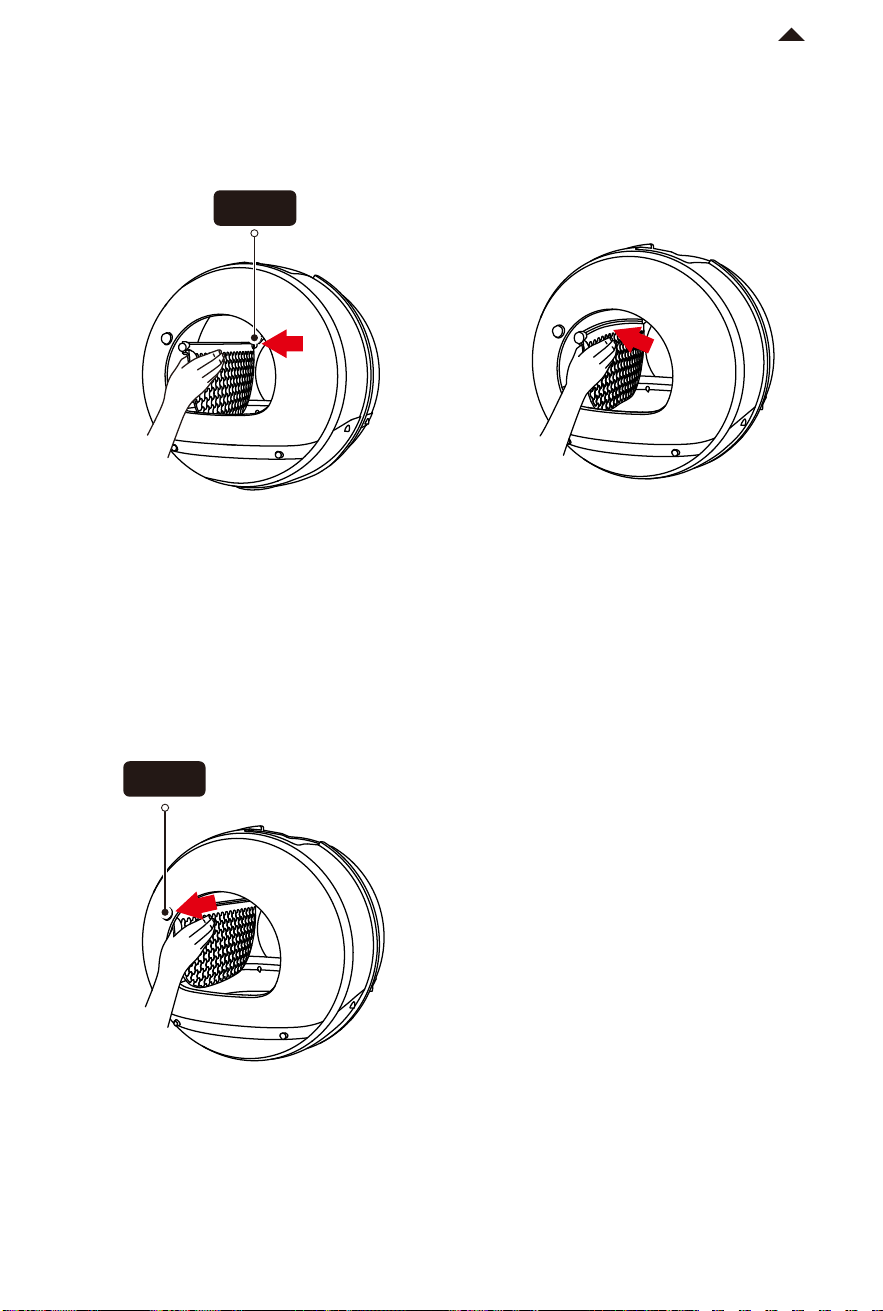
Point A
① Secure the front side of the litter sier
into point A.
② Grasp the litter sier and press it until
it is slightly bent.
③ Secure the other side of the litter sier
into point B.
④ If the litter screen can be shaken back
and forth, the installation is complete.
Point B
-19-
RETURN TO
CONTENT
Grasp the dump port and put the cylinder into the main unit; Aer the cylinder is placed
stably, turn the cylinder knob on the back of the main unit counterclockwise and put on
the lid.
5.6 Installing Cylinder
Locked
The "PETKIT" logo should
always face forward
VIDEO GUIDE
06
Please copy the video URL and open it in your browser to view it.
https://m.youtube.com/watch?v=74Ybb7CuZeA&feature=youtu.be
6.1 Installation & Usage Video
Please copy the video URL and open it in your browser to view it.
https://m.youtube.com/watch?v=ptcG5y6ynrE&feature=youtu.be
6.2 Maintenance & Cleaning Video

FAQ
07
Q: Why does the cylinder rotate automatically when I put it into the machine without any
operation?
A: The device automatically detects the position of the cylinder and restores it to the
original position.
Q: Why does it show that the lid is not in place even though I have already placed it on the
main unit properly?
A: Please ensure that the lid is correctly placed with the "PETKIT" logo facing the display.
Q: Why does the cylinder stop rotating during the working process?
A: During cylinder operation, the device activates comprehensive safety monitoring. It
immediately stops running when a pet gets close or enters, and resumes automatically
once the danger is cleared, with corresponding prompts on the display screen. The litter
box entrance features an invisible safety fence that suspends operation when people
approach.
Q: Why does the waste container display as full even though it is not full?
A: There are sensors on the top of the waste container to detect its fullness. Ensure that the
trash bag is securely placed, press the trash bag ring firmly, and smooth the bag to prevent
it from tilting and blocking the sensors, which could aect the detection.
Q: Why does the display screen turn o?
A: Under normal circumstances, when there is no operation for a certain period of time, the
display screen enters the screen saver mode and shows the dynamic PETKIT logo. If the
display screen is turned o in the App, it will appear as a black screen. Press any button to
illuminate the screen. If the bright screen at night aects your rest, you can adjust the
screen brightness settings.
Q: How do I use the App smart settings?
A: The smart settings for the cat litter box include Automatic Cleaning, Periodic Cleaning,
and Periodic Deodorization. For households with fewer cats (less than 3), it is recommended
to use Automatic Cleaning. For households with more cats (more than 3) or frequent use by
cats, it is recommended to use Periodic Cleaning to avoid excessive cleaning. The device
automatically deodorizes during the cleaning process, and Periodic Deodorization can be
used based on your needs.
-20-
RETURN TO
CONTENT
BASIC SPECIFICATIONS
08
-21-
RETURN TO
CONTENT
A MESSAGE TO OUR VALUED
CUSTOMERS
09
· Thank you for choosing the PETKIT PURAX SELF-CLEANING CAT LITTER BOX.
· It is important to read and follow the User Manual before using the product. By using
this product, you acknowledge that you have read and accepted the safety guidelines.
· PETKIT is not liable for any accidents or injuries resulting from improper use of the
product.
· PETKIT reserves the rights of interpretation and revision.
Name
Code
Dimensions
Weight
PETKIT PURAX SELF-CLEANING CAT LITTER BOX
P9901
522*504*642mm
About 15kg (including adapter)
Rated Voltage
Connection
Application
12V
Wi-Fi
Rated Power 24W
Cat
USER SAFETY GUIDE
10
* Failure to follow the safety guides outlined below can result in product malfunction or
other unforeseen mishaps.
· Please install and use the product as instructed in the User Manual.
· Pets under six months of age are not recommended to use this product.
· The product is for indoor use only. Avoid direct sunlight exposure and keep it away from
open flames.
· Although the device uses low voltages, pets chewing on the power cord can cause electrical
leakage. Please ensure proper guidance for your pets' use of the product.
· Use only the original adapter to avoid device damage or safety hazards.
· Place the device on a level surface to prevent purifying liquid leakage or equipment
abnormalities.
· Do not immerse or soak the bottom of the main body of the product in water.
· If you are not using or moving the product for an extended period, it is recommended to
unplug the power cord.
· Children should use this product under the supervision and guidance of adults.
· Repairs should only be performed by professionals to avoid safety hazards.
· Before leaving for an extended period, ensure that there is enough litter in the litter box
and suicient space in the waste container.
· If you encounter any issues with the product, please contact our customer service for
assistance.
-22-
RETURN TO
CONTENT