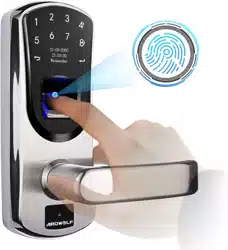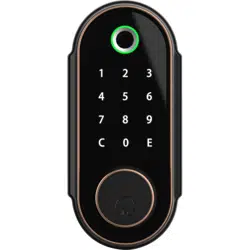
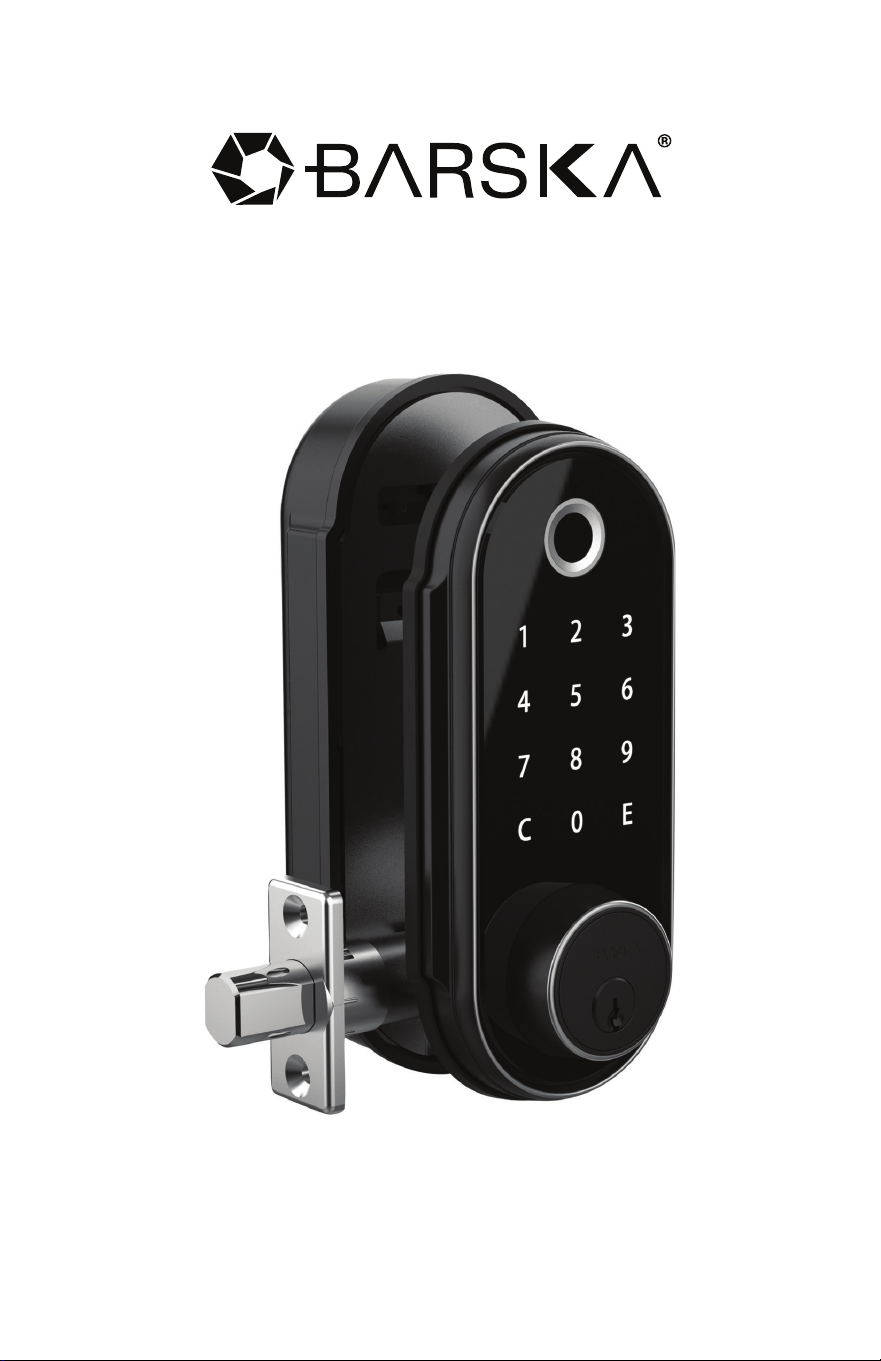
Biometric & Keypad Security Door Lock
BC637
3/20
© 2020 BARSKA® | Pomona, CA 91767, USA
(t) 888.666.6769 | (f) 909.445.8169 | www.barska.com
www.barska.com www.barska.com
2 3
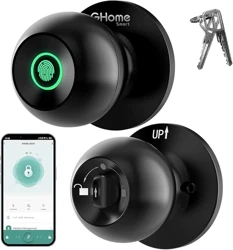
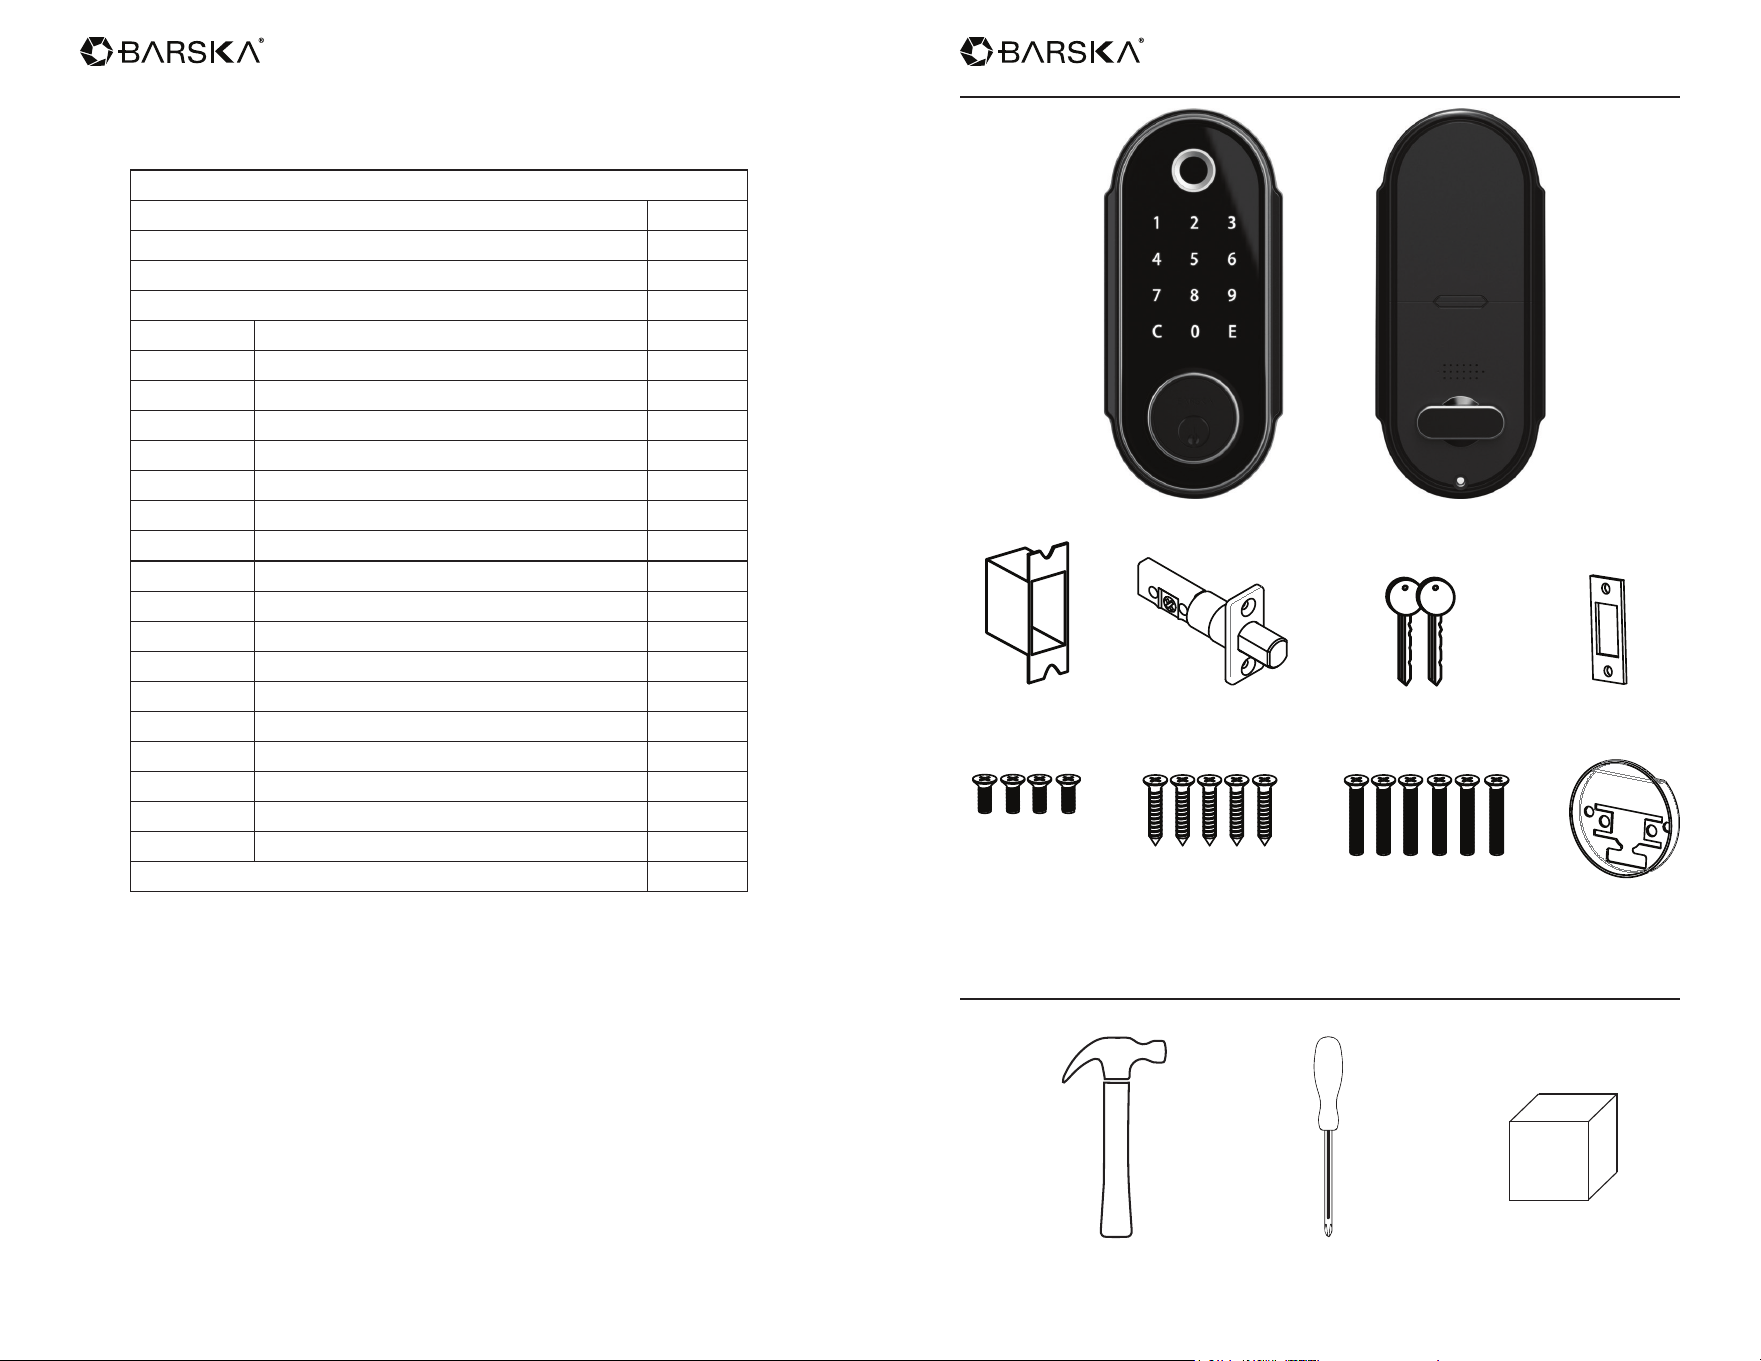
Front Lock Body Back Lock Body
Strike Box Latch Keys Strike Plate
4pcs M4
*8mm screws
5pcs M5
*14mm self-tapping
screws
6pcs M4
*24mm screws
Adaptor Ring
Parts
Additional Tools for Installation (Not Included)
Hammer Cross Screwdriver Strike Wood Block
Contents
Parts 3
Additional Tools for Installation 3
Installation Instructions 4
Operation Instructions 13
Parts of The Door Lock 13
Install Batteries 13
Before You Start to Use 14
Change the Master Code 14
Register a User Code 15
Register a Fingerprint 15
Delete Single User Code and Fingerprint 15
Delete All User Codes and Fingerprints 16
Auto-Lock Function 16
Restore to Factory Default Setting 17
Four Ways to Unlock the Door 17
Three Ways to Lock the Door 17
Lock Out Mode 17
Anti-Beep Password Function 18
Temporary Code Function 18
Vacation Mode 19
Sound On & Off 19
Low Battery Status 20
Warranty 21
www.barska.com www.barska.com
4 5
Installation Instructions
1. Check dimensions
2-3/8"(60mm)
1-1/2"
38mm
2-1/8"
54mm
or
o
1"
25mm
or . o
2-3/4"(70mm)
1-3/8"-1-3/4"
35mm-44mm
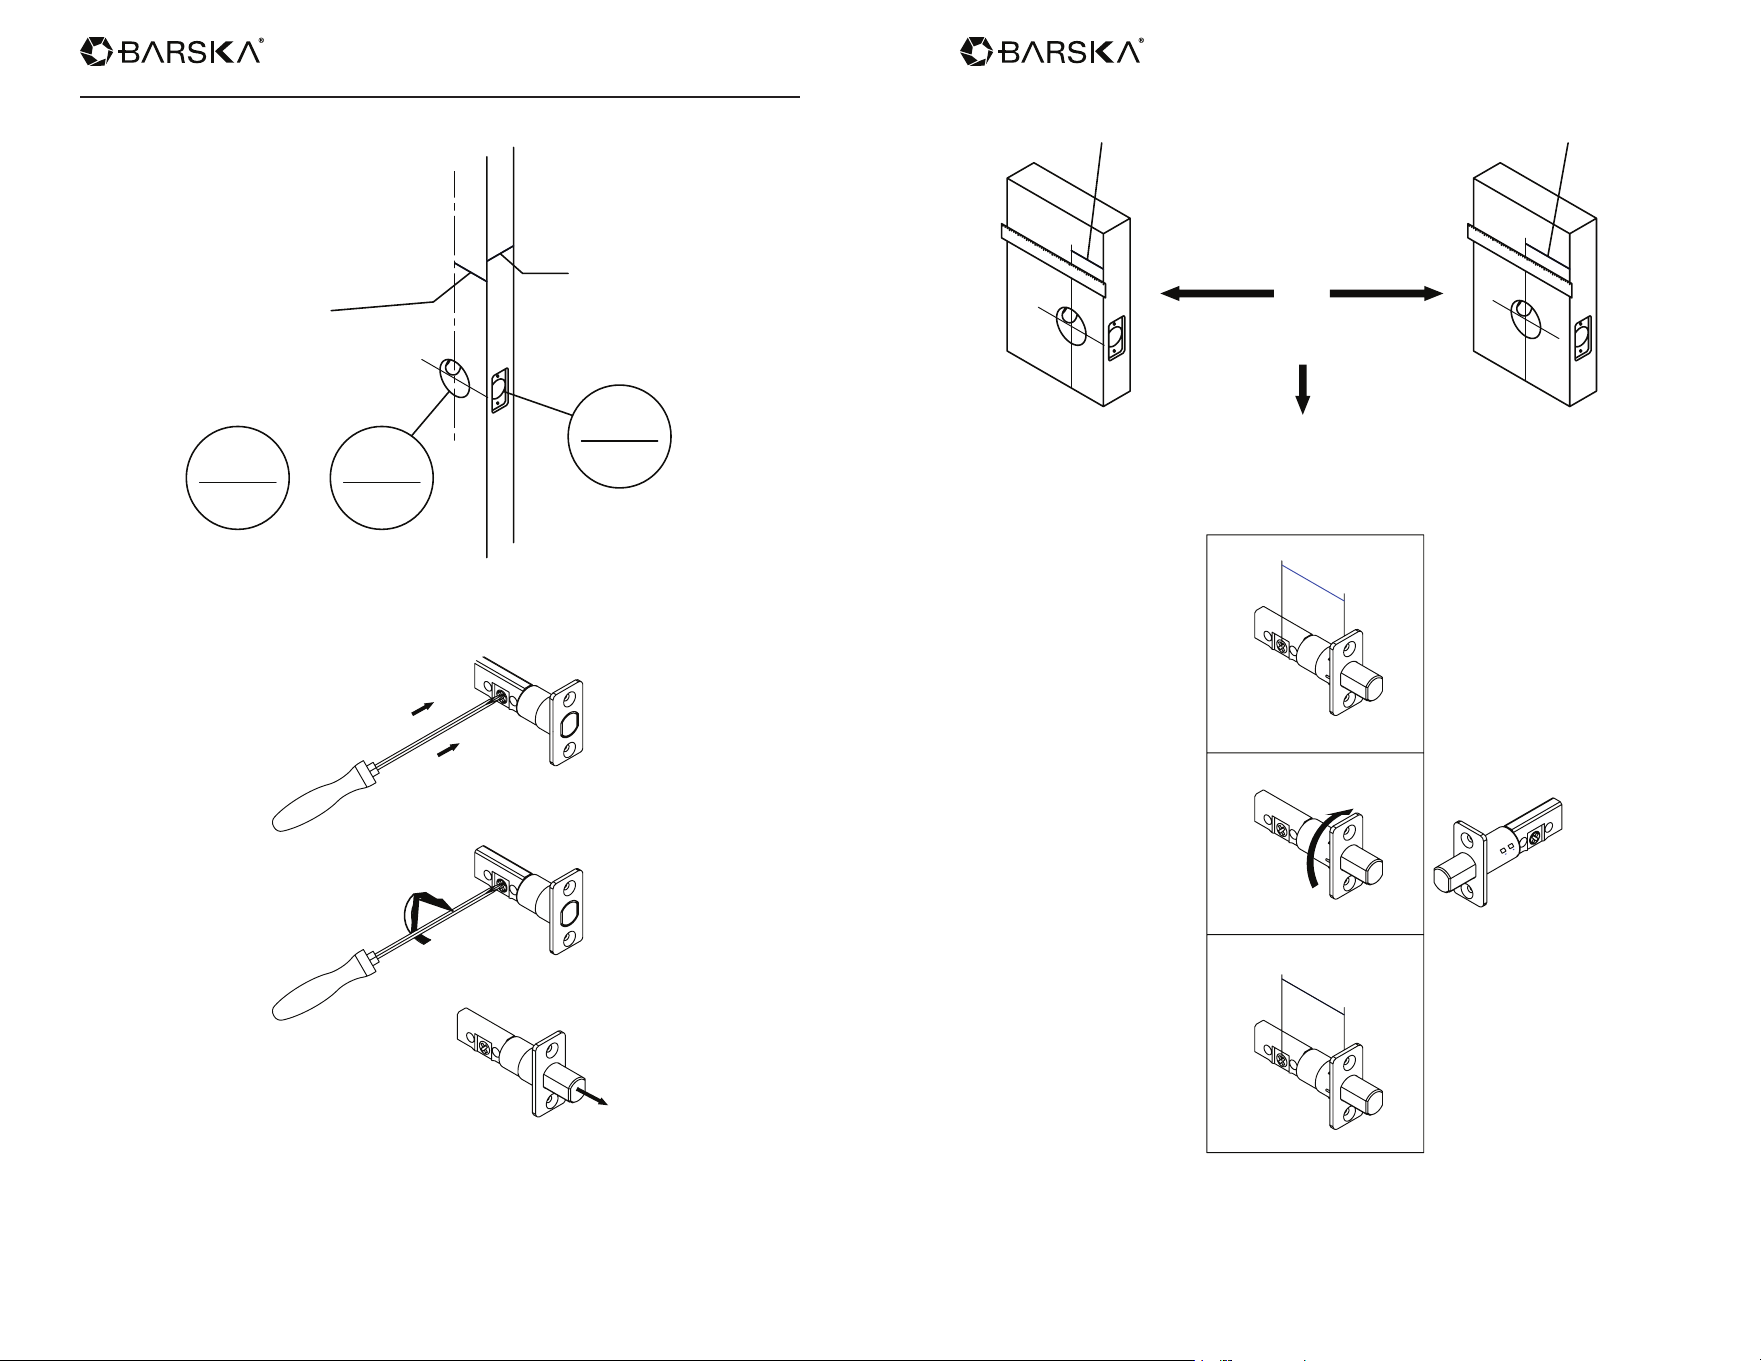
2. Check if the latch works well
A/A2
3. Check the position of the front installation hole
2-3/8"(60mm) 2-3/4"(70mm)
or
o
2-3/8"
60mm
2-3/4"
70mm
30°
70
2
3
4
"
60
2
3
8
"
Pre-set drive-in latch is 60mm
Adjust the latch to 70mm as below if needed
www.barska.com www.barska.com
6 7
4. Check the size of the side installation hole
UP
Insert the latch to the side hole
(Please follow the “up” direction)
Fix the bold with 2pcs self-tapping
screws
M5*14mm
Self-Tapping
Screws x 2
Check the latch function
with a screwdriver
5. Check the size of the front installation hole
or
o
2-1/8"(54mm) 2-1/8"(38mm)
up
38mm
1-1/2"
up
54mm
2-1/8"
www.barska.com www.barska.com
8 9
6.
or
o
2-1/8"(54mm) 2-1/8"(38mm)
Install smaller size adaptor ring
onto the front door
Turn the bolt out, straightly put
the exterior keypad through
the holes on the latch
7.
Pull the connecting wire through the
square hole on the back mounting
plate, screw the plate to the door back
with 2pcs M4 * 24mm screws
M4*24mm
screws
Screws x 2
M5*14mm
Self-Tapping
Screws x 1
Do not use an
electric screw driver
www.barska.com www.barska.com
10 11
8.
L
R
L
R
L
R
L
R
When the door is
left side opening
Pull the interior lid switch
to the left
Pull the interior lid switch
to the right
When the door is
right side opening
9. Inset the connecting wire to the cable on the interior lid
Left side opening
1. When the lock bolt retracted,
switch button stays level
2. When the lock bolt turned
out, switch button
stays straight
Right side opening
1. When the lock bolt retracted
switch button stays straight
2. When the lock bolt turned
out, switch button stays level
www.barska.com www.barska.com
12 13
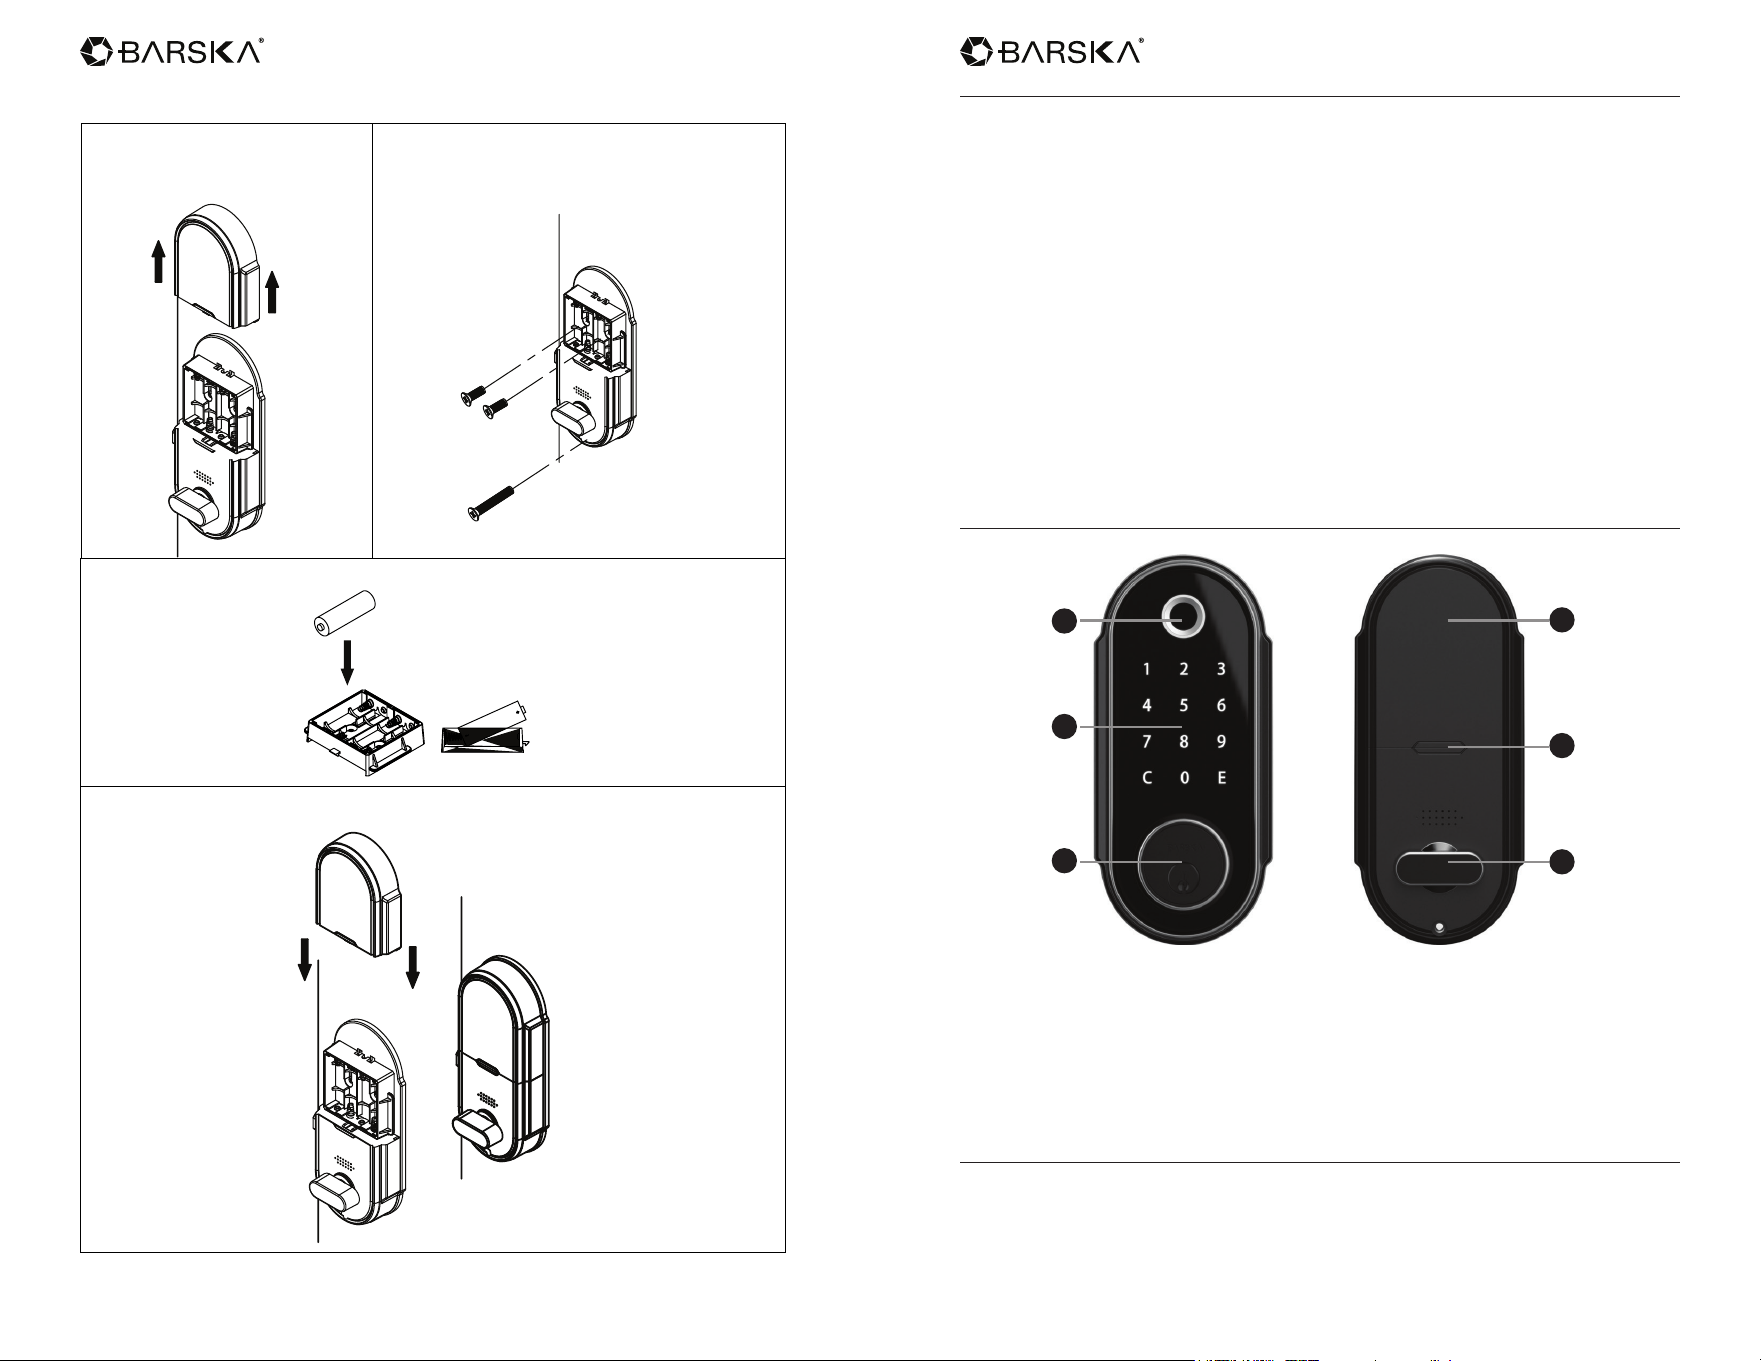
10. Install the battery
4. Install the batter case cover
3. Insert 4AA batteries
2. Fix the interior lid to the mounting plate
with 2pcs M4*8mm and 1pc
M4*24mm screws
1. Pull the batter case
cover upright
Operation Instructions
* Please read all instructions before using this door lock
1. New door lock is in factory default mode: No ngerprint can open the door lock
and Default Master Code is 123456. Under factory default mode, you can use
default master code to open the lock.
2. For security purposes, change the default master code as soon as possible.
3. Door lock can be opened by ngerprint, user code, master code, or
emergency keys.
4. Register ngerprints and PIN codes and test a few times before closing
the door.
5. Test door lock functions before installing onto door.
6. Test with a non-registered ngerprint and non-registered user code to make
sure that the registrations are successfully.
7. Test the keys and store them in proper place in case power off or
malfunction situation.
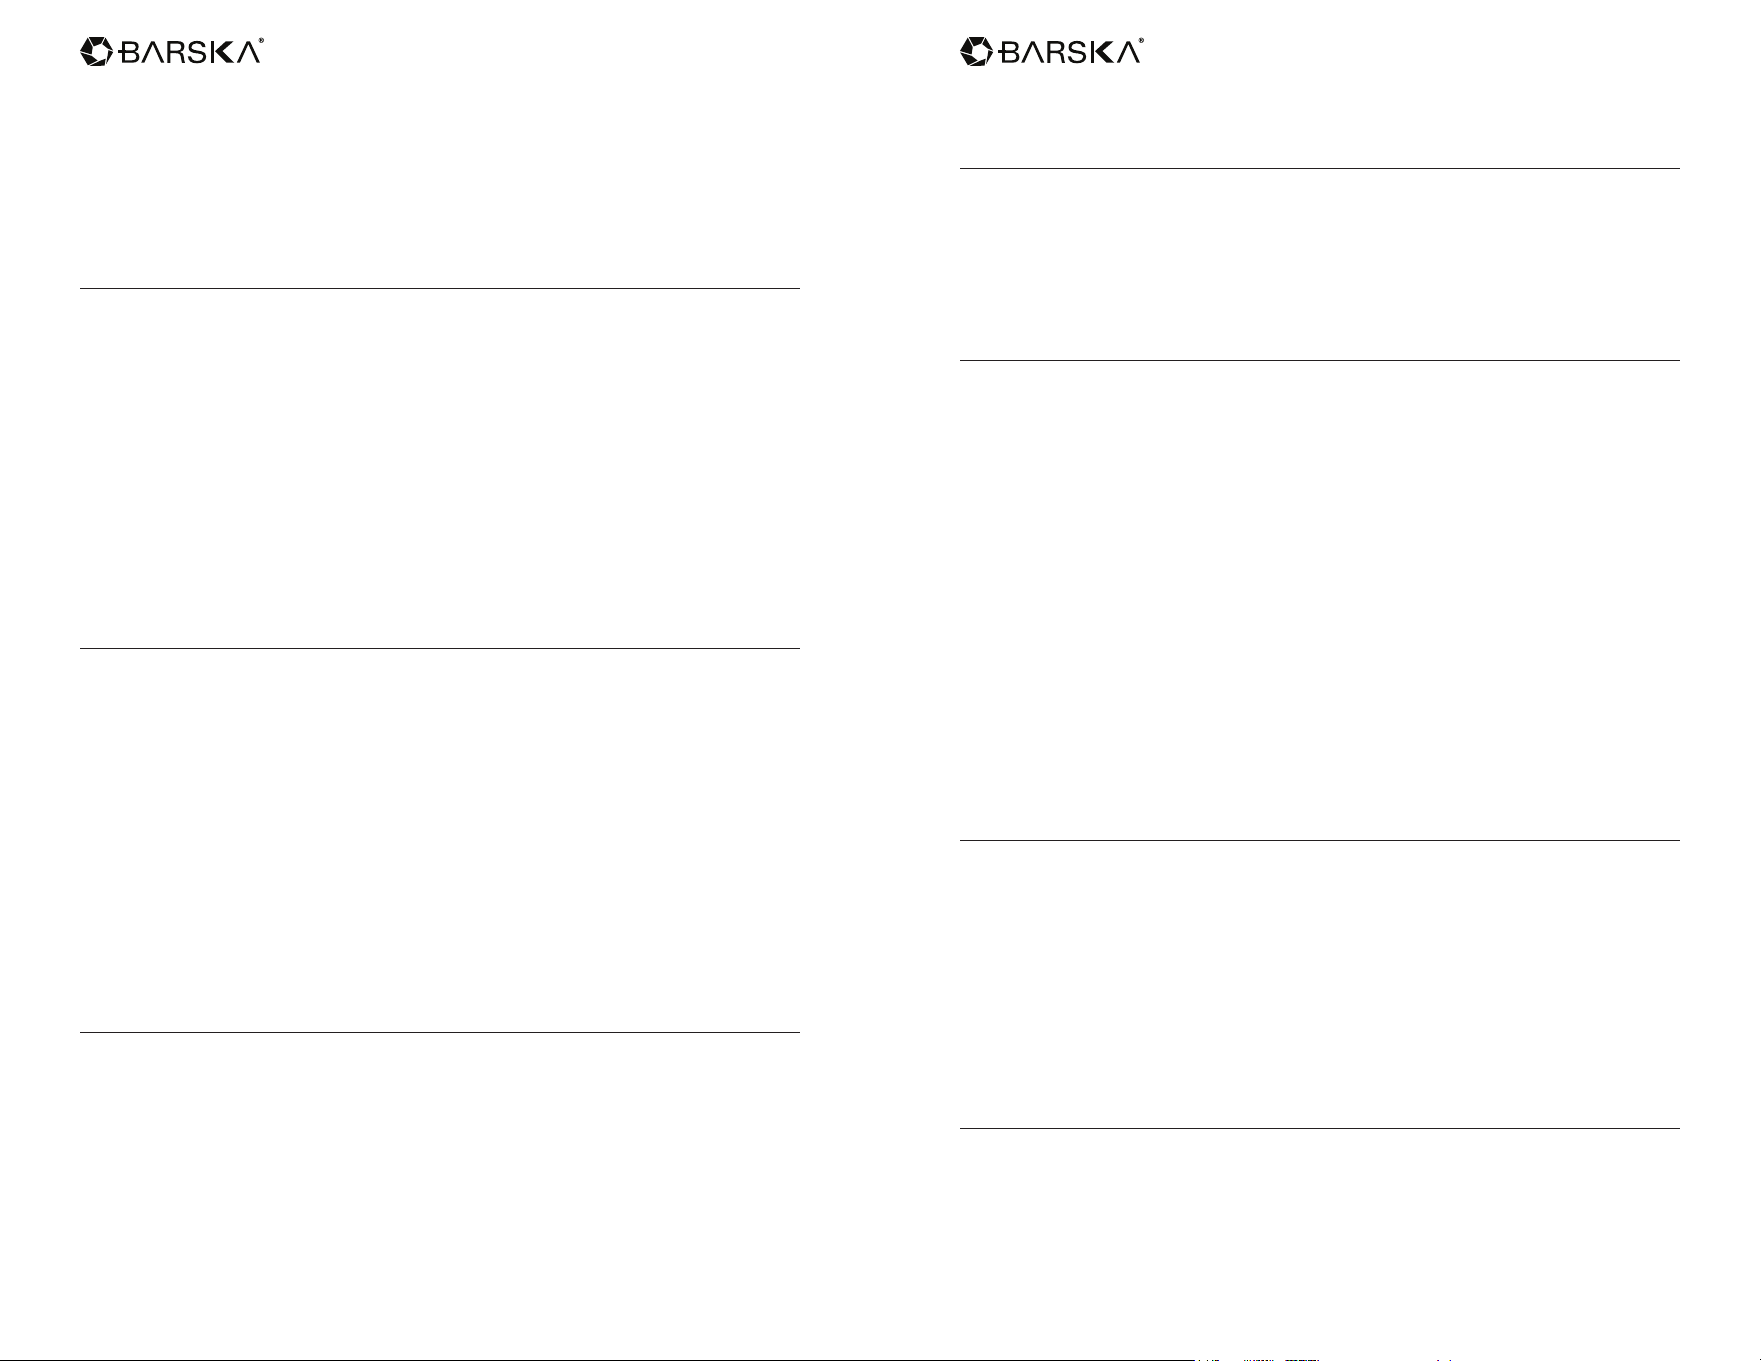
Parts of The Door Lock
A. Fingerprint Scanner & Indicator Lights
B. Keypad
C. Emergency Key Access
D. Battery Cover
E. Battery Cover Button
F. Knob
Install Batteries
1. Require 4 new Alkaline AA batteries (not included)
2. Press in the battery cover button and gently lift the battery cover to expose the
battery compartment.
A
B
C
D
E
F

www.barska.com www.barska.com
14 15
3. Insert 4 new Alkaline AA batteries into the battery compartment and pay
attention to the polarity of the batteries.
4. Gently place the battery cover back into place
NOTE:
- Do not mix old and new batteries.
Before You Start to Use
1. The lock retains one master code and 50 user codes (50 user IDs).
2. The lock includes 50 user IDs (1-50). Each ID contains a single user’s code &
a single ngerprint (you can set one user code & one ngerprint for each ID or
set either one user code or one ngerprint for each ID. Don’t need to set both
to get the access.) Each user code must be set with 4-8 digits.
*If the ID has registered before, register to the same ID will override the
previous user’s code and ngerprint.
3. The lock is with automatic deadbolt. Please use it with latching handle which
can x the deadbolt in right position to avoid the door can’t
open/close properly.
4. Use the key to check if the locking mechanism works well.
5. Try to use factory default master code to unlock the door; test if the auto-lock
feature works well. (Please refer to the section of Auto-Lock feature for
setting up.)
6. The lock is powered by 4 AA batteries (not included) that can last up to 8
months depending on usage. We suggest the users check the battery status
and replace with new batteries every six months.
Use factory default master code to unlock the safe
• Factory Default Master Code: 123456
• Touch the screen to activate the keypad.
• Press and HOLD “E” for 3 seconds and you will hear one beep.
• Input “123456” and conrm by press “E”; after three short beeps are heard, the
door will open automatically.
NOTE:
- Please change the factory default master code to your owns after the rst
usage.
Change the Master Code
1. Touch the screen to activate the keypad.
2. Input the current master code, conrm by press “E” and will hear three
short beeps.
3. Press “4”, conrm by press “E” and will hear three short beeps.
4. Enter a new master code (4-8 digits), conrm by press “E” and will hear three
short beeps.
5. Re-enter the new master code again, conrm by press “E” and will hear three
short beeps.
6. A new master code is set successfully.
* Faulty operation will cause ve long beeps. Please set it by following
above steps again.
Register a User Code
1. Touch the screen to activate the keypad.
2. Input the master code, conrm by press “E” and will hear three short beeps.
3. Press “1”, conrm by press “E” and will hear three short beeps.
4. Press User ID (ID: 1-50), conrm by press “E” and will hear three short beeps.
5. Enter a new user’s code (4-8 digits), conrm by press “E “. Three short beeps
will be heard and the light of keypad keeps on.
6. Re-enter the new user code, conrm by press “E”.
7. Keypad will beep three times shortly and the light of keypad will disappear. A
new user code is registered successfully.
* Faulty operation will cause ve long beeps. Please restart from the rst
step of this section.
* If the ID has registered before, register to the same ID will override the
previous user’s code.
Register a Fingerprint
1. Touch the screen to activate the keypad.
2. Input the master code, conrm by press “E” and will hear three short beeps.
3. Press “1”, conrm by press “E” and will hear three short beeps.
4. Press User ID (ID: 1-50), conrm by press “E” and will hear three short beeps.
5. The blue light around the ngerprint scanner stays on.
6. Put your nger on the ngerprint scanner, a single beep stands for one time
successful setting of the ngerprint. After a single beep is heard, please
release your nger; repeat 6 times. (When you put your ngerprint on scanner
each time, please slightly change the position of your nger. Therefore, the
system will have a full image of your nger after you repeat this step 6 times).
A user’s ngerprint is registered successfully after three short beeps and the
light will turn to green.
* Faulty operation will cause ve long beeps. Please restart from the rst
step of this section.
* If the ID has registered before, register to the same ID will override the
previous user’s ngerprint.
Delete Single User Code and Fingerprint
1. Touch the screen to activate the keypad.
2. Input the master code, conrm by press “E” and will hear three short beeps.
3. Press “2”, conrm by press “E” and will hear three short beeps.
4. Enter the specic User ID (ID: 1-50) you would like to delete, conrm by press
www.barska.com www.barska.com
16 17
“E”. Three short beeps will be heard and the light of keypad keeps on.
5. Re-enter the ID, conrm by press “E”. Keypad beeps three times shortly and
the light of keypad will disappear. The user’s code and ngerprint of a specic
ID No. is deleted successfully.
* Faulty operation will cause ve long beeps. Please restart from the rst
step of this section.
Delete All User Codes and Fingerprints
1. Touch the screen to activate the keypad.
2. Input the master code, conrm by press “E” and will hear three short beeps.
3. Press “3”, conrm by press “E”. Three short beeps will be heard and the light
of keypad keeps on.
4. Re-enter the master code and conrmed by “E”.
5. Keypad beeps three times shortly and the light of keypad will disappear. All
users’ codes and ngerprints are deleted successfully.
* Faulty operation will cause ve long beeps. Please restart from the rst
step of this section.
* Please consider carefully before doing this operation. Once this operation
is conducted, all codes will be deleted & could not be reverted.
Auto-Lock Function
Door lock will be auto-locked after the time you set up.
Turn on the Auto-Lock Function
1. Touch the screen to activate the keypad.
2. Enter master code and conrmed by “E” and will hear three short beeps.
3. Press “5”, conrm by press “E” and will hear three short beeps.
4. Enter “Your Desired Auto-Lock Time” (you can set up from 5-900 seconds),
and conrmed by “E”.
*For example, if you want to set up Auto-Lock function in 20 seconds, enter
“20” and conrmed by “E”.
5. Keypad beeps three times shortly; the auto locking has set successfully
Turn off the Auto-Lock Function
Door lock will not be auto-locked once you turn off this function. Please make
sure that you lock the door while you are leaving.
1. Touch the screen to activate the keypad.
2. Enter master code and conrmed by “E” and will hear three short beeps.
3. Press “5”, conrm by press “E” and will hear three short beeps.
4. Enter “00”, and conrmed by “E”.
5. Keypad beeps three times shortly; the auto locking has turned off successfully.
* Faulty operation will cause ve long beeps. Please enter the codes to set
it by above steps again.
Restore to Factory Default Setting
1. Take out all batteries; touch the keypad screen for electric discharging.
2. Install all batteries after 10 seconds and will hear two short beep
3. Within 2 seconds, press “C” three times
4. Keypad beeps three times shortly and the lock is restored to factory default
setting (all users’ code and ngerprint codes will be deleted at the meantime)
Four Ways to Unlock the Door
1. Open the lock with master code:
- Touch the screen to activate the keypad.
- Press and HOLD “E” for 3 seconds and you will hear one beep.
- Input the master code and conrm by press “E”; after the short three beeps,
the lock will open automatically.
2. Open the lock with user code:
- Touch the screen to activate the keypad.
- Enter a user’s code and conrmed by “E”. Lock opens after three
short beeps.
3. Open the lock with ngerprint:
- Put a registered ngerprint on ngerprint scanner. Once the scanner accepts
the ngerprint, the indicator light will turn green and the lock will open after
three short beeps.
4. Use an override key:
- Insert the override key; turn counter clockwise to unlock the door.
* Faulty operation will cause ve long beeps. Please try it again.
Three Ways to Lock the Door
1. When you are inside of the house, turn the door lock knob at the back door to
lock the door.
2. When you are outside of the house, touch the screen to activate the keypad
and press “E”. The locking bolt will automatically pull out and one short beep
will be heard. Please re-check if the door is locked.
3. Set the Auto-Lock function to lock the door. Please refer to the instruction
within Auto-Lock section.
* Please make sure that your door is locked while you are leaving.
Lock Out Mode
1. Entry the wrong code consecutively for 3 times, the keypad will shut down for
15 seconds; 3 times more wrong entries will shut down the keypad 1 minutes;
3 times wrong entries again will shut down the keypad for 15 minutes. While
shutting down, even a correct code won’t open the door; only an override key
can unlock the door.
www.barska.com www.barska.com
18 19
2. Entry the wrong ngerprint code consecutively for 6 times, the keypad will
shut down for 15 seconds; 6 times more wrong entries will shut down the
keypad 1 minutes; 6 times wrong entries again will shut down the keypad 15
minutes. While shutting down, even a correct code won’t open the door; only
an override key can unlock the door.
* During the lock-out duration, the alarm will keep on.
* While shutting down, any touch on the keypad will cause faulty operation
of ve long beeps.
* Remove the batteries will release the keypad from shutting down mode.
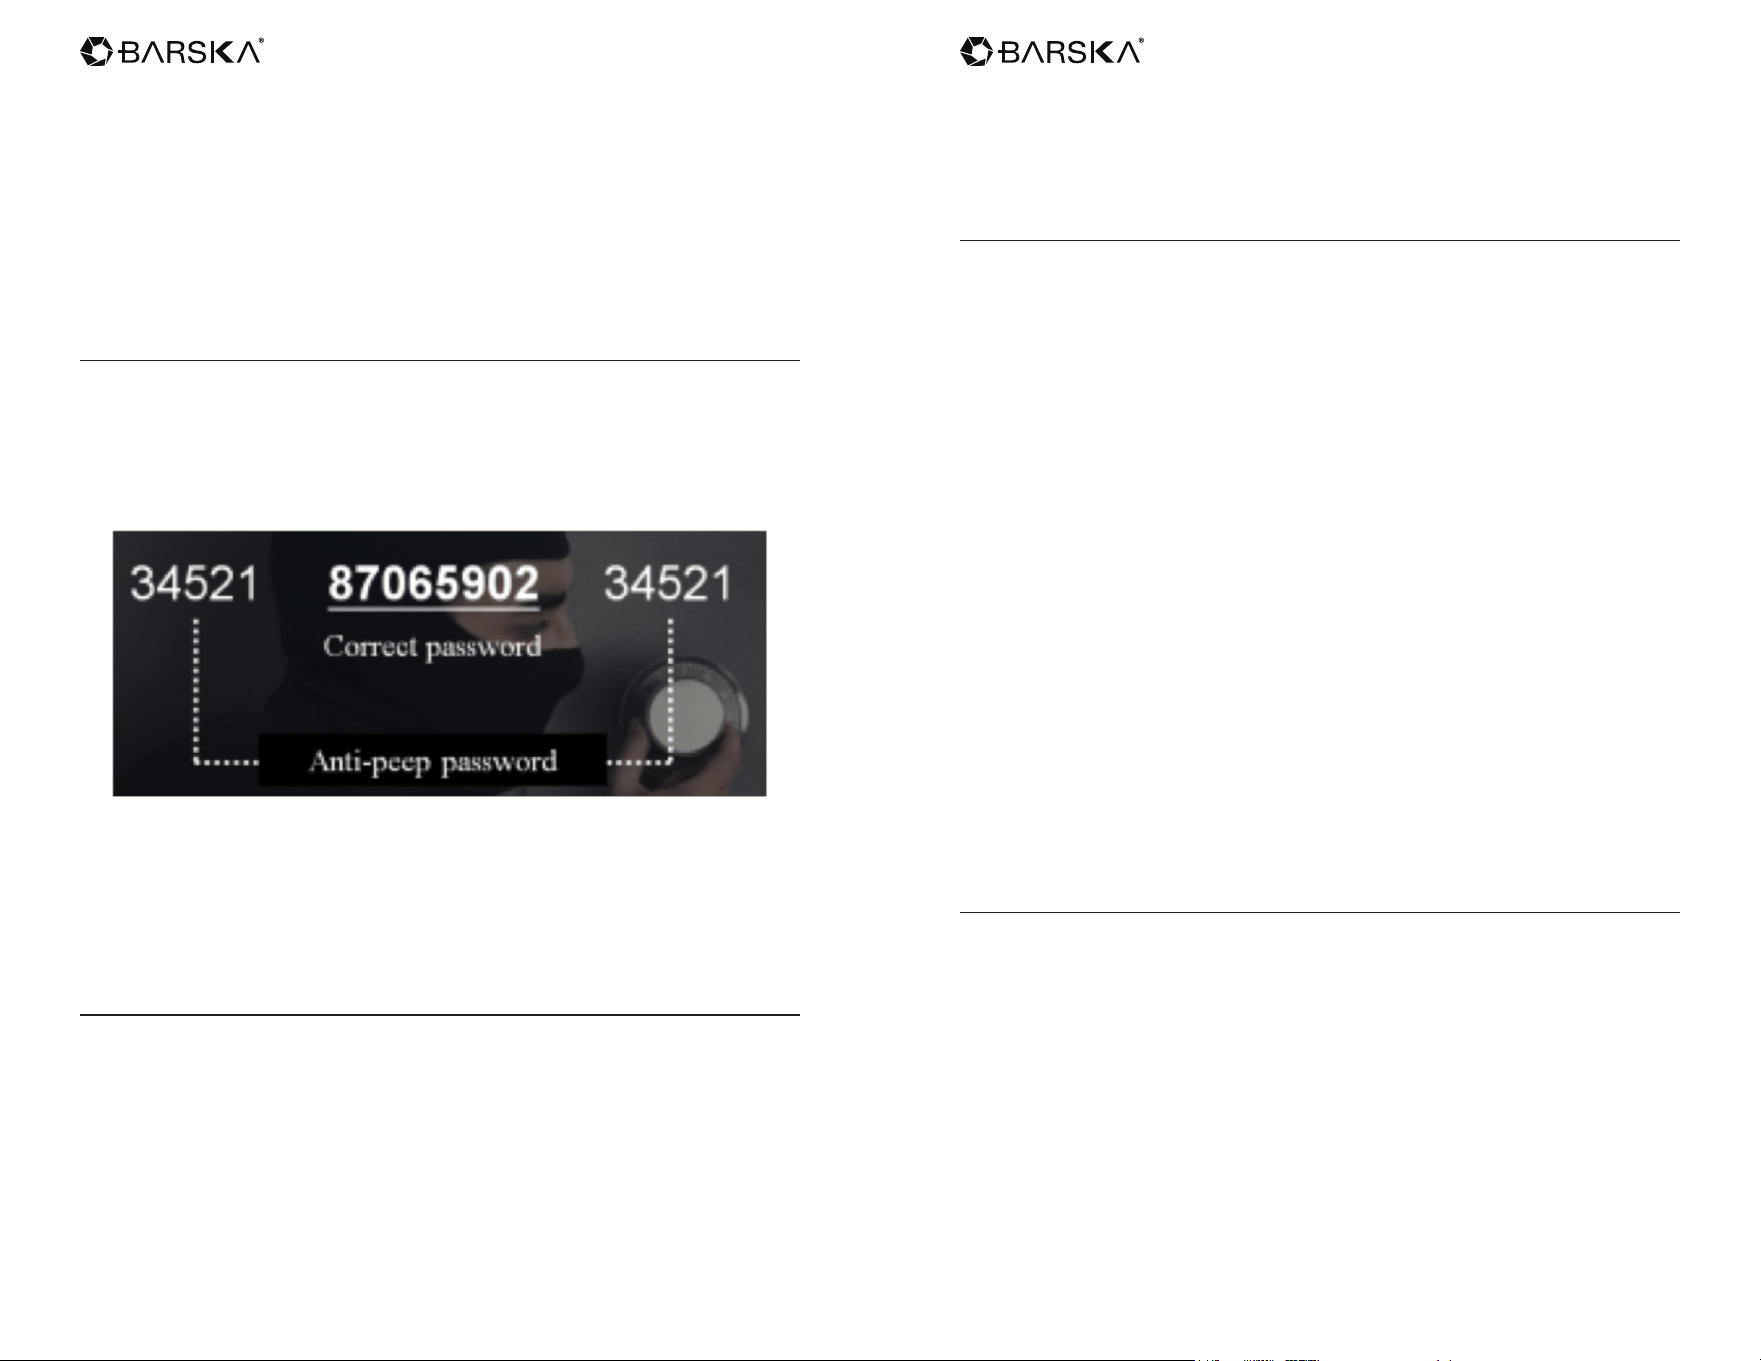
Anti-Beep Password Function
Barska’s Biometric & Keypad Security Door Lock has Anti-Beep Password
Function which could effectively avoid code spying while others are surrounding.
- Random Numbers + Correct User Code or Master Code + Random Numbers
(Within 30 Digits)
- There will be three short beeps and door will open after the correct code
is entered.
* Master code also has anti-beep password function. Users can use this
function when they use master codes to unlock the door or do
other operations.
Temporary Code Function
A temporary code will be helpful if there is a friend stops by or housekeeping
service needs to get into your house while you are not at home. (The temporary
code can be used only once.)
1. Touch the screen to activate the keypad.
2. Enter master code and conrmed by “E” and will hear three short beeps.
3. Press “8”, conrm by press “E” and will hear three short beeps.
4. Enter the temporary code (4 – 8 digits) and conrmed by “E”. Three short
beeps will be heard and the light of keypad keeps on.
5. Re-enter the temporary code and conrmed by “E”.
6. Keypad beeps three times shortly and the light of keypad will disappear. A
single-use code has been set successfully.
* Faulty operation will cause ve long beeps. Please restart from the rst
step of this section.
Vacation Mode
Under the vacation mode, the door can be unlocked only by master code or an
override key. This mode is suitable for ofce & commercial management during
vacation.
1. Turn on vacation mode:
- Touch the screen to activate the keypad.
- Enter master code and conrmed by “E” and will hear three short beeps.
- Press “10”, conrm by press “E”. Three short beeps will be heard and the light
of keypad keeps on.
- Press “1”, conrm by press “E “.
- Keypad beeps three shortly and the light of keypad will disappear, vacation
mode has been turned on.
* Once the lock has been opened by master code, the vacation mode will be
turned off automatically.
2. Turn off vacation mode:
- Touch the screen to activate the keypad.
- Press & hold “E” for 3 seconds and will hear one beep.
- Enter master code and conrmed by “E”.
- Keypad beeps three times shortly. The lock has been opened and vacation
mode has been turned off.
* Faulty operation will cause ve long beeps. Please restart from the rst
step of this section.
Sound On & Off
1. Turn on the sound: (Sound is turned on in factory default setting)
- Touch the screen to activate the keypad.
- Enter master code and conrmed by “E” and will hear three short beeps.
- Press “6”, conrm by press “E”. Three short beeps will be heard and the light of
keypad keeps on.
- Press “2”, conrm by press “E “.
- Keypad beeps three shortly and the light of keypad will disappear, sound has
been turned on.
2. Turn off the sound: (No alarm system)
- Touch the screen to activate the keypad.
- Enter master code and conrmed by “E” and will hear three short beeps.
- Press “6”, conrm by press “E”. Three short beeps will be heard and the light of
keypad keeps on.
www.barska.com www.barska.com
20 21
- Press “1”, conrm by press “E “.
- Keypad beeps three shortly and the light of keypad will disappear, sound has
been turned off.
* Faulty operation will cause ve long beeps. Please restart from the rst
step of this section.
Low Battery Status
1. When the lock is in low battery, the light around the ngerprint scanner turns
red (normally it shows green); the keypad will also beep 10 times
after opening.
2. In low battery condition, touching the keypad will cause four beeps. Please
replace the new batteries as soon as possible.
1 YEAR LIMITED WARRANTY
Biometric & Keypad Security Door Lock
BARSKA® Optics, as manufacturer, warrants this new product to be free of original
defects in materials and/or workmanship for the length of time specied by this
warranty. This warranty does not include damage caused by abuse, improper
handling, installation, maintenance, normal wear-and-tear, unauthorized repairs or
modications and tampering in anyway.
This warranty is limited to the original purchaser and is not transferable. This warranty
applies only to products purchased in the United States of America.
In the event of a defect within 30 days, the consumer must return the defective unit to
the BARSKA dealer (the place of purchase) at his/her own expense.
Beyond 30 days, BARSKA products should be sent to the following address for
warranty repairs. Products must be packed carefully and sturdily to prevent damage in
transit, and returned freight prepaid to:
BARSKA® OPTICS
Repair Department
855 Towne Center Drive
Pomona, CA 91767
For additional and updated information please visit our website at www.barska.com
Please email [email protected] or call 1-888-666-6769 for Return Merchandise
Number (RMA#) before any returns.
NOTE: All merchandise received without a valid RMA # will be returned to shipper at
his/her own expense.
Please include all of the following when returning BARSKA products for service and/
or replacement:
1. Please write your complete details (Name, Address, Telephone #, E-mail address,
RMA#, etc.)
2. Purchase receipt or Proof of Purchase. (Original/Copy)
3. A brief explanation of the defect.
4. A Check/Money Order of $40.00 to cover inspection, shipping and handling.
*Please allow 6-8 weeks for delivery.
This product will either be replaced or repaired at the discretion of the warrantor. If it’s
a discontinued item, we will replace the product with an equivalent product. Should
the repair not be covered by this warranty, an estimate will be sent for your approval.
Non-warranty repairs or refurbishing of your products are always provided at a
reasonable cost.
BARSKA® Optics shall not be liable for any consequential, incidental and/or
contingent damages whatsoever. We will not pay shipping, insurance or transportation
charges from you to us, or any import fees, duties and or taxes. This warranty
supersedes all previous BARSKA® Optics warranties.
BC302