
Technical Support and E-Warranty Certificate www.vevor.com/support
HEAT PRESS MACHINE
USER MANUAL
MODEL:F1130
We continue to be committed to provide you tools with competitive price.
"Save Half", "Half Price" or any other similar expressions used by us only represents an
estimate of savings you might benefit from buying certain tools with us compared to the major
top brands and does not necessarily mean to cover all categories of tools offered by us. You
are kindly reminded to verify carefully when you are placing an order with us if you are
actually saving half in comparison with the top major brands.

- 1 -
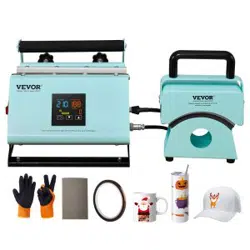
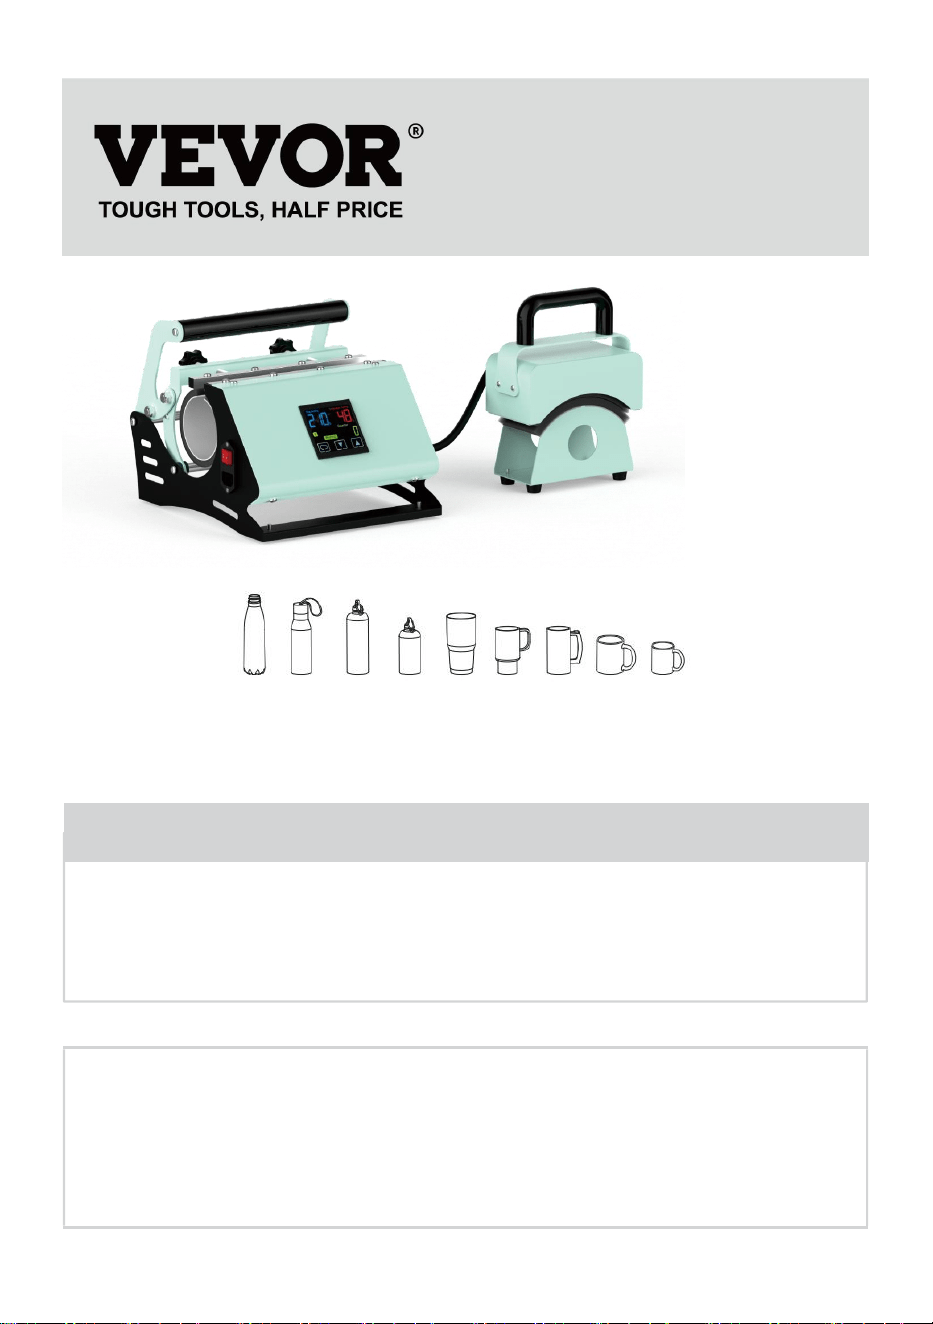
Max.diameter:85mm Max.Length:250mm
Maximum printing size is 30oz aluminum bottle
Note: The actual product you receive determines its look.
Have product questions? Need technical support? Please feel free to
contact us:
Technical Support and E-Warranty Certificate
www.vevor.com/support
NEED HELP? CONTACT US!
This is the original instruction, please read all manual instructions
carefully before operating. VEVOR reserves a clear interpretation of our
user manual. The appearance of the product shall be subject to the
product you received. Please forgive us that we won't inform you again if
there are any technology or software updates on our product.
HEAT PRESS MACHINE
- 2 -
1. Important safety instructions
This instruction manual is intended for your benefit. Please read and follow the
safety, installation, maintenance and troubleshooting steps described within to
ensure your safety and satisfaction.
The contents of this instruction manual are based on the latest product information
available at the time of publication. The manufacturer reserves the right to make
product changes at any time without notice.
Always use common sense and pay particular attention to all the DANGER,
WARNING, CAUTION and NOTICE statements in this manual.
These carry important information. The label on your tool may include the following
symbols. The symbols and their definitions are as follows:
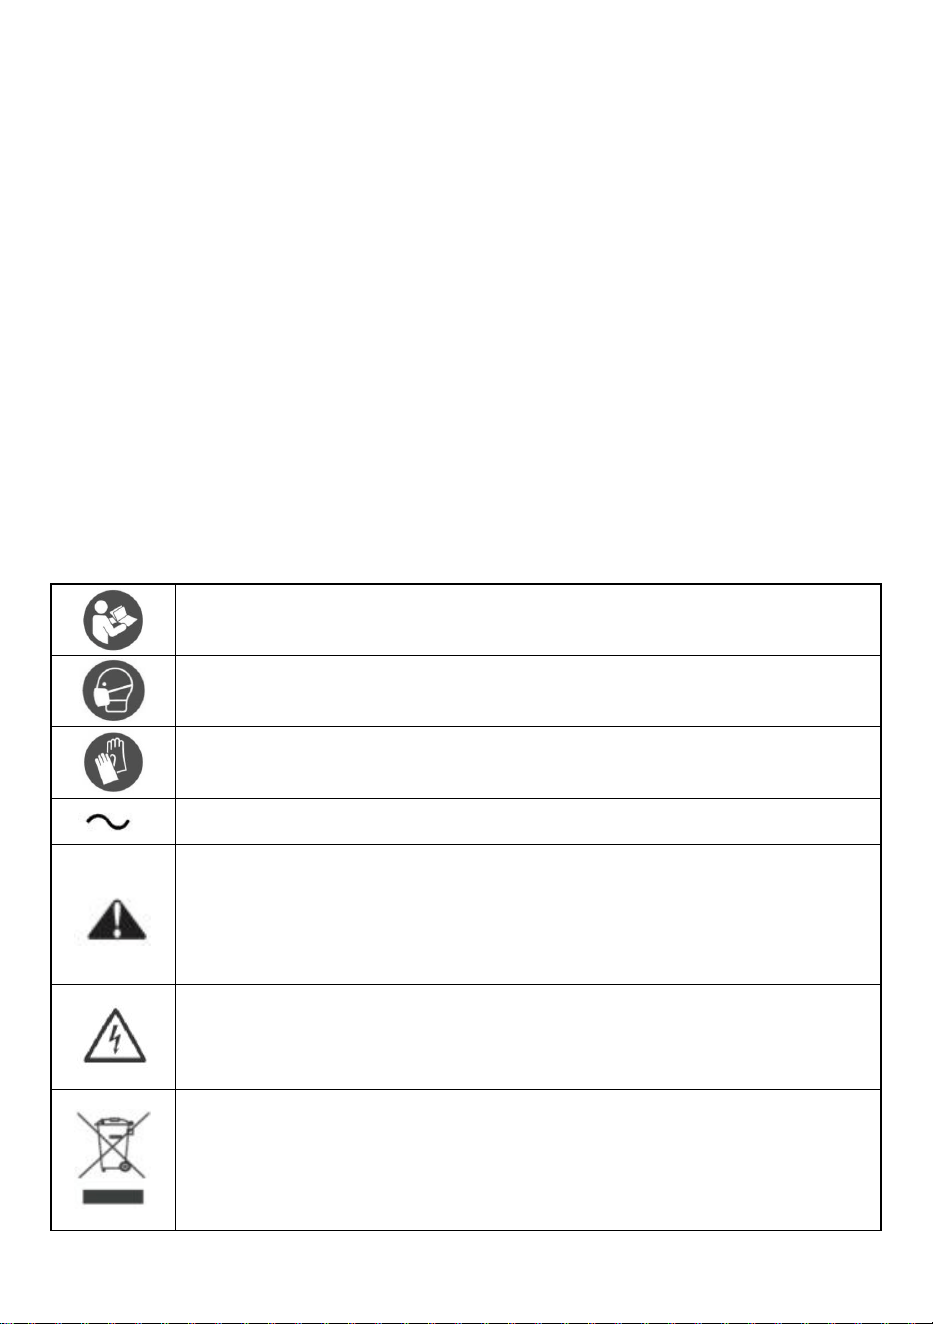
Warning - To reduce the risk of injury, user must read instructions manual carefully.
Warning- Be sure to wear dust masks when using this product.
Warning- Be sure to wear gloves when using this product.
Alternating current
This symbol, placed before a safety comment, indicates a kind of precaution, warning,
or danger. Ignoring this warning may lead to an accident. To reduce the risk of injury,
fire, or electrocution, please always follow the recommendations shown below.
Danger!
Risk of personal injury or environmental damage! Risk of electric shock! Risk of
personal injury by electric shock!
Disposal information:
This product is subject to the provision of European Directive 2012/19/EC. The symbol
showing a wheelie bin crossed through indicates that the product requires separate
refuse collection in the European Union. This applies to the product and all accessories
marked with this symbol. Products marked as such may not be discarded with normal
domestic waste, but must be taken to a collection point for recycling electrical and
electronic devices.

- 3 -
WARNING!
Before using this product, please read the following safety
instructions carefully
To reduce the risk of injury, death, or property damage due to electric
shock, fifire, be sure to follow the following safety precautions!
Safety instruction
1. Keep unplug when moving the machine.
2. Keep unplug when installing accessories.
3. Place on a flat and stable platform and operate under ventilated
conditions.
4. Wear special protective equipment when operating the machine.
5. Do not use this machine in a hazardous location.
6. Do not use when the machine is not working properly.
7. Do not disassemble and repair this machine.
8. Do not use an unsuitable AC outlet.
9. Do not touch the heating plate when the machine heating.
10. This Appliance is not intended for use by persons(including children)
with reduced physical, sensory or capabilities, or lack of experience
and knowledge, unless they have been given supervision concerning
use of the appliance by a person responsible for their safety.
11. Children should be supervised to ensure that they do not play with the
appliance.
12. When operating, be careful of high temperature and burns.
13. If the supply cord is damaged, it must be replaced by a special cord or
assembly available from the manufacturer or its service agent.
FCC Information:
CAUTION: Changes or modifications not expressly approved by the party
responsible for compliance could void the user's authority to operate the

- 4 -
equipment!
This device complies with Part 15 of the FCC Rules. Operation is subject to
the following two conditions:
1) This product may cause harmful interference.
2)This product must accept any interference received, including
interference that may cause undesired operation.
WARNING: Changes or modifications to this product not expressly
approved by the party.responsible for compliance could void the user's
authority to operate the product.
Note: This product has been tested and found to comply with the limits for
a Class B digital device pursuant to Part 15 of the FCC Rules, These limits
are designed to provide reasonable protection against harmful interference
in a residential installation.
This product generates, uses and can radiate radio frequency energy, and
if not installed and used in accordance with the instructions, may cause
harmful interference to radio communications. However, there is no
guarantee that interference will not occur in a particular installation. If this
product does cause harmful interference to radio or television
reception,which can be determined by turning the product off and on, the
user is encouraged to try to correct the interference by one or more of the
following measures.
· Reorient or relocate the receiving antenna.
· Increase the distance between the product and receiver.
· Connect the product to an outlet on a circuit different from that to which
the receiver is connected.
· Consult the dealer or an experienced radio/TV technician for assistance.
- 5 -
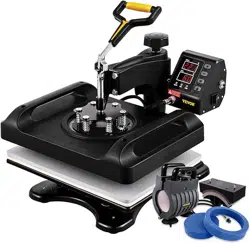
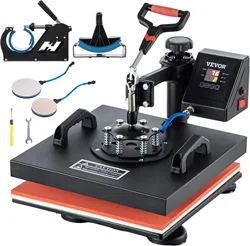
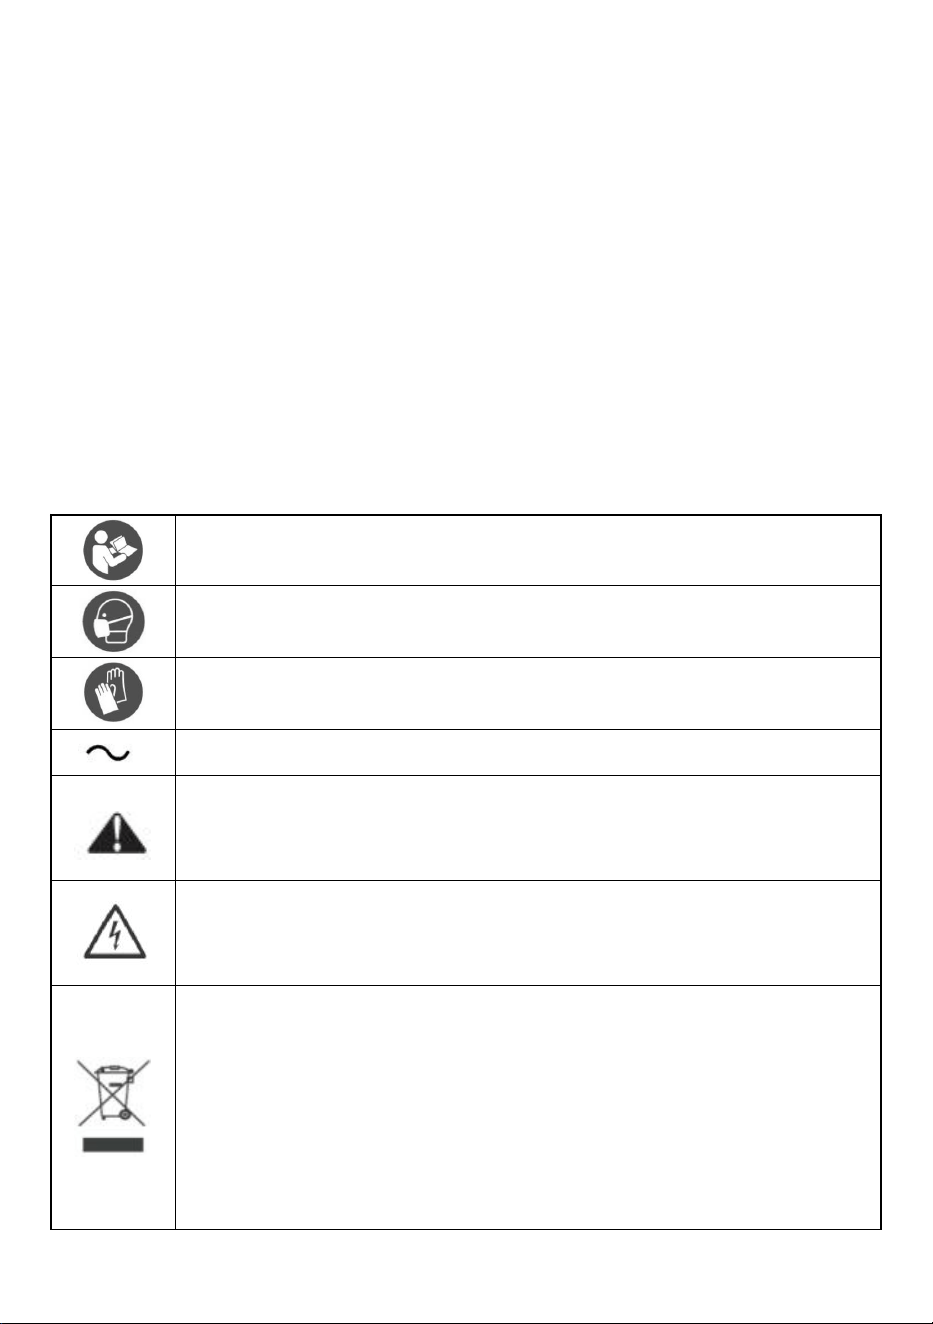
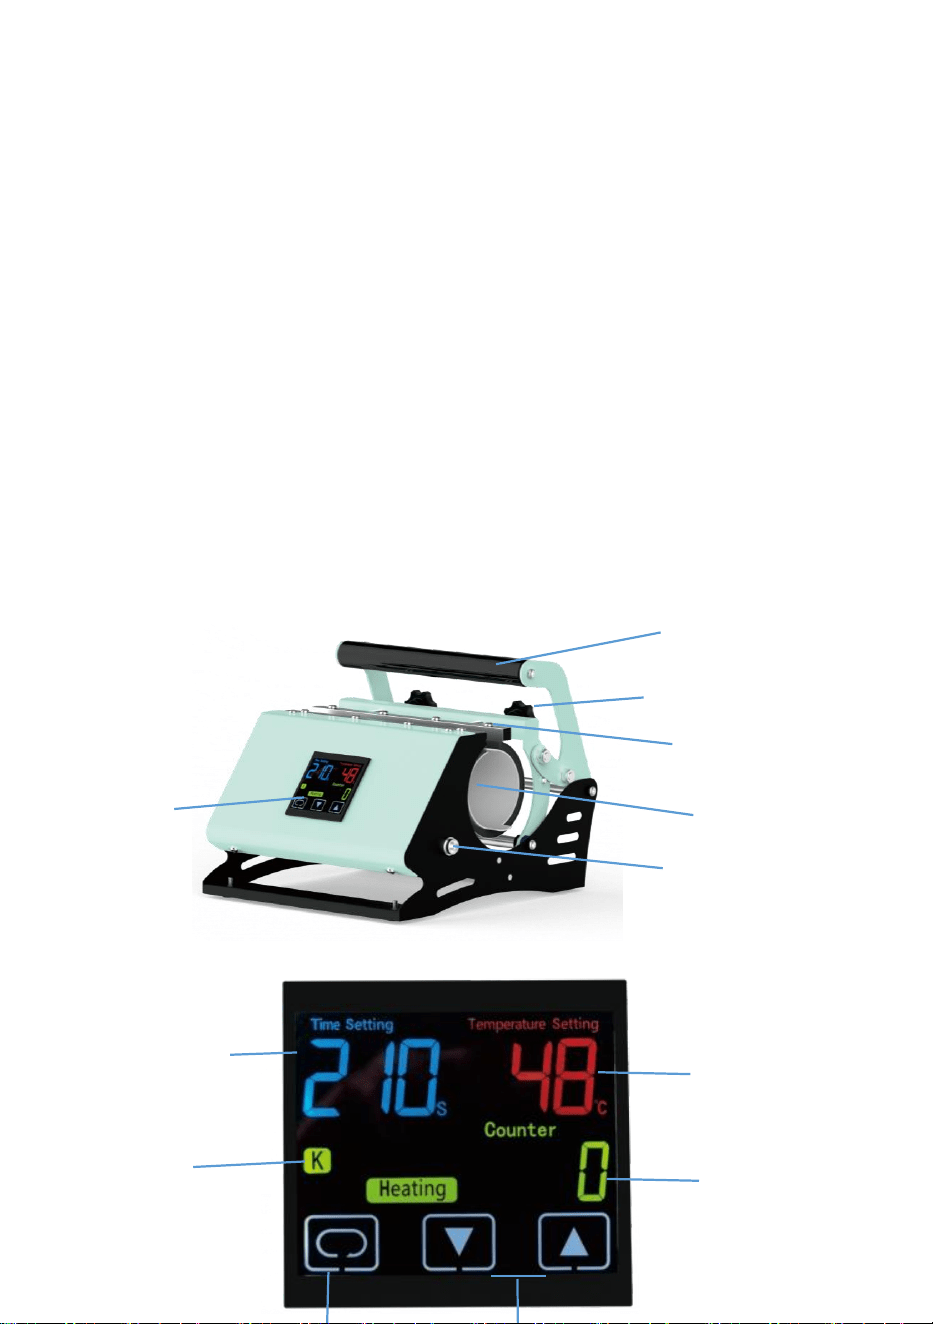
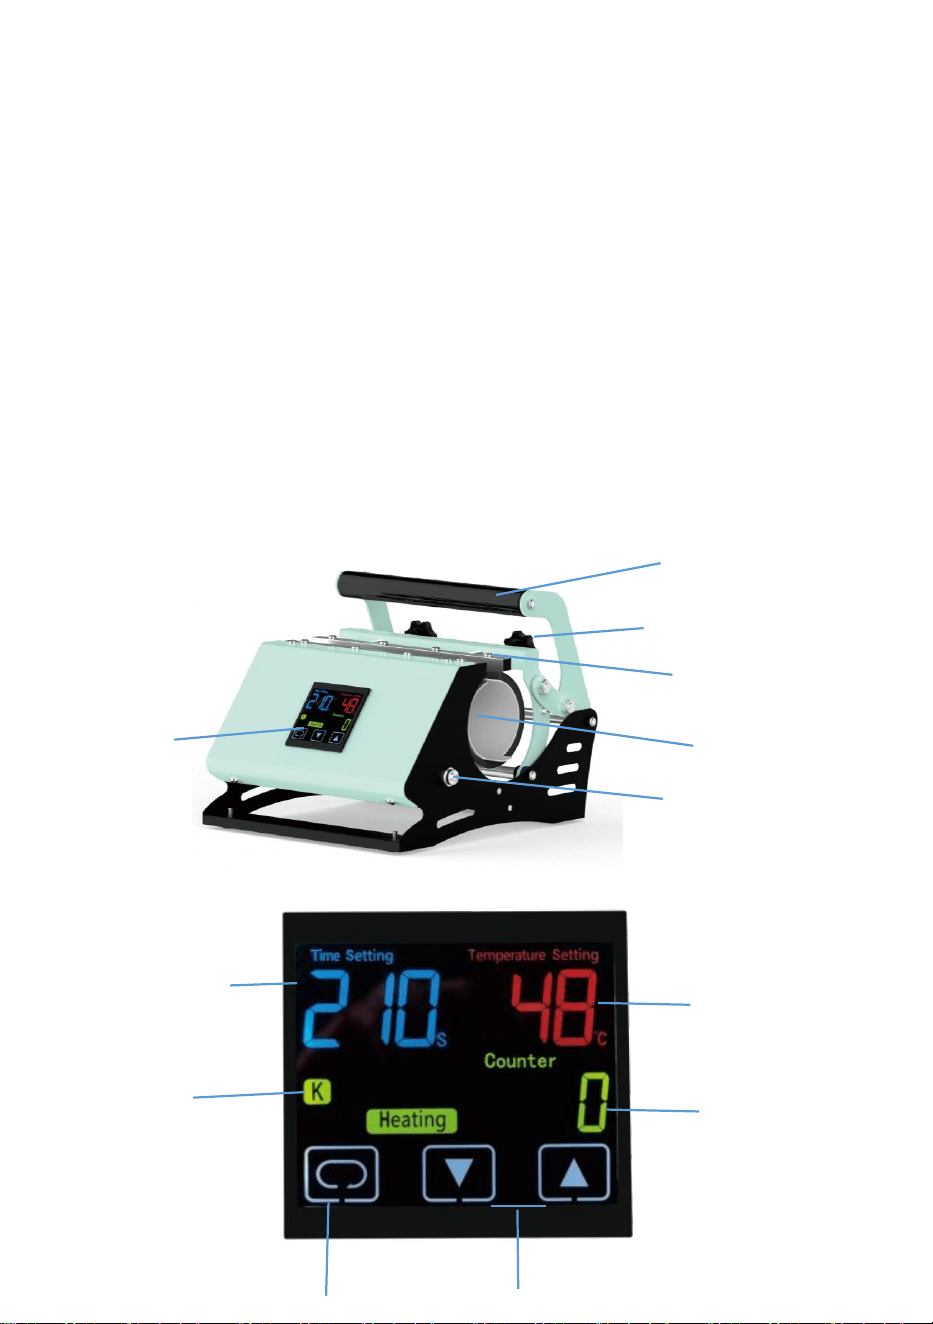
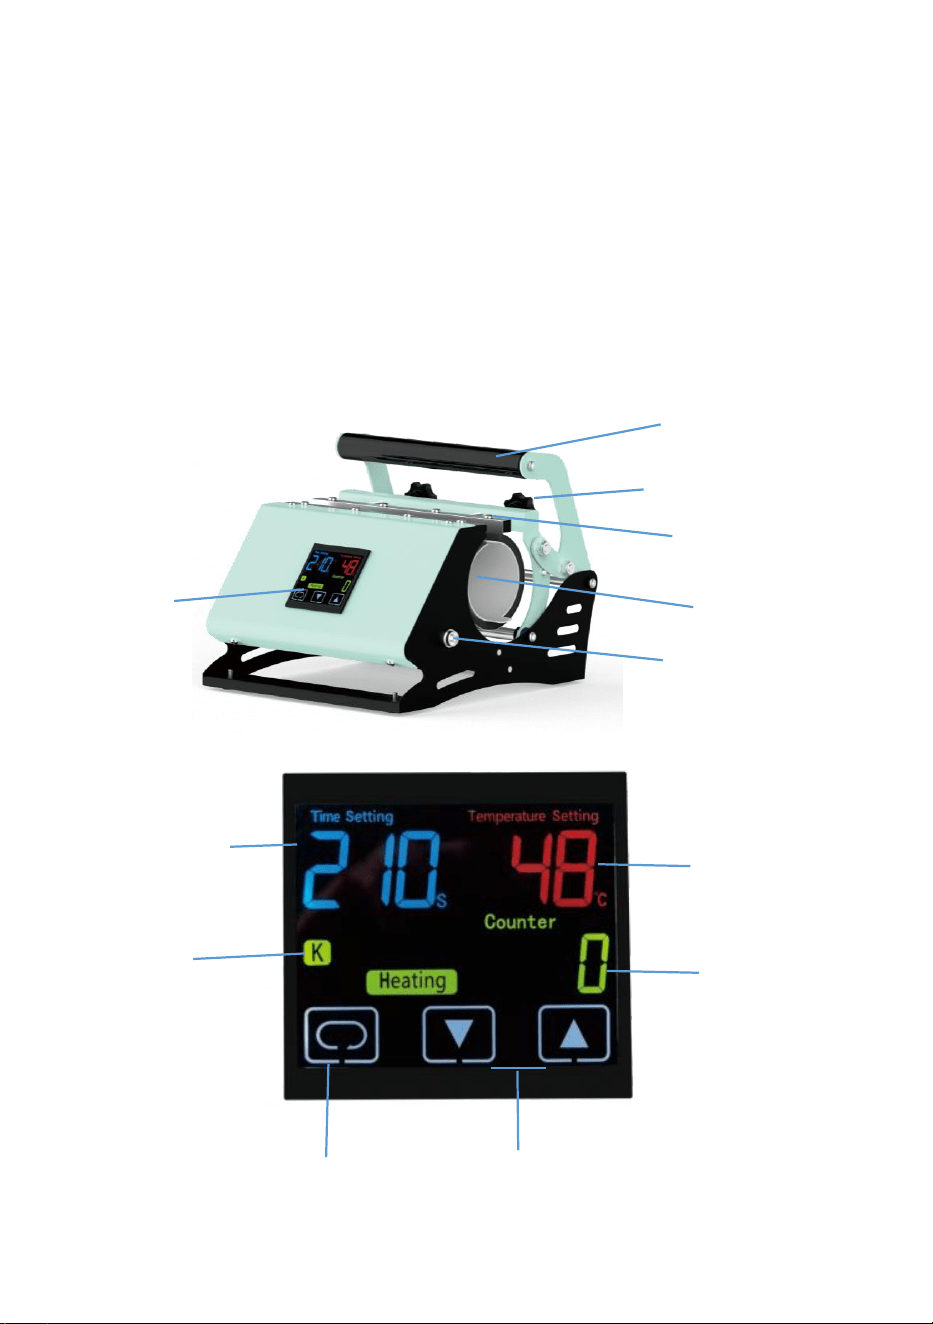
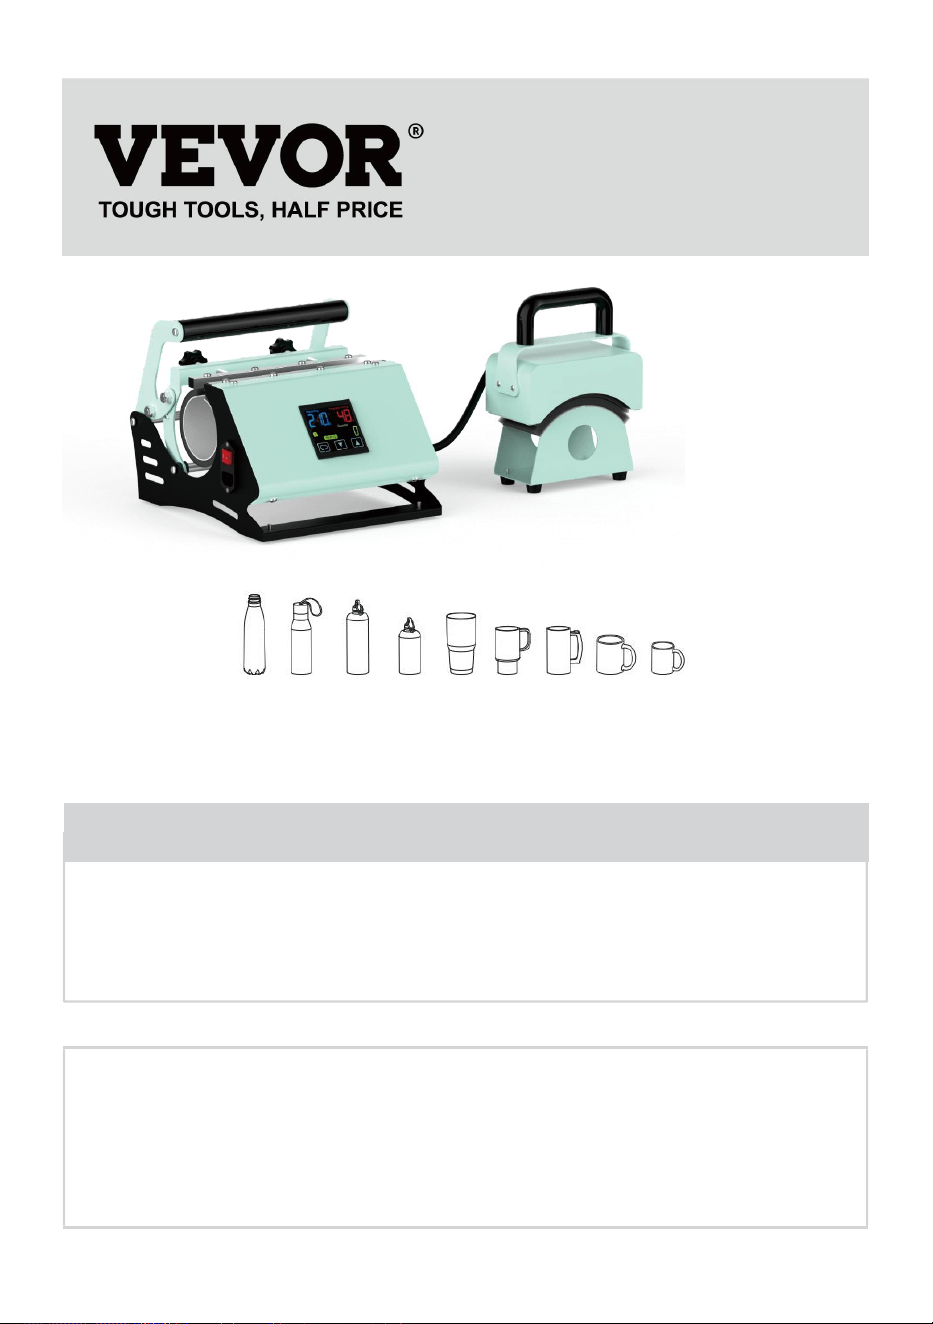
2. Product Introduction
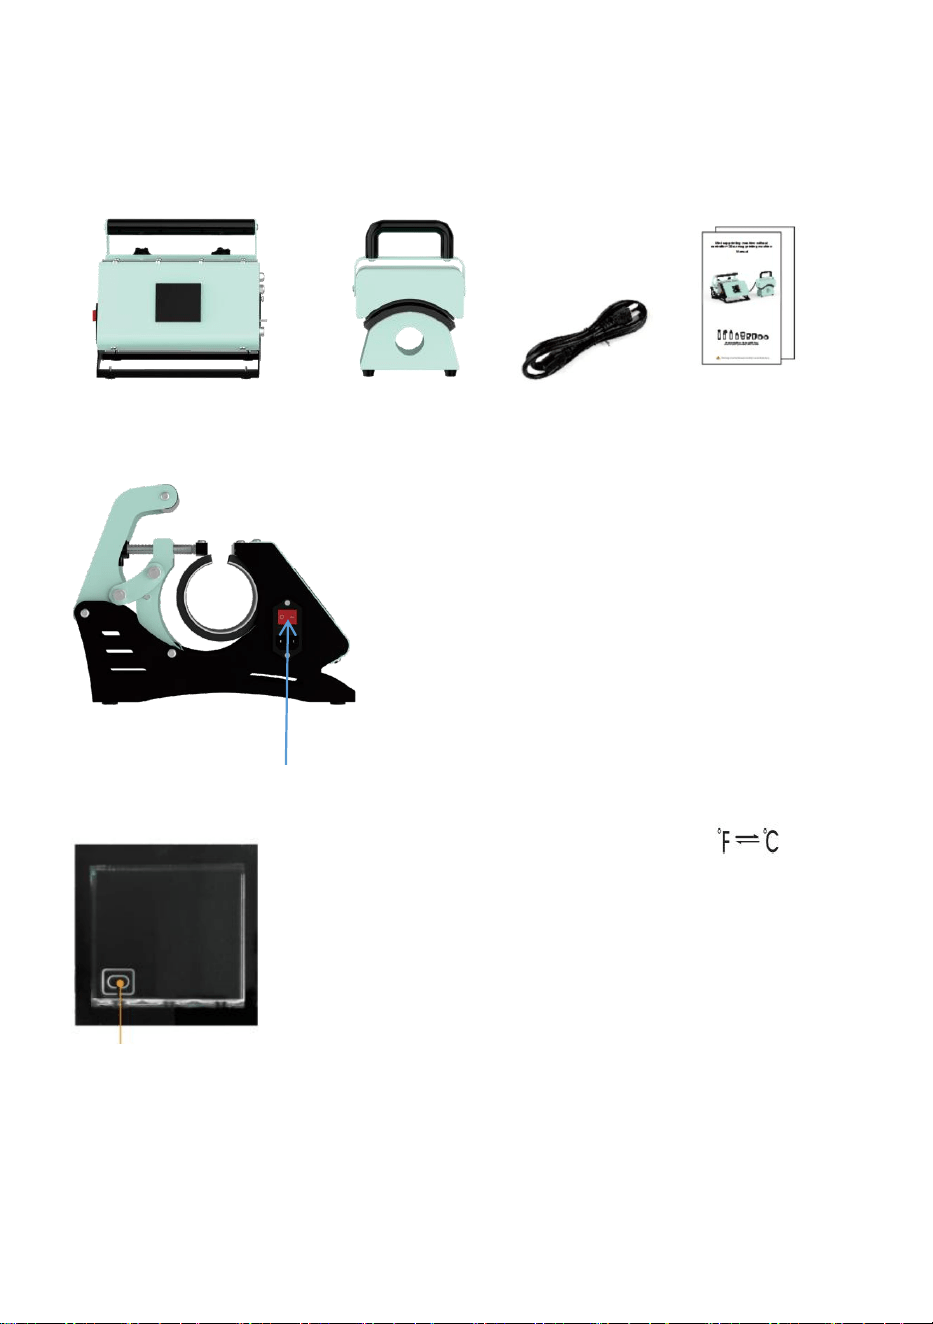
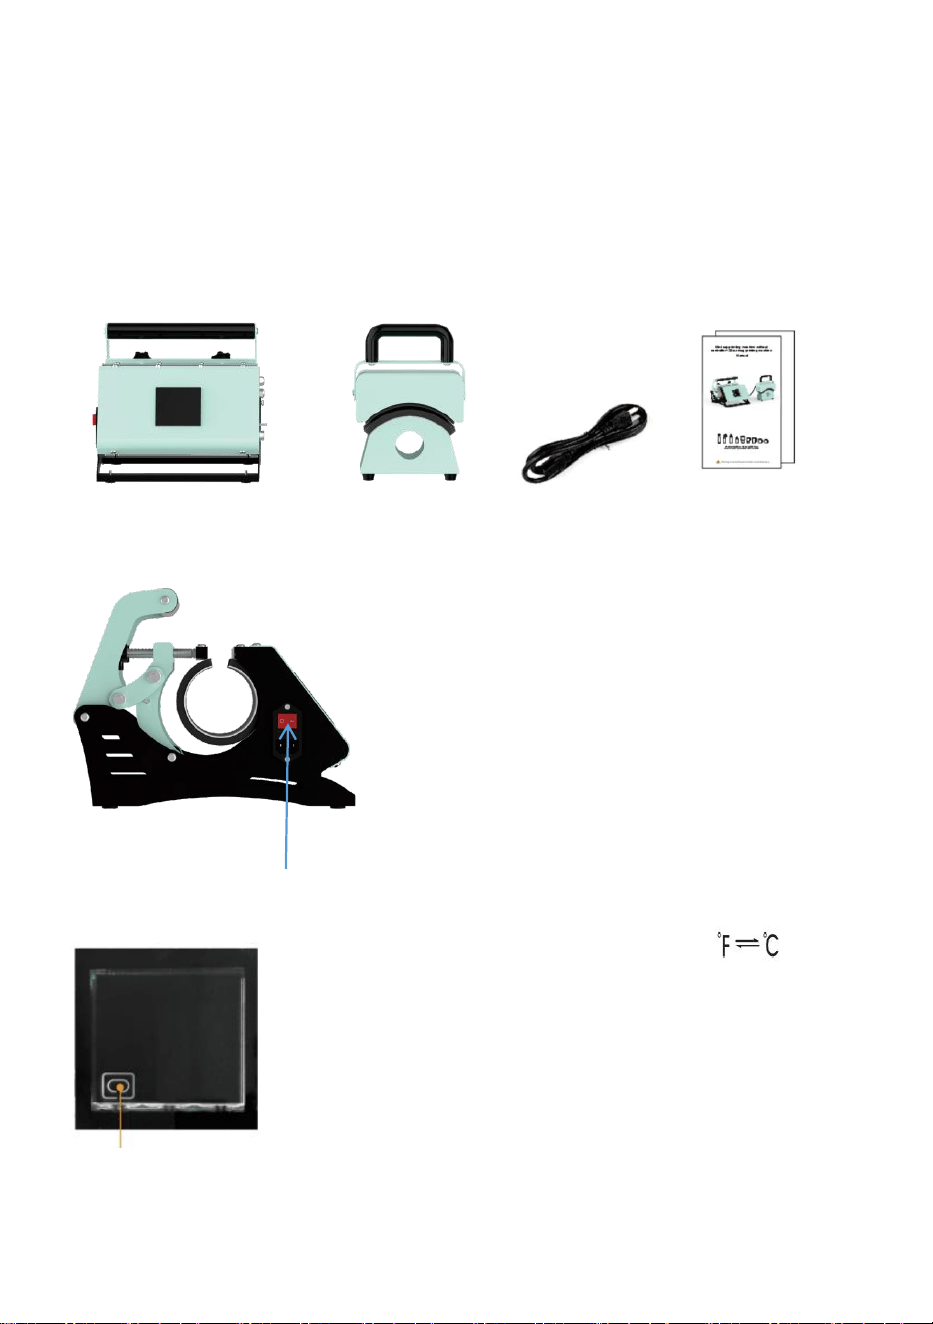
Accessories list
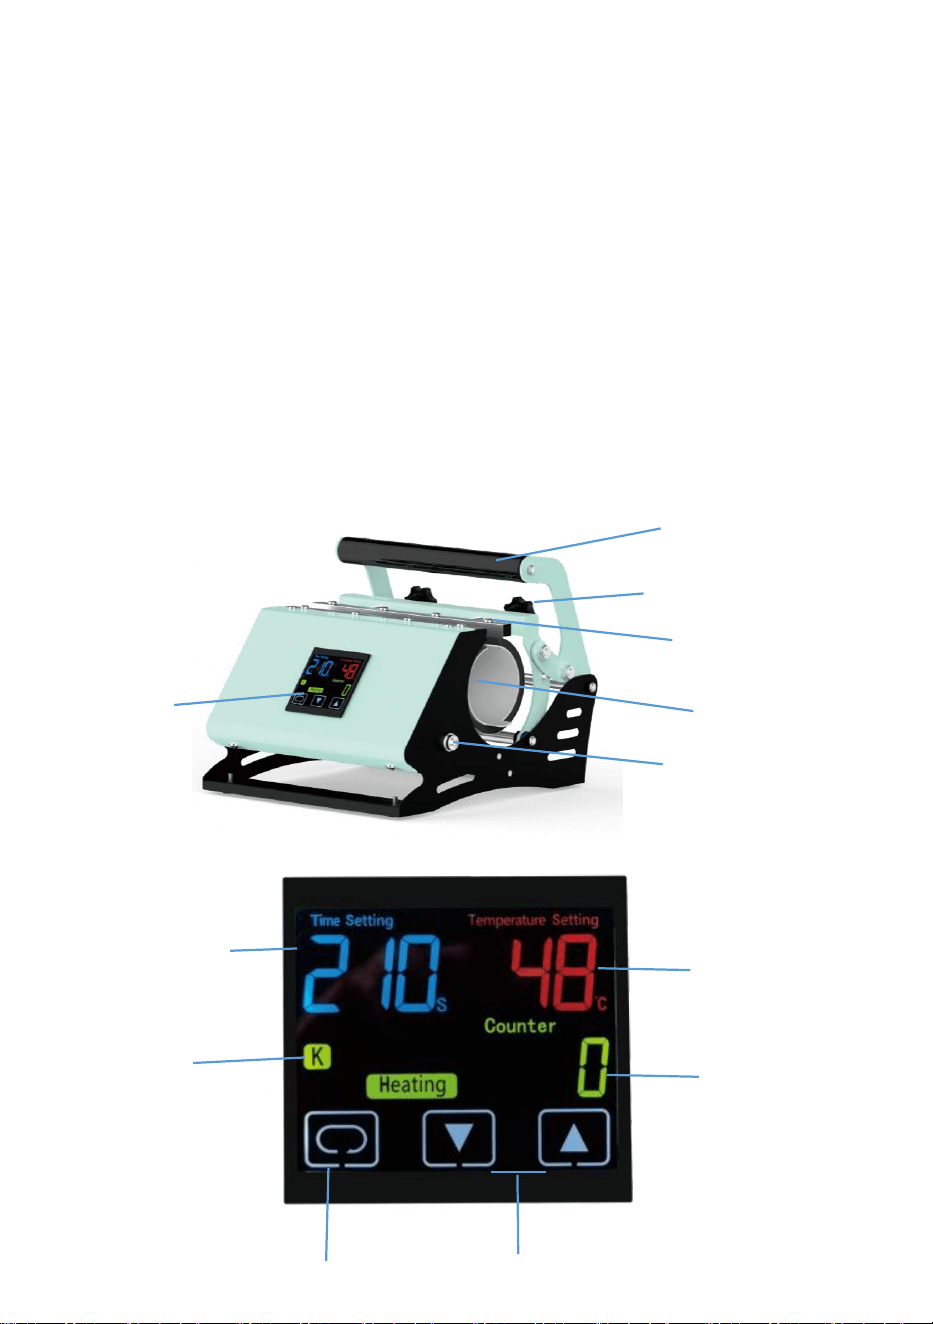
Sponge handle sleeve
Pressure adjustment knob
Aviation connector
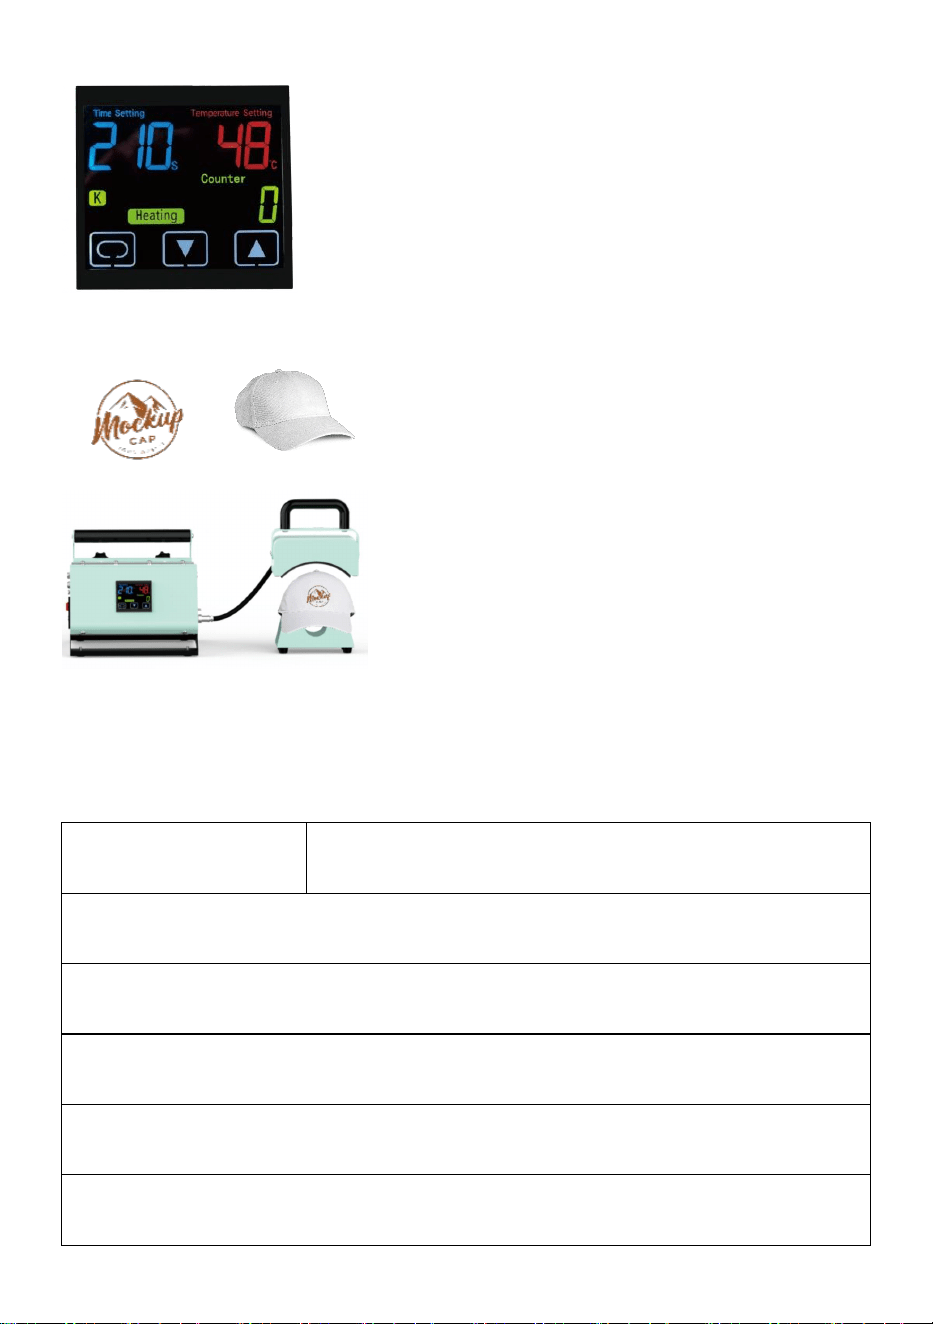
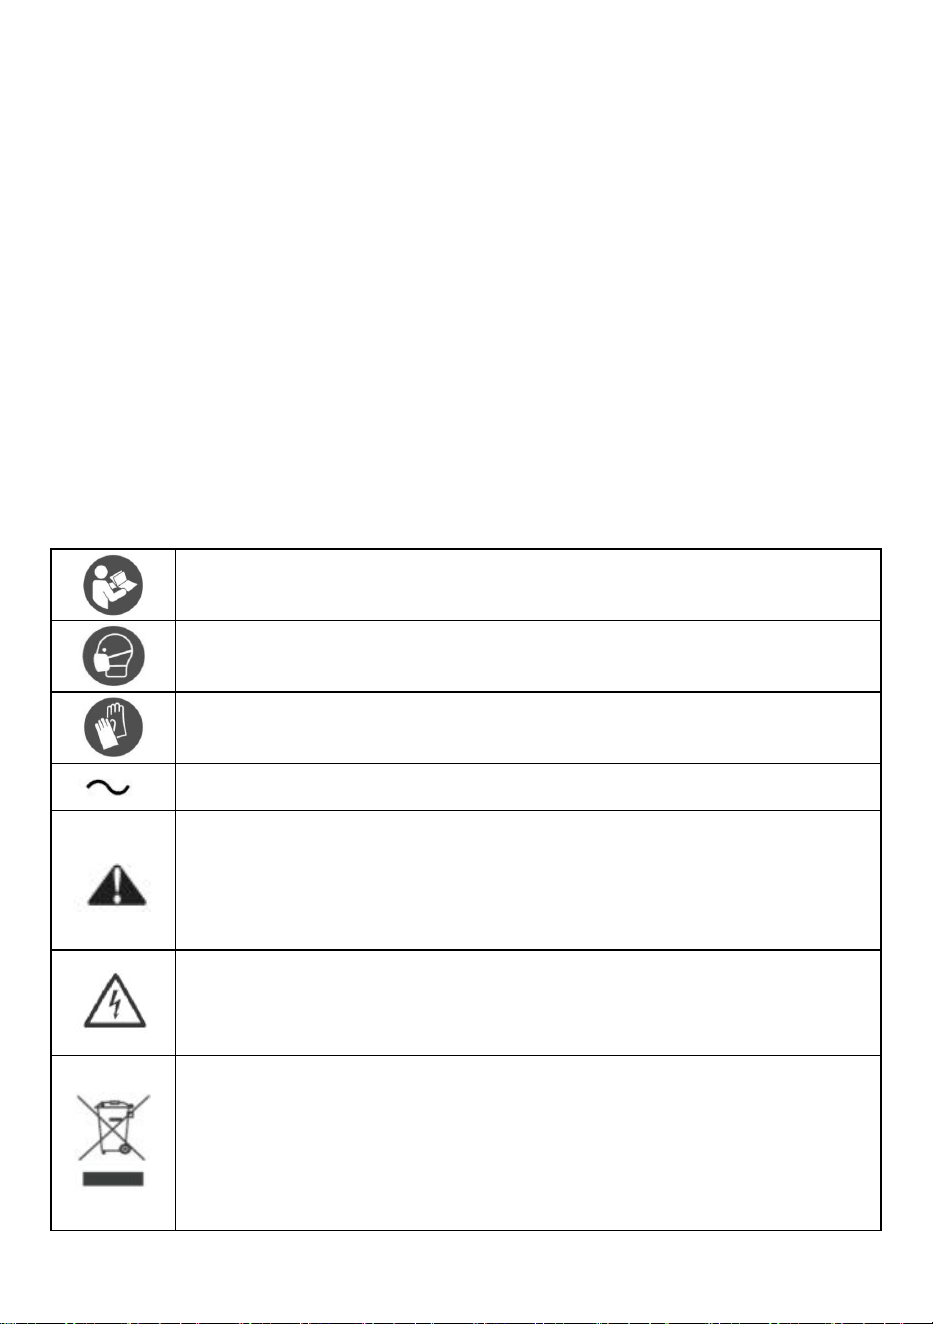
Time
Temperature
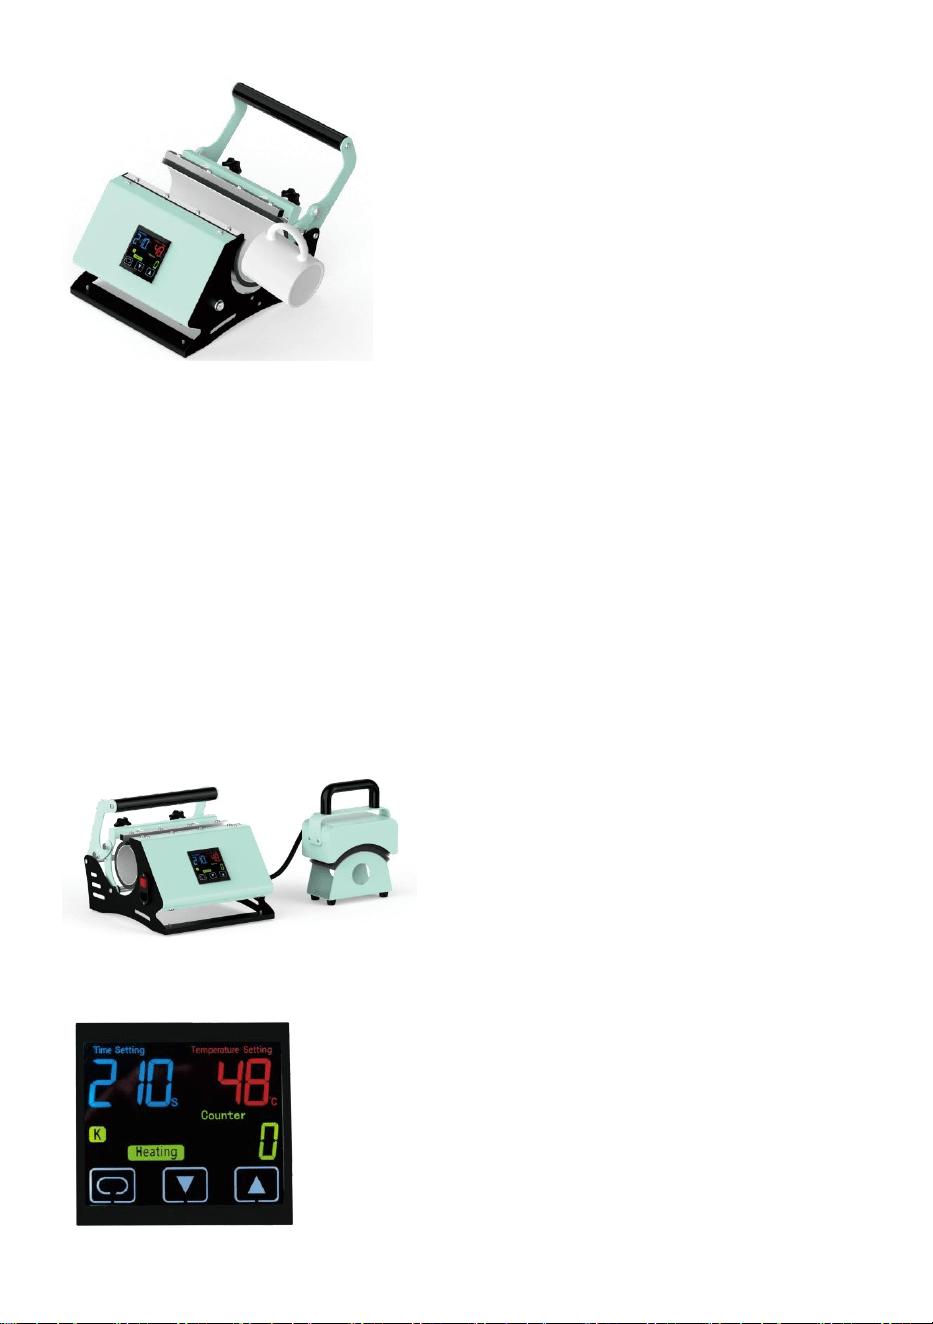
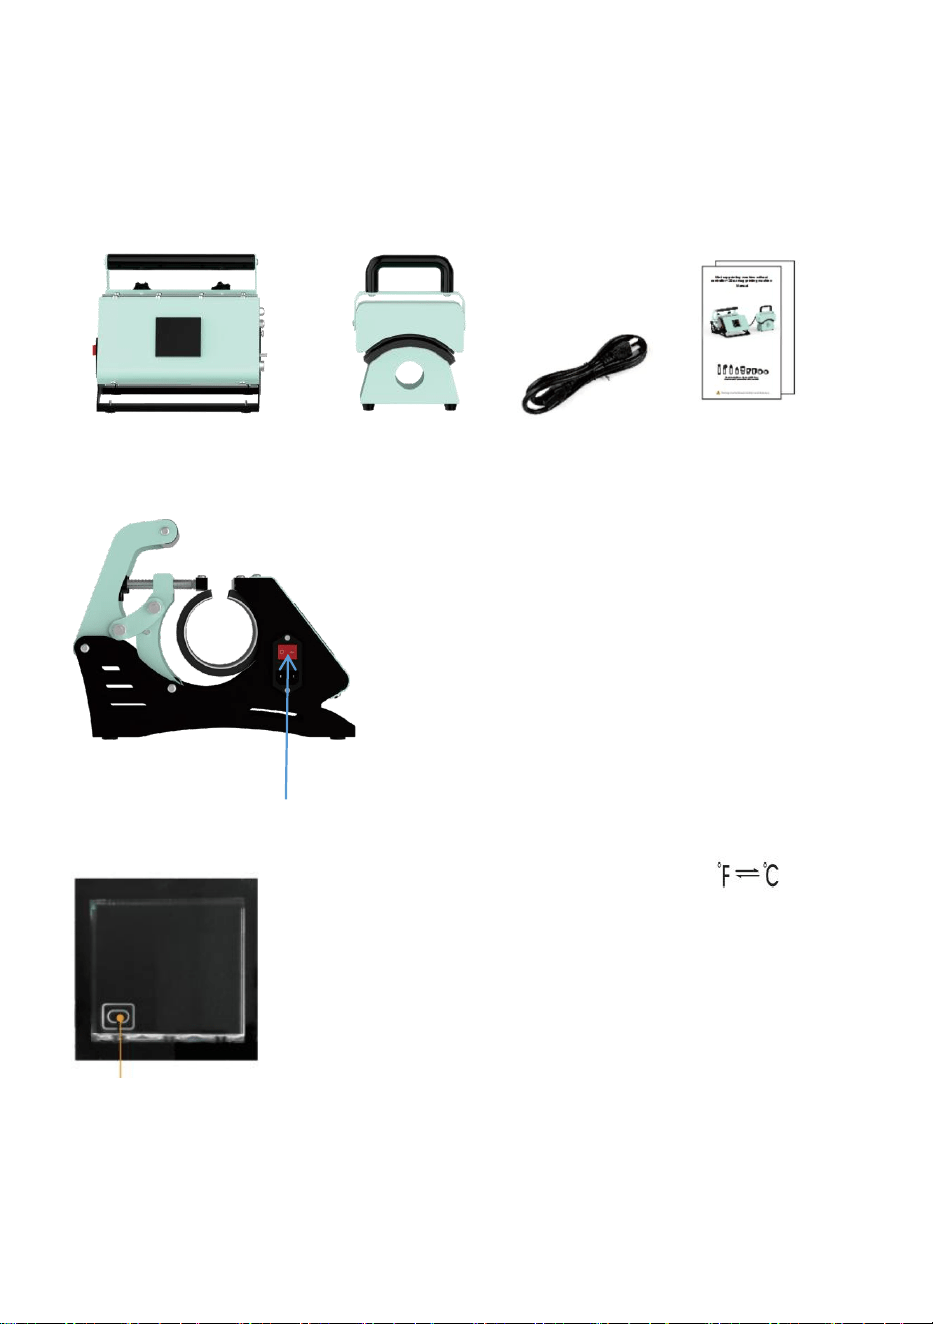
30 oz mug printing machine
Controller
Power cable
Manual
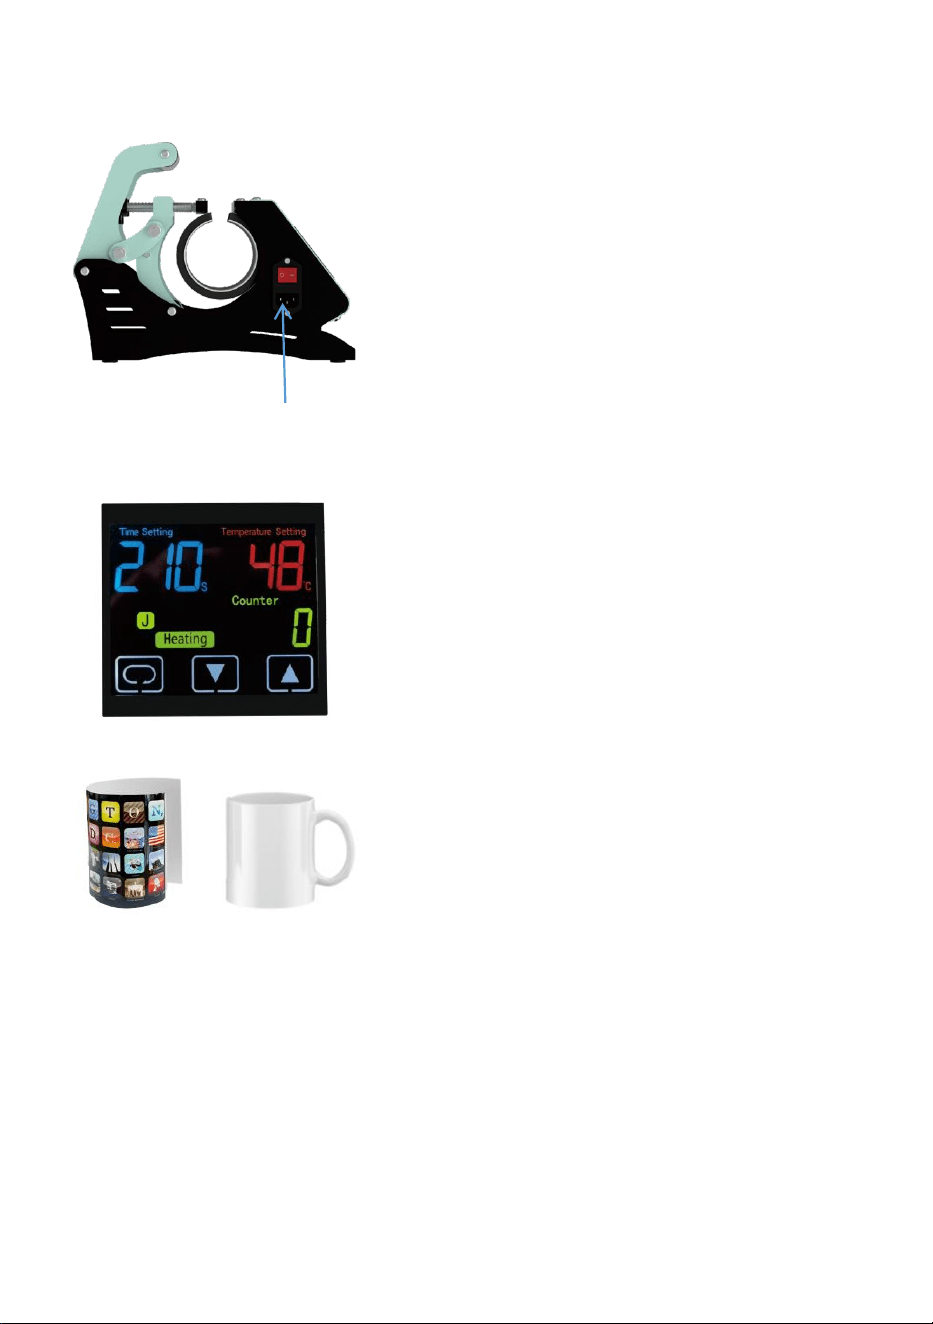
LED display
Screw
Mug heating pad
Count display
Mode display
Power button
Plus/Minus
- 6 -
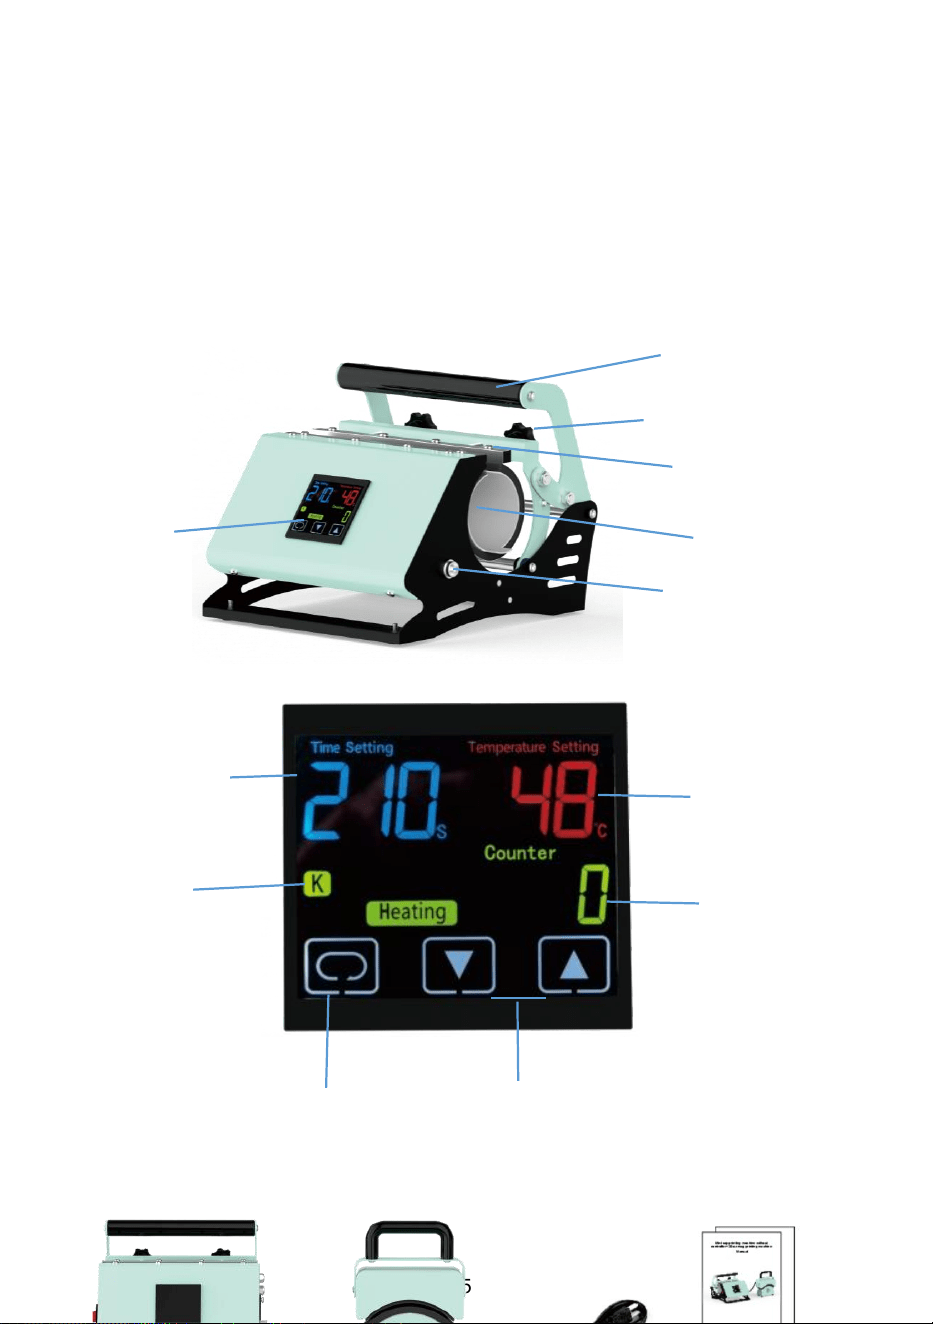
3. Key Function Introduction
1.Power on
After powering on, turn on the switch and enter standby
mode. Short press the power button to turn on the
machine.
2.Power off
Long press the power button for 2 seconds to turn off
the machine.
3.Automatic power off
If there is no operation within 30 minutes,the machine
will automatically power off.
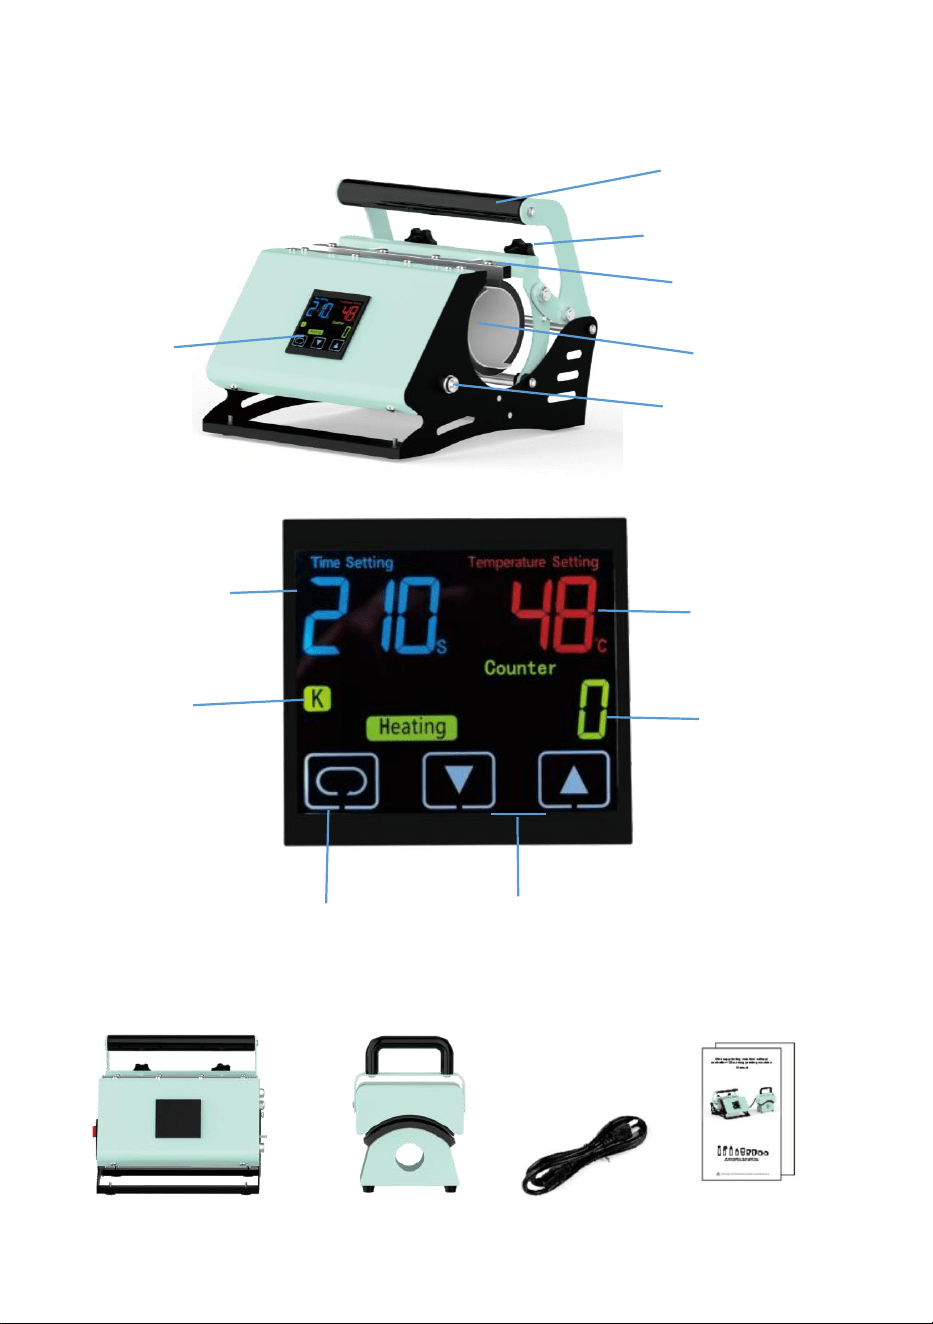
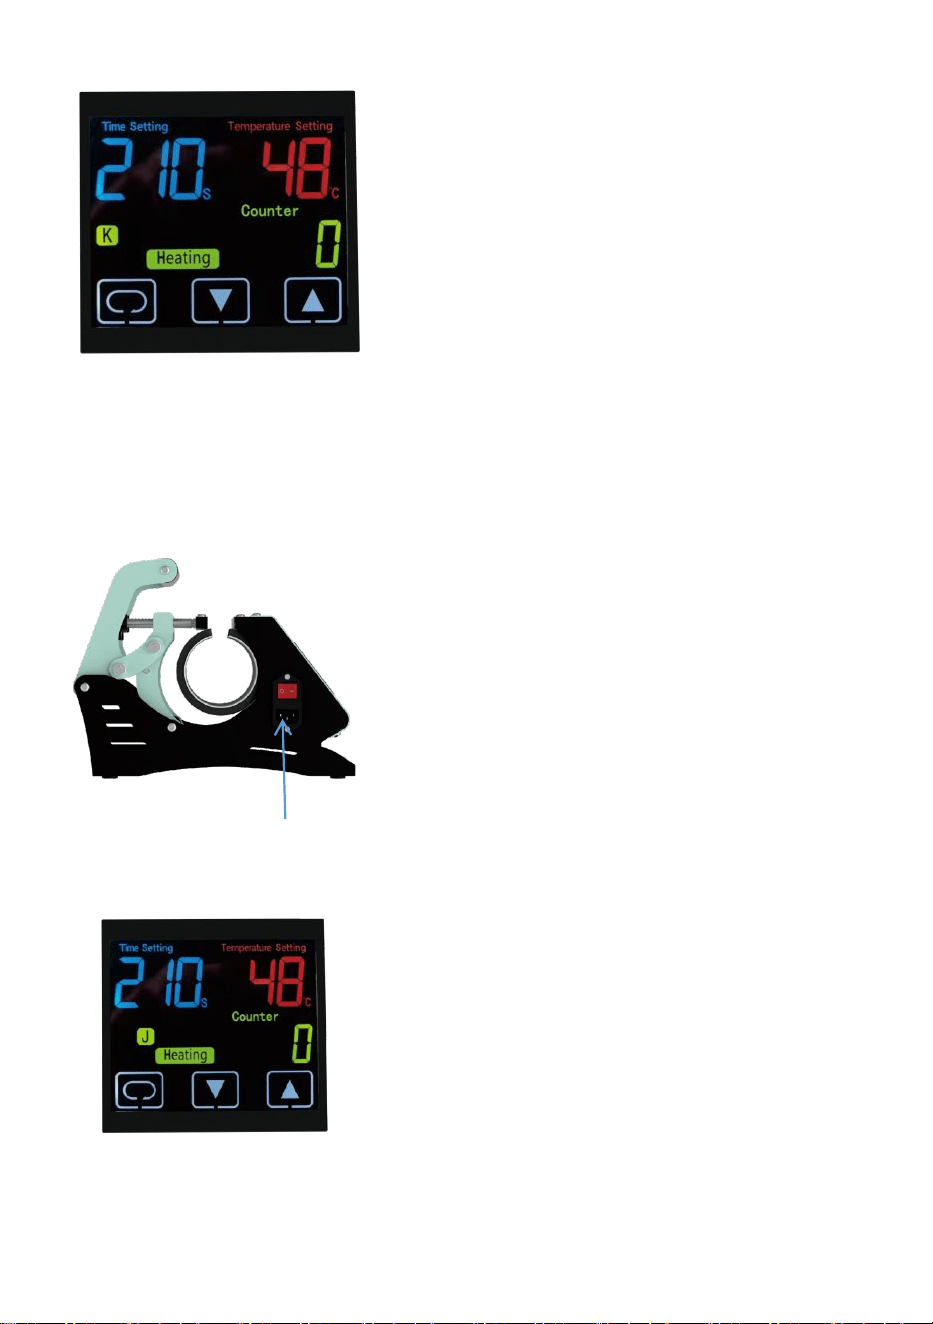
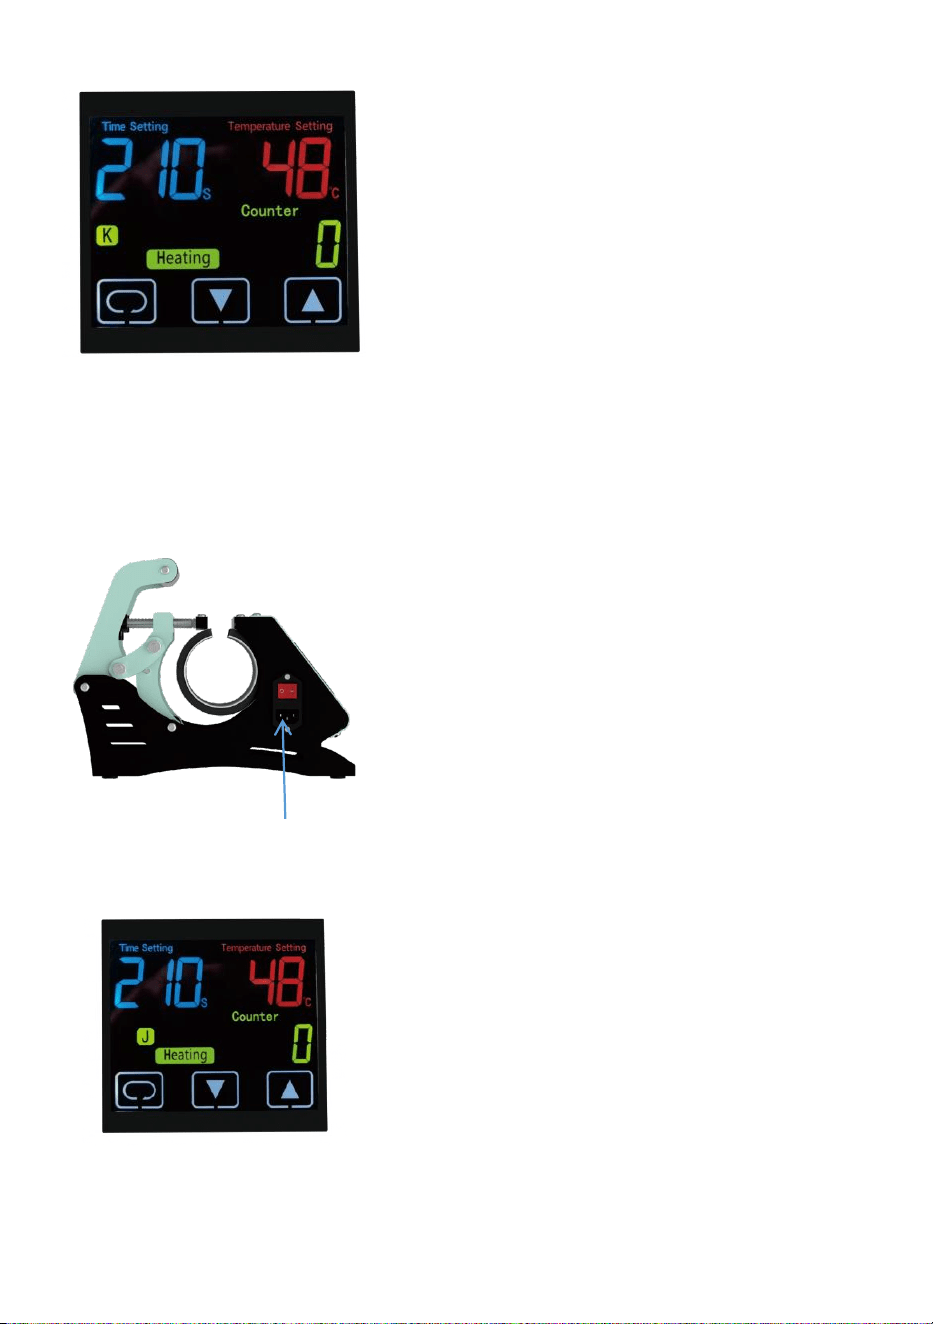
4.Temperature unit conversion
In standby mode, press and hold the power button for 4
seconds, and press the up and down arrows to select
the heating mode."K"cap printing mode/"J"mug printing
mode.Press the power button again and press the up
and down arrows to select the temperature unit.
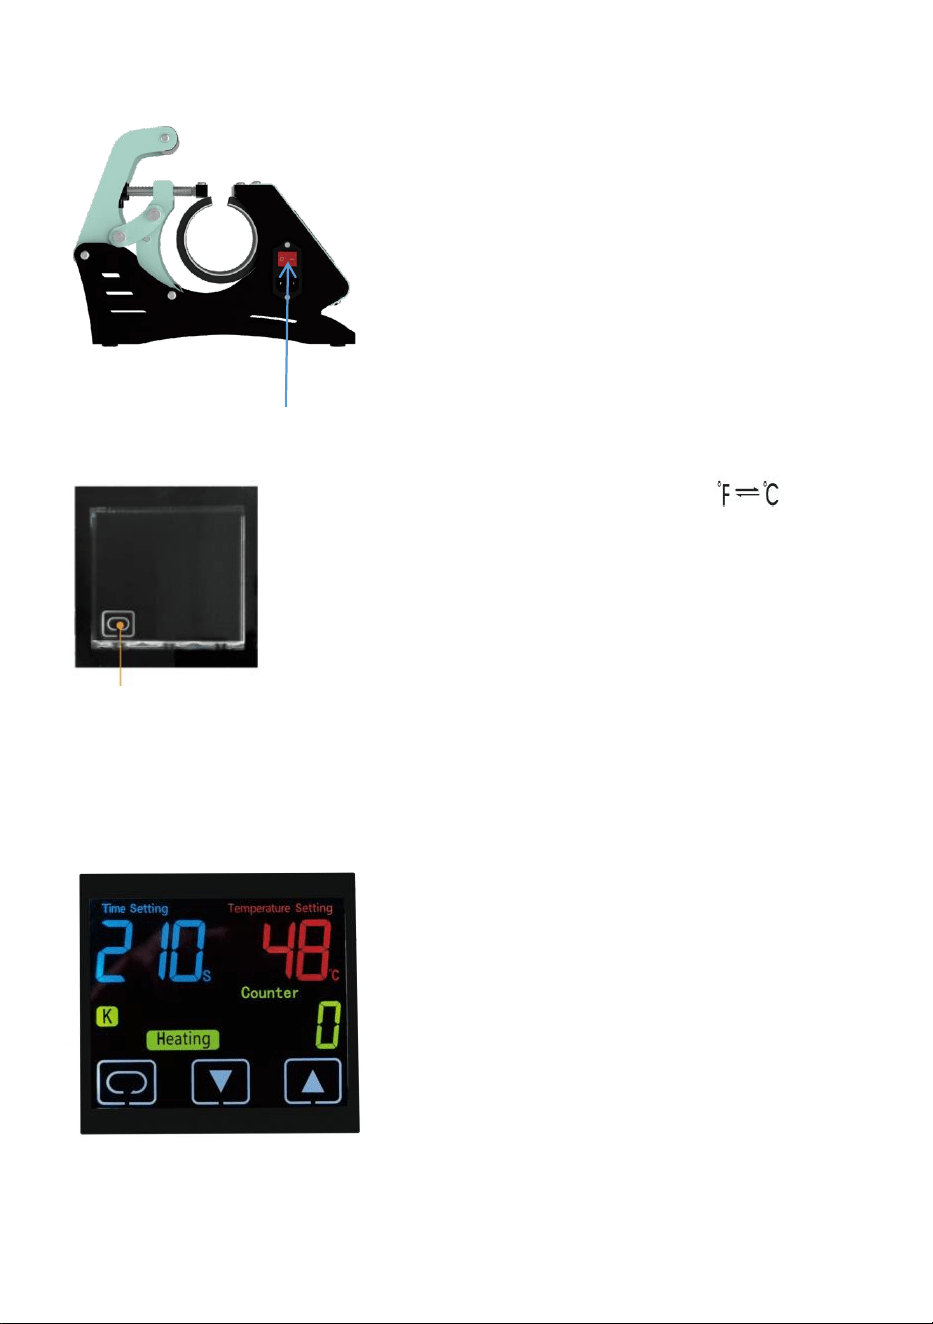
5. Temperature setting
After powering on, short press the power button to
enter the temperature setting mode, and press the up
and down arrows to set parameters.Wait 5 seconds
or press the power button twice to exit temperature
mode.
6. Time setting
After powering on, short press the power button twice
to enter the time setting mode, and press the up and
down arrows to set parameters. Wait 5 seconds or
press the power button once to exit time mode.
7.Count reset to zero
Press the up and down arrows simultaneously for 5
seconds to reset the counter to zero.
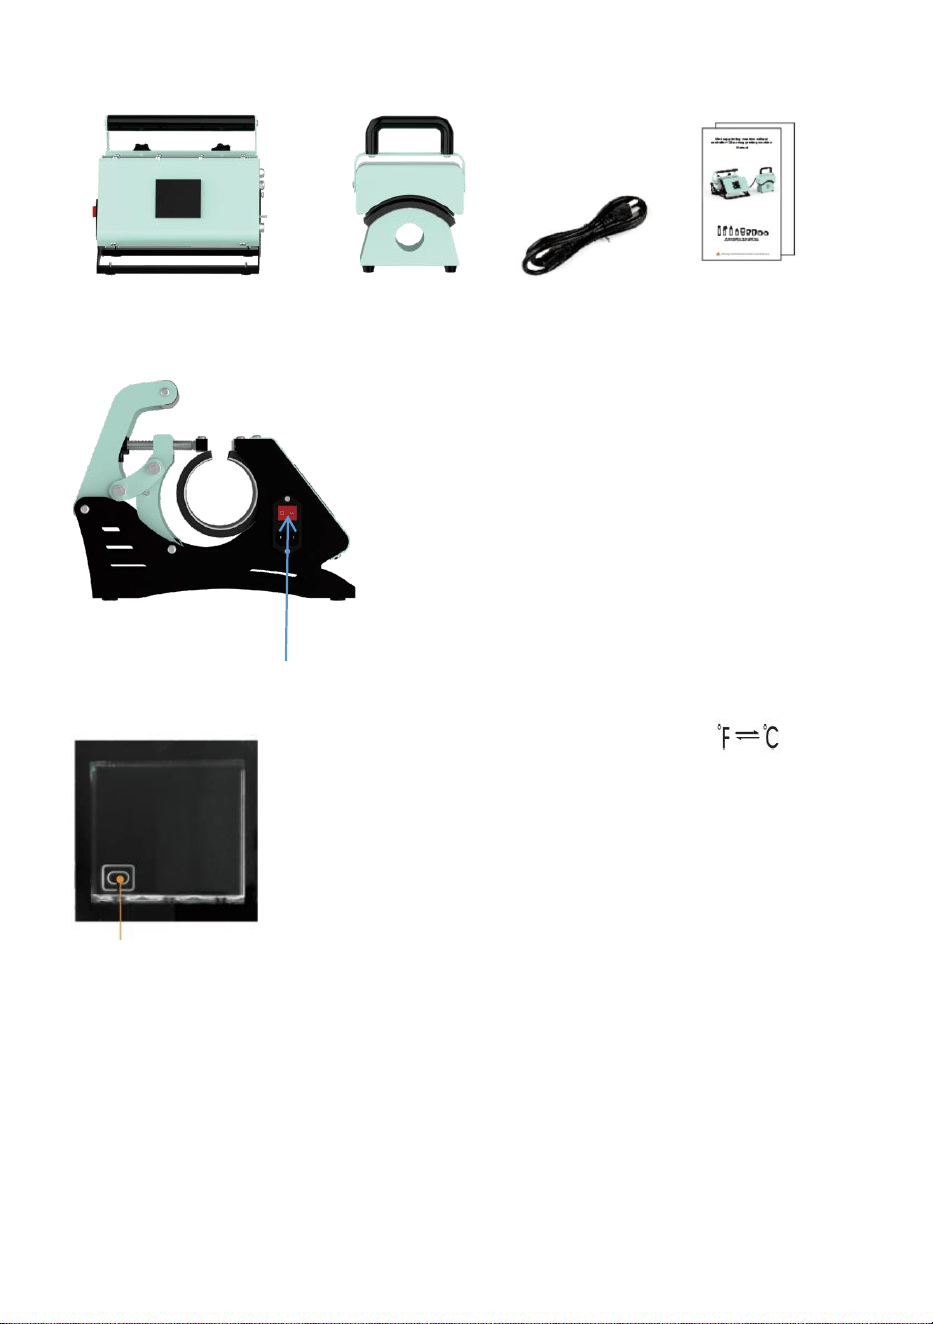
Switch
Power button
- 7 -
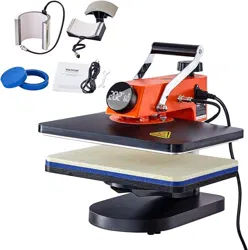
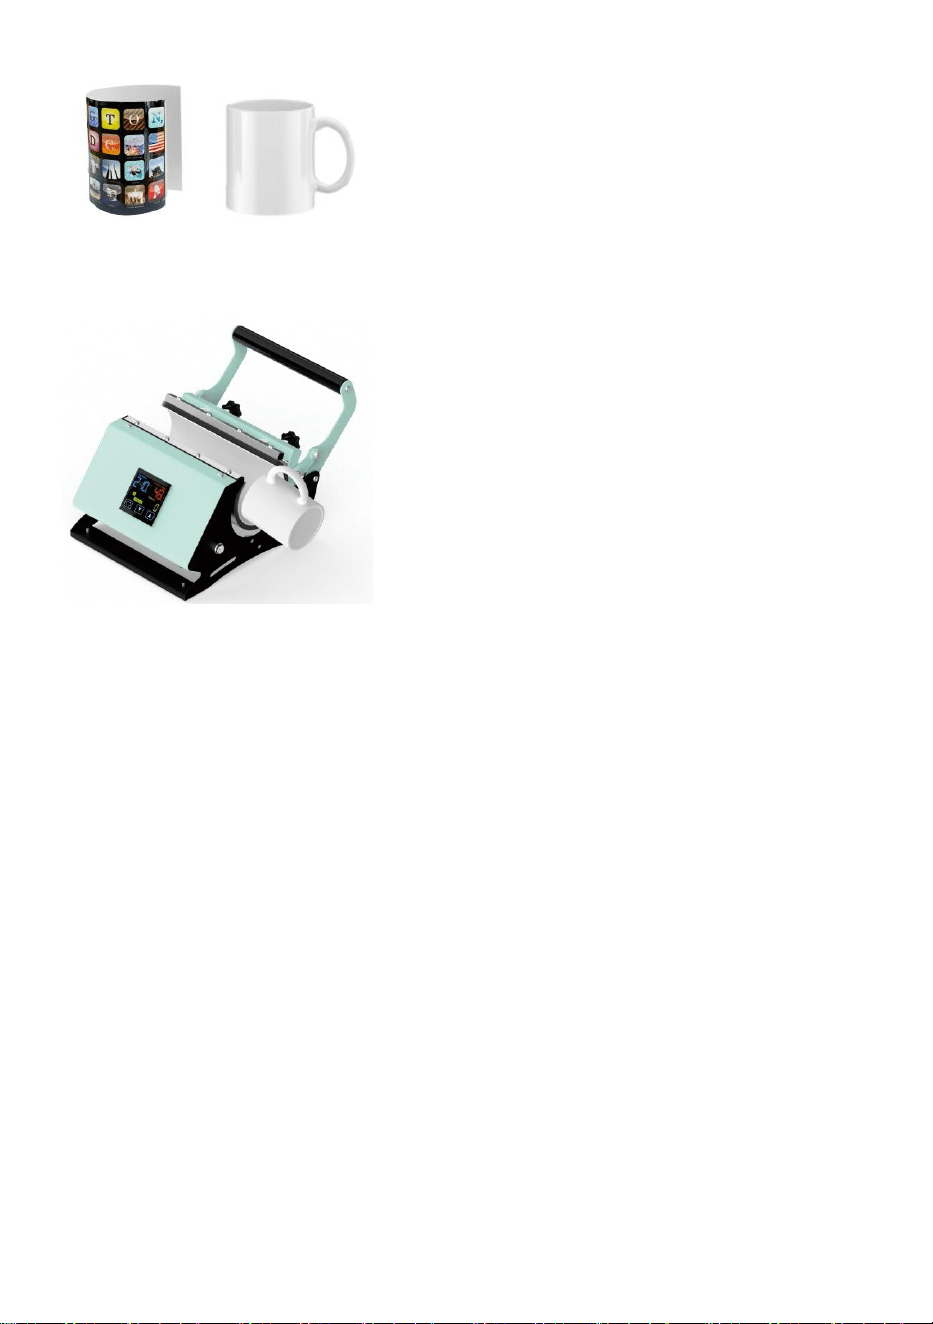
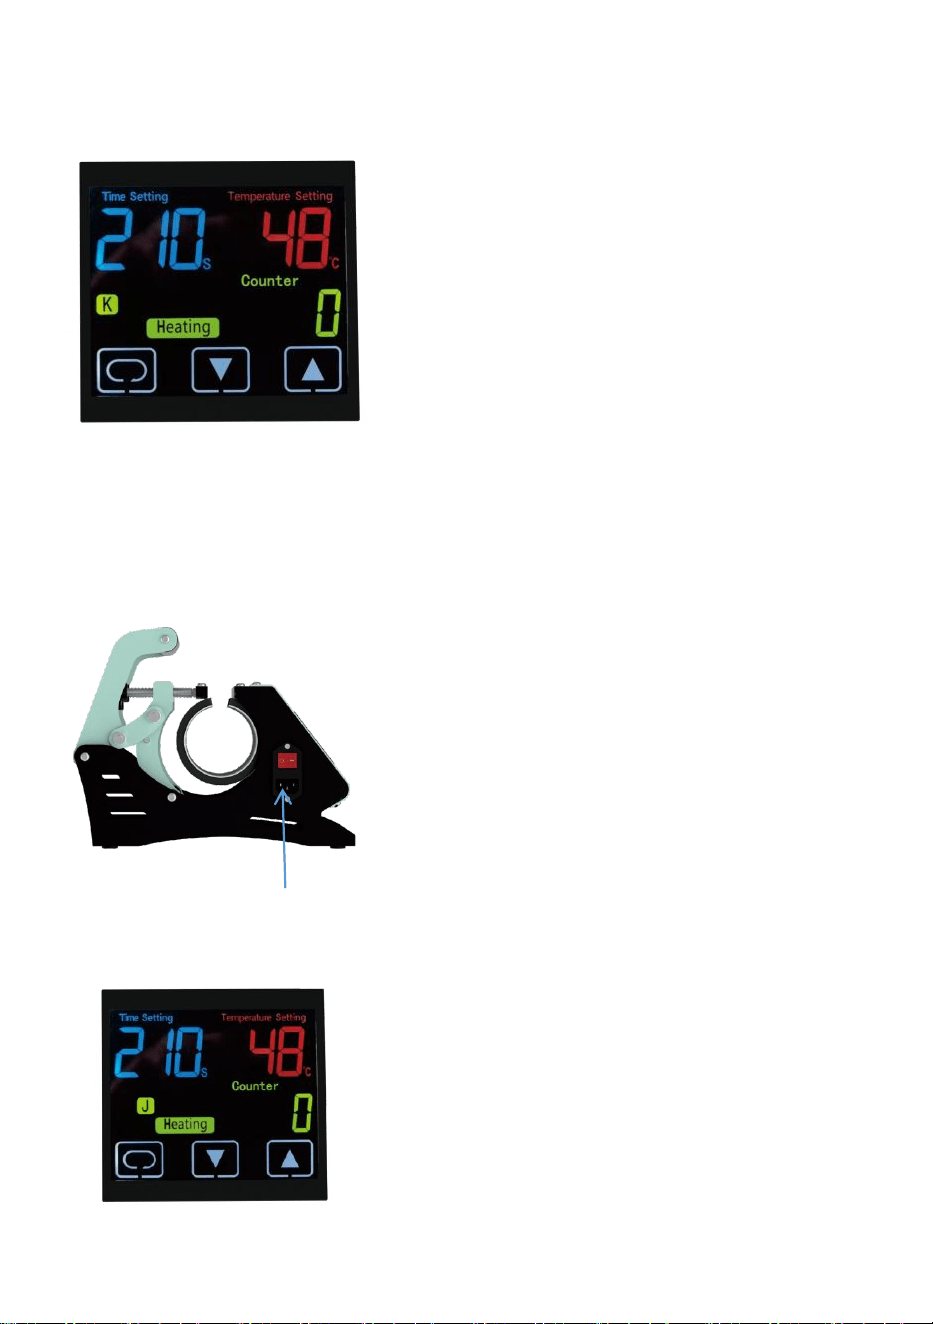
4. Operation process
Power socket
1. Plug in the power cord, turn on the power
switch, and enter standby mode.Press and
hold the power button for 4 seconds to
select "J" mug printing mode.
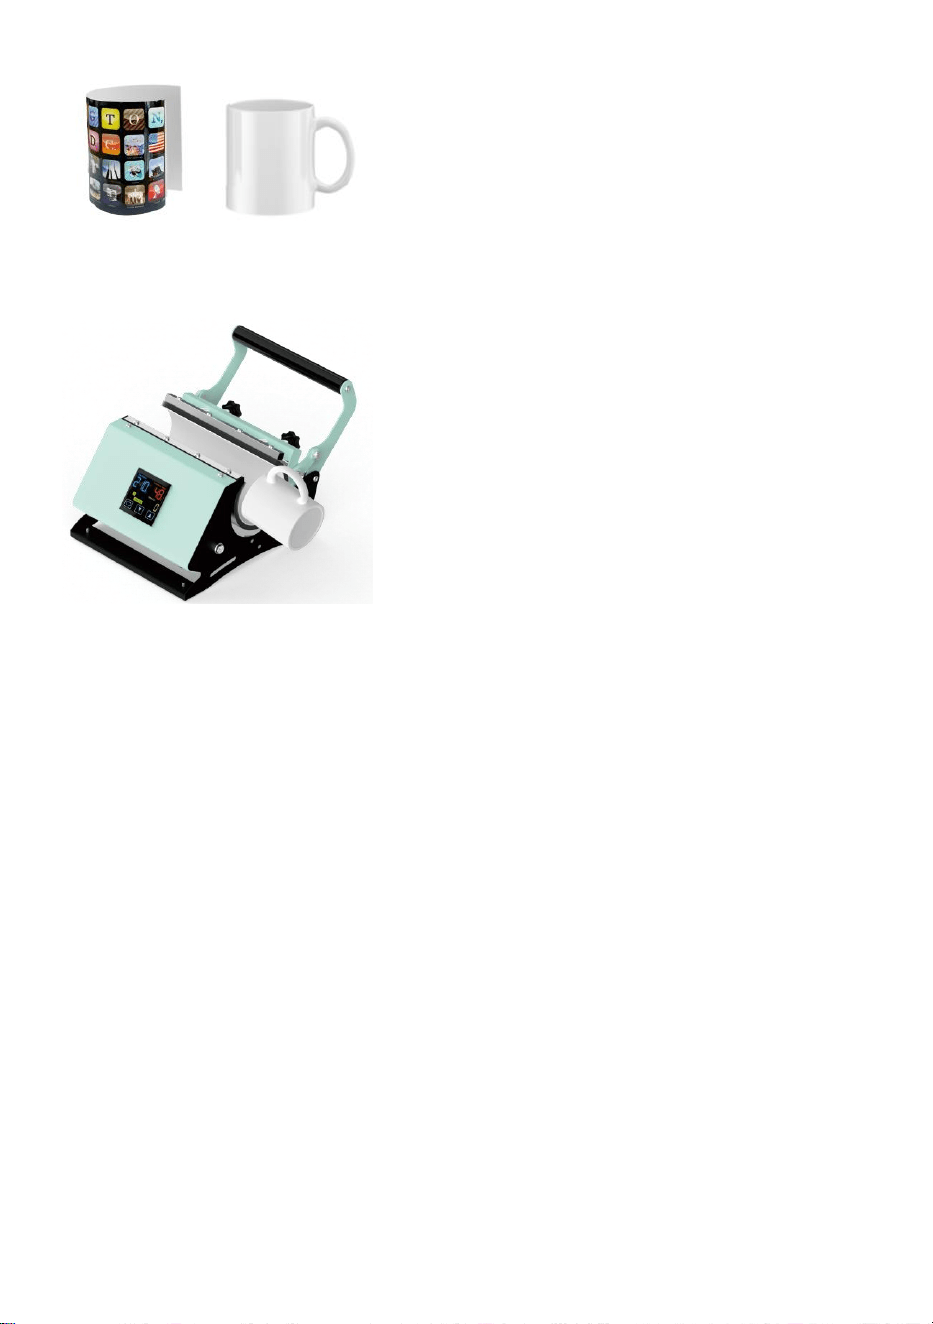
2. Short press the power button to turn on
the machine,
to set the time and temperature.
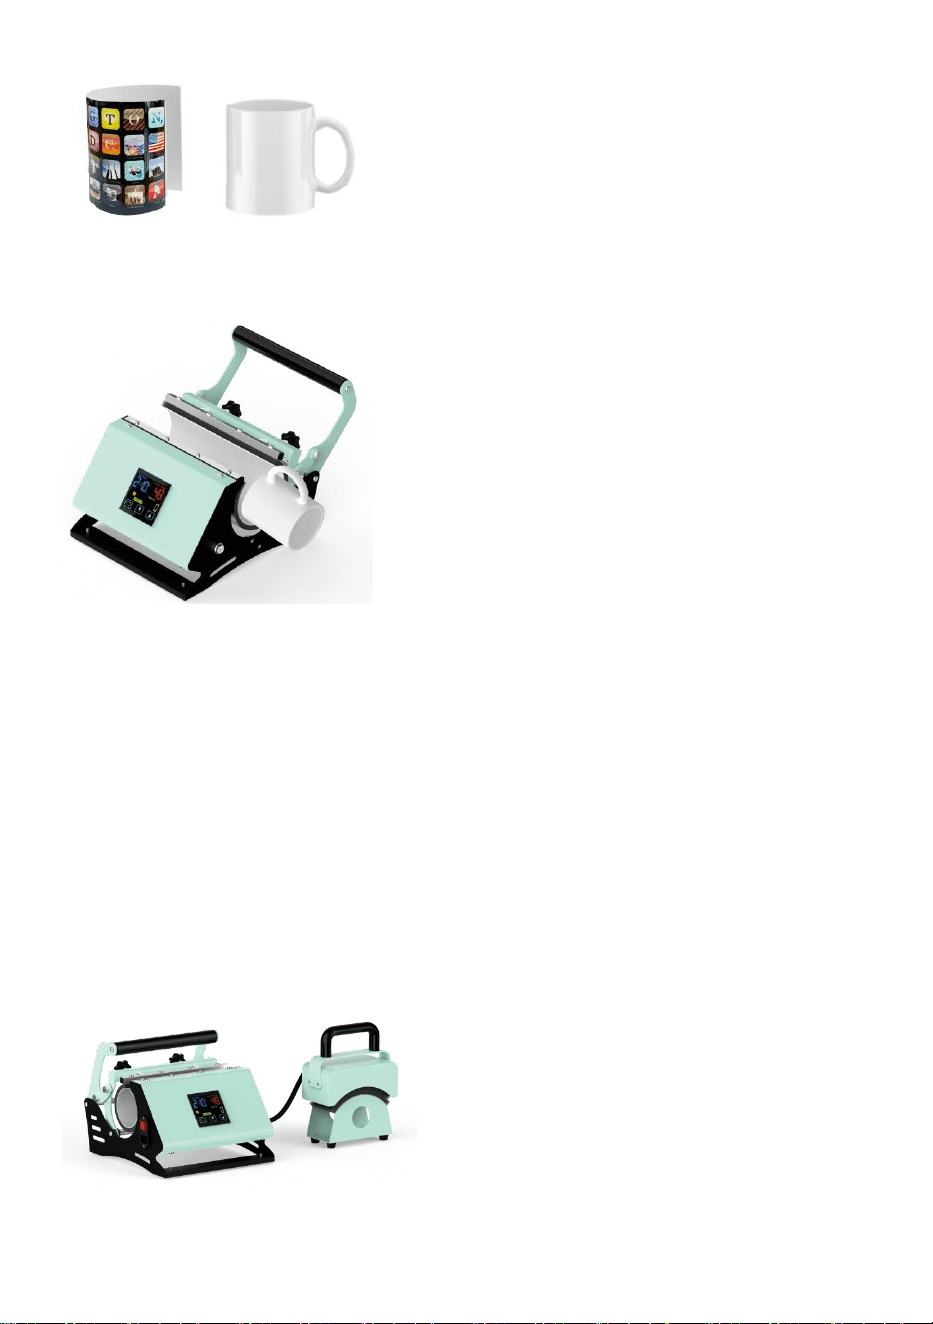
11oz mug
3. Stick the photo on the mug
- 8 -
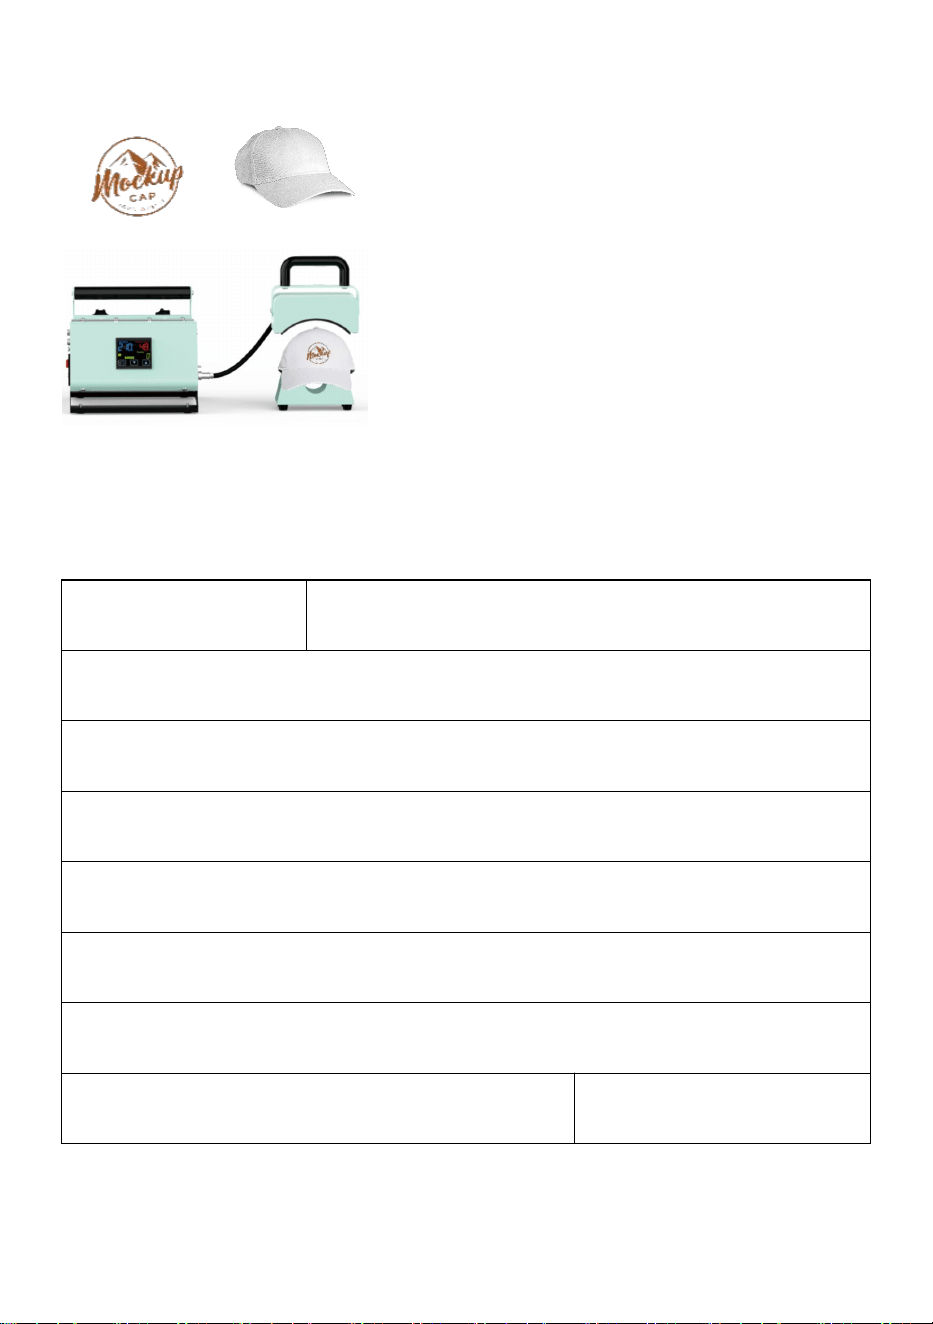
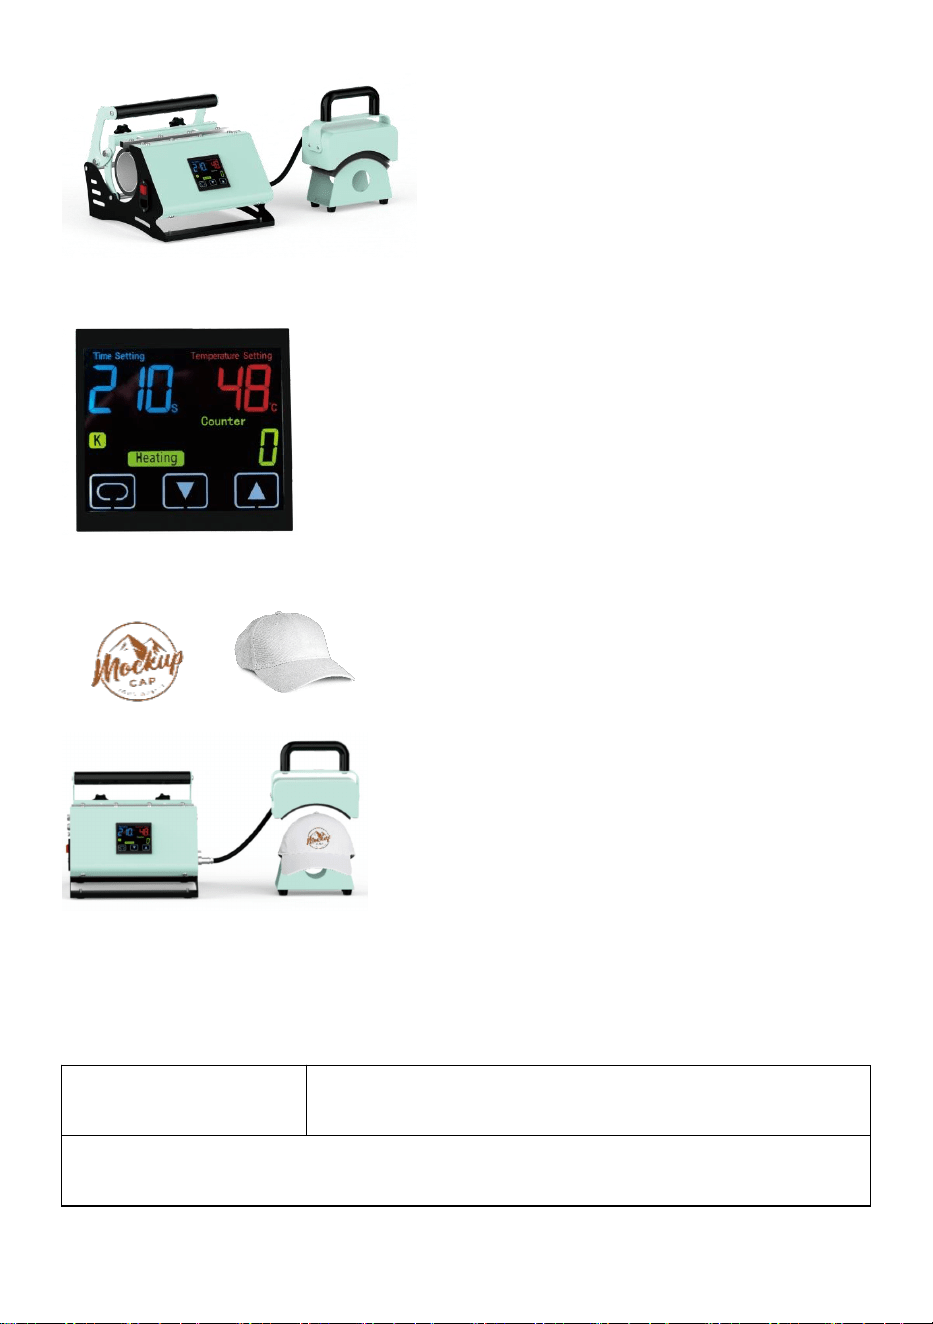
5. Cap printing machine operation process
1. When the host is powered off, connect the
aviation connector cable of the cap printing
machine to the host.
2. Plug in the power cord, turn on the power
switch, and enter standby mode.Press and hold
the power button for 4 seconds to select "K" cap
printing mode.
3. Short press the power button to turn on the
machine,to set the time and temperature.
4. When the machine reaches the setting
temperature, it will make a beeping sound. Press the
power button to cancel the beep, then put the mug in,
press the power button, and the machine will start
working.
Tips:
1. If the color of the pattern is too light, please
increase the transfer time.
2. If the color of the pattern is too dark, please
reduce the transfer time.
3. This product features a long mug wrap (270mm),
typically suitable for 300Z mugs. lf it istemporarily
used for shorter mugs (such as 110Z or 150Z mugs),
two mugs need to beplaced simultaneously to ensure
that the entire length of the mug wrap is in contact
with themugs. This is to ensure even heating and to
extend the service life of the mug wrap.
- 9 -
6. Basic Parameters
Model: F1130
Name: Heat press machine
Hat Heating plate size: 5.9"×3.15"
Mug heating pad size: 9.8"×8.1"
Heating voltage/frequency: 120V~ 60Hz For US User
Heating voltage/frequency: 230V~ 50Hz For EU / AU User
Rated power: 350W (Hat heat press machine)
Rated power: 550W (Mug heat press machine)
Temperature range:40°C~205°C(104°F~401°F)
Time range:1~999s
4.Stick the photo on the cap.
5. When the machine reaches the setting
temperature, it will make a beeping sound. Press the
power button to cancel the beep, then put the hat in,
press the power button, and the machine will start
working.

- 10 -
Manufacturer:Shanghaimuxinmuyeyouxiangongsi
Address: Shuangchenglu 803nong11hao1602A-1609shi, baoshanqu, shanghai
200000 CN.
Imported to AUS: SIHAO PTY LTD. 1 ROKEVA STREETEASTWOOD NSW 2122
Australia
Imported to USA: Sanven Technology Ltd. Suite 250, 9166 Anaheim Place,
Rancho Cucamonga, CA 91730
REP
EC
E-CrossStu GmbH
Mainzer Landstr.69, 60329 Frankfurt am Main.
REP
UK
YH CONSULTING LIMITED.
C/O YH Consulting Limited Office 147, Centurion House,
London Road, Staines-upon-Thames, Surrey, TW18 4AX


- 2 -
Technique Assistance et certificat de garantie électronique
www.vevor.com/support
PRESSE À CHALEUR
MANUEL DE L'UTILISATEUR
MODÈLE: F1130
We continue to be committed to provide you tools with competitive price.
"Save Half", "Half Price" or any other similar expressions used by us only represents an
estimate of savings you might benefit from buying certain tools with us compared to the major
top brands and does not necessarily mean to cover all categories of tools offered by us. You
are kindly reminded to verify carefully when you are placing an order with us if you are
actually saving half in comparison with the top major brands.

- 1 -
Diamètre maximum : 85 mm Longueur maximum : 250 mm
La taille d'impression maximale est une bouteille en aluminium de 30 oz
Remarque : le produit réel que vous recevez détermine son apparence.
Have product questions? Need technical support? Please feel free to
contact us:
Technical Support and E-Warranty Certificate
www.vevor.com/support
NEED HELP? CONTACT US!
This is the original instruction, please read all manual instructions
carefully before operating. VEVOR reserves a clear interpretation of our
user manual. The appearance of the product shall be subject to the
product you received. Please forgive us that we won't inform you again if
there are any technology or software updates on our product.
HEAT PRESS MACHINE

- 2 -
1. Consignes de sécurité importantes
Ce manuel d'instructions est destiné à votre bénéfice . Veuillez lire et suivre les
étapes de sécurité, d'installation, de maintenance et de dépannage décrites
ci-dessous pour garantir votre sécurité et votre satisfaction.
Le contenu de ce manuel d'instructions est basé sur les dernières informations sur
le produit disponibles au moment de la publication. Le fabricant se réserve le droit
d'apporter des modifications au produit à tout moment et sans préavis.
Faites toujours preuve de bon sens et portez une attention particulière à toutes les
déclarations DANGER, AVERTISSEMENT, ATTENTION et AVIS contenues dans
ce manuel.
Ceux-ci contiennent des informations importantes. L'étiquette de votre outil peut
inclure les symboles suivants. Les symboles et leurs définitions sont les suivants :
Avertissement - Pour réduire le risque de blessure, l'utilisateur doit lire attentivement le
manuel d'instructions.
Avertissement - Assurez-vous de porter des masques anti-poussière lorsque vous
utilisez ce produit.
Avertissement - Assurez-vous de porter des gants lorsque vous utilisez ce produit.
Courant alternatif
Ce symbole, placé avant un commentaire de sécurité, indique une sorte de précaution,
d'avertissement ou de danger. Ignorer cet avertissement peut entraîner un accident.
Pour réduire le risque de blessure, d'incendie ou d'électrocution, veuillez toujours
suivre les recommandations indiquées ci-dessous.
Danger!
Risque de blessures ou de dommages à l'environnement ! Risque de choc electrique!
Risque de blessures par choc électrique !
Informations sur l'élimination :
Ce produit est soumis aux dispositions de la directive européenne 2012/19/CE. Le
symbole représentant une poubelle barrée indique que le produit nécessite une
collecte sélective des déchets dans l'Union européenne. Ceci s'applique au produit et à
tous les accessoires marqués de ce symbole. Les produits marqués comme tels ne

- 3 -
peuvent pas être jetés avec les ordures ménagères normales, mais doivent être
déposés dans un point de collecte pour le recyclage des appareils électriques et
électroniques .
AVERTISSEMENT !
Avant d'utiliser ce produit, veuillez lire attentivement les
instructions de sécurité suivantes
Pour réduire le risque de blessure, de mort ou de dommages
matériels dus à un choc électrique ou à un incendie, assurez-vous
de suivre les précautions de sécurité suivantes !
Instruction de sécurité
14. Gardez le débranchement lorsque vous déplacez la machine.
15. Gardez le débranchement lors de l'installation des accessoires.
16. Placer sur une plate-forme plate et stable et fonctionner dans des
conditions aérées.
17. Portez un équipement de protection spécial lorsque vous utilisez la
machine.
18. N'utilisez pas cette machine dans un endroit dangereux.
19. Ne pas utiliser lorsque la machine ne fonctionne pas correctement.
20. Ne démontez pas et ne réparez pas cette machine.
21. N'utilisez pas une prise secteur inappropriée.
22. Ne touchez pas la plaque chauffante lorsque la machine chauffe.
23. Cet appareil n'est pas destiné à être utilisé par des personnes (y
compris des enfants) ayant des capacités physiques, sensorielles ou
réduites, ou un manque d'expérience et de connaissances, à moins
qu'elles n'aient été supervisées concernant l'utilisation de l'appareil
par une personne responsable de leur sécurité.
24. Les enfants doivent être surveillés pour s'assurer qu'ils ne jouent pas
avec l'appareil.
25. Lors du fonctionnement, faites attention aux températures élevées et
aux brûlures.

- 4 -
26. Si le cordon d'alimentation est endommagé, il doit être remplacé par
un cordon ou un ensemble spécial disponible auprès du fabricant ou
de son agent de service.
Informations FCC :
ATTENTION : Les changements ou modifications non expressément
approuvés par la partie responsable de la conformité pourraient annuler le
droit de l'utilisateur à utiliser l'équipement !
Cet appareil est conforme à la partie 15 des règles FCC. L’exploitation est
soumise aux deux conditions suivantes :
1) Ce produit peut provoquer des interférences nuisibles.
2) Ce produit doit accepter toute interférence reçue, y compris les
interférences susceptibles de provoquer un fonctionnement indésirable.
AVERTISSEMENT : les changements ou modifications apportés à ce
produit non expressément approuvés par la partie responsable de la
conformité pourraient annuler l'autorité de l'utilisateur à utiliser le produit.
Remarque : Ce produit a été testé et déclaré conforme aux limites d'un
appareil numérique de classe B conformément à la partie 15 des règles de
la FCC. Ces limites sont conçues pour fournir une protection raisonnable
contre les interférences nuisibles dans une installation résidentielle.
Ce produit génère, utilise et peut émettre de l'énergie radiofréquence et,
s'il n'est pas installé et utilisé conformément aux instructions, il peut
provoquer des interférences nuisibles aux communications radio.
Cependant, rien ne garantit que des interférences ne se produiront pas
dans une installation particulière. Si ce produit provoque des interférences
nuisibles à la réception radio ou télévision, ce qui peut être déterminé en
éteignant et rallumant le produit, l'utilisateur est encouragé à essayer de
corriger les interférences en prenant une ou plusieurs des mesures
suivantes.
· Réorientez ou déplacez l'antenne de réception.
· Augmentez la distance entre le produit et le récepteur.
· Connectez le produit à une prise sur un circuit différent de celui auquel le
récepteur est connecté.
- 5 -
· Consultez le revendeur ou un technicien radio/TV expérimenté pour
obtenir de l'aide.
3. Présentation du produit
Sponge handle sleeve
Pressure adjustment knob
Aviation connector
Time
Temperature
LED display
Screw
Mug heating pad
Count display
Mode display
Power button
Plus/Minus
- 6 -
Liste des accessoires
3. Introduction aux fonctions clés
30 oz mug printing machine
Controller
Power cable
Manual
1.Power on
After powering on, turn on the switch and enter standby
mode. Short press the power button to turn on the
machine.
2.Power off
Long press the power button for 2 seconds to turn off
the machine.
3.Automatic power off
If there is no operation within 30 minutes,the machine
will automatically power off.
4.Temperature unit conversion
In standby mode, press and hold the power button for 4
seconds, and press the up and down arrows to select
the heating mode."K"cap printing mode/"J"mug printing
mode.Press the power button again and press the up
and down arrows to select the temperature unit.
7. Temperature setting
After powering on, short press the power button to
enter the temperature setting mode, and press the up
and down arrows to set parameters.Wait 5 seconds
or press the power button twice to exit temperature
mode.
Switch
Power button

- 7 -
4. Processus opérationnel
Power socket
1. Plug in the power cord, turn on the power
switch, and enter standby mode.Press and
hold the power button for 4 seconds to
select "J" mug printing mode.
2. Short press the power button to turn on
the machine,
to set the time and temperature.
- 8 -
6. Processus de fonctionnement de la machine
d'impression de casquettes
11oz mug
3. Stick the photo on the mug
4. When the machine reaches the setting
temperature, it will make a beeping sound. Press the
power button to cancel the beep, then put the mug in,
press the power button, and the machine will start
working.
Tips:
4. If the color of the pattern is too light, please
increase the transfer time.
5. If the color of the pattern is too dark, please
reduce the transfer time.
6. This product features a long mug wrap (270mm),
typically suitable for 300Z mugs. lf it istemporarily
used for shorter mugs (such as 110Z or 150Z mugs),
two mugs need to beplaced simultaneously to ensure
that the entire length of the mug wrap is in contact
with themugs. This is to ensure even heating and to
extend the service life of the mug wrap.
- 9 -
6. Paramètres de base
Modèle: F1130
Nom : presse à chaud.
Taille de la plaque chauffante du chapeau : 5,9 "× 3,15"
1. When the host is powered off, connect the
aviation connector cable of the cap printing
machine to the host.
2. Plug in the power cord, turn on the power
switch, and enter standby mode.Press and hold
the power button for 4 seconds to select "K" cap
printing mode.
3. Short press the power button to turn on the
machine,to set the time and temperature.
4.Stick the photo on the cap.
5. When the machine reaches the setting
temperature, it will make a beeping sound. Press the
power button to cancel the beep, then put the hat in,
press the power button, and the machine will start
working.
- 10 -
Taille du coussin chauffant : 9,8 "
×
8,1"
Tension/fréquence de chauffage : 120 V ~ 60 Hz pour les utilisateurs
américains
Tension/fréquence de chauffage : 230 V ~ 50 Hz pour les utilisateurs EU/AU
Puissance nominale : 350 W (presse à chaud pour chapeaux)
Puissance nominale : 550 W (presse à chaleur pour tasses)
Plage de température : 40 ° C~205 ° C (104 °
F~401 ° F)
Plage de temps : 1 à 999 s
Fabricant : Shanghaimuxinmuyeyouxiangongsi
Adresse : Shuangchenglu 803nong11hao1602A-1609shi, baoshanqu, Shanghai
200000 CN.
Importé en Australie : SIHAO PTY LTD. 1 ROKEVA STREETASTWOOD NSW
2122 Australie
Importé aux États-Unis : Sanven Technology Ltd. Suite 250, 9166 Anaheim
Place, Rancho Cucamonga, CA 91730
REP
EC
E-CrossStu GmbH
Mainzer Landstr.69, 60329 Frankfurt am Main.
REP
UK
YH CONSULTING LIMITED.
C/O YH Consulting Limited Office 147, Centurion House,
London Road, Staines-upon-Thames, Surrey, TW18 4AX

- 11 -


- 2 -
Technisch Support und E-Garantie-Zertifikat www.vevor.com/support
HITZE DRUCK MASCHINE
BENUTZERHANDBUCH
MODELL:F1130
We continue to be committed to provide you tools with competitive price.
"Save Half", "Half Price" or any other similar expressions used by us only represents an
estimate of savings you might benefit from buying certain tools with us compared to the major
top brands and does not necessarily mean to cover all categories of tools offered by us. You
are kindly reminded to verify carefully when you are placing an order with us if you are
actually saving half in comparison with the top major brands.

- 1 -
Max. Durchmesser: 85 mm, Max. Länge: 250 mm
Maximale Druckgröße ist 30oz Aluminiumflasche
Hinweis: Das tatsächliche Produkt, das Sie erhalten, bestimmt sein Aussehen.
Have product questions? Need technical support? Please feel free to
contact us:
Technical Support and E-Warranty Certificate
www.vevor.com/support
NEED HELP? CONTACT US!
This is the original instruction, please read all manual instructions
carefully before operating. VEVOR reserves a clear interpretation of our
user manual. The appearance of the product shall be subject to the
product you received. Please forgive us that we won't inform you again if
there are any technology or software updates on our product.
HEAT PRESS MACHINE

- 2 -
1. Wichtige Sicherheitshinweise
Diese Bedienungsanleitung ist zu Ihrem Nutzen gedacht . Bitte lesen und befolgen
Sie die darin beschriebenen Schritte zu Sicherheit, Installation, Wartung und
Fehlerbehebung, um Ihre Sicherheit und Zufriedenheit zu gewährleisten.
Der Inhalt dieser Bedienungsanleitung basiert auf den neuesten
Produktinformationen zum Zeitpunkt der Veröffentlichung. Der Hersteller behält
sich das Recht vor, jederzeit und ohne Vorankündigung Produktänderungen
vorzunehmen.
Gehen Sie stets mit gesundem Menschenverstand vor und beachten Sie
insbesondere die Hinweise zu GEFAHR, WARNUNG, VORSICHT und HINWEIS
in diesem Handbuch.
Diese enthalten wichtige Informationen. Das Etikett auf Ihrem Werkzeug kann die
folgenden Symbole enthalten. Die Symbole und ihre Bedeutungen lauten wie folgt:
Warnung – Um das Verletzungsrisiko zu verringern, muss der Benutzer die
Bedienungsanleitung sorgfältig lesen.
Warnung: Tragen Sie bei der Verwendung dieses Produkts unbedingt eine
Staubmaske.
Achtung: Tragen Sie bei der Verwendung dieses Produkts unbedingt Handschuhe.
Wechselstrom
Dieses Symbol vor einem Sicherheitshinweis weist auf eine Vorsichtsmaßnahme,
Warnung oder Gefahr hin. Das Ignorieren dieser Warnung kann zu einem Unfall
führen. Um das Risiko von Verletzungen, Bränden oder Stromschlägen zu verringern,
befolgen Sie bitte immer die unten aufgeführten Empfehlungen .
Gefahr!
Gefahr von Personen- oder Umweltschäden! Gefahr durch Stromschlag! Gefahr von
Personenschäden durch Stromschlag!
Hinweise zur Entsorgung:
Dieses Produkt unterliegt den Bestimmungen der europäischen Richtlinie 2012/19/EU.
Das Symbol einer durchgestrichenen Mülltonne weist darauf hin, dass dieses Produkt
in der Europäischen Union einer getrennten Müllentsorgung unterliegt. Dies gilt für das

- 3 -
Produkt und alle mit diesem Symbol gekennzeichneten Zubehörteile. So
gekennzeichnete Produkte dürfen nicht im normalen Hausmüll entsorgt werden,
sondern müssen an einer Sammelstelle für das Recycling von elektrischen und
elektronischen Geräten abgegeben werden .
WARNUNG !
Bevor Sie dieses Produkt verwenden, lesen Sie bitte die
folgenden Sicherheitshinweise sorgfältig durch
Um das Risiko von Verletzungen, Todesfällen oder Sachschäden
durch Stromschlag oder Feuer zu verringern, befolgen Sie unbedingt
die folgenden Sicherheitsvorkehrungen!
Sicherheitsanleitung
27. Ziehen Sie beim Bewegen der Maschine stets den Stecker.
28. Ziehen Sie beim Installieren von Zubehör stets den Stecker.
29. Auf einer flachen und stabilen Plattform platzieren und unter belüfteten
Bedingungen betreiben.
30. Tragen Sie beim Bedienen der Maschine besondere
Schutzausrüstung.
31. Verwenden Sie diese Maschine nicht an gefährlichen Orten.
32. Nicht verwenden, wenn die Maschine nicht ordnungsgemäß
funktioniert.
33. Zerlegen und reparieren Sie diese Maschine nicht.
34. Verwenden Sie keine ungeeignete Wechselstromsteckdose.
35. Berühren Sie die Heizplatte nicht, während die Maschine aufheizt.
36. Dieses Gerät ist nicht für die Benutzung durch Personen
(einschließlich Kinder) mit eingeschränkten physischen, sensorischen
oder geistigen Fähigkeiten oder Mangel an Erfahrung und Wissen
bestimmt, es sei denn, sie werden bei der Benutzung des Geräts
durch eine für ihre Sicherheit verantwortliche Person beaufsichtigt.
37. Kinder sollten beaufsichtigt werden, um sicherzustellen, dass sie nicht
mit dem Gerät spielen.

- 4 -
38. Achten Sie beim Betrieb auf hohe Temperaturen und Verbrennungen.
39. Wenn das Netzkabel beschädigt ist, muss es durch ein spezielles
Kabel oder eine spezielle Baugruppe ersetzt werden, die beim
Hersteller oder seinem Kundendienst erhältlich ist.
FCC-Informationen:
ACHTUNG: Durch Änderungen oder Modifikationen, die nicht ausdrücklich
von der für die Konformität verantwortlichen Partei genehmigt wurden,
kann die Berechtigung des Benutzers zum Betrieb des Geräts erlöschen!
Dieses Gerät entspricht Teil 15 der FCC-Bestimmungen. Der Betrieb
unterliegt den folgenden zwei Bedingungen:
1) Dieses Produkt kann schädliche Störungen verursachen.
2) Dieses Produkt muss alle empfangenen Störungen tolerieren,
einschließlich Störungen, die einen unerwünschten Betrieb verursachen
können.
WARNUNG: Änderungen oder Modifikationen an diesem Produkt, die
nicht ausdrücklich von der für die Konformität verantwortlichen Partei
genehmigt wurden, können zum Erlöschen der Berechtigung des
Benutzers zum Betrieb des Produkts führen.
Hinweis: Dieses Produkt wurde getestet und entspricht den Grenzwerten
für digitale Geräte der Klasse B gemäß Teil 15 der FCC-Bestimmungen.
Diese Grenzwerte sollen einen angemessenen Schutz gegen schädliche
Störungen bei der Installation in Wohngebieten bieten.
Dieses Produkt erzeugt und verwendet Hochfrequenzenergie und kann
diese auch ausstrahlen. Wenn es nicht gemäß den Anweisungen installiert
und verwendet wird, kann es zu Störungen des Funkverkehrs kommen. Es
gibt jedoch keine Garantie dafür, dass bei einer bestimmten Installation
keine Störungen auftreten. Wenn dieses Produkt Störungen des Radio-
oder Fernsehempfangs verursacht (was durch Ein- und Ausschalten des
Produkts festgestellt werden kann), wird dem Benutzer empfohlen, die
Störungen durch eine oder mehrere der folgenden Maßnahmen zu
beheben.
· Empfangsantenne neu ausrichten oder verlegen.
- 5 -
· Vergrößern Sie den Abstand zwischen Produkt und Empfänger.
· Schließen Sie das Produkt an eine Steckdose eines anderen
Stromkreises an als den, an den der Empfänger angeschlossen ist.
· Wenden Sie sich an den Händler oder einen erfahrenen
Radio-/Fernsehtechniker.
4. Produkteinführung
Sponge handle sleeve
Pressure adjustment knob
Aviation connector
Time
Temperature
LED display
Screw
Mug heating pad
Count display
Mode display
- 6 -
Zubehörliste
3. Einführung in die wichtigsten Funktionen
30 oz mug printing machine
Controller
Power cable
Manual
1.Power on
After powering on, turn on the switch and enter standby
mode. Short press the power button to turn on the
machine.
2.Power off
Long press the power button for 2 seconds to turn off
the machine.
3.Automatic power off
If there is no operation within 30 minutes,the machine
will automatically power off.
4.Temperature unit conversion
In standby mode, press and hold the power button for 4
seconds, and press the up and down arrows to select
the heating mode."K"cap printing mode/"J"mug printing
mode.Press the power button again and press the up
and down arrows to select the temperature unit.
9. Temperature setting
After powering on, short press the power button to
enter the temperature setting mode, and press the up
Switch
Power button
- 7 -
4. Betriebsablauf
Power socket
1. Plug in the power cord, turn on the power
switch, and enter standby mode.Press and
hold the power button for 4 seconds to
select "J" mug printing mode.
2. Short press the power button to turn on
the machine,
to set the time and temperature.
- 8 -
7. Betriebsablauf der Kappendruckmaschine
11oz mug
3. Stick the photo on the mug
1. When the host is powered off, connect the
aviation connector cable of the cap printing
machine to the host.
2. Plug in the power cord, turn on the power
switch, and enter standby mode.Press and hold
the power button for 4 seconds to select "K" cap
printing mode.
4. When the machine reaches the setting
temperature, it will make a beeping sound. Press the
power button to cancel the beep, then put the mug in,
press the power button, and the machine will start
working.
Tips:
7. If the color of the pattern is too light, please
increase the transfer time.
8. If the color of the pattern is too dark, please
reduce the transfer time.
9. This product features a long mug wrap (270mm),
typically suitable for 300Z mugs. lf it istemporarily
used for shorter mugs (such as 110Z or 150Z mugs),
two mugs need to beplaced simultaneously to ensure
that the entire length of the mug wrap is in contact
with themugs. This is to ensure even heating and to
extend the service life of the mug wrap.
- 9 -
6. Grundlegende Parameter
Modell: F1130
Name: Wärmepressmaschine
Hut Heizplatte Größe: 5,9"×3,15"
des Becher-Heizkissens: 9,8"×8,1"
Heizspannung/-frequenz: 120 V ~ 60 Hz Für US-Benutzer
Heizspannung/-frequenz: 230 V ~ 50 Hz Für EU-/AU-Benutzer
Nennleistung: 350 W (Hitzepresse für Hüte)
3. Short press the power button to turn on the
machine,to set the time and temperature.
4.Stick the photo on the cap.
5. When the machine reaches the setting
temperature, it will make a beeping sound. Press the
power button to cancel the beep, then put the hat in,
press the power button, and the machine will start
working.

- 10 -
Nennleistung: 550 W (Maschine zum Heißpressen von Tassen)
Temperaturbereich: 40 ° C ~ 205 ° C (104 ° F ~
401 ° F)
Zeitbereich: 1~999s
Hersteller : Shanghaimuxinmuyeyouxiangongsi
Adresse: Shuangchenglu 803nong11hao1602A-1609shi, Baoshanqu, Shanghai
200000 CN.
Nach AUS importiert: SIHAO PTY LTD. 1 ROKEVA STREETEASTWOOD NSW
2122 Australien
Importiert in die USA: Sanven Technology Ltd. Suite 250, 9166 Anaheim Place,
Rancho Cucamonga, CA 91730
REP
EC
E-CrossStu GmbH
Mainzer Landstr.69, 60329 Frankfurt am Main.
REP
UK
YH CONSULTING LIMITED.
C/O YH Consulting Limited Office 147, Centurion House,
London Road, Staines-upon-Thames, Surrey, TW18 4AX

- 11 -


- 2 -
Techniczny Certyfikat wsparcia i e-gwarancji www.vevor.com/support
PRASA CIEPLNA
INSTRUKCJA OBSŁUGI
MODEL:F1130
We continue to be committed to provide you tools with competitive price.
"Save Half", "Half Price" or any other similar expressions used by us only represents an
estimate of savings you might benefit from buying certain tools with us compared to the major
top brands and does not necessarily mean to cover all categories of tools offered by us. You
are kindly reminded to verify carefully when you are placing an order with us if you are
actually saving half in comparison with the top major brands.

- 1 -
Maksymalna średnica: 85 mm Maksymalna długość: 250 mm
Maksymalny rozmiar nadruku to aluminiowa butelka o pojemności 30 uncji
Uwaga: rzeczywisty produkt, który otrzymasz, określa jego wygląd.
Have product questions? Need technical support? Please feel free to
contact us:
Technical Support and E-Warranty Certificate
www.vevor.com/support
NEED HELP? CONTACT US!
This is the original instruction, please read all manual instructions
carefully before operating. VEVOR reserves a clear interpretation of our
user manual. The appearance of the product shall be subject to the
product you received. Please forgive us that we won't inform you again if
there are any technology or software updates on our product.
HEAT PRESS MACHINE

- 2 -
1. Ważne instrukcje dotyczące bezpieczeństwa
Niniejsza instrukcja obsługi została stworzona dla Twojej korzyści . Aby zapewnić
sobie bezpieczeństwo i satysfakcję, przeczytaj i postępuj zgodnie z opisanymi
poniżej krokami dotyczącymi bezpieczeństwa, instalacji, konserwacji i
rozwiązywania problemów.
Treść niniejszej instrukcji obsługi opiera się na najnowszych informacjach o
produkcie dostępnych w momencie publikacji. Producent zastrzega sobie prawo
do wprowadzenia zmian w produkcie w dowolnym momencie i bez uprzedzenia.
Zawsze kieruj się zdrowym rozsądkiem i zwracaj szczególną uwagę na wszystkie
stwierdzenia NIEBEZPIECZEŃSTWO, OSTRZEŻENIE, PRZESTROGA i UWAGA
zawarte w tej instrukcji.
Niosą one ważne informacje. Etykieta narzędzia może zawierać następujące
symbole. Symbole i ich definicje są następujące:
Ostrzeżenie — aby zmniejszyć ryzyko obrażeń, użytkownik musi uważnie przeczytać
instrukcję obsługi.
Ostrzeżenie — podczas korzystania z tego produktu należy nosić maski
przeciwpyłowe.
Ostrzeżenie — podczas korzystania z tego produktu należy nosić rękawiczki.
Prąd przemienny
Ten symbol, umieszczony przed uwagą dotyczącą bezpieczeństwa, wskazuje rodzaj
środka ostrożności, ostrzeżenia lub niebezpieczeństwa. Zignorowanie tego ostrzeżenia
może prowadzić do wypadku. Aby zmniejszyć ryzyko obrażeń, pożaru lub porażenia
prądem, należy zawsze przestrzegać zaleceń przedstawionych poniżej.
Niebezpieczeństwo!
Ryzyko obrażeń ciała lub szkód dla środowiska! Ryzyko porażenia prądem! Ryzyko
obrażeń ciała w wyniku porażenia prądem!
Informacje o utylizacji:
Ten produkt podlega przepisom Dyrektywy Europejskiej 2012/19/EC. Symbol
przekreślonego kosza na śmieci oznacza, że produkt wymaga selektywnej zbiórki
śmieci na terenie Unii Europejskiej. Dotyczy to produktu i wszystkich akcesoriów

- 3 -
oznaczonych tym symbolem. Produktów oznaczonych jako takie nie można wyrzucać
razem ze zwykłymi odpadami domowymi, lecz należy je oddać do punktu zbiórki w celu
recyklingu urządzeń elektrycznych i elektronicznych .
OSTRZEŻENIE !
Przed użyciem tego produktu prosimy o dokładne zapoznanie
się z poniższymi instrukcjami bezpieczeństwa
Aby zmniejszyć ryzyko obrażeń, śmierci lub uszkodzenia mienia w
wyniku porażenia prądem elektrycznym lub pożaru, należy
przestrzegać następujących środków ostrożności!
Instrukcja bezpieczeństwa
40. Podczas przenoszenia urządzenia należy zachować wtyczkę z
gniazdka.
41. Podczas instalowania akcesoriów należy odłączyć wtyczkę.
42. Umieścić na płaskiej i stabilnej platformie i używać w wentylowanych
warunkach.
43. Podczas obsługi maszyny należy nosić specjalne wyposażenie
ochronne.
44. Nie używaj tej maszyny w niebezpiecznym miejscu.
45. Nie używać, gdy maszyna nie działa prawidłowo.
46. Nie demontuj i nie naprawiaj tej maszyny.
47. Nie używaj nieodpowiedniego gniazdka elektrycznego.
48. Nie dotykaj płyty grzewczej podczas nagrzewania urządzenia.
49. To urządzenie nie jest przeznaczone do użytku przez osoby (w tym
dzieci) o ograniczonych możliwościach fizycznych, sensorycznych lub
możliwościach lub nieposiadające doświadczenia i wiedzy, chyba że
znajdują się pod nadzorem osoby odpowiedzialnej za ich bezpieczeń
stwo w zakresie użytkowania urządzenia.
50. Dzieci należy nadzorować, aby mieć pewność, że nie bawią się
urządzeniem.

- 4 -
51. Podczas pracy należy uważać na wysoką temperaturę i oparzenia.
52. Jeżeli przewód zasilający jest uszkodzony, należy go wymienić na
specjalny przewód lub zespół dostępny u producenta lub jego
przedstawiciela serwisowego.
Informacje FCC:
UWAGA: Zmiany lub modyfikacje, które nie zostały wyraźnie zatwierdzone
przez stronę odpowiedzialną za zgodność, mogą unieważnić uprawnienia
użytkownika do obsługi urządzenia!
To urządzenie jest zgodne z częścią 15 przepisów FCC. Działanie podlega
następującym dwóm warunkom:
1) Ten produkt może powodować szkodliwe zakłócenia.
2) Ten produkt musi akceptować wszelkie odbierane zakłócenia, w tym
zakłócenia, które mogą powodować niepożądane działanie.
OSTRZEŻENIE: Zmiany lub modyfikacje tego produktu, które nie zostały
wyraźnie zatwierdzone przez stronę odpowiedzialną za zgodność, mogą
unieważnić uprawnienia użytkownika do obsługi produktu.
Uwaga: ten produkt został przetestowany i stwierdzono, że spełnia
ograniczenia dla urządzeń cyfrowych klasy B zgodnie z częścią 15
przepisów FCC. Ograniczenia te mają na celu zapewnienie rozsądnej
ochrony przed szkodliwymi zakłóceniami w instalacjach domowych.
Ten produkt generuje, wykorzystuje i może emitować energię o
częstotliwości radiowej, a jeśli nie zostanie zainstalowany i nie będzie
używany zgodnie z instrukcją, może powodować szkodliwe zakłócenia w
komunikacji radiowej. Nie ma jednak gwarancji, że w konkretnej instalacji
nie wystąpią zakłócenia. Jeśli produkt powoduje szkodliwe zakłócenia w
odbiorze radia lub telewizji, co można stwierdzić poprzez wyłączenie i
włączenie produktu, zachęca się użytkownika do podjęcia próby
skorygowania zakłóceń za pomocą jednego lub kilku z poniższych
środków.
· Zmień orientację lub położenie anteny odbiorczej.
· Zwiększ odległość pomiędzy produktem a odbiornikiem.
· Podłącz produkt do gniazdka w innym obwodzie niż ten, do którego
- 5 -
podłączony jest odbiornik.
· Skonsultuj się ze sprzedawcą lub doświadczonym technikiem
radiowo-telewizyjnym w celu uzyskania pomocy.
5. Wprowadzenie produktów
Sponge handle sleeve
Pressure adjustment knob
Aviation connector
Time
Temperature
LED display
Screw
Mug heating pad
Count display
Mode display
Power button
Plus/Minus
- 6 -
Lista akcesoriów
3. Wprowadzenie do funkcji klawisza
30 oz mug printing machine
Controller
Power cable
Manual
1.Power on
After powering on, turn on the switch and enter standby
mode. Short press the power button to turn on the
machine.
2.Power off
Long press the power button for 2 seconds to turn off
the machine.
3.Automatic power off
If there is no operation within 30 minutes,the machine
will automatically power off.
4.Temperature unit conversion
In standby mode, press and hold the power button for 4
seconds, and press the up and down arrows to select
the heating mode."K"cap printing mode/"J"mug printing
mode.Press the power button again and press the up
and down arrows to select the temperature unit.
11. Temperature setting
After powering on, short press the power button to
enter the temperature setting mode, and press the up
and down arrows to set parameters.Wait 5 seconds
or press the power button twice to exit temperature
Switch
Power button

- 7 -
4. Proces operacyjny
Power socket
1. Plug in the power cord, turn on the power
switch, and enter standby mode.Press and
hold the power button for 4 seconds to
select "J" mug printing mode.
2. Short press the power button to turn on
the machine,
to set the time and temperature.

- 8 -
8. Proces obsługi maszyny do drukowania czapek
11oz mug
3. Stick the photo on the mug
1. When the host is powered off, connect the
aviation connector cable of the cap printing
machine to the host.
2. Plug in the power cord, turn on the power
switch, and enter standby mode.Press and hold
the power button for 4 seconds to select "K" cap
printing mode.
4. When the machine reaches the setting
temperature, it will make a beeping sound. Press the
power button to cancel the beep, then put the mug in,
press the power button, and the machine will start
working.
Tips:
10. If the color of the pattern is too light, please
increase the transfer time.
11. If the color of the pattern is too dark, please
reduce the transfer time.
12. This product features a long mug wrap (270mm),
typically suitable for 300Z mugs. lf it istemporarily
used for shorter mugs (such as 110Z or 150Z mugs),
two mugs need to beplaced simultaneously to ensure
that the entire length of the mug wrap is in contact
with themugs. This is to ensure even heating and to
extend the service life of the mug wrap.

- 9 -
6. Podstawowe parametry
Model: F1130
Nazwa: Prasa termiczna
Rozmiar płyty grzewczej kapelusza: 5,9 cala × 3,15 cala
Rozmiar poduszki grzewczej kubka: 9,8 "×8,1"
Napięcie/częstotliwość ogrzewania: 120 V ~ 60 Hz Dla użytkownika z USA
Napięcie/częstotliwość ogrzewania: 230 V ~ 50 Hz Dla użytkownika z UE/AU
Moc znamionowa: 350 W (maszyna do prasowania kapeluszy)
3. Short press the power button to turn on the
machine,to set the time and temperature.
4.Stick the photo on the cap.
5. When the machine reaches the setting
temperature, it will make a beeping sound. Press the
power button to cancel the beep, then put the hat in,
press the power button, and the machine will start
working.
- 10 -
Moc znamionowa: 550 W (prasa do kubków)
Zakres temperatur: 40 ° C~205 ° C(104 °
F~401 ° F)
Zakres czasu: 1 ~ 999 s
Producent : Shanghaimuxinmuyeyouxiangongsi
Adres: Shuangchenglu 803nong11hao1602A-1609shi, baoshanqu, szanghaj
200000 CN.
Import do AUS: SIHAO PTY LTD. 1 ROKEVA STREETEASTWOOD NSW 2122
Australia
Import do USA: Sanven Technology Ltd. Suite 250, 9166 Anaheim Place, Rancho
Cucamonga, CA 91730
REP
EC
E-CrossStu GmbH
Mainzer Landstr.69, 60329 Frankfurt am Main.
REP
UK
YH CONSULTING LIMITED.
C/O YH Consulting Limited Office 147, Centurion House,
London Road, Staines-upon-Thames, Surrey, TW18 4AX

- 11 -


- 2 -
Tecnico Supporto e certificato di garanzia elettronica www.vevor.com/support
MACCHINA PER PRESSA A CALDO
MANUALE D'USO
MODELLO:F1130
We continue to be committed to provide you tools with competitive price.
"Save Half", "Half Price" or any other similar expressions used by us only represents an
estimate of savings you might benefit from buying certain tools with us compared to the major
top brands and does not necessarily mean to cover all categories of tools offered by us. You
are kindly reminded to verify carefully when you are placing an order with us if you are
actually saving half in comparison with the top major brands.
- 1 -
Diametro massimo: 85 mm Lunghezza massima: 250 mm
La dimensione massima di stampa è una bottiglia di alluminio da 30 once
Nota: il prodotto effettivo che ricevi ne determina l'aspetto.
Have product questions? Need technical support? Please feel free to
contact us:
Technical Support and E-Warranty Certificate
www.vevor.com/support
NEED HELP? CONTACT US!
This is the original instruction, please read all manual instructions
carefully before operating. VEVOR reserves a clear interpretation of our
user manual. The appearance of the product shall be subject to the
product you received. Please forgive us that we won't inform you again if
there are any technology or software updates on our product.
HEAT PRESS MACHINE
- 2 -
1. Importanti istruzioni di sicurezza
Questo manuale di istruzioni è inteso a vostro vantaggio . Si prega di leggere e
seguire le fasi di sicurezza, installazione, manutenzione e risoluzione dei problemi
descritte all'interno per garantire la vostra sicurezza e soddisfazione.
Il contenuto di questo manuale di istruzioni si basa sulle informazioni più recenti
sul prodotto disponibili al momento della pubblicazione. Il produttore si riserva il
diritto di apportare modifiche al prodotto in qualsiasi momento senza preavviso.
Usare sempre il buon senso e prestare particolare attenzione a tutte le indicazioni
di PERICOLO, AVVERTENZA, ATTENZIONE e AVVISO contenute in questo
manuale.
Questi contengono informazioni importanti. L'etichetta sullo strumento può
includere i seguenti simboli. I simboli e le loro definizioni sono i seguenti:
Avvertenza - Per ridurre il rischio di lesioni, l'utente deve leggere attentamente il
manuale di istruzioni.
Avvertenza: assicurarsi di indossare maschere antipolvere quando si utilizza questo
prodotto.
Avvertenza: assicurarsi di indossare guanti quando si utilizza questo prodotto.
Corrente alternata
Questo simbolo, posto prima di un commento sulla sicurezza, indica un tipo di
precauzione, avvertenza o pericolo. Ignorare questo avvertimento potrebbe provocare
un incidente. Per ridurre il rischio di lesioni, incendio o elettrocuzione, seguire sempre
le raccomandazioni riportate di seguito.
Pericolo!
Rischio di lesioni personali o danni ambientali! Rischio di scossa elettrica! Rischio di
lesioni personali dovute a scosse elettriche!
Informazioni sullo smaltimento:
Questo prodotto è soggetto alle disposizioni della Direttiva Europea 2012/19/CE. Il
simbolo del bidone della spazzatura barrato indica che nell'Unione Europea il prodotto
richiede la raccolta differenziata dei rifiuti. Ciò vale per il prodotto e tutti gli accessori
contrassegnati da questo simbolo. I prodotti contrassegnati come tali non possono

- 3 -
essere smaltiti con i normali rifiuti domestici, ma devono essere portati in un punto di
raccolta per il riciclaggio di dispositivi elettrici ed elettronici .
AVVERTIMENTO !
Prima di utilizzare questo prodotto, leggere attentamente le
seguenti istruzioni di sicurezza
Per ridurre il rischio di lesioni, morte o danni materiali dovuti a
scosse elettriche o incendi, assicurarsi di seguire le seguenti
precauzioni di sicurezza!
Istruzioni di sicurezza
53. Tenere scollegato quando si sposta la macchina.
54. Tenere scollegato durante l'installazione degli accessori.
55. Posizionare su una piattaforma piana e stabile e operare in condizioni
ventilate.
56. Indossare dispositivi di protezione speciali durante l'utilizzo della
macchina.
57. Non utilizzare questa macchina in un luogo pericoloso.
58. Non utilizzare quando la macchina non funziona correttamente.
59. Non smontare e riparare questa macchina.
60. Non utilizzare una presa CA non adatta.
61. Non toccare la piastra riscaldante durante il riscaldamento della
macchina.
62. Questo apparecchio non è destinato all'uso da parte di persone
(compresi i bambini) con capacità fisiche, sensoriali o ridotte, o con
mancanza di esperienza e conoscenza, a meno che non abbiano
ricevuto la supervisione relativa all'uso dell'apparecchio da una
persona responsabile della loro sicurezza.
63. I bambini devono essere sorvegliati per assicurarsi che non giochino
con l'apparecchio.
64. Durante il funzionamento, fare attenzione alle alte temperature e alle

- 4 -
ustioni.
65. Se il cavo di alimentazione è danneggiato, deve essere sostituito con
un cavo o un gruppo speciale disponibile presso il produttore o il suo
agente di assistenza.
Informazioni FCC:
ATTENZIONE: cambiamenti o modifiche non espressamente approvati
dalla parte responsabile della conformità potrebbero invalidare il diritto
dell'utente a utilizzare l'apparecchiatura!
Questo dispositivo è conforme alla Parte 15 delle norme FCC. Il
funzionamento è soggetto alle seguenti due condizioni:
1) Questo prodotto può causare interferenze dannose.
2)Questo prodotto deve accettare qualsiasi interferenza ricevuta,
comprese le interferenze che potrebbero causare un funzionamento
indesiderato.
AVVERTENZA: cambiamenti o modifiche a questo prodotto non
espressamente approvati dalla parte responsabile della conformità
potrebbero annullare l'autorità dell'utente a utilizzare il prodotto.
Nota: questo prodotto è stato testato ed è risultato conforme ai limiti per un
dispositivo digitale di Classe B ai sensi della Parte 15 delle norme FCC.
Questi limiti sono progettati per fornire una protezione ragionevole contro
interferenze dannose in un'installazione residenziale.
Questo prodotto genera, utilizza e può irradiare energia in radiofrequenza
e, se non installato e utilizzato in conformità con le istruzioni, può causare
interferenze dannose alle comunicazioni radio. Tuttavia, non vi è alcuna
garanzia che non si verifichino interferenze in una particolare installazione.
Se questo prodotto causa interferenze dannose alla ricezione radiofonica o
televisiva, cosa che può essere determinata spegnendo e accendendo il
prodotto, si consiglia all'utente di provare a correggere l'interferenza
adottando una o più delle seguenti misure.
· Riorientare o riposizionare l'antenna ricevente.
· Aumentare la distanza tra il prodotto e il ricevitore.
· Collegare il prodotto ad una presa su un circuito diverso da quello a cui è

- 5 -
collegato il ricevitore.
· Consultare il rivenditore o un tecnico radio/TV esperto per assistenza.
6. introduzione al prodotto
Sponge handle sleeve
Pressure adjustment knob
Aviation connector
Time
Temperature
LED display
Screw
Mug heating pad
Count display
Mode display
Power button
Plus/Minus

- 6 -
Elenco accessori
3. Introduzione alle funzioni chiave
30 oz mug printing machine
Controller
Power cable
Manual
1.Power on
After powering on, turn on the switch and enter standby
mode. Short press the power button to turn on the
machine.
2.Power off
Long press the power button for 2 seconds to turn off
the machine.
3.Automatic power off
If there is no operation within 30 minutes,the machine
will automatically power off.
4.Temperature unit conversion
In standby mode, press and hold the power button for 4
seconds, and press the up and down arrows to select
the heating mode."K"cap printing mode/"J"mug printing
mode.Press the power button again and press the up
and down arrows to select the temperature unit.
13. Temperature setting
After powering on, short press the power button to
enter the temperature setting mode, and press the up
and down arrows to set parameters.Wait 5 seconds
or press the power button twice to exit temperature
mode.
Switch
Power button
- 7 -
4. Processo operativo
Power socket
1. Plug in the power cord, turn on the power
switch, and enter standby mode.Press and
hold the power button for 4 seconds to
select "J" mug printing mode.
2. Short press the power button to turn on
the machine,
to set the time and temperature.
- 8 -
9. Processo operativo della macchina per la stampa di
tappi
11oz mug
3. Stick the photo on the mug
4. When the machine reaches the setting
temperature, it will make a beeping sound. Press the
power button to cancel the beep, then put the mug in,
press the power button, and the machine will start
working.
Tips:
13. If the color of the pattern is too light, please
increase the transfer time.
14. If the color of the pattern is too dark, please
reduce the transfer time.
15. This product features a long mug wrap (270mm),
typically suitable for 300Z mugs. lf it istemporarily
used for shorter mugs (such as 110Z or 150Z mugs),
two mugs need to beplaced simultaneously to ensure
that the entire length of the mug wrap is in contact
with themugs. This is to ensure even heating and to
extend the service life of the mug wrap.

- 9 -
6. Parametri di base
Modello: F1130
Nome: pressa di calore
Dimensioni della piastra riscaldante del cappello: 5,9 "× 3,15"
1. When the host is powered off, connect the
aviation connector cable of the cap printing
machine to the host.
2. Plug in the power cord, turn on the power
switch, and enter standby mode.Press and hold
the power button for 4 seconds to select "K" cap
printing mode.
3. Short press the power button to turn on the
machine,to set the time and temperature.
4.Stick the photo on the cap.
5. When the machine reaches the setting
temperature, it will make a beeping sound. Press the
power button to cancel the beep, then put the hat in,
press the power button, and the machine will start
working.
- 10 -
della tazza: 9,8 "
×
8,1"
Voltaggio/frequenza di riscaldamento: 120 V~ 60 Hz Per utenti statunitensi
Voltaggio/frequenza di riscaldamento: 230 V~ 50 Hz Per utenti UE/AU
Potenza nominale: 350 W (pressa a caldo per cappelli)
Potenza nominale: 550 W (pressa a caldo per tazze)
Intervallo di temperatura: 40 ° C~205 ° C(104 °
F~401 ° F)
Intervallo di tempo:
1~999s
Produttore : Shanghaimuxinmuyeyouxiangongsi
Indirizzo: Shuangchenglu 803nong11hao1602A-1609shi, baoshanqu, shanghai
200000 CN.
Importato in AUS: SIHAO PTY LTD. 1 ROKEVA STREETEASTWOOD NSW
2122 Australia
Importato negli Stati Uniti: Sanven Technology Ltd. Suite 250, 9166 Anaheim
Place, Rancho Cucamonga, CA 91730
REP
EC
E-CrossStu GmbH
Mainzer Landstr.69, 60329 Frankfurt am Main.
REP
UK
YH CONSULTING LIMITED.
C/O YH Consulting Limited Office 147, Centurion House,
London Road, Staines-upon-Thames, Surrey, TW18 4AX

- 11 -


- 2 -
Técnico Soporte y certificado de garantía electrónica www.vevor.com/support
MÁQUINA DE PRENSA DE CALOR
MANUAL DE USUARIO
MODELO:F1130
We continue to be committed to provide you tools with competitive price.
"Save Half", "Half Price" or any other similar expressions used by us only represents an
estimate of savings you might benefit from buying certain tools with us compared to the major
top brands and does not necessarily mean to cover all categories of tools offered by us. You
are kindly reminded to verify carefully when you are placing an order with us if you are
actually saving half in comparison with the top major brands.

- 1 -
Diámetro máximo: 85 mm Longitud máxima: 250 mm
El tamaño máximo de impresión es una botella de aluminio de 30 oz.
Nota: El producto real que recibe determina su apariencia.
Have product questions? Need technical support? Please feel free to
contact us:
Technical Support and E-Warranty Certificate
www.vevor.com/support
NEED HELP? CONTACT US!
This is the original instruction, please read all manual instructions
carefully before operating. VEVOR reserves a clear interpretation of our
user manual. The appearance of the product shall be subject to the
product you received. Please forgive us that we won't inform you again if
there are any technology or software updates on our product.
HEAT PRESS MACHINE
- 2 -
1. Instrucciones de seguridad importantes
Este manual de instrucciones está destinado a su beneficio . Lea y siga los pasos
de seguridad, instalación, mantenimiento y solución de problemas que se
describen a continuación para garantizar su seguridad y satisfacción.
El contenido de este manual de instrucciones se basa en la información más
reciente del producto disponible en el momento de su publicación. El fabricante se
reserva el derecho de realizar cambios en el producto en cualquier momento sin
previo aviso.
Utilice siempre el sentido común y preste especial atención a todas las
declaraciones de PELIGRO, ADVERTENCIA, PRECAUCIÓN y AVISO de este
manual.
Estos llevan información importante. La etiqueta de su herramienta puede incluir
los siguientes símbolos. Los símbolos y sus definiciones son los siguientes:
Advertencia: para reducir el riesgo de lesiones, el usuario debe leer atentamente el
manual de instrucciones.
Advertencia: asegúrese de usar máscaras antipolvo cuando utilice este producto.
Advertencia: asegúrese de usar guantes cuando utilice este producto.
Corriente alterna
Este símbolo, colocado antes de un comentario de seguridad, indica un tipo de
precaución, advertencia o peligro. Ignorar esta advertencia puede provocar un
accidente. Para reducir el riesgo de lesiones, incendio o electrocución, siga siempre
las recomendaciones que se muestran a continuación.
¡Peligro!
¡Riesgo de lesiones personales o daños medioambientales! ¡Riesgo de shock
eléctrico! ¡Riesgo de lesiones personales por descarga eléctrica!
Información de eliminación:
Este producto está sujeto a las disposiciones de la Directiva Europea 2012/19/CE. El
símbolo que muestra un contenedor con ruedas tachado indica que el producto
requiere recogida selectiva de basura en la Unión Europea. Esto se aplica al producto

- 3 -
y a todos los accesorios marcados con este símbolo. Los productos marcados como
tales no podrán desecharse con la basura doméstica normal, sino que deberán
llevarse a un punto de recogida para el reciclaje de aparatos eléctricos y electrónicos .
ADVERTENCIA !
Antes de utilizar este producto, lea atentamente las siguientes
instrucciones de seguridad.
Para reducir el riesgo de lesiones, muerte o daños a la propiedad
debido a descargas eléctricas o incendios, asegúrese de seguir las
siguientes precauciones de seguridad.
Instrucción de seguridad
66. Mantenga desenchufado cuando mueva la máquina.
67. Manténgalo desconectado al instalar accesorios.
68. Colóquelo sobre una plataforma plana y estable y opere en
condiciones de ventilación.
69. Utilice equipo de protección especial cuando opere la máquina.
70. No utilice esta máquina en un lugar peligroso.
71. No lo utilice cuando la máquina no esté funcionando correctamente.
72. No desmonte ni repare esta máquina.
73. No utilice una toma de CA inadecuada.
74. No toque la placa calefactora cuando la máquina esté calentando.
75. Este aparato no está diseñado para que lo utilicen personas (incluidos
niños) con capacidades físicas, sensoriales o reducidas, o con falta de
experiencia y conocimiento, a menos que hayan recibido supervisión
sobre el uso del aparato por parte de una persona responsable de su
seguridad.
76. Se debe supervisar a los niños para asegurarse de que no jueguen
con el aparato.
77. Al operar, tenga cuidado con las altas temperaturas y las quemaduras.
78. Si el cable de alimentación está dañado, debe reemplazarse por un
cable o conjunto especial disponible del fabricante o su agente de

- 4 -
servicio.
Información de la FCC:
PRECAUCIÓN: ¡ Los cambios o modificaciones no aprobados
expresamente por la parte responsable del cumplimiento podrían anular la
autoridad del usuario para operar el equipo!
Este dispositivo cumple con la Parte 15 de las normas de la FCC. La
operación está sujeta a las dos condiciones siguientes:
1) Este producto puede causar interferencias perjudiciales.
2) Este producto debe aceptar cualquier interferencia recibida, incluidas
las interferencias que puedan causar un funcionamiento no deseado.
ADVERTENCIA: Los cambios o modificaciones a este producto que no
estén aprobados expresamente por la parte responsable del cumplimiento
podrían anular la autoridad del usuario para operar el producto.
Nota: Este producto ha sido probado y cumple con los límites para un
dispositivo digital Clase B de conformidad con la Parte 15 de las reglas de
la FCC. Estos límites están diseñados para brindar una protección
razonable contra interferencias dañinas en una instalación residencial.
Este producto genera, usa y puede irradiar energía de radiofrecuencia y, si
no se instala y usa de acuerdo con las instrucciones, puede causar
interferencias dañinas en las comunicaciones por radio. Sin embargo, no
hay garantía de que no se produzcan interferencias en una instalación en
particular. Si este producto causa interferencias dañinas en la recepción
de radio o televisión, lo cual se puede determinar apagando y
encendiendo el producto, se recomienda al usuario que intente corregir la
interferencia mediante una o más de las siguientes medidas.
· Reorientar o reubicar la antena receptora.
· Aumentar la distancia entre el producto y el receptor.
· Conecte el producto a una toma de corriente de un circuito diferente al
que está conectado el receptor.
· Consulte al distribuidor o a un técnico experimentado en radio/TV para
obtener ayuda.
- 5 -
7. Introducción del producto
Sponge handle sleeve
Pressure adjustment knob
Aviation connector
Time
Temperature
LED display
Screw
Mug heating pad
Count display
Mode display
Power button
Plus/Minus
- 6 -
Lista de accesorios
3. Introducción a las funciones clave
30 oz mug printing machine
Controller
Power cable
Manual
1.Power on
After powering on, turn on the switch and enter standby
mode. Short press the power button to turn on the
machine.
2.Power off
Long press the power button for 2 seconds to turn off
the machine.
3.Automatic power off
If there is no operation within 30 minutes,the machine
will automatically power off.
4.Temperature unit conversion
In standby mode, press and hold the power button for 4
seconds, and press the up and down arrows to select
the heating mode."K"cap printing mode/"J"mug printing
mode.Press the power button again and press the up
and down arrows to select the temperature unit.
15. Temperature setting
After powering on, short press the power button to
enter the temperature setting mode, and press the up
and down arrows to set parameters.Wait 5 seconds
or press the power button twice to exit temperature
mode.
16. Time setting
After powering on, short press the power button twice
to enter the time setting mode, and press the up and
Switch
Power button
- 7 -
4. Proceso de operación
Power socket
1. Plug in the power cord, turn on the power
switch, and enter standby mode.Press and
hold the power button for 4 seconds to
select "J" mug printing mode.
2. Short press the power button to turn on
the machine,
to set the time and temperature.

- 8 -
10. Proceso de operación de la máquina de impresión de
tapas.
11oz mug
3. Stick the photo on the mug
4. When the machine reaches the setting
temperature, it will make a beeping sound. Press the
power button to cancel the beep, then put the mug in,
press the power button, and the machine will start
working.
Tips:
16. If the color of the pattern is too light, please
increase the transfer time.
17. If the color of the pattern is too dark, please
reduce the transfer time.
18. This product features a long mug wrap (270mm),
typically suitable for 300Z mugs. lf it istemporarily
used for shorter mugs (such as 110Z or 150Z mugs),
two mugs need to beplaced simultaneously to ensure
that the entire length of the mug wrap is in contact
with themugs. This is to ensure even heating and to
extend the service life of the mug wrap.

- 9 -
6. Parámetros básicos
Modelo: F1130
Nombre: Máquina de prensado en caliente
Tamaño de la placa calefactora del sombrero: 5,9 "× 3,15"
1. When the host is powered off, connect the
aviation connector cable of the cap printing
machine to the host.
2. Plug in the power cord, turn on the power
switch, and enter standby mode.Press and hold
the power button for 4 seconds to select "K" cap
printing mode.
3. Short press the power button to turn on the
machine,to set the time and temperature.
4.Stick the photo on the cap.
5. When the machine reaches the setting
temperature, it will make a beeping sound. Press the
power button to cancel the beep, then put the hat in,
press the power button, and the machine will start
working.

- 10 -
taza : 9.8"
×
8.1"
Voltaje/frecuencia de calefacción: 120 V ~ 60 Hz para usuarios de EE. UU.
Voltaje/frecuencia de calefacción: 230 V ~ 50 Hz para usuarios de UE/AU
Potencia nominal: 350W (máquina de prensado en caliente para sombreros)
Potencia nominal: 550 W (máquina de prensado en caliente para tazas)
Rango de temperatura: 40 ° C~205 ° C(104 °
F~401 ° F)
Rango de tiempo: 1~999s
Fabricante : Shanghaimuxinmuyeyouxiangongsi
Dirección: Shuangchenglu 803nong11hao1602A-1609shi, baoshanqu, shanghai
200000 CN.
Importado a AUS: SIHAO PTY LTD. 1 ROKEVA STREET ASTWOOD NSW 2122
Australia
Importado a EE. UU.: Sanven Technology Ltd. Suite 250, 9166 Anaheim Place,
Rancho Cucamonga, CA 91730
REP
EC
E-CrossStu GmbH
Mainzer Landstr.69, 60329 Frankfurt am Main.
REP
UK
YH CONSULTING LIMITED.
C/O YH Consulting Limited Office 147, Centurion House,
London Road, Staines-upon-Thames, Surrey, TW18 4AX

- 11 -


- 2 -
Teknisk Support och e-garanticertifikat www.vevor.com/support
VÄRMEPRESSMASKIN
ANVÄNDARMANUAL
MODELL: F1130
We continue to be committed to provide you tools with competitive price.
"Save Half", "Half Price" or any other similar expressions used by us only represents an
estimate of savings you might benefit from buying certain tools with us compared to the major
top brands and does not necessarily mean to cover all categories of tools offered by us. You
are kindly reminded to verify carefully when you are placing an order with us if you are
actually saving half in comparison with the top major brands.
- 1 -
Max.diameter:85mm Max.Längd:250mm
Maximal utskriftsstorlek är 30 oz aluminiumflaska
Obs: Den faktiska produkten du får avgör dess utseende.
Have product questions? Need technical support? Please feel free to
contact us:
Technical Support and E-Warranty Certificate
www.vevor.com/support
NEED HELP? CONTACT US!
This is the original instruction, please read all manual instructions
carefully before operating. VEVOR reserves a clear interpretation of our
user manual. The appearance of the product shall be subject to the
product you received. Please forgive us that we won't inform you again if
there are any technology or software updates on our product.
HEAT PRESS MACHINE

- 2 -
1. Viktiga säkerhetsinstruktioner
Denna bruksanvisning är avsedd för din fördel . Vänligen läs och följ stegen för
säkerhet, installation, underhåll och felsökning som beskrivs här för att säkerställa
din säkerhet och tillfredsställelse.
Innehållet i denna bruksanvisning är baserat på den senaste produktinformationen
som var tillgänglig vid publiceringstillfället. Tillverkaren förbehåller sig rätten att
göra produktändringar när som helst utan föregående meddelande.
Använd alltid sunt förnuft och var särskilt uppmärksam på alla uttalanden om
FARA, VARNING, FÖRSIKTIGHET och OBSERVERA i denna handbok.
Dessa innehåller viktig information. Etiketten på ditt verktyg kan innehålla följande
symboler. Symbolerna och deras definitioner är följande:
Varning - För att minska risken för skada måste användaren läsa bruksanvisningen
noggrant.
Varning- Var noga med att bära dammmasker när du använder denna produkt.
Varning- Var noga med att bära handskar när du använder denna produkt.
Växelström
Denna symbol, placerad före en säkerhetskommentar, indikerar en slags
försiktighetsåtgärd, varning eller fara. Att ignorera denna varning kan leda till en olycka.
För att minska risken för skada, brand eller elstöt, följ alltid rekommendationerna
nedan .
Fara!
Risk för personskador eller miljöskador! Risk för elektriska stötar! Risk för personskada
genom elektriska stötar!
Information om avfallshantering:
Denna produkt omfattas av bestämmelserna i det europeiska direktivet 2012/19/EC.
Symbolen som visar en soptunna korsad anger att produkten kräver separat
sophämtning i EU. Detta gäller för produkten och alla tillbehör märkta med denna
symbol. Produkter märkta som sådana får inte kasseras tillsammans med vanligt
hushållsavfall, utan måste lämnas till en insamlingsplats för återvinning av elektriska

- 3 -
och elektroniska apparater .
VARNING !
Innan du använder denna produkt, läs följande
säkerhetsinstruktioner noggrant
För att minska risken för personskada, dödsfall eller
egendomsskada på grund av elektriska stötar, brand, var noga med
att följa följande säkerhetsföreskrifter!
Säkerhetsinstruktion
79. Dra ut kontakten när du flyttar maskinen.
80. Dra ut kontakten när du installerar tillbehör.
81. Placera på en platt och stabil plattform och kör under ventilerade
förhållanden.
82. Bär speciell skyddsutrustning när du använder maskinen.
83. Använd inte denna maskin på en farlig plats.
84. Använd inte när maskinen inte fungerar som den ska.
85. Ta inte isär och reparera denna maskin.
86. Använd inte ett olämpligt vägguttag.
87. Rör inte vid värmeplattan när maskinen värms upp.
88. Denna apparat är inte avsedd att användas av personer (inklusive
barn) med nedsatta fysiska, sensoriska eller förmågor, eller bristande
erfarenhet och kunskap, såvida de inte har övervakats angående
användningen av apparaten av en person som är ansvarig för deras
säkerhet.
89. Barn bör övervakas för att säkerställa att de inte leker med apparaten.
90. Var försiktig med höga temperaturer och brännskador under drift.
91. Om nätsladden är skadad måste den bytas ut mot en speciell sladd
eller enhet som finns tillgänglig från tillverkaren eller dess
servicerepresentant.

- 4 -
FCC-information:
FÖRSIKTIGHET: Ändringar eller modifieringar som inte uttryckligen
godkänts av den part som ansvarar för efterlevnaden kan upphäva
användarens behörighet att använda utrustningen!
Denna enhet uppfyller del 15 av FCC-reglerna. Driften är föremål för
följande två villkor:
1) Denna produkt kan orsaka skadliga störningar.
2) Denna produkt måste acceptera alla mottagna störningar, inklusive
störningar som kan orsaka oönskad funktion.
VARNING: Ändringar eller modifieringar av denna produkt som inte
uttryckligen godkänts av den part som är ansvarig för efterlevnaden kan
upphäva användarens behörighet att använda produkten.
Obs: Denna produkt har testats och befunnits överensstämma med
gränserna för en digital enhet av klass B i enlighet med del 15 av
FCC-reglerna. Dessa gränser är utformade för att ge rimligt skydd mot
skadliga störningar i en bostadsinstallation.
Denna produkt genererar, använder och kan utstråla radiofrekvensenergi,
och om den inte installeras och används i enlighet med instruktionerna kan
den orsaka skadliga störningar på radiokommunikation. Det finns dock
ingen garanti för att störningar inte kommer att inträffa i en viss installation.
Om denna produkt orsakar skadliga störningar på radio- eller
tv-mottagning, vilket kan fastställas genom att stänga av och på produkten,
uppmanas användaren att försöka korrigera störningen med en eller flera
av följande åtgärder.
· Rikta om eller flytta mottagningsantennen.
· Öka avståndet mellan produkten och mottagaren.
· Anslut produkten till ett uttag på en annan krets än den som mottagaren
är ansluten till.
· Kontakta återförsäljaren eller en erfaren radio/TV-tekniker för hjälp.
- 5 -
8. produkt introduktion
Tillbehörslista
Sponge handle sleeve
Pressure adjustment knob
Aviation connector
Time
Temperature
LED display
Screw
Mug heating pad
Count display
Mode display
Power button
Plus/Minus
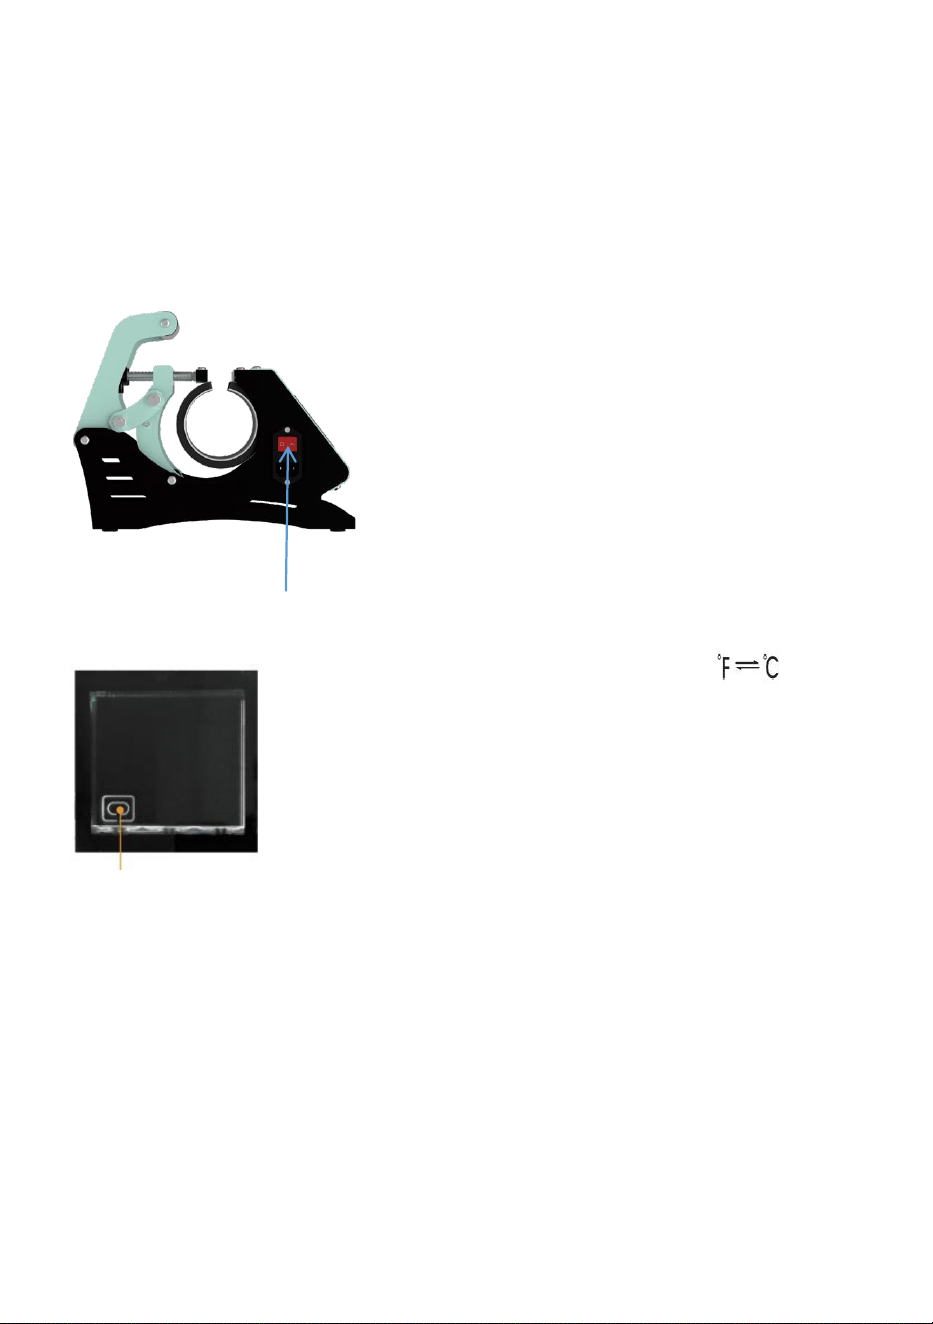
- 6 -
3. Nyckelfunktion Introduktion
30 oz mug printing machine
Controller
Power cable
Manual
1.Power on
After powering on, turn on the switch and enter standby
mode. Short press the power button to turn on the
machine.
2.Power off
Long press the power button for 2 seconds to turn off
the machine.
3.Automatic power off
If there is no operation within 30 minutes,the machine
will automatically power off.
4.Temperature unit conversion
In standby mode, press and hold the power button for 4
seconds, and press the up and down arrows to select
the heating mode."K"cap printing mode/"J"mug printing
mode.Press the power button again and press the up
and down arrows to select the temperature unit.
17. Temperature setting
After powering on, short press the power button to
enter the temperature setting mode, and press the up
and down arrows to set parameters.Wait 5 seconds
or press the power button twice to exit temperature
mode.
18. Time setting
After powering on, short press the power button twice
to enter the time setting mode, and press the up and
down arrows to set parameters. Wait 5 seconds or
press the power button once to exit time mode.
Switch
Power button
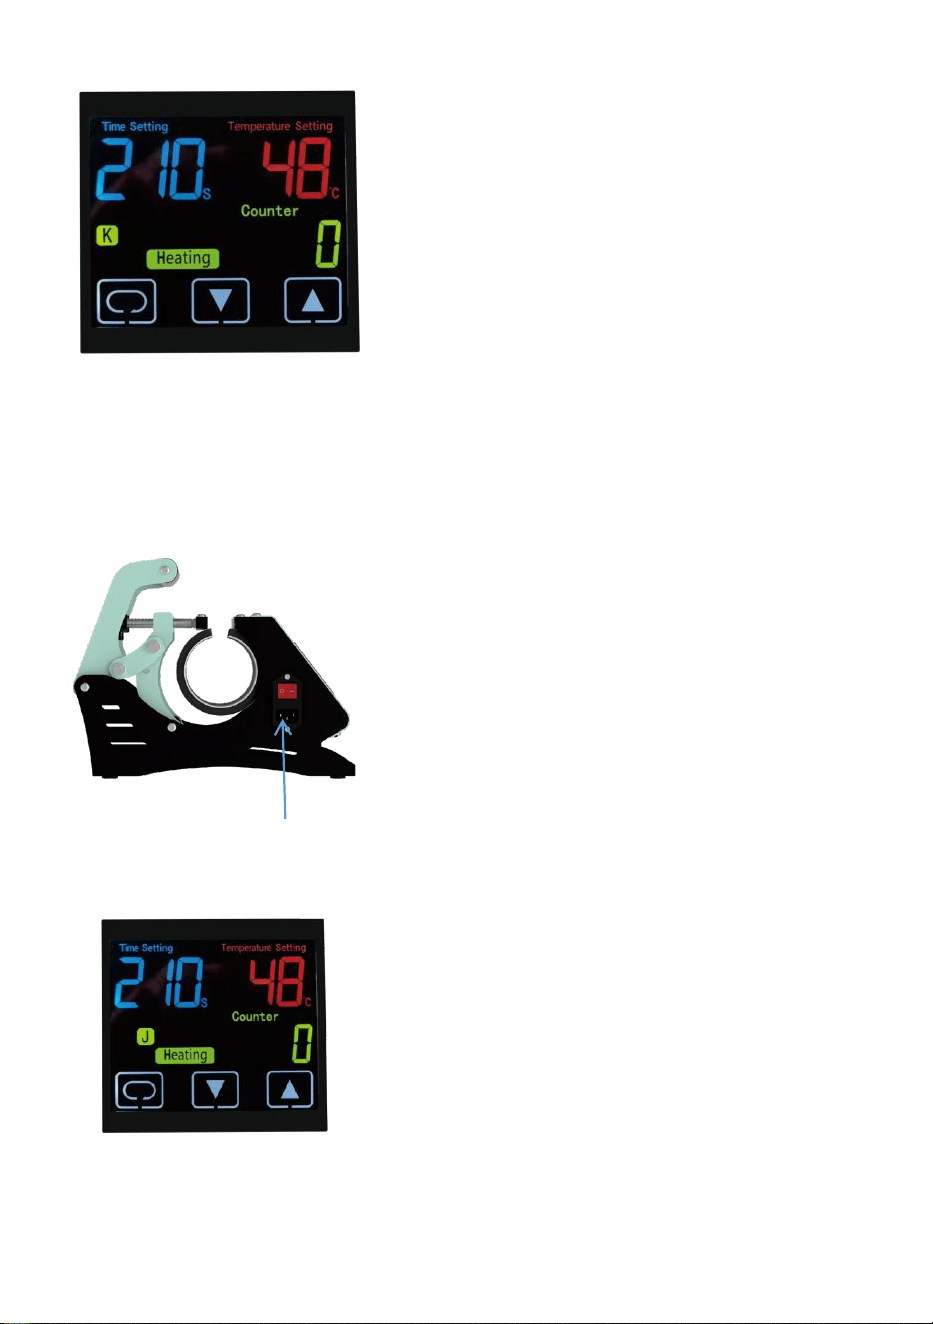
- 7 -
4. Driftprocess
Power socket
1. Plug in the power cord, turn on the power
switch, and enter standby mode.Press and
hold the power button for 4 seconds to
select "J" mug printing mode.
2. Short press the power button to turn on
the machine,
to set the time and temperature.
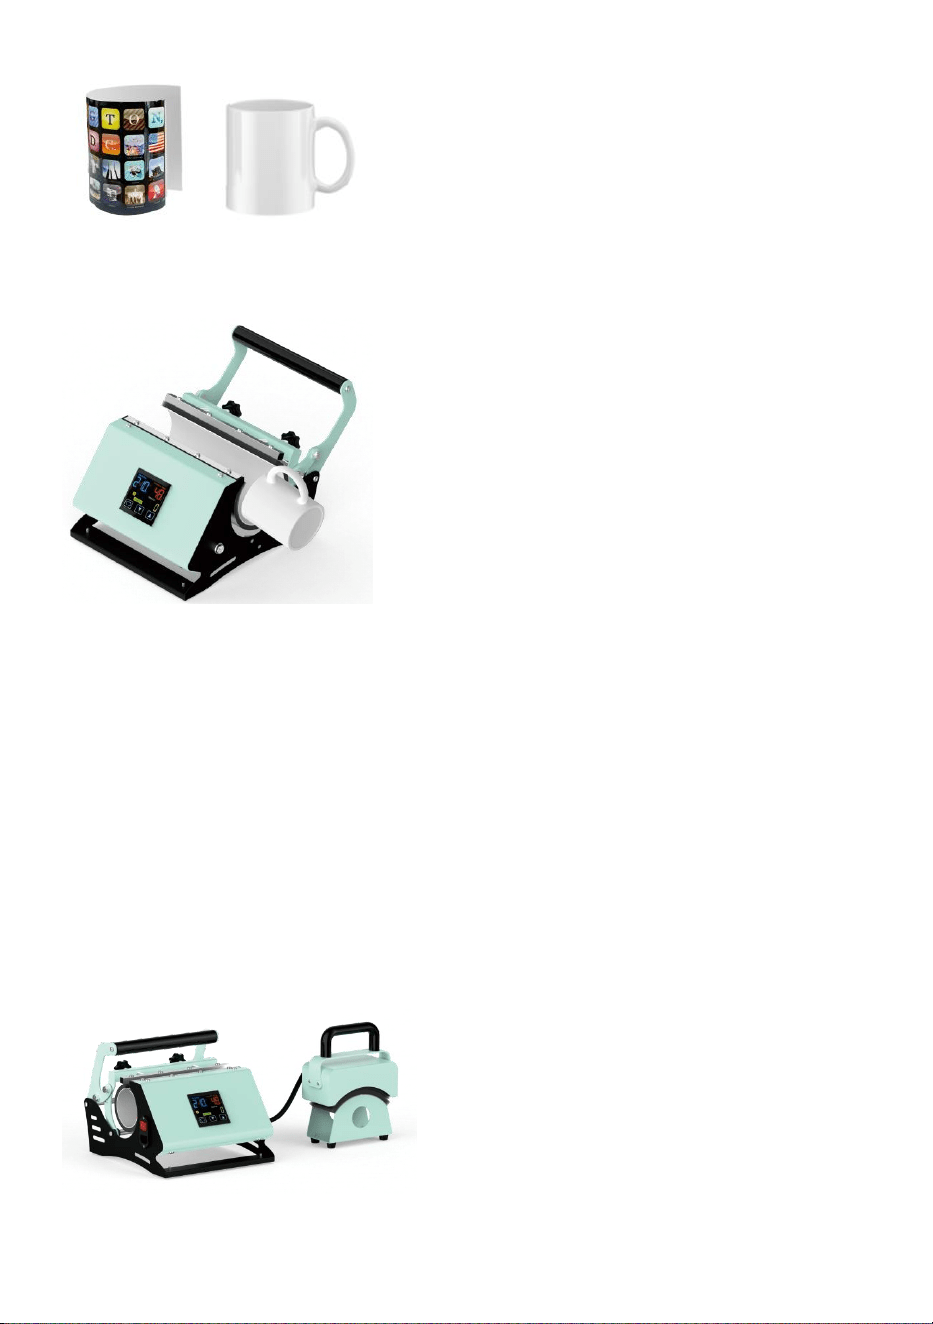
- 8 -
11. Cap-utskriftsmaskinens driftprocess
11oz mug
3. Stick the photo on the mug
1. When the host is powered off, connect the
aviation connector cable of the cap printing
machine to the host.
2. Plug in the power cord, turn on the power
switch, and enter standby mode.Press and hold
the power button for 4 seconds to select "K" cap
printing mode.
4. When the machine reaches the setting
temperature, it will make a beeping sound. Press the
power button to cancel the beep, then put the mug in,
press the power button, and the machine will start
working.
Tips:
19. If the color of the pattern is too light, please
increase the transfer time.
20. If the color of the pattern is too dark, please
reduce the transfer time.
21. This product features a long mug wrap (270mm),
typically suitable for 300Z mugs. lf it istemporarily
used for shorter mugs (such as 110Z or 150Z mugs),
two mugs need to beplaced simultaneously to ensure
that the entire length of the mug wrap is in contact
with themugs. This is to ensure even heating and to
extend the service life of the mug wrap.

- 9 -
6. Grundläggande parametrar
Modell: F1130
Namn: Värmepressmaskin
Hatt Värmeplatta storlek: 5,9"×3,15"
M ug värmedynas storlek: 9,8"×8,1"
Värmespänning/frekvens: 120V~ 60Hz För amerikansk användare
Värmespänning/frekvens: 230V~ 50Hz För EU / AU-användare
Märkeffekt: 350W (Hattvärmepressmaskin)
3. Short press the power button to turn on the
machine,to set the time and temperature.
4.Stick the photo on the cap.
5. When the machine reaches the setting
temperature, it will make a beeping sound. Press the
power button to cancel the beep, then put the hat in,
press the power button, and the machine will start
working.

- 10 -
Märkeffekt: 550W (Mugg värmepressmaskin)
Temperaturområde: 40 ° C~205 ° C (104 °
F~401 ° F)
Tidsintervall: 1~999s
Tillverkare : Shanghaimuxinmuyeyouxiangongsi
Adress: Shuangchenglu 803nong11hao1602A-1609shi, baoshanqu, shanghai
200000 CN.
Importerad till AUS: SIHAO PTY LTD. 1 ROKEVA STREETEASTWOOD NSW
2122 Australien
Importerad till USA: Sanven Technology Ltd. Suite 250, 9166 Anaheim Place,
Rancho Cucamonga, CA 91730
REP
EC
E-CrossStu GmbH
Mainzer Landstr.69, 60329 Frankfurt am Main.
REP
UK
YH CONSULTING LIMITED.
C/O YH Consulting Limited Office 147, Centurion House,
London Road, Staines-upon-Thames, Surrey, TW18 4AX

- 11 -


- 2 -
Technisch Ondersteuning en e-garantiecertificaat www.vevor.com/support
WARMTE PERSMACHINE
HANDLEIDING
MODEL:F1130
We continue to be committed to provide you tools with competitive price.
"Save Half", "Half Price" or any other similar expressions used by us only represents an
estimate of savings you might benefit from buying certain tools with us compared to the major
top brands and does not necessarily mean to cover all categories of tools offered by us. You
are kindly reminded to verify carefully when you are placing an order with us if you are
actually saving half in comparison with the top major brands.
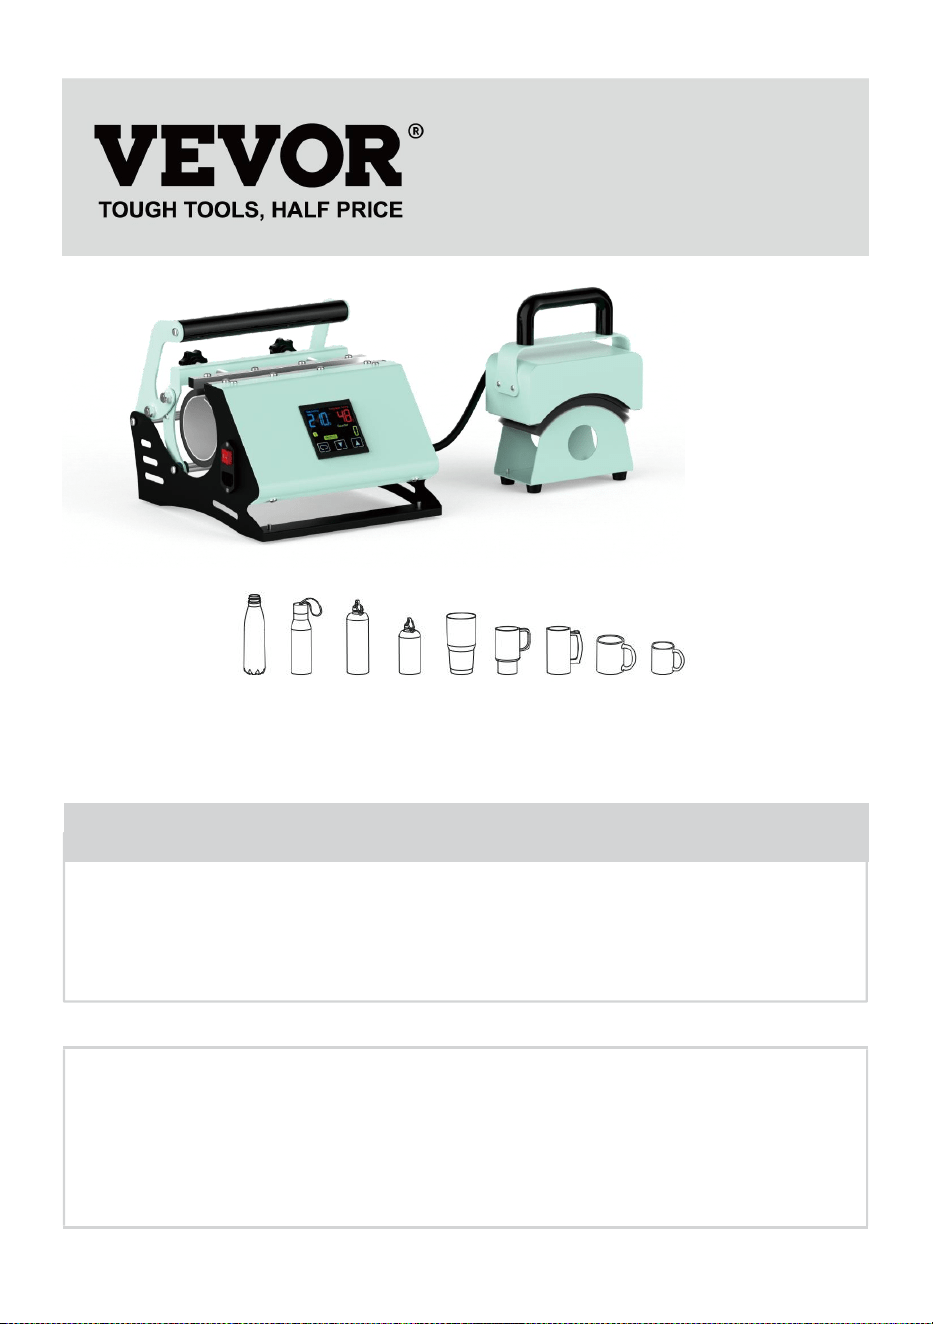
- 1 -
Max. diameter: 85 mm Max. lengte: 250 mm
Het maximale afdrukformaat is een aluminium fles van 30 oz
Let op: Het daadwerkelijke product dat u ontvangt, bepaalt de uitstraling.
Have product questions? Need technical support? Please feel free to
contact us:
Technical Support and E-Warranty Certificate
www.vevor.com/support
NEED HELP? CONTACT US!
This is the original instruction, please read all manual instructions
carefully before operating. VEVOR reserves a clear interpretation of our
user manual. The appearance of the product shall be subject to the
product you received. Please forgive us that we won't inform you again if
there are any technology or software updates on our product.
HEAT PRESS MACHINE

- 2 -
1. Belangrijke veiligheidsinstructies
Deze handleiding is bedoeld voor uw voordeel . Lees en volg de stappen op het
gebied van veiligheid, installatie, onderhoud en probleemoplossing die hierin
worden beschreven om uw veiligheid en tevredenheid te garanderen.
De inhoud van deze gebruiksaanwijzing is gebaseerd op de meest recente
productinformatie die beschikbaar was op het moment van publicatie. De fabrikant
behoudt zich het recht voor om op elk moment en zonder voorafgaande
kennisgeving productwijzigingen door te voeren.
Gebruik altijd uw gezond verstand en besteed bijzondere aandacht aan alle
GEVAAR-, WAARSCHUWING-, VOORZICHTIG- en LET OP-verklaringen in deze
handleiding.
Deze bevatten belangrijke informatie. Het label op uw gereedschap kan de
volgende symbolen bevatten. De symbolen en hun definities zijn als volgt:
Waarschuwing - Om het risico op letsel te verminderen, moet de gebruiker de
handleiding zorgvuldig lezen.
Waarschuwing- Zorg ervoor dat u stofmaskers draagt wanneer u dit product gebruikt.
Waarschuwing- Zorg ervoor dat u handschoenen draagt wanneer u dit product
gebruikt.
Wisselstroom
Dit symbool, geplaatst vóór een veiligheidsopmerking, duidt op een soort
voorzorgsmaatregel, waarschuwing of gevaar. Het negeren van deze waarschuwing
kan tot een ongeval leiden. Om het risico op letsel, brand of elektrocutie te
verminderen, dient u altijd de onderstaande aanbevelingen op te volgen.
Gevaar!
Risico op persoonlijk letsel of milieuschade! Risico op elektrische schokken! Gevaar
voor persoonlijk letsel door elektrische schokken!
Informatie over verwijdering:
Dit product valt onder de bepalingen van de Europese richtlijn 2012/19/EG. Het
symbool met een doorgestreepte afvalcontainer geeft aan dat het product in de
Europese Unie een aparte afvalinzameling vereist. Dit geldt voor het product en alle

- 3 -
accessoires die met dit symbool zijn gemarkeerd. Producten die als zodanig zijn
gemarkeerd, mogen niet bij het normale huisvuil worden weggegooid, maar moeten
worden ingeleverd bij een inzamelpunt voor recycling van elektrische en elektronische
apparaten .
W AARSCHUWING !
veiligheidsinstructies zorgvuldig door voordat u dit product
gebruikt
Om het risico op letsel, overlijden of materiële schade als gevolg van
een elektrische schok of brand te verminderen, dient u de volgende
veiligheidsmaatregelen te volgen!
Veiligheidsinstructie
92. Haal altijd de stekker uit het stopcontact wanneer u de machine
verplaatst.
93. Haal altijd de stekker uit het stopcontact wanneer u accessoires
installeert.
94. Plaats het op een vlak en stabiel platform en werk onder geventileerde
omstandigheden.
95. Draag speciale beschermingsmiddelen wanneer u de machine
bedient.
96. Gebruik deze machine niet op een gevaarlijke locatie.
97. Niet gebruiken als de machine niet goed werkt.
98. Demonteer en repareer deze machine niet.
99. Gebruik geen ongeschikt stopcontact.
100. Raak de verwarmingsplaat niet aan wanneer de machine
opwarmt.
101. Dit apparaat is niet bedoeld voor gebruik door personen (inclusief
kinderen) met verminderde fysieke, zintuiglijke of vermogens, of een
gebrek aan ervaring en kennis, tenzij ze onder toezicht staan bij het
gebruik van het apparaat door een persoon die verantwoordelijk is
voor hun veiligheid.

- 4 -
102. Er moet toezicht gehouden worden op kinderen om ervoor te
zorgen dat ze niet met het apparaat spelen.
103. Wees tijdens het gebruik voorzichtig met hoge temperaturen en
brandwonden.
104. Als het netsnoer beschadigd is, moet het worden vervangen door
een speciaal snoer of een speciaal snoer dat verkrijgbaar is bij de
fabrikant of zijn serviceagent.
FCC-informatie:
LET OP: Wijzigingen of aanpassingen die niet uitdrukkelijk zijn
goedgekeurd door de partij die verantwoordelijk is voor naleving kunnen de
bevoegdheid van de gebruiker om de apparatuur te bedienen ongeldig
maken!
Dit apparaat voldoet aan Deel 15 van de FCC-regels. De werking is
onderworpen aan de volgende twee voorwaarden:
1) Dit product kan schadelijke interferentie veroorzaken.
2)Dit product moet alle ontvangen interferentie accepteren, inclusief
interferentie die een ongewenste werking kan veroorzaken.
WAARSCHUWING: Wijzigingen of aanpassingen aan dit product die niet
uitdrukkelijk zijn goedgekeurd door de partij die verantwoordelijk is voor
naleving kunnen de bevoegdheid van de gebruiker om het product te
bedienen ongeldig maken.
Opmerking: Dit product is getest en voldoet aan de limieten voor een
digitaal apparaat van Klasse B overeenkomstig Deel 15 van de FCC-regels.
Deze limieten zijn bedoeld om redelijke bescherming te bieden tegen
schadelijke interferentie in een residentiële installatie.
Dit product genereert, gebruikt en kan radiofrequentie-energie uitstralen,
en als het niet wordt geïnstalleerd en gebruikt in overeenstemming met de
instructies, kan het schadelijke interferentie aan radiocommunicatie
veroorzaken. Er is echter geen garantie dat er geen interferentie zal
optreden in een bepaalde installatie. Als dit product schadelijke
interferentie veroorzaakt aan radio- of televisieontvangst, wat kan worden
vastgesteld door het product uit en weer in te schakelen, wordt de
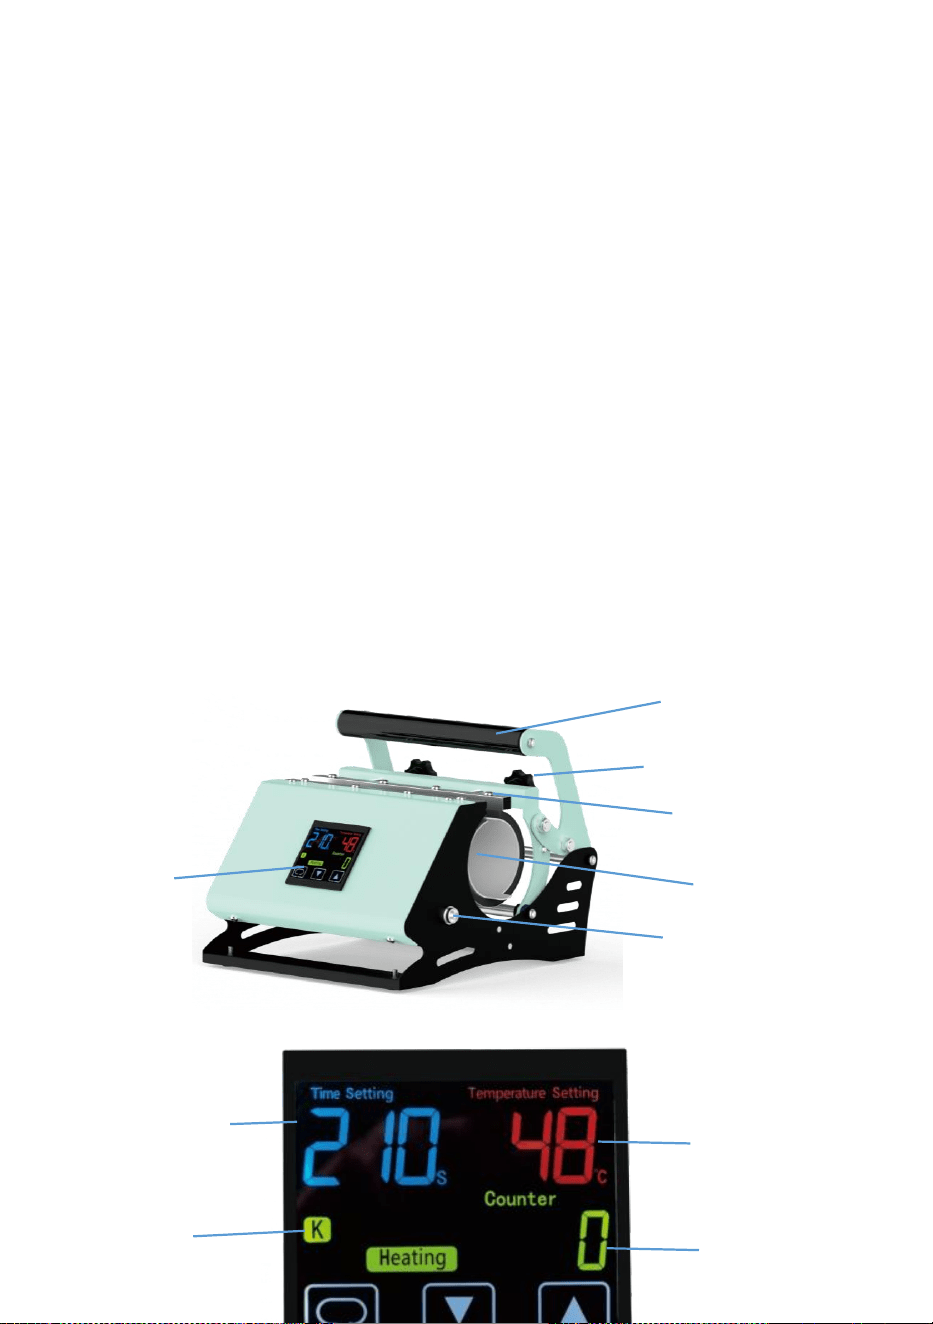
- 5 -
gebruiker aangeraden te proberen de interferentie te corrigeren door een
of meer van de volgende maatregelen.
· Heroriënteer of verplaats de ontvangstantenne.
· Vergroot de afstand tussen het product en de ontvanger.
· Sluit het product aan op een stopcontact op een ander circuit dan dat
waarop de ontvanger is aangesloten.
· Raadpleeg de dealer of een ervaren radio-/tv-technicus voor hulp.
9. product Introductie
Sponge handle sleeve
Pressure adjustment knob
Aviation connector
Time
Temperature
LED display
Screw
Mug heating pad
Count display
Mode display
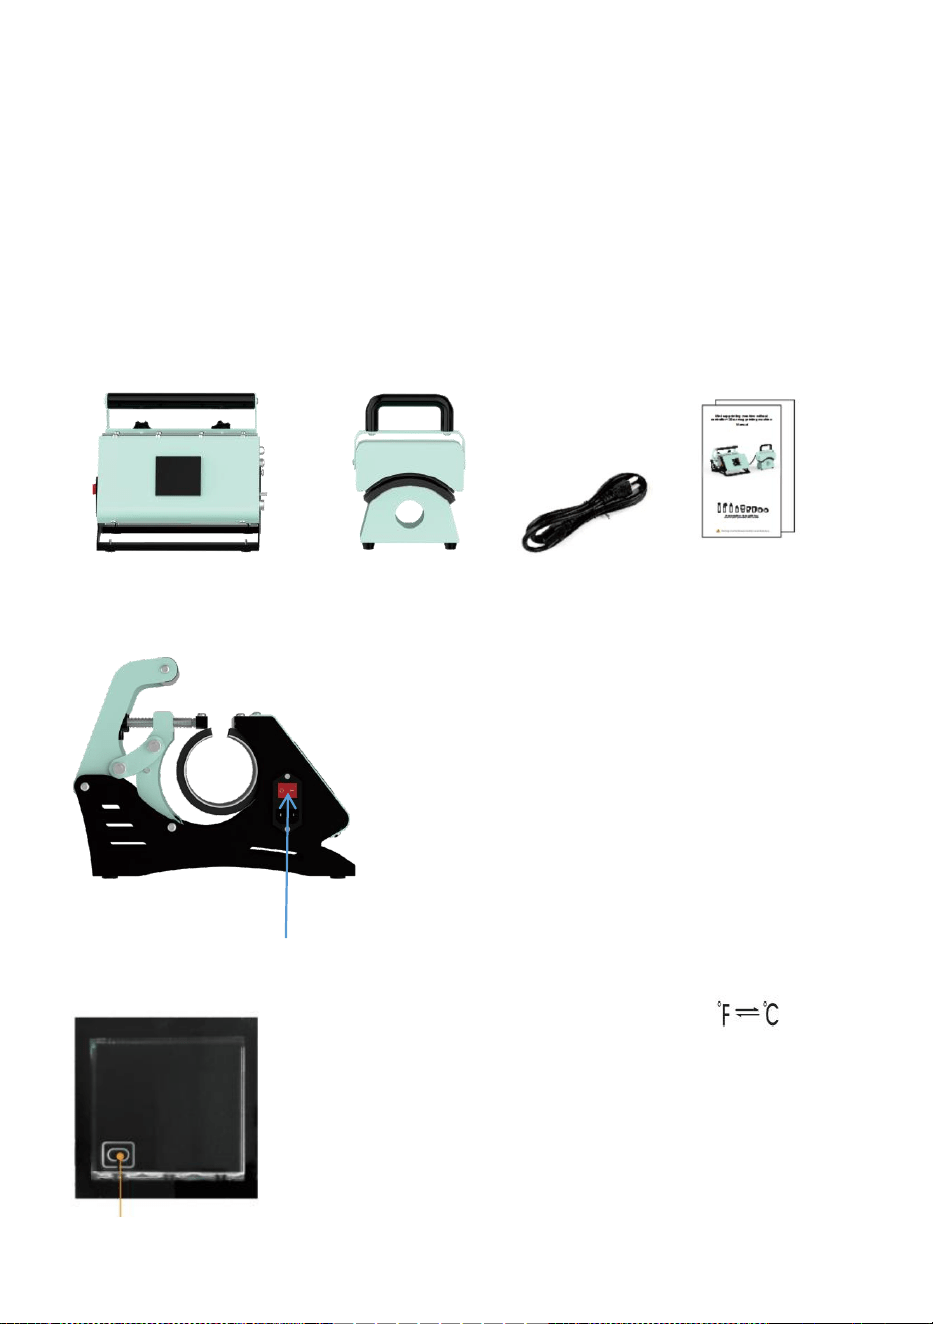
- 6 -
Accessoireslijst
3. Toetsfunctie Introductie
30 oz mug printing machine
Controller
Power cable
Manual
1.Power on
After powering on, turn on the switch and enter standby
mode. Short press the power button to turn on the
machine.
2.Power off
Long press the power button for 2 seconds to turn off
the machine.
3.Automatic power off
If there is no operation within 30 minutes,the machine
will automatically power off.
4.Temperature unit conversion
In standby mode, press and hold the power button for 4
seconds, and press the up and down arrows to select
the heating mode."K"cap printing mode/"J"mug printing
mode.Press the power button again and press the up
and down arrows to select the temperature unit.
Switch
Power button
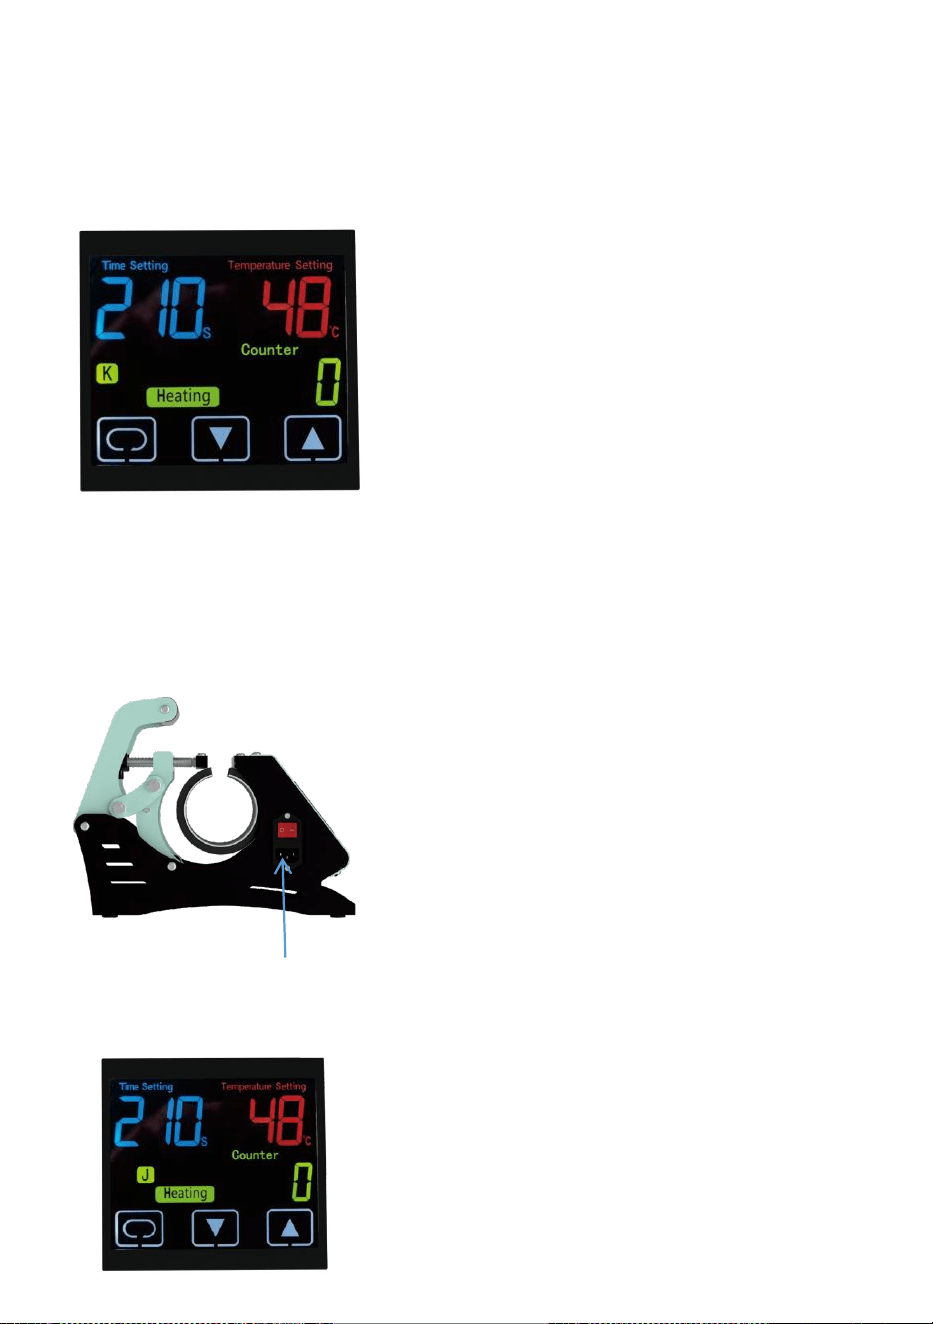
- 7 -
4. Bedieningsproces
19. Temperature setting
After powering on, short press the power button to
enter the temperature setting mode, and press the up
and down arrows to set parameters.Wait 5 seconds
or press the power button twice to exit temperature
mode.
20. Time setting
After powering on, short press the power button twice
to enter the time setting mode, and press the up and
down arrows to set parameters. Wait 5 seconds or
press the power button once to exit time mode.
7.Count reset to zero
Press the up and down arrows simultaneously for 5
seconds to reset the counter to zero.
Power socket
1. Plug in the power cord, turn on the power
switch, and enter standby mode.Press and
hold the power button for 4 seconds to
select "J" mug printing mode.
2. Short press the power button to turn on
the machine,
to set the time and temperature.
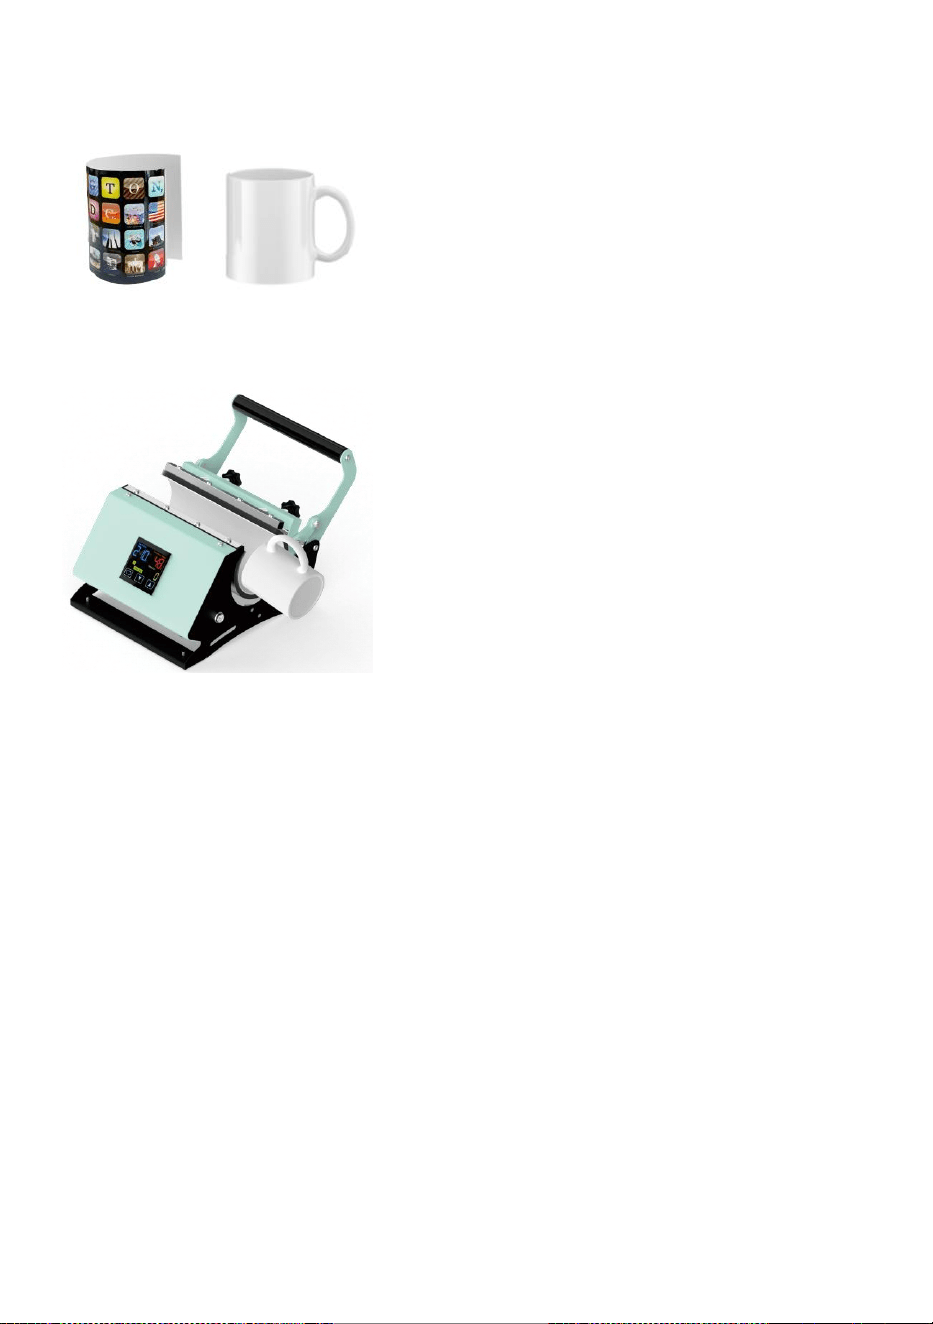
- 8 -
12. Bedieningsproces van de dopdrukmachine
11oz mug
3. Stick the photo on the mug
4. When the machine reaches the setting
temperature, it will make a beeping sound. Press the
power button to cancel the beep, then put the mug in,
press the power button, and the machine will start
working.
Tips:
22. If the color of the pattern is too light, please
increase the transfer time.
23. If the color of the pattern is too dark, please
reduce the transfer time.
24. This product features a long mug wrap (270mm),
typically suitable for 300Z mugs. lf it istemporarily
used for shorter mugs (such as 110Z or 150Z mugs),
two mugs need to beplaced simultaneously to ensure
that the entire length of the mug wrap is in contact
with themugs. This is to ensure even heating and to
extend the service life of the mug wrap.

- 9 -
6. Basisparameters
Model: F1130
Naam: Warmtepersmachine
Afmetingen hoedverwarmingsplaat: 5,9 "× 3,15"
1. When the host is powered off, connect the
aviation connector cable of the cap printing
machine to the host.
2. Plug in the power cord, turn on the power
switch, and enter standby mode.Press and hold
the power button for 4 seconds to select "K" cap
printing mode.
3. Short press the power button to turn on the
machine,to set the time and temperature.
4.Stick the photo on the cap.
5. When the machine reaches the setting
temperature, it will make a beeping sound. Press the
power button to cancel the beep, then put the hat in,
press the power button, and the machine will start
working.

- 10 -
Grootte mokverwarmingskussen: 9,8 "
×
8,1"
Verwarmingsspanning/frequentie: 120V~ 60Hz Voor Amerikaanse gebruikers
Verwarmingsspanning/frequentie: 230V~ 50Hz Voor EU / AU-gebruikers
Nominaal vermogen: 350 W (hoed-hittepersmachine)
Nominaal vermogen: 550 W (mok hittepersmachine)
Temperatuurbereik: 40 ° C ~ 205 ° C (104 ° F ~
401 ° F)
Tijdbereik: 1~999s
Fabrikant : Shanghaimuxinmuyeyouxiangongsi
Adres: Shuangchenglu 803nong11hao1602A-1609shi, baoshanqu, shanghai
200000 CN.
Geïmporteerd naar AUS: SIHAO PTY LTD. 1 ROKEVA STREETEASTWOOD
NSW 2122 Australië
Geïmporteerd naar de VS: Sanven Technology Ltd. Suite 250, 9166 Anaheim
Place, Rancho Cucamonga, CA 91730
REP
EC
E-CrossStu GmbH
Mainzer Landstr.69, 60329 Frankfurt am Main.
REP
UK
YH CONSULTING LIMITED.
C/O YH Consulting Limited Office 147, Centurion House,
London Road, Staines-upon-Thames, Surrey, TW18 4AX

- 11 -