
www.silverstonetek.com
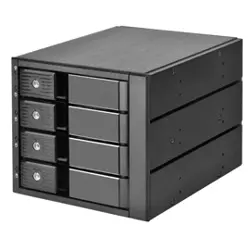
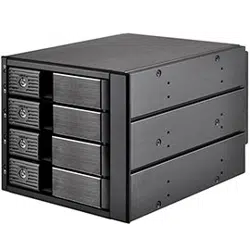
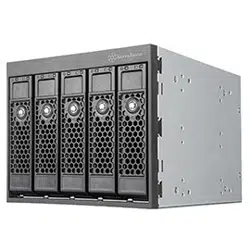
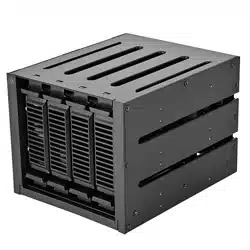
FS304-V
4-bays 2.5”/3.5”HDD Tray
9215 Fan
7 pin SATA connector
15 pin SATA power connector
Molex 4 pin power connector
Fan power connector
1
2
3
4
5
6
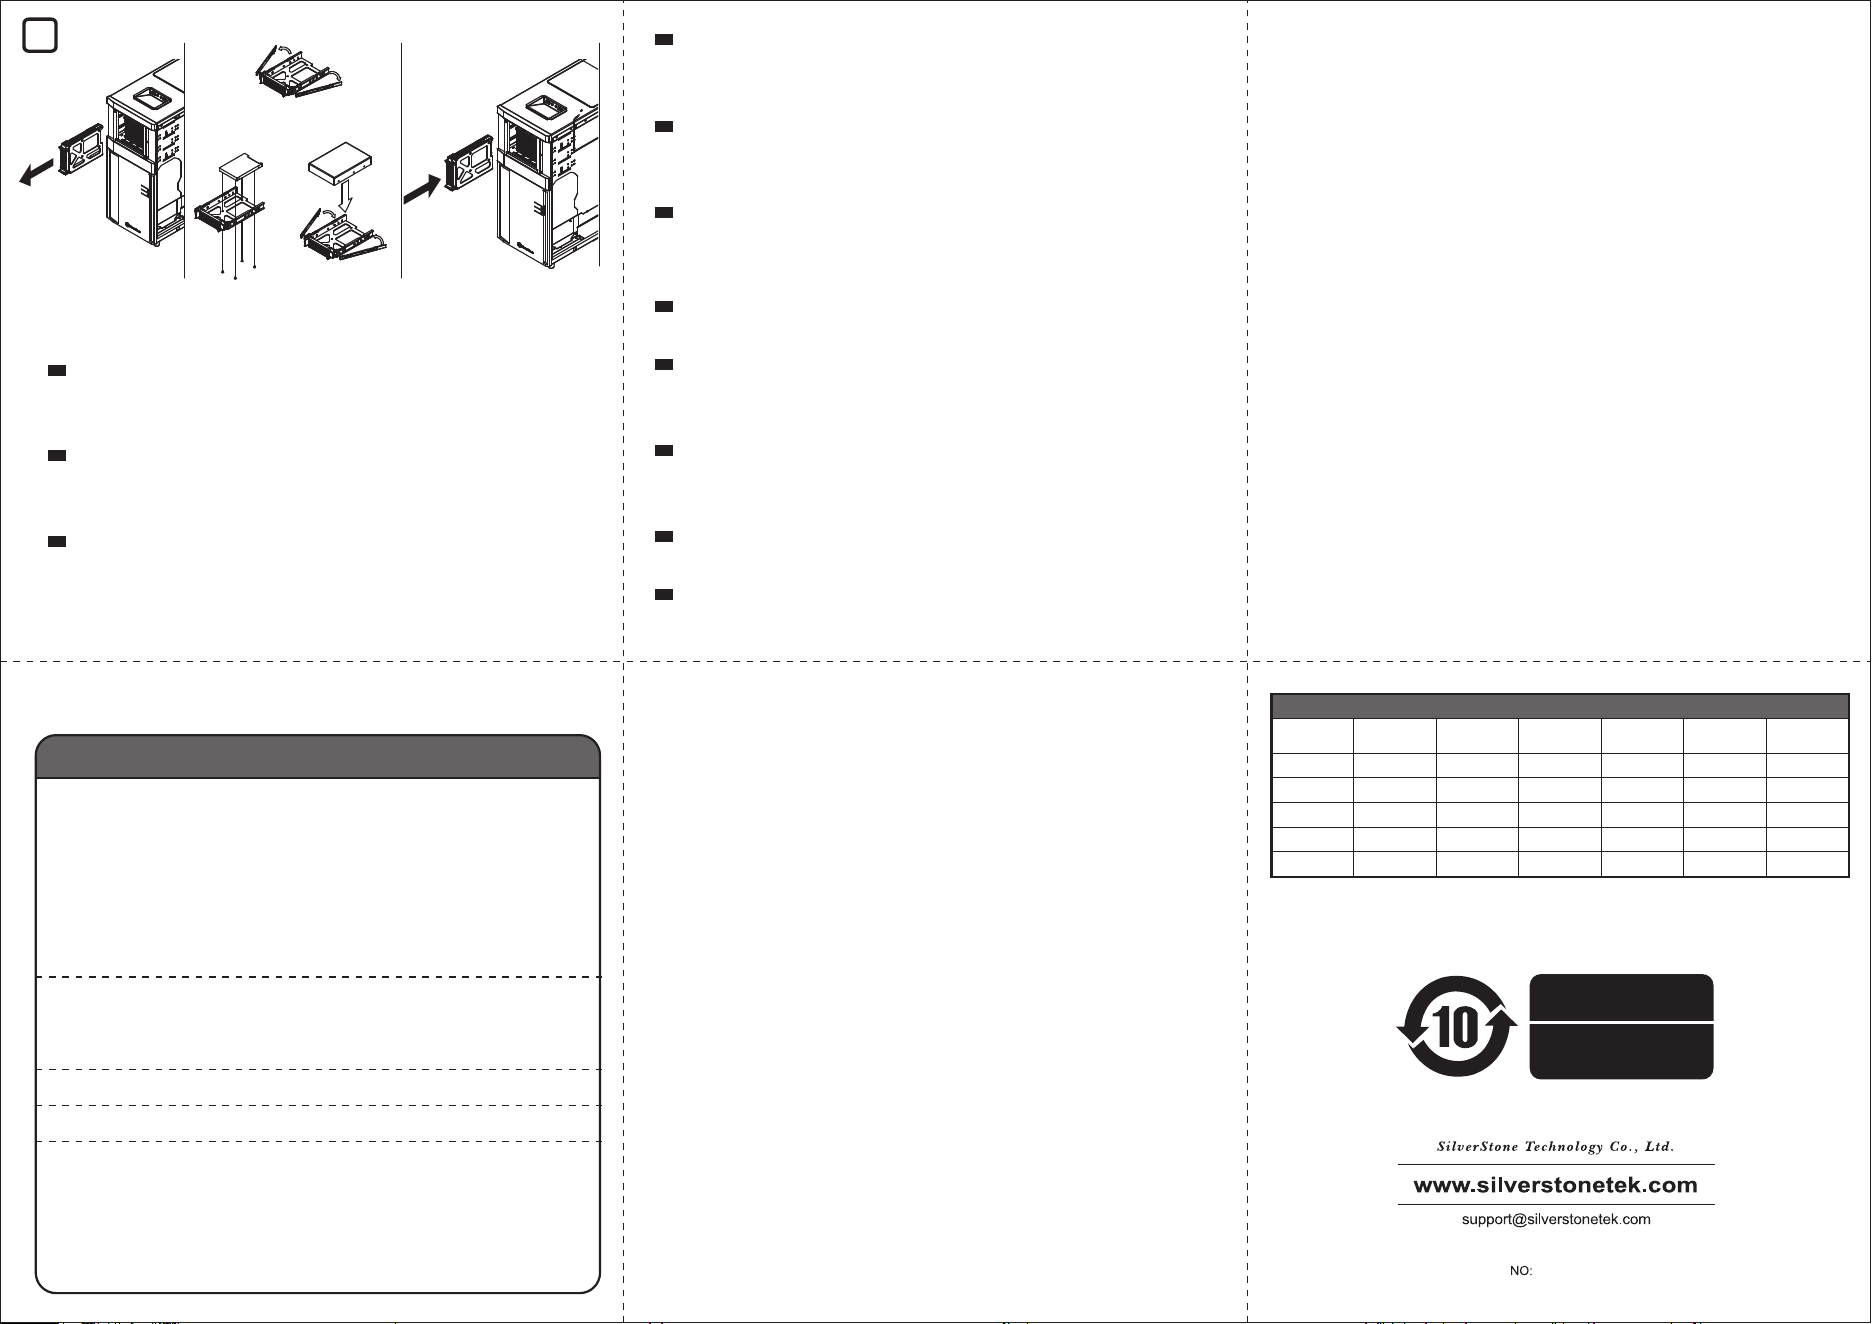
Remove slim ODD cover to install slim ODD device
Die schmale ODD-Abdeckung zur Installation des schmalen ODD-Geräts entfernen
Retirez le cache de lecteur de disque optique plat pour installer un lecteur de disque
optique plat
Retira la cubierta del ODD delgado para instalar el dispositivo ODD delgado
Rimuovere il coperchio ODD sottile per installare il dispositivo ODD sottile
Снимите крышку ODD, чтобы установить тонкое устройство ODD
นำฝา ODD แบบบางออก เพื่อติดตั้งอุปกรณ์ ODD แบบบาง
スリムODDカバーを外してスリムODDデバイスをインストールします。
슬림 ODD 커버를 제거하여 슬림 ODD 장치 설치
卸下Slim-ODD面板, 安装Slim-ODD装置
卸下Slim-ODD面板, 安裝Slim-ODD裝置
DE
EN
FR
ES
IT
TH
RU
CN
TW
JP
KR
TH
Connect SATA and power cable.
If your motherboard has a fan speed monitoring function, it is recommended to
connect the 80mm PWM fan attached to the hard drive tray module to the fan
header on the motherboard, to be able to adjust to the desired speed.
SATA- und Stromkabel anschließen
Falls Ihr Motherboard über eine Funktion zur Überwachung der Lüftergeschwind-
igkeit verfügt, sollten Sie den am Festplattenmodul befestigten 80-mm-PWM-Lüfter
an der Lüfterstiftleiste am Motherboard anschließen, damit Sie ihn auf die
gewünschte Geschwindigkeit einstellen können.
Connectez les câbles SATA et d'alimentation.
Si votre carte mère dispose d'une fonction de contrôle de la vitesse du ventilateur,
il est recommandé de connecter le ventilateur PWM de 80 mm fixé au module du
plateau de disque dur au connecteur du ventilateur sur la carte mère, afin de
pouvoir régler la vitesse souhaitée.
Conecte el cable SATA y de corriente.
Si su placa base tiene función de control de la velocidad del ventilador,se
recomienda que conecte el ventilador PWM de 80mm al módulo de la bandeja
para discos duros al conector del ventilador en la placa base para ser capaz de
ajustarlo a la velocidad deseada.
Collegare SATA e cavo di alimentazione.
Se la scheda madre dispone di una funzione di monitoraggio della velocità della
ventola, si consiglia di collegare la ventola PWM da 80 mm collegata al modulo del
cassetto del disco rigido al connettore della ventola sulla scheda madre, per poterla
regolare alla velocità desiderata.
Подключите SATA и кабель питания.
Если ваша материнская плата имеет функцию контроля скорости вращения в
ентилятора, рекомендуется подключить 80 мм PWM-вентилятор, установленн
ый в модуль лотка накопителей, к разъёму на материнской плате, чтобы имет
ь возможность настроить нужную скорость вращения
SATA
ถ้าเมนบอร์ดของคุณมีฟังก์ชั่นการตรวจสอบความเร็วพัดลม แนะนำให้เชื่อมต่อ พัดลม PWM
80 มม. เข้ากับโมดูลถาดฮาร์ดไดรฟ์เข้ากับหัวต่อพัดลมบน เมนบอร์ด เพื่อให้สามารถปรับไปเป็น
ความเร็วที่ต้องการได้
SATAおよび電源ケーブルを接続します。
マザーボードにファン回転数モニタリング機能がある場合は、マザーボードの
ファンヘッダに接続されたハードディスクドライブトレイモジュールに80mm
PWMファンを収めるようお勧めいたします。これで必要な回転数への調節が可
能です。
SATA 및 전원 케이블을 연결합니다.
메인보드에 팬 속도 모니터링 기능이 있으면 하드 드라이브 트레이 모듈에 부착된
80mm PWM 팬을 메인보드의 팬 헤더에 연결하여, 원하는 속도로 조절할 수
있도록 하는 것을 권장합니다.
连接SATA线与电源线。
若您的主机板具有监控风扇转速功能,建议将硬盘抽取盒模组所附的8公分PWM
可调转速风扇,改接到主机板上的风扇接头,可透过主机板调整所需转速
連接SATA線與電源線。
若您的主機板具有監控風扇轉速功能,建議將硬碟抽取盤模組所附的8公分PWM
可調轉速風扇,改接到主機板上的風扇接頭,可透過主機板調整所需轉速
DE
EN
FR
ES
IT
RU
CN
TW
JP
KR
Install FS304-V into the chassis, then secure it with screws.
FS304-V im Gehäuse installieren, dann mit Schrauben befestigen.
Installez le FS304-V dans le châssis, puis fixez-le avec des vis.
Instale el FS304-V en el chasis, luego fíjelo con tornillos.
Installare FS304-V nello chassis, quindi fissarlo con le viti.
Установите FS304-V в корпус, затем закрепите винтами.
ติดตั้ง FS304-V เข้ากับตัวเครื่อง แล้วยึดด้วยสกรู
FS304-Vをケースに装着して、ネジで固定します。
섀시에 FS304-V를 설치한 후 나사로 고정합니다.
将 FS304-V放入机箱,并锁上螺丝
將 FS304-V放入機箱,並鎖上螺絲
DE
EN
FR
ES
IT
TH
RU
CN
TW
JP
KR
1
2
3
4
5
6
CHA_FAN
1 2
3
Warranty terms & conditions
Additional info & contacts
Warranty Information
G11252280
有毒有害物质/元素及其化学含量表
部件名称
风扇
线材
螺丝
包材
机壳
(金属)
汞
(Hg)
○
○
○
○
○
镉
(Cd)
○
○
○
○
○
六价铬
(Cr(VI))
○
○
○
○
○
多溴联苯
(PBB)
○
○
○
○
○
多溴二苯醚
(PBDE)
○
○
○
○
○
铅
(Pb)
○
○
○
○
○
产品合格证
检验员:检01
生产日期:见产品条码
本表格依据 SJ/T 11364 的规定编制。
○ : 表示该有害物质在该部件所有均质材料中的含量均在 GB/T 26572 规定的限量要求以下。
— : 表示该有害物质至少在该部件的某一均质材料中的含量超出 GB/T 26572 规定的限量要求。且該限用物質為排除項目
Extraiga los módulos de bandejas de dispositivos de cambio en caliente
para instalar los dispositivos de 3,5” o 2,5”. Conecte el mecanismo sin
herramientas a los dispositivos y luego vuelva a fijarlo al módulo
Estrarre i cassetti dell'unità modulo Hot-swap per installare dispositivi da
3,5" o 2,5". Collegare il meccanismo ad incastro ai dispositivi, quindi
fissarlo nuovamente al modulo
Извлеките лотки модуля диска с горячей заменой, чтобы установить
устройства 3,5" или 2,5". Подсоедините tool-free механизм к устройст
вам, затем закрепите его обратно на модуле.
แยกถาดไดรฟ์โมดูลฮ็อตสว็อปออก เพื่อติดตั้งอุปกรณ์ 3.5 นิ้ว หรือ 2.5 นิ้ว เชื่อมต่อ
กลไกแบบไม่ต้องใช้เครื่องมือเข้ากับอุปกรณ์ จากนั้นยึดกลับเข้ากับโมดูลให้แน่น
ホットスワップモジュールドライブトレイを引き出して3.5”または2.5”デ
バイスを装着します。デバイスにツール不要機構を接続してからモジュ
ールを戻します。
핫스왑 모듈 드라이브 트레이를 추출하여 3.5” 또는 2.5” 장치를
설치합니다. 공구가 필요 없는 메커니즘을 장치에 연결한 후 모듈에 다시
고정합니다.
抽出热插拔硬碟抽取盘, 装上3.5”或2.5”硬碟, 两侧用免工具支架固定后, 再
装回硬碟架。
抽出熱插拔硬碟抽取盤, 裝上3.5”或2.5”硬碟, 兩側用免工具支架固定後, 再
裝回硬碟架。
Extract the hot-swap module drive trays to install 3.5” or 2.5” devices.
Connect the tool-free mechanism to the devices then secure back to the
module.
Einschübe für Hot-Swapping-fähiges Laufwerkmodul zur Installation von
3,5- oder 2,5-Zoll-Geräten herausnehmen. Werkzeuglosen Mechanis-
mus mit den Geräten verbinden und diese wieder am Modul sichern
Retirez les plateaux de lecteur du module remplaçable à chaud afin
d’installer des périphériques de 3,5" ou 2,5". Connectez le mécanisme
sans outil aux périphériques, puis fixez ce dernier au module
DE
EN
FR
ES
IT
RU
TH
CN
TW
JP
KR
For North America ([email protected])
SilverStone Technology in North America may repair or replace defective product with
refurbished product that is not new but has been functionally tested.
Replacement product will be warranted for remainder of the warranty period or thirty days,
whichever is longer. All products should be sent back to the place of purchase if it is
within 30 days of purchase, after 30 days, customers need to initiate RMA procedure with
SilverStone Technology in USA by first downloading the “USA RMA form for end-users”
form from the below link and follow its instructions. http://silverstonetek.com/contac-
tus.php
For Australia only ([email protected])
Our goods come with guarantees that cannot be excluded under the Australian Consumer
Law.
You are entitled to a replacement or refund for a major failure and for compensation for
any other reasonably foreseeable loss or damage.
You are also entitled to have the goods repaired or replaced if the goods fail to be of
acceptable quality and the failure does not amount to a major failure.
Please refer to above “Warranty terms & conditions” for further warranty details.
SilverStone Technology Co., Ltd. 12F No. 168 Jiankang Rd., Zhonghe Dist., New Taipei
City 235 Taiwan R.O.C. + 886-2-8228-1238 (standard international call charges apply)
For Europe ([email protected])
For China ([email protected])
For all other regions ([email protected])
1. Product component defects or damages resulted from defective production is covered under
warranty. Defects or damages with the following conditions will be fixed or replaced under SilverStone
Technology’s jurisdiction.
a) Usage in accordance with instructions provided in this manual, with no misuse, overuse, or other
inappropriate actions.
b) Damage not caused by natural disaster (thunder, fire, earthquake, flood, salt, wind, insect, animals,
etc…)
c) Product is not disassembled, modified, or fixed. Components not disassembled or replaced.
d) Warranty mark/stickers are not removed or broken.Loss or damages resulted from conditions other
than ones listed above are not covered under warranty.
2. Under warranty, SilverStone Technology’s maximum liability is limited to the current market value
for the product (depreciated value, excluding shipping, handling, and other fees). SilverStone
Technology is not responsible for other damages or loss associated with the use of product.
3. Under warranty, SilverStone Technology is obligated to repair or replace its defective products.
Under no circumstances will SilverStone Technology be liable for damages in connection with the
sale, purchase, or use including but not limited to loss of data, loss of business, loss of profits, loss
of use of the product or incidental or consequential damage whether or not foreseeable and whether
or not based on breach of warranty, contract or negligence, even if SilverStone Technology has
been advised of the possibility of such damages.
4. Warranty covers only the original purchaser through authorized SilverStone distributors
and resellers and is not transferable to a second hand purchaser.
5. You must provide sales receipt or invoice with clear indication of purchase date to determine
warranty eligibility.
6. If a problem develops during the warranty period, please contact your retailer/reseller/SilverStone
authorized distributors or SilverStone http://www.silverstonetek.com.
Please note that: (i) You must provide proof of original purchase of the product by a dated itemized
receipt; (ii) You shall bear the cost of shipping
(or otherwise transporting) the product to SilverStone authorized distributors. SilverStone authorized
distributors will bear the cost of shipping (or otherwise transporting) the product back to you after
completing the warranty service; (iii) Before you send the product, you must be issued a Return
Merchandise Authorization (“RMA”) number from SilverStone. Updated warranty information will be
posted on SilverStone’s official website.
Please visit http://www.silverstonetek.com for the latest updates.
This product has a limited 1 year warranty in North America and Australia.
For information on warranty periods in other regions, please contact your reseller or SilverStone authorized distributor.
本产品自购买之日起,于中国地区(不包含澳门,香港特别行政区)享有一年有限责任保固(部分产品为二年,三年
或五年)。详细保固年限请参照官方网站 https://silverstonetek.com.cn/ 公布之产品型号为依据。
OR
4