Oven
Cuptor
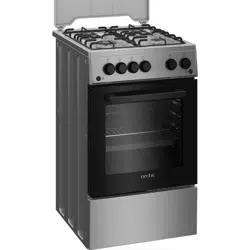
DM 5612 DL
DM 5612 GL
arctic
OPERATING INSTRUCTIONS
INSTRUCTIUNI DE UTILIZARE
O
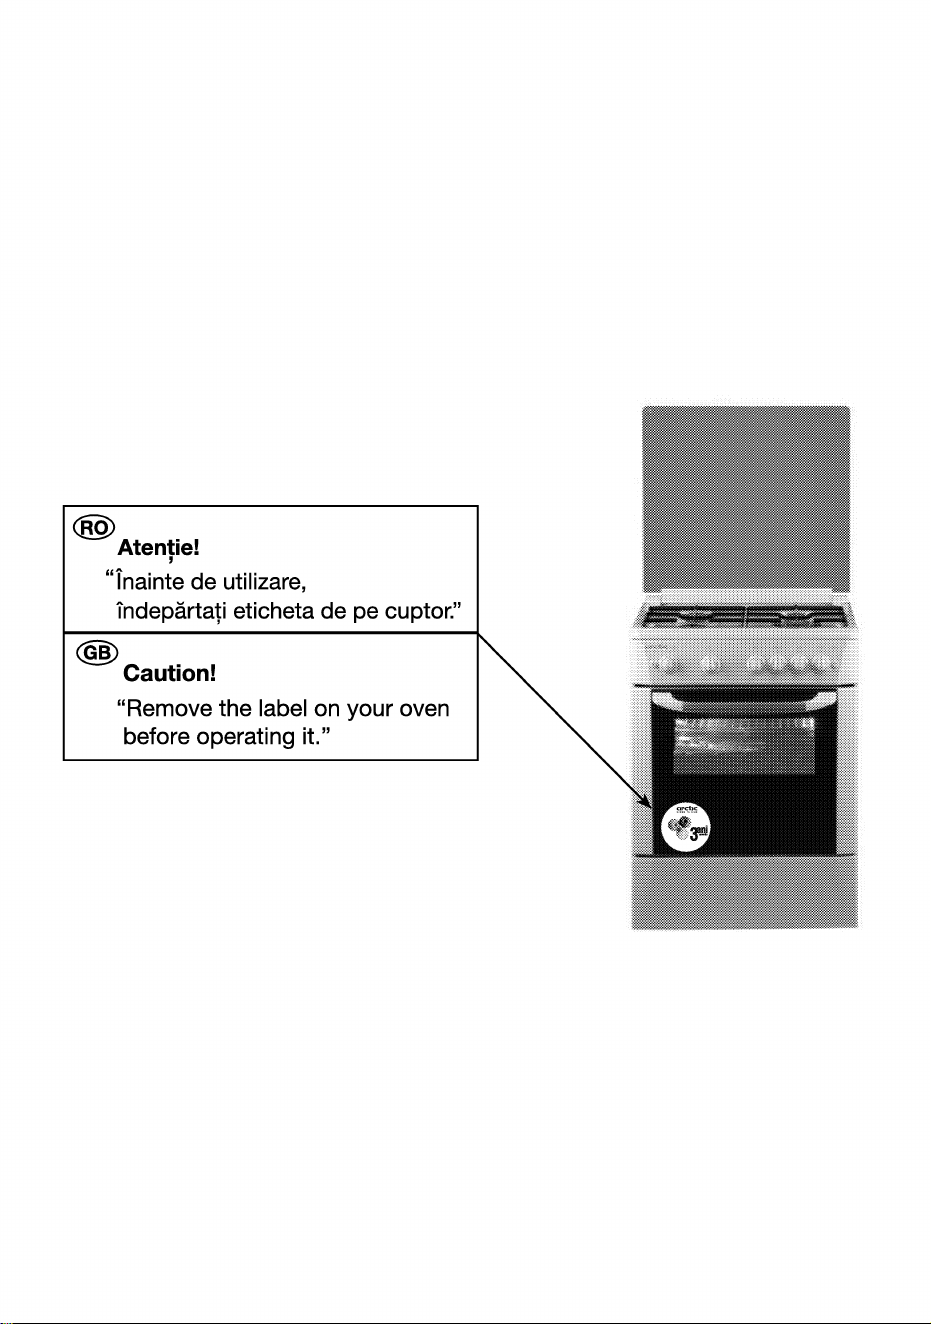
Atentie!
tnainte de utilizare,
tndepärtati eticheta de pe cuptor."
Caution!
"Remove the label on your oven
before operating it."
Please read these instructions before installation or using your
appliance!
Dear Customer,
By purchasing this product you have chosen an appliance of
advanced technology and high quality.
The appliance was produced in modern facilities which
meet all environmental standards.
The instructions will help you to operate the appliance quickly and
safely.
•
•
•
Upon delivery, please check that the appliance is not damaged.
If you note any transport damage, please contact your point of
sale immediately and do not connect and operate the appliance!
Before you connect and start using the appliance, please read
this manual and all enclosed documents. Please note in
particular the safety instructions.
Keep all documents so that you can refer to the information
again later on. Please keep your receipt for any repairs which
may be required under warranty.
When you pass on the appliance to another person, please
provide all documents with it.
Table of Contents
General Information ..
Overview .
Technical Data....
Injector Table.
...................5
Safety Instructions.
............6
. .20
..............22
..............23
.... ..........24
.............25
.. ..25
12
......16
6
Explanation of safety instructions
Basic safety instructions ..... ........
Safety for children ....................................7
Safety when working with gas.. ...
Safety when working with electricity ........8
Intended use...... .8
Disposal.........................
Packaging material .
Old equipment..............................
Future transportation.
Installation........................... 10
Before installation.......... .... .. .... ... .. 10
Installation and connection ....................I I
Gas conversion
a Preparation.......................... 16
Tips for saving energy 16
Initial operation.................
First cleaning of the appliance 16
Initial heating .
. .. ... ......16
How To Use The Hob 18
General information on cooking ..... ........ 18
How to use hobs .................................... 18
How To Operate The Oven . 20
General information on baking, roasting
and grilling
How to use the gas oven........................21
Cooking times table ...............................22
How to operate the gas grill .....
Cooking times table —
Maintenance and Care........ 24
General information................................24
How to clean the hob......... ...........24
Cleaning the control panel —
Cleaning the oven ................
Removal of oven door ..
Replacing the oven lamp..................
Troubleshooting
26
31 EN
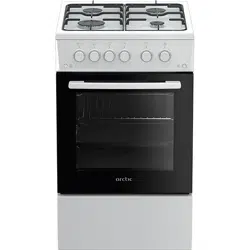
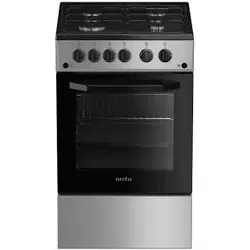
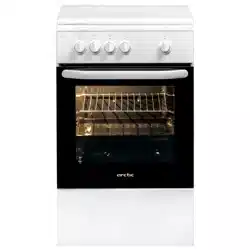
General Information
Overview
1
2
3
7
6
5
1
2
3
4
1
2
3
4
8
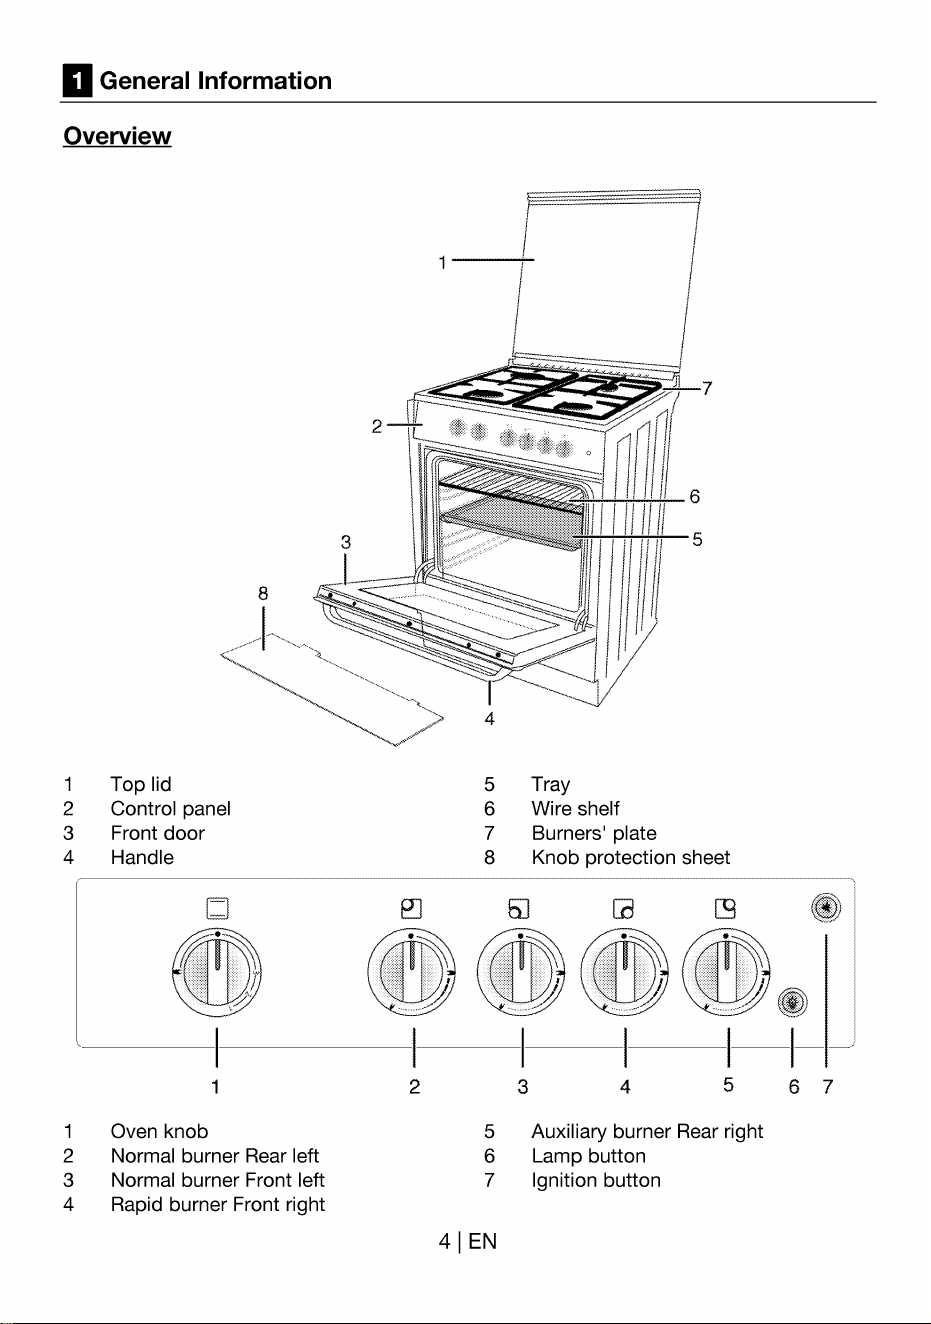
Top lid
Control panel
Front door
Handle
1
Oven knob
Normal burner Rear left
Normal burner Front left
Rapid burner Front right
2
4
5
6
7
8
5
6
7
41 EN
Tray
Wire shelf
Burners' plate
Knob protection sheet
3 4
5
Auxiliary burner Rear right
Lamp button
Ignition button
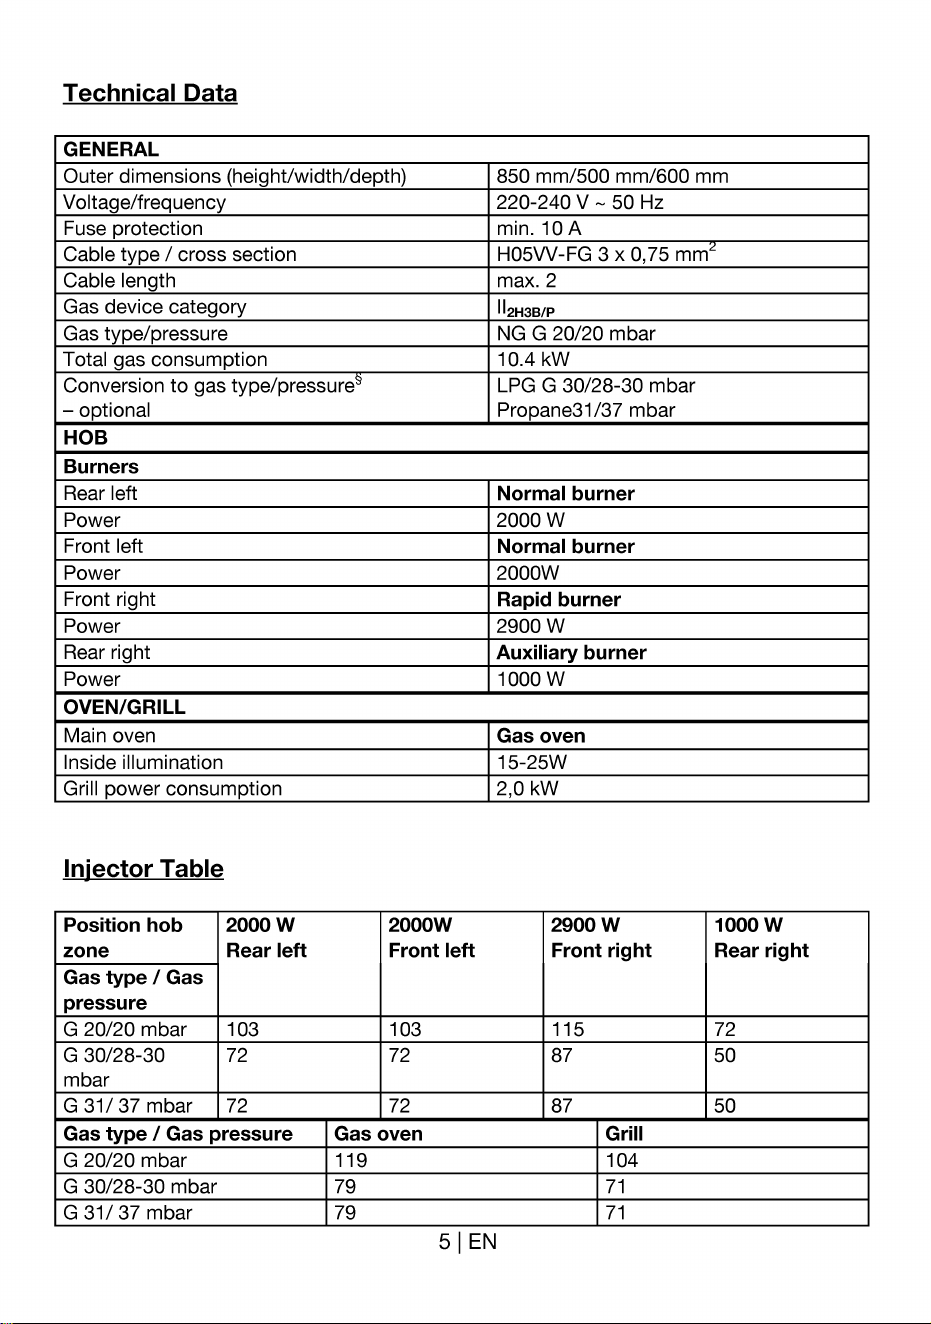
Technical Data
GENERAL
Outer dimensions (height/width/depth)
Voltage/frequenc
Fuse protection
Cable type / cross section
Cable len th
Gas device category
Gas type/pressure
Total gas consumption
Conversion to gas type/pressure
—optional
HOB
Burners
Rear left
Power
Front left
Power
Front right
Power
Rear right
Power
OVEN/GRILL
Main oven
Inside illumination
Grill power consumption
Injector Table
850 mm/500 mm/600 mm
220-240 V 50 Hz
min. IOA
H05VV-FG 3 x 0,75 mm
max. 2
2H3B/P
NG G 20/20 mbar
10.4 kW
LPG G 30/28-30 mbar
Position hob
zone
Gas type / Gas
pressure
G 20/20 mbar
G 30/28-30
mbar
G 31/ 37 mbar
2000 w
Rear left
103
72
72
2000W
Front left
103
72
72
Gas oven
119
79
79
51 EN
Pro ane31/37 mbar
Normal burner
2000 w
Normal burner
2000W
Rapid burner
2900 w
Auxiliary burner
1 ooo w
Gas oven
15-25W
2,OkW
2900 w
Front right
115
Grill
104
71
71
1000 w
Rear right
72
50
50
Gas type / Gas pressure
G 20/20 mbar
G 30/28-30 mbar
G 31/ 37 mbar
Safety Instructions
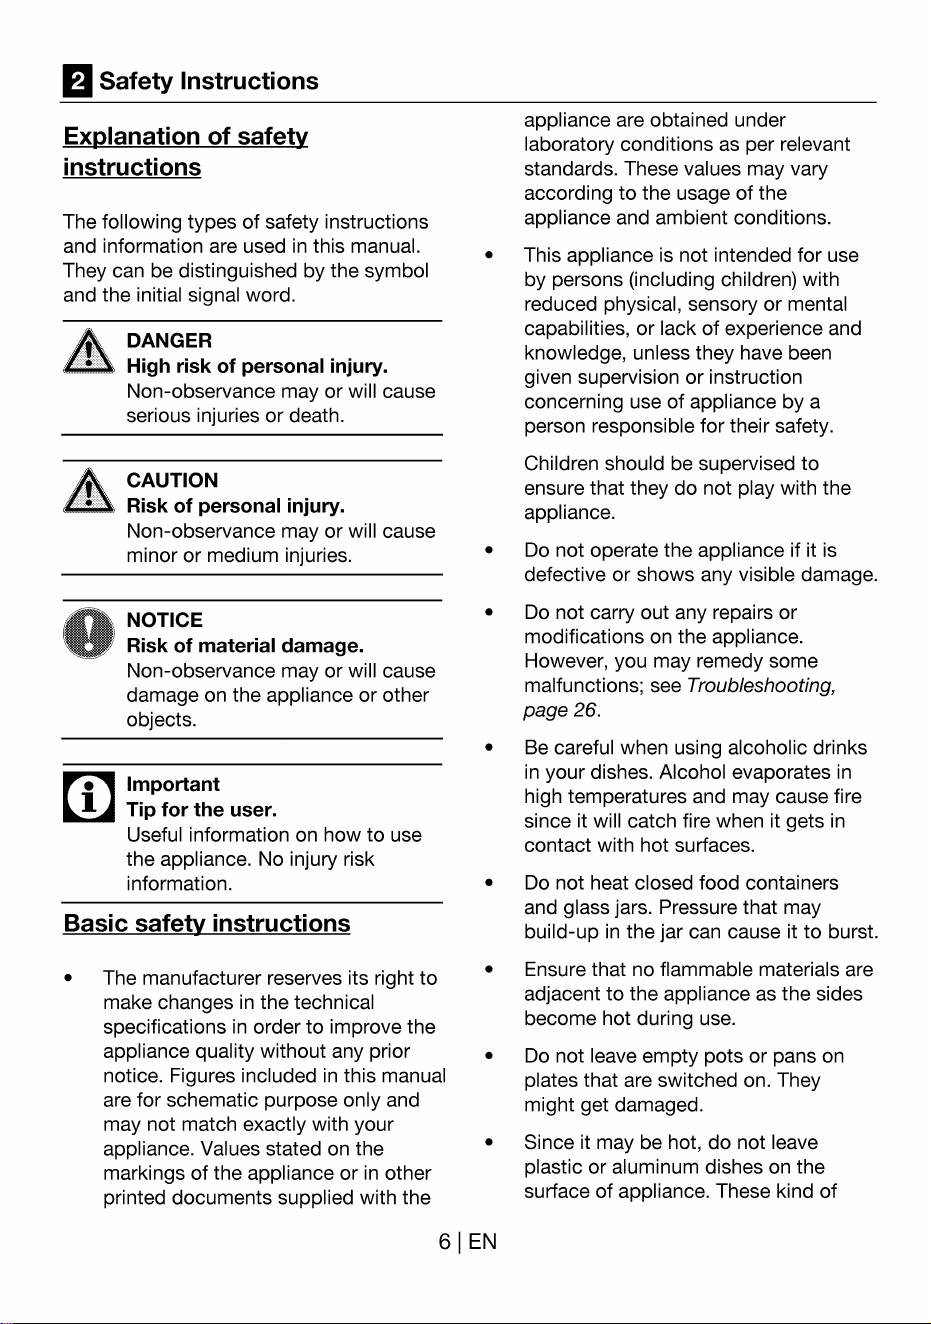
Explanation of safety
instructions
The following types of safety instructions
and information are used in this manual.
They can be distinguished by the symbol
and the initial signal word.
DANGER
High risk of personal injury.
Non-observance may or will cause
serious injuries or death.
CAUTION
Risk of personal injury.
Non-observance may or will cause
minor or medium injuries.
NOTICE
Risk of material damage.
Non-observance may or will cause
damage on the appliance or other
objects.
Important
Tip for the user.
Useful information on how to use
the appliance. No injury risk
information.
Basic safety instructions
• The manufacturer reserves its right to
make changes in the technical
specifications in order to improve the
appliance quality without any prior
notice. Figures included in this manual
are for schematic purpose only and
may not match exactly with your
appliance. Values stated on the
markings of the appliance or in other
printed documents supplied with the
•
•
•
appliance are obtained under
laboratory conditions as per relevant
standards. These values may vary
according to the usage of the
appliance and ambient conditions.
This appliance is not intended for use
by persons (including children) with
reduced physical, sensory or mental
capabilities, or lack of experience and
knowledge, unless they have been
given supervision or instruction
concerning use of appliance by a
person responsible for their safety.
Children should be supervised to
ensure that they do not play with the
appliance.
Do not operate the appliance if it is
defective or shows any visible damage.
Do not carry out any repairs or
modifications on the appliance.
However, you may remedy some
malfunctions; see Troubleshooting,
page 26.
Be careful when using alcoholic drinks
in your dishes. Alcohol evaporates in
high temperatures and may cause fire
since it will catch fire when it gets in
contact with hot surfaces.
Do not heat closed food containers
and glass jars. Pressure that may
build-up in the jar can cause it to burst.
Ensure that no flammable materials are
adjacent to the appliance as the sides
become hot during use.
Do not leave empty pots or pans on
plates that are switched on. They
might get damaged.
Since it may be hot, do not leave
plastic or aluminum dishes on the
surface of appliance. These kind of
61 EN
•
•
•
dishes should not be used to keep
food either.
Do not close the lid before the hob has
cooled down sufficiently.
In order to avoid any spillage from
leaking down the back or into the oven,
you must wipe the surface of the the
lid before opening upright.
Do not place baking trays, dishes or
aluminium foil directly onto the bottom
of the oven. The heat accumulation
might damage the bottom of the oven.
Appliance may be hot when it is in use.
Never touch the hot burners, inner
sections of the oven, heating elements
etc. Keep children away!
Always use heat-resistant gloves when
putting or removing the dishes
into/from your oven.
Rear surface of the oven gets hot
when it is in use. Gas / Electric
connection should not touch the rear
surface, otherwise the mains cable
may get damaged. Do not trap the
mains cable between the hot oven
door and frame. Do not route the
mains cable over the hot cooking
section. Otherwise, cable insulation
may melt and cause fire as a result of
short circuit.
Check all controls on the appliance are
switched off after use.
•
use and until the appliance has cooled,
children should be kept away.
Do not store any items above the
appliance that children may reach.
The packaging materials will be
dangerous for children. Keep the
packaging materials away from
children. Please dispose of all parts of
the packaging according to
environmental standards.
When the door is open, do not load
any heavy object on it and do not
allow children to sit on it . It may
overturn or door hinges may get
damaged.
Safety when working with gas
Important
i
For the warranty to be valid, the
appliance must be installed by a
qualified person in accordance
with current regulations.
Safety for children
• Accessible parts of the appliance will
become hot whilst the appliance is in
•
71 EN
Any works on gas equipment and
systems may only be carried out by
authorised qualified persons who are
gas safe registered.
Prior to the installation, be sure that
the conditions of local distribution (gas
type and gas pressure) and the
adjustment of the appliance are
compatible.
It shall be installed and connected in
accordance with current installation
regulations. Particular attention shall
be given to the relevant requirements
regarding ventilation; See Before
installation, page 10
The use of a gas-cooking appliance
produces heat and humidity in the
space where it is located. You should
assure a good ventilation of the
kitchen: keep open the natural
ventilation exits, or install a mechanic
ventilation device (hood).
Gas appliances and systems must be
regularly checked for proper
functioning. Please arrange for annual
maintenance.
Clean the gas burners regularly. The
flames should be blue and burn evenly.
Good combustion is required in gas
appliances. In case of incomplete
combustion, carbon monoxide (CO)
might develop. Carbon monoxide is a
colourless, odourless and very toxic
gas, which has lethal effect even in
very small doses.
Request information about gas
emergency telephone numbers and
safety measures in case of gas smell
from you local gas provider.
What to do when you smell gas
DANGER
Risk of explosion and poisoning!
1.
2.
3.
4.
5.
6.
Do not use open fire and do not
smoke.
Do not operate any electric
switches (e.g. light switch or door
bell).
Do not use a telephone or mobile
phone.
Close all valves on gas appliances and
gas meter.
Open doors and windows.
Check all tubes and connections for
tightness. If you still smell gas leave the
property.
Warn the neighbours.
Call the fire-brigade. Use a telephone
outside the house.
Do not re-enter the property until you
are told it is safe to do so.
Safety when working with
electricity
• Any work on electric equipment and
systems may only be carried out by
authorized qualified persons.
In case of any damage, switch off the
appliance and disconnect it from the
mains supply by removing the fuse or
switching off the circuit breaker.
• Ensure that the fuse rating is correct.
Intended use
The appliance is designed for domestic use
only. Commercial use is not admissible.
This appliance should not be used for
heating purposes.
The manufacturer shall not be liable for any
damage caused by improper use or
handling errors.
The appliance can be used for defrosting,
baking, roasting and grilling food.
Disposal
Packaging material
DANGER
L.S Riskofsuffocationbythe
packaging materials!
Keep children away from the
packaging materials.
The packaging material and transport locks
are made from materials that are not
harmful to the environment. Please dispose
of all parts of the packaging according to
environmental standards. This is beneficial
to the environment.
81 EN
Old equipment
This appliance bears the selective sorting
symbol for waste electrical and electronic
equipment (WEEE). This means that this
appliance must be handled pursuant to
European Directive 2002/96/EC in order to
be recycled or dismantled to minimize its
impact on the environment. For further
information, please contact your local or
regional authorities.
Electronic appliances not included in the
selective sorting process are potentially
dangerous for the environment and human
health due to the presence of hazardous
substances.
Future transportation
NOTICE
Do not place other items on the
top of the appliance. The appliance
must be transported upright.
Store the appliance's original box and
transport the appliance in its original carton.
Follow the guidance marks that are printed
on the carton.
Important
I Verifythegeneralappearanceof
your equipment by identifying
possible damage during the
transportation.
Secure the caps and pan supports with
adhesive tape.
To prevent the wire shelf and tray inside
the oven from damaging the oven door,
place a strip of cardboard onto the inside
of the oven door that lines up with the
position of the trays. Tape the oven door to
the side walls.
If you do not have the original carton
Pack the appliance in bubble wrap or thick
cardboard and tape it securely in order to
prevent damage during transportation.
91 EN
Installation
Before installation
To ensure that critical air gaps are
maintained under the appliance, we
recommend that this appliance is mounted
on a solid base and that the feet do not
sink into any carpet or soft flooring.
The kitchen floor must be able to carry the
weight of the appliance plus the additional
weight of cookware and bakeware and
food; see Technical Data, page 5.
Hood
E 65 mmmin
5 nn min
surface and 600mm to a cabinet
above.
If a appliance hood is to be fitted, refer
to the manufacturer's instructions
regarding fixing height.
The appliance corresponds to device
class 1, i.e. it may be placed with the
rear and one side to kitchen walls,
kitchen furniture or equipment of any
size. The kitchen furniture or
equipment on the other side may only
be of the same size or smaller.
Any kitchen furniture next to the
appliance must be heat-resistant (up
to 100 oc min.).
Room ventilation
The air for combustion is taken from the
room air and the exhaust gases are emitted
directly into the room.
Good room ventilation is essential for safe
operation of your appliance. If there is no
window or door available for room
ventilation, an extra ventilation must be
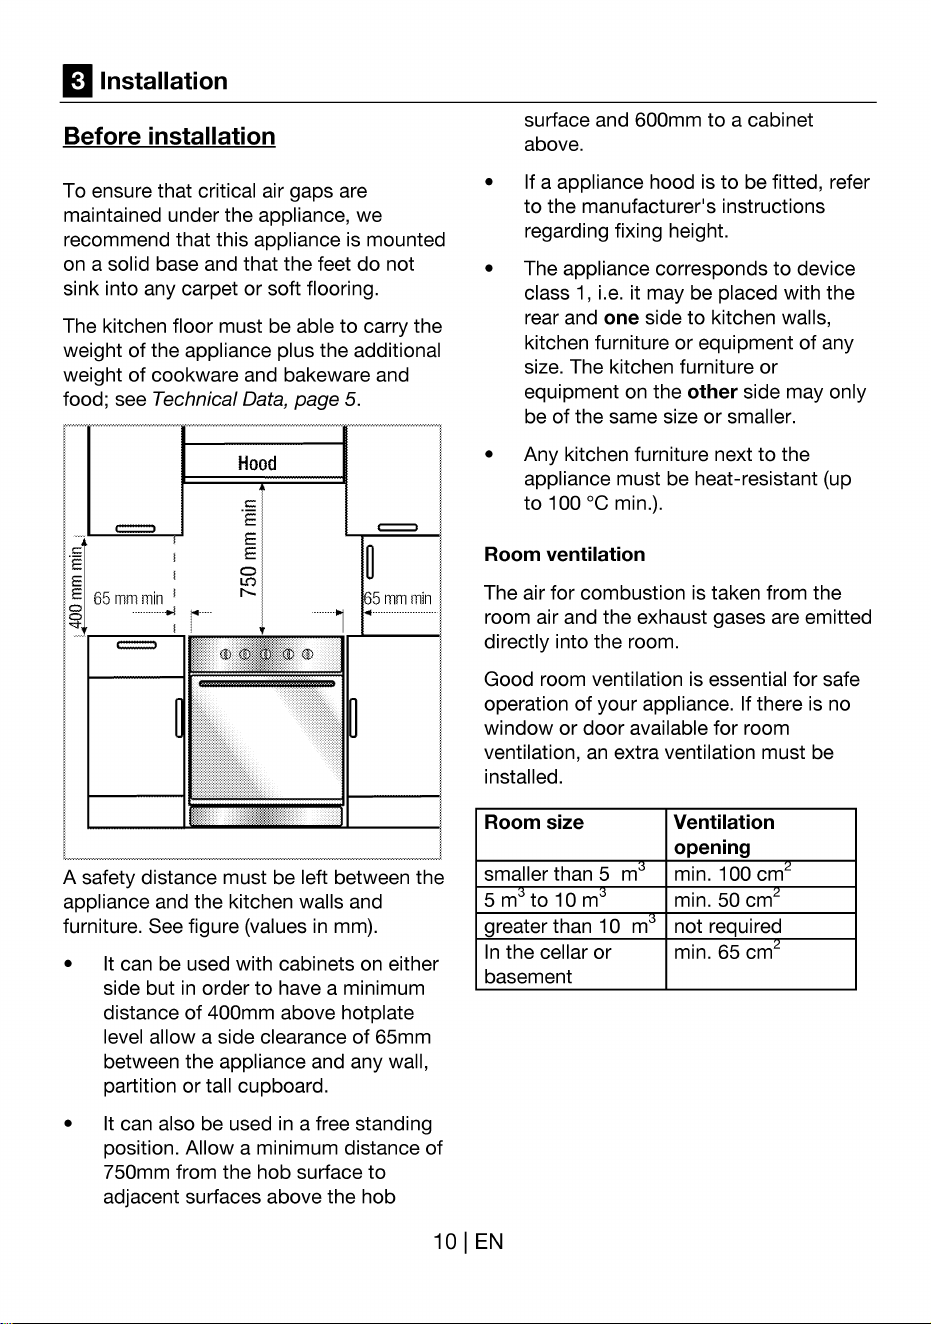
A safety distance must be left between the
appliance and the kitchen walls and
furniture. See figure (values in mm).
It can be used with cabinets on either
side but in order to have a minimum
distance of 400mm above hotplate
level allow a side clearance of 65mm
between the appliance and any wall,
partition or tall cupboard.
It can also be used in a free standing
position. Allow a minimum distance of
750mm from the hob surface to
adjacent surfaces above the hob
installed.
Room size
smaller than 5 m
5m to 10m
greater than 10 m
In the cellar or
basement
Ventilation
opening
min. 100 cm
min. 50 cm
not required
min. 65 cm
101 EN
Installation and connection
i
•
Important
Do not install the appliance next to
refrigerators or freezers. The heat
emitted by the appliance will lead
to an increased energy
consumption of cooling
appliances.
For installation the appliance must be
connected in accordance with all local
gas and/or electrical regulations.
Carry the appliance with at least two
persons.
NOTICE
Material damage!
The door handle must not be used
for lifting or moving the appliance.
The appliance must be placed directly
on the floor. It must not be placed onto
a base or a pedestal.
•
1
2
NOTICE
Your appliance is adjusted for
Natural gas.
Your natural gas installation must be
adjusted before the appliance is
installed.
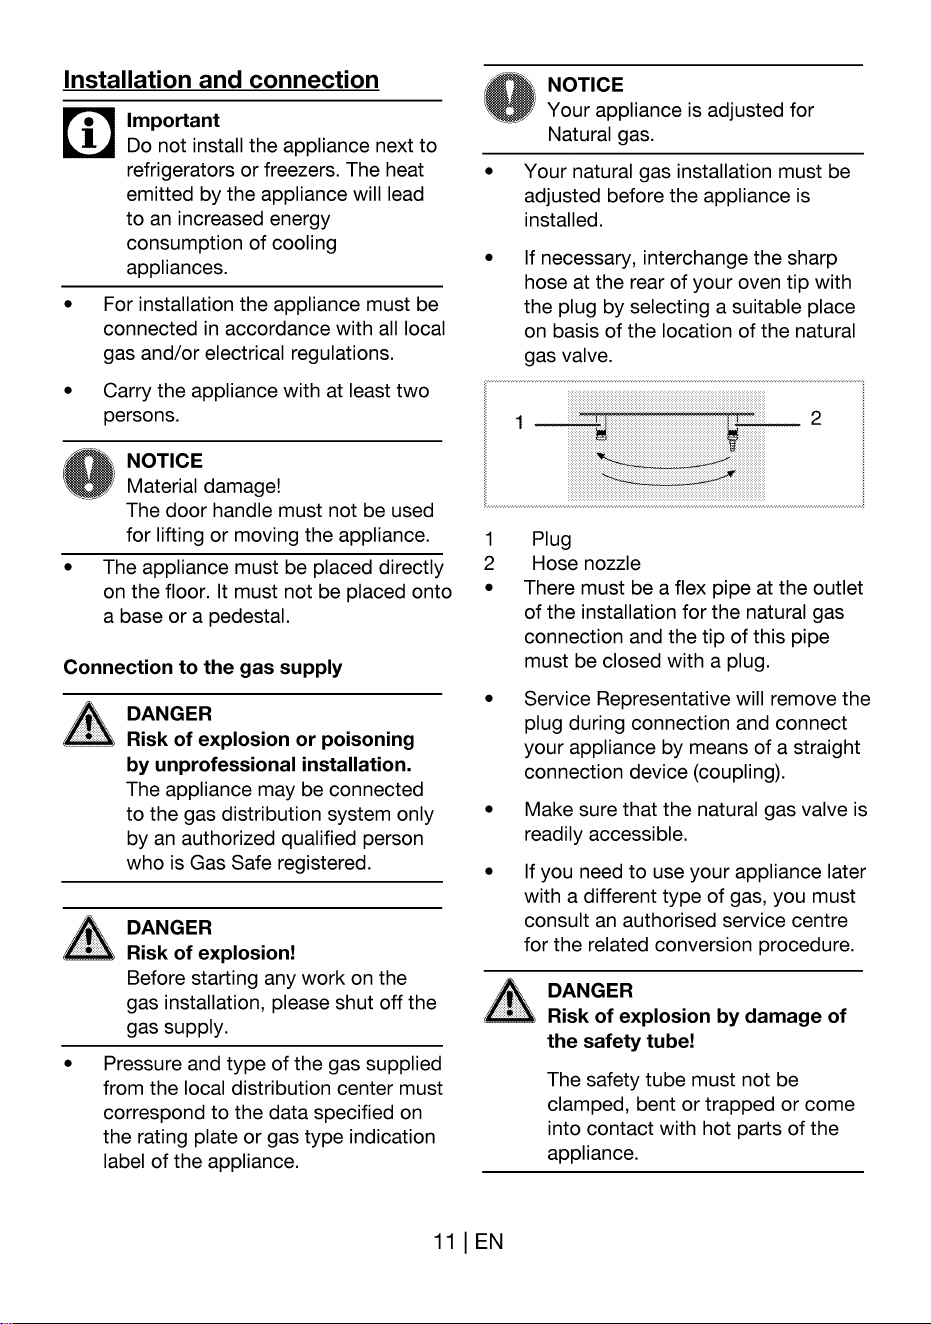
If necessary, interchange the sharp
hose at the rear of your oven tip with
the plug by selecting a suitable place
on basis of the location of the natural
gas valve.
1
Plug
Hose nozzle
2
Connection to the gas supply
DANGER
Risk of explosion or poisoning
by unprofessional installation.
The appliance may be connected
to the gas distribution system only
by an authorized qualified person
who is Gas Safe registered.
A DANGER
Risk of explosion!
There must be a flex pipe at the outlet
of the installation for the natural gas
connection and the tip of this pipe
must be closed with a plug.
Service Representative will remove the
plug during connection and connect
your appliance by means of a straight
connection device (coupling).
Make sure that the natural gas valve is
readily accessible.
If you need to use your appliance later
with a different type of gas, you must
consult an authorised service centre
for the related conversion procedure.
Before starting any work on the
DANGER
gas installation, please shut off the
Risk of explosion by damage of
gas supply.
the safety tube!
Pressure and type of the gas supplied
The safety tube must not be
from the local distribution center must
clamped, bent or trapped or come
correspond to the data specified on
into contact with hot parts of the
the rating plate or gas type indication
appliance.
label of the appliance.
11 | EN
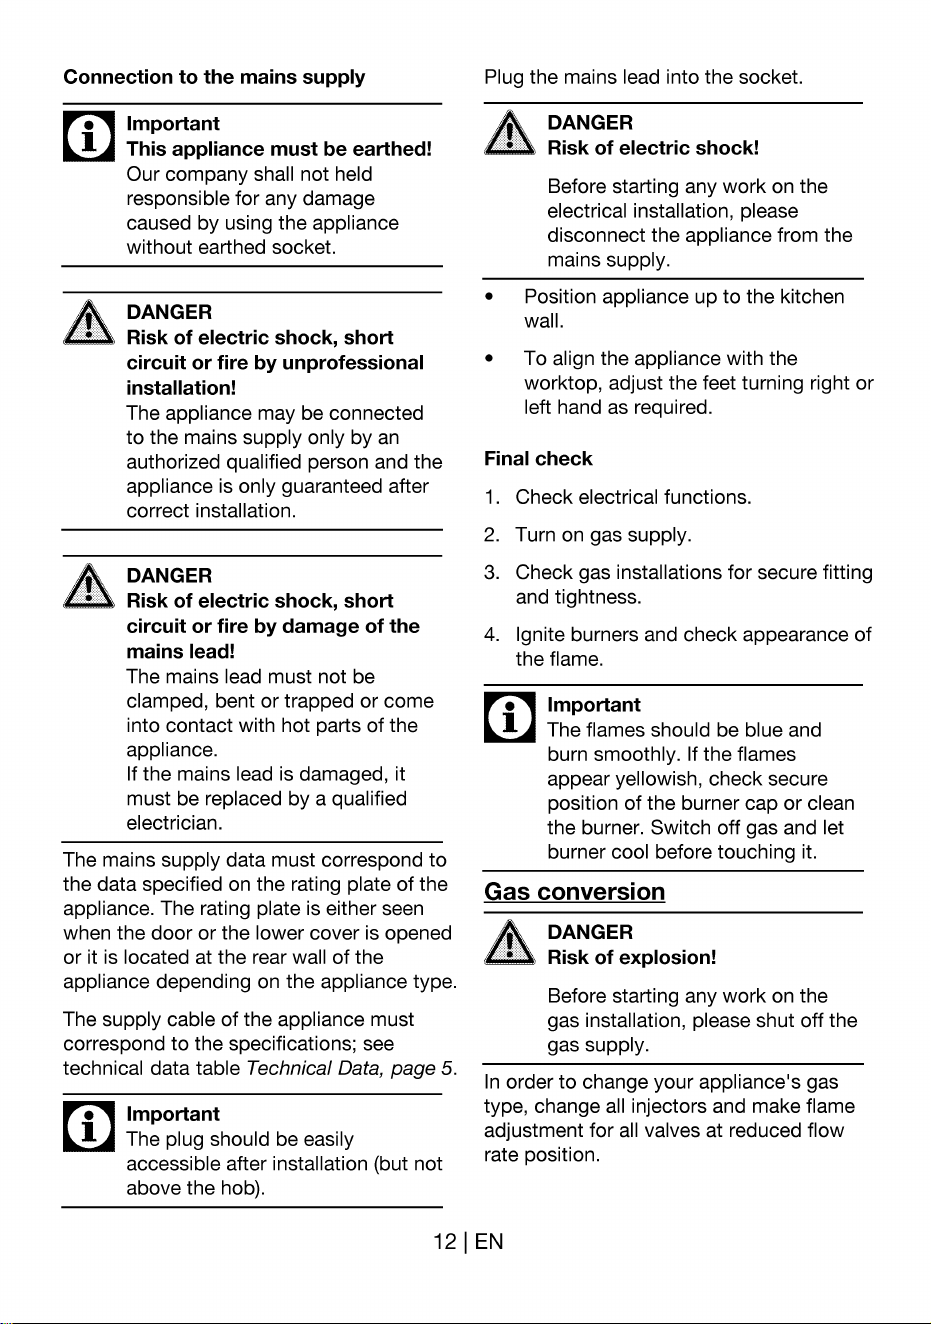
Connection to the mains supply
Important
This appliance must be earthed!
Our company shall not held
responsible for any damage
caused by using the appliance
without earthed socket.
DANGER
Risk of electric shock, short
circuit or fire by unprofessional
installation!
The appliance may be connected
to the mains supply only by an
authorized qualified person and the
appliance is only guaranteed after
correct installation.
DANGER
Risk of electric shock, short
circuit or fire by damage of the
mains lead!
The mains lead must not be
clamped, bent or trapped or come
into contact with hot parts of the
appliance.
If the mains lead is damaged, it
must be replaced by a qualified
electrician.
The mains supply data must correspond to
the data specified on the rating plate of the
appliance. The rating plate is either seen
when the door or the lower cover is opened
or it is located at the rear wall of the
appliance depending on the appliance type.
The supply cable of the appliance must
correspond to the specifications; see
technical data table Technical Data, page 5.
Important
The plug should be easily
accessible after installation (but not
above the hob).
Plug the mains lead into the socket.
DANGER
Risk of electric shock!
Before starting any work on the
electrical installation, please
disconnect the appliance from the
mains supply.
Position appliance up to the kitchen
wall.
To align the appliance with the
worktop, adjust the feet turning right or
left hand as required.
Final check
1.
2.
3.
4.
Check electrical functions.
Turn on gas supply.
Check gas installations for secure fitting
and tightness.
Ignite burners and check appearance of
the flame.
• Important
I Theflamesshouldbe blueand
burn smoothly. If the flames
appear yellowish, check secure
position of the burner cap or clean
the burner. Switch off gas and let
burner cool before touching it.
Gas conversion
DANGER
Risk of explosion!
Before starting any work on the
gas installation, please shut off the
gas supply.
In order to change your appliance's gas
type, change all injectors and make flame
adjustment for all valves at reduced flow
rate position.
12 EN
Gas conversion must only be carried
out by a Gas Safe registered
installer or service agent.
Exchange injector for the burners
Reduced gas flow rate setting for hob
taps
I.
2.
3.
4.
1
2
3
4
Take off burner cap and burner body.
Unscrew injectors.
Fit new injectors.
Check all connections for secure fitting
and tightness.
1.
2.
3.
Ignite the burner that is to be adjusted
and turn the knob to the reduced
position.
Remove the knob from the gas tap.
Use an appropriately sized screwdriver
to adjust the flow rate adjustment
screw.
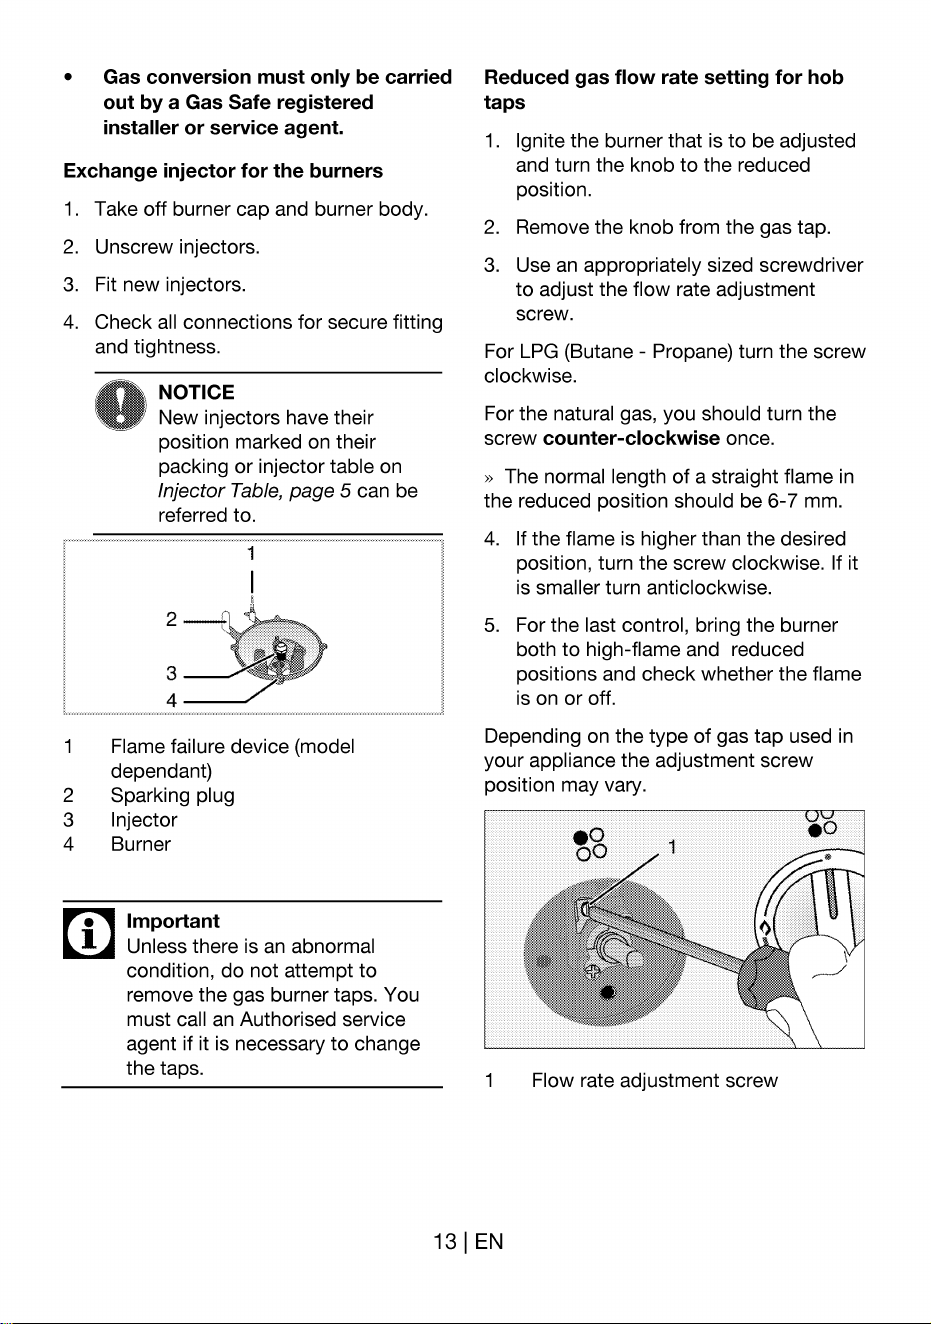
NOTICE
New injectors have their
position marked on their
packing or injector table on
Injector Table, page 5 can be
referred to.
1
2
3
4
Flame failure device (model
dependant)
Sparking plug
Injector
Burner
Important
Unless there is an abnormal
condition, do not attempt to
remove the gas burner taps. You
must call an Authorised service
agent if it is necessary to change
the taps.
For LPG (Butane - Propane) turn the screw
clockwise.
For the natural gas, you should turn the
screw counter-clockwise once.
» The normal length of a straight flame in
the reduced position should be 6-7 mm.
4.
5.
If the flame is higher than the desired
position, turn the screw clockwise. If it
is smaller turn anticlockwise.
For the last control, bring the burner
both to high-flame and reduced
positions and check whether the flame
is on or off.
Depending on the type of gas tap used in
your appliance the adjustment screw
position may vary.
•o
i
1
131 EN
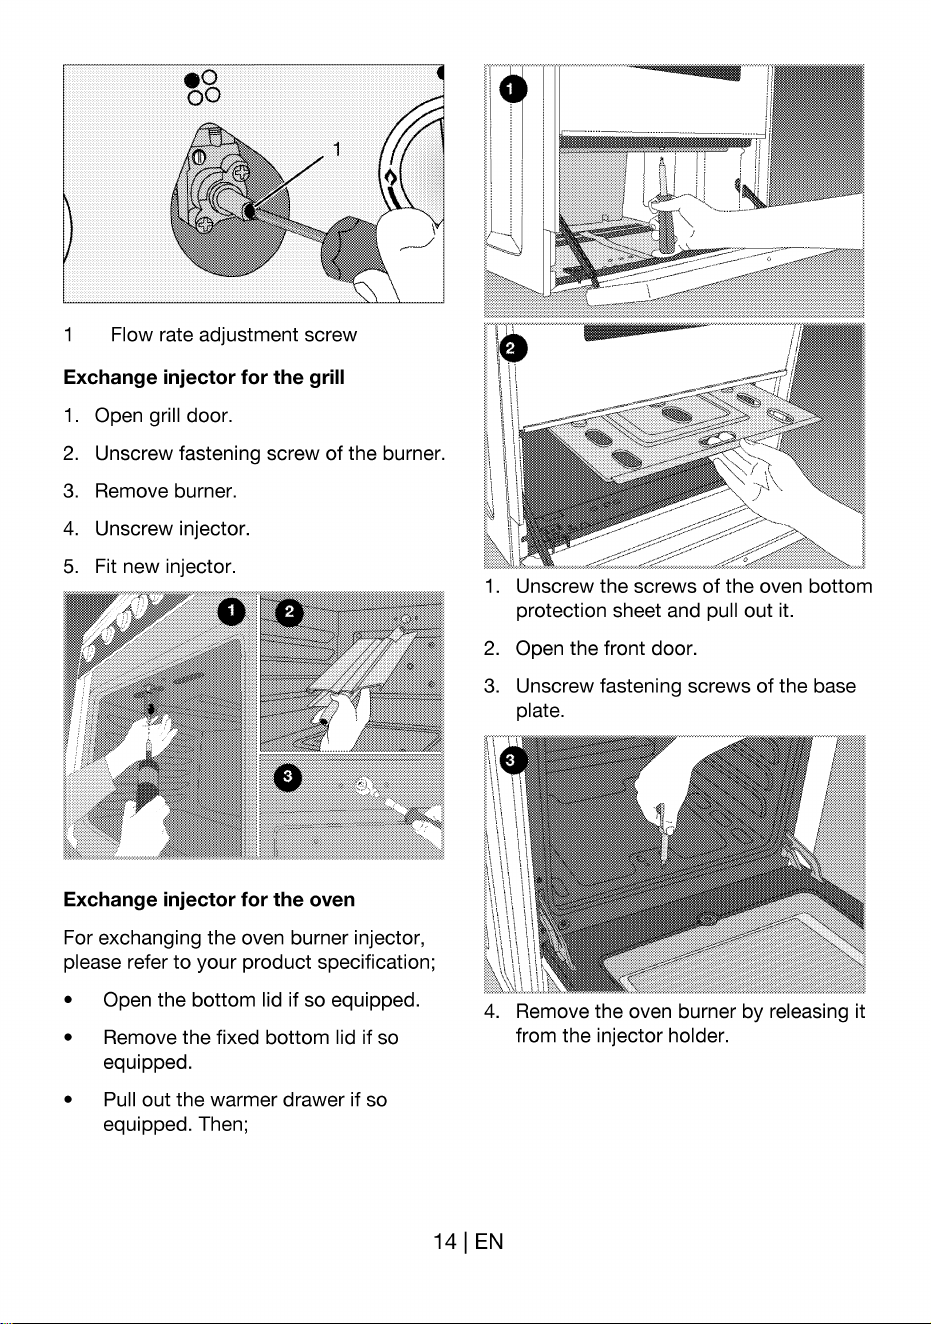
Flow rate adjustment screw
•o
00
1
Flow rate adjustment screw
Exchange injector for the grill
1.
2.
3.
4.
5.
Open grill door.
Unscrew fastening screw of the burner.
Remove burner.
Unscrew injector.
Fit new injector.
O
1.
2.
3.
Unscrew the screws of the oven bottom
protection sheet and pull out it.
Open the front door.
Unscrew fastening screws of the base
plate.
Exchange injector for the oven
For exchanging the oven burner injector,
please refer to your product specification;
•
•
Open the bottom lid if so equipped.
Remove the fixed bottom lid if so
equipped.
Pull out the warmer drawer if so
equipped. Then;
4. Remove the oven burner by releasing it
from the injector holder.
14 | EN
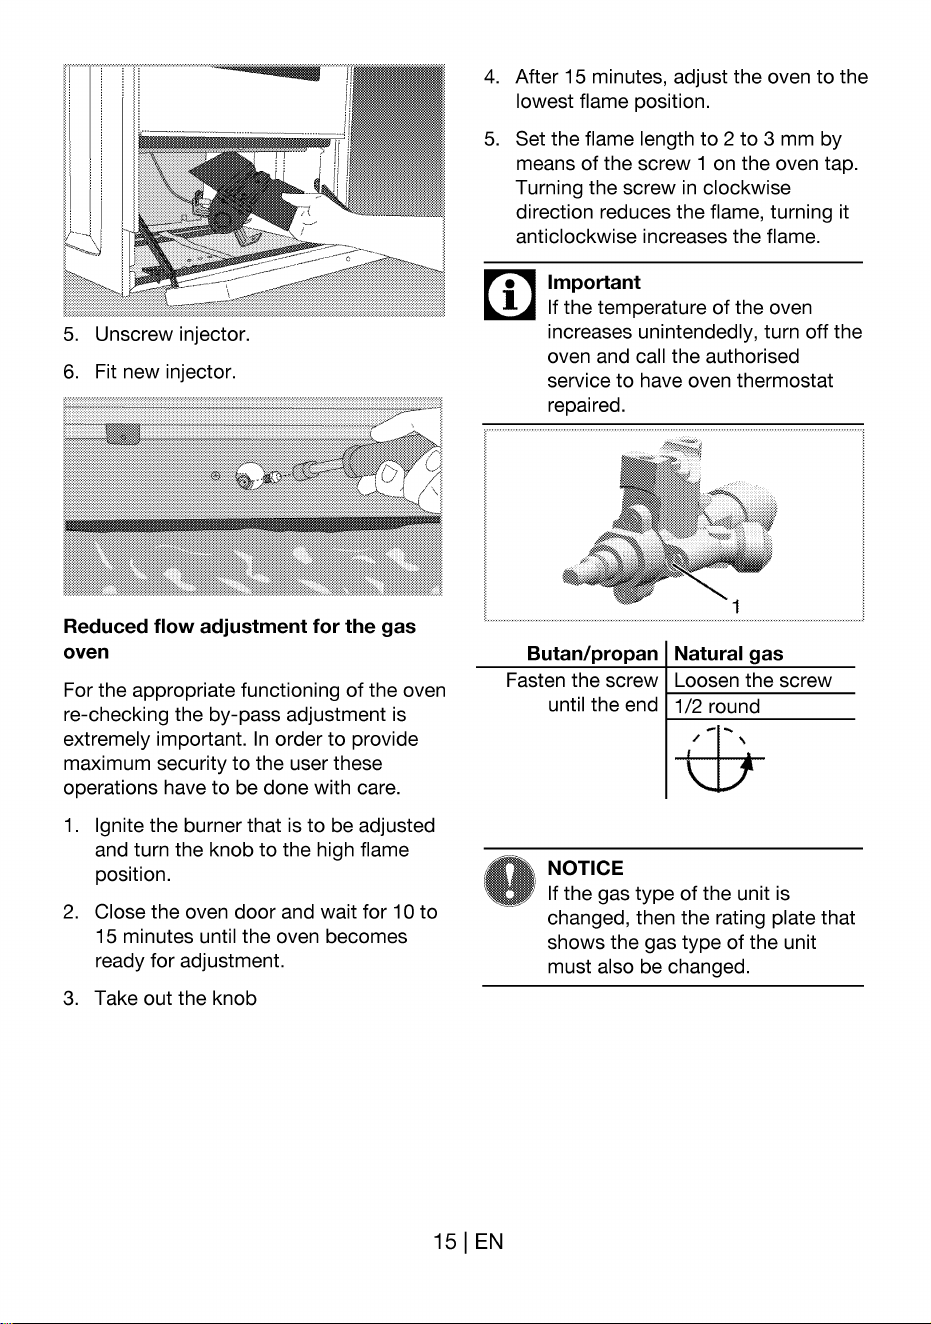
4.
5.
After 15 minutes, adjust the oven to the
lowest flame position.
Set the flame length to 2 to 3 mm by
means of the screw 1 on the oven tap.
Turning the screw in clockwise
direction reduces the flame, turning it
anticlockwise increases the flame.
• Important
increases unintendedly, turn off the
oven and call the authorised
service to have oven thermostat
5. Unscrew injector.
6. Fit new injector.
Reduced flow adjustment for the gas
oven
For the appropriate functioning of the oven
re-checking the by-pass adjustment is
extremely important. In order to provide
maximum security to the user these
operations have to be done with care.
repaired
Butan/propan
Fasten the screw
until the end
NOTICE
1
Natural gas
Loosen the screw
1/2 round
1.
2.
3.
Ignite the burner that is to be adjusted
and turn the knob to the high flame
position.
Close the oven door and wait for 10 to
15 minutes until the oven becomes
ready for adjustment.
Take out the knob
151 EN
If the gas type of the unit is
changed, then the rating plate that
shows the gas type of the unit
must also be changed.
Preparation
Tips for saving energy
The following tips will help you to use your
appliance in an ecological way and to save
energy:
Initial operation
First cleaning of the appliance
•
•
•
•
Use dark coloured and enamel coated
trays, since the heat transmission will
be better.
While cooking your meals, perform a
preheating operation if it is advised in
the user manual or cooking
instructions.
During cooking, do not open the oven
door frequently.
Try to cook more than one type of
meal within the oven at the same time
(You can cook two different meals at
the same time by locating cooking
bowls on the same shelf). It will be
suitable to cook more than one meal
after each other. The oven will already
be hot.
Defrost frozen meals before cooking
them.
Use pots/pans with lids for cooking.
Without a lid, the energy consumption
may be up to four times higher.
Choose the burner/plate which is
suitable to the saucepan base. Always
choose the correct size of saucepans
for your meals. For larger
burners/plates more energy is needed.
I.
2.
NOTICE
The surface might get damaged by
some detergents or cleaning
materials.
Do not use aggressive detergents,
cleaning powder/cream or any
sharp objects.
Remove all packaging materials.
Wipe the surfaces of the appliance with
a damp cloth or sponge and dry with a
cloth.
Initial heating
WARNING
Hot surfaces may cause burns!
Do not touch the hot surfaces of
the appliance. Use oven gloves.
Keep children away from the
appliance.
Allow the appliance to cool down
before you take off the heat shield.
Important
Smell and smoke may emit during
first heating. Ensure that the room
is well ventilated.
Any production residues or conservation
layers must be burnt off before the first use.
Heat up the appliance for about 30 minutes
and then switch it off.
161 EN
Gas oven
Grill oven
1.
2.
3.
4.
5.
Take all baking trays and wire shelf
from the oven.
Close oven door.
Select largest flame of the gas oven;
see How to use the gas oven, page 21.
Heat approximately 30 minutes.
Switch off oven; see How to use the
gas oven, page 21
1.
2.
3.
4.
5.
Take all baking trays and wire shelf
from the oven.
Close oven door.
Select largest flame of the grill oven;
see How to operate the gas grill,
page 22.
Heat approximately 30 minutes.
Switch off grill; see How to operate the
gas grill, page 22
171 EN
How To Use The Hob
General information on cooking
DANGER
Risk of fire by overheated oil!
When you heat oil, do not leave it
unattended.
Never try to extinguish the fire
with water! When oil has caught
fire, immediately cover the pot or
pan with a lid. Switch off the hob if
safe to do so and phone the fire
service.
Ensure handles of pans cannot
accidentally be caught or knocked and
do not get hot by adjacent heating
zones.
Cooking with gas
• The size of the pan and the size of the
gas flame should match each other.
Adjust the gas flames so that they do
not go beyond the bottom of the pan
always place the pan onto the pan
support in a central position.
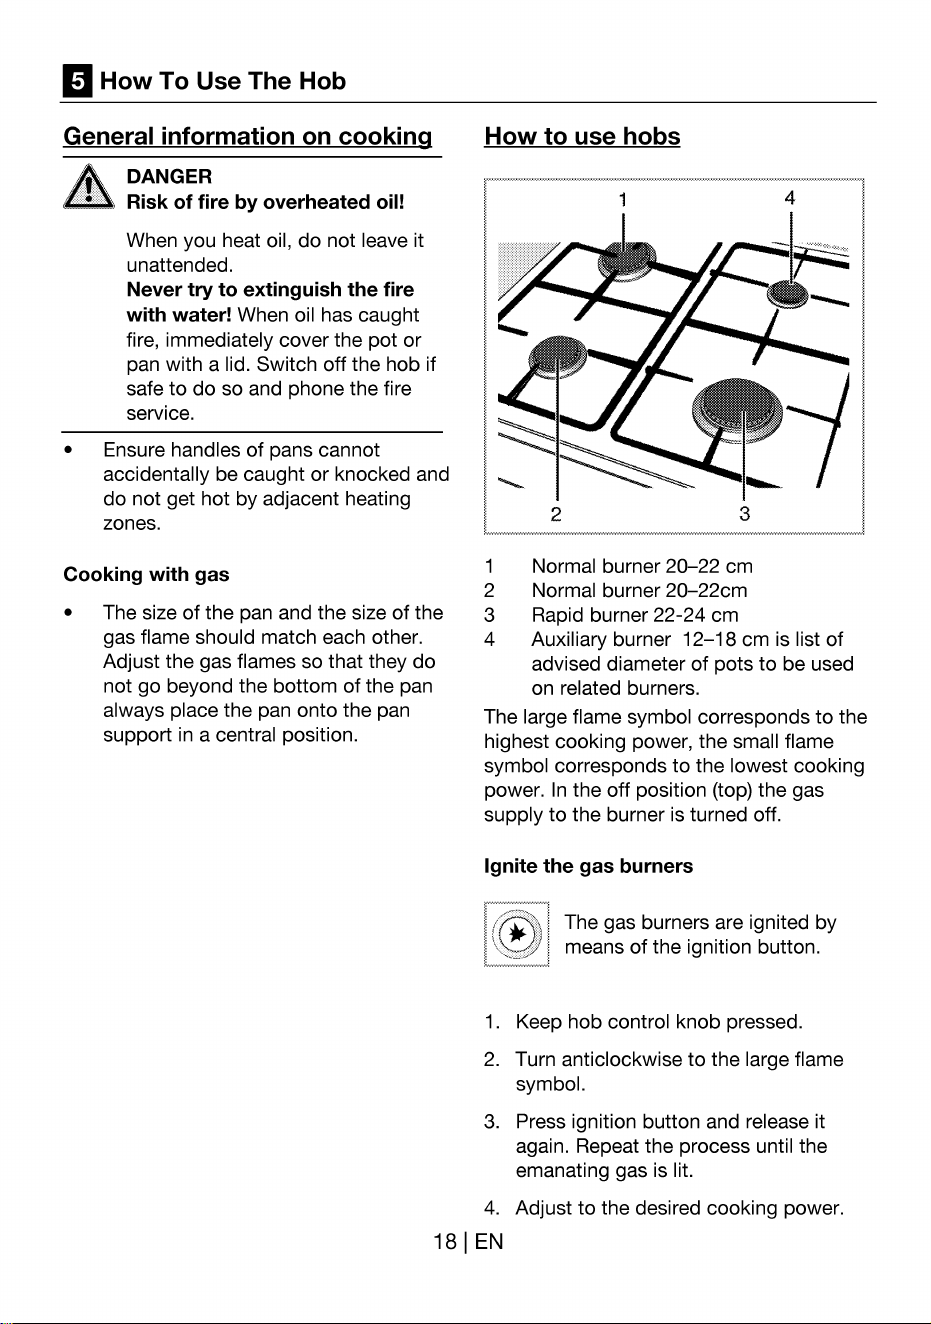
How to use hobs
1
2
4
3
1
2
3
4
Normal burner 20—22 cm
Normal burner 20—22cm
Rapid burner 22-24 cm
Auxiliary burner 12—18cm is list of
advised diameter of pots to be used
on related burners.
The large flame symbol corresponds to the
highest cooking power, the small flame
symbol corresponds to the lowest cooking
power. In the off position (top) the gas
supply to the burner is turned off.
Ignite the gas burners
I.
2.
3.
4.
181 EN
The gas burners are ignited by
means of the ignition button.
Keep hob control knob pressed.
Turn anticlockwise to the large flame
symbol.
Press ignition button and release it
again. Repeat the process until the
emanating gas is lit.
Adjust to the desired cooking power.
Switch off the gas burners
Turn burner control knob to off position
(top).
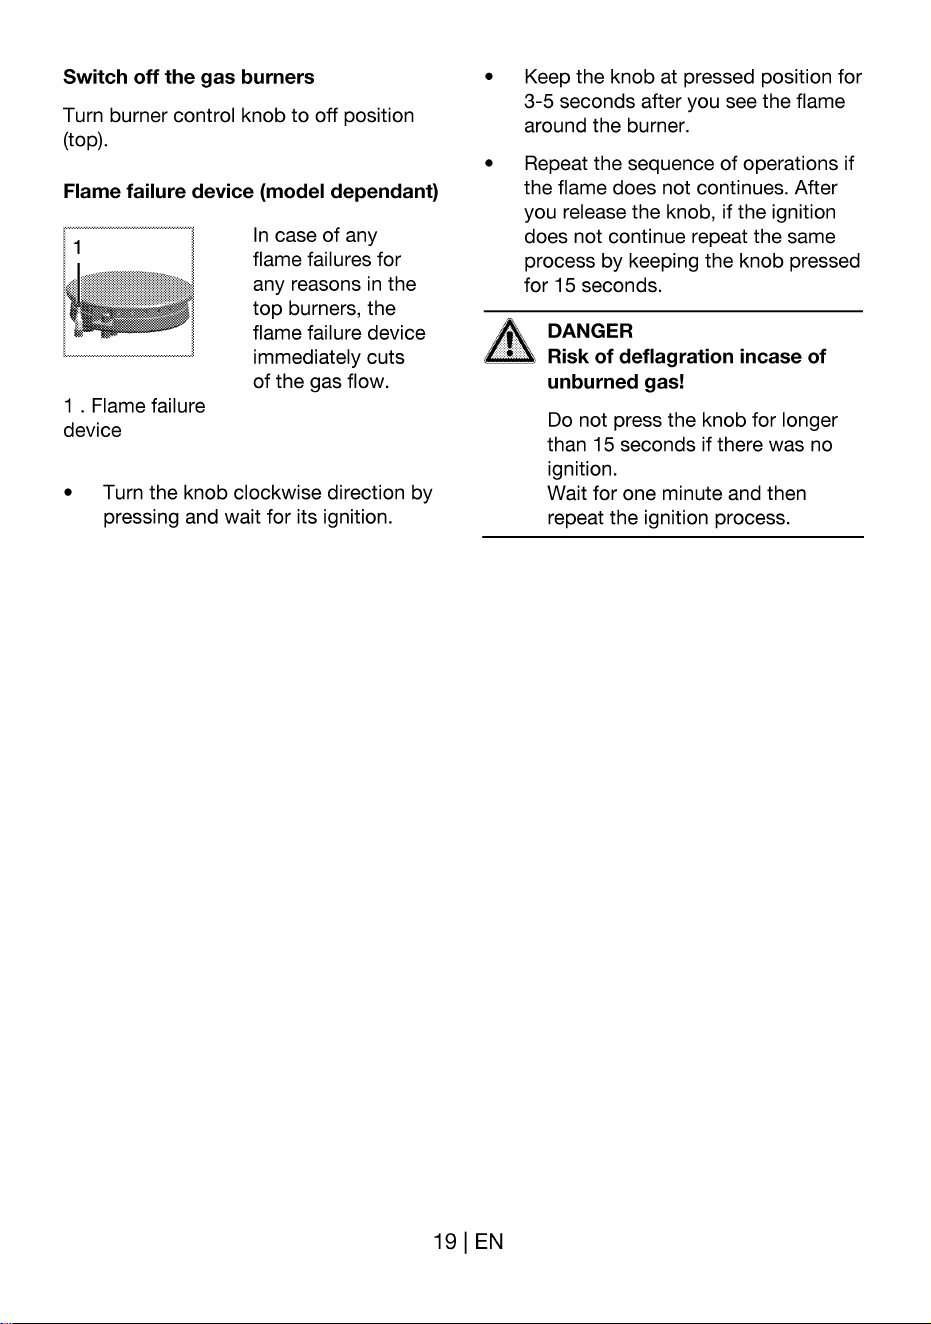
Flame failure device (model dependant)
1
1 . Flame failure
device
In case of any
flame failures for
any reasons in the
top burners, the
flame failure device
immediately cuts
of the gas flow.
• Turn the knob clockwise direction by
pressing and wait for its ignition.
Keep the knob at pressed position for
3-5 seconds after you see the flame
around the burner.
Repeat the sequence of operations if
the flame does not continues. After
you release the knob, if the ignition
does not continue repeat the same
process by keeping the knob pressed
for 15 seconds.
DANGER
Risk of deflagration incase of
unburned gas!
Do not press the knob for longer
than 15 seconds if there was no
ignition.
Wait for one minute and then
repeat the ignition process.
191 EN
How To Operate The Oven
General information on baking,
roasting and grilling
A DANGER
Risk of scalding by hot steam!
Take care when opening the oven
door as steam may escape.
Tips for baking
•
Use non-stick coated appropriate
metal plates or aluminum containers or
heat-resistant silicone moulds.
Make best use of the space on the
rack.
It is recommended to place the baking
mould in the middle of the rack.
Keep the oven door closed.
Tips for roasting
•
•
•
•
Seasoning with lemon juice and black
pepper will improve the cooking
performance when cooking a whole
chicken, turkey or a large piece of
meat.
Meat with bones takes about 15 to 30
minutes longer before it is cooked than
a roast of the same size without bones.
You should calculate about 4 to 5
minutes cooking time per centimeter
height of the meat.
Let meat rest in the oven for about
10 minutes after the cooking time. The
juice is better distributed all over the
roast and does not run out when the
meat is cut.
Fish in a fire-resistant dish should be
placed on the rack at the medium or
lower level.
Tips for grilling
Grilling is ideal for cooking meat, fish and
poultry and will achieve a nice brown sur-
face without it drying out to much. Flat
pieces, meat skewers and sausages are
particularly suited for grilling as are vege-
tables with a high water content such as
tomatoes and onions.
Distribute the pieces to be grilled on
the wire shelf.
If the grilling is on the wire shelf, locate
a dripping pan under it in order to
collect the fat.
Add some water in dripping pan for
easy cleaning.
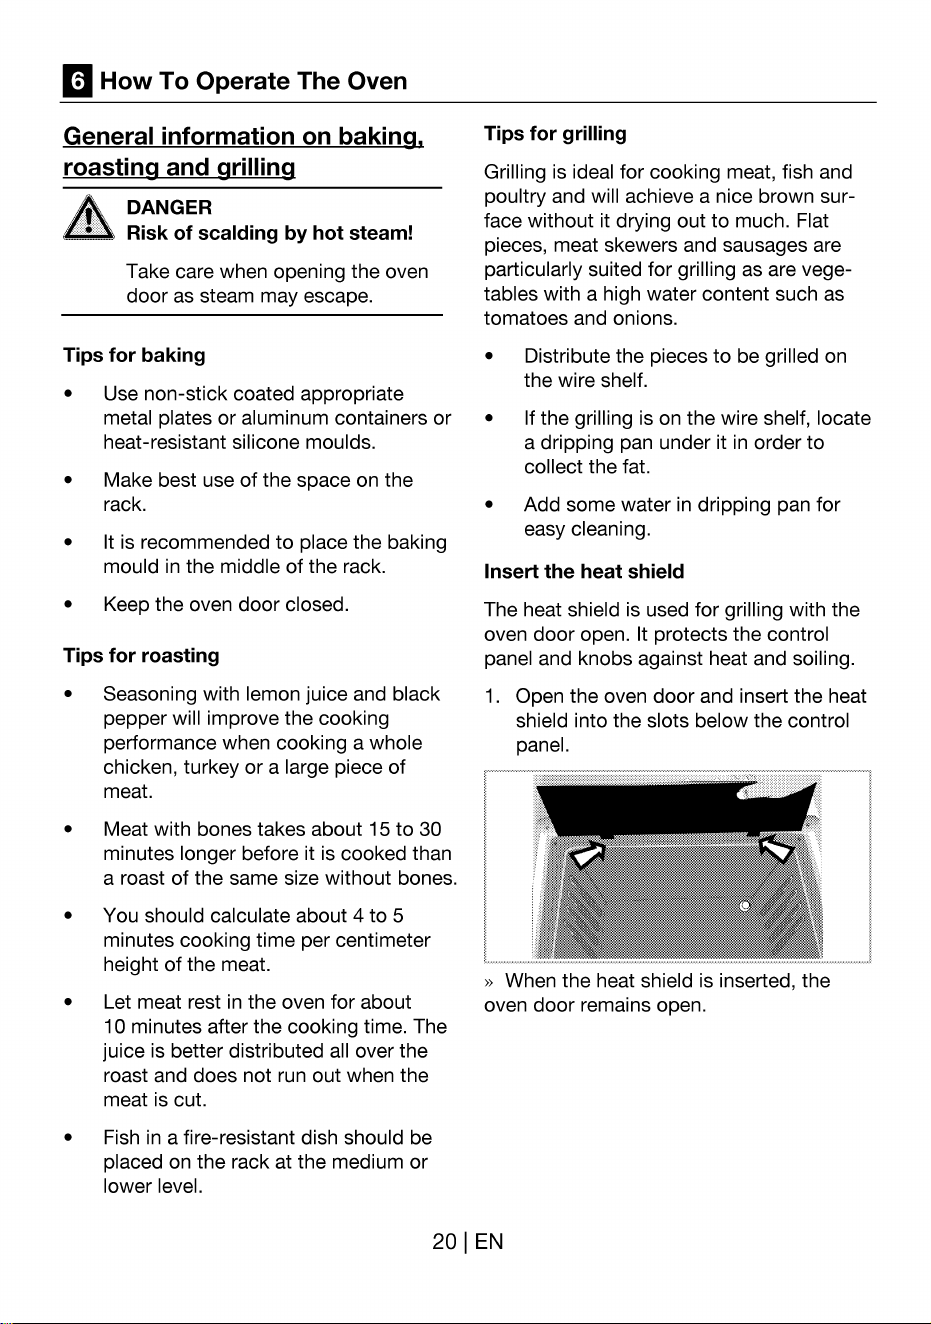
Insert the heat shield
The heat shield is used for grilling with the
oven door open. It protects the control
panel and knobs against heat and soiling.
1. Open the oven door and insert the heat
shield into the slots below the control
panel.
When the heat shield is inserted, the
oven door remains open.
20 | EN
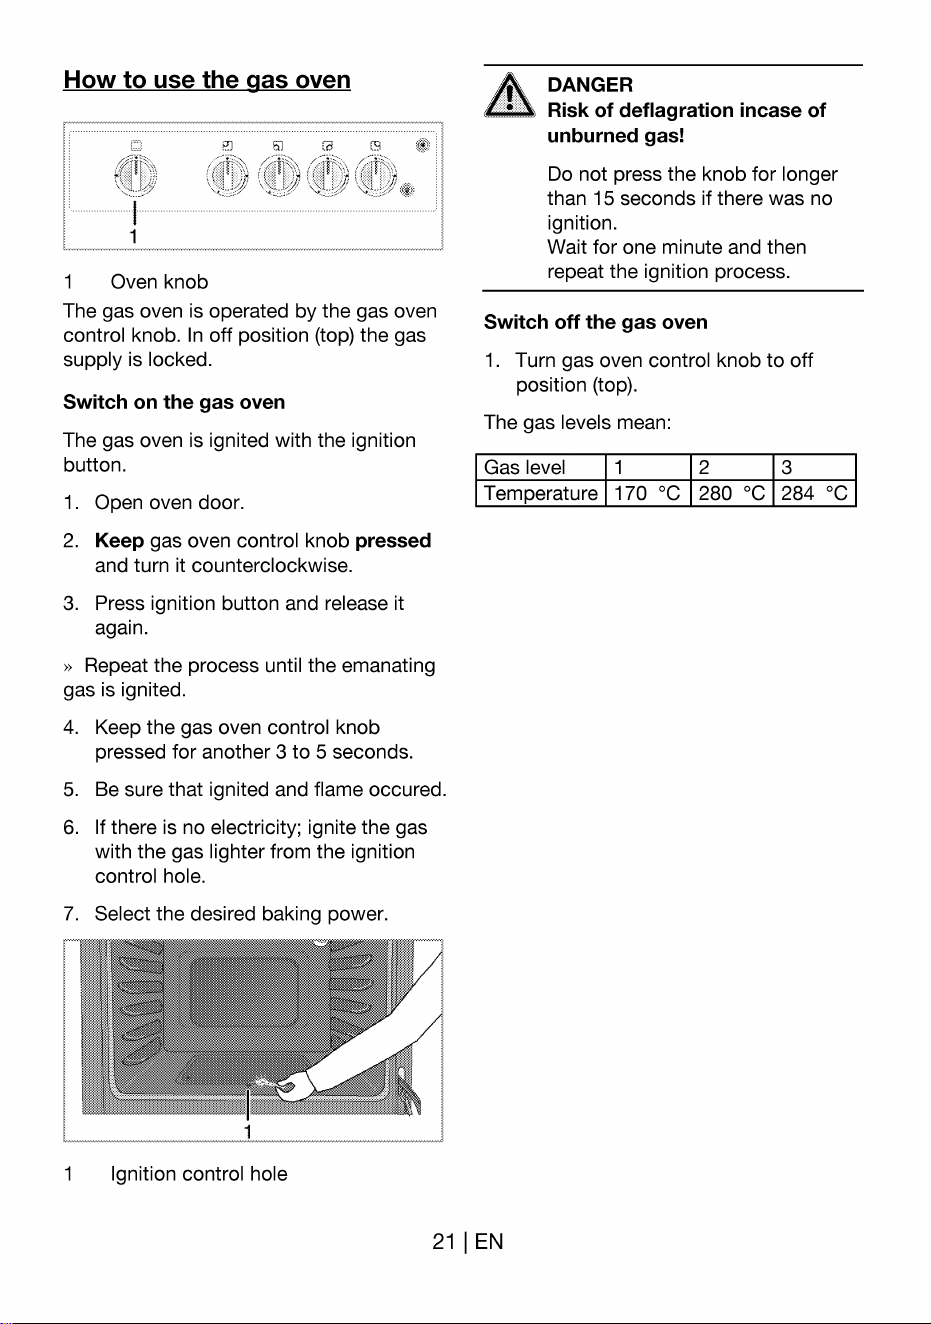
How to use the gas oven
1
1 Oven knob
The gas oven is operated by the gas oven
control knob. In off position (top) the gas
supply is locked.
Switch on the gas oven
The gas oven is ignited with the ignition
button.
I. Open oven door.
2. Keep gas oven control knob pressed
and turn it counterclockwise.
3. Press ignition button and release it
again.
» Repeat the process until the emanating
gas is ignited.
DANGER
Risk of deflagration incase of
unburned gas!
Do not press the knob for longer
than 15 seconds if there was no
ignition.
Wait for one minute and then
repeat the ignition process.
Switch off the gas oven
1. Turn gas oven control knob to off
position (top).
The gas levels mean:
Gas level 1
Temperature 170 oc
2 3
280 oc 284 oc
4.
5.
6.
7.
1
Keep the gas oven control knob
pressed for another 3 to 5 seconds.
Be sure that ignited and flame occured.
If there is no electricity; ignite the gas
with the gas lighter from the ignition
control hole.
Select the desired baking power.
1
Ignition control hole
21 | EN
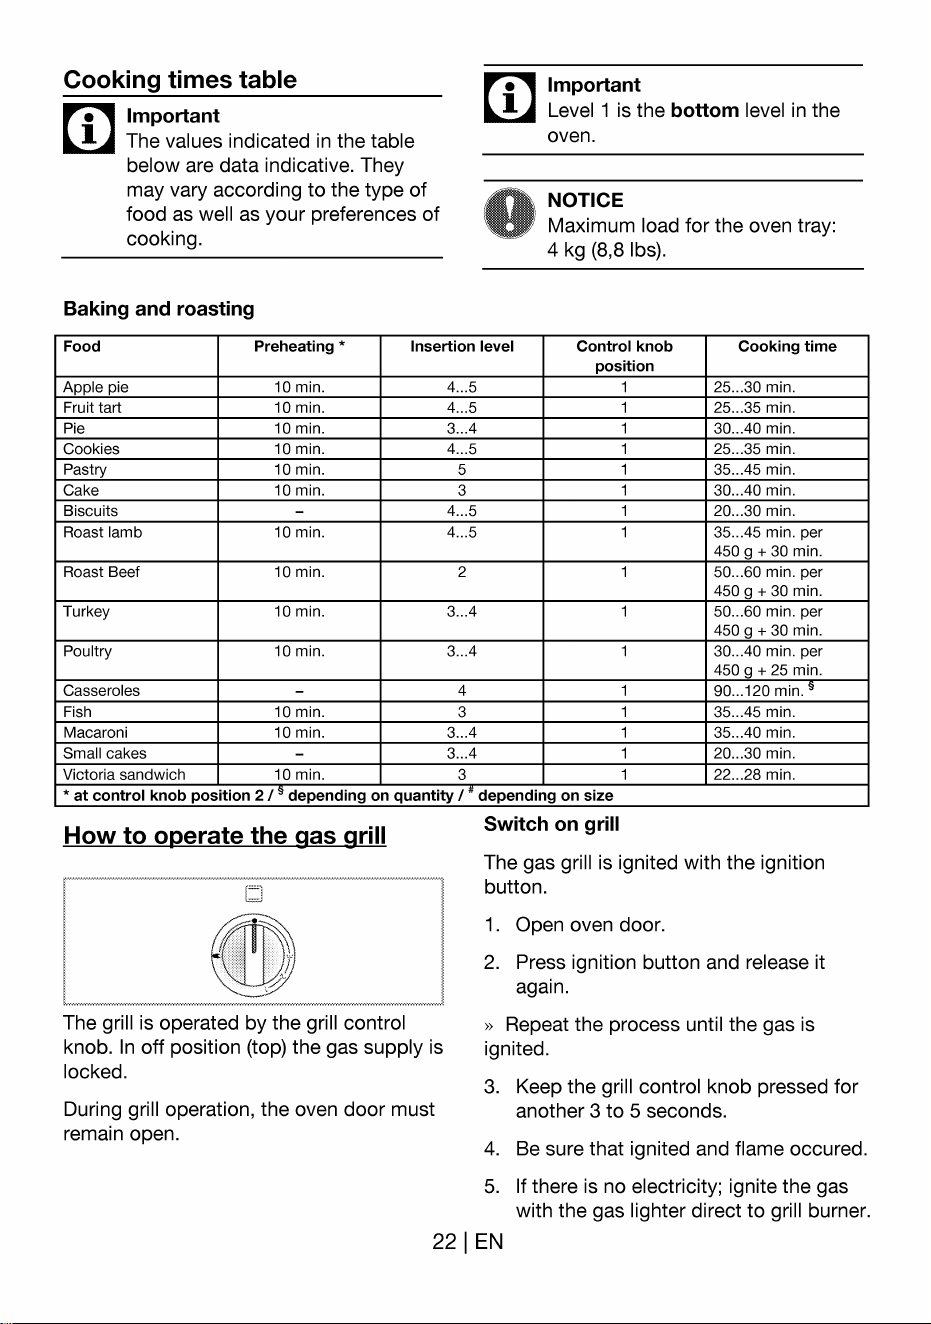
Cooking times table
Important
i
The values indicated in the table
below are data indicative. They
may vary according to the type of
food as well as your preferences of
cooking.
Baking and roasting
i
Important
Level I is the bottom level in the
oven.
NOTICE
Maximum load for the oven tray:
4 kg (8,8 lbs).
Food
Apple pie
Fruit tart
Pie
Cookies
Pastry
Biscuits
Roast lamb
Roast Beef
Turkey
Poultry
Casseroles
Fish
Macaroni
Small cakes
Victoria sandwich
Preheating *
10 min.
10 min.
10 min.
10 min.
10 min.
10 min.
10 min.
10 min.
10 min.
10 min.
10 min.
10 min.
10 min.
Insertion level
5
3
2
3...4
3
3
Control knob
position
Cooking time
25...30 min.
25...35 min.
30...40 min.
25...35 min.
35...45 min.
30...40 min.
20...30 min.
35...45 min. per
450 g + 30 min.
50...60 min. per
450 +30 min.
50...60 min. per
450 g + 30 min.
30...40 min. per
450 +25 min.
90...120 min.
35...45 min.
35...40 min.
20...30 min.
22...28 min.
* at control knob position 2 / depending on quantity / depending on size
How to operate the gas grill
The grill is operated by the grill control
knob. In off position (top) the gas supply is
locked.
During grill operation, the oven door must
remain open.
Switch on grill
The gas grill is ignited with the ignition
button.
1. Open oven door.
2. Press ignition button and release it
again.
Repeat the process until the gas is
ignited.
3.
4.
5.
Keep the grill control knob pressed for
another 3 to 5 seconds.
Be sure that ignited and flame occured.
If there is no electricity; ignite the gas
with the gas lighter direct to grill burner.
22 | EN
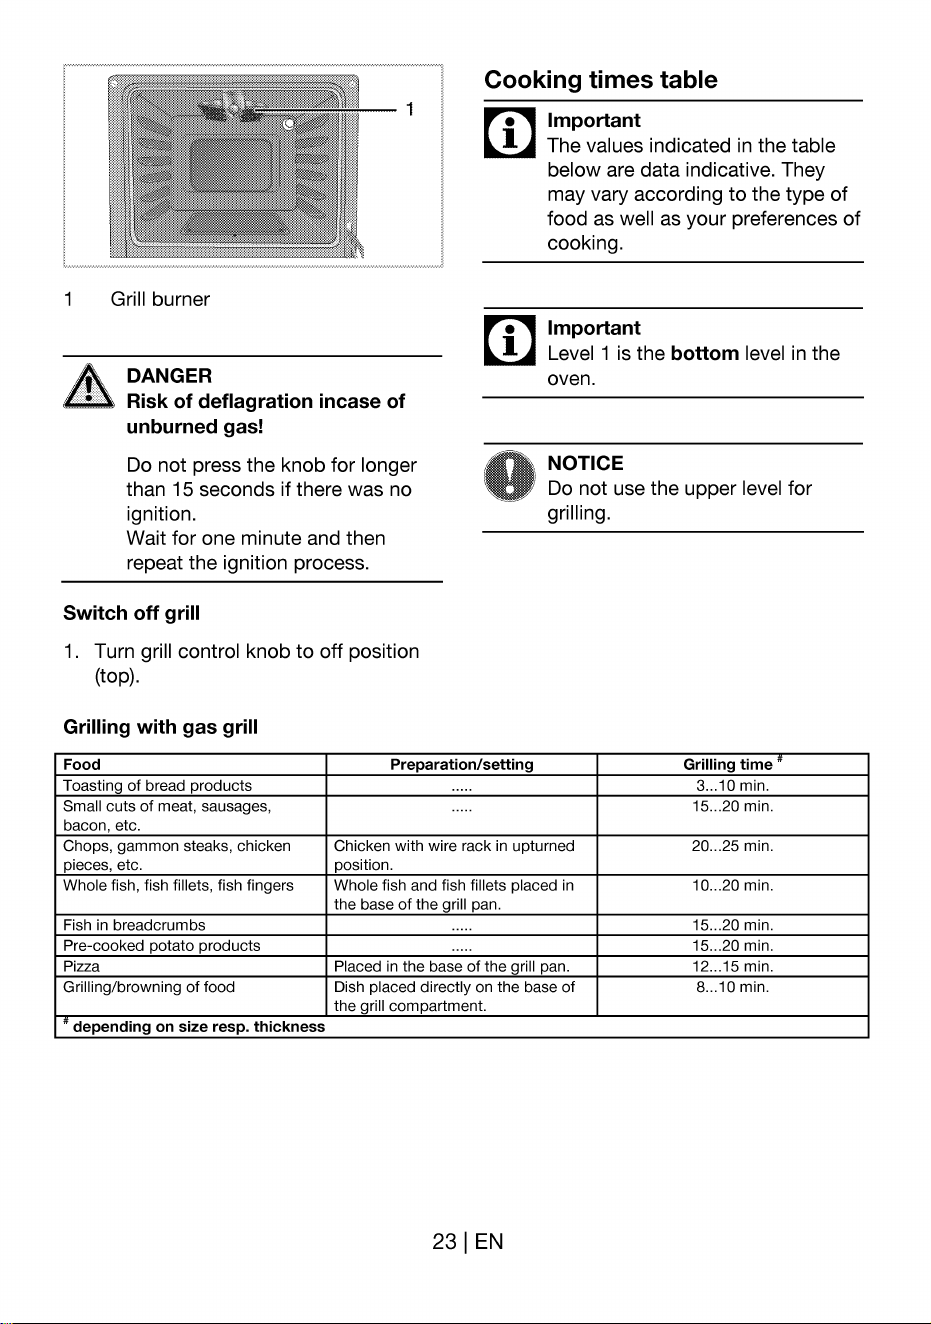
Cooking times table
1
I Grill burner
DANGER
i
i
L.,ÅX Risk of deflagration incase of
unburned gas!
Do not press the knob for longer
than 15 seconds if there was no
ignition.
Wait for one minute and then
repeat the ignition process.
Switch off grill
1. Turn grill control knob to off position
Important
The values indicated in the table
below are data indicative. They
may vary according to the type of
food as well as your preferences of
cooking.
Important
Level I is the bottom level in the
oven.
NOTICE
Do not use the upper level for
grilling.
Grilling time
(top).
Grilling with gas grill
Food
Toasting of bread products
Small cuts of meat, sausages,
bacon, etc.
Chops, gammon steaks, chicken
pieces, etc.
Whole fish, fish fillets, fish fingers
Fish in breadcrumbs
Pre-cooked potato products
Pizza
Grilling/browning of food
Preparation/setting
Chicken with wire rack in upturned
position.
Whole fish and fish fillets placed in
the base of the rill pan.
Placed in the base of the grill pan.
Dish placed directly on the base of
the rill compartment.
3...10 min.
15...20 min.
20...25 min.
10...20 min.
15...20 min.
15...20 min.
12...15 min.
8...10 min.
depending on size resp. thickness
23 | EN
Maintenance and Care
General information
DANGER
Risk of electric shock!
Switch off the electricity before
cleaning appliance to avoid an
electric shock.
DANGER
Hot surfaces may cause burns!
Allow the appliance to cool down
before you clean it.
NOTICE
The surface might get damaged by
some detergents or cleaning
materials.
Do not use aggressive detergents,
cleaning powder/cream or any
sharp objects.
Clean the appliance thoroughly after each
use; in this way it will be possible to
remove cooking residues more easily, thus
avoiding these from burning the next time
the appliance is used.
No special cleaning agents are required for
cleaning the appliance. It is recommended
to use warm water with washing liquid, a
soft cloth or sponge and use a dry cloth for
drying.
Do not use any abrasive cleaning
materials!
Important
i
Do not use steam cleaners for
cleaning.
How to clean the hob
Gas hobs
1.
2.
3.
4.
Remove pan supports and burner caps
and clean them.
Clean the hob.
Refit burner caps and check that they
are securely positioned.
While placing pan supports, take care
that burners centered to pan supports.
Cleaning the control panel
NOTICE
Damage of the control panel!
Do not remove the control knobs
for control panel cleaning.
Clean control panel and control knobs.
Cleaning the oven
No oven cleaner or any other special
cleaning agent is required for cleaning the
oven. It is recommended to wipe the oven
with a damp cloth while it is still warm.
Clean oven door
Don't use any harsh abrasive cleaners or
sharp metal scrapers for cleaning the oven
door. They could scratch the surface and
destroy the glass.
24 | EN
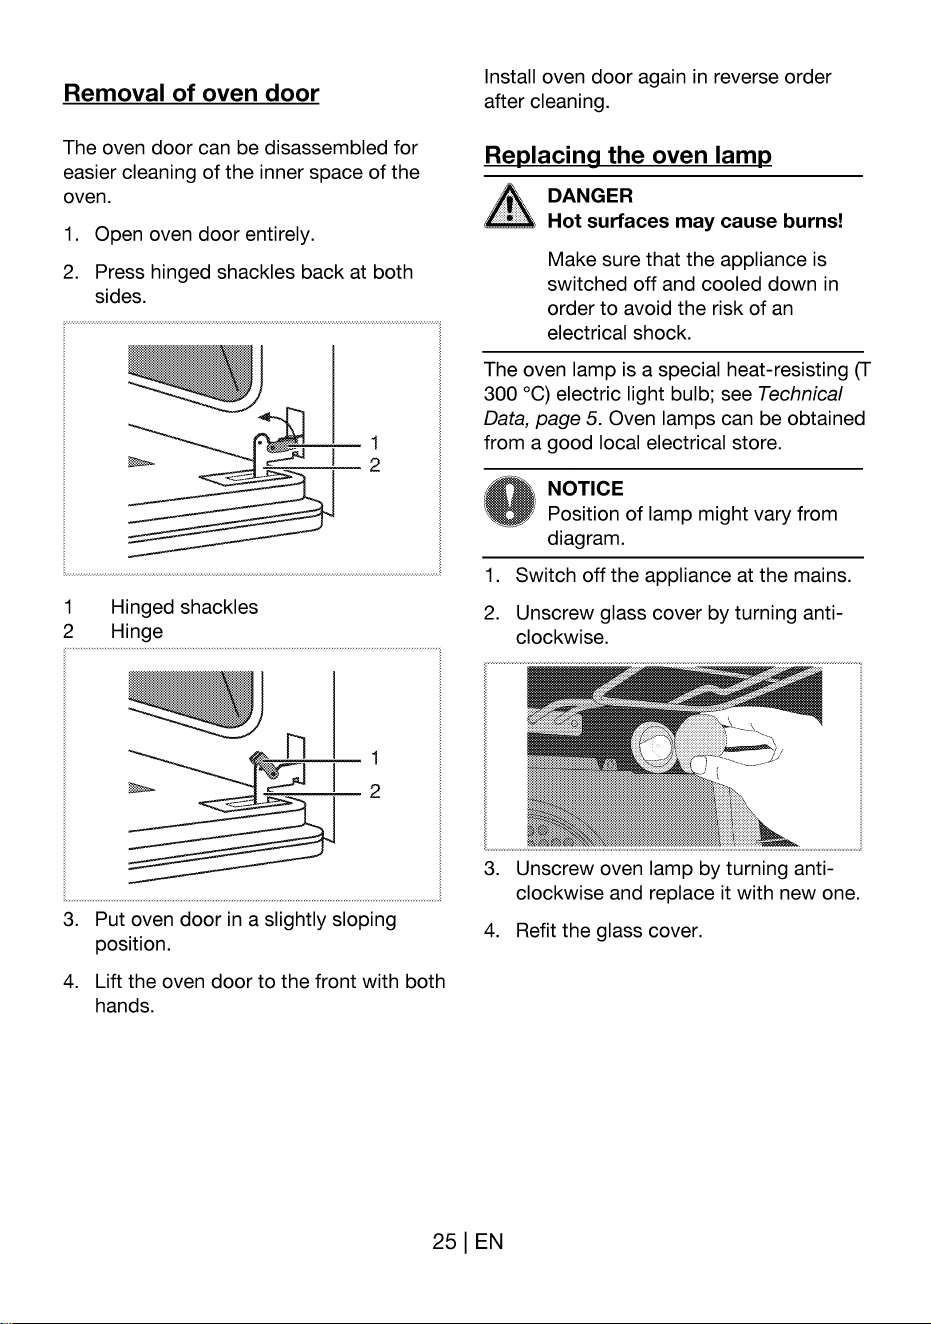
Removal of oven door
The oven door can be disassembled for
easier cleaning of the inner space of the
oven.
I.
2.
1
2
3.
4.
Open oven door entirely.
Press hinged shackles back at both
sides.
Install oven door again in reverse order
after cleaning.
Replacing the oven lamp
DANGER
Hot surfaces may cause burns!
Make sure that the appliance is
switched off and cooled down in
order to avoid the risk of an
electrical shock.
The oven lamp is a special heat-resisting (T
300 oc) electric light bulb; see Technical
Data, page 5. Oven lamps can be obtained
from a good local electrical store.
Hinged shackles
Hinge
1
2
1
2
1.
2.
3.
4.
NOTICE
Position of lamp might vary from
diagram.
Switch off the appliance at the mains.
Unscrew glass cover by turning anti-
clockwise.
Unscrew oven lamp by turning anti-
clockwise and replace it with new one.
Refit the glass cover.
Put oven door in a slightly sloping
position.
Lift the oven door to the front with both
hands.
25 | EN
Troubleshooting
DANGER
Risk of electric shock, short
circuit or fire by unprofessional
repairs!
Repairs on the appliance must be
carried out by an approved service
centre.
DANGER
Risk of explosion or poisoning
by unprofessional repair.
Repairs on the appliance must be
carried out by an approved service
Normal operating conditions
•
Smoke and smell may emit for a
couple of hours during the first
operation.
It is normal that steam escapes during
operation.
When the metal parts are heated, they
may expand and cause noise.
Before you call the service, please
check the following points.
centre.
Electrical equipment
Malfunction/problem
The appliance does not
work.
Oven light does not work
Oven does not heat.
Possible cause
The mains fuse is defective
or has tripped.
Appliance's plug can not be
connected to the grounded
socket.
Oven lamp is defective.
No current.
Function knob
and/thermostat knob are
not set.
If the appliance has a timer,
the timer ma not be set.
No power.
26 | EN
Advice/remedy
Check fuses in the fuse box.
If necessary, replace or
reset them.
Check the plug connection.
Replace oven lamp.
Check fuses in the fuse box.
If necessary, replace or
reset them.
Set function knob and
thermostat knob.
Set the time.
Check mains supply and
fuse box.
Gas
Malfunction/problem
No ignition spark is
produced.
No gas is emitted.
Burners do not burn
smoothly or not at all.
Possible cause
No electric supply to the
appliance.
Main gas tap is closed.
Safety tube is bent.
Burners are dirty.
Burners are not dry.
Burner cap is not securely
positioned.
Gas tap is closed.
Gas container is empty (in
case of LPG connection).
Advice/remedy
Check fuses in the fuse box.
Open gas tap.
Install safety tube without
bends.
Clean burner parts.
Dry burner parts.
Position burner correctly.
Open gas tap.
Replace gas container.
If the problem has not been solved:
1. Separate unit from the mains supply
(deactivate or unscrew fuse).
2. Call the after-sales service of your store
i
Important
Do not attempt to repair the
appliance yourself. There are
no customer service items
inside the appliance.
27 | EN
Citi!i aceste instruc!iuni inainte de instalarea sau utilizarea apa-
ratului!
Stimate Client,
Ati ales un produs avansat tehnologic, de calitate superioarä.
Acest aparat a fost produs in intreprinderi moderne, cu
respectarea standardelor de mediu.
Instructiunile Vä vor ajuta sä utilizati rapid tn sigurantä echipamen-
tul.
•
•
La livrare, verificati dacä aparatul nu este deteriorat. Dacä ob-
servati deterioräri datorate transportului, contactati imediat ma-
gazinul de la care I-ati achizitionat nu puneti aparatul in functi-
une!
tnaintedea conecta utilizaaparatul,cititi acestmanual
toate documentele incluse. Acordati o atentie deosebitä in-
structiunilor privind siguranla.
Pästrati toate documentele pentru a Ie putea consulta ulterior.
Pästrati chitanta pentru a putea beneficia de garantie.
Cånd transferati aparatul unei alte persoane, includeti toate
documentele.
Cuprins
Informatii Generale ..
Prezentare generalä
Date tehnice
Tabelul injectoarelor.................................5
18
.. ..21
.......23
........8
..... ..... 10
. . .....24
. ........11
.............12
.......25
Intruc!iuni Privind Siguranta 6
Descrierea simbolurilor privind siguranta .6
Instructiuni esentiale privind siguranta .....6
Siguranta copiilor .
Siguranta la lucrul cu gazul .
Siguranta la lucrul cu electricitatea ..........8
Utilizare vizatä .
.8
Depozitare la d"euri................................8
Materialul de ambalare —
Echipamente vechi...................................9
Transportul ulterior ...................................9
Instalare........................... .. 10
fnainte de instalare .......................
Instalarea conectarea
Adaptarea la tipul de gaz folosit
a Pregätiri............................... 16
Sfaturi pentru economisirea energiei...... 16
Punerea in 16
Curä!area initialä a aparatului.......
. .......16
tncälzireainitialä.....................................16
Utilizarea Plitei 18
Informatii generale despre prepararea
alimentelor ... ... ... .... .... ... 18
Utilizarea plitelor....
Utilizarea Cuptorului ........... 20
Informatii generale referitoare la coacere,
fripturi preparare la grill ..... ..........
Utilizarea cuptorului cu gaz .....
Tabelul duratelor de preparare...
..22
Utilizarea grill-ului cu gaz
.....22
Tabelul duratelor de preparare.... .
intre!inere Curä!are
24
Informatii generale..................................24
Curä!area plitei.......................................24
Curätarea panoului de control................24
Curätarea cuptorului.
Demontarea I-I*ii cuptorului ....................25
inlocuirea lämpii cuptorului
Remedierea Problemelor.... 26
Informatii Generale
Prezentare generalä
1
2
3
7
6
5
1
2
3
4
1
2
3
4
8
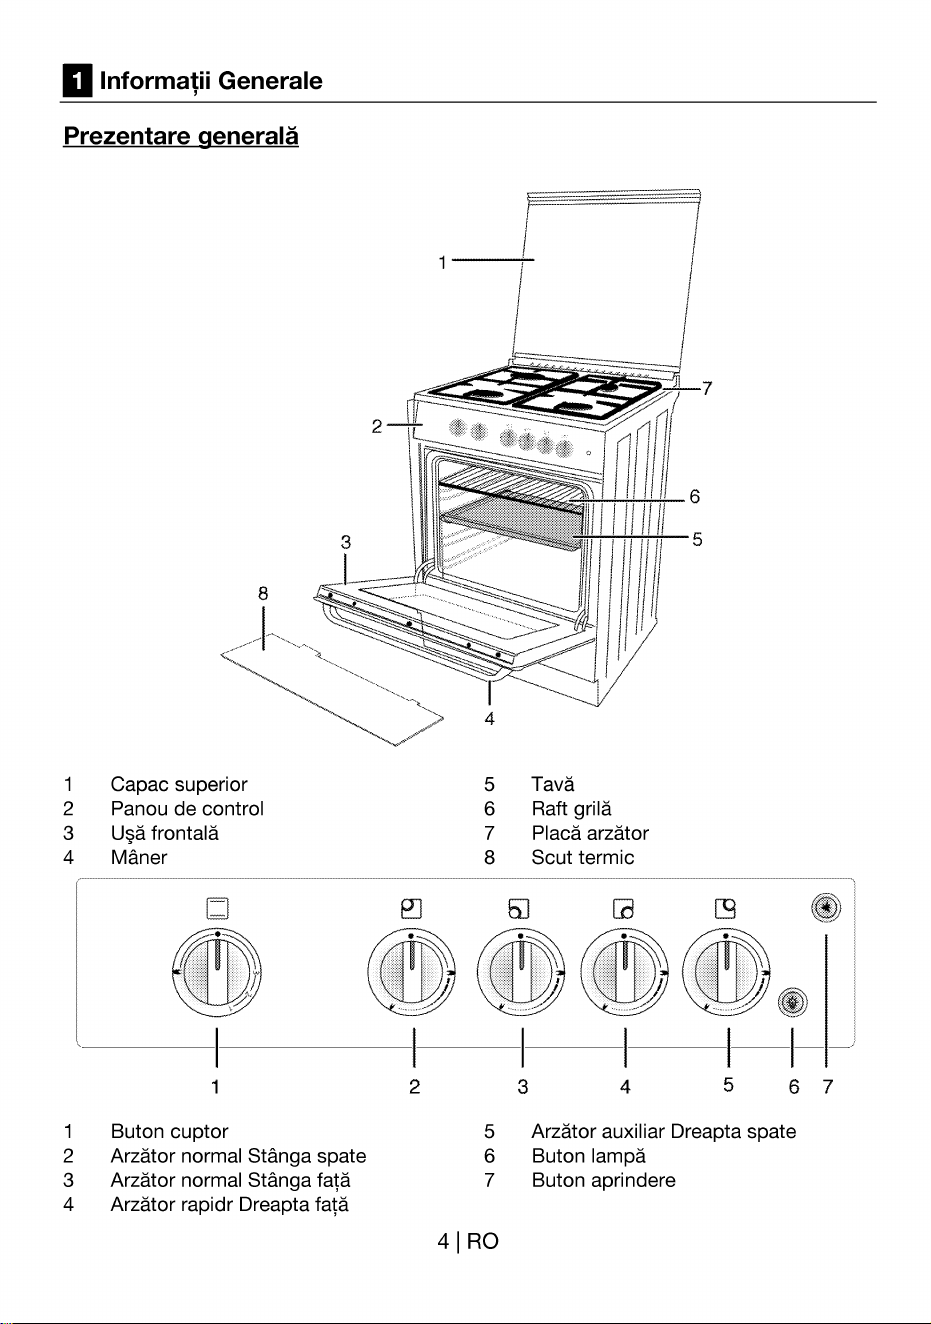
Capac superior
Panou de control
I-J#äfrontalä
Mäner
1
Buton cuptor
Arzätor normal Stänga spate
Arzätor normal Stånga fatä
Arzätor rapidr Dreapta fatä
2
4
5
6
7
8
5
6
7
4 | RO
3
Tavä
Raft grilä
Placä arzätor
Scut termic
4
5
Arzätor auxiliar Dreapta spate
Buton lampä
Buton aprindere
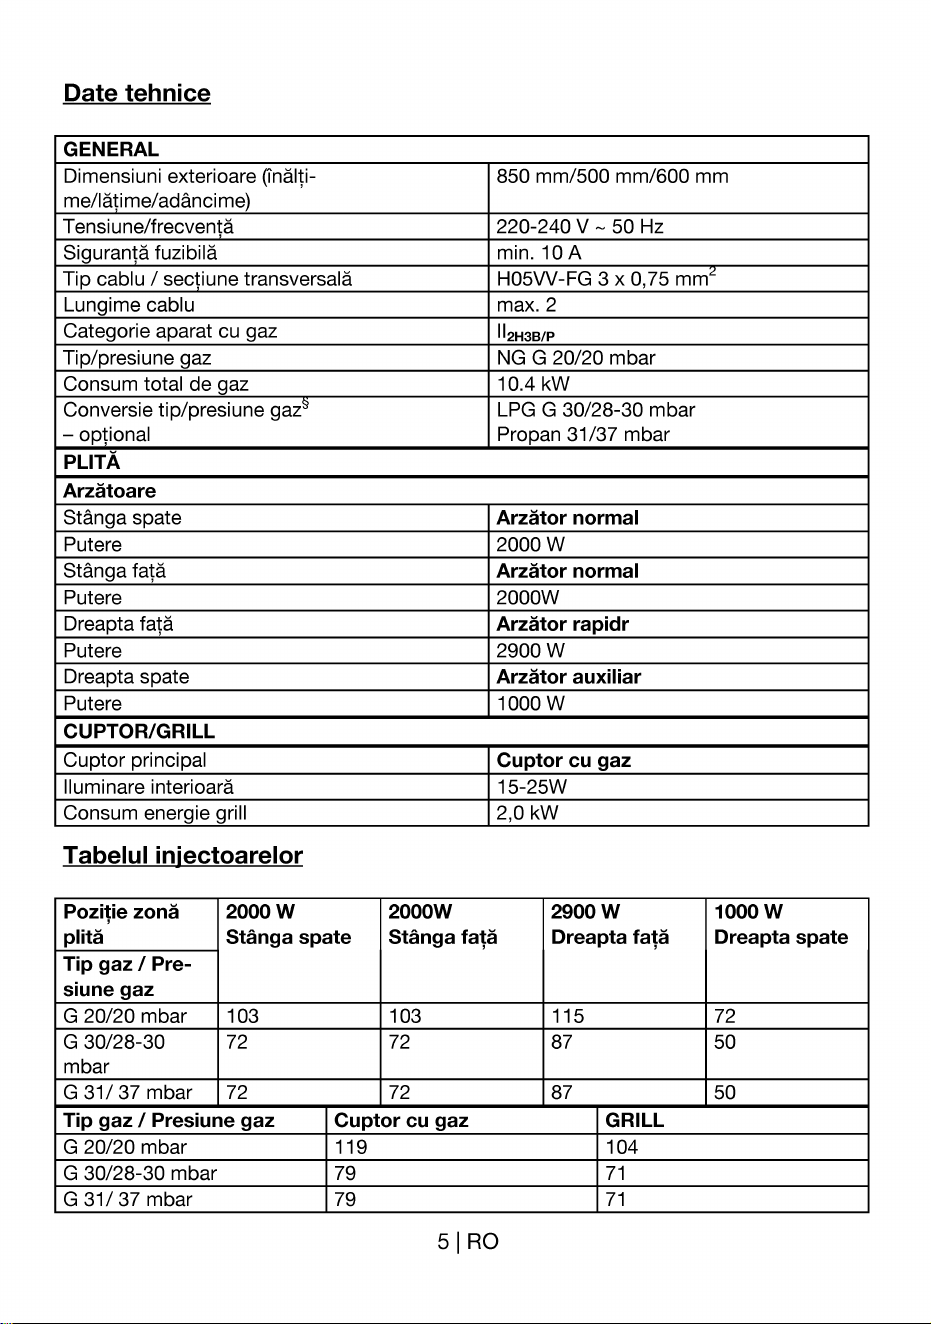
Date tehnice
GENERAL
Dimensiuni exterioare (inälti-
me/lätime/adäncime
Tensiune/frecventä
Sigurantä fuzibilä
Tip cablu / sec iune transversalä
Lun ime cablu
Categorie aparat cu gaz
Tip/presiune gaz
Consum total de az
Conversie tip/presiune gaz
—optional
PLITÄ
Arzätoare
Stånga spate
Putere
Stånga fa ä
Dreapta fatä
Putere
Dreapta spate
Put ere
CUPTOR/GRILL
Cuptor principal
Iluminare interioarä
Consum energie grill
Tabelul iniectoarelor
850 mm/500 mm/600 mm
220-240 V 50 Hz
min. IOA
H05VV-FG 3 x 0,75 mm
max. 2
2H3B/P
NG G 20/20 mbar
10.4 kW
LPG G 30/28-30 mbar
Propan 31/37 mbar
Arzätor normal
2000 w
Arzätor normal
2000W
Arzätor rapidr
2900 w
Arzätor auxiliar
1000 w
Cuptor cu gaz
15-25W
2,OkW
Pozi!ie zonä
plitä
Tip gaz / Pre-
siune gaz
G 20/20 mbar
G 30/28-30
mbar
G 31/ 37 mbar
2000 w
Stånga spate
103
72
72
2000W
Stånga fa!ä
103
72
72
2900 w
Dreapta fa!ä
115
87
GRILL
104
71
71
1000 w
Dreapta spate
72
50
50
Tip gaz / Presiune gaz
G 20/20 mbar
G 30/28-30 mbar
G 31/ 37 mbar
Cuptor cu gaz
119
79
79
Intruc!iuni Privind Siguran!a
Descrierea simbolurilor privind
siguranta
in acest manual sunt folosite urmätoarele
tipuri de instructiuni informatii privind
siguranta. Acestea pot fi diferentiate prin
intermediul simbolului expresiei de Ia
tnceput.
PERICOL
Pericol mare de vätämäri corpo-
rale.
Nerespectarea poate provoca
vätämäri grave sau moartea.
A ATENTIE
Pericol de vätämäri corporale.
Nerespectarea poate provoca
vätämäri minore sau medii.
OBSERVATIE
Pericol de pagube materiale.
Nerespectarea poate provoca
deteriorarea aparatului sau a altor
obiecte.
Important
Sfat pentru utilizator.
Informatii utile referitoare la utiliza-
rea aparatului. Nu contine infor-
matii referitoare Ia vätämäri corpo-
rale.
Instructiuni esen!iale privind si-
guran!a
• Producätorul Gi rezervä dreptul de a
modifica färä preaviz specificatiile teh-
nice in scopul tmbunätä!irii calitä!ii
produsului. Ilustratiile din acest manual
ar doar rol descriptiv, fiind posibil sä
nu fie identice cu produsul dvs. Valori-
•
•
•
•
le declarate Tn inscriptiile de pe aparat
sau Tn alte documente tipärite sunt
obtinute Tnlaborator, conform stan-
dardelor in vigoare. Acest valori pot sä
varieze tn functie de utilizarea produ-
sului de conditiile ambientale.
Acest aparat nu este destinat utilizärii
de cätre persoane (inclusiv copii) cu
deficiente fizice, senzoriale sau mintale,
sau care nu au experienta cuno#-
tintele necesare, cu exceptia cazului in
care sunt supravegheate sau instruite
cu privire la utilizarea aparatului de
cätre o persoanä responsabilä de si-
guranta acestora.
Supravegheati copiii pentru a nu se ju-
ca cu aparatul.
Nu folositi aparatul dacä este defect
sau are deterioräri vizibile.
Nu efectuati reparatii sau modificäri ale
aparatului. Puteti totu#i remedia anu-
mite defectiuni; vezi Remedierea
Problemelor, pagina 26.
Aveti grijä cänd preparati retete care
includ bäuturi alcoolice. Alcoolul se
evaporä la temperaturi mari poate
provoca incendii deoarece se va
aprinde in contact cu suprafetele fier-
binti.
Nu tncälziti conserve cu måncare sau
borcane inchise in cuptor. Presiunea
acumulatä poate provoca explozia
acestora.
Nu läsati obiecte inflamabile Iångä
aparat, deoarece pärtile laterale ale
acestuia se tncälzesc in timpul utilizärii.
Nu läsati vase goale pe arzätoarele
pornite. Acestea se pot deteriora.
Nu läsati recipiente din plastic sau
aluminiu pe suprafata aparatului, de-
oarece aceasta poate fi fierbinte. De
•
•
•
•
•
asemenea, nu pästrati alimente Tn
acest tip de recipiente.
fnchideticapaculnumaidupäce plita
s-a räcit suficient.
Pentru a evita scurgerea lichidelor
värsate tn spatele sau Tn interiorul cup-
torului, #tergeti suprafata capacului
inainte de a-I ridica.
Nu amplasati tävi de gätit, recipiente
sau folie din aluminiu direct pe partea
inferioarä a cuptorului. Cäldura acu-
mulatä poate deteriora partea inferio-
arä a cuptorului.
Produsul se poate infierbänta Tntimpul
utilizärii. Nu atingeti arzätoarele fier-
binti, interiorul cuptorului, elementele
de tncälzire etc. Tineti copiii la distantä!
Folosi!i mänu$ termoizolatoare cand
introduceti sau scoateti alimente in/din
cuptor.
Suprafata din spatele cuptorului se
tnfierbåntä tn timpul utilizärii. Conexiu-
nile la gaz / electricitate nu trebuie sä
atingä suprafata din spate, Tncaz
contrar pot fi deteriorate. Nu striviti
cablurile de conectare intre fierbin-
te a cuptorului cadru. Nu trasati
cablurile de conectare peste zona de
gätit. in caz contrar, izolatiacablurilor
se poate topi, putänd provoca scurt-
circuite incendii.
Verificati dacä toate butoanele apara-
tului sunt tnchise dupä utilizare.
nu läsati copiii sä se apropie pånä
cand aparatul se räce$e.
Nu depozitati pe aparat obiecte pe
care copiii ar fi tentati sä le ia.
Ambalajele pot fi periculoase pentru
copii. Nu läsati copiii sä se apropie de
ambalaje. Depozitati Ia depuri toate
ambalajele conform standardelor de
mediu.
Nu amplasati obiecte grele pe Ll#a
deschisä nu permite copiilor sä se
a#eze pe aceasta. Existä pericolul de
rästurnare sau de deteriorare a bala-
malelor.
Siguran!a Ia lucrul cu gazul
Important
i
Pentru ca garantia produsului sä
fie valabilä, acesta trebuie instalat
de o persoanä calificatä, conform
reglementärilor tn vigoare.
Siguran!a copiilor
• Piesele accesibile ale aparatului se
infierbäntä in timpul utilizärii acestuia;
•
Lucrärile la echipamentele retelele
de gaz pot fi efectuate numai de per-
soane calificate autorizate.
fnaintede instalare,asigurati-väcä
aparatul este reglat pentru parametrii
retelei locale de gaz (tipul presiunea
gazului).
Aparatul trebuie instalat conectat
conform reglementärilor in vigoare. Se
va acorda o atentie deosebitä regle-
mentärilor in vigoare privind ventilatia;
vezi inaintede instalare,pagina 10
Utilizarea unei ma$ni de gätit cu gaz
produce cäldurä umiditate. Asigurati
o bunä ventilare a bucätäriei: mentineti
cäile de ventilare naturalä deschise,
sau instalati un dispozitiv de ventilare
mecanicä (hotä).
Echipamentele retelele de gaz trebu-
ie verificate periodic pentru a asigura
functionarea corectä a acestora. Asi-
gurati tntretinerea anualä.
Curä!ati regulat arzätoarele. Flacära
trebuie sä fie albasträ uniformä.
•
Aparatele cu gaz necesitä o combustie
corectä. in cazul unei combustii in-
complete, este posibil sä se genereze
monoxid de carbon (CO). Monoxidul
de carbon este un gaz incolor, inodor
foarte toxic, ce poate produce mo-
artea chiar in doze foarte mici.
Solicitati de Ia compania distribuitoare
de gaze informatii cu privire la numere-
le de urgentä mäsurile de sigurantä
ce trebuie luate la detectarea mirosului
de gaz.
Mäsuri de luat la detectarea mirosului
de gaz
PERICOL
Pericol de explozie 9i intoxica!ie!
1.
2.
3.
4.
5.
6.
Nu folositi fläcäri deschise nu
fumati.
Nu actionali intrerupätoare electri-
ce (de ex. intrerupätoare pentru
becuri, soneria).
Nu folositi telefoane fixe sau mobi-
Inchideti toate robineteleaparatelorcu
gaz gazometrelor.
Deschideti u*ile ferestrele.
Verificati strångerea tuturor tuburilor
conexiunilor. Dacä simtiti in continuare
miros de gaz, päräsiti locuinta.
Avertizati vecinii.
Chemati pompierii. Folositi un telefon
din afara locuintei.
Nu reveniti Tncasä decät dupä ce vi se
confirmä cä nu existä pericole.
Siguran!a la lucrul cu electricita-
tea
Lucrärile la echipamentele retelele
electrice pot fi efectuate numai de per-
soane calificate autorizate.
In cazulunor defectiuni,opriti aparatul
deconectati-l de la reteaua electricä.
Tnacestscop,scoatetisiguranta.
Asigurati-vä cä amperajul sigurantei
corespunde amperajului ma$nii de
gätit.
Utilizare vizatä
Aparatul este destinat exclusiv uzului cas-
nic. Se interzice utilizarea comercialä.
Acest produs nu trebuie folosit pentru
Tncälzirea tncäperilor.
Producätorul nu este responsabil pentru
pagubele provocate de utilizarea incorectä
sau manipularea incorectä.
Aparatul poate fi folosit pentru dezghe!area,
coacerea, präjirea prepararea Ia grill a
alimentelor.
Depozitare la depuri
Materialul de ambalare
PERICOL
Pericol de sufocare datoritä
ambalajelor!
Nu läsati copiii sä se apropie de
ambalaje.
Ambalajul materialele de fixare la trans-
port sunt fabricate din materiale care nu
afecteazä mediul inconjurätor. Depozitati la
d+euri toate ambalajele conform standar-
delor de mediu. Astfel, veti proteja mediul
inconjurätor.
Echipamente vechi
Acest produs este inscriptionat cu simbolul
de colectare selectivä a depurilor electro-
nice (WEEE). Acesta indicä faptul cä pro-
dusul trebuie depozitat la d+euri conform
Directivei europene 2002/96/EC pentru a fi
reciclat sau dezasamblat, Tn scopul mini-
mizärii impactului asupra mediului. Pentru
informatii suplimentare, contactati auto-
ritätile locale sau regionale.
Produsele electronice care nu sunt colecta-
te selectiv pot fi periculoase pentru mediu
sänätate datoritä prezentei substantelor
toxice.
Transportul ulterior
OBSERVATIE
Nu apzati alte articole pe aparat.
Aparatul trebuie transportat tn
pozitie verticalä.
Pästrati cutia originalä a aparatului
transportati-l in aceasta. Respectati in-
structiunile indicate pe cutie.
Important
Verificati aspectul aparatul pentru a
identifica eventualele deterioräri
survenite tn timpul transportului.
Asigurati capacele arzätoarelor suportu-
rile pentru recipiente cu bandä adezivä.
Pentru a preveni deteriorarea Ll#ii cuptoru-
lui de cätre grilajul tava din interior, ap-
zati o bandä de carton in interiorul u*ii
cuptorului, in dreptul tävilor. Lipiti cu bandä
adezivä up cuptorului de peretii laterali.
Dacä nu mai ave!i cutia originalä
impachetatiaparatulin ambalajde plastic
cu bule de aer sau tn carton gros fixati-l
bine cu bandä adezivä pentru a preveni
deteriorarea acestuia pe durata transportu-
lui.
Instalare
inainte de instalare
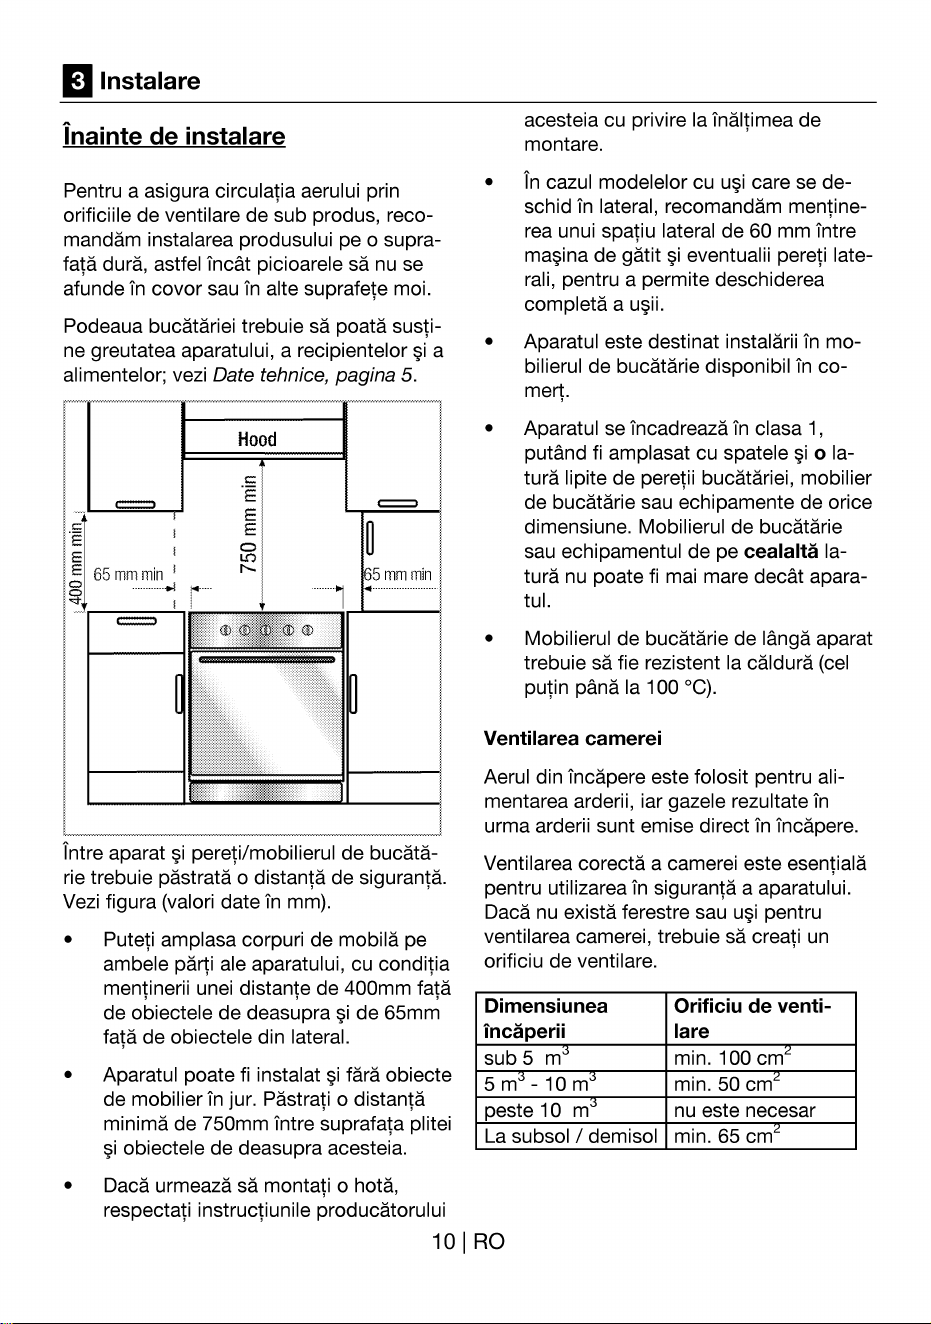
Pentru a asigura circulatia aerului prin
orificiile de ventilare de sub produs, reco-
mandäm instalarea produsului pe o supra-
fatä durä, astfel incåt picioarele sä nu se
afunde tn covor sau tn alte suprafete moi.
Podeaua bucätäriei trebuie sä poatä susli-
ne greutatea aparatului, a recipientelor a
alimentelor; vezi Date tehnice, pagina 5.
Hood
E 65 mmmin
5 nn min
intre aparat pereti/mobilierulde bucätä-
rie trebuie pästratä o distan!ä de sigurantä.
Vezi figura (valori date in mm).
acesteia cu privire la tnältimea de
montare.
Tncazul modelelor cu care se de-
schid in lateral, recomandäm mentine-
rea unui spatiu lateral de 60 mm intre
ma$na de gätit eventualii pereti late-
rali, pentru a permite deschiderea
completä a u$i.
Aparatul este destinat instalärii in mo-
bilierul de bucätärie disponibil in co-
mert.
Aparatul se incadreazä in clasa 1,
putänd fi amplasat cu spatele o la-
turä lipite de peretii bucätäriei, mobilier
de bucätärie sau echipamente de orice
dimensiune. Mobilierul de bucätärie
sau echipamentul de pe cealaltä la-
turä nu poate fi mai mare decät apara-
tul.
Mobilierul de bucätärie de längä aparat
trebuie sä fie rezistent la cäldurä (cel
pulin pänä Ia 100 oc).
Ventilarea camerei
Aerul din incäpere este folosit pentru ali-
mentarea arderii, iar gazele rezultate in
urma arderii sunt emise direct in tncäpere.
Ventilarea corectä a camerei este esentialä
pentru utilizarea in sigurantä a aparatului.
Dacä nu existä ferestre sau pentru
ventilarea camerei, trebuie sä creati un
•
•
•
Puteti amplasa corpuri de mobilä pe
ambele pärti ale aparatului, cu conditia
mentinerii unei distante de 400mm fatä
de obiectele de deasupra de 65mm
fatä de obiectele din lateral.
Aparatul poate fi instalat färä obiecte
de mobilier Tnjur. Pästrati o distantä
minimä de 750mm intre suprafata plitei
obiectele de deasupra acesteia.
Dacä urmeazä sä montati o hotä,
respectati instructiunile producätorului
orificiu de ventilare.
Dimensiunea
incäperii
sub 5 m
5m -10m
peste 10 m
La subsol / demisol
Orificiu de venti-
lare
min. 100 cm
min. 50 cm
nu este necesar
min. 65 cm
10 | RO
Instalarea $i conectarea
Important
i
Nu instalati aparatul Iångä frigidere
OBSERVATIE
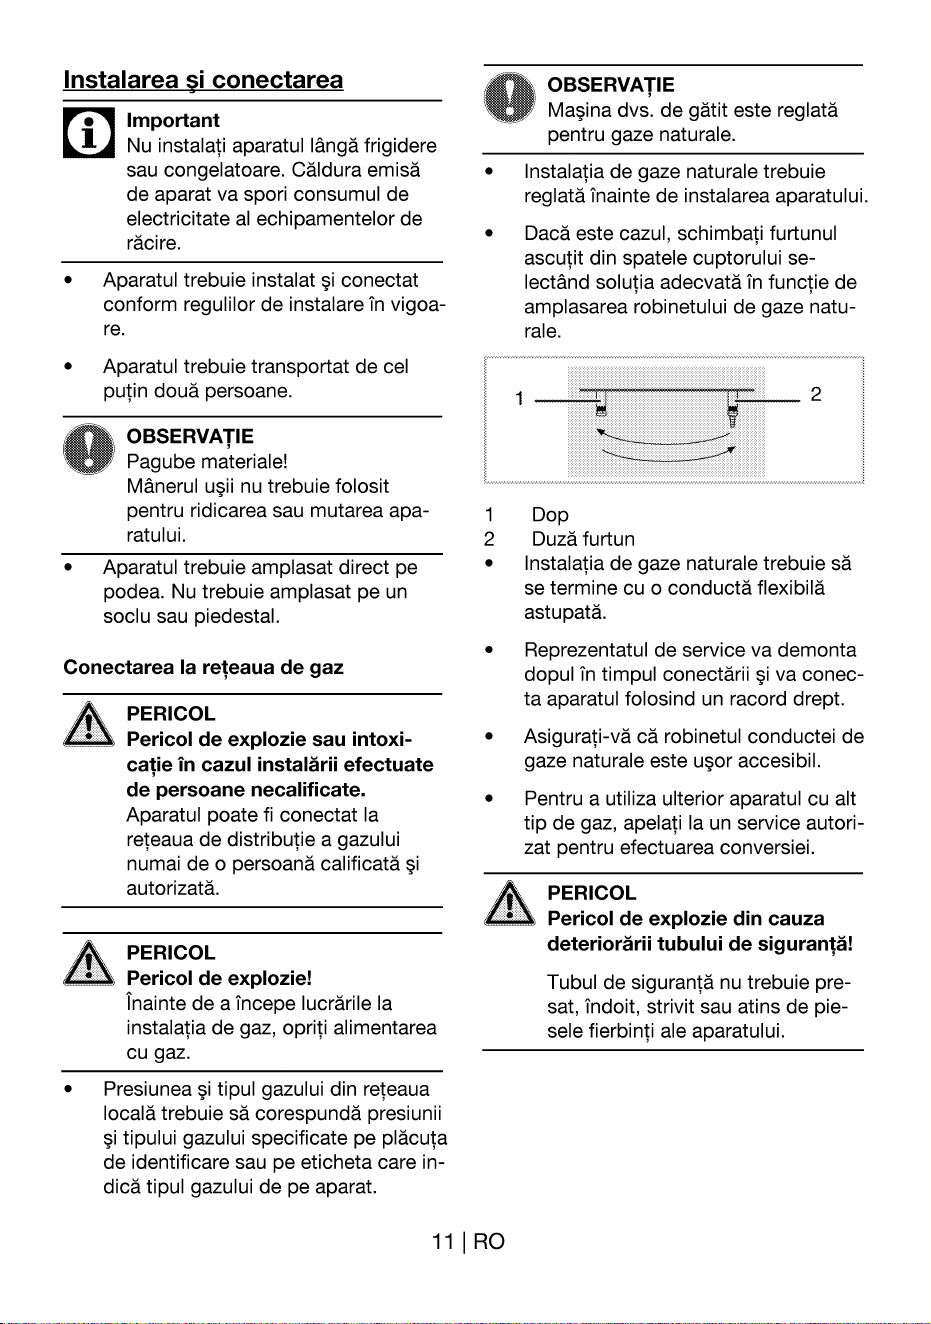
Ma$na dvs. de gätit este reglatä
pentru gaze naturale.
Instalatia de gaze naturale trebuie
reglatä inainte de instalarea aparatului.
Dacä este cazul, schimbati furtunul
ascutit din spatele cuptorului se-
lectånd solutia adecvatä in functie de
amplasarea robinetului de gaze natu-
rale.
•
•
sau congelatoare. Cäldura emisä
de aparat va spori consumul de
electricitate al echipamentelor de
räcire.
Aparatul trebuie instalat conectat
conform regulilor de instalare Tnvigoa-
re.
Aparatul trebuie transportat de cel
putin douä persoane.
OBSERVATIE
Pagube materiale!
Mänerul u*ii nu trebuie folosit
pentru ridicarea sau mutarea apa-
ratului.
Aparatul trebuie amplasat direct pe
podea. Nu trebuie amplasat pe un
soclu sau piedestal.
1
Dop
Duzä furtun
2
1
2
•
•
Conectarea la releaua de gaz
PERICOL
Pericol de explozie sau intoxi-
calie tn cazul instalärii efectuate
de persoane necalificate.
Aparatul poate fi conectat la
reteaua de distributie a gazului
numai de o persoanä calificatä
autorizatä.
PERICOL
Pericol de explozie!
Instalatia de gaze naturale trebuie sä
se termine cu o conductä flexibilä
astupatä.
Reprezentatul de service va demonta
dopul tn timpul conectärii va conec-
ta aparatul folosind un racord drept.
Asigurati-vä cä robinetul conductei de
gaze naturale este upr accesibil.
Pentru a utiliza ulterior aparatul cu alt
tip de gaz, apelati la un service autori-
zat pentru efectuarea conversiei.
PERICOL
Pericol de explozie din cauza
deteriorärii tubului de siguran!ä!
Tubul de sigurantä nu trebuie pre-
sat, indoit, strivit sau atins de pie-
sele fierbinti ale aparatului.
•
tnaintede a incepe lucrärile Ia
instalatia de gaz, opriti alimentarea
cu gaz.
Presiunea tipul gazului din reteaua
localä trebuie sä corespundä presiunii
tipului gazului specificate pe pläcuta
de identificare sau pe eticheta care in-
dicä tipul gazului de pe aparat.
11 IRO
Conectarea la prizä
Important
Acest aparat trebuie
impämåntat!
Societatea noasträ nu va fi respon-
sabilä de deteriorärile provocate de
utilizarea aragazului färä
impämäntare.
A PERICOL
Pericol de electric, scurtcir-
cuit sau incendiu in cazul in-
stalärii de cätre persoane necali-
ficate!
Aparatul poate fi conectat la
reteaua electricä numai de o per-
soanä calificatä autorizatä; garantia
este valabilä numai in cazul instalä-
rii corecte.
PERICOL
Pericol de electric, scurtcir-
cuit sau incendiu in cazul deteri-
orärii cablului de alimentare!
Cablul nu trebuie presat, indoit,
strivit sau atins de piesele fierbinti
ale aparatului
in cazul tn care cablul de alimenta-
re este deteriorat, trebuie tnlocuit
de un electrician calificat.
Parametrii retelei electrice trebuie sä co-
respundä parametrilor specificati pe
pläcuta de identificare a aparatului. Pläcuta
de identificare poate fi väzutä dupä de-
schiderea capacului inferior sau este
amplasatä pe peretele posterior al aparatu-
lui, tn functie de tipul acestuia.
Cablul de alimentare a aparatului trebuie sä
corespundä specificatiilor; vezi tabelul cu
date tehnice Date tehnice, pagina 5.
i
Important
$techerul trebuie sä fie upr acce-
sibil dupä instalare (färä sä fie
amplasat deasupra plitei).
Conectati cablul de alimentare Ia prizä.
4 PERICOL
Pericol de electric!
•
tnainte de a efectua lucräri la insta-
latia electricä, deconecta!i produ-
sul de la prizä.
Impingeti aparatulspre peretele
bucätäriei.
Pentru a alinia aparatul cu blatul,
reglati piciorul rotindu-l spre dreapta
sau spre stänga, dupä caz.
Verificarea finalä
I.
2.
3.
4.
Verificati functionarea sistemului elect-
ric.
Deschideti alimentarea cu gaz.
Verificati fixarea strängerea corectä a
instalatiei de gaz.
Aprindeti arzätoarele verificati aspec-
tul fläcärii.
Important
Flacära trebuie sä fie albasträ
uniformä. Dacä flacära are tente
gälbui, verificati pozitia capacului
arzätorului sau curätati arzätorul.
Adaptarea la tipul de gaz folosit
PERICOL
• Pericol de explozie!
Tnaintede a incepe lucrärileIa
instalatia de gaz, opriti alimentarea
cu gaz.
Pentru a modifica tipul de gaz folosit,
schimbati toate injectoarele reglati toate
robinetele in pozitia de debit redus.
12 | RO
•
Apela!i Ia un service autorizat
pentru schimbarea tipului de gaz fo-
Iosit.
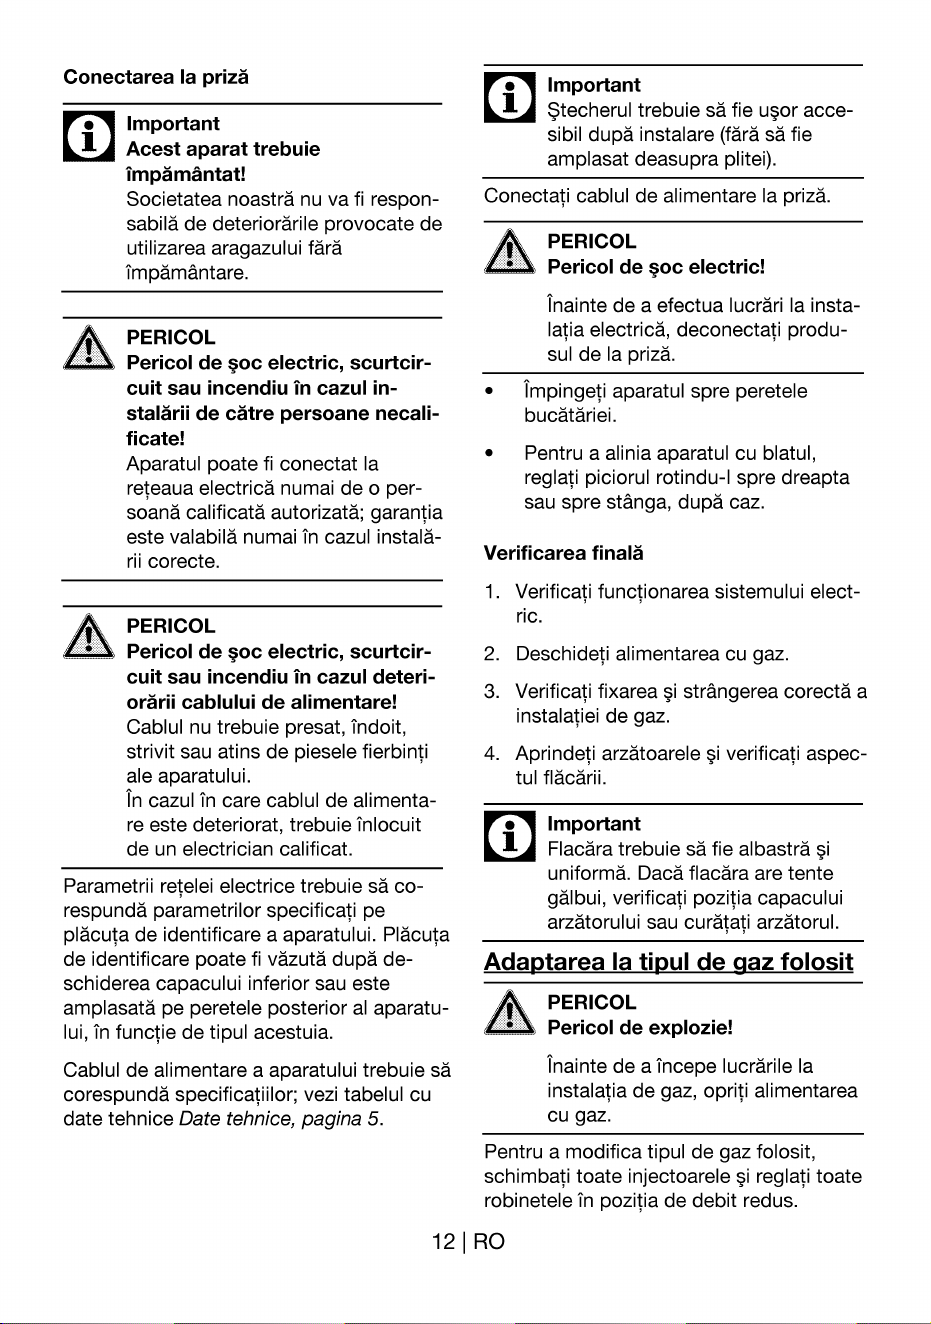
Schimbarea injectoarelor arzätoarelor
I.
2.
3.
4.
1
2
3
4
Scoateti capacul corpul arzätorului.
D+urubati injectoarele.
Montati injectoarele noi.
Verificati fixarea strångerea corectä a
tuturor conexiunilor.
OBSERVATIE
Pozitia injectoarelor noi este
marcatä pe ambalaj sau tn
tabel Tabelul injectoarelor,
pagina 5
1
2
3
4
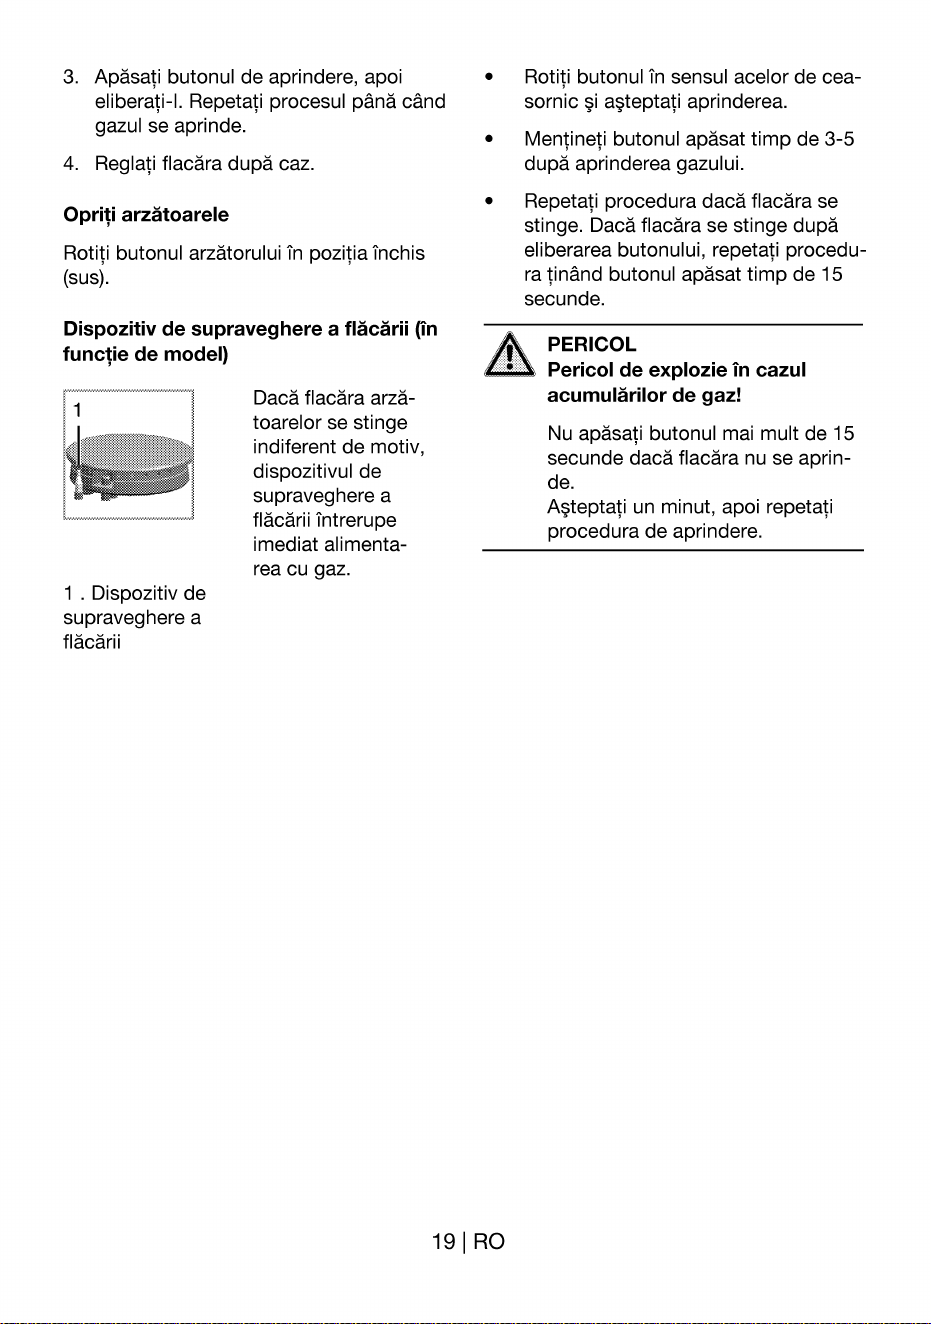
Dispozitiv de supraveghere a fläcärii
(tn functie de model)
Aprindere electricä
Injector
Arzätor
Important
Cu exceptia unor situatii speciale,
nu incercati sä demontati robinete-
le arzätoarelor. Schimbarea robine-
telor poate fi efectuatä numai de
personal de service autorizat.
3. Folosind o #urubelnitä, reglati injectorul
de pe robinetul de gaz in pozitia de de-
bit redus.
Pentru GPL (butan-propan) este suficient
sä strångeti *urubul.
Tncazulgazuluinatural,trebuie sä räsuciti
o singurä datä *urubul in sens contrar
acelor de ceasornic.
fnältimeanormaläa uneifläcäri dreptetn
pozitia flacärä micä trebuie sä fie de 6-7
mm.
4. Dacä flacära este mai tnaltä, rotiti *uru-
bul Tn sensul acelor de ceasornic. Dacä
este mai micä, rotiti Tnsens opus.
5. Ca verificare finalä, rotiti robinetul Tn
pozitia flacärä mare flacärä micä
verificati dacä flacära nu se stinge.
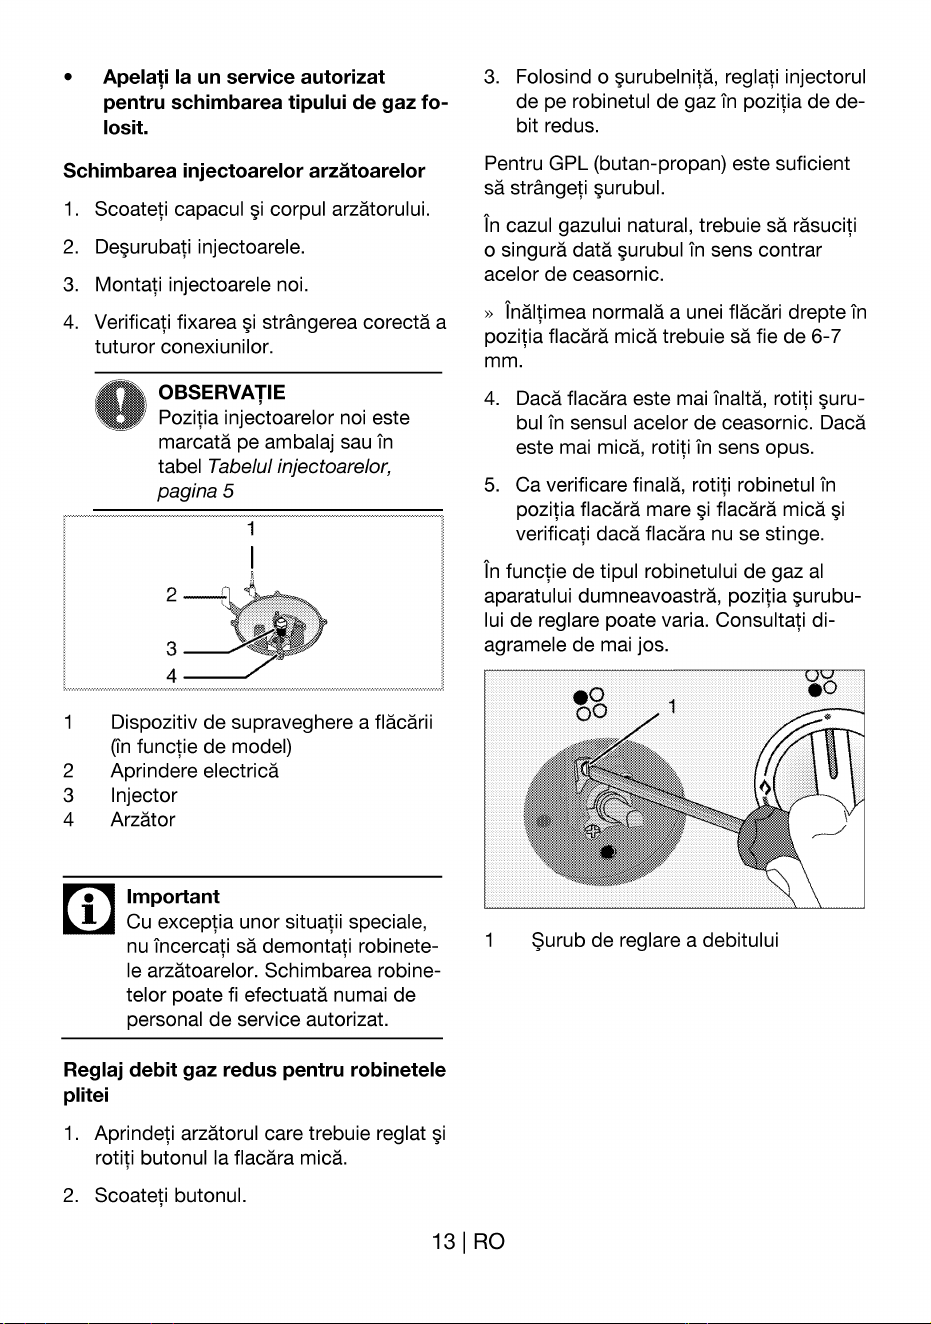
tn functie de tipul robinetuluide gazal
aparatului dumneavoasträ, pozitia *urubu-
lui de reglare poate varia. Consultati di-
agramele de mai jos.
•o
i
I
00
oo
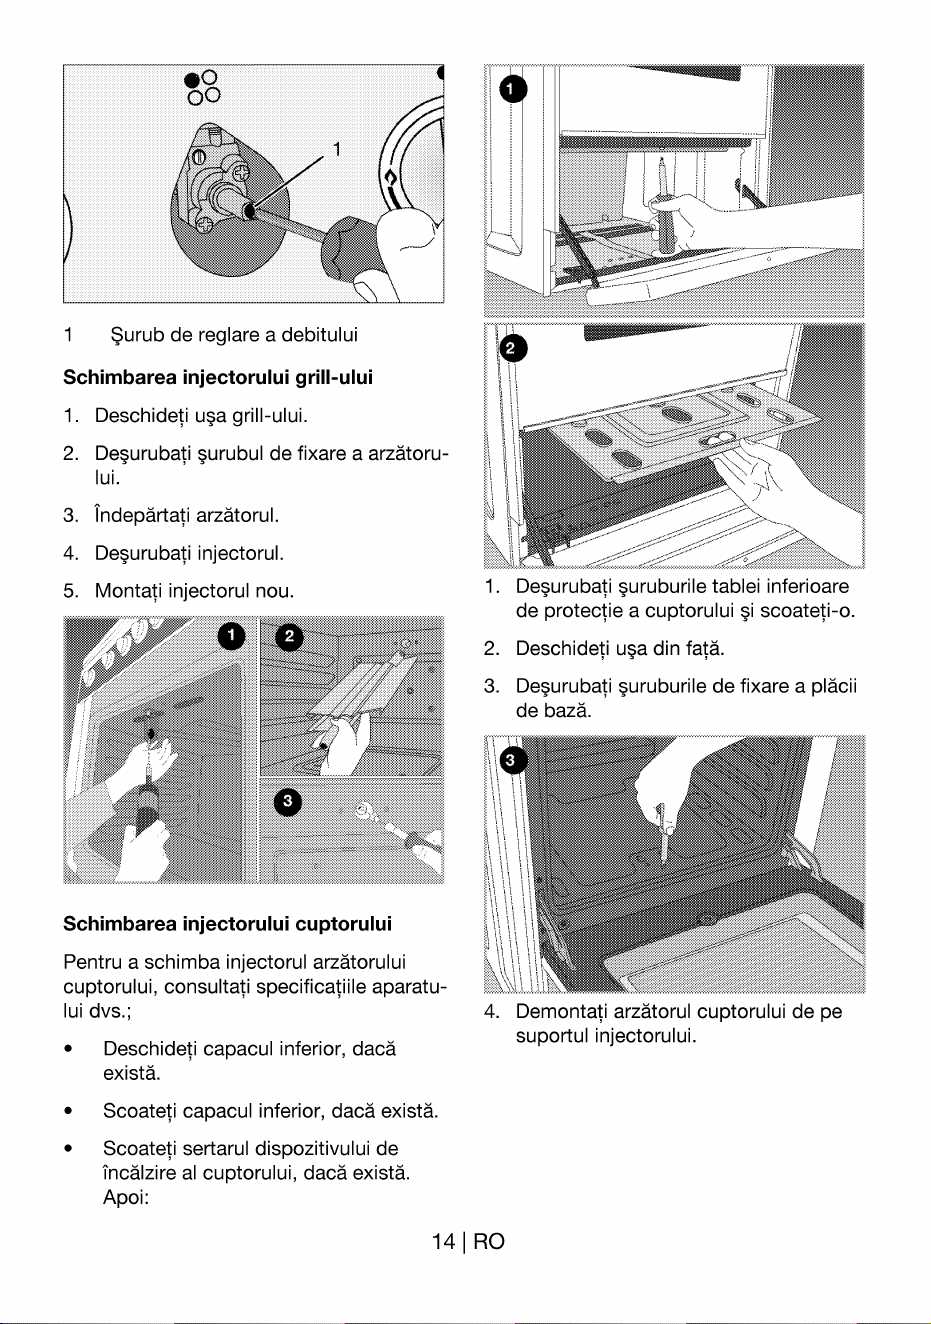
$urub de reglare a debitului
Reglaj debit gaz redus pentru robinetele
plitei
I.
2.
Aprindeti arzätorul care trebuie reglat
rotiti butonul la flacära micä.
Scoateti butonul.
13 | RO
•o
00
I $urub de reglare a debitului
Schimbarea injectorului grill-ului
1.
2.
3.
4.
5.
Deschide!i up grill-ului.
D+urubati *urubul de fixare a arzätoru-
lui.
indepärtatiarzätorul.
D#urubati injectorul.
Montati injectorul nou.
1.
2.
3.
D+urubati #uruburile tablei inferioare
de protectie a cuptorului scoateti-o.
Deschideti 1.19adin fatä.
D#urubati #uruburile de fixare a pläcii
de bazä.
Schimbarea injectorului cuptorului
Pentru a schimba injectorul arzätorului
cuptorului, consultati specificatiile aparatu-
lui dvs.;
4. Demontati arzätorul cuptorului de pe
suportul injectorului.
•
Deschideti capacul inferior, dacä
existä.
Scoateti capacul inferior, dacä existä.
Scoateti sertarul dispozitivului de
incälzire al cuptorului, dacä existä.
Apoi:
14 | RO

5.
Reglati #urubul 1 de pe robinetul cupto-
rului astfel incät flacära sä aibä o tnälti-
me de 2-3mm. Rotiti #urubul in sensul
acelor de ceasornic pentru a reduce
flacära, sau Tn sens contrar acelor de
ceasornic pentru a märi flacära.
• Important
Dacä temperatura cuptorului cre#-
te nejustificat, opriti cuptorul
apelati la un service autorizat
pentru a repara termostatul cupto-
5. D+urubati injectorul.
6. Montati injectorul nou.
Reglarea debitului redus pentru cuptorul
cu gaz
Verificarea periodicä a reglajului este ex-
trem de importantä pentru functionarea
corespunzätoare a cuptorului. Pentru sigu-
rantä maximä, instructiunile din acest ma-
nual trebuie urmate cu atentie.
rului.
Butan/ propan
Strängeti *urubul
pänä la capät
OBSERVATIE
1
Gaze naturale
Släbiti #urubul
cu o jumätate de
turä
1.
2.
3.
4.
Aprindeti arzätorul care trebuie reglat
rotiti butonul la flacära mare.
Inchidetiup cuptorului a*eptati 10-
15 minute mainte de a efectua reglajul.
Scoateti butonul.
Dupä 15 minute, rotiti butonul la flacära
micä.
15 | RO
Dacä ati schimbat tipul gazului,
trebuie sä schimbati 9i pläcuta de
identificare care indicä tipul gazului
folosit de aparat.
Pregätiri
Sfaturi pentru economisirea
energiei
Urmätoarele sfaturi Vä vor ajuta sä protejati
mediul inconjurätor sä economisiti ener-
gie:
Punerea in functiune
Curä!area initialä a aparatului
1.
2.
OBSERVATIE
Suprafata poate fi deterioratä de
unii detergenti sau materiale de
curätare.
Nu folositi obiecte ascutite, deter-
genti, prafuri sau substante de
curätare agresive.
indepärtati toate ambalajele.
$tergeti suprafetele aparatului cu o
cårpä umedä sau cu un burete umed,
apoi uscati-le cu o cårpä.
•
•
•
Folositi recipiente de culoare inchisä
emailate, deoarece transferul de
cäldurä va fi mai eficient.
La prepararea mäncärurilor, efectuati
preincälzirea dacä se specificä in ma-
nualul de utilizare sau in retetä.
Nu deschideti frecvent cuptorului
in timpul preparärii.
fncercatisäpreparatimaimulte
mäncäruri simultan tn cuptor (puteti
prepara simultan douä måncäruri dife-
rite amplasänd recipientele pe acela$
grilaj). Este recomandabil sä preparati
mäncärurile tn succesiune. Astfel, nu
va fi necesar sä preincälzi!i din nou
cuptorul.
Decongelati alimentele tnainte de a le
gäti.
Folosi!i recipient cu capace pentru
prepararea mäncärurilor. Dacä nu folo-
siti capace, consumul de curent poate
spori de pänä la patru ori.
Folositi arzätorul de dimensiune adec-
vatä bazei recipientului. Folositi reci-
piente adaptate Ia mäncarea preparatä.
Recipientele mai mari necesitä mai
multä energie.
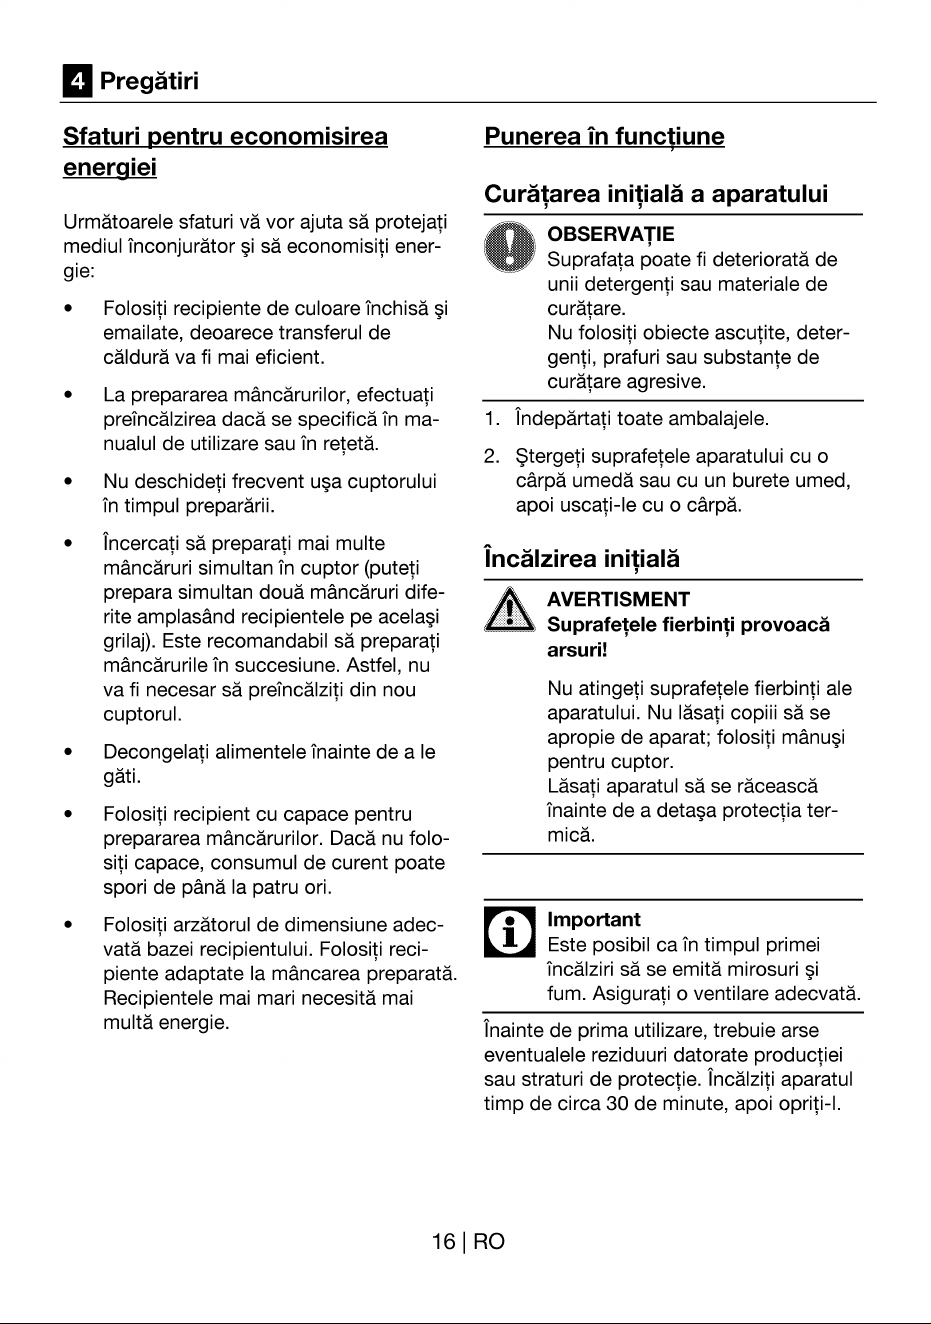
incälzirea initialä
i
AVERTISMENT
Suprafe!ele fierbin!i provoacä
arsuri!
Nu atingeti suprafetele fierbinti ale
aparatului. Nu läsati copiii sä se
apropie de aparat; folositi mänu#i
pentru cuptor.
Läsati aparatul sä se räceascä
Tnainte de a deta#a protectia ter-
micä.
Important
Este posibil ca tn timpul primei
incälziri sä se emitä mirosuri
fum. Asigurati o ventilare adecvatä.
tnainte de prima utilizare,trebuie arse
eventualele reziduuri datorate productiei
saustraturide protectie.incälzitiaparatul
timp de circa 30 de minute, apoi opriti-l.
16 | RO
Cuptor cu gaz
Cuptor grill
I.
2.
3.
4.
5.
Scoateti toate tävile grilajele din cup-
tor.
inchidetiup cuptorului.
Selectati flacära maximä in cuptor; vezi
Utilizarea cuptorului cu gaz, pagina 21.
incälziti timp de aproximativ30 de
minute.
Opriti cuptorul; vezi Utilizarea cuptorului
cu gaz, pagina 21
1.
2.
3.
4.
5.
Scoateti toate tävile grilajele din cup-
tor.
Inchideti I-19acuptorului.
Selectati flacära maximä a grill-ului; vezi
Utilizarea grill-ului cu gaz, pagina 22.
incälzititimpde aproximativ30de
minute.
Opriti grill-ul; vezi Utilizarea grill-ului cu
gaz, pagina 22
17 | RO
Utilizarea Plitei
Informatii generale despre pre-
pararea alimentelor
A PERICOL
Pericol de incendiu datoritä ulei-
ului supraincälzit!
Nu läsati uleiul nesupravegheat pe
plitä.
Nu incerca!i sä stinge!i incendiul
cu apä! Dacä uleiul s-a aprins,
acoperiti imediat oala sau tigaia cu
un capac. Opriti plita dacä este
posibil telefonati la pompieri.
Asigurati-vä cä mänerele tigäilor nu
pot fi lovite accidental nu se
tncälzesc datoritä zonelor fierbinti din
jur.
Prepararea la gaz
• Dimensiunea recipientului trebuie sä
corespundä dimensiunii fläcärii.
Regla!i flacära astfel Tncåt sä nu
dep$eascä partea inferioarä a reci-
pientului; amplasati recipientul central
deasupra arzätorului.
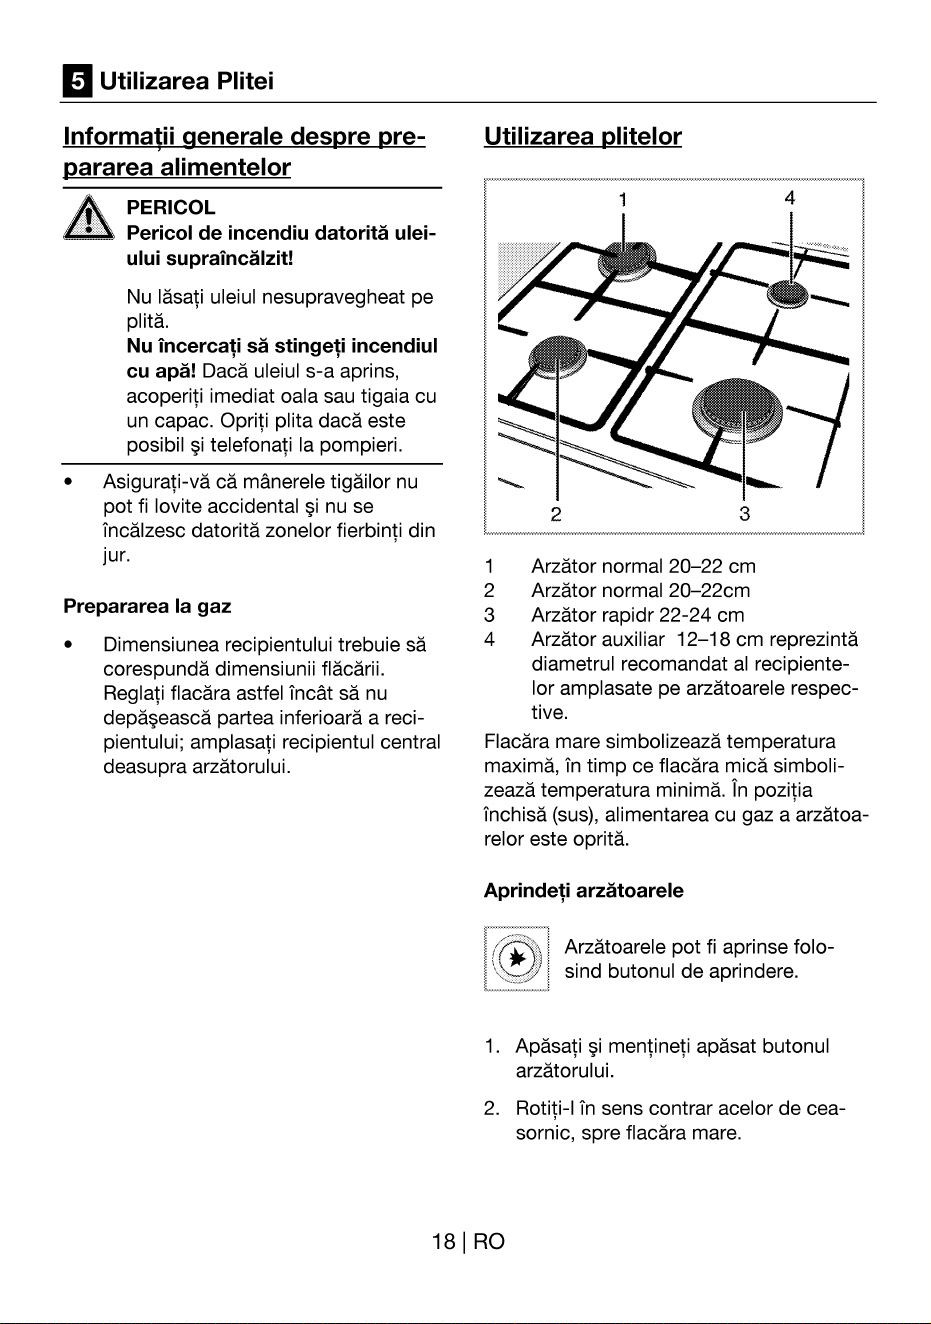
Utilizarea plitelor
1
2
4
3
1
2
3
4
Arzätor normal 20—22 cm
Arzätor normal 20—22cm
Arzätor rapidr 22-24 cm
Arzätor auxiliar 12—18cm reprezintä
diametrul recomandat al recipiente-
lor amplasate pe arzätoarele respec-
tive.
Flacära mare simbolizeazä temperatura
maximä, in timp ce flacära micä simboli-
zeazätemperaturaminimä.'(npozitia
tnchisä (sus), alimentarea cu gaz a arzätoa-
relor este opritä.
Aprinde!i arzätoarele
Arzätoarele pot fi aprinse folo-
sind butonul de aprindere.
I.
2.
18 | RO
Apäsati mentineti apäsat butonul
arzätorului.
Rotiti-l tn sens contrar acelor de cea-
sornic, spre flacära mare.
3.
4.
Apäsati butonul de aprindere, apoi
eliberati-l. Repetati procesul pänä cand
gazul se aprinde.
Reglati flacära dupä caz.
•
Opri!i arzätoarele
Rotiti butonul arzätorului in pozi!ia inchis
(sus).
Dispozitiv de supraveghere a fläcärii (in
func!ie de model)
1
I . Dispozitiv de
supraveghere a
fläcärii
Dacä flacära arzä-
toarelor se stinge
indiferent de motiv,
dispozitivul de
supraveghere a
fläcärii intrerupe
imediat alimenta-
rea cu gaz.
Rotiti butonul tn sensul acelor de cea-
sornic a$eptati aprinderea.
Mentineti butonul apäsat timp de 3-5
dupä aprinderea gazului.
Repetati procedura dacä flacära se
stinge. Dacä flacära se stinge dupä
eliberarea butonului, repetati procedu-
ra tinänd butonul apäsat timp de 15
secunde.
PERICOL
Pericol de explozie in cazul
acumulärilor de gaz!
Nu apäsati butonul mai mult de 15
secunde dacä flacära nu se aprin-
de.
A*teptati un minut, apoi repetati
procedura de aprindere.
19 | RO
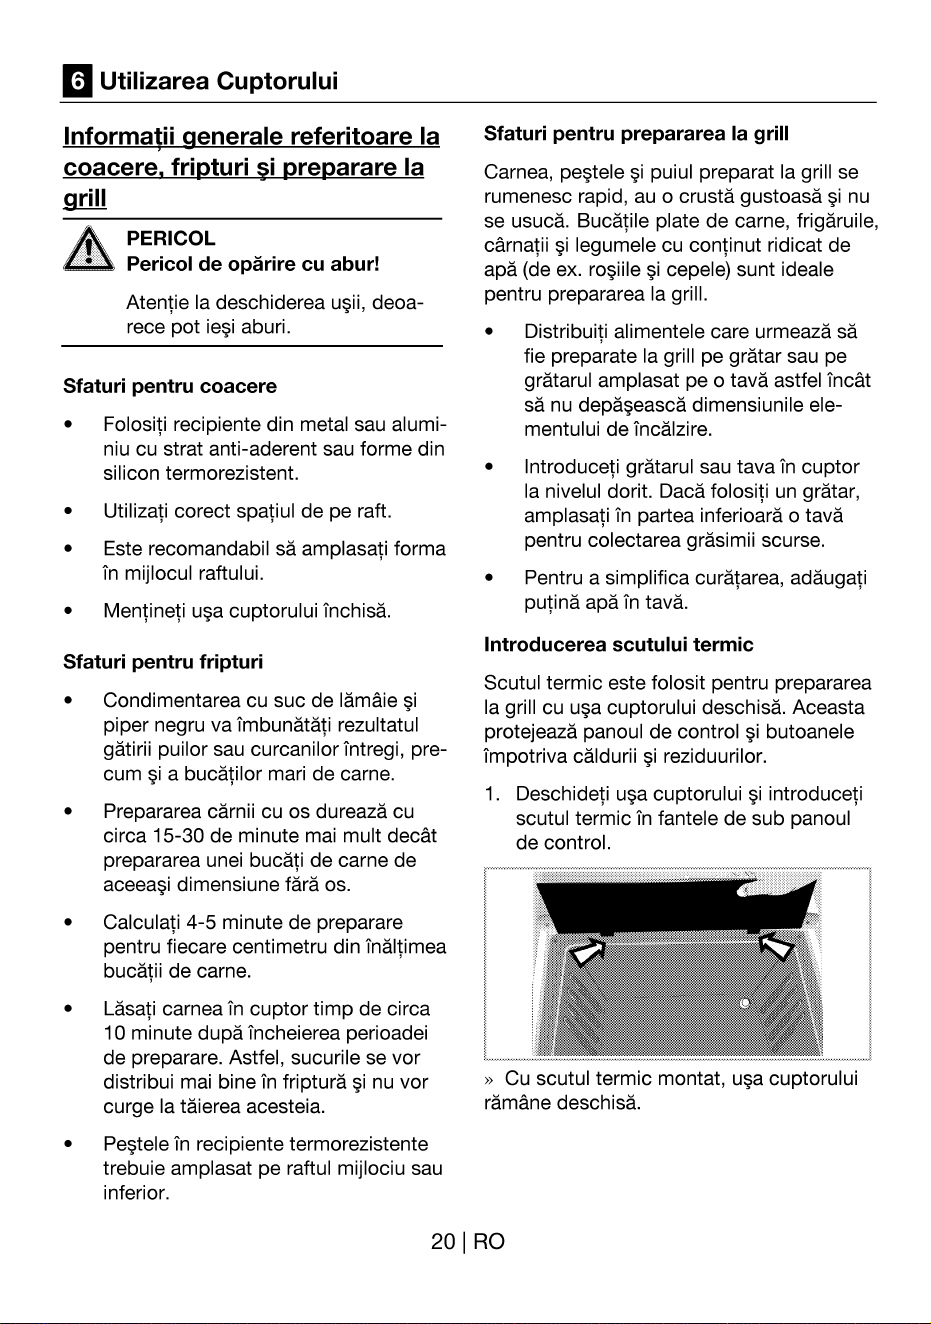
Utilizarea Cuptorului
Informatii generale referitoare Ia
coacere, fripturi preparare la
grill
PERICOL
Pericol de opärire cu abur!
Atentie Ia deschiderea u*ii, deoa-
rece pot ie#i aburi.
Sfaturi pentru coacere
•
Folositi recipiente din metal sau alumi-
niu cu strat anti-aderent sau forme din
silicon termorezistent.
Utilizati corect spatiul de pe raft.
Este recomandabil sä amplasati forma
Tnmijlocul raftului.
Mentineti up cuptorului inchisä.
Sfaturi pentru fripturi
•
•
•
•
Condimentarea cu suc de lämäie
piper negru va imbunätä!i rezultatul
gätirii puilor sau curcanilor intregi, pre-
cum a bucätilor mari de carne.
Prepararea cärnii cu os dureazä cu
circa 15-30 de minute mai mult decåt
prepararea unei bucäti de carne de
aceea$ dimensiune färä os.
Calculati 4-5 minute de preparare
pentru fiecare centimetru din tnältimea
bucä!ii de carne.
Läsati carnea in cuptor timp de circa
10 minute dupä tncheierea perioadei
de preparare. Astfel, sucurile se vor
distribui mai bine in fripturä nu vor
curge la täierea acesteia.
P+tele tn recipiente termorezistente
trebuie amplasat pe raftul mijlociu sau
inferior.
Sfaturi pentru prepararea la grill
Carnea, pe$ele puiul preparat la grill se
rumenesc rapid, au o crustä gustoasä nu
se usucä. Bucätile plate de carne, frigäruile,
cårnatii legumele cu continut ridicat de
apä (de ex. ro$ile cepele) sunt ideale
pentru prepararea Ia grill.
Distribuiti alimentele care urmeazä sä
fie preparate la grill pe grätar sau pe
grätarul amplasat pe o tavä astfel tncät
sä nu dep$eascä dimensiunile ele-
mentului de incälzire.
Introduceti grätarul sau tava tn cuptor
la nivelul dorit. Dacä folositi un grätar,
amplasati Tn partea inferioarä o tavä
pentru colectarea gräsimii scurse.
Pentru a simplifica curätarea, adäugati
putinä apä tn tavä.
Introducerea scutului termic
Scutul termic este folosit pentru prepararea
Ia grill cu up cuptorului deschisä. Aceasta
protejeazä panoul de control butoanele
tmpotriva cäldurii reziduurilor.
1. Deschideti cuptorului introduceti
scutul termic in fantele de sub panoul
de control.
» Cu scutul termic montat, cuptorului
rämåne deschisä.
20 | RO

Utilizarea cuptorului cu gaz
1
1 Buton cuptor
Cuptorul cu gaz poate fi utilizat prin inter-
mediul butonului acestuia.in pozitiatnchisä
(sus), alimentarea cu gaz este opritä.
Pornirea cuptorului cu gaz
Flacära cuptorului cu gaz se aprinde folo-
sind butonul de aprindere.
I. Deschideti up cuptorului.
2. apäsat butonul cuptorului
rotiti-l Tn sens contrar acelor de ceasor-
nic.
3. Apäsati butonul de aprindere, apoi
eliberati-l.
» Repetati procesul pänä cand gazul se
aprinde.
PERICOL
Pericol de explozie in cazul
acumulärilor de gaz!
Nu apäsati butonul mai mult de 15
secunde dacä flacära nu se aprin-
de.
A*teptati un minut, apoi repetati
procedura de aprindere.
Oprirea cuptorului cu gaz
I. Rotiti butonul cuptorului in pozitia
inchis (sus).
Semnificatia nivelurilor gazului:
Nivel gaz
1 2 3
Temperaturä 170 oc 280 oc 284 oc
4.
5.
6.
7.
1
Mentineti apäsat butonul cuptorului
pentru tncä 3 - 5 secunde.
Verificati dacä aprinderea functioneazä.
in cazul Tncare curentul electric este
intrerupt, aprindeti gazul cu bricheta din
orificiul de aprindere.
Reglati flacära dupä caz.
1
Orificiu aprindere
21 IRO
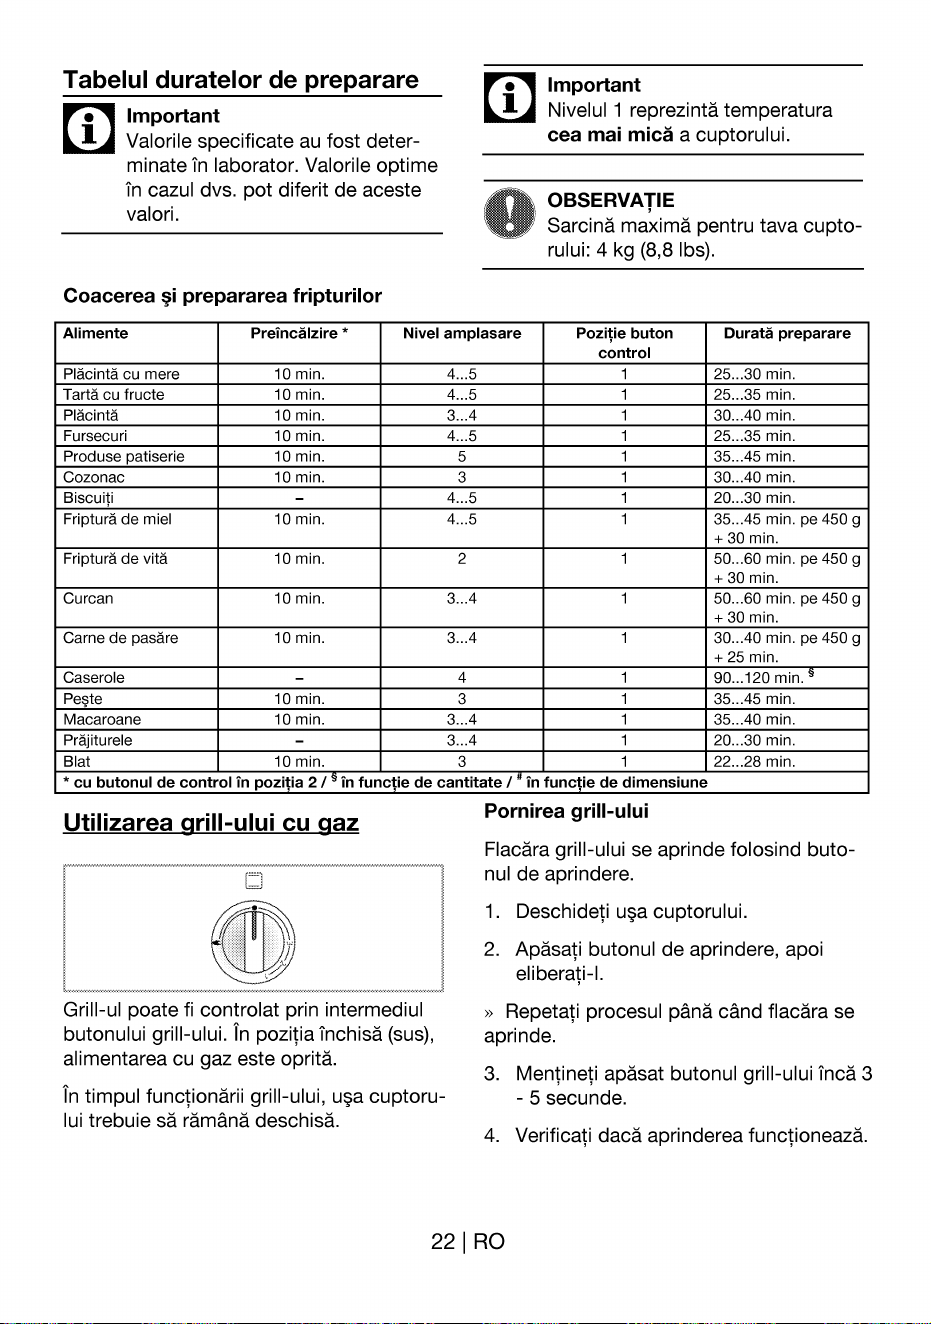
Tabelul duratelor de preparare
Important
i
Valorile specificate au fost deter-
minate in laborator. Valorile optime
in cazul dvs. pot diferit de aceste
valori.
Coacerea prepararea fripturilor
i
Important
Nivelul 1 reprezintä temperatura
cea mai micä a cuptorului.
OBSERVATIE
Sarcinä maximä pentru tava cupto-
rului: 4 kg (8,8 lbs).
Alimente
Pläcintä cu mere
Tartä cu fructe
Pläcintä
Fursecuri
Produse patiserie
Cozonac
Biscuiti
Fripturä de miel
Fripturä de vitä
Curcan
Carne de pasäre
Caserole
Peste
Macaroane
Präjiturele
Blat
Preincälzire *
10 min.
10 min.
10 min.
10 min.
10 min.
10 min.
10 min.
10 min.
10 min.
10 min.
10 min.
10 min.
10 min.
Nivel amplasare
5
3
2
3...4
4
3
3...4
3
Pozitie buton
control
Duratä preparare
25...30 min.
25...35 min.
30...40 min.
25...35 min.
35...45 min.
30...40 min.
20...30 min.
35...45 min. pe 450 g
+ 30 min.
50...60 min. pe 450 g
+ 30 min.
50...60 min. pe 450 g
+ 30 min.
30...40 min. pe 450 g
+ 25 min.
90...120 min.
35...45 min.
35...40 min.
20...30 min.
22...28 min.
* cu butonul de control in pozi ia 2 / in func
Utilizarea grill-ului cu gaz
•e de cantitate/ in fun •e de dimensiune
Pornirea grill-ului
Flacära grill-ului se aprinde folosind buto-
nul de aprindere.
1. Deschideti cuptorului.
2. Apäsati butonul de aprindere, apoi
eliberati-l.
Repetati procesul pånä cånd flacära se
aprinde.
Grill-ul poate fi controlat prin intermediul
butonului grill-ului.in pozitiainchisä (sus),
alimentarea cu gaz este opritä.
in timpul functionäriigrill-ului, up cuptoru-
lui trebuie sä rämånä deschisä.
3.
4.
Mentineti apäsat butonul grill-ului incä 3
- 5 secunde.
Verificati dacä aprinderea functioneazä.
22 | RO
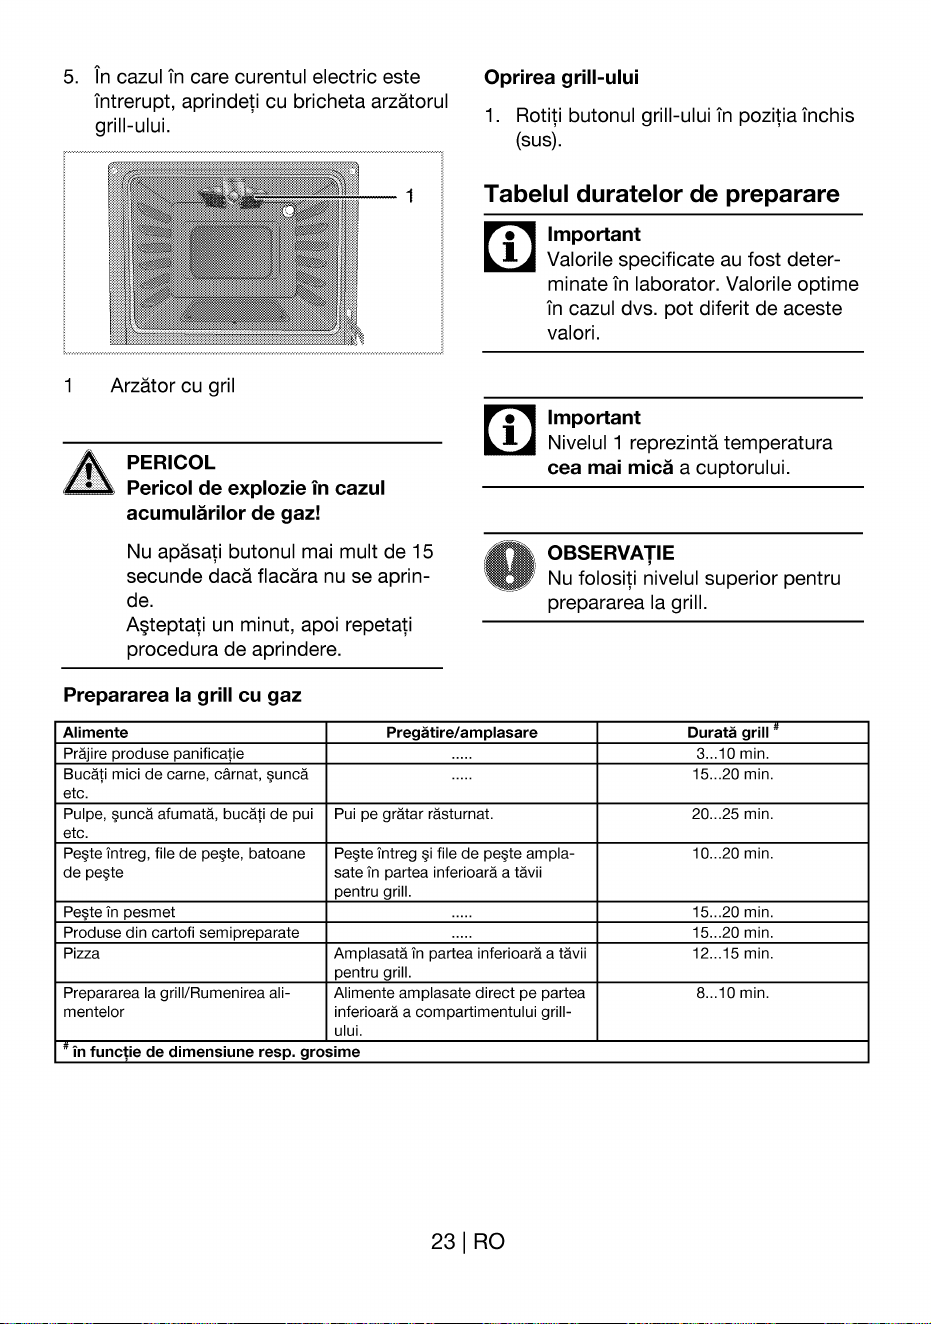
5.
I
In cazul tn care curentul electric este
intrerupt, aprindeti cu bricheta arzätorul
grill-ului.
1
Arzätor cu gril
PERICOL
Pericol de explozie in cazul
acumulärilor de gaz!
Nu apäsati butonul mai mult de 15
secunde dacä flacära nu se aprin-
de.
A*teptati un minut, apoi repetati
procedura de aprindere.
Oprirea grill-ului
1. Rotiti butonul grill-ului in pozi!ia inchis
(sus).
Tabelul duratelor de preparare
i
i
Important
Valorile specificate au fost deter-
minate in laborator. Valorile optime
in cazul dvs. pot diferit de aceste
valori.
Important
Nivelul 1 reprezintä temperatura
cea mai micä a cuptorului.
OBSERVATIE
Nu folositi nivelul superior pentru
prepararea Ia grill.
Prepararea Ia grill cu gaz
Alimente
Prä'ire roduse anificatie
Bucä!i mici de carne, cärnat, suncä
etc.
Pulpe, suncä afumatä, bucäti de pui
etc.
Peste intreg, file de peste, batoane
de peste
Peste in pesmet
Produse din cartofi semipreparate
Pizza
Prepararea la grill/Rumenirea ali-
mentelor
Pregätire/amplasare
Pui pe grätar rästurnat.
Peete intreg file de peste ampla-
sate in partea inferioarä a tävii
pentru grill.
Amplasatä in partea inferioarä a tävii
pentru grill.
Alimente amplasate direct pe partea
inferioarä a compartimentului grill-
ului.
Duratä grill
3...10 min.
15...20 min.
20...25 min.
10...20 min.
15...20 min.
15...20 min.
12...15 min.
8...10 min.
in fun ie de dimensiune resp. grosime
23 | RO
intre!inere Curä!are
Informa!ii generale
PERICOL
Pericol de electric!
Pentru a evita *ocurile electrice,
tntrerupeti alimentarea cu electrici-
tate mainte de curätarea aparatului.
A PERICOL
Suprafe!ele fierbin!i provoacä
arsuri!
Läsati aparatul sä se räceascä
tnainte de curätare.
OBSERVATIE
Suprafata poate fi deterioratä de
unii detergenti sau materiale de
curätare.
Nu folositi obiecte ascutite, deter-
genti, prafuri sau substante de
curätare agresive.
Curätati bine aparatul dupä fiecare utilizare;
astfel, reziduurile pot fi indepärtate mai
upr, evitändu-se arderea lor la urmätoarea
utilizare a aparatului.
Curätarea aparatului nu necesitä substante
de curätare speciale. Este recomandabil sä
folositi apä caldä cu lichid de spälat vase,
un burete sau o cårpä moale o cårpä
pentru uscare.
Nu folosi!i substante de curä!at abrazive!
Important
i
Nu folositi jeturi de aburi pentru
curätare.
Curä!area plitei
Plite cu gaz
I. Demontati curätati suporturile pentru
oale capacele arzätoarelor.
2.
3.
4.
Curätati plita.
Montati la loc capacele arzätoarelor
verificati dacä sunt corect fixate.
La apzarea suporturilor pentru reci-
piente, asigurati-vä cä acestea sunt
centrate deasupra arzätoarelor.
Curätarea panoului de control
OBSERVATIE
Deteriorarea panoului de control!
Nu demontatati butoanele pentru a
curäta panoul de control.
Curätati panoul de control butoanele.
Curä!area cuptorului
Curätarea acestui cuptor nu necesitä sub-
Stante speciale de curätare. Se recomandä
*tergerea cuptorului cald cu o cårpä
umedä.
up cuptorului.
Nu folositi substante de curä!are abrazive
sau lamele metalice ascutite pentru curä!a-
rea u*ii cuptorului; acestea pot zgäria
suprafata distruge sticla.
24 | RO
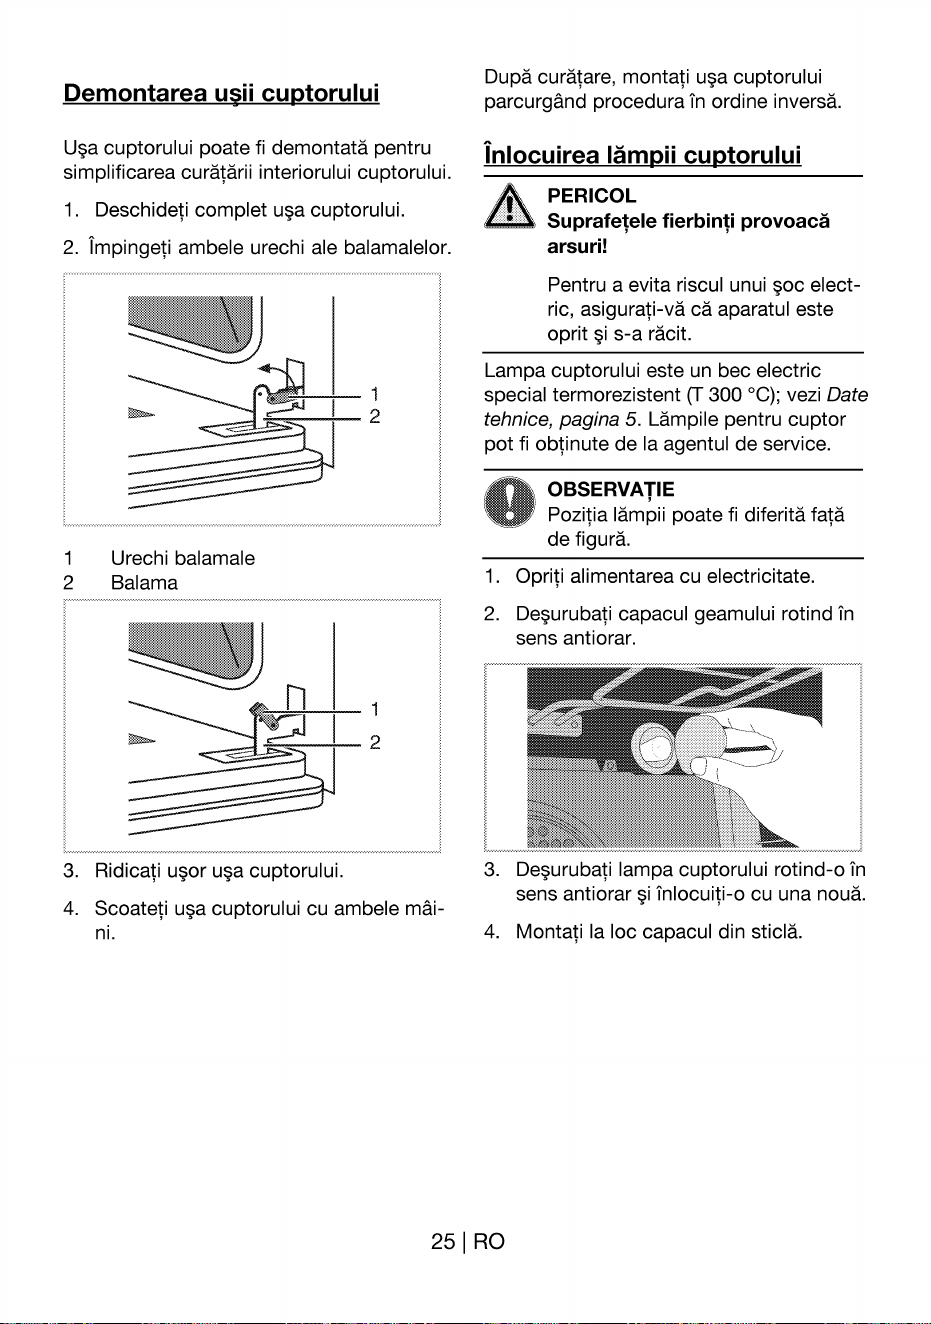
Demontarea u$i cuptorului
cuptorului poate fi demontatä pentru
simplificarea curä!ärii interiorului cuptorului.
I.
2.
I
2
3.
4.
Deschideti complet cuptorului.
impingetiambeleurechialebalamalelor.
Dupä curätare, montati cuptorului
parcurgånd procedura tn ordine inversä.
inlocuirea lämpii cuptorului
PERICOL
Suprafe!ele fierbin!i provoacä
arsuri!
Pentru a evita riscul unui elect-
ric, asigurati-vä cä aparatul este
oprit s-a räcit.
Lampa cuptorului este un bec electric
special termorezistent (T 300 0C); vezi Date
tehnice, pagina 5. Lämpile pentru cuptor
pot fi obtinute de la agentul de service.
Urechi balamale
Balama
Ridicati upr Ll#acuptorului.
1
2
1
2
Scoateti Ll#acuptorului cu ambele måi-
ni.
1.
2.
3.
4.
OBSERVATIE
Pozitia lämpii poate fi diferitä fatä
de figurä.
Opriti alimentarea cu electricitate.
D#urubati capacul geamului rotind tn
sens antiorar.
D#urubati lampa cuptorului rotind-o tn
sens antiorar tnlocuiti-o cu una nouä.
Montati Ia Ioc capacul din sticlä.
25 | RO
Remedierea Problemelor
PERICOL
Pericol de electric, scurtcir-
cuit sau incendiu in cazul repa-
ratiilor realizate de persoane
necalificate!
Aparatul poate fi reparat numai de
cätre centrele de service autoriza-
te.
PERICOL
Pericol de explozie sau intoxi-
ca!ie in cazul reparatiilor efectu-
ate de persoane necalificate.
Reparatiile trebuie efectuate de
personal de service sau de un
Conditii normale de utilizare
•
Este posibil ca tn primele ore de dupä
prima pornire, cuptorul sä emitä fum
mirosuri.
Este normalä ie$rea aburului in timpul
functionärii.
Cänd piesele de metal se tncälzesc, se
dilatä pot emite zgomote.
inainte de a apela la service,verificati
urmätoarele.
tehnician calificat.
Echipament electric
Defectiune/problemä
Aparatul nu functioneazä.
Lampa cuptorului nu se
aprinde.
Cuptorul nu se tncälze#te.
Cauzä posibilä
Siguranta este defectä sau
arsä.
$techerul aparatului nu
poate fi cuplat Ia priza cu
impämäntare.
Lampa cuptorului este arsä.
Aparatul nu este alimentat
cu curent.
Nu au fost reglate butonul
functiei butonul termosta-
tului.
Dacä aparatul are un cro-
nometru, acesta nu a fost
setat.
Aparatul nu este alimentat
cu curent.
26 | RO
Sfat/remediu
Verificati tabloul de sigu-
rante. Dacä este cazul,
tnlocuiti-le.
Verificati conexiunea
cherului.
inlocuiti lampacuptorului.
Verificati tabloul de sigu-
ran!e. Dacä este cazul,
inlocuiti-le.
Reglati butonul functiei
butonul termostatului.
Setati ora.
Verificati sursa de alimenta-
re 9i sigurantele.
Gaz
Defectiune/problemä
Nu se produce scänteia de
aprindere.
Arzätoarele nu emit gaz.
Arzätoarele ard neuniform
sau nu ard deloc.
Cauzä posibilä
Aparatul nu este alimentat
cu curent.
Robinetul principal de gaz
este inchis.
Tubul de siguran!ä este
tndoit.
Arzätoarele sunt murdare.
Arzätoarele sunt ude.
Capacul arzätorului nu este
amplasat corect.
Robinetul de gaz este
inchis.
Recipientul cu gaz este gol
(tn cazul utilizärii GPL).
Sfat/remediu
Verificati tabloul de sigu-
rante.
Deschideti robinetul de gaz.
Tubul de siguran!ä nu trebu-
ie sä fie tndoit.
Curätati componentele
arzätorului.
Uscati componentele arzä-
torului.
corect arzätorul.
Deschideti robinetul de gaz.
Inlocui!irecipientulcu gaz.
Dacä problema nu a fost remediatä:
1.
2.
Deconectati aparatul de la reteaua
electricä (dewrubati siguranta).
Luati legätura cu service-ul post vånza-
re al distribuitorului.
i
Important
Nu incercati sä reparati pe cont
propriu ma9ina de gätit.
Aceasta nu contine componen-
te care pot fi reparate de utili-
zator.
27 | RO

arctic
service
Re!eauadeserviceARCTIC
Sediu\CentralServiceGäe$ti
Str.13 Decembriena210,Gäe$i,Jud.Dämbovi!a
Centrul de apeluri
0245 605 1II , numärapelabilTnre!eauaRomtelecom
0372 - 015 111, numärapetabilin reteauaVodafone
Programulde functionareal CentruluideApeluri
Luni Vineri: 08:00 20:00
Sämbätä: 09:00 - 17:00
Nr. crt. JUD
2.
3.
4.
5.
6.
8.
9.
10.
ALBA
ARAD
ARGE
BAC U
BIHOR
BISTRITA N
BüLA
BRA OV
BUCURE Tl
BUZÅU
REPREZENTAN
ALBA IULIA
PITE Tl
BAC U
ORADEA
BISTRI A
SRÅiLA
B OV
DECEBAL
BUZÅU
ADRESA
Bd. Transilvaniei, bl. 3FG rter
Pia# Arenei, bloc E SEA_parter
Sir, Fra •i GOI , bloc S-9C, arter
Str.
Ene iei nr. 39 Bl.39, rter
Bd. Dacia nr. 54 bl.
Str. Constantin Roman Vivu, bl.l, Sc.A,
rter
Str.9coEiIornr-37,bloc C, parter
Str. Je ilor nr. 2, cartier Räcädäu
Bd. Decebal, nr. 18 —20, bloc S4,
Str. Ion Bäie u, bloc C2 rter
rter
Nr. Crt.
12.
13.
14.
15.
16.
17.
18.
19.
20.
21.
22.
23,
24.
25.
26.
27
28.
29.
30.
31.
32.
33.
34.
35.
36.
37.
38.
JUDE
CARA SEVERIN
CLUJ
CONSTAN
COVASNA
DÅMBOVI
D MBOVI A
DOLJ
GALA
GORJ
HARGHITA
HUNEDOARA
IALOM!TA
MARAMURE
MEHEDIN
MURE
NEAM
OLT
PRAHOVA
SATU MARE
SIBIU
SUCEAVA
TELEORMAN
TIMI
TULCEA
V LCEA
VASLUI
REPREZENTAN
CLUJ
CONSTAN A
SF NTU GHEORGHE
"CÅE Tl
T RGOVI TE
CRAIOVA
GALA
T RGU JIU
MIERCUREA Cluc
DEVA
SLOBOZIA
BAIA MARE
TURNU SEVERIN
T RGU MURE
PIATRA NEA
SLATINA
PLOIE Tl
ZALÅÜ
SATU MARE
SIBIU
SUCEAVA
ALEXANDRIA
TIM!'OARA
TULCEA
R MNICUV LCEA
VASLUI
ADRESA
Str. B.A. Petculescu bloc I arter
Str. C. Bråncu9i nr. 2, bloc 3B,parter
os- Man aliei nr- 93, bloc S, rter
Bd. Nicolae lorga nr. IOA, BJ.10, parter
Str. I Decembrie, bloc 64
Str. l. C. Bratianu, bl. Dl,
Sd. Decebal, nr.79-81,bl,38, arter
Str. Constructorilor nr. 7
Str. 1 Decembrie 1918, bl. D6 arter
Str. Pietei, nr&sc. .Dnparter
Bd. 22 Decembrie bloc 10 sc.l arter
Str. Dobrogeanu Gherea, bl. Dl scg.parter
Str. Sf. Lazär nr- 6, rter
Str.
Str. Ind ndentei, nr. 39, bl. KA 2 arter
Str. Libertä ii nr. 97
Str. l. Antonescu, nr. 6 bl. T6 sc. B rter
Str. Nicolae Titulescu,
Str. Gheorghe Doja bl.35, sc. C, parter
Str. Gheor he Do•a, nr.91, bl. Dll sc
Bd. Lucian Blaga,. bloc U18, parter
Str.
Parcul Tineretului, bl.9,
Str, Märä e ti nr- 39a
Str. Dunärii, bloc BM2, sc. F, arter
Bd. Stegan cel Mare, bl. Uléxparter
Str. Babada bl. 3 sc.
rter
Str. Tudor Vladimirescu,nr. 5, sc C,
Bd. Re ublicii nr. 12, bloc G45
arter
rter