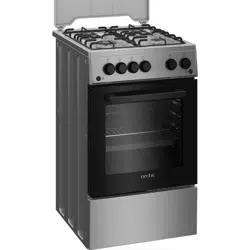
Oven
Cuptor
UAM4S
arctic
OPERATING INSTRUCTIONS
INSTRUCTIUNI DE UTILIZARE
Please read this user manual first!
Dear Customer,
Thankyoufor purchasingthis Arctic product,Wehopethat youget the bestresultsfromyourproduct
which hasbeenmanufacturedwith highqualityand state-of-the-arttechnology.Therefore,pleaseread
this entire usermanualandall otheraccompanyingdocumentscarefullybeforeusingthe productand
keepit as a referenceforfuture use.If youhandoverthe productto someoneelse,givethe usermanual
as well. Followall warningsandinformationin the usermanual.
Rememberthatthis usermanualisalsoapplicablefor severalothermodels.Differencesbetweenmodels
will be identified in the manual.
Explanation of symbols
Throughoutthis usermanualthe followingsymbolsareused:
i
Importantinformationor useful hints
aboutusage.
Warningof hazardoussituationswith
regardto lifeandproperty.
Warning of electric shock.
Warningof risk of fire.
Warningof hotsurfaces.
Argelik A.S.
KaraaöagcaddesiNo:2-6
34445 Sütlüce/lstanbul/TURKEY
Made in TURKEY
TABLE OF CONTENTS
Important instructions and warnings
for safety and environment
Generalsafety..
Safetywhenworkingwith gas..
Productsafety
Intended use.
Safetyfor children .
Disposingof the old product.
Packageinformation..
General information
Overview
Packagecontents..
Technicalspecifications..
Injectortable
Installation
Before installation
Installation and connection .
FutureTransportation
Preparation
Tipsfor savingenergy,
Initial use.
Firstcleaningof the appliance...
4
.4
.6
8
...9
.9
11
...11
.12
16
.16
.16
.16
Initialheating.
How to use the hob
Generalinformationaboutcooking
Usingthe hobs.
How to operate the oven
Generalinformationon baking,roasting.
Howto usethe gasoven.
Cookingtimestable..
Recipes.
Maintenance and care
General information .
Cleaningthe hob
Cleaningthe controlpanel
Cleaningthe oven
Removingthe ovendoor ,
Removingthe doorinnerglass.
Troubleshooting
.16
17
.17
.17
19
.19
19
. 20
21
22
. 22
22
. 22
. 22
. 22
23
24
3/EN
'dImportant instructionsandwarningsforsafetyand
environment
Thissection contains safety
instructionsthat will help protect from
risk of personalinjuryor property
damage.Failureto follow these
instructions shall void anywarranty.
General safety
Thisappliancecan be used by
children aged from 8 yearsand
aboveand personswith reduced
physical,sensoryor mental
capabilitiesor lack of experience
and knowledgeif they havebeen
givensupervisionor instruction
concerninguse of the appliance
in a safeway and understandthe
hazards involved.
Childrenshall not playwith the
appliance.Cleaningand user
maintenance shall not be made
by children without supervision.
Neverplacethe product on a
carpet-coveredfloor. Otherwise,
lack of airflow beneath the
productwill causeelectrical parts
to overheat. This will cause
problemswith your product.
Installationand repair procedures
must alwaysbe performedby
AuthorizedServiceAgents. The
manufacturer shall not be held
responsiblefor damagesarising
from procedurescarried out by
unauthorizedpersonswhich may
4/EN
also void the warranty. Before
installation, read the instructions
carefully.
Do not operate the product if it is
defectiveor has any visible
damage.
Ensurethat the product function
knobsare switchedoff after every
use.
Safety when working with gas
Any works on gas equipmentand
systems mayonly be carried out
by authorisedqualified persons
who are GasSafe registered.
Prior to the installation, ensure
that the local distribution
conditions (natureof the gas and
gas pressure)and the adjustment
of the applianceare compatible.
This applianceis not connectedto
a combustionproductsor
evacuation device. It shall be
installed and connected in
accordance with current
installationregulations.Particular
attention shall be givento the
relevantrequirementsregarding
ventilation; See Before installation,
page 11
The useof gas cookingappliance
results in the productionof heat
and moisture in the room in which
it is installed. Ensure that the
kitchen is well ventilated: keep
naturalventilation holesopen or
install a mechanical ventilation
device (mechanicalextractor
hood).Prolongedintensive useof
the appliance may call for
additionalventilation,for example
increasingthe levelof the
mechanical ventilation where
present.
Gasappliancesand systems must
be regularlycheckedfor proper
functioning.Regulator,hoseand
its clamp must bechecked
regularlyand replacedwithin the
periodsrecommendedby its
manufactureror when necessary.
Cleanthe gas burners regularly.
The flames should be blue and
burn evenly.
Goodcombustionis requiredin
gas appliances.In caseof
incompletecombustion,carbon
monoxide(CO)might develop.
Carbon monoxide is a colourless,
odourlessand very toxic gas,
which has a lethal effect even in
verysmall doses.
Requestinformation about gas
emergencytelephonenumbers
and safety measuresin case of
gas smell from you local gas
provider.
What to do when you smell gas
Do not useopen flame or do not
smoke. Do not operateany
electrical buttons(e.g. lamp
button,door bell and etc.) Donot
usefixed or mobile phones.Risk
of explosionand toxication!
Opendoors and windows.
Turn off all valveson gas
appliancesand gas meter at the
main control valve, unless it's in a
confined spaceor cellar.
Check all tubes and connections
for tightness. If you still smell gas
leavethe property.
Warnthe neighbours.
Callthe fire-brigade. Usea
telephoneoutsidethe house.
Do not re-enter the property until
you are told it is safeto do so.
Product safety
The applianceand its accessible
partsbecome hot during use.
Care should be taken to avoid
touching heating elements.
Childrenless than 8 yearsof age
shall be kept away unless
continuouslysupervised.
Neverusethe productwhen your
judgment or coordinationis
impairedbythe useof alcohol
and/or drugs.
Becareful when using alcoholic
drinks in your dishes.Alcohol
evaporatesat high temperatures
and maycausefire since it can
ignitewhen it comes into contact
with hot surfaces.
5/EN
Do not close the top cover before
the hotplatesor burners cool
down.
Wipe the top coverdry before
opening it in orderto avoidwater
leakageto the rear and inner
sections of the oven.
Unattendedcooking on a hob with
fat or oil can be dangerousand
may result in fire. NEVERtry to
extinguisha fire with water, but
switch off the applianceandthen
coverflamee.g.with a lidor a
fire blanket.
Dangerof fire: Donot store items
on the cooking surfaces.
Preventionagainst possiblefire risk!
•
6/EN
Do not place anyflammable
materialsclose to the product as
the sides maybecome hot during
use.
Duringusethe appliance
becomes hot. Care should be
takento avoidtouching heating
elements inside the oven.
Keepall ventilationslots clear of
obstructions.
Do not heatclosedtins and glass
jars in the oven.The pressure
thatwouldbuild-upinthe tin/jar
maycauseit to burst.
Donot place baking trays, dishes
or aluminium foil directlyonto the
bottom of the oven. The heat
accumulationmight damagethe
bottom of the oven.
Do not use harsh abrasive
cleanersor sharp metal scrapers
to cleanthe ovendoor glass since
they can scratch the surface,
which may result in shatteringof
the glass.
Do not use steam cleaners to
clean the applianceas this may
cause an electric shock.
Donot usethe product if the front
door glass removedor cracked.
Alwaysuse heat resistantoven
gloveswhen putting in or
removingdishes into/from the hot
oven.
•
Ensure all electrical connections
are secureand tight to prevent
risk of arcing.
Do not use damagedcablesor
extension cables.
Ensureliquid or moistureis not
accessible to the electrical
connectionpoint.
To preventgas leakageensure
that the gas connectionis sound.
Intended use
This product is designedfor
domestic use. Commercial use
will void the guarantee.
This applianceis for cooking
purposesonly. It must not be
usedfor other purposes,for
exampleroom heating.
The manufacturer shall not be
liable for any damagecausedby
improper use or handlingerrors.
The oven can be used for
defrosting,baking, roastingand
grilling food.
Safety for children
Accessibleparts maybecomehot
during use. Youngchildren should
be kept away.
The packagingmaterialswill be
dangerousfor children. Keepthe
packagingmaterialsawayfrom
children. Pleasedisposeof all
parts of the packagingaccording
to environmental standards.
Electricaland/or gas products are
dangerousto children. Keep
children awayfrom the product
when it is operatingand do not
allow them to playwith the
product.
An additional protectivemeansto
avoid contact with the oven door
is available.This part should be
fitted when youngchildren are
likelyto be present.
Do not placeany items above the
appliancethat children may reach
for.
Whenthe door is open,do not
loadany heavyobject on it and do
not allow children to sit on it. It
mayoverturn or door hingesmay
get damaged.
Disposing of the old product
Package information
• Packagingmaterialsof the
productare manufacturedfrom
recyclablematerials in
accordance with our National
EnvironmentRegulations.Do not
disposeof the packaging
materialstogether with the
domestic or other wastes. Take
them to the packagingmaterial
collectionpoints designatedby
the local authorities.
UEN
General information
Overview
2
3
1
4
2
7
6
5
2
3
4
2
3
4
5
8/EN
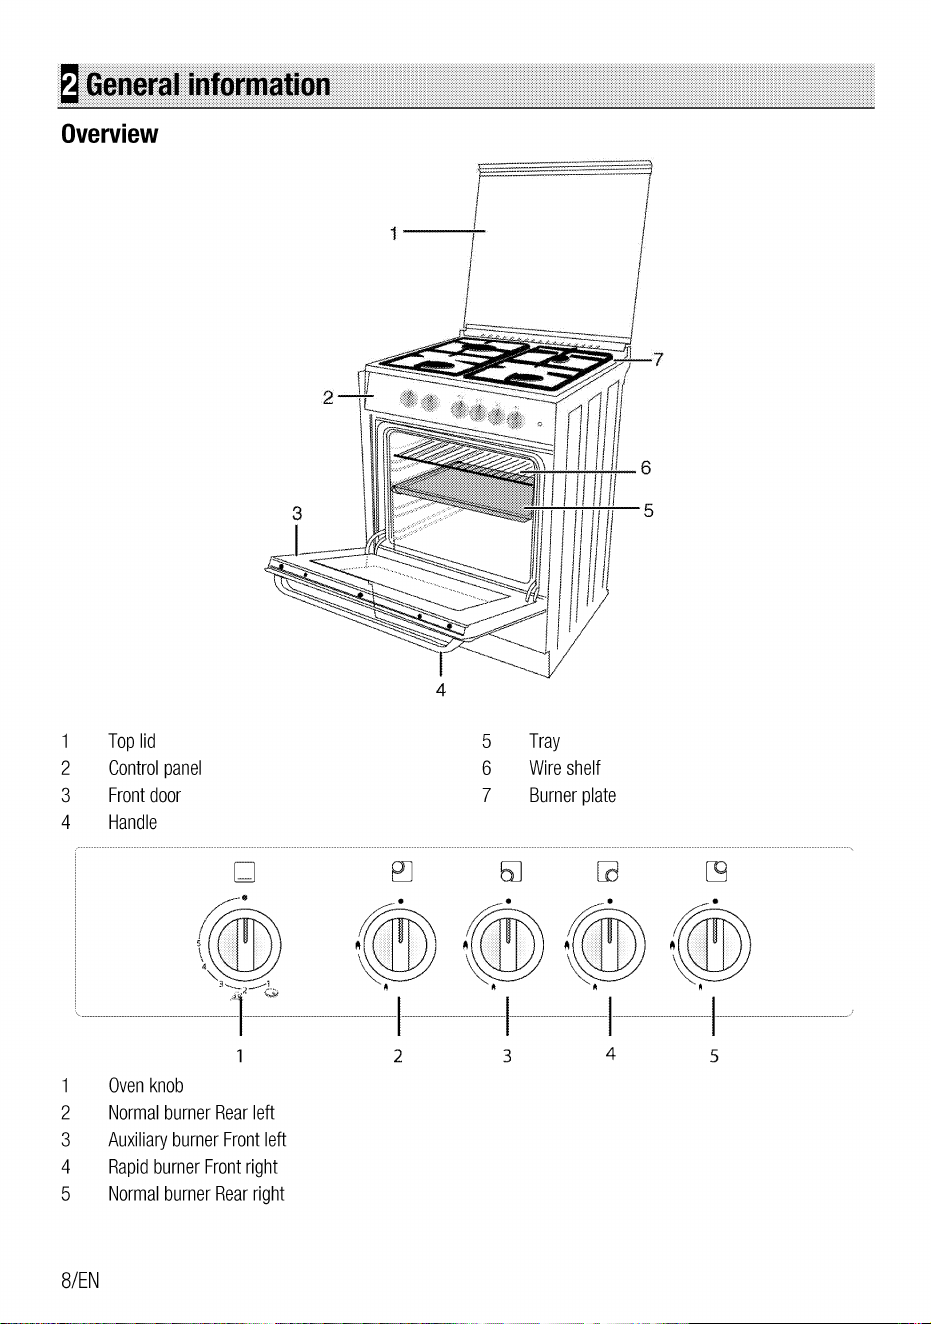
Top lid
Controlpanel
Front door
Handle
Oven knob
Normal burner Rear left
Auxiliary burner Front left
Rapidbumer Front right
NormalburnerRearright
5
6
7
3
Tray
Wire shelf
Burnerplate
4
5
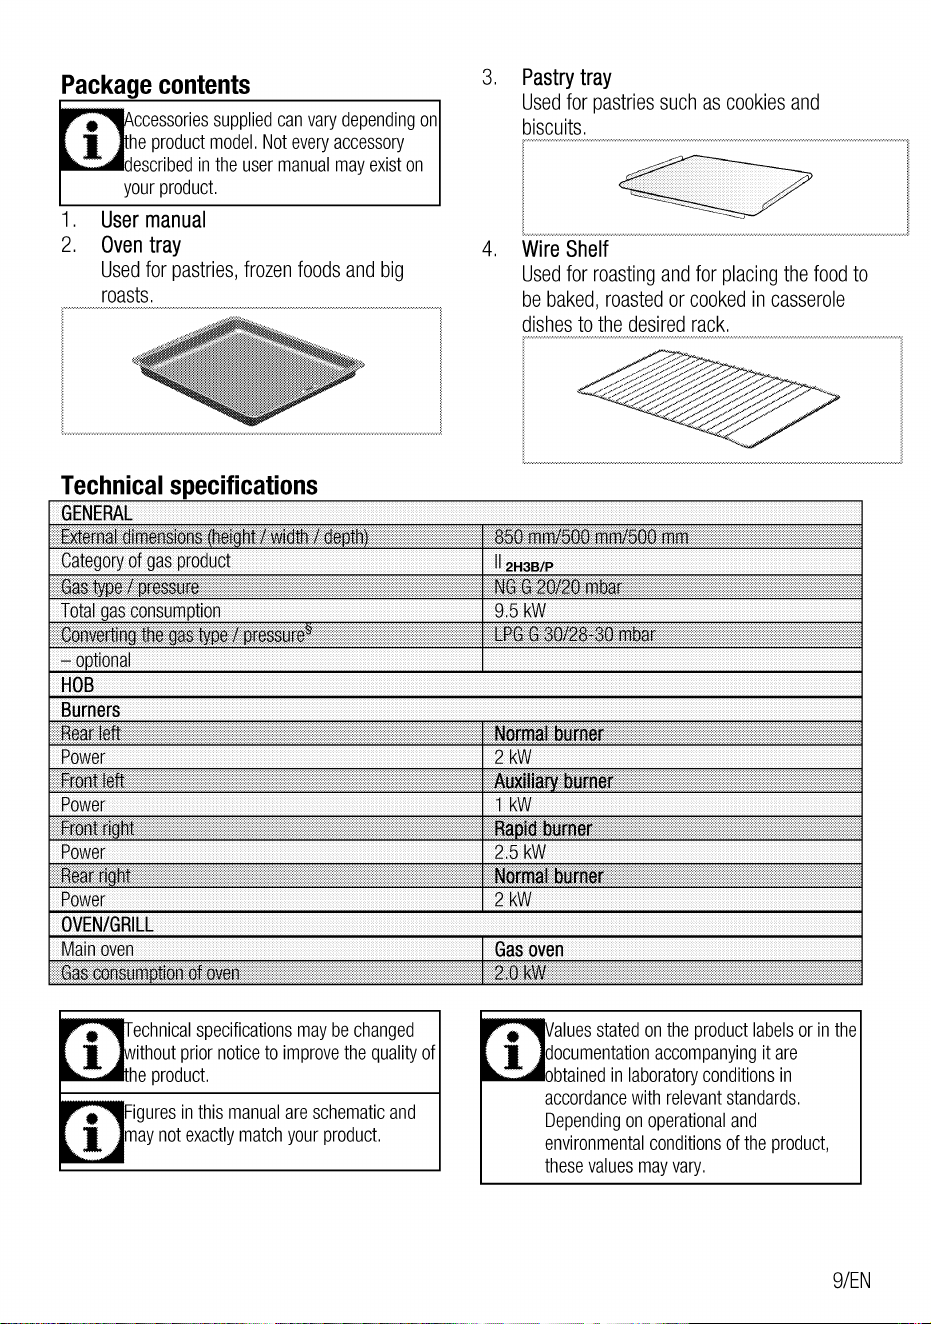
Package contents
ccessoriessupplied can vary dependingon
heproductmodel.Noteveryaccessory
2.
escribed in the user manual may exist on
your product.
User manual
Oventray
Usedfor pastries,frozenfoodsandbig
roasts.
3,
4,
Pastrytray
Usedfor pastriessuchas cookiesand
biscuits.
Wire Shelf
Usedfor roastingandfor placingthe foodto
be baked, roasted or cooked in casserole
dishes to the desired rack.
Technical specifications
GENERAL
ExtemaldimenSions t
Categoryof gasproduct
Gastype/ pressure
Total as consum tion
Converti the
-o tional
HOB
Burners
-Rear
Power
FrontBefr
Power
Power
earr
Power
OVEN/GRILL
Main oven
m
-II2H3B/P
9.5 kW
m mm
i
echnicalspecificationsmaybechanged
ithout prior notice to improvethe quality of
he product.
iguresin thismanualareschematicand
ay not exactlymatch your product.
mLPGGm30/28,30n
Normal burner
Auxilj burner
2.5 kW
Normal burner
2 kW
Gas oven
aluesstated on the product labelsor in the
documentationaccompanyingit are
btained in laboratoryconditions in
accordance with relevant standards.
Dependingon operationaland
environmentalconditionsof the product,
these values mayvary.
9/EN
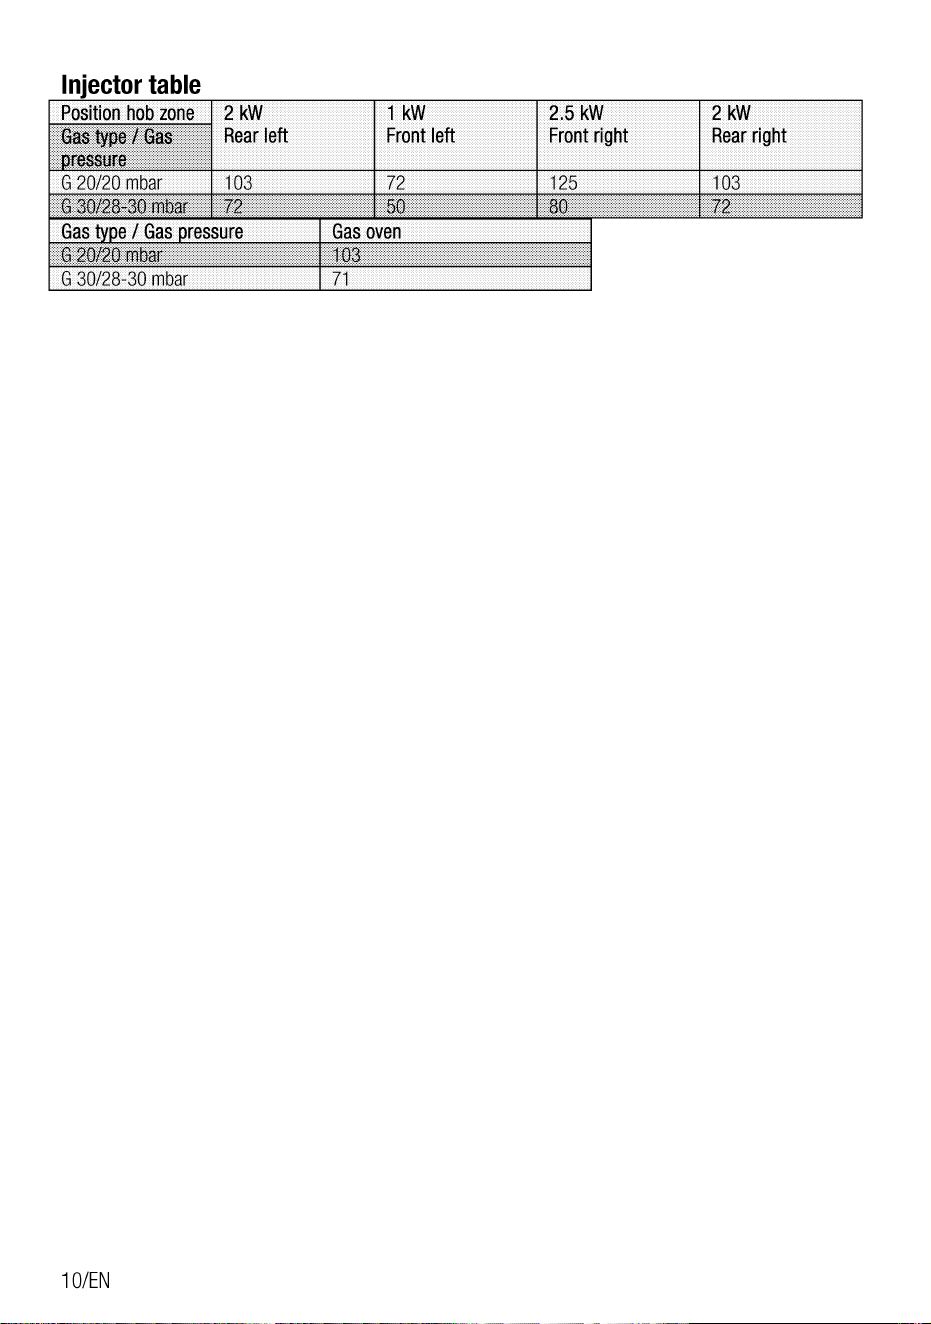
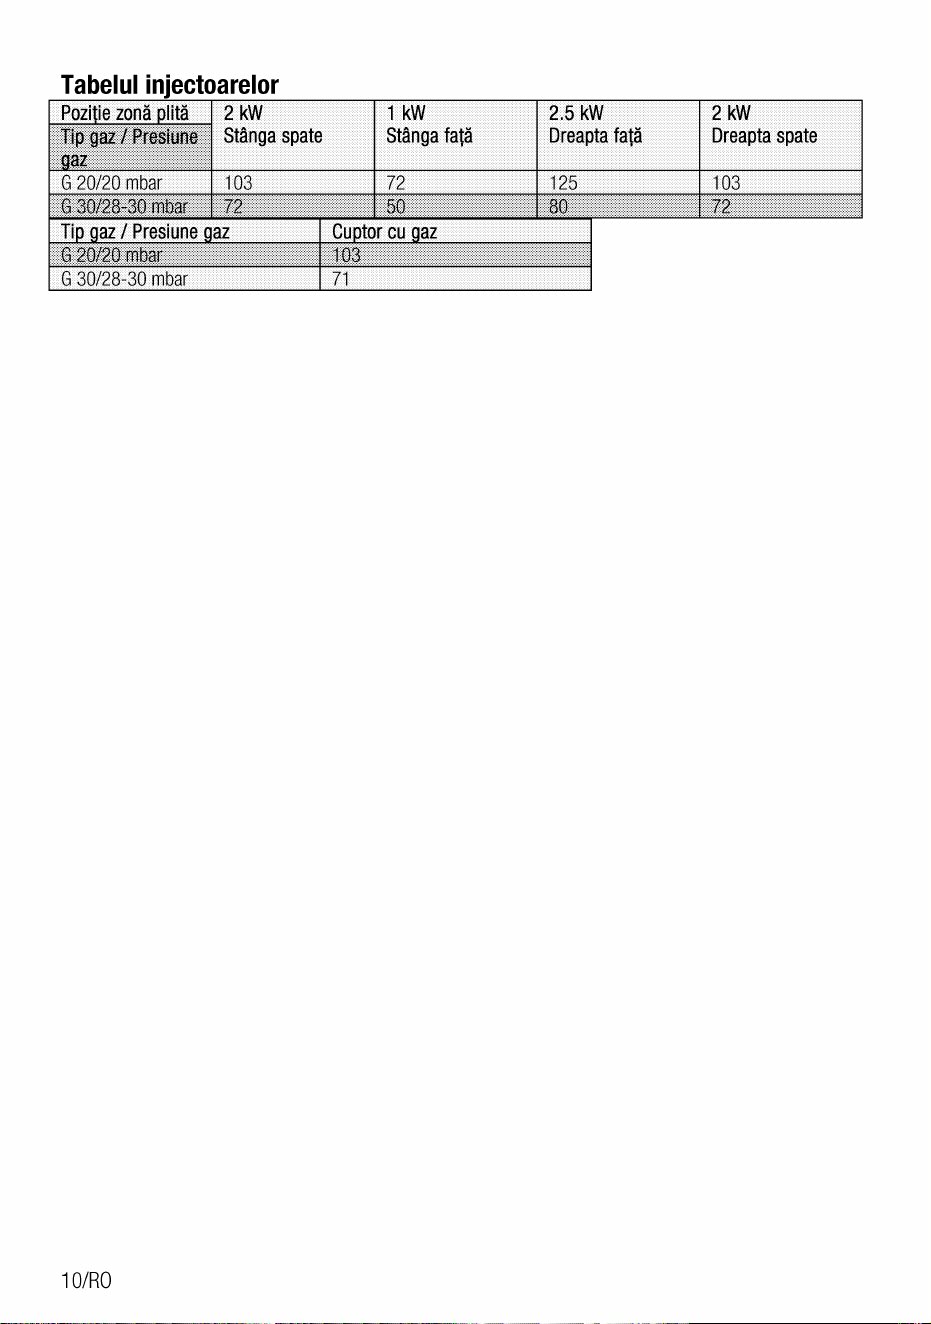
Injector table
Position hob zone
Gas type[Gas
ressure
G 20/20 mbar
30/28930
2 kW
Rear left
103
7
Front left
72
Gas oven
71
2.5 kW
Frontright
125
80
2 kW
Rearright
103
Gas e / Gas ressure
G 20/2jinbår
G 30/28-30 mbar
1 0/EN
Installation
Product must be installed by a qualified person in
accordancewith the regulationsin force.The
manufacturershall not beheld responsiblefor
damagesarisingfromprocedurescarriedout by
unauthorized persons which may also void the
warran
E
i
Preparationof locationandelectricaland
gas installationfor the product is under
ustomer's responsibility.
DANGER:
The product must be installed in
accordancewithall localgasand/or
electrical regulations.
DANGER:
Priorto installation,visually check if the
product has any defectson it. If so, do not
have it installed.
Damagedproductscauserisksforyour
safety.
100 mm min
100 mrnnfi
Before installation
Toensurethatcriticalair gapsare maintained
underthe appliance,we recommendthat this
applianceis mountedon a solidbaseandthat
the feet do not sinkinto anycarpetor soft
flooring.
Thekitchenfloormustbeableto carrythe
weightof the applianceplusthe additionalweight
of cookware and bakeware and food.
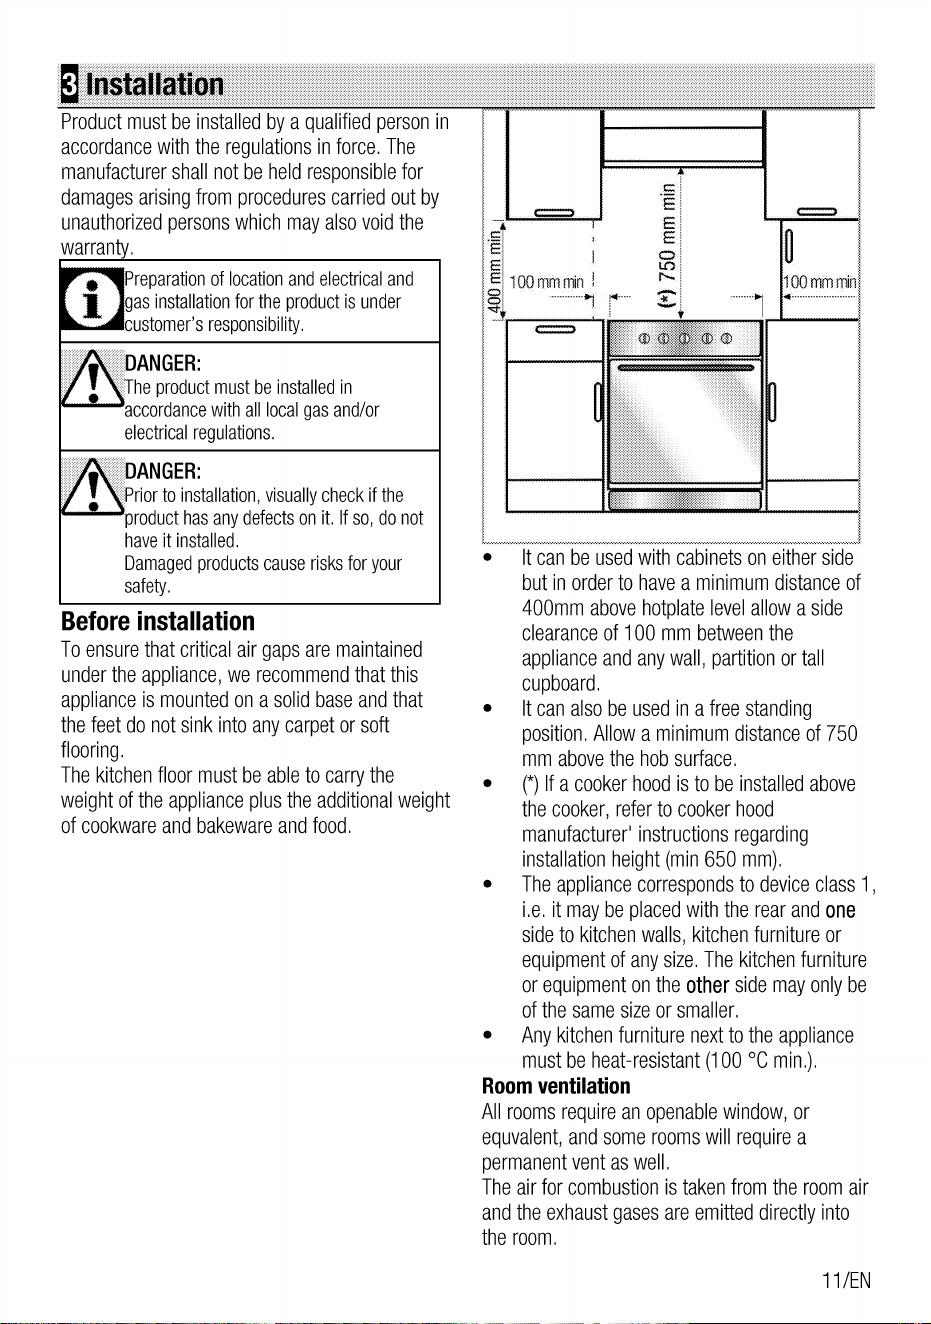
It can be used with cabinets on either side
but in order to have a minimum distance of
400mm abovehotplatelevelallowa side
clearance of 100 mm between the
applianceandanywall, partitionor tall
cupboard.
Itcanalsobe usedin afree standing
position.Allowa minimumdistanceof 750
mm above the hob surface.
(*)If a cookerhoodisto be installedabove
the cooker, refer to cooker hood
manufacturer'instructionsregarding
installationheight(min650 mm).
The appliance corresponds to device class 1,
i.e.it maybe placedwiththe rearandone
side to kitchen walls, kitchen furniture or
equipmentof anysize,Thekitchenfurniture
or equipmentonthe other side mayonlybe
of the same size or smaller.
Anykitchenfurniturenextto the appliance
mustbe heat-resistant(100 oc min.).
Room ventilation
All rooms require an openable window, or
equvalent, and some rooms will require a
permanentventas well.
The air for combustion is taken from the room air
andthe exhaustgasesareemitteddirectlyinto
the room.
IIIC-N
Good room ventilation is essential for safe
operationof yourappliance.If thereis nowindow
or door available for room ventilation, an extra
ventilation must be installed.
Theappliancemaybe locatedin a kitchen,
kitchen/dinerora bed-sittingroom,but not in a
roomcontaininga bathor shower.Theappliance
must not be installedin a bed-sittingroomof
3
less than 20m
Donot installthis appliancein a roombelow
groundlevelunlessit is opento groundlevelon
at least one side.
Room size
smaller
5m to 10m
eaterthämjOr
In the cellar or
basement
Ventilation o enin
min. 50 cm
min. 65 cm
DANGER:
Beforestartinganyworkon thegas
installation, disconnect the gas supply.
Thereisthe riskof explosion!
• Gasadjustmentconditionsandvaluesare
stated on labels or ion e label
ourproductis equippedfornaturalgas
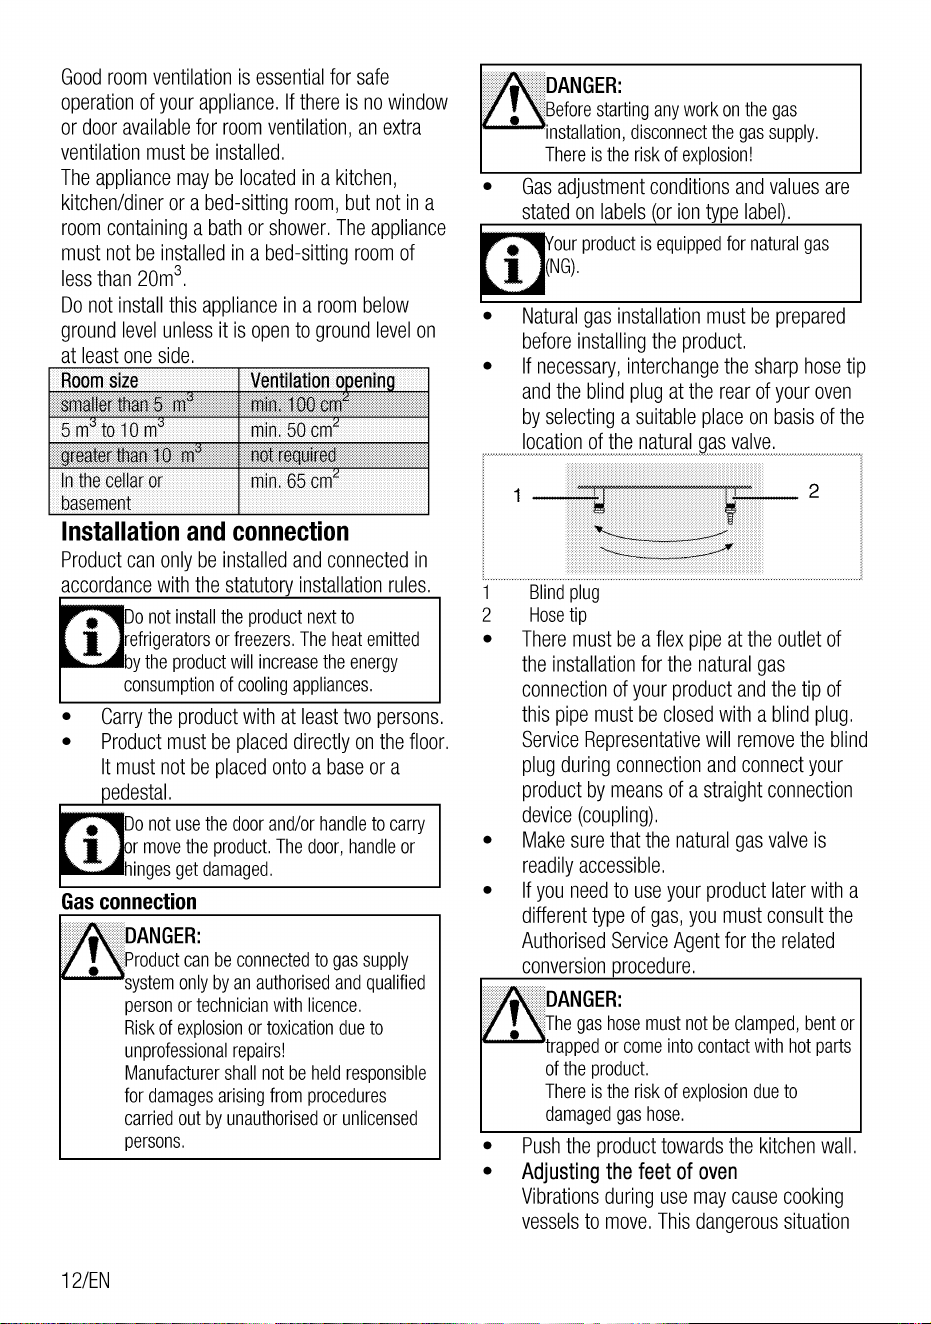
Naturalgas installationmust beprepared
beforeinstallingthe product.
Ifnecessary,interchangethe sharphosetip
andthe blindplugat the rearof youroven
by selectingasuitableplaceon basisof the
locationofthenaturalsgsvalve.
2
1
Blind plug
Hosetip
2
Installation and connection
Product can only be installed and connected in
accordance with the statuto installation rules.
o not install the product next to
efrigeratorsor freezers.The heat emitted
•
y the productwill increasetheenergy
consumptionof coolingappliances.
Carrythe productwith at leasttwo persons.
Productmustbe placeddirectlyon the floor.
It must not be placed onto a base or a
edestal.
o not usethe doorand/or handleto carry
i
r move the product. The door, handleor
inges get damaged.
Gas connection
DANGER:
Product can be connectedto gas supply
systemonlybyan authorisedandqualified
person or technician with licence.
Risk of explosionor toxication due to
unprofessionalrepairs!
Manufacturer shall not be held responsible
fordamagesarisingfromprocedures
carried out by unauthorisedor unlicensed
persons.
1 2/EN
Theremustbe aflex pipeat the outlet of
the installationforthe naturalgas
connectionof yourproductand the tip of
this pipe mustbe closedwith a blindplug.
ServiceRepresentativewill removethe blind
plug duringconnectionandconnectyour
productby meansof a straightconnection
device (coupling).
Makesurethatthe naturalgasvalveis
readilyaccessible.
Ifyouneedto useyourproductlaterwith a
differenttypeof gas,you mustconsultthe
AuthorisedServiceAgentforthe related
conversion rocedure.
DANGER:
The gas hose must not be clamped, bent or
trapped or come into contactwith hot parts
of the product.
There is the risk of explosiondue to
damagedgashose.
Pushthe product towards the kitchen wall.
Adjusting the feet of oven
Vibrationsduringusemaycausecooking
vesselsto move.Thisdangeroussituation
canbe avoidedif the productisleveland
balanced.
Foryourownsafetypleaseensurethe
productis levelby adjustingthe fourfeet at
the bottombyturningleftor rightand align
levelwith the worktop.
Final check
1. Opengassupply.
2. Checkgasinstallationsfor securefittingand
tightness.
3. Igniteburnersandcheckappearanceof the
flame.
lame must be blueand have a regular
1 hape. Iftheflameisyellowish, checkifthe
urner cap is seatedsecurelyor clean the
burner.
Gas conversion
DANGER:
Beforestartinganyworkonthe gas
installation, disconnectthe gas supply.
Thereis theriskof explosion!
In orderto changeyourappliance'sgastype,
changeall injectorsand makeflame adjustment
for allvalvesat reducedflow rateposition.
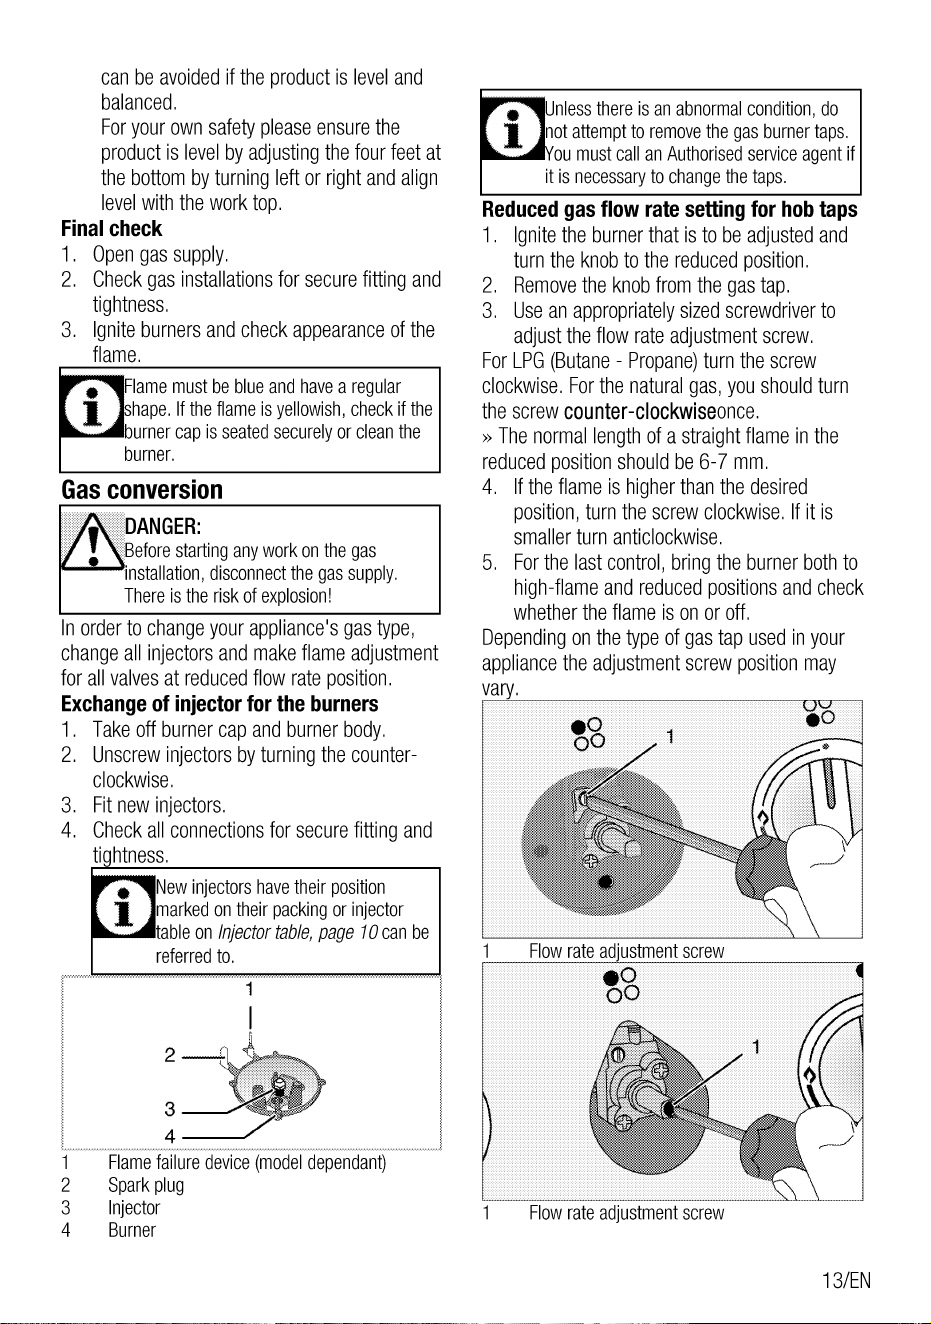
Exchange of injector for the burners
i
Unless there is an abnormal condition, do
not attempt to removethe gas burner taps.
ou mustcallanAuthorisedserviceagentif
it is necessaryto change the taps.
Reduced gas flow rate setting for hob taps
1. Ignitetheburnerthat is to be adjustedand
turn the knobto the reducedposition.
2. Removethe knobfromthe gastap.
3. Usean appropriatelysizedscrewdriverto
adjustthe flow rateadjustmentscrew.
ForLPG(Butane- Propane)turn the screw
clockwise. Forthe natural gas, you should turn
the screw counter-clockwiseonce.
» Thenormallengthof a straightflamein the
reduced position should be 6-7 mm.
4. If the flameis higherthanthe desired
position,turn the screwclockwise.Ifit is
smaller turn anticlockwise.
5. Forthe lastcontrol,bringtheburnerbothto
high-flameand reducedpositionsand check
whether the flame is on or off.
Dependingon thetype of gastap usedinyour
appliancethe adjustmentscrewpositionmay
va
1.
2.
3.
4.
2
3
4
Takeoff burnercap andburnerbody.
Unscrewinjectorsbyturningthe counter-
clockwise.
Fit new injectors.
Checkallconnectionsfor securefitting and
ti htness.
New injectorshave their position
i
markedontheirpackingorinjector
ableon Injectortable,page 10canbe
referred to.
1
2
3
4
Flamefailuredevice(modeldependant)
Sparkplug
Injector
Burner
00
1
Flow rate ad'ustment screw
•o
00
Flowrate adjustmentscrew
13/EN
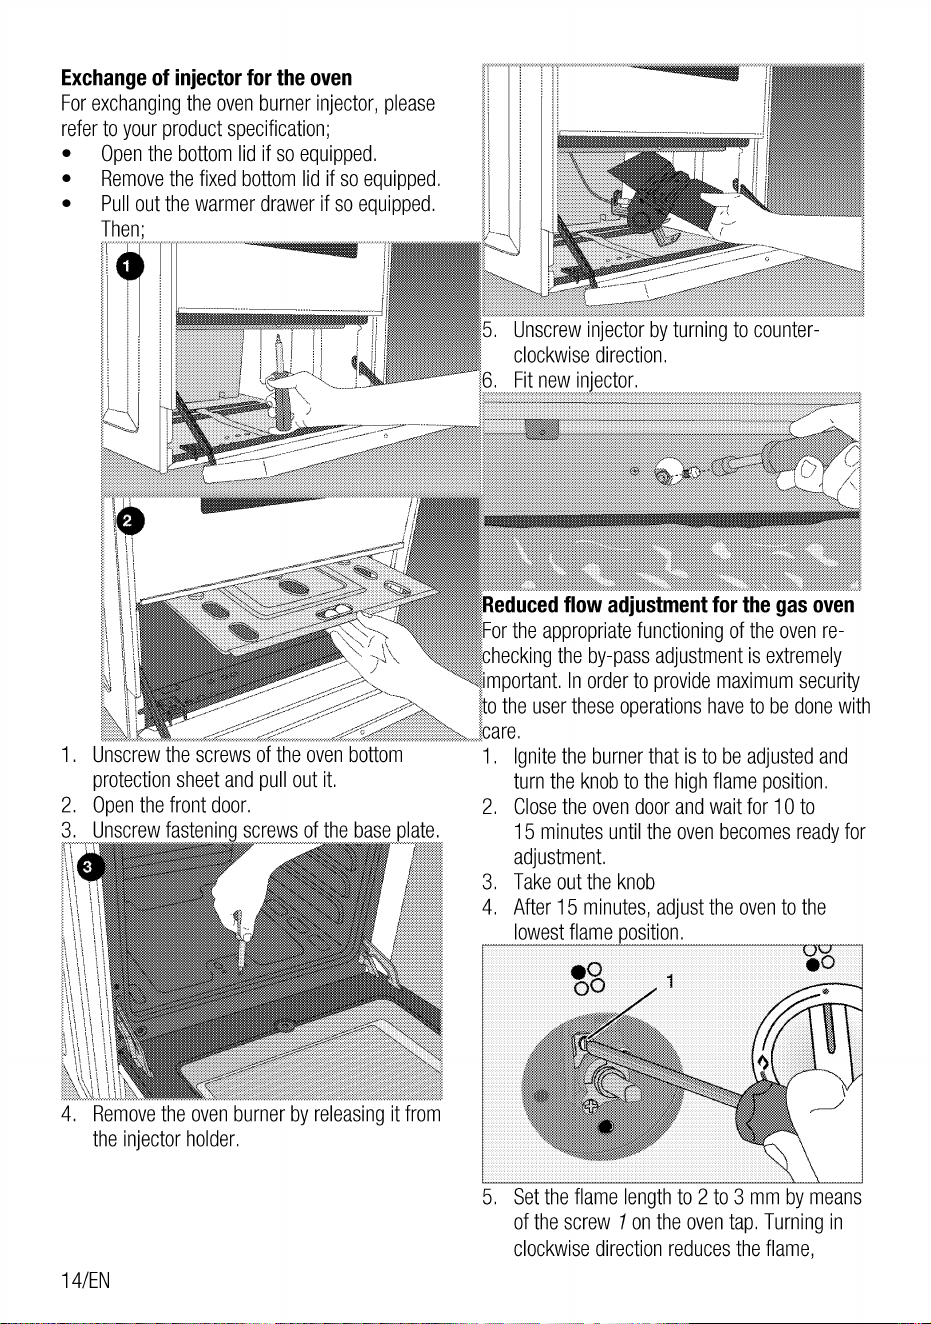
Exchange of injector for the oven
Forexchangingthe ovenburnerinjector,please
referto yourproductspecification;
Openthe bottomlid if so equipped.
•
1.
2.
3.
Removethe fixedbottomlid if so equipped.
Pullout the warmerdrawerif so equipped.
Then;
Unscrew the screws of the oven bottom
protectionsheetand pull out it.
Openthe front door.
Unscrewfasteningscrewsof the base late,
5. Unscrewinjectorbyturningto counter-
clockwise direction.
6. Fitney!ojector.
Reducedflow adjustment for the gas oven
Forthe appropriatefunctioningofthe ovenre-
hecking the by-pass adjustment is extremely
important. In order to provide maximum security
othe usertheseoperationshaveto be donewith
are.
1.
2.
3.
4.
5.
Ignitethe burnerthat isto be adjustedand
turn the knobto the highflameposition.
Close the oven door and wait for 10 to
15 minutesuntil the ovenbecomesreadyfor
adjustment.
Take out the knob
After15 minutes,adjustthe ovento the
lowest flame osition.
o
1
4. Removethe ovenburnerbyreleasingit from
the injectorholder,
14/EN
Setthe flame lengthto 2 to 3 mmby means
of the screw 1on the oventap,Turningin
clockwise direction reduces the flame,
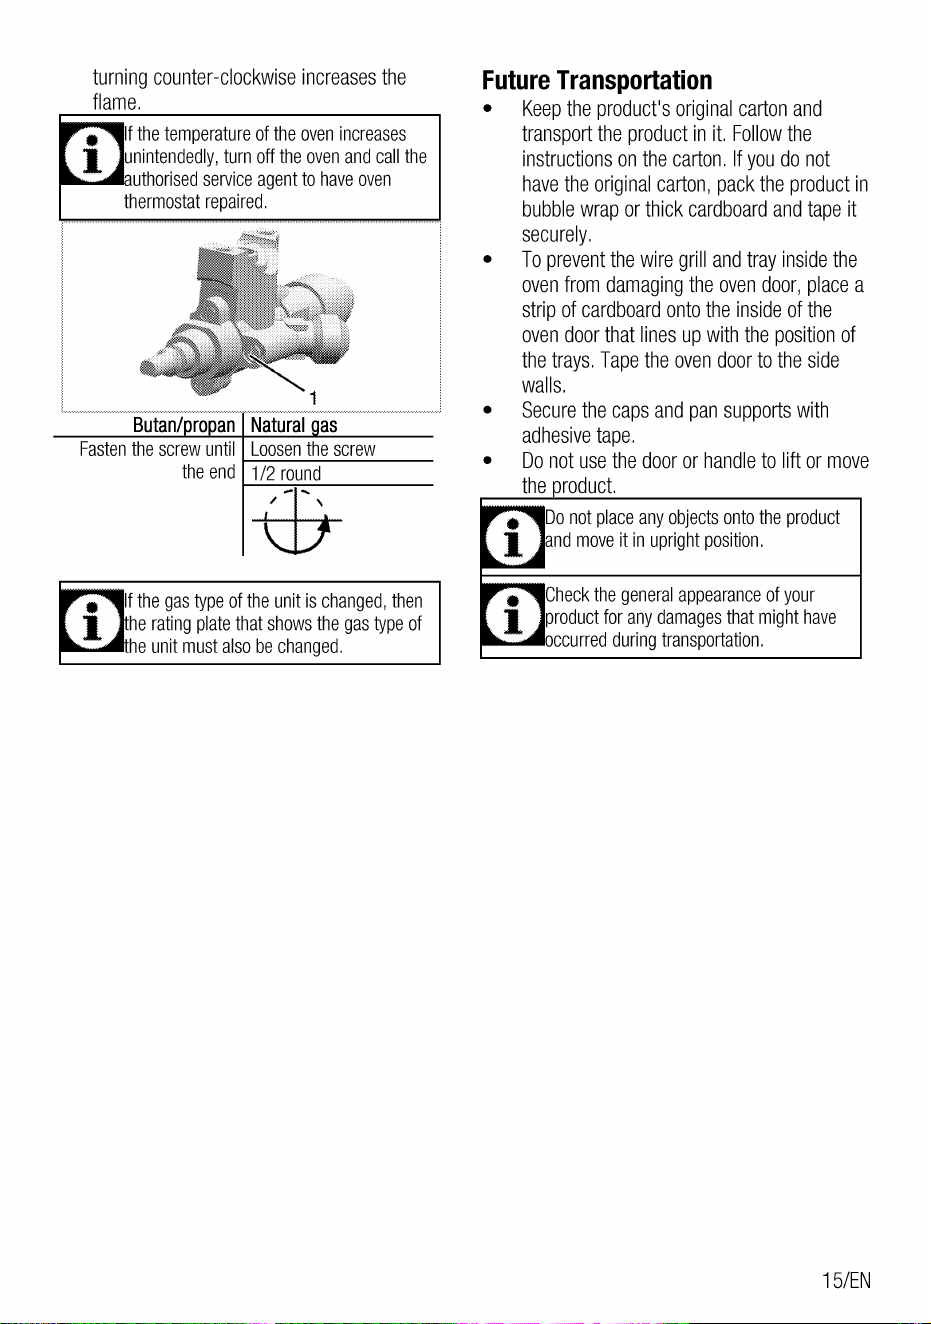
turningcounter-clockwiseincreasesthe
flame.
f the temperatureof the ovenincreases
i
nintendedly,turn off the oven and call the
uthorisedservice agent to have oven
thermostat repaired.
1
Butan/ ro an Natural as
Fasten the screw until Loosen the screw
the end 1/2 round
f the gas typeof the unit is changed,then
he rating plate that shows the gastype of
heunitmustalsobechanged.
Future Transportation
•
Keepthe product'soriginalcartonand
transportthe productin it. Followthe
instructionsonthe carton,If youdo not
havethe originalcarton,packthe productin
bubblewraporthick cardboardandtapeit
securely.
Topreventthe wire grill andtrayinsidethe
ovenfrom damagingtheovendoor,placea
strip of cardboardontothe insideof the
ovendoorthat linesup withthe positionof
the trays.Tapethe ovendoorto the side
walls.
Securethe capsandpansupportswith
adhesivetape.
Do not use the door or handle to lift or move
the roduct.
i
Do not place any objects onto the product
nd move it in upright position.
Checkthe generalappearanceof your
productfor anydamagesthatmighthave
urred during transportation.
15/EN
Preparation
Tips for saving energy
Thefollowinginformationwill helpyouto use
yourappliancein an ecologicalway,andto save
energy:
•
•
•
•
•
•
•
Use dark coloured or enamel coated
cookware in the oven since the heat
transmission will be better.
Whilecookingyourdishes,performa
preheatingoperationif it is advisedin the
usermanualorcookinginstructions.
Donot openthe door ofthe ovenfrequently
duringcooking.
Tryto cookmorethanonedish in the oven
at the same time whenever possible. You
cancookby placingtwo cookingvessels
onto the wire shelf.
Cook more than one dish one after another.
Theovenwill alreadybe hot.
Defrostfrozendishesbeforecookingthem.
Usepots/panswith coverfor cooking.If
thereis nocover,energyconsumptionmay
increase 4 times,
Select the burner which is suitable for the
bottomsizeof the potto beused.Always
selectthe correctpotsizefor yourdishes.
Largerpotsrequiremoreenergy.
1. Removeall packagingmaterials.
2. Wipethe surfacesof the appliancewith a
dampclothor spongeanddrywith a cloth.
Initial heating
Heatup the productfor about30 minutesand
thenswitchit off. Thus,anyproductionresidues
or layerswill be burntoff andremoved,
WARNING
Hot surfaces cause burns!
Product may be hot when it is in use. Never
touch the hot burners, innersections of the
oven,heatersandetc. Keepchildrenaway.
Always use heat resistant oven gloves when
putting in or removingdishes into/from the
hot oven.
Gas oven
1.
2.
3.
4.
5.
Takeall bakingtraysandthe wiregrill out of
the oven.
Close the oven door.
Selectthe highestflameof the gasoven;see
Howto usethegas oven,page 19.
Operate the oven about 30 minutes.
Turnoff youroven;SeeHowto usethegas
oven,page 19
Smokeand smell may emit for a couple of
1 hoursduringtheinitialoperation.Thisis
quite normal. Ensurethat the room is well
ventilated to remove the smoke and smell.
Avoiddirectlyinhalingthesmokeandthe
smell that emits.
Initial use
First cleaning of the appliance
hesurfacemightgetdamagedby some
1 etergents orcleaning materials.
o not useaggressivedetergents, cleaning
powders/creamsor anysharp objects
duringcleaning.
Donot use harsh abrasivecleaners or sharp
metal scrapersto clean the oven door glass
since they can scratchthe surface, which
mayresultin shatteringof the glass.
16/EN
How to use the hob
General information about cooking
Neverfill the panwith oilmorethan
one third of it. Do not leave the hob
unattendedwhen heating oil.
the cookingzoneyouwantinsteadof sliding
it.
Gascooking
Size of the vessel and the flame must match
eachother.Adjustthe gasflamesso that
theywill not extendthe bottomof the vessel
and center the vesselon saucepancarrier.
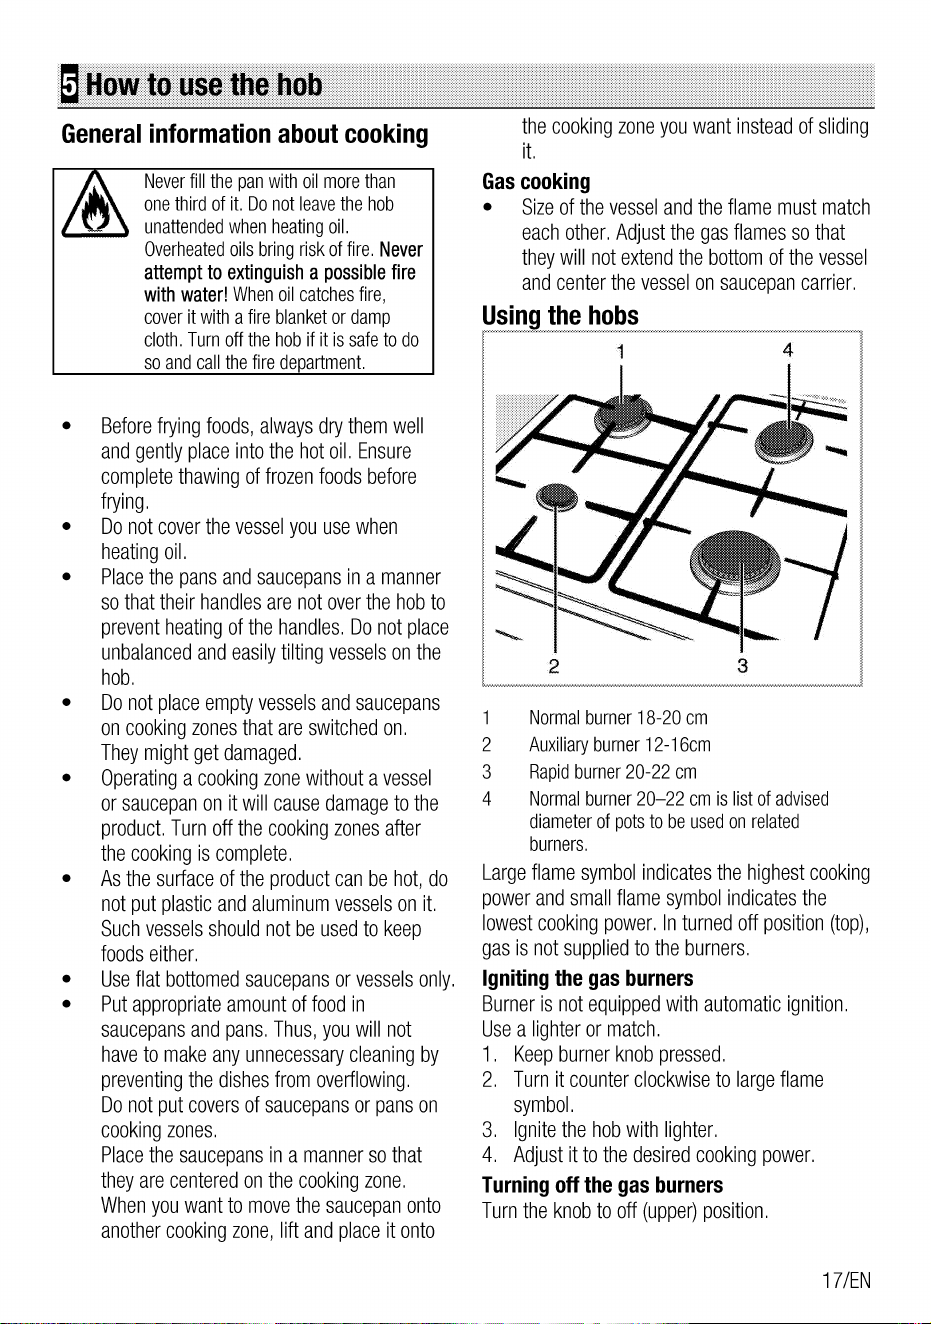
Using the hobs
•
•
•
•
Overheatedoils bring risk of fire. Never
attempt to extinguisha possiblefire
with water! Whenoil catchesfire,
coverit with a fire blanketor damp
cloth. Turn off the hob if it is safe to do
so and call the fire de artment,
Beforefrying foods,alwaysdry themwell
andgentlyplaceintothe hot oil. Ensure
completethawingoffrozenfoodsbefore
frying.
Do not cover the vessel you use when
heatingoil,
Placethe pansandsaucepansin a manner
so that their handles are not over the hob to
preventheatingof the handles.Donot place
unbalancedandeasilytiltingvesselson the
hob.
Donot placeemptyvesselsand saucepans
on cookingzonesthat areswitchedon.
Theymightget damaged.
Operatinga cookingzonewithouta vessel
or saucepanon it will causedamageto the
product.Turnoff the cookingzonesafter
the cooking is complete.
Asthe surfaceof the productcanbe hot, do
not put plasticandaluminumvesselson it.
Suchvesselsshouldnot be usedto keep
foods either.
Useflat bottomedsaucepansor vesselsonly.
Putappropriateamountof foodin
saucepans and pans. Thus, you will not
haveto makeanyunnecessarycleaningby
preventingthe dishesfrom overflowing.
Donot put coversof saucepansor panson
cookingzones.
Placethe saucepansin a mannerso that
theyarecenteredonthe cookingzone.
Whenyouwantto movethesaucepanonto
anothercookingzone,lift andplaceit onto
1
2
4
3
2
3
4
Normal burner 18-20 cm
Auxiliary burner 12-16cm
Rapidburner 20-22 cm
Normal burner 20—22 cm is list of advised
diameterof potsto beusedon related
burners.
Largeflame symbolindicatesthe highestcooking
powerand smallflame symbolindicatesthe
lowestcookingpower.Inturnedoff position(top),
gas is notsuppliedto the burners.
Igniting the gas burners
Burneris not equippedwith automaticignition.
Usea lighteror match.
1. Keepburnerknobpressed.
2. Turnit counterclockwiseto largeflame
symbol.
3. Ignitethe hobwith lighter.
4. Adjustit to the desiredcookingpower.
Turning off the gas burners
Turntheknobto off (upper)position.
1 UEN
Gasshut off safety system (in models with
thermic component)
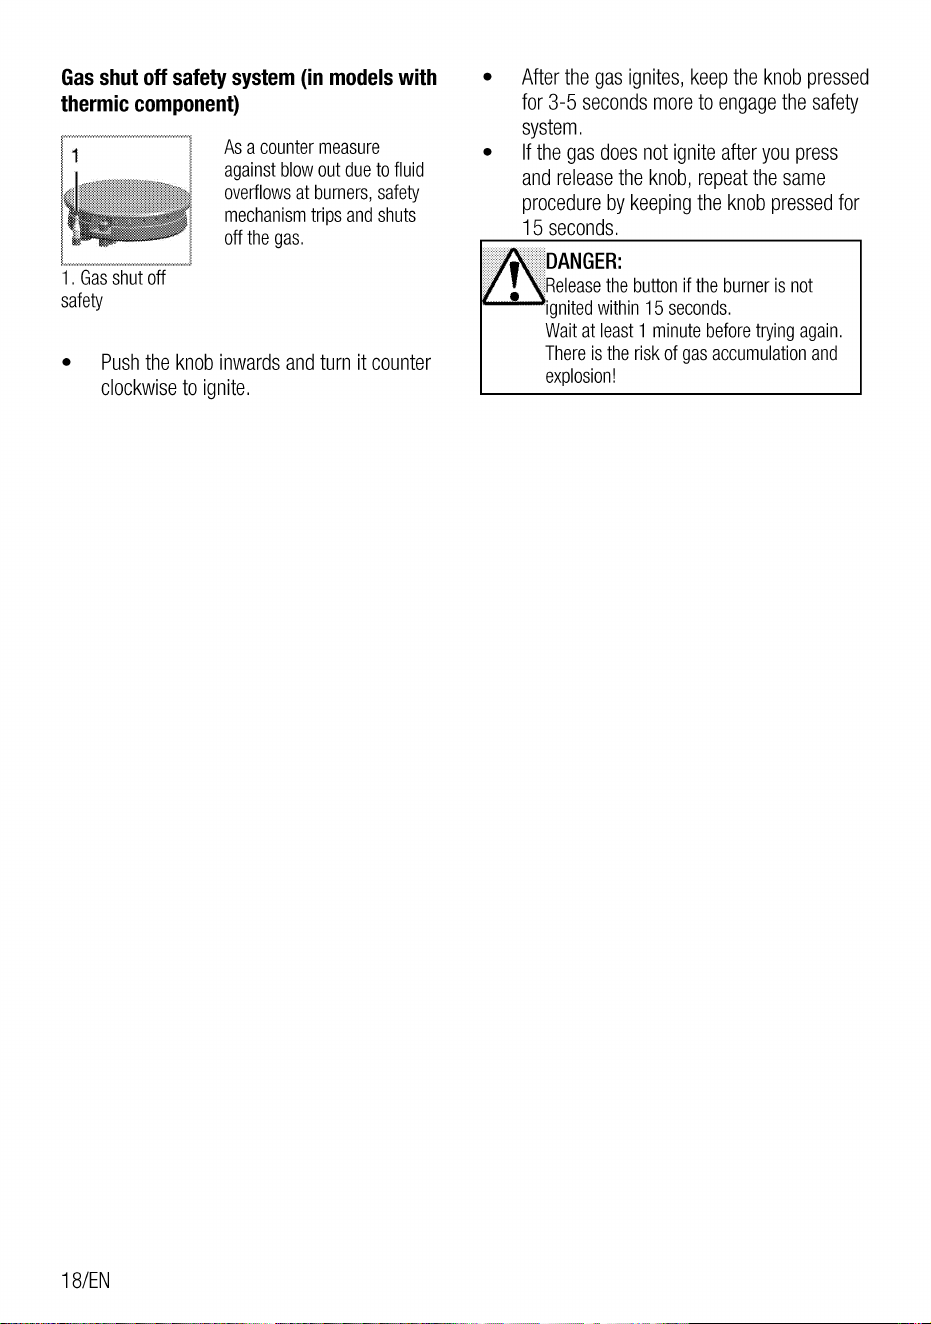
1
1. Gas shut off
safety
As a counter measure
againstblowoutduetofluid
overflowsat burners, safety
mechanism trips and shuts
offthe gas.
Afterthe gasignites,keepthe knobpressed
for 3-5 secondsmoreto engagethe safety
system.
Ifthe gasdoesnot igniteafteryoupress
andreleasethe knob,repeatthe same
procedureby keepingthe knob pressedfor
15 seconds.
DANGER:
4Releasethe button if the burner is not
ignitedwithin 15 seconds.
Waitat least1 minutebeforetryingagain.
There is the risk of gas accumulation and
explosion!
• Push the knob inwards and turn it counter
clockwiseto ignite.
1 8/EN
@How tooperate theoven
0
General information on baking,
roasting
WARNING
-Hot surfaces cause burns!
Productmaybehotwhenit isin use.Never
touch the hot burners, inner sections of the
oven, heatersand etc, Keepchildrenaway.
Alwaysuseheatresistantovengloveswhen
puttingin orremovingdishesinto/fromthe
hot oven.
DANGER:
Be careful when openingthe oven door as
steam may escape.
Exitingsteamcanscaldyourhands,face
and/or eyes.
Tips for baking
•
•
Usenon-stickycoatedappropriatemetal
plates or aluminum vessels or heat-resistant
silicone moulds,
Makebest useof the spaceon the rack.
Placethe bakingmouldin the middleof the
shelf.
Selectthe correctrack positionbefore
turningthe ovenor grill on. Donotchange
the rack position when the oven is hot,
Keeptheovendoorclosed.
Fishshouldbe placedon the middleor
lower rack in a heat-resistant plate.
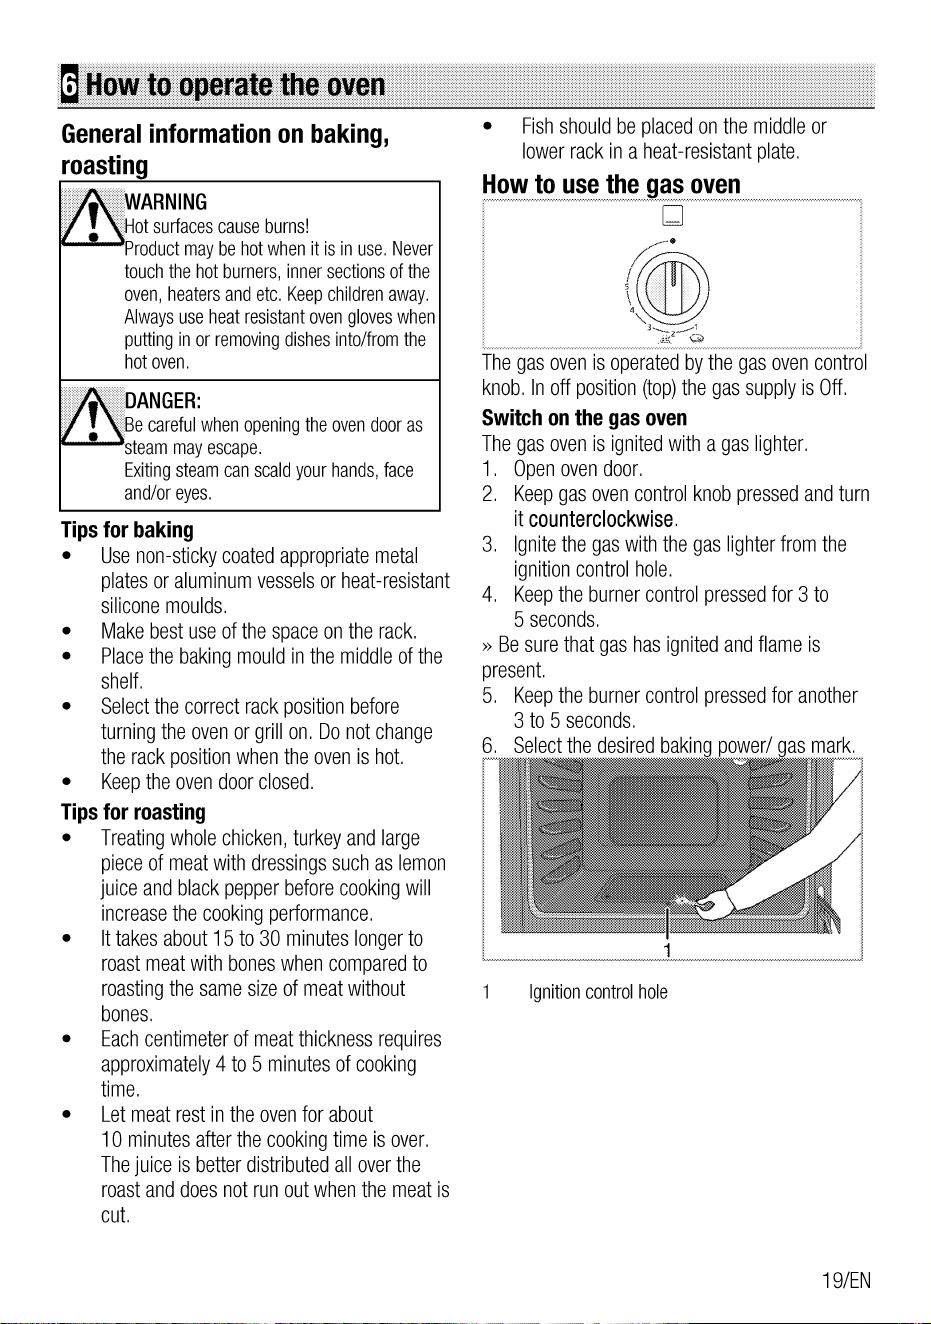
Howto usethgwgasoven
Thegasovenisoperatedby the gasovencontrol
knob.Inoff position(top)the gassupplyis Off.
Switch on the gas oven
Thegasovenis ignitedwith a gaslighter.
1. Openovendoor.
2. Keepgasovencontrolknobpressedand turn
it counterclockwise.
3. Ignitethegaswiththe gaslighterfromthe
ignitioncontrolhole.
4. Keepthe burnercontrolpressedfor 3 to
5 seconds.
» Be surethat gashasignitedandflameis
present.
5. Keepthe burnercontrolpressedfor another
Tips for roasting
•
•
•
Treatingwholechicken,turkeyandlarge
pieceof meatwith dressingssuchas lemon
juice andblackpepperbeforecookingwill
increasethe cookingperformance.
It takes about 15 to 30 minutes longer to
roast meat with bones when compared to
roastingthe samesizeof meatwithout
bones.
Eachcentimeterof meatthicknessrequires
approximately4 to 5 minutesof cooking
time.
Let meat rest in the oven for about
10 minutesafterthe cookingtimeis over.
Thejuice is betterdistributedall overthe
roast and does not run out when the meat is
cut.
3 to 5 seconds,
6. Select the desired bakin
1
Ignitioncontrol hole
ower/ as mark.
19/EN
DANGER:
•here is theriskof gascompressionand
explosion!
Do not attempt to ignite the gas more that
15seconds.If the burneris notignited
within 15 seconds, turn off the knob and
wait for 1 minute. Ventilate the room before
reattemptingto ignitethe burner.Thereis
theriskof gascompressionandexplosion!
Switch off the gas oven
1. Turngasovencontrolknobto off position
(top).
Gasleveltemperaturechart
Gas level
Temperåtåré 236
Bakin and roastin
266
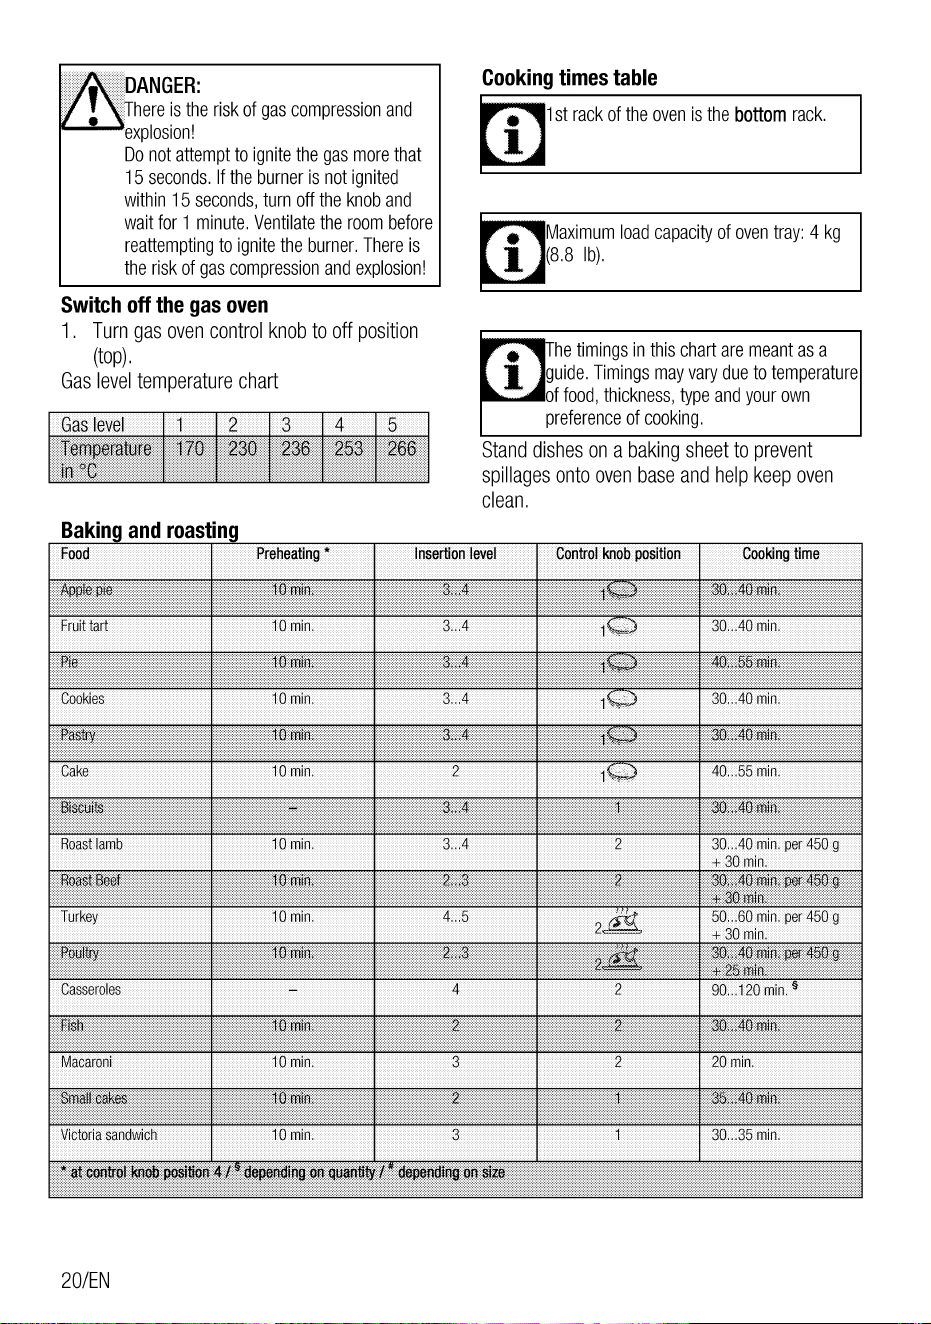
Cooking times table
1st rack of the oven is the bottom rack.
Maximumloadcapacityof oventray:4 kg
(8.8 lb).
he timings in this chart are meant as a
guide. Timings mayvary due to temperature
of food, thickness, type and your own
preferenceof cooking.
Standdisheson a bakingsheetto prevent
spillagesontoovenbaseand helpkeepoven
clean.
Food
.polObidÄ
Fruit tart
Cookies
Roast lamb
Turkey
Ppy!tw
Casseroles
Macaroni
Victoria sandwich
Preheating•
10 min.
iO min.
10 min.
10 min.
VIC)min.
10 min,
10 min.
Insertion level
2
4
3
3
Controlknobposition
2
2
2
Cookingtime
30. .40 mill,
30...40 min.
40.„.55 mine
30...40 min. per450g
+ 30 nn.
50...60 min.per450 g
+ 30 nn.
90.,.120 min
20 min.
30...35 min.
-dependingon quentitya/€;dependingonsize
20/EN
Recipes
Perfect Roast Chicken with Stuffing Balls
6.
thickestpart,andthe stuffingballshave
startedto turn golden.
Removethe roastingtin from the ovenand
transferchicken,stuffingballsand
vegetablesto hot servingplate,coverloosely
with foil and leavein a warm placeforthe
meat to rest.
•
•
1
2.
3.
4.
5.
1 mediumchicken(approx.1.5 kg)
Saltandgroundblackpepper
1 lemon, quartered
3-4 springsof thyme
1-2 tablespoonsoliveoil
1 onion,peeledandcut intowedges
Forthe stuffing balls:
125gfreshwhite breadcrumbs
3-4 leveltablespoons freshly chopped
parsley
1 leveltablespoonfreshlychoppedthyme
Zest of lemon
50g butter,melted
1 mediumegg
SettheoventogasmarkA.
Seasonthe cavityof chickenwith saltand
pepper,thenplacethe lemonwedgesand
thymeinside.Rubtheoliveoil overthe skin
of the chicken.
Putthe onionandcarrotsin the roastingtin,
placethe chickenontop andseason.
Tomakethe stuffing,placeall ingredientsin
a bowlandmixtogether,thenforminto6
balls.Chillthemwhilethe chickenis cooking.
Place the chicken in the centre of the oven
andcookfor 1 hour,thenput the stuffing
balls around the chicken and cook for a
further20-30 minutes,or untilthe juicesrun
clear when the chicken is pierced in the
To freeze : Pack leftover chicken into freezer
bagswhencoldandfreezefor up to 1 month.
Easy Apple Cake
1.
2.
3.
4.
175g self-raisingflour
175g softbakingmargarine
175g castersugar
3 largeeggs
| 1/2medium-sizedcookingapples,peeled
and cubed
1 levelteaspooncinnamon
Grated rind of lemon
SettheoventogasmarkC).
Putthe flour, margarineandsugarina bowl.
Addthe eggsgraduallyandbeatwell. Stir in
the apple, cinnamon, lemon rind and
sultanas.
Bakein the oven for 40-50 minutes, until the
cake has risen and feels firm to the touch in
the center , and a skewer comes out clean
afterbeinginsertedintothe cake.
Leaveto cool in the tin for 10 minutes, then
transferto awire rackto cool.Dustwith icing
sugarbeforeserving.
21/EN
Maintenance and care
General information
Servicelife ofthe productwill extendandthe
possibilityof problemswill decreaseif the
roduct is cleaned at re ular intervals.
DANGER:
Disconnectthe product from mains supply
beforestartingmaintenanceandcleaning
works.
There is the risk of electric shock!
DANGER:
•Allow the product to cool down beforeyou
Cleaning the hob
Gas hobs
1.
2.
3.
4.
Removeand cleanthe saucepancarriersand
burnercaps.
Clean the hob.
Install the burner caps and make sure that
they are seatedcorrectly.
Wheninstallingthe uppergrills, payattention
to placethe saucepancarriersso thatthe
burners are centered.
•
clean it.
Hot surfaces may cause burns!
Cleanthe productthoroughlyafter each use.
In this way it will be possible to remove
cookingresiduesmoreeasily,thusavoiding
thesefromburningthe nexttime the
applianceis used.
Nospecialcleaningagentsare requiredfor
cleaningthe product.Usewarmwaterwith
washingliquid,a softclothorspongeto
cleanthe productand wipeit with a dry
cloth.
Alwaysensureanyexcessliquidis
thoroughlywipedoff aftercleaningandany
spillageis immediatelywipeddry.
Donot usecleaningagentsthat contain
acid or chloride to clean the stainless or
inox surfaces and the handle. Use a soft
clothwith a liquiddetergent(notabrasive)to
wipethosepartsclean,payingattentionto
swee in one direction.
Cleaning the control panel
Clean the control paneland knobs with a damp
cloth and wi e them d
Do not remove the control buttons/knobs to
clean the control panel.
Controlpanelmaygetdamaged!
Cleaning the oven
Clean oven door
To clean the oven door, use warm water with
washingliquid,a softclothor spongeto clean
the roduct and wi eit with ad cloth.
Don't use any harsh abrasivecleaners or
sharpmetalscrapersfor cleaningtheoven
door.Theycouldscratchthesurfaceand
destroy the glass.
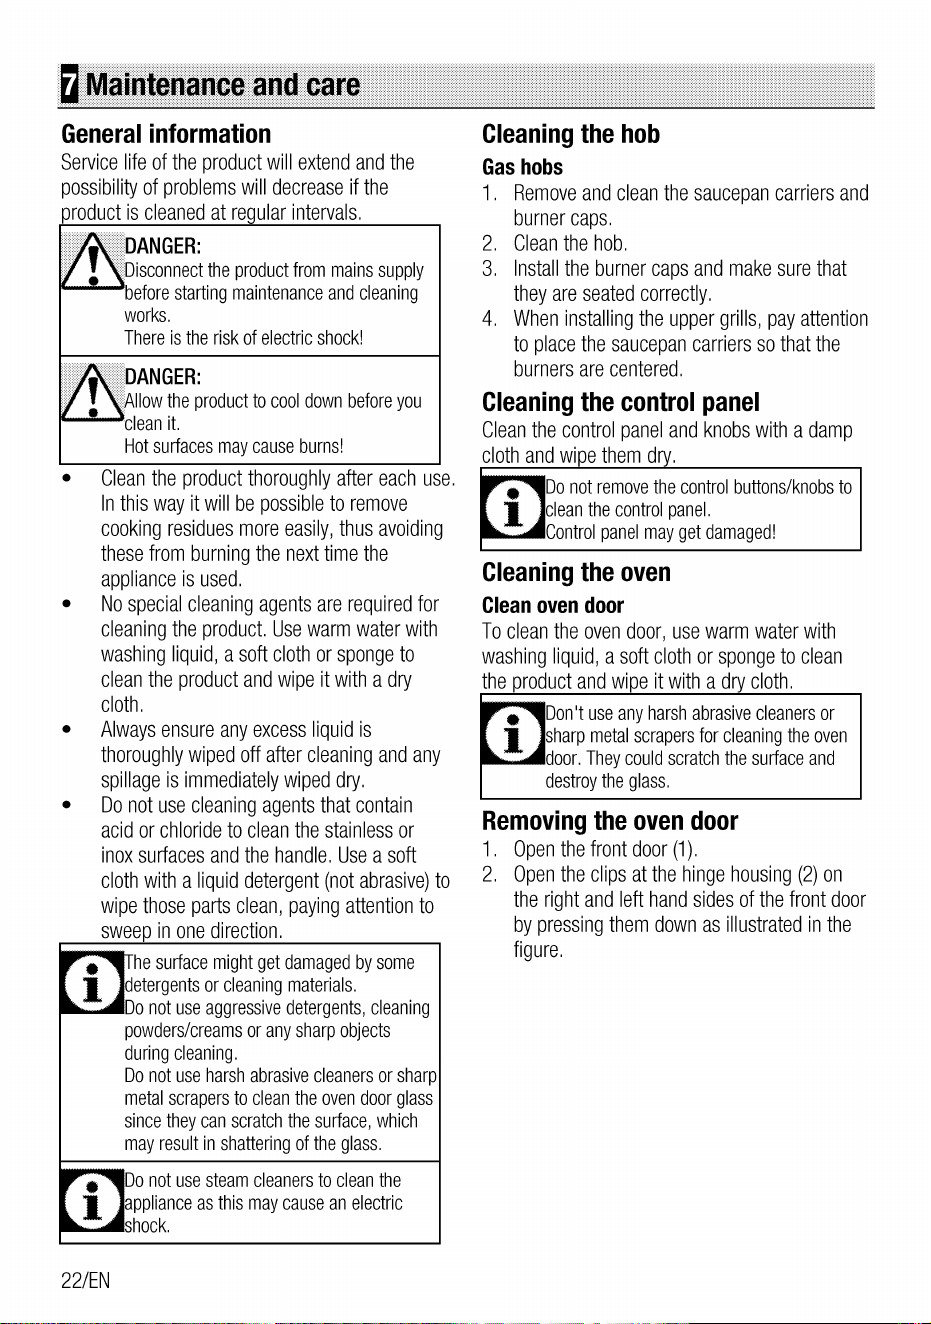
Removing the oven door
1. Openthe front door (1).
2, Opentheclips at the hingehousing(2)on
the rightandleft handsidesof the front door
by pressingthem downas illustratedin the
figure,
i
22/EN
hesurfacemightgetdamagedbysome
detergentsor cleaning materials.
Do not use aggressivedetergents, cleaning
powders/creams or anysharp objects
duringcleaning.
Do not use harsh abrasivecleaners or sharp
metalscrapersto cleantheovendoorglass
since they can scratch the surface, which
mayresultin shatteringofthe glass.
Do not use steam cleaners to clean the
pplianceas this may cause an electric
hock.
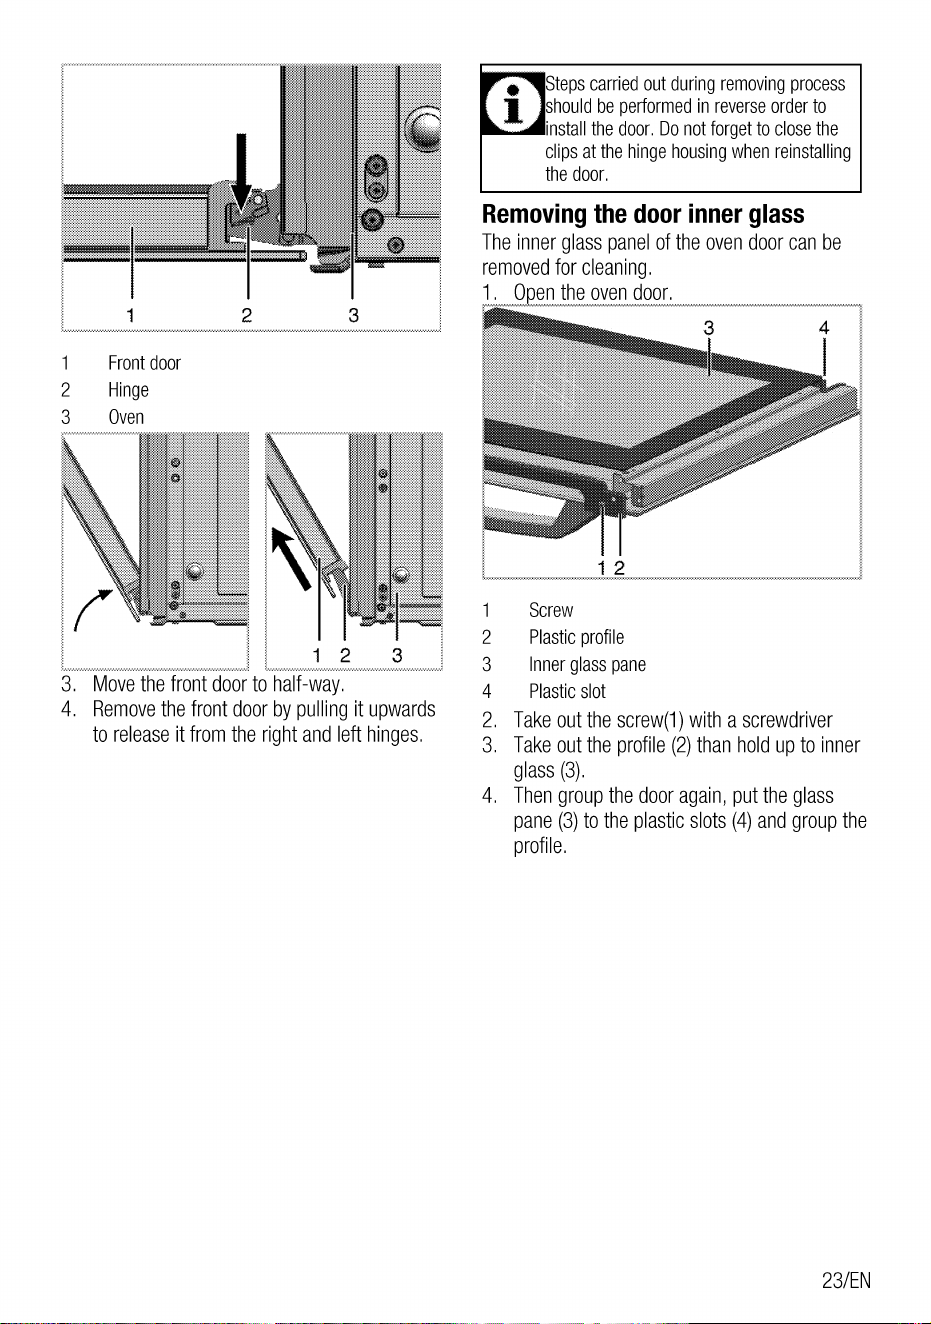
Stepscarriedoutduringremovingprocess
should be performedin reverseorder to
installthedoor.Donotforgetto closethe
clips at the hinge housing when reinstalling
the door.
Removing the door inner glass
Theinnerglasspanelof the ovendoorcanbe
3
removedfor cleaning.
1. 0 en the oven door.
3 4
2
3
1
Front door
Hinge
Oven
2
3
3. Movethefront doorto half-way.
4. Removethe front doorby pullingit upwards
to releaseit from the rightand lefthinges.
2
3
4
2.
3.
4.
12
Screw
Plasticprofile
Inner glass pane
Plastic slot
Takeout the screw(l) with a screwdriver
Takeout the profile(2)thanholdup to inner
glass(3).
Thengroupthe dooragain,putthe glass
pane(3)to the plasticslots(4)andgroupthe
profile.
23/EN
@Troubleshooting
Oven emiB steam Mien itis in use.
• It is normalthat steamescapesduringoperation. Thisis nota fault.
Productemitsmetal noiseswhileheatingandcooling;
• Whenthe metalpartsareheated,they mayexpandandcausenoise.>>> Thisis nota fault.
There iS ignition spark,
• No current >>> Check fuses in the fuse box.
Thereis no gas,
• Maingasvalveis closed.>>> Opengas valve.
• Gaspipe isbent.>>> Instal/gaspipeproperly.
burnersarenotburningproperlyoratall.
•
•
•
Burnersaredirty. >>> Cleanburnercomponents.
Burnersarewet. >>> DO/the burnercomponents.
Burnercapis not mountedsafely,>>> Mountthe burnercapproperly.
Gasvalveis closed. Opengas valve.
Gascylinderis empty(whenusingLPG), Replacegas cylinder.
Consultthe AuthorisedServiceAgentor
i
echnician with licence or the dealer where
ou have purchasedthe product if you can
notremedythetroublealthoughyouhave
implementedthe instructions in this section.
Neverattemptto repaira defectiveproduct
yourself.
24/EN

Vä rugäm sä cititi mai intai manualul de utilizare!
Stimate client,
Vä multumimpentrucä preferatiun produsArctic. Sperämsä obtineticelemaibunerezultatede peurma
produsuluinostrucarea fostfabricatutilizåndo calitatesuperioaräsi otehnologiemodernä.Prinurmare,
Värugämsä cititi cu atentieintregul manualde utilizaresi documenteleinsotitoareacestuiamaintede
utilizarea produsului sisälepästratipentruconsultäriulterioare.,Tncazulincarepredatiprodusulaltcuiva,
predati$i manualulde utilizare.Respectatitoateavertizärile informatiiledin manualulde utilizare.
Retineticä manualulde utilizarese aplicä$i pentrualte modele.Diferenteledintre modelevorfi
identificate Tn manual.
Explica!iasimbolurilor
Tn manualulde utilizaresunt utilizateurmätoarelesimboluri:
i
Informatiiimportante sau recomandäri
utile cu privire la utilizare.
Avertismentdesituatiipericuloasecu
privirela viatä$i proprietate.
Aveftismentdesocelectric
AveÄisment de risc de incendiu,
Avertismentdesuprafetefierbinti,
Argelik A.S.
Karaaöac caddesiNo:2-6
34445 Sütlüce/lstanbul/TURKEY
Made in TURKEY
CUPRINS
Instruc!iuni importante 9i
avertismente privind siguranta
mediul inconjurätor
Sigurantageneralä
Sigurantala lucrulcu gazul
Sigurantaprodusului...
Domeniu de utilizare„.,
Sigurantacopiilor..
Depozitareala depuri a produsuluivechi
DepozitareaIadepuri a materialelorde
ambalare ,
Informatii generale
Prezentaregeneralä
Continutulpachetului...
Specificatiitehnice
Tabelulinjectoarelor
Instalare
tnaintede instalare,
Instalareasi conectarea,.
Adaptarealatipul de gazfolosit
Transportul
Pregätiri
Sfaturipentrueconomisireaenergiei
Prima utilizare
Curätareainitialäa aparatului...
fncälzireainitialä..
Utilizarea plitei
.16
17
4
8
..9
11
...11
...12
...13
.15
16
.16
.16
Informatiigeneraledesprepreparareaalimentelor
.17
Utilizareaplitelor..„
.17
Utilizarea cuptorului
19
InformatiigeneralereferitoareIacoacere,fripturi
si prepararea
.19
Utilizareacuptoruluicu gaz.
.19
Tabelulduratelorde preparare...
. 20
Retete 21
intretinere$icurätare
22
Informatiigenerale.
. 22
Curätareaplitei .
. 22
Curätareapanouluide control.
22
Curätareacuptorului..
. 22
DemontareaLl$iicuptorului..
. 22
Demontareageamuluiinterioral u$i...
. 23
Remedierea problemelor
24
3/RO
'dInstruc!iuni importanteavertismenteprivindsiguran!aii
mediulinconjurätor
Aceastä sectiune contine informatii cu
privirelasigurantacareVävorajuta
säVäprotejatitmpotrivarisculuide
vätämarecorporaläsau pagube
materiale. Nerespectareaacestor
instructiuni va duce la anularea
oricäreigarantii.
Sigurantageneralä
Acestprodus poatefi utilizat de
cätre copii cu vårsta peste 8 ani
sau mai mari $i persoanecu
capacitätifizice,senzorialesau
mintale reduse sau lipsä de
experientä cuno$tinte,dacä
suntsupravegheatisau instruiti
cu privire la utilizareaprodusului
tntr-o manieräsiguräsitnteleg
pericoleleimplicate.
Acestprodus nu este destinat
pentrujoculcopiilor.Curätareasi
Tntretinerea nu vor fi efectuate de
cätrecopiifäräsupraveghere.
A nu se amplasaprodusulpe o
pardosealä acoperitäcucovor.in
caz contrar, lipsafluxului de aer
sub produsva conduce la
supratncälzireapärtilorelectrice.
Acestava cauza probleme
produsului.
Procedurilede instalaresi
reparatiitrebuie efectuatede
cätreagentide serviceautorizati.
Producätorulnu este räspunzätor
pentru daunelerezultatedin
procedurileefectuate de cätre
persoaneleneautorizatecare pot
anula$igarantia.inaintede
instalare, cititi instructiunile cu
atentie.
Nufolositiprodusuldacäeste
defect sau prezintädefecte
vizibile.
Dupäfiecareutilizareverificati
dacä butoaneleprodusuluisunt
tnchise.
Siguranta Ia lucrul cu gazul
Lucrärilela echipamentelesi
retelelede gazpotfi efectuate
numaide persoanecalificate
autorizate.
inaintedeinstalare,asigurati-vä
cä aparatuleste reglatpentru
parametriireteleilocale de gaz
(tipul$i presiuneagazului).
Acestaparat nu este conectat la
un sistem de evacuarea gazelor
arse.Aparatul trebuie instalat
conectat conform reglementärilor
tn vigoare.Seva acordao atentie
deosebitäreglementärilortn
vigoareprivindventilatia; vezi
inaintedeinsta/are,pagina11
Utilizareauneimasinide gätitcu
gaz produce !cäldurä, umiditate
gazede combustietn tncäpereaTn
careesteinstalatä.Asigurati-vä
cä bucätäria !este bine ventilatä
Tnspecialcåndfolositiaparatul:
mentineti orificiile de ventilare
naturalä deschise, sau instalati un
dispozitivdeventilaremecanicä
(hotä).Utilizareaprelungitäsi
intensiväa aparatului poate
necesitaventilaresuplimentarä,
de exempluprin sporireaturatiei
ventilatorului hotei.
Echipamentele9iretelelede gaz
trebuieverificate periodic pentru a
asigurafunctionareacorectäa
acestora.Regulatorul,furtunul si
colierul acestuia trebuie verificate
periodic tnlocuite la perioadele
recomandatede producätorul
acestora sau cånd este necesar.
Curätatiregulatarzätoarele.
Flacäratrebuiesäfie albasträ$i
uniformä.
Aparatelecu gaz necesitäo
combustiecorectä.in cazulunei
combustii incomplete,este posibil
sä se generezemonoxidde
carbon (CO).Monoxidulde carbon
este un gaz incolor, inodor $i
foarte toxic, ce poateproduce
moarteachiar$itn dozefoarte
mici.
Solicitatide la compania
distribuitoarede gazeinformatii
cu privirela numereledeurgentä
mäsuriledesigurantäce
trebuie luate la detectarea
mirosului de gaz.
Mäsuri de luat la detectarea mi-
rosului de gaz
Nufolositifläcäri deschise nu
fumati. Nu actionati butoane
electrice(deex.tntrerupätoarele
becurilor,soneriaetc). Nufolositi
telefoane fixe sau mobile. Pericol
de exploziesi intoxicatie!
inchideti toate robinetele
aparatelorcu gazsi gazometrelor.
Deschideti119ile$iferestrele.
Verificatisträngereatuturor
tuburilor conexiunilor. Dacä
simtititn continuaremirosde gaz,
päräsitilocuinta.
Avertizati vecinii.
Chematipompierii.Folositiun
telefon din afara locuintei.
NurevenitiTncasädecätdupäce
vi se confirmä cä nu existä
pericole.
Siguran!a produsului
Aparatulsi pieselesaleaccesibile
potdevenifierbintitn timpul
folosirii. Evitatiatingerea
elementelorfierbinti.Copiiimai
mici de 8 ani trebuie tinuti Ia
distantäsausupravegheati
continuu.
Nufolositi produsulcänd logica
sau coordonarea Vä sunt afectate
de alcool$i / sau medicamente.
Avetigrijäcandpreparatiretete
care includ bäuturi alcoolice.
Alcoolulse evaporäla temperaturi
mari$i poateprovocaincendii
5/RO
deoarecese va aprindetn contact
cu suprafetelefierbinti.
Nu läsati materiale inflamabile
längäprodus, deoarecepärtile
lateralealeacestuiase pottncälzi
tn timpul utilizärii.
tntimpulfolosirii,aparatulse
tnfierbåntä.Evitatiatingerea
elementelor de tncälzire din
interiorul cuptorului.
Asigurati-väcä orificiilede
ventilare nu sunt infundate.
Nutncälziticutii si borcane
tnchisetn cuptor.Presiunea
acumulatätn cutie/borcanpoate
provocaexploziaacestuia.
Nuamplasatitävi degätit,
recipientesau folie din aluminiu
direct pe partea inferioaräa
cuptorului. Cälduraacumulatä
poatedeteriora partea inferioaräa
cuptorului.
'Nu folositi substante de curätare
abrazive sau raclete metalice
ascutitepentrua curätageamul
usiicuptorului,deoareceacestea
potsäzgåriesuprafatasi potsä
ducäla spargereageamului.
Nu folositi sisteme cu aburi
pentru a curäta acest aparat,
deoareceexistäpericoldesoc
electric.
Nufolositiprodusuldacägeamul
usiiestedemontatsaucräpat.
Folositimän119i decuptor
termoizolatoare cand introduceti
6/RO
sau scoateti alimente tn/din
cuptorul fierbinte.
inchideticapaculnumaidupäce
plitele sauarzätoareles-au räcit.
Capacultrebuie sä fie uscat
mainte de deschidere,pentru a
evita scurgereaapeitn spatele
cuptorului sautn interiorul
acestuia.
Preparareanesupravegheatäpe
plitä a alimentelorcu ulei sau
gräsimepoatefi periculoasäsi
poateprovocaincendii. Nu
incercatiNICIODATÄsästingeti
unincendiucu apä,ci opriti
aparatul,apoiacoperitiflacäracu
un capacsau cu o päturä contra
incendiului.
Pericolde incendiu: Nu depozitati
obiectepesuprafetelede gätit.
Pentrua preveniincendiile;
Asigurati-väcä$techeruleste
conectat corect la prizä pentru a
nu face scåntei.
Nu folositi cabluri deteriorate,
täiatesauprelungitoare;folositi
cablul original.
Asigurati-väcästecherulnueste
umed sau ud.
Asigurati-väcä racordulla gaz
este montat corect nu existä
scurgeri.
Domeniu de utilizare
• Acest produs este destinat uzului
casnic. Se interzice utilizarea
comercialä.
Acestaparat este destinat numai
gätitului alimentelor.Nutrebuie
folosit pentru alte scopuri, de
exemplupentrutncälzirea
tncäperilor.
Producätorulnu este responsabil
pentru pagubeleprovocatede
utilizareasau manipularea
incorectä.
Cuptorulpoatefi folosit pentru
dezghetarea,coacerea,präjirea
preparareala grill a alimentelor.
Siguran!a copiilor
Componenteleaccesibilese pot
tnfierbäntaTntimpul folosirii. Nu
läsaticopiiisä seapropiede
aparat.
Ambalajelepot fi periculoase
pentrucopii. Nuläsatiambalajele
latndemänacopiilor.Depozitatila
depuri toateambalajeleconform
standardelor de mediu.
Produseleelectrice$i/sau pe gaz
sunt periculoasepentrucopii. Nu
läsaticopiiisäseapropiede
produstn timpcefunctioneazä$i
nuti läsatisä sejoacecu acesta.
Avetiladispozitieunsistem
suplimentarde protectietmpotriva
atingeriiusiicuptorului.Aceastä
piesätrebuiemontatäcandtn
apropiereacuptorului se aflä copii
mici.
Nuamplasati pe aparat obiecte
pecarecopiiiar fi tentatisä le
apuce.
NuamplasatiobiectegrelepeL19a
deschisä$i nu permiteticopiilor
sä seasezepeaceasta.Pericol
de rästurnarea cuptorului sau de
deteriorare a balamalelor.
Depozitarea la depuri a
produsului vechi
Depozitarea la depuri a
materialelor de ambalare
• Materialele de ambalare sunt
periculoasepentrucopii.Pästrati
materialele de ambalare tntr-un
loc sigur, la care copiii nu au
acces. Materialele de ambalare
ale produsuluisunt fabricate din
materialereciclabile. Sortati-le
depozitati-leladepuri tn mod
corect.Nule depozitatitmpreunä
cu gunoiul menajer.
URO
Informa!iigenerale
Prezentare generalä
1
4
2
7
2
3
4
2
3
4
5
8/RO
2
3
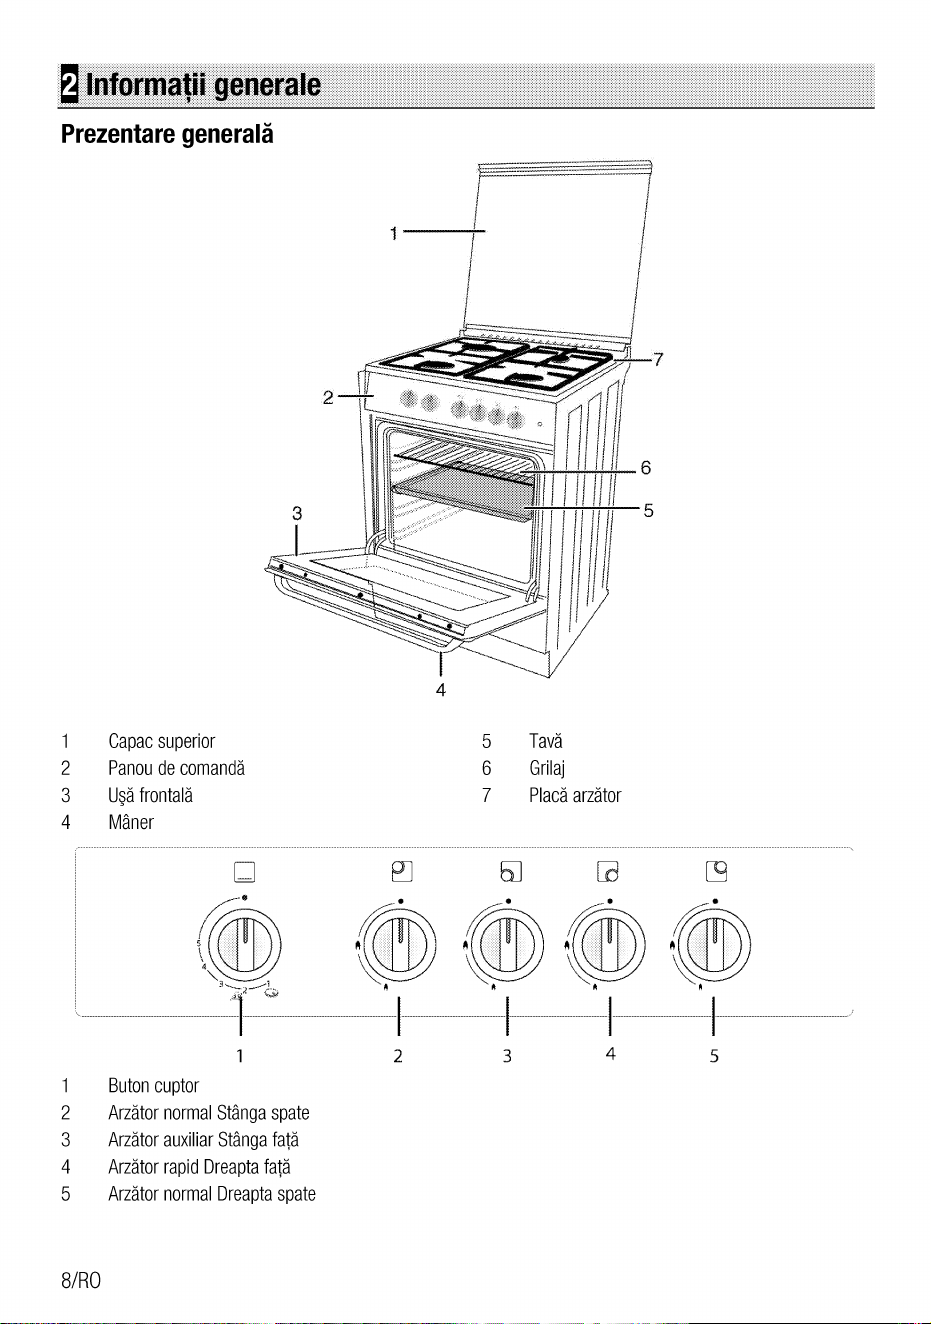
Capacsuperior
Panou de comandä
I-J$äfrontalä
Mäner
Butoncuptor
ArzätornormalStångaspate
ArzätorauxiliarStängafatä
ArzätorrapidDreaptafatä
Arzätor normal Dreaptaspate
6
5
5
6
7
3
Tavä
Grilaj
Placä arzätor
4
5
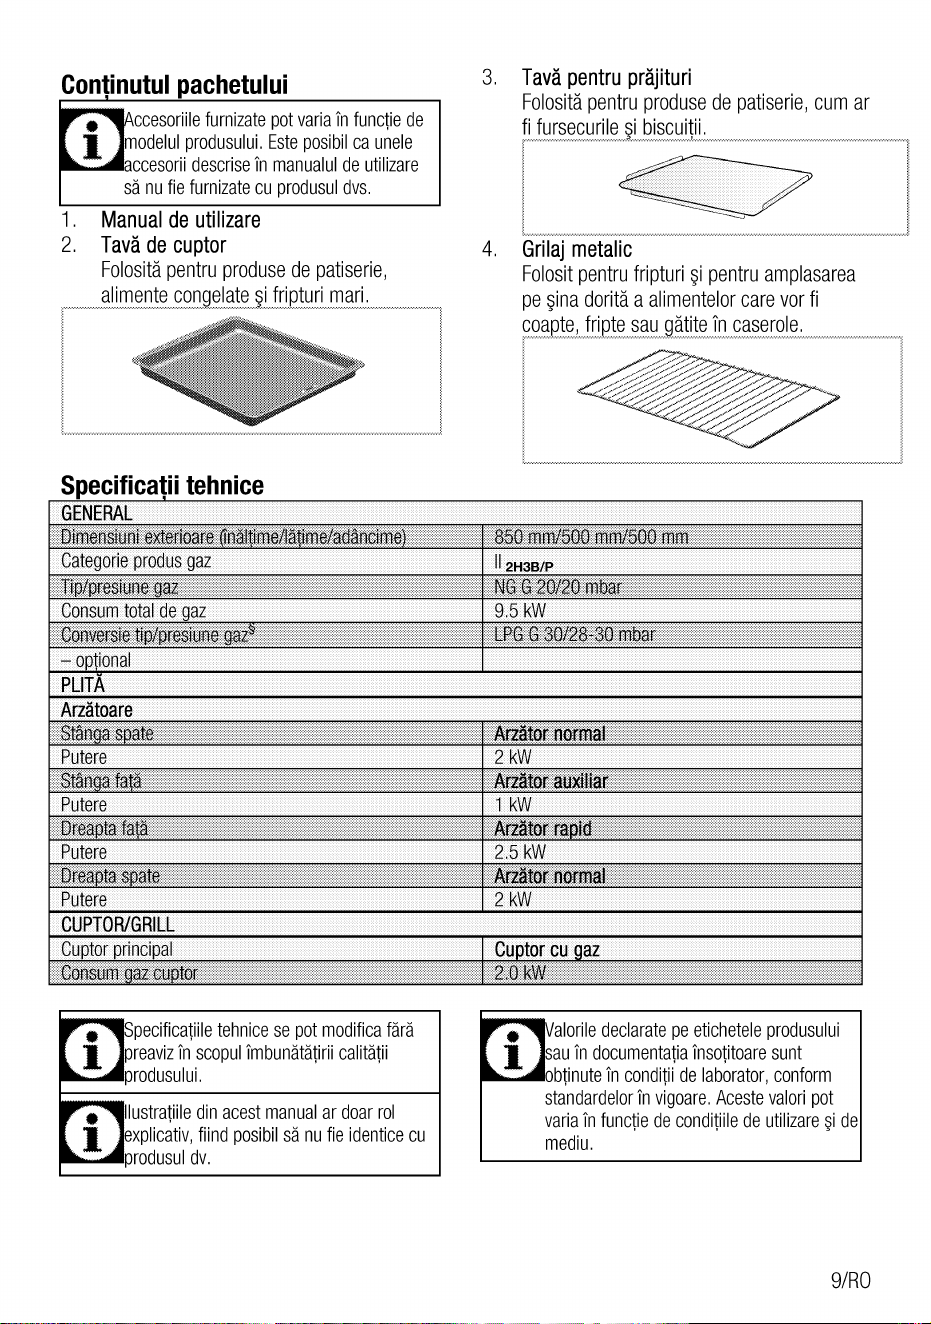
Continutul pachetului
ccesoriilefurnizatepotvariain functiede
odelulprodusului.Esteposibilca unele
2.
ccesorii descrise in manualul de utilizare
sä nu fie furnizatecu produsuldvs,
Manual de utilizare
Taväde cuptor
Folositäpentruprodusede patiserie,
alimentecongelatesi$ip!urimari.
3,
4,
Tavä pentru präjituri
Folositäpentruprodusede patiserie,cum ar
fi fursecurile i biscui ii.
Grilaj metalic
Folositpentrufripturi pentruamplasarea
pe sinadoritäa alimentelorcarevorfi
coa te, fri te sau ätite in caserole.
Specificatii tehnice
GENERAL
Dimensi •é*teriOare näl
Categorieprodusgaz
-Tiptoresiune
Consum total de az
$june
-o 'onal
PUTA
Arzätoare
Putere
St fa
Putere
Putere
Putere
CUPTOR/GRILL
Cu tor rinci al
"mela
m
-II2H3B/P
9.5 kW
m mm
mLPGGm30/28,30n
'Arzätornormal
Arzätoroauxiliar
vArzätor id
2.5 kW
Arzätor normal
2 kW
Cu tor cu az
i
pecificatiiletehnicese potmodificafärä
reavizin scopulimbunätätiriicalitätii
rodusului.
lustratiile din acest manual ar doar rol
xplicativ,fiind posibil sä nu fie identicecu
rodusul dv.
i
alorile declaratepe etichetele produsului
auin documentatiainsotitoaresunt
btinutein conditiidelaborator,conform
standardelorin vigoare.Acestevaloripot
variain functiedeconditiiledeutilizare$ide
mediu.
9/RO
Tabelul injectoarelor
Pozi ie zonä litä
TipgzCPresiune
G 20/20 mbar
30/2840
Ti az/ Presiune
G 20/2jinbår
G 30/28-30 mbar
1 0/RO
2 kW
Stångaspate
103
7
az
Stängafatä
2.5 kW
Dreaptafatä
125
80
2 kW
Dreaptaspate
10372
Cu tor cu
71
az
@Instalare
Produsultrebuieinstalatde o persoanäcalificatä,
conform reglementärilor Tnvigoare.Tncazcontrar,
garantiavafi anulatä.ProducätorulnuGi asumä
räspundereapentrudauneleprodusein urma
efectuärii procedurilor de cätre persoane
neautorizate i oate anula arantia.
i
Pregätireainstalatiilorelectrice$i degazin
edereainstalärii produsului constituie
responsabilitateaclientului.
PERICOL:
Produsul trebuie instalat in conformitate cu
oatereglementärilelocaleprivindinstalatiile
degazsi/ sauelectricitate,
PERICOL:
inaintedeinstalare,verificativizualdacä
produsul nu este deteriorat.
Dacäestedeteriorat,nuil instalati.
Produseledeterioratesunt periculoase.
•
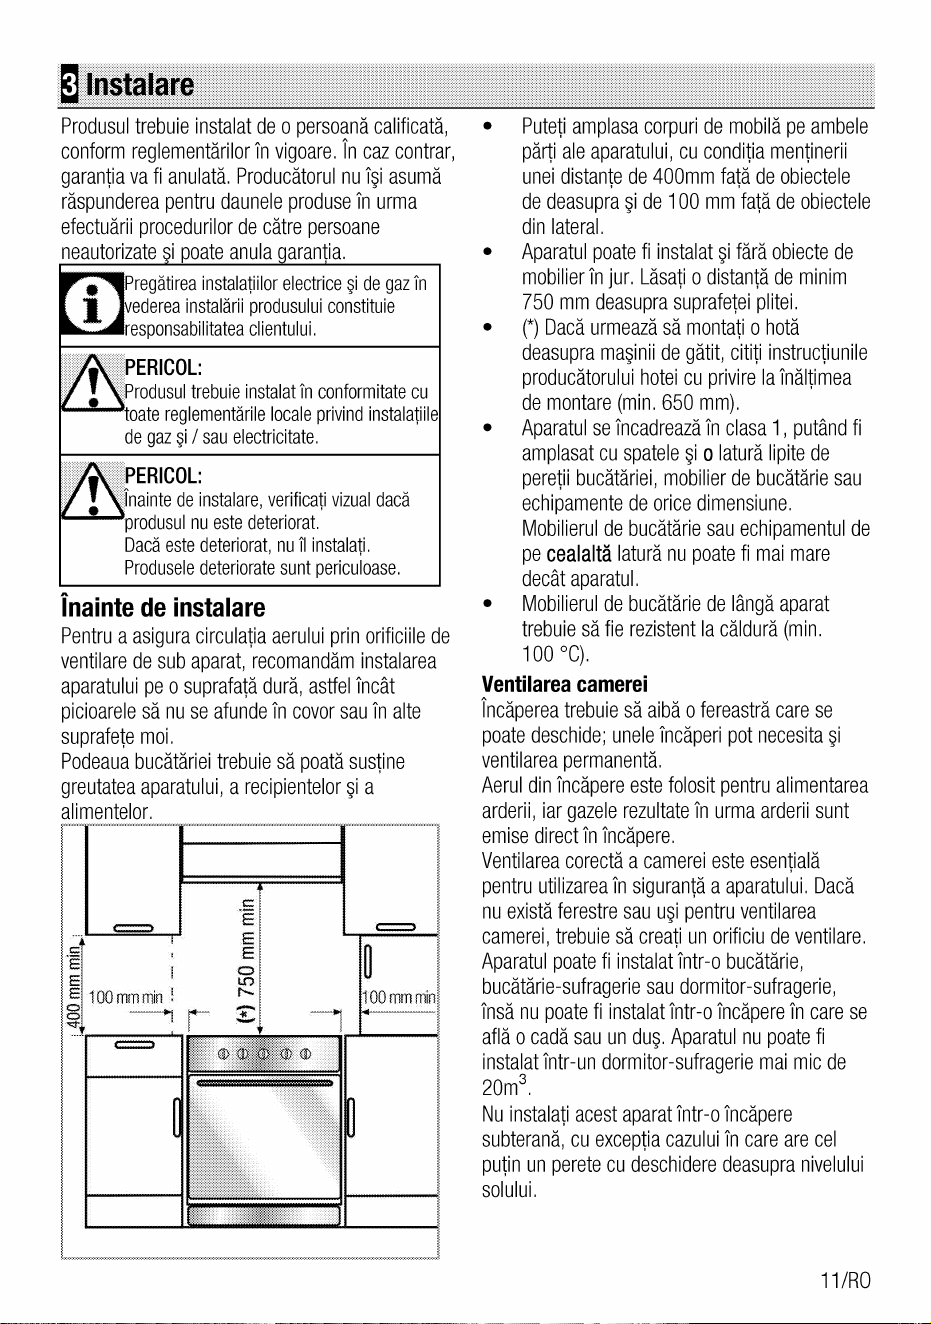
Putetiamplasacorpuride mobiläpeambele
pärtialeaparatului,cu conditiamentinerii
uneidistantede400mm fatä de obiectele
de deasupra de 100 mmfatä deobiectele
din lateral,
Aparatulpoatefi instalatsi färä obiectede
mobilierin jur. Läsatio distantäde minim
750 mm deasuprasuprafeteiplitei.
(*)Dacäurmeazäsä montatio hotä
deasupramasiniidegätit,cititi instructiunile
producätoruluihoteicu privirelaTnältimea
de montare(min.650 mm).
Aparatulseincadreazäin clasa1, putändfi
amplasatcu spatelesi o laturälipitede
peretiibucätäriei,mobilierde bucätäriesau
echipamentede oricedimensiune.
Mobilierul de bucätärie sau echipamentul de
pe cealaltä laturänu poatefi maimare
decåtaparatul.
Mobilierulde bucätäriede längäaparat
trebuiesä fie rezistentla cäldurä(min.
100 T).
inainte de instalare
Pentrua asiguracirculatiaaeruluiprinorificiilede
ventilarede subaparat,recomandäminstalarea
aparatuluipe o suprafatädurä,astfeltncåt
picioarelesä nuse afundeTncovorsauTnalte
suprafetemoi.
Podeauabucätärieitrebuiesä poatäsustine
greutatea aparatului, a recipientelor a
alimentelor,
E 100mmrfin
IEj.
00 mm
Ventilarea camerei
Tncäpereatrebuiesäaibäofereasträcarese
poatedeschide;uneleTncäperipot necesitasi
ventilareapermanentä.
Aeruldinincäpereestefolositpentrualimentarea
arderii,iargazelerezultateTnurmaarderiisunt
emisedirecttn incäpere.
Ventilareacorectäa camereiesteesentialä
pentruutilizareain sigurantäa aparatului.Dacä
nuexistäferestresauusi pentruventilarea
camerei, trebuie sä creati un orificiu de ventilare.
Aparatulpoatefi instalatintr-o bucätärie,
bucätärie-sufrageriesaudormitor-sufragerie,
tnsä nu poatefi instalatintr otncäpereTncarese
aflä ocadäsau undl]i. Aparatulnupoatefi
instalatintr-un dormitor-sufrageriemaimic de
20m3
Nuinstalatiacestaparatintr-oTncäpere
subteranä,cuexceptiacazuluitn careare cel
putin un peretecu deschideredeasupranivelului
solului.
II/RO
Dimensiunea
tncä erii
sub $
5m -10m
pest$10m den
La subsol / demisol
Orificiu de ventilare
100
min. 50 cm
hjeste riétesar
min, 65 cm
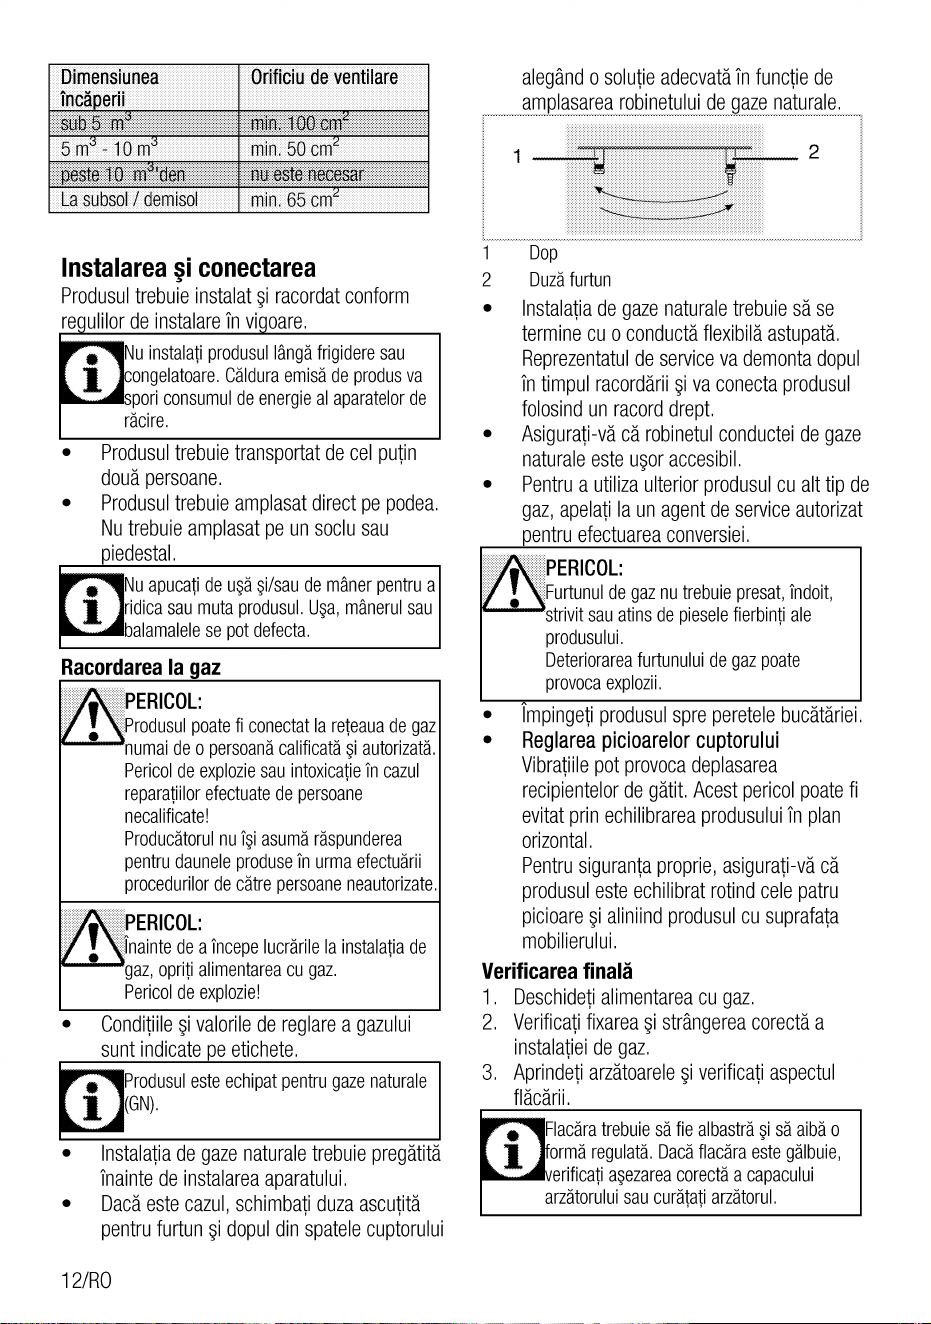
alegåndo solutieadecvatätn functiede
amplasarearobinetuluidegazenaturale.
2
1
Dop
Duzä furtun
2
Instalarea conectarea
Produsultrebuieinstalat$i racordatconform
re ulilor de instalare tn vi oare.
u instalatiprodusullängäfrigideresau
ongelatoare.Cälduraemisädeprodusva
pori consumul de energieal aparatelor de
räcire.
• Produsultrebuietransportatde cel putin
douäpersoane.
• Produsultrebuieamplasatdirectpe podea.
Nutrebuieamplasatpe un soclusau
iedestal.
u apucatide ug $i/saudemånerpentrua
i
idicasaumutaprodusul.Up, månerulsau
alamalelese pot defecta.
Racordarea Ia gaz
PERICOL:
Produsulpoatefi conectatla reteauadegaz
numaideo persoanäcalificatäsi autorizatä.
Pericoldeexploziesau intoxicatiein cazul
reparatiilorefectuate de persoane
necalificate!
Producätorulnui$iasumäräspunderea
pentrudauneleprodusein urmaefectuärii
procedurilor de cätre persoaneneautorizate.
PERICOL:
inaintedeaincepelucrärilelainstalatiade
gaz,opritialimentareacu gaz.
Pericol de explozie!
Conditiile9i valorilede reglarea gazului
sunt indicate e etichete.
rodusul esteechipat pentru gaze naturale
•
Instalatiade gazenaturaletrebuiepregätitä
maintede instalareaaparatului.
Dacä este cazul, schimbati duza ascutitä
pentrufurtun sidopuldinspatelecuptorului
Instalatiade gazenaturaletrebuiesäse
termine cu o conductä flexibilä astupatä.
Reprezentatulde serviceva demontadopul
tn timpul racordärii$ivaconectaprodusul
folosindun racorddrept.
Asigurati-väcärobinetulconducteide gaze
naturaleesteu;or accesibil.
Pentrua utilizaulteriorprodusulcu alt tip de
gaz,apelatila un agentde serviceautorizat
entru efectuarea conversiei.
PERICOL:
Furtunulde gaznutrebuiepresat,indoit,
strivitsauatinsdepieselefierbintiale
produsului.
Deteriorareafurtunului de gaz poate
provoca explozii.
Impingetiprodusulspreperetelebucätäriei.
Reglareapicioarelor cuptorului
Vibratiilepot provocadeplasarea
recipientelorde gätit, Acestpericolpoatefi
evitatprinechilibrareaprodusuluiin plan
orizontal.
Pentrusigurantaproprie,asigurati-väcä
produsulesteechilibratrotindcelepatru
picioare$i aliniindprodusulcu suprafata
mobilierului.
Verificarea finalä
1. Deschidetialimentareacu gaz.
2. Verificatifixareasi strångereacorectäa
instalatieide gaz.
3. Aprindetiarzätoarelesi verificatiaspectul
fläcärii.
Flacäratrebuiesäfie albasträ$isä aibäo
i
ormä regulatä. Dacäflacära este gälbuie,
erificatiavzarea corectäa capacului
arzätoruluisaucurätatiarzätorul.
1 2/RO
Adaptarea Ia tipul de gaz folosit
PERICOL:
Inaintedea incepelucrärilela instalatiade
gaz,opritialimentareacu gaz.
Pericol de explozie!
Pentrua modificatipulde gazfolosit,schimbati
toateinjectoarelesi reglatitoaterobinetelein
pozitiade debit redus.
Schimbarea injectoarelor arzätoarelor
tncazulGPL(butan- propan)rotitisurubulin
sensulacelordeceasornic.Tncazulgazului
natural,rotitio singurädatä tn sens
contrar acelor de ceasornic.
»TnältimeanormaläauneifläcäridrepteTn
pozitiaflacärämicätrebuiesäfie de 6-7 mm.
4. Dacäflacäraestemaiinaltä, rotiti surubulin
sensul acelor de ceasornic. Dacä este mai
micä, rotiti in sens invers acelor de ceasornic.
5. Caverificarefinalä,rotiti robinetulTnpozitia
flacärämare flacärämicä verificatidacä
flacäranuse stinge,
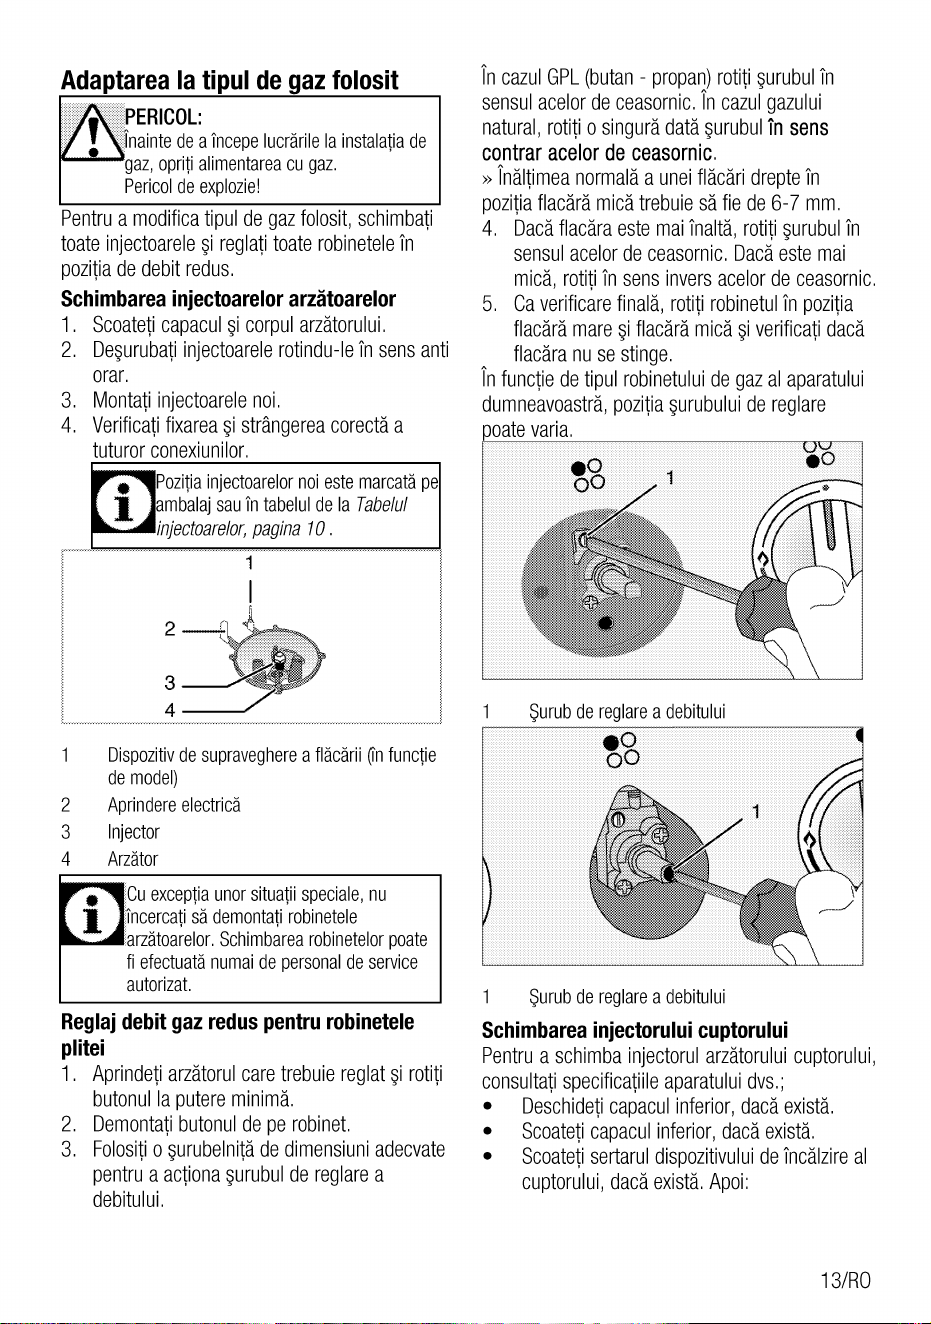
Tnfunctiedetipulrobinetuluidegazalaparatului
dumneavoasträ,pozitia9urubuluide reglare
oate varia,
1
2.
3.
4.
2
3
4
Scoateticapacul$icorpularzätorului.
Desurubatiinjectoarelerotindu-lein sensanti
orar.
Montatiinjectoarelenoi.
Verificatifixareasi strångereacorectäa
tuturor conexiunilor,
Pozitiainjectoarelornoi estemarcatäpe
mbalajsauin tabelulde la Tabelul
injectoare/or,pagina 10
1
2
3
4
Dispozitivdesupravegherea fläcärii(Tnfunctie
de model)
Aprindereelectricä
Injector
Arzätor
Cuexceptiaunorsituatiispeciale,nu
eo
00
$urubdereglarea debitului
00
$urubdereglarea debitului
Schimbarea injectorului cuptorului
•o
i
incercatisädemontatirobinetele
arzätoarelor,Schimbarearobinetelorpoate
fi efectuatä numai de personalde service
autorizat.
Reglaj debit gaz redus pentru robinetele
plitei
1. Aprindetiarzätorulcaretrebuiereglatsi rotiti
butonulla putereminimä.
2. Demontatibutonuldepe robinet.
3. Folositio surubelnitäde dimensiuniadecvate
pentrua actiona$urubulde reglarea
debitului.
Pentrua schimbainjectorularzätoruluicuptorului,
consultatispecificatiileaparatuluidvs.;
• Deschideticapaculinferior,dacäexistä.
• Scoateticapaculinferior,dacäexistä.
• Scoatetisertaruldispozitivuluidetncälzireal
cuptorului,dacäexistä.Apoi:
13/RO
5. Desurubatiinjectorulrotindu-lin sensinvers
acelor de ceasornic.
6. Montati injectorul nou.
Reglareadebitului redus pentru cuptorul cu
gaz
Verificareaperiodicäa reglajuluiesteextremde
importantäpentrufunctionareacorespunzätoare
cuptorului.Pentrusigurantämaximä,
instructiuniledin acestmanualtrebuieurmatecu
tentie.
1.
2.
3.
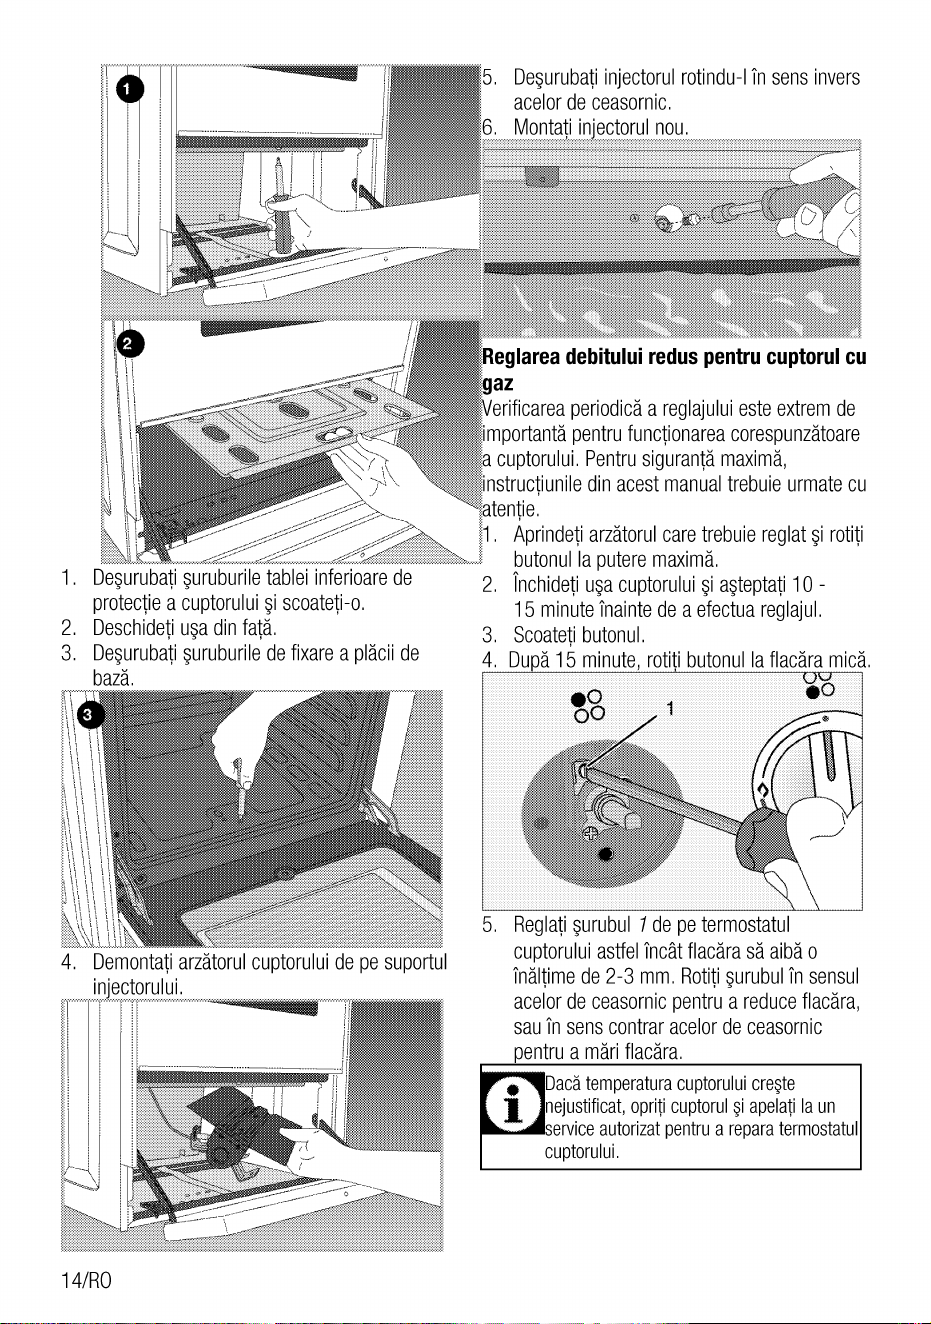
Dewrubatiiuruburile tableiinferioarede
protectiea cuptorului scoateti-o.
DeschidetiLl$adinfatä.
Desurubati$uruburilede fixarea pläciide
bazä.
1.
2.
3.
4.
5.
Aprindetiarzätorulcaretrebuiereglat$i rotiti
butonul la putere maximä.
inchidetiusacuptoruluisiasteptati10-
15 minutemaintede a efectuareglajul.
Scoatetibutonul.
Du ä 15 minute, rotiti butonul laflacära micä.
•o
00
•o
4. Demontatiarzätorulcuptoruluide pe suportul
in•ectorului.
Reglati$urubul1de pe termostatul
cuptoruluiastfelincåtflacärasäaibäo
tnältimede2-3 mm. RotitisurubulTnsensul
acelorde ceasornicpentrua reduceflacära,
sau in sens contrar acelor de ceasornic
entru a märi flacära.
Dacätemperaturacuptoruluicre$e
1 nejustificat,opriticuptorul$iapelatilaun
ervice autorizatpentru a repara termostatul
cuptorului.
1
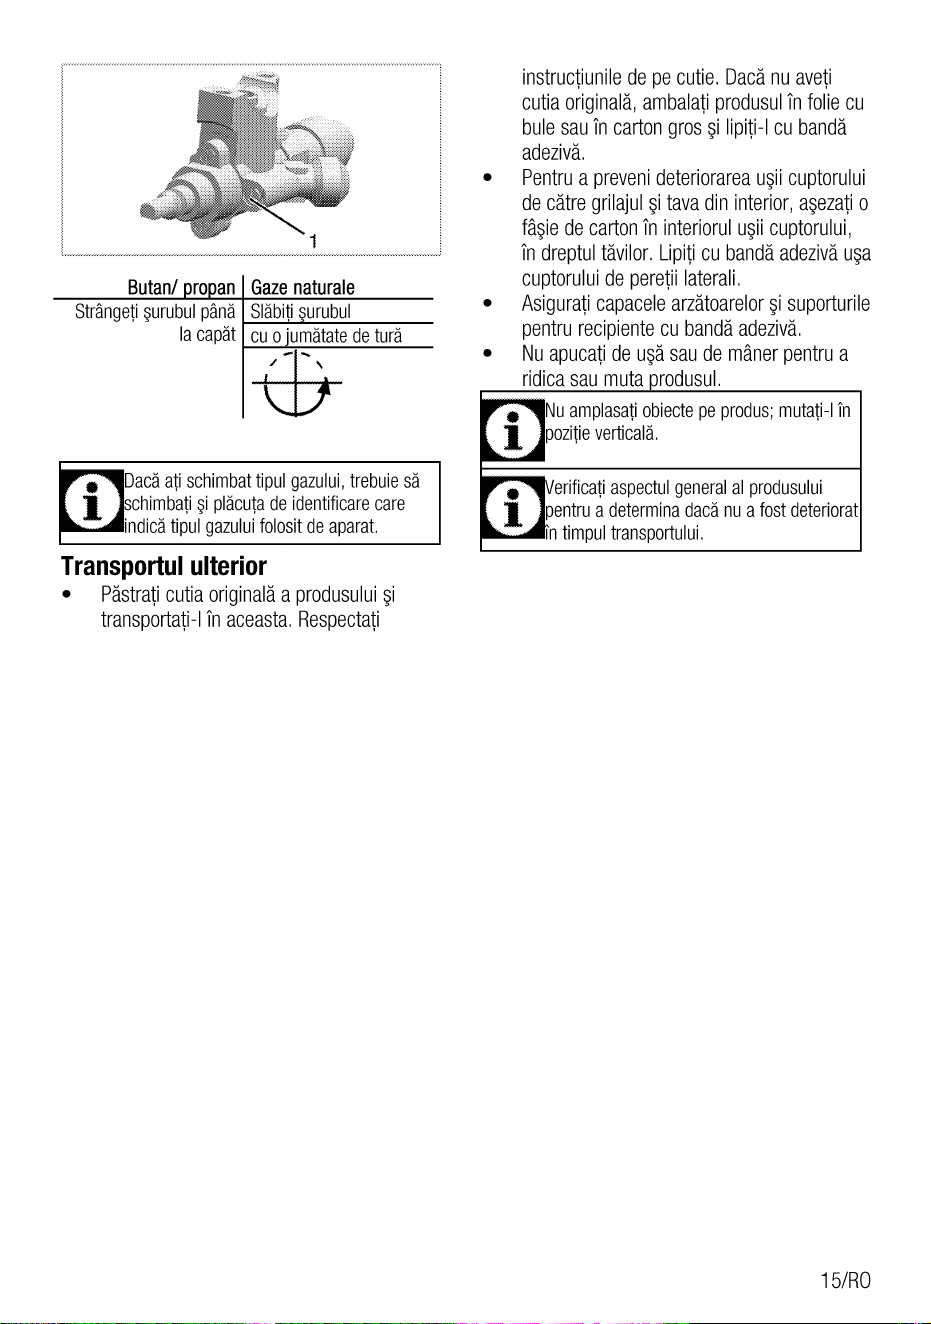
Butan/ ro an Gaze naturale
Strångetisurubulpånä Släbi' urubul
i
la capät cu o 'umätate de turä
acä ati schimbat tipul gazului,trebuie sä
chimbati pläcutade identificarecare
ndicä tipul gazuluifolosit de aparat.
Transportul ulterior
• Pästraticutiaoriginaläa produsuluisi
transportati-lTnaceasta,Respectati
instructiunilede pe cutie.Dacänuaveti
cutiaoriginalä,ambalatiprodusulin folie cu
bulesauTncartongros$ lipiti-lcu bandä
adezivä.
Pentrua prevenideteriorareall$ii cuptorului
de cätregrilajulsi tavadin interior,asezatio
få$iedecartontn interiorulusii cuptorului,
in dreptultävilor.Lipiticu bandäadeziväll$a
cuptoruluide peretiilaterali.
Asiguraticapacelearzätoarelorsi suporturile
pentrurecipientecu bandäadezivä.
Nuapucatide saude månerpentrua
ridica sau muta rodusul.
Nuamplasatiobiectepeprodus;mutati-lin
pozitieverticalä.
erificati aspectul generalal produsului
pentru a determina dacä nu a fost deteriorat
In timpul transportului.
15/RO
Pregätiri
Sfaturi pentru economisirea energiei
UrmätoareleinformatiiVävor ajutasäprotejati
mediulinconjurätor sä economisitienergie:
•
•
•
•
Folositirecipientede culoareinchisäsau
emailatetn cuptor,deoarecetransferulde
cäldurä va fi mai eficient.
La preparareamäncärurilor,pretncälziti
cuptoruldacäsespecificäTnmanualulde
utilizare sau Tnretetä.
NudeschidetifrecventusacuptoruluiTn
timpulgätirii.
tncercati pecatposibilsägätitisimultanmai
multefeluride mäncarein cuptor.Putetisä
amplasaticatedouärecipientepegrilajul
metalic.
Gätitisuccesivmai multefeluride måncare.
Astfel,nu vafi necesarsä preincälzitidin
noucuptorul.
Decongelatialimentelecongelatemaintede
a le gäti.
Folositirecipientecu capacpentru
prepararea mäncärurilor. Tnlipsacapacului,
consumulde energiepoatecre$tede 4 ori.
Selectati arzätorul in functie de dimensiunea
bazeirecipientuluiutilizat Alegetirecipiente
de dimensiuneadaptatäla mäncarea
preparatä,Recipientelemarinecesitämai
multäenergie.
2. $tergetisuprafeteleaparatuluicu ocärpä
umedäsaucu un bureteumed,apoiuscati-
le cu o cärpä.
incälzireainitialä
Tncälzitiprodusultimpdecirca30deminute,
apoiopriti-l, Astfelvorfi arse9i indepärtate
eventualelereziduurisau peliculerämasedupä
fabricatie.
AVERTISMENT
Suprafetelefierbintiprovoacäarsuri!
Produsulse poateinfierbåntaTntimpul
utilizärii. Nu atingeti arzätoarelefierbinti,
interiorulcuptorului,arzätoareleetc.Tineti
copiii Ia distantä.
Folositimänll$idecuptortermoizolatoare
candintroducetisauscoatetialimentein/din
cuptorul fierbinte.
Cuptor cu gaz
1.
2.
3.
4.
5.
Scoatetitoatetävile grilajeledincuptor.
Inchideti119acuptorului.
SelectatiflacäramaximäTncuptor;vezi
Utilizareacuptoru/uicu gaz,pagina 19.
Läsaticuptorulsäfunctionezecirca30 de
minute.
Opriticuptorul;veziUtilizareacuptoru/uicu
gaz,pagina 19
Esteposibil ca timp de cätevaore dupä
primapornire,cuptorulsä emitäfum$i
mirosuri. Acesta este un fenomen normal.
Ventilatibineincäpereapentrua elimina
fumulsi mirosurile.Evitatiinhalareadirectä
a fumuluifi a mirosuluiemis.
Prima utilizare
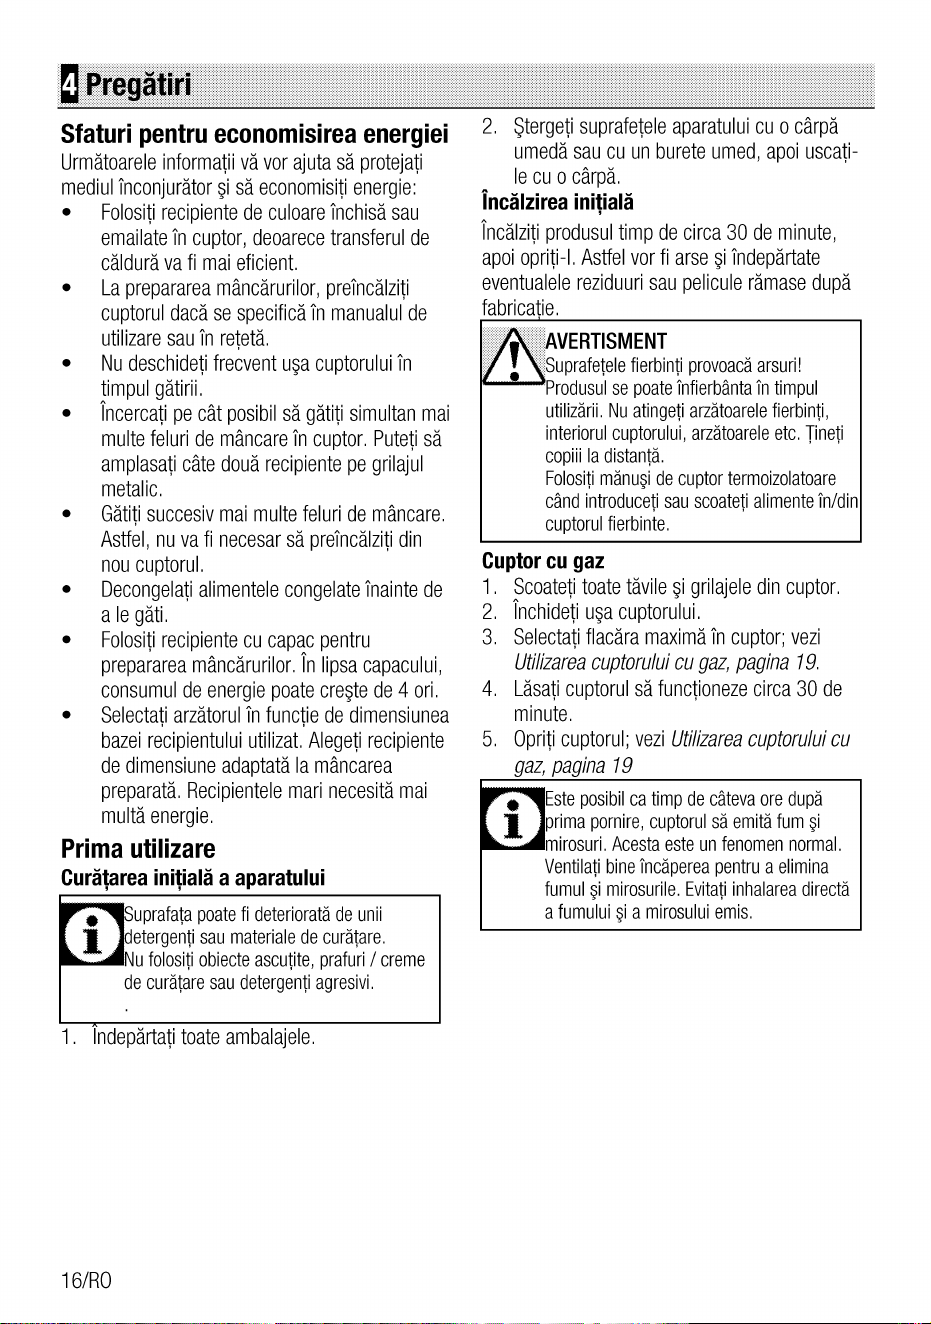
Curätarea initialä a aparatului
uprafatapoatefi deterioratäde unii
i
etergentisau materialede curätare.
u folositiobiecteascutite,prafuri/ creme
decurätaresaudetergentiagresivi.
Indepärtatitoateambalajele.
16/RO
Utilizarea plitei
Informa!ii generale despre
prepararea alimentelor
Nu umpletivasele pe mai mult de o
treime cu ulei. Nuläsati
nesupravegheatäplitacandincälziti
uleiul.Uleiulsupraincälzitpoate
provocaincendii.Nutncercati sä
stingeti eventualulincendiucu apä!
Dacäuleiuls-aaprins,acoperiti-lcuo
gätit pe altaridicändu-le;nu le tragetipe
suprafataplitei.
Gätitul cu gaz
• Dimensiunearecipientului a fläcärii
trebuiesä fie similare.Potrivitiflacäratncåt
sä nudep$eascä bazarecipientului$i
centratirecipientulpe suport.
Utilizarea plitelor
1
•
•
•
•
päturäignifugäsaucu o cårpäumedä,
Opritiplitadacäesteposibilsi
telefona ila om ieri.
Uscatialimentelepe careurmeazäsä Ie
präjitimaintedea le asezatn uleiulincälzit.
Dezghetaticompletalimentelemaintedea
le präji.
Nuacoperitivasulin careincälzitiuleiul.
Apzati cratitelesi tigäileastfelcamånerele
acestorasä nufie deasupraplitei, pentrua
evitaTnfierbäntareaacestora.Nuasezatipe
plitärecipienteinstabile,carese pot
rästurnausor.
Nupunetipezoneledegätit porniteale
plitei recipiente tigäi goale.Acestease
pot deteriora.
Produsulse va deterioradacäpornitizonele
pentrugätit färä a apza peele recipiente,
Opritizoneledegätit dupäce ati terminatde
gätit.
Nuavzati recipientede plasticsau
aluminiupe suprafataplitei,aceastapoatefi
fierbinte.
Nufolositiastfelde recipientepentru
pästrareaalimentelor.
Folositinumairecipientecu fundulplat.
Puneticantitätiadecvatede alimentein
recipientelepentrugätit.Astfel preveniti
värsareaacestorasi nevoiade a curätaplita.
Nuasezaticapacelerecipientelorde gätit pe
zonelede gätit,
Asezatirecipienteletn centrulzonelorde
gätit. Mutatirecipientelede pe ozonäde
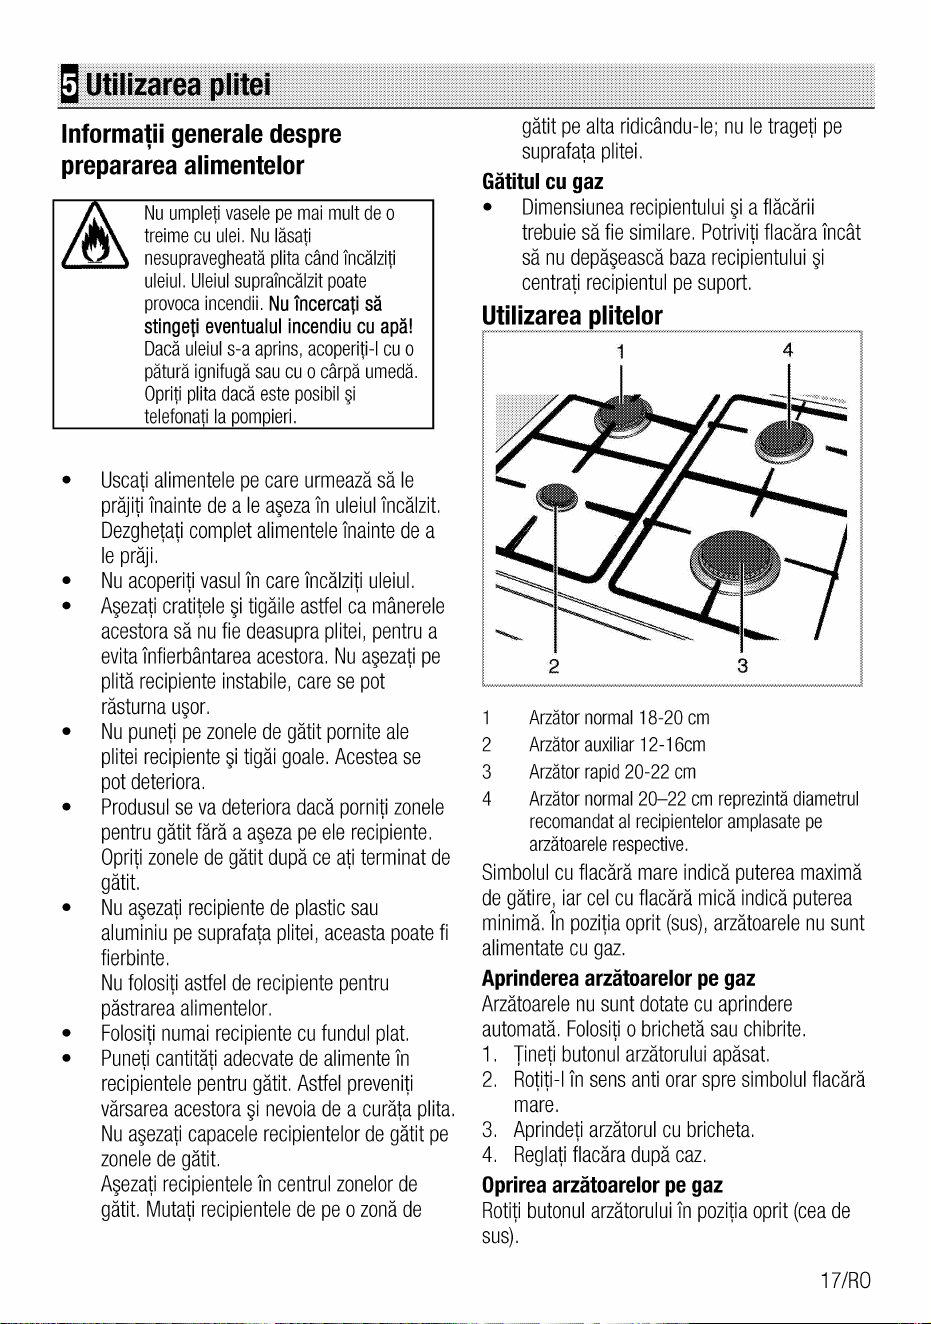
2
4
3
2
3
4
Arzätor normal 18-20 cm
Arzätor auxiliar 12-16cm
Arzätor rapid 20-22 cm
Arzätor normal 20—22cm reprezintädiametrul
recomandatal recipienteloramplasatepe
arzätoarelerespective.
Simbolulcu flacärämareindicäputereamaximä
de gätire,iar cel cu flacärämicäindicäputerea
minimä,Tnpozitiaoprit(sus),arzätoarelenusunt
alimentatecu gaz.
Aprinderea arzätoarelor pe gaz
Arzätoarelenusunt dotatecu aprindere
automatä.Folositio brichetäsauchibrite.
1. Tinetibutonularzätoruluiapäsat.
2. Rotiti-lTnsensantiorarspresimbolulflacärä
mare,
3. Aprindetiarzätorulcu bricheta.
4. Reglatiflacäradupäcaz.
Oprirea arzätoarelor pe gaz
Rotitibutonularzätoruluitn pozitiaoprit(ceade
sus).
1 URO

Sistemuldesiguran!ä pentruoprirea gazu-
lui (pentru modelele cu componentä
termicä)
1
1. Sistem de
sigurantäpentru
oprireagazului
Sistemuldesigurantä
pentruoprireagazuluiare
rolul de a preveni exploziile
cauzatede scurgerilede
gaz.
Dupäaprindereagazuluitinetibutonul
apäsatincä 3-5 secundepentrua activa
sistemulde sigurantä.
Dacägazulnuse aprindedupäapäsareasi
eliberareabutonului,repetatiprocesul
tinänd butonul a äsat tim de 15 secunde.
PERICOL:
Eliberatibutonuldacäarzätorulnu s-a
aprinstn 15 secunde.
Asteptaticel putin1 minutmaintedea
incerca din nou, Pericol de acumulare a
gazuluifi deexplozie!
Apäsatibutonulsi rotiti-ltn sensanti-orar
pentruaprindere.
1 8/RO
@Utilizarea cuptorului
Informa!ii generale referitoare la
coacere, fripturi i prepararea
AVERTISMENT
Suprafetelefierbintiprovoacäarsuri!
Produsulse poatetnfierbåntain timpul
utilizärii.Nuatingetiarzätoarelefierbinti,
interiorul cuptorului, arzätoareleetc. Tineti
copiiiladistantä.
Folositimänu$idecuptortermoizolatoare
cåndintroducetisauscoatetialimentein/din
cuptorul fierbinte.
PERICOL:
Atentieladeschidereau$i cuptorului,
deoarecepotie$ aburi.
AburiievacuatiVäpotopärimäinile,fatasi/
sau ochii.
Sfaturi pentru copt
•
Folositirecipientedin metalsaualuminiucu
strat anti aderent sau forme din silicon
termorezistent
Utilizatiadecvatspatiulde pe raft.
Amplasatiformade coptin mijloculraftului,
Selectatipozitiacorectäa raftuluitnaintede
a pornicuptorulsaugrill-ul. Nuschimbati
pozitiaraftuluiTntimp ce cuptoruleste
fierbinte,
Mentinetiusacuptoruluiinchisä.
Sfaturi pentru fripturi
•
•
•
Veti obtine rezultate mai bune dacä tratati
maintedegätirepuiitntregi,curcaniiintregi
saubucätilemaride carnero$ecu
dresinguri,cum arfi suc de lämäie piper
negru.
Preparareacärniicuoasedureazäcu circa
15-30 de minutemaimult decåtprepararea
uneibucätide carnede aceeasidimensiune
färä oase.
Fiecarecentimetrude grosimea cärnii
necesitäaproximativ4 - 5 minutepentru
preparare.
Läsaticarneain cuptortimp de circa
10 minutedupätncheiereaperioadeide
preparare.Astfel,sucurilesevordistribui
maibinein fripturäsi nuvorcurgela täierea
acesteia.
• Pe$eletrebuieamplasatpe raftulmijlociu
sau inferior,intr-un recipienttermorezistent.
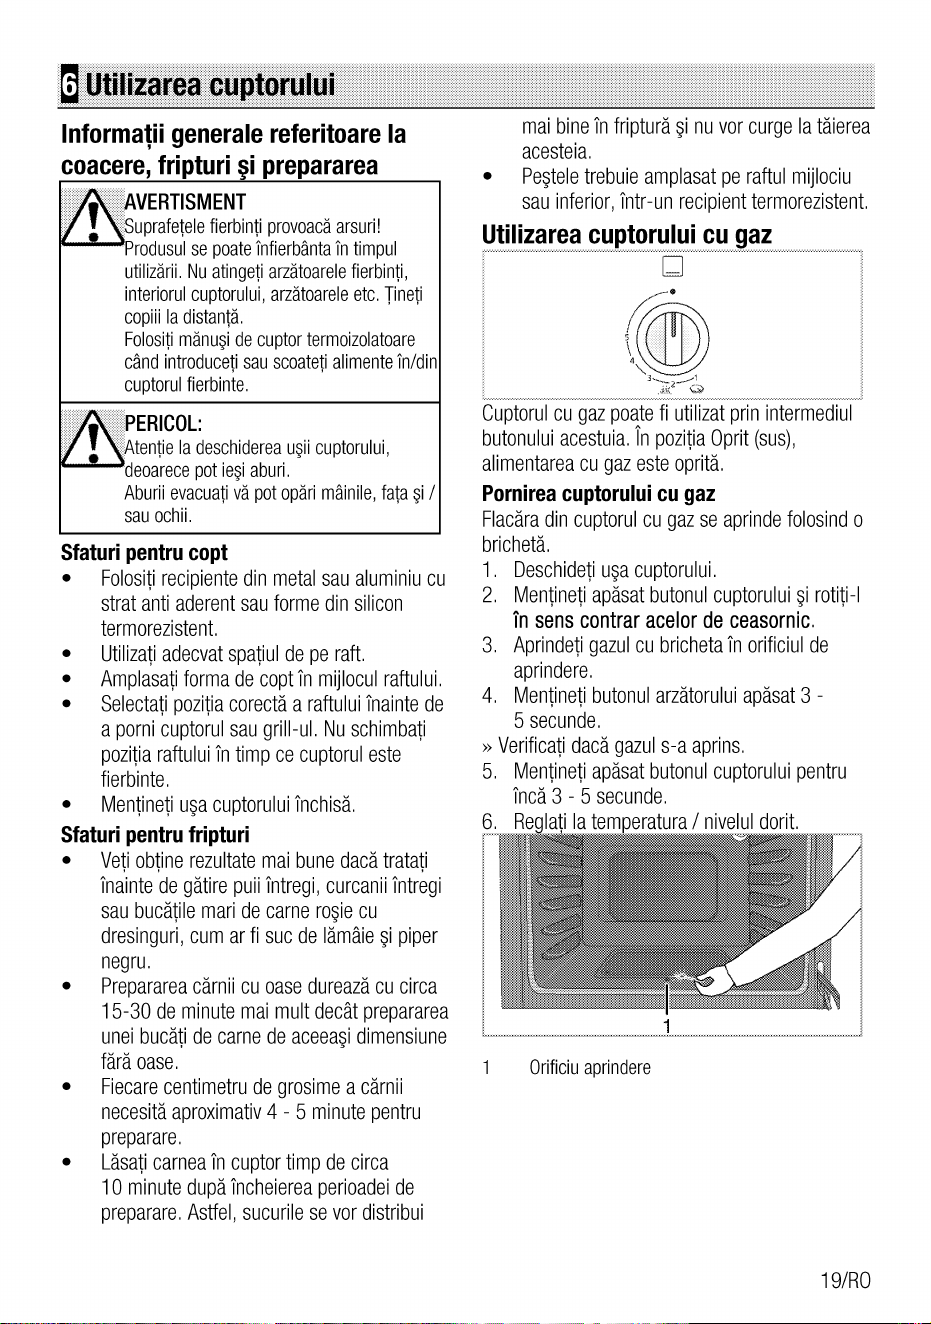
Utilizarea cuptorului cu gaz
Cuptorulcu gazpoatefi utilizatprinintermediul
butonuluiacestuia.TnpozitiaOprit(sus),
alimentareacu gazesteopritä.
Pornirea cuptorului cu gaz
Flacäradincuptorulcugazseaprindefolosindo
brichetä.
1. Deschidetiusacuptorului.
2. Mentinetiapäsatbutonulcuptorului$i rotiti-l
tn sens contrar acelor de ceasornic,
3. Aprindetigazulcu brichetain orificiulde
aprindere.
4. Mentinetibutonularzätoruluiapäsat3 -
5 secunde.
» Verificatidacägazuls-a aprins.
5. Mentinetiapäsatbutonulcuptoruluipentru
incä 3 - 5 secunde.
6. Re lati la temperatura/ niveluldorit.
1
Orificiuaprindere
19/RO
PERICOL:
Pericoldecomprimarea gazului$i de
explozie!
Nuincercatisä aprindetigazulmai multde
15secunde.Dacäarzätorulnuseaprindetn
15 secunde,inchidetirobinetul$ia$eptati
1 minut.Ventilatiincäpereatnaintedea
reincercaaprindereaarzätorului. Pericolde
comprimare a gazului$i de explozie!
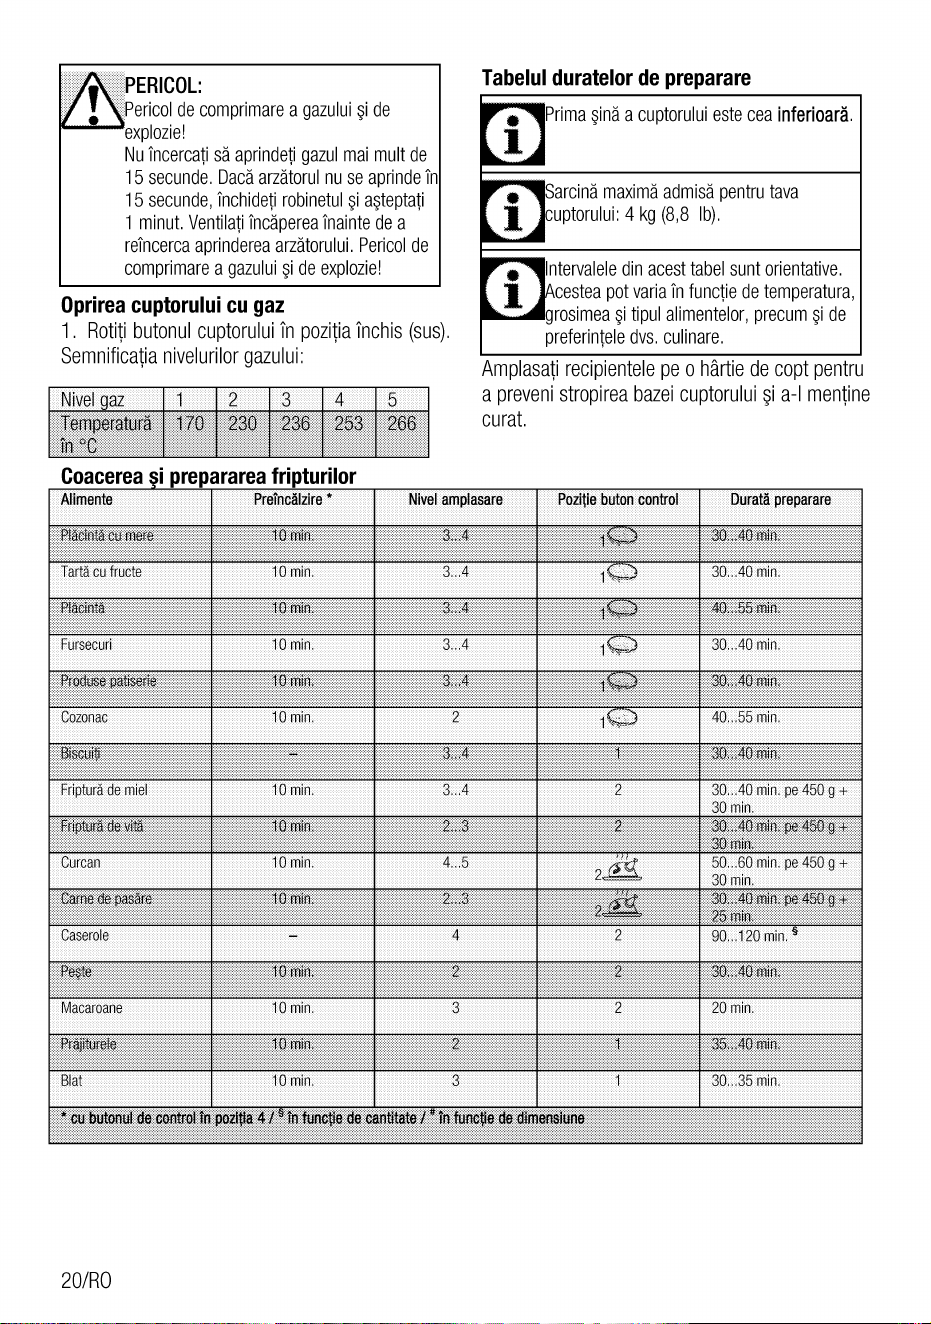
Oprirea cuptorului cu gaz
1. Rotitibutonulcuptoruluiin pozitiainchis (sus).
Semnificatianivelurilorgazului:
4
5
Tabelul duratelor de preparare
Prima$nä a cuptoruluiesteceainferioarä.
Sarcinä maximä admisä pentrutava
uptorului: 4 kg (8,8 lb).
Intervalele din acest tabel sunt orientative.
cesteapotvariain functiedetemperatura,
grosimeasi tipulalimentelor,precum$i de
preferinteledvs.culinare.
Amplasatirecipientelepeo härtiede coptpentru
a prevenistropireabazeicuptorului a-I mentine
curat.
Nivel az
Temperatutü;
Coacerea i
Alimente
Tartä cu fructe
Fursecuri
rie
Cozonac
Fripturäde miel
Curcan
Caserole
Macaroane
ajitüf
Blat
20/RO
2
3
*30; 236
repararea fripturilor
Preincälzire
-o
-10 mill
10 min.
Offutt,
10 min.
10 min,
VIC)min.
60 min.
10 min.
Nivel amplasare
2
4
3
3
Poitie butoncontrol
2
2
Duratä preparare
30...40 min.
30...40 min.
40. .55 min.
30.,.40 min,pe450 g +
30 min.
50„.60 min, g +
30 min.
5
90. .120 min.
30,740mm,
20 min.
30.„.35 mine
oozitiå4
tnfun$iedæcantitate:r
unc#e dedimensiunez
Retete
Fripturä de pui cu chiftele
Präjiturä simplä cu mere
•
1.
2.
3.
4.
5.
6.
1 pui mediu(aprox.1,5 kg)
Saresi pipernegrumäcinat
1 lämåietäiatäin patru
3-4 fire de cimbru
1-2 linguride uleide mäsline
1 ceapäcurätatäsi täiatäfelii groase
Pentru chiftele:
125gde pesmetalb proaspät
3-4 lingurirasede pätrunjelproaspättocat
1 lingurärasäde cimbruproaspättocat
Zeamä de lämäie
50g de unt topit
1 ou mediu
Seaprinde cuptorullanr.A.
Secondimenteazäinteriorulpuiuluicu sare$i
piper,apoise introducfeliilede lämäie
cimbrul.Sefreacäpieleapuiuluicuulei de
mäsline.
Sepun morcoviisi ceapain tavadefripturä,
se aseazädeasuprapuiul$i se
condimenteazä.
Pentrua faceumplutura,se puntoate
ingredienteleintr-un bol se formeazä6
chiftele.SeräcescTntimp ce puiulse gät#te.
SeamplaseazäpuiulTncentrulcuptoruluisi
se gätestetimpde 1 orä, apoisepun
chiftelelein jurul puiuluisi se maigäteste
20-30 de minute,saupänäcandsuculscurs
cändpuiulesteintepatin parteaceamai
groasäestecurat, iarchifteleleincepsäse
rumeneascä.
Se scoatetavade fripturädin cuptorsi se
1.
2.
3.
4,
mutäpuiul,chiftelelesi legumelepe un platou
cald,se acoperäpartial cu folie$ise lasäintr-un
loc cald sä se odihneascä.
Pentru congelare : Se ambaleazäresturilereci
de puiin pungi$i se tin in congelatormaxim1
lunä.
175gfäinä cupraf de copt
175g margarinäpentrupatiserie
175gzahärpraf
3 ouä mari
| 1/2meremedii,decojite täiatecubulete
1 linguritärasäde scortisoarä
Coajärasäde lämåie
Seaprindecuptorullanr.Q
Se punfäina,margarinasi zahärultntr-un bol.
Se adaugätreptat ouäle$i sebat bine.Se
adaugäsi se amestecämerele,coajade
lämäie$i stafidele.
Secoacetn cuptortimp de 40-50 de minute,
pånäcåndpräjituraa crescutsi opune
rezistentäla apäsarein centru,iarfurculita
introdusäTnpräjituräiesecuratä.
Se lasäsä se räceascäTntavätimp de 10
minute,apoise transferäpe un raft pentrua
se räci.Se pudreazäcu zahärde glazurä
inainte de servire.
21/RO
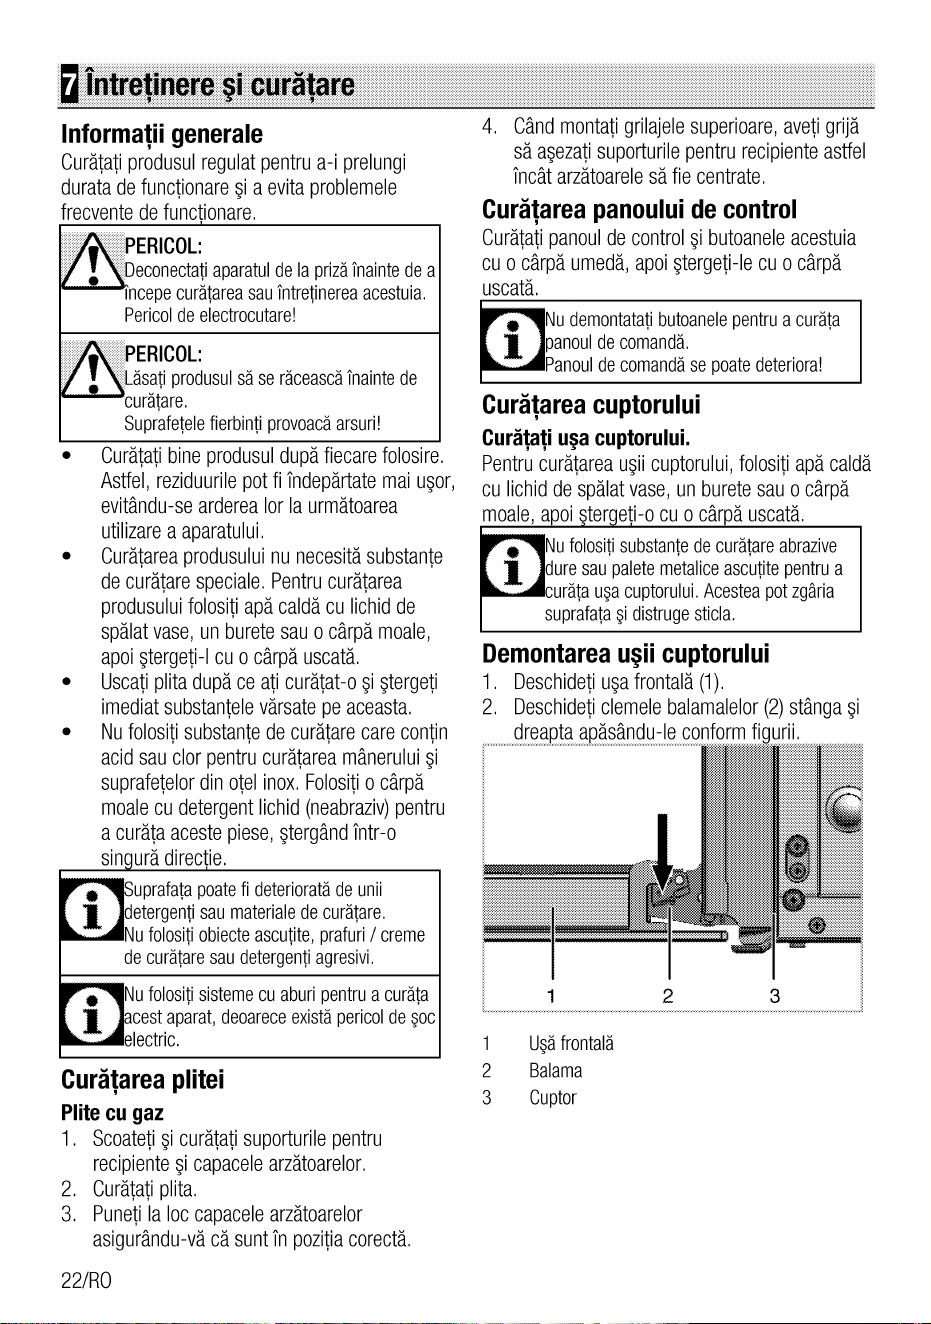
itntretinere icurätare
Informa!ii generale
Curätatiprodusulregulatpentrua-i prelungi
duratade functionare a evitaproblemele
frecvente de functionare.
PERICOL:
Deconectatiaparatulde la prizäinaintedea
Incepecurätareasauintretinereaacestuia.
Pericol de electrocutare!
PERICOL:
Läsatiprodusulsäse räceascäinaintede
•
•
•
curätare.
Suprafetelefierbintiprovoacäarsuri!
Curätatibineprodusuldupäfiecarefolosire.
Astfel,reziduurilepot fi indepärtatemaiusor,
evitändu-se arderea lor la urmätoarea
utilizare a aparatului.
Curätareaprodusuluinu necesitäsubstante
de curätarespeciale.Pentrucurätarea
produsuluifolositiapäcaldäcu lichidde
spälatvase,un buretesau o cärpämoale,
apoi9tergeti-lcu o cårpäuscatä.
Uscatiplitadupäce ati curätat-o$i $tergeti
imediatsubstantelevärsatepe aceasta.
Nu folositi substante de curätare care contin
acidsauclorpentrucurätareamänerului$i
suprafetelordin otelinox.Folositio cärpä
moalecu detergentlichid(neabraziv)pentru
a curätaacestepiese,$tergändTntr-o
sin urä directie.
4. Cändmontatigrilajelesuperioare,avetigrijä
sä asezatisuporturilepentrurecipienteastfel
tncät arzätoarele sä fie centrate.
Curä!areapanouluide control
Curätatipanoulde controlsi butoaneleacestuia
cu o cärpäumedä,apoiitergeti-le cu o cärpä
uscatä.
Nudemontatatibutoanelepentrua curäta
1 panouldecomandä.
Panouldecomandäse poatedeteriora!
Curä!area cuptorului
Curä!ati up cuptorului.
Pentrucurätareausiicuptorului,folositiapäcaldä
cu lichidde spälatvase,un buretesauo cärpä
moale, a oi ter e i-o cu o car äuscatä.
Nufolositisubstantedecurätareabrazive
dure sau palete metalice ascutite pentrua
urätaup cuptorului.Acesteapotzgåria
suprafatasidistrugesticla.
Demontarea Ll#ii cuptorului
1. DeschidetiIlia frontalä(1),
2. Deschideticlemelebalamalelor(2)stångasi
dreaptaapäsåndu-leconformfigurii.
i
i
uprafatapoatefi deterioratäde unii
etergentisau materialede curätare.
u folositiobiecteascutite,prafuri/ creme
decurätaresaudetergentiagresivi.
u folositi sistemecu aburi pentru a curäta
cestaparat,deoareceexistäpericolde pc
lectric.
2
3
1
IJ$äfrontalä
Balama
Cuptor
2 3
Curä!areaplitei
Plite cu gaz
1. Scoateti curätatisuporturilepentru
recipiente capacele arzätoarelor.
2. Curätatiplita.
3. Punetila loccapacelearzätoarelor
asigurändu-väcä suntin pozitiacorectä.
22/RO
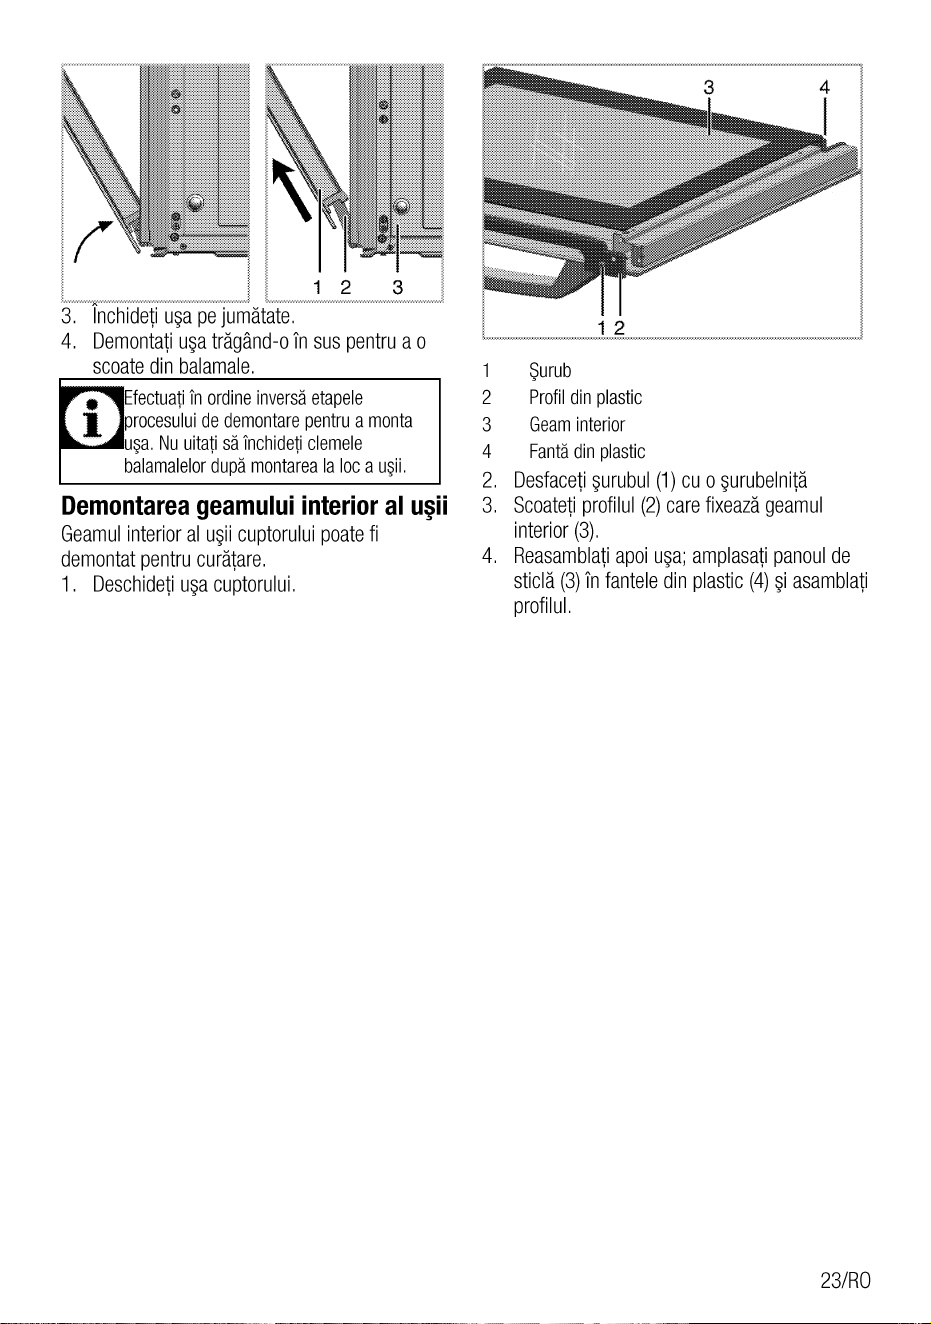
3 4
3
3. InchidetiIlia pejumätate.
4. Demontatiusaträgänd-oin sus pentrua o
scoate din balamale.
fectuatiin ordineinversäetapele
i
rocesului de demontarepentru a monta
p. Nuuitatisäinchideticlemele
balamalelordupä montarea la loc a Ll$ii.
Demontarea geamului interior al Lifii
Geamulinterioral usii cuptoruluipoatefi
demontatpentrucurätare.
1. Deschidetill$acuptorului.
2
3
4
2.
3.
4.
12
$urub
Profildin plastic
Geam interior
Fantädin plastic
Desfaceti$urubul(1)cu o surubelnitä
Scoatetiprofilul(2)carefixeazägeamul
interior(3).
Reasamblatiapoiusa;amplasatipanoulde
sticlä(3)Tnfanteledin plastic(4)si asamblati
profilul,
23/RO
@Remedierea problemelor
CuptoruLemiteabuti in timpul functionärii..
• le$reaaburuluiin timpul functionäriieste normalä. Acestlucrunu reprezintäo
defectiune.
Produsulemitezgomotemetalicein timpül jncälzirji 'i räcirij/
Cändpieselede metalsetncälzesc,se dilatä pot emitezgomote.>>> Acestlucrunu
reprezintäo defectiune.
Nuseproducescänteia de aprindere.
• Aparatulnuestealimentatcu curent. Verificatitablou/desigurante.
Gazmeste intrerupt:
• Robinetulprincipalde gazesteinchis.>>> Deschide{irobinetuldegaz.
Conductade gazesteTndoitä.>>> Montaticorectconductadegaz.
Aiiåtoarele ard neuniforin sau nu ard deioc.
•
Arzätoarelesunt murdare,>>> Curätaticomponentelearzätoru/ui.
Arzätoarelesunt ude. [Jscaticomponente/earzätorului.
Capacularzätoruluinuesteamplasatcorect, Amplasaticorectcapacularzätorului.
Robinetulde gazesteinchis. Deschide{irobinetu/degaz.
Buteliadegazestegoalä(dacäsefolose$eGPL). inlocui{icilindru/degaz.
acä instructiunile din aceastäsectiune nu
1 -auajutatsäremediatiproblema,
ontactatiagentuldeserviceautorizatsau
dealerulde la careati cumpäratprodusul.
Nuincercatisä reparatipecont propriu
produsuldefect.
24/RO
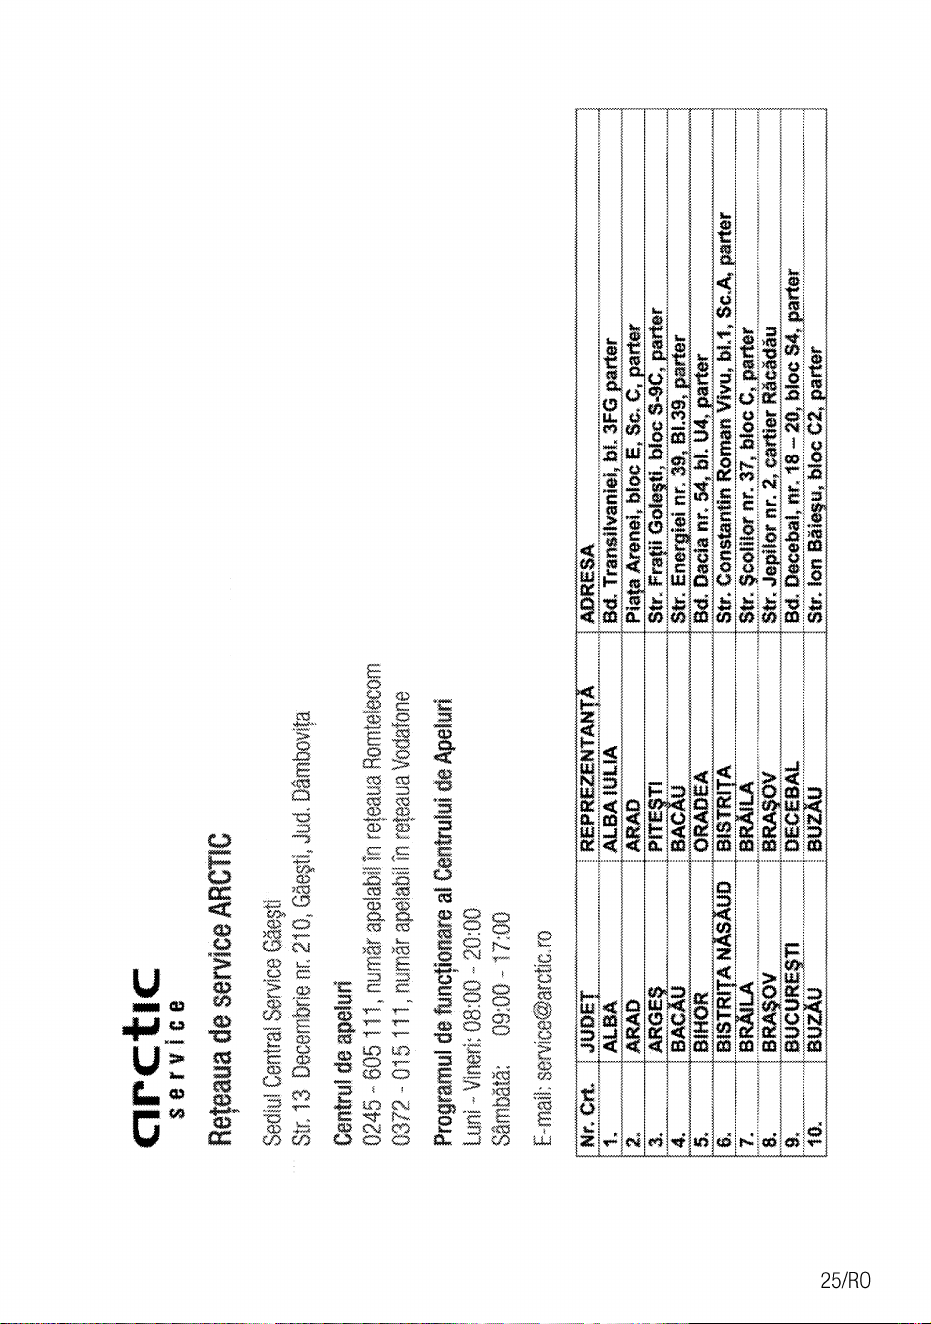
arctic
service
ReteauadeserviceARCTIC
SediutCentralServiceGäe$ti
Str.13 Decembrienr.210,Gä$tigJud.Dåmbovi!a
Centrul de apeluti
0245 605111,numärapelabilin re!eauaRomtelecom
0372 - 015 111,numärapelabiiin reteauaVodafone
Programuldefunctionareal CentruluideApeluri
Luni Vineri:
Sämbätä: 09:00 - 17:00
Nr. crt. JUDET
ALBA
ARAD
REPREZENTANT
ALBA IULIA
ARAD2.
3.
4.
5.
6.
7.
8.
9,
10.
BACÅU
BACAU
BläÖk ORADEA
D BISiRiTA
BRÄiLA
BRASOV
BÜCURE'TI
BUZÅU
BRÅiLÄ
SRA90V
DECEBAL
BUZÅU
ADRESA
Bd. Transilvaniei,biÄFG rter
Pia Arenei bloc E, Sc. C, rter
Str. Fra!ii Gp!g$i, bloc S*9C,parter
Str. nr.
Bd. Dacia nr. 54, bLY40arter
Str. Constantin Roman Vivu, bl.l. parter
Str.9c6iiior nr. bloc g;parter
Str. Jepiior nr. 2, cartier Räeädäu
Bd. Decebal,. —20mbloc S4tparter
Str. Ion Bäi u bloc C arter
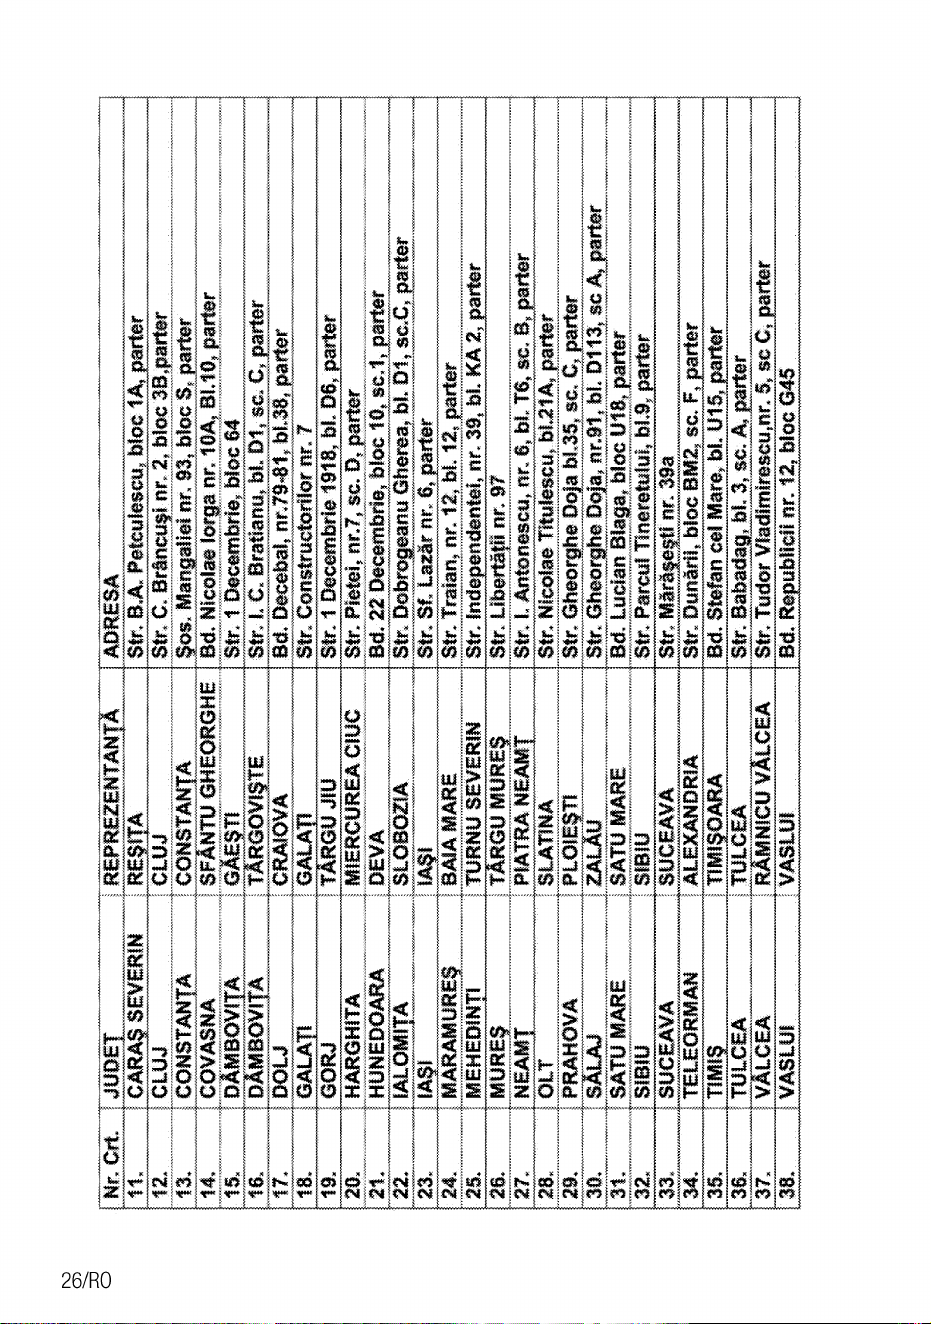
Crt.
12.
13.
14.
17.
18.
19.
21.
22.
23.
24.
26.
28v
29.
30.
31.
33.
35.
37.
38.
JUDEI—
CAQA SEVERIN
CLUJ
CONSTA A
COVASNA
DÅMBOVi A
D MBOVI A
DOLJ
GORJ
HARGHITA
HÜNEDOARA
IALOLII&
MARAMURE#
MEHEDIN
MUKES
NEAM
OLT
PRAHOVA
s
SATU MARE
SIBIU
SUCEAVA
TELEÖNMÄN
TIMI
TULCEA
VÅÜC€A
VASLUI
REPREZENTAN
CLUJ
CONSTA A
SF NTU GHEORGHE
T RGOVI TE
CRÄIOVA
GALA
T RGU JIU
MIERCUREA Cluc
DEVA
SLOBOZIA
BAIA MARE
TURNU SEVERIN
T UMCRE#
PiATRA NEAM
SLATINA
PLOiE9T1
SATU MARE
stBlÜ
SUCEAVA
AXÉÄÖRIA
TIMI OARA
TULCEA
VASLUI
ADRESA
Petculescu bloc I
Str. C. Bråncu9i nrv2, bloc 3B,parter
Bd. Nicolae lorga nr, IOA Bl.102parter
Str.
1 Decembrie, bloc 64
Str. I. C, Bratianu,
Bd. Decebal, nr.79„81, bl,38 arter
Str. Constructorilor nr. 7
Str. 1 Decembrie 191 bl.D6
Str. Pietei, nr.7, sc. D,parter
Bd. 22 Decembrie, bloc 10, sc.l, atter
Str. Dobrogeanu Gherg?2bl. D',
Lazü 6, rter
Str.
Str._Traian, nr. 12, bl. 12, parter
Str. Ingppendentei, nr. 39 bl. KA 2, arter
Liberiätunr. 97
Str.
Str."L Antonescu, nr.G bL T6, sc. B, arter
Str. Nicolae Titulescu,
Str.Gheorghe Exparter
Str.Gheorg@eDoja,nr.91!bl. DIIA ScAæparter
Bd. Lucian Blaga, bloc U18tparter
Str. Parcul Tineretuiui, bl.9 rter
StryMäräse%t!pr. 39a
Str. Dunärii, bioc Bü2, sc. F, rter
Bd. Stefan cel Mare, bl. U15 rter
Str. sc. A, parter
Str. Tudor Vladimirescu nr. 5, sc C
Bd. Re ublicii nr. 12 bloc G45
rter


585.3001.21/R.AA/21.03.2014