Read all instructions before assembly.
Failure to do so may result in faulty assembly and potential injury.
Questions, problems, missing parts?
Before returning to your retailer, call our customer service at 1-877-615-1378
Monday – Friday 8:00 a.m. – 4:00 p.m. EST
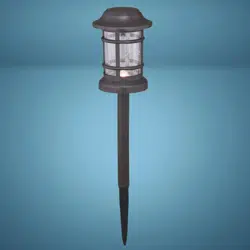
Sku Number: 343-4194
Euro LED Low Voltage Path Light
Model Number: 29052 LV-3CCT
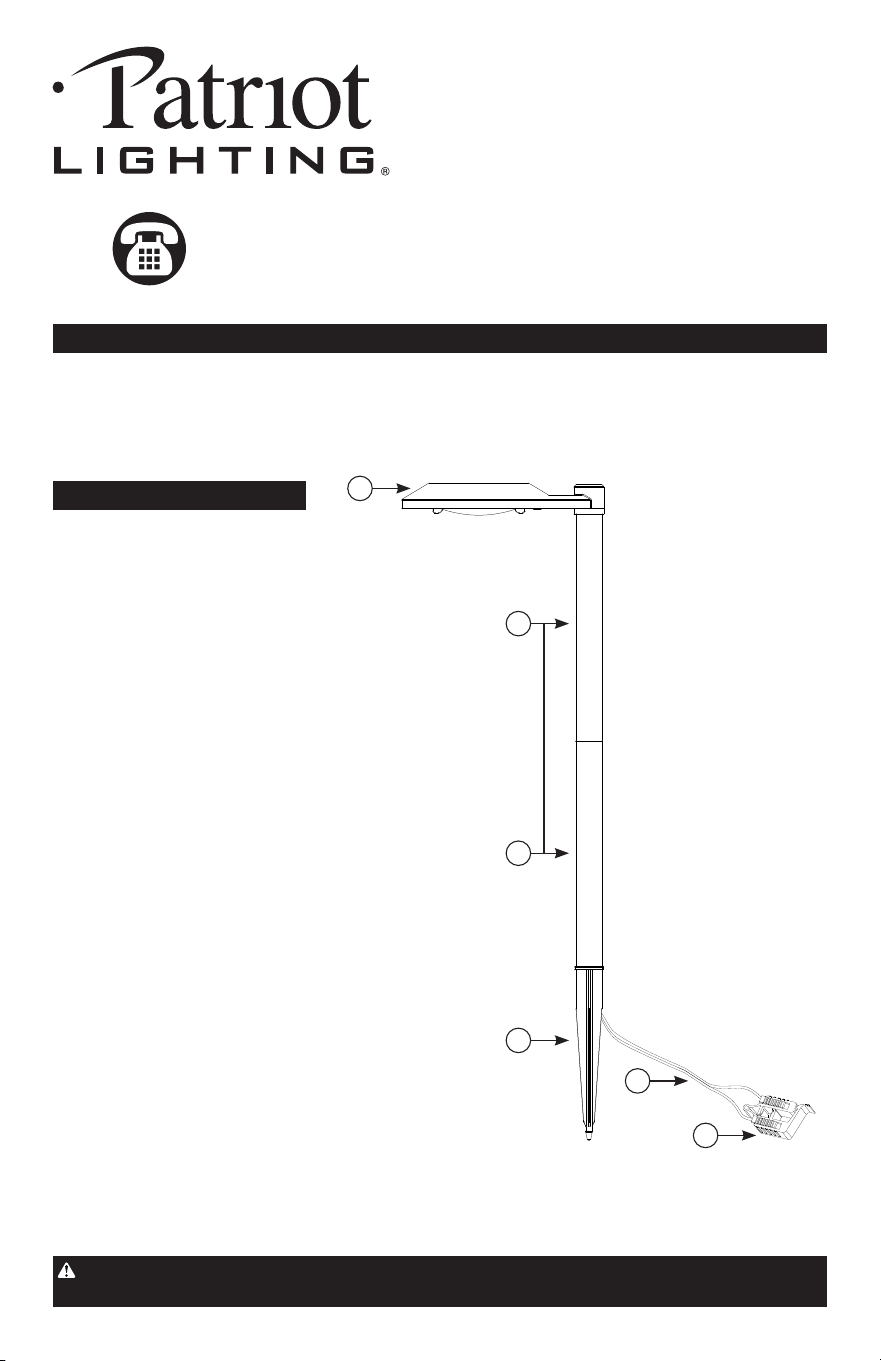
PACKAGE CONTENTS
Ref. Part Name
A Light Head
B Connection Tube (2 Part)
C Ground Stake
D Wire
E Connector
B
A
C
D
E
B
ASSEMBLY OF THE LIGHT FIXTURE
SAFETY INFORMATION
Please read and understand this entire manual before attempting to assemble, operate, or install
the product. Keep this instruction manual in a safe place for future reference.
WARNING:
• Risk of fire or electrical shock. Turn off power before assembly.
• Do not install or connect wires with wet hands.
• Do not install this product within 10 feet (3.05 meters) of a pool, spa, fountain, or other water source.
• The main cable is intended for shallow burial - maximum depth must not exceed 6 inches (15.24 cm).
• For low voltage landscape lighting systems only.
• Do not step on, or drive over the main cable.
CAUTION:
• This lighting fixture is only suitable for 12V power supply.
• This LED lamp is a highly efficient, extremely low wattage, energy saving product.
• Use shielded cable for outdoor use in the following sizes: SPT-2W 18G, SPT-2W 16G, SPT-2W 14G, SPT-
2W 12G.
• Do not attempt to service, adjust, or replace any part of the LED light source.
• Do not repair or modify this product.
• Do not submerge in water.
PREPARATION
Before beginning assembly, installation or operation of product, make sure all parts are present. Compare
parts with package contents list and diagram on previous page. If any part is missing or damaged, do not
attempt to assemble, install or operate the product. Contact customer service for replacement parts.
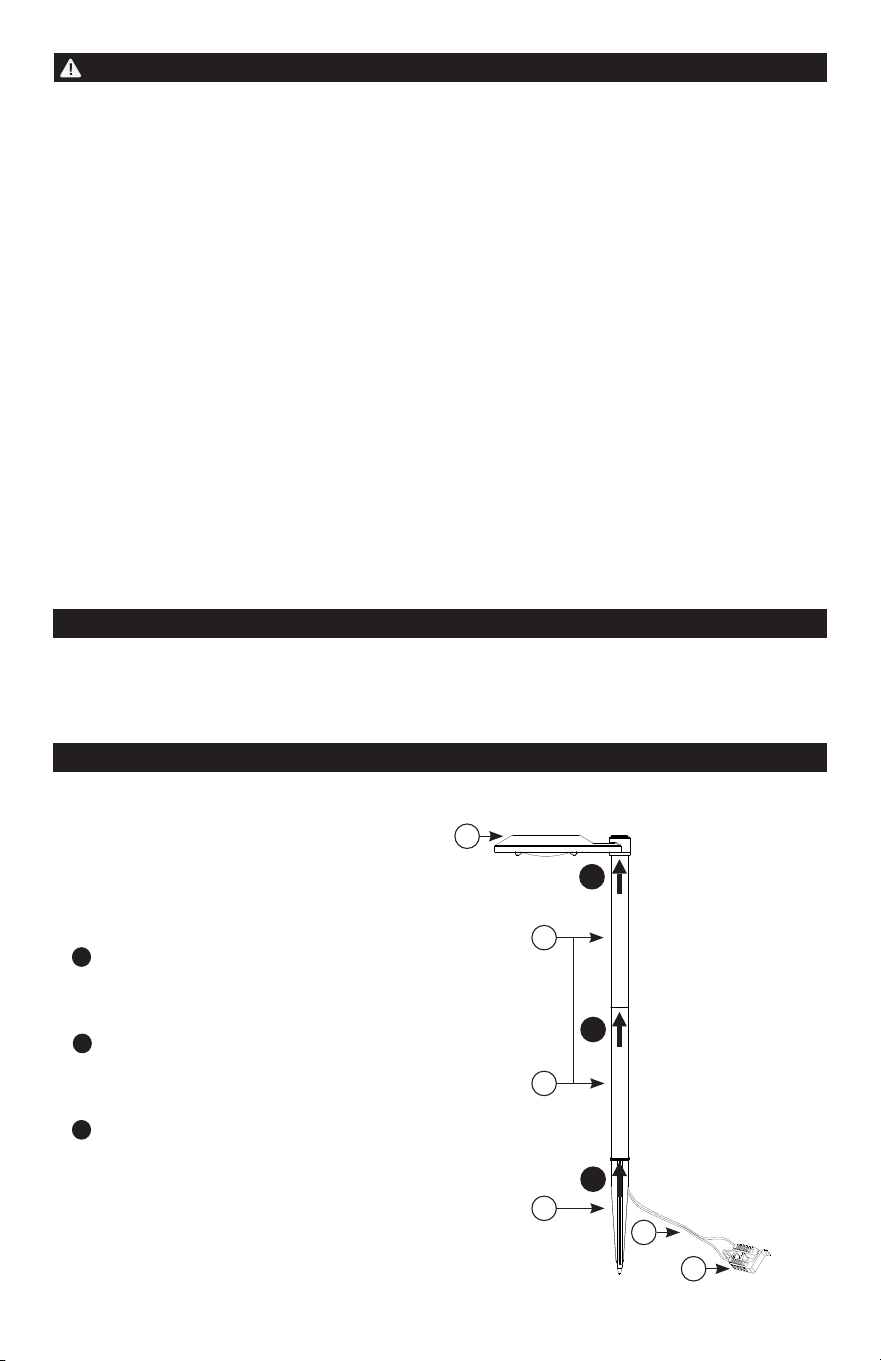
ASSEMBLY
• Gently remove all parts from the package and
lay them out on a smooth surface.
• Note: Some components may come
preassembled.
• Insert the Connection Tube (Part B) onto the
adapter at the base of the Light Head (Part A),
pressing together until secure.
• Insert the lower section of the Connection
Tube (Part B) into the upper section, pressing
together until secure.
• Insert the Ground Stake (Part C) into the
bottom of the Connection Tube (Part B), pressing
together until secure.
A
C
D
E
1
1
3
2
3
B
B
2
RUN THE LANDSCAPE WIRE (not included)
1. RUN THE LANDSCAPE WIRE:
• The included cable connectors are to be used only on low voltage power cable with SPT-2W or
equivalent 18, 16, 14, or 12 AWG cable.
• Do not use landscape cable smaller than listed in the chart below.
• The landscape wire should run from the power pack to each light fixture without being cut.
• Do not run the wire within 10 feet (3.05 meters) of a pool, spa, fountain, or other water source.
• The landscape wire should be protected by routing it close to the light fixture; near a building, deck,
fence, or other outdoor structure.
3. CONNECT LIGHT FIXTURE TO LANDSCAPE
WIRE (Figures 1 & 2)
• The included cable connectors are to be used only on
low voltage power cable with SPT-2W or equivalent
18, 16, 14, or 12 AWG cable.
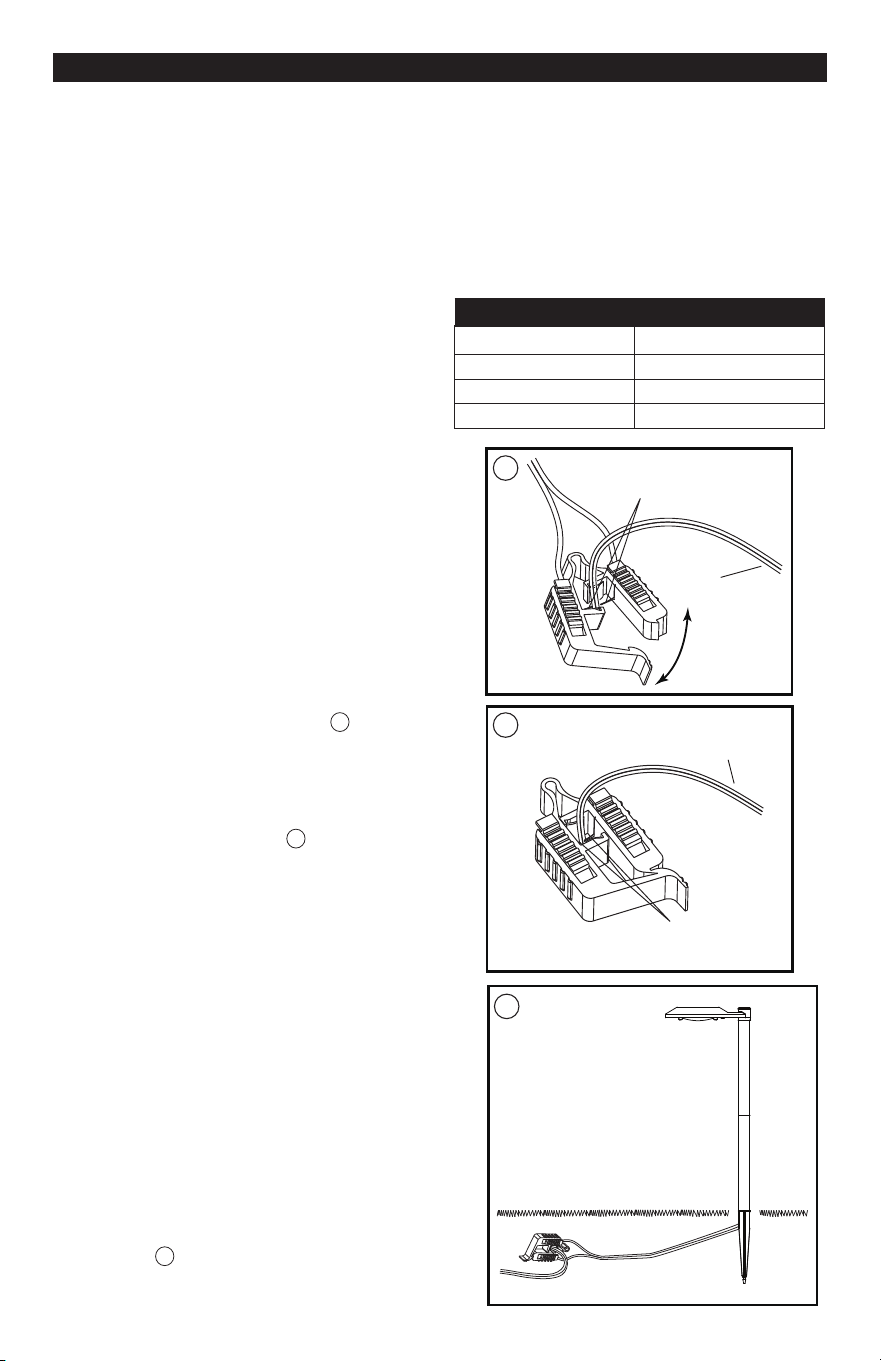
1. Open the Connector (Part E) that is attached to the
end of the Wire (Part D). See Figure
2. Align the landscape wire (not included) through the
Connector (Part E), allowing the contact pins (2) to
pierce the wire on both sides. Close the Connector
(Part E) to secure. See Figure
3. Choose the ground area where you would like the
light and insert the stake (Part C). Never push the
fixture into the ground by the fixture head.
CAUTION: In compacted, clay, or hard soils, moisten
the ground with water before inserting the stake
into the ground to avoid breakage.
4. LIGHT FIXTURE ADJUSTMENT:
• Before burying the landscape cable underground, it is
recommended you adjust your light fixtures at night
to ensure you are happy with the position and lighting
effect of each.
5. BURYING THE LANDSCAPE WIRE:
• The landscape wire can be buried under soil, grass,
or stone at a maximum depth of 6 inches (15.24 cm).
See Figure
Contact Pins
Power
Wires
Contact Pins
Power Wires
2
1
Power Pack Wattage Minimum Gauge Cable
240-300 12
120-240 14-12
60-120 16-14-12
0-60 18-16-14-12
2. SELECT LIGHT FIXTURE LOCATION:
• To achieve consistent brightness and longer light
fixture life, install the first light fixture at least 10 feet
(3.05 meters) from the power pack.
3
1
2
3
• SELECT CABLE: Use the chart to determine the
MINIMUM gauge cable to be used, depending on
the wattage of the power pack. Using larger cable
will ensure maximum light output.

CARE AND MAINTENANCE
• Clean the lens and coated metal surfaces with a non-abrasive cleaner.
• Do not use any cleaners with chemicals, solvents or harsh abrasives.
FIVE-YEAR LIMITED WARRANTY: If, during normal use, this PATRIOT LIGHTING
®
lighting fixture breaks or fails due
to a defect in material and workmanship within (5) years from the date of original purchase, simply bring this lighting
fixture with the original sales receipt back to your nearest MENARDS
®
retail store. At its discretion, PATRIOT LIGHTING
®
agrees to have the product or any defective part(s) repaired or replaced with the same or similar PATRIOT LIGHTING
®
product or part free of charge, within the stated warranty period, when returned by the original purchaser with original
sales receipt. This warranty; (1) excludes expendable parts including but not limited to light bulbs; (2) does not cover
damage that resulted from abuse or misuse; and (3) does not cover any losses, labour, injuries to persons/property or
costs. This warranty does give you specific legal rights and you may have other rights, which vary from state to state.
TROUBLESHOOTING
If only some of the lights work:
1. Check the contact pins of the connector to make sure they have pierced the landscape wire correctly.
2. The problem could be with the connector or LED of the light fixture.
6
7
8
6
7
8
If the light does not work at all:
1. Make sure the switch and circuit breaker are on.
2. Make sure the wiring connection is correct.
3. Make sure the connections between the contact
pins of the connector and the landscape wire are
correct.
Should you need to re-connect the Wire (Part D)
to the Connector (Part E):
1. Push up the lever on each side of the Connector
(Part E) to open. See Figure
2. Feed one separated end of the Wire (Part D) into
one of the openings on the Connector (Part E), and
the other separated end of the wire into the other
opening, until each wire reaches the back of the
opening (about 3/4”). See Figure
3. Press both levers down to close. See Figure
Questions, problems, missing parts?
Before returning to your retailer, call our customer service at
1-877-615-1378 Monday – Friday 8:00 a.m. – 4:00 p.m. EST
SELECT YOUR LED LIGHT COLOR
• This light has a selectable color temperature
feature.
1. Locate the pushbutton selector switch underneath
the Light Head (Part A). See Figure
4
2. Press the button once to select Soft White
(3000K), press the button a second time to select
Bright White (4000K), press the button a third
time to select Daylight (5000K). See Figure
4 5
PRESS
A
5