
Technical Support and E-Warranty Certificate www.vevor.com/support
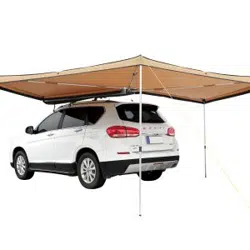
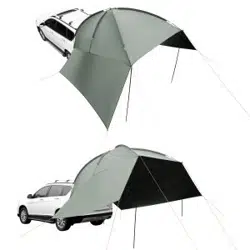
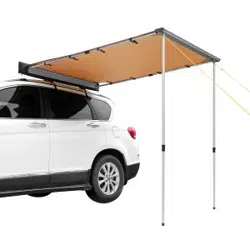
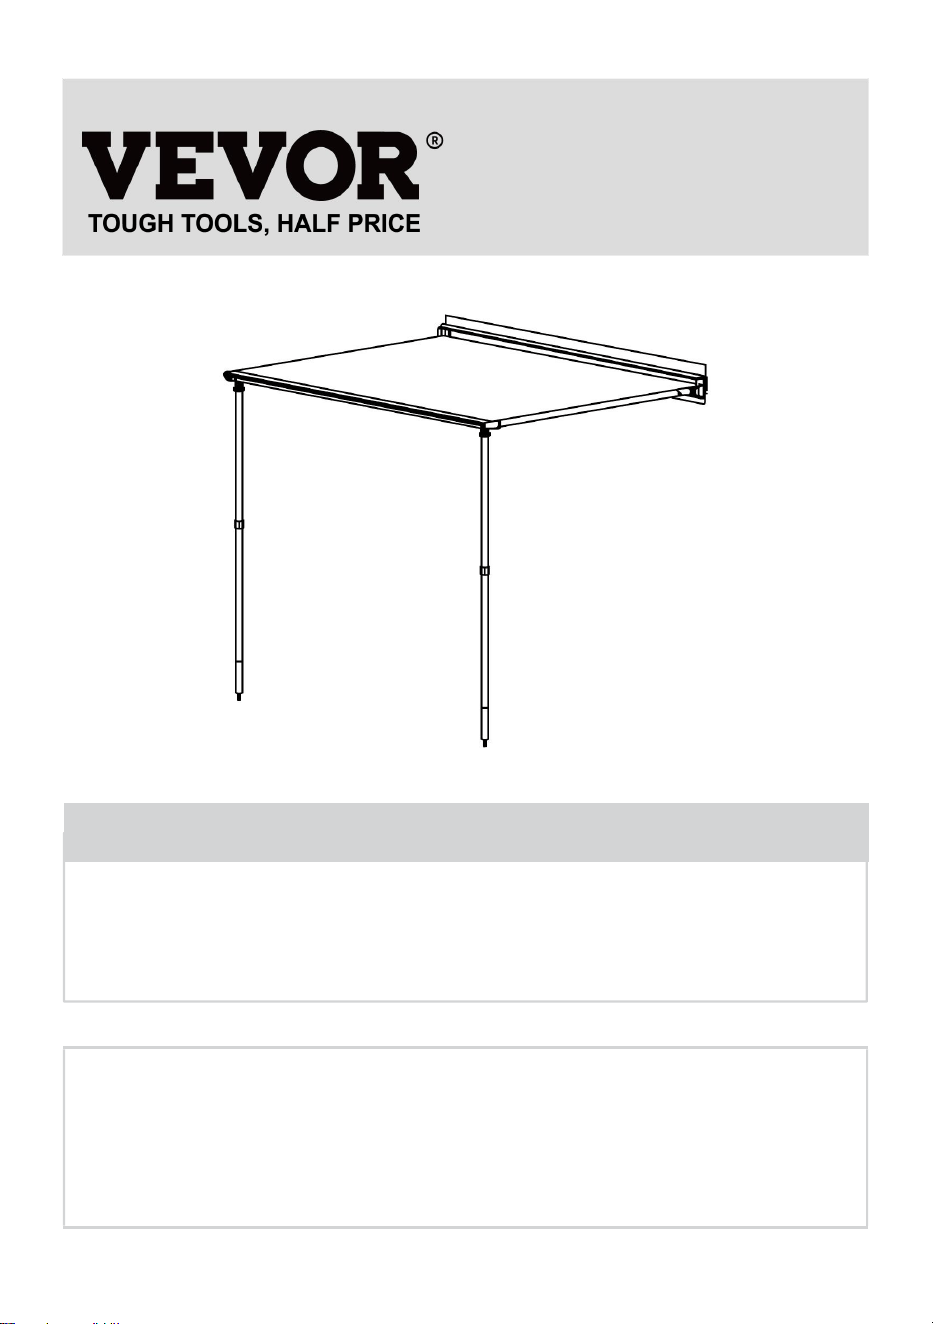
CAR SIDE AWNING USER MANUAL
We continue to be committed to provide you tools with competitive price.
"Save Half", "Half Price" or any other similar expressions used by us only represents an
estimate of savings you might benefit from buying certain tools with us compared to the major
top brands and does not necessarily mean to cover all categories of tools offered by us. You
are kindly reminded to verify carefully when you are placing an order with us if you are
actually saving half in comparison with the top major brands.
1
Model: ATSA1420, ATSA2025
Have product questions? Need technical support? Please feel free to
contact us:
Technical Support and E-Warranty Certificate
www.vevor.com/support
NEED HELP? CONTACT US!
This is the original instruction, please read all manual instructions
carefully before operating. VEVOR reserves a clear interpretation of our
user manual. The appearance of the product shall be subject to the
product you received. Please forgive us that we won't inform you again if
there are any technology or software updates on our product.
PET STROLLER
2
SPECIFICATIONS
Model
ATSA1420
Product Size
4.6×6.6ft
Color
Biege
Model
ATSA2025
Product Size
6.6×8.2ft
Color
Biege
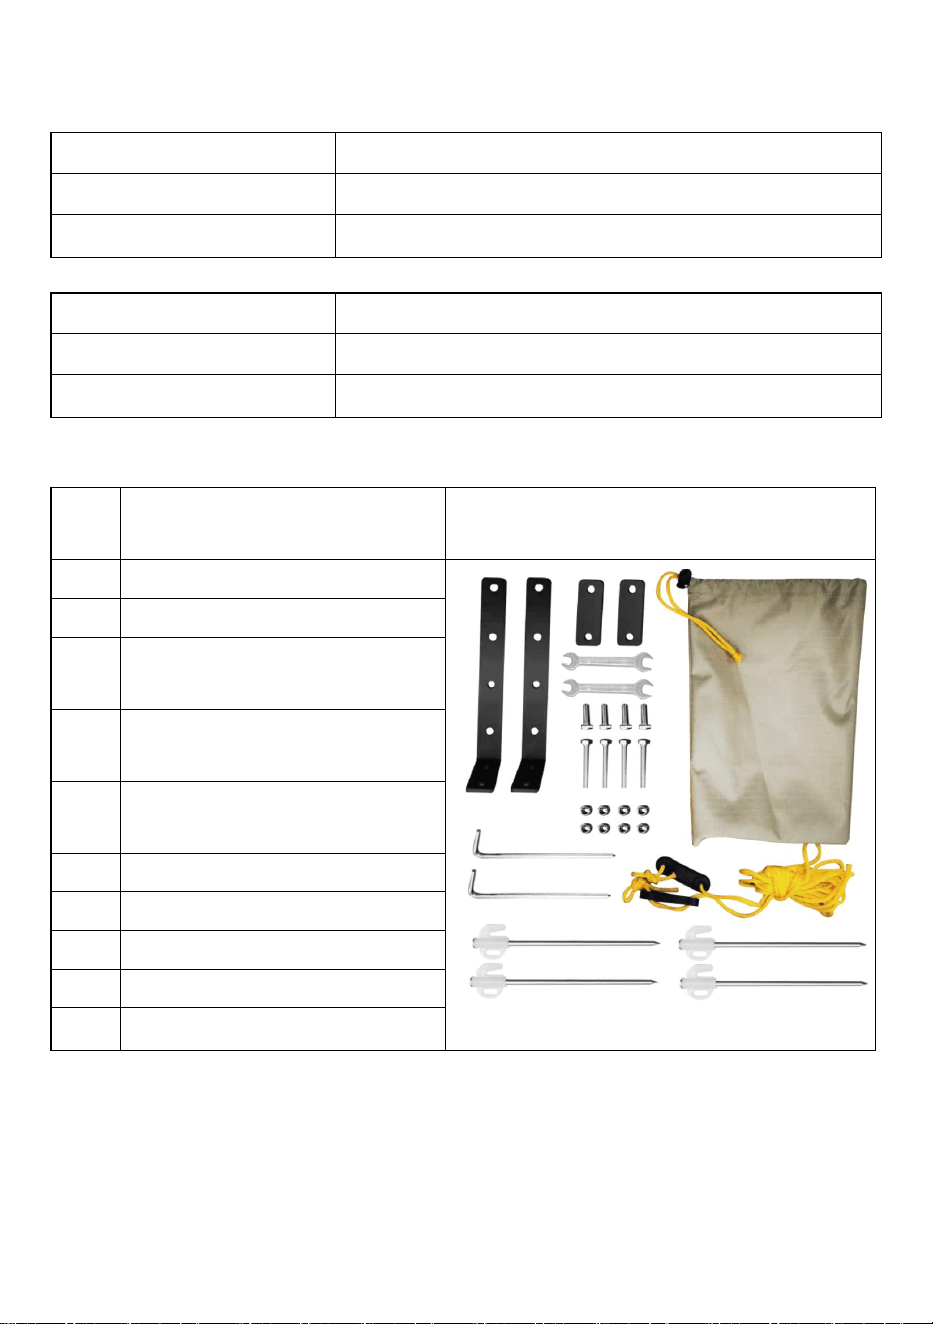
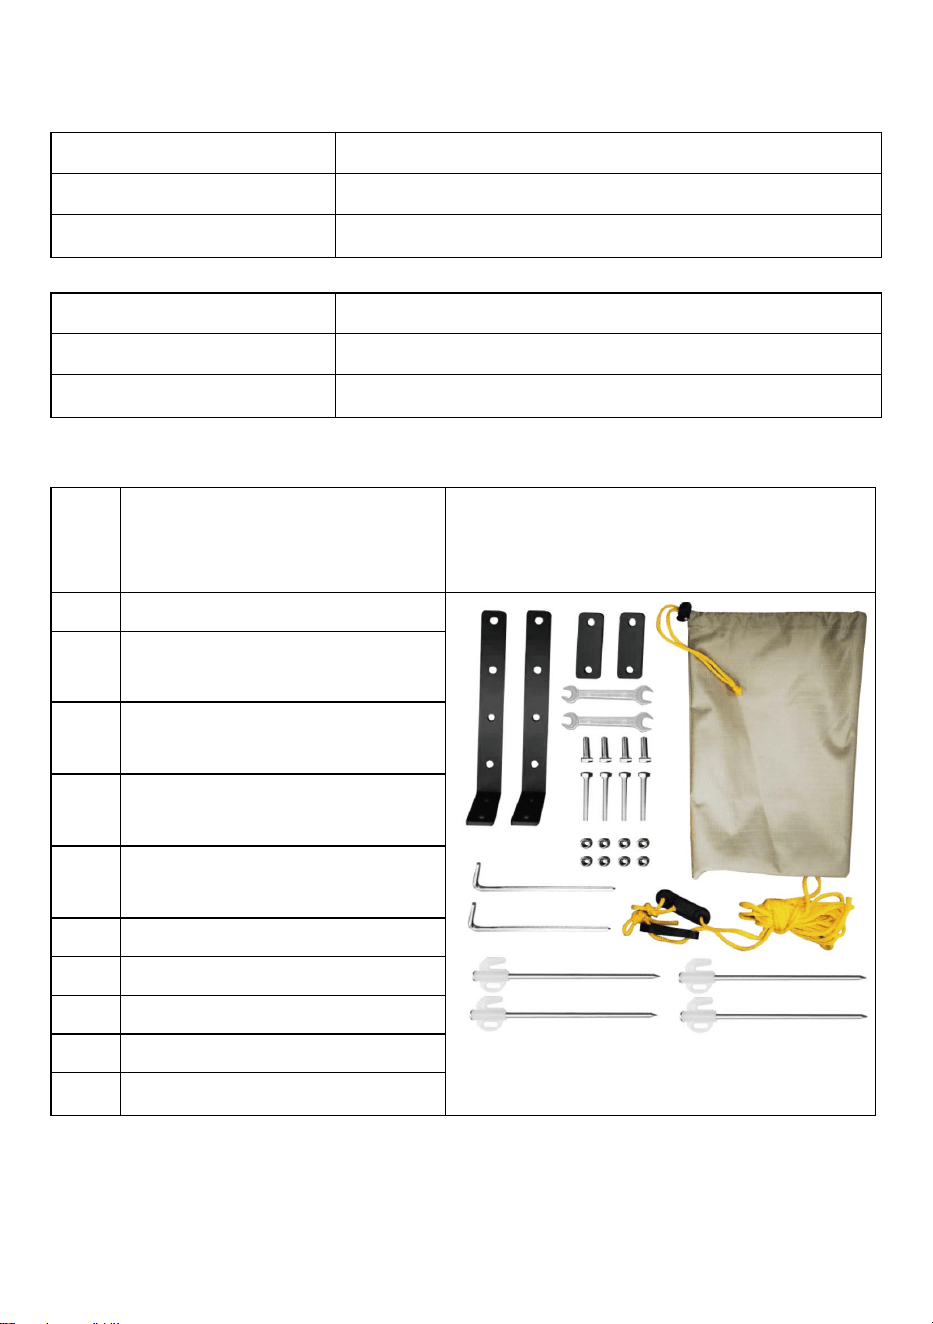
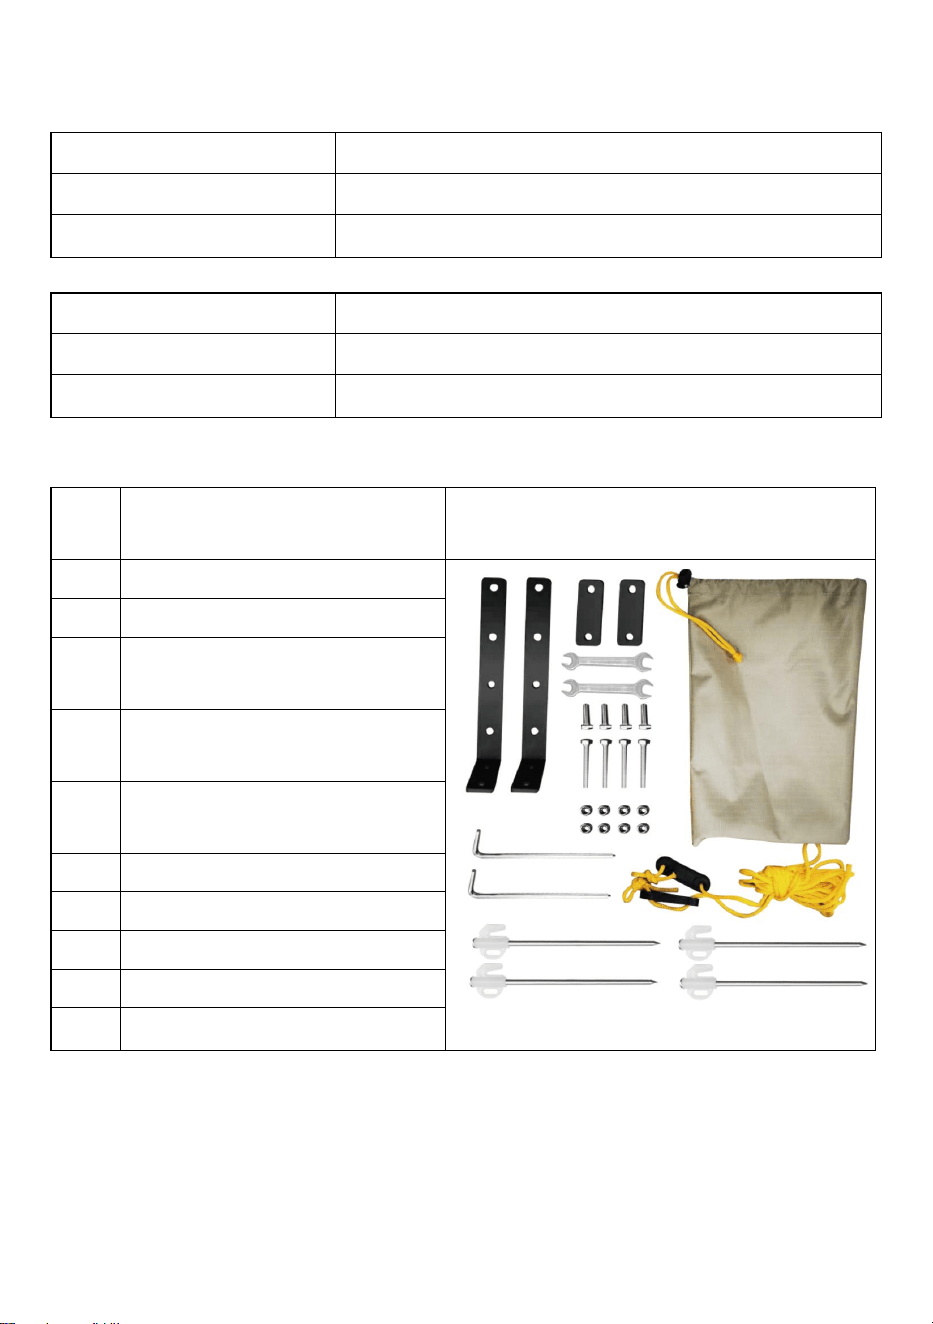
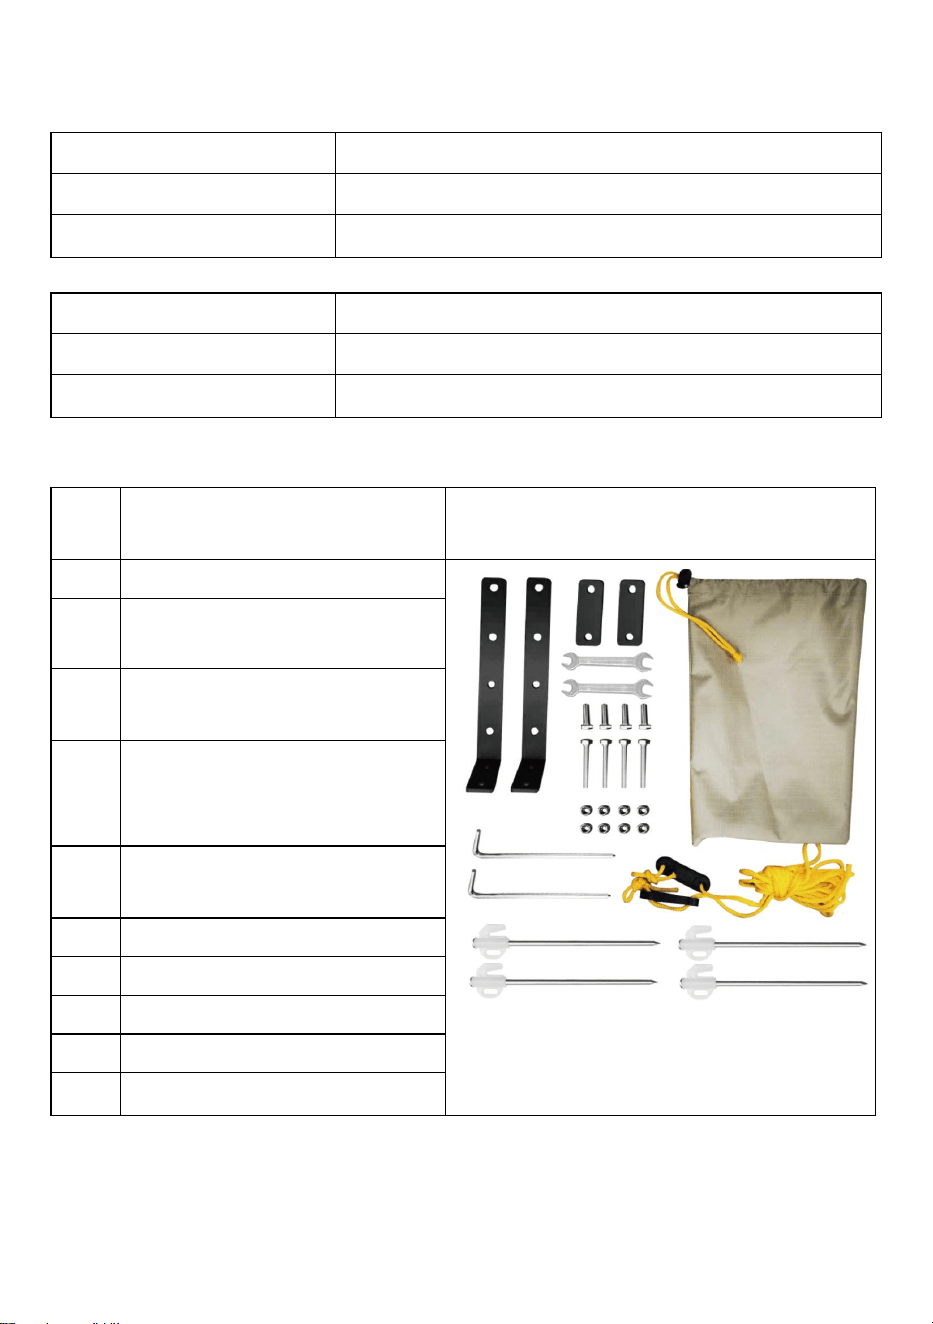
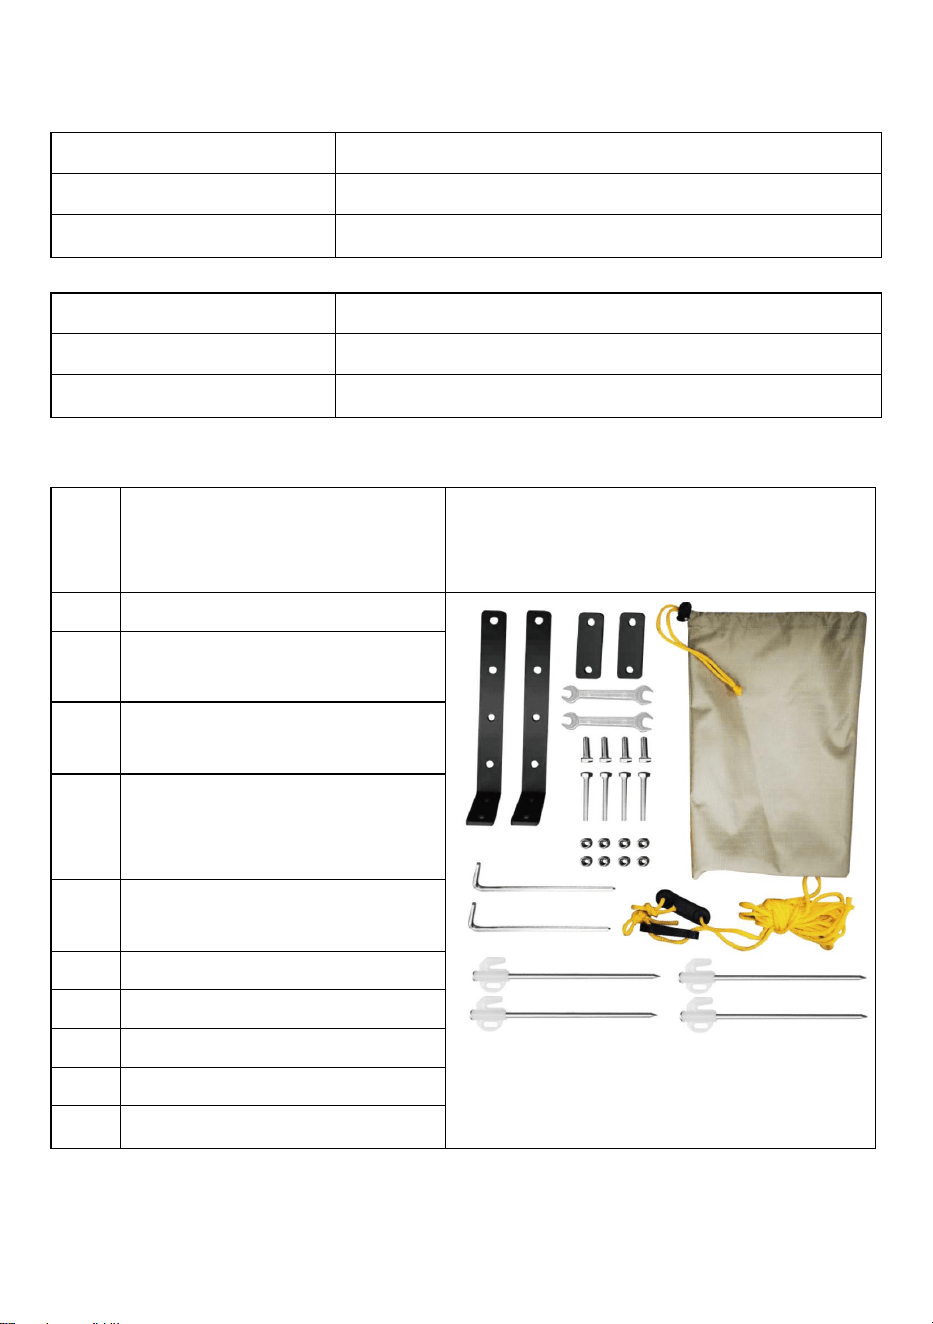
COMPONENTS
SN
FITTING
LIST-SPECIFICATIONS
PICTURE
1
Manual x1
2
Stainless Steel Ground Peg x4
3
Black Powdercoated Steel L -
Bracket x2
4
lack Powdercoated Steel
Backing Plate x2
5
2.7m Rope with Plastic Fixed
unit x2
6
SS304 M8X20mm bolt x4
7
SS304 M8X55mm bolt x4
8
SS304 M8 Nylock nut X8
9
WRENCH x2
10
Carry Bag x1
Simply follow the easy assembly instructions in this manual, and follow the setup
and safety guidelines closely.
Inspections: during trips regularly check that all nuts and bolts attaching your
awning to your vehicle are tight and in good repair.
IMPORTANT SAFETY WARNING
3
Do not attempt to set up the awning in windy conditions.
All guy ropes must be properly attached to the awning and pegged to the
ground at all times.
Guy ropes are trip hazards in the day and night.
Keep all flame and heat sources away from the awning materials. Under no
circumstance should any naked flame sources, fuel burning devices or heating
devices be used under or near the awning.
Keep campfires well away from awning.
Keep a look out for any airborne burning embers that may come into contact
with the awning.
Keep a fire extinguisher or water bucket nearby.
Do not smoke within the awning. Keep exit clear.
FITTING GUIDE
Options for mounting your awning are outlined below.
It is important when mounting the awning to ensure it is positioned to allow
sufficient clearance for the vehicle doors to open.
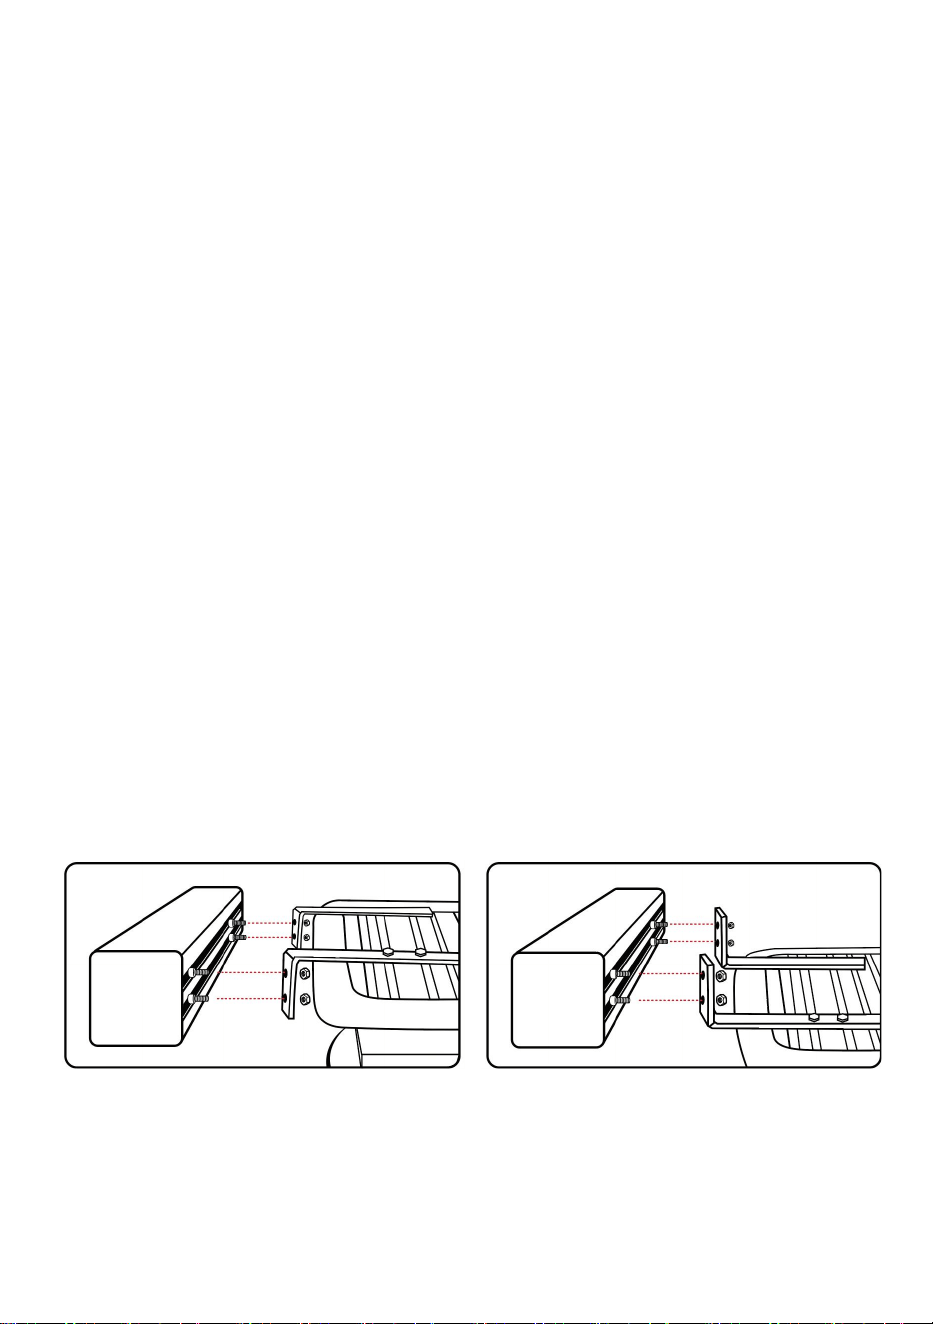
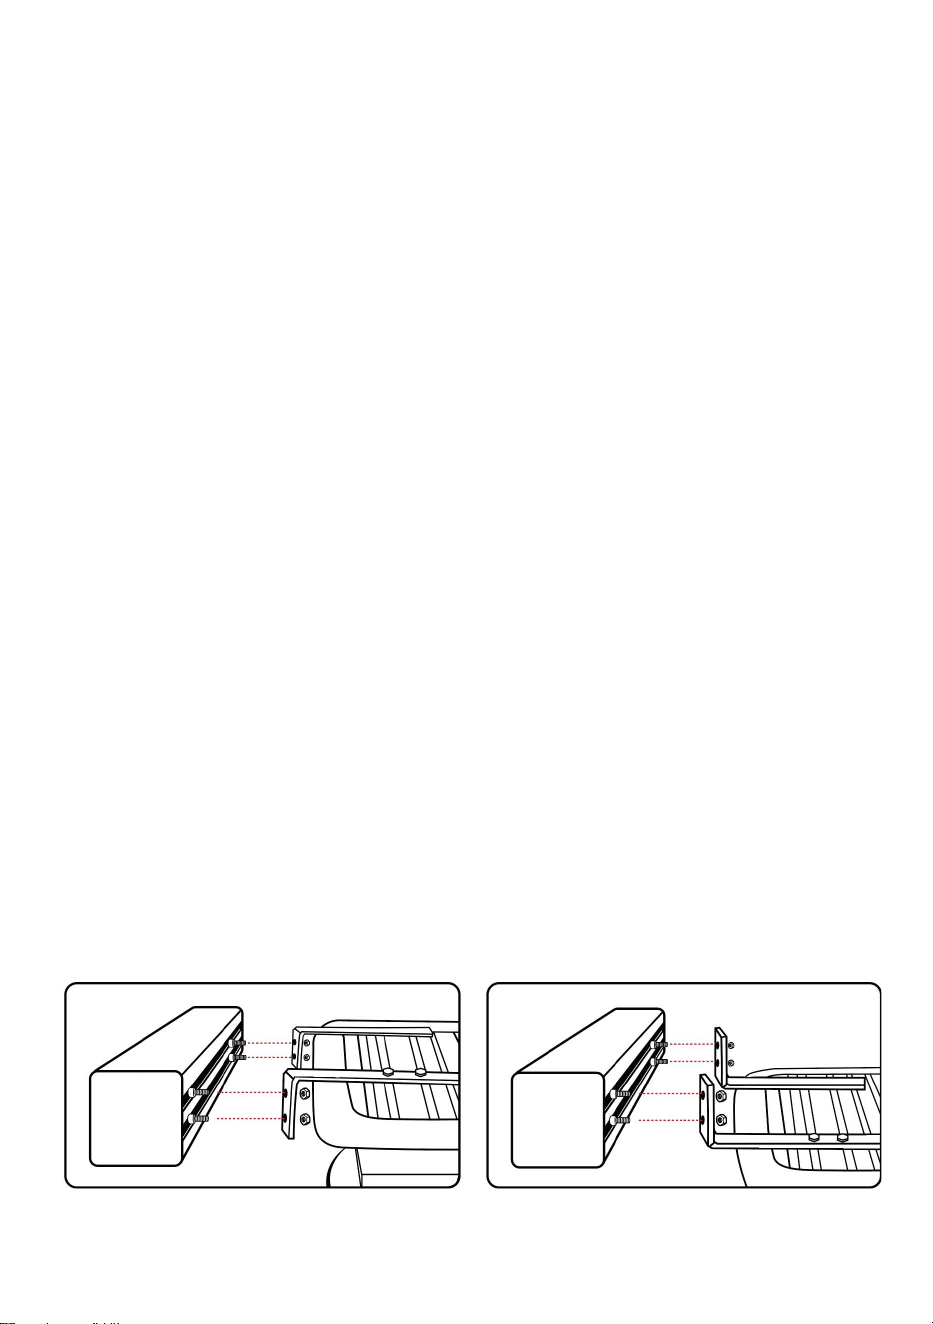
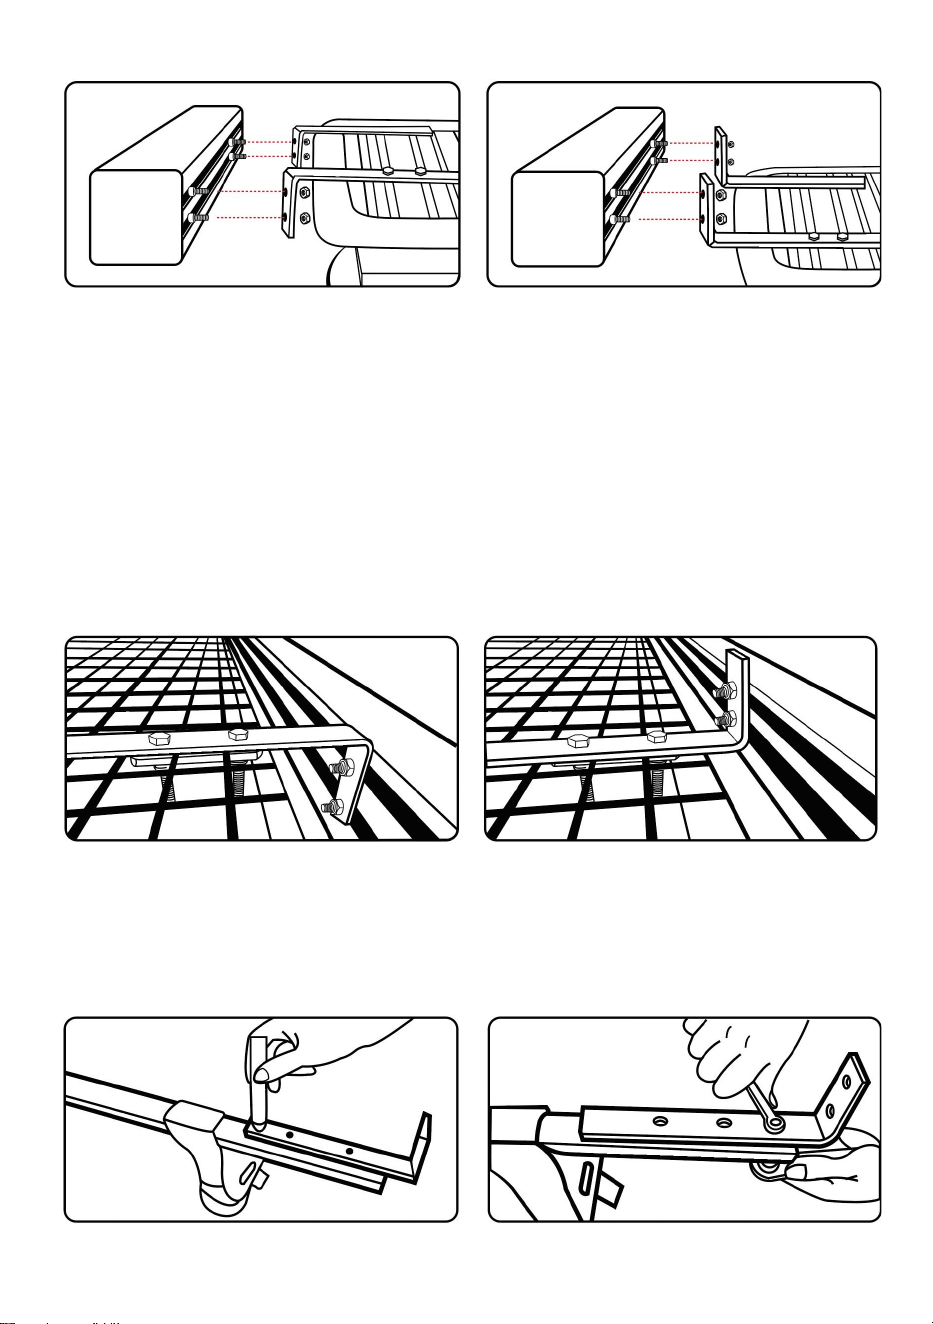
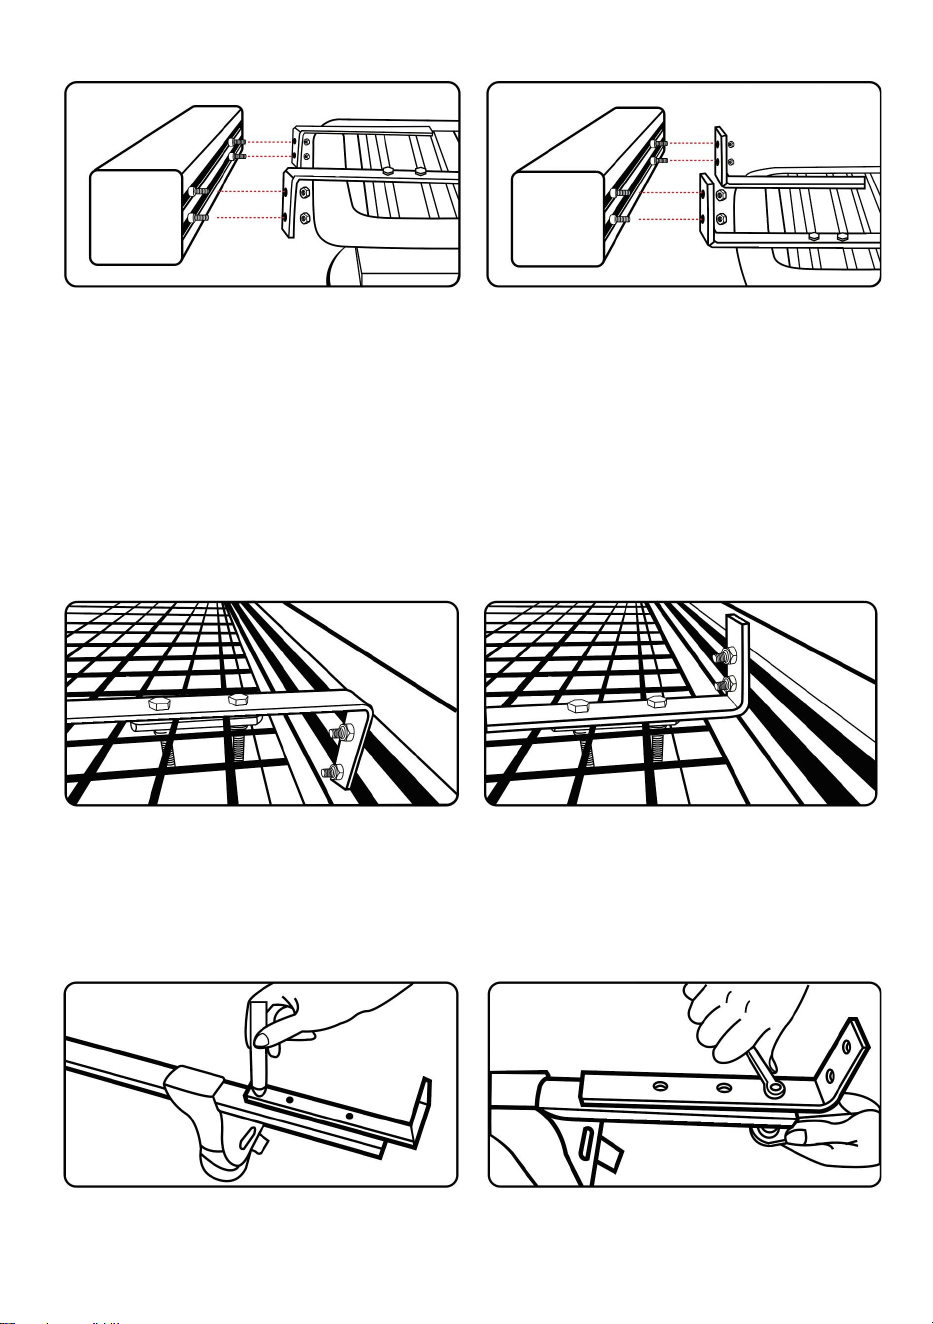
INSTALLATION
●
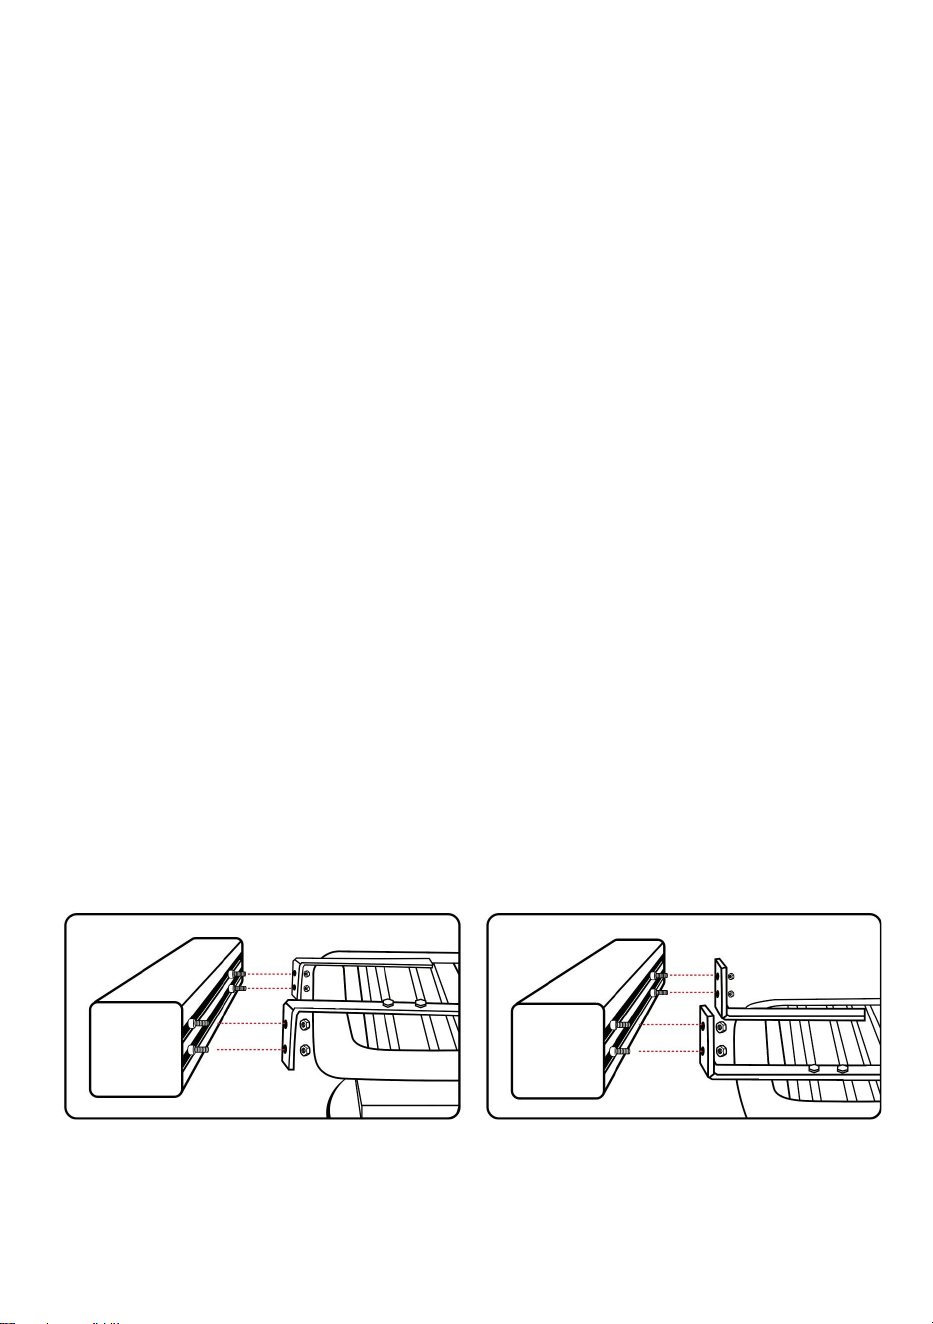
FOR ROOFTOP RACK
NOTE: You can choose option A or option B to install according to your requirement.
OPTION A
OPTION B
4
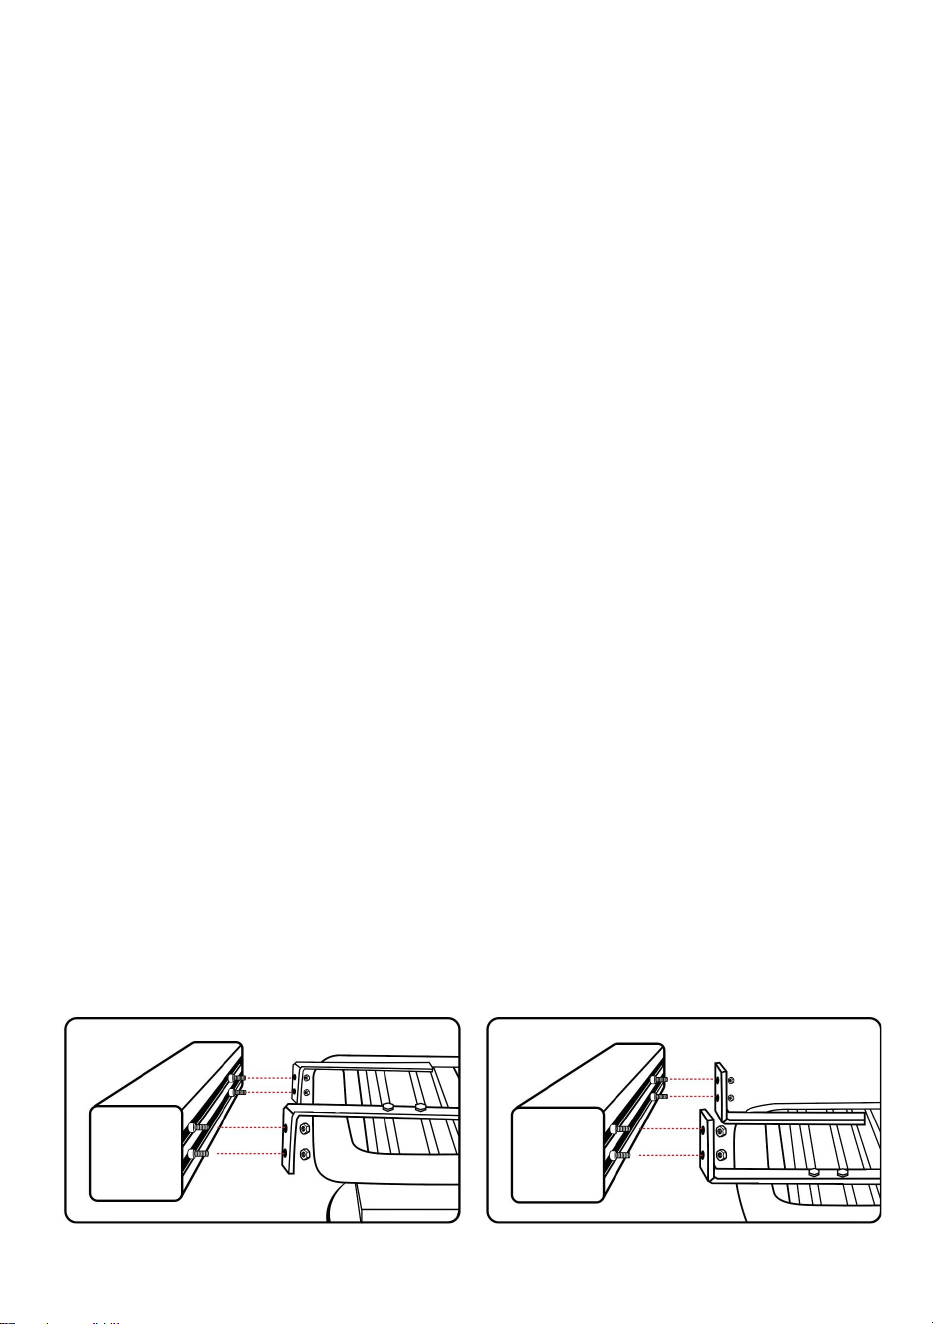
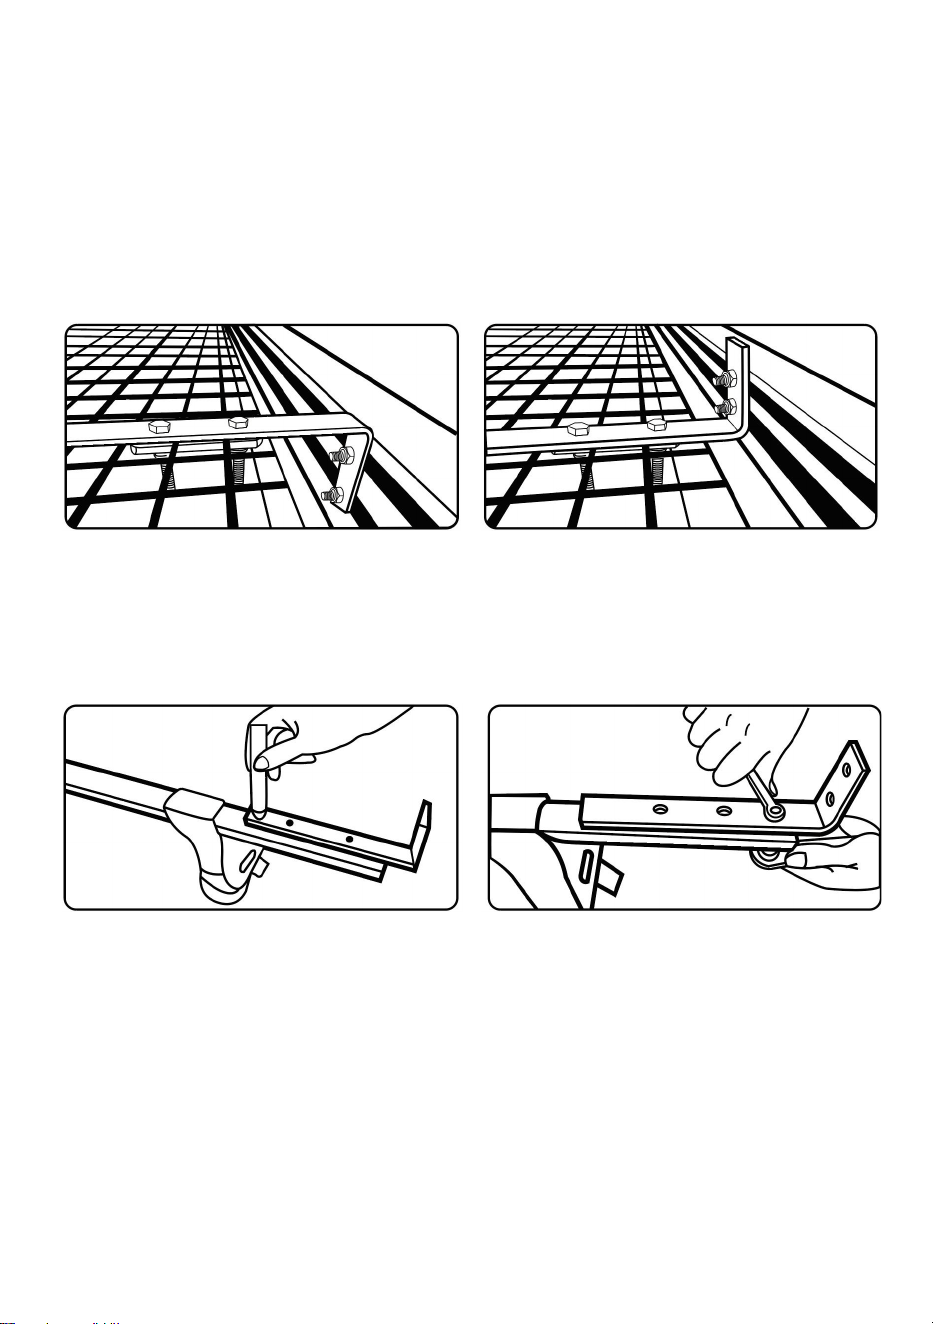
●
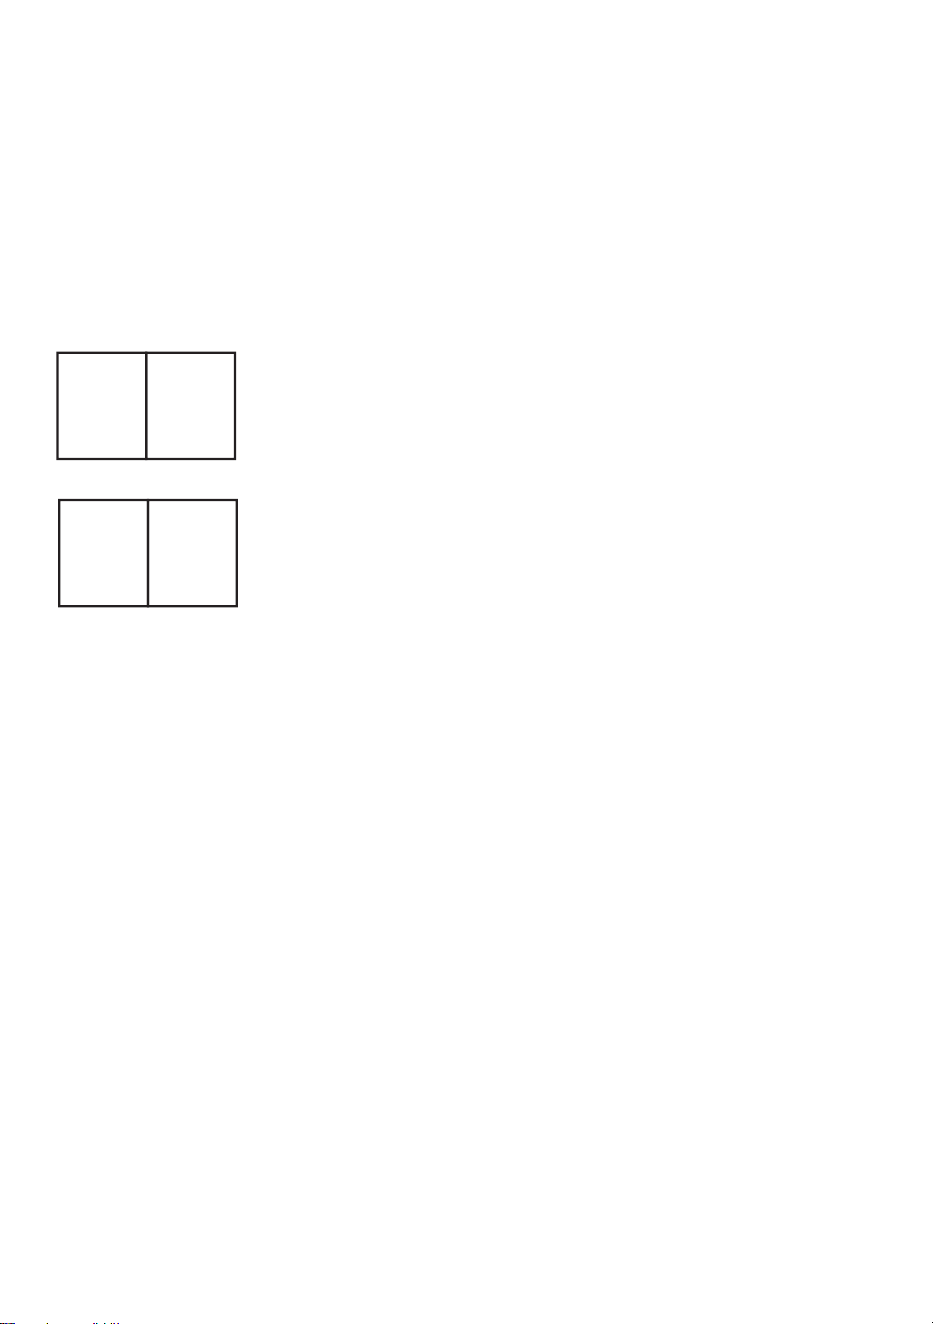
FOR ROOFTOP BASKET
NOTE: You can choose option A or option B to install according to your requirement.
OPTION A
OPTION B
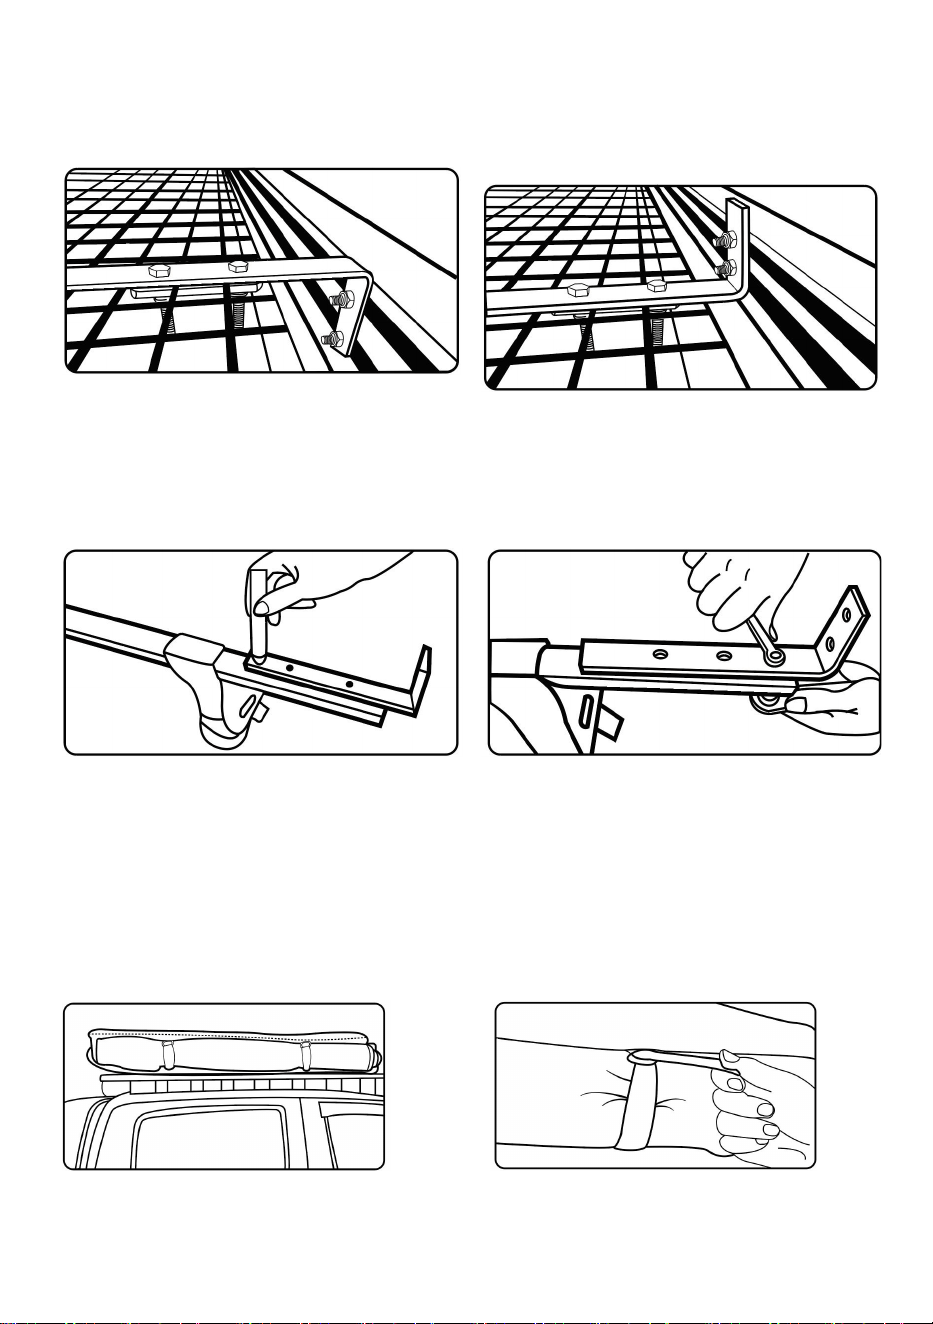
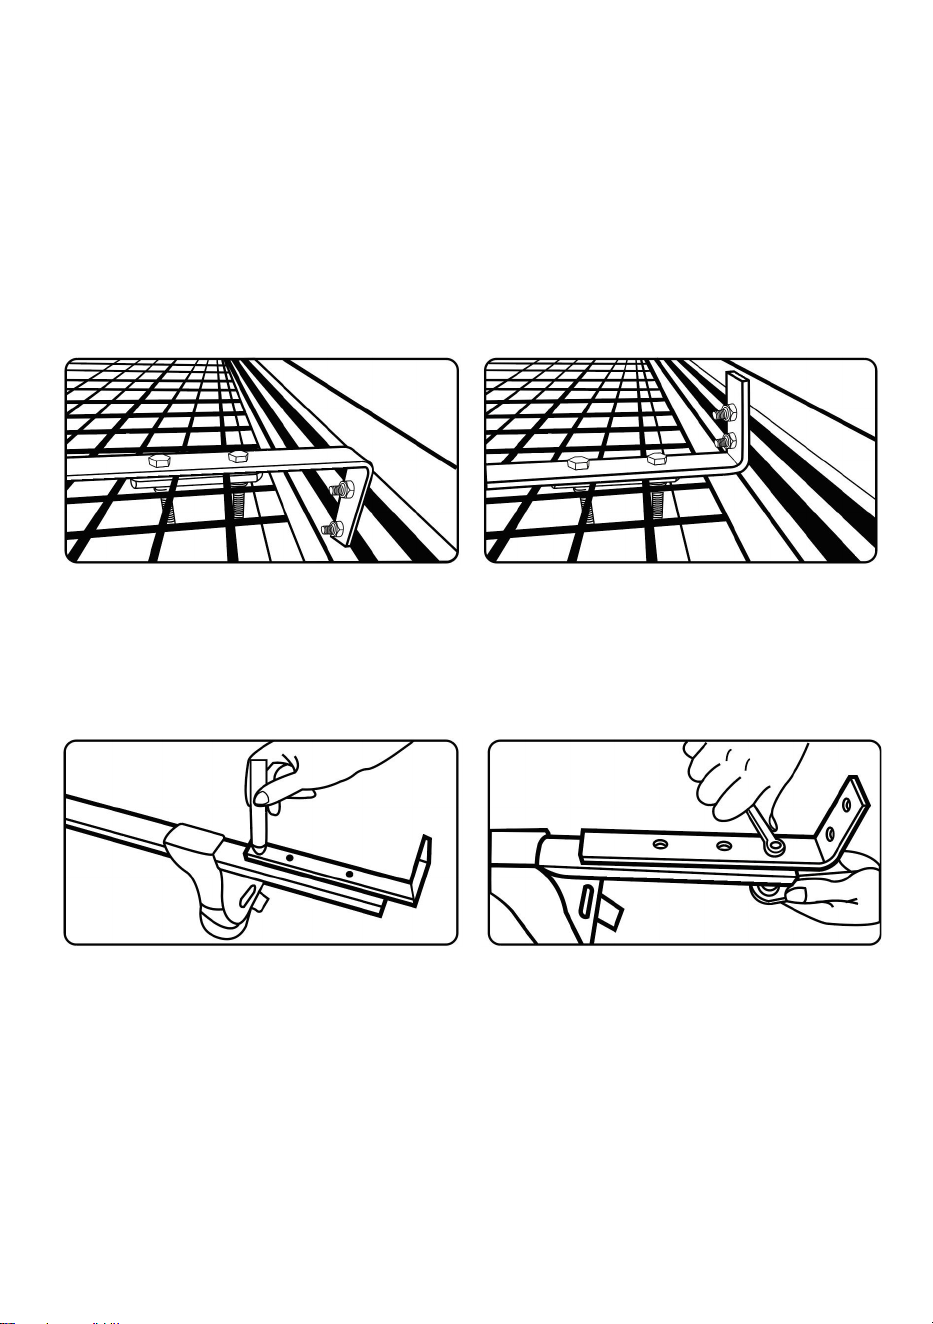
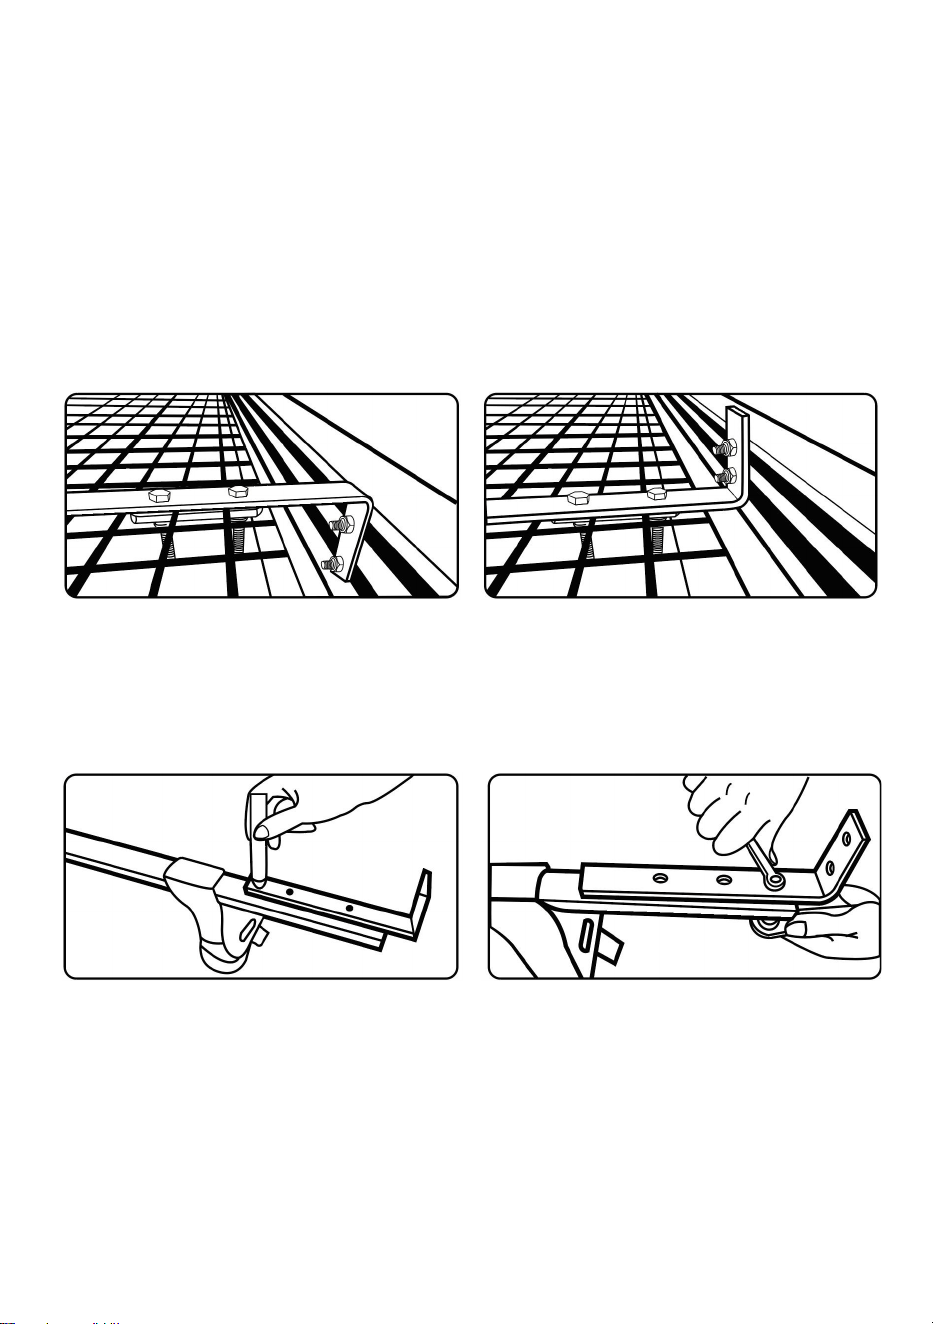
●
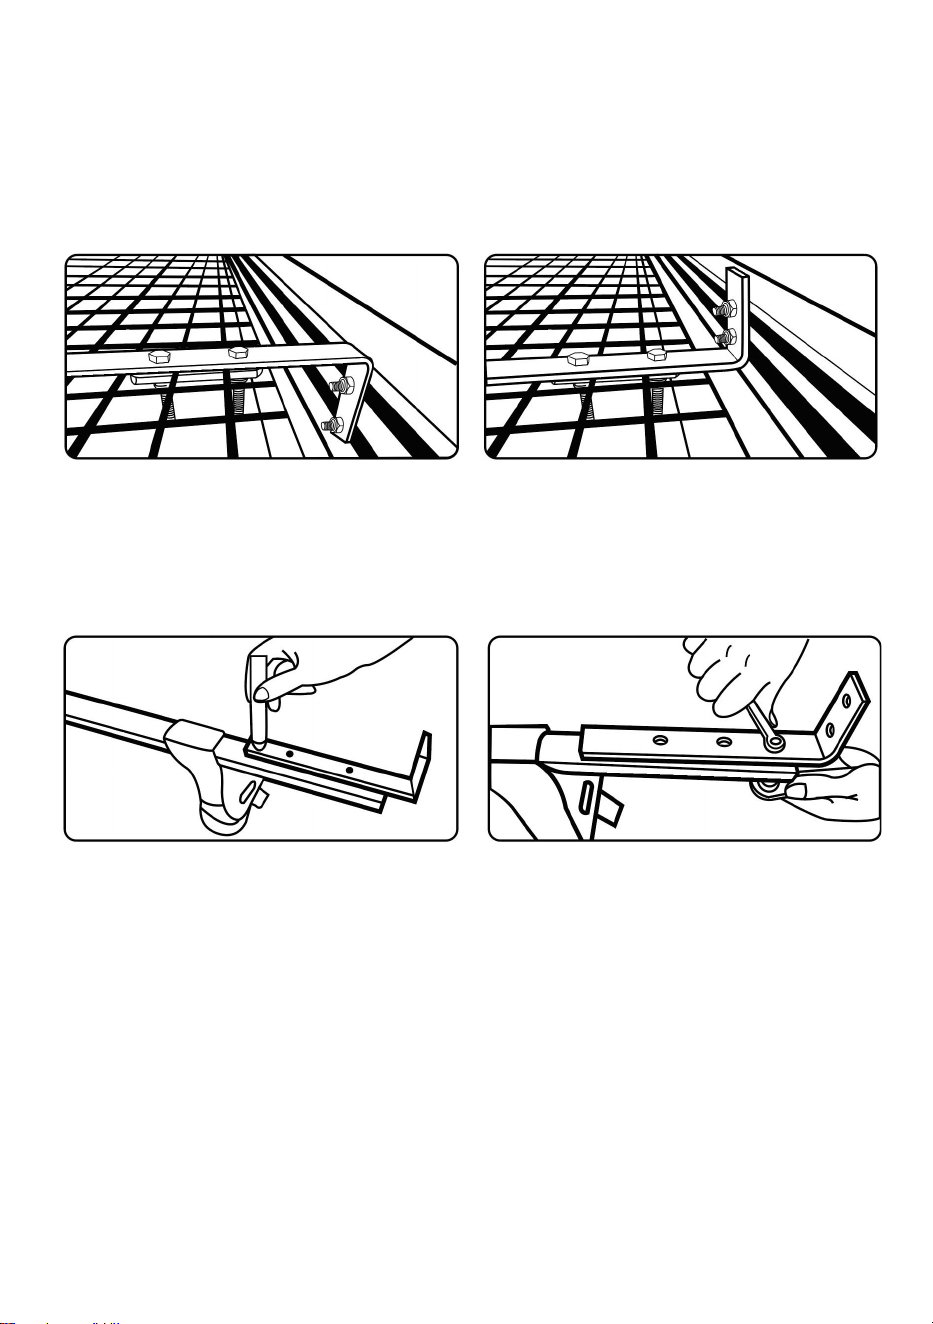
FOR CROSS BAR (DRILLING MIGHT BE NEEDED)
NOTE: If there are no holes in the cross bar, it is necessary to drill the holes before installing
the bracket.
STEP 1:Cross bar drilling
STEP 2:Bracket installing
Note: Partial DIY might needed due to different fittings of rooftop rack models. Not all
provided parts are necessary to be used for installation, some of them are backups for
different models.
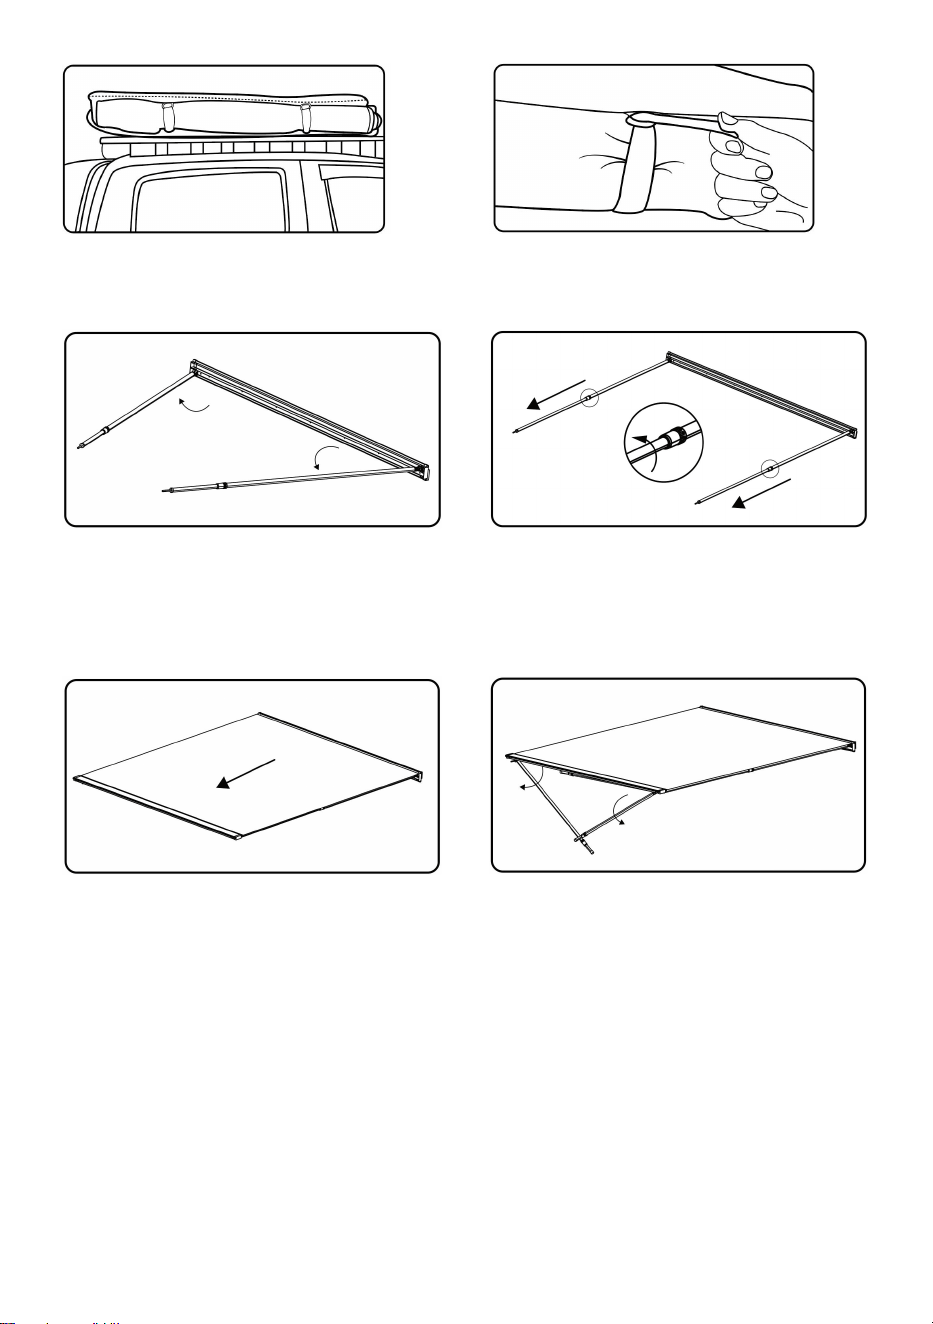
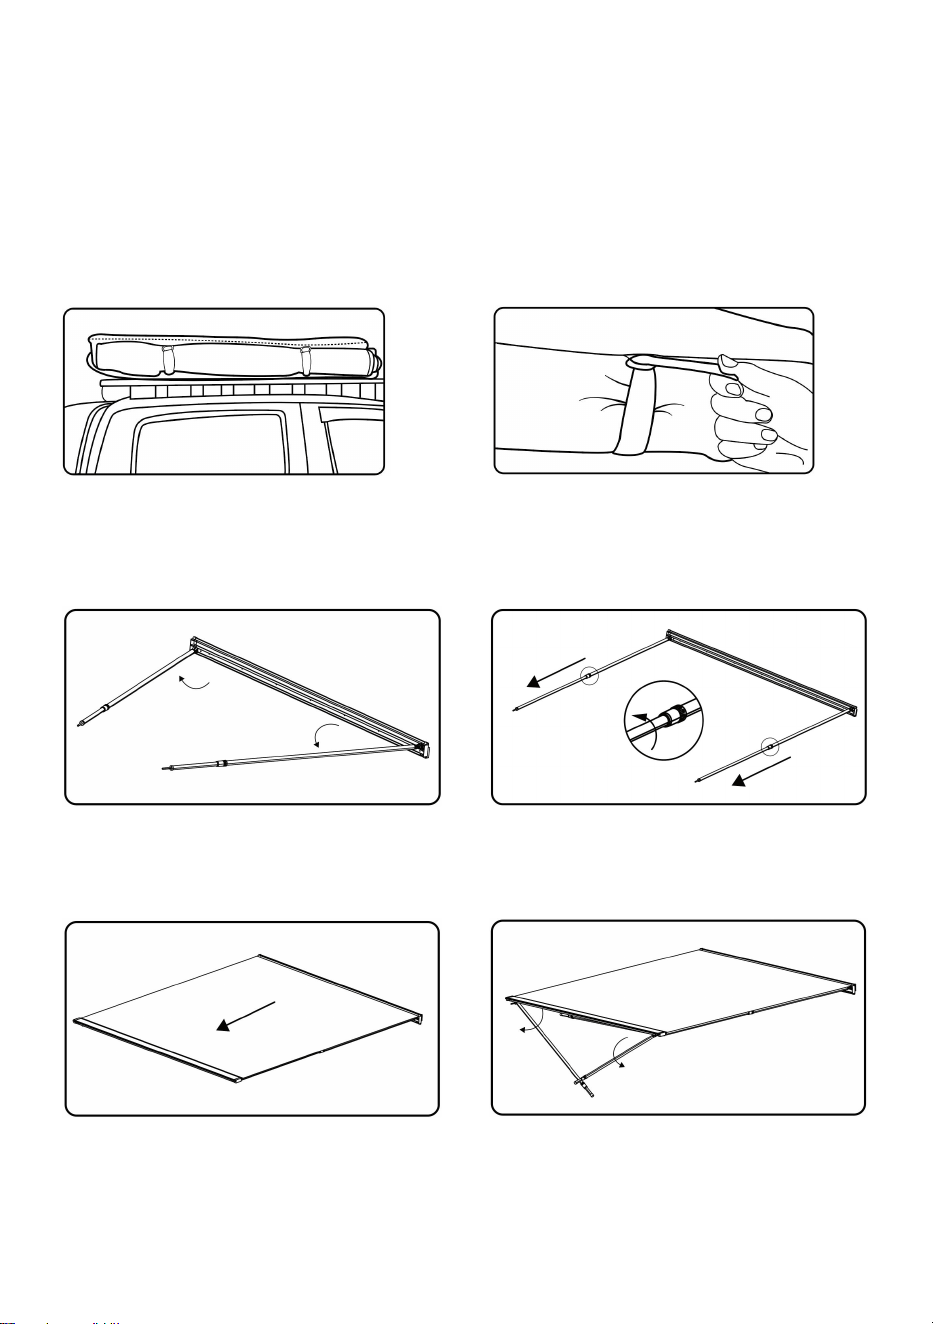
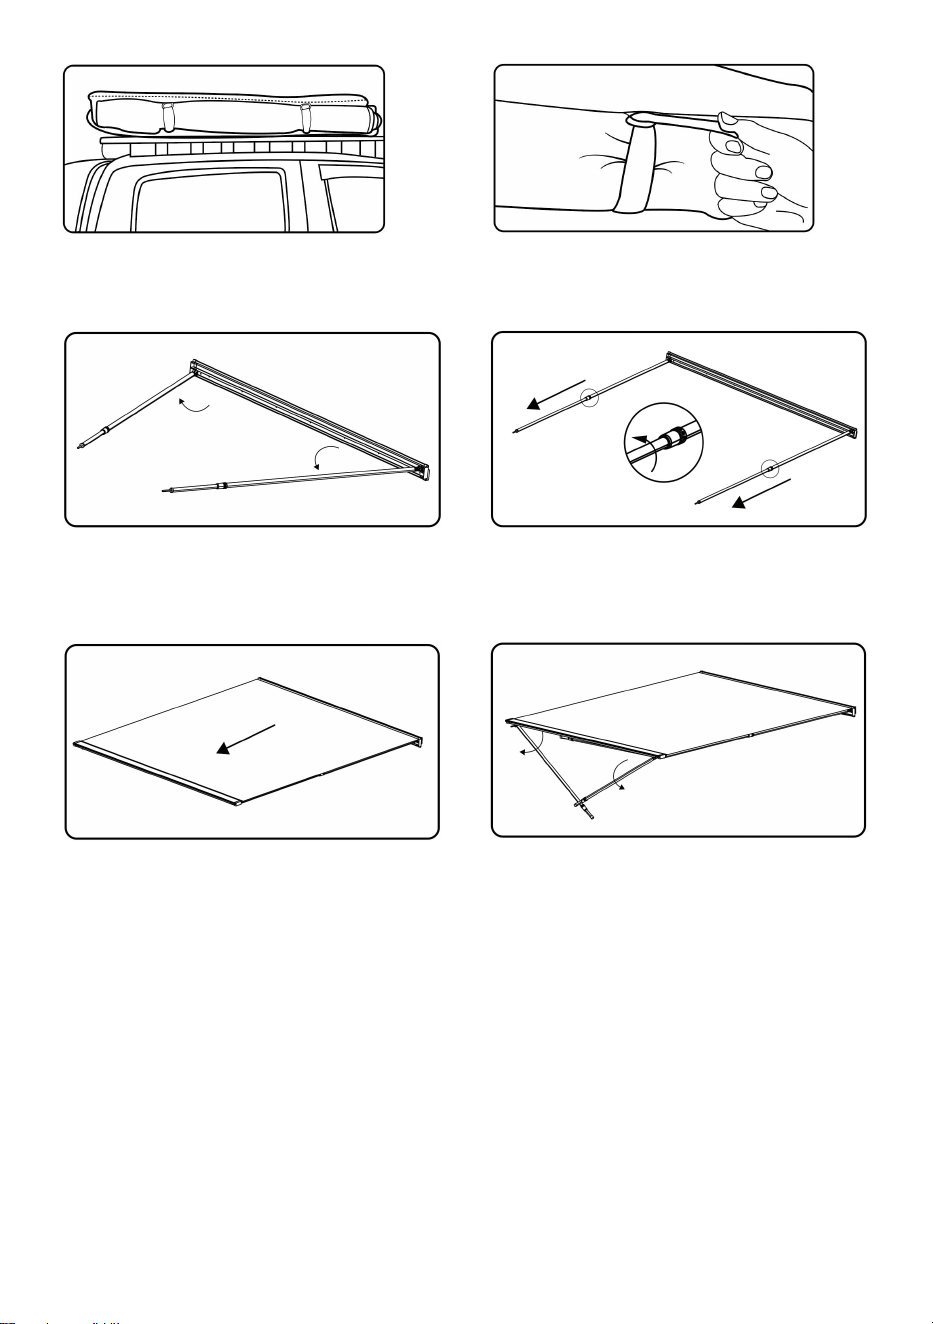
SETUP
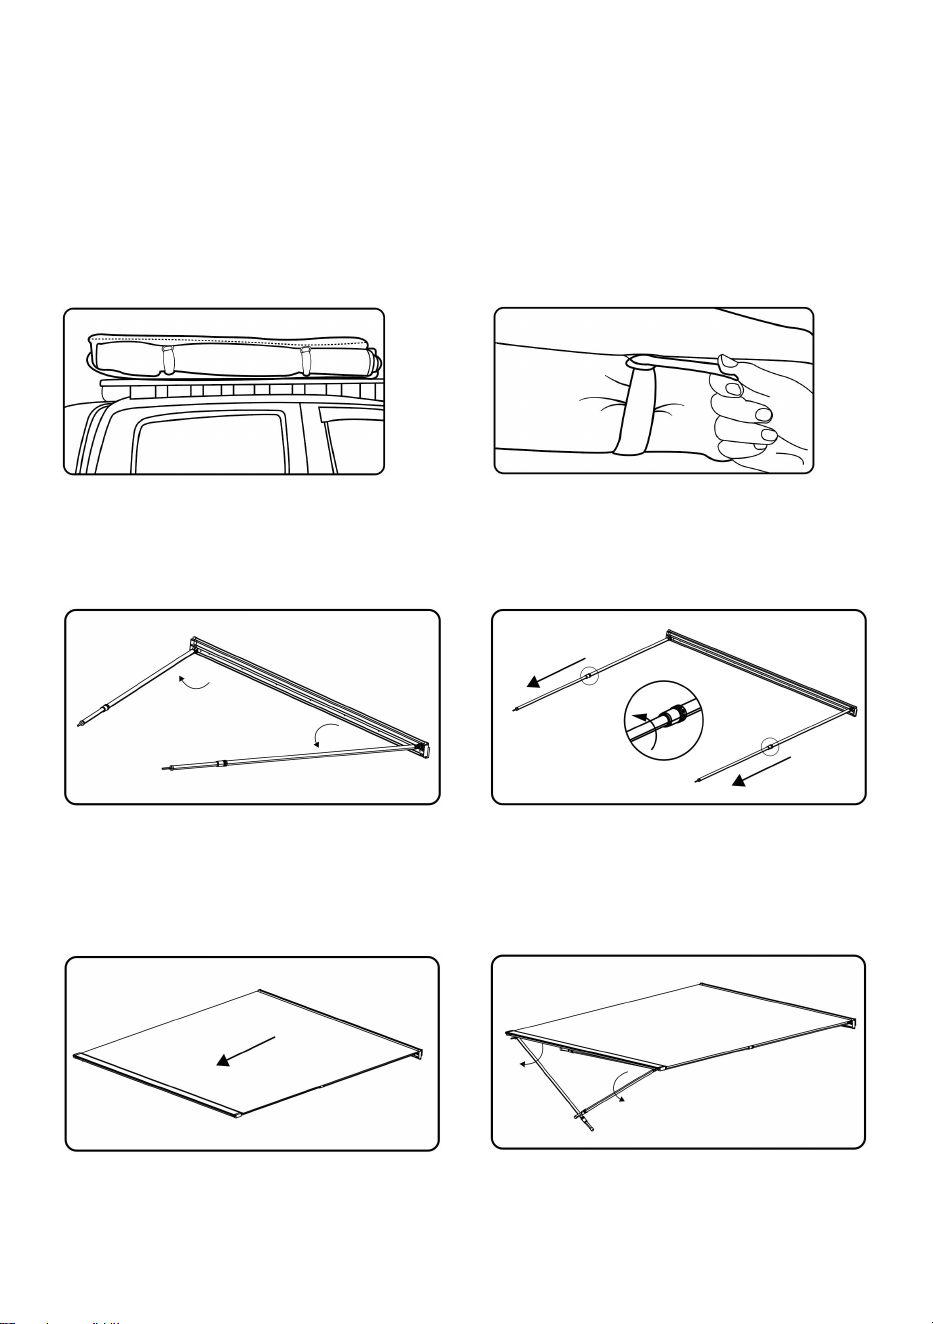
STEP1
STEP2
Unzip the PVC Protective Bag
Unhook the straps
5
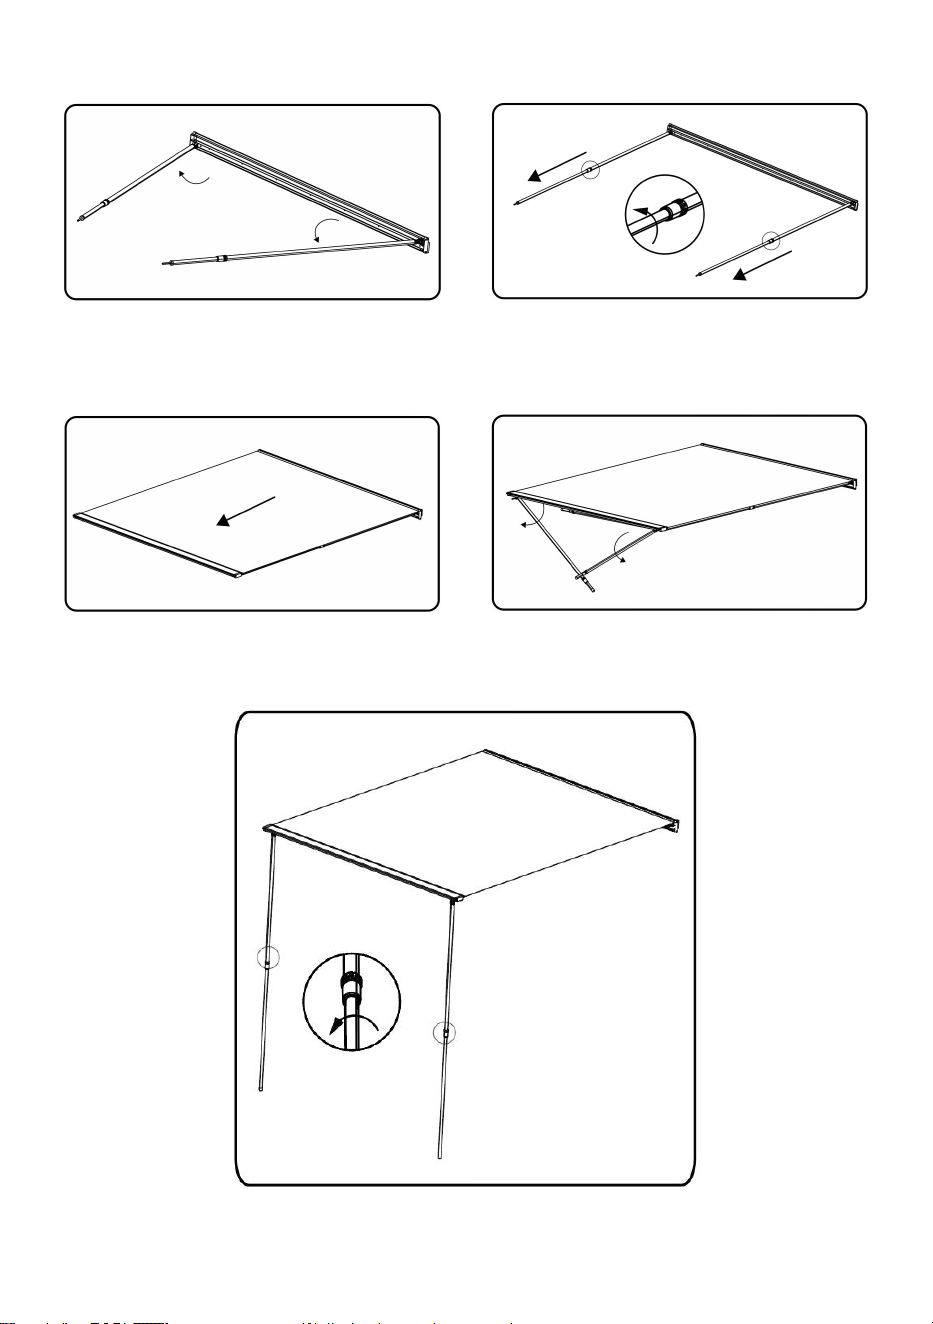
STEP3
STEP4
Open the lateral support poles.
Rotate the lower part of the poles to
adjust the length of the pole.
STEP5
STEP6
Unfold the awning.
Open the vertical support poles.
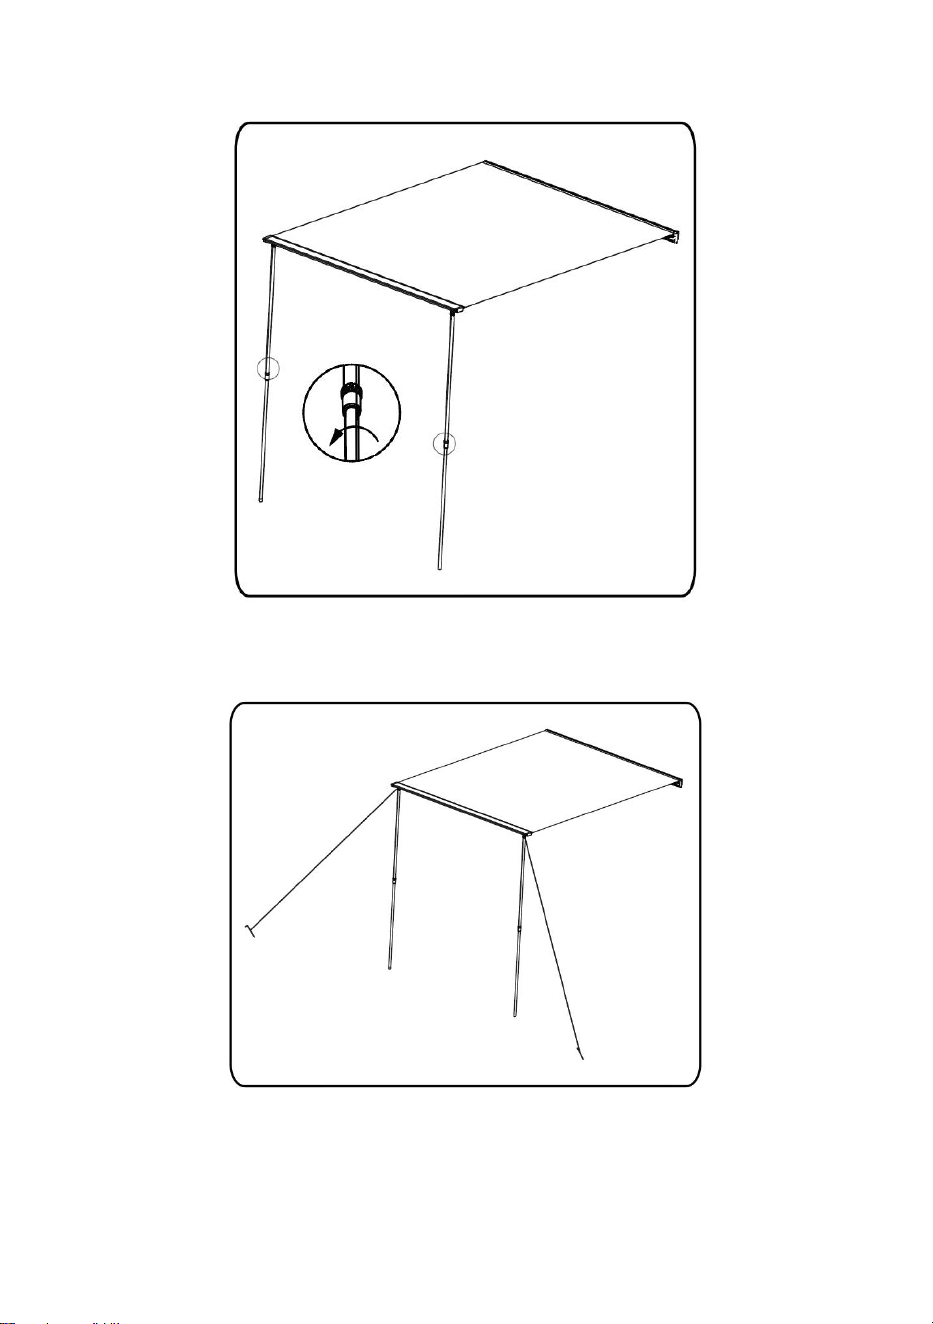
STEP7
Rotate the lower part of the poles to adjust standing height.
6
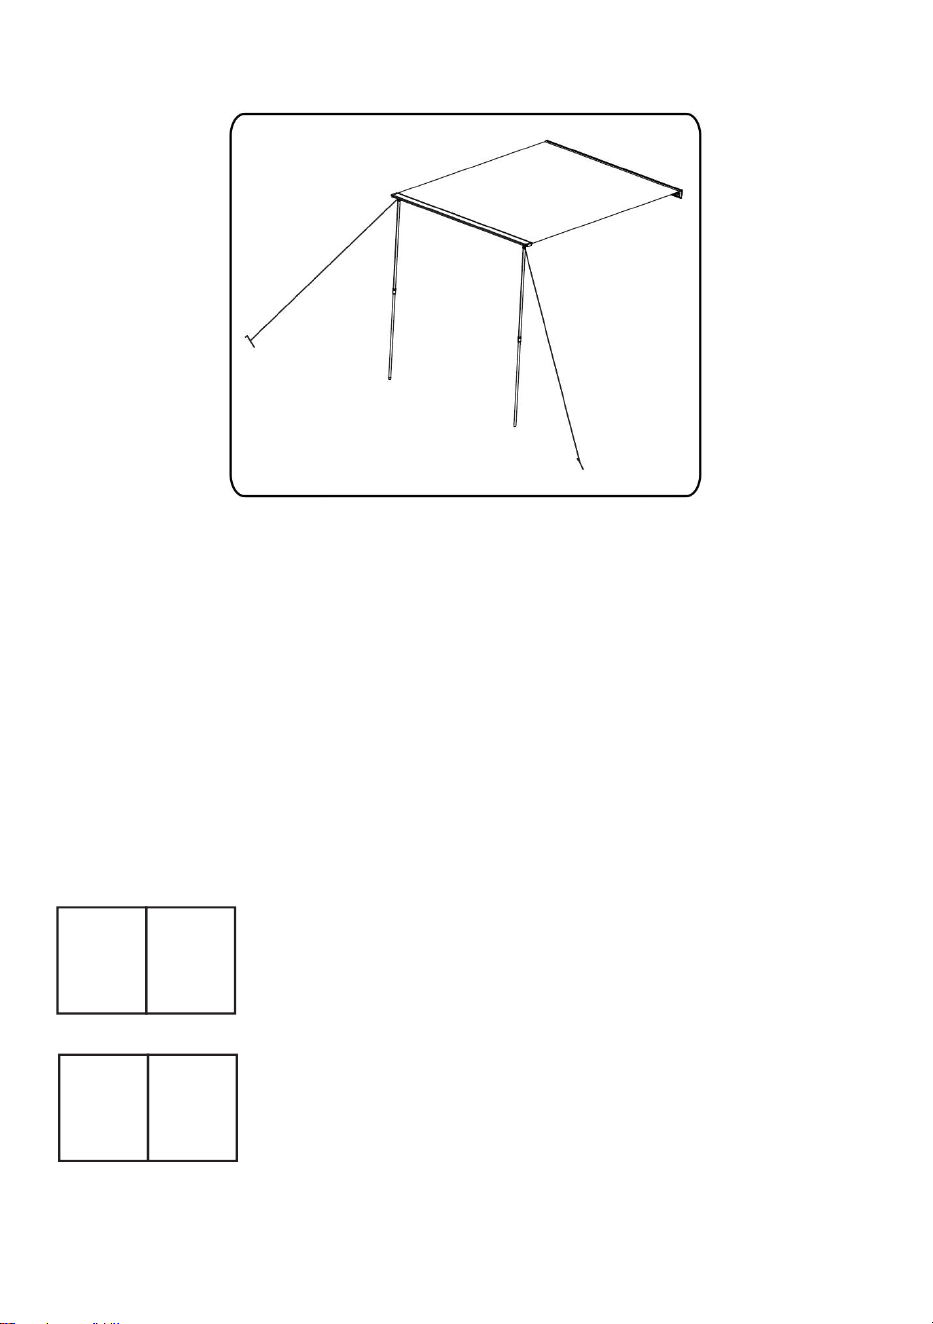
STEP8
Tie camping ropes through joint holes, set ground pegs and tension all ropes.
SETUP PROCEDURE
1. Clean only with cold water and a soft brush-do not use soap or detergent.
2. Do not expose to petrol, oil or solvents
3. Avoid creases and seams when rolling up the awning.
Address: Baoshanqu Shuangchenglu 803long 11hao 1602A-1609shi Shanghai
Imported to AUS: SIHAO PTY LTD, 1 ROKEVA STREETEASTWOOD NSW 2122 Australia
Imported to USA: Sanven Technology Ltd.Suite 250, 9166 Anaheim Place, Rancho
Cucamonga, CA 91730
Made In China
REP
EC
SHUNSHUN GmbH
Römeräcker 9 Z2021,76351
Linkenheim-Hochstetten,Germany
REP
UK
Pooledas Group Ltd
Unit 5 Albert Edward House, The Pavilions
Preston, United Kingdom


We continue to be committed to provide you tools with competitive price.
"Save Half", "Half Price" or any other similar expressions used by us only represents an
estimate of savings you might benefit from buying certain tools with us compared to the major
top brands and does not necessarily mean to cover all categories of tools offered by us. You
are kindly reminded to verify carefully when you are placing an order with us if you are
actually saving half in comparison with the top major brands.

1
Modèle : ATSA1420, ATSA2025
Have product questions? Need technical support? Please feel free to
contact us:
Technical Support and E-Warranty Certificate
www.vevor.com/support
NEED HELP? CONTACT US!
This is the original instruction, please read all manual instructions
carefully before operating. VEVOR reserves a clear interpretation of our
user manual. The appearance of the product shall be subject to the
product you received. Please forgive us that we won't inform you again if
there are any technology or software updates on our product.
PET STROLLER
2
CARACTÉRISTIQUES
Modèle
ATSA1420
Taille du produit
4,6 × 6,6 pieds
Couleur
Biège
Modèle
ATSA2025
Taille du produit
6,6 × 8,2 pieds
Couleur
Biège
COMPOSANTS
SN
LISTE DE
MONTAGE-SPÉCIFICATION
S
IMAGE
1
Manuel x1
2
Piquet de terre en acier
inoxydable x4
3
Acier thermolaqué noir L -
Support x2
4
manque de plaque de support
en acier enduit de poudre x2
5
Corde de 2,7 m avec unité fixe
en plastique x2
6
Boulon SS304 M8X20mm x4
7
Boulon SS304 M8X55mm x4
8
SS304 M8 Écrou Nylock X8
9
CLE x2
dix
Sac de transport x1
Suivez simplement les instructions d'assemblage faciles de ce manuel et suivez
attentivement les consignes d'installation et de sécurité.

3
Inspections : lors de vos déplacements, vérifiez régulièrement que tous les écrous
et boulons fixant votre auvent à votre véhicule sont bien serrés et en bon état.
AVERTISSEMENT DE SÉCURITÉ IMPORTANT
N'essayez pas de régler l'auvent par temps venteux.
Tous les haubans doivent être correctement attachés à l’auvent et ancrés au sol
à tout moment.
Les haubans présentent des risques de trébuchement de jour comme de nuit.
Gardez toutes les sources de flammes et de chaleur éloignées des matériaux de
l'auvent. En aucun cas, des sources de flammes nues, des appareils à combustion
ou des appareils de chauffage ne doivent être utilisés sous ou à proximité de
l'auvent.
Gardez les feux de camp loin de l'auvent.
Faites attention aux braises ardentes en suspension dans l’air qui pourraient
entrer en contact avec l’auvent.
Gardez un extincteur ou un seau d'eau à proximité.
Ne fumez pas à l’intérieur de l’auvent. Gardez la sortie dégagée.
GUIDE DE MONTAGE
Les options de montage de votre auvent sont décrites ci-dessous.
Il est important lors du montage de l'auvent de s'assurer qu'il est positionné
de manière à laisser un espace suffisant pour l'ouverture des portes du
véhicule.
INSTALLATION
●
POUR BARRE DE TOIT
REMARQUE : Vous pouvez choisir l'option A ou l'option B à installer selon vos besoins.
OPTIONA
OPTIONB

4
●
POUR PANIER DE TOIT
REMARQUE : Vous pouvez choisir l'option A ou l'option B à installer selon vos besoins.
OPTIONA
OPTIONB
●
POUR BARRE TRANSVERSALE (UN PERÇAGE PEUT ÊTRE NÉCESSAIRE)
REMARQUE : S'il n'y a pas de trous dans la barre transversale, il est nécessaire de percer
les trous avant d'installer le support.
ÉTAPE 1 : Perçage de la barre transversale
ÉTAPE 2 : Installation du support
Remarque : Un bricolage partiel peut être nécessaire en raison des différents raccords des
5
modèles de barres de toit. Toutes les pièces fournies ne sont pas nécessaires pour être
utilisées pour l'installation, certaines d'entre elles sont des sauvegardes pour différents
modèles.
INSTALLATION
ÉTAPE 1
ÉTAPE 2
Décompressez le sac de protection en
PVC
Décrochez les sangles
ÉTAPE 3
ÉTAPE 4
Ouvrez les poteaux de support latéraux.
Faites pivoter la partie inférieure des
poteaux pour ajuster la longueur du
poteau .
ÉTAPE5
ÉTAPE6
Dépliez le store.
Ouvrez les poteaux de support
verticaux.
6
ÉTAPE7
Faites pivoter la partie inférieure des poteaux pour régler la hauteur debout .
ÉTAPE8
Attachez les cordes de camping à travers les trous de joint , installez des piquets de sol
et tendez toutes les cordes .
PROCÉDURE DE CONFIGURATION
7
4. Nettoyer uniquement avec de l'eau froide et une brosse douce. N'utilisez pas
de savon ni de détergent.
5. Ne pas exposer à l'essence, à l'huile ou aux solvants
6. Évitez les plis et les coutures lorsque vous enroulez le store.
Adresse : Baoshanqu Shuangchenglu 803long 11hao 1602A-1609shi Shanghai
Importé en Australie : SIHAO PTY LTD, 1 ROKEVA STREETASTWOOD NSW 2122
Australie
Importé aux États-Unis : Sanven Technology Ltd.Suite 250, 9166 Anaheim Place, Rancho
Cucamonga, CA 91730
Fabriqué en Chine
REP
EC
SHUNSHUN GmbH
Römeräcker 9 Z2021,76351
Linkenheim-Hochstetten,Germany
REP
UK
Pooledas Group Ltd
Unit 5 Albert Edward House, The Pavilions
Preston, United Kingdom


We continue to be committed to provide you tools with competitive price.
"Save Half", "Half Price" or any other similar expressions used by us only represents an
estimate of savings you might benefit from buying certain tools with us compared to the major
top brands and does not necessarily mean to cover all categories of tools offered by us. You
are kindly reminded to verify carefully when you are placing an order with us if you are
actually saving half in comparison with the top major brands.

1
Modell: ATSA1420, ATSA2025
Have product questions? Need technical support? Please feel free to
contact us:
Technical Support and E-Warranty Certificate
www.vevor.com/support
NEED HELP? CONTACT US!
This is the original instruction, please read all manual instructions
carefully before operating. VEVOR reserves a clear interpretation of our
user manual. The appearance of the product shall be subject to the
product you received. Please forgive us that we won't inform you again if
there are any technology or software updates on our product.
PET STROLLER
2
SPEZIFIKATIONEN
Modell
ATSA1420
Produktgröße
4,6 x 6,6 Fuß
Farbe
Biege
Modell
ATSA2025
Produktgröße
6,6 x 8,2 Fuß
Farbe
Biege
KOMPONENTEN
SN
Passende
Listen-Spezifikationen
BILD
1
Handbuch x1
2
Edelstahl-Erdnagel x4
3
Schwarz pulverbeschichteter
Stahl L – Halterung x2
4
ohne pulverbeschichtete
Stahlträgerplatte x2
5
2,7 m langes Seil mit fester
Kunststoffeinheit x2
6
SS304 M8X20mm Bolzen x4
7
SS304 M8X55mm Bolzen x4
8
SS304 M8 Nylock-Mutter X8
9
SCHLÜSSEL x2
10
Tragetasche x1
Befolgen Sie einfach die einfachen Montageanweisungen in diesem Handbuch
und befolgen Sie die Einrichtungs- und Sicherheitsrichtlinien genau.
Inspektionen: Überprüfen Sie während der Fahrt regelmäßig, ob alle Schrauben
und Muttern, mit denen Ihr Vorzelt an Ihrem Fahrzeug befestigt ist, fest angezogen
und in gutem Zustand sind.
3
WICHTIGER SICHERHEITSHINWEIS
Versuchen Sie nicht, das Gerät einzustellen Bei Wind die Markise hochfahren.
Alle Abspannleinen müssen ordnungsgemäß am Vorzelt befestigt und jederzeit
am Boden verankert sein.
Abspannseile stellen sowohl tagsüber als auch nachts Stolperfallen dar.
Halten Sie alle Flammen- und Wärmequellen von den Markisenmaterialien fern.
Unter oder in der Nähe des Vorzeltes dürfen unter keinen Umständen offene
Flammen, Brennstoffverbrennungsgeräte oder Heizgeräte verwendet werden.
Halten Sie Lagerfeuer von der Markise fern.
Achten Sie auf in der Luft schwebende Glut, die mit der Markise in Berührung
kommen könnte.
Halten Sie einen Feuerlöscher oder einen Wassereimer in der Nähe.
Rauchen Sie nicht im Vorzelt. Halten Sie den Ausgang frei.
ANPASSUNGSANLEITUNG
Im Folgenden werden die Möglichkeiten zur Montage Ihrer Markise
beschrieben.
Bei der Montage der Markise ist darauf zu achten, dass sie so positioniert ist,
dass genügend Freiraum zum Öffnen der Fahrzeugtüren bleibt.
INSTALLATION
●
FÜR DACHTRÄGER
HINWEIS: Sie können Option A oder Option B wählen, um die Installation entsprechend
Ihren Anforderungen durchzuführen.
OPTION A
OPTION B
4
●
FÜR DACHKORB
HINWEIS: Sie können Option A oder Option B wählen, um die Installation entsprechend
Ihren Anforderungen durchzuführen.
OPTION A
OPTION B
●
FÜR QUERSTANGE (KÖNNTE BOHREN ERFORDERLICH sein)
HINWEIS: Wenn in der Querstange keine Löcher vorhanden sind, müssen die Löcher vor
der Montage der Halterung gebohrt werden.
SCHRITT 1: Querstangenbohren
SCHRITT 2: Montage der Halterung
Hinweis: Aufgrund der unterschiedlichen Ausstattung der Dachträgermodelle ist
möglicherweise ein teilweiser Eigenbau erforderlich. Nicht alle mitgelieferten Teile müssen
für die Installation verwendet werden, einige davon sind Backups für verschiedene Modelle.
AUFSTELLEN
SCHRITT 1
SCHRITT 2
5
Öffnen Sie den PVC-Schutzbeutel
Haken Sie die Gurte aus
SCHRITT 3
SCHRITT 4
Öffnen Sie die seitlichen Stützstangen.
Drehen Sie den unteren Teil der
Stangen, um die Länge der Stange
anzupassen .
SCHRITT5
SCHRITT6
Klappen Sie die Markise aus.
Öffnen Sie die vertikalen Stützstangen.
SCHRITT7

6
Drehen Sie den unteren Teil der Stangen, um die Stehhöhe anzupassen .
SCHRITT8
Binden Sie die Campingseile durch die Verbindungslöcher , setzen Sie Erdnägel ein
und spannen Sie alle Seile .
EINRICHTUNGSVERFAHREN

7
7. Nur mit kaltem Wasser und einer weichen Bürste reinigen – keine Seife oder
Reinigungsmittel verwenden.
8. Nicht Benzin, Öl oder Lösungsmitteln aussetzen
9. Vermeiden Sie beim Aufrollen der Markise Falten und Nähte.
Adresse: Baoshanqu Shuangchenglu 803long 11hao 1602A-1609shi Shanghai
Importiert nach AUS: SIHAO PTY LTD, 1 ROKEVA STREETEASTWOOD NSW 2122
Australien
In die USA importiert: Sanven Technology Ltd. Suite 250, 9166 Anaheim Place, Rancho
Cucamonga, CA 91730
In China hergestellt
REP
EC
SHUNSHUN GmbH
Römeräcker 9 Z2021,76351
Linkenheim-Hochstetten,Germany
REP
UK
Pooledas Group Ltd
Unit 5 Albert Edward House, The Pavilions
Preston, United Kingdom


Tecnico Supporto e certificato di garanzia elettronica www.vevor.com/support
TENDALINO LATERALE AUTO MANUALE D'USO
We continue to be committed to provide you tools with competitive price.
"Save Half", "Half Price" or any other similar expressions used by us only represents an
estimate of savings you might benefit from buying certain tools with us compared to the major
top brands and does not necessarily mean to cover all categories of tools offered by us. You
are kindly reminded to verify carefully when you are placing an order with us if you are
actually saving half in comparison with the top major brands.

1
Modello: ATSA1420, ATSA2025
Have product questions? Need technical support? Please feel free to
contact us:
Technical Support and E-Warranty Certificate
www.vevor.com/support
NEED HELP? CONTACT US!
This is the original instruction, please read all manual instructions
carefully before operating. VEVOR reserves a clear interpretation of our
user manual. The appearance of the product shall be subject to the
product you received. Please forgive us that we won't inform you again if
there are any technology or software updates on our product.
PET STROLLER
2
SPECIFICHE
Modello
ATSA1420
Taglia del prodotto
4,6×6,6 piedi
Colore
Biegio
Modello
ATSA2025
Taglia del prodotto
6,6×8,2 piedi
Colore
Biegio
COMPONENTI
SN
SPECIFICHE ELENCO
RACCORDI
IMMAGINE
1
Manuale x1
2
Picchetto da terra in acciaio
inossidabile x4
3
Staffa a L in acciaio verniciato
a polvere nera x2
4
mancanza piastra di supporto
in acciaio verniciato a polvere
x2
5
Corda da 2,7 m con unità fissa
in plastica x2
6
Bullone SS304 M8X20mm x4
7
Bullone SS304 M8X55mm x4
8
SS304 M8 Nylock dado X8
9
CHIAVE x2
10
Borsa per il trasporto x1
Segui semplicemente le semplici istruzioni di montaggio contenute in questo
manuale e segui attentamente le linee guida di installazione e sicurezza.

3
Ispezioni: durante i viaggi controlla regolarmente che tutti i dadi e i bulloni che
fissano il tuo tendalino al tuo veicolo siano serrati e in buono stato.
IMPORTANTE AVVISO DI SICUREZZA
Non tentare di impostare alzare la tenda in caso di vento.
Tutti i tiranti devono essere fissati correttamente alla tenda e sempre ancorati al
suolo.
I tiranti rappresentano un pericolo di inciampo sia di giorno che di notte.
Tenere tutte le fiamme e le fonti di calore lontane dai materiali della tenda da
sole. Non utilizzare in nessun caso fonti di fiamme libere, dispositivi di
combustione di carburante o dispositivi di riscaldamento sotto o in prossimità della
tenda.
Tenere i fuochi da campo ben lontani dalla tenda da sole.
Tieni d'occhio eventuali braci ardenti disperse nell'aria che potrebbero entrare in
contatto con la tenda.
Tieni un estintore o un secchio d'acqua nelle vicinanze.
Non fumare all'interno della tenda. Mantenere l'uscita libera.
GUIDA AL MONTAGGIO
Le opzioni per il montaggio della tenda da sole sono descritte di seguito.
È importante quando si monta il tendalino assicurarsi che sia posizionato in
modo da garantire spazio sufficiente per l'apertura delle porte del veicolo.
INSTALLAZIONE
●
PER PORTAPACCHI DA TETTO
NOTA: è possibile scegliere l'opzione A o l'opzione B da installare in base alle proprie
esigenze.
OPZIONE A
OPZIONE B
4
●
PER CESTO SUL TETTO
NOTA: è possibile scegliere l'opzione A o l'opzione B da installare in base alle proprie
esigenze.
OPZIONE A
OPZIONE B
●
PER LA TRAVERSA (POTREBBE ESSERE NECESSARIA LA FORATURA)
NOTA: se non sono presenti fori nella barra trasversale, è necessario praticare i fori prima
di installare la staffa.
FASE 1: Foratura della barra trasversale
FASE 2:Installazione della staffa
5
Nota: potrebbe essere necessario un fai-da-te parziale a causa dei diversi accessori dei
modelli di portapacchi da tetto. Non tutte le parti fornite sono necessarie per essere
utilizzate per l'installazione, alcune di esse sono backup per diversi modelli.
IMPOSTARE
PASSO 1
PASSO 2
Apri la cerniera della borsa protettiva in
PVC
Sganciare le cinghie
PASSO3
PASSO4
Aprire i pali di sostegno laterali.
Ruotare la parte inferiore dei pali per
regolare la lunghezza del palo .
PASSO5
PASSO6
Apri la tenda.
Aprire i pali di sostegno verticali.
PASSO7

6
Ruotare la parte inferiore dei pali per regolare l'altezza in piedi .
PASSO 8
Legare le corde da campeggio attraverso i fori di giunzione , posizionare i picchetti a
terra e tendere tutte le corde .
PROCEDURA DI IMPOSTAZIONE

7
10. Pulisci solo con acqua fredda e una spazzola morbida, non usare sapone o
detersivo.
11. Non esporre a benzina, olio o solventi
12. Evitare pieghe e cuciture durante l'avvolgimento della tenda.
Indirizzo: Baoshanqu Shuangchenglu 803long 11hao 1602A-1609shi Shanghai
Importato in AUS: SIHAO PTY LTD, 1 ROKEVA STREETEASTWOOD NSW 2122
Australia
Importato negli Stati Uniti: Sanven Technology Ltd.Suite 250, 9166 Anaheim Place,
Rancho Cucamonga, CA 91730
Made in China
REP
EC
SHUNSHUN GmbH
Römeräcker 9 Z2021,76351
Linkenheim-Hochstetten,Germany
REP
UK
Pooledas Group Ltd
Unit 5 Albert Edward House, The Pavilions
Preston, United Kingdom


Técnico Soporte y certificado de garantía electrónica www.vevor.com/support
TOLDO LATERAL DEL COCHE MANUAL DE USUARIO
We continue to be committed to provide you tools with competitive price.
"Save Half", "Half Price" or any other similar expressions used by us only represents an
estimate of savings you might benefit from buying certain tools with us compared to the major
top brands and does not necessarily mean to cover all categories of tools offered by us. You
are kindly reminded to verify carefully when you are placing an order with us if you are
actually saving half in comparison with the top major brands.

1
Modelo: ATSA1420, ATSA2025
Have product questions? Need technical support? Please feel free to
contact us:
Technical Support and E-Warranty Certificate
www.vevor.com/support
NEED HELP? CONTACT US!
This is the original instruction, please read all manual instructions
carefully before operating. VEVOR reserves a clear interpretation of our
user manual. The appearance of the product shall be subject to the
product you received. Please forgive us that we won't inform you again if
there are any technology or software updates on our product.
PET STROLLER
2
ESPECIFICACIONES
Modelo
ATSA1420
Tamaño del producto
4,6×6,6 pies
Color
Biege
Modelo
ATSA2025
Tamaño del producto
6,6×8,2 pies
Color
Biege
COMPONENTES
SN
LISTA DE
MONTAJE-ESPECIFICACIO
NES
IMAGEN
1
Manual x1
2
Clavija de tierra de acero
inoxidable x4
3
Soporte L de acero pintado en
polvo negro x2
4
Falta placa de respaldo de
acero con recubrimiento en
polvo x2
5
Cuerda de 2,7 m con unidad
fija de plástico x2
6
Perno SS304 M8X20mm x4
7
Perno SS304 M8X55mm x4
8
SS304 M8 Tuerca Nylock X8
9
LLAVE x2
10
Bolsa de transporte x1
Simplemente siga las sencillas instrucciones de montaje de este manual y siga
atentamente las pautas de configuración y seguridad.

3
Inspecciones: durante los viajes, compruebe periódicamente que todas las
tuercas y tornillos que sujetan su toldo a su vehículo estén apretados y en buen
estado.
ADVERTENCIA DE SEGURIDAD IMPORTANTE
No intente configurar Levante el toldo en condiciones de viento.
Todos los tensores deben estar correctamente sujetos al toldo y clavados al
suelo en todo momento.
Los tensores suponen un peligro de tropiezo durante el día y la noche.
Mantenga todas las llamas y fuentes de calor alejadas de los materiales del
toldo. Bajo ninguna circunstancia se deben utilizar fuentes de llamas, dispositivos
de quema de combustible o dispositivos de calefacción debajo o cerca del toldo.
Mantenga las fogatas alejadas del toldo.
Esté atento a las brasas encendidas en el aire que puedan entrar en contacto
con el toldo.
Mantenga cerca un extintor de incendios o un balde de agua.
No fumar dentro del toldo. Mantenga la salida despejada.
GUÍA DE MONTAJE
Las opciones para montar su toldo se describen a continuación.
Es importante al montar el toldo asegurarse de que esté colocado de
manera que permita suficiente espacio para que se abran las puertas del
vehículo.
INSTALACIÓN
●
PARA RACK DE TECHO
NOTA: Puede elegir la opción A o la opción B para instalar según sus requisitos.
OPCIÓN A
OPCIÓN B
4
●
PARA CESTA DE TECHO
NOTA: Puede elegir la opción A o la opción B para instalar según sus requisitos.
OPCIÓN A
OPCIÓN B
●
PARA LA BARRA TRANSVERSAL (PODRÍA SER NECESARIO PERFORAR)
NOTA: Si no hay agujeros en la barra transversal, es necesario perforarlos antes de instalar
el soporte.
PASO 1: Perforación de barra transversal
PASO 2: Instalación del soporte
Nota: Es posible que sea necesario realizar bricolaje parcial debido a los diferentes

5
accesorios de los modelos de portaequipajes para techo. No todas las piezas
proporcionadas son necesarias para la instalación, algunas de ellas son copias de
seguridad para diferentes modelos.
CONFIGURACIÓN
PASO 1
PASO 2
Abra la cremallera de la bolsa protectora
de PVC.
Desenganchar las correas
PASO 3
ETAPA 4
Abra los postes de soporte laterales.
Gire la parte inferior de los postes para
ajustar la longitud del poste .
PASO 5
PASO 6
Despliegue el toldo.
Abra los postes de soporte verticales.
PASO 7

6
Gire la parte inferior de los postes para ajustar la altura de pie .
PASO8
Ate las cuerdas para acampar a través de los orificios de las juntas , coloque clavijas
para el suelo y tense todas las cuerdas .
PROCEDIMIENTO DE CONFIGURACIÓN

7
13. Limpiar únicamente con agua fría y un cepillo suave; no utilice jabón ni
detergente.
14. No exponer a gasolina, aceite o disolventes.
15. Evite arrugas y costuras al enrollar el toldo.
Dirección: Baoshanqu Shuangchenglu 803long 11hao 1602A-1609shi Shanghai
Importado a AUS: SIHAO PTY LTD, 1 ROKEVA STREETEASTWOOD NSW 2122
Australia
Importado a EE. UU.: Sanven Technology Ltd.Suite 250, 9166 Anaheim Place, Rancho
Cucamonga, CA 91730
Hecho en china
REP
EC
SHUNSHUN GmbH
Römeräcker 9 Z2021,76351
Linkenheim-Hochstetten,Germany
REP
UK
Pooledas Group Ltd
Unit 5 Albert Edward House, The Pavilions
Preston, United Kingdom


We continue to be committed to provide you tools with competitive price.
"Save Half", "Half Price" or any other similar expressions used by us only represents an
estimate of savings you might benefit from buying certain tools with us compared to the major
top brands and does not necessarily mean to cover all categories of tools offered by us. You
are kindly reminded to verify carefully when you are placing an order with us if you are
actually saving half in comparison with the top major brands.

1
Model: ATSA1420, ATSA2025
Have product questions? Need technical support? Please feel free to
contact us:
Technical Support and E-Warranty Certificate
www.vevor.com/support
NEED HELP? CONTACT US!
This is the original instruction, please read all manual instructions
carefully before operating. VEVOR reserves a clear interpretation of our
user manual. The appearance of the product shall be subject to the
product you received. Please forgive us that we won't inform you again if
there are any technology or software updates on our product.
PET STROLLER

2
SPECYFIKACJE
Model
ATSA1420
Rozmiar produktu
4,6 × 6,6 stopy
Kolor
Biege
Model
ATSA2025
Rozmiar produktu
6,6 × 8,2 stopy
Kolor
Biege
SKŁADNIKI
SN
LISTA MONTAŻÓW –
SPECYFIKACJE
ZDJĘCIE
1
Instrukcja x1
2
Kołek uziemiający ze stali
nierdzewnej x4
3
Stal malowana proszkowo na
czarno L - wspornik x2
4
brak płyty nośnej ze stali
malowanej proszkowo x2
5
Lina 2,7 m z plastikowym
elementem stałym x2
6
Śruba SS304 M8X20mm x4
7
Śruba SS304 M8X55mm x4
8
SS304 M8 Nakrętka
zabezpieczająca X8
9
KLUCZ x2
10
Torba transportowa x1
Wystarczy postępować zgodnie z instrukcjami łatwego montażu zawartymi w tej
instrukcji i ściśle przestrzegać wskazówek dotyczących konfiguracji i
bezpieczeństwa.
3
Przeglądy: podczas podróży regularnie sprawdzaj, czy wszystkie nakrętki i śruby
mocujące markizę do pojazdu są dokręcone i są w dobrym stanie.
WAŻNE OSTRZEŻENIE DOTYCZĄCE BEZPIECZEŃSTWA
Nie próbuj ustawiać podnosić markizę przy wietrznej pogodzie.
Wszystkie liny odciągowe muszą być prawidłowo przymocowane do markizy i
przez cały czas przytwierdzone do podłoża.
Liny odciągowe stwarzają ryzyko potknięcia się w dzień i w nocy.
Trzymaj wszystkie źródła płomieni i ciepła z dala od materiałów markizy. W
żadnym wypadku nie należy używać źródeł otwartego ognia, urządzeń
spalających paliwo ani urządzeń grzewczych pod markizą lub w jej pobliżu.
Trzymaj ogniska z dala od markizy.
Uważaj na unoszące się w powietrzu żary, które mogą zetknąć się z markizą.
Trzymaj w pobliżu gaśnicę lub wiadro z wodą.
Nie pal pod markizą. Trzymaj wyjście w czystości.
PRZEWODNIK MONTAŻU
Poniżej opisano opcje montażu markizy.
Podczas montażu markizy ważne jest, aby upewnić się, że jest ona
ustawiona tak, aby zapewnić wystarczający odstęp umożliwiający otwarcie
drzwi pojazdu.
INSTALACJA
●
DO REGAŁU DACHOWEGO
UWAGA: Możesz wybrać opcję A lub opcję B, aby zainstalować zgodnie ze swoimi
wymaganiami.
OPCJA A
OPCJA B
4
●
DO KOSZYKA DACHOWEGO
UWAGA: Możesz wybrać opcję A lub opcję B, aby zainstalować zgodnie ze swoimi
wymaganiami.
OPCJA A
OPCJA B
●
DO POPRZECZKI (MOŻE WYMAGAĆ WIERCENIA)
UWAGA: Jeżeli w poprzeczce nie ma otworów, należy je wywiercić przed montażem
wspornika.
KROK 1: Wiercenie poprzeczne
KROK 2: Instalacja wspornika
Uwaga: może być konieczne częściowe samodzielne wykonanie ze względu na różne
mocowania modeli bagażników dachowych. Nie wszystkie dostarczone części są
niezbędne do montażu, niektóre z nich stanowią kopie zapasowe dla różnych modeli.
ORGANIZOWAĆ COŚ
KROK 1
KROK 2
5
Rozpakuj torbę ochronną z PVC
Odepnij paski
KROK 3
KROK 4
Otwórz boczne wsporniki.
Obróć dolną część drążków, aby
wyregulować ich długość .
KROK 5
KROK 6
Rozłóż markizę.
Otwórz pionowe słupki nośne.
KROK 7

6
Obróć dolną część drążków, aby wyregulować wysokość stania .
KROK 8
Zawiąż liny kempingowe przez otwory łączące , ustaw kołki uziemiające i napnij
wszystkie liny .
PROCEDURA KONFIGURACJI
7
16. Czyścić wyłącznie zimną wodą i miękką szczoteczką – nie używać mydła ani
detergentów.
17. Nie narażać na działanie benzyny, oleju ani rozpuszczalników
18. Podczas zwijania markizy należy unikać zagnieceń i szwów.
Adres: Baoshanqu Shuangchenglu 803long 11hao 1602A-1609shi Szanghaj
Import do AUS: SIHAO PTY LTD, 1 ROKEVA STREETEASTWOOD NSW 2122 Australia
Import do USA: Sanven Technology Ltd.Suite 250, 9166 Anaheim Place, Rancho
Cucamonga, CA 91730
Wyprodukowano w Chinach
REP
EC
SHUNSHUN GmbH
Römeräcker 9 Z2021,76351
Linkenheim-Hochstetten,Germany
REP
UK
Pooledas Group Ltd
Unit 5 Albert Edward House, The Pavilions
Preston, United Kingdom


Technisch Ondersteuning en e-garantiecertificaat www.vevor.com/support
AUTO ZIJLUIFEL HANDLEIDING
We continue to be committed to provide you tools with competitive price.
"Save Half", "Half Price" or any other similar expressions used by us only represents an
estimate of savings you might benefit from buying certain tools with us compared to the major
top brands and does not necessarily mean to cover all categories of tools offered by us. You
are kindly reminded to verify carefully when you are placing an order with us if you are
actually saving half in comparison with the top major brands.
1
Modellen: ATSA1420, ATSA2025
Have product questions? Need technical support? Please feel free to
contact us:
Technical Support and E-Warranty Certificate
www.vevor.com/support
NEED HELP? CONTACT US!
This is the original instruction, please read all manual instructions
carefully before operating. VEVOR reserves a clear interpretation of our
user manual. The appearance of the product shall be subject to the
product you received. Please forgive us that we won't inform you again if
there are any technology or software updates on our product.
PET STROLLER

2
SPECIFICATIES
Model
ATSA1420
Product grootte
4,6×6,6ft
Kleur
Groot
Model
ATSA2025
Product grootte
6,6×8,2ft
Kleur
Groot
COMPONENTEN
SN
MONTAGELIJST-SPECIFICA
TIES
AFBEELDING
1
Handmatig x1
2
Roestvrijstalen grondpen x4
3
Zwart gepoedercoat staal L -
Beugel x2
4
gebrek aan gepoedercoate
stalen achterplaat x2
5
2,7 m touw met kunststof
vaste eenheid x2
6
SS304 M8X20mm bout x4
7
SS304 M8X55mm bout x4
8
SS304 M8 Nylock-moer X8
9
SLEUTEL x2
10
Draagtas x1
Volg eenvoudigweg de eenvoudige montage-instructies in deze handleiding en
volg nauwgezet de installatie- en veiligheidsrichtlijnen.
Inspecties: controleer tijdens reizen regelmatig of alle moeren en bouten waarmee
uw voortent aan uw voertuig is bevestigd, goed vastzitten en in goede staat
verkeren.

3
BELANGRIJKE VEILIGHEIDSWAARSCHUWING
Probeer niet in te stellen bij wind de luifel op.
Alle scheerlijnen moeten te allen tijde goed aan de voortent zijn bevestigd en
aan de grond zijn vastgepind.
Scheerlijnen zijn zowel overdag als 's nachts een struikelgevaar.
Houd alle vlammen en warmtebronnen uit de buurt van de luifelmaterialen.
Onder geen enkele omstandigheid mogen bronnen van open vuur,
brandstofverbrandingsapparaten of verwarmingsapparaten onder of in de buurt
van de luifel worden gebruikt.
Houd kampvuren ver weg van de luifel.
Let op eventuele brandende kolen in de lucht die in contact kunnen komen met
de luifel.
Houd een brandblusser of wateremmer in de buurt.
Rook niet binnen de luifel. Uitrit vrijlaten.
MONTAGEGIDS
Hieronder vindt u de mogelijkheden voor het monteren van uw luifel.
Het is belangrijk dat u er bij het monteren van de luifel voor zorgt dat deze zo
wordt geplaatst dat er voldoende ruimte is om de deuren van het voertuig te
kunnen openen.
INSTALLATIE
●
VOOR ROOFTOP-RACK
OPMERKING: U kunt optie A of optie B kiezen om te installeren volgens uw vereisten.
OPTIE A
OPTIE B
4
●
VOOR DAKMAND
OPMERKING: U kunt optie A of optie B kiezen om te installeren volgens uw vereisten.
OPTIE A
OPTIE B
●
VOOR DWARSBALK (BOREN KAN NODIG ZIJN)
OPMERKING: Als er geen gaten in de dwarsbalk zitten, is het noodzakelijk om de gaten te
boren voordat u de beugel installeert.
STAP 1: Boren van dwarsbalken
STAP 2: Beugel installeren
Let op: Gedeeltelijke doe-het-zelfwerkzaamheden kunnen nodig zijn vanwege de
verschillende montagemogelijkheden van dakdragermodellen. Niet alle meegeleverde
onderdelen zijn nodig voor de installatie; sommige ervan zijn back-ups voor verschillende
modellen.
OPGERICHT
STAP 1
STAP 2

5
Rits de PVC-beschermtas open
Maak de riemen los
STAP 3
STAP 4
Open de zijdelingse steunpalen.
Draai het onderste deel van de stokken
om de lengte van de stokken aan te
passen .
STAP 5
STAP6
Vouw de luifel uit.
Open de verticale steunpalen.
STAP 7

6
Draai het onderste deel van de stokken om de stahoogte aan te passen .
STAP 8
Bind de kampeertouwen door de verbindingsgaten , plaats grondpennen en span alle
touwen .
INSTALLATIEPROCEDURE

7
19. Alleen reinigen met koud water en een zachte borstel; gebruik geen zeep of
schoonmaakmiddel.
20. Niet blootstellen aan benzine, olie of oplosmiddelen
21. Vermijd kreuken en naden bij het oprollen van de luifel.
Adres: Baoshanqu Shuangchenglu 803long 11hao 1602A-1609shi Shanghai
Geïmporteerd naar AUS: SIHAO PTY LTD, 1 ROKEVA STREETEASTWOOD NSW 2122
Australië
Geïmporteerd naar de VS: Sanven Technology Ltd.Suite 250, 9166 Anaheim Place,
Rancho Cucamonga, CA 91730
Gemaakt in China
REP
EC
SHUNSHUN GmbH
Römeräcker 9 Z2021,76351
Linkenheim-Hochstetten,Germany
REP
UK
Pooledas Group Ltd
Unit 5 Albert Edward House, The Pavilions
Preston, United Kingdom


Teknisk Support och e-garanticertifikat www.vevor.com/support
BILSIDOMARKIS ANVÄNDARMANUAL
We continue to be committed to provide you tools with competitive price.
"Save Half", "Half Price" or any other similar expressions used by us only represents an
estimate of savings you might benefit from buying certain tools with us compared to the major
top brands and does not necessarily mean to cover all categories of tools offered by us. You
are kindly reminded to verify carefully when you are placing an order with us if you are
actually saving half in comparison with the top major brands.

1
Modell: ATSA1420, ATSA2025
Have product questions? Need technical support? Please feel free to
contact us:
Technical Support and E-Warranty Certificate
www.vevor.com/support
NEED HELP? CONTACT US!
This is the original instruction, please read all manual instructions
carefully before operating. VEVOR reserves a clear interpretation of our
user manual. The appearance of the product shall be subject to the
product you received. Please forgive us that we won't inform you again if
there are any technology or software updates on our product.
PET STROLLER

2
SPECIFIKATIONER
Modell
ATSA1420
Produktstorlek
4,6×6,6 fot
Färg
Biege
Modell
ATSA2025
Produktstorlek
6,6×8,2 fot
Färg
Biege
KOMPONENTER
SN
PASSNINGSLISTA-SPECIFIK
ATIONER
BILD
1
Manual x1
2
Markpinne i rostfritt stål x4
3
Svart pulverlackerat stål L -
Fäste x2
4
saknar pulverlackerad
stålstödplåt x2
5
2,7 m rep med plastfast enhet
x2
6
SS304 M8X20mm bult x4
7
SS304 M8X55mm bult x4
8
SS304 M8 Nylåsmutter X8
9
NYCKEL x2
10
Bärväska x1
Följ helt enkelt de enkla monteringsinstruktionerna i denna manual och följ
instruktionerna för installation och säkerhet noga.
Inspektioner: under resor kontrollera regelbundet att alla muttrar och bultar som
fäster din markis på ditt fordon är åtdragna och i gott skick.
VIKTIG SÄKERHETSVARNING
3
Försök inte ställa in upp förtältet i blåsiga förhållanden.
Alla slaglinor måste vara ordentligt fastsatta i markisen och fästa i marken hela
tiden.
Killrep är en snubbelrisk på dagen och natten.
Håll alla lågor och värmekällor borta från markismaterialen. Under inga
omständigheter får källor med öppen låga, bränsleförbränningsanordningar eller
värmeanordningar användas under eller nära markisen.
Håll lägereldar långt borta från markisen.
Håll utkik efter eventuella luftburna brinnande glöd som kan komma i kontakt
med markisen.
Håll en brandsläckare eller vattenhink i närheten.
Rök inte i förtältet. Håll utgången fri.
MONTERINGSGUIDE
Alternativen för att montera din markis beskrivs nedan.
Det är viktigt vid montering av markisen att säkerställa att den är placerad så
att det finns tillräckligt med utrymme för att fordonsdörrarna ska kunna
öppnas.
INSTALLATION
●
FÖR TAKHÅLLARE
OBS: Du kan välja alternativ A eller alternativ B för att installera enligt dina krav.
ALTERNATIV A
ALTERNATIV B
4
●
FÖR TAKKORG
OBS: Du kan välja alternativ A eller alternativ B för att installera enligt dina krav.
ALTERNATIV A
ALTERNATIV B
●
FÖR KORSSTÅNG (KANSKE BEHÖVS BORRNING)
OBS: Om det inte finns några hål i tvärstången är det nödvändigt att borra hålen innan du
installerar fästet.
STEG 1: Tvärstångsborrning
STEG 2: Montering av fäste
Obs: Delvis gör-det-själv kan behövas på grund av olika anpassningar av takställsmodeller.
Alla medföljande delar är inte nödvändiga för att användas för installation, några av dem är
säkerhetskopior för olika modeller.
UPPSTART
STEG 1
STEG 2

5
Öppna PVC-skyddsväskan
Haka av remmarna
STEG 3
STEG 4
Öppna sidostödstolparna.
Vrid den nedre delen av stängerna för
att justera längden på stången .
STEG 5
STEG 6
Fäll ut markisen.
Öppna de vertikala stödstolparna.
STEG 7

6
Vrid den nedre delen av stängerna för att justera ståhöjden .
STEG 8
Knyt campinglinor genom foghål , sätt i markpinnar och spänn alla linor .
INSTÄLLNINGSPROCEDUR
22. Rengör endast med kallt vatten och en mjuk borste - använd inte tvål eller
rengöringsmedel.
7
23. Utsätt inte för bensin, olja eller lösningsmedel
24. Undvik veck och sömmar när du rullar upp markisen.
Adress: Baoshanqu Shuangchenglu 803long 11hao 1602A-1609shi Shanghai
Importerad till AUS: SIHAO PTY LTD, 1 ROKEVA STREETEASTWOOD NSW 2122
Australien
Importerad till USA: Sanven Technology Ltd.Suite 250, 9166 Anaheim Place, Rancho
Cucamonga, CA 91730
Tillverkad i Kina
REP
EC
SHUNSHUN GmbH
Römeräcker 9 Z2021,76351
Linkenheim-Hochstetten,Germany
REP
UK
Pooledas Group Ltd
Unit 5 Albert Edward House, The Pavilions
Preston, United Kingdom