www.tenker.co/warranty
facebook.com/Tenkerofficial
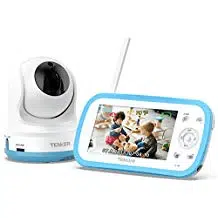
TBABY MONITOR
EXPLORE YOUR ADVENTURE

Register within 2 weeks after receiving your new product.
www.tenker.co/warranty
PLEASE VISIT NOW
CUSTOMER SERVICE
[email protected] @Tenkerofficial
ACTIVATE YOUR 12 MONTH WARRANTY
& GET EXCLUSIVE GIFT
NOTE
1. In ZOOM mode, volume control is not supported and the camera
CANNOT pan and tilt.
2. In single camera mode, the other three cameras are turned off.
Please place the camera in a bright place during the daytime to
avoid triggering night mode.
3. Please pay attention to the volume of the monitor.

A Big Thank You
We’re thrilled that you have chosen to purchase the baby monitor.
At TENKER, we’re committed to providing you with products that
enhance your daily life. We also aim to give our customers excellent
support. Should you have any questions or feedback about your
new product, simply get in touch with our customer support team at
1-855-558-8666, or by email at [email protected]
Enjoy your new product!
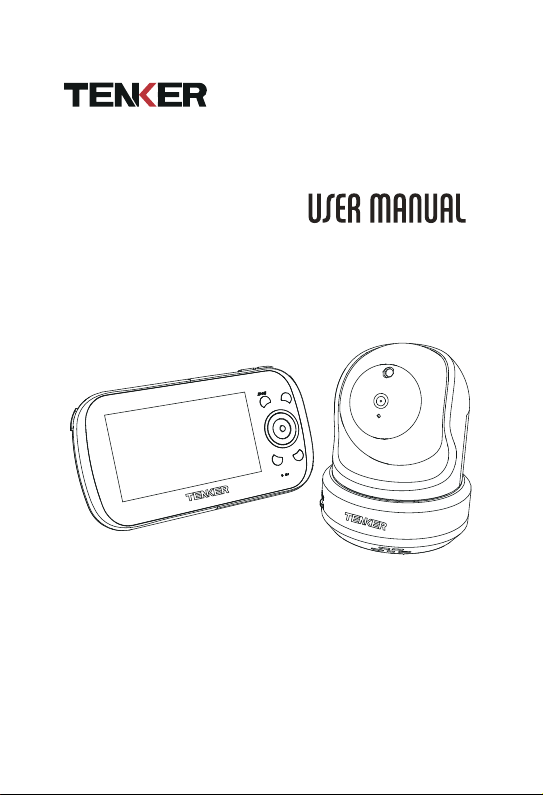
CONTENTS
Getting Started
Overview
Camera Installing
LCD Display
System Menu Descriptions
Special Features
Troubleshooting
Technical Specification
01
02
07
10
13
26
31
32

The system comes with the following components:
• Camera X1
• Video Monitor X1
• Power adapter for camera X1
• Power adapter for video monitor X1
• User’s manual X1
• Mounting kit X1
Check your package to confirm that you have received the complete
system,including all components shown above.
GETTING STARTED
@Tenkerofficial [email protected]
-01 -
1.WIRELESS CAMERA
OVERVIEW
@Tenkerofficial [email protected]
-02 -
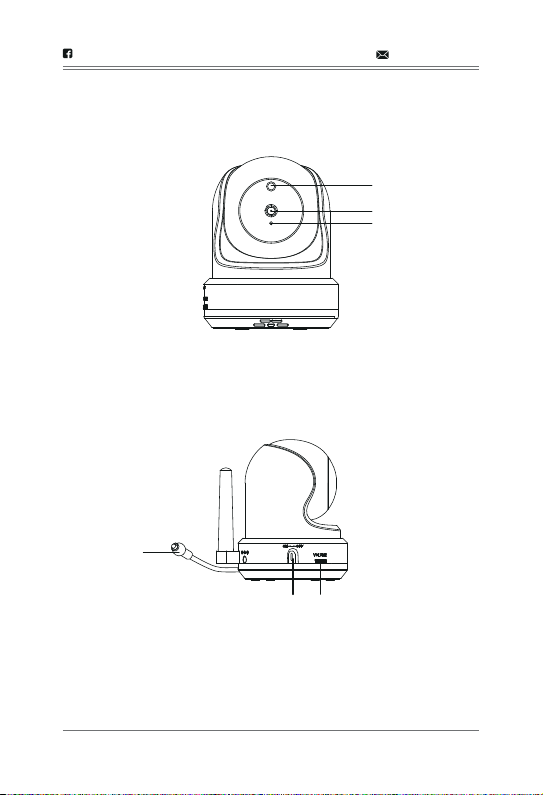
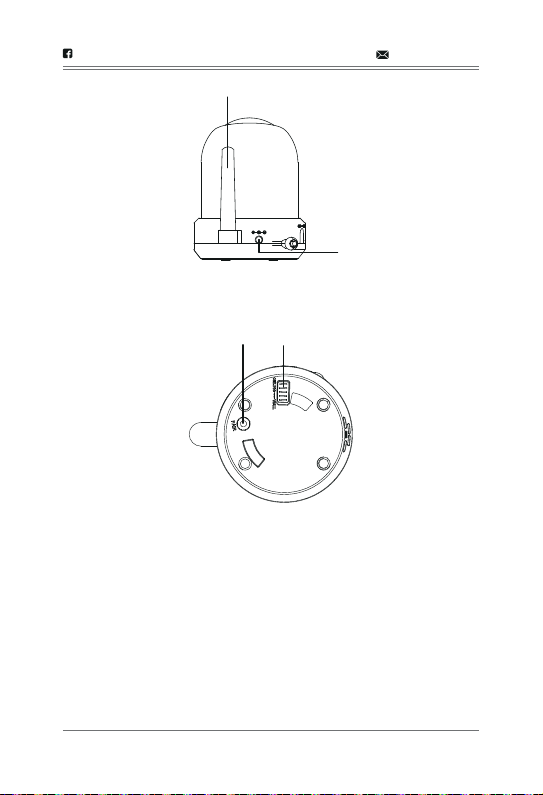
1. Light sensor: Measures light intensity on the camera side.
2. Lens: Camera lens.
3. Microphone: Receives sounds for the area near the camera, and
transmits sound from the camera to the monitor.
4. Temperature sensor: Detects temperature at camera side and
displays it on the monitor LCD.
5. Power Switch: Turns the camera ON or OFF.
6. Volume Switch: Turn to increase or decrease volume.
1
2
3
4
5
6
@Tenkerofficial [email protected]
-03-
7. Camera Antenna: Sends and receives signals to or from the monitor.
8. DC 5V Power: Connects the DC 5V power adaptor to the camera.
9. PAIR: Pairs the camera to the monitor.
10. Ceiling/Wall flip switch: Slide the switch to rotate the camera view
depending on where the camera is mounted (wall or ceiling).
7
8
9 10
@Tenkerofficial [email protected]
-04-
2.WIRELESS MONITOR
1. Antenna: Receives video and audio signals from the camera.
2. Power: Turns the monitor on and off.
3. LED light bar: The bottom LED indicates power and the remaining
LED indicate sound.
4. Trans Flash Card slot: Insert Trans Flash Card to record video.
5. 4.3 inch LCD screen.
6.
▲Vol:
• Increase speaker volume. • In Menus: Scroll up.
• In Lullaby: Increase volume. • In Zoom: Scroll up.
• In Video Playback - Pause or playback.
CH◄:
• In Menus: Scroll left. • In Zoom: Scroll left.
• In Live view: Switch between available cameras.
• In Video Playback - Fast reverse.

7.Play record: Access video files.
8.Microphone: Receives sound and transmits it to the camera, when
the TALK button is pressed and held.
9.MENU/BACK:
Press to display the menu options.
• In Menus: Back one level.
• In Video Playback: Back out of Video Playback function one screen
at a time.
10.DC 5V: Connects the DC 5V power adaptor to the monitor.
11.Charge LED
• Green = Battery is fully charged.
• Orange = Battery is almost charged.
• Red = Battery is charging.
If the monitor becomes unplugged from the adaptor, this LED turns
off.
@Tenkerofficial [email protected]
-05-
▼Vol:
• Decrease speaker volume. • In Menus: Scroll down.
• In Lullaby: decrease volume. • In Zoom: Scroll down.
• In Video Playback - Stop playback.
CH►:
• In Menus: Scroll right. • In Zoom: Scroll right.
• In Live view: Switch between available cameras
• In Video Playback - Fast forward.
Joy Stick:
• Press down - To select a menu or accept a setting
• Move Up/Down/Left/Right - To pan and tilt the camera.(Live and
Zoom view)

12.LULLABY SKIP: Skips to the next lullaby in the series. See page 21 for
details.
13.LULLABY PLAY/STOP: Press this button to remotely play lullabies. See
page 21 for details.
14.TALK: Activate Intercom function
15.MANUAL REC: Press to start recording manually. Press again to stop.
16.ZOOM: Displays the camera image in double size
17.NIGHT LIGHT - Remotely turn the night light ON or OFF for the camera
currently being displayed.
The monitor’s night light function is only available when the camera is
paired to the monitor.
18.Stand
19.Reset
@Tenkerofficial [email protected]
-06-

Installation Warnings:
Note: Pair the cameras to the monitor before mounting them. Before
you install the camera, carefully plan where and how it will be positioned,
and where you will route the cable that connects the camera to the
power adaptor.
Before starting permanent installation, verify its performance by
observing the image on the receiver when camera is positioned in the
same location/position where it will be permanently installed and the
receiver is placed in the location where it will be used most of the time.
Aim the camera(s) to best optimize the viewing area: Select a location
for the camera that provides a clear view of the area you want to
monitor, which is free from dust, and is not in line-of-sight to a strong
light source or direct sunlight.
Avoid installing the cameras where there are thick walls, or obstructions
between the Cameras and the Receiver.
1. Carefully unpack the Camera.
Note: If you are installing Cameras that did not come with the System,
please see the Pairing Camera section of this manual for details on
installation.
CAMERA INSTALLING
@Tenkerofficial [email protected]
-07-
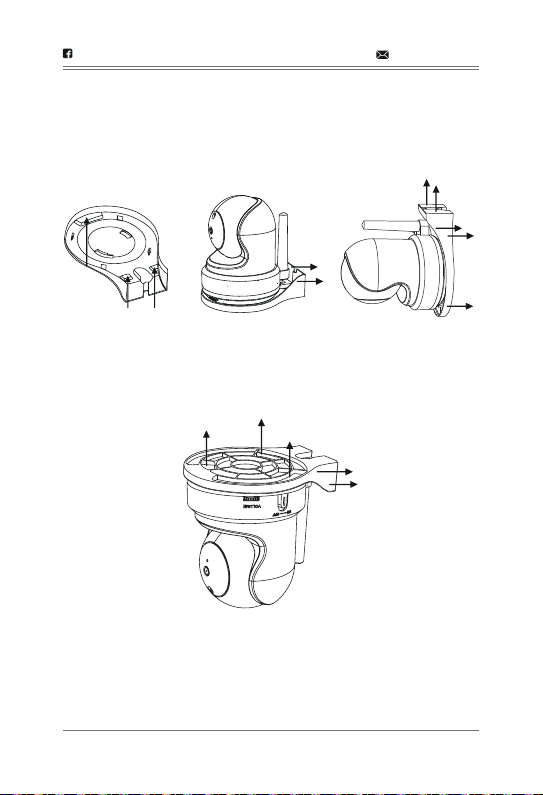
2. Mount the Camera to the wall:
If wall mounting:
Drill 2 holes in the wall with centers exactly 26mm apart.
If ceiling mounting:
Hold the included P/T mounting plate against the ceiling. Use a pencil to
mark the centers of the 3 mounting slots. Drill holes where you have
marked.
@Tenkerofficial [email protected]
-08-
NOTE: Make sure that the lone mounting slot points toward the viewing
area. Tap anchors into holes with a hammer. Insert screws 2/3 of the
way. Align the slots on the mounting plate with the screws and push
down to lock in place.Tighten the screws to secure the mounting plate
in place. Place the camera on the mounting plate and twist clockwise to
lock in place. For ceiling mounting, use the ceiling mounting switch on
the bottom of the P/T camera to invert the video image.
@Tenkerofficial [email protected]
-09-
ceiling mounting switch
LCD DISPLAY
@Tenkerofficial [email protected]
-10-
Item
1
2
Icon What it is
Signal Indicator (displays in full
screen mode only). The
number of bars in the signal
indicator shows the strength
of the signal received from the
camera.One or no bars
indicates the signal is poor,
and 4 bars indicate a very
strong signal.
Camera Indicator. This Indicates which camera is displaying.
Press CH►or CH◄ on the monitor to switch between
available cameras. It will cycle in the following order:
CH► :
CAM1—CAM2—CAM3—CAM4—QUAD—AUTO SCAN — CAM1
CH
◄ :
CAM1—AUTO SCAN—QUAD—CAM4—CAM3—CAM2—CAM1

@Tenkerofficial [email protected]
-11-
3
Trans Flash Card: This icon displays when there is a
Trans Flash Card inserted into the card slot.
8
ZOOM indicator. The zoomed image displays as the
background image.
4
New Record Indicator. This icon indicates when a
new video record is available.
5
Temperature indicator (displays in full screen mode
only). Displays the temperature on the camera side.
6
Night light indicator (displays in full screen mode
only). Displays when the night light is turned on. (See
page 21)
9
Overwrite indicator. When this icon displays, the
overwrite function is enabled; the video monitor will
overwrite old video files when the Trans Flash Card is
full.
7
Battery level. Indicates the amount of power left in the
battery. The icon displays when the battery is
charging. The icon flickers when charging is
nearly complete.
10
Auto recording indicator. This icon displays when the
motion triggers automatic recording. You can set how
long the camera will record from the RECORD screen
by setting the Record Time.
11
Recording indicator. This grouping displays when
video is recording. REC 063020-1.AVI: 06 = hour;
30 = minute; 20 = second; -1 = recording camera
12
Intercom (Talk). Displays in full screen mode only
when you press and hold TALK on the monitor (see
page 22).
@Tenkerofficial [email protected]
-12-
13
Volume indicator. Displays when ▲Vol or ▼Vol is
pressed on the monitor. If the volume is muted,
displays.
14
Lullaby (displays in full screen mode only). Displays
when a lullaby is playing. The number indicates which
melody is playing (see page 21).
15
Date and Time (displays in full screen mode only).
Displays the time as set through the monitor.
09.02.2017 12:26:00 =
month.day.year hour:minute:second
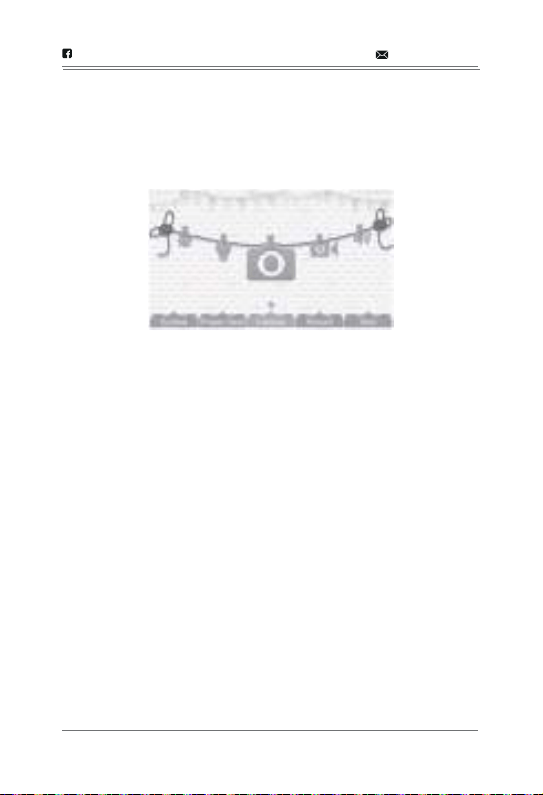
Press MENU/BACK to access system menus. Use the navigating
buttons to navigate up (▲Vol), down (▼Vol ), left (CH◄), and right (CH
►) in the menus, then press Joy Stick to confirm a setting. Use CH ►
or CH ◄ to focus on the 5 different system menu selections on the
clothesline.
SYSTEM MENU DESCRIPTIONS
@Tenkerofficial [email protected]
-13-
• System
• Power Save
• Camera
• Record
• Alert
1. SYSTEM
Move the focus to the System option and press Joy Stick to access the
seven
System options:
• Date/Time
• Brightness
• Format Storage
• Factory Reset
• Language
• Temp. display unit
• Temp. alert range
@Tenkerofficial [email protected]
-14-
1.From the System menu, select Date/Time and press Joy Stick. The
Date/Time screen displays.
2.Press ▲Vol or▼Vol to increase/decrease the number for that setting.
3.Press CH ► or CH◄ to save the current setting and move to the next
setting.
4.Press Joy Stick to save the completed date and time setting and
return to the main System options. Press BACK to step backwards
one level until you are out of the menu system.
1.From the System menu, select Brightness and press Joy Stick. The
Brightness screen displays.
2.Press CH ►or CH◄to increase or decrease the brightness level (6
levels).
3.Press Joy Stick to save the setting and return to the main System
options. The new brightness level displays the next time you are in
Live view.
Date/Time
This option allows you to set the system date and time. The display
format is Month.Day.Year Hour: Minute (Default = 09.02.2017 12:26).
Brightness
This option allows you to adjust the brightness level for each camera.
(Default= 3).

@Tenkerofficial [email protected]
-15-
1.From the System menu, select Format Storage and press Joy Stick.
The Format Storage screen displays.
2.Press ▲Vol or ▼Vol to toggle between accepting or canceling the
Trans Flash Card reformat.
3.Press Joy Stick to save the setting and return to the main System
options.
Format Storage
Turning on Format Storage allows you to delete the files on your
memory card. (Default = No).
@Tenkerofficial [email protected]
-16-
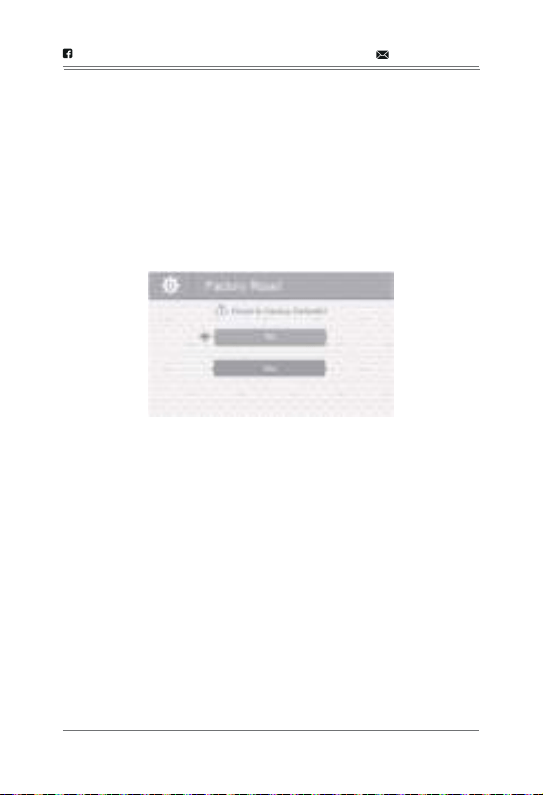
1.From the System menu, select Factory Reset and press Joy Stick.
The Factory Reset screen displays.
2.Press ▲Vol or ▼Vol to select or cancel a reset to factory defaults.
3.Press Joy Stick to save the setting and return to the main System
options.
Factory Reset
This option allows you to restore your system to factory setting. (Default
= No).
Note: All menu settings except Camera Pairing settings and the
Date/Time Setting WILL be affected by a reset. Cameras will remain
paired with the monitor.
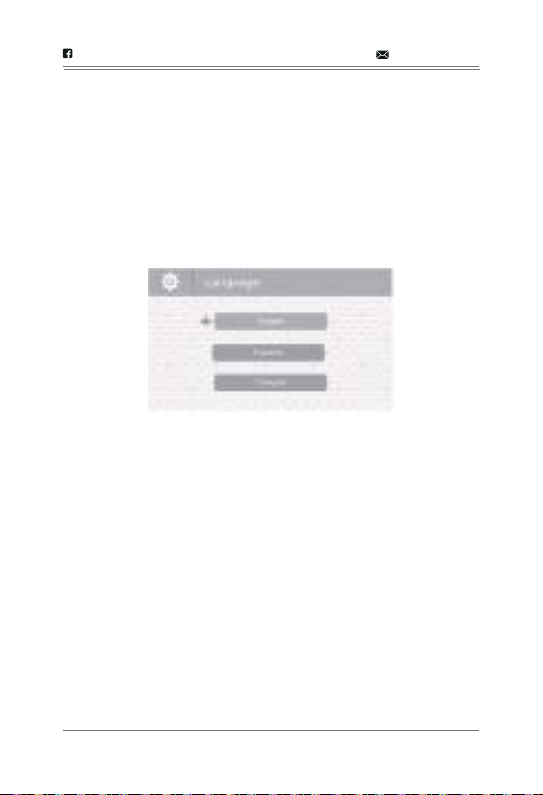
Language
This option allows you to select the system’s display language from
English, Spanish, or French. (Default = English).
1.From the System menu, select Language and press Joy Stick. The
Language screen displays.
2.Press ▲Vol or ▼Vol to select a language.
3.Press Joy Stick to save the setting and return to the main System
options.
@Tenkerofficial [email protected]
-17-
Temperature Display Unit
This option allows you to set the temperature to display in Celsius (C) or
Fahrenheit (F). (Default = F).
1.From the System menu, select Temp. display unit and press Joy Stick.
The Temp. display unit screen displays.
2.Press ▲Vol or ▼Vol to select °C or °F.
3.Press Joy Stick to save the setting and return to the main System
options.
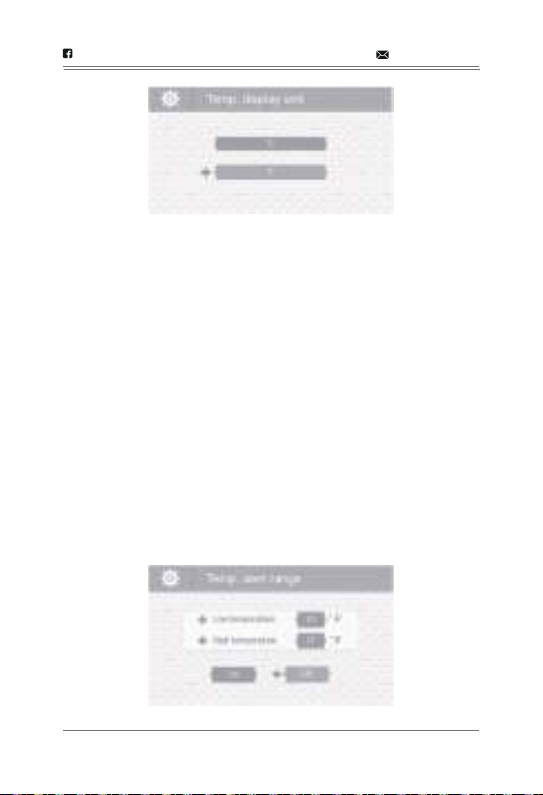
Temperature Alert Range
Your CM5341 measures the ambient room temperature where the
camera is. If the temperature falls outside of a preset range, the system
alerts you. Temp. alert range lets you set that range. (Default =Off) .Low
Temperature: 61°F ; High Temperature: 77°F.
1.From the System menu, select Temp. alert range and press Joy Stick.
The Temp. alert range screen displays.
2.Press CH ►or CH◄ to select Low temperature or High temperature
3.Press ▲Vol or ▼Vol to increase or decrease the temperature value.
4.After setting the temperature range, press CH►or CH◄ to select the
On/Off row.
5.Press CH ►or CH◄ to toggle between On (Enable) or Off (disable).
Either button will work.
6.Press Joy Stick to save the settings and return to the main System
options.
@Tenkerofficial [email protected]
-18-
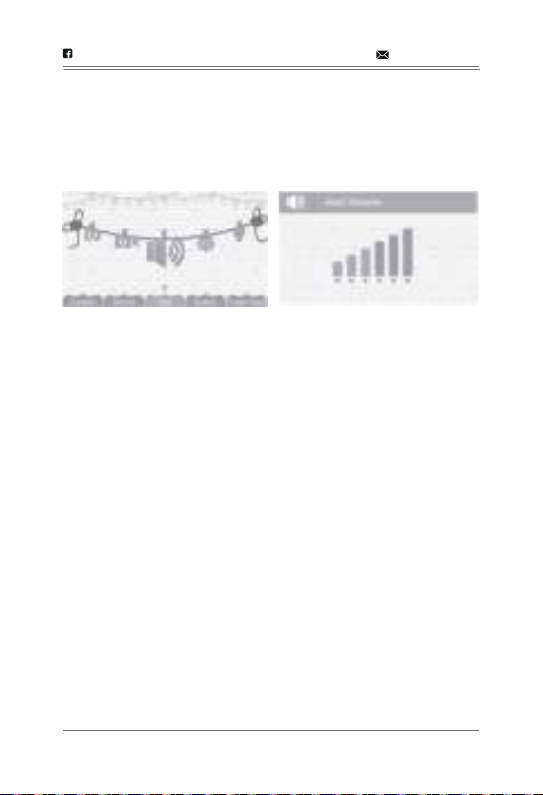
2. ALERT
Temperatures out of range or a camera out of range triggers alerts, or
the sound alert activated (VOX function). This option allows you to set
the alert volume. There are 6 levels available. [Default = Zero (Mute)]
@Tenkerofficial [email protected]
-19-
1.From the main menu selections, select Alert and press Joy Stick. The
Alert Volume screen displays.
2.Press CH►or CH◄ to adjust the volume.
3.Press Joy Stick to save the selection and return to the main menu
selections.
3. RECORD
Note: The Parent Unit Can Only Supports Files in MJPEG Formats. Do
Not Play File in Other Formats . Play Files in Other Formats may Lead
into Blank Screen and Malfunction, in this Situation, Please Press the
RESET Button on the Back of the Monitor, and Reboot the Parent Unit
into Normal Condition. This option allows you to set the parameters for
your recorded files. The RECORD options are:
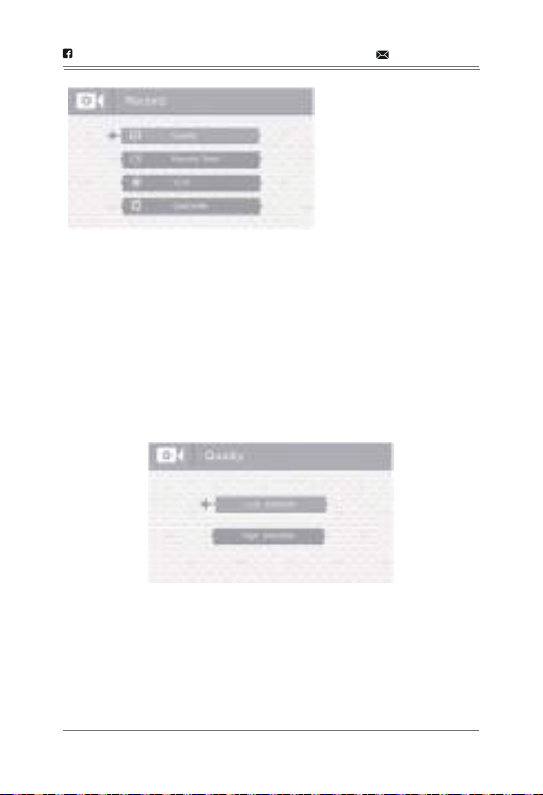
Quality
This option allows you to choose between a high or low resolution
recording quality. (Default=Low 320 x 240)
1.From the Record menu, select Quality and press Joy Stick. The
Quality screen displays.
2.Press ▲Vol or▼Vol to select a level (High or Low).
3.Press Joy Stick to save the selection and return to the main RECORD
options.
@Tenkerofficial [email protected]
-20-
• Quality
• Record Time
• VOX
• Overwrite
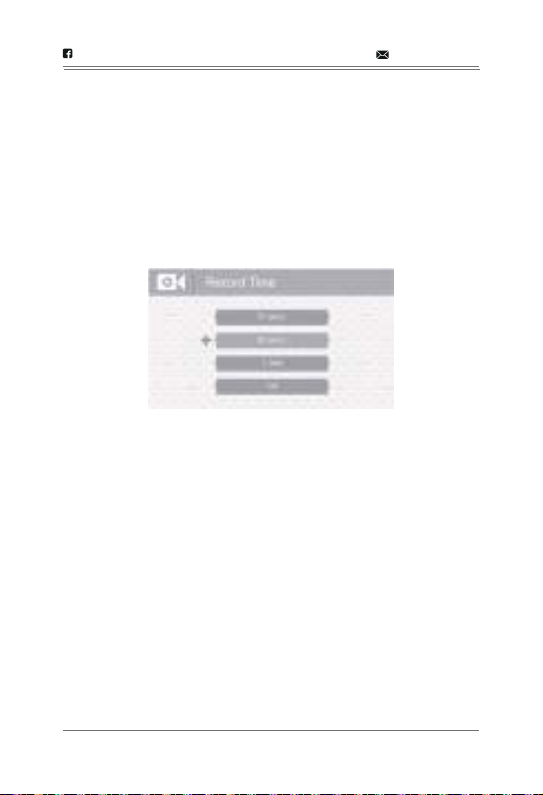
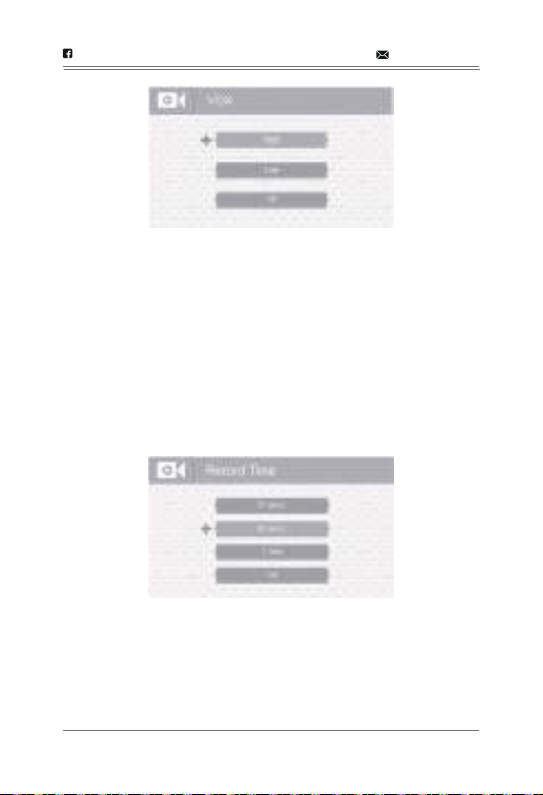
Record Time
This option allows you to select how long the camera will record when
the motion sensitivity function is activated. (Default = 30 secs.)
1.From the Record menu, select Record Time and press Joy Stick. The
Record Time screen displays.
2.Press ▲Vol or ▼Vol to select a recording time block.
3.Press Joy Stick to save the selection and return to the main RECORD
options.
@Tenkerofficial [email protected]
-21-
VOX
VOX allows you to set the sound sensitivity for the camera. This feature
will automatic record when sound detected in the camera unit. (Default
=High).
1.From the Record menu, select VOX and press Joy Stick. The VOX
sensitivity screen displays.
2.Press ▲Vol or ▼Vol to select a level (High, Low, or Off).
3.Press Joy Stick to save the selection and return to the main RECORD
options.
Overwrite
Activating this function allows the oldest files to be deleted when you
want to record but the memory card is full.
1.From the Record menu, select Overwrite and press Joy Stick. The
Overwrite screen displays. (Default = No)
2.Press ▲Vol or ▼Vol to toggle between Yes and No to activate or
deactivate this feature.
3.Press Joy Stick to save the selection and return to the main RECORD
options.
@Tenkerofficial [email protected]
-22-
Note: Note: Please use well-known brands of Trans Flash Card to avoid
operation errors. The CM5341 supports up to 32GB Trans Flash Card.
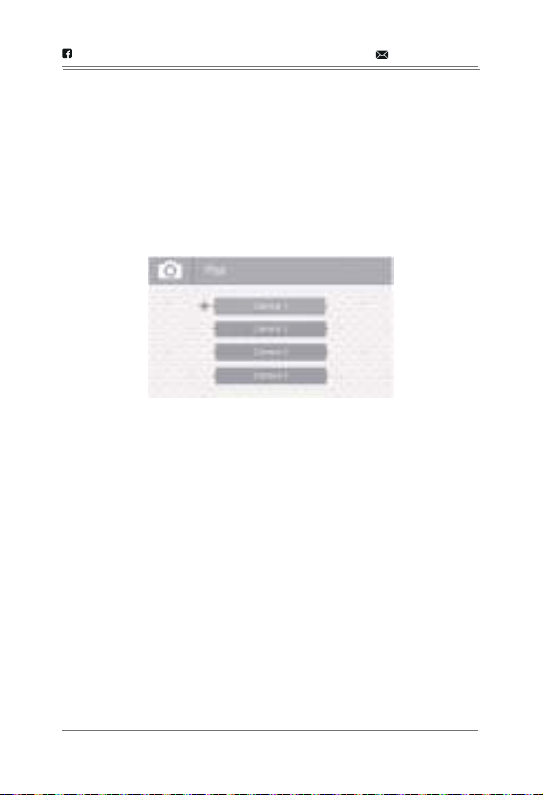
4.CAMERA
This option allows you to pair the monitor with cameras (up to 4
cameras supported) or to turn on/ off individual camera. The cameras
are still powered on but no longer visible to the monitor in off mode.
@Tenkerofficial [email protected]
-23-
Pair
Note: Pair the cameras to the monitor before mounting them.Pairing
allows you to introduce additional cameras to the monitor. The monitor
can then recognize and display video from them. The camera that
comes with this system is already paired. (Default = Camera 1).
Note: Before pairing additional cameras, be sure they are powered and
turned on. See page 4-5.
1.From the main menu selections, select Camera and press Joy Stick.
2.The Camera options screen displays. Two options display: Pair and
On/Off. (Default =Pair)
@Tenkerofficial [email protected]
-24-
1.Select Pair from the Camera options screen. The camera selection
screen displays.
2.Press ▲Vol or ▼Vol to select the camera you want to pair, then press
Joy Stick. The monitor prompts you to press PAIR on the back of the
camera within 30 seconds.
3.Press PAIR on the back of the camera within 30 seconds.
4.That camera’s video displays on the monitor when pairing is
successful.
On/Off
This option allows you to turn individual cameras on/off so their video is
not visible through the monitor. (Default = Camera 1 - On; Cameras 2 -
4 - Off).
1.Select On / Off from the Camera options screen. The On / Off screen
displays.
2.Press ▲Vol or ▼Vol to select a camera.
3.Press CH►or CH◄ to toggle between On and Off for that camera.
Either button will work.
4.Press ▲Vol or ▼Vol to select another camera.
5.Press Joy Stick to accept that setting and return to the Camera
options screen.
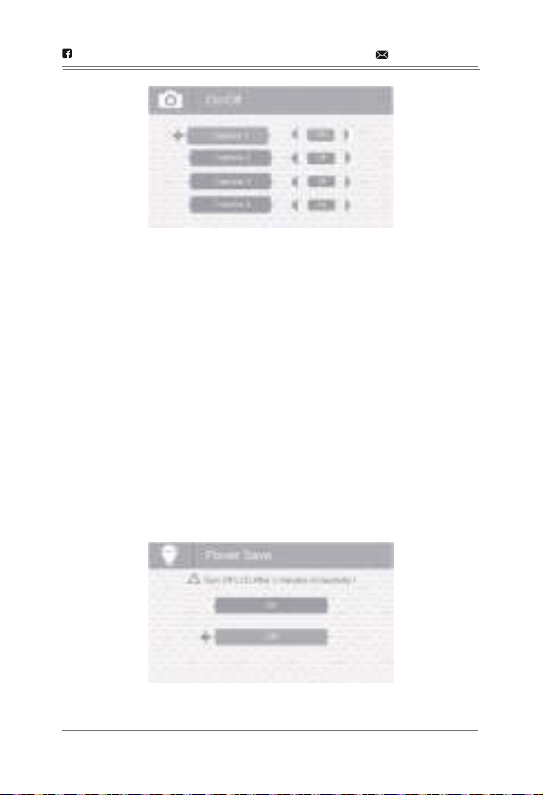
5.POWER SAVE
Activating the Power Save feature turns off the LCD after two minutes of
inactivity. Be sure that VOX is activated, however, If VOX is deactivated,
press any button on the monitor to turn the LCD back on. This option
allows you to enable or disable this function. (Default = Off).
Voice Activation (VOX) will turn the LCD back on. Even with the LCD off,
the LED light bar is still active.
1.From the main menu selections, select Power Save and press Joy
Stick. The Power Save screen displays.
2.Press ▲Vol or ▼Vol to toggle between turning the Power Save
feature on or off.
3.Press Joy Stick to accept that setting and return to the main menu
selections.
@Tenkerofficial [email protected]
-25-

Recording
Be sure a Trans Flash Card is inserted into the Trans Flash Card slot.
1.Press MANUAL REC on the monitor. The New Record icon flashes
yellow to indicate a new file has recorded. The recording indicator also
displays.
2.Press MANUAL REC again to cancel manual recording.
1. RECORDING VIDEO
You can manually record video to a Trans Flash Card (not included). The
CM5341 supports up to 32GB Trans Flash Card. The system records
video in 10 minute blocks; however, you can manually stop recording at
any time. During recording, only TALK is active. All other buttons are
disabled.
Note: The Parent Unit Can Only Supports Files in MJPEG Formats. Do
Not Play File in Other Formats . Play Files in Other Formats may Lead
into Blank Screen and Malfunction, in this Situation, Please Press the
RESET Button on the Back of the Monitor, and Restart the Parent Unit
into Normal Condition.
Note: The New Record icon flashes red when the Trans Flash Card is
full. Either manually delete video records, enable Overwrite, or reformat
the Trans Flash Card to delete all records.
SPECIAL FEATURES
@Tenkerofficial [email protected]
-26-

Viewing Recorded Video
@Tenkerofficial [email protected]
-27-
1.Press PLAY RECORD to enter the PLAY FILE list.
2.Select the Video folder and press Joy Stick
3.That folder contains other folders sorted by date (Format =
MMDDYYYY). For example: 03302017 means the videos in this folder
are recorded on March 30th, 2017. Press ▲Vol or ▼Vol to select a
folder you want to view and press Joy Stick to open that folder and
browse the files inside. Scroll down to see a complete list of folders or
recorded files if needed.
4.Inside that folder are record files, sorted by time. For example:
123030-1 means the video is recorded at 12:30:30 and from camera
1.
5.Select the video you want to view and press Joy Stick. The video plays
on the LCD screen.
6.Use the following buttons to manage the video:
—— ▲Vol—Pause, resume video
—— ▼Vol—Stop
—— CH ►—Fast forward (up to x16 speed)
—— CH◄ —Reverse (up to x16 speed)
—— BACK—Back out of the video playback function, one screen at a
time.

2. ZOOM
Press ZOOM to display the camera image in double size. Press ▲Vol,
▼Vol, CH►, or CH◄ to see the parts of the image not displayed on the
LCD screen. Press ZOOM again to return to normal view.
3. NIGHT LIGHT
You can control the CM5341 night light using the NIGHT LIGHT button
on the top of the monitor. However, if you want to control it from the
monitor, you must place that camera in full screen mode.
Deleting Folders and Video Files
You can delete a specific video record or an entire folder of records. As
you scroll through folders, you will see a red "X" to the right of folders
and video records on the PLAY FILE screen.
1.Press CH ►to highlight the red "X" beside the folder or record you
want to delete. Press Joy Stick.
2.A confirmation screen displays. Use CH►or CH◄ to select Yes.
Press Joy Stick.
3.The system returns to the same screen where you can see that the
folder or record has been deleted.
1.To turn the night light on from the monitor, place the night light camera
in full screen mode.
2.Press NIGHT LIGHT on the side of the monitor. The camera's night
light turns on and a night light icon displays on the monitor.
3.Press NIGHT LIGHT again to turn it off.
@Tenkerofficial [email protected]
-28-

4. LULLABIES
Your system comes with four preprogrammed lullabies. You can control
the lullabies from the monitor. However, if you want to control them from
the monitor, the camera you want to play them through must be in full
screen mode.
When you press LULLABY PLAY/STOP to turn on the lullaby feature,
Lullaby #1 begins playing. It will repeat until you press LULLABY SKIP to
move to the next lullaby.
The Lullaby feature can also play all lullabies one after the other. Press
LULLABY PLAY/STOP to turn on the Lullaby system and begin playing
Lullaby #1. Press LULLABY SKIP four (4) times after Lullaby #1 begins
playing. Lullaby #1 restarts and then cycles through the rest of the
lullabies.
1.To control the lullabies from the monitor, decide which camera you
want to play lullabies and make it the full screen live view camera.
2.Press LULLABY PLAY/STOP on the monitor or camera. The system
plays Lullaby #1 then repeats it.
3.Press LULLABY SKIP to skip to Lullaby #2. The system plays Lullaby
#2 then repeats it.
4.Press LULLABY SKIP to skip to Lullaby #3. The system plays Lullaby
#3 then repeats it.
5.Press LULLABY SKIP to skip to Lullaby #4. The system plays Lullaby
#4 then repeats it.
6.Press LULLABY SKIP to skip to Lullaby #1. The system plays Lullaby
#1 then cycles through all lullabies.
7.Press ▲Vol and ▼Vol on the monitor or camera to adjust the volume.
Press ▼Vol all the way down on the monitor to mute the lullaby
playing through the monitor.
@Tenkerofficial [email protected]
-29-

5. USING THE INTERCOM
The Intercom feature lets you talk to whomever is within camera range.
1.Decide which camera you want to establish an intercom link with, and
make it the full screen live view camera.
2.Press and hold TALK the monitor.
3.Speak clearly into the microphone.
4.Release TALK to listen to the response.
6. VOX
This feature will automatic record video when sound detected in the
camera unit. You can check the video when back to the parent unit.
VOX allows you to Set the sound sensitivity for the camera. You can set
how long the camera will record from the RECORD screen by setting
the Record Time.
1.From the Record menu, select VOX and press Joy Stick. The VOX
sensitivity screen displays.
2.Press ▲Vol or ▼Vol to select a level (High, Low, or Off).
3.Press Joy Stick to save the selection and return to the main RECORD
options.
@Tenkerofficial [email protected]
-30-
-31-
@Tenkerofficial
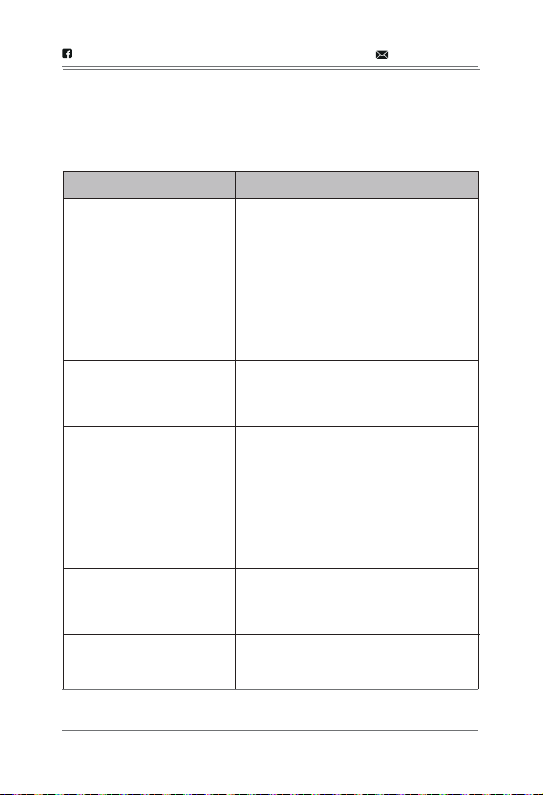
TROUBLESHOOTING
If you have problems with your System, there is often a quick and
simple solution. Please try the following:
Problem Solution
No video displayed on
the monitor
*Press and hold the power button for 3
seconds to power on the monitor.
*Monitor is out of batteries, Plug in the
monitor power adaptor.
*Video off mode is on. Press any button
to turn the screen back on.
*Power save model is on; Press any
button to turn the screen back on.
*If none of the solutions above work,
press the RESET button on the back of
the monitor.
The camera is not
detected; ”Out of range”
is shown on the monitor
*Make sure the camera is powered on.
*The camera and monitor may be out of
range. Extend the antenna on the
monitor and camera or move the
monitor and camera closer together.
*You may need to pair the camera and
the monitor again.
*Wrong channel selected. Press Pairing
button repeatedly to select a channel
with a camera connected to it.
Monitor screen keeps
turning off
*The monitor battery is low. Plug in the
monitor power adaptor.
*Power save model is on; Press any
button to turn the screen back on.
Feedback/squealing
noise coming from the
monitor
*The monitor battery is low. Plug in the
monitor power adaptor.
*Power save model is on; Press any
button to turn the screen back on.
Display is frozen or blank
screen
*Press the Reset button on the back of
the monitor to reboot. Settings and
saved files are unaffected.
-32-
TECHNICAL SPECIFICATION
If you have problems with your System, there is often a quick and
simple solution. Please try the following:
@Tenkerofficial [email protected]
Operating Frequency Range 2400MHz—2483.5MHz
Transmitting Power/ERT 15dBm Max
Receiving Sensitivity -81dBm
Type of Spread Spectrum FHSS 39 Channels
Type of Modulation GSFK
Data Rate 2Mbps
Transmitting Distance
Up to 1000ft communication range
(Line of Sight, NO interference)
Camera
Image Sensor Type
1/6’’ CMOS Image Sensor
Effective Pixel
H: 640, V: 480
Image Resolution/Frame Rate
20fps
White Balance
Auto
Lens
3.0mm, F2.8
Field of view
60 degree
IR On/Off
5-8 Lux Off, 9-12Lux On
IR LED Type/Night Vision
850nm/5m
Loud Speaker Output
5W Max
Power Requirement
DC5V +/-10%
Operating Temperature Range
14°F ~ 104°F (-10°C ~ 40°C)
Operating Humid Range
80% HR
N/A (indoor use only)
Regulation Compliance
FCC/CE
Environment Rating
RoHS Compliance
Yes
System General
-33-
@Tenkerofficial
Camera Housing Material Plastic
Built-in Microphone, Night vision,
Press button Power on/off
Moving angle(degree)
Upward:90 Downward:20
Leftward:135 Rightward:135
Other Special Feature
LCD Monitor
Receiving Frequency Range
Data Rate
Receiving Sensitivity
Modulation Type
LCD Panel size
LCD Resolution
View Angle
Power Requirement
Operating Temperature
Operating Humidity Charging
Charging
2400Mhz~2483.5Mhz
2 Mbps
-81dBm
GFSK with FHSS
4.3 Inch
480 (H) x 272 (V)
H: 150° V: 130°
DC5V 1A ±5%
14°F ~ 104°F (-10°C ~ 40°C)
0% ~ 85%
Charging time:
6 and a half Hours
Working Time: 4 and a half Hours
(Power save off);
9 Hours (Power save on)
Charging LED:
• Green = Battery is fully charged.
• Orange = Battery is almost charged.
• Red = Battery is charging.
If the monitor becomes unplugged
from the adaptor, this LED turns off.

FCC WARNING
This device complies with part 15 of the FCC rules. Operation is subject
to the following two conditions:
(1) this device may not cause harmful interference, and (2) this device
must accept any interference received, including interference that may
cause undesired operation.)
The manufacturer is not responsible for any radio or tv interference
caused by unauthorized modifications or change to this equipment.
Such modifications or change could void the user’s authority to operate
the equipment.
This equipment has been tested and found to comply with the limits for
a Class B digital device, pursuant to part 15 of the FCC Rules.
These limits are designed to provide reasonable protection against
harmful interference in a residential installation. This equipment
generates, uses and can radiate radio frequency energy and, if not
installed and used in accordance with the instructions, may cause
harmful interference to radio communications. However, there is no
guarantee that interference will not occur in a particular installation. If
this equipment does cause harmful interference to radio or television
reception, which can be determined by turning the equipment off and
on, the user is encouraged to try to correct the interference by one or
more of the following measures:
-- Reorient or relocate the receiving antenna.
-- Increase the separation between the equipment and receiver.
-- Connect the equipment into an outlet on a circuit different from that to
which the receiver is connected.
-- Consult the dealer or an experienced radio/TV technician for help.
RF warning statement:
The device has been evaluated to meet general RF exposure
requirement. The device can be used in portable exposure condition
without restriction.
-34-
@Tenkerofficial
Register within 2 weeks after receiving your new product.
www.tenker.co/warranty
PLEASE VISIT NOW
CUSTOMER SERVICE
[email protected] @Tenkerofficial
ACTIVATE YOUR 12 MONTH WARRANTY
& GET EXCLUSIVE GIFT
NOTE
1. In ZOOM mode, volume control is not supported and the camera
CANNOT pan and tilt.
2. In single camera mode, the other three cameras are turned off.
Please place the camera in a bright place during the daytime to
avoid triggering night mode.
3. Please pay attention to the volume of the monitor.

Made in China
FCCID:SJ8-CA530(Camera)
FCCID:SJ8-M410A(Monitor)
www.tenker.co
1-855-558-8666 (Mon - Fri 9:00 AM - 5:00 PM EST)
