USER MANUAL
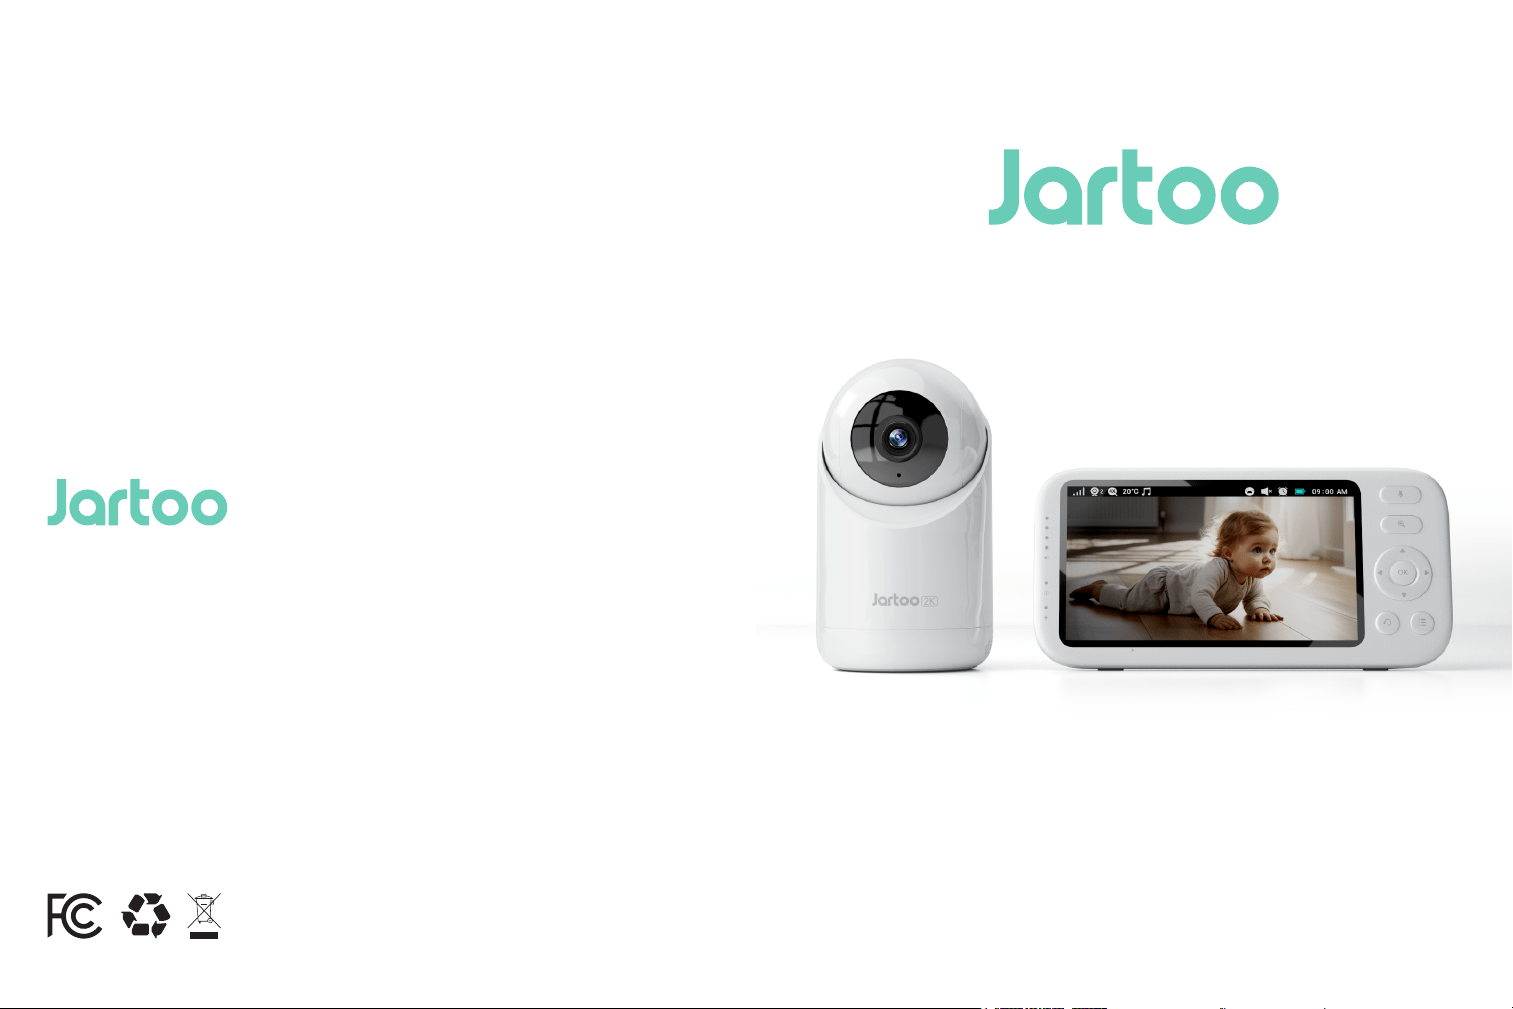
Model: JT-VBM002
Jartoo Baby Monitor
Email
MANUFACTURER
Shenzhen Core Shadow Feiyang Technology Co.,Ltd.
Room 702,Building 11,Phase II(02-08 Plot),Tianan Yungu Industrial Park,Gangtou
Community,Bantian Street,Longgang Distrct,Shenzhen.
www.jartoo.com
MADE IN CHINA

CONTENTS
1.SAFETY INSTRUCTIONS
2. CAUTION
3. PACKAGE CONTENTS
4.PRODUCT DIAGRAM
5.GETTING STARTED
6.FUNCTIONS & OPERATIONS
7.SPECIFICATIONS
8.TROUBLESHOOTING
9.WARRANTY & CUSTOMER SERVICE
00
00
00
00
00
00
00
00
00
--------------------------------------------------------------
---------------------------------------------------------------------------------------
------------------------------------------------------------------
---------------------------------------------------------------------
-----------------------------------------------------------------------
--------------------------------------------------------
--------------------------------------------------------------------------
--------------------------------------------------------------------
------------------------------------------

SAFETY INSTRUCTIONS
PACKAGE CONTENTS
User Manual Warranty
CAUTION
3
ft
Keep cord out of the reach of children (more than 3ft / 0.9m away) in case
of STRANGULATION.
NEVER place the camera or cord in or near the crib or playpen.
NEVER mount the camera directly above the crib or playpen to avoid the
risk of injury.
Only use the AC adapters provided.
Never use the unit near water, including near a bathtub, sink, laundry
machine tube, wet basement, etc.
Do not install near any heat sources such as radiators, heat registers,
stoves, or other devices that produce heat.
Only use attachments and accessories specified by the manufacturer.
Unplug this device when unused for long periods of time.
·
·
·
·
·
·
NOT toys. Do not allow children to play with them.
This product is NOT intended to replace the proper supervision of children.
You MUST check your child’s activity regularly.
This product is not intended for use as a medical camera and its use should
not replace adult supervision.
Unplug the product during lightning storms.
Please check the operating range and condition of the camera carefully at
the initial installation, and on a regular basis after that.
Check the reception regularly. Test the camera before use and after
changing the camera’s location.
·
·
·
·
·
· Clean the camera with a dry cloth only.
· Do not block any ventilation openings.
· Microphone feedback might occur when the monitor is too close to the
camera. Please keep them at least 1.5m / 4.9ft apart.
Jartoo Baby Monitor & Camera (Model: JT-VBM002)
· Monitor Adapter (5V 2A )
· Camera Adapter (5V 1.2A)
· Micro USB Cable *2
· User Manual
· Warranty
Press and hold the Talk button to speak the camera.
Press Power button to switch on/off the monitor screen. Press and hold
the Power button 2 seconds to switch on/off the monitor.
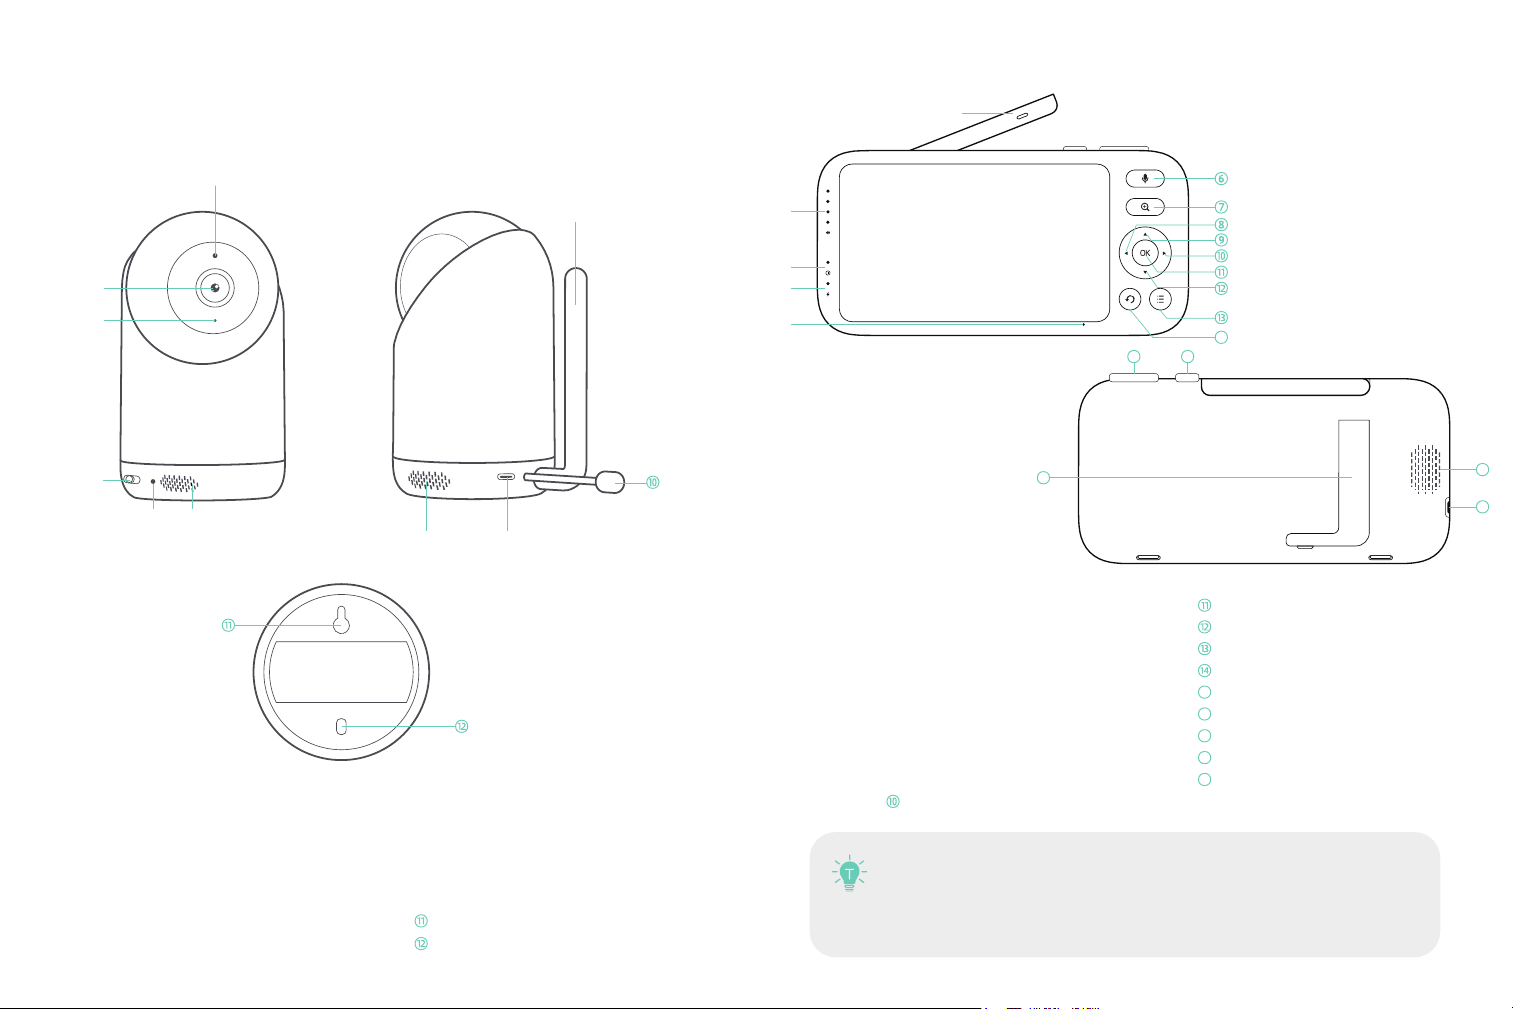
Camera
Baby Monitor
PRODUCT DIAGRAM
①
②
③
④
⑤
15
14
16
17
18
19
Antenna
Volume Indicators
Power Indicator
Charging Indicator
Microphone
Talk Button
Zoom Button
Left Button
Up Button
Right Button
OK Button
Down Button
Menu Button
Back Button
Lolume Control
Power Button
Back Stand
Speaker
USB-C Port
①
②
③
④
⑤
⑥
⑦
⑧
⑨
15
16
17
18
19
Light sensor
Lens
Microphone
Power Switch
Power indicator
Microphone
Speaker
USB-C
Camera Antenna
Temperature Sensor
Mounting Hole
Pairing Button
①
②
⑧
⑨
①
②
③
④
⑤
⑥
⑦
⑧
⑨
⑩
⑤
③
⑦
④
⑥
1.Charging & Powering Baby Monitor
GETTING STARTED
1) Connect the monitor adapter to the monitor and a power outlet.
2) Unplug the unit when its power indicator turns off, indicating a full charge.
3) Press and hold the Power button on the monitor to power on
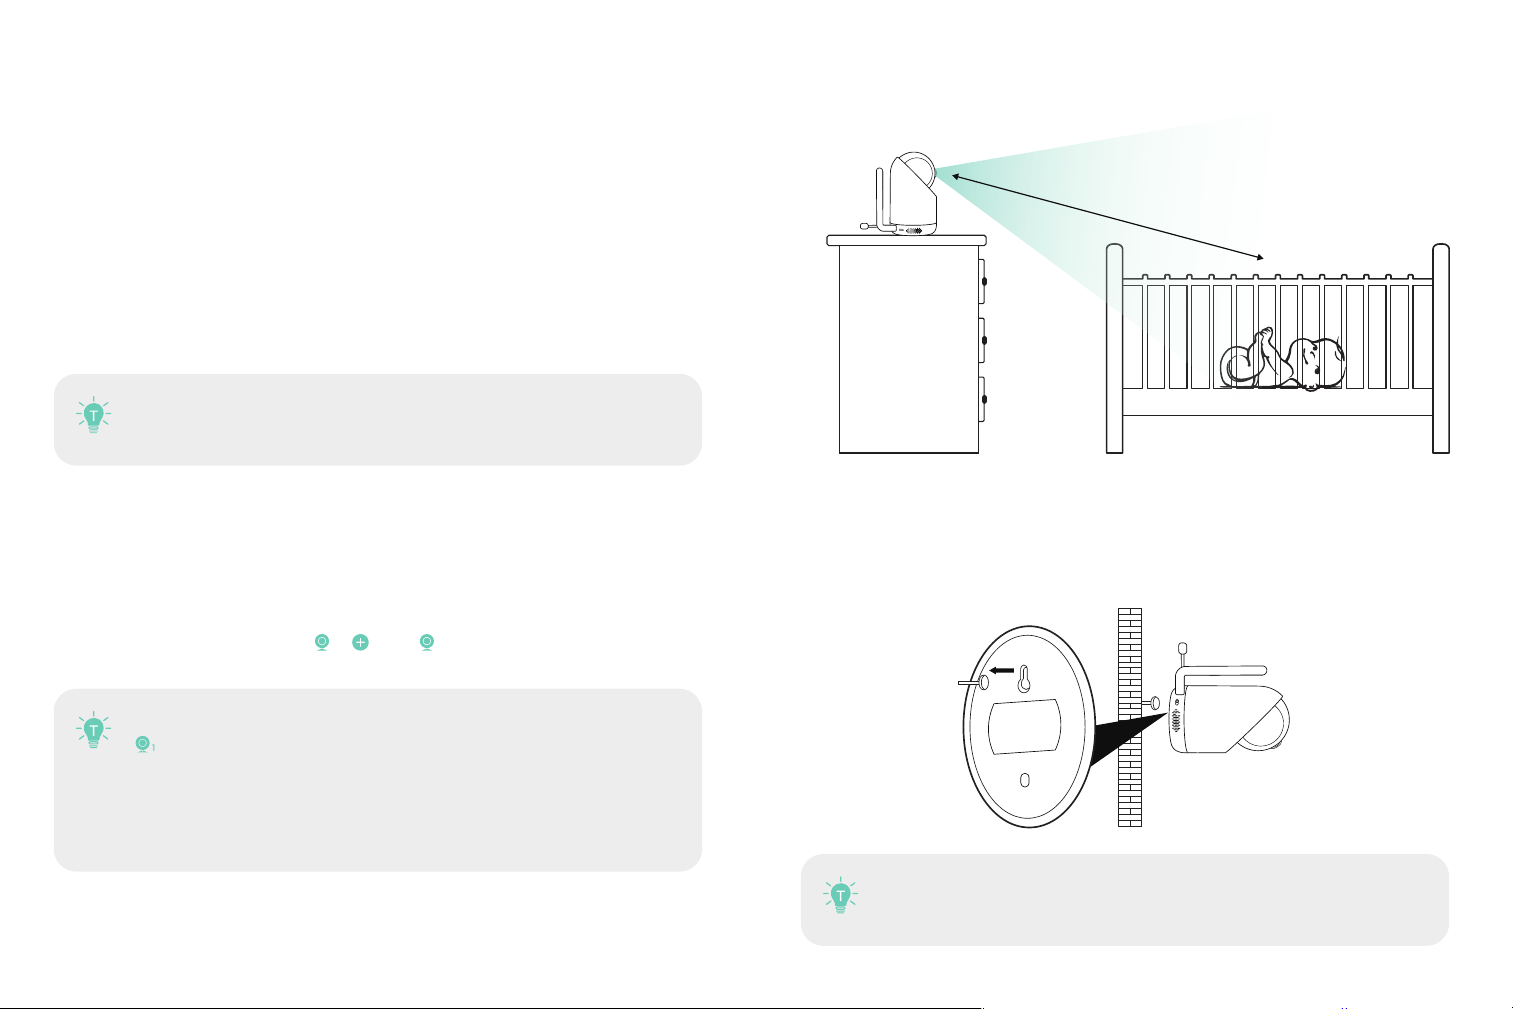
4. Placing the Camera
Place the camera 2m / 6.6ft away from your baby for safety reason
and for a better view when in night vision mode.
5. Wall Mounting Camera
1) Select the spot to mount the camera, keeping it beyond your baby’s reach.
2) Insert the screw (not included) pre-installed on wall into the mounting hole of the
camera.
3. Pairing the Baby Monitor & the Camera
By default, one camera has been paired with the monitor when manufactured.
When you power on the monitor and camera, the two will automatically pair.
To add more cameras, press the Pair Button at the the camera,
press Menu button, select through -> Add-> , and then the monitor will auto-pair
with the camera.
2. Powering Camera
1) Connect the camera to power source via the TYPE-C cable and camera adapter.
2) Slide the Power Switch on camera to power on. Make sure the power indicator light
is green.
Only use the power adapters included in the package.
· Do not place the camera and power cord within the reach of your baby.
It’s strongly recommended to use a screw and screw anchor. Don’t
release the camera until you’re sure it is firmly mounted.
Once they’re paired successfully, the camera number with icon
will be shown at the top left.
Microphone feedback might occur when the monitor is too close
to the camera. Please keep them at least 1.5m / 4.9ft apart.
It is recommended to pair in the baby's room, or wherever you
intend to place the camera.
·
·
1.5-2m/4.9-6.6ft
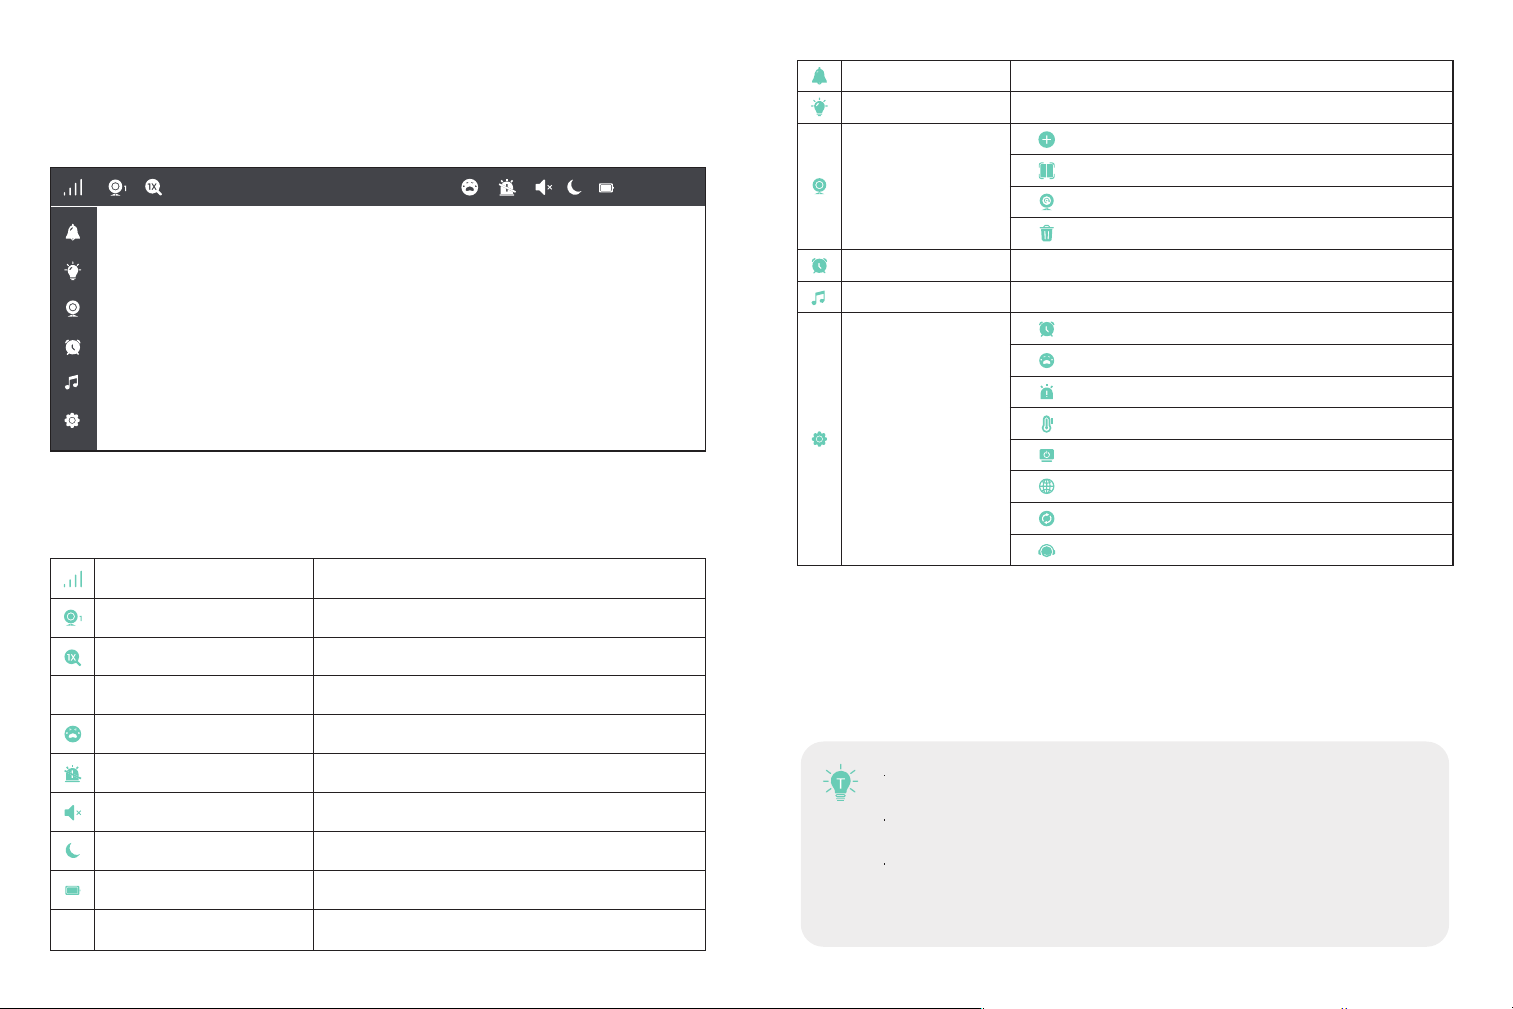
Monitor Interface overview
Top Seatus Indications
1. Talkback
Press and hold the Talk button to talk to camera and release to exit. When monitor on
Under Split Screen Mode: Press Left / Right Button to select the camera (Camera 1 or
2) you want to talk to. Hold to talk and release to exit.
When you enter the talking mode, the icon will be shown on
the monitor.
When it’s mute or the speaker volume is too low, you may not be
able to hear the baby.
When you’re pressing the Talk Button, the camera will not
transfer the sound to the monitor. Please release the button to
listen to your baby.
FUNCTIONS & OPERATIONS
80℉ 12:00PM
Signal
Current Camera
Zoom
Current Temperature
Cry Detection
Warning
Mute
Night Vision
Battery
Current Time
4 levels
Camera 1 / Camera 2 / Camera 3/Camera 4
2X/4X
℃/ ℉
???
???
Mute all system sounds
Auto ON in a dim environment
4 levels
12Hr/24Hr
℉
PM12:00
Speaker Volume
Brightness
0-7 levels
1-8 levels
1 Hr/3 Hr/5 Hr/Set Time
Accommodates 4 lullabies
To add (Max 4 Camera)
Split
Scan (selec to view or scan each at a time)
Delete cameras (selec to delete camera)
Time
Cry Detection
Warning
Temp Unit
Display
Language
Reset
Help
Alarm
Lullaby
Settings
Camera
2.Digital Zoom & Circulating
1) Under split screen mode, press Left / Right Button -> OK Button to select
the camera (Camera 1 or 2) you want to view or zoom in.
2) Press Zoom Button to zoom in to 2X / 4X when viewing the camera. A third
pressing of the button will restore to the original image.
3)Long press “OK” key for 3 seconds, the PTZ will cruise automatically twice, and then
press“OK” key again to end the cruise.
3.Pan-n-Tilt
When viewing the camera, press Left / Right / Up / Down Button to view at different
angles, 108 degrees vertically and 350 degrees horizontally.
4.Night Vision
The night vision is automatically activated in a dim environment. The camera has
high-intensity infrared LEDs for picking up clear images in the dark. Black and white
images can be captured within 6m distance.
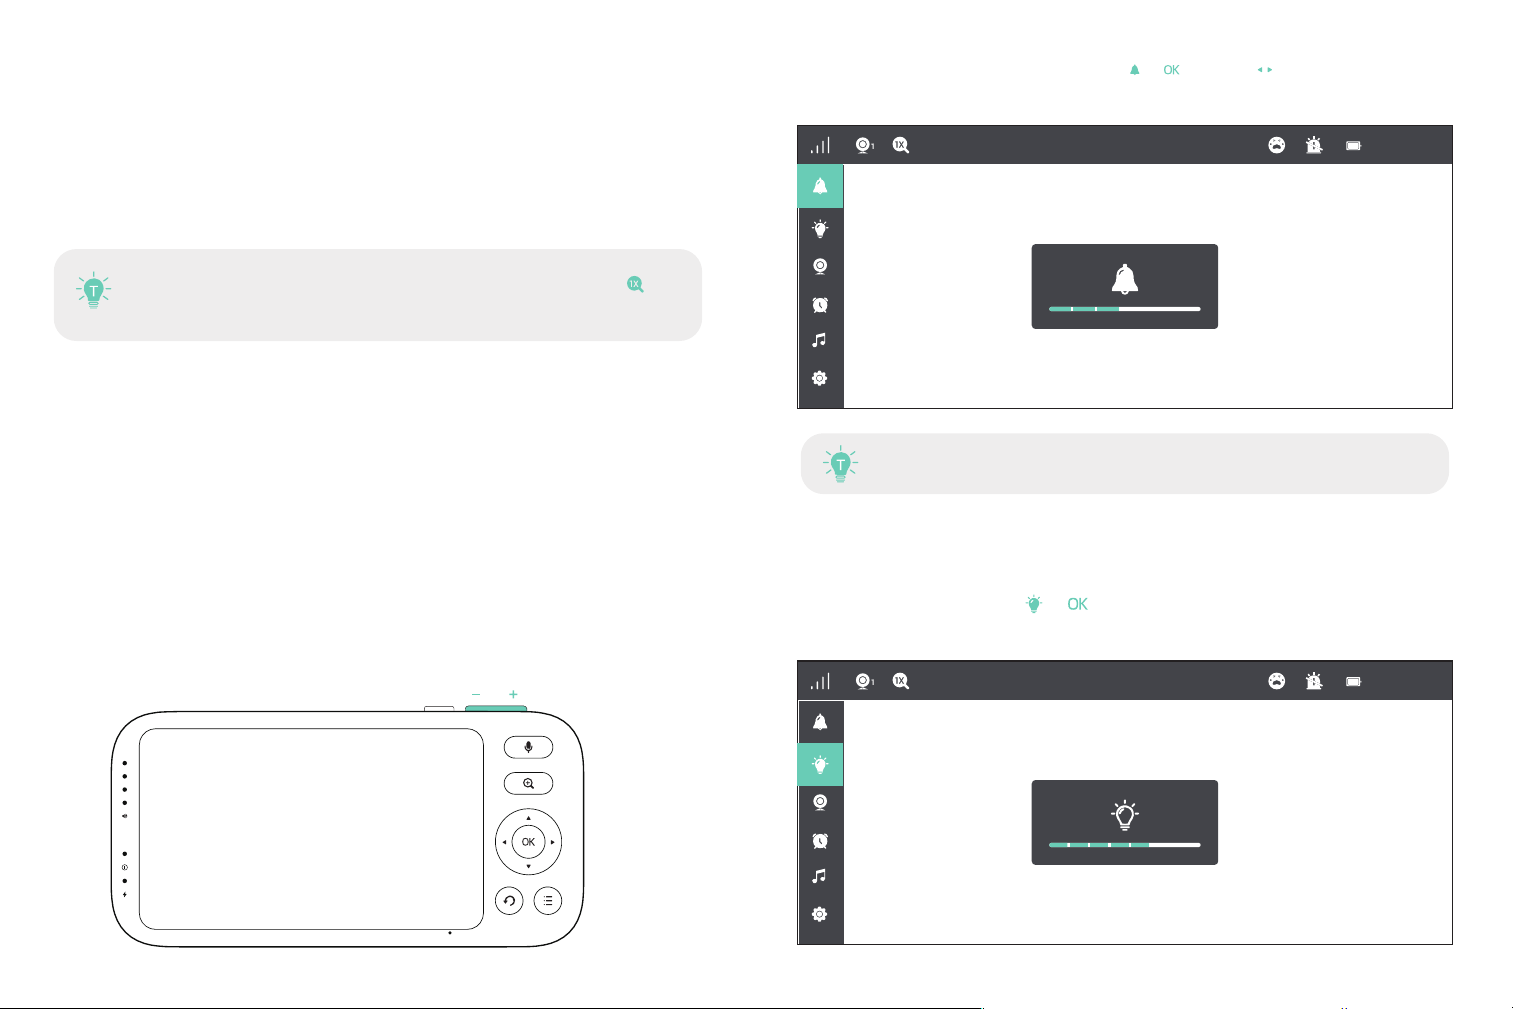
5.Volume Adjustment
1) Use the volume + - button on the top of monitor to quickly adjust the volume
2) Or you can press Menu Button: Choose -> Button -> Left / Right Button to
volume down / up
The current zoom level number will be shown with the Zoom icon on
the monitor
When the monitor is mute, you may not be able to hear the baby.
6. Display Brightness Adjustment
Press Menu Button: Choose -> Button ->Left / Right Button to adjust the
brightness
80℉ 12:00PM
80℉ 12:00PM
4) Under Split screen mode, you can also press Left / Right Button -> Button to
select one camera (Camera 1 or 2) you want to view or zoom in. Press the Button
to return to Split screen mode.
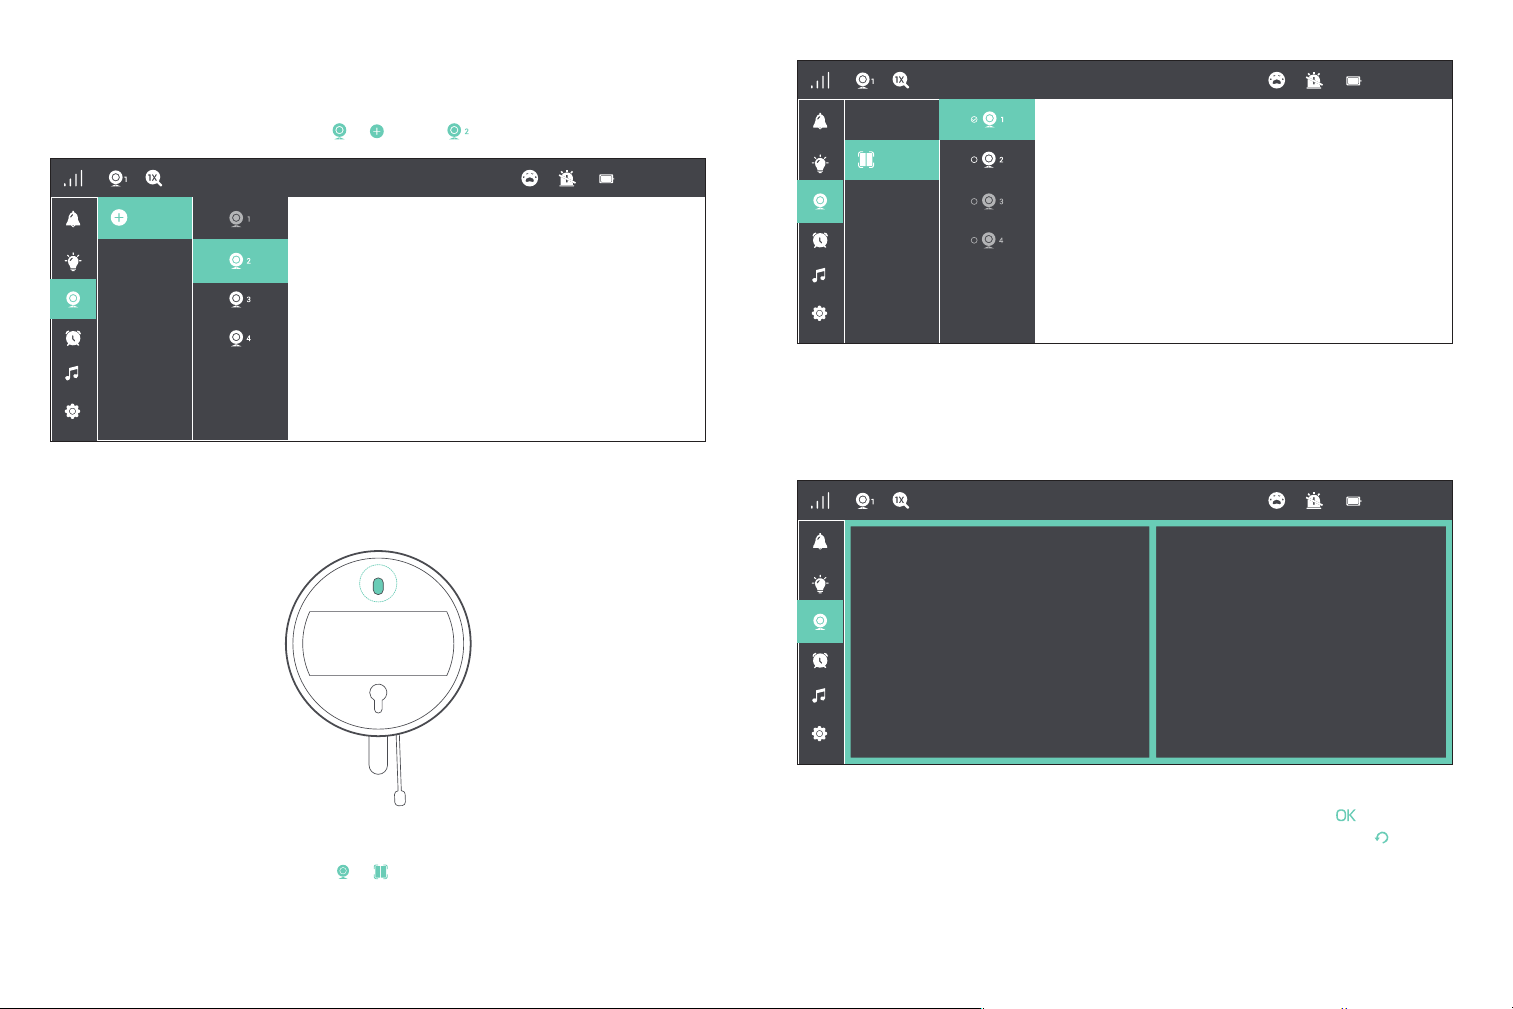
7.Camera
Add Camera
1)Press Menu button, select through -> ADD -> to add a camera.
2)Press and hold the Pair Button on the camera for 3 seconds
3)Once set, you can view two cameras at one time without delay. The sound of the
two rooms will be switched every 15 seconds
Split Screen
1) Press Menu button, select through -> .
2) Then select two cameras (Camera 1/2/3/4) for Split screen display.
Pair
Add
80℉ 12:00PM
Split
80℉ 12:00PM
80℉ 12:00PM
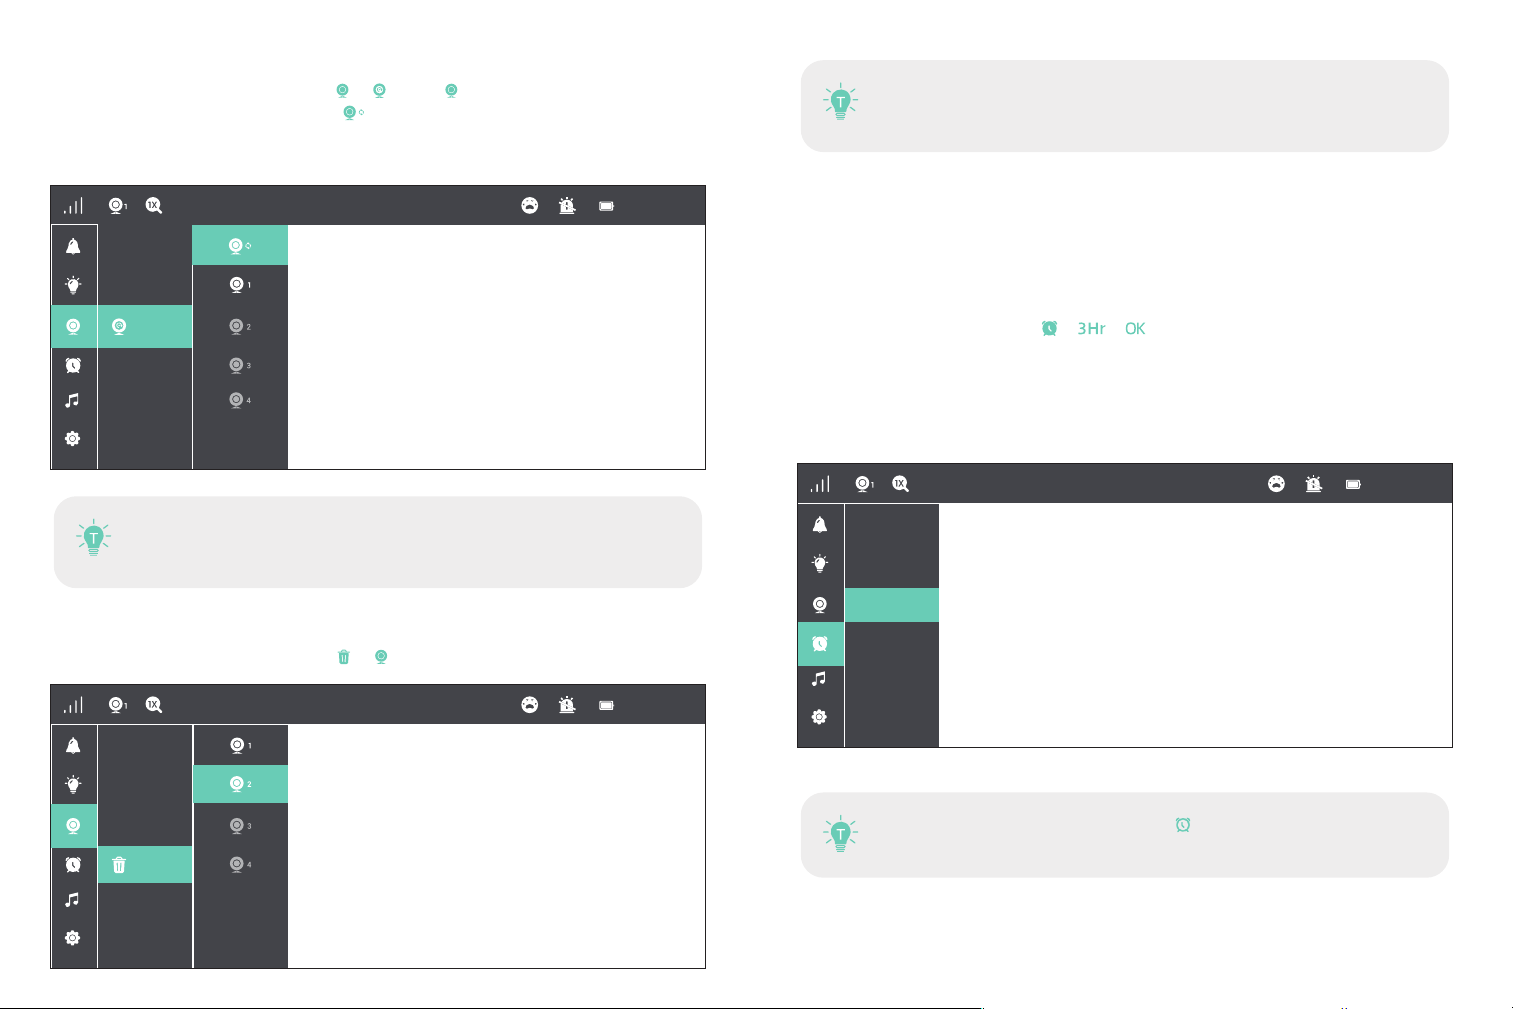
8. Alarm
1) Explanation:This function is to remind you of feeding your baby. OFF means you
shut down the function; 3 hour means it reminds you every 3 hours and so on for the
other options
2) Press Menu button, Choose -> -> Button.
3) Select the time you want. or set the hour and minute otherwise. When the alarm
time is reached, a beep will be heard. Press OK Button to stop; otherwise it’ll keep
beeping for 10s, beeping again in 1min, stops after it’s alerted 4 times.
You can switch viewing different cameras; the current camera
number will be shown with the Camera icon on the monitor.
At least one camera shall be added. Do not delete all the
cameras. If necessary, please add a new camera before deletion.
· When the timer is set, the Alarm icon will be shown on the monitor.
· Before setting, please check that the monitor time is your current time.
Delete Camera
1) Press Menu button, select through -> to delete a camera.
View Camera
1) Press Menu button, select through -> Scan-> to view a camera.
·If there are 2 or more cameras, select to cyclethrough the added cameras every
15 seconds.
·Select the camera number (1/2/3/4) to view the corresponding camera.
1
2
Scan
80℉ 12:00PM
Delete
80℉ 12:00PM
OFF
3 Hr
5 Hr
Set Time
1 Hr
80℉ 12:00PM
1) Explanation:
There are three options of Cry detection, LOW 78dB, MEDIUM 65dB and 60dB. LOW
HIGH means the sound of Baby cry can be detected if it reached 78dB, and so on for
MEDIUM and HIGH.
Setting “ off ” turns off the alarm sound in Cry Detection mode.
2) Press Menu button, Choose Cry -> Button.
3) Select the option you want. Press Button.
The monitor will prompt too high (>35°C / 95°F) and too low (<0°C / 32°F)temperatures
with the “HH” and “LL” icon, accompanied with a & and a beep alert
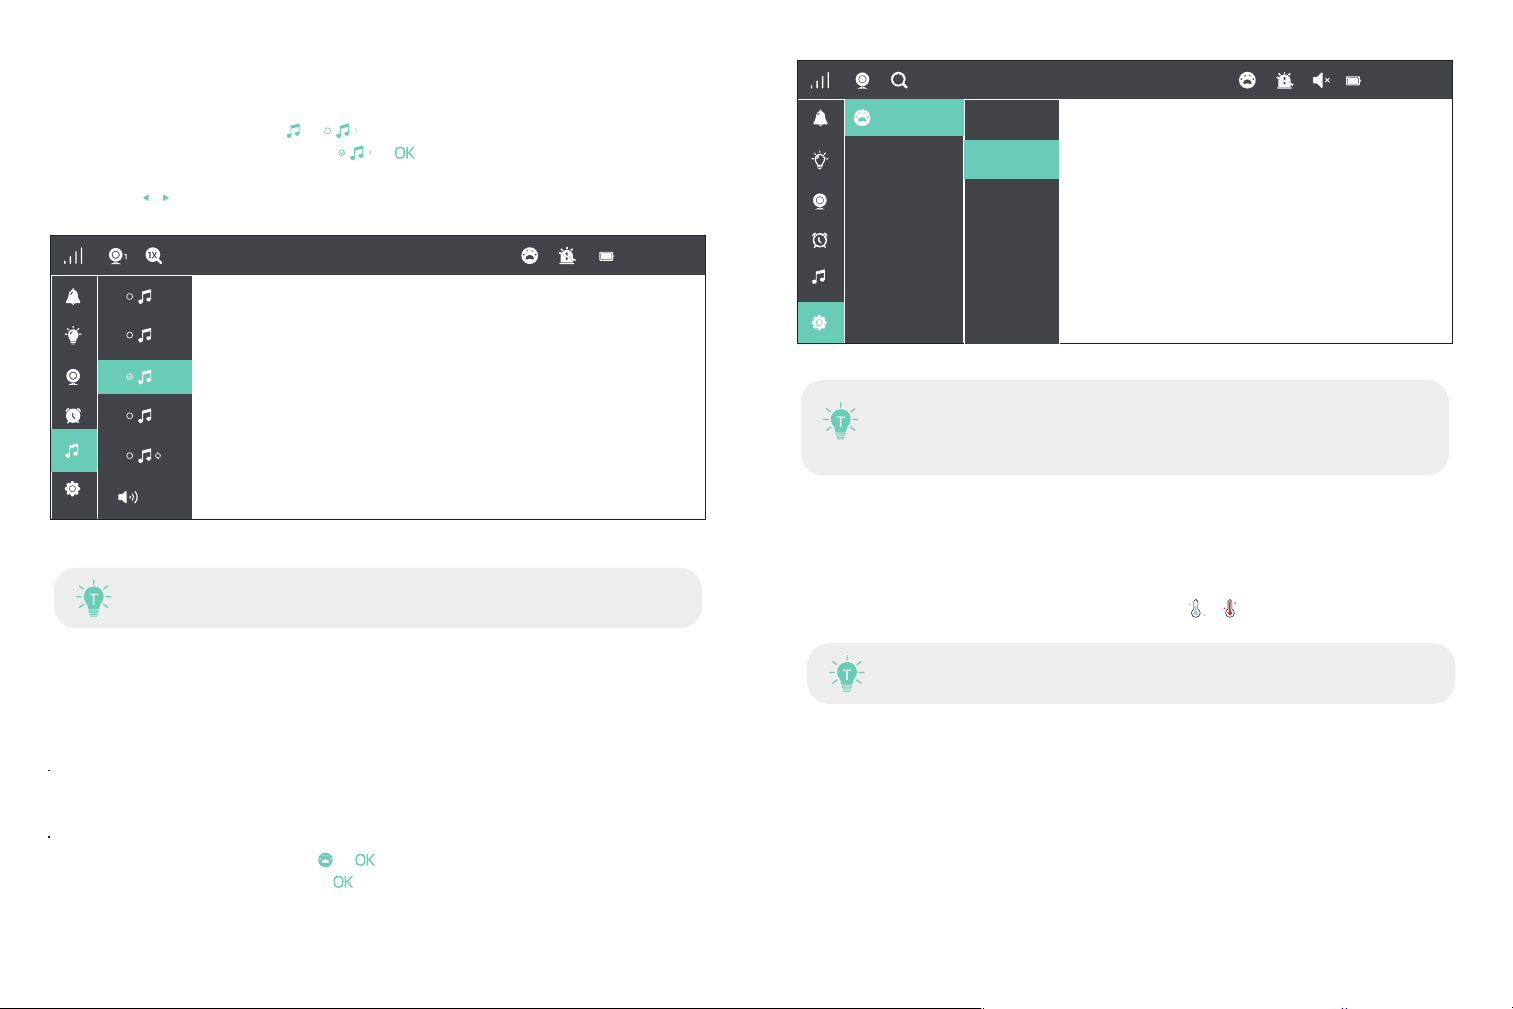
9. Lullabies
1) Explanation: This function is to comfort baby when needed.
2) Press Menu button, Choose -> Button.
3) Select the lullaby you want. Select -> to play the lullabies in a loop, and
press OK again to stop playing.
4)choose Left / Right Button to adjust the volume of the lullaby.
11.Temperature Alert
12.Monitor Settings
Press Menu Button, Left and Right Buttons, and then OK Button to set the monitor
1)Time setting: Set the current time by setting hour, minute, and AM/ PM.
2)Cry Detection:Automatically detect the baby’s crying,wake up the display screen,and
send out a prompt tone; the sensitivity can be set to OFF, Low ,middle or High
3)Warning volume: Select between Low, High, and Mute.
4)Temperature unit: Select between °C and °F.
5)Display (Screen auto-sleep time): Select between 1min, 2min, 5min, and Always on.
10. Cry Detection
·When Cry Detection is turned off, the monitor will no longer emit an
alarm sound, nor will it trigger a bright screen and icon alarm.
when the monitor is mute,you may not be able to hear the baby
The lullaby will automatically stop looping after 1 hour
80℉
Cry Detection
12:00PM
1×
1
OFF
Low
Middle
High
VOL
3
4
2
1
80℉ 12:00PM

12 months warranty
Lifetime customer service (contacts on the monitor, and back cover of this User Guide)
WARRANTY & CUSTOMER SERVICE
Screen
SPECIFICATIONS
Model
Resolution
Image
Image compression
Operating Range
Temperature Alert
Baby Cry Alert
Volume Control
Brightness
Antenna
Zoom
Auto-Pilot
Two-Way Talk
Power Input
Storage Temperature
Operation Temperature
JT-VBM002
IPS1920*1080 PPI=400
16:9
h.264
600m(antenna vertically positioned at 90°)
Yes
Yes
8 Levels
8 Levels
Rotatable (max. 90 degree)
Zoom In (2X)
Zoom In (4X)
2 cycles
Max. 4 cameras
5V/2A (1.5m long USB C cable)
-10°C ~ 55°C / 14°F - 131°
0°C ~ 40°C / 32°F - 104°F
Camera
Cmos
Image compression
Pan-n-Tilt
Zoom
Auto-Pilot
View Angle
Depth of Field
Night Vision
IR LED
Light Sensor
Two-Way Talk
Temperature sensor
Power Input
Storage Temperature
Operation Temperature
2K
h.264
108 degrees vertical (Up=90, Down=18)
270 degrees horizontal (Left=135, Right=135)
Zoom In (2X)
Zoom In (4X)
2 cycles
60°
1.5m to 8m
Black & White image, 2m clear range,up to 8m
Non-visible IR LED with wavelength 940nm
Yes
Yes
Yes
5V/1.2A (1.5m long USB C cable)
-10°C ~ 55°C / 14°F - 131°
0°C ~ 40°C / 32°F - 104°F
6)Language:English, French, German, Spanish, Italian
7)Reset: Press OK Button to confirm factory resetting screen;
“confirm factory resetting screen” will be shown when restoring, and you can’t press
any button to control the device during this period. The monitor will auto restart
when it’s done.
8)Help: Check the email for customer service

FCC STATEMENT
For Jartoo Baby Monitor:
This equipment complies with FCC radiation exposure limits set forth for an uncon-
trolled environment. This equipment should be installed and operated with minimum
distance 0cm between the radiator & your body.
For Jartoo Baby Camera:
This equipment complies with FCC radiation exposure limits set forth for an uncon-
trolled environment. This equipment should be installed and operated with minimum
distance 20cm between the radiator & your body.
FCC Radiation Exposure Statement:
TROUBLESHOOTING
1.Product not powering on?
Check that the camera and monitor are turned on.
Check the camera is connected to power properly (it cannot be charged; it’s power off
once disconnected from power).
Check that the monitor is of enough battery (it’ll auto shut off when battery level icon
flashes red slowly on the monitor).
Check the intactness of the power cable.
2.Baby monitor can’t connect with the camera?
Check whether the monitor is of low battery. Charge it in time to restore good
connection.
Check whether the camera is well connected to power.
Check whether there are any large metallic objects including doors, refrigerators,
mirrors, etc., are placed between the camera and monitor thus blocking the radio
signals.
Check whether there’s any other 900MHZ product is used nearby , which may interfere
the connection.
Check whether the camera is placed on a metallic table Or put it directly on the ground
If nothing above is involved, please retry to restart the monitor or to repair the camera:
press the Pair Button at the bottom of the camera, press Menu button, select through
11-> 11 , and then the monitor will auto-pair with the camera.
3.Too much noise?
-Volume may be set too high. Press volume - button which is on the top of the
screen to volume down
-Microphone feedback might occur when the monitor is too close to the camera.
Please keep them at least 1.5m / 4.9ft apart.
-The camera may be too out of range. Please keep it within 10m / 32.8ft to the
monitor.
4.The Video is not clear?
-Make sure the camera lens and display screen are clean, otherwise you can use a lens
cloth to wipe them.
-Confirm that the camera is not obstructed around
4. Black and white pictures?
Night vision LED may be ON. Please turn on room lights to force it out of the night
mode.
5.Choppy videos?
-Check whether the camera is near the monitor and that there’re no obstacles between
them.
-Adjust the monitor antenna to vertical position for better signal transfer.
Operating bands(Tx and Rx) and maximum power
Frequency Band(s):
902MHz-928MHz(TX/RX)
Maximum output power:
Jartoo Baby Monitor: 0.6266W
Jartoo Baby Camera: 0.4256W