IN240500204V01_ES
ES
IMPORTANTE - CONSERVE ESTA INFORMACIÓN
PARA SU CONSULTA POSTERIOR: LEER DET ALLA DAMENTE
MANUAL DE USUARIO
842-197V01

Contenido
Advertencia . . . . . . . . . . . . . . . . . . . . . . . . . . . . . . . . . . . . . 3
Prueba de Fugas . . . . . . . . . . . . . . . . . . . . . . . . . . . . . . . . . 4
Lugar de uso del Dispositivo . . . . . . . . . . . . . . . . . . . . . . . . .4
Precauciones de Seguridad . . . . . . . . . . . . . . . . . . . . . . . . .5
Instalación . . . . . . . . . . . . . . . . . . . . . . . . . . . . . . . . . . . . . . .6
Especificaciones Técnicas . . . . . . . . . . . . . . . . . . . . . . . . . .6
Lista de Piezas. . . . . . . . . . . . . . . . . . . . . . . . . . . . . . . . . . . .7
Instrucciones de Montaje. . . . . . . . . . . . . . . . . . . . . . . . . . . .8
Operación . . . . . . . . . . . . . . . . . . . . . . . . . . . . . . . . . . . . . 12
2

Advertencia
Lea todas las instrucciones proporcionadas atentamente antes de usar este
aparato. Este calentador debe instalarse de acuerdo con las instrucciones y
las regulaciones locales. El uso de este aparato en áreas cerradas puede ser
peligroso, por eso está prohibido.
• Realice la "prueba de fugas" después de cada reemplazo del cilindro de
gas.
Nunca verifique las fugas con una llama abierta.
• No almacene gases o líquidos inflamables cerca de este aparato.
Siga los siguientes pasos si huele a gas:
1 Apague todas las llamas abiertas; no enciende ningún aparato eléctrico.
2 Cierre la válvula del regulador para detener el flujo de gas hacia la unidad y
APAGUE el calentador (disco completo = •)
3 Asegúrese de que el regulador esté correctamente fijado a la botella.
4 Compruebe que la manguera entre la botella de gas y la unidad no tenga
grietas; se puede detectar grietas en la manguera con agua jabonosa.
5 Si el olor persiste, póngase en contacto con Heat Outdoors o con el sumin-
istrador de gas.
3

Prueba de Fugas
Lugar de uso del Dispositivo
Antes del envío, se han probado las conexiones de gas del aparato para
detectar fugas. El mal manejo del aparato durante el transporte puede dañar
la integridad de algunas piezas.
Se debe realizar una completa prueba de fuga de gas en el sitio de insta-
lación. Siga el siguiente procedimiento para la prueba de fuga.
1 Se recomienda preparar una solución de jabón/detergente líquido para
detectar agujeros/grietas o conexiones sueltas en la manguera.
2 Asegúrese de que el control esté en la posición de APAGADO (disco com-
pleto = ) en el panel de control
3 Aplique la solución a la manguera con un cepillo o un trapo.
4 ENCIENDA el suministro de gas y compruebe si hay burbujas en la mangu-
era. La burbuja indica que hay fuga en la manguera.
5 Si hay fuga, cierre el suministro de gas de inmediato, apriete todas las
conexiones que tienen fugas con cuidado. Luego vuelva a encender el gas y
verificar.
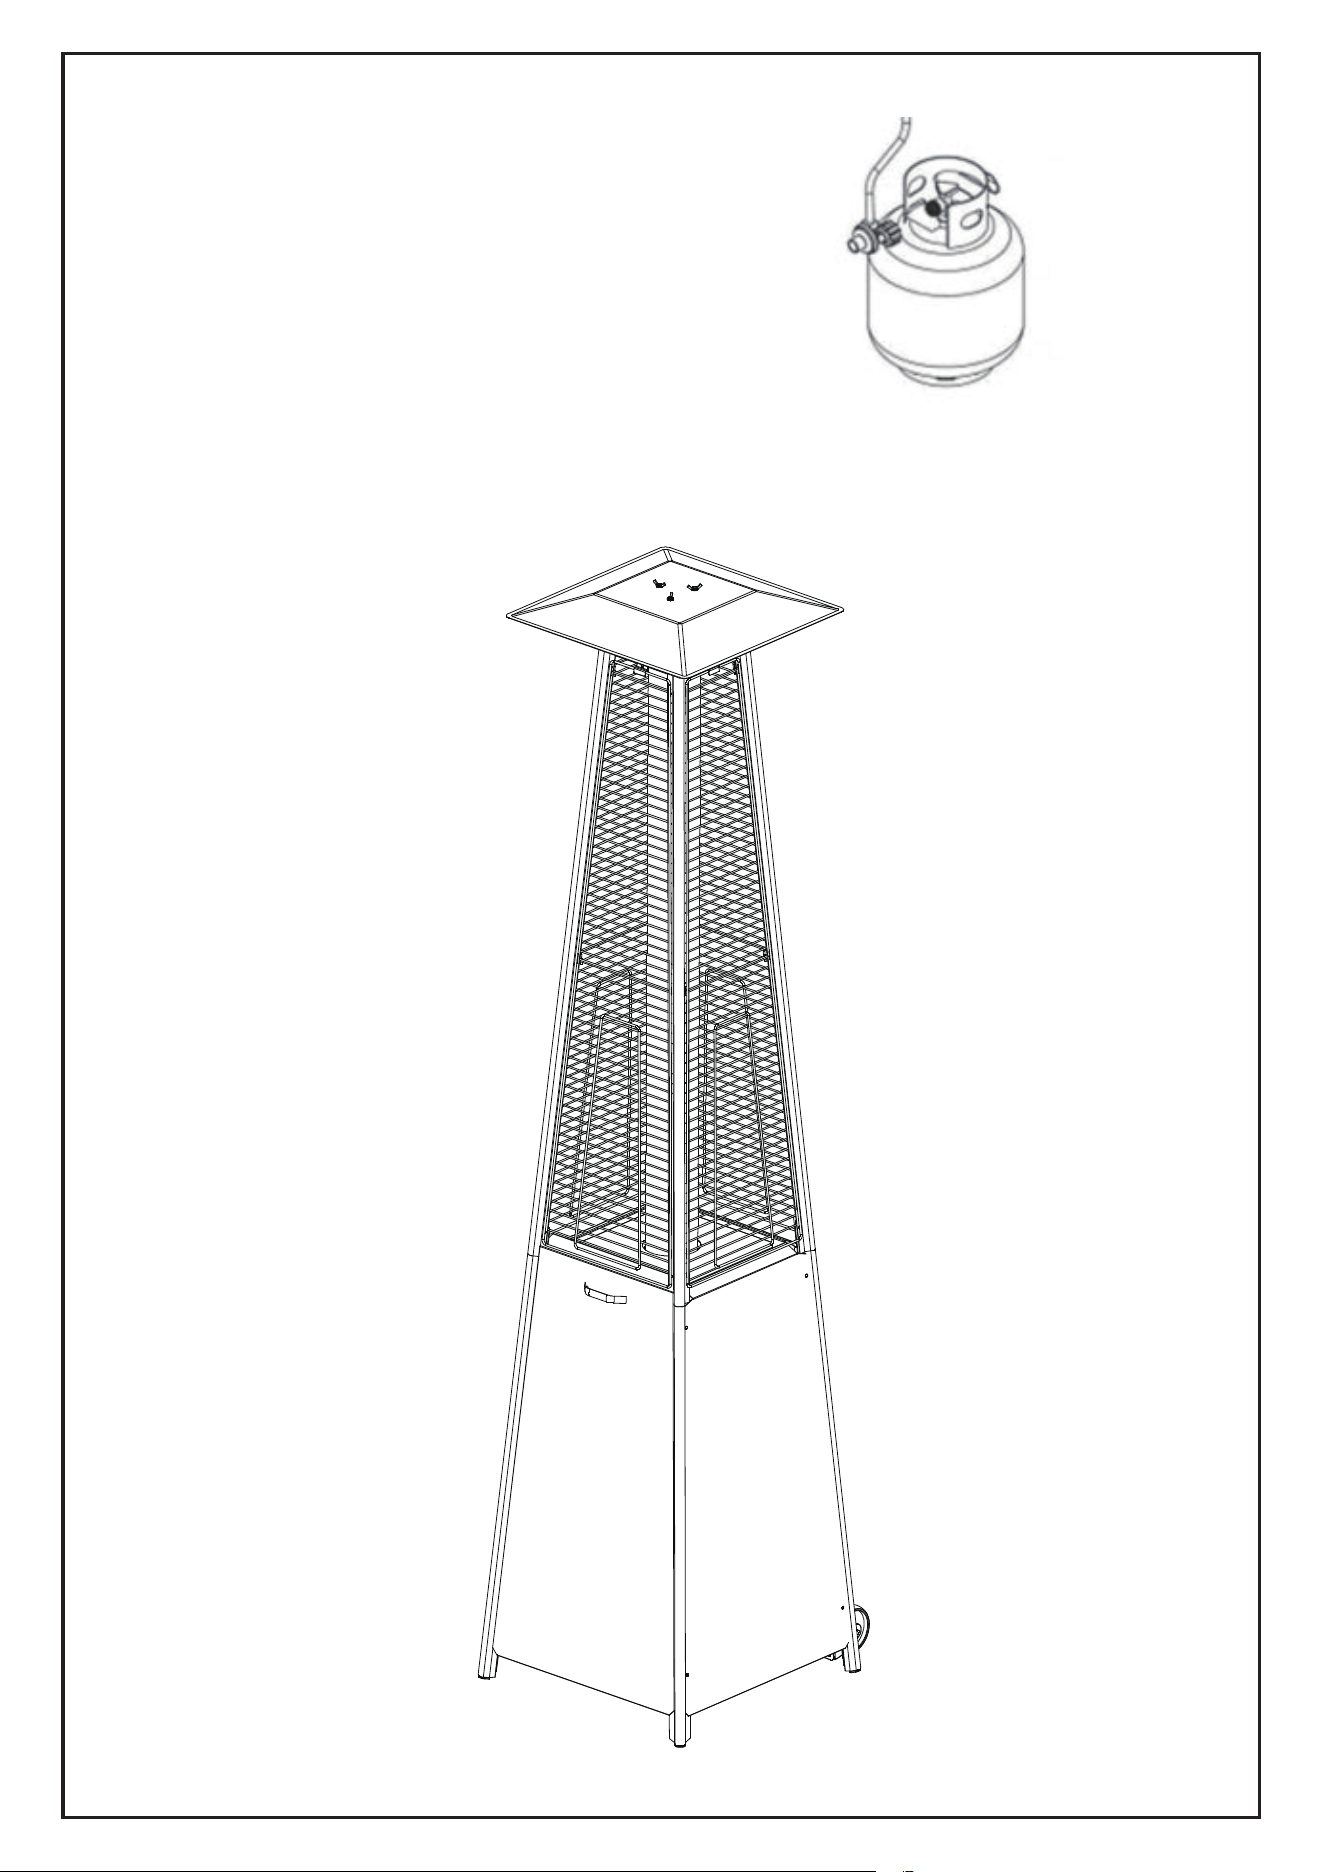
El aparato es sólo para uso en exteriores.
No lo use en interiores o en un área cerrada.
Mantenga siempre una distancia adecuada de los materiales combustibles:
mínimo de 800 mm desde la parte superior de la unidad y mínimo de 650 mm
desde los lados.
4

Precauciones de Seguridad
• Anualmente se debe realizar una inspección del rendimiento y seguridad a este
calentador por un ingeniero de gas calificado.
• No utilice el calentador en una atmósfera combustible.
• Antes de usar la unidad, asegúrese de que la manguera no tenga grietas ni torce-
duras que puedan causar fugas de gas o impedir el flujo.
• Desconecte el cilindro de gas antes de mover el calentador.
• No intente modificar ninguna pieza del calentador.
• No se recomienda usar el aparato en sótanos, nivel debajo del suelo, ni en áreas
con ventilación limitada o sin ventilación.
• Asegúrese de que el calentador esté colocado sobre una superficie sólida y nive-
lada.
• Se recomienda reemplazar el regulador anualmente para evitar bloqueos.
• No limpie el calentador con limpiadores combustibles o corrosivos.
• No pinte ninguna parte del calentador.
• La válvula del cilindro de gas debe cerrarse cuando el calentador no esté en uso.
• No use el calentador cuando llueve para evitar la entrada de agua.
• Mantenga a los niños y las personas vulnerables alejados del calentador cuando
se utiliza.
• No mueva el calentador cuando se utiliza.
• Inspeccione el calentador inmediatamente si existe alguno de los siguientes
fenómenos:
- Hay olor a gas.
- El rendimiento del calentador es bajo.
- El calentador hace un chasquido durante el uso (un ligero chasquido es normal
cuando la llama se apaga después del uso).
• Cuando el calentador está en uso, la superficie de las rejillas, el reflector y el
vidrio son muy calientes. No toque estas partes.
• No obstruya los orificios de ventilación del cilindro.
• Se recomienda reemplazar el tubo de gas anualmente para evitar grietas o aguje-
ros.
• Únicamente utilice el gas especificado: gas propano para patio de 13 kg a 15 kg.
• En condiciones climáticas adversas, se recomienda guardar el calentador bajo
techo o en el interior cuando sea posible.
5
Instalación
Especificaciones Técnicas
Importantes requisitos de seguridad:
ESTE APARATO ES PARA USO EN EXTERIORES SOLAMENTE
1. No se recomienda instalar o usar este calentador en interiores, garajes o
cualquier otra área cerrada.
2. NO coloque artículos sobre o contra este aparato.
3. NO use ni almacene materiales inflamables cerca de este aparato.
4.NO opere este aparato a menos que esté completamente ensamblado con
el reflector y el protector en forma adecuada.
5. La instalación y la reparación deben realizarse por una persona de servicio
calificada. El aparato debe ser inspeccionado antes de su uso, y debe ser
revisado por un ingeniero de gas calificado al menos una vez al año. Es
posible que se requiera una limpieza más frecuente.
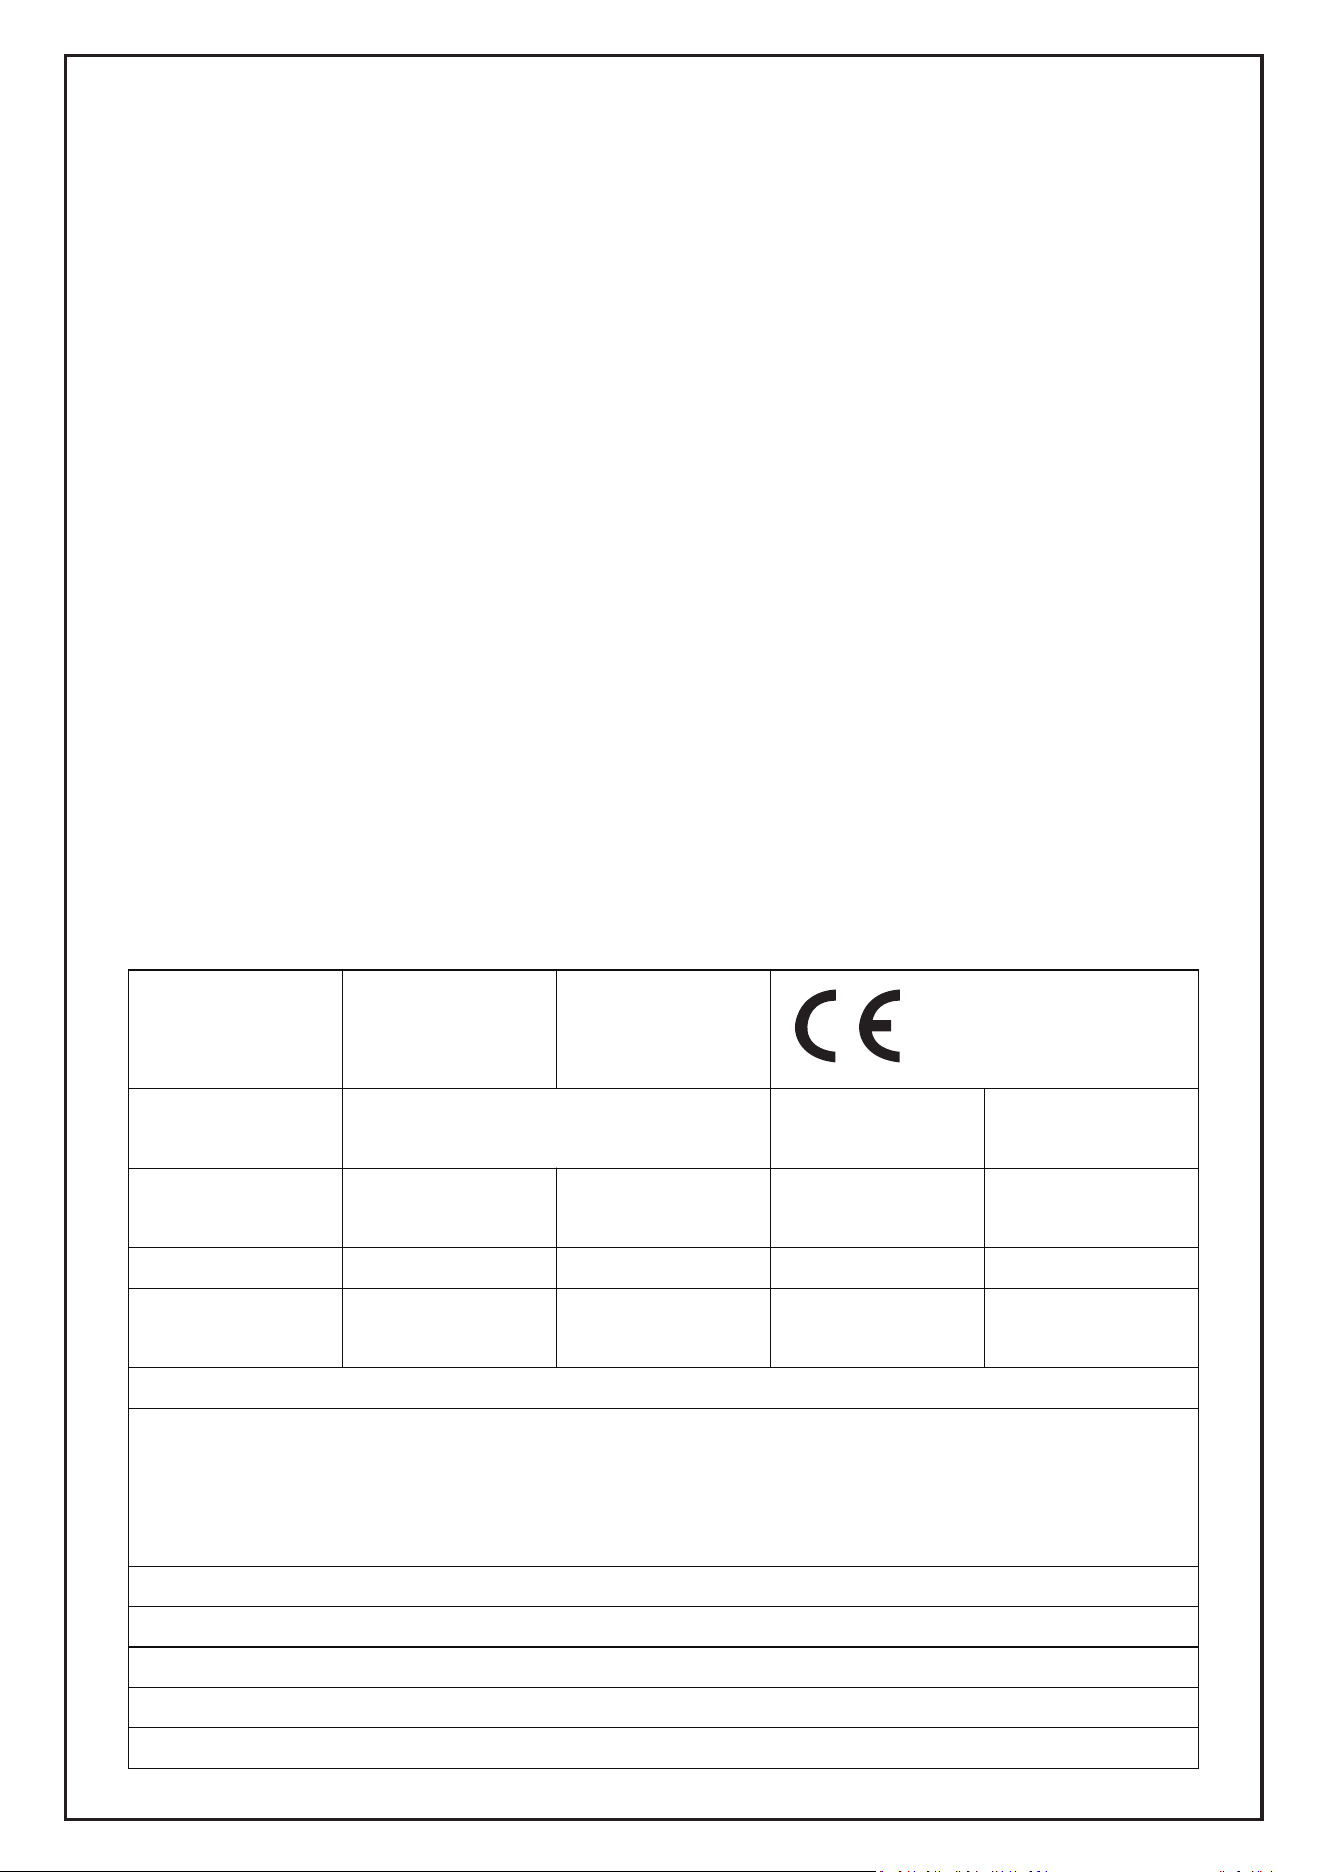
Referencia Calentador de
llama
ENTRADA DE
CALOR Nominal
10,5 kW (762 g/h)
Categoría del
aparato
I3+(28-30/37) I3B/P(30) I3B/P(37) I3B/P(50)
Referencia de gas G30/G31 G30/G31 G30/G31 G30/G31
Presión de Gas
Normal
28-30/37 mbar 30 mbar 37 mbar 50 mbar
PARA USO EXTERIOR SOLAMENTE
Cierre la válvula del cilindro de gas o el regulador después de su uso.
El uso de este aparato en áreas cerradas puede ser peligroso y está PROHIBIDO.
Lea todas las in
s
trucciones antes de usar este aparato.
El aparato debe instalarse de conformidad con las instrucciones y las normativas locales.
País de destino:
I3+(28-30/37) para BE-CH-CY-CZ-ES-FR-GB-GR-IE-IT-LT-L-U-LV-PT-SK-SI
I3B/P(30) para BE-CY-DK-EE-FI-FR-HU-IT-LT-NL-NO-SE-SI-SK-SK-RO-HR-TR-BG
I3B/P(37) para PL
I3B/P(50) para AT-CH-DE-SK
6
2575DO39032
2575-24
842-197V01
(KLD7001SS)
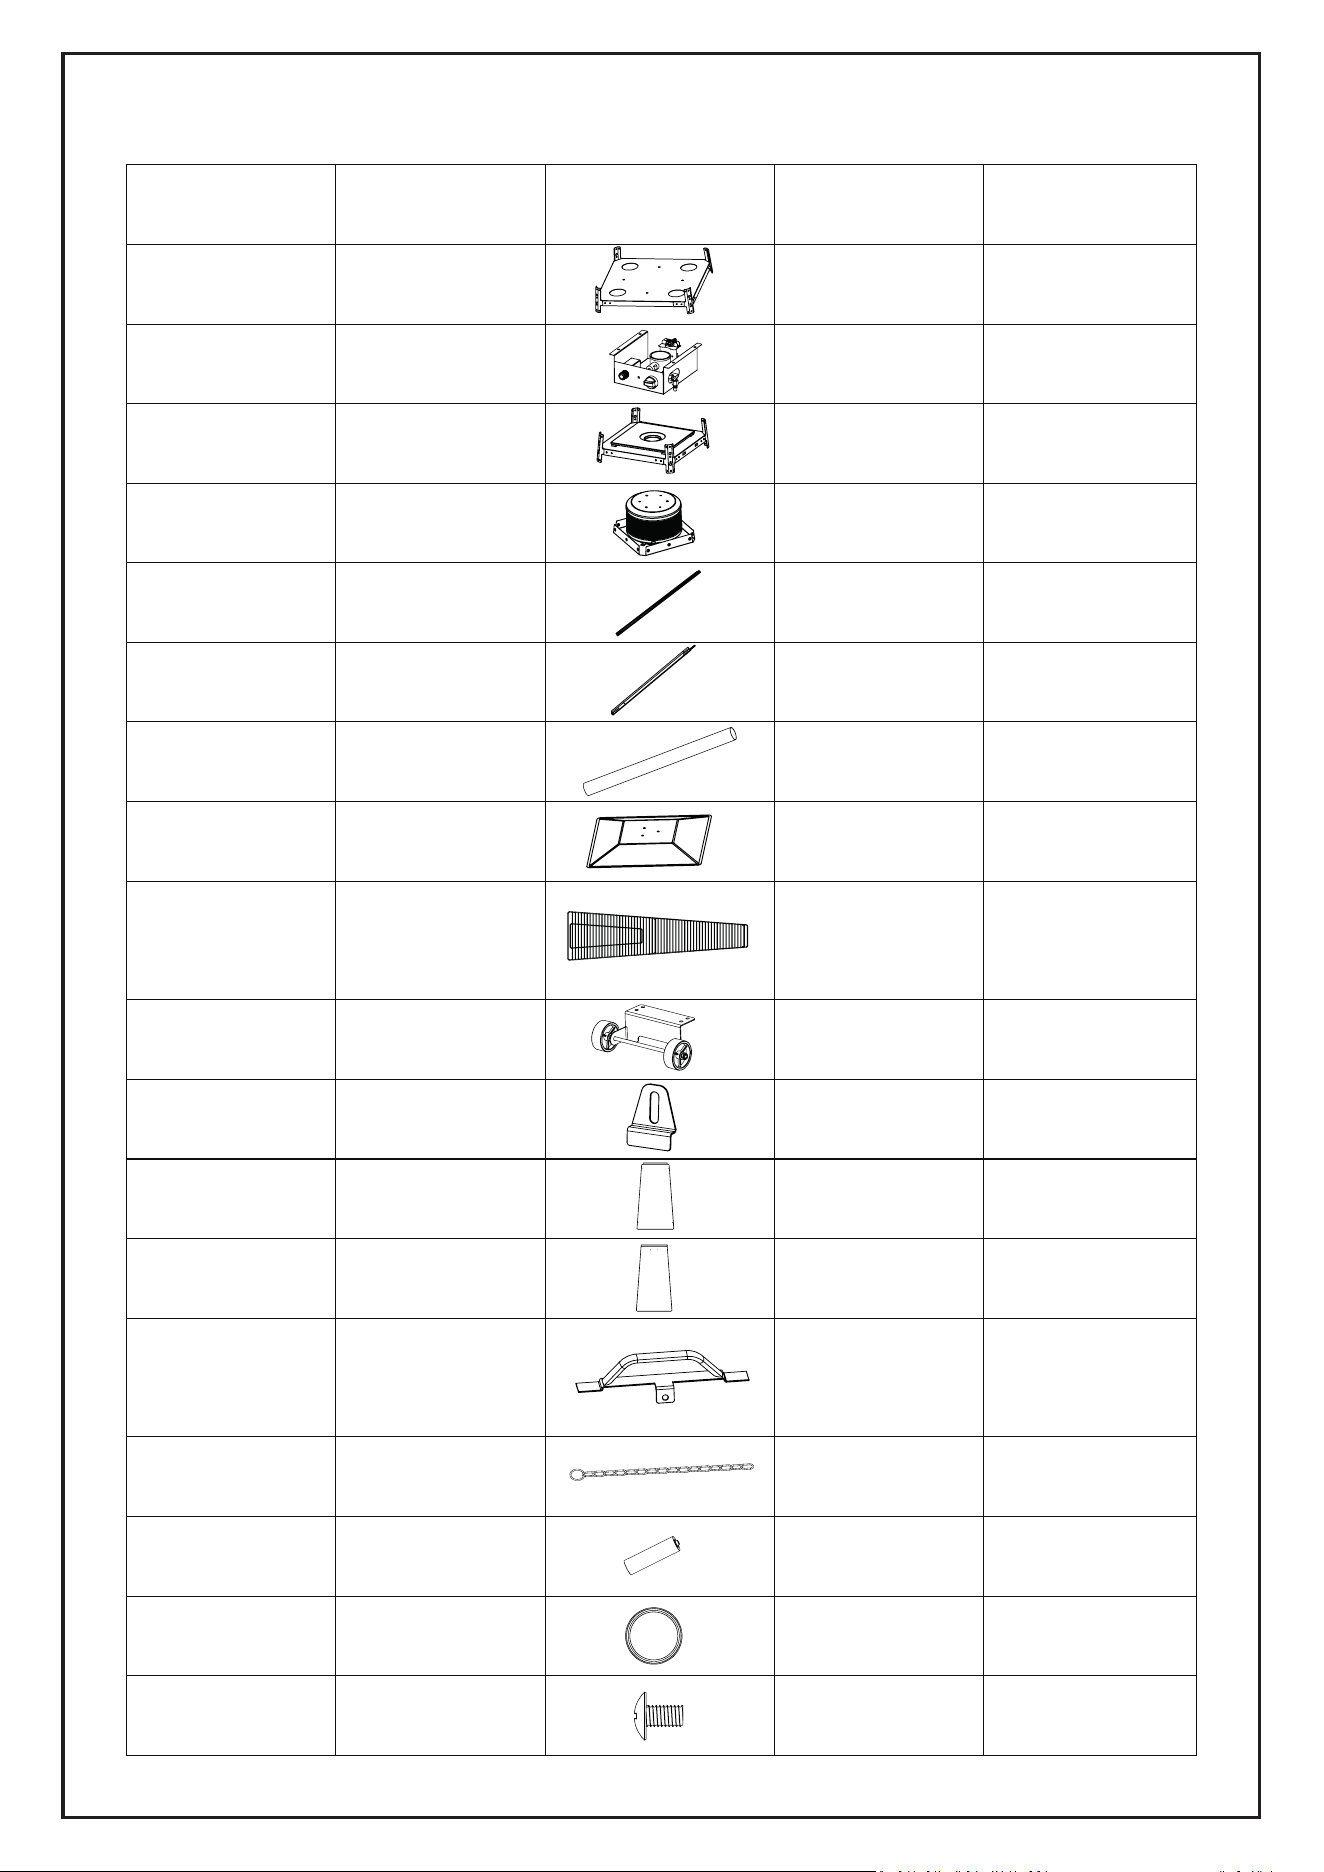
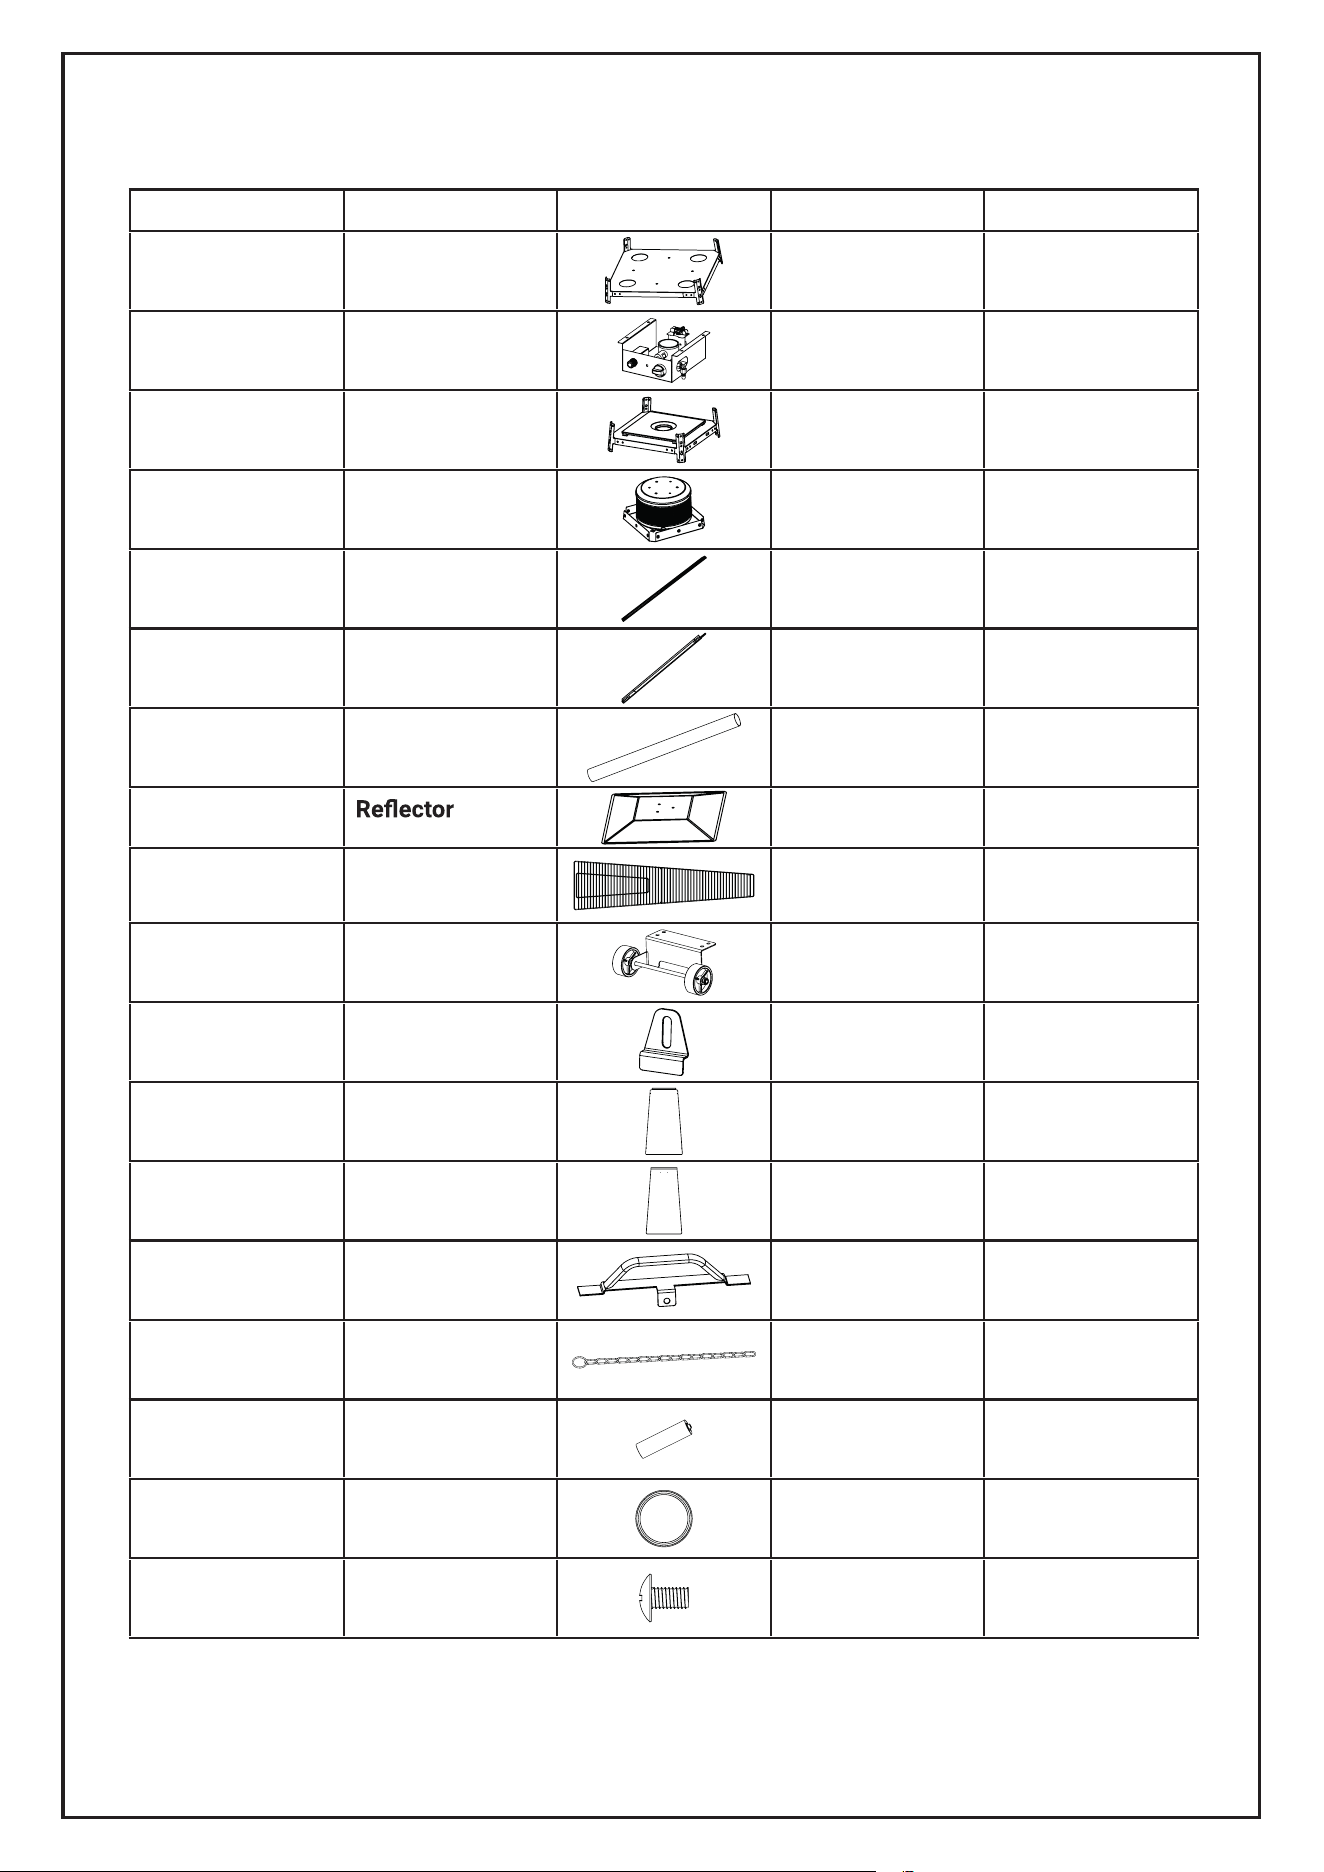
Lista de Piezas
Número de
Piezas
Nombre de Pieza Imagen Cantidad Notas
1 Placa inferior 1
2 Caja de Control 1
3 Placa Intermedia 1
4 Apagador 1
5 Soporte Superior 4
6 Soporte Inferior 4
7 Tubo de vidrio 1
Reflector
9 Resguardo de
protección
inferior
10 Ruedas
11 Soporte de
Fijación
12 Panel Lateral 3
13 Panel Frontal 1
14 Manija 1
15 Cadena 1
16 Pila AA 1 incluido
17 Anillo de goma 1
18 T
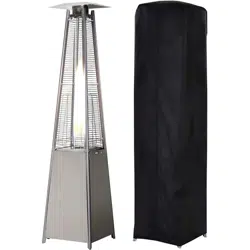
Incluyendo regulador de España, manguera de gas, y cubierta completa de longitud.
ornillo 68 Preensamblado
4
1
4
1
8
M5X10
7
No
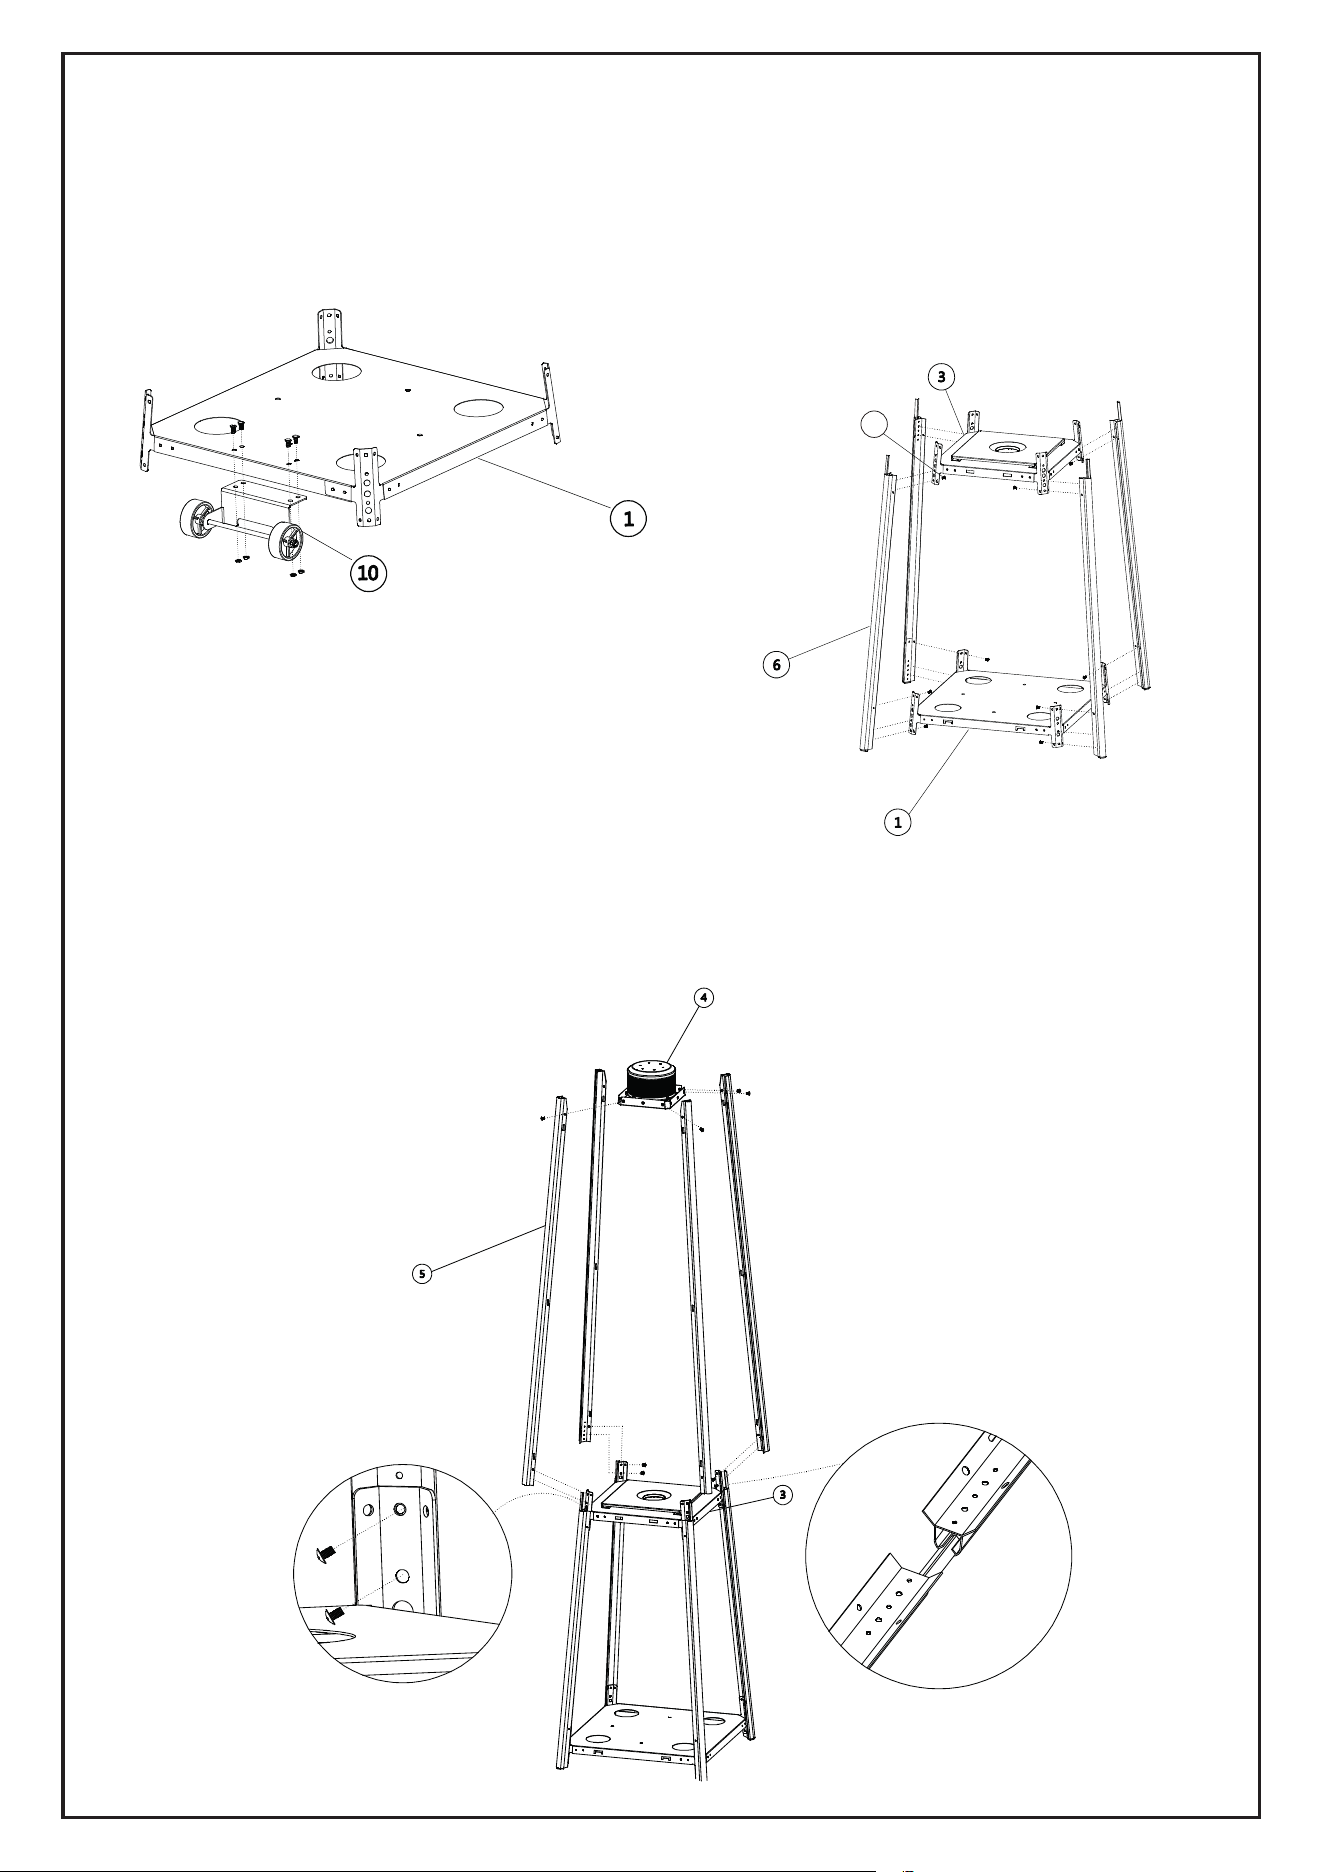
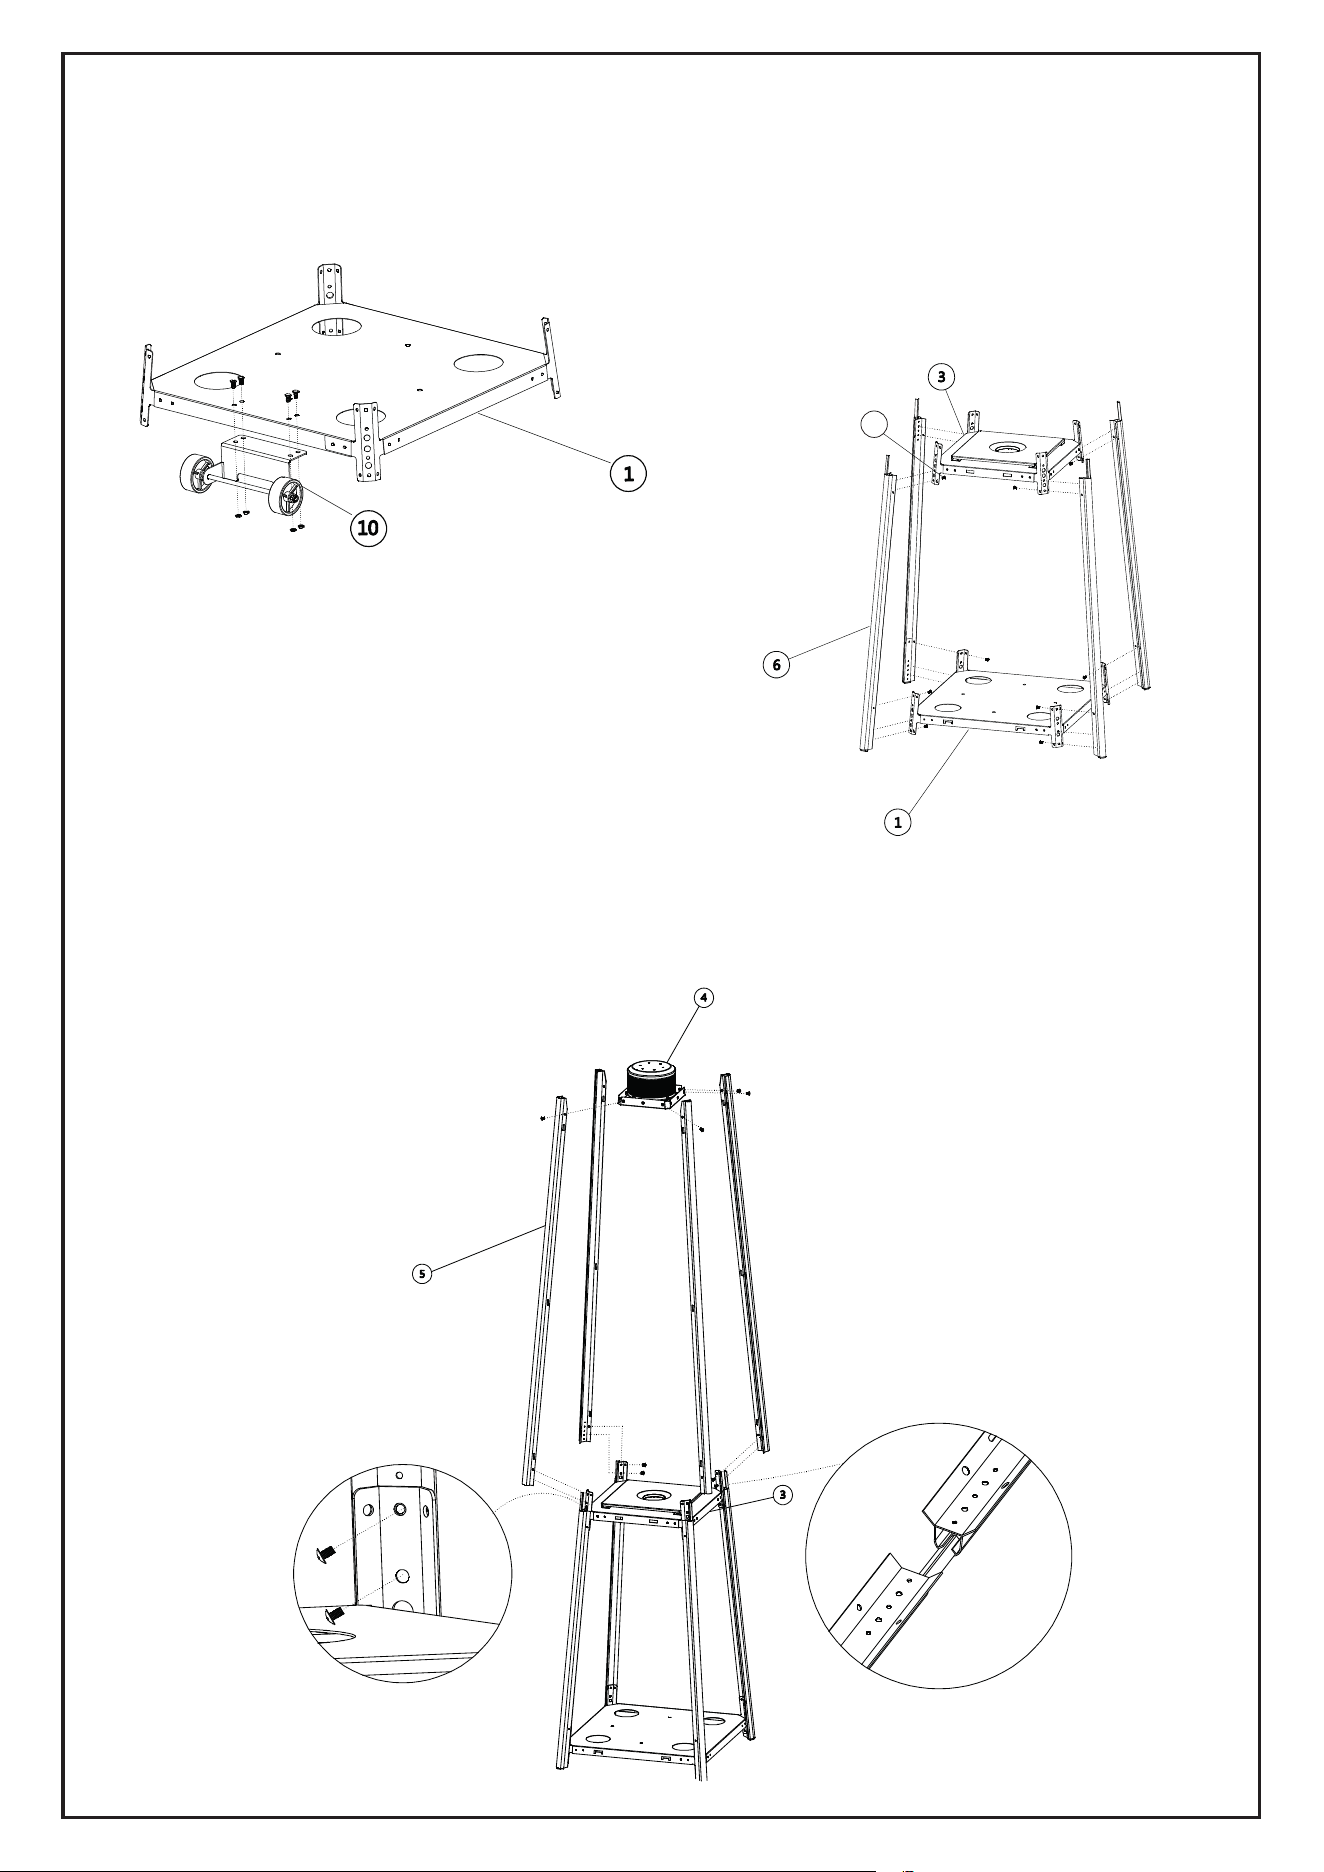
Instrucciones de Ensamblaje
1 Monte las ruedas (10) en la
placa inferior (1).
3 Monte 4 soportes superiores (5) a los soportes inferiores (6) con tornillos (18),
luego fije la placa superior (4) con los tornillos (18)
2 Monte y fije 4 x soportes inferiores (6)
a la placa inferior (1) y la placa interme-
dia (3) con tornillos (19)
18
8
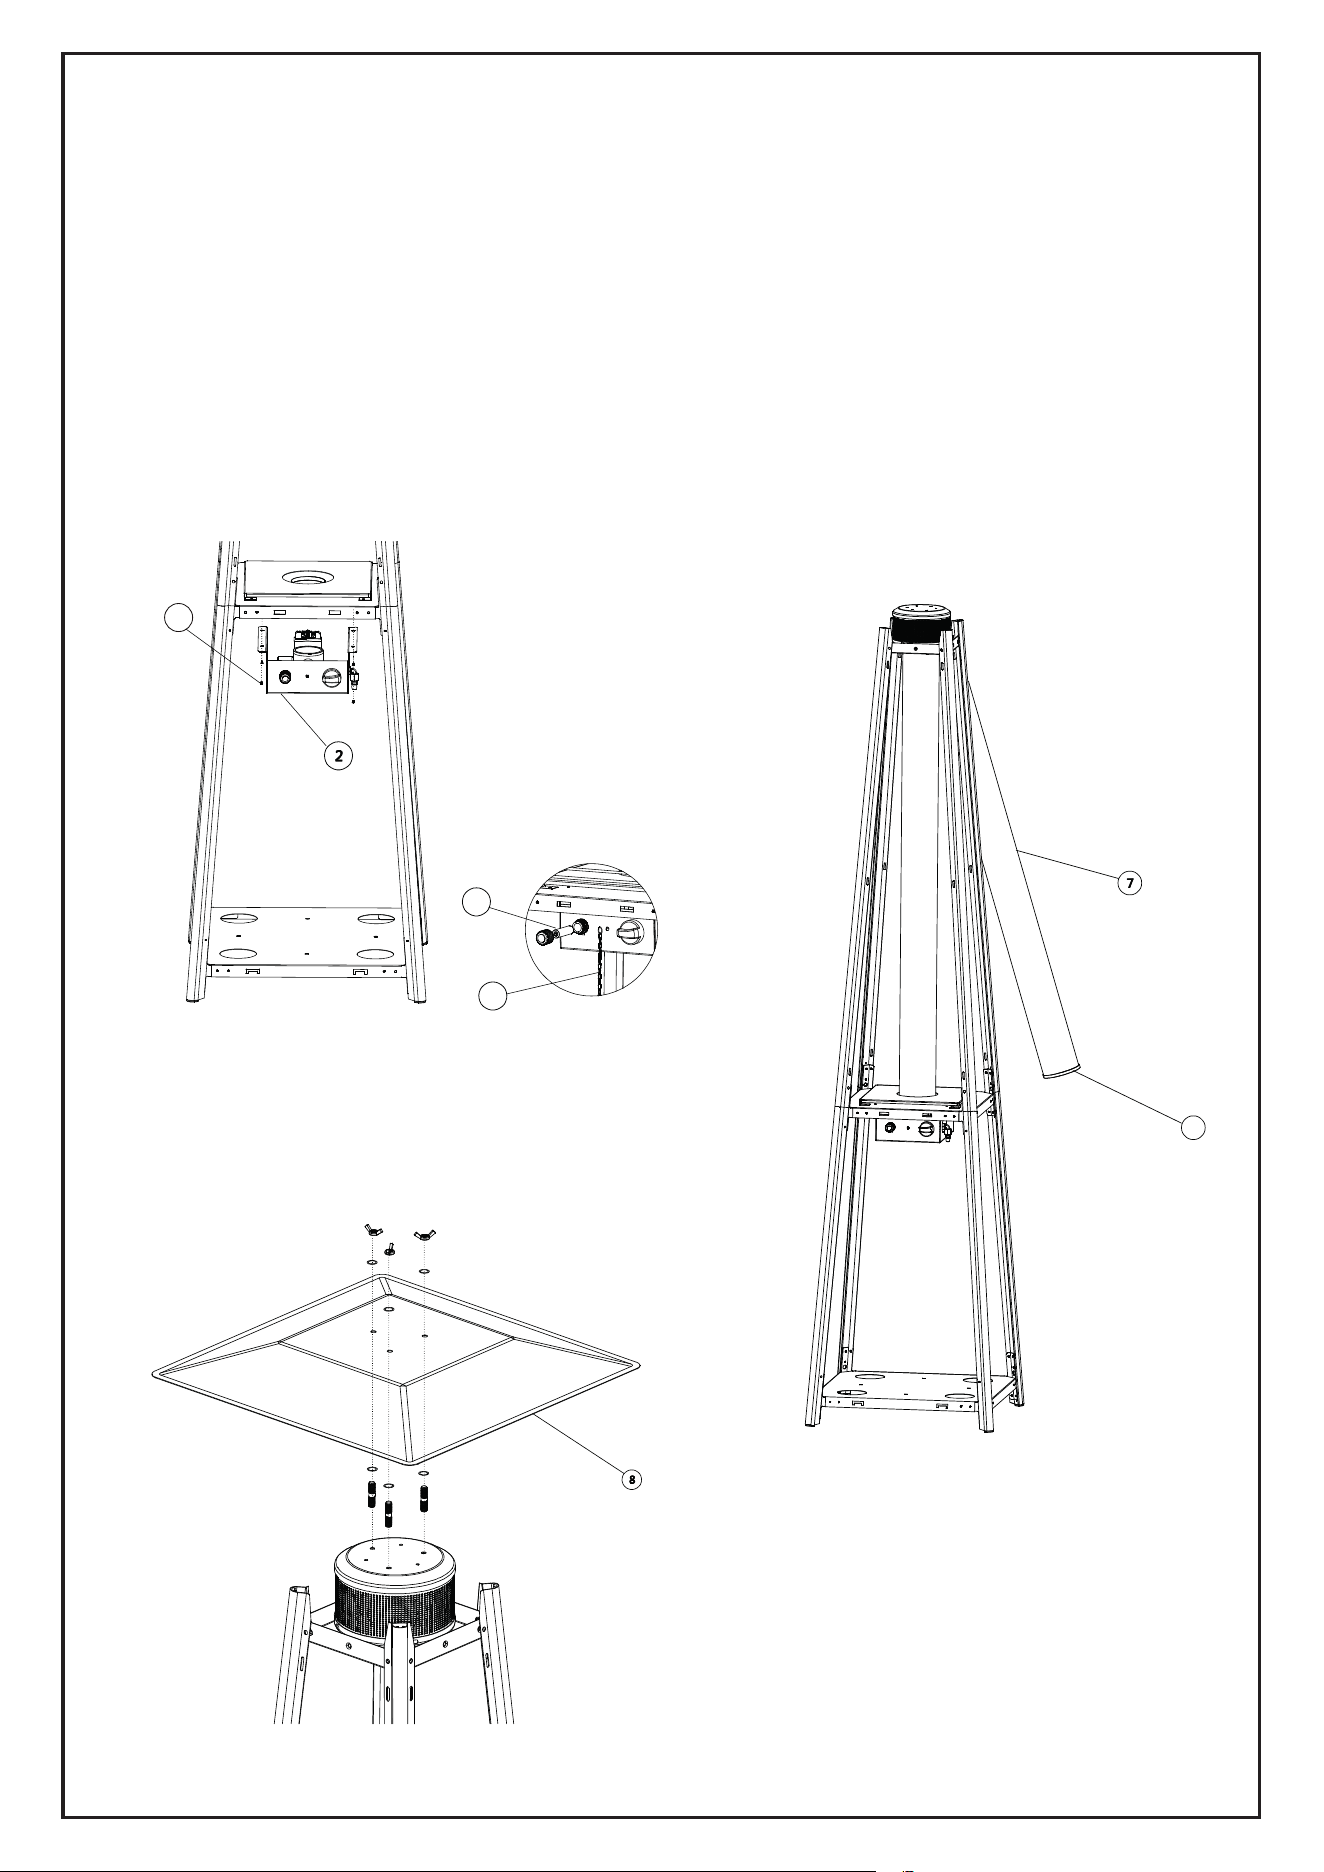
4 Desenrosque la perilla de encen-
dido roja en la caja de control e
inserte la pila AA (16) con el
extremo POSITIVO hacia afuera.
Luego fije la caja de control (2)
debajo de la placa central (3) con
tornillos (18).
6 Coloque el reflector (8) en la placa
superior (4) y fíjelo con tornillos (18).
5 Monte el tubo de vidrio (7) a través del
centro del orificio en la placa superior (4)
con cuidado. Asegúrese de que el anillo
de goma (17) esté montado en el
extremo inferior del tubo de vidrio. Ahora
monte el tubo de vidrio a través del orifi-
cio en la placa intermedia (3). Asegúrese
de que el tubo de vidrio cubra el orificio
central de la placa intermedia.
18
16
15
17
9
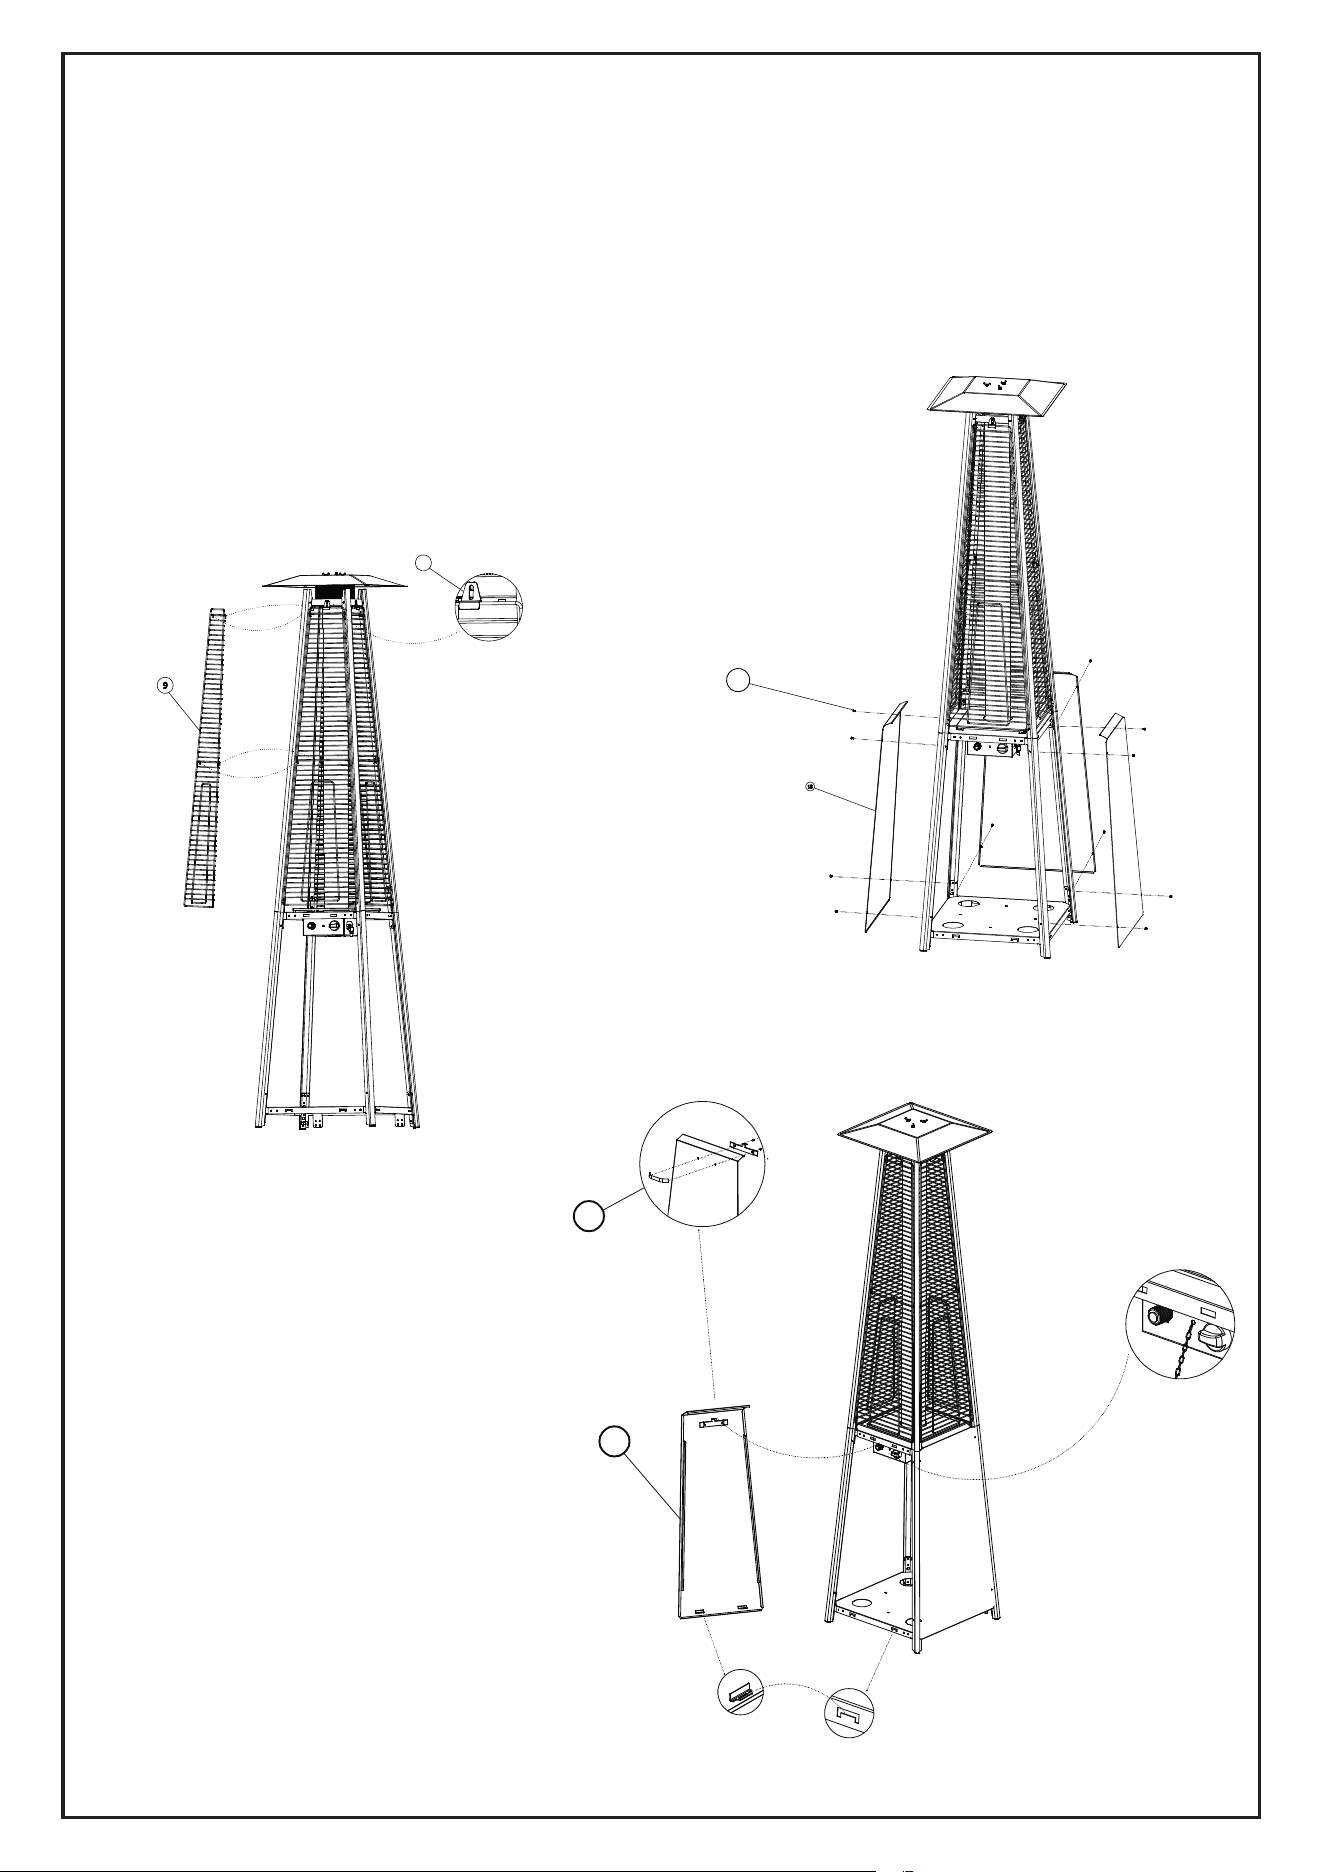
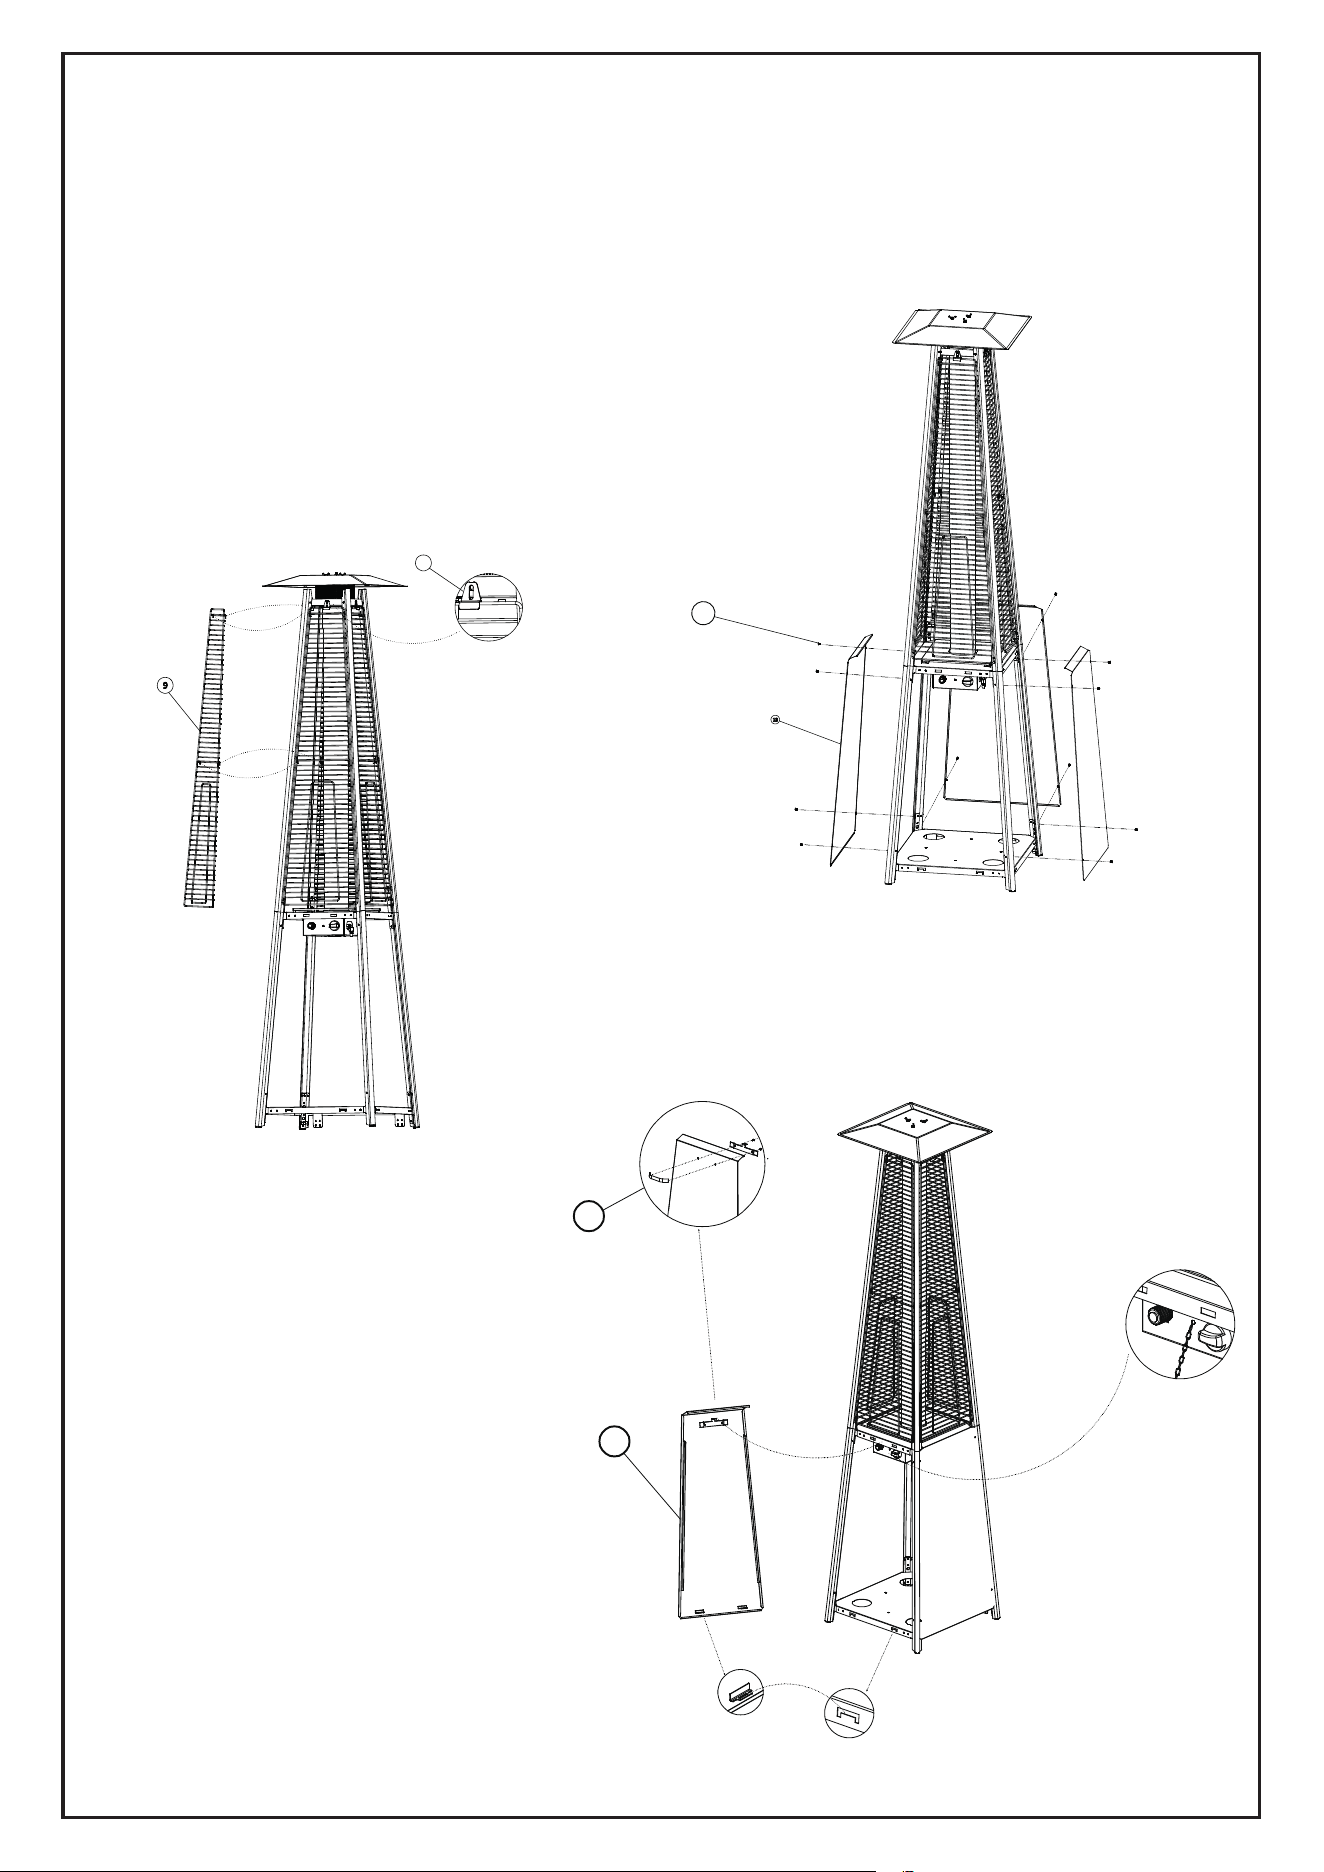
7 Fije los resguardos de protección (9) al
marco superior insertando los ganchos en
la parte superior de los resguardos en los
orificios de los soportes. Repetir en la parte
inferior de los soportes. Fije los resguardos
de protección a la parte superior de los
soportes con los soportes de fijación (11 ) y
atorníllelos de forma adecuada.
9 Atornille la manija (14) en el
panel frontal (13) - fije el panel
insertando sus dos ganchos en
los orificios de la placa inferior.
Enganche la cadena (15) en el
orificio de la caja de control, luego
cierre el panel por la placa inter-
media - el panel está unido por
los imanes. Consejos: la cadena
puede sostener el panel mientras
se realiza el control.
8 Fije los paneles laterales (12)
con los tornillos (18). Nota: No
cubra el lado donde está la perilla
de control.
11
19
13
14
10
10. Conecte la manguera de gas al cilindro de
GLP de20. Ib. (no incluido). Conecte el regula-
dor al cilindro.
Apriételo firmemente. Mueva el cilindro a un
lugar cerca de la placa de base.
Completado
11

Preparación
Deberá comprar un cilindro de GLP de tamaño adecuado que pueda insta-
larse en el sitio. Debe utilizar un regulador de presión y un tubo flexible que
cumplan con la presión de salida del aparato. Conecte la manguera al conec-
tor de la manguera en la caja de control.
Advertencia
Siempre pruebe la manguera para detectar fugas según el procedimiento de
prueba de fugas descrita al comienzo de este manual de instrucciones.
• Nunca use el calentador mientras está lloviendo, el tubo de vidrio puede
romperse si entra en contacto con el agua repentinamente.
• Nunca salpique líquido en el tubo de vidrio cuando el calentador esté
encendido.
• El tubo de vidrio estará extremadamente caliente cuando esté en funciona-
miento, nunca intente tocarlo durante el uso.
• Los niños y las personas vulnerables deben mantenerse alejados del calen-
tador en todo momento.
• Asegúrese siempre de que el calentador se mantenga firme, el tubo de
vidrio puede romperse si el calentador cae.
• Nunca use el calentador si el tubo de vidrio tiene signos de daño, tal como
agrietamiento.
Operación
12
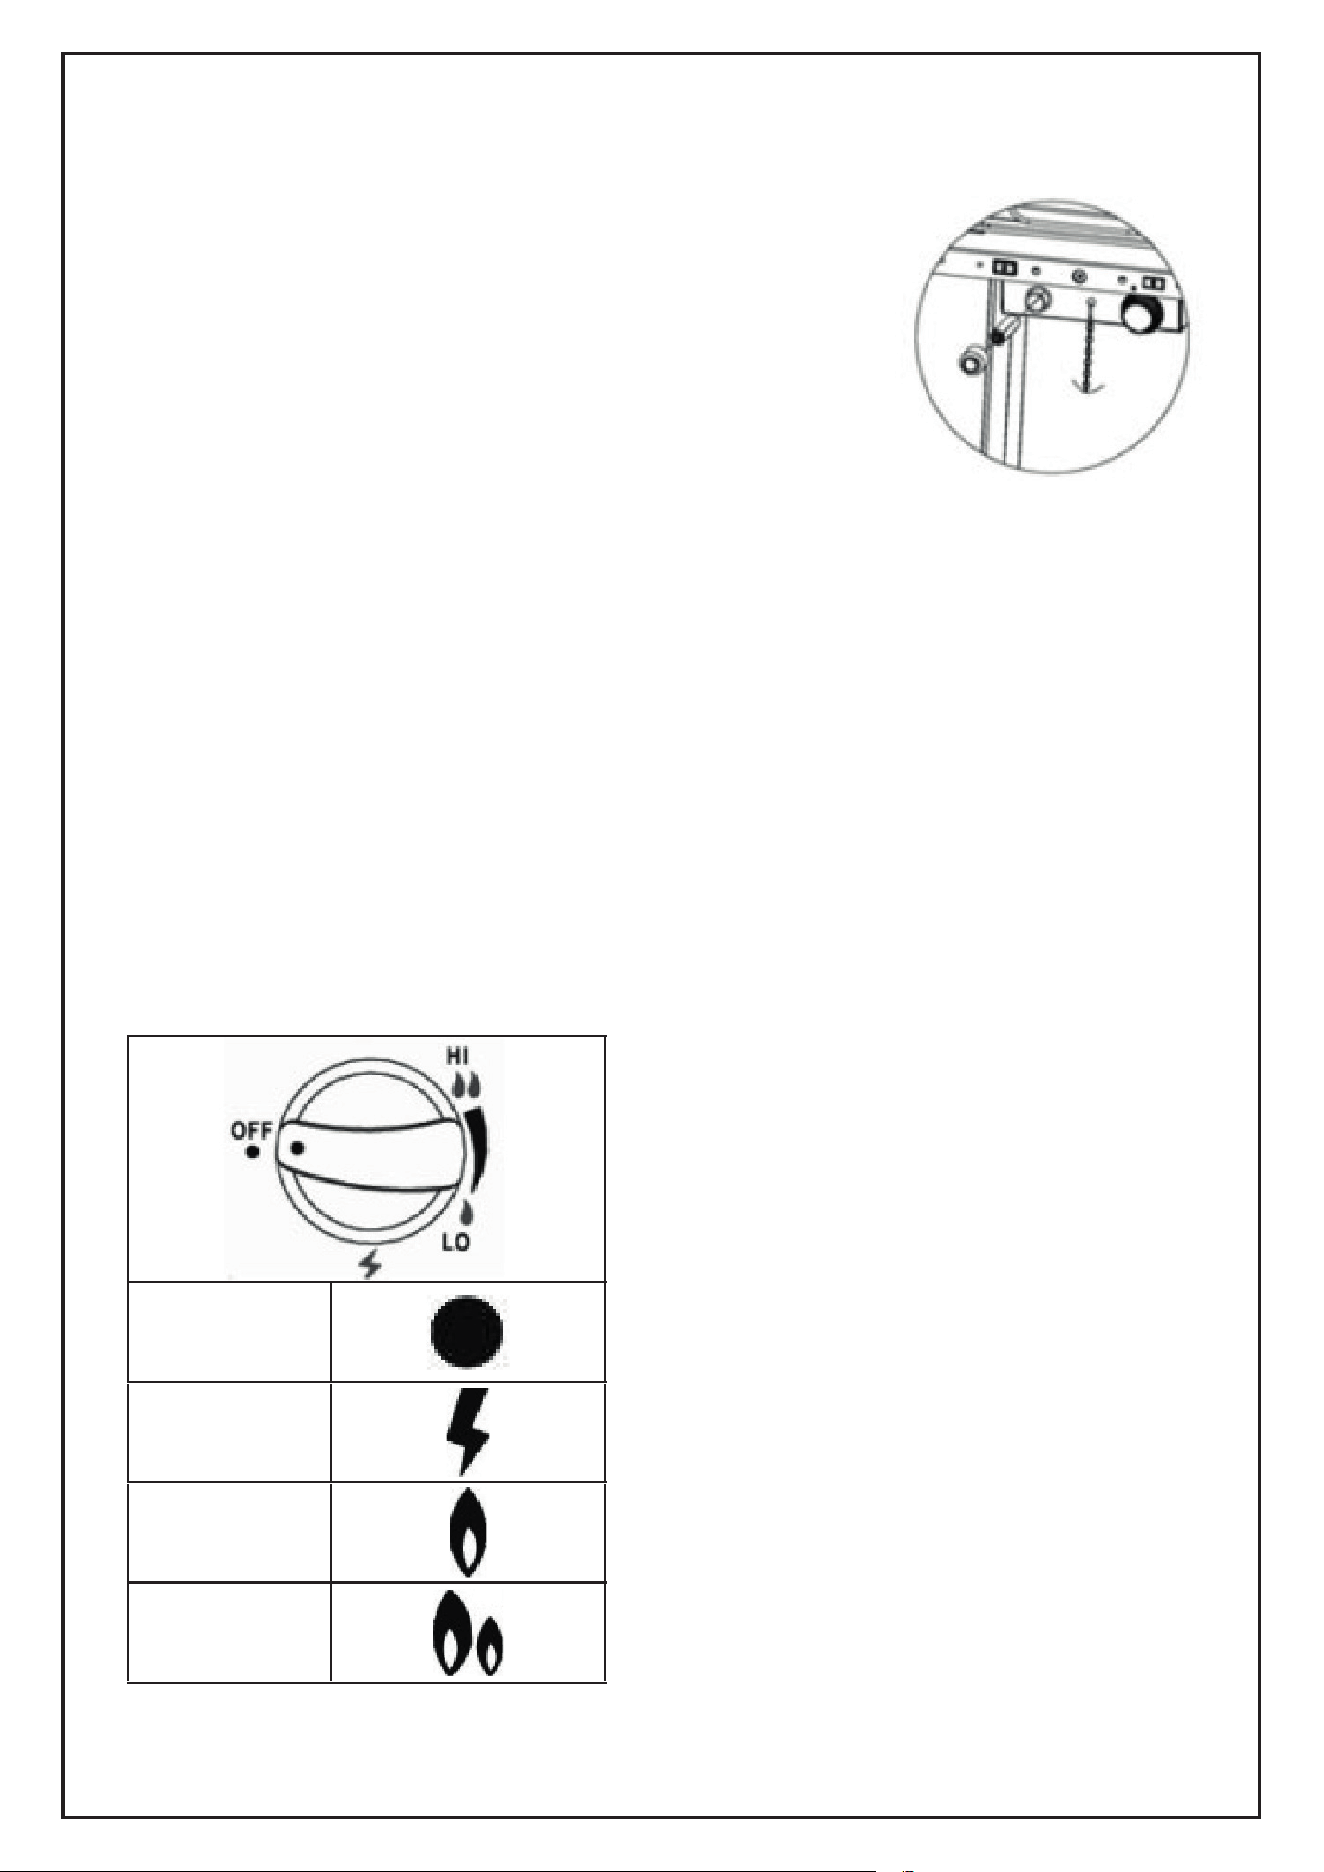
Instrucciones de Encendido
Verifique y asegúrese de que haya pila AA (no
incluida) dentro de la caja de encendido y que
tenga energía.
Asegúrese de que el positivo (+) mire hacia
afuera.
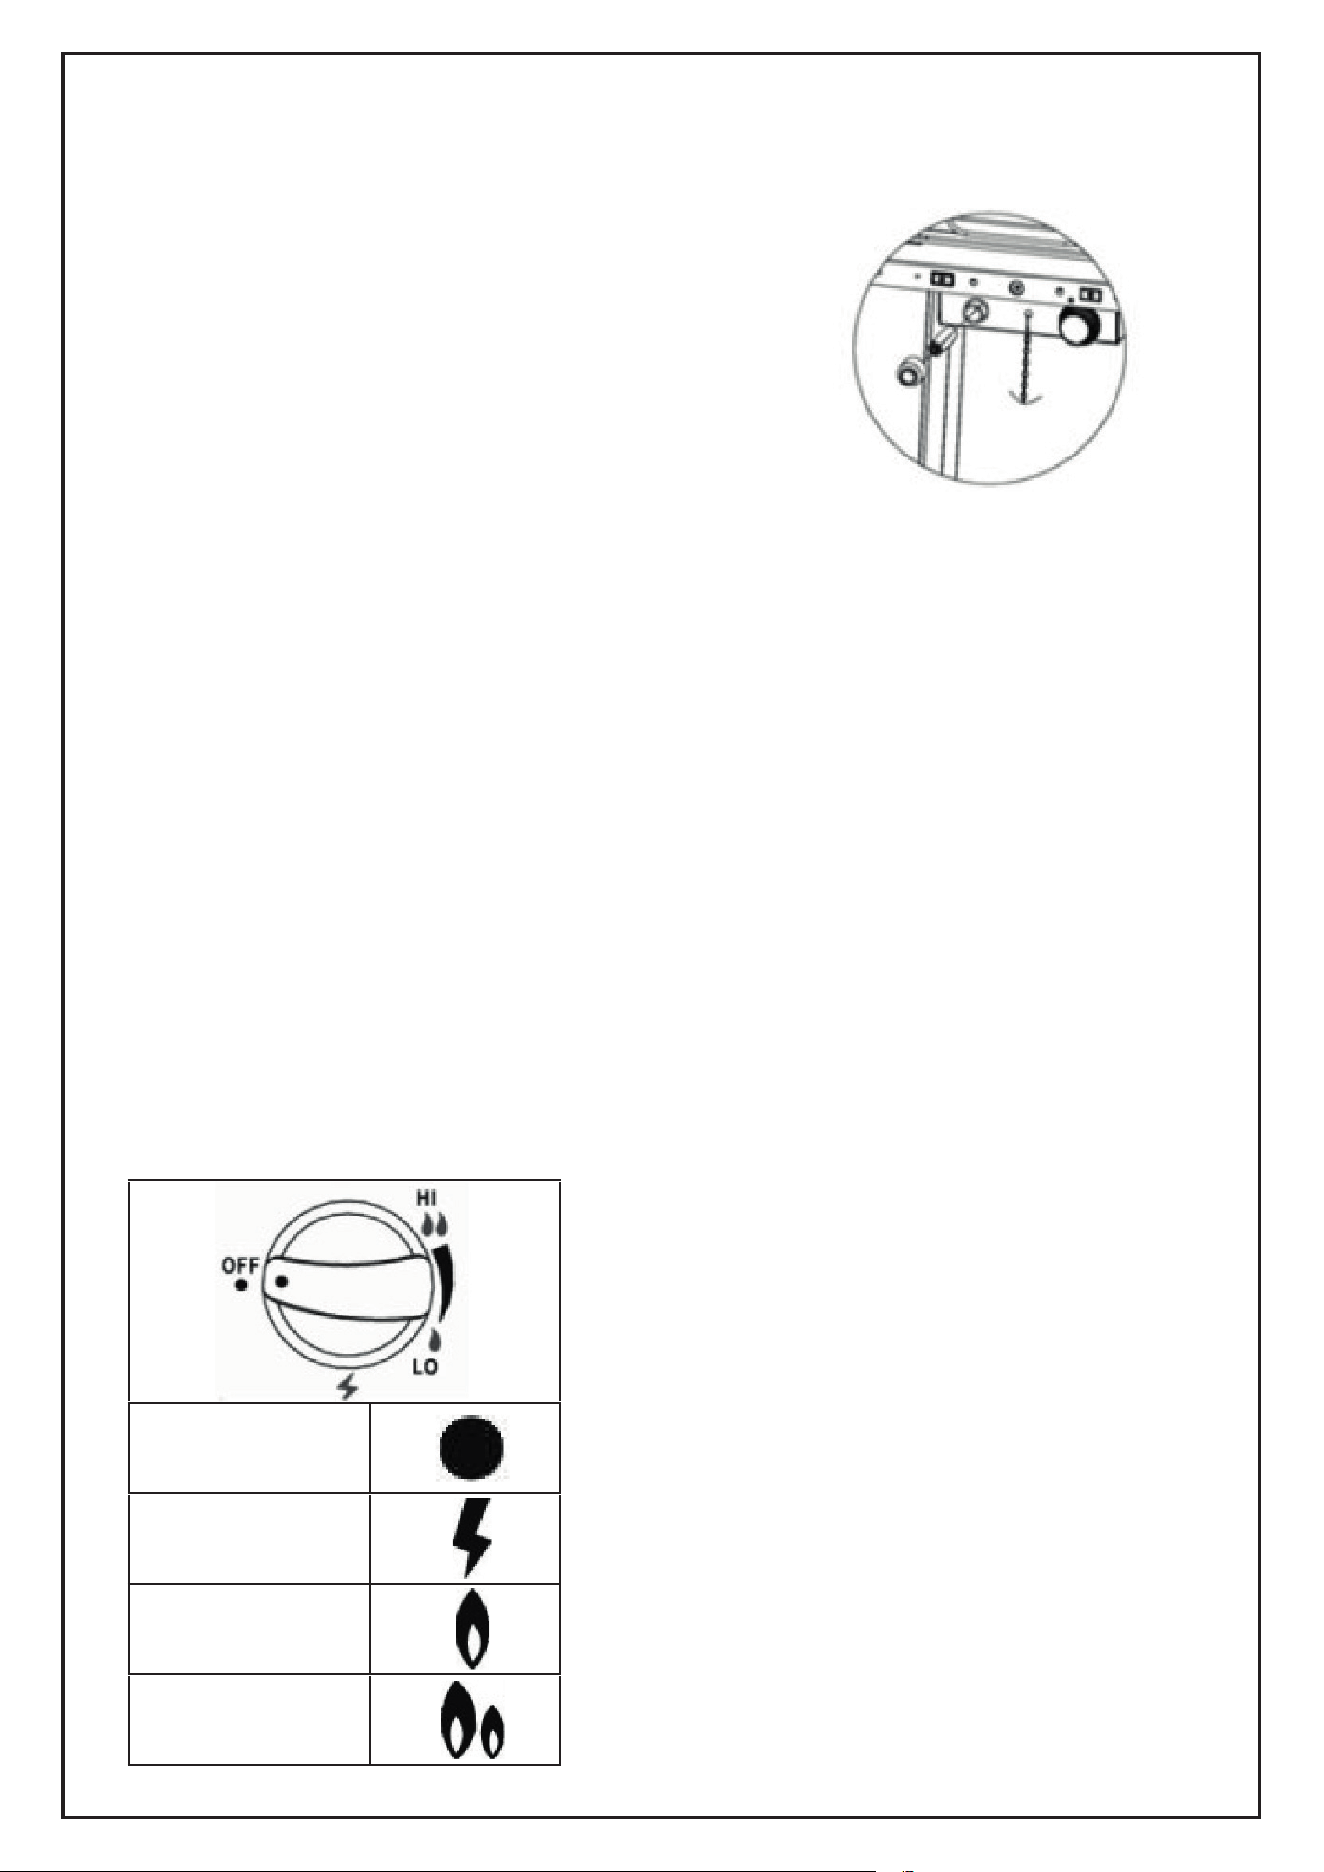
1. Asegúrese de que la perilla de control esté
APAGADA. Abra la válvula del cilindro de gas
lentamente.
2. Presione y gire la perilla de control a la posición ENCENDER, presione el
encendedor para generar chispa mientras mantiene la perilla de control en la
posición presionada.
3. Verifique la llama del piloto a través del tubo de vidrio. Si el piloto no se
enciende, gire la perilla de control a la posición de APAGADO, espere dos
minutos como mínimo para volver a intentarlo desde el principio. Posiblemente
se requieren varios intentos.
4. Si el piloto está encendido, mantenga la perilla de control presionada duran-
te 15 segundos y luego gire la perilla de control a BAJO.
5. Para obtener la máxima calefacción, gire la perilla de control a ALTO.
6. Para apagar el calentador, gire la perilla de control a la posición de APAGA-
DO.
7. Cierre la válvula del cilindro de gas o el regulador después de su uso.
APAGADO
ENCENDER
BAJO
ALTO
13

Para mantener un excelente rendimiento de su calentador durante años,
asegúrese de realizar las siguientes actividades de mantenimiento de forma
regular:
• Mantenga las superficies exteriores limpias.
• Utilice agua tibia con jabón para limpiarlo. Nunca use limpiadores inflam-
ables, corrosivos o abrasivos.
• Mientras lava su unidad, asegúrese de mantener seca el área alrededor del
calentador y el conjunto del piloto en todo momento. Si el control de gas está
expuesto al agua de alguna manera, NO intente usarlo. Debe reemplazar el
control.
• Después de una interrupción prolongada del funcionamiento, debe inspec-
cionar la unidad para detectar arañas, telas de araña u otros insectos.
• El flujo de aire no debe estar obstruido. Mantenga los controles, quemador
y conductos de aire circulante limpios.
Los signos de bloqueo incluyen:
• Olor a gas con punta de llama extremadamente amarilla.
• El calentador NO alcanza la temperatura deseada.
• El brillo del calentador es excesivamente desigual.
• El calentador hace ruidos de estallido.
• Las arañas y los insectos pueden anidar en quemador u orificios. Este caso
puede dañar el calentador y es inseguro para su uso. Limpie los orificios del
quemador con un limpiador de tuberías de alta resistencia. Puede usar el aire
comprimido para eliminar las partículas más pequeñas.
• Los depósitos de carbón pueden crear un riesgo de incendio. Limpie el
reflector y el tubo de vidrio en el interior con agua jabonosa si se forman
depósitos de carbón. Siempre tenga cuidado al limpiar el tubo de vidrio.
Entre usos:
• Gire la perilla de control a la posición "APAGADO".
• Gire el cilindro de GLP a la posición "APAGADO".
• Guarde el calentador en posición vertical en un área protegida de las condi-
ciones climáticas adversas (tales como lluvia, aguanieve, granizo, nieve)
• Si es necesario, cubra el calentador para proteger las superficies exteriores
y para evitar que el polvo y la suciedad se acumulen en los conductos de
aire.
Limpieza y Mantenimiento
Almacenamiento
14

Durante largo período de inactividad o durante el trans-
porte:
• Gire la perilla de control a la posición "APAGADO".
• Desconecte el Cilindro de GLP y muévalo a un lugar seguro y bien ventilado
al aire libre.
• NO lo almacene en un lugar que supere los 50 grados C.
• Guarde el calentador en posición vertical en un área protegida de las condi-
ciones climáticas adversas (tales como lluvia, aguanieve, granizo, nieve)
• Si es necesario, cubra el calentador para proteger las superficies exteriores
y para evitar que el polvo y la suciedad se acumulen en los conductos de
aire.
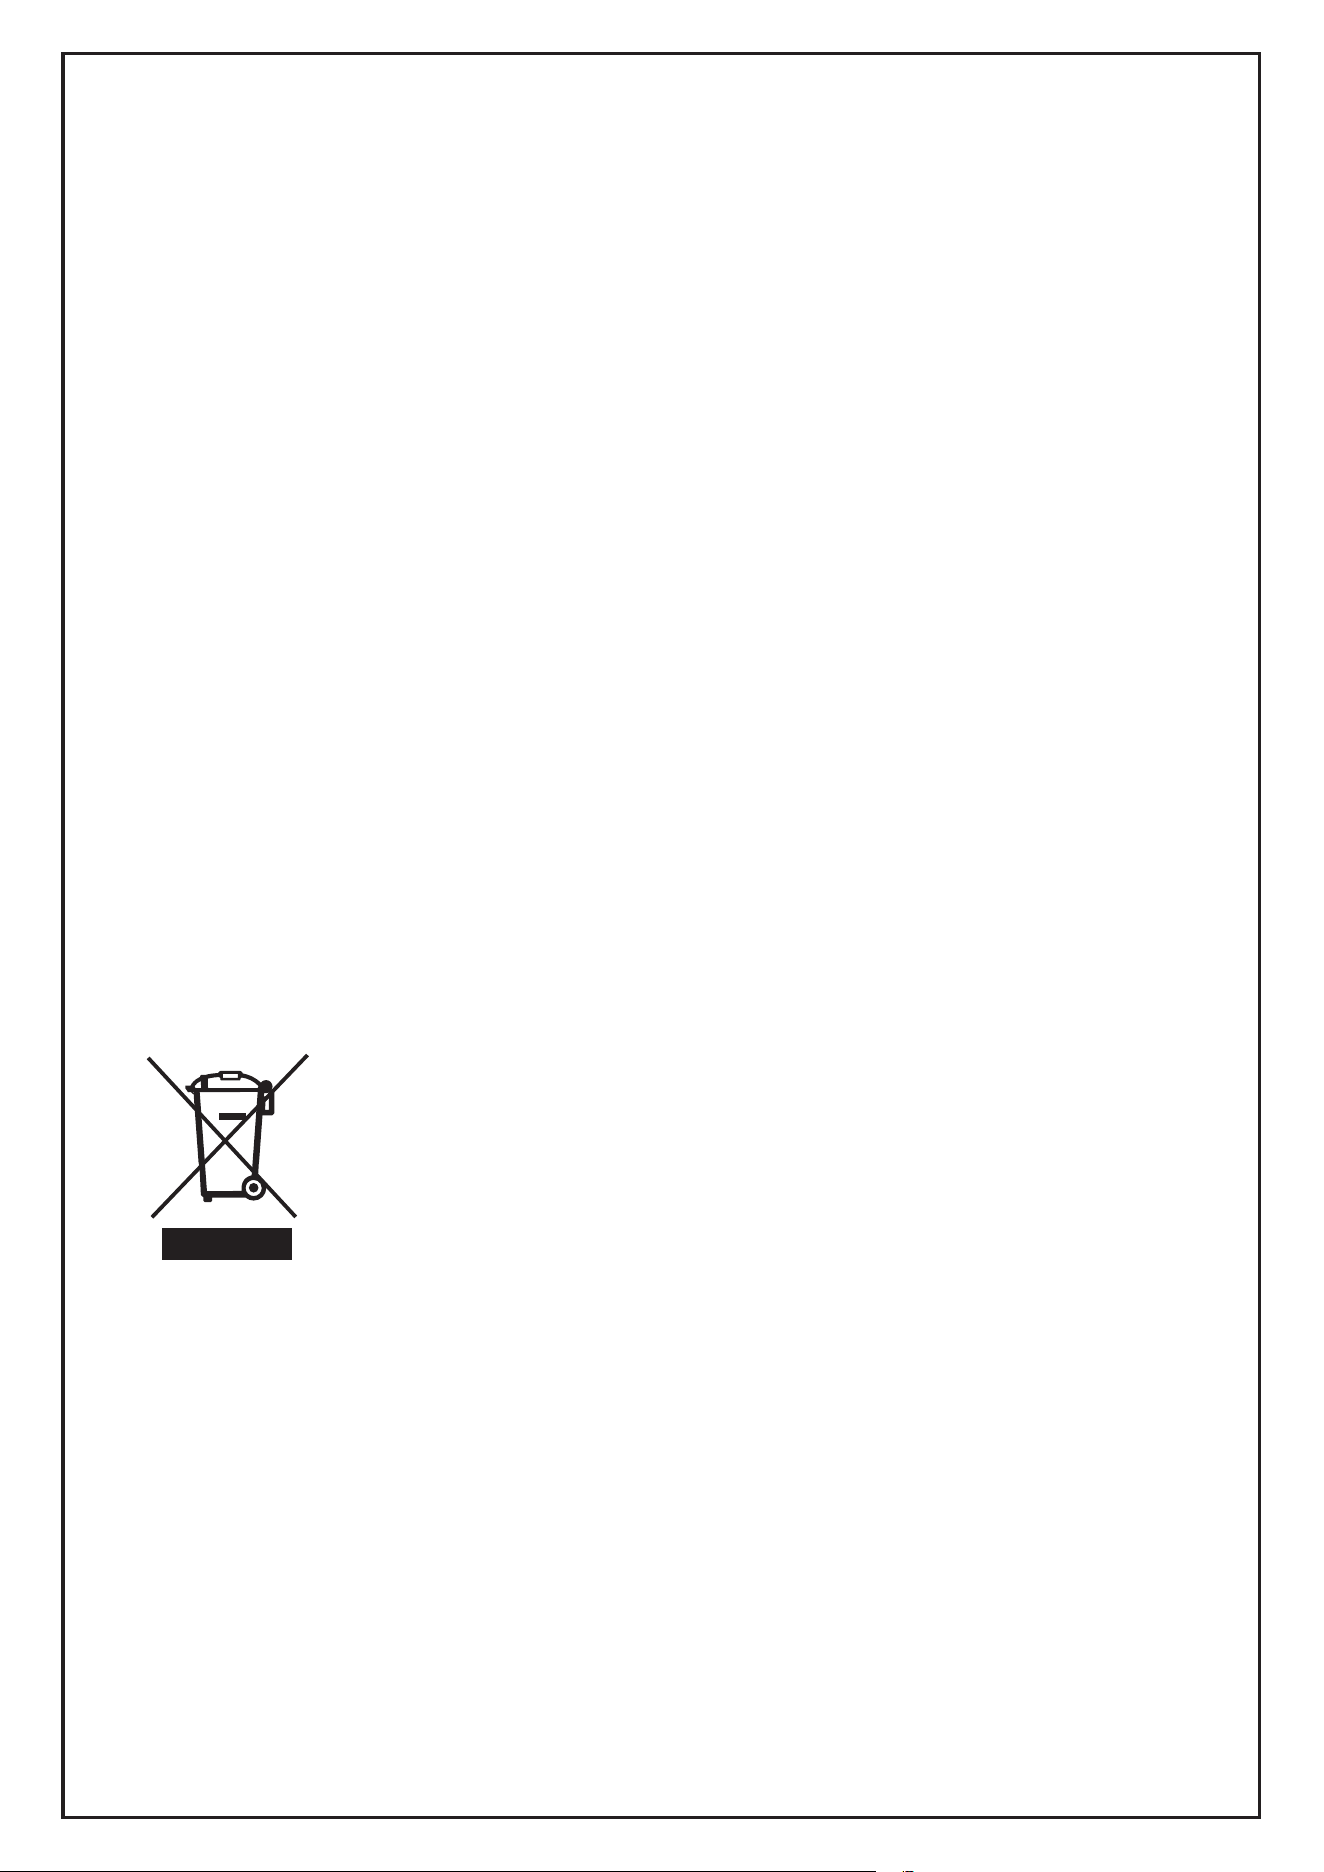
De acuerdo con la Directiva Europea 2001/96/EG sobre los
aparatos eléctricos y electrónicos usados (desechos de
equipos eléctricos y electrónicos - WEEE), por favor envíe
el equipo eléctrico que ya no utilice a los puntos de recogi-
da previstos para su eliminación.
Este símbolo indica que el aparato no puede disponerse
como basura doméstica normal, sino que debe entregarse
en un punto de reciclaje para los aparatos eléctricos y elec-
trónicos.
Se puede obtener la información sobre dónde se puede
desechar el equipo de su autoridad local.
Advertencia
PARA SU SEGURIDAD:
• NO toque ni mueva el calentador durante al
menos 45 minutos después de su uso
• Espere que todos los elementos del calen-
tador se enfríen antes de tocarlos.
NOTA
• En un ambiente de aire salino (como
cerca de un océano), la corrosión ocurre
más antes de lo normal.
• Espere que el calentador se enfríe antes
de cubrirlo.
Disposición
15

16
IN240500204V01_EN
EN
IMPORTANT, RETAIN FOR FUTURE REFERENCE: READ CAREFULLY
INSTRUCTION MANUAL
842-197V01

Contents
Warning . . . . . . . . . . . . . . . . . . . . . . . . . . . . . . . . . 18
Leakage Test . . . . . . . . . . . . . . . . . . . . . . . . . . . . . 19
Appliance and Location . . . . . . . . . . . . . . . . . . . . . 19
Safety Precautions. . . . . . . . . . . . . . . . . . . . . . . . .20
Installation . . . . . . . . . . . . . . . . . . . . . . . . . . . . . . . 21
Technical Specifications . . . . . . . . . . . . . . . . . . . . .21
Parts List . . . . . . . . . . . . . . . . . . . . . . . . . . . . . . . . 22
Assembly Instructions . . . . . . . . . . . . . . . . . . . . . .23
Operation. . . . . . . . . . . . . . . . . . . . . . . . . . . . . . . . 27
17

Warning
Please carefully read all instructions provided before using this appliance.
This heater
must be installed in accordance with the instructions and local regulations.
The use of
this appliance in enclosed areas can be dangerous and is prohibited.
• Perform the ‘leak test’ after each changing gas cylinder.
Never check for leaks with a naked flame
• Do not store other flammable vapours or liquids near this appliance.
If you smell gas, follow the steps below:
1. Extinguish all naked flames; do not operate any electrical appliances
2. Close the valve of the regulator to stop gas running to the unit and turn the
heater to the OFF position (full disk = )
3. Ensure the regulator is fixed to the bottle correctly.
4. Check the hose from the gas bottle to the unit has no splits - this can be
done with soapy water to identify splits in the hose.
5. If odour persist contact Heat Outdoors or a gas supplier.
18

Leakage Test
Appliance and Location
Gas connections on the appliance are leak tested prior to shipment. Possible
mishandling of the appliance during shipment can damage the integrity of
some parts.
A complete gas leakage test must be performed again at the installation site.
Please follow the procedure below for leakage test.
1. It is advised to make a soap / liquid detergent and water solution to identify
any holes/splits or loose fittings in the tube.
2. Make sure the control tap is in the OFF position (full disk = ) on the con-
trol panel.
3. Apply the solution to the hose using a brush or rag.
4. Turn ON the gas supply and check for bubbles from the hose. If the air
bubbles appear this indicates a leak in the hose.
5. If a leak is present, turn OFF the gas supply immediately, tighten any leak-
ing fitting carefully, turn gas again and recheck.
The appliance is for outdoor use only.
Do not use indoors or in an enclosed area.
Always maintain suitable clearance from combustible materials - minimum
800mm from the top of the unit, and a minimum of 650mm from sides.
19

Safety Precautions
• Performance and safety service of this heater should be performed annually
by a qualified gas engineer.
• Do not use the heater in a combustable atmosphere.
• Before using the unit check the hose for splits, twists which may cause gas
to leak or prevent flow.
• Disconnect gas cylinder before moving the heater.
• Do not attempt to modify any parts of the heater.
• The appliance is not recommended to be used in basements, below ground
level or in areas with limited / no ventilation.
• Ensure the heater is placed on a solid and level surface.
• It is recommended that you should change your regulator annually to avoid
blockages.
• Do not clean the heater with cleaners that are combustible or corrosive.
• Do not paint any part of the heater.
• The gas cylinder valve should be turned off when the heater is not in use.
• Avoid using the heater when it is raining to prevent water ingress.
• Keep children and vulnerable people away from the heater when in use.
• Do not move the heater when it is in use.
• Check the heater immediately if any of the following exists:
- There is smell of gas.
- The heater performance of the heater seems to be reduced.
- The burner makes popping noise during use (a slight popping noise is
normal when the flame is extinguished after use).
• When the heater is in use the surface of the grills, reflector and glass will
reach a high temperature. Do not touch these parts.
• Do not obstruct the ventilation holes of the cylinder housing.
• It is recommended that the gas tube is replaced annually to avoid any splits
or holes forming.
• Only use the gas specified - 13kg-15kg Propane patio gas.
• In adverse weather conditions it is advised the heater is stored undercover
or inside where possible.
20
Installation
Technical Specifications
Important safety requirements:
THIS APPLIANCE IS FOR OUTDOOR USE ONLY
1. It is not recommended for this heater to be installed or used indoors,
garages or any other enclosed area.
2. DO NOT place articles on or against this appliance.
3. DO NOT use or store flammable materials near this appliance.
4. DO NOT operate this appliance unless it is fully assembled with reflector
and protection guard in place.
5. Installation and repair should be done by a qualified service person.The
appliance must be inspected before use and at least annually serviced by a
qualified gas engineer. More frequent cleaning may be required.
Item Number Flame Heater
Nominal HEAT
INPUT
10.5 kW (762 g/h)
Appliance
Category
I3+(28-30/37) I3B/P(30) I3B/P(37) I3B/P(50)
Gas Reference G30/G31 G30/G31 G30/G31 G30/G31
Normal Gas
Pressure
28-30/37 mbar 30 mbar 37 mbar 50 mbar
FOR USE OUTDOORS ONLY
Close the valve of the gas cyclinder or the regulator after use.
The use of this applicance in closed a reas can be dangerous and is PROHIBITED.
Read the instructions befo re using this appliance.
The appliance must be installed in acco rdance with the intructions and local regulations.
Country of destination:
I3+(28-30/37) for BE-CH-C Y-CZ-ES-FR-GB-GR-IE-IT-LT-L-U- LV-PT-SK-SI
I3B/P(30) for BE-CY-DK-EE-FI-FR-HU-IT-LT-NL-NO-SE-SI-S K-SK-RO-HR-TR-BG-
I3B/P(37) for PL
I3B/P(50) for AT-CH-DE-SK
21
2575DO39032
2575-24
842-197V01
(KLD7001SS)
Including Spain regulator,gas hose,full length cover.
Parts List
Part Number Part Name Picture Quantity Remarks
1 Bottom Plate
1
2 Control Box
1
3 Middle Plate
1
4 Damper
1
5 Upper Support
4
6 Lower Support
4
7 Glass Tube
1
8
1
9 Lower Protection
Guard
4
10 Wheels
1
11 Fixing Bracket
4
12 Side Panel
3
13 Front Panel
1
14 Handle
1
15 Chain
1
16 AA Battery
1
17 Rubber Ring
1
18 Screw M5X10
68
Not Included
Preassembled
22
Assembly Instructions
1. Attach wheels (10) to bottom
plate (1).
3. Connect 4 upper supports (5) to the lower supports (6) with screw (18), then fix
the upper plate (4) with screws (18)
2. Connect and fix 4 x lower support (6)
to the bottom plate (1) and middle plate
(3) with screws (19).
18
23

4. Unscrew the red ignitor button on
the control box and insert the AA
battery (16) with the POSITIVE end
facing outwards.Then attach the
control box (2) underneath the
middle plate (3) with screws (18).
6. Attach the reflector (8) onto the upper
plate (4) and fix with screws (18).
5. Carefully put the glass tube (7) up
through the center of the hole in the
upper plate (4).Make sure the rubber ring
(17) is attached on the lower end of the
glass tube. Now place the glass tube
through the hole on the middle plate (3).
Check to ensure the glass tube covers
the center hole of the middle plate.
18
16
15
17
24
7. Attach the protection guards (9) to
the upper frame by inserting the
hooks at the top of the guards into
the holes on the supports. Repeat at
the bottom of the supports. Secure
the protection guards to the top of
the supports with the fixing brackets
(11) and screw in place.
9. Screw the handle (14) on the
front panel (13) - attach the
panel by inserting its two hooks
into the holes on the bottom
plate. Hook the chain (15) to the
hole in the control box,then
close the panel to the middle
plate - the panel is attached
by the magnets. Tips: the chain
can hole the panel while operat-
ing the control.
8. Fix the sides panels (12) with the
screws (18). Note: Do not cover the side
where the control knob is.
11
19
13
14
25

10. Connect gas hose to 20. Ib. LPG
cylinder (not included). Attach regulator
to cylinder.
Tighten securely. Move cylinder to the
plate of base assembly
Complete
26

Preparation
You will need to purchase a suitable size LPG cylinder that can be installed to
the compartment. You must use a pressure regulator and flexible tube which
complies with the outlet pressure of the appliance. Connect the hose to the
hose connector on the control box.
Warning
Always test the hose for leaks during the leakage test desribed at the start of
the instruction manual.
• Never use the heater while it is raining, the glass tube may break if suddenly
coming into contact with water.
• Never splash liquid on the glass tube when the heater is on.
• The glass tube will be extremely hot when in operation, never try to touch it.
• Children and vulnerable people must be kept away from the heater at all
times.
• Always ensure the heater stands firmly, the glass tube may break if the
heater falls.
• Never use the heater if the glass tube has signs of damage ie. cracking
Operation
27
Ignition Instructions
Check and ensure that an AA battery (Not Included)
is inside the ignition chamber and has power.
Ensure the anode (+) faces outwards.
1. Ensure that the control knob is OFF. Slowly open
the gas cylinder valve.
2. Press and turn the control knob to LIGHT position,
push the igniter to generate spark while keeping
control knob in pressed position
3. Check for pilot flame through glass tube. If pilot
does not light, turn control knob to OFF position wait
two minutes minimum and try again from the star.t
Several attempts may be necessary.
4. If the pilot s lit, keep control knob pressed for 15
seconds then turn the control knob to LOW.
5. For maximum heat turn control knob to HIGH.
6. To turn heater off, turn control knob to OFF.
7. Close the valve of the gas cylinder or the regulator
after use.
OFF
LIGHT
LOW
HIGH
28

To enjoy outstanding performance of your heater for years make sure you
perform the following maintenance activities on a regular basis:
• Keep exterior surfaces clean.
• Use warm soapy water for cleaning. Never use flammable, corrosive or
abrasive cleaners.
• While washing your unit, be sure to keep the area around the burner and
pilot assembly dry at all time. If the gas control is exposed to water in any
way, do NOT try to use it. It must be replaced.
• After a long break from operation, the unit should be inspected for spiders,
spider webs or other insects.
• Air flow must be unobstructed. Keep controls. Burner and circulating air
passageways clean.
Signs of possible blockage include:
• Gas odour with extreme yellow tipping of flame.
• Heater does NOT reach the desired temperature.
• Heater glow is excessively uneven.
• Heater makes popping noises.
• Spider and insects can nest in burner or orifices. This dangerous condition
can damage the heater and render it unsafe for use. Clean burner holes by
using a heavy duty pipe cleaner. Compressed air may help clear away small-
er particles.
• Carbon deposits may create a fire hazard. Clean reflector and glass tube
inside with soapy water if any carbon deposits develop. Always be careful
when cleaning the glass tube.
Between uses:
• Turn the control knob to “OFF” position.
• Turn LPG cylinder to “OFF” position.
• Store heater upright in an area sheltered away from weather conditions
(such as rain, sleet, hail, snow).
• If desired, cover heater to protect exterior surfaces and to help prevent dust
and debris collecting in air passages.
Cleaning & maintenance
Cleaning & maintenance
29
During periods of extended inactivity or when transport-
ing:
• Turn the control knob to “OFF” position.
• Disconnect LPG Cylinder and move to a secure, well-ventilated location
outdoors.
• DO NOT store in a location that will exceed 50 degrees C.
• Store heater upright in an area sheltered away from weather conditions
(such as rain, sleet, hail, snow).
• If desired, cover heater to protect exterior surfaces and to help prevent dust
and debris collecting in air passages.
In accordance with European Directive 2001/96/EG con-
cerning used electrical and electronic appliances (waste
electrical and electronic equipment – WEEE), please return
any electrical equipment that you will no longer use to the
collection points provided for their disposal.
This symbol indicates that the appliance cannot be treated
as normal domestic trash, but must be handed to a collec-
tion point for recycling electric and electronic appliances.
Information concerning where the equipment can be dis-
posed of can be obtained from your local authority.
Warning
FOR YOUR SAFETY:
• DO NOT touch or move heater for at
least 45 minutes after use.
• Allow all burner elements to cool
before Touching
NOTE
• In a salt-air environment (such as near
an Ocean) corrosion occurs more quick-
ly than normal.
• Wait until heater is cool before cover-
ing.
Disposal
30