CONSTRUCTION LIGHT STRINGS
USER MANUA
Technical Support and E-Warranty Certificate
www.vevor.com/support
L
MODEL: CSL10-2Y-ES01
We continue to be committed to provide you tools with competitive price.
"Save Half", "Half Price" or any other similar expressions used by us only
represents an estimate of savings you might benefit from buying certain tools
with us compared to the major top brands and does not necessarily mean to cover
all categories of tools offered by us. You are kindly reminded to verify carefully
when you are placing an order with us if you are actually Saving
Half in comparison with the top major brands.
CONSTRUCTION LIGHT
STRINGS
MODEL: CSL10-2Y-ES01
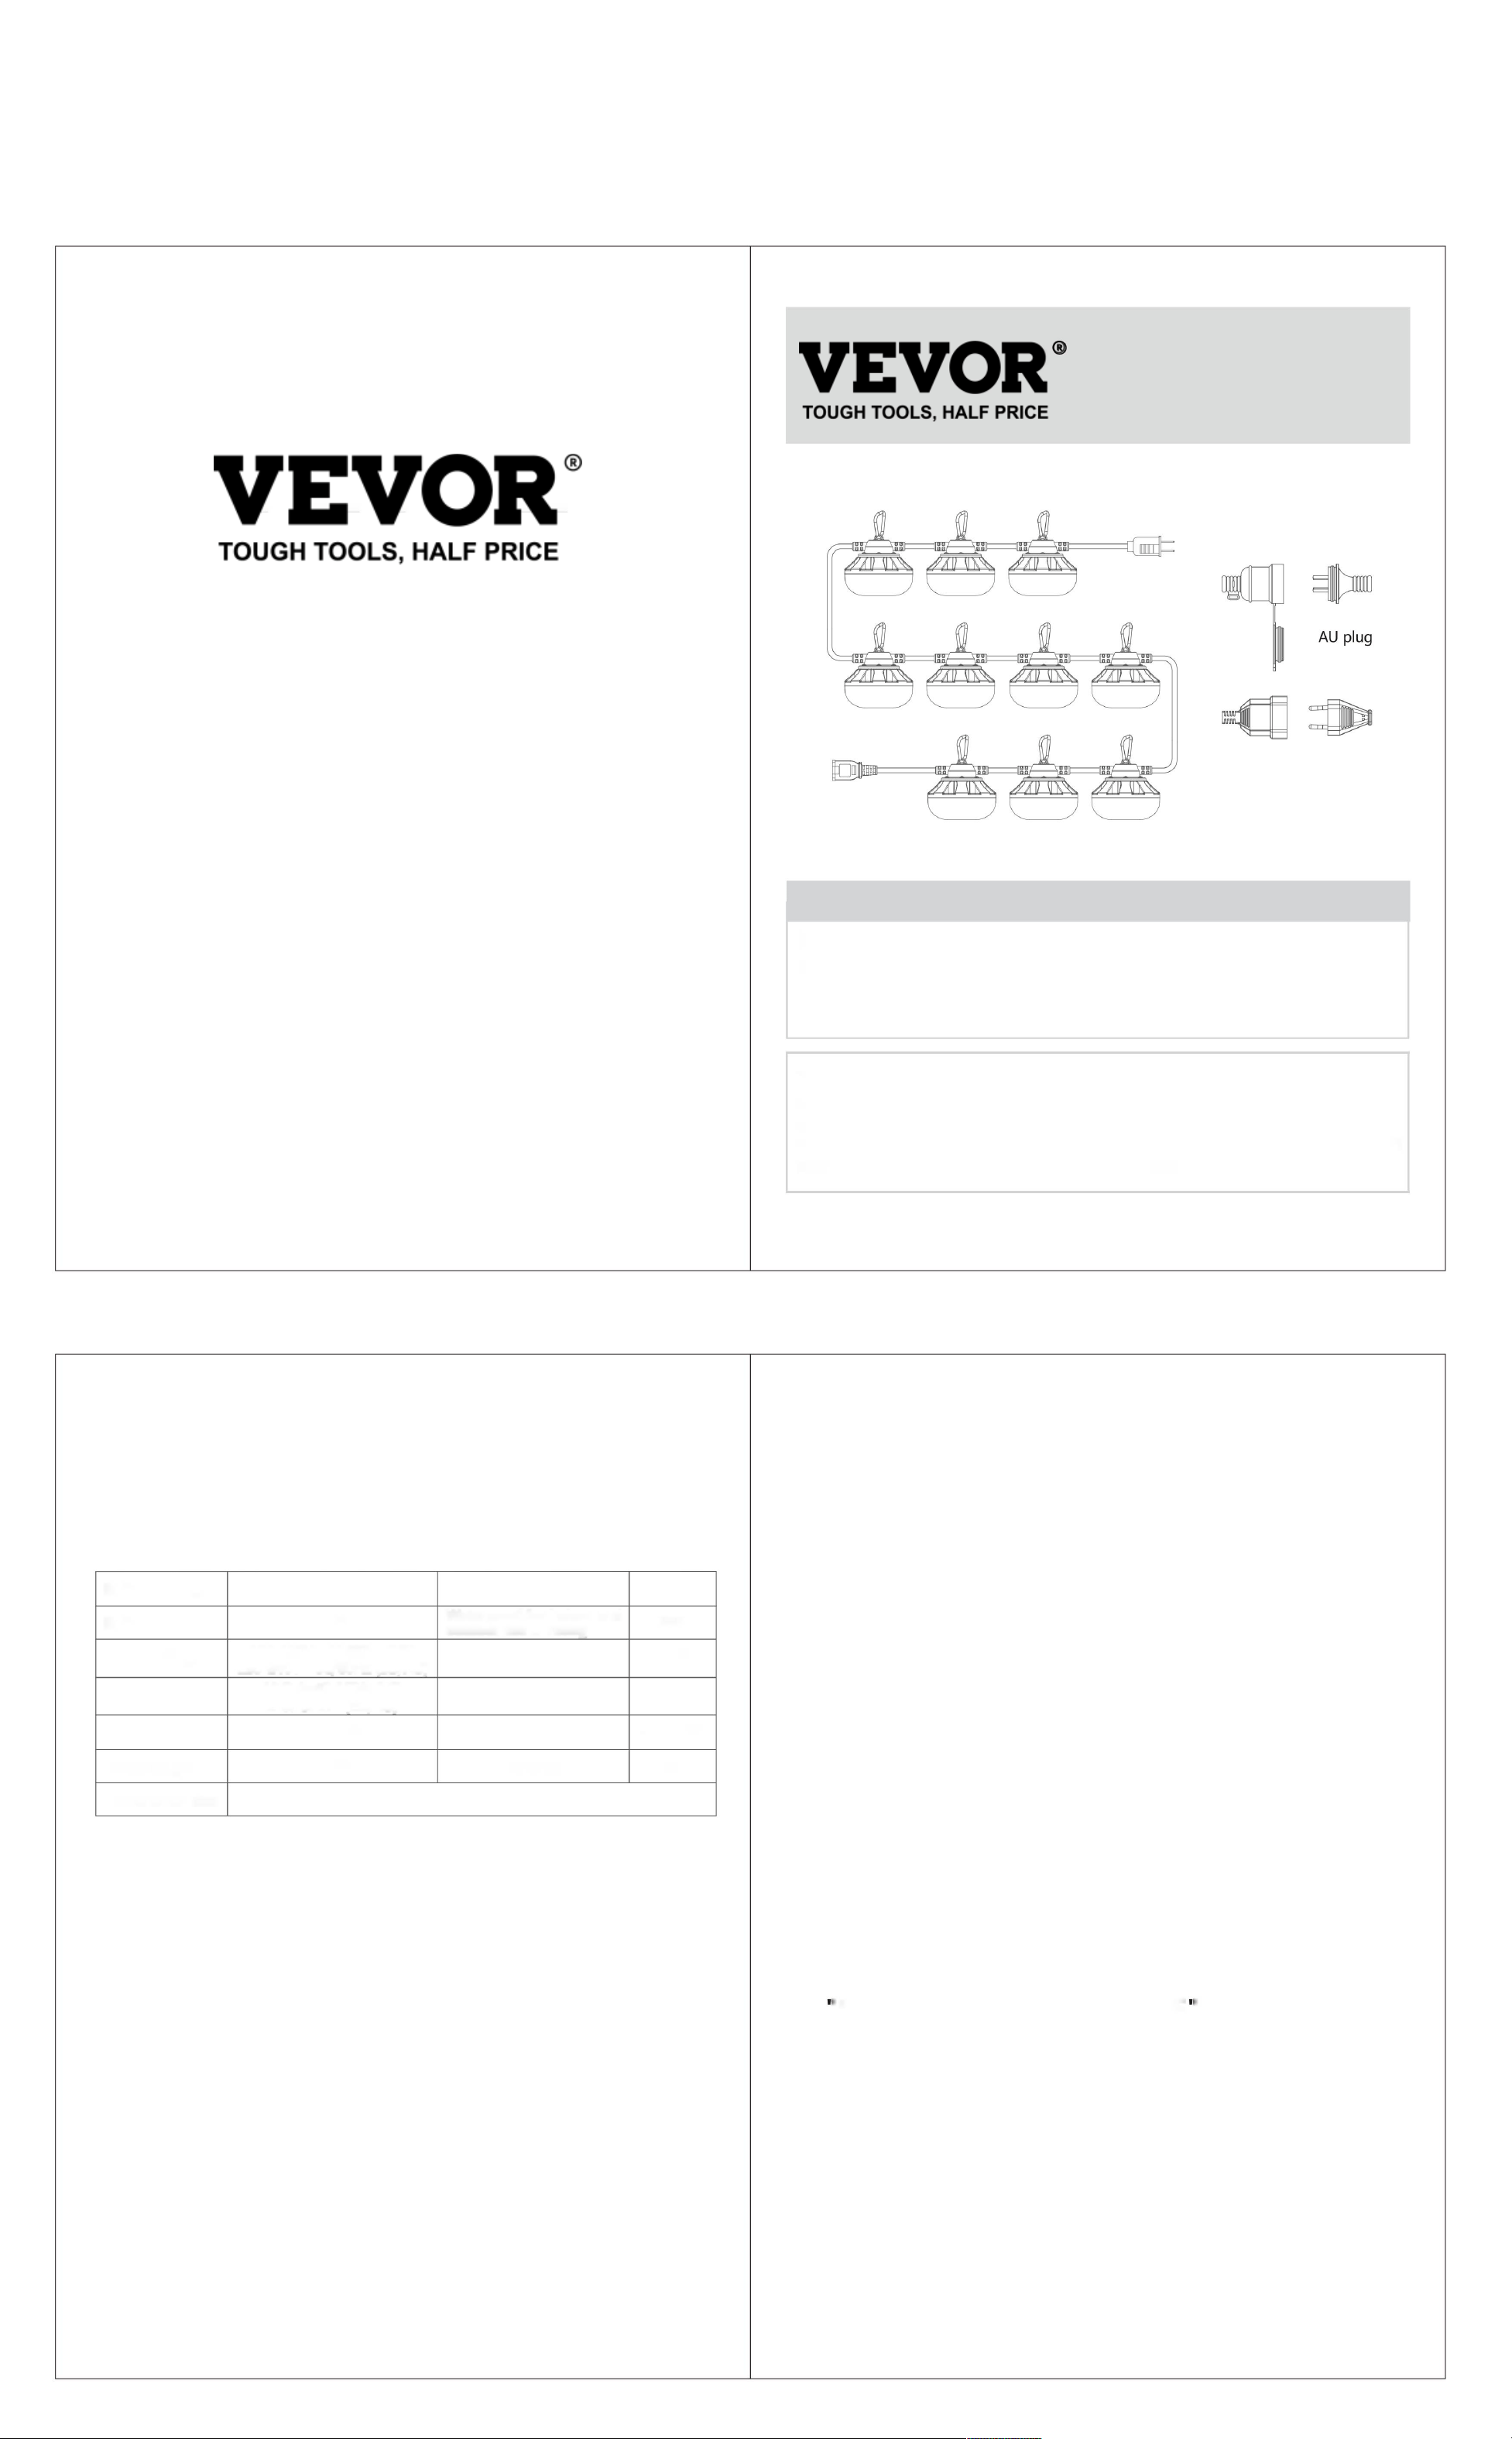
EU plug
(The picture is for reference only, please refer to the actual object)
NEED HELP? CONTACT US!
Have product questions? Need technical support? Please feel free to
contact us:
This is the original instruction, please read all manual instructions
carefully before operating. VEVOR reserves a clear interpretation of our
user manual. The appearance of the product shall be subject to the
product you received. Please forgive us that we won't inform you again if
there are any technology or software updates on our product
Technical Support and E-Warranty Certificate
www.vevor.com/support
.
Temporary Lighting
Thank you for choosing our temporary lighting. Please read this user manual
carefully and keep it for further use.
Specifications
Bulb quantity
10*bulb
Wattage 100W
Bulbs spacing
10ft
Waterproof for indoor and
outdoor use IP rating
IP65
Input voltage
100-120V~ 50/60Hz (US)
220-240V- 50/60HZ (EU/AU)
Beam angle 210°
Wire info
18/2 AWG SJTW (US)
2*0.75mm
2
(EU/AU)
Luminous
10000LM
Light color cool white Temperature limiter
-20~40°C
Total length
100ft
Dimmer
NO
Hook open size
12mm
Operation Instructions
• Plug and Play.
• Just insert the power plug into an appropriate power socket to turn on the string
light and unplug it to turn off the light No need to installation bulbs.
Series Connection
The string light is designed with the tail plug to use together with 8 set other our
temporary lighting insert the power prong of one string light to the tail plug of another
one for series connection.
IMPORTANT SAFETY INSTRUCTIONS
When using electrical products, basic precautions should always be followed
including the following:
a) READ AND FOLLOW ALL SAFETY INSTRUCTIONS
b) "Do not use these products outdoors unless marked suitable for indoor and outdoor
use. When products are used in outdoor applications, connect the product to a Ground
Fault Circuit Interrupting (GFCI) outlet. If one is not provided, contact a qualified electrician
for proper installation."
c) "Do not mount or place near gas or electric heaters, fireplaces, candles or other similar
sources of heat."
d) "Do not secure the wiring of the product with staples or nails, or place on sharp hooks
or nails." For light sets employing medium screw lamps, this statement shall include :
"Install only using the mounting means provided".
e) "Do not let lamps rest on the supply cord or on any wire."
f) "Do not use this product for other than its intended use."
g) "Do not hang objects from cord, wire, or light string."
h) "Do not close doors or windows on the product or extension cords as this may damage
the wire insulation."
i) "Do not cover the product with cloth, paper or any material not part of the product
when in use."
j) "This product has a polarized plug (one blade is wider than the other) as a feature to
reduce the risk of electric shock. This plug will fit in a polarized outlet only one way.
If the plug does not fit fully in the outlet, reverse the plug. If it still does not fit, contact
a qualified electrician. Do not use with an extension cord unless plug can be fully inserted.
Do not alter or replace the plug." It is acceptable to omit this item if the product does not
employ a polarized plug.
k) "This product employs overload protection (fuse). A blown fuse indicates an overload
or short circuit situation. If the fuse blows, unplug the product from the outlet. Also
unplug any additional strings or products that may be attached to the product. Replace
the fuse as per the user servicing instructions (follow product marking for proper fuse
rating) and check the product. If the replacement fuse blows, a short-circuit may be
present and the product should be discarded." It is acceptable to omit this item if the
fuse is not replaceable or where overload protection is not required.
l) "Read and follow all instructions that are on the product or provided with the product."
m) This product is not a power cord, can not be used as a power extension cord.
n) After multiple sets of lights are connected in series, if one of the fuses trips or one of
the lights does not light up, after self checking then replace fuse or bulb.
O) "SAVE THESE INSTRUCTIONS ".
USER SERVICING INSTRUCTIONS
HOW TO PHYSICALLY REPLACE THE FUSE
Risk of fire. Do not replace attachment plug. Contains a safety device (fuse) that should
not be removed.
Discard product if the attachment plug is damaged.
a) Grasp plug and remove from the receptacle or other outlet device. Do not unplug
by pulling on cord.
b) Open fuse cover. Slide open fuse access cover on top of attachment plug towards
blades.
c) Remove fuse carefully. Push the fuse from the other side.
d) Risk of fire. Replace fuse only with _8_ Amp, 125 Volt fuse (provided with product).
e) Close fuse cover. Slide closed the fuse access cover on top of attachment plug.
01
02

blancfroid
i)"Necouvrezpasleproduitavecuntissu,dupapieroutoutautrematériaunefaisantpaspartieduproduitlorsdesonutilisation."j)"Ce
produitestdoté
d'unefichepolarisée(unelameestpluslargequel'autre)pourréduirelerisquedechocélectrique.Cettefichenes'insèredansuneprise
polariséequedansunseulsens.
210°
b)"N'utilisezpascesproduitsàl'extérieuràmoinsqu'ilsnesoientindiquéscommeétantadaptésàuneutilisationintérieureet
extérieure.Lorsquelesproduitssontutilisésdansdesapplicationsextérieures,connectezleproduitàuneprisededisjoncteurde
fuiteàlaterre(GFCI).Sicellecin'estpasfournie,contactezunélectricienqualifié.pouruneinstallationcorrecte."
Quantitéd'ampoule
Nouscontinuonsànousengageràvousfournirdesoutilsàdesprixcompétitifs.
Nemodifiezpasetneremplacezpaslafiche."Ilestacceptabled'omettrecetélémentsileproduitn'utilisepasdefichepolarisée.k)
"Ceproduitutiliseuneprotection
contrelessurcharges(fusible).Unfusiblegrilléindiqueunesituationdesurchargeoudecourtcircuit.Silefusiblesaute,débranchez
leproduitdelaprise.Débranchezégalementtouteslescordesouproduitssupplémentairesquipourraientêtreattachésau
produit.Remplacezlefusibleconformémentauxinstructionsd'entretiendel'utilisateur(suivezlemarquageduproduitpour
connaîtrelavaleurnominaledufusible)etvérifiezleproduit.Silefusiblederemplacementsaute,uncourtcircuitpeutêtre
présentetleproduitdoitêtrejeté."Ilestacceptabled'omettrecetélémentsilefusiblen'estpasremplaçableousiune
protectioncontrelessurchargesn'estpasrequise.l)"Lisezetsuiveztouteslesinstructionsquisetrouventsurleproduitou
fournisavecleproduit.oul'undesvoyantsnes'allumepas,aprèsautovérification,remplacezle
fusibleoul'ampoule.
Lumineux
Variateur
Laguirlandelumineuseestconçueaveclafichearrièreàutiliseravec8autresjeuxd'éclairagetemporaire.Insérezla
broched'alimentationd'uneguirlandelumineusedanslafichearrièred'uneautrepouruneconnexionensérie.
01
20~40°C
Tensiond'entrée
IP65
12mm
c)"Nepasmonterouplaceràproximitéderadiateursàgazouélectriques,decheminées,debougiesoud'autressourcesdechaleursimilaires."
PriseUE
Puissance
220240V50/60HZ(UE/AU)
Couleurclaire
•Prêtàl'emploi.
Lorsdel’utilisationdeproduitsélectriques,desprécautionsdebasedoiventtoujoursêtresuivies,notammentles
suivantes:
Angledefaisceau
Tailleouverteducrochet
Jetezleproduitsilafichedefixationestendommagée.a)Saisissez
laficheetretirezladelapriseoudetoutautredispositifdeprise.Nedébranchezpasentirantsurlecordon.b)
Ouvrezlecouvercledu
fusible.Faitesglisserlecouvercled'accèsaufusibleouvertsurledessusdelafichedefixationversleslames.c)
Retirez
lefusibleavecprécaution.Poussezlefusibledel'autrecôté.d)Risque
d'incendie.Remplacezlefusibleuniquementparunfusiblede_8_Amp,125Volts(fourniavecleproduit).e)
Fermezlecouvercledufusible.Faitesglisserlecouvercled'accèsaufusiblesurledessusdelafichedefixationpourlefermer.
Silafichenerentrepascomplètementdanslaprise,inversezla.Sicelaneconvienttoujourspas,contactezunélectricien
qualifié.Nepasutiliseravecunerallongeàmoinsquelafichepuisseêtrecomplètementinsérée.
Informationssurlefil
Limiteurdetempérature
10pieds
Espacementdesampoules
"Économisezlamoitié","Moitiéprix"outouteautreexpressionsimilairequenousutilisonsnereprésente
qu'uneestimationdeséconomiesdontvouspourriezbénéficierenachetantcertainsoutilscheznousparrapport
auxgrandesmarquesetnesignifiepasnécessairementcouvrirtouteslescatégoriesd'outilsproposés.parnous.Nousvous
rappelonsdebienvouloirvérifierattentivementlorsquevouspassezunecommandecheznoussivouséconomisez
réellementlamoitiéparrapportauxgrandesmarques.
10000LM
100pieds
COMMENTREMPLACERPHYSIQUEMENTLEFUSIBLE
10*ampoule
Risqued'incendie.Neremplacezpaslafichedefixation.Contientundispositifdesécurité(fusible)quinedoitpasêtreretiré.
100120V~50/60Hz(ÉtatsUnis)
NON
100W
18/2AWGSJTW(ÉtatsUnis)
2*0,75mm2(UE/AU)
Longueurtotale
•Insérezsimplementlafiched'alimentationdansuneprisedecourantappropriéepourallumerlaguirlandelumineuseet
débranchezlapouréteindrelalumière.Pasbesoind'installerdesampoules.
d)"Nefixezpaslecâblageduproduitavecdesagrafesoudesclous,etneleplacezpassurdescrochetsoudesclouspointus."
Pourlesensemblesd'éclairageutilisantdeslampesàvismoyennes,cettedéclarationdoitinclure:"Installeruniquementen
utilisantlesmoyensdemontagefournis".e)"Nelaissezpasleslampes
reposersurlecordond'alimentationousurunfil."f)"N'utilisezpasceproduitàdesfins
autresquecellespourlesquellesilestprévu."g)"Nesuspendezpasd'objetsàun
cordon,unfilouuneguirlandelumineuse."h)"Nefermezpaslesportesoules
fenêtresduproduitoudesrallongescarcelapourraitendommagerl'isolationdesfils."
Éclairagetemporaire
Connexionensérie
CONSIGNESDESÉCURITÉIMPORTANTES
Moded'emploi
Caractéristiques
INSTRUCTIONSD'ENTRETIENPOURL'UTILISATEUR
a)LISEZETSUIVEZTOUTESLESCONSIGNESDESÉCURITÉ
O)"CONSERVEZCESINSTRUCTIONS".
Étanchepouruneutilisationintérieureet
extérieure.IndicedeprotectionIP
Mercid'avoirchoisinotreéclairagetemporaire.Veuillezlireattentivementcemanueld'utilisation
etleconserverpouruneutilisationultérieure.
Assistancetechniqueetcertificatdegarantieélectronique
www.vevor.com/support
L
GUIDESLUMINEUSESDECONSTRUCTION
UTILISATEURRÉUSSI
(L'imageestuniquementàtitrederéférence,veuillezvousréféreràl'objetréel)
MODÈLE:CSL102YES01
MODÈLE:CSL102YES01
Vousavezdesquestionssurlesproduits?Besoind'uneassistancetechnique?N'hésitez
pasànous
contacter:Supporttechniqueetcertificatdegarantieélectronique
www.vevor.com/support
Ils'agitdesinstructionsoriginales,veuillezlireattentivementtouteslesinstructions
dumanuelavantdel'utiliser.VEVORseréserveuneinterprétationclairedenotremanuel
d'utilisation.L'apparenceduproduitdépendduproduitquevousavezreçu.Veuillez
nouspardonnerdeneplusvousinformers'ilyadesmisesàjourtechnologiquesoulogicielles
surnotreproduit.
.
CORDES
LUMIÈREDECONSTRUCTION
BESOIND'AIDE?CONTACTEZNOUS!
02
Machine Translated by Google

Abstrahlwinkel
Haken offen Größe
Entsorgen Sie das Produkt, wenn der Anschlussstecker beschädigt ist. a)
Fassen Sie den Stecker und ziehen Sie ihn aus der Steckdose oder einem anderen Anschlussgerät. Ziehen Sie den Stecker nicht durch
Ziehen am Kabel. b) Öffnen
Sie die Sicherungsabdeckung. Schieben Sie die Sicherungszugangsabdeckung oben auf dem Anschlussstecker in Richtung der Klingen.
c)
Entfernen Sie die Sicherung vorsichtig. Drücken Sie die Sicherung von der anderen Seite.
d) Brandgefahr. Ersetzen Sie die Sicherung nur durch eine _8_ Ampere, 125 Volt Sicherung (im Lieferumfang des Produkts
enthalten). e) Schließen Sie die Sicherungsabdeckung. Schieben Sie die Sicherungszugangsabdeckung oben auf dem Anschlussstecker zu.
c) „Nicht in der Nähe von Gas- oder Elektroheizungen, Kaminen, Kerzen oder anderen ähnlichen Wärmequellen
montieren oder aufstellen.“
EU-Stecker
Leistung
220–240ÿV – 50/60ÿHz (EU/AU)
Lichtfarbe
Dimmer
• Plug-and-Play.
Die Lichterkette ist mit einem Endstecker für die Verwendung zusammen mit 8 anderen Sets unserer
temporären Beleuchtung ausgestattet. Stecken Sie den Stromstecker einer Lichterkette in den Endstecker der
anderen, um eine Reihenschaltung zu erreichen.
Bei der Verwendung elektrischer Produkte sollten immer grundlegende Vorsichtsmaßnahmen beachtet
werden, darunter die folgenden:
01
-20~40°C
Eingangsspannung
IP65
i) „Decken Sie das Produkt während des Gebrauchs nicht mit Stoff, Papier oder anderen Materialien ab, die nicht Teil
des Produkts
sind.“ j) „Dieses Produkt verfügt über einen polarisierten Stecker (ein Stift ist breiter als der andere), um das Risiko eines
Stromschlags zu verringern. Dieser Stecker passt nur auf eine Art in eine polarisierte Steckdose.
210°
Kaltweiß
12 mm
b) „Verwenden Sie diese Produkte nicht im Freien, es sei denn, sie sind für den Innen- und Außenbereich geeignet. Wenn
Produkte im Außenbereich verwendet werden, schließen Sie das Produkt an eine Steckdose mit Fehlerstromschutzschalter
an. Wenn keine vorhanden ist, wenden Sie sich für die ordnungsgemäße Installation an einen qualifizierten Elektriker.“
Glühbirnenmenge
Wir sind weiterhin bestrebt, Ihnen Werkzeuge zu wettbewerbsfähigen Preisen anzubieten.
Den Stecker nicht verändern oder ersetzen." Dieser Punkt kann weggelassen werden, wenn das Produkt keinen polarisierten
Stecker hat. k) "Dieses Produkt
hat einen Überlastungsschutz (Sicherung). Eine durchgebrannte Sicherung weist auf eine Überlastung oder einen Kurzschluss
hin. Wenn die Sicherung durchbrennt, ziehen Sie den Stecker des Produkts aus der Steckdose. Ziehen Sie auch alle
zusätzlichen Kabel oder Produkte ab, die an das Produkt angeschlossen sein könnten. Ersetzen Sie die Sicherung gemäß
den Wartungsanweisungen des Benutzers (folgen Sie der Produktkennzeichnung für die richtige Sicherungsstärke) und
überprüfen Sie das Produkt. Wenn die Ersatzsicherung durchbrennt, liegt möglicherweise ein Kurzschluss vor und das
Produkt sollte entsorgt werden." Dieser Punkt kann weggelassen werden, wenn die Sicherung nicht austauschbar ist
oder kein Überlastungsschutz erforderlich ist. l) "Lesen und befolgen Sie alle Anweisungen, die
sich auf dem Produkt befinden oder mit dem Produkt geliefert werden." m) Dieses Produkt ist kein Netzkabel und kann nicht
als Verlängerungskabel verwendet werden. n) Wenn nach dem Anschluss mehrerer Lampen in Reihe eine der
Sicherungen durchbrennt oder eine der Lampen nicht leuchtet, ersetzen Sie nach der Selbstprüfung die Sicherung oder die Glühbirne.
Leuchtend
100 W
18/2 AWG SJTW (USA) 2 x
0,75 mm2 (EU/AU)
Gesamtlänge
• Stecken Sie den Netzstecker einfach in eine entsprechende Steckdose, um die Lichterkette einzuschalten, und
ziehen Sie ihn heraus, um das Licht auszuschalten. Es müssen keine Glühbirnen installiert werden.
d) „Befestigen Sie die Verkabelung des Produkts nicht mit Klammern oder Nägeln und legen Sie es nicht an
scharfe Haken oder Nägel.“ Bei Leuchten mit mittelgroßen Schraublampen muss dieser Hinweis Folgendes
enthalten: „Installieren Sie das Produkt nur mit den mitgelieferten
Befestigungsmitteln.“ e) „Lassen Sie Lampen nicht auf dem Netzkabel oder
auf Drähten ruhen.“ f) „Verwenden Sie dieses Produkt nur für den
vorgesehenen Zweck.“ g) „Hängen Sie keine Gegenstände an Kabel,
Drähte oder Lichterketten.“ h) „Schließen Sie keine Türen oder Fenster am Produkt oder an Verlängerungskabeln, da dies
die Isolierung der Drähte beschädigen kann.“
10 * Glühbirne
Brandgefahr. Den Anschlussstecker nicht ersetzen. Enthält eine Sicherheitsvorrichtung (Sicherung), die nicht entfernt
werden darf.
100–120ÿV ~ 50/60ÿHz (USA)
NEIN
10 Fuß
„Sparen Sie die Hälfte“, „Halber Preis“ oder andere ähnliche Ausdrücke, die wir verwenden, stellen nur
eine Schätzung der Ersparnis dar, die Sie beim Kauf bestimmter Werkzeuge bei uns im Vergleich zu den
großen Topmarken erzielen können, und decken nicht unbedingt alle von uns angebotenen Werkzeugkategorien ab.
Wir möchten Sie freundlich daran erinnern, bei der Bestellung bei uns sorgfältig zu prüfen, ob Sie im Vergleich
zu den großen Topmarken tatsächlich die Hälfte sparen.
Abstand der Glühbirnen
10000LM
100 Fuß
SO ERSETZEN SIE DIE SICHERUNG PHYSISCH
Wenn der Stecker nicht vollständig in die Steckdose passt, drehen Sie den Stecker um. Wenn er immer noch nicht passt, wenden
Sie sich an einen qualifizierten Elektriker. Verwenden Sie kein Verlängerungskabel, wenn der Stecker nicht vollständig eingesteckt werden kann.
Drahtinfo
Temperaturbegrenzer
Temporäre Beleuchtung
Reihenschaltung
O) „BEWAHREN SIE DIESE ANWEISUNGEN AUF“.
Bedienungsanleitung
Technische Daten
WICHTIGE SICHERHEITSHINWEISE
a) LESEN UND BEFOLGEN SIE ALLE SICHERHEITSHINWEISE
WARTUNGSANLEITUNG FÜR DEN BENUTZER
Vielen Dank, dass Sie sich für unsere temporäre Beleuchtung entschieden haben. Bitte lesen Sie diese Bedienungsanleitung sorgfältig
durch und bewahren Sie sie für den späteren Gebrauch auf.
Technischer Support und E-Garantie-Zertifikat
www.vevor.com/support
M
BAULICHTERKETTEN
ERFOLGREICHER BENUTZER
(Das Bild dient nur als Referenz, bitte beziehen Sie sich auf das tatsächliche Objekt)
Haben Sie Fragen zum Produkt? Benötigen Sie technischen Support? Bitte kontaktieren Sie
uns:
Technischer Support und E-Garantie-Zertifikat www.vevor.com/
support
MODELL: CSL10-2Y-ES01
MODELL: CSL10-2Y-ES01
.
Dies ist die Originalanleitung. Bitte lesen Sie alle Anweisungen sorgfältig durch,
bevor Sie das Produkt in Betrieb nehmen. VEVOR behält sich eine klare Auslegung unserer
Bedienungsanleitung vor. Das Erscheinungsbild des Produkts hängt von dem Produkt
ab, das Sie erhalten haben. Bitte verzeihen Sie uns, dass wir Sie nicht erneut informieren,
wenn es Technologie- oder Software-Updates für unser Produkt gibt.
SAITEN
BAULICHT
Brauchen Sie Hilfe? Kontaktieren Sie uns!
02
Wasserdicht für den Innen- und
Außenbereich (IP-Schutzart)
Machine Translated by Google

COME SOSTITUIRE FISICAMENTE IL FUSIBILE
c) "Non montare né posizionare vicino a stufe a gas o elettriche, caminetti, candele o altre fonti di calore simili."
Spina europea
Potenza
220-240 V- 50/60 HZ (UE/AU)
Colore chiaro
• Collega e usa.
Quando si utilizzano prodotti elettrici, è necessario seguire sempre le precauzioni di base, tra cui:
Angolo del fascio
Gancio aperto
Eliminare il prodotto se la spina di collegamento è danneggiata. a)
Afferrare la spina e rimuoverla dalla presa o da altro dispositivo di presa. Non scollegare tirando il cavo. b) Aprire il
coperchio del fusibile.
Far scorrere il coperchio di accesso ai fusibili aperto sulla parte superiore della spina di collegamento verso le lame. c)
Rimuovere
con attenzione il fusibile. Spingere il fusibile dall'altro lato. d) Rischio di incendio.
Sostituire il fusibile solo con un fusibile da _8_ Amp, 125 Volt (fornito con il prodotto). e) Chiudere il coperchio del
fusibile. Far scorrere per chiudere il coperchio di accesso ai fusibili sulla parte superiore della spina di collegamento.
bianco freddo
i) "Non coprire il prodotto con stoffa, carta o qualsiasi materiale non facente parte del prodotto quando è in uso." j)
"Questo prodotto
è dotato di una spina polarizzata (una lama è più larga dell'altra) come caratteristica per ridurre il rischio di scosse
elettriche. Questa spina si inserisce in una presa polarizzata solo in un modo.
210°
b) "Non utilizzare questi prodotti all'aperto a meno che non siano contrassegnati come idonei per uso interno ed
esterno. Quando i prodotti vengono utilizzati in applicazioni esterne, collegare il prodotto a una presa con interruzione
del circuito per guasto a terra (GFCI). Se non ne viene fornita una, contattare un elettricista qualificato per una corretta
installazione."
Quantità di lampadine
Continuiamo a impegnarci per fornirvi strumenti a prezzi competitivi.
Non alterare o sostituire la spina." È accettabile omettere questa voce se il prodotto non utilizza una spina polarizzata.
k) "Questo prodotto utilizza una
protezione da sovraccarico (fusibile). Un fusibile bruciato indica una situazione di sovraccarico o cortocircuito. Se il
fusibile si brucia, scollegare il prodotto dalla presa. Scollegare inoltre eventuali stringhe o prodotti aggiuntivi che
potrebbero essere collegati al prodotto. Sostituire il fusibile secondo le istruzioni di manutenzione dell'utente (seguire
la marcatura del prodotto per la corretta classificazione del fusibile) e controllare il prodotto. Se il fusibile sostitutivo
si brucia, potrebbe essere presente un cortocircuito e il prodotto deve essere smaltito." È accettabile omettere
questa voce se il fusibile non è sostituibile o se non è richiesta la protezione da sovraccarico. l) "Leggere e seguire
tutte le istruzioni presenti sul prodotto o forniti con il prodotto." m) Questo prodotto non è un
cavo di alimentazione, non può essere utilizzato come prolunga di alimentazione. n) Dopo aver collegato più set di luci
in serie, se uno dei fusibili scatta oppure una delle luci non si accende, dopo l'autocontrollo sostituire il fusibile
o la lampadina.
Luminoso
Dimmer
La stringa luminosa è progettata con la spina posteriore da utilizzare insieme ad 8 set di altre nostre luci
temporanee: inserisci il polo di alimentazione di una stringa luminosa nella spina posteriore di un'altra per il
collegamento in serie.
01
-20~40°C
Tensione in ingresso
IP65
10 lampadine
12 mm
100-120 V~ 50/60 Hz (USA)
NO
Rischio di incendio. Non sostituire la spina dell'accessorio. Contiene un dispositivo di sicurezza (fusibile) che non deve essere
rimosso.
100 W
18/2 AWG SJTW (USA) 2*0,75
mm2 (UE/AU)
Lunghezza totale
• Basta inserire la spina in una presa di corrente adeguata per accendere la catena luminosa e scollegarla per
spegnere la luce. Non è necessario installare le lampadine.
d) "Non fissare il cablaggio del prodotto con graffette o chiodi, né posizionarlo su ganci o chiodi affilati." Per i set
di luci che utilizzano lampade a vite media, questa dichiarazione deve includere: "Installare solo utilizzando i
mezzi di montaggio forniti". e) "Non lasciare che le lampade
poggino sul cavo di alimentazione o su qualsiasi filo." f) "Non utilizzare questo
prodotto per usi diversi da quelli previsti." g) "Non appendere oggetti a
corde, fili o fili luminosi." h) "Non chiudere porte o finestre sul prodotto
o sulle prolunghe poiché ciò potrebbe danneggiare l'isolamento del cavo."
Se la spina non si inserisce completamente nella presa, invertire la spina. Se ancora non si adatta, contattare un
elettricista qualificato. Non utilizzare con una prolunga a meno che la spina non possa essere completamente inserita.
Informazioni sul filo
Limitatore di temperatura
10 piedi
"Risparmia la metà", "Metà prezzo" o qualsiasi altra espressione simile da noi utilizzata rappresenta
solo una stima del risparmio che potresti trarre dall'acquistare determinati strumenti con noi rispetto ai
principali marchi più importanti e non significa necessariamente coprire tutte le categorie di strumenti offerti da
noi. Ti ricordiamo di verificare attentamente quando effettui un ordine con noi se stai effettivamente
risparmiando la metà rispetto ai principali marchi principali.
Distanza tra i bulbi
10000LM
100 piedi
Illuminazione temporanea
Istruzioni operative
O) “CONSERVARE QUESTE ISTRUZIONI”.
Collegamento in serie
Specifiche
IMPORTANTI ISTRUZIONI DI SICUREZZA
a) LEGGERE E SEGUIRE TUTTE LE ISTRUZIONI DI SICUREZZA
ISTRUZIONI DI ASSISTENZA PER L'UTENTE
Impermeabile per uso interno ed
esterno Grado di protezione IP
Grazie per aver scelto la nostra illuminazione temporanea. Si prega di leggere attentamente questo
manuale utente e di conservarlo per un ulteriore utilizzo.
Supporto tecnico e certificato di garanzia elettronica
www.vevor.com/support
UTENTE DI SUCCESSO
STRINGHE LEGGERE DA COSTRUZIONE
l
(L'immagine è solo di riferimento, fare riferimento all'oggetto reale)
Hai domande sul prodotto? Hai bisogno di supporto tecnico? Non esitate a contattarci:
Supporto
tecnico e certificato di garanzia elettronica www.vevor.com/
support
MODELLO: CSL10-2Y-ES01
MODELLO: CSL10-2Y-ES01
.
Queste sono le istruzioni originali, leggere attentamente tutte le istruzioni
del manuale prima dell'uso. VEVOR si riserva una chiara interpretazione del
nostro manuale d'uso. L'aspetto del prodotto sarà soggetto al prodotto
ricevuto. Ti preghiamo di perdonarci se non ti informeremo più se sono presenti
aggiornamenti tecnologici o software sul nostro prodotto
HAI BISOGNO DI AIUTO? CONTATTACI!
LUCE DA COSTRUZIONE
STRINGHE
02
Machine Translated by Google

Ángulodehaz
Tamañoabiertodelgancho
Desecheelproductosielenchufedelaccesorioestádañado.a)
Sujeteelenchufeyretírelodelreceptáculouotrodispositivodesalida.Nolodesenchufetirandodelcable.b)Abrala
tapadefusibles.Deslice
lacubiertadeaccesoalfusibleparaabrirenlapartesuperiordelenchufedeconexiónhacialascuchillas.c)Retireel
fusible
concuidado.Empujeelfusibledesdeelotrolado.d)Riesgodeincendio.
Reemplaceelfusibleúnicamenteconunfusiblede_8_amperiosy125voltios(incluidoconelproducto).e)Cerrar
latapadefusibles.Desliceycierrelacubiertadeaccesoalfusibleenlapartesuperiordelenchufedeconexión.
c)“Nomontarnicolocarcercadecalentadoresdegasoeléctricos,chimeneas,velasuotrasfuentesdecalorsimilares”.
Enchufeeuropeo
Potencia
220240V50/60HZ(UE/AU)
colorclaro
Reguladordeintensidad
•Conectaryusar.
Lacadenadelucesestádiseñadaconelenchufetraseroparausarjuntoconotros8juegosdeiluminación
temporal.Insertelaclavijadealimentacióndeunacadenadelucesenelenchufetraserodeotraparala
conexiónenserie.
Alutilizarproductoseléctricos,siempresedebenseguirprecaucionesbásicas,incluidaslassiguientes:
01
20~40°C
voltajedeentrada
IP65
i)"Nocubraelproductocontela,papelocualquiermaterialquenoformepartedelproductocuandoestéenuso".j)
"Esteproducto
tieneunenchufepolarizado(unaclavijaesmásanchaquelaotra)comocaracterísticaparareducirelriesgodedescarga
eléctrica.Esteenchufeencajaenuntomacorrientepolarizadodeunasolamanera.
210°
blancofrio
12mm
b)"Noutiliceestosproductosenexterioresamenosqueesténmarcadoscomoadecuadosparausoeninteriores
yexteriores.Cuandolosproductosseutilicenenaplicacionesenexteriores,conéctelosauntomacorrientede
interrupcióndelcircuitodefallaatierra(GFCI).Sinoseproporcionauno,comuníqueseconunelectricistacalificado.
paraunacorrectainstalación."
Cantidaddebombillas
Seguimoscomprometidosaproporcionarleherramientasaprecioscompetitivos.
Noalterenireemplaceelenchufe".Esaceptableomitiresteelementosielproductonoempleaunenchufe
polarizado.k)"Esteproducto
empleaproteccióncontrasobrecarga(fusible).Unfusiblequemadoindicaunasituacióndesobrecargao
cortocircuito.Sielfusiblesefunde,desenchufeelproductodeltomacorriente.Tambiéndesenchufecualquier
hilooproductoadicionalquepuedaestarconectadoalproducto.Reemplaceelfusiblesegúnlasinstruccionesde
serviciodelusuario(sigalasmarcasdelproductoparaconocerlaclasificaciónadecuadadelfusible)yverifique
elproducto.Sisefundeelfusiblederepuesto,puedehaberuncortocircuitoyelproductodebedesecharse".
Esaceptableomitiresteelementosielfusiblenoesreemplazableosinoserequiereproteccióncontra
sobrecargas.l)"Leaysigatodaslasinstruccionesqueseencuentranenelproductoose
proporcionanconelproducto".m)Esteproductonoesuncabledealimentación,nosepuedeutilizarcomocable
deextensióndealimentación.n)Despuésdeconectarvariosjuegosdelucesenserie,siunodelos
fusiblessedisparaounadelaslucesnoseenciende,despuésdelaautocomprobaciónreemplaceelfusibleolabombilla.
Luminoso
100W
18/2AWGSJTW(EE.UU.)
2*0,75mm2(UE/AU)
longitudtotal
•Simplementeinserteelenchufeenunatomadecorrienteadecuadaparaencenderlacadenadelucesy
desenchúfeloparaapagarlaluz.Noesnecesarioinstalarbombillas.
d)“Nofijarelcableadodelproductocongrapasoclavos,nicolocarsobreganchosoclavosafilados”.Paralosjuegos
delucesqueempleanlámparasdetornillomediano,estadeclaracióndeberáincluir:"Instaleúnicamente
utilizandolosmediosdemontajeproporcionados".e)“Nodejar
laslámparasreposarsobreelcabledealimentaciónnisobreningúncable”.f)
"Noutiliceesteproductoparaotrousoquenoseaelprevisto".g)"Nocuelgue
objetosdecuerdas,alambresocordelesdeluz".h)"Nocierrepuertasni
ventanassobreelproductonisobreloscablesdeextensión,yaqueestopodríadañarelaislamientodelcable".
10*bombilla
Riesgodeincendio.Noreemplaceelenchufedelaccesorio.Contieneundispositivodeseguridad(fusible)quenodebe
retirarse.
100120V~50/60Hz(EE.UU.)
NO
10pies
"Ahorreamitaddeprecio","Amitaddeprecio"ocualquierotraexpresiónsimilarutilizadapor
nosotrossolorepresentaunaestimacióndelosahorrosquepodríabeneficiarsealcomprarciertas
herramientasconnosotrosencomparaciónconlasprincipalesmarcasynosignificanecesariamentecubrir
todaslascategoríasdeherramientasofrecidas.pornosotros.Lerecordamosque,cuandorealiceun
pedidoconnosotros,verifiquecuidadosamentesirealmenteestáahorrandolamitad
encomparaciónconlasprincipalesmarcas.
Espaciadodebombillas
10000LM
100pies
CÓMOREEMPLAZARFÍSICAMENTEELFUSIBLE
Sielenchufenoencajacompletamenteeneltomacorriente,inviértalo.Siaúnasínoencaja,comuníquesecon
unelectricistacalificado.Nolouseconuncabledeextensiónamenosqueelenchufepuedainsertarsecompletamente.
Informacióndelcable
Limitadordetemperatura
Iluminacióntemporal
Instruccionesdeoperación
O)"GUARDARESTASINSTRUCCIONES".
Conexiónenserie
Presupuesto
INSTRUCCIONESDESEGURIDADIMPORTANTES
a)LEAYSIGATODASLASINSTRUCCIONESDESEGURIDAD
INSTRUCCIONESDESERVICIOALUSUARIO
Graciasporelegirnuestrailuminacióntemporal.Leaatentamenteestemanualde
usuarioyconsérveloparasuusoposterior.
Soportetécnicoycertificadodegarantíaelectrónica
www.vevor.com/support
USUARIOEXITOSO
CUERDASDELUCESDECONSTRUCCIÓN
l
(Laimagenessolodereferencia,consulteelobjetoreal)
¿Tienepreguntassobreelproducto?¿Necesitasoportetécnico?Nodudeencontactarnos:
Soporte
técnicoycertificadodegarantíaelectrónicawww.vevor.com/support
MODELO:CSL102YES01
MODELO:CSL102YES01
.
Estassonlasinstruccionesoriginales;leaatentamentetodaslas
instruccionesdelmanualantesdeoperar.VEVORsereservauna
interpretaciónclaradenuestromanualdeusuario.Laaparienciadel
productoestarásujetaalproductoquerecibió.Perdonequenoleinformaremos
nuevamentesihayactualizacionesdetecnologíaosoftwareennuestroproducto.
¿NECESITARAYUDA?¡CONTÁCTANOS!
LUZDECONSTRUCCIÓN
INSTRUMENTOSDECUERDA
02
Resistentealaguaparausoen
interioresyexterioresClasificaciónIP
Machine Translated by Google
Kąt wiązki
Rozmiar otwarty haka
Wyrzucić produkt, jeżeli wtyczka przyłączeniowa jest uszkodzona.
a) Chwyć wtyczkę i wyjmij ją z gniazdka lub innego urządzenia wyjściowego. Nie odłączaj urządzenia, ciągnąc za
przewód. b) Otwórz
pokrywę bezpieczników. Przesuń otwartą pokrywę dostępu do bezpiecznika na górze wtyczki w kierunku ostrzy. c)
Ostrożnie
wyjmij bezpiecznik. Wciśnij bezpiecznik z drugiej strony. d) Ryzyko pożaru.
Wymieniaj bezpiecznik wyłącznie na bezpiecznik 125 V o natężeniu _8_ Amp (dostarczany wraz z produktem). e)
Zamknąć pokrywę bezpieczników. Zasuń pokrywę dostępu do bezpiecznika na górze wtyczki.
c) „Nie montuj ani nie umieszczaj w pobliżu grzejników gazowych lub elektrycznych, kominków, świec lub innych podobnych
źródeł ciepła”.
Wtyczka UE
Moc
220-240 V-50/60 Hz (UE/AU)
Jasny kolor
Opornik
• Podłącz i graj.
Łańcuszek świetlny został zaprojektowany z wtyczką tylną do użycia razem z 8 zestawami innych naszych
tymczasowych lamp oświetleniowych. Włóż wtyk zasilania jednego ciągu świetlnego do wtyczki ogonowej
drugiego w celu połączenia szeregowego.
Podczas korzystania z produktów elektrycznych należy zawsze przestrzegać podstawowych środków
ostrożności, w tym:
01
-20~40°C
Napięcie wejściowe
IP65
i) „Nie przykrywaj produktu podczas użytkowania tkaniną, papierem ani żadnym materiałem niebędącym częścią
produktu.” j) „Ten
produkt jest wyposażony w spolaryzowaną wtyczkę (jeden wtyk jest szerszy od drugiego), która zmniejsza ryzyko
porażenia prądem. Wtyczka ta pasuje do spolaryzowanego gniazdka tylko w jeden sposób.
210°
chłodna biel
12mm
b) „Nie używaj tych produktów na zewnątrz, chyba że są oznaczone jako odpowiednie do użytku wewnątrz i na
zewnątrz. Jeśli produkty są używane na zewnątrz, podłącz produkt do gniazdka z przerywaczem obwodu
ziemnozwarciowego (GFCI). Jeśli takiego nie ma, skontaktuj się z wykwalifikowanym elektrykiem dla prawidłowego
montażu.”
Ilość żarówek
Nadal dokładamy wszelkich starań, aby zapewnić Państwu narzędzia w konkurencyjnej cenie.
Nie przerabiaj ani nie wymieniaj wtyczki. Dopuszczalne jest pominięcie tej pozycji, jeśli produkt nie zawiera
polaryzowanej wtyczki. k) „W
tym produkcie zastosowano zabezpieczenie przed przeciążeniem (bezpiecznik). Przepalony bezpiecznik wskazuje na
przeciążenie lub zwarcie. Jeżeli przepali się bezpiecznik, odłącz produkt od gniazdka. Odłącz także wszelkie
dodatkowe sznurki lub produkty, które mogą być dołączone do produktu. Wymień bezpiecznik zgodnie z instrukcją
serwisowania użytkownika (przestrzegaj oznakowania produktu, aby uzyskać prawidłowe parametry bezpiecznika)
i sprawdź produkt. Jeżeli bezpiecznik zamienny przepali się, może nastąpić zwarcie i produkt należy wyrzucić.”
Dopuszczalne jest pominięcie tej pozycji, jeśli bezpiecznik nie jest wymienny lub gdy nie jest wymagane
zabezpieczenie przed przeciążeniem. l) „Przeczytaj i postępuj zgodnie ze wszystkimi
instrukcjami znajdujących się na produkcie lub dostarczonych z produktem. m) Ten produkt nie jest kablem
zasilającym i nie może być używany jako przedłużacz zasilający. n) Jeśli jeden z bezpieczników zostanie
włączony po szeregowym połączeniu wielu zestawów świateł lub jedna z lampek nie świeci się, po samokontroli wymień
bezpiecznik lub żarówkę.
Świetlny
100 W
18/2 AWG SJTW (USA) 2*0,75
mm2 (UE/AU)
Całkowita długość
• Wystarczy włożyć wtyczkę zasilania do odpowiedniego gniazdka, aby włączyć lampę i odłączyć ją, aby
wyłączyć lampę. Nie ma potrzeby instalowania żarówek.
d) „Nie mocuj przewodów produktu za pomocą zszywek lub gwoździ ani nie umieszczaj ich na ostrych hakach lub
gwoździach”. W przypadku zestawów oświetleniowych zawierających średnie lampy śrubowe stwierdzenie to
powinno zawierać: „Instaluj wyłącznie przy użyciu dostarczonych
środków montażowych”. e) „Nie zostawiaj lamp na przewodzie zasilającym ani
na jakimkolwiek innym przewodzie.” f) „Nie używaj tego produktu do celów
innych niż jego przeznaczenie”. g) „Nie wieszaj przedmiotów na sznurku,
drucie lub sznurku świetlnym”. h) „Nie zamykaj drzwi ani okien produktu ani przedłużaczy, ponieważ może to spowodować
uszkodzenie izolacji przewodu”.
10 * żarówka
Ryzyko pożaru. Nie wymieniaj wtyczki przyłączeniowej. Zawiera urządzenie zabezpieczające (bezpiecznik), którego nie
należy usuwać.
100-120 V ~ 50/60 Hz (USA)
NIE
10 stóp
„Zaoszczędź połowę”, „połowa ceny” lub inne podobne wyrażenia używane przez nas przedstawiają
jedynie szacunkową oszczędność, jaką możesz zyskać kupując u nas określone narzędzia w porównaniu
z głównymi najlepszymi markami i niekoniecznie oznaczają uwzględnienie wszystkich kategorii oferowanych
narzędzi przez nas. Przypominamy, aby podczas składania zamówienia u nas dokładnie sprawdzić, czy
faktycznie oszczędzasz połowę w porównaniu z czołowymi markami.
Rozstaw żarówek
10000LM
100 stóp
JAK FIZYCZNIE WYMIENIĆ BEZPIECZNIK
Jeżeli wtyczka nie pasuje całkowicie do gniazdka, należy ją odwrócić. Jeśli nadal nie pasuje, skontaktuj się z
wykwalifikowanym elektrykiem. Nie używaj przedłużacza, jeśli wtyczki nie można całkowicie włożyć.
Informacje o przewodzie
Ogranicznik temperatury
Oświetlenie tymczasowe
Instrukcje obsługi
O) „ZACHOWAJ TE INSTRUKCJE”.
Połączenie szeregowe
Dane techniczne
WAŻNE INSTRUKCJE BEZPIECZEŃSTWA
a) PRZECZYTAJ I PRZESTRZEGAJ WSZYSTKICH INSTRUKCJI BEZPIECZEŃSTWA
INSTRUKCJA OBSŁUGI UŻYTKOWNIKA
Dziękujemy za wybranie naszego oświetlenia tymczasowego. Proszę uważnie przeczytać niniejszą instrukcję
obsługi i zachować ją do dalszego wykorzystania.
Wsparcie techniczne i certyfikat e-gwarancji www.vevor.com/
support
SZCZĘŚLIWY UŻYTKOWNIK
CIĄGI LEKKIE KONSTRUKCYJNE
L
(Zdjęcie ma charakter wyłącznie poglądowy, proszę zapoznać się z rzeczywistym obiektem)
Masz pytania dotyczące produktu? Potrzebujesz wsparcia technicznego? Prosimy o kontakt:
Wsparcie
techniczne i certyfikat e-gwarancji www.vevor.com/support
MODEL: CSL10-2Y-ES01
MODEL: CSL10-2Y-ES01
.
To jest oryginalna instrukcja. Przed przystąpieniem do obsługi prosimy o dokładne
zapoznanie się ze wszystkimi instrukcjami. VEVOR zastrzega sobie jasną interpretację naszej
instrukcji obsługi. Wygląd produktu zależy od produktu, który otrzymałeś. Proszę
wybaczyć nam, że nie będziemy ponownie informować Państwa, jeśli pojawią się jakieś
aktualizacje technologii lub oprogramowania naszego produktu
SMYCZKI
ŚWIATŁO BUDOWLANE
POTRZEBUJESZ POMOCY? SKONTAKTUJ SIĘ Z NAMI!
02
Wodoodporny do użytku wewnątrz i
na zewnątrz. Stopień ochrony IP
Machine Translated by Google

Serieverbinding
O) "BEWAAR DEZE INSTRUCTIES ".
Bedieningsinstructies
Specificaties
GEBRUIKERSONDERHOUDSINSTRUCTIES
BELANGRIJKE VEILIGHEIDSINSTRUCTIES
a) LEES EN VOLG ALLE VEILIGHEIDSINSTRUCTIES
Tijdelijke verlichting
SUCCESVOLLE GEBRUIKER
BOUWLICHTSTRINGEN
L
Waterdicht voor gebruik
binnen en buiten IP-classificatie
Bedankt dat u voor onze tijdelijke verlichting heeft gekozen. Lees deze gebruikershandleiding
aandachtig door en bewaar hem voor verder gebruik.
Technische ondersteuning en e-garantiecertificaat
www.vevor.com/support
De lichtslinger is ontworpen met de staartstekker om samen met 8 andere tijdelijke verlichting te
gebruiken. Steek de stroom van de ene lichtslinger in de staartstekker van een andere voor serieschakeling.
01
10 * lamp
100-120V~ 50/60Hz (VS)
NEE
Brandgevaar. Vervang de bevestigingsplug niet. Bevat een veiligheidsvoorziening (zekering) die niet mag worden
verwijderd.
d) "Zet de bedrading van het product niet vast met nietjes of spijkers, en plaats hem niet op scherpe haken of
spijkers." Voor lichtsets waarin middelgrote schroeflampen worden gebruikt, moet deze verklaring het
volgende omvatten: "Installeer uitsluitend met behulp van de
meegeleverde montagemiddelen". e) "Laat lampen niet op het netsnoer of op
een draad rusten." f) "Gebruik dit product niet voor een ander doel dan
waarvoor het bedoeld is." g) "Hang geen voorwerpen aan een snoer,
draad of lichtsnoer." h) "Sluit geen deuren of ramen van het product of verlengsnoeren, aangezien dit de draadisolatie kan
beschadigen."
100W
18/2 AWG SJTW (VS) 2*0,75
mm2 (EU/AU)
Totale lengte
Draadinformatie
Temperatuurbegrenzer
• Steek gewoon de stekker in een geschikt stopcontact om de lichtslinger in te schakelen en haal de stekker
uit het stopcontact om het licht uit te schakelen. U hoeft geen lampen te installeren.
Als de stekker niet volledig in het stopcontact past, draai de stekker dan om. Als het nog steeds niet past, neem dan contact
op met een gekwalificeerde elektricien. Niet gebruiken met een verlengsnoer, tenzij de stekker er volledig in kan worden gestoken.
HOE DE ZEKERING FYSIEK VERVANGEN
Bollen afstand
'Bespaar de helft', 'Halve prijs' of andere soortgelijke uitdrukkingen die door ons worden gebruikt
vertegenwoordigen slechts een schatting van de besparingen die u zou kunnen profiteren als u
bepaalde gereedschappen bij ons koopt in vergelijking met de grote topmerken en betekenen niet
noodzakelijkerwijs dat ze alle aangeboden categorieën gereedschappen dekken. door ons. U wordt er
vriendelijk aan herinnerd om, wanneer u een bestelling bij ons plaatst, zorgvuldig te
verifiëren of u daadwerkelijk de helft bespaart in vergelijking met de grote topmerken.
10ft
10000LM
EU-stekker
c) "Niet monteren of plaatsen in de buurt van gas- of elektrische kachels, open haarden, kaarsen of andere soortgelijke
warmtebronnen."
Wattage
220-240V- 50/60HZ (EU/AU)
Lichte kleur
100ft
• Plug-and-Play.
Stralingshoek
Haak open maat
Bij het gebruik van elektrische producten moeten altijd de basisvoorzorgsmaatregelen in acht worden
genomen, waaronder de volgende:
Gooi het product weg als de bevestigingsplug beschadigd is. a) Pak
de stekker vast en verwijder deze uit het stopcontact of een ander stopcontact. Trek de stekker niet uit het stopcontact
door aan het snoer te
trekken. b) Open het zekeringdeksel. Schuif het toegangsdeksel voor de zekeringen bovenop de bevestigingsplug
richting
de messen. c) Verwijder de zekering voorzichtig. Duw de zekering vanaf de
andere kant. d) Brandgevaar. Vervang de zekering uitsluitend door een zekering van _8_ Amp, 125 Volt
(meegeleverd met product). e) Sluit het zekeringdeksel. Schuif het deksel van de zekeringtoegang bovenop de bevestigingsplug dicht.
We blijven ons inzetten om u gereedschap tegen een concurrerende prijs te bieden.
Aantal lampen
i) "Bedek het product niet met stof, papier of ander materiaal dat geen deel uitmaakt van het product wanneer het in
gebruik is." j) "Dit
product heeft een gepolariseerde stekker (de ene pen is breder dan de andere) om het risico op een elektrische schok
te verminderen. Deze stekker past slechts op één manier in een gepolariseerd stopcontact.
210°
Wijzig of vervang de stekker niet." Het is acceptabel om dit item weg te laten als het product geen gepolariseerde
stekker heeft. k) "Dit product
maakt gebruik van overbelastingsbeveiliging (zekering). Een doorgebrande zekering duidt op een situatie van
overbelasting of kortsluiting. Als de zekering doorbrandt, haalt u de stekker van het product uit het stopcontact.
Koppel ook eventuele extra kabels of producten los die mogelijk aan het product zijn bevestigd. Vervang de zekering
volgens de onderhoudsinstructies voor de gebruiker (volg de productmarkering voor de juiste zekeringwaarde) en
controleer het product. Als de vervangende zekering doorbrandt, kan er sprake zijn van kortsluiting en moet
het product worden weggegooid." Het is acceptabel om dit item weg te laten als de zekering niet vervangbaar is
of als bescherming tegen overbelasting niet vereist is. l) "Lees en volg alle instructies die
op het product staan of bij het product zijn geleverd." m) Dit product is geen netsnoer en kan niet worden gebruikt als
verlengsnoer. n) Nadat meerdere sets lampen in serie zijn aangesloten en een van de zekeringen doorslaat
of een van de lampjes gaat niet branden, vervang na zelfcontrole de zekering of het lampje.
Lichtgevend
koel wit
b) "Gebruik deze producten niet buitenshuis, tenzij gemarkeerd als geschikt voor gebruik binnen en buiten. Wanneer
producten worden gebruikt in buitentoepassingen, sluit het product dan aan op een aardlekschakelaar (GFCI). Als
er geen aanwezig is, neem dan contact op met een gekwalificeerde elektricien voor een correcte installatie."
Ingangsspanning
IP65
-20~40°C
Dimmer
12 mm
(De afbeelding is alleen ter referentie, raadpleeg het werkelijke object)
.
MODEL: CSL10-2Y-ES01
MODEL: CSL10-2Y-ES01
Dit is de originele instructie. Lees alle handleidingen zorgvuldig door voordat
u ermee aan de slag gaat. VEVOR behoudt zich een duidelijke interpretatie van
onze gebruikershandleiding voor. Het uiterlijk van het product is afhankelijk
van het product dat u heeft ontvangen. Vergeef ons alstublieft dat we u niet opnieuw
zullen informeren als er technologie- of software-updates zijn voor ons product
Heeft u productvragen? Technische ondersteuning nodig? Neem gerust contact met ons op:
Technische
ondersteuning en e-garantiecertificaat www.vevor.com/
support
SNAREN
BOUWLICHT
HULP NODIG? NEEM CONTACT MET ONS OP!
02
Machine Translated by Google

LYCKAD ANVÄNDARE
KONSTRUKTIONSLJUSSÄNGAR
L
10 000 LM
Ljus färg
EU-kontakt
c) "Montera eller placera inte i närheten av gas- eller elvärmare, eldstäder, ljus eller andra liknande värmekällor."
Wattal
220-240V- 50/60HZ (EU/AU)
100 fot
• Plug and Play.
När du använder elektriska produkter bör grundläggande försiktighetsåtgärder alltid följas,
inklusive följande:
Kassera produkten om fästpluggen är skadad. a) Ta tag i kontakten och ta
bort den från uttaget eller annan uttagsenhet. Dra inte ur kontakten genom att dra i sladden. b) Öppna säkringslocket. Skjut det öppna
locket till säkringen ovanpå
fästpluggen mot bladen. c) Ta försiktigt bort säkringen. Tryck på säkringen från andra sidan. d) Brandrisk. Byt endast ut säkringen mot
_8_ Amp,
125 volts säkring (medföljer produkten). e) Stäng säkringslocket. Skjut stängt
säkringsåtkomstlocket ovanpå fästpluggen.
Strålvinkel
Krok öppen storlek
Vi fortsätter att vara engagerade i att ge dig verktyg till konkurrenskraftiga priser.
Antal glödlampor
Ändra eller byt inte ut kontakten." Det är acceptabelt att utelämna denna artikel om produkten inte använder en
polariserad kontakt. k) "Denna
produkt använder överbelastningsskydd (säkring). En trasig säkring indikerar en överbelastnings- eller
kortslutningssituation. Om säkringen går, koppla ur produkten från uttaget. Koppla också ur alla
ytterligare strängar eller produkter som kan vara fästa på produkten. Byt ut säkringen enligt användarens
serviceinstruktioner (följ produktmärkningen för korrekt säkringsklassning) och kontrollera produkten. Om
ersättningssäkringen går kan en kortslutning förekomma och produkten bör kasseras." Det är acceptabelt
att utelämna denna artikel om säkringen inte är utbytbar eller där överbelastningsskydd inte krävs. l) "Läs
och följ alla instruktioner som finns på produkten eller levereras med produkten." m)
Denna produkt är inte en nätsladd, kan inte användas som en strömförlängningssladd. n) Om en av säkringarna
löser ut efter att flera uppsättningar lampor har anslutits i serie. eller en av lamporna inte tänds, efter
självkontroll byt sedan ut säkring eller glödlampa.
Lysande
i) "Täck inte produkten med tyg, papper eller annat material som inte ingår i produkten när den används." j) "Denna
produkt har en
polariserad kontakt (det ena bladet är bredare än det andra) som en funktion för att minska risken för elektriska stötar.
Denna kontakt passar bara i ett polariserat uttag på ett sätt.
210°
Ingångsspänning
IP65
-20~40°C
kall vit
12 mm
b) "Använd inte dessa produkter utomhus om de inte är märkta som lämpliga för inomhus- och utomhusbruk.
När produkter används i utomhusapplikationer, anslut produkten till ett jordfelsavbrottsuttag (GFCI). Kontakta
en kvalificerad elektriker om ett sådant inte tillhandahålls. för korrekt installation."
Dimmer
Strängljuset är designat med bakkontakten för att använda tillsammans med 8 set andra. Vår tillfälliga
belysning sätter in strömstiftet på en stränglampa i bakkontakten på en annan för seriekoppling.
01
100-120V~ 50/60Hz (USA)
INGA
Risk för brand. Byt inte ut fästpluggen. Innehåller en säkerhetsanordning (säkring) som inte bör tas bort.
10* glödlampa
d) "Fäst inte produktens ledningar med häftklamrar eller spikar, och placera inte på vassa krokar eller spikar." För
ljusuppsättningar som använder medelstora skruvlampor, ska detta uttalande innehålla: "Installera endast med
hjälp av medföljande monteringsanordningar". e) "Låt inte lampor
vila på nätsladden eller på någon kabel." f) "Använd inte denna produkt för
annat än dess avsedda användning." g) "Häng inte föremål från sladd, tråd
eller ljussnöre." h) "Stäng inte dörrar eller fönster på produkten eller
förlängningssladdar eftersom detta kan skada trådisoleringen."
• Sätt bara i nätkontakten i ett lämpligt eluttag för att tända ljusslingan och koppla ur den för att släcka
ljuset. Inget behov av att installera glödlampor.
100W
18/2 AWG SJTW (US)
2*0,75 mm2 (EU/AU)
Total längd
Trådinformation
Temperaturbegränsare
Om kontakten inte passar helt i uttaget, vänd på kontakten. Om den fortfarande inte passar, kontakta en
behörig elektriker. Använd inte med en förlängningssladd om inte kontakten kan sättas in helt.
HUR MAN FYSISKT BYTER SÄKRINGEN
Glödlampor avstånd
"Spara hälften", "halva priset" eller andra liknande uttryck som används av oss representerar
bara en uppskattning av besparingar du kan dra nytta av att köpa vissa verktyg hos oss jämfört
med de stora toppmärkena och betyder inte nödvändigtvis att täcka alla kategorier av verktyg som
erbjuds av oss. Du påminns om att noggrant kontrollera när du gör en beställning hos oss om du
verkligen sparar hälften i jämförelse med de främsta varumärkena.
10 fot
Serieanslutning
ANVÄNDARSERVICEINSTRUKTIONER
Driftinstruktioner
Specifikationer
VIKTIGA SÄKERHETSINSTRUKTIONER
O) "SPARA DESSA INSTRUKTIONER".
a) LÄS OCH FÖLJ ALLA SÄKERHETSINSTRUKTIONER
Vattentät för inom- och
utomhusbruk IP-klassificering
Teknisk support och e-garanticertifikat
www.vevor.com/support
Tack för att du valde vår tillfälliga belysning. Läs denna bruksanvisning noggrant
och spara den för vidare användning.
Tillfällig belysning
MODELL: CSL10-2Y-ES01
Har du produktfrågor? Behöver du teknisk support? Kontakta oss gärna: Teknisk support och
e-
garanticertifikat www.vevor.com/support
(Bilden är endast för referens, se det faktiska objektet)
MODELL: CSL10-2Y-ES01
Detta är den ursprungliga instruktionen, läs alla instruktioner noggrant
innan du använder den. VEVOR reserverar sig för en tydlig tolkning av vår
användarmanual. Utseendet på produkten är beroende av den produkt
du fått. Ursäkta oss att vi inte kommer att informera dig igen om det finns
någon teknik eller mjukvaruuppdateringar på vår produkt
.
STRINGS
KONSTRUKTIONSLJUS
BEHÖVER HJÄLP? KONTAKTA OSS!
02
Machine Translated by Google