
AC240
Portable Power Station
User Manual V2.0
Please read this manual carefully before use and keep it for future reference.
Warning
1. Charge the unit before first use.
2. Do not use solar panels with open circuit voltage higher than 60VDC. Solar input
voltage range for the unit is 11V-60VDC.
3. Charge the unit immediately when the SoC drops below 5%. If the SoC drops to 0,
power off the unit and charge it for at least 30 minutes before restarting.
4. The unit is for off-grid use only. Do not connect its AC output to the grid.
5. If not used for more than 3 months, charge the unit to 40%-60% SoC and store it
with the power off. For optimum battery life, discharge and charge the unit every 3
months.

Notice
BLUETTI's products, services, and features are subject to the agreed-upon terms and
conditions during purchase. Please note that some products, services, or features
described in this manual may not be available under your purchase contract. Unless
otherwise specified in the contract, BLUETTI makes no representations or warranties
of any kind, express or implied, with respect to the contents of this manual.
The contents of this manual are subject to change without notice. Please get the
latest version from: https://www.bluettipower.com/pages/user-guides
If you have any questions or concerns about this manual, please contact BLUETTI
support for further assistance.
Thank You!
Thank you for making BLUETTI a part of your family.
From the very beginning, BLUETTI has tried to stay true to a sustainable future
through green energy storage solutions while delivering an exceptional
eco-friendly experience for our homes and our world.
That's why BLUETTI makes its presence in 100+ countries and is trusted by
millions of customers across the globe.
France
Germany
Netherlands
Copyright © ShenzhenPowerOakNewenerCo., Ltd. All rights reserved.
No part of this document may be reproduced or transmitted in any form or by any
means without the prior written consent of ShenzhenPowerOakNewenerCo., Ltd.
Symbol Conventions
This manual uses the following symbols to highlight important information:
Symbol Category
Danger / Warning
/ Attention
Notice
Description
It indicates a hazardous situation which, if not avoided,
could result in death or serious injury.
It indicates a potentially hazardous situation which, if
not avoided, could cause substantial damage to
property and the environment.

Safety Instructions
Packing List
Product Introduction
Product Overview
Power ON / OFF
LED Screen
Charging
Discharging
Settings
AC240 + B210 Expansion Connection
Parallel Operation
BLUETTI App
Specifications
Button Operation Instructions
Troubleshooting
Contents
1
2
3
4
5
6
7
8
9
10
11
12
13
14
15
Appx. 1 Estimating Operation Time
Appx. 2 FAQ
Appx. 3 FCC Statement
Appx. 4 IC Caution
Appx. 5 Consignes de sécurité
05
09
12
12
13
14
16
19
20
24
25
26
26
28
29
30
31
32
33
34

1. Safety Instructions
Read this manual for instructions on the proper use and safety information for the
product. The safety instructions provided herein are for illustrative purposes that include
but are not limited to those listed in this manual. Actual operation shall comply with all
applicable safety standards. If you have any questions, feel free to contact BLUETTI
support or your local BLUETTI dealers.
1.1 Statement
To ensure a safe operation, it's crucial to observe and adhere to the following conditions:
• Always operate or store the product in the conditions specified in this manual.
• The installation and ambient conditions must comply with the requirements in the
relevant international, national, or regional standards.
• Avoid unauthorized disassembly, component replacement, or modification of software
codes.
BLUETTI shall not be liable for damages resulting from the following circumstances:
· Damage resulting from force majeure events such as earthquakes, fires, storms,
floods, or mudslides.
· Damage caused by the customer's own transportation.
· Damage resulting from inadequate storage conditions as specified in the manual.
· Hardware or data damage caused by customer negligence, improper operation, or
intentional actions.
· System damage caused by third parties or customers, including but not limited to
improper handling and installation not in accordance with the instructions in this manual.
· The product doesn't fulfill power supply needs for power-reliant equipment in
critical sectors like atomic energy, aviation, medical, and other domains where safety
is paramount. BLUETTI assumes no liability for incidents involving personal safety,
fire, equipment malfunction, or any adverse aftermath resulting from using this
product with such equipment.
· Damage caused by adjustments, changes, or removal of labels in violation of this manual.
· This product is not intended for use with devices that require a high-performance
Uninterruptible Power Supply (UPS), including but not limited to data servers, work-
stations, medical equipment, and other similar devices. BLUETTI shall not be liable
for any data loss, equipment damage, or personal injury resulting from the violation
of this requirement.
1.2 General Requirements
INSTRUCTIONS PERTAINING TO RISK OF FIRE, ELECTRIC SHOCK, OR INJURY TO PERSONS
IMPORTANT SAFETY INSTRUCTIONS
JUST POWER ON 05

WARNING:
When using this product, basic precautions should always be followed, including the
following:
• Read all the instructions before using the product.
• To reduce the risk of injury, close supervision is necessary when the product is used near
children.
• Do not put fingers or hands into the product. And do not insert foreign objects into any
ports of the product.
• Use of an attachment not recommended or sold by the manufacturer may result in a risk
of fire, electric shock, or injury to persons.
• To reduce the risk of damage to the electric plug and cord, pull the plug rather than the
cord when disconnecting the product.
• Do not use a battery pack or appliance that is damaged or modified, as they may exhibit
unpredictable behavior resulting in fire, explosion, or personal injury.
• Do not operate the product with a damaged cord or plug, or a damaged output cable.
• Do not attempt to replace the internal battery or any other component of the product by
anyone other than authorized personnel. There are no end-user serviceable components.
Do not disassemble the product, take it to a qualified service person when service or
repair is required. Incorrect reassembly may result in a risk of fire or electric shock.
• To reduce the risk of electric shock, unplug the product from the outlet before attempting
any instructed servicing.
• WARNING - RISK OF EXPLOSIVE GASES. To reduce the risk of battery explosion, follow
these instructions and those published by the battery manufacturer and manufacturer of
any equipment you intend to use in the vicinity of the battery. Review cautionary markings
on these products and engines.
• PERSONAL PRECAUTIONS
a. Wear complete eye protection and clothing protection. Avoid touching eyes while working
near the battery.
b. Never smoke or allow a spark or flame in the vicinity of the battery or engine.
c. Be extra cautious to reduce the risk of dropping a metal tool onto the battery. It might
spark or short-circuit the battery or other electrical parts which may cause an explosion.
• When charging the internal battery, work in a well ventilated area and do not restrict
ventilation in any way.
• Under abusive conditions, liquid may be ejected from the battery; avoid contact. If
contact accidentally occurs, flush with water. If liquid contacts eyes, additionally seek
medical help. Liquid ejected from the battery may cause irritation or burns.
• Do not expose the product to fire or excessive temperature. Exposure to fire or temperature
above 80°C (176°F) may cause an explosion.
JUST POWER ON06

• Have servicing performed by a qualified repair person using only identical replacement
parts. This will ensure that safety is maintained.
• WARNING: Avoid contact with seawater, which may cause corrosion of metal parts.
• Do not stack anything on top of the product while in storage or while in use. Do not move
the product while operating as vibrations and sudden impacts may lead to poor connections
to the hardware inside.
• In case of fire, use only a dry powder fire extinguisher appropriate for the product.
• WARNING - RISK OF ELECTRIC SHOCK. Never use the product to supply power tools to
cut or access live parts or live wirings, or materials that may contain live parts or live
wirings inside, such as building walls, etc.
1.3 Grounding Instructions
This product must be grounded when connected to the grid. If it should malfunction or
break down, grounding provides a path of least resistance for electric current to reduce
the risk of electric shock. This product is equipped with a cord having an equip-
ment-grounding conductor and a grounding plug. The plug must be plugged into an
outlet that is properly installed and grounded in accordance with all local codes and
ordinances.
WARNING - Improper connection of the equipment-grounding conductor can result in a
risk of electric shock. Check with a qualified electrician if you are in doubt as to whether
the product is properly grounded. Do not modify the plug provided with the product - if it
does not fit the outlet, have a proper outlet installed by a qualified electrician.
1.4 Handling Requirements
During transportation or storage, take care to avoid dropping, violently impacting, or
tilting the product as it may result in internal damage. If necessary, use mechanical
assistance such as carts or adjustable height workbenches to ensure safe handling.
Recommended number of people based on the weight of product
Weight
<18kg (39.7lbs)
18kg~32kg (39.7lbs~70.5lbs)
32kg~55kg (70.5lbs~121.3lbs)
>55kg (121.3lbs)
Number of people
1
2
3
4 or a cart
1.5 Storage Instructions
•
When the SoC drops to 5%, please charge the product immediately.
• Before storing the product, charge it to 40% to 60% SoC to keep it in optimal condition.
In addition, power off the unit and disconnect all electrical connections from it.
JUST POWER ON 07

• Store the product in a cool and dry place, keeping it away from flammable or combustible
materials and gases.
• The product can be safely stored within a temperature range of -20°C to 45°C ( -4°F to
113°F). However, if the storage duration exceeds one month, it's recommended to maintain
an ideal storage temperature of around 30°C (86°F).
• Fully cycle the product every 3 months to maintain the battery's health. It's NOT
recommended to store the unit for extended periods of time, as it may affect its
performance and overall lifespan.
If the SoC drops to 0 (during storage or upon startup), take the following actions to
safely restart the product:
• Shut down immediately.
• Charge within 48 hours.
• Keep it at an ambient temperature of 5°C to 35°C (41°F to 95°F) for 6 hours before
charging. It's recommended to charge the product via an AC source. If charging via solar
energy, ensure that your solar system provides an output of more than 100W.
The symbol displayed is intended to remind you to read the instructions in the
literature accompanying the product before operation and maintenance.
• Connect the product to a socket-outlet that has an earthing connection using the power
cord provided.
• The socket-outlet should be installed near the product and easily accessible for safety
purposes.
• Never dispose of a battery by throwing it into fire or a hot oven, or by mechanically crushing
or cutting it, as these may cause it to explode.
• Avoid leaving batteries in extremely high-temperature environments, as this can result in
an explosion or the leakage of flammable liquid or gas.
• The battery subjected to extremely low air pressure may result in an explosion or the
leakage of flammable liquid or gas.
• Attention should be drawn to the environmental aspects of battery disposal.
• Please refer to the information on the exterior bottom enclosure for electrical and safety
information before installing or operating the apparatus.
SAVE THESE INSTRUCTIONS
BLUETTI shall not be liable for any equipment damage caused by the violation of the
above instructions.
JUST POWER ON08
1
1
1
1
1
1
AC240
Portable Power Station
User Manual V2.0
Please read this manual carefully before use and keep it for future reference.
1
2. Packing List
Item Picture Qty.
Standard Accessories
Portable Power Station
AC Charging Cable
Solar Charging Cable
Car Charging Cable
Product Documentation
Grounding Screw
(M5 x 10)
Warranty Card
JUST POWER ON 09
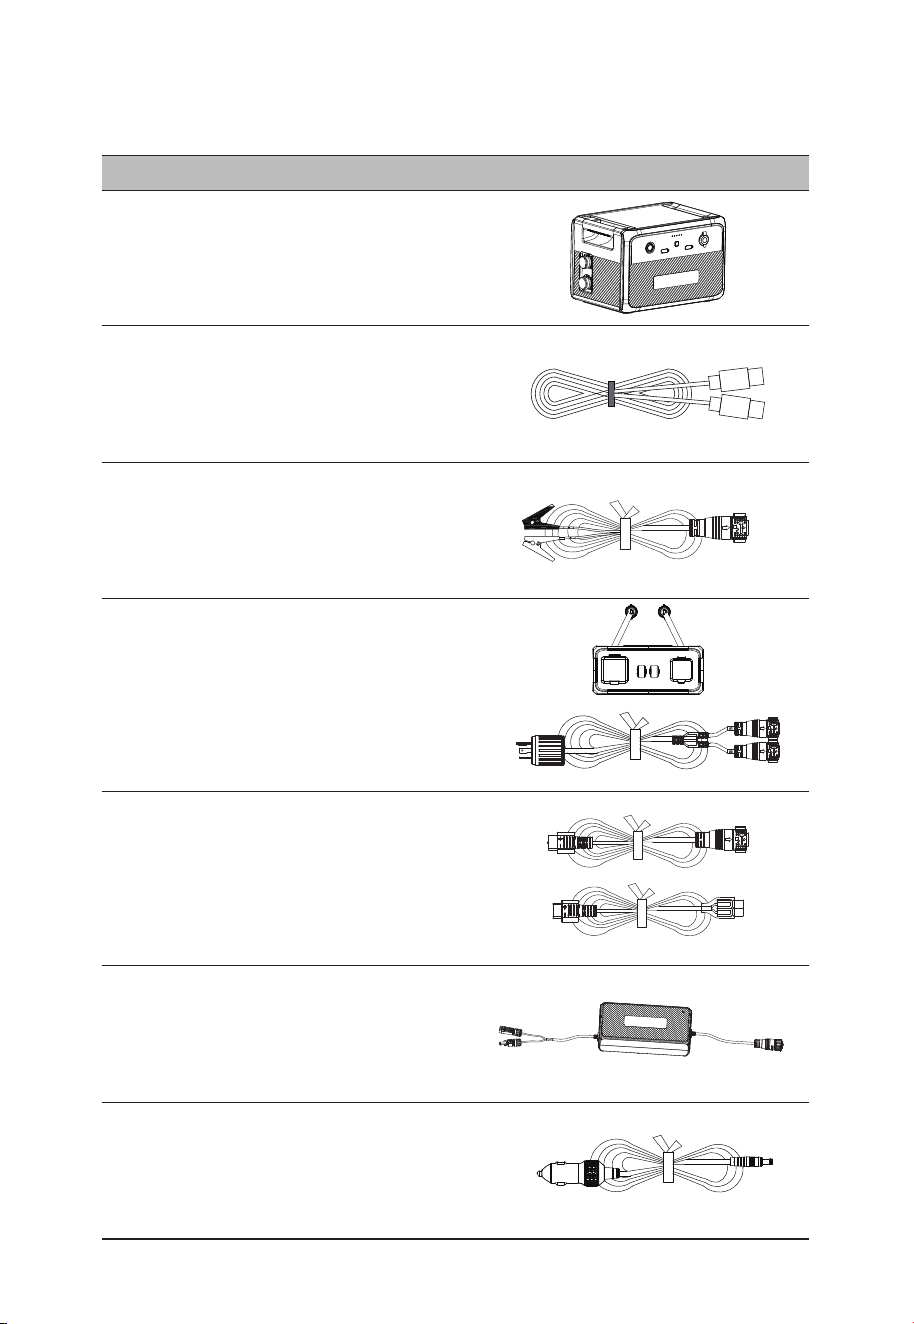
RV Power Cable
(For RV's 12V devices)
Lead-acid Battery Charging Cable
(Charge the AC240 via a lead-acid battery)
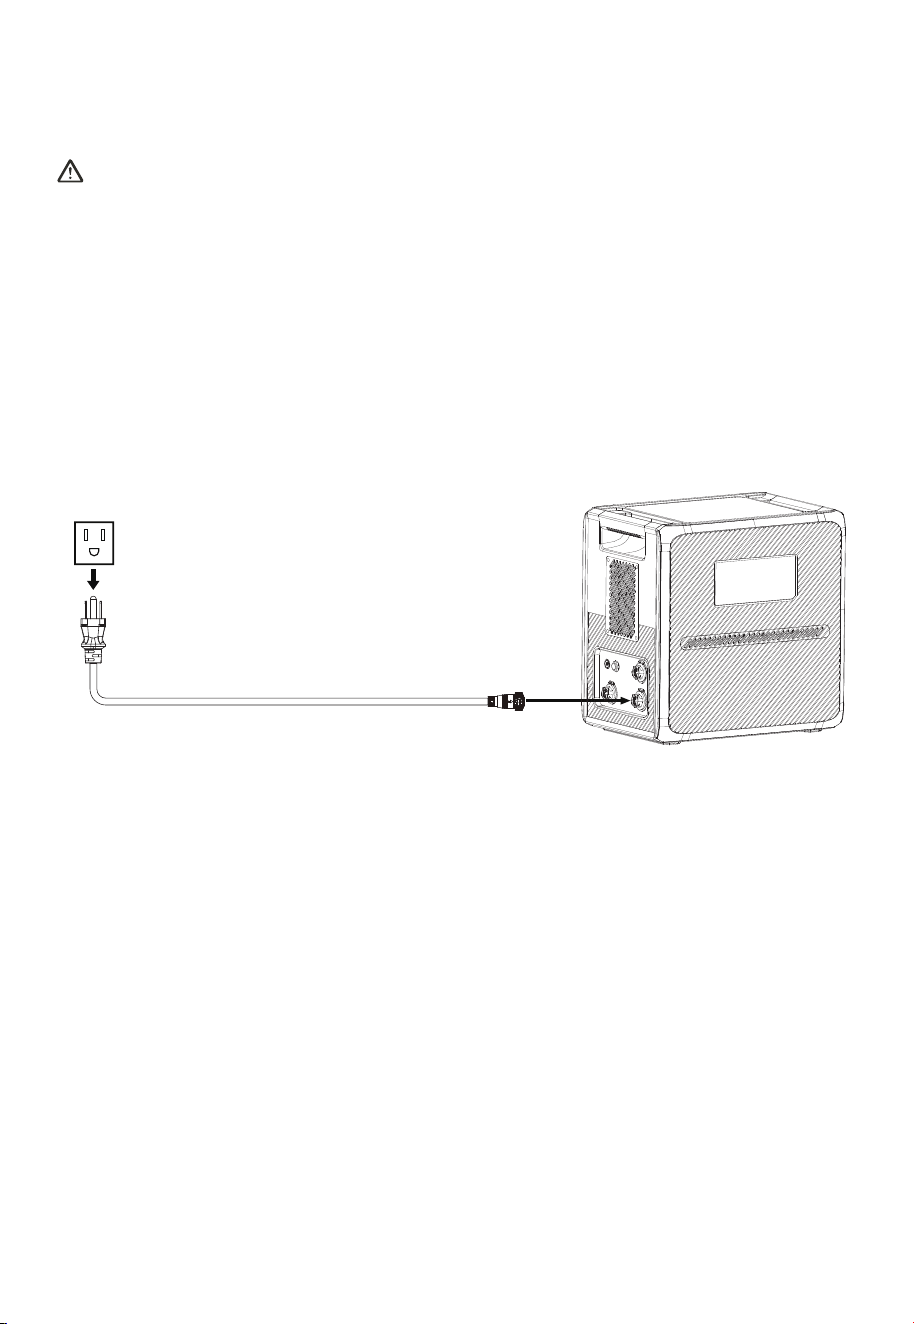
PV Voltage Regulator
(Convert high solar panel voltage
to a suitable level for battery charging)
12V Power Cable
(For 12V devices with DC5521 port,
such as routers, cameras, etc.)
B210 Expansion Battery
USB-C to USB-C Cable (output)
P480A Parallel Box
AC Parallel Charging Cable
(The appearance of the cable is
subject to the cable received)
Item Picture
Optional Accessories
(Available on the official BLUETTI website: https://www.bluettipower.com)
JUST POWER ON10

L14-30 AC Charging Cable
TT-30 AC Charging Cable
N14-50P AC Charging Cable
TT-30 30A AC Parallel Charging Cable
(The appearance of the cable is
subject to the cable received)
N14-50P 50A AC Parallel Charging Cable
(The appearance of the cable is
subject to the cable received)
JUST POWER ON 11
Item Picture
31 2
17
16
15
14
13
4 5 6 7 8
10
11
12
9
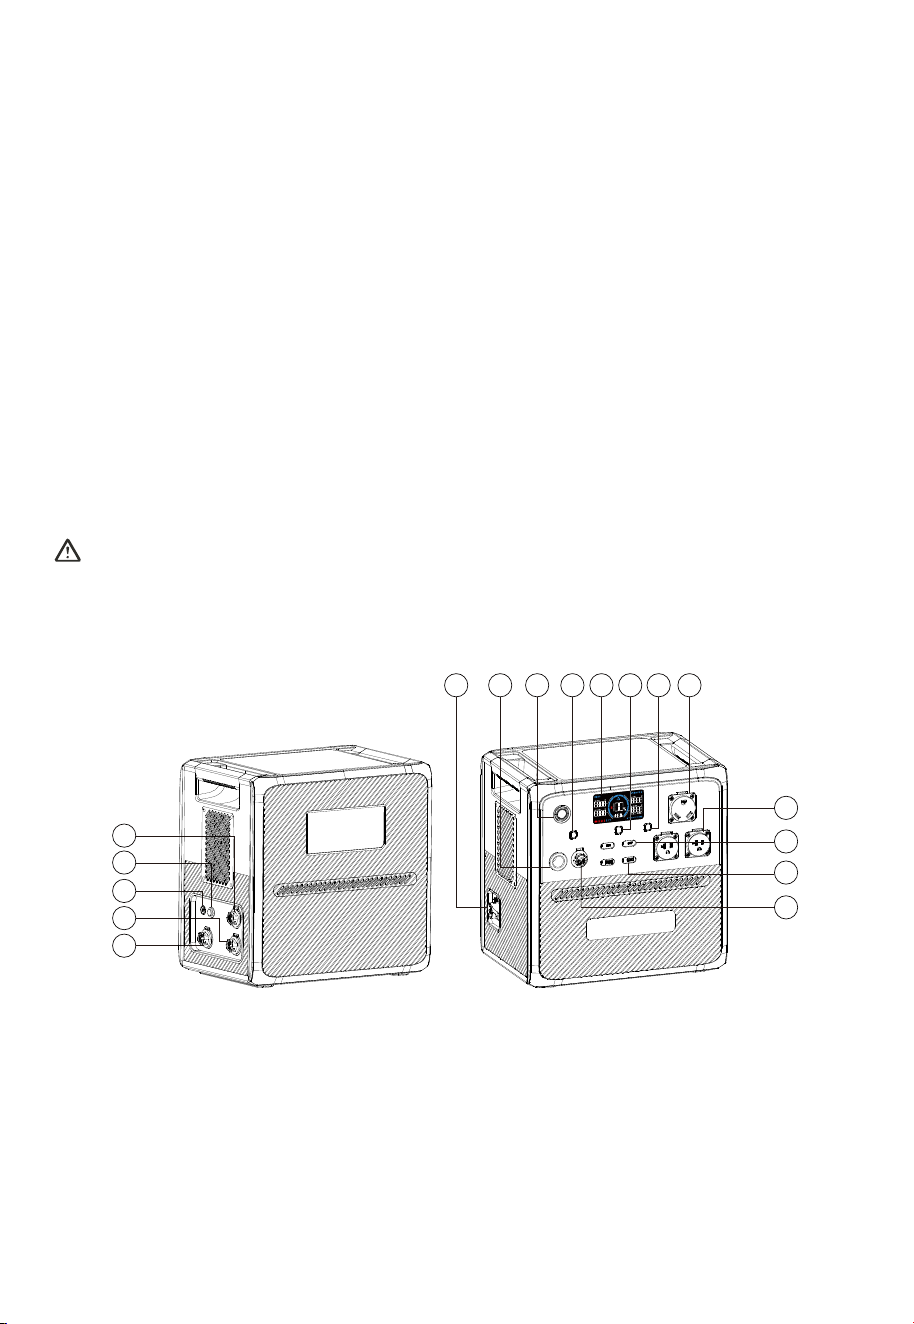
3. Product Introduction
4. Product Overview
Meet the BLUETTI AC240 Power Station, an exceptional energy solution for travel enthusiasts
who demand the best. With a massive 2,400W output, it can power everything from
small electronics to large RV appliances. Plus, its IP65-rated water and dust resistance
makes it durable enough to withstand even the harshest weather conditions.
Not only that, but the AC240 also boasts an impressive battery capacity that ranges from
1,536Wh to a staggering 10,136Wh with four B210 expansion batteries. And if you need
even more power, you can simply connect another AC240 for uninterrupted power for
days on end.
Managing the AC240 is a breeze thanks to the BLUETTI App, which lets you control the
unit's various functions and settings with ease. With features like ECO Mode and UPS
Mode, you can optimize your power consumption and protect your device at all times.
Whether you're camping or on a road trip, the AC240 provides a reliable and easy-to-use
energy solution for your on-the-go lifestyle.
Danger:
Do not connect the AC output of AC240 to the grid.
DC Input
AC Input
Grounding Terminal
Bleed Valve
Parallel Port
⑬
⑭
⑮
⑯
⑰
Battery Expansion Port
Cigarette Lighter Port
Power Button
DC Output Power Button
LED Screen
USB Power Button
①
②
③
④
⑤
⑥
AC Output Power Button
NEMA TT-30 Port
AC Output
USB-C Port
USB-A Port
RV Port
⑦
⑧
⑨
⑩
⑪
⑫
JUST POWER ON12
5. Power ON / OFF
Attention:
Please place the unit on the platform firmly and stably.
• Power ON: Press the power button once, and the button lights up indicating that the
AC240 is now on standby.
• Power OFF: Press and hold the power button for 2 seconds to turn off the unit.
• AC ON / OFF: When the AC240 is on, press the AC power button to turn it on / off.
• USB ON / OFF: When the AC240 is on, press the USB power button to turn it on / off.
• DC ON / OFF: When the AC240 is on, press the DC power button to turn it on / off.
• Restart: Power off the AC240 first, then press the power button to restart.
• If you do not perform any operation in 1 minute, the screen will turn off automatically.
JUST POWER ON 13
2 3 4 5 6
7
8
9
10
11
12
13
14
15
16
17
18
19
20
21
22
23
24
25
26
27
28
29
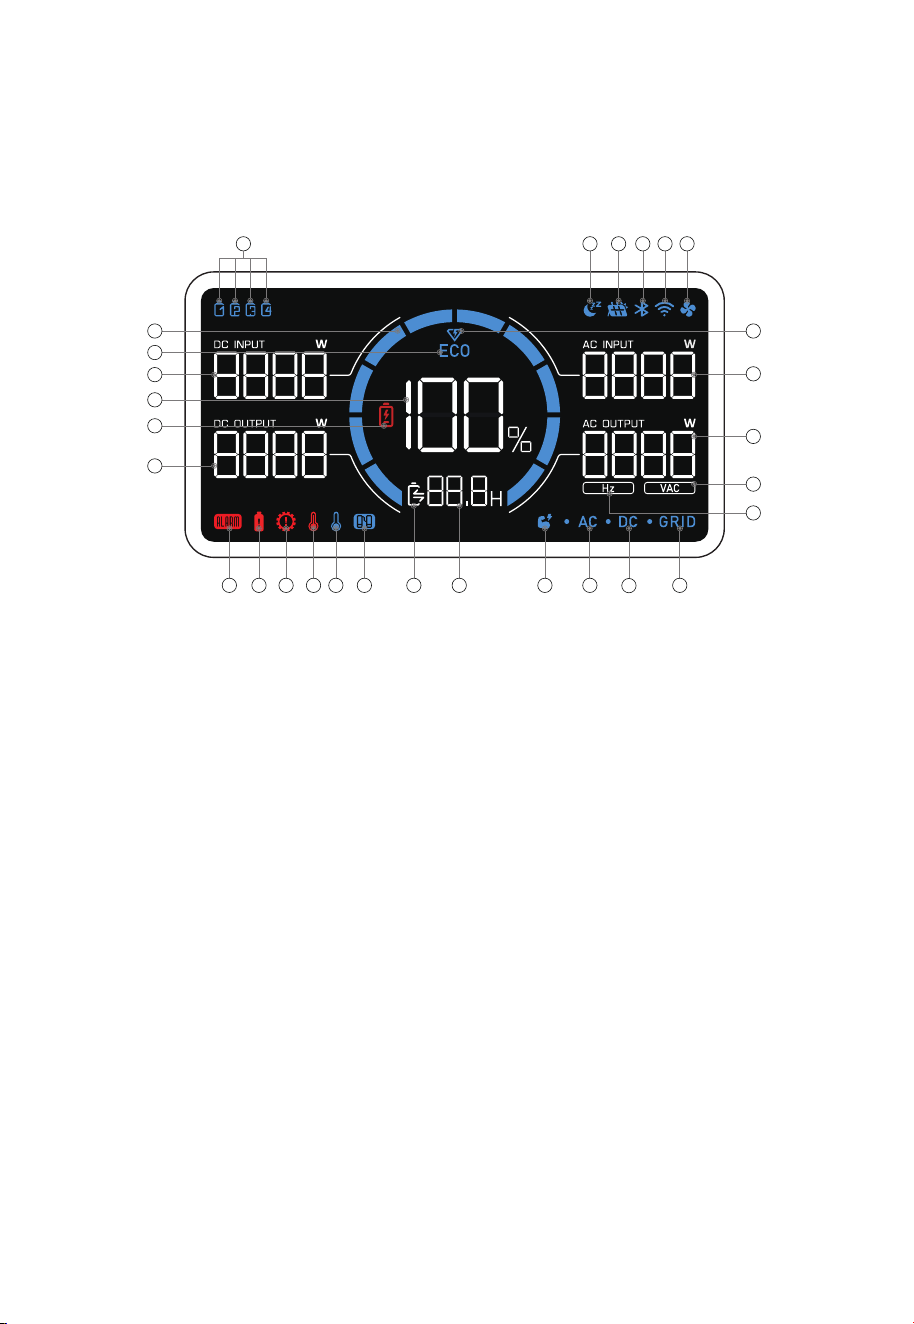
1
①
②
③
④
⑤
⑥
⑦
⑧
⑨
⑩
⑪
Expansion Battery
Silent Charging
DC Input
Bluetooth Connection
WiFi Connection
Fan Status
Turbo Charging
AC Input Power
AC Output Power
AC Output Voltage
AC Output Frequency
⑫
⑬
⑭
⑮
⑯
⑰
⑱
⑲
⑳
㉑
Grid Connection
DC Output
AC Output
Power Lifting Mode
Charge / Discharge
Remaining Time
Charge / Discharge Status
Parallel Connection
Low Temperature Alert
High Temperature Alert
Overcurrent Alert
Overload Alert
Fault Alert
DC Output Power
Low Battery Alert
Battery Capacity (SoC)
DC Input Power
ECO Mode
Charge / Discharge
Progress
㉒
㉓
㉔
㉕
㉖
㉗
㉘
㉙
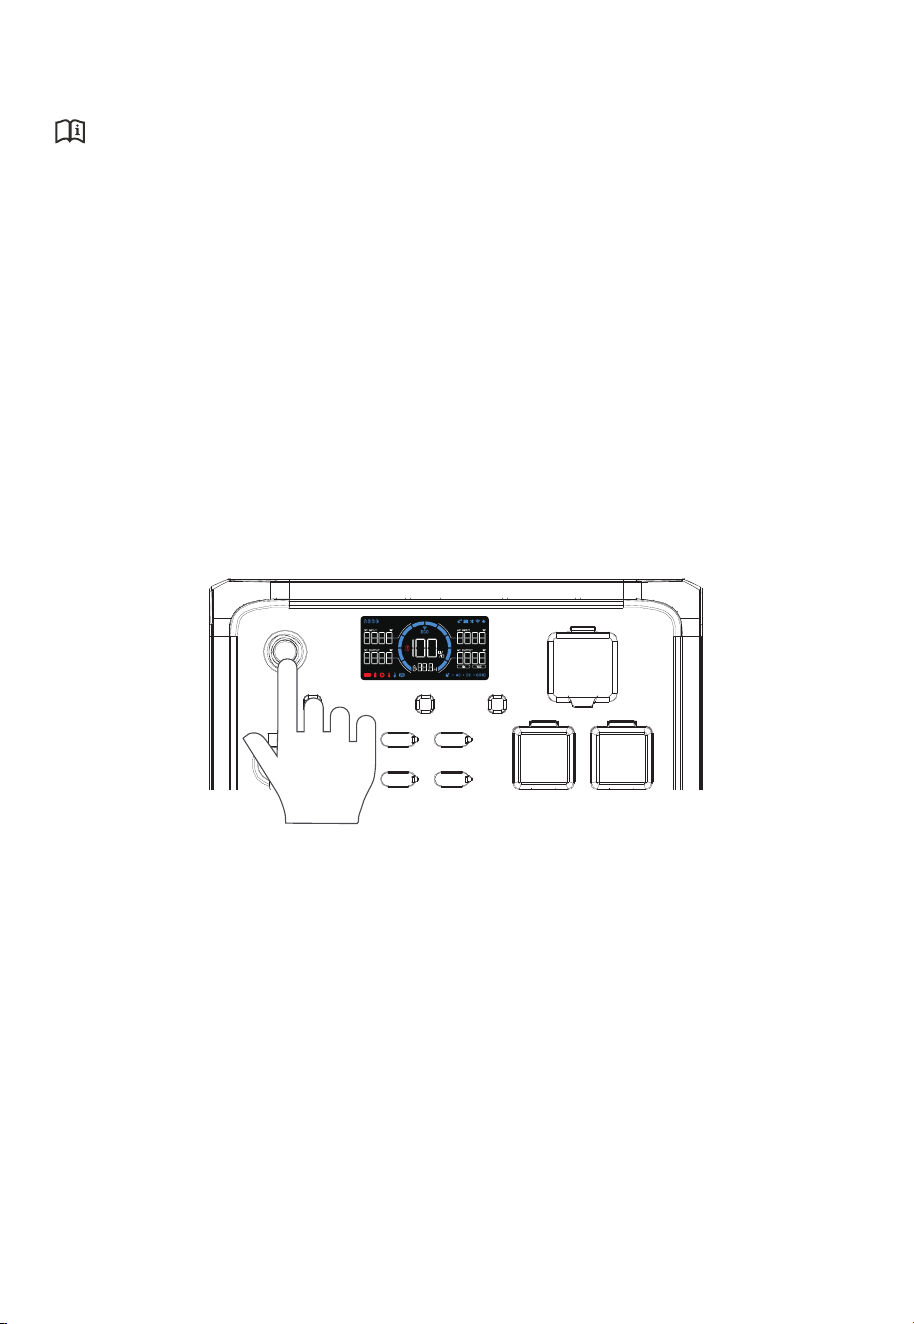
6. LED Screen
The AC240 features an informative LED screen that offers easy access to all the essential
information about the unit's status and performance. When you power on the unit, the
LED screen lights up, and when you power off the unit, the screen turns off as well.
JUST POWER ON14
LCD Instructions
Startup
Shutdown
Each icon represents an attached expansion battery. The AC240 can display up
to 4 battery icons.
The AC240 is charging in Silent Charging Mode.
The AC240 is charging from solar panels.
The AC240 connects to BLUETTI app via Bluetooth.
The AC240 connects to BLUETTI app via WiFi.
When it lights up, the fan is activated and working properly. If it flashes, there
may be a problem with the fan.
The AC240 is charging in Turbo Charging Mode.
The real-time AC charging power.
The real-time total AC output power.
The real-time AC output voltage.
The real-time AC output frequency.
The AC240 is charging from the home grid.
The DC output is turned on.
The AC output is turned on.
The AC240 is operating in Power Lifting Mode.
The remaining time of charging or discharging.
: Charging : Discharging
The AC240 is operating in parallel mode with another AC240 unit.
The temperature inside the unit is lower than -20°C (-4°F).
The temperature inside the unit is higher than 70°C (158°F).
The AC240 is drawing too much current, which can cause damage to the
unit or any connected devices.
The AC240 is overloaded.
There's an issue with the AC240, which may require troubleshooting or repair.
The real-time DC output power.
The SoC drops below 5%.
The remaining battery capacity.
The real-time DC input power.
The ECO Mode is activated to save power.
The bar increases during charging and decreases during discharging.
LCD lights up
LCD lights off
JUST POWER ON 15
7. Charging
AC240 supports five charging methods: AC, solar, car, generator, and lead-acid battery.
Attention:
• Double-check that all cables are firmly plugged in.
• Avoid getting the plug and socket wet to prevent any potential damage.
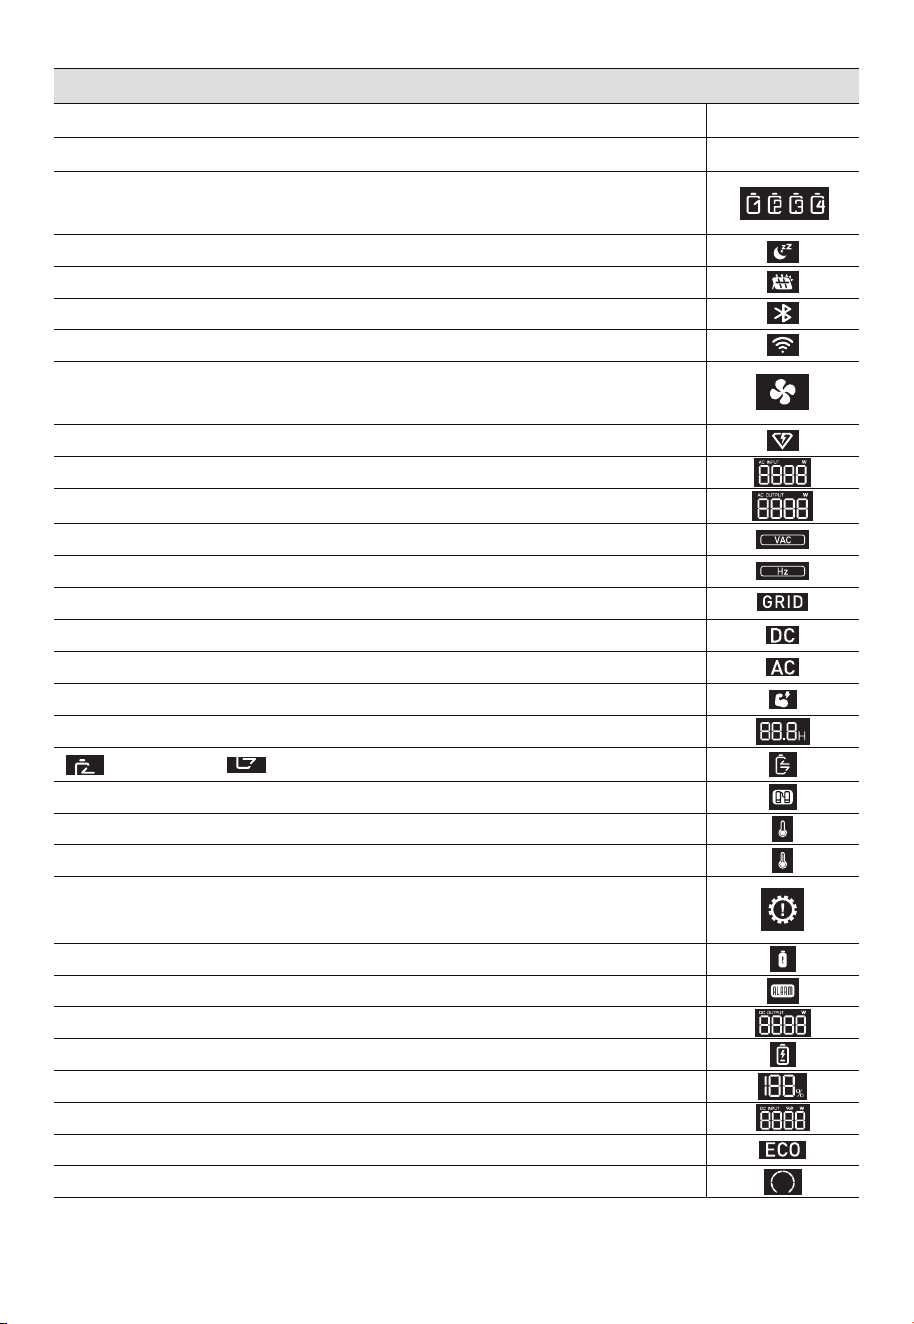
7.1 AC Charging
Plug the AC240 into a standard wall outlet and start charging. Once it's fully charged, the
AC240 automatically stops charging to prevent overcharging. For a fast charge, you can
enable Turbo Charging in the BLUETTI App, which allows for an 80% capacity in just 45
minutes at an ambient temperature of 25°C (77°F).
7.2 Solar Charging
Connect the solar panels (in series or parallel) to AC240 via the solar charging cable. When
receiving a continuous input of 1200W, the AC240 can be charged up to 80% in about 1.3
hours. However, please be aware that the charging time may vary based on weather
conditions, sunlight intensity, panel orientation, and other variables.
Note:
• Make sure your solar panels meet the following requirements:
Voc: 11V-60V Current: 21A Max. Power: 1200W Max.
• Non-waterproof solar panels will lose efficiency if they get exposed in the rain for a
long time.
JUST POWER ON16
Attention:
For solar panels with an open circuit voltage between 60V and 145V, you can still use them
to charge the AC240. Simply connect the solar panels to the AC240 via the PV Voltage
Regulator, and you can enjoy seamless and hassle-free solar charging.
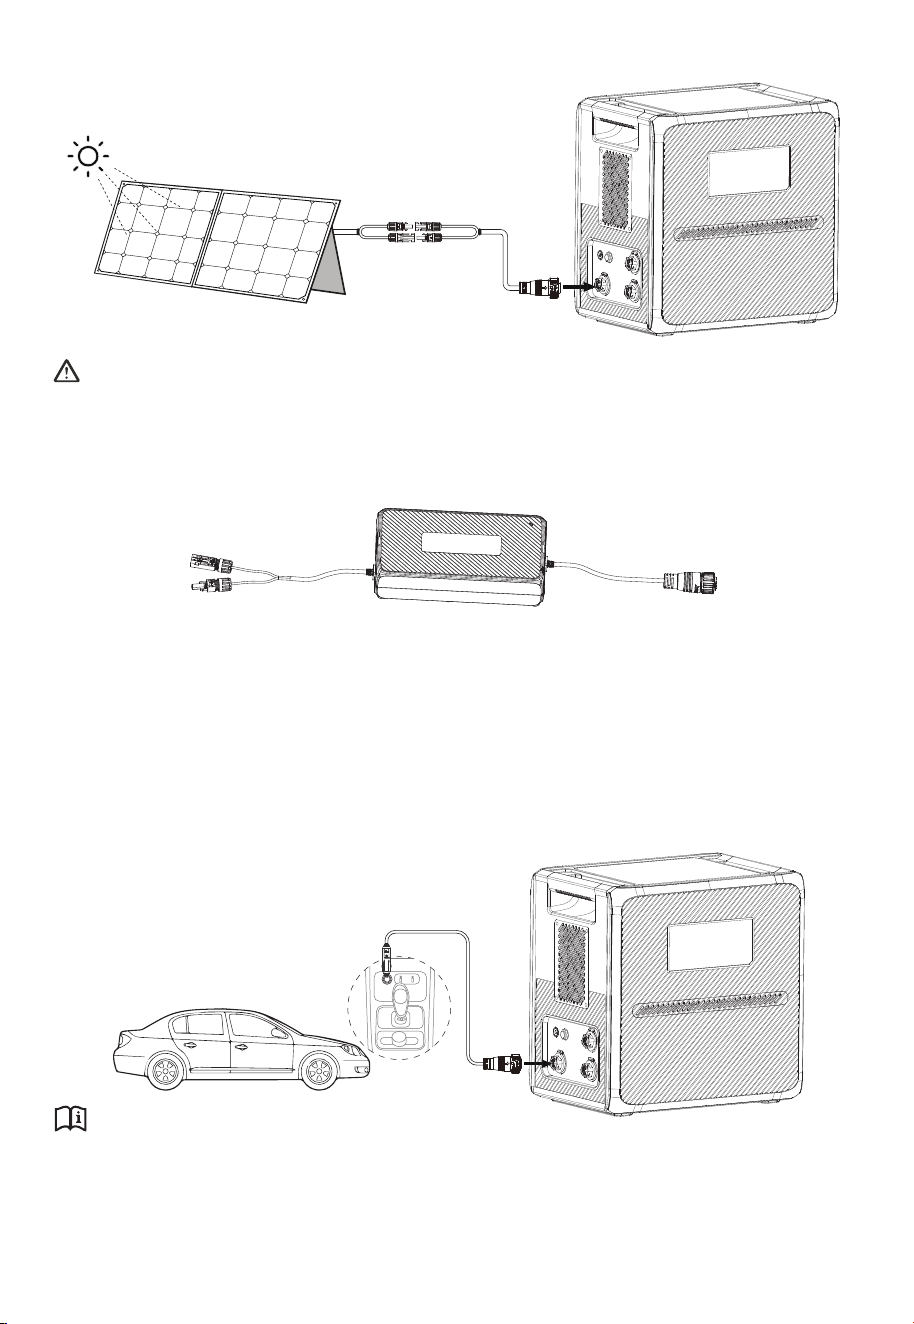
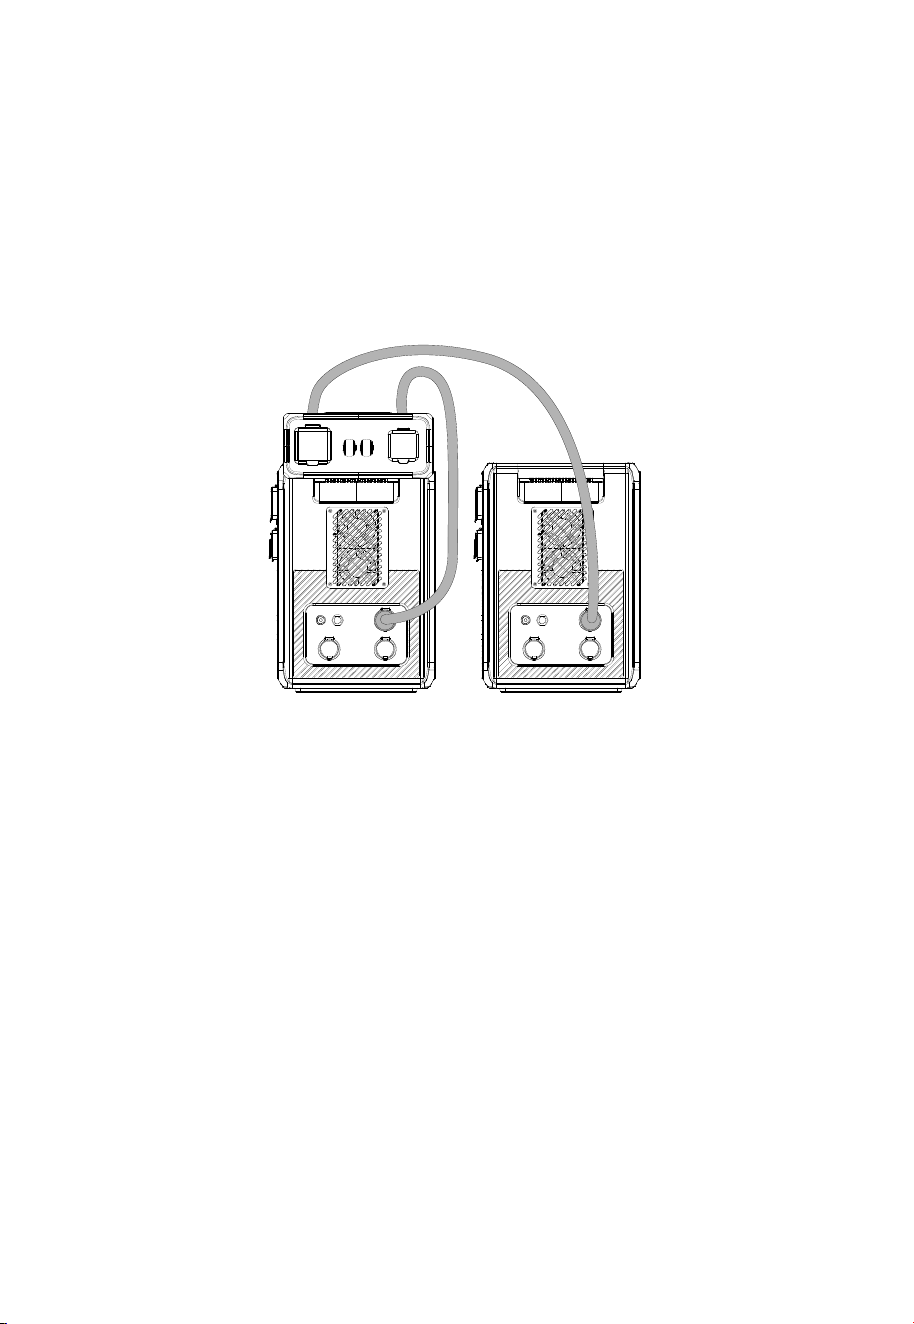
7.3 Car Charging
Connect AC240 to the vehicle's 12V / 24V cigarette lighter port via the car charging cable.
The AC240 automatically stops charging once it's fully charged.
Note: Make sure your vehicle meets the following conditions for charging:
• The vehicle is capable of supplying power with a maximum current of 8.2A.
• The vehicle's engine is running during the charging process.
Notice:
The AC240 has a low-voltage disconnect function designed to protect your vehicle's
battery during charging. When the car battery is low, the unit will automatically stop
charging to prevent over-discharging and potential damage to the battery.
JUST POWER ON 17
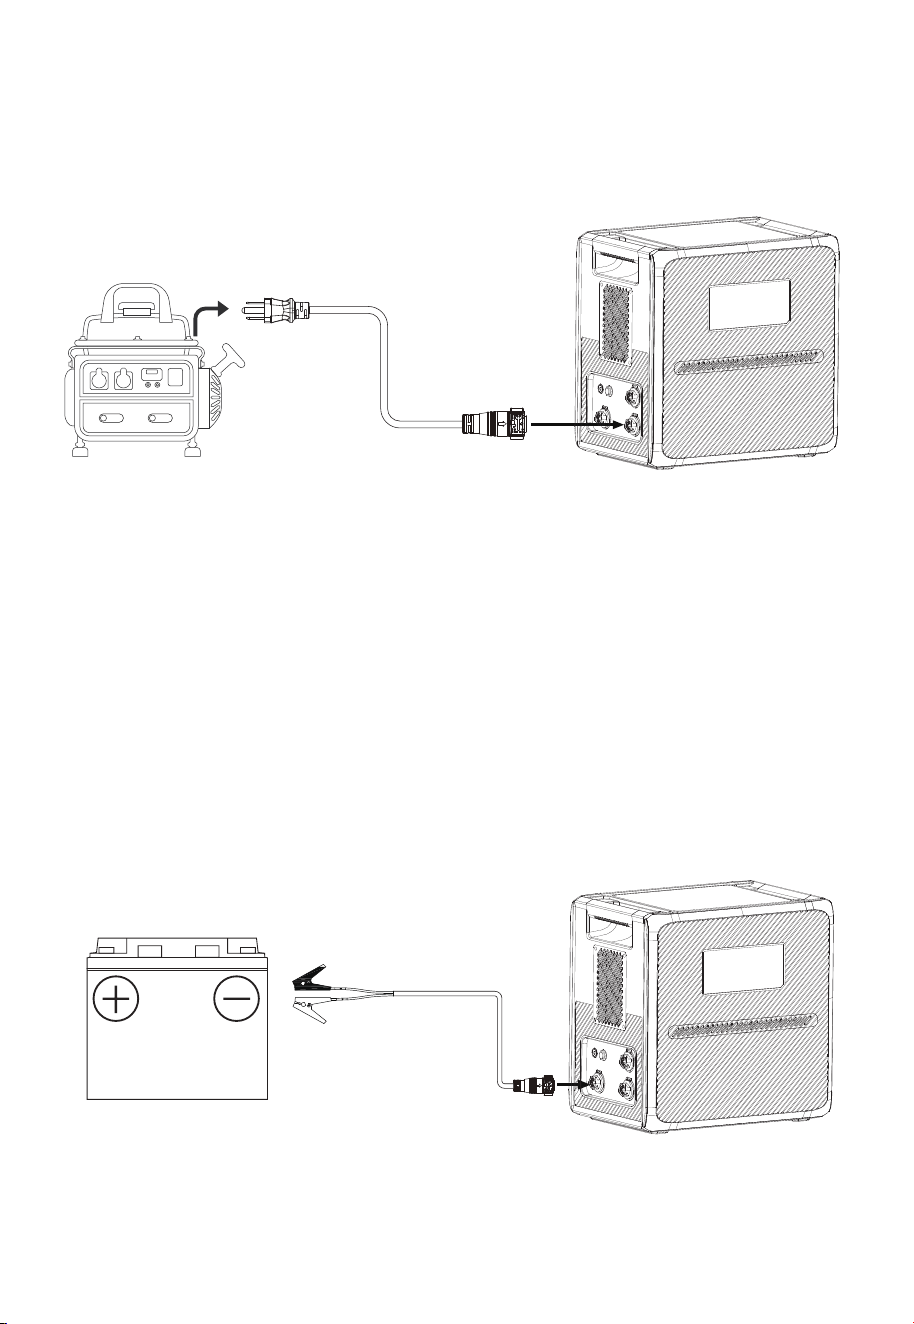
Note: Make sure your generator delivers the AC output with charging voltage and
frequency that meet AC240's specifications.
If the total power demand of your connected devices exceeds the generator's output
capacity, please turn on the Grid Self-adaption Mode to ensure a seamless charging
experience.
7.4 Generator Charging
Connect the AC240 to a generator via the AC charging cable. The AC240 also automatically
stops charging when it's fully charged.
7.5 Lead-acid Battery Charging
Connect the AC240 to a lead-acid battery via the lead-acid battery charging cable. The AC240
also automatically stops charging when it's fully charged.
JUST POWER ON18
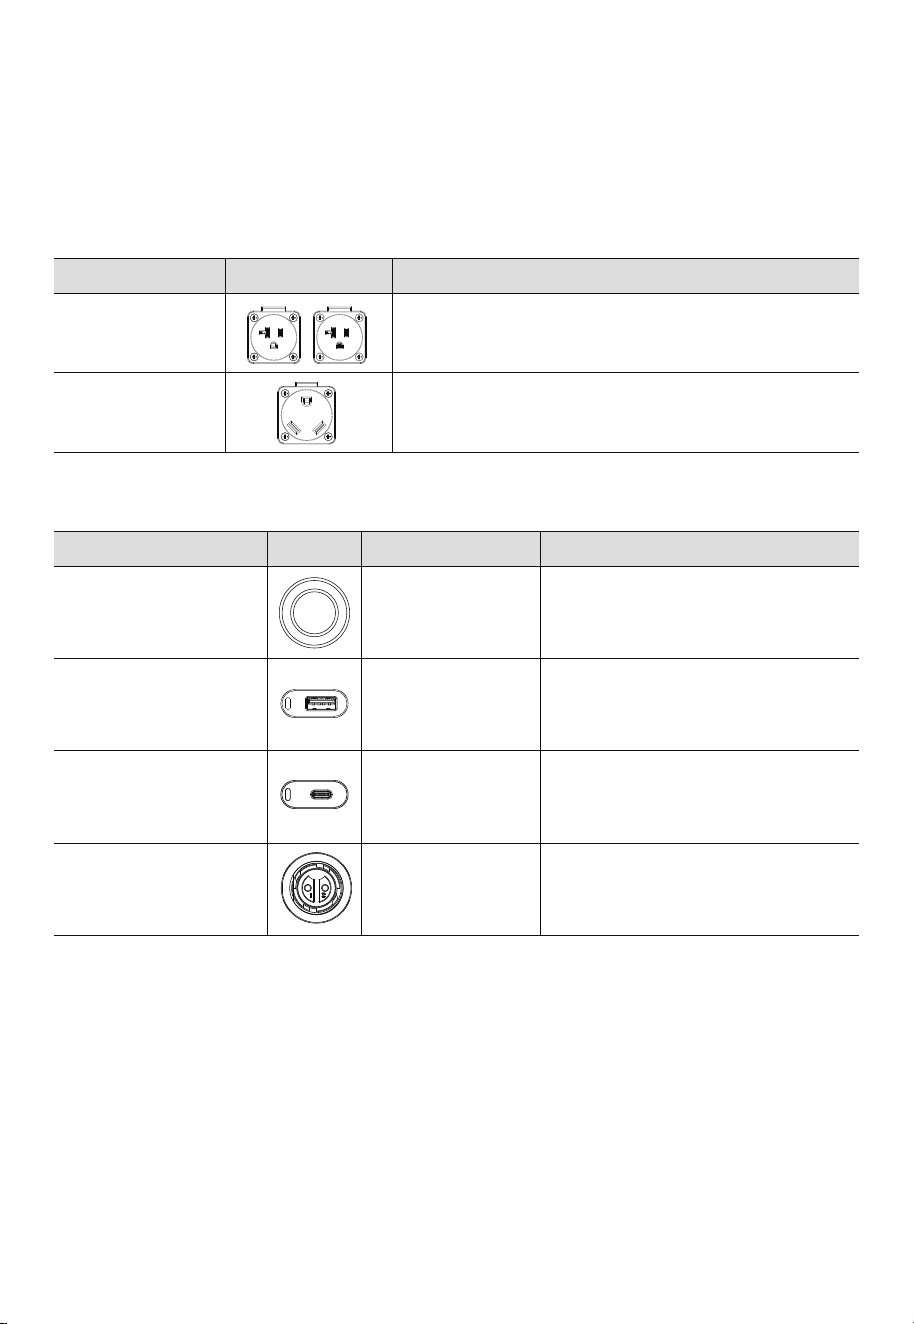
Port
AC Outlet
x 2
NEMA TT-30 x 1
(AC output)
Picture Description
For AC electrical devices.
For AC electrical devices with NEMA TT-30 plug.
Port
Cigarette Lighter Port
x 1
USB-A x 2
USB-C x 2
RV Port x 1
Specifications
12V / 10A
QC 3.0, 18W Max.
PD 3.0, 100W Max.
12V / 30A
Compatible Loads
12V DC appliances.
Mobile phones and other
small loads.
Mobile phones, laptops, etc.
RV's 12V DC appliances.
Picture
8. Discharging
Besides the cigarette lighter port, USB-A, and USB-C, AC240 also features two types of AC
outlets and an RV port, expanding your charging options.
8.1 AC Discharging
Note: To ensure optimal performance, avoid short-circuiting the ports and keep them dry
during use or storage. Additionally, do not block or cover the ports while ensuring proper
ventilation.
8.2 DC Discharging
JUST POWER ON 19

9. Settings
The AC240 offers the convenience of adjusting its settings either via the LED screen or the
BLUETTI app. With the unit's LED screen, you have direct control over various settings
such as Power Lifting Mode, ECO Mode, output frequency, and charging modes.
Additionally, by using the BLUETTI app, you can access a user-friendly interface on your
phone to conveniently monitor and control the AC240.
9.1 Setting Mode
When the screen is on and the AC output is off, press and hold the AC and DC power
buttons for about 2 seconds till the output frequency flashes to enter the Setting Mode.
9.2 ECO Mode
The AC240 has two ECO modes that help you save power and extend battery life:
• AC-ECO Mode
In this mode, if the AC power output falls below a certain level for a set period of time, the
AC power will automatically turn off.
Note: This mode is not available when the AC240 is charging from an AC source like a wall
outlet or generator.
• DC-ECO Mode
In this mode, if the DC power output falls below a certain level for a set period of time, the
DC power will automatically turn off.
Attention:
• The AC-ECO and DC-ECO modes are enabled by default to save energy, and it's
recommended to keep them enabled at all times.
• Use the BLUETTI app to enable or disable AC-ECO Mode and DC-ECO Mode separately.
If you use the LED screen, they'll be turned on or off at the same time.
• To avoid any interruption in charging, disable ECO Mode when charging a small device
that consumes less than 60W of power.
In the Setting Mode, press the DC power button to navigate through the setting items.
When the icon flashes on the screen, press the AC power button to enable or disable
the ECO Mode.
JUST POWER ON20

9.3 Frequency Switching
The current output frequency (50Hz / 60Hz) is displayed in the lower right corner of the
screen. In the Setting Mode, press the DC power button to navigate until the output
frequency appears on the screen. Then, press the AC power button to switch the frequency
options based on your requirements.Remember to turn off the AC output before setting it.
9.4 WiFi & Bluetooth Connection
To connect the AC240 to the BLUETTI app, turn on the WiFi or Bluetooth first. In the
Setting Mode, press the DC power button to navigate through the setting items. When
the icon flashes on the screen, press the AC power button to turn Bluetooth on. Similarly,
when the icon flashes on the screen, press the AC power button to toggle WiFi on.
Note:Bluetooth and WIFI on by default
9.5 Power Lifting Mode
The Power Lifting Mode is specifically designed to handle resistive loads up to 3,600W,
including electric blankets, kettles, hairdryers, and other heating devices. To enable it,
access the Setting Mode, navigate with the DC power button until the appears, and
press the AC power button to enable the mode.
Note: The Power Lifting Mode is not enabled by default and is only suitable for resistive
loads with a power rating between 2,400W-3,600W.
Although the AC240 can handle higher power demands, its actual operating power
remains at 2,400W. Also, the mode is not available when the AC240 is working with
another AC240 unit in parallel.
9.6 AC Charging Mode
The AC240 supports 3 AC charging modes - Standard, Turbo, and Silent to fit your specific
needs. In the Setting Mode, press the DC power button to navigate through the setting
items until both the and start simultaneously flashing on the screen. Then, press
the AC power button to choose the charging mode. Please refer to the table below for
useful instructions.
JUST POWER ON 21

9.7 UPS Mode
With the UPS mode enabled, the AC240 can provide uninterrupted power to your essential
appliances during a power outage. And there are four different modes available through
the BLUETTI app, allowing you to choose the best option for your needs.
• Standard UPS Mode
In this mode, the AC240 and its expansion batteries (if any) are always charged using
available solar or grid power, ensuring that they are ready to provide backup power in
case of a grid failure. When the grid fails, the AC240 units seamlessly take over to keep
your devices running without any interruption.
Note: This mode is only available when two AC240 units are connected in parallel.
• Time Control UPS Mode
This mode allows you to program the AC240 to charge during off-peak hours when
electricity is cheaper. Then, during peak hours when electricity is more expensive, the
AC240 seamlessly switches over to power your devices, helping you to save money on
your electricity bills.
• PV Priority UPS Mode
In this mode, the AC240 is mainly charged by solar energy to save power. You can also set a
specific State of Charge (SoC) threshold. AC240 charges from the grid until reaching the
designated SoC, and then seamlessly switches to solar charging for the remaining capacity.
• Customized UPS Mode
Tailor your UPS settings to match your unique needs in this mode. Create personalized
schedules for charging and discharging, set battery SoC limits, and even control the grid
charging switch and scheduled charging switch according to your diverse requirements.
Mode
Standard
Turbo
Silent
Recharging Power
AC
800W Max.
2200W Max.
800W Max.
PV
800W Max.
1200W Max.
800W Max.
AC+PV
800W Max.
2200W Max.
800W Max.
Description
Fully charged in
about 3 hours
80% charge in
45 minutes
Low operation
noise less than 50dB
Note
More friendly to
AC240's battery.
Comes in handy
when recharging time
is a priority.
Offers a quiet,
low-power operation
for long battery life.
Icon
None
JUST POWER ON22

9.8 Grid Self-adaption Mode
If you are charging the AC240 using a generator or unstable grid voltage, and the total
power demand of your connected devices exceeds the AC240's input power, it is recom-
mended that you enable the Grid Self-adaption Mode through the BLUETTI app to ensure
a stable, safe charging experience for both the AC240 and your devices.
9.9 Max. Grid Input Current
The Max. Grid Input Current is set to 15A by default. If the grid current doesn't match this
setting, adjust the setting in the BLUETTI app.
Attention:
A single AC240 unit allows a maximum grid input current of up to 20A.
If you need to increase the setting beyond the default 15A, please contact BLUETTI and
request a password to make the necessary adjustments.
9.10 Exit Setting Mode
To save your AC240 settings and exit the Setting Mode, press and hold down both the DC
and AC power buttons at the same time.
Note: If you do not perform any operation in 1 minute, the AC240 will automatically exit the
Setting Mode, and no changes will be saved.
JUST POWER ON 23
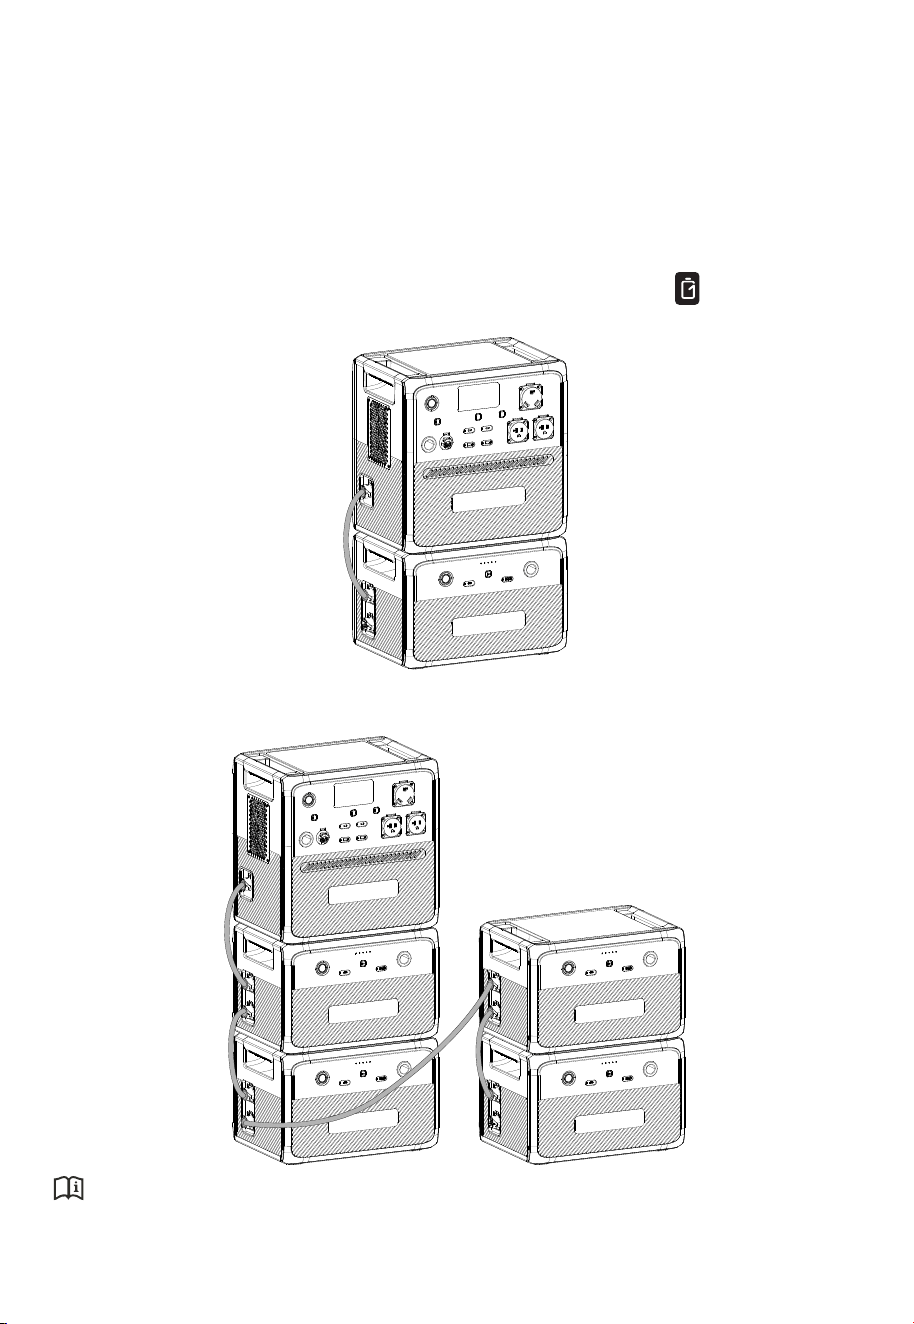
10. AC240 + B210 Expansion Connection
If you want to add more B210 units, please set up the system as shown below.
Attention:
The AC240 connects to the upper battery expansion port of B210.
The AC240 unit supports up to 4 B210 expansion batteries, providing a total capacity of up
to 10,136Wh. Follow these steps to connect the two units:
1. Make sure both the AC240 and B210 are turned off.
2. Connect them using the battery expansion cable.
3. Power the AC240 on and the B210 turns on automatically. The displays on the
AC240's screen.
JUST POWER ON24
11. Parallel Operation
To increase your power output, you can connect two AC240 units in parallel. When
connected in this way, the two units can deliver up to 4,800W of power. To connect them,
please follow these steps:
1. Make sure both AC240 units are turned off.
2. Connect them using the parallel box and AC parallel charging cable.
3. Power on one AC240 unit, and the other unit will automatically turn on.
When you connect the Parallel System to a wall outlet, your device will be energized by
the grid or the system's power frame, depending on its power demand. If the load
demand is less than 4000W, the parallel system can tap into the grid and energize the
load. However, if the load demand is between 4000W and 4800W, the grid needs to be
removed to obtain a more stable output of energy to the load.
Note:
• All the settings made on one AC240 unit will be synchronized to the other unit.
• If you need to adjust the Max. Grid Input Current, please use the BLUETTI app and make
the necessary changes.
• Charge the two AC240s using the Parallel Charging Cable(with parallel box in Optional
Accessories) in parallel mode.
• When the charging current exceeds 15A, be sure to check that the parallel charging
cable used is capable of carrying the maximum grid input current setting, otherwise
overheating of the charging cable may cause a fire.
JUST POWER ON 25

Battery Capacity
Cell Type
AC + DC Input Power
AC+DC Output Power
Weight
Dimensions (L × W × H)
Charging Temperature
Discharging Temperature
Storage Temperature
Working Humidity
Noise
Working Altitude
1,536Wh (30Ah)
Lithium Iron Phosphate (LiFePO4, LFP)
2,400W Max.
2,500W Max.
33kg / 72lbs
419.5mm × 293.5mm × 409.5mm / 16.5in × 11.6in × 16.1in
0°C to 40°C / 32°F to 104°F
-20°C to 40°C / -4°F to 104°F
Up to 1 month: -20°C to 45°C / -4°F to 113°F
Up to 3 months: -20°C to 30°C / -4°F to 86°F
Up to 12 months: -20°C to 25°C / -4°F to 77°F
10% to 90%
53dB Max.
2,000m / 6,561ft
Model AC240
12. BLUETTI App
Scan the QR code below or search "BLUETTI" in the App Store or Google Play to download
the BLUETTI app.
For more details, please refer to AC240 BLUETTI App User Manual.
13. Specifications
JUST POWER ON26

12VDC / 10A
18W Max. (QC3.0: 5V / 3A; 9V / 2A; 12V / 1.5A)
100W Max. (PD3.0: 5 / 9 / 12 / 15 / 20V 3A; 20V / 5A, with built-in EMarker chip)
12VDC / 30A, 360W Max.
DC Output
Voltage
Current
Frequency
UPS
Power
AC Input
Interface
Power
Current
Voltage
2-pin Aviation Socket
1,200W Max.
21A Max.
11V to 60VDC
DC Input
Voltage
Input Current
44.8V to 57.6VDC
60A Max.
Battery Expansion Port
Interface
Output Current
3-pin Aviation Socket + 8-pin Aviation Socket
24A Max.
Parallel Port
120VAC
20A Max.
50Hz / 60Hz
Switching time ≤20ms
0-80% in 45 min 2,200W Max.(Pair with B210 for2,400W Max.)
Cigarette Lighter Port × 1
USB-A × 2
USB-C × 2
RV Port × 1
Power
Overload Power
Voltage
Current
Frequency
2,400W in total
2500W-3000W, 2min;
3000W-3600W, 10s;
>3600W, 500ms
120VAC
20A
50Hz / 60Hz
AC Output
JUST POWER ON 27

14. Button Operation Instructions
JUST POWER ON28
Operation Function
Press the AC power button
Press the DC power button
Press the USB power button
Press the AC and DC power
buttons simultaneously and hold
for more than 2 seconds till the
output frequency flashes
Press the DC power button in
the Setting Mode
Press the AC power button when
the setting item is flashing
Press and hold the DC power
button in the Setting Mode
Turn on / off the AC output
Turn on / off the cigarette
lighter port and RV port
output
Turn on / off the USB
output
Enter / exit the Setting
Mode
Navigate through the
setting items
Enable or disable the
selected function.
Switch the status page
/
/
/
In the Setting Mode, the icons for the
currently enabled functions remain lit,
except for the flashing output
frequency icon.
If you do not perform any operation
in 1 minute, the AC240 will automatically
exit the Setting Mode, and no changes
will be saved.
The flashing setting item is selected
and editable. In the Setting Mode,
the corresponding codes will be
displayed on the left side:
P01: Output Frequency
P03: Charging Mode
P04: Power Lifting Mode
P05: ECO Mode
P06: Bluetooth
P07: WiFi
/
You can view relevant information
on the status page.
: Serial Number (SN)
: Error Code
: Fault History
: Version
Description
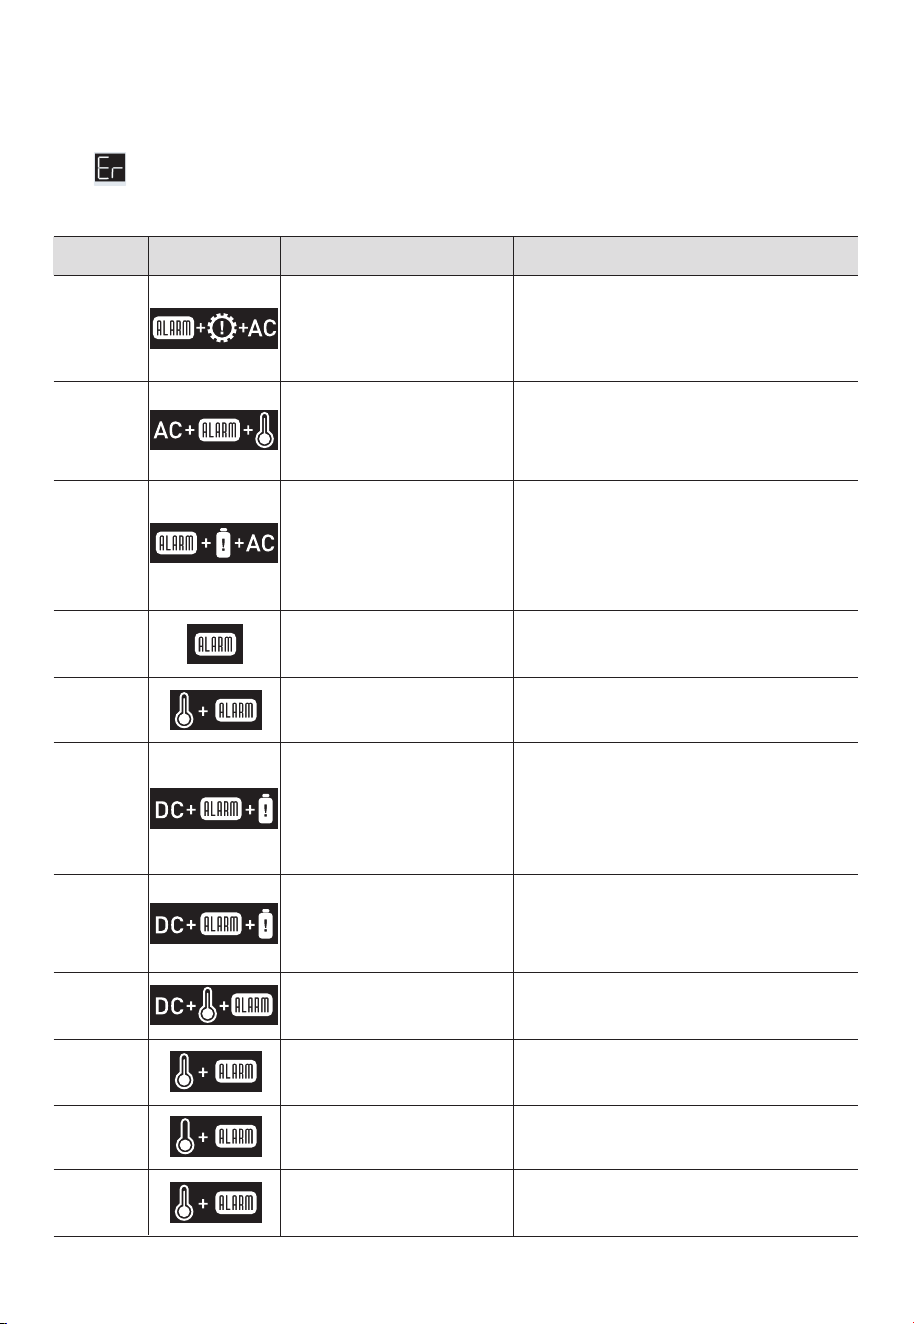
15. Troubleshooting
In the Setting Mode, press and hold the DC power button to switch the status page until
the icon and the error code appear simultaneously on the screen. Please refer to the
table below for helpful guidance.
JUST POWER ON 29
Error Code Description
Inverter overload
Inverter overtemperature
protection, AC output off
Inverter short circuit
PV overvoltage
PV overtemperature
DC output short circuit
DC output overcurrent
DC output overtemperature
Charging temperature too
high
Charging temperature too
low
Discharging temperature
too high
Alarm Icon
E001
E002
E003
E033
E039
E065
E067
E068
E085
E086
E087
Check if the power consumption of your
devices is too high. Reduce the load if
necessary.
Wait for about 10 minutes until the unit
cools down, then turn on the AC output
again.
1. Check if the power consumption of your
devices is too high.
2. Check if any of your electrical devices are
causing a short circuit.
Make sure the PV input voltage is within
the range of 11V-60VDC.
Wait for about 10 minutes until the unit
cools down, then re-enable the PV input.
1. Check if the power consumption of your
devices is too high.
2. Check if any of your electrical devices are
causing a short circuit.
Check if the power consumption of your
devices is too high. Reduce the load if
necessary.
Wait for about 10 minutes until the unit
cools down, then restart your devices.
Wait for the unit to cool down before
charging.
Make sure the unit is placed in an ambient
temperature of 0°C to 40°C (32°F to 104°F).
Wait for the unit to cool down before
discharging.
Troubleshooting

JUST POWER ON30
Discharging temperature
too low
Grid overfrequency
Grid underfrequency
/
E088
E115
E116
Others
/
Make sure the unit is placed in an ambient
temperature of -20°C to 40°C (-4°F to 104°F).
Check if the grid frequency is too high.
Contact your local power provider if
necessary.
Check if the grid frequency is too low.
Contact your local power provider if
necessary.
Please contact BLUETTI support for
assistance.
To estimate the operation time of the AC240, consider the load you're applying:
Operation time = Battery Capacity (Wh) x DoD x η ÷ (Load Power + AC240
Self-consumption)
Note: DoD refers to the depth of discharge. AC240 works at 95% DoD for longer battery
life.
η is the conversion efficiency of the inverter, typically over 85% for AC240.
The self-consumption of AC240 is approximately 9W.
Please keep in mind that the estimated operation time provided is for reference
purposes and may vary based on actual usage conditions. Factors such as low temperature
and excessive loads can significantly affect the battery capacity, leading to a reduction in
Appx. 1 Estimating Operation Time

JUST POWER ON 31
Appx. 2 FAQ
Q1:
A:
Q2:
A:
Q3:
A:
Q4:
A:
How do I know whether my devices will work well with this product?
Please evaluate the total constant load of your devices. If it doesn't exceed the Max.
output power of AC240 (2,400W), you can use this power station to run your devices.
Note: Some devices with built-in motors or compressors may start at 2-4 times the
rated power, which can easily overload the AC240.
Can I use third-party solar panels to charge this product?
Yes, you can. However, make sure your solar panels have an open circuit voltage of
11V-60V and are equipped with MC4 connectors. It's also important not to mix different
types of solar panels.
Can it charge and discharge at the same time?
Yes. It supports pass-through charging. The AC240 comes with the premium
LiFePO₄ battery and proprietary Battery Management System to ensure that it can
charge and discharge at the same time.
Why is the charging power often too low?
AC240 has a built-in intelligent BMS that automatically adjusts the charging power in
response to the battery temperature and SoC, thus protecting the battery and
extending its service life.

JUST POWER ON32
This device complies with part 15 of the FCC Rules. Operation is subject to the following
two conditions:
(1) This device may not cause harmful interference.
(2) This device must accept any interference received, including interference that may
cause undesired operation.
This equipment has been tested and found to comply with the limits for a Class B digital
device, pursuant to part 15 of the FCC Rules. These limits are designed to provide
reasonable protection against harmful interference in a residential installation. This
equipment generates, uses and can radiate radio frequency energy and, if not installed
and used in accordance with the instructions, may cause harmful interference to radio
communications. However, there is no guarantee that interference will not occur in a
particular installation. If this equipment does cause harmful interference to radio or
television reception, which can be determined by turning the equipment off and on, the
user is encouraged to try to correct the interference by one or more of the following
measures:
- Reorient or relocate the receiving antenna.
- Increase the separation between the equipment and receiver.
- Connect the equipment into an outlet on a circuit different from that to which the
receiver is connected.
- Consult the dealer or an experienced radio / TV technician for help.
FCC Caution: Any changes or modifications not expressly approved by the party
responsible for compliance could void the user's authority to operate this equipment.
IMPORTANT NOTE: FCC Radiation Exposure Statement
This equipment complies with FCC radiation exposure limits set forth for an uncontrolled
environment. This equipment should be installed and operated with a minimum
distance of 20cm between the radiator & your body.
Appx. 3 FCC Statement

JUST POWER ON 33
This device contains licence-exempt transmitter(s) / receiver(s) that comply with
Innovation, Science and Economic Development Canada’s licence-exempt RSS(s).
Operation is subject to the following two conditions:
(1) This device may not cause interference.
(2) This device must accept any interference, including interference that may cause
undesired operation of the device.
RF exposure statement: The equipment complies with IC Radiation exposure limits set
forth for uncontrolled environments. This equipment should be installed and operated
with a minimum distance of 20cm between the radiator and your body.
CAN ICES-3 (B)/NMB-3(B) (Canada)
This Class B digital apparatus complies with Canadian ICES-003.
Appx. 4 IC Caution

JUST POWER ON34
Appx. 5 Consignes de sécurité
Lisez ce manuel pour savoir comment utiliser correctement le produit et connaître les
consignes de sécurité correspondantes. Les exigences en matière de sécurité sont
fournies à titre d'exemple et comprennent, sans s'y limiter, les exigences énumérées
dans le présent manuel. Le fonctionnement réel doit être conforme à toutes les normes
de sécurité applicables. Si vous avez des questions, n'hésitez pas à contacter l'équipe de
support BLUETTI ou votre revendeur local.
1) Déclaration
Pour garantir un fonctionnement sûr, il est essentiel de respecter les conditions suivantes:
• Utilisez ou stockez toujours le produit dans les conditions spécifiées dans ce manuel.
• Évitez tout démontage, tout remplacement des composants ou toute modification des
codes logiciels non autorisés.
BLUETTI n'est pas responsable des dommages résultant des circonstances suivantes:
•
Les cas de force majeure tels que les tremblements de terre, les incendies, les
tempêtes, les inondations ou les coulées de boue.
• Les dommages causés par le transport du client.
• Les dommages résultant de conditions de stockage inadéquates telles que spécifiées
dans le manuel.
• Les dommages causés par la négligence du client, une mauvaise utilisation ou des
actions intentionnelles.
• Les dommages occasionnés au système ou au matériel par des tiers ou des clients, y
compris, mais sans s'y limiter, une manipulation ou une installation non conforme aux
consignes du présent manuel.
• L'utilisation du produit avec des appareils nécessitant une alimentation sans interruption
(ASI) de haute performance, y compris, mais sans s'y limiter, les serveurs de données, les
stations de travail, les équipements médicaux et d'autres appareils similaires.
AVERTISSEMENT–Les précautions de base suivantes doivent toujours être prises lorsque
vous utilisez ce produit:
a. Lisez l'ensemble des consignes avant toute utilisation du produit.
b. Pour réduire le risque de blessure, une surveillance étroite est nécessaire lorsque vous
utilisez le produit à proximité d'enfants.
c. Ne placez pas vos doigts ou vos mains à l'intérieur du produit. N'insérez pas de corps
étrangers dans les ports du produit.
2) Exigences générales
CONSIGNES RELATIVES AU RISQUE D'INCENDIE, D'ÉLECTROCUTION OU DE BLESSURE
CONSIGNES DE SÉCURITÉ IMPORTANTES

JUST POWER ON 35
d. L'utilisation d'un accessoire non recommandé ou vendu par le fabricant peut entraîner
un risque d'incendie, d'électrocution ou de blessure.
e. Pour réduire le risque d'endommagement de la fiche et du câble électriques, tirez au
niveau de la fiche plutôt que sur le cordon lors du débranchement.
f. N'utilisez pas un bloc-batterie ou un appareil endommagé ou modifié, car ils peuvent
présenter un comportement imprévisible entraînant un risque d'incendie, d'explosion ou
de blessure.
g. N'utilisez pas le produit avec un câble ou une fiche endommagés, ou un câble de sortie
endommagé.
h. SEUL du personnel autorisé peut remplacer la batterie interne ou tout autre composant
du produit. Aucun composant ne peut être réparé par l'utilisateur final. Ne démontez pas
le produit par vous-même, adressez-vous à un technicien qualifié pour tout service de
réparation ou d'entretien. Un réassemblage incorrect peut entraîner un risque d'incendie
ou d'électrocution.
i. Pour réduire le risque d'électrocution, débranchez le produit de la prise avant de
procéder à toute opération d'entretien prévue dans les consignes.
j. AVERTISSEMENT – RISQUE DE GAZ EXPLOSIFS. Pour réduire le risque d'explosion de la
batterie, suivez ces consignes ainsi que les consignes du fabricant de la batterie et du
fabricant de tout équipement que vous avez l'intention d'utiliser à proximité de la batterie.
Examinez les mises en garde apposées sur ces produits et sur les moteurs.
k. PRÉCAUTIONS PERSONNELLES
1)Protégez-vous complètement et portez des vêtements et des lunettes de protection.
Évitez tout contact avec les yeux lorsque vous travaillez à proximité de la batterie.
2)Ne fumez JAMAIS et ne produisez JAMAIS d'étincelles ou de flammes à proximité de la
batterie ou du moteur.
3)Travaillez avec une extrême prudence et évitez toute chute d'outil métallique sur la
batterie. Cela pourrait provoquer une étincelle ou un court-circuit de la batterie ou d'autres
pièces électriques, entraînant par conséquent un risque d'explosion.
l. Lorsque vous chargez la batterie interne, travaillez dans un endroit bien ventilé et ne
limitez en rien la ventilation.
m. Dans des conditions abusives, du liquide peut être éjecté de la batterie, évitez tout
contact. En cas de contact accidentel, rincez à l'eau. Si le liquide entre en contact avec les
yeux, consultez immédiatement un médecin. Le liquide éjecté de la batterie peut
provoquer des irritations ou des brûlures.
n. N'exposez pas le produit au feu ou à une température excessive. L'exposition au feu ou à
une température supérieure à 130°C peut entraîner un risque d'explosion.
o. Confiez l'entretien du produit à un réparateur qualifié qui utilisera uniquement des
pièces de rechange identiques, de manière à assurer une sécurité continue.

JUST POWER ON36
3) Consignes de mise à la terre
Ce produit doit être mis à la terre. En cas de dysfonctionnement ou de panne, la mise à
la terre fournit un chemin de moindre résistance pour le courant électrique afin de
réduire le risque d'électrocution. Ce produit est équipé d'un câble muni d'un conducteur de
mise à la terre et d'une fiche de mise à la terre. La fiche doit être branchée dans une prise
correctement installée et mise à la terre conformément à tous les codes et règlements
locaux.
AVERTISSEMENT
Une mauvaise connexion du conducteur de mise à la terre de l'équipement peut
entraîner un risque d'électrocution. Vérifiez auprès d'un électricien qualifié en cas de
doutes quant à la mise à la terre de l'appareil. Ne modifiez pas la fiche fournie avec le
produit. Si elle n'est pas adaptée à la prise, faites installer une prise adéquate par un
électricien qualifié.
4) Consignes de stockage
a. Lorsque le SoC atteint 5%, veuillez charger le produit immédiatement.
b. Avant de stocker le produit, veuillez le charger de manière à ce que le SoC soit compris
entre 40% et 60% afin de préserver l'état optimal du produit. De plus, éteignez le
produit et débranchez toutes les raccordements électriques de celui-ci.
c. Stockez le produit dans un endroit frais et sec, à l'écart des matériaux et des gaz
inflammables ou combustibles.
p. N'utilisez PAS le produit dans des conditions humides. Si le produit est mouillé, veuillez
le sécher soigneusement avant de l'utiliser.
q. Veuillez assurer une ventilation adéquate pendant l'utilisation et ne pas obstruer les
ouvertures du ventilateur. Une ventilation inadéquate peut causer des dommages
permanents sur le produit.
r. NE placez RIEN sur la surface supérieure du produit lors de l'utilisation ou du stockage.
NE déplacez PAS le produit pendant son fonctionnement, car les vibrations et les chocs
soudains peuvent conduire à de mauvaises connexions avec le matériel à l'intérieur.
s. En cas d'incendie, seul un extincteur à base de poudre sèche est adapté au produit.
t. AVERTISSEMENT – RISQUE DE CHOC ÉLECTRIQUE. N'utilisez jamais le produit pour
alimenter des outils électriques dans le but de couper ou d'accéder à des pièces ou des
câbles sous tension, ou à des matériaux pouvant contenir des pièces ou des câbles sous
tension, tels que les murs d'un bâtiment, etc.
u. Pour éviter tout contact avec des liquides, n'utilisez pas ce produit par temps de pluie ou
dans des environnements à forte humidité.

JUST POWER ON 37
• Mettez-le immédiatement hors tension.
• Chargez-le dans les 48heures.
• Placez-le à une température ambiante comprise entre 5℃ et 35℃ (entre 41℉ et 95℉)
pendant 24heures avant de le charger. Il est recommandé de charger le produit via
une source CA. Si vous le chargez à l'aide de l'énergie solaire, assurez-vous que votre
système solaire fournit une puissance supérieure à 100W.
BLUETTI n'est pas responsable des dommages causés à l'équipement en raison du
non-respect des consignes ci-dessus.
CONSERVEZ CES CONSIGNES
Le symbole représenté vous rappelle de lire les consignes figurant dans la
documentation accompagnant le produit avant toute utilisation ou tout entretien.
• Branchez le produit sur une prise de courant avec mise à la terre à l'aide du câble
d'alimentation fourni.
• La prise de courant doit être installée à proximité du produit et facilement accessible
pour des raisons de sécurité.
• Concernant l'élimination, ne JAMAIS procéder aux actions suivantes pour cause de
risque d'explosion: ne jamais placer une batterie au feu ou dans un four chaud et ne
jamais écraser ou couper mécaniquement une batterie.
• Évitez de placer les batteries dans des environnements à très haute température, car
cela peut entraîner une explosion ou une fuite de liquide ou de gaz inflammable.
• Les batteries soumises à une pression d'air extrêmement basse peuvent entraîner une
explosion ou une fuite de liquide ou de gaz inflammable.
• Il convient d'attirer l'attention sur les critères environnementaux quant à l'élimination
des batteries.
• Avant toute installation ou utilisation de l'appareil, veuillez vous référer aux informations
figurant sur le dessous extérieur de l'appareil pour obtenir des informations sur les
caractéristiques électriques et la sécurité.
Si le SoC chute à 0 (pendant le stockage ou au démarrage), prenez les mesures
suivantes pour redémarrer le produit en toute sécurité:
d. Le produit peut être stocké en toute sécurité à une température comprise entre -20℃
et 40 ℃ (entre -4℉ et 104℉). Toutefois, si la durée de stockage dépasse un mois, il est
recommandé de maintenir une température de stockage idéale d'environ 30℃ (86℉).
Afin de maintenir le produit en bon état, veuillez décharger et charger complètement
l'appareil au moins une fois tous les 3mois. l n'est PAS recommandé de stocker l'appareil
pendant des périodes prolongées, car cela peut altérer les performances et la durée de
vie générale du produit.

@ BLUETTI Support
@ BLUETTI Official
@bluetti.inc@ bluetti_inc @bluetti_official service@
bluettipower.com
For more information, please visit:
Web: https://www.bluettipower.com
SHENZHEN POWEROAK NEWENER CO., LTD.
Add: F19, BLD No.1, Kaidaer, Tongsha Rd No.168, Xili Street,
Nanshan, Shenzhen, China
USA Agent
Company: BLUETTI POWEROAK INC
Add: 6185SVALLEYVIEWBLVDSTEDLASVEGAS
NEVADA89118UnitedStates
FRN: 0033559824
Customer Service
Tel: 800-200-2980 (Monday to Sunday 9:00-17:00)
Email: sale@bluettipower.com (Pre-sales),
service@bluettipower.com (After-sales)

P/N:17.0303.0629-02A2
Certificate
Inspector:
QC: