
A5P | 01
3000227.1
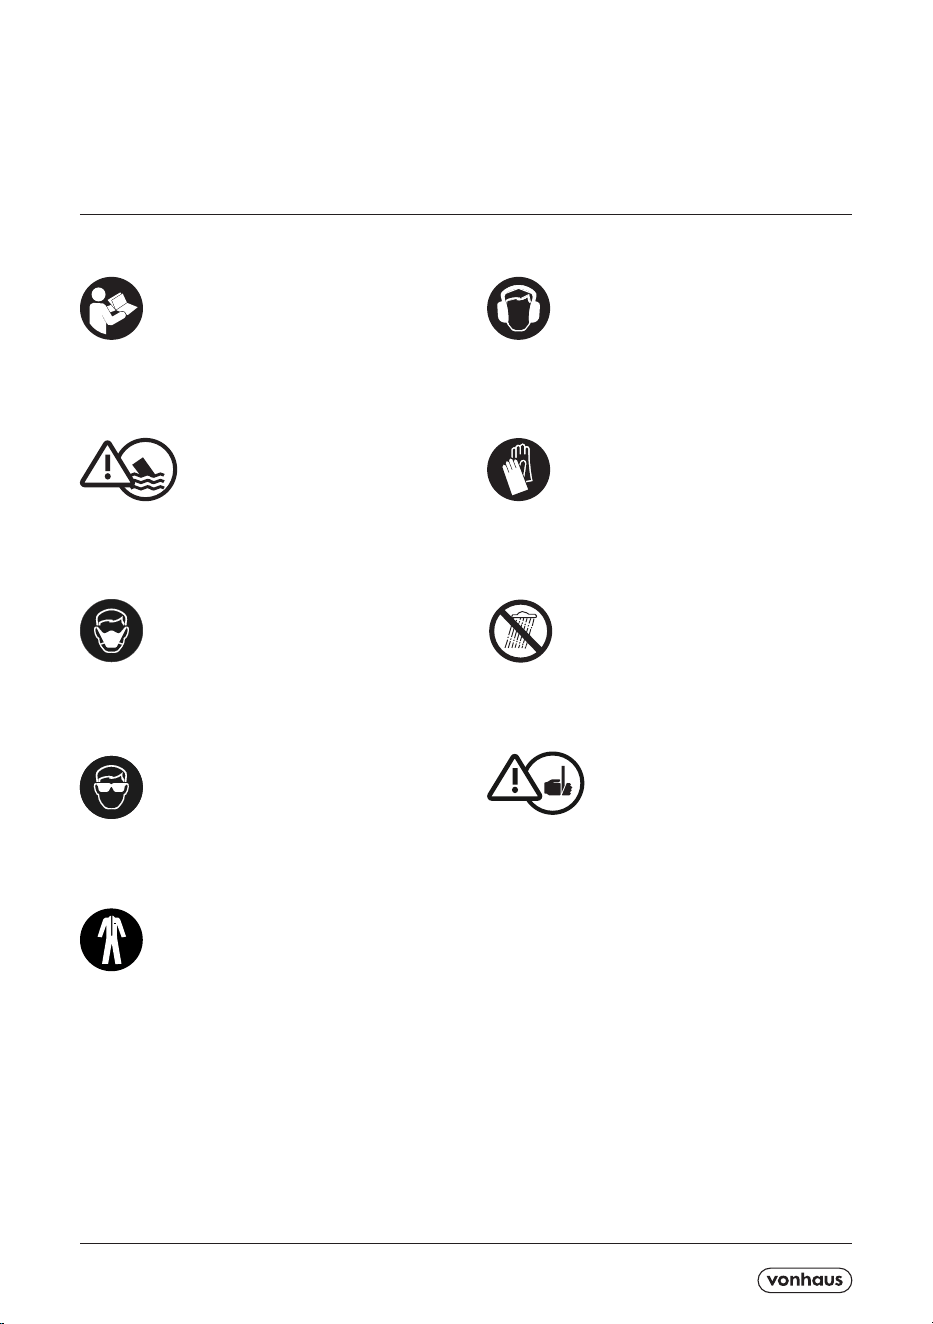
Please read all instructions carefully before use and
retain for future reference.
CAUTION Do not immerse in water.
Protect your eyes.
Protect your ears.
Protect your hands.
Wear a dust mask.
Protective clothing must be worn
Do not use in wet conditions.
CAUTION Sharp edges.

A5P | 01
Please read all instructions carefully before use and retain
for future reference.
INTENDED USE Only operate the power tool/machine
for its intended purpose and within the parameters spec-
ied in this manual.
This power tool/machine is for domestic use only. This
power tool/machine is not intended for use by persons
with reduced physical, sensory or mental capabilities, or
lack of experience and knowledge, unless supervised or
given appropriate instruction concerning the product’s
use by a person responsible for their safety.
GENERAL PRECAUTION Do not allow to be used as a
toy. Children should be supervised to ensure they do not
play with the power tool/machine.
If the power tool/machine is not functioning properly,
has been dropped, damaged, left outdoors, or immersed
in liquid, do not use, contact DOMU Brands Customer
Services.
Do not use the power tool/machine if any parts appear to
be faulty, missing or damaged.
Ensure all parts are securely attached before use.
RISK OF PERSONAL INJURY Avoid body contact with
earthed or grounded surfaces such as pipes,radiators,
ranges and refrigerators. There is an increased risk of
electric shock if your
body is earthed or grounded.
Prevent unintentional starting. Ensure the switch is in the
o position before connecting to the power source and/
or battery pack, picking up or carrying the tool. Carrying
power tools with your nger on the switch, or energising
power tools that are switched on, invites accidents.
Do not operate power tools in explosive atmospheres
such as in the presence of ammable liquids, gases or
dust. Power tools create sparks which may ignite the
dust or fumes.
Always wear eye protection. Any power tool can throw
foreign objects into your eyes and cause permanent
eye damage. Always wear safety goggles (not glasses)
that comply with ANSI safety standard Z87.1. Every day
glasses have only impact resistant lenses.
Do not expose power tools to rain or wet conditions.
Water entering the power tools will increase the risk of
electric shock.
Stay alert, watch what you are doing and use common
sense when operating a power tool/machine. Do not use
a power tool/machine while you are tired or under the
inuence of drugs, alcohol or medication. A moment of
inattention while operating power tool/machine may re-
sult in serious personal injury.
Use personal protective equipment. Always wear eye
protection. Protective equipment such as dust mask,
non-skid safety shoes, hard hat, or hearing
protection used for appropriate conditions will reduce
personal injuries.
Prevent unintentional starting. Ensure the switch is in the
o-position before connecting to power source and/or
battery pack, picking up or carrying the tool.
Carrying power tool/machine with your nger on the
switch or energizing power tool/machine that have the
switch on invites accidents.
Remove any adjusting key or spanner before turning the
power tool/machine on. A spanner or a key left attached
to a rotating part of the power tool/machine may result in
personal injury.
Do not overreach. Keep proper footing and balance at
all times. This enables better control of the power tool/
machine in unexpected situations.
Dress appropriately. Do not wear loose clothing or jew-
ellery.
Keep your hair, clothing and gloves away from moving
parts. Loose clothes, jewellery or long hair can be caught
in moving parts.
If devices are provided for the connection of dust extrac-
tion and collection facilities, ensure these are connected
and properly used. Use of dust collection can reduce
dust-related hazards.
WORK AREA SAFETY Keep work area clean and well lit.
Cluttered or dark areas invite accidents.
Do not operate power tool/machine in explosive atmos-
pheres, such as in the presence of ammable liquids,
gases or dust.
Power tool/machine create sparks which may ignite the
dust or fumes.
Keep children and bystanders away while operating a
power tool/machine. Distractions can cause you to lose
control.
GENERAL POWER TOOL USE AND CARE Do not force
the power tool/machine. Use the correct power tool/ma-
chine for your application. The correct power tool/ma-
chine will do the job better and safer at the rate for which
it was designed.
Do not use the power tool/machine if the switch does not
turn it on and o. Any power tool/machine that cannot
be controlled with the switch is dangerous and must be
repaired.
Disconnect the plug from the power source and/or the
battery pack from the power tool/machine before making
any adjustments, changing accessories, or storing pow-
er tool/machine tools. Such preventive safety measures
reduce the risk of starting the power tool/machine ac-
cidentally.
Store idle power tool/machine out of the reach of children
and do not allow persons unfamiliar with the power tool/
machine or these instructions to operate the power tool/
machine.
Power tool/machines are dangerous in the hands of un-
trained users.
Maintain power tool/machines. Check for misalignment
or binding of moving parts, breakage of parts and any
other condition that may aect the power tool/machines
operation. If damaged, have the power tool/machines re-
paired before use. Many accidents are caused by poorly
maintained power tool/machines.
Keep cutting tools sharp and clean.
Properly maintained cutting tools with sharp cutting edg-
es are less likely to bind and are easier to control.
Use the power tool/machine accessories and tool bits in
accordance with these instructions, take into account the
working conditions and the work to be performed.
Use of the power tool/machine for operations dierent
from those intended could result in a hazardous situation.
CLEANING & MAINTENANCE Never soak or immerse
electrical components and or a component that has a
plug attached.
Disconnect the plug from the power source before mak-
ing any adjustments, changing accessories, or storing.
Such preventive safety measures reduce the risk of start-
ing the power tool accidentally.
Ensure the motor has fully stopped before cleaning,
clearing a blockage, checking, or carrying out any main-
tenance on the tool.
Maintain your power tool. Check for misalignment or
binding of moving parts, breakage of parts and any oth-
er condition that may aect the power tool’s operation.
If damaged, have the power tool repaired by a qualied
repair person before use. Many accidents are caused by
poorly maintained power tools.
Keep cutting tools sharp and clean. Properly maintained
cutting tools with sharp cutting edges are less likely to
bind and are easier to control.
Regularly check external nuts and xings to ensure vibra-
tion caused by normal use has not begun to loosen them.
Store idle power tools out of reach of children and do

A5P | 01
not allow persons unfamiliar with the power tool or these
instructions to operate the Breaker.
Locate the power tool out of reach of children, in a dry,
locked unit.
Make sure that the cord is located so that it will not be
stepped on, tripped over, or otherwise subjected to dam-
age or stress.
Remove the plug from the mains socket / battery (where
applicable) before carrying out any adjustment or main-
tenance.
Always store the power tool/machine in a dry place.
If the power cord is damaged, it must be replaced by a
qualied service technician.
Keep the ventilation slots and motor housing as free of
dirt and dust as possible (where applicable).
Clean the power tool/machine by rubbing it with a clean
cloth and blow it clean using low-pressure compressed
air is recommended.
Ensure you have all the pieces listed. If you are missing
any components, contact our customer services
department at
[email protected] DO NOT proceed with assembly
if any components are missing.
LAWNMOWERS
Do not expose the Lawnmower to rain or wet conditions.
Water entering the Lawnmower will increase the risk of
electric shock.
Always check the area to be worked on for wire and other
debris that could cause potential damage to the Lawn-
mower and injury to the operator.
Always wear substantial footwear and long trousers
whilst operating the Lawnmower.
Never operate the Lawnmower without the Grass Catch-
er in place, unless otherwise specied in this manual.
Keep children, pets and bystanders away whilst operat-
ing the Lawnmower. Distractions can cause you to lose
control. Switch on the motor carefully according to in-
structions and with feet well away from the blade.
Do not start the Lawnmower whilst standing in front of
the discharge opening. Keep clear of the discharge open-
ing at all times. Do not use the Lawnmower if the switch
does not turn it on and o. Any garden tool that cannot
be controlled with the switch is dangerous and must be
repaired. Do not tilt the Lawnmower when switching on
the motor, except for if the machine has to be tilted for
starting. In this case, do not tilt it more than absolutely
necessary and lift only the part which is away from the
operator. Always keep your arms and legs a safe distance
from the cutting mechanism, particularly after turning the
appliance on.
Do not put hands or feet near or under rotating parts.
Keep hair, loose clothing, ngers, and all parts of body
away from openings and moving parts.
Walk, never run.
Do not overreach. Keep proper footing and balance at all
times. Always be sure of your footing on slopes.
Always mow across the face of slopes, never up or down.
Do not mow excessively steep slopes.
Exercise extreme caution when changing direction on
slopes. Use extreme caution when reversing or pulling
the Lawnmower towards you.
Do not transport the Lawnmower whilst the power source
is running. If the Lawnmower has to be tilted when trans-
porting it between areas, stop the blade before attempt-
ing to move it. The same applies when crossing surfaces
other than grass. If a foreign body or other debris ac-
cidentally become entangled in the Lawnmower, stop it
immediately. Disconnect from the mains and do not use
again until cleared.
If the Lawnmower makes any unusual sounds or starts to
vibrate abnormally, stop it immediately. Disconnect from
the mains and investigate the cause. Inspect for damage,
tighten any loose parts and have any damaged parts re-
paired or replaced.
TECHNICAL SPECIFICATION
Rated Voltage 230V - 240V
Rated Power 1200W
Rated Frequency 50Hz

A5P | 01
DECLARATION OF CONFORMITY
We
DOMU Brands Ltd
6th Floor The Tower
Deva City Oce Park
Manchester
M3 7BF
DOMU Brands Ltd
Unit 30, Finlan Road
Stakehill Industrial Estate
Middleton, Manchester
M24 2RW
Declare under our sole responsibility the product:
SKU
3500227.1
Description
1200W Corded Lawn Mower
Complies with the essential requirements of the following directives:
2006/42/EC
2000/14/EC
2014/30/EU
2011/65/EU
And the Standards
BS EN 60335-1:2012+A13:2017 , BS EN 60335-2-77:2010, BS EN 62233:2008, EN 55014-1:2006+A1+A2
EN 55014-2:2015, EN 61000-3-2:2014, EN 61000-3-3:2013
Authorised Signatory on behalf of DOMU Brands Ltd.
A5P | 01
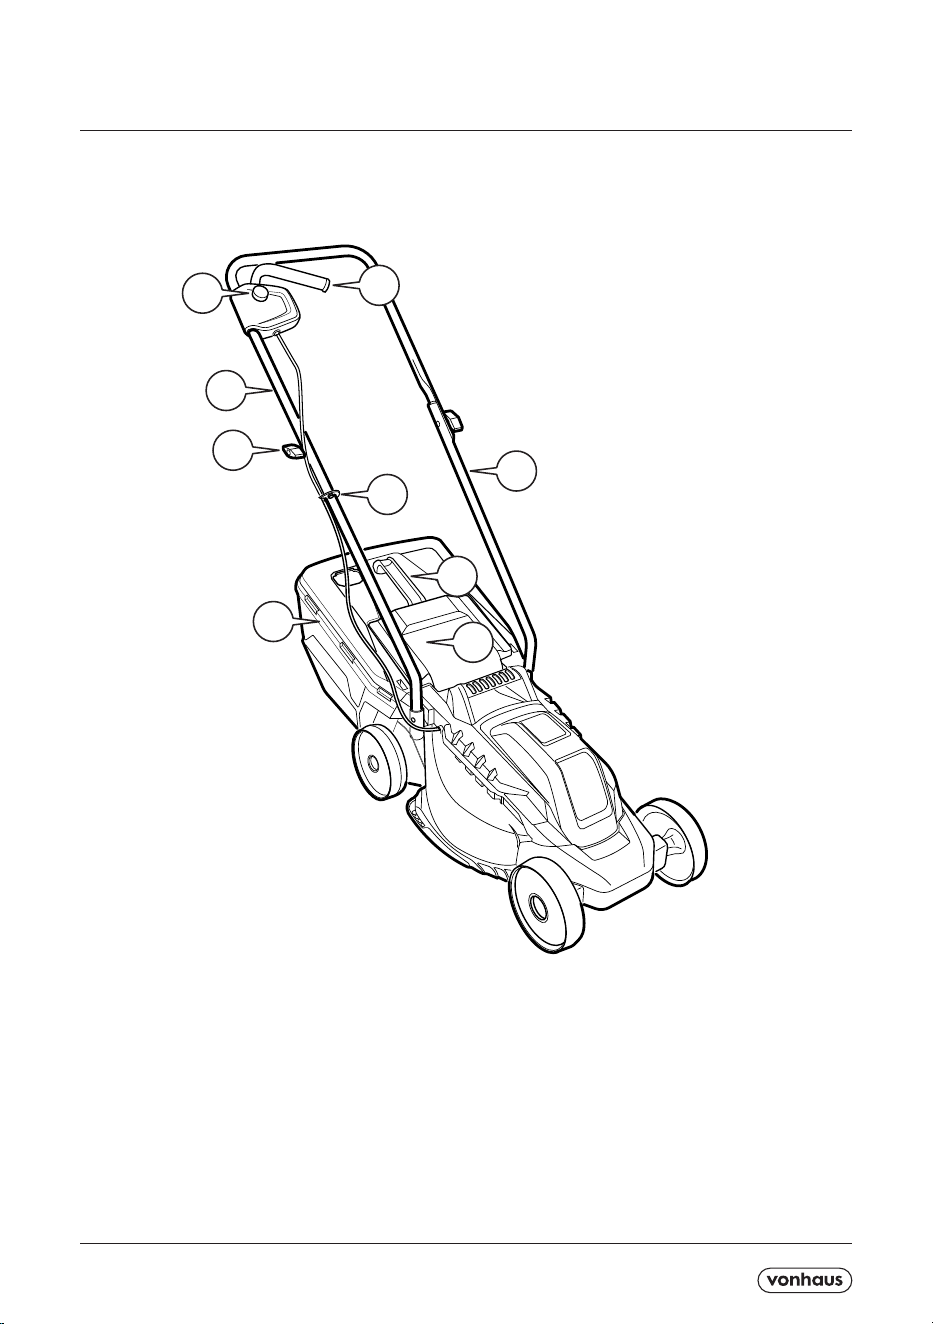
COMPONENTS
1. Safety Button
2. Switch Lever
3. Upper Support Bars
4. Lower Support Bars
5. Locking Knob Assembly x2
6. Wing Nut
7. Cable Relief
8. Wire Clip
9. Collection Basket Cover
10. Grass Collector Handle
11. Carry Handle
12. Rear Flap
13. Cutting Height Adjustment Lever
14. Collection Basket Cover
3
5
2
1
7
8
9
6
4
A5P | 01
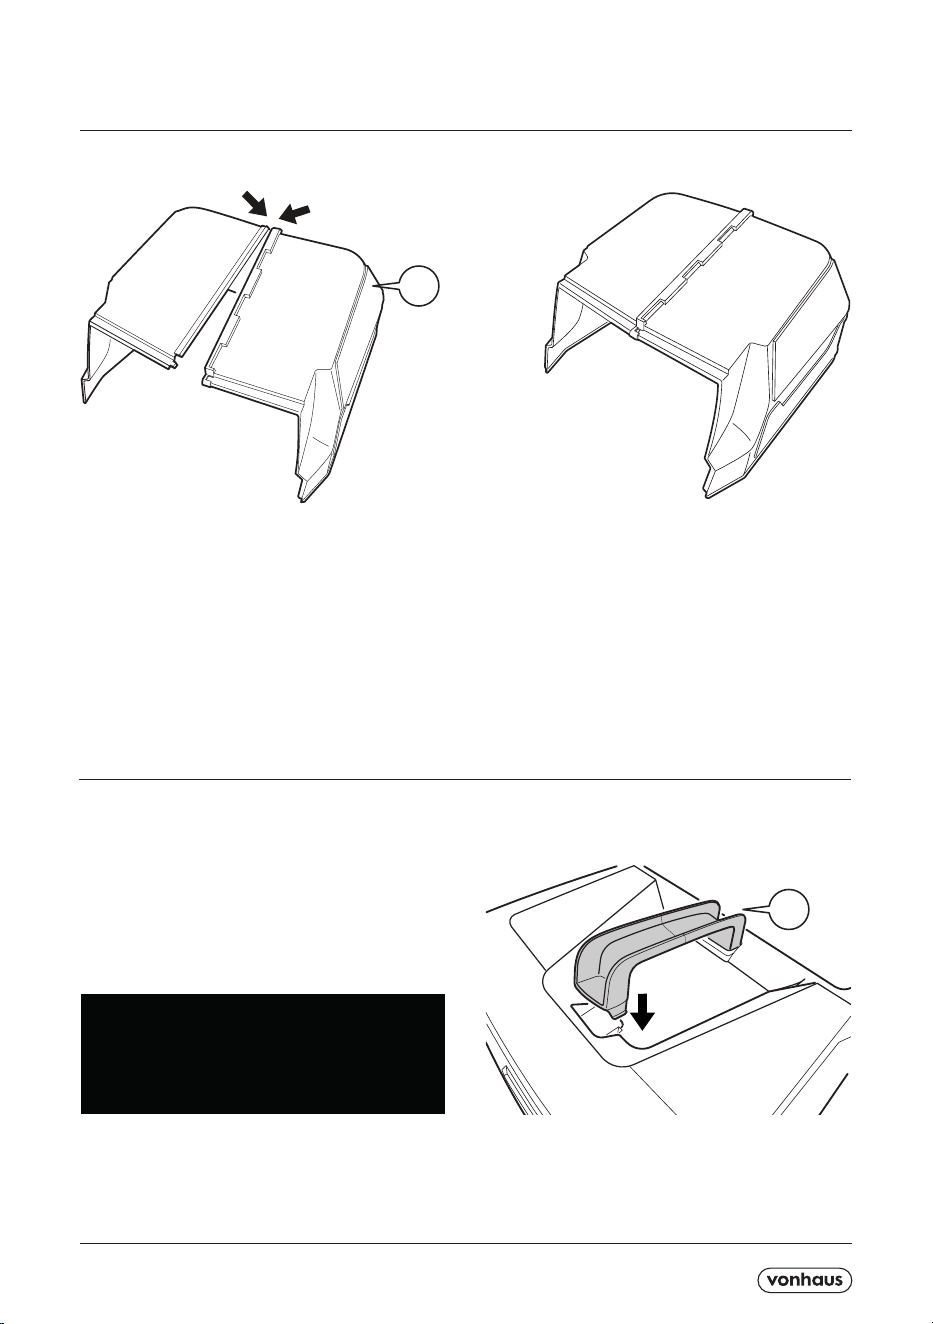
COLLECTION BASKET ASSEMBLY
Push together the clips of the COLLECTION BASKET
(7) into the recess on the basket starting from the back
working towards the front.
7
Click the CARRY HANDLE (8) into the top panel of the
COLLECTION BASKET (7)
Assemble the top and lower panel to complete the
COLLECTION BASKET (7) assembly. The two sections
snap together at along the edges.
8
NOTE To attach to the COLLECTION BASKET
(7) lawnmower, lift the COLLECTION BASKET
COVER (9) and hook into place on the mounting
points at the rear of the lawnmower
COLLECTION BASKET ASSEMBLY
A5P | 01
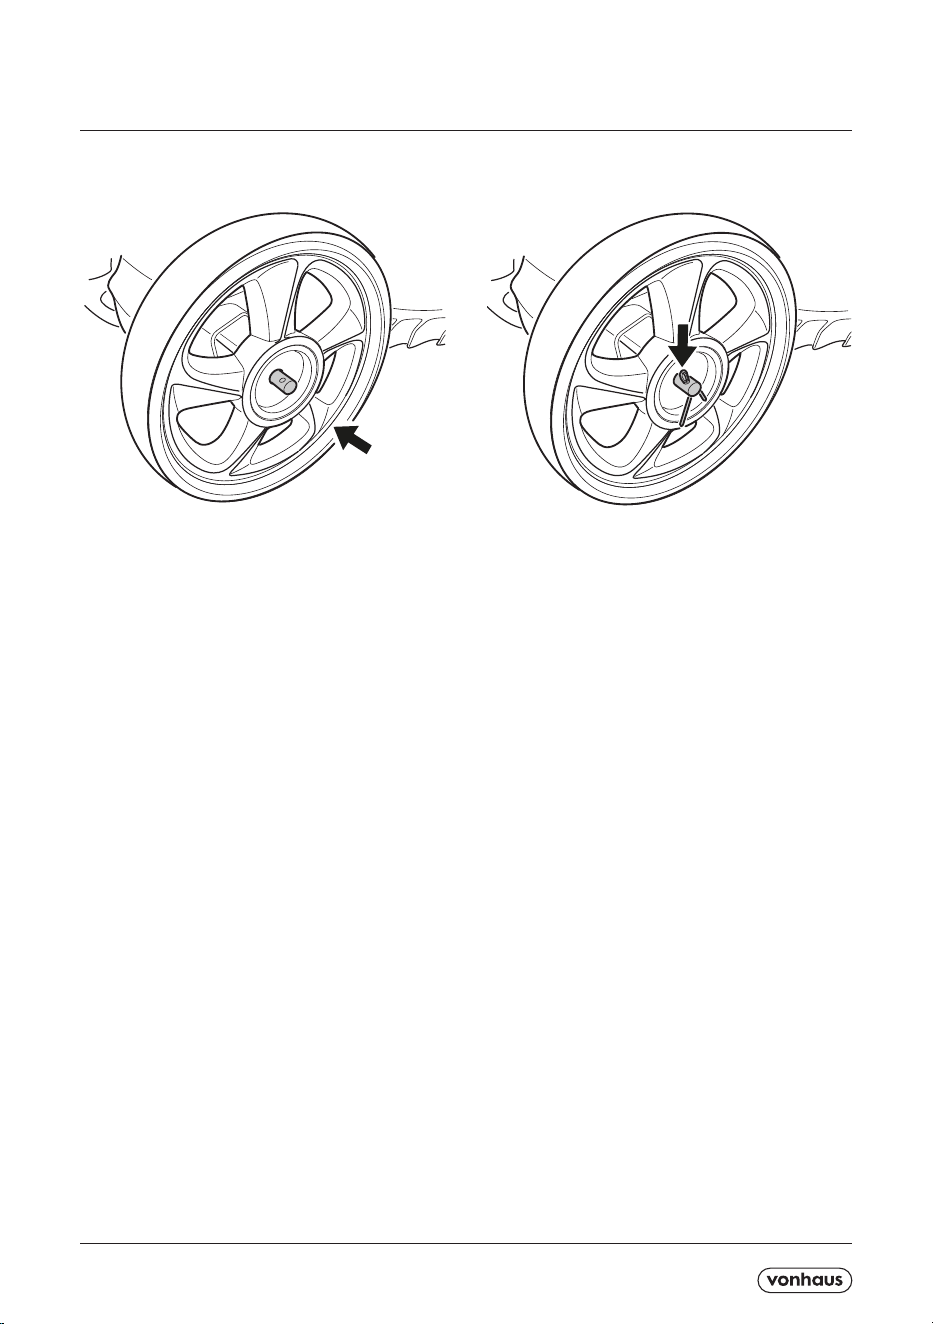
WHEEL ASSEMBLY
Slide each wheel onto the ADJUSTABLE AXLE Secure each wheel with SPLIT PINS and add the
WHEEL CAPS provided.
A5P | 01
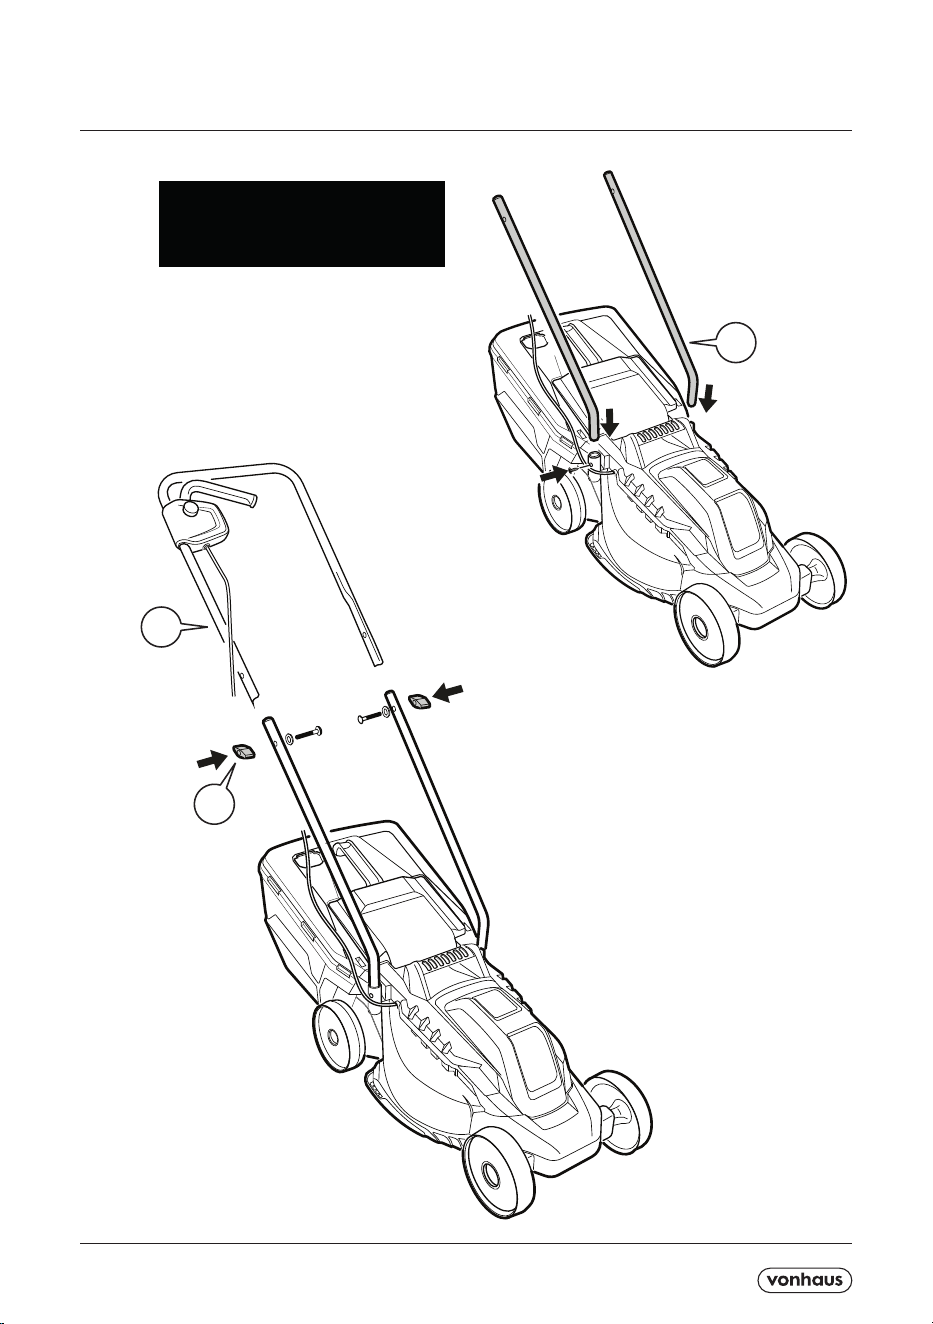
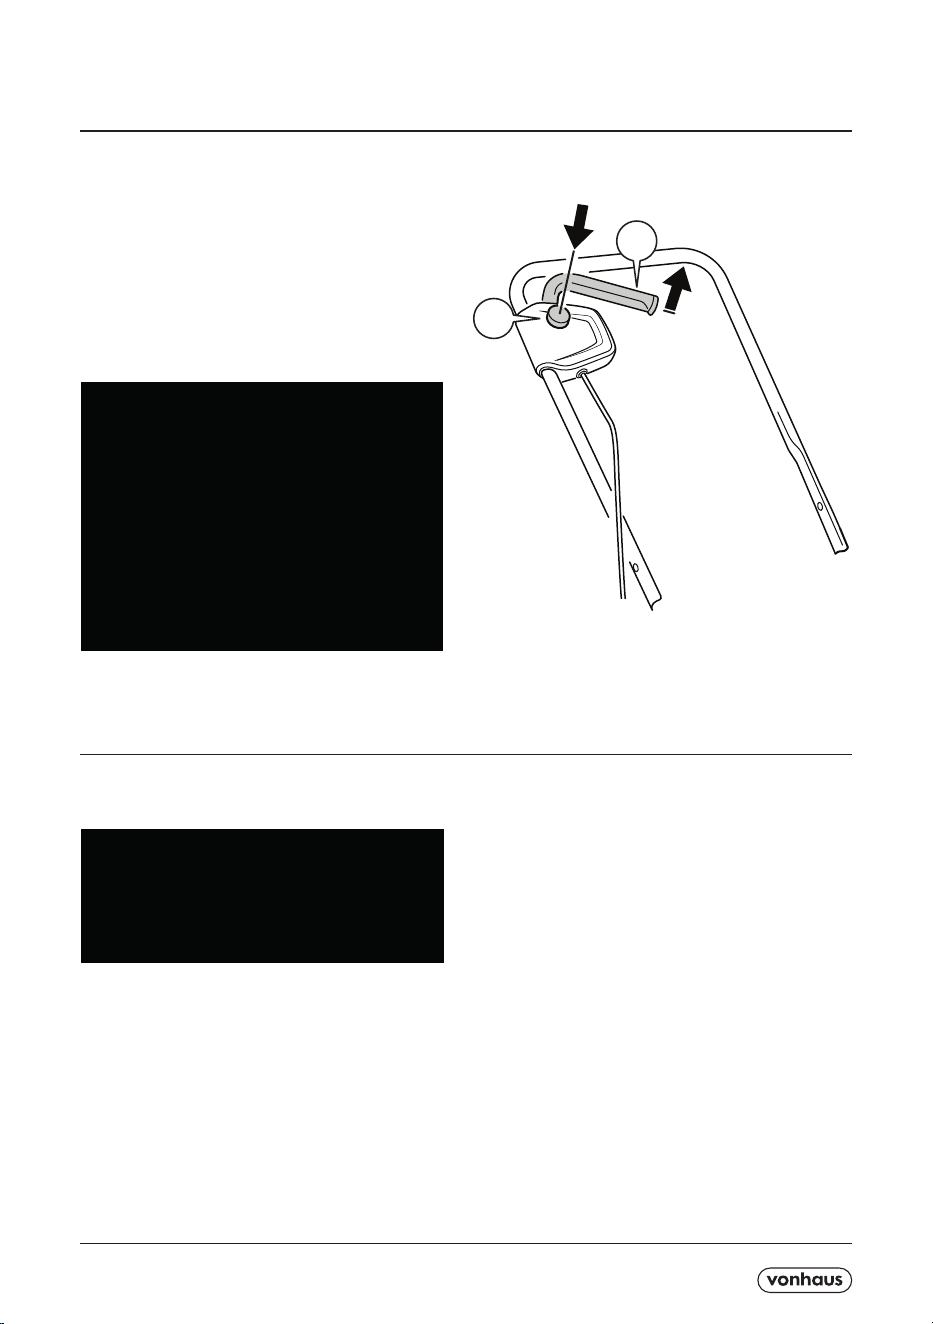
HANDLE ASSEMBLY
4
3
5
NOTE Loosen the screw to lower
the LOWER SUPPORT BARS (4)
into position and re-tighten

A5P | 01
CUTTING HEIGHT ADJUSTMENT
Adjust the cutting height of the lawnmower by moving
the ADJUSTABLE AXLE within the three slots.
NOTE The HIGHEST NOTCH (A) will set the
lawnmower at the lowest ride height giving the
most shallow cut.
As you go down the notches, the lawnmower
ride height will raise, decreasing the cutting
depth.
NOTE This can be adjusted with or without
the wheels attached. Adjust each corner inde-
pendently and not at the axle centre.
A
IMPORTANT Adjust the cutting height
only when the engine is switched o and
the power cable has been disconnected.
1. Turn the mower upside down.
2. Pull the wheel axle towards the front of the
lawnmower.
3. Locate the wheel axle into the desired cutting
height adjustment position.
ADJUSTING THE FRONT WHEEL CUTTING HEIGHT
1. Turn the mower on its side.
2. Pull the rear wheel axle towards the lawn-
mower's COLLECTION BASKET COVER (9).
3. Locate the wheel axle into the desire cutting
height adjustment position.
ADJUSTING THE REAR WHEEL CUTTING HEIGHT
NOTE Make sure that both right and left
wheel for both axels are located in the same
cutting height adjustment position.
NOTE Wheel adjustment resistance will ease
after rst few uses.
25mm
45mm
65mm
IMPORTANT Height adjust each wheel
independently. Do not adjust both at the
same time using the axle column.
IMPORTANT Height adjust each wheel
independently. Do not adjust both at the
same time using the axle column.
A5P | 01
REMOVING THE BLADE
While wearing gloves, wedge a block of wood between
the blade and the mower deck in order to prevent the
blade from turning when the nut is being removed.
Using a 12mm wrench or socket, loosen the blade nut
and remove the blade.
Turn the nut anticlockwise to loosen it and clockwise to
tighten, remove the blade.
To re-install the blade, position the blade with the cutting
edges toward the ground ensuring to re-assemble the
washers and spring washer assembly.
Using a 12mm socket or wrench, turn the blade nut
clockwise to secure the blade.
IMPORTANT Disconnect the lawnmower
from the mains and wait until the blade has
stopped rotating before proceeding.
Use heavy-duty gloves or a cloth to grip the
blade.
1
2
IMPORTANT To prevent the machine
switching on accidentally, the lawnmower
is equipped with a SAFETY BUTTON (1)
which must be pressed before the SWITCH
LEVER (2) can be activated.
The lawnmower switches itself o when the
SWITCH LEVER (2) is released.
Recommend to repeat this process
several times with the blade removed
so that you familiarise yourself with this
functionality.
Press and hold SAFETY BUTTON (1) then squeeze
the SWITCH LEVER (2) towards the handle.
Release the SAFETY BUTTON (1).
To stop the lawnmower, release the SWITCH
LEVER (2)
OPERATION

A5P | 01
CLEANING & MAINTENANCE
Keep all air vents and the motor housing free of dirt and
dust where possible.
Wipe the equipment with a clean cloth or clean with
compressed air at low pressure.
We recommend that you clean the lawnmower
immediately each time you have nished using it.
Clean the equipment regularly with a moist cloth and
some soft soap. Do not use cleaning agents or solvents;
Ensure to prevent water ingress into the motor.
Blade maintenance
Regularly remove grass and dirt from the blade.
At the beginning of the season, carefully examine the
condition of the blade.
- If the blade is blunt, sharpen or replace the blade.
- If the blade is damaged or worn, t a new blade.
IMPORTANT Disconnect the lawnmower
from the mains and wait until the blade has
stopped rotating before proceeding.
Use heavy-duty gloves or a cloth to grip the
blade.
Always clean your mower before storage.
Store the lawnmower in a clean, dry environment. To
avoid mould on remaining contents, make sure the
COLLECTION BASKET (7) is empty and dry.
STORAGE

A5P | 01
DISPOSAL INFORMATION Please recycle where
facilities exist. Check with your local authority for
recycling advice.
CUSTOMER SERVICE If you are having diculty using
this product and require support, please contact
WARRANTY To register your product and nd out if you
qualify for a free extended warranty please go to
www.vonhaus.com/warranty. Please retain a proof of
purchase receipt or statement as proof of the purchase
date. The warranty only applies if the product is used
solely in the manner indicated in the warnings page of
this manual, and all other instructions have been followed
accurately. Any abuse of the product or the manner in
which it is used will invalidate the warranty. Returned
goods will not be accepted unless re-packaged in its
original packaging and accompanied by a relevant and
completed returns form. This does not aect your stat-
utory rights. No rights are given under this warranty to a
person acquiring the appliance second-hand or for com-
mercial or communal use.
COPYRIGHT All material in this instruction manual are
copyrighted by DOMU Brands. Any unauthorised use
may violate worldwide copyright, trademark, and other
laws.
THANK YOU
Thank you for purchasing your product/appliance.
Should you require further assistance with your pur-
chase, you can contact us at
VonHaus is a registered trademark of DOMU Brands
Ltd. Made in China for DOMU Brands. M24 2RW.
C