CSG12H
STUMP GRINDER
Operations Manual

2
Table of Contents
1. SAFETY INFORMATION
- Fire Safety
- Operating Safety
- Service Safety
- Electric Motors
- Plugs
- Extension Cables
- NVR - No Volt Release
- Health and Safety
2. EQUIPMENT DATA
- Features
- Equipment Specifications
- Maximum Recommended Cord Length
3. BEFORE STARTING THE MACHINE
4. STARTING THE MACHINE
5. STORAGE
6. APPLICATIONS
- Blade Angles
- Operation on Concrete Floors
- Operation on Wood Floors
7. DUST AND CRYSTALLINE SILICA WARNING
8. MAINTENANCE RECORD
9. REPLACEMENT PARTS
10. TROUBLESHOOTING
11. WARRANTY
12. PARTS MANUAL
13. CATALOG AND COUPON
4
5
5
6
7
7
7
7
8
8
8
9
9
10
10
11
11
11
11
11
12
13
13
14
15
17
22

3
Register Your Equipment
Thank you for purchasing CARDINAL® equipment! Your product is covered by the CARDINAL®
Warranty policy, but in order to activate your warranty, we need you to register your product.
In addition to activating your equipment warranty, product registration will grant you access
to important product updates, streamlined customer service and more.
INCLUDED WITH YOUR REGISTRATION
☑ Equipment Warranty Activation
☑ Product Updates
☑ Streamlined Customer Service
☑ Excusive Discounts and Sales
STEPS TO REGISTER YOUR EQUIPMENT
1. Visit www.cardinalsprayers.com
2. Choose “Product Registration” at the bottom of the page
3. Enter your equipment’s serial number to get started
4. Provide all required information
5. Submit Registration
Equipment Resources
CARDINAL® Customer Service doesn’t stop at checkout. We understand to keep a job-site
running smoothly - the proper equipment, spare parts, instruction manuals, and more are
needed at the drop of a hat. Visit www.cardinalsprayer.com to gain access to the incredible
resources below.
How To Video Library
More of a visual person? Visit our Video Library for equipment
assembly instructions, troubleshooting tips, and more!
Found at the CARDINAL® Resource Center
Manual and Assembly Guide Library
Visit our Manual Library if you are looking for a lost
operations manual or a particular spare part?
Found on the CARDINAL® Manuals Page
Service Requests
In need of a quick fix or a service center referral? Submit a
Service Request and a CARDINAL® Technician will respond
shortly to get you the help you need.
Choose “Service Request” at the bottom of www.cardinal-sprayers.com

This manual provides information and procedures to safely operate and maintain this
model. For your own safety and protection from injury, carefully read, understand and
observe the safety instructions described in this manual.
Keep this manual or a copy of it with the machine. If you lose this manual or need an
additional copy, please contact CARDINAL® or visit www.cardinalsprayer.com This machine is
built with user safety in mind; however, it can present hazards if improperly operated and
serviced. Follow operating instructions carefully. If you have questions about operating or
servicing this equipment, please contact CARDINAL®.
The information contained in this manual is based on machines in production at the time of
publication. CARDINAL® reserves the right to change any portion of this information without
notice.
No part of this publication may be reproduced in any form or by any means, electronic or
mechanical, including photocopying, without express written permission from CARDINAL®.
Any type of reproduction or distribution not authorized by CARDINAL® represents an
infringement of valid copyrights and will be prosecuted. We expressly reserve the right to
make technical modifications, even without due notice, which aim at improving our
machines or their safety standards.
1. Safety Information
This manual contains DANGER, WARNING, CAUTION, and NOTE callouts which must be
followed to reduce the possibility of personal injury, damage to the equipment, or improper
service.
This is the safety alert symbol. It is used to alert you to potential personal injury
hazards. Obey all safety messages that follow this symbol to avoid possible injury
or death.
DANGER indicates an imminently hazardous situation which, if not avoided, will
result in death or serious injury.
WARNING indicates a potentially hazardous situation which, if not avoided, could
result in death or serious injury.
CAUTION indicates a potentially hazardous situation which, if not avoided, may
result in minor or moderate injury.
DANGER
WARNING
CAUTION
4

5
1.1 Fire Safety
If your machine catches fire, turn off the electric supply. Using a dry powder or C02 fire
extinguisher, put out the fire. If the fire cannot be put out, keep away and call the fire
departement. If you are in any doubt about the safety condition of your machine, please
consult CARDINAL ®.
1.2 Operating Safety
Familiarity and proper training are required for the safe operation of equipment!
Equipment operated improperly or by untrained personnel can be dangerous! Read
the operating instructions contained in both this manual and the engine manual and
familiarize yourself with the location and proper use of all controls. Inexperienced operators
should receive instruction from someone familiar with the equipment before being allowed
to operate the machine.
1.2.1 NEVER allow anyone to operate this equipment without proper training. People
operating this equipment must be familiar with the risks and hazards associated with it.
1.2.2 NEVER use accessories or attachments for this equipment, which are not
recommended by CARDINAL®. Damage to the rammer and/or injury to user may occur.
1.2.3 NEVER leave machine running unattended.
1.2.4 ALWAYS be sure operator is familiar with proper safety precautions and operation
techniques before using machine.
1.2.5 ALWAYS wear hearing protection when operating equipment.
1.2.6 ALWAYS wear protective clothing appropriate to the job site when operating
equipment.
1.2.7 ALWAYS wear hearing protection when operating equipment.
1.2.8 ALWAYS store equipment properly when it is not being used. Equipment should be
stored in a clean, dry location out of the reach of children.
1.2.9 ALWAYS operate machine with all safety devices and guards in place and in working
order. DO NOT modify or remove safety devices. DO NOT operate machine if any safety
devices or guards are missing or inoperative.
1.2.10 ALWAYS read, understand, and follow procedures in Operator's Manual before
attempting to operate equipment.
WARNING

1.3 Service Safety
For your own personal protection and for the safety of those around you, please read
and ensure you fully understand the following safety information. It is the
responsibility of the operator to ensure that he/she fully understands how to operate
this equipment safely. If you are unsure about the safe and correct use of this equipment
consult your supervisor.
1.3.1 DO NOT attempt to clean or service machine while it is running. Rotating parts can
cause severe injury.
1.3.2 ALWAYS replace worn or damaged components with spare parts designed and
recommended by CARDINAL
®.
1.3.3 ALWAYS keep machine clean and labels legible. Replace all missing and hard-to-read
labels. Labels provide important operating instructions and warn of dangers and hazards.
1.3.4 This equipment is heavy and must not be lied single-handedly. Must be listed with
two people or use suitable liing equipment.
1.3.5 Cordon off the work area and keep members of the public and unauthorized personnel
at a safe distance.
1.3.6 Personal Protective Equipment (PPE) must be worn by the operator whenever this
equipment is being used.
1.3.7 Make sure you know how to safely switch this machine OFF before you switch it ON in
case you get into diffculty.
1.3.8 Always switch OFF and unplug the motor before transporting, moving it around the
site, or servicing it.
1.3.9 During use, the motor becomes very hot, allow the motor to cool before touching it.
Never leave the motor running and/or unattended.
1.3.10 NEVER remove or tamper with any guards fitted, they are there for your protection.
Always check that guards are in proper condition, if any are damaged or missing, DO NOT
USE THE MACHINE until the guard has been replaced or repaired.
1.3.11 NEVER pull or guide the machine using the cable and never pull on the cable to
diconnect the plug.
1.3.12 DO NOT operate the machine when you are ill, feeling tired, or when under the
influence of alcohol or drugs.
1.3.13 Ensure that any trailing cable is protected against damage and not liable to be tripped
over or trapped underneath the machine.
1.3.14 DO NOT use the Motor Guard as a Liing Point.
1.3.15 DO NOT Jet Wash the machine as this could result in serious injury or even death!
1.3.16 DO NOT use this machine in wet conditions. The electrical components of the
machine NEVER be exposed to water or liquid of any kind as this could result in serious
injury or even death!
WARNING
6

7
1.4 Fuel Safety
For your own personal protection and for the safety of those around you, please read and
ensure you fully understand the following safety information. It is the responsibility of the
operator to ensure that he/she fully understands how to operate this equipment safely. If
you are unsure about the safe and correct use of this equipment consult your supervisor.
1.4.1 PAY ATTENTION while handling fuel. They are flammable amd the vapours are highly
explosive.
1.4.2 NEVER remove the fuel cap or add fuel with the fuel with the power running. Stop the
engine
and allow engine and exhaust components to cool before refueling.
1.4.3 DO NOT smoke while adding fuel.
1.4.4 FILL your engine with 10w-30/ 10w-40/ 15w-30/ 15w-40 non-synthetic engine oil
before use
or serious damage will occur.
1.4.5 USE extreme care when handling fuel. Fuel is extremely flammable and the vapors are
explosive.
1.4.6 NEVER fuel machine indoors or whule the engine is hot or running
1.4.7 NEVER refuel or store the machine in a place where ther is open flame, sparks or other
ignition objects.
1.4.8 DO NOT Attempt to start the engine if fuel is spilled. Wipe away the spillage and ensure
all
fuel has dried before starting the machine.
1.4.9 ALWAYS make sure the fuel cap is securely tightened and replace before starting.
1.4.10 IF the fuel tank needs to be drained, it should be done outdoors.
2. OPERATION
2.1 Adding Oil to the Engine
2.1.1 Only fill the fuel tank to a level 15mm
lower than the top of the fuel tank. Do not
overfill.
2.1.2 Use the dipstick to check the fuel
level.
USE: 10w-30/ 10w-340/ 15w-30/ 15w-40
non-synthetic oil
2.1.3 The engine is shipped without oil. Fill
to the correct level before use. Operating
the engine with no oil or oil at a low rate will
destroy the engine - this is NOT covered
under warranty.
8
WARNING
The next step may cause the cutter wheel to rotate, maintain a safe distance.
2.2 STARTING THE ENGINE
2.2.1 Lock the wheel by pulling brake lever fully back
2.2.2 Make sure the throttle is in slow position.
DO NOT ALLOW the rope to snap back, return it by hand to prevent damage to the starter.
2.2.3 If the engine is cold move the choke lever to the closed position.
2.2.4 Raise the cutter wheel 4 to 5 inches off the ground by pushing downwards on the
handle bar,
hold it in that position.
2.2.5 Pull the starter rope lightly until resistance is felt then pull briskly
2.2.6 Move the choke lever to the open position.
2.2.7 Move the throttle to fast. If the engine is cold, allow the engine to idle. Throttle set to
slow for a
few minutes.
2.3 REMOVING STUMPS
2.3.1 Remove all loose
pieces of wood, stones, wire
and other debris from the
area before beginning
stump removal.
2.3.2 Wind direction should
be considered, as it will
influence the direction the
debris and dust are
directed.
2.3.3 Never operate the grinder aer dark. The operater needs adequate lighting to use the
grinder
safely.
2.3.4 Always allow a cold engine time to warm up before starting the cutting of the stump.
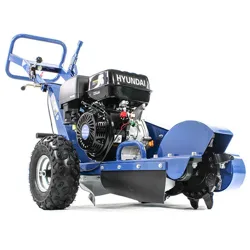
2.3.5 Only the portion of cutting wheel within the 80 degree area shown should engage the
stump.
Never undercut the stump or use the bottom of the cutting wheel for cutting purposes.
2.3.7 Never leave controls when the cutting wheel is rotating.
WARNING
The next step may cause the cutter wheel to rotate, maintain a safe distance.
2.4 PREPARE THE GRINDER AT THE STUMP
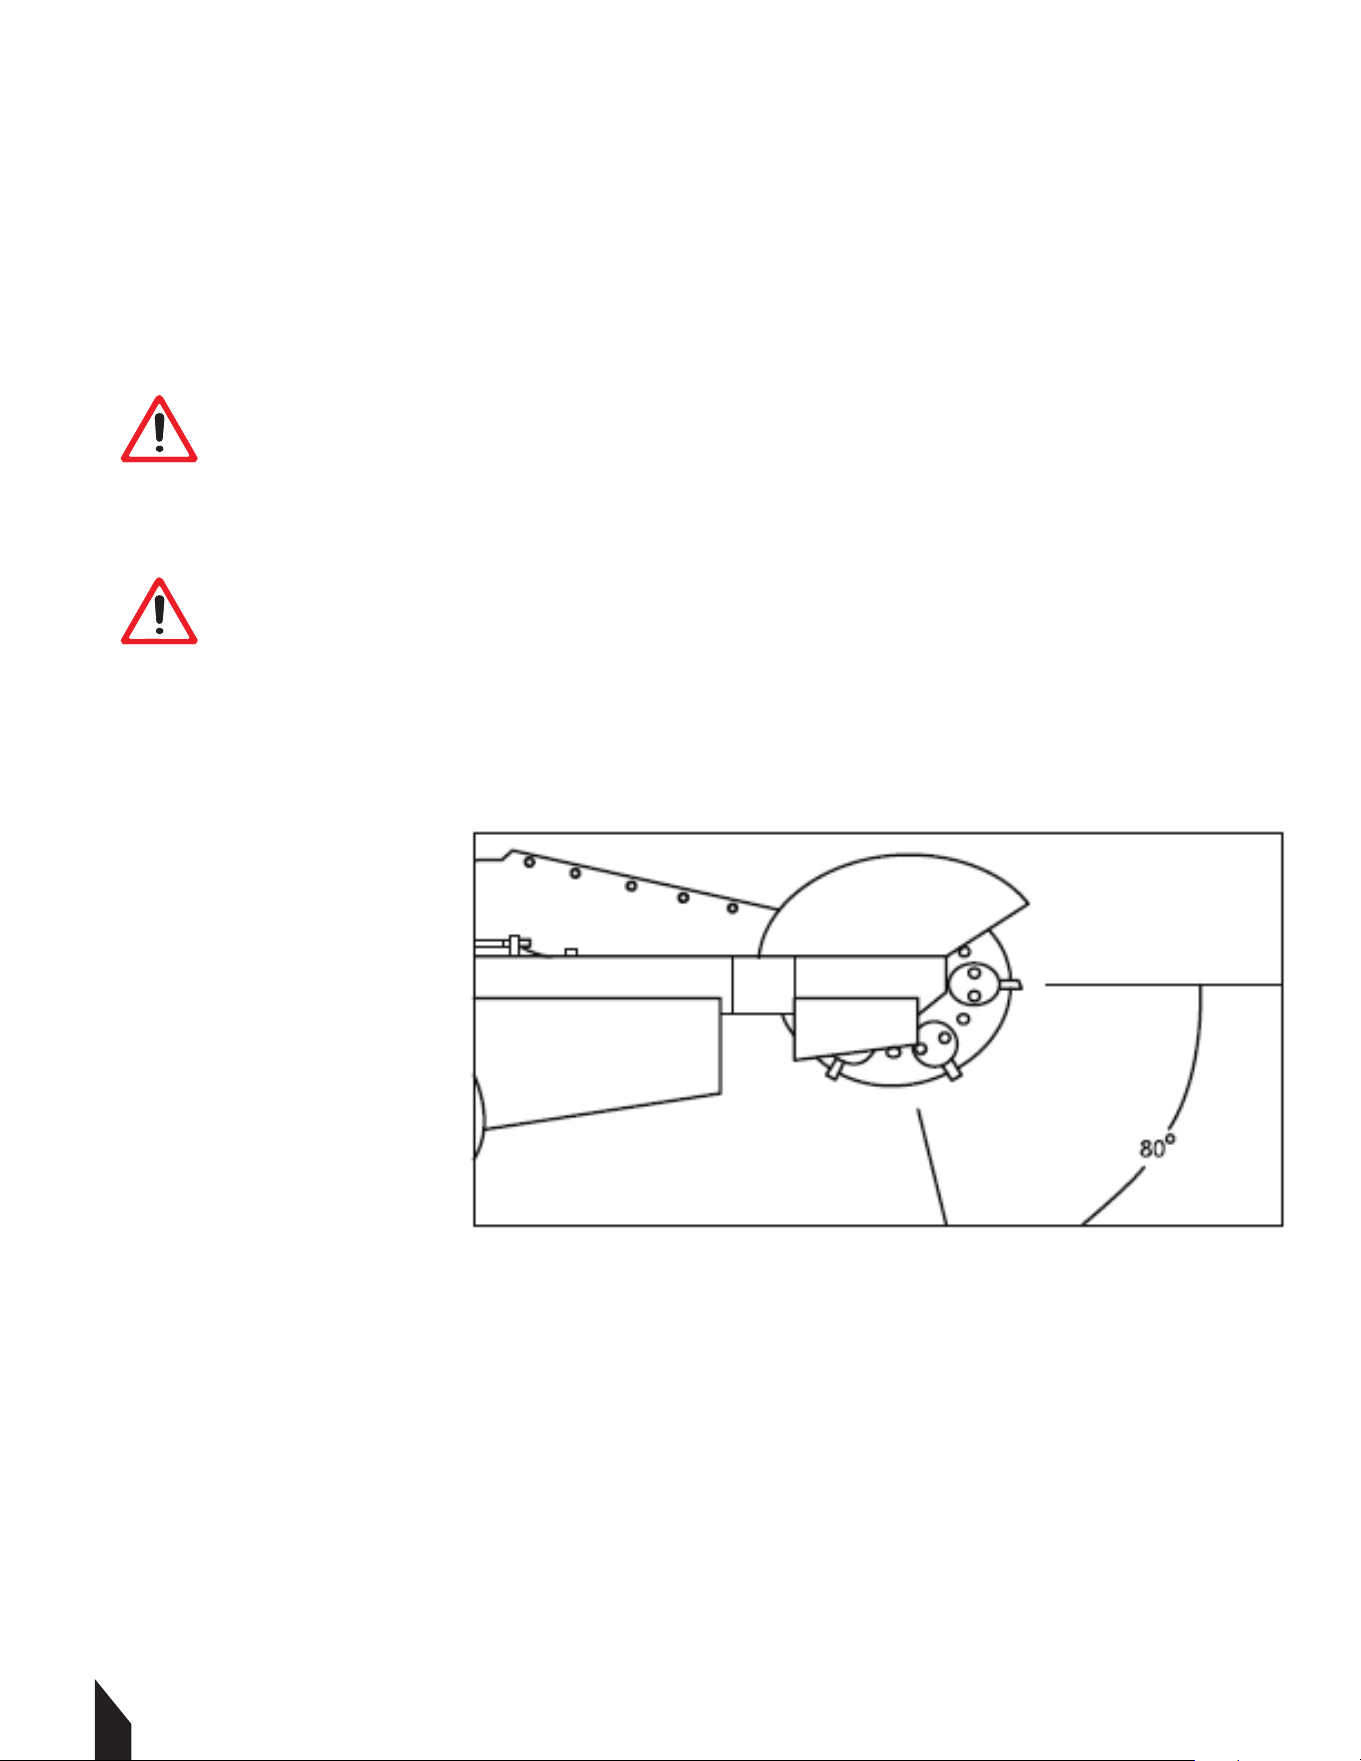
2.4.1 Removing Roots
1. Make sure the throttle is set to fast,
the cutter will accelerate to cutting
speed.
2. Swing the cutting wheel to one
side, then lower it into the nearest
roots that are buried at the foot of the
stump.
3. Swing the cutting wheel before each sweep, until the roots are sufficiently removed.
4. Raise the cutting wheel until the center of the cutting wheel is just above the top of the
stump.
5. Allow the cutter wheel to stop, release the brake and reposition the machine.
6. Lock the brake again.
2.4.2 Cutting The Full Stump Removing Roots
1. Make sure the throttle is set to
fast. The cutter wheel will accelerate
to cutting speed.
2. Direct the cutter wheel against
the stump, beginning with the
nearest top corner of the stump.
3. Steadily sweep it across the
stump le and right, cutting away
1/2 inch of wood on each sweep.
4. Raise the machine forward and back, by pushing and pulling on the control.
5. Roll the machine forward and back, by pushing and pulling the contol handle. To do this
release the brake. Relock it when the machine has been repositioned and continue cutting.
9

10
2.4.2 Cutting The Full Stump Removing Roots Continued
Cut the remaining roots as described in STEP 2 until satisfactorily removed.
3. SHUTTING DOWN MACHINE
3.1 Shutting Off the Grinder
1. When stopping the machine aer normal operation, lower the engine speed to slow, and
push
the emergency switch.
2. Set the park brake before leaving the controls.
3. Shut off the engine by pushing the on/off switch.
3.2 Normal Shutdown Procedure
Considering your own safety and that of others, you should always use the following normal
shutdown procedures before departing from the controls for any reason
including cleaning, servicing, transporting or inspecting the stump grinder. Never deviate
from this procedure unless so instructed in this manual or in an emrgency that requires it.
A rotating cutting wheel is very dangerous. Stand at controls and ensure that the
cutting wheel comes to a complete stop before doing anything else.
1. Move the engine throttle to slow position
2. Push the emergency (on/off) switch to stop the engine.
3. Set park brake before leaving controls
3.3 Emergency Cutoff Procedure
1. Immediately push the emergency switch for the engine to shut off.
2. Be sure to allow all moving parts to come to a complete stop.
3. Pull the brake lever to engage brake.
4. Rectify the emergency station and return to normal operation

11
4. MACHINE MAINENTANCE
4.1.1 Make sure all nuts, bolts and screws are tightened
4.1.2 Never store the equipment with fuel in the tank inside a building where fumes can
reach an open flame or spark. Allow the engine to cool before moving the grinder.
4.1.3 To reduce fire hazards, keep the engine and fuel storage area free of grass, grease, and
dirt.
4.1.4 Replace worn or damaged parts for safety. If the fuel tank has to be drained, this should
take place outdoors.
4.1.5 Regularly check the grinder and ensure that all bark and dirt deposits are removed
from beneath the deck.
4.1.6 Frequently check the grinder and ensure that all bark and dirt deposits are removed
from beneath the deck.
4.1.7 Lubricate the wheel axle and the bearings with grease regularly.
4.1.8 Check the cutting wheel oen. In order to acheive clean work the blade should always
be sharp and well balanced.
4.1.9 Check the tightening of all bolts and screws at regularly intervals. Nuts and bolts that
are worn out or badly tightened can damage the engine or the frame.
5. TRANSPORTATION
The stump grinder is designed to be transported via a large van, truck, or small trailer. The
machine is equipped with grab bars that are able to be used for both liing the machine,
and strapping it down. This machine weighs approximately 243 lbs and should only be lied
using correct apparatus or an adequate number of people working as a team.
The legal road requirement for towing equipment and trailers. It is the owners responsibility
to be aware of these laws and to adhere to them.
6. SPECIFICATIONS
8. MAINTENANCE RECORD
CARDINAL® tools are assembled with care and will provide years of service when properly
maintained. Preventative maintenance and routine service are essential to the long life of
your tamping rammer. Adhere to reading through this manual thoroughly. You will find that
you can do some of the regular maintenance yourself. However, when in need of parts or
major service, be sure to contact a CARDINAL® Technician. For your convenience we have
provided this space to record relevant data about your CARDINAL® equipment.
9. REPLACEMENT PARTS
9.1
9.2
9.3
9.4
12

13
11. WARRANTY
Your new CARDINAL® equipment is warranted to the original purchaser for a period of
one-year.
(12 months) from the original date of purchase. The CARDINAL® warranty is against defects in
design, materials and workmanship.
The following are not covered under the warranty:
1. Damage caused by abuse, misuse, dropping or other similar damage caused by or as a
result of failure to follow assembly, operation or user maintenance instructions.
2. Alterations, additions or repairs carried out by persons other than CARDINAL® or their
recognised agents.
3. Transportation or shipment costs to and from CARDINAL® or their recognised agents, for
repair or assessment against a warranty claim, on any machine.
4. Materials and/or labor costs to renew, repair or replace components due to fair wear and
tear.
CARDINAL® and/or their recognised agents, directors, employees or insurers will not be held
liable for consequential or other damages, losses or expenses in connection with or by
reason of or the inability to use the machine for any purpose.
Warranty Claims
Before submitting any warranty claim, your new CARDINAL® equipment should be registered
through www.cardinalsprayers.com. Follow the steps on page 3 to complete the equipment
registration. Aer registration is complete, all warranty claims should firstly be directed to
CARDINAL® through the online Service Request form found at www.cardinalsprayers.com

1.6HP Backpack Concrete Vibrator
Part#: TVIBH + TVW10-P
1.6 HP Honda GX35 engine
Consolidation with speeds of 10,000-12,000 VPM
Quick Connect centrifugal clutch vibrator
1” and 2” Diameter Whips Available in 10ft Length
3 Year Engine Warranty & 1 Year Product Warranty
8” Gas Powered Concrete Scarifier
Part#: TSCAR8H
5.5 HP Honda GX160 Engine
Remove traffic lines at 800 - 1,000 linear ft/hr
Tungsten Carbide Blade Kit Available
OSHA approved dust port for silica vacuum removal
3 Year Engine Warranty & 1 Year Product Warranty
36” & 46” Concrete Power Trowel
Part#: TPT36H/K & TPT46H/K
6 HP/14HP Kohler & 5.5HP/8.5HP Honda Engines
Adjust trowel blade pitch from 0-28°
60-115 RPM rotor speed for superior concrete finishes
Includes float pan and trowel blades
3 Year Engine Warranty & 1 Year Product Warranty
HAVE QUESTIONS?
Contact us. We’re here to help!
Email us at [email protected]
3,550 lbs/ft Vibratory Rammer
Part#: TR68H
3.6 HP Honda GXR120 Engine
Easily achieve a 100% compaction rating
3-in-One Fuel System with carburetor protection
13” x 11” plate for narrow trenches and corners
3 Year Engine Warranty & 1 Year Product Warranty
3,400 lbs/ft Plate Compactor
Part#: TPC90H
5.5 HP Honda GX160 Engine
Easily achieve a 100% compaction rating
22” x 20” cold, rolled steel beveled base plate
Includes 3.5 gallon water tank for asphalt compaction
3 Year Engine Warranty & 1 Year Product Warranty
3,000 lbs/ft Plate Compactor
Part#: TPC80 & TPC80H
6 HP Kohler CH260 & 5.5 HP Honda GX160 Engines
Easily achieve a 100% compaction rating
16.5” x 21.5” plate for narrow trenches and corners
Optional Honda Engine model: TPC80H
3 Year Engine Warranty & 1 Year Product Warranty
COMPACTION
6.5 Gal Backpack Concrete Sprayer
Part#: TCS6.5
Maintain constant, adjustable pressure up to 450 PSI
Achieve superior concrete finishes with even spraying
Spray 15,000 sq ft in less than 10 minutes
Compatible with major manufacturer wands
1 Year Product Warranty
1.6 HP Vibratory Concrete Screed
Part#: TVSA-H
1.6 HP Honda GX35 Engine
Aluminum Magnesium blades available from 8ft - 14ft
Finish concrete 4X faster than other screed methods
360° adjustable handle placement
3 Year Engine Warranty & 1 Year Product Warranty
6” Early Entry Green Concrete Saw
Part#: TFS6H
5.5 HP Honda GX160 Engine
Maximum cutting depth of 1 3/16 inches
OSHA compliant vacuum port for dust collection
Includes 6” early entry concrete blade
3 Year Engine Warranty & 1 Year Product Warranty
FINISHINGFINISHING
14
USE CODE
SAVE10
AT CHECKOUT FOR
10% OFF YOUR ORDER AT
WWW.TOMAHAWK-POWER.COM
www.tomahawk-power.com
www.tomahawk-power.com
(866) 577-4476
ASSEMBLED IN THE
PARTS SOURCED GLOBALLY
USA
INVERTER SERIESINVERTER SERIES
www.tomahawk-power.com
(866) 577-4476
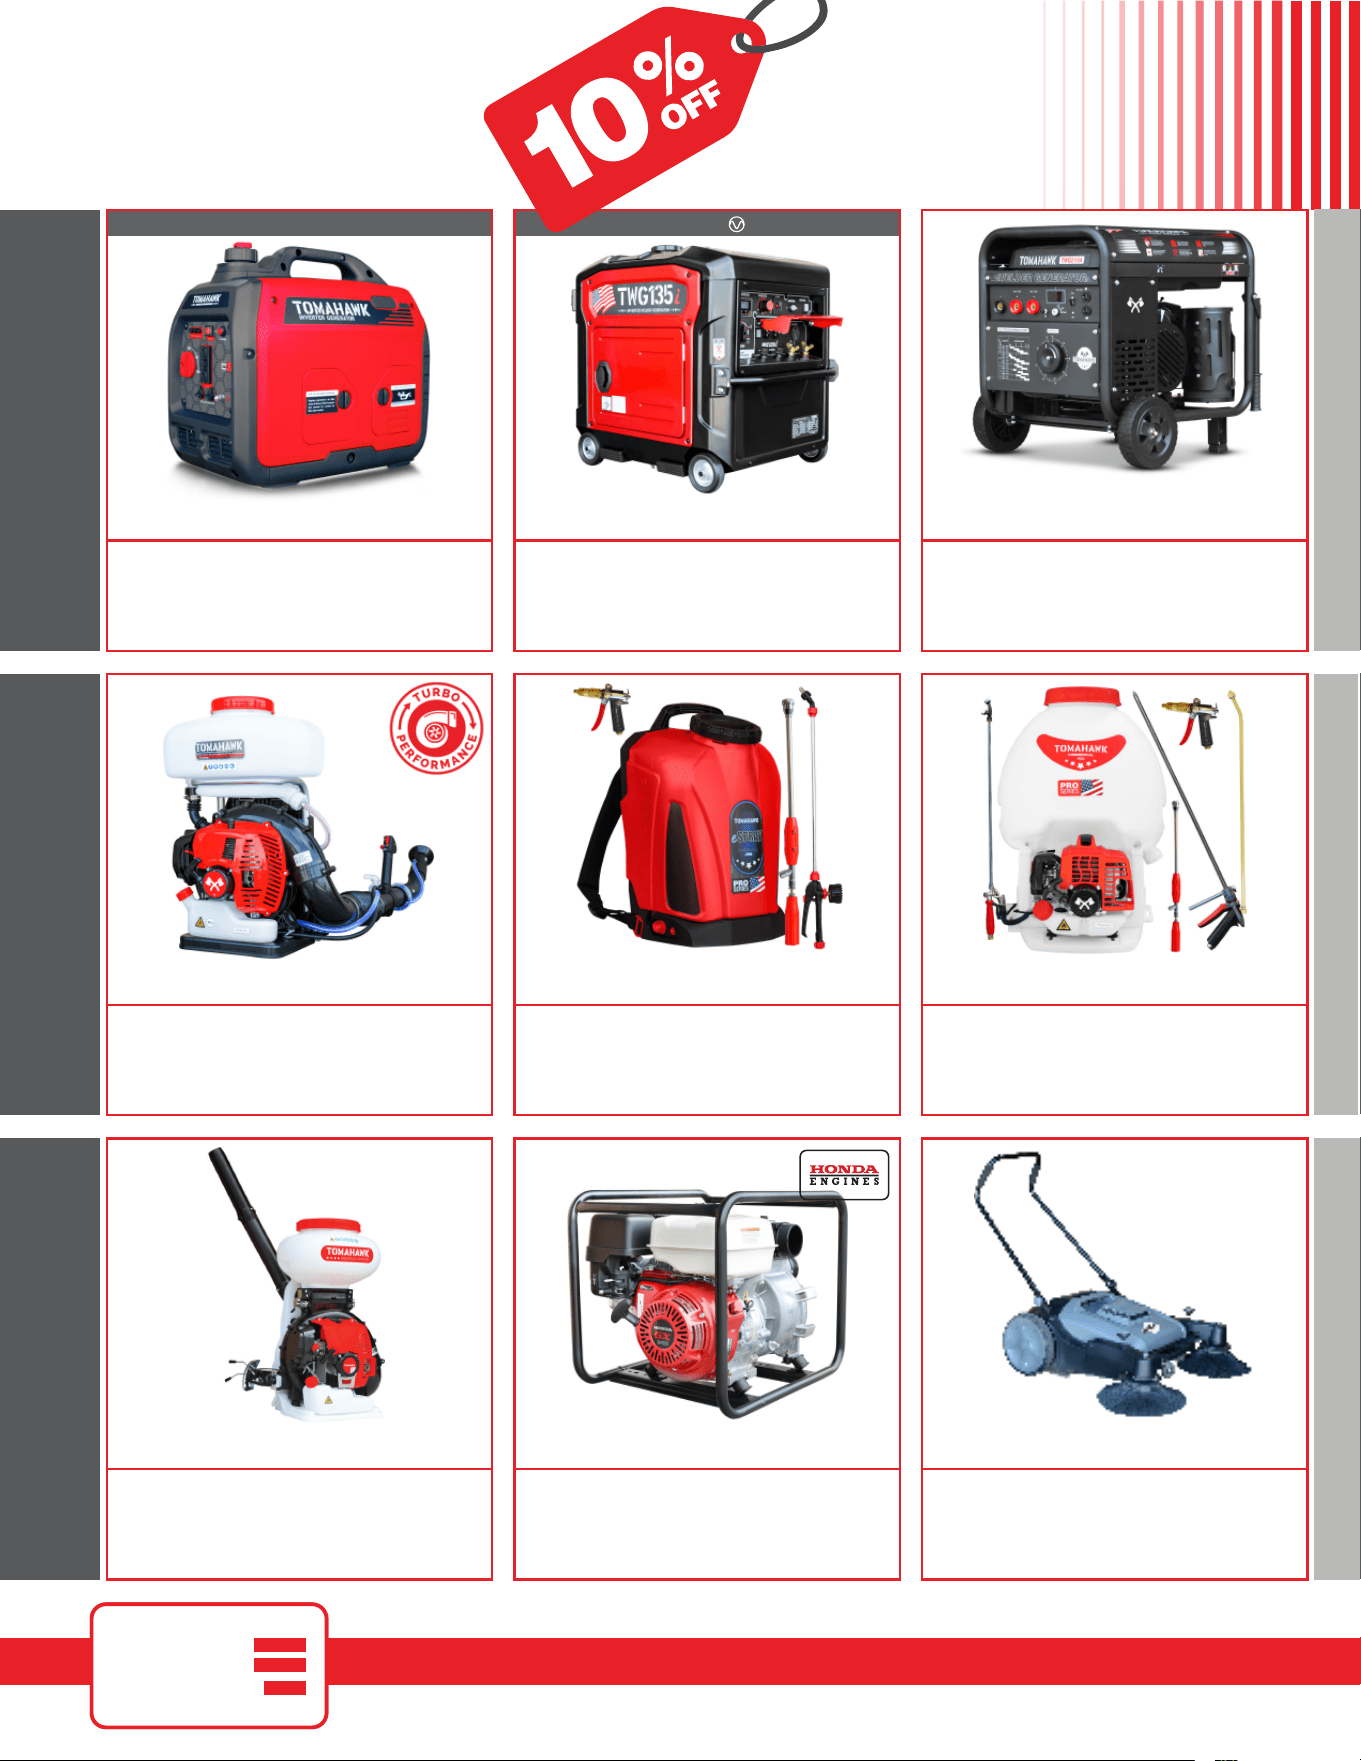
3.7 Gallon 3HP Backpack Fogger
Part#: TMD14
Turbo Boosted Pump with 40ft + Horizontal Reach
Sprays 1 acre in 30 minutes
10X Faster than Manual Pump Sprayers
Converts to Leaf Blower with 200 MPH Air Velocity
1 Year Product Warranty
Commercial 38" Push Sweeper
Part#: TOS38
Collect up to 14.5 gallons of dust and debris
Can be used indoors & outdoors on wet or dry surfaces
Includes integrated airflow control and fine dust filter
Lightweight design, capable of fitting through doorways
1 Year Product Warranty
210 Amp Portable Welder Generator
Part#: TWG135Ai
Steady 50 - 135 Amp DC welding output
3300 Watt Inverter Generator
60% Duty Cycle for extended use
Suitable for welding rods from 6010 to 7024
2 Year Product Warranty
210 Amp Portable Welder Generator
Part#: TWG210A
Steady 50 - 210 Amp DC welding output
2000 Watt Inverter Generator
60% Duty Cycle for extended use
Suitable for welding rods from 6010 to 7024
2 Year Product Warranty
INVERTER SERIES
Part#: TG2000i
2000 Max Watts, 1600 Rated Watts
Run Time of 8 hours on 1 gallon of gas
OSHA and GFCI Compliant
Parallel technology capable for double the power
2 Year Product Warranty
2000 Watt Inverter Generator
5 Gallon Backpack Power Sprayer
Part#: TPS25
Reach Up to 30ft Horizontal Reach
Sprays acres in 10 minutes
10X Faster than Manual Pump Sprayers
50-435 Adjustable PSI Commercial Grade Pump
1 Year Product Warranty
4.75 Gallon Battery Power Sprayer
Part#: eTPS18
Reach Up to 30ft Horizontal Reach
Sprays 6000 sq ft in 10 minutes
10X Faster than Manual Pump Sprayers
70 PSI Commercial Grade Pump
1 Year Product Warranty
4 Gal. Motorized Fertilizer Spreader
Part#: TGS30
Reach up to 30ft Horizontally
Sprays 1 acre in 30 minutes
20X Faster than push spreaders
Converts to Leaf Blower with 200 MPH Air Velocity
1 Year Product Warranty
3” Full Trash Water Pump
Part#: TW3H
Moves liquids at a rate up to 375 gal/min
Handle solids up to 1.5"
Silicone carbide seals and a chrome plated volute
8 HP engine protected by rugged all purpose frame
3 Year Engine Warranty & 1 Year Product Warranty
AND MORE GENERATORSWELDING / POWER
INVERTER SERIES
Part#: TG2000i
2000 Max Watts, 1600 Rated Watts
Run Time of 8 hours on 1 gallon of gas
OSHA and GFCI Compliant
Parallel technology capable for double the power
2 Year Product Warranty
2000 Watt Inverter Generator
AND MORE POWER / WELDINGPEST CONTROL
ASSEMBLED IN THE
PARTS SOURCED GLOBALLY
USA
* All coupons in this manual are valid only for orders placed on www.tomahawk-power.com, unless otherwise noted. Coupon codes
may only be used once per customer and may not be combined with any other offer. Coupons may expire at any time without notice.

16