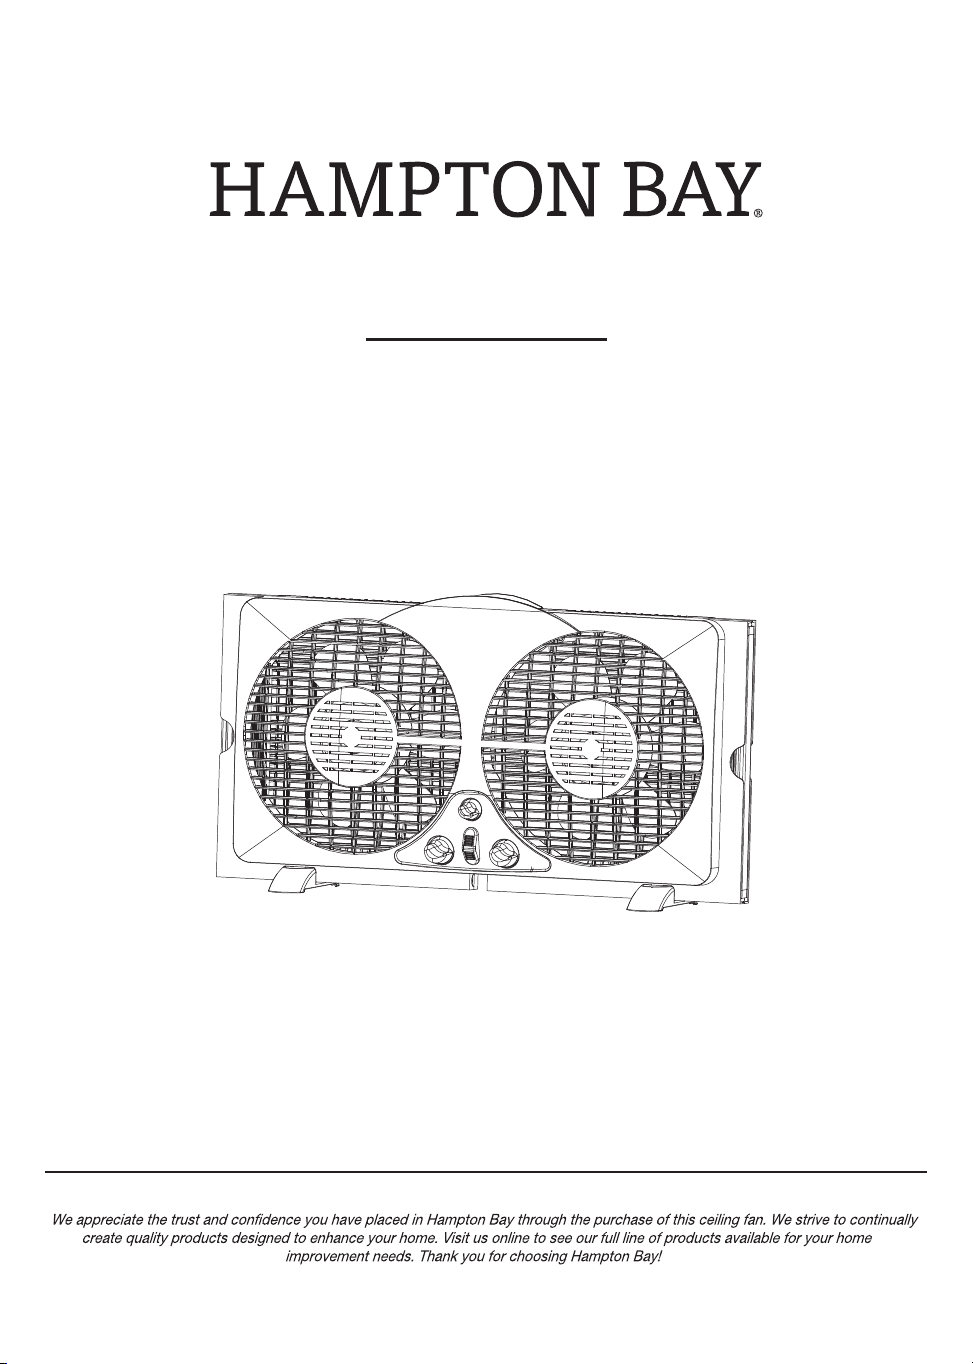
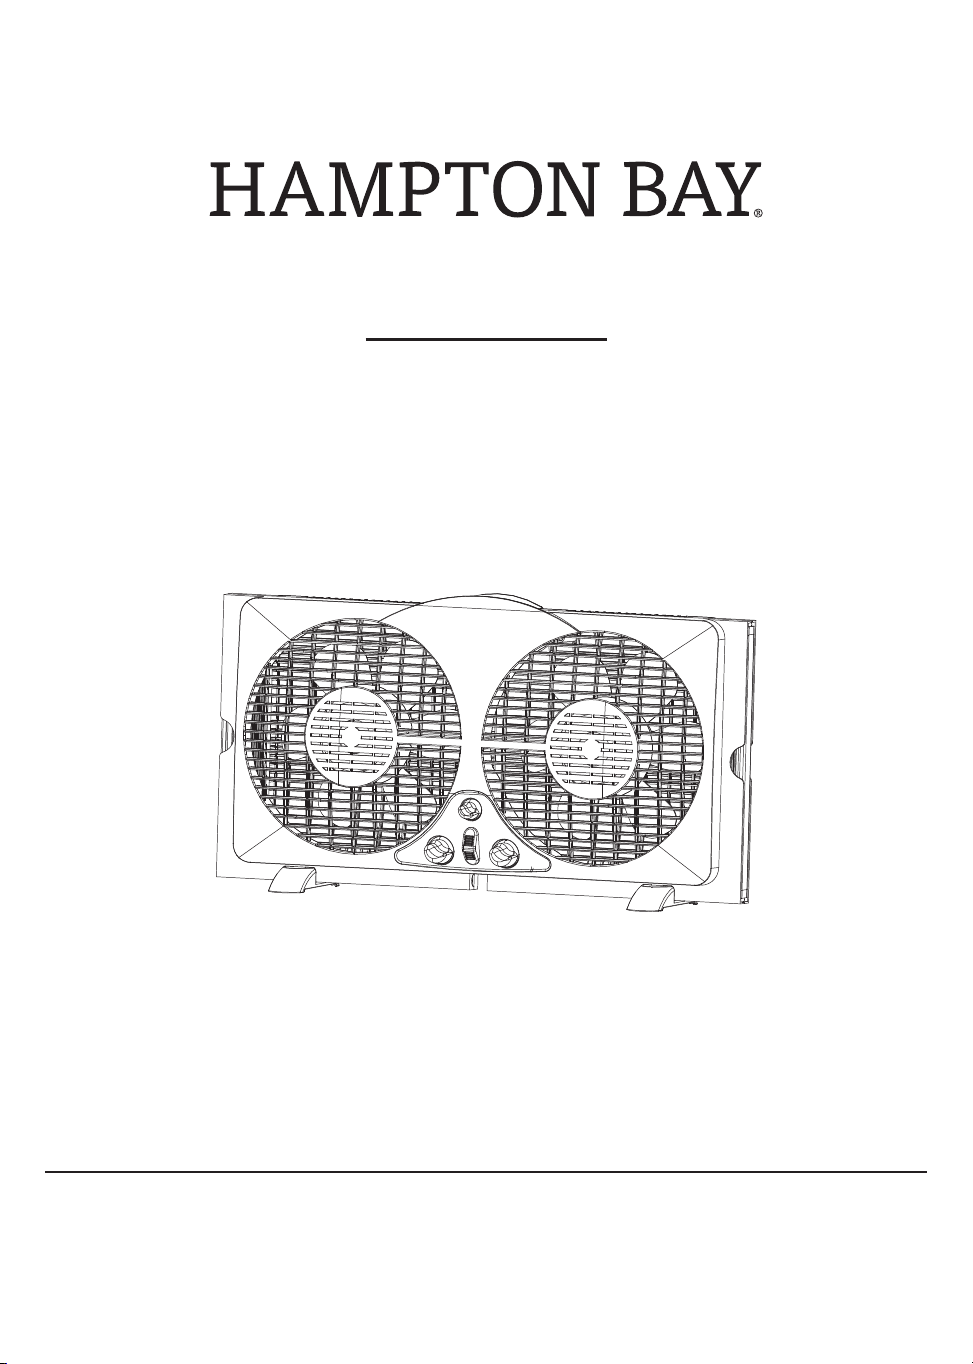
9 INCH WINDOW FAN
USE AND CARE GUIDE
Item #1002 774 783
Model #WDF9-2
THANK YOU
1-855-HD-HAMPTON
HAMPTONBAY.COM
Questions, problems, missing parts? Before returning to the store,
8 a.m. - 7 p.m., EST, Monday-Friday, 9 a.m. - 6 p.m., EST Saturday
call Hampton Bay Customer Service
2
One-year Limited Warranty
7
7
8
8
Preparation
Assembly Instructions
Operating Instructions
Care And Maintenance
9
Table of Contents
2
Package Contents
3
Safety Information
4
5
Polarized Plug
Plug And Power Cord Instructions
5
Power Cord Safety Tips
5
READ AND SAVE THESE INSTRUCTIONS
Table of Contents
A
G
B
E
F
D
C
HAMPTONBAY.COM
Please contact 1-855-HD-HAMPTON for further assistance.
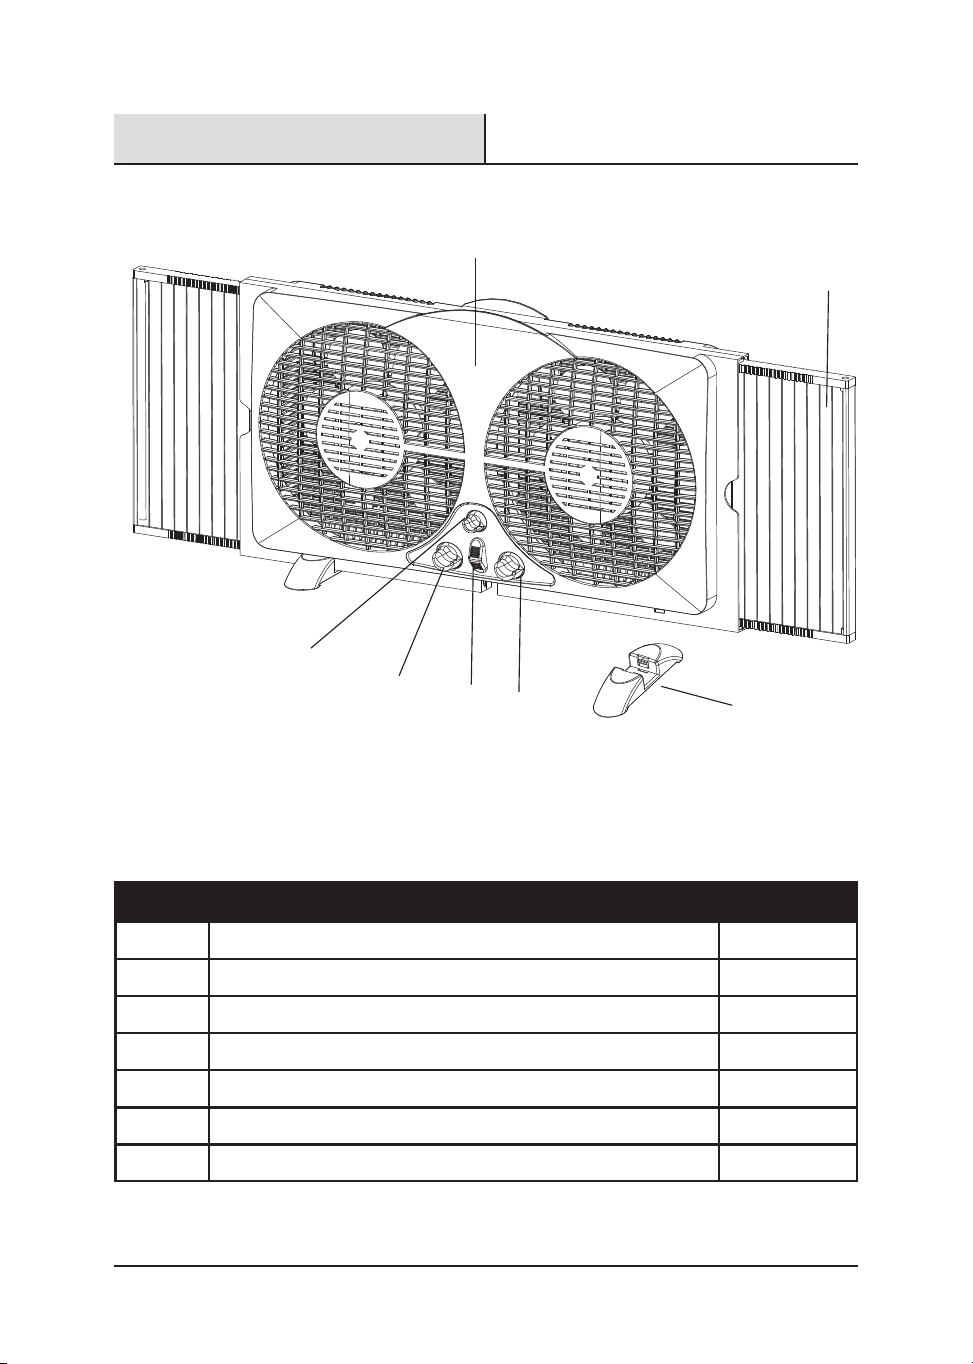
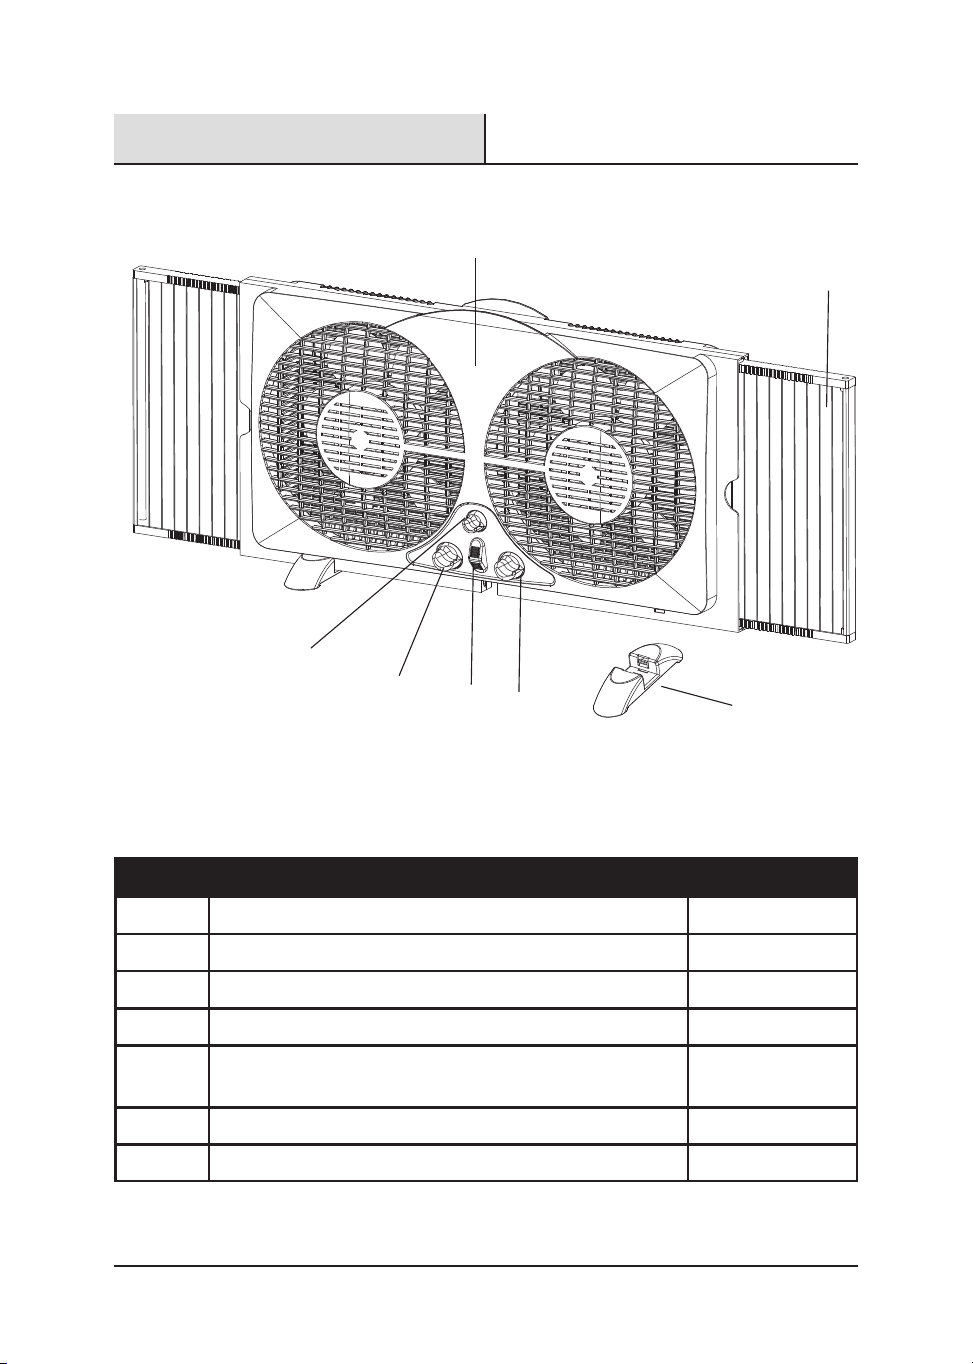
Fan Body
Left Fan Speed Control
Right Fan Speed Control
Thermostat Control
Feet
Expandable Panels
Right and Left Intake/Exhaust/Exchange Control Lever
PART DESCRIPTION QUANTITY
A
B
C
D
E
F
G
1
1
1
1
1
2
2
3
Package Contents

Please read and understand this entire manual before attempting to assemble, operate
or install the product.
When using electrical appliances, basic precautions should always be followed to
reduce the risk of fire, electric shock and injury to persons,including the following:
1. Do not operate any fan with a damaged cord or plug. Discard fan or return to an
authorized service facility for examination and/or repair.
2. Do not run cord under carpeting. Do not cover with throw rugs, runners, or similar
coverings. Do not route cord under furniture or appliances. Arrange cord away from
traffic area and where it will not be trip over.
3. Never insert fingers, pencils, or any other object through the grille when fan is
running.
4 Disconnect fan when moving from one location to another, before putting on or
taking off parts.
5. Disconnect fan when removing grilles for cleaning.
6. Do not operate in the presence of explosive and/or flammable fumes.
7. Do not place fan or any parts near an open flame, cooking or other heating
appliance.
8. Always use on a dry, level surface, do not use outdoors.
9. Do not let the cord hang over the edge of a table, counter, or come in contact with
hot surfaces.
10. To disconnect grip plug and pull from wall outlet. Never yank on cord.
PLEASE READ AND SAVE THESE IMPORTANT SAFETY INSTRUCTIONS
.
Safety Information
4
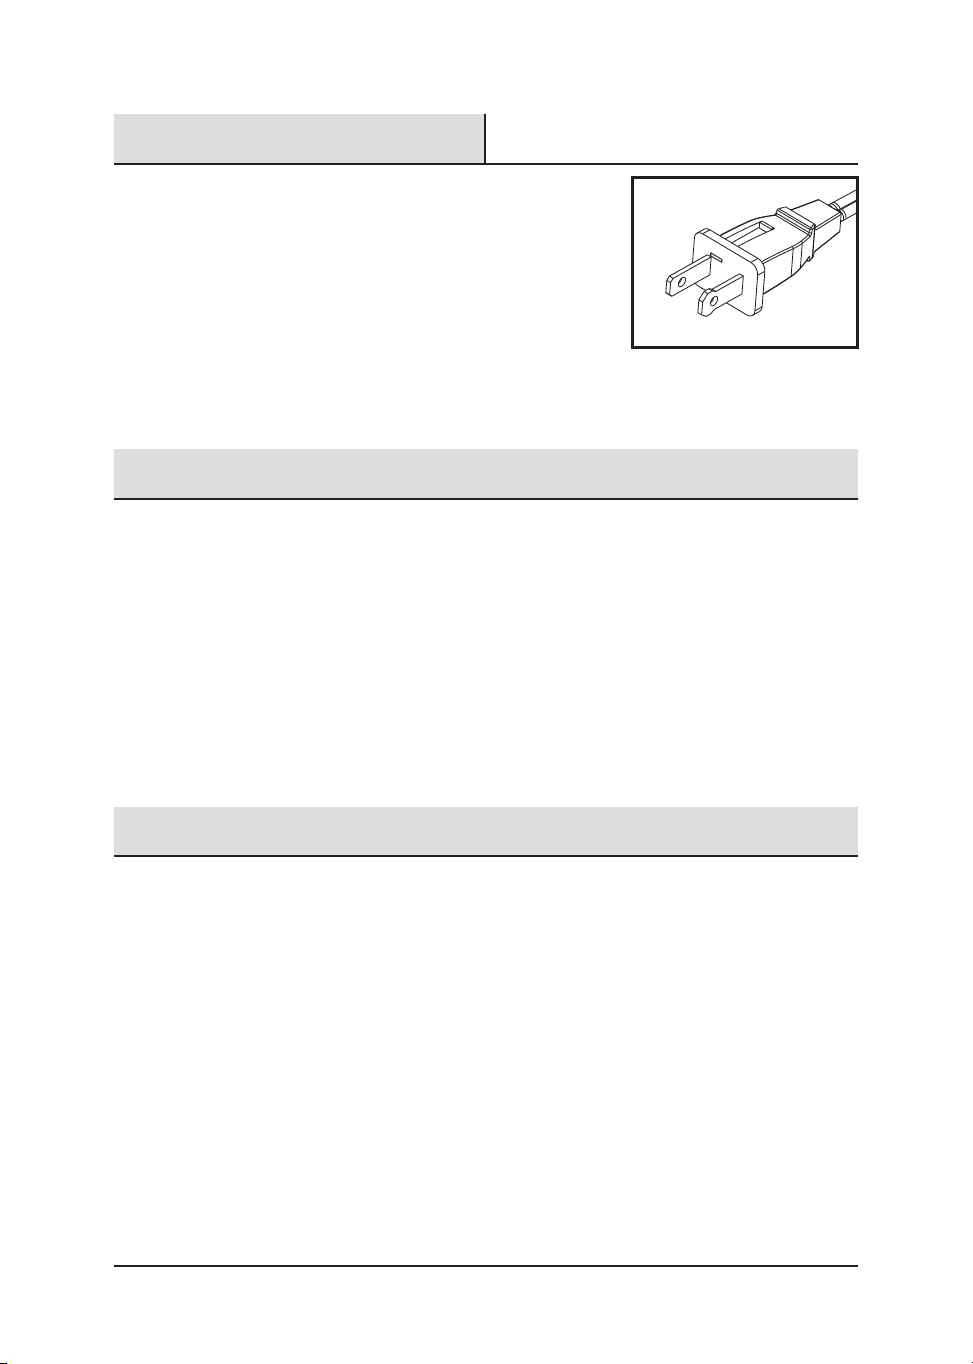
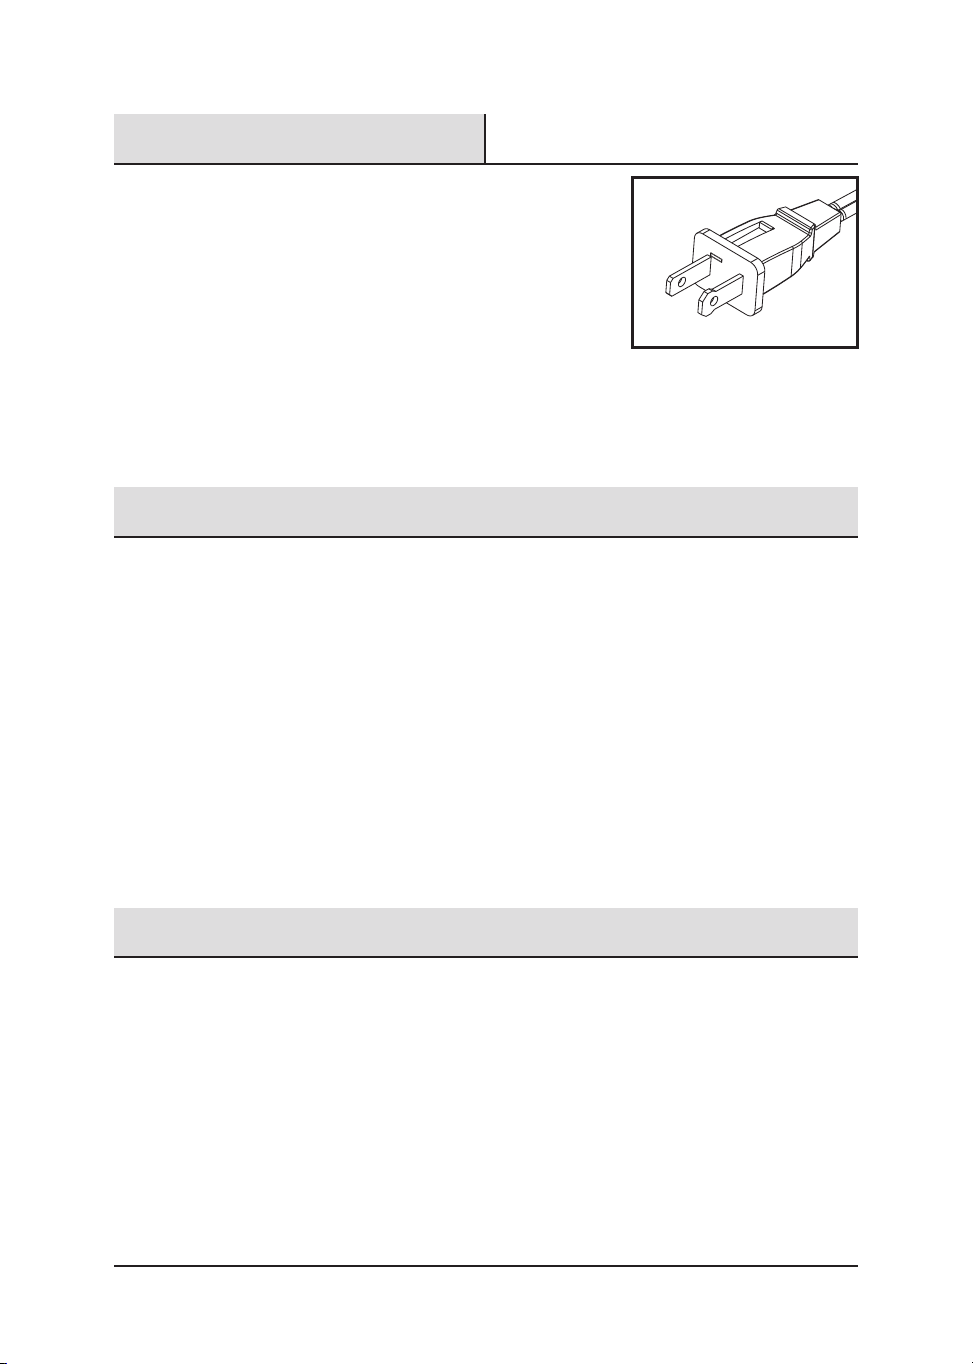
Polarized Plug
NOTE: This appliance has a polarized plug (one
blade is wider than the other). The polarized plug
is not intended to be used in non-polarized outlets
(having both slots the same size). To reduce the
risk of electric shock, this plug is intended to fit in a
polarized outlet only one way. If the plug does
not fit fully in the outlet, reverse the plug. If it still does not
fit, contact a qualified electrician to install the proper
outlet. Do not attempt to modify this plug or override this
safety feature in any way.
Power Cord Safety Tips
1. Never pull or yank on the cord or the appliance.
2. To insert plug, grasp it firmly and guide it into outlet.
3. To disconnect appliance, grasp plug and remove it from outlet
4. Before each use, inspect the line cord for cuts and/or abrasion marks. If any are
found, this indicates that the appliance should be serviced and the line cord
replaced. Please return it to an authorized service representative.
5. Never wrap the cord tightly around the appliance, as this could place undue stress
on the cord where it enters the appliance and cause it to fray and break.
Plug And Power Cord Instructions
This product employs overload protection (fuse). A blown fuse indicates an overload or
short-circuit situation. If the fuse blows, unplug the product from the outlet. Replace the
fuse as per the user servicing instructions (follow product marking for proper fuse
rating) and check the product. If the replacement fuse blows, a short circuit may be
present and the product should be discarded or returned to an authorized service facility
for examination and/or repair.
HAMPTONBAY.COM
Please contact 1-855-HD-HAMPTON for further assistance.
5
REPLACEABLE FUSE
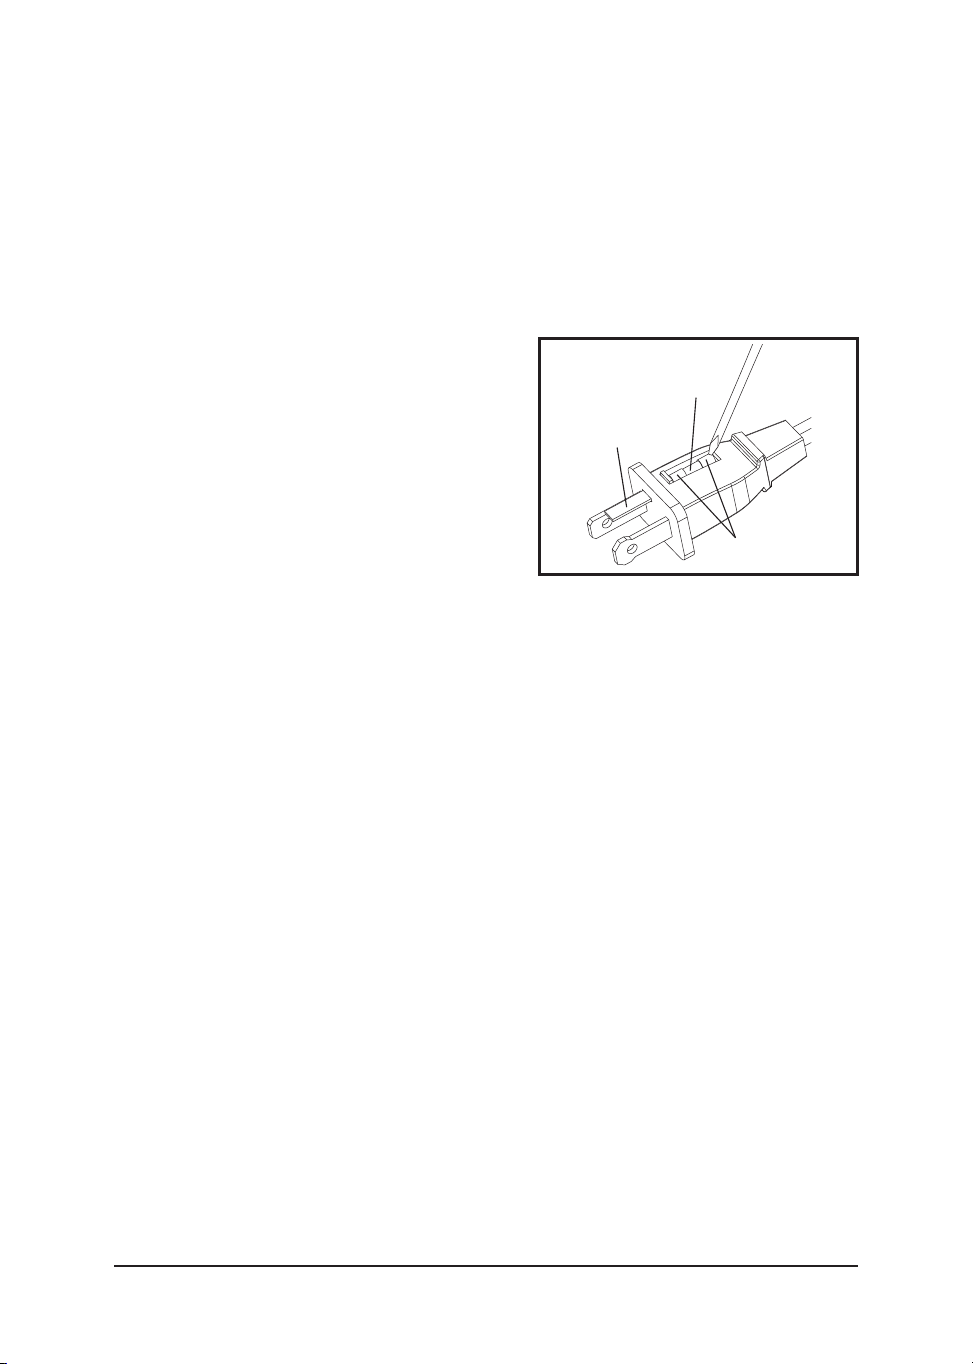
User Servicing Instructions
1 Unplug your fan. Grasp plug and remove from the receptacle or other outlet device.
Do not unplug by pulling on cord.
2 Open fuse cover, located on the top of the plug, by using your thumb or a flathead
screwdriver (not included) to slide the cover down toward the prongs.
NOTE: Ensure that fuse cover is
completely open before attempting to
remove fuse.
3. Remove fuse carefully by using a small
screwdriver to pry the fuse out of the
compartment by the metal ends of the fuse.
4. Place plug on a solid, flat surface. Insert
new 2.5 Amp, 125 volt fuse into fuse
compartment and use a small screwdriver
to secure the metal ends of the fuse into the
compartment.
CAUTION: Risk of fire. Replace fuse only with 2.5 Amp, 125 volt fuse.
5. Slide fuse cover closed. If fuse cover is difficult to close, make sure fuse is secured
in place by pressing down on metal ends of the fuse.
6. Risk of fire. Do not replace attachment plug. Contains a safety device (fuse) that
should not be removed. Discard product if the attachment plug is damaged.
DO NOT OPERATE APPLIANCE IF THE LINE CORD SHOWS ANY
DAMAGE OR IF APPLIANCE WORKS INTERMITTENTLY OR STOPS
WORKING ENTIRELY.
IMPORTANT: During the first few minutes of initial use, you may notice a slight odor.
This is normal and will quickly disappear.
.
.
6
Assembly Instructions
Before beginning assembly of product, make sure all parts are present. Compare parts
with package contents list. If any part is missing or damaged, do not attempt to
assemble the product.
Estimated Assembly Time: 5-10 minutes
No Tools Required for Assembly.
A
G
Fig. 3
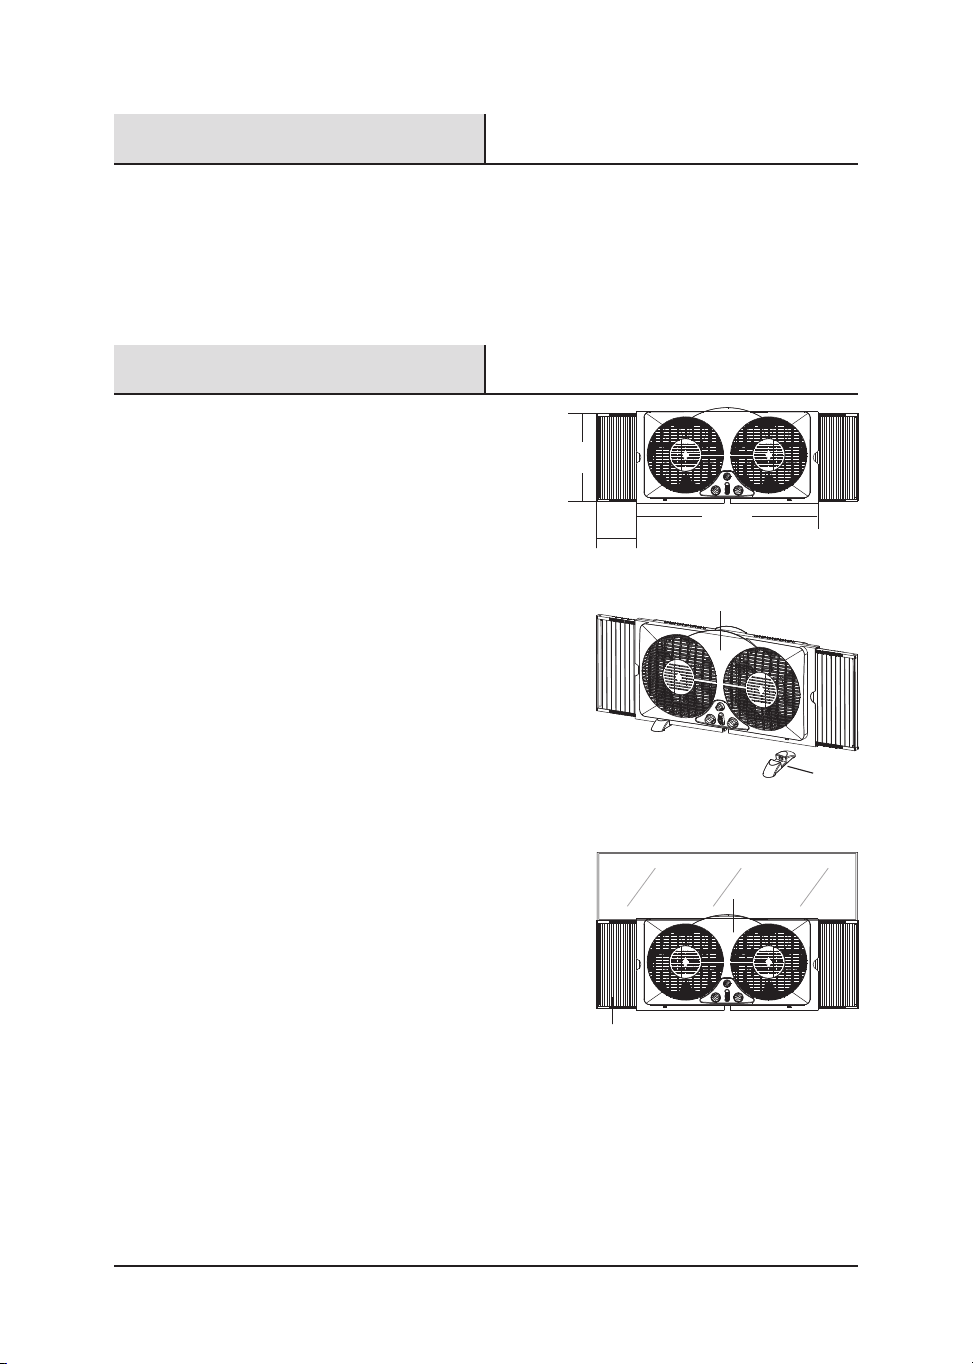
1. This window fan has been designed to
fit double-hung, slider ad casement
windows with minimum openings of
24.4 in. wide and 13 in. high. ( Fig. 1 ).
No feet required when using in the
window. This fan is designed and
recommended for use with your window
screen in place.
2. This fan can also be used on the floor.
Push the feet (F) into the fan body (A)
and snap together. (Fig. 2)
FOR DOUBLE-HUNG TYPE WINDOWS ( Fig. 3 )
1. With the window fully open, set the fan in
the window with front (A) of fan facing the
INSIDE.
2. Hold fan with one hand while adjusting panels
(G) with the other.
3. Close the window on top of the fan with the
bottom edge of the window behind the lip of
fan housing.
4. If the fan still does not fit properly in the window, readjust the expandable panel on
right/left side of fan to fill in remaining space between panel and window frame
until a secure fit is achieved.
Preparation
HAMPTONBAY.COM
Please contact 1-855-HD-HAMPTON for further assistance.
7
12.3 in.
23.8 in.
Pulls out up to 5.5 in.
Fig. 1
A
F
Fig. 2

1. Make sure rotary switches are in the OFF position.
2. Plug into 120V AC electric outlet.
3. Set the individual fan motors on either In ( intake ), Out ( exhaust ) or Exch
(exchange) using the control lever.
4. Turn the Thermostat Control to its highest setting (full clockwise).
5. To start the unit turn the rotary switches to desired speed: 0=Off, 3=High,
2=Medium, 1=Low.
6. While the window fan is on, turn the Thermostat Control counter-clockwise towards
the smaller dots until the fan stops (Away from Cooler). This is the selected comfort
level.
7. If the fan is stopped and you want to turn it back on, turn the Thermostat Control
clockwise until the fan starts, towards the larger dots (Towards Cooler).
Care And Maintenance
TO CLEAN: Always disconnect the power cord from the electrical outlet when
cleaning your fan. Light accumulated dust can be removed by using a soft cloth to wipe
away the dust at the back grille of the fan. Wipe the exterior surfaces of the fan
occasionally with a damp cloth (not dripping wet) and dry thoroughly with a soft dry cloth
before operating the fan. Do not use harsh cleaners or materials to clean this unit, doing
so will cause damages to it
CAUTION: DO NOT ALLOW WATER TO RUN INTO THE INTERIOR OF THE FAN AS THIS
COULD CREATE A FIRE OR ELECTRIC SHOCK HAZARD. THE FAN MOTOR IS FACTORY
LUBRICATED FOR LIFE AND WILL REQUIRE NO FURTHER LUBRICATION NO OTHER USER
MAINTENANCE IS REQUIRED OR RECOMMENDED. IF SERVICE IS REQUIRED, SEND YOUR
FAN TO THE AUTHORIZED SERVICE FACILITY.
TO STORE: Make sure to disassemble and clean the fan before storing. Retain the
original packaging for the purpose of storing your fan. Always store fan in a dry place.
Never store it while it is still plugged in. Never wrap the cord tightly around the fan, and
do not put any stress on the cord where it enters the fan, as it could cause the cord to fray
and break.
Operating Instructions
8

The manufacturer warrants to the original purchaser that each new product and service
part is free from defects in material and workmanship and agrees to repair or replace
under this warranty any defective product or part as follows from the original date of
purchase for a period of one (1) year.
THIS WARRANTY IS NOT TRANSFERABLE AND DOES NOT COVER:
1. Products sold damaged or incomplete, sold "as is", sold reconditioned or used as
rental equipment.
2. Delivery, installation or normal adjustments explained in the owner's manual.
3. Damage or liability caused by shipping, improper handling, improper installation,
incorrect voltage or improper wiring, improper maintenance, improper
modification, or the use of accessories and/or attachments not specifically
recommended by the manufacturer.
4. Repairs necessary because of operator abuse or negligence, or the failure to install,
operate, maintain and store the product according to the instructions in the owner's
manual.
5. Damage caused by cold, heat, rain, excessive humidity, corrosive environments and
materials, or other contaminants.
6. Expendable items that become worn during normal use.
7. Freight costs from customer to vendor.
8. Repair and transportation costs of products or parts determined not to be defective.
9. Any incidental, indirect or consequential loss, damage, or expense that may result
from any defect, failure or malfunction of the product. Some states do not allow the
exclusion or limitation of consequential damages so the above exclusions or
limitations may not apply to you.Some states do not allow the exclusion or
limitations on how long an implied warranty lasts, so the above limitations may not
apply to you. You may have other rights which vary from state to state.
One-year Limited Warranty
HAMPTONBAY.COM
Please contact 1-855-HD-HAMPTON for further assistance.
9
VENTILADOR PARA VENTANA
DE 22,86 CM (9 PULG.)
Item #1002 774 783
Model #WDF9-2
UGUÍA DE USO Y CUIDADO
1-855-HD-HAMPTON
HAMPTONBAY.COM
¿Problemas, preguntas o piezas faltantes?
Antes de regresar a la tienda, llama al servicio al cliente de Hampton Bay de lunes a viernes entre
8 a.m. y 7 p.m. y los sábados entre 9 a.m. y 6 p.m.(hora estándar del Este)
Agradecemos la con anza que has depositado en Hampton Bay al comprar este ventilador. Nos esforzamos por crear continuamente productos de
calidad diseñados para mejorar tu hogar. Visítanos en Internet para ver nuestra línea completa de productos disponibles para las necesidades
de mejoras de tu hogar. Gracias por elegir a Hampton Bay!
GRACIAS
11
11
12
13
14
Contenido Del Paquete
Información De Seguridad
14
Enchufe Polarizado
14
Consejos De Seguridad
Del Cable De Alimentación
Instrucciones Del Enchufe
Y El Cable De Alimentación
Preparación
16
16
17
17
18
Instrucciones De Ensamblaje
Instrucciones De Funcionamiento
Cuidado Y Mantenimiento
Un Año De Garantía Limitada
Tabla De Contenido
Tabla De Contenido
LEA Y GUARDE ESTAS INSTRUCCIONES
12
A
G
B
E
F
D
C
Contenido Del Paquete
DESCRIPCIÓN
CANTIDADPIEZA
Cuerpo del ventilador
Control de velocidad del ventilador izquierda
Control de velocidad del ventilador derecha
Control del termostato
Palanca de control de entrada/salida/intercambio
derecha e izquierda
1
1
1
1
2
2
Patas
Paneles extensibles
1
A
B
C
D
E
F
G

HAMPTONBAY.COM
13
Información De Seguridad
Lea y comprenda completamente este manual antes de intentar ensamblar, usar o
instalar el producto.
Cuando utilice electrodomésticos, siempre tome medidas de precaución básicas para
reducir el riesgo de incendios, descargas el ctricas y lesiones personales, incluidas las
siguientes:
1. No usar ventiladores con el cable o el enchufe dañado. Desecharlo o devolverlo a
centro de mantenimiento autorizado para ser revisado y/o reparado.
2. No colocar el cable bajo la alfombra. No cubrir el cable con tapetes, alfombras de
pasillo o cubiertas similares. No colocar los cables debajo de muebles o
electrodomésticos. Colocar el cable lejos de las zonas de alto tráfico, donde no
vaya a ser pisado.
3. Nunca introduzcas los dedos, lápices ni ningún otro objeto a través de la rejilla
cuando el ventilador esté funcionando.
4. Desconecta el ventilador cuando lo muevas de un lugar a otro o antes de montar y
desmontar sus piezas.
5. Desconecta el ventilador cuando retires las rejillas para limpiar.
6. No lo enciendas donde haya gases explosivos y/o inflamables.
7. No coloques el ventilador o cualquiera de sus piezas cerca del fuego o cerca de
otros electrodomésticos de cocción o calefacción.
8. Siempre úsalo sobre una superficie seca y nivelada, no lo uses en exteriores.
9. No dejes el cable colgando del borde de una mesa, mostrador ni en contacto con
superficies calientes.
10. Para desconectar agarra el enchufe y sácalo del tomacorriente de la pared. Nunca
tires del cable.
LEA Y GUARDE ESTAS INSTRUCCIONES IMPORTANTES DE SEGURIDAD
é
Comuníquese con el 1-855-HD-HAMPTON para obtener más ayuda.
14
NOTA: Este electrodoméstico tiene un enchufe
polarizado (una clavija es más ancha que la otra).
El enchufe polarizado no está diseñado para su uso
en tomacorrientes no polarizados (en los cuales
ambas ranuras tienen el mismo tamaño). Para
reducir el riesgo de descarga eléctrica, este enchufe
está diseñado para encajar en un tomacorriente polarizado
de una sola manera, Si el enchufe no encaja por completo
en el tomacorriente, inviértalo. Si aún no encaja en el
tomacorriente, póngase en contacto con un electricista calificado para instalar el
tomacorriente apropiado. No intente modificar este enchufe ni anular esta característica
de seguridad de ninguna manera.
1. Nunca jale del cable ni del electrodoméstico.
2. Para insertar el enchufe, sujételo firmemente y guíelo hacia el tomacorriente.
3. Para desconectar el electrodoméstico, sujete el enchufe y retírelo del
tomacorriente.
4. Antes de cada uso, verifique que el cable de línea no tenga cortes ni marcas de
abrasión. De estar presentes, estos daños indican que se debe reparar el
electrodoméstico y se debe reemplazar el cable de línea. Devuélvalo a un
representante de servicio autorizado.
5. Nunca enrolle el cable firmemente alrededor del electrodoméstico, ya que podría
tensionar el cable en el lugar donde ingresa al electrodoméstico y hacer que este
se deshilache o rompa.
Este producto posee protección contra sobrecargas (fusible). Un fusible fundido indica
que se ha producido una sobrecarga o un cortocircuito. Si el fusible se funde,
desenchufe el producto del tomacorriente. Reemplace el fusible según las instrucciones
de mantenimiento para el usuario (consulte las etiquetas del producto para instalar el
tipo de fusible adecuado) y verifique si el producto funciona. Si el fusible de repuesto se
funde, es posible que exista un cortocircuito y que el producto se deba desechar o llevar
a un local autorizado para su revisión o reparación.
Enchufe Polarizado
Consejos De Seguridad Del Cable De Alimentación
Instrucciones Del Enchufe Y El Cable De Alimentación
FUSIBLE REEMPLAZABLE
Instrucciones de mantenimiento para el usuario
1. Desenchufe el ventilador. Tome el enchufe y retírelo del receptáculo o de cualquier
otro tomacorriente. No jale del cable para desenchufarlo.
2. Abra la cubierta del fusible, ubicada en la parte superior del enchufe,deslizándola
hacia las clavijas con su pulgar o un destornillador de cabeza plana (no se incluye).
NOTA: Asegúrese de que la cubierta del
fusible esté completamente abierta antes
de retirar el fusible.
3. Con un destornillador pequeño, retire el
fusible con cuidado haciendo palanca en
los extremos de metal del fusible para
sacarlo del compartimento.
4. Coloque el enchufe sobre una superficie
plana y sólida. Inserte el nuevo fusible de
2,5 amperios y 125 voltios en el
compartimento del fusible y use un
destornillador pequeño para asegurar los extremos de metal del fusible en el
compartimiento.
PRECAUCIÓN: Riesgo de incendios. Reemplace solo con un fusible de 2,5 amperios
y 125 voltios.
5. Deslice la cubierta del fusible para cerrarla. Si es difícil cerrarla, verifique que el
fusible esté bien asegurado en su lugar, presionando los extremos de metal del
fusible.
6. Riesgo de incendios. No reemplace el enchufe. Contiene un dispositivo de
seguridad (fusible) que no se debe retirar. Deseche el producto si el enchufe está
dañado.
NO USE EL ELECTRODOMÉSTICO SI EL CABLE DE LÍNEA PRESENTA
ALGÚN DAÑO O SI EL ELECTRODOMÉSTICO FUNCIONA DE FORMA
INTERMITENTE O DEJA DE FUNCIONAR.
IMPORTANTE: Durante los primeros minutos del uso inicial, usted podría sentir un
leve olor. Esto es normal y desaparecerá rápidamente.
HAMPTONBAY.COM
15
Comuníquese con el 1-855-HD-HAMPTON para obtener más ayuda.
Fusible
Cubierta del
fusible
Extremos
de metal
A
G
Fig. 3
INSTRUCCIONES DE INSTALACIÓN
1. Este ventilador para ventana se ha
diseñado para ajustarse a ventanas de
doble abertura, corredizas y giratorias
con aberturas mínimas de 61,97 cm
(24,4 pulg.) de ancho y 33,02 cm (13
pulg.) de alto. (Fig. 1). No se requieren
pies cuando se usa en la ventana. Este
ventilador estádiseñado y recomendado
para usarse con la malla de la ventana
puesta.
2. Este ventilador también se puede
utilizar en el suelo. Presione las patas
(F) contra el cuerpo del ventilador (A) y
acóplelas. ( Fig. 2).
PARA VENTANAS DE DOBLE ABERTURA (Fig.3)
1. Con la ventana completamente abierta, coloque el
ventilador en la ventana con el frente (A) del
ventilador hacia el INTERIOR.
2. Sujete el ventilador con una mano y con la
otra ajuste los paneles (G).
3. Cierre la ventana sobre el ventilador con el borde
inferior de la ventana detrás del reborde de la
carcasa del ventilador.
4. Si el ventilador no se ajusta correctamente en la ventana, vuelva a ajustar el panel
extensible a la derecha/izquierda del ventilador para ocupar el espacio que queda
entre el panel y el marco de la ventana hasta que quede firme.
Antes de comenzar a ensamblar el producto, asegúrese de tener todas las piezas.
Compare las piezas con la lista del contenido del paquete. No intente ensamblar el
producto si falta alguna pieza o si estas están dañadas.
Tiempo estimado de ensamblaje: 5-10 minutos
No se necesitan herramientas para el ensamblaje.
Preparación
Instrucciones De Ensamblaje
16
A
F
Fig. 2
Fig. 1
33,02 cm
(13 pulg.)
60,4 cm (23,8 pulg.)
Se extrae en hasta 13,97 cm (5,5 pulg.)

Cuidado Y Mantenimiento
PARA LIMPIAR: Siempre desconecte el cable de alimentación del tomacorriente
antes de limpiar el ventilador. La acumulación leve de polvo se puede eliminar con un
paño suave. Se debe eliminar el polvo de la parte posterior de la rejilla del ventilador.
Limpie ocasionalmente las superficies exteriores del ventilador con un paño húmedo
(que no gotee) y séquelas bien con un paño suave y seco antes de usar el ventilador. No
use limpiadores o materiales abrasivos para limpiar esta unidad, ya que podría dañarla.
PRECAUCIÓN: NO PERMITA QUE ESCURRA AGUA AL INTERIOR DEL
VENTILADOR, YA QUE ESTO PODRÍA CREAR EL RIESGO DE INCENDIOS
O DESCARGAS ELÉCTRICAS. EL MOTOR DEL VENTILADOR VIENE
LUBRICADO DE FÁBRICA DE POR VIDA Y NO REQUERIRÁ OTRA
LUBRICACIÓN. NO SE REQUIERE NI SE RECOMIENDA QUE EL
USUARIO REALICE EL MANTENIMIENTO. SI REQUIERE
MANTENIMIENTO, ENVÍE EL VENTILADOR AL LOCAL DE SERVICIO
AUTORIZADO.
PARA ALMACENAR: Asegúrese de desensamblar y limpiar el ventilador antes de
almacenarlo. Conserve el empaque original para almacenar el ventilador. Siempre
almacene el ventilador en un lugar seco. Nunca lo almacene mientras está enchufado.
Nunca enrolle el cable firmemente alrededor del ventilador ni tense el cable en el lugar
donde ingresa al ventilador, ya que el cable se podría deshilachar o romper.
Instrucciones De Funcionamiento
1. Asegúrate de que los interruptores rotativos estén en la posición de OFF (apagado).
2. Conéctalo en un tomacorriente de 120V CA.
3. Configura los motores individuales del ventilador en In (hacia dentro), Out (hacia
fuera) o Exch (intercambio) usando la palanca de control.
4. Gira el Control del Termostato hacia su configuración máxima (giro completo de
izquierda a derecha).
5. Para encender la unidad gira los interruptores rotatorios a la velocidad deseada:
0=Apagado, 3=Alta, 2=Media, 1=Baja.
6. Con el ventilador encendido, gira el Control del Termostato de derecha a izquierda
hacia los puntos más pequeños hasta que el ventilador se dentenga (contrario a la
posición de Cooler - más frío). Este es el nivel seleccionado de confort.
7. Si el ventilador se detiene y quieres volver a encenderlo, gira el Control del
Termostato de izquierda a derecha hasta que el ventilador arranque, hacia los
puntos más grandes (hacia la posición Cooler -más frío).
HAMPTONBAY.COM
17
Comuníquese con el 1-855-HD-HAMPTON para obtener más ayuda.

El fabricante garantiza al comprador original que cada producto nuevo y sus respectivos
repuestos no presentan defectos en los materiales y la mano de obra, y se compromete a
reparar o cambiar, en virtud de esta garantía, cualquier producto o pieza dañado durante
un período de un (1) año a partir de la fecha de compra original.
ESTA GARANTÍA NO ES TRANSFERIBLE Y NO CUBRE:
1. Productos vendidos dañados o incompletos, vendidos "tal como están",
reacondicionados o usados como equipos de alquiler.
2. La entrega, la instalación o los ajustes normales detallados en el manual del
propietario.
3. Daño o responsabilidad provocados por el envío, manipulación o instalación
inadecuadas, voltaje o cableado incorrectos, mantenimiento inadecuado,
modificaciones incorrectas o el uso de accesorios no recomendados por el
fabricante.
4. Reparaciones necesarias producto del abuso o la negligencia del operador, o la
instalación, funcionamiento, mantenimiento y almacenaje del producto realizados
de una manera distinta de cómo se indica en el manual del propietario.
5. Daño provocado por frío, calor, lluvia, humedad excesiva, entornos y materiales
corrosivos u otros contaminantes.
6. Artículos fungibles que se desgastan durante el uso normal.
7. Costos de flete del cliente al proveedor.
8. Costos de reparaciones y transporte de productos o piezas que resultaron no estar
dañados.
9. Cualquier pérdida, daño o gasto accidental, indirecto o resultante, que se origine
por defecto, falla o funcionamiento incorrecto del producto. Algunos estados no
permiten la exclusión o limitación de los daños resultantes, de manera que es
posible que las exclusiones o limitaciones anteriores no se apliquen en su caso.
Algunos estados no permiten exclusiones o limitaciones con respecto a la
extensión de una garantía implícita, de manera que es posible que las limitaciones
anteriores no se apliquen en su caso. Usted podría tener otros derechos que varían
según el estado.
Un Año De Garantía Limitada
18

Conserve este manual para su uso futuro.
¿Problemas, preguntas o piezas faltantes?
Antes de regresar a la tienda, llama al servicio al cliente de Hampton Bay de lunes a viernes entre
8 a.m. y 7 p.m. y los sábados entre 9 a.m. y 6 p.m.(hora estándar del Este)