
Poly Partner Mode User Guide 4.4.0
SUMMARY
This guide provides the end-user with task-based user information for the featured product.

Legal information
Copyright and license
© 2021, 2024, HP Development Company,
L.P. The information contained herein is
subject to change without notice. The only
warranties for HP products and services are
set forth in the express warranty statements
accompanying such products and services.
Nothing herein should be construed as
constituting an additional warranty. HP shall
not be liable for technical or editorial errors
or omissions contained herein.
Trademark credits
All third-party trademarks are the property
of their respective owners. Google and the
Google Logo are registered trademarks of
Google LLC.
Privacy policy
HP complies with applicable data privacy
and protection laws and regulations. HP
products and services process customer
data in a manner consistent with the HP
Privacy Policy. Please refer to
HP Privacy
Statement.
Open source software used in this product
This product contains open source
software. You may receive the open source
software from HP up to three (3) years
after the distribution date of the applicable
product or software at a charge not
greater than the cost to HP of shipping
or distributing the software to you. To
receive software information, as well as
the open source software code used in
this product, contact HP by email at

Table of contents
1About this guide.................................................................................................................................................. 1
Audience, purpose, and required skills ........................................................................................................... 1
Icons used in Poly documentation .................................................................................................................. 1
2Getting Started ................................................................................................................................................... 2
Poly Partner Mode Overview .......................................................................................................................... 2
Navigating Your System.................................................................................................................................. 3
Poly IR Remote Control Button Functions ............................................................................................... 3
Bluetooth Remote Control Button Functions............................................................................................ 4
Enable TalkBack in Microsoft Teams Rooms .......................................................................................... 5
Navigating Talkback in Microsoft Teams Rooms.............................................................................. 5
Using a Connected Trio in a Microsoft Teams Rooms Environment ....................................................... 6
Product Overview of Poly Video Systems....................................................................................................... 7
Poly G7500 System Features and Capabilities ....................................................................................... 7
Poly Studio X72 features and capabilities................................................................................................ 7
Poly Studio X70 Features and Capabilities.............................................................................................. 8
Poly Studio X52 Features and Capabilities.............................................................................................. 8
Poly Studio X50 Features and Capabilities.............................................................................................. 9
Poly Studio X30 Features and Capabilities.............................................................................................. 9
Poly Studio E70 Camera Overview........................................................................................................ 10
Administrator Features and Capabilities ................................................................................................ 10
Overview of system hardware....................................................................................................................... 11
Poly G7500 Hardware............................................................................................................................ 11
Poly G7500 System Ports............................................................................................................... 11
Poly Studio X72 hardware ..................................................................................................................... 12
Poly Studio X72 privacy shutter behavior....................................................................................... 13
Poly Studio X72 hardware ports ..................................................................................................... 13
Poly Studio X70 Hardware..................................................................................................................... 14
Poly Studio X70 System Hardware Ports ....................................................................................... 15
Poly Studio X70 and Poly Studio X72 Privacy Shutter Behavior.................................................... 15
Poly Studio X52 Hardware..................................................................................................................... 16
Poly Studio X52 System Ports........................................................................................................ 16
Poly Studio X52 Privacy Cover....................................................................................................... 17
Poly Studio X50 Hardware..................................................................................................................... 17
Poly Studio X50 System Ports........................................................................................................ 18
Poly Studio X50 Privacy Cover....................................................................................................... 19
iii

Poly Studio X30 Hardware..................................................................................................................... 19
Poly Studio X30 System Ports........................................................................................................ 20
Poly Studio X30 Privacy Cover....................................................................................................... 20
Poly Studio E70 Camera Hardware ....................................................................................................... 21
Poly Studio E70 Ports..................................................................................................................... 21
Poly Studio E70 Privacy Shutter Behavior...................................................................................... 22
LED Status Indicators ................................................................................................................................... 23
LED Status Indicators for the Poly G7500 System ................................................................................ 23
LED status indicators for the Poly Studio X72 and Poly Studio X70 systems ....................................... 23
LED Status Indicators for Poly Studio X50 and Poly Studio X30 Systems ............................................ 24
LED Status Indicators for the Poly Studio E70 Camera......................................................................... 25
Powering the System On and Off.................................................................................................................. 25
Wake the System .......................................................................................................................................... 25
Accessibility Features ................................................................................................................................... 26
Users Who Are Deaf or Hard of Hearing ............................................................................................... 26
Users Who Are Blind, Have Low Vision, or Have Limited Vision........................................................... 26
Users with Limited Mobility .................................................................................................................... 26
3Sharing Content ............................................................................................................................................... 28
Share Content Using an HDMI Connection .................................................................................................. 28
4Using device mode........................................................................................................................................... 29
Computer and cable requirements for Device Mode..................................................................................... 29
Access Device Mode..................................................................................................................................... 30
Use your system as a computer accessory .................................................................................................. 30
Adjust the system audio and camera settings in Device Mode..................................................................... 30
Managing incoming calls when in Device Mode .......................................................................................... 31
Exit Device Mode and disconnect your computer ......................................................................................... 31
5Settings ............................................................................................................................................................ 32
Cameras........................................................................................................................................................ 33
Adjust an In-Room Camera ................................................................................................................... 33
Turn Camera Tracking On or Off ........................................................................................................... 33
Audio Adjustments ........................................................................................................................................ 34
Adjust the Volume.................................................................................................................................. 34
6Troubleshooting................................................................................................................................................ 35
Poly Device Mode ......................................................................................................................................... 36
Audio Levels are Too High or Low......................................................................................................... 36
Conferencing Application Doesn’t Use System Camera or Audio ......................................................... 36
Can’t Use System’s Camera or Audio ................................................................................................... 36
Improve Audio Quality............................................................................................................................ 37
Improve Laptop Screen Mirroring .......................................................................................................... 37
7Getting help ...................................................................................................................................................... 38
HP Inc. addresses......................................................................................................................................... 38
iv

About this guide1
This section provides clarifying information about this guide.
Audience, purpose, and required skills
This guide is intended for beginning users, as well as intermediate and advanced users, who want to
learn how to use the features available with Poly G7500, Poly Studio G62, and Poly Studio X series .
Icons used in Poly documentation
This section describes the icons used in Poly documentation and what they mean.
WARNING! Indicates a hazardous situation that, if not avoided, could result in serious injury or
death.
CAUTION: Indicates a hazardous situation that, if not avoided, could result in minor or moderate
injury.
IMPORTANT: Indicates information considered important but not hazard-related (for example,
messages related to property damage). Warns the user that failure to follow a procedure exactly as
described could result in loss of data or in damage to hardware or software. Also contains essential
information to explain a concept or to complete a task.
NOTE: Contains additional information to emphasize or supplement important points of the main
text.
TIP: Provides helpful hints for completing a task.
About this guide
1

Getting Started2
Before you use your system, familiarize yourself with its features and local interface.
Poly Partner Mode Overview
Poly Partner Mode allows you to run third-party conferencing applications on supported Poly video
systems. For example, after powering on your system for the first time, you can select Zoom Rooms
to place Zoom calls.
NOTE: Observe the following when using your system in partner mode:
● Not all providers are supported on all systems. For the latest information on partner applications
supported on each system, see the
Poly VideoOS Release Notes
.
● Dialpad and Google Meet aren't supported on Poly G7500 systems.
● As of Poly VideoOS 4.2.0, BlueJeans is no longer supported. After updating to Poly VideoOS
4.2.0, systems that are still using BlueJeans will automatically update to Poly Video Mode.
● Poly Studio G62 is certified for Microsoft Teams Rooms and Zoom Rooms.
Certification for Tencent and other providers is pending.
Refer to the supported partner documentation for information on using third-party applications:
● Microsoft Teams Rooms: https://support.office.com/en-us/teams
● Zoom Rooms: https://support.zoom.us/hc/en-us
● Google Meet: https://apps.google.com/meet/
● Dialpad: https://help.dialpad.com/
(Not supported on Poly Studio G62 and Poly G7500)
● GoToRoom by LogMeIn: https://support.goto.com/products
● RingCentral Rooms (RCV Rooms): https://support.ringcentral.com/
● Tencent: https://meeting.tencent.com/cloud-rooms.html
2
Chapter 2Getting Started
Navigating Your System
The system has icons and user screens to help you navigate and understand important information
about your system.
When the system is running a partner application such as Teams Rooms or Zoom Rooms, the partner
application provides controls and a user interface specific to their application.
When you pair a Poly TC8 touch controller with your system, the partner application presents the
system controls on the TC8 touch controller.
Available system controls vary between partner applications.
Poly IR Remote Control Button Functions
When you connect a Poly IR receiver to your G7500 or Studio X system, you can use the Poly IR
remote control to navigate your system.
NOTE: Remote control functionality may be limited in other partner applications.
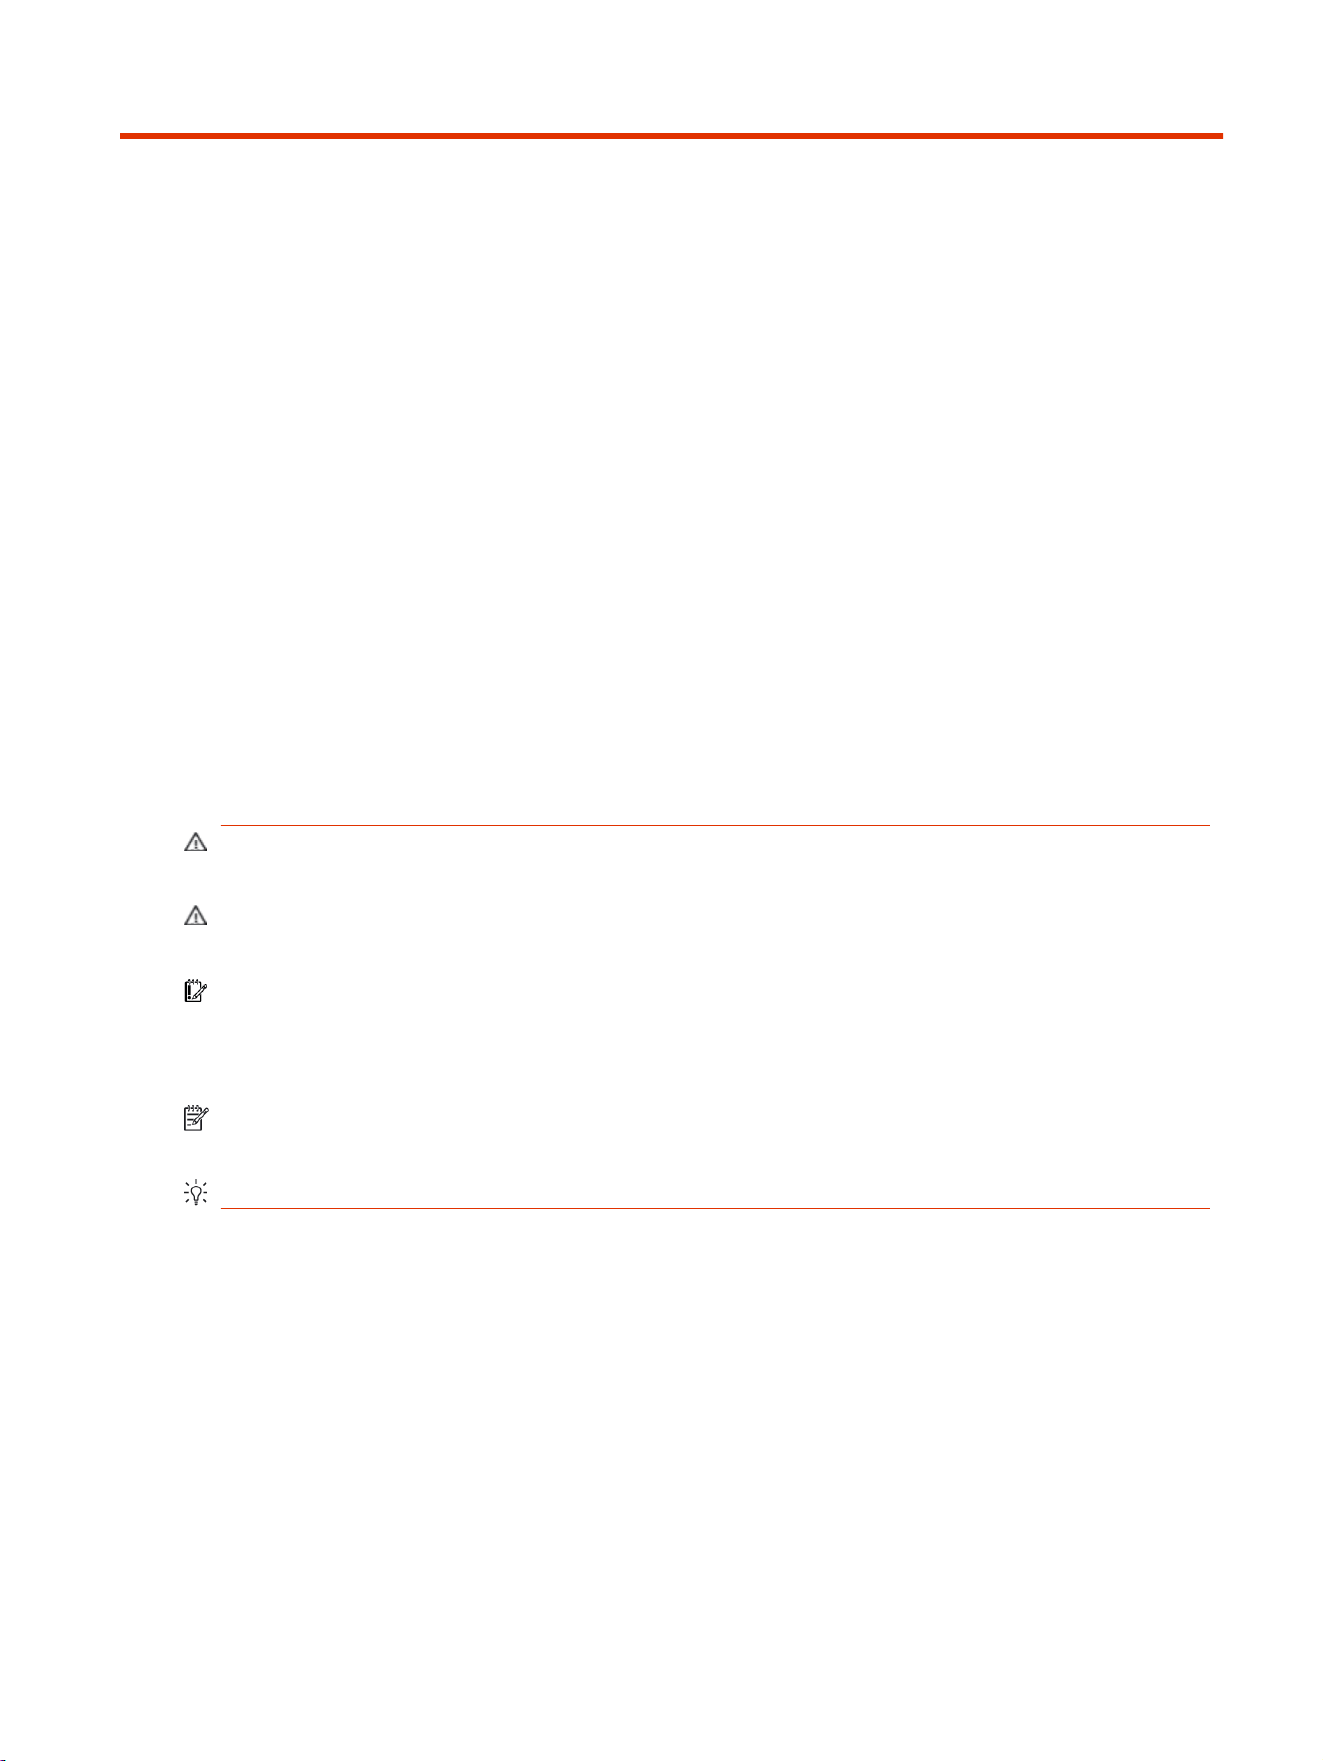
The following illustration and table show the buttons and functionality of the Poly IR remote control.
Table 2-1
IR Remote Button Functions
Item Description Function
1 IR LED Sends IR signals to the IR receiver
2 Volume Increase or decrease the volume
3 Camera zoom Zoom the camera in or out
Navigating Your System 3
Table 2-1 IR Remote Button Functions (continued)
Item Description Function
4 Navigation controls Navigate the user interface.
5 Select Select an item on the user interface or adjust a toggle
6 Back arrow Return to the previous screen
7 Menu In Poly Video mode only, show or hide the settings and
camera controls
8 Call Display the calls screen or answer an incoming call
9 End call End an active call or reject an incoming call
10 Dialpad Dial a number
11 Mute Mute or unmute the system microphones
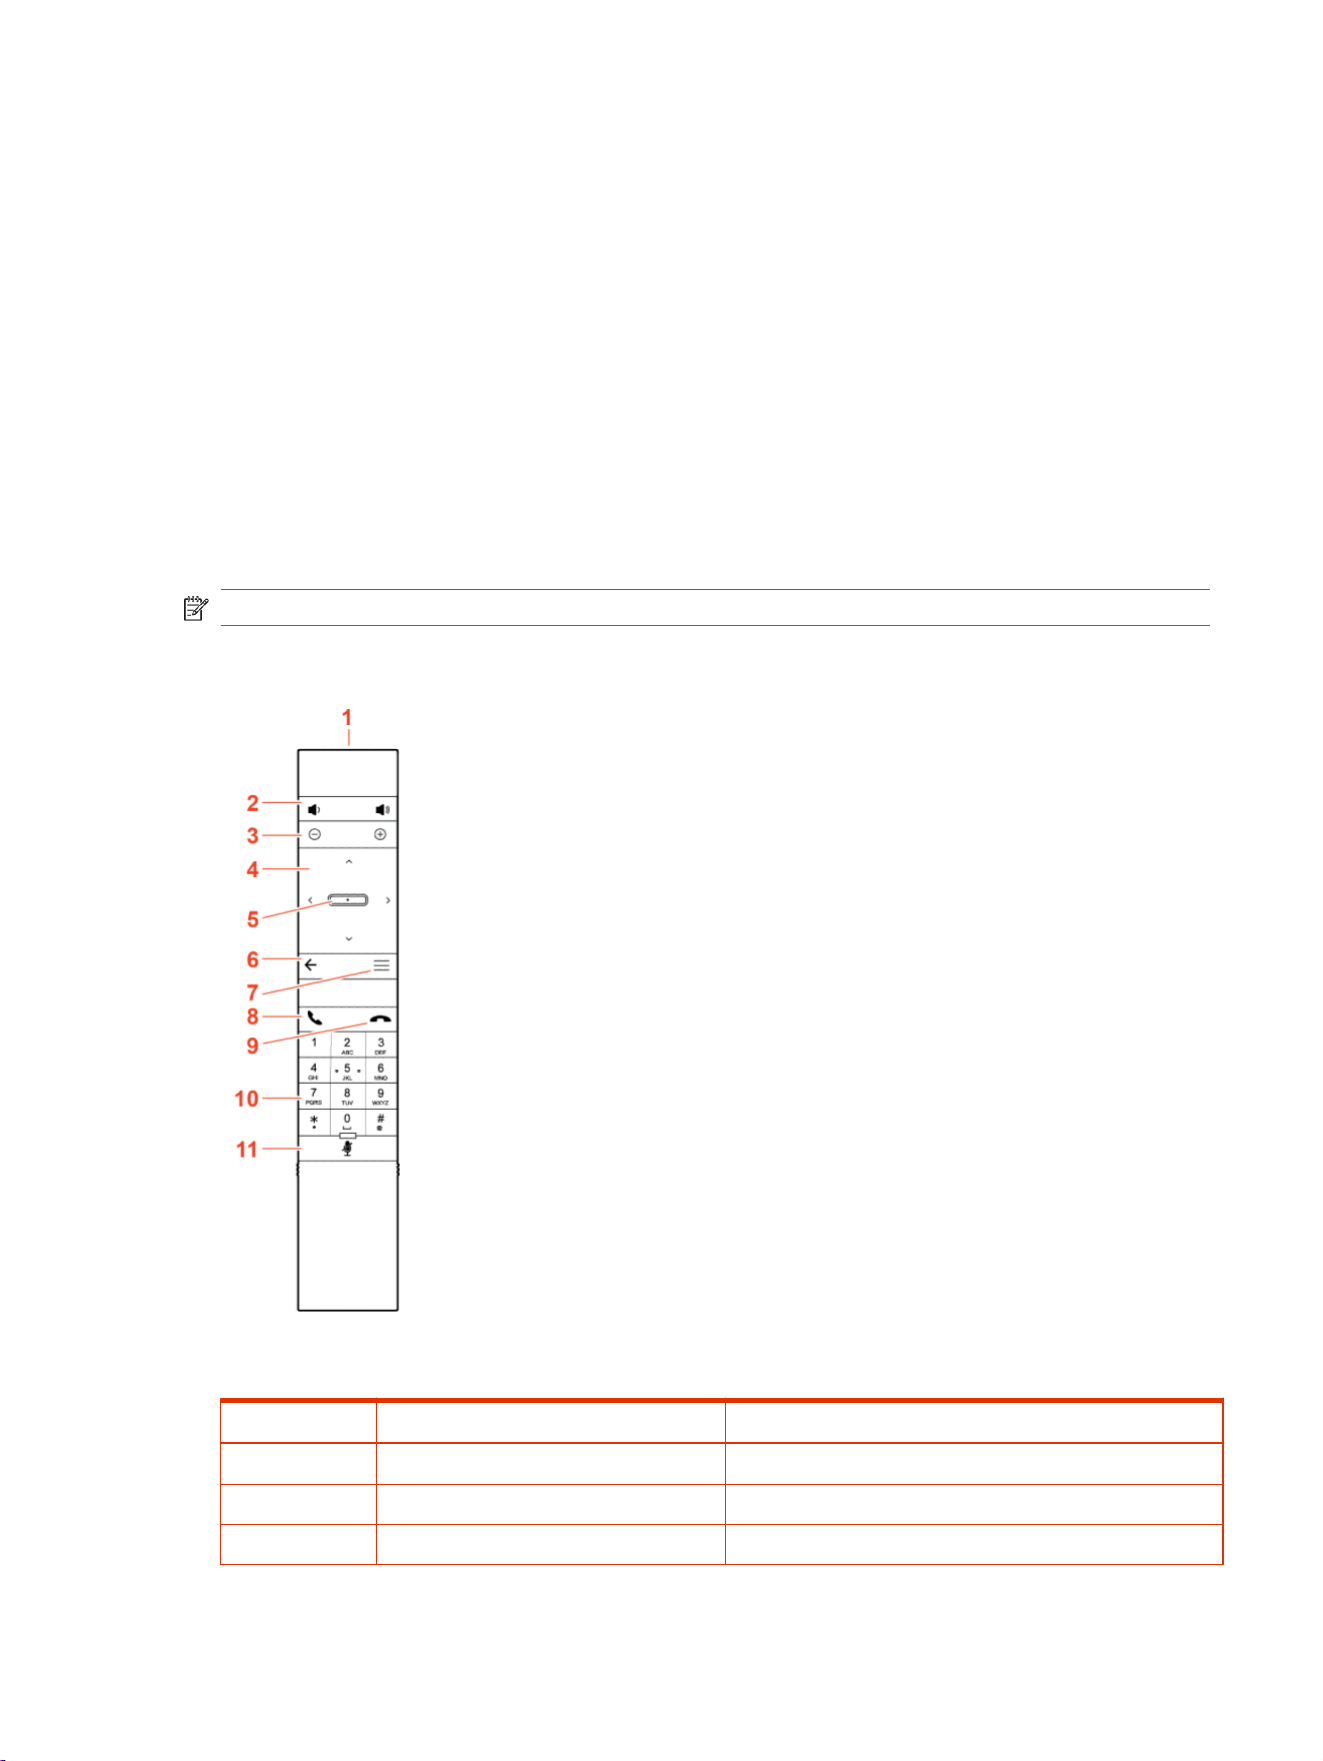
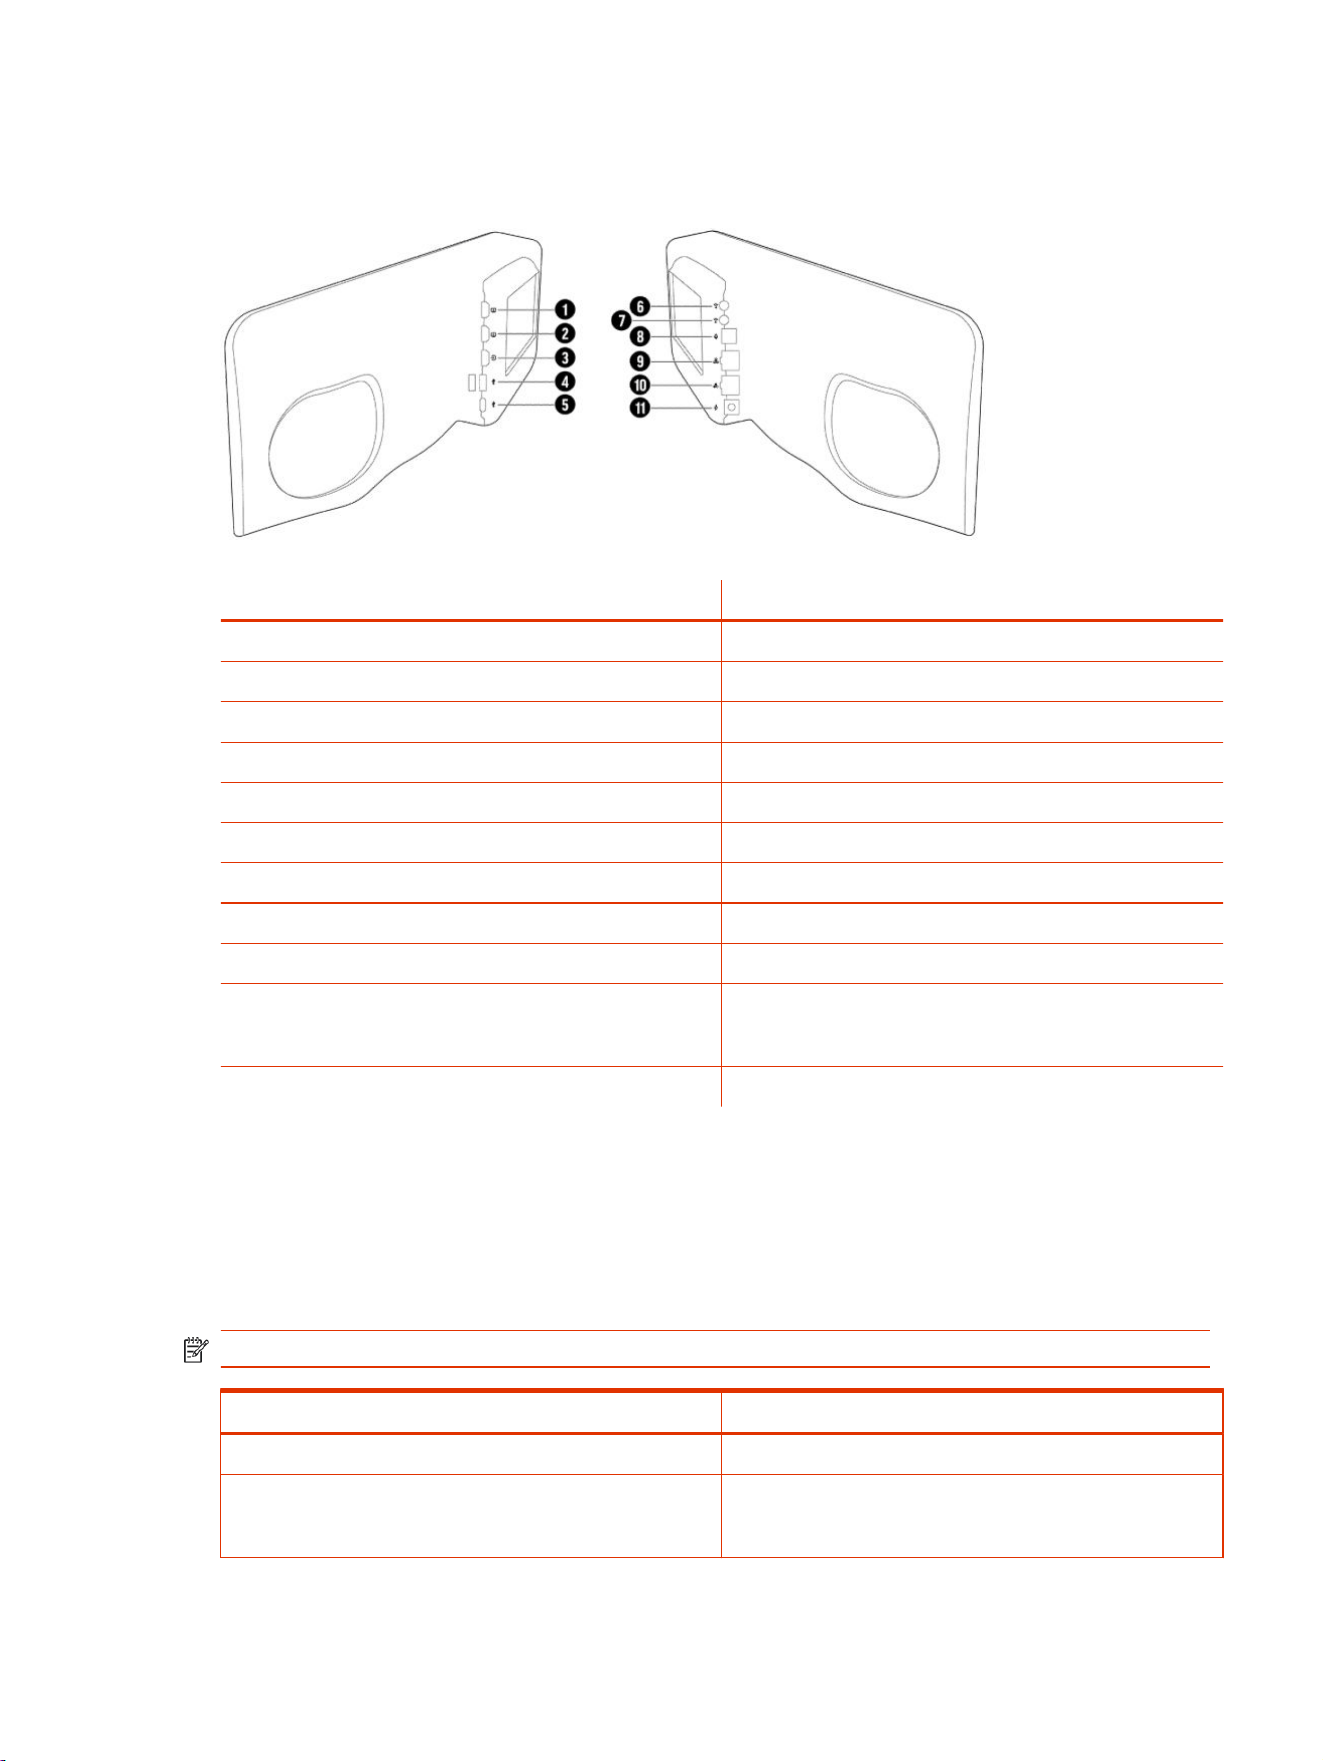
Bluetooth Remote Control Button Functions
When you pair the Poly Bluetooth remote control with your Poly Studio G62, Poly G7500, or Poly
Studio X system, you can use the remote control to navigate your system.
NOTE: Remote control functionality may be limited in other partner applications.
The following illustration and table show the buttons and functionality of the Bluetooth remote control.
The functionality is specific to Poly Video mode.
4
Chapter 2Getting Started
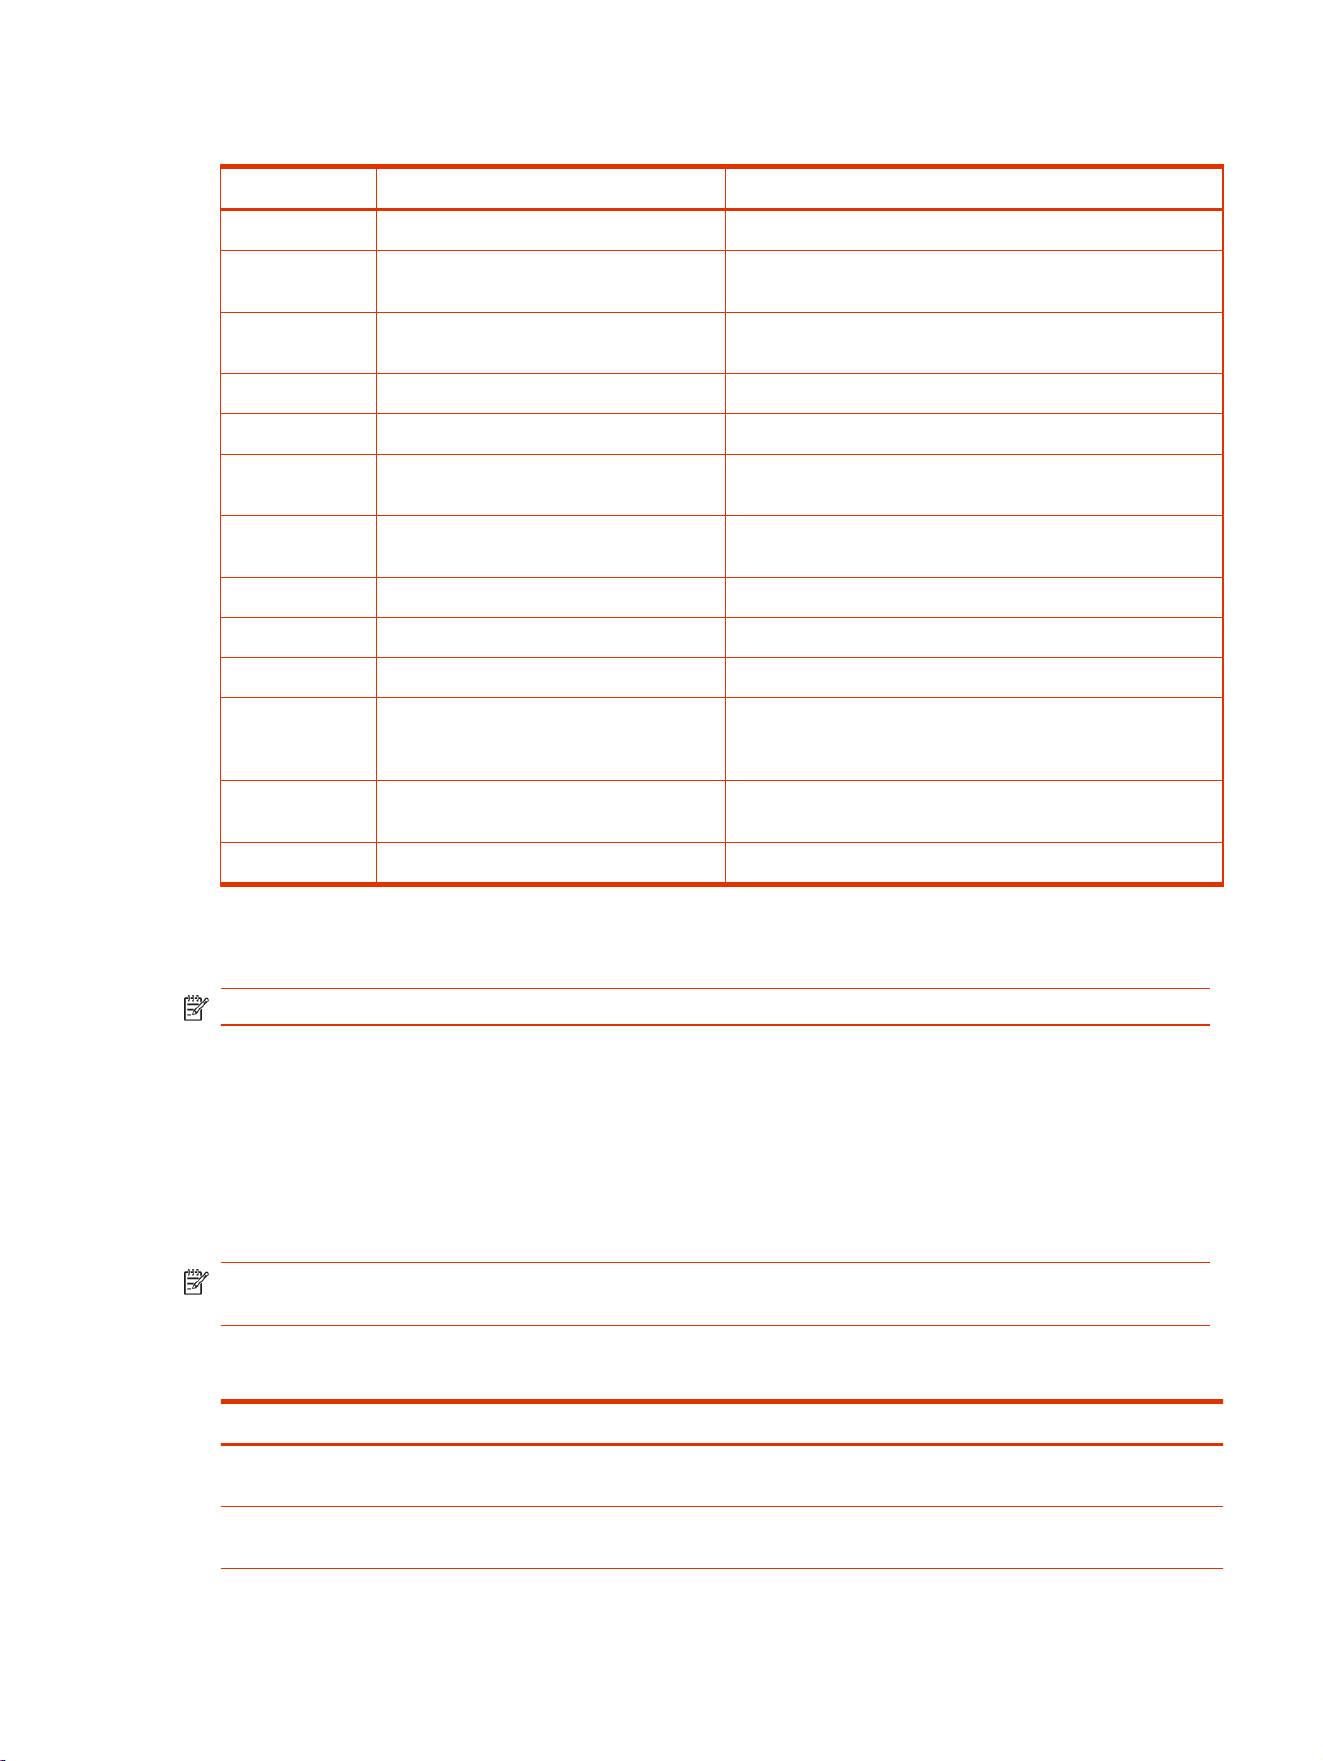
Table 2-2 IR Remote Button Functions
Item Description Function
1 Voice Assistant Feature planned for future use
2 Volume or zoom Adjust volume up and down or, in camera mode, zoom the
camera in or out
3 Navigation controls Navigate the screen
In camera mode, controls camera pan and tilt
4 Select Select an item on the user interface or adjust a toggle
5 Back arrow Return to the previous screen
6 Mute Mute the system microphones.
Long press to pair the remote control with the system
7 Keypad Dial a number.
Select camera presets while in a call in
8 Call button Display the calls screen or answer an incoming call
9 End call End an active call, reject an incoming call, or end a meeting
10 Menu Open the available system menu to access features
11 Present content From the home screen, display the content help screen
In a meeting, open the content tray and select available
content to share
12
Layout Open the layout screen to choose how two or more
participants display on the screen
13 Voice Assistant Microphone Feature planned for future use
Enable TalkBack in Microsoft Teams Rooms
NOTE: Talkback is disabled by default. If the device restarts, you'll need to reenable Talkback.
1. On the touch controller, select More > Settings > Device Settings > Accessibility.
2. Enable Talkback.
Navigating Talkback in Microsoft Teams Rooms
Navigate the user interface by touch using a menu of available gestures. As you navigate the screen,
the device announces the item you select.
NOTE: Items in the Settings menu may appear below the screen. To access items below the
screen, use two fingers to scroll up or swipe right on the screen to go down the list.
Talkback Navigation
Touch Gesture
Result
Swipe right Moves to the next user interface element and announces the
element name
Swipe left Moves to the previous user interface element and announces
the element name
Enable TalkBack in Microsoft Teams Rooms 5

Touch Gesture Result
Drag one finger around the screen Speaks the name of the user interface item or the onscreen
text as your finger moves over it
Double tap the screen Selects the user interface item currently in focus
Swipe down then left Returns to the main screen
Swipe up or down and right Opens the Talkback menu
Swipe up or down with two fingers Scrolls through menu items
Swipe down then left Return to the main screen
Using a Connected Trio in a Microsoft Teams Rooms Environment
Your Microsoft Teams Rooms solution may include one or two connected Poly Trio speakerphones.
The Poly Trio speakerphones are used as external speakers and microphones for your system.
From a connected Poly Trio in Microsoft Teams Rooms mode, you can:
● Mute or unmute the microphones
● Adjust the call volume
6
Chapter 2Getting Started

Product Overview of Poly Video Systems
Poly Studio G62, Poly G7500, Poly Studio X72, Poly Studio X70, Poly Studio X52, Poly Studio X50,
and Poly Studio X30 systems support Poly video conferencing and content sharing features.
Poly G7500 System Features and Capabilities
G7500 systems support the following features:
● Peripheral cameras and microphones make the system scalable for medium rooms and up to
large integrated rooms
● Placing and joining video calls
● Sharing wireless and wired content
● Camera tracking technology that can automatically zoom in on the person talking or frame the
group of people in the room (depending on the paired camera and system configuration)
● Poly NoiseBlockAI, which eliminates background and extraneous sound during calls in common
working environments
● Polycom Acoustic Fence technology, which enables video conferencing in open workspaces by
capturing only the voices in a defined area
● HDMI: Single input and dual output
● Using a wired or wireless USB mouse as an input device
Poly Studio X72 features and capabilities
Poly Studio X72 systems support the following features.
● Dual 4K 20MP cameras with 70-degree and 120-degree horizontal field of view ideal for large-
size conference rooms.
● Poly Expansion microphone support using the RJ11 Poly Expansion microphone port
● High fidelity audio powered by built-in microphones that pick up sound within 7.62 m (25 ft)
● Poly Acoustic Fence technology shields your calls from distracting outside voices and sounds
using your conference room microphones to create a defined sound zone
● Poly DirectorAI, which includes a perimeter feature plus group framing, speaker framing, and
people framing
● Poly Lens Cloud support for setting up, configuring, and managing your device
● Multiple mounting options. Use the wall mount included with your Poly Studio X72, or purchase a
VESA mount, or tabletop stand.
You can mount the Poly Studio X72 above or below a display. The Poly Studio X72 doesn't support
inverted mounting. For more information, see the Poly Studio X72 quick start guides.
Product Overview of Poly Video Systems
7

Poly Studio X70 Features and Capabilities
Poly Studio X70 Features and Capabilities
Studio X70 systems support the following features:
● All-in-one collaboration system for medium-to-large rooms
● No need for a separate PC, laptop, or codec to run video-conferencing software
● Placing and joining video calls
● Sharing wireless and wired content
● Dual built-in 4K cameras
● Camera tracking technology that automatically frames the group of people in the room
● Hi-fidelity, built-in stereo microphones that pick up sound within 7.62 m (25 ft) and use spatial
audio for life-like presence and clarity
● Poly NoiseBlockAI, which eliminates background and extraneous sound during calls in common
working environments
● HDMI: Single input and dual output
● Using a wired or wireless USB mouse as an input device
Poly Studio X70 Mounting Orientation
You can mount the Studio X70 above or below a display. The Studio X70 doesn't support inverted
mounting. For information on mounting the Studio X70, see the Studio X70 setup sheet.
Poly Studio X52 Features and Capabilities
Studio X52 systems support the following features:
● All-in-one collaboration system for huddle rooms and small-to-medium rooms
● No need for a separate PC, laptop, or codec to run video-conferencing software
● Placing and joining video calls
● Sharing wireless and wired content
● Sharp 4K, 20MP camera with 95-degree horizontal field of view
● Camera tracking technology that automatically frames the group of people in the room
● Hi-fidelity, built-in stereo microphones that pick up sound within 7.62 m (25 ft) and use spatial
audio for life-like presence and clarity
● Poly NoiseBlockAI, which eliminates background and extraneous sound during calls in common
working environments
● Dual stereo speakers
● HDMI: Single input and dual output
● Simple to set up, manage, and use with Poly Lens
8
Chapter 2Getting Started

Poly Studio X52 Mounting Orientation
You can mount the Studio X52 above or below a display. The Studio X52 doesn't support inverted
mounting. For information on mounting the Studio X52, see the
Poly Studio X52 Quick Start Guide
.
Poly Studio X50 Features and Capabilities
Studio X50 systems support the following features:
● All-in-one collaboration system for huddle rooms and small-to-medium rooms
● No need for a separate PC, laptop, or codec to run video-conferencing software
● Placing and joining video calls
● Sharing wireless and wired content
● Built-in 4K camera with ultra-wide 120-degree field of view
● Camera tracking technology that automatically frames the group of people in the room
● Hi-fidelity, built-in stereo microphones that pick up sound within 7.62 m (25 ft) and use spatial
audio for life-like presence and clarity
● Poly NoiseBlockAI, which eliminates background and extraneous sound during calls in common
working environments
● Dual stereo speakers
● HDMI: Single input and dual output
● Using a wired or wireless USB mouse as an input device
Poly Studio X50 Mounting Orientation
You can mount the Studio X50 above or below a display. The Studio X50 doesn't support inverted
mounting. For information on mounting the Studio X50, see the Studio X50 setup sheet.
Poly Studio X30 Features and Capabilities
Studio X30 systems support the following features:
● All-in-one collaboration system for huddle rooms and small-to-medium rooms
● No need for a separate PC, laptop, or codec to run video-conferencing software
● Placing and joining video calls
● Sharing wireless and wired content
● Built-in 4K camera with ultra-wide 120-degree field of view
● Camera tracking technology that automatically frames the group of people in the room
● High-fidelity, built-in stereo microphones that pick up sound within 4.57 m (15 ft) and use spatial
audio for life-like presence and clarity
● Poly NoiseBlockAI, which eliminates background and extraneous sound during calls in common
working environments
Poly Studio X50 Features and Capabilities
9

● Single mono speaker
● HDMI: Single input and output
● Using a wired or wireless USB mouse as an input device
Poly Studio X30 Mounting Orientation
You can mount the Studio X30 above or below a display. The Studio X30 supports inverted mounting.
For information on mounting the Studio X30, see the Studio X30 setup sheet.
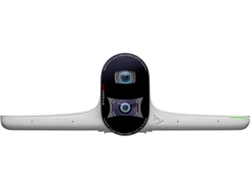
Poly Studio E70 Camera Overview
Poly Studio E70 is a dual-camera solution for medium to large conference rooms.
The Poly Studio E70 includes the following features:
● Standalone USB 4K camera with full tracking and framing capabilities
● Visual coverage up to 7.6 m (25 ft)
● Microphones that provide accurate sound source location to support camera tracking
Administrator Features and Capabilities
The G7500 and Studio X Family systems provide features for administrators to deploy, manage, and
access systems.
These systems provide the following features and capabilities:
● Remote access for managing standalone systems
● Provisioning with Poly Clariti Manager to support single system, small business, and large
multisite enterprise deployments
● SNMP reporting and remote logging
● Industry-standard security techniques, including 802.1X authentication
10
Chapter 2Getting Started
Overview of system hardware
The figures and tables in the following topics provide information about hardware features available
on your system.
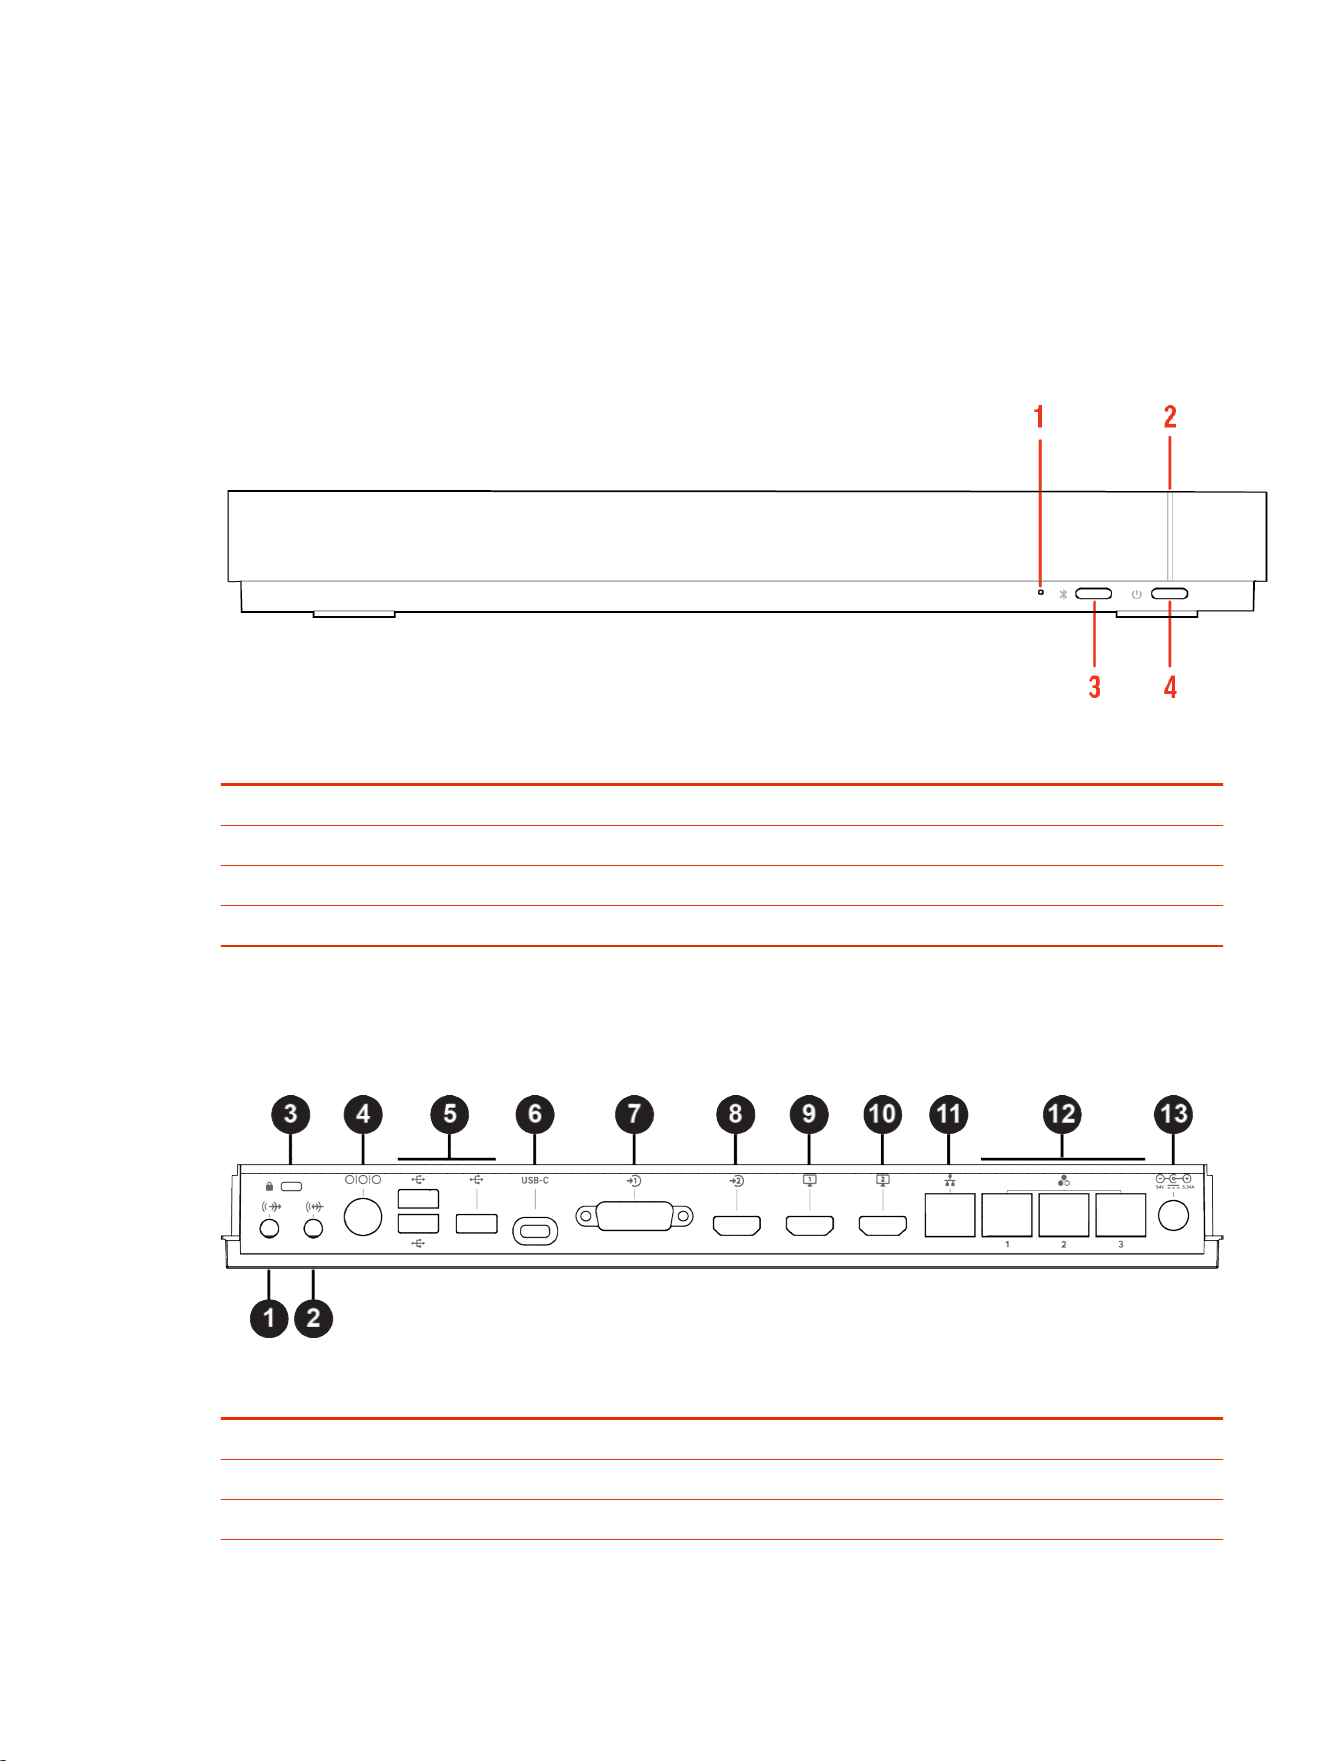
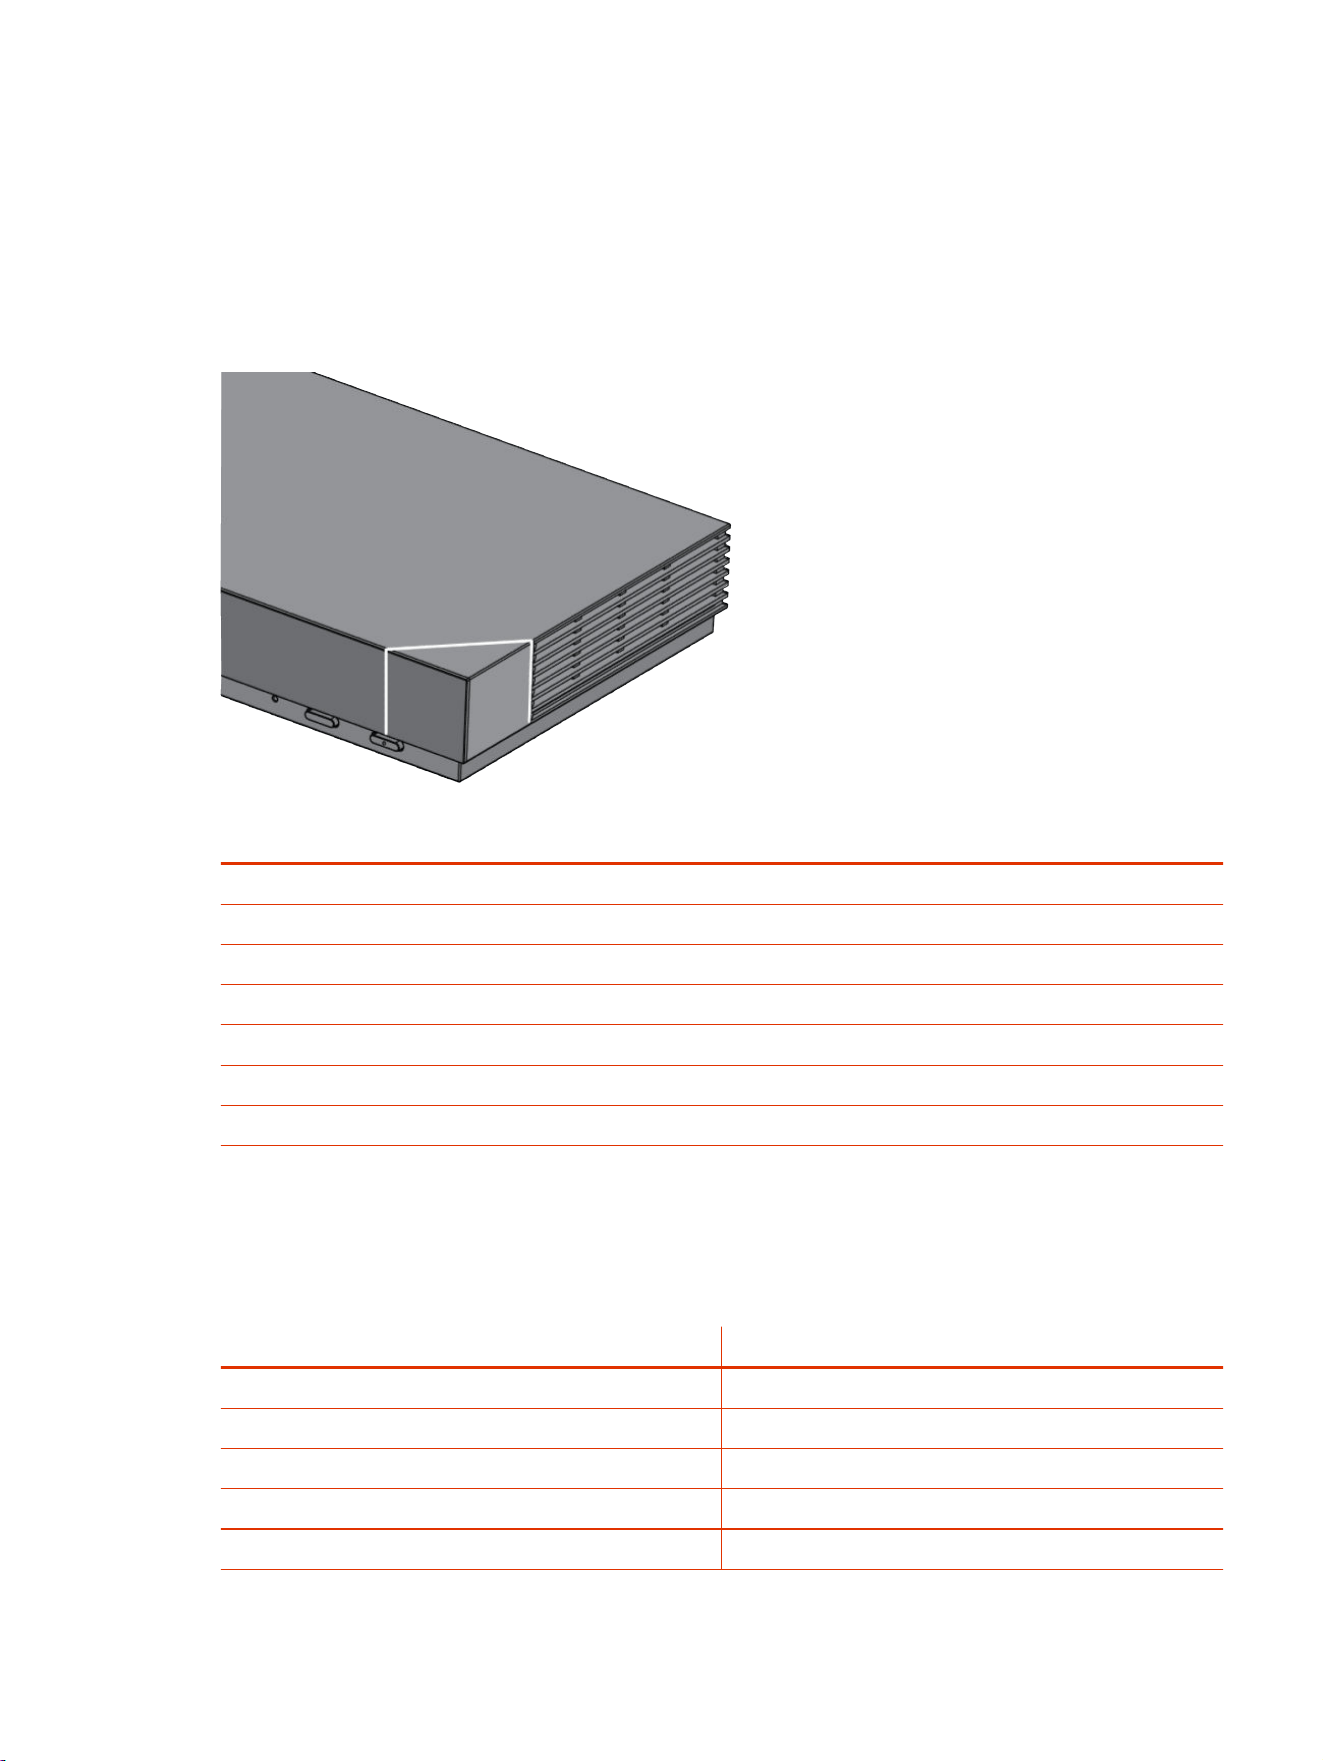
Poly G7500 Hardware
The following figure displays the hardware features on the Poly G7500 system. The table lists each
feature numbered in the figure.
Table 2-3 Poly G7500 Feature Descriptions
Ref. Number Feature Feature Description
1 Reset button Resets the Poly G7500 to the factory software version
2 LED indicator Indicates the system status
3 Remote control pairing button Enables the Bluetooth remote control pairing mode
4 Restart button Restarts your system
Poly G7500 System Ports
The following illustration and table explain the ports on the back panel of your G7500 system.
Table 2-4
G7500 System Port Descriptions
Ref. Number Port Description
1 3.5 mm audio line out
2 3.5 mm audio line in
3 Security lock
Overview of system hardware 11
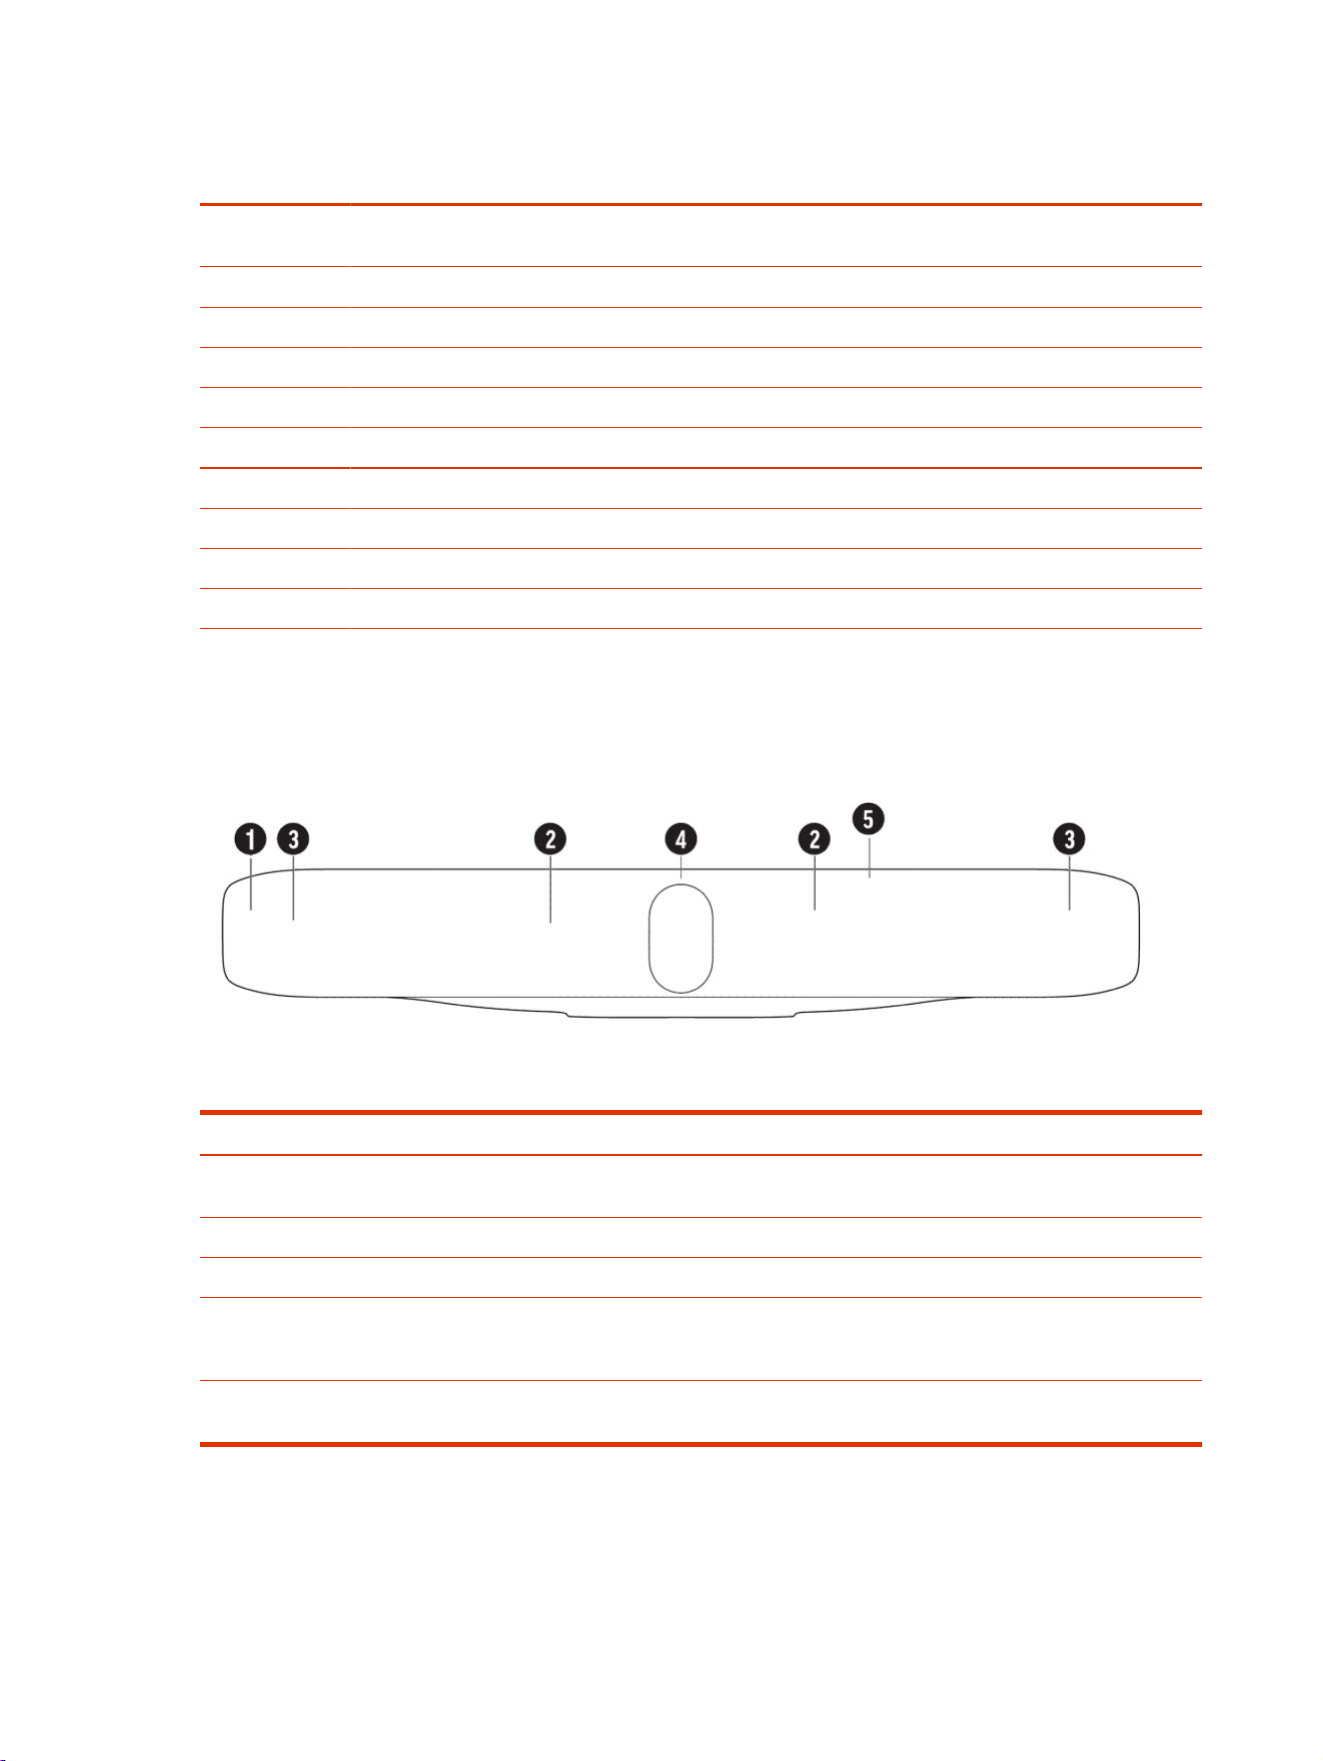
Table 2-4 G7500 System Port Descriptions (continued)
Ref. Number Port Description
4 Mini-DIN/RS-232 serial port
NOTE: The serial port is occasionally used by third party control system devices for automation.
5 USB-A ports
6 USB-C port
7 HDCI input for Polycom cameras
8 HDMI input for sharing content (for example, from a laptop)
9 HDMI output for the primary monitor
10 HDMI output for the secondary monitor
11 LAN connection for the system
12 Link-local network (LLN) connections for IP-based peripheral devices
13 Power cord port
Poly Studio X72 hardware
The following illustration and table explain the hardware components on your Poly Studio X72 system.
Table 2-5
Poly Studio X72 hardware components
Ref. Number Feature Description
1 Mesh screen Protective screen that covers the front
of the system
2 Microphone array Microphone array that captures audio
3 Speakers Audio output
4 Dual cameras Camera array with a privacy shutter
that automatically opens or closes,
depending on the camera state
5
LED indicators Indicates the system status and
information on the tracked speaker
12 Chapter 2Getting Started
Poly Studio X72 privacy shutter behavior
The privacy shutter automatically opens and closes depending on the state of the connected video
system.
NOTE: Shutter behavior may vary depending on the partner application.
Table 2-6 Poly Studio X72 privacy shutter behavior
System event Shutter behavior
The system powers on Shutters open
The system powers off Shutters close
NOTE: If you remove power immediately, the shutters don't
close.
The system enters sleep mode or digital signage starts and
the
Camera Sleep Setting is set to Save Energy
Shutters close
The system enters sleep mode or digital signage starts and
Camera Sleep Setting is set to Fast Wake
Shutters remain open
NOTE: When Fast Wake is set, the shutters never close.
You wake the system
Shutters open
You wake the system and the built-in camera isn’t the
primary camera
Shutters remain closed
You select the built-in camera as the primary camera Shutters open
The system receives an incoming call Shutters open
The system is sending video Shutters are open
The system is in an active call and the video is muted Shutters are open
Poly Studio X72 hardware ports
The following illustration and table explain the hardware ports on your Poly Studio X72 system.
Table 2-7
Poly Studio X72 hardware port descriptions
Ref. Number Port Description
1 HDMI output for the secondary monitor
2 HDMI output for the primary monitor
Poly Studio X72 privacy shutter behavior 13
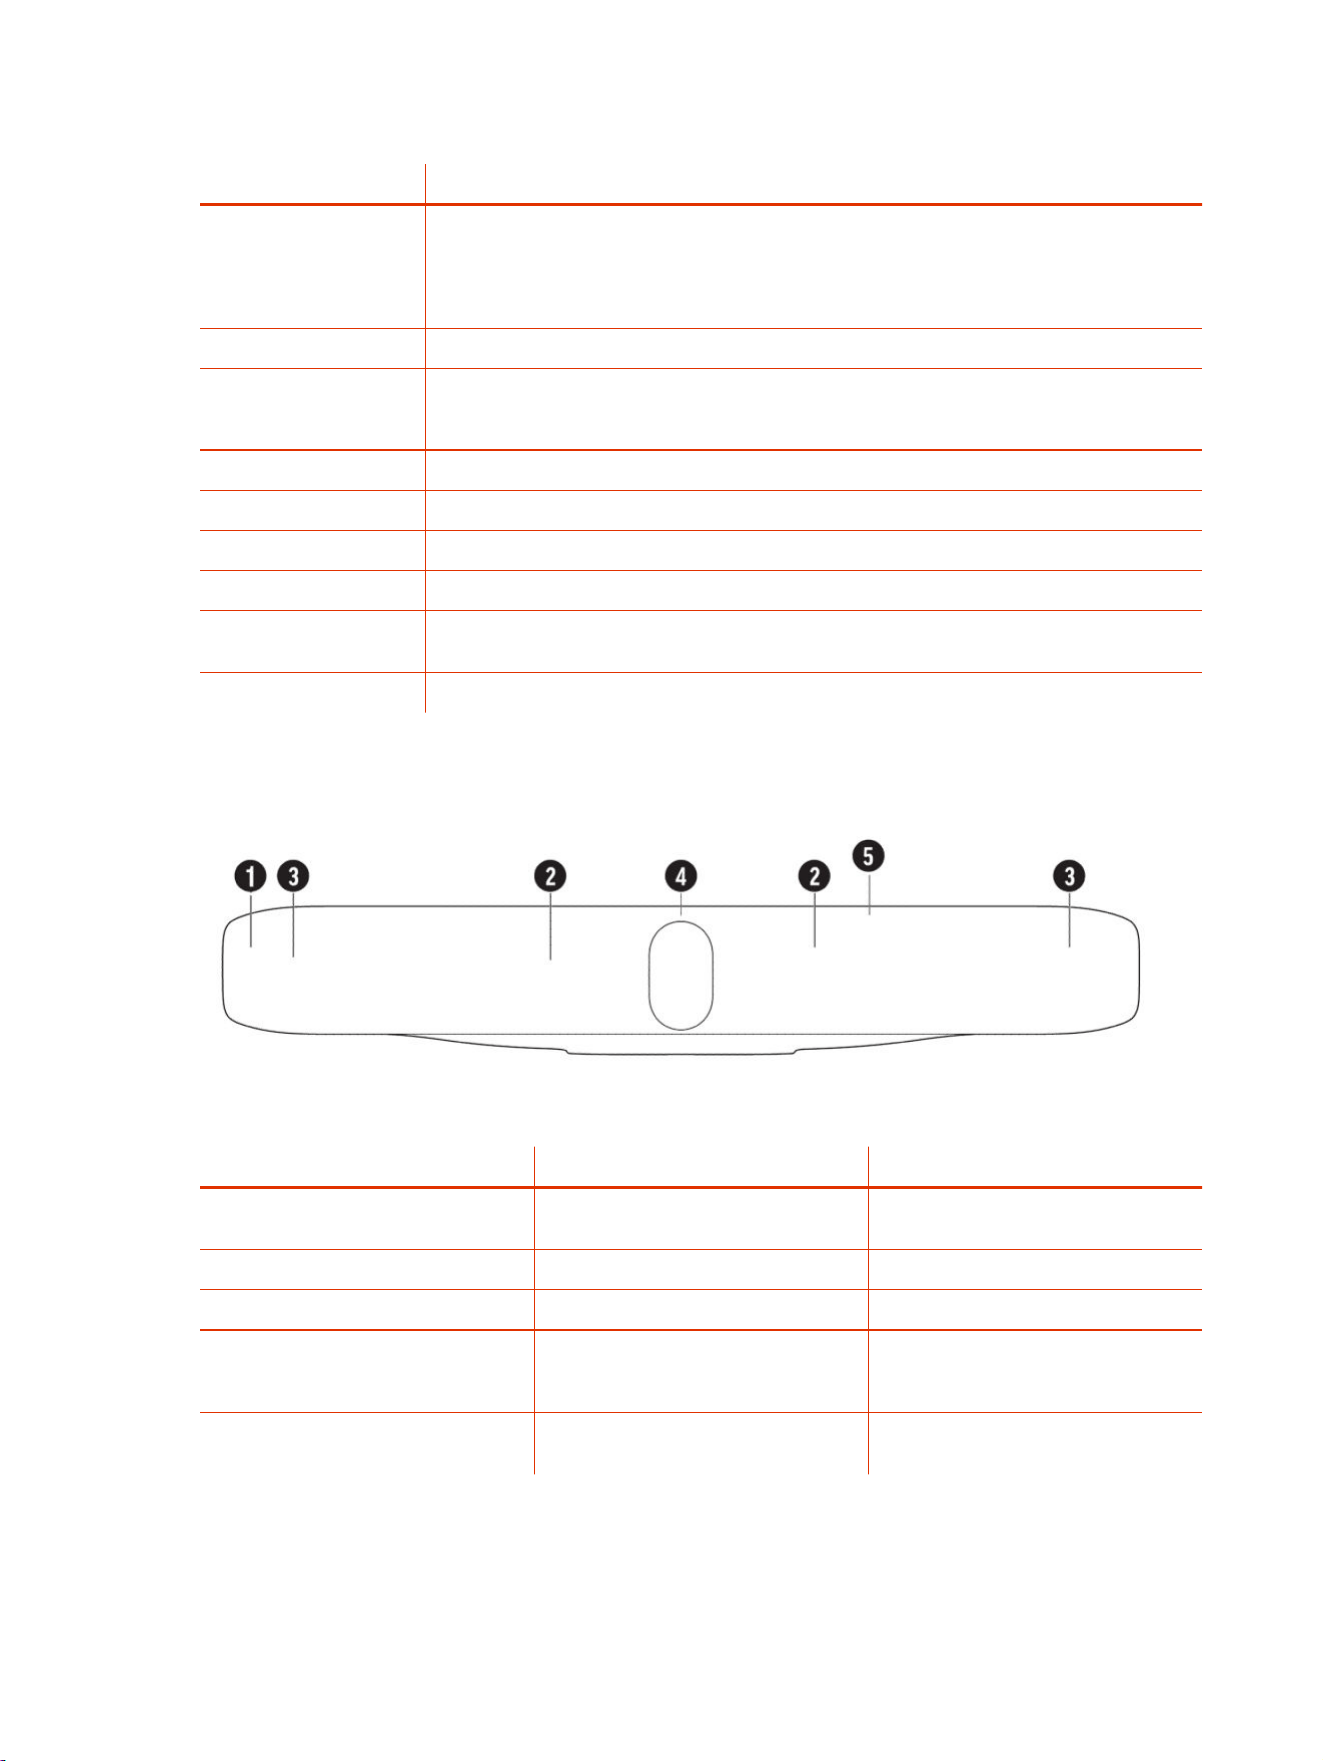
Table 2-7 Poly Studio X72 hardware port descriptions (continued)
Ref. Number Port Description
3 HDMI input
Connects a laptop for content sharing or to use the system monitor in Device Mode
Connects an HDMI camera for use as an additional people camera
4
USB-A ports
5 USB Type-C port (for Device Mode only)
NOTE: Note: USB Type-C port is used for service, installation, and Poly Device Mode only.
6
3.5 mm audio line in
7 3.5 mm audio line out
8 Expansion microphone connection
9 LAN connection for the system
10 Link-local network (LLN) connections for IP-based peripheral devices
(supported in a future Poly VideoOS release)
11 Power cord port
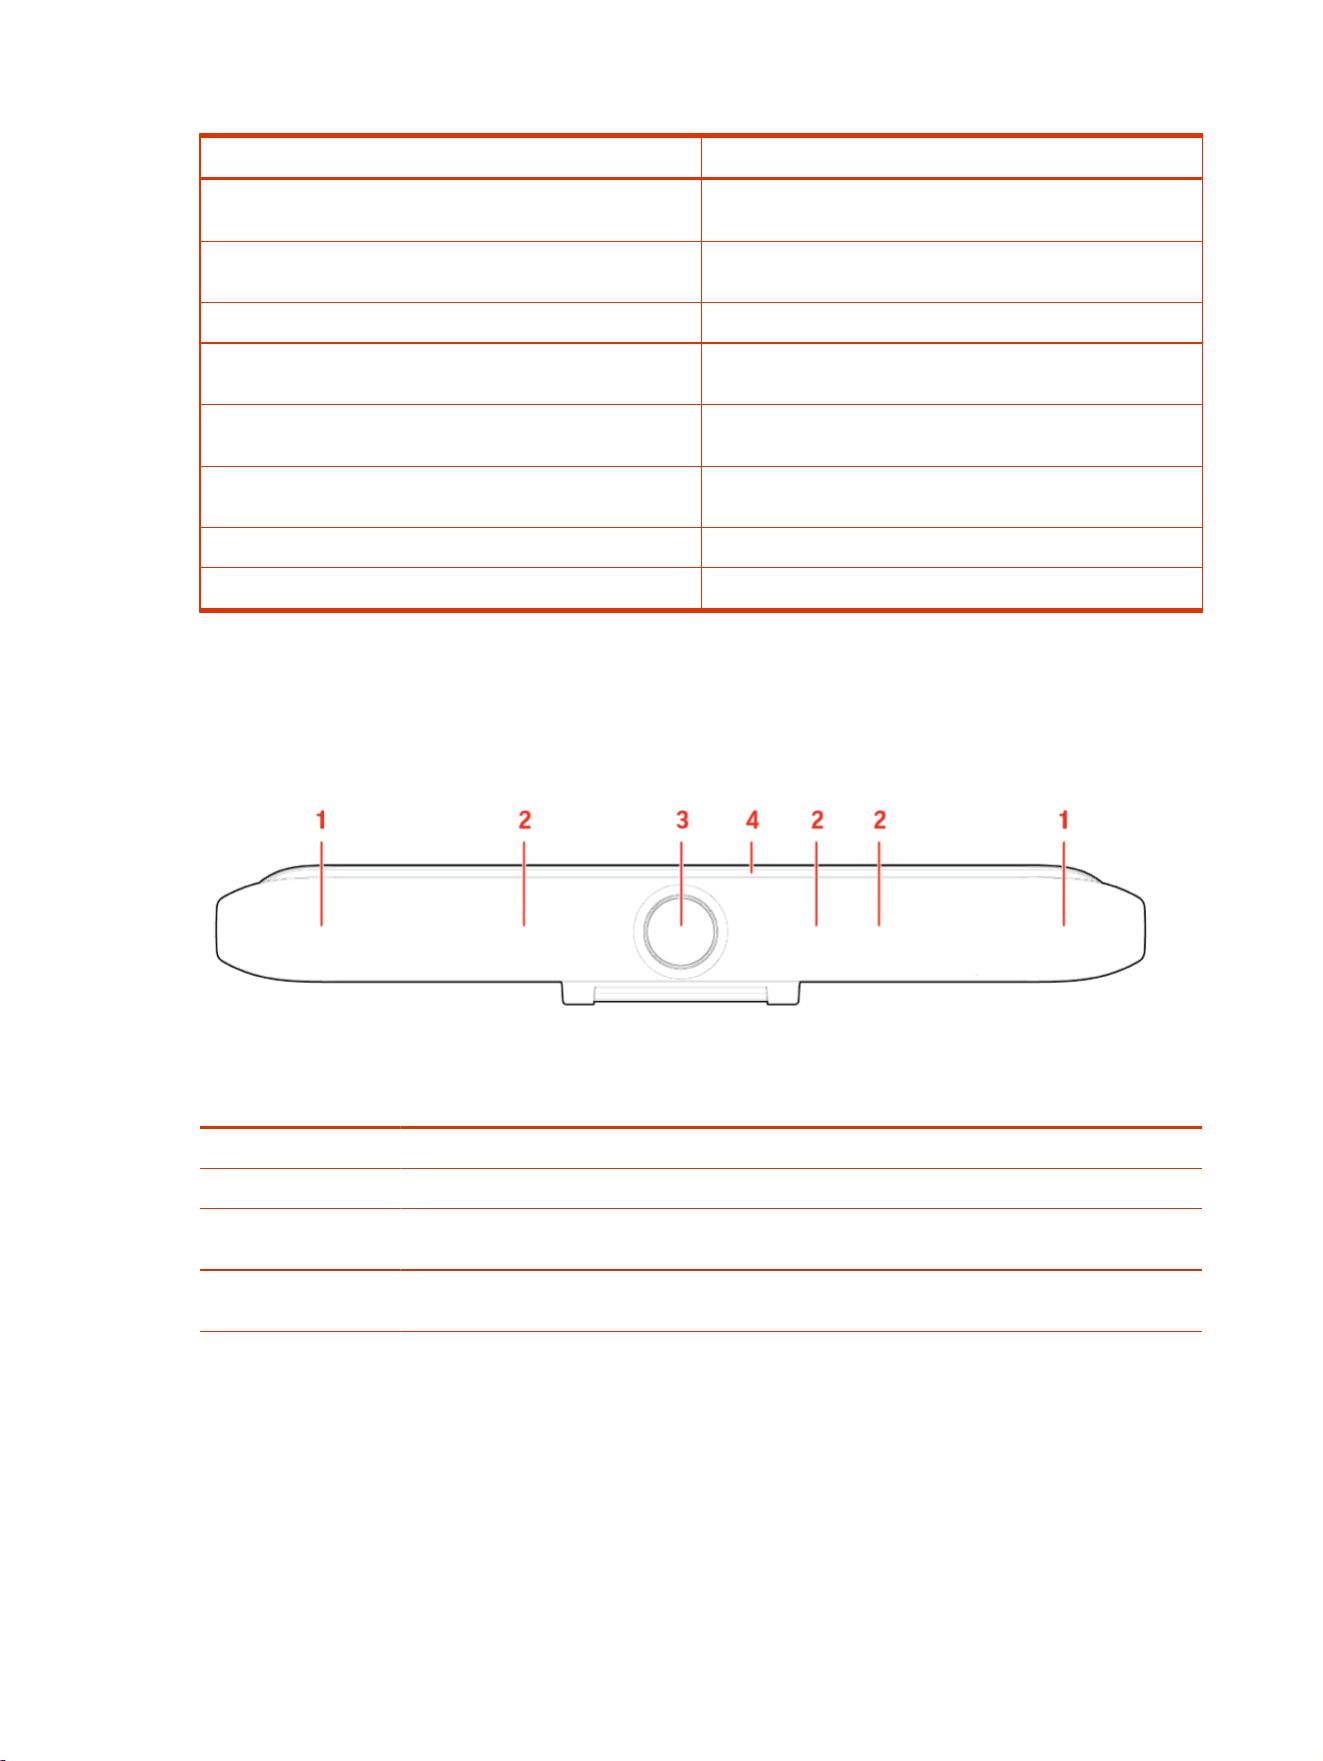
Poly Studio X70 Hardware
Table 2-8
Ref. Number Feature Description
1 Screen Protective screen that covers the front
of the system
2 Microphone array Microphone array that captures audio
3 Speakers Audio output
4 Dual cameras Camera array with a privacy shutter
that automatically opens or closes,
depending on the camera state
5
LED indicators Indicates the system status and
information on the tracked speaker
14 Chapter 2Getting Started
Poly Studio X70 System Hardware Ports
The following illustration and table explain the hardware ports on your Poly Studio X70 system.
Table 2-9 Poly Studio X70 System Hardware Port Descriptions
Ref. Number Port Description
1 HDMI output for the secondary monitor
2 HDMI output for the primary monitor
3 HDMI input for sharing content (for example, from a laptop)
4 USB-A ports
5 USB-C port
6 3.5 mm audio line in
7 3.5 mm audio line out
8 Expansion microphone connection
9 LAN connection for the system
10 Link-local network (LLN) connections for IP-based peripheral
devices
NOTE: This port is disabled and is reserved for future use.
11
Power cord port
Poly Studio X70 and Poly Studio X72 Privacy Shutter Behavior
The privacy shutter automatically opens and closes depending on the state of the connected video
system.
Poly Studio X70 Privacy Shutter Behavior
NOTE: Shutter behavior may vary depending on the partner application.
System Event
Shutter Behavior
The system powers on Shutters open
The system powers off Shutters close
NOTE: If you remove power immediately, the shutters don't
close.
Poly Studio X70 System Hardware Ports 15
System Event Shutter Behavior
The system enters sleep mode or digital signage starts and
the Camera Sleep Setting is set to Save Energy
Shutters close
The system enters sleep mode or digital signage starts and
Camera Sleep Setting is set to Fast Wake
Shutters remain open
NOTE: When Fast Wake is set, the shutters never close.
You wake the system Shutters open
You wake the system and the Studio X70 built-in camera
isn’t the primary camera
Shutters remain closed
You select the Studio X70 built-in camera as the primary
camera
Shutters open
The system receives an incoming call If the shutters are closed, they remain closed until the call is
answered
The system is sending video Shutters are open
The system is in an active call and the video is muted Shutters are open
Poly Studio X52 Hardware
The following figure displays the hardware features on the Poly Studio X52 system. The table lists
each feature numbered in the figure.
Table 2-10
Poly Studio X52 Feature Descriptions
Ref. Number Feature Feature Description
1 Speakers Audio output
2 Microphone array Microphone array that captures audio
3 Camera Camera with a privacy cover that enables or disables the
video input as you choose
4 LED indicators Indicates the system status and information on the tracked
speaker
Poly Studio X52 System Ports
The following illustration and table explain the ports on your Poly Studio X52 system.
16
Chapter 2Getting Started

Table 2-11 Poly Studio X52 System Port Descriptions
Ref. Number Port Description
1 Poly Table Expansion Microphone connection
2 USB-A ports
3 RJ45 Ethernet port
4 Power port
5 HDMI port for secondary monitor
6 HDMI port for primary monitor
7 HDMI port for content sharing and Device Mode
8 USB-C port for Device Mode
Poly Studio X52 Privacy Cover
The Poly Studio X52 system provides a physical cover that you can place over the camera lens to
protect your privacy.
Poly Studio X50 Hardware
The following figure displays the hardware features on the Poly Studio X50 system. The table lists
each feature numbered in the figure.
Poly Studio X52 Privacy Cover
17
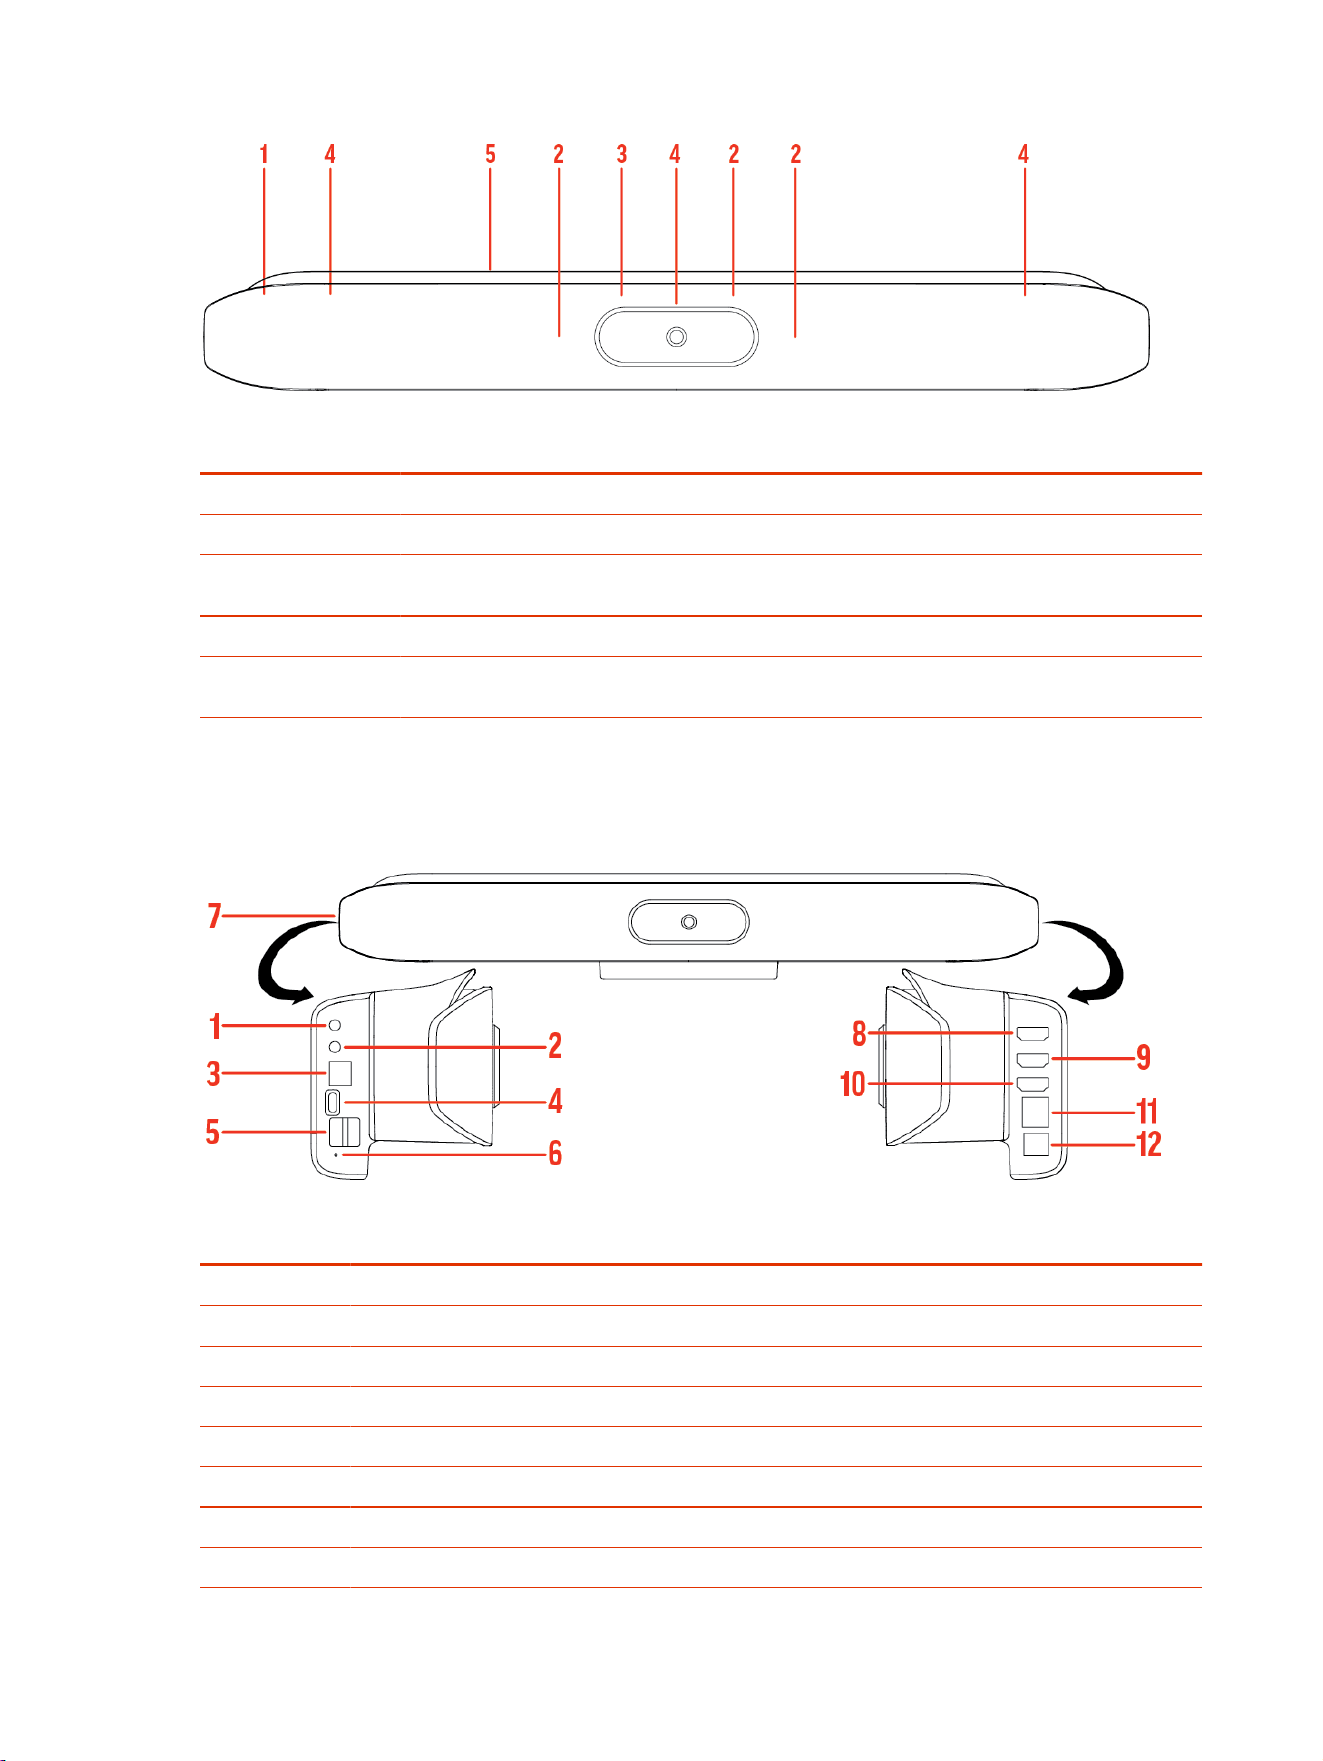
Table 2-12 Poly Studio X50 Feature Descriptions
Ref. Number Feature Feature Description
1 Screen Protective screen that covers the front of your system
2 Microphone array Microphone array that captures audio
3 Camera Camera with a privacy cover that enables or disables the
video input as you choose
4 Speakers Audio output
5 LED indicators Indicates the system status and information on the tracked
speaker
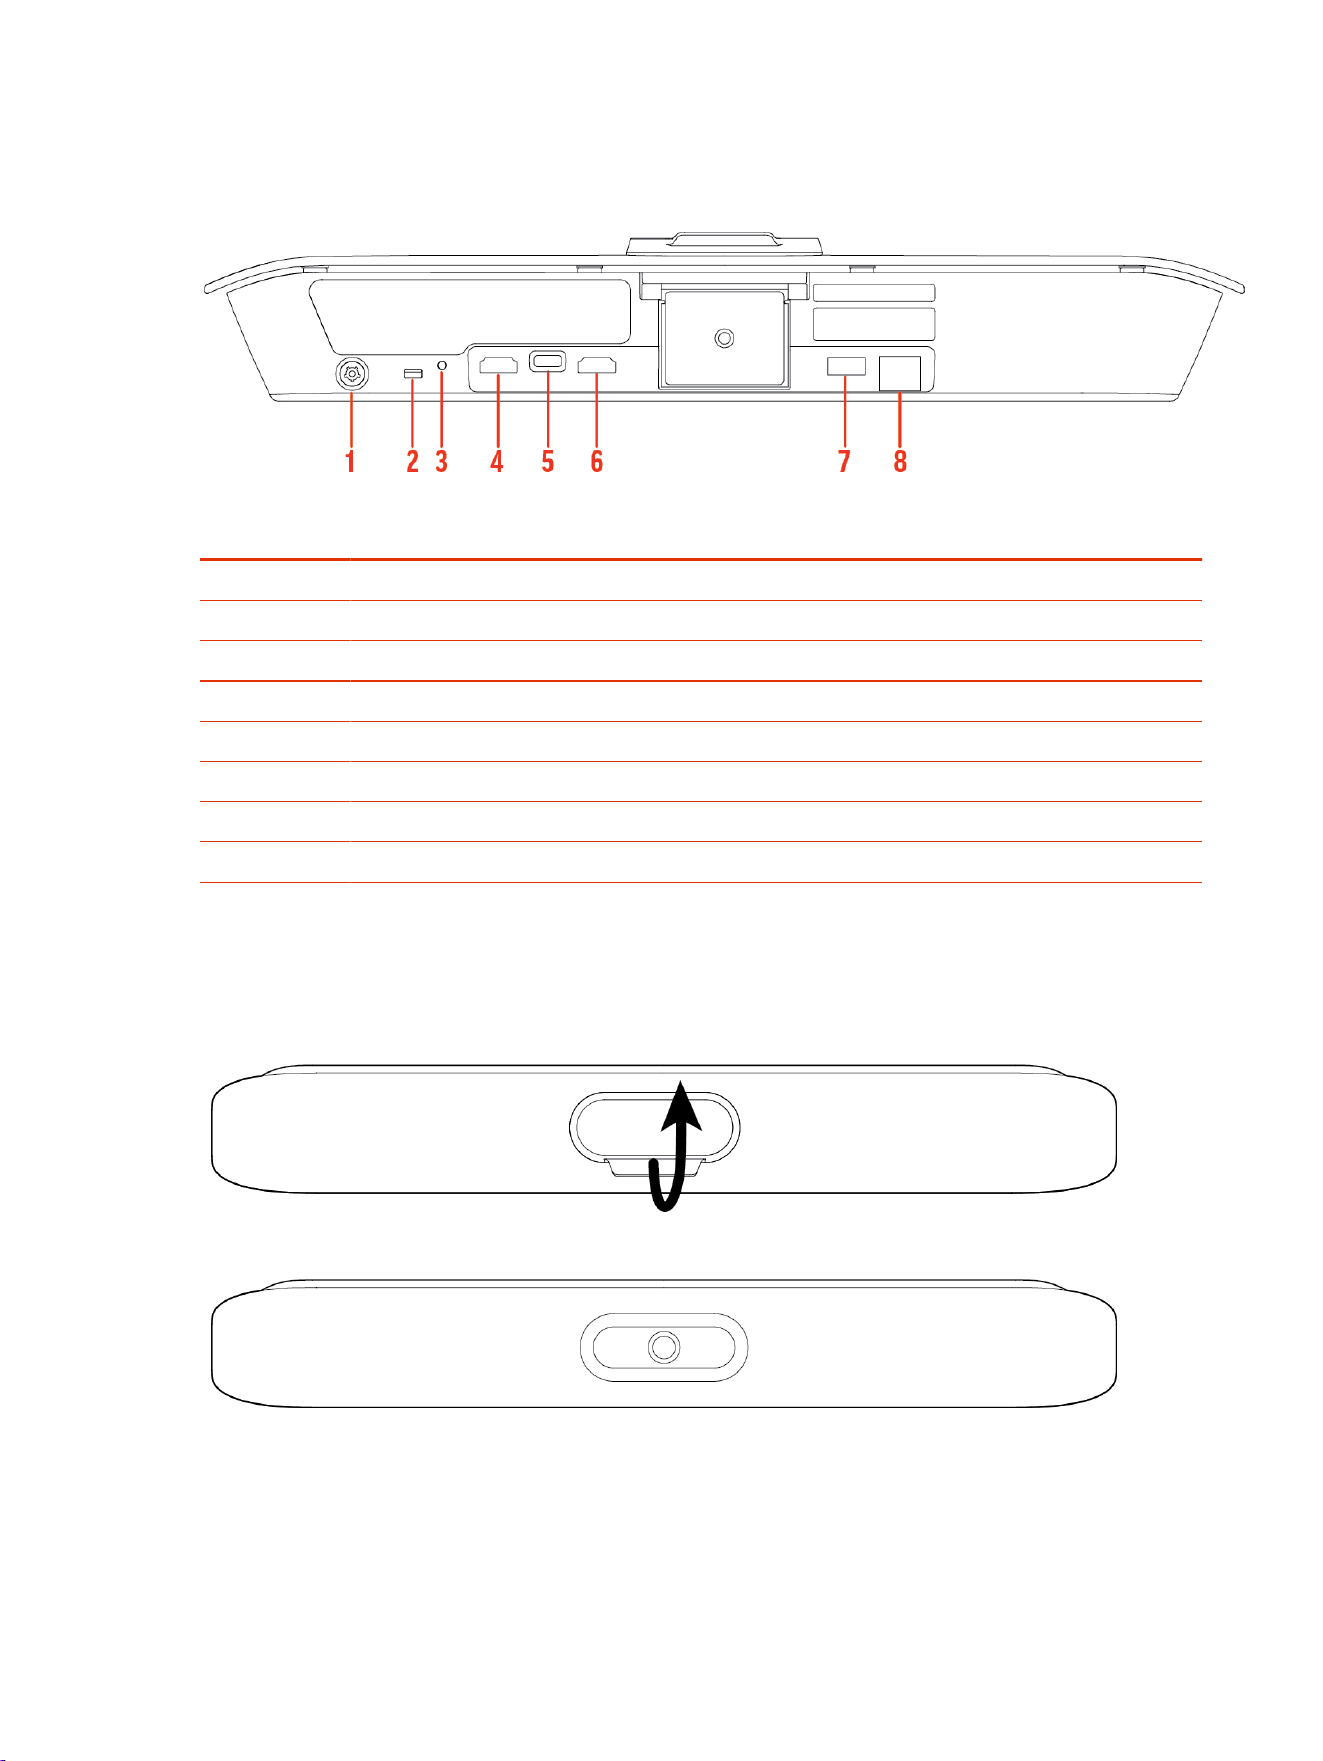
Poly Studio X50 System Ports
The following illustration and table explain the ports on your Poly Studio X50 system.
Table 2-13
Poly Studio X50 System Port Descriptions
Ref. Number Port Description
1 3.5 mm audio line in
2 3.5 mm audio line out
3 Polycom RealPresence Debut expansion microphone connection
4 USB-C port
5 USB-A ports
6 Factory restore pinhole
7 Security lock (on the back flat section of the system)
8 HDMI output for the secondary monitor
18 Chapter 2Getting Started
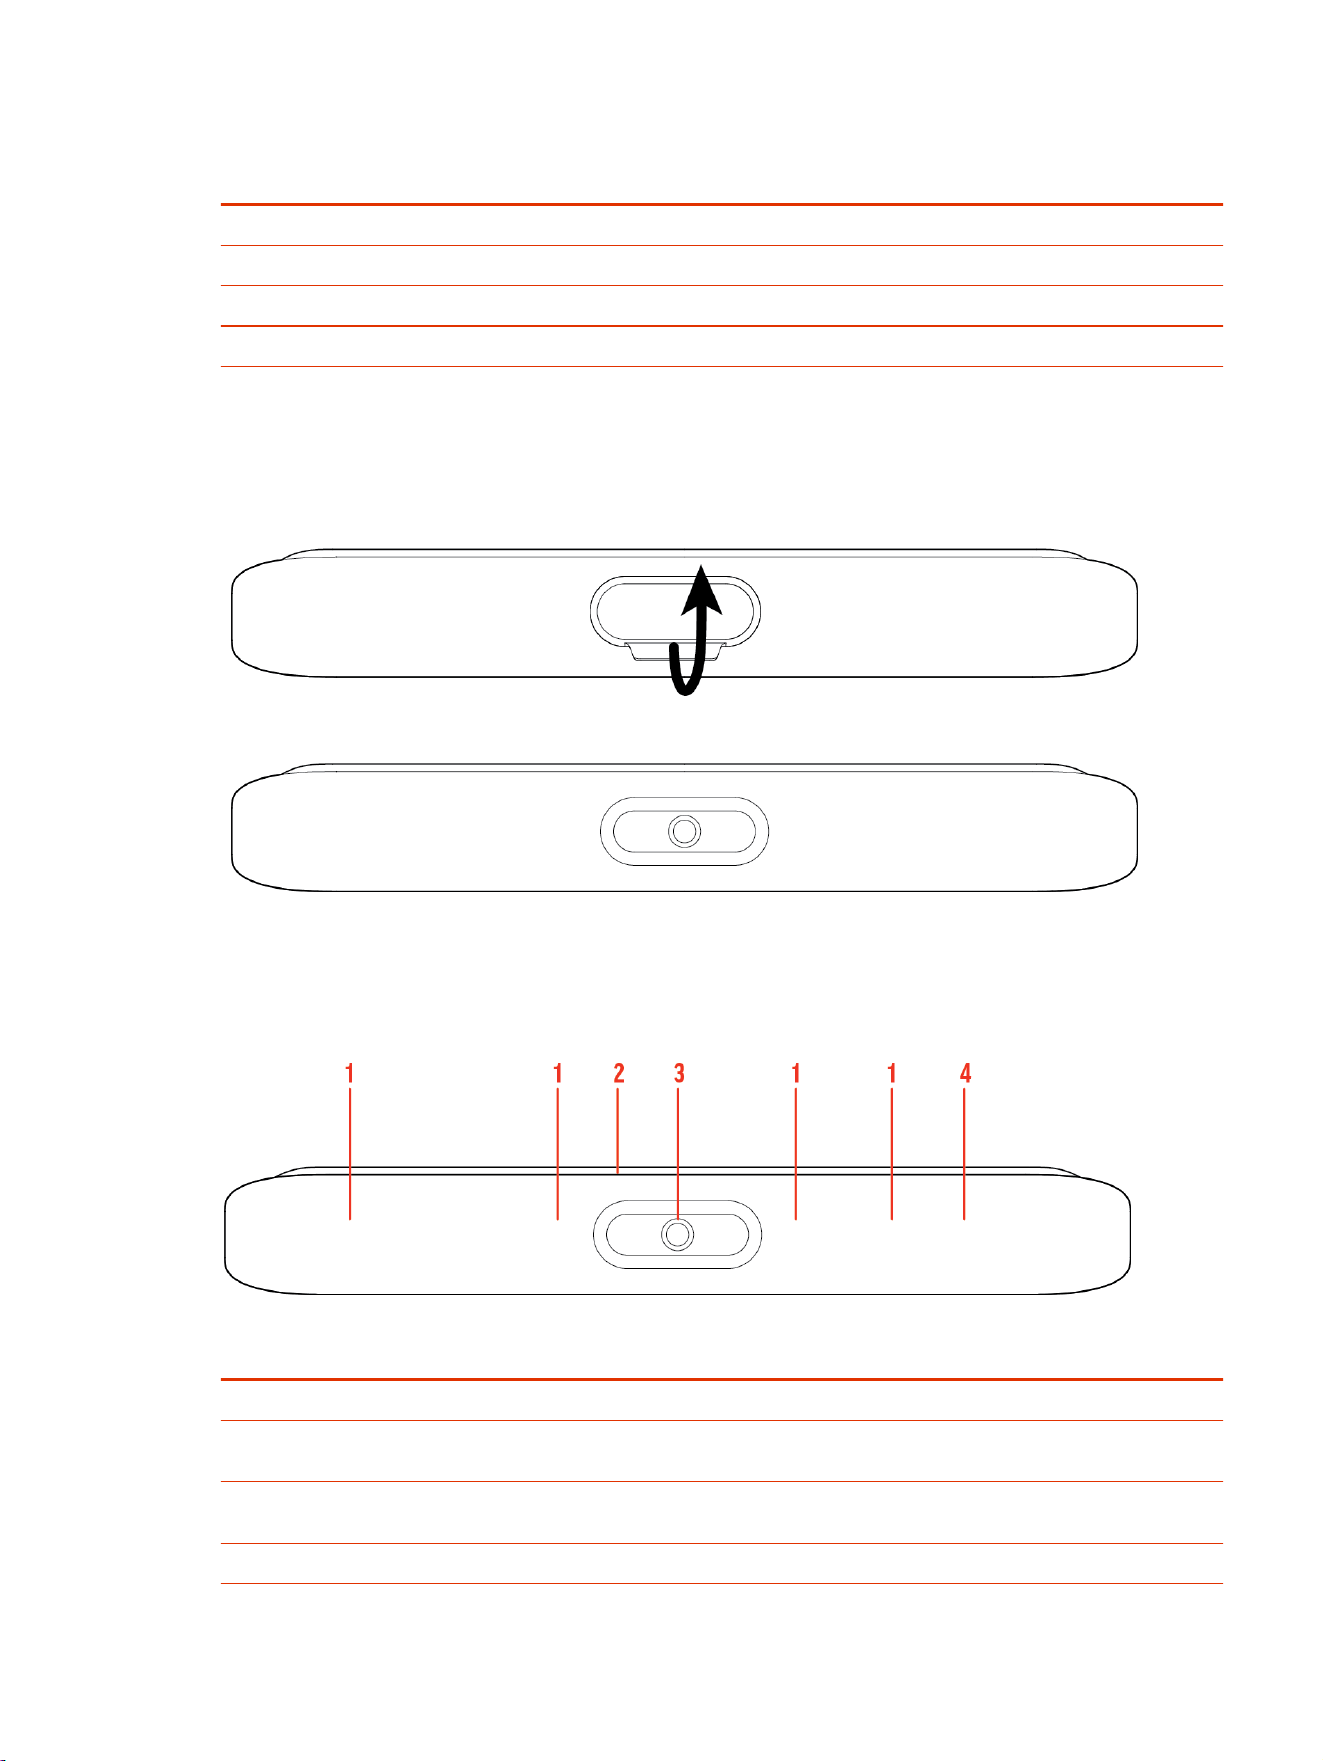
Table 2-13 Poly Studio X50 System Port Descriptions (continued)
Ref. Number Port Description
9 HDMI output for the primary monitor
10 HDMI input for sharing content (for example, from a laptop)
11 LAN connection for the system
12 Power cord port
Poly Studio X50 Privacy Cover
The Poly Studio X50 provides a physical cover that you can place over the camera lens to protect
your privacy.
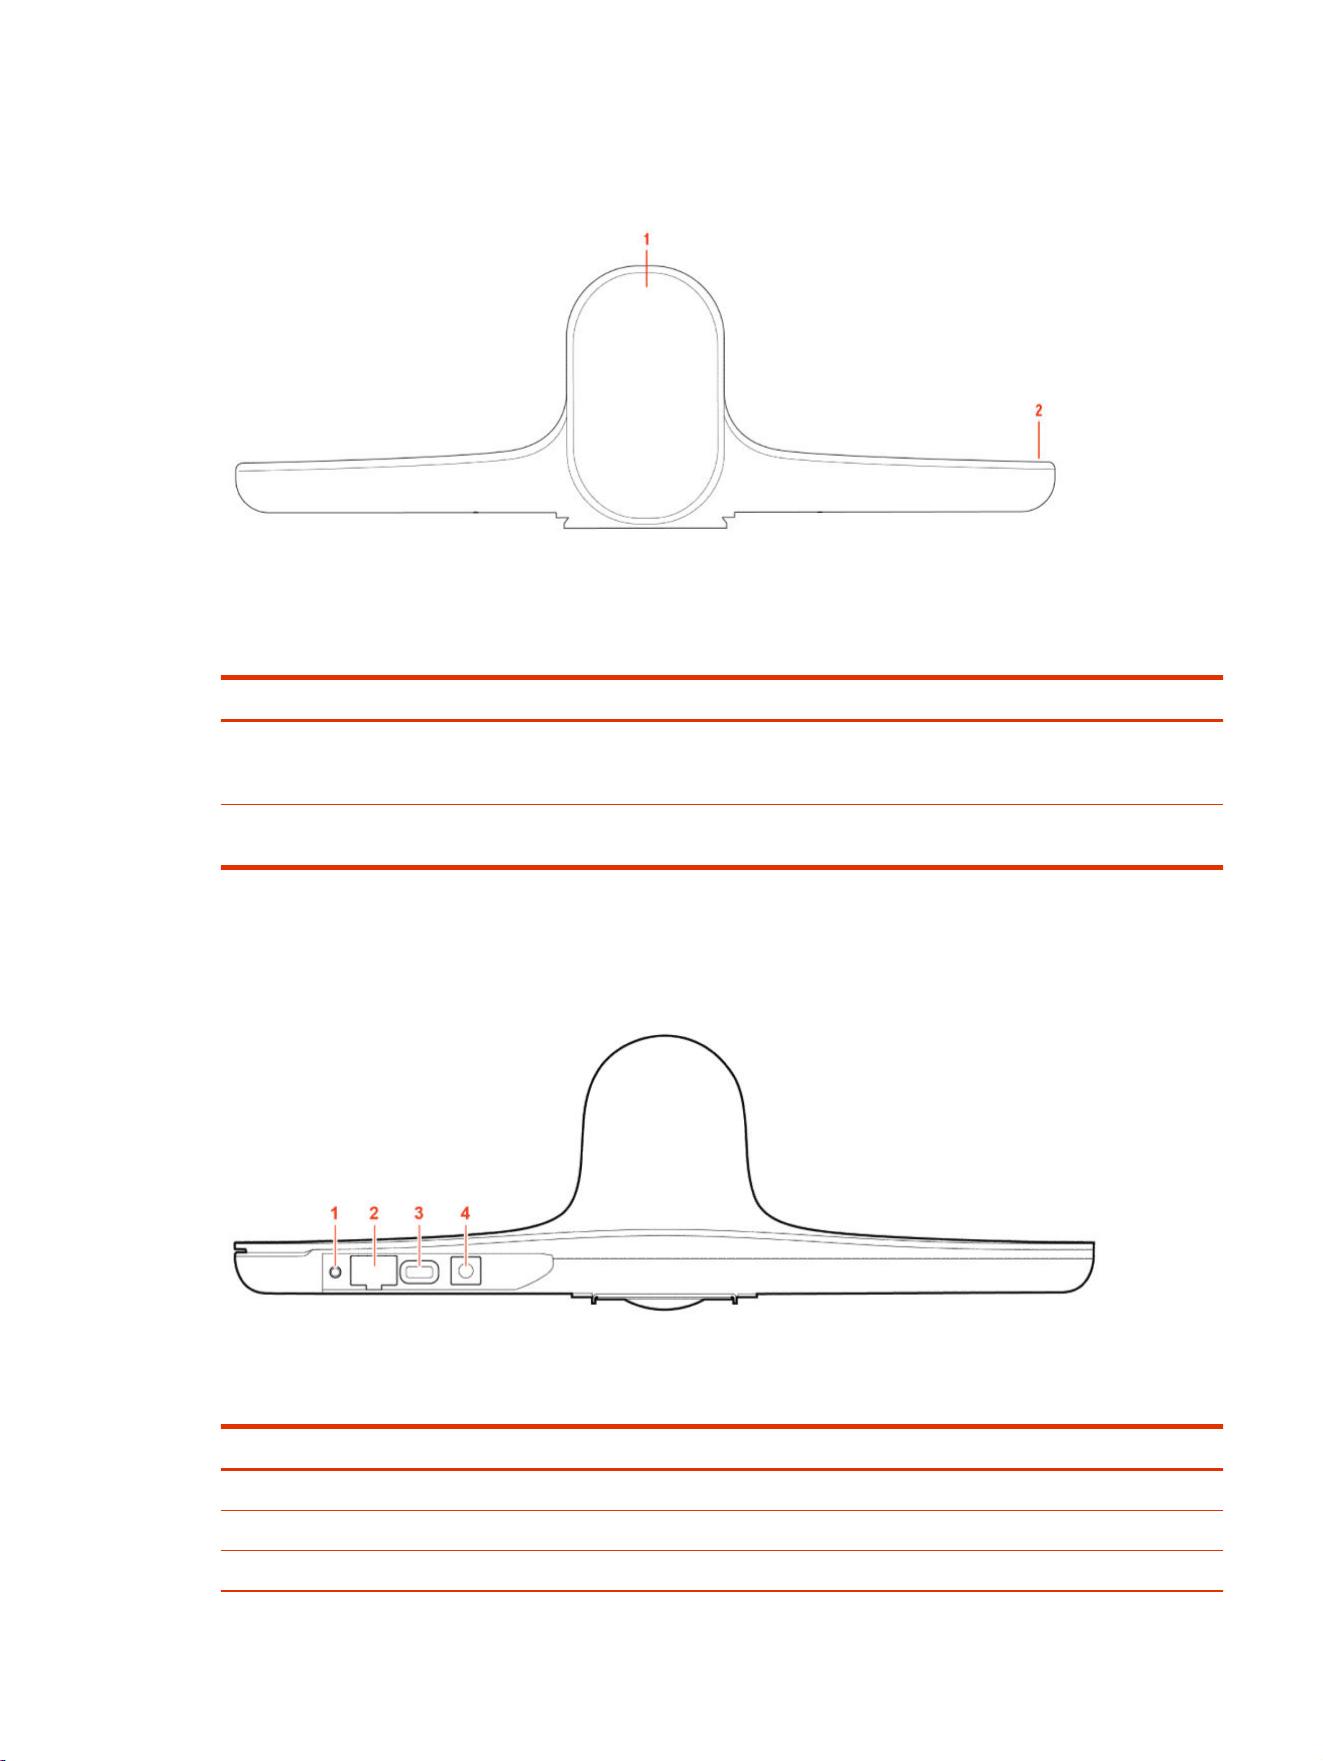
Poly Studio X30 Hardware
The following figure displays the hardware features on the Poly Studio X30 system. The table lists
each feature numbered in the figure.
Table 2-14
Poly Studio X30 Feature Descriptions
Ref. Number Feature Feature Description
1 Microphone array Microphone array that captures audio
2 LED indicators Indicates the system status and information on the tracked
speaker
3 Camera Camera with a privacy cover that enables or disables the
video input as you choose
4 Speaker Mono audio output
Poly Studio X50 Privacy Cover 19
Poly Studio X30 System Ports
The following illustration and table explain the ports on your Poly Studio X30 system.
Table 2-15 Poly Studio X30 System Port Descriptions
Ref. Number Port Description
1 Power cord port
2 Security lock
3 Factory restore pinhole
4 HDMI output for the primary monitor
5 USB-C port
6 HDMI input for sharing content (for example, from a laptop)
7 USB-A ports
8 LAN connection for the system
Poly Studio X30 Privacy Cover
The Poly Studio X30 provides a physical cover that you can place over the camera lens to protect
your privacy.
20
Chapter 2Getting Started
Poly Studio E70 Camera Hardware
Table 2-16 Poly Studio E70 Feature Descriptions
Reference Number Feature Description
1 Dual-cameras Camera array with a privacy shutter
that automatically opens or closes
depending on the camera state
2
LED indicators Front and right indicators that show the
status of the camera
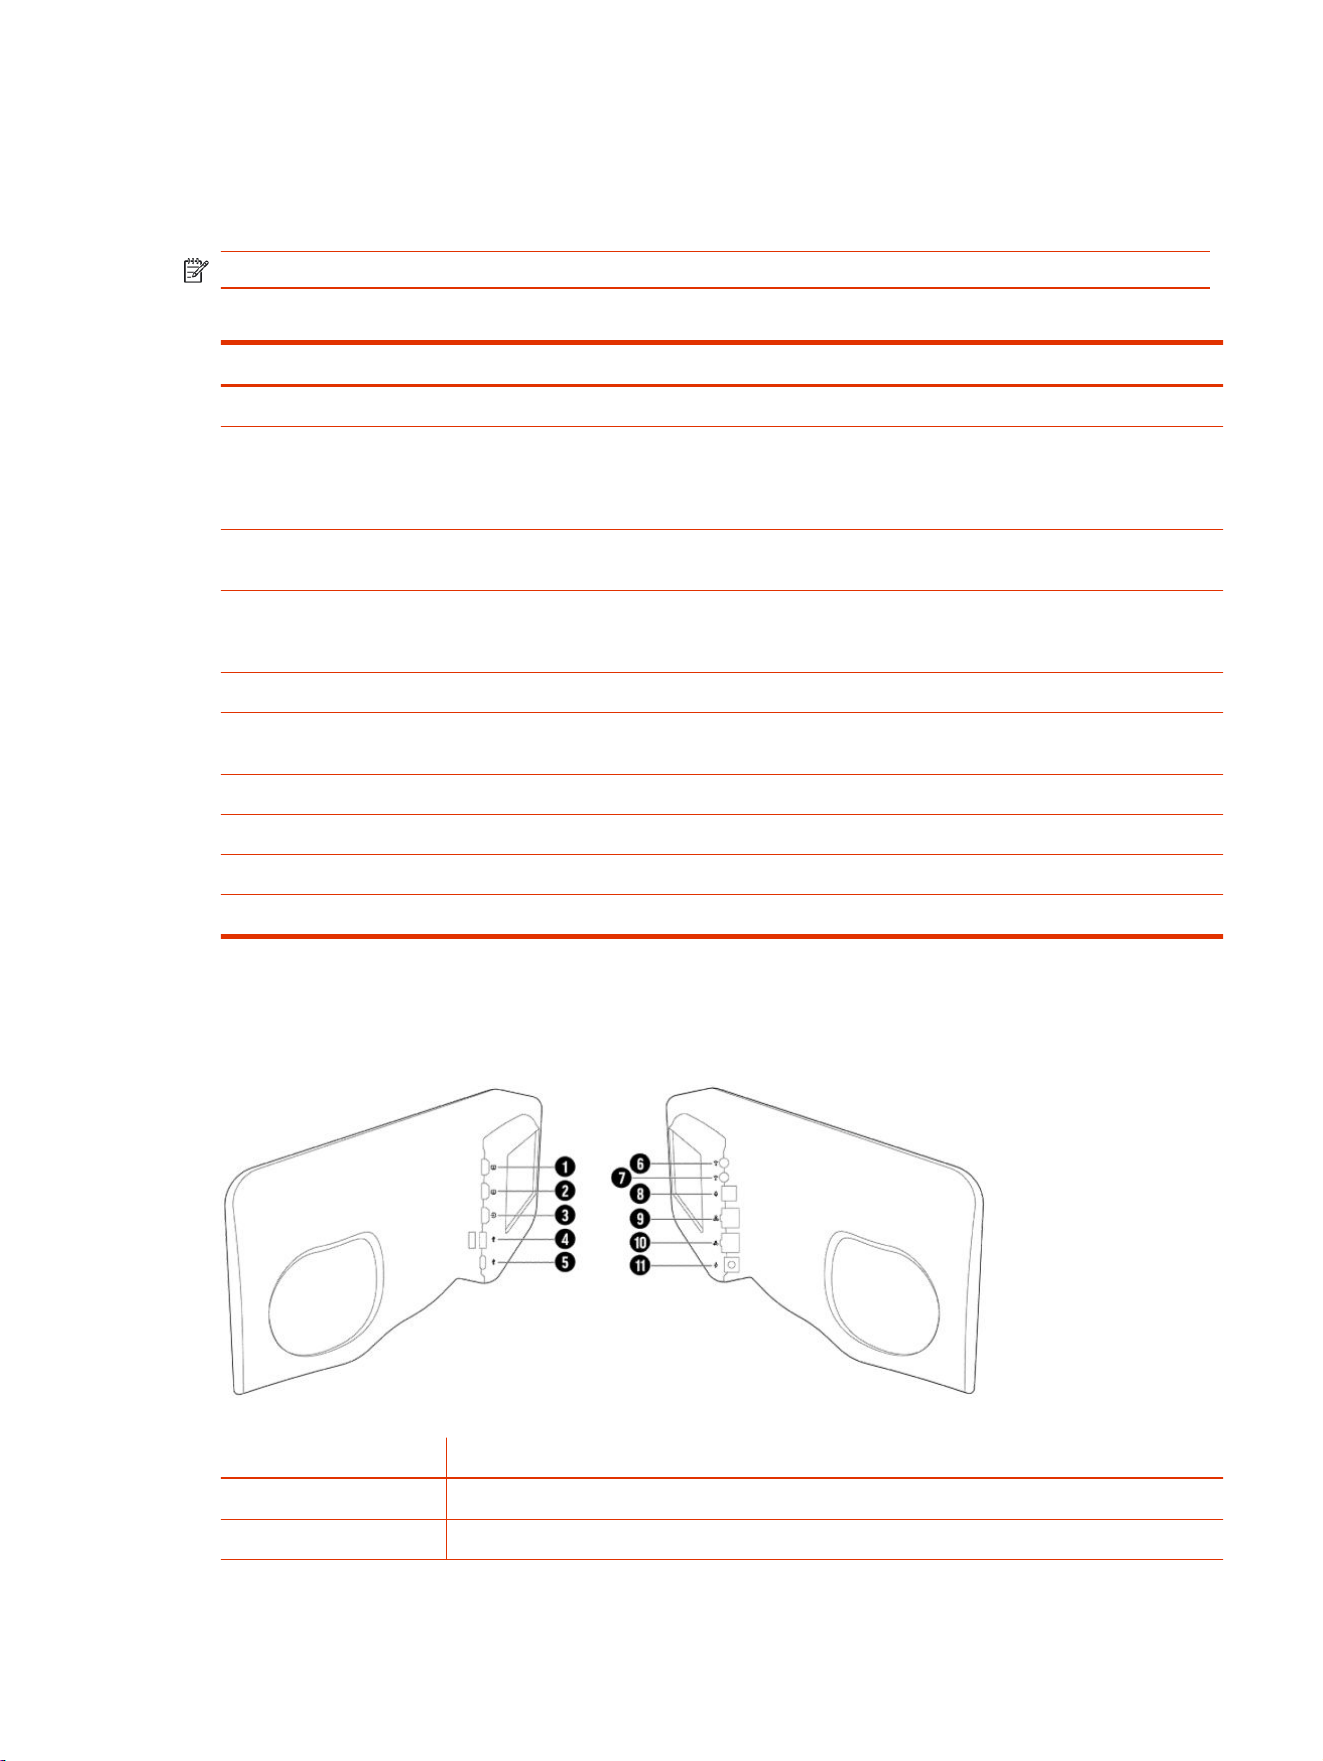
Poly Studio E70 Ports
The following illustration and table explain the ports on your Poly Studio E70 camera.
Table 2-17
Poly Studio E70 Port Descriptions
Ref. Number Port Description
1 Reset button
2 Ethernet port (Can be used to provide power to the camera)
3 USB-C port
Poly Studio E70 Camera Hardware 21
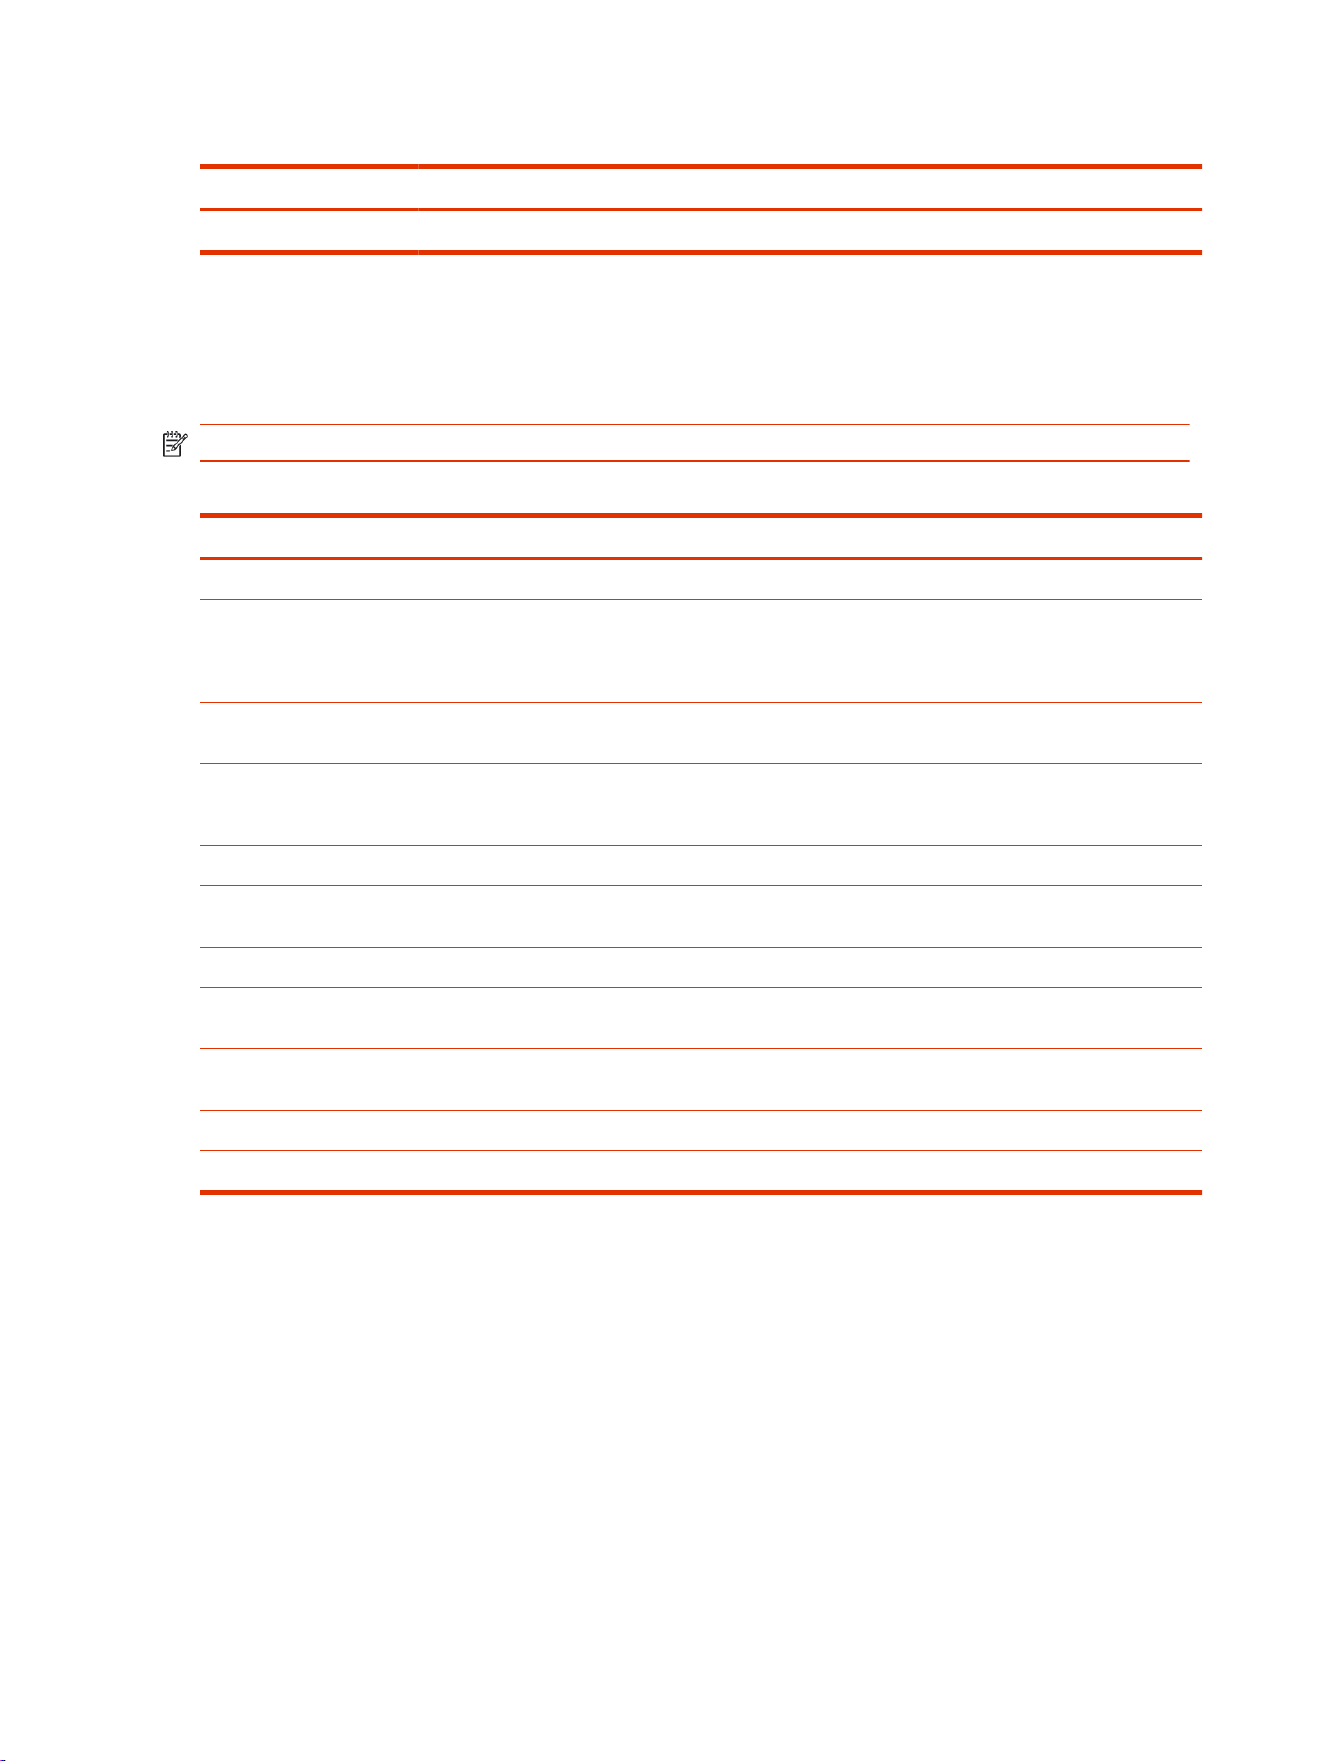
Table 2-17 Poly Studio E70 Port Descriptions (continued)
Ref. Number Port Description
4 Power cord port
Poly Studio E70 Privacy Shutter Behavior
The privacy shutter automatically opens and closes depending on the state of the connected video
system.
NOTE: Shutter behavior may vary depending on partner application.
Table 2-18
Poly Studio E70 shutter behavior
System event Shutter behavior
The system powers on Shutters open
The system powers off Shutters close
NOTE: If you remove power immediately, the shutters don't
close.
The system enters sleep mode or digital signage starts and
the
Camera Sleep Setting is set to Save Energy
Shutters close
The system enters sleep mode or digital signage starts and
Camera Sleep Setting is set to Fast Wake
Shutters remain open
NOTE: When Fast Wake is set, the shutters never close.
You wake the system
Shutters open
You wake the system and the Studio E70 isn’t the primary
camera
Shutters remain closed
You select the Studio E70 as the primary camera Shutters open
The Studio E70 isn't the primary camera and is idle for five
minutes
Shutters close
The system receives an incoming call If the shutters are closed, they remain closed until the call is
answered
The system is sending video Shutters are open
The system is in an active call and the video is muted Shutters are open
22 Chapter 2Getting Started
LED Status Indicators
The following topics list the LED behavior for your system. The tables list each LED indicator and its
associated status.
LED Status Indicators for the Poly G7500 System
Use the LED on the front right corner of the codec to get information on the state of your system.
Table 2-19 Poly G7500 System LED Status Indicators
Indicator Status
Blinking white Powering on
Solid white Working normally
Solid green In a call
Blinking amber Update in progress.
Solid amber Sleeping
Blinking red Error preventing normal operation
Solid red Muted microphone
LED status indicators for the Poly Studio X72 and Poly Studio X70 systems
Use the LED on the right side of the system to help you understand the system's behaviors.
Table 2-20
Poly Studio X72 and Poly Studio X70 LED Indicators and Status
Indicator Status
Solid white Device is idle and standing by
Pulsing white Boot initiation in progress
Pulsing amber Firmware update or factor restore in progress
Blinking blue and white Bluetooth pairing
Solid blue Bluetooth paired
LED Status Indicators 23

Table 2-20 Poly Studio X72 and Poly Studio X70 LED Indicators and Status (continued)
Indicator Status
Solid green Active call in progress
Solid red Audio mute
LED Status Indicators for Poly Studio X50 and Poly Studio X30 Systems
The system provides an LED light bar above the camera to help you understand the system’s
behaviors.
Table 2-21
Poly Studio X50 and Studio X30 LED Indicators and Status
Indicator Position Status
Solid white All Boot initialization in progress
Blinking blue Twelve in the middle Bluetooth in discover
Solid blue for 3 seconds All Bluetooth paired
Blinking green All Incoming call
Solid green All Outgoing call
Solid green Four to eight (when in the middle),
indicating the tracked speaker or the
direction of the camera
Working
The lights are green with supported
applications in the following cases:
● Tracking people in group framing
and speaker tracking mode
● Indicating the direction of the
camera that you customize in pan-
tilt-zoom (PTZ) mode
Solid amber Twelve in the middle Standing by
System in sleep mode with no active
video output
Pulsing red
Twelve in the middle Call on hold
Pulsing green Twelve in the middle Call on hold (by far site)
Solid white for 3 seconds Twelve in the middle Saving a preset
Solid red All Muted microphone
Solid red Four in the middle Muted camera
Muted microphone LEDs take
precedence over camera mute LEDs
Pulsing amber
All Firmware update in progress
Blinking red All Error preventing normal operation
Blinking amber Twelve alternating In a POST sequence, at least one test
results in a warning error. The system
continues to blink amber but initializes
after the sequence is complete if no
severe errors occur.
24 Chapter 2Getting Started

LED Status Indicators for the Poly Studio E70 Camera
The camera provides LED indicators on the front and right side of the camera to help you understand
the camera’s behaviors when connected to a Poly Studio G62, Poly G7500, or Poly Studio X system.
Table 2-22 Poly Studio E70 Camera System LED Status Indicators
Color and Pattern Status
Pulsing white Boot initialization is in progress
Solid white (50% brightness) Powered on but disconnected from video system
Sleep mode
Solid white (100% brightness)
Powered on and connected to the video system
Solid green In a call or the camera is active
Pulsing amber Firmware update or factory reset in progress
Flashing blue Camera is IP pairing
NOTE: If LED continues to flash blue, unplug and then
replug the Poly Studio E70 camera.
Powering the System On and Off
The system powers on when you plug it in to a power source.
Poly recommends the following when powering off or restarting your system:
● Don’t restart or power off the system during maintenance activities (for example, while a software
update is in progress).
Wake the System
After a period of no activity, the system enters sleep mode (if configured by your administrator). You
can wake it using a touch monitor or Poly TC8.
■
Do one of the following:
● If you’re using a touch monitor, tap the primary screen.
● If you’re using the TC8, tap the screen.
● If you’re using a Poly Trio, tap the screen.
LED Status Indicators for the Poly Studio E70 Camera
25

Accessibility Features
Poly products include a number of features to accommodate users with disabilities.
NOTE: Accessibility features for Poly Studio G62 include peripherals required for system
functionality included connected cameras, microphones, speakers, and monitors.
Users Who Are Deaf or Hard of Hearing
Your system includes accessibility features so that users who are deaf or hard of hearing can use the
system.
The following table lists the accessibility features for users who are deaf or hard of hearing.
Table 2-23
Accessibility Features for Users Who Are Deaf or Hard of Hearing
Accessibility Feature Description
Visual notifications Status and icon indicators let you know when you have incoming, outgoing,
active, or held calls. Indicators also alert you of the device’s status and when
features are enabled.
Status indicator lights
The system uses LEDs to indicate some statuses, including if your microphones
are muted.
Adjustable call volume While in a call, you can raise or lower the volume of the device.
Auto-answering You can enable the system to auto-answer calls.
Users Who Are Blind, Have Low Vision, or Have Limited Vision
Your system includes accessibility features so that users who are blind, have low vision, or have
limited vision can use the system.
The following table lists the accessibility features for users who are blind, have low vision, or have
limited vision.
Table 2-24
Accessibility Features for Users Who Are Blind, Have Low Vision, or Have Limited Vision
Accessibility Feature Description
Auto-answering You can enable the system to auto-answer calls.
Adjustable backlight settings You can change the brightness of the screen by adjusting backlight intensity
settings.
Visual notifications Status and icon indicators let you know when you have incoming, outgoing,
active, or held calls. Indicators also alert you of the device’s status and when
features are enabled.
Users with Limited Mobility
Your system includes accessibility features so that users with limited mobility can use various system
features.
The following table lists the accessibility features for users with limited mobility.
26
Chapter 2Getting Started

Table 2-25 Accessibility Features for Users with Limited Mobility
Accessibility Feature Description
Alternative control interface This product provides an alternative control interface for the connected video
conferencing system for people with disabilities that cause limited manipulation
issues.
Auto-answering
You can enable the system to auto-answer calls.
Calling from a personal device With administrator credentials, you can wirelessly access the system web
interface from your own device to make calls and manage contacts and
favorites.
Flexible mounting/display configurations
Product isn’t stationary and can be mounted or displayed in various
configurations. Touch controls require minimal strength to operate.
Users with Limited Mobility 27

Sharing Content3
To enhance the collaboration experience, you can share documents, graphics, and videos with other
participants using a computer.
Share Content Using an HDMI Connection
Share content from your device through an HDMI connection. This method doesn’t require you to
connect using a wireless service.
■
Connect your device to the video system’s HDMI input port.
28
Chapter 3Sharing Content
Using device mode4
Poly Device Mode enables you to use the system’s camera, speaker, microphone, and connected
monitors from your computer.
Once you connect the system to your computer with a USB cable, you can control the video system’s
camera and audio features using your computer’s third-party conferencing application.
For example, instead of using your computer’s camera for Zoom Rooms calls, connect the Studio X30
and use its 4K camera to automatically follow the conversation in the room. You also gain a Poly
echo-cancelling microphone and speaker technology during calls.
NOTE: The system doesn't support hot plugging cameras. To connect a camera to the system,
power the system off, connect the camera, and restart the system.
Computer and cable requirements for Device Mode
Your computer and cables must meet the following requirements to use Device Mode.
Operating system requirements:
● Windows 10 1803 or later
● macOS 10.12 or later
USB cable requirements:
● A cable with at least one USB-C connection for the video system
● USB 2.0 or USB 3.0 cable (preferred to ensure connection reliability and video and audio quality)
● Self-powered USB booster extension cable for connections longer than 2 m (6.6 ft)
NOTE: Don’t use a cable used for charging devices. A charging cable may not be capable of
sending data.
HDMI cable requirements:
● An HDMI adapter is required if your computer doesn’t have an HDMI port.
Using device mode
29

Access Device Mode
Use the system touchscreen or a TC10 or TC8 touch controller to start Device Mode.
NOTE: Your administrator may configure your system to remain in Device Mode. If your system is
already in Device Mode, the system monitor and TC10 or TC8 touch controller prompt you to
connect a USB and HDMI cable to your computer.
■
Do one of the following:
● From the right border of your screen, swipe left. Select Device Mode .
● When using Zoom Rooms, connect the USB-C cable to the video system and connect the
other end of the USB cable to your computer to automatically enter Device Mode.
The
Device Mode
screen appears.
Use your system as a computer accessory
To use the video system as an external camera and audio accessory, set your system to Device
Mode and connect your Windows or macOS computer with a USB cable.
If your system isn’t already in Device Mode, access Device Mode. If your conferencing application
uses echo cancellation, disable that feature.
You must use a cable with at least one USB-C connection for your video system. If you use a cable
with only one USB-C connection, the USB-C end must connect to your video system for Device Mode
to work properly.
NOTE: Device Mode isn’t available if your system administrator disables the system USB ports. If
you need help with Device Mode or connecting a computer to your system, contact your
administrator.
1. Connect a USB-C end of the USB cable to the video system’s USB-C port, and connect the other
end of the USB cable to your computer.
The system monitor and the TC10 or TC8 touch controller display a confirmation message.
If you’re using Microsoft Teams or Zoom Rooms, Device Mode automatically starts when you
connect the USB cable to your computer. Once you disconnect the USB cable, the system
automatically exits Device Mode in 20 to 30 seconds.
2. Optional: To display your computer on the video system monitor, connect your computer using
the system’s HDMI input port.
Adjust the system audio and camera settings in Device Mode
In Device Mode, you can mute the system, adjust the volume, and adjust camera settings.
Access Device Mode and connect your computer to the system.
NOTE: The controls on a connected Poly Trio phone don’t work if the system is in Device Mode.
30
Chapter 4Using device mode
1. To mute the microphones, do one of the following:
● In a conference application on your computer, select mute.
● On the touch controller or any connected microphone, select Mute .
2. To adjust the volume, do one of the following:
● On the touchscreen or TC10 or TC8, select Volume and adjust the volume slider.
● Adjust the volume from your computer using the computer or conference application settings.
NOTE: Ensure that you select the correct device when adjusting the volume. Changing the
volume alone may not work. You must select the Poly video system as the audio device.
3. To configure camera settings:
a. From the right border of the TC10 or TC8 or the touchscreen, swipe left and select Camera
Settings.
b. Select Camera Control.
● Turn Camera Tracking on or off.
● Select or set a Preset.
● Press + to zoom in or - to zoom out.
● Press the arrows to tilt up and down or to pan left to right.
Managing incoming calls when in Device Mode
If there’s an incoming call, your video system may exit Device Mode. This depends on the partner
conferencing application you’re using for the video system.
Exit Device Mode and disconnect your computer
Any camera options you change on the video system with your USB-connected computer revert to
their previous settings when you exit Device Mode.
NOTE: If the system is using Device Mode as the provider, Exit isn't available.
■
Do one of the following:
● On the video system local interface or TC10 or TC8 touch controller, select Exit .
● Unplug the cables connecting your computer and video system. After a short delay, you see
the home screen (even if you haven’t selected Exit).
Managing incoming calls when in Device Mode
31

Settings5
Before or during calls, you can adjust the system volume. During calls, you can adjust your camera’s
position.
32
Chapter 5Settings

Cameras
Depending on the camera type, you can control the following options:
● Adjust near-site (local) camera positions.
● Turn tracking on or off.
Adjust an In-Room Camera
To enhance the view of meeting participants, make adjustments to the in-room camera.
If camera tracking is on, camera control is unavailable. Turn tracking off to access camera controls.
You can only make camera adjustments during a call.
With the Studio X50 and Studio X30 systems, you can’t pan or tilt the camera if it’s zoomed all the
way out.
1. From the right border of your screen, swipe left.
2. Go to Camera Settings > Camera Controls.
3. Press + to zoom in or - to zoom out. Press the arrows to tilt up and down or to pan left to right.
4. To exit the control screen, select Back .
Turn Camera Tracking On or Off
When camera tracking is on, the camera automatically frames the group of people in the room or the
current speaker (depending on your camera and how your system is configured).
1. From the right border of your screen, swipe left.
2. Select Camera Settings.
3. Select Tracking On or Tracking Off .
Cameras
33

Audio Adjustments
You can control several audio settings on the system.
Adjust the Volume
You can adjust the volume before or during a call.
■
Use the volume slider on the device controlling your video system.
34 Chapter 5Settings

Troubleshooting6
This section includes information related to troubleshooting issues with your system. You can also
find information on pairing your remote, configuring your monitors, and where to find help tips.
Troubleshooting
35

Poly Device Mode
Use these topics to troubleshoot problems you may encounter using Device Mode.
Audio Levels are Too High or Low
In Device Mode, audio from the video system speakers is too loud or it’s difficult to hear call
participants.
In Device Mode, your conferencing application and laptop control the video system’s audio. You may
need to adjust those volume controls.
Follow these steps until you get the audio levels you want:
1. Adjust your conferencing application’s volume.
2. Adjust your laptop’s volume.
Conferencing Application Doesn’t Use System Camera or Audio
Your conferencing application isn’t using the video system’s camera or audio in Device Mode.
Your conferencing application by default may choose the connected monitor speakers instead of, for
example, the Studio X50 speakers.
■
In your conferencing application, select the video system as your speaker, microphone, and
camera device.
Can’t Use System’s Camera or Audio
Your conferencing application isn’t using the video system’s camera or audio in Device Mode. There
could be a few reasons for these types of problems. For instance, your conferencing application
by default may choose the connected monitor speakers instead of, for example, the Studio X50
speakers.
You may notice the following while using Device Mode:
● In your laptop’s conferencing application, you can’t select the video system as a camera or audio
source.
● The video system’s camera and audio seem unavailable.
● The video system’s camera doesn’t display live video.
Follow these steps until you fix your problem:
1. In your conferencing application, select the video system as your speaker, microphone, and
camera device.
2. In your laptop settings, select the video system as your speaker, microphone, and camera
device.
3. Exit and restart Device Mode.
4. Replug the USB cable.
5. Connect the cable to a different USB port on your laptop.
6. Try using a different USB cable.
36
Chapter 6Troubleshooting

7. Restart your laptop.
Improve Audio Quality
Audio quality during calls in Device Mode could be better. For example, people on the call notice
interference or dropped words when you’re speaking.
You may encounter these problems for the following reasons: additional USB connections, a bad
cable, or audio processing settings.
Follow these steps until your audio quality improves:
1. Remove USB audio devices (such as a headset) connected to your laptop.
2. Connect your laptop and video system with a different USB cable.
3. If your conferencing application uses echo cancellation, disable that feature.
4. If you’re playing a musical instrument, enable M-Mode in the system web interface.
Improve Laptop Screen Mirroring
When mirroring your laptop screen with an HDMI connection, the picture on the connected monitor
isn’t ideal.
The resolution on your laptop may need to be adjusted for the monitor connected to the Poly video
system.
Follow these steps until screen mirroring quality improves:
1. Adjust your laptop’s resolution settings.
2. Adjust your laptop’s display settings so the screen duplicates on the monitor.
Improve Audio Quality
37

Getting help7
Poly is now a part of HP. The joining of Poly and HP paves the way for us to create the hybrid work
experiences of the future. Information about Poly products has transitioned from the Poly Support site
to the HP Support site.
The Poly Documentation Library is continuing to host the installation, configuration/administration, and
user guides for Poly products in HTML and PDF format. In addition, the Poly Documentation Library
provides Poly customers with information about the transition of Poly content from Poly Support to HP
Support.
The HP Community provides additional tips and solutions from other HP product users.
HP Inc. addresses
HP US
HP Inc.
1501 Page Mill Road
Palo Alto 94304, U.S.A.
650-857-1501
HP Germany
HP Deutschland GmbH
HP HQ-TRE
71025 Boeblingen, Germany
HP UK
HP Inc UK Ltd
Regulatory Enquiries, Earley West
300 Thames Valley Park Drive
Reading, RG6 1PT
United Kingdom
Document information
Model ID: Poly Bluetooth® Remote Control (model: P010), Poly IR Receiver (model: BW7650), Poly
IR Remote (model: BW7600), Poly Microphone IP Adapter (model: P012), Poly IP Table Microphone
(model: P013), Poly IP Ceiling Microphone (model: P014), Poly Studio X70 (model: P026), Poly
Studio X50 (model: P017), Poly Studio X30 (model: P018), Poly Studio E70 (model: P025), Poly
TC10 (model: P030), Poly TC8 (model: P020), Poly Studio G62 (Radio model: PBJ-STG-62R, No
radio model: PBJ-STG-62N), Poly Studio X72 (Radio model: PATX-STX-72R, No radio model: PATX-
STX-72N)
38
Chapter 7Getting help

Document part number: P10730-001A
Last update: November 2024
Email us at [email protected] with queries or suggestions related to this document.
Document information 39
