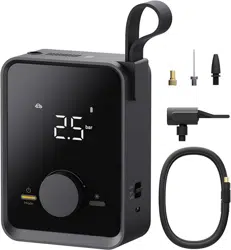
HOTO Air Pump
Pocket
+
-

Before using the product, please read this manual carefully and retain
it for future reference.
Please carefully read all safety warnings, instructions, illustrations and
prescriptions in this manual. The air compressor generates noise
exceeding 80 dB(A) during operation. Please take appropriate
precautions to protect your hearing. When this air compressor operates
continuously for long, both the body and air hose will be very hot. Please
cool it before use again. This product is not a toy and is not intended for
use by children.
Thank you for using the HOTO Air Pump Pocket.
HOTO Electric Air Pump can inflate some bicycles, motorcycles, cars,
and balls. For a detailed list, please visit the product sales page or
contact HOTO customer service.
Warning!
1. Safety Instructions
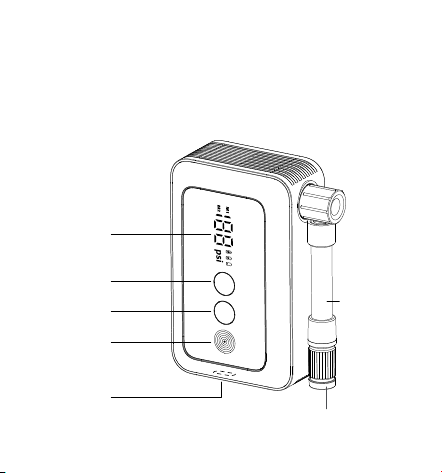
2. Product Description
1
Components
2
+
-
Display
High-pressure
Air Hose
"+" button
"-" button
Start/Mode
Button
Charging Port
America air valve
Note: Illustrations of products, accessories, user interfaces, etc. in the
user manual are schematic and are for reference only. Due to product
renewal and upgrades, there may be slight differences between the
actual product and the schematic diagram. Please refer to the actual
product.
3. How to Use
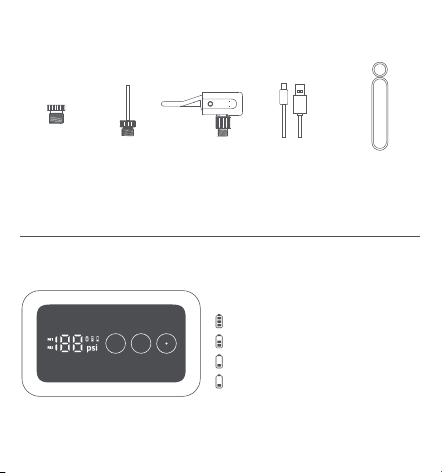
3.1 Battery level indicator and charging
Battery level indicator:
Stays on: 70%< battery level ≤100%
Stays on: 35%< battery level ≤70%
Stays on: 10%< battery level ≤35%
Flashes: Battery level <10%
Needle Valve
Adapter
Presta Valve
Adapter
Accessories
3
Quick Connect
Valve Adapter
Charging Cable
Soft rubber band
+
-
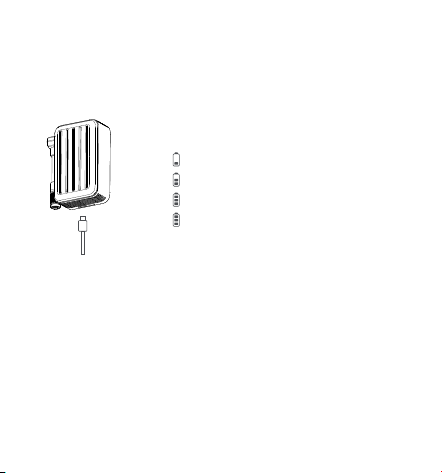
3.2 Turning on/off
Please fully charge this product before first use. Connect the Type-C
charging cable to a power adapter to charge the air compressor.
Charging
The air compressor cannot be used while charging.
Note:
Charging status
4
Flashes: Battery level <35%
Flashes: 35%≤ battery level <70%
Flashes: 70%≤ battery level <99%
When the battery level is 100%, it will be
off after it stays on for 20 seconds.
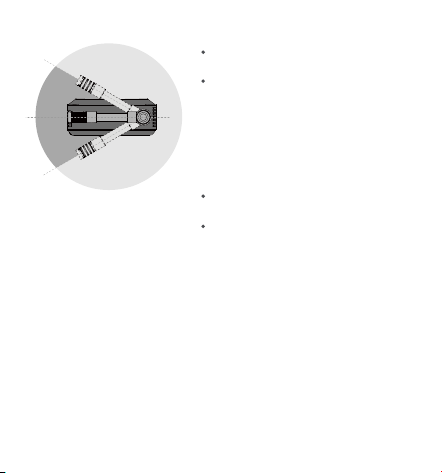
3.3 Connecting the high-pressure air hose to the air
valve
Turning on:
Switch the air tube to the light grey
area to power the machine on.
The machine will automatically
shut down if it is not operated for 3
minutes after it is powered on. Hold
the "Mode/Start-stop" button to
power it on again.
Turning off:
Switch the air tube to the dark grey
area to power the machine off.
The machine will automatically shut
down if it is not operated for 3
minutes.
5
30°
30°
Power On
Range
Power Off
Range
Valve Type
Inflation
Adapter
Valve Type
Inflation
Adapter
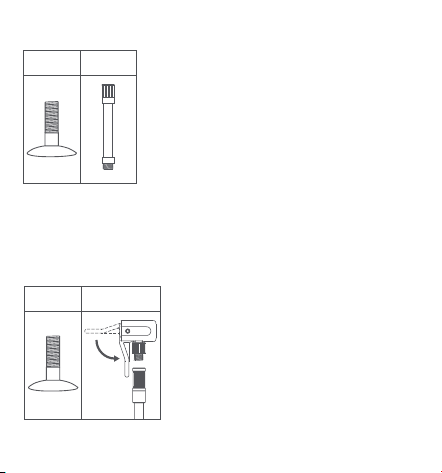
Schrader valve
Quick-connect valve
Inflate:
Directly connect the air compressor to a
"Schrader valve" on the high-pressure air
hose for inflation.
Deflate:
Use an appropriate tool (e.g. a 4-mm hex
wrench) to press the inflation needle inside
the air valve for deflation.
Mountain bicycles, electric bicycles,
motorcycles, and cars will be equipped
with Schrader valves.
Inflate:
1. Connect the quick-connect valve to the
Schrader valve on the high-pressure air hose.
2. Connect the quick-connect valve to the
Schrader valve and press the wrench to lock it
as shown in the picture for inflation.
Connect a quick-connect valve to the
Schrader valve by using a quick-connect
adapter for inflation.
6

Deflate:
Connect the quick-connect valve adapter to
the Schrader valve and then press the
quick-connect valve for deflation.
Valve Type
Inflation
Adapter
Presta valve adapter
Inflate:
1. Connect the Presta valve adapter to the
Schrader valve on the high-pressure air hose.
2. Unscrew the Presta valve connected to the
tire.
3. Connect the Presta valve to the adapter for
inflation.
Deflate:
Unscrew the Presta valve, and press the
screw for deflation.
Road bicycles and certain mountain
bicycles may use a Presta valve adapter
for inflation.
7
3.4 Detecting air pressure
The current air pressure will automatically be displayed after the
high-pressure air hose is connected to the object of inflation pressure
detection while the air compressor is turned on.
3.5 Determining inflation pressure
To ensure safety and prevent injuries from bursting items due to
over-inflation, please always refer to the user manual or relevant
directions accompanying the item to be inflated before inflation, in
order to determine the air pressure required.
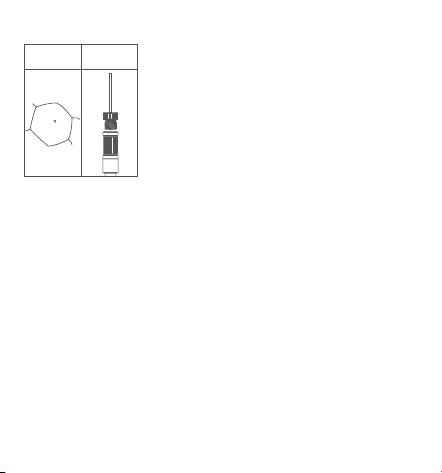
Inflation needle
Inflate:
Screw the inflation needle onto the Schrader
valve, and insert the needle into the air hole
of the ball for inflation.
Deflate:
Insert the inflation needle into the air hole of
the ball for deflation.
An inflation needle is required to inflate
balls such as basketballs and footballs.
Valve Type
Inflation
Adapter
0
.
8
b
a
r
1
2
p
s
i
8
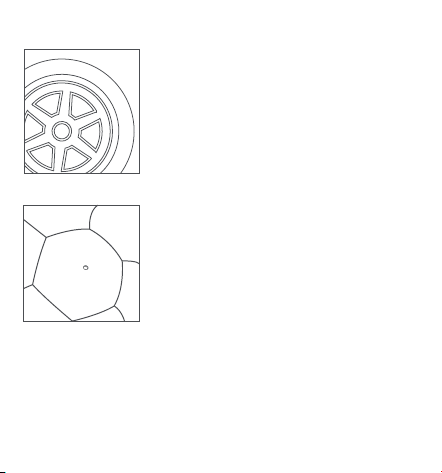
The recommended air pressure for footballs,
basketballs, volleyballs, and other balls is
indicated near the ball's air valve.
The recommended air pressure of tires for cars,
bicycles, and motorcycles is indicated on the
sidewall of the tire. The recommended tire
pressure for cars is usually indicated on the
driver's side door jamb. The inflation pressure
level is related to the weight of the load. For
more details concerning recommended air
pressure, please refer to your vehicle's
instructions or manual.
3
6
p
s
i
/
2
5
0
k
P
a
/
2
.
5
b
a
r
Tires
Balls
0
.
8
b
a
r
1
2
p
s
i
9

10
12-inch, 14-inch and 16-inch
bicycle tires
20-inch, 22-inch and 24-inch
bicycle tires
26-inch, 27.5-inch and 29-inch
mountain bicycle tires
700c road bike clincher tires
700c road bike tubular tires
Product
category
Bicycles
Motorcycles
Cars
Balls
Product type
Motorcycle and electric
motorcycle tires
Car tires
Basketball
Football
Volleyball
Rugby
Recommended
range of pressure
30 - 50 psi
40 - 50 psi
45 - 65 psi
100 - 130 psi
120 - 145 psi
1.8-3.0bar
/26psi-44psi
1.8-3.5bar
/26psi-51psi
7 - 9 psi
8 - 16 psi
4 - 5 psi
12 - 14 psi
Recommended inflation pressure for common products
Note: The recommended pressure range values are for reference only.
Please refer to the user manual of the item being inflated.

3.6 Presetting pressure
Hold the "Mode/Start-stop" button to switch between M1 and M2
custom modes.
In both custom modes, the present pressure can be freely adjusted,
and values and mode can be memorized.
Mode and unit switching
Adjusting the preset pressure
After the inflation mode is set, press "+" or "-" to
adjust the preset pressure, or hold "+" or "-" for sharp
pressure adjustment.
The number flashes when you adjust the preset
pressure. It stays on when the real-time pressure is
indicated.
8psi by default
Pressure range: 3 to 150psi
Memorize the last working pressure before power-off.
45psi by default
Pressure range: 3 to 150psi
Memorize the last working pressure before power-off.
11
M1
M2

3.7 Inflating
Start inflating
Stop inflating
Caution
Press the "Start/Mode" button to start inflation. During
inflation, there are figures to indicate real-time pressure
changes.
Once the preset pressure is reached, the air compressor
will automatically stop inflating.
During inflation, press the "Start/Mode" button to stop
inflating.
Items such as balloons, leather toy balls, and swim rings cannot be
automatically inflated because they have an air pressure
requirement below the air compressor's minimum pressure range.
They cannot automatically stop inflating through the preset
pressure. Please use the product with caution.
12
3.8 Removing the air hose
The air compressor's air hose may get very hot after inflating. To
prevent injuries, exercise caution when removing it from a valve.
Some air may leak out of the valve when removing the air compressor.
To avoid air leakage, quickly remove the air hose from the valve.
13
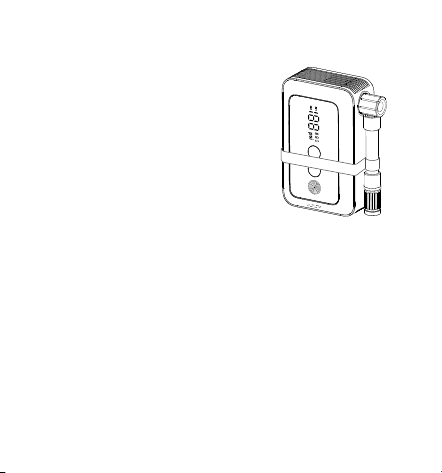
3.9 Instructions for Using the Strap
As shown in the right image, installing
the soft rubber strap can better secure
the inflatable hose.
+
-

14
1. This product is not a toy, and children are forbidden to use it. The minimum
recommended age for users is 16 years old. During the inflation, please keep
children at a safe distance from the air compressor.
2. The built-in lithium battery of the product cannot be disassembled. Do not throw
the product into the fire or discard it at will. Overheating and hitting of the lithium
battery and water damage to it may cause fire, autoignition, and explosion. Please
do not place the product in hot environments such as vehicles for long.
3. Do not keep the product at a temperature below -10°C or above 45°C, because
overcooling or overheating will shorten the product's life of service and damage the
built-in battery.
4. If the product is left idle for long, its battery may be damaged. Please charge the
product at least every three months. The product is equipped with a built-in direct
current machine, which may generate electric sparks when working. Please do not
use it in flammable and explosive environments.
5. Please turn off the machine immediately
if it makes a strange voice or overheats
when working.
6. Before setting the inflation pressure value, please make sure that the correct unit of
measurement is selected. Otherwise, it may lead to accidents such as flat tyres.
7. Common unit conversion: 1 bar ≈ 14.5 psi, 1 bar = 100 kPa, 1 psi ≈ 6.89 kPa. Please
do not leave during the inflation. Observe the inflation process to prevent the
inflation pressure from being too high in the event of no preset pressure value.
8. Please use the product in a dry and clean environment, as mud and dust intrusion
may l
ead to product damage. As the product is not waterproof, do not rinse the
product.
9. Please use a charger that matches the charging power of this product and a
04. Precautions

15
compliant charging cable to charge the product. Failure caused by charging in
breach of the above requirements is not covered by the warranty.
10. After the air compressor works for a long time, the temperature of the connection
between the air tube and the body rises. Do not touch it to avoid scalds.
General Power Tool Safety Warnings
Warning: Read all safety warnings and instructions. Failure to
follow the warnings and instructions may result in electric shock,
fire and/or serious injury.
Save all warnings and instructions for future reference.
ruoy ot srefer sgninraw eht ni ”loot rewop“ mret ehT
mains-operated (corded) power tool or battery-operated (cordless)
power tools.
Work Area Safety
Keep work area clean and well lit. Cluttered or dark areas invite
accidents.
Do not operate power tools in explosive atmospheres, such as in the
presence of flammable liquids, gases or dust. Power tools create sparks
which may ignite the dust or fumes.
Keep children and bystanders away while operating a power tool.
Distractions can cause you to lose control.

16
Personal Safety
Stay alert, watch what you are doing and use common sense when
operating a power tool. Do not use a power tool while you are tired or
under the influence of drugs, alcohol or medication. A moment of
inattention while operating power tools may result in serious personal
injury.
Electrical safety
Power tool plugs must match the outlet. Never modify the plug in any
way. Do not use any adapter plugs with grounded power tools.
Unmodified plugs and matching outlets will reduce risk of electric shock.
Avoid body contact with grounded surfaces such as pipes, radiators,
ranges and refrigerators. There is an increased risk of electric shock if your
body is grounded.
Do not expose power tools to rain or wet conditions. Water entering a
power tool will increase the risk of electric shock.
Do not abuse the cord. Never use the cord for carrying, pulling or
unplugging the power tool. Keep cord away from heat, oil, sharp edges
or moving parts. Damaged or entangled cords increase the risk of electric
shock.
When operating a power tool outdoors, use an extension cord suitable
for outdoor use. Use of a cord suitable for outdoor use reduces the risk of
electric shock.
If operating a power tool in a damp location is unavoidable, use a
residual current device (RCD) protected supply. Use
of an RCD reduces
the risk of electric shock.

17
Use personal protective equipment. Always wear eye protection.
Protective equipment such as a dust mask, non-skid safety shoes, hard
hat or hearing protection used for appropriate conditions will reduce
personal injuries.
Prevent unintentional starting. Ensure the switch is in the off-position
before connecting to power source and/or battery pack, picking up or
carrying the tool. Carrying power tools with your finger on the switch or
energising power tools that have the switch on invites acciden
ts.
Remove any adjusting key or wrench before turning the power tool on.
A wrench or a key left attached to a rotating part of the power tool may
result in personal injury.
Do not overreach. Keep proper footing and balance at all times. This
enables better control of the power tool in unexpected situations.
Dress properly. Do not wear loose clothing or jewellery. Keep your hair
and clothing away from moving parts. Loose clothes, jewellery or long
hair can be caught in moving parts.
If devices are provided for the connection of dust extraction and
collection facilities, ensure these are connected and properly used. Use
of dust collection can reduce dust-related hazards.

18
Power Tool Use And Care
Do not force the power tool. Use the correct power tool for your
application. The correct power tool will do the job better and safer at the
rate for which it was designed.
Do not use the power tool if the switch does not turn it on and off. Any
power tool that cannot be controlled with the switch is dangerous and
must be repaired.
Disconnect the plug from the power source and/or remove the battery
pack, if detachable, from the power tool before making any
adjustments, changing accessories,
or storing power tools. Such
preventive safety measures reduce the risk of starting the power tool
accidentally.
Store idle power tools out of the reach of children and do not allow
persons unfamiliar with the power tool or these instructions to operate
the power tool. Power tools are dangerous in the hands of untrained
users.
Maintain power tools and accessories. Check for misalignment or
binding of moving parts, breakage of parts and any other condition that
may affect the power tool's operatio
n.
If damaged, have the power tool repaired before use.
Many accidents are caused by poorly maintained power tools.
Keep cutting tools sharp and clean. Properly maintained cutting tools
with sharp cutting edges are less likely to bind and are easier to control.

19
Battery tool use and care
Recharge only with the charger specified by the manufacturer. A charger
that is suitable for one type of battery pack may create a risk of fire when
used with another battery pack.
Use power tools only with specifically designated battery packs. Use of
any other battery packs may create a risk of injury and fire.
When battery pack is not in use, keep it away from other metal objects, like
paper clips, coins, keys, nails, screws or other small metal objects, that can
make a connection from
one terminal to another. Shorting the battery
terminals together may cause burns or a fire.
Under abusive conditions, liquid may be ejected from the battery; avoid
contact. If contact accidentally occurs, flush with water. If liquid contacts
eyes, additionally seek medical help. Liquid ejected from the battery may
cause irritation or burns.
Do not use a battery pack or tool that is damaged or modified. Damaged
or modified batteries may exhibit unpredictable behaviour resulting in
fire, explosion or risk of injury.
Use the p
ower tool, accessories and tool bits etc. in accordance with
these instructions, taking into account the working conditions and the
work to be performed. Use of the power tool for operations different from
those intended could result in a hazardous situation.

20
Do not expose a battery pack or tool to fire or excessive temperature.
Exposure to fire or temperature above 130 °C may cause explosion.
erutarepmet eht yb decalper eb nac ”C° 031“ erutarepmet ehT ETON
265°F”
Follow all charging instructions and do not charge the battery pack or tool
outside the temperature range specified in the instructions. Charging
improperly or at temperatures outside the specified range may damage
the battery and increase the risk of fire.
Service
Have your power tool serviced by a qualified repair person using only
identical replacement parts. This will ensure that the safety of the power
tool is maintained.
Never service damaged battery packs. Service of battery packs should
only be performed by the manufacturer or authorized service providers.

21
Battery safety
Only use the battery approved by the manufacturer. Replacing with a
battery of wrong type may result in failure of safety protection, causing an
explosion or fire.
Do not place the battery in an environment with an extremely high
temperature, such as in direct sunlight, fire, microwave oven, or oven.
Otherwise, it may result in an explosion or leakage of flammable liquids or
gases.
Do not disassemble, impact, squeeze, or cut the battery, as it may result in
an explosion.
Do not subject the batt
ery to extremely low air pressure. Otherwise, it may
result in an explosion or leakage of flammable liquids or gases.
Stop using the battery immediately if there is any swelling.
Do not swallow the battery to avoid chemical burns.
If you believe that the battery may have been swallowed or placed
anywhere inside the body, seek medical aid immediately.
Stop using the air compressor if its battery compartment is not closed
safely. Keep it away from children.
Keep new and used batteries away from children.
Do not dispose of the batteries as household waste. Dispose of them
safely as per loca
l laws and regulations.

22
06. Troubleshooting
Faults
Slow inflation
1. Whether the power is sufficient 2. Check whether the
air tube is leaking
3.
Check whether the inflated object is leaking
Failure to
turn this product on
1.Turn on the machine after it is fully charged.
2. Ensure that the inflation valve is connected properly.
Failure to inflate
under the
power-on mode
1. Check whether the power is sufficient
2. Check whether the current tyre pressure is higher
than the preset.
Solutions
Check whether the product is working in an incorrect
profile, select the free mode without any icons lighting
on to adjust the preset value within a range of 3-150psi
Failure to adjust preset
pressure up or down
Press and hold the "power" button to turn on the
product again
Automatically power-on
of the air compressor
after screwing the valve
Tighten the air tubeAir leakage when
connecting air tube
Low-pressure inflatable products such as balloons are
not included in the measurement range of the device
Normal inflation
but zero
pressure displayed

23
07. Basic Parameters
Name: HOTO Air Pump Pocket
Model: QWCQA002
Size: Approx. 93x58x38 mm / 3.66x2.28x1.50 in
(air pump only, excluding Soft-rubber handle)
Weight: Approx. 255g /0.56 Ib
Charging temperature: 5°C-40°C
Operating temperature: -10°C-45°C
Storage temperature: -10°C-45°C
Battery type: Lithium-ion battery
Battery capacity: 2000 mAh (7.2 Wh)
Working noise: Approx.80 dB(A),1m distance from the product
Rated input: 5V 2A
Charging time: Approx. 1.5 h
Sensor Accuracy: ±1psi
Inflation Pressure: 3‒150 psi

24
The declared vibration total value and the declared noise emission
value have been measured in accordance with a standard test method
and may be used for comparing one tool with another;
The declared vibration total value and the declared noise emission
value may also be used in a preliminary assessment of exposure.
Information:
The vibration and noise emissions during actual use of the power tool
can differ from the declared values depending on the ways in which
the tool is used especially what kind of workpiece is processed; and
It is necessary to identify safety measures to protect the ope
rator that
are based on an estimation of exposure in the actual conditions of use
(taking account of all parts of the operating cycle such as the times
when the tool is switched off and when it is running idle in addition to
the trigger time).
Warning:
The battery is undetachable.
Declaration of the noise emission values according to EN 62841
(considered uncertainty 3 dB(A))
Sound pressure level: 76.8 dB(A)
Sound power level: 87.8 dB(A)
Declaration of the vibration emission according to EN 62841
(considered uncertainty 1.5 m/s²): 4.33 m/s²

25
This device complies with part 15 of the FCC Rules. Operation is subject to the
following two conditions: (1) This device may not cause harmful interference,
and (2) this device must accept any interference received, including interference
that may cause undesired operation.
Note: This equipment has been tested and found to comply with the limits for a Class
B digital device, pursuant to part 15 of the FCC Rules. These limits are designed to
provide reasonable protection against harmful interference in a residential
installation. This equipment generates, uses and can radiate radio frequency
energy and, if not installed and used in accordance with the instructions, may cause
harmful interference to radio communications. However, there is no guarantee that
interference will not occur in a particular installation. If this equipment does
cause harmful interference to radio or television reception, which can be
determined by turning the equipment off and on, the user is encouraged to try to
correct the interference by one or more of the following measures:
Product: HOTO Air Pump Pocket
Model Number(s):Product model: QWCQA002
Brand/Trade: HOTO
We declare that the above mentioned device has been tested
and found in compliance with CFR 47 Part 15 Regulation.

26
Representative of Responsible Party for SDoC
Reorient or relocate the receiving antenna.
Increase the separation between the equipment and receiver.
Connect the equipment into an outlet on a circuit different from that to which
the receiver is connected.
Consult the dealer or an experienced radio/TV technician for help.
Company: HOTO (US) TECHNOLOGY CO LTD
Address: 919 North Market Street, Suite 950, Wilmington DE 19801
Country: U.S.A.
Customer Service(US): +1 855-577-2659
Mon-Fri 9:00am-5:00pm(CST)
27
Shanghai HOTO Technology Co., Ltd.
Building 45, No.50 Moganshan Road, Shanghai,
China.
DECLAR ATION OF CONFORMITY
Shanghai HOTO Technology Co., Ltd.
Declare that the product:
HOTO Air Pump Pocket
/
QWCQA002
EU Declaration of Conformity We
Complies with the essential health and safety
requirements of the
following directives:
2014/30/EU Electromagnetic Compatibility
directive References to the
following harmonized standard were made:
EN55014-1:2021
EN55014-2:2021
ENIEC 61000-3-2:2019+A1:2021
EN 61000-3-3:2013+A2:2021
2011/65/EU+ (EU) 2015/863 Restrictions of the
Use of Certain Hazardous
Substances in Electrical and Electronic
Equipment
Authorised signatory and technical file holder:

28
The packaging materials are recyclable. Please dispose of packaging
in an environmentally friendly manner.
Notes for packaging
All products bearing this symbol are waste electrical and electronic
equipment (WEEE as in directive 2012/19/EU) which should not be
mixed with unsorted household waste.
Instead, you should protect human health and the environment by handing
over your waste equipment to a designated collection point for the recycling
of waste electrical and electronic equipment, appointed by the government or
local authorities. Correct disposal and recycling will help prevent potential
negative consequences to the environment and human health. Please contact
the installer or local authorities for more information about the location as
well as terms and conditions of such collection points.
Disposal and recycling information