EN
Original Instructions
Version 1 – August 2024
29098
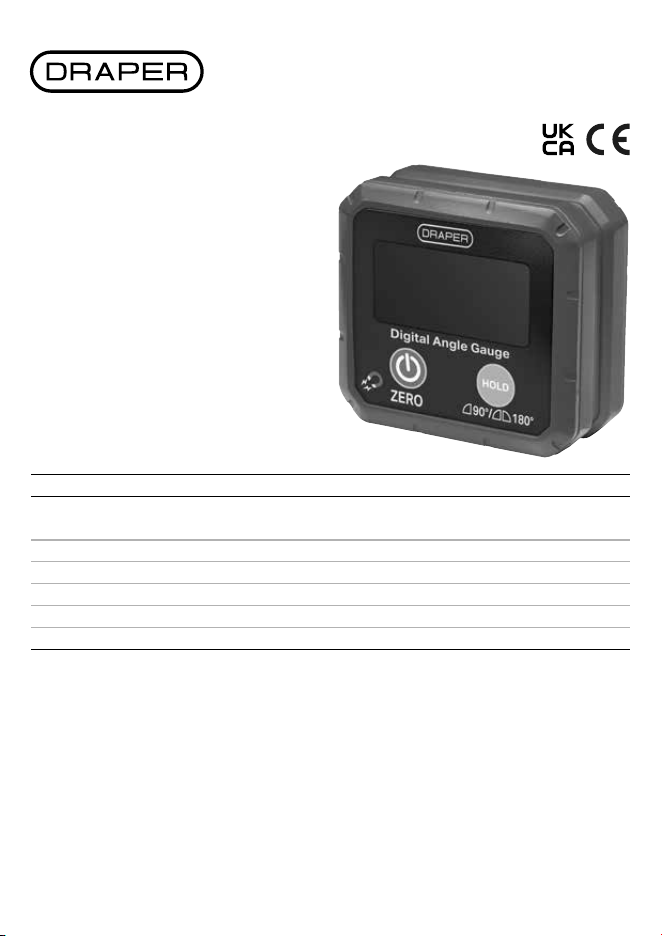
DIGITAL
BOX LEVEL
2. Specication
Stock No. 29098
Part No. DBL100
Measuring ranges 0 – 90°
0 – 180°
Auto shut down (approx.) 10 minutes
Operating/Storage temperature 0 – 50°C /<85%RH
Batteries required 2 × AAA 1.5V (not supplied)
Dimensions W 30 × H 68 × D 62mm
Net Weight (approx.) 100g
3. Health and Safety Information
Important: Read all the Health and Safety instructions before attempting to operate, maintain or repair this product.
Failure to follow these instructions may result in injury or damage to the user or the product.
• DO NOT use if the device is damaged in any way or evidence of battery leakage.
• When replacing the batteries check that they are tted in the correct +/- orientation.
• DO NOT disassemble or drop this device.
• DO NOT attempt to repair this device; it contains no user-serviceable parts.
• DO NOT use this product for purposes other than its intended use.
• DO NOT expose to high temperatures or humidity.
Read this manual in full before using this product and
retain it for future use. Always use the latest version of the
manual. Please visit drapertools.com/manuals for the
latest version.
1. Intended Use
This product is designed to measure or set angles and for
use as a digital level. Strong magnetic base to attach to
surfaces such as conduit, pipes, saw blades and vents.
Any other application beyond the conditions established
for use will be considered misuse. Draper Tools accepts no
responsibility for improper use of this product.
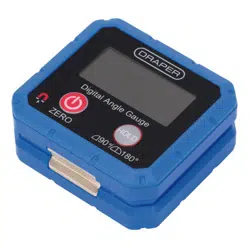
4. Identication
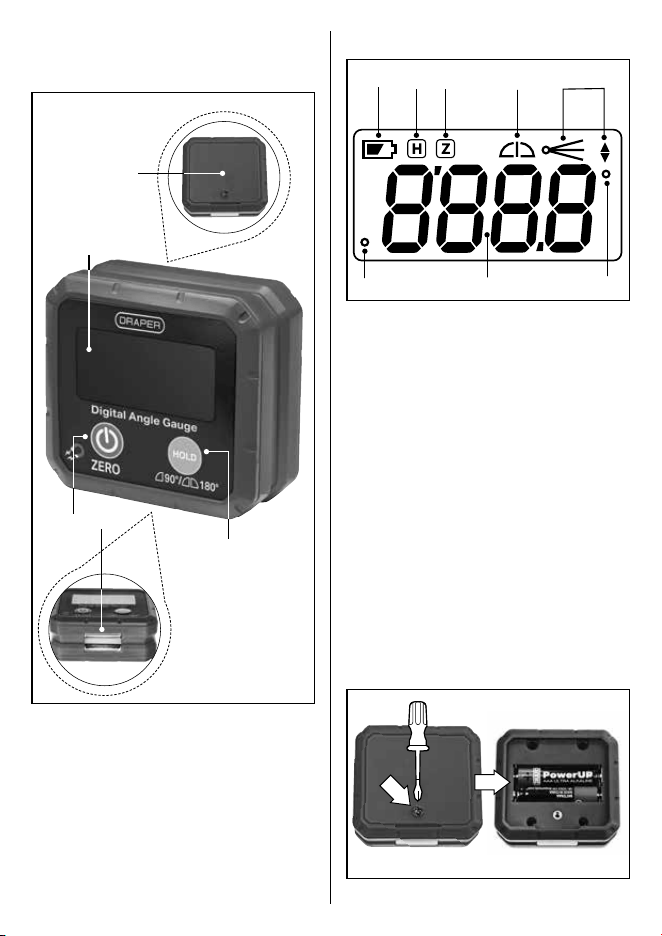
4.1 Product Overview
(1)
(5)
(2)
(3)
(4)
(1) Display screen
(2) Power/Zero button
(3) Magnetic base
(4) Hold/Range button
(5) Battery compartment
4.2 Display Overview
(B)
(G) (A) (G)
(C) (D) (E) (F)
(A) Measurement value
(B) Low battery
(C) Hold
(D) Zero
(E) Range setting (90°/180°)
(F) Inclination direction
(G) Degree angle
5. Operation
5.1 Fitting or Replacing the batteries
Requires 2 × AAA batteries (not supplied).
1. Unscrew the battery compartment cover.
2. Insert 2× AAA batteries.
− Check that the batteries are tted in the
correct +/- orientation.
3. Ret the battery compartment and secure with the
screw.
• Replace the batteries when the low battery symbol (B)
appears on the screen.
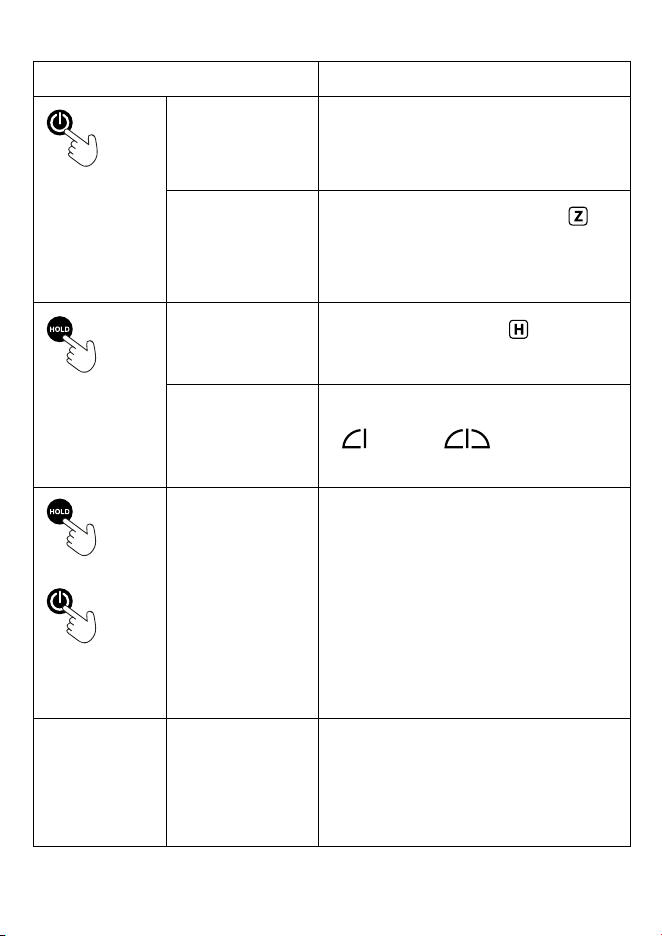
6. Buttons and Functions
Function Button Sequence
POWER button
Turns the unit ON and
OFF
• Press the POWER button once to turn on.
• Press and hold the button to turn o.
• The device will switch o automatically after 10
minutes of inactivity.
ZERO
Use to set a reference
plane.
• Turn on and press the POWER button again –
will
appear on the screen and the measurement value will
change to ‘0.0°’.
• Press the button again to return to measuring the true
level.
HOLD button
Use to HOLD and retain a
measurement value on
the screen.
• Press the HOLD button once and
will be displayed
on the screen.
RANGE
MEASUREMENTS
To switch between the
90° and 180°
measurement range
• Press and hold the HOLD button. The screen will show
either:
0 - 90° 0 - 180°
HOLD button
Plus
POWER button
RECALIBRATION
To recalibrate the device
if required
• With the device turned o, place on a at level surface
with the display facing forwards.
• Press and hold the HOLD button, then press the
POWER button to enter recalibration mode. ‘CAL’ will
be shown the screen. Release both buttons.
• Press the POWER button again. The device will beep for
a few seconds before ‘CAL1 ’ will be appear on the
screen.
• Without lifting the device up, rotate 180° and press the
POWER button again.
• The device will beep for a few seconds and ‘CAL 2’ will
appear on the screen. Calibration is now complete.
ERROR CODE ‘Err’ will appear on the
screen if the device is
tilted either 30°
backwards or forwards.
At these angles the level
is unable to provide
accurate measurements.
7. Maintenance, Storage and
Disposal
• Wipe the casing with a dry clean cloth.
• DO NOT use abrasive cleaners or solvents.
• Remove the batteries when storing the product for
extended periods.
• Store in the case supplied in a clean, dry place and out
of the reach of children.
At the end of its working life, dispose of the product
responsibly and in line with local regulations. Recycle
where possible.
• DO NOT dispose of this product with domestic waste;
most local authorities provide appropriate recycling
facilities.
• DO NOT burn or mutilate batteries; this may release
toxic or corrosive substances.
8. Warranty
12 months - Visit drapertools.com/warranty for full
details.
9. Explanation of Symbols
Read the instruction manual
Warning!
Do not incinerate or throw onto re
WEEE – Waste Electrical
& Electronic Equipment
Do not dispose of Waste Electrical & Electronic
Equipment in with domestic rubbish
European conformity
UK Conformity Assessed
Helpline: +44 (0) 23 8049 4344 Sales Desk: +44 (0) 23 8049 4333 General Enquiries: +44 (0) 23 8026 6355 Website: drapertools.com Email: [email protected]
Draper Tools Limited, Hursley Road, Chandler’s Ford, Eastleigh, Hampshire, SO53 1YF, UK Delta International BV, Oude Graaf 8, 6002 NL, Weert, Netherlands 0823