
Technical Support and E-Warranty Certificate www.vevor.com/support
DIGITAL AIR FRYER OVEN
MODEL NUMBER: TE204-K
We continue to be committed to provide you tools with competitive price.
"Save Half", "Half Price" or any other similar expressions used by us only represents an
estimate of savings you might benefit from buying certain tools with us compared to the major
top brands and doses not necessarily mean to cover all categories of tools offered by us. You
are kindly reminded to verify carefully when you are placing an order with us if you are
actually saving half in comparison with the top major brands.

- 1 -
MODEL: IMN1000-UL
TE204-K
Have product questions? Need technical support? Please feel free to
contact us:
CustomerService@vevor.com
NEED HELP? CONTACT US!
This is the original instruction, please read all manual instructions carefully before
operating. VEVOR reserves clear interpretation of our user manual. The
appearance of the product shall be subject to the product you received. Please
forgive us that we won't inform you again if there is any technology or software
updates on our product.
DIGITAL AIR FRYER
OVEN

- 2 -
Thank you for purchasing the Digital Air Fryer Oven. Please read the User Manual
carefully before use and keep it in a convenient place for future reference.
IMPORTANT SAFETY GUIDES
Please read, understand, and comply with all of the instructions provided in this
manual before using the electrical appliance. Failure to comply with the
instructions given in this manual or using the electrical appliance not mentioned in
this manual may cause serious personal injury or equipment damage.
When using an electrical appliance, especially when children are present, basic
safety precautions should always be taken, including the following:
General Safely
1.Read all instructions.
2.UNPLUG FROM THE OUTLET WHEN NOT IN USE AND BEFORE CLEANING.
Allow cooling before cleaning or handling, putting on, or taking off parts.
3.Do not touch hot surfaces. Use handles or knobs.
4.To protect against electric shock, do not place any part of the Air Fryer Oven in
water or other liquids. See instructions for cleaning.
5. This appliance can be used by children aged 8 years and above and persons
with reduced physical, sensory or mental capabilities or lack of experience and
knowledge if they have been given supervision or instruction concerning use of the
appliance in a safe way and understand the hazards involved. Children shall not
play with the appliance. Cleaning and user maintenance shall not be made by
children without supervision. This appliance should not be used by or near children
or individuals with certain disabilities.
6. Do not operate any appliance with a damaged cord or plug or after the
appliance has malfunctioned, been dropped or damaged in any way, or dropped in
water. Instead, return the Air Fryer Oven to the store or retailer purchased for
examination, repair, or adjustment.
7. Using accessory attachments not recommended by the instruction book may
cause injury.

- 3 -
8.Do not use outdoors.
9. Do not let the cord hang over the edge of the table or countertop, where it could
be pulled on inadvertently by children or pets or touch hot surfaces, damaging the
cord.
10. Do not place the Air Fryer Oven on or near a hot gas, electric burner, or heated
oven.
11.Do not use this Air Fryer Oven for anything other than its intended purpose.
12.Extreme caution should be exercised when using containers constructed of
materials other than metal or glass in the oven.
13.To avoid burns, use extreme caution when removing Air Fryer Oven
accessories or disposing of hot grease.
14.When not in use, always unplug the unit.Do not store materials other than the
manufacturer's recommended ovenproof accessories in this Air Fryer Oven.
15. Do not place any materials in the Air Fryer Oven: paper, cardboard, plastic,
and similar products.
16. Do not cover the Crumb Tray or any oven part with metal foil. This will cause
overheating of the oven.
17.Oversize foods, metal foil packages and utensils must not be inserted in the Air
Fryer Oven, as they may involve a fire or electric shock risk.
18.A fire may occur if the Air Fryer Oven is covered or touching flammable
materials such as curtains; draperies or walls when in operation. Do not store any
items on top of the appliance when in operation. Do not operate under wall
cabinets.
19.Do not clean with metal scouring pads. Pieces can break off the pad and touch
electrical parts, involving a risk of electric shock.
20. Only attempt to dislodge food when the Air Fryer Oven is plugged into an
electrical outlet.
21.Warning: To avoid possibility of fire, NEVER leave Air Fryer Oven unattended
during use.
22.Use recommended temperature settings for all cooking/baking, toasting and Air
Frying.
23.Do not rest cooking utensils or baking dishes on glass door.
24.Do not operate your appliance in an appliance garage or under a wall cabinet.
- 4 -
When storing in an appliance garage, always unplug the cord from the electrical
outlet. Not doing so could create a risk of fire, especially if the appliance touches
the walls of the garage or the door touches the unit as it closes.
25.Extreme caution must be used when moving an appliance containing hot oil or
other hot liquids.
26.To disconnect, press START to ensure cooking is stopped, then remove plug
from wall outlet.
27. Type Y attachment: If the supply cord is damaged, it must be replaced by the
manufacturer, its service agent or similarly qualified persons in order to avoid a
hazard.
SAVE THE INSTRUCTIONS
SPECIFICATIONS
Thank you for purchasing the Air fryer oven. Please read this manual carefully and
keep it for future reference. If you need any assistance, please contact our support
team with your product model number and Amazon order number.
Product Name
Air fryer oven
Model
TE204-K
Voltage(V)
120V- 60Hz
Power (Wattage)
1700W
Capacity
24L
Temperature Range
95°F-450°F
Time Range
1 mins-12 hours
PRODUCT SIZE
40.5*41*37cm
Gross Weight (KG)
10.05KG
- 5 -
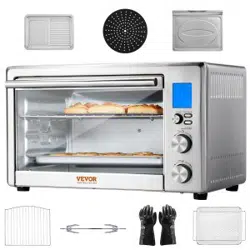
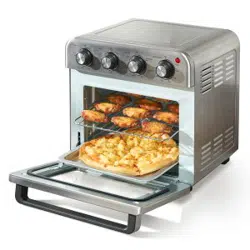
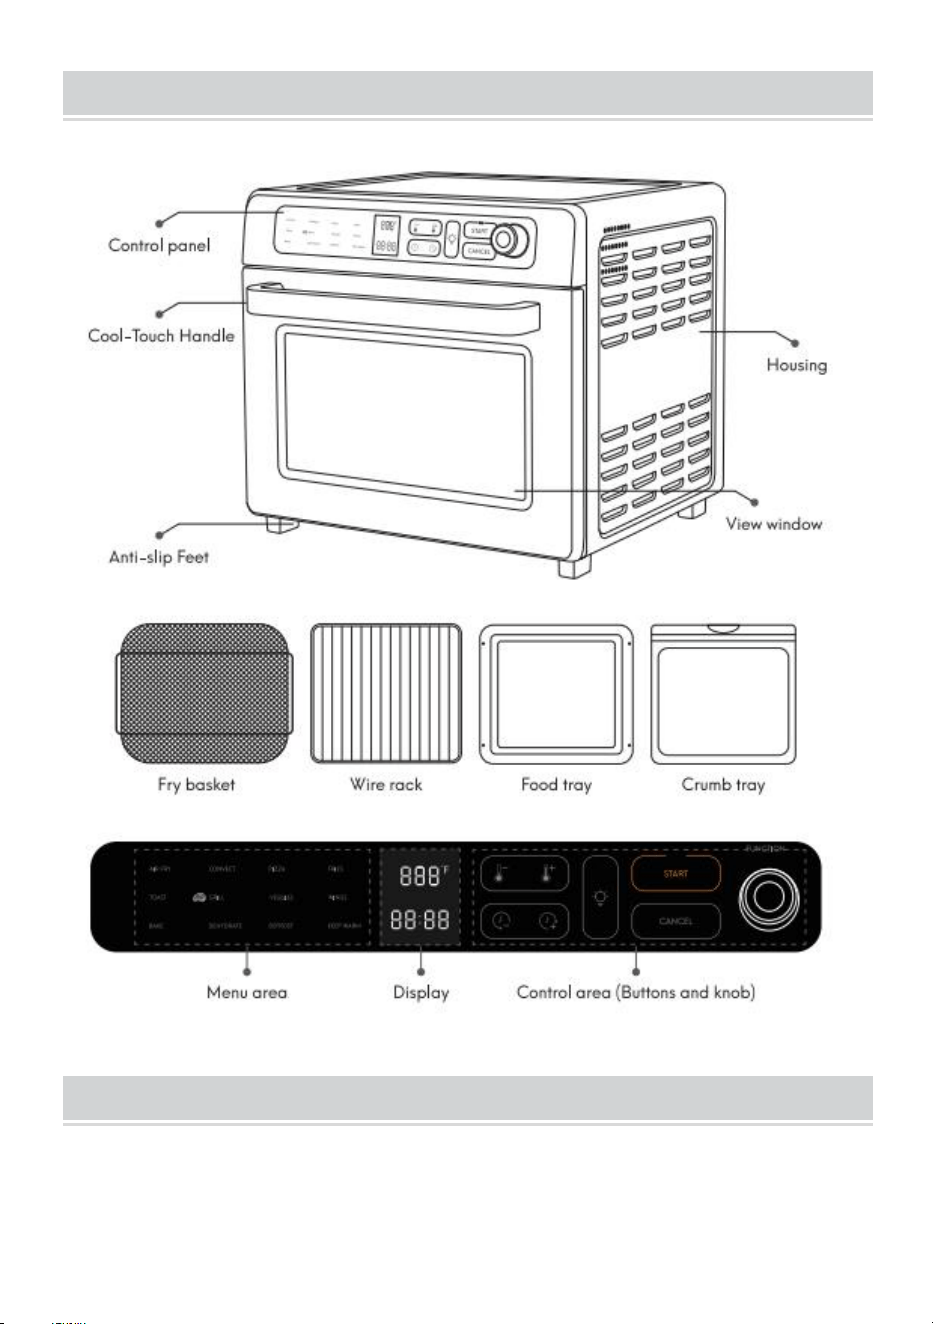
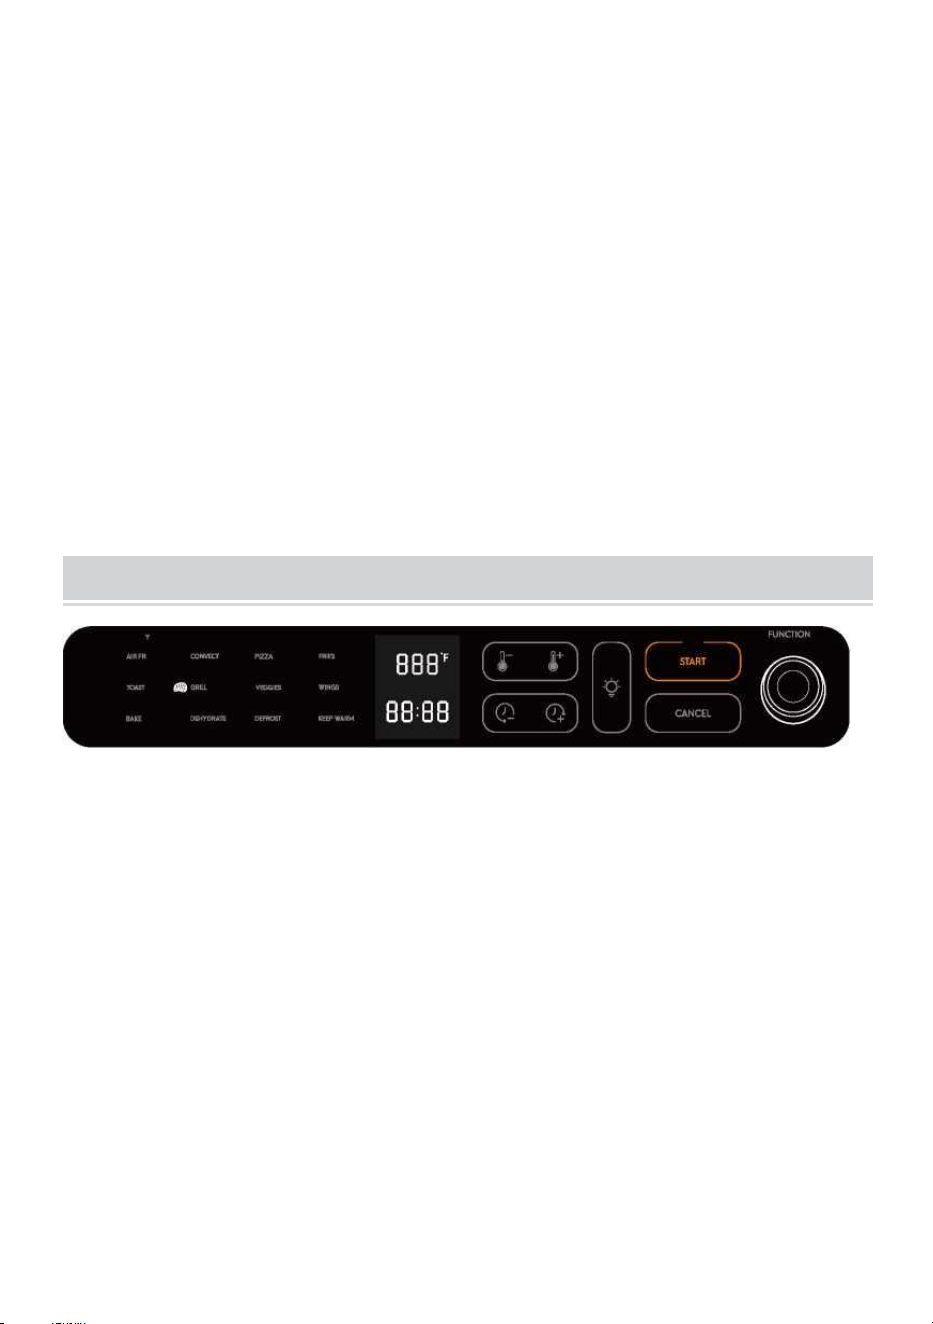
GETTING TO KNOW YOUR AIR FRYER OVEN
BEFORE THE FIRST USE
1.Remove all accessories and parts from the oven.
2. Use warm water to clean accessories such as pans. Wipe the inside of the oven
- 6 -
with a soft, soapy cloth and wait until it is completely dry.
3. There shall be enough space around the oven, and make sure the oven's
surface is more than 10cm from the other objects.No objects shall be put on the
top of the oven.
4. Before using the oven for the first time, plug in the unit,press the START button
to turn on the oven then followed by below steps.
a.Press the 'Temp' button once and use the + button set to 430°F.
b.Press the 'Time' button once , and using the + button, set it to 5 minutes.
c.Press the START button and let the unit cook for 5 minutes at 430°F in order to
burn off any remaining residue left from the manufacturer.
5. A NOTE
There may be a slight burning smell, but it will dissipate after a few minutes.
USING YOUR AIR FRYER
1.Product Operating Instruction
• After plugging the unit, it will power on, the buzzer will ring for 1 second and the
digital screen will show.
• After that the product will get into standby mode: The first menu AIR FRY or the
memorized menu will light up and digital screen will show the preset Temp value &
Time value of this menu, light of START will flash continuously. In standby mode,
the product will shut down automatically if there is no operation within 2 minutes.
2.Setting Cooking Time and Temperature
• Turn the knob to choose the menu and then press START button to start cooking.
The cooking can be stopped in any time by pressing the button CANCEL
Note: The machine should only work properly when the front door is closed.

- 7 -
• After choosing the menu, if you want to set a custom cooking temperature and
time, press TIME or TEMP buttons to adjust the desired cooking temperature and
cooking time.
• The adjustable range of cooking temperature is 95-450°F. Cooking Time can
be adjusted either in standby mode or in cooking mode.
• The adjustable range of cooking time is 1 mins - 12 hours. Cooking Time can be
adjusted either in standby mode or in cooking mode. (Dehydrate function is 12
hours MAX).
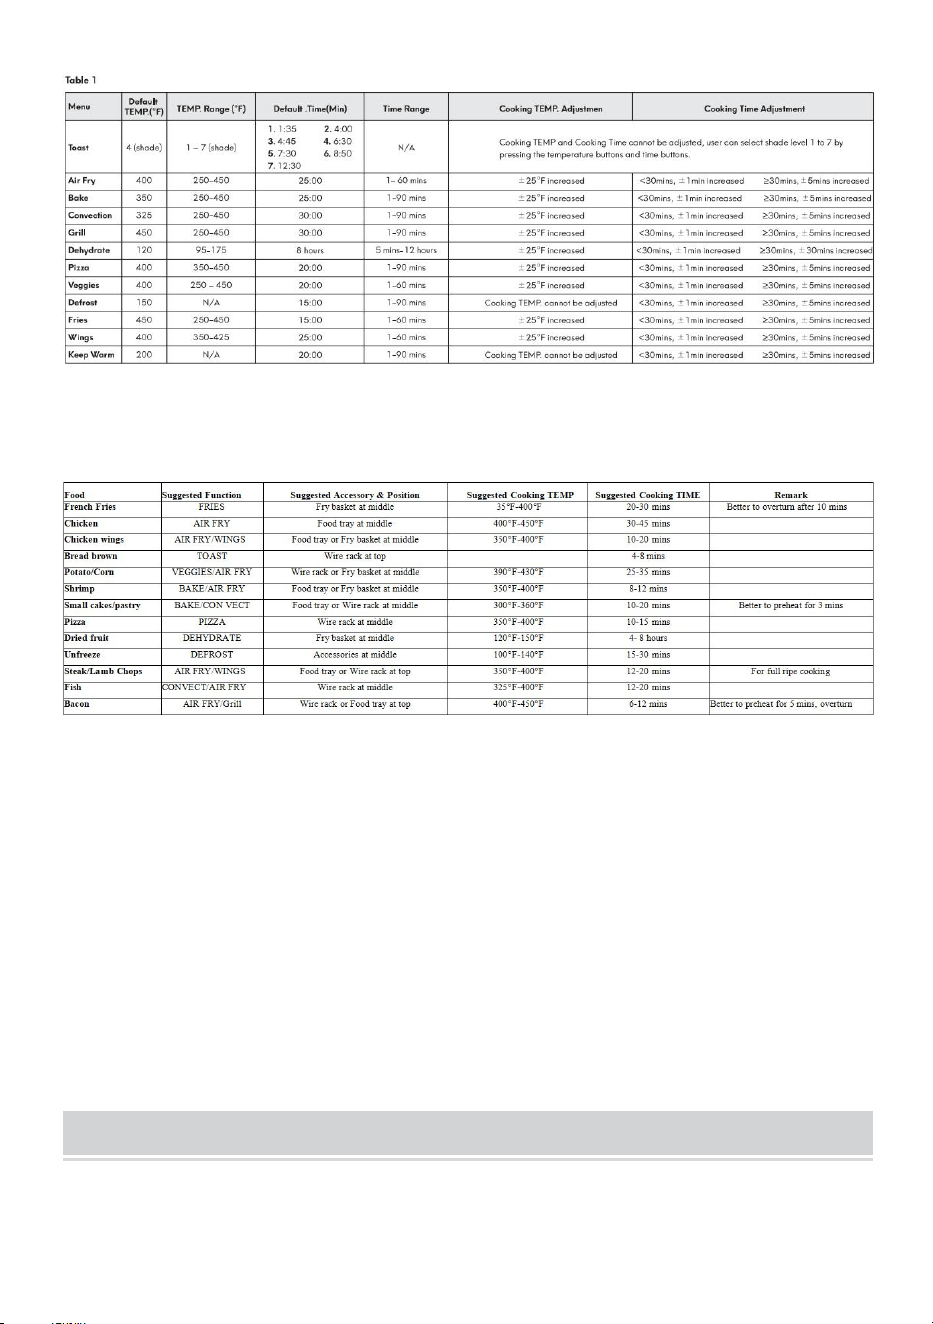
3.Menu Function Selection
The preset menu information is below. It can change the cooking time and
temperature according to your needs and recipes. [See the following page for
details Table 1]
4.Light Function
Press the "LIGHT" button to turn on the light inside the oven, and press again to
turn it off.
Note: The light will stay on for 1 minute whenever you press the "LIGHT" button,
unless you turn off the light by pressing the "LIGHT" button.
5.When Finished Cooking
• When the cooking is finished, the product will 'BEEP' for 5 times, and then stop
working, indicated light of START button will flash and digital screen shows the
Temp value & Time value.
• When removing the basket and/or accessories from the product, do not touch
them with your hands. Use oven mitts or the cage tong.
Tip: If the food doesn't look ready after cooking, set customized cooking Temp &
Time and resume cooking until the food is OK. Next time try changing the tray level
and setting the cooking Temp & Time properly.
• After cooking, unplug the power cord from the wall inlet.
- 8 -
6.Cooking Functions Quick Reference
Notes:
1. The above data of different food temperatures and times are for reference only.
2.Please notice that the temperatures and time should also be adjusted
appropriately according to each person's taste preference and the size and
thickness of the food.
3.To better lock the nutrition of the food and evenly heat them, it is recommended
that food should be padded or wrapped with tinfoil before cooking to pursue a
better taste.
Wiring Diagram
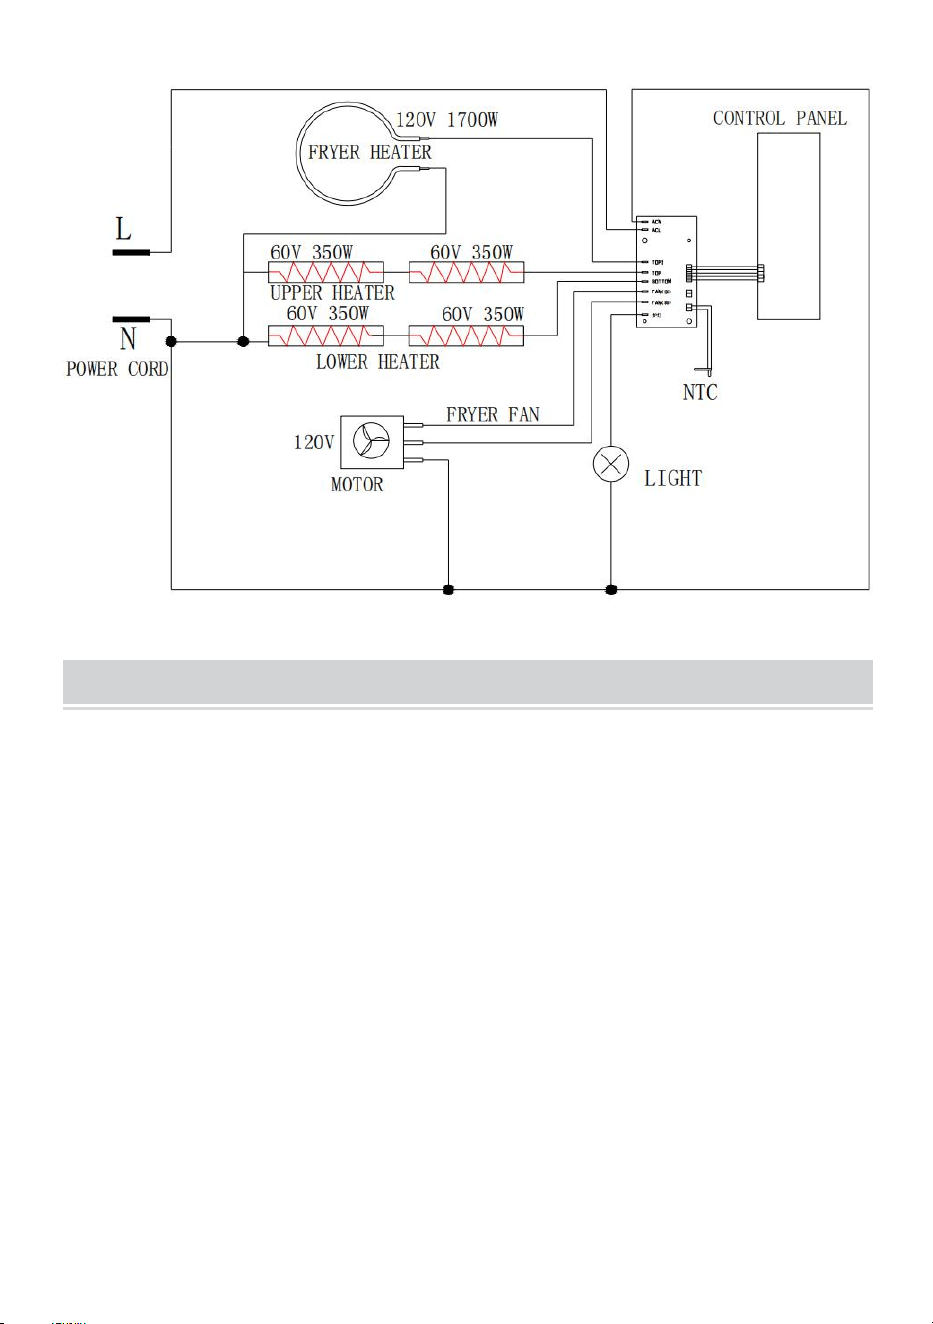
- 9 -
CLEANING & MAINTENANCE
1.Unplug the power cord before cleaning the oven and allow the oven to cool down
completely.
2.The inner and outer surfaces of the electric oven, baking trays and baking nets
can be cleaned with a soft cotton cloth or sponge with a neutral detergent and
cleaned with water.
3.Do not use hard brushes or articles for cleaning to avoid damaging the inner
surface of the electric oven and the protective layer of the baking tray and baking
net.
4.Do not use toxic and corrosive cleaning agents such as gasoline, thinners, or
polish.
5.The cleaned parts must be wiped dry before plugging in.
6.Please do not clean the heating tube, the heating tube cleans itself.
7.Do not immerse the oven in a liquid such as water.
- 10 -
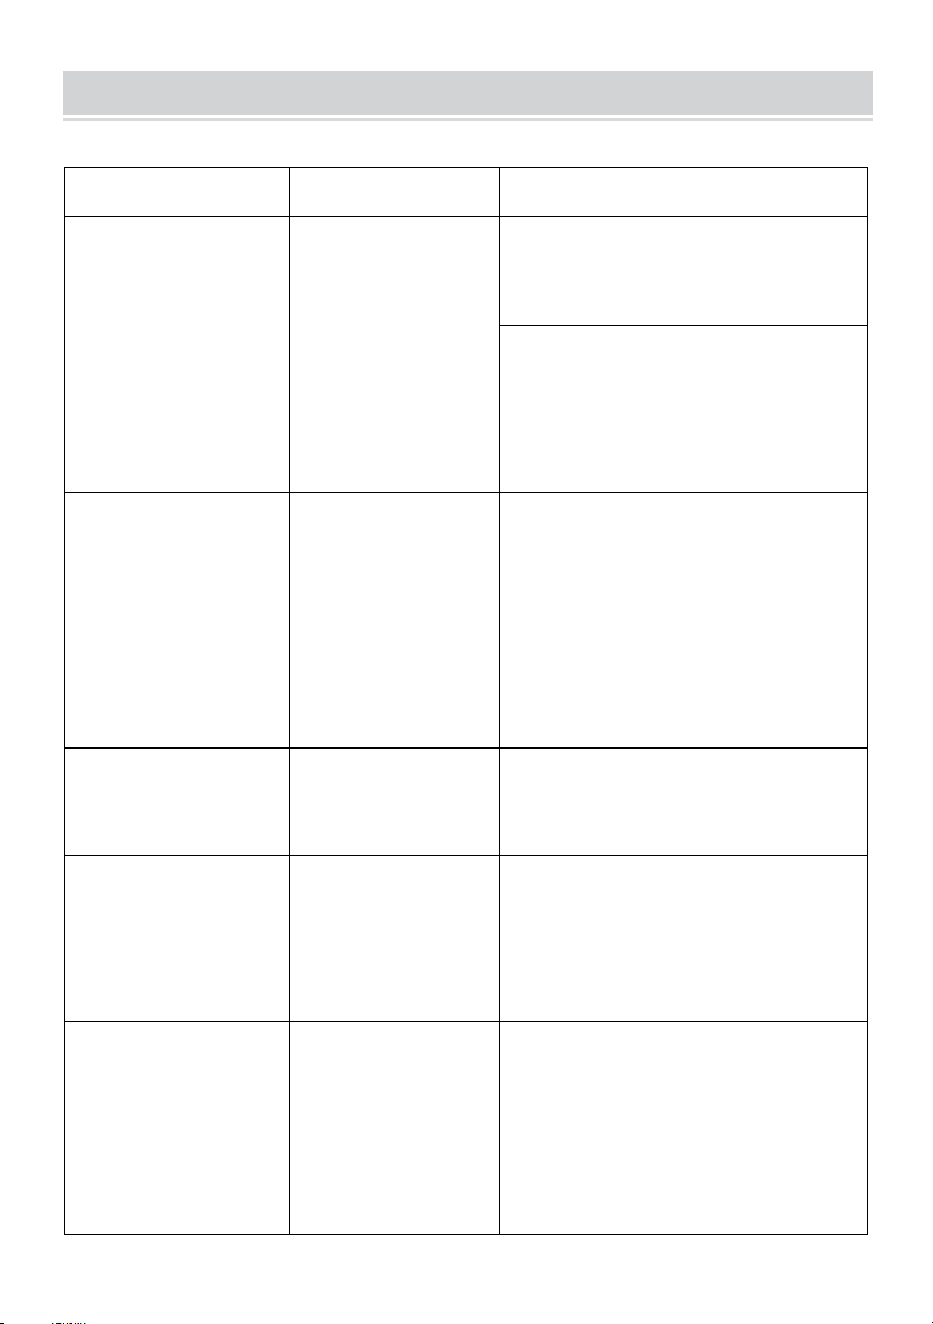
TROUBLESHOOTING
Please read the following before calling your service center.
Problem
Potential Cause
Solution
Overcooked/
Undercooked Foods
Incorrect
temperature or time
setting
You may have to adjust the time and
temperature to the desired taste.
Because your countertop oven is
smaller than your regular oven, it will
heat up faster and generally cook in
shorter periods of time.
Burnt Smell
First Use
Food build-up inside
oven, on heating
elements or in crumb
tray.
It is recommended to heat
countertop oven to 430°F for
approximately 15 minutes to
eliminate any manufacturing residue
that may remain after shipping.
The smell of the food being burnt in
the crumb tray, please clean up the
food residue in time.
Oven does not turn
ON
Unit is unplugged
Plug the countertop oven into a 120-
volt AC electrical outlet.
Only one heating
element is heating up
Function setting
selection determines
which heating
element will operate.
Refer to instructions for each
function to confirm which heating
elements will operate.
Heating elements do
not stay ON
Heating elements
will cycle ON and
OFF to maintain
proper heat.
Be certain that function is as desired.

- 11 -
The oven light is not
on
The oven light timer
has timed out and
automatically shut
the light off.
The light bulb has
burned out.
Please press the light key on the
control panel to turn the light back
on. Note the light will automatically
shut off.
Please contact the service center for
replacement parts.
The oven is loud when
it runs
The accessories are
not securely placed
in the racks
Unused accessories
are on top of the unit
while running
The unit when cool
to hot would have
noise.
Check that the wire rack or baking
pan are properly secured in the rack
channels. If the air fry basket is in
use, ensure it has all feet on the
baking pan.
Remove all items from the top of the
unit while it is running.
The outer layer of the oven to
expand when hot and to shrink when
cold. This is a typical situation.