
Technical Support and E-Warranty Certificate www.vevor.com/support
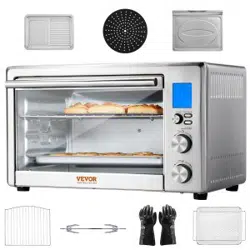
DIGITAL TOASTER OVEN WITH AIR FRY
MODEL NUMBER: TE283-D
We continue to be committed to provide you tools with competitive price.
"Save Half", "Half Price" or any other similar expressions used by us only represents an
estimate of savings you might benefit from buying certain tools with us compared to the major
top brands and doses not necessarily mean to cover all categories of tools offered by us. You
are kindly reminded to verify carefully when you are placing an order with us if you are
actually saving half in comparison with the top major brands.

- 1 -
MODEL: IMN1000-UL
TE283-D
Have product questions? Need technical support? Please feel free to
contact us:
CustomerService@vevor.com
NEED HELP? CONTACT US!
This is the original instruction, please read all manual instructions carefully before
operating. VEVOR reserves clear interpretation of our user manual. The
appearance of the product shall be subject to the product you received. Please
forgive us that we won't inform you again if there is any technology or software
updates on our product.
Thank you for purchasing the Digital Turbo Convection Toaster Oven. Please read
the User Manual carefully before use and keep it in a convenient place for future
reference.
DIGITAL TOASTER OVEN
WITH AIR FRY

- 2 -
SPECIFICATION
1. MODEL NO.: TE283-D
2. POWER: 120VAC 60Hz 1800W
3. PRODUCT SIZE: 500x390x305mm
4. TEMPERATURE RANGE: 130°F-450°F
5. TIME RANGE: 1 Min ~ 12 Hours
IMPORTANT SAFEGUARDS
Fire and electric shock are present in all electrical appliances and may cause
personal Injury. Read this manual and follow the safety precautions below:
1. Read all instructions before using this product.
2. This appliance generates heat during use. Do not touch hot surfaces. Use
handles or knobs. Always protect your hands with non-slip oven mitts or similar.
3. To protect against electric shock, do not place or immerse cord, plugs, or
appliance in water or other liquid.
4. This appliance is not to be used by children or by persons with reduced
physical, sensory or mental capabilities.
5. Close supervision is necessary when any appliance is used near children.
Children should not play with the appliance.
6. Unplug from outlet when not in use, before putting on or taking off parts and
before cleaning. Allow to cool before putting on or taking off parts, and before
cleaning. To disconnect, turn any control to OFF, then unplug power cord from
outlet. Do not disconnect by pulling on cord. Always grasp the plug and pull to
disconnect.
7. Do not operate any appliance with a damaged cord or plug or after the
appliance malfunctions, or has been damaged in any manner. Do not attempt
to replace or splice a damaged cord. Return appliance to the manufacturer (see
warranty) for examination, repair or adjustment.
8. The use of accessory attachments not recommended by the appliance
manufacturer may cause injuries.

- 3 -
9. Do not use outdoors or for commercial purposes.
10. Do not let cord hang over edge of table or counter, or touch hot surfaces.
11. Do not place on or near wet surfaces, or heat sources such as a hot gas or
electric burner, or in a heated oven.
12. Extreme caution must be used when moving an appliance or removing a pan,
containing hot oil or other hot liquids. Always protect your hands with non-slip
oven mitts or similar.
13. Do not use appliance for other than intended use. Misuse can cause injuries.
Intended for household countertop use only. Keep 6 inches (152 mm) clear
from the wall and on all sides. Always use appliance on a dry, stable, level
surface.
14. Oversize foods or metal utensils must not be inserted in a countertop oven as
they may create a fire or risk of electric shock.
15. A fire may occur if the countertop oven is covered, touching or near flammable
materials, including curtains, draperies, towels, walls, and the like, when in
operation. Do not store any item on top of the appliance when in operation.
16. Do not clean with metal scouring pads. Pieces can break off the pad and
touch electrical parts, creating a risk of electric shock.
17. Extreme caution should be exercised when using containers constructed of
materials other than metal or glass.
18. Do not store any materials, other than manufacturers recommended
accessories, in this oven when not in use.
19. Do not place any of the following materials in the oven: paper, cardboard,
plastic, or any materials that may catch fire or melt.
20. Do not cover crumb tray or any part of the oven with metal foil. This will cause
overheating of the oven.
21. Empty the crumb tray after each use.
22. The glass door is made of tempered glass. Always inspect the glass door for
chips, cracks or any other damage. Do not use the countertop oven if the
glass door is damaged, as the glass may shatter during use.
23. Do not use with a programmer, timer, wireless plug adapter or outlet that
allows control remotely, or connect to a circuit that is regularly switched on
and off by the utility.
- 4 -
PLEASE SAVE THE INSTRUCTIONS
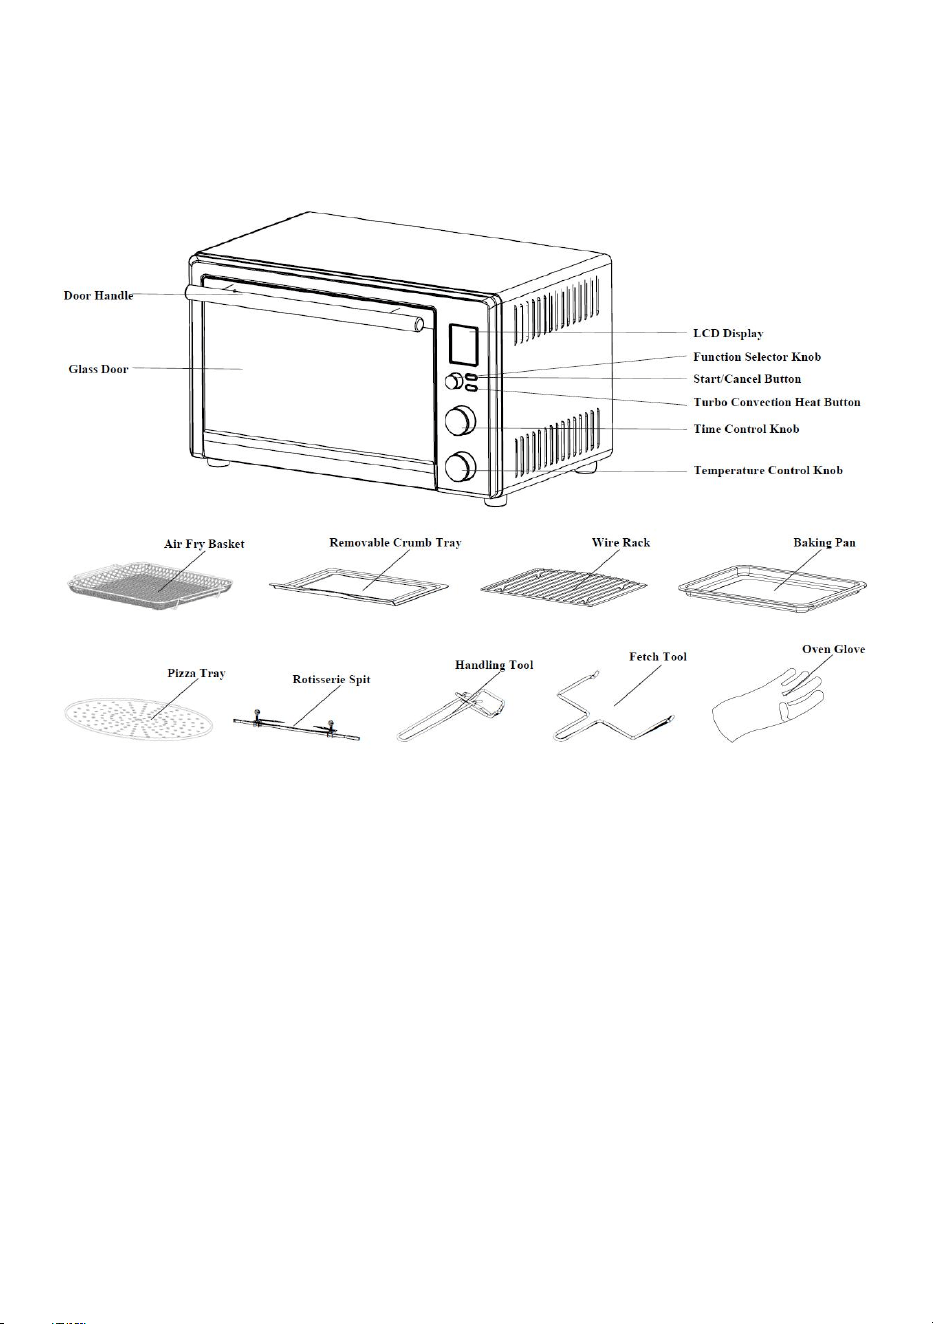
Product Diagram:
- 5 -
OPERATION INSTRUCTIONS
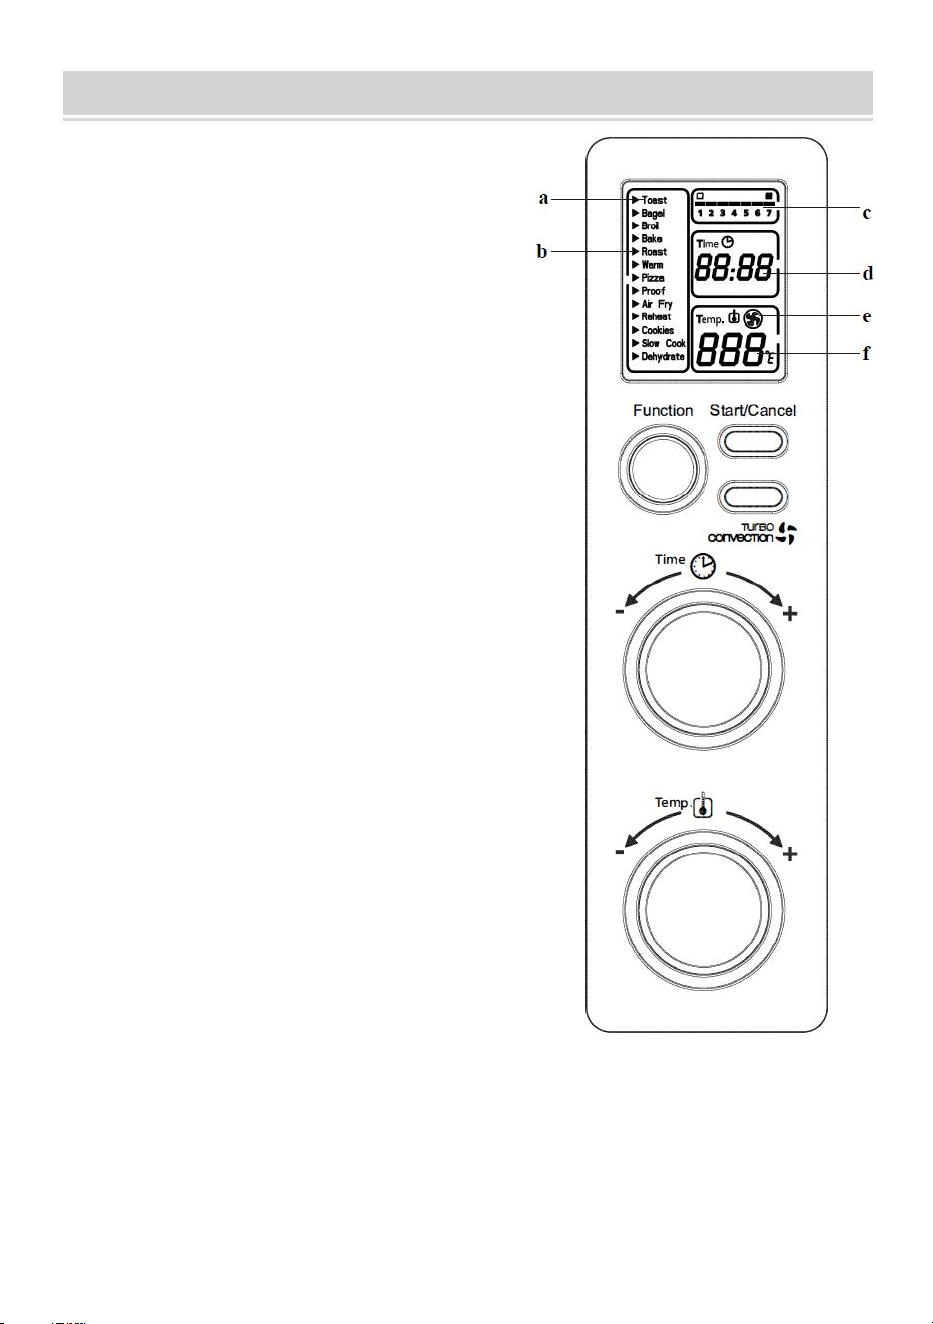
LCD Display & Control Panel Diagram:
a. Functions Indicator - Toast, Bagel, Broil,
Bake, Roast(Rotisserie), Warm, Pizza,
Proof, Air Fry, Reheat, Cookies, Slow Cook
Dehydrate.
b. Function Indicator Arrow.
c. 1-7 color shade setting indicator for Toast
and Bagel mode.
d. Time Indicator.
e. Turbo Convection Heat Icon.
f. Temperature Indicator.
How to use the Toaster Oven?
Plug the unit in. The unit will emit two long
“beeps” and the LCD screen will illuminate.
The function option will appear with an
indicator on the preset TOAST function. The
LCD and the Start/Cancel button light will be
illuminated for 30 seconds and then go out if
no other buttons or knobs are pressed or
moved.
PLEASE NOTE:
Once the blue LCD display
goes out - you can press or move any button
or knob to "wake up" the display and operate it
normally.
Step 1. Select Function:
Turn the Function Knob to choose one of the following 13 options from the menu:
Toast, Bagel, Broil, Bake, Roast(Rotisserie), Warm, Pizza, Proof, Air Fry, Reheat,
Cookies, Slow Cook and Dehydrate.. The indicator arrow will move from function
to function as the knob is turned.

- 6 -
NOTE: If the cooking process is not started, no other button is pressed, or the
knob is turned within 30 seconds, the blue backlight and the Start/Cancel Button
Light will turn off.
Step 2. Time:
Turn the time knob to increase or decrease the cooking time.
The maximum time setting is 12 hours.
Step 3. Temperature:
Turn the temperature knob to increase or decrease the temperature setting.
FIRST USE
1. When using this product for the first time, the product may have a little smoke
or flavor. This is a normal phenomenon and will disappear soon. Make sure the
product has good ventilation.
2. Please check that all parts and accessories of the product are intact and
undamaged.
3. Clean all parts of the product according to the "Cleaning and Maintenance"
section.
4. Dry the parts thoroughly and assemble them into the inside of the product.
Then, the product can be put into use.

- 7 -
Cooking Functions Quick Reference Table:
Function
Default
Temp.
Default
Time
Range
Default
Turbo
Toast
//
Shade 4
(5:45)
Shape 1-7
1:35 - 8:00
Off
Bagel
//
Shade 4
(5:45)
Shape 1-7
1:35 - 11:00
Off
Bake
350℉
30 mins.
150 - 450℉
1 - 60 mins.
Off / Optional
Roast
(Rotisserie)
350℉
60 mins.
150 - 450℉
1 - 120 mins.
Off / Optional
Broil
450℉
10 mins.
350 - 450℉
1 - 120 mins.
Off / Optional
Pizza
400℉
17 mins.
150 - 450
1 - 60 mins.
Off / Optional
Proof
95℉
60 mins.
75 - 95℉
1 - 120 mins.
Off / Optional
Air Fry
400℉
25 mins.
250 - 450℉
1 - 60 mins.
On (Hi-speed)
Warm
150℉
60 mins.
150 - 200℉
1 - 60 mins.
Off / Optional
Reheat
325℉
15 mins.
150 - 450℉
1 - 60 mins.
Off / Optional
Cookies
350℉
11 mins.
150 - 450℉
1 - 60 mins.
On / Optional
Slow Cook
225℉
4 hours
225/ 250 / 275
30 mins - 10 hours
Off / Optional
Dehydrate
150℉
60 mins.
130 - 200℉
1 - 12 hours
On / Optional
- 8 -
Notes:
1. The above data of different food temperatures and times are for reference only.
2. Please notice that the temperatures and time should also be adjusted
appropriately according to each person's taste preference and the size and
thickness of the food.
3. To better lock the nutrition of the food and evenly heat them, it is recommended
that food be padded or wrapped with tinfoil before cooking to pursue a better
taste.
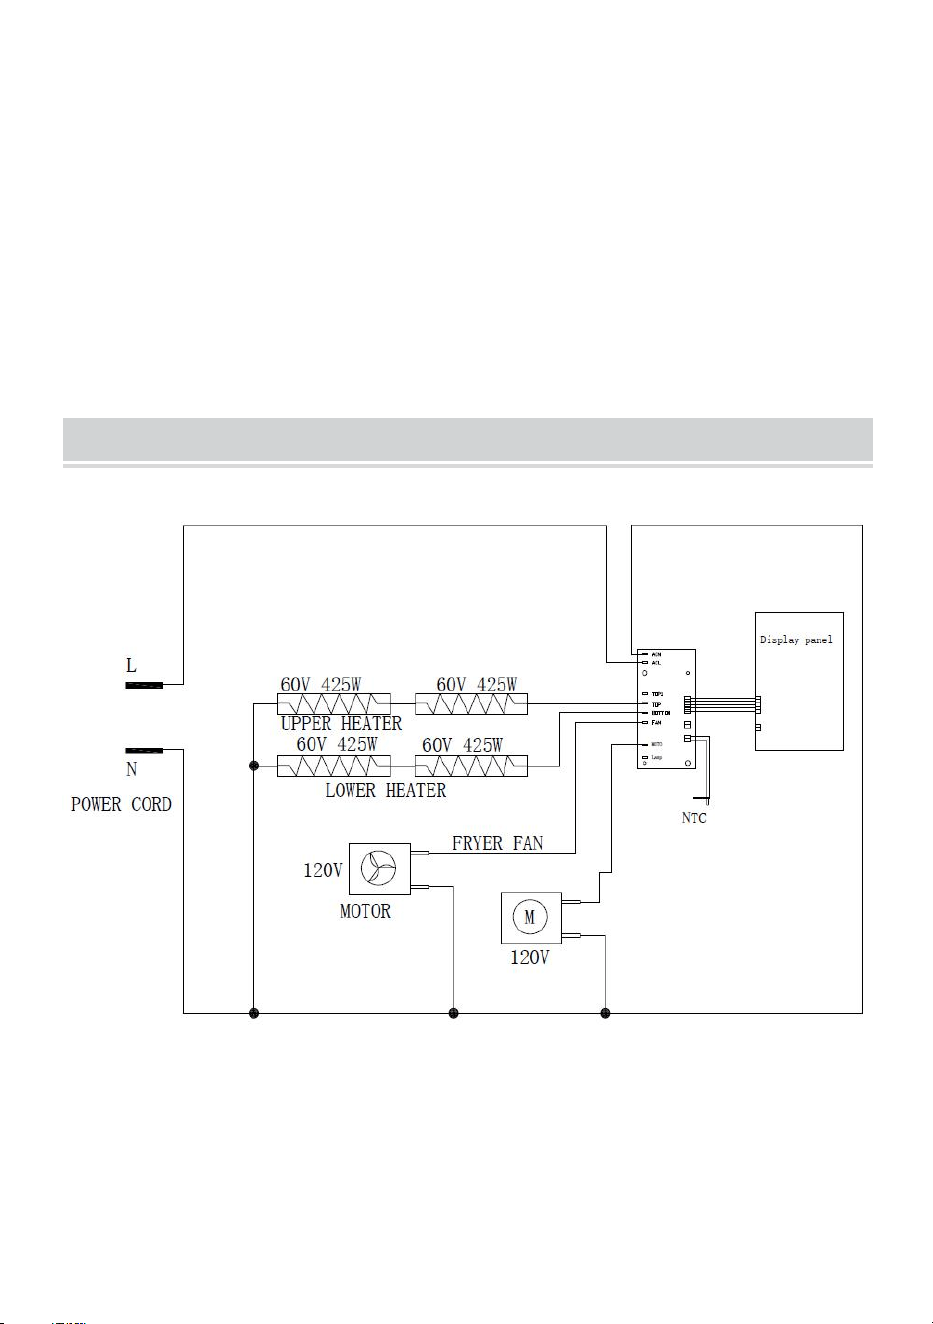
Wiring Diagram

- 9 -
CLEANING AND MAINTENANCE
1. The product must be disconnected from the power supply and cooled
thoroughly before cleaning.
2. Please use a soft dry cloth to wipe the inner cavity of the product. Do not use
sharp or frictional materials to wipe the product's internal cavity to protect the
inner cavity's metal coating.
3. The plate can be washed with water directly, and the water traces are dried
with a dry cloth. Do not soak with detergent or similar detergent.
4. Before packing and storing products, make sure that the products are
completely cooled, clean, and dry.
ATTENTION ENVIRONMENT PROTECTION
Attention Environment Protection
Please obey local law: put wasted electrical products and devices into a proper
recycling station.