
Saeco
International Group S.p.A.
Via Torretta, 240
I-40041 Gaggio Montano, Bologna
Tel: + 39 0534 771111
Fax: + 39 0534 31025
www.saeco.com
The manufacturer reserves the right to change the features of the product without prior notice.
Le producteur se réserve le droit d“apporter toutes modifications sans préavis.
© Saeco International Group S.p.A.
Type SUP030ADR Cod.15001614 Rev.00 del 15-09-08

Table of ConTenTs
Operation and maintenance manual
before using the machine, please read the attached operating instructions.
carefully read the safety rules
Mode d'emploi
veuillez lire attentivement le mode d'emploi
(notamment les consignes de sécurité) avant d'utiliser l'appareil.
FOR HOUSEHOLD USE ONLY
USAGE DOMESTIQUE SEULEMENT

IMPORTANT SAFEGUARDS
When using electrical appliances, basic safety precautions should always be
followed, including the following:
1. Read all instructions.
2. Do not touch hot surfaces. Use handles or knobs.
3. To protect against fire, electric shock and injury to person do not immerse
cord, plugs, or machine in water or other liquid.
4. Close supervision is necessary when the appliance is used by or near
children.
5. Unplug from outlet when not in use and before cleaning. Allow to cool before
putting on or taking off parts, and before cleaning the appliance.
6. Do not operate any appliance with a damaged cord or plug or after the
appliance malfunctions, or has been damaged in any manner. Return
appliance to the nearest authorized service facility for examination, repair or
adjustment.
7. The use accessory attachments not recommended by the appliance
manufacturer may result in fire, electric shock or injury to persons.
8. Do not use outdoors.
9. Do not let cords hang over edge of table or counter, or touch hot surfaces.
10. Do not place on or near a hot gas or electric burner, or in a heated oven.
11. Always attach plug to appliance first, then plug cord into wall outlet. To
disconnect, turn any control to “off”, then remove plug from wall outlet.
12. Do not use appliance for than intended use.
13. Warning! Do not open the service door during the brewing, dispensing,
washing or rinse
14. Save these instructions.
SAVE THESE INSTRUCTIONS

CAUTION
This appliance is for household use only. Any servicing, other than cleaning and
user maintenance, should be performed by an authorized service center. Do
not immerse machine in water. To reduce the risk of fire or electric shock, do not
disassemble the machine. There are no parts inside the machine serviceable
by the user. Repair should be done by authorized service personnel only.
1 Check voltage to be sure that the voltage indicated on the nameplate
corresponds with your voltage.
2 Never use warm or hot water to fill the water tank. Use cold water only.
3 Keep your hands and the cord away from hot parts of the appliance during
operation.
4 Never clean with scrubbing powders or harsh cleaners. Simply use a soft
cloth dampened with water.
5 For optimal taste of your coffee, use purified or bottled water. Periodic
descaling is still recommended every 2-3 months.
6 Do not use flavored or caramelized coffee
INSTRUCTIONS FOR THE POwER
SUPPly CORD
A. A short power-supply cord (or detachable power-supply cord) is to be
provided to reduce risks resulting from becoming entangled in or tripping
over a longer cord.
B. Longer detachable power-supply cords or extension cords are available and
may be used if care is exercised in their use.
C. If a long detachable power-supply cord or extension cord is used,
1. The marker electrical rating of the detachable power-supply cord or
extension cord should be at least as great as the electrical rating of the
appliance
2. If the appliance is of the grounded type, the extension cord should be a
grounding-type 3-wire cord, and
3. The longer cord should be arranged so that it will not drape over the counter
top or table top where it can be pulled on by children or tripped over.

2
general information .................................................................................................................................3
machine ........................................................................................................................................................4
a c c e s s o r i e s ....................................................................................................................................................................4
installation ................................................................................................................................................5
st a r t i n g t h e m a c h i n e ........................................................................................................................................................5
ma n u a l p r i m i n g o f t h e w a t e r c i r c u i t ....................................................................................................................................6
se t t i n g t h e l a n g u a g e ........................................................................................................................................................6
i n t e n z a w a t e r f i l t e r .........................................................................................................................................................7
display .........................................................................................................................................................8
a r o m a o p t i -d o s e ..............................................................................................................................................................8
adjustments ...............................................................................................................................................9
m i l k c o n t a i n e r .................................................................................................................................................................9
d r i p t r a y h e i g h t a d j u s t m e n t ..............................................................................................................................................9
c o f f e e s t r e n g t h ............................................................................................................................................................10
s a e c o a d a p t i n g s y s t e m ....................................................................................................................................................10
beverage dispensing ................................................................................................................................11
b r e w i n g w i t h w h o l e b e a n s ...............................................................................................................................................11
b r e w i n g w i t h p r e -g r o u n d c o f f e e ......................................................................................................................................12
h o t w a t e r .................................................................................................................................................................... 13
l a t t e m a c c h i a t o .............................................................................................................................................................13
e s p r e s s o m a c c h i a t o ........................................................................................................................................................ 15
ca p p u c c i n o ...................................................................................................................................................................15
h o t m i l k .......................................................................................................................................................................16
beverage programming ..........................................................................................................................16
b e v e r a g e p r o g r a m m i n g m e n u ............................................................................................................................................16
p r o g r a m m i n g c o f f e e b e v e r a g e s ........................................................................................................................................16
pr o g r a m m i n g m i l k b e v e r a g e s ............................................................................................................................................17
programming the machine .....................................................................................................................19
m a c h i n e s e t t i n g s ...........................................................................................................................................................19
l a n g u a g e ..................................................................................................................................................................... 20
c u p illumination ........................................................................................................................................................... 20
w a t e r f i l t e r ................................................................................................................................................................. 20
w a t e r h a r d n e s s - i n t e n z a a r o m a s y s t e m ........................................................................................................................... 21
r i n s e ........................................................................................................................................................................... 21
c u p w a r m i n g p l a t e ......................................................................................................................................................... 22
a c c o u s t i c t o n e s a n d a l a r m s ........................................................................................................................................... 22
d i s p l a y ........................................................................................................................................................................ 22
b e v e r a g e s e t t i n g s ..........................................................................................................................................................23
b r e w t e m p e r a t u r e ......................................................................................................................................................... 23
a r o m a o p t i -d o s e ........................................................................................................................................................... 24
p r e b r e w i n g .................................................................................................................................................................. 24
ad d i t i o n a l f u n c t i o n s ......................................................................................................................................................25
c o f f e e o f t h e w o r l d ...................................................................................................................................................... 25
d e m o m o d e ................................................................................................................................................................... 27
b e v e r a g e c o u n t e r ......................................................................................................................................................... 27
m a i n t e n a n c e ..................................................................................................................................................................28
mi l k c i r c u i t r i n s e c y c l e .................................................................................................................................................. 28
m i l k c i r c u i t w a s h c y c l e .................................................................................................................................................. 29
c o f f e e c i r c u i t c l e a n i n g c y c l e (b r e w g r o u p w a s h c y c l e ) ....................................................................................................... 32
l o c k d i s p l a y ................................................................................................................................................................ 32
de s c a l i n g ....................................................................................................................................................................33
cl o c k s e t t i n g s ..............................................................................................................................................................35
t i m e s e t t i n g ................................................................................................................................................................. 35
a u t o m a t i c t i m e r s e t t i n g s ................................................................................................................................................ 36
s t a n d -b y s e t t i n g s .........................................................................................................................................................38
s p e c i a l .........................................................................................................................................................................39
f a c t o r y s e t t i n g s ........................................................................................................................................................... 39
cleaning and maintenance .....................................................................................................................40
m a i n t e n a n c e d u r i n g o p e r a t i o n ..........................................................................................................................................40
g e n e r a l m a c h i n e c l e a n i n g ................................................................................................................................................40
m i l k c o n t a i n e r m a i n t e n a n c e a n d c l e a n i n g ...........................................................................................................................41
c l e a n i n g t h e b r e w g r o u p .................................................................................................................................................43
g r i n d e r m a i n t e n a n c e ......................................................................................................................................................44
s t o r i n g t h e m a c h i n e .......................................................................................................................................................45
r e s t a r t i n g t h e m a c h i n e ...................................................................................................................................................45
error codes ..............................................................................................................................................46
technical data ..........................................................................................................................................47
safety rules .............................................................................................................................................48
Table of ConTenTs
3
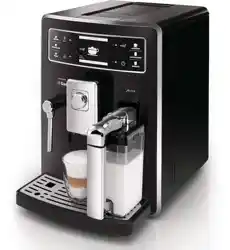
This coffee machine is intended for preparing espresso by using either coffee beans or ground coffee. It
includes an automatic device for preparing milk beverages and a hot water dispenser.
This machine is designed for domestic use only, and is not suitable for continuous heavy or professional use.
Warning: no liability is assumed for any damage caused by:
•Incorrectusenotinaccordancewiththeintendeduses;
•Repairsnotcarriedoutbyauthorizedcustomerservicecenters;
•Tamperingwiththepowercord;
•Tamperingwithanypartofthemachine;
•Theuseofnon-originalsparepartsandaccessories;
•Failuretodescalethemachineoruseattemperaturesbelow0°C(32°F).
IN THESE CASES, THE WARRANTY IS NOT VALID.
Keeptheseoperatinginstructionsinasafeplaceandmakethemavailabletoanyoneelsewhomayusethecoffee
machine.Forfurtherinformationorifyouexperienceproblemsnotcompletelyorsufcientlyaddressedinthese
instructions, please contact an authorized service center.
KEEP THESE INSTRUCTIONS
A WARNINg TRIANgLE DRAWS ATTENTION TO ALL THE INSTRUCTIONS THAT ARE
ImPORTANT fOR USER SAfETY. PLEASE fOLLOW THESE INSTRUCTIONS CAREfULLY
TO AVOID SERIOUS INjURY!
HOW TO USE THESE OPERATINg INSTRUCTIONS
gENERAL INfORmATION
4
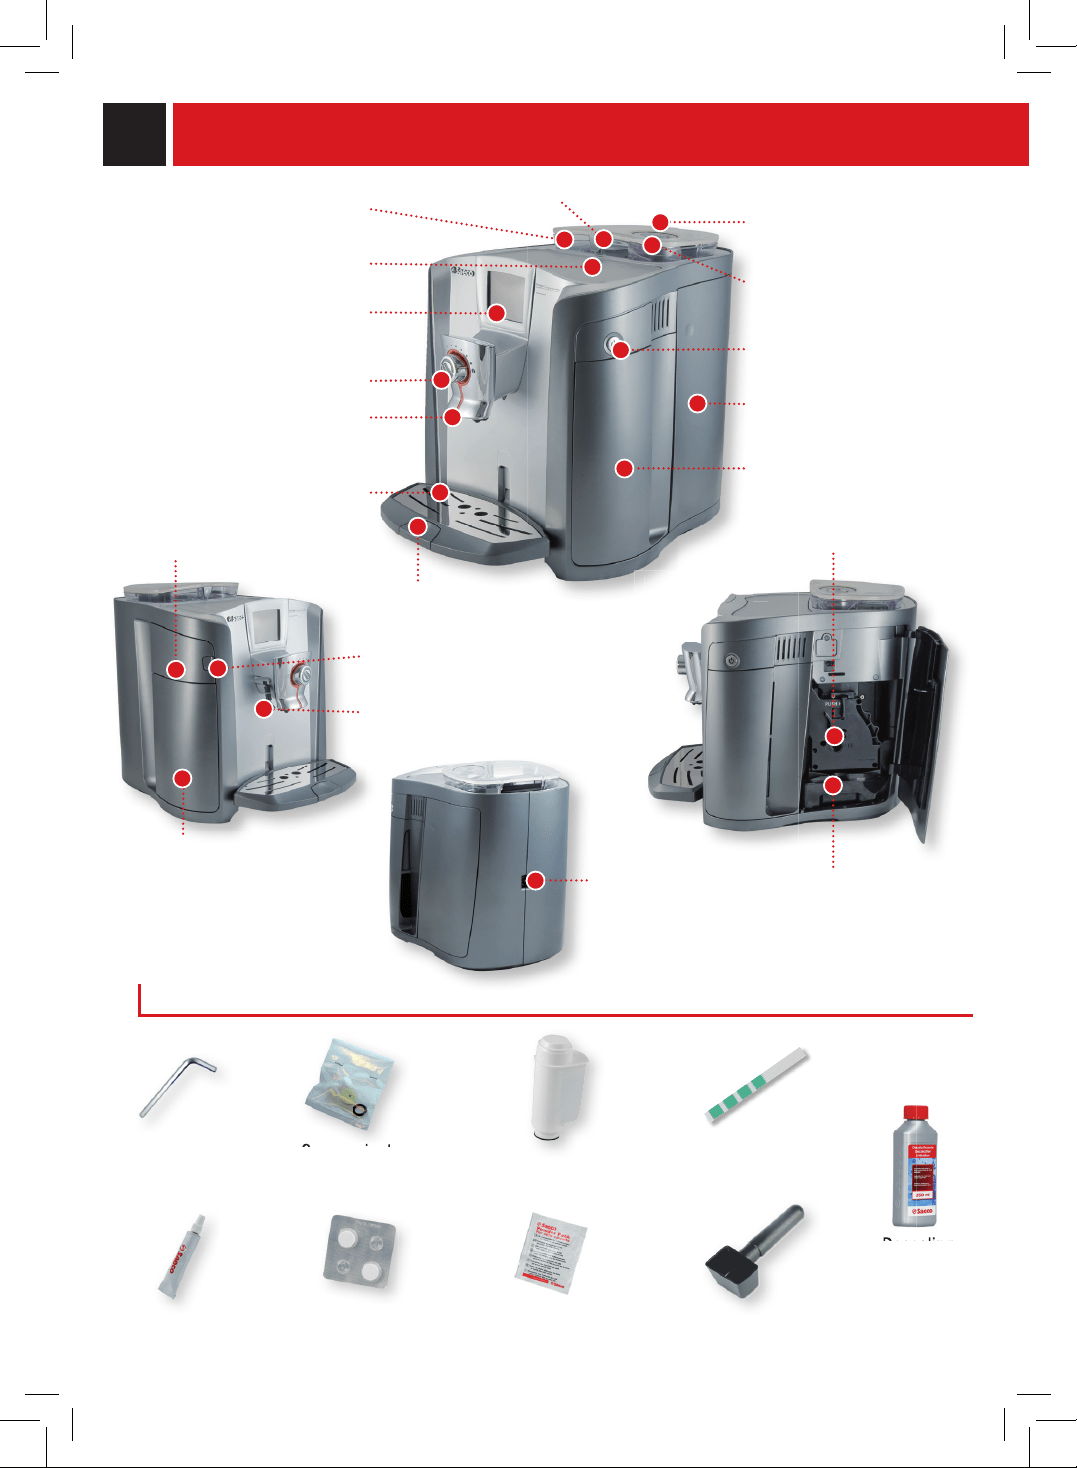
cappuccinatore
maintenance kit
cappuccinatore
Pre-groundbypassdoser
Brewgroup
Dregdrawer
socket for
powercord
Opencoffeebeanhopperbutton
Coffeebeanhopper
Cupwarmingsurface
Powerbutton
service door
ACCESSORIES
Coffeebeanhopperlid
drip tray
Buttonforraising/lowering
the drip tray
touch screen display
sbs dial
dispensing head
drip tray + grill
compartment for milk container
Hotwaterspout
Water tank
Intenzawaterlter
Pre-groundcoffee
scoop
Brewgroupcleaning
tablets
Water hardness
test strip
grinder
adjustment key
MaChIne
Lubricantforthe
brewgroup
detergent for cleaning
milk container
Milkcompartmentbutton
descaling
solution
descaling
5
1 2 3
4
7
65
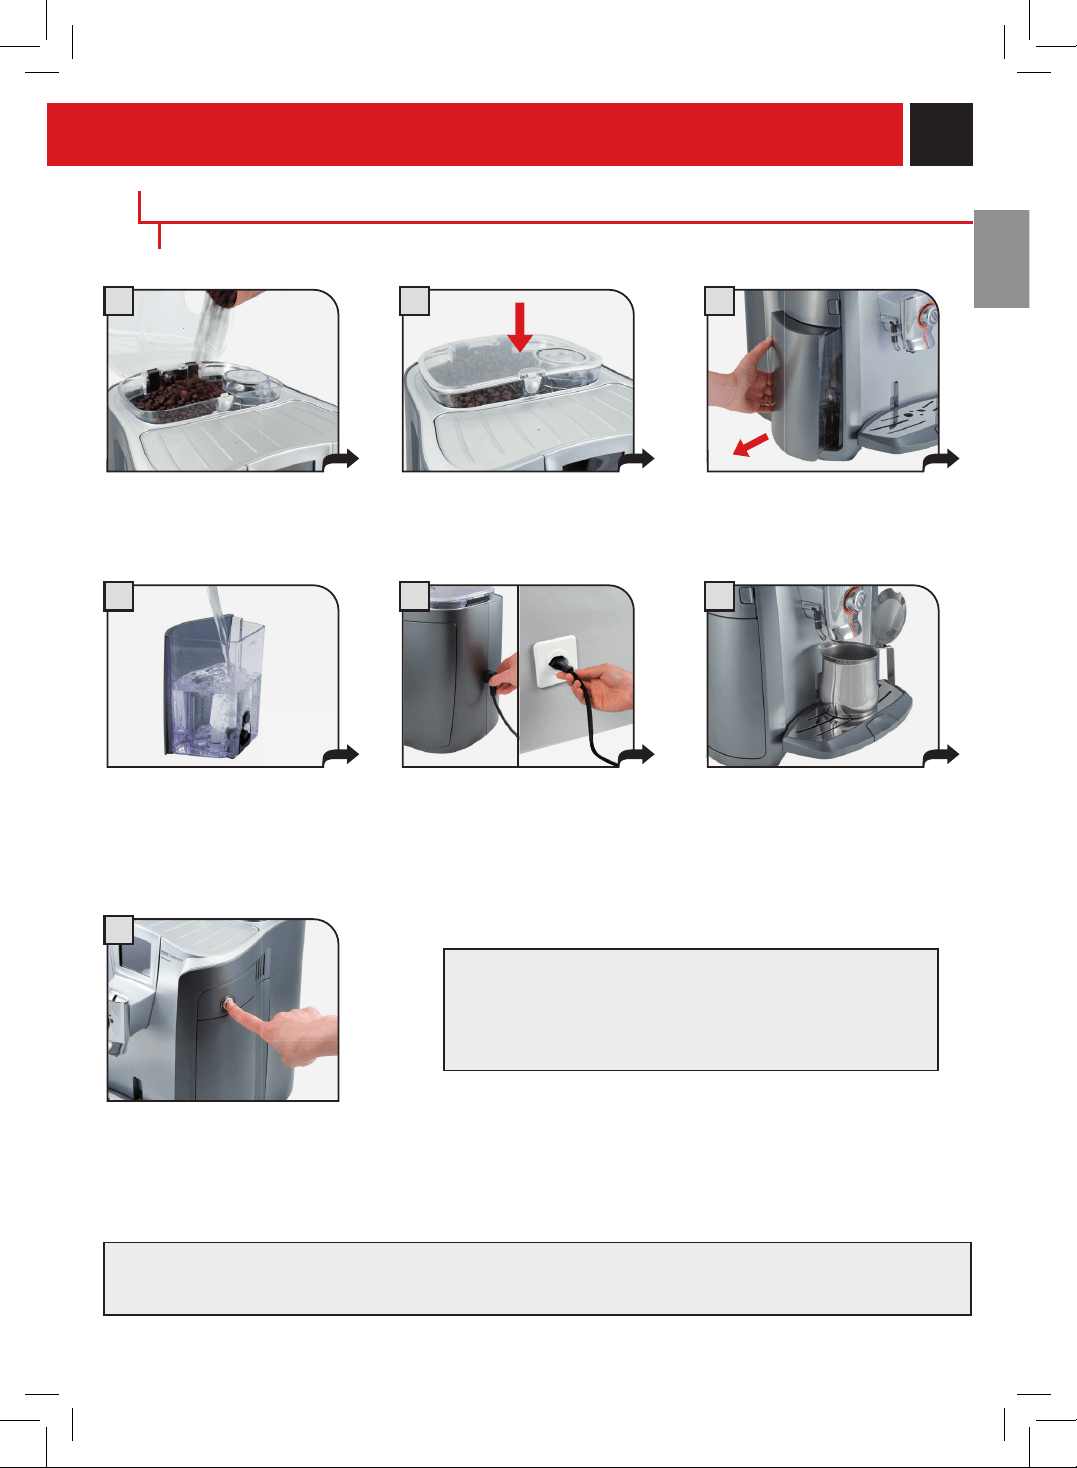
InsTallaTIon
insert the plug into the socket
locatedonthebackofthe
machine and insert the other end
intoapoweroutletwithsuitable
current.
Placeacontainerbeneaththehot
waterspout.
Openthecoffeebeanhopperby
pressingthebuttononthelid.Fill
thebeanhopperwithcoffee
beans.
Closethelidpushingitdown
completely.
Removethewatertank.
Werecommendinstallingthewater
lter(seepage7).
Pressthepowerbuttononcetoturn
on the machine. the appliance
automatically performs a diagnosis of
its functions. this test is performed
each time the machine is turned on.
Themachineautomaticallyprimesthewatercircuit.
Themachineisnowreadyforuse.
Watermaynotbedispensedduringthiscycle.
Thisshouldnotbeconsideredamalfunction.
Makesurethepowerbuttonisnotpressedandthemachineisturnedoff.
Fillthetankwithfreshdrinking
water.Donotexceedthe“max”
levelindicatedonthewatertank.
Oncelledplacethetankback
into the machine.
STARTINg THE mACHINE
TO ADjUST THE WATER HARDNESS LEVEL AND SET
THE INTENZA AROmA SYSTEm SEE THE «WATER
HARDNESS mENU» ON PAgE 21.
descaling
solution
bEfORE A LONg PERIOD Of INACTIVITY, AND bEfORE THE mACHINE IS RESTARTED, PLEASE
CHECK THE RELEVANT INfORmATION IN THE CLEANINg AND mAINTENANCE SECTION.
6
1 3
press to select the desired
language.
the machine starts and displays
the menu in the selected
language.
see manual on page 35 to
adjust the clock.
6
italiano (ch)
language
1/2
français
deutsch
nederlands
english
Italiano (i)
ok
1
choose the desired language.
press
for the other languages.
Press“ok”.
demo
self-test
4
italiano (ch)
language
1/2
français
deutsch
nederlands
english
Italiano (i)
ok
2
italiano (ch)
language
1/2
français
deutsch
nederlands
english
Italiano (i)
ok
3
Ifdesired,the“demo”function(seepage27)
maybeactivatedbypressingtheicon,eachtime
themachinecarriesoutaself-diagnosis.
demo
self-test
5
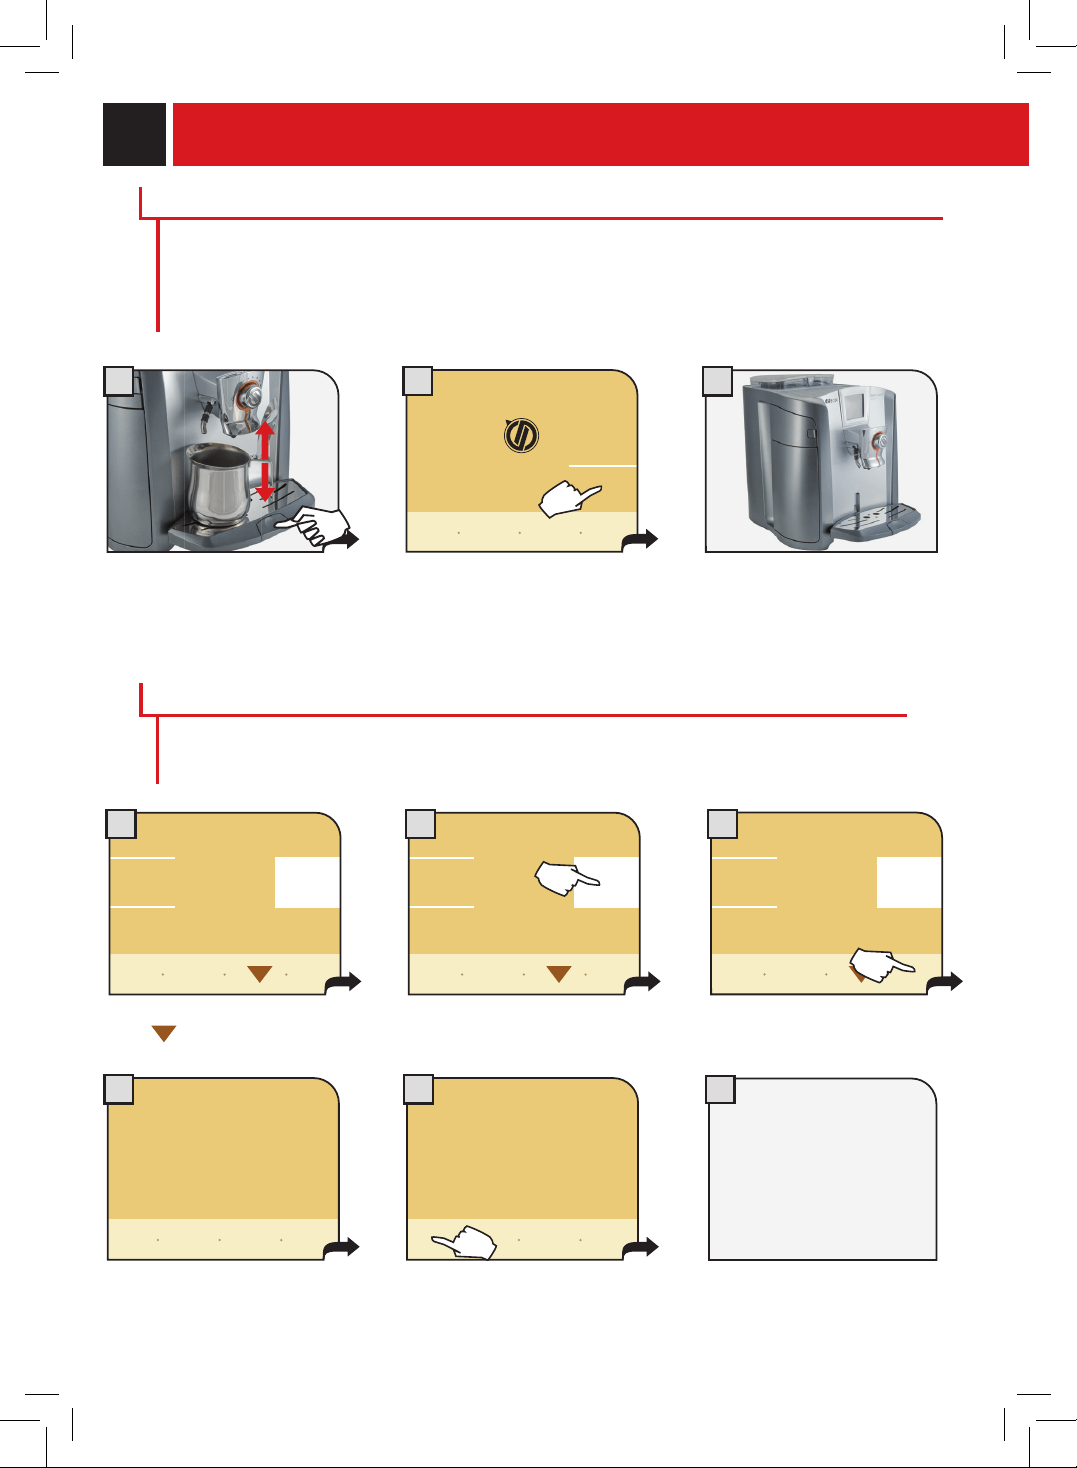
mANUAL PRImINg Of THE WATER CIRCUIT
position a container under the hot
waterspout(itispossiblethat
waterwillnotcomeoutofthe
spout).
press the display once and the
machinewillbeginprimingthe
watercircuit.
When the priming cycle is
nished,removethecontainer.
Themachineisnowreadyfor
use.
InsTallaTIon
SETTINg THE LANgUAgE
Whenthemachineisswitched-onforthersttime,itrequirestheselectionofthedesiredlanguage.
Thisallowsyoutoadjusttheparametersofthebeveragestothetypicalparametersofthecountry
wherethemachineisused.Thisiswhysomelanguagesaredifferentiatedalsobycountry.
2
start
priming the machine
Manualprimingofthewatercircuitisonlyrequiredwhentheprimingdisplayscreenappears.
Note:thewatertankmustbefullbeforeprimingthemachine.
Important:Beforepriming,theSBSknob(seepage9)mustbepositionedasshownonthedisplayscreen.
Itcanbeadjustedbacktothedesiredpositiononceprimingiscomplete.Ifthewarningmessagestill
appearsonthedisplayscreen,pleaserefertothesectiononwarningmessagesonpage46.
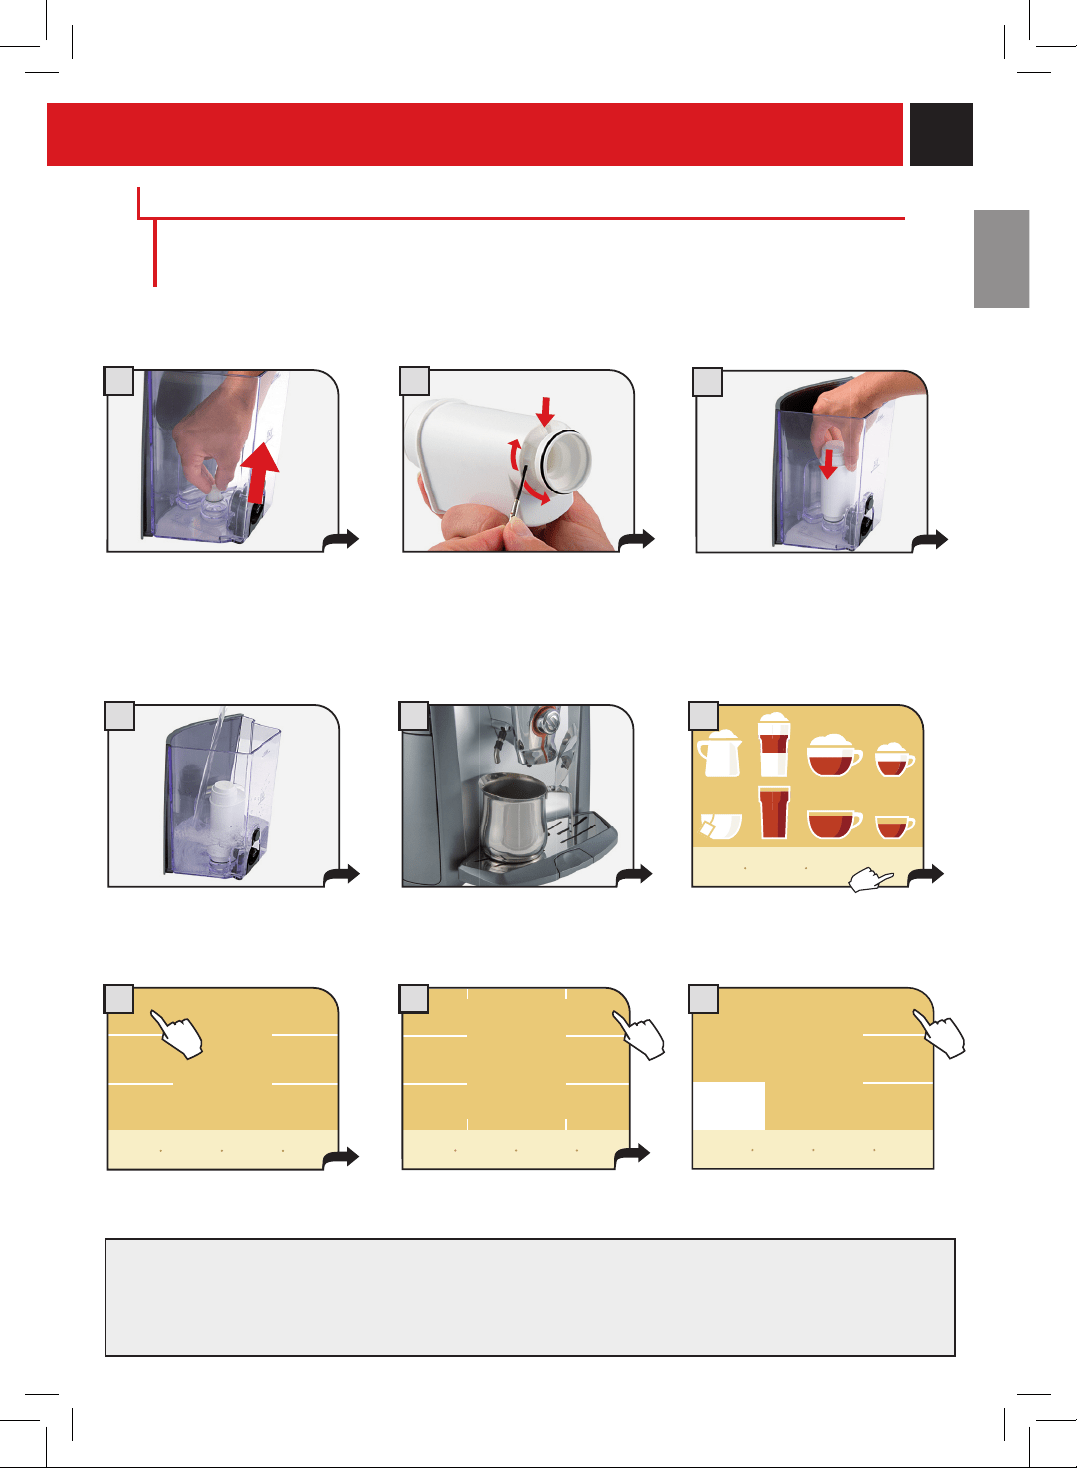
7
5 6
9
4
1
3
2
Removethesmallwhitelter
from the tank and store it in a dry
place sheltered from dust.
Fillthetankwithfreshdrinking
waterandreinsertitintothe
machine.
set the intenza aroma system:
A=Lightwater
B=Mediumwater(standard)
C=Hardwater
Forfurtherdetailsseepage21.
INTENZA WATER fILTER
Toimprovethequalityofthewateryouuse,andextendthelifeofyourmachineatthesametime,itis
recommendedthatyouinstallthewaterlter.Afterinstallation,gotothewaterltermenutoinitialize(see
programming).Byactivatingthewaterlter,themachineinformstheuserwhenthewaterltermustbe
replaced.
remove the water fi lter from its packaging, immerse it vertically (with the opening facing upwards)
in cold water and gently press its sides so as to let the air bubbles out.
Insertthelterintheemptytank.
the reference mark and the
groovemustmatch.Pushrmly
until it is completely inserted.
press "machine settings".
Press"waterlter".
Press"waterlteractivation".
water
lter
inserted
not
inserted
water lter
activation
Themachineperformsthewaterlteractivation.Waituntilthecyclestopsautomatically.
Attheendoftheactivationcycle,themachinereturnstotheproductselectionmenu.Donotusethewater
dispensed during this phase.
noTe: If the Intenza water fi lter is not available, insert the small white fi lter previously removed (see
point 1) into the tank.
Placeacontainerbeneaththe
hotwaterspout.
press "programming menu".
show icon
explanation
my custom
coffee
program-
ming
menu
main-
tenance
main
menu
specials
machine
settings
clock
settings
extras
beverage
settings
stand-by
back to
coffee
menu
alerts &
acoustic
settings
machine
settings
display
language
rinsing
water
hardness
water
lter
cup
illumination
cup
warmer
go back
restore
default
settings
back to
menu
go back
restore
default
settings
back to
menu
save
settings
8
7
8
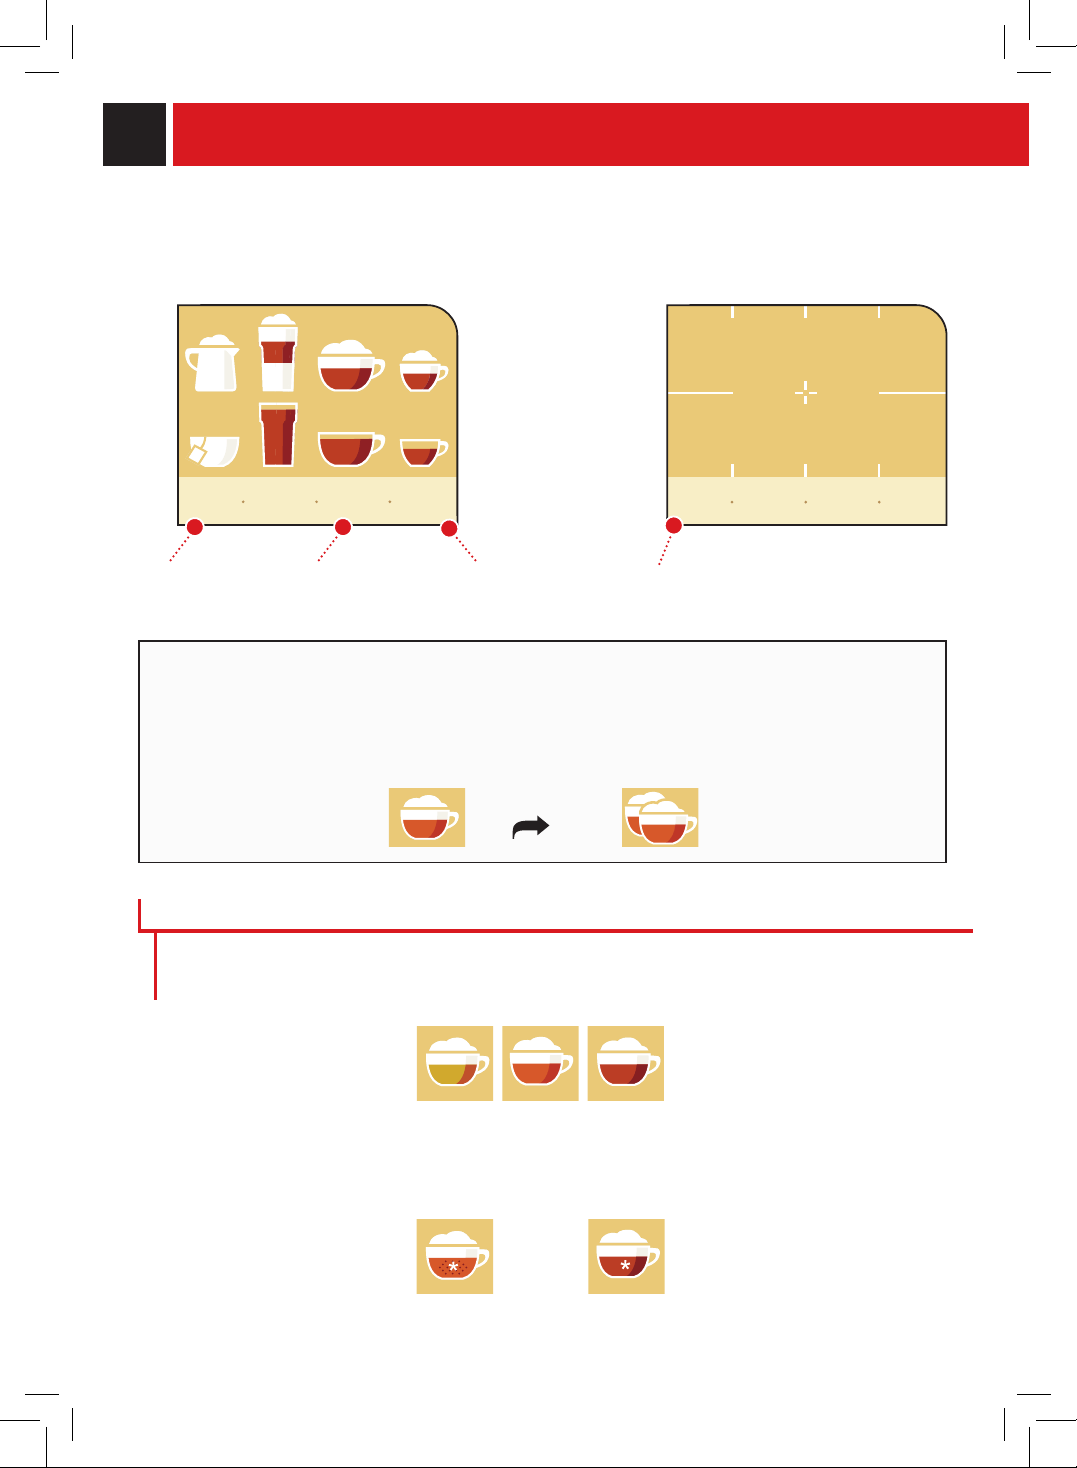
• Togetthedesiredbeverage,pressthecorrespondingicononthedisplay.
the machine automatically performs all the necessary operations.
•Tomake2cups,pressthebeverageicontwice.
presstwice
weak medium strong
Thecolorintensityofthecupicon(onlyvalidforcoffeebeverages)indicatesthearoma,orquantityof
coffeetobeground,foreachbeverage.Thegreaterthequantityofcoffeegroundthestrongerthecoffee
willtaste.
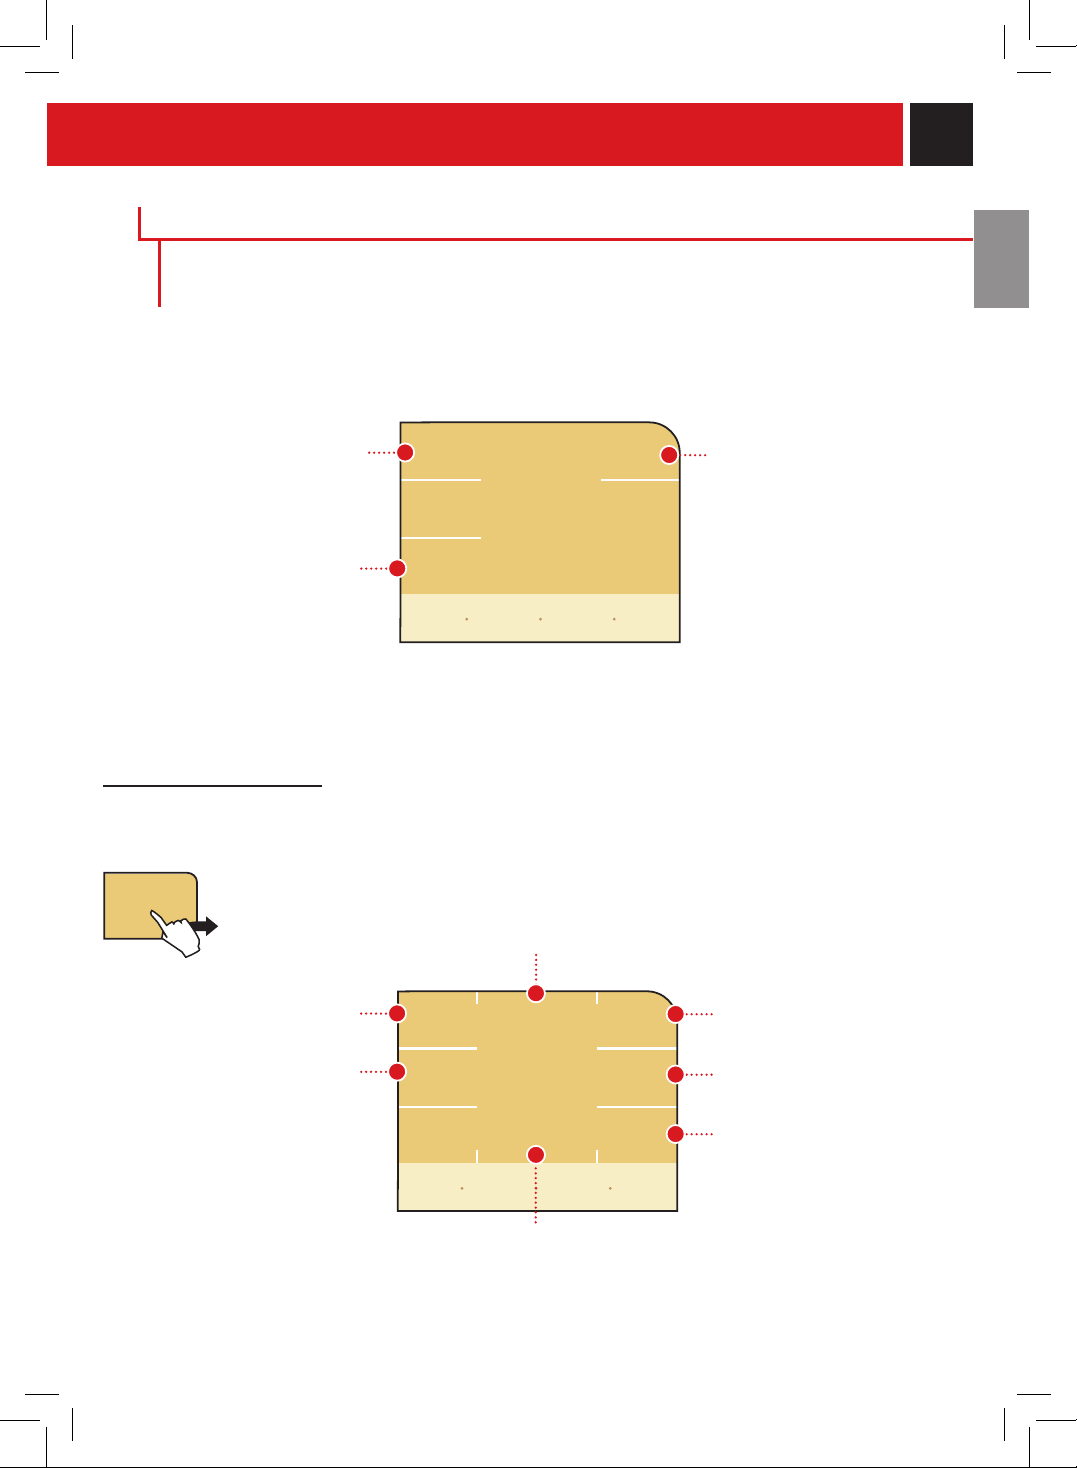
dIsplaY
go to the "text
format" menu
beverage
programming
enter programming
menu
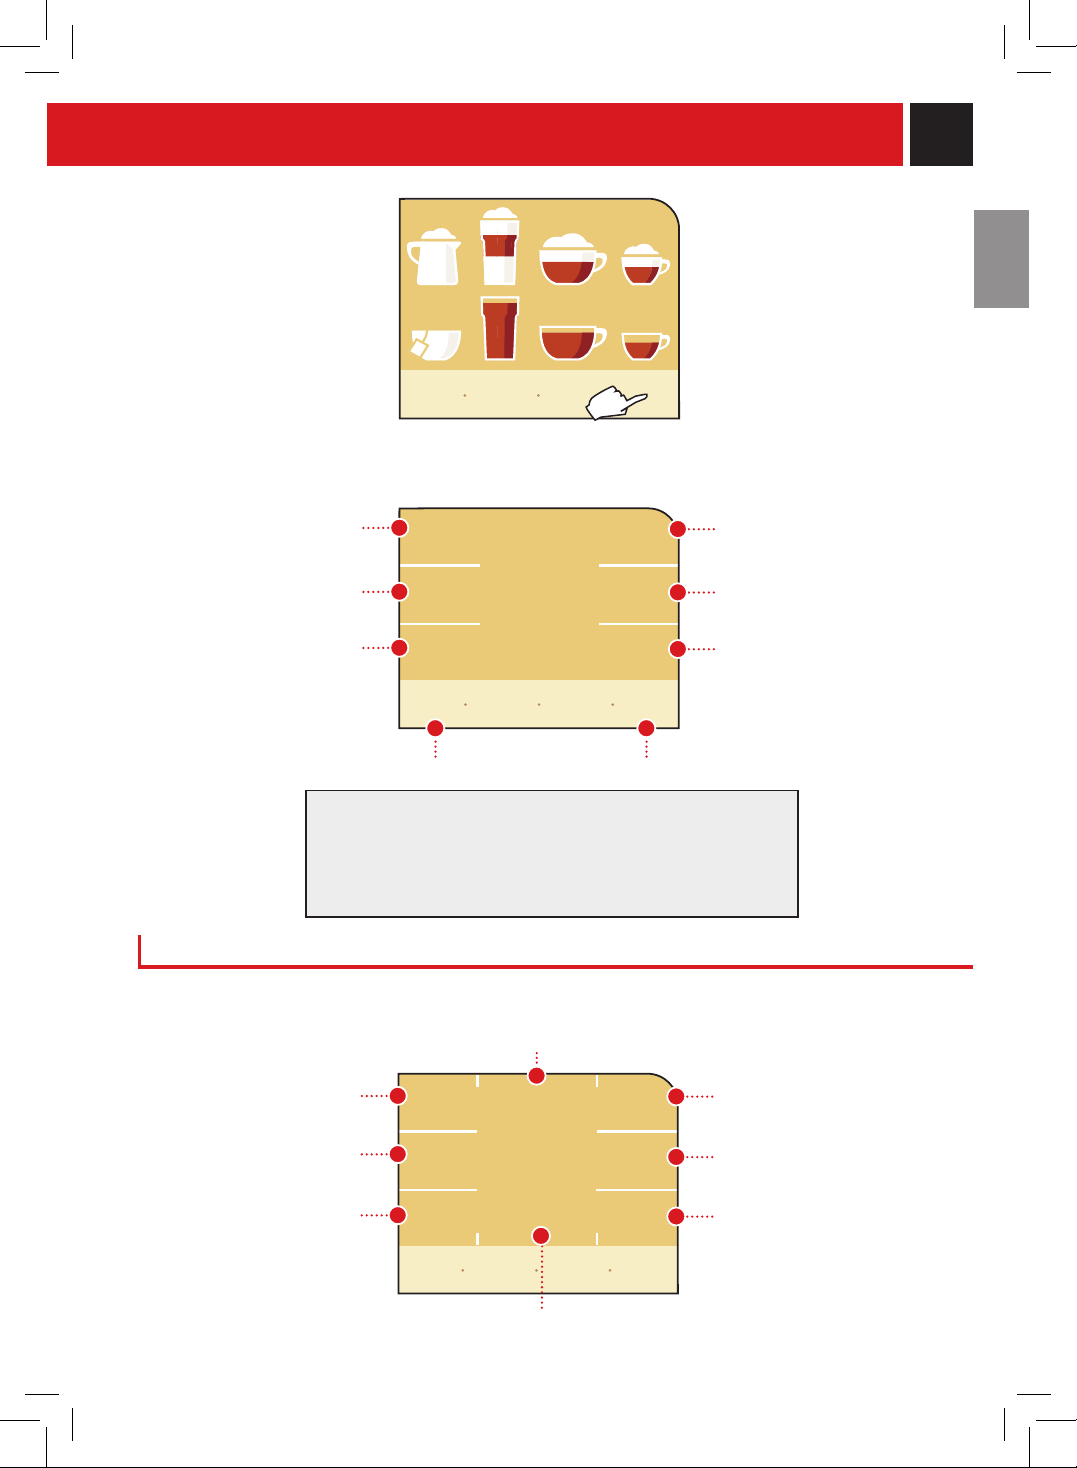
Itispossibletochangethetypeofdisplaytoeithericonformatortextformat.
ICON fORmAT
long
coffee
hot
water
coffee espresso
hot
milk
latte
macchiato
espresso
macchiato
cappuccino
medium strongmedium
medium strongmedium
go to the "icon
format" menu
TExT fORmAT
AROmA OPTI-DOSE
Whenthemachineisprogrammedtousepre-groundcoffeeorwhenabeverageiscustomized,theiconis
displayedinadifferentwayand/oraccompaniedbyanasterisk(see"beverageprogramming"section).
pre-ground customization
show icon
explanation
my custom
coffee
program-
ming
menu
show
icon
my custom
coffee
program-
ming
menu
9
Toraisethedriptray,presslightlyonthelowerpartofthebutton.Tolowerthetray,
presslightlyontheupperpartofthebutton;whenthedesiredheightisreached,
releasethebutton.
Note:Thereisaredoaterinthedriptray.Whenitrises,thetraymustbeemptied
andwashed.
DRIP TRAY HEIgHT ADjUSTmENT
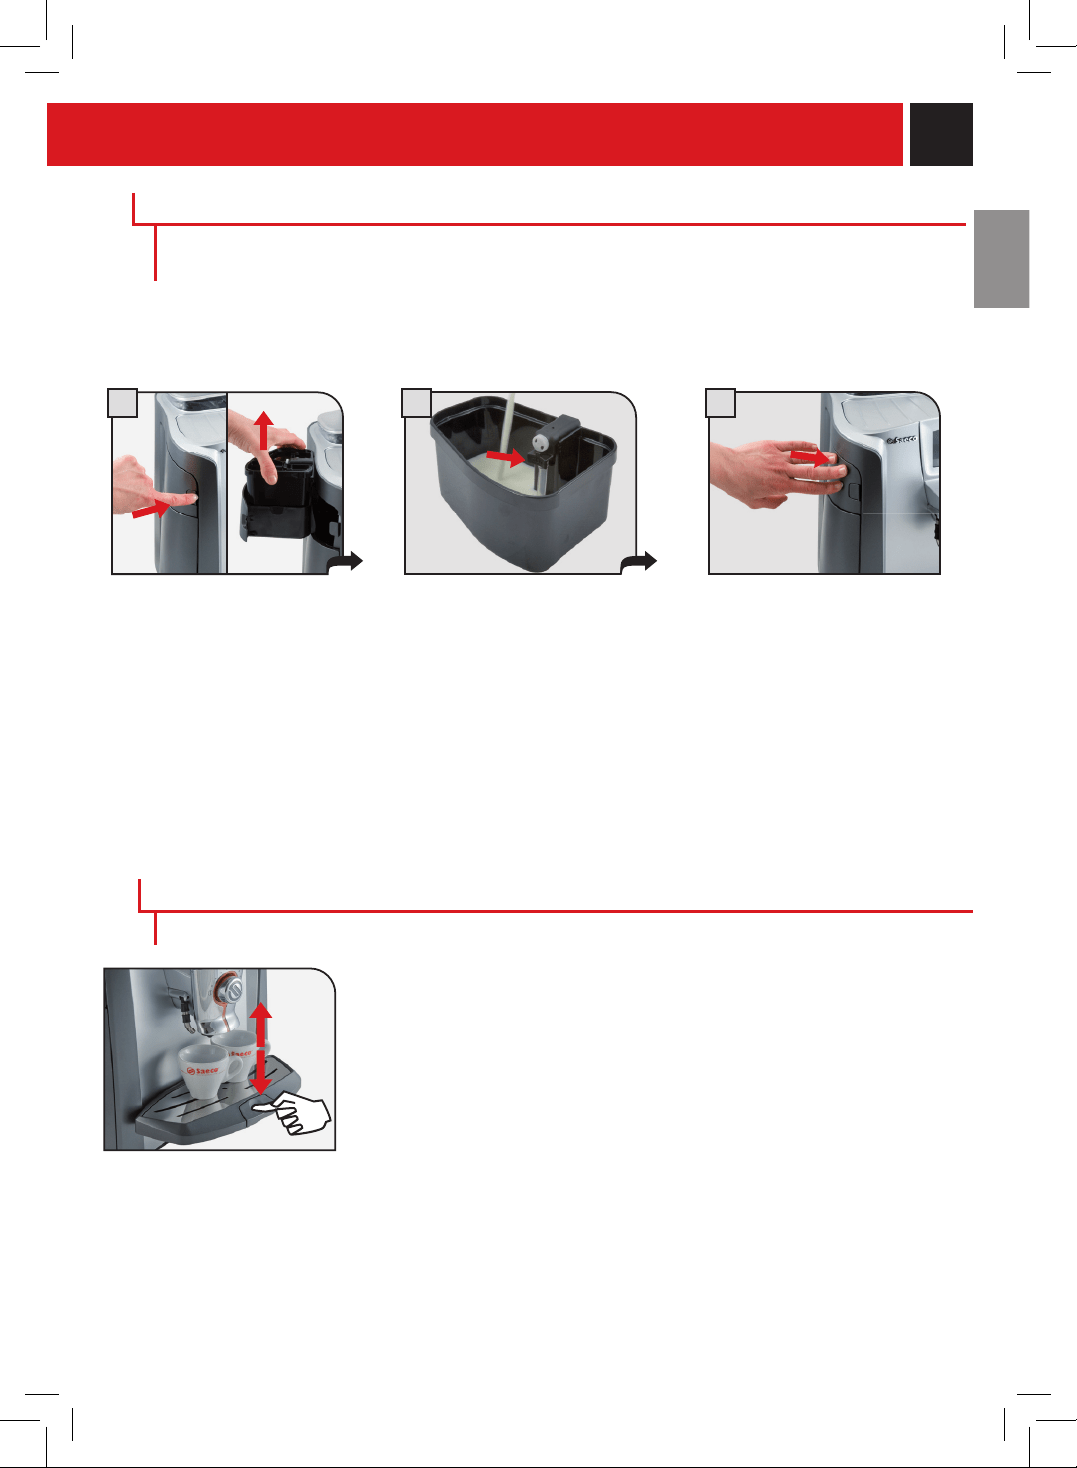
mILK CONTAINER
adJUsTMenTs
Adjustthedriptraytotheappropriatecupsizebeforeselectingthebeverage.
21 3
Openthemilkcompartmentby
pressingthebuttonandremove
the milk container.
remove the cover and pour in the
milk. do not eXceed the
MAXIMUMLEVELshowninthe
g u r e .
replace the lid on the container
andplaceitbackinthemilk
compartment. make sure to
carefully close the compartment.
WARNINg! DO NOT OPEN THE SERVICE DOOR DURINg THE bREWINg, DISPENSINg,
WASHINg OR RINSE CYCLE.
Onlythecontainerwiththecappuccinatoremustbelledbeforepreparingbeverageswithmilk.Donotuse
milkafterthebest-beforedate.(important! refer to the instructions for maintenance and cleaning of the
cappuccinatore on page 41).
10
mEDIUm
COffEE
STRONg
COffEE
mILD
COffEE
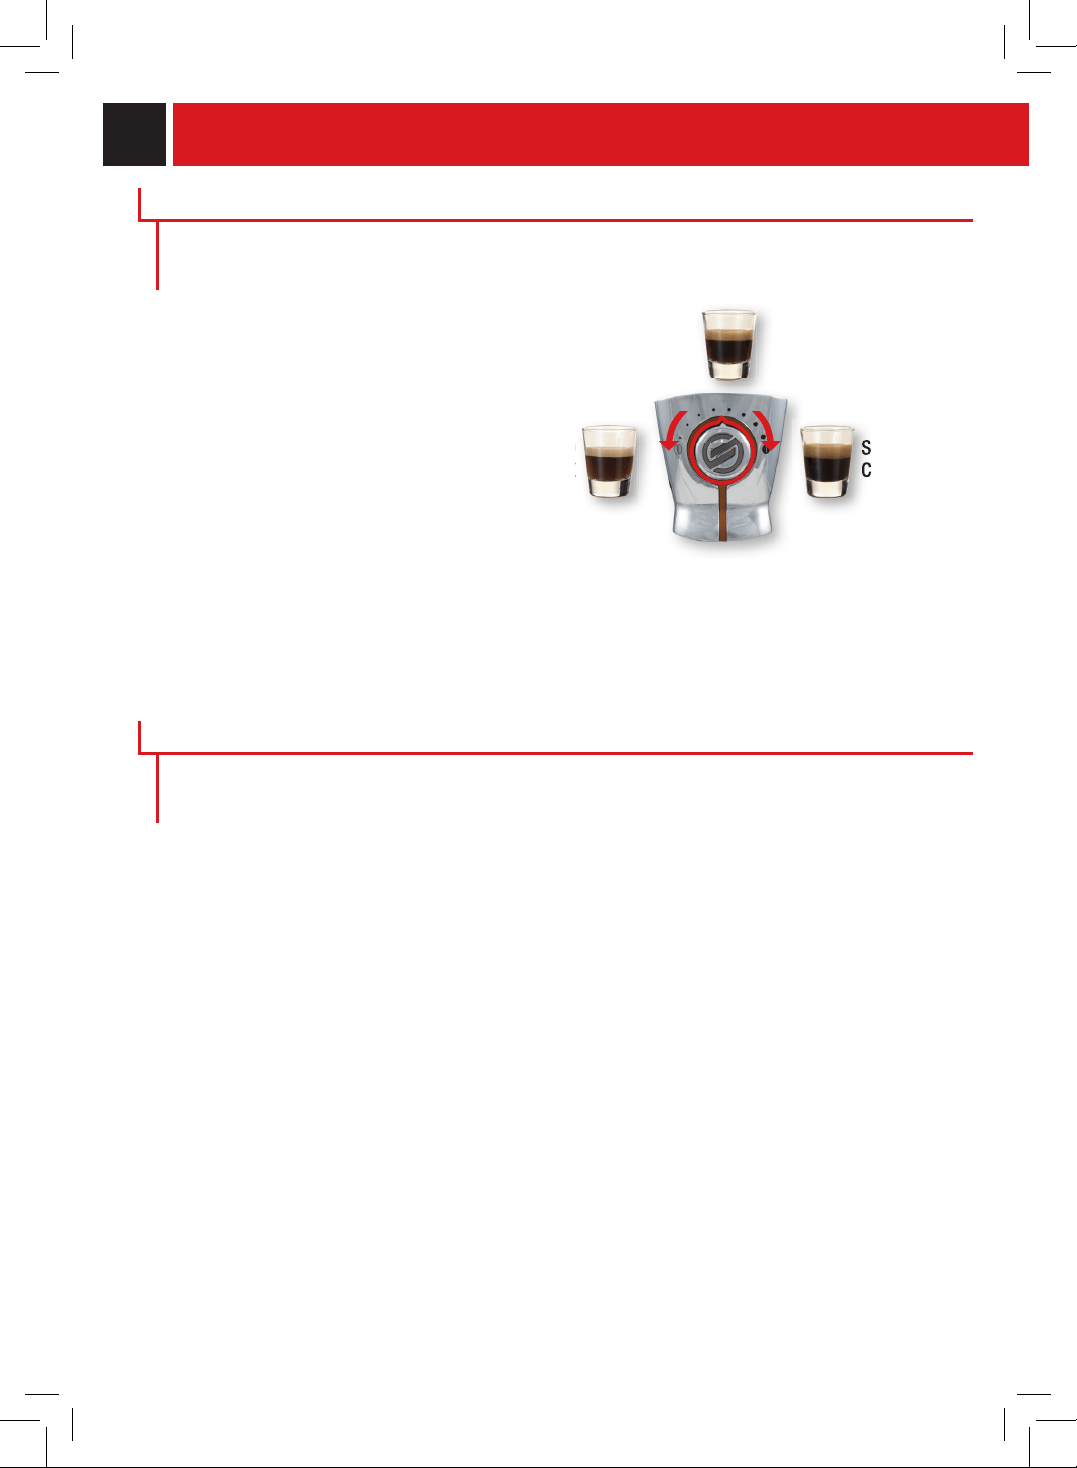
SBSadjuststhefullnessofthebrewedcoffee,
andcanevenbeadjustedwhilebrewing.Any
adjustment has an immediate effect on the
brewingcoffee.
COffEE STRENgTH
SbS – SAECO bREWINg SYSTEm
TheSBSdialhasbeencarefullydesignedtogiveyourcoffeethefullnessandintensityyoudesire.
Simplyturnthedial,andyouwillnoticethatthecoffeebrewedwilladjusttothesettingselected.
mILD
COffEE
mEDIUm
COffEE
STRONg
COffEE
SAECO ADAPTINg SYSTEm
Coffeeisanaturalproductanditscharacteristicsmaychangeaccordingtoitsorigin,blendandroast.
TheSaecocoffeemachineisequippedwithaself-adjustingsystemthatallowstheuseofalltypesof
coffeebeansavailableonthemarket(notincludingavoredorcarmelized).
•Themachineautomaticallyadjustsitselfinordertooptimizetheextractionofthecoffee,ensuring
perfectcompressionofthebeanstoobtainacreamyespressocoffeethatisabletoreleaseallthe
aromas, regardless of the type of coffee used.
•Theoptimizationprocessisalearningprocessthatrequiresthebrewingofacertainnumberof
coffeestoallowthemachinetoadjustthecompactnessofthegroundcoffee.
adJUsTMenTs
11
1 2
3
DISPENSINg COffEE, HOT WATER AND mILK CAN bE INTERRUPTED AT ANY TImE bY
SELECTINg THE "STOP ... DISPENSINg" bUTTON.
THE DISPENSED mILK CAN REACH HIgH TEmPERATURES: THERE IS A DANgER Of
SCALDINg. DO NOT TOUCH IT WITH bARE HANDS.
THE mILK USED mUST HAVE bEEN PROPERLY PRESERVED.
DO NOT USE IT AfTER THE ExPIRATION DATE ON THE PACKAgE.
Checkthatallcontainersarecleanbyfollowingthe"CleaningandMaintenance"instructionsonpage40.
WHEN YOU HAVE fINISHED PREPARINg bEVERAgES CONTAININg mILK, PROCEED
WITH CLEANINg THE CONTAINER AND THE mACHINE'S CIRCUIT.
Tobrew2cups,themachinedispensestherstcoffee,andbrieyinterruptsdispensinginordertogrind
thesecondcoffeedose.Coffeedispensingisthenrestartedandcompleted.Ifamilkbeveragehasbeen
chosen,themachineautomaticallydispensesthemilk.Iftherstcoffeeisinterrupted,thesecondwillnot
bedispensed.
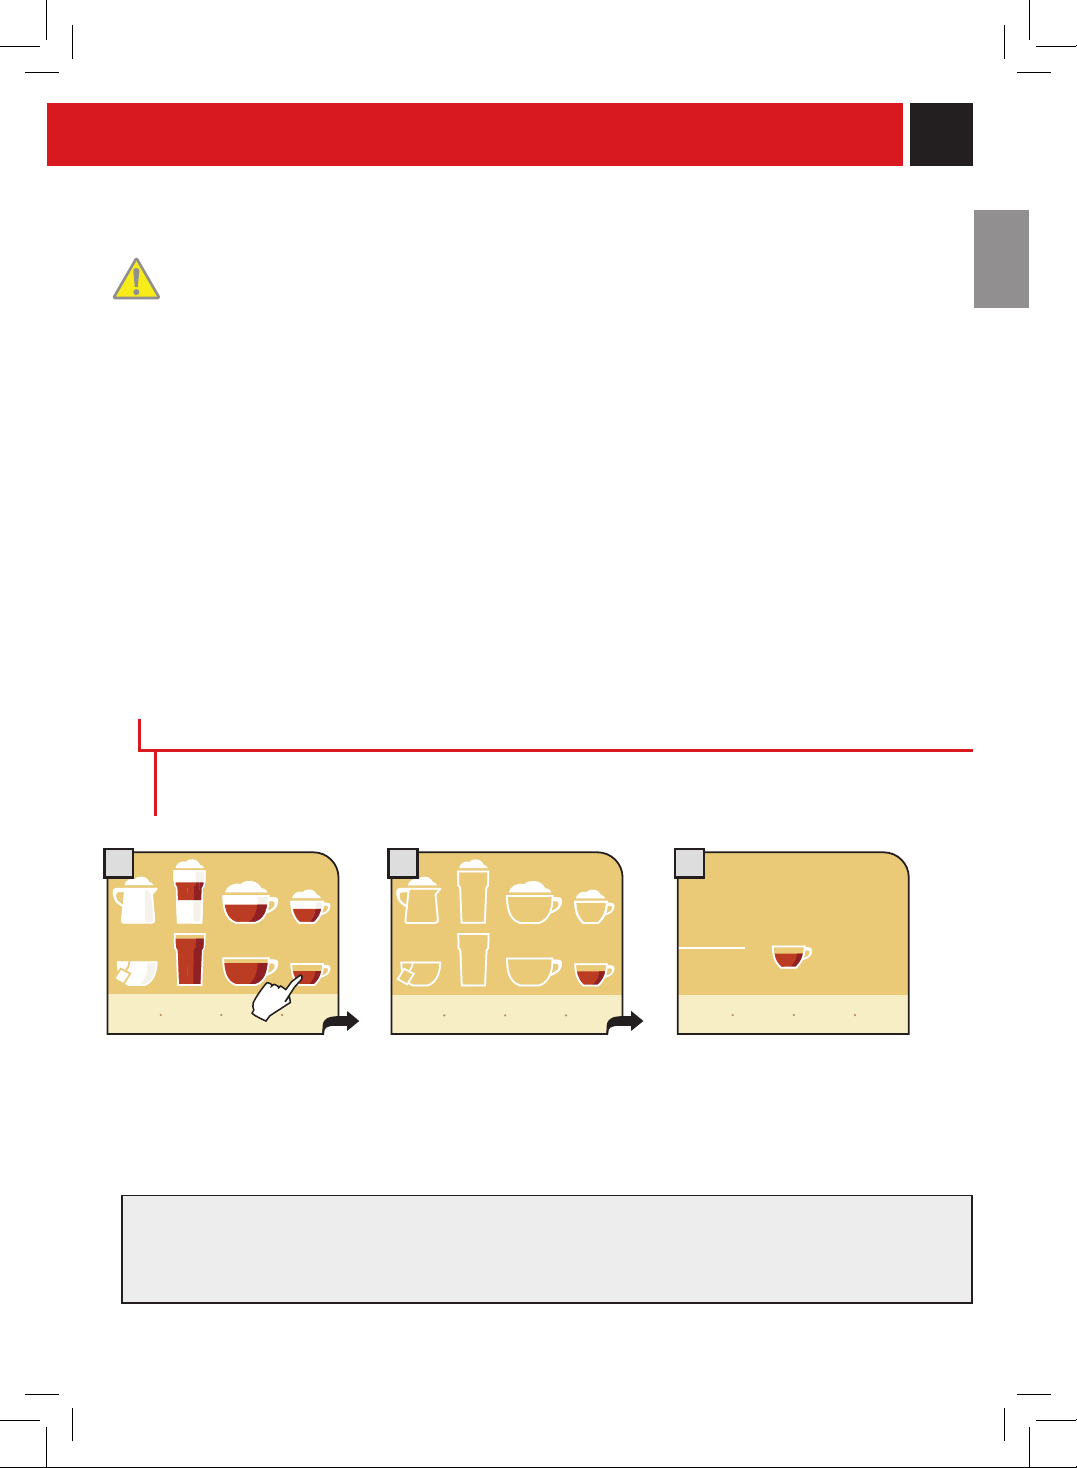
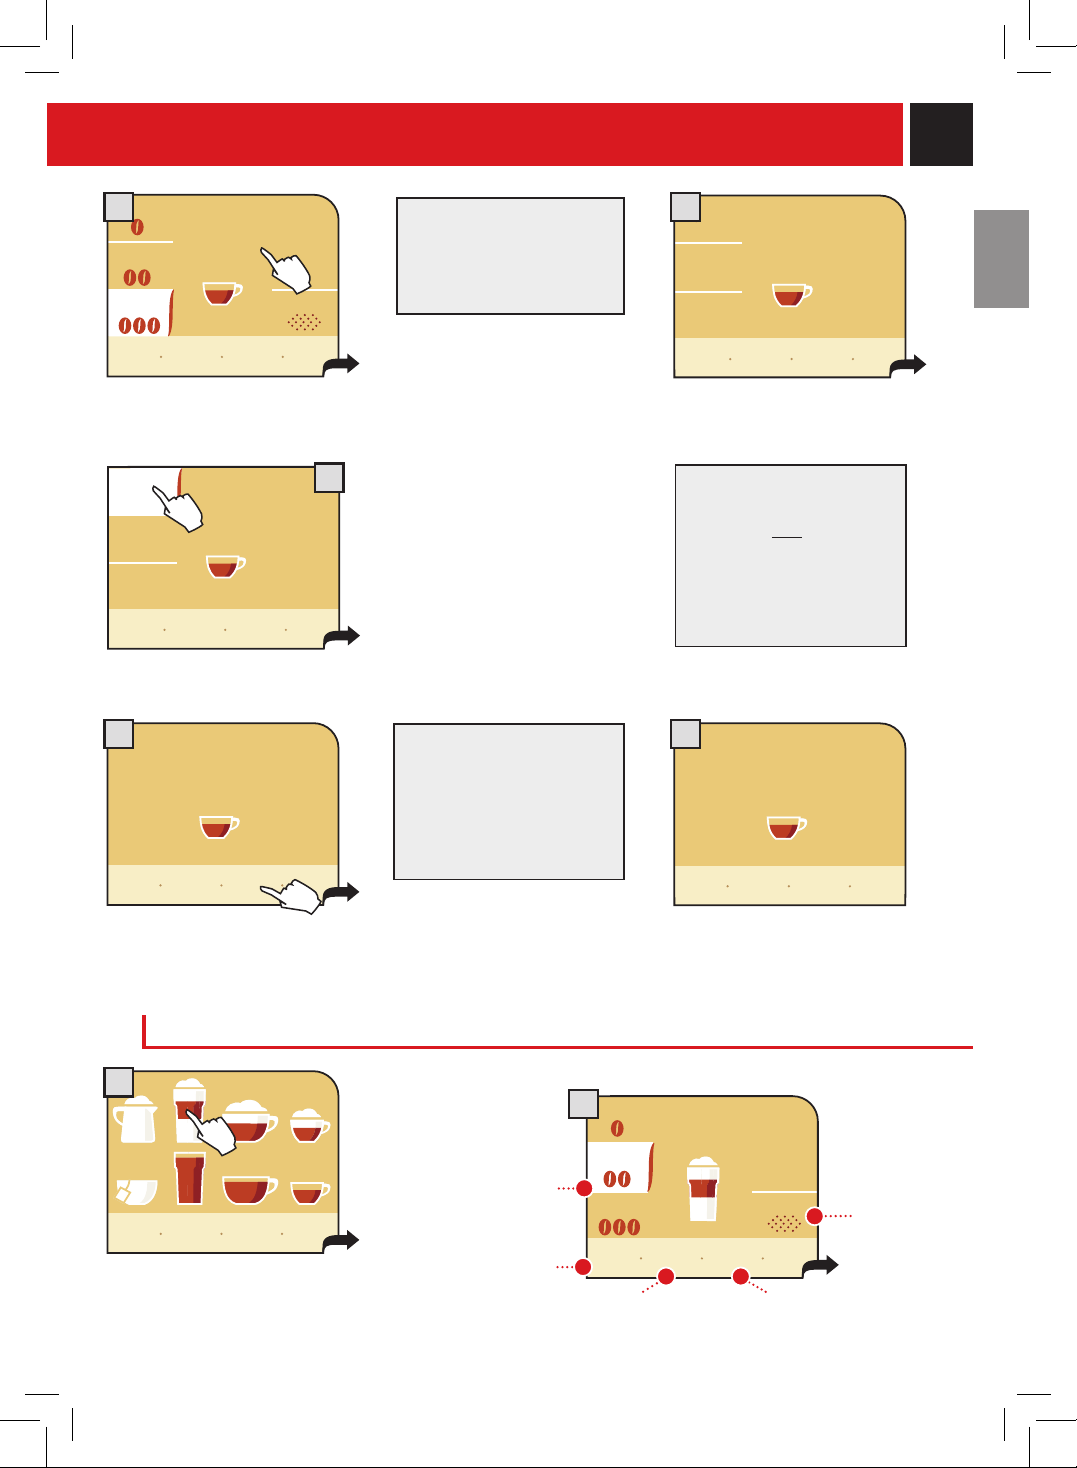
bREWINg WITH WHOLE bEANS
Choosethebeverageandpress
the corresponding icon on the
display:oncefor1cupandtwice
for2cups.
Themachinebeginsgrindingthe
setquantityofcoffee.
Themachinebeginsdispensing
theselectedbeverage.
stop
coffee
dispensing
espresso
beverage dIspensIng
Thisprocedureshowshowtodispenseanespresso.Todispenseanothertypeofcoffee,pressthe
appropriateicon.Useappropriateespressoorcoffeecupssothatthecoffeewillnotoverow.
Themachinestopsdispensingautomaticallybasedonthequantitydeterminedbythemanufacturer.Itispossible
tocustomizethisquantity(seepage16).
Ifyouwishtointerruptthedispensingcycle,pressthe"stopcoffeedispensing"icon.
show icon
explanation
my custom
coffee
program-
ming
menu

12
1 2 3
4 5
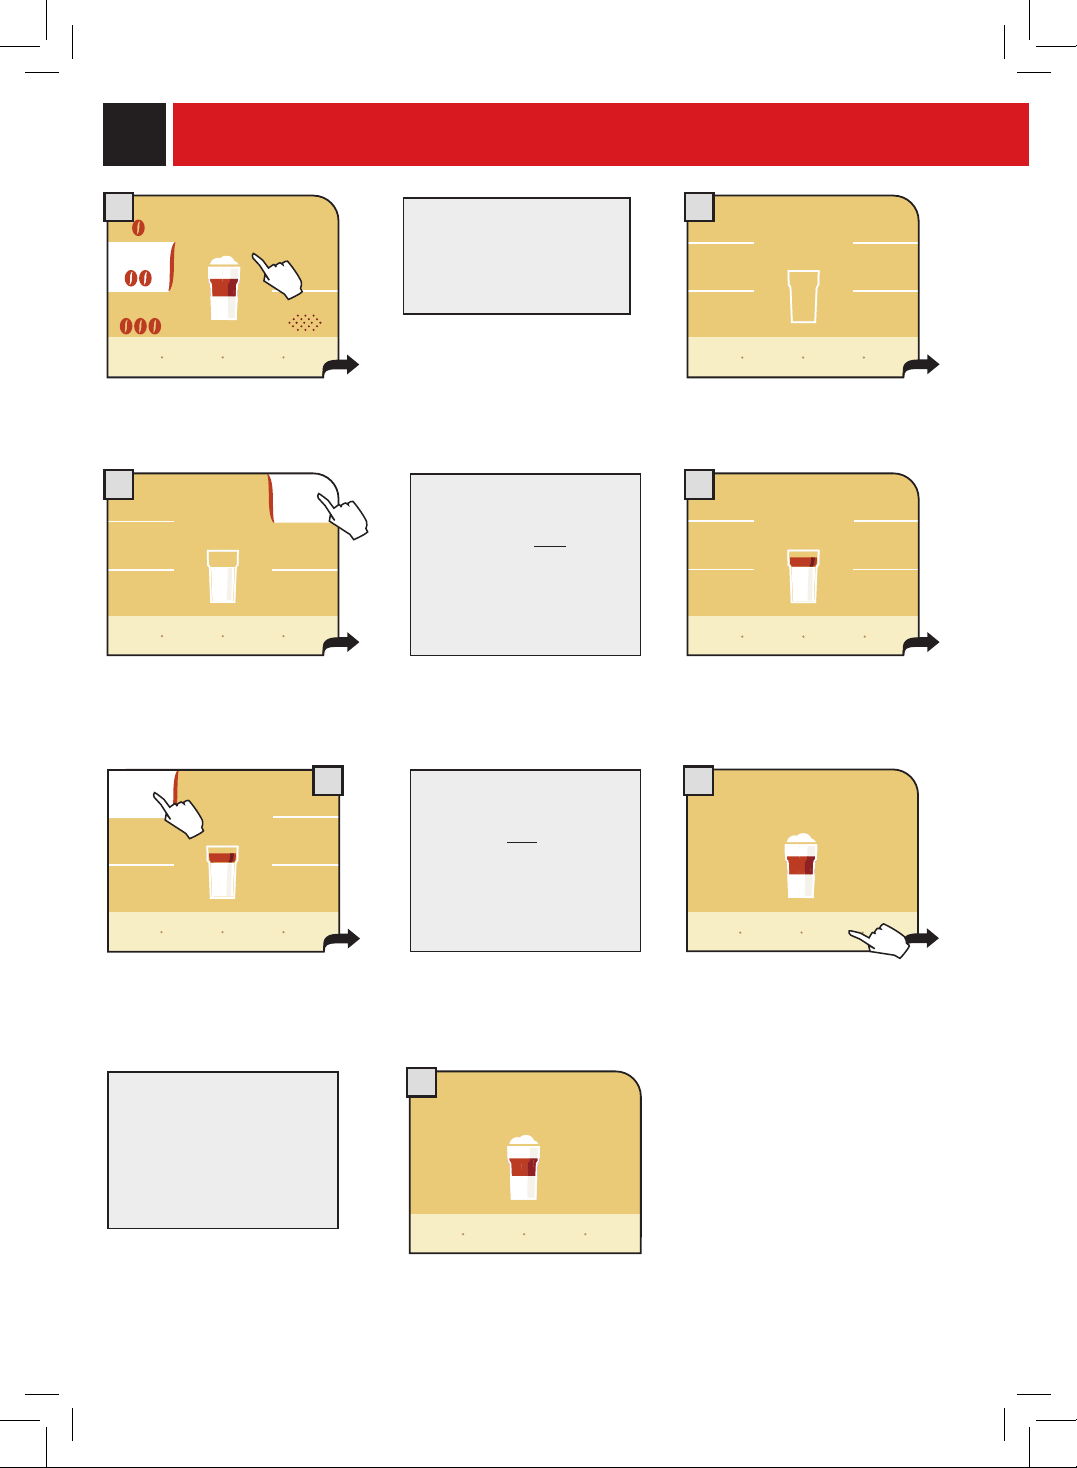
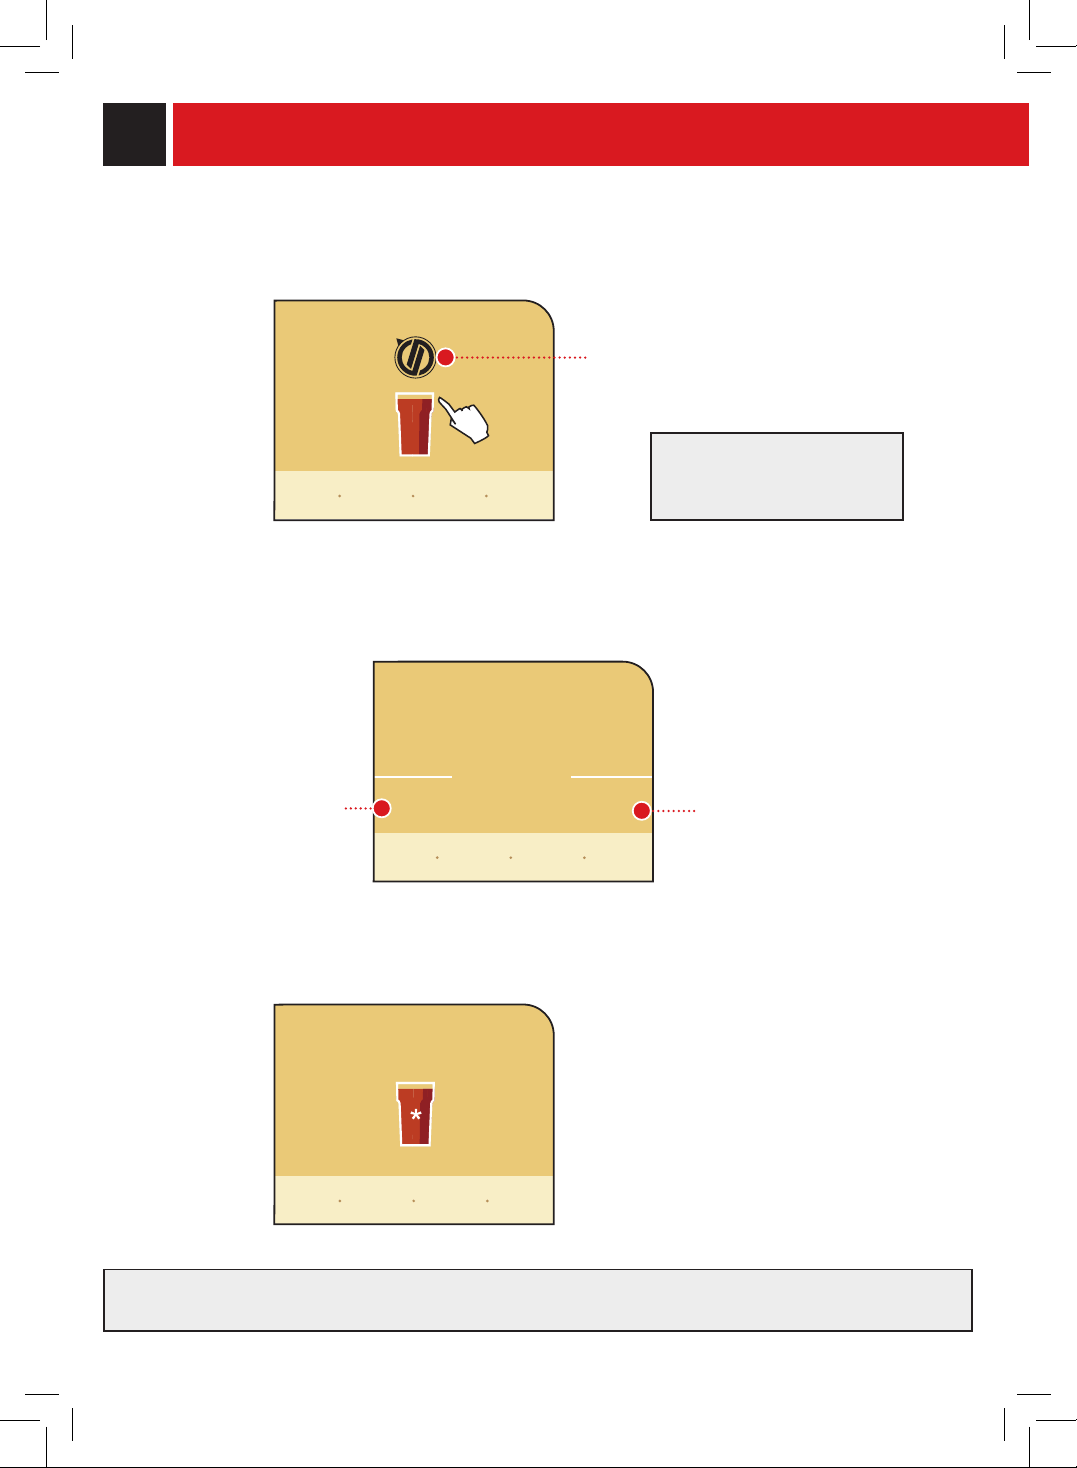
bREWINg WITH PRE-gROUND COffEE
Pre-groundcoffeemustbescoopedintothebypassdosernexttothecoffeebeanhopper.Onlyusecoffee
thatisgroundspecicallyforespressomachinesandnevercoffeebeansorinstantcoffee.
WARNINg: PUT PRE-gROUND COffEE IN THE bYPASS DOSER ONLY WHEN YOU WISH
TO DISPENSE THIS TYPE Of bEVERAgE.
INSERT ONLY ONE SCOOP Of gROUND COffEE AT A TImE. TWO CUPS Of COffEE
CANNOT bE DISPENSED AT THE SAmE TImE.
press the appropriate icon and
thedisplaywillshow:
a message appears, reminding
theusertopourpre-ground
coffeeintothebypassdoser.
add preground
coffee
start!
go
back
press the "start!" icon to start
dispensing.
pour one scoop of ground coffee
intothebypassdoserusingthe
measuring scoop provided.
add preground
coffee
start!
go
back
Themachinebeginsdispensing
theselectedbeverage.
long
coffee
stop
coffee
dispensing
note:
• After1minutefromwhenthe"addpregroundcoffee"messageappears(2),ifbrewinghasnotstartedthe
machinewillreturntothemainmenuanddiscardanyinsertedcoffeeintothedregdrawer.
• Ifnopre-groundcoffeeispouredintothebypassdoser,onlywaterwillbedispensed.
• If2ormorescoopsofcoffeeareadded,themachinewillnotdispensethebeverageandthecoffeeinthe
bypassdoserwillbedumpedintothedregdrawer.
Theexamplegivenbelowshowshowtobrewalongcoffeeusingpre-groundcoffee.Thecustomizedoption
ofusingpre-groundcoffeeisshownonthedisplaywithanasteriskinthechosenbeverage.
show icon
explanation
my custom
coffee
program-
ming
menu
beverage dIspensIng
13
2
2
3
4 5
1
1
6
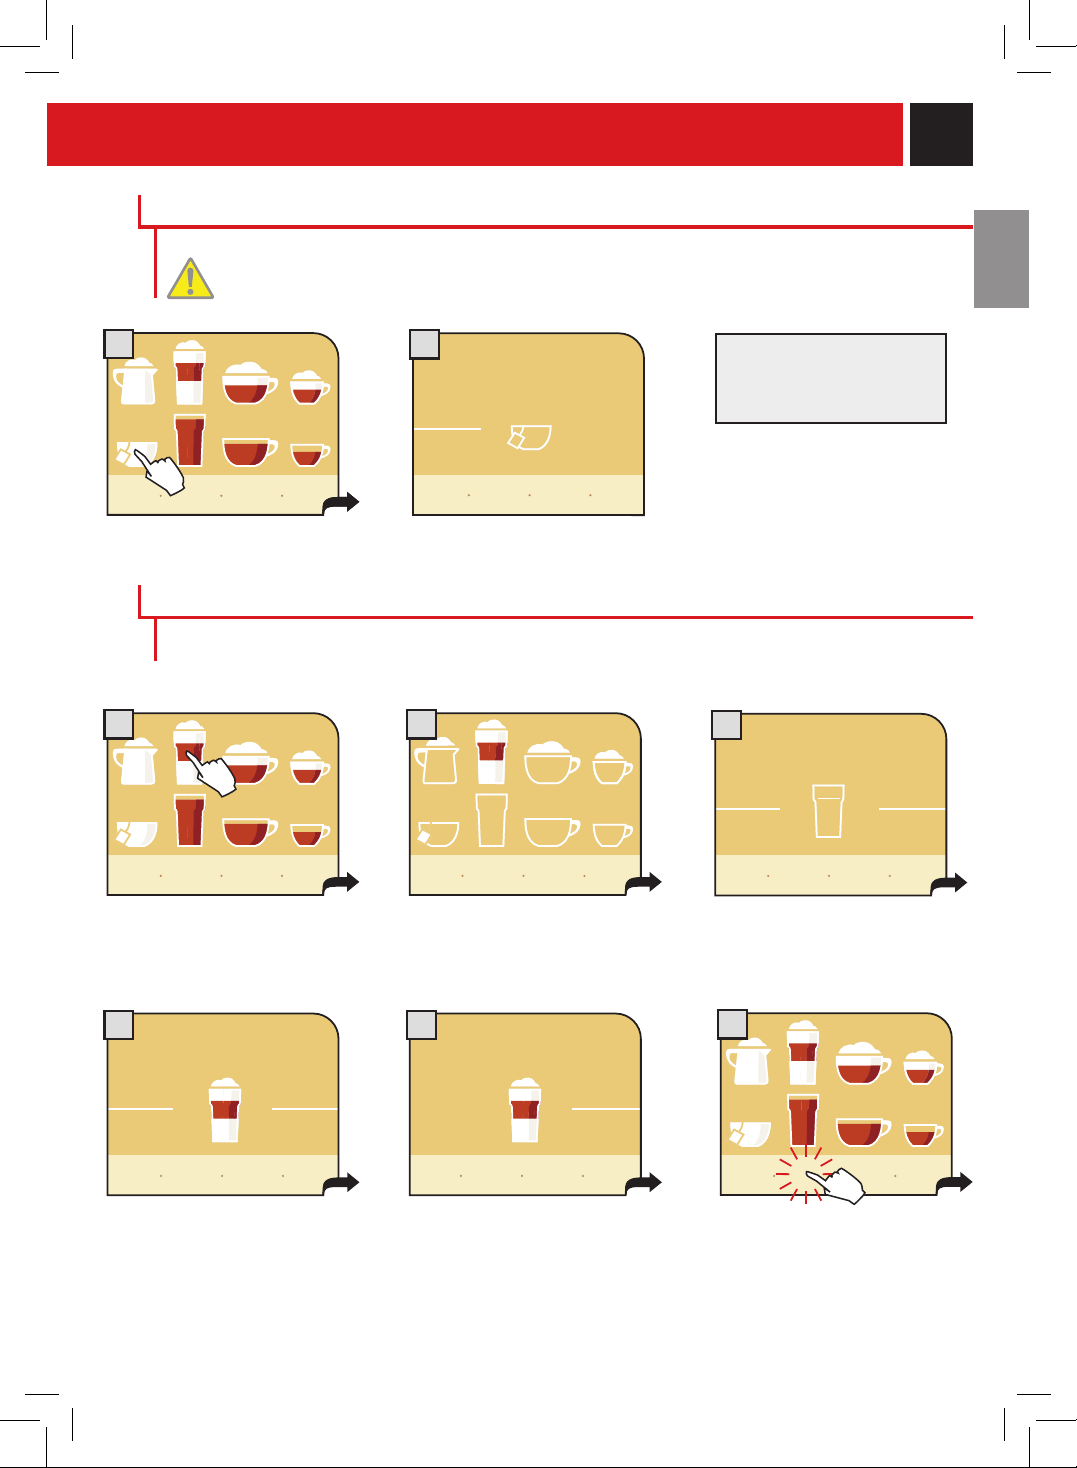
Pressthehotwatericononce.
HOT WATER
DISPENSINg mAY bE PRECEDED bY SHORT SPURTS Of HOT WATER AND
SCALDINg IS POSSIbLE. THE HOT WATER SPOUT mAY REACH HIgH
TEmPERATURES: DO NOT TOUCH IT WITH bARE HANDS.
Themachinewillbegindispensing
hotwater.
to dispense another cup of
hotwater,repeatthis
operation.
latte
macchiato
latte
macchiato
latte
macchiato
Themachinebeginsgrindingthe
setquantityofcoffee.
Selectthebeverageandpressthe
corresponding icon on the
display:oncefor1cupandtwice
for2cups.
Whenthecoffeenishesgrinding,
themachinewillautomatically
dispensetheprogrammedquantity
of hot milk.
Oncemilkhasbeendispensed,the
machine automatically dispenses
the coffee.
Afterthis,themachineallowsyouto
dispensemoremilkifyouwish.This
option remains active for
approximately2seconds.Toactivate,
pressthe“addmilk”icon.
The“milkrinsing”iconwillash
once the machine is done
dispensing in order to clean the
milkcircuit.Pressthe“milk
rinsing”icontocleantheinternal
milk circuit.
stop
milk
dispensing
add
milk
stop
water
dispensing
hot
water
milk
rinsing
fill the milk container
LATTE mACCHIATO
show icon
explanation
my custom
coffee
program-
ming
menu
show icon
explanation
my custom
coffee
program-
ming
menu
show icon
explanation
my custom
coffee
program-
ming
menu
stop
coffee
dispensing
stop
milk
dispensing
stop
coffee
dispensing
SEE INSTRUCTIONS ON PAgE 41 fOR OPTImAL mILK DISPENSINg.
WARNINg! DO NOT OPEN THE SERVICE DOOR DURINg THE bREWINg, DISPENSINg,
WASHINg OR RINSE CYCLE.
14
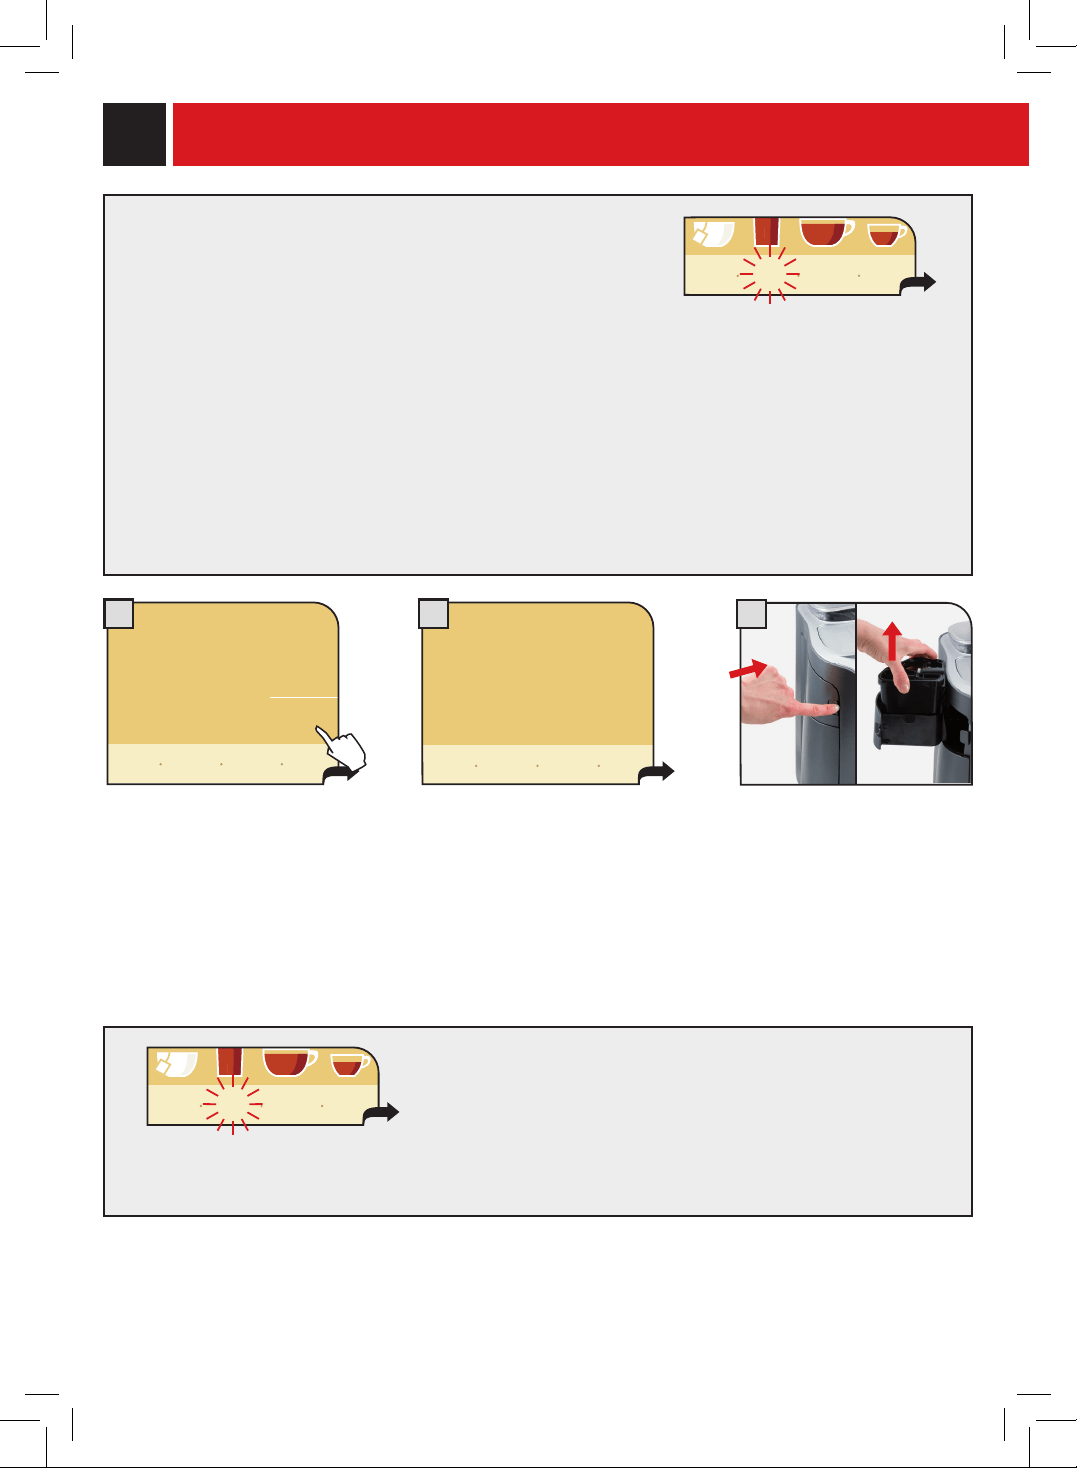
9
start
rinsing
milk rinsing cycle
8
rinsing...
rinsing milk circuit-
please wait
Iftheuserwishestocontinuepreparingotherdrinksthe
machinewillkeepthe“milkrinsing”signalactive.
After20minutesofinactivity,themachinerequirestheuser
toperformarinsingcycleasdescribedinstep7.
if the machine is turned off immediately after dispensing a
milkbeverage,thenexttimethemachineisturnedonitwill
requiretheusertoperformarinsingcycle.
Note:Beforeperformingthe“milkrinsing”functionmake
sure that:
1.anadequatesizedcontainerisplacedunderthe
dispensing head
2.thewatertankisfulloffreshwater.
7
to perform a rinse cycle,
press“startrinsing”.
Waitforthecycletobecompleted.
after this, the machine returns to
the main menu.
THIS PROCEDURE mUST bE PERfORmED fOR ALL mILK bEVERAgES!
AfTER USE, ALWAYS REmOVE THE mILK CONTAINER AND PUT IT IN THE REfRIgERATOR If IT
CONTAINS REmAININg mILK.
remove the container and put
it in the refrigerator if it
contains remaining milk.
THE CONTAINER mAY bE LEfT IN THE mACHINE ONLY If IT HAS bEEN WASHED WITH
DRINKINg WATER AND IT DOES NOT CONTAIN mILK (SEE PAgE 41).
after performing the rinse cycle, the machine reminds the user to
removethecontainerwiththeremainingmilkthroughthemessage
“removemilk”.
REmOVE THE mILK CONTAINER ONLY WHEN THE mACHINE IS ON.
show icon
explanation
my custom
coffee
program-
ming
menu
remove
milk
beverage dIspensIng
milk
cleaning
show icon
explanation
my custom
coffee
program-
ming
menu
After14daysfromtherstdispensingof
amilk-basedbeverage,themessage
“milkcleaning”isdisplayed;itis
advisabletocleanthemilkcircuitsas
shownonpage29.
after another 7 days the machine stops
dispensingmilk-basedbeveragesandthe
milkcircuitsmustbewashed;duringthis
phase,coffeeandhotwatermaybe
brewed.
15
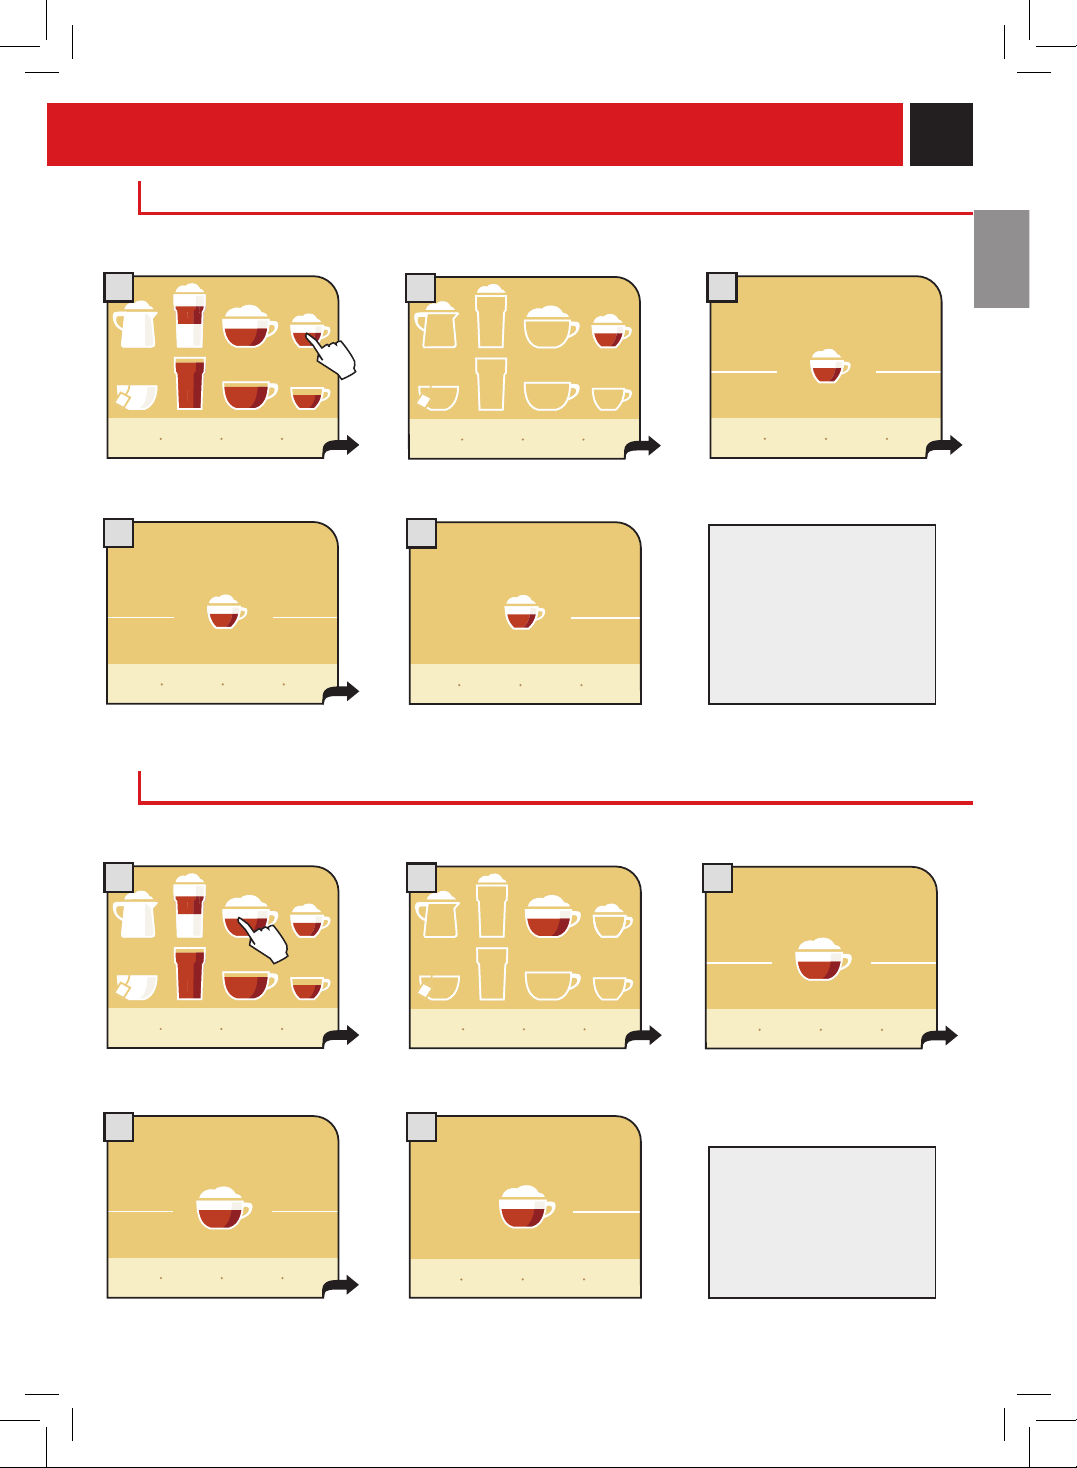
2
31
4
5
2
3
4 5
1
espresso
macchiato
espresso
macchiato
cappuccino
cappuccino
cappuccino
ESPRESSO mACCHIATO
Themachinebeginsgrindingthe
setquantityofcoffee.
press the icon once for 1 cup and
twicefor2cups.
Themachinebeginsbrewing
coffee.
Oncethecoffeehasbeenbrewed,the
machine automatically dispenses the hot milk.
CAPPUCCINO
Themachinebeginsgrindingthe
setquantityofcoffee.
press the icon once for 1 cup and
twicefor2cups.
Afterthis,themachineallowsyoutodispensemoremilkifyouwish.
Pressthe“addmilk”buttonwithin2seconds.
fill the milk container
fill the milk container
When the "milk rinsing"
symbolashes,cleanthe
milkcircuitsasdescribedfor
latte macchiato (see page 13,
step 6).
When the "milk rinsing"
symbolashes,cleanthe
milkcircuitsasdescribedfor
latte macchiato (see page 13,
step 6).
Whenthecoffeenishesgrinding,
themachinewilldispensethe
programmedquantityofhotmilk.
Oncemilkhasbeendispensed,themachine
automatically dispenses the coffee.
add
milk
to dispense more milk, press the
“addmilk”icon.
espresso
macchiato
show icon
explanation
my custom
coffee
program-
ming
menu
show icon
explanation
my custom
coffee
program-
ming
menu
stop
milk
dispensing
stop
coffee
dispensing
stop
milk
dispensing
stop
coffee
dispensing
stop
milk
dispensing
stop
coffee
dispensing
stop
milk
dispensing
stop
coffee
dispensing
add
milk
WARNINg! DO NOT OPEN THE SERVICE DOOR DURINg THE bREWINg, DISPENSINg,
WASHINg OR RINSE CYCLE.
WARNINg! DO NOT OPEN THE SERVICE DOOR DURINg THE bREWINg, DISPENSINg,
WASHINg OR RINSE CYCLE.
16
2
1
2
1
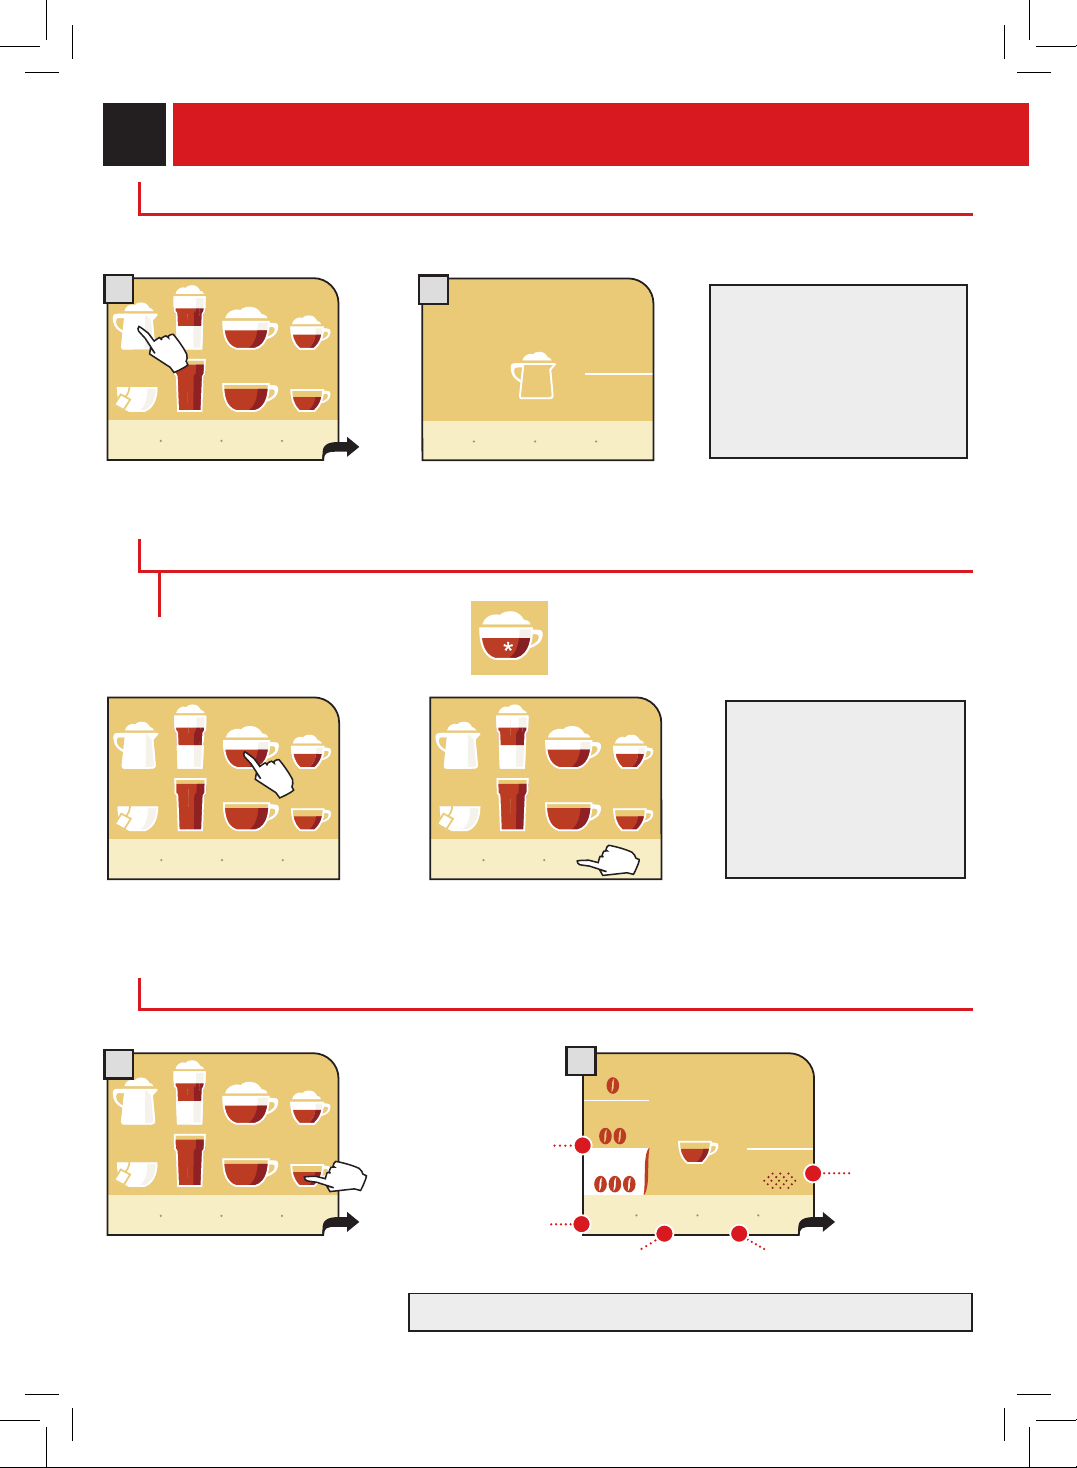
beverage dIspensIng - beverage prograMMIng
bEVERAgE PROgRAmmINg mENU
Holddownthebeverageiconfor
twoseconds
press the "my custom coffee"
iconandwithintwoseconds,
pressthebeverageicon.
Eachbeveragecanbeprogrammedaccordingtoyourindividualtaste.Customizationisshownonthe
displaywiththeadditionofanasterisk.
To program the desired beverage:
or
PROgRAmmINg COffEE bEVERAgES
Enterthemenuofthebeverageto
becustomizedbypressingand
holdingtheiconfor2seconds.
In this menu you can:
save settings.
return to the
previous
window.
adjust the
quantityofcoffee
tobeground
(aroma).
go
back
save
settings
restore
settings
strong
preground
my
espresso
medium
light
start!
Onceabeveragehasbeen
customizeditwillonly
dispense that type of
beverage.Tochangeormodify
thebeverageanewcustomi-
zationmustbedone.
Selectingadifferentquantityofcoffeechangesthearomaofthebeverage.
show icon
explanation
my custom
coffee
program-
ming
menu
show icon
explanation
my custom
coffee
program-
ming
menu
show icon
explanation
my custom
coffee
program-
ming
menu
select the use
ofpre-ground
coffee.
hot
milk
HOT mILK
press the hot milk icon once. the hot milk is dispensed.
fill the milk container
to dispense another cup of milk,
repeat this operation.
Whenthe"milkrinsing"symbol
flashes, clean the milk circuits as
describedforlattemacchiato
(see page 13, step 6).
show icon
explanation
my custom
coffee
program-
ming
menu
stop
milk
dispensing
WARNINg! DO NOT OPEN THE SERVICE DOOR DURINg THE bREWINg, DISPENSINg,
WASHINg OR RINSE CYCLE.
restore previous settings.
17
1
5
6 7
save settings.
Tobrewadifferentamountofcoffee
thantheonepresetbythe
manufacturer,press“custom
coffeeamount”beforetheendof
thebrewcycleinprogress.When
thequantityisreached,
press“stopcoffeedispensing”.
pressing start!allowsthe
machinetobrewcoffee.
Themachinewillautomaticallystartand
nishabrewingcycleaccordingtothe
standard settings.
Thebrewcyclemaybe
interrupted onlybypressing
“stopcoffeedispensing”.
if the icon is not pressed, the
coffeecanoverowinthe
cup.
Oncethebrewcyclenishes,
press "savesettings"withinve
seconds.
if the "save settings" icon is
not pressed the machine
returns to the main menu
and the customized settings
willnotbesaved.
saved!
Thedisplayshowstheconrmationof
the memorized settings, and the
machine automatically returns to the
main menu.
PROgRAmmINg mILK bEVERAgES
Enterthemenuofthebeverageto
becustomizedbypressingand
holdingtheiconfor2seconds.
In this menu you can:
adjust the
quantityof
coffeetobe
ground.
select the use
ofpre-ground
coffee.
save settings.
return to the
previous
window.
my
espresso
custom
coffee
amount
my
espresso
my
espresso
my latte
macchiato
fill the milk tank
after pressing the start!
button,thebrewcyclewill
start.
my
espresso
my
espresso
show icon
explanation
my custom
coffee
program-
ming
menu
go
back
save
settings
restore
settings
strong
preground
medium
light
start!
go
back
save
settings
restore
settings
strong
preground
medium
light
start!
stop
coffee
dispensing
custom
coffee
amount
stop
coffee
dispensing
save
settings
go
back
restore previous settings.
3 4
2
18
8
9
pressing start!allowsthe
machinetobrewcoffee.
Themachinewillautomaticallystart
andnishdispensingmilkaccording
to the standard settings.
my latte
macchiato
Todispenseadifferentamountofmilkthantheonepresetbythe
manufacturer,press“custommilkamount”beforetheendofthe
dispensingcycleinprogress.Whenthequantityisreached,press
“stopmilkdispensing”.
the dispensing cycle may
beinterruptedonlyby
pressing“stopmilk
dispensing”.
if the icon is not pressed,
themilkmayoverow.
my latte
macchiato
Themachinewillautomatically
startandnishabrewingcycle
according to the standard
settings.
my latte
macchiato
Tobrewadifferentamountofcoffeethantheonepresetbythe
manufacturer,press“customcoffeeamount”beforetheendofthe
brewcycleinprogress.Whenthedesiredquantityis
reached,press“stopcoffeedispensing”.
Thebrewcyclemaybe
interrupted onlybypressing
“stopcoffeedispensing”.
if the icon is not
pressed, the coffee may
overow.
save
settings
Oncethebrewcyclenishes,
press "savesettings"withinve
seconds.
if the "save settings" icon is
not pressed the machine
returns to the main menu
and the customized settings
willnotbesaved.
saved!
my latte
macchiato
Thedisplayshowstheconrmationofthe
saved settings, and the machine
automatically returns to the main menu.
my latte
macchiato
my latte
macchiato
after pressing the start!
button,thebrewcyclewill
start.
my latte
macchiato
go
back
save
settings
restore
settings
strong
preground
medium
light
start!
custom
coffee
amount
stop
coffee
dispensing
stop
milk
dispensing
custom
milk
amount
stop
milk
dispensing
custom
milk
amount
custom
coffee
amount
stop
coffee
dispensing
stop
milk
dispensing
custom
milk
amount
custom
coffee
amount
stop
coffee
dispensing
stop
milk
dispensing
custom
milk
amount
custom
coffee
amount
stop
coffee
dispensing
go
back
beverage prograMMIng
3
5
7
6
4
19
prograMMIng The MaChIne
mACHINE SETTINgS
Whenthemachinesettingsareselectedthefollowingscreenappears.Hereyoucan:
set the language of the menus.
set the cup illumination function.
setthewaterlterfunction.
set/activate the tones.
setthewaterhardness.
set the circuit rinse cycle.
settheoperationofthecupwarmingplate.
setthebrightnessofthe
display colors.
Afterhavingseteachofthefollowingmenus,press
-"goback"toreturntothepreviousscreen
-"restoredefaultsettings"torestoretheinitialvalues
-"savesettings"tosavethesettings
-"backtomenu"toreturntothemainmenu
some of the machine’s functions can
beprogrammedtocustomize
operationsaccordingtoyourown
requirements.
Pressthe"programmingmenu"button.
The programming menu will access:
programming the machine
settings (see page 19)
special functions
(see page 39)
maintenance (cleaning the
machine)(seepage28)
Indepthbeverageprogramming
(seepage23)
-Currentdateandtime
-Standbytimer
-Timestoturnon/turnoffover
the span of a day (see page 35).
Extrafunctions(seepage25)
Activatestandby
exit
show icon
explanation
my custom
coffee
program-
ming
menu
main-
tenance
main
menu
specials
machine
settings
clock
settings
extras
beverage
settings
stand-by
back to
coffee
menu
alerts &
acoustic
settings
machine
settings
display
language
rinsing
water
hardness
water
lter
cup
illumination
cup
warmer
go back
restore
default
settings
back to
menu
20
“LANgUAgE”
for changing the language of the display.
Thisfunctionwasdescribedatthe
beginningofthemanual.
this setting is of fundamental
importance for correctly adjusting
the parameters of the machine
accordingtothecountrywherethe
machine is used.
language
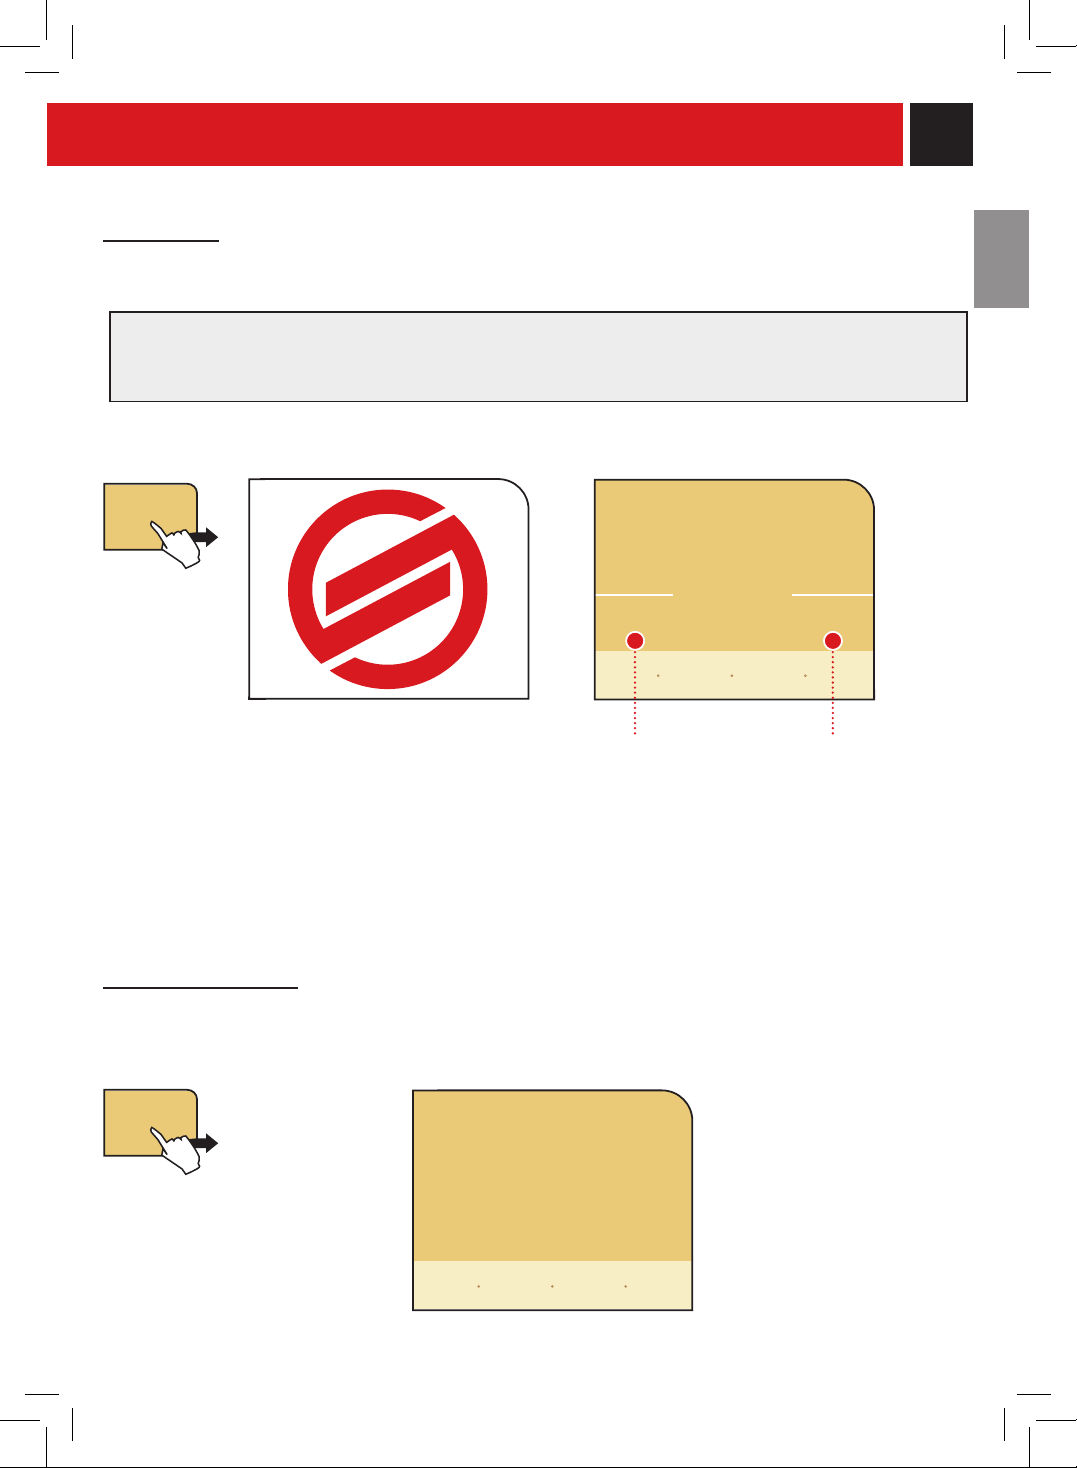
“WATER fILTER”
Thewaterlterpurieswaterandallowsyoutotastethefullaromaofcoffee.
proceedwiththeinitialization
(cleaning)ofthewaterlter(see
page 7). after initialization the
«insert» option is activated.
set the machine for the
operationwithoutwaterlter.
set the machine for the
operationwithwaterlter.
turn off illumination.
“CUP ILLUmINATION”
Thisfunctionallowsactivating/deactivatingtheilluminationofthebeveragedispensingarea.
turn on illumination.
italiano (ch)
language
1/2
français
deutsch
nederlands
english
Italiano (i)
inserted
not
inserted
water lter
activation
note:
• Press"waterlteractivation"everytimeanewwaterlterisinstalled.
• Press"notinserted"whenthewaterlterisnotused.
• Press“inserted”whenthewaterlterisused.Thisfunctionmaybeactivatedalsoafterhavingpressed
the“waterlteractivation”icon.
cup
illumination
water
lter
In this menu you can:
In this menu you can:
water
lter
cup
illumination
off
on
go back
back to
menu
go back
restore
default
settings
back to
menu
save
settings
go back
restore
default
settings
back to
menu
save
settings
Pressthearrowtodisplaythe
next page.
prograMMIng The MaChIne
21
1
2
1 2 3 4
a
b
c
intenza aroma system
Machinewaterhardnesssetting
rinsing
on
off
“RINSE”
Tocleantheinternalcircuitsforcoffeebrewinginordertoguaranteethatbeveragesarebrewedwithfreshwater
only.
In this menu you can:
deactivate the rinse cycle. activate the rinse cycle.
note: this rinse cycle is
performed every time the
machineisturnedonwhenit
is cool.
water
hardness
rinsing
water
hardness
WATER HARDNESS - INTENZA AROmA SYSTEm
Withthe"waterhardness”functionyoucanadjustyourmachineandtheIntenzawaterltertothelevelofhardness
ofthewateryouuse,sothatthemachinewillrequestdescalingattherightmoment.
ThewaterhardnessintheIntenzawaterlterisexpressedonascalefromAtoC.
Thewaterhardnessinthemachineisexpressedonascalefrom1to4.
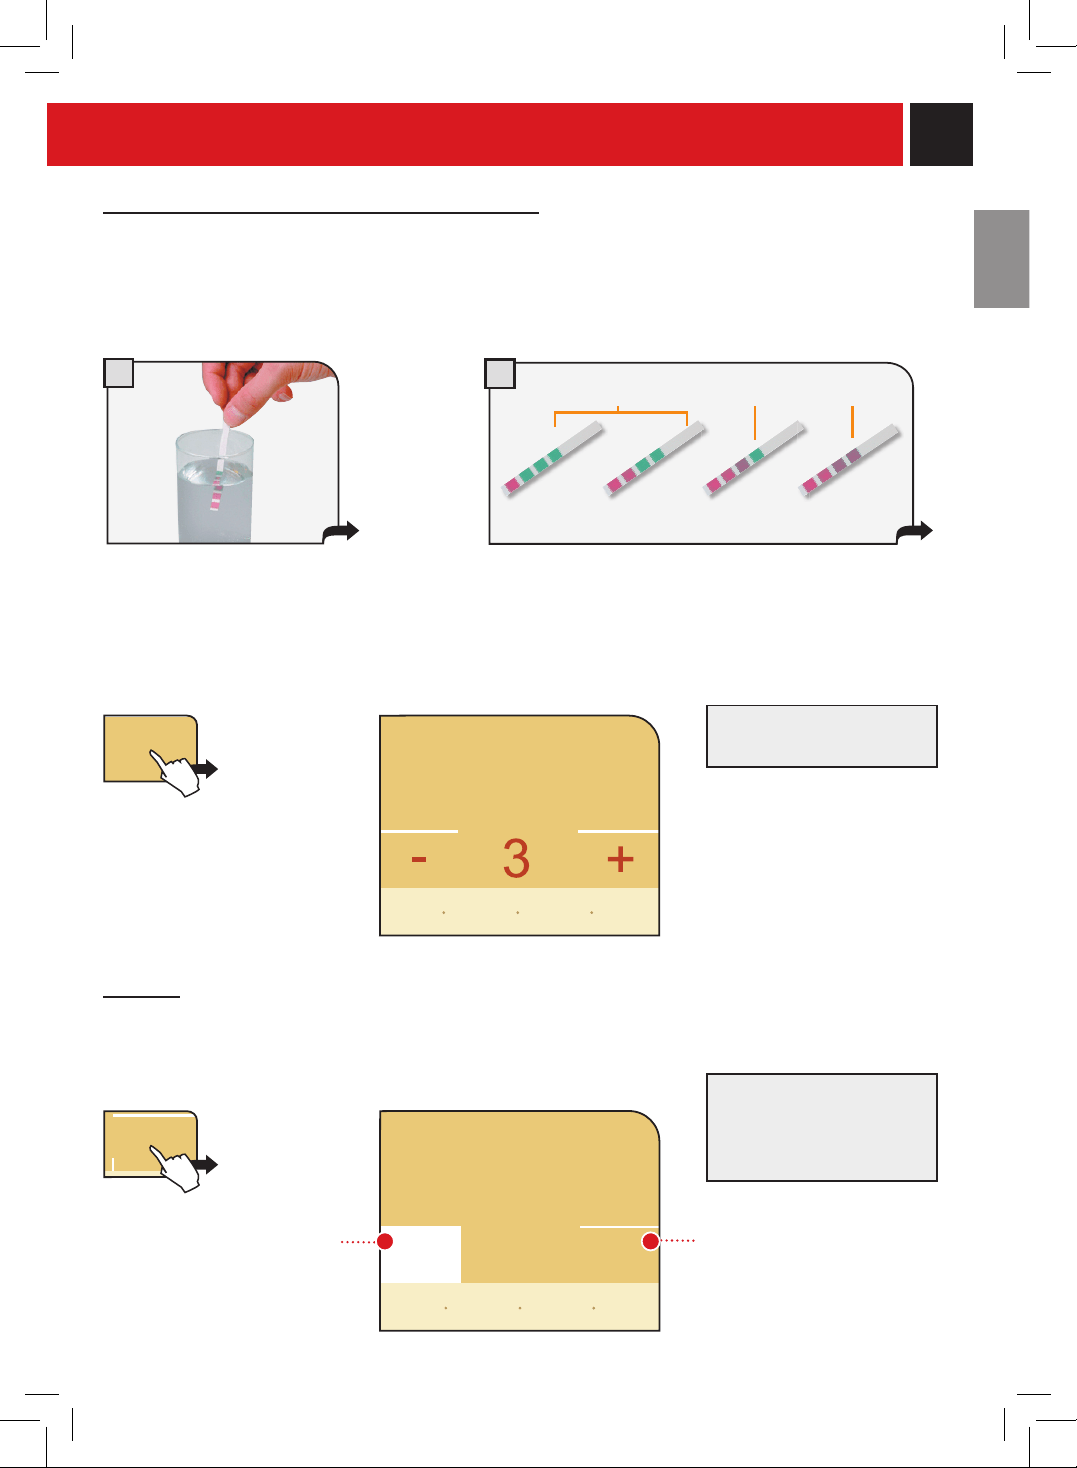
Immersethewaterhardness
stripforonesecondinwater.
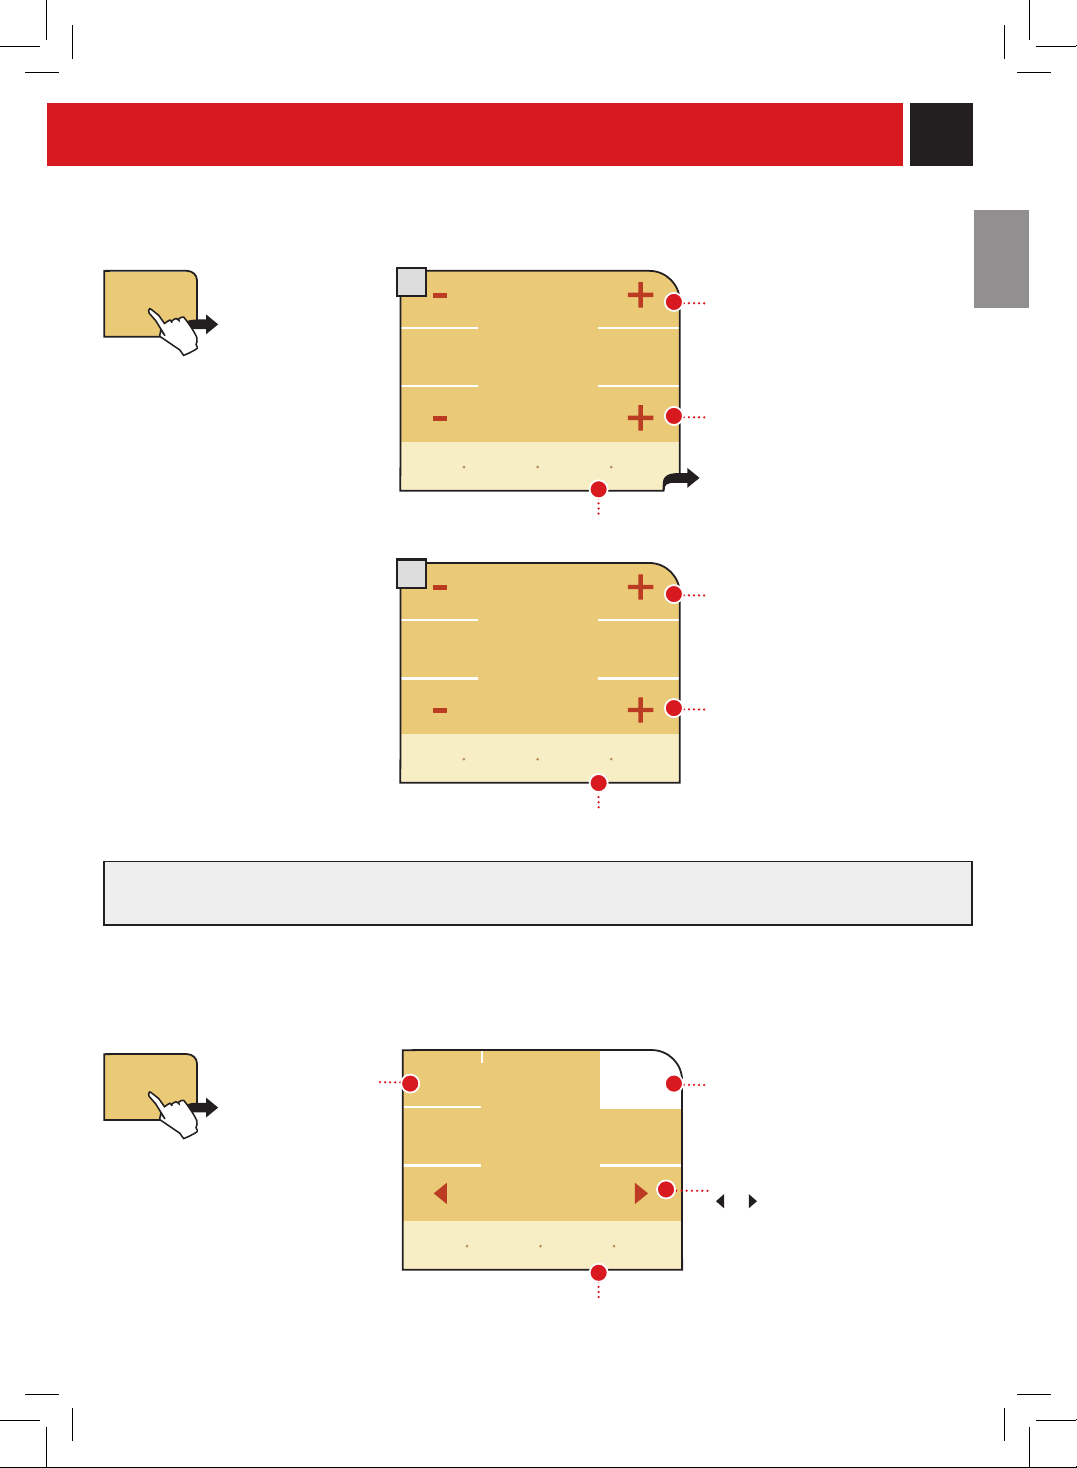
Setthewaterhardnessonthe
machinebypressing+ or -
Checkthewaterhardnesslevelobtainedfromthetest.
ThemeasurementcanbeusedtosettheIntenzaAroma
system correctly (see page 7). matching parameters are
describedontheupperpart.
Theteststripcanbeused
only for one measurement.
Pressthe"waterhardness"icon.
go back
restore
default
settings
back to
menu
save
settings
go back
restore
default
settings
back to
menu
save
settings
22
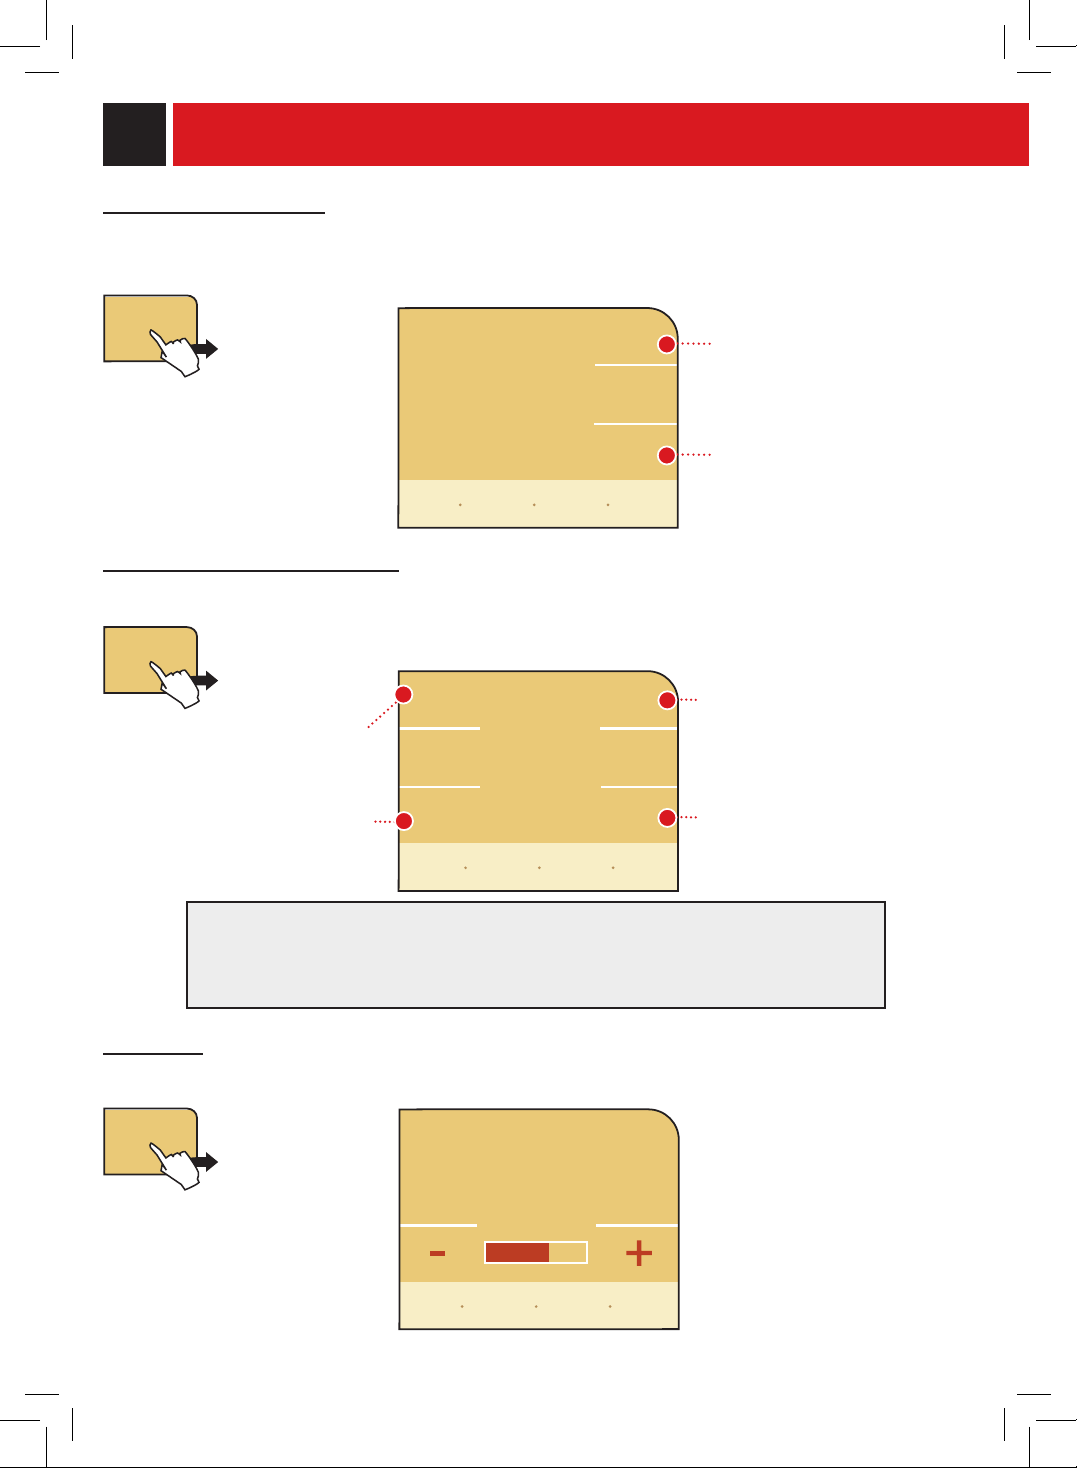
In this menu you can:
activate/deactivate a machine
ready tone.
activate/deactivate a tone
eachtimeabuttonispressed.
activate/deactivate a tone that
remindstheusertoproceedwith
washingthecircuitstoprepare
milk.
Note:Thetonesaredividedinthefollowingway:
•Longcontinuoustoneindicatesamachinemalfunction;
•Brieftonewhenabuttonispressedandtoindicatethatthemachineisreadyforuse;
•Intermittenttonetoindicatethatthemachineneedstobecleaned.
activate/deactivate a tone that
reminds the user to perform the
rinse cycle of the milk circuits (the
tone is activated after one minute
fromthebeveragebrewing).
machine ready
tone
off
milk quality
alert
off
key tones
on
alerts &
acoustic
settings
go back
restore
default
settings
back to
menu
save
settings
milk rinsing
alert
off
go back
restore
default
settings
back to
menu
save
settings
“CUP WARmINg PLATE”
In this menu you can:
ACOUSTIC TONES AND ALARmS
Toactivate/deactivatethemachine’sacoustictones.Pressingthebuttondoesnotimmediatelychangethestatus.
“DISPLAY”
Tosetthecorrectbrightnessofthedisplaycolors,pressthe“display”icon.
Adjustthebrightnessby
pressing + or -
cup
warmer
display
alerts &
acoustic
settings
display
go back
restore
default
settings
back to
menu
save
settings
prograMMIng The MaChIne
cup
warmer
off
on
Toactivate/deactivatethecupwarmingsurfacelocatedonthetopofthemachine.Thecupwarmingsurfaceisalwaysoff
whenthemachineisinstand-bymode.
tokeepthecupwarming
surface on.
tokeepthecupwarming
surface off.
23
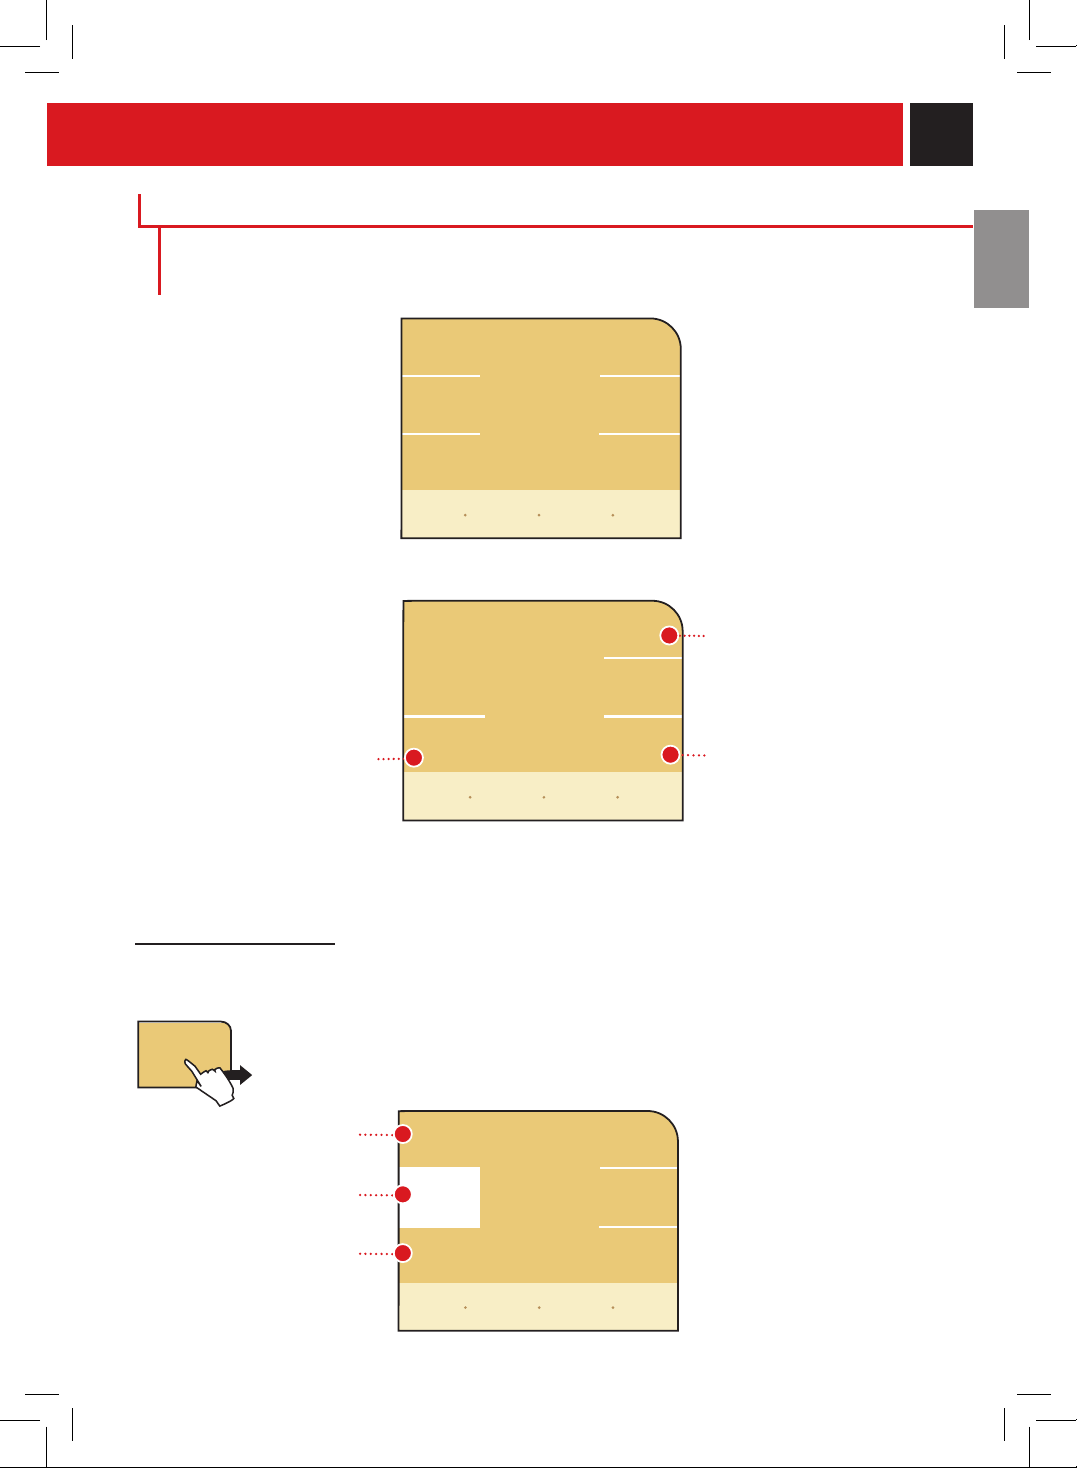
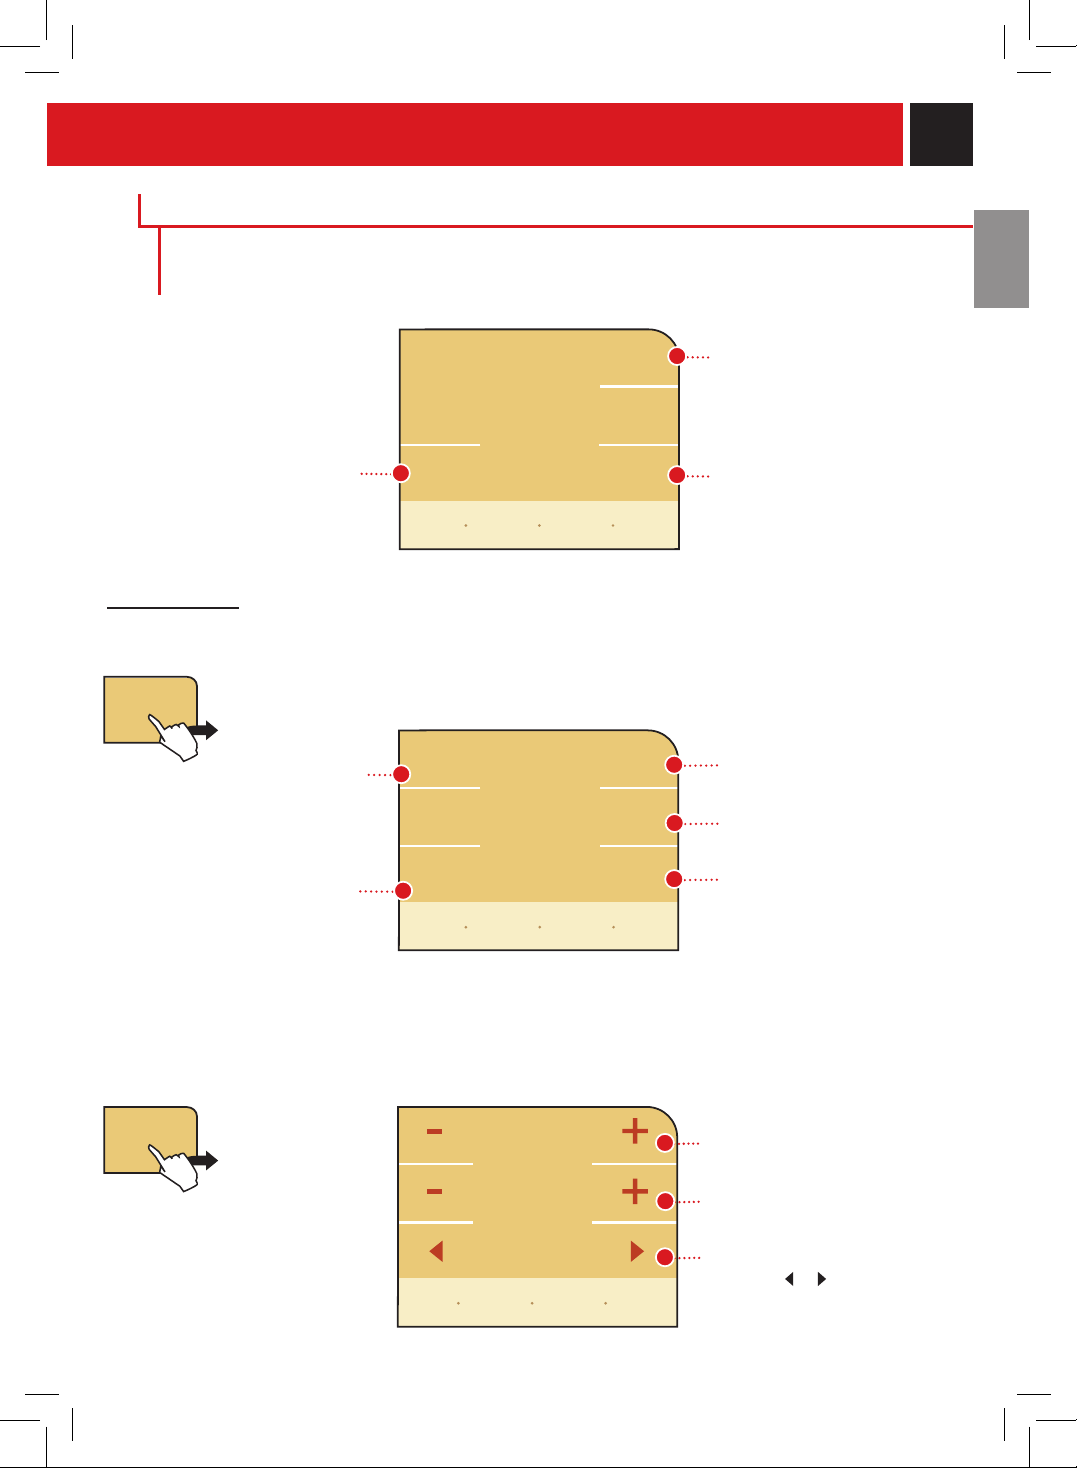
bEVERAgE SETTINgS
Toadjustthegeneralbrewparametersofthevarioustypesofcoffee,pressthe“beveragesettings”
buttononthemainmenu.
for every single beverage, you can adjust:
thecoffee’sbrewtemperature.
thequantityofcoffeetobeground
andtheuseofpre-groundcoffee.
the coffee’s
pre-brewing.
the current programming status is indicated according to each parameter.
bREW TEmPERATURE
Tosetthetemperatureforpreparingcoffee,pressthe“temperature”iconandselectthedesiredtemperature.
then, press the "save settings" icon.
lowtemperature
medium temperature
high temperature
temperature
medium
beverage
settings
long
coffee
coffee
cappuccino
espresso
latte
macchiato
espresso
macchiato
low
coffee
temperature
medium
high
coffee
settings
temperature
medium
strength
medium
prebrewing
normal
go back
back to
menu
go back
restore
default
settings
back to
menu
go back
restore
default
settings
back to
menu
save
settings
24
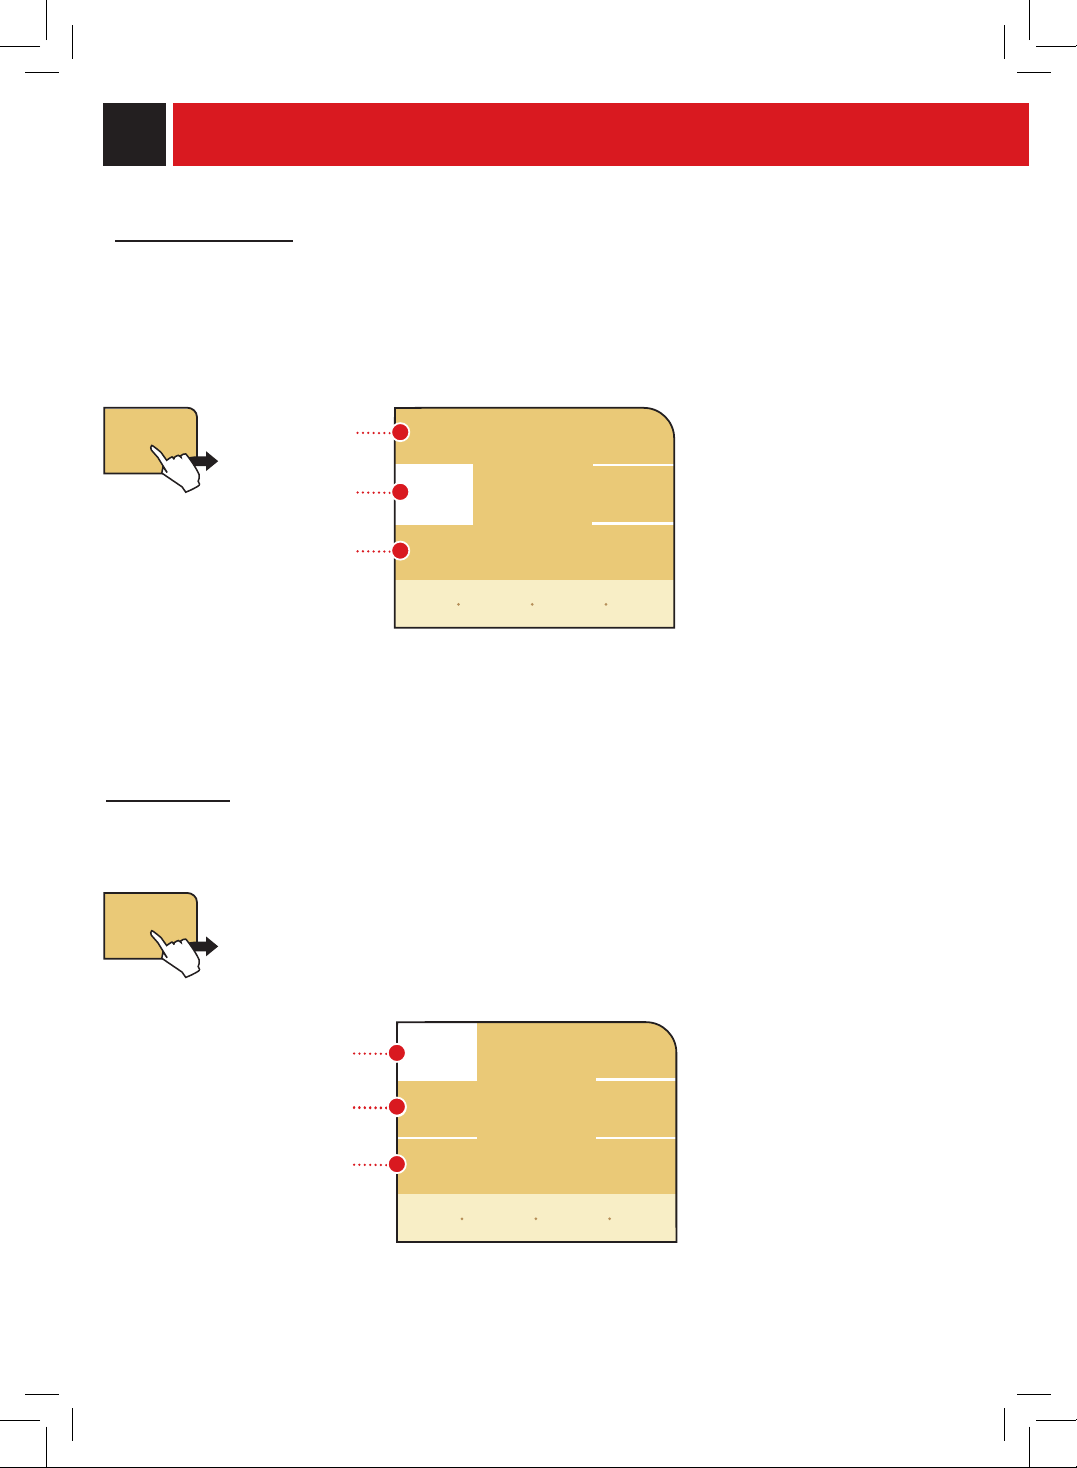
AROmA OPTI-DOSE
Tosetthequantityofcoffeetobeground,andtosettheuseofpre-groundcoffee.Youcanhaveyourbeverage
withthequantityofcoffeeyoudesireoryoucanchoosetoprepareitwithdecaffeinatedcoffeebyusingthe
“preground”function.
light
medium
strong
normal
coffee
prebrew
strong
off
PREbREWINg
Tosettheprebrewingfunction.Thecoffeeisslightlydampenedbeforebrewing,bringingoutthefullaromaofthe
coffeeandextractingthebestavor.
normalprebrewing
strongprebrewing(longer)
deactivateprebrewing
preground
strenght
medium
prebrewing
normal
light
coffee
strength
medium
strong
go back
restore
default
settings
back to
menu
save
settings
go back
restore
default
settings
back to
menu
save
settings
prograMMIng The MaChIne
25
COffEE Of THE WORLD
Thisfunctionallowstheusertopreparecoffeeaccordingtothemostfamousrecipesintheworld.
coffee
of the
world
espresso
italiano
ristretto
good night
milk
café creme
café
american
coffee
good morning
coffee
prepare a true italian
ristretto.
prepare a typical north european
coffee.
prepare a typical french/
Swisscoffee.
prepare a flavorful latte macchiato
withoutthefearofnotbeingable
to sleep.
prepare a coffee for a day full
of energy.
prepare a typical italian
espresso.
prepare a typical american coffee.
beverage
counters
extras
coffee
of the
world
demo
Therearesomeadditionalfunctionsofthemachine.Pressingthe“extras”iconallowsyoutoaccess
theextrasmenuandthefollowingmessagewillappearonthedisplay.
ADDITIONAL fUNCTIONS
In this menu you can:
access some of the most famous
recipesintheworld.
activatethe“demo”functionto
showthemachine’smain
functions.
viewthequantitiesofeverytype
ofproductbrewed.
In this menu you can:
coffee
of the
world
go back
restore
default
settings
back to
menu
save
settings
go back
back to
menu
26
this message
remains active for
approximately 5
seconds and then
returns to the main
message.
american
coffee
Thebeveragesinthe“CoffeeoftheWorld”function,if
saved,willbeassociatedwiththefollowingbuttons,
andaccompaniedbyanasterisk:
•ristretto:
•Italianespresso:
•coffee:
•cafécrème:
•Americancoffee:
•goodmorningcoffee:
•goodnightmilk:
espresso (small cup)
espresso (small cup)
coffee (medium cup)
coffee (medium cup)
long coffee (glass)
espresso (small cup)
latte macchiato
Tosavethebeverageyoujustmade,thedisplayshowstheiconthatallowsthisfunction.
american
coffee
If,forexample,youwanttotasteatypicalAmericancoffee,youmustpressthe“Americancoffee”icon.Inthiscase,
thefollowingmessageappearsinthedisplay.
Afterbrewingthedesiredbeverage,itcanbesavedononeoftheiconsofthemainmenu.
go
back
AdjustthepositionoftheSBSknob
andcupsizeasshown.
pressing the
go!
buttonstarts
thebrewingprocess.
return to the recipe
preparation menu
savethebeverage
Youcanassociateonlyonebeveragewithasingleicon.Theoriginalsettingscanberestoredusingthe“Beverage
Settings”menu.
is now saved under the icon
choose an icon to brew it
do you want to save
this beverage?
american coffee
go!
no yes
prograMMIng The MaChIne
27
espresso (small cup)
espresso (small cup)
coffee (medium cup)
coffee (medium cup)
long coffee (glass)
espresso (small cup)
latte macchiato
beverage counters
bEVERAgE COUNTER
Thisfunctionshowshowmanybeverageshavebeenpreparedforeverysingletypeofbeverage.
hot milk 0
latte macchiato 1
cappuccino 0
espresso macchiato 0
hot water 0
coffee long 15
coffee 0
espresso 0
this function demonstrates different features of the machine.
Thisisthewaythe“demo”mode
operationbegins.Themessagesthat
followillustratethemachine’s
functionality.
Toexitthismode,pressanywhereon
the display.
DEmO mODE
Note:Whenthisfunctionisactivated,themachineisinstand-byandallthefunctionsaredisabled.The“demo”
modeissavedevenwhenthemachineisturnedoffbythemainswitch.
Thenexttimethemachineisturnedon,themachinewillstillbeinthe“demo”mode.
Pressingthedemobuttononthedisplayshows:
continue the tour exit and activate the
machine’s normal functions
demo
beverage
counters
no yes
leave demo mode?
go back
back to
menu
28
coffee
cleaning
cycle
maintenance
descaling
cycle
lock
display
mAINTENANCE
Toclean/maintainallofthemachine’sinternalcircuits,pressthe“maintenance”icononthemain
programming menu.
In this menu you can:
beginthewashcycleofthebrew
group.
perform the descaling cycle.
beginrinsingthemilk
circuits.
lock the touch screen (to perform
cleaning of the display).
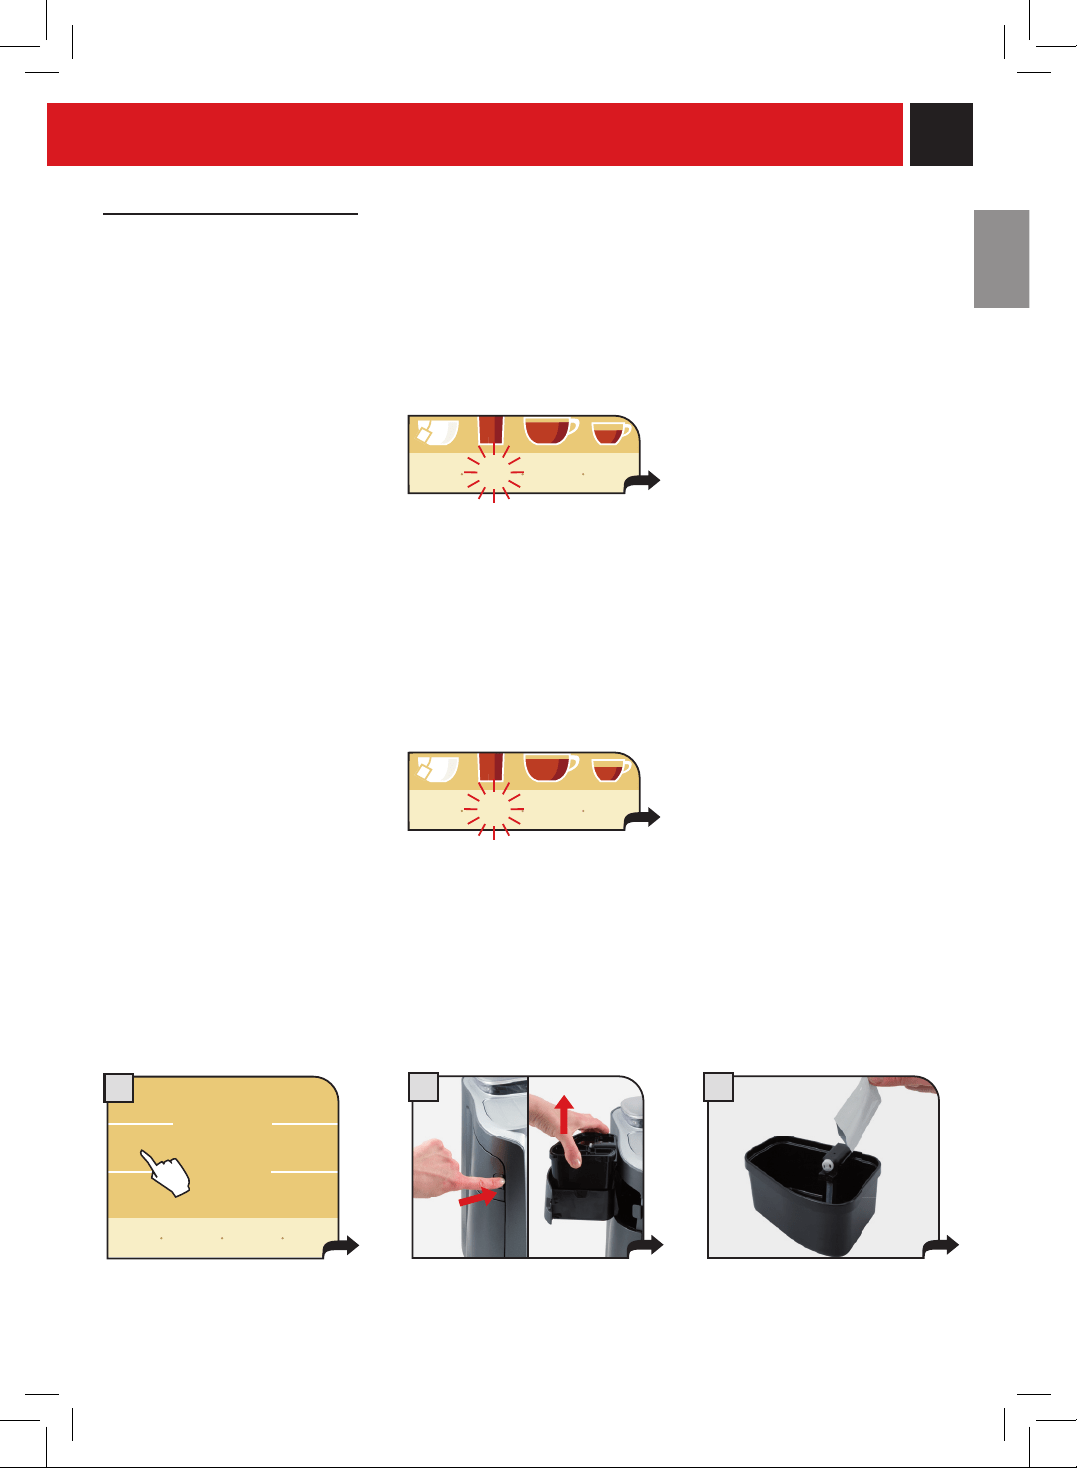
mILK CIRCUIT RINSE CYCLE
to rinse the machine’s internal circuits used for preparing milk.
Thisshortcyclemustbeperformedafter20minutesfromthelastdispensingofabeveragewithmilk.
Ifitisnotperformed,themachinecomestoahaltanddoesnotallowthedispensingofmilkbeverages.
before performing this function make sure that:
1. a large enough container is positioned under the spout.
2.themilkcontainerhasbeencorrectlyinsertedinthemachine.
3.thewatertankcontainsasufcientquantityofwater.
Pressthe"milkrinsingcycle"buttonandthen"startrinsing"tostartthemilkcircuitrinsecycle.
Waitforthecycletonish.
Themachinewillreturntothemain
menu.
remove the container, rinse and
dry.
milk
cleaning
cycle
milk circuit
rinsing
cycle
beginwashingthemilk
circuits.
rinsing...
rinsing milk circuit-
please wait
milk circuit
rinsing
cycle
start
rinsing
go back
back to
menu
AfTER USE, ALWAYS REmOVE THE mILK CONTAINER AND PUT IT IN THE REfRIgERATOR.
Thecontainermaybeleftinthemachineonlyifithasbeenwashedwithdrinkingwateranditdoesnotcontainmilk;
see page 41.
WARNINg! DO NOT OPEN THE SERVICE DOOR DURINg THE bREWINg, DISPENSINg, WASHINg
OR RINSE CYCLE.
prograMMIng The MaChIne
29
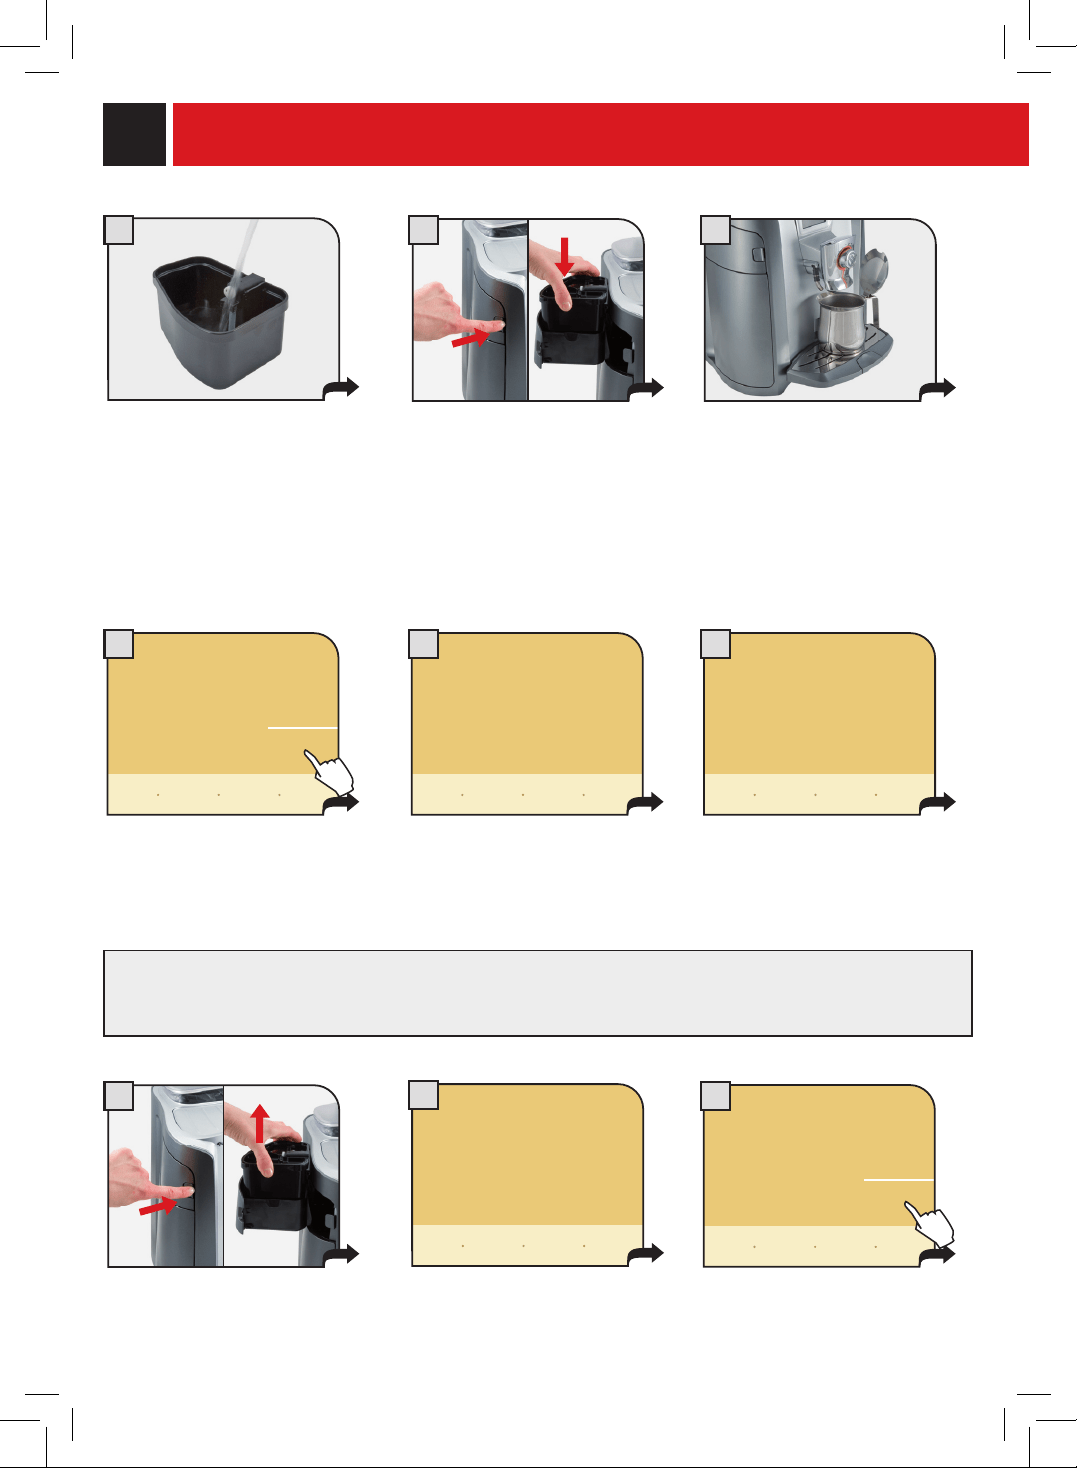
mILK CIRCUIT WASH CYCLE
Towashthemachine’sinternalcircuitsusedforpreparingmilk.
Thiscycleisproposedafter14daysfromtherstdispensingofamilk-basedbeverage.After14days,the“milk
cleaning”messagestartsashing(seepage14).Performthewashcycleasdescribedinthissection.
Selectthefunctionby
pressingthe“milkcleaning
cycle”icon.
coffee
cleaning
cycle
maintenance
descaling
cycle
lock
display
milk
cleaning
cycle
milk circuit
rinsing
cycle
go back
back to
menu
Pushthe“milkcleaning”buttonandrefertotheinstructionsbelow,atstep2.Themachineswitchestothestatus
describedatpoint7.
Ifthemilkcircuitwashcycleisnotperformedafter14days,thedispensingofmilk-basedbeverageswillbestill
possibleforonly7moredays.After7days,thewashcyclemustbeperformedbecausethedispensingofmilk-based
beveragesisdisabled.(Themachinestillenablesdispensinghotwaterandcoffee).
Toremindtheuserofthisimportantoperation,themessage“milkcleaning-3”isshownonthedisplay3daysbefore
thedeadlineandisupdatedonsubsequentdays.
before performing this function make sure that:
1. a large enough container is at hand.
2.themilkcontainerhasbeenadequatelycleanedofallmilkresidue.
3.thewatertankcontainsasufcientquantityofwater.
THE WASH CYCLE CANNOT bE INTERRUPTED. A PERSON mUST bE PRESENT DURINg THE OPERATION.
USE ONLY THE PROVIDED mILK CLEANINg DETERgENT.
open the compartment and
remove the milk container.
insert the contents of the
detergent packet into the
container.
3
2
WARNINg! DO NOT OPEN THE SERVICE DOOR DURINg THE bREWINg, DISPENSINg, WASHINg
OR RINSE CYCLE.
1
milk
cleaning
show icon
explanation
my custom
coffee
program-
ming
menu
milk
cleaning
-3
show icon
explanation
my custom
coffee
program-
ming
menu
30
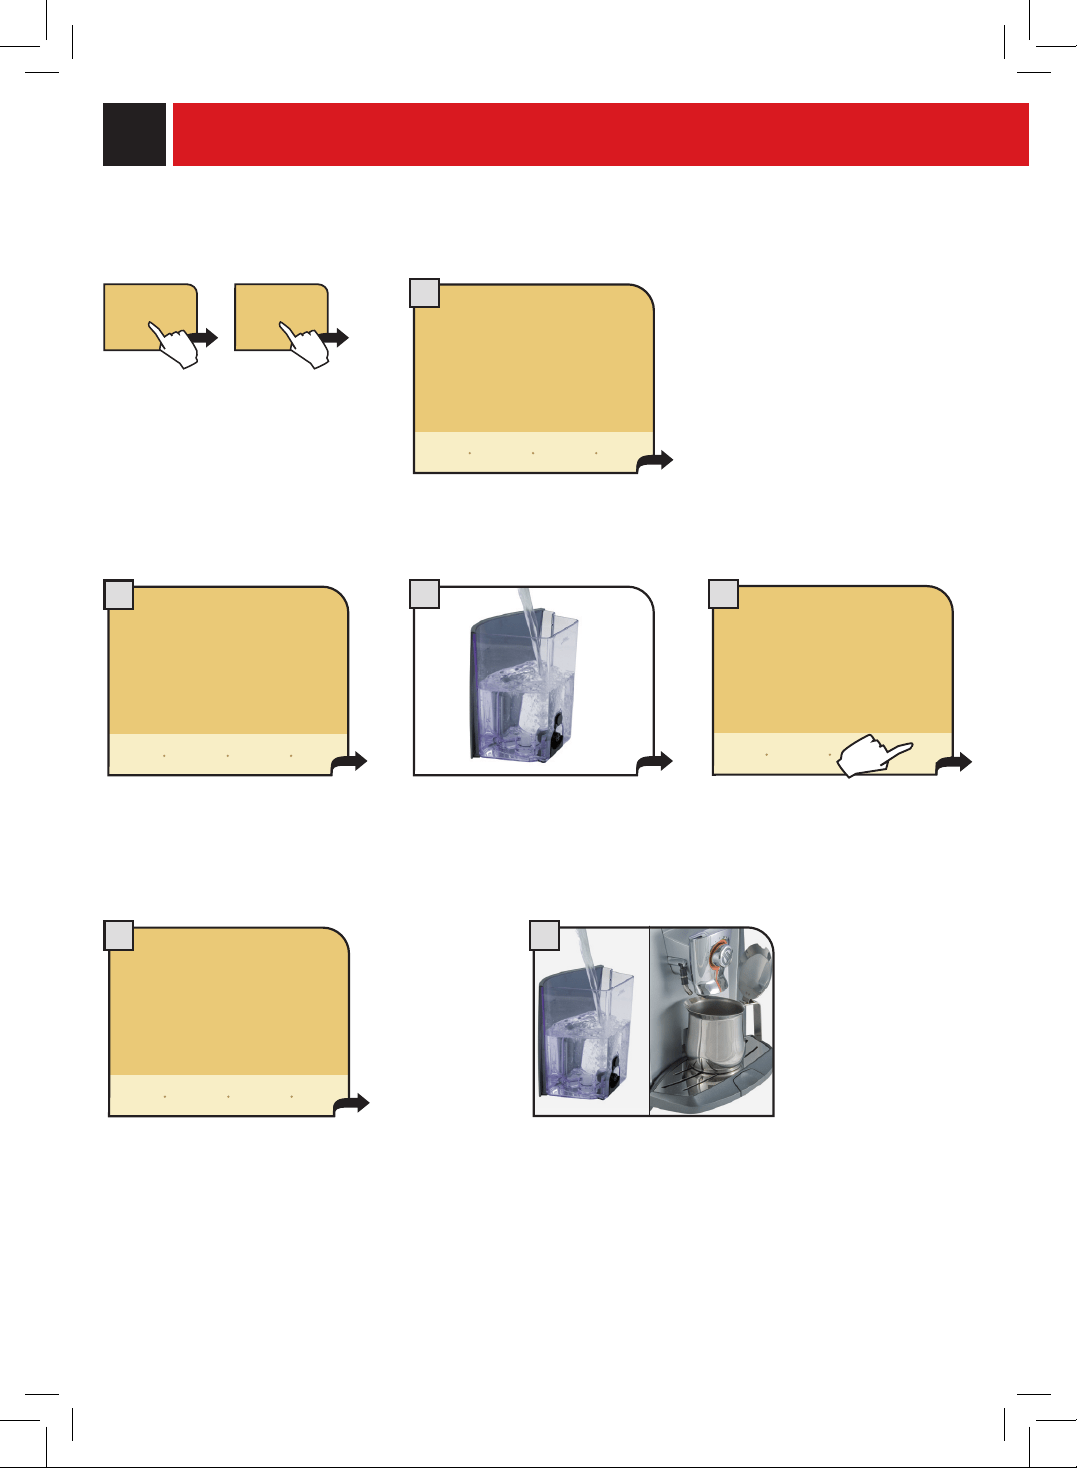
add cleaner
to milk conteiner
milk cleaning cycle
cleaning...
milk cleaning cycle
Fillthemilkcontainerwith
freshwateruptothe«max»
level.
7 8
Positionanadequatelysized
container under the dispensing
spout.
Thewashcyclestartsautomati-
cally.
Waitforthewashcycletonish.
9
11
12
ok
insert the container into the
compartment and close.
close the compartment.
press ok.
Whenthewashcyclehas
nishedthefollowingappears…
the machine signals the cycle is
completewithanacoustictone.
remove the milk container.
start
Rinsethecontainerandllit
withfreshwater.
insert the container and press
the icon.
rinse the milk container
milk cleaning cycle
fill milk container with cold water
milk cleaning cycle
start rinsing cycle
milk cleaning cycle
5 64
10
Detergentresidueorwatermayremaininthecontainerduringthewashandrinsecycles.Inthiscase,emptythe
containerandrinseoutanyresiduebeforellingitagain.
prograMMIng The MaChIne

31
13
14
16
15
rinsing...
milk cleaning cycle
rinse the milk container
milk cleaning cycle
fill milk container with cold water
milk cleaning cycle
Wait… Whentherinsecyclehasnished
theabovemessagewillappear.
remove the milk container.
Rinsethecontainerandllit
withfreshwater.
perform another rinse cycle as
shownpreviously.
Whennished,themachine
automatically returns to the
main menu.

32
COffEE CIRCUIT CLEANINg CYCLE (bREW gROUP WASH CYCLE)
Tocleanthemachine’sinternalcircuitusedforbrewingcoffee.
Itisadvisabletoperformthiswashcycleafter500coffeebrewingcycles,ormonthly.
PackagesofSaecodetergenttabletsmaybepurchaseddirectlyfromSaecooranauthorizedservicecenter.
note: before performing this function make sure that:
1. a large enought container is positioned under the spout.
2. theappropriatetabletforcleaningthebrewgrouphasbeeninsertedintothe
pre-groundbypassdoser.
3. thewatertankcontainsasufcientquantityofwater.
THE WASH CYCLE CANNOT bE INTERRUPTED.
A PERSON mUST bE PRESENT DURINg THE OPERATION.
Pressthe"coffeecleaningcycle"iconandthen"startcleaningcycle"tostartthewashcycle.
cleaning coffee circuit –
please wait
cleaning...
Waitforthecycletonish.Themachinewill
return to the main menu.
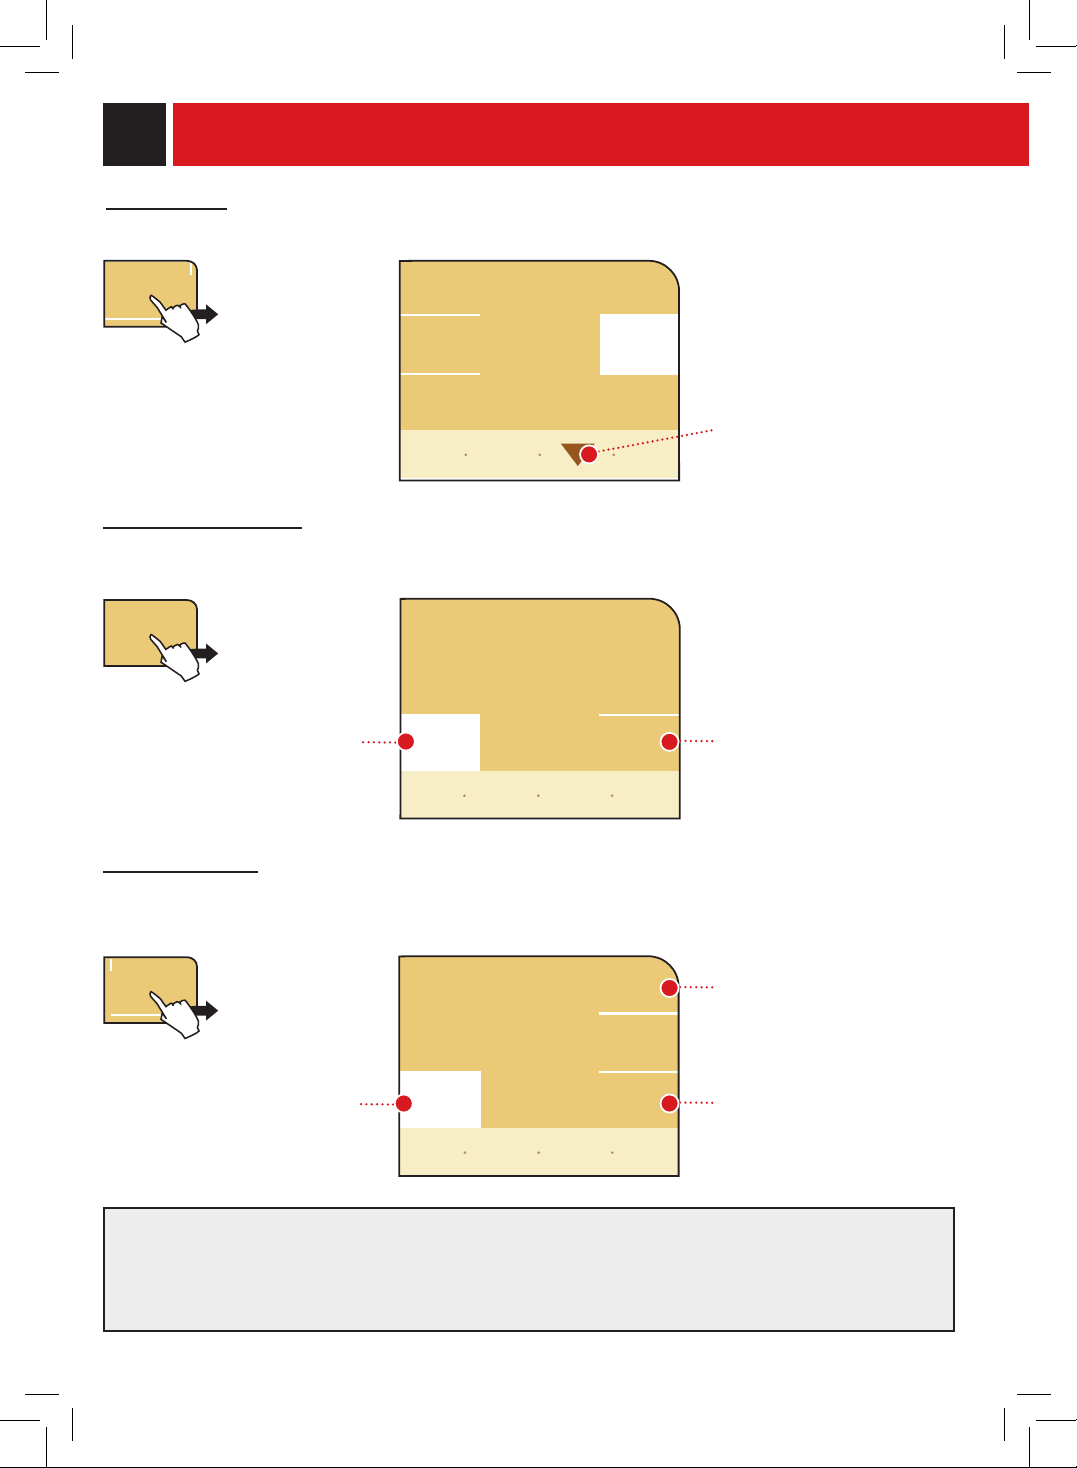
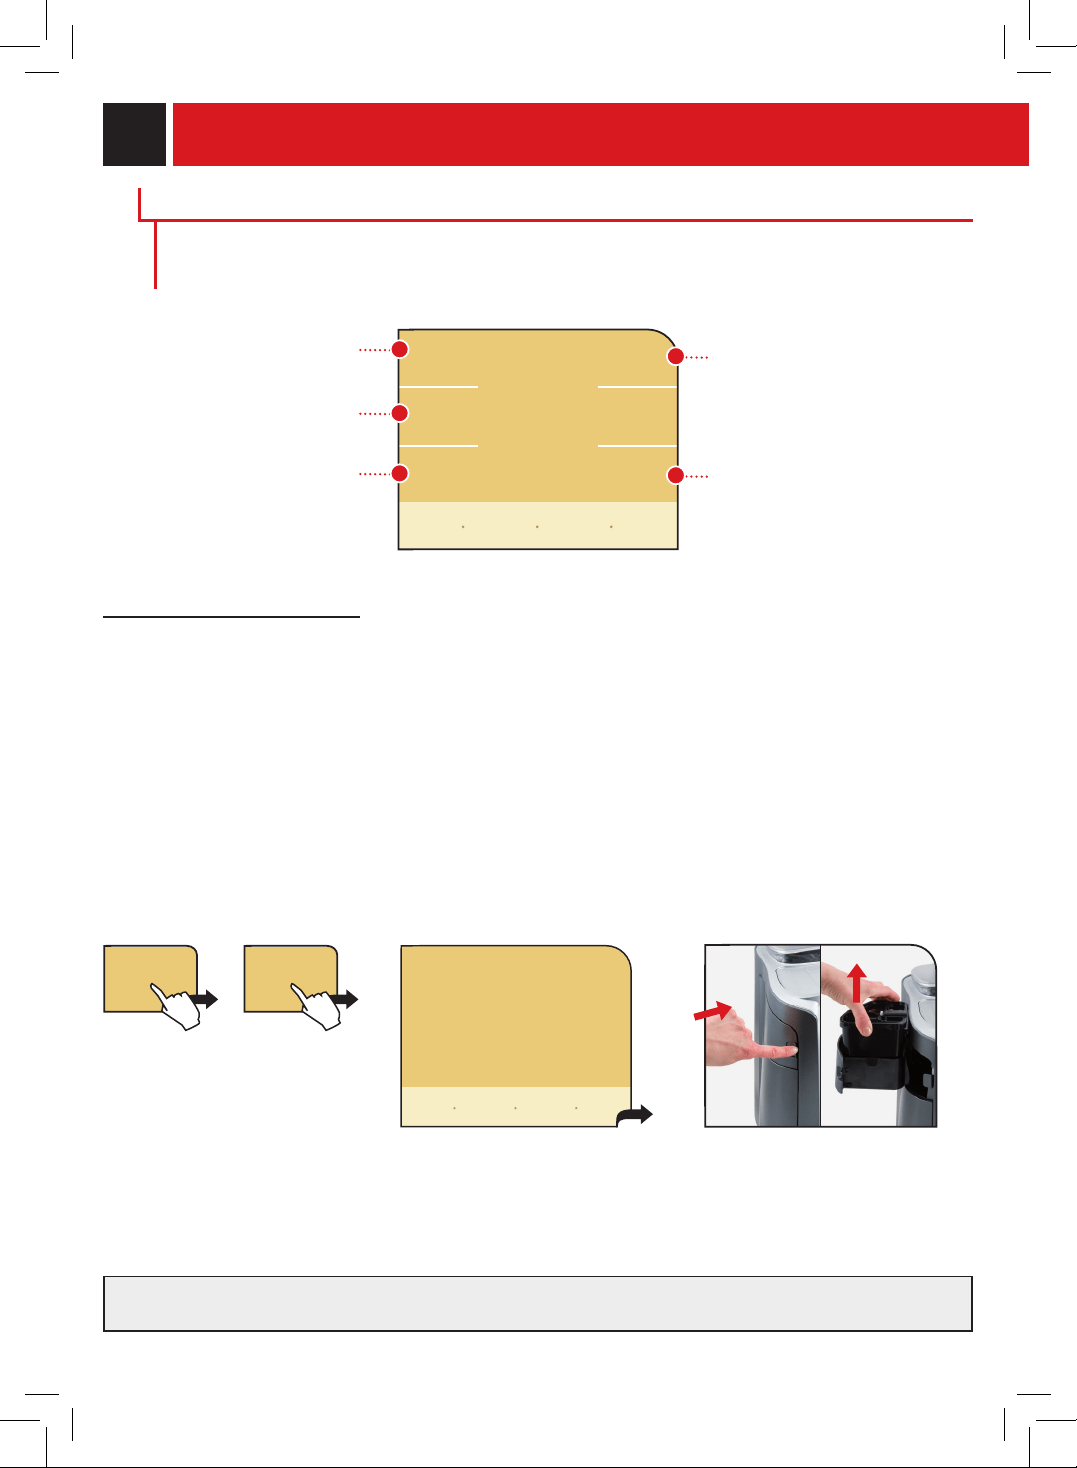
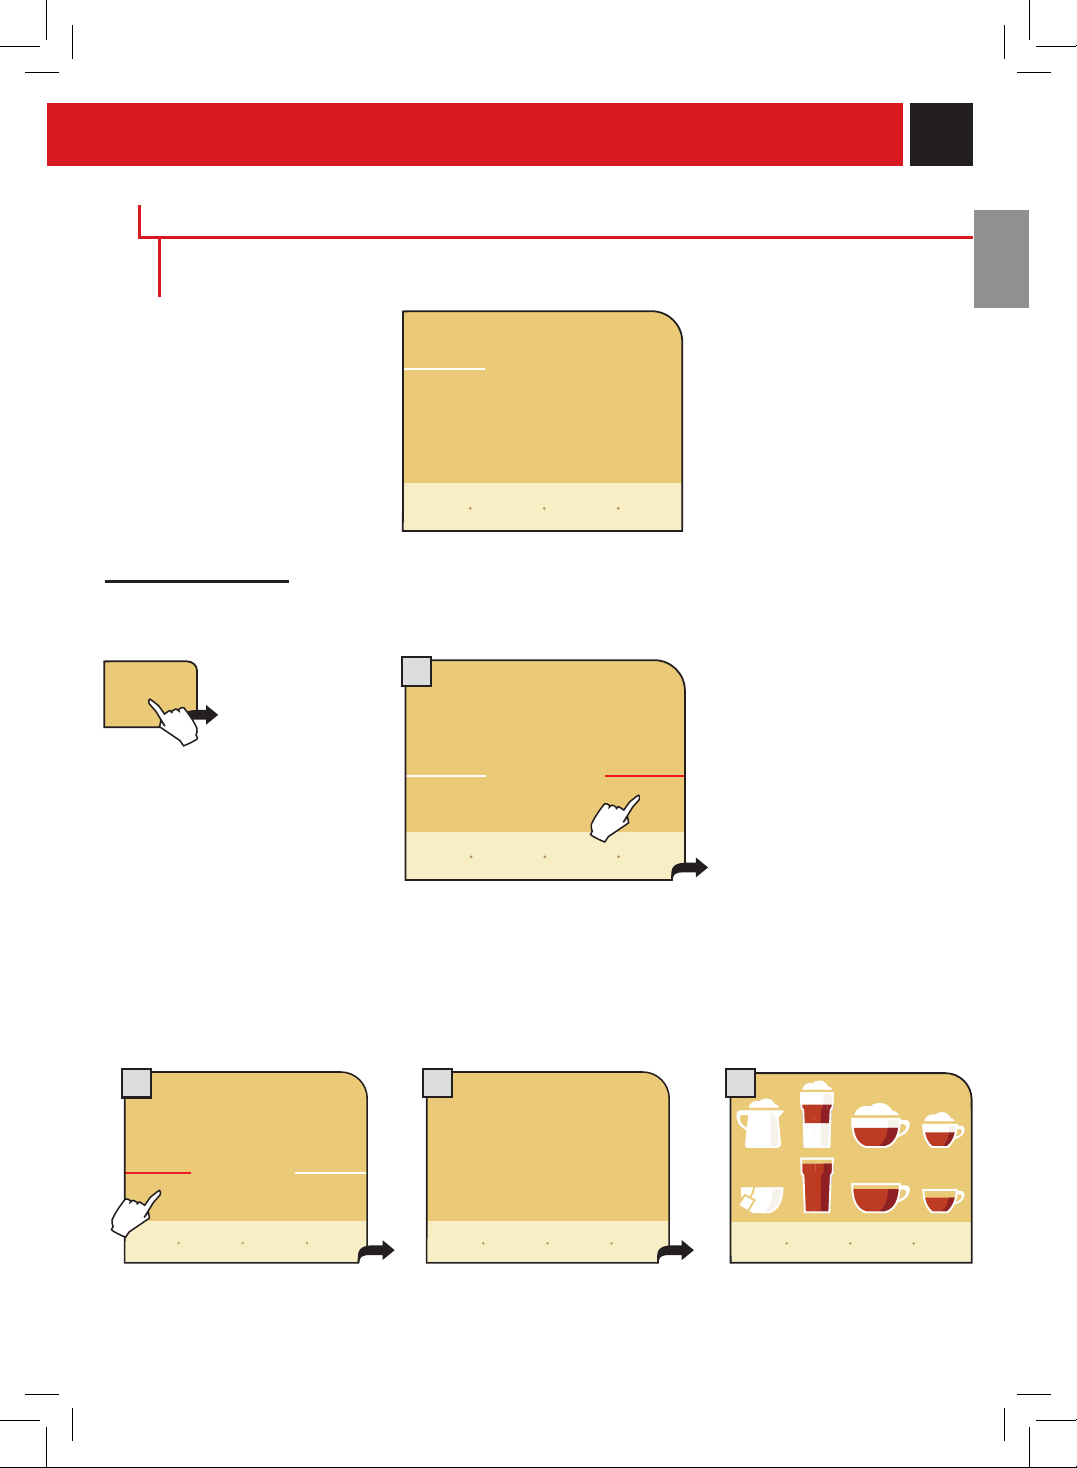
LOCK DISPLAY
Tocleanthedisplay.Thetouchscreendisplaycanbecleanedwithasoftdampenedclothorwiththeappropriate
detergents for cleaning displays sold on the market.
SOLVENTS, ALCOHOL, HARSH DETERgENTS AND/OR SHARP ObjECTS THAT CAN DAmAgE
THE DISPLAY mUST NOT bE USED.
Pressthe"lockdisplay"button
Toreactivatethedisplay,press"unlock"onthelowerright-handcornerandthen
(withintwoseconds)"unlock"intheupperleft-handcorner(thisbuttonappears
onlyafterhavingpressedthepreviousbutton).
coffee
cleaning
cycle
start
cleaning
cycle
lock
display
unlock
display
locked
unlock
THE mAINTENANCE AND CLEANINg Of THE
bREW gROUP IS DESCRIbED ON PAgE 43.
display
locked
prograMMIng The MaChIne
21

33
21
DESCALINg
to perform the automatic descaling cycle.
Descalingisnecessaryevery1-2months,accordingtothewaterhardness,whenwatercomes
outmoreslowlythannormalorwhenthemachineindicatesit.Themachinemustbeturnedon
andwillautomaticallymanagethedistributionofthedescalingagent.
A PERSON mUST bE PRESENT DURINg THE OPERATION.
WARNINg! NEVER USE VINEgAR AS A DESCALER.
Please use Saeco descaling solution in your machine. It has been specifi cally developed to preserve
performance and functionality throughout the lifetime of the machine and to ensure, with regular use, a high
quality delivered product. Saeco descaling solution should be disposed of according to the manufacturer
instructions and/or the regulations in the country of use.
note: before starting a descaling cycle make sure that:
1. alargeenoughcontainerispositionedunderthewaterspoutandthebrewhead.
2. the Water filter has been removed.
3. thewatertankhasbeenlledwiththedescalingsolutionuptothelevelindicatedwithan
.
Pause descaling.
The descaling and/or rinsing can be paused and then restarted. When descaling is interrupted the machine will
warn the user that it must be turned off.
WARNINg! DESCALINg mUST bE COmPLETED WITHIN 24 HOURS fROm ITS INTERRUPTION.
The next time the machine is turned on, the machine will warn the user that the descaling and/or rinse process
must be completed.
the machine indicates to the user the need to complete the descaling
throughthemessageonthemainmenu.Thisdoesnotblockthe
machine’s operation.
Thenumberunderthemessageindicatesthenumberofbeveragesthat
canbedispensedbeforethemachineneedstobedescaled.
30beveragesbeforedescaling,thebuttonwillbegintoash.Whenthe
numberreacheszero,themachinemustbedescaled.
pressing the descaling icon accesses the descaling menu.
When in the descaling menu, the
message“llthewatertankwith
descalingsolution”appearsonthe
display.
Performthedescalingcycleby
pressing“startdescaling”as
shown.
descaling cycle
ll the water tank
with descaling solution
start
descaling
descaling
200
show icon
explanation
my custom
coffee
program-
ming
menu
go back
back to
menu
34
1
ciclo di risciacquo
3
2
65
4
Themachinebeginstodispensethedescalingsolutionthroughthehot
waterspout.Thedispensingoccursatpreestablishedintervals,inorderto
allowthesolutiontobemoreeffective.
Inordertorunadescalingcyclebeforethemachineindicatesthenecessitytodoso,pressthe"descalingcycle"icon
and then "start descaling".
Whenthesolutionisnishedthe
followingmessageappearsonthe
display:
Removethewatertankandrinse
withfreshdrinkingwatertoeliminate
traces of descaling solution.
Then,rellwithfreshdrinkingwater
andreinsertwatertank.
Rinsethemachinecircuitsby
pressing "start rinsing".
start
rinsing
the machine performs the rinse cycle.
Attheendoftherinsecyclellthe
tankwithfreshdrinkingwater.Before
llingthetankthewaterlter(if
desired)orthesmallwhitelter(see
page 7).
Putacontainerunderthewaterspout.
Whenthewatertankisinsertedthe
machine automatically proceeds to prime
thewatercircuit.Ifthisoperationisnot
successful, see the "manual priming of
thewatercircuit"section(page6).
rinsing...
descaling
cycle
start
descaling
insert the water tank
with fresh water
pause
rinsing
descaling cycle
please wait
descaling...
pause
descaling
rinsing
cycle
descaling cycle
please wait
descaling cycle
please wait
descaling cycle
please wait
prograMMIng The MaChIne
Whendescalingiscomplete,performacleaningandmaintenancecycleonthemilkcontainerasdescribedonpage41-42.
35
current
time
09:45 (am)
time
settings
time
format
current
weekday
thursday
TImE SETTINg
to set all the parameters relating to the clock and calendar. important: to correctly program the times for turning the
machineonandoff,pressthe“timersettings”button.
viewthecurrenttimesetting.
viewthecurrenttimeformat
setting.
modify the settings relating to
viewingthetime(in24houror
am/pm format).
CLOCK SETTINgS
Tosetdate,currenttime,timerandclockformachineuse.Press“clocksettings”onthemainmenu.
In this menu you can:
set
- thecurrenttime
- thecurrentdate
- theviewformat
(24hour–AM/PM)
set the intervals for turning the
machine on and off (three
intervalsthatcanbeactivated
separately).
set the parameters
forstand-byafter
thelastbrew.
Current time/weekday
Tosetthedayoftheweekandthecurrenttimeonthemachine.Pressthe"time/weekday"button.
viewthecurrentdayoftheweek
setting.
time
weekday
modify the settings related to the
current time and the day of the
currentweek.
adjust the day
pressing or
09h (am)
43 min
Adjustthehourby
pressing + or -
adjust the minutes
pressing + or -
thursday
time
weekday
time
settings
current
format
24h
In this menu you can:
In this menu you can:
time
weekday
time
settings
clock
settings
stand-by
settings
clock
settings
go back
back to
menu
go back
restore
default
settings
back to
menu
save
settings
go back
back to
menu
save
settings

36
Time format
Tosetthetimeviewmode.Thissettingadjustsallclockfunctionstoeither“am/pm”or“24hour”formats.
Tosetthetimeviewmode,pressthe“timeformat”button.Themodicatinoisimmediatelyappliedandinsmall
writingappears‘am/pm”or“24hour”.
AUTOmATIC TImER SETTINgS
Withthisfunction,itispossibletocustomizethetimesthatthemachineturnsonandoff.
PleaserememberthatthemachineperformsthisfunctiononlyifthepowerbuttonisturnedON.
set the second interval
for turning on and off
set the third interval
for turning on and
off
settherst
interval for turning
on and off
in order to perform correctly:
-seteachintervalwithanonandofftime.
-choosethedayswhenthesesetintervalswillturnthemachineonandoff(instand-bymode).
it is recommended to not overlap intervals for turning on the machine.
clock
settings
chooseonwhatdays
the intervals are
active
In this menu you can:
setting 2
on 12:00 pm
off 14:00 pm
select a
timer setting
setting
weekday
setting 3
on 17:00 pm
off 19:00 pm
setting 1
on 07:00 am
off 09:00 am
go back
restore
default
settings
back to
menu
save
settings
go back
back to
menu
current
time
09:45 (am)
time
settings
time
format
current
weekday
thursday
time
weekday
current
format
24h
prograMMIng The MaChIne
37
08h (am)
turn
machine
on
15 min
Setting an interval
Inordertoprogramanintervalforturningthemachineonandoff,pressthebuttonfortheintervalthatyouwishto
set.
Adjustthehourtoturnonby
pressing + or -
Adjusttheminutesby
pressing + or -
to save the adjusted settings and go to the next screen
adjust the hour to turn off
(stand-by)bypressing+or–
Adjusttheminutesby
pressing + or -
to save the adjusted settings.
Setting the weekday for each interval
Arrowthroughthedaysoftheweek,andforeachday,selecttheintervalsyouwishtoactivate.
setting 2
monday
Selectthedaybypressing
or
each day you can select
various intervals.
to save the settings
setting 2
on 12:00 pm
off 14:00 pm
09h (am)
turn machine
off
15 min
setting 2
edit weekday
timer
setting 2
on 12:00 pm
off 14:00 pm
setting 1
on 07:00 am
off 09:00 am
setting 3
on 17:00 pm
off 19:00 pm
interval active for the
selected day
setting
weekday
interval not active
for the selected day
go back
back to
menu
save
settings
go back
back to
menu
save
settings
go back
back to
menu
save
settings
Note:Theautomaticstand-bytimessetasonpage38arealwaysvalid.Theywillbeactivatedalsoduringthe
activeintervalsselectedwiththisfunction.Ifnecessary,adjusttheautomaticstand-bytimes.
1
2

38
When the selected duration of time has
passed,thedisplayreads“stand-by”.
Toactivatethemachine,press“start”.
after having performed the function
diagnostics and the heating up phase,
the machine is once again ready for
use.
stand-by
settings
Selectdelayedtimeafterbrewing
thatthemachinewillturnoff
(stand-by).
after
30 min
standby
setting
after
3 hours
after
1 hour
after
15 min
standby
start
go back
restore
default
settings
back to
menu
save
settings
prograMMIng The MaChIne
STAND-bY SETTINgS
Tosetthetimegapbetweenlastdispensingandmachine'sautomaticstand-bymode.
the default time value is after 1 hour.
39
fACTORY SETTINgS
the function for restoring all the factory settings is contained in this menu. this function is particularly important for
restoringtheoriginalsettings.Pressthe“factorysettings”icon.
If"yes"isselected,asubsequentconrmationisrequestedtobesurethatyou
wanttoperformthereset.
selecting "yes" restores the
factory settings.
ALL THE CUSTOm SETTINgS WILL bE LOST AND CANNOT bE RECOVERED. AfTER RESTORINg fACTORY
SETTINgS, YOU mUST, If DESIRED, REPROgRAm ALL THE mACHINE'S fUNCTIONS.
Onthedisplay,themessage“all
defaultsettingsarerestored”
appearsfortwoseconds.
after this period, the machine
returns to the main display.
SPECIAL
Thismenuallowsyoutoaccessspecialfunctionsonthemachine.Pressthe"specials"icononthemain
programming menu.
factory
settings
specials
factory
settings
yes
attention!
no
do you really want to
restore all factory settings?
all custom settings will be lost!
no
are you sure?
yes
do you really want to
restore all factory settings?
all custom settings will be lost!
all default settings
are restored
show icon
explanation
my custom
coffee
program-
ming
menu
go back
back to
menu
go back
back to
menu
go back
back to
menu
1
3
2
4
40
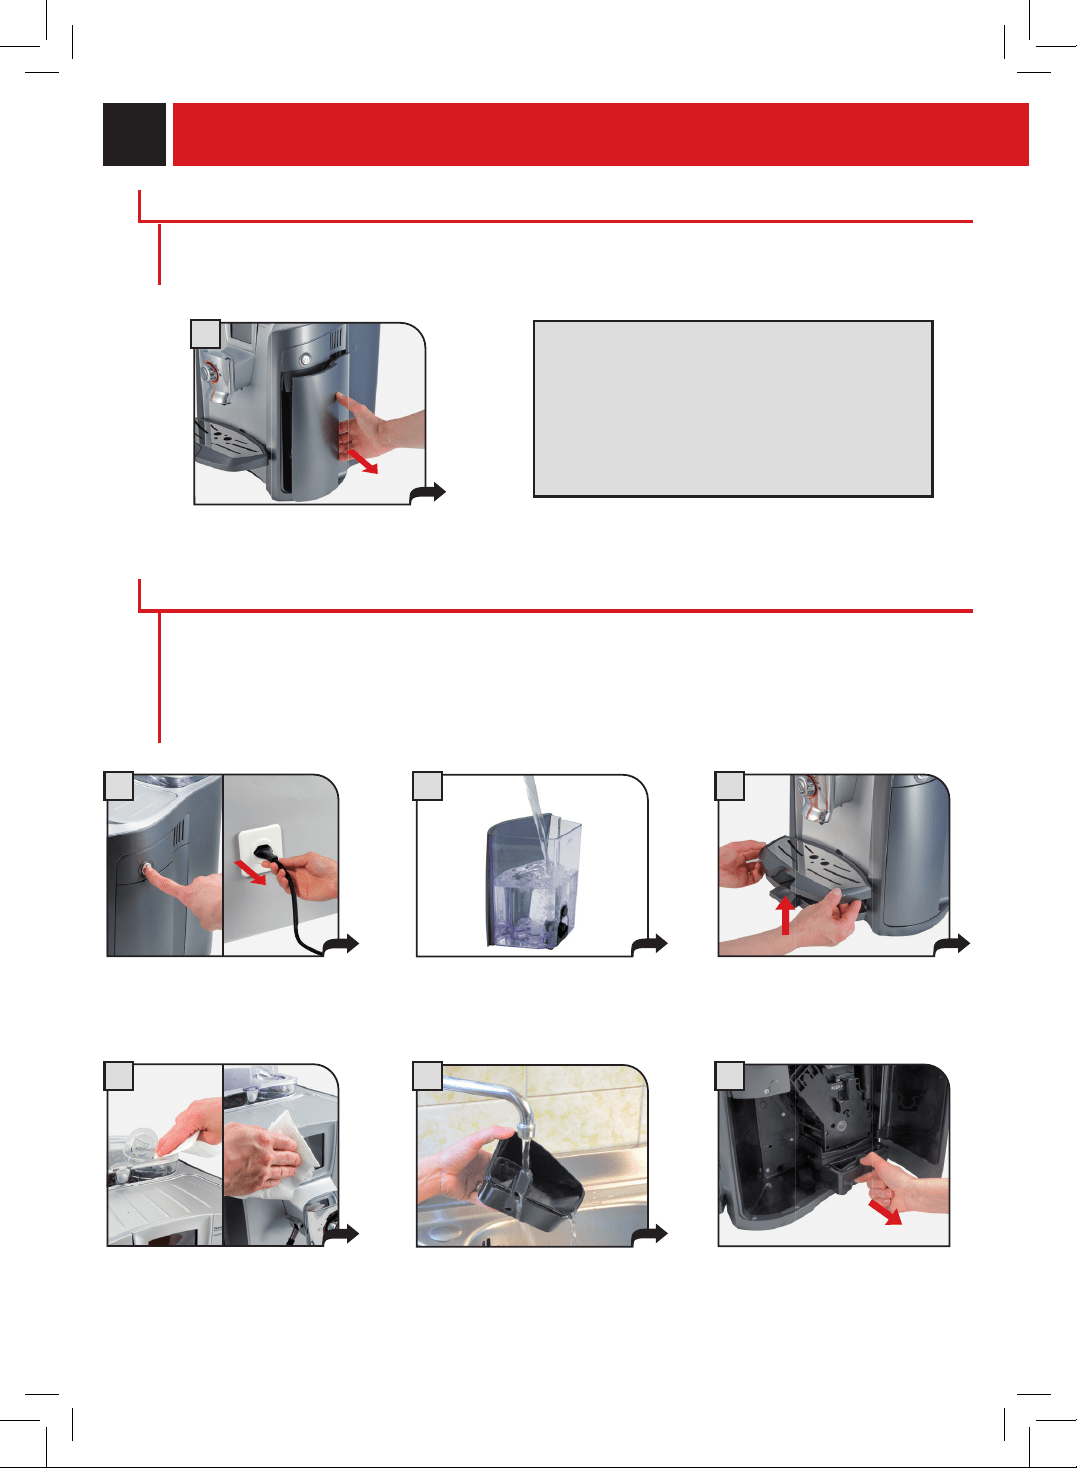
1 2 3
1
6
54
mAINTENANCE DURINg OPERATION
Duringnormaloperation,the“emptydregdrawer”messagemayappear.Thisoperationmustbeperformed
whenthemachineison.
Ifthedregdrawerisemptiedwiththemachineoffor
whenitisnotsignalledonthedisplay,thecountof
thecoffeegroundscontainedinthedrawerisnot
reset. for this reason the machine might display the
“emptydregdrawer”messageevenwhenthe
dregdrawerisnotfull.
turn the machine off and unplug
the cord.
clean the tank and the cover. remove the drip tray, empty and
handwash.
remove the
dregdrawer,
emptyandwash.
remove the drip tray, empty and
handwash.
gENERAL mACHINE CLEANINg
Thecleaningdescribedbelowmustbeperformedonceaweek.
Note:Alwaysusefreshwater.Ifwaterisinthemachineforseveraldays,emptytankandrellit.
WARNING!Donotimmersethemachineinwater.
Refertotheinstructionsformaintenanceandcleaningofthecappuccinatoreonpages41-42.
clean the cappuccinatore as
shownonpage41and42.
Cleanthepre-groundbypass
doserwithadrycloth.
Cleanthedisplay(seepage32).
CleanIng and MaInTenanCe
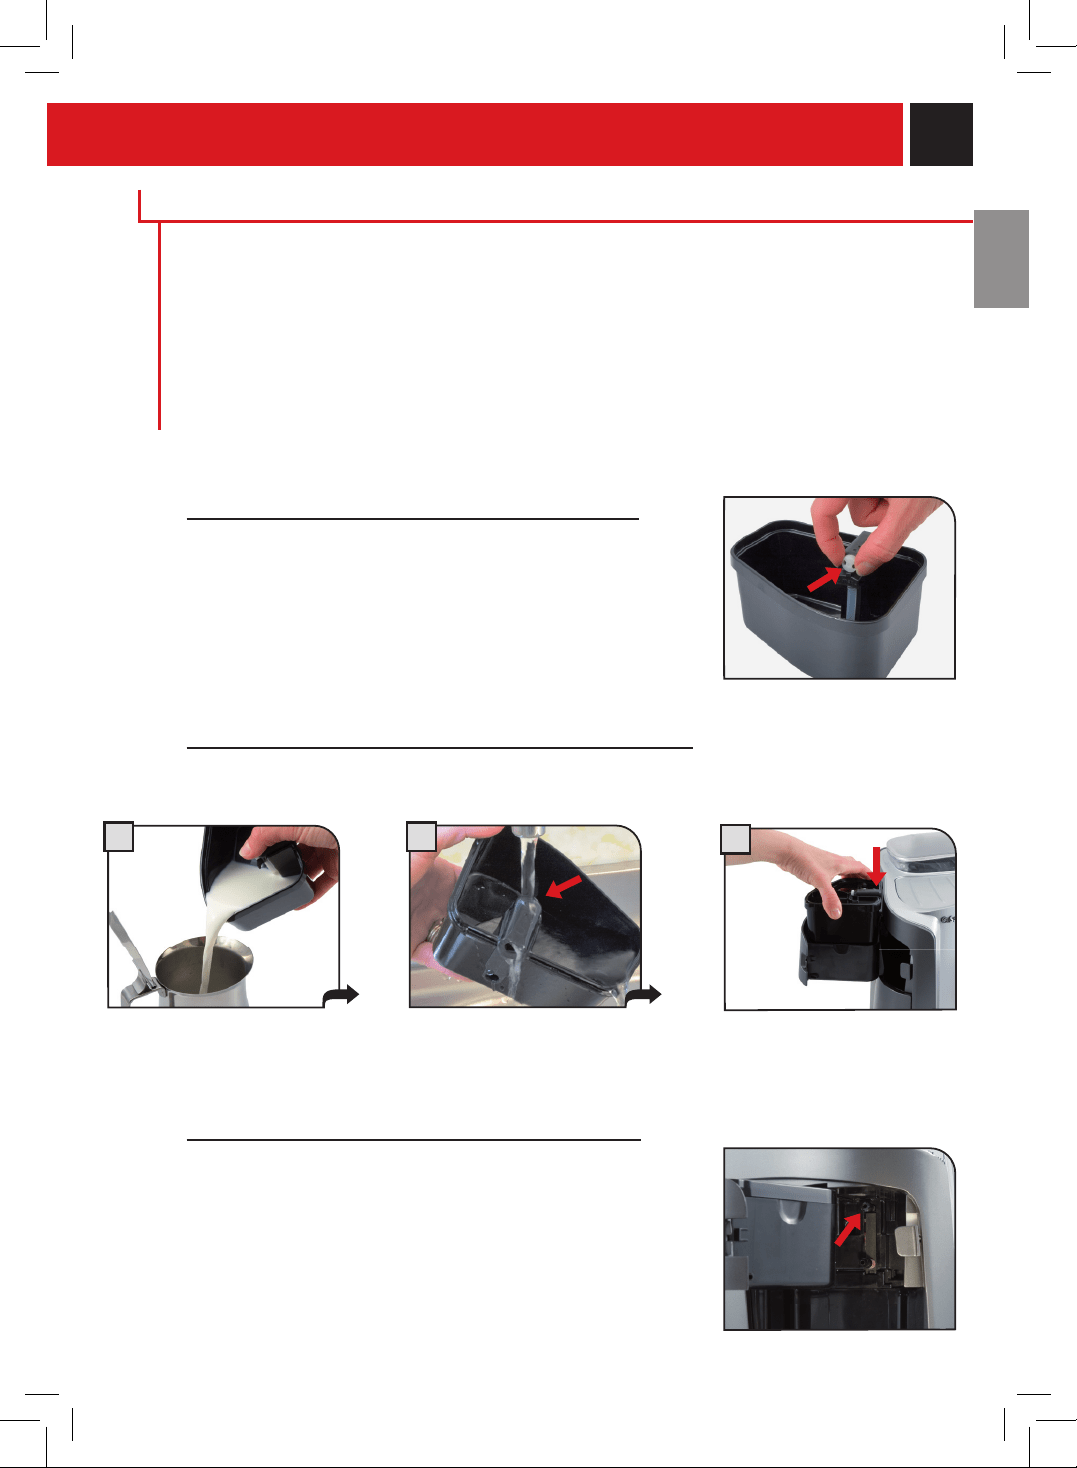
41
WARNINg! DO NOT OPEN THE SERVICE DOOR DURINg THE bREWINg, DISPENSINg,
WASHINg OR RINSE CYCLE.
Themilkcontainerandthecappuccinatorehavebeendesignedtooptimizethemilkfroth.
Thoroughcleaningandmaintenanceofthemilkcontainerandcappuccinatorewillallowyoutosavor
excellentmilk-basedbeverages.
It is recommended to rinse the cappuccinatore before the fi rst daily dispensing of milk-based
products and wash it thoroughly at least once a week.
mILK CONTAINER mAINTENANCE AND CLEANINg
discard any extra milk.
QUICK mAINTENANCE Of THE CAPPUCCINATORE
Ifyounoticeareductioninthemilkfroth,simplyturntheowregulator
asshowninthegure.
Turntheregulator2-3timestoperformquickmaintenance.
Note:Iftheowregulatorismissing,replaceitwiththeowregulator
suppliedwiththecappuccinatoremaintenancekit.
Rinseallthepartsincontactwith
milkwithlukewarmwater.
1 2
3
dry and replace the milk
container into the compartment.
WASHINg TO STORE THE CONTAINER IN THE mACHINE
Afterusingmilktopreparebeverages,thecontainermaybestoredinthemachineonlyifithasbeen
washedwithfreshdrinkingwater.Thesefewsimplestepsguaranteethatthemachinewilloperateproperly.
mAINTENANCE Of O-RINg fOR mILK CONTAINER
InthemachinethereisanO-ringwhichguaranteesthecorrect
operation of the milk container.
Every6months,removethewatertank,openthemilkcontainerand
lubricatetheO-ringusingthebrewgrouplubricantsuppliedwiththe
machine.
ExtrabrewgrouplubricantmaybepurchaseddirectlyfromSaecoor
any authorized service center.
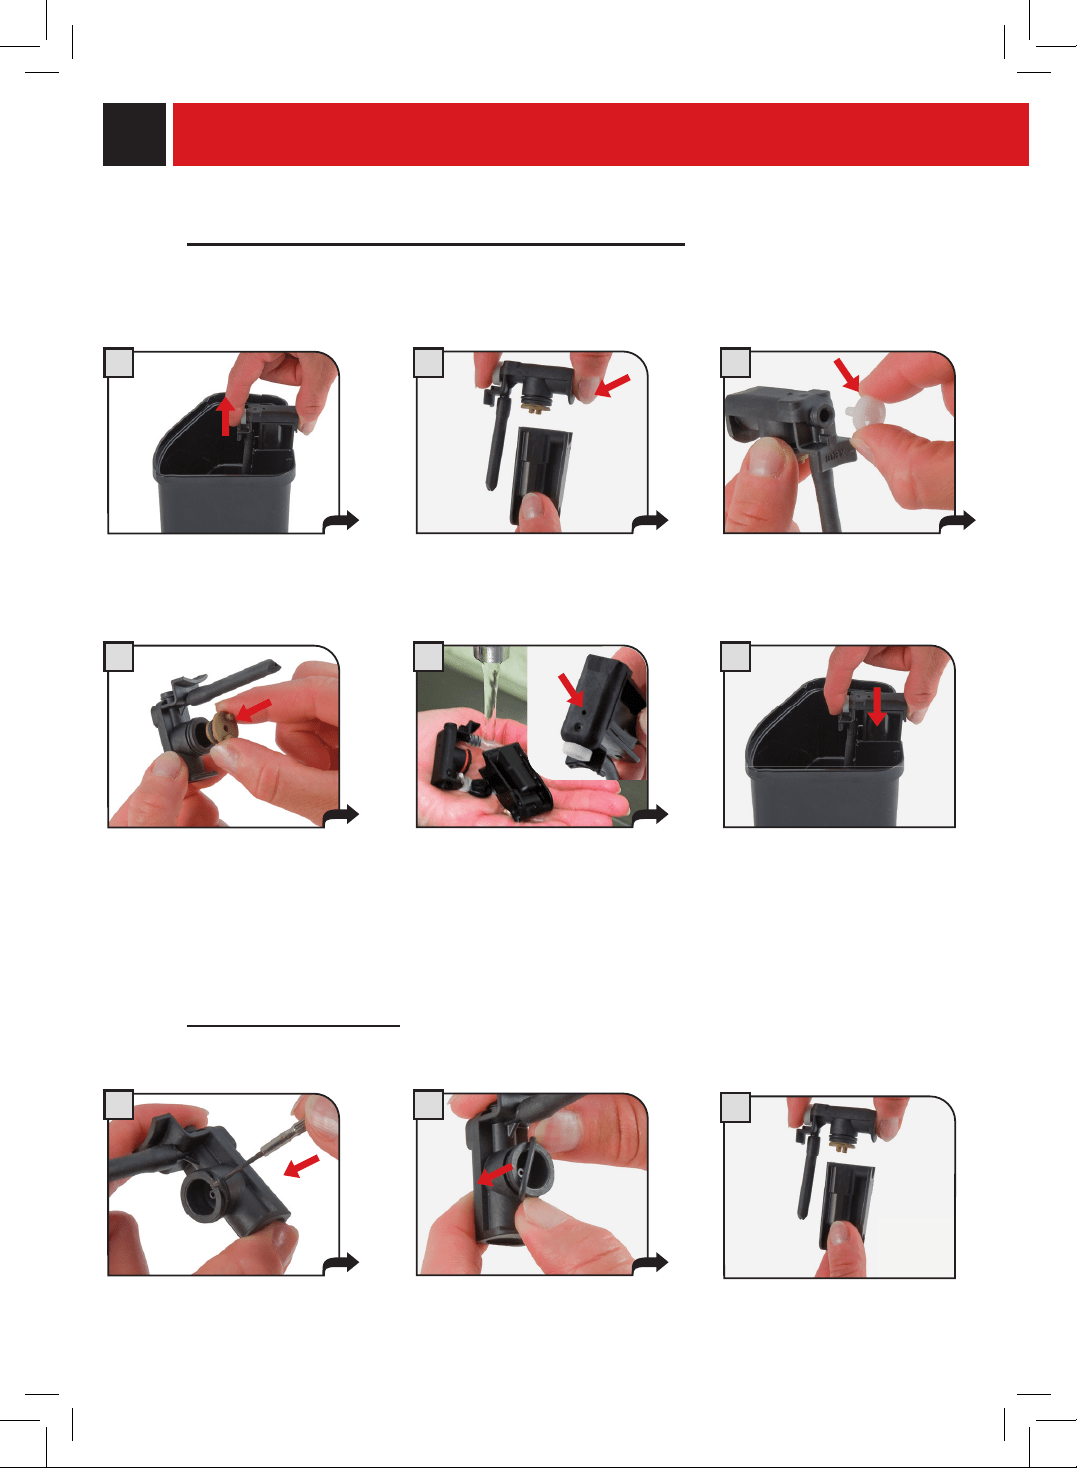
42
remove the cappuccinatore.
THOROUgH mAINTENANCE Of THE CAPPUCCINATORE
Thoroughlywashthecappuccinatoreatleastonceaweek.
Thecomponentsshouldbehand-washedwithhouseholddetergents.
separate the upper part of the
cappuccinatorefromthelower
part.
Removetheowregulator.
Removethecapfromthelower
part.
Wash all components. make sure
that the hole is clean and
unobstructed.
Reassemblethecomponentsand
install the cappuccinatore in the
container.
RemovetheO-ringwithapointy
object.
InsertthenewO-ringpressingit
delicately.
Assembletheupperandlower
part of the cappuccinatore.
O-RINg REPLACEmENT
Whentheupperandlowerpartsofthecappuccinatoremovetoofreely,replacetheO-ringwiththeones
supplied.
1 2 3
4 5 6
1 2
3
CleanIng and MaInTenanCe
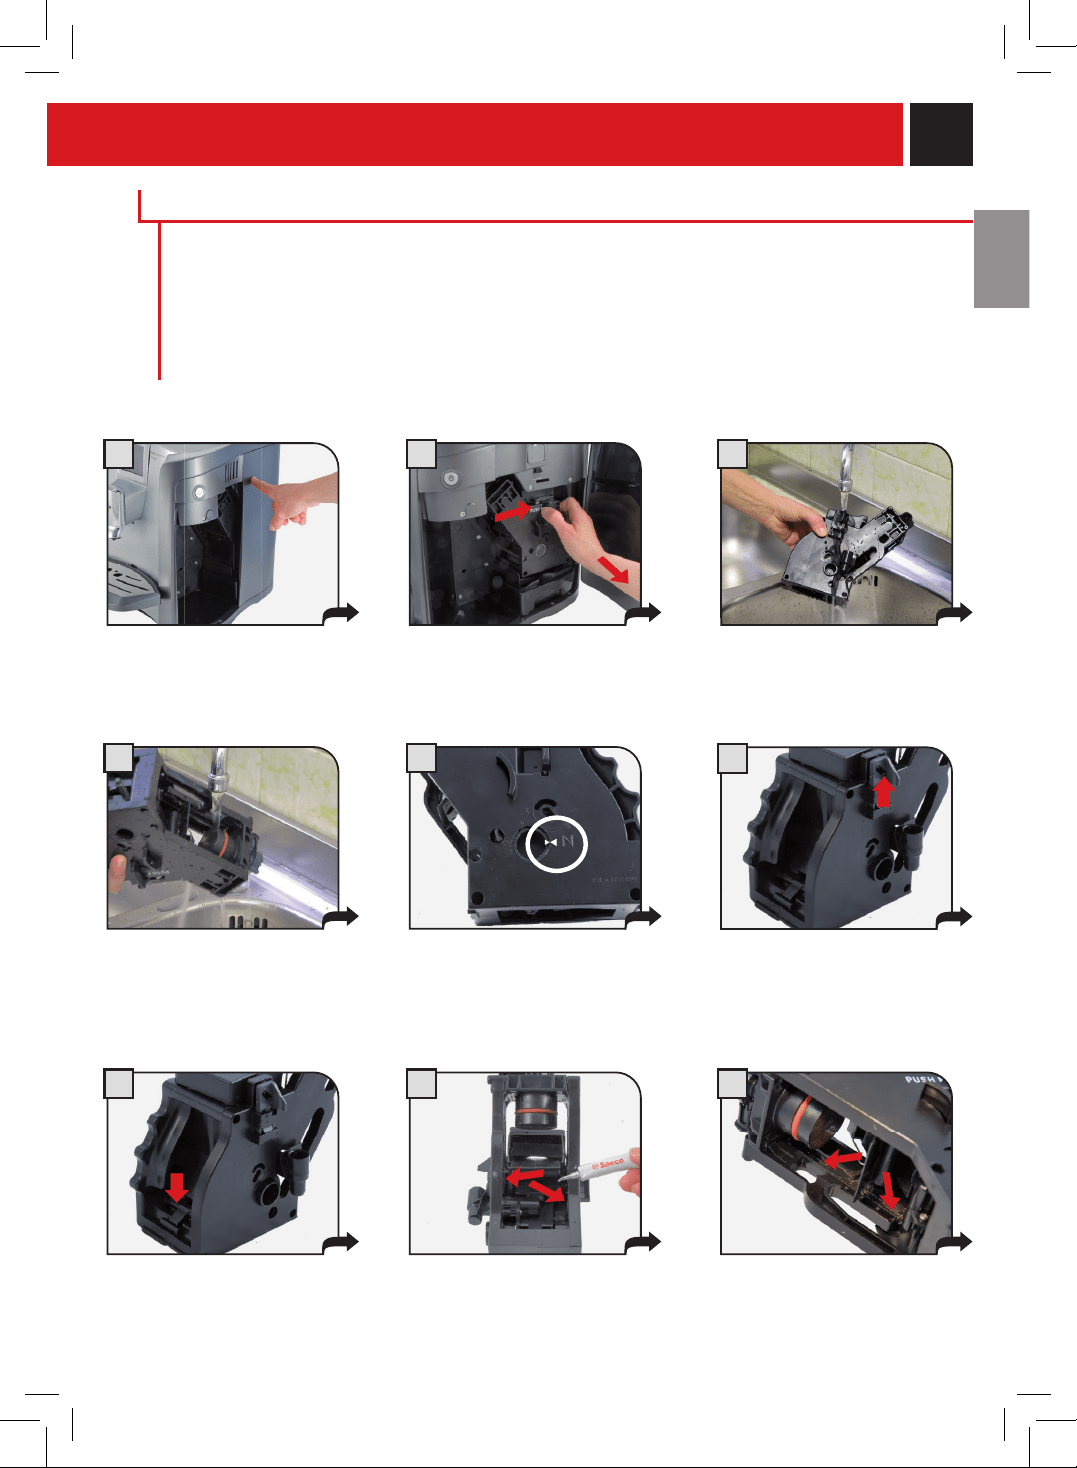
43
1 2 3
54
press to open the service door.
Thebrewgroupmustbecleanedatleastonceaweek.
Lubricatethebrewgroupafterapproximately500brewingcycles.Thebrewgrouplubricantmaybe
purchased directly from saeco or any authorized service center.
Washthebrewgroupwithwarmwater.
WARNINg! Do not wash the brew group with detergents that can compromise its correct operation. Do
not wash in the dishwasher.
Wash any coffee residues from
thebrewgroup.
PressthePUSHbuttontoremove
thebrewgroup.
Makesurethebrewgroupis
readytobeputbackin.Thetwo
references must align.
CLEANINg THE bREW gROUP
Washtheupperlterwith
runningwater.
7 8 9
the lever on the rear part of
thegroupmustbeincontact
withthegroupbase.
6
make sure the components are in
the correct position. the hook
shownmustbeinthecorrect
position;tocheckitsposition,
rmlypressthe“PUSH”button.
Lubricatethebrewgroupguides
onlywiththesuppliedlubricant.
Applythelubricantevenly.
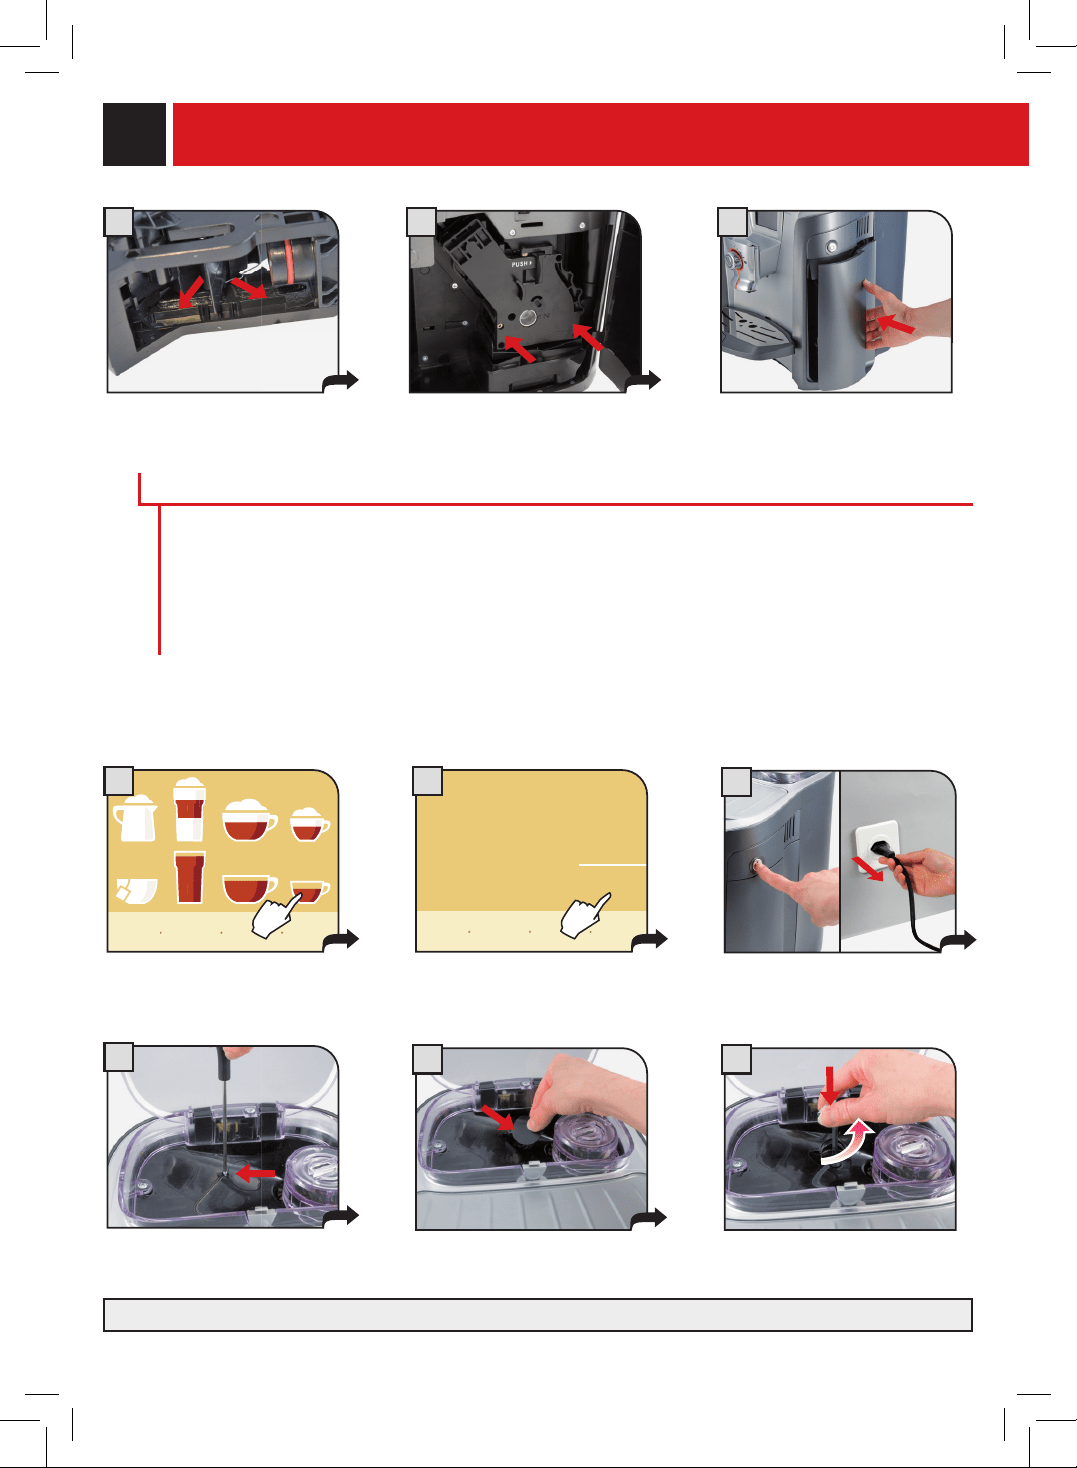
44
65
4
Afterapproximately2000grindingcycles,thegrinderneedsaslightadjustmenttoensureitisrunningin
peak condition.
Warning!
Thisoperationshouldbecarriedoutcarefullyandbyanexperienceduser.Thescrewcouldfallintothe
grinder;ifthishappensremoveitbeforerestartingthemachine.Protectthegrinderholewithaclothto
avoidthisproblem.Thesnapissignalledbyamessageonthecoffeebeanhopper;refertothesemessages
whenthisadjustmentisperformed.
eMpTY The Coffee bean hopper.
gRINDER mAINTENANCE
adjust until it clicks.Removescrewsandgrinderdoor.
Unscrewthescrewthatholdsthe
grinder door closed.
Thenrepositionthegrinderandattachitwiththepreviouslyremovedscrew.
10 1211
apply the grease evenly. Insertthedregdrawer.
close the service door.
Insertthewashedanddriedbrew
group. do not press the
“PUSH”BUTTON.
3
repeat the cycle, turn off the
machine and unplug it.
1
Pressanddispensetwocoffees.
2
add coffee
beans
ok
Whenthefollowingdisplayappears,
press“ok”andrepeattheoperation
from point 1 just one time.
show icon
explanation
my custom
coffee
program-
ming
menu
CleanIng and MaInTenanCe

45
Theseinstructionsshouldbefollowedwhenaprolongedtimeofmachineinactivityisforeseen.
Withfew,simplesteps,themachinewillbereadyforuseagain.
- Withthemachineon:
- Performawashcycleonthemilkcircuits(seepage29);
- Performacleaningcycleonthecoffeecircuits(seepage32).
- Withthemachineoff("CleaningandMaintenance"section):
- Empty,washanddryallthecontainersofthemachine.
- Removeandcleanthebrewgroup,andlubricateitsguides.
- Thoroughlycleanthecappuccinatore.
- Removecoffeefromthecoffeebeanhopperandkeepitinanairtightsealedcontainer.
- Unplugthemachinefromthepowersocket.
- Storethemachineinadryplace,awayfromdustandoutofthereachofchildren.
- Storethemachineinaroomwheretemperaturenevergoesbelow5°C(41°F)inordertopreventthe
internalpartsofthemachinefromgettingdamagedbywaterfreezing.
Theseinstructionsshouldbefollowedwhenthemachineisrestartedafteraprolongedperiodofinactivity.
Beforeproceedingwiththefollowingsteps,performthe“StartingtheMachine”operationsasexplainedon
page 5.
- Withthemachineon:
- Performarinsecycleonthemilkcircuits(seepage28);
- Performacleaningcycleonthecoffeecircuits(seepage32).
- Checkthatthemachinepartsareclean.Themachineisnowreadyforuse.
STORINg
RESTARTINg THE mACHINE
46
error Codes
gUIDE mESSAgE THAT APPEARS HOW TO REmOVE THE mESSAgE
restart the machine turn off and after 30 minutes turn the machine on again
to restore normal operation.
call assistance contact an authorized service center.
insert drip tray insert drip tray underthebrewgroup.
closecoffeebeancontainer Closethecoffeebeanhoppercovertobeabletobrew
anybeverage.
add ground coffee Addonescoopofpre-groundcoffeetothepre-ground
bypassdoser.
insertbrewgroup Insertthebrewgroupinitsplace.
insertdregdrawer insert the
dregdrawer.
emptydregdrawer remove the
dregdrawer
and empty the grounds in an
appropriate container.
note: the
dregdrawer
mustbeemptiedonlywhenthe
machinesignalstodoso,andwhenthemachineis
turned on.
Emptyingthedrawerwiththemachineturnedoffdoes
notallowthemachinetoregisterthatithasbeen
emptied.
close side door close the side door of the machine.
rellwatertank Rellthewatertankwithfreshdrinkingwater.
empty drip tray open the side door and empty the drip tray under the
brewgroup.
insert the milk container insert the milk container in its compartment.
prime the machine Pressonthedisplayinordertoproceedwithmanually
primingthewatercircuit.Themachineperformsan
automatic attempt to prime the circuit. if this attempt
doesnotperformcorrectlyyoumustproceedwiththese
instructions.
circuit priming failure contact an authorized service center.
thedescalingcyclehasnotbeencompleted
correctly
Repeattheoperationasdescribedinthedescaling
section.
milk rinsing Seepage13and28.
milk cleaning Seepage13and29.
prime the circuit SettheSBSdialtothepositionshownonthedisplay
screen,andproceedwithcleaningthebrewgroup.Then,
prime the circuit once again.
47
error Codes / TeChnICal daTa
Subjecttoengineeringandmanufacturingchangesduetotechnologicaldevelopments.
ThemachineconformstotheEuropeanDirective89/336/EEC(ItalianLegislativeDecree476dated04/12/92)
concerningelectromagneticcompatibility.
nominal voltage Seelabelontheappliance
power rating Seelabelontheappliance
power supply Seelabelontheappliance
shell material plastic
size (w x h x d) 355x380x460mm-13.8”x15.4”x16.9”
Weight 14Kg-30.9lbs
Cable length 1200mm-42.2”
Control panel (digital) front
Water tank 2liters-68oz./Removeable
Milk Tank ca.0.400liters-12.5oz./Removeable
Coffee bean hopper Capacity 350grams-8.9oz./ofcoffeebeans
pump pressure 15bar
boiler Twoinstainlesssteel
Coffee grinder With ceramic grinders
pressure safety device boiler pressure safety valve
Temperature safety device boiler thermostats and thermal fuses
TECHNICAL DATA
gUIDE mESSAgE THAT APPEARS HOW TO REmOVE THE mESSAgE
changewaterlter Thewaterltermustbereplacedinthefollowingcases:
1.60litersofwaterhasbeendispensed;
2.60dayshavepassedsinceitsinstallation;
3.20dayshavepassedandthemachinehasnotbeen
used.
Note:Thismessageappearsonlywhen"inserted"has
beenselectedinthewaterlterfunction(Seepage20).
thecleaningcyclehasnotbeencompleted
correctly
Repeattheoperationasdescribedintheappropriate
section.
insertmilkcontainerwithcappuccinatore insert the cappuccinatore in the milk container. Without
thecappuccinatore,milk-basedbeveragescannotbe
dispensed.
Closemilkcontainerdrawer close the milk compartment in order to dispense the
beverage.
rinse the milk tank Washthemilktankafterithasbeenused.
descale the machine perform a descaling cycle on the machine's internal
circuits.
stand-by Pressthe"start"button.
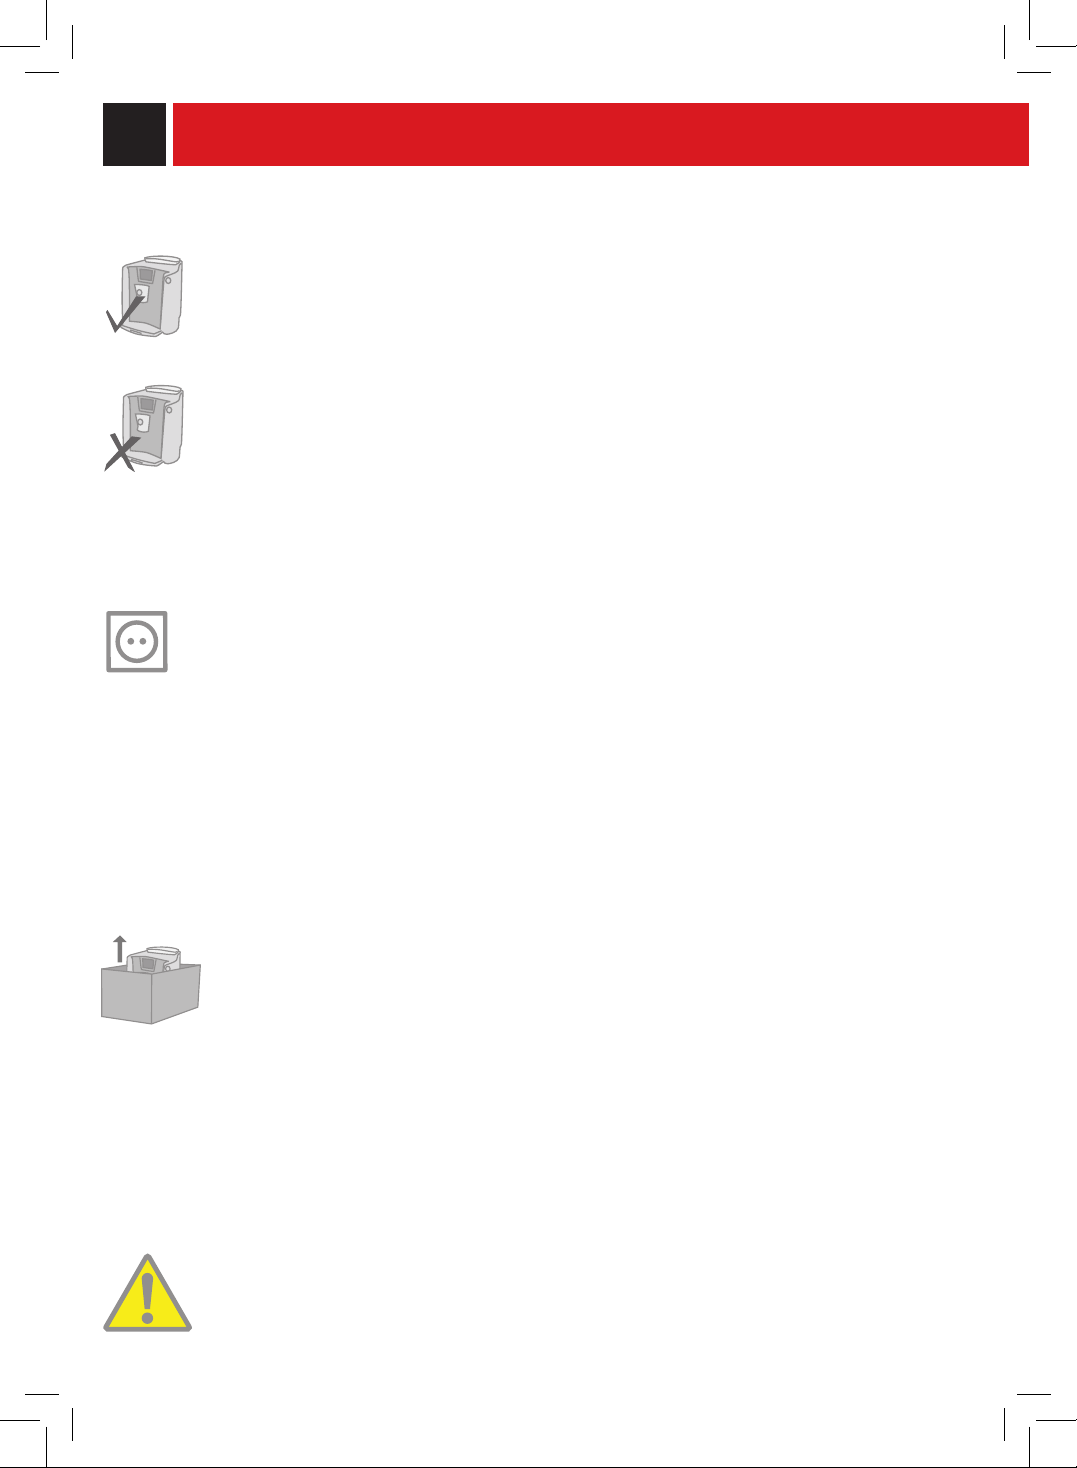
48
sos
IN CASE Of EmERgENCY
immediately unplug the cord from the outlet.
ONLY USE THE APPLIANCE
• Indoors.
• Forpreparingcoffee,hotwaterandforfoamingmilk.
• Fordomesticuse.
• Thisapplianceisnotintendedforusebypersons(includingchildren)withreducedphysical,sensoryormental
capabilities,orlackofexperienceandknowledge,unlesstheyhavebeengivensupervisionorinstructionconcerning
useoftheappliancebyapersonresponsiblefortheirsafety.
PRECAUTIONS fOR THE USE Of THE mACHINE
• Donotusethemachineforpurposesotherthanthoseindicatedabove,inordertoavoiddanger.
• Donotintroduceanysubstancesotherthanthoseindicatedintheinstructionmanual.
• Duringthenormalllingofanyreservoirs,allnearbyreservoirsmustbeclosed.
• Fillthewatertankonlywithfreshdrinkingwater:Hotwaterand/oranyotherliquidmaydamagethemachine.
• Donotusewaterwithcarbondioxideadded.
• Donotputngersoranymaterialotherthancoffeebeansinthecoffeegrinder.
• Beforemanipulatingthecoffeegrinder,turnofthemachine'smainswitchandunplugthecord.
• Donotputinstantcoffeeorwholebeancoffeeinthegroundcoffeecontainer.
• Tooperatethemachinewiththetouchscreen,useonlyyourngers.
CONNECTION TO ELECTRICAL POWER
Theconnectiontotheelectricalnetworkmustbecarriedoutinaccordancewiththesafetyregulationsinforcein
the user's country.
Themachinemustbeconnectedtoasocketwhichis:
• compatiblewiththetypeofpluginstalledonthemachine;
• suitablysizedtocomplywiththeratingsshownonthemachineidenticationplate.
• effectivelygrounded.
Thepowercordmustnot:
• comeintocontactwithanytypeofliquid:dangerofelectricshocksand/orre;
• becrushedand/orcomeincontactwithsharpsurfaces;
• beusedtomovethemachine;
• beusedifdamaged;
• behandledwithdamporwethands;
• bewoundinacoilwhenthemachineisbeingoperated.
• betamperedwith.
INSTALLATION
• Chooseasolid,stationaryatsurface(nomorethan2°ofinclination).
• Donotinstallthemachineinareaswherewatercouldbesprayed.
• Optimaloperationaltemperature:10°C-40°C/50-104degreesFahrenheit
• maximumhumidity:90%.
• Themachineshouldbeinstalledinanadequatelylit,ventilated,hygieniclocationandtheelectricsocketshouldbe
withineasyreach.
• Donotplaceonheatedsurfaces!
• Installitatleast10cm/4"fromthewallsandcookingsurfaces.
• Donotuseinplaceswherethetemperaturemaydroptoalevelequaltoand/orlowerthan0°C/32degrees
Fahrenheit.Ifthemachinehasbeenexposedtosuchconditionsnotifythecustomerservicecenter,whowillhaveto
carry out a safety check.
•Donotusethemachinenearinammableand/orexplosivesubstances.
• Themachinemustnotbeusedinanexplosiveorvolatileatmosphereorwherethereisahighconcentrationofdust
oroilysubstancessuspendedintheair.
• Donotinstallthemachineontopofotherappliances.
DANgERS
• Childrenshouldbesupervisedtoensurethattheydonotplaywiththeappliance.
• Theapplianceisdangeroustochildren.Whenleftunattended,unplugfromtheelectricaloutlet.
• Keepthecoffeemachinepackagingoutofthereachofchildren.
safeTY rUles
49
• Neverdirectthejetofhotwaterand/orsteamtowardsyourselforothers.Dangerofscalding.
• Donotinsertobjectsthroughtheappliance’sopenings.(Danger!ElectricalCurrent!).
• Donotpullouttheplugbyyankingonthepowercordortouchingitwithwethands.
• Warning.Dangerofburningwhenincontactwithhotwater,steamandthehotwaterspout.
fAILURES
• Donotusetheapplianceifafailurehasbeenveriedorsuspected,forexampleafterbeingdropped.
• Anyrepairsmustbeperformedbyanauthorizedcustomerservicecenter.
• Donotusetheappliancewithadefectivepowercord.Themanufactureroritscustomerservicecenterwillhaveto
replacethepowercableifdamaged.(Caution!ElectricalCurrent!)
• Turnofftheappliancebeforeopeningtheservicedoor.Dangerofburns!
CLEANINg / DESCALINg
• Cleanthemilkcircuitonlywiththerecommendeddetergentpowdersuppliedwiththemachine.Carefullyfollowthe
safety instructions given on the packaging.
• Cleanthecoffeecircuitonlywiththerecommendeddetergenttabletssuppliedwiththemachine.Carefullyfollow
the safety instructions given on the packaging.
• Beforecleaningthemachine,themainswitchmustbeturnedtoOFF(0),unpluggedfromthesocketandcooled
down.
• Keeptheappliancefromcomingintocontactwithsplashesofwaterorimmersinginwater.
• Donotdrythemachine’spartsinconventionalormicrowaveovens.
• Themachineanditscomponentsmustbecleanedandwashedafterthemachinehasnotbeenusedforacertain
period.
REPLACEmENT PARTS
for safety reasons, use only original replacement parts and original accessories.
WASTE DISPOSAL
- Thepackingmaterialscanberecycled.
- Appliance:unplugtheapplianceandcutthepowercord.
- Delivertheapplianceandpowercordtoaservicecenterorpublicwastedisposalfacility
ThisproductcomplieswithEUDirective2002/96/EC.
Thesymbolontheproductoronitspackagingindicatesthatthisproductmaynotbetreatedashouseholdwaste.
Insteaditshallbehandedovertotheapplicablecollectionpointfortherecyclingofelectricalandelectronic
equipment.Byensuringthisproductisdisposedofcorrectly,youwillhelppreventpotentialnegative
consequencesfortheenvironmentandhumanhealth,whichcouldotherwisebecausedbyinappropriatewaste
handlingofthisproduct.Formoredetailedinformationaboutrecyclingofthisproduct,pleasecontactyourlocal
cityofce,yourhouseholdwastedisposalserviceortheshopwhereyoupurchasedtheproduct.
fIRE SAfETY
Incaseofre,useCarbonDioxideextinguishers(CO
2
).Donotusewaterordry-powderextinguishers.
ADDITIONAL INfORmATION fOR THE CORRECT USE Of THE INTENZA WATER
fILTER
TocorrectlyusetheIntenzawaterlter,pleaseconsiderthefollowinginstructions:
1.Storethewaterlterinacoolareainwhichtheroomtemperatureisbetween+1°C-+50°C(34°Fto122°F).
do not store it in direct sunlight.
2.Carefullyreadtheoperatinginstructionsandthesafetywarningsprovidedwitheachlter.
3.Keepthelterinstructionstogetherwiththemanual.
4.Theseinstructionsintegratethosecontainedinthemanual,astheyfocusonthespecicapplicationofthe
lterinthemachine.

Important
Lors de l’utilisation d’appareils électriques, il est indispensable de respecter
toujours les précautions de sécurité principales, y compris les suivantes :
1. Lire toutes les instructions.
2. Ne pas toucher de surfaces chaudes. Utiliser les poignées ou les boutons.
3. Afin d’éviter tout incendie, choc électrique et blessure, ne pas plonger le
cordon, la fiche ou l’appareil dans l’eau ou dans n’importe quel liquide.
4. Il est nécessaire de contrôler attentivement lorsque l’appareil est utilisé par
des enfants ou à leur proximité.
5. Débrancher de la prise de courant lorsque l’appareil n’est pas en service et
avant son nettoyage. Laisser refroidir l’appareil aussi bien avant de retirer et
de mettre en place ses accessoires qu’avant de le nettoyer.
6. Ne pas utiliser l’appareil avec un cordon ou une fiche détériorés, après un
mauvais fonctionnement de l’appareil ou son endommagement de n’importe
quelle manière. Renvoyer l’appareil au centre d’assistance agréé le plus
proche pour tout contrôle, réparation et réglage.
7. L’utilisation d’accessoires non recommandés par le constructeur de l’appareil
pourrait engendrer des incendies, des chocs électriques et des blessures.
8. Ne pas utiliser à l’extérieur.
9. Ne pas laisser les cordons pendre des bords de la table ou du plan de
travail, ni toucher des surfaces chaudes.
10. Ne pas placer près du feu ou sur une cuisinière, électrique et à gaz, ou dans
un four chaud.
11. Toujours brancher le cordon d’alimentation à la machine d’abord et ensuite
à la prise de courant sur le mur. Pour débrancher, éteindre toute commande
en appuyant sur « OFF » et ensuite enlever la fiche de la prise de courant sur
le mur.
12. Ne pas utiliser l’appareil pour toute autre utilisation non prévue.
13. Attention ! Ne pas ouvrir la porte de service pendant la phase de distribution,
de lavage ou de rinçage.
14. Garder ces instructions.
ConSErVEr CES InStruCtIonS

préCautIonS
Appareil destiné à un usage domestique seulement. Tout entretien, en dehors du
nettoyage et de l’entretien usuel par l’usager, doit être fait par un centre de service
autorisé. Ne pas plonger la base dans l’eau. Pour éviter les courts-circuits et les
décharges électriques, ne pas démonter la base. Elle ne contient aucune pièce qui
demande un entretien de la part de l’usager. Toute réparation doit être effectuée
par le personnel d’un service après-vente autorisé.
1 Vérifier si le voltage correspond bien aux spécifications apparaissant sur la
plaque signalétique.
2 Ne jamais mettre de l’eau tiède ou chaude dans le réservoir; mais toujours de
l’eau froide.
3 Ne pas toucher les surfaces chaudes de l’appareil pendant le fonctionnement
et en écarter le cordon électrique.
4 Ne pas utiliser d’alcool éthylique, de solvants, d’essences, de poudre à
récurer et/ou d’objets abrasifs pour le nettoyage de la machine.
5 Utiliser de l’eau purifiée ou en bouteille pour assurer le bon goût du café. Quand même
il vous sera nécessaire de faire le détrartage de votre machine tous les 2-3 mois.
6 Ne pas utiliser du café au caramel
InStruCtIonS Sur lE Cordon ElECtrIquE
a. Votre appareil est muni d’un cordon électrique court ou d’un cordon
d’alimentation détachable, afin d’éviter de trébucher ou de s’emmêler avec
un câble plus long.
B. Des cordons détachables plus longs ou bien des rallonges sont disponibles
et ne peuvent être utilisés que si l’on prend toutes les précautions d’usage.
C. En cas d’utilisation d’un long cordon d‘alimentation détachable ou d’une
rallonge,
1. La tension électrique de fonctionnement marquée sur le cordon
d’alimentation détachable ou sur la rallonge doit être au moins égale à
celle de l’appareil.
2. Si la fiche de l’appareil a une connexion de terre, la rallonge devrait être
une rallonge de terre à 3 fils et
3. La rallonge ne devra pas encombrer le plan de travail ou le dessus de table,
afin d’éviter que les enfants la tirent ou trébuchent accidentellement.

2
INFORMATIONS GENERALES ..........................................................................................................3
dEScRIpTION dE L'AppAREIL .........................................................................................................4
a c c e s s o i r e s ................................................................................................................................................4
INSTALLATION ...............................................................................................................................5
m i s e e n m a r c h e d e l a m a c h i n e .........................................................................................................................5
a m o r ç a g e m a n u e l d u c i r c u i t h y d r a u l i q u e ..........................................................................................................6
r é g l a g e d e l a l a n g u e e t d e l'h o r l o g e ..............................................................................................................6
f i l t r e à e a u i n t e n z a ......................................................................................................................................7
AFFIchEuR ....................................................................................................................................8
a f f i c h a g e d e l'a r ô m e d u c a f é ..........................................................................................................................8
REGLAGES .....................................................................................................................................9
r e m p l i s s a g e d u récipient d u l a i t .....................................................................................................................9
r é g l a g e d e l a h a u t e u r d u b a c d'é g o u t t e m e n t ....................................................................................................9
d e n s i t é d u c a f é .........................................................................................................................................10
s a e c o a d a p t i n g s y s t e m ................................................................................................................................10
dISTRIbuTION dES bOISSONS ..................................................................................................... 11
c a f é e x p r e s s o / c a f é / c a f é a l l o n g é ..............................................................................................................11
d i s t r i b u t i o n b o i s s o n a v e c c a f é m o u l u ............................................................................................................12
d i s t r i b u t i o n d'e a u c h a u d e ............................................................................................................................13
l a i t n o i s e t t e .............................................................................................................................................13
c a f é e x p r e s s o c r è m e ..................................................................................................................................15
ca p p u c c i n o ...............................................................................................................................................15
d i s t r i b u t i o n d e l a i t c h a u d ...........................................................................................................................16
pROGRAMMATION dES bOISSONS ...............................................................................................16
m e n u d e p r o g r a m m a t i o n d e s b o i s s o n s ............................................................................................................16
p r o g r a m m a t i o n c a f é e x p r e s s o / c a f é / c a f é a l l o n g é .........................................................................................16
p r o g r a m m a t i o n d e s b o i s s o n s à b a s e d e l a i t ....................................................................................................17
pROGRAMMATION dE LA MAchINE ..............................................................................................19
r é g l a g e s d e l a m a c h i n e ...............................................................................................................................19
m e n u « l a n g u e » ................................................................................................................................................................ 20
m e n u « illumin ation t a s s e » ............................................................................................................................................... 20
m e n u « f i l t r e à e a u ».......................................................................................................................................................... 20
m e n u « d u r e t é e a u » - i n t e n z a a r o m a s y s t e m ...........................................................................................................................21
m e n u « r i n ç a g e » ................................................................................................................................................................21
m e n u « p l a q u e c h a u f f e -t a s s e s » .......................................................................................................................................... 22
m e n u « t o n s e t a l a r m e s s o n o r e s » ....................................................................................................................................... 22
m e n u « a f f i c h e u r » ............................................................................................................................................................ 22
r é g l a g e s b o i s s o n s ......................................................................................................................................23
r é g l a g e d e l a t e m p é r a t u r e p o u r l a d i s t r i b u t i o n d u c a f é .......................................................................................................... 23
r é g l a g e « a r ô m e » p o u r l a d i s t r i b u t i o n d u c a f é .......................................................................................................................24
r é g l a g e « p r é -i n f u s i o n » (u n i q u e m e n t b o i s s o n s à b a s e d e c a f é ) ..................................................................................................24
f o n c t i o n s s u p p l é m e n t a i r e s ..........................................................................................................................25
f o n c t i o n « c a f é d u m o n d e » ................................................................................................................................................. 25
f o n c t i o n « d é m o » ............................................................................................................................................................. 27
f o n c t i o n « c o m p t e u r s d e s p r o d u i t s » .................................................................................................................................... 27
e n t r e t i e n ................................................................................................................................................28
c y c l e d e r i n ç a g e c i r c u i t s l a i t .............................................................................................................................................. 28
c y c l e d e l a v a g e c i r c u i t s l a i t ............................................................................................................................................... 29
c y c l e d e d é t a r t r a g e c i r c u i t s c a f é (c y c l e d e l a v a g e d u g r o u p e d e d i s t r i b u t i o n ) ............................................................................ 32
b l o c a g e a f f i c h e u r .............................................................................................................................................................. 32
d é t a r t r a g e ....................................................................................................................................................................... 33
r é g l a g e s h o r l o g e ......................................................................................................................................35
r é g l a g e d e l'h e u r e ............................................................................................................................................................. 35
r é g l a g e h o r l o g e ................................................................................................................................................................ 36
r é g l a g e d u s t a n d -b y a u t o m a t i q u e ......................................................................................................................................... 38
f o n c t i o n s s p é c i a l e s ....................................................................................................................................39
a n n u l e r t o u s l e s r é g l a g e s .................................................................................................................................................. 39
NETTOyAGE ET ENTRETIEN ..........................................................................................................40
e n t r e t i e n p e n d a n t l e f o n c t i o n n e m e n t ............................................................................................................40
n e t t o y a g e g é n é r a l d e l a m a c h i n e ..................................................................................................................40
n e t t o y a g e e t e n t r e t i e n d u r é s e r v o i r à l a i t .....................................................................................................41
n e t t o y a g e d u g r o u p e d e d i s t r i b u t i o n ..............................................................................................................43
e n t r e t i e n d e s m e u l e s ..................................................................................................................................44
r a n g e m e n t ................................................................................................................................................45
r e m i s e e n m a r c h e d e l a m a c h i n e ....................................................................................................................45
MESSAGES d'ERREuRS ...............................................................................................................46
dONNéES TEchNIquES ................................................................................................................47
cONSIGNES dE SécuRITé ...........................................................................................................48
TABLE DES MATIÈRES
3
Cette machine est indiquée pour la préparation de café Expresso à partir de café en grains ou de café
moulu ; elle est dotée d'une valve vapeur et eau chaude. Le corps de la machine a été conçu pour un
usage domestique et n'est donc pas indiqué pour un fonctionnement continu de type professionnel.
Attention. Aucune responsabilité n'est assumée pour les éventuels dommages résultant de :
•emploierronéetnonconformeauxbutsprévus;
•réparationseffectuéesendehorsd'unserviceaprès-venteagréé;
•manipulationincorrectedecordond'alimentation;
•manipulationincorrectedetoutcomposantdelamachine;
•emploidepiècesderechangeetd'accessoiresnonoriginaux.
•détartragenoneffectuéousilamachineestutiliséeaunetempératureambianteaudessousde0°C.
DANS LES CAS CITÉS, LA GARANTIE EST ANNULÉE.
Conservercemoded'emploidansunendroitsûretlajoindreàlamachinesiuneautrepersonnedevait
l'utiliser.Pourdesrenseignementsultérieursouencasdeproblèmesnontraitésoupartiellementtraités
dansleprésentmoded'emploi,veuillezvousadresserauxservicesaprès-venteagréés.
CoNSERvER CES INSTRUCTIoNS
LE TRIANGLE D'AvERTISSEMENT INDIQUE ToUTES LES INSTRUCTIoNS
IMPoRTANTES PoUR LA SÉCURITÉ DE L'UTILISATEUR. SUIvRE SCRUPULEUSEMENT
CES INDICATIoNS PoUR ÉvITER LES RISQUES DE BLESSURES
GRAvES.
UTILISATIoN DU MoDE D'EMPLoI
INFoRMATIoNS GENERALES
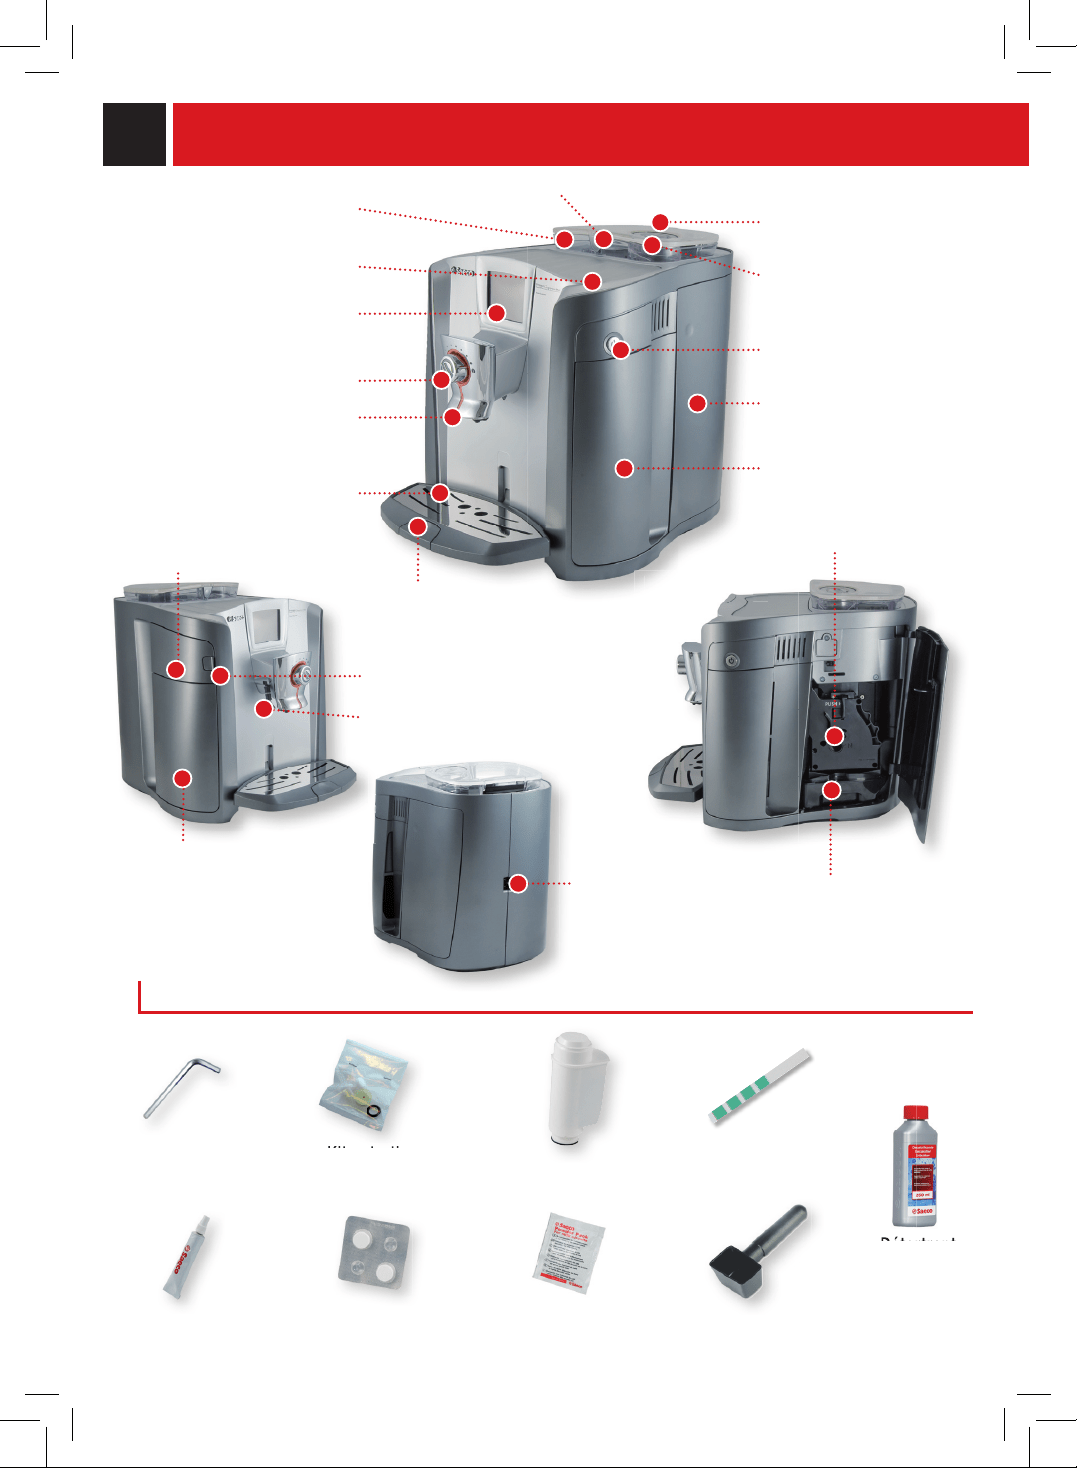
4
Détergentpournettoyer
leréservoiràlait
Kitentretien
cappuccinatore
Kitentretien
Logementcaféprémoulu
Groupecafé
Réservoirpour
marcdecafé
Prisepourl'alimentation
électrique
Touchepourl'ouvertureduréservoiràgrainsdecafé
Réservoirpourgrainsdecafé
Plaqueavecfonctionde
réchauffementdestasses
Interrupteurgénéral
Portedemaintenance
ACCESSoIRES
Couvercledurécipient
àgrainsdecafé
Bacde
récupérationd'eau
Touchepourlesoulèvementet
l'abaissementdubacd'égouttage
Ecranàtouchestactiles
SbS
Sortieducafé
Bac+grilled'égouttage
Dispositifpourle
réservoiràlait
Bused'eauchaude
Réservoird'eau
FiltreàeauIntenza
Doseurpourle
cafémoulu
Détergentpourle
nettoyage(Groupecafé)
Testdedureté
del'eau
Cléde
réglage
DESCRIPTION DE L'APPAREIL
Graissepourle
groupededistribution
Boutond’ouverture
logementréservoiràlait
Détartrant
Détartrant
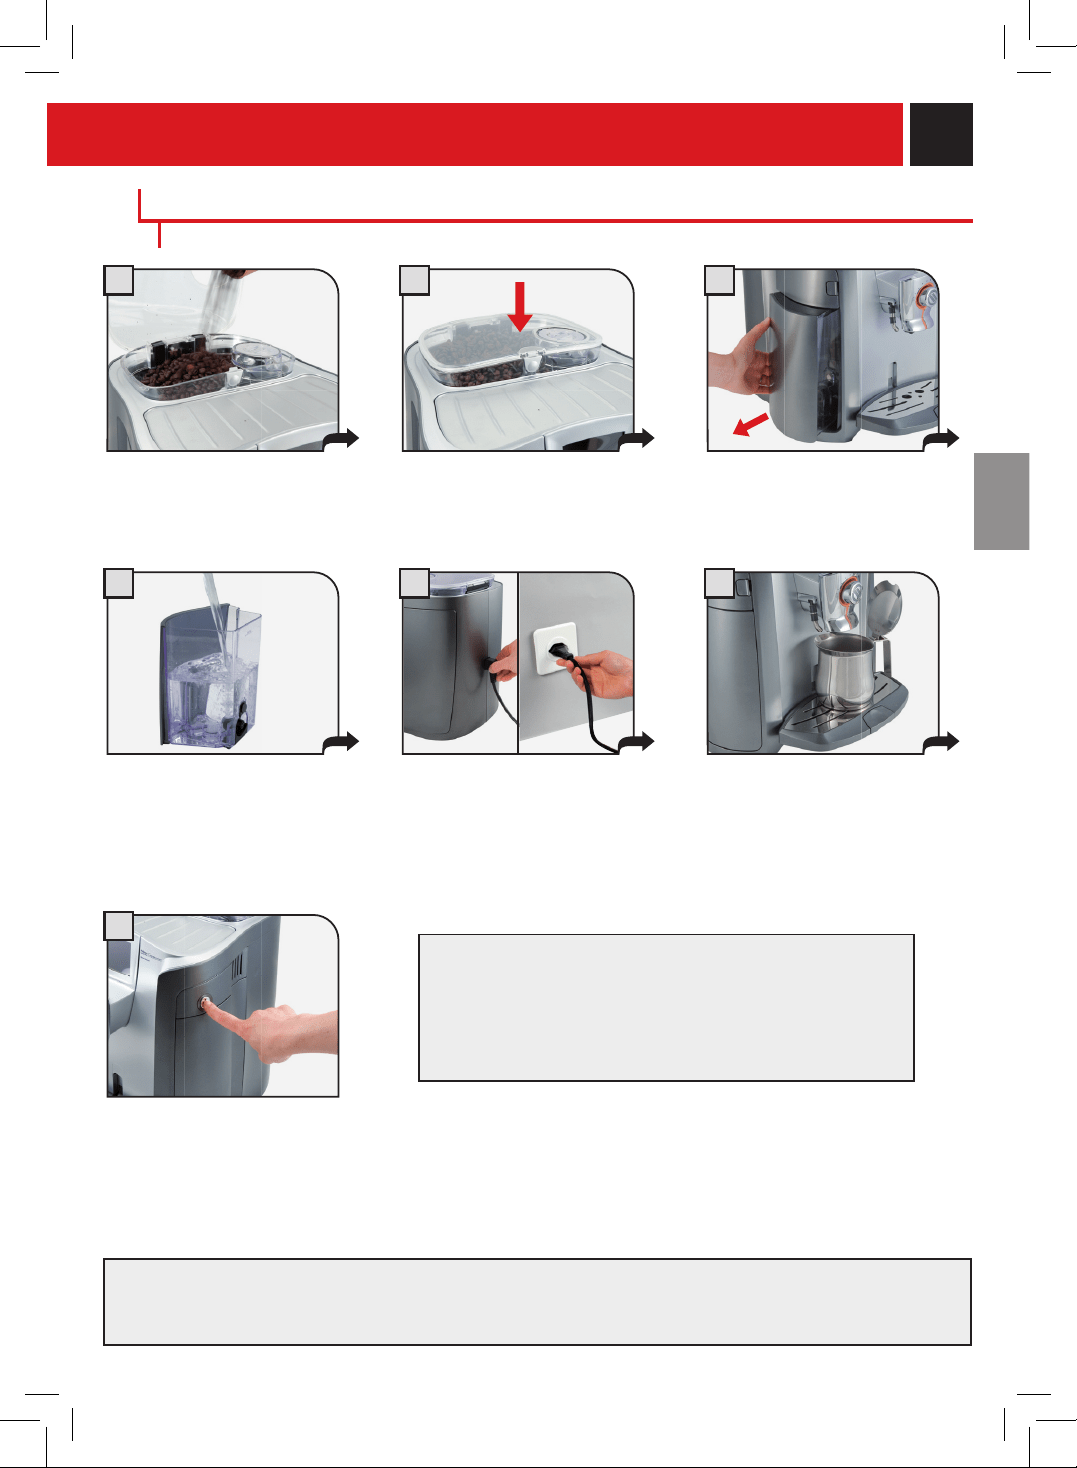
5
1 2 3
4
7
65
INSTALLATION
Branchezlachesurlaprise
situéeaudosdel'appareil.
Branchezl'autreextrémitédu
câblesuruneprisedecourant
appropriée(reportez-vousàla
plaquettedesdonnées).
Placezunrécipientsouslabuse
d'eauchaude.
Appuyezsurlatouchesituéesurle
réservoiràcafépourouvrirle
couvercle.Remplissezleréservoir
avecducaféengrains.
Fermezlecouvercleenappuyant
jusqu'aubout.
Retirerleréservoiràeau.
Ilestconseilléd’installerleltreà
eau(voirpage7).
Appuyezunefoissurl'interrupteur
généralpourallumerlamachine.
L'appareilprocèdelui-mêmeàun
diagnosticdesfonctions.Cetestest
effectuéchaquefoisquel'appareilest
allumé.
Lamachineeffectueautomatiquementl'amorçageducircuit
hydraulique.
Lamachineestprêteàfonctionner.
Ilestpossiblequel'eaunes'écoulepasdanslegobelet.Celane
constituepasunedéfaillance.
Assurez-vousquel'interrupteurgénéraln'estpasactivé.
Remplissezleréservoiravecde
l'eaupotablefraîche;nedépassez
jamaisleniveaumaximumindiqué
surleréservoir.Ensuite,remettez
leréservoirenplace.
MISE EN MARCHE DE LA MACHINE
PoUR RÉGLER LE DEGRÉ DE DURETÉ DE L’EAU ET
RÉGLER INTENZA ARoMA SYSTEM
voIR « MENU DURETÉ EAU » À LA PAGE 21.
Couvercledurécipient
àgrainsdecafé
Détartrant
DANS LE CAS oÙ LA MACHINE NE SERAIT PAS UTILISEE DURANT UNE LoNGUE PERIoDE
vEUILLEZ CoNSULTER LE CHAPITRE " SECTIoN ET ENTRETIEN" AvANT SA REMISE EN
MARCHE (PAGE 45)
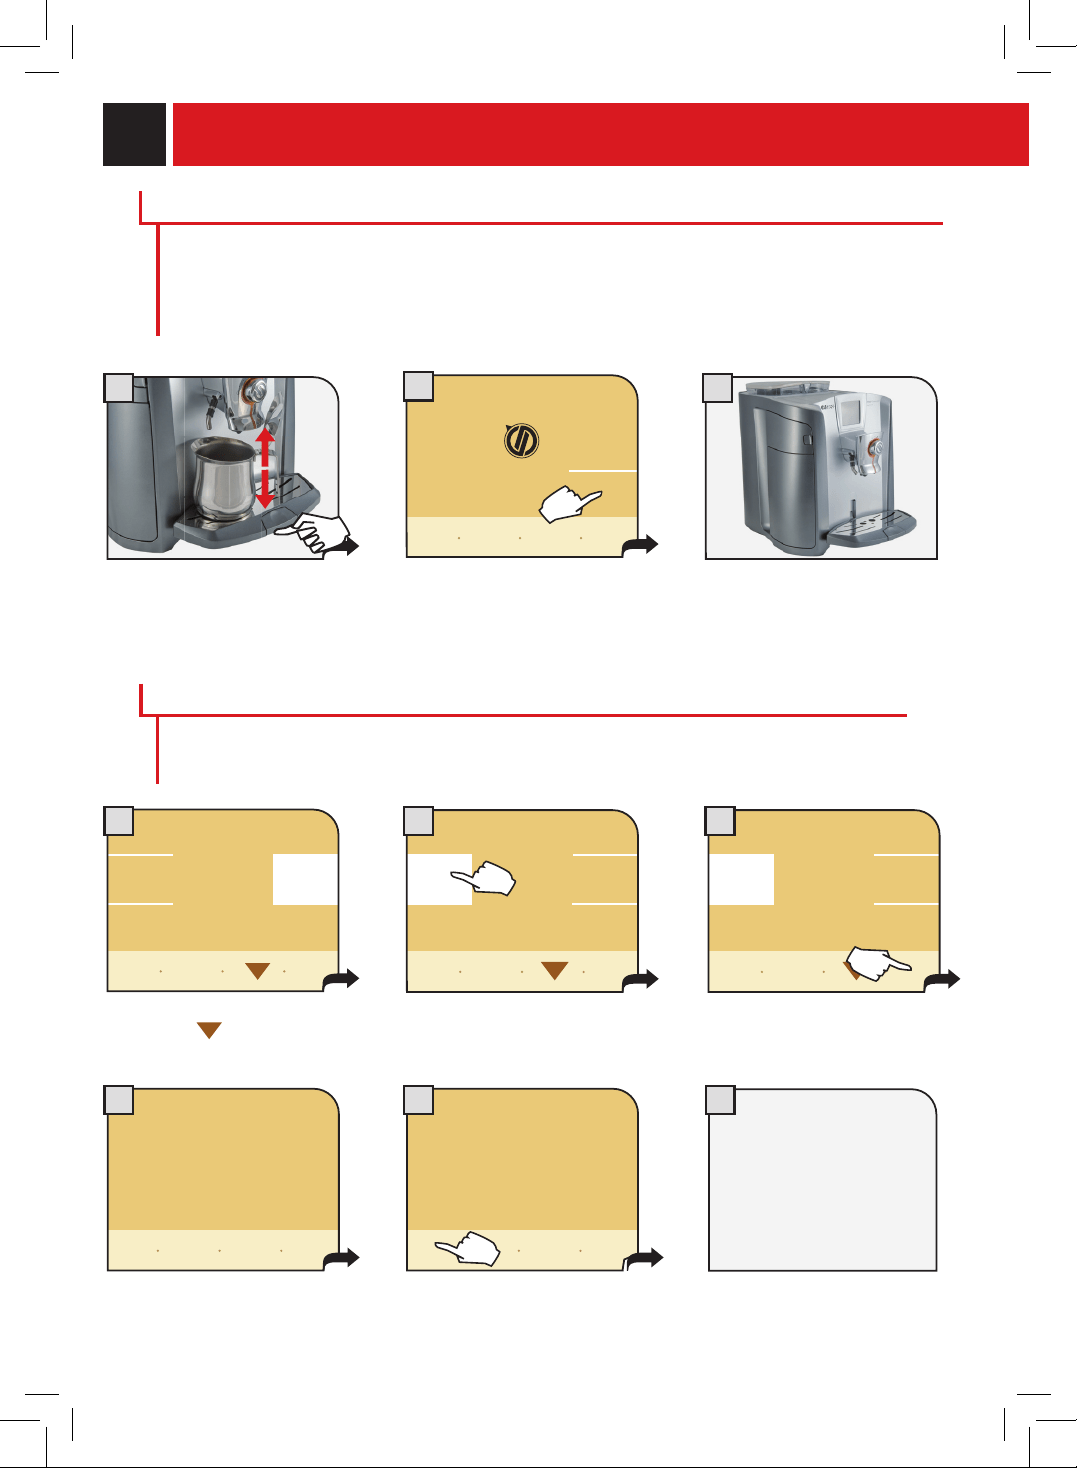
6
1 3
Appuyerpoursélectionnerlalangue
souhaitée.
Lamachinesemetenmarcheet
indiquelemenudanslalangue
sélectionnée.
Consulterlemanuelàla
page35pourleréglage
del’horloge.
6
italiano (ch)
language
1/2
français
deutsch
nederlands
english
Italiano (i)
ok
1
Sélectionnerlalanguesouhaitée.
Appuyersur
pourlesautres
langues.
Appuyersur«ok».
démo
test
automatique
4
italiano (ch)
langue
1/2
français
deutsch
nederlands
english
Italiano (i)
2
ok
italiano (ch)
langue
1/2
français
deutsch
nederlands
english
Italiano (i)
3
ok
Ilestpossible,éventuellement,d’activerlafonction«
démo»(voirpage27)enappuyantsurlatouchechaque
foisquelamachineeffectuel’autodiagnostic.
démo
test
automatique
5
2
démarrer
remplir le circuit
L’amorçagemanuelducircuithydrauliquen’estpossiblequelorsquel’afcheurindiquelapage-écran(2).
Remarque:avantd’effectuercetteopération,s’assurerqueleréservoiràeauestrempli.
Important:avantd'effectuerl'amorçage,placerledispositifSBS(voirpage9)commeilestindiquésur
l'afcheur.Vouspourrezensuiteleréglerselonvotregoûtaprèsl'amorçage.Sicen’estpassufsant,
consulterlasectionrelativeauxmessagesdesignalisationàlapage46.
AMoRçAGE MANUEL DU CIRCUIT HYDRAULIQUE
Placezunrécipientsouslabuse
d'eauchaude(ilsepeutquel'eau
nes'écoulepasdelabuse).
Appuyezunefoissurl'écrantactile;
lamachinedémarrelecycle
d'amorçageducircuithydraulique.
Unefoisl'amorçageducircuit
terminé,retirezlerécipient.La
machineestprêteàfonctionner.
INSTALLATION
RÉGLAGE DE LA LANGUE ET DE L'HoRLoGE
Lorsdelapremièremiseenmarchedelamachine,ilfautsélectionnerlalanguesouhaitée;cela
permetd’adapterlesparamètresdesboissonsàceuxduPaysd’utilisation.C’estpourquoicertaines
languessontdifférenciéesaussienfonctiondupays.
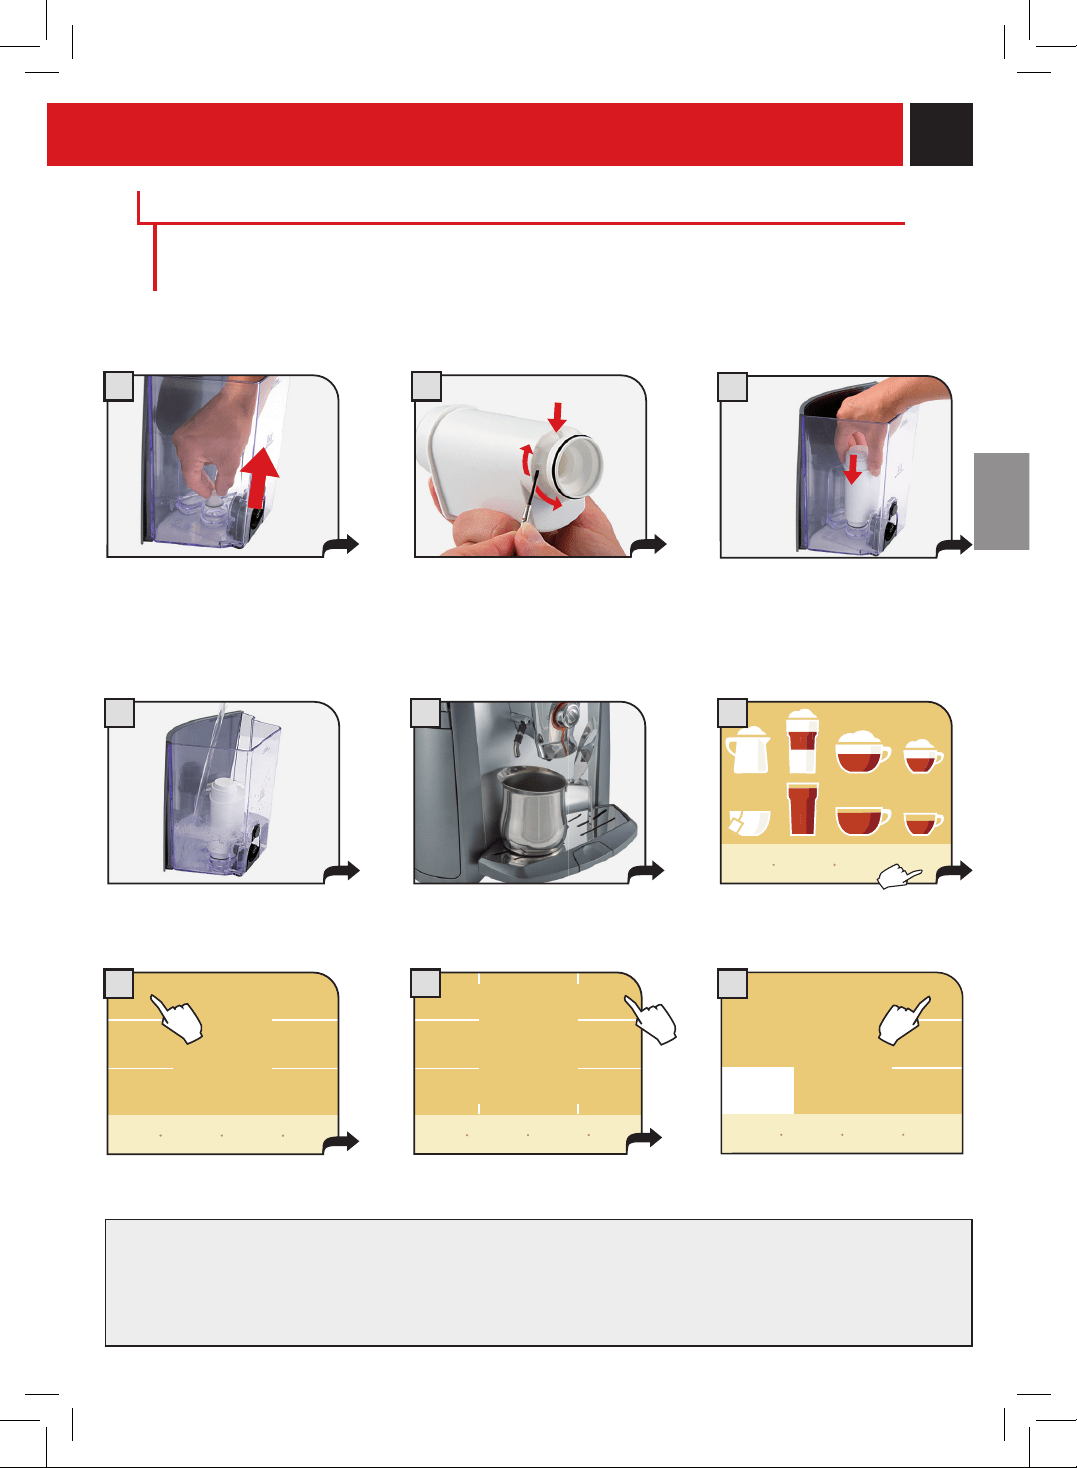
7
5 6
9
FILTRE À EAU INTENZA
Pouraméliorerlaqualitédel’eauutiliséeetgarantirenmêmetempsuneduréedevieaccruedel’appareil,il
estconseilléd’installerleltreàeau.Aprèsl’installation,procéderauprogrammed’activationdultre(voir
programmation)demanièreàcequelamachinepuisseprévenirl’utilisateurduremplacementdultre.
Enlever le fi ltre de son emballage, ensuite le plonger verticalement dans l’eau froide (l’ouverture vers
le haut). Pousser le fi ltre délicatement sur les bords pour faire sortir toute bulle d’air.
Insérezleltredanssonlogement
àl'intérieurduréservoirvide
(regardezlagure).
Appuyezjusqu'aupointd'arrêt.
Appuyezsur«réglagesmachine».
Appuyezsur«ltreàeau».
Appuyezsur«activationltreà
eau».
ltre à
eau
inséré
pas
inséré
activation
ltre à eau
enregistrer
pré-
sélections
Lamachineactiveleltreàeau.Attendrequelecyclesetermineautomatiquement.
Unefoislecycled’activationterminé,lamachinerevientaumenudesélectiondesproduits.Nepasutiliserl’eau
obtenuependantcettephase.
REMARQUE : si le fi ltre à eau n’est pas présent, insérer dans le réservoir le petit fi ltre blanc précédemment
enlevé au point 1.
Placezunrécipientsouslabuse
d'eauchaude.
Appuyezsur«menu
programmation».
a f c h e r
menu avec
textes
mon
café
menu pro-
grammation
entretien
spécialités
réglages
machine
réglages
horloge
fonctions
supplémen-
taires
présélec-
tions
boissons
stand-by
menu
préparation
café
sons et
alarmes
réglages
machine
af cheur
langue
rinçage
dureté
eau
ltre à
eau
illumination
tasse
plaque
chauffe-tasses
retourner
en arrière
rétablir
valeurs
standard
retourner
au menu
retourner
en arrière
rétablir
valeurs
standard
retourner
au menu
menu
principale
4
1
3
2
Enleverlepetitltreblancà
l’intérieurduréservoir,le
conserverdansunendroitsecet
leprotégercontrelapoussière.
Remplirleréservoiravecdel’eau
fraîchepotableetlerepositionner
danslamachine.
RéglerIntenzaAromaSystem:
A=Eaulégère
B=Eaumoyennementdure(standard)
C=Eaudure
Plusd’informationsàlapage21.
8
7
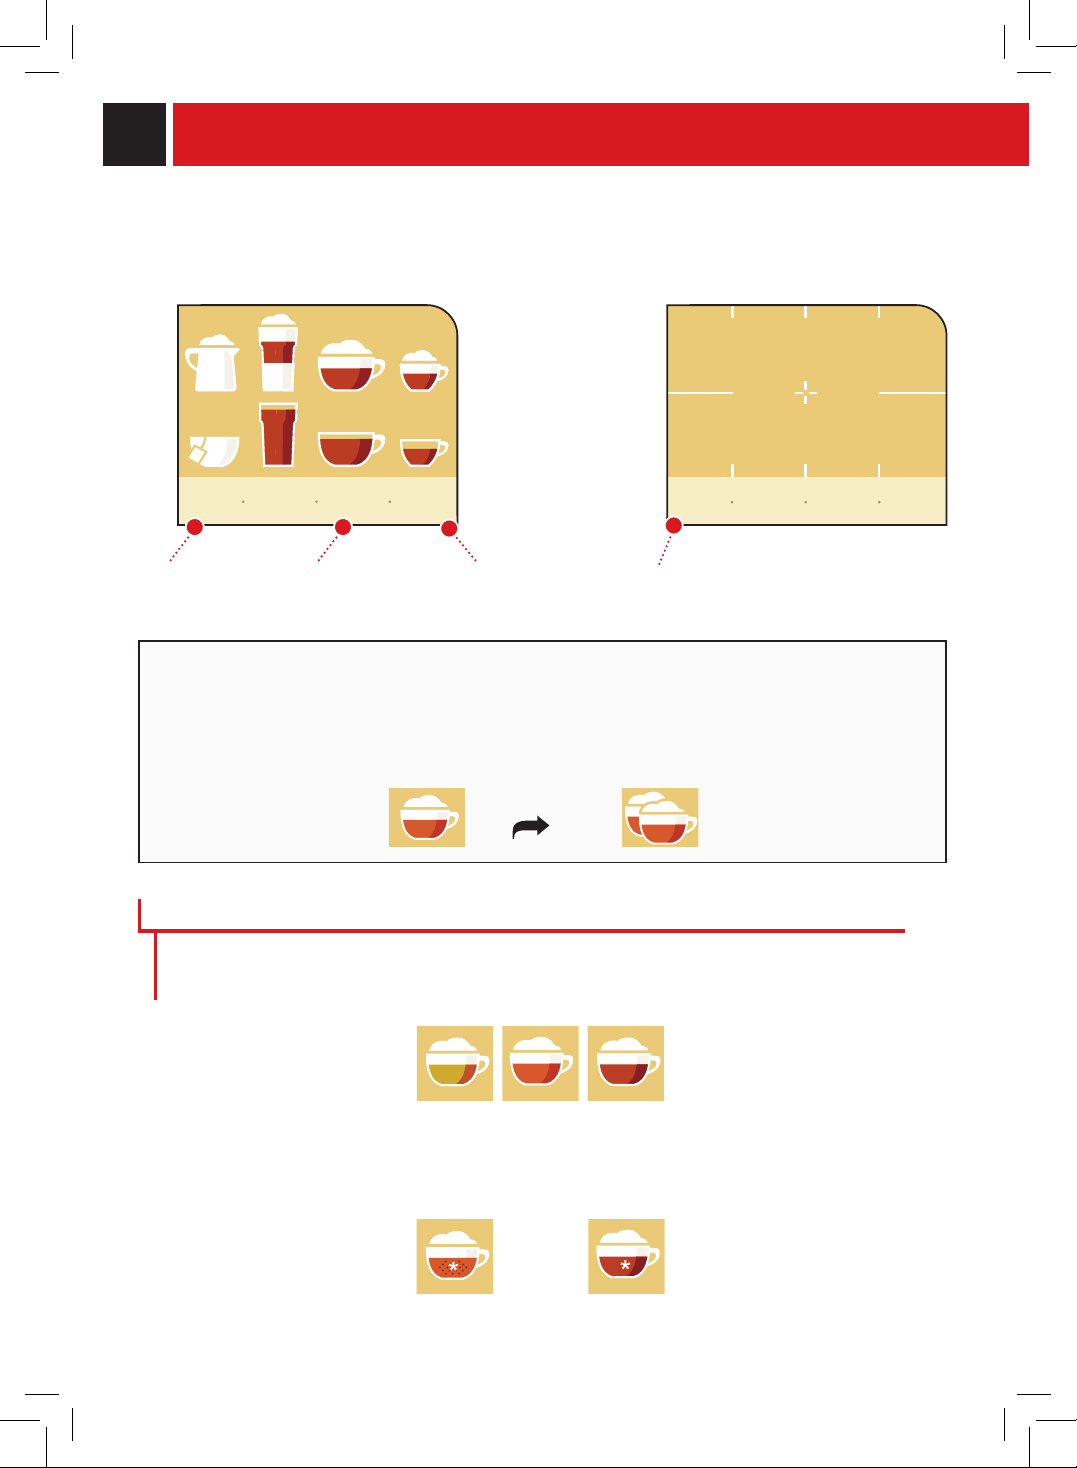
8
• Pourobtenirlaboissonsouhaitée,appuyezsurlesymbolecorrespondantsurl'afcheur.
Lamachineeffectueautomatiquementtouteslesopérationsnécessaires.
•Pourobtenir2tasses,appuyezdeuxfoissurlesymboledelaboissonsouhaitée.
appuyez2fois
léger moyen fort
L'intensitédelacouleurdel'icône(valableuniquementpourlesboissonsàbasedecafé)indique
l'intensitédel'arôme(soitlaquantitédecaféàmoudre)pourlapréparationdelaboisson.Majeure
estlaquantitédecafémoulu,plusfortestl'arômeducafédistribué.
AFFICHEUR
Passezaumenu
«formattexte»
Programmation
desproduits
Accédezaumenu
deprogrammation
Ilestpossibledemodierlapage-écrandel'afcheuretdechoisirentrele«formaticône»etle
«formattexte».
FoRMAT ICÔNE
cafè
long
eau
chaude
cafè expresso
lait
chaud
lait
noisette
expresso
crème
cappuccino
moyen fortemoyen
moyen fortemoyen
Passezaumenu
«formaticône»
FoRMAT TEXTE
AFFICHAGE DE L'ARÔME DU CAFÉ
Lorsquelamachineestprogramméepourutiliserlecaféprémouluoubienlorsqu'onpersonnaliseun
produit,l'icôneestafchéedefaçondifférenteet/oumarquéeparunastérisque(reportez-vousaux
sectionsrelativesàlaprogrammationdesboissons).
prémoulu personnalisation
a f c h e r
menu avec
textes
mon
café
menu pro-
grammation
a f c h e r
icônes
mon
café
menu pro-
grammation
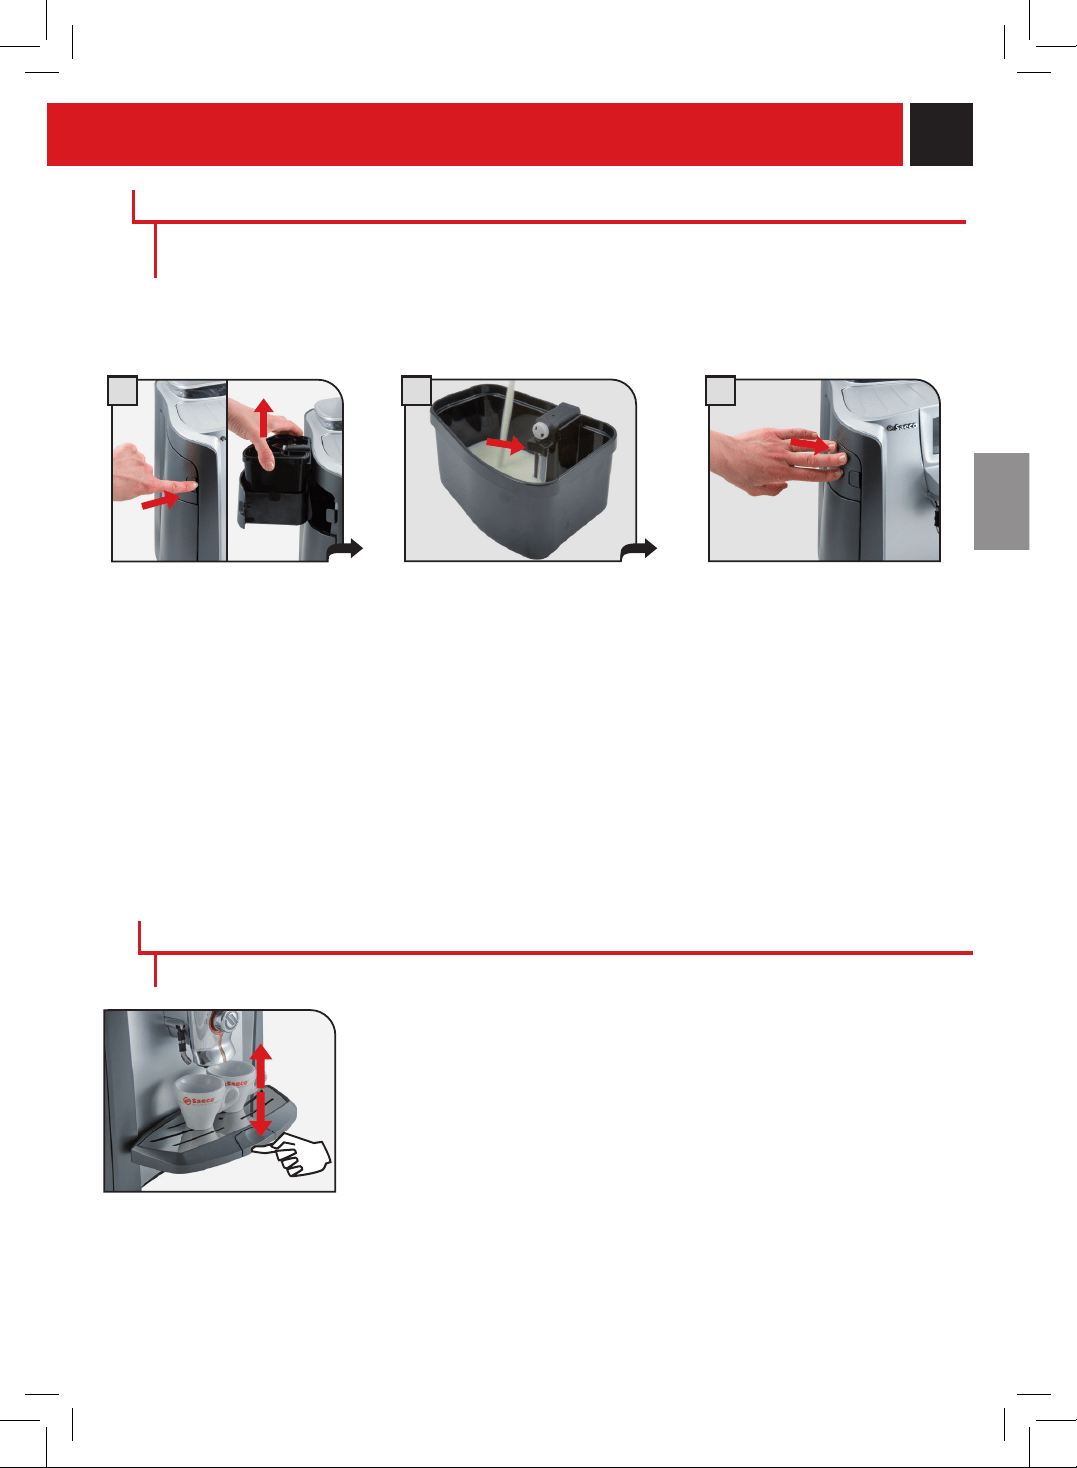
9
Bacd'égouttementréglableenhauteur.
Appuyezlégèrementsurlapartieinférieuredelatouchepoursouleverlebacou
biensurlapartiesupérieurepourlebaisser.Unefoislahauteursouhaitéeatteinte,
vouspouvezrelâcherlatouche.
Remarque:lebacd'égouttementestmunid'unotteurrouge;lorsqueleotteur
sesoulève,ilfautvideretlaverlebac.
RÉGLAGE DE LA HAUTEUR DU BAC D'ÉGoUTTEMENT
REMPLISSAGE DU RÉCIPIENT DU LAIT
REGLAGES
Réglezlahauteurdubacd'égouttementavantdedistribuerlesboissons.
21 3
Ouvrirlelogementduréservoirà
laitenappuyantsurleboutonet
retirerleréservoir.
Retirerlecouvercleetyverserdu
lait.NEJAMAISDÉPASSERLE
NIVEAUMAXIMUMindiquésurla
g u r e .
Refermerleréservoiretleremettre
danssonlogement,envériantde
bienfermercedernier.
ATTENTIoN ! NE PAS oUvRIR LA PoRTE DE SERvICE PENDANT LA PHASE DE
DISTRIBUTIoN, DE LAvAGE oU DE RINçAGE.
Ilnefautremplirquelerécipientéquipédecappuccinatoreavantdeprépareruneboissonquelconqueà
basedelait.Nepasutiliserlelaitaprèsladatedepéremption.(Important!Sereporteràlasectionrelative
àl’entretienetaunettoyageàlapage41).
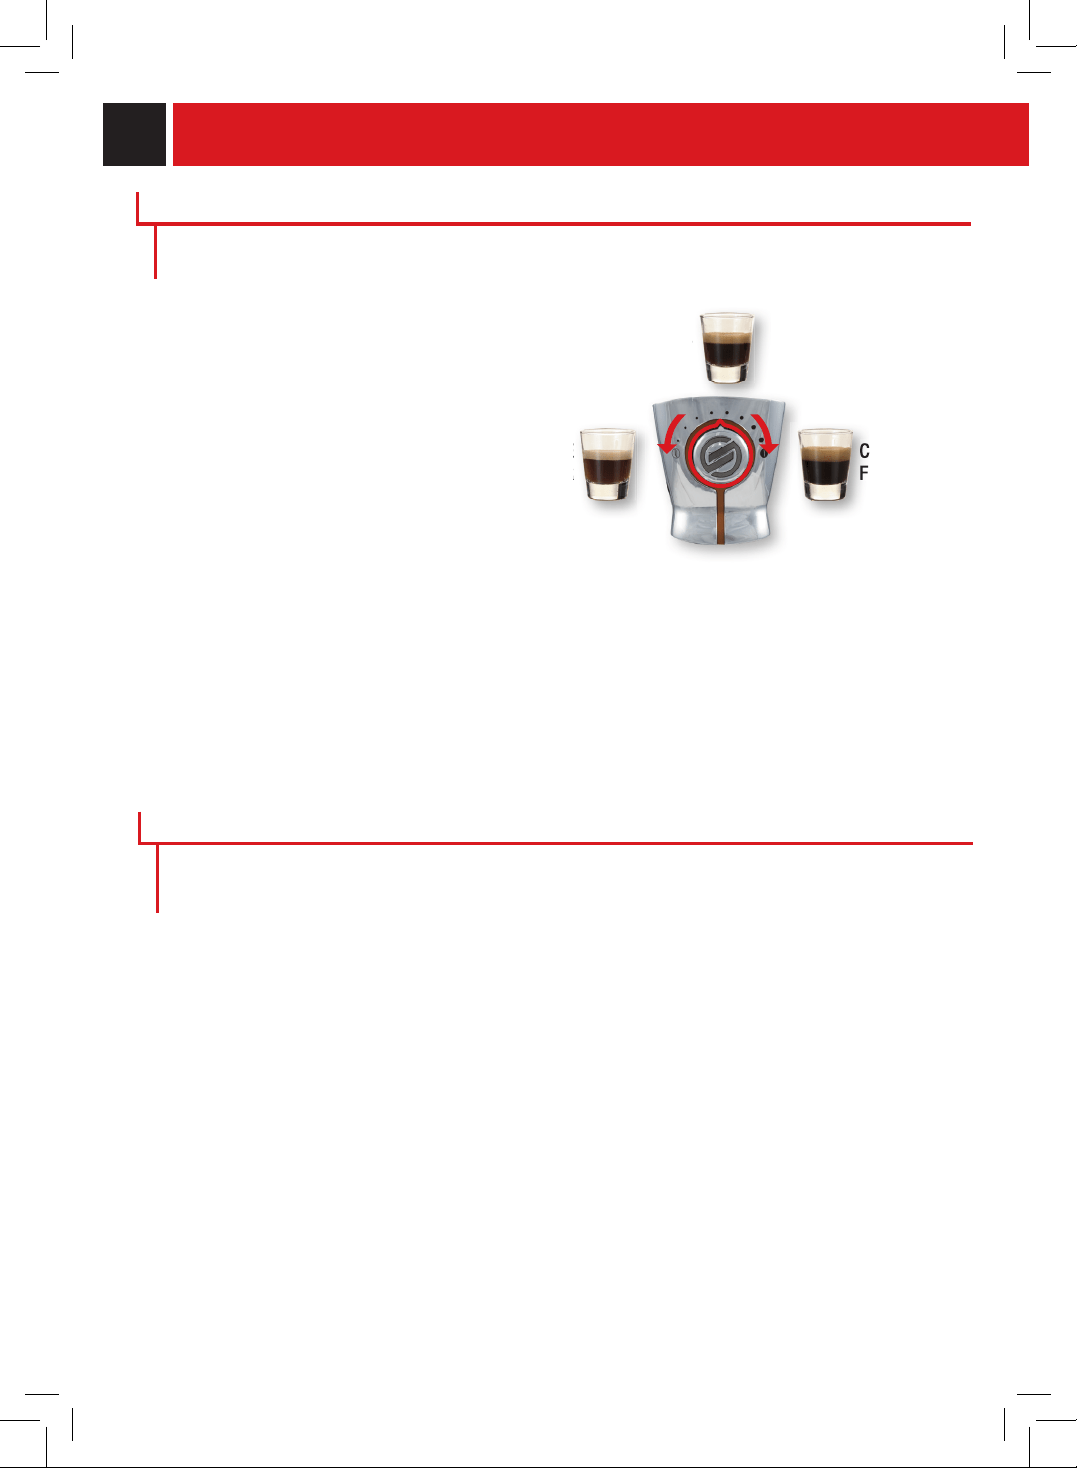
10
DISTRIBUTION DES BOISSONS
CAFÉ
MoYEN
CAFÉ
FoRT
CAFÉ
LÉGER
Celapermetderéglerladensitéducafé
distribué.Ilestpossibled'effectuerleréglage
mêmependantladistributionducafé.Le
réglageauneffetimmédiatsurladistribution
delaboissonsélectionnée.
DENSITÉ DU CAFÉ
SBS – SAECo BREWING SYSTEM
LedispositifSBSaétéconçupourvouspermettredechoisirladensitéetl'intensitédugoûtdevotrecafé.Il
sufttoutsimplementdetournerleboutonpourobteniruncaféquis'adaptelemieuxàvosgoûts.
CAFÉ
LÉGER
CAFÉ
CAFÉ
FoRT
SAECo ADAPTING SYSTEM
Lecaféestunproduitnatureletsescaractéristiquespeuventchangerselonsonorigine,sonmélange
etsatorréfaction.LamachineàcaféSaecoestmunied’unsystèmed’autoréglagepermettantd’utiliser
touttypedecaféengrainsdisponibledanslecommerce(noncaramélisé).
•Lamachineserègleautomatiquementand’optimiserl‘extractionducafé,enassurantle
compactageparfaitdelapastillepourprépareruncaféexpressocrémeux,àmêmedelibérertous
lesarômes,indépendammentdutypedecaféutilisé.
•Leprocessusd’optimisationsecomposed‘unephasedecalibragedemandantladistributiond’un
certainnombredecafésandepermettreàlamachinederéglerlecompactagedelapoudre.
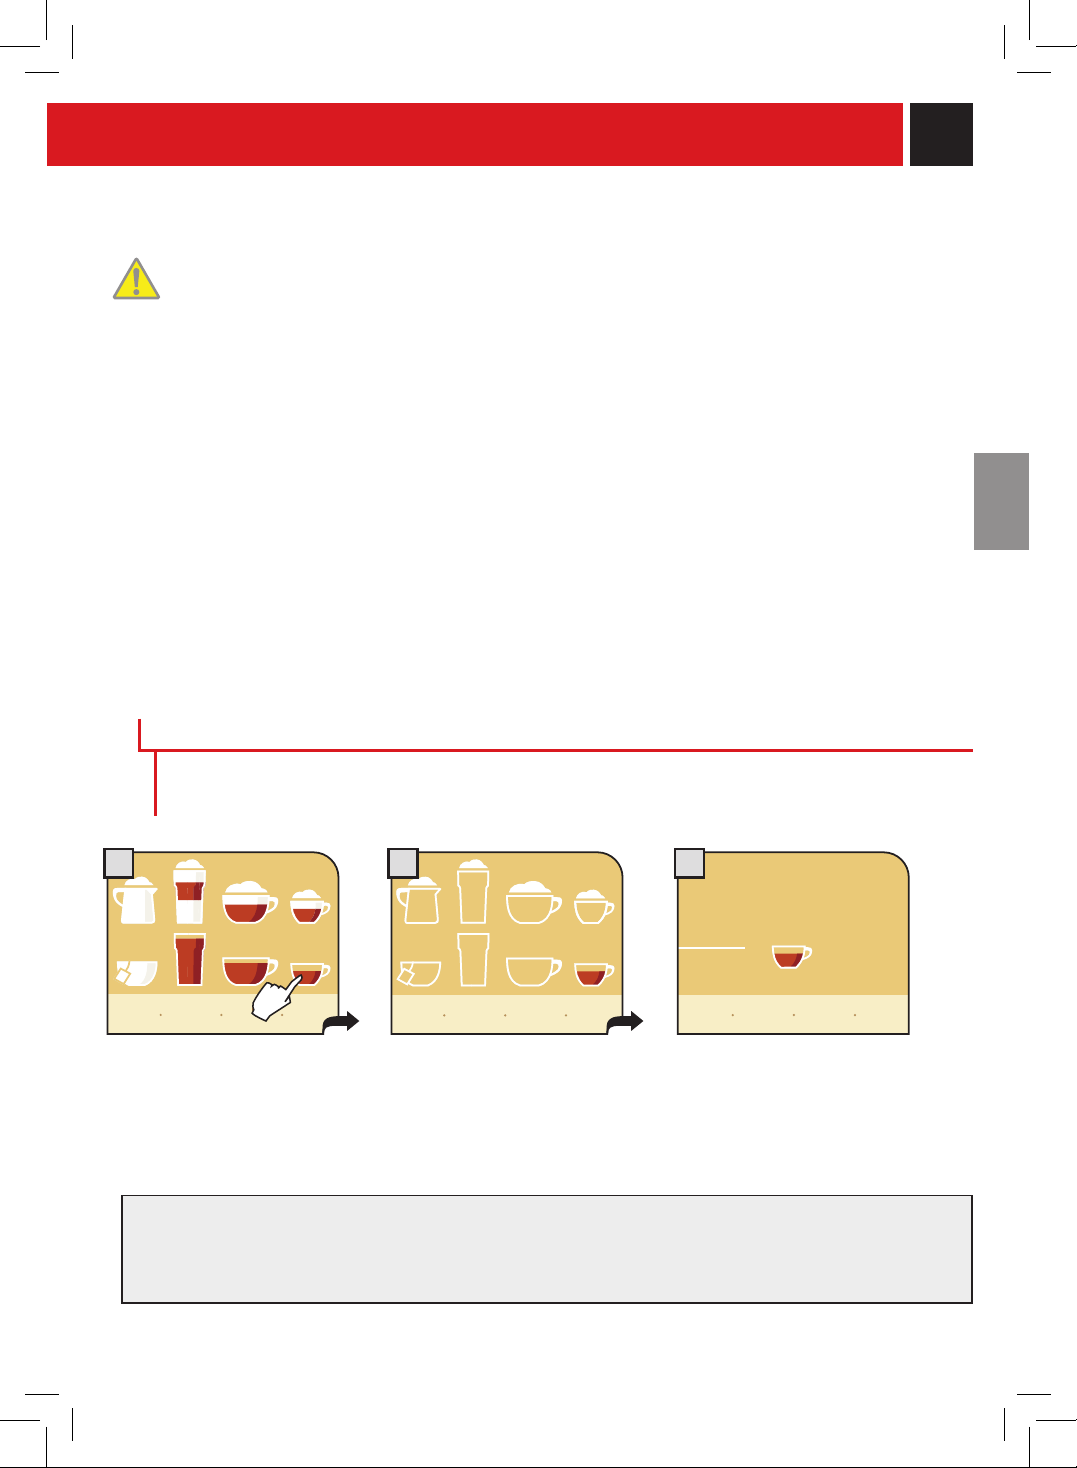
11
1 2
3
LA DISTRIBUTIoN DU CAFÉ, DE L'EAU CHAUDE ET DU LAIT PEUT ÊTRE INTERRoMPUE
À ToUT MoMENT EN APPUYANT SUR LA ToUCHE « ARRÊTER DISTRIBUTIoN ... ».
LE LAIT DISTRIBUÉ PEUT ATTEINDRE DES TEMPÉRATURES ÉLEvÉES : RISQUE DE
BRÛLURES. ÉvITER ToUT CoNTACT DIRECT AvEC voS MAINS.
LE LAIT UTILISÉ DoIT AvoIR ÉTÉ CoNSERvÉ CoRRECTEMENT. N'UTILISEZ JAMAIS DE
LAIT APRÈS LA DATE DE PÉREMPTIoN INDIQUÉE SUR L'EMBALLAGE.
Assurez-vousquetouslesréservoirssontpropres.Acetégard,conformez-vousauxconsignesdelasection
«Nettoyageetentretien»(consultezlapage40).
APRÈS LA DISTRIBUTIoN DE BoISSoNS À BASE DE LAIT, LE RÉCIPIENT DU LAIT ET
LES CIRCUITS DE L'APPAREIL DoIvENT ÊTRE LAvÉS.
Pourladistributionde2tasses,l'appareilpréparelapremièremoitiédelaquantitédecaféprogramméeet
interromptpendantunbrefmomentladistributiondecaféandemoudrelasecondemoitié.Ladistribution
ducafésepoursuitensuiteetseterminesansautreinterruption.Silaboissonsélectionnéecontientdulait,
lamachinedistribueautomatiquementlelait.Siladistributiondelapremièretassedecaféestinterrompue,
lasecondetasseneserapasdistribuée.
CAFÉ EXPRESSo / CAFÉ / CAFÉ ALLoNGÉ
Choisissezleproduitsouhaitéet
appuyezsurl'icône
correspondantedel'écran;
appuyezunefoispourobtenirune
tasse,deuxfoispour2tasses.
Lamachinecommenceàmoudre
laquantitédecaféprogrammée.
Ladistributiondelaboisson
sélectionnéecommence.
Cetteprocéduremontrecommentdistribueruncaféexpresso.Pourladistributiond'unautretypedecafé,
appuyezsurl'icônecorrespondante.N'utilisezquedepetitestassesoudetassesappropriéespouréviter
toutdéversementdecafé.
Lamachinearrêteautomatiquementladistributionducaféenfonctiondesquantitésprérégléeslorsdela
fabricationenusine.Ilestpossibledeprogrammerlaquantitéàdistribuer,consultezlapage16.
Sivoussouhaitezinterromprelecyclededistribution,appuyezsurlatouche«arrêterdistributioncafé».
arrêter
distribution
café
expresso
afcher
menu avec
textes
mon
café
menu pro-
grammation
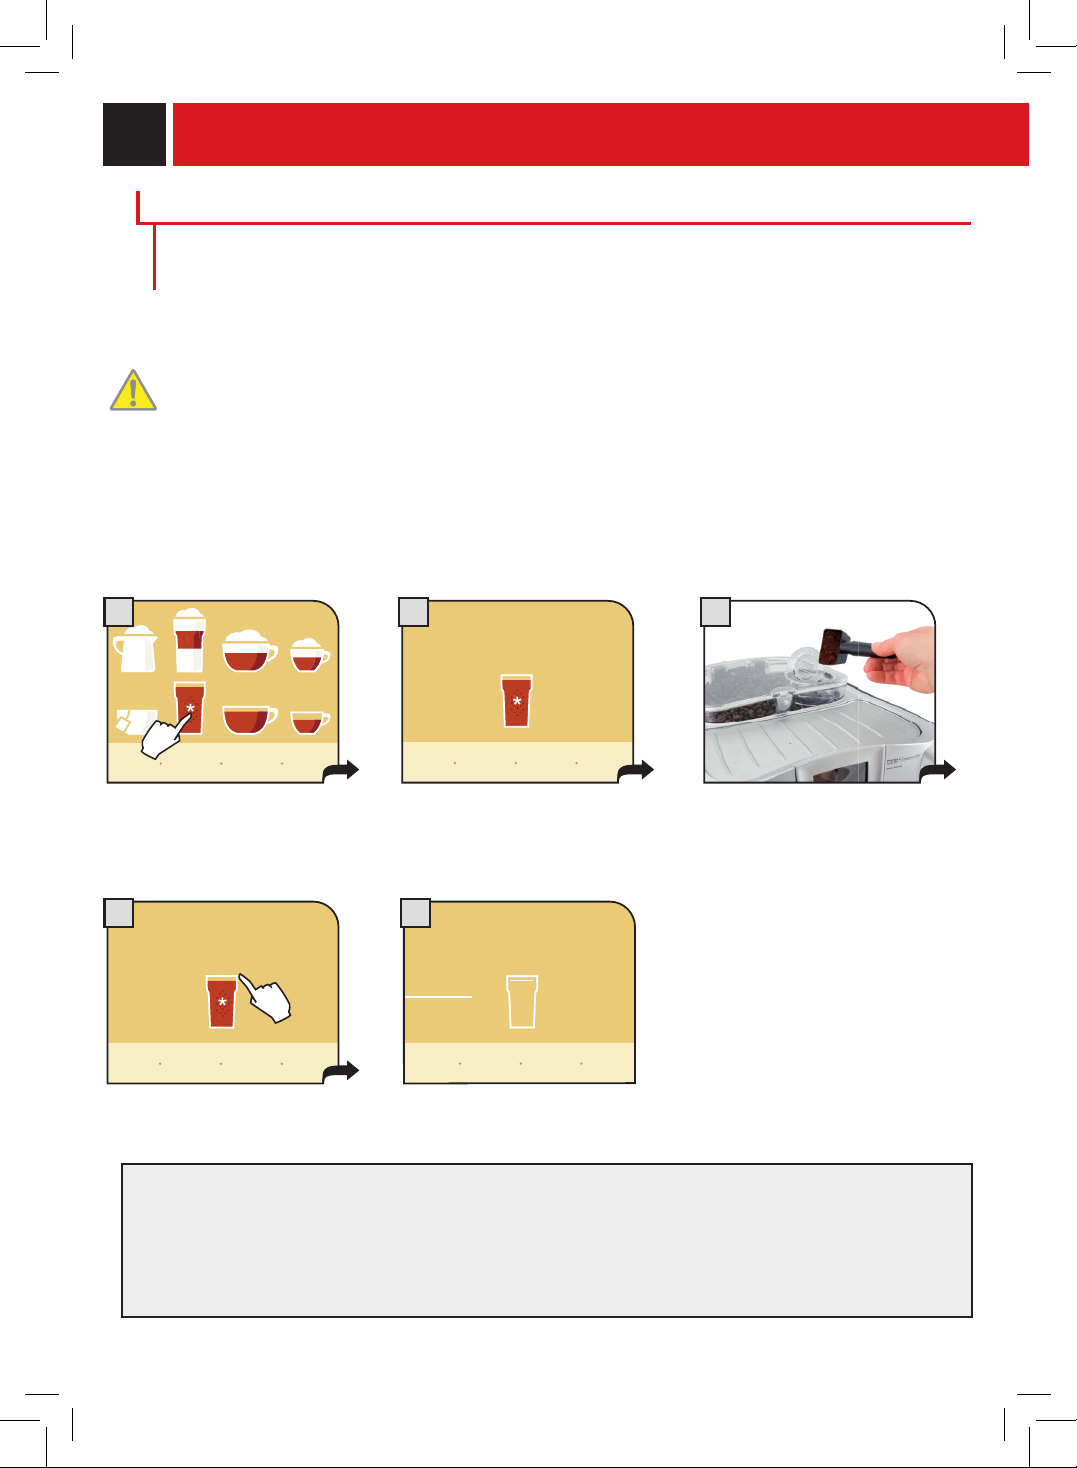
12
1 2 3
4 5
DISTRIBUTIoN BoISSoN AvEC CAFÉ MoULU
Lecaféprémouludoitêtreversédanslecompartimentprévuàceteffet,situéàcôtéduréservoiràcaféen
grain.Vousnedevezverserqueducafémoulupourmachinesexpresso;neversezjamaisdecaféengrains
nidecafésoluble(consultezlasection«Programmationdesboissons»,page16)
ATTENTIoN : NE vERSEZ DU CAFÉ PRÉMoULU DANS LE CoMPARTIMENT QUE SI voUS
DÉSIREZ PRÉPARER UNE BoISSoN AvEC CE TYPE DE CAFÉ.
N'INTRoDUISEZ QU'UNE SEULE MESURE DE CAFÉ MoULU À LA FoIS. IL N'EST PAS
PoSSIBLE DE DISTRIBUER DEUX CAFÉS À LA FoIS.
Enappuyantsurlatouche
correspondante,l'afcheur
indique:
Lapage-écranrappelleà
l'utilisateurdeverserlecafé
mouludanslecompartiment
prévuàceteffet.
ajouter café
pré-moulu
démarrer!
retourner
en arrière
Appuyezsurlatouche
démarrer!
pourcommencerladistribution.
Versezlecafémouludansle
compartimentprévuàceteffetà
l'aidedelamesurefournie.
ajouter café
pré-moulu
démarrer!
retourner
en arrière
Ladistributiondelaboisson
sélectionnéecommence.
café
long
arrêter
distribution
café
Remarque:
• Siladistributionn'estpasdémarréedansuneminuteaprèsl'afchagedelapage-écran(2),lamachine
revientaumenuprincipaletdéchargel'éventuelcaféintroduitdanslebacd'égouttement;
• Silecaféprémoulun'estpasversédanssoncompartiment,lamachinenedistribueraquedel'eau;
• Si2ouplusieursmesuresdecafésontverséesdanslecompartiment,lamachinenedistribuepasde
boissonetlecaféverséseradéchargédanslebacd'égouttement.
Dansl'exempleci-dessous,onachoisidedistribuerlecaféallongéenutilisantducaféprémoulu.Lechoix
personneld'utiliserducaféprémouluestindiquésurl'afcheurparl'astérisquesituésurlaboisson
présélectionnée.
a f c h e r
menu avec
textes
mon
café
menu pro-
grammation
DISTRIBUTION DES BOISSONS
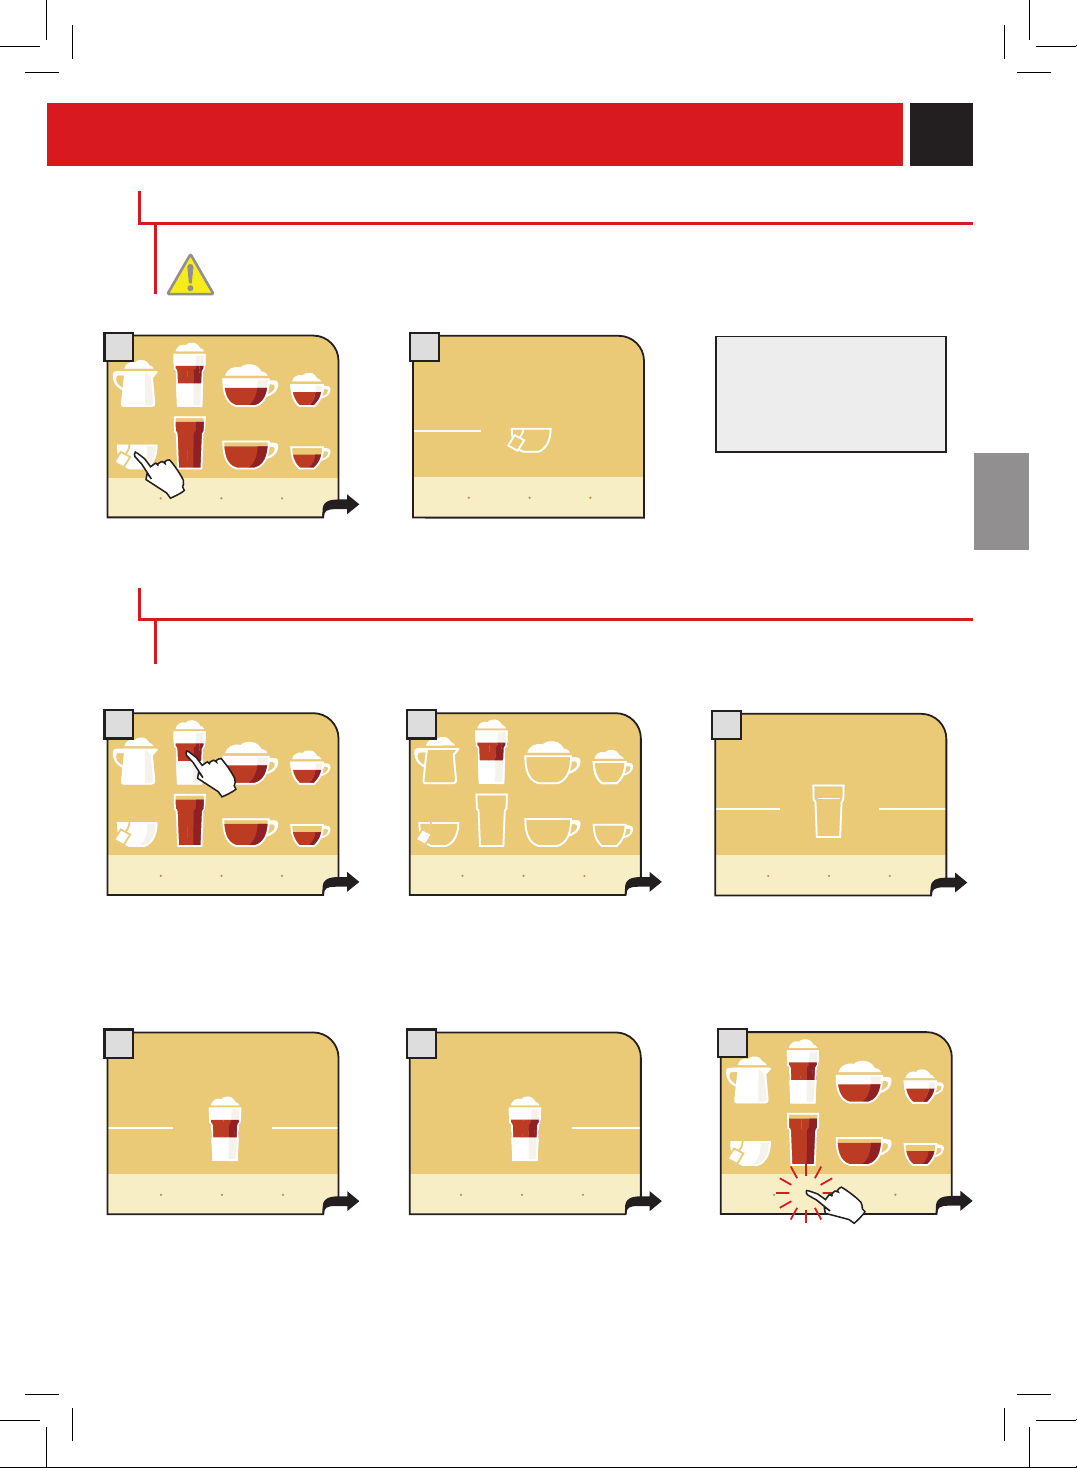
13
2
2
3
4 5
1
1
6
Appuyezunefoissurl'icône
correspondantàl'eauchaude.
DISTRIBUTIoN D'EAU CHAUDE
AU DÉBUT DE LA DISTRIBUTIoN, DES ÉCLABoUSSURES D'EAU CHAUDE
PEUvENT S'ÉCHAPPER DE L'APPAREIL : RISQUE DE BRÛLURES. LA BUSE D'EAU
CHAUDE PEUT ATTEINDRE DES TEMPÉRATURES ÉLEvÉES : ÉvITER ToUT
CoNTACT DIRECT AvEC voS MAINS.
Ladistributiondel'eauchaude
commence.
Répétezlaprocédurepourla
distributiond'unetasse
d'eauchaude
supplémentaire.
lait
noisette
lait
noisette
lait
noisette
Lamachinecommenceàmoudre
laquantitédecaféprogrammée.
Choisissezunproduitetappuyez
surl'icônecorrespondantede
l'écran;appuyezunefoispour
obtenirunetasse,deuxfoispour
2tasses
Dèsqueleprocessusdemouture
estterminé,lamachinedistribue
automatiquementlaquantité
programméedelaitchaud.
Unefoisladistributiondulait
terminée,lamachineprépare
automatiquementlecafé.
Sisouhaité,lamachinepeut
distribuerunedosesupplémentaire
delait.Cetteoptionresteactive
pendantenviron2secondes.Vous
pouvezl'activerenappuyantsurla
touche«ajouterlait».
L'appareilproposedenettoyerles
circuitslait.Latoucheclignote.
Appuyezsur«rinçagelait»pour
effectuerlenettoyagedescircuits
internes.
rinçage
lait
Remplissezleréservoiràlait
afcher
menu avec
textes
mon
café
menu pro-
grammation
afcher
menu avec
textes
mon
café
menu pro-
grammation
arrêter
distribution
eau
eau
chaude
arrêter
distribution
café
arrêter
distribution
lait
arrêter
distribution
café
arrêter
distribution
lait
ajouter
lait
afcher
menu avec
textes
mon
café
menu pro-
grammation
LAIT NoISETTE
PoUR UNE DISTRIBUTIoN oPTIMALE DU LAIT, SE REPoRTER AUX INSTRUCTIoNS
INDIQUÉES À LA PAGE 41. ATTENTIoN ! NE PAS oUvRIR LA PoRTE DE SERvICE
PENDANT LA PHASE DE DISTRIBUTIoN, DE LAvAGE oU DE RINçAGE.

14
9
démarrage
rinçage
cycle rinçage circuits lait
8
rinçage...
rinçage circuits lait
attendre svp
Sivousignorezl'avertissementdenettoyageetquevous
désirezpréparerd'autresboissons,lemessagederinçage
descircuitslaitcontinueàs'afcher.
Sivousn'entreprenezriendansles20minutesquisuivent,
vousserezalorsobligésd'effectueruncyclederinçage
commedécritaupoint7.
Sivouséteignezlamachineaprèsladistributiond'une
boissonàbasedelait,lorsd'unenouvelleremiseen
marchevousserezobligéd'effectuerlecyclederinçage
descircuitslait.
Remarque:avantd'activercettefonction,assurez-vous
que:
1.unrécipientdetaillesufsantesetrouvesouslabusedu
distributeur;
2.leréservoiràeaucontientunequantitéd'eausufsante.
7
Lemessage«rinçagelait»s’afche14jours
aprèslapremièredistributiond’uneboissonà
basedelait.Ilestconseilléderincerles
circuitsdulaitcommedécritàlapage29.
Lorsque7jourssupplémentairessesont
écoulés,lamachinebloqueladistributiondes
boissonsàbasedelaitetilfauteffectuer
obligatoirementlelavagedescircuitsdulait.
Pendantcettephase,ilesttoutefoispossible
dedistribuerducaféetdel’eauchaude.
Poureffectuerlerinçage,appuyer
sur«démarragerinçage».
Attendrequelecyclesoitterminé.
Lamachineretourneensuiteau
menuprincipal.
CETTE PRoCEDURE EST NECESSAIRE PoUR ToUTES LES BoISSoNS A BASE DE LAIT !
APRÈS L’EMPLoI, RETIRER ToUJoURS LE RÉSERvoIR À LAIT ET LE METTRE AU
RÉFRIGÉRATEUR S’IL CoNTIENT ENCoRE DU LAIT.
Retirerleréservoiretlemettre
auréfrigérateuraucasoùil
contiendraitencoredulait.
LE RESERvoIR NE PEUT ETRE LAISSE DANS LA MACHINE QUE S’IL A ETE LAvE AvEC DE
L’EAU PoTABLE ET QU’IL NE CoNTIENT PLUS DE LAIT (voIR PAGE 41).
Unefoislecyclederinçageterminé,lamachinesignaleà
l’utilisateurderetirerleréservoiraveclerésidudelaitenafchant
lemessage«retirerlait».
ENLEvER LE RESERvoIR A LAIT SEULEMENT LoRSQUE LA MACHINE EST ALLUMEE.
a f c h e r
menu avec
textes
mon
café
menu pro-
grammation
retirer
lait
DISTRIBUTION DES BOISSONS
rinçage
lait
a f c h e r
menu avec
textes
mon
café
menu pro-
grammation
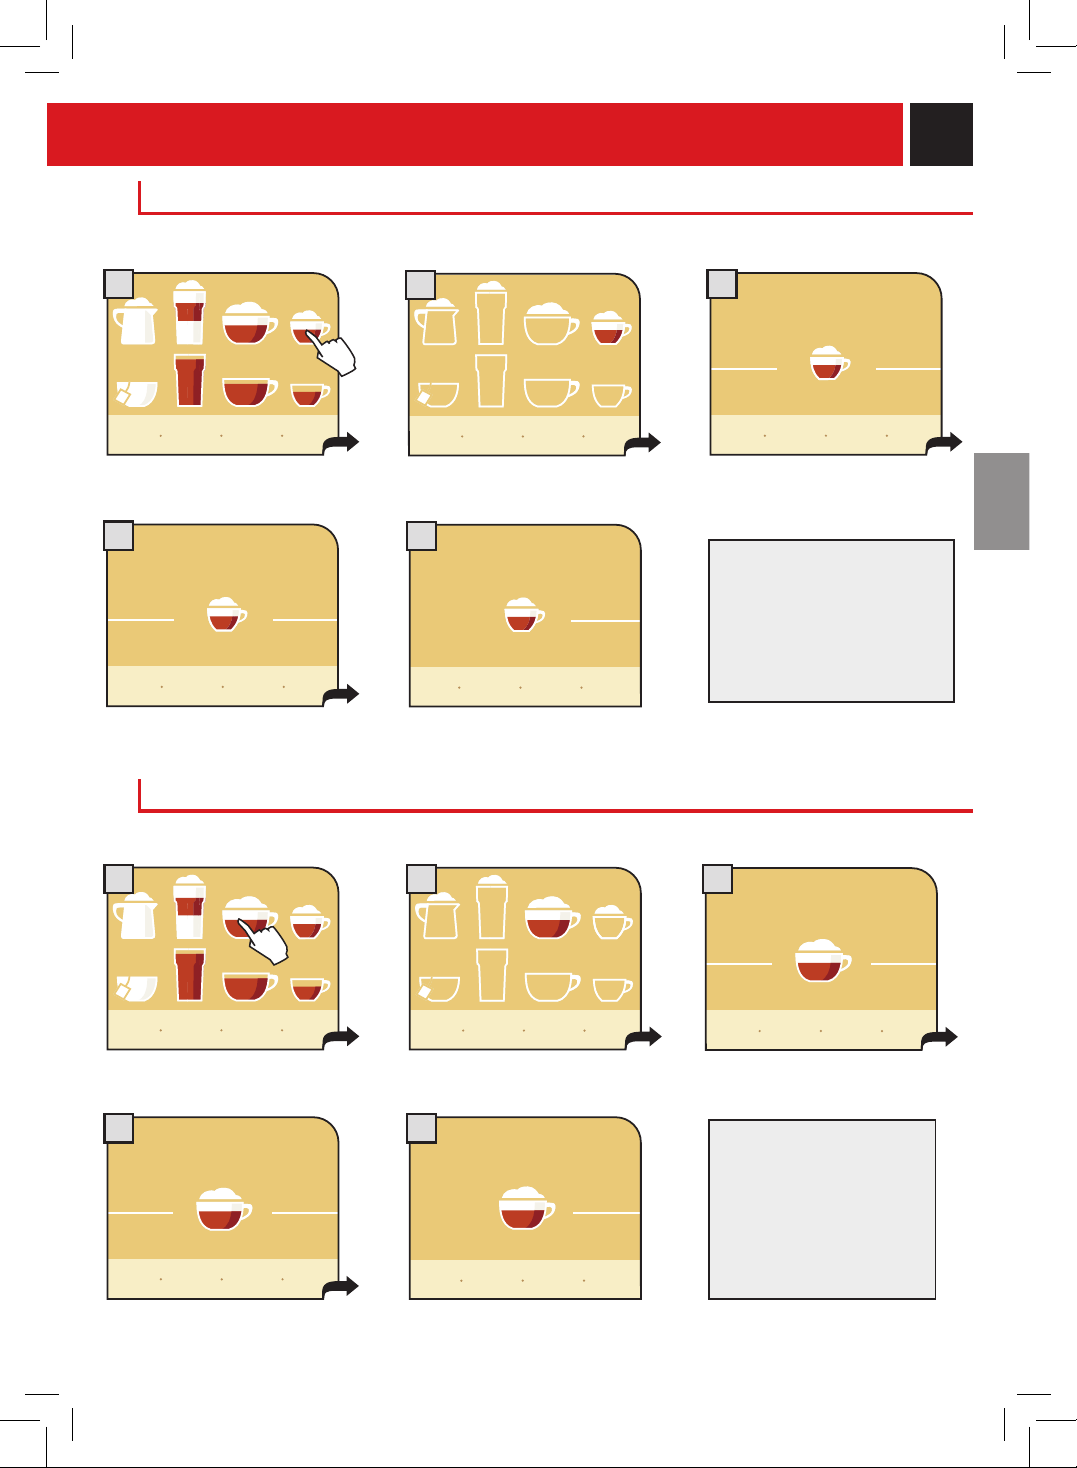
15
2
31
4
5
2
3
4 5
1
expresso
crème
expresso
crème
cappuccino
cappuccino
cappuccino
CAFÉ EXPRESSo CRÈME
Lamachinecommenceàmoudrela
quantitédecaféprogrammée
Appuyezunefoissurl'icônepour
obtenirunetasseetdeuxfoispour
obtenir2tasses.
Ladistributionducaféexpresso
crèmecommence.
Unefoisladistributionducafé
terminée,lamachineprépare
automatiquementlelaitchaud.
CAPPUCCINo
Lamachinecommenceàmoudrela
quantitédecaféprogrammée.
Appuyezunefoissurl'icônepour
obtenirunetasseetdeuxfoispour
obtenir2tasses.
Lamachinepermetensuite,aubesoin,dedistribuerune
quantitésupplémentairedelait.Appuyersurlatouche«ajouter
dulait»dansles2minutesquisuivent.
Remplissezleréservoiràlait
Remplissezleréservoiràlait
Lorsquelesymbole«rinçage
lait»clignote,effectuezle
nettoyagedescircuitslait
commedécritdanslasection
consacréeaulaitnoisette
(consultezlapage13,icône
6etsuivantes).
Lorsquelesymbole«rinçage
lait»clignote,effectuezle
nettoyagedescircuitslait
commedécritdanslasection
consacréeaulaitnoisette
(consultezlapage13,icône6
etsuivantes).
Unefoislamoutureterminée,la
machinedistribuelaquantitédelait
chaudprogrammée.
Unefoisladistributiondulaitterminée,la
machineprépareautomatiquementlecafé.
Appuyezsur«ajouterlait»pourla
distributiond'unequantitédelait
supplémentaire,sisouhaitée.
expresso
crème
a f c h e r
menu avec
textes
mon
café
menu pro-
grammation
a f c h e r
menu avec
textes
mon
café
menu pro-
grammation
arrêter
distribution
café
arrêter
distribution
lait
arrêter
distribution
café
arrêter
distribution
lait
ajouter
lait
arrêter
distribution
café
arrêter
distribution
lait
arrêter
distribution
café
arrêter
distribution
lait
ajouter
lait
ATTENTIoN ! NE PAS oUvRIR LA PoRTE DE SERvICE PENDANT LA PHASE DE DISTRIBUTIoN,
DE LAvAGE oU DE RINçAGE.
ATTENTIoN ! NE PAS oUvRIR LA PoRTE DE SERvICE PENDANT LA PHASE DE DISTRIBUTIoN,
DE LAvAGE oU DE RINçAGE.
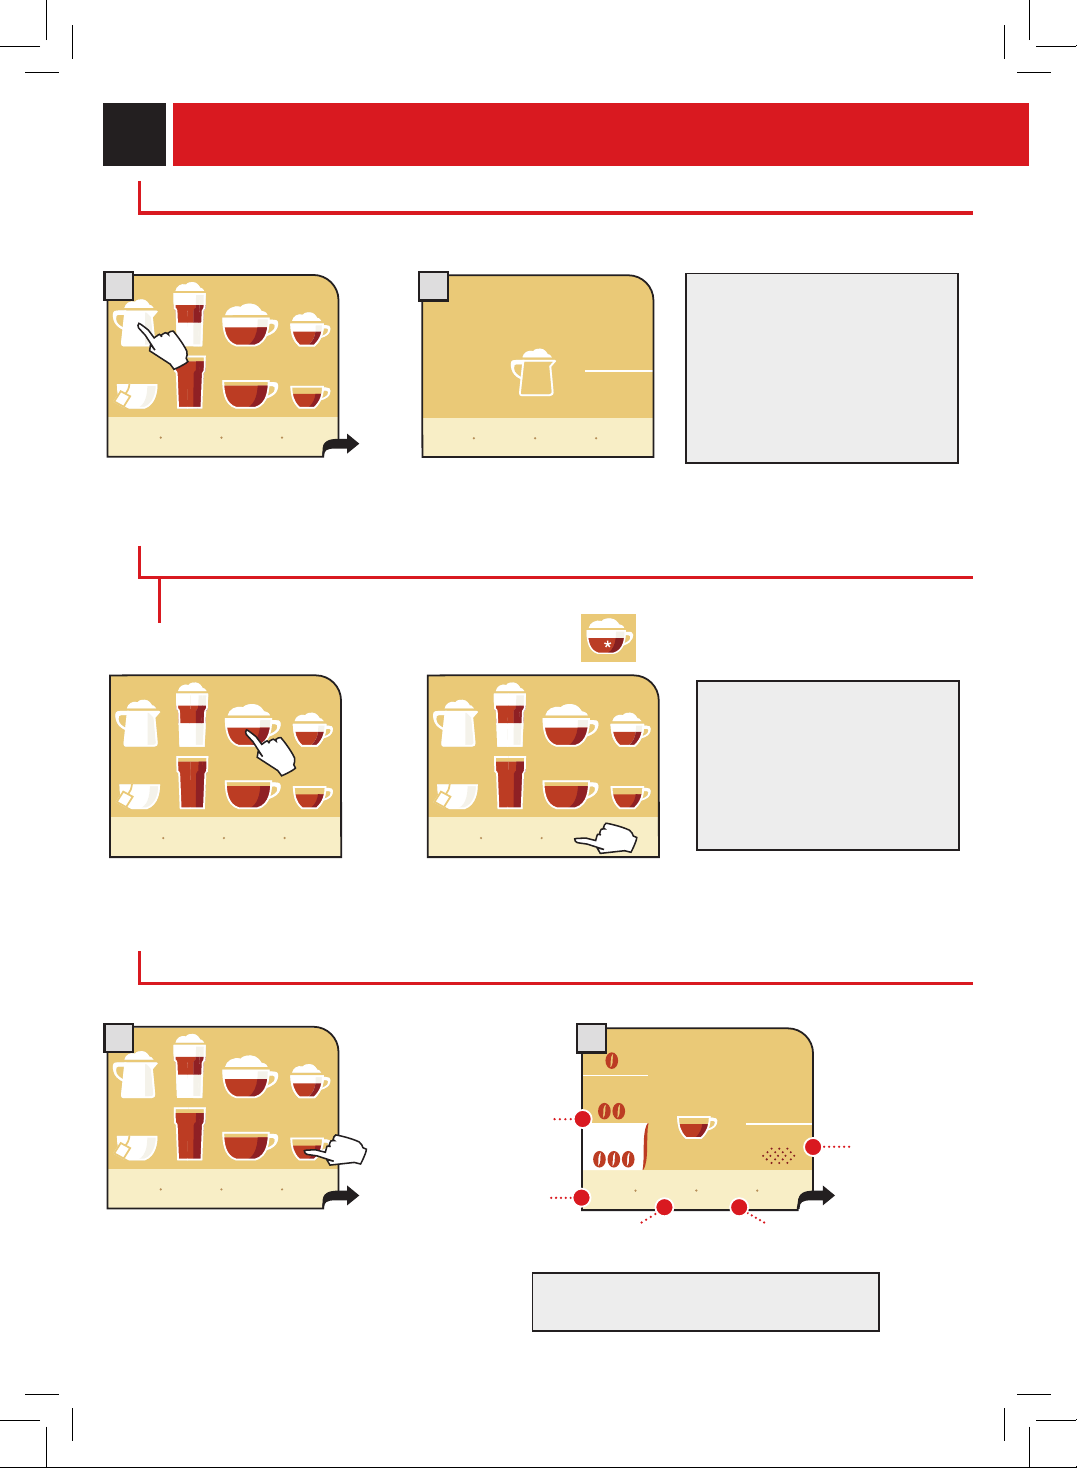
16
1
2
1
MENU DE PRoGRAMMATIoN DES BoISSoNS
Gardezlatouchedelaboisson
souhaitéeappuyéependantdeux
secondes
Appuyezsurlatouche«moncafé»et
ensuitesurlatouchecorrespondantàla
boissonsouhaitéedansdeuxsecondes.
Chaqueboissonpeutêtreprogramméeselonvosgoûtspersonnels.Lafonctiondeprogrammationd'une
boissonestindiquéesurl'afcheurparunastérisque.
Programmation de la boisson souhaitée :
ou
PRoGRAMMATIoN CAFÉ EXPRESSo / CAFÉ / CAFÉ ALLoNGÉ
Accéderaumenudelaboissonà
personnaliserengardantlebouton
appuyépendantdeuxsecondes.
Au cours de cette phase, vous pouvez :
choisirsivous
désirezutiliser
lecafé
prémoulu
sauvegardervosréglagesrétablirlesréglages
dedépart
reveniràla
fenêtre
précédente
sélectionnerla
quantitédecaféà
moudre(arôme)
forte
pré-moulu
mon
expresso
moyen
léger
démarrer!
Quanduneboissonaété
programmée,seulcetypede
boissonpeutêtredistribué.Pour
modierlaquantitédelaitoude
café,vousdevezprocéderàune
nouvelleprogrammationou
annulercellequiestencours.
Sivoussélectionnezunequantitédecafé
différente,l'arômedelaboissonchange.
afcher
menu avec
textes
mon
café
menu pro-
grammation
afcher
menu avec
textes
mon
café
menu pro-
grammation
afcher
menu avec
textes
mon
café
menu pro-
grammation
retourner
en arrière
enregistrer
pré-
sélections
rétablir
réglages
DISTRIBUTIoN DE LAIT CHAUD
Appuyezunefoissurl'icône
correspondantaulaitchaud.
Ladistributiondulaitchaud
commence.
Remplissezleréservoiràlait
Pourunedistributionsupplémen-
tairedelait,répétezlaprocédure.
Lorsquelesymbole«rinçagelait»
clignote,effectuezlenettoyagedes
circuitslaitcommedécritdansla
sectionconsacréeaulaitnoisette
(consultezlapage13,icône6et
suivantes).
afcher
menu avec
textes
mon
café
menu pro-
grammation
lait
chaud
arrêter
distribution
lait
ATTENTIoN ! NE PAS oUvRIR LA PoRTE DE SERvICE PENDANT LA PHASE DE DISTRIBUTIoN,
DE LAvAGE oU DE RINçAGE.
DISTRIBUTION / PROGRAMMATION DES BOISSONS
2

17
1
5
6 7
sauvegardervosréglages
Sivousdésirezdistribuerune
quantitédecafésupérieureàcelle
quiaétéprévueparlefabricant,
appuyezsurlatouche«réglage
personnelcafé»avantlandu
processusdedistributionencours.
Lorsquelaquantitésouhaitéeest
atteinte,appuyezsurlatouche
«arrêterdistributioncafé»
Enappuyantsurlatouche
démarrer!
,lamachineseprépare
àdistribuerlecafé.
L'appareilprocèdeautomatiquementàla
distributionducaféconformémentaux
réglagesstandard.
Ladistributionnepeutêtre
interrompuequ'enappuyant
surlatouche«arrêter
distributioncafé».Sicette
touchen'estpasappuyée,le
cafépeutdéborderdela
tasse.
Unefoisladistributionterminée,
appuyersur«enregistrerpré-
sélections»danslescinqsecondes
quisuivent.
Sivousn'appuyezpassurla
touche«enregistrerpré-
sélections»,l'appareil
revientaumenuprincipalet
lesréglagesindividuelsne
serontpasmémorisés.
mémorisé!
L'afcheurvousconrme
l'enregistrementdevotre
programmation.L'appareilrevient
automatiquementaumenuprincipal.
PRoGRAMMATIoN DES BoISSoNS À BASE DE LAIT
Accéderaumenudelaboissonà
personnaliserengardantlebouton
appuyépendantdeuxsecondes.
Au cours de cette phase, vous pouvez :
sélectionnerla
quantitéde
caféàmoudre
(arôme)
choisirsivous
désirezutiliser
lecafé
prémoulupour
lapréparationà
effectuer
sauvegardervosréglages
reveniràla
fenêtre
précédente
mon
expresso
réglage
personnel
café
mon
expresso
mon
expresso
enregistrer
pré-
sélections
mon lait
noisette
Remplissezleréservoiràlait
Sivousappuyezsurla
touche
démarrer!
,vous
devezobligatoirement
terminerlecyclede
distribution.
mon
expresso
afcher
menu avec
textes
mon
café
menu pro-
grammation
forte
pré-moulu
mon
expresso
moyen
léger
démarrer!
retourner
en arrière
enregistrer
pré-
sélections
rétablir
réglages
arrêter
distribution
café
réglage
personnel
café
arrêter
distribution
café
forte
pré-moulu
moyen
léger
démarrer!
retourner
en arrière
enregistrer
pré-
sélections
rétablir
réglages
retourner
en arrière
rétablirlesréglages
dedépart
3 4
2

18
8
9
Enappuyantsurlatouche
démarrer!
,la
machineseprépareàdistribuerla
boissonprogrammée.
L'appareilprocèdeautomatiquementà
ladistributiondulaitconformément
auxréglagesstandard.
mon lait
noisette
Sivousdésirezdistribuerunequantitédelaitsupérieureàcellequiaété
prévueparlefabricant,appuyezsurlatouche«réglagepersonnellait»
avantlanduprocessusdedistributionencours.Lorsquelaquantité
souhaitéeestatteinte,appuyezsurlatouche«arrêterdistributionlait»
Ladistributionnepeutêtre
interrompuequ'en
appuyantsurlatouche
«arrêterdistributionlait».
Sicettetouchen'estpas
appuyée,lelaitpeut
déborderdelatasse
mon lait
noisette
L'appareilprocède
automatiquementàladistribution
ducaféconformémentaux
réglagesstandard.
mon lait
noisette
Sivousdésirezdistribuerunequantitédecafésupérieureàcellequi
aétéprévueparlefabricant,appuyezsurlatouche«réglage
personnelcafé»avantlanduprocessusdedistributionencours.
Lorsquelaquantitésouhaitéeestatteinte,appuyezsurlatouche
«arrêterdistributioncafé»
Ladistributionnepeutêtre
interrompuequ'enappuyant
surlatouche«arrêter
distributioncafé».Sicette
touchen'estpasappuyée,le
cafépeutdéborderdela
tasse.
Unefoisladistributionterminée,
appuyersur«enregistrerpré-
sélections»danslescinqsecondesqui
suivent.
Sivousn'appuyezpassurla
touche«enregistrerpré-
sélections»,l'appareil
revientaumenuprincipalet
lesréglagesindividuelsne
serontpasmémorisés.
mémorisé!
mon lait
noisette
L'afcheurvousconrmel'enregistrementde
votreprogrammation.L'appareilrevient
automatiquementaumenuprincipal.
réglage
personnel
lait
mon lait
noisette
Sivousappuyezsurla
touche
démarrer!
,vous
devezobligatoirement
terminerlecyclede
distribution.
mon lait
noisette
mon lait
noisette
forte
pré-moulu
moyen
léger
démarrer!
retourner
en arrière
enregistrer
pré-
sélections
rétablir
réglages
réglage
personnel
café
arrêter
distribution
café
réglage
personnel
café
arrêter
distribution
café
réglage
personnel
café
arrêter
distribution
café
arrêter
distribution
lait
réglage
personnel
lait
arrêter
distribution
lait
réglage
personnel
lait
arrêter
distribution
lait
réglage
personnel
lait
arrêter
distribution
lait
réglage
personnel
café
arrêter
distribution
café
enregistrer
pré-
sélections
retourner
en arrière
PROGRAMMATION DES BOISSONS
3
5
7
6
4
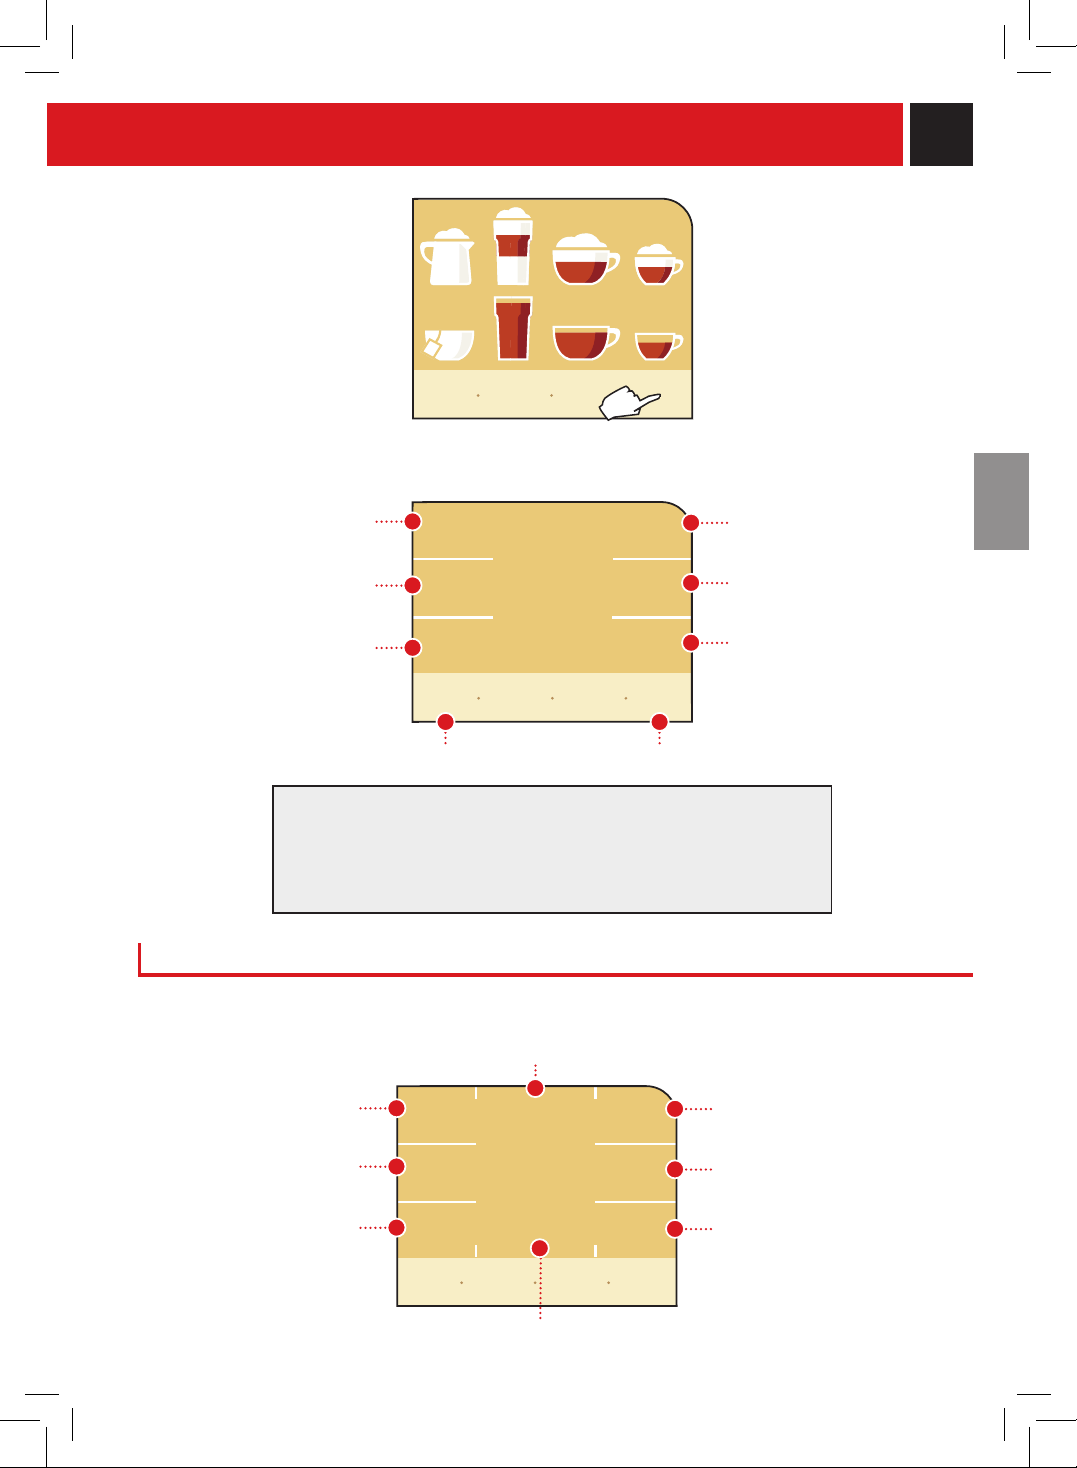
19
PROGRAMMATION DE LA MACHINE
RÉGLAGES DE LA MACHINE
Lorsquevoussélectionnezlemenu«réglagesmachine»,lapage-écransuivantes'afche,àpartirdelaquellevous
pouvez:
réglerlalanguedesmenus
réglerlefonctionnementdel'éclairagedestasses
sélectionnerlefonctionnementde
l’appareilavecleltreàeau
régler/activerlesindicateurs
sonores
réglerledegrédeduretédel'eau
réglerlerinçagedescircuitsde
l'appareil
réglerlefonctionnementdelaplaquechauffe-tasses
réglerlaluminositédescouleurs
del'afcheur
Aprèsavoirrégléchacundecesmenus,appuyezsur:
-«retournerenarrière»pourreveniràlapage-écranprécédente
-«rétablirvaleursstandard»pourrétablirlesvaleursdebase
-«enregistrerpré-sélections»poursauvegarderlesréglages
-«retourneraumenu»pourreveniraumenuprincipal
Vouspouvezprogrammercertaines
fonctionsdelamachineanque
celles-cisoientadaptéesàvos
besoins.
Appuyezsurlatouche«menudeprogrammation».
L'écran affiche le menu de programmation :
Programmationdesfonctionsde
lamachine(consultezlapage19)
Fonctionsspéciales
(consultezlapage39)
Entretien(nettoyagedelamachine)
(consultezlapage28)
Programmationapprofondiedes
produits(consultezlapage23)
-Dateetheureactuelles
-Minuterie(standby)
-Heuresdemarcheetd'arrêt
auseind'unejournée
(consultezlapage35)
Fonctionssupplémentaires
(consultezlapage25)
Misedel'appareilenmodestandby
Quitter
afcher
menu avec
textes
mon
café
menu pro-
grammation
entretien
menu
principale
spécialités
réglages
machine
réglages
horloge
fonctions
supplémen-
taires
présélec-
tions
boissons
stand-by
menu
préparation
café
sons et
alarmes
réglages
machine
afcheur
langue
rinçage
dureté d'
eau
ltre à
eau
illumination
tasse
chauffe-tasses
retourner
en arrière
rétablir
valeurs
standard
retourner
au menu

20
MENU « LANGUE »
Cemenupermetdemodierlalanguedel'afcheur.
Cettefonctionaétédécriteau
débutdumoded'emploi.La
sélectiondelalangueest
fondamentalepourrégler
correctementlesparamètresde
lamachineselonlepays
d'utilisation.
MENU « FILTRE À EAU »
Leltreàeauépurel’eauetvouspermetdesavourertoutl’arômeducafé.
activerleltre(lavage)(voir
page7).Unefoisl’activation
terminée,l’option«inséré»est
activée.
réglerlamachineanqu’elle
fonctionnesansltreàeau.
réglerlamachinedefaçonqu’elle
fonctionneavecleltreàeau.
éteindre
l'éclairage.
MENU « ILLUMINATIoN TASSE »
Cettefonctionpermetd’activer/désactiverl’éclairagedelazonededistribution.
Cettefonctionpermet
d'activeroudedésactiver
l'éclairagedepetitestasses.
allumer
l'éclairage.
italiano (ch)
langue
1/2
français
deutsch
nederlands
english
Italiano (i)
Remarque:
• Appuyersur«activationltreàeau»chaquefoisqu’unnouveaultreestinstallé.
• Appuyersur«pasinséré»lorsqueleltreàeaun’estpasutilisé.
• Appuyersur«inséré»lorsqueleltreàeauestutilisé.Cettefonctionpeutégalementêtreactivéeaprès
avoirappuyésurlatouche«activationltreàeau».
ltre à
eau
Dans ce menu, vous pouvez :
Dans ce menu, vous pouvez :
ltre à
eau
illumination
tasse
désactivé
activé
langue
retourner
en arrière
retourner
au menu
retourner
en arrière
retourner
au menu
rétablir
valeurs
standard
enregistrer
pré-
sélections
illumination
tasse
inséré
pas
inséré
activation
ltre à eau
retourner
en arrière
retourner
au menu
rétablir
valeurs
standard
enregistrer
pré-
sélections
Appuyerpourafcherlapagesuivante
PROGRAMMATION DE LA MACHINE
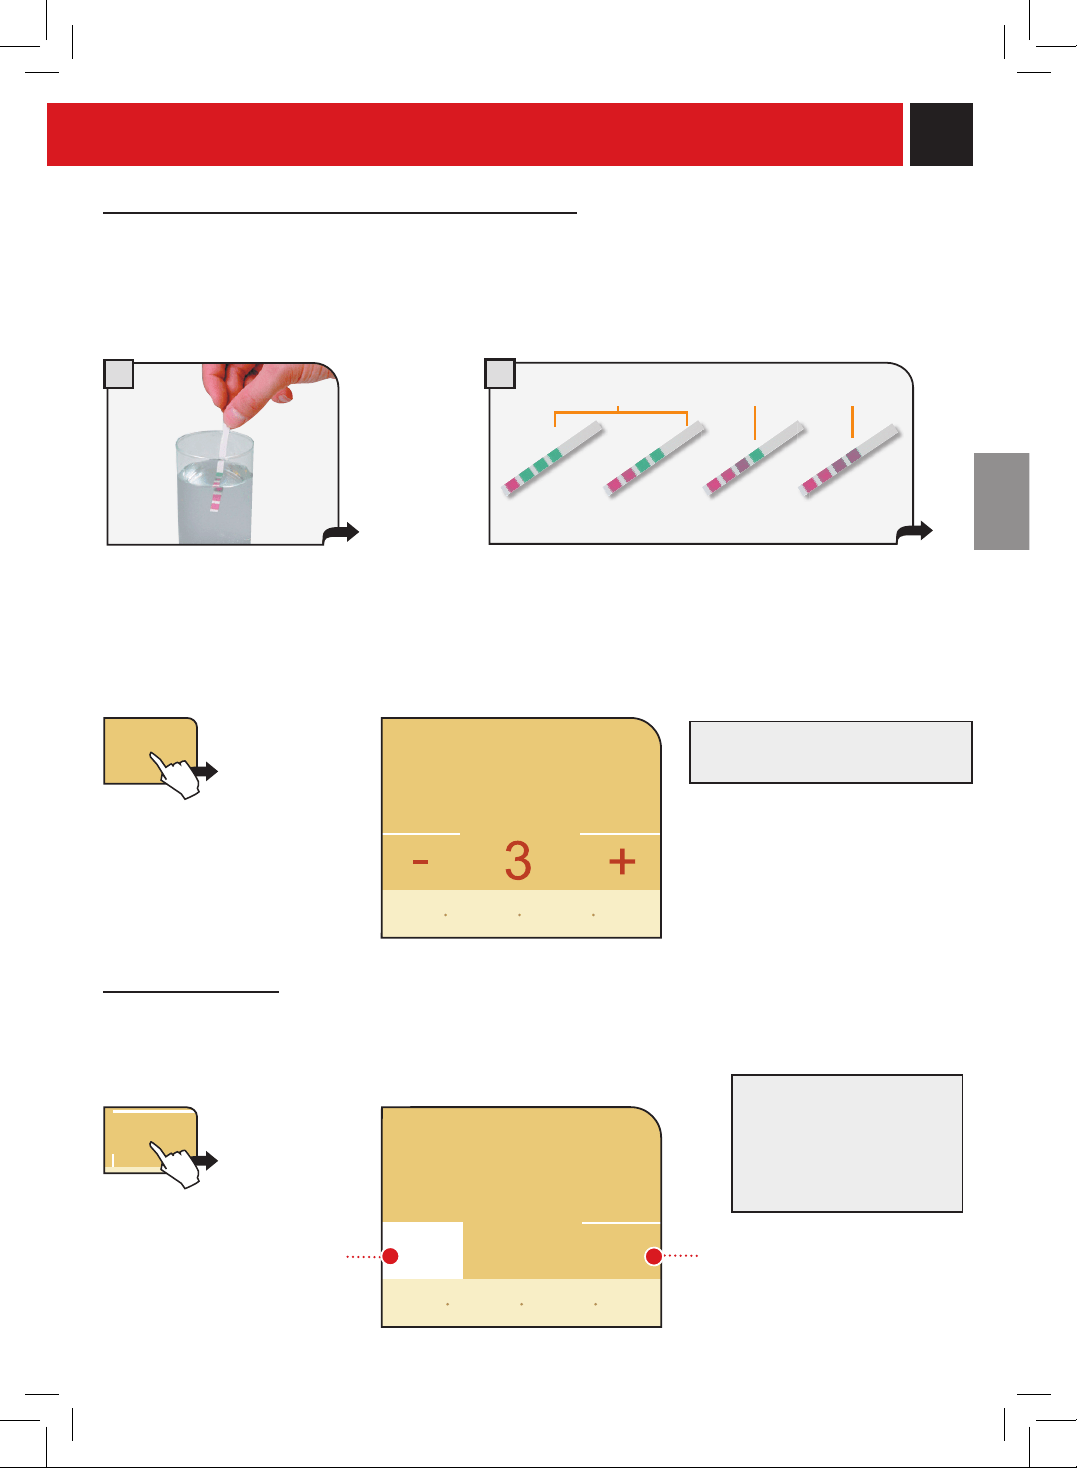
21
1
2
1 2 3 4
A
b
c
IntenzaAromaSystem
Réglagedeladuretédel’eaudanslamachine
rinçage
activé
désactivé
MENU « RINçAGE »
Cemenupermetlenettoyagedesconduitesinternespourladistributionducafé,andegarantirqueladistribution
desboissonsesteffectuéeuniquementavecdel’eaufraîche.
Dans ce menu, vous pouvez :
désactiverlerinçage activerlerinçage
Remarque:lerinçageest
effectuéàchaquemiseen
marchedelamachine
lorsquecelle-cis'est
refroidie.
rinçage
dureté d'
eau
MENU « DURETÉ EAU » - INTENZA ARoMA SYSTEM
Lafonction«Duretéeau»permetd’adapterlamachineetleltreIntenzaaudegrédeduretédel’eauutilisée,an
quelamachinepuissedemanderd’effectueruncyclededétartrageaumomentvoulu.
Laduretédel’eaudansleltreàeauIntenzaestexpriméeàl’échelledeAàC.
Laduretédel’eaudanslamachineestexpriméeàl’échellede1à4.
Plongezdansl'eaulabandedetestfournie
aveclekitpendantuneseconde,ande
vérierladuretédevotreeau.
Réglezledegrédeduretéde
l'eausurlamachineàl'aidedes
touches+ou–
Contrôlerlavaleurdeduretédel’eaudanslabandedetest.
Lamesurepermetd’installercorrectementIntenzaAroma
System(voirpage7).Lalégendesetrouvedanslapartie
supérieure.
Labandenepeutêtreutiliséeque
pouruneseulemesure.
Appuyezsurlatouche«duretéeau».
dureté d'
eau
retourner
en arrière
retourner
au menu
rétablir
valeurs
standard
enregistrer
pré-
sélections
retourner
en arrière
retourner
au menu
rétablir
valeurs
standard
enregistrer
pré-
sélections

22
MENU « PLAQUE CHAUFFE-TASSES »
Dans ce menu, vous pouvez :
MENU « ToNS ET ALARMES SoNoRES »
Cemenupermetd'activeroudedésactiverlesindicateurssonoresdel'appareil.Vouspouvezenmodierl'étaten
appuyantsurlatouchecorrespondante.
MENU « AFFICHEUR »
Cemenupermetderéglerlaluminositécorrectedel'afcheur.Appuyezsurlatouche«afcheur».
Réglezlaluminositéen
appuyantsur+ou–
chauffe-
tasses
afcheur
sons et
alarmes
afcheur
retourner
en arrière
retourner
au menu
rétablir
valeurs
standard
enregistrer
pré-
sélections
PROGRAMMATION DE LA MACHINE
chauffe-
tasses
désactivé
activé
pourgarderlaplaquechauffe-
tassesallumée.
pourgarderlaplaquechauffe-
tasseséteinte.
Pouractiveroudésactiverlaplaquechauffe-tassessituéesurlapartiesupérieuredel’appareil.Laplaquechauffe-tasses
esttoujourshors-tensionlorsquelamachineestenmodestand-by.
Dans ce menu, vous pouvez :
activeroudésactiverunsignal
sonoredemachineprête
activeroudésactiverunsignal
sonorequisefaitentendreà
chaquepressiondetouche
activeroudésactiverunsignal
sonorevoussignalantd'effectuer
lelavagedescircuitslait
Remarque:lessignauxsonoressontd'habitudedivisésdelafaçonsuivante:
•Signallongetcontinupoursignalerunedéfaillancedelamachine;
•Signalbrefpoursignalerqu'unetoucheaétéappuyéeetquelamachineestprêteàêtreutilisée;
•Signalintermittentpoursignalerqu'ilestnécessaireeffectuerunnettoyage.
avis rinçage
lait
désactivé
activer/désactiverunsignalsonore
quirappelleàl’utilisateurderincer
lescircuitspourlapréparationdu
lait(lapréparationdelaboisson
terminée,lesignalsedéclenche
auboutd’uneminute).
son machine
prête
désactivé
avis qualité
lait
désactivé
touches
sonore
activé
sons et
alarmes
retourner
en arrière
retourner
en arrière
retourner
au menu
retourner
au menu
rétablir
valeurs
standard
rétablir
valeurs
standard
enregistrer
pré-
sélections
enregistrer
pré-
sélections
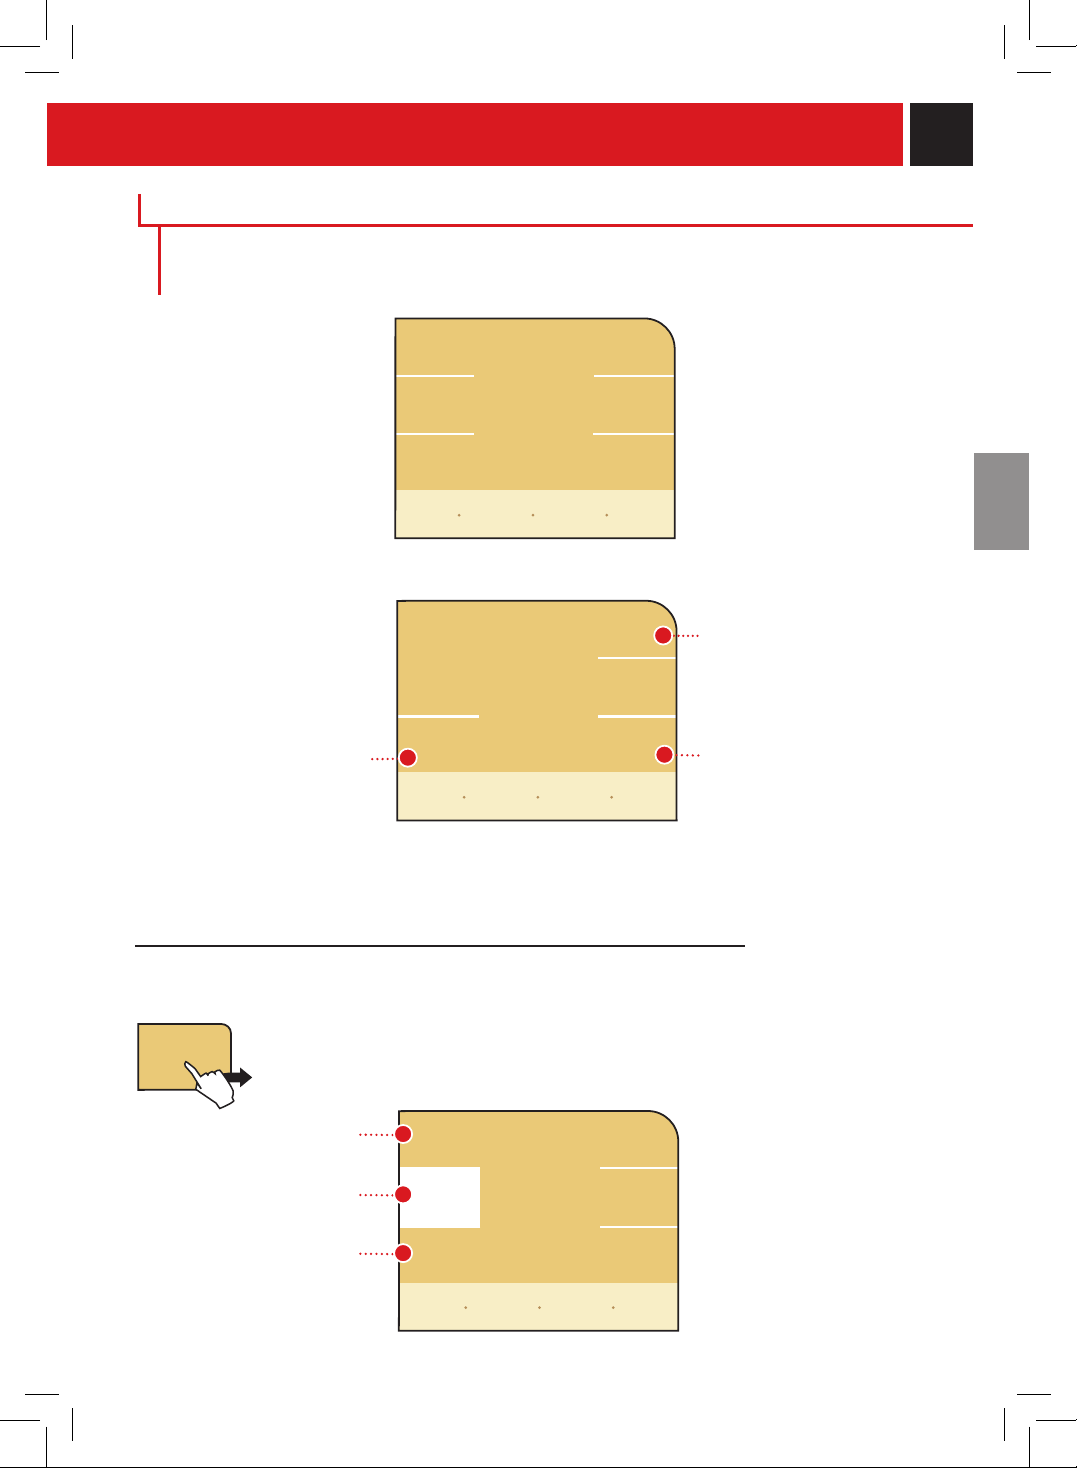
23
RÉGLAGES BoISSoNS
Cemenupermetderéglerlesparamètresgénérauxdedistributiondesdifférentesboissonsàbase
decafé.Appuyezsurlatouche«présélectionsboissons»danslemenuprincipal.
En sélectionnant chaque boisson, vous pouvez régler :
latempératurede
distributionducafé
laquantitédecaféàmoudreet
l'utilisationducaféprémoulu
lapré-infusiondu
café
L'étatactueldelaprogrammationestindiquéàlahauteurdechaqueparamètre.
RÉGLAGE DE LA TEMPÉRATURE PoUR LA DISTRIBUTIoN DU CAFÉ
Cemenupermetderéglerlatempératurededistributionducafé.Appuyezsurlatouche«température»et
sélectionnezlatempératuresouhaitée.
Températurebasse
Températuremoyenne
Températureélevée
témperature
moyenne
présélec-
tions
boissons
café
long
cafè
cappuccino
expresso
lait
noisette
expresso
créme
basse
témperature
café
moyenne
haute
présélections
cafè
témperature
moyenne
force
moyenne
retourner
en arrière
retourner
au menu
retourner
en arrière
retourner
au menu
rétablir
valeurs
standard
retourner
en arrière
retourner
au menu
rétablir
valeurs
standard
enregistrer
pré-
sélections
préinfusion
normale
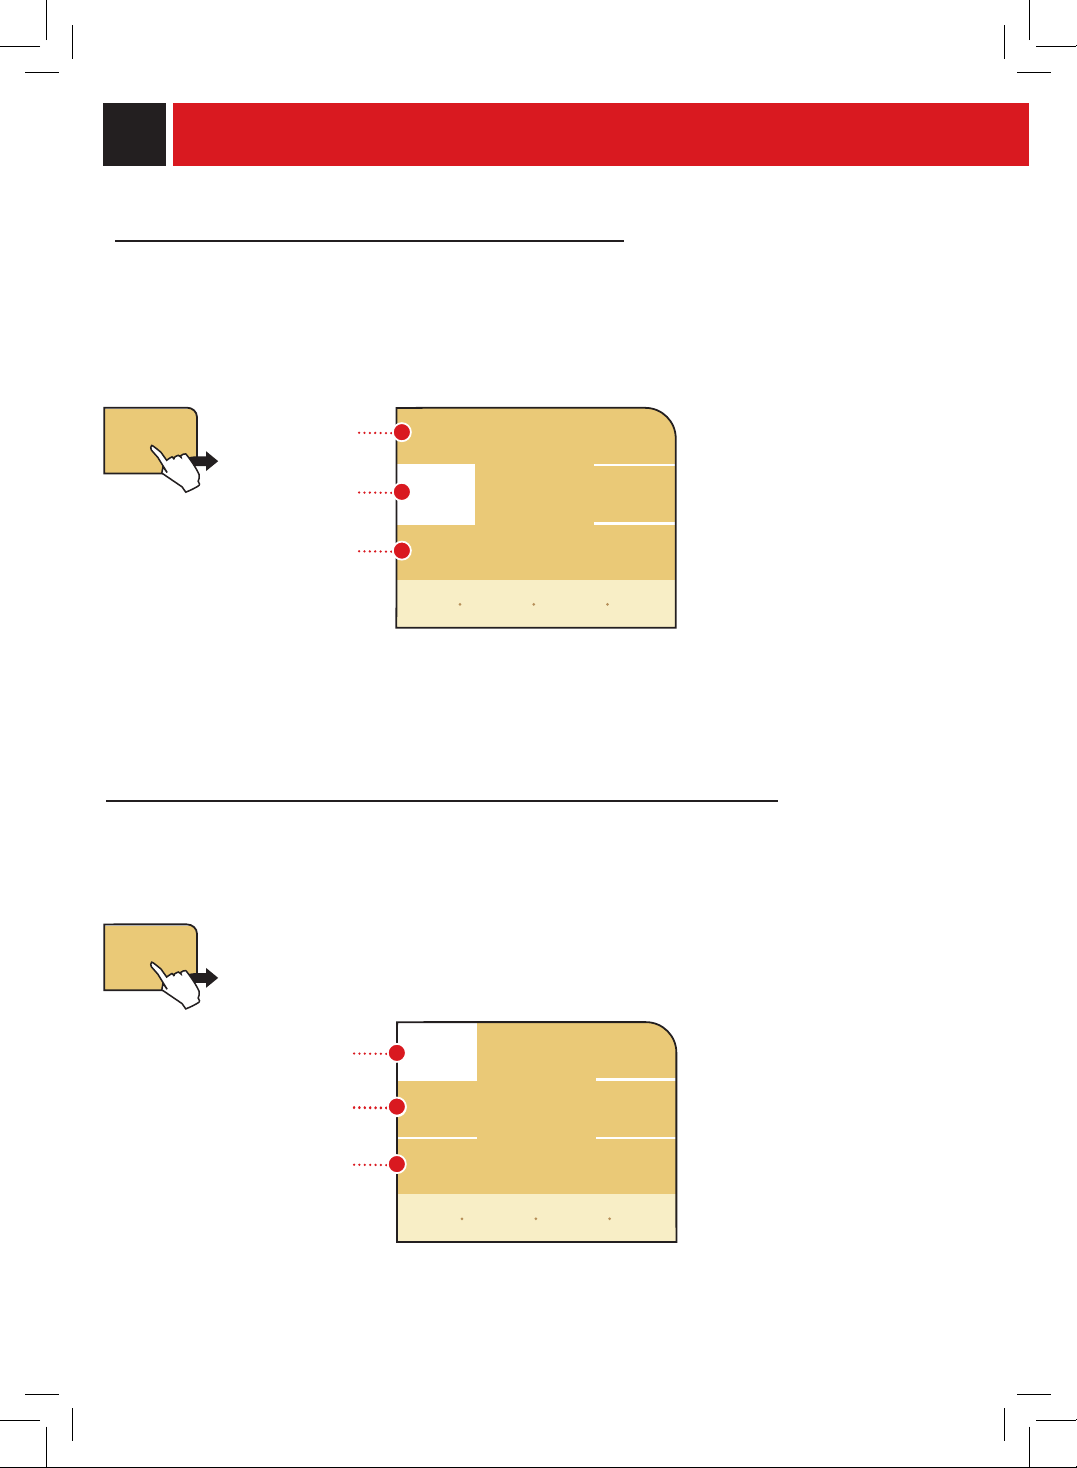
24
RÉGLAGE « ARÔME » PoUR LA DISTRIBUTIoN DU CAFÉ
Cemenupermetderéglerl'«Arôme»,soitlaquantitédecaféàmoudre,ainsiquel'utilisationdecaféprémoulu.
Vouspouvezgoûtervotreboissonaveclaquantitédecafésouhaitéeoubienvouspouvezlaprépareravecdu
cafédécaféinéenutilisantlafonction«pré-moulu».
léger
moyen
fort
normale
préinfusion
café
longue
désactivé
RÉGLAGE « PRÉ-INFUSIoN » (UNIQUEMENT BoISSoNS À BASE DE CAFÉ)
Cemenupermetderéglerlafonctiondepré-infusion:lecaféestlégèrementhumidiéavantl'infusion,cequi
permetaucafédedévelopperl'ensembledesonarôme,luiconférantainsiungoûtincomparable.
pré-infusionnormale
pré-infusionforte(pluslongue)
pré-infusiondésactivée
pré-moulu
force
moyenne
légère
force
du café
moulu
moyenne
forte
préinfusion
normale
retourner
en arrière
retourner
au menu
rétablir
valeurs
standard
enregistrer
pré-
sélections
retourner
en arrière
retourner
au menu
rétablir
valeurs
standard
enregistrer
pré-
sélections
PROGRAMMATION DE LA MACHINE
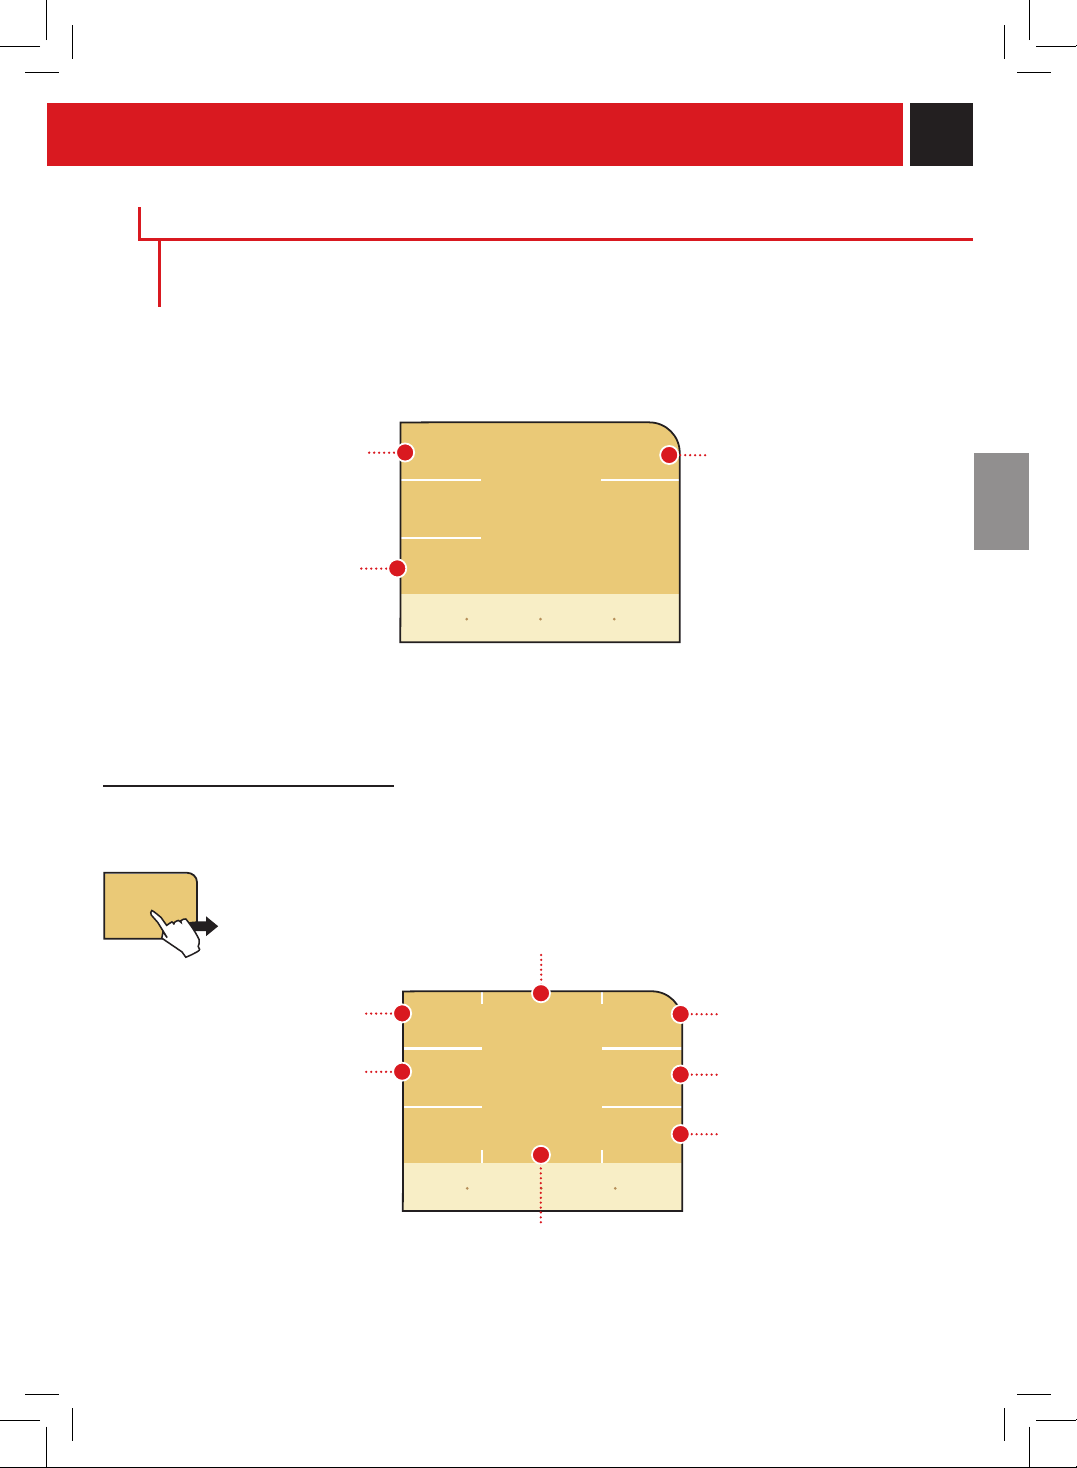
25
FoNCTIoN « CAFÉ DU MoNDE »
Cettefonctionvouspermetdepréparerlecaféselonlesrecetteslespluscélèbresaumonde.
cafè
du
monde
espresso
italiano
ristretto
goodnight
milk
café
creme
café
american
coffee
goodmorning
coffee
préparerunvéritablecafé
serréitalien
prépareruntypiquecaféde
l'EuropeduNord
prépareruntypiquecafé
françaisousuisse
préparerunlaitnoisette
savoureuxsanscraindredenepas
réussiràvousendormir
prépareruncafépourune
journéepleined'énergie
prépareruntypiquecafé
expressoitalien
prépareruntypiquecaféaméricain
compteurs
produit
fonctions
supplémen-
taires
cafè
du
monde
démo
Lamachineprésentedesfonctionssupplémentaires.Pouraccéderàcemenu,appuyezsurlatouche«
fonctionssupplémentaires».L'afcheurmontrelapage-écransuivante:
FoNCTIoNS SUPPLÉMENTAIRES
Dans ce menu, vous pouvez :
accéderaumenucontenant
certainesdesrecetteslesplus
célèbresaumonde.
activerlafonction«démo»pour
afcherlesfonctionsprincipales
delamachine
afcherlesquantitésdistribuées
pourchaquetypedeboisson.
Dans ce menu, vous pouvez :
cafè
du
monde
retourner
en arrière
retourner
au menu
rétablir
valeurs
standard
enregistrer
pré-
sélections
retourner
en arrière
retourner
au menu

26
Cettepage-écran
resteactivependant
environ5secondes;
ensuite,onrevientà
lapage-écran
principale.
american
coffee
Silesboissonsfaisantpartiedelafonction«Cafédu
monde»sontmémorisées,ellesserontassociéesaux
touchessuivantesavecl'ajoutd'unastérisque:
•caféserré:
•caféexpressoitalien:
•café:
•cafécrème:
•caféaméricain:
•cafébonjour:
•laitbonnenuit:
caféexpresso(tassepetite)
caféexpresso(tassepetite)
café(tassemoyenne)
café(tassemoyenne)
caféallongé(gobelet)
caféexpresso(tassepetite)
laitnoisette
Sivouschoisissezdesauvegarderlaboissonquivientd'êtredistribuée,l'afcheurmontrelatouchequienpermet
l'accèsrapide.
american
coffee
Siparexemplevousvoulezsavoureruntypiquecaféaméricain,appuyezsurlatouche«americancoffee».Encecas,
l'afcheurmontreralapage-écransuivante:
Unefoislaboissonsouhaitéedistribuée,vouspouvezlamémoriserdanslestouchesdumenuprincipalpourla
distribuerlorsquevousdésirez.
l'afcheurmontrelapositionduboutonSBS
ainsiqueletypedetasseàutiliserde
préférence.
Enappuyantsurlatouche
démarrer!
lamachine
commenceladistributiondela
boissonprésélectionnée.
revenezaumenude
préparationdesrecettes
mémorisezlaboisson
Chaquetouchenepeutêtreassociéequ'àuneseuleboisson.
Pourrétablirlesvaleursdebase,utilisezlemenu«Réglagesboissons».
ici sauvé sous l'icône
sélect. icône pour la distribution
voulez-vous sauvergarder
cette boisson?
american coffee
non oui
démarrer!
retourner
en arrière
PROGRAMMATION DE LA MACHINE
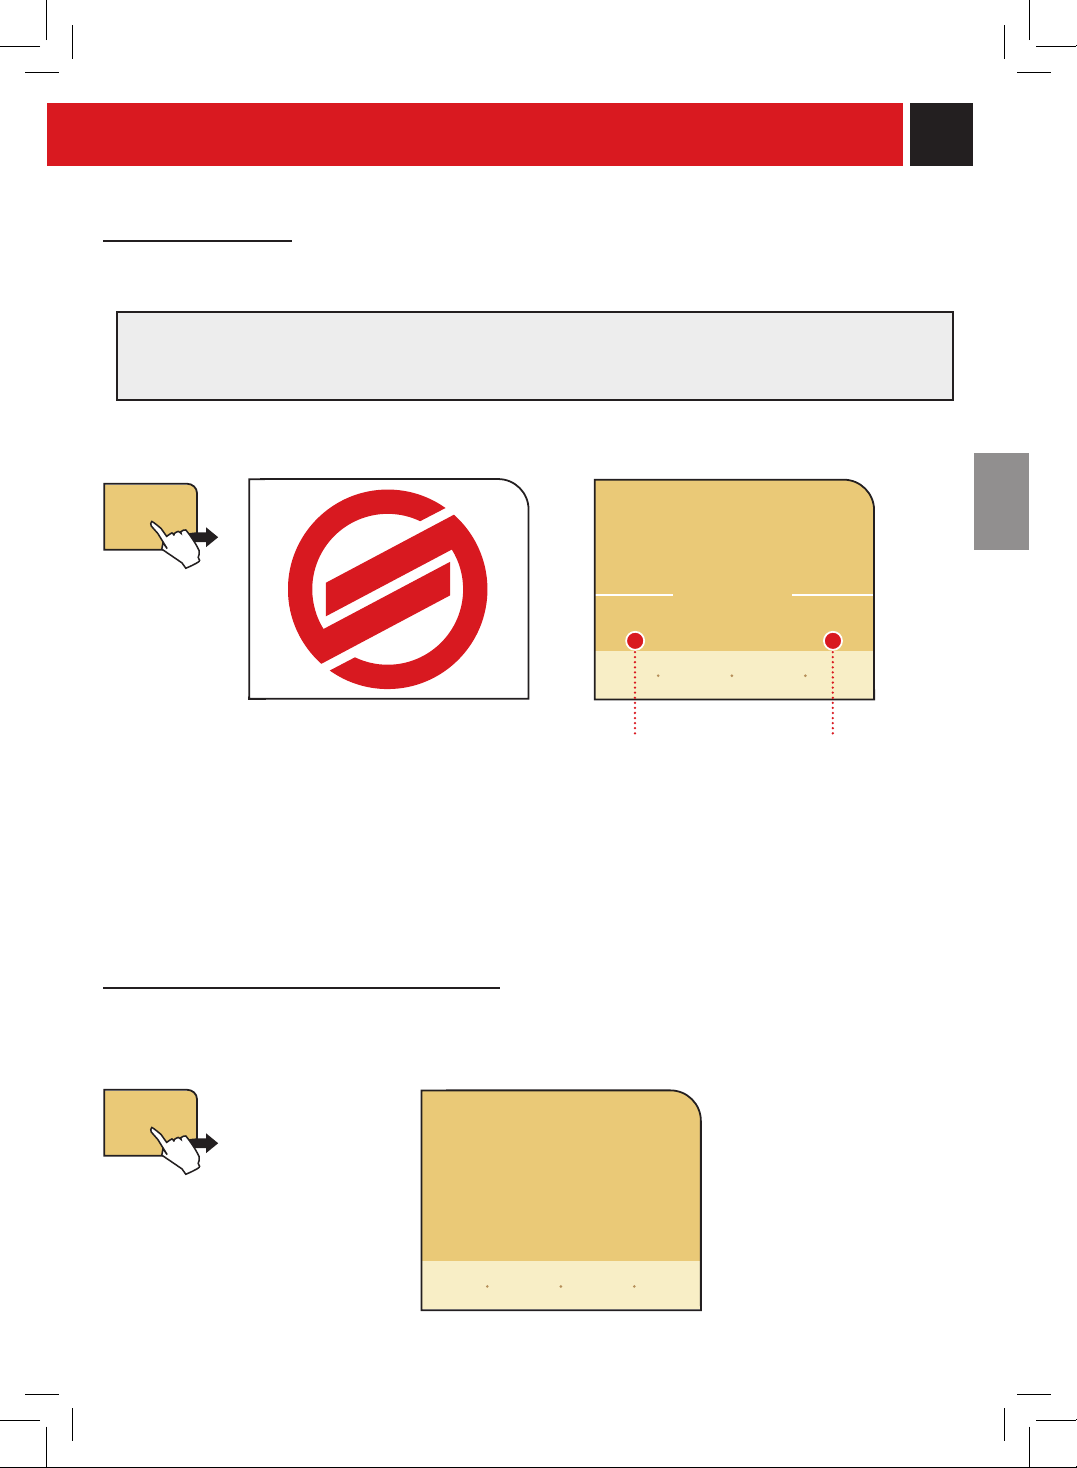
27
compteurs produit
FoNCTIoN « CoMPTEURS DES PRoDUITS »
Cettefonctionpermetd'afcherlenombredesproduitsquiontétépréparéspourchaquetypedeboisson.
lait chaud 0
lait noisette 1
cappuccino 0
expresso crème 0
eau chaude 0
cafè long 15
cafè 0
expresso 0
Cettefonctionpermetd'afcherlespotentialitésdelamachine.
Lefonctionnementdelamachineen
mode«démo»estainsidémarré.Les
pages-écranquiserontensuite
afchéesmontrerontles
fonctionnalitésdelamachine.
Pourquitterlafonction,appuyezsur
unpointquelconquedel'afcheur.
FoNCTIoN « DÉMo »
Remarque:lorsquecettefonctionestactivée,lamachineestenmodestandbyettoutessesfonctionssont
désactivées.Lafonction«démo»restemémoriséemêmelorsqu'onéteintlamachineàl'aidedel'interrupteur
général.Quandlamachineseraremiseenmarche,elleredémarreraàpartirdelafonction«démo».
Enappuyantsurlatouche«démo»,l'afcheurmontre:
continuezà
afficher
quittezetactivezles
fonctionsstandarddela
machine.
démo
compteurs
produit
non oui
quitter mode démo?
retourner
en arrière
retourner
au menu
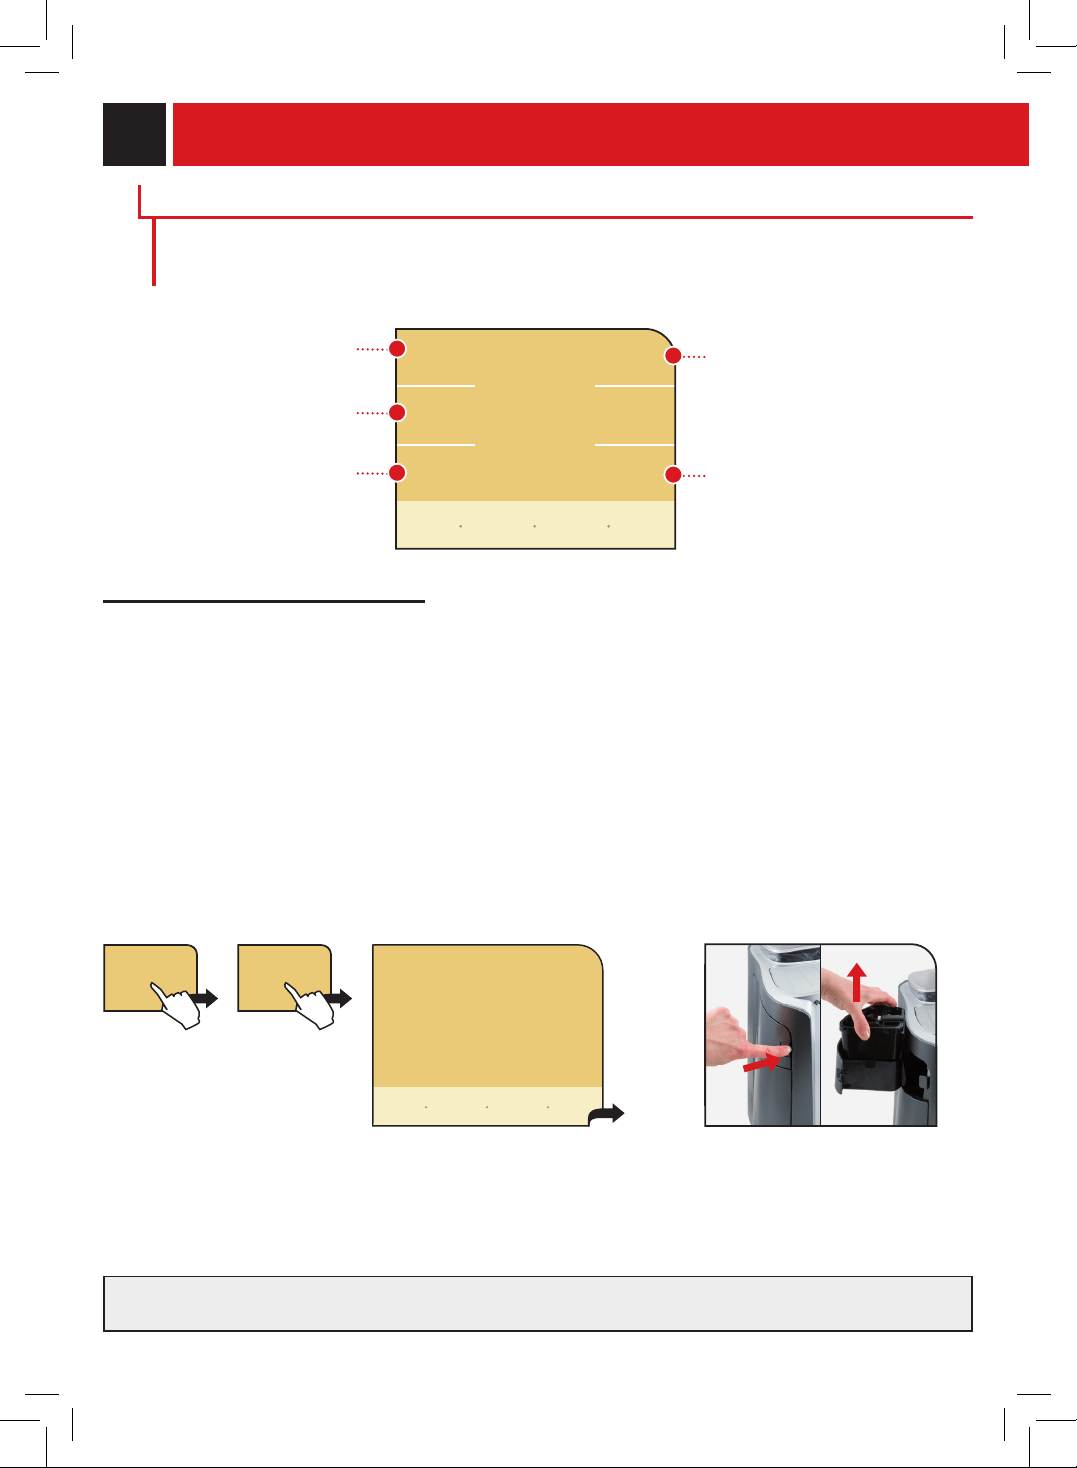
28
cycle
nettoyage
circuits café
entretien
détartrage
blocage
af cheur
ENTRETIEN
Cemenupermetd'effectuerlenettoyageetl'entretiendetouslescircuitsinternesdel'appareil.Appuyez
surlatouche«entretien»danslemenuprincipal.
Dans ce menu, vous pouvez :
démarrerlecycledelavagedu
groupededistribution
lancerlecyclededétartrage
démarrerlerinçagedes
circuitslait
effectuerlenettoyagede
l'afcheur(cettefonction
bloquel'écrantactile)
CYCLE DE RINçAGE CIRCUITS LAIT
Cemenuvouspermetd'effectuerlerinçagedescircuitsinternesdel'appareilquiserventàlapréparationdes
boissonsàbasedelait.Cecyclebrefdoitêtreeffectuéobligatoirementaprèsque20minutessesontécouléesà
partirdeladistributiondeladernièreboissonàbasedelait.
Sicelan’estpaseffectué,lamachinesebloqueetnepermetpasladistributiondeboissonsàbasedelait.
Remarque:avantd'activercettefonction,assurez-vousque:
1.unrécipientdetaillesufsantesetrouvesouslabusedudistributeur;
2.queleréservoiràlaitaitétéinsérédanslamachine;
3.leréservoiràeaucontientunequantitéd'eausufsante.
Appuyezsurlatouche«cyclerinçagecircuitslait»etpuissurlatouche«démarragerinçage»pourdémarrerle
cyclederinçagedescircuitslait.
Attendezquelecyclederinçagesoit
terminé;l'appareilrevientaumenu
principal.
Retirezlerécipient,rincez-le
etséchez-le.
cycle
nettoyage
circuits lait
cycle
rinçage
circuits lait
démarrerlelavagedes
circuitslait
cycle
rinçage
circuits lait
démarrage
rinçage
retourner
en arrière
retourner
au menu
rinçage...
rinçage circuits lait
attendez svp
APRÈS L’EMPLoI, ÔTER ToUJoURS LE RÉSERvoIR AvEC LE RÉSIDU DE LAIT ET LE METTRE
AU RÉFRIGÉRATEUR.
Leréservoirnepeutêtrelaissédanslamachineques’ilaétélavéavecdel’eaupotableetqu’ilnecontientplusde
lait;voirpage41.
ATTENTIoN ! NE PAS oUvRIR LA PoRTE DE SERvICE PENDANT LA PHASE DE DISTRIBUTIoN,
DE LAvAGE oU DE RINçAGE.
PROGRAMMATION DE LA MACHINE
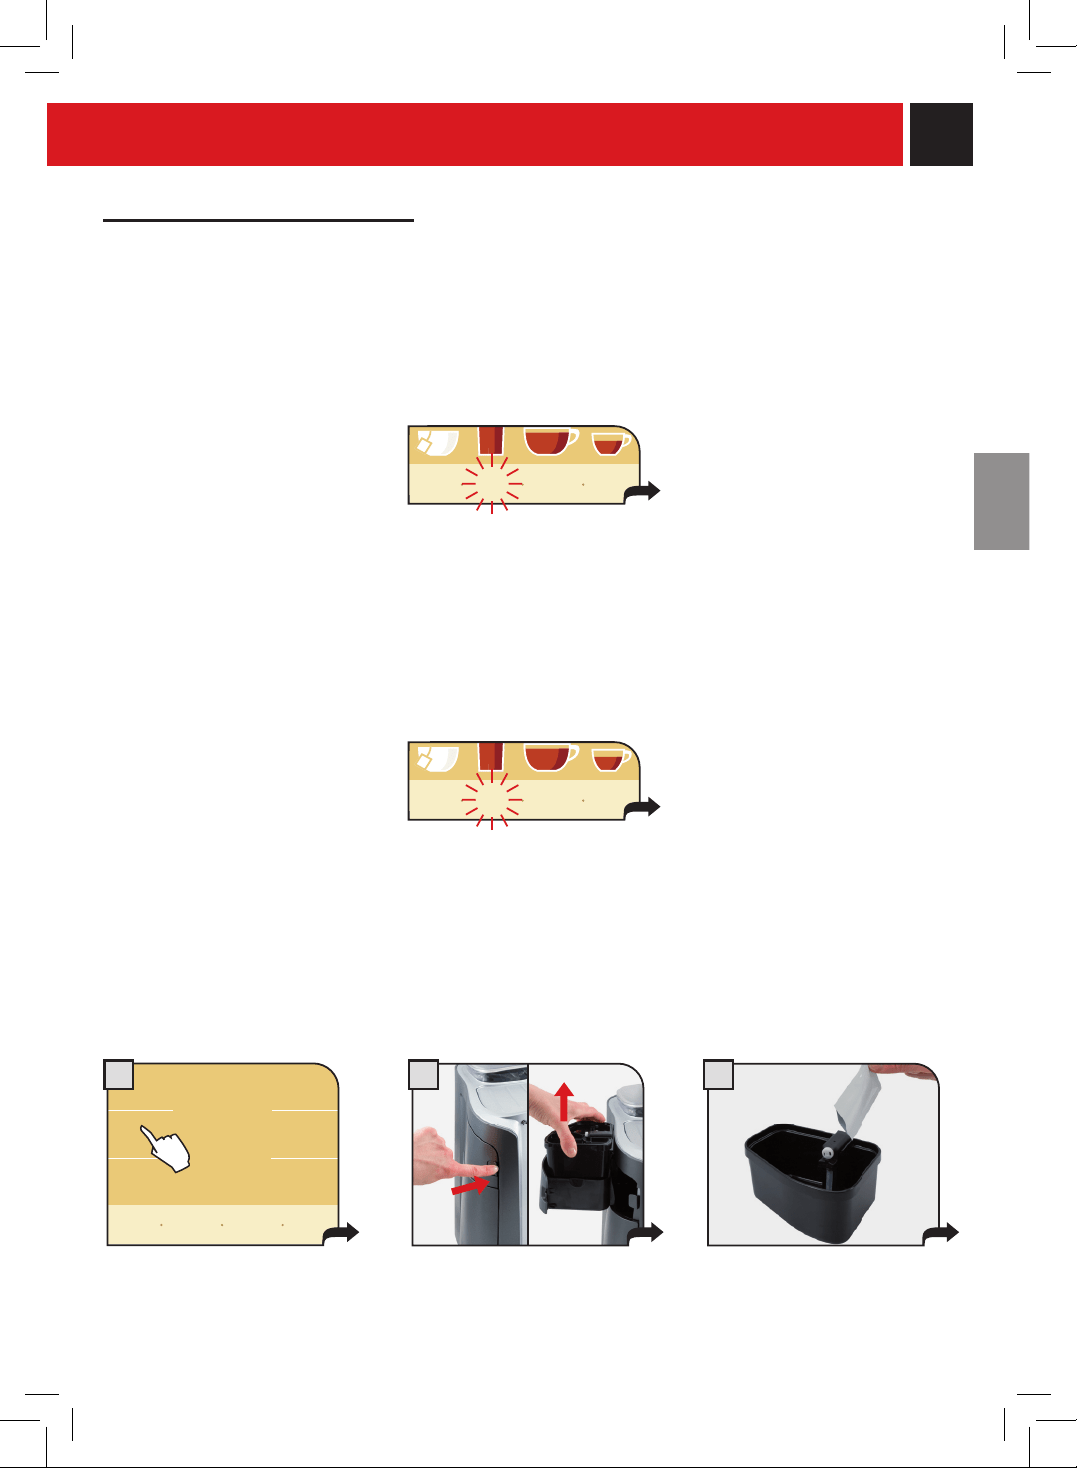
29
CYCLE DE LAvAGE CIRCUITS LAIT
Cettefonctionpermetderincerlescircuitsinternesdelamachinequiserventàlapréparationdulait.
Lamachineproposed’effectuercecycle14joursaprèsladistributiondelapremièreboissonàbasedelait.
L’inscriptionclignotante«rinçagelait»s’afcheauboutde14jours(voirpage14);procéderaurinçagecomme
décritdansleprésentparagraphe.
Sélectionnezlafonctionen
appuyantsurlatouche.
cycle
nettoyage
circuits café
détartrage
blocage
af cheur
cycle
nettoyage
circuits lait
cycle
rinçage
circuits lait
retourner
en arrière
retourner
au menu
Appuyersurlatouche«rinçagelait»etsereporterauxinstructionsindiquéesaupoint2(auxpages29-30);la
machinesemetaupoint7.
Ilseratoutefoispossiblededistribuertouteslesboissonsàbasedelaitpendantencore7jours.Maintenant,lecycle
delavagedoitêtrenécessairementeffectuépuisqueladistributiondesproduitsàbasedelaitestinvalidée.(La
machinepermettoutefoisladistributiond’eauchaudeetdecafé).
Pouraiderl’utilisateurànepasoubliercetteopérationimportante,lemessage«rinçagelait-3»estafché3jours
avantl’échéanceetainsidesuitelesjourssuivants.
Appuyersurlatouche«rinçagelait»etsereporterauxinstructionsindiquéesaupoint2(auxpages29-30);la
machinesemetaupoint7.
Remarque:avantd'activercettefonction,assurez-vousque:
1.unrécipientdetaillesufsanteestàportéedelamain;
2.lerécipientdulaitaétécorrectementlavéetqu'ilnecontientplusderésidusdelait;
3.leréservoiràeaucontientunequantitéd'eausufsante.
LE CYCLE DE LAvAGE NE PEUT PAS ÊTRE INTERRoMPU. PENDANT CETTE oPÉRATIoN, LA PRÉSENCE
D'UNE PERSoNNE EST NÉCESSAIRE. N'UTILISEZ QUE LE DÉTERGENT FoURNI AvEC L’APPAREIL
Ouvrirlelogementetenleverle
réservoiràlait.
Verserlecontenudusachet
dedétergentdansle
réservoir.
3
2
ATTENTIoN ! NE PAS oUvRIR LA PoRTE DE SERvICE PENDANT LA PHASE DE DISTRIBUTIoN,
DE LAvAGE oU DE RINçAGE.
1
rinçage
lait
a f c h e r
menu avec
textes
mon
café
menu pro-
grammation
rinçage
lait
-3
a f c h e r
menu avec
textes
mon
café
menu pro-
grammation
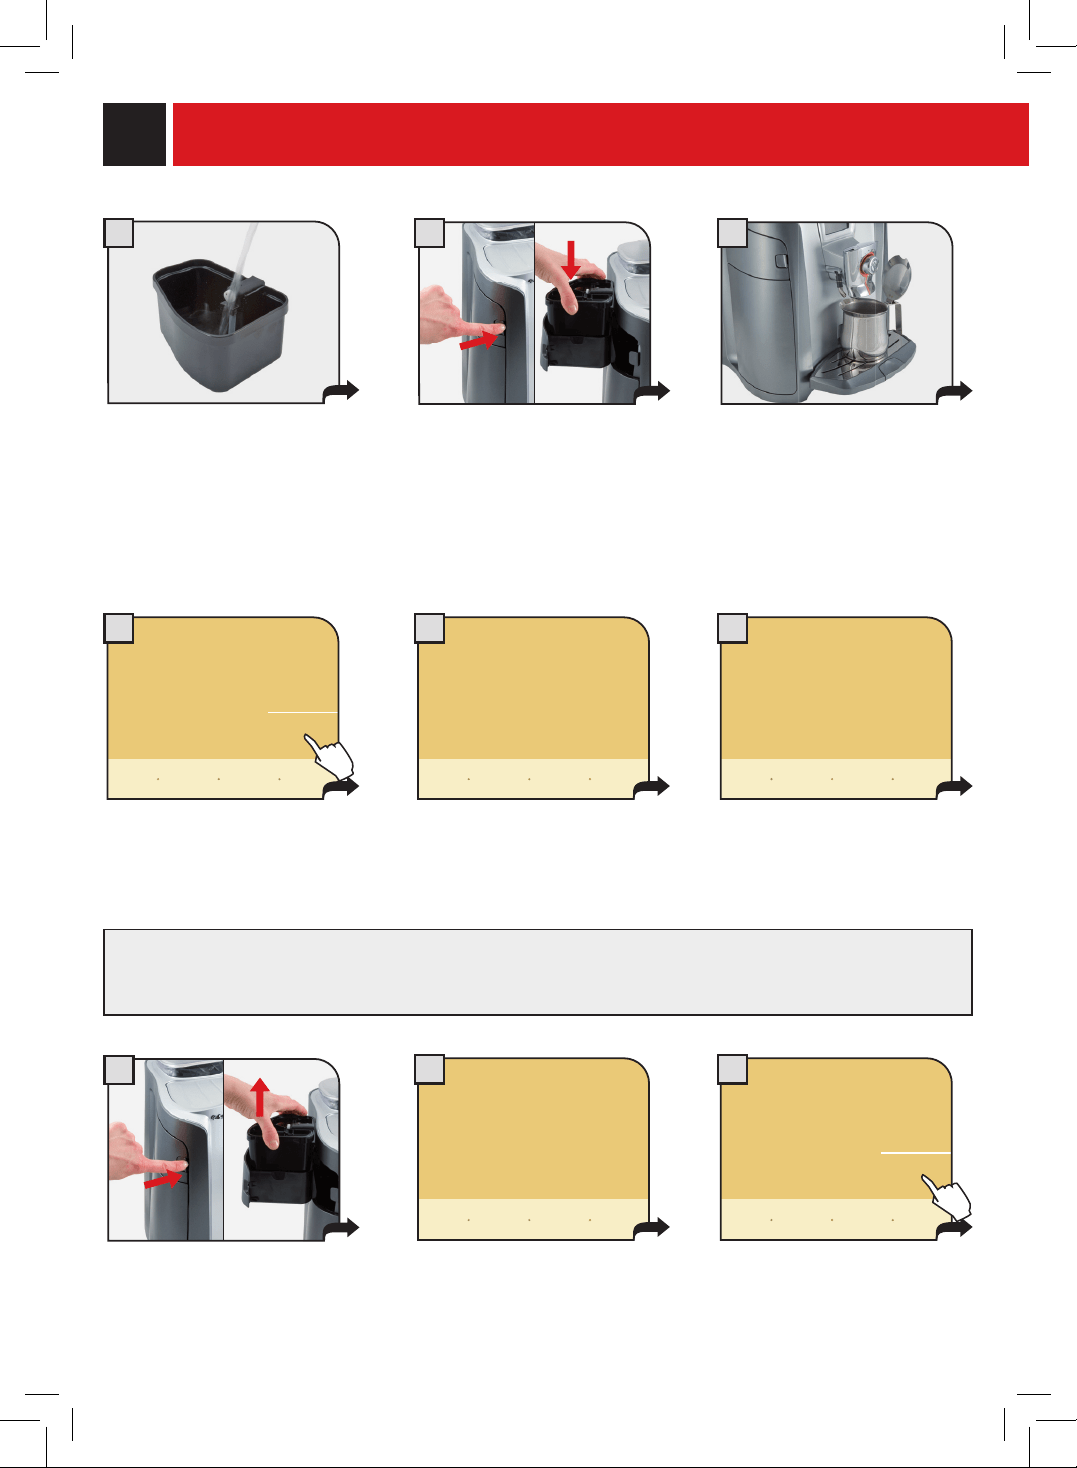
30
verser le détergents dans
le récipient du lait
cycle nettoyage circuits lait
Remplirleréservoiràlait
d’eaufraîchejusqu’auniveau
«max».
7 8
Placerunrécipientsufsam-
mentgrandsouslabusede
distributiondulait.
Lecyclederinçagecommence
automatiquement.
Attendrequelerinçagesoit
terminé.
9
11 12
ok
Ouvrirlelogementetyinsérer
leréservoiravecledétergent.
Fermerlelogement.
Appuyersurlatouche.
Lorsquelerinçageestterminé,
l’écranafche....
Lamachineémetunbip.
Retirerleréservoiràlait. Rincerleréservoiretle
rempliravecdel’eaufraîche.
Insérerleréservoiretappuyer
surlatouche.
lavage...
cycle nettoyage circuits lait
rincer le réservoir à lait
cycle nettoyage circuits lait
remplir le réservoir à lait
d'eau froide
cycle nettoyage circuits lait
démarrer rinçage
démarrage
cycle nettoyage circuits lait
retourner
en arrière
5 64
10
Ilestpossiblequ’àl’issuedesphasesdelavageouderinçage,ilrestedudétergentoudel’eaudanslebac.Vider
entoutcasleliquideprésentdansleréservoiravantdeleremplirànouveau.
PROGRAMMATION DE LA MACHINE
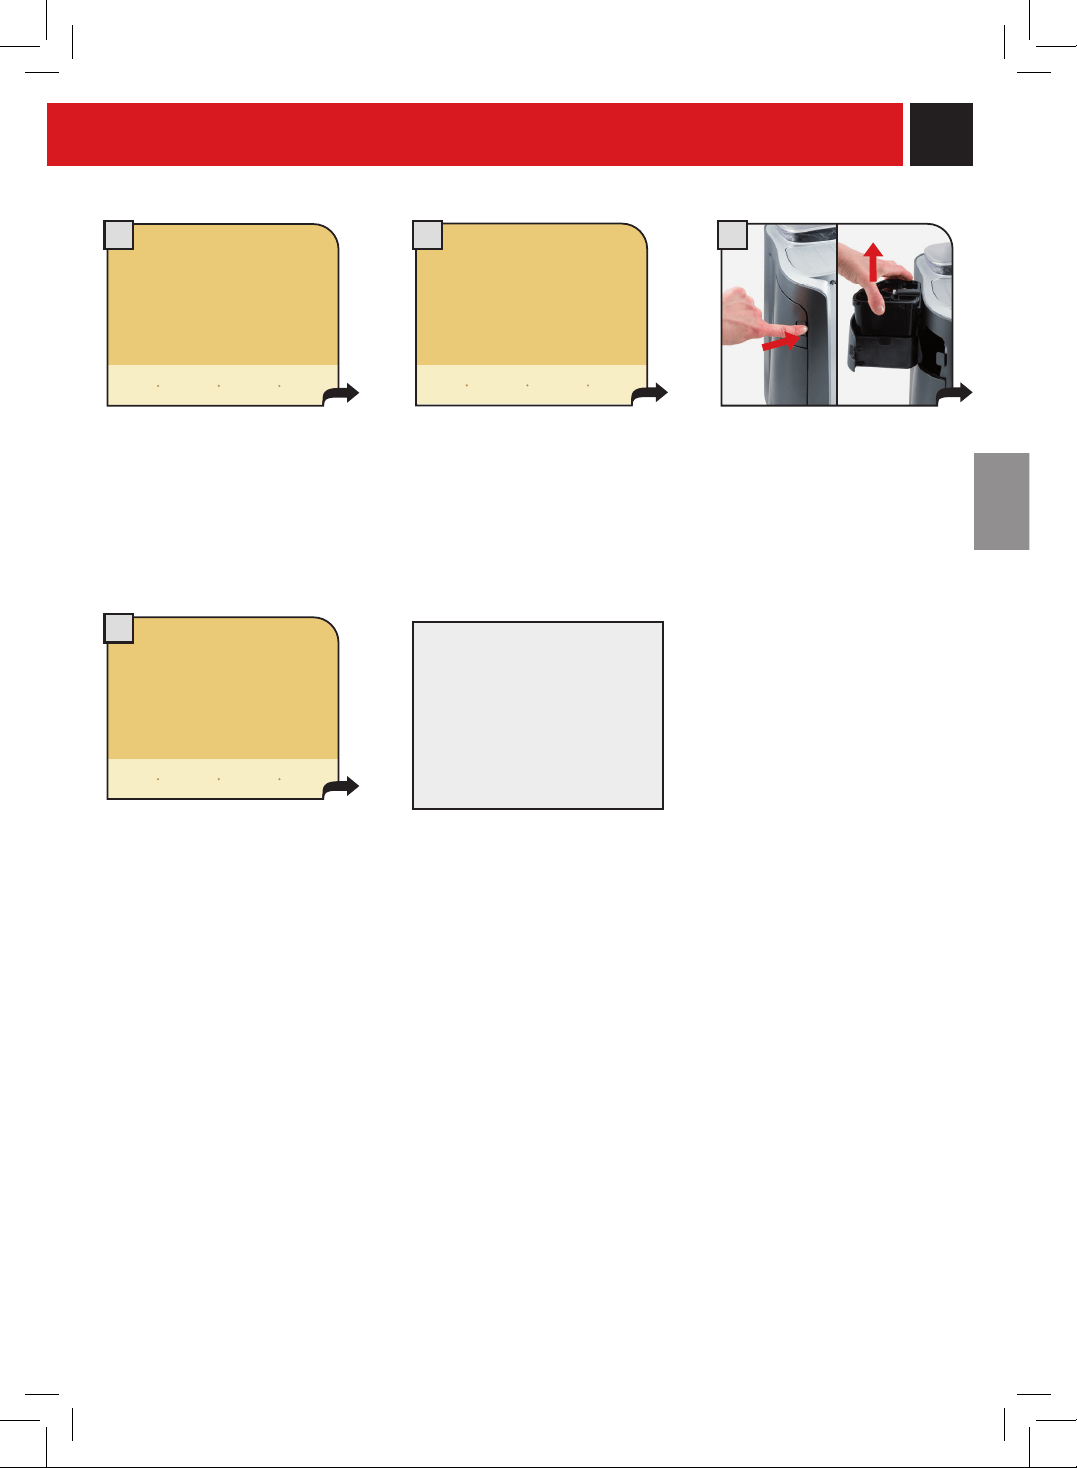
31
13
14
16
15
rinçage... rincer le réservoir à lait
remplir le réservoir à lait
d'eau froide
Attendez.... Lorsquelerinçageest
terminé,l'écranafche....
Retirezlerécipientdulait
Rincezlerécipientet
remplissez-leavecdel'eau
fraîche.
Effectuezunautrecyclede
rinçageensuivantlaprocédure
décriteauparavant.
Unefoisterminé,lamachine
revientautomatiquementau
menuprincipal
cycle nettoyage circuits lait
cycle nettoyage circuits lait cycle nettoyage circuits lait
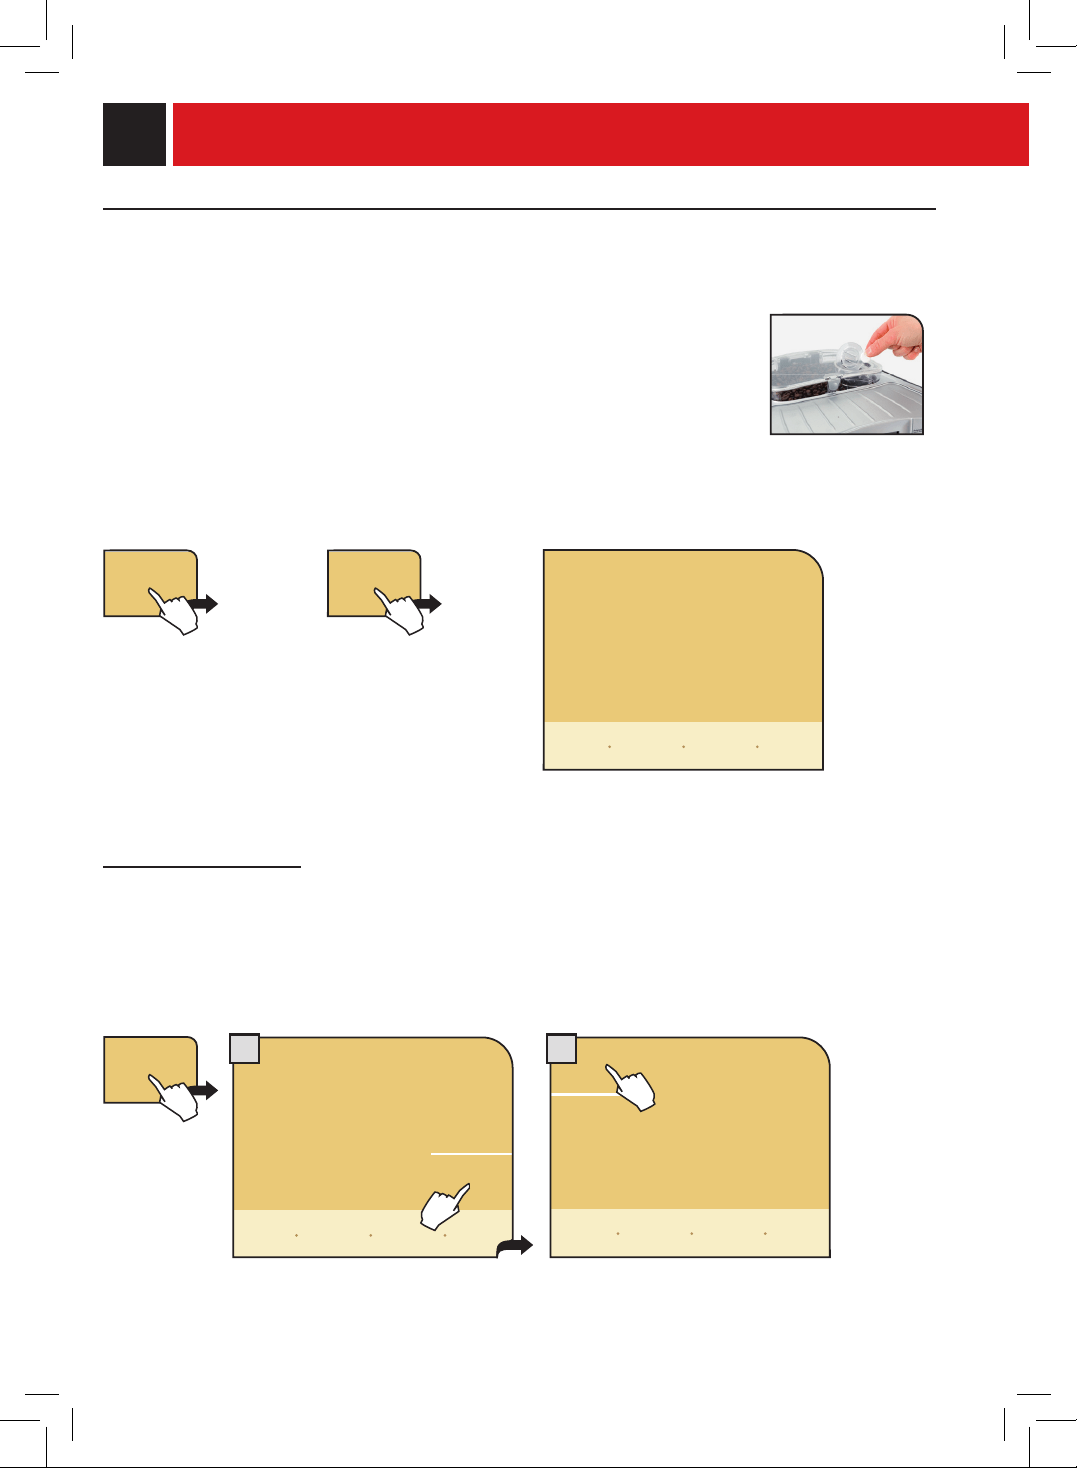
32
CYCLE DE NETToYAGE CIRCUITS CAFÉ (CYCLE DE LAvAGE DU GRoUPE DE DISTRIBUTIoN)
Cettefonctionpermetd'effectuerlenettoyagedescircuitsinternesdel'appareilquiserventàladistributiondu
café.Ilestconseilléd’effectuercecycledelavageaprès500distributionsdeboissonscontenantducaféoubien
unefoisparmois.Ilestpossibled’acheterlesemballagesdedétergentenpastillesSaecochezvotrerevendeur
habitueloubienauprèsdescentresd’assistanceagréés.
Remarque:avantd'activercettefonction,assurez-vousque:
1.unrécipientdetaillesufsantesetrouvesouslabusedudistributeur;
2.vousavezintroduitlapastillespécialedenettoyagedanslegroupededistribution;
3.leréservoiràeaucontientunequantitéd'eausufsante.
LE CYCLE DE LAvAGE NE PEUT PAS ÊTRE INTERRoMPU. PENDANT CETTE
oPÉRATIoN, LA PRÉSENCE D'UNE PERSoNNE EST NÉCESSAIRE.
Appuyezsurlatouche«cyclenettoyagecircuitscafé»etensuitesur«démarragecyclenettoyage»,ande
démarrerlecycledelavage.
lavage circuits café-
attendre svp
lavage...
Attendezquelecycledelavagesoitterminé;
l'appareilrevientaumenuprincipal.
BLoCAGE AFFICHEUR
Cettefonctionpermetdenettoyerl'afcheur.Pourlenettoyagedel'écrantactile,veuilleztoujoursutiliserunchiffon
douxethumideoubienundétergentspécialpourécransvendudanslecommerce.
ToUTE UTILISATIoN DE SoLvANTS, D'ALCooL, DE DÉTERGENTS AGRESSIFS ET/oU D'oBJETS
PoINTUS QUI PoURRAIENT ENDoMMAGER LA SURFACE DE L'AFFICHEUR EST INTERDITE.
Appuyezsurlatouche«blocageafcheur»
Pourréactiverl'afcheur,appuyezsur«déblocage»enbasàdroite,ensuite(dans
lesdeuxsecondesquisuivent)sur«déblocage»enhautàgauche(cettetouche
n'apparaîtquelorsquevousavezappuyésurlapremièretouchededéverrouillage).
démarrage
cycle nettoyage
blocage
af cheur
déblocage
af cheur
bloqué
déblocage
cycle
nettoyage
circuits café
af cheur
bloqué
PoUR L’ENTRETIEN ET LE NETToYAGE DU
GRoUPE DE DISTRIBUTIoN, SE REPoRTER
À LA PAGE 43.
PROGRAMMATION DE LA MACHINE
21
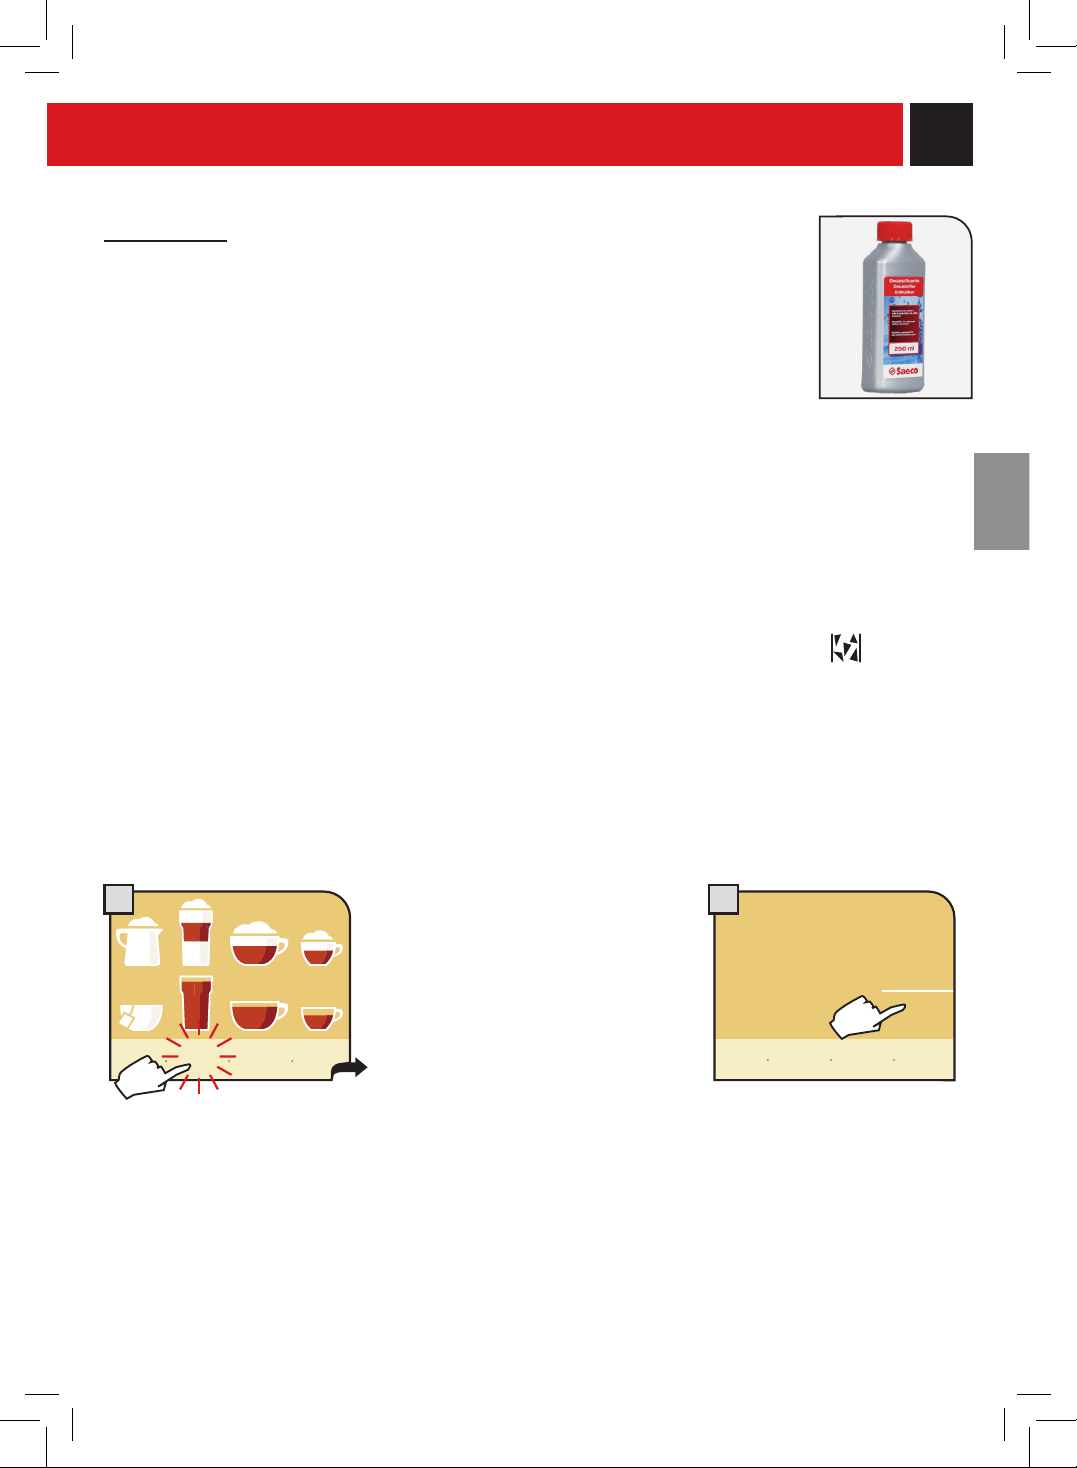
33
21
DÉTARTRAGE
Cettefonctionpermetdedémarrerlecycleautomatiquededétartrage.
Ledétartrageestnécessairetousles3-4moisenfonctiondeladuretédel’eau,quandl’eau
s’écoulepluslentementqued’habitudeouquandlamachinelesignale.Lamachinedoitêtre
alluméeetellegèreautomatiquementladistributiondudétartrant.
PENDANT CETTE oPÉRATIoN, LA PRÉSENCE D'UNE PERSoNNE EST
NÉCESSAIRE.
ATTENTIoN ! N'UTILISEZ JAMAIS DE vINAIGRE PoUR DÉTARTRER LA MACHINE.
Utiliser le détartrant SAECo. Il a été développé de manière spécifi que pour préserver les performances et la
longévité de la machine à café, et pour éviter le bouchage des buses de diffusion. Le détartrant doit être utilisé
en suivant à la lettre les préconisations du mode d’emploi de l’appareil concerné et selon la réglementation en
vigueur dans le pays.
Remarque:avantdedémarrerlecyclededétartrage,assurez-vousque:
1.unrécipientdetaillesufsantesetrouvesouslabused’eauetdudistributeur;
2. LEFILTREÀEAUN’ESTPLUSDANSLERÉSERVOIRÀEAU;
3. leproduitdétartrantaétéversédansleréservoiràeaujusqu’auniveaumarquéparlesymbole
.
Arrêt du cycle de détartrage.
Le détartrage et/ou le rinçage peut être arrêté momentanément. Lorsque le cycle de détartrage est arrêté, la
machine vous signale qu’elle doit être éteinte.
ATTENTIoN ! LE DÉTARTRAGE DoIT ÊTRE TERMINÉ DANS LE 24 HEURES QUI SUIvENT SoN ARRÊT.
Lorsque la machine est remise en marche, elle vous signale que le processus de détartrage et/ou de rinçage
doit être terminé.
L'appareilsignalequeledétartrageestnécessaireviaunmessage
apparaissantdanslemenuprincipal.Cemessaged'avertissementne
bloquepaslefonctionnementdel'appareil.Lechiffreindiquésousle
messaged'avertissementindiquelenombrededistributionsquevous
pouvezeffectueravantl'arrêtdel'appareil(cechiffreseréduitchaque
foisquevouspréparezuneboisson).Lorsqu'ilneresteque30
distributionsavantl'arrêtdel'appareil,latouched'avertissement
commenceàclignoter.Lorsquelechiffreatteintzéro,l'appareils'arrête
etilfautprocéderaudétartragedelamachine.
Pouraccéderaumenudedétartrage,appuyezsurlatouche.
Lorsquelamachines'arrête,l'écran
afchelemessagesuivant:
«remplirleréservoird'eau
aveclasolutiondétartrante».
Procédezaudétartragede
l'appareilenappuyantsur«
démarragedétartrage»comme
décritprécédemment.
cycle de détartrage
remplir le réservoir d'eau
avec la solution détartrante
démarrage
détartrage
détartrage
200
a f c h e r
menu avec
textes
mon
café
menu pro-
grammation
retourner
en arrière
retourner
au menu
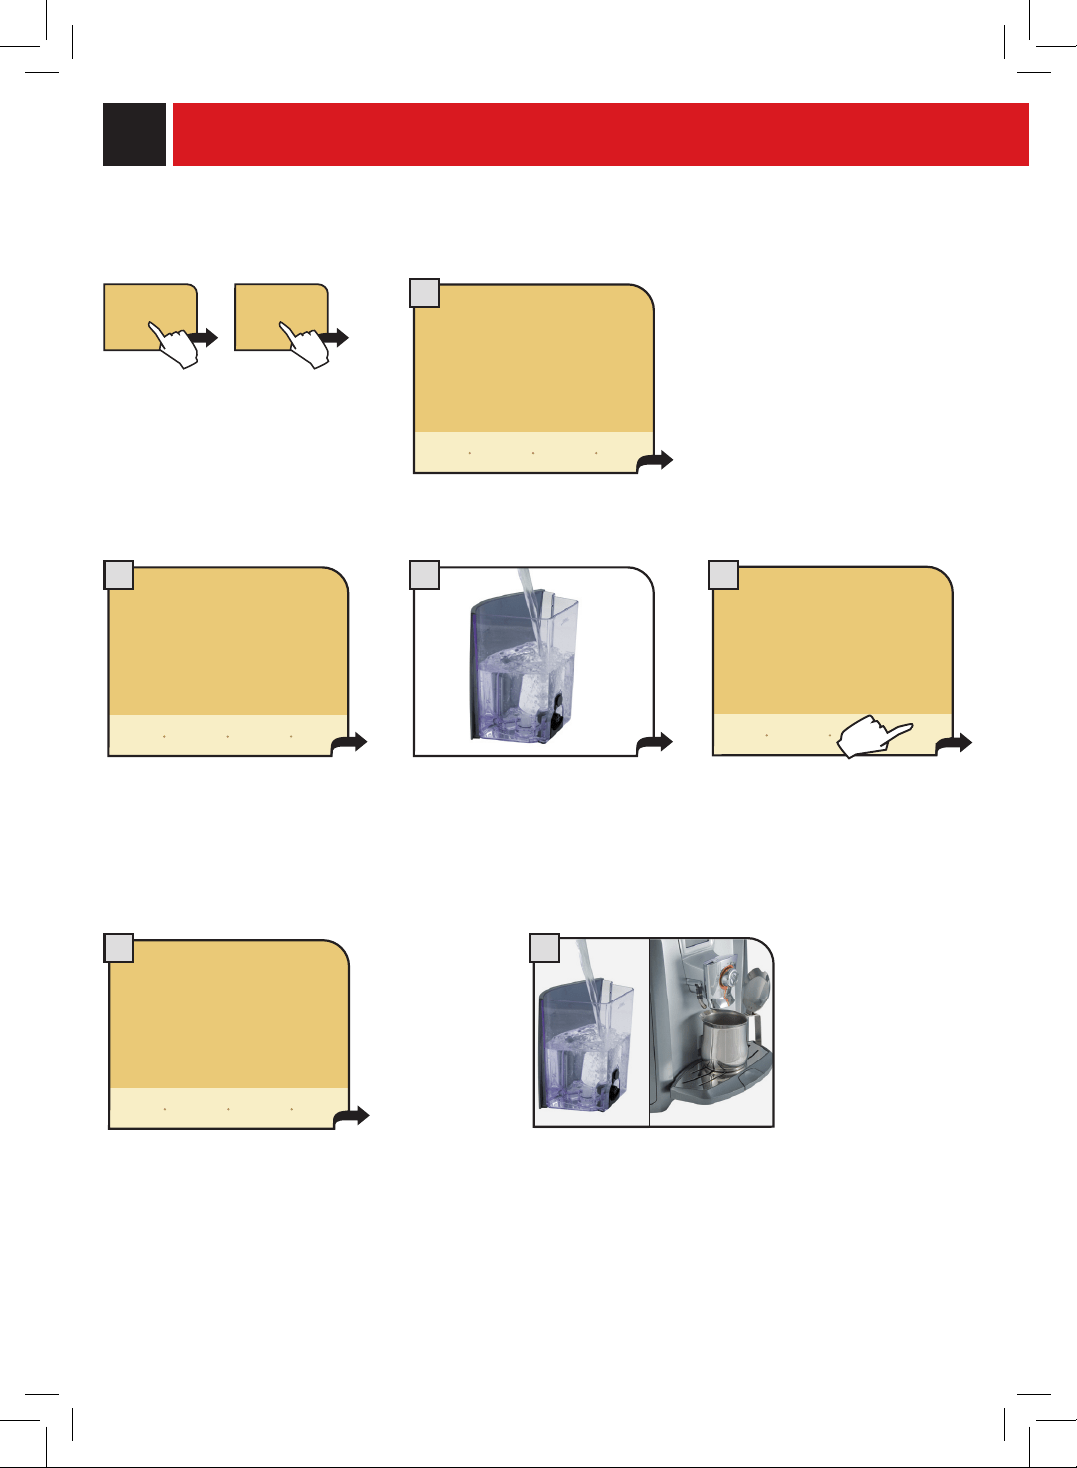
34
1
ciclo di risciacquo
3
2
65
4
Unefoisledétartrageterminéeffectueruncycledenettoyageetd’entretienduréservoiràlait,commecommecelaestdécrità
lapage41-42.
L'appareilcommenceàdistribuerleproduitdétartrantàtraverslabused'eau
chaude.Ladistributionduproduitdétartrants'effectueàdesintervalles
prédénis;decettemanière,leproduitdétartrantpeutagirefcacement.
And'effectuerledétartragedel'appareilavantquelamachinenes'arrêteouquelemessagededétartrage
obligatoiren'apparaisse,appuyezsurlatouche«détartrage»,puissur«démarragedétartrage»pourdémarrerle
cyclededétartrage.
Dèsquelasolutiondétartrantea
étécomplètementdiffusée,
l'écranafchelemessage
suivant:
Retirezleréservoiràeauetrincez-le
avecdel'eaupotablefraîchean
d'éliminerlestraceséventuelles
laisséesparleproduitdétartrant.
Ensuite,remplissezleréservoiravec
del'eaupotablefraîcheetremettez-le
enplace.
Effectuezlerinçagedescircuitsde
lamachineenappuyantsur«
démarragerinçage».
cycle de détartrage
attendre svp
démarrage
rinçage
L'appareilprocèdeaurinçage.Unefoisle
rinçageterminé,ilfautremplirleréservoir
avecdel’eaufraîchepotable.Avantde
remplirleréservoir,sionledésire,monterà
nouveauleltreàeau;autrement,
réintroduirelepetitltreblanc(voirpage7).
Placezunrécipientsouslabused'eau.Aprèsque
leréservoiràeauaétéremisenplace,l'appareil
procèdeautomatiquementàl'amorçageducircuit
hydraulique.Sicetteopérationneréussitpas,
veuillezvousreporteràlasection«amorçage
manuelducircuithydraulique»(page6).
cycle de détartrage
attendre svp
rinçage…
placer le réservoir avec
de l'eau fraîche
pause
rinçage
détartrer…
pause
détartrage
détartrage
démarrage
détartrage
cycle de
rinçage
cycle de détartrage
attendre svp
cycle de détartrage
attendre svp
PROGRAMMATION DE LA MACHINE
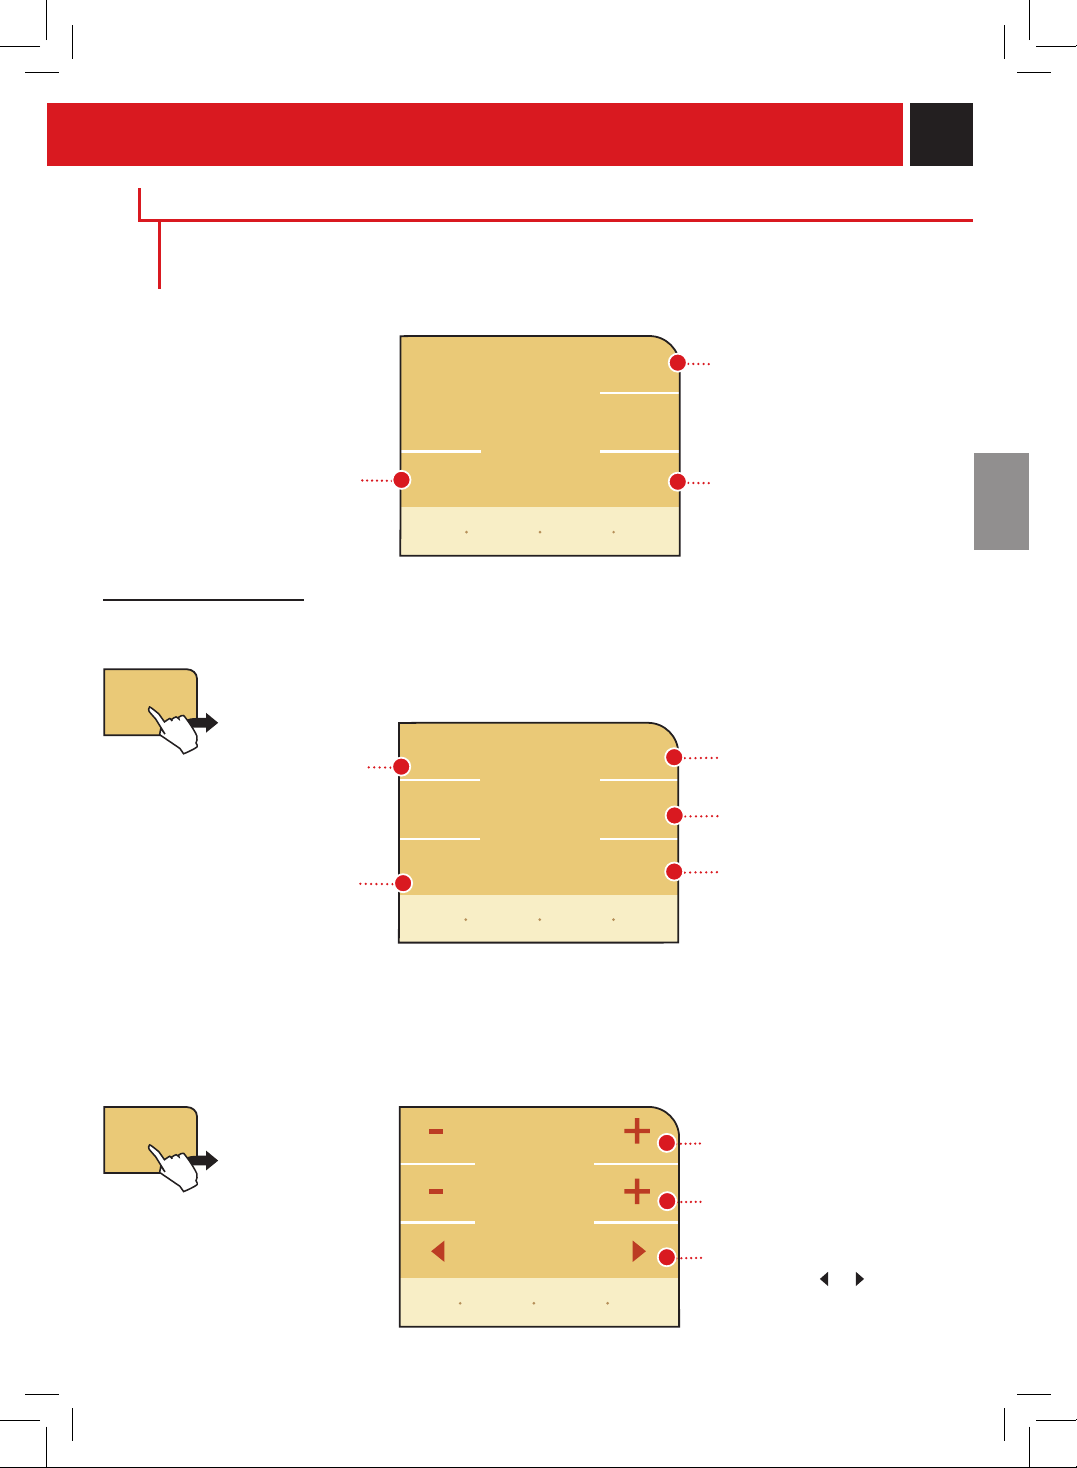
35
heure
actuelle
09:45 (am)
réglage de
l'heure
format
heure
jour de la
semaine
vendredi
RÉGLAGE DE L'HEURE
Cettefonctionvouspermetderéglerlesparamètresdel'heureetdeladate.Cettefonctionestimportantepour
pouvoirensuiteprogrammercorrectementleshorairesdemarcheetd'arrêtdelamachine!
afcherl'heureactuellement
réglée;
afcherleformatd'afchagede
l'heureactuellementréglé.
modierlesréglagesconcernant
leformatd'afchagedel'heure
(enformat24heuresouAM/PM)
RÉGLAGES HoRLoGE
Pourréglerladate,l’heureactuelle,laminuterieetl’horlogepourlagestiondelamachine.Appuyersurla
touche«réglageshorloge»danslemenuprincipal.
Dans ce menu, vous pouvez :
régler:
-l'heureactuelle;
-ladateactuelle;
-leformatd'afchagedel'heure;
-(24heures–AM/PM).
réglerlesintervallesdetemps
entrelamiseenmarcheetl'arrêt
del'appareil(troisintervalles
peuventêtreactivésséparément).
réglerlesparamètres
pourlepassageenmode
standbyaprèsladernière
distribution
HEURE ACTUELLE/JoUR DE LA SEMAINE
Cemenupermetderéglerlejourdelasemaineainsiquel'heureactuellesurlamachine.
Appuyezsurlatouche«tempsjourdelasemaine».
afcherlejourdelasemaine
actuellementréglé;
temps
jour de la
semaine
modierlesréglagesconcernant
l'heureactuelleetlejourdela
semaineencours;
réglerlejouren
appuyantsur ou
09h (am)
43 min
réglerl'heureen
appuyantsur+ou–
réglerlesminutesen
appuyantsur+ou–
vendredi
temps
jour semaine
réglage de
l'heure
format
courant
24h
Dans ce menu, vous pouvez :
Dans ce menu, vous pouvez :
temps
jour de la
semaine
réglage de
l'heure
réglages
horloge
réglage
stand-by
réglage
de l'horloge
retourner
en arrière
retourner
au menu
retourner
en arrière
retourner
au menu
rétablir
valeurs
standard
enregistrer
pré-
sélections
retourner
en arrière
retourner
au menu
enregistrer
pré-
sélections
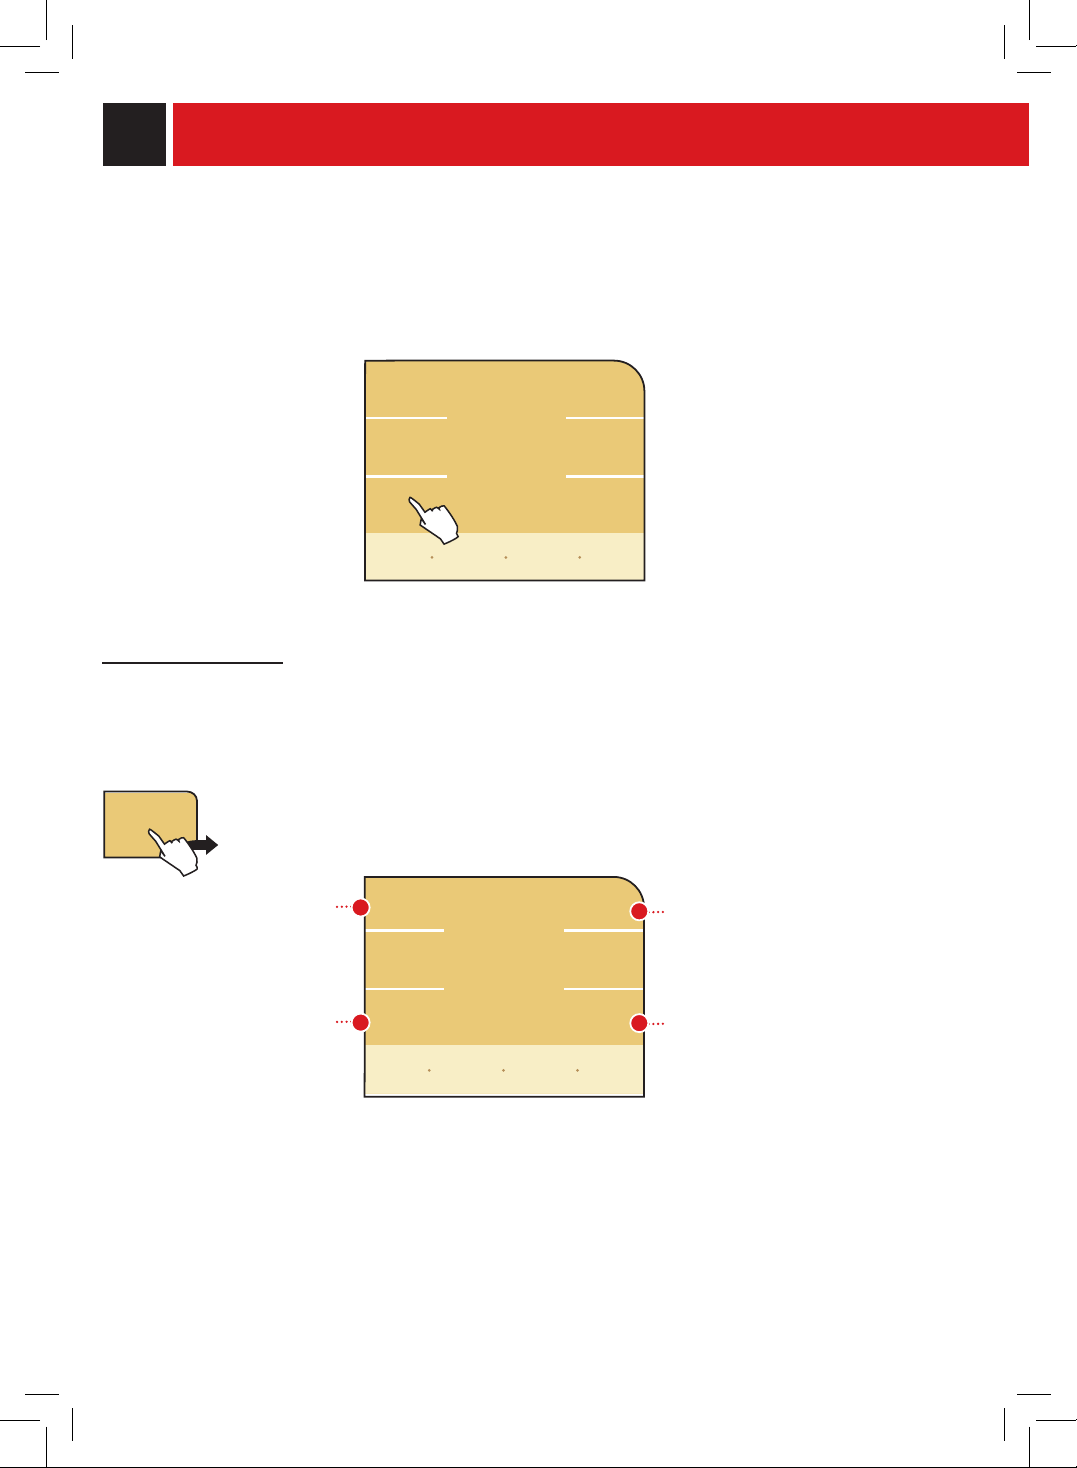
36
FoRMAT HEURE
Cettefonctionpermetderéglerlemoded'afchagedel'heure.Toutchangementdumoded'afchagemodietous
lesparamètresquinécessitentd'unafchage/réglagedel'heure!
Appuyezsurlatouche«formatheure».Lechangementestimmédiatementenregistréetl'écranafche«am/pm»
ou«24h»selonlecas.
RÉGLAGE HoRLoGE
Cettefonctionvouspermetdemettreenmarche(activer)etd’arrêter(stand-by)lamachineauxhorairesque
voussouhaitez.
Rappelez-vousquelamachineactivecettefonctionàconditionquel’interrupteurgénéralsoitenclenché.
réglerledeuxième
intervalledemiseen
marche
réglerletroisième
intervalledemiseen
marche
réglerlepremier
intervalledemise
enmarche
Pourunréglagecorrectvousdevez:
-réglerchaqueintervalledemiseenmarcheetd’arrêtdelamachine.
-choisirlesjoursdanslesquelslamachineseramiseenmarcheouarrêtée(stand-by)selonlesintervalles.
Ilestconseillédeprogrammerlesintervallesdemiseenmarchedemanièreàcequ'ilsnesechevauchentpas.
choisirlesjours
pendantlesquels
activerlesintervalles
Dans ce menu, vous pouvez :
sélectionner
le réglage
réglage
jour semaine
réglage 3
allumé 17:00 pm
éteint 19:00 pm
réglage 1
allumé 07:00 am
éteint 09:00 am
heure
actuelle
09:45 (am)
réglage de
l'heure
format
heure
jour de la
semaine
vendredi
temps
jour de la
semaine
format
courant
24h
retourner
en arrière
retourner
au menu
rétablir
valeurs
standard
enregistrer
pré-
sélections
retourner
en arrière
retourner
au menu
réglage
2
allumé
12:00 pm
éteint 14:00 pm
réglage
de l'horloge
PROGRAMMATION DE LA MACHINE
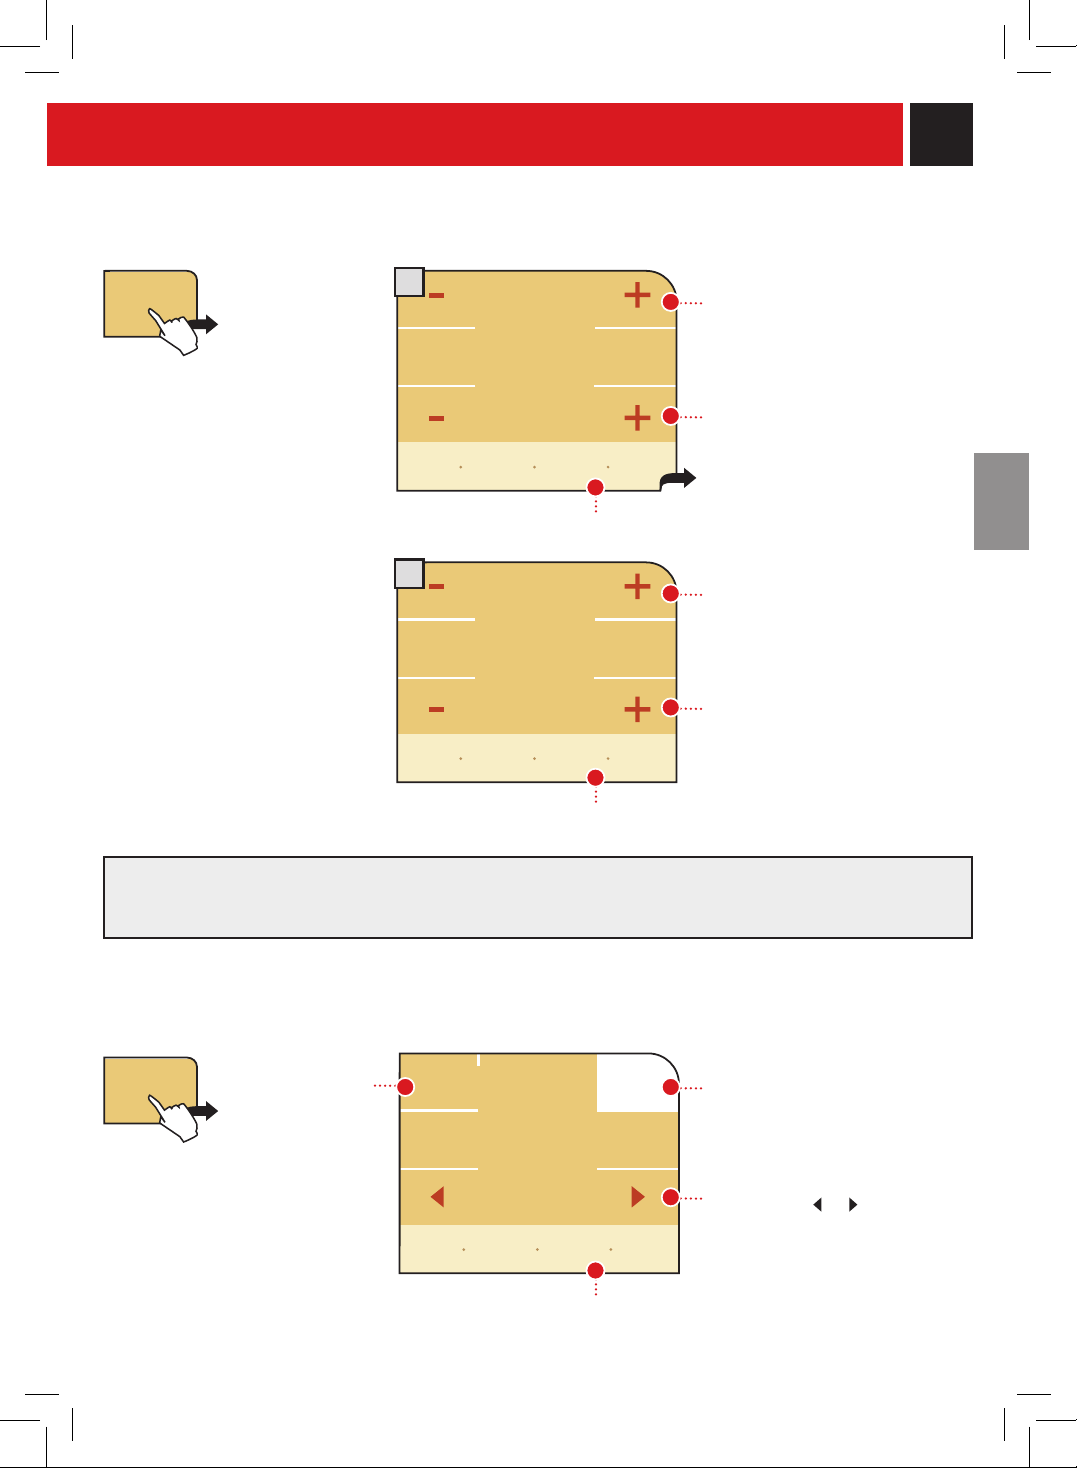
37
08h (am)
enclecher
la machine
15 min
RÉGLAGE D'UN INTERvALLE DE MISE EN MARCHE
Anderéglerunintervalledemiseenmarche,appuyezsurlatouchedel'intervallequevoussouhaitezrégler.
Réglezl'heuredemiseenmarche
enappuyantsur+ou–
Réglezlesminutesen
appuyantsur+ou–
poursauvegarderlesvaleursintroduitesetpasseràlapage-écransuivante.
Réglerl’heured’arrêt(Stand-by)
enappuyantsur+ou–
Réglezlesminutesen
appuyantsur+ou–
poursauvegarderlesvaleursintroduites.
CHoISIR LES INTERvALLES DE MISE EN MARCHE PoUR CHAQUE JoUR
Faitesdélerlesjoursdelasemaineetsélectionnezpourchaquejourle/lesréglage/squevoussouhaitezactiver.
réglage 2
mardi
Sélectionnezlejouren
appuyantsur ou
Vouspouvezsélectionnerdes
intervallesdifférentspour
chaquejour.
pourmémoriserlesréglages
09h (am)
éteindre
la machine
15 min
réglage 2
modif. compt.
jour semaine
réglage 2
allumé
12:00 pm
éteint 14:00 pm
réglage 1
allumé 07:00 am
éteint 09:00 am
réglage 3
allumé 17:00 pm
éteint 19:00 pm
Intervallepas
activépourlejour
sélectionné
Intervalleactivépourlejour
sélectionné
retourner
en arrière
retourner
au menu
enregistrer
pré-
sélections
retourner
en arrière
retourner
au menu
enregistrer
pré-
sélections
retourner
en arrière
retourner
au menu
enregistrer
pré-
sélections
réglage
2
allumé
12:00 pm
éteint 14:00 pm
réglage
jour semaine
Remarque:lafonctiondeStand-byautomatiquerégléeàlapage38esttoujoursactivée;celle-ciinterviendra
mêmependantlesintervallesactifssélectionnésdanscettefonction.Sinécessaire,réglerlafonctiondeStand-by
automatique.
1
2
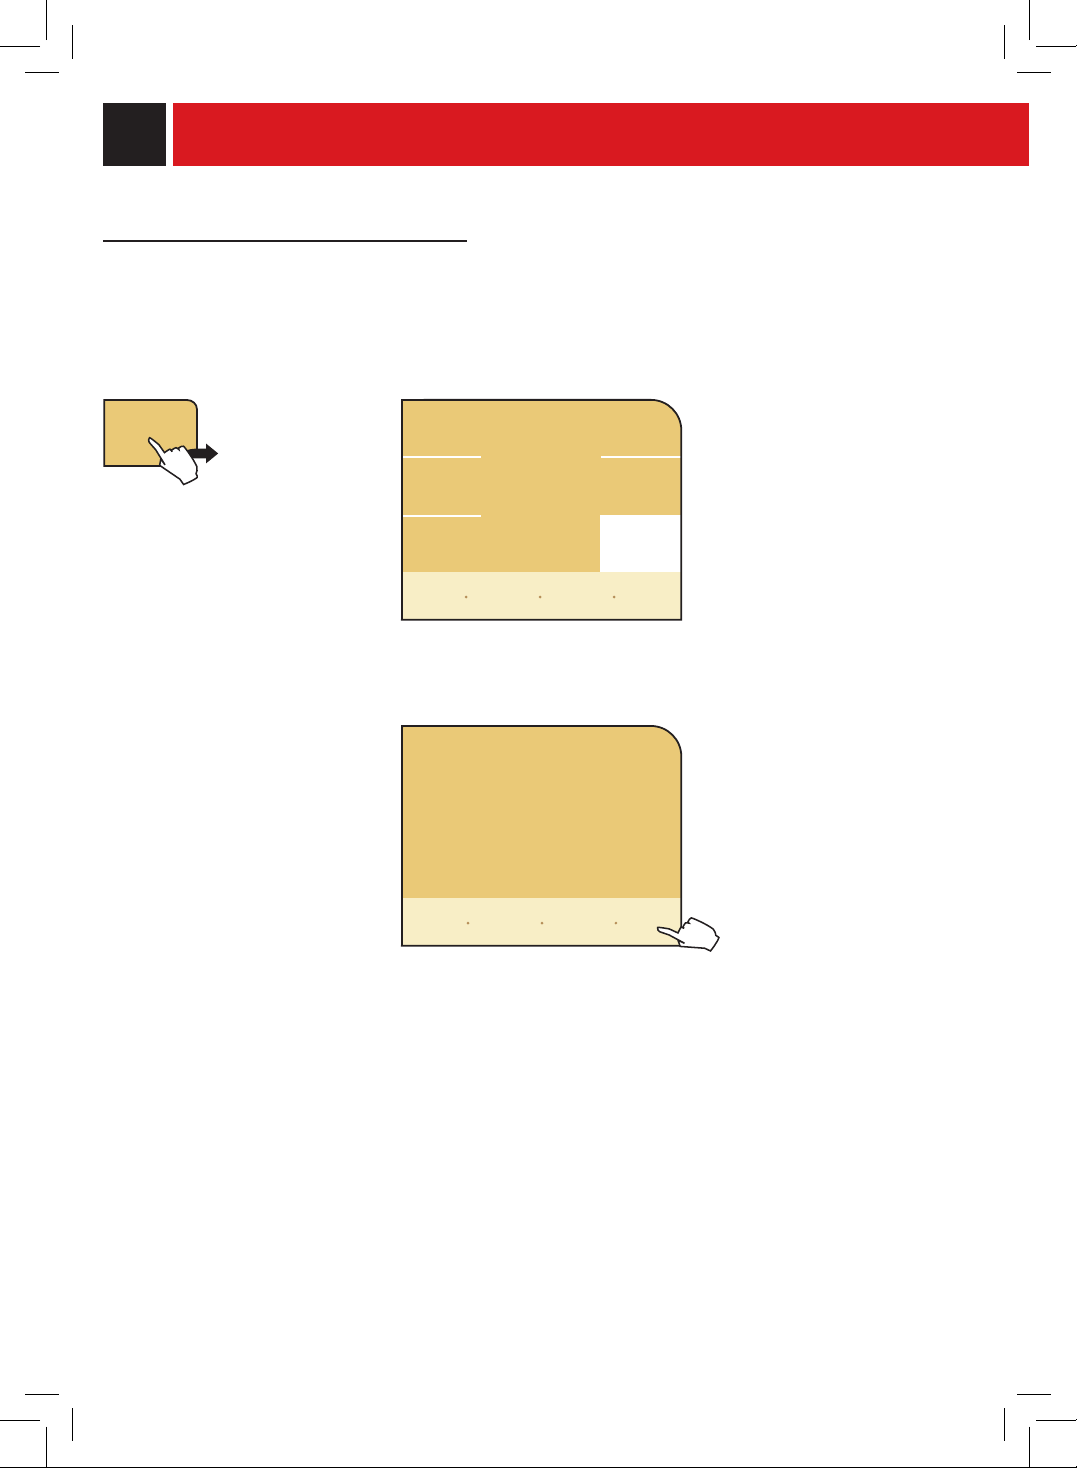
38
Lorsqueletempsprogrammépourle
retardd'arrêttermine,lemessage
suivantapparaît:
Pourdémarrerlamachine,appuyez
sur«démarrer».Lamachineprocède
audiagnosticdesfonctions.Aprèsla
phasedechauffage,elleestprêteà
fonctionner.
réglage
stand-by
Sélectionnezleretardd’arrêt
(stand-by).
au bout de
30 min
réglage
stand-by
au bout de
3 heures
au bout de
1 heure
au bout de
15 min
stand-by
démarrer
retourner
en arrière
retourner
au menu
rétablir
valeurs
standard
enregistrer
pré-
sélections
PROGRAMMATION DE LA MACHINE
RÉGLAGE DU STAND-BY AUToMATIQUE
Pourréglerl’intervalledetempsentreladernièredistributiondeboissonetlepassagedel’appareilenmode
stand-by.
L’intervallepardéfautest«après1heure».
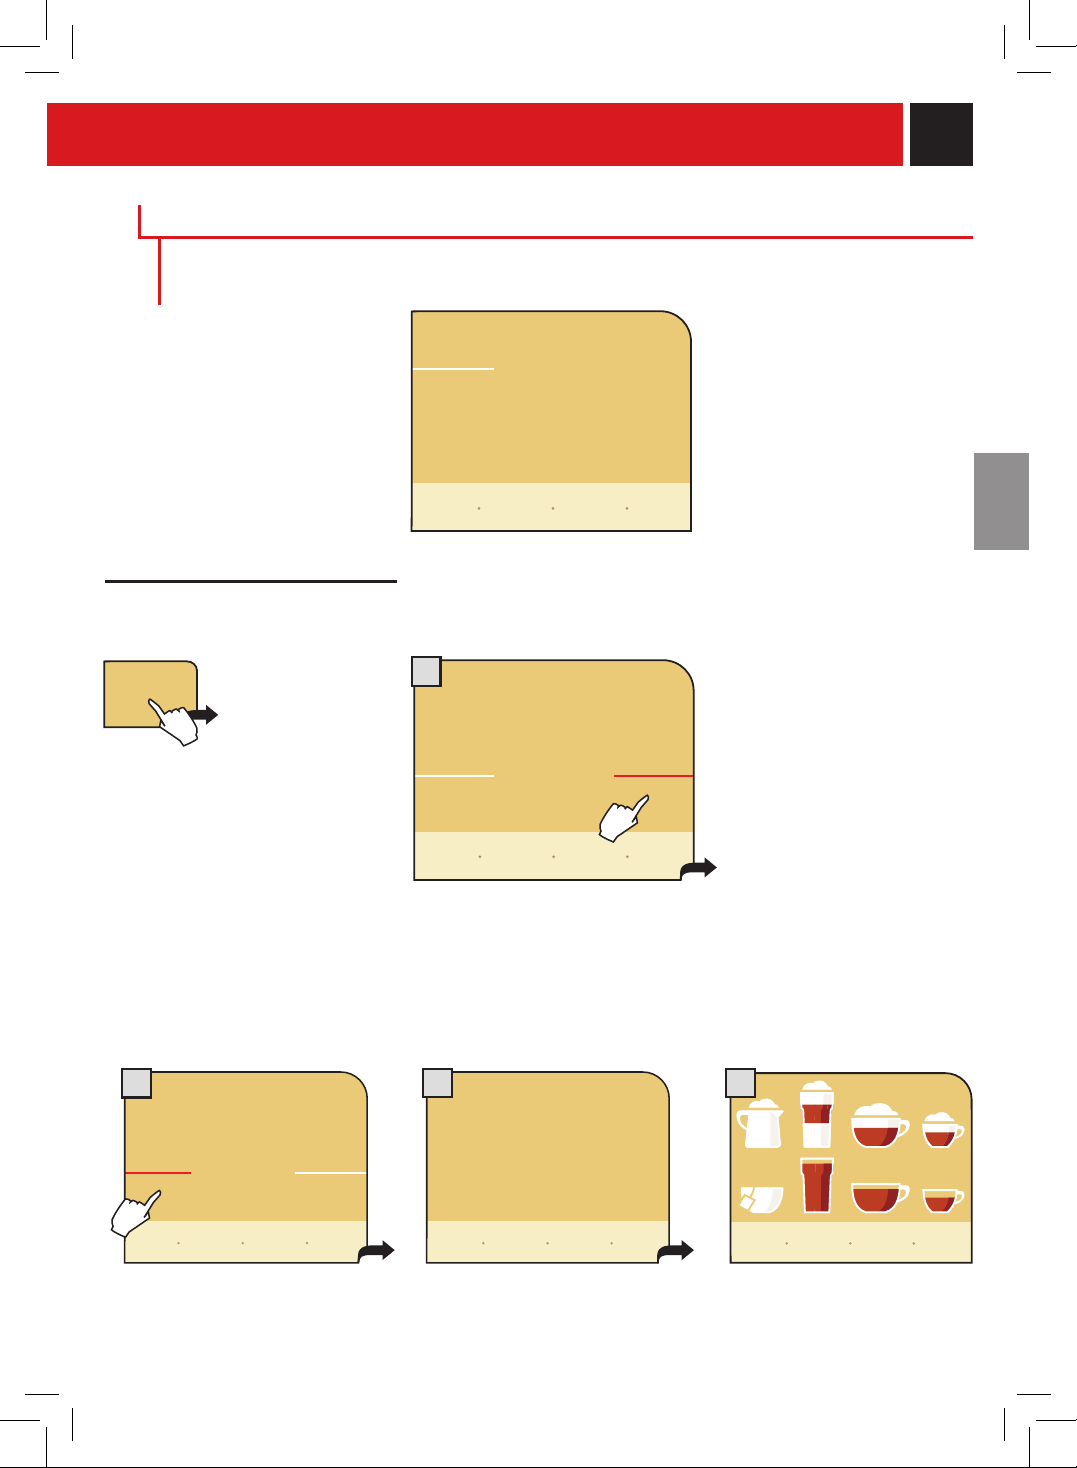
39
ANNULER ToUS LES RÉGLAGES
Cemenupermetderétablirtouslesparamètresréalisésenusine.Cettefonctionestnotammentimportantesivous
désirezrétablirlesparamètresdebase.Appuyezsurlatouche«annulertouslesréglages».
Sivoussélectionnez«oui»,vousdevezconrmervotrechoixànouveau,an
d'empêchertoutrétablissementinvolontairedesparamètresdebase.
Lerétablissementdesdonnées
standardss'effectueen
sélectionnant«oui».
ToUS LES RÉGLAGES PERSoNNELS SERoNT DEFINITIvEMENT PERDUS ET NE PoURRoNT
PLUS ÊTRE RÉCUPÉRÉS. UNE FoIS LES PARAMÈTRES STANDARDS RÉTABLIS, voUS
PoURREZ REPRoGRAMMER ToUTES LES FoNCTIoNS DE LA MACHINE, SI SoUHAITÉ.
L'écranafchependant2secondes
lemessagesuivant:«Tousles
paramètresontétérétablis»
Unefoiscettepériodedetemps
écoulée,l'appareilrevientau
menuprincipal.
FoNCTIoNS SPÉCIALES
Cemenupermetd'accéderauxfonctionsspécialesdel'appareil.Appuyezsurlatouche«spécialités»dans
lemenuprincipal.
annuler tous
les réglages
spécialités
annuler tous
les réglages
oui
attention!
non
voulez-vous vraiment mèmoriser les
paramètres standard?
tous les réglages personnelles
seront annulés!
non
êtes-vous sûr?
oui
voulez-vous vraiment mèmoriser les
paramètres standard?
tous les réglages personnelles
seront annulés!
tous les paramètres
ont été rétablis
retourner
en arrière
retourner
au menu
retourner
en arrière
retourner
au menu
retourner
en arrière
retourner
au menu
afcher
menu avec
textes
mon
café
menu pro-
grammation
1
3
2
4

40
1 2 3
1
6
54
ENTRETIEN PENDANT LE FoNCTIoNNEMENT
Lemessage«viderréser.marcàcafé»pourraits’afcherlorsdufonctionnementnormal.Cetteopération
doitêtreeffectuéeaveclamachinesoustension.
Lecomptagedumarcdéposédansletiroirn’estpas
remisàzéroenvidantlemarcquandlamachineest
éteinteouquandcetteopérationn’estpassignalée
surl’afcheur.C’estlaraisonpourlaquellela
machinepeutafcherlemessage«viderréser.
marcàcafé»mêmeaprèsn’avoirpréparéque
quelquescafés.
Éteignezl'appareiletdébranchez
laprise.
Lavezleréservoiretlecouvercle. Retirezlebacd'égouttement,
videz-leetnettoyez-le.
Retirezletiroiràmarc,videz-leetnettoyez-le.
Retirezlebacd'égouttement,
videz-leetlavez-le.
NETToYAGE GÉNÉRAL DE LA MACHINE
Lenettoyagedécritci-dessousdoits'effectueraumoinsunefoisparsemaine.
Remarque:n'utilisezpasdel'eauquin'apasétéremplacéedepuisplusieursjours.
ATTENTION!Nepasimmergerlamachinedansl’eau.
Pourlenettoyageetl’entretienducappuccinatore,sereporteràlasectioncorrespondanteàlapage41-42.
Retirerlerécipientdulaitetlelaver
(sereporteràlapage41-42pourle
nettoyageducappuccinatore).
Nettoyezlecompartimentducafé
prémouluàl'aidedupinceau.
Nettoyezl'afcheur(consultezla
page32)
NETTOYAGE ET ENTRETIEN
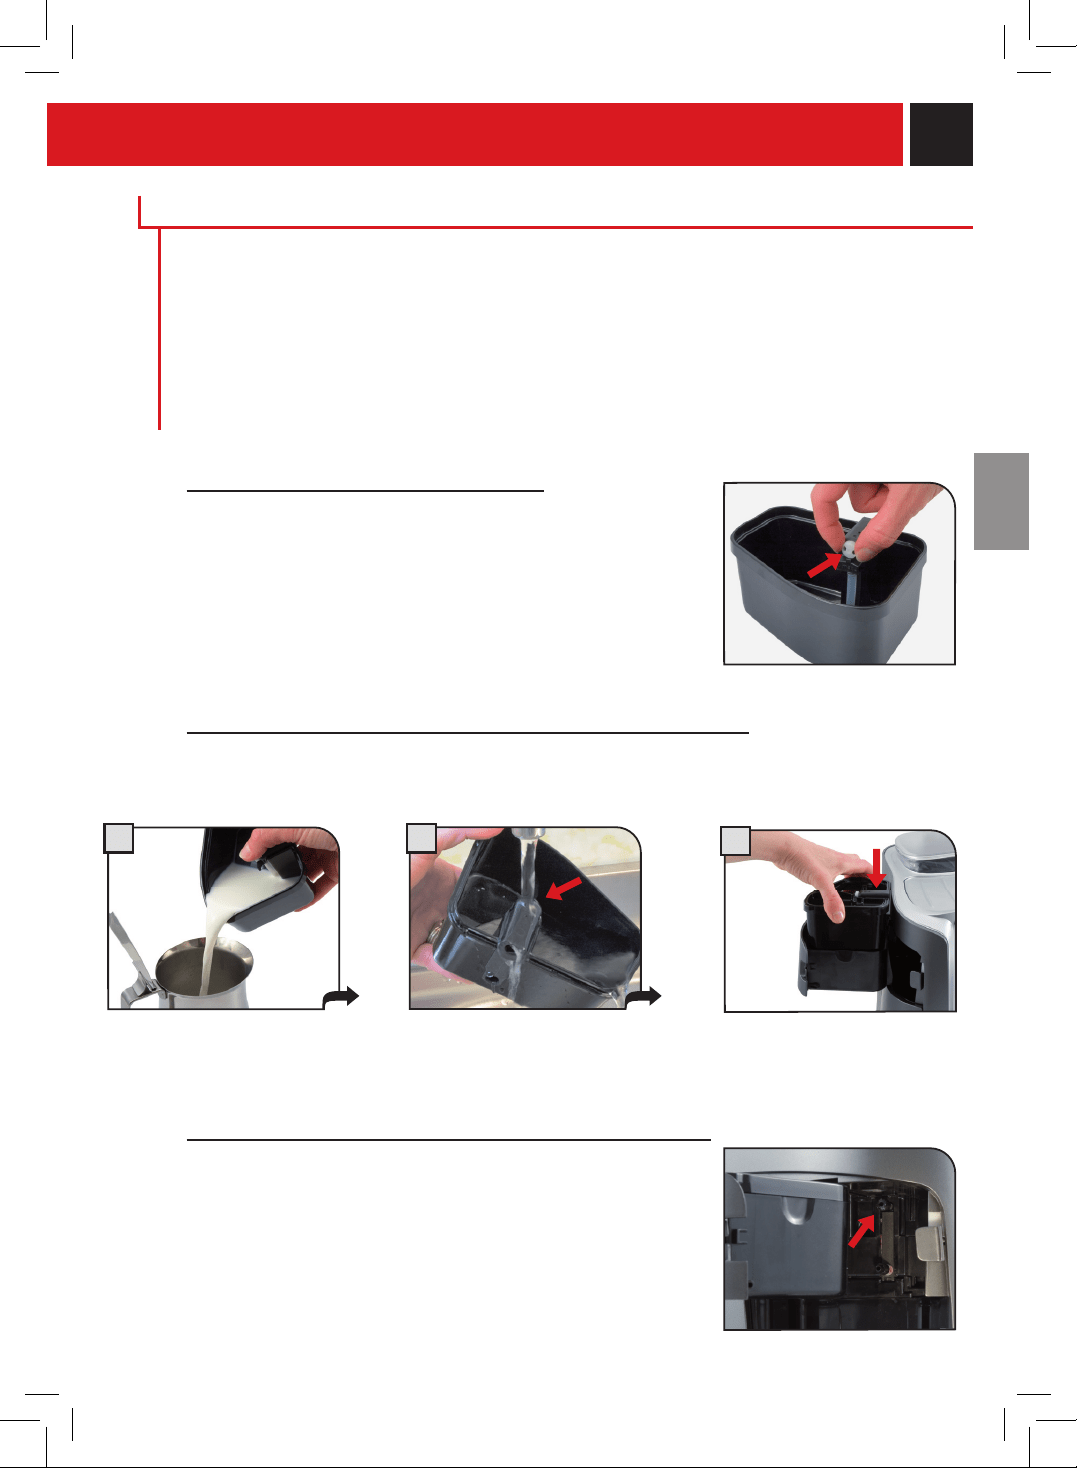
41
ATTENTIoN ! NE PAS oUvRIR LA PoRTE DE SERvICE PENDANT LA PHASE DE
DISTRIBUTIoN, DE LAvAGE oU DE RINçAGE.
Leréservoiràlaitainsiquelecappuccinatoreontétéconçuspouroptimiserl’utilisationdulait.
Eneffectuantleurnettoyageetentretiendefaçonconstante,ilserapossiblededégusterd’excellentes
boissonsàbasedelait.
Il est conseillé de rincer le cappuccinatore avant la première distribution quotidienne de produits à
base de lait et de toute façon de le laver soigneusement au moins une fois par semaine.
NETToYAGE ET ENTRETIEN DU RÉSERvoIR À LAIT
Verserlelaitdansunrécipient.
ENTRETIEN RAPIDE CAPPUCCINAToRE
Ilsepourraitquelelaitnesoitpasémulsionnédefaçonoptimale.Dans
cescas,tournerlerégulateurd’écoulementillustrésurlagure.
Tournerlerégulateur2-3foispoureffectuerunentretienrapide.
Remarque:encasdepertedurégulateurinstallé,leremplacerpar
celuifourniaveclekitd’entretienducappuccinatore.
Rincertouteslespartiesquisont
entréesencontactaveclelait
avecdel’eautiède.
1 2
3
Essuyeretremettredansle
logement.
LAvAGE PoUR REMETTRE LE RÉSERvoIR DANS LA MACHINE
Aprèsavoirutilisélelaitpourpréparerlesboissons,ilfautlaverleréservoiravecdel’eaufraîcheetpotable
avantdeleremettredanslamachine.Ilnesuftquedequelquessimplesopérationspourgarantirle
fonctionnementoptimaldelamachine.
ENTRETIEN DU JoINT ToRIQUE PoUR RÉSERvoIR À LAIT
Unjointtoriqueinstallédanslamachinegarantitlebonfonctionnement
duréservoiràlait.
Tousles6mois,enleverleréservoiràeau,ouvrirleréservoiràlaitet
lubrierlejointtoriqueaveclagraissefournieaveclamachine.
Ilestpossibled’acheterdelagraissepourlubrierlegroupede
distributionauprèsdescentresd’assistanceagréés.
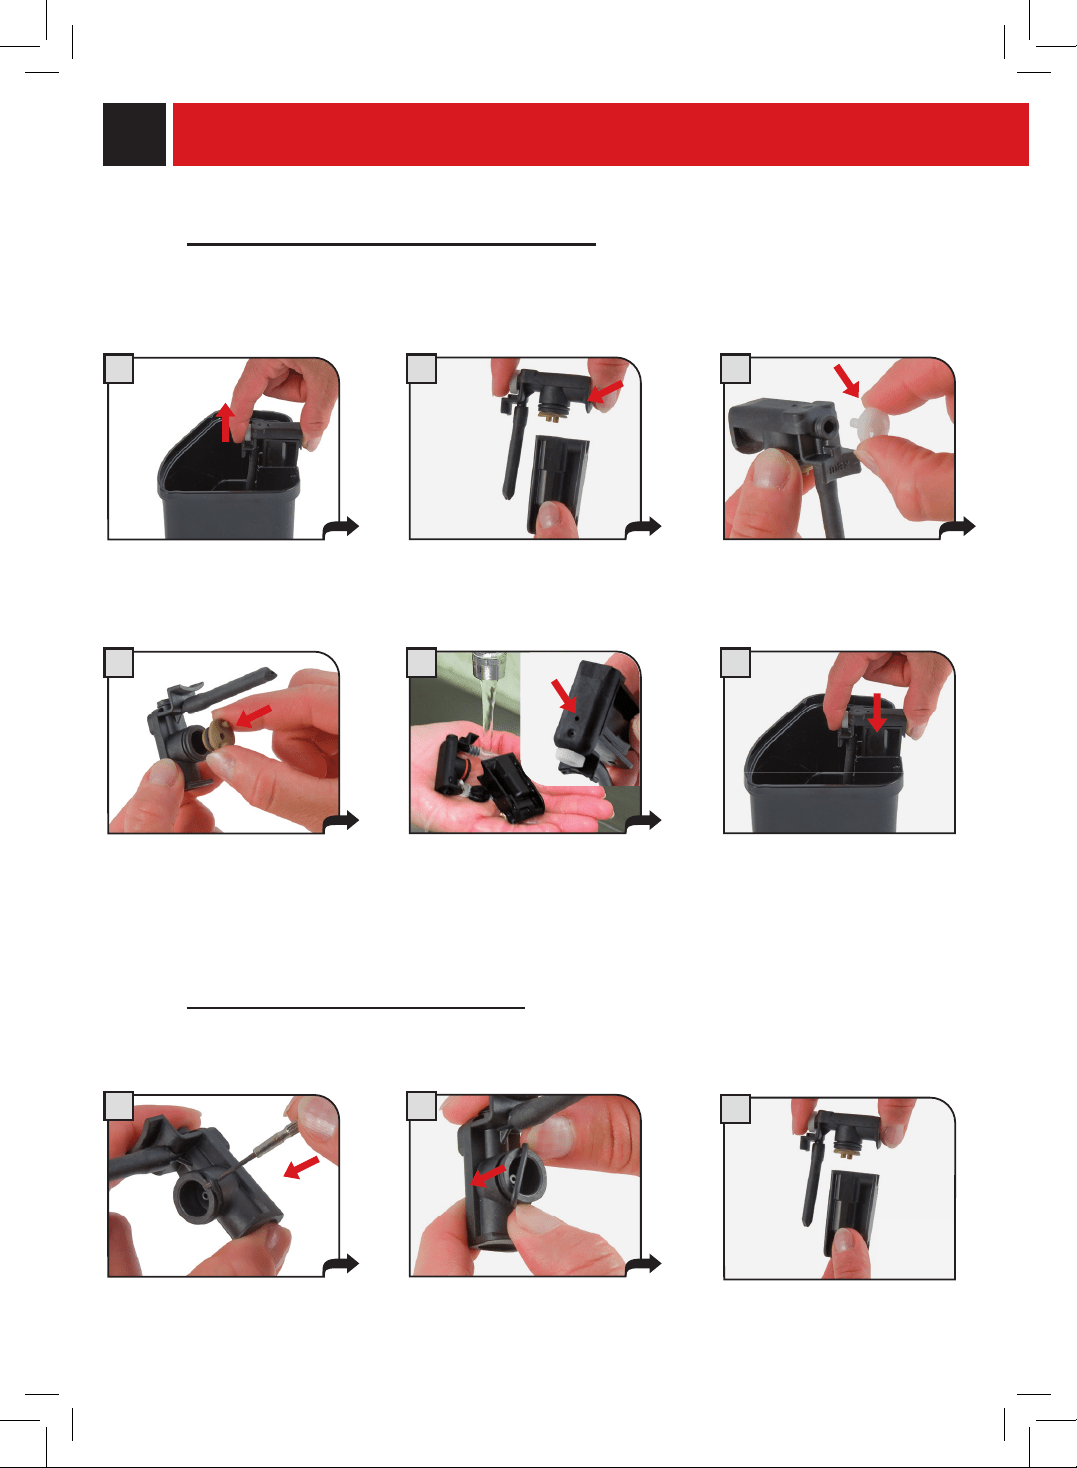
42
Retirerlecappuccinatore.
ENTRETIEN APPRoFoNDI CAPPUCCINAToRE
Laversoigneusementlecappuccinatoreaumoinsunefoisparsemaine.
Lescomposantspeuventêtrelavésavecdesdétergentsàusagedomestique.
Séparerlapartiesupérieurede
celleinférieuredu
cappuccinatore.
Retirerlebouchon.
Enleverlebouchondelapartie
inférieure.
Lavertouslescomposants.
S’assurerqu’iln’yapasde
salissuresnid’obstructionsdansle
trou.
Remontertouslescomposantset
installerlecappuccinatoredans
leréservoir.
Retirerlejointtoriqueàl’aide
d’unobjetpointu.
Insérerlenouveaujointtorique
enappuyantdélicatement.
Assemblerlapartiesupérieureet
celleinférieuredu
cappuccinatore.
REMPLACEMENT DU JoINT ToRIQUE
Lorsquelesdeuxpartiesducappuccinatorebougenttroplibrement,ilfautremplacerlejointtoriqueavecun
desjointsfournisendotation.
1 2 3
4 5 6
1 2
3
NETTOYAGE ET ENTRETIEN
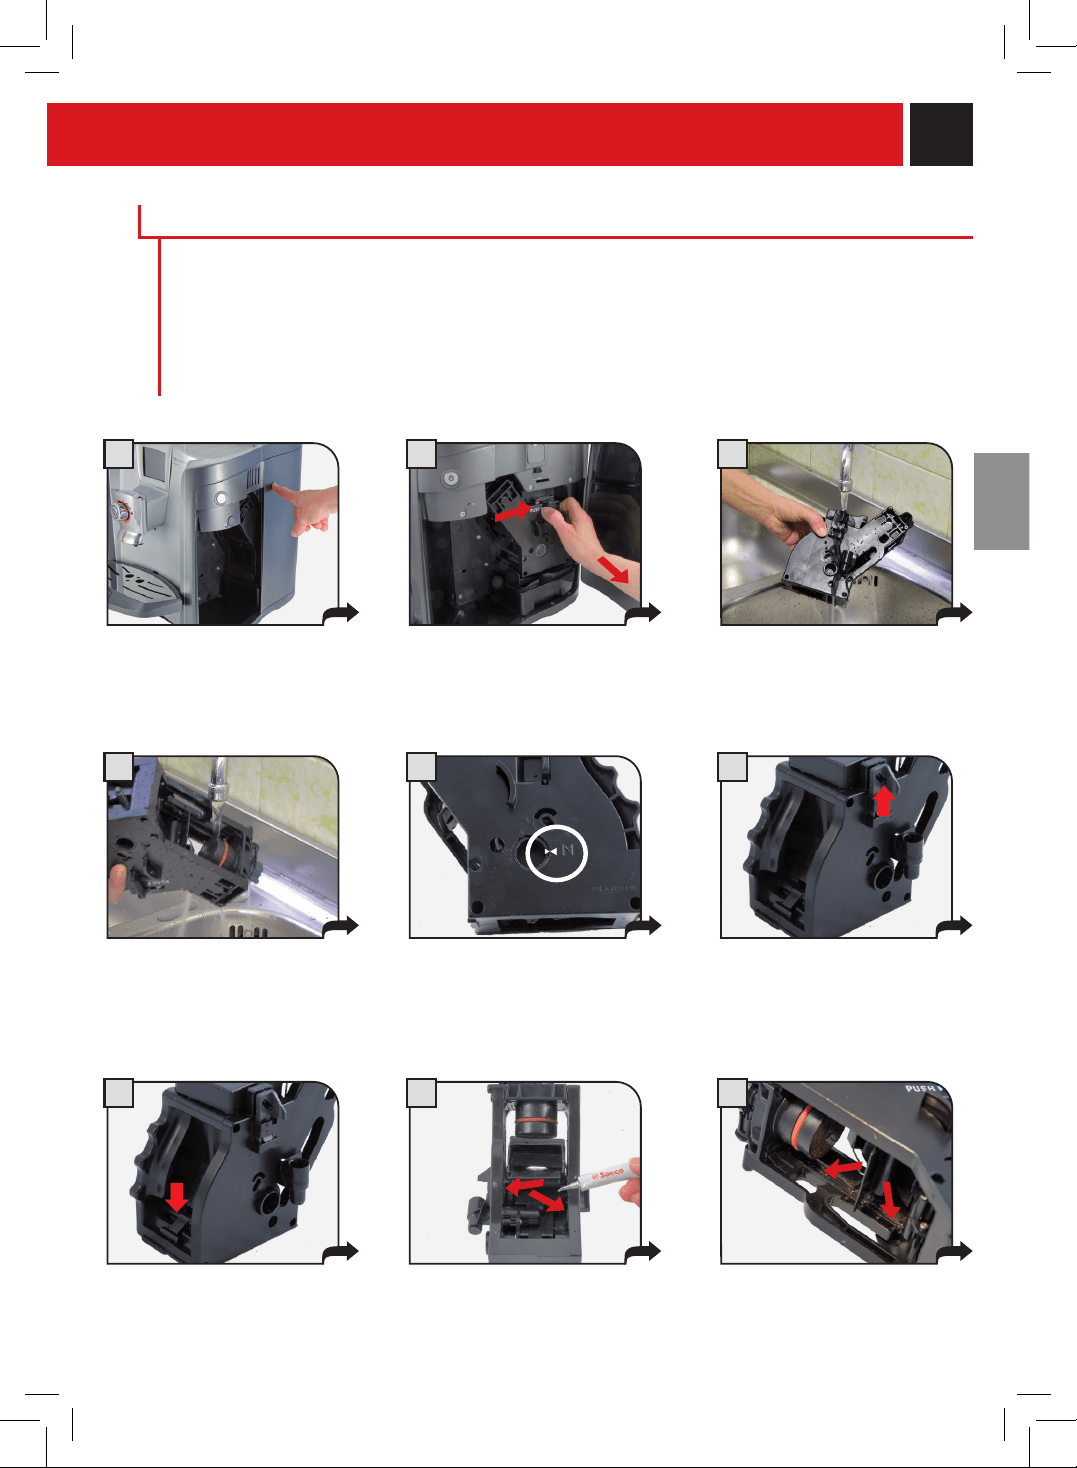
43
1 2 3
54
7 8 9
Lelevierplacésurlapartie
arrièredugroupedoitêtreen
contactaveclabase.
6
S’assurerquetousles
composantssetrouventdansla
bonneposition.Lecrochetindiqué
doitêtredanslapositioncorrecte
;pourvérier,appuyerd’uncoup
secsurlatouche«PUSH».
Lubrierlesconvoyeursdu
groupeuniquementavecla
graissefournie.
Distribuerlagraissedefaçon
uniforme.
Appuyezsurlaportedeservice
pourl'ouvrir.
Legroupededistributiondoitêtrenettoyéaumoinsunefoisparsemaine.
Lubrierlegroupededistributionaprès500distributionsenviron.Ilestpossibled’acheterlagraissepour
lubrierlegroupededistributionauprèsdescentresd’assistanceagréés.
Lavezlegroupededistributionavecdel'eautiède.
ATTENTIoN ! Ne lavez pas le groupe de distribution avec de détergents qui pourraient affecter son
fonctionnement. Ne le lavez pas au lave-vaisselle.
Pourretirerlegroupede
distribution,appuyezsurla
touchePUSH.
Assurez-vousquelegroupede
distributionestenpositionde
repos;lesdeuxréférences
doiventcoîncider.
NETToYAGE DU GRoUPE DE DISTRIBUTIoN
Laverlegroupededistributionen
éliminanttoutrésidudecafé.
Laverleltresupérieursousl’eau
courante.
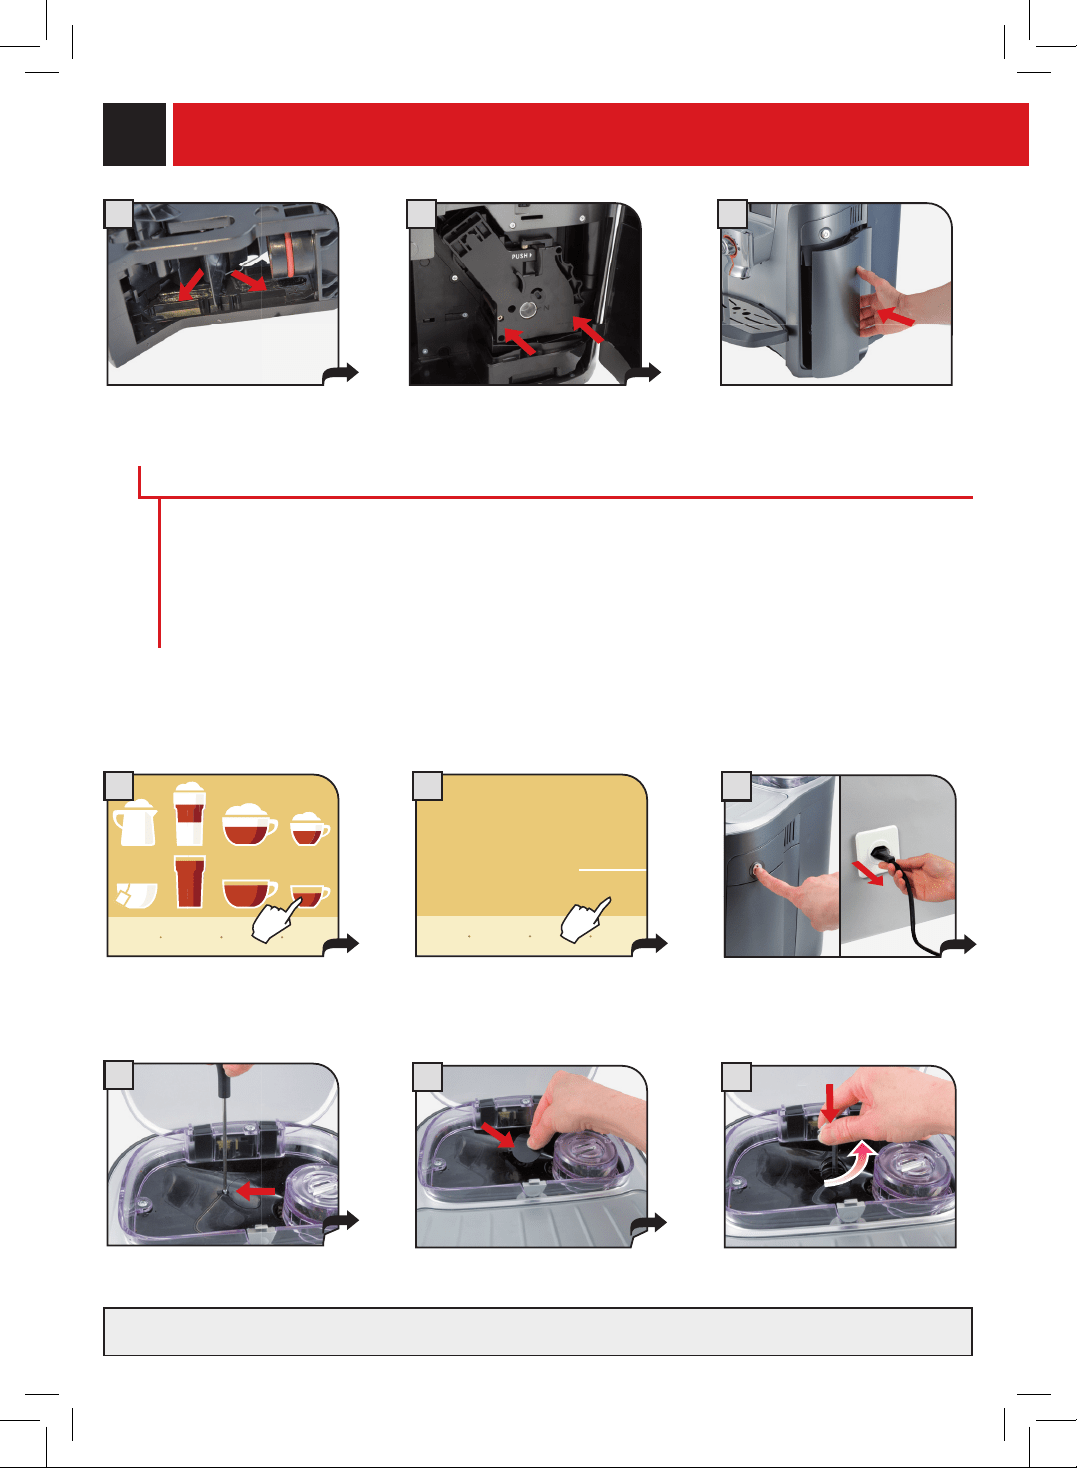
44
65
4
10 1211
Distribuerlagraissedefaçon
uniforme.
Fermerlaportedeserviceet
insérerletiroiràmarc.
Remontez-lesansappuyersurla
touchePUSH!
3
Unefoiscecyclerépété,éteindre
lamachineetdébrancherlache.
1
Appuyeretdistribuerdeuxcafés.
2
ajouter
grains de café
ok
Lorsquelapage-écransuivante
s’afche,appuyersur«ok»et
répéteruneseulefoisàpartirdu
point(1).
a f c h e r
menu avec
textes
mon
café
menu pro-
grammation
Aprèsplusieurscyclesdemouture(2000environ),ilestnécessaired'effectuerunpetitréglagedesmeules
and'obteniruncafémoulutoujoursparfait.
ATTENTION!
Ilestconseilléd’effectuercetteopérationenprêtantbeaucoupd’attention;ellepeutêtreeffectuéeparun
utilisateurexpert.Ilsepourraitquelavistombeàl’intérieurdumoulinàcafé.Sicelasepasse,récupérerla
visavantderemettrelamachineenmarche.Pourévitercetinconvénient,protégerletroudumoulinàcafé
aumoyend’unchiffon.Lecranestsignaléparuneindicationsituéesurleréservoiràcafé.Sereporterà
cesindicationslorsduréglage.
vIDER LE RÉSERvoIR À CAFÉ EN GRAIN.
ENTRETIEN DES MEULES
Réglezd'uncran.Retirezlavisetlaporte.
Dévissezlavisquixelaportede
service.
Ensuite,remettezlaporteenplaceetxez-laàl'aidedelavisquevousavezenlevéeauparavant.
NETTOYAGE ET ENTRETIEN

45
Observezlesinstructionssuivantesaucasoùlamachinen'apasétéutiliséedurantunelonguepériode.
Quelquessimplesopérationssontsufsantesàremettrelamachineenconditiondetravail.
- Aveclamachineenmarche:
- Exécuteruncycledelavagedescircuitsdulait(Voirpage29);
- Exécuteruncycledenettoyagedescircuitscafé(Voirpage32).
- Aveclamachineéteinte(Section«Nettoyageetentretien»):
- Vider,laveretséchertouslesbacsdelamachine.
- EnleveretnettoyerleGroupededistribution;ensuitegraisserlesguides.
- Nettoyersoigneusementlecappucinatore.
- Viderlecaféduconteneuretlemettreaufrigodansunconteneurétanche.
- Débrancherlachedelaprisemurale.
- Rangerlamachineàcafédansunendroitsec,àl’abridelapoussièreethorsdelaportéedesenfants.
- Latempératuredansl’endroitoùlamachineestrangéenedoitpasêtreinférieureà5°C,pouréviterle
risquedegeldel’eau,quipourraitendommagerlespartiesinternes.
Observezcesinstructionslorsdelaremiseenmarchedelamachineaprèsunelonguepériode
d'inutilisation.
Avantdepasserauxpointssuivants,effectuerlesopérationsde«Miseenmarchedelamachine»àlapage5.
- Aveclamachineenmarche:
- Exécuteruncycledelavagedescircuitsdulait(Voirpage28).
- Exécuteruncycledenettoyagedescircuitscafé(Voirpage32).
- Vérierquelescomposantsdelamachinesontpropres.Ensuite,ilestpossibled’utiliserlamachine.
RANGEMENT
REMISE EN MARCHE DE LA MACHINE

46
MESSAGES D'ERREURS
MESSAGES D
'
ERREUR MESURES À PRENDRE
éteindreetrallumerl’appareilpourremédierau
défaut
Anderétablirlefonctionnementnormalde
l'appareil,éteignez-leetrallumez-leauboutde
trentesecondes.
appelerassistance L'appareilprésenteunproblèmequinepeutêtreéliminé
queparlecentred'assistance.
remettreenplacelebacderécupération Remettezenplacelebacderécupération
situésouslegroupecafé).
refermerlecouvercleduréservoiràgrainsde
café
Fermezlecouvercleduréservoiràgrainsdecafé
andepermettreàlaboissondes'écouler.
ajoutercafépré-moulu Introduisezducaféenpoudrelorsquevousavez
sélectionnéunprogrammeindividuelqui
nécessitecetypedecafé.
remettreenplacelegroupecafé Remettezenplacelegroupecafédansle
compartimentprévuàceteffet.
remettreenplaceleréservoirdemarcàcafé Remettezenplaceleréservoirdemarcdecafé.
viderréservoirmarcàcafé Retirezletiroiràmarcetvidez-ledansunbacapproprié.
Remarque:letiroiràmarcnepeutêtrevidéquelorsque
lamachineledemande.Cetteopérationdoitêtreeffectuée
quandlamachineestallumée.Eneffet,envidantletiroir
pendantquel'appareilestéteint,vousempêcherez
l’enregistrementdel’actiondevidageparl’appareil.
refermerlaportelatérale Laportelatéraledoitêtreferméepourquel'appareil
fonctionnecorrectement.
remplirleréservoird’eau Retirezleréservoird'eauetremplissez-led'eau
potablefraîche.
viderlebacderécupérationsouslegroupe
café
(Ouvrezlaportelatéraleetvidezlebacderécupération
situésouslegroupecafé).
mettreenplacelerécipientàlait (Lerécipientàlaitdoitêtreplacédansleréservoir
prévuàceteffet).
purgerlamachine Andepoursuivrelechargementducircuitd'eau,
appuyezsurlatouchecorrespondantedel'écran.
L'appareilessayedechargerlecircuitautomatiquement;
encasd'échec,vousdevezprocéderau
chargementmanuel.
lechargementducircuitn'apasété
correctementexécuté
Contactezleserviceaprès-ventepourremédieràce
problème.
lecyclededétartragen'apasété
correctementexécuté
Répétezl'opérationcommeindiquéedanslasection
spécique.
rinçagelait sereporterauxpages13et28.
rinçagelait sereporterauxpages13et29.
amorcerlecircuit PositionnerleboutonSBScommeilestindiquéparla
machineeteffectuerlenettoyagedugroupede
distribution.Ensuite,exécuterànouveaulaprocédure
d’amorçageducircuit.
47
MESSAGES D'ERREURS / DONNÉES TECHNIQUES
Toutesmodicationsdeconstructionetd'exécutionréservéesdanslecadred'uneamélioration
techniquedel'appareil.Conformitédel'appareilavecladirectiveeuropéenne89/336/CEErelativeàla
compatibilitéélectromagnétique(adoptiondelaloi476du04/12/92).
Tension nominale voirplaquesignalétiquedel’appareil
Puissance nominale voirplaquesignalétiquedel’appareil
Alimentation voirplaquesignalétiquedel’appareil
Matériel du boîtier Plastique
Dimensions (l x h x p) 355x380x460mm
Poids 14Kg
Longueur du câble 1200mm
Tableau de commande surledevant(écrannumérique)
Réservoir d»eau 2l-amovible
Récipient à lait 0,400l-amovible
Capacité du réservoir à café 350gdecaféengrains
Pression de la pompe 15bar
Chauffe-eau deuxenacierinoxydable
Moulin à café encéramique
Dispositif de sécurité de la pression soupapedesécurité,pressiondesélémentschauffants
Dispositif de sécurité de la température thermostatsetfusiblesthermiques
desélémentschauffants
DoNNÉES TECHNIQUES
MESSAGES D
'
ERREUR MESURES À PRENDRE
changerleltreàeau Leltreàeaudoitêtreremplacédanslescassuivants:
1.60litresd'eauontdéjàétédistribués;
2.60jourssesontécoulésdepuissoninstallation;
3.20jourssesontécoulés,aucoursdesquelsl'appareil
n'apasétéutilisé.
Remarque:cemessagen'apparaîtquesilemessage«
inséré»aétésélectionnédanslafonctionltreàeau
(reportez-vousàlapage20).
lecycledenettoyagen'apasétécorrectement
exécuté
Mêmesinstructionsqu'auparagrapheconcernantle
chargementducircuit.
mettreenplacelerécipientàlaitavec
labuseàcappuccino
Mettezlabuseàcappuccinodanslerécipientàlait.
Sanscedispositif,l'appareilnepeutfournirde
boissonsavecdulait.
fermerletiroirdurécipientàlait Fermerleréservoiràlaitpourdistribuerlaboisson.
rincerleréservoiràlait Nettoyezlerécipientàlaitaprèsutilisation.
détartrerl'appareil Vousdevezprocéderaudétartragedescircuits
internesdel'appareil.
économied'énergie Appuyezsurlatouche«démarrer».
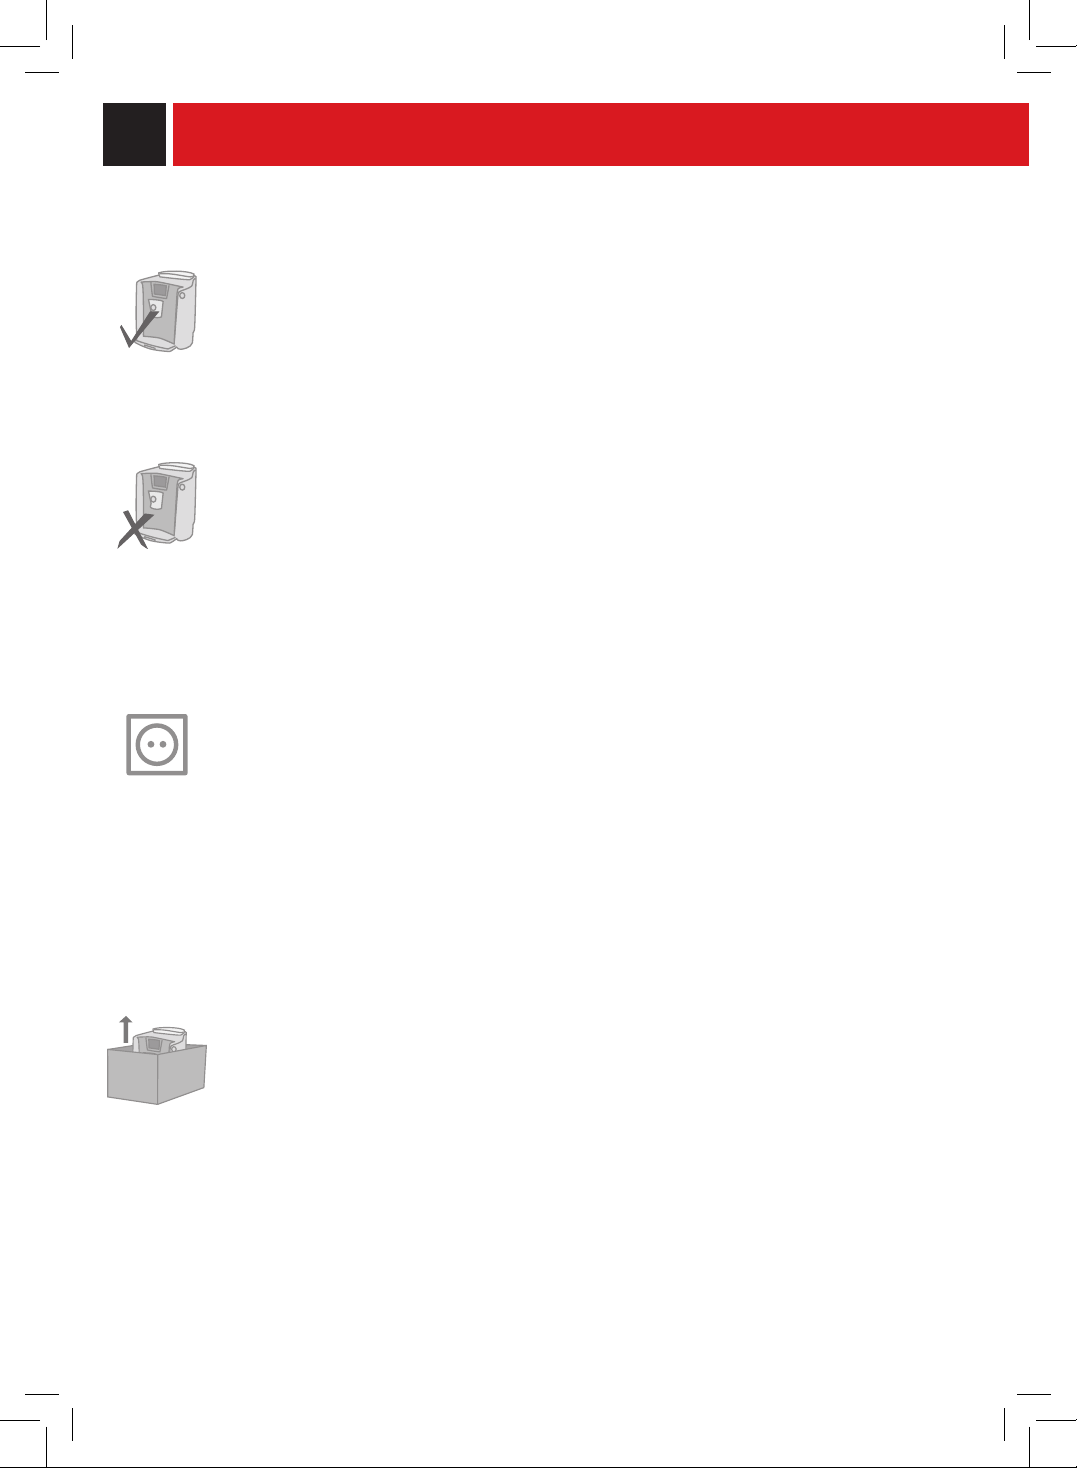
48
SOS
CONSIGNES DE SÉCURITÉ
EN CAS D'URGENCE
Retirerimmédiatementlachedelapriseélectrique.
N'UTILISER L'APPAREIL
• quedansdeslocauxfermés
• quepourlapréparationdecafé,d'eauchaudeetdemoussedelait
• qu'àdesnsdomestiques
• L’appareiln’estpasdestinéàêtreemployépardespersonnes(ycomprislesenfants)avecdefaiblescapacités
physiques,mentalesousensoriellesouavecexpérienceet/oudescompétencesinsufsantes,àmoinsqu’ellesne
soientsouslasupervisiond’unepersonneresponsabledeleursécuritéouqu’ellesnesoientinstruitesparcette
personneencequiconcernel’emploidel’appareil.
MESURES DE PRÉCAUTIoN CoNCERNANT L'UTILISATIoN DE L'APPAREIL
• And'évitertoutesituationdedanger,nepasutiliserl'appareilàd'autresnsquecellesprévues.
• Nepasmettredanslesréservoirsetrécipientsd'autressubstancesquecellesprévuesdanslemoded'emploi.
• Lorsqu'unréservoir/récipientaétécorrectementrempli,touslesautresréservoirsdoiventêtrefermés.
• Nemettrequedel'eaupotablefraîchedansleréservoird'eau:l'eauchaudeet/oud'autresliquidespeuvent
endommagerl'appareil.
• Nepasutiliserd'eaugazeuse.
• Nepasmettrelesdoigtsdanslemoulinàcaféetnepasymettred'autressubstancesquedesgrainsdecafé.Avant
d'inspecterlemoulinàcafé,vousdevezéteindrel'appareilenappuyantsurl'interrupteurgénéral,puisdébrancherla
chedelapriseélectrique.
• Nepasmettredecafésolubleoudecaféengrainsdansleréservoirpourcaféenpoudre
• Andecommanderl'appareilaumoyendel'écranàtouchestactiles,vousdevezuniquementutiliserlesdoigts.
RACCoRDEMENT ÉLECTRIQUE
Leraccordementélectriquedoitêtreconformeauxdispositionsdesécuritédevotrepays.
Lapriseélectriqueàlaquellelamachineestbranchéedoit:
• êtrecompatibleaveclacheducâbledel'appareil;
• présenterlabonnetailleandeseconformerauxinstructionsdelaplaquedufabricantsituéesurlapartieinférieure
del'appareil;
• êtrecorrectementreliéeàlaterre.
Lecâbleélectriquenedoitenaucuncas:
• entrerencontactavecunquelconqueliquide:risquededéchargeélectriqueet/oud'incendie;
• êtrecoincéet/ouentrerencontactavecdesobjetspointus;
• êtreutilisépourdéplacerl'appareil;
• êtreutilisélorsqu'ilestendommagé;
• êtreencontactavecdesmainshumidesoumouillées;
•êtretordulorsquel'appareilestenservice;
•êtreendommagé
INSTALLATIoN
• Choisircommelieud'emplacementdel'appareilunendroitbienaménagé,platetsolide(l'angled'inclinaisonnedoit
enaucuncasêtresupérieurà2°).
• Nepasplacerl'appareildansdesendroitsoùl'eaupourraits'inltrerdedans.
• Températuredeserviceoptimale:entre10°Cet40°C.
• Humiditémaximaledel'air:90%.
• Lelieud'emplacementdoitêtrehygiénique,bienéclairéetbienaéré.Lapriseélectriquedoitêtrefacilement
accessible.
• Nepasposerl'appareilsurdessurfacesbrûlantesouchaudes!
• Respecterunintervallede10cmàpartirdesmursetdesplaquesdecuisson.
• Nepasutiliserl'appareildansdespiècesafchantunetempératureégaleouinférieureà0°C.Sil'appareilest
exposéàdetellesconditions,contacterleserviceaprès-venteanqu'uncontrôledesécuritépuisseêtreeffectué.
• Nepasmettreenmarchel'appareilàproximitédesubstancesfacilementinammableset/ouexplosives.
• Ileststrictementinterditd'utiliserl'appareildansdespiècessoumisesàunrisqueélevéd'explosionoudontl'air
contientunehauteconcentrationdepoudresoudesubstancesàbased'huile.
• Nepasplacerlamachinesurd'autresappareils.
49
DANGERS
• Garderlesenfantssoussupervision,and’éviterqu’ilsnejouentavecl’appareil.
• L'appareilpeutreprésenterundangerpourlesenfants.Sil'appareilestlaissésanssurveillance,débrancherlache.
• Nepasconserverlesmatériauxd'emballageàlaportéedesenfants.
• Nejamaisorienterlejetdevapeuroud'eauchaudesursoi-mêmeousurd'autrespersonnes:risquedebrûlures.
• Nepasinsérerd'objetsdanslesouverturesdel'appareil(danger:courantélectrique!).
• Nepastoucherlacheélectriqueavecdesmainsoudespiedsmouillés,nepasdébrancherlacheentirantsurle
câble.
• Attention:risquedebrûlureslorsducontactavecl'eauchaude,lavapeuretlabused'eauchaude.
PANNES
•Nepasutiliserl'appareilencasdeproblèmesdefonctionnementouencasdedoute(parex.:aprèsquel'appareilest
tombéparterre).
•Faireprocéderauxréparationséventuellesparleserviceaprès-venteagréé.
•Nejamaisutiliserl'appareillorsquelecâbleélectriqueestdéfectueux.Lecâbledéfectueuxdoitêtreremplacéparle
producteurouleserviceaprès-venteagréé(danger:courantélectrique!).
•Eteindrel'appareilavantd'ouvrirlaportedemaintenance.Risquedebrûlures!
NETToYAGE / DÉTARTRAGE
• Pourlaverlecircuitdulait,n’utiliserqueledétergentenpoudreconseilléetfourniaveclamachine.Seconformer
scrupuleusementauxconsignesdesécuritéreportéessurl’emballage.
• Pourlaverlecircuitducafé,n’utiliserqueledétergentenpastillesconseilléetfourniaveclamachine.Se
conformerscrupuleusementauxconsignesdesécuritéreportéessurl’emballage.
• Avantdepouvoircommencerlenettoyage,l'interrupteurdoitêtreenpositionOFF(0).
Débrancherlacheetlaisserrefroidirl'appareil.
• Protégerl'appareilcontreleséclaboussuresd'eauetnepasleplongerdansl'eau.
• Nepasfairesécherlespiècesdel'appareildanslesfourstraditionnelset/oudanslemicro-ondes.
• Nettoyerl'appareiletsescomposantsaprèsunemisehorsserviceprolongée.
PIÈCES DÉTACHÉES
Pourdesraisonsdesécurité,toujoursutiliserlespiècesdétachéesetlesaccessoiresdufabricant.
ELIMINATIoN
L'emballagepeutêtrerecyclé.
L'appareilestenconçuetfabriquépourfacilitersavalorisation,sonrecyclageousaréutilisationconformémentà
ladirectiveeuropéenne2002/96/CEErelativeauxappareilsélectriquesetélectroniquesusagés(wasteelectrical
andelectronicequipment-WEEE).
Lelogoci-contreapposésurl'appareilindiquequeceproduitnepeutpasêtreéliminéaveclesdéchetsménagers
nontriés.
Lorsquevousaurezdécidédevousenséparerdénitivement,ilconvientdefaireprocéderàlacollectesélectivede
cetappareilenvousconformantaumodedereprisemisenplacedansvotrecommune(collecteponctuelledes
encombrants,déchèterie),ouenfaisantappelauservicederepriseproposéparvotredistributeur,oubien,enle
conantàdesorganisationscaritativesetdesassociationsàbutnonlucratif.
Envousassurantqueceproduitestéliminécorrectement,vousfavorisezlapréventiondesconséquences
négativespourl'environnementetlasantéhumaine.
PRoTECTIoN CoNTRE LES INCENDIES
Encasd'incendie,utiliserunextincteuràbasedegazcarbonique(extincteurCO
2
).Nepasutiliserd'eauni
d'extincteuràbasedepoudre.
INFoRMATIoNS ADDITIoNNELLES PoUR L’UTILISATIoN CoRRECTE DU FILTRE INTENZA
Pourutilisercorrectementleltreintenza,voilaquelquesavertissementsdontilfauttenircompte
1.Conserverleltreàeaudansunendroitfrais,àl’abridusoleil;latempératureambiantedoitêtrecompriseentre
+1°Cet+50°C;
2.Lireattentivementlemoded’emploiainsiquelesavertissementsdesécuritéassociésaultre.
3.Conserverlesinstructionscontenuesdansl’emballagedultreainsiquecemoded’emploi.
4.Lesinstructionsci-jointescomplètentcellessetrouvantdanslemanuel,etdécriventl’applicationspéciquedultre
danslamachine.

R & D Manager
Mr. Andrea Castellani
EC DECLARATION OF CONFORMITY
EC 2006/95, EC 2004/118,
EC 1992/31, EC 1993/68
SAECO INTERNATIONAL GROUP S.P.A
- Via Torretta, 240 - 40041 Gaggio Montano (Bo) - Italy
declare under our responsability that the product:
AUTOMATIC COFFEE MAKER
SUP 030 ADR
to which this declaration relates is in conformity with the following standards or other normative documents :
• Safety of household and electrical appliances - General requirements
EN 60335-1(2002) + A1(2004) + A2(2006) + A11(2004) + A12(2006)
• Safety of household and electrical appliances - Part 2-15
Particular requirements for appliances for heating liquids
EN 60335-2-15(2002) + A1(2005)
• Household and similar electrical appliances - Electromagnetic elds - methods
for evaluation and measurement EN 50366 (2003) + A1 (2006).
• Household and similar electrical appliances - safety - Part 2-14
Particular requirements for kitchen machines EN 60335-2-14 (2006).
• Electromagnetic compatibility (EMC) - Requirements for household appliances , electric
tools and similar apparatus - Part 1
Emission EN 55014-1 (2006)
• Electromagnetic compatibility (EMC)
Part. 3^ Limits - Section 2 : Limits for harmonic current emissions (equipment input
current ≤ 16A for phase) - EN 61000-3-2 (2006)
• Electromagnetic compatibility (EMC)
Part 3^ : Limits - Section 3 : Limitation of voltage changes , voltage uctuations and icker
in public low - voltage supply systems , for equipment with rated current ≤ 16 A for phase
and not subject to conditional connection EN 61000-3-3 (1995) + A1 (2001) + A2 (2005).
• Electromagnetic compatibility - Requirements for household appliances , electric tools
and similar apparatus - Part 2.
Immunity - Product family standard EN 55014-2 (1997) + A1 (2001)
Following the provision of the directives: EC 73/23, EC 89/336, EC 92/31, EC 93/68
Gaggio Montano - li, 23/06/2008

R & D Manager
Mr. Andrea Castellani
DECLARATION DE CONFORMITÉ CE
EC 2006/95, EC 2004/118,
EC 1992/31, EC 1993/68
SAECO INTERNATIONAL GROUP S.P.A
- Via Torretta, 240 - 40041 Gaggio Montano (Bo) - Italy
déclarons sous notre responsabilité que le produit:
MACHINE À CAFÉ AUTOMATIQUE
SUP 030 ADR
auquel se réfère cette déclaration est conforme aux normes suivantes :
• Sécurité d’appareils électroménagers et électriques - Prescriptions générales
EN 60335-1 (2002) + A1(2004) + A2(2006) + A11(2004) + A12 (2006)
• Sécurité d’appareils électroménagers et électriques - Partie 2-15
Prescriptions particulières pour les appareils de chauffage des liquides
EN 60335-2-15 (2002) + A1(2005)
• Sécurité des appareils pour usage domestique et analogue. Champs électromagnétiques
Méthodes pour l’évaluation et les mesures EN 50366 (2003) + A1 (2006).
• Sécurité d’appareils électroménagers et électriques - Partie 2-14
Prescriptions particulières pour poulvérisateurs et moulins à café EN 60335-2-14 (2006).
• Limites et méthodes de mesure des perturbations radio produites par les appareils électroménagers ou analogues
com électriques ou des dispositifs thermiques, par les outils électriques et par les
appareils électriques analogues - EN 55014-1 (2006)
• Compatibilité électromagnétique (CEM)
Partie 3 Limites - Section 2 : Limites pour les émissions de courant harmonique (courant
appelé par les appareils ≤ 16A par phase) - EN 61000-3-2 (2006)
• Compatibilité électromagnétique (CEM)
Partie 3 Limites - Section 3 : Limitation des variations et des uctuations de tension et du papillotement dans les
réseaux d’alimentation basse tension pour appareils ayant un courant nominal ≤ 16A.
EN 61000-3-3 (1995) + A1 (2001) + A2 (2005).
• Prescriptions d’immunité pour les appareils électroménagers, outils électriques et appareils analogues.
Norme de famille de produits EN 55014-2 (1997) + A1 (2001)
suivant les dispositions des directives CE 73/23, CE 89/336, CE 92/31, CE 93/68.
Gaggio Montano - li, 23/06/2008