COFFEE GRINDER
K3 - K6
USER MANUAL

2
K09652H00 | PROC-CAL/002/03 USER MANUAL | V. 29/06/2023

3
K09652H00 | PROC-CAL/002/03 USER MANUAL | V. 29/06/20023
K3-K6
COFFEE GRINDER
1. SAFETY 4
2. DESCRIPTION 6
3. INSTRUCTIONS 6
4. IDENTIFICATION 7
5. TECHNICAL CHARACTERISTICS 7
6. EXTERNAL COMPONENTS 8
7. INSTALLATION 10
8. ADJUSTMENT 11
9. OPERATION 13
10. CLEANING 14
11. MAINTENANCE 16
12. DECLARATION OF CONFORMITY 18
CONTENTS
4
K09652H00 | PROC-CAL/002/03 USER MANUAL | V. 29/06/2023
1. SAFETY
This coee grinder
should only be used
for the function
for which it was designed:
grinding coee beans.
Do not use the
grinder to grind
other types of
foods such as nuts or to
grind finer granulated foods
such as sugar and others.
This device may be
used by children
aged 8 years and
over, by people with
reduced physical, sensory
or mental capacities and
by people without prior
experience/knowledge,
provided they have received
supervision or instructions
on the safe use of the
device and understand the
associated risks.
Children should not
play with the device.
Cleaning and
maintenance of the
device should not be
carried out by children without
supervision.
Do not allowing
liquids to come
into contact with
internal or external surfaces
while the appliance is on or
o, except for those parts
expressly mentioned in the
“CLEANING” section.
If, for any reason, this happens,
disconnect the power supply
immediately and dry all
surfaces carefully.
ADDITIONAL SAFETY MEASURES BUILT-IN
TO OUR GRINDERS:
• Special screw to keep the hopper fixed.
5
K09652H00 | PROC-CAL/002/03 USER MANUAL | V. 29/06/20023
1. SAFETY
If it is necessary to
access the interior,
where the electrical
components are located, go to
the nearest technical service
In the event of
any component
breaking, or for
any intervention we
recommend contacting
a technical services
centre, who will carry out
the repair or replacement,
guaranteeing that safety
standards are adhered to.
If the supplied cord is
damaged, it must be
replaced by the
manufacturer, its service agent
or similarly qualified persons in
order to avoid a hazard.
USERS SHOULD PAY
SPECIAL ATTENTION TO,
AND SCRUPULOUSLY
OBEY THE FOLLOWING
SAFETY INSTRUCTIONS
Any other use will be
considered improper
and dangerous.
NOTE: The manufacturer will not be liable for damage caused either by the
improper use of the device or by not following the stated safety measures.
6
K09652H00 | PROC-CAL/002/03 USER MANUAL | V. 29/06/2023
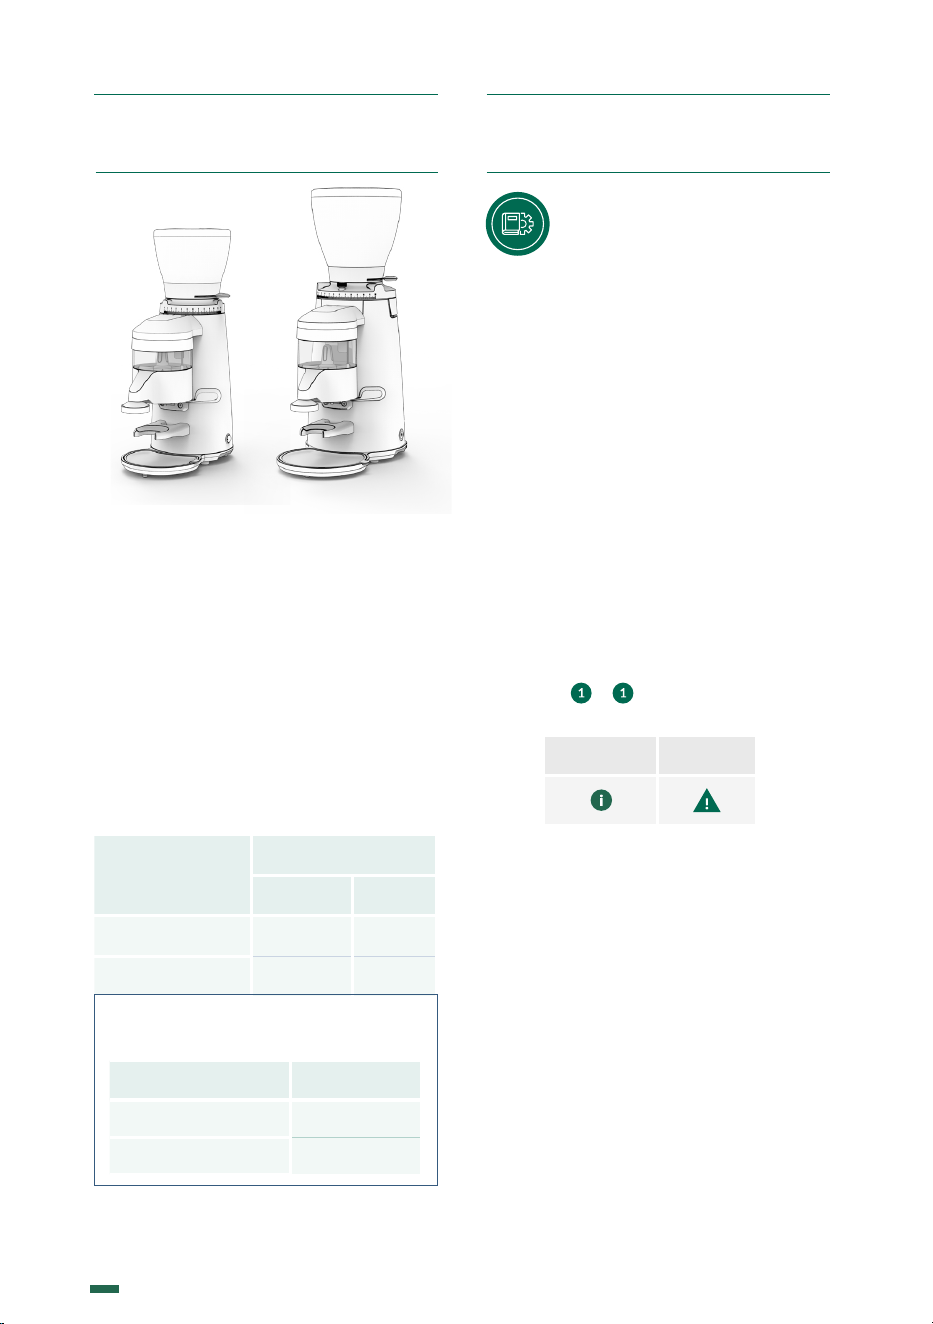
2. DESCRIPTION
3.1 This manual is designed
to provide the necessary
information to correctly install,
use and maintain the grinder, as
well as to highlight precautions for users to
keep in mind.
To ensure the best operation of the coee
grinder, please follow the instructions as
outlined in this manual.
This manual should be saved for the life of
the grinder, and should always be at the
disposal of the operator.
3.2 This manual uses some special terms,
such as:
• Text in bold to highlight the importance
of some terms.
• Numbers in parentheses after a word,
which match the numbering of the
items in the image to the side or in the
image of the external components.
3. INSTRUCTIONS
Information Warning
Example: ( ) - Hopper Lid.
Icons:
Your new grinder has been designed using
the most sophisticated technologies in
existence. The result is a product of high
quality that oers the assurance of
the best results possible. Our products
are manufactured by hand, one by one,
following the strictest quality requirements.
In the manufacturing process, we use only
the highest quality materials (aluminum,
stainless steel, etc.) especially designated for
being in contact with food stu.
For the optimum functionality of the grinder
models described in this user manual, the
maximum work cycles are as follows:
Model
Work cycle
ON OFF
K3 2min 10min
K6 2min 10min
SOUND LEVEL
The level of sound emitted is:
Sound level
With coee
K3 81 dB
K6 81 dB

7
K09652H00 | PROC-CAL/002/03 USER MANUAL | V. 29/06/20023
The technical characteristics
plate is indelibly marked with
the following information:
4. IDENTIFICATION
5.1 SCOPE
The coee grinders are intended for
commercial applications where ground
coee must be used, or in small shops
selling coee, but not for continuous mass
production of food.
This grinder should only be
used to grind coee beans.
Any other use is considered
improper and dangerous.
NOTE: The manufacturer reserves
the right to change the machine
components, according to the
requirements of each market, and
also for technological advances.
NOTE: The manufacturer is not
liable for damage to persons, goods
or the machine itself, if the safety
regulations given in this manual are
not followed, or the machine is used
incorrectly.
5. TECH. CHARACTERISTICS
5.2. TECHNICAL DATA
Model
100 V
50 Hz
100 V
60 Hz
110 V
60 Hz
220 V
60 Hz
230 V
50 Hz
240 V
50 Hz
K3
Electrical Power
200 200 175 210 220 255
W
Rotational Velocity
1320 1620 1640 1700 1380 1400 rpm
K6
Electrical Power
230 230 245 375 375 375 W
Rotational Velocity
1320 1620 1100 1700 1380 1400 rpm
* Production based on a medium roast coee and Espresso grinding point.
Ø Flat Burrs Production 50 Hz* Production 60 Hz*
K3 58 2,3 3,7 8,2 4,3 9,5
K6 64 2,5 6 13 7 15
mm in Kg/h lb/h Kg/h lb/h
Dose Capacity Lever Position Net weight Height x Width x Depth
K3 300 0,66 Right or Left 6,80 14,99 660x230x384 26x9,1x15,1
K6 300 0,66 Right or Left 14,01 30,89 660x230x384 26x9,1x15,1
g lb Side Kg lb mm in
8
K09652H00 | PROC-CAL/002/03 USER MANUAL | V. 29/06/2023
1
2
10
6
8
12
15
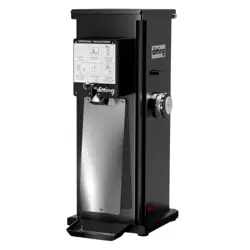
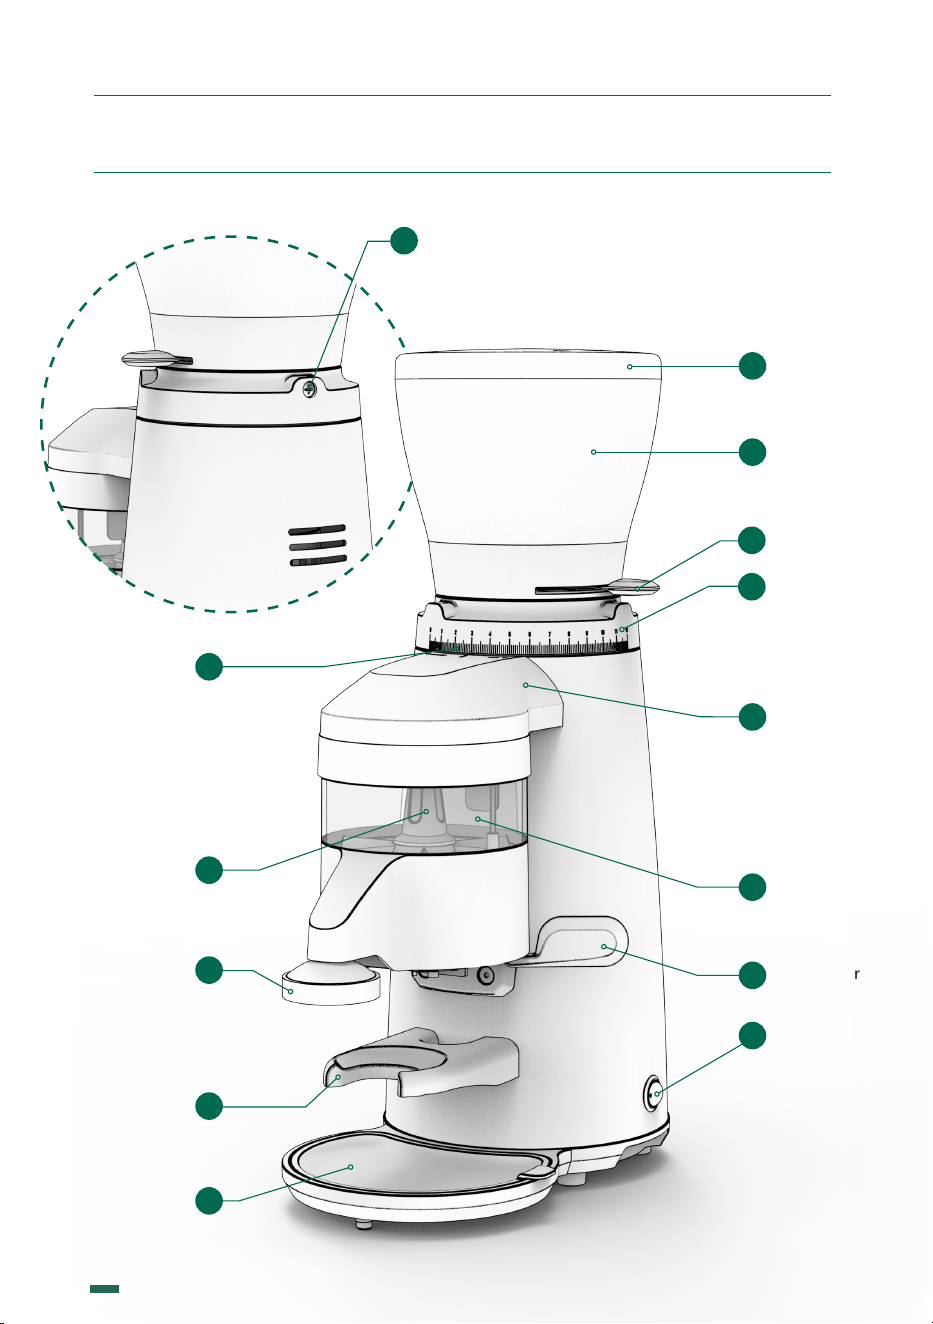
6. EXTERNAL COMPONENTS
Position
indicator
Tamper
Dose regulator
Coee
collection tray
Hopper
lid
Coee bean
hopper
Grind
regulator
Ground
coee
deposit
4
Hopper
shutter
3
Hopper security screw
7
11
Portafilter holder
14
Doser lid
Switch
ON-OFF
13
9
Dosing lever
K3
9
K09652H00 | PROC-CAL/002/03 USER MANUAL | V. 29/06/20023
1
2
10
6
8
12
15
5
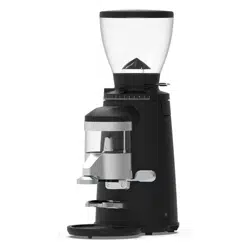
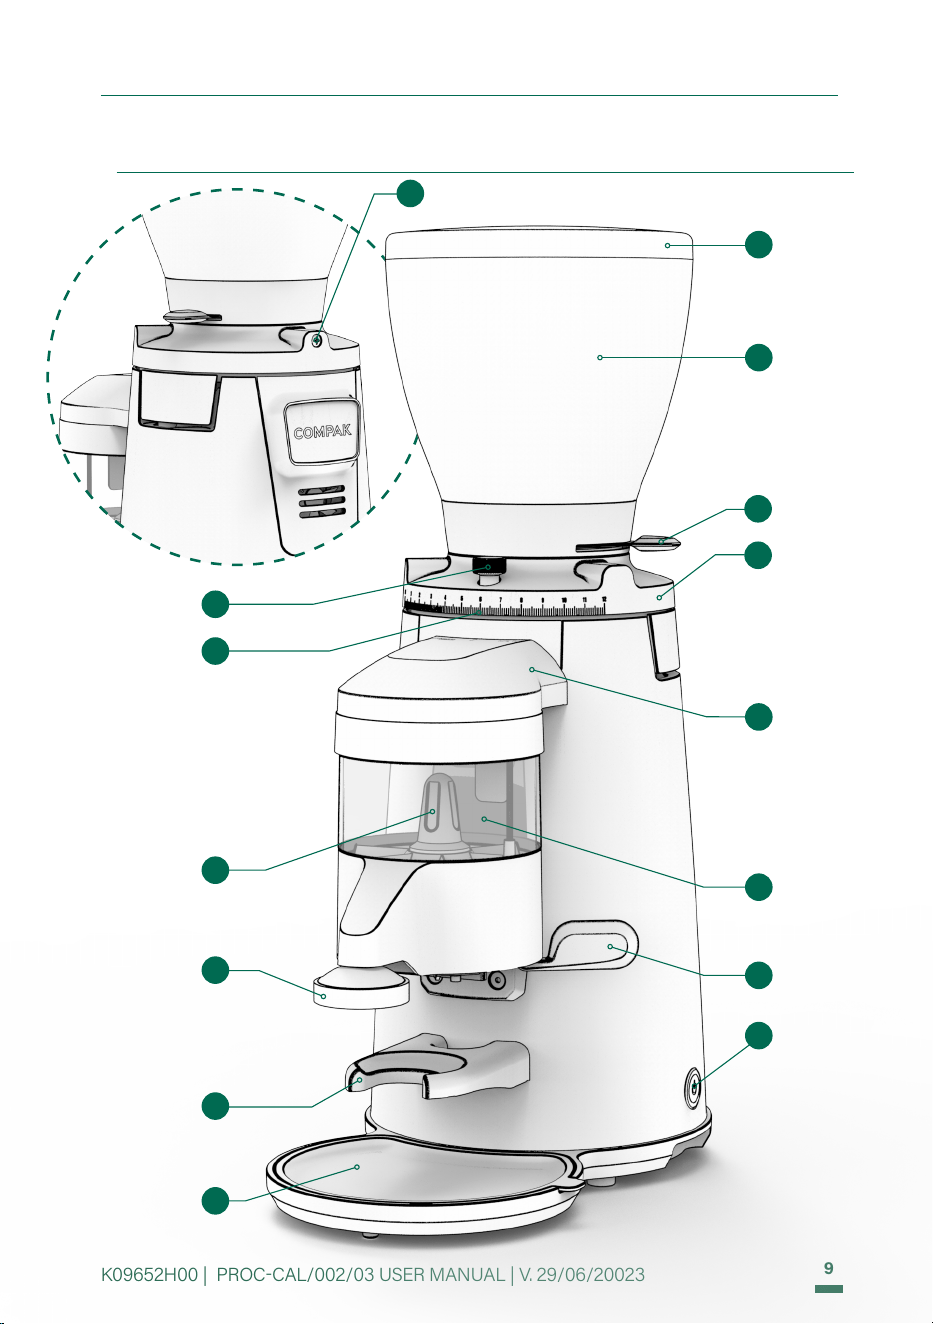
6. EXTERNAL COMPONENTS
Position
indicator
Tamper
Dose regulator
Coee
collection tray
Brake option
stepped grind
Hopper
lid
Coee bean
hopper
Grind
regulator
Ground
coee
deposit
4
Hopper
shutter
3
Hopper security screw
7
11
Portafilter holder
14
Doser lid
Switch
ON-OFF
13
9
Dosing lever
K6

10
K09652H00 | PROC-CAL/002/03 USER MANUAL | V. 29/06/2023
7. INSTALLATION
7.1 LEGAL NOTICES
The installer must read this instruction
manual carefully before installing the
machine.
The installation of the
device must be carried out
by qualified and authorised
personnel, obeying all the
current safety and hygiene regulations.
7.2 IMPORTANT WARNINGS
The operator must be a responsible
adult. Never a child nor someone without the
ability to accept that responsibility.
When handling the grinder, the following
precautions should be obeyed:
• When removing the grinder from
the packaging, always pull it by the
handles of the bag.
• Feet must not be bare.
• Hands and feet must be dry.
• Do not get the machine wet.
• Do not expose the machine to direct
sunlight or other atmospheric agents.
• Never insert any object into the coee
inlet or outlet while the appliance is
running. (Please remember that when
the grinder stops, the burrs will keep
turning for a short while).
• When unplugging the grinder, always
pull on the plug and never the power
cable to avoid a possible short circuit.
• Care is needed when handling cutting
burrs during cleaning.
7.3 WHERE TO USE IT
The appliance must be installed on a
solid and flat surface.
The minimum size for the
working space, to ensure you
get the best performance from
the machine, must be the following:
Model K3 K6
Height
535
21
680
26,8
mm
in
Width
210
8,3
250
9,8
mm
in
Depth
360
14,2
405
16
mm
in
• Install the grinders on tables that are
completely level and in areas free from
external vibrations
• Install the grinders in areas where
there are installations with a ground
connection.
• Avoid places where abrupt changes in
temperature, humidity or airflow may
occur.
7.4 INSTALLING THE COFFEE GRINDER
Before connecting the coee grinder, check
the following:
• The characteristics on the data plate
must match those of the electrical
mains network.
• The electrical connection plug
matches the socket into which it is to
be plugged.
• Ensure that the electrical power of
the facility is adequate for the power
consumed by the appliance.
• The point of connection to the electrical
mains network must be protected with
the appropriate electrical protection
device.
• The equipment must be correctly
connected to a ground connection
according to the current safety
regulations.
NOTE: This coee grinder should
not be installed in places (SUCH
AS INDUSTRIAL KITCHENS)
where are expected to be
cleaned using water jets or a
steam cleaner.
11
K09652H00 | PROC-CAL/002/03 USER MANUAL | V. 29/06/20023
8. ADJUSTMENT
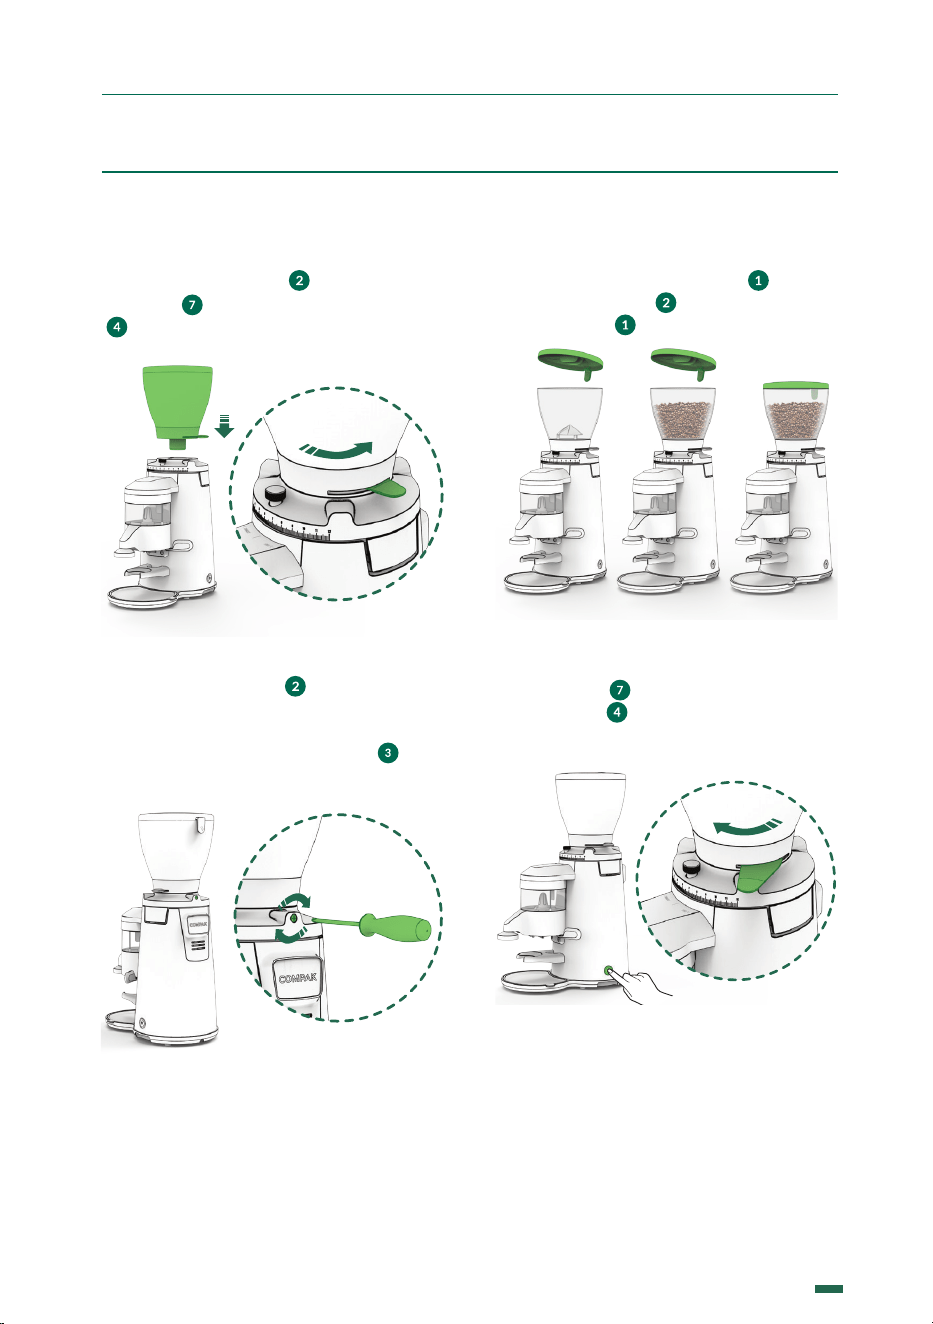
8.1.3 Remove the hopper lid ( ), fill the
hopper with coee ( ), and replace the lid
on the hopper ( ) (Fig. 3).
Fig. 3
8.1.4 Plug in the grinder, and press the main
power switch ( ) to ON position, and open
the bean trap ( ) to allow coee to pass into
the grind chamber (Fig. 4).
Fig. 4
8.1 GRINDER SET UP
8.1.1 Place the hopper ( ) on the grind
regulator ( ) and make sure the bean trap
( ) is in the closed position (Fig. 1).
Fig. 1
8.1.2 Lock the hopper ( ) in place using a
phillips head screw driver to gently tighten
the hopper security screw making it match
to the hole at the bean hopper collar ( ) (Fig.
2).
Fig. 2
12
K09652H00 | PROC-CAL/002/03 USER MANUAL | V. 29/06/2023
8. ADJUSTMENT
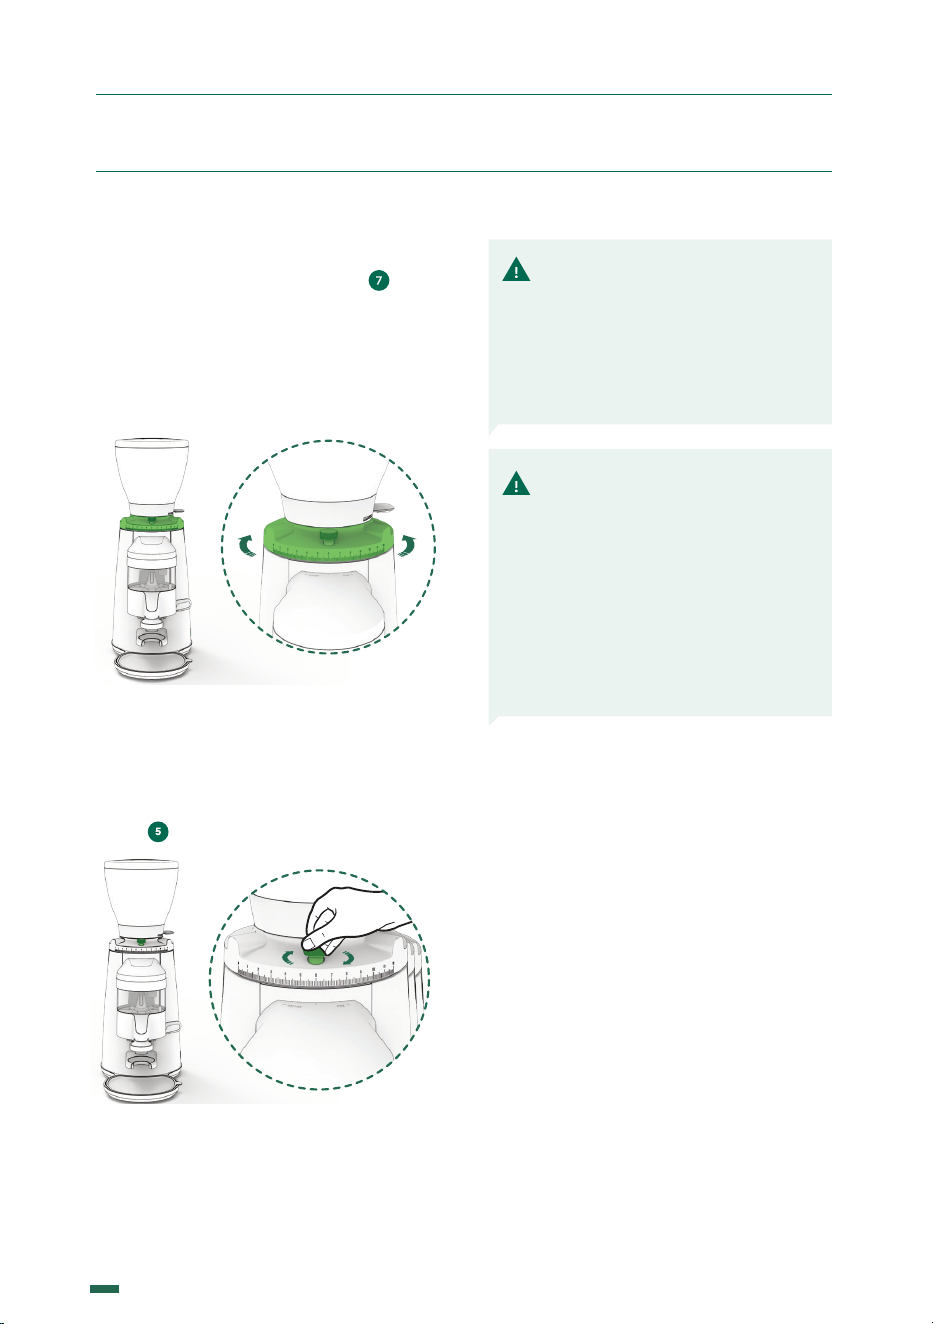
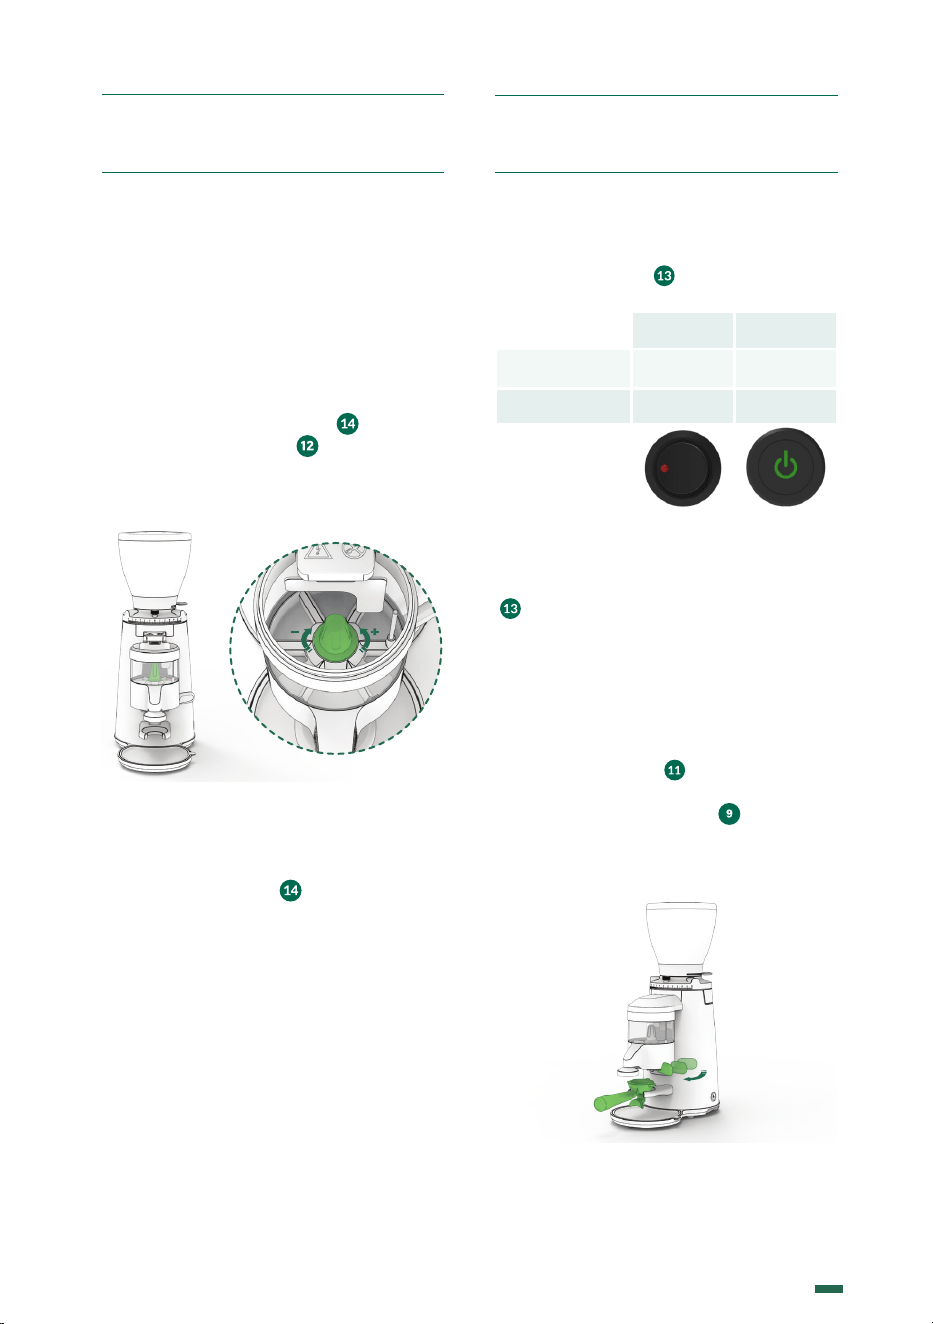
8.2 GRIND ADJUSTMENT SYSTEM
8.2.1 Rotate the grind regulator ( ) until
reaching the grind level desired.
Rotating the grind regulator clockwise will
result in a courser grind; turning the regulator
counterclockwise will result in a finer grinder
(Fig. 1).
Fig. 1
Only for a K6 model: Once you reach
the desired grinding point, you can fix the
grinding regulation using the regulation
brake ( ) (Fig. 2).
Fig. 2
NOTE: If the coee
throughput is very low, this
is because the coee is
being ground very fine. If
the throughput is very high,
this is because the coee is
being ground very coarse. A
perfect Espresso is produced
when the grinding gives an
infusion of 25 ml of coee in
25 seconds using about 7 g of
ground coee.
NOTE: It is recommended
that this operation be
performed, when changing
to a finer grinding, with the
motor running, to prevent
coee from building up
between the burrs and
blocking the grinder.
13
K09652H00 | PROC-CAL/002/03 USER MANUAL | V. 29/06/20023
8. ADJUSTMENT
9.1 MAIN SWITCH
The main switch ( ) has the following
positions: OFF/ON.
K3 K6
Equipment ON ON ON
Equipment OFF OFF OFF
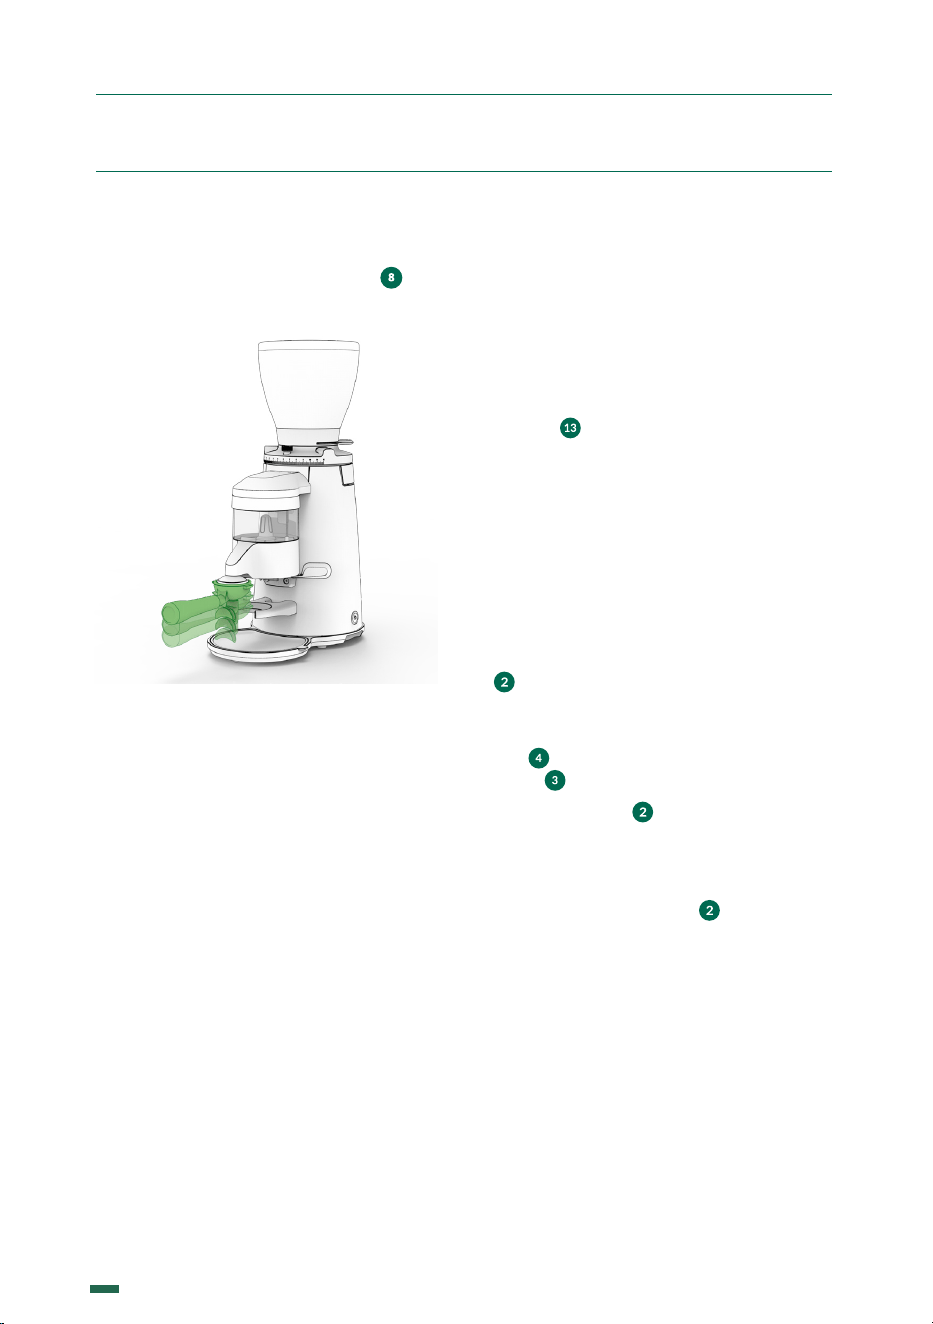
9.2 UTILIZATION
Turn on the grinder using the ON – OFF switch
( ), the appliance starts grinding coee. The
grinder will stop grinding coee when the
dispenser reaches the maximum possible
capacity level in the dispenser and will restart
after serving approximately 8 doses of coee,
to return to its maximum level.
To serve the coee doses, place the filter holder
on the support fork ( ), bringing it to the
bottom so that it is under the ground coee
spout. Pull the dosing lever ( ) to obtain a
dose of coee (one dose corresponds to one
coee), and let the lever return to its position
without accompanying it (Fig. 1).
Fig. 1
9. OPERATION
8.3 REGULATION OF THE DOSE OF
COFFEE SERVED
The dispenser is factory calibrated to serve
about 7 grams of ground coee, but this
amount can be adjusted between 6 and 10
grams in the following way:
• Remove the dosing lid ( ) and turn
the adjustment bolt ( ); in a clockwise
direction we will obtain a smaller dose of
coee, and in an anti-clockwise direction
to obtain a larger dose (Fig. 3).
Fig. 3
• Once the dose has been adjusted, refit
the cover of the ground coee dispenser
with the dosing lid( ).
14
K09652H00 | PROC-CAL/002/03 USER MANUAL | V. 29/06/2023
10. CLEANING
9.3 TAMPER
Position the portafilter below the tamper ( ) and
push up to tamp the ground coee (Fig. 2).
Fig. 2
9. OPERATION
10.1 GENERAL CLEANING
To ensure that the grinder functions properly,
and produces the highest quality grind
possible, the parts that come into contact
with coee should cleaned periodically.
General Cleaning guidelines as follows:
Always turn the main power switch to the o
position ( ).
Unplug the machine from the power source.
Do not submerge the grinder in water or use
power washing devises.
The appliance is not to be cleaned with a
water jet or a steam cleaner.
10.2 BEAN HOPPER CLEANING
In order to properly clean the bean hopper
( ), first empty out all remaining beans and
fragments.
To remove the hopper, first close the bean
trap ( ), and then loosen the hopper lock
screw ( ) and lift the hopper straight up.
Clean the hopper ( ) with a moist soft cloth
or with a small amount of water and neutral
soap to eliminate any oily residue from the
beans.
Replace the bean hopper ( ) following the
same steps as the removal process, but in
reverse.
15
K09652H00 | PROC-CAL/002/03 USER MANUAL | V. 29/06/20023
10. CLEANING
10.3 CLEANING THE GROUND COFFEE
DEPOSIT
To proceed with the cleaning of the ground
coee deposit, empty all the coee that is
inside.
Remove the ground coee dispenser lid
( )
and clean the entire interior with a brush.
Once everything has been clean, we finish the
operation, always checking the dose of coee
served following the instructions in point 8.3.
10.4 CLEANING THE GRIND CHAMBER
It is recommended that the grind chamber
be cleaned monthly with a cleaner . This
process will eliminate smelly residues from
the coee remains, which can negatively
aect the quality of the brewed coee.
Care is needed when handling cutting burrs
during cleaning.
The steps to follow are:
• To properly clean the bean hopper
( ), first empty out all remaining beans
and fragments.
• Close the bean trap on the hopper ( )
and grind out the remaining coee in the
grind chamber.
• Pour the recommended grinder cleaning
product into the bean hopper ( ) and
open the bean trap ( ), allowing the
cleaning product to pass into the grind
chamber.
• Grind the cleaning product at a medium
coarse grind setting until the
• recommended amount is passed
through the system and nothing remains
in the grind chamber.
• Clean the hopper ( ) and refill with
coee beans.
• Discard the first 2-3 doses of coee to
assure that the residual cleaning product
is removed from the grind chamber and
set the grind regulator to the desired
setting ( ).
• Following these steps will ensure that
the grinder is clean and ready for use.
• We do not recommend the taking
apart of the grind assembly unless
changing burrs, or removing a blockage/
obstruction in the grind chamber.
Removal of the grind assembly should
be performed by a qualified service
technician.
10.5 CLEANING THE OUTSIDE OF THE
GRINDER
To clean the exterior of the grinder, first wipe
with a dry soft cloth, and then gently wipe
with a damp cloth and neutral soap.
16
K09652H00 | PROC-CAL/002/03 USER MANUAL | V. 29/06/2023
11. MAINTENANCE
Not following the recommended
burr life guidelines can
compromise the safety of the
grinder.
These operation should be done
by a qualified service technician
wearing safety gloves.
11.1 GENERAL WARNING
Before performing any type of maintenance
you should:
• Always turn OFF the main power switch
to the o position ( ).
• If the grinder is jammed, unplug it
from the power source and contact an
authorized service technician.
In case of breakdown or malfunction, turn o
the appliance, we should never try to repair
it, it is essential to call the nearest technical
service.
NOTE: Not following these
warnings can compromise the
safety of the grinder as well as the
user.
11.2 GENERAL MAINTENANCE OF THE
GRIND CHAMBER
To guarantee the eiciency and correct
operation of the grinder, it is essential to follow
manufacturer instructions and ensure that all
maintenance work is carried out by qualified
sta.
Dull burrs will result in; a lower quality grind,
greater heat generation in the coee and grinder,
increased electrical consumption, and finally it
puts additional stress on the grinder motor.
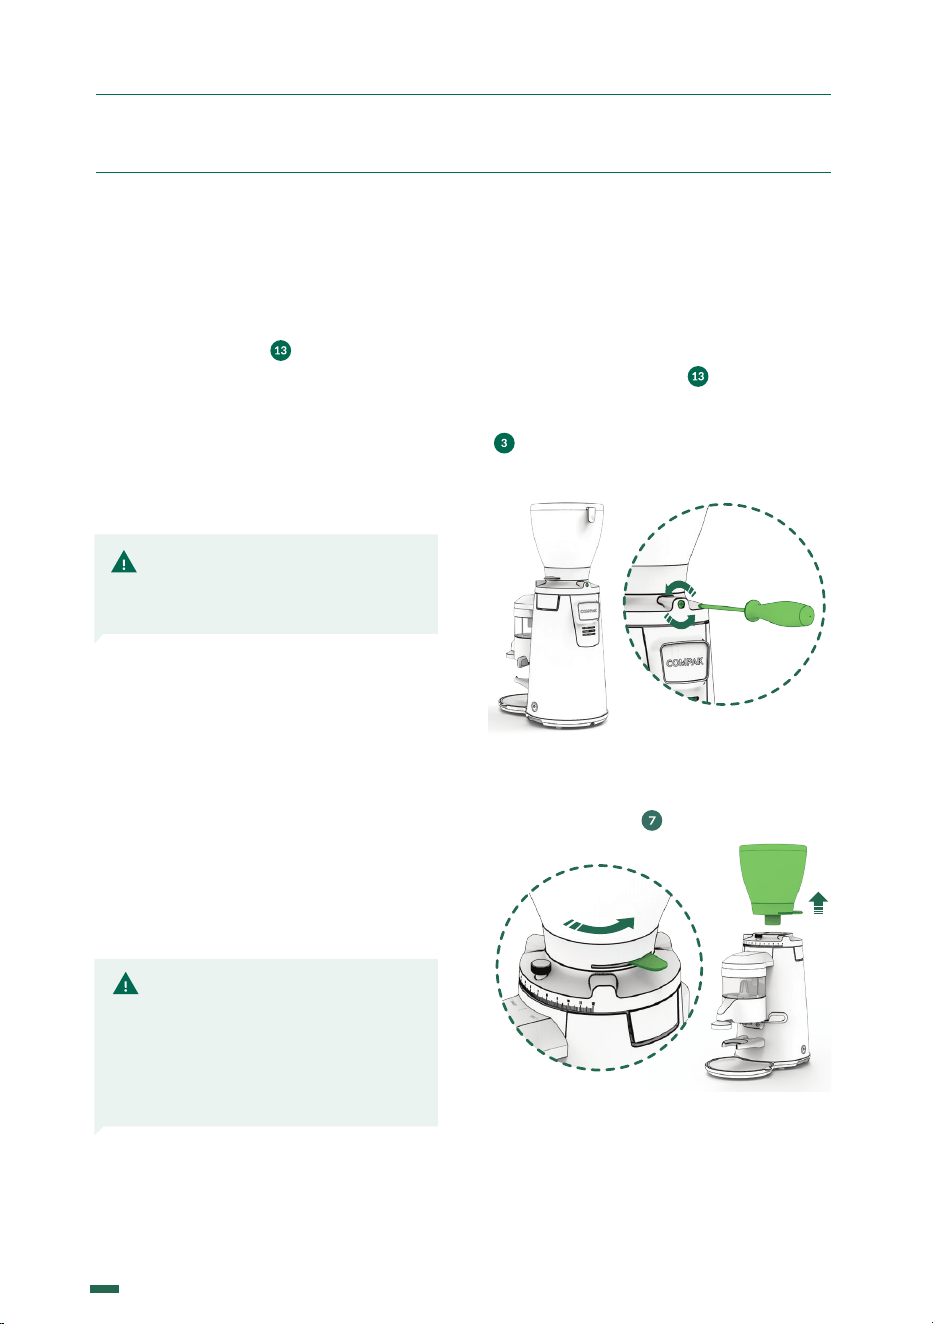
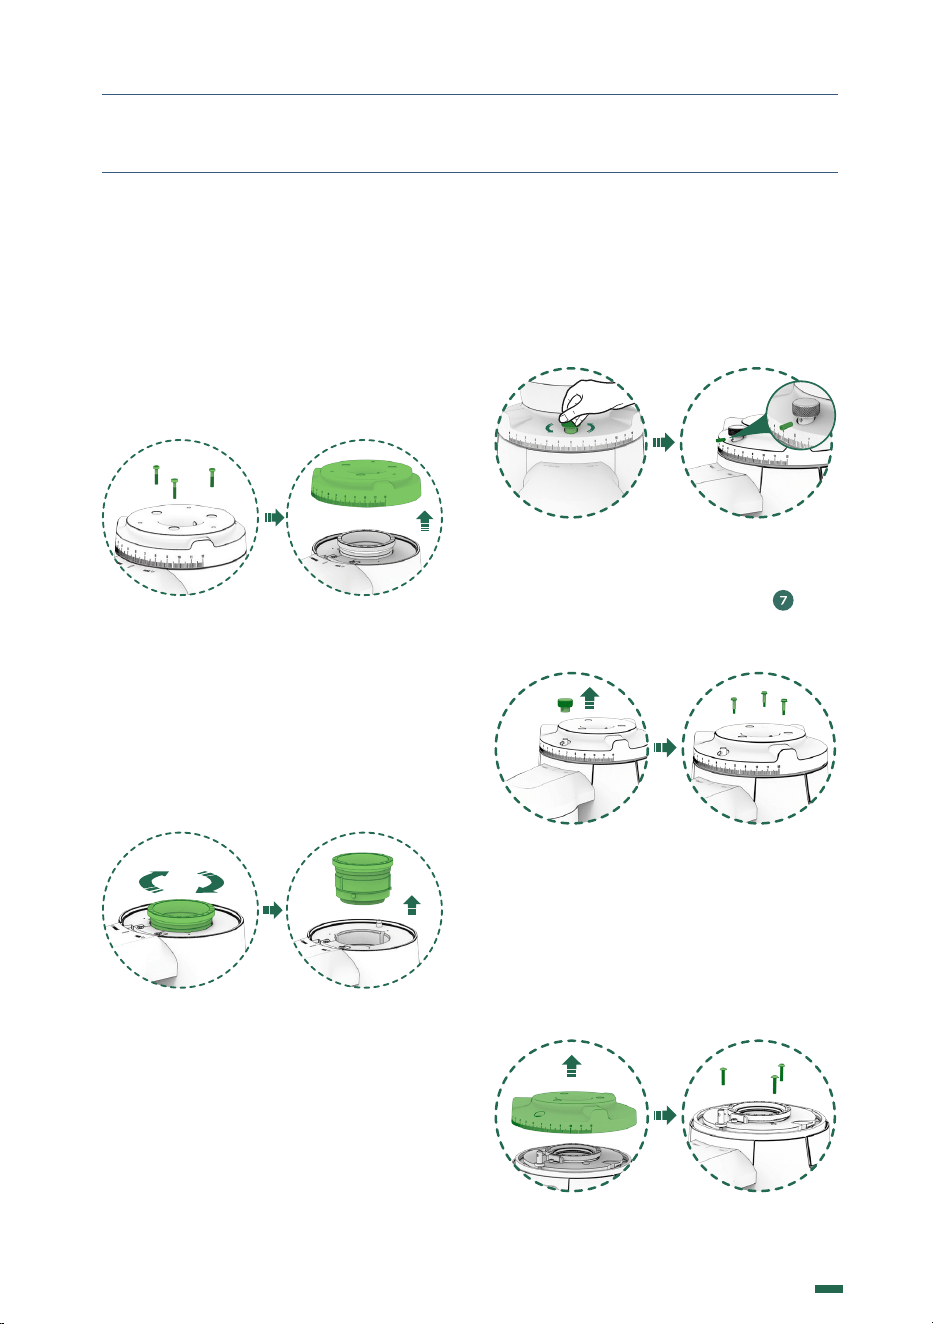
11.3 GRINDING GROUP MAINTENANCE
To perform grind chamber maintenance
please observe the following steps:
11.3.1 Turn o the grinder by making sure
the main power switch ( ) is on the OFF
position. Disconnect the plug from the power
source. Loosen the hopper security screw
( ) using a Phillips head screw driver as
seen in (Fig. 1).
Fig. 1
11.3.2 Check that the shutter is in the closed
position before removing the hopper from
the grind regulator ( ) (Fig. 2).
Fig. 2
17
K09652H00 | PROC-CAL/002/03 USER MANUAL | V. 29/06/20023
11. MAINTENANCE
From that point, if your grinder is a K6 skip
until the point 11.3.5. if not, keep following
the next the steps:
11.3.3 Loosen the grinding regulator screws
using an Hex Allen screwdriver #3, according
to (Fig.3). Remove the regulator by pulling
up. (Fig.4).
Fig. 3 Fig. 4
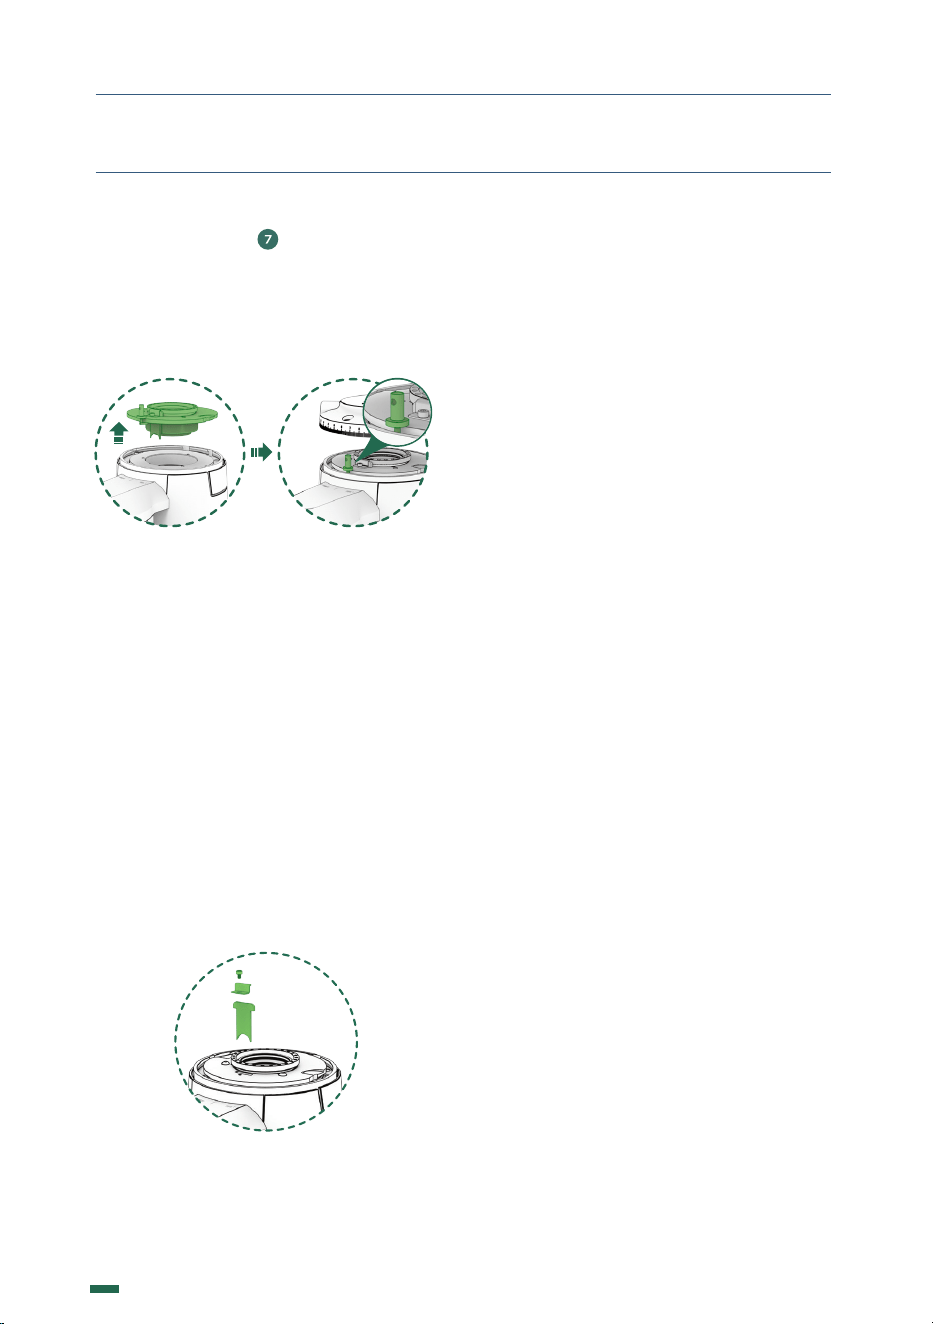
11.3.4 Turn the grinding regulator clockwise
until it is removed from its seat. Clean the
inside of the grinding cavity with a brush
or vacuum cleaner and remove any coee
residue as well as the lubricant from the
threads of the upper burr holder and the
grinding cavity (Fig.5). and (Fig.6).
Fig. 5 Fig. 6
Renew the food lubricant of the threads of
the upper cutter holder and of the grinding
cavity. Insert the upper cutter holder, turning
it counterclockwise until the upper and
lower cutter touch and cannot be turned any
further.
11.3.5 Loosen the grinding regulator screws
using an Hex Allen screwdriver #3, according
to (Fig. 7). Before remove the regulator take
a look to the position in the scale and take a
note. (Fig. 8).
Fig. 7 Fig. 8
11.3.6 Loosen the regulation brake ( ) until
it feels free from the Parallel (Fig. 9). Remove
the regulator by pulling up (Fig. 10).
Fig. 9 Fig. 10
11.3.7 Loosen the upper burs support screws
with a Hex Allen screwdriver #3, according to
(Fig. 11). Remove the upper holder by pulling
upwards to access the grinding cavity,
clean the interior with the help of a brush
or vacuum cleaner and remove any coee
residue from the grinding cavity (Fig. 12).
Fig. 11 Fig. 12
18
K09652H00 | PROC-CAL/002/03 USER MANUAL | V. 29/06/2023
11. MAINTENANCE
11.3.6 When reassembling the regulator, face
the regulating brake ( ) with the shoe of the
Parallel System and tighten until they link
(Fig. 13). Turn the regulator until the position
meets the previous one that you take a
note in the point 12.3.3 and keep going by
reversing the steps (Fig. 14).
Fig. 13 Fig. 14
11.4 REPLACING THE SILICONE
CURTAIN
Only for a K6 model: The silicon curtain
ensures regularity in the dose and reduces
static electricity. Located inside the coffee
spout, can be replaced once the regulator
has been removed from the grinder (Fig. 10).
Using a # 3 Allen key, the screw is loosened
and the curtain support is removed to gain
access to the silicone curtain, being able to
replace it with a new one or of a different
thickness according to the needs of each
coffee. (Fig. 15).
Fig. 15
19
K09652H00 | PROC-CAL/002/03 USER MANUAL | V. 29/06/20023
12. DECLARATION OF CONFORMITY
In accordance with European community directives, quality certificates have been applied.
All materials have been adapted and technical reports are available at our offices.
2014/30/UE on the approximation of the laws of the Member States relating to
electromagnetic compatibility.
06/42/EC amending Directive 95/16/EC on the approximation of the laws of the Member
States relating to machinery
REG. 1935/2004 amending Directive 89/109/EC on the approximation of the laws of the
Member States relating to material and objects destinated to make contact with nutritional
products.
03/108/EC amending Directive 2002/96/EC on waste electrical and electronic equipment
(WEEE).
2014/34/UE on the harmonization of the laws of Member States relating to electrical
equipment designed for use within certain voltage limits.
2012/19/UE of 04/07/2012 on the approximation of the laws of the Member States on waste
electrical and electronic equipment (WEEE).
11/65/EU related to the restriction on the usage of certain dangerous substances with electrical
equipment and electronics.
Environment
Do not throw the applianceaway with the normal household waste; hand it in at an official
recycling collection point. By doing this, you will help to preserve the environment.
The Legal Representative
Jesús Ascaso
Compak Coee Grinders, s.a.
Molí Barri, Parcela B - Pol. Ind. Can Barri - 08415 Bigues i Riells - Barcelona - Spain
Ph. 34 93 703 13 00 - www.compak.es - info@compak.es
www.fsc.org
USER MANUAL
K09652H00 | PROC-CAL/002/03 | V.29/06/2023