

2 MAN POST HOLE DIGGER 3HP 63CC
SAVE THIS MANUAL: KEEP THIS MANUAL FOR SAFETY WARNINGS, PRECAUTIONS, ASSEMBLY,
OPERATING, INSPECTION, MAINTENANCE AND CLEANING PROCEDURES. WRITE THE PRODUCT’S
SERIAL NUMBER ON THE BACK OF THE MANUAL NEAR THE ASSEMBLY DIAGRAM (OR MONTH
AND YEAR OF PURCHASE IF PRODUCT HAS NO NUMBER).
OWNER’S MANUAL AND SAFETY INSTRUCTIONS
ITEM: 81008
FOR QUESTIONS PLEASE CALL OUR CUSTOMER SUPPORT: (909) 628 4900 MON-FRI 9AM TO 3PM PST

GENERAL SAFETY WARNINGS
Read all safety warnings and instructions. Failure to follow the warnings and instructions may result
in electric shock, re and/or serious injury. Save all warnings and instructions for future reference.
SAFETY
Please read this section carefully. Read entire operating and maintenance instructions AND the instructions
for the equipment this engine powers. Failure to follow instructions could result in serious injury or death.
Operate the auger according to the safety instructions outlined here and inserted throughout the text. Anyone
who uses this auger must read the instructions and be familiar with the controls.
1
The size, power, complexity and operating characteristics of this type of powered equipment would dic-
tate that each operator must receive adequate, professional instruction regarding the proper operation
of this Hole Digger before being allowed to utilize it. BEFORE attempting to utilize this Hole Digger,
read this Operator Manual, to familiarize each operator with its correct operating procedures. Avoid the
urge not to take the necessary time to read this Operator Manual before operating the Hole Digger. DO
NOT OPERATE THE HOLE DIGGER UNTIL EACH OPERATOR COMPLETELY COMPREHENDS THE
CONTENTS OF THIS MANUAL, THE APPLICABLE SAFETY AND OPERATIONAL INFORMATION
DVD, APPLICABLE SUPPLEMENTAL INFORMATION AND THE INFORMATION SUPPLIED BY THE
ENGINE MANUFACTURER.
IMPORTANT SAFETY INFORMATION
Develop a comprehensive program for the safe operation of the Hole Digger by its owner(s) and/or
operator(s). Such a program will include, but is not limited to: instructional requirements for operation,
applicable OSHA requirements, local laws and regulations, job site safety and a Hole Digger maintenance
program. Constantly examine and upgrade this program to guarantee owner(s) and/or operator(s) safety.
Determine that the Hole Digger is in its original, factory conguration and has not been modied in any
manner. Many modications can result in potentially dangerous congurations that can lead to property
damage and/or personal injury.
Minors should never be allowed to operate the Hole Digger. Bystanders, especially children and animals,
should not be allowed in the area where the Hole Digger is in use. The hole digging process can result in
ying particles being emitted at high velocity and striking the operator and/or onlookers. This can lead to
the possibility of property damage and/or personal injury. Keep all body parts, loose clothing, foreign
objects and onlookers clear of the rotating auger and/or auger extensions.
Operators must be in proper physical condition, mental health and not under the inuence of any substance
(drugs, alcohol, etc.) which might impair vision, dexterity or judgment. Working with the Hole Digger is
strenuous. If you have any condition that might be aggravated by strenuous work, check with your doctor
BEFORE operating the Hole Digger.
Prolonged use of the Hole Digger (or other, similar machines) exposes the operator to vibrations which
may produce Whitenger Disease (Raynaud’s Phenomenon). This phenomenon reduces the hand’s
ability to feel and regulate temperature, produces numbness and burning sensations and may cause
nerve and circulation damage and tissue necrosis. Anti-vibration systems do not guarantee that you will
not sustain Whitenger Disease. Therefore, continuous and regular users should closely monitor the
condition of their hands and ngers. After each period of use, exercise to restore normal blood circulation.
If any of the symptoms appear, seek medical advice immediately.
Clothing must be sturdy and snug tting, but allow complete freedom of movement. Never wear loose
tting jackets, scarves, neck ties, jewelry, ared or cuffed pants or anything that could become caught on
controls or moving parts. Wear long pants to protect your legs. Protect your hands with heavy duty, non-
slip
gloves to improve your grip. Good footing is most important when operating the Hole Digger. Wear sturdy

2
IMPORTANT SAFETY INFORMATION
THE ENGINE EXHAUST FROM THIS PRODUCT CONTAINS CHEMICALS KNOWN TO THE STATE OF
CALIFORNIA TO CAUSE CANCER, BIRTH DEFECTS OR OTHER REPRODUCTIVE HARM. THIS
STATEMENT IS MADE IN COMPLIANCE TO CALIFORNIA PROPOSITION 65.
Flying debris, generated by the hole digging process, can cause eye injury. Eye protection is required
while operating or when near operating equipment.
Visually inspect the Hole Digger, auger(s), auger extension, and accessories for damaged or worn parts.
Inspect each auger for the proper screw bit and blade. Look for loose and/or damaged handle grip areas.
Check for loose and/or broken parts. Determine that operator controls work freely, all safety devices are
operative and information/safety decals are readable. Check to determine that the Hole Digger and all
related accessories are in good mechanical condition BEFORE utilization.
Contact appropriate representatives to determine if/where electrical cables, gas lines and other hazardous
items are buried under the work surface BEFORE utilization. The Hole Digger and related accessories
are not classied as being insulated. Contact with buried electrical cables, gas lines and other hazardous
items can result in electrocution and/or an explosion.
Know how the controls operate. Know how to stop the engine quickly in an emergency. ALWAYS start the
engine according to the instructions as outlined in this manual to minimize the possibility of unexpected or
uncontrolled auger rotation. Unexpected auger rotation can cause loss of machine control, and the
possibility of property damage and/or personal injury.
Breathing Carbon Monoxide fumes while operating the Hole Digger can result in property damage and/or
personal injury. The normal operation of the Hole Digger is outdoors where the potential effects of Carbon
Monoxide to the operator are minimized. If the Hole Digger is operated in a closed area (indoors or
outdoors), determine if supplemental ventilation is required to minimize the potential effects of Carbon
Monoxide to the operator. Follow all current OSHA regulations pertaining to ventilation.
Gasoline is an extremely ammable fuel. Use extreme caution when handling gasoline or mixing fuel.
Always utilize UL®, CSA or CE approved containers for the storage and/or transportation of fuel. Do
not smoke or bring any re or ame near the fuel. Always shut off the engine and allow it to cool before
refueling. Never remove the fuel tank ller cap while the engine is running. Never operate an engine
without a fuel tank ller cap. Select bare ground for fueling and move at least 10 feet from the fueling spot
before starting the engine. Wipe off any spilled fuel before starting the engine and check for leakage. If a
fuel or oil leak is found, do not start or run the engine until the leak is xed and the spillage has been wiped
away. Take care not to get fuel or oil on your clothing. If this happens, change your clothing immediately.
DO NOT operate the Hole Digger with onlookers close by. Caution all onlookers to stand clear. The hole
digging process can result in ying particles being emitted at high velocity and striking the operator and/or
onlookers, This can lead to the possibility of property damage and/or personal injury. Wear proper safety
eyewear. Keep all body parts, loose clothing and foreign objects clear of the rotating auger.
DO NOT utilize a shovel and/or foreign object to remove the loose soil from a hole area while the Hole
Digger is in use. Such a practice can result in the shovel and/or foreign object to become entrapped by
the rotating auger, leading to the possibility of property damage and/or personal injury.
Start and operate the Hole Digger only in a well ventilated area. Carbon Monoxide fumes given off by
an engine are poisonous. Breathing these fumes can result in property damage and/or personal injury.
Operate the Hole Digger only when/where visibility and light are adequate for the job at hand. Work
carefully. Always hold the Hole Digger rmly with both hands.
Contact with a hot engine mufer and heat shield can cause property damage and/or personal injury.
Remain clear of hot engine mufer and heat shield.
Operate only when/where visibility and light are adequate for the job at hand.
Stop the engine between each hole to minimize the possibility of property damage and/or personal injury.
Normal operation is on level surfaces.
3
PRODUCT INFORMATION / ASSEMBLY
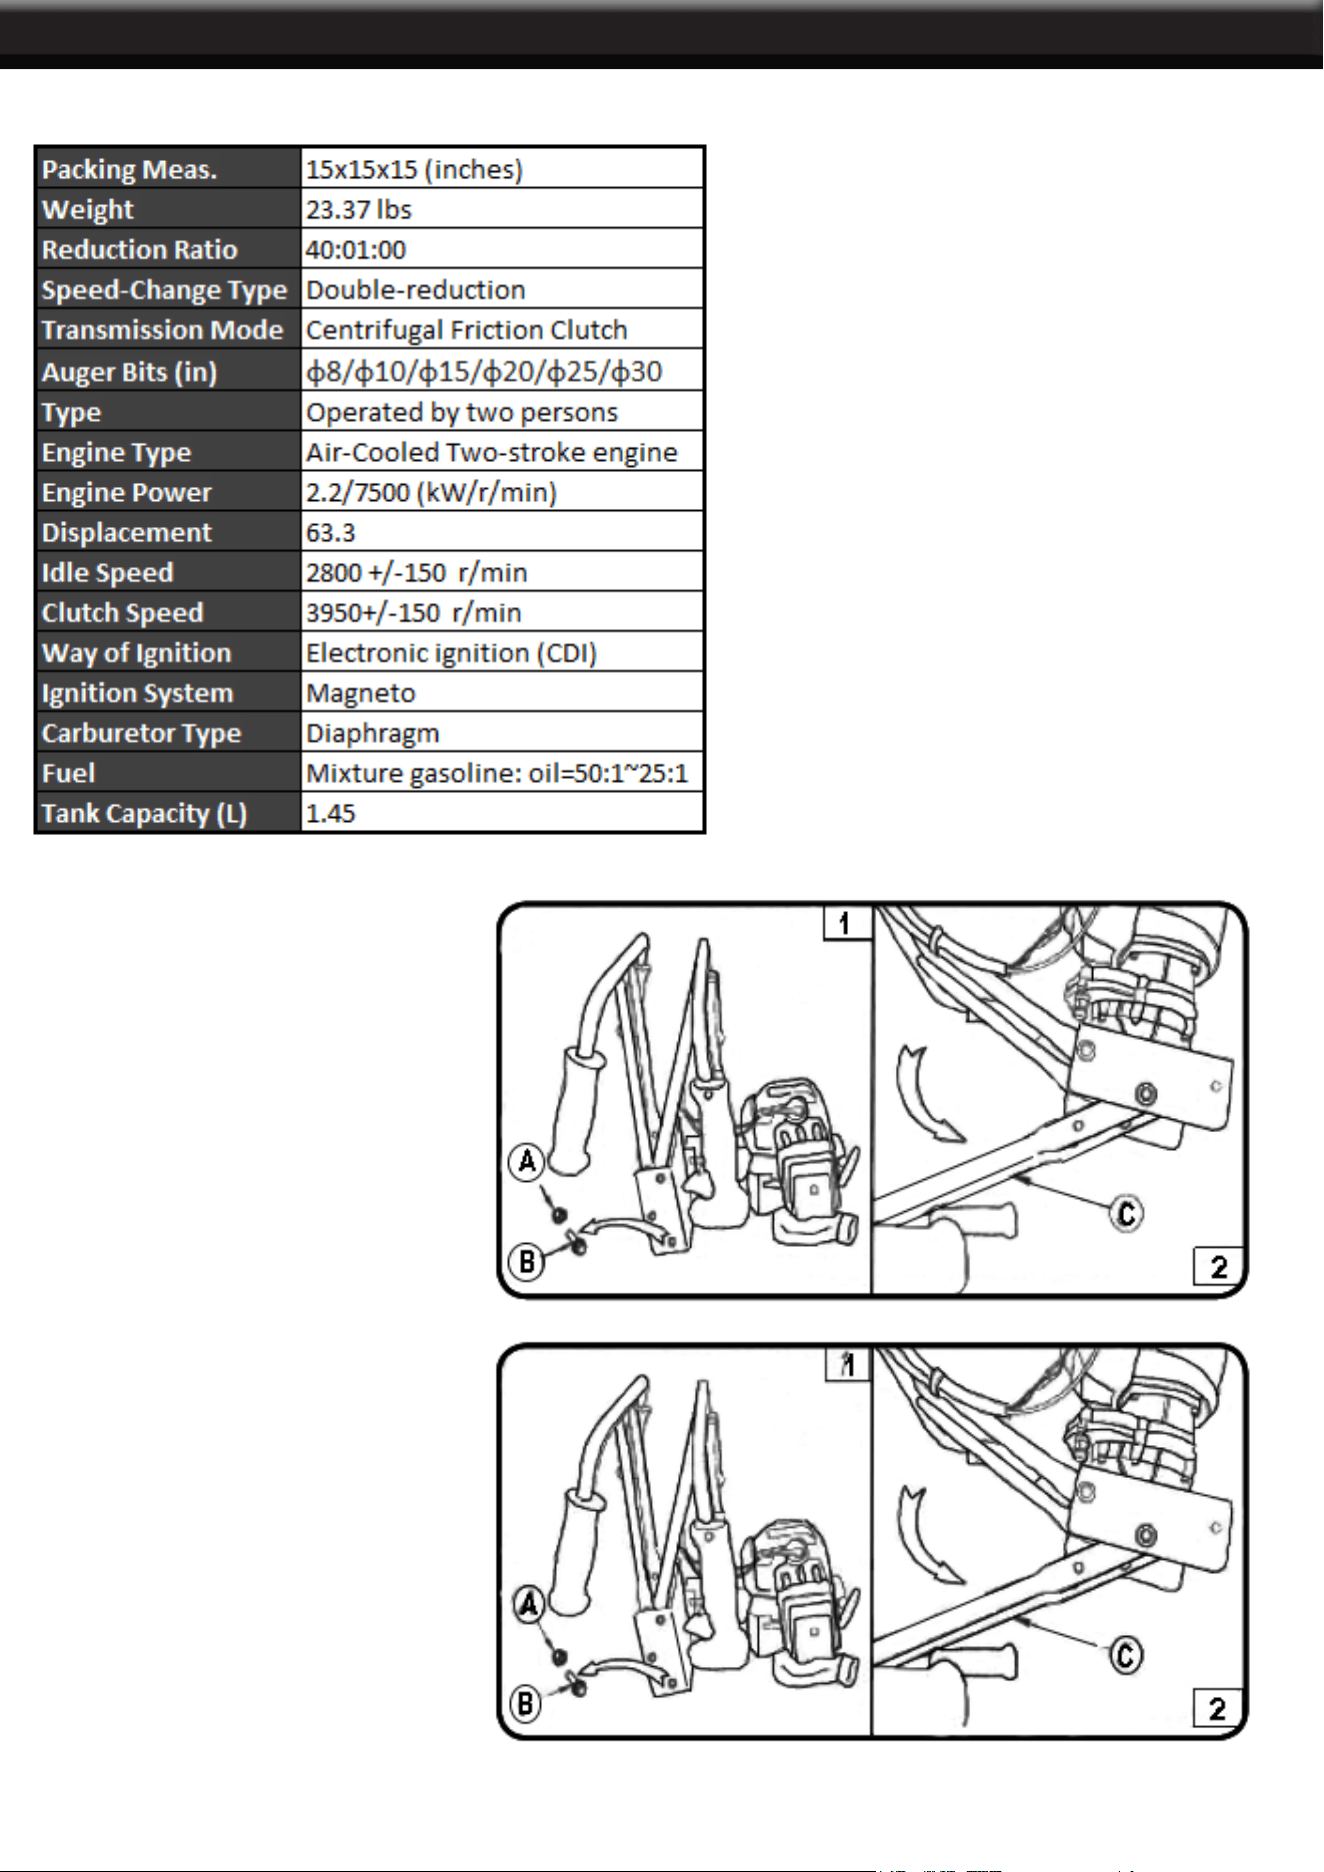
SPECIFICATIONS
ASSEMBLY
1. Take out the product from the
packaging. Take out the 2 lock nuts
and 2 screws from the link plank.
Rotate the right handle bracket,
follow the direction in the 2nd
gure, until it reaches the position.
2. Fix the right handle bracket, the
link plank and the shock absorber
with the lock nuts and the screws.
Tighten the 2 lock nuts securely in
the center of the plank.
4
PRODUCT INFORMATION / ASSEMBLY ASSEMBLY
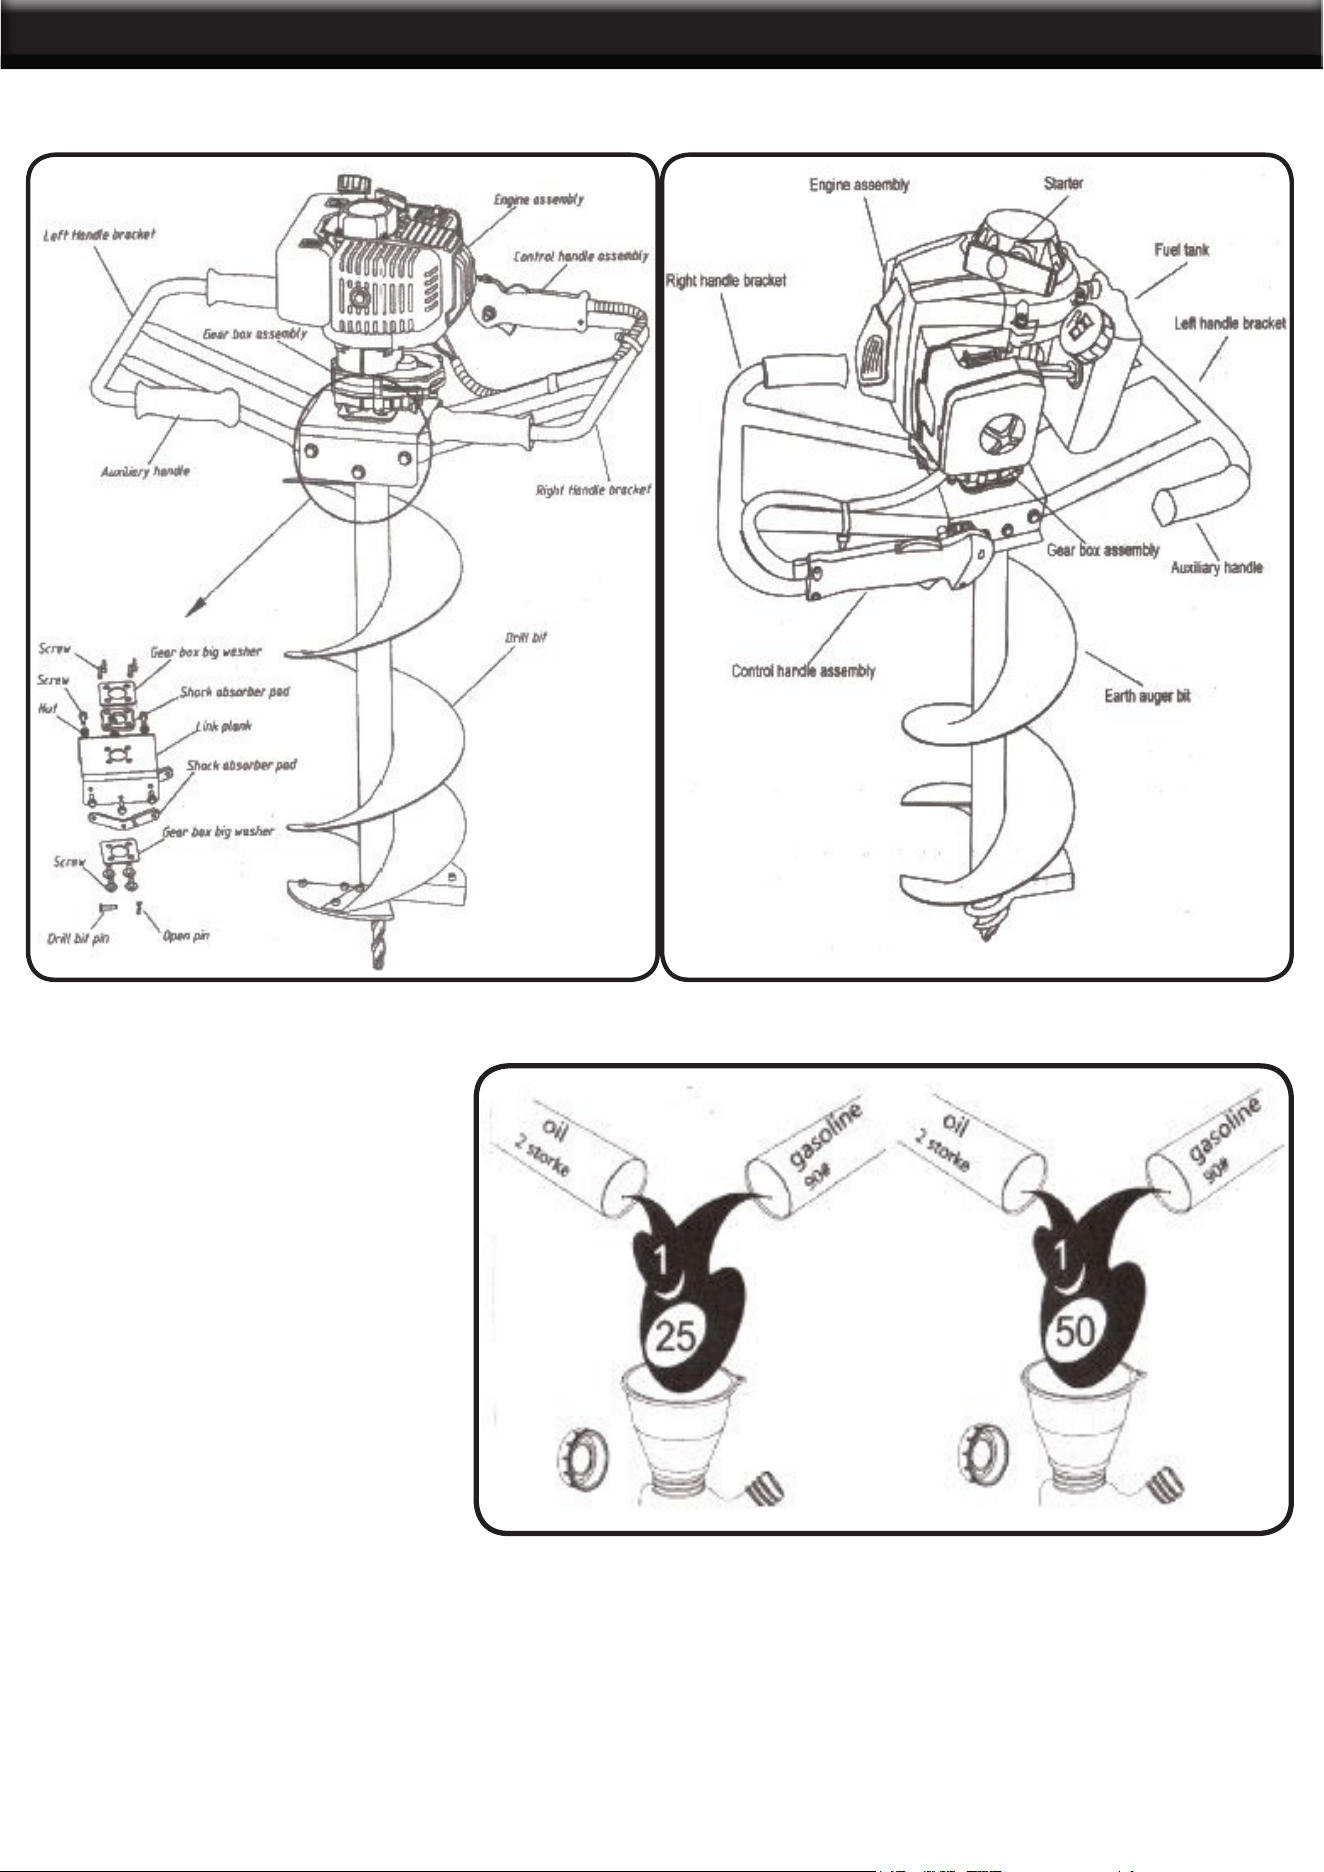
3. Put the drill onto the PTO shaft and x it with a drill bit pin. DO NOT chanhe the ratio of the reduction
gearbox. The characteristics of the machine could change and unforseen reactions could occur.
Use 2% or 4% (50:1 or 25:1)
gasoline:oil mxture
FUEL MIXTURE
2-stroke engines have high specic
horsepower, it is recommended you
use well known, regular or super
gasoline, with or without lead and an
octane rating of no less than 90.
When preparing the mixture, only
use oil for a 2-stroke engine. Shake
the fuel container before lling. Rell
when the engine is switched off
and far away from naked ames.
Before unscrewing the fuel tank cap,
position the earth auger on a solid,
at surface to prevent fuel spills.
Gasoline is very ammable. Select outdoor bare ground for fueling. NEVER add or replace fuel when the
engine is in operation or before the engine stops. DO NOT leave the mixture in the fuel tank or in a fuel
canister for a long period of time. DO NOT start the engine if fuel leakage is found. Run the engine until the
leak is xed.
OPERATION / MAINTENANCE
5
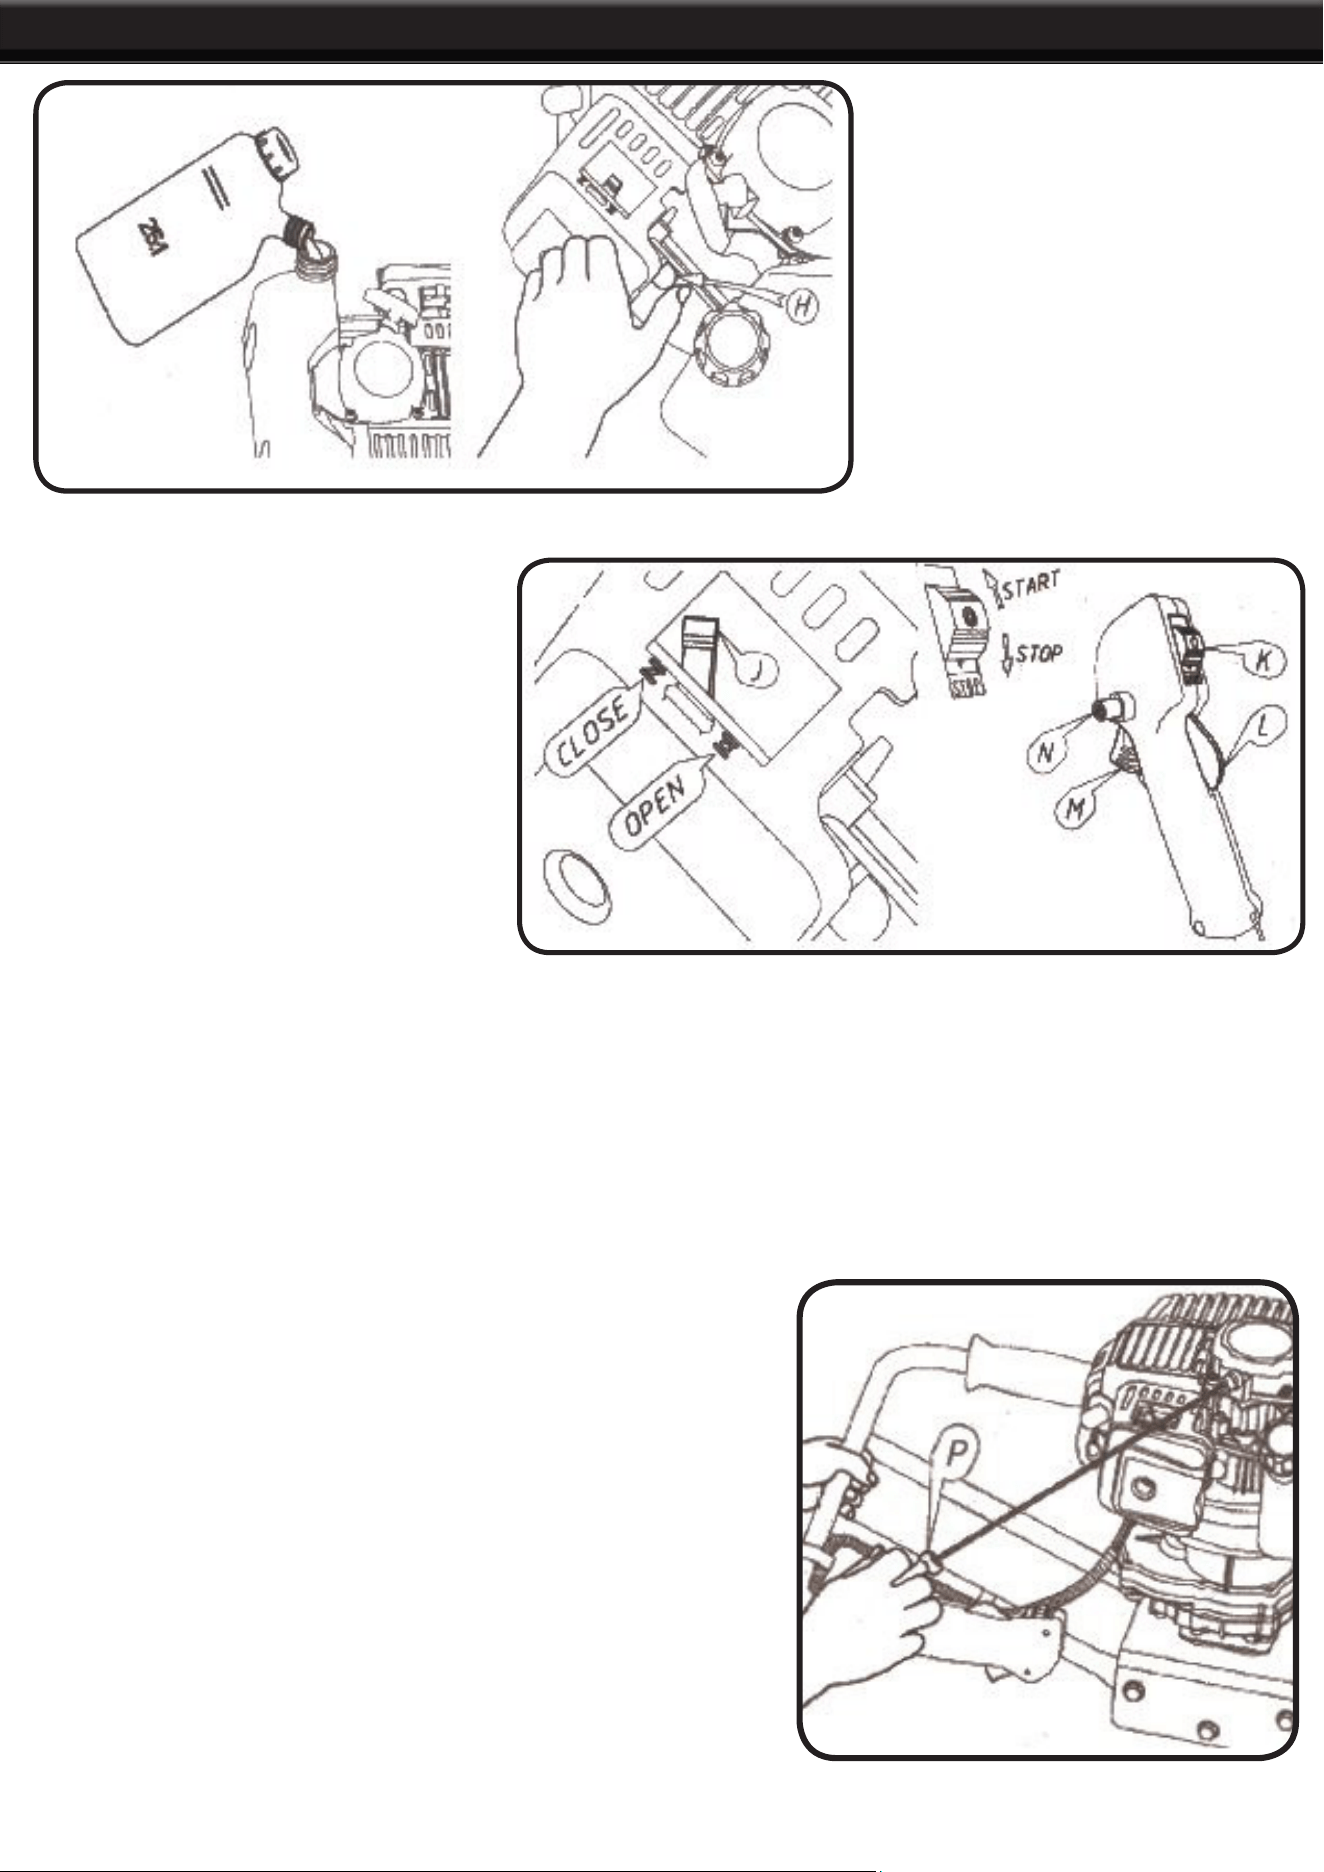
STARTING THE ENGINE
1. Put switch (K0 in the START
position. Press the safety lever (L) and
throttle lever (M), lock it by pressing
the button.
2. Release lever L and M
3. Put the choke lever (J) in the
CLOSE position.
4. Push the primer bulb (H) a few times until the fuel comes out of the fuel tube.
5. Pull the starter rope (P) a few times until the engine starts.
6. Put the choke lever (J) back into the original position OPEN. Once the engine is running, press the
throttle lever (M) to release button and let the engine idle.
NOTE: DO NOT use the choke (J) when starting a hot engine.
When the engine is idling, the bit should not turn.
WARNING: If the bit jams, stop the engine immediately. When
pulling the starting rope: A. DO NOT let the starter grip snap
back. B. DO NOT pull the starter rope out all the way as it
might break. (See illustration). Guide it slowly back into the
housing so that the starter rope can rewind properly.
OPERATION / STORAGE
6
STOPPING THE ENGINE
1. Bring the throttle to the idle position (M) and run it for 2-3 minutes at a low speed until the engine cools.
2. Switch off the engine by putting the stop switch (K) in the STOP position.
3. Remove the bit and clean the machine.
NOTE: Avoid stopping the engine suddenly when it runs in high speed. Doing so could cause damage to the
machine.
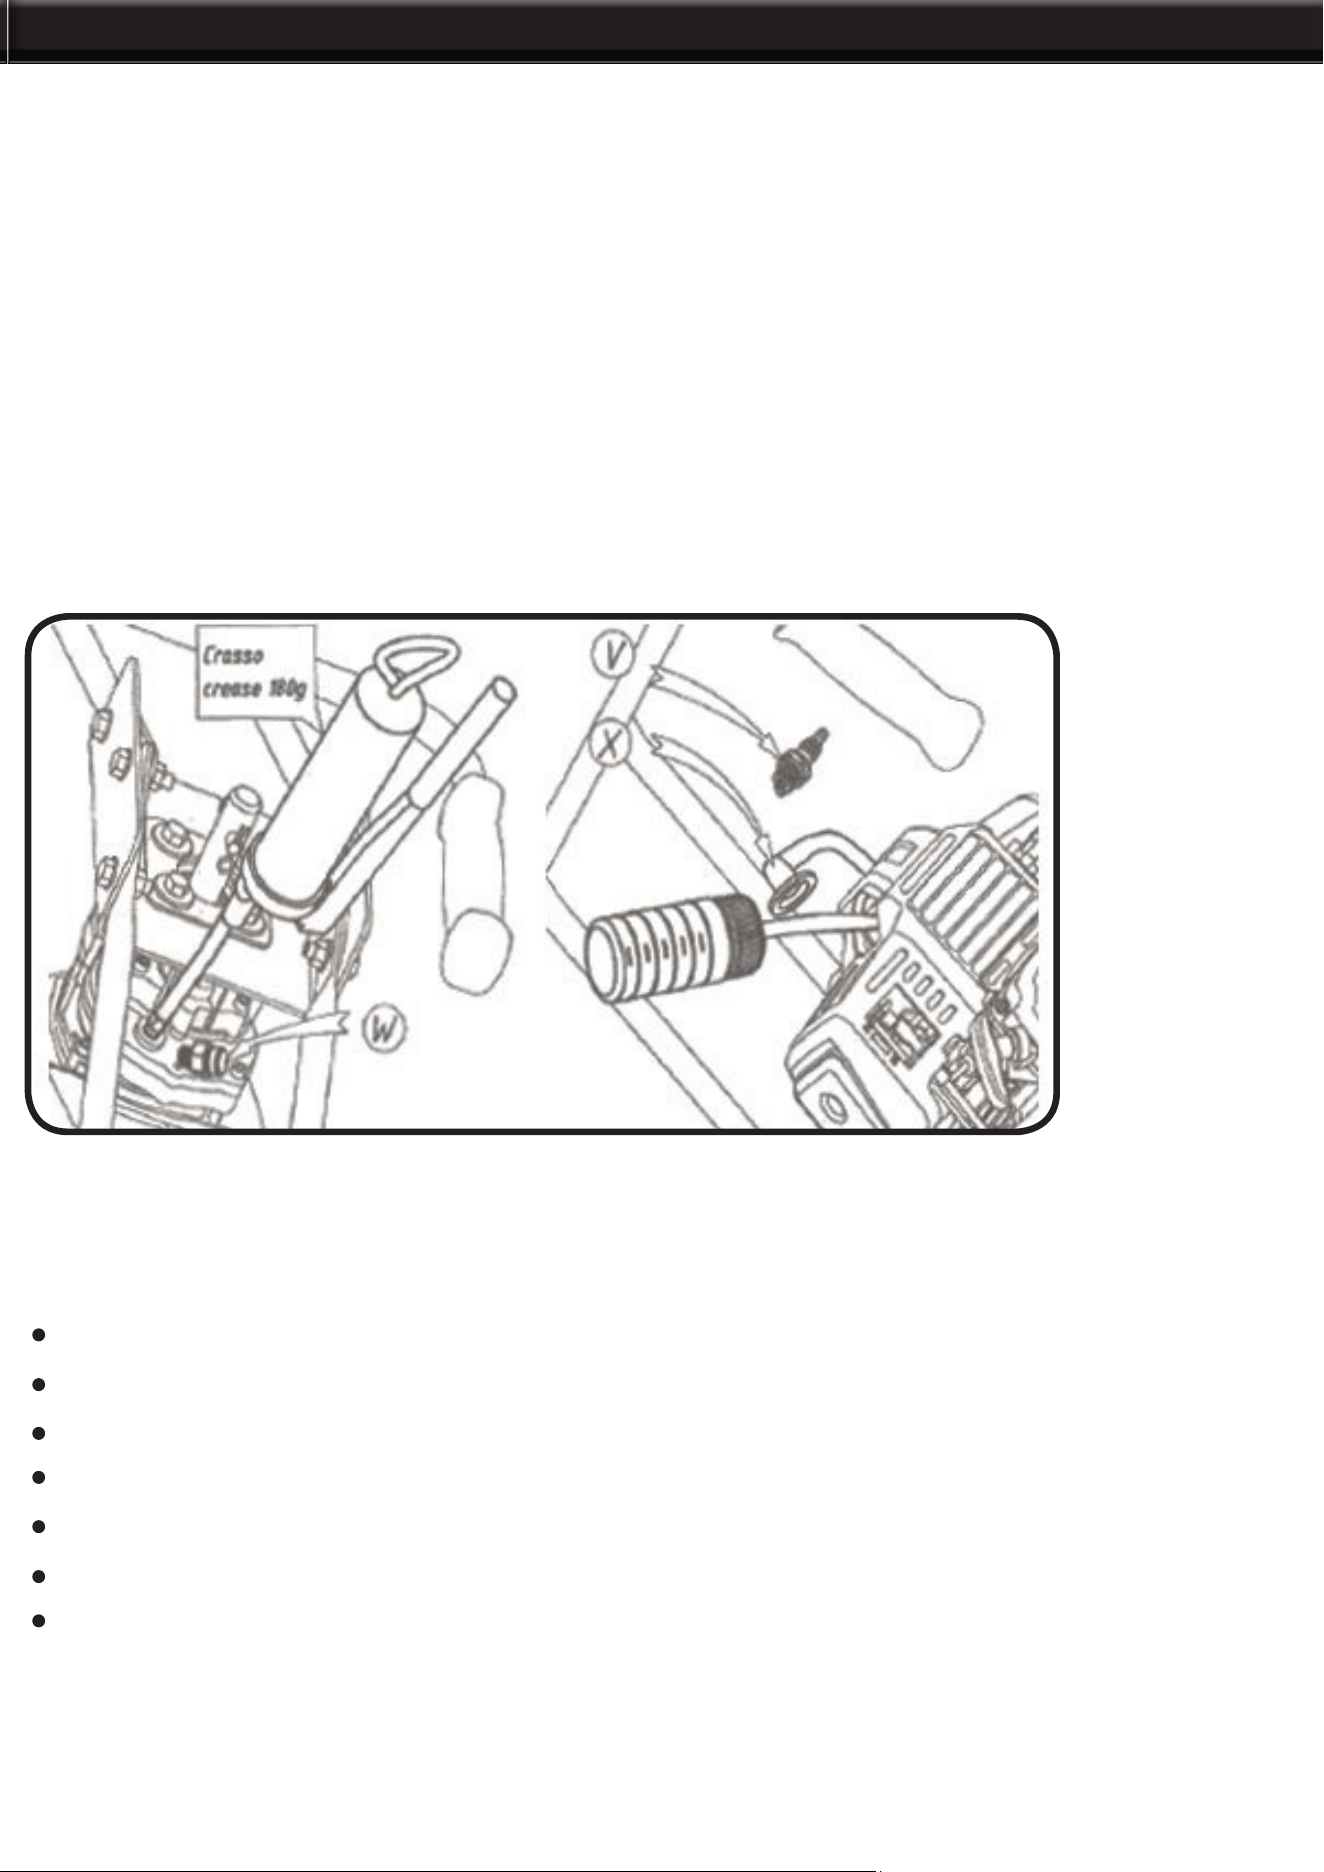
REDUCTION GEARBOX: During normal operation, every 50 hours, remove, check and clean the vent cap
(W). Every 100 hours, change the grease in the reduction gearbox.
STORAGE
If storing for a long period of time, clean the earth auger completely and grease the metal parts.
Remove, clean and oil the bit to prevent rusting.
Empty the fuel tank and put the cap back on.
Remove the spark plug and pour a small amount of oil into the cylinder.
Pull the starting rope several times, rotate the crankshaft to distribute the oil. Put the spark plug back in.
Wrap the engine in a plastic sheet.
Store the auger in a clean, dry place, preferably off the ground, away from heat sources and out of reach
of children.
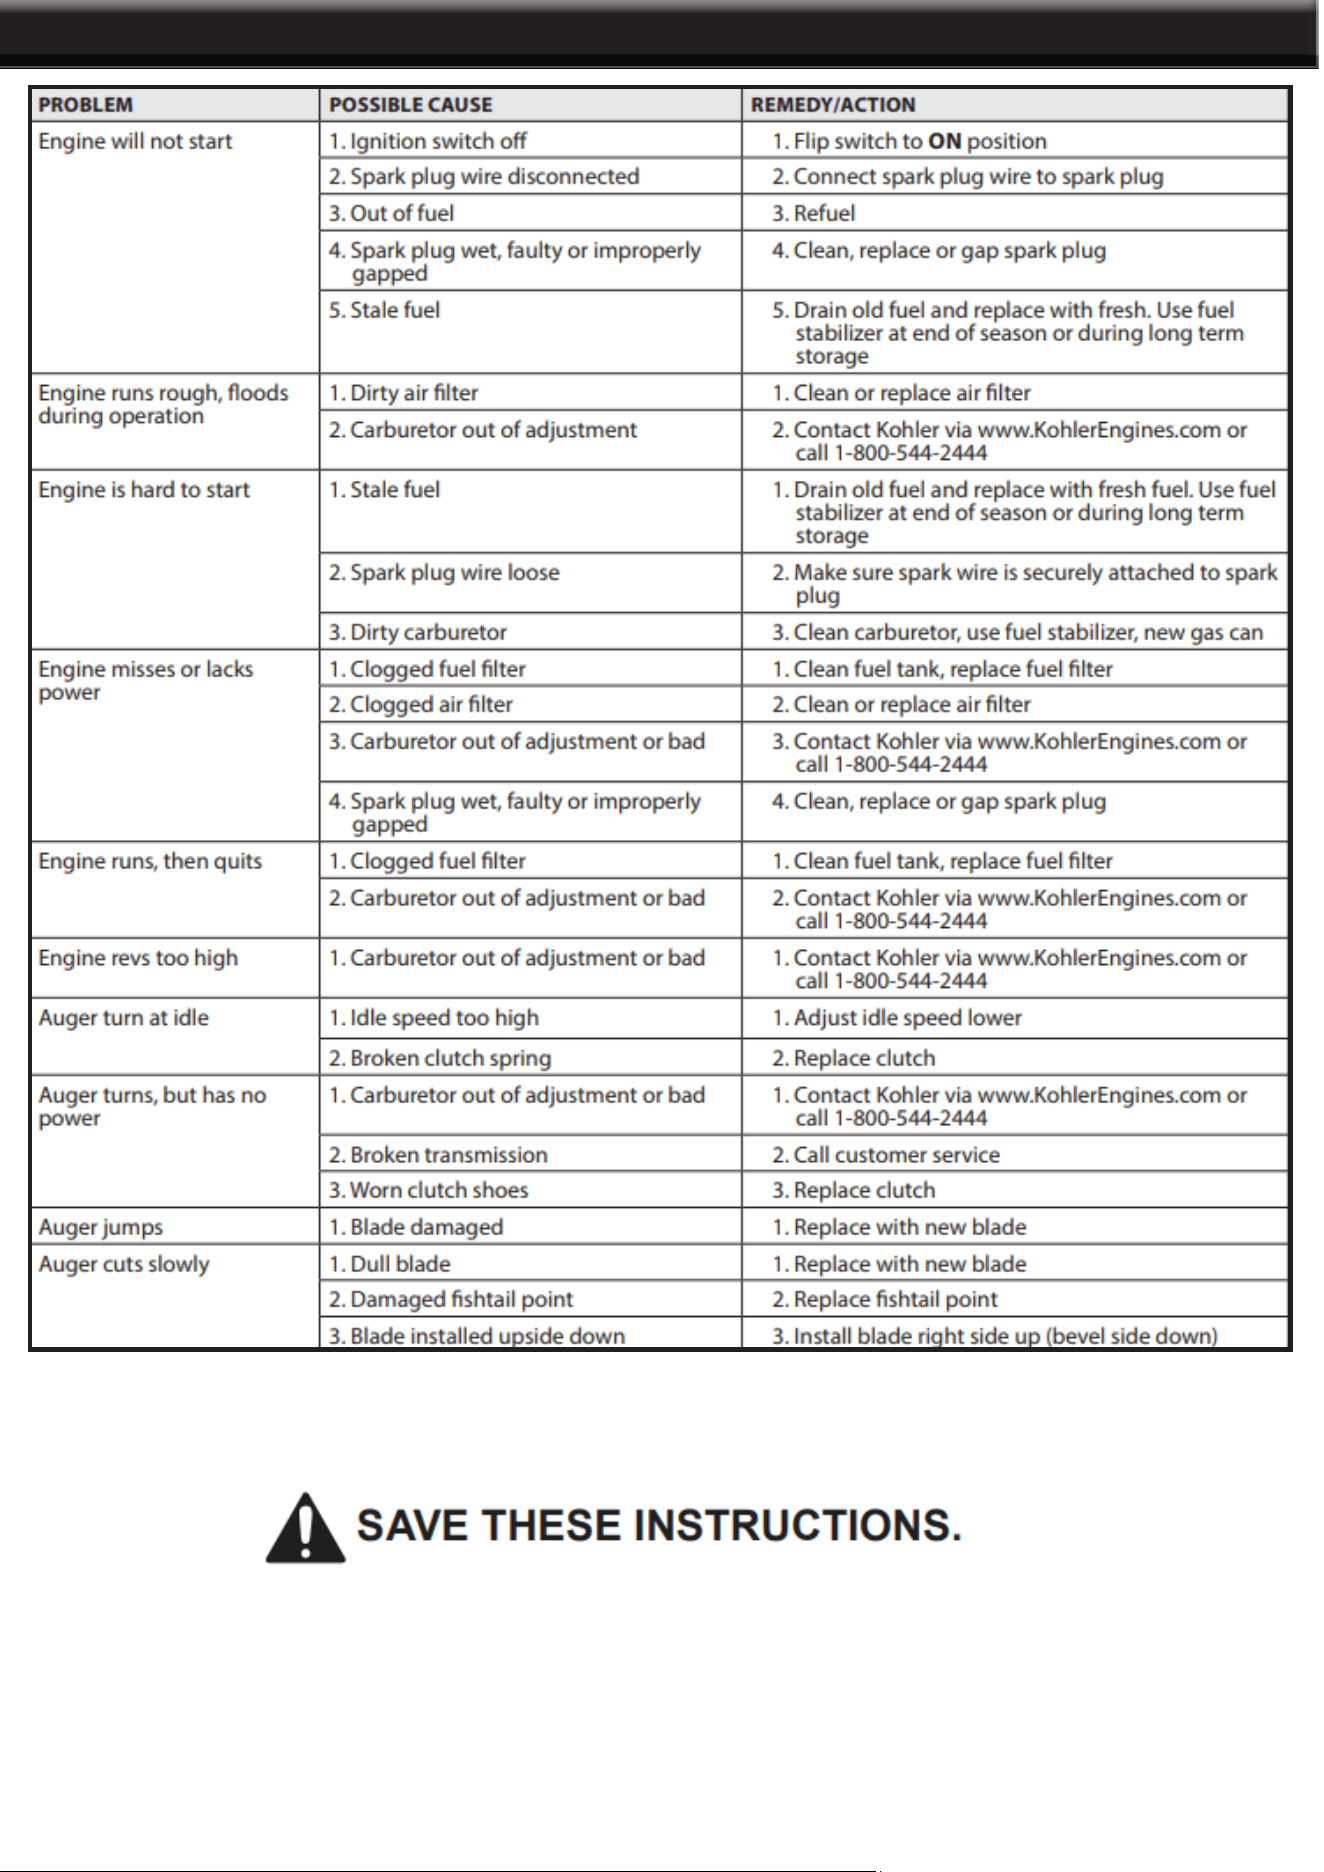
TROUBLESHOOTING
7

8
THE MANUFACTURER AND/OR DISTRIBUTOR HAS PROVIDED THE PARTS LIST AND ASSEMBLY
DIAGRAM IN THIS MANUAL AS A REFERENCE TOOL ONLY. NEITHER THE MANUFACTURER OR
DISTRIBUTOR MAKES ANY REPRESENTATION OR WARRANTY OF ANY KIND TO THE BUYER THAT
HE OR SHE IS QUALIFIED TO MAKE ANY REPAIRS TO THE PRODUCT, OR THAT HE OR SHE IS
QUALIFIED TO REPLACE ANY PARTS OF THE PRODUCT. IN FACT, THE MANUFACTURER AND/OR
DISTRIBUTOR EXPRESSLY STATES THAT ALL REPAIRS AND PARTS REPLACEMENTS SHOULD BE
UNDERTAKEN BY CERTIFIED AND LICENSED TECHNICIANS, AND NOT BY THE BUYER. THE BUYER
ASSUMES ALL RISK AND LIABILITY ARISING OUT OF HIS OR HER REPAIRS TO THE ORIGINAL
PRODUCT OR REPLACEMENT PARTS THERETO, OR ARISING OUT OF HIS OR HER INSTALLATION
OF REPLACEMENT PARTS THERETO.
Record Product’s Serial Number Here:
Note: If product has no serial number, record month and year of purchase instead.
Note: Some parts are listed and shown for illustration purposes only and are not available individually
as replacement parts.
PLEASE READ THE FOLLOWING CAREFULLY
DISCLAIMER
PRODUCT MADE IN CHINA