EN
Owner's Manual
THANK YOU FOR BUYING A HOTPOINT/ARISTON
PRODUCT
In order to receive a more complete assistance, please
register your product on www . hotpoint. eu/ register
Before using the appliance carefully read the Safety
Instruction.
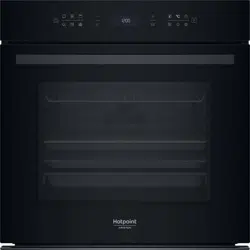
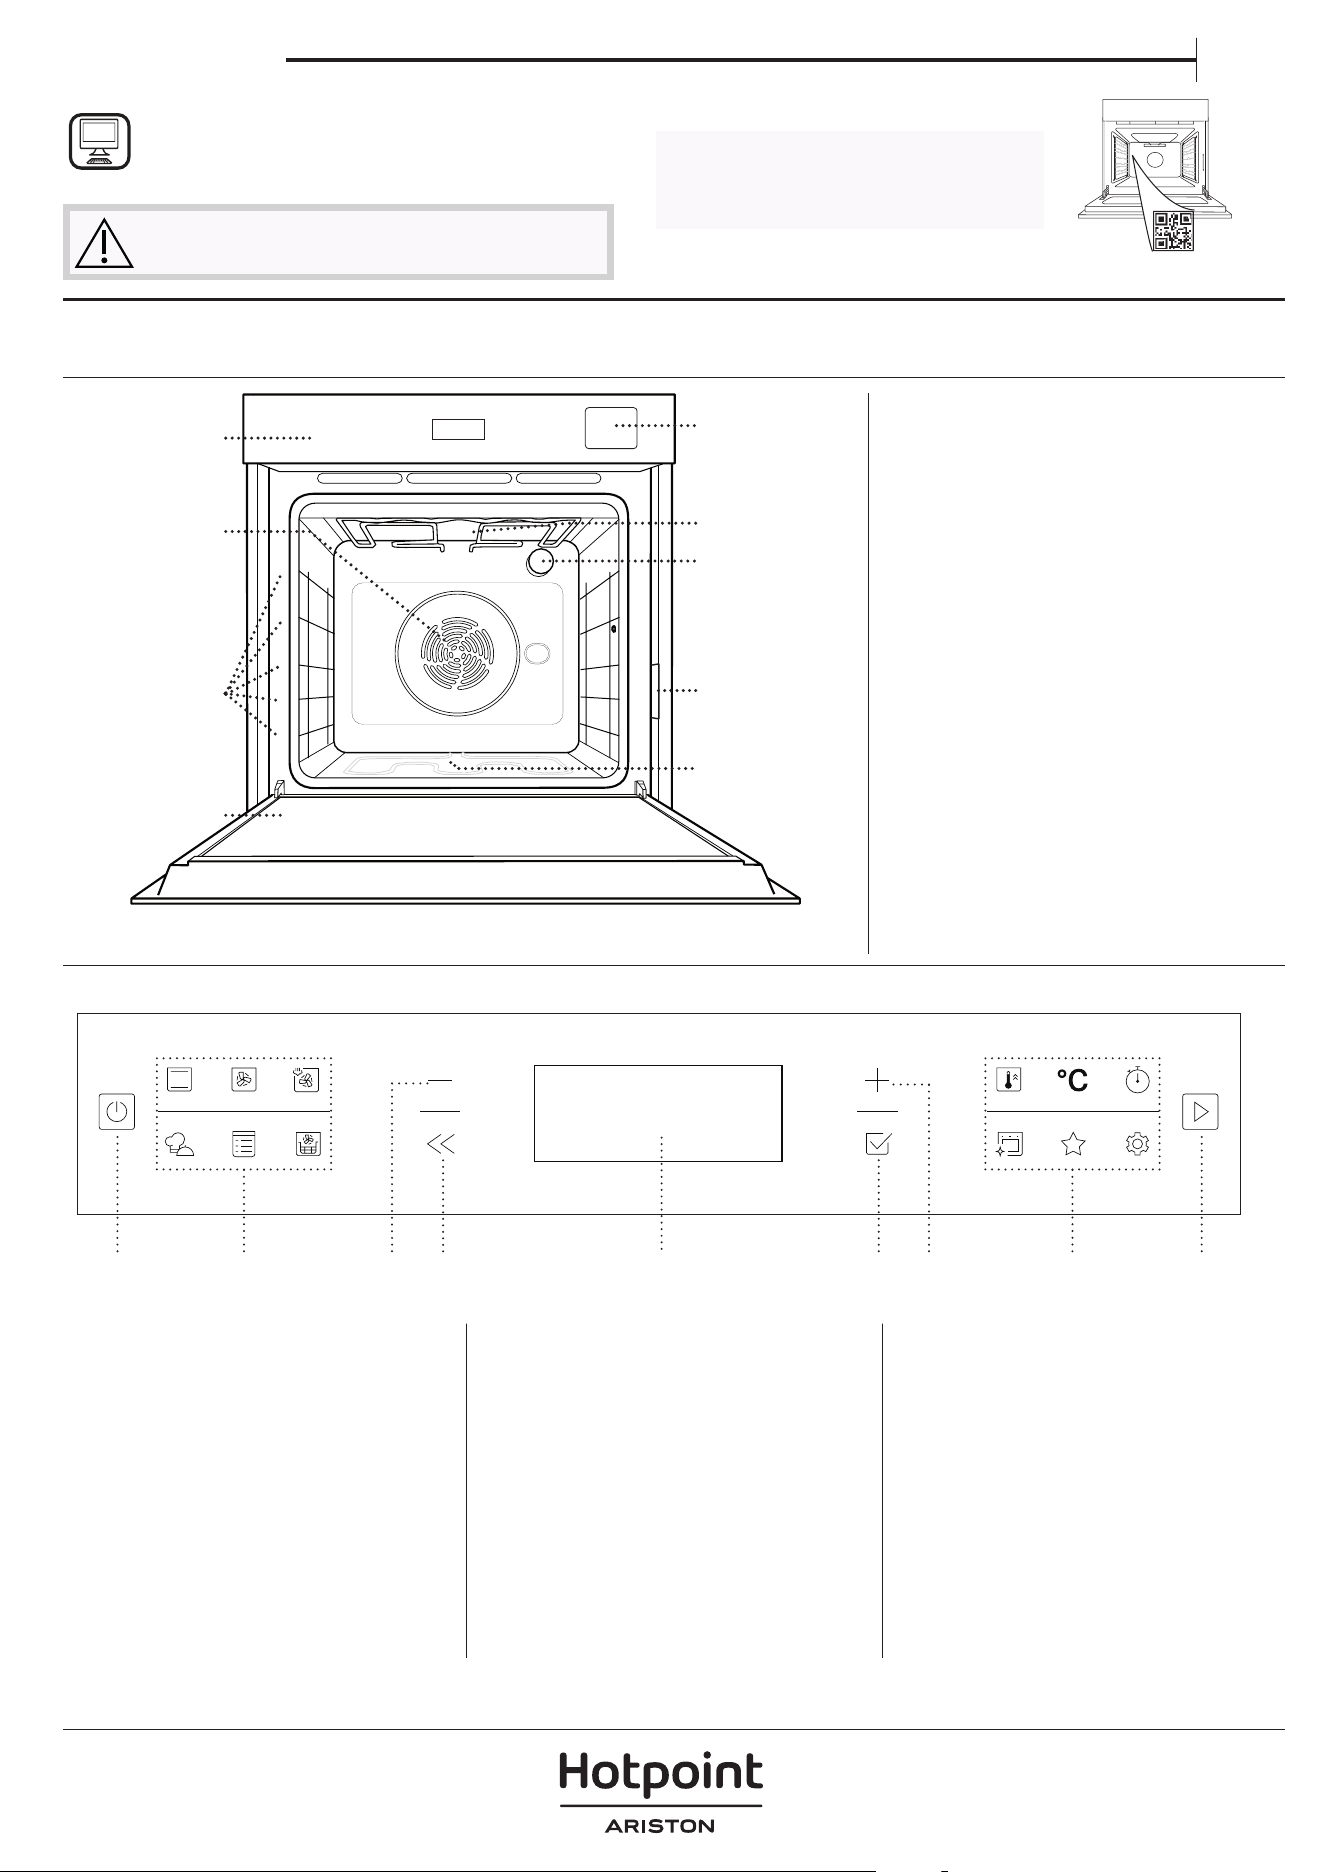
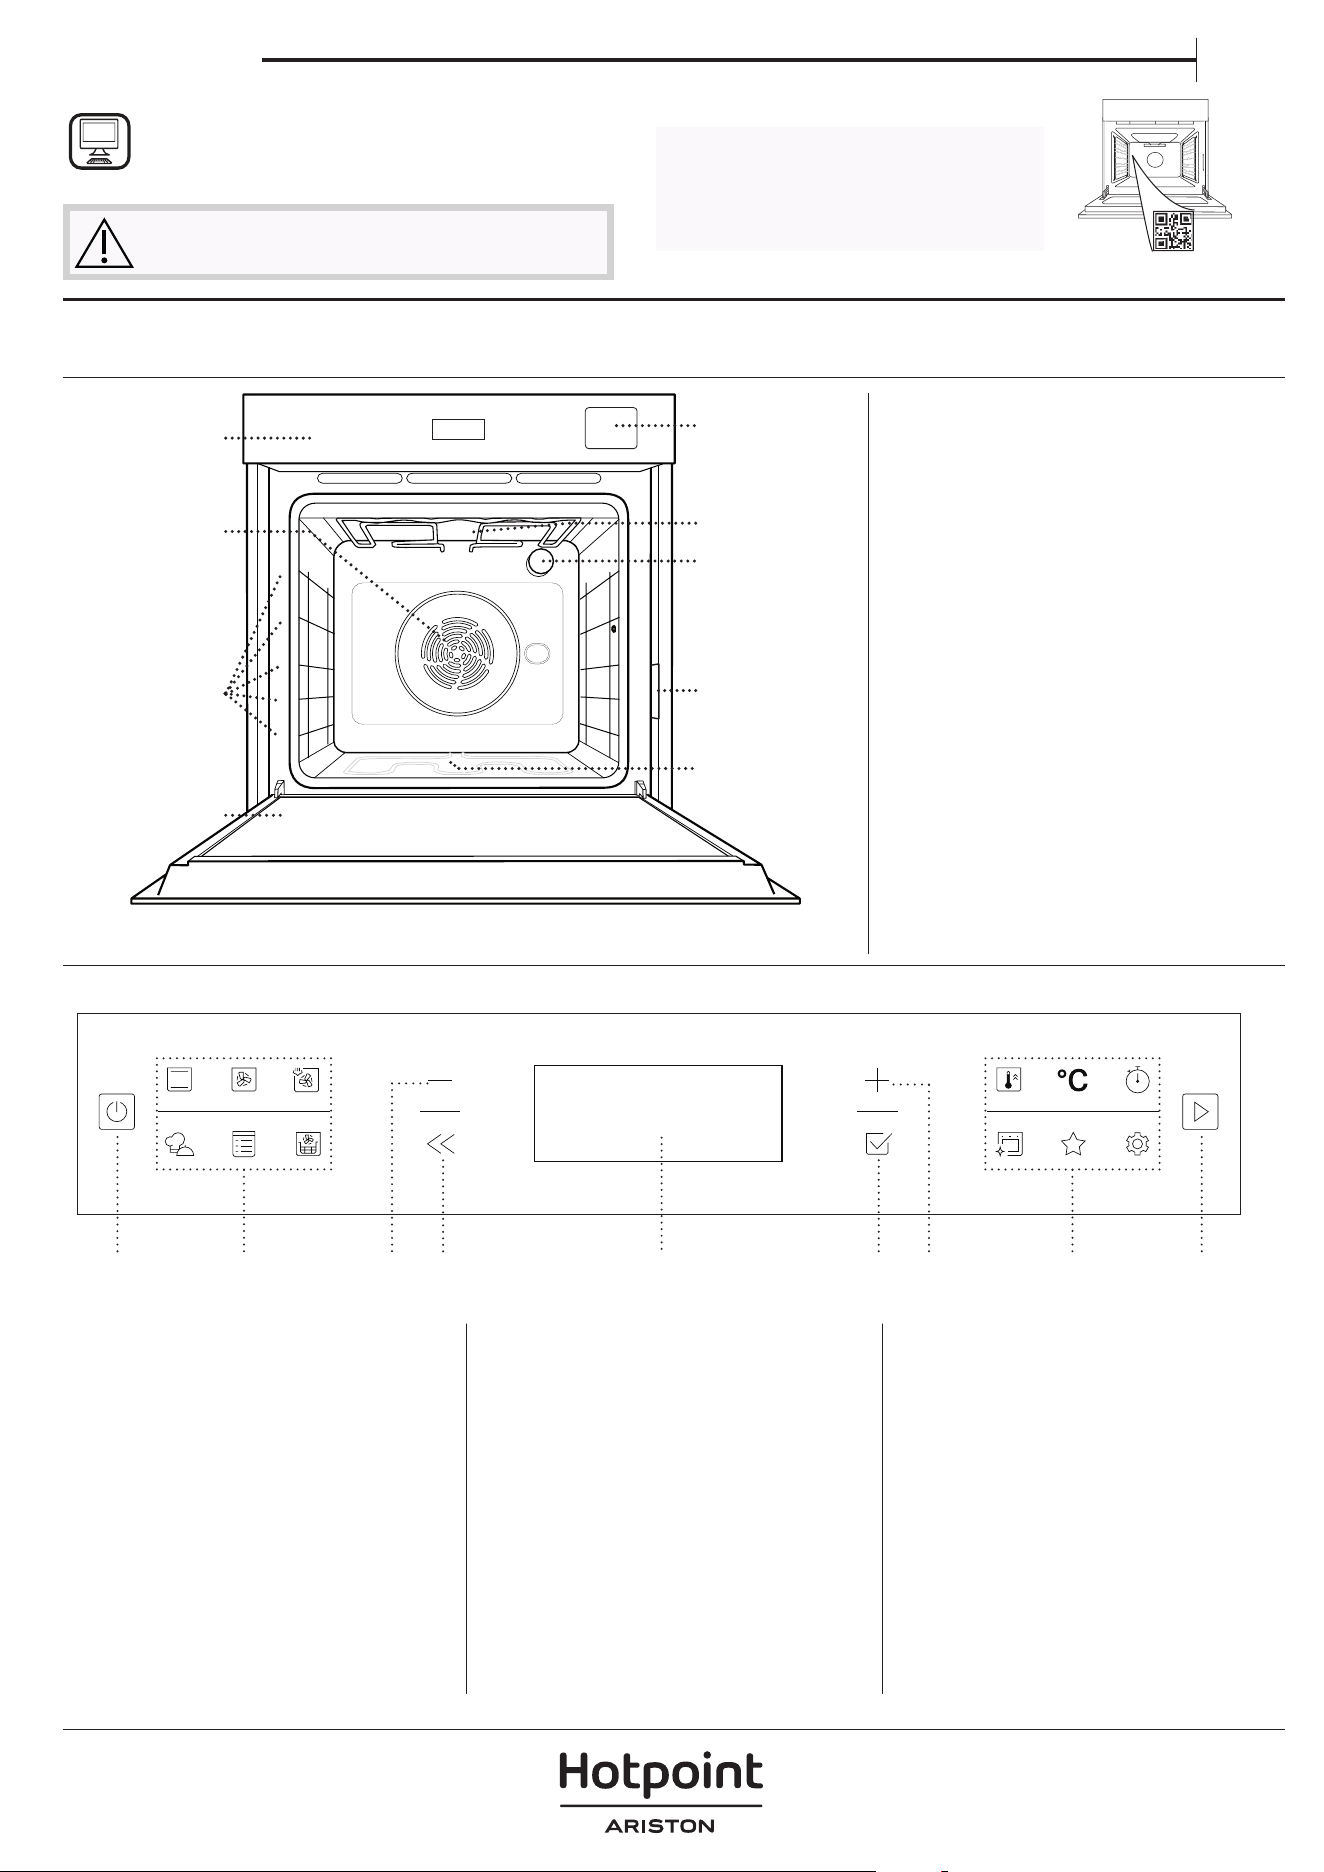
PRODUCT DESCRIPTION
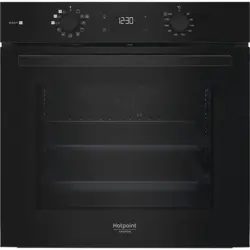
CONTROL PANEL
1. Control panel
2. Fan and circular heating element
(non-visible)
3. Shelf guides
(the level is indicated on the front
of the oven)
4. Door
5. Water drawer
6. Upper heating element/grill
7. Lamp
8. Identification plate
(do not remove)
9. Lower heating element
(non-visible)
1. ON / OFF
For switching the oven on and
off and for stopping an active
function.
2. FUNCTIONS DIRECT ACCESS
For quick access to the functions
and menu.
3. NAVIGATION BUTTON MINUS
For scrolling through a menu and
decreasing the settings or values
of a function.
4. BACK
For returning to the previous
screen. During cooking, allows
settings to be changed.
5. DISPLAY
6. CONFIRM
For confirming a selected function
or a set value.
7. NAVIGATION BUTTON PLUS
For scrolling through a menu and
increasing the settings or values of
a function.
8. OPTIONS / FUNCTIONS
DIRECT ACCESS
For quick access to the functions,
duration, settings and favorites.
9. START
For starting a function using the
specified or basic settings.
5
4
3
2
1
5
4
3
2
1
1
2
3
4
5
9
7
6
PLEASE SCAN THE QR CODE ON
YOUR APPLIANCE IN ORDER TO
REACH MORE INFORMATION
8
1 3 4 5 6 7 8 92
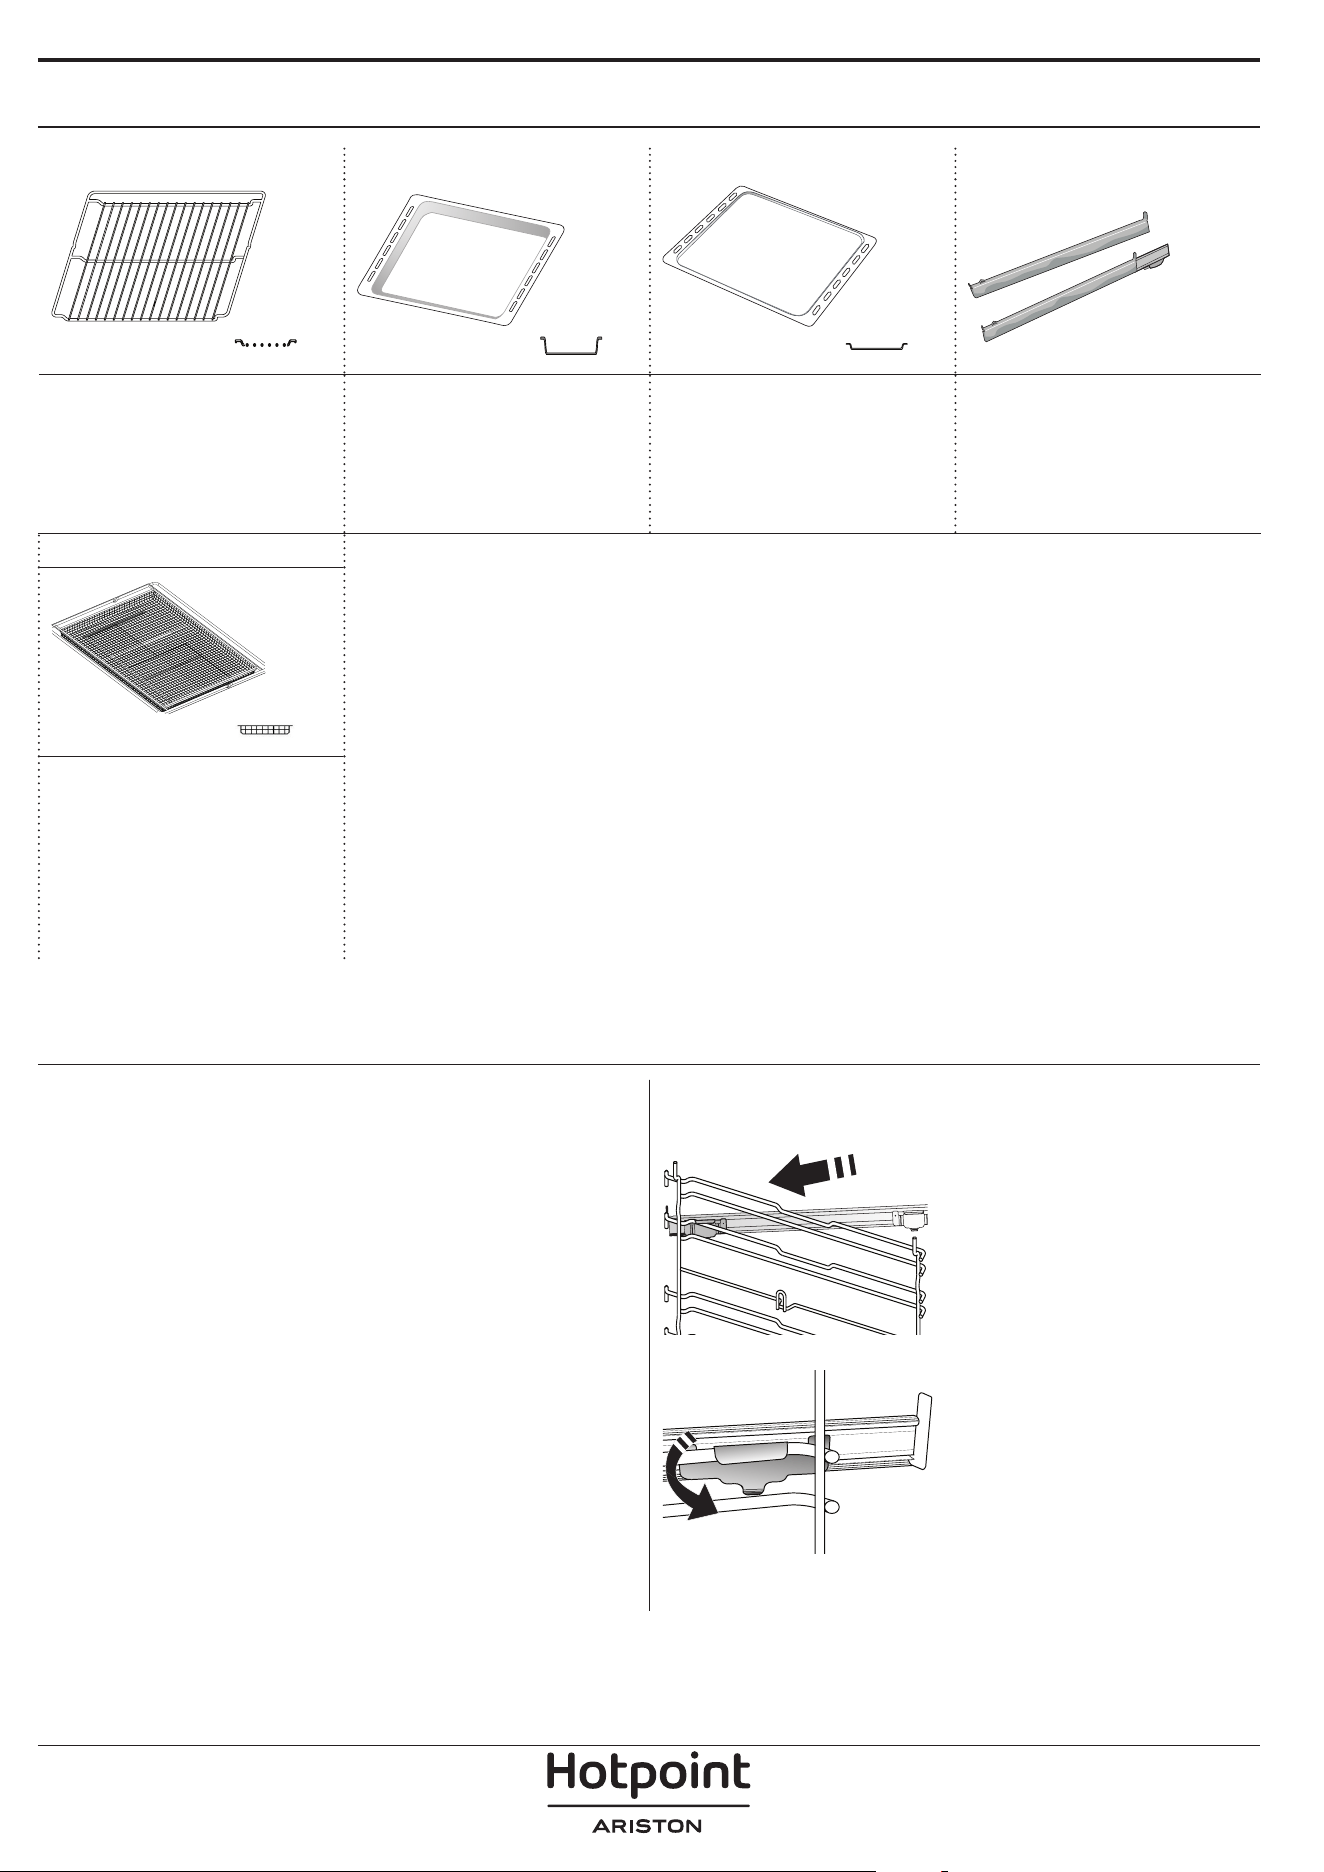
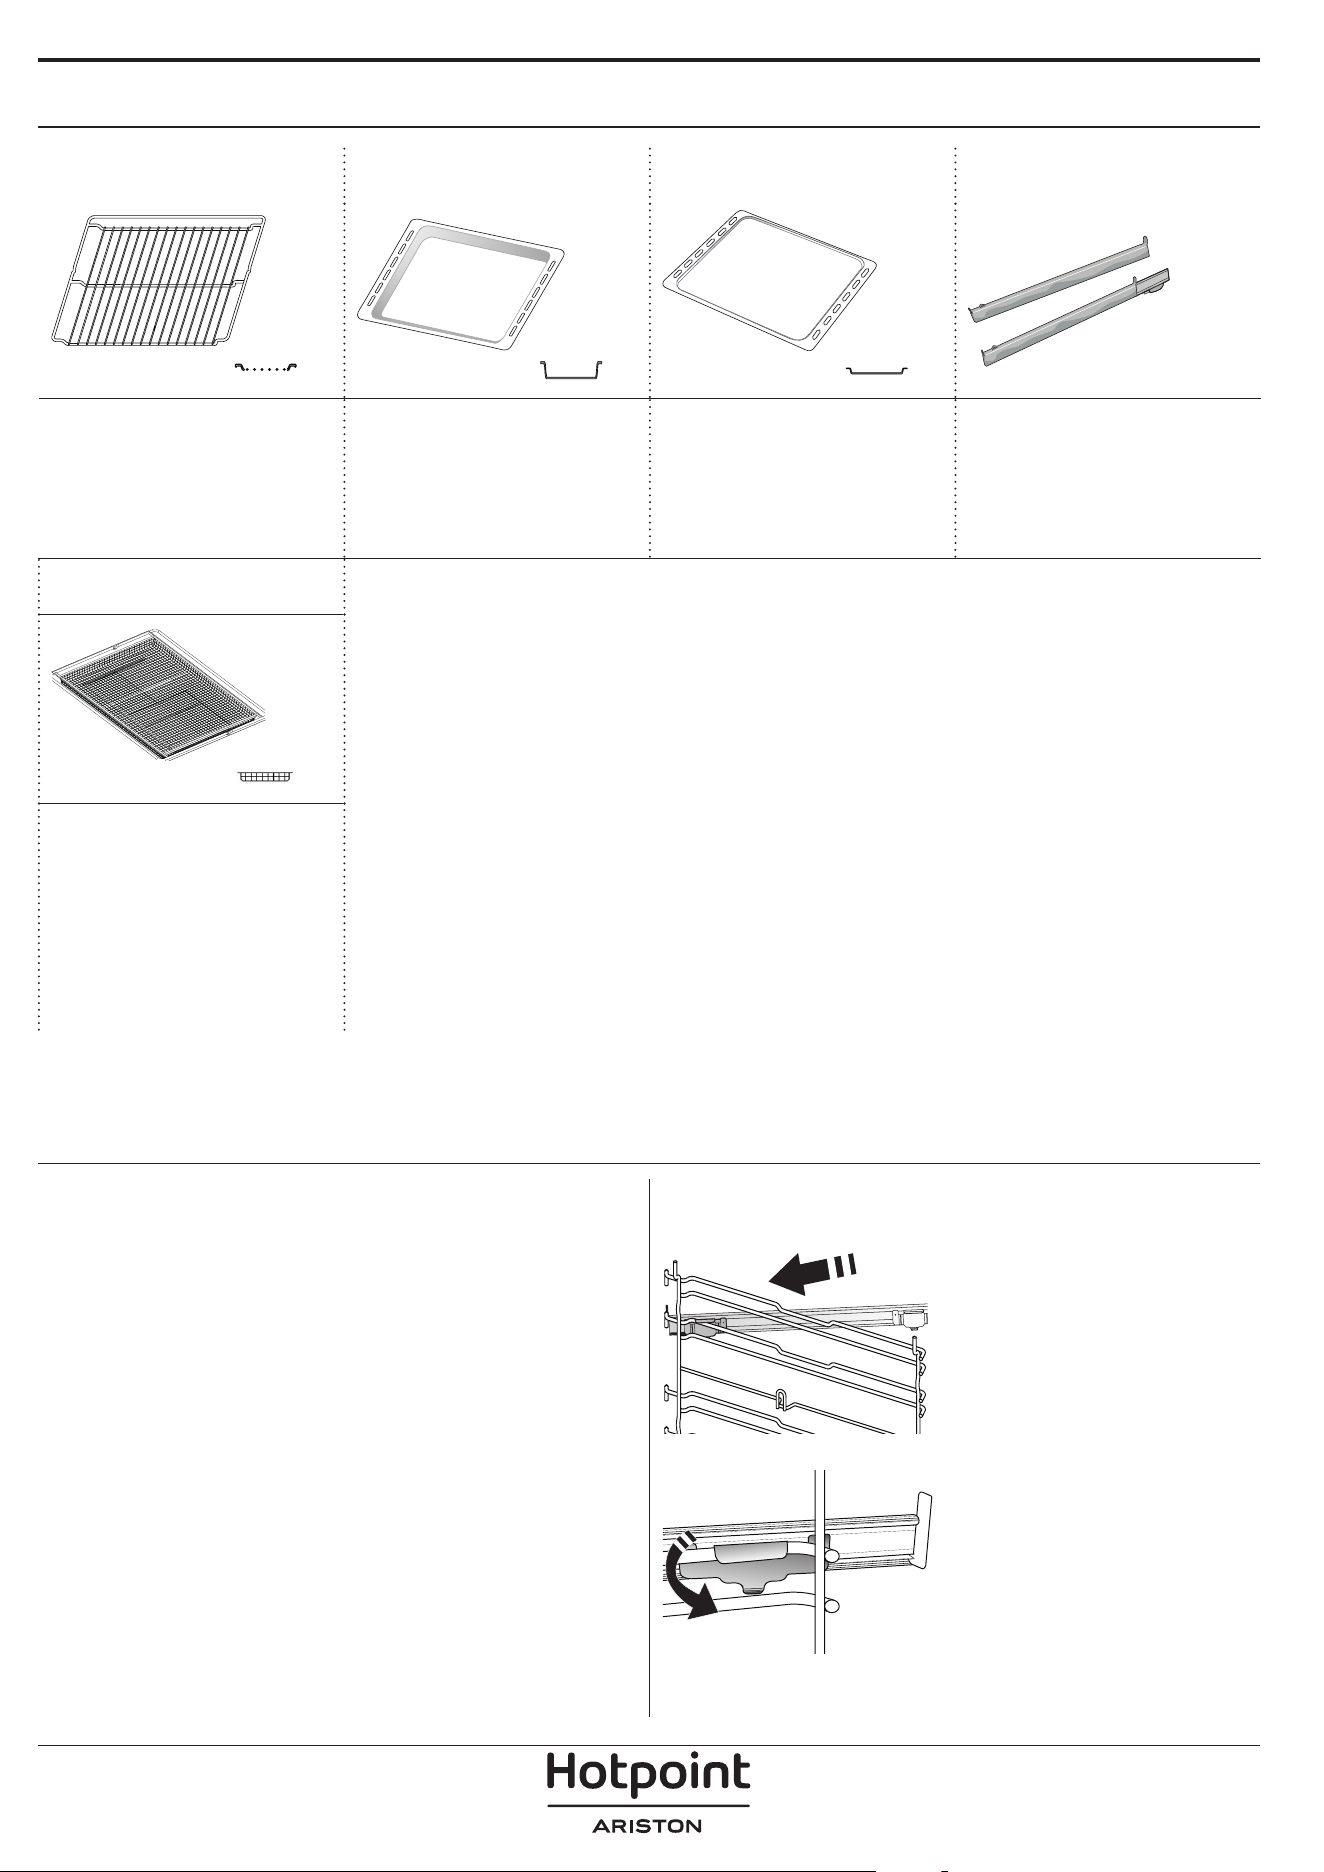
ACCESSORIES
WIRE SHELF DRIP TRAY BAKING TRAY* SLIDING RUNNERS*
Use to cook food or as a
support for pans, cake
tins and other ovenproof
items of cookware.
Use as an oven tray
for cooking meat, fish,
vegetables, focaccia, etc.
or position underneath
the wire shelf to collect
cooking juices.
Use for cooking all bread
and pastry products, but
also for roasts, fish en
papillotte, etc.
To facilitate inserting or
removing accessories.
AIR FRY TRAY *
To be used when
cooking foods with Air
Fry function, with a
baking tray positioned
at a lower level to collect
possible crumbs and
drip. It can be cleaned in
the dishwasher.
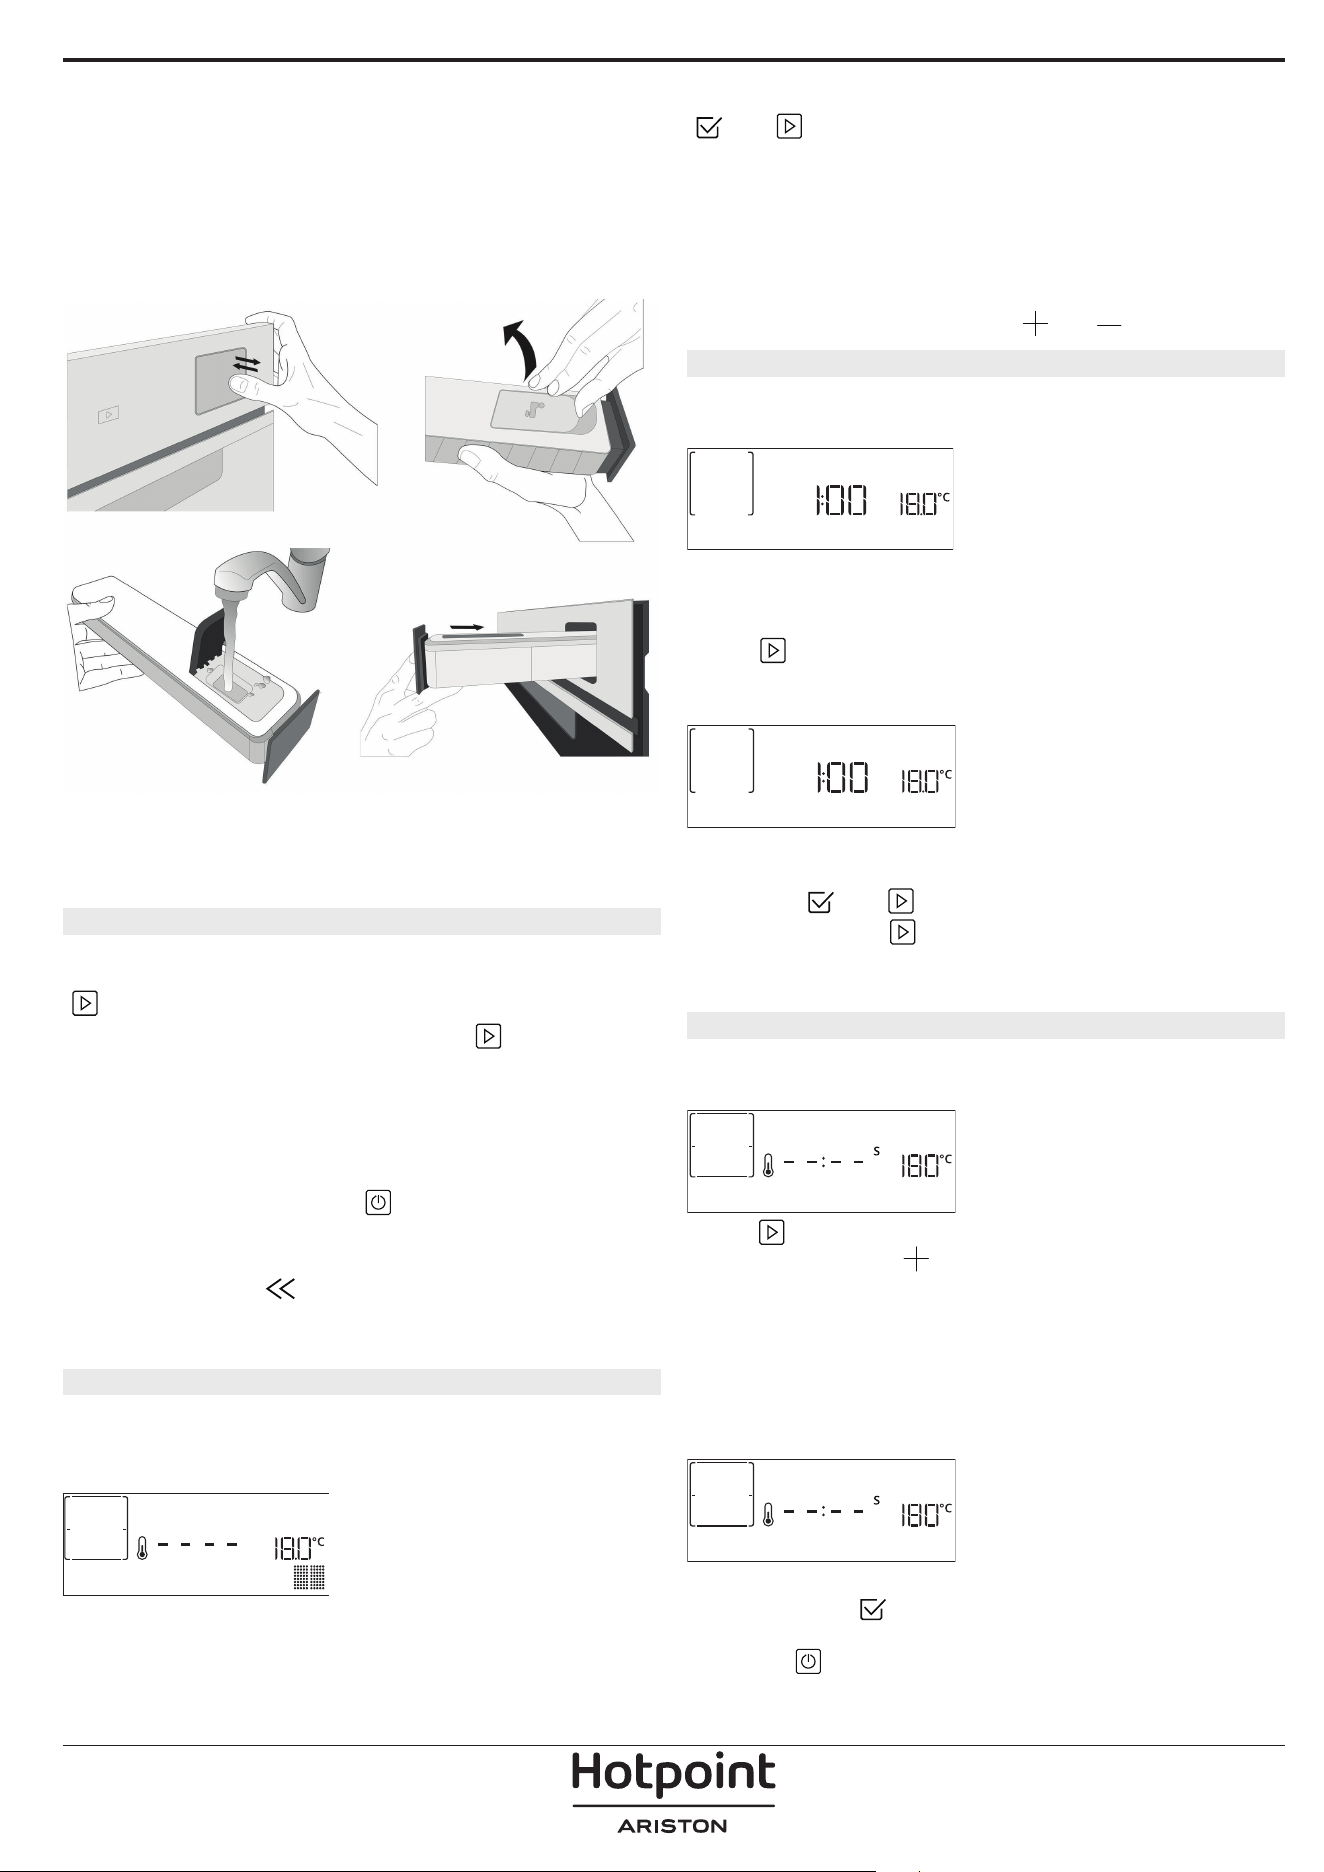
INSERTING THE WIRE SHELF AND OTHER
ACCESSORIES
Insert the wire shelf horizontally by sliding it across
the shelf guides, making sure that the side with the
raised edge is facing upwards.
Other accessories, such as the drip tray and the
baking tray, are inserted horizontally in the same way
as the wire shelf.
REMOVING AND REFITTING THE SHELF GUIDES
• To remove the shelf guides, lift them up and pull the
lower parts out of their lodgings: The shelf guides can
now be removed.
• To refit the shelf guides, first fit them back into their
upper seating. Keeping them held up, slide them
into the cooking compartment, then lower them into
position in the lower seating.
FITTING THE SLIDING RUNNERS
Remove the shelf guides
from the oven and remove
the protective plastic from
the sliding runners.
Fasten the upper clip of the
runner to the shelf guide
and slide it along as far as it
will go. Lower the other clip
into position.
To secure the guide, press
the lower portion of the clip
firmly against the shelf
guide. Make sure that the
runners can move freely.
Repeat these steps on the
other shelf guide on the
same level.
Please note: The sliding runners can be tted on any level.
The number and the type of accessories may vary depending on which model is
purchased.
Other accessories can be purchased separately; for orders and information contact
the after sales service.
* Available only in certain models
The number and the type of accessories may vary depending on which model is purchased.
Other accessories can be purchased separately; for orders and information contact the after sales service.
* Available only in certain models
FUNCTIONS
CONVENTIONAL
For cooking any kind of dish on one shelf only.
FORCED AIR
For cooking different foods that require the same
cooking temperature on several shelves (maximum
three) at the same time. This function can be used to
cook different foods without odours being transferred
from one food to another.
STEAM + AIR
Combining the properties of steam with thoseof the
forced air, this function allows you tocook dishes
pleasantly crispy and browned outside, but at the
same time tender and succulent inside. To achieve the
best cooking results, we recommend to select a LEVEL
3 steam for fish cooking, LEVEL 2 steam for meat and
LEVEL 1 for bread and desserts.
For more information on Steam + Air manual cooking
cycles head to the “Steam + Air” Cooking Table.
MY MENU
These allow a fully automatic cooking for all types
of food (Lasagna, Meat, Fish, Vegetables, Cakes &
Pastries, Salt cakes, Bread, Pizza). To get the best from
this function, follow the indications on the relative
cooking table.
MANUAL FUNCTIONS
• CONVECT BAKE
For cooking meat, baking cakes with fillings on
one shelf only
• MULTIFLOW MENU
For cooking different foods that require the same
cooking temperature on four levels at the same
time. This function can be used to cook cookies,
cakes, round pizzas (also frozen) and to prepare a
complete meal. Follow the cooking table to obtain
the best results.
• GRILL
For grilling steaks, kebabs and sausages, cooking
vegetables au gratin or toasting bread. When
grilling meat, we recommend using a drip tray to
collect the cooking juices: Position the tray on any
of the levels below the wire shelf and add 500 ml
of drinking water.
• TURBO GRILL
For roasting large joints of meat (legs, roast beef,
chicken). We recommend using a drip tray to
collect the cooking juices: Position the pan on any
of the levels below the wire shelf and add 500 ml
of drinking water.
• FROZEN BAKE
The function automatically selects the ideal
cooking temperature and mode for 5 different
types of ready frozen food. The oven does not
have to be preheated.
• SPECIAL FUNCTIONS
» PIZZA
This function allows you to cook great
homemade pizza, in less than 10 minutes like
in a restaurant.
The dedicated cooking cycle works at
temperature level above 300 degree Celsius,
delivering pizza soft inside, crunchy on the
edges and with a perfectly even browning.
Combining this function with the Pizza Stone
WPro accessory and preheating for 30 minutes
can bake a pizza in 5-8 min. (For orders and
information contact the after sales service or
www.hotpoint.eu.)
» RISING
For optimal proving of sweet or savoury
dough. To maintain the quality of proving, do
not activate the function if the oven is still hot
following a cooking cycle.
» KEEP WARM
For keeping just-cooked food hot and crisp.
» DEFROST
To speed up defrosting of food. Place food on
the middle shelf. Leave food in its packaging
to prevent it from drying out on the outside.
» ECO CYCLE
For cooking stuffed roasting joints and fillets
of meat on a single shelf. When this Eco Cycle
is in use, the light will remain switched off
during cooking. To use the Eco Cycle and
therefore optimise power consumption, the
oven door should not be opened until the
food is completely cooked.
» MAXI COOKING
The function automatically selects the best
cooking mode and temperature to cook large
joints of meat (above 2.5 kg). It is advisable
to turn the meat over during cooking, to
obtain even browning on both sides. It is best
to baste the meat every now and again to
prevent it from drying out.
• SLOW COOKING
To gently cook meat and fish. This function cooks
food slowly to keep it tender and succulent. Due
to the low temperature, the food does not brown
on the outside and the end result is similar to
steam cooking. We recommend searing roast meat
in a pan first to brown the meat and help seal in
its natural juices. For best results, keep the oven
door closed during cooking in order to avoid heat
dispersion.Suggested cooking times ranges for
fish (300 g - 3 kg) are between 2-5 hours, for meat
(1-3 kg) between 4-7 hours.
AIR FRY
This function allows you to cook French fries, chicken
nuggets and more using less oil, resulting pleasantly
crispy. Heating elements cycle to properly heat the
cavity, while the fan circulates hot air. Best expected
cooking results can be achieved only by using an Air
Fry tray (provided with some models). Position the
food on the Air Fry tray in a single layer and follow Air
Fry Cooking Table instructions for best performances.
Avoid using more than one tray to prevent uneven
cooking..
FAST PREHEAT
For preheating the oven quickly.
MINUTE-MINDER
For keeping time without activating a function.
DIAMOND CLEAN
The action of the steam released during this special
low-temperature cleaning cycle allows dirt and food
residues to be removed with ease. Pour 200 ml of
drinking water on the bottom of the oven and only
activate the function when the oven is cold.
DESCALE
For removing limescale deposits from the boiler. We
recommend using this function at regular intervals. If
you do not, a message will appear on the display
reminding you to clean the oven.
FAVORITES
For retrieving the list of 10 favorite functions.
SETTINGS
For adjusting the oven settings. When “ECO” mode is
active the brightness of the display will be reduced
to save energy and lamp switches off after 1 minute.
It will be reactivated automatically whenever any of
the buttons are pressed. When “DEMO” is “On” all
commands are active and menus available but the
oven doesn’t heat up. To deactivate this mode, access
“DEMO” from “SETTINGS” menu and select “Off”. By
selecting “FACTORY RESET”, the product switches off
and then it returns to first switch on. All settings will
be deleted.

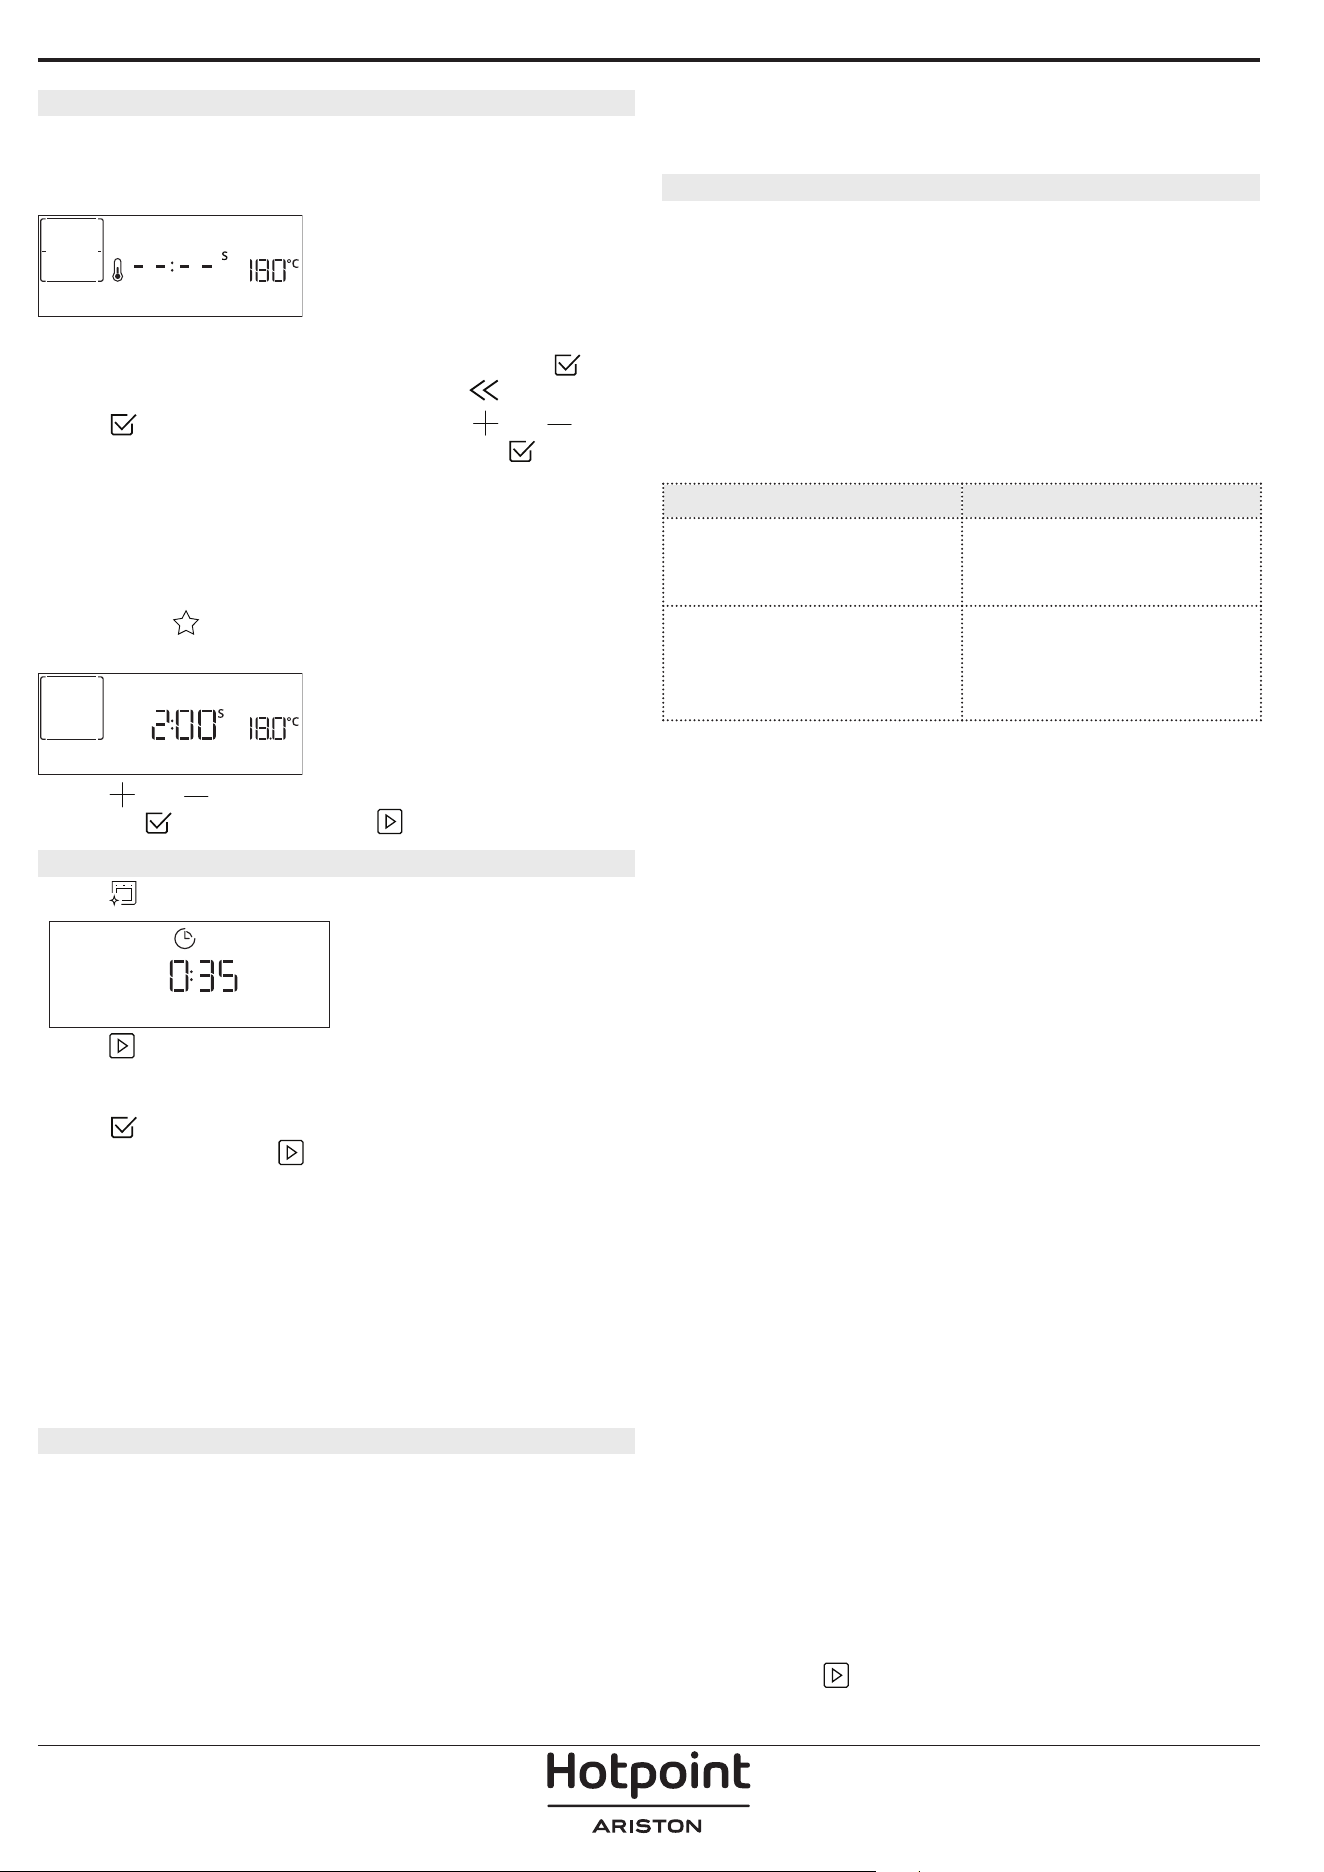
FIRST TIME USE
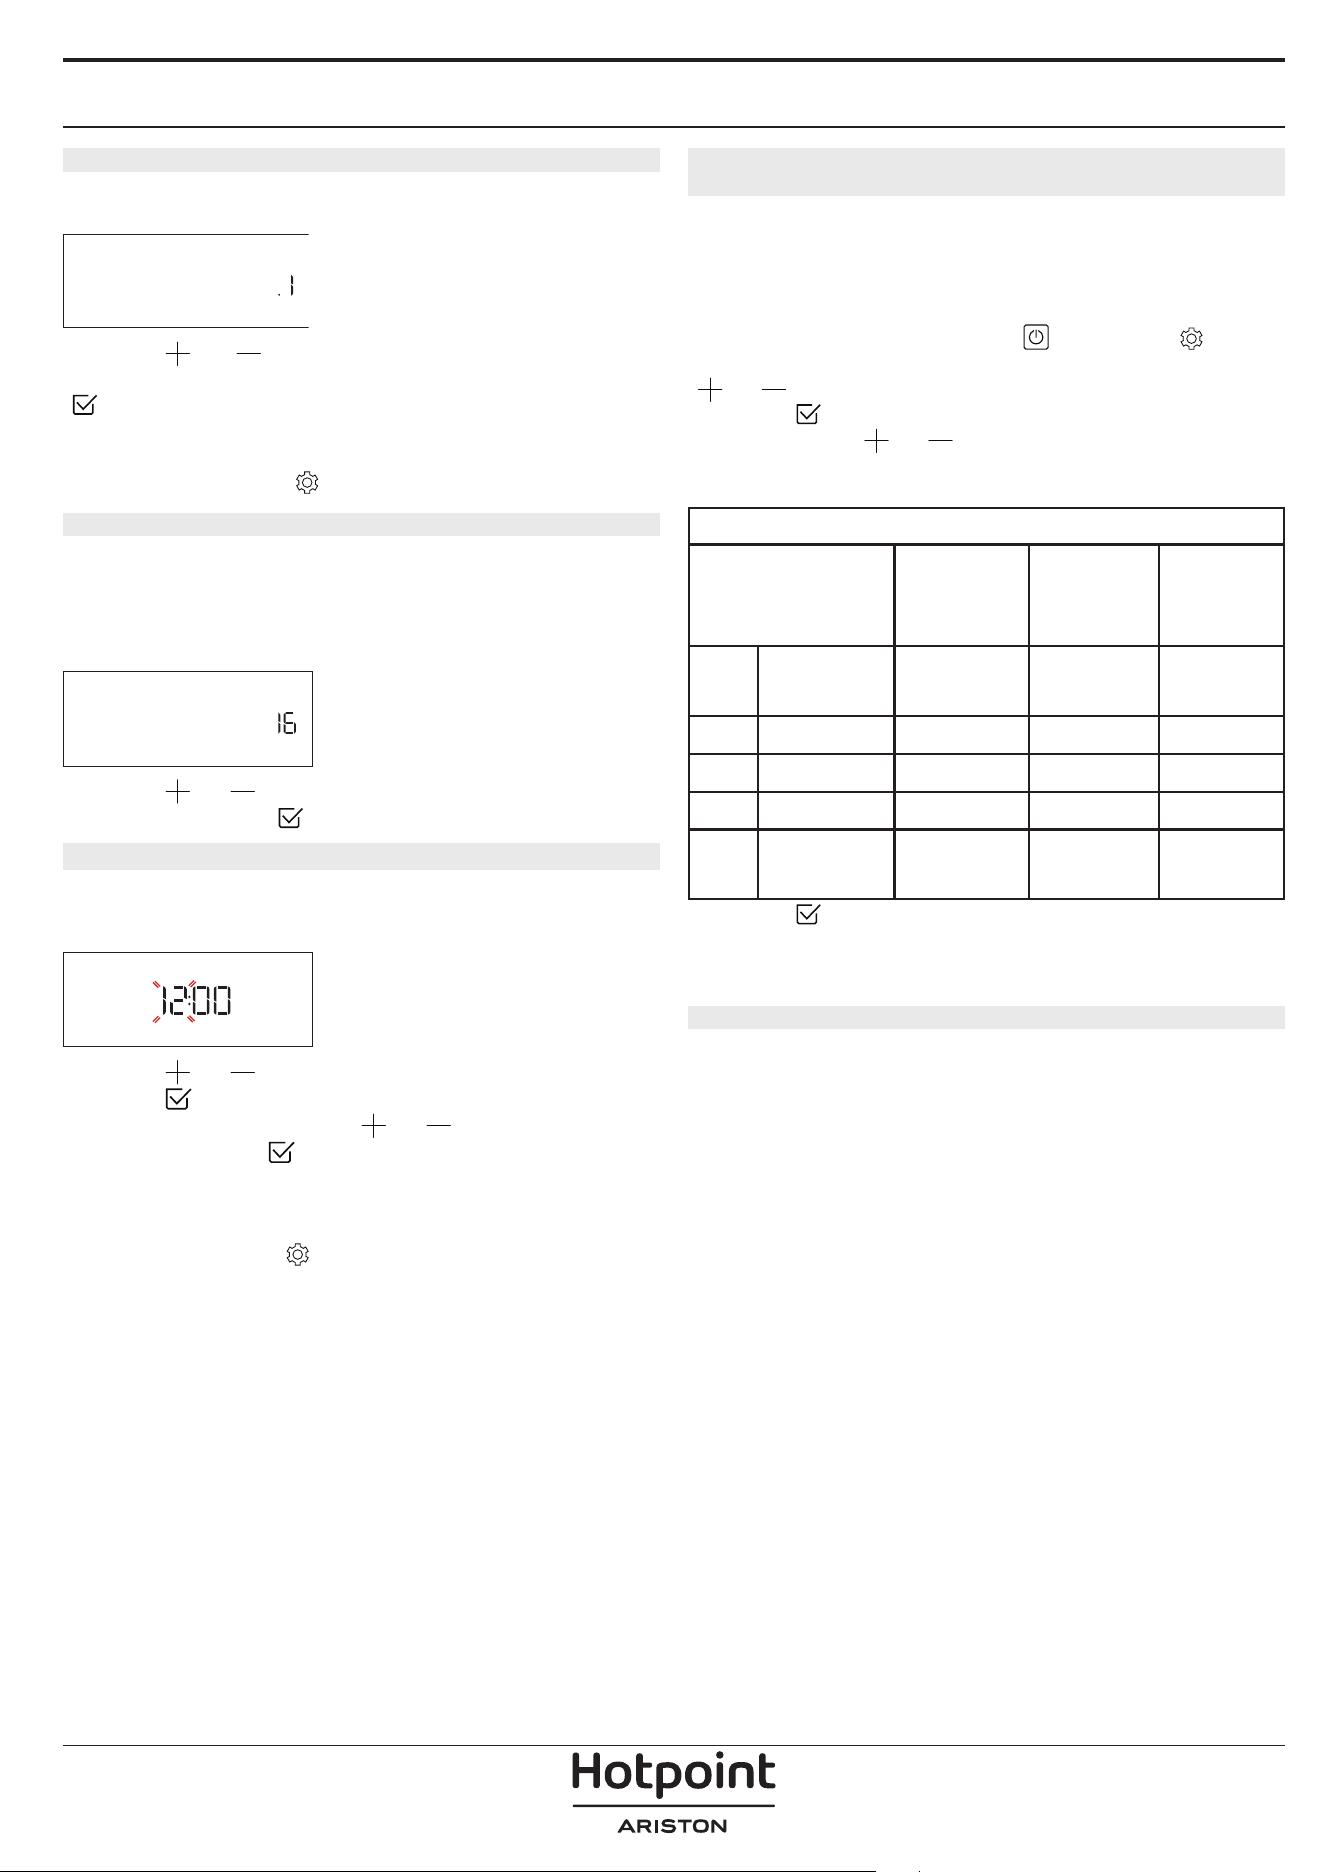
1. SELECT THE LANGUAGE
You will need to set the language and the time
when you switch on the appliance for the first time:
“English” will show on the display.
ENGLISH
Press or to scroll through the list of available
languages and select the one you require. Press
to confirm your selection.
Please note: The language can subsequently be changed
by selecting “LANGUAGE” in “SETTINGS” menu, available by
pressing
2. SET THE POWER CONSUMPTION
The oven is programmed to consume a level of
electrical power that is compatible with a domestic
network that has a rating of more than 3 kW (16): If
your household uses a lower power, you will need to
decrease this value (13).
POWER
Press or to select 16 “High” or 13 “Low” and
press
to confirm.
3. SET THE TIME
After selecting the language, you will need to set the
current time: The two digits for the hour will flash on
the display.
CLOCK
Press or to set the correct hour and press
: The two digits for the minutes will flash on the
display. Press
or to set the minutes and press
to confirm.
Please note: You may need to set the time again following
lengthy power outages. Select “CLOCK” in “SETTINGS” menu,
available by pressing
4. SET THE WATER HARDNESS LEVEL
In order to allow the oven to work efficiently, and
to guarantee that it regularly prompts the user to
perform Descale cycle when needed, it is important
to set the correct water hardness level. To set it,
switch on the oven by pressing
, press
Settings and use navigation buttons and
to select “WATER HARDNESS”. Press
to confirm.
Use navigation buttons
and to select the
correct level for the water of your area, based on the
following table:
WATER HARDNESS LEVELS TABLE
Level
°dH
German
degrees
°fH
French
degrees
°Clark
English
degrees
1 Very soft 0-6 0-10 0-7
2 Soft 7-11 11-20 8-14
3 Mid 12-16 21-29 15-20
4 Hard 17-34 30-60 21-42
5 Very hard 35-50 61-90 43-62
Press to confirm.
For Water Hardness level, “Hard” is preset.
5. HEAT THE OVEN
A new oven may release odours that have been left
behind during manufacturing: This is completely
normal.
Before starting to cook food, we therefore
recommend heating the oven with it empty in
order to remove any possible odours.
Remove any
protective cardboard or transparent film from the
oven and remove any accessories from inside it. Heat
the oven to 200 °C for around one hour, ideally using
a function with air circulation (e.g. “Forced Air” or
“Convection Bake”).
Please note: It is advisable to air the room after using the
appliance for the rst time.
DAILY USE
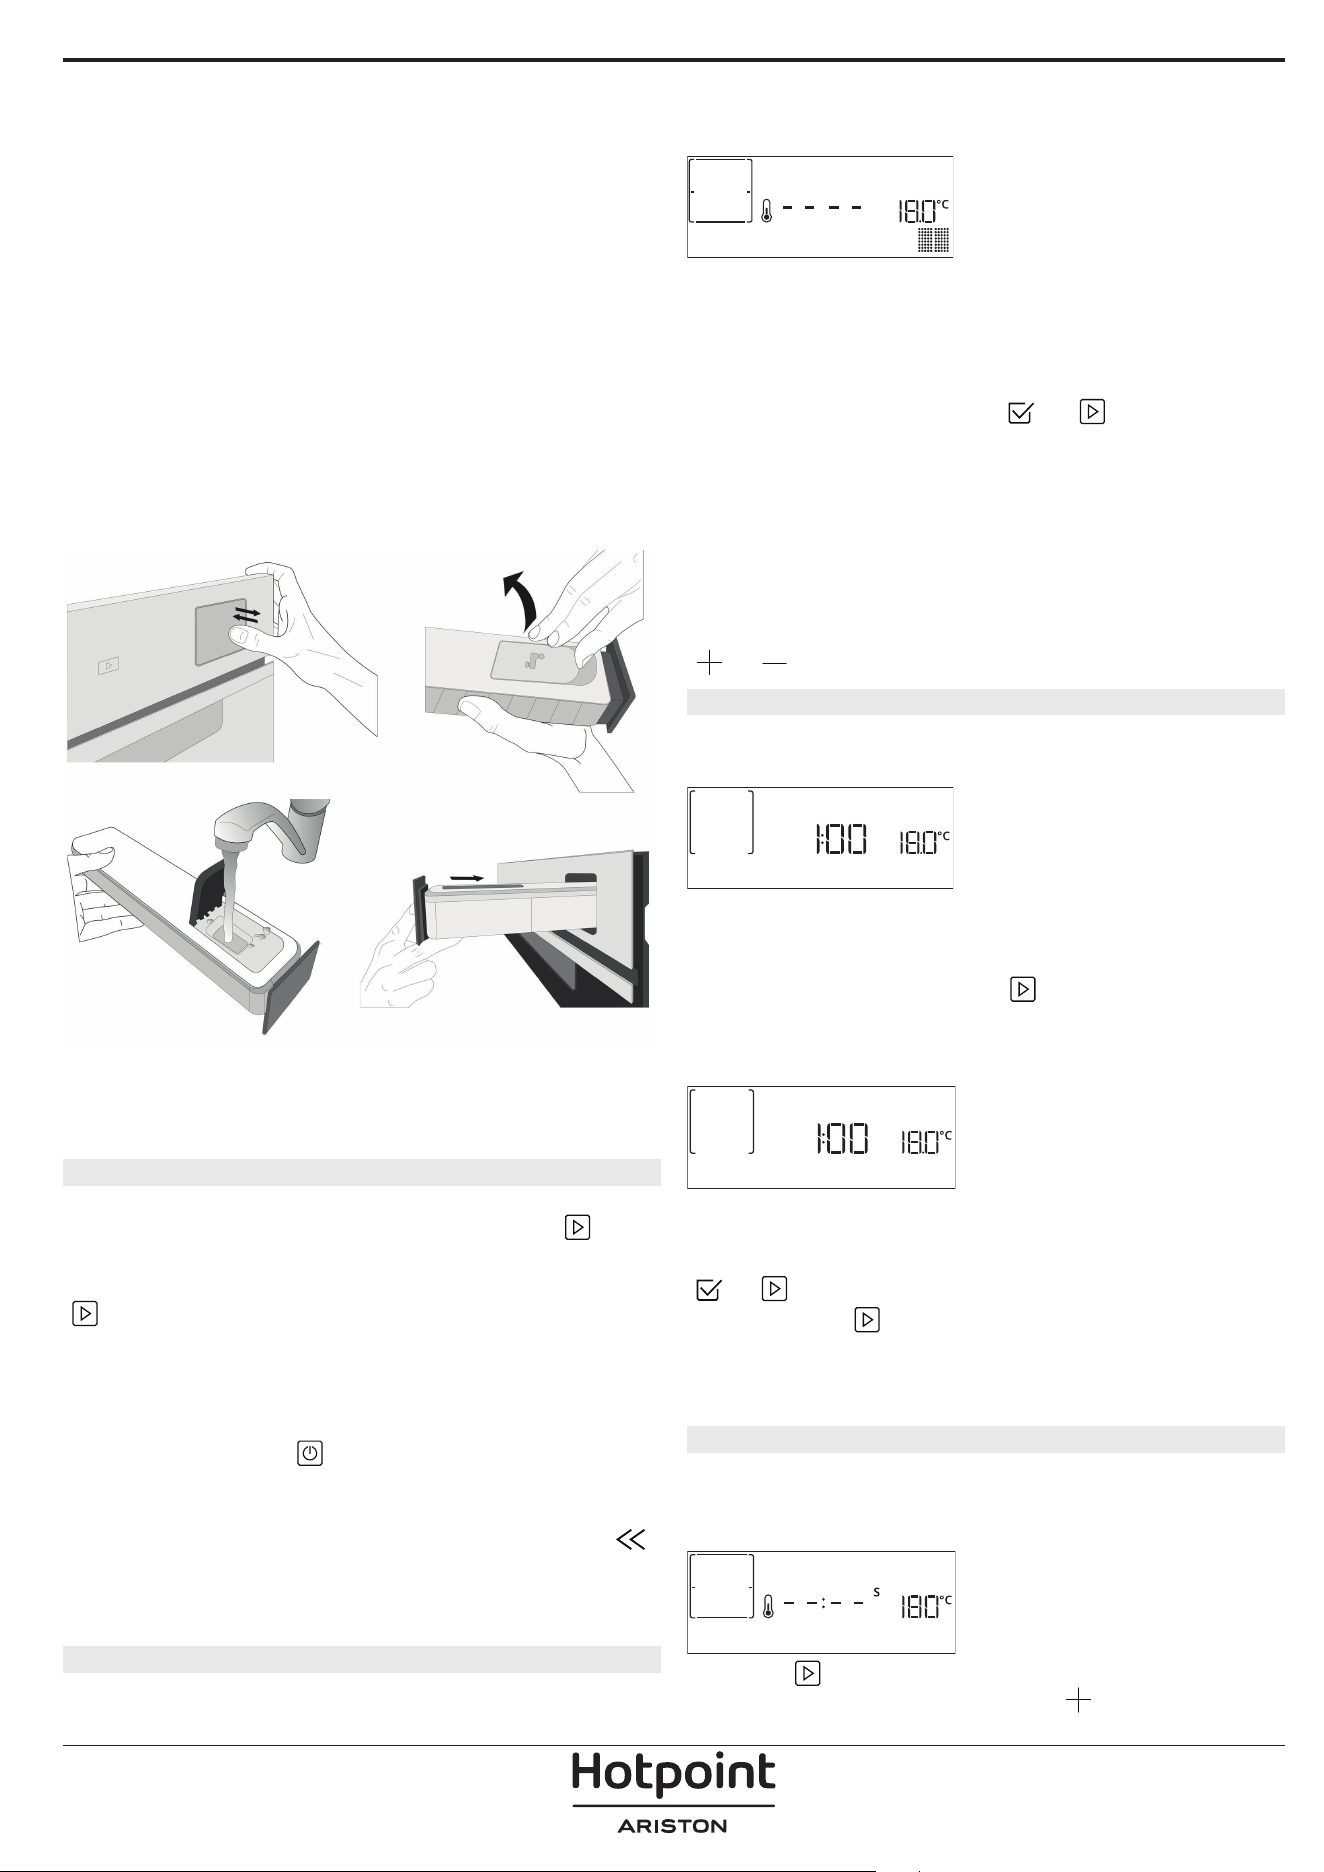
1. SELECT A FUNCTION
Press to switch on the oven: the display will show
the last running main function or the main menu.
The functions can be selected by pressing the icon
for one of the main functions or by scrolling through
a menu: To select an item from a menu (the display
will show the first available item), press
or to
select the desired one, then press
to confirm.
2. SET THE FUNCTION
After having selected the function you require, you
can change its settings. The display will show the
settings that can be changed in sequence. Pressing
allows you to change the previous setting again.
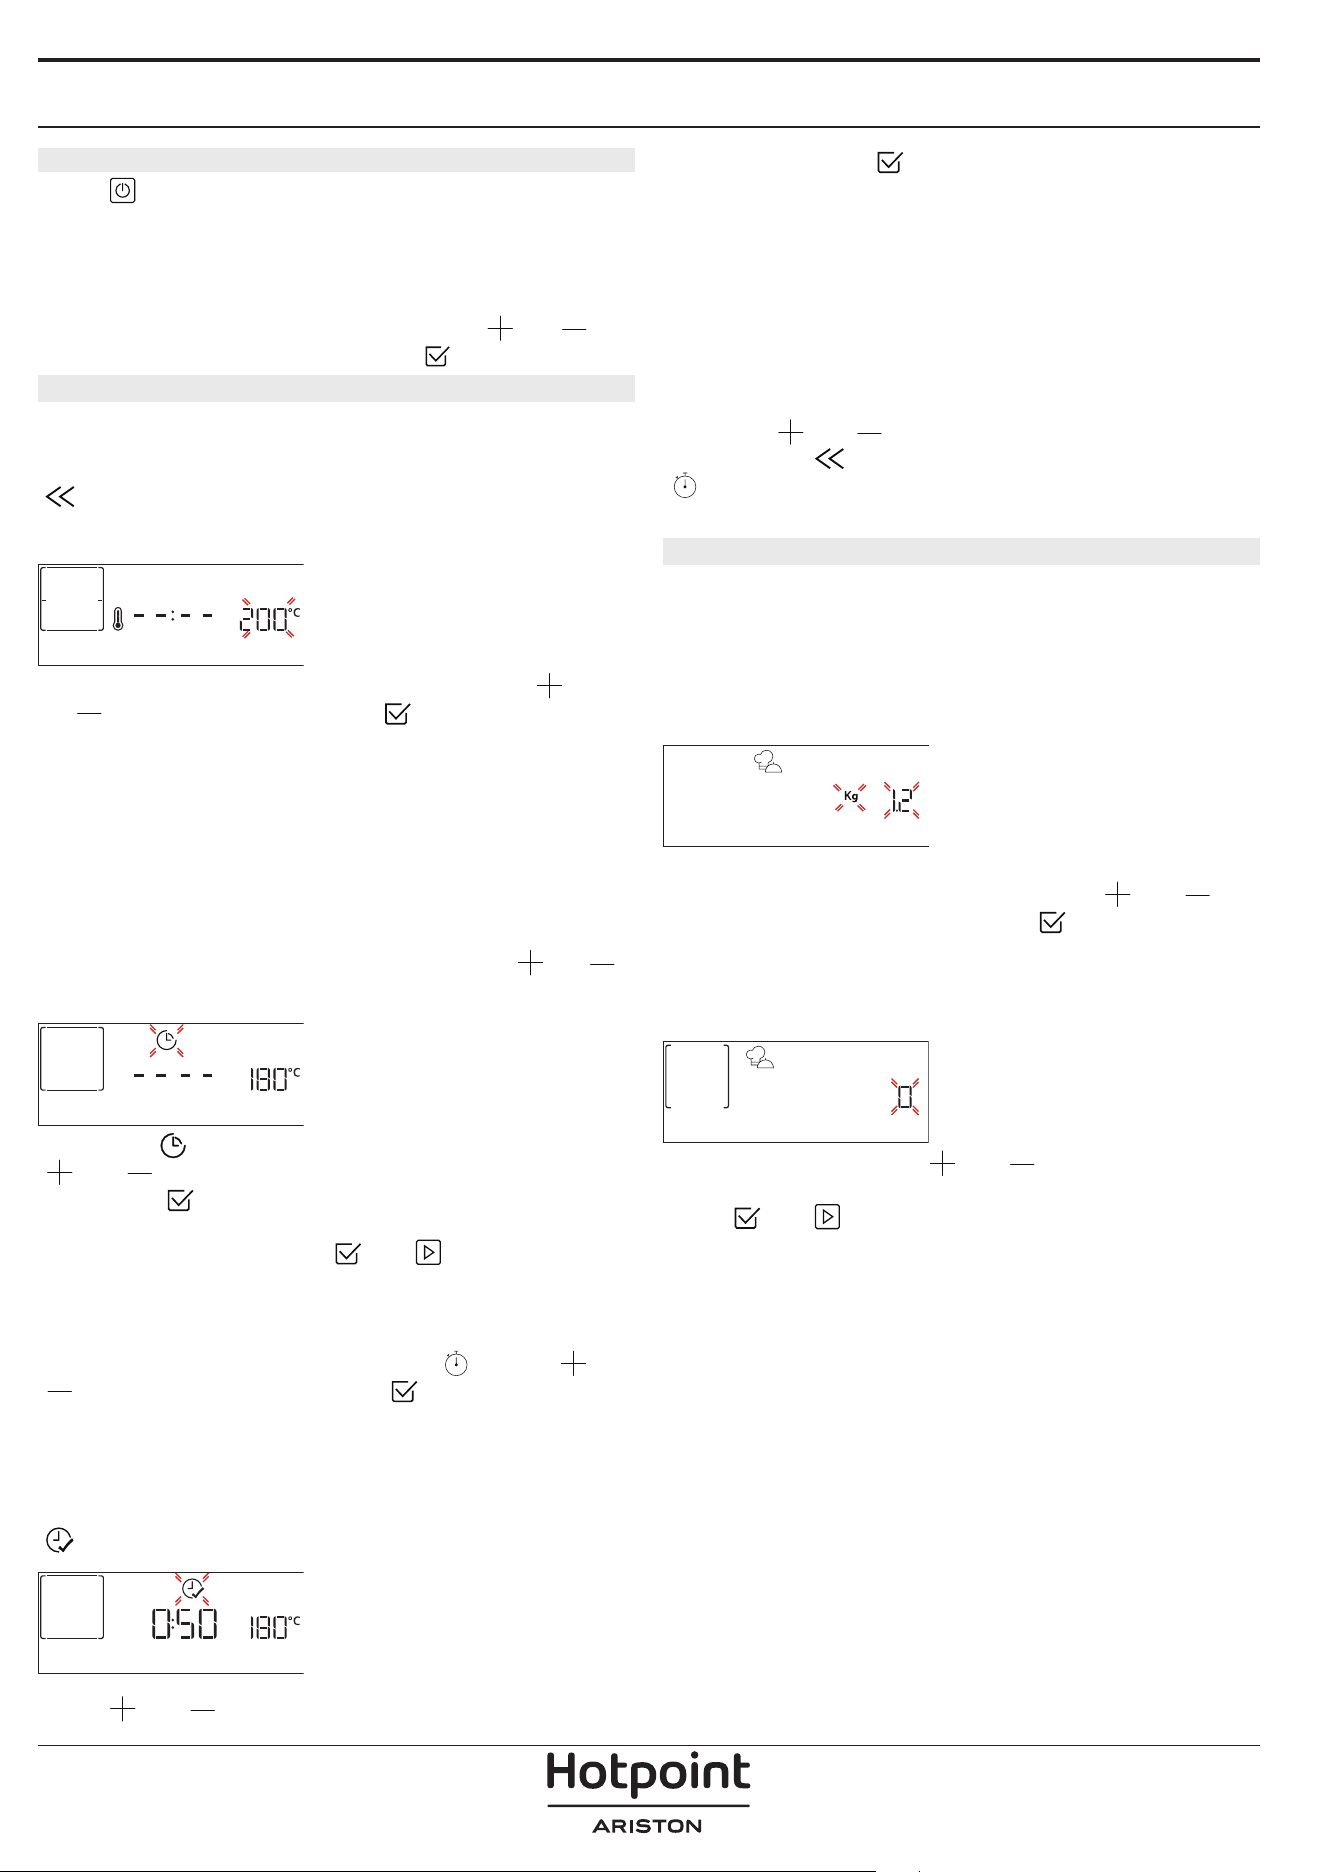
TEMPERATURE / STEAM LEVEL
TEMPERATURE
When the value flashes on the display, press
or
to change it, then press to confirm and
continue with the settings that follow (if possible).
In the same way, it is possible to set the grill level:
There are three defined power levels for grilling: 3
(high), 2 (mid), 1 (low).
In “Forced Air + Steam” function, you can select the
amount of steam from the following values: STEAM 1,
STEAM 2.
Please note: Once the function has been activated, the
temperature/grill level can be changed using
or .
DURATION
DURATION
When the icon flashes on the display, press
or to set the cooking time you require and
then press
to confirm. You do not have to set
the cooking time if you want to manage cooking
manually (untimed): Press
or to confirm and
start the function. By selecting this mode, you cannot
program a delayed start.
Please note: You can adjust the cooking time that has
been set during cooking by pressing
: press or
to amend it and then press to confirm.
END TIME (START DELAY)
In many functions, once you have set a cooking time
you can delay starting the function by programming
its end time. The display shows the end time while the
icon flashes.
END TIME
Press or to set the time you want cooking
to end, then press to confirm and activate the
function. Place the food in the oven and close the
door: The function will start automatically after the
period of time that has been calculated in order for
cooking to finish at the time you have set.
Please note: Programming a delayed cooking start time
will disable the oven preheating phase: The oven will
reach the temperature your require gradually, meaning
that cooking times will be slightly longer than those
listed in the cooking table. During the waiting time, you
can press
or to amend the programmed end
time or press
to change other settings. By pressing
, in order to visualize information, it is possible to
switch between end time and duration.
3. MY MENU
These functions automatically select the best cooking
mode, temperature and duration to cook, roast or
bake all the dishes available.
When required, simply indicate the characteristic of
food to obtain an optimal result.
WEIGHT / HEIGHT (ROUND-TRAY-LAYERS)
KILOGRAMS
To set the function correctly, follow the indications on
the display, when prompted, and press
or to
set the required value then press
to confirm.
DONENESS / BROWNING
In some MyMenu functions it is possible to adjust the
doneness level.
DONENESS
When prompted, press or to select the
desired level between rare (-1) and well done (+1).
Press
or to confirm and start the function.
In the same way, where allowed, in some MyMenu
functions, it’s possible to adjust the browning level
between low (-1) and high (+1).
COOKING WITH STEAM
By selecting the “Steam” or “Forced Air + Steam”
inside the Manual Functions or one of the several
MyMenu dedicated recipes it is possible cook any
kind of food thanks to the use of the steam. Steam
spreads more quickly and more evenly through food
compared to just the hot air typical of Conventional
Functions: this reduce cooking times, locking in food’s
precious nutrients and ensuring you obtain excellent,
truly delicious results with all your recipes. Through
the complete duration of the steam cooking the door
must be kept closed.
To proceed with steam cooking, it will be necessary
to provide water to the boiler located inside the oven
using the extractable drawer on the control panel.
When requested on the display with ”ADD WATER”
indications, extract the drawer, open drawer’s lid and
fill it with water until the level requested on the
display. Close the drawer by pushing it carefully
towards the panel until completely closed. After the
drawer insertion, press START to proceed with the
cooking cycle. The drawer must always remain closed,
except for water filling.
After the first filling, in case of longer cooking cycles,
once water will have ran out, it could be necessary to
add it again, in order to complete the cycle: the oven
will prompt it in case it is needed.
4. START THE FUNCTION
At any time, if the default values are those desired or
once you have applied the settings you require, press
to activate the function.
During the delay phase, by pressing
the oven
will ask if you want to skip this phase, starting
immediately the function.
Please note: Once a function has been selected, the
display will recommend the most suitable level for each
function. At any time you can stop the function that has
been activated by pressing
.
If the oven is hot and the function requires a specific
maximum temperature, a message will shown on
the display. Press
to return to previous screen
and select a different function or wait for a complete
cooling.
5. PREHEATING
Some functions have an oven preheating phase: Once
the function has started, the display indicates that
the preheating phase has been activated.
PREHEATING
Once this phase has finished, an audible signal will
sound and the display will indicate that the oven
has reached the set temperature, requiring to “ADD
FOOD”. At this point, open the door, place the food in
the oven, close the door and start cooking by pressing
or .
Please note: Placing the food in the oven before
preheating has finished may have an adverse effect on
the final cooking result. Opening the door during the
preheating phase will stop pause it.
The cooking time does not include a preheating
phase. You can always change the temperature you
want the oven to reach using
or .
6. TURN OR CHECK FOOD
Some MyMenu functions will require the food to be
turned during cooking.
TURN FOOD
An audible signal will sound and the display shows
the action to be done. Open the door, do the action
prompted by the display and close the door, then
press
to continue cooking.
In the same way, at 10% of time before the end of
cooking, the oven prompts you to check the food.
CHECK ON FOOD
An audible signal will sound and the display shows
the action to be done. Check the food, close the door
and press
or to continue cooking.
Please note: Press
to skip these actions. Otherwise,
if no action is done after a certain time the oven will
continue the cooking.
7. END OF COOKING
An audible signal will sound and the display will
indicate that cooking is complete.
END
Press to continue cooking in manual mode
(untimed) or press
to extend the cooking time
by setting a new duration. In both cases, the cooking
parameters will be retained.
BROWNING
Some functions of the oven enable you to brown
the surface of the food by activating the grill once
cooking is complete.
PRESS v TO BROWN
When the display shows the relevant message, if
required press
to start a five-minute browning
cycle. You can stop the function at any time by
pressing
to switch the oven off.
8. FAVORITES
Once cooking is complete the display will prompt you
to save the function in a number between 1 and 10
on your list of favorites.
ADD FAVORITE?
If you would like to save a function as a favorite and
store the current settings for future use, press
otherwise, to ignore the request press
.
Once
has been pressed, press the or
to select the number position, then press
to
confirm.
Please note: If the memory is full or the number chosen
has already been taken, the oven will ask you to confirm
overwriting the previous function.
To call up the functions you have saved at a later
time, press
: The display will show your list of
favorite functions.
1. CONVENTIONAL
Press or to select the function, confirm by
pressing
, and then press to activate.
9. DIAMOND CLEAN
Press to show “Diamond Clean” on the display.
Diamond clean
Press to activate the function: the display will
prompt you to do all actions needed to obtain the
best cleaning results: Follow the indications and then
press
when done. Once you have done all steps,
when required press
to activate the cleaning
cycle.
Please note: It is reccommended to do not open the
oven door during the cleaning cycle to avoid a loss of
water vapor that could get an adverse effect on the
final cleaning result.
An appropriate message will start ashing on the
display once the cycle has nished. Leave the oven to
cool and then wipe and dry the interior surfaces with a
cloth or sponge.
10. DRAIN
The drain function allows the water to be drained in
order to prevent stagnation in the boiler. This product
has been developed in order to automatically run a
drain cycle once cooking has been stopped/has
ended.
Approximately 30min after the stop/end of cooking,
the oven will automatically drain the system, moving
the residual water in the drawer (be careful not to
remove the drawer after cooking). Once done, the
drawer can be extracted and emptied. We
recommend emptying the drawer as soon as the
drain is completed.
11. DESCALE
This special function, activated at regular intervals,
allows you to keep the steam system in the best
condition. Once the function is started, follow all the
steps indicated on the display. The average duration
of the full function is around 140 minutes.
Descale can be initiated anytime by the user from the
Cleaning Menu.
The display will show you when it is time to run a
Descale cycle (see the table below).
DESCALE MESSAGE MEANING
<DESCALE RECOMMENDED>
It appears after around 15
hours of steam cycles*
It is recommended to run a
Descale cycle.
<DESCALE NEEDED>
It appears after around 20
hours of steam cycles*
Descale is mandatory. It is not
possible to run a Steam cycle
until a Descale cycle will be
carried out.
*considering the default value (4 - Hard) of water
hardness level. The number of hours of steam cycles
that must pass before the Decale messages are shown
depends on the water hardness level set on the
appliance.
The descaling procedure can also be performed
whenever the user desires a deeper cleaning of the
internal steam circuit.
Before to run the descaling phase, the appliance will
check if some residual water is contained into the
boiler, and a Drain cycle could be performed, if
needed. In this case, you will have to empty the
drawer after the Drain cycle, before continuing with
the Descale Phase.
Please note: to ensure that the water is cold, it is not
possible to perform this activity before 30 minutes have
elapsed from the last cycle (or the last time the product
was powered). During this waiting time, the display will
show the following feedback “WATER IS HOT”.
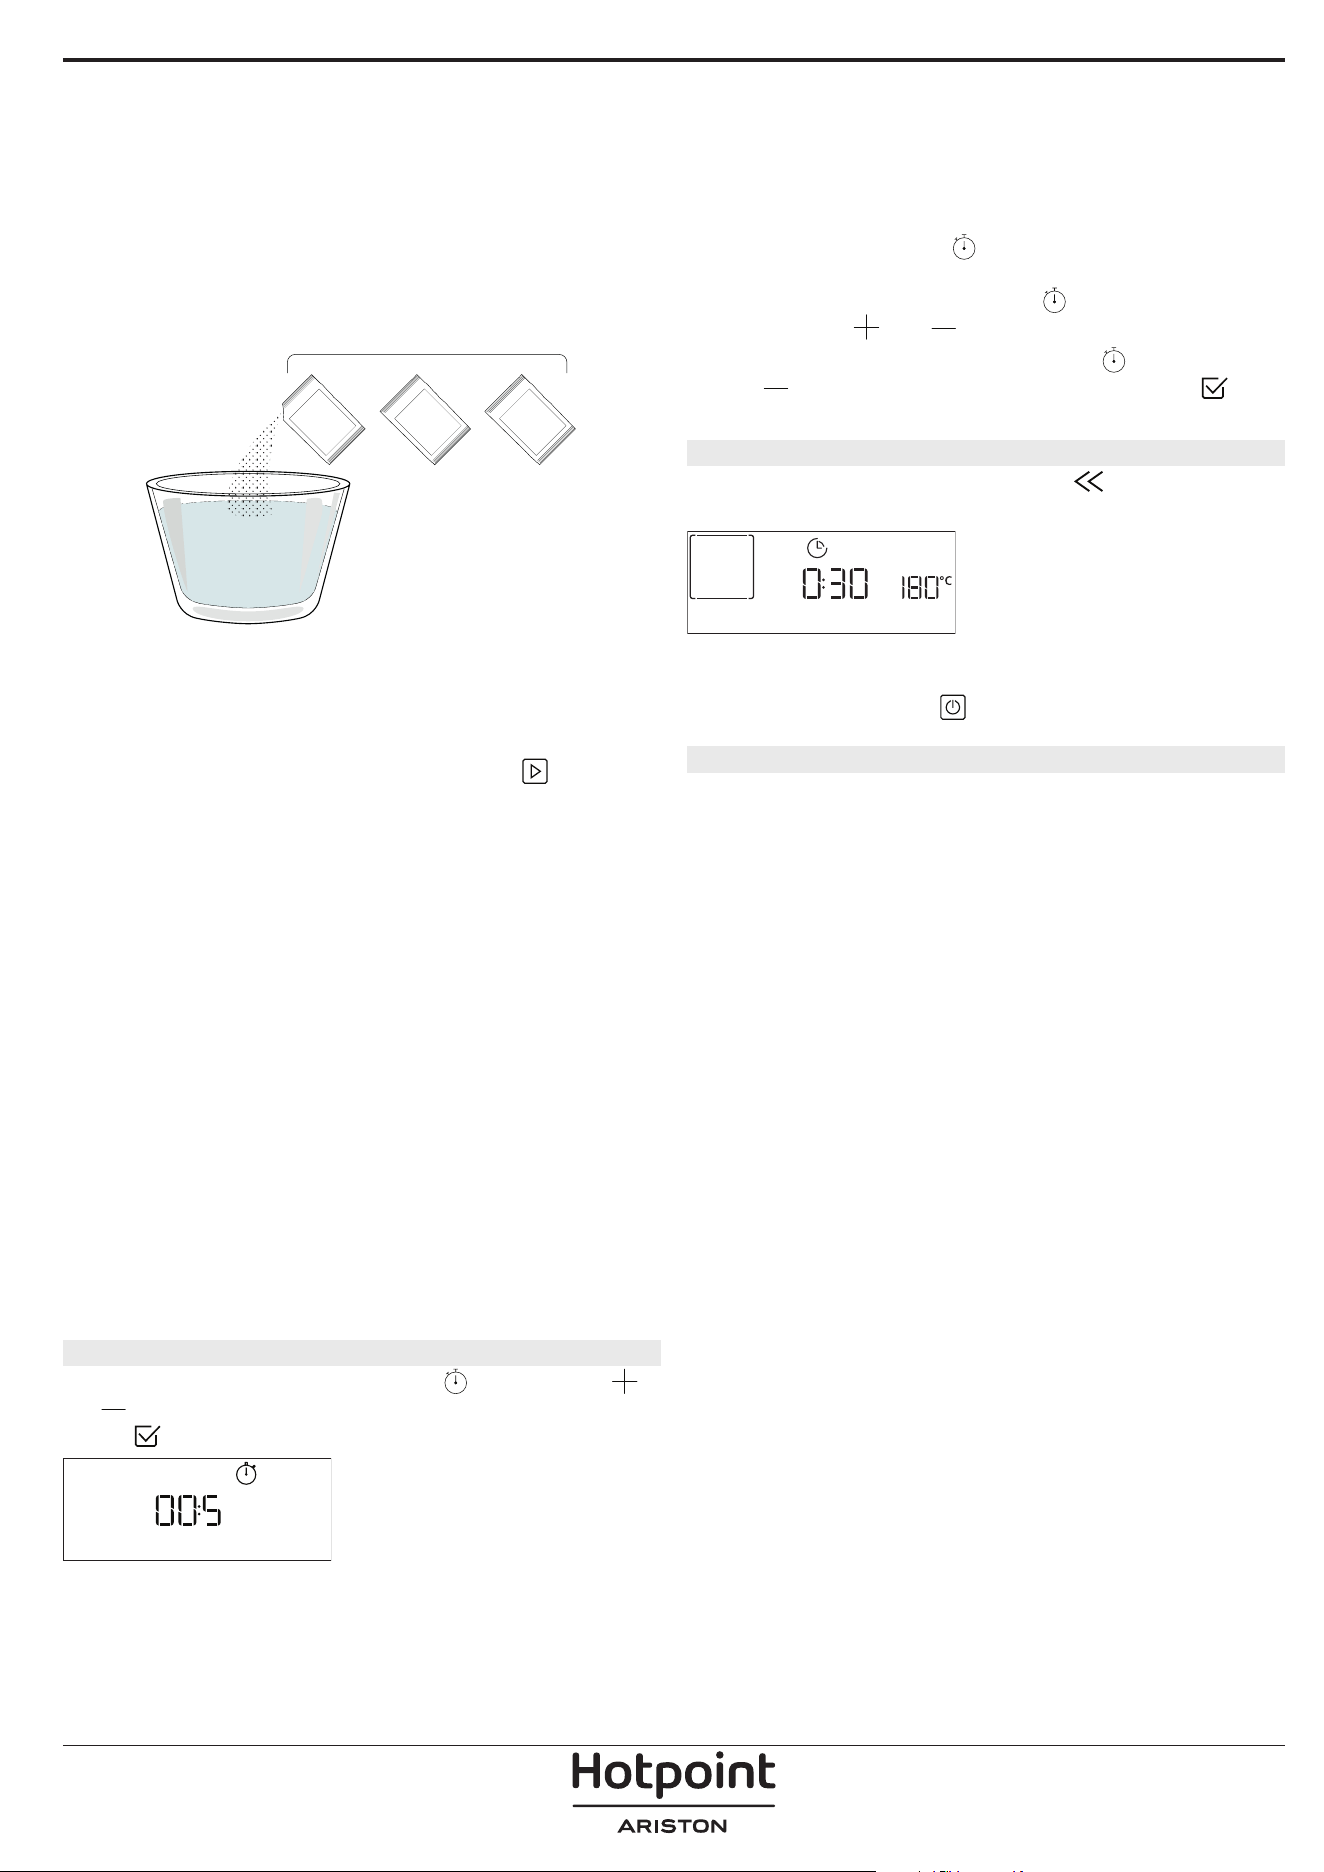
» PHASE 1/2: DESCALING (70 MIN)
When display will show <ADD 0.25 L OF SOLUTION>,
please pour the descaling solution in the drawer. For
best results in descaling, we recommend filling the
tank with a solution composed of 75 g of the specific
WPRO product and 250 ml of drinking water. WPRO
descaler is the suggested professional product for the
maintenance of the best performance of your steam
function in the oven. For orders and information
contact the after sales service or
www . hotpoint. eu.
Hotpoint will not be held responsible for any damage
caused by the use of other cleaning products
available on the market.
Once the descaling solution is poured inside the
drawer, press
to start the main descaling process.
The descaling phases do not need you to stay in front
of the appliance. After each phase is completed, an
acoustical feedback will be played and the display
will show instructions to proceed with the next
phase.
Once the descaling phase has been completed, the
boiler will be drained: the descaling solution used
during this phase will be poured into the extractable
drawer.
» PHASE 2/2: RINSING (30 MIN.)
To remove descale residuals from the drawer and
the steam circuit, rinse cycle has to be done. When
display shows <ADD 0.25 L OF WATER> fill the tank
with 0,25 L of drinking water, then press
to start
the rinsing. Do not turn off the oven until all the steps
required by the function have been completed.
Please note: if needed from the system, it could be
requested to emty the drawer and to repeat this
operation.
When Descale procedure is completed, it is suggested
to dry the cavity from potential water residuals. It will
be then possible to use all the steam functions.
Please note: during the Descale cycle, some noise
could potentially be heard since the oven pumps are
activated in order to guarantee the optimal descale
efficiency.
Once the maintenance cycle has started, do not remove
the drawer unless requested by the appliance.
Please note: After the boiler gets filled by the descaling
solution and the display shows “DESCALING PHASE
1/2”, the cycle should not be interrupted, otherwise the
entire descaling cycle must be repeated before being
able to run any steam function.
12. MINUTEMINDER
To activate this function press the icon. Press
or to set the length of time you require and then
press
to activate the timer.
MINUTE-MINDER
An audible signal will sound and the display will
indicate once the minuteminder has nished counting
down the selected time.
Please note: The minuteminder does not activate any of
the cooking cycles.
The minute minder can be activated also when a
function is running.
The timer will continue to count down independently
without interfering with the function itself.
During this phase, it isn’t possible to see the
minuteminder (only the
icon will be displayed), that
will continue counting down in background. To edit the
minuteminder you can press the
icon and set the
time using the
or icon.
To cancel the minuteminder, press the
icon, then
select
until the time displayed is “--:--”. Press to
conrm.
13. KEYLOCK
To lock the keypad, press and hold for at least ve
seconds. Do this again to unlock the keypad.
KEYLOCK
Please note: This function can also be activated during
cooking. For safety reasons, the oven can be switched o
at any time by pressing
.
. NOTES
• Do not cover the inside of the oven with
aluminium foil.
• Never drag pots or pans across the bottom of the
oven as this could damage the enamel coating.
• Do not place heavy weights on the door and do
not hold on to the door.
• Due to the higher temperature of the Pizza cycle it
is expected to experience slightly higher cooling
fan noise.
1+
= 75 g
+2
250 ml
3

USEFUL TIPS
HOW TO READ THE COOKING TABLE
The table lists the best function, accessories and level
to use to cook different types of food. Cooking times
start from the moment food is placed in the oven,
excluding preheating (where required). Cooking
temperatures and times are approximate and depend
on the amount of food and the type of accessory
used. Use the lowest recommended settings to
begin with and, if the food is not cooked enough,
then switch to higher settings. Use the accessories
supplied and preferably dark-coloured metal cake
tins and baking trays. You can also use Pyrex or
stoneware pans and accessories, but bear in mind
that cooking times will be slightly longer.
COOKING DIFFERENT FOODS AT THE SAME TIME
Using the “Forced Air” function, you can cook
different foods which require the same cooking
temperature at the same time (for example: fish and
vegetables), using different shelves. Remove the food
which requires a shorter cooking time and leave the
food which requires a longer cooking time in the
oven.
MEAT
Use any kind of oven tray or pyrex dish suited to the
size of the piece of meat being cooked. For roast
joints, it is best to add some stock to the bottom of
the dish, basting the meat during cooking for added
flavour. Please note that steam will be generated
during this operation. When the roast is ready, let it
rest in the oven for another 10-15 minutes, or wrap it
in aluminium foil.
When you want to grill meat, choose cuts with an
even thickness all over in order to achieve uniform
cooking results. Very thick pieces of meat require
longer cooking times. To prevent the meat from
burning on the outside, lower the position of the
wire shelf, keeping the food farther away from the
grill. Turn the meat two thirds of the way through
cooking. Take care when opening the door as steam
will escape.
To collect the cooking juices, we recommend placing
a dripping pan filled with half a litre of drinking water
directly underneath the wire shelf on which the food
is placed. Top-up when necessary.
DESSERTS
Cook delicate desserts with the conventional function
on one shelf only.
Use dark-coloured metal baking pans and always
place them on the wire shelf supplied. To cook on
more than one shelf, select the forced air function and
stagger the position of the cake tins on the shelves,
aiding optimum circulation of the hot air.
To check whether a leavened cake is cooked, insert a
wooden toothpick into the centre of the cake. If the
toothpick comes out clean, the cake is ready.
If using non-stick baking pans, do not butter the
edges as the cake may not rise evenly around the
edges.
If the item “swells” during baking, use a lower
temperature next time and consider reducing the
amount of liquid you add or stirring the mixture more
gently.
For desserts with moist fillings or toppings (such
as cheesecake or fruit tarts), use the “Convection
bake” function. If the base of the cake is soggy, lower
the shelf and sprinkle the bottom of the cake with
breadcrumbs or biscuit crumbs before adding the
filling.
RISING
It is always best to cover the dough with a damp cloth
before placing it in the oven. Dough proving time
with this function is reduced by approximately one
third compared to proving at room temperature (20-
25°C). The rising time for pizza starts at around one
hour for 1 kg of dough.

FOOD CATEGORIES QUANTITY
DONENESS
LEVEL
BROWNING
LEVEL
TURN
(OF COOK
TIME)
LEVEL AND ACCESSORIES
BAKED
Main dishes
Lasagna 0.5 - 3 kg - 0 -
2
Salty cakes 0.8 - 1.2 kg - 0 -
2
Stued
Vegetables
0.1 - 0.5 kg
[each]
- - -
3
Pizza & bread
Bread Rolls 60 - 150g [each] - - -
3
Sandwich Loaf 400 - 600 g [each] - - -
2
Big Bread 0.7 - 2.0kg - - -
2
Baguettes 200 - 300g [each] - - -
3
Round Pizza round - - -
2
Thick Pizza tray - - -
2
Pizza [frozen]
1 layer* - - -
2
2 layers* - - -
4
1
3 layers* - - -
5
3 1
4 layers* - - -
5
4 2 1
Sweet bakery
Sponge Cake 0.5 - 1.2 kg - - -
2
Cookies 0.2 - 0.6 kg - - -
3
Choux Pastry one tray* - - -
3
Tart 0.4 - 1.6kg - - -
3
Strudel 0.4 - 1.6kg - - -
3
Fruit Pie 0.5 -2 kg - - -
2
ROASTED
Meat
Roast Beef 0.6 - 2 kg 0 0 -
3
Roast Pork 0.6 - 2.5 kg - 0 -
3
Roast Chicken 0.6 - 3 kg - 0 -
2
Side dish
Roasted
Vegetables
0.5 - 1.5 kg - 0 -
3
Roasted Potatoes 0.5 - 1.5 kg - - -
3
GRILLED
Meat
Burger 1.5 - 3 cm 0 - 3/5
5
4
Sausages &
Wurstel
1.5 - 4.5 cm - - 2/3
5
4
Kebabs one grid - - 1/2
5
4
Fillet & Breast 1 - 5 cm - - 2/3
5
4
Fish & seafood
Fillets 0.5 - 3 (cm) - - -
3
2
Fillets [frozen] 0.5 - 3 (cm) - - -
3
2
* Suggested quantity
ACCESSORIES
Wire shelf
Oven tray / Cake tray / Round
pizza tray on wire shelf
Drip tray / Baking tray Drip tray with 500 ml of water
MY MENU COOKING TABLE
FOOD CATEGORIES QUANTITY
DONENESS
LEVEL
BROWNING
LEVEL
TURN
(OF COOK
TIME)
LEVEL AND ACCESSORIES
GRILLED Side dish
Tomatoes Gratin one tray - - -
3
Peppers Gratin one tray - - -
3
Broccoli Gratin one tray - - -
3
Cauliflower
Gratin
one tray - - -
3
Vegetables
Gratin
one tray - - -
3
MY MENU COOKING TABLE
* Suggested quantity
ACCESSORIES
Wire shelf
Oven tray / Cake tray / Round
pizza tray on wire shelf
Drip tray / Baking tray Drip tray with 500 ml of water
ACCESSORIES
Air Fry tray Oven tray or cake tray on wire shelf
Drip tray / Baking tray or
oven tray on wire shelf
AIR FRY COOKING TABLE
RECIPE FUNCTION
SUGGESTED
QUANTITY
PREHEAT
TEMPERATURE
(°C)
DURATION
(MIN.)
SHELF AND
ACCESSORIES
FROZEN FOOD
Frozen French Fries 650 - 850g Yes 200 25 - 30
4
2
Frozen Chicken Nugget
500g Yes 200 15 - 20
4
2
Fish Sticks 500g Yes 220 15 - 20
4
2
Onion Rings 500g Yes 200 15 - 20
4
2
VEGETABLES
Fresh Breaded Zucchini 400g Yes 200 15 - 20
4
2
Homemade Fries 300 - 800 g Yes 200 20 - 40
4
2
Mixed Vegetables 300 - 800 g Yes 200 20 - 30
4
2
MEAT AND FISH
Chicken Breasts 1 - 4 cm Yes 200 20 - 40
4
2
Chicken Wings 200 - 1500 g Yes 220 30 - 50
4
2
Breaded Cutlet 1 - 4 cm Yes 220 20 - 50
4
2
Fish Fillet 1 - 4 cm Yes 220 15 - 25
4
2
For cooking fresh or homemade foods, spread a thin layer of oil across the food surface.
In order to guarantee uniform cooking results, mix food halfway through the recommended cooking time.
FUNCTIONS
Air Fry

STEAM + AIR COOKING TABLE
ACCESSORIES
Oven tray or cake tray on wire shelf
Drip tray / Baking tray or
oven tray on wire shelf
RECIPE STE AM LEV EL*
PREHEAT
TEMPERATURE
(°C)
DURATION
(MIN.)
SHELF AND
ACCESSORIES
Shortbread / Cookies 1 YES 140 - 150 35 - 55
3
Small cake / Muffin 1 YES 160 - 170 30 - 40
3
Leavened cakes 1 YES 170 - 180 40 - 60
2
Sponge cakes 1 YES 160 - 170 30 - 40
2
Focaccia 1 YES 200 - 220 20 - 40
3
Bread loaf 1 YES 170 -180 70 - 100
3
Small bread 1 YES 200 - 220 30 - 50
3
Baguette 1 YES 200 - 220 30 - 50
3
Roast potatoes 2 YES 200 - 220 50 - 70
3
Veal / Beef / Pork 1 kg 2 YES 180 - 200 60 - 100
3
Veal / Beef / Pork (pieces) 2 YES 160 - 180 60-80
3
Roast Beef rare 1 kg 2 YES 200 - 220 40 - 50
3
Roast Beef rare 2 kg 2 YES 200 55 - 65
3
Leg of lamb 2 YES 180 - 200 65 - 75
3
Stew pork knuckles 2 YES 160 - 180 85 - 100
3
Chicken / guinea fowl / duck 1 - 1.5 kg 2 YES 200 - 220 50 - 70
3
Chicken / guinea fowl / duck (pieces) 2 YES 200 - 220 55 - 65
3
Stuffed vegetables
(tomatoes, courgettes, aubergines)
2 YES 180 - 200 25 - 40
3
Fish fillet 3 YES 180 - 200 15 - 30
3
*Please consider the In case of selecting Convect Steam Auto function this correlation must be skipped. The oven will
automatically select the best level of steam suited for the temperature selected.

COOKING TABLE
RECIPE FUNCTION PREHEAT TEMPERATURE (°C) DURATION (MIN.) SHELF AND ACCESSORIES
Leavened cakes / Sponge cakes
Yes 170 30 - 50
2
Yes 160 30 - 50
2
Yes 160 30 - 50
4
1
Filled cakes
(cheesecake, strudel, apple pie)
Yes 160 - 200 30 - 85
3
Yes 160 - 200 30 - 90
4
1
Cookies
Yes 150 20 - 40
3
Yes 140 30 - 50
4
Yes 140 30 - 50
4
1
Yes 135 40 - 60
5
3 1
Small cakes / Mun
Yes 170 20 - 40
3
Yes 150 30 - 50
4
Yes 150 30 - 50
4
1
Yes 150 40 - 60
5
3 1
Choux buns
Yes 180 - 200 30 - 40
3
Yes 180 - 190 35 - 45
4
1
Yes 180 - 190 35 - 45 *
5
3 1
Meringues
Yes 90 110 - 150
3
Yes 90 130 - 150
4
1
Yes 90 140 - 160 *
5
3 1
Pizza / Bread / Focaccia
Yes 190 - 250 15 - 50
2
Yes 190 - 230 20 - 50
5
3 1
Pizza (Thin, thick, focaccia)
Yes 310 7 - 12
2
Yes 220 - 240 25 - 50 *
5
3 1
Frozen pizza
Yes 250 10 - 15
3
Yes 250 10 - 20
4
1
Yes 220 - 240 15 - 30
5
3 1
Savoury pies
(vegetable pie, quiche)
Yes 180 - 190 45 - 55
3
Yes 180 - 190 45 - 60
4
1
Yes 180 - 190 45 - 70 *
5
3 1
ACCESSORIES
Wire shelf
Oven tray or cake tray on
wire shelf
Drip tray / Baking tray or
oven tray on wire shelf
Drip tray / Baking tray
Drip tray with 500 ml of
water
FUNCTIONS
XL
ECO
Conventional Forced Air Convection Bake Grill Turbo Grill MaxiCooking Multiflow Menu Eco Cycle Pizza
RECIPE FUNCTION PREHEAT TEMPERATURE (°C) DURATION (MIN.) SHELF AND ACCESSORIES
Vols-au-vent / Pu pastry crackers
Yes 190 - 200 20 - 30
3
Yes 180 - 190 20 - 40
4
1
Yes 180 - 190 20 - 40 *
5
3 1
Lasagna / Flans / Baked pasta /
Cannelloni
Yes 190 - 200 45 - 65
3
Lamb / Veal / Beef / Pork 1 kg Yes 190 - 200 80 - 110
3
Roast pork with crackling 2 kg
XL
- 170 110 - 150
2
Chicken / Rabbit / Duck 1 kg Yes 200 - 230 50 - 100
3
Turkey / Goose 3 kg Yes 190 - 200 80 - 130
2
Baked sh / en papillote (llets, whole) Yes 180 - 200 40 - 60
3
Stued vegetables
(tomatoes, courgettes, aubergines)
Yes 180 - 200 50 - 60
2
Toast - 3 (High) 3 - 6
5
Fish llets / Steaks - 2 (Mid) 20 - 30 **
4
3
Sausages / Kebabs / Spare ribs /
Hamburgers
- 2 - 3 (Mid - High) 15 - 30 **
5
4
Roast chicken 1-1.3 kg - 2 (Mid) 55 - 70 ***
2
1
Leg of lamb / Shanks - 2 (Mid) 60 - 90 ***
3
Roast potatoes - 2 (Mid) 35 - 55 ***
3
Vegetable gratin - 3 (High) 10 - 25
3
Cookies
Cookies
Yes 135 50 - 70
5
4 3 1
Tarts
Tarts
Yes 170 50 - 70
5
3 2 1
Round pizzas
Pizza
Yes 210 40 - 60
5
3 2 1
Complete meal: Fruit tart (level 5) /
lasagna (level 3) / meat (level 1)
Yes 190 40 - 120 *
5
3 1
Complete meal: Fruit tart (level 5) /
roasted vegetables (level 4) / lasagna
(level 2) / cuts of meat (level 1)
Menu
Yes 190 40 - 120 *
5
4 2 1
Lasagna & Meat Yes 200 50 - 100 *
4
1
Meat & Potatoes Yes 200 45 - 100 *
4
1
Fish & Vegetebles Yes 180 30 - 50 *
4
1
Stued roasting joints
ECO
- 200 80 - 120 *
3
Cuts of meat
(rabbit, chicken, lamb)
ECO
- 200 50 - 100 *
3
* Estimated length of time: dishes can be removed from the oven at different times depending on personal preference.
** Turn food halfway through cooking.
*** Turn food two thirds of the way through cooking (if necessary).
ACCESSORIES
Wire shelf
Oven tray or cake tray on
wire shelf
Drip tray / Baking tray or
oven tray on wire shelf
Drip tray / Baking tray
Drip tray with 500 ml of
water
FUNCTIONS
XL
ECO
Conventional Forced Air Convection Bake Grill Turbo Grill MaxiCooking Multiflow Menu Eco Cycle Pizza

Make sure that the oven has
cooled down before carrying out
any maintenance or cleaning.
Do not use steam cleaners.
Do not use wire wool, abrasive
scourers or abrasive/corrosive
cleaning agents, as these could
damage the surfaces of the
appliance.
Wear protective gloves.
The oven must be disconnected
from the mains before carrying
out any kind of maintenance
work.
MAINTENANCE AND CLEANING
HOW TO READ THE COOKING TABLE
The table lists the best function, accessories and level to use to cook different types of food.
Cooking times start from the moment food is placed in the oven, excluding preheating (where required).
Cooking temperatures and times are approximate and depend on the amount of food and the type of accessory used.
Use the lowest recommended settings to begin with and, if the food is not cooked enough, then switch to higher
settings.
Use the accessories supplied and preferably darkcoloured metal cake tins and baking trays. You can also use Pyrex or
stoneware pans and accessories, but bear in mind that cooking times will be slightly longer.
EXTERIOR SURFACES
• Clean the surfaces with a damp microfibre cloth.
If they are very dirty, add a few drops of pH-neutral
detergent. Finish off with a dry cloth.
• Do not use corrosive or abrasive detergents. If any of
these products inadvertently comes into contact with
the surfaces of the appliance, clean immediately with
a damp microfibre cloth.
INTERIOR SURFACES
• After every use, leave the oven to cool and then
clean it, preferably while it is still warm, to remove
any deposits or stains caused by food residues. To
dry any condensation that has formed as a result of
cooking foods with a high water content, leave the
oven to cool completely and then wipe it with a cloth
or sponge.
• Activate the “Diamond Clean” function for optimum
cleaning of the internal surfaces. (Only in some
models).
• Clean the glass in the door with a suitable liquid
detergent.
• The oven door can be removed to facilitate cleaning.
ACCESSORIES
Soak the accessories in a washing-up liquid solution
after use, handling them with oven gloves if they
are still hot. Food residues can be removed using a
washing-up brush or a sponge.
Do not clean Food Probe and Meat Probe (if present)
in the dishwasher.
Air Fry tray (if present) can be cleaned in the dishwasher.
WATER DRAWER MAINTENANCE
Caution: The water drawer is not suitable for
dishwasher use: risk of damage!
At the end of each cooking cycle with steam, after
about 30 min the oven automatically performs a drain
cycle lasting about one minute, thus transferring all
the water in the system to the extractable drawer.
Note: Avoid to leave the water in the system more than
2 days.
In order to completely remove the water inside or
clean the internal surfaces, you can open the water
drawer:
1. Push towards the top the
back flap to remove the
water drawer top cover.
2. Once the cleaning is done,
you can close the drawer by
inserting the two front flaps
inside the front openings
and pushing down the back
side.
Use only room temperature water when filling the
water drawer: hot water may affect the operation of
the steam system. Use only drinking water.
BOILER
To ensure that the oven always works at optimum
performance and to help prevent the build-up of
limescale deposits over time, we recommend using
the “Descale” function regularly. After a long period of
non-use of the “Steam” functions, it is higly suggested
to activate a cooking cycle with the empty oven by
filling completely the tank.

REMOVING AND REFITTING THE DOOR
1. To remove the door, open it fully and lower the
catches until they are in the unlock position.
b
a
2. Close the door as much as you can.
Take a firm hold of the door with both hands – do not
hold it by the handle.
Simply remove the door by continuing to close it
while pulling it upwards at the same time until it is
released from its seating. Put the door to one side,
resting it on a soft surface.
a
b
~15°
3. Refit the door by moving it towards the oven,
aligning the hooks of the hinges with their seating
and securing the upper part onto its seating.
4. Lower the door and then open it fully.
Lower the catches into their original position: Make
sure that you lower them down completely.
b
a
Apply gentle pressure to check that the catches are in
the correct position.
“CLICK”
5. Try closing the door and check to make sure that it
lines up with the control panel. If it does not, repeat
the steps above: The door could become damaged if
it does not work properly.
REPLACING THE LAMP
For the replacement of the lamp, contact the after sales service.
Problem Possible cause Solution
The oven is not working.
Power cut.
Disconnection from the
mains.
Check for the presence of mains electrical power
and whether the oven is connected to the
electricity supply.
Turn off the oven and restart it to see if the fault
persists.
The display shows the letter “F”
followed by a number.
Software problem.
Contact the Call Center and state the number
following the letter “F”.
The oven does not heat up.
When “DEMO” is “On” all
commands are active and
menus available but the
oven doesn’t heat up.
DEMO appears on display
every 60 seconds.
Access “DEMO” from “SETTINGS” and select “Off”.
The light switches off.
“ECO” mode is “On”. Access “ECO” from “SETTINGS” and select “Off”.
The door will not close
properly.
The safety catches are in the
wrong position.
Make sure that the safety catches are in the
correct position by following the instructions for
removing and refitting the door in the “Cleaning
and Maintenance” section.
The home power goes off.
Power setting wrong.
Verify if your domestic network has at least a
rating of more than 3 kW. If no, decrease the
power to 13 Ampere. Access “POWER” from
“SETTINGS” and select “LOW”.
Cooking cycle with probe
ended without evident cause
or error F3E3 is printed on the
screen
Food Probe is not properly
connected
Food Probe is not properly connected
TROUBLESHOOTING
Policies, standard documentation and additional product information can be found by:
• Using the QR on your product
• Visiting our website docs . hotpoint. eu
• Alternatively, contact our After-sales Service (See phone number in the warranty booklet). When contacting
our After-sales Service, please state the codes provided on your product's identication plate.
400020002504
IT
Manuale d'uso
GRAZIE PER AVERE ACQUISTATO UN PRODOTTO
HOTPOINT/ARISTON
Per ricevere un'assistenza più completa, registrare il
prodotto su www . hotpoint. eu/ register
Prima di utilizzare l'apparecchio leggere
attentamente le istruzioni di sicurezza.
DESCRIZIONE DEL PRODOTTO
PANNELLO COMANDI
1. Pannello comandi
2. Ventola e resistenza circolare
(non visibile)
3. Griglie laterali
(il livello è indicato sulla parte
frontale del forno)
4. Porta
5. Cassetto per l'acqua
6. Resistenza superiore / Grill
7. Luce
8. Targhetta matricola
(da non rimuovere)
9. Resistenza inferiore
(non visibile)
1. ON / OFF
Per accendere e spegnere il forno o
arrestare un funzione attiva.
2. ACCESSO DIRETTO ALLE
FUNZIONI
Per accedere rapidamente alle
funzioni e al menu.
3. TASTO DI NAVIGAZIONE
MENO
Per scorrere i menu e ridurre
le impostazioni o i valori delle
funzioni.
4. INDIETRO
Per tornare alla schermata
precedente. Durante la cottura,
permette di modificare le
impostazioni.
5. DISPLAY
6. CONFERMA
Per confermare la selezione di una
funzione o un valore impostato.
7. TASTO DI NAVIGAZIONE PIÙ
Per scorrere i menu e aumentare
le impostazioni o i valori delle
funzioni.
8. TASTI DI ACCESSO DIRETTO A
OPZIONI/FUNZIONI
Per impostare rapidamente le
funzioni, la durata, le impostazioni
e i preferiti.
9. AVVIO
Per avviare una funzione
utilizzando le impostazioni
specificate o quelle di base.
5
4
3
2
1
5
4
3
2
1
1
2
3
4
5
9
7
6
SCANSIONARE IL CODICE QR
SUL PROPRIO APPARECCHIO
PER OTTENERE MAGGIORI
INFORMAZIONI
8
1 3 4 5 6 7 8 92
ACCESSORI
GRIGLIA LECCARDA TEGLIA*
GUIDE DI
SCORRIMENTO*
Utilizzare per cuocere
gli alimenti o come
supporto per teglie,
tortiere e altre pentole
da forno.
Utilizzare come teglia da
forno per cucinare carne,
pesce, verdure, focacce,
ecc. o posizionare sotto
la griglia per raccogliere i
succhi di cottura.
Utilizzare per la cottura
di tutti i prodotti di
panetteria e pasticceria,
ma anche per arrosti,
pesce en papillotte, ecc.
Per facilitare
l'inserimento o la
rimozione degli
accessori.
LECCARDA FRITTURA
AD ARIA *
Da utilizzare quando si
cucinano alimenti con la
funzione Frittura ad aria,
con una teglia posizionata
a un livello inferiore per
raccogliere eventuali
briciole e sgocciolamenti.
Può essere lavata in
lavastoviglie.
INSERIRE LA GRIGLIA E GLI ALTRI ACCESSORI
Inserire la griglia orizzontalmente facendola scivolare
sulle griglie laterali inserendo dapprima il lato rialzato
orientato verso l'alto.
Gli altri accessori, come la leccarda o la teglia, si
inseriscono orizzontalmente come la griglia.
TOGLIERE E RIMONTARE LE GRIGLIE LATERALI
• Per togliere le griglie, sollevare le griglie prima di
scostare la parte inferiore dalle proprie sedi: a questo
punto è possibile rimuovere le griglie.
• Per rimontare le griglie, inserirle dapprima nelle sedi
superiori. Avvicinarle alla cavità tenendo sollevato,
quindi abbassarle in posizione nelle sedi inferiori.
MONTARE LE GUIDE SCORREVOLI
Togliere dal forno le griglie
laterali e rimuovere la
protezione in plastica dalle
guide scorrevoli.
Ancorare alla griglia laterale
la clip superiore della guida
e farla scivolare fino a fine
corsa. Abbassare l'altra clip
in posizione.
Per fissare la guida, premere
la parte inferiore della clip
contro la griglia laterale.
Assicurarsi che le guide
possano scorrere
liberamente. Ripetere questa
operazione sull'altra griglia
laterale, allo stesso livello.
Note: le guide scorrevoli possono essere montate a qualsiasi
livello.
Il numero e il tipo di accessori possono variare a seconda del modello acquistato.
Altri accessori possono essere acquistati separatamente; per ordini e informazioni
contattare il servizio assistenza clienti.
* Disponibile solo in alcuni modelli
Il numero e il tipo di accessori possono variare a seconda del modello acquistato.
Altri accessori possono essere acquistati separatamente; per ordini e informazioni contattare il servizio assistenza
clienti.
* Disponibile solo in alcuni modelli
FUNZIONI
STATICO
Per cuocere qualsiasi tipo di pietanza su un solo ripiano.
TERMOVENTILATO
Per cuocere contemporaneamente su più ripiani
(massimo tre) alimenti diversi che richiedono la
medesima temperatura di cottura. Questa funzione
permette di eseguire la cottura senza trasmissione di
odori da un alimento all'altro.
VAPORE + ARIA
Combinando le proprietà del vapore con quelle della
cottura termoventilata, questa funzione permette
di ottenere una cottura piacevolmente croccante
e dorata all'esterno mantenendo 'interno tenero e
succoso. Per ottenere i migliori risultati di cottura, si
consiglia di selezionare un vapore di LIVELLO 3 per
la cottura del pesce, di LIVELLO 2 per la carne e di
LIVELLO 1 per pane e dolci. Per maggiori informazioni
sui cicli di cottura manuali Vapore + Aria, consultare la
Tabella di cottura "Vapore + Aria".
MY MENU
Questa funzione permette la cottura completamente
automatica di tutte le pietanze (lasagna, carne, pesce,
verdure, torte & dolci, torte salate, pane, pizza). Per
utilizzare al meglio questa funzione si raccomanda di
seguire le indicazioni della tabella di cottura.
FUNZIONI MANUALI
• VENTILATO
Per cuocere carni o torte ripiene su un solo ripiano
• MULTIFLOW MENU
Per cuocere contemporaneamente su quattro
ripiani alimenti diversi che richiedono la medesima
temperatura di cottura. Questa funzione può
essere utilizzata per cuocere biscotti, torte, pizze
tonde (anche surgelate) e per preparare un
pasto completo. Per ottenere risultati ottimali si
raccomanda di seguire la tabella di cottura.
• GRILL
Per grigliare bistecche, spiedini e salsicce,
cucinare verdure gratinate o tostare il pane. Per
la grigliatura delle carni, si consiglia di utilizzare
una leccarda per raccogliere il liquido di cottura:
posizionare la leccarda un livello sotto la griglia e
aggiungere 500 ml di acqua potabile.
• TURBO GRILL
Per arrostire grandi tagli di carne (cosce, roast
beef, pollo). Si consiglia di utilizzare una leccarda
per raccogliere il liquido di cottura: posizionarla
un livello sotto la griglia e aggiungere 500 ml di
acqua potabile.
• CIBI SURGELATI
Questa funzione seleziona automaticamente la
temperatura e la modalità di cottura ottimali per 5
diverse categorie di alimenti pronti surgelati. Non
è necessario preriscaldare il forno.
• FUNZIONI SPECIALI
» PIZZA
Questa funzione consente di cucinare
un'ottima pizza fatta in casa, in meno di 10
minuti come al ristorante.
Il ciclo di cottura dedicato funziona a
temperature superiori a 300 gradi Celsius,
garantendo una pizza morbida all'interno,
croccante sui bordi e con una doratura
perfettamente uniforme. Combinando questa
funzione con l'accessorio Pizza Stone WPro e
preriscaldando per 30 minuti, può cuocere una
pizza in 5-8 minuti (per ordini e informazioni,
contattare il servizio assistenza clienti o www.
hotpoint.eu.)
» LIEVITAZIONE
Per ottenere una lievitazione ottimale di
impasti dolci o salati. Allo scopo di preservare
la qualità della lievitazione, non attivare la
funzione se il forno è ancora caldo dopo un
ciclo di cottura.
» MANTENIMENTO IN CALDO
Per mantenere caldi e croccanti cibi appena
cotti.
» SCONGELARE
Per velocizzare lo scongelamento degli
alimenti. Posizionare gli alimenti sul ripiano
intermedio. Si suggerisce di lasciare l'alimento
nella sua confezione per impedire che si
asciughi eccessivamente all'esterno.
» CICLO ECO
Per cuocere arrosti ripieni e filetti di carne in
pezzi su un solo ripiano. Quando questo Ciclo
Eco è in uso, la spia rimarrà spenta durante
la cottura. Per utilizzare il Ciclo Eco e quindi
ottimizzare il consumo di energia, la porta
del forno non deve essere aperta finché gli
alimenti non sono completamente cotti.
» MAXI COOKING
Questa funzione seleziona automaticamente la
migliore temperatura e modalità di cottura per
tagli di carne di grandi dimensioni (oltre 2,5
kg). Si suggerisce di girare la carne durante la
cottura per ottenere una doratura omogenea
su entrambi i lati. È preferibile irrorarla di tanto
in tanto con il fondo di cottura per evitare che
si asciughi eccessivamente.
• COTTURA LENTA
Per cuocere delicatamente carne e pesce.
Questa funzione cuoce gli alimenti lentamente
per mantenerli teneri e saporiti. Grazie alla
bassa temperatura, la pietanza non si asciuga
esternamente e il risultato finale è simile a
quello che si ottiene con la cottura a vapore.
Per gli arrosti, si suggerisce di farli rosolare
prima in padella per creare una crosta esterna
che trattenga i succhi interni della carne. Per un
risultato ottimale, tenere chiusa la porta del forno
durante la cottura per evitare la dispersione del
calore. I tempi di cottura consigliati per il pesce
(300 g - 3 kg) variano tra 2 e 5 ore, per la carne
(1-3 kg) tra 4 e 7 ore.
FRITTURA AD ARIA
Questa funzione consente di cuocere patate fritte,
bocconcini di pollo e altro ancora utilizzando
meno olio, ottenendo un risultato piacevolmente
croccante. Gli elementi riscaldanti si attivano per
riscaldare adeguatamente la cavità, mentre la
ventola fa circolare l'aria calda. I migliori risultati di
cottura previsti si ottengono solo utilizzando una
leccarda Frittura ad aria (fornita con alcuni modelli).
Posizionare gli alimenti sulla leccarda Frittura ad aria
in un unico strato e seguire le istruzioni della tabella
di cottura Frittura ad aria per ottenere le migliori
prestazioni. Evitare di utilizzare più di una leccarda
per evitare una cottura non uniforme.
PRERISCALDAMENTO RAPIDO
Per preriscaldare rapidamente il forno.
CONTA MINUTI
Per impostare il timer senza attivare una funzione.
DIAMOND CLEAN
L'azione del vapore rilasciato durante questo speciale
ciclo di pulizia a bassa temperatura permette di
rimuovere facilmente sporco e residui di cibo. Versare
200 ml di acqua potabile sul fondo del forno,
attivando la funzione a forno freddo.
DECALCIFICAZIONE
Per rimuovere i depositi di calcare dalla caldaia. Si
consiglia di attivare la funzione a intervalli regolari. In
caso contrario, sul display comparirà un messaggio
per ricordare che è necessario pulire il forno.
PREFERITI
Per richiamare la lista delle 10 funzioni preferite.
IMPOSTAZIONI
Per regolare le impostazioni del forno. Attivando la
modalità "ECO", la luminosità del display si riduce e la
luce si spegne dopo 1 minuto per risparmiare energia.
Il display si riattiva automaticamente premendo un
tasto qualsiasi. Se la modalità "DEMO" è impostata
su "On", tutti i comandi sono operativi e i menu
sono disponibili ma il forno non viene riscaldato. Per
disattivare questa modalità, accedere a "DEMO" dal
menu "IMPOSTAZIONI" e scegliere "Off". Selezionando
"RESET", l'apparecchio si spegne e vengono
ripristinate le impostazioni della prima accensione.
Tutte le impostazioni successive vengono cancellate.
PRIMO UTILIZZO
1. SELEZIONE DELLA LINGUA
Alla prima accensione, è necessario impostare lingua
e ora: Sul display compare "English".
ITALIANO
Premere o per scorrere L'elenco delle lingue
disponibili e selezionare quella desiderata. Premere
per confermare la selezione.
Note: La lingua può essere successivamente modicata
selezionando "LINGUA" nel menu "IMPOSTAZIONI",
disponibile premendo
2. IMPOSTARE L'ASSORBIMENTO DI POTENZA
Il forno è programmato per assorbire una potenza
elettrica compatibile con una rete domestica di
capacità superiore a 3 kW (16): nel caso si disponga di
una potenza inferiore, è necessario diminuire questo
valore (13).
POTENZA
Premere o per selezionare 16 "Alto" o 13
"Basso" e premere
per confermare.
3. IMPOSTARE L'ORA
Dopo aver selezionato la lingua, sarà necessario
impostare l'ora corrente: sul display lampeggiano le
due cifre relative all'ora.
OROLOGIO
Premere o per impostare l'ora corretta e
premere
: sul display lampeggiano le due cifre
relative ai minuti. Premere
o per impostare i
minuti e premere
per confermare.
Note: dopo una prolungata interruzione di corrente
potrebbe essere necessario impostare nuovamente l'ora.
Selezionare "OROLOGIO" nel menu "IMPOSTAZIONI",
accessibile premendo
4. IMPOSTARE IL LIVELLO DI DUREZZA
DE LL'ACQ UA
Per consentire al forno di funzionare in modo
efficiente e per garantire che richieda regolarmente
all'utente di eseguire il ciclo di decalcificazione
quando necessario, è importante impostare il
corretto livello di durezza dell'acqua. Per impostarlo,
accendere il forno premendo
, premere
Impostazioni e utilizzare i pulsanti di navigazione
e per selezionare "DUREZZA ACQUA".
Premere
per confermare. Utilizzare i pulsanti
di navigazione
e per selezionare il livello
corretto per l'acqua della propria zona, in base alla
seguente tabella:
TABELLA DEI LIVELLI DI DUREZZA DELL'ACQUA
Livello
°dH
Tedesco
gradi
°fH
Francese
gradi
°Clark
Italiano
gradi
1
Molto
dolce
0-6 0-10 0-7
2 Dolce 7-11 11-20 8-14
3 Medio 12-16 21-29 15-20
4 Dura 17-34 30-60 21-42
5
Molto
dura
35-50 61-90 43-62
Premere per confermare.
Per il livello di durezza dell'acqua, è preimpostato
"Dura".
5. RISCALDAMENTO DEL FORNO
Un nuovo forno può rilasciare degli odori dovuti alla
lavorazione di fabbrica: questo è normale.
Prima di cucinare gli alimenti è dunque raccomandato
di riscaldare a vuoto il forno per rimuovere
ogni odore.
Rimuovere protezioni di cartone o
pellicole trasparenti e togliere gli accessori dal
forno. Riscaldare il forno a 200°C per circa un'ora
utilizzando preferibilmente una funzione ventilata
("Termoventilato" o "Ventilato").
Note: si consiglia di arieggiare il locale dopo il primo utilizzo
dell'apparecchio.
USO QUOTIDIANO
1. SELEZIONARE UNA FUNZIONE
Premere per accendere il forno: il display
mostrerà l'ultima funzione utilizzata o il menu
principale.
Per selezionare una funzione è possibile premere
l'icona corrispondente (per le funzioni principali)
oppure scegliere la voce desiderata da un menu: Per
selezionare una voce da un menu (il display mostrerà
la prima voce disponibile), premere
o per
selezionare quella desiderata, quindi premere
per confermare.
2. IMPOSTARE LA FUNZIONE
Dopo avere selezionato la funzione desiderata è
possibile modificarne le impostazioni. Il display
mostra in sequenza le impostazioni che è possibile
modificare. premendo
è possibile modificare
nuovamente il valore precedente.
TEMPERATURA / LIVELLO VAPORE
TEMPERATURA
Quando il valore lampeggia sul display, premere
o per modificarlo, quindi premere
per confermare e continuare con le impostazioni
successive (se possibile). Usare la stessa procedura per
impostare il livello grill: Sono disponibili tre livelli di
potenza per il grill: 3 (alto), 2 (medio), 1 (basso).
Nella funzione "Termoventilato + Vapore", è possibile
scegliere la quantità di vapore tra i seguenti valori:
VAPORE 1, VAPORE 2.
Note: una volta attivata la funzione, il livello
temperatura/grill può essere modicato utilizzando
o .
DURATA
DURATA
Quando l'icona lampeggia sul display, premere
o per impostare il tempo di cottura
desiderato, quindi premere
per confermare. È
possibile non impostare la durata se si preferisce
gestire manualmente il tempo di cottura: Premere
o per confermare e avviare la funzione.
Selezionando questa modalità non è possibile
programmare un avvio ritardato.
Note: durante la cottura, premendo
è possibile
regolare il tempo impostato: premere
o per
modificarlo, quindi premere
per confermare.
ORA DI FINE (AVVIO RITARDATO)
In molte funzioni, una volta impostato un tempo di
cottura è possibile posticipare l'avvio della funzione
programmando l'ora di fine cottura. Il display mostra
l'ora di fine mentre l'icona
lampeggia.
FINE COTTURA
Premere o per impostare l'ora in cui si
desidera terminare la cottura, quindi premere
per confermare e attivare la funzione. Posizionare gli
alimenti nel forno e chiudere la porta: la funzione si
avvierà automaticamente dopo un periodo di tempo
calcolato per terminare la cottura all'orario impostato.
Note: La programmazione dell'avvio ritardato di una
cottura disattiva la fase di preriscaldamento del forno: la
temperatura desiderata viene raggiunta gradualmente,
quindi i tempi di cottura si allungheranno leggermente
rispetto a quanto indicato nella tabella di cottura.
Durante il tempo di attesa, è possibile premere
o per modificare l'ora di fine programmata o
premere
per modificare altre impostazioni.
Premendo
è possibile alternare la visualizzazione tra
l'ora di fine cottura e la durata.
3. MY MENU
Queste funzioni selezionano automaticamente la
modalità, la temperatura e la durata di cottura più
adatte per ottenere risultati ottimali. Alla richiesta,
sarà sufficiente indicare le caratteristiche degli
alimenti per ottenere un risultato ottimale.
PESO / ALTEZZA (LIVELLI TEGLIA ROTONDA)
CHILOGRAMMI
Per impostare correttamente la funzione, seguire le
indicazioni sul display, quando richiesto, e premere
o per impostare il valore richiesto e premere
per confermare.
GRADO DI COTTURA / DORATURA
In alcune funzioni My Menu è possibile regolare il
grado di cottura.
GRADO DI COTTURA
Alla richiesta, premere o per selezionare
il livello desiderato tra al sangue (-1) e ben cotto
(+1). Premere
o per confermare e avviare
la funzione. Allo stesso modo, in alcune funzioni
MyMenu è possibile regolare il grado di doratura tra
un valore minimo (-1) e un valore massimo (+1).
COTTURA A VAPORE
Selezionando "Vapore" o "Termoventilato + Vapore"
all'interno delle Funzioni manuali o una delle
numerose ricette dedicate del MyMenu è possibile
cucinare qualsiasi tipo di alimento grazie all'utilizzo
del vapore. Il vapore penetra negli alimenti in modo
più veloce e uniforme rispetto alla sola aria calda
utilizzata nelle funzioni statiche: questa azione
riduce i tempi di cottura, preservando le preziose
sostanze nutritive degli alimenti e assicurando
risultati eccellenti e saporiti in tutte le preparazioni. È
importante che la porta del forno rimanga chiusa per
l'intera durata della cottura a vapore. Per procedere
con la cottura a vapore, sarà necessario fornire acqua
al boiler situato all'interno del forno utilizzando il
cassetto estraibile sul pannello comandi.
Quando viene richiesto sul display con l'indicazione
"AGGIUNGI ACQUA", estrarre il cassetto, aprire il
coperchio del cassetto e riempirlo d'acqua fino al
livello richiesto sul display. Chiudere il cassetto
spingendolo con attenzione verso il pannello finché
non è completamente chiuso. Dopo l'inserimento del
cassetto, premere AVVIO per procedere con il ciclo di
cottura. Il cassetto deve restare sempre chiuso, tranne
quando è necessario rabboccare l'acqua.
Dopo il primo riempimento, in caso di cicli di cottura
più lunghi, una volta esaurita l'acqua, potrebbe essere
necessario aggiungerla nuovamente per completare il
ciclo: il forno lo richiede in caso di necessità.
4. AVVIO DELLA FUNZIONE
Dopo avere confermato i valori predefiniti o avere
applicato le impostazioni preferite, premere
per
attivare la funzione prescelta.
Se è stato impostato un avvio ritardato, premendo
il forno chiederà se si desidera saltare questa
fase, avviando immediatamente la funzione.
Note: dopo avere selezionato una funzione, il display
consiglia il livello più adatto per quella funzione. La
funzione avviata può essere interrotta in qualsiasi
momento premendo
.
Se il forno è caldo e la funzione prevede una
determinata temperatura massima, sul display
compare un messaggio corrispondente. Premere
per tornare alla schermata precedente e selezionare
un’altra funzione o attendere il raffreddamento
completo.
5. PRERISCALDAMENTO
In alcune funzioni, è prevista una fase di
preriscaldamento del forno: una volta avviata la
funzione, il display segnala che si è attivata la fase di
preriscaldamento.
PRERISCALDAMENTO
Al termine di questa fase, un segnale acustico e
il display indicheranno che il forno ha raggiunto
la temperatura impostata e comparirà la richiesta
"AGG. ALIMENTO". A questo punto, aprire la porta,
posizionare gli alimenti nel forno, chiudere la porta e
avviare la cottura premendo
o .
Note: inserire gli alimenti nel forno prima della
fine del preriscaldamento può compromettere
i risultati di cottura. Aprendo la porta durante la
fase di preriscaldamento, questa si interrompe
temporaneamente.
Il tempo di cottura non comprende la fase di
preriscaldamento. È sempre possibile modificare la
temperatura che il forno deve raggiungere utilizzando
o .
6. GIRARE O CONTROLLARE GLI ALIMENTI
Alcune funzioni My Menu prevedono che gli alimenti
vengano girati durante la cottura.
GIRA ALIMENTO
Questa richiesta sarà segnalata da un segnale acustico
e da un messaggio corrispondente sul display. Aprire
la porta, eseguire l'operazione indicata sul display,
chiudere la porta e premere
per continuare la
cottura. Allo stesso modo, quando manca il 10%
del tempo di cottura impostato, il forno richiede di
controllare gli alimenti.
CONTROLLARE IL CIBO
Questa richiesta sarà segnalata da un segnale acustico
e da un messaggio corrispondente sul display.
Controllare gli alimenti, chiudere la porta e premere
o per continuare la cottura.
Note: Premere
per saltare queste azioni. In ogni
caso, una volta trascorso un certo tempo senza
che l'operazione venga eseguita, il forno riprende
automaticamente la cottura.
7. FINE COTTURA
Allo scadere del tempo programmato, un segnale
acustico e il display indicheranno che la cottura è
terminata.
FINE
Premere per continuare la cottura in modalità
manuale (senza timer) o premere
per prolungare
il tempo di cottura impostando una nuova durata.
In entrambi i casi, i parametri di cottura saranno
mantenuti.
DORATURA
Con alcune funzioni, alla fine della cottura il forno
consente di dorare la superficie del cibo grazie
all'utilizzo del grill.
PREMERE v PER DORARE
Quando il display visualizza il messaggio pertinente,
se necessario, premere
per avviare un ciclo di
doratura di cinque minuti. Questa funzione può
essere interrotta in qualsiasi momento premendo
per spegnere il forno.
8. PREFERITI
Al termine della cottura, sul display compare un
messaggio che propone di salvare la funzione nella
lista dei preferiti con un numero da 1 a 10.
AGG. PREFERITO?
Se si desidera salvare una funzione come preferita e
memorizzare le impostazioni attuali per un uso futuro,
premere
altrimenti, per ignorare la richiesta
premere
. Una volta premuto , premere o
per selezionare la posizione del numero, quindi
premere
per confermare.
Note: se la memoria è piena o la posizione è già
occupata, viene chiesto di confermare la sovrascrittura
della funzione precedente.
Per richiamare successivamente le funzioni salvate
premere
: il display mostrerà la lista delle funzioni
preferite.
1. STATICO
Premere o per selezionare la funzione,
confermare premendo
, quindi premere per
attivare.
9. DIAMOND CLEAN
Premere per visualizzare "Diamond Clean" sul
display.
DIAMOND CLEAN
Premere per attivare la funzione: il display
indicherà le operazioni richieste per ottenere una
pulizia ottimale: Seguire le indicazioni, quindi
premere
al termine. Una volta eseguite tutte le
operazioni preliminari, alla richiesta del forno premere
per attivare il ciclo di pulizia.
Note: Si raccomanda di non aprire la porta del forno
durante il ciclo di pulizia per evitare perdite di vapore, che
potrebbero avere un eetto negativo sul risultato nale.
A ciclo ultimato, il relativo messaggio di avviso
lampeggia sul display. Lasciar rareddare il forno,
quindi pulire e asciugare le superci interne con un
panno o una spugna.
10. SCARICO ACQUA
Questa funzione permette di scaricare l'acqua per
impedire che ristagni nel boiler. Questo prodotto è
stato sviluppato per eseguire automaticamente un
ciclo di scarico acqua una volta terminata la cottura.
Circa 30 minuti dopo l'arresto/fine della cottura, il
forno svuoterà automaticamente il sistema,
spostando l'acqua residua nel cassetto (fare
attenzione a non rimuovere il cassetto dopo la
cottura). Una volta fatto, il cassetto può essere
estratto e svuotato. Si consiglia di svuotare il cassetto
non appena lo scarico acqua viene completato.
11. DECALCIFICAZIONE
Questa funzione speciale, attivata a intervalli regolari,
consente di mantenere il sistema a vapore nelle
migliori condizioni. Dopo avere avviato la funzione,
eseguire le operazioni indicate sul display. La durata
media della funzione completa è di circa 140 minuti.
La decalcificazione può essere avviata in qualsiasi
momento dall'utente dal Menu Pulizia.
Il display indica quando è il momento di eseguire un
ciclo di decalcificazione (vedere la tabella seguente).
MESSAGGIO DI
DECALCIFICAZIONE
SIGNIFICATO
<DECALCIFICAZIONE CONSI-
GLIATA>
Appare dopo circa 15 ore di
cicli di vapore*
Si consiglia di eseguire un
ciclo di decalcicazione.
<DECALCIFICAZIONE NECES-
SARIA>
Appare dopo circa 20 ore di
cicli di vapore*
La decalcicazione è ob-
bligatoria. Non è possibile
eseguire un ciclo a vapore no
a quando non viene eseguito
un ciclo di decalcicazione.
*considerando il valore predefinito (4 - Dura) del livello
di durezza dell'acqua. Il numero di ore di cicli di vapore
che devono trascorrere prima che vengano visualizzati i
messaggi di decalcificazione dipende dal livello di
durezza acqua impostato sull'apparecchio.
La procedura di decalcificazione può essere eseguita
anche quando l'utente desidera una pulizia più
profonda del circuito interno del vapore. Prima di
eseguire la fase di decalcificazione, l'apparecchio
controllerà se nel boiler è presente dell'acqua residua
e, se necessario, potrà essere eseguito un ciclo di
scarico acqua. In questo caso, è necessario svuotare il
cassetto dopo il ciclo di scarico acqua, prima di
proseguire con la fase di decalcificazione.
Note: per garantire che l'acqua sia fredda, non è
possibile eseguire questa attività prima che siano
trascorsi 30 minuti dall'ultimo ciclo (o dall'ultima volta

che il prodotto è stato alimentato). Durante questo
tempo di attesa, il display mostrerà il seguente feedback
"WATER IS HOT" (L'ACQUA È CALDA).
» FASE 1/2: DECALCIFICARE (70 MIN)
Quando il display visualizza <AGG. 0,25 L DI
SOLUZIONE>, versare la soluzione decalcificante nel
cassetto. Per ottenere risultati ottimali nella
decalcificazione, si consiglia di riempire il serbatoio
con una soluzione composta da 75 g del prodotto
specifico WPRO e 250 ml di acqua potabile. WPRO è il
decalcificante professionale consigliato per ottenere
prestazioni sempre ottimali dalle funzioni di cottura a
vapore del forno. Per ordini e informazioni, contattare
il Servizio Assistenza o
www . hotpoint. eu.
Hotpoint non sarà responsabile per i danni causati
dall'impiego di altri prodotti di pulizia reperibili in
commercio.
Una volta versata la soluzione decalcificante
all'interno del cassetto, premere
per avviare il
processo di decalcificazione principale. Le fasi di
decalcificazione non richiedono la presenza
dell'utente davanti all'apparecchio. Al termine di ogni
fase, verrà riprodotto un feedback acustico e il display
mostrerà le istruzioni per procedere con la fase
successiva.
Una volta completata la fase di decalcificazione, il
boiler verrà svuotato: La soluzione decalcificante
utilizzata in questa fase sarà versata nel cassetto
estraibile.
» FASE 2/2: RISCIACQUO (30 MIN.)
Per rimuovere i residui di calcare dal cassetto e dal
circuito del vapore, è necessario effettuare un ciclo di
risciacquo. Quando il display visualizza <AGG. 0.25 L
DI ACQUA> riempire il serbatoio con 0,25 L di acqua
potabile, quindi premere
per avviare il risciacquo.
Non spegnere il forno prima di avere completato
tutte le operazioni richieste dalla funzione.
Note: se necessario da parte del sistema, è possibile
che venga richiesto di svuotare il cassetto e di ripetere
l'operazione.
Al termine della procedura di decalcificazione, si
consiglia di asciugare la cavità da eventuali residui
d'acqua. Sarà quindi possibile utilizzare tutte le
funzioni del vapore.
Note: durante il ciclo di decalcificazione, è possibile che
si senta un po' di rumore, poiché le pompe del forno
vengono attivate per garantire l'efficienza ottimale della
decalcificazione.
Una volta avviato il ciclo di manutenzione, non
rimuovere il cassetto se non richiesto dall'apparecchio.
Note: Una volta riempito il boiler con la soluzione
decalcificante e dopo che il display visualizza "FASE
1/2 DI DECALCIFICAZIONE", il ciclo non deve essere
interrotto, altrimenti è necessario ripetere l'intero ciclo
di decalcificazione prima di poter eseguire qualsiasi
funzione di vapore.
12. CONTA MINUTI
Per attivare questa funzione, premere l'icona .
Premere
o per impostare la durata desiderata,
quindi premere
per attivare il timer.
CONTA MINUTI
Verrà emesso un segnale acustico e il display indicherà
che il cronometro ha terminato il conteggio dell'ora
selezionata.
Note: il conta minuti non attiva nessun ciclo di cottura.
Il minutaggio può essere attivato anche quando è
attiva una funzione.
Il timer continuerà il conto alla rovescia in modo
indipendente, senza interferire con la funzione stessa.
Durante questa fase non sarà possibile vedere il
contaminuti (sarà visualizzata solo l'icona
), che
continuerà il conteggio alla rovescia in background. Per
modicare il minutaggio, è possibile premere il l'icona
e impostare l'ora usando l'icona o .
Per annullare il promemoria, premere l'icona
, quindi
selezionare
nché l'ora visualizzata è "--:--". Premere
per confermare.
13. BLOCCO TASTI
Per bloccare il tastierino, tenere premuto per
almeno cinque secondi. Ripetere la procedura per
sbloccare il tastierino..
BLOCCO TASTI
Nota: questa funzione può essere attivata anche durante
la cottura. Per ragioni di sicurezza, è possibile spegnere il
forno in ogni momento premendo
.
. NOTE
• Non coprire l'interno del forno con pellicola di
alluminio.
• Non trascinare pentole o tegami sul fondo del
forno, perché così facendo si potrebbe rovinare lo
smalto.
• Non appoggiare pesi elevati sulla porta e non
aggrapparsi ad essa.
• A causa della temperatura più elevata del ciclo
Pizza, si prevede che il rumore della ventola di
raffreddamento sarà leggermente più elevato.
1+
= 75 g
+2
250 ml
3

CONSIGLI UTILI
COME LEGGERE LA TABELLA DI COTTURA
La tabella indica la funzione, gli accessori e il livello
migliore da utilizzare per cuocere svariati tipi di cibo.
I tempi di cottura si intendono dall'introduzione
degli alimenti nel forno, escluso il preriscaldamento
(dove richiesto). Le temperature e i tempi di cottura
sono indicativi e dipendono dalla quantità di cibo e
dal tipo di accessori. Utilizzare inizialmente i valori
più bassi consigliati e, se il risultato della cottura
non è quello desiderato, passare a quelli più alti. Si
consiglia di utilizzare gli accessori in dotazione e
tortiere o teglie possibilmente in metallo scuro. È
possibile utilizzare anche tegami e accessori in pyrex
o in ceramica, ma occorre considerare che i tempi di
cottura si allungheranno leggermente.
COTTURA SIMULTANEA DI PIETANZE DIVERSE
Utilizzando la funzione "Termoventilato", è possibile
cuocere contemporaneamente alimenti diversi (ad
esempio: pesce e verdure) che richiedono la stessa
temperatura, su differenti ripiani. Si potranno estrarre
prima gli alimenti che richiedono tempi di cottura più
brevi e lasciare continuare la cottura per quelli che
necessitano di tempi più lunghi.
CARNE
Utilizzare qualunque tipo di teglia o pirofila adatta
alle dimensioni della carne da cuocere. Per gli arrosti,
aggiungere preferibilmente del brodo sul fondo della
pirofila inumidendo la carne durante la cottura per
insaporirla. Fare attenzione al vapore che si sviluppa
durante tale operazione. Quando l'arrosto è pronto,
lasciarlo riposare in forno per altri 10-15 minuti
oppure avvolgerlo in un foglio di alluminio.
Per la cottura uniforme della carne alla griglia,
scegliere tagli dello stesso spessore. I pezzi di carne
molto spessi richiedono tempi di cottura più lunghi.
Per evitare che si brucino in superficie, allontanarli dal
grill disponendoli su ripiani più bassi. Girare la carne a
due terzi della cottura. Aprire con cautela la porta in
quanto può fuoriuscire vapore caldo.
Si consiglia di posizionare una leccarda con mezzo
litro d'acqua potabile direttamente sotto la griglia
sulla quale avete posizionato il cibo da grigliare, per
raccogliere il liquido di cottura. Rabboccare quando
necessario.
DESSERT
Cuocere i dessert delicati con la funzione statica su un
solo livello.
Utilizzare tortiere in metallo scuro e posizionarle
sempre sulla griglia in dotazione. Per la cottura su
più livelli selezionare la funzione termoventilato e
disporre le tortiere sfalsate sulle griglie, in modo da
favorire la circolazione dell'aria.
Per capire se la torta lievitata è cotta, inserire uno
stuzzicadenti nella parte centrale del dolce. Se lo
stuzzicadenti rimane asciutto, il dolce è pronto.
Se si utilizzano tortiere antiaderenti, non
imburrare i bordi, il dolce potrebbe non crescere
omogeneamente sui lati.
Se il dolce si "sgonfia" durante la cottura, la volta
successiva utilizzare una temperatura inferiore,
magari riducendo la quantità di liquido e mescolando
più delicatamente l'impasto.
I dessert con guarnitura succosa (torte al formaggio o
crostate di frutta) richiedono la funzione "Ventilato".
Se la base della torta risulta troppo umida, usare un
ripiano più basso e cospargere la base del dolce di
pan grattato o biscotti sbriciolati prima di aggiungere
il ripieno.
LIEVITAZIONE
Si consiglia di coprire l'impasto con un panno umido
prima di introdurlo nel forno. Con questa funzione,
i tempi di lievitazione si riducono di circa un terzo
rispetto ai tempi di lievitazione a temperatura
ambiente (20-25°C). Il tempo di lievitazione per un
impasto da pizza da 1 kg è di circa un'ora.
CATEGORIE DI ALIMENTI QUANTITÀ
GRADO DI
COTTURA
LIVELLO DI
DORATURA
GIRARE
(DEL
TEMPO DI
COTTURA)
LIVELLO E ACCESSORI
COTTURA
TRADIZ.
PIATTI UNICI
Lasagna 0,5 - 3 kg - 0 -
2
Torte salate 0,8 - 1,2 kg - 0 -
2
Verdure ripiene
0,1 - 0,5 kg
[l'uno]
- - -
3
PIZZA & PANE
Panini 60 - 150 g [l'uno] - - -
3
Pane per
tramezzini
400 - 600 g [l'uno] - - -
2
Pane Grande 0,7 - 2,0 kg - - -
2
Baguette 200 - 300 g [l'una] - - -
3
Pizza al piatto Rotonda - - -
2
Pizza alta Leccarda - - -
2
Pizza [surgelata]
1 strato* - - -
2
2 strati* - - -
4
1
3 strati* - - -
5
3 1
4 strati* - - -
5
4 2 1
Prodotti da
forno dolci
Pan di spagna 0,5 - 1,2 kg - - -
2
Biscotti 0,2 - 0,6 kg - - -
3
Bignè una teglia * - - -
3
Crostata 0,4 - 1,6 kg - - -
3
Strudel 0,4 - 1,6 kg - - -
3
Torta di frutta 0,5 - 2 kg - - -
2
ARROSTITI
Carne
Roast Beef 0,6 - 2 kg 0 0 -
3
Arrosto di maiale 0,6 - 2,5 kg - 0 -
3
Pollo arrosto 0,6 - 3 kg - 0 -
2
Contorni
Verdure arrostite 0,5 - 1,5 kg - 0 -
3
Patate arrosto 0,5 - 1,5 kg - - -
3
GRIGLIATI
Carne
Burger 1,5 - 3 cm 0 - 3/5
5
4
Salsicce &
wurstel
1,5 - 4,5 cm - - 2/3
5
4
Spiedini una griglia - - 1/2
5
4
Filetto & petto 1 - 5 cm - - 2/3
5
4
Pesci e frutti di
mare
Filetti 0,5 - 3 cm - - -
3
2
Filetti [surgelati] 0,5 - 3 cm - - -
3
2
* Quantità consigliata
ACCESSORI
Griglia
Pirofila / Tortiera / Teglia per pizza
tonda su griglia metallica
Leccarda / Teglia Leccarda con 500 ml di acqua
TABELLA DI COTTURA MY MENU
CATEGORIE DI ALIMENTI QUANTITÀ
GRADO DI
COTTURA
LIVELLO DI
DORATURA
GIRARE
(DEL
TEMPO DI
COTTURA)
LIVELLO E ACCESSORI
GRIGLIATI Contorni
Pomodori al
gratin
una teglia - - -
3
Peperoni al
gratin
una teglia - - -
3
Broccoli al gratin una teglia - - -
3
Cavolfiori al
gratin
una teglia - - -
3
Verdure
gratinate
una teglia - - -
3
TABELLA DI COTTURA MY MENU
* Quantità consigliata
ACCESSORI
Griglia
Pirofila / Tortiera / Teglia per pizza
tonda su griglia metallica
Leccarda / Teglia Leccarda con 500 ml di acqua
ACCESSORI
Teglia frittura ad aria Pirofila o tortiera su griglia
Leccarda/piastra dolci o
teglia su griglia
TABELLA DI COTTURA PER FRITTURA AD ARIA
RICET TA FUNZIONE
QUANTITÀ
CONSIGLIATA
PRERISC.
TEMPERATURA
(°C)
DURATA
(MIN.)
RIPIANI E
ACCESSORI
ALIMENTI SURGELATI
Patate fritte surgelate
650 - 850 g Sì 200 25 - 30
4
2
Nugget di pollo surgelati
500 g Sì 200 15 - 20
4
2
Bastoncini di pesce 500 g Sì 220 15 - 20
4
2
Anelli di cipolle
500 g Sì 200 15 - 20
4
2
VERDURE
Zucchini freschi impanati 400 g Sì 200 15 - 20
4
2
Patatine fritte fatte in casa
300 - 800 g Sì 200 20 - 40
4
2
Verdure miste 300 - 800 g Sì 200 20 - 30
4
2
CARNE E PESCE
Petti di pollo 1 - 4 cm Sì 200 20 - 40
4
2
Alette di pollo 200 - 1500 g Sì 220 30 - 50
4
2
Cotolette impanate 1 - 4 cm Sì 220 20 - 50
4
2
Filetti di pesce 1 - 4 cm Sì 220 15 - 25
4
2
Per cucinare alimenti freschi o fatti in casa, distribuire uno strato sottile di olio sulla superficie dell'alimento.
Per garantire risultati di cottura uniformi, mescolare gli alimenti a metà del tempo di cottura consigliato.
FUNZIONI
Frittura ad aria
TABELLA DI COTTURA VAPORE + ARIA
ACCESSORI
Pirofila o tortiera su griglia
Leccarda/piastra dolci o
teglia su griglia
RICET TA LIVELLO VAPORE*
PRERISC.
TEMPERATURA
(°C)
DURATA
(MIN.)
RIPIANI E ACCESSORI
Pasta frolla / Biscotti 1 SÌ 140 - 150 35 - 55
3
Tortine / Muffin 1 SÌ 160 - 170 30 - 40
3
Torte lievitate 1 SÌ 170 - 180 40 - 60
2
Pan di spagna 1 SÌ 160 - 170 30 - 40
2
Focaccia 1 SÌ 200 - 220 20 - 40
3
Pagnotta 1 SÌ 170 -180 70 - 100
3
Panini 1 SÌ 200 - 220 30 - 50
3
Baguette 1 SÌ 200 - 220 30 - 50
3
Patate arrosto 2 SÌ 200 - 220 50 - 70
3
Vitello / Manzo / Maiale 1 Kg 2 SÌ 180 - 200 60 - 100
3
Vitello / Manzo / Maiale (pezzi) 2 SÌ 160 - 180 60-80
3
Roast beef al sangue 1 kg 2 SÌ 200 - 220 40 - 50
3
Roast beef al sangue 2 kg 2 SÌ 200 55 - 65
3
Coscia d'agnello 2 SÌ 180 - 200 65 - 75
3
Stinco di maiale stufato 2 SÌ 160 - 180 85 - 100
3
Pollo / Faraona / Anatra (1-1,5 kg) 2 SÌ 200 - 220 50 - 70
3
Pollo / Faraona / Anatra (in pezzi) 2 SÌ 200 - 220 55 - 65
3
Verdure ripiene
(pomodori, zucchine, melanzane)
2 SÌ 180 - 200 25 - 40
3
Filetto di pesce 3 SÌ 180 - 200 15 - 30
3
*Tener presente che in caso di selezione della funzione Steam Auto, questa correlazione deve essere saltata.. Il forno
selezionerà automaticamente il miglior livello di vapore adatto alla temperatura selezionata.
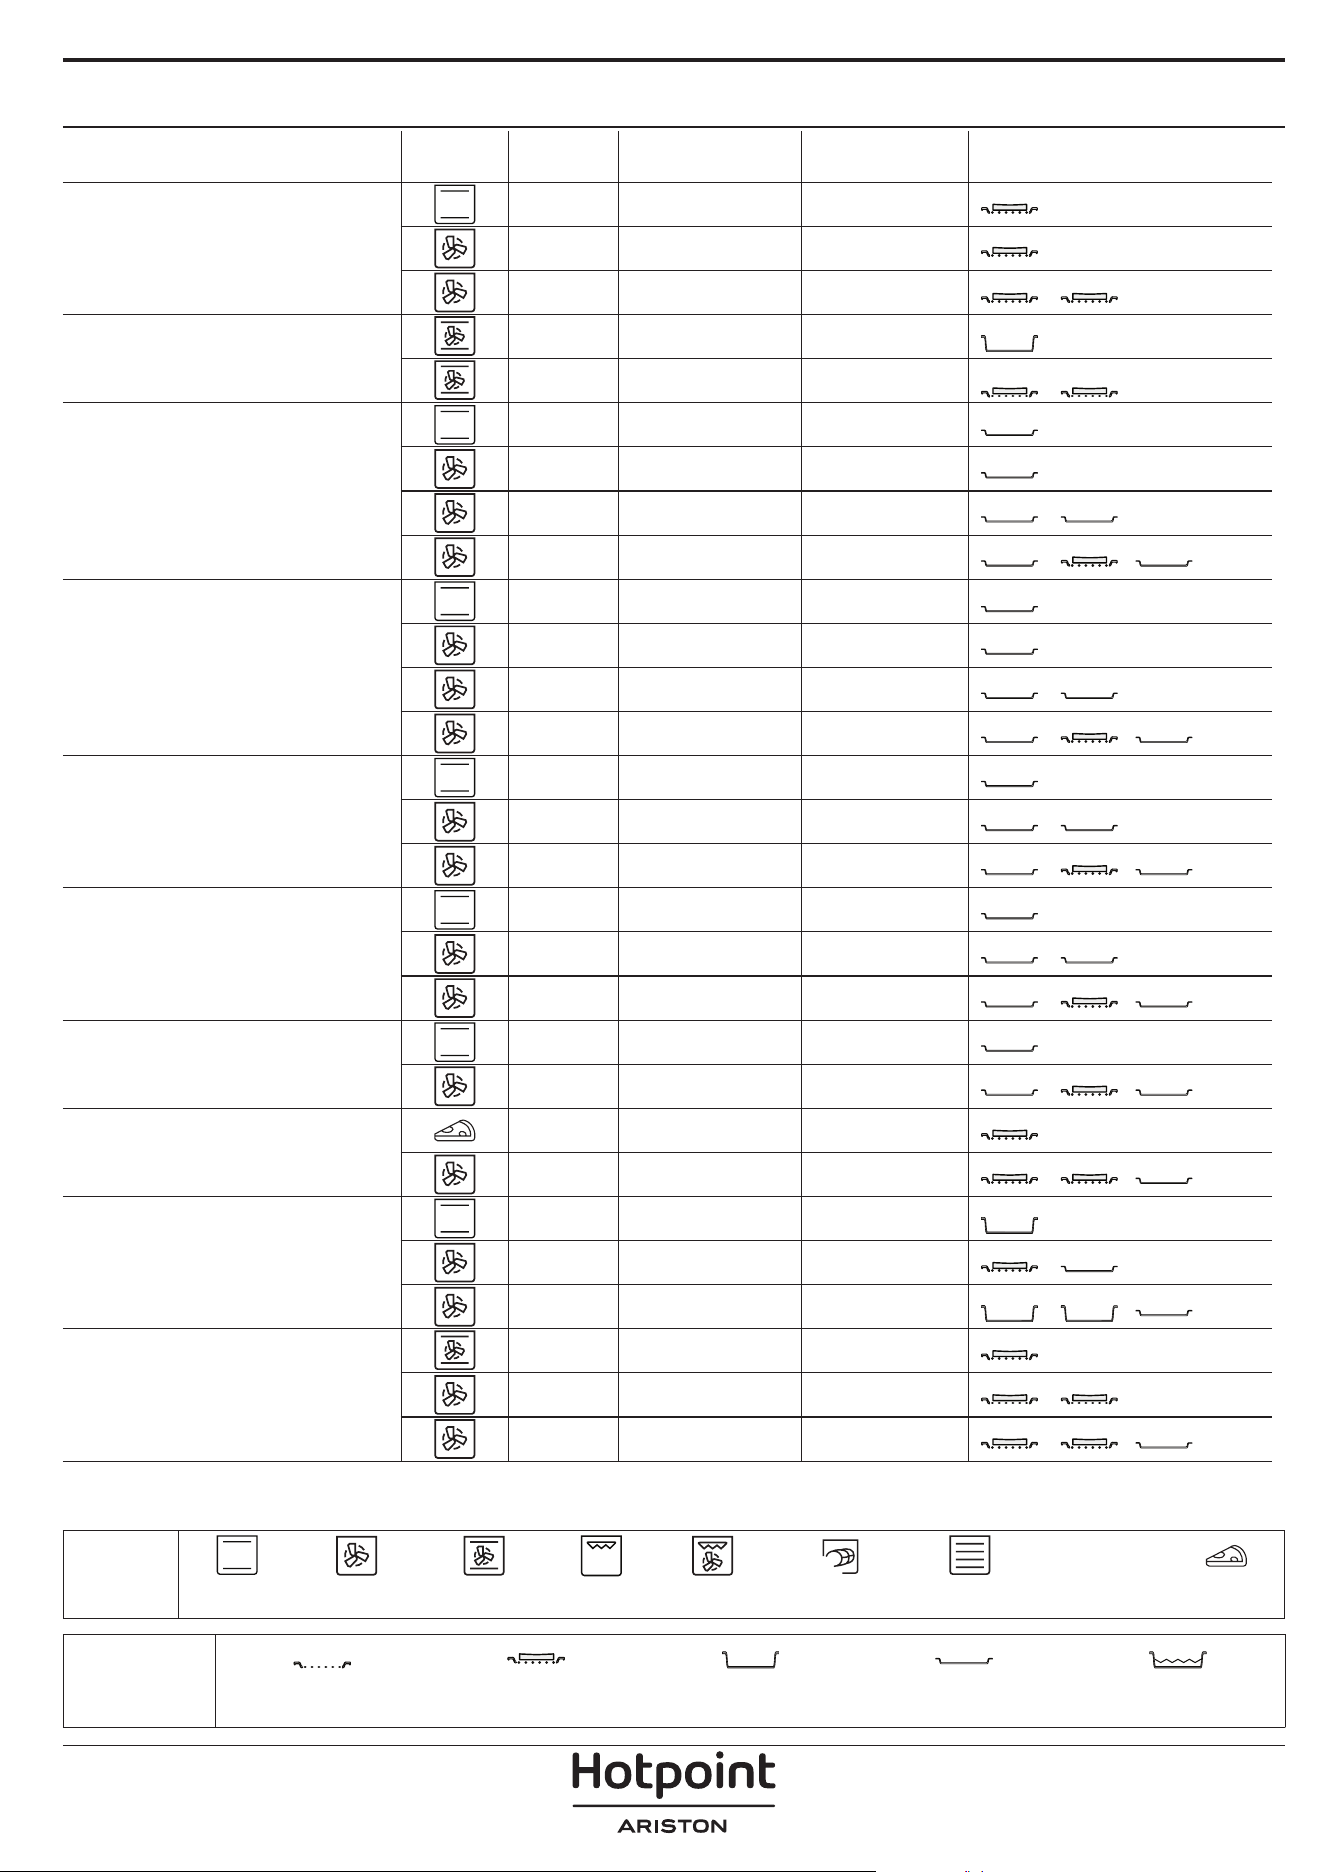
TABELLA DI COTTURA
RICETTA FUNZIONE PRERISC. TEMPERATURA (°C) DURATA (MIN.) RIPIANI E ACCESSORI
Torte lievitate / Pan di Spagna
Sì 170 30 - 50
2
Sì 160 30 - 50
2
Sì 160 30 - 50
4
1
Torte ripiene
(cheesecake, strudel, torta di mele)
Sì 160 – 200 30 - 85
3
Sì 160 – 200 30 - 90
4
1
Biscotti
Sì 150 20 - 40
3
Sì 140 30 - 50
4
Sì 140 30 - 50
4
1
Sì 135 40 - 60
5
3 1
Tortine / Mun
Sì 170 20 - 40
3
Sì 150 30 - 50
4
Sì 150 30 - 50
4
1
Sì 150 40 - 60
5
3 1
Bigné
Sì 180 - 200 30 - 40
3
Sì 180 - 190 35 - 45
4
1
Sì 180 - 190 35 - 45 *
5
3 1
Meringhe
Sì 90 110 - 150
3
Sì 90 130 - 150
4
1
Sì 90 140 - 160 *
5
3 1
Pizza / Pane / Focaccia
Sì 190 - 250 15 - 50
2
Sì 190 - 230 20 - 50
5
3 1
Pizza (sottile, alta, focaccia)
Sì 310 7 - 12
2
Sì 220 - 240 25 - 50 *
5
3 1
Pizza surgelata
Sì 250 10 - 15
3
Sì 250 10 - 20
4
1
Sì 220 - 240 15 - 30
5
3 1
Torte salate
(torta di verdure, quiche)
Sì 180 - 190 45 - 55
3
Sì 180 - 190 45 - 60
4
1
Sì 180 - 190 45 - 70 *
5
3 1
ACCESSORI
Griglia Pirofila o tortiera su griglia
Leccarda / piastra dolci o
teglia su griglia
Leccarda / Teglia
Leccarda con 500 ml di
acqua
FUNZIONI
XL
ECO
Statico Termoventilato Ventilato Grill Turbo Grill Maxi Cooking Multiflow menu Ciclo ECO Pizza

RICETTA FUNZIONE PRERISC. TEMPERATURA (°C) DURATA (MIN.) RIPIANI E ACCESSORI
Vols-au-vent / Salatini di pasta sfoglia
Sì 190 - 200 20 - 30
3
Sì 180 - 190 20 - 40
4
1
Sì 180 - 190 20 - 40 *
5
3 1
Lasagne / Sformati / Pasta al forno /
Cannelloni
Sì 190 - 200 45 - 65
3
Agnello / Vitello / Manzo / Maiale 1 kg Sì 190 - 200 80 - 110
3
Arrosto di maiale con cotenna 2 kg
XL
- 170 110 - 150
2
Pollo / Coniglio / Anatra 1 kg Sì 200 - 230 50 - 100
3
Tacchino / Oca 3 kg Sì 190 - 200 80 - 130
2
Pesce al forno / al cartoccio (letti,
intero)
Sì 180 - 200 40 - 60
3
Verdure ripiene
(pomodori, zucchine, melanzane)
Sì 180 - 200 50 - 60
2
Pane tostato - 3 (Alta) 3 - 6
5
Filetti di pesce / Bistecche - 2 (media) 20 - 30 **
4
3
Salsicce / Spiedini / Costine /
Hamburger
- 2 - 3 (media – alto) 15 - 30 **
5
4
Pollo arrosto (1-1,3 kg) - 2 (media) 55 - 70 ***
2
1
Coscia d'agnello / Stinco - 2 (media) 60 - 90 ***
3
Patate arrosto - 2 (media) 35 - 55 ***
3
Verdure gratinate - 3 (Alta) 10 - 25
3
Biscotti
Biscotti
Sì 135 50 - 70
5
4 3 1
Crostate
Crostate
Sì 170 50 - 70
5
3 2 1
Pizze tonde
Pizza
Sì 210 40 - 60
5
3 2 1
Pasto completo: Crostata di frutta (livello
5) / Lasagne (livello 3) / Carne (livello 1)
Sì 190 40 - 120 *
5
3 1
Pasto completo: Crostata di frutta (livello
5) / Verdure arrostite (livello 4) / Lasagne
(livello 2) / Tagli di carne (livello 1)
Menu
Sì 190 40 - 120 *
5
4 2 1
Lasagne e carne Sì 200 50 - 100 *
4
1
Carne e patate Sì 200 45 - 100 *
4
1
Pesce e verdure Sì 180 30 - 50 *
4
1
Arrosti ripieni
ECO
- 200 80 - 120 *
3
Carne in pezzi
(coniglio, pollo, agnello)
ECO
- 200 50 - 100 *
3
* Il tempo di cottura è indicativo: i piatti possono essere estratti dal forno in momenti diversi, a seconda delle preferenze
personali.
** Girare gli alimenti a metà cottura.
*** Girare gli alimenti a due terzi di cottura (se necessario).
ACCESSORI
Griglia Pirofila o tortiera su griglia
Leccarda / piastra dolci o
teglia su griglia
Leccarda / Teglia
Leccarda con 500 ml di
acqua
FUNZIONI
XL
ECO
Statico Termoventilato Ventilato Grill Turbo Grill Maxi Cooking Multiflow menu Ciclo ECO Pizza

Assicurarsi che il forno si sia
rareddato prima di eettuare
qualsiasi intervento di
manutenzione o pulizia.
Non utilizzare apparecchi a
vapore.
Non usare pagliette metalliche,
panni abrasivi e detergenti
abrasivi o corrosivi che possano
danneggiare le superci.
Indossare guanti protettivi.
Il forno deve essere scollegato
dalla rete elettrica prima di
eettuare qualsiasi tipo di
manutenzione.
MANUTENZIONE E PULIZIA
COME LEGGERE LA TABELLA DI COTTURA
La tabella indica la funzione, gli accessori e il livello migliore da utilizzare per cuocere svariati tipi di cibo.
I tempi di cottura si intendono dall'introduzione degli alimenti nel forno, escluso il preriscaldamento (dove richiesto).
Le temperature e i tempi di cottura sono indicativi e dipendono dalla quantità di cibo e dal tipo di accessori.
Utilizzare inizialmente i valori più bassi consigliati e, se il risultato della cottura non è quello desiderato, passare a quelli
più alti.
Si consiglia di utilizzare gli accessori in dotazione e tortiere o teglie possibilmente in metallo scuro. È possibile utilizzare
anche tegami e accessori in pyrex o in ceramica, ma occorre considerare che i tempi di cottura si allungheranno
leggermente.
SUPERFICI ESTERNE
• Pulire le superfici con un panno in microfibra umido.
Se molto sporche, aggiungere qualche goccia di
detergente con pH neutro. Asciugare con un panno.
• Non utilizzare detergenti corrosivi o abrasivi. Se
inavvertitamente uno di questi prodotti dovesse
venire a contatto con le superfici, pulire subito con un
panno in microfibra umido.
SUPERFICI INTERNE
• Dopo ogni uso, lasciare raffreddare il forno e
pulirlo preferibilmente quando è ancora tiepido per
rimuovere incrostazioni e macchie dovute a residui
di cibo. per asciugare la condensa dovuta alla cottura
di alimenti ad alto contenuto di acqua, usare a forno
freddo un panno o una spugna.
• Attivare la funzione "Diamond Clean" per una
pulizia ottimale delle superfici interne. (Solo in alcuni
modelli).
• Pulire i vetri della porta con detergenti liquidi
specifici.
• La porta del forno può essere rimossa per facilitare la
pulizia.
ACCESSORI
Mettere a bagno gli accessori con detersivo per piatti
dopo l'uso, maneggiandoli con guanti da forno, se
ancora caldi. I residui di cibo possono essere rimossi
con una spazzola per piatti o con una spugna.
Non pulire la sonda alimenti e la sonda carne (se
presente) in lavastoviglie.
La teglia per frittura ad aria (se presente) può essere
lavata in lavastoviglie.
MANUTENZIONE DEL CASSETTO DELL'ACQUA
Attenzione: Il cassetto dell'acqua non è adatto all'uso
in lavastoviglie: rischio di danni!
Al termine di ogni ciclo di cottura a vapore, dopo
circa 30 minuti il forno esegue automaticamente un
ciclo di scarico acqua della durata di circa un minuto,
trasferendo così tutta l'acqua presente nel sistema nel
cassetto estraibile.
Nota: Evitare di lasciare l'acqua nel sistema per più di 2
giorni.
Per rimuovere completamente l'acqua all'interno o
pulire le superfici interne, è possibile aprire il cassetto
dell'acqua:
1. Spingere verso l'alto
l'aletta posteriore per
rimuovere il coperchio
superiore del cassetto
dell'acqua.
2. Una volta terminata la
pulizia, è possibile chiudere
il cassetto inserendo le due
alette anteriori all'interno
delle aperture anteriori e
spingendo verso il basso il
lato posteriore.
Per riempire il cassetto dell'acqua, utilizzare solo
acqua a temperatura ambiente: l'acqua calda può
influire sul funzionamento del sistema a vapore.
Utilizzare solo acqua potabile.
BOILER
Per garantire che il forno funzioni sempre in modo
ottimale e per aiutare a prevenire la formazione di
depositi di calcare nel tempo, consigliamo di utilizzare
regolarmente la funzione "Decalcificazione". Dopo un
lungo periodo di inutilizzo delle funzioni "Vapore",
si consiglia vivamente di attivare un ciclo di cottura
con il forno vuoto, riempiendo completamente il
serbatoio.
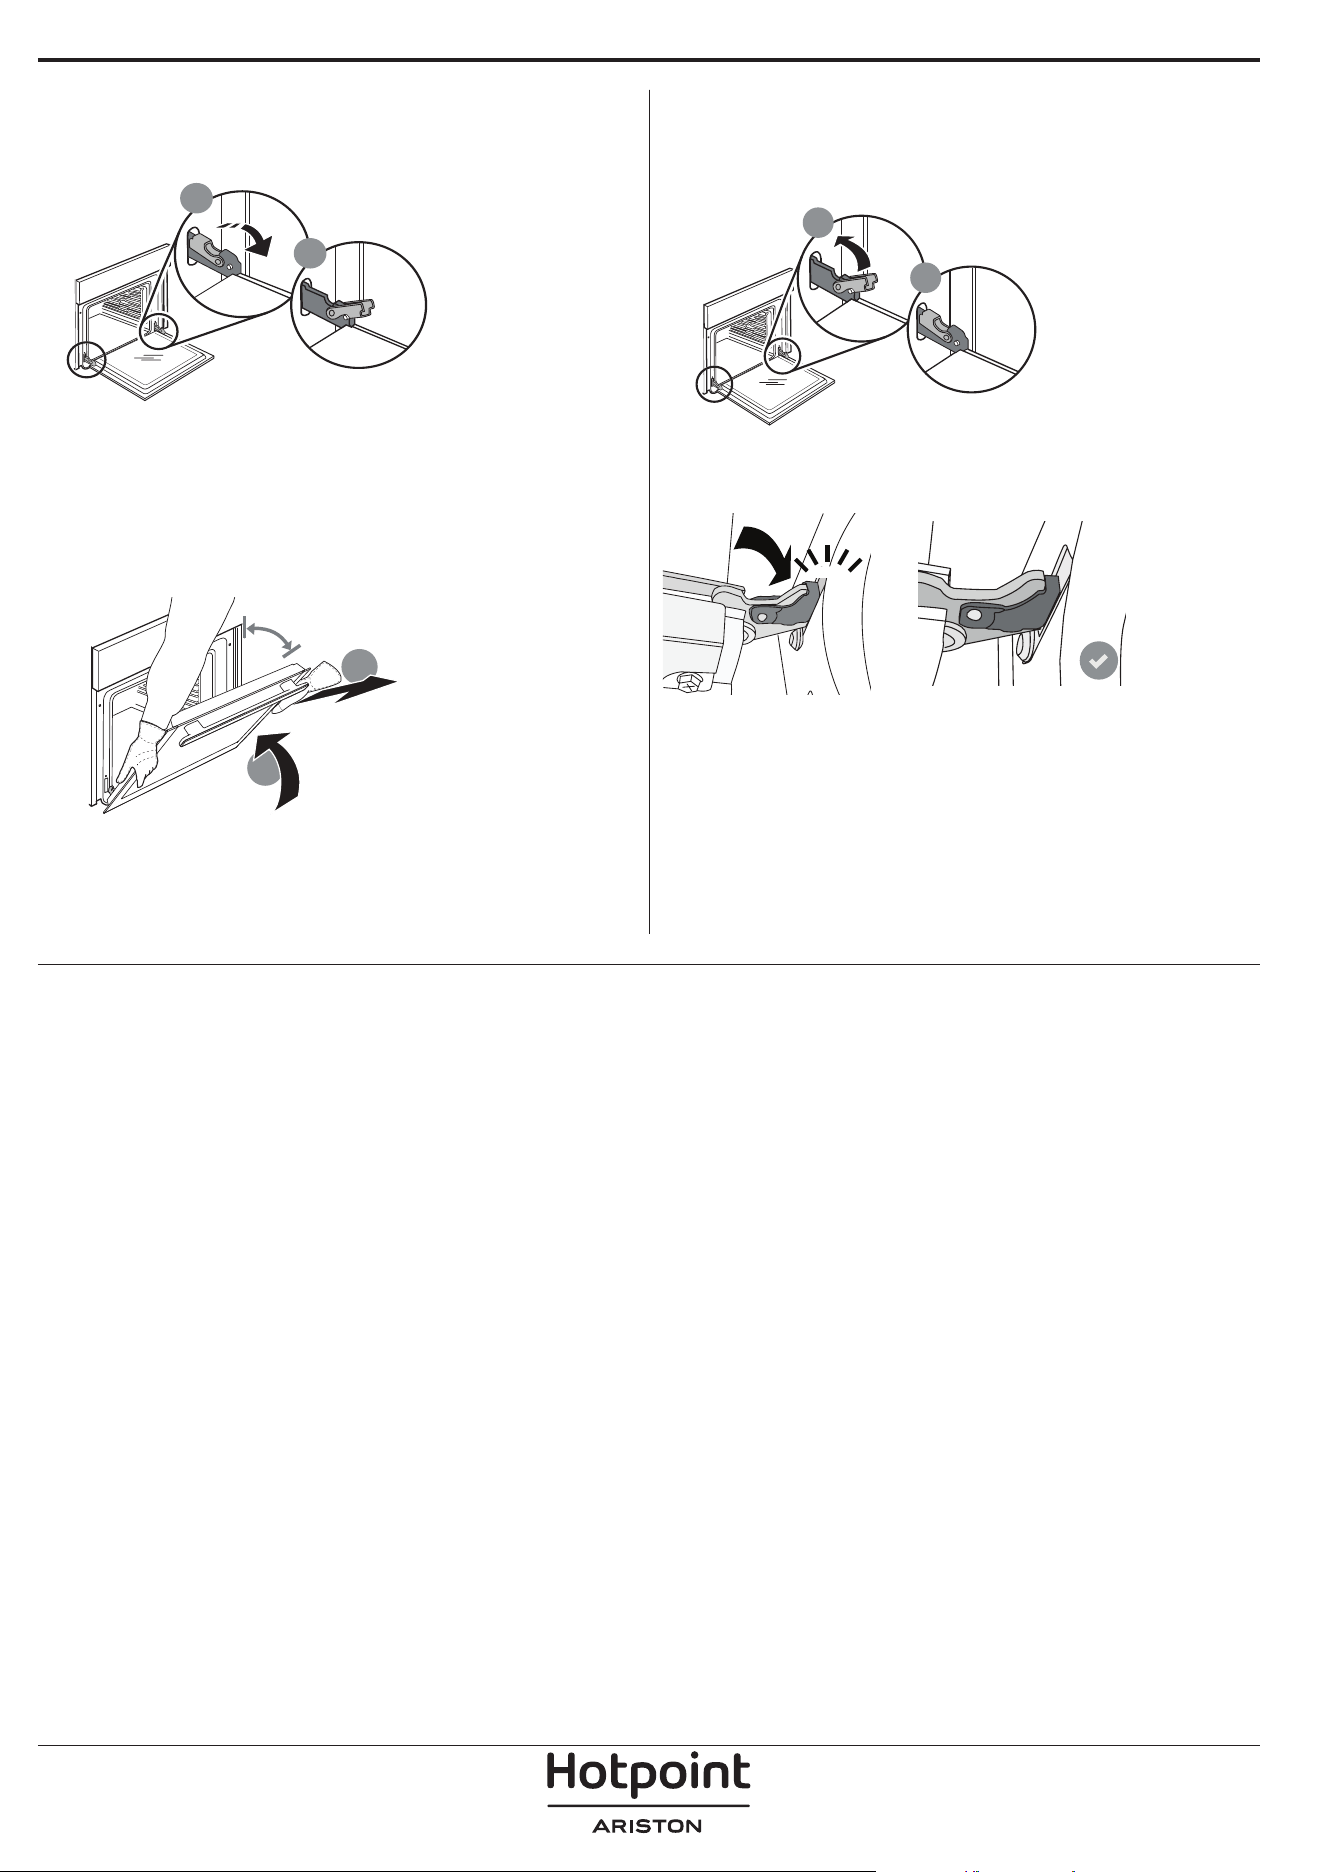
RIMOZIONE E MONTAGGIO DELLA PORTA
1. Per rimuovere la porta, aprirla completamente e
abbassare i fermi fino alla posizione di sblocco.
b
a
2. Chiudere la porta fino a quando è possibile.
Prendere saldamente la porta con entrambe le mani,
evitando di tenerla per la maniglia.
È sufficiente rimuovere la porta continuando a
chiuderla e tirandola contemporaneamente verso
l'alto, finché non si sgancia dalla propria sede. Togliere
la porta e appoggiarla su un piano morbido.
a
b
~15°
3. Per rimontare la porta, avvicinarla al forno
allineando i ganci delle cerniere alle proprie sedi e
ancorare la parte superiore agli alloggiamenti.
4. Abbassare la porta e poi aprirla completamente.
Abbassare i fermi nella posizione originale: fare
attenzione che siano completamente abbassati.
b
a
Sarà necessario applicare una leggera pressione per
assicurare il corretto posizionamento dei fermi.
“CLICK”
5. Provare a chiudere la porta, verificando che sia
allineata al pannello di controllo. Nel caso non lo
fosse, ripetere i passi sopra descritti: La porta
potrebbe danneggiarsi se non funziona
correttamente.
SOSTITUZIONE DELLA LAMPADINA
Per la sostituzione della lampadina, contattare il servizio assistenza.

Problema Possibile causa Soluzione
Il forno non funziona.
Interruzione di corrente
elettrica.
Disconnessione dalla rete
principale.
Verificare che ci sia tensione in rete e che il forno
sia collegato all'alimentazione elettrica.
Spegnere e riaccendere il forno e verificare se
l'inconveniente persiste.
Il display mostra la lettera "F"
seguita da un numero.
Problema software.
Contattare il Call Center e indicare il numero che
segue la lettera "F".
Il forno non si riscalda.
Se la modalità "DEMO" è
impostata su "On", tutti i
comandi sono operativi e i
menu sono disponibili ma il
forno non viene riscaldato.
Sul display appare la scritta
"DEMO" ogni 60 secondi.
Accedere a "DEMO" dal menu "IMPOSTAZIONI" e
scegliere "Off".
La luce si spegne.
La modalità "ECO" è
impostata su "On".
Accedere a "ECO" dal menu "IMPOSTAZIONI" e
scegliere "Off".
La porta non si chiude
correttamente.
I fermi di sicurezza si trovano
in posizione errata.
Verificare che i fermi di sicurezza siano in
posizione corretta facendo riferimento alle
istruzioni di rimozione e riapplicazione della porta
contenute nella sezione "Pulizia e manutenzione".
L'interruttore generale
dell'impianto domestico si
spegne.
La potenza dell'apparecchio
non è regolata
correttamente.
Verificare che la rete domestica abbia una portata
nominale di almeno 3 kW. In caso contrario,
ridurre la potenza a 13 Ampere. Selezionare
"POTENZA" dal menu "IMPOSTAZIONI" e scegliere
"BASSO".
Il ciclo di cottura con la sonda
è terminato senza una causa
evidente o l'errore F3E3 è
stampato sullo schermo
La sonda alimenti non è
collegata correttamente
La sonda alimenti non è collegata correttamente
RISOLUZIONE DEI PROBLEMI
Per le linee guida, la documentazione standard e altre informazioni sui prodotti:
• Utilizzare il QR sul proprio prodotto
• Visitare il nostro sito web docs . hotpoint. eu
• Oppure, contattare il Servizio Assistenza Tecnica (al numero di telefono riportato sul libretto di garanzia).
Prima di contattare il Servizio Assistenza Clienti, prepararsi a fornire i codici riportati sulla targhetta matricola
del prodotto.
400020002504