
Technical Support and E-Warranty Certificate www.vevor.com/support
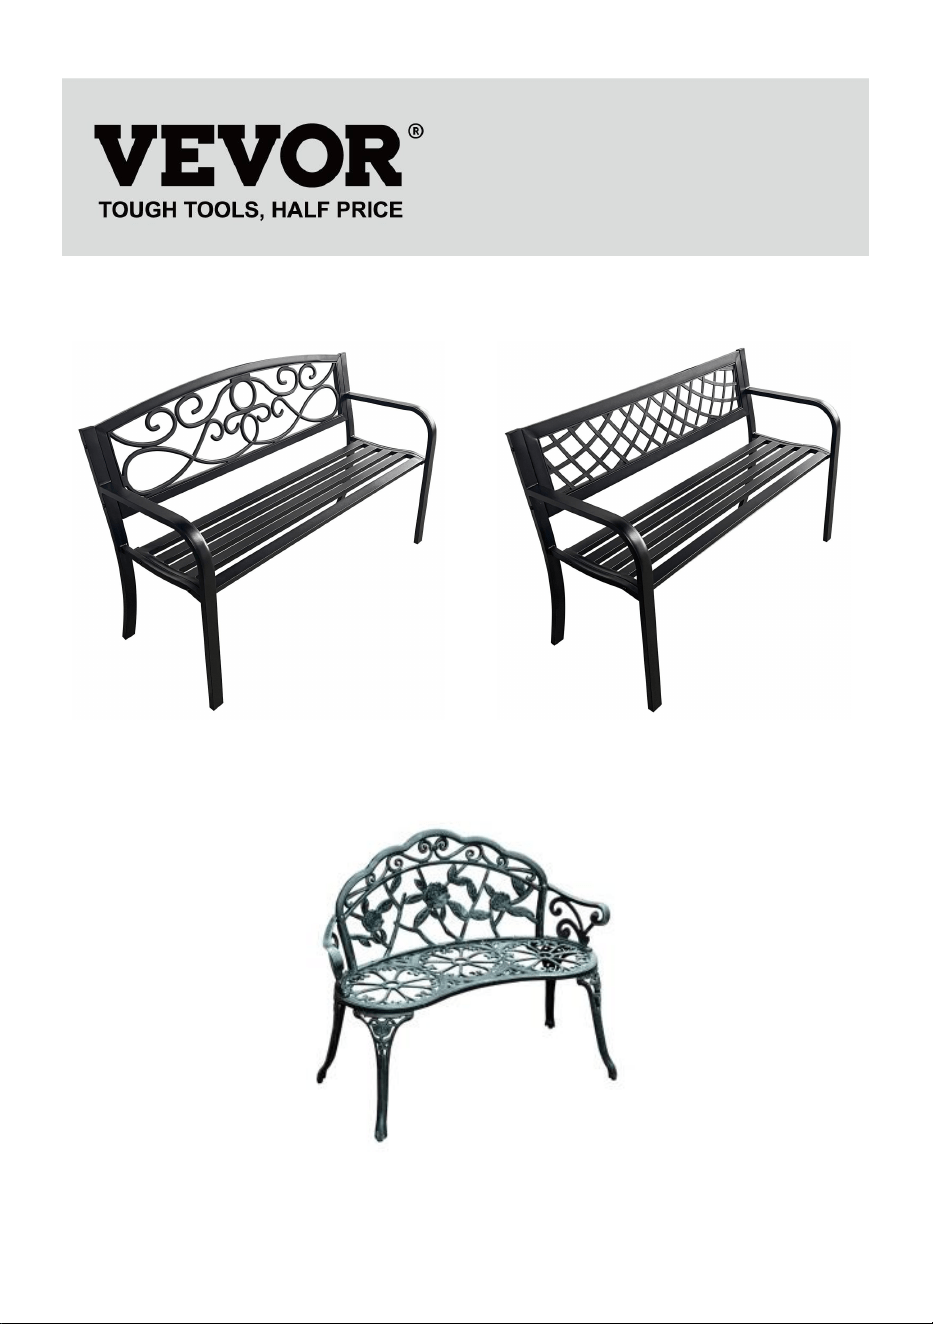
Park Benches
We continue to be committed to provide you tools with competitive price.
"Save Half", "Half Price" or any other similar expressions used by us only represents an
estimate of savings you might benefit from buying certain tools with us compared to the major
top brands and does not necessarily mean to cover all categories of tools offered by us. You
are kindly reminded to verify carefully when you are placing an order with us if you are
actually saving half in comparison with the top major brands.
- 1 -
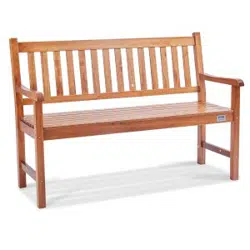
wkl776
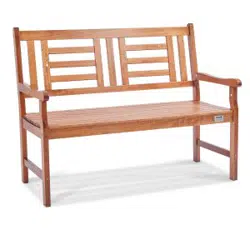
wkl-734
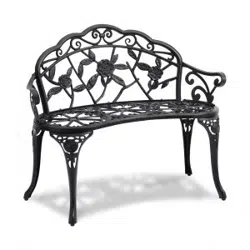
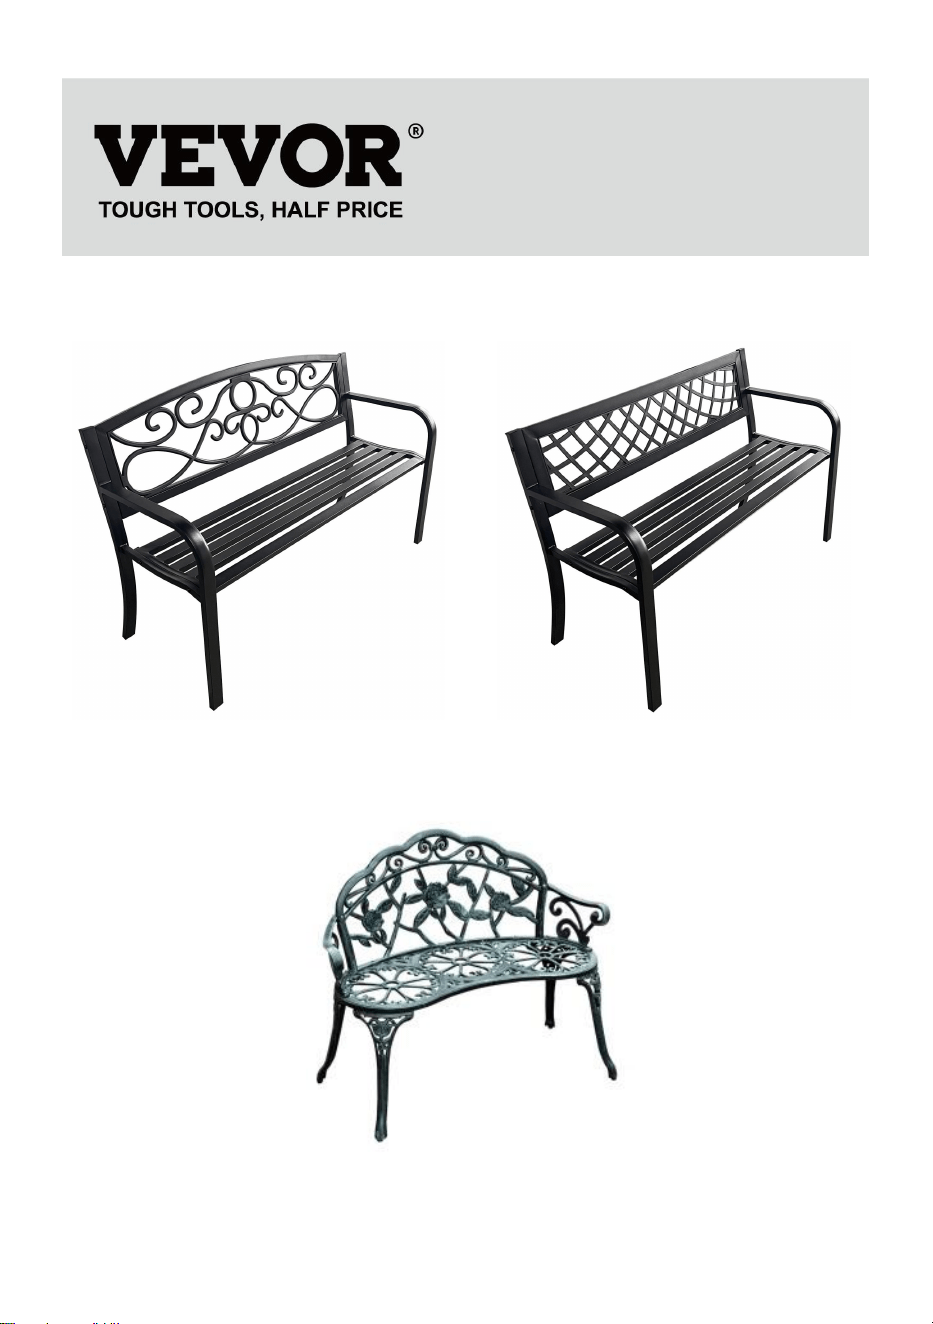
XG1002
Park Benches

- 2 -
Have product questions? Need technical support? Please feel free to
contact us:
Technical Support and E-Warranty Certificate
www.vevor.com/support
NEED HELP? CONTACT US!
This is the original instruction, please read all manual instructions
carefully before operating. VEVOR reserves a clear interpretation of our
user manual. The appearance of the product shall be subject to the
product you received. Please forgive us that we won't inform you again if
there are any technology or software updates on our product.
INSTRUCTIONS
Thank you very much for choosing this Park Benches.
- Please read all of the instructions before using it. The information will help
you achieve the best possible results.
The products carried in this catalog may be different in color than the actual
item.
WARNING:
1. Operate in a safe work environment. Keep your work area clean, well-lit,
and free of distractions.
2. Wear heavy-duty work gloves during assembly.
3. Over-loading is strictly forbidden.

- 3 -
MODEL AND PARAMETERS
Model
wkl776
wkl-734
XG1002
Size
50inch
46inch
39inch
Rating loading
550lbs / 250kg
480lbs / 218kg
480lbs / 218kg
Park bench which used metal: Consisting of a seat frame, seat panel,
backrest, and armrests etc.,
ASSEMBLY AND USE
wkl776 and wkl-734 assembly
A. Handrails * 2 B. Seat board * 1 C.Backrest * 1
D. Screw(M6X50) * 4 E. Screw(M6X55) * 4 F. Washer *8 G. Nut*4
- 4 -
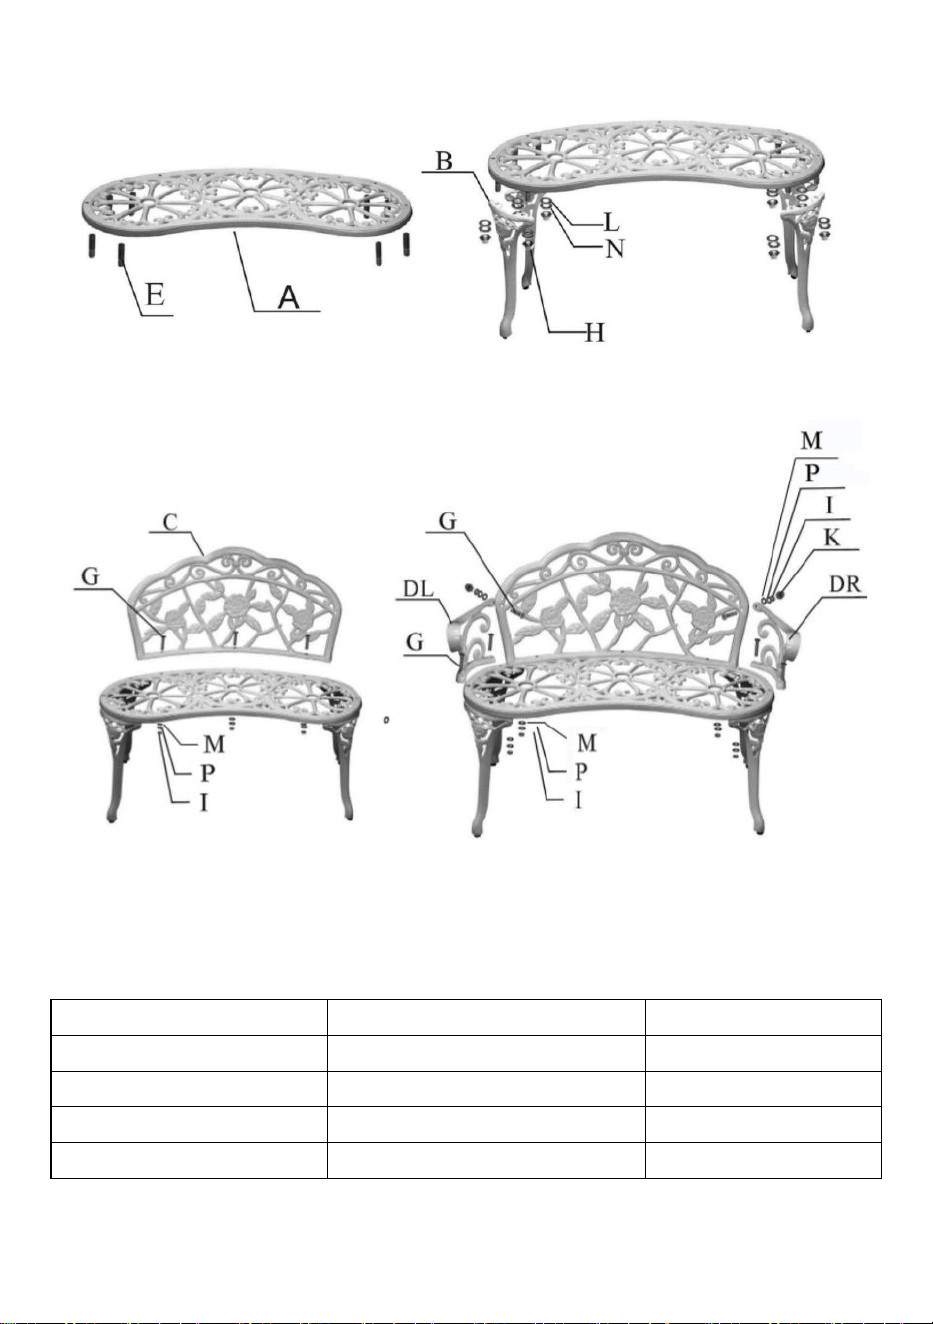
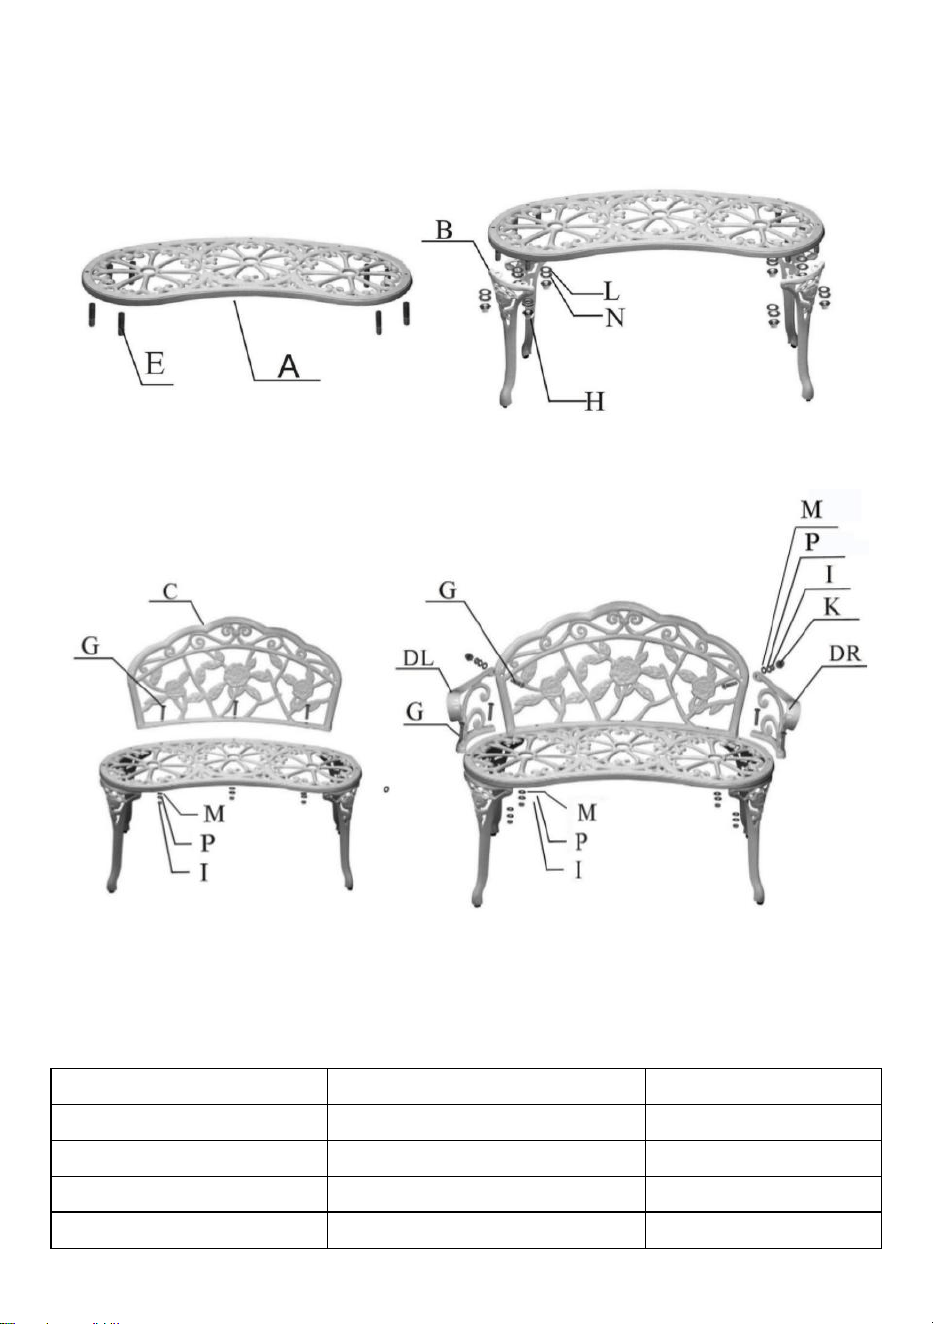
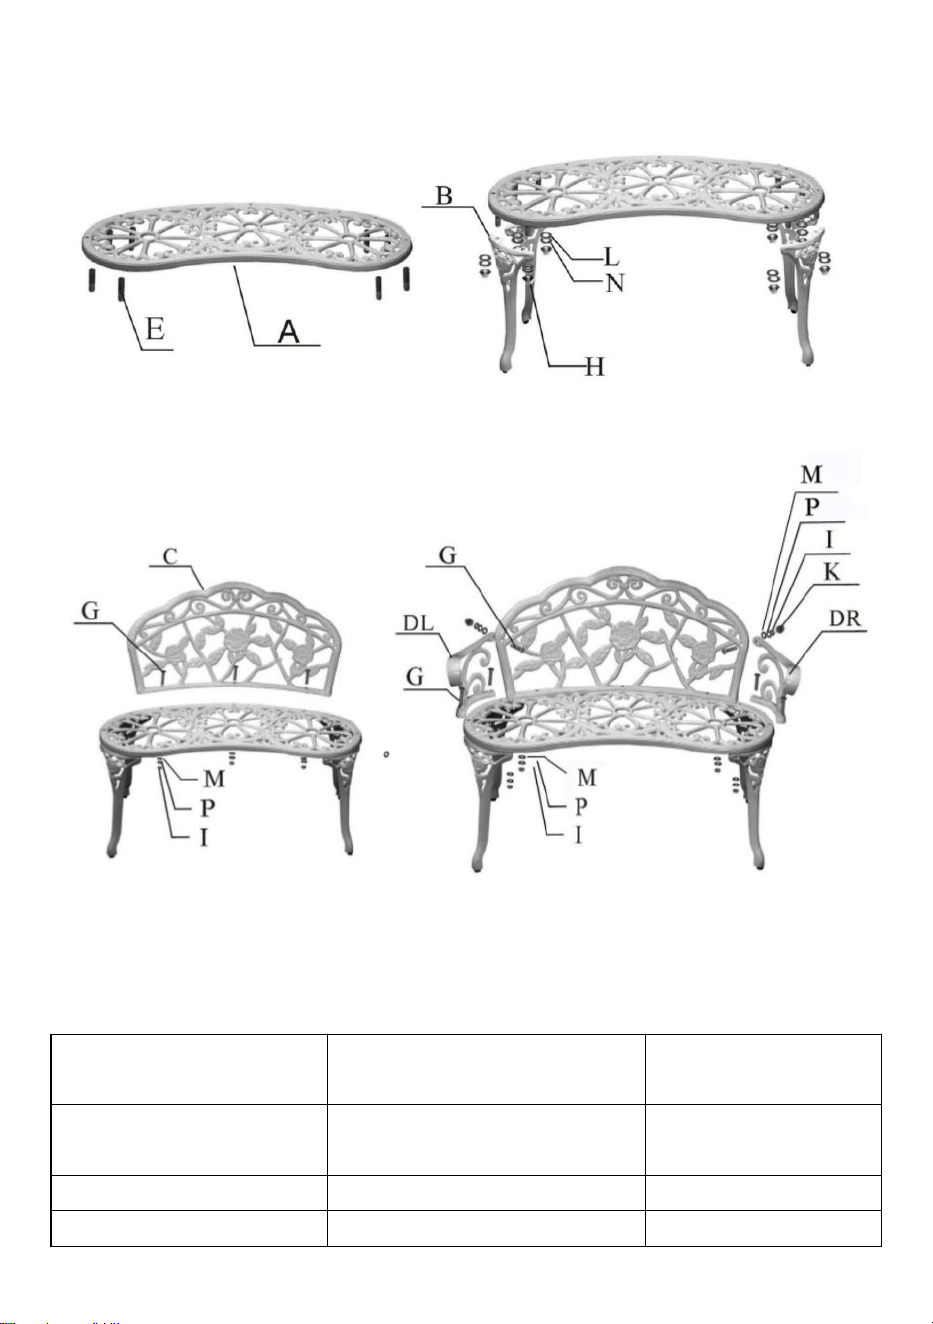
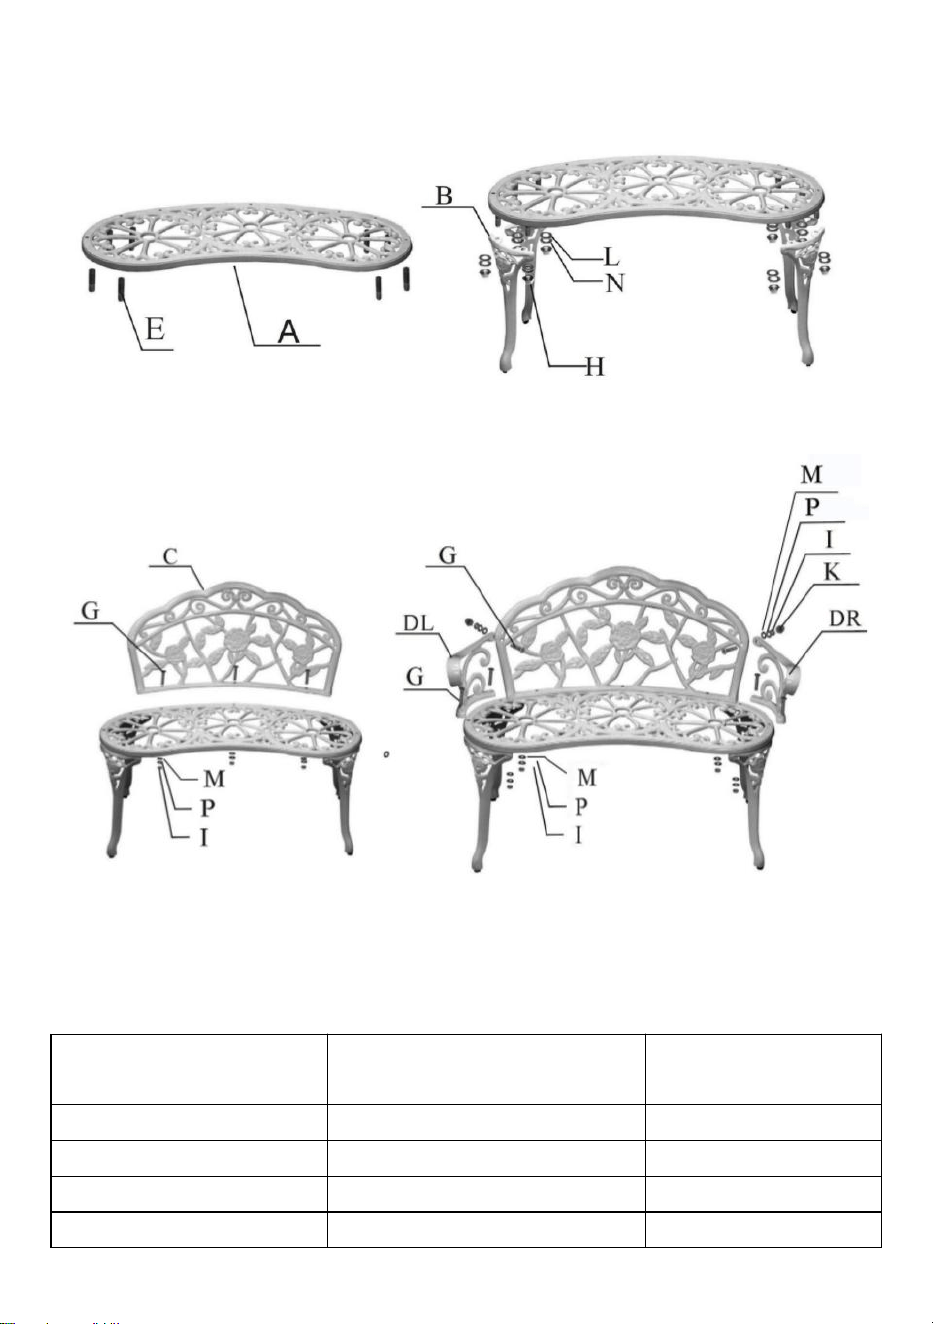
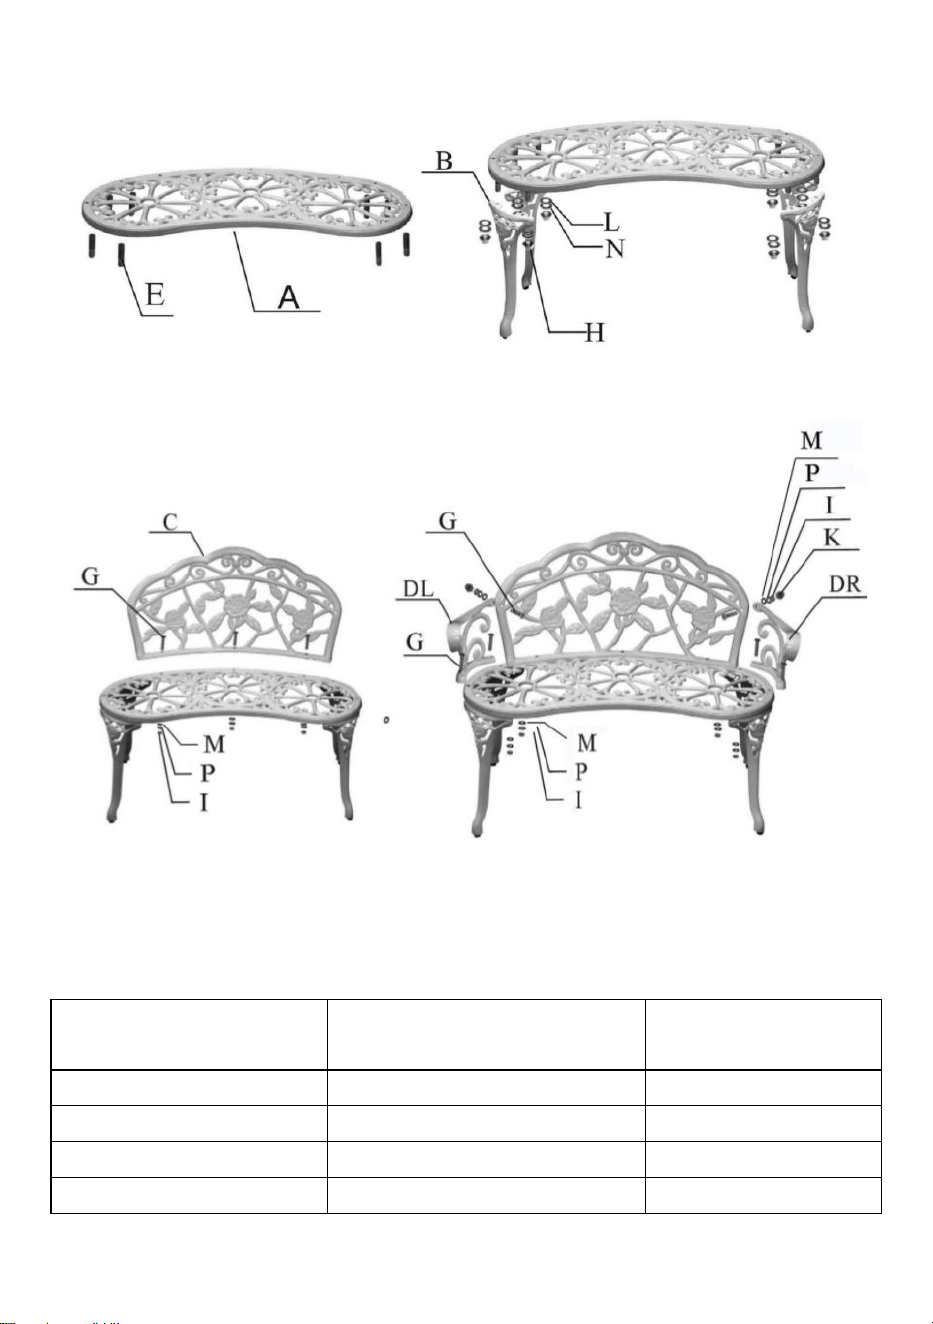
XG1002 assembly :
Step 1 Step 2
Step 3 Step 4
Part list:
A. Seat Plate* 1
B. Chair Legs* 4
C. Backrest Left* 1
DL. Left Arm rest*1
DR. Right Armrest* 1
E. M8 X 30 Bolt* 8
G. M6 X 35 Bolt* 9
H. M8 Nut * 8
I. M6 Nut P* 9
K. Plastic Cap
L. ∅ 8 Washer * 8
M. ∅ 6 Washer * 9
N. ∅ 8 Spring Washer * 8
P. ∅ 6 Spring Washer * 9pcs

- 5 -
ASSEMBLY STEPS NOTE:
Leave bolts half-tightened on the bench during assembly until the unit is
assembled, then finish tightening bolts ·
STEP 1: Screw 8 pcs M8X30 bolts (E) into seat plate (A)
STEP 2: Attach one of chair legs (B) to seat plate (A) with 2 pcs
∅
8
washers(L), 2 pcs
∅
8 spring washers (N) and 2 pcs M8 nuts (H). Repeat
this procedure for assembling the rest of 3 chair legs(B).
STEP 3: Attach backrest (C) to seat plate (A) with 3 pcs M6X35 bolts(G), 3
pcs ∅ 6 spring washer (P) 3 pcs ∅ 6 washers (M) and 3 pcs M6 Nuts (l).
STEP 4. Attach left armrest (DL) to seat plate (A) with 2 pcs M6X35bolts (G),
2 pcs
∅
6 spring washer (P), 2 pcs
∅
6 washers (M) and 2 pcs M6 nuts (l),
then assemble left armrest (DL) to backrest (C) with M6X35bolt (G).
∅
6
spring washer (P)
∅
6 washer (M) and M6 lock nut (l) Repeat this procedure
for the right armrest (DR). Tighten all nuts. cover M6 lock nuts(I) with plastic
caps (K).
Maintenance
1.Check screw fastening regularly.
- 6 -
Manufacturer:Shanghaimuxinmuyeyouxiangongsi
Address: Shuangchenglu 803nong11hao1602A-1609shi, baoshanqu,
shanghai 200000 CN.
Imported to AUS: SIHAO PTY LTD. 1 ROKEVA STREETEASTWOOD
NSW 2122 Australia
Imported to USA: Sanven Technology Ltd. Suite 250, 9166 Anaheim
Place, Rancho Cucamonga, CA 91730
REP
UK
E-CrossStu GmbH
Mainzer Landstr.69, 60329 Frankfurt am Main.
REP
EC
YH CONSULTING LIMITED.
C/O YH Consulting Limited Office 147, Centurion House,
London Road, Staines-upon-Thames, Surrey, TW18 4AX


- 2 -
Supporto tecnico e certificato di garanzia elettronica www.vevor.com/support
Panchine del parco
We continue to be committed to provide you tools with competitive price.
"Save Half", "Half Price" or any other similar expressions used by us only represents an
estimate of savings you might benefit from buying certain tools with us compared to the major
top brands and does not necessarily mean to cover all categories of tools offered by us. You
are kindly reminded to verify carefully when you are placing an order with us if you are
actually saving half in comparison with the top major brands.

- 1 -
wkl776
wkl-734
XG1002
Park Benches

- 2 -
Have product questions? Need technical support? Please feel free to
contact us:
Technical Support and E-Warranty Certificate
www.vevor.com/support
NEED HELP? CONTACT US!
This is the original instruction, please read all manual instructions
carefully before operating. VEVOR reserves a clear interpretation of our
user manual. The appearance of the product shall be subject to the
product you received. Please forgive us that we won't inform you again if
there are any technology or software updates on our product.
INSTRUCTIONS
Grazie mille per aver scelto queste panchine .
- Si prega di leggere tutte le istruzioni prima di utilizzarlo. Le informazioni ti
aiuteranno a ottenere i migliori risultati possibili.
I prodotti presenti in questo catalogo potrebbero differire nel colore rispetto
all'articolo reale .
AVVERTIMENTO:
2. Operare in un ambiente di lavoro sicuro. Mantieni la tua area di lavoro
pulita, ben illuminata e priva di distrazioni.
2. Indossare guanti da lavoro resistenti durante il montaggio.
4. È severamente vietato sovraccaricare.

- 3 -
MODEL AND PARAMETERS
Modello
wkl776
wkl-734
XG1002
Misurare
50 pollici
46 pollici
39 pollici
Caricamento
della valutazione
550 libbre/250
kg
480 libbre/218
kg
480 libbre/218
kg
Panchina da parco in metallo: composta da telaio del sedile, pannello del
sedile, schienale, braccioli ecc.,
ASSEMBLY AND USE
wkl776 e wkl-734 un assieme
B. Corrimano * 2 B . Pannello sedile * 1 C. Schienale * 1
D . Vite(M6X50) * 4 E. Vite (M6X55) * 4 F. Rondella * 8 G. Dado * 4

- 4 -
XG1002 un assieme :
Passaggio 1 Passaggio 2
Passaggio 3 Passaggio 4
Elenco delle parti:
A. Piastra del sedile * 1
B. Gambe della sedia * 4
C. Schienale sinistro
* 1
DL. Poggiabraccio
sinistro*1
DR. Bracciolo destro * 1
E. Bullone M8 X 30 *
8
G. Bullone M6 X 35* 9
H. Dado M8 * 8
I. Dado M6 P* 9
K. Tappo in plastica
L. ∅ 8 Rondella * 8
M. ∅ 6 Rondella * 9

- 5 -
N. Rondella Molla ∅ 8 * 8
P. ∅ 6 Rondella elastica * 9 pz
FASI DI MONTAGGIO NOTA:
Lasciare i bulloni serrati a metà sul banco durante il montaggio finché l'
unità non è fissata assemblato , quindi finire di stringere i bulloni ·
PASSO 1: Vite 8 pz M8X30 bulloni (E) nella piastra del sedile (A)
PASSO 2: Fissare una delle gambe della sedia (B) alla piastra del sedile (A)
con 2 pezzi ∅ 8 rondelle(L), 2 rondelle elastiche ∅ 8 (N) e 2 dadi M8 (H).
Ripetere questa procedura per assemblando il resto delle 3 gambe della
sedia(B).
PASSO 3: Fissare lo schienale (C) alla piastra del sedile (A) con 3 bulloni
M6X35 (G), 3 rondelle elastiche ∅ 6 (P), 3 rondelle ∅ 6 (M) e 3 dadi M6 (l).
PASSO 4. Fissare il bracciolo sinistro (DL) alla piastra del sedile (A) con 2
bulloni M6X35 (G), 2 pezzi Rondella elastica ∅ 6 (P), 2 rondelle ∅ 6 (M) e 2
dadi M6 (l), quindi assemblare il bracciolo sinistro (DL) allo schienale (C) con
un bullone M6X35 (G). Rondella elastica ∅ 6 (P) Rondella ∅ 6 (M) e dado
di bloccaggio M6 (l) Ripetere questa procedura per il bracciolo destro (DR).
Stringere tutti i dadi. coperchio serratura M6 dadi (I) con tappi in plastica (K).
Manutenzione
1.Controllare regolarmente il fissaggio delle viti.
- 6 -
Produttore : Shanghaimuxinmuyeyouxiangongsi
Indirizzo: Shuangchenglu 803nong11hao1602A-1609shi, baoshanqu,
shanghai 200000 CN.
Importato in AUS: SIHAO PTY LTD. 1 ROKEVA STREETEASTWOOD
NSW 2122 Australia
Importato negli Stati Uniti: Sanven Technology Ltd. Suite 250, 9166
Anaheim
Luogo, Rancho Cucamonga, CA 91730
REP
UK
E-CrossStu GmbH
Mainzer Landstr.69, 60329 Frankfurt am Main.
REP
EC
YH CONSULTING LIMITED.
C/O YH Consulting Limited Office 147, Centurion House,
London Road, Staines-upon-Thames, Surrey, TW18 4AX


- 2 -
Wsparcie techniczne i certyfikat e-gwarancji www.vevor.com/support
Ławki parkowe
We continue to be committed to provide you tools with competitive price.
"Save Half", "Half Price" or any other similar expressions used by us only represents an
estimate of savings you might benefit from buying certain tools with us compared to the major
top brands and does not necessarily mean to cover all categories of tools offered by us. You
are kindly reminded to verify carefully when you are placing an order with us if you are
actually saving half in comparison with the top major brands.

- 1 -
wkl776
wkl-734
XG1002
Park Benches

- 2 -
Have product questions? Need technical support? Please feel free to
contact us:
Technical Support and E-Warranty Certificate
www.vevor.com/support
NEED HELP? CONTACT US!
This is the original instruction, please read all manual instructions
carefully before operating. VEVOR reserves a clear interpretation of our
user manual. The appearance of the product shall be subject to the
product you received. Please forgive us that we won't inform you again if
there are any technology or software updates on our product.
INSTRUCTIONS
Dziękujemy bardzo za wybór ławek parkowych .
- Przed użyciem przeczytaj całą instrukcję. Informacje te pomogą Ci
osiągnąć najlepsze możliwe rezultaty.
Produkty prezentowane w tym katalogu mogą różnić się kolorem od
rzeczywistego .
OSTRZEŻENIE:
3. Pracuj w bezpiecznym środowisku pracy. Utrzymuj miejsce pracy w
czystości, dobrze oświetlone i wolne od czynników rozpraszających.
2. Podczas montażu należy nosić grube rękawice robocze.
5. Przeciążanie jest surowo zabronione.

- 3 -
MODEL AND PARAMETERS
Model
wkl776
wkl-734
XG1002
ROZMIAR
50 cali
46 cali
39 cali
Ładowanie ocen
550 funtów / 250
kg
480 funtów / 218
kg
480 funtów / 218
kg
Ławka parkowa wykonana z metalu: składająca się z ramy siedziska,
panelu siedziska, oparcia i podłokietników itp.,
ASSEMBLY AND USE
wkl776 i wkl-734 to zespół
C. Poręcze * 2 B . Deska siedziskowa * 1 C. Oparcie * 1
D . Śruba (M6X50) * 4 E. Śruba (M6X55) * 4 F. Podkładka * 8 G. Nakrętka
- 4 -
*4
XG1002 to zestaw :
Krok 1 Krok 2
Krok 3 Krok 4
Lista części:
A. Płyta siedziska * 1
B. Nogi do krzeseł * 4
C. Oparcie lewe * 1
DL. Lewy podłokietnik*1
DR. Prawy podłokietnik * 1
E. Śruba M8 X 30 * 8
G. Śruba M6 X 35* 9
H. Nakrętka M8 * 8
I. Nakrętka M6 P* 9
K. Plastikowa zakrętka
Podkładka L. ∅ 8 * 8
Podkładka M. ∅ 6 * 9
N. ∅ 8 Podkładka
P. ∅ 6 Podkładka sprężysta *

- 5 -
sprężysta * 8
9szt
ETAPY MONTAŻU UWAGA:
pozostawić śruby do połowy dokręcone na stole warsztatowym, aż
urządzenie zostanie zamontowane zmontowane , następnie zakończ
dokręcanie śrub ·
KROK 1: Śruba 8 szt . M8X30 śruby (E) w płycie siedziska (A)
KROK 2: Przymocuj jedną z nóg krzesła (B) do płyty siedziska (A) za
pomocą 2 szt. ∅ 8 podkładki (L), 2 szt. ∅ 8 podkładek sprężystych (N) i 2
szt. nakrętek M8 (H). Powtórz tę procedurę dla montaż pozostałych 3 nóg
krzesła (B).
KROK 3: Przymocuj oparcie (C) do płyty siedziska (A) za pomocą 3 szt. śrub
M6X35 (G), 3 szt. podkładek sprężystych ∅ 6 (P), 3 szt . podkładek ∅ 6 (M) i 3
szt. nakrętek M6 (l).
KROK 4. Przymocuj lewy podłokietnik (DL) do płyty siedziska (A) za
pomocą 2 szt. śrub M6X35 (G), 2 szt . ∅ 6 podkładek sprężystych (P), 2 szt.
∅ 6 podkładek (M) i 2 szt. Nakrętek M6 (l), następnie przymocuj lewy
podłokietnik (DL) do oparcia (C) za pomocą śruby M6X35 (G). ∅ 6
podkładka sprężysta (P) ∅ 6 podkładka (M) i nakrętka zabezpieczająca M6 (l)
Powtórz tę procedurę dla prawego podłokietnika (DR). Dokręć wszystkie
nakrętki. osłona zamka M6 nakrętki (I) z plastikowymi nakładkami (K).
Konserwacja
1. Regularnie sprawdzaj dokręcenie śrub.

- 6 -
Producent : Shanghaimuxinmuyeyouxiangongsi
Adres: Shuangchenglu 803nong11hao1602A-1609shi, baoshanqu,
szanghaj 200000 CN.
Import do AUS: SIHAO PTY LTD. 1 ROKEVA STREETEASTWOOD NSW
2122 Australia
Import do USA: Sanven Technology Ltd. Suite 250, 9166 Anaheim
Place, Rancho Cucamonga, Kalifornia 91730
REP
UK
E-CrossStu GmbH
Mainzer Landstr.69, 60329 Frankfurt am Main.
REP
EC
YH CONSULTING LIMITED.
C/O YH Consulting Limited Office 147, Centurion House,
London Road, Staines-upon-Thames, Surrey, TW18 4AX


- 2 -
Technischer Support und E-Garantiezertifikat www.vevor.com/support
Parkbänke
We continue to be committed to provide you tools with competitive price.
"Save Half", "Half Price" or any other similar expressions used by us only represents an
estimate of savings you might benefit from buying certain tools with us compared to the major
top brands and does not necessarily mean to cover all categories of tools offered by us. You
are kindly reminded to verify carefully when you are placing an order with us if you are
actually saving half in comparison with the top major brands.

- 1 -
wkl776
wkl-734
XG1002
Park Benches

- 2 -
Have product questions? Need technical support? Please feel free to
contact us:
Technical Support and E-Warranty Certificate
www.vevor.com/support
NEED HELP? CONTACT US!
This is the original instruction, please read all manual instructions
carefully before operating. VEVOR reserves a clear interpretation of our
user manual. The appearance of the product shall be subject to the
product you received. Please forgive us that we won't inform you again if
there are any technology or software updates on our product.
INSTRUCTIONS
Vielen Dank, dass Sie sich für diese Parkbänke entschieden haben .
- Bitte lesen Sie alle Anweisungen, bevor Sie es verwenden. Die
Informationen helfen Ihnen, die bestmöglichen Ergebnisse zu erzielen.
Die in diesem Katalog aufgeführten Produkte können farblich vom
tatsächlichen Artikel abweichen .
WARNUNG:
4. Arbeiten Sie in einer sicheren Arbeitsumgebung. Halten Sie Ihren
Arbeitsbereich sauber, gut beleuchtet und frei von Ablenkungen.
2. Tragen Sie bei der Montage robuste Arbeitshandschuhe.
6. Überladung ist strengstens verboten.

- 3 -
MODEL AND PARAMETERS
Modell
wkl776
wkl-734
XG1002
Größe
50 Zoll
46 Zoll
39 Zoll
Bewertung wird
geladen
250 kg
218 kg
218 kg
Parkbank aus Metall: Bestehend aus Sitzgestell, Sitzplatte, Rückenlehne
und Armlehnen etc.,
ASSEMBLY AND USE
Wkl776 und Wkl-734 eine Baugruppe
D. Handläufe * 2 B . Sitzbrett * 1 C. Rückenlehne * 1
D . Schraube (M6X50) * 4 E. Schraube (M6X55) * 4 F. Unterlegscheibe * 8

- 4 -
G. Mutter*4
XG1002 - Baugruppe :
Schritt 1 Schritt 2
Schritt 3 Schritt 4
Stückliste:
A. Sitzplatte * 1
B. Stuhlbeine * 4
C. Rückenlehne links
* 1
DL. Linke Armlehne*1
DR. Rechte Armlehne * 1
E. M8 x 30 Bolzen * 8
G. M6 x 35 Bolzen* 9
H. M8 Mutter * 8
I. M6-Mutter P* 9
K. Kunststoffkappe
L. ∅ 8 Unterlegscheibe * 8
M. ∅ 6

- 5 -
Unterlegscheibe * 9
N. ∅ 8 Federscheibe * 8
P. ∅ 6 Federscheibe * 9St
MONTAGESCHRITTE HINWEIS:
während des Zusammenbaus auf der Bank halb angezogen, bis das Gerät
montiert ist zusammengebaut , dann Schrauben festziehen ·
SCHRITT 1: Schraube 8 Stück M8X30 Schrauben (E) in die Sitzplatte (A)
SCHRITT 2: Befestigen Sie eines der Stuhlbeine (B) mit 2 Stück ∅ 8 an
der Sitzplatte (A). Unterlegscheiben (L), 2 Stück ∅ 8 Federscheiben (N) und
2 Stück M8 Muttern (H). Wiederholen Sie diesen Vorgang für Zusammenbau
der restlichen 3 Stuhlbeine (B).
SCHRITT 3:
Befestigen Sie die Rückenlehne (C) mit 3
Stück M6X35-Schrauben
(G), 3 Stück ∅ 6-Federscheiben (P), 3 Stück ∅ 6-Unterlegscheiben (M) und 3
Stück M6-Muttern (l) an der Sitzplatte (A) .
SCHRITT 4. Befestigen Sie die linke Armlehne (DL) mit 2
M6X35-Schrauben (G) an der Sitzplatte ( A) . ∅ 6 Federscheiben (P), 2
Stück ∅ 6 Unterlegscheiben (M) und 2 Stück M6-Muttern (l), dann montieren
Sie die linke Armlehne (DL) mit der M6X35-Schraube (G) an der Rückenlehne
(C). ∅ 6 Federscheibe (P) ∅ 6 Unterlegscheibe (M) und M6
Sicherungsmutter (l) Wiederholen Sie diesen Vorgang für die rechte Armlehne
(DR). Ziehen Sie alle Muttern fest. Abdeckung M6 Schloss Muttern (I) mit
Kunststoffkappen (K).
Wartung
1.Schraubenbefestigung regelmäßig prüfen.

- 6 -
Hersteller : Shanghaimuxinmuyeyouxiangongsi
Adresse: Shuangchenglu 803nong11hao1602A-1609shi, baoshanqu,
Shanghai 200000 CN.
Importiert nach AUS: SIHAO PTY LTD. 1 ROKEVA STREETEASTWOOD
NSW 2122 Australien
In die USA importiert: Sanven Technology Ltd. Suite 250, 9166 Anaheim
Place, Rancho Cucamonga, CA 91730
REP
UK
E-CrossStu GmbH
Mainzer Landstr.69, 60329 Frankfurt am Main.
REP
EC
YH CONSULTING LIMITED.
C/O YH Consulting Limited Office 147, Centurion House,
London Road, Staines-upon-Thames, Surrey, TW18 4AX


- 2 -
Assistance technique et certificat de garantie électronique www.vevor.com/support
Bancs de parc
We continue to be committed to provide you tools with competitive price.
"Save Half", "Half Price" or any other similar expressions used by us only represents an
estimate of savings you might benefit from buying certain tools with us compared to the major
top brands and does not necessarily mean to cover all categories of tools offered by us. You
are kindly reminded to verify carefully when you are placing an order with us if you are
actually saving half in comparison with the top major brands.

- 1 -
wkl776
wkl-734
XG1002
Park Benches

- 2 -
Have product questions? Need technical support? Please feel free to
contact us:
Technical Support and E-Warranty Certificate
www.vevor.com/support
NEED HELP? CONTACT US!
This is the original instruction, please read all manual instructions
carefully before operating. VEVOR reserves a clear interpretation of our
user manual. The appearance of the product shall be subject to the
product you received. Please forgive us that we won't inform you again if
there are any technology or software updates on our product.
INSTRUCTIONS
Merci beaucoup d'avoir choisi ces bancs de parc .
- Veuillez lire toutes les instructions avant de l'utiliser. Les informations
vous aideront à obtenir les meilleurs résultats possibles.
Les produits présentés dans ce catalogue peuvent avoir une couleur
différente de celle de l'article réel .
AVERTISSEMENT:
5. Opérez dans un environnement de travail sécuritaire. Gardez votre
espace de travail propre, bien éclairé et exempt de distractions.
2. Portez des gants de travail résistants pendant l'assemblage.
7. La surcharge est strictement interdite.

- 3 -
MODEL AND PARAMETERS
Modèle
wkl776
wkl-734
XG1002
Taille
50 pouces
46 pouces
39 pouces
Chargement de
la note
550 livres / 250
kg
480 livres / 218
kg
480 livres / 218
kg
Banc de parc en métal : composé d'un cadre de siège, d'un panneau de
siège, d'un dossier et d'accoudoirs, etc.,
ASSEMBLY AND USE
wkl776 et wkl-734 un assemblage
E. Mains courantes * 2 B . Planche de siège * 1 C. Dossier * 1
D . Vis (M6X50) * 4 E. Vis (M6X55) * 4 F. Rondelle * 8 G. Écrou * 4
- 4 -
XG1002 un assemblage :
Étape 1 Étape 2
Étape 3 Étape 4
Liste des pièces:
A. Plaque de siège * 1
B. Pieds de chaise * 4
C. Dossier gauche *
1
DL. Accoudoir gauche * 1
DR. Accoudoir droit * 1
E. Boulon M8 X 30 *
8
G. Boulon M6 X 35* 9
H. Écrou M8 * 8
I. Écrou M6 P* 9
K. Capuchon en plastique
L. ∅ 8 Rondelle * 8
M. ∅ 6 Rondelle * 9

- 5 -
N. ∅ 8 Rondelle à ressort
* 8
P. Rondelle à ressort ∅ 6 * 9
pièces
ÉTAPES D'ASSEMBLAGE REMARQUE :
Laissez les boulons à moitié serrés sur le banc pendant l'assemblage
jusqu'à ce que l' unité soit assemblé , puis terminer le serrage des
boulons ·
ÉTAPE 1: Vis 8 pièces M8X30 boulons (E) dans la plaque de siège (A)
ÉTAPE 2: Fixez l'un des pieds de chaise (B) à la plaque d'assise (A) avec 2
pièces ∅ 8 rondelles (L), 2 rondelles élastiques ∅ 8 (N) et 2 écrous M8 (H).
Répétez cette procédure pour assembler le reste des 3 pieds de chaise (B).
ÉTAPE 3: Fixez le dossier (C) à la plaque d'assise (A) avec 3 boulons
M6X35 (G), 3 rondelles élastiques ∅ 6 (P), 3 rondelles ∅ 6 (M) et 3 écrous M6
(l).
ÉTAPE 4. Fixez l'accoudoir gauche (DL) à la plaque de siège (A) avec 2
boulons M6X35 (G), 2 pièces Rondelle élastique ∅ 6 (P), 2 rondelles
élastiques ∅ 6 (M) et 2 écrous M6 (l), puis assemblez l' accoudoir gauche
(DL) au dossier (C) avec le boulon M6X35 (G). Rondelle élastique ∅ 6 (P)
Rondelle ∅ 6 (M) et contre-écrou M6 (l) Répétez cette procédure pour
l'accoudoir droit (DR). Serrez tous les écrous. couvercle serrure M6 écrous (I)
avec capuchons en plastique (K).
Entretien
1. Vérifiez régulièrement le serrage des vis.
- 6 -
Fabricant : Shanghaimuxinmuyeyouxiangongsi
Adresse : Shuangchenglu 803nong11hao1602A-1609shi, baoshanqu,
Shanghai 200000 CN.
Importé en Australie : SIHAO PTY LTD. 1 ROKEVA STREETASTWOOD
NSW 2122 Australie
Importé aux États-Unis : Sanven Technology Ltd. Suite 250, 9166
Anaheim
Lieu, Rancho Cucamonga, CA 91730
REP
UK
E-CrossStu GmbH
Mainzer Landstr.69, 60329 Frankfurt am Main.
REP
EC
YH CONSULTING LIMITED.
C/O YH Consulting Limited Office 147, Centurion House,
London Road, Staines-upon-Thames, Surrey, TW18 4AX


- 2 -
Technische ondersteuning en e-garantiecertificaat www.vevor.com/support
Parkbanken
We continue to be committed to provide you tools with competitive price.
"Save Half", "Half Price" or any other similar expressions used by us only represents an
estimate of savings you might benefit from buying certain tools with us compared to the major
top brands and does not necessarily mean to cover all categories of tools offered by us. You
are kindly reminded to verify carefully when you are placing an order with us if you are
actually saving half in comparison with the top major brands.

- 1 -
wkl776
wkl-734
XG1002
Park Benches

- 2 -
Have product questions? Need technical support? Please feel free to
contact us:
Technical Support and E-Warranty Certificate
www.vevor.com/support
NEED HELP? CONTACT US!
This is the original instruction, please read all manual instructions
carefully before operating. VEVOR reserves a clear interpretation of our
user manual. The appearance of the product shall be subject to the
product you received. Please forgive us that we won't inform you again if
there are any technology or software updates on our product.
INSTRUCTIONS
Hartelijk dank dat u voor deze parkbanken heeft gekozen .
- Lees alle instructies voordat u het gebruikt. De informatie zal u helpen de
best mogelijke resultaten te bereiken.
De producten in deze catalogus kunnen qua kleur afwijken van het
daadwerkelijke artikel .
WAARSCHUWING:
6. Werken in een veilige werkomgeving. Houd uw werkplek schoon, goed
verlicht en vrij van afleiding.
2. Draag tijdens de montage stevige werkhandschoenen.
8. Overbelasting is ten strengste verboden.

- 3 -
MODEL AND PARAMETERS
Model
wkl776
wkl-734
XG1002
Maat
50 inch
46 inch
39 inch
Beoordeling
laden
550 pond / 250
kg
480 pond / 218
kg
480 pond / 218
kg
Parkbank waarin metaal is gebruikt: bestaande uit een zitframe, zitpaneel,
rugleuning en armleuningen enz.,
ASSEMBLY AND USE
wkl776 en wkl-734 een montage
F. Leuningen * 2 B . Zitplank * 1 C. Rugleuning * 1
D . Schroef (M6X50) * 4 E. Schroef (M6X55) * 4 F. Sluitring * 8 G. Moer*4
- 4 -
XG1002 een montage :
Stap 1 Stap 2
Stap 3 Stap 4
Onderdelen lijst:
A. Zitplaat * 1
B. Stoelpoten * 4
C. Rugleuning links *
1
DL. Linkerarmsteun*1
DR. Rechterarmsteun * 1
E. M8 X 30 Bout * 8
G. M6 X 35 Bout* 9
H. M8 Moer * 8
I. M6 moer P* 9
K. Kunststof dop
L. ∅ 8 Sluitring * 8
M. ∅ 6 Sluitring * 9
N. ∅ 8 Veerring * 8
P. ∅ 6 Veerring * 9st

- 5 -
MONTAGESTAPPEN OPMERKING:
Laat de bouten tijdens de montage half aangedraaid op de bank zitten
totdat de unit staat gemonteerd en voltooi vervolgens het aandraaien van
de bouten ·
STAP 1: Schroef 8 stuks M8X30 bouten (E) in de zittingplaat (A)
STAP 2: Bevestig een van de stoelpoten (B) aan de zitplaat (A) met 2 stuks
∅
8 ringen(L), 2 stuks
∅
8 veerringen (N) en 2 stuks M8 moeren (H).
Herhaal deze procedure voor het monteren van de rest van de 3 stoelpoten
(B).
STAP 3: Bevestig de rugleuning (C) aan de zitplaat (A) met 3 stuks M6X35
bouten (G), 3 stuks ∅ 6 veerringen (P), 3 stuks ∅ 6 ringen (M) en 3 stuks M6
moeren (l).
STAP 4. Bevestig de linkerarmsteun (DL) aan de zitplaat (A) met 2 stuks
M6X35 bouten (G), 2 stuks
∅
6 veerringen (P), 2 stuks
∅
6 ringen (M) en 2
stuks M6 moeren (l), monteer vervolgens de linker armleuning (DL) aan de
rugleuning (C) met M6X35 bout (G).
∅
6 veerringen (P)
∅
6 ringen (M) en
M6 borgmoer (l) Herhaal deze procedure voor de rechter armleuning (DR).
Draai alle moeren vast. deksel M6 slot moeren (I) met plastic doppen (K).
Onderhoud
1. Controleer de schroefbevestiging regelmatig.
- 6 -
Fabrikant : Shanghaimuxinmuyeyouxiangongsi
Adres: Shuangchenglu 803nong11hao1602A-1609shi, baoshanqu,
shanghai 200000 CN.
Geïmporteerd naar AUS: SIHAO PTY LTD. 1 ROKEVA
STREETEASTWOOD NSW 2122 Australië
Geïmporteerd in de VS: Sanven Technology Ltd. Suite 250, 9166
Anaheim
Plaats, Rancho Cucamonga, CA 91730
REP
UK
E-CrossStu GmbH
Mainzer Landstr.69, 60329 Frankfurt am Main.
REP
EC
YH CONSULTING LIMITED.
C/O YH Consulting Limited Office 147, Centurion House,
London Road, Staines-upon-Thames, Surrey, TW18 4AX


- 2 -
Teknisk support och e-garanticertifikat www.vevor.com/support
Park bänkar
We continue to be committed to provide you tools with competitive price.
"Save Half", "Half Price" or any other similar expressions used by us only represents an
estimate of savings you might benefit from buying certain tools with us compared to the major
top brands and does not necessarily mean to cover all categories of tools offered by us. You
are kindly reminded to verify carefully when you are placing an order with us if you are
actually saving half in comparison with the top major brands.
- 1 -
wkl776
wkl-734
XG1002
Park Benches

- 2 -
Have product questions? Need technical support? Please feel free to
contact us:
Technical Support and E-Warranty Certificate
www.vevor.com/support
NEED HELP? CONTACT US!
This is the original instruction, please read all manual instructions
carefully before operating. VEVOR reserves a clear interpretation of our
user manual. The appearance of the product shall be subject to the
product you received. Please forgive us that we won't inform you again if
there are any technology or software updates on our product.
INSTRUCTIONS
Tack så mycket för att du valde denna parkbänk .
- Läs alla instruktioner innan du använder den. Informationen hjälper dig att
uppnå bästa möjliga resultat.
Produkterna i denna katalog kan ha en annan färg än den faktiska varan .
VARNING:
7. Arbeta i en säker arbetsmiljö. Håll ditt arbetsområde rent, väl upplyst
och fritt från distraktioner.
2. Använd kraftiga arbetshandskar vid montering.
9. Överbelastning är strängt förbjudet.

- 3 -
MODEL AND PARAMETERS
Modell
wkl776
wkl-734
XG1002
Storlek
50 tum
46 tum
39 tum
Betyg laddas
550 lbs / 250 kg
480 lbs / 218 kg
480 lbs / 218 kg
Parkeringsbänk som använde metall: Bestående av en sitsram, sittpanel,
ryggstöd och armstöd etc.,
ASSEMBLY AND USE
wkl776 och wkl-734 en sammansättning
G. Ledstänger * 2 B . Sittbräda * 1 C. Ryggstöd * 1
D . Skruv (M6X50) * 4 E. Skruv (M6X55) * 4 F. Bricka * 8 G. Mutter*4
- 4 -
XG1002 en enhet :
Steg 1 Steg 2
Steg 3 Steg 4
Dellista:
A. Sätesplatta * 1
B. Stolsben * 4
C. Ryggstöd vänster
* 1
DL. Vänster armstöd*1
DR. Höger armstöd * 1
E. M8 X 30 Bult * 8
G. M6 X 35 Bult* 9
H. M8 Mutter * 8
I. M6 Mutter P* 9
K. Plastlock
L. ∅ 8 Bricka * 8
M. ∅ 6 Bricka * 9
N. ∅ 8 fjäderbricka * 8
P. ∅ 6 Fjäderbricka * 9st

- 5 -
MONTERINGSSEG OBS:
Låt bultarna vara halvåtdragna på bänken under monteringen tills enheten
är monteras och dra sedan åt bultarna ·
STEG 1: Skruv 8 st M8X30 bultar (E) i sätesplattan (A)
STEG 2: Fäst ett av stolsbenen (B) till sittplattan (A) med 2 st
∅
8 brickor
(L), 2 st
∅
8 fjäderbrickor (N) och 2 st M8 muttrar (H). Upprepa denna
procedur för montering av resten av 3 stolsben(B).
STEG 3: Fäst ryggstödet (C) på sittplattan (A) med 3 st M6X35 bultar(G), 3
st ∅ 6 fjäderbricka (P) 3 st ∅ 6 brickor (M) och 3 st M6 muttrar (l).
STEG 4. Fäst vänster armstöd (DL) till sittplattan (A) med 2 st M6X35bultar
(G), 2 st .
∅
6 fjäderbrickor (P), 2 st
∅
6 brickor (M) och 2 st M6 muttrar (l),
montera sedan det vänstra armstödet (DL) till ryggstödet (C) med M6X35bult
(G).
∅
6 fjäderbrickor (P)
∅
6 bricka (M) och M6 låsmutter (l) Upprepa
denna procedur för höger armstöd (DR). Dra åt alla muttrar. lock M6 lås
muttrar (I) med plastlock (K).
Underhåll
1.Kontrollera regelbundet skruvarna.

- 6 -
Tillverkare : Shanghaimuxinmuyeyouxiangongsi
Adress: Shuangchenglu 803nong11hao1602A-1609shi, baoshanqu,
shanghai 200000 CN.
Importerad till AUS: SIHAO PTY LTD. 1 ROKEVA STREETEASTWOOD
NSW 2122 Australien
Importerad till USA: Sanven Technology Ltd. Suite 250, 9166 Anaheim
Place, Rancho Cucamonga, CA 91730
REP
UK
E-CrossStu GmbH
Mainzer Landstr.69, 60329 Frankfurt am Main.
REP
EC
YH CONSULTING LIMITED.
C/O YH Consulting Limited Office 147, Centurion House,
London Road, Staines-upon-Thames, Surrey, TW18 4AX

- 2 -
Soporte técnico y certificado de garantía electrónica www.vevor.com/support
Bancos del parque
We continue to be committed to provide you tools with competitive price.
"Save Half", "Half Price" or any other similar expressions used by us only represents an
estimate of savings you might benefit from buying certain tools with us compared to the major
top brands and does not necessarily mean to cover all categories of tools offered by us. You
are kindly reminded to verify carefully when you are placing an order with us if you are
actually saving half in comparison with the top major brands.

- 1 -
wkl776
wkl-734
XG1002
Park Benches

- 2 -
Have product questions? Need technical support? Please feel free to
contact us:
Technical Support and E-Warranty Certificate
www.vevor.com/support
NEED HELP? CONTACT US!
This is the original instruction, please read all manual instructions
carefully before operating. VEVOR reserves a clear interpretation of our
user manual. The appearance of the product shall be subject to the
product you received. Please forgive us that we won't inform you again if
there are any technology or software updates on our product.
INSTRUCTIONS
Muchas gracias por elegir estos bancos del parque .
- Lea todas las instrucciones antes de usarlo. La información le ayudará a
conseguir los mejores resultados posibles.
Los productos incluidos en este catálogo pueden tener un color diferente
al del artículo real .
ADVERTENCIA:
8. Operar en un ambiente de trabajo seguro. Mantenga su área de trabajo
limpia, bien iluminada y libre de distracciones.
2. Utilice guantes de trabajo resistentes durante el montaje.
10.Está estrictamente prohibida la sobrecarga.

- 3 -
MODEL AND PARAMETERS
Modelo
wkl776
wkl-734
XG1002
Tamaño
50 pulgadas
46 pulgadas
39 pulgadas
Carga de
calificación
550 libras/250
kg
480 libras / 218
kg
480 libras / 218
kg
Banco de parque de metal: compuesto por estructura de asiento, panel de
asiento, respaldo y reposabrazos, etc.
ASSEMBLY AND USE
wkl776 y wkl-734 un conjunto
H. Pasamanos * 2 B . Tabla de asiento * 1 C. Respaldo * 1
D . Tornillo (M6X50) * 4 E. Tornillo (M6X55) * 4 F. Arandela * 8 G. Tuerca *

- 4 -
4
XG1002 un conjunto :
Paso 1 Paso 2
Paso 3 Paso 4
Lista de:
A. Placa de asiento * 1
B. Patas de la silla * 4
C. Respaldo
izquierdo * 1
DL. Reposabrazos
izquierdo*1
DR. Reposabrazos derecho *
1
E. Perno M8 X 30 * 8
G. Perno M6 X 35* 9
H. Tuerca M8 * 8
I. Tuerca M6 P* 9

- 5 -
K. Tapa de plástico
L. ∅ 8 Arandela * 8
M. ∅ 6 Arandela * 9
N. Arandela elástica ∅ 8 *
8
P. Arandela elástica ∅ 6 * 9
piezas
PASOS DE MONTAJE NOTA:
Deje los pernos medio apretados en el banco durante el montaje hasta
que la unidad esté ensamblado , luego termine de apretar los pernos ·
PASO 1: Tornillo 8 piezas M8X30 pernos (E) en la placa del asiento (A)
PASO 2: Fije una de las patas de la silla (B) a la placa del asiento (A) con 2
piezas de ∅ 8 arandelas (L), 2 arandelas elásticas de ∅ 8 (N) y 2 tuercas
M8 (H). Repita este procedimiento para ensamblar el resto de las 3 patas de
la silla (B).
PASO 3: Fije el respaldo (C) a la placa del asiento (A) con 3 pernos M6X35
(G), 3 arandelas de resorte ∅ 6 (P), 3 arandelas ∅ 6 (M) y 3 tuercas M6 (l).
ETAPA 4. Fije el reposabrazos izquierdo (DL) a la placa del asiento (A) con
2 pernos M6X35 (G), 2 piezas Arandela de resorte ∅ 6 (P), 2 arandelas ∅ 6
(M) y 2 tuercas M6 (l), luego ensamble el reposabrazos izquierdo (DL) al
respaldo (C) con un perno M6X35 (G). Arandela elástica ∅ 6 (P) Arandela
∅ 6 (M) y contratuerca M6 (l) Repita este procedimiento para el reposabrazos
derecho (DR). Apriete todas las tuercas. cubierta cerradura M6 tuercas (I) con
tapas de plástico (K).
Mantenimiento
1.Compruebe periódicamente el ajuste de los tornillos.

- 6 -
Fabricante : Shanghaimuxinmuyeyouxiangongsi
Dirección: Shuangchenglu 803nong11hao1602A-1609shi, baoshanqu,
shanghai 200000 CN.
Importado a AUS: SIHAO PTY LTD. 1 ROKEVA STREETASTWOOD
NSW 2122 Australia
Importado a EE. UU.: Sanven Technology Ltd. Suite 250, 9166 Anaheim
Lugar, Rancho Cucamonga, CA 91730
REP
UK
E-CrossStu GmbH
Mainzer Landstr.69, 60329 Frankfurt am Main.
REP
EC
YH CONSULTING LIMITED.
C/O YH Consulting Limited Office 147, Centurion House,
London Road, Staines-upon-Thames, Surrey, TW18 4AX