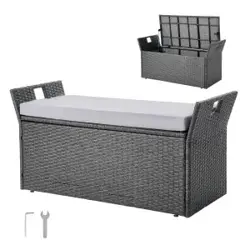

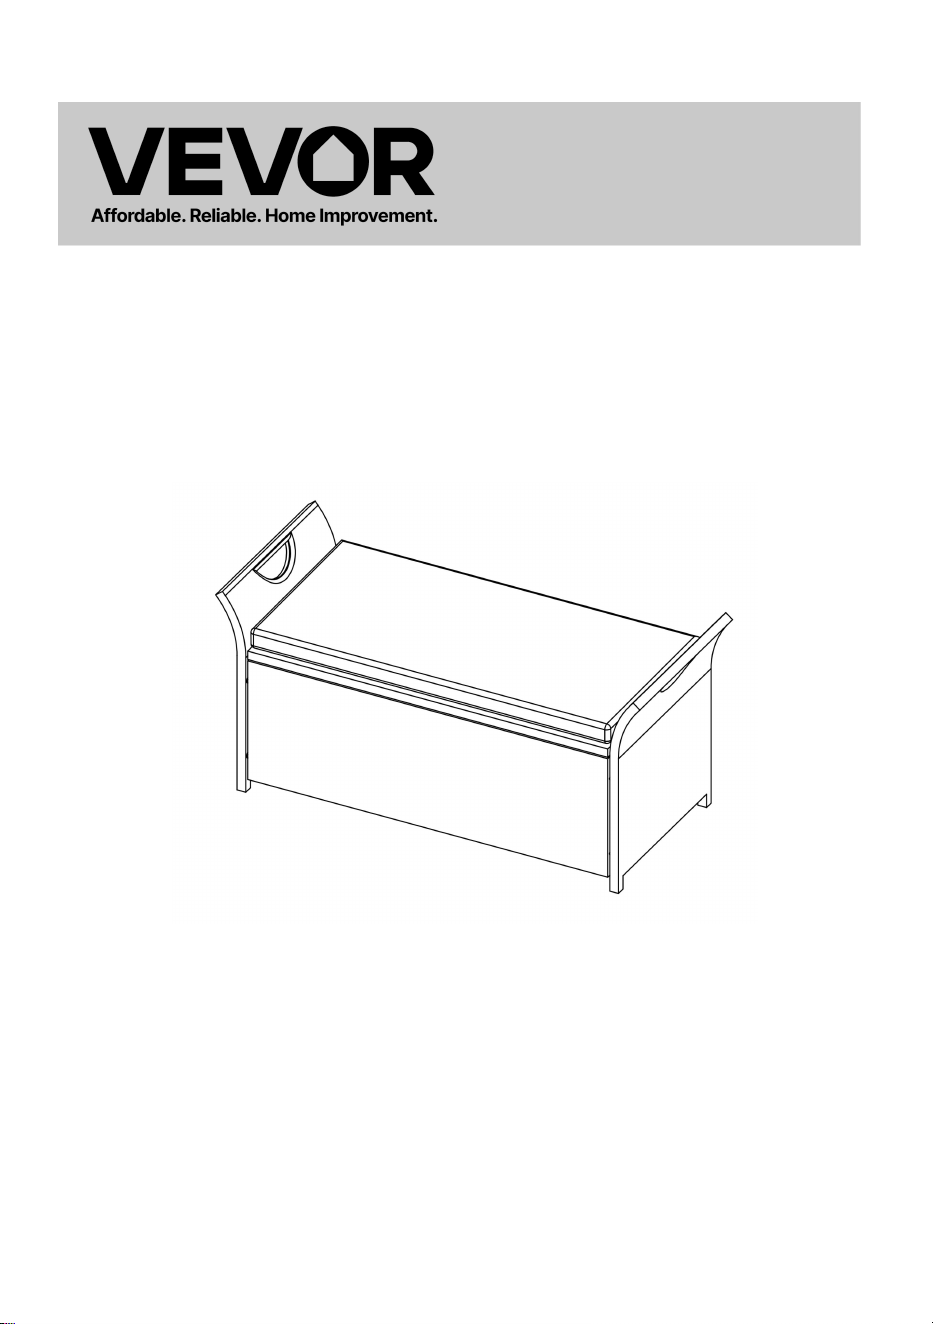
OUTDOOR STORAGE BENCHES
MODEL: DL-RSB05 / DL-RSB05S
- 1 -
MODEL:DL-RSB05 / DL-RSB05S
This is the original instruction, please read all manual instructions carefully
before operating. VEVOR reserves a clear interpretation of our user
manual. The appearance of the product shall be subject to the product you
received. Please forgive us that we won't inform you again if there are any
technology or software updates on our product.
OUTDOOR STORAGE
BENCHES

- 2 -
- 3 -
- 4 -
ATTENTION:
Keep children away during assembly. This item contains small parts that
can be dangerous forchildren.
Children should always be under direct adult supervision while using this
product.
Do not discard of any of the packaging until you have checked that you
have all of the parts and fittings required.
Carefully remove the contents from the package. If any parts are missing,
do not attempt to use the product until they have been obtained.
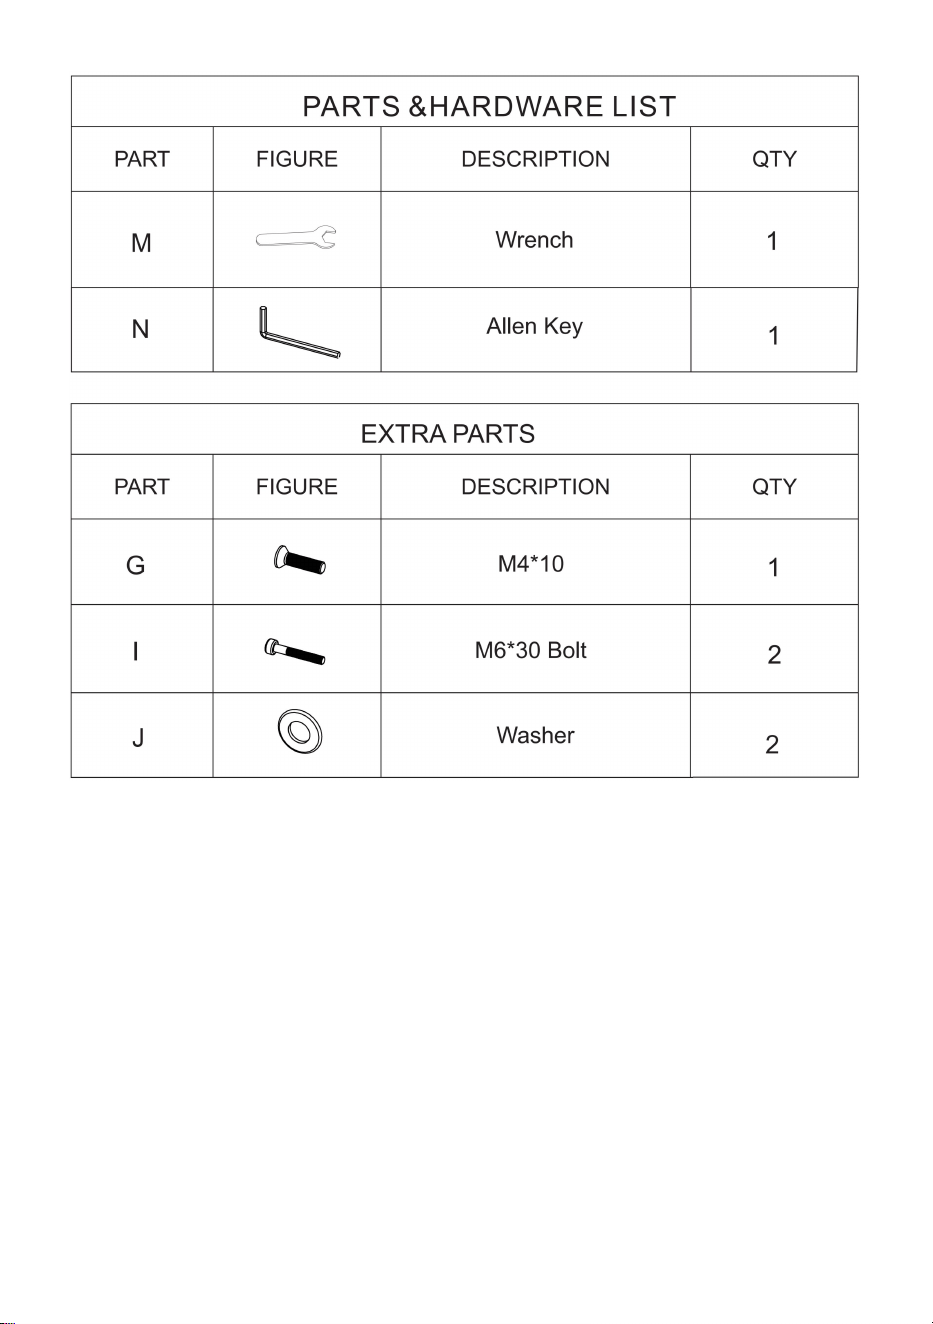
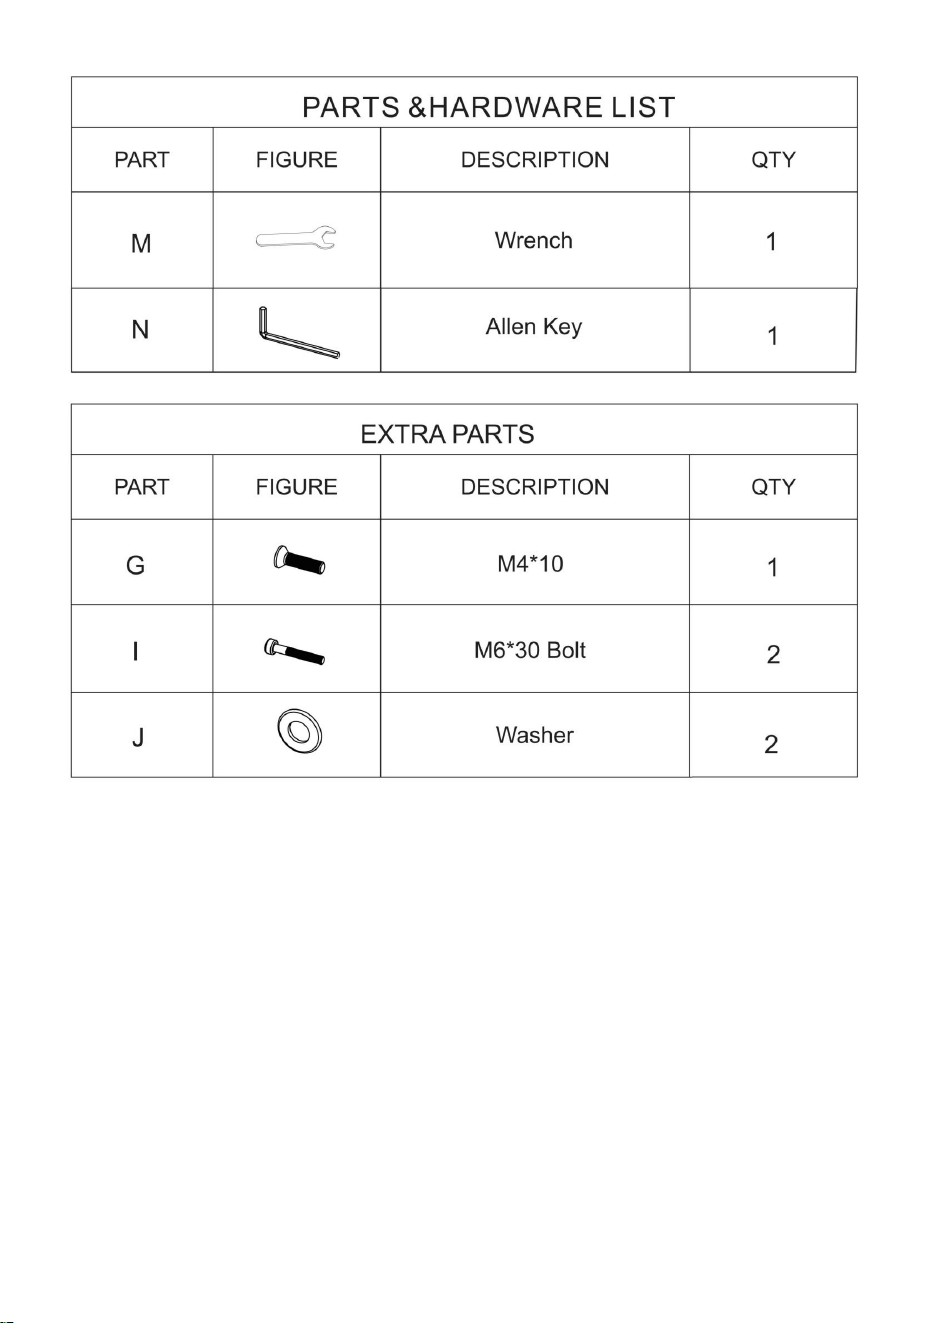
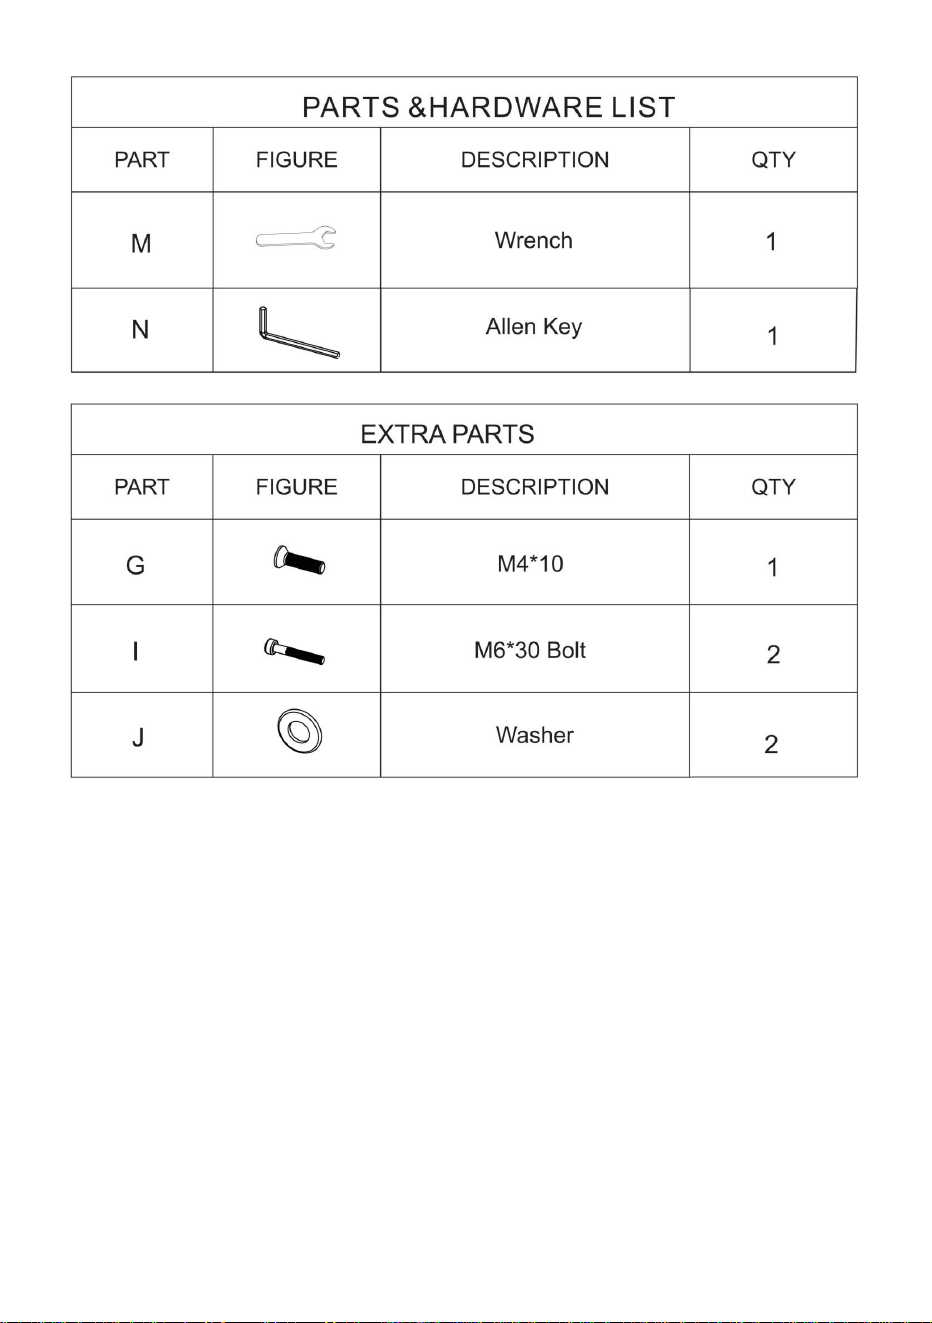
Make sure that each bolt needed for all steps matches the corresponding
figure ensure proper assembly.
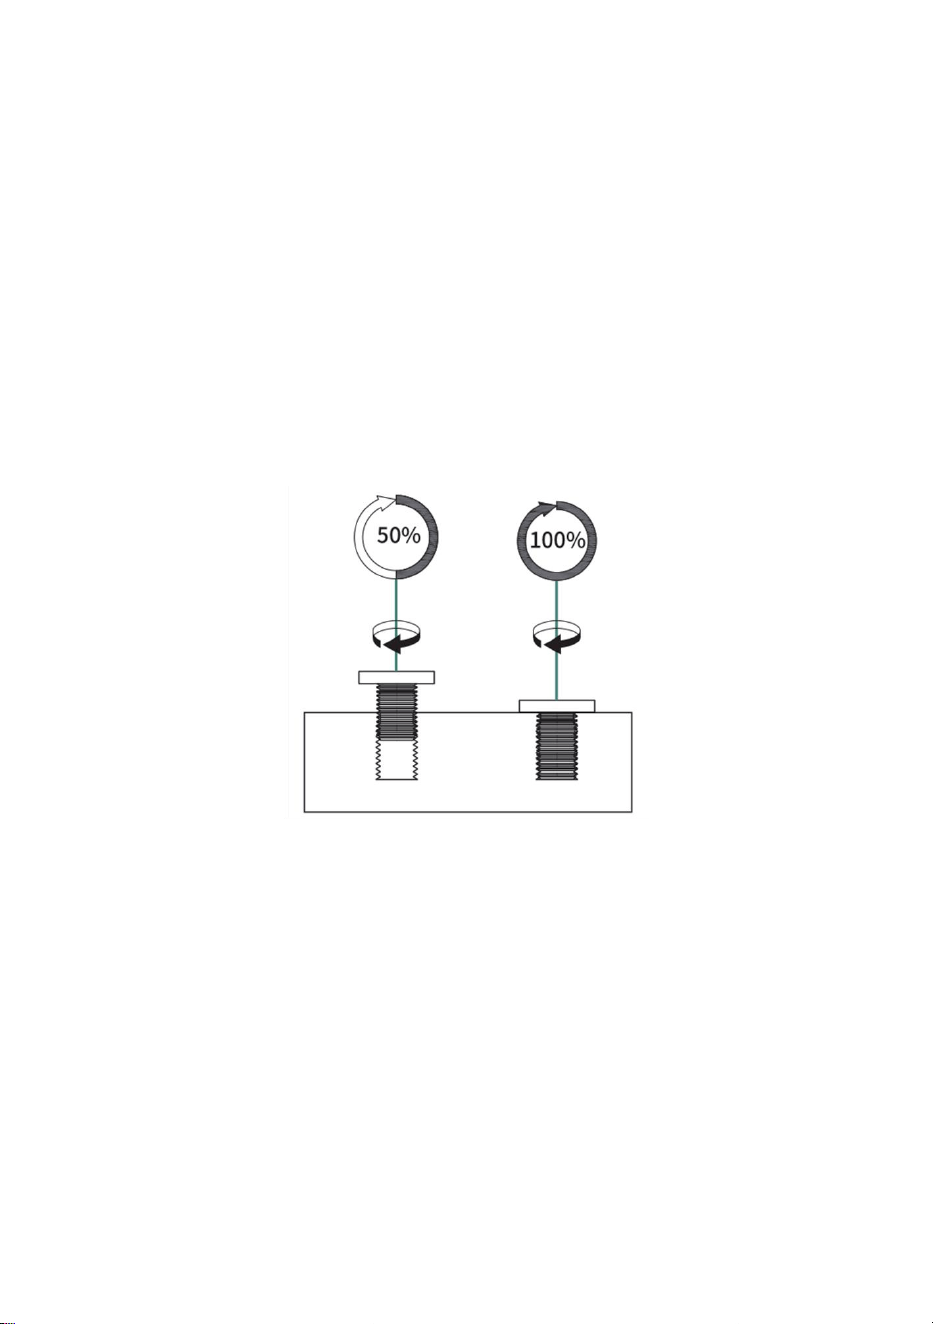
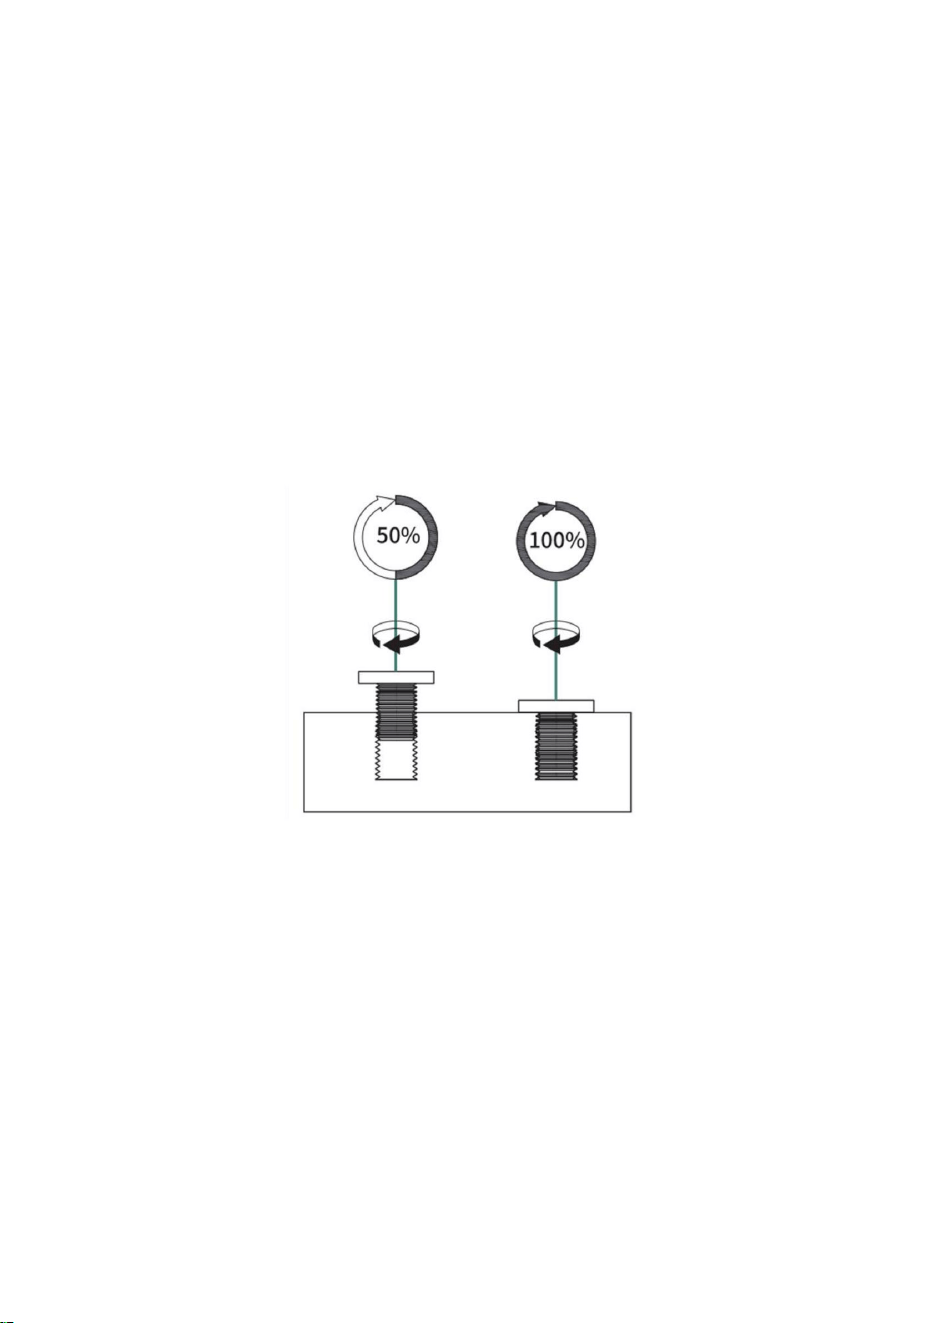
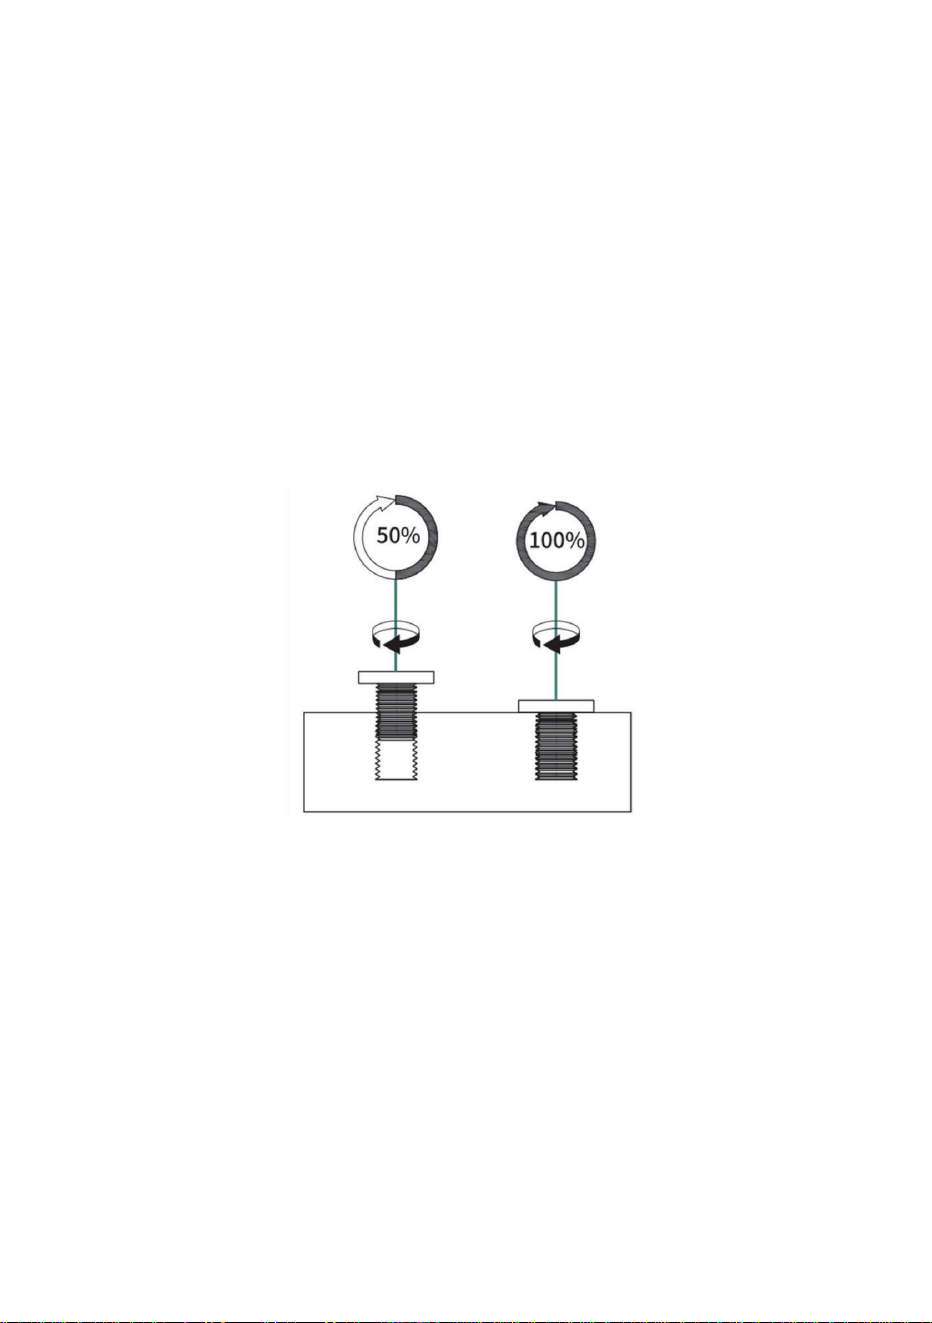
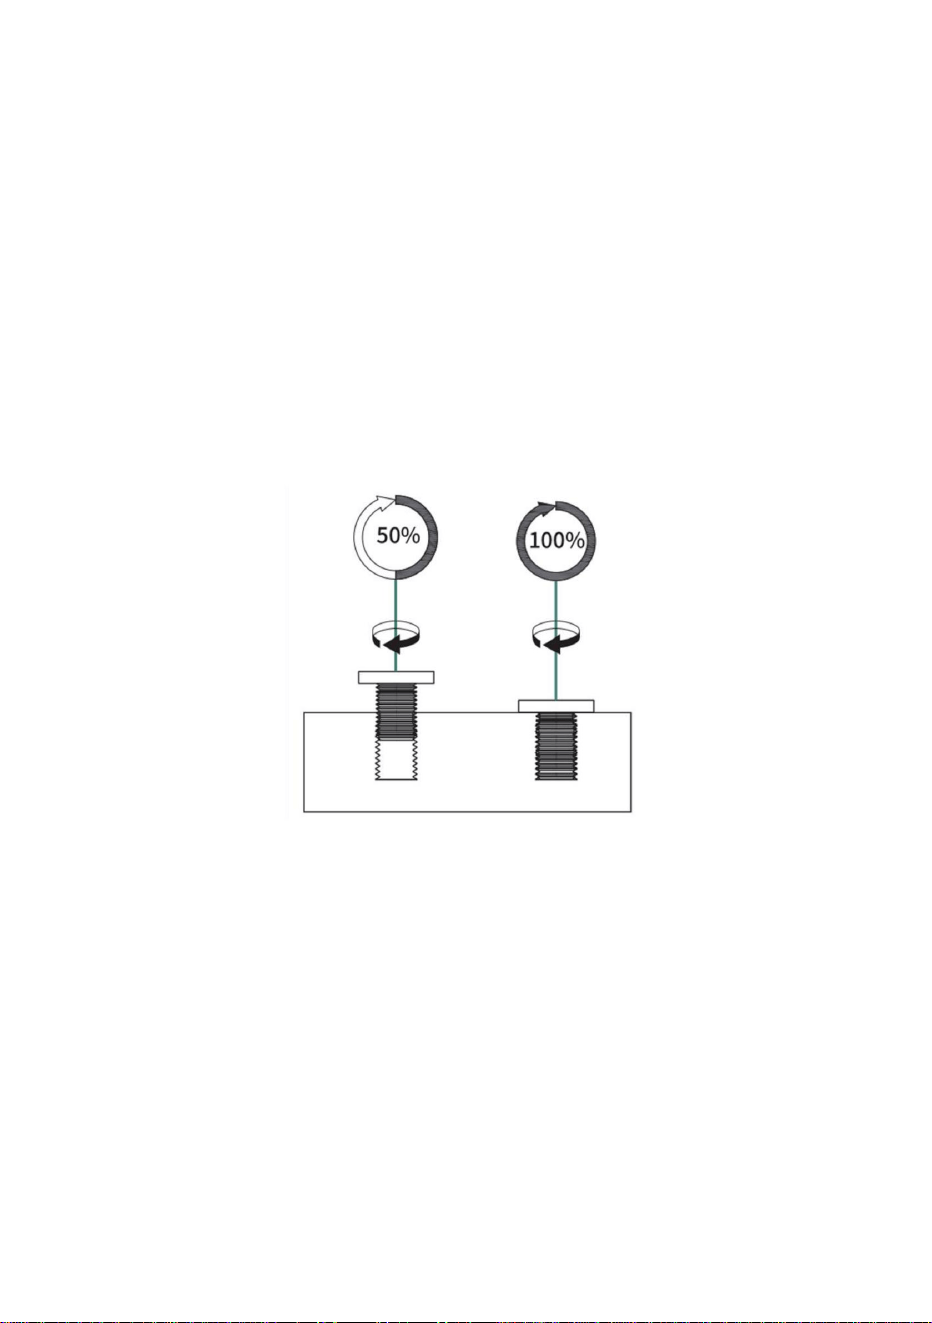
Before the complete installation, do not tighten the screws all the way.
You can first tighten the screws to 50%, and then once the entire assembly
is complete, you can fully tighten all the screws
- 5 -
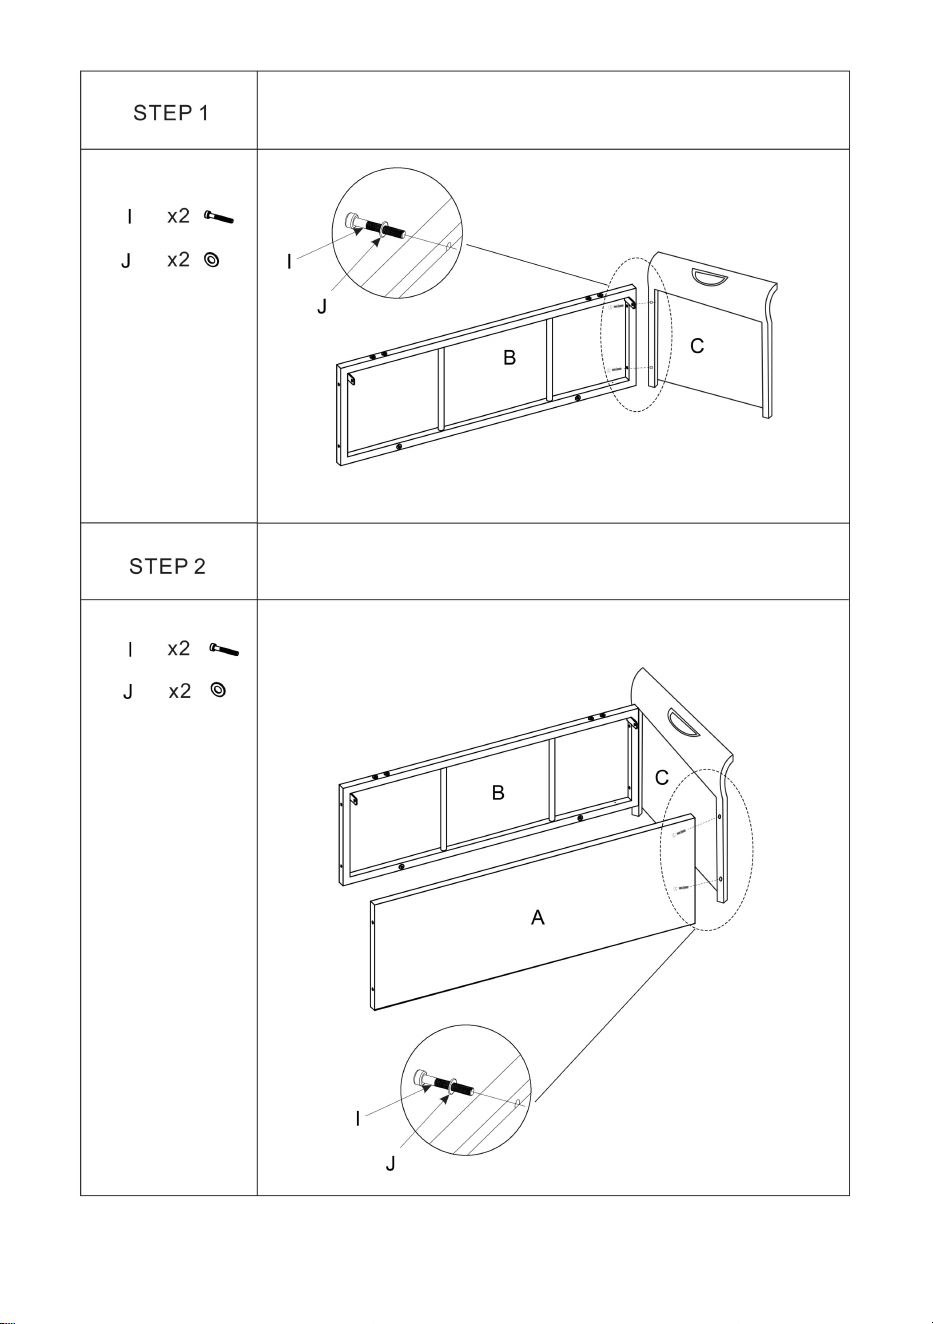
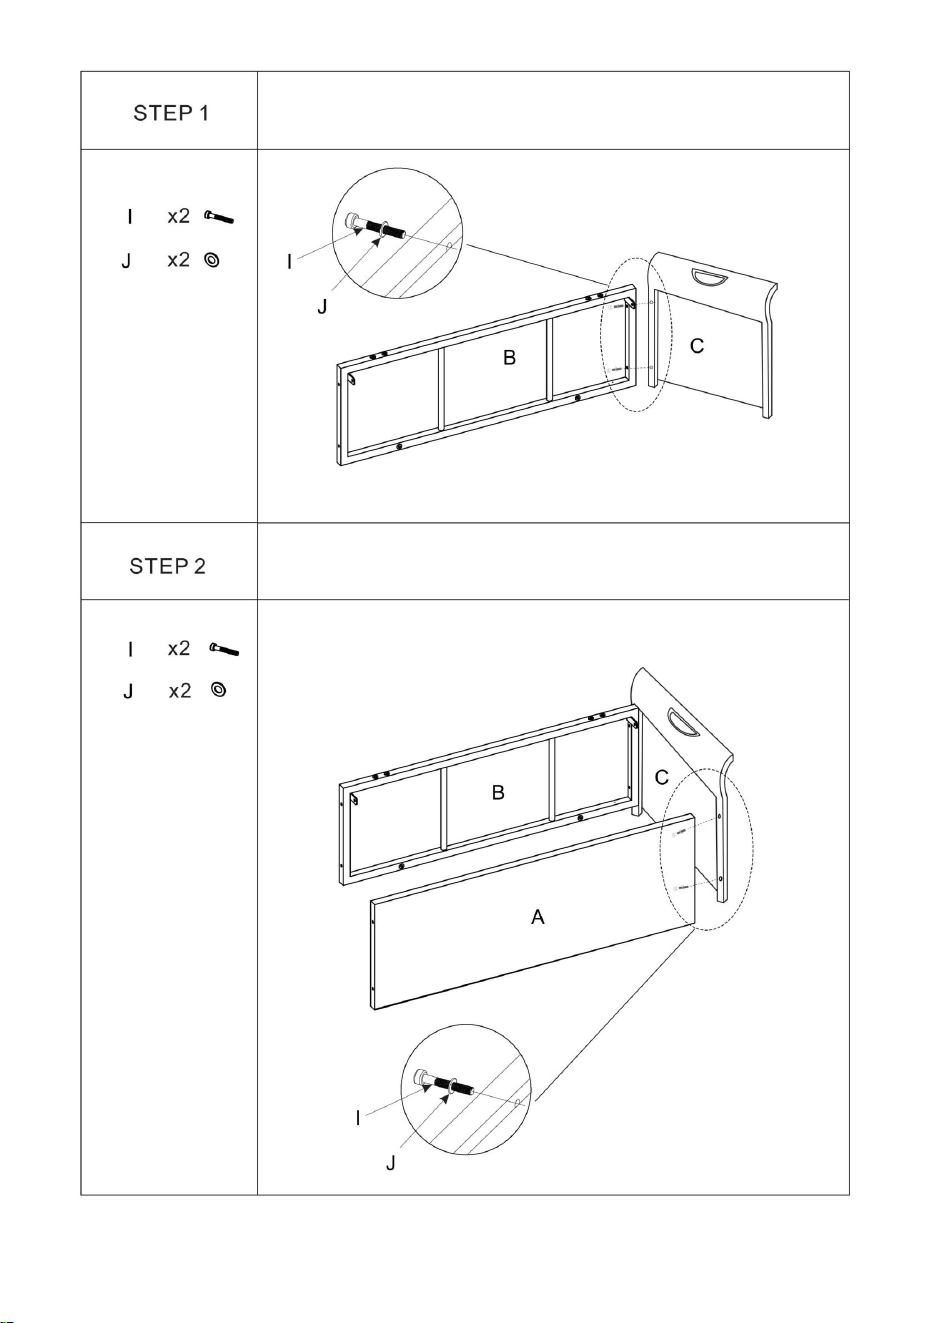
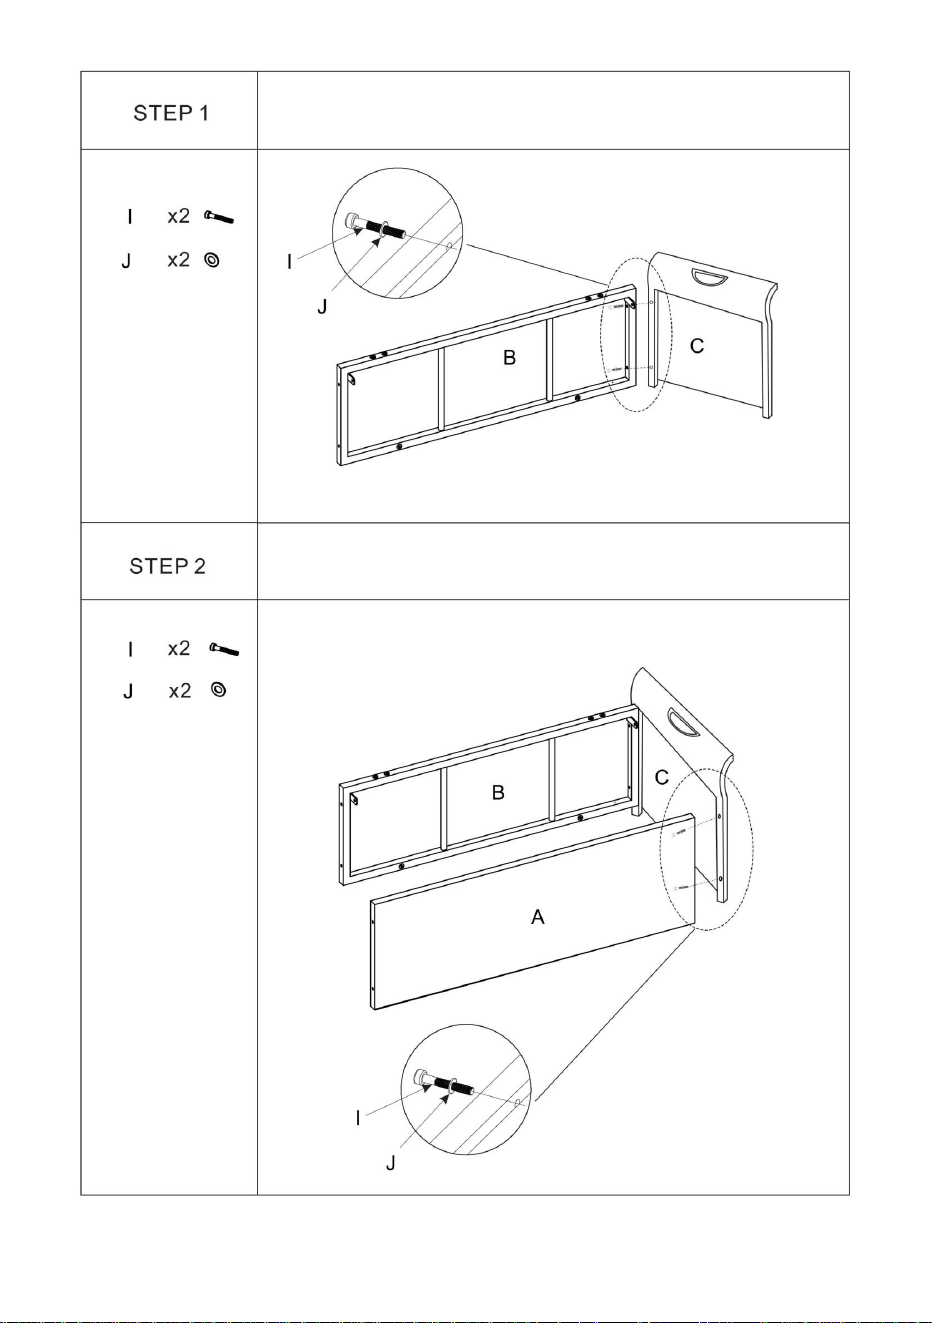
Attach Right Panel (C) to Back Panel (B) using Bolts (I) and
Washers (J).Hand tighten only.
Attach Front Panel (A) to Right Panel (C)using Bolts
(I) and Washers (J).Hand tighten only.

- 6 -
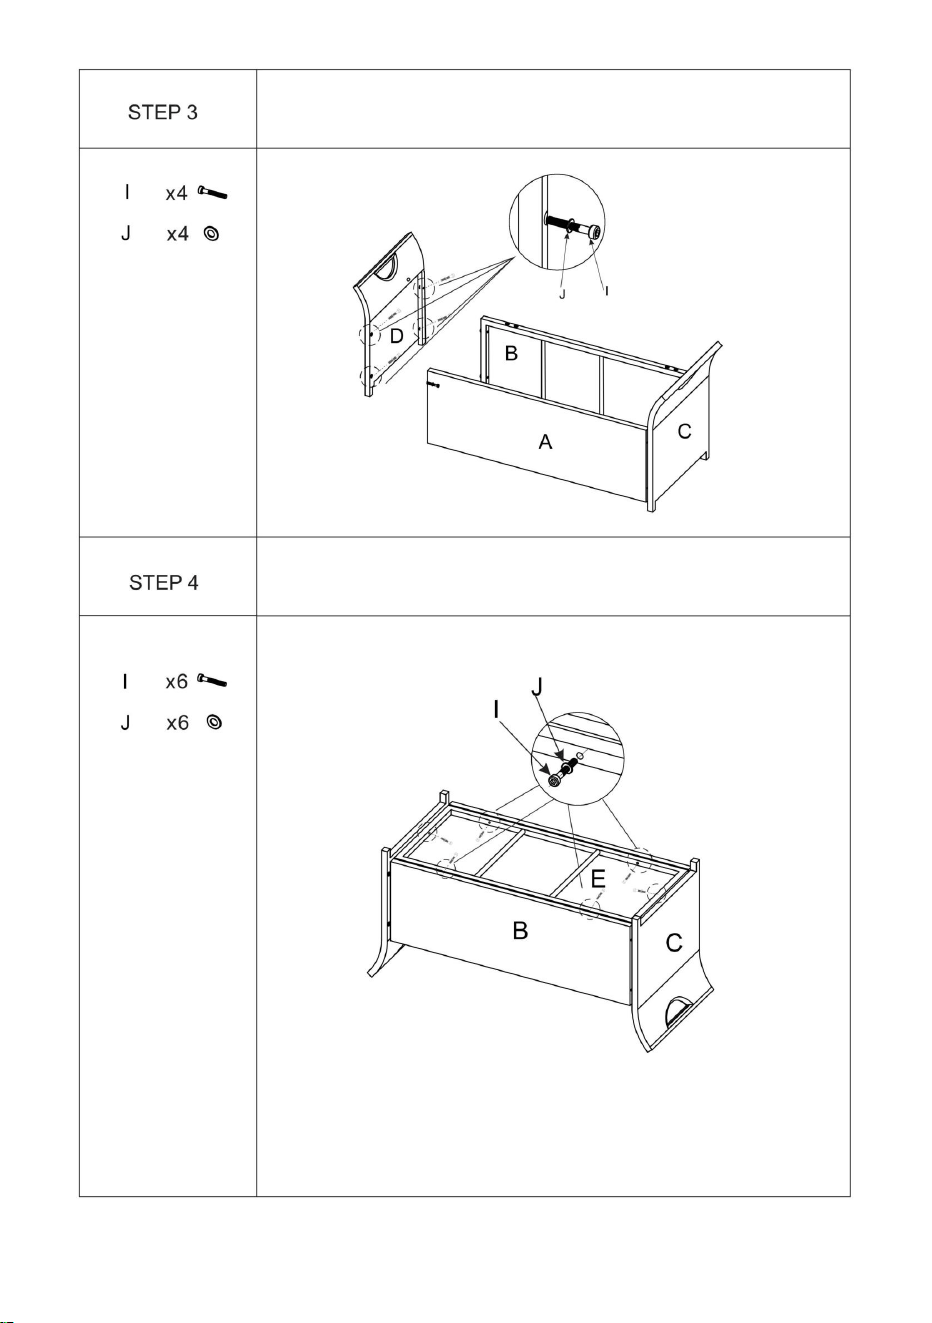
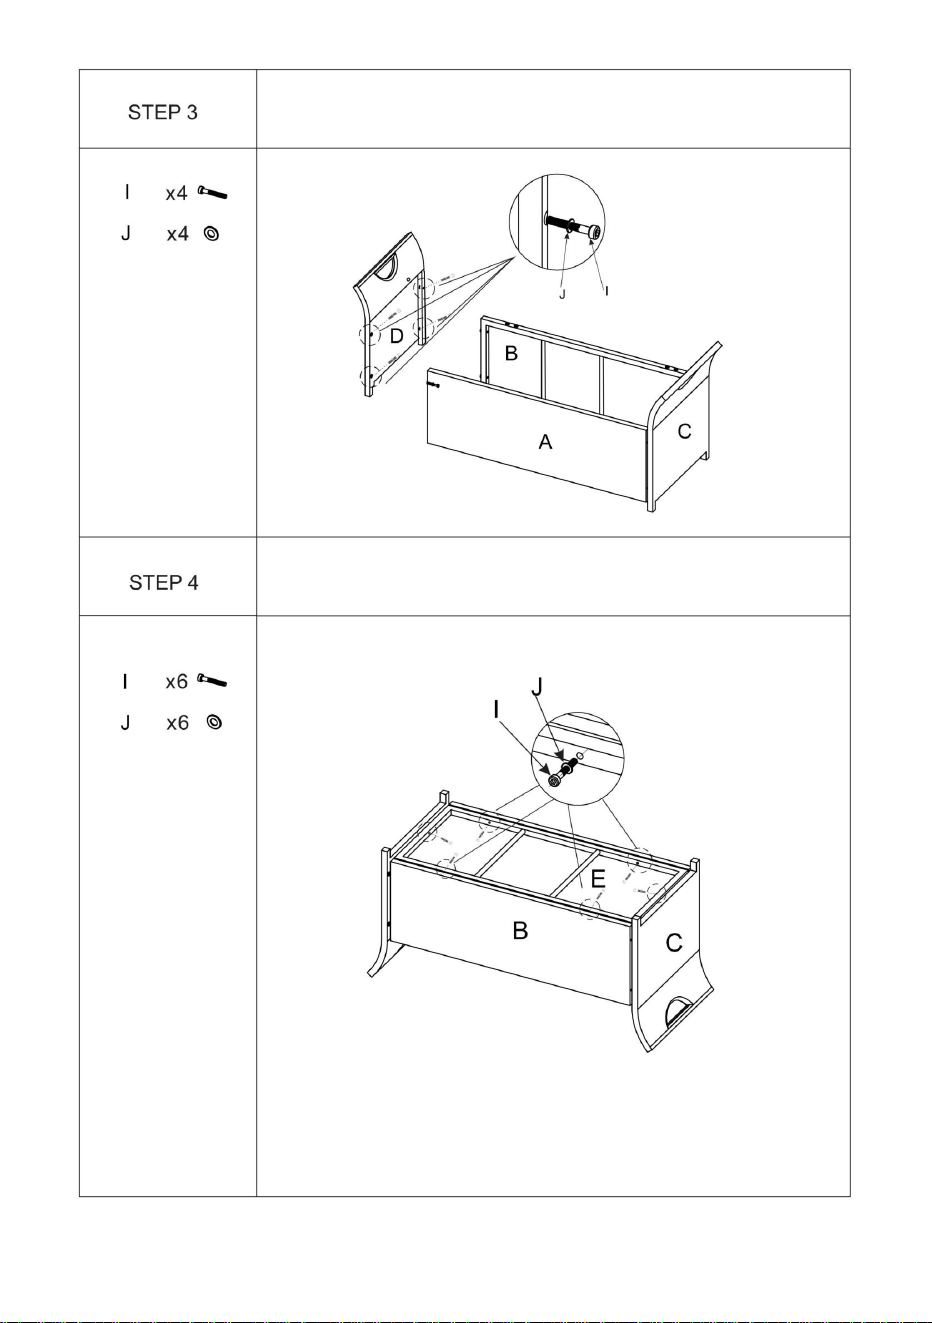
Attach Left Panel (D) to Back Panel (B),Front Panel(A) using
Bolts (I) and Washers (J).Hand tighten only.
Attach Bottom Panel (E) to Panel(A,B,C, D) using Bolts (I) and
Washers (J).Hand tighten only.
- 7 -
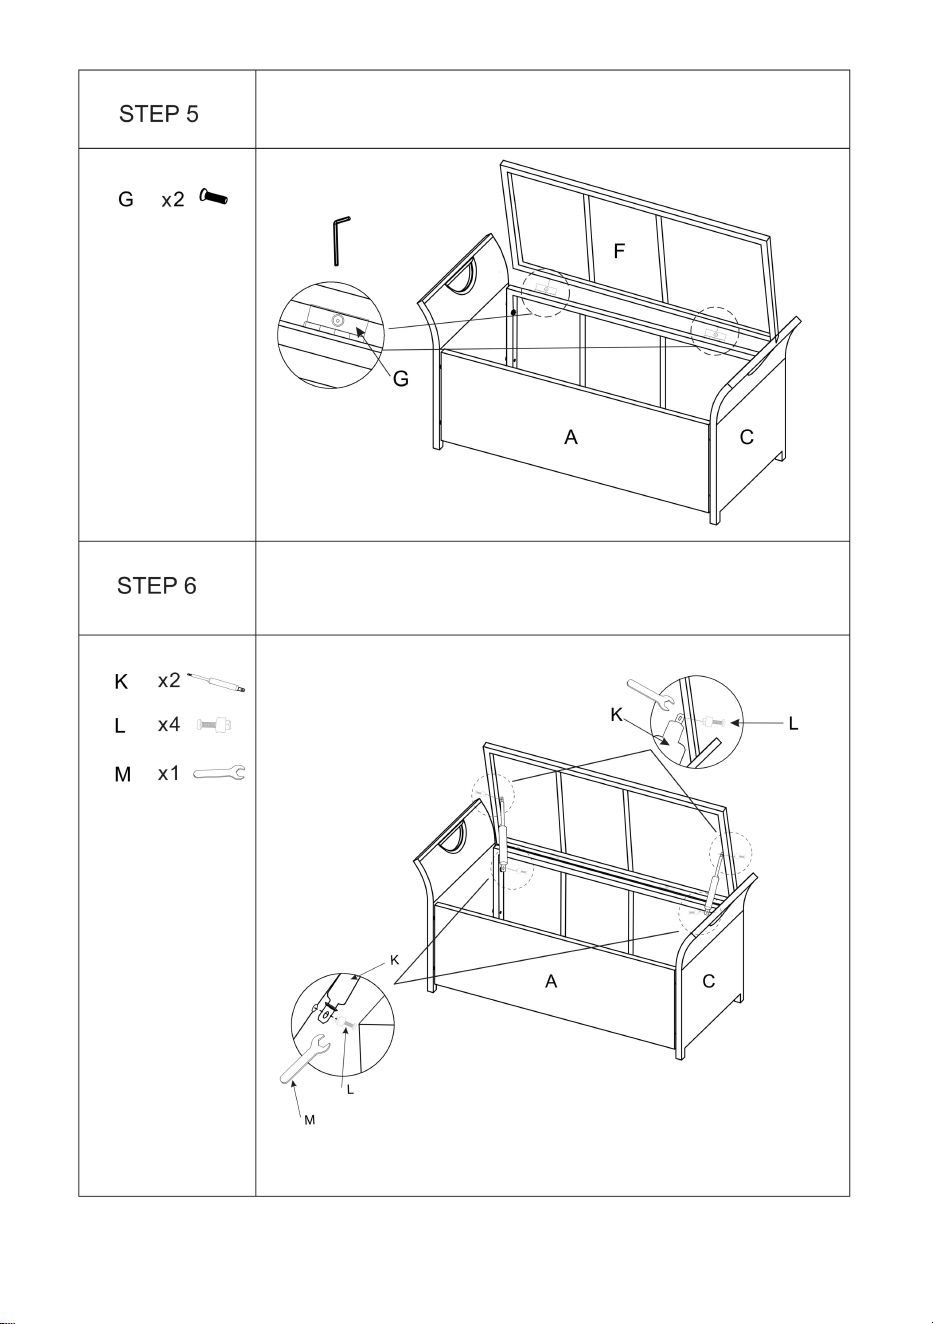
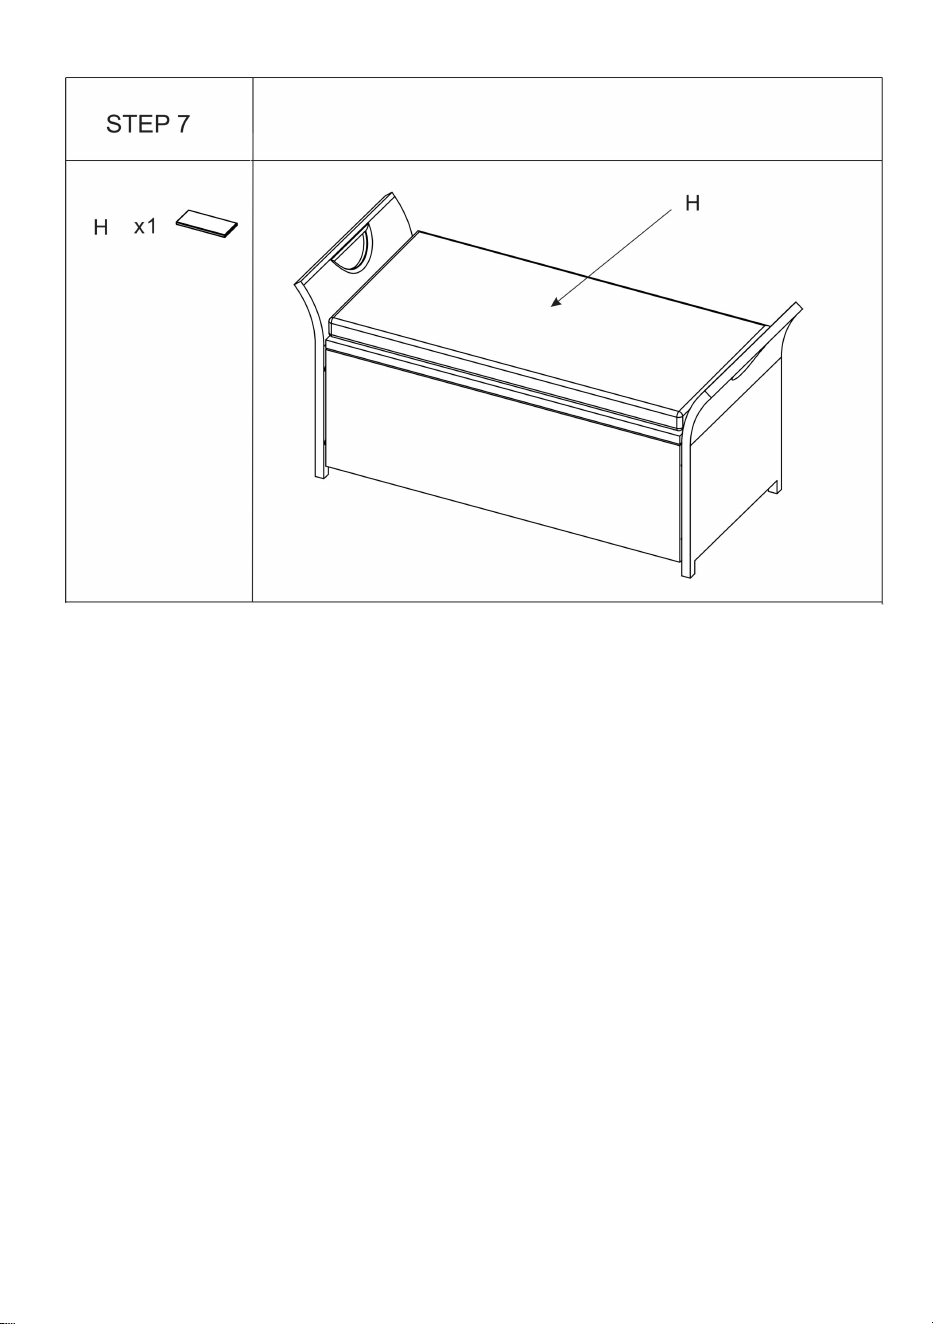
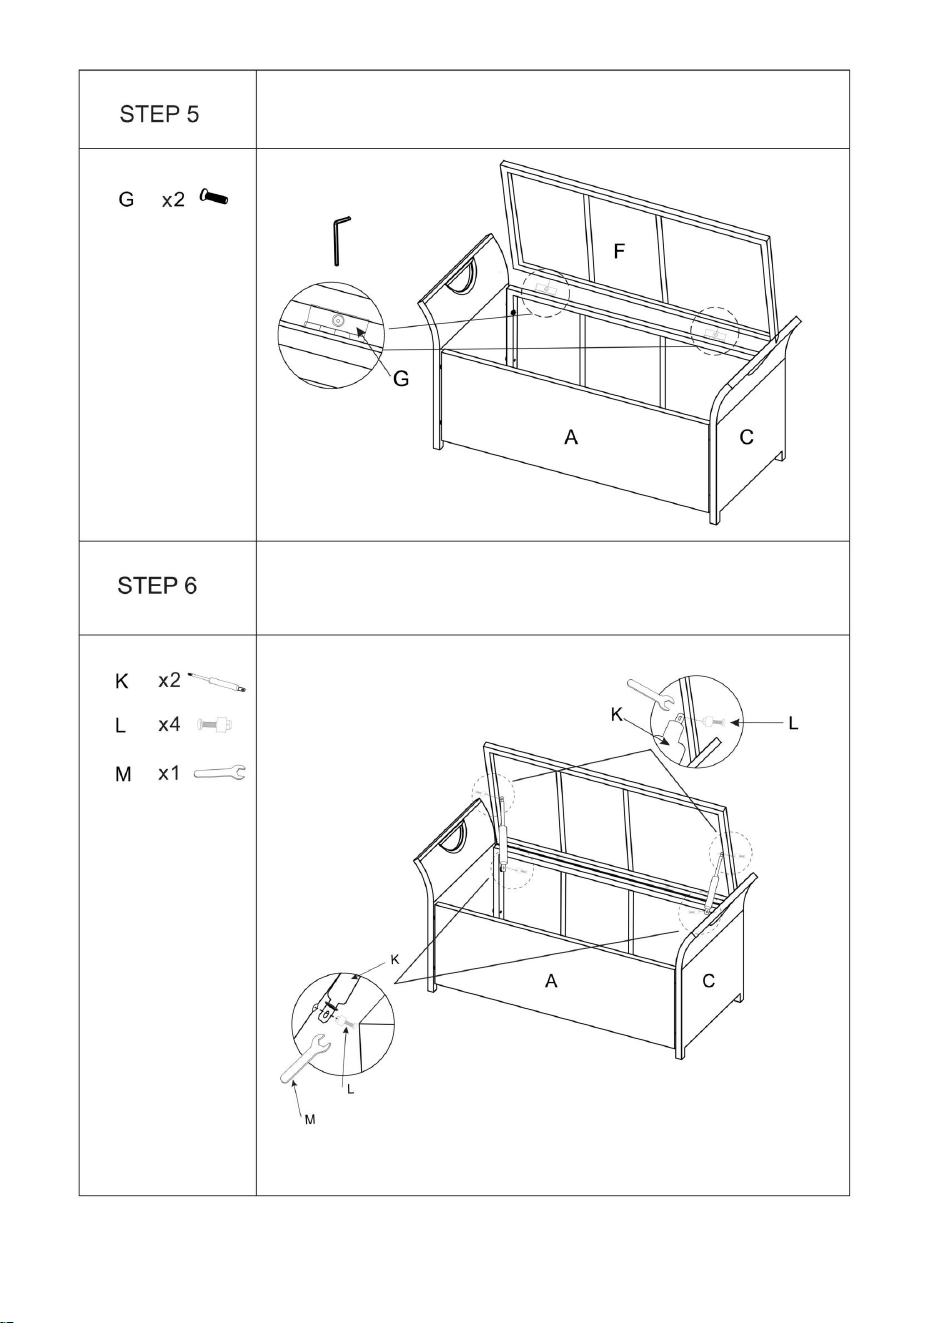
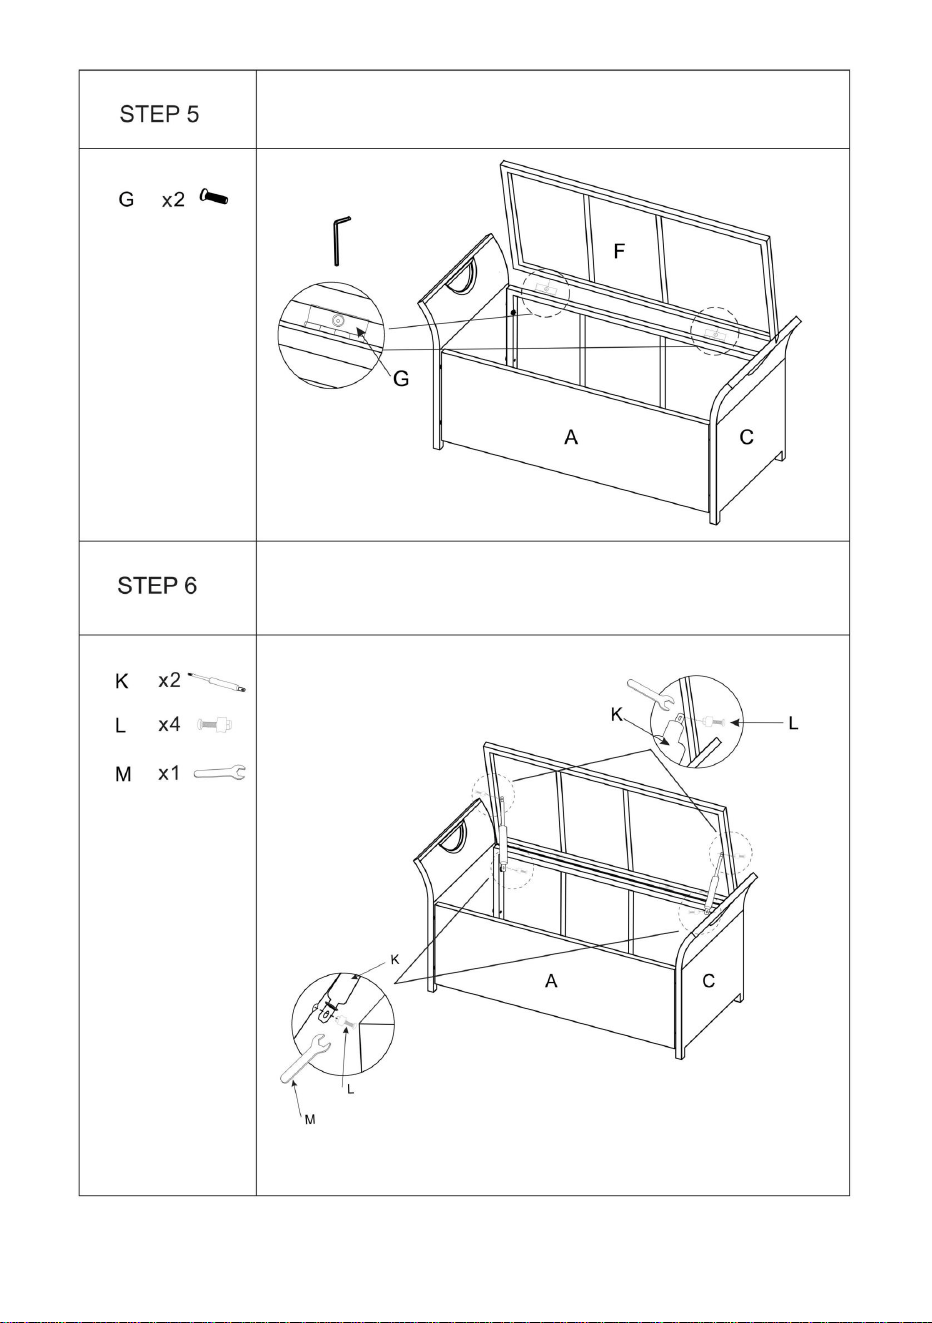
Attach the Top Panel (F) to Back Panel (B) using Bolts
(G).Fully tighten all bolts using Allen Key.
Please fully tighten hinge support using Wrench(M).
- 8 -
Cleaning and Maintenance
We recommend the use of furniture covers to protect the Wicker Storage
Benchwhen not in use.
Inspect and tighten allbolts on a regular basis to ensure proper
performanceand safety.
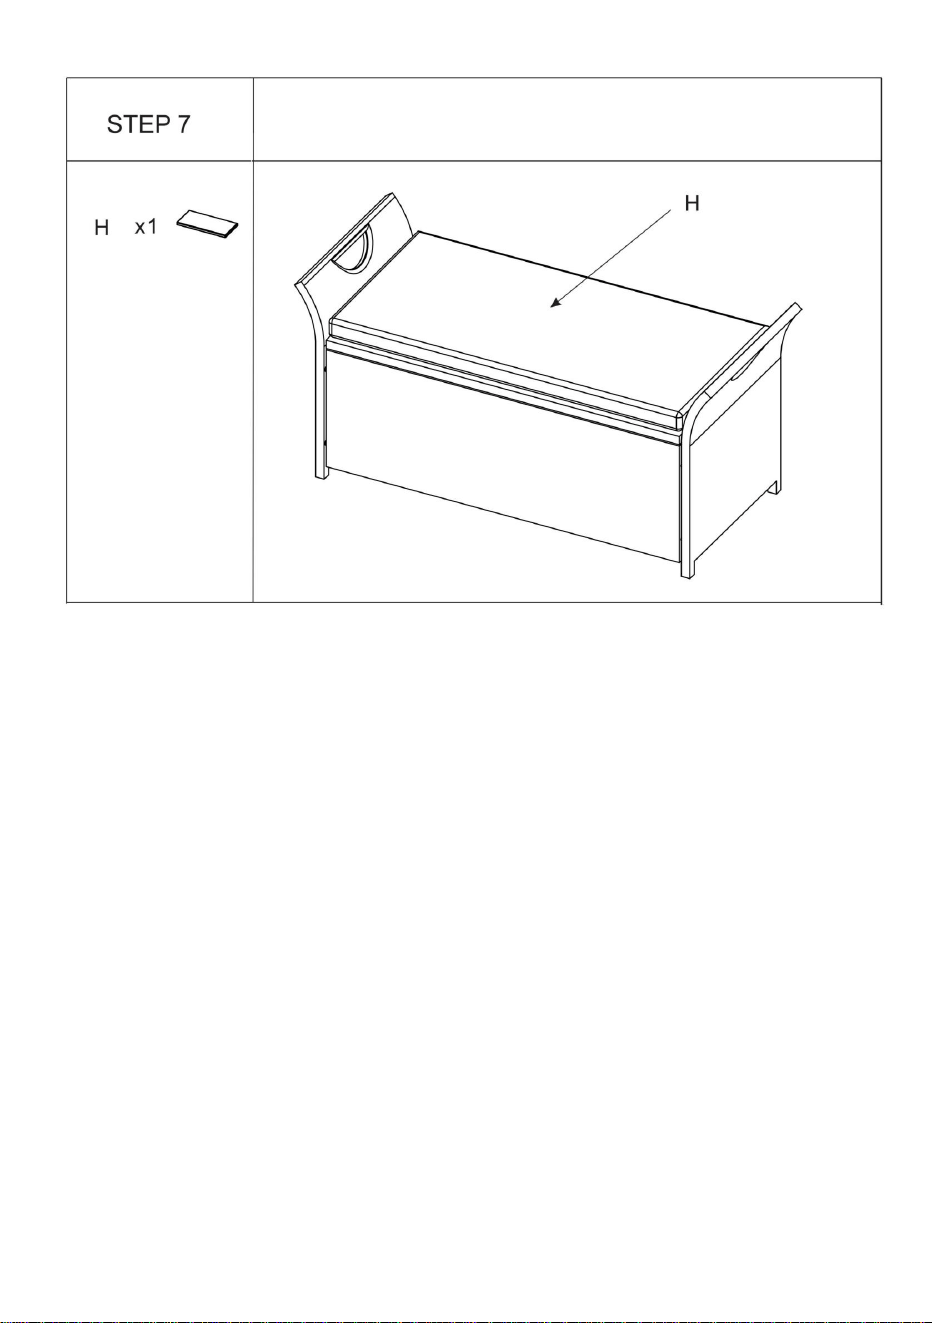
Place cushion (H).
Now please enjoy your new Wicker Storage Bench.
- 9 -
Manufacturer: Shanghaimuxinmuyeyouxiangongsi
Address: Shuangchenglu 803nong11hao1602A-1609shi, baoshanqu,
shanghai 200000 CN.
Imported to AUS: SIHAO PTY LTD. 1 ROKEVA STREETEASTWOOD
NSW 2122 Australia
Imported to USA: Sanven Technology Ltd. Suite 250, 9166 Anaheim
Place, Rancho Cucamonga, CA 91730
REP
UK
YH CONSULTING LIMITED. C/O YH Consulting
Limited Office 147, Centurion House, London
Road, Staines-upon-Thames, Surrey, TW18 4AX
REP
EC
E-CrossStu GmbH
Mainzer Landstr.69,
60329 Frankfurt am Main.


ŁAWKI DO MAGAZYNOWANIA NA
MODEL: DL-RSB05 / DL-RSB05S
ZEWNĄTRZ

PRZECHOWYWANIE NA
MODEL:DL-RSB05 / DL-
To jest oryginalna instrukcja, przed użyciem należy uważnie przeczytać wszystkie
instrukcje. VEVOR zastrzega sobie jasną interpretację naszej instrukcji obsługi.
Wygląd produktu będzie zależał od produktu, który otrzymałeś. Prosimy o
wybaczenie, że nie poinformujemy Cię ponownie, jeśli w naszym produkcie pojawią
się jakiekolwiek aktualizacje technologiczne lub oprogramowania.
RSB05S
ŁAWKI
ZEWNĄTRZ
- 1 -

- 2 -
- 3 -
UWAGA:
Trzymaj dzieci z dala od siebie podczas montażu. Ten przedmiot zawiera małe części, które
może być niebezpieczne dla
Dzieci powinny zawsze znajdować się pod bezpośrednim nadzorem osoby dorosłej podczas korzystania z tego
- 4 -
urządzenia.
dzieci.
produkt.
Nie wyrzucaj żadnego elementu opakowania, dopóki nie sprawdzisz, czy jest ono
posiadają wszystkie niezbędne części i osprzęt.
Ostrożnie wyjmij zawartość z opakowania. Jeśli brakuje jakichkolwiek części, nie próbuj
używać produktu, dopóki ich nie uzyskasz.
Upewnij się, że każda śruba potrzebna do wszystkich kroków pasuje do odpowiedniej
Rysunek zapewnia prawidłowy montaż.
Przed całkowitym montażem nie dokręcaj śrub do końca.
Najpierw dokręć śruby do 50%, a następnie po całkowitym złożeniu
jest kompletny, możesz w pełni dokręcić wszystkie śruby
Przymocuj prawy panel (C) do tylnego panelu (B) za pomocą śrub
Podkładki (J). Dokręcać tylko
- 5 -
ręcznie.
(I) i
Przymocuj panel przedni (A) do panelu prawego (C) za pomocą śrub
(I) i podkładki (J). Dokręcać tylko ręcznie.
Przymocuj dolny panel (E) do panelu (A, B, C, D) za pomocą śrub
- 6 -
(I)
Przymocuj lewy panel (D) do tylnego panelu (B), przedniego panelu (A) za pomocą
Śruby (I) i podkładki (J). Dokręcać tylko
i
ręcznie.
Podkładki (J). Dokręcać tylko ręcznie.
(G). Dokręć całkowicie wszystkie śruby za pomocą klucza imbusowego.
Przymocuj panel górny (F) do panelu tylnego (B) za pomocą
Dokręć wspornik zawiasu za pomocą klucza (M).
śrub
- 7 -

Umieść poduszkę (H).
Zapraszamy do korzystania z naszej nowej ławki wiklinowej ze
Czyszczenie i konserwacja Zalecamy
stosowanie pokrowców na meble w celu ochrony ławy wiklinowej, gdy nie jest używana.
Regularnie sprawdzaj i dokręcaj wszystkie śruby, aby zapewnić właściwą pracę i
bezpieczeństwo.
schowkiem.
- 8 -

Producent: Shanghaimuxinmuyeyouxiangongsi Adres:
Shuangchenglu 803nong11hao1602A-1609shi, baoshanqu, szanghaj 200000 CN.
Importowane do AUS: SIHAO PTY LTD. 1 ROKEVA STREETEASTWOOD NSW 2122 Australia
Importowane do USA: Sanven Technology Ltd. Suite 250, 9166 Anaheim Place, Rancho
Cucamonga, CA
REP WIELKIEJ
Przedstawiciel UE
BRYTANII
91730
YH CONSULTING LIMITED. C/O YH Consulting Limited Biuro
147, Centurion House, London Road, Staines-upon-
Thames, Surrey, TW18 4AX
E-CrossStu GmbH
Mainzer Landstr.69,
60329 Frankfurt nad Menem.
- 9 -


PANCHE PORTAOGGETTI PER
MODELLO: DL-RSB05 / DL-RSB05S
ESTERNI

MODELLO: DL-RSB05 / DL-RSB05S
STOCCAGGIO
Queste sono le istruzioni originali, si prega di leggere attentamente tutte le
istruzioni del manuale prima di utilizzare il prodotto. VEVOR si riserva la
piena interpretazione del manuale utente. L'aspetto del prodotto dipenderà dal
prodotto ricevuto. Vi preghiamo di non informarvi ulteriormente in caso di
aggiornamenti tecnologici o software relativi al nostro prodotto.
PANCHE
ESTERNO
- 1 -

- 2 -

- 3 -

ATTENZIONE:
Tenere lontani i bambini durante il montaggio. Questo articolo contiene piccole parti che
può essere pericoloso per i bambini.
I bambini devono sempre essere sotto la diretta supervisione di un adulto durante l'utilizzo di questo
prodotto.
Non gettare via alcun imballaggio prima di aver verificato che
avere tutti i pezzi e gli accessori necessari.
Estrarre con cautela il contenuto dalla confezione. Se mancano parti, non utilizzare il
prodotto finché non le si è recuperate.
Assicurarsi che ogni bullone necessario per tutti i gradini corrisponda al corrispondente
figura garantire il corretto
Non stringere completamente le viti prima di aver completato l'installazione.
Puoi prima stringere le viti al 50% e poi una volta l'intero gruppo
è completo, puoi stringere completamente tutte le
- 4 -
viti
montaggio.

Fissare il pannello destro (C) al pannello posteriore (B) utilizzando i bulloni (I) e
Rondelle (J). Serrare solo a
Fissare il pannello anteriore (A) al pannello destro (C) utilizzando i bulloni
(I) e rondelle (J). Serrare solo a mano.
mano.
- 5 -

Fissare il pannello sinistro (D) al pannello posteriore (B), pannello anteriore (A) utilizzando
Bulloni (I) e rondelle (J). Serrare solo a
Fissare il pannello inferiore (E) al pannello (A, B, C, D) utilizzando i bulloni (I) e
Rondelle (J). Serrare solo a mano.
mano.
- 6 -

Fissare il pannello superiore (F) al pannello posteriore (B) utilizzando i bulloni
(G). Serrare completamente tutti i bulloni utilizzando la chiave a brugola.
Stringere completamente il supporto della cerniera utilizzando la chiave inglese
- 7 -
(M).
Posizionare il cuscino (H).
Ora godetevi la vostra nuova panca portaoggetti in
Pulizia e manutenzione Si consiglia
l'uso di fodere per mobili per proteggere la panca portaoggetti in vimini quando non viene
utilizzata.
Ispezionare e serrare regolarmente tutti i bulloni per garantire prestazioni
adeguate e sicurezza.
vimini.
- 8 -

Produttore: Shanghaimuxinmuyeyouxiangongsi Indirizzo:
Shuangchenglu 803nong11hao1602A-1609shi, baoshanqu, shanghai 200000
Importato in AUS: SIHAO PTY LTD. 1 ROKEVA STREETEASTWOOD NSW 2122
Australia
Importato negli USA: Sanven Technology Ltd. Suite 250, 9166 Anaheim Place,
Rancho Cucamonga, CA
YH CONSULTING LIMITED. C/O YH Consulting
RAPPRESENTANTE DEL REGNO
Rappresentante della CE
UNITO
Limited
91730
CN.
Ufficio 147, Centurion House, London Road, Staines-
upon-Thames, Surrey, TW18 4AX
E-CrossStu GmbH
Mainzer Landstr.69,
60329 Francoforte sul Meno.
- 9 -


BANCOSDEALMACENAMIENTOPARAEXTERIORES
MODELO:DLRSB05/DLRSB05S

ALMACENAMIENTOALAIRE
MODELO:DLRSB05/DL
Estassonlasinstruccionesoriginales;leaatentamentetodaslasinstruccionesdel
manualantesdeutilizarlo.VEVORsereservaelderechodeinterpretarsu
manualdeusuario.Laaparienciadelproductodependerádelproductoquehaya
recibido.Lerogamosquenosdisculpesinoleinformamosdenuevosihay
actualizacionestecnológicasodesoftwareennuestroproducto.
RSB05S
BANCOS
LIBRE
1

2
3
ATENCIÓN:
Mantengaalosniñosalejadosduranteelmontaje.Esteartículocontienepiezaspequeñasque...
Puedeserpeligrosoparalosniños.
Losniñossiempredebenestarbajolasupervisióndirectadeunadultomientrasutilizanesteproducto.
producto.
Nodesecheningunodelosenvaseshastaquehayacomprobadoque
Tienetodaslaspiezasyaccesoriosnecesarios.
Retireconcuidadoelcontenidodelpaquete.Sifaltaalgunapieza,nointenteutilizarelproductohasta
obtenerla.
Asegúresedequecadapernonecesarioparatodoslospasoscoincidaconelcorrespondiente
Figuraaseguraruncorrecto
4
montaje.
Antesdecompletarlainstalación,noaprietelostornilloscompletamente.
Primeropuedesapretarlostornillosal50%,yluegounavezquetodoelconjuntoestéapretado.
estácompleto,puedesapretarcompletamentetodoslostornillos

Fijeelpanelderecho(C)alpanelposterior(B)usandopernos(I)y
Arandelas(J).Apretarúnicamentea
Fijeelpanelfrontal(A)alpanelderecho(C)conpernos
(I)yArandelas(J).Apretarúnicamenteamano.
mano.
5

Conecteelpanelizquierdo(D)alpanelposterior(B)yalpanelfrontal(A)usando
Pernos(I)yarandelas(J).Apretarúnicamenteconla
Fijeelpanelinferior(E)alpanel(A,B,C,D)usandopernos(I)y
Arandelas(J).Apretarúnicamenteamano.
mano.
6

Fijeelpanelsuperior(F)alpanelposterior(B)usandopernos
(G)AprietecompletamentetodoslospernosconlallaveAllen.
Aprietecompletamenteelsoportedelabisagraconlallave
7
(M).

Coloqueelcojín(H).
Ahoradisfrutedesunuevobancodemimbrecon
8
almacenamiento.
Limpiezaymantenimiento
Recomendamoselusodefundasparamueblesparaprotegerelbancodealmacenamiento
demimbrecuandonoestéenuso.
Inspeccioneyaprietetodoslospernosperiódicamenteparagarantizarel
rendimientoylaseguridadadecuados.

REPRESENTANTEDELREINOUNIDO
Fabricante:ShanghaimuxinmuyeyouxiangongsiDirección:
Shuangchenglu803nong11hao1602A1609shi,baoshanqu,shanghai200000
ImportadoaAUS:SIHAOPTYLTD.1ROKEVASTREET,EASTWOOD,NSW2122,
Australia
ImportadoaEE.UU.:SanvenTechnologyLtd.Suite250,9166AnaheimPlace,
RanchoCucamonga,CA
YHCONSULTINGLIMITADA.A/CYHConsulting
RepresentantedelaCE
Limited
91730
CN.
Oficina147,CenturionHouse,LondonRoad,Staines
uponThames,Surrey,TW184AX
ECrossStuGmbH
MainzerLandstr.69,
60329FráncfortdelMeno.
9


FÖRVARINGSBÄNKAR FÖR
MODELL: DL-RSB05 / DL-RSB05S
UTOMHUS
MODELL: DL-RSB05 / DL-RSB05S
FÖRVARING
Detta är originalinstruktionerna, vänligen läs alla instruktioner noggrant innan du
använder produkten. VEVOR förbehåller sig en tydlig tolkning av vår
användarmanual. Produktens utseende ska vara beroende av den produkt du
mottagit. Vi ber om ursäkt för att vi inte kommer att informera dig igen om det
finns några teknik- eller programuppdateringar för vår produkt.
BÄNKAR
UTOMHUS
- 1 -

- 2 -

- 3 -

- 4 -
UPPMÄRKSAMHET:
Håll barn borta under monteringen. Denna produkt innehåller smådelar som
kan vara farligt för barn.
Barn bör alltid vara under direkt vuxenövervakning när de använder detta
produkt.
Släng inte någon av förpackningarna förrän du har kontrollerat att du
har alla delar och tillbehör som behövs.
Ta försiktigt ut innehållet ur förpackningen. Om några delar saknas, försök inte
använda produkten förrän du har fått tag på dem.
Se till att varje bult som behövs för alla steg matchar motsvarande
figur säkerställ korrekt
Dra inte åt skruvarna helt före installationen.
Du kan först dra åt skruvarna till 50 %, och sedan dra åt hela enheten en gång.
är klar kan du dra åt alla skruvar helt
montering.

Fäst höger panel (C) på bakpanelen (B) med hjälp av bultar (I) och
Brickor (J). Dra endast åt för
- 5 -
hand.
Fäst frontpanelen (A) på den högra panelen (C) med bultar
(I) och brickor (J). Dra endast åt för hand.

Fäst vänster panel (D) på bakpanelen (B), frampanelen (A) med hjälp av
Bultar (I) och brickor (J). Dra endast åt för
- 6 -
hand.
Fäst bottenpanelen (E) på panelen (A, B, C, D) med hjälp av bultar (I) och
Brickor (J). Dra endast åt för hand.
Fäst den övre panelen (F) på den bakre panelen (B) med bultar
(G). Dra åt alla bultar helt med insexnyckeln.
Dra åt gångjärnsstödet helt med hjälp av nyckel (M).
- 7 -

Placera kudden (H).
Nu kan du njuta av din nya förvaringsbänk i
Rengöring och underhåll Vi
rekommenderar användning av möbelöverdrag för att skydda rottingbänken när den inte
används.
Inspektera och dra åt alla bultar regelbundet för att säkerställa korrekt prestanda
och säkerhet.
rotting.
- 8 -

Tillverkare: Shanghaimuxinmuyeyouxiangongsi Adress:
Shuangchenglu 803nong11hao1602A-1609shi, baoshanqu, shanghai 200000
Importerad till Australien: SIHAO PTY LTD. 1 ROKEVA STREETEASTWOOD NSW
2122 Australien
Importerad till USA: Sanven Technology Ltd. Suite 250, 9166 Anaheim Place,
Rancho Cucamonga, CA
Storbritanniens
EG-representant
republikaner
91730
CN.
YH CONSULTING LIMITED. C/O YH Consulting Limited
Kontor 147, Centurion House, London Road, Staines-
upon-Thames, Surrey, TW18 4AX
E-CrossStu GmbH
Mainzer Landstr.69,
60329 Frankfurt am Main.
- 9 -


BUITEN
MODEL: DL-RSB05 / DL-RSB05S
OPBERGBANKEN

MODEL: DL-RSB05 / DL-
Dit is de originele handleiding. Lees alle instructies zorgvuldig door voordat u het product
gebruikt. VEVOR behoudt zich het recht voor om de gebruiksaanwijzing duidelijk
te interpreteren. Het uiterlijk van het product is afhankelijk van het product dat u hebt
ontvangen. Neemt u het ons niet kwalijk dat we u niet meer op de hoogte stellen van
eventuele technologische of software-updates voor ons product.
RSB05S
BUITENOPSLAG
BANKEN
- 1 -

- 2 -

- 3 -

AANDACHT:
Houd kinderen uit de buurt tijdens de montage. Dit artikel bevat kleine onderdelen die
kan gevaarlijk zijn voor kinderen.
Kinderen moeten altijd onder direct toezicht van volwassenen staan tijdens het gebruik van dit product.
product.
Gooi geen verpakking weg voordat u heeft gecontroleerd of u
beschikken over alle benodigde onderdelen en fittingen.
Haal de inhoud voorzichtig uit de verpakking. Als er onderdelen ontbreken, probeer het product dan
niet te gebruiken totdat u deze hebt ontvangen.
Zorg ervoor dat elke bout die nodig is voor alle stappen overeenkomt met de bijbehorende
figuur zorgen voor een correcte
Draai de schroeven nog niet helemaal vast voordat u de installatie uitvoert.
Je kunt de schroeven eerst tot 50% aandraaien en dan de hele montage
is voltooid, kunt u alle schroeven volledig
- 4 -
vastdraaien
montage.
Bevestig het rechterpaneel (C) aan het achterpaneel (B) met behulp van bouten (I) en
Ringen (J).Alleen met de hand
- 5 -
vastdraaien.
Bevestig het voorpaneel (A) aan het rechterpaneel (C) met bouten
(I) en ringen (J). Alleen met de hand vastdraaien.
Bevestig het linkerpaneel (D) aan het achterpaneel (B) en het voorpaneel (A) met behulp van
Bouten (I) en ringen (J). Alleen met de hand
- 6 -
vastdraaien.
Bevestig het onderste paneel (E) aan het paneel (A, B, C, D) met behulp van bouten (I) en
Ringen (J).Alleen met de hand vastdraaien.

Bevestig het bovenpaneel (F) met bouten aan het achterpaneel (B).
(G). Draai alle bouten volledig vast met de inbussleutel.
Draai de scharnierondersteuning volledig vast met behulp van de sleutel (M).
- 7 -

Plaats kussen (H).
Veel plezier met uw nieuwe rieten
Reiniging en onderhoud Wij
adviseren het gebruik van meubelhoezen om de Wicker Storage Bench te beschermen
wanneer deze niet in gebruik is.
Controleer alle bouten regelmatig en draai ze goed vast om een goede werking
en veiligheid te garanderen.
opbergbank.
- 8 -

Fabrikant: Shanghaimuxinmuyeyouxiangongsi Adres:
Shuangchenglu 803nong11hao1602A-1609shi, baoshanqu, shanghai 200000
Geïmporteerd naar AUS: SIHAO PTY LTD. 1 ROKEVA STREETEASTWOOD NSW
2122 Australië
Geïmporteerd naar de VS: Sanven Technology Ltd. Suite 250, 9166 Anaheim Place,
Rancho Cucamonga, CA
VK
EC REP
REP
91730
CN.
YH CONSULTING LIMITED. T.a.v. YH Consulting Limited
Kantoor 147, Centurion House, London Road, Staines-
upon-Thames, Surrey, TW18 4AX
E-CrossStu GmbH
Mainzer Landstr.69,
60329 Frankfurt am Main.
- 9 -


BANCSDERANGEMENT
MODÈLE:DLRSB05/DLRSB05S
EXTÉRIEURS

STOCKAGE
MODÈLE:DLRSB05/DL
Ceciestlemoded'emploid'origine.Veuillezlireattentivementl'intégralitédumanuelavant
utilisation.VEVORseréserveledroitd'interpréterclairementcemanueld'utilisation.
L'apparenceduproduitdépendduproduitquevousavezreçu.Veuilleznousexcuserpour
leséventuellesmisesàjourtechnologiquesoulogicielles.
RSB05S
BANCS
EXTÉRIEUR
1

2

3

ATTENTION:
Tenirlesenfantséloignéspendantlemontage.Cetarticlecontientdepetitespiècesqui
peutêtredangereuxpourlesenfants.
Lesenfantsdoiventtoujoursêtresouslasurveillancedirected'unadultelorsqu'ilsutilisentcetappareil.
produit.
Nejetezaucundesemballagesavantd'avoirvérifiéquevous
avoirtouteslespiècesetaccessoiresnécessaires.
Retirezsoigneusementlecontenudel'emballage.Sidespiècessontmanquantes,n'utilisez
pasleproduitavantdelesavoirrécupérées.
Assurezvousquechaqueboulonnécessaireàtouteslesétapescorrespondaubouloncorrespondant.
figureassurerunassemblage
4
correct.
Avantl'installationcomplète,neserrezpascomplètementlesvis.
Vouspouvezd'abordserrerlesvisà50%,puisunefoisl'ensembledel'assemblage
estterminé,vouspouvezserrercomplètementtouteslesvis

Fixezlepanneaudroit(C)aupanneauarrière(B)àl'aidedesboulons(I)et
Rondelles(J).Serreràlamain
5
uniquement.
Fixezlepanneauavant(A)aupanneaudroit(C)àl'aidedeboulons
(I)etrondelles(J).Serreràlamainuniquement.

Fixezlepanneaugauche(D)aupanneauarrière(B)etaupanneauavant(A)àl'aide
Boulons(I)etrondelles(J).Serreràlamain
6
uniquement.
Fixezlepanneauinférieur(E)aupanneau(A,B,C,D)àl'aidedesboulons(I)et
Rondelles(J).Serreràlamainuniquement.

Fixezlepanneausupérieur(F)aupanneauarrière(B)àl'aidedeboulons
(G).Serrezcomplètementtouslesboulonsàl’aidedelacléAllen.
Veuillezserrercomplètementlesupportdecharnièreàl'aidedelaclé(M).
7

Placerlecoussin(H).
Profitezmaintenantdevotrenouveaubancderangementen
NettoyageetentretienNous
recommandonsl'utilisationdehoussesdemeublespourprotégerlebancderangementen
osierlorsqu'iln'estpasutilisé.
Inspectezetserrezrégulièrementtouslesboulonspourgarantirdes
performancesetunesécuritéoptimales.
osier.
8

Fabricant:ShanghaimuxinmuyeyouxiangongsiAdresse:
Shuangchenglu803nong11hao1602A1609shi,baoshanqu,shanghai200000
ImportéenAustralie:SIHAOPTYLTD.1ROKEVASTREET,ASTWOODNSW2122,
Australie
ImportéauxÉtatsUnis:SanvenTechnologyLtd.Suite250,9166AnaheimPlace,
RanchoCucamonga,CA
ReprésentantduRoyaume
REPRÉSENTANTDELACE
Uni
91730
CN.
YHCONSULTINGLIMITED.A/SYHConsultingLimited,
bureau147,CenturionHouse,LondonRoad,Staines
uponThames,Surrey,TW184AX
ECrossStuGmbH
MainzerLandstr.69,
60329FrancfortsurleMain.
9


OUTDOOR-
MODELL: DL-RSB05 / DL-RSB05S
AUFBEWAHRUNGSBÄNKE

MODELL: DL-RSB05 / DL-RSB05S
LAGERUNG IM
Dies ist die Originalanleitung. Bitte lesen Sie alle Anweisungen sorgfältig durch, bevor
Sie das Gerät in Betrieb nehmen. VEVOR behält sich das Recht vor, die
Bedienungsanleitung klar und deutlich zu interpretieren. Das Aussehen des Produkts
hängt vom gelieferten Produkt ab. Bitte haben Sie Verständnis dafür, dass wir Sie
nicht erneut über Technologie- oder Software-Updates informieren.
BÄNKE
FREIEN
- 1 -
- 2 -

- 3 -
AUFMERKSAMKEIT:
Halten Sie Kinder während der Montage fern. Dieser Artikel enthält Kleinteile,
kann für Kinder gefährlich sein.
Kinder sollten bei der Verwendung dieses Geräts immer unter direkter Aufsicht von Erwachsenen stehen.
Produkt.
Werfen Sie die Verpackung nicht weg, bevor Sie überprüft haben, dass Sie
alle erforderlichen Teile und Armaturen haben.
Entnehmen Sie den Inhalt vorsichtig aus der Verpackung. Sollten Teile fehlen, verwenden Sie das Produkt
erst, wenn Sie diese erhalten haben.
Stellen Sie sicher, dass jede für alle Schritte benötigte Schraube mit der
Abbildung, um eine ordnungsgemäße Montage
Vor der vollständigen Montage die Schrauben nicht ganz festziehen.
Sie können die Schrauben zunächst zu 50 % anziehen und dann, wenn die gesamte Baugruppe
Wenn die Schraube vollständig festgezogen
- 4 -
ist,
sicherzustellen.
entsprechenden

Befestigen Sie die rechte Platte (C) mit den Schrauben (I) an der Rückplatte (B) und
Unterlegscheiben (J). Nur mit der Hand
Befestigen Sie die Frontplatte (A) mit Schrauben an der rechten Platte (C).
(I) und Unterlegscheiben (J). Nur mit der Hand festziehen.
festziehen.
- 5 -

Befestigen Sie das linke Paneel (D) an der Rückwand (B), der Frontwand (A) mit
Schrauben (I) und Unterlegscheiben (J). Nur mit der Hand
Befestigen Sie die untere Platte (E) mit den Schrauben (I) an den Platten (A,B,C,D) und
Unterlegscheiben (J). Nur mit der Hand festziehen.
festziehen.
- 6 -

Befestigen Sie die obere Platte (F) mit Schrauben an der hinteren Platte (B).
(G). Ziehen Sie alle Schrauben mit einem Inbusschlüssel vollständig fest.
Bitte ziehen Sie die Scharnierhalterung mit dem Schraubenschlüssel (M) vollständig
- 7 -
fest.

Kissen (H) platzieren.
Und nun viel Freude mit Ihrer neuen Korbbank mit
Reinigung und Wartung: Wir empfehlen
die Verwendung von Möbelabdeckungen, um die Korbbank mit Stauraum zu schützen, wenn sie nicht
verwendet wird.
Überprüfen und ziehen Sie alle Schrauben regelmäßig fest, um ordnungsgemäße Leistung
und Sicherheit zu gewährleisten.
Stauraum.
- 8 -

YH CONSULTING LIMITED. C/O YH Consulting
EG-Vertreter
Limited,
Hersteller: Shanghaimuxinmuyeyouxiangongsi Adresse:
Shuangchenglu 803nong11hao1602A-1609shi, baoshanqu, Shanghai 200000
Importiert nach AUS: SIHAO PTY LTD. 1 ROKEVA STREETEASTWOOD NSW 2122
Australien
Importiert in die USA: Sanven Technology Ltd. Suite 250, 9166 Anaheim Place,
Rancho Cucamonga, CA
Britische Republik
Büro 147, Centurion House, London Road, Staines-upon-
91730
CN.
Thames, Surrey, TW18 4AX
E-CrossStu GmbH
Mainzer Landstr.69,
60329 Frankfurt am Main.
- 9 -