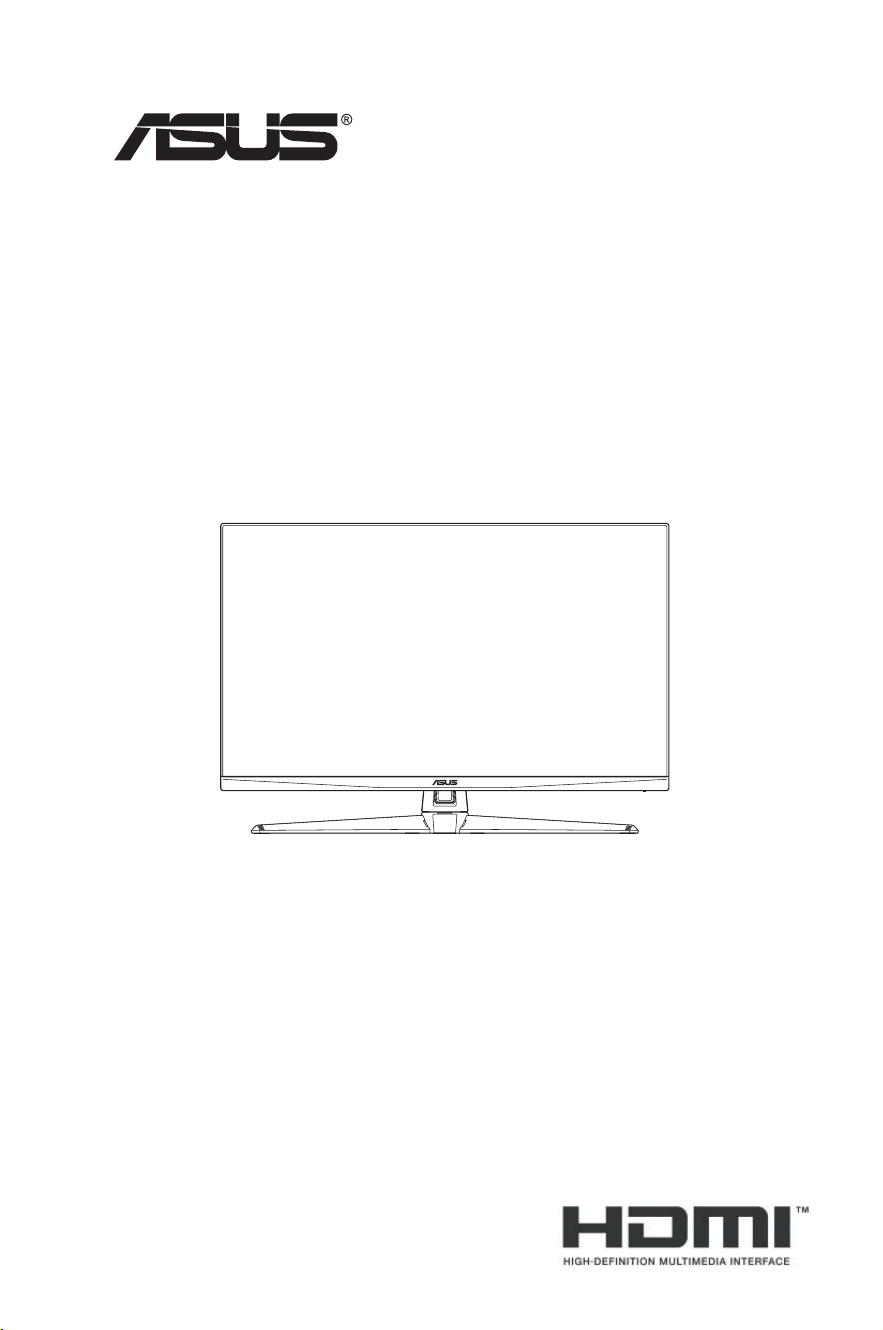
TUF Gaming Monitor
VG32U Series
User Guide

ii
Copyright © 2023 ASUSTeK COMPUTER INC. All Rights Reserved.
No part of this manual, including the products and software described in it, may be reproduced,
transmitted, transcribed, stored in a retrieval system, or translated into any language in any form or by any
means, except documentation kept by the purchaser for backup purposes, without the express written
permission of ASUSTeK COMPUTER INC. (“ASUS”).
Product warranty or service will not be extended if: (1) the product is repaired, modied or altered, unless
such repair, modication of alteration is authorized in writing by ASUS; or (2) the serial number of the
product is defaced or missing.
ASUS PROVIDES THIS MANUAL “AS IS” WITHOUT WARRANTY OF ANY KIND, EITHER EXPRESS
OR IMPLIED, INCLUDING BUT NOT LIMITED TO THE IMPLIED WARRANTIES OR CONDITIONS OF
MERCHANTABILITY OR FITNESS FOR A PARTICULAR PURPOSE. IN NO EVENT SHALL ASUS, ITS
DIRECTORS, OFFICERS, EMPLOYEES OR AGENTS BE LIABLE FOR ANY INDIRECT, SPECIAL,
INCIDENTAL, OR CONSEQUENTIAL DAMAGES (INCLUDING DAMAGES FOR LOSS OF PROFITS,
LOSS OF BUSINESS, LOSS OF USE OR DATA, INTERRUPTION OF BUSINESS AND THE LIKE),
EVEN IF ASUS HAS BEEN ADVISED OF THE POSSIBILITY OF SUCH DAMAGES ARISING FROM ANY
DEFECT OR ERROR IN THIS MANUAL OR PRODUCT.
SPECIFICATIONS AND INFORMATION CONTAINED IN THIS MANUAL ARE FURNISHED FOR
INFORMATIONAL USE ONLY, AND ARE SUBJECT TO CHANGE AT ANY TIME WITHOUT NOTICE,
AND SHOULD NOT BE CONSTRUED AS A COMMITMENT BY ASUS. ASUS ASSUMES NO
RESPONSIBILITY OR LIABILITY FOR ANY ERRORS OR INACCURACIES THAT MAY APPEAR IN THIS
MANUAL, INCLUDING THE PRODUCTS AND SOFTWARE DESCRIBED IN IT.
Products and corporate names appearing in this manual may or may not be registered trademarks or
copyrights of their respective companies, and are used only for identication or explanation and to the
owners’ benet, without intent to infringe.
First Edition
January 2023

iii
Contents
Notices ......................................................................................................... iv
Safety information ....................................................................................... v
Care & Cleaning .......................................................................................... vi
Takeback Services ..................................................................................... vii
Product information for EU energy label ................................................. vii
1.1 Welcome! ...................................................................................... 1-1
1.2 Package contents ......................................................................... 1-1
1.3 Monitor introduction .................................................................... 1-2
1.3.1 Front view ....................................................................... 1-2
1.3.2 Back view ........................................................................ 1-3
1.3.3 GamePlus Function ........................................................ 1-4
1.3.4 GameVisual Function ...................................................... 1-5
2.1 Assembling the monitor arm/base ............................................. 1-6
2.2 Adjusting the monitor .................................................................. 2-1
2.3 Detaching the arm (for VESA wall mount) ................................. 2-1
2.4 Cable management ...................................................................... 2-2
2.5 Connecting the cables ................................................................. 2-2
2.6 Turning on the monitor ................................................................ 2-3
3.1 OSD (On-Screen Display) menu.................................................. 3-1
3.1.1 Howtorecongure .......................................................... 3-1
3.1.2 OSD function introduction ............................................... 3-2
3.2 Specifications ............................................................................... 3-9
3.3 Outline dimensions .................................................................... 3-11
3.4 Troubleshooting (FAQ) ............................................................... 3-12
3.5 Supported timing list ................................................................. 3-13
iv
Notices
Federal Communications Commission Statement
This device complies with Part 15 of the FCC Rules. Operation is subject
tothefollowingtwoconditions:
• This device may not cause harmful interference, and
• Thisdevicemustacceptanyinterferencereceivedincluding
interference that may cause undesired operation.
This equipment has been tested and found to comply with the limits for
aClassBdigitaldevice,pursuanttoPart15oftheFCCRules.These
limitsaredesignedtoprovidereasonableprotectionagainstharmful
interferenceinaresidentialinstallation.Thisequipmentgenerates,uses
andcanradiateradiofrequencyenergyand,ifnotinstalledandusedin
accordance with the instructions, may cause harmful interference to radio
communications.However,thereisnoguaranteethatinterferencewill
not occur in a particular installation. If this equipment does cause harmful
interference to radio or television reception, which can be determined by
turningtheequipmentoffandon,theuserisencouragedtotrytocorrect
theinterferencebyoneormoreofthefollowingmeasures:
• Reorientorrelocatethereceivingantenna.
• Increase the separation between the equipment and receiver.
• Connect the equipment into an outlet on a circuit different from that to
which the receiver is connected.
• Consult the dealer or an experienced radio/TV technician for help.
WARNING:Theuseofshieldedcablesforconnectionofthemonitorto
thegraphicscardisrequiredtoassurecompliancewithFCCregulations.
Changesormodicationstothisunitnotexpresslyapprovedbytheparty
responsible for compliance could void the user’s authority to operate this
equipment.
Canadian Department of Communications Statement
ThisdigitalapparatusdoesnotexceedtheClassBlimitsforradio
noiseemissionsfromdigitalapparatussetoutintheRadioInterference
RegulationsoftheCanadianDepartmentofCommunications.
ThisclassBdigitalapparatuscomplieswithCanadianICES-003.
ThisClassBdigitalapparatusmeetsallrequirementsofthe
CanadianInterference-CausingEquipmentRegulations.
Cet appareil numérique de la classe B respecte toutes les
exigencesduRéglementsurlematérielbrouillerduCanada.

v
Safety information
• Beforesettingupthemonitor,carefullyreadallthedocumentationthat
camewiththepackage.
• To prevent fire or shock hazard, never expose the monitor to rain or
moisture.
• Nevertrytoopenthemonitorcabinet.Thedangeroushighvoltages
inside the monitor may result in serious physical injury.
• If the power supply is broken, do not try to fix it by yourself. Contact a
qualified service technician or your retailer.
• Beforeusingtheproduct,makesureallcablesarecorrectlyconnected
andthepowercablesarenotdamaged.Ifyoudetectanydamage,
contact your dealer immediately.
• Slotsandopeningsonthebackortopofthecabinetareprovidedfor
ventilation. Do not block these slots. Never place this product near or
over a radiator or heat source unless proper ventilation is provided.
• The monitor should be operated only from the type of power source
indicated on the label. If you are not sure of the type of power supply to
your home, consult your dealer or local power company.
• Usetheappropriatepowerplugwhichcomplieswithyourlocalpower
standard.
• Donotoverloadpowerstripsandextentioncords.Overloadingcan
result in fire or electric shock.
• Avoid dust, humidity, and temperature extremes. Do not place the
monitor in any area where it may become wet. Place the monitor on a
stable surface.
• Unplugtheunitduringalightningstormorifitwillnotbeusedforalong
periodoftime.Thiswillprotectthemonitorfromdamageduetopower
surges.
• Never push objects or spill liquid of any kind into the slots on the monitor
cabinet.
• To ensure satisfactory operation, use the monitor only with UL listed
computerswhichhaveappropriateconfiguredreceptaclesmarked
between100-240VAC.
• If you encounter technical problems with the monitor, contact a qualified
service technician or your retailer.
• Adjustment of the volume control as well as the equalizer to other
settingsthanthecenterpositionmayincreasetheear-/headphones
outputvoltageandthereforethesoundpressurelevel.
• The adapter is only used for this monitor, do not use it for other purpose.
• Yourdeviceusesoneofthefollowingpowersupplies:
-Manufacturer:DeltaElectronics,Inc.,Model:ADP-120VHB
vi
This symbol of the crossed out wheeled bin indicates that the
product(electrical,electronicequipment,andmercury-containing
button cell battery) should not be placed in municipal waste.
Pleasechecklocalregulationsfordisposalofelectronicproducts.
AEEE yönetmeliine uygundur
Care & Cleaning
• Before you lift or reposition your monitor, it is better to disconnect the cables
andpowercord.Followthecorrectliftingtechniqueswhenpositioningthe
monitor.Whenliftingorcarryingthemonitor,grasptheedgesofthemonitor.
Do not lift the display by the stand or the cord.
• Cleaning.Turnyourmonitoroffandunplugthepowercord.Cleanthe
monitor surface with a lint-free, non-abrasive cloth. Stubborn stains may
be removed with a cloth dampened with mild cleaner.
• Avoid using a cleaner containing alcohol or acetone. Use a cleaner
intended for use with the monitor. Never spray cleaner directly on the
screen, as it may drip inside the monitor and cause an electric shock.
The following symptoms are normal with the monitor:
• Thescreenmayflickerduringtheinitialuseduetothenatureofthe
fluorescentlight.TurnoffthePowerSwitchandturnitonagainto
make sure that the flicker disappears.
• Youmayfindslightlyunevenbrightnessonthescreendependingon
the desktop pattern you use.
• Whenthesameimageisdisplayedforhours,anafterimageofthe
previousscreenmayremainafterswitchingtheimage.Thescreenwill
recover slowly or you can turn off the Power Switch for hours.
• When the screen becomes black or flashes, or cannot work anymore,
contact your dealer or service center to fix it. Do not repair the screen
by yourself!
Conventions used in this guide
WARNING:Informationtopreventinjurytoyourselfwhentrying
to complete a task.
CAUTION:Informationtopreventdamagetothecomponents
whentryingtocompleteatask.
IMPORTANT:InformationthatyouMUSTfollowtocompleteatask.
NOTE:Tipsandadditionalinformationtoaidincompletingatask.

vii
Where to find more information
Refertothefollowingsourcesforadditionalinformationandforproduct
and software updates.
1. ASUS websites
The ASUS websites worldwide provide updated information on ASUS
hardwareandsoftwareproducts.Refertohttp://www.asus.com
2. Optional documentation
Yourproductpackagemayincludeoptionaldocumentationthatmay
have been added by your dealer. These documents are not part of
thestandardpackage.
3. About Flicker
https://www.asus.com/Microsite/display/eye_care_technology/
Takeback Services
ASUSrecyclingandtakebackprogramscomefromourcommitmenttothe
higheststandardsforprotectingourenvironment.Webelieveinproviding
solutions for our customers to be able to responsibly recycle our products,
batteriesandothercomponentsaswellasthepackagingmaterials.
Pleasegotohttp://csr.asus.com/english/Takeback.htmfordetailrecycling
informationindifferentregion.
Product information for EU energy label
1-1
Chapter 1: Product Introduction
1.1 Welcome!
ThankyouforpurchasingtheASUS
®
LCD monitor!
The latest widescreen LCD monitor from ASUS provides a broader,
brighterandcrystal-cleardisplay,plusahostoffeaturesthatenhanceyour
viewingexperience.
Withthesefeatures,youcanenjoytheconvenienceanddelightfulvisual
experiencethatthemonitorbringstoyou!
1.2 Package contents
Checkyourpackageforthefollowingitems:
LCD monitor
Monitor base
Monitor arm
Quick Start Guide
Warranty card
Power adapter
Power cord
DisplayPort cable (optional)
HDMI cable (optional)
USB cable (optional)
• Ifanyoftheaboveitemsisdamagedormissing,contactyourretailer
immediately.
1-2
ASUS TUF Gaming Monitor VG32U Series
1.3 Monitor introduction
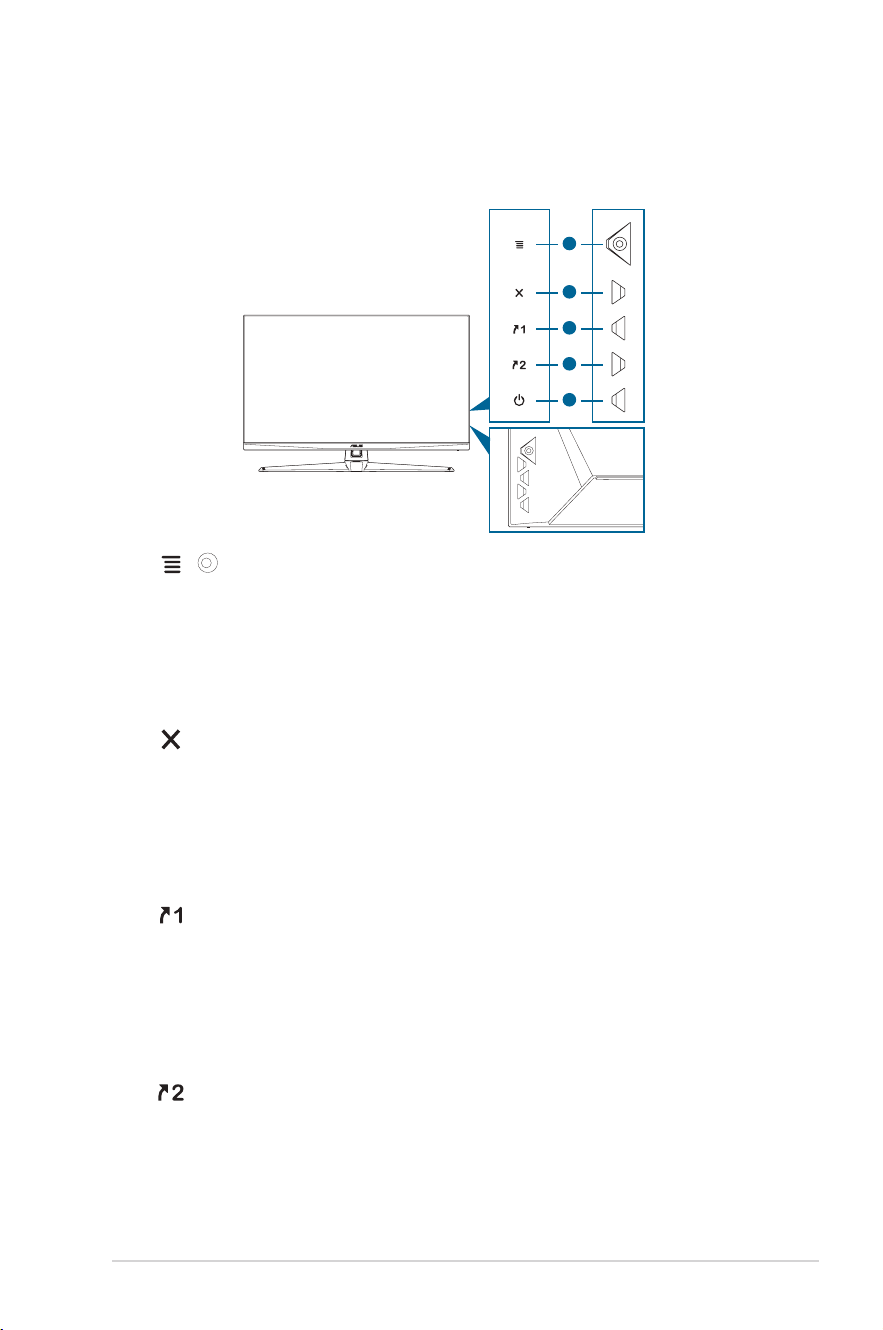
1.3.1 Front view
1
2
3
4
5
1. ( 5-way)
button
:
• TurnsontheOSDmenu.EnactstheselectedOSDmenuitem.
• Increases/Decreases values or moves your selection up/down/
left/right.
• Displays the input selection bar when the monitor enters standby
modeordisplaysthe“NOSIGNAL“message.
2. button:
• ExitstheOSDmenuitem.
• Displays the input selection bar when the monitor enters standby mode
ordisplaysthe“NOSIGNAL“message.
• TogglestheKeyLockfunctionbetweenonandoffwithalongpressfor
5 seconds.
3. Shortcut1button:
• Default:GamePlus.
• Tochangetheshortcutfunction,gototheMyFavorite>Shortcut>
Shortcut 1 menu.
• Displays the input selection bar when the monitor enters standby mode
ordisplaysthe“NOSIGNAL“message.
4. Shortcut2button:
• Default:GameVisual.
• Tochangetheshortcutfunction,gototheMyFavorite>Shortcut>
Shortcut 2 menu.
1-3
Chapter 1: Product Introduction
• Displays the input selection bar when the monitor enters standby mode
ordisplaysthe“NOSIGNAL“message.
5. Powerbutton/powerindicator:
• Turns the monitor on/off.
• The color definition of the power indicator is as the below table.
Status Description
White ON
Amber Standbymode/Nosignal
OFF OFF
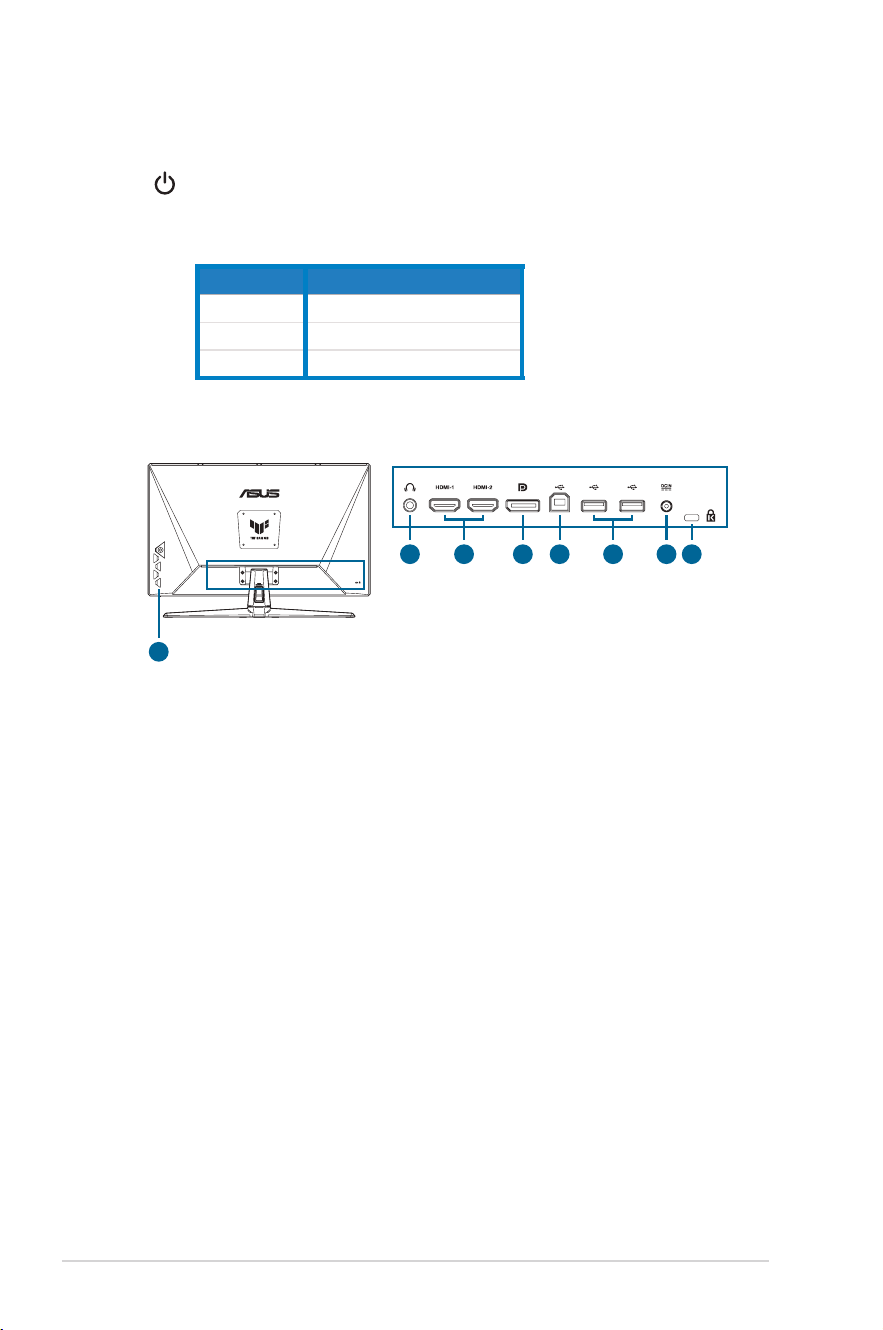
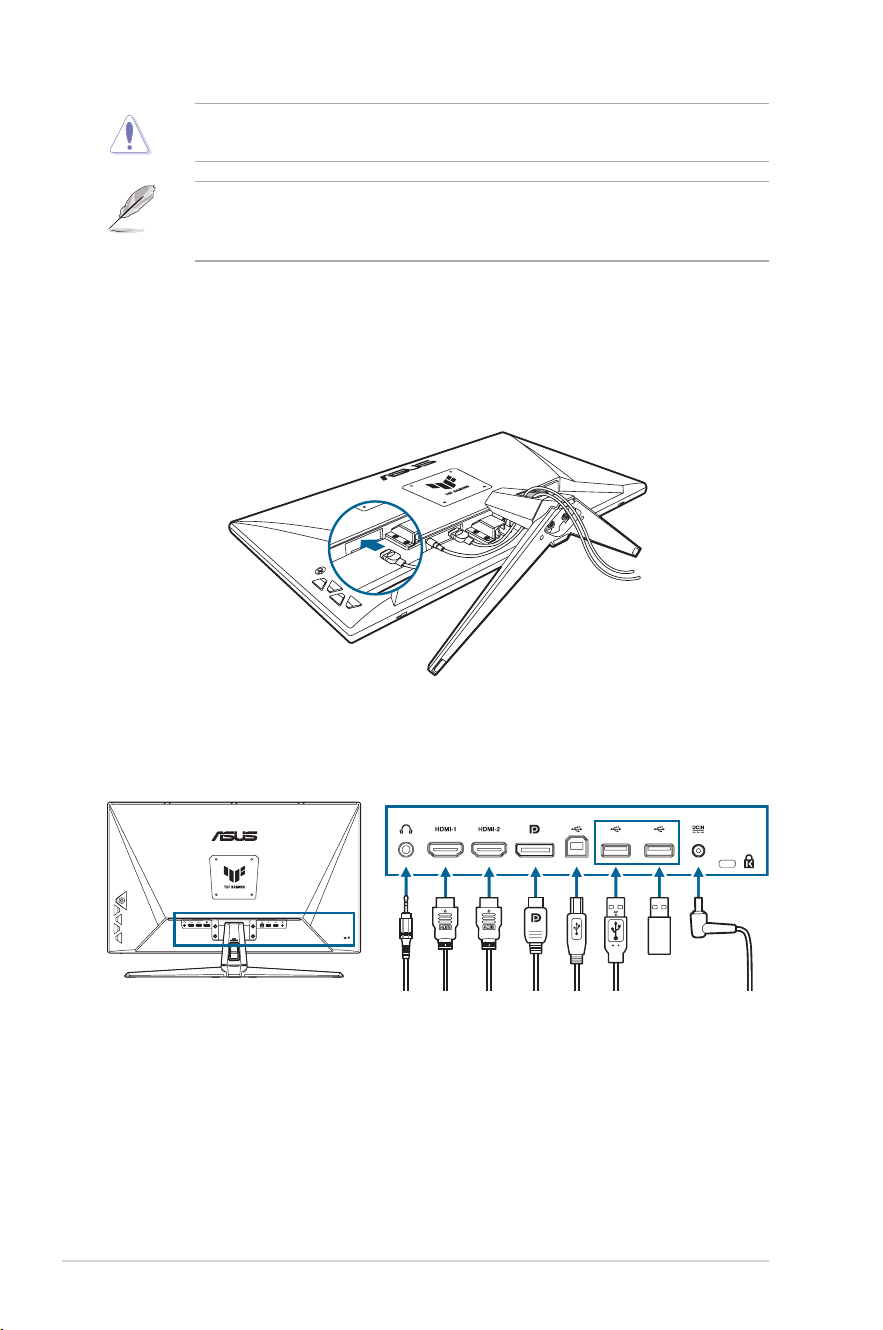
1.3.2 Back view
1
8
3 4 6 752
1. Earphone jack. This port is only available when an HDMI/
DisplayPort/Type-C cable is connected.
2. HDMI ports. These ports are for connection with an HDMI compatible
devices.
3. DisplayPort. This port is for connection for a DisplayPort compatible
device.
4. USB Type-B. This port is for connection with a USB upstream cable.
The connection enables the USB ports on the monitor.
5. USB Type-A. These ports are for connection with USB devices,
suchasUSBkeyboard/mouse,USBashdrive,etcandforrmware
upgrade.
6. DCIN port. This port connects the power adapter.
7. Kensington lock slot.
8. Control buttons.
1-4
ASUS TUF Gaming Monitor VG32U Series
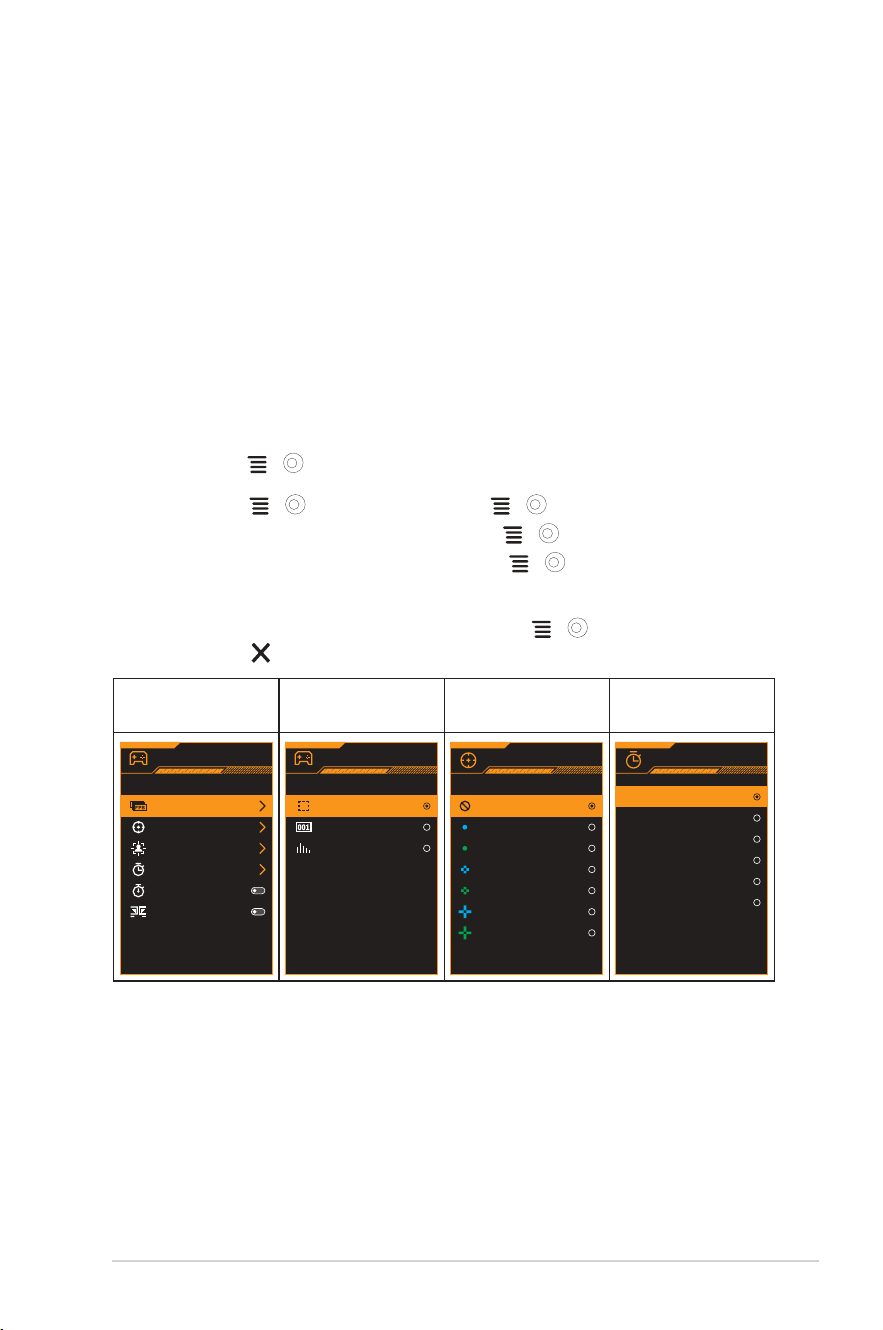
1.3.3 GamePlus Function
TheGamePlusfunctionprovidesatoolkitandcreatesabettergaming
environmentforuserswhenplayingdifferenttypesofgames.TheFPS
(framespersecond)counterletsyouknowhowsmooththegameis
running.Thecrosshairoverlaywith6differentcrosshairoptionslettingyou
choosetheonethatbestsuitsthegameyou'replaying.Therearealso
on screen timer and stopwatch you can position on the left of the display
soyoucankeeptrackofthegamingtime.DisplayAlignmentdisplays
alignmentlineson4sidesofthescreen,servingasaneasyandhandy
tool for you to line up multiple monitors perfectly.
ToactiveGamePlus:
1. Press the GamePlus hotkey.
2. Move the ( )buttonup/downtoselectamongdifferentfunctions.
3. Press the ( ) button or move the ( )buttonrighttoconrm
the function you choose, and move the ( ) button up/down to
navigatethroughthesettings.Movethe ( )buttonlefttogoback,
off, and exit.
4. Highlightthedesiredsettingandpressthe ( ) button to activate it.
Press the button to inactivate it.
GamePlus
Main Menu
GamePlus — FPS
counter
GamePlus —
Crosshair
GamePlus — Timer
GamePlus
FPS Counter
Crosshair
Sniper
Timer
Stopwatch
DisplayAlignment
FPS Counter
Crosshair
OFF
Timer
OFF
30:00
40:00
50:00
60:00
90:00
1-5
Chapter 1: Product Introduction
1.3.4 GameVisual Function
TheGameVisualfunctionhelpsyouselectamongdifferentpicturemodes
in a convenient way.
ToactiveGameVisual:
Press the GameVisual hotkey repeatedly to select.
• Scenery mode:Thisisthebestchoiceforsceneryphoto
displayingwithGameVisual
TM
VideointelligenceTechnology.
• Racing Mode:Thisisthebestchoiceforracinggameplaying
with GameVisual
TM
VideointelligenceTechnology.
• Cinema Mode:Thisisthebestchoiceformoviewatchingwith
GameVisual
TM
VideointelligenceTechnology.
• RTS/RPG Mode:ThisisthebestchoiceforReal-TimeStrategy
(RTS)/Role-PlayingGame(RPG)playingwithGameVisual
TM
VideointelligenceTechnology.
• FPS Mode:ThisisthebestchoiceforFirstPersonShooter
gameplayingwithGameVisual
TM
VideointelligenceTechnology.
• sRGB Mode:Thisisthebestchoiceforviewingphotosand
graphicsfromPCs.
• MOBA Mode:Thisisthebestchoiceformultiplayeronline
battlearenagameplayingwithGameVisual
TM
Videointelligence
Technology.
• IntheRacingmode,thefollowingfunction(s)arenotuser-congurable:
Saturation and ASCR.
• InthesRGBmode,thefollowingfunction(s)arenotuser-congurable:
Brightness,Contrast,Saturation,ColorTemp.,andASCR.
• IntheMOBAmode,thefollowingfunction(s)arenotuser-congurable:
Saturation and ASCR.
GameVisual
Scenery Mode
Racing Mode
Cinema Mode
RTS/RPG Mode
FPS Mode
sRGB Mode
MOBA Mode
1-6
ASUS TUF Gaming Monitor VG32U Series
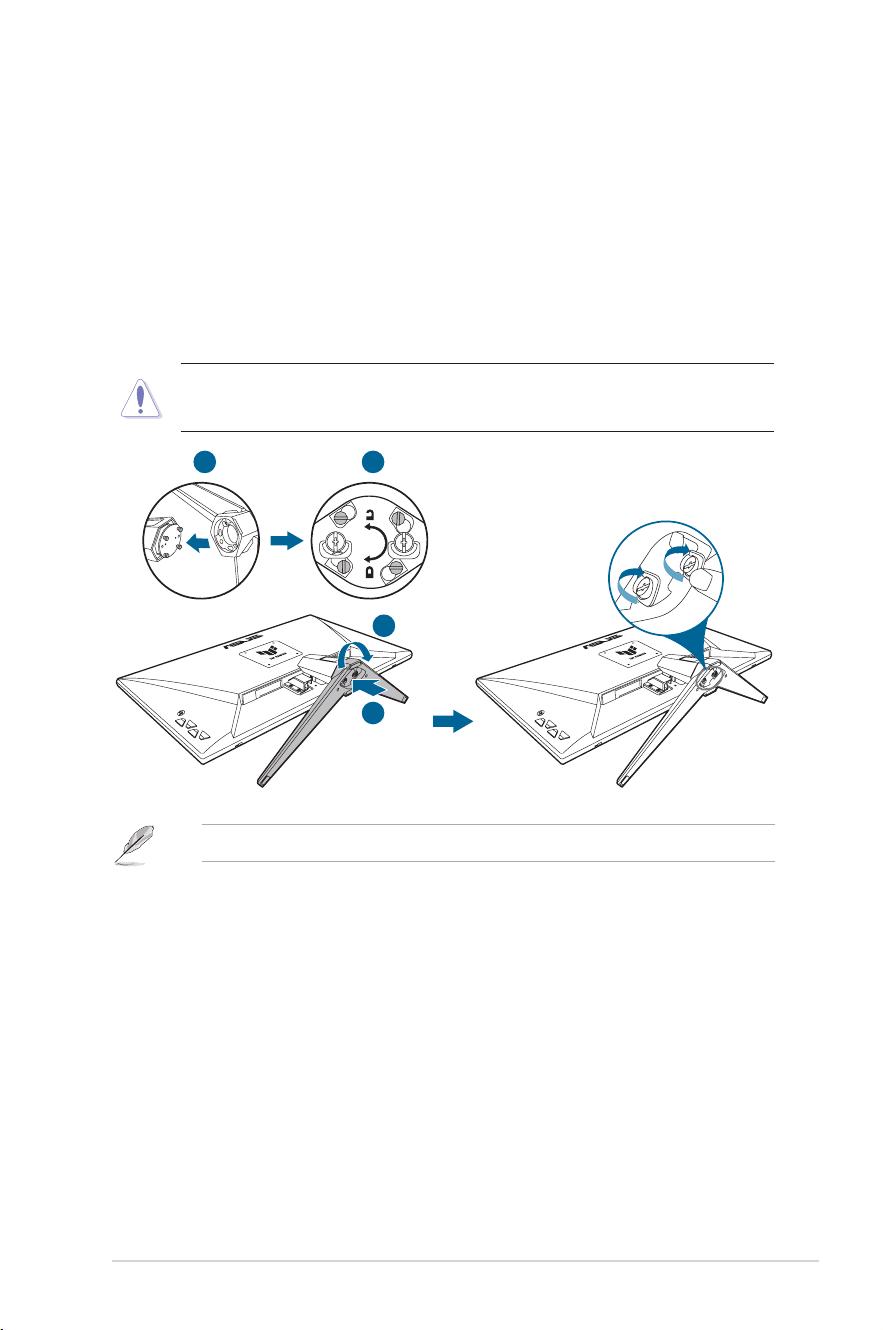
2.1 Assembling the monitor arm/base
Toassemblethemonitorbase:
1. Have the front of the monitor face down on a table.
2. Attachthebaseintothearm,makingsurethetabonthearmtsinto
thegrooveonthebase.
3. Fixthebasetothearmbyfasteningthebundledscrew(s).
We recommend that you cover the table surface with soft cloth to prevent
damagetothemonitor.
1
2
1
2
• Basescrewsize:M4x8mm.
2-1
ASUS TUF Gaming Monitor VG32U Series
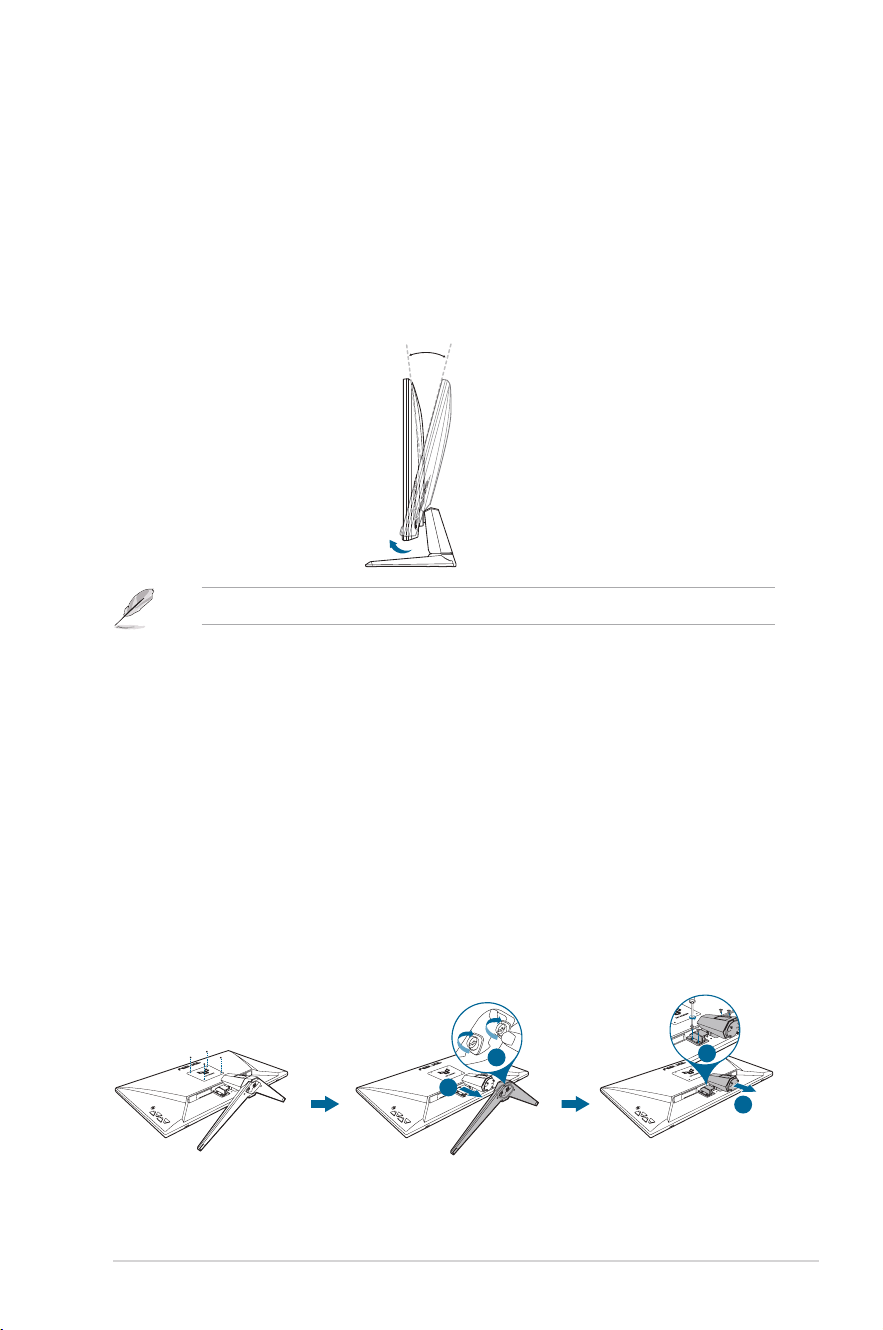
2.2 Adjusting the monitor
• Foroptimalviewing,werecommendthatyoulookatthefullfaceofthe
monitor,thenadjustthemonitortotheanglethatismostcomfortable
for you.
• Holdthestandtopreventthemonitorfromfallingwhenyouchangeits
angle.
• Therecommendedadjustingangleis-5˚to15˚.
-5°~+15°
• Itisnormalthatthemonitorslightlyshakeswhileyouadjusttheviewingangle.
2.3 Detaching the arm (for VESA wall mount)
Thedetachablearm/baseofthismonitorisspeciallydesignedforVESA
wall mount.
Todetachthearm/base:
1. Have the front of the monitor face down on a table.
2. Removetherubbersinthefourscrewholes.(Figure1)
3. Removethebase.(Figure2)
4. Useascrewdrivertoremovethescrewonthehinge(Figure3),then
removethehinge.
(Figure1)
2
1
2
1
(Figure2)
(Figure3)
2-2
Chapter 2: Setup
• We recommend that you cover the table surface with soft cloth to prevent
damagetothemonitor.
• TheVESAwallmountkit(100x100mm)ispurchasedseparately.
• UseonlytheULListedWallMountBracketwithminimumweight/load
22.7kg(Screwsize:M4x8mm).
2.4 Cable management
Youcanorganizethecablesusingthecablemanagmentslot.Removethe
coverbeforeputtingthecablesthroughtheslotandattachthecoverbackon.
2.5 Connecting the cables
Connectthecablesasthefollowinginstructions:
• To use the earphone: Connecttheendwithplugtypetothemonitor’s
earphonejackwhenanHDMI/DisplayPortsignalisfed.
2-3
ASUS TUF Gaming Monitor VG32U Series
• To connect the HDMI/DisplayPort cable:
a. PlugoneendoftheHDMI/DisplayPortcabletothemonitor’sHDMI/
DisplayPort jack.
b.
Connect the other end of the HDMI/DisplayPort cable to your device’s
HDMI/DisplayPort jack.
• To use the USB 3.2 type-A/B ports: Take the supplied USB 3.2
cable,andplugthesmallerend(type-B)oftheUSBupstreamcableto
themonitor’sUSBupstreamport,andthelargerend(type-A)toyour
computer’s USB 3.2 port. Make sure your computer is installed with the
lastestWindows8.1/Windows10/Windows11operatingsystem.Thatwill
enable the USB ports on the monitor to work.
• Whenthesecablesareconnected,youcanchoosethedesiredsignal
from the Input Select item in the OSD menu.
• To connect the power cord:
a. Connect the power adapter securely to the monitor’s DC input.
b. Connect one end of the power cord to the power adapter and the other
end to a power outlet.
2.6 Turning on the monitor
Press the power button . See
page 1-2
for the location of the power
button. The power indicator lightsupinwhitetoshowthatthemonitor
is ON.
3-1
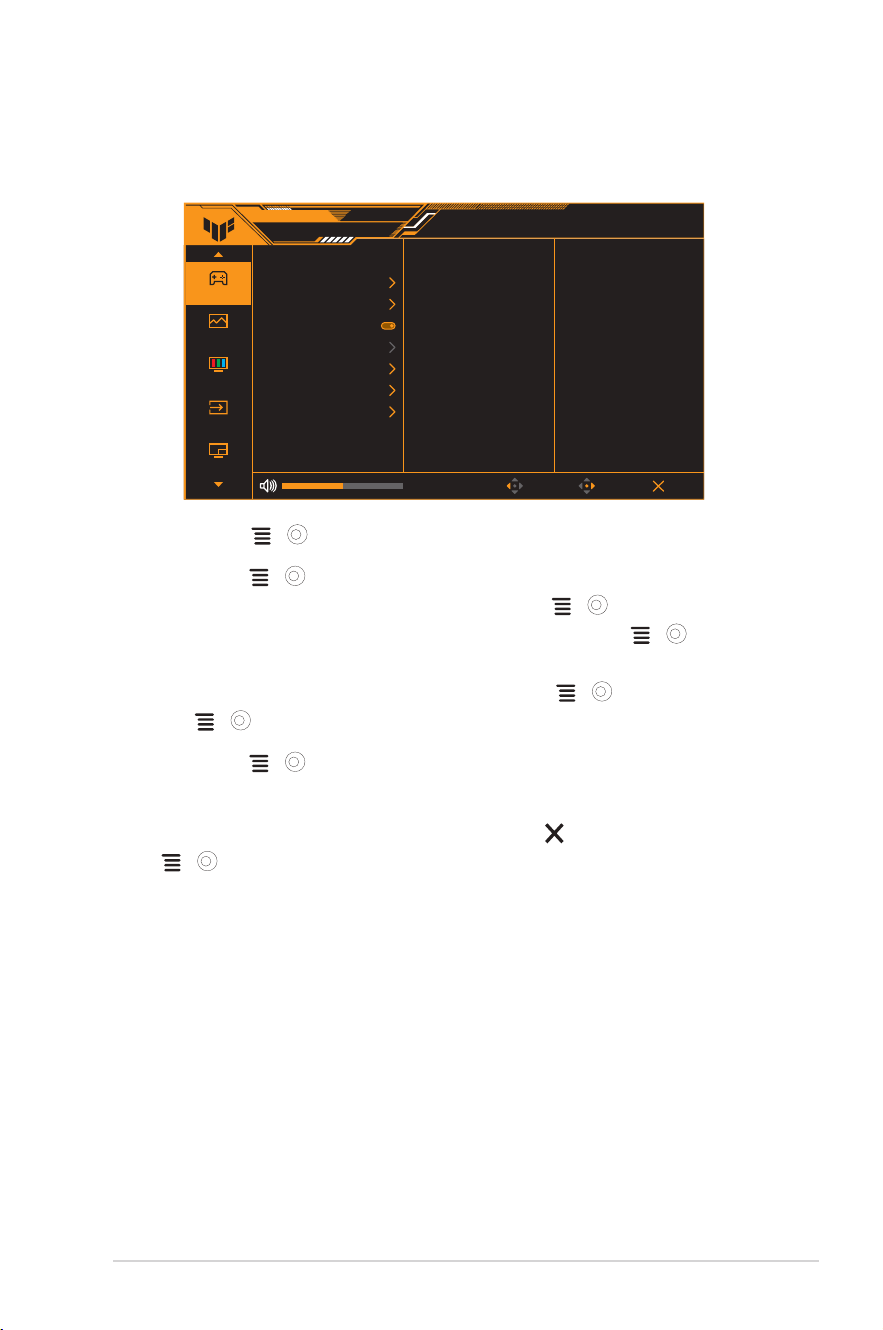
ASUS TUF Gaming Monitor VG32U Series
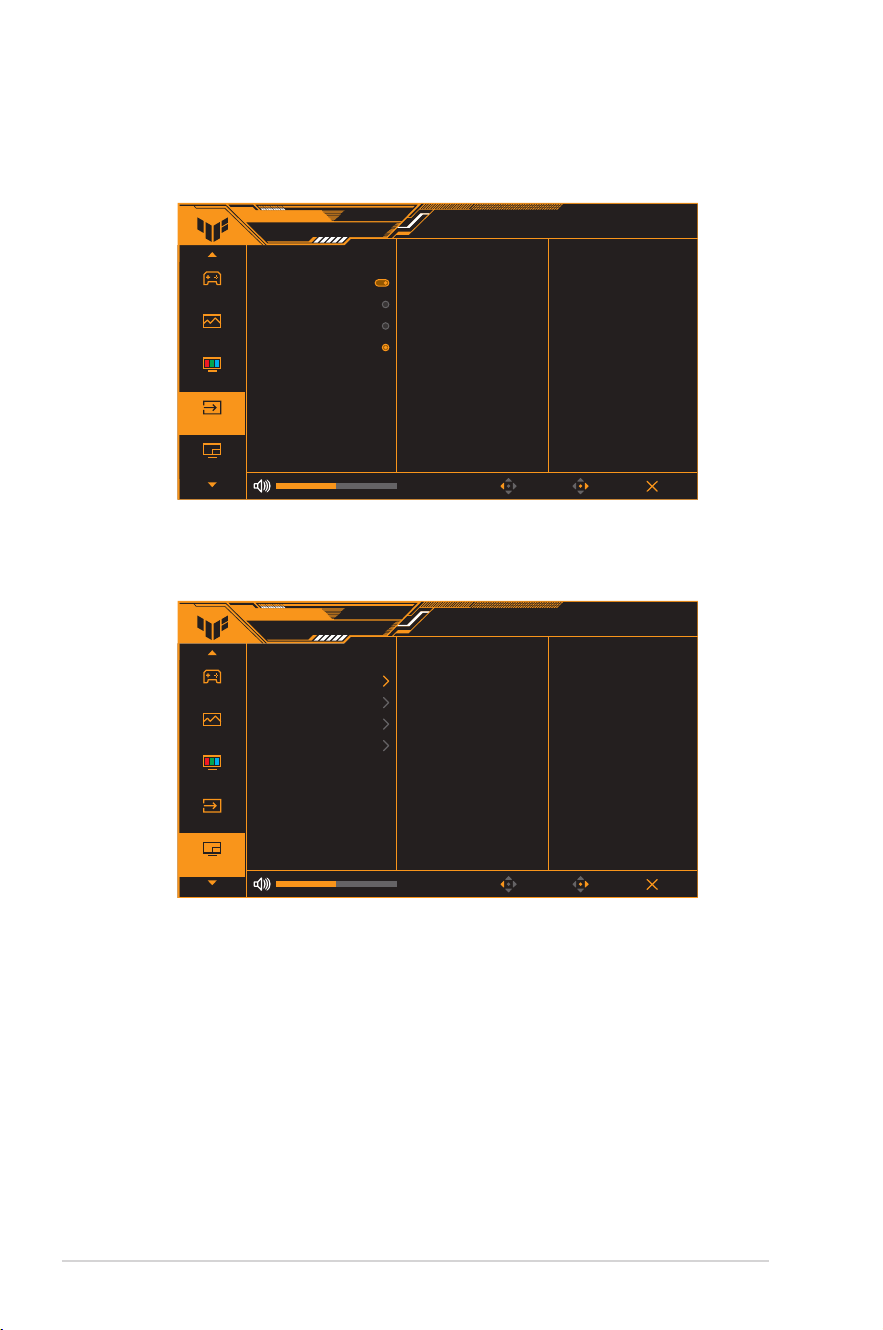
3.1 OSD (On-Screen Display) menu
3.1.1 How to reconfigure
Gaming
Image
Color
Input Select
PIP/PBP Setup
ASUS TUF GAMING
VG32UQA1A Racing Mode144Hz
3840x2160
GameVisual
HDMI-1
Input Source
OFF
HDR
Back Enter Exit
Overclocking
Variable OD
Variable Refresh Rate
ELMB
GamePlus
GameVisual
Shadow Boost
1. Press the ( ) button twice to activate the OSD menu.
2. Move the ( )buttonup/downtonavigatethroughthefunctions.
Highlightthedesiredfunctionandpressthe ( ) button to activate
it. If the function selected has a sub-menu, move the ( ) button
up/downagaintonavigatethroughthesub-menufunctions.Highlight
the desired submenu function and press the ( ) button or move
the ( )buttonrighttoactivateit.
3. Move the ( )buttonbuttonup/downtochangethesettingsofthe
selected function.
4. To exit and save the OSD menu, press the button or move the
( ) button left repeatedly until the OSD menu disappears. To
adjust other functions, repeat steps 1-3.
3-2
Chapter 3: General Instruction
3.1.2 OSD function introduction
1. Gaming
Gaming
Image
Color
Input Select
PIP/PBP Setup
ASUS TUF GAMING
VG32UQA1A Racing Mode144Hz
3840x2160
GameVisual
HDMI-1
Input Source
OFF
HDR
Back Enter Exit
Overclocking
Variable OD
Variable Refresh Rate
ELMB
GamePlus
GameVisual
Shadow Boost
• Overclocking:
* ON:Thisfunctionallowsyoutoadjusttherefreshrate.
* Max Refresh Rate:Allowsyoutoselectamaximumrefreshrate
of160Hz.Afterselecting,pressthe
( )
button to activate
thesetting.
• Overclockingmaycausescreenflickering.Toreducesucheffects,
disconnect the DisplayPort cable and use the monitor OSD menu to try
againwithasaferMax.Refreshrate.
• Variable OD:SpeedsuptheresponsetimebyOverDrive
technology.IncludingLevel0~Level5.
• Variable Refresh Rate:AllowsanAdaptive-Syncsupported
graphicssourcetodynamicallyadjustdisplayrefreshratebased
on typical content frame rates for power efficient, virtually stutter
free and low-latency display update.
• Variable Refresh Ratecanonlybeactivatedwithin48Hz~160Hzforboth
HDMI and DisplayPort.
• For supported GPUs, minimum PC system and driver requirements, please
contact the GPU manufactures..
• ELMB SYNC:AllowsyoutoturnonthefunctionwhenVariable
Refresh Rate is On.Thisfunctioneliminatesscreentearing,
reducesghostingandmotionblurwhenplayinggames.

3-3
ASUS TUF Gaming Monitor VG32U Series
• When Variable Refresh Rate is Off, this function can only be activated
whentherefreshrateis120Hz,144Hz,or160Hz.
• GamePlus:Seepage 1-4 for details.
• GameVisual:Seepage 1-5 for details.
• Shadow Boost:Darkcolorenhancementadjustsmonitor
gammacurvetoenrichthedarktonesinanimage,makingdark
scenes and objects much easier to be seen.
• ThisfunctionisonlyavailableinRacingmode,RTS/RPGmode,FPSmode,
or sRGB mode.
3-4
Chapter 3: General Instruction
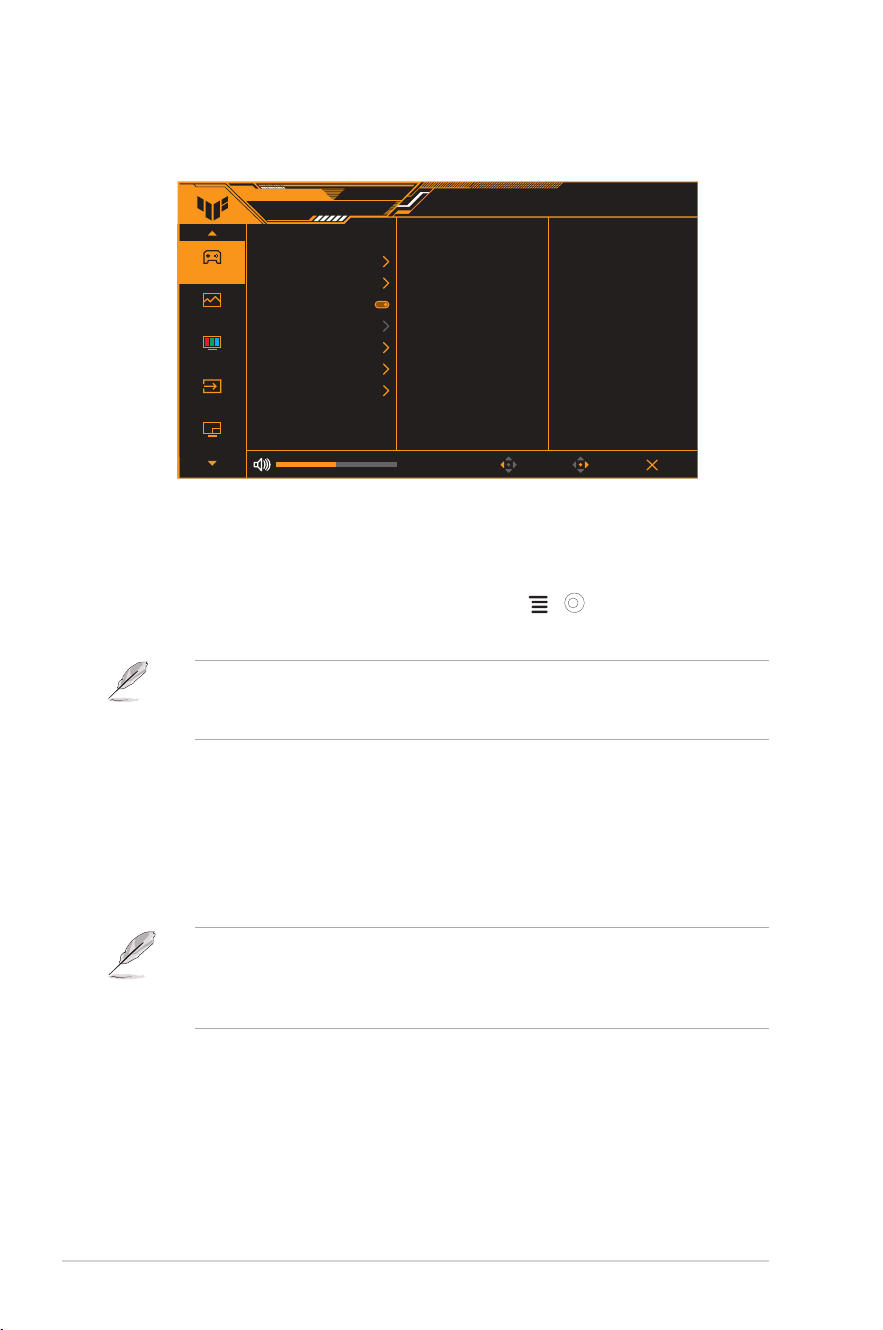
2. Image
Adjusttheimagesettings.
Gaming
Image
Color
Input Select
PIP/PBP Setup
ASUS TUF GAMING
VG32UQA1A Racing Mode144Hz
3840x2160
GameVisual
HDMI-1
Input Source
OFF
HDR
Back Enter Exit
Brightness
Contrast
VividPixel
HDR Setting
ASCR
Aspect Control
Blue Light Filter
80
80
0
• Brightness:Theadjustingrangeisfrom0to100.
• ThisfunctionisnotavailablewhenELMB/ELMBSYNCisenabled.
• Contrast:Theadjustingrangeisfrom0to100.
• VividPixel:Enhancestheoutlineofthedisplayedpictureand
generateshigh-qualityimagesonscreen.
• HDR Setting:SettheHDRmodetoASUSGamingHDR,ASUS
CinemaHDR,orConsoleHDR.TheHDRbrightnesscanbe
adjustedwhentheBrightnessAdjustablefunctionisenabled.
• WhendetectingHDRcontent,an“HDRON”messagewillpopup.When
displayingHDRcontent,thefollowingfunction(s)arenotavailable:ELMB,
GameVisual,ShadowBoost,Brightness,Contrast,ASCR,AspectControl,
BlueLightFilter,ColorTemp.,Gamma,andSaturation.
• ASCR:Turnson/offtheASCR(ASUSSmartContrastRatio)
function.
• This function is only available under Scenery Mode, Cinema Mode, RTS/
RPG Mode or FPS Mode.
• Aspect Control:Selecttheaspectratioandadjustthescreen
position.
• This function is not available when HDR is enabled.
3-5
ASUS TUF Gaming Monitor VG32U Series
• Blue Light Filter:
* Level 0:Nochange.
* Level 1~4:Thehigherthelevel,thelessbluelightisscattered.
WhenBlueLightFilterisactivated,thedefaultsettingsofRacing
Mode will be automatically imported. Between Level 1 to Level 3,
theBrightnessfunctionisuser-congurable.Level4isoptimized
setting.ItiscompliancewithTUVLowBlueLightCertication.
TheBrightnessfunctionisnotuser-congurable.
Pleaserefertothefollowingtoalleviateeyestrains:
• Usersshouldtakesometimeawayfromthedisplayifworkingforlong
hours. It is advised to take short breaks (at least 5 mins) after around 1
hourofcontinuousworkingatthecomputer.Takingshortandfrequent
breaksismoreeffectivethanasinglelongerbreak.
• To minimize eye strain and dryness in your eyes, users should rest the eye
periodicallybyfocusingonobjectsthatarefaraway.
• Eyeexercisescanhelptoreduceseyestrain.Repeattheseexercises
often.Ifeyestraincontinuespleaseconsultaphysician.Eyeexercises:(1)
Repeatinglookupanddown(2)Slowlyrollyoureyes(3)Moveyoureyes
diagonal.
• HighenergybluelightmayleadtoeyestrainandAMD(Age-Related
MacularDegeneration).BluelightFiltertoreduce70%(max.)harmfulblue
lighttoavoidingCVS(ComputerVisionSyndrome).
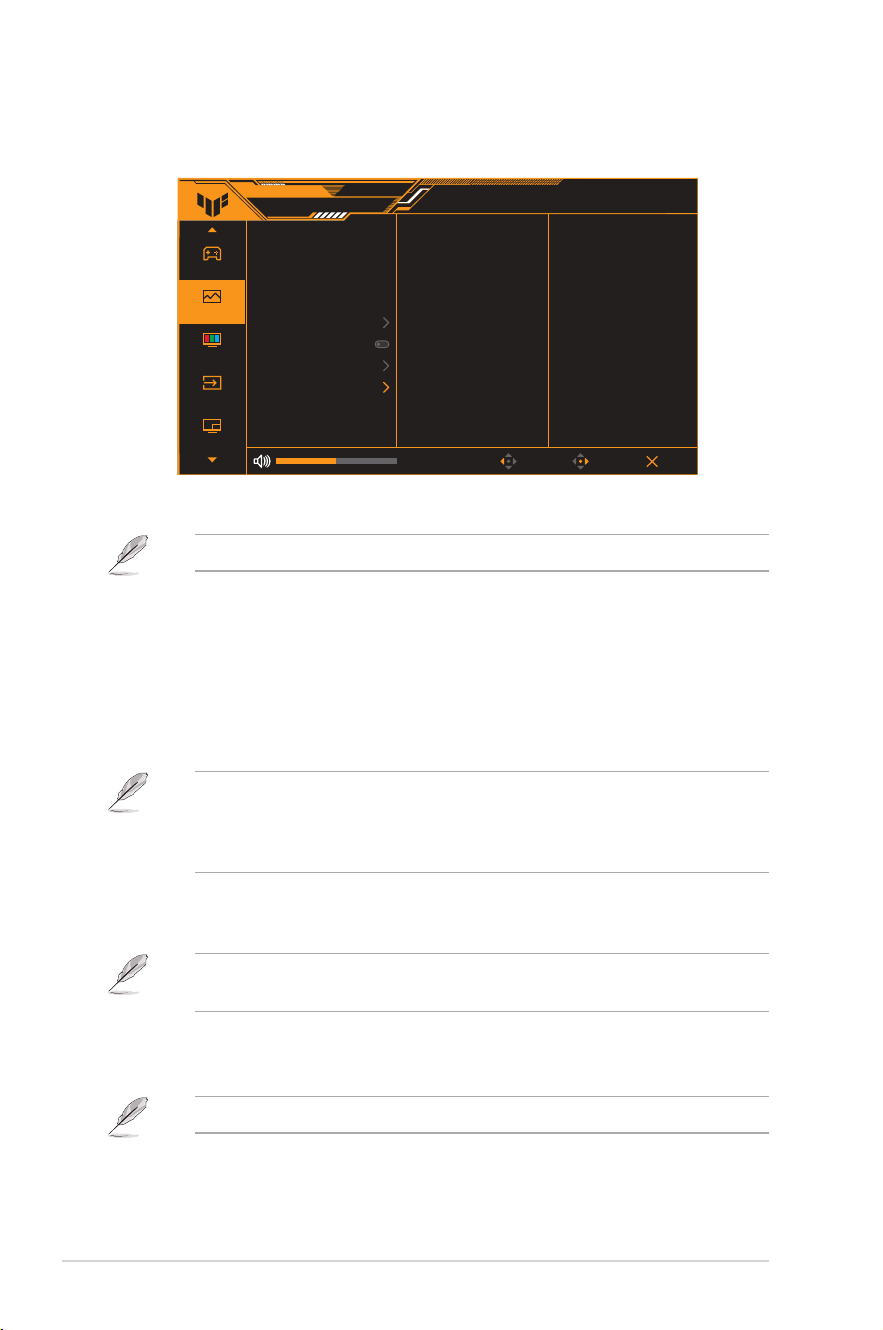
3. Color
Setadesiredcolorsettingfromthismenu.
Gaming
Image
Color
Input Select
PIP/PBP Setup
ASUS TUF GAMING
VG32UQA1A Racing Mode144Hz
3840x2160
GameVisual
HDMI-1
Input Source
OFF
HDR
Back Enter Exit
Color Temp.
Saturation50
• Color Temp.:Contains4modesincludingCool, Normal, Warm,
and User Mode.
• Saturation:Theadjustingrangeisfrom0to100.
3-6
Chapter 3: General Instruction
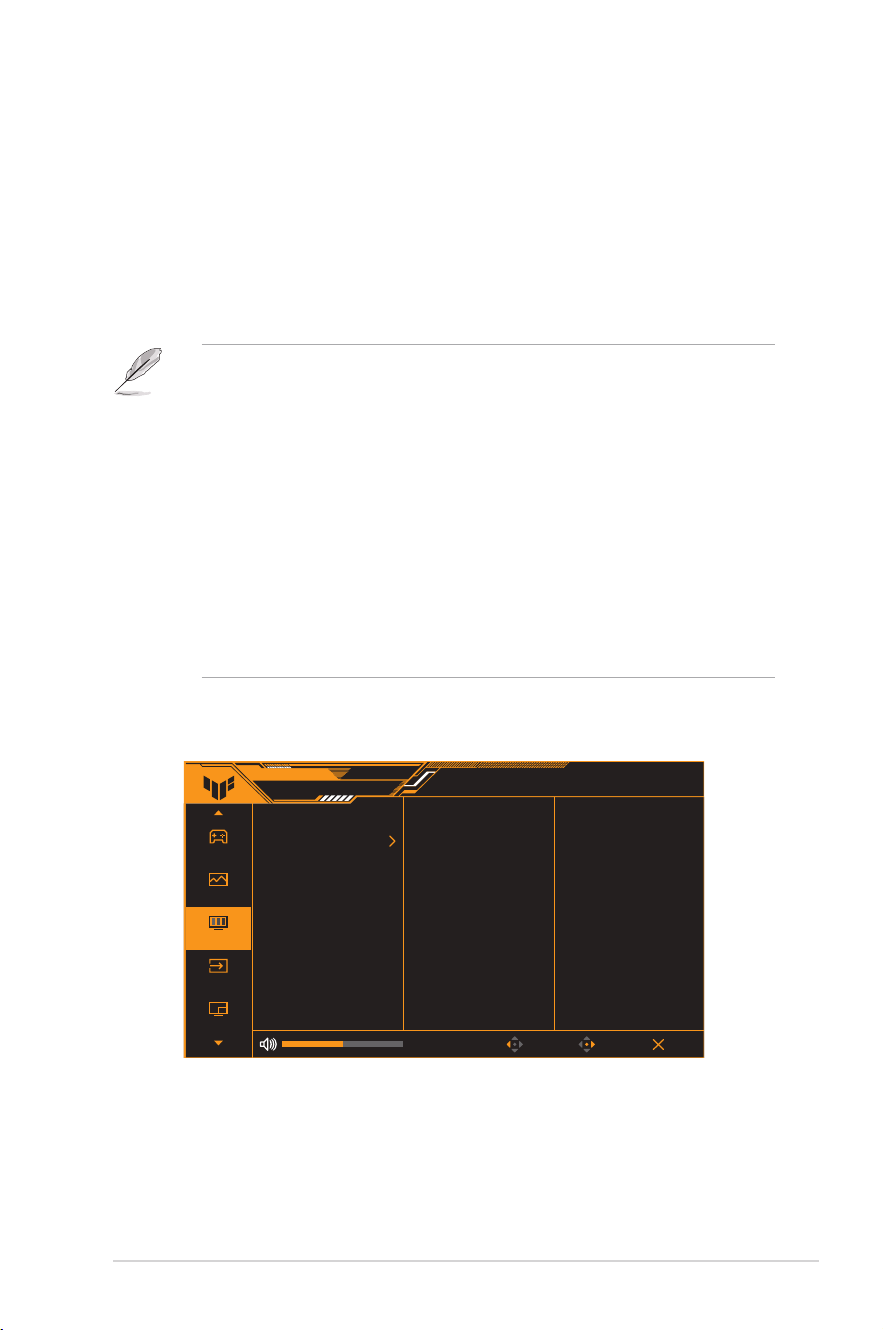
4. Input Select
In this function, you can select your desired input source or allow to
automatically detect the input source.
Gaming
Image
Color
Input Select
PIP/PBP Setup
ASUS TUF GAMING
VG32UQA1A Racing Mode144Hz
3840x2160
GameVisual
HDMI-1
Input Source
OFF
HDR
Back Enter Exit
Auto Input Detection
DisplayPort
HDMI-2
HDMI-1
5. PIP/PBP Setup
Configurethemulti-picturerelatedsettings.ThePBPmodecannotbe
enabled when the Variable Refresh Rate function is enabled.
Gaming
Image
Color
Input Select
PIP/PBP Setup
ASUS TUF GAMING
VG32UQA1A Racing Mode144Hz
3840x2160
GameVisual
HDMI-1
Input Source
OFF
HDR
Back Enter Exit
PIP / PBP Mode
PIP / PBP Source
Color Setting
PIP Size
• PIP/PBP Mode:EnablethePIP/PBPfunctionandselectthesplit
screen type.
• PIP/PBP Source:Selectthevideoinputsourceforthe
designatedsplitscreen.
• Color Setting:SettheGameVisualmodeforthedesignated
split screen.
• PIP Size:Adjusttheinsetwindowsize.
3-7
ASUS TUF Gaming Monitor VG32U Series
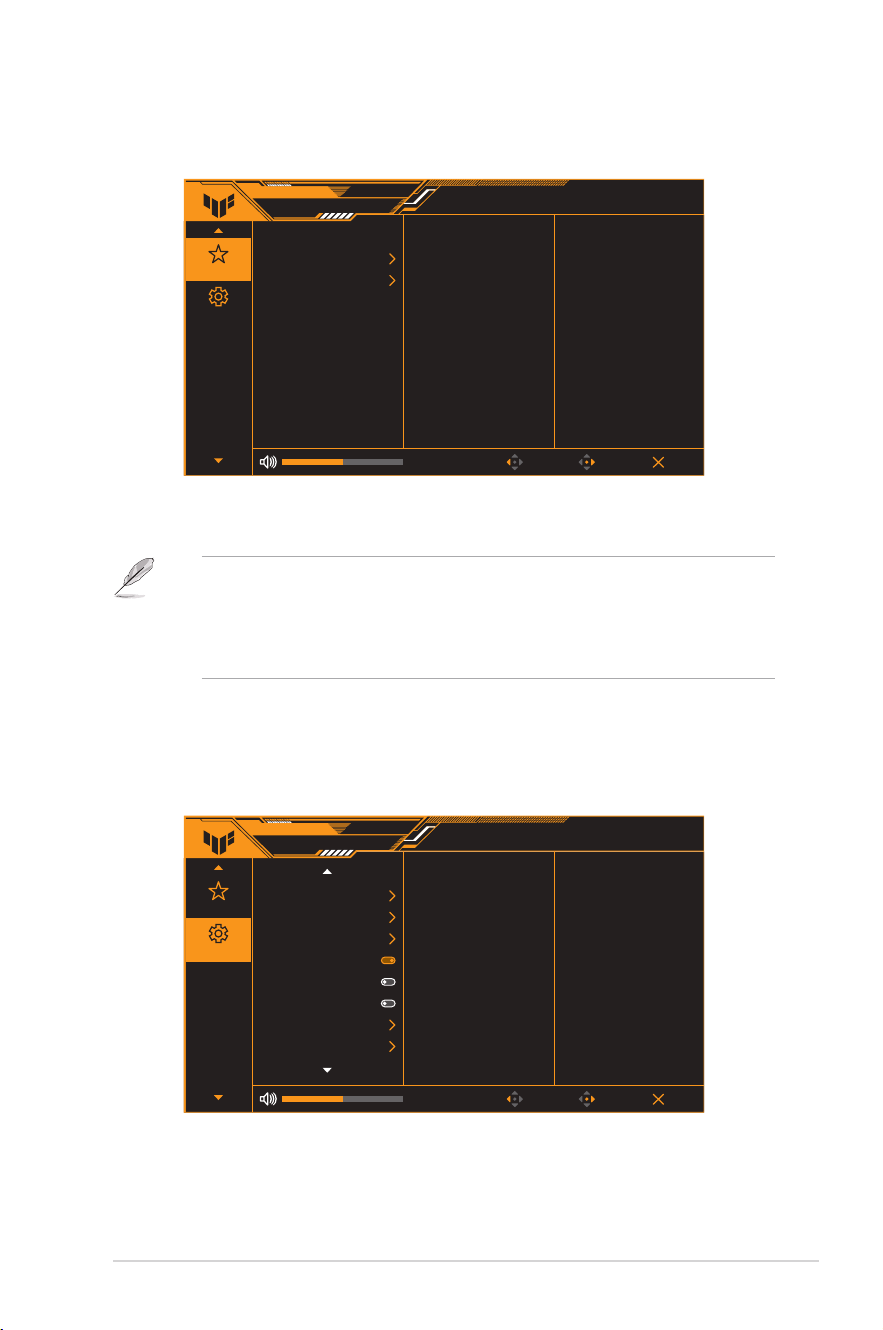
6. MyFavorite
Adjust Shortcut and Customized Setting from this main function.
ASUS TUF GAMING
VG32UQA1A Racing Mode144Hz
3840x2160
GameVisual
HDMI-1
Input Source
OFF
HDR
Back Enter Exit
Shortcut
Customized Setting
MyFavorite
System Setup
• Shortcut 1/Shortcut 2:Setstheshortcutfunctionsforshortcut
buttons.
• When a certain function is selected or activated, your shortcut button
maynotsupport.Availablefunctionchoicesforshortcut:GamePlus,
GameVisual, Variable OD, Brightness, Mute, Shadow Boost, Contrast,
Input Select, HDR Setting, Blue Light Filter, Volume, and Customized
Setting-1/Customized Setting-2.
• Customized Setting:Loads/Savesallsettingsonthemonitor.
7. System Setup
Adjustthesystemconguration.
ASUS TUF GAMING
VG32UQA1A Racing Mode144Hz
3840x2160
GameVisual
HDMI-1
Input Source
OFF
HDR
Back Enter Exit
Language
Sound
USB Setup
Power Indicator
Power Key Lock
Key Lock
Power Setting
OSD Setup
MyFavorite
System Setup

3-8
Chapter 3: General Instruction
• Language:SelectsanavailablelanguagefortheOSDmenu.
TheoptionsincludeEnglish,French,German,Spanish,Italian,
Dutch,Russian,Polish,Japanese,Korean,Persian,Thai,
Indonesian, and Ukrainian.
• Sound:
* Volume:Adjuststhevolumelevelfrom0to100.
* Mute: If checked, mutes the volume.
* Sound Source: Select the monitor sound comes from which
source.
• USB Setup > USB Hub:ConfigureUSBportsettings.
* On During StandbyallowstheUSBdownstreamportstocharge
external devices when the monitor is turned on or in standby
mode.
* Off During StandbyallowstheUSBdownstreamportstocharge
external devices only when the monitor is turned on.
• Power Indicator:TurnsthepowerLEDindicatoron/off.
• Power Key Lock:Enablesordisablesthepowerkey.
• Key Lock:Enablethisfunctiontodisableallfunctionkeys.
Press the Navigation button down for more than five seconds to
cancel the key lock function.
• Power Setting:Setsthepowermode.Ifthesettingissetto
Standard Mode,itmayresultinhigherpowerconsumption.On
theotherhand,ifthesettingissettoPower Saving Mode, it
may cause limited luminance performance.
• OSD Setup:
* Sets the OSD menu position.
* AdjuststheOSDtimeoutfrom10to120seconds.
* AdjuststheOSDbackgroundfromopaquetotransparent.
* EnablesordisablestheDDC/CIfunction.
• DisplayPort Stream:SelectDisplayPort1.2orDisplayPort1.4
accordingtothegraphiccardDPversion.
• Information:Showsthemonitorinformation.
• All Reset:SelectYEStorevertallsettingstothefactorydefault
mode.
3-9
ASUS TUF Gaming Monitor VG32U Series
3.2 Specications
Model VG32UQA1A
Panel Size 31.5inches(80.01cm)diagonal
Max. Resolution 3840(H)x2160(V)pixels
Brightness(Typ.) 400cd/m
2
Contrast Ratio (Typ.) 2500:1
ViewingAngle(CR≤10) 178°(V);178°(H)
Display Colors 1.07Bcolors(8bits+Hi-FRC)
Response Time (Typ.) <4ms (G to G), 1ms MPRT
Color temperature
selection
4 color temperatures
Digitalinput
HDMI v2.1 x 2, DisplayPort v1.4 x 1, Audio out x 1, USB Type-B x 1,
USB Type-A x 2
Earphonejack Yes
Audio input No
Speaker (Built-in) 2 W x 2 Stereo, RMS
Colors Black
PowerLED White (On)/Amber (Standby)
Tilt +15˚~-5˚
Pivot No
Swivel No
Heightadjustment No
VESAwallmounting 100x100mm
Kensingtonlock Yes
VoltageRating
120WadapterDC20V6A
AC100~240Vat50/60Hz(DeltaElectronics,Inc.ADP-120VHB)
Power consumption <45W**
Standby power
consumption
<0.5W
Power off power
consumption
<0.3W
Temperature
Operatingtemperature:0~40˚C
Non-operatingtemperature:-20~60˚C
Dimension (W x H x D)
without stand
716x427x55mm
Dimension (W x H x D)
with stand
716x496x214mm
Box Dimension
(W x H x D)
950x550x156mm
NetWeight(incl.stand) 7.5kg
GrossWeight(Esti.) 10.5kg

3-10
Chapter 3: General Instruction
Model VG32UQA1A
Muti-language
27Languages(English,SimpliedChinese,TraditionalChinese,
Japanese, Russian, Spanish, Italian, German, French, Dutch,
Portuguese,Czech,Croatia,Romania,Turkish,Arabic,Danish,
Finnish,Greek,Hungarian,Slovak,Slovenian,Swedish,Polish,
Korean&Persian),Ukraine
Accessories
Adapter, Power Cord, HDMI cable(optional), DP cable(optional),
USB cable(optional), Warranty Card, QSG
Compliance and
Standards
cTUVus,CU,CB,CE,ErP,FCC,ICES-3,EUEnergylabel,CEC,
CCC,RCM,BSMI,VCCI,RoHS,J-MOSS,MEPS,WEEE,Windows
8.1/10/11WHQL,CEL,KCC,e-Standby,sDoC,TUVickerfree
andlowbluelight,HDMIandDPcertied,FreeSyncpremium,
UkrSEPRO
*Specifications subject to change without notice.
** Measuring a screen brightness of 200 nits without audio/ USB/ Card reader connection.

3-11
ASUS TUF Gaming Monitor VG32U Series
3.3 Outline dimensions
715.8
496.1
54.5
239.3
100
100
22.9
426.9
57.8
3-12
Chapter 3: General Instruction
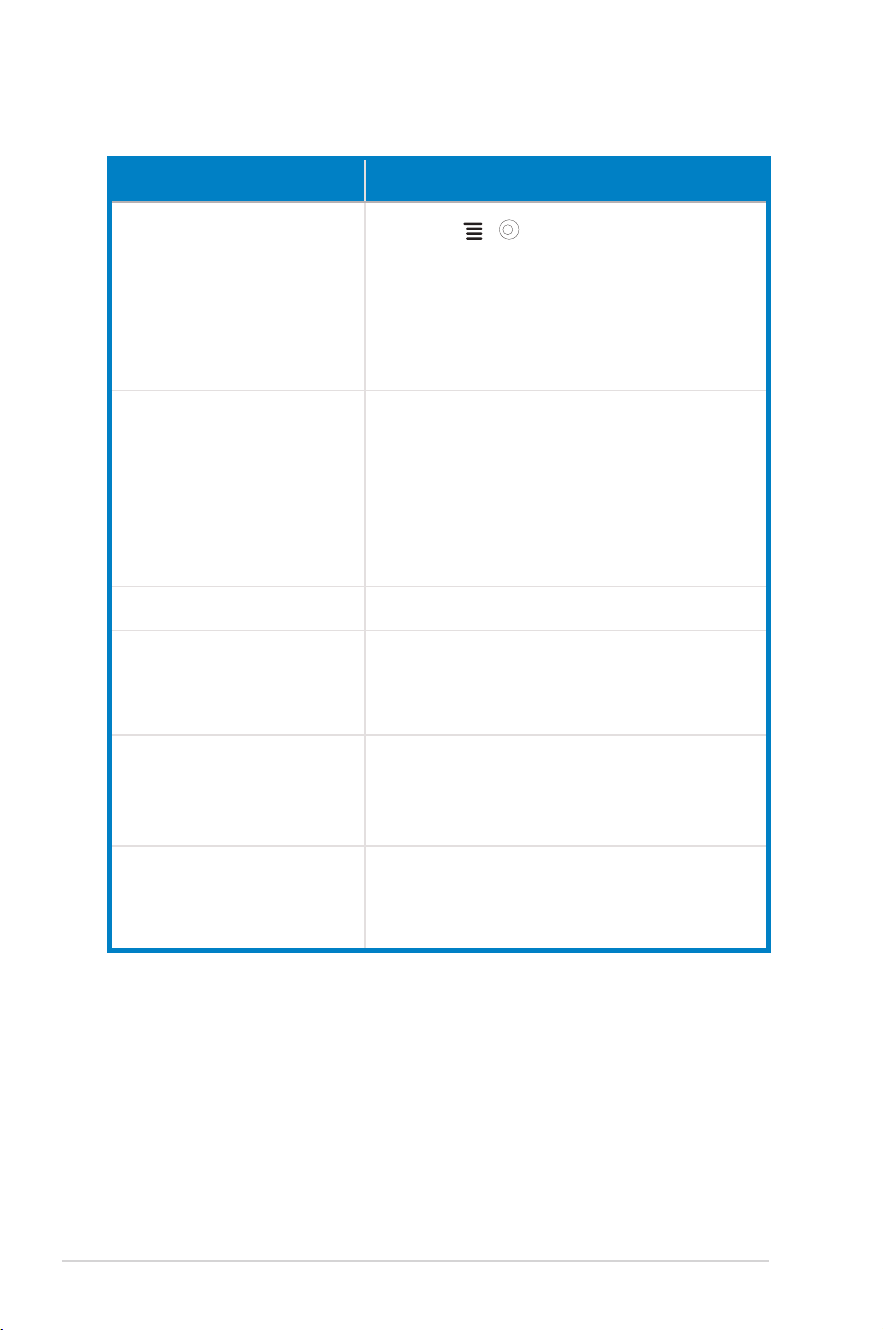
3.4 Troubleshooting (FAQ)
Problem Possible Solution
PowerLEDisnotON
• Press the
( )
button to check if the monitor is
in the ON mode.
• Check if the power adapter is connected to the
monitor and the power cord is properly connected to
the adapter and the power outlet.
• Check Power Indicator function in main menu OSD.
Select ONtoturnonpowerLED.
ThepowerLEDlightsamberand
thereisnoscreenimage
• Check if the monitor and the computer are in the ON
mode.
• Makesurethesignalcableisproperlyconnectedthe
monitor and the computer.
• Inspectthesignalcableandmakesurenoneofthe
pins are bent.
• Connect the computer with another available monitor
tocheckifthecomputerisproperlyworking.
Screenimageistoolightordark • AdjusttheContrastandBrightnesssettingsviaOSD.
Screenimagebouncesorawave
patternispresentintheimage
• Makesurethesignalcableisproperlyconnectedto
the monitor and the computer.
• Move electrical devices that may cause electrical
interference.
Screenimagehascolordefects
(white does not look white)
• Inspectthesignalcableandmakesurethatnoneof
the pins are bent.
• Perform Reset via OSD.
• Select the appropriate Color Temperature via OSD.
No sound or sound is low • Adjustthevolumesettingsofbothyourmonitorand
computer.
• Make sure the computer sound card driver is
properly installed and activated.
3-13
ASUS TUF Gaming Monitor VG32U Series
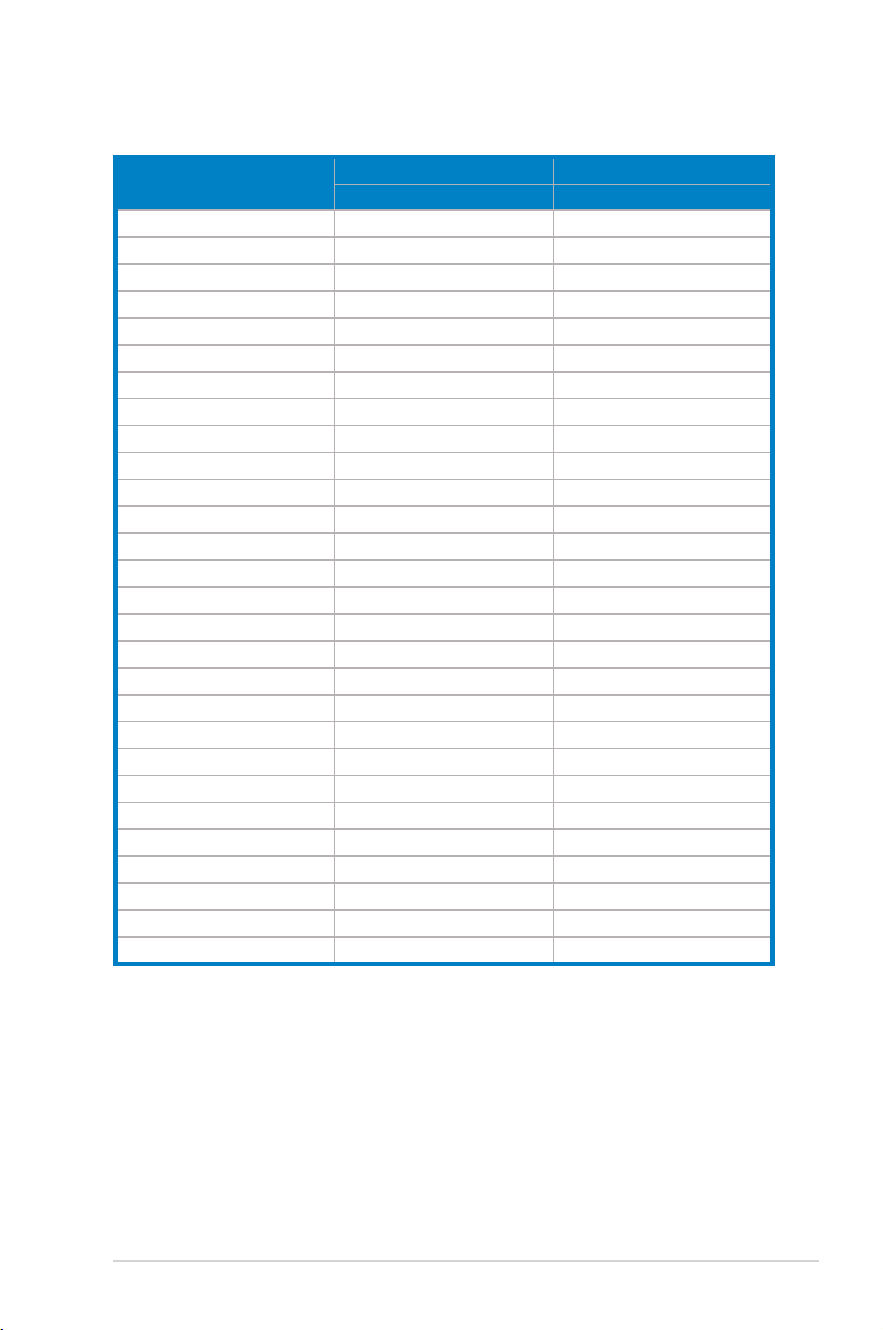
3.5 Supported timing list
Resolution Frequency
HDMI DP
Refresh Rate Refresh Rate
640x480 60Hz 60Hz
640x480 75Hz 75Hz
720x480 60Hz 60Hz
800x600 60Hz 60Hz
800x600 75Hz 75Hz
1024x768 60Hz 60Hz
1024x768 75Hz 75Hz
1280x1024 60Hz 60Hz
1280x720 60Hz 60Hz
1440x900 60Hz 60Hz
1680x1050 60Hz 60Hz
1920x1080 24Hz 60Hz
1920x1080 50Hz 60Hz
1920x1080 60Hz 50Hz
1920x1080 100Hz 120Hz
1920x1080 120Hz 100Hz
1920x2160
X
60Hz
2560x1440 60Hz 60Hz
2560x1440 120Hz 120Hz
2560x1440 144Hz 144Hz
3840x2160 24Hz
X
3840x2160 30Hz 30Hz
3840x2160 50Hz 50Hz
3840x2160 60Hz 60Hz
3840x2160 100Hz 100Hz
3840x2160 120Hz 120Hz
3840x2160 144Hz 144Hz
3840x2160 160Hz(overclock) 160Hz(overclock)