USER GUIDE
ROG
SWIFT OLED
PG27UCDM

ii
Copyright © 2024 ASUSTeK COMPUTER INC. All Rights Reserved.
No part of this manual, including the products and software described in it, may be reproduced,
transmitted, transcribed, stored in a retrieval system, or translated into any language in any form or by any
means, except documentation kept by the purchaser for backup purposes, without the express written
permission of ASUSTeK COMPUTER INC. (“ASUS”).
Product warranty or service will not be extended if: (1) the product is repaired, modied or altered, unless
such repair, modication of alteration is authorized in writing by ASUS; or (2) the serial number of the
product is defaced or missing.
ASUS PROVIDES THIS MANUAL “AS IS” WITHOUT WARRANTY OF ANY KIND, EITHER EXPRESS
OR IMPLIED, INCLUDING BUT NOT LIMITED TO THE IMPLIED WARRANTIES OR CONDITIONS OF
MERCHANTABILITY OR FITNESS FOR A PARTICULAR PURPOSE. IN NO EVENT SHALL ASUS, ITS
DIRECTORS, OFFICERS, EMPLOYEES OR AGENTS BE LIABLE FOR ANY INDIRECT, SPECIAL,
INCIDENTAL, OR CONSEQUENTIAL DAMAGES (INCLUDING DAMAGES FOR LOSS OF PROFITS,
LOSS OF BUSINESS, LOSS OF USE OR DATA, INTERRUPTION OF BUSINESS AND THE LIKE),
EVEN IF ASUS HAS BEEN ADVISED OF THE POSSIBILITY OF SUCH DAMAGES ARISING FROM ANY
DEFECT OR ERROR IN THIS MANUAL OR PRODUCT.
SPECIFICATIONS AND INFORMATION CONTAINED IN THIS MANUAL ARE FURNISHED FOR
INFORMATIONAL USE ONLY, AND ARE SUBJECT TO CHANGE AT ANY TIME WITHOUT NOTICE,
AND SHOULD NOT BE CONSTRUED AS A COMMITMENT BY ASUS. ASUS ASSUMES NO
RESPONSIBILITY OR LIABILITY FOR ANY ERRORS OR INACCURACIES THAT MAY APPEAR IN THIS
MANUAL, INCLUDING THE PRODUCTS AND SOFTWARE DESCRIBED IN IT.
Products and corporate names appearing in this manual may or may not be registered trademarks or
copyrights of their respective companies, and are used only for identication or explanation and to the
owners’ benet, without intent to infringe.
First Edition
December 2024

iii
Contents
Notices ......................................................................................................... iv
Safety Information ....................................................................................... v
Care & Cleaning .......................................................................................... vi
Takeback Services ..................................................................................... vii
Trademark Information ............................................................................. viii
Chapter 1: Product Introduction
1.1 Welcome! ...................................................................................... 1-1
1.2 Package Contents ........................................................................ 1-1
1.3 Monitor Introduction .................................................................... 1-2
1.3.1 Front View ....................................................................... 1-2
1.3.2 Back View ....................................................................... 1-4
1.3.3 GamePlus Function ........................................................ 1-5
1.3.4 GameVisual Function ...................................................... 1-9
Chapter 2: Setup
2.1 Attaching the Stand ..................................................................... 2-1
2.2 Cable Management ...................................................................... 2-2
2.3 Detaching the Stand (for VESA wall mount) .............................. 2-3
2.4 Connecting the Cables ................................................................ 2-4
2.5 Turning On the Monitor ............................................................... 2-5
2.6 Adjusting the Monitor .................................................................. 2-5
Chapter 3: General Instructions
3.1 OSD (On-Screen Display) Menu .................................................. 3-1
3.1.1 HowtoRecongure ........................................................ 3-1
3.1.2 OSD Function Introduction .............................................. 3-2
3.2 Specications ............................................................................. 3-15
3.3 Outline Dimensions ................................................................... 3-17
3.4 Troubleshooting (FAQ) .............................................................. 3-18
3.5 Supported Timing List ............................................................... 3-19

iv
Notices
Federal Communications Commission Statement
This device complies with Part 15 of the FCC Rules. Operation is subject
tothefollowingtwoconditions:
• This device may not cause harmful interference, and
• Thisdevicemustacceptanyinterferencereceivedincluding
interference that may cause undesired operation.
This equipment has been tested and found to comply with the limits for a
ClassBdigitaldevice,pursuanttoPart15oftheFCCRules.Theselimits
aredesignedtoprovidereasonableprotectionagainstharmfulinterference
inaresidentialinstallation.Thisequipmentgenerates,usesandcan
radiateradiofrequencyenergyand,ifnotinstalledandusedinaccordance
with manufacturer’s instructions, may cause harmful interference to radio
communications.However,thereisnoguaranteethatinterferencewill
not occur in a particular installation. If this equipment does cause harmful
interference to radio or television reception, which can be determined by
turningtheequipmentoffandon,theuserisencouragedtotrytocorrect
theinterferencebyoneormoreofthefollowingmeasures:
• Reorientorrelocatethereceivingantenna.
• Increase the separation between the equipment and receiver.
• Connect the equipment to an outlet on a circuit different from that to
which the receiver is connected.
• Consult the dealer or an experienced radio/TV technician for help.
Theuseofshieldedcablesforconnectionofthemonitortothegraphicscardis
requiredtoassurecompliancewithFCCregulations.Changesormodications
to this unit not expressly approved by the party responsible for compliance
could void the user’s authority to operate this equipment.
Canadian Department of Communications Statement
ThisdigitalapparatusdoesnotexceedtheClassBlimitsforradio
noiseemissionsfromdigitalapparatussetoutintheRadioInterference
RegulationsoftheCanadianDepartmentofCommunications.
ThisclassBdigitalapparatuscomplieswithCanadianICES-003.
ThisClassBdigitalapparatusmeetsallrequirementsoftheCanadian
Interference-CausingEquipmentRegulations.
CetappareilnumériquedelaclasseBrespectetouteslesexigencesdu
RéglementsurlematérielbrouillerduCanada.

v
Safety Information
This equipment is not suitable for use in locations where
children are likely to be present.
• Beforesettingupthemonitor,carefullyreadallthedocumentationthat
camewiththepackage.
• To prevent fire or shock hazard, never expose the monitor to rain or
moisture.
• Nevertrytoopenthemonitorcabinet.Thedangeroushighvoltagesinside
the monitor may result in serious physical injury.
• If the power supply is broken, do not try to fix it by yourself. Contact a
qualified service technician or your retailer.
• Beforeusingtheproduct,makesureallcablesarecorrectlyconnected
andthepowercablesarenotdamaged.Ifyoudetectanydamage,contact
your dealer immediately.
• Slotsandopeningsonthebackortopofthecabinetareprovidedfor
ventilation. Do not block these slots. Never place this product near or over
a radiator or heat source unless proper ventilation is provided.
• The monitor should be operated only from the type of power source
indicated on the label. If you are not sure of the type of power supply to
your home, consult your dealer or local power company.
• Usetheappropriatepowerplugwhichcomplieswithyourlocalpower
standard.
• Donotoverloadpowerstripsandextentioncords.Overloadingcanresult
in fire or electric shock.
• Avoid dust, humidity, and temperature extremes. Do not place the
monitor in any area where it may become wet. Place the monitor on a
stable surface.
• Unplugtheunitduringalightningstormorifitwillnotbeusedforaong
periodoftime.Thiswillprotectthemonitorfromdamageduetopower
surges.
• Never push objects or spill liquid of any kind into the slots on the monitor
cabinet.
• To ensure satisfactory operation, use the monitor only with UL listed
computers which have appropriate configured receptacles marked
between100-240VAC.
• If you encounter technical problems with the monitor, contact a qualified
service technician or your retailer.

vi
• Adjustmentofthevolumecontrolaswellastheequalizertoothersettings
thanthecenterpositionmayincreasetheear-/headphonesoutputvoltage
and therefore the sound pressure level.
• CLASS1CONSUMERLASERPRODUCT
EN50689:2021
This symbol of the crossed out wheeled bin indicates that the product (electrical,
electronicequipment,andmercury-containingbuttoncellbattery)shouldnot
beplacedinmunicipalwaste.Pleasechecklocalregulationsfordisposalof
electronic products.
AEEEyönetmeliğineuygundur
Care & Cleaning
• Before you lift or reposition your monitor, it is better to disconnect the
cables and power cord. Follow the correct lifting techniques when
positioningthemonitor.Whenliftingorcarryingthemonitor,graspthe
edgesofthemonitor.Donotliftthedisplaybythestandorthecord.
• Cleaning.Turnyourmonitoroffandunplugthepowercord.Cleanthe
monitor surface with a lint-free, non-abrasive cloth. Stubborn stains may
be removed with a cloth dampened with mild cleaner.
• Avoid using a cleaner containing alcohol or acetone. Use a cleaner
intended for use with the OLED. Never spray cleaner directly on the
screen, as it may drip inside the monitor and cause an electric shock.
The following symptoms are normal with the monitor:
• The screen may flicker during the initial use due to the nature of the
fluorescentlight.TurnoffthePowerSwitchandturnitonagaintomake
sure that the flicker disappears.
• Youmayfindslightlyunevenbrightnessonthescreendependingonthe
desktop pattern you use.
• Whenthesameimageisdisplayedforhours,anafterimageoftheprevious
screenmayremainafterswitchingtheimage.Thescreenwillrecover
slowly or you can turn off the Power Switch for hours.
• Whenthescreenbecomesblackorflashes,orcannotworkanymore,
contact your dealer or service center to fix it. Do not repair the screen
by yourself!
vii
Conventions used in this guide
WARNING:Informationtopreventinjurytoyourselfwhentrying
to complete a task.
CAUTION:Informationtopreventdamagetothecomponents
whentryingtocompleteatask.
IMPORTANT:InformationthatyouMUSTfollowtocompletea
task.
NOTE:Tipsandadditionalinformationtoaidincompletingatask.
Where to nd more information
Refertothefollowingsourcesforadditionalinformationandforproduct
and software updates.
1. ASUS websites
The ASUS websites worldwide provide updated information on ASUS
hardware and software products. Refer to http://www.asus.com
2. Optional documentation
Yourproductpackagemayincludeoptionaldocumentationthatmay
have been added by your dealer. These documents are not part of
thestandardpackage.
3. About Flicker
https://www.asus.com/Microsite/display/eye_care_technology/
4. Product information for EU Energy label
PG27UCDM
Takeback Services
ASUSrecyclingandtakebackprogramscomefromourcommitmenttothe
higheststandardsforprotectingourenvironment.Webelieveinproviding
solutions for our customers to be able to responsibly recycle our products,
batteriesandothercomponentsaswellasthepackagingmaterials.
Pleasegotohttp://csr.asus.com/english/Takeback.htmfordetailrecycling
informationindifferentregion.

viii
Trademark Information
Dolby,DolbyVision,andthedouble-Dsymbolareregisteredtrademarks
ofDolbyLaboratoriesLicensingCorporation.Manufacturedunderlicense
fromDolbyLaboratoriesLicensingCorporation.Condentialunpublished
works.Copyright©2013–2024DolbyLaboratories.Allrightsreserved.
TheAdoptedTrademarksHDMI,HDMIHigh-DenitionMultimedia
Interface,HDMItradedressandtheHDMILogosaretrademarksor
registeredtrademarksofHDMILicensingAdministrator,Inc.intheUnited
States and other countries.

1-1
ROG Swift PG27UCDM Gaming Monitor
Chapter 1: Product Introduction
1.1 Welcome!
ThankyouforpurchasingtheASUS
®
OLEDGamingmonitor!
ThelatestwidescreenOLEDmonitorfromASUSprovidesacrisper,
broader,andbrighterdisplay,plusahostoffeaturesthatenhanceyour
viewingexperience.
Withthesefeatures,youcanenjoytheconvenienceanddelightfulvisual
experiencethatthemonitorbringstoyou!
1.2 Package Contents
Checkyourpackageforthefollowingitems:
OLEDMonitor
Quick Start Guide
WarrantyCard
Power Cord
ROG Pouch
ROG Sticker
Monitor Base
WallMountKit
MicroberCloth
USBType-Ccable(optional)
HDMIcable(optional)
DPcable(optional)
USBcable(optional)
Featurelabel(optional)
Ifanyoftheaboveitemsisdamagedormissing,contactyourretailer
immediately.
1-2
Chapter 1: Product Introduction
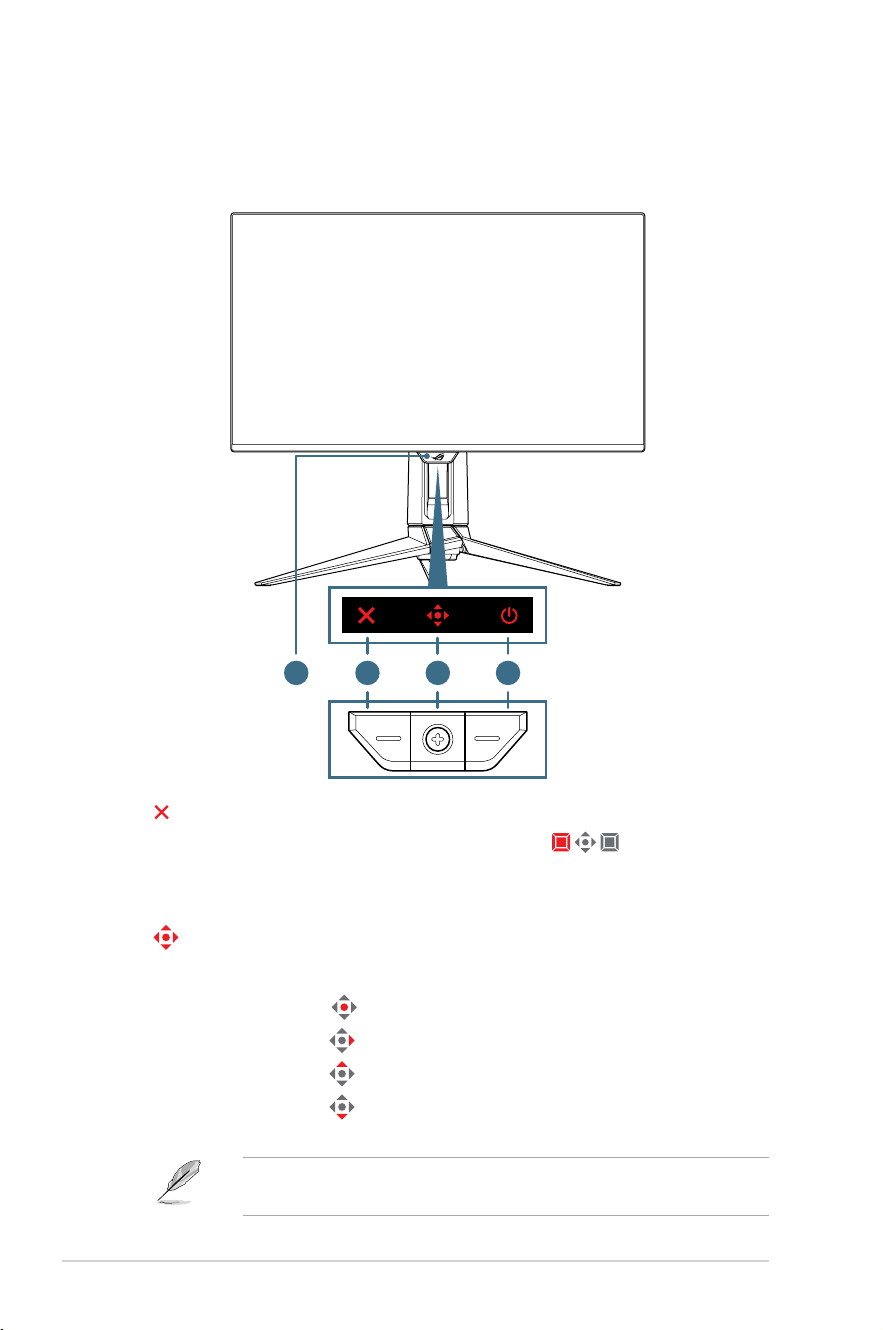
1.3 Monitor Introduction
1.3.1 Front View
1 2 34
1. Close button:
• WhentheOSDmenuisOFF,pressthe
button to
activate the Pixel Cleaning hotkey.
• WhentheOSDmenuisON,presstoexittheOSDmenu.
2. Control buttons:
a. WhentheOSDmenuisOFF:
• Press the
button to activate the OSD menu.
• Move the
buttonrighttoactivate the GamePlus hotkey.
• Move the
button up to activate the GameVisual hotkey.
• Move the
button down to activate the Input Select
hotkey.
Tochangethepresethotkeyfunction,gototheMyFavorite > Shortcut
menu.

1-3
ROG Swift PG27UCDM Gaming Monitor
b. WhentheOSDmenuisON:
• Press the
button to enact the selected OSD menu item.
• Move the
buttonrightto enter the submenu.
• Move the
button left to return to the previous menu or
exit the menu.
• Move the
button up to move your selection up or
increase value.
• Move the
button down to move your selection down or
decrease value.
3.
Power button:Turn the monitor on/off.
4. Neo proximity sensor: Measure the distance between the user and
monitor.
1-4
Chapter 1: Product Introduction
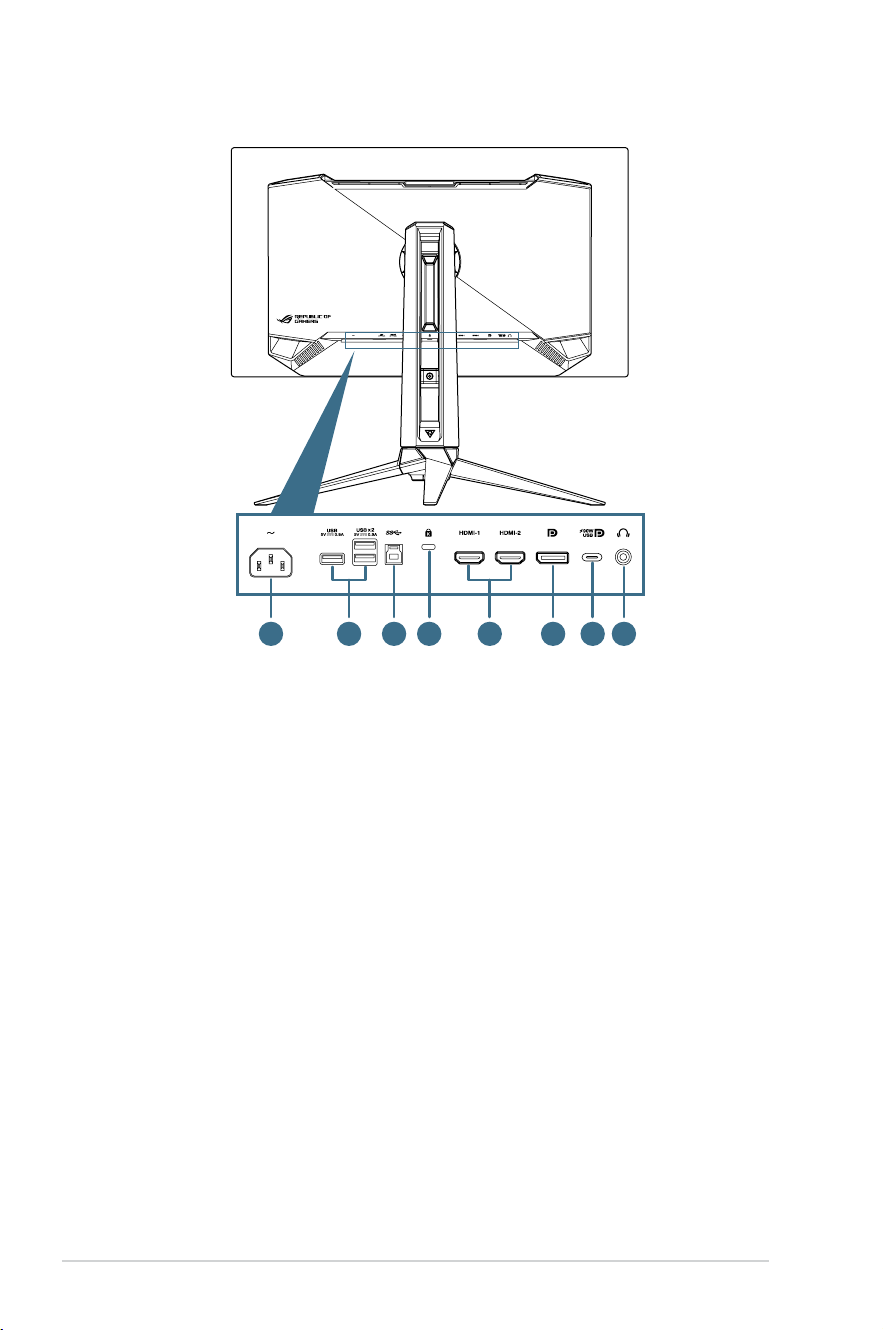
1.3.2 Back View
1 3 4 6 7 852
1. AC-IN port:Thisportconnectsthepowercord.
2. USB3.2 Gen 1 downstream ports:Whentheupstreamportis
connected. The connection enables the USB 3.2 port on the monitor
andpowerdelivery5V/0.9A.
3. USB3.2 Gen 1 upstream port:ThisportisforconnectionwithaUSB
upstream cable. The connection enables the USB hub function on the
monitor.
4. Kensington lock slot
5. HDMI ports:ThisportisforconnectionwithanHDMI2.1compatible
device.
6. DisplayPort:ThisportisforconnectionwithaDisplayPort2.1
compatible device.
1-5
ROG Swift PG27UCDM Gaming Monitor
7. USB Type-C Port:ThisportisforconnectionwithaUSBType-C
cable.Theconnectionsupportsvideosignal(DPAltmode),power
delivery, and data transmission.
• Theportoffersoutputvoltage5V/3A,9V/3A,15V/3A,and20V/4.5A.
USB Type-C port supports power delivery and data. USB Type-C
portsupportspowerdeliveryanddatatransmission.Connectingthe
USB Type-C to Type-A cable only enables the USB Type-A ports
(downstream)onthemonitor.
• Disclaimer:ConnectedUSBType-CDevicesneedtosupportDPAlt
mode.
8. Earphone jack:ThisportisconnectionwithanEarphone
(Impedance:32Ωat1kHz)
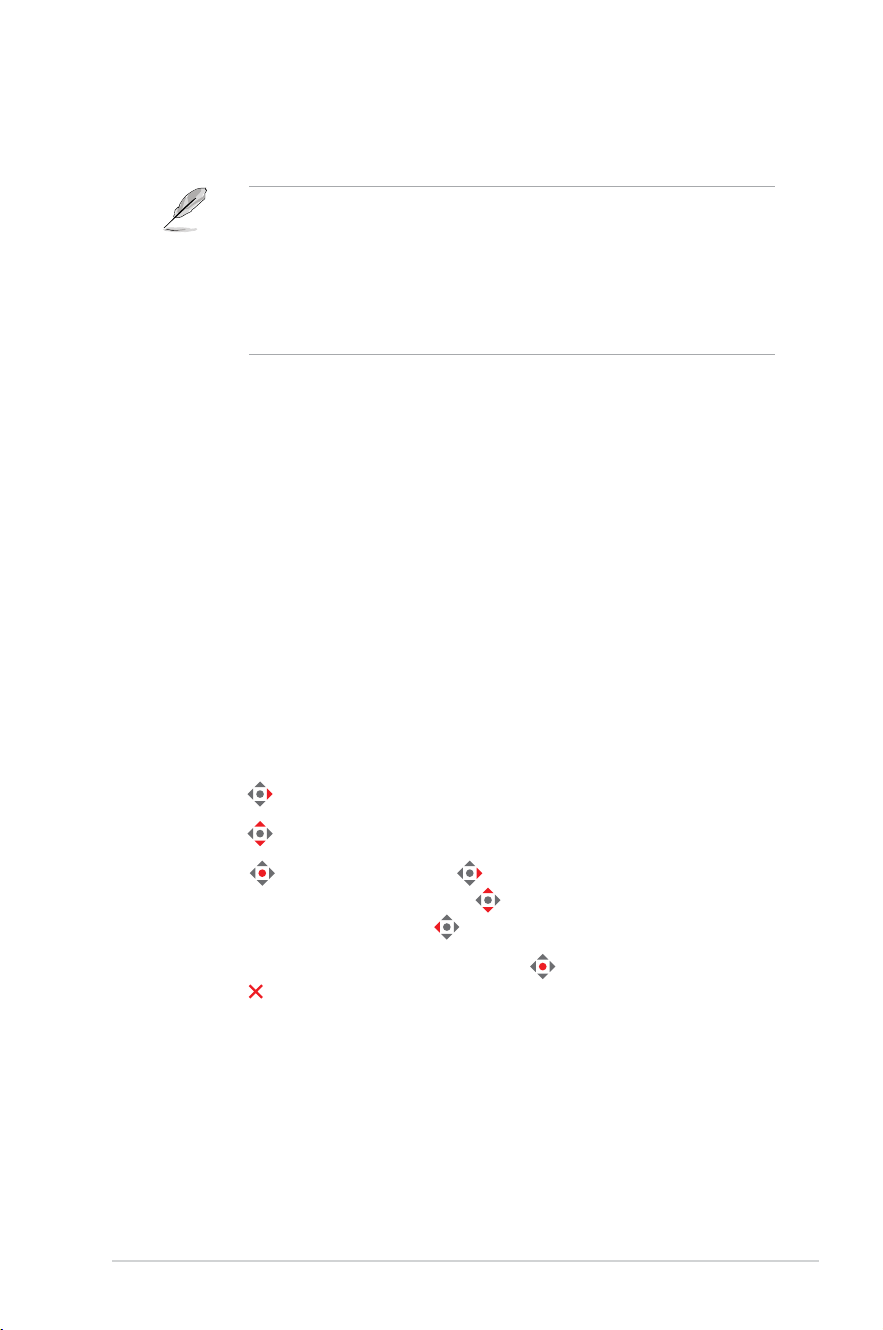
1.3.3 GamePlus Function
TheGamePlusfunctionprovidesatoolkitandcreatesabettergaming
environmentforuserswhenplayingdifferenttypesofgames.The
crosshairoverlaywithseveralcrosshairoptionslettingyouchoosetheone
thatbestsuitsthegameyou'replaying.Therearealsoonscreentimer
and stopwatch you can position on the left of the display so you can keep
trackofthegamingtime;whiletheFPS(framespersecond)counterlets
youknowhowsmooththegameisrunning.Sniperfunction(onlyavailable
whenHDRisdisabledonyourdevice)iscustomizedforrst-person
shooters.Youcanselectthemagnicationratioandthetypeofalignment
in sequence.
ToactivateGamePlus:
1. Move the
buttonright.
2. Move the
buttonup/downtoselectamongdifferentfunctions.
3. Press the
button or move the buttonrighttoconrmthe
function you choose, and move the
buttonup/downtonavigate
throughthesettings.Movethe buttonlefttogoback,off,orexit.
4. Highlightthedesiredsettingandpressthe
button to activate it.
Press the button to inactivate it.
1-6
Chapter 1: Product Introduction
GamePlus Main Menu GamePlus — FPS
Counter
GamePlus — Crosshair
(the Dynamic Crosshair
willchangecolor
dependingonthe
backgroundcolor)
GamePlus
FPS Counter
Crosshair
Sniper
Timer
Stopwatch
Display Alignment
FPS Counter
OFF
Number
Bar Graph
Crosshair
Dynamic Crosshair
OFF
GamePlus — Sniper
GamePlus — Timer
OFF
1.2x
1.2x
1.5x
1.5x
2.0x
2.0x
Sniper
Timer
OFF
30:00
40:00
50:00
60:00
90:00
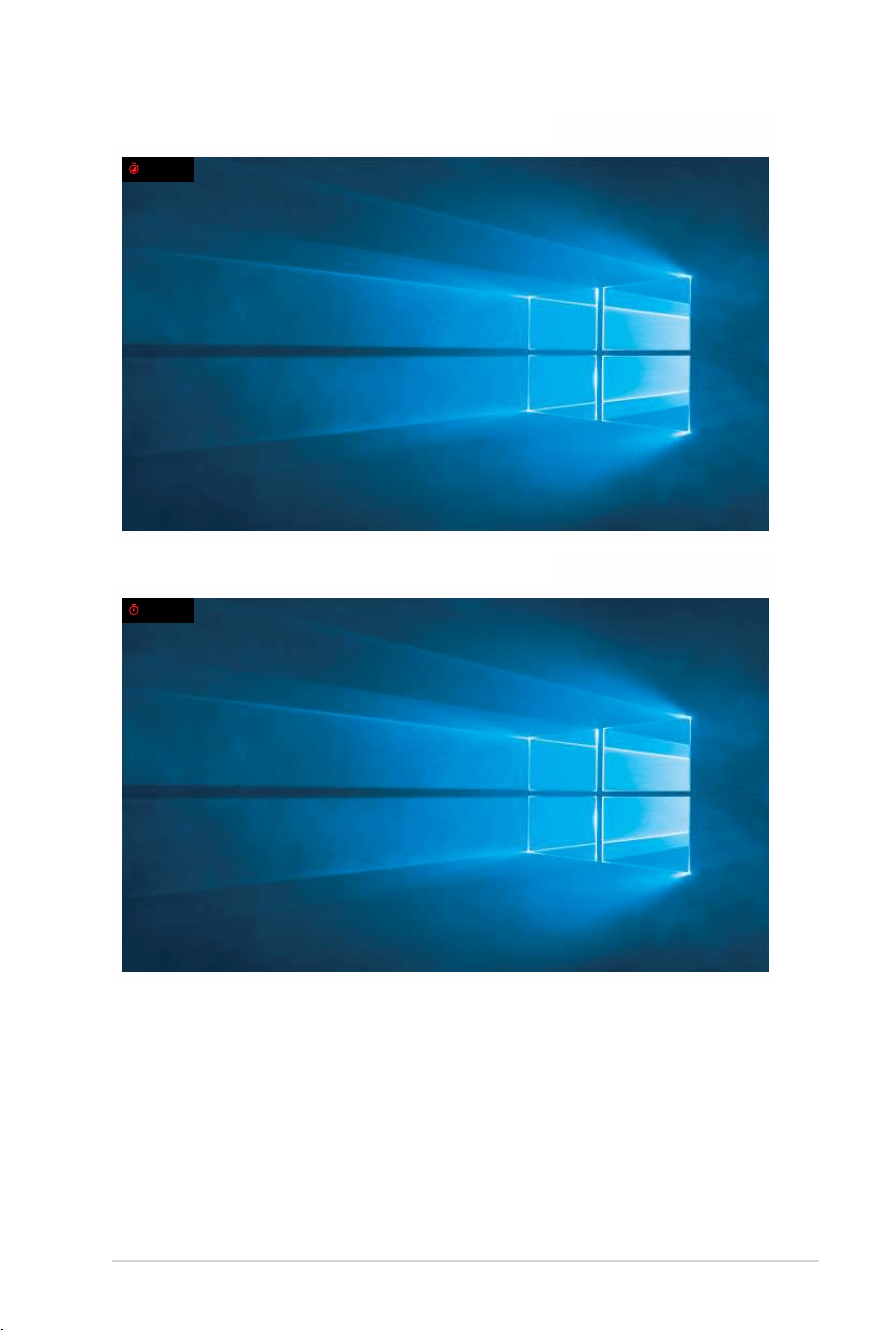
1-7
ROG Swift PG27UCDM Gaming Monitor
GamePlus — Timer
29:58
GamePlus — Stopwatch
00:02
1-8
Chapter 1: Product Introduction
GamePlus—DisplayAlignment

1-9
ROG Swift PG27UCDM Gaming Monitor
1.3.4 GameVisual Function
TheGameVisualfunctionhelpsyouselectamongdifferentpicturemodes
in a convenient way.
ToactivateGameVisual:
1. Press the GameVisual shortcut button.
2. Move the
buttonup/downtoselectthedesiredsetting.
• Scenery Mode:Thisisthebestchoiceforsceneryphotodisplaying
with GameVisual
TM
VideointelligenceTechnology.
• Racing Mode:Thisisthebestchoiceforracinggameplayingwith
GameVisual
TM
VideointelligenceTechnology.
• Cinema Mode: This is the best choice for movie watching with
GameVisual
TM
VideointelligenceTechnology.
• RTS/RPG Mode: This is the best choice for Real-Time Strategy
(RTS)/Role-PlayingGame(RPG)playingwithGameVisual
TM
Video
intelligenceTechnology.
• FPS Mode:ThisisthebestchoiceforFirstPersonShootergame
playingwithGameVisual
TM
VideointelligenceTechnology.
• sRGB Cal Mode:Thisisthebestchoiceforviewingphotosand
graphicsfromPCs.
• MOBA Mode:ThisisthebestchoiceforMultiplayerOnlineBattle
Arena(MOBA)gamesplayingwithGameVisual
TM
Videointelligence
Technology.
• Night Vision: This is the best choice for dark scenery playing
GameVisual
TM
VideointelligenceTechnology.
• User Mode:MoreitemsareadjustableintheColormenu.
3. Press the
buttontoactivatethesetting.
• InthesRGBCalmode,thefollowingfunction(s)arenotuser-configurable:
ShadowBoost,UniformBrightness,Contrast,BlueLightFilter,Display
Color Space, Color Temp., Saturation, Six-axis Saturation, Gamma.
• IntheMOBAMode,thefollowingfunction(s)arenotuser-configurable:
Shadow Boost, VividPixel, Saturation, Six-axis Saturation.
• IntheNightVisionmode,thefollowingfunction(s)arenotuser-
configurable:Saturation,Six-axisSaturation.
2-1
Chapter 2: Setup
Chapter 2: Setup
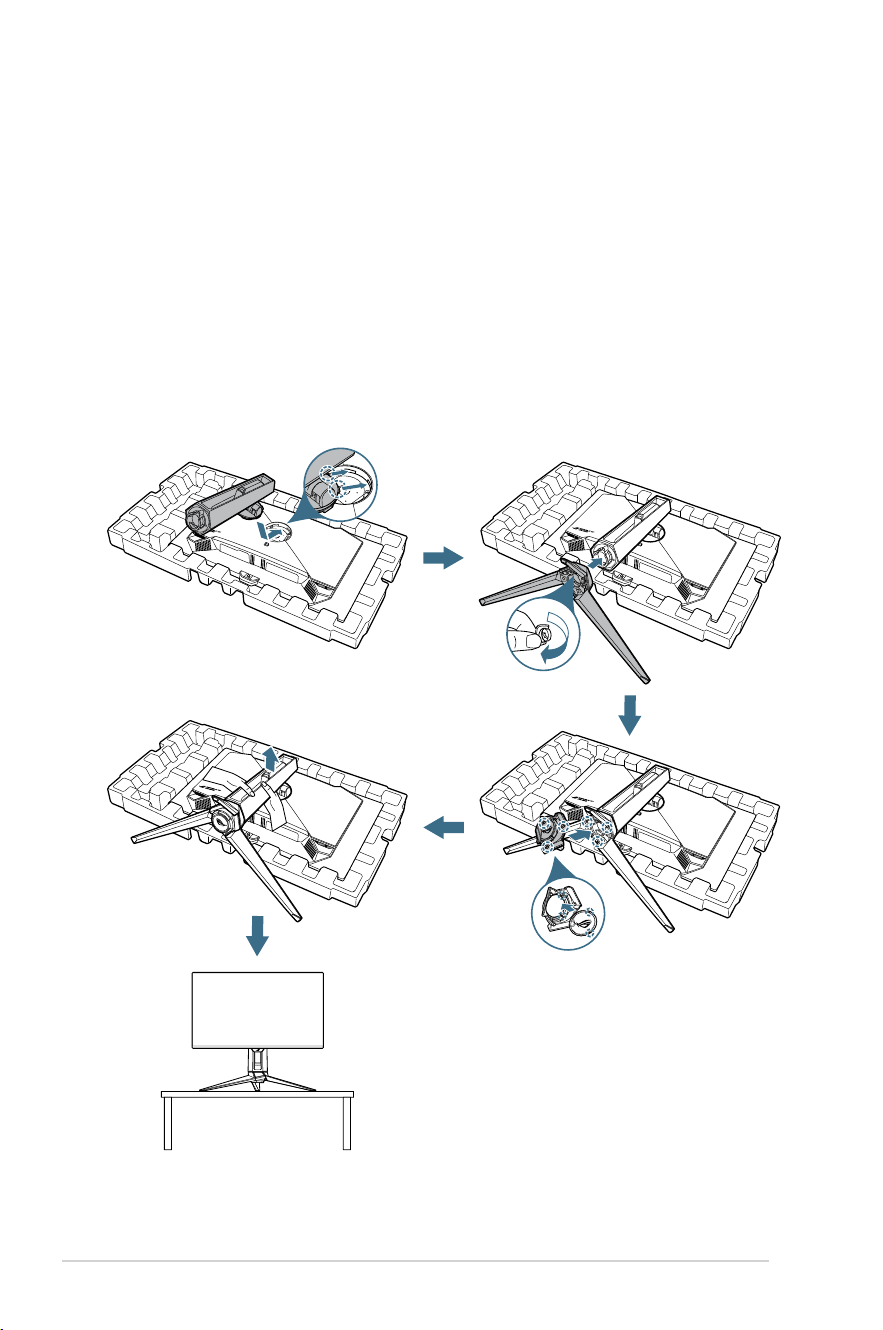
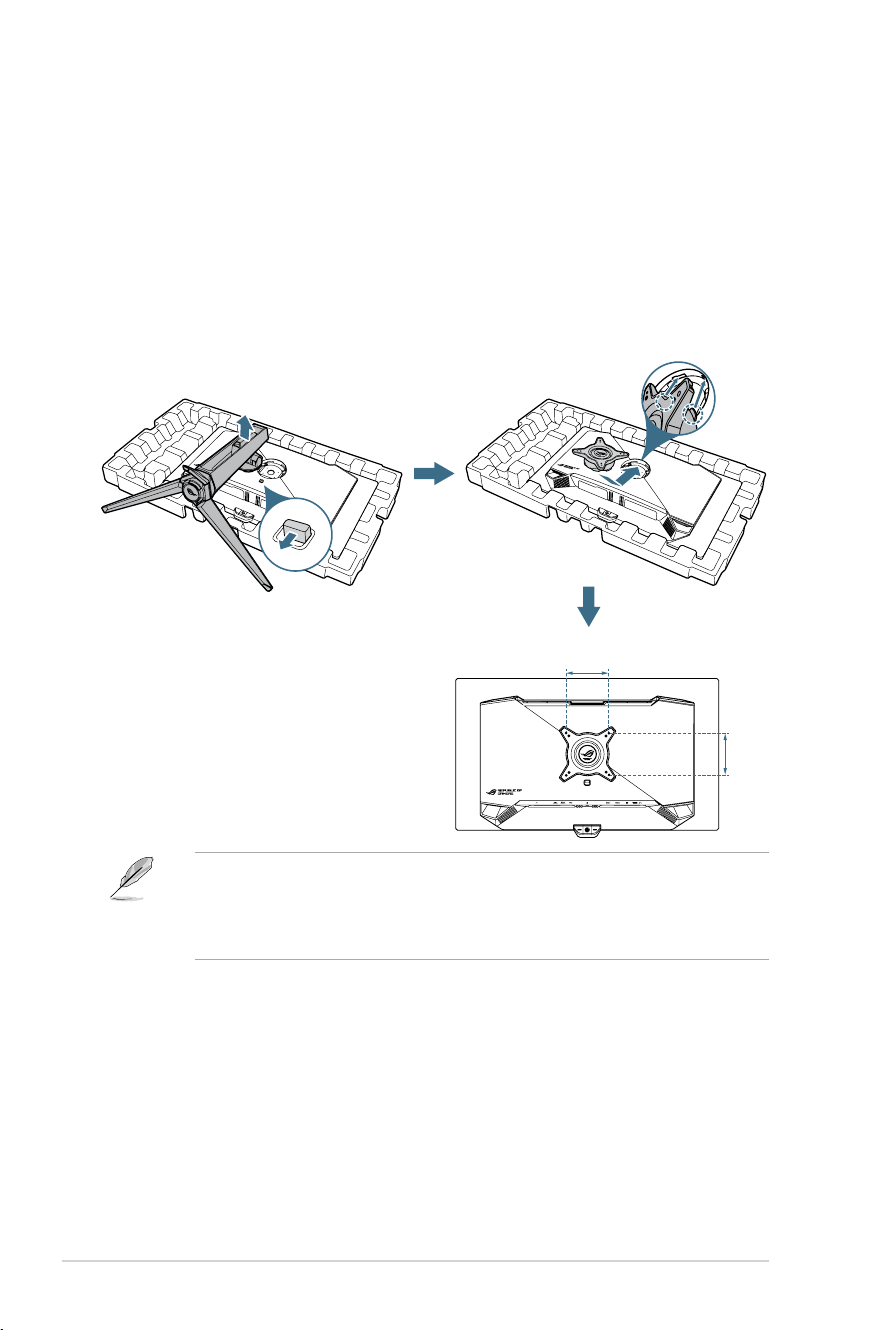
2.1 Attaching the Stand
1. Alignandinstallthestandtoitscompartmentontherearofthe
monitor.
2. Alignandinstallthebasetothestand.Thenxthebasetothestand
byfasteningthebundledscrew.
3. PlacethechangeablelmintotheLEDprojectioncover.Then,by
aligningwiththemagneticpads,installtheLEDprojectioncoverto
the stand.
4. Carefully remove the monitor from the molded plump.
5. Placethemonitoronastablesurfaceintheuprightposition.
2-2
ROG Swift PG27UCDM Gaming Monitor
2.2 Cable Management
Youcanorganizethecablesbyarrangingthemasshownintheillustration
below:
2-3
Chapter 2: Setup
2.3 Detaching the Stand (for VESA wall mount)
ThedetachablestandofthismonitorisspeciallydesignedforVESAwall
mount.
1. Press the release button to detach the stand from the monitor. Then
remove the stand.
2. Install the wall mount bracket on the rear of the monitor.
3. InstallVESAwallmountkitifyouneedtouseVESAwallmount.
100mm
100mm
• TheVESAwallmountkit(100x100mm)ispurchasedseparately.
• UseonlytheULListedWallMountBracketwithminimumweight/load
22.7kg.
• MountingscrewsizeisM4x8mm(4pcs).
2-4
ROG Swift PG27UCDM Gaming Monitor
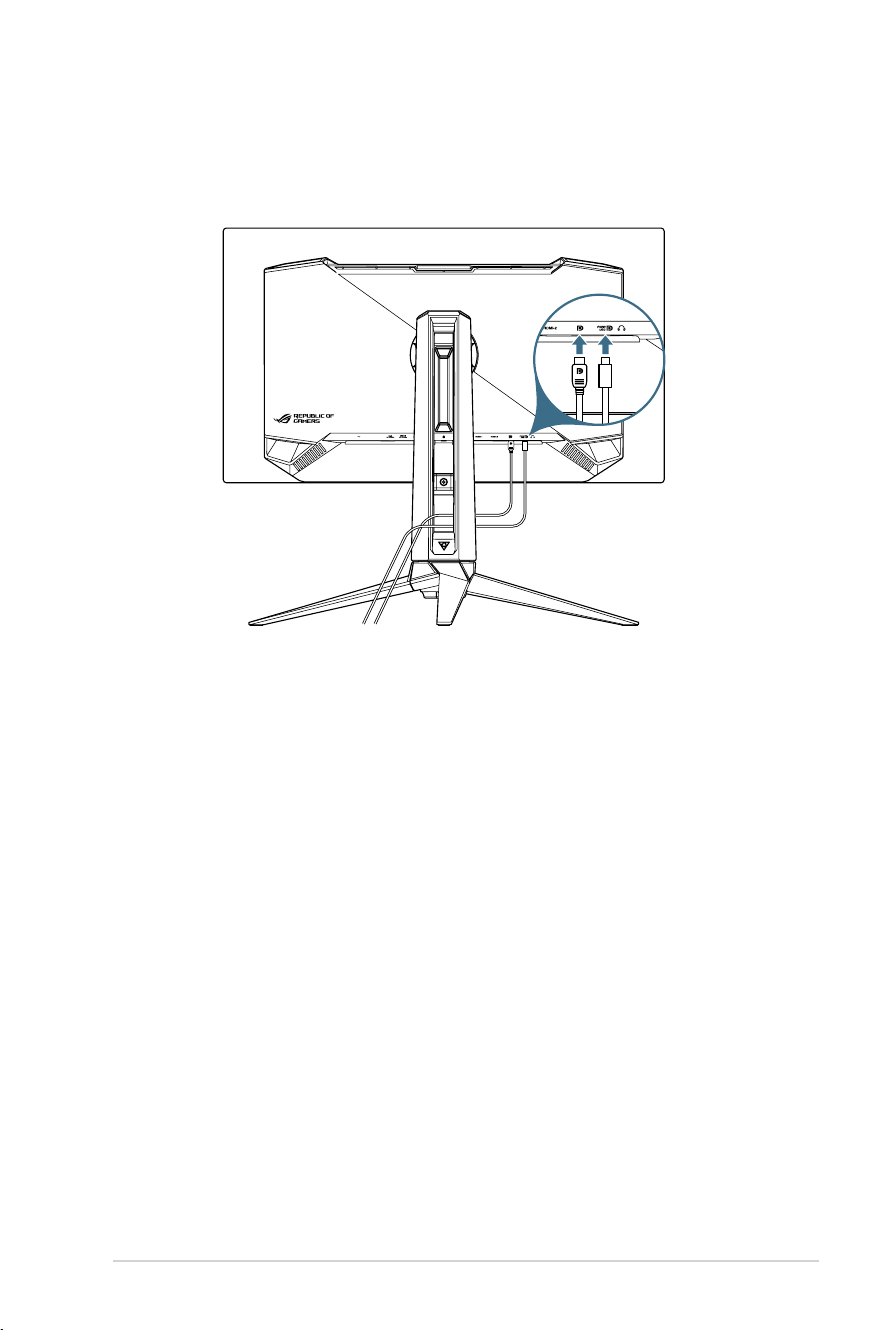
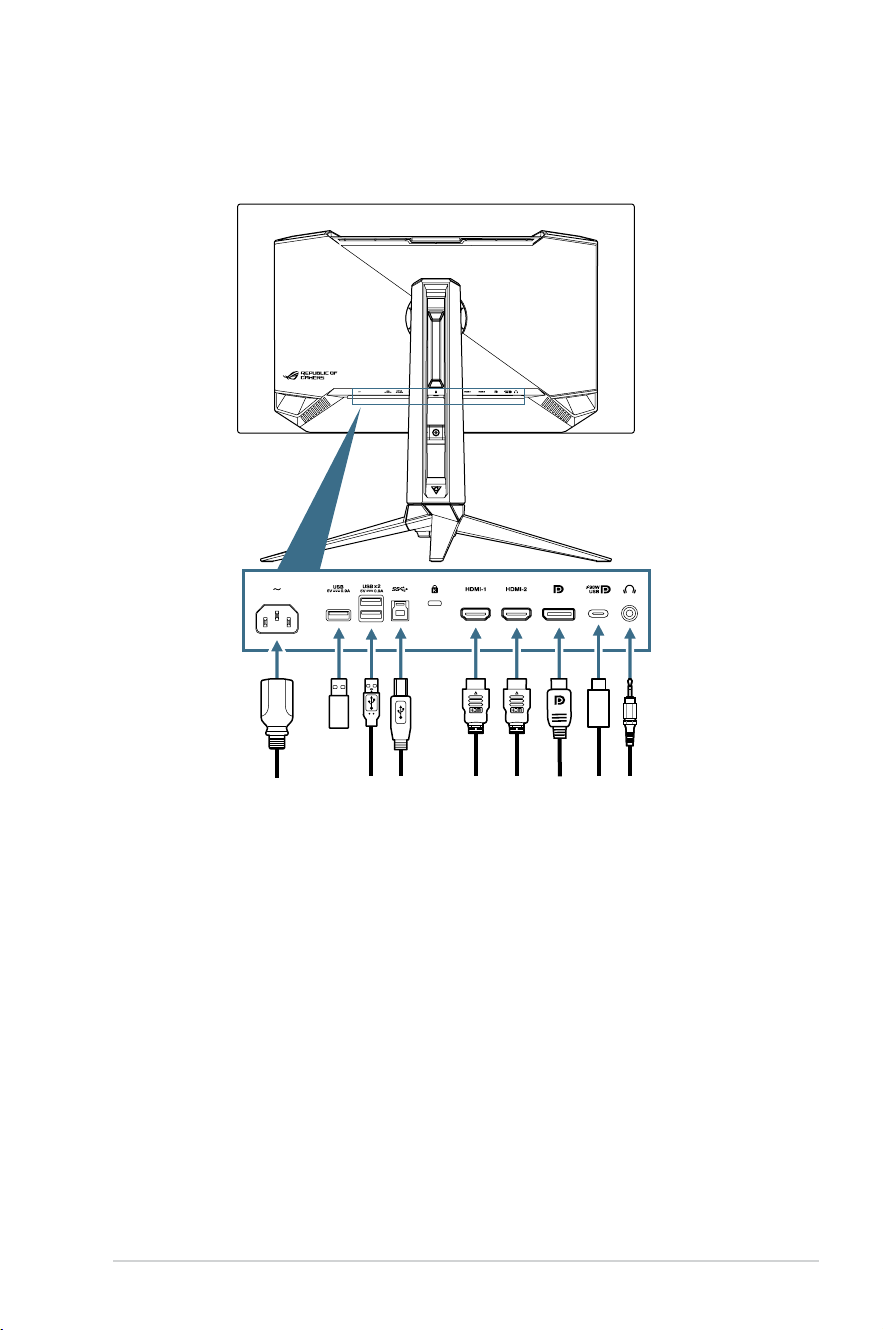
2.4 Connecting the Cables
Connectthecablesasthefollowinginstructions:
• To connect the power cord:Connectoneendofthepowercordto
the monitor’s AC IN input and the other end to a power outlet.
• To use the USB Type-A/B ports:TakethesuppliedUSB3.2cable,
andplugthesmallerend(Type-B)oftheUSBupstreamcabletothe
monitor’sUSBupstreamport,andthelargerend(Type-A)toyour
computer’s USB 3.2 port. Make sure your computer is installed with the
lastestWindows10/Windows11operatingsystem.Thatwillenable
the USB hub function on the monitor to work.
• To connect the DisplayPort/HDMI/USB Type-C cable:
a.PlugoneendoftheDisplayPort/HDMI/USBType-Ccabletothe
monitor’s DisplayPort/ HDMI/USB Type-C port.
b. Connect the other end of the DisplayPort/HDMI/USB Type-C cable
toyourcomputer'sDisplayPort/HDMI/USBType-Cport.
• To use the earphone:Connecttheendwith3.5mmaudiojacktothe
monitor’s earphone jack.
2-5
Chapter 2: Setup
2.5 Turning On the Monitor
Press the button on the monitor to turn on the monitor.
If the Power Indicator function is enabled and an input source is detected,
thepowerLEDwilllightupredtoindicatethatthemonitoristurnedon.
ThepowerLEDwillnotlightupinPowerSavingmode.
You can also press any button to turn on the monitor when the monitor is
turned off.
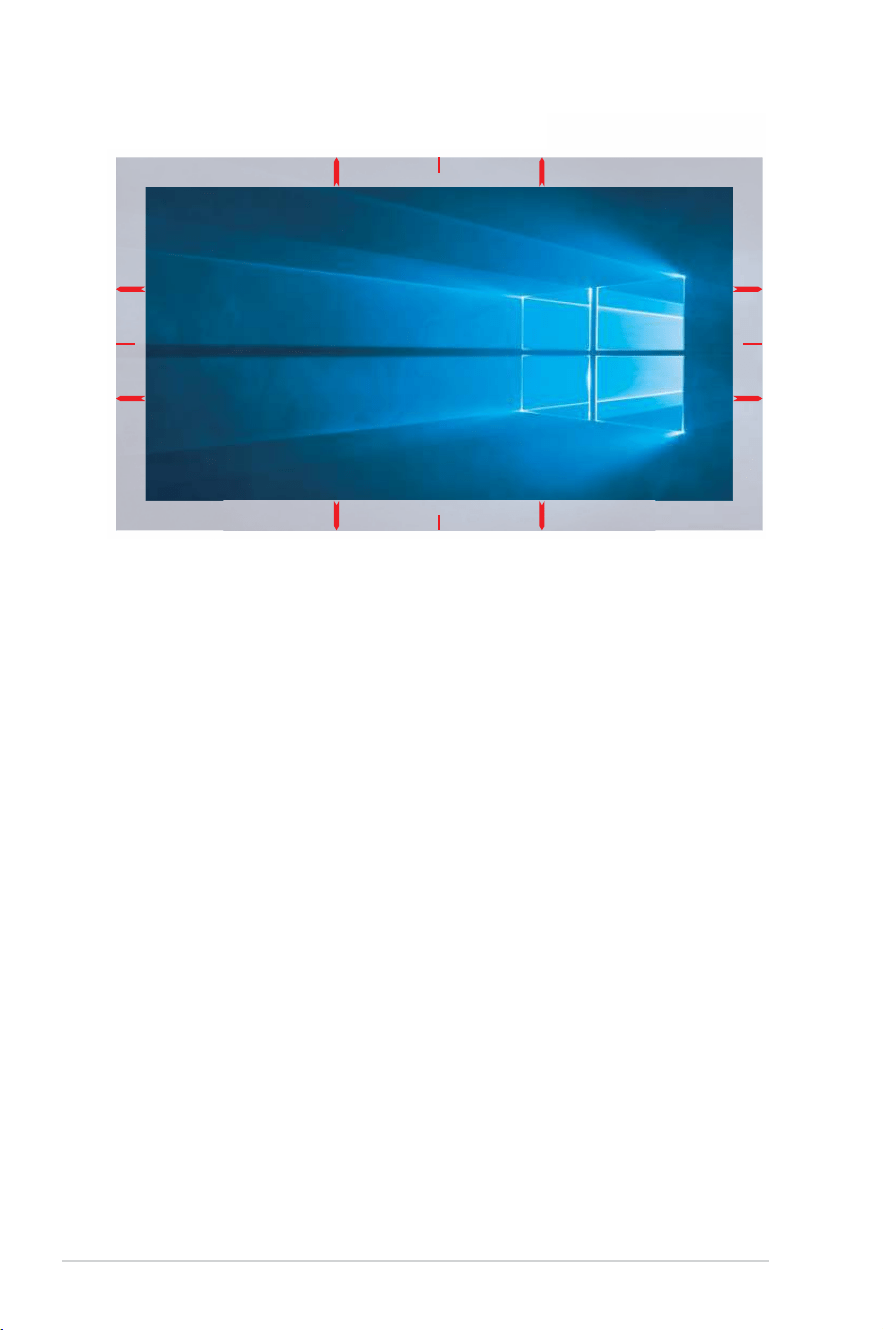
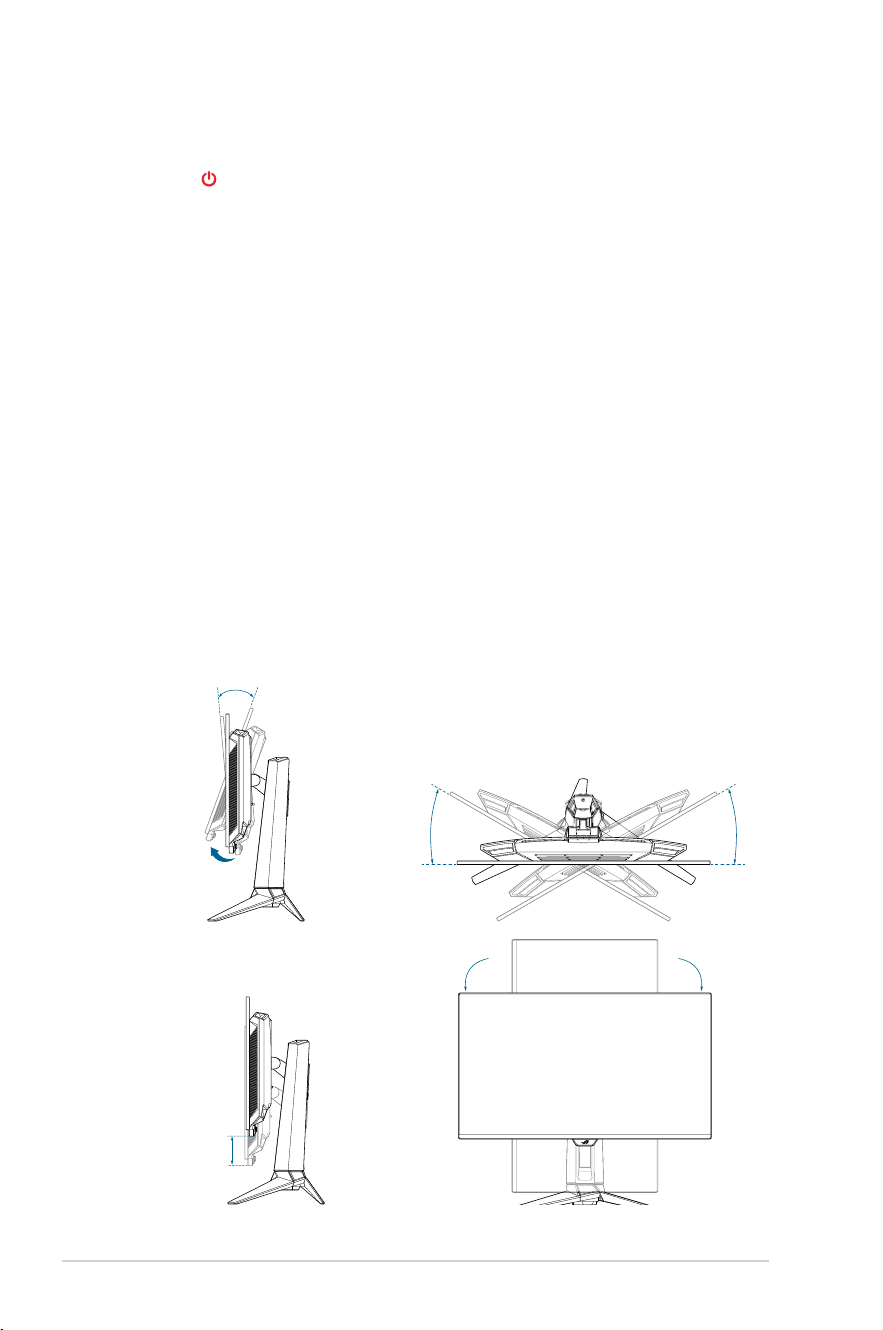
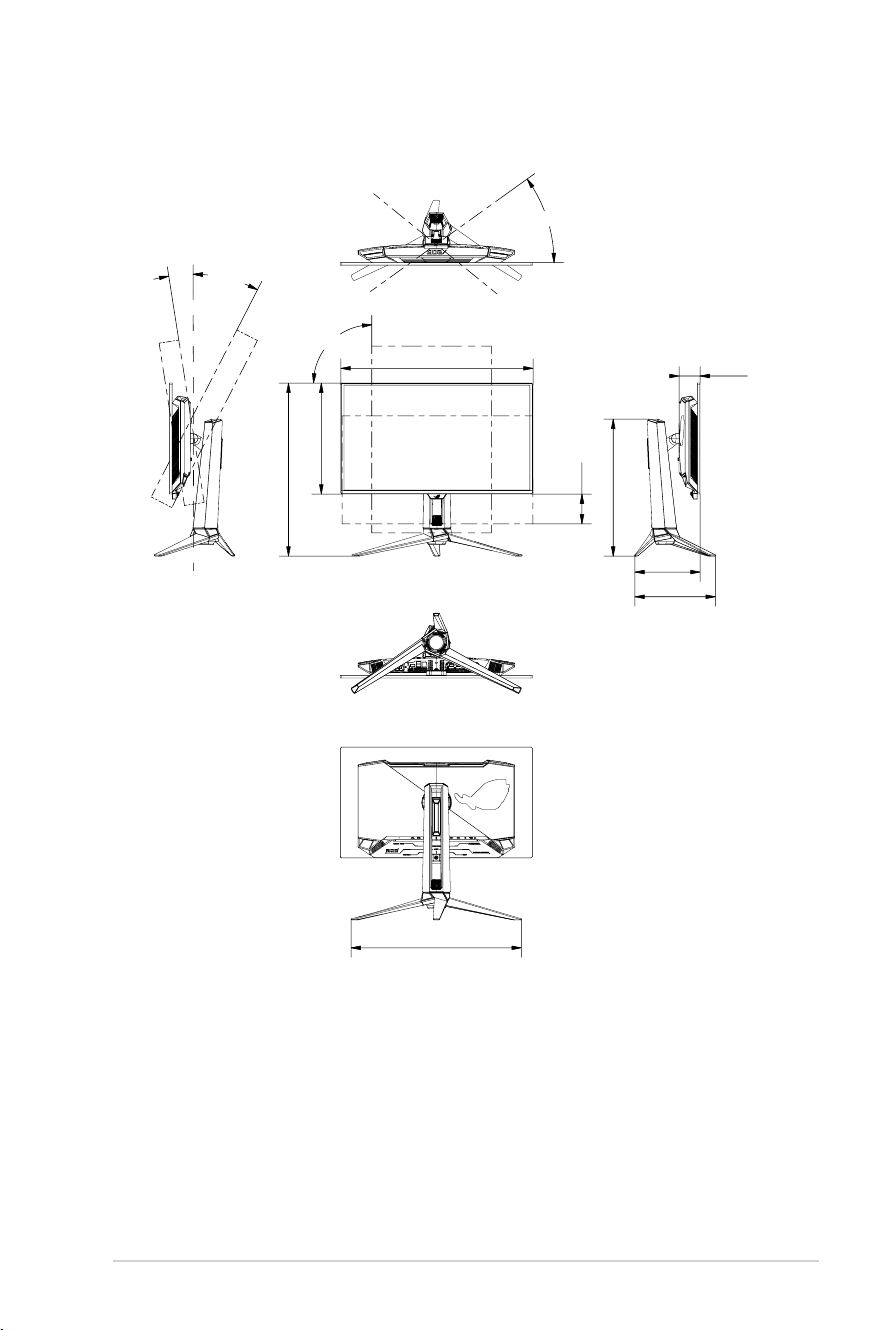
2.6 Adjusting the Monitor
• Foroptimalviewing,werecommendthatyoulookatthefullfaceofthe
monitor,thenadjustthemonitortotheanglethatismostcomfortable
for you.
• Holdthestandtopreventthemonitorfromfallingwhenyouchangeits
angle.
• Youcanadjustthemonitor'sanglefrom-5°to20°anditallows30°
swiveladjustmentfromeitherleftorright.Youcanalsoadjustthe
monitor'sheightwithin±110mmandrotatethemonitor(90˚clockwise
orcounter-clockwise)toportraitorientation.
-5° 20°
30°30°
110m
m
0°
-90°
0°
-90°
3-1
ROG Swift PG27UCDM Gaming Monitor
Chapter 3: General Instructions
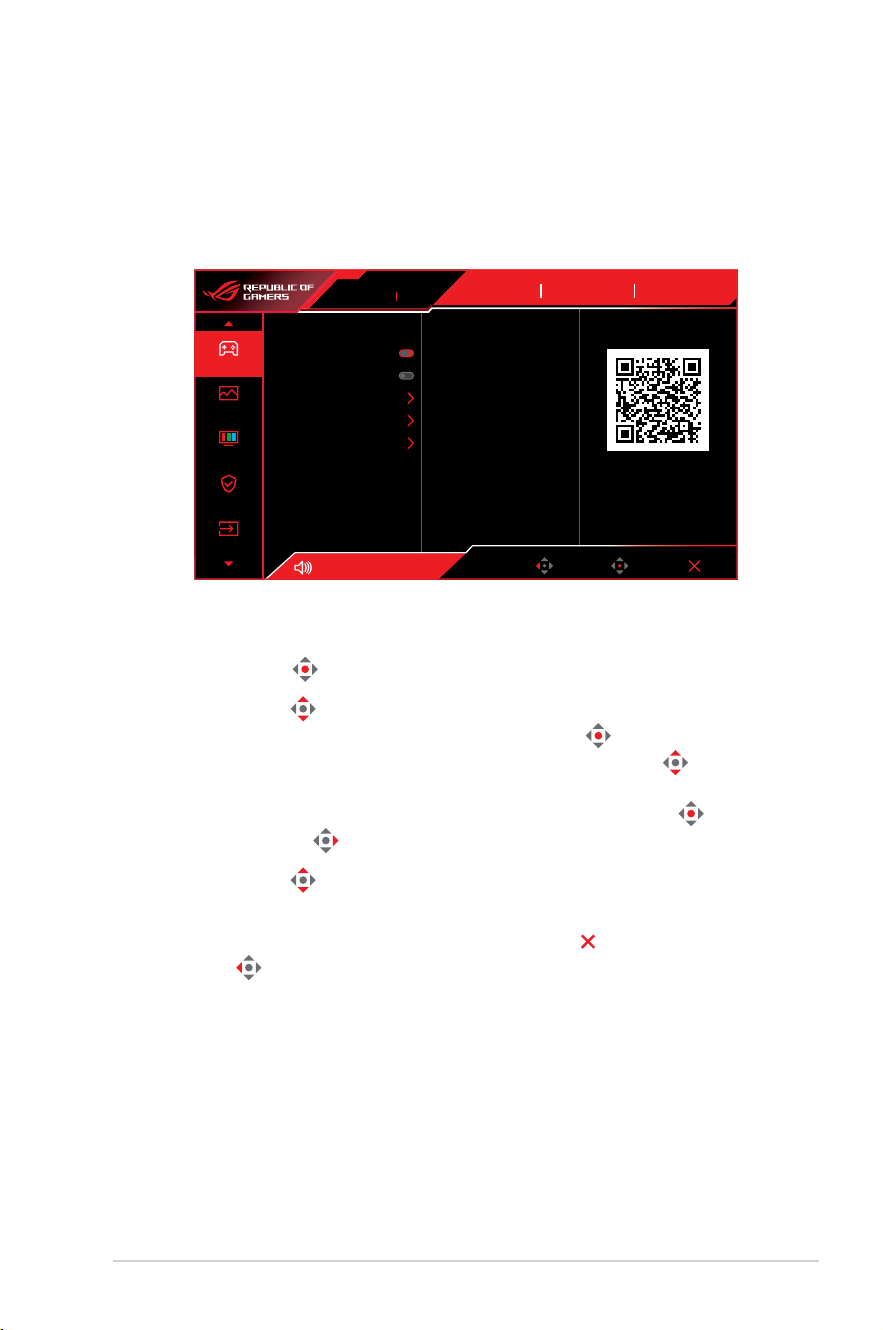
3.1 OSD (On-Screen Display) Menu
3.1.1 How to Recongure
Usethecontrolbuttonsonthemonitortonavigatethroughthemenu
and make adjustments.
Gaming
Image
Color
OLED Care
Input Select
Racing Mode
GameVisual
DisplayPort
Input Select
OFF
HDR
Variable Refresh Rate
ELMB
GamePlus
GameVisual
Shadow Boost
ASUS DisplayWidget Center
Back Enter ExitVolume 50
ASUS DisplayWidget Center
Learn More
ROG SWIFT PG27UCDM
3840 x 2160 60Hz
Tonavigatethroughthemenuandmakeadjustments,dothe
following:
1. Press the
button to activate the OSD menu.
2. Move the
buttonup/downtonavigatethroughthefunctions.
Highlightthedesiredfunctionandpressthe
button to activate
it. If the function selected has a sub-menu, move the button
up/downagaintonavigatethroughthesub-menufunctions.
Highlightthedesiredsub-menufunctionandpressthe
button
or move the buttonrighttoactivateit.
3. Move the
buttonup/downtochangethesettingsofthe
selected function.
4. To exit and save the OSD menu, press the
button or move
the
button left repeatedly until the OSD menu disappears. To
adjust other functions, repeat steps 1 to 3.
3-2
Chapter 3: General Instruction
3.1.2 OSD Function Introduction
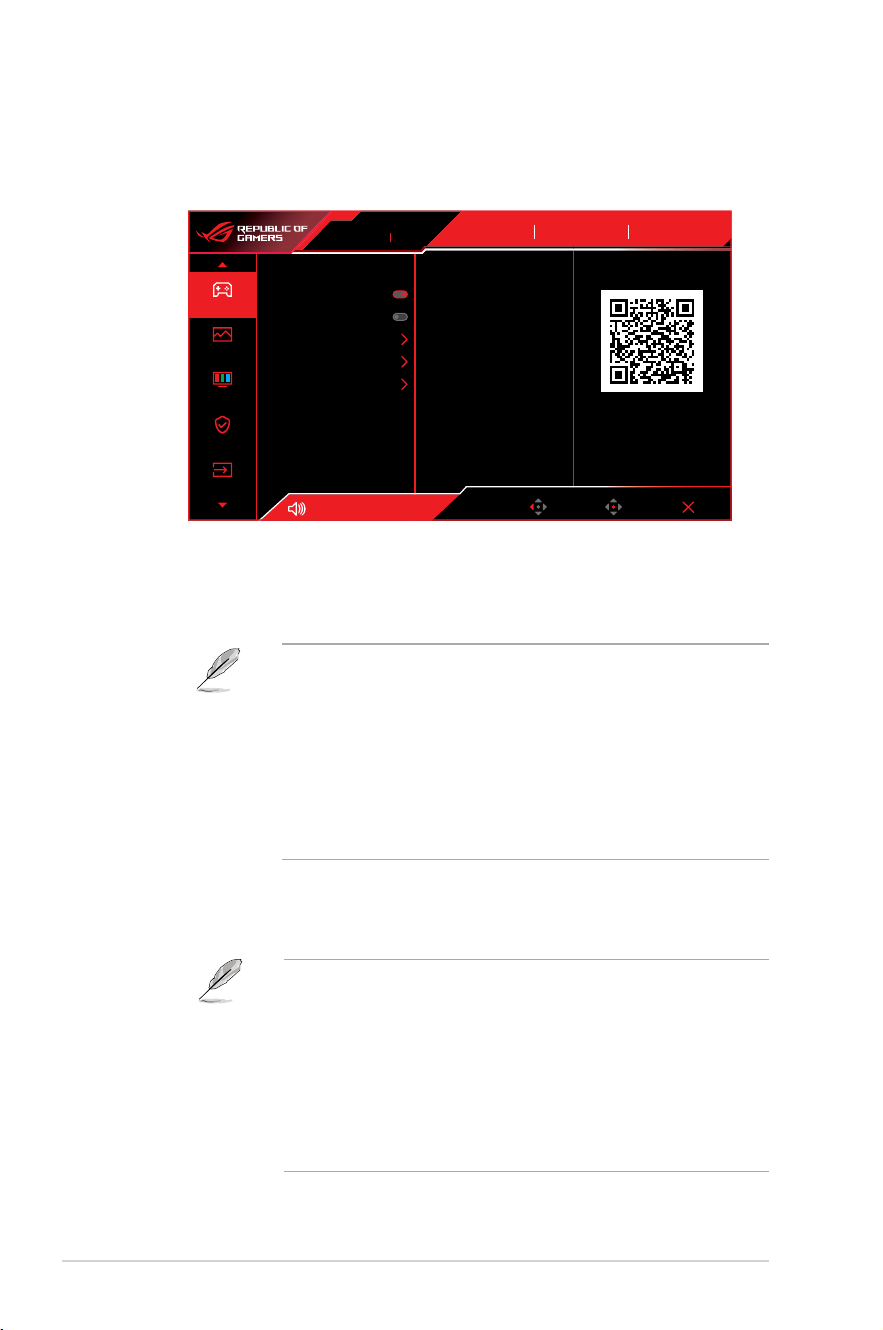
1. Gaming
Configureyourgamingpreferences.
Gaming
Image
Color
OLED Care
Input Select
Racing Mode
GameVisual
DisplayPort
Input Select
OFF
HDR
Variable Refresh Rate
ELMB
GamePlus
GameVisual
Shadow Boost
ASUS DisplayWidget Center
Back Enter ExitVolume 50
ASUS DisplayWidget Center
Learn More
ROG SWIFT PG27UCDM
3840 x 2160 60Hz
• Variable Refresh Rate:AllowsanVariableRefreshRate
supportedgraphicssourcetodynamicallyadjustdisplayrefresh
ratebasedontypicalcontentframeratesforpowerefcient,
virtually stutter free and low-latency display update.
• Thisfunctioncanonlybeactivatedwithin48Hz~240Hzfor
HDMI and DisplayPort.
• For supported GPUs, minimum PC system and driver
requirements, please contact the GPU manufactures.
• ThefollowingfunctionwillbedisabledwhenVariableRefresh
Rate turn on.
– PIP/PBP
– ELMB
– Aspect Control
• ELMB:ConfiguretheELMBrelatedsettings.Thisfunction
eliminatesscreentearing,reducesghostingandmotionblur
whenplayinggames.
• ToactivateELMB,turnoffVariableRefreshRatefunctionrst.
• ThefollowingfunctionwillbedisabledwhenELMBturnon.
– Variable Refresh Rate
– BlueLightFilter
– Aspect Control
– PIP/PBP
– Brightness
– UniformBrightness
• Thisfunctionisonlyavailablewhentherefreshrateis120Hz.

3-3
ROG Swift PG27UCDM Gaming Monitor
• GamePlus:Configurethegamingenvironment.
See 1.3.3 GamePlus Function for details.
• GameVisual:Selectthepicturemode.
See 1.3.4 GameVisual Function for details.
WhenHDRfunctionisturnedon,GameVisualwillbedisabled.
• Shadow Boost:Adjustthemonitorgammacurvetoenrichthe
darktonesinanimage,makingdarkscenesandobjectsmuch
easier to be seen.
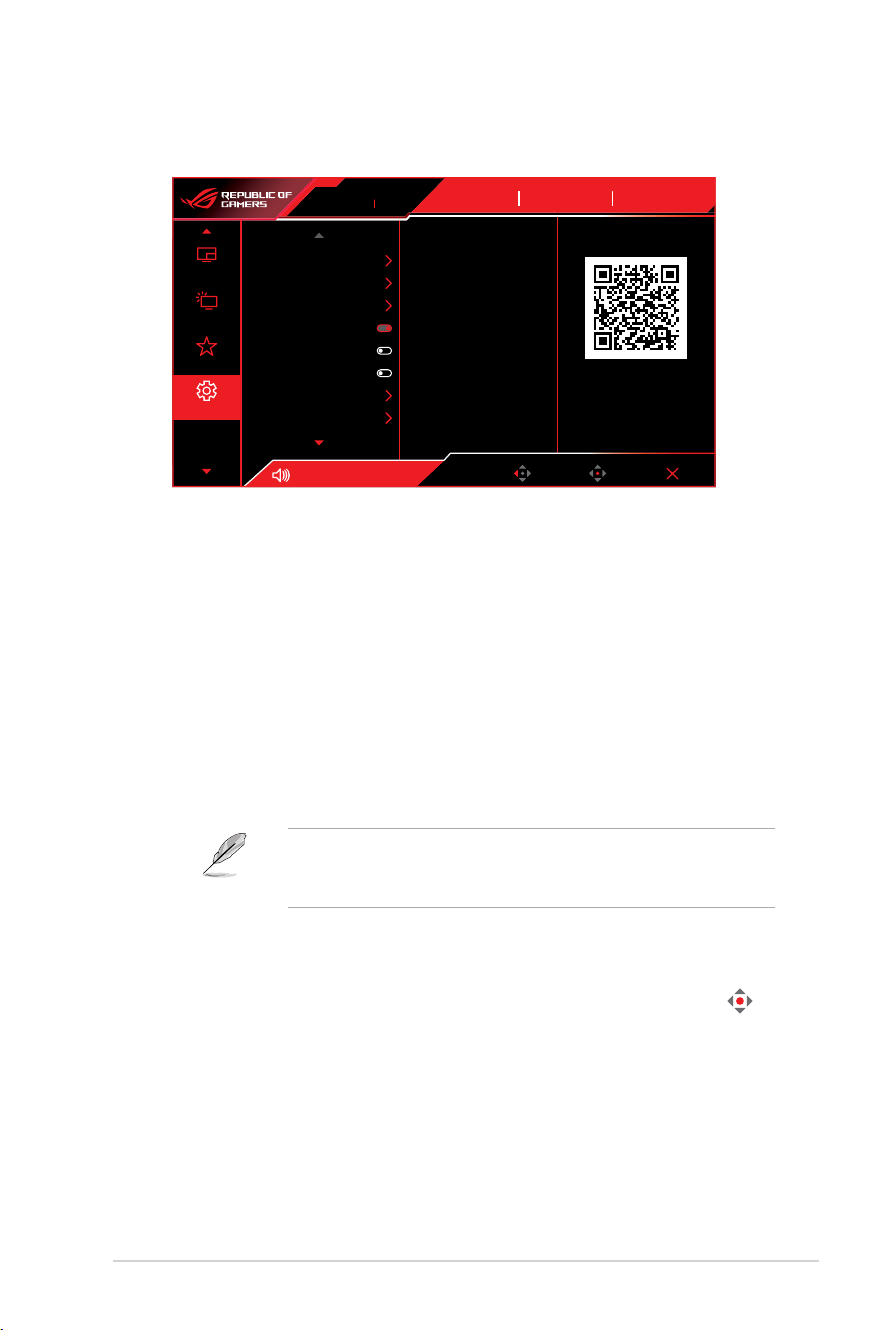
• ASUS DisplayWidget Center:DisplayaQRcodeforyouto
accesstheinformationaboutASUSDisplayWidgetCenter.

3-4
Chapter 3: General Instruction
2. Image
Conguretheimagesettings.
Gaming
Image
Color
OLED Care
Input Select
Brightness
Uniform Brightness
Contrast
OLED Anti-Flicker
HDR Format
HDR Setting
Aspect Control
Blue Light Filter
80
80
Volume 50
Racing Mode
GameVisual
OFF
HDR
DisplayPort
Input Select
Back Enter Exit
ASUS DisplayWidget Center
Learn More
ROG SWIFT PG27UCDM
3840 x 2160 60Hz
• Brightness:Adjustthebrightnesslevel.
• Uniform Brightness:Withthefeatureenabled,thesystem
willnotadjustthemaximumbrightnessofthescreenwhenthe
screen is displayed in a different screen size.
• Contrast:Adjustthecontrastlevel.
• OLED Anti-Flicker:Designedtoenhanceyourviewing
experiencebystabilizingtherefreshratewithinaspecified
range.
• OLEDAnti-Flickeronlysupportsinthelimitedrefreshrate.
• This function is only available when the input source is
DisplayPort or USB-C.
• HDR Format:SelectHDRformat.
• HDR10:SupportsHDR10format.
• DolbyVision:SupportsDolbyVisionformat.

3-5
ROG Swift PG27UCDM Gaming Monitor
• HDR Setting:SelectHDRmode.
• Gaming HDR:Includesabuilt-inDynamicBrightnessBoost
function that cannot be disabled.
• Cinema HDR:Includesabuilt-inDynamicBrightnessBoost
function that cannot be disabled.
• Console HDR
• DisplayHDR 400 True Black
• Adjustable HDR:TheHDRbrightnesscanbeadjusted
when the Adjustable HDR function is enabled. HDR PQ
curve will be affected when the Adjustable HDR is ON under
HDR mode.
• Dynamic Brightness Boost:Thisfunctionisdesignedfor
usewithConsoleHDR.Enablingthisfunctionwillenhance
theHDRbrightness.
• DolbyVision Setting:SelectDolbyVisionmode.
Ô DolbyVisionBright
Ô DolbyVision Dark
Ô DolbyVisionGaming
• DolbyVisionSettingisonlyavailablewhenHDR Format is
DolbyVision and the monitor receives DolbyVision content.
• WhendisplayingHDRcontent,thefollowingfunction(s)arenot
available:
– ELMB
– PIP/PBP
– GameVisual
– Shadow Boost
– Contrast
– BlueLightFilter
– Color Temp.
– Gamma
– Saturation
– PowerSaving
– Display Color Space
– Six-axis Saturation
– Sniper
– SniperNightVision
– Brightness
– UniformBrightness
3-6
Chapter 3: General Instruction
• Aspect Control:Selecttheaspectratioandadjustthescreen
position.
• ThefollowingfunctionwillbedisabledwhenAspectControl
turn on.
– Variable Refresh Rate
– ELMB
– PIP/PBP
• Blue Light Filter:Reducetheenergylevelofbluelightemitted
fromtheharmfulbluelight.
• OFF:Nochange.
• Level 1~4:Thehigherthelevel,thelessbluelightis
scattered.WhenBlueLightFilterisactivated,thedefault
settingsofRacingModewillbeautomaticallyimported.
Ô BetweenLevel1toLevel3,theBrightnessfunctionis
user-configurable.
Ô Level4isoptimizedsetting.TheBrightnessfunctionis
notuser-configurable.
• The ELMB function will be disabled when Blue Light Filter is
turned on.
• Themonitoruseslowbluelightpanelandcompliancewith
TUVRheinlandLowBlueLightHardwareSolutionatfactory
reset/defaultsettingmode.
Pleaserefertothefollowingtoalleviateeyestrains:
• Usersshouldtakesometimeawayfromthedisplayifworking
forlonghours.Itisadvisedtotakeshortbreaks(atleast
5mins)afteraround1hourofcontinuousworkingatthe
computer.Takingshortandfrequentbreaksismoreeffective
thanasinglelongerbreak.
• To minimize eye strain and dryness in your eyes, users should
resttheeyeperiodicallybyfocusingonobjectsthatarefar
away.
• Eyeexercisescanhelptoreduceseyestrain.Repeatthese
exercises often. If eye strain continues please consult a
physician.Eyeexercises:(1)Repeatinglookupanddown
(2)Slowlyrollyoureyes(3)Moveyoureyesdiagonal.
• HighenergybluelightmayleadtoeyestrainandAMD(Age-
RelatedMacularDegeneration).Bluelightltertoreduce70%
(max.)harmfulbluelighttoavoidingCVS(ComputerVision
Syndrome).
• VividPixel:Enhancetheoutlineofthedisplayedpictureand
generateshigh-qualityimagesonscreen.
3-7
ROG Swift PG27UCDM Gaming Monitor
3. Color
Configuretheimagecolorsettings.
Gaming
Image
Color
OLED Care
Input Select
Display Color Space
Color Temp.
Saturation
Six-axis Saturation
Gamma
50
Volume 50
Racing Mode
GameVisual
OFF
HDR
DisplayPort
Input Select
Back Enter Exit
ASUS DisplayWidget Center
Learn More
ROG SWIFT PG27UCDM
3840 x 2160 60Hz
• Display Color Space:Selectthecolorspaceforthemonitor
color output.
• Color Temp.:Contain8modesincluding4000K,5000K,6500K,
7500K,8200K,9300K,10000KandUsermode.
• Saturation:Adjustthesaturationlevel.
• Six-axis Saturation:AdjustthesaturationforR,G,B,C,M,Y.
• Gamma:Allowyoutosetthecolormodeto1.8,2.0,2.2,2.4
and2.6.
3-8
Chapter 3: General Instruction
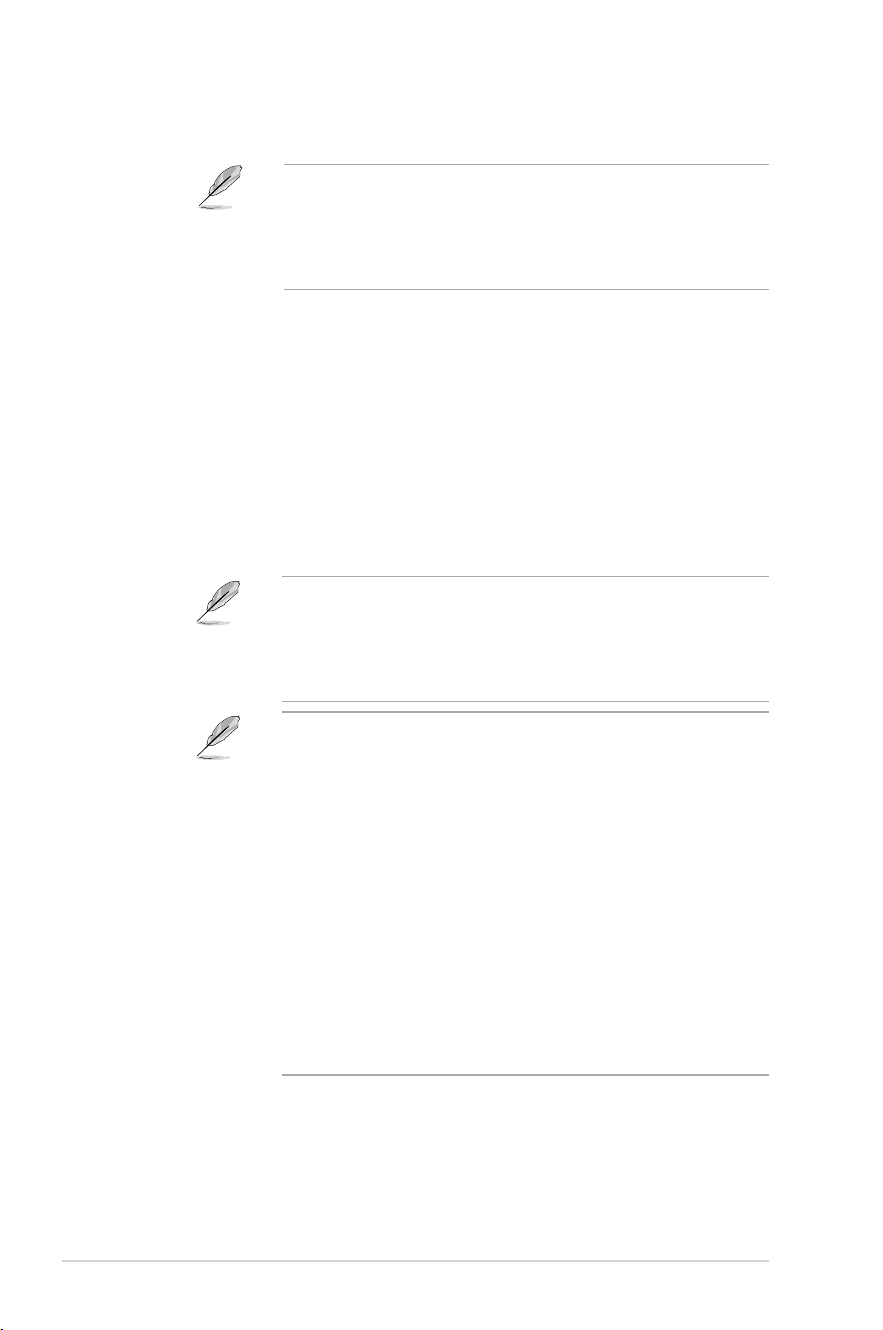
4. OLED Care
Configurethescreenprotectionrelatedsettings.
Gaming
Image
OLED Care
Color
Input Select
Volume 50
Racing Mode
GameVisual
OFF
HDR
DisplayPort
Input Select
Back Enter Exit
Screen Saver
Pixel Cleaning
Pixel Cleaning Reminder
Screen Move
Auto Logo Brightness
Neo Proximity Sensor
OLED Usage Info
ASUS DisplayWidget Center
Learn More
ROG SWIFT PG27UCDM
3840 x 2160 60Hz
• Screen Saver:Enable/Disablethescreensaverfunction.The
screenbrightnesswillautomaticallydecreasewhenthereisno
changeonthescreen.
• Pixel Cleaning:Itcalibratesanyissuesthatmayariseonthe
screenwhenyourmonitorhasbeenturnedonforalongtime.
Theprocesswilltakeapproximately6minutes.Thisfunction
will automatically activate when the monitor is turn off. Do not
unplugthepowercordwhileitisinprogress.Ifyoupoweronthe
monitor,thePixelCleaningwillstopoperating.
• Pixel Cleaning Reminder:Setareminderforusertoperform
thePixelCleaning.
ThescreenmayhavemuraandimagestickingduetoOLED
characteristicduringtheinitialuseorre-usedafteralongtime.Itis
advisedtoperformPixelCleaningwhileturningonmonitortomake
sure situation disappear.
• Screen Move:Selectthescreenmovementleveltoprevent
imagestickingonthedisplaypanel.
• Auto Logo Brightness:Enablethisfunctiontoallowthe
systemtoautomaticallyadjustthelogobrightnesstocorrectthe
potential picture quality issues.
3-9
ROG Swift PG27UCDM Gaming Monitor
• Neo Proximity Sensor:Ifthefunctionisenabledandthe
systemdoesnotdetectthepresenceofobjectwithin60cm–
120cm(dependingonyourselection)overthepresenttime,the
monitor will apply Screen-off.
Screenofftimecanbesetas1minute,5minutes,or10
minutes.
• Tailored mode:AllowsuserstocustomizetheNeo
Proximity Sensor detection distance. It is recommended to
setthedistancewithin120cm.Afterasetperiodoftime,the
monitor will apply Screen-off.
• Theangleandplacementofthemonitorsensormightaffect
thesignaldetectionresults.
• Beforeusingthesensor,makesurethesensorwindowisclean
andfreeofdirt,andensurethatnoobjectsarecoveringthe
sensor window.
• OLED Usage Info:RecordthenumberoftimesthePixel
CleaninghasbeenperformedanddisplaysthePixelCleaning
interval information.
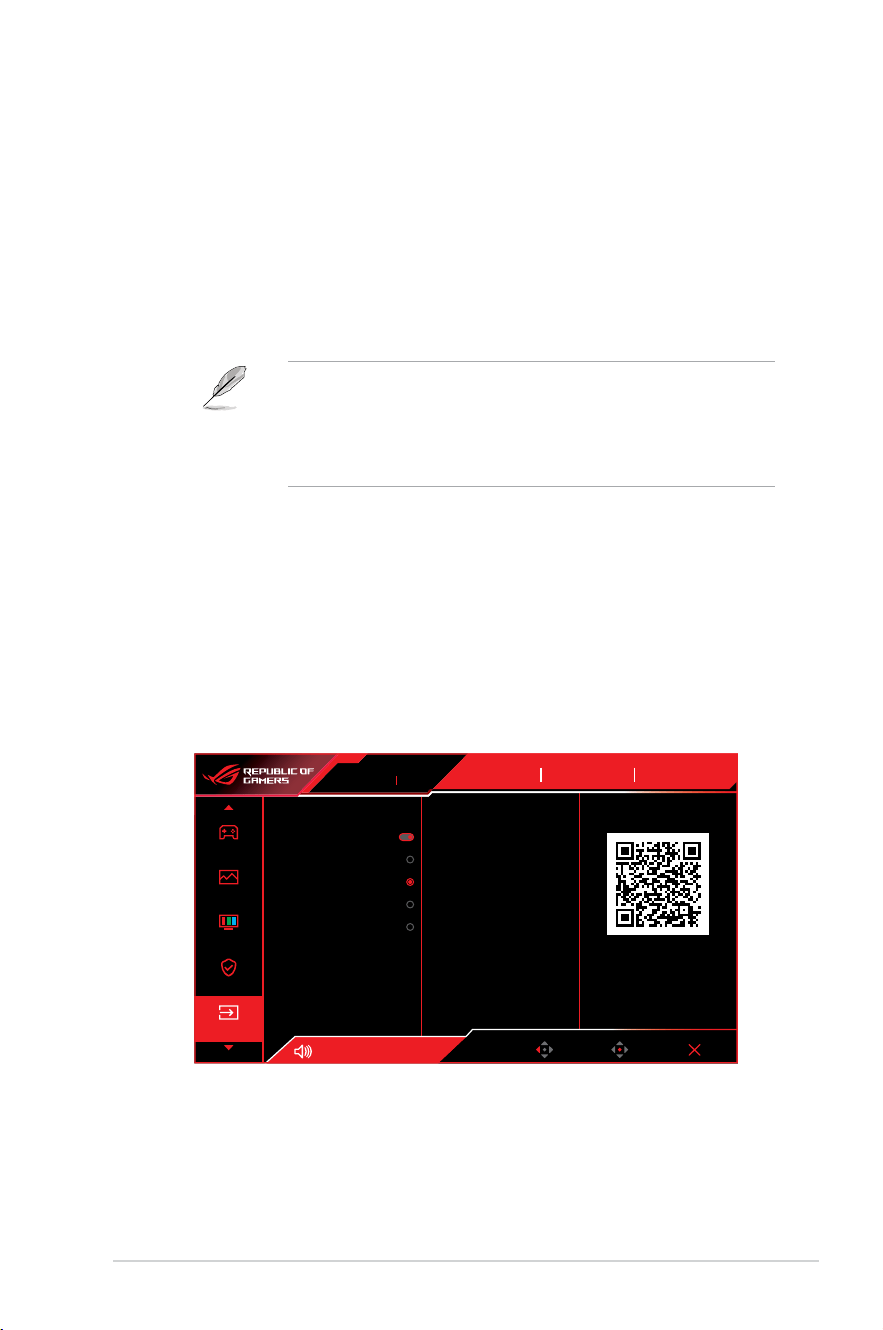
5. Input Select
SelectyourdesiredinputsourceandtoggletheAutoInputDetection
function between on and off. The monitor input source will not
automatically switch when the Auto Input Detection function is
disabled.
Gaming
Image
Color
Input Select
OLED Care
Auto Input Detection
USB-C
DisplayPort
HDMI-1
HDMI-2
Volume 50
Racing Mode
GameVisual
OFF
HDR
DisplayPort
Input Select
Back Enter Exit
ASUS DisplayWidget Center
Learn More
ROG SWIFT PG27UCDM
3840 x 2160 60Hz
3-10
Chapter 3: General Instruction
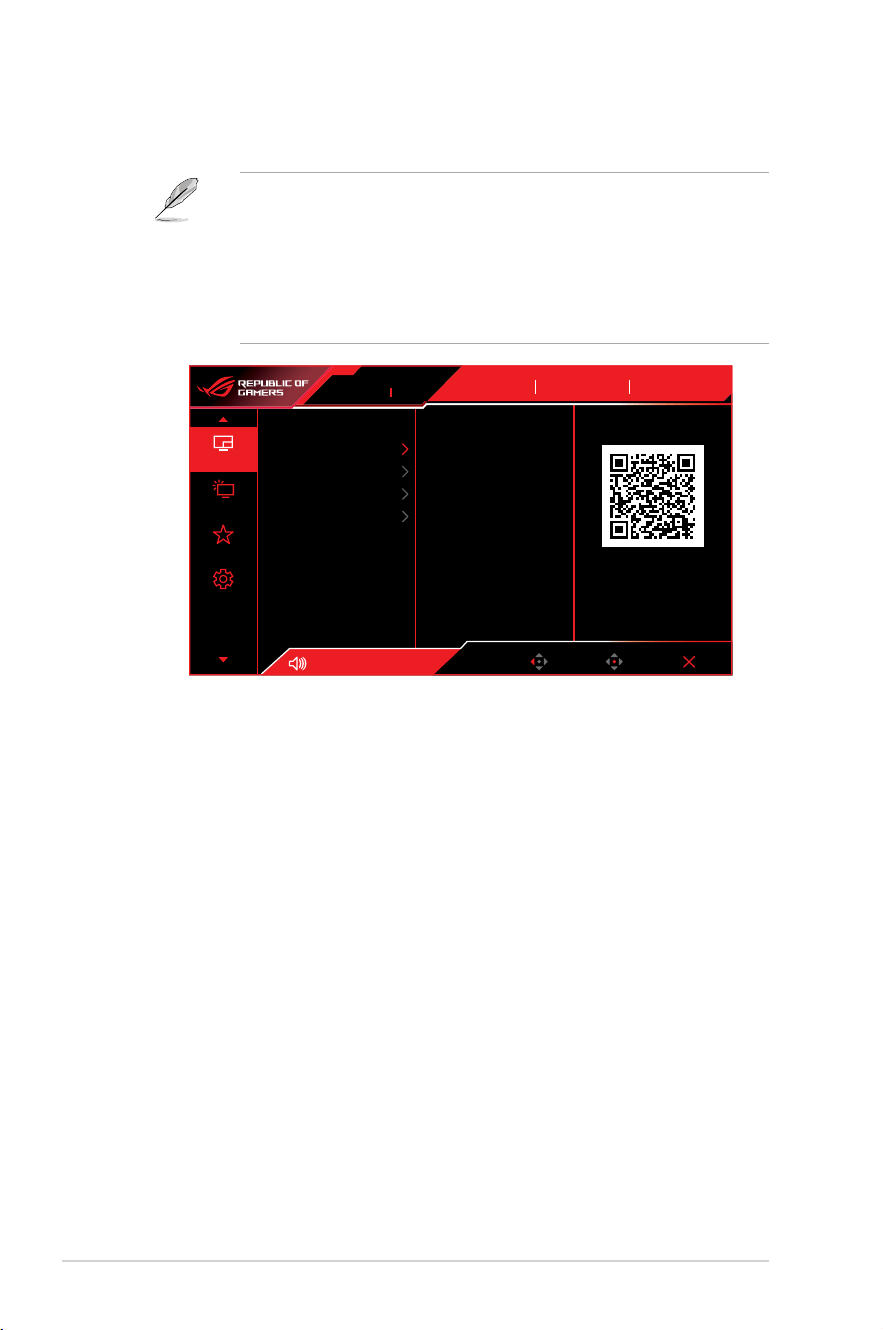
6. PIP/PBP
Congurethemulti-picturerelatedsettings.
• PIP/PBPmodecan'tsupportHDRfunction.
• ThefollowingfunctionwillbedisabledwhenPIP/PBPmodeturnon.
– Variable Refresh Rate
– ELMB
– Sniper
– Aspect Control
– DSC Support
System Setup
MyFavorite
Lighting Effect
PIP/PBP
PIP/PBP Mode
PIP/PBP Source
Color Setting
PIP Size
Volume 50
Racing Mode
GameVisual
OFF
HDR
DisplayPort
Input Select
Back Enter Exit
ASUS DisplayWidget Center
Learn More
ROG SWIFT PG27UCDM
3840 x 2160 60Hz
• PIP/PBP Mode:EnablethePIP/PBPfunctionandselectthesplit
screen type.
• PIP/PBP Source:Selectthevideoinputsourceforthe
designatedsplitscreen.
• Color Setting:SettheGameVisualmodeforthedesignatedsplit
screen.
• PIP Size:AdjustthePIPsizetoSmall,Middle,orLarge.
3-11
ROG Swift PG27UCDM Gaming Monitor
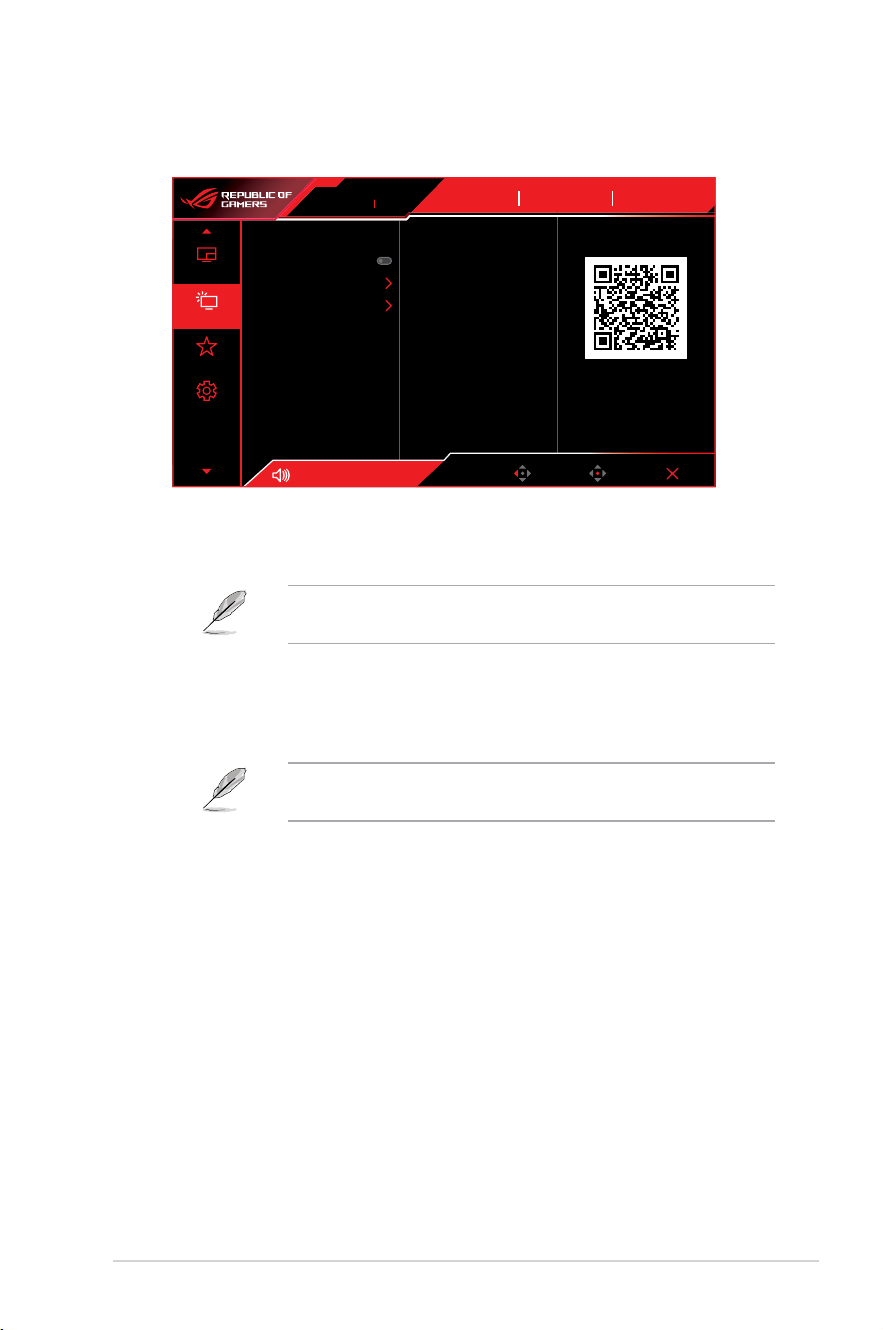
7. Lighting Eect
Configurethelightingeffectfortherearcoverandbasecover.
System Setup
MyFavorite
Lighting Effect
PIP/PBP
Aura Sync
Aura RGB
LIGHT IN MOTION
Volume 50
Racing Mode
GameVisual
OFF
HDR
DisplayPort
Input Select
Back Enter Exit
ASUS DisplayWidget Center
Learn More
ROG SWIFT PG27UCDM
3840 x 2160 60Hz
• Aura Sync:AllowyoutoturnonorofftheAuraSyncfunction
thatsynchronizestheAuraRGBlighteffectamongallsupported
devices.
The Aura RGB function will be disabled when AURA Sync is
turned on.
• Aura RGB:Therearefivelivingcolorsthatcanbechosen:
Rainbow, Color Cycle, Static, Breathing, Strobing, and OFF.
YoucanmanuallychangetheR/G/B/C/M/YcolorforStatic,
Breathing, and Strobing modes.
The Aura Sync function will be disabled when AURA RGB is
turned on.
• LIGHT IN MOTION:Selectthebrightnesslevelofthelighton
thestand.TheadjustingrangeisfromLevel 1~Level 3 and
OFF.
3-12
Chapter 3: General Instruction
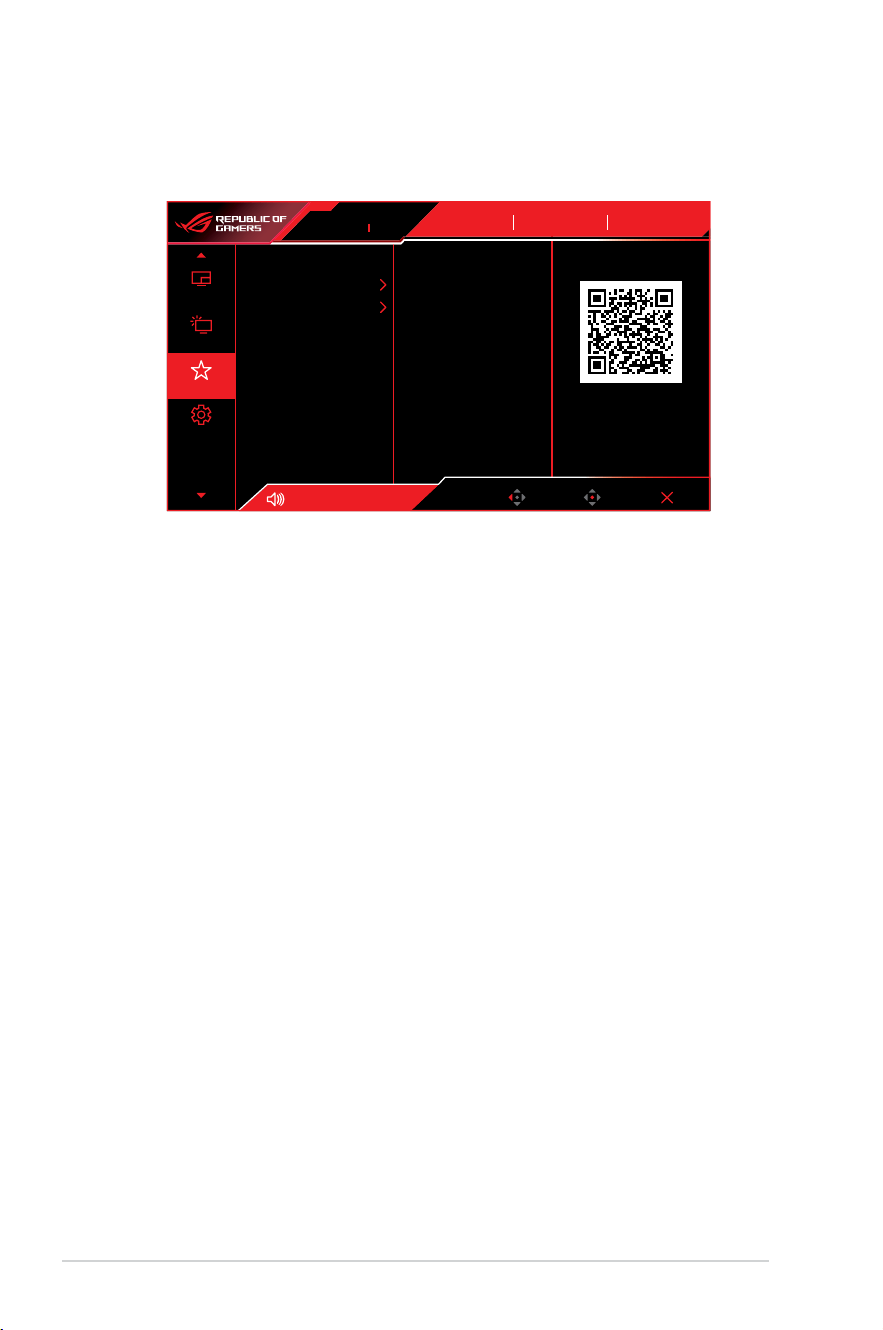
8. MyFavorite
Assignafunctiontotheshortcutbutton,savethecurrentsystem
congurations,orrestorethesystemconguration.
System Setup
MyFavorite
Lighting Effect
PIP/PBP
Shortcut
Customized Setting
Volume 50
Racing Mode
GameVisual
OFF
HDR
DisplayPort
Input Select
Back Enter Exit
ASUS DisplayWidget Center
Learn More
ROG SWIFT PG27UCDM
3840 x 2160 60Hz
• Shortcut:Assignafunctionforthedesignatedshortcutbutton.
• Customized Setting:Load/Saveallsettingsonthemonitor.
3-13
ROG Swift PG27UCDM Gaming Monitor
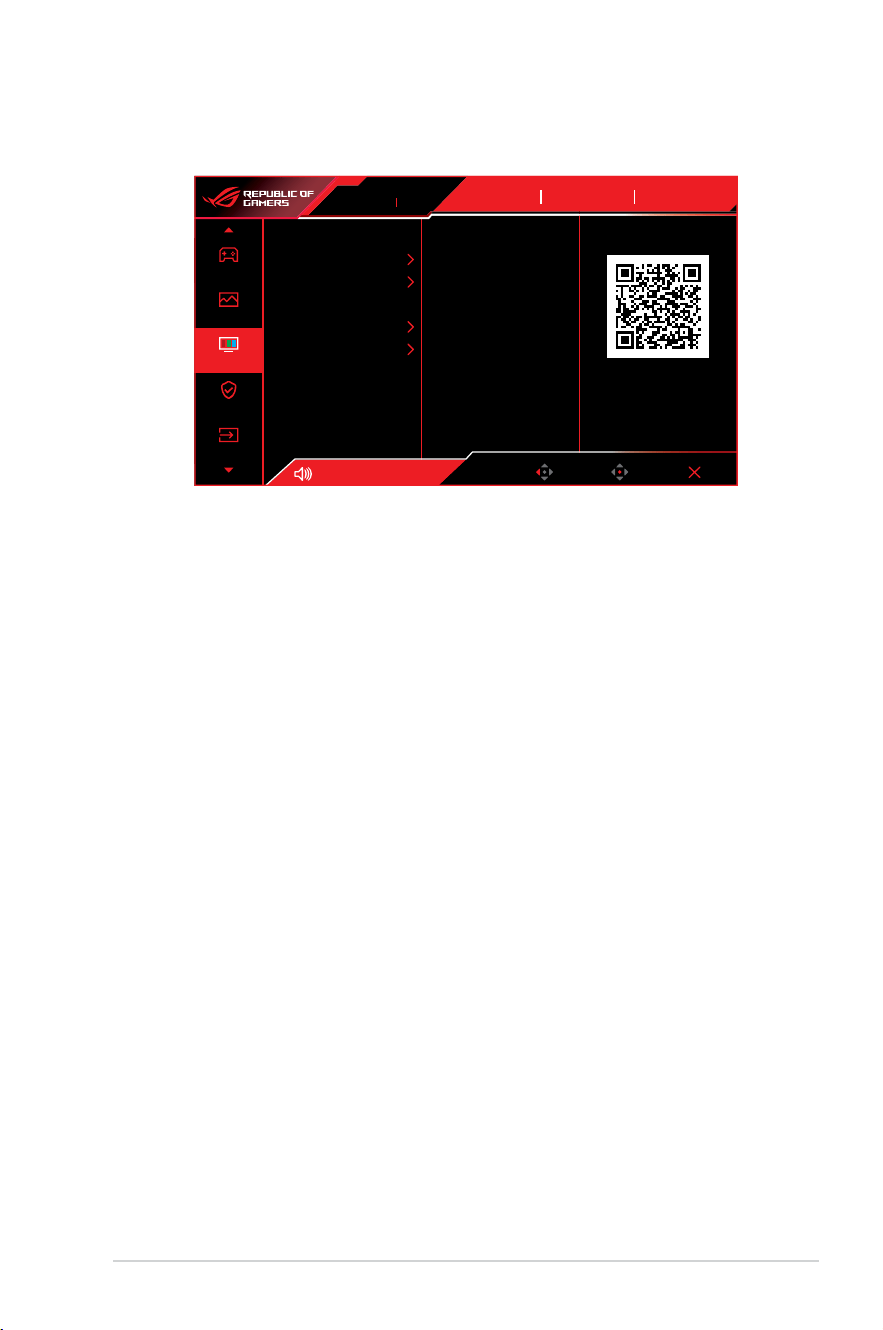
9. System Setup
Adjustthesystemcongurations.
System Setup
MyFavorite
Lighting Effect
PIP/PBP
Language
Sound
USB Setup
Power Indicator
Power Key Lock
Key Lock
Power Setting
OSD Setup
Volume 50
Racing Mode
GameVisual
OFF
HDR
DisplayPort
Input Select
Back Enter Exit
ASUS DisplayWidget Center
Learn More
ROG SWIFT PG27UCDM
3840 x 2160 60Hz
• Language:SelecttheOSDlanguage.
• Sound:Configurethesoundrelatedsettings.
• Volume (Earphone Out):Adjustthevolumelevel.
• Mute:Enable/Disablethemutefunction.
• Sound Source:Selectthemonitorsoundcomesfromwhich
source.
• USB Setup:ConfiguretheUSBportsettings.
• KVM:ConfigureKVMsettingsforeachinputsource.
• Type-C Bandwidth:SelectUSBType-CwithUSB2.0or
USB3.2.USB3.2isupto3840x2160@120Hz.
• USB Hub:SettheUSBHubavailabilityduringstandby.
Once the USB Type-C cable is connected to the device, the USB
HubsettingisautomaticallysettoOn During Standby. The Off
During Standby option will be disabled.
• Power Indicator:TurnthepowerLEDindicatoron/off.
• Power Key Lock:Disable/EnablethePowerkey.
• Key Lock:Todisableallfunctionkeys.Pressandholdthe
button downward for more than five seconds to cancel the key
lock function.
• Power Setting:
Selectthepowersettingmode.
IfthesettingissettoPerformance Mode, it may result in
higherpowerconsumption.Ontheotherhand,ifthesettingis
set to Power Saving Mode, it may cause limited luminance
performance.

3-14
Chapter 3: General Instruction
• OSD Setup:ConfiguretheOSDmenurelatedsettings.
• OSD Position:SettheOSDmenuposition.
• OSD Timeout:AdjusttheOSDtimeout.
• Transparency:AdjusttheOSDbackgroundfromopaqueto
transparent.
• DDC/CI:Enable/DisabletheDDC/CIfunction.
DDC/CI option can be adjusted when VRR is OFF.
• DisplayPort Stream:Compatibilitywithgraphiccard.Select
DisplayPort1.2,DisplayPort1.4,orDisplayPort2.1bygraphic
card supported DP version.
• DSC Support:Enable/DisabletheDSC(DisplayStream
Compression)function.
• ASUS Power Sync:Allowthepoweron/offcontroloftheconsole
device or setup box, such as Apple TV, Sony PlayStation, Xbox
SeriesX/S,NintendoSwitchthroughthemonitor.Thedefault
settingisOFF.Ifthemonitoristurnedon,theCECsourcedevice
willautomaticallypoweron,andviceversa.IftheCECsource
device is turned on, the monitor will automatically power on.
• Color Calibration:Viewthecalibrationreport.
• Color Calibration Report:Viewthecolorcalibrationreportfor
this monitor.
• Information:Displaythemonitorinformation.
• All Reset:SelectYestorevertallsettingstothefactorydefault
mode.
3-15
ROG Swift PG27UCDM Gaming Monitor
3.2 Specications
Panel type
240Hz
Panel size 26.5"
Max. resolution 3840x2160
Brightness 250nits(typ.)
Contrast ratio 1.5M:1
Viewingangle(H/V)
178°(H)/178°(V)
Display colors 10bit
Response time 0.03ms
Color temperature selection
8modes(4000K/5000K/6500K/7500K/8200K/
9300K/10000K/UserMode)
Analoginput No
Digitalinput
DisplayPort v2.1 x1
HDMI v2.1 x2
USB Type-A x3
USB Type-B x1
USBType-Cx1(DPaltmode)(PD90W)
Earphonejack Yes
SPDIF out No
Speaker(Built-in) No
USB3.2 Gen 1 port
Downstream:USBType-Ax3(5V/0.9A)
Upstream:USBType-Bx1
USB2.0port No
Colors Black
PowerLED
Red(On)
Orange(Standby)
Tilt -5°to20°
Swivel ±30°
Pivot ±90°
Heightadjustment 0to110mm
VESAwallmount 100x100mm
Kensingtonlock Yes
Voltagerating AC100-240V,50/60Hz
Power consumption
PowerOn:<80W**
Powersaving:<0.5W
PowerOff:<0.3W
Temperature(Operating) 0˚Cto40˚C
Temperature
(Non-operating)
-20˚Cto60˚C
Dimensions(WxHxD)
610.3x439.5x218.8mm(withstand,lowest)
610.3x549.5x218.8mm(withstand,highest)
610.3x369.2x66.5mm(withoutstand)

3-16
Chapter 3: General Instruction
Packagedimensions
(WxHxD)
490x894x188mm
Weight
7.62±0.5kg(withstand)
5.0±0.5kg(withoutstand)
12.2±0.5kg(Gross)
Multi-languages
23languages(English,French,German,
Spanish, Italian, Dutch, Russian, Polish, Czech,
Croatian,Hungary,Romania,Portuguese,
Turkey,SimpliedChinese,TraditionalChinese,
Japanese,Korean,Persian,Thai,Indonesian,
Ukrainian,Vietnamese)
Compliance and Standards
cTUVus,CB,CE,ErP,FCC,ICES-003,FDA,
CEC,CCC,BSMI,CU,RCM,VCCI,PSE,CEL,
J-MOSS,RoHS,WEEE,Windows10/11WHQL,
KC,KCC,E-STANDBY,UkraineEnergy,
AUMEPS,VNMEPS,TUV-FlickerFree,
TUV-LowBlueLight
*Specications subject to change without notice.
** Measuring a screen brightness of 200 nits without audio/ USB/ card reader connections.
3-17
ROG Swift PG27UCDM Gaming Monitor
3.3 Outline Dimensions
549.52
352.4
110
610.31
540.38
255.75
207.05
435
66.5
5°
20°
30°
90°
TILT
SWIVEL
PIVOT
LIFT
3-18
Chapter 3: General Instruction
3.4 Troubleshooting (FAQ)
Problem Possible Solution
PowerLEDisnotON • Press any button to check if the monitor is in
the ON mode.
• Check if the power cord is properly connected
to the monitor and the power outlet.
• Check the Power Indicator function in the
OSD menu. Select “ON“ to turn on the power
LED.
ThepowerLEDlightsred
andthereisnoscreenimage
• Check if the monitor and the computer are
turned on.
• Makesurethesignalcableisproperly
connected the monitor and the
computer.
• Inspectthesignalcableandmakesurenoneof
the pins are bent.
• Connect the computer with another available
monitor to check if the computer is properly
working.
Screenimageistoolightor
dark
• Adjust the Contrast and Brightnesssettings
via OSD.
Screenimagebouncesor
a wave pattern is present in
theimage
• Makesurethesignalcableisproperly
connected to the monitor and the
computer.
• Move electrical devices that may cause
electrical interference.
Screenimagehascolor
defects (white does not look
white)
• Inspectthesignalcableandmakesurethat
none of the pins are bent.
• Perform All Reset via OSD.
• Select the appropriate color temperature
(Color Temp.)viaOSD.
HDR content is not played
properly
• Make sure the input source supports HDR
playback(withpropersystemsettingsand
latestsoftware).
• Make sure the content is HDR encoded.

3-19
ROG Swift PG27UCDM Gaming Monitor
3.5 Supported Timing List
Supporting Timing
HDMI DP USB Type-C
640x480@60Hz 640x480@60Hz 640x480@60Hz
640x480@75Hz 640x480@75Hz 640x480@75Hz
800x600@60Hz 800x600@60Hz 800x600@60Hz
800x600@75Hz 800x600@75Hz 800x600@75Hz
1024x768@60Hz 1024x768@60Hz 1024x768@60Hz
1024x768@75Hz 1024x768@75Hz 1024x768@75Hz
1280x960@60Hz 1280x960@60Hz 1280x960@60Hz
1280x1024@60Hz 1280x1024@60Hz 1280x1024@60Hz
1600x1200@60Hz 1600x1200@60Hz 1600x1200@60Hz
720x480@60Hz 720x480@60Hz 720x480@60Hz
720x576@50Hz 720x576@50Hz 720x576@50Hz
1280x720@50Hz 1280x720@50Hz 1280x720@50Hz
1280x720@60Hz 1280x720@60Hz 1280x720@60Hz
1920x1080@24Hz 1920x1080@24Hz 1920x1080@24Hz
1920x1080@25Hz 1920x1080@25Hz 1920x1080@25Hz
1920x1080@30Hz 1920x1080@30Hz 1920x1080@30Hz
1920x1080@50Hz 1920x1080@50Hz 1920x1080@50Hz
1920x1080@60Hz 1920x1080@60Hz 1920x1080@60Hz
1920x1080@100Hz 1920x1080@100Hz 1920x1080@100Hz
1920x1080@120Hz 1920x1080@120Hz 1920x1080@120Hz
2560x1440@60Hz 2560x1440@60Hz 2560x1440@60Hz
2560x1440@120Hz 2560x1440@120Hz 2560x1440@120Hz
3840x2160@24Hz 3840x2160@24Hz 3840x2160@24Hz
3840x2160@25Hz 3840x2160@25Hz 3840x2160@25Hz
3840x2160@30Hz 3840x2160@30Hz 3840x2160@30Hz
3840x2160@50Hz 3840x2160@50Hz 3840x2160@50Hz
3840x2160@60Hz 3840x2160@60Hz 3840x2160@60Hz
3840x2160@97Hz 3840x2160@97Hz 3840x2160@97Hz
3840x2160@100Hz 3840x2160@100Hz 3840x2160@100Hz
3840x2160@120Hz 3840x2160@120Hz 3840x2160@120Hz
3840x2160@240Hz 3840x2160@240Hz 3840x2160@240Hz