Instruction Booklet
Model: RC2126/RC2129
multifunction micom
rice cooker

IMPORTANT SAFEGUARDS
When using electrical appliances, basic safety precautions should
always be followed, including the following:
1. Read all instructions.
2. DO NOT touch hot surfaces. Use handles or knobs and use oven
mitts when lifting the steaming basket or cooking pot from the base.
3. To protect against electrical hazards, do not immerse cord, plugs, or
the appliance in water or other liquid.
4. Close supervision is necessary when any appliance is used by or
near children. Children should be supervised to ensure that they do
not play with the appliance.
5. This appliance is not intended for use by persons (including children)
with reduced physical, sensory, or mental capabilities or lack of
experience and knowledge, unless they have been given supervision
or instruction concerning the use of the appliance by a person
responsible for their safety.
6. Unplug from outlet when not in use and before cleaning. Allow to
cool before putting on or taking o parts, and before cleaning the
appliance.
7. DO NOT operate any appliance with a damaged cord or plug or after
the appliance malfunctions or has been damaged in any manner.
Return appliance to Salton for examination, repair or adjustment.
See Warranty.
8. The use of accessories or attachments not recommended by Salton
may cause hazards.
9. DO NOT use outdoors.
10. DO NOT let cord hang over edge of table or counter where it could
be pulled on inadvertently by children or pets, or touch hot surfaces,
which could damage the cord.
11. DO NOT place on or near a hot gas or electric burner, or in a heated
oven.
12. Extreme caution must be used when moving an appliance
containing hot liquids.
13. CAUTION: The surface of the heating element is subject to residual
heat after use.
14. Always attach plug to appliance rst, then plug cord into the wall
outlet. To disconnect, turn any control to ‘OFF’, then remove plug
from wall outlet. Always hold the plug, never pull on the cord.
15. CAUTION: This appliance generates heat and escaping steam
during use. Proper precautions must be taken to prevent the risk of
burns, res or other damage to persons or property.
2

16. This appliance generates steam. Do not operate uncovered.
17. Keep your face and hands away from the steam vent. Do not block
or obstruct steam vent holes.
18. During or immediately after cooking, the area near the Steam Vent
Hole is kept at high temperature. To avoid burns do not touch this
area.
19. DO NOT leave unit unattended while in use.
20. This appliance is for Household Use Only. Do not use appliance for
other than intended use.
21. DO NOT place the Rice Bowl on other heat sources (e.g. cooking
stove). It may become deformed.
22. To reduce the risk of electric shock, cook only in the removable
bowl.
23. While in use, place the appliance away from cabinets, walls, etc. to
prevent possible steam damage.
SAVE THESE INSTRUCTIONS
HOUSEHOLD USE ONLY
SHORT CORD INSTRUCTIONS
1. A short power supply cord (or cord set) is provided to reduce the
hazards of entanglement or tripping over a longer cord.
2. Longer detachable power-supply cords or extension cords are
available and may be used if care is exercised in their use.
3. If a longer detachable power-supply extension cord is used, the
marked electrical rating of the extension cord should be at least as
great as the electrical rating of the appliance.
a) The marked electrical rating of the extension cord should be at
least as great as the electrical rating of the appliance.
b) The cord should be arranged so that it will not drape over the
countertop or tabletop where it can be pulled on by children or
tripped over unintentionally.
POLARIZED PLUG
This appliance has a polarized plug (one blade is wider than the other).
To reduce the risk of electric shock, this plug will t in a polarized outlet
only one way. If the plug does not t fully in the outlet, reverse the plug.
If it still does not t, contact a qualied electrician. Do not modify the
plug in any way.
3

DESCRIPTION OF PARTS
1. Lid
2. Inner Lid Release Button
3. Removable Inner Lid
4. Temperature Sensor
5. Detachable Steam Vent – the orange wheel spins and breaks down
any foamy substance that comes out with the steam. The rice cooks
better because the steam vent allows the rice cooker to cook at a
higher heat without worrying about overow since the steam vent
captures excess moisture and bubbles.
6. Removable Rice/Cooking Bowl
7. Lid Release Button
8. Rice Cooker Base
9. Detachable Power Cord
10. Control panel
a) Display Screen
b) PRESET (delay timer) Indicator
c) WARM/CANCEL Button/Indicator
d) TIMER (preset delay timer) Button
e) HOUR Button
f) MIN Button
g) MENU Button
h) Start Button/Indicator Button
13. Heating Sensor/Plate
14. Spatula
15. Soup Ladle
16. Measuring Cup
17. Steamer Basket
4
9
7
8
3
2
1
4
5
6
13
10
10c 10d 10e 10f 10g
10a 10b
10h
6
17
16
1514
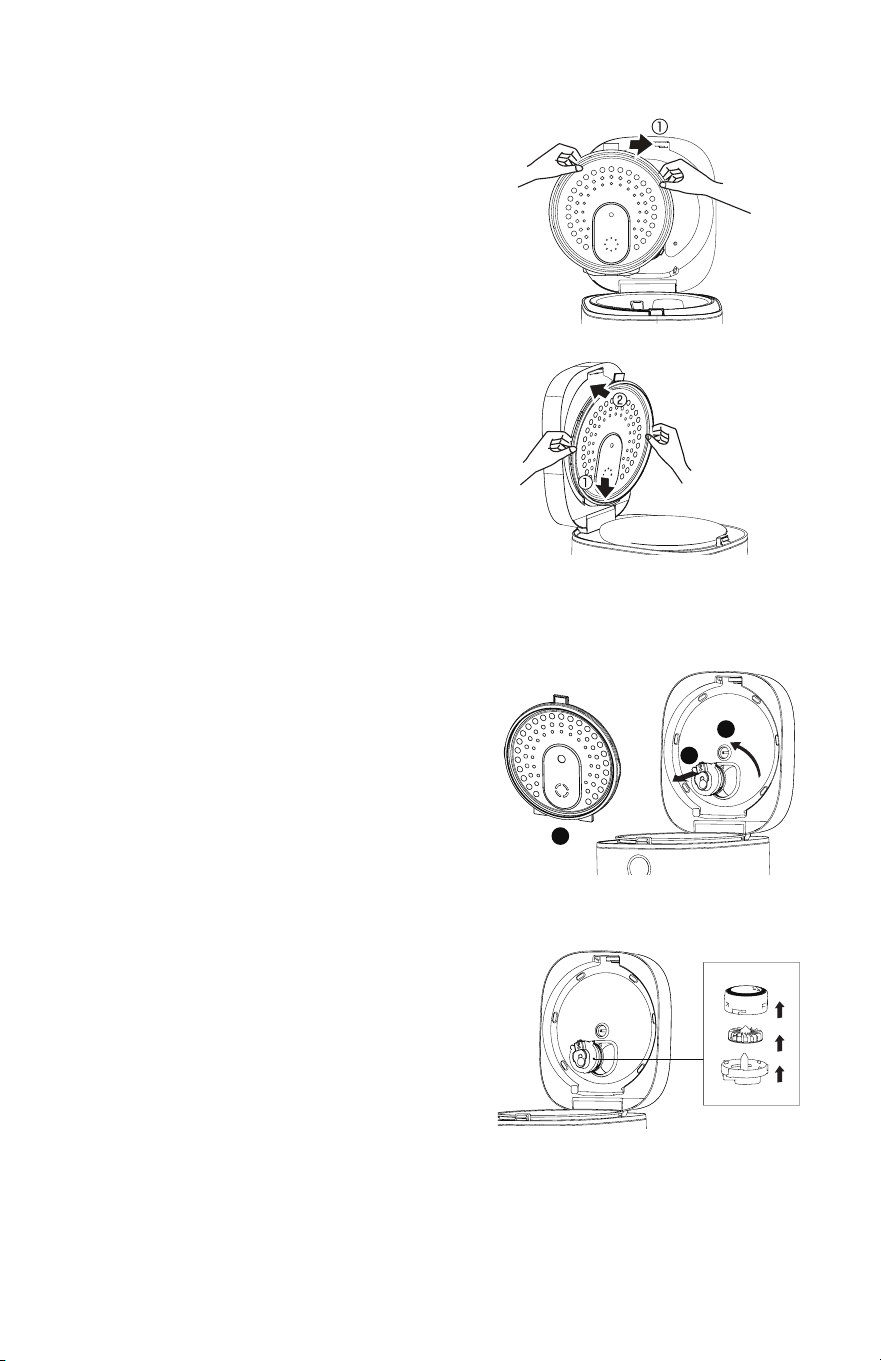
HOW TO REMOVE INNER LID
Removal:
Push the Inner Lid Release Button to
the right. The top of the Inner Lid will
pop out. Grasp the top of the Inner Lid
with one hand and gently pull upwards
to release the Inner Lid.
Installation:
Align the bottom of the Inner Lid in the
groves near the bottom of the lid and
then gently press the top of the Inner
Lid until it snaps into place.
HOW TO REMOVE THE STEAM VENT
Once the Inner Lid has been removed,
hold the Lid with one hand and with the
other hand grasp the Steam Vent and
turn counterclockwise. You will hear it
click and detach. Remove.
One the Steam Vent is detached, you
can go a step further and disassemble
the Steam Vent. Twist the clear cover
clockwise to release the inner orange
wheel. Wash all the components in
warm soapy water, dry, reassemble
and put back in place. NEVER USE
THE RICE COOKER WITHOUT THE
STEAM VENT IN POSITION.
5
1
2
3

BEFORE FIRST USE
Wash the Removable Inner Lid, Rice/Cooking Bowl, Measuring Cup,
Steaming Basket, Spatula, and Soup Ladle in warm soapy water. Rinse
and dry. Wipe the Base with a clean, damp cloth.
NOTE: Handle the Rice Bowl carefully. Scratching or denting the Rice
Bowl may result in unsatisfactory performance.
DO NOT use harsh detergents or abrasive cleansers on any part of the
appliance. NEVER immerse the Base in water or any other liquid.
HOW TO USE
1. Open the Rice Cooker by pressing on the Lid Release Button.
2. Lift out the Rice/Cooking Bowl and make sure that the outside of the
Bowl is clean and dry and that the Heat Sensor in the center, on the
inside of the Base, is clean, dry and cool. Use the Measuring Cup
provided to measure the desired amount of rice/grain/oats and place
in Rice/Cooking Bowl.
IMPORTANT: NEVER PUT ANY WATER INTO THE RICE COOKER
BASE
3. Add the appropriate amount of water into the Rice/Booking Bowl by
following the level markings inside the Bowl.
Example: to cook 3 cups of rice, measure (using Measuring Cup
provided) 3 cups of rice and add to Rice/Cooking Bowl. Then, follow
the type of rice on the inside of the Rice/Cooking Bowl and ll with
water (or other desired liquid) to the level 3 marking.
4. Place the Rice/Cooking Bowl back in the Rice Cooker Base. Make
sure that the Bowl is seated correctly by turning the Bowl slightly
from side to side.
5. Close the Lid. You will hear a ‘click’ when the Lid is closed properly.
6. Plug unit into the wall outlet.
7. Press the MENU button until you reach the desired setting (Quick,
White/Sushi, Brown/Gaba, Porridge, Quinoa, Steel-Cut Oats).
NOTE:
DO NOT press the MENU button before placing the Rice/Cooking
Bowl containing the ingredients into the Cooker.
DO NOT block the Steam Vent while Rice Cooker is operating.
8. Press the START button to start the cooking cycle. If you wish to
delay the time, see section ‘Setting the Delay Start Timer.’ NOTE: If
using PORRIDGE function, you can adjust the HOUR/MIN and then
press the START button.
6

9. When the cooking is complete, the WARM/CANCEL light indicator
will light up.
10. Open the Lid and u rice with the Spatula as soon as the light
comes on. The rice can be served immediately or close the Lid and
leave the rice in the Rice Cooker for up to 24 hours to keep warm.
NOTE: To cancel the WARM function, press and hold the WARM/
CANCEL button for 1 second until the indicator light goes o.
NOTE: Before removing the Rice/Cooking Bowl from the Rice
Cooker, always unplug the power cord from the wall outlet.
11.Unplug after use.
NOTE:
1. Handle the Rice/Cooking Bowl carefully. Scratching or denting the
Rice/Cooking Bowl may result in unsatisfactory performance.
2. DO NOT lift the Lid more than once during any cycle. This releases
an excessive amount of steam, lowers the temperature and aects
both the timing and the end result.
7

8
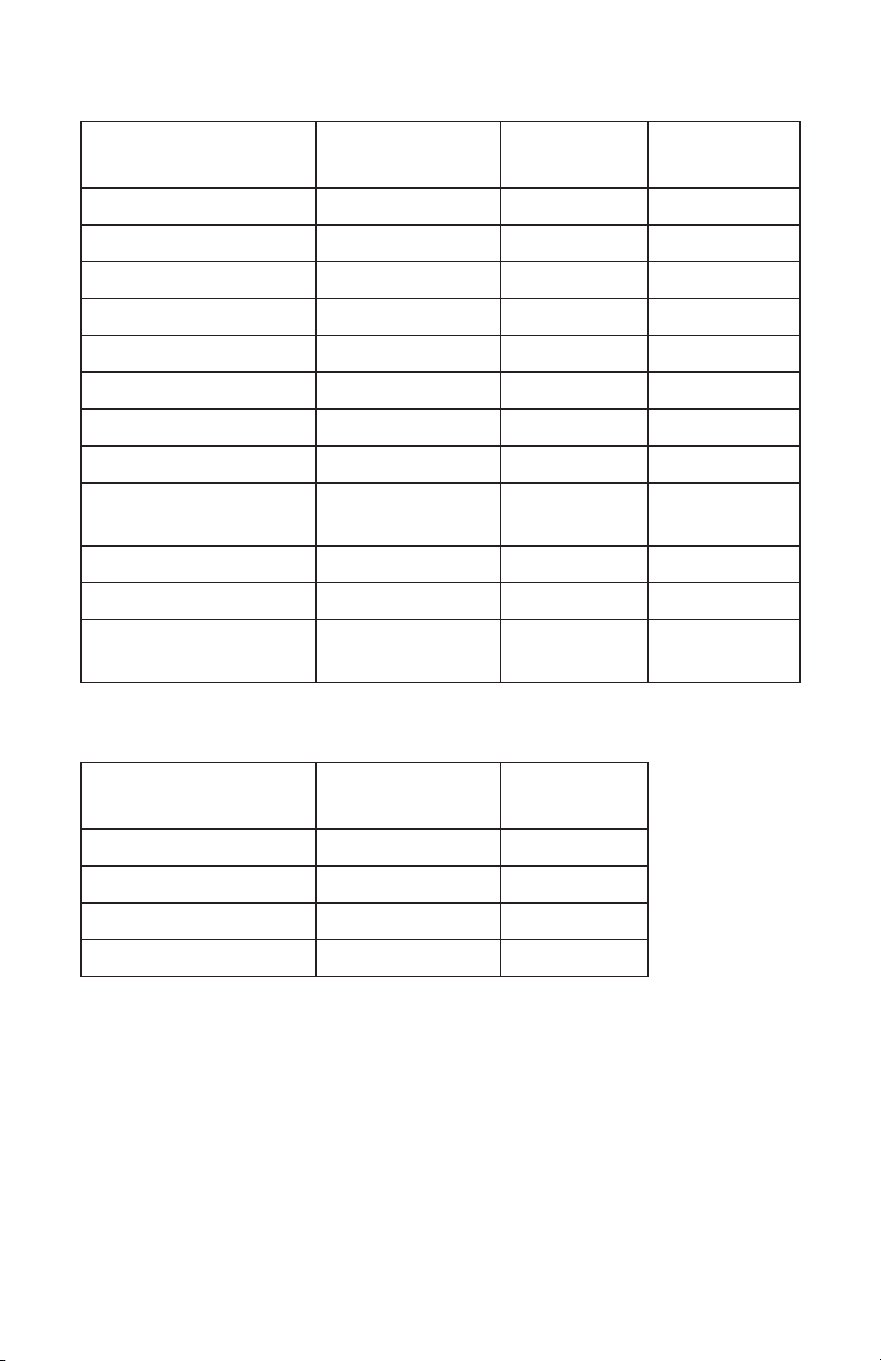
ESTIMATED COOKING TIME BY MENU
Please note that these are just approximate times and will vary
depending on rice and water amount, ambient temperature, water
temperature and rice type. The cooking time displayed on the rice
cooker is the time remaining after the water boils.
MENU
ESTIMATED
COOK TIME
RC2126
MAXIMUM
COOK
CAPACITY
(uncooked)
RC2129
MAXIMUM
COOK
CAPACITY
(uncooked)
QUICK approx. 30-60 minutes 6 cups 10 cups
WHITE/SUSHI approx. 30-60 minutes 6 cups 10 cups
BROWN/GABA approx. 60-90 minutes 3 cups 5 cups
PORRIDGE
approx. 60min–4 hours
NOTE: Default is set to
2 hours. Time can be
adjusted between 1hr
to 4 hrs. by 10 minute
increments.
1/2 cup 1-1/2 cups
QUINOA approx. 30-60 minutes 3 cups 5 cups
STEEL-CUT
OATS
approx. 30-50 minutes 2 cups 4 cups
STEAM
Approx. 1-60 minutes
NOTE: Default is set to
30 minutes.
Time can be adjusted
between 1-60 minutes
in 1 minute increments.
FLAVOURED RICE
To avour rice, the following liquids can be used instead of water.
•
Chicken or beef stock
•
Orange juice
•
Pineapple juice (1/2 juice, 1/2 water)
•
Tomato juice (2/3 juice, 1/3 water)
•
Milk
•
Vegetable soup

You can also avour the rice by adding the following:
•
Mixed herbs
•
Saron – 3 ml (1/4 tsp) per 225g (8 oz.) of rice
•
Parmesan cheese
•
Sautéed chopped onions
NOTE: If ingredients, other than liquids, have been added to the rice,
the WARM cycle should be on for no longer than 1 hour. This will keep
the avours fresh.
HINTS:
1. There are diering opinions about whether rice should be washed
before cooking. Those in favor argue that this washes away the
starch content and ensures non-sticky grains. Those against feel
valuable soluble vitamins and minerals are lost. Drier, uer rice is
obtained by pre-washing rice. To pre-wash rice, rinse uncooked rice
in Rice Bowl with cold water and drain thoroughly.
2. Brown rice may be cooked using the same instructions as for white
rice. (Note: For best results we suggest washing the brown rice
thoroughly before cooking.) It is important to leave the rice in the
WARM cycle for a minimum of 30 minutes, as brown rice takes
slightly longer to prepare.
3. As a general guide allow 56g (2 oz.) of uncooked rice per person.
When cooked, rice will usually double its volume and weight.
4. Ensure that the rice is level in the Rice/Cooking Bowl so that it cooks
evenly and properly.
5. If desired, add a little butter or oil (15 ml/1 tbsp. per cup of rice) at
the start of cooking to moisten the grains of rice.
6. Flu up the rice at least once during the WARM cycle.
Keep Warm Setting
Your rice cooker automatically switches itself to WARM at the end of all
cooking cycles and will keep warm for up to 24 hours. The Display will
show the elapsed keep warm time in hour(s).
If the cook setting you have chosen is too long and you wish to stop the
cooking cycle and start the WARM cycle, press and hold the WARM/
CANCEL button for 1 second to stop the current cooking setting. Press
the WARM/CANCEL button again and then press the START button to
start the WARM cycle for up to 24 hours.
You may also use it to reheat or keep cooked foods that you haven’t
cooked in your Rice Cooker warm. Press the WARM/CANCEL button
and then press the START button to start the WARM cycle for up to 24
hours.
9

How to use the steamer basket
1. Open the Rice Cooker by pressing the Lid Release Button.
2. Lift out the Rice/Cooking Bowl and make sure that the outside of the
Bowl is clean and dry and that the Heat Sensor in the center, on the
inside of the Base, is clean, dry and cool.
3. Place the Rice Bowl back in the Rice Cooker Base. Make sure that
the Rice Bowl is seated correctly by turning the Bowl slightly from
side to side.
4. Add water or other liquid to the Rice Bowl. IMPORTANT: NEVER
ADD ANY WATER OR LIQUID TO THE RICE COOKER BASE.
5. Place vegetables, meat, poultry, etc. in the Steaming Basket. Place
the Steaming Basket onto the inner rim of the Rice Bowl.
6. Close the Lid. You will hear a ‘click’ when the Lid is closed properly.
7. Plug unit into the wall outlet.
8. Press the MENU button until you reach STEAM.
9. Use the HOUR and/or MIN buttons to adjust the time.
10. Press the START button to start the cooking cycle.
DO NOT press the MENU button before placing the Rice/Cooking
Bowl containing the ingredients into the Cooker.
DO NOT block the Steam Vent while Rice Cooker is operating.
11. Steam until done to taste. The following charts can be used as a
guide.
HINT: You can cook and steam dierent foods at the same time. Cook
rice and steam sh, vegetables or poultry at the same time. Use foods
with similar cooking times.
10
VEGETABLE COOKING CHART
VEGETABLE Quantity
WATER
ml (cups)
TIME
minutes
Asparagus 450g (1 lb. ) 250 (1 ) 10
Bean Sprouts 750ml (3 cups) 250 (1) 5
Broccoli – spears 750ml (3 cups) 375 (1-1/2) 15
orets 750 ml (3 cups) 375 (1-1/2) 10 - 12
Cabbage – shredded 500ml (2 cups) 250 (1) 10
Carrots – sliced 500ml (2 cups) 250 (1) 10 -12
Cauliower – orets 340g (3/4 lb.) 375 (1-1/2) 15
Green, yellow beans 225g (1/2 lb.)
375 (1-1/2) 12
Potatoes, medium
size, quartered
950g (2 lbs.)
500 (2) 20 - 22
Spinach 115g (1/4 lb.)
250 (1) 7
Squash, sliced 450g (1 lb.)
250 (1) 10
Summer squash,
Zucchini
450g (1 lb.)
250 (1) 10
MEAT AND FISH STEAMING CHART
LIQUID
ml (cups)
TIME
minutes
Beef - ¼” slices 500 (2) 12
Chicken breasts 500 (2) 15 – 20
Salmon 1” thick 500 (2) 12
Shrimps 500 (2) 12 – 15
Setting the Delay Start Timer
Allows you to begin cooking food up to 24 hours later. The Delay Start
feature can be used on White/Sushi, Brown/Gaba, Porridge, Quinoa,
Steel-cut Oats or Steam cook settings.
NOTE: The Delay Start for White/Sushi, Brown/Gaba and Porridge is
maximum 24 hours. The Delay Start for Quinoa and Steel-Cut Oats is
maximum 12 hours.
11

CAUTION: Perishable foods such as meat and poultry products, sh,
cheese and dairy products cannot be left at room temperature for more
than 2 hours. (No longer than 1 hour when the room temperature is
above 32
o
C/90
o
F.) When cooking these foods, do not set the Delay Start
Timer for more than 1-2 hours.
1. Press the MENU button until you reach the desired setting.
2. Press the TIMER button, then using the HOUR AND MIN buttons,
set the desired number or hours/minutes which you would like the
cooking to nish.
3. Press the START button.
4. When cooking is complete the Rice Cooker will automatically switch
to WARM.
NOTE: To cancel the timer at any time, press and hold the WARM/
CANCEL button for 1 second.
CARE AND CLEANING
1. Unplug the Rice Cooker from the wall outlet.
2. NEVER immerse the Rice Cooker Base in water or any other liquid.
NEVER add any liquid into the Rice Cooker Base.
3. The Removable Inner Lid, Rice/Cooking Bowl, Steaming Basket and
Steam Vent may be washed in warm soapy water. Dry.
NOTE: Never use harsh cleansers or scouring pads that may
damage the non-stick nish on the Rice Bowl.
4. The Rice Cooker Base and Inner Lid should be wiped with a soft
damp cloth.
5. The Heating Sensor/Plate should be wiped clean. NOTE: DO NOT
depress the Heat Sensor in the middle of the Heating Sensor/Plate.
12

A short supply cord is provided to reduce the hazards of becoming
entangled in or tripping over a long cord. Extension cords may be used
if care is exercised in their use. If an extension cord is used, the marked
electrical rating of the detachable power-supply cord or extension cord
should be at least as great as the electrical rating of the appliance. If
the appliance is of the grounded type, the extension cord should be a
grounded 3-wire cord. The extension cord should be arranged so that
it will not drape over the counter top or table top, where it can be pulled
on by children or tripped over.
This warranty does not include the cost of shipping, which is to be borne by the
customer.
LIMITED WARRANTY
**The original sales receipt is the only acceptable proof of purchase**
Salton Appliances (1985) Corp. warrants that this appliance shall be free from
defects in material and workmanship for a period of two (2) years from the date
of original purchase. Salton Appliances (1985) Corp. at its sole discretion during
this warranty period, will repair or replace a defective product or issue a refund.
Any refund to the purchaser will be at a pro-rated value based on the remaining
period of the warranty. All liability is limited to the amount of the purchase price.
This warranty covers normal domestic usage and does not cover damage which
occurs in shipment or failure which results from alteration, accident, misuse,
abuse, glass breakage, neglect, improper maintenance, use contrary to the
operating instructions or commercial use. This warranty is not available to
retailers or other commercial purchasers or owners.

Contact one of our many Service Centers found on our website
www.salton.com/customer-care
For added protection, we suggest that you use an insured delivery service with
tracking information when returning your product. Salton Appliances (1985) Corp.
will not be held responsible for in-transit damage or for packages that are not
received.
This warranty does not include the cost of shipping, which is to be borne by the
customer.
To contact our Customer Service Department:
Salton Appliances (1985) Corp.
81A Brunswick,
Dollard-des-Ormeaux, Quebec H9B 2J5
Canada
Telephone: 514-685-3660
E-mail: [email protected]
Fax: 514-685-8300
www.salton.com
Securely package and return the appliance to us. Please enclose:
• Original proof of purchase
• The completed form below with a $12.50 Return Shipping & Handling fee –
either a cheque, money order or credit card (A personal cheque will delay return
shipping by 2-3 weeks)
TO OBTAIN PROMPT WARRANTY SERVICE:
or
Name
Address
City Prov/State Postal/Zip Code
Daytime Phone No. Email
Product defect:
Type of payment Cheque/Money Order Visa MasterCard
Name on card Expiry Date CSV No
Card No.
□ □ □