128g铜版纸 骑马钉
尺寸:100x150mm
Foreword
Thank you very much for your support of Nufebs
security cameras
, your approval is our greatest
encouragement. As a security camera technology
company we are committed to producing and
selling the most popular security cameras
, if you
have any trouble with the product please contact
us through the official website
, any problem will be
solved.
Catalog
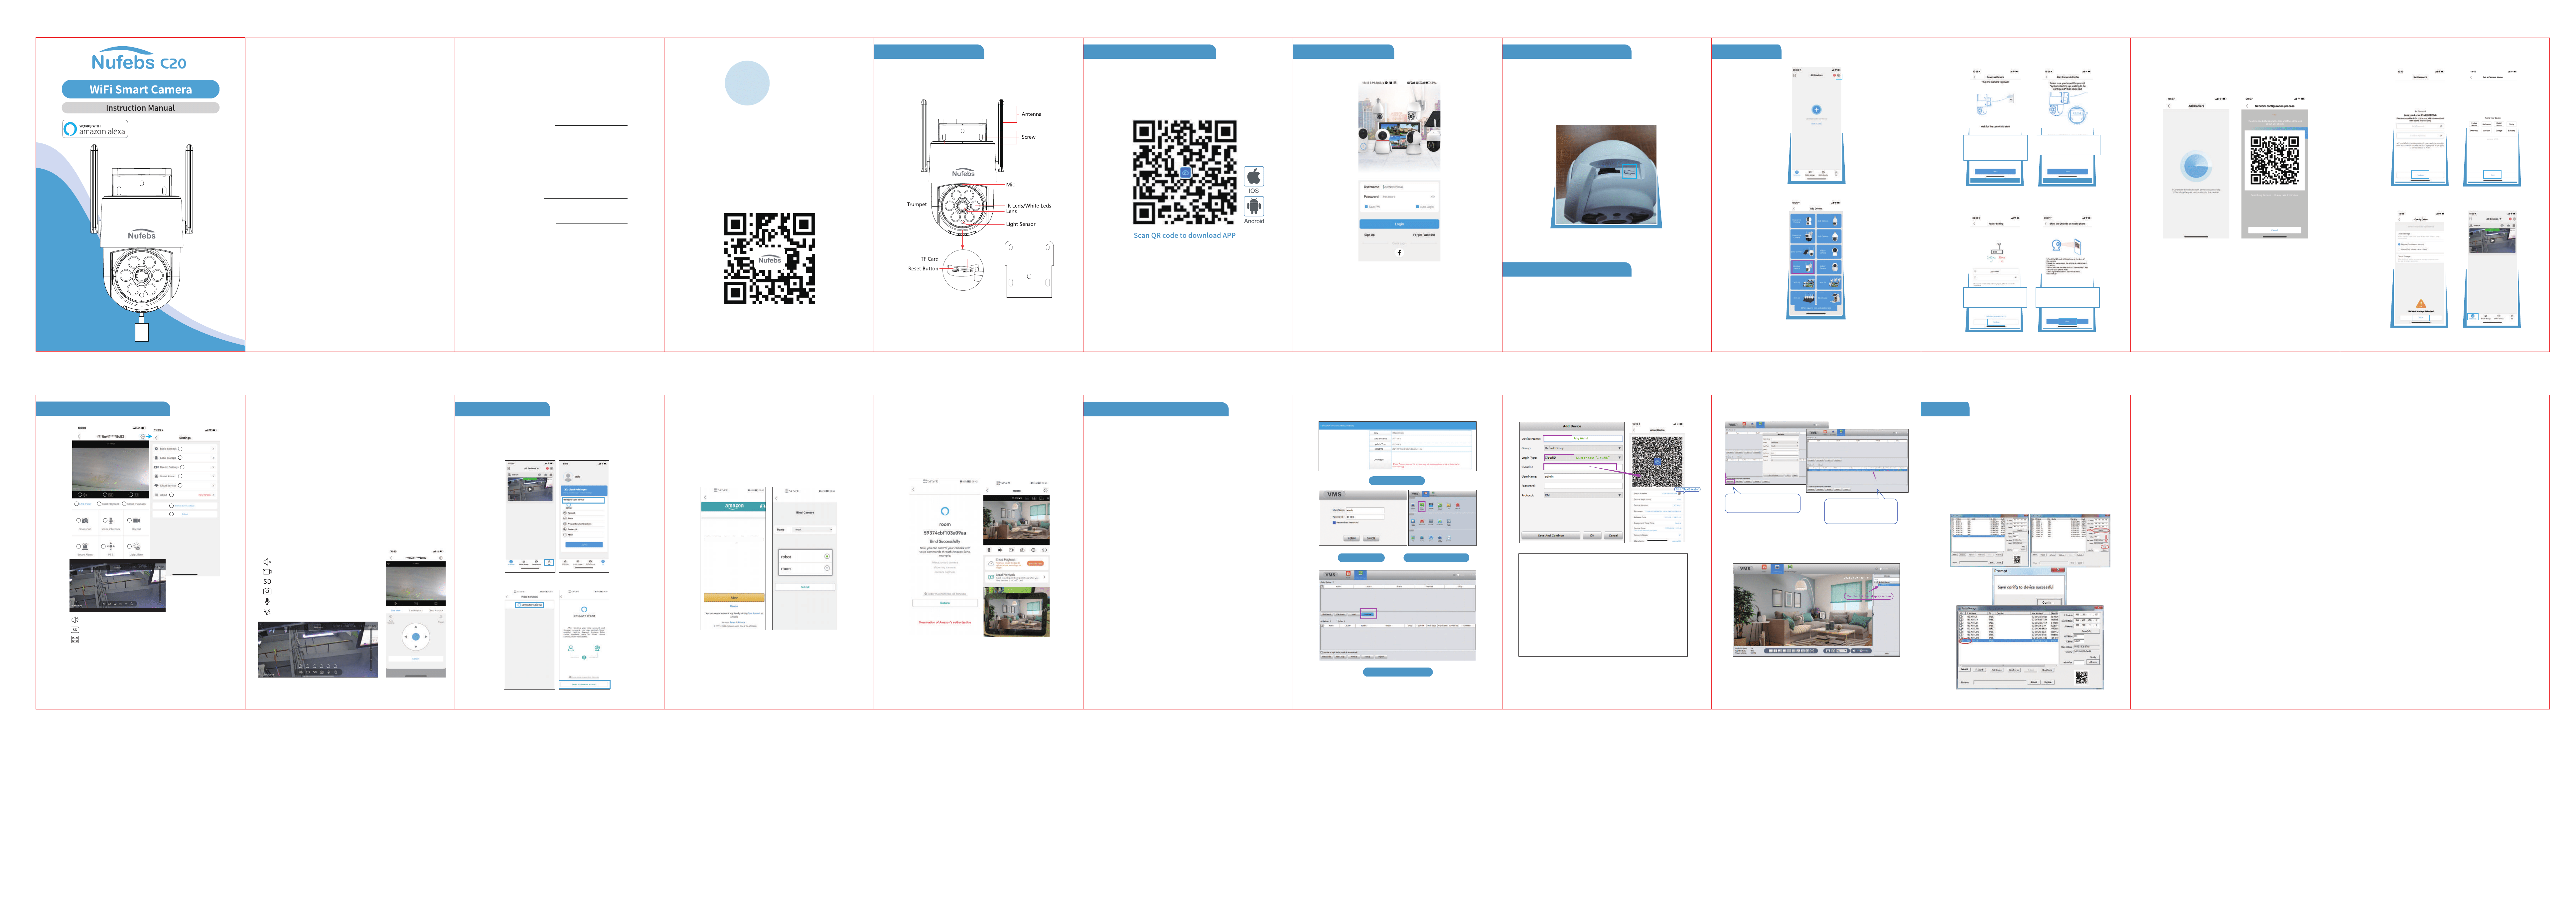
Product Description 1
2
3
18
14
11
How to match the camera
App function introduction
Alexa connection
Connect to computer
Find the IP address
2
PAGE
Download “Tris Home” APP
Search for “Tris Home” app in App Store / Google Play Store, or
scan the QR code below to download.
2. How to match the camera
1
PAGE
1. Product description
Ceiling install use
Wall install use
4
PAGE
Please first power it on. Wait one minute for the camera to
rotate and self-test.
After 5 seconds of pressing the reset button, there will
be a beep sound and the cameraself-test and reset.
Turn on Bluetooth on your phone
4. How to reset the camera
•
•
5. Turn on Bluetooth
3
PAGE
a. lf you already have an account, please log in.
b.lf you don' t have an Tris Home account yet, please click sign up
to go to the registration page.
3. Sign up and load in
6
PAGE
3. Screw the camera into the socket and power it up.
Then select “Next”.
4. Connect your phone to the same WiFi which your
camera will be connecting to, then press “Confrm”.
Note:
Only 2.4GHz WiFi is supported
5GHz WiFi is not supported.
Click “Next” to go to the next step.
Note:
Bulb camera has no battery,
you need to screw it into
socket and keep it powered up.
Note:
When you power it up, the
camera will rotate and self-test.
5
PAGE
6. Add device
1. Click the“+” in the upper right corner to add a device.
2. Slect the list “Outdoor Camera”
7
PAGE
The following page appears:
1. Your phone will automatically connect when you turn on
Bluetooth, or use the camera to scan this QR code.
2. Full screen function:
1. Radio Function
2. Video Recording
3. Normal HD and HD resolution switching
4. Photo Record
5. Long press for voice intercom
6. Full Color, Infrared Vision, Double Liht Alert
9. Record: Video Recording
10. Smart Alarm: Smart alarm settings
11. PTZ: PTZ setting, you can set the mobile monitoring
12. Light Alarm: Full Color, Infrared Vision, Double Liht Alert
13. Basic Settings: About camera image inversion, speaker
volume and other settings
14. Local Storage: View memory card
15. Record Settings: About recording settings
16. Smart Alarm: Smart alarm settings
17. Cloud Service: About cloud storage
18. About: Information about the device
19. Restore factory settings: Restore initial settings
20. Reboot: Reboot the device
10
PAGE
1 2 3 4 5 6
9
PAGE
7. App function introduction
1. Radio Function
2. Normal HD and HD resolution switching
3. Watch the video in full screen
4. Live View: Preview video
5. Card Playback: Watch recorded video or pictures
6. Cloud Playback: Watch cloud storage videos or pictures
7. Snapshot: Photo Record
8. Voice intercom: Long press for voice intercom
1
4 5 6
7 8
10 11 12
13
14
16
17
18
20
19
15
9
2 3
12
PAGE
Login your amazon account and click allow then it will show
the devices under your Tris Home account. Choose the device
you want to associate and sumbit.
Click‘Allow’to Sign-In to Tris Home.
8. Work with Alexa
The camera supports Alexa. Follow the below steps to link Tris
Home to your Alexa account and operate.
Login to your Tris Home account add a camera then click
“me”, you will see “Third party voice service”.
It will show amazon alexa click it and you will see the login page.
11
PAGE
9. Remove Access on PC Client
lmportant: You must connect the mobile phone success-
fully before you can log in to the PC port.
When connecting to the computer, make sure that the
mobile phone device and the computer have the same
network IP address. Connection fails if WiFi is different.
1. Enter this link: https://bit.ly/3MPicsee
2. Download PC Client "VMS" and installed it
3. Remain the default user name and password, click "SIGN IN"
4. Click "Device Manager"
5. Add Device
① Click “Cloud Add” or ② select “Manual Add”, enter CloudID
Number
✔Device Name: Any name
✔Group: Default Group
✔Login Type: Must choose "CloudID"
✔CloudID: Click Device--"Settings"--"About"--Find the "Serial
Number" and then copy it. (60e26f32******) This is “CloudID
Number"
✔UserName: admin or not
✔Password: any
✔Protocol: XM
6. Show connected (connected successfully) Home Live View.
7. Double-click to display the screen, and the connection is
successful.
In "Live View" Select the display location and double--click the
device.
14
PAGE
13
PAGE
After successful association of devices it will show as
bleow. And now your alexa app would find the device.
First say "Alexa open smart camera " then say" show my
camera" you will see your camera on amazon devices like
Echoshow / Echo dot .
16
PAGE
✔ Device Name: Any name
✔ Group: Default Group
✔ Login Type: Must choose"CloudID"
✔ CloudID: Click Device--"Settings"--"About"--Find the
"Serial Number" and then copy it. (60e26f32******)
✔ UserName: admin
✔ Password: Any symbol or number, but it must be
the same as the login password of the mobile device.
✔ Protocol: XM
15
PAGE
Clink To Download
Clink “SIGNIN”
Clink “Cloud Add”
Clink “Device Manager”
18
PAGE
10. FAQ
How to find the camera’s IP address?
1. Keep the camera working on the same router with your comput-
er/better use LAN cable to connect the camera with your router.
2. Install Device manages software on computer: https://bit.ly/3MPic-
see
3. Click search →choose lP address →change camera's IP address
→Same to pc →Modify →confirm “Save config to device successful”
→Search again.
4. If with the same gateway, you can directly use IP address to login
in lE browser (user name: admin password: as you set )
17
PAGE
In "Live View"-Select the display location and double--click
the device.
Or select “Manual Add”,
enter CloudID Number.
Show connected
(connected successfully)
→Home→Live View.
8
PAGE
3. Set password → Pick a name→ Configure Guide
4. The connection is successful.
