1
Soft-Serve Success Guide
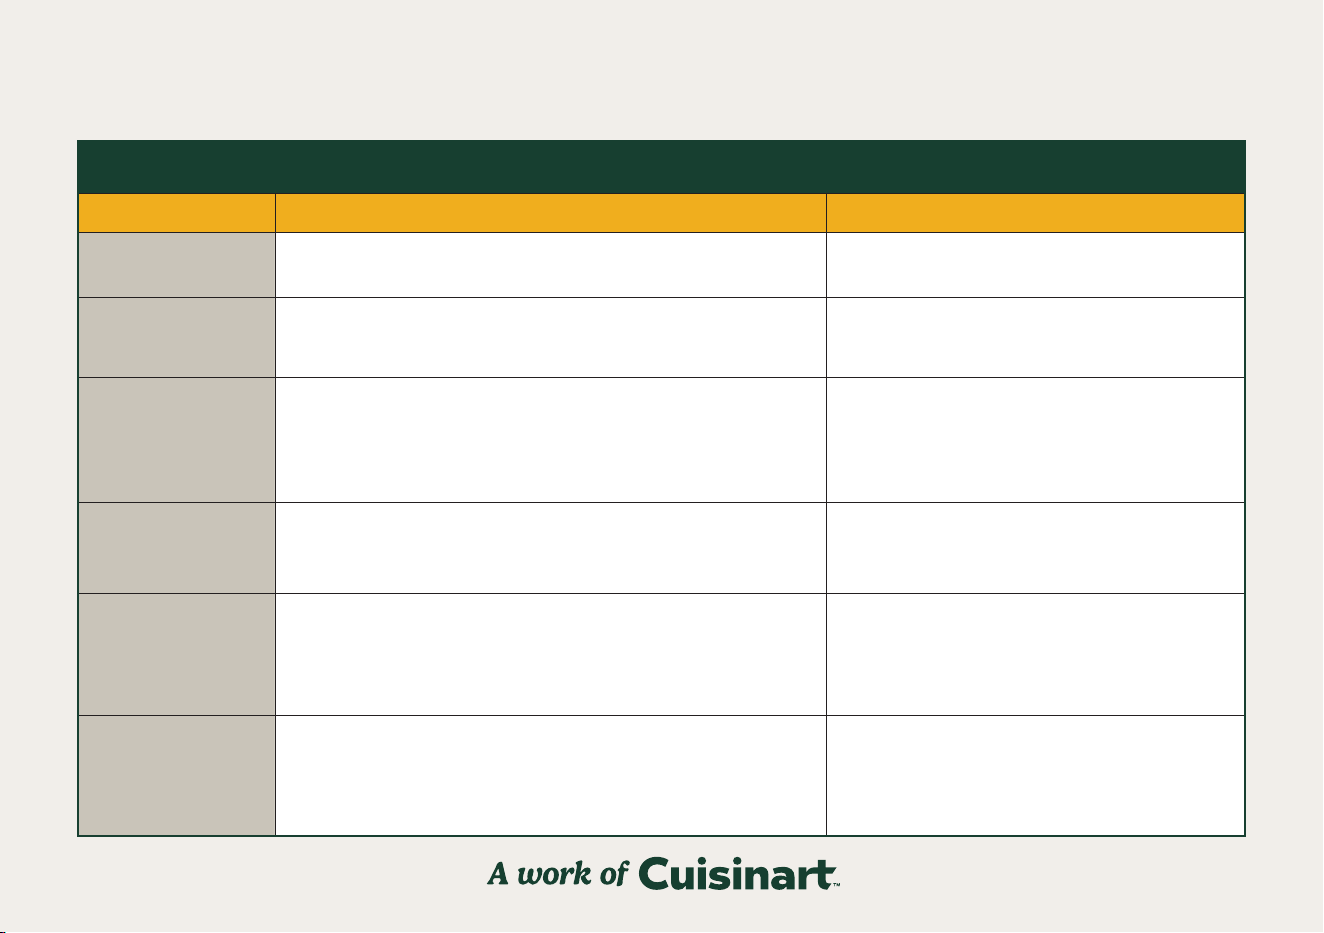
Category Key Points Pro Tips
Ingredients Matter
• Use full-fat dairy for smooth, rich texture.
• Low-fat ingredients produce icier, less rm results.
Stick to cream and whole milk for best results.
Balance Sugar
• Sugar sweetens and controls freezing point.
• Too little sugar makes the mixture too rm and may damage the unit.
Use recipe ratios; avoid cutting sugar drastically.
Prep & Chilling
• Chill base 4 hours to overnight for smoother texture.
• Whisk well to dissolve sugar.
• Rewhisk after chilling.
• Mixture must be lump-free.
• Sift powders before adding.
Chill longer for extra creaminess; strain if needed
for smoothness.
Texture & Firmness
• Soft serve needs precise fat, sugar, avor, salt balance.
• Home recipes skip commercial stabilizers—use fresh ingredients.
Follow tested recipes for best results.
Boosters for Firmness
• Malted Milk Powder: Adds body and lecithin.
• Cream Cheese: Adds fat and emulsiers.
• Liquid Sugars: Swap 2 tablespoons granulated for syrup.
• Xanthan Gum: Stabilizer.
• Brown Sugar: Improves consistency.
Start small with recipe changes; whisk and
strain well.
Flavor Tips
• Use the Cuisinart vanilla recipe from the recipe booklet as a
base; swap extracts for new avors.
• Freeze-dried fruit: Pulverize and sift before adding.
• Chill avored mix before churning.
Keep recipe changes minimal to avoid texture issues.
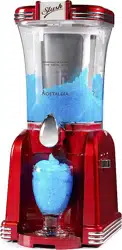
ICE-200 SERIES
6-in-1 Slushy & Soft-Serve Maker
*Scroll down for instruction booklet
2
Tips
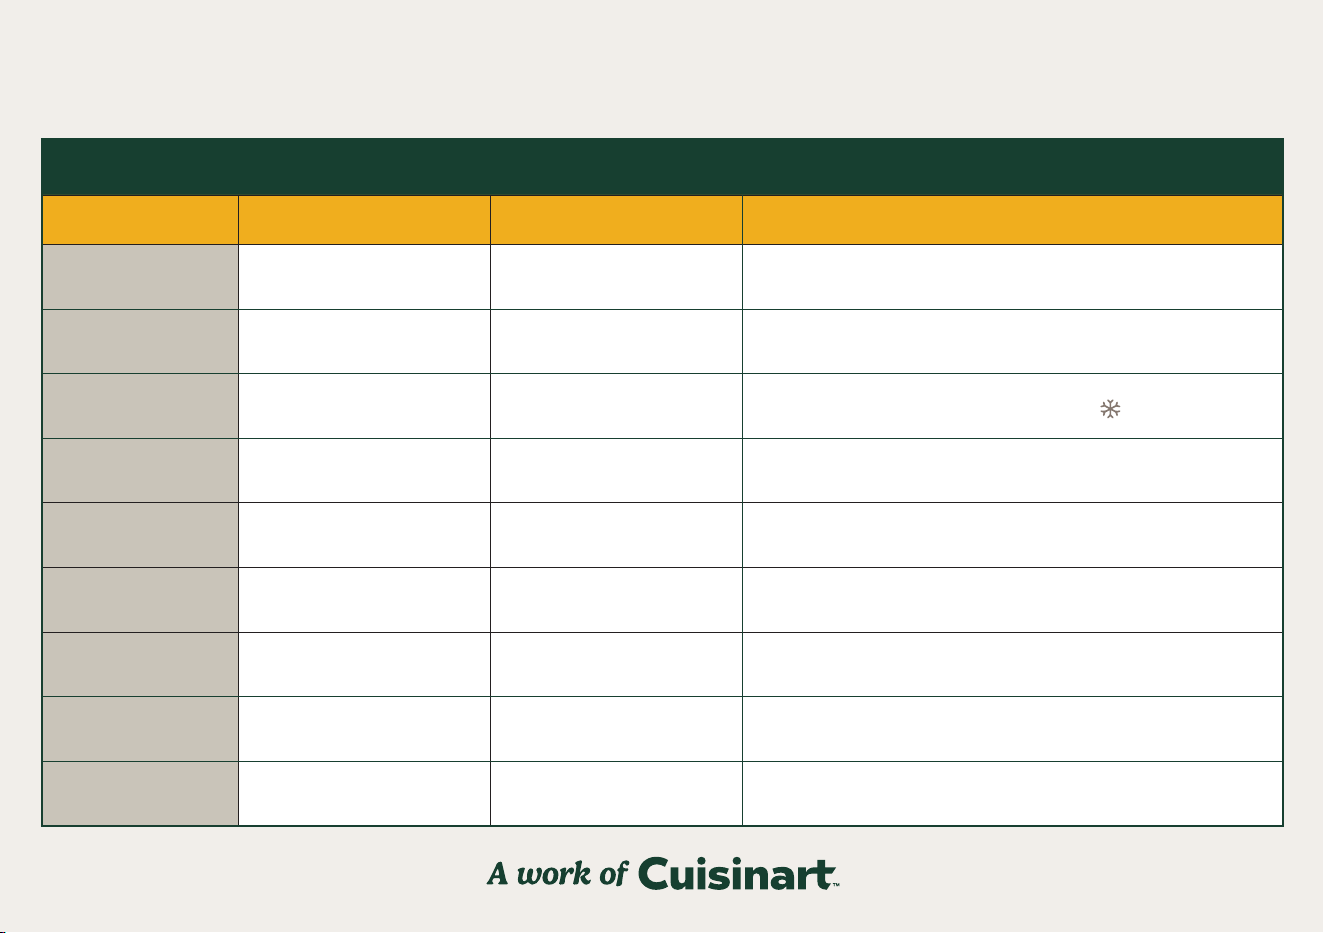
Issue Type of Recipe Likely Cause
Quick Fix
Ingredients not going
into funnel
All Mixture is too thick Add gradually to the ingredient funnel.
Mixture will not freeze Cocktail, Wine Alcohol content is too high Increase nonalcoholic ingredients in the mixture.
Mixture not
frozen enough
Slushy, Frappé, Wine,
Cocktail only
Firmness selection too low Increase the rmness selection by pressing button.
Too Soft Ice Cream Too much sugar Reduce sugar in the base recipe; chill overnight before churning.
Too Firm Ice Cream Not enough sugar or fat
Add additional sugar; be sure that the ratio of milk to cream is 2:1
in the base recipe.
Icy Texture Ice Cream Not enough fat
Be sure to use full-fat milk and cream in recipes; chill overnight
before churning.
Mixture will not
dispense
All
Smart Dispense System not
triggered
Grasp the handle with entire hand to activate the Smart
Dispense System.
Mixture will not
dispense
Sorbet and Beverages Star tip being used Only use the star tip to dispense ice cream.
Mixture frozen in unit All Not enough sugar
Turn o the unit immediately to protect the motor, allow mixture
to thaw, dispense fully.
ICE-200 SERIES
6-in-1 Slushy & Soft-Serve Maker
*Scroll down for instruction booklet
ICE-200 SERIES
Instruction &
Recipe Booklet
For your safety and continued enjoyment of this product,
always read the instruction book carefully before using.
6-in-1 Slushy &
Soft-Serve Maker

4
Important Safeguards
When using an electrical appliance, basic safety precautions should always
be followed to reduce the risk of re, electric shock, and/or injury, including
the following:
1. READ ALL INSTRUCTIONS BEFORE USING.
2. Always unplug from outlet when not in use, before putting on or taking
o parts, and before cleaning.
3. To protect against risk of electric shock, do not place cord, plug, or base
of appliance in water or any other liquid.
4. This appliance is not intended for use by persons (including children) with
reduced physical, sensory, or mental capabilities, or lack of experience
and knowledge, unless they have been given supervision or instruction
concerning use of the appliance by a person responsible for their safety.
Children should be supervised to ensure that they do not play with the
appliance.
5. Avoid contact with moving parts. Keep hands, hair, and clothing as well as
spatulas and other utensils away from unit during operation to reduce
the risk of injury and/or damage to the appliance.
6. Do not operate any appliance with a damaged cord or plug, or after
the appliance malfunctions or is dropped or damaged in any manner.
Please contact Cuisinart
®
Customer Service for help with your item.
7. The use of attachments not recommended by Cuisinart may cause re,
electric shock, or risk of injuries.
8. Do not use outdoors.
9. Do not let cord hang over edge of table or counter, or touch hot surfaces.
10. DO NOT USE SHARP OBJECTS OR UTENSILS INSIDE THE VESSEL!
Sharp objects will scratch and damage the inside of the vessel. A rubber
spatula or wooden spoon may be used when the appliance is in the
o position.
11. This appliance is for household use. Any servicing other than
cleaning and user maintenance should be done only by authorized
Cuisinart
®
repair personnel.
12. Do not use appliance for other than intended use.
13. Do not operate your appliance in an appliance garage or under a wall
cabinet. When storing in an appliance garage, always unplug the unit
from the electrical outlet. Not doing so could create a risk of re,
especially if the appliance touches the walls of the garage or the door
touches the unit as it closes.
14. The refrigerant (R600a) is ammable. Caution: The refrigerant circuit of
the appliance contains isobutane (R600a). Isobutane is a natural
refrigerant gas with a high level of environmental compatibility, but it is
nevertheless ammable. During transportation and installation of the
appliance, ensure that none of the components of the refrigerant circuit
becomes damaged. If the refrigerant circuit should be damaged, avoid
open ames and sources of ignition. Thoroughly ventilate the room in
which the appliance is situated.
15. Keep the appliance 4 inches from other objects to ensure motor
ventilation.
16. Do not upend this product or incline it over a 45˚ angle.
17. Do not use the appliance near an open ame, hot plate, or stove.
18. Do not remove the dispenser assembly when unit is mixing.
19. Dispose of the ammable refrigerant used in the appliance according to
local regulations.
20. Caution: Flammable refrigerant used. When handling, moving, and using
the unit, be sure to avoid damaging the refrigerant tubing and increasing
the risk of a leak.
Save These Instructions
For Household Use Only
Special Cord Set Instructions
A short power-supply cord is provided to reduce the risks resulting from
becoming entangled in or tripping over a longer cord. Longer extension cords
may be used if care is exercised in their use.
If a long, grounded 3-prong extension cord is used, the marked electrical
rating of the extension cord should be at least as great as the electrical rating
of the appliance, and the longer cord should be arranged so that it will not
drape over the countertop or tabletop, where it can be pulled on by children
or animals, or tripped over.
Ice cream
Cocktail
Frozen treats
firmness
selection/
progress bar
Sorbet
Slushy
Wine
Frappé
Power button
Rinse
program
Start/StopFunction selection
5
Caution
This appliance is for household use. Any servicing other than cleaning and
user maintenance should be performed by an authorized Cuisinart
®
service
representative.
• Do not immerse the compressor base in water.
• To reduce the risk of re or electric shock, do not disassemble the base.
Note: The base does not contain any user-serviceable parts.
• Repairs should be made only by Cuisinart
®
authorized personnel.
• Check voltage to be sure that the voltage indicated on the nameplate
agrees with your voltage.
• Never clean with scouring powders or hard implements.
• Unit should remain upright at all times. If unit is turned on its side or
upside down, you will need to put it in the upright position and wait 24
hours before using.
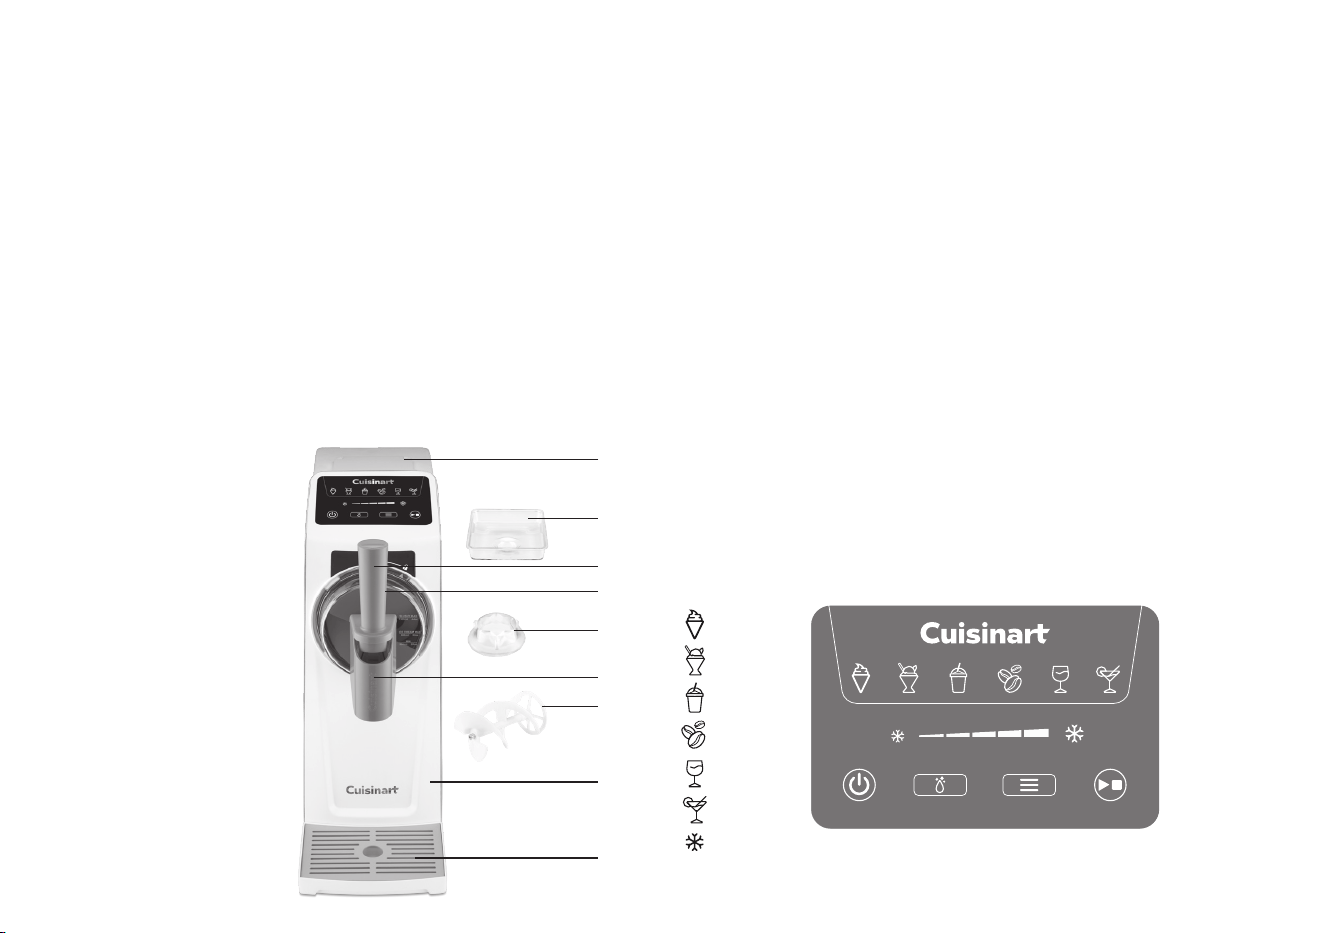
Parts and Features
1. Ingredient funnel cover
2. Ingredient funnel tray
3. Smart Dispense Sensor
4. Dispenser assembly
5. Star tip (In bag with the
instruction booklet)
6. Dispenser cover
7. Auger
8. Compressor base
9. Drip tray
Contents
Important Safeguards 2
Parts and Features 3
Before First Use 3
Operating Instructions 4
Safety Feature 5
Cleaning, Storage, and Maintenance 5
Troubleshooting 5
Recipe Tips 6
Recipes 9
Warranty 17
Before First Use
DO NOT immerse the compressor base in water. Wipe it with a moist cloth.
Wash all removable parts to remove any dust or residue from the
manufacturing and shipping process. Only the auger is top-rack dishwasher
safe. All other removable parts are hand wash only. DO NOT clean any parts
with abrasive cleaners or hard implements. Place the base in its upright
position at the desired location and allow it to rest for 24 hours before use.
Control Panel
1.
2.
4.
3.
5.
6.
7.
8.
9.
Note:
The LCD
control panel
and the
Smart
Dispense
Sensor areas
are covered
by a
protective
lm. Remove
them before
the rst use.
6
Operating Instructions
1. Position the drip tray at the bottom front of the unit.
2. Install the removable ingredient funnel cover onto the top of the unit.
3. Insert the auger with the X-shaped ring facing inside the vessel.
4. Position the dispenser assembly onto the vessel, ensuring the handle is
facing upward and tilted to the left. Turn the dispenser assembly
clockwise until it locks securely in place, ensuring the handle is upright at
the 12 o’clock position. Follow the markings on the front housing.
5. Press the dispenser cover onto the dispenser assembly to snap it into
place. (Attach the star tip in the dispenser cover when preparing
soft-serve ice cream or yogurt.)
Note: Other treats will not dispense with the star tip in place.
6. After the 24-hour rest period, plug the unit into the power outlet. The
LCD screen will blink for one second, and the unit will beep to indicate it
is ready to use.
7. Prepare the ingredients (refer to the recipe section for recipe tips).
8. Press the Power button to turn the unit on. The LCD display will illuminate.
9. Pour the treat mixture into the ingredient funnel tray, ensuring not to
exceed the appropriate ll line on the dispenser assembly.
10. Select the desired preset using the Function Selection button
a. Soft-serve ice cream
- Recommended for any blended ice cream
or frozen yogurt base.
b. Sorbet
- Recommended for any blended sorbet base.
c. Slushy - Recommended for any sweetened beverage or liquid like
lemonade or a carbonated drink.
i. When Slushy is selected, the display will show the rmness selection.
d. Frappé - Recommended for any sweetened coee or latte drink.
Adding milk or creamer to the base (either dairy or nondairy) makes a
creamier and richer frozen treat.
i. When Frappé is selected, the display will show
rmness selection.
e. Wine - Recommended for wine-based frozen cocktails.
i. When Wine is selected, the display will show the rmness selection.
f. Cocktail - Recommended for frozen beverages with a higher alcohol
content like margaritas and daiquiris.
i. When Cocktail is selected, the display will show the
rmness selection.
11. To adjust the rmness of frozen treats (Slushy, Frappé, Wine, and Cocktail
only), press the frozen treats rmness selection button .
It is recommended to start with a low freeze level and adjust if a thicker
consistency is preferred.
12. Once ready, press the Start/Stop button to begin the selected
preset cycle.
13. While the unit is making treats, the progress bar will blink in the display.
It will be solid when the treat is ready.
14. When the selected preset cycle is complete, the unit will emit three quick
beeps and automatically activate the Keep Cool feature for 1/2 hour for Ice
Cream, 2 hours for Frappé, and 16 hours for Slushy, Sorbet, Wine, and Cocktail.
Note: For Ice Cream only, the unit will beep 3 times after Keep Cool has
been running for 25 minutes to signal that 5
minutes remain before the machine
automatically shuts o.
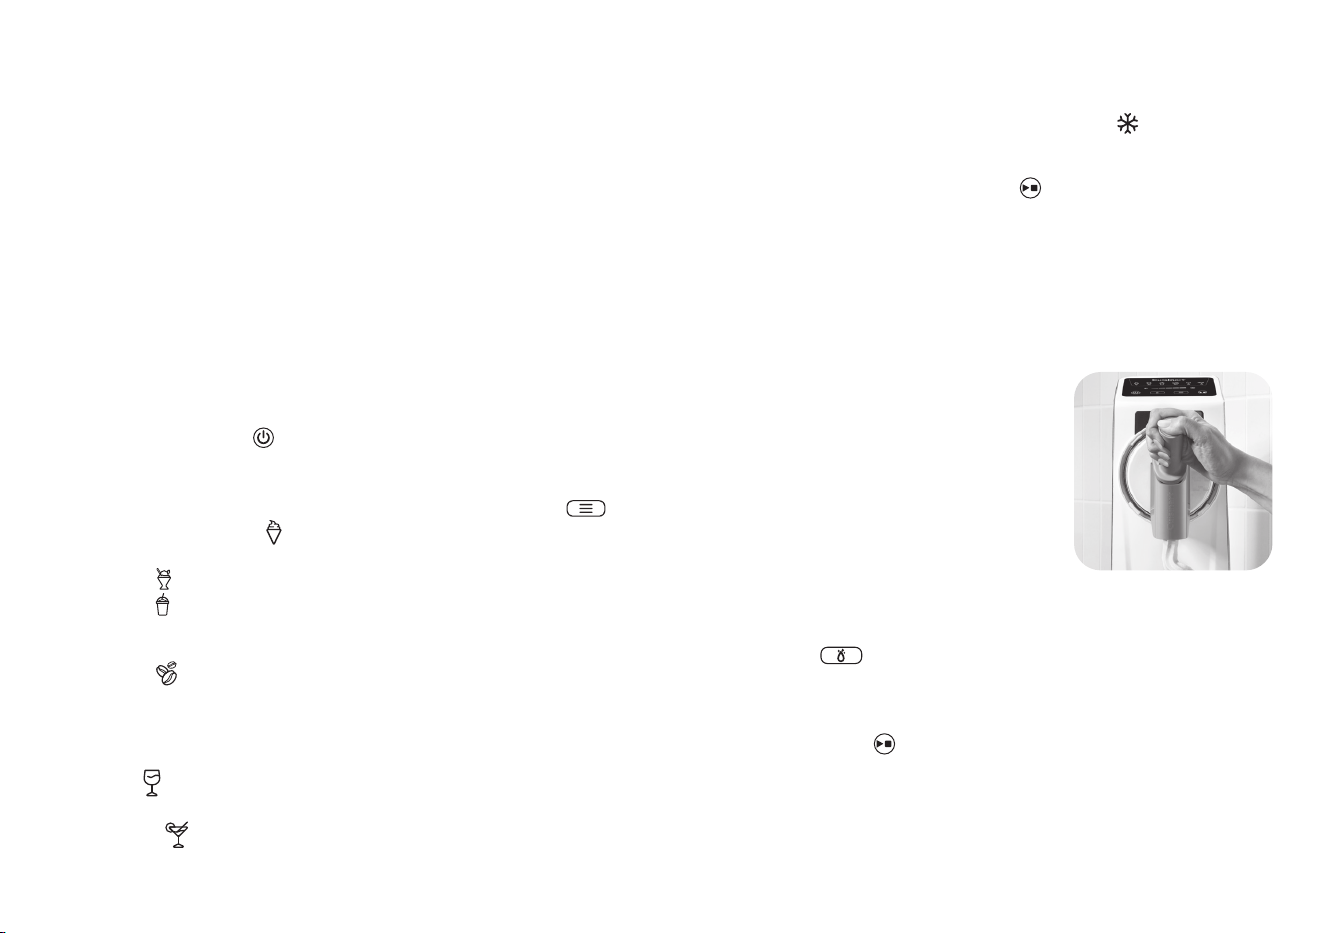
15. To dispense, grasp the handle with your entire
hand (see image). This machine features a
Smart Dispense System. There may be a delay
when dispensing; the machine is pushing the
treat to the front of the vessel. If the frozen
treat becomes stuck in the dispenser cover,
gently move the handle up and down to
dislodge it.
16. Once the selected preset cycle is complete,
be sure to dispense all of the frozen treat inside the vessel and run the
rinse program (read operating instructions above).
Rinse Program
i. To activate the Rinse Program, pour warm water into the ingredient
funnel, ensuring not to exceed the slushy MAX ll line. Then press the
Rinse Program button.
ii. Press Start/Stop .
iii. After 30-45 seconds pull down on the handle to dispense the dirty
water from the vessel.
iv. Press Start/Stop, then repeat as many time with clean, warm water
until the dispensed water is clear.
v. After running the Rinse Program, use a damp cloth or sponge to wipe

7
the inside of the vessel. A soapy sponge may be used but remember
to wipe all soap away.
17. Turn o the unit by pressing the Power button .
18. To remove the dispenser assembly from the unit, locate the release
button at the bottom of the dispenser assembly. Using both hands, press
the release button and turn the dispenser assembly counterclockwise to
remove, put aside. Then, pull the auger out of the vessel.
Note: Ensure the vessel is emptied before removing the dispenser
assembly from the unit.
Note: Do not use the handle or dispenser cover to rotate the dispenser
assembly. Grasp the round clear part of the dispenser assembly to
remove or attach.
19. If making treats back, to back run the Rinse Program in between.
Safety Feature
The Cuisinart
®
6-in-1 Slushy & Soft-Serve Maker is equipped with a safety
feature that automatically stops the unit if the motor overheats. This may
happen if the unit is used for other than its intended purpose, or if the unit
has been running for an excessively long period of time. To reset the unit,
press the Power button and unplug the unit. Let the unit rest. After 10
minutes, you may turn the unit on again and dispense any remaining treat,
clean, and start a new batch.
Cleaning, Storage, and Maintenance
Cleaning After Using the Rinse Progam
Clean the dispenser assembly, auger, dispenser cover, and star tip in warm
soapy water. For a more thorough clean, use a soapy sponge or damp cloth to
wipe the inside of the vessel. Be sure to thoroughly rinse away all soapy
water before preparing frozen treats, as any residue can aect the unit’s
performance and alter the treat’s avor. Wipe the unit base clean with damp
cloth. Dry all parts thoroughly. DO NOT CLEAN WITH ABRASIVE CLEANSERS
OR IMPLEMENTS.
Storage
Be sure to store your unit in an upright position. Do not store anything inside
the vessel other than the auger. Transfer the treats to a freezer-safe, airtight
container for storage in the freezer.
Maintenance
Servicing should be performed by a Cuisinart
®
authorized service
representative.
This unit contains a ammable refrigerant. Check your local regulations on
the proper way to dispose of the unit.
Troubleshooting
Problem Solution
Unit turns o
unexpectedly.
The overload safety feature has been activated.
Let unit rest for 10 minutes before powering on,
cleaning, and starting a new batch.
If not the reason above, unplug the unit and let it
rest for 2 hours. Power unit on and begin making
your frozen dessert.
If these solutions do not correct the problem,
please contact Cuisinart
®
Customer Service.
At any time during the
cooling/mixing cycle,
the unit beeps
continuously for 30
seconds.
Power o and unplug the unit. Let it rest for
2 hours. Power unit on and being making your
frozen dessert. If this happens again, let the unit
rest for 24 hours. If unit continues to beep after
you have tried the above procedure, contact
consumer service.

8
Important Tips
General
• Be sure the dispenser assembly is properly attached before adding
contents to the ingredient funnel. The assembly should be completely
ush with the unit when correctly attached. There should be no gap
between the assembly and the front of the unit.
• The minimum amount of treat mixture to add to the machine is 20
ounces or 21/2 cups. Use the MIN line on the front of the dispenser
assembly as your guide.
• The maximum amount of ice cream or frozen yogurt base to add to the
machine is 30 ounces or 33/4 cups. You can also use the maximum line
for ice cream on the front of the dispensing assembly as your guide.
• The maximum amount of sorbet/slushy/frappé/wine/cocktail mixture to
add to the machine is 44 ounces or 51/2 cups. You can use the maximum
line for slushy on the front of the dispensing assembly as your guide.
• All mixtures should be smooth and well blended before adding
to the machine.
• Mix-ins cannot be added to the unit. Nuts, sprinkles, etc., must be
added after dispensing.
• Sugar is an essential ingredient in all frozen treat recipes. Should the
sugar content be too low, the mixture will freeze past the point of being
able to dispense.
• Freezing times range per recipe. Most treats will be ready in
20 to 40 minutes.
Adjusting Firmness While Unit is Running
Press the Start/Stop button at any point in the cooling/mixing cycle to
pause the cycle. To adjust the rmness of frozen treats, press frozen treats
rmness selection button . To resume, press the Start/Stop button again.
Dispensing Tips
1. Once the frozen treats are ready, position your ice cream cone, cup, glass,
or bowl beneath the dispenser. Pull down the handle to start dispensing.
For soft-serve ice cream, gently move your hand in a circle to create a
swirl pattern.
Note: After the rst dispense, a small amount of frozen treat may collect
inside the dispenser cover. During the second dispense, this leftover
portion will be released, and it may be slightly melted.
Note: To dispense correctly, grasp the handle with your entire hand (see
image). This machine features a Smart Dispense System. There may be a
slight delay when dispensing; the machine is pushing the mixture to the
front of the canister. If the frozen treat becomes stuck in the dispenser
nozzle, gently move the handle up and down to dislodge the clog.
Note: Depending on the consistency of the frozen treat mix, some
product may seep through the gap between the dispenser cover and the
dispenser assembly. If this occurs, simply remove the dispenser cover,
rinse it with warm water, and reattach it.
2. When you’ve lled the cone or bowl to your liking, slowly release
the handle, guiding it back to the vertical position to stop the ow of
frozen treats.
3. Once you are done using the unit, be sure to dispense the remainder of
the frozen treats and run the Rinse Program a few times.
4. After all the frozen treats have been dispensed from the vessel
and the Rinse Program is complete, press the ON/OFF to power
o the unit.
Recipe Tips
Ice Cream: The base recipes from Cuisinart were created specically for this
unit. These recipes were calculated to include the appropriate percentages of
liquid fat, sugar, and protein to create the best soft-serve ice cream. While
other recipes exist for ice cream, soft serve requires very specic formulas.
Flavors can be adjusted using dierent extracts, such as almond or
peppermint, but in order to achieve the most successful soft serve, the dairy
and sugar amounts should remain the same.
Use full-fat dairy: Cream and whole milk give the smoothest, richest texture.
Low-fat versions will create icier textures that also will not rm up as well as
full-fat varieties.
Balance Sugar: Sugar doesn’t just sweeten – it lowers the freezing point, keeping
the ice cream the perfect texture for dispensing. If you use too little sugar, the
ice cream can become too rm to dispense and potentially damage the unit.
Dairy-Free Ice Cream
• When substituting dairy-free products for dairy products, choose nut or
grain products (i.e. almond, cashew, oat, etc.) over coconut for the
rmest results.
• If choosing to use coconut-based recipes, note that the frozen results

9
will not be as rm as noncoconut recipes, dairy or nondairy.
• “Barista” style milks produce creamier results than nonbarista style.
Seek out unsweetened varieties to ensure the proper balance of sugar
in the recipe.
• Dairy-free creamers should be used in place of heavy cream.
• The addition of 1 tablespoon of corn syrup and 1 tablespoon of olive oil
add body and help to create a richer texture to the frozen ice cream.
• For the true nut lovers, nut butters can transform an otherwise icier
result into a rich and creamy dessert. Refer to our recipe for Iced
Peanut Butter-Banana-Coee Frappé as a starting point.
• Silken tofu is a sure way to make a protein-rich frozen dessert. Once
blended with dairy-free milk, sweetener, and avoring, it is ready to be
frozen into a delicious frozen treat.
Prep & Chilling
Chilling ice cream, frozen yogurt, and sorbet bases creates a rmer frozen
product. While it is not required, the texture of the frozen treat will be smoother
and more stable when chilled for a minimum of 4 hours and up to overnight.
Mixtures should be whisked well, ensuring that the sugars are dissolved into
the milk before adding the cream. If the mixture was chilled, always rewhisk
before adding to the unit to freeze.
Mixtures should always be completely smooth before adding to the unit. If
there are lumps in the ice cream or seeds present, they will not dispense
properly and potentially damage the unit. If using powders, always sift before
adding to mixtures.
Achieving the Best Ice Cream Texture and Firmness
A lot goes into formulating a soft-serve ice cream recipe. Unlike other ice
cream machines, in order to dispense from a compressor soft-serve machine,
the mixture must be a very specic composition of fat (from dairy), sugar,
avoring, and salt. The proper combination of these ingredients produces an
ice cream that is cold, smooth, and rm enough to hold in an ice cream cone.
Commercial soft-serve ice creams include a variety of stabilizers and
emulsiers that are not readily available in all markets, or ingredients that are
not desirable for everyday home use. The beauty of making your own ice
cream at home is the ability to use the freshest ingredients and to really
know what goes into your frozen treat. We created recipes that include
ingredients that can be found at your neighborhood grocery stores to avoid
hunting in specialty shops or hunting online.
There are some shortcuts to achieve rmer results if the recipes are not
holding up to your standards. Here are a list of how those ingredients can
help to improve texture and rmness.
Malted Milk Powder: Malted milk powder is a secret weapon in adding body
and rmness to ice creams. In addition to it being a dried milk (therefore
adding fat and protein) it also contains soy lecithin, which is a common
ingredient in commercial soft-serve ice creams. These, in addition to the
ours in the mixture, add body and rmness to the nal frozen ice cream.
Note: Malted milk powder is not gluten or soy free.
Cream Cheese: Cream cheese is a great combination of dairy fat, emulsiers,
and stabilizers all in one. Add between 4 and 6 tablespoons of softened
cream cheese to your ice cream recipe. Be sure to whisk well and then strain
to avoid any cream cheese bits from owing into your ice cream maker.
Liquid Sugars: Simple syrup (liquid granulated sugar), golden syrup (liquid cane
sugar), corn syrup, and maple syrup can all be added to recipes in place of a
portion of granulated sugar. It is recommended to use 2 tablespoons of the
liquid sugar and remove 2 tablespoons of granulated as a starting point.
Xanthan Gum: Xanthan is a common stabilizer found in many gluten-free
baking recipes.
Sugars: Most recipes require a variety of sugars in order to achieve a more
stable ice cream. Our base formulas call for a combination of granulated and
light brown sugars. If using a dierent recipe than our recommended recipes,
substitute part of the granulated sugar for brown sugar to help achieve a
better consistency.
Making New Flavors
Since soft-serve ice cream recipes are precise formulas, adding too many
dierent ingredients can alter the nal texture and rmness.
Use the vanilla soft-serve recipe as a base, and change the extracts to make
new avors e.g., peppermint, lemon, almond, coee, etc).
Freeze-dried fruit is another great way to get avor and color. Finely process
and sift before adding to the soft-serve vanilla ice cream base. This mixture
benets from chilling for a few hours before churning.
Slushy
• For easy slushies, many store-bought beverages can simply be added to
the unit. Some examples are soda, sweetened iced tea, lemonade,
sports or energy drinks, kombucha, and fruit punch.
• Do not use sugar-free or diet beverages in this unit. They will damage
the unit and freeze solid.

10
Wine & Cocktail
• Since alcohol inhibits freezing, a mixture with too high alcohol content
will not freeze.
Issue Type of Recipe Likely Cause Quick Fix
Ingredients
not owing
into unit
All
Mixture is
too thick
Add gradually to the
ingredient funnel, or add
liquid to slightly thin the
mixture
Too sof t Ice cream
Too much
sugar
Reduce sugar in the base
recipe; chill overnight
before churning
Too rm Ice cream
Not enough
sugar or fat
Add additional sugar; be
sure that the ratio of milk
to cream is 2:1 in the base
recipe
Icy texture Ice cream
Not enough
fat
Be sure to use full fat
milk and cream in recipes;
chill overnight before
churning
Ingredients
not owing
into unit
Ice cream
Mixture
too rm
See above note
Mixture will
not dispense
Sorbet and
beverages
Star tip is
being used
Only use the star tip to
dispense ice cream

11
Recipes
The recipes that follow oer a variety of options for delicious frozen treats.
Use our guidelines when creating new recipes of your own. Be sure mixtures
meet the minimum requirements and do not exceed the MAX ll line for the
specic treat.
Ice Cream
Vanilla Soft Serve ................................................................................................. 9
Chocolate Soft Serve .........................................................................................10
Coffee Soft Serve ................................................................................................10
Strawberry Soft Serve ........................................................................................10
Pumpkin Pie Frozen Yogurt ............................................................................... 11
Strawberry-Banana Frozen Yogurt .................................................................. 11
Chocolate Frozen Yogurt ................................................................................... 11
Dairy Free Ice Cream
Creamy Dairy Free Soft Serve .......................................................................... 12
Maple-Nut Dairy Free Soft Serve ..................................................................12
Berry Tofu Soft Serve ........................................................................................ 12
Sorbet
Tangerine Sorbet .................................................................................................13
Mango-Lime Sorbet ............................................................................................13
Slushy
Pink Lemonade Slushy ....................................................................................... 13
Cherry Cola Slushy ..............................................................................................13
Watermelon-Mint Slushy ..................................................................................14
Frappé
Thin Mint Iced Coffee ........................................................................................14
Iced Peanut Butter-Banana-Coffee Frappé .................................................14
Frozen Sweet Latte .............................................................................................14
Pistachio Matcha Latte ......................................................................................15
Wine
Blood Orange Grand Mimosa ...........................................................................15
Strawberry Frosé .................................................................................................15
Cider Slushy ..........................................................................................................15
Cocktail
Classic Frozen Margarita ...................................................................................15
Frozen Aperol Spritz ...........................................................................................16
Frozen Mudslide ..................................................................................................16
Frozen Negroni .....................................................................................................16
Simple Syrup ........................................................................................................16
Vanilla Soft Serve
This simple recipe guarantees smiles for kids of all ages.
Makes about 4 cups
1¾ cups whole milk
1/3 cupgranulatedsugar
2 tablespoons packed light brown sugar
¼ teaspoonneseasalt
1¼ cups heavy cream
1 tablespoon pure vanilla extract
1. In a medium bowl whisk together the milk, sugar, and salt until sugar is
dissolved. Stir in the heavy cream and vanilla. Refrigerate until ready to use.
2. When ready, assemble the 6-in-1 Slushy & Soft-Serve Maker with the star tip
placed inside the dispensing assembly. Pour the ice cream base into the
ingredient funnel. Select Ice Cream and press Start.

12
3. When ice cream is ready to dispense, the unit will signal before going into
Keep Cool mode.
4. Dispense into cones or cups to serve.
Chocolate Soft Serve
This recipe is for the true chocolate lovers.
Makes about 4 cups
1¾ cups whole milk
6 tablespoons chocolate syrup
¼ cup granulated sugar
1 ½ tablespoons packed light brown sugar
2 tablespoons cocoa powder, sifted
½ teaspoonneseasalt
1 tablespoon pure vanilla extract
1 cup heavy cream
1. Put the milk, chocolate syrup, sugars, cocoa powder, and salt in a medium
bowl and whisk together to combine and remove any lumps. Add vanilla and
heavy cream and whisk well to incorporate. Refrigerate until ready to use.
2. When ready, assemble the 6-in-1 Slushy & Soft-Serve Maker with the star tip
placed inside the dispensing assembly. Pour the ice cream base into the
ingredient funnel. Select Ice Cream and press Start.
3. When ice cream is ready to dispense, the unit will signal before going into
Keep Cool mode.
4. Dispense into cones or cups to serve.
Coffee Soft Serve
Get your coee x with this cold and creamy treat.
Makes about 4 cups
1¾ cups whole milk
1/3 cupgranulatedsugar
2 tablespoons packed light brown sugar
¼ teaspoonneseasalt
1¼ cups heavy cream
1to2 tablespoonscoeeextract
1 teaspoon pure vanilla extract
1. In a medium bowl, whisk the milk, sugars, and salt until the sugar is
dissolved. Stir in the heavy cream and coee and vanilla extracts. Refrigerate
until ready to use.
2. When ready, assemble the 6-in-1 Slushy & Soft-Serve Maker with the star tip
placed inside the dispensing assembly. Pour the ice cream base into the
ingredient funnel. Select Ice Cream and press Start.
3. When ice cream is ready to dispense, the unit will signal before going into
Keep Cool mode.
4. Dispense into cones or cups to serve.
Strawberry Soft Serve
Freeze-dried fruit is a a great way to get the true avor of fruit without the added
water content, perfect when creating a soft-serve ice cream recipe.
Makes about 4 cups
13/4 cupswholemilk
1/3 cupgranulatedsugar
2 tablespoons packed light brown sugar
¼ teaspoonneseasalt
2 cups freeze-dried strawberries*
1 cup heavy cream
½ teaspoon pure vanilla extract
1. Put the milk, sugars, and salt into a large mixing bowl. Whisk well to dissolve
the sugars. Add the dehydrated strawberries and allow to steep, in the
refrigerator, for a minimum of 2 hours and up to overnight.
2. Put the strawberry mixture into a blender jar and run on high until well
blended. Add the heavy cream and vanilla and blend on low to just combine.
3. Assemble the 6-in-1 Slushy & Soft-Serve Maker with the star tip placed
inside the dispensing assembly. Pour the ice cream base into the ingredient
funnel. Select Ice Cream and press Start.

13
3. When ice cream is ready to dispense, the unit will signal before going into
Keep Cool mode.
4. Dispense into cones or cups to serve.
*If freeze-dried strawberries are not available, a simple version of this recipe can
be prepared by using store-bought strawberry syrup (in the dessert or ice cream
section of the grocery store). To prepare, replace the freeze-dried strawberries
with 1/3 cup strawberry syrup and increase the heavy cream by 1/3 cup. Whisk
together in a mixing bowl and then follow instructions for preparing the ice cream.
Pumpkin Pie Frozen Yogurt
Frozen yogurt is a cool variation for this popular autumn dessert.
Makes about 4 cups
1/2 cupheavycream
1 can(15ounces)pumpkinpurée(about11/4cups)
1¼ cups packed light brown sugar
11/2 teaspoonsgroundcinnamon
1 teaspoon ground ginger
¼ teaspoon ground nutmeg
Pinchneseasalt
11/2 cupsplainorvanillawhole-milkyogurt(notGreek-style)
11/2 teaspoonspurevanillaextract
1. In a medium saucepan, combine the heavy cream, pumpkin, sugar,
and spices. Bring to a slight simmer, whisking to combine. Cool to
room temperature.
2. In a medium bowl, whisk the yogurt and vanilla together. Slowly whisk
in the cooled cream-pumpkin mixture until combined. Refrigerate until ready
to use.
3. When ready, assemble the 6-in-1 Slushy & Soft-Serve Maker with the star tip
placed inside the dispensing assembly. Pour the yogurt base into the
ingredient funnel. Select Ice Cream and press Start.
4. When frozen yogurt is ready to dispense, the unit will signal before going into
Keep Cool mode.
5. Dispense into cones or cups to serve.
Strawberry-Banana Frozen Yogurt
Strawberry and banana come together in classic fashion in
this tangy frozen dessert.
Makes about 4 cups
1 ripe banana, cut into 1-inch pieces
6 ounces fresh, ripe strawberries, hulled and halved
1/2 cupwholemilk
1/2 cupheavycream
1 cup granulated sugar
Pinchneseasalt
½ teaspoon pure vanilla extract
2½ cups plain or vanilla whole-milk yogurt (not Greek-style)
1. Put the banana, strawberries, milk, heavy cream, sugar, salt, and vanilla
extract into a blender jar and run on high until smooth. Transfer to a medium
bowl and whisk in the yogurt. Refrigerate until ready to use.
2. Assemble the 6-in-1 Slushy & Soft-Serve Maker with the star tip placed
inside the dispensing assembly. Pour the yogurt base into the ingredient
funnel. Select Ice Cream and press Start.
3. When frozen yogurt is ready to dispense, the unit will signal before going into
the Keep Cool mode.
4. Dispense into cones or cups to serve.
Chocolate Frozen Yogurt
A treat for the chocolate lovers out there who are seeking
all ways to get in their daily protein.
Makes about 4 cups
¾ cup whole milk
½ cup cocoa powder, sifted
¾ cup granulated sugar
¾ cup heavy cream
2 cups whole-milk vanilla yogurt (not Greek-style)

14
1 teaspoon pure vanilla extract
¼ teaspoonneseasalt
1. In a medium mixing bowl, whisk together the milk, cocoa powder, and sugar
together until well combined. Whisk in the heavy cream, yogurt, and vanilla.
Refrigerate until ready to use.
2. When ready, assemble the 6-in-1 Slushy & Soft-Serve Maker with the star tip
placed inside the dispensing assembly. Pour the yogurt base into the
ingredient funnel. Select Ice Cream and press Start.
3. When frozen yogurt is ready to dispense, the unit will signal before going into
Keep Cool mode.
4. Dispense into cones or cups to serve.
Creamy Dairy-Free Soft Serve
There are a few tricks to achieving a true soft-serve texture when using dairy-free
ingredients. The combination of dairy-free milk and creamer makes sure that the
ice cream is not too heavy or icy, while the corn syrup and olive oil help to ensure
that the ingredients blend well together and achieve the perfect soft-serve swirl.
Makes about 4 cups
1½ cups dairy-free milk (nut or oat, preferably barista-style)
1½ cups dairy-free creamer, unsweetened
½ cup granulated sugar
¼ cup packed light brown sugar
1 tablespoon light corn syrup
1 tablespoon olive oil
1 tablespoon pure vanilla extract
¼ teaspoon sea salt
1. In a medium bowl, whisk all the ingredients until the sugars are dissolved.
Refrigerate until ready to use.
2. When ready, assemble the 6-in-1 Slushy & Soft-Serve Maker with the star tip
placed inside the dispensing assembly. Pour the ice cream base into the
ingredient funnel. Select Ice Cream and press Start.
3. When ice cream is ready to dispense, the unit will signal before going into
Keep Cool mode.
4. Dispense into cones or cups to serve.
Maple-Nut Dairy-Free Soft Serve
These ve ingredients create a frozen treat for all the nut-lovers out there.
Makes about 4 cups
½ cupcreamynutbutter(preferablyamildavor,suchascashew
or almond)
2½ cups nut milk (barista blend not necessary)
2/3 cupmaplesyrup
1 tablespoon pure vanilla extract
Pinch sea salt
1. Put all ingredients into a blender jar. Blend on high to fully combine.
Refrigerate until ready to use.
2. When ready, assemble the 6-in-1 Slushy & Soft-Serve Maker with the star tip
placed inside the dispensing assembly. Pour the ice cream base into the
ingredient funnel. Select Ice Cream and press Start.
3. When ice cream is ready to dispense, the unit will signal before going into
Keep Cool mode.
4. Dispense into cones or cups to serve.
Berry Tofu Soft Serve
Silken tofu has long been used to make dairy-free desserts, from mousses to puddings.
Here, we blend up a handful of ingredients to make a creamy and fruity soft serve.
Makes about 4 cups
1 pound silken tofu
½ cup dairy-free milk, unsweetened
1 tablespoon pure vanilla extract
¾ cup granulated sugar

15
10 ounces defrosted frozen berries (either strawberries, raspberries, or
a bag of mixed berries works well)
Pinch sea salt
1. Put all ingredients into a blender jar. Blend on high to fully combine. Strain
through a ne-mesh strainer to remove any seeds from the ice cream base.
Refrigerate until ready to use.
2. When ready, assemble the 6-in-1 Slushy & Soft-Serve Maker with the star tip
placed inside the dispensing assembly. Pour the strained ice cream base into
the ingredient funnel. Select Ice Cream and press Start.
3. When ice cream is ready to dispense, the unit will signal before going into
Keep Cool mode.
4. Dispense into cones or cups to serve.
Tangerine Sorbet
This sorbet looks and tastes like sunshine in a cup!
Makes about 3½ cups
3 cups tangerine juice, strained
11/2 cupssimplesyrup(seerecipeonpage16)
11/2 tablespoonspremiumorangeliqueur
1 tablespoon grated tangerine or orange zest
Pinchneseasalt
1. Stir all ingredients together. Refrigerate until ready to use.
2. When ready, assemble the 6-in-1 Slushy & Soft-Serve Maker. Pour the sorbet
base into the ingredient funnel. Select Sorbet and press Start.
3. When sorbet is ready to dispense, the unit will signal before going into
Keep Cool mode.
4. Dispense into cups to serve.
Mango-Lime Sorbet
Taste of the tropics any time of year.
Makes about 4 cups
2½ cups mango nectar or juice
½ cup fresh lime juice
1 cup simple syrup
½ tesapoon grated lime zest
Pinchneseasalt
1. Stir all ingredients together. Refrigerate until ready to use.
2. When ready, assemble the 6-in-1 Slushy & Soft-Serve Maker. Pour the sorbet
base into the ingredient funnel. Select Sorbet and press Start.
3. When sorbet is ready to dispense, the unit will signal before going into Keep
Cool mode.
4. Dispense into cups to serve.
Pink Lemonade Slushy
Simple and refreshing. In a pinch store-bought lemonade may be substituted.
Makes about 6 cups
3 cups water
¾ cup fresh lemon juice
½ cup simple syrup
¼ cup cranberry juice cocktail
1. When ready, assemble the 6-in-1 Slushy & Soft-Serve Maker. Pour the
ingredients directly base into the ingredient funnel. Select Slushy, select
rmness level 1, and press Start.
2. When slushy is ready to dispense, the unit will signal before going into
Keep Cool mode.
3. Dispense into cups when ready.
Cherry Cola Slushy
A classic combination, slushy-style!
Makes about 4 cups
3 cans (12 ounces each) cola
1/2 cupgrenadine

16
1/3
½
2/3
3/4
1
11/3
1½
12/3
1 3/4
2
21/3
2½
22/3
23/4
3
31/3
3½
32/3
3 3/4
4
41/3
4½
42/3
4 3/4
1/4 cupluxardocherrysyrup
1. When ready, assemble the 6-in-1 Slushy & Soft-Serve Maker. Pour the
ingredients directly into the ingredient funnel. Select Slushy, select rmness
level 1, and press Start.
2. When slushy is ready to dispense, the unit will signal before going into
Keep Cool mode.
3. Dispense into cups to serve.
Watermelon-Mint Slushy
Quite refreshing on a hot summer’s day!
Makes about 4 cups
6 cups watermelon, cut into cubes, include any juice
1/4 cupsimplesyrup(seerecipeonpage16)
1 tablespoon fresh lime juice
1 teaspoon fresh lime zest
6 mint leaves
1. Put all ingredients into a blender jar and run on high until smooth.
2. When ready, assemble the 6-in-1 Slushy & Soft-Serve Maker. Pour the slushy
base into the ingredient funnel. Select Slushy, select rmness level 1, and
press Start.
3. When slushy is ready to dispense, the unit will signal before going into
Keep Cool mode.
4. Dispense into cups to serve.
Thin Mint Iced Coffee
Is it coee disguised as dessert or dessert disguised as coee? Either way this
frosty mint coee is delicious!
Makes 3 cups
1 cup brewed espresso, cooled to room temperature
1 cup sweet cream creamer
1 cup whole milk
2 tablespoonschocolatesyrup
1/2 teaspoonpeppermintextract
1. Put ingredients into a mixing bowl and whisk well until combined. Refrigerate
until ready to use.
2. When ready, assemble the 6-in-1 Slushy & Soft-Serve Maker. Pour the frappé
base into the ingredient funnel. Select Frappé and press Start.
3. When ready to dispense, the unit will signal before going into
Keep Cool mode.
4. Dispense into cups to serve.
Iced Peanut Butter-Banana-Coffee Frappé
We had peanut butter and banana lovers in mind when
thinking up this fun iced coee treat.
Makes about 5 cups
1½ cups extra-creamy oat milk
3 cups cold brew
3 ripe bananas
1/3 cupcreamy-stylepeanutbutter
1. Put ingredients into a blender jar and run on High until smooth.
Refrigerate until ready to use.
2. When ready, assemble the 6-in-1 Slushy & Soft-Serve Maker. Pour the frappé
base into the ingredient funnel. Select Frappé and press Start.
3. When ready to dispense, the unit will signal before going into
Keep Cool mode.
4. Dispense into cups to serve.
Frozen Sweet Latte
Customize your frozen latte with any avored coee creamer.
Makes about 5 cups
4½ cups cold brew
1½ cupsfavoriteavoredcreamer
1. When ready, assemble the 6-in-1 Slushy & Soft-Serve Maker. Pour the frappé
ingredients into the ingredient funnel. Select Frappé, select rmness level 2,

17
and press Start.
2. When ready to dispense, the unit will signal before going into
Keep Cool mode.
3. Dispense into cups to serve.
Pistachio Matcha Latte
Pistachio pairs well with matcha in this cool and creamy nondairy latte. Should
pistachio syrup be unavailable, simple syrup may be substituted.
Makes about 5 cups
4 cups extra-creamy oat milk
2 tablespoons matcha powder
½ cup prepared pistachio syrup (may substitute simple syrup)
1. Put ingredients into a blender jar and run on high until smooth. Refrigerate
until ready to use.
2. When ready, assemble the 6-in-1 Slushy & Soft-Serve Maker. Pour the frappé
base into the ingredient funnel. Select Frappé and press Start.
3. When ready to dispense, the unit will signal before going into
Keep Cool mode.
4. Dispense into cups to serve.
Blood Orange Grand Mimosa
This upscale version of the traditional brunch cocktail really takes it up a notch.
Makes about 6 cups
32 ounces blood orange juice
1 375ml bottle prosecco
1/3 cuppremiumorangeliqueur
1. When ready, assemble the 6-in-1 Slushy & Soft-Serve Maker. Pour ingredients
into the ingredient funnel. Select Wine, select rmness level 1, and
press Start.
2. When ready to dispense, the unit will signal before going into
Keep Cool mode.
3. Dispense into cups to serve.
Strawberry Frosé
Kick o warm weather vibes with this adults-only treat.
Makes about 6 cups
1 750ml bottle rosé
½ cup simple syrup (recipe on page 16)
1 pound strawberries, hulled and halved
1. Working in 2 to 3 batches, add equal parts of the ingredients to a blender jar
and run on high until smooth. Refrigerate until ready to use.
2. When ready, assemble the 6-in-1 Slushy & Soft-Serve Maker. Pour the base
into the ingredient funnel. Select Wine and press Start.
3. When ready to dispense, the unit will signal before going into
Keep Cool mode.
4. Dispense into cups to serve.
Cider Slushy
Use your favorite spiked cider to create a fun autumn-inspired slush – we love a
cider donut avor for a sweet twist.
Makes about 4 cups
3 cans(12ounceseach)hardcider(preferablydonutavor)
1. When ready, assemble the 6-in-1 Slushy & Soft-Serve Maker. Pour the cider
into the ingredient funnel. Select Wine, set to rmness level 1, and
press Start.
2. When ready to dispense, the unit will signal before going into
Keep Cool mode.
3. Dispense into cups to serve.
Classic Frozen Margarita
The name “classic” says it all.
Makes about 6 cups
11/3 cupsfreshlimejuice
1 cup premium tequila

18
1 cup water
2/3 cupagavenectar
1/3 cuppremiumorangeliqueur
1. When ready, assemble the 6-in-1 Slushy & Soft-Serve Maker. Pour the
ingredients directly into the ingredient funnel. Select Cocktail
and press Start.
2. When ready to dispense, the unit will signal before going into Keep
Cool mode.
3. Dispense into cups to serve.
Frozen Aperol Spritz
An already-fun apertif brings the party with a frozen twist.
Makes about 5 cups
1 375ml bottle prosecco
11/3 cupsAperol
11/3 cupsbloodorangesoda
1. When ready, assemble the 6-in-1 Slushy & Soft-Serve Maker. Pour the
ingredient directly into the ingredient funnel. Select Cocktail and press Start.
3. When ready to dispense, the unit will signal before going into Keep
Cool mode.
3. Dispense into cups to serve.
Frozen Mudslide
Ice cream for adults!
Makes about 4½ cups
1½ cups whole milk
1½ cups heavy cream
½ cup Irish cream liqueur
½ cupcoeeliqueur
1/3 cupvodka
1. When ready, assemble the 6-in-1 Slushy & Soft-Serve Maker. Pour the
ingredients directly into the ingredient funnel. Select Cocktail and press Start.
2. When ready to dispense, the unit will signal before going into
Keep Cool mode.
3. Dispense into cups to serve.
Frozen Negroni
As always, the negroni, frozen or not, packs a punch!
Makes about 4 cups
1 cup gin
1 cup Campari
1 cup sweet vermouth
1 can (11 to 12 ounces) blood orange soda
1. When ready, assemble the 6-in-1 Slushy & Soft-Serve Maker. Pour the
ingredient directly into the ingredient funnel. Select Cocktail and press Start.
2. When ready to dispense, the unit will signal before going into about 4
Keep Cool mode.
3. Dispense into cups to serve.
Simple Syrup
Makes 11/2 cups
1 cup water
1 cup granulated sugar
1. Put water and sugar together in a saucepan over medium heat. Bring to a
simmer and continue to heat until sugar is completely dissolved.
2. Remove from heat and chill before using.
3. Store in an airtight container in the refrigerator.

19
Limited Warranty
Subject to the exclusions and limitations contained herein, Conair LLC dba
Cuisinart (“Cuisinart”) warrants that the Cuisinart
®
6-in-1 Slushy & Soft Serve
Maker ("Product") will be free from material defects in materials and
workmanship under normal, home-use conditions conditions for a period of
THREE (3) years beginning on the date the Product was purchased in its
original, sealed packaging, unless otherwise specied in this Limited
Warranty. This Limited Warranty is only for U.S. consumers (dened herein as
purchasers at retail for personal, family, or household use) who originally
purchase the Product from Cuisinart or an authorized Cuisinart
®
reseller (if
you are unsure whether a retailer or other point of sale is an authorized or
unauthorized Cuisinart reseller, contact Cuisinart).
This Limited Warranty does NOT cover:
• Normal wear and tear;
• Any Product purchased by commercial purchasers or for commercial or
nonhousehold uses;
• Accessories, parts, or software added to the Product after the system is
shipped from Cuisinart;
• Any costs associated with the replacement or repair of the Product,
including labor, installation, or other costs incurred by you without prior
Cuisinart approval;
• Damage to the Product, defective conditions, or nonconformities due to:
(1) external causes, including shipping, accidents, problems with electrical
power (Product designed only for use with 120-volt outlets), abnormal
conditions (such as mechanical or environmental); (2) usage not in
accordance with Product instructions; (3) misuse, neglect, unauthorized
alteration, unauthorized repair; and (4) acts of God or other events
beyond Cuisinart’s control;
• Damage caused by you or any nonauthorized third party, even though
necessary repairs and maintenance might be performed by any company;
• Damage caused by accessories or replacement parts not specically
authorized by Cuisinart may void this Limited Warranty; and
• Any Product where the original Product identication markings
(trademark or serial number) have been removed, altered, or obliterated
from the Product.
It is recommended that you visit our website, https://www.cuisinart.com/
register-your-product.html, for a fast, ecient way to complete your
product registration. However, product registration does not eliminate the
need for the consumer to maintain the original proof of purchase in order to
obtain the warranty benets. In the event that you do not have proof of
purchase date, the purchase date for purposes of this Limited Warranty will
be the date of manufacture.
Hassle-free warranty
If the Product that is the subject of this Limited Warranty fails during the
warranty period for reasons covered by this Limited Warranty, Cuisinart will,
at its option, repair the Product, replace the Product with another identical or
reasonably equivalent product, or if Cuisinart is unable to repair or replace
the Product, refund the purchase price, less the amount directly attributable
to the consumer’s prior usage of the Product. To obtain a return shipping
label, email us at https://www.cuisinart.com/customer-care/product-
assistance/product-inquiry/, or call our Consumer Service Center toll-free at
1-800-726-0190 to speak with a representative.
Upon receipt of the Product, Cuisinart will inspect the Product and, if
required under this Limited Warranty, attempt to repair, replace, or refund
the Product within thirty (30) days. However, there may be delays beyond
Cuisinart’s control, in which case that time period may be extended as
reasonably necessary.
IMPORTANT: If the nonconforming Product is to be serviced by someone
other than Cuisinart’s Authorized Service Center, please remind the servicer
to call our Consumer Service Center at 1-800-726-0190 to ensure that the
problem is properly diagnosed, the Product is serviced with the correct parts,
and the Product is still under warranty.
California residents only
The THREE (3) year Limited Warranty period begins on the date the Product
was delivered, which may be dierent than the date the Product was
purchased. California residents also have the option of obtaining the benets
of this Limited Warranty by bringing the Product to (A) the store where it was
purchased or (B) another retail store that sells Cuisinart products of the
same type. The retail store shall then, according to its preference, either
repair the Product, refer the consumer to an independent repair facility,
replace the Product with another identical or reasonably equivalent product,
or refund the purchase price less the amount directly attributable to the
consumer’s prior usage of the Product. California residents may also,
according to their preference, return nonconforming products directly to
Cuisinart for repair or, if necessary, replacement with another identical or

20
reasonably equivalent product by calling our Consumer Service Center
toll-free at 1-800-726-0190. Cuisinart will be responsible for the cost of such
repair, replacement, and/or shipping and handling for such nonconforming
products under warranty.
THIS LIMITED WARRANTY GIVES YOU SPECIFIC LEGAL RIGHTS, AND YOU MAY
ALSO HAVE OTHER RIGHTS THAT VARY FROM STATE TO STATE OR BY
JURISDICTION. IN THE EVENT THIS LIMITED WARRANTY IS BREACHED, YOU
MAY HAVE CLAIMS FOR REPLACEMENT, DAMAGES, OR OTHER PENALTIES.
LIMITATIONS OF LIABILITY/ADDITIONAL LIMITATIONS AND EXCLUSIONS
ALL EXPRESS AND IMPLIED WARRANTIES ARE LIMITED IN DURATION TO THE
LIMITED WARRANTY PERIOD. NO WARRANTIES APPLY AFTER THAT PERIOD.
SOME STATES (OR JURISDICTIONS) DO NOT ALLOW LIMITATIONS ON HOW
LONG AN IMPLIED WARRANTY LASTS, SO THIS LIMITATION MAY NOT APPLY
TO YOU. CUISINART’S RESPONSIBILITY UNDER THIS OR ANY OTHER
WARRANTY, IMPLIED OR EXPRESS, IS LIMITED TO REPAIR, REPLACEMENT,
OR REFUND, AS SET FORTH ABOVE. THESE REMEDIES ARE THE SOLE AND
EXCLUSIVE REMEDIES FOR ANY BREACH OF WARRANTY. TO THE MAXIMUM
EXTENT PERMITTED BY LAW, CUISINART IS NOT RESPONSIBLE FOR ANY
DIRECT, INDIRECT, SPECIAL, INCIDENTAL, OR CONSEQUENTIAL DAMAGES
RESULTING FROM ANY BREACH OF WARRANTY OR UNDER ANY OTHER LEGAL
THEORY (INCLUDING, BUT NOT LIMITED TO, LOST PROFITS, DOWNTIME,
LOSS OF GOODWILL, DAMAGE TO OR REPLACEMENT OF EQUIPMENT AND
PROPERTY, AND ANY COSTS OF RECOVERING, REPROGRAMMING, OR
REPRODUCING ANY PROGRAM OR DATA STORED IN OR USED WITH A SYSTEM
CONTAINING THE PRODUCT), EVEN IF CUISINART HAS BEEN ADVISED OF THE
POSSIBILITY OF SUCH DAMAGES. SOME STATES DO NOT ALLOW THE
EXCLUSION OR LIMITATION OF INCIDENTAL OR CONSEQUENTIAL DAMAGES,
SO THE ABOVE LIMITATIONS OR EXCLUSIONS MAY NOT APPLY TO YOU. ALL
EXPRESS AND IMPLIED WARRANTIES ARE LIMITED IN DURATION TO THE
LIMITED WARRANTY PERIOD. NO WARRANTIES APPLY AFTER THAT PERIOD.
SOME STATES (OR JURISDICTIONS) DO NOT ALLOW LIMITATIONS ON HOW
LONG AN IMPLIED WARRANTY LASTS, SO THIS LIMITATION MAY NOT APPLY
TO YOU.
This Limited Warranty is issued by:
Conair LLC
1 Cummings Point Road
Stamford, CT 06902
1-800-726-0190
©2025 Cuisinart, a
division of Conair LLC
7475 North Glen Harbor Boulevard
Glendale, AZ 85307
Printed in China
25CE200420
IB-18817-ESP