
Prima Latte
Semi-Auto Espresso Machine
VCF183/VCF190
COOK1949_VCF183_VCF190_25EM1 (UK).indd 1COOK1949_VCF183_VCF190_25EM1 (UK).indd 1 2025/3/24 14:412025/3/24 14:41

3
2
PRODUCT SAFETY
Read carefully and save all
instructions provided with
an appliance.
• Cleaning and maintenance
shall not be made by
children. Keep the
appliance and its cord out
of the reach of children.
Children shall not play
with the appliance.
• This appliance can be
used by persons with
reduced physical, sensory
or mental capabilities or
lack of experience and
knowledge if they have
been given supervision or
instruction concerning use
of the appliance in a safe
way and understand the
hazards involved.
• Children shall not play
with the appliance.
• If the supply cord
is damaged, it must
be replaced by the
manufacturer, its service
agent or similarly qualified
persons in order to avoid a
hazard.
• There is a risk of potential
injury if the unit is
misused.
• Do not remove the
Portafilter during the
espresso pour or water
flow as the unit is under
pressure. Removing the
Portafilter during either of
these operations can lead
to a scalding or injury.
! This appliance generates heat during
use. Adequate precaution must be taken
to prevent the risk of burns, scalds, res
or other damage to persons or property
caused by touching the exterior whilst in
use or during cooling. The surfaces will
remain hot after use.
! Never use this appliance for anything
other than its intended use. This
appliance is intended to be used in
household and similar applications such
as:
– staff kitchen areas in shops, ofces
and other working environments;
– farm houses;
– by clients in hotels, motels and other
residential type environments;
– bed and breakfast type environments.
Do not use this appliance outdoors.
! Always ensure that hands are dry
before handling the plug or switching on
the appliance.
! Always place the unit on a secure,
stable, at, dry and level surface.
! This appliance must not be placed on or
near any potentially hot surfaces (such
as a gas or electric hob).
! Do not operate this appliance with a
damaged cord or plug or if the appliance
has been damaged in any manner. If
the supply cord is damaged it must be
replaced by the manufacturer, its service
agent or similarly qualied persons in
order to avoid a hazard.
! Ensure the appliance is switched off and
unplugged from the supply socket after
use and before cleaning.
! Always switch off, unplug and allow
to cool before removing/tting parts,
cleaning or storing, if there is any
problem during the coffee making
process.
! Never immerse the main body of the
appliance or power cord and plug in
water or any other liquid.
! Never let the power cord hang over the
edge of a worktop, touch hot surfaces or
become knotted, trapped or pinched.
! Do not allow the Power Cord to come
into contact with the hot parts of the
espresso machine, including the Cup
Warming Plate and the Steam & Hot
Water Wand.
! Never leave the appliance unattended
when in use.
! The coffee maker shall not be placed in
a cabinet when in use.
! Avoid spilling water on the connector.
! This appliance is not intended to be
operated by means of an external timer
or separate remote control system.
! Do not operate without water in
reservoir. Fill reservoir with only clean
and cold water. Observe the maximum
lling volume is 2.8 litres.
FOR HOUSEHOLD USE
ONLY
ELECTRICAL SAFETY
This appliance must be earthed.
If the plug is not suitable for the socket
outlets in your home, it can be removed
and replaced by a plug of the correct type.
If the fuse in a moulded plug needs to be
changed, the fuse cover must be retted.
The appliance must not be used without
the fuse cover tted.
If the plug is unsuitable, it should be
dismantled and removed from the supply
cord and an appropriate plug tted as
detailed. If you remove the plug it must not
be connected to a 13 amp socket and the
plug must be disposed of immediately.
If the plug fuse requies replacement, a
fuse of the same rating as that tted by
the manufacturer must be used. In order
to prevent a hazard do not t a fuse of a
lower or higher rating.
Blue
(Neutral)
Brown
Fuse
(Live)
Green/Yellow
(Earth)
Plug should be ASTA approved to BS1363
Fuse should be ASTA approved to BS1362
Ensure that the outer sheath of
the cable is firmly held by the cord grip
COOK1949_VCF183_VCF190_25EM1 (UK).indd 2-3COOK1949_VCF183_VCF190_25EM1 (UK).indd 2-3 2025/3/24 14:412025/3/24 14:41
5
4
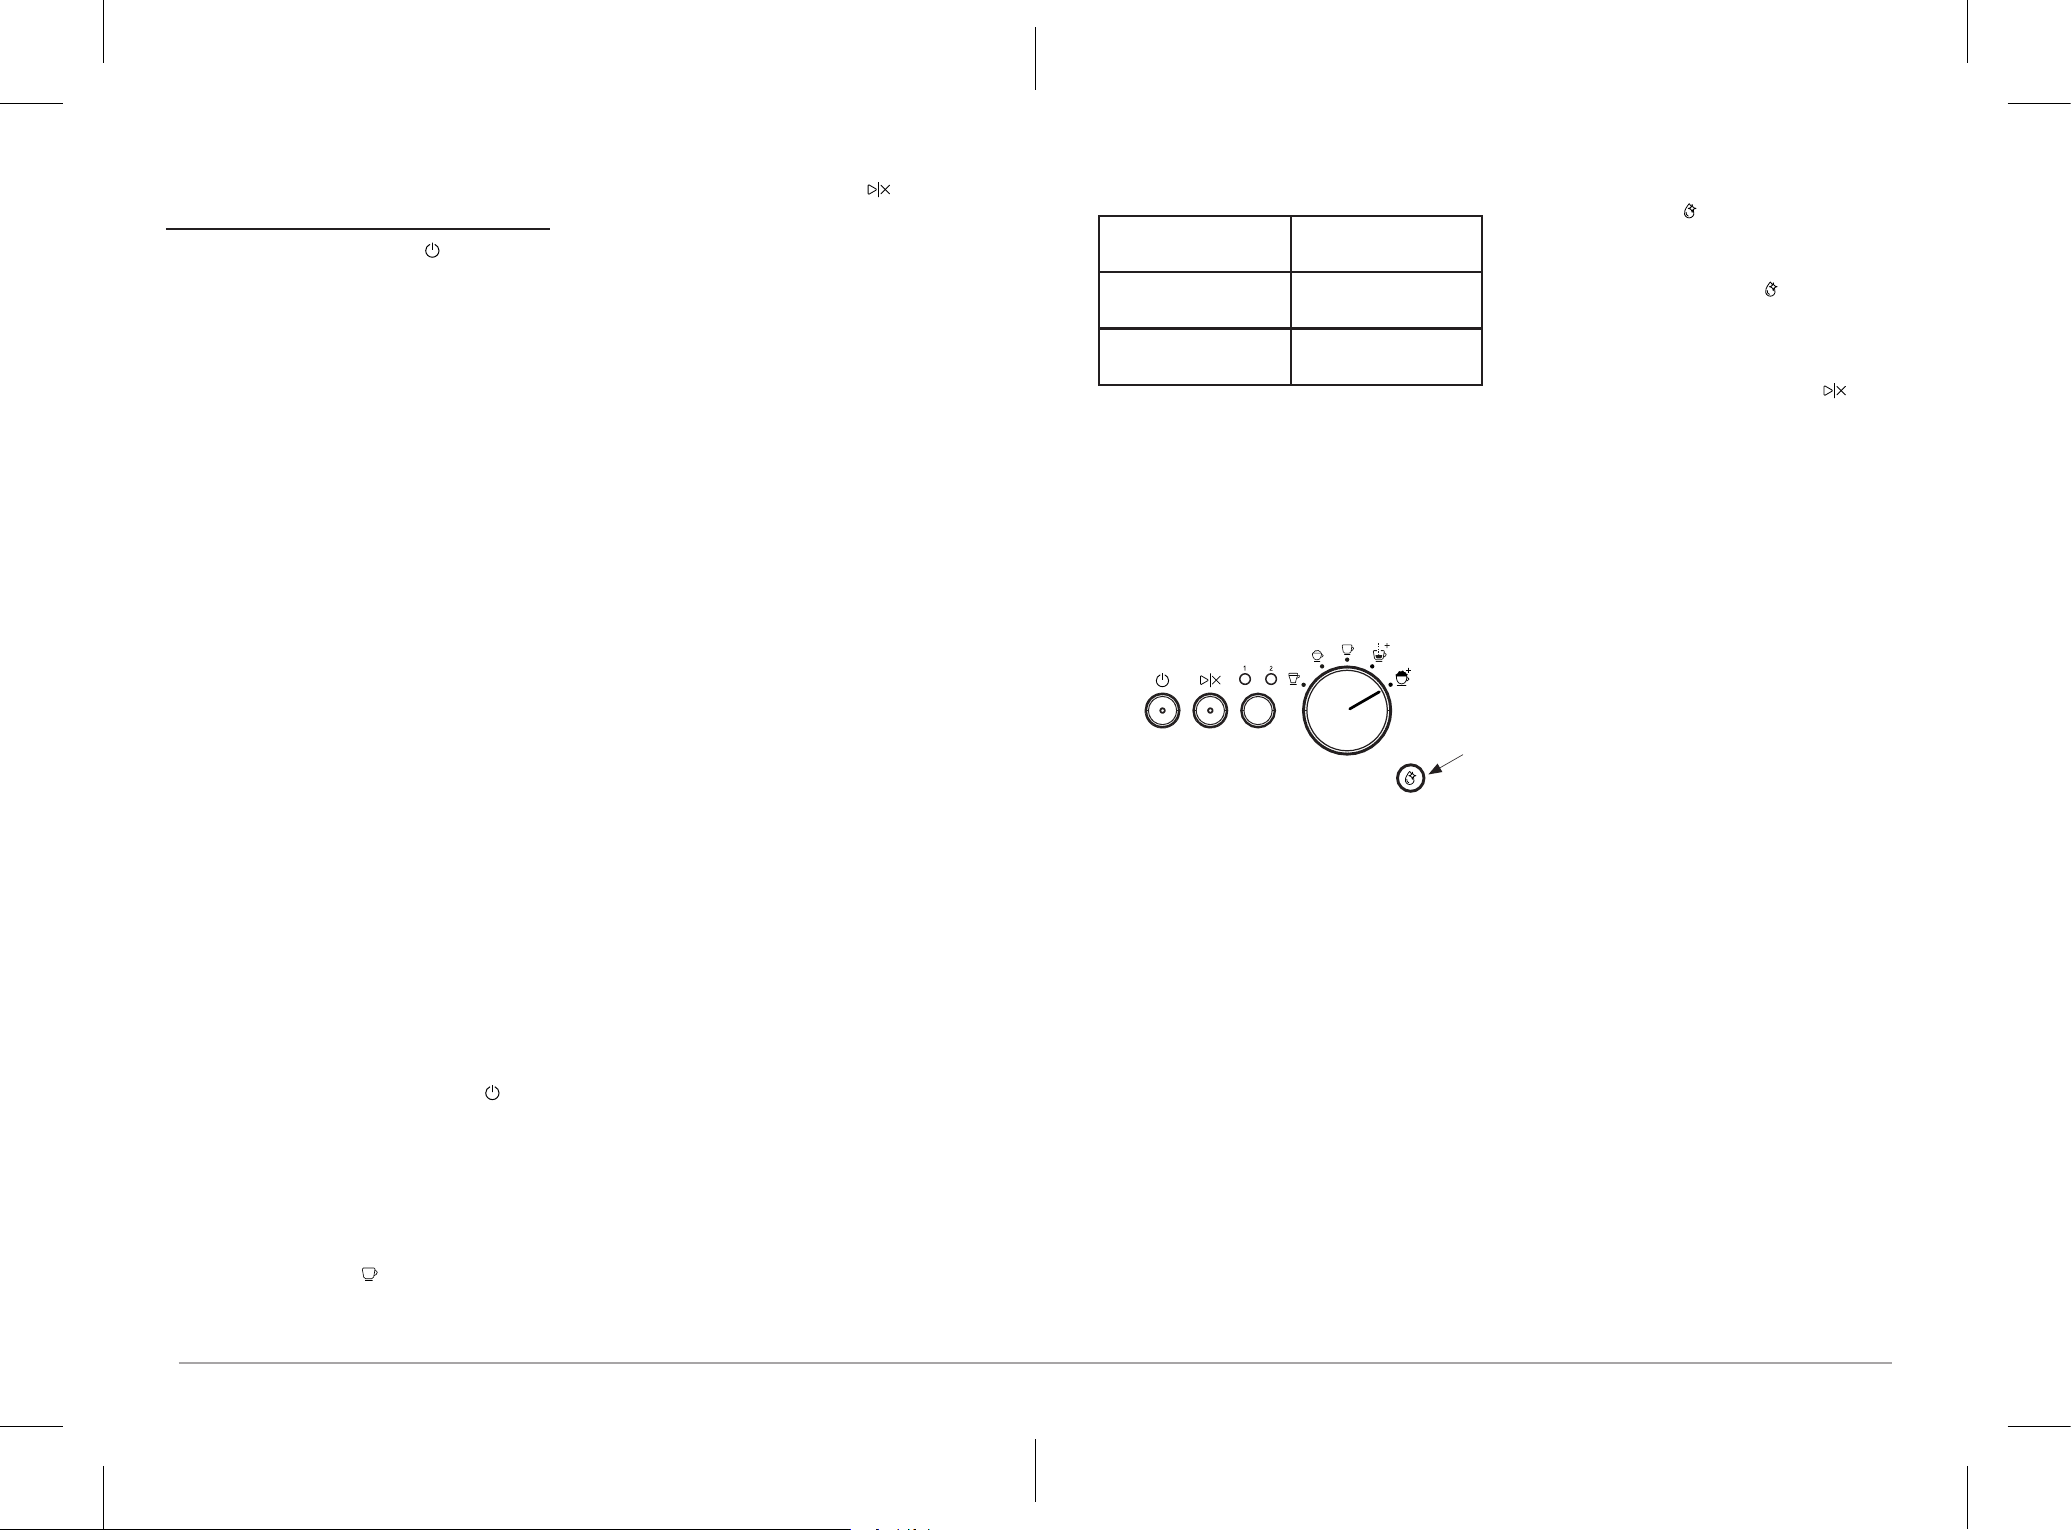
Start/Stop Button
The LED on button stays fully illuminated
when ready. When pressed, the LED
pulses on and off to signal that brewing is
in progress.
On/Off Power Button
The LED on button
illuminates and
pulses on and off to
indicate that the unit
is heating up. When
ready, it remains fully
illuminated and ready
for use.
Brew Head
See “Placing the
Portafilter” section for
detailed information.
Portalter
See “Placing the Filter
on the Portafilter” and
“Placing the Portafilter”
sections for detailed
information.
Frothed Milk
Dispensing Tube
Dispenses frothed
milk to your beverage.
Height Adjusting Slot
For small cups.
Drip Tray Water Level Float
See “Cleaning the Drip Tray”
section.
Adjustable Cup Platform
For small cups.
The adjustable cup platform
can be removed and
inserted into the height-
adjusting slot. Refer to
“Using the Adjustable Cup
Platform”.
Removable Milk
Reservoir
See “Filling the Milk
Reservoir” section for
detailed information.
Mode Selection Knob
Latte
Cappuccino
Espresso
Manual Espresso
Manual Milk Frothing
Clean Button
See “Deep Cleaning
Notification” section for
detailed information.
Milk Reservoir Knob
Allows you to switch
between:
• Milk Froth: See
“Filling the Milk
Reservoir” section.
• Clean: See “Cleaning
the Milk Reservoir
and Frothing System”
section.
• Unlock: See “Cleaning
the Milk Reservoir
and Frothing System”
section.
Shot Selection Button
1 Shot: When selected, pours a single
shot of espresso (30ml)
2 Shot: When selected, pours a double
shot of espresso (60ml)
NOTE: The last selected (single shot or
double shot) will always be illuminated
until changed.
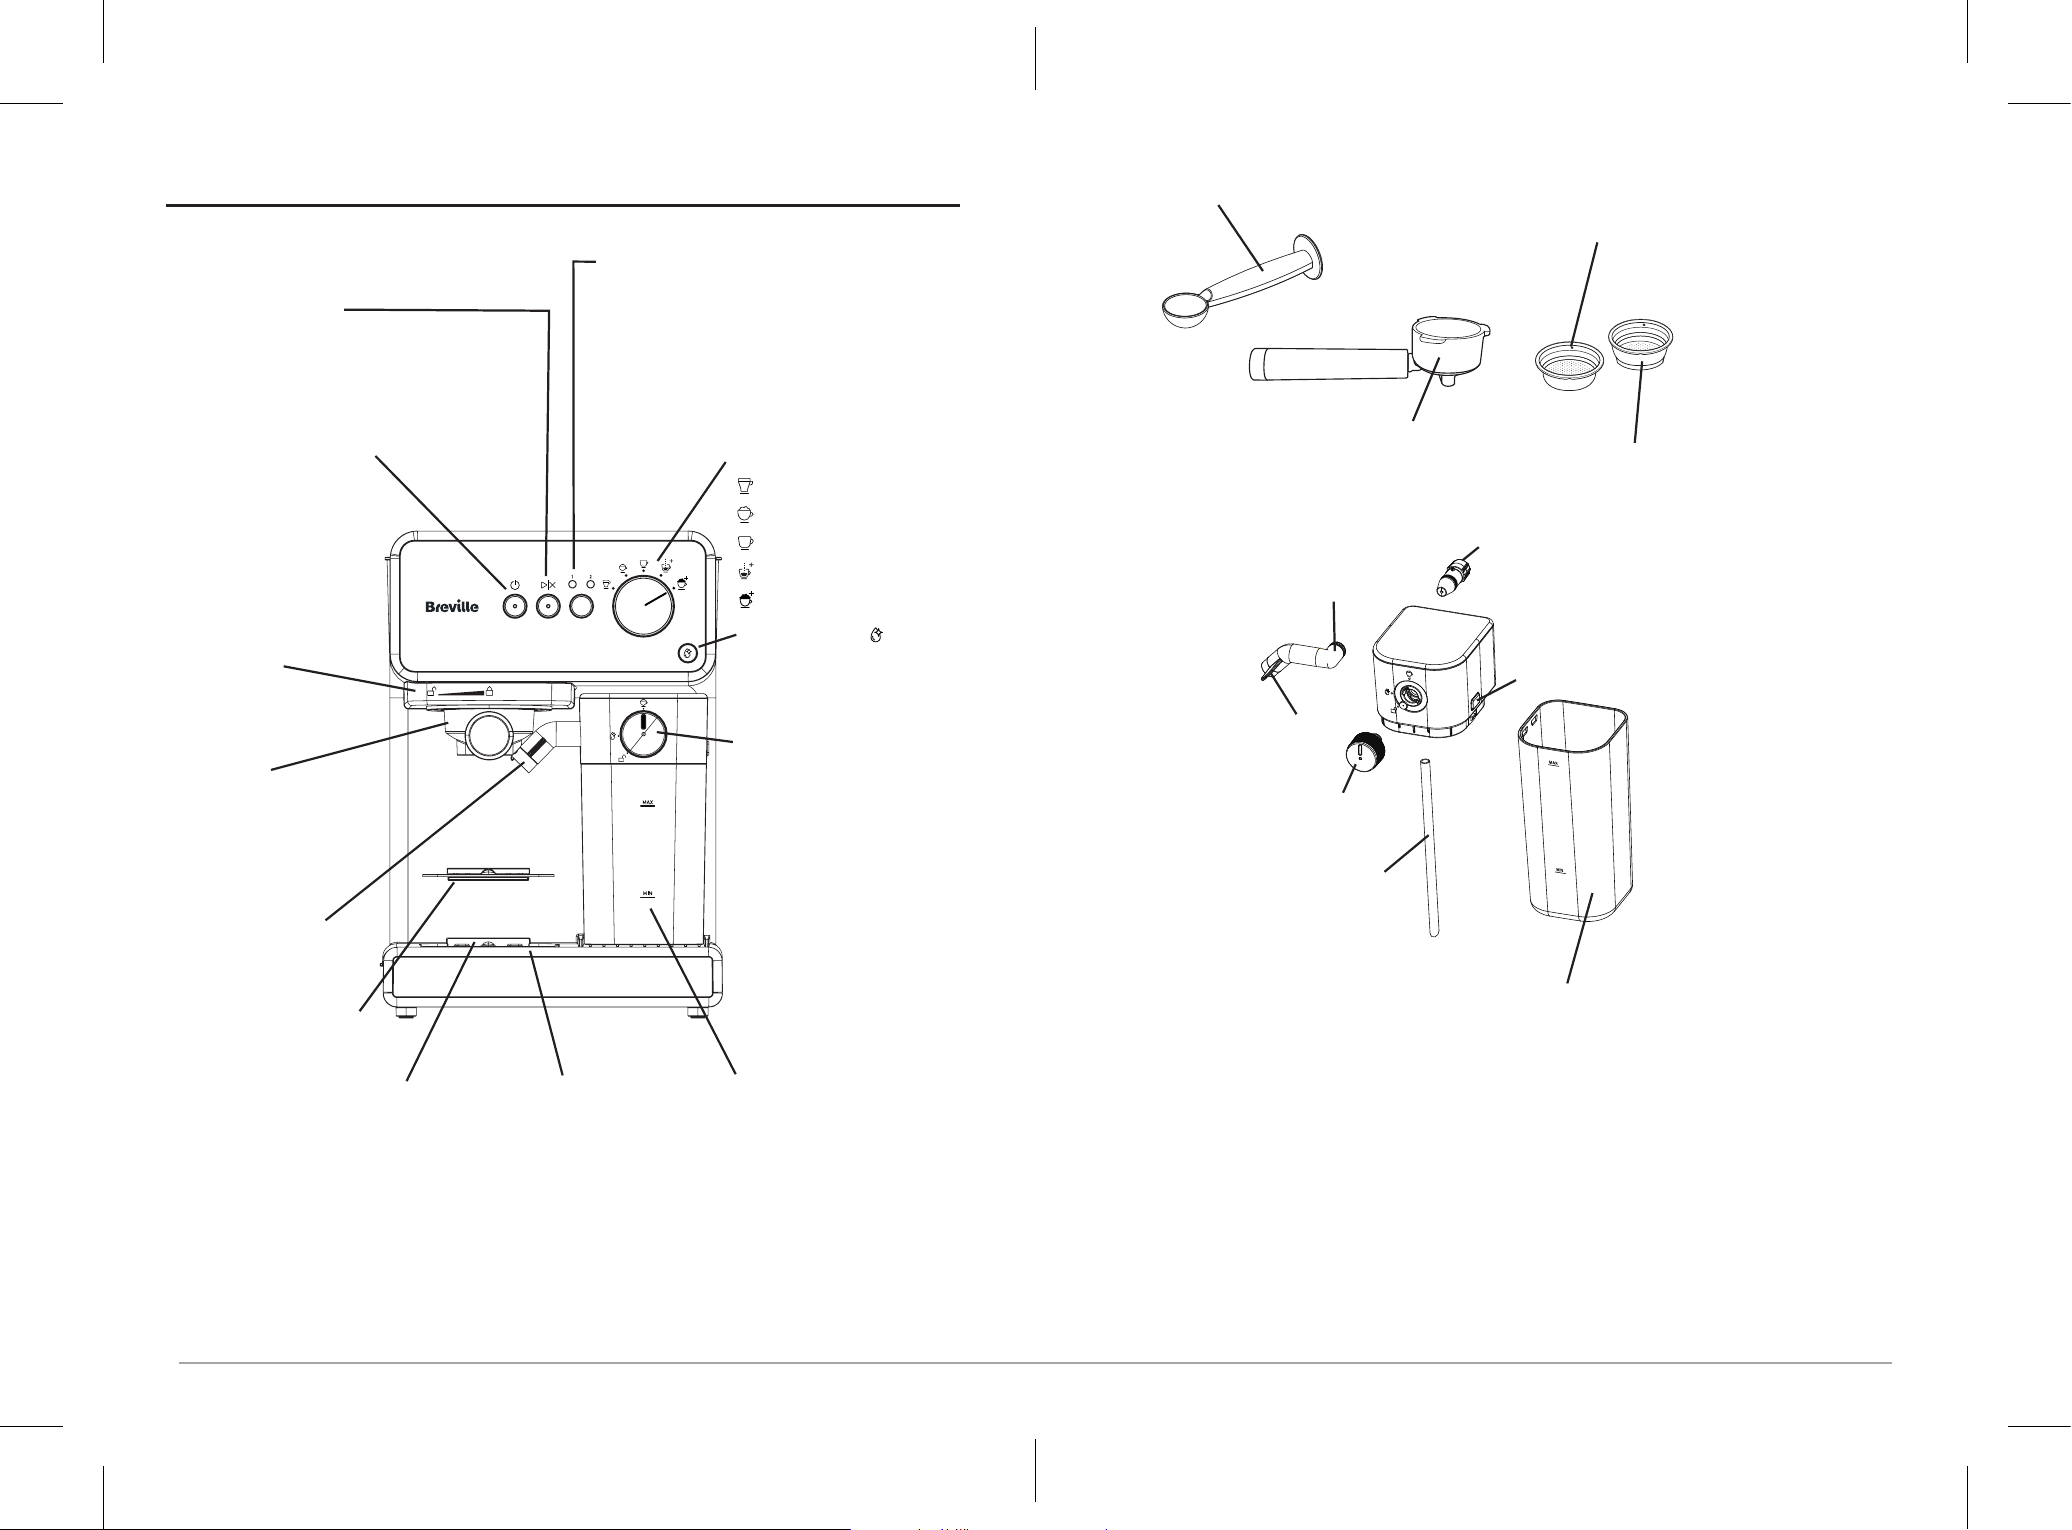
GETTING TO KNOW YOUR ESPRESSO MACHINE
Measuring Scoop and Tamp
Portalter
Filter for Single Shot of Espresso
Filter for Double Shot of Espresso
Frothed Milk Dispensing Tube
Frothed Milk Dispensing
Tube Guide Lever
Milk Froth Control Knob
Milk Straw
Milk Reservoir Release Button
Milk Reservoir (550 ml)
Steam Nozzle
COOK1949_VCF183_VCF190_25EM1 (UK).indd 4-5COOK1949_VCF183_VCF190_25EM1 (UK).indd 4-5 2025/3/24 14:412025/3/24 14:41
7
6
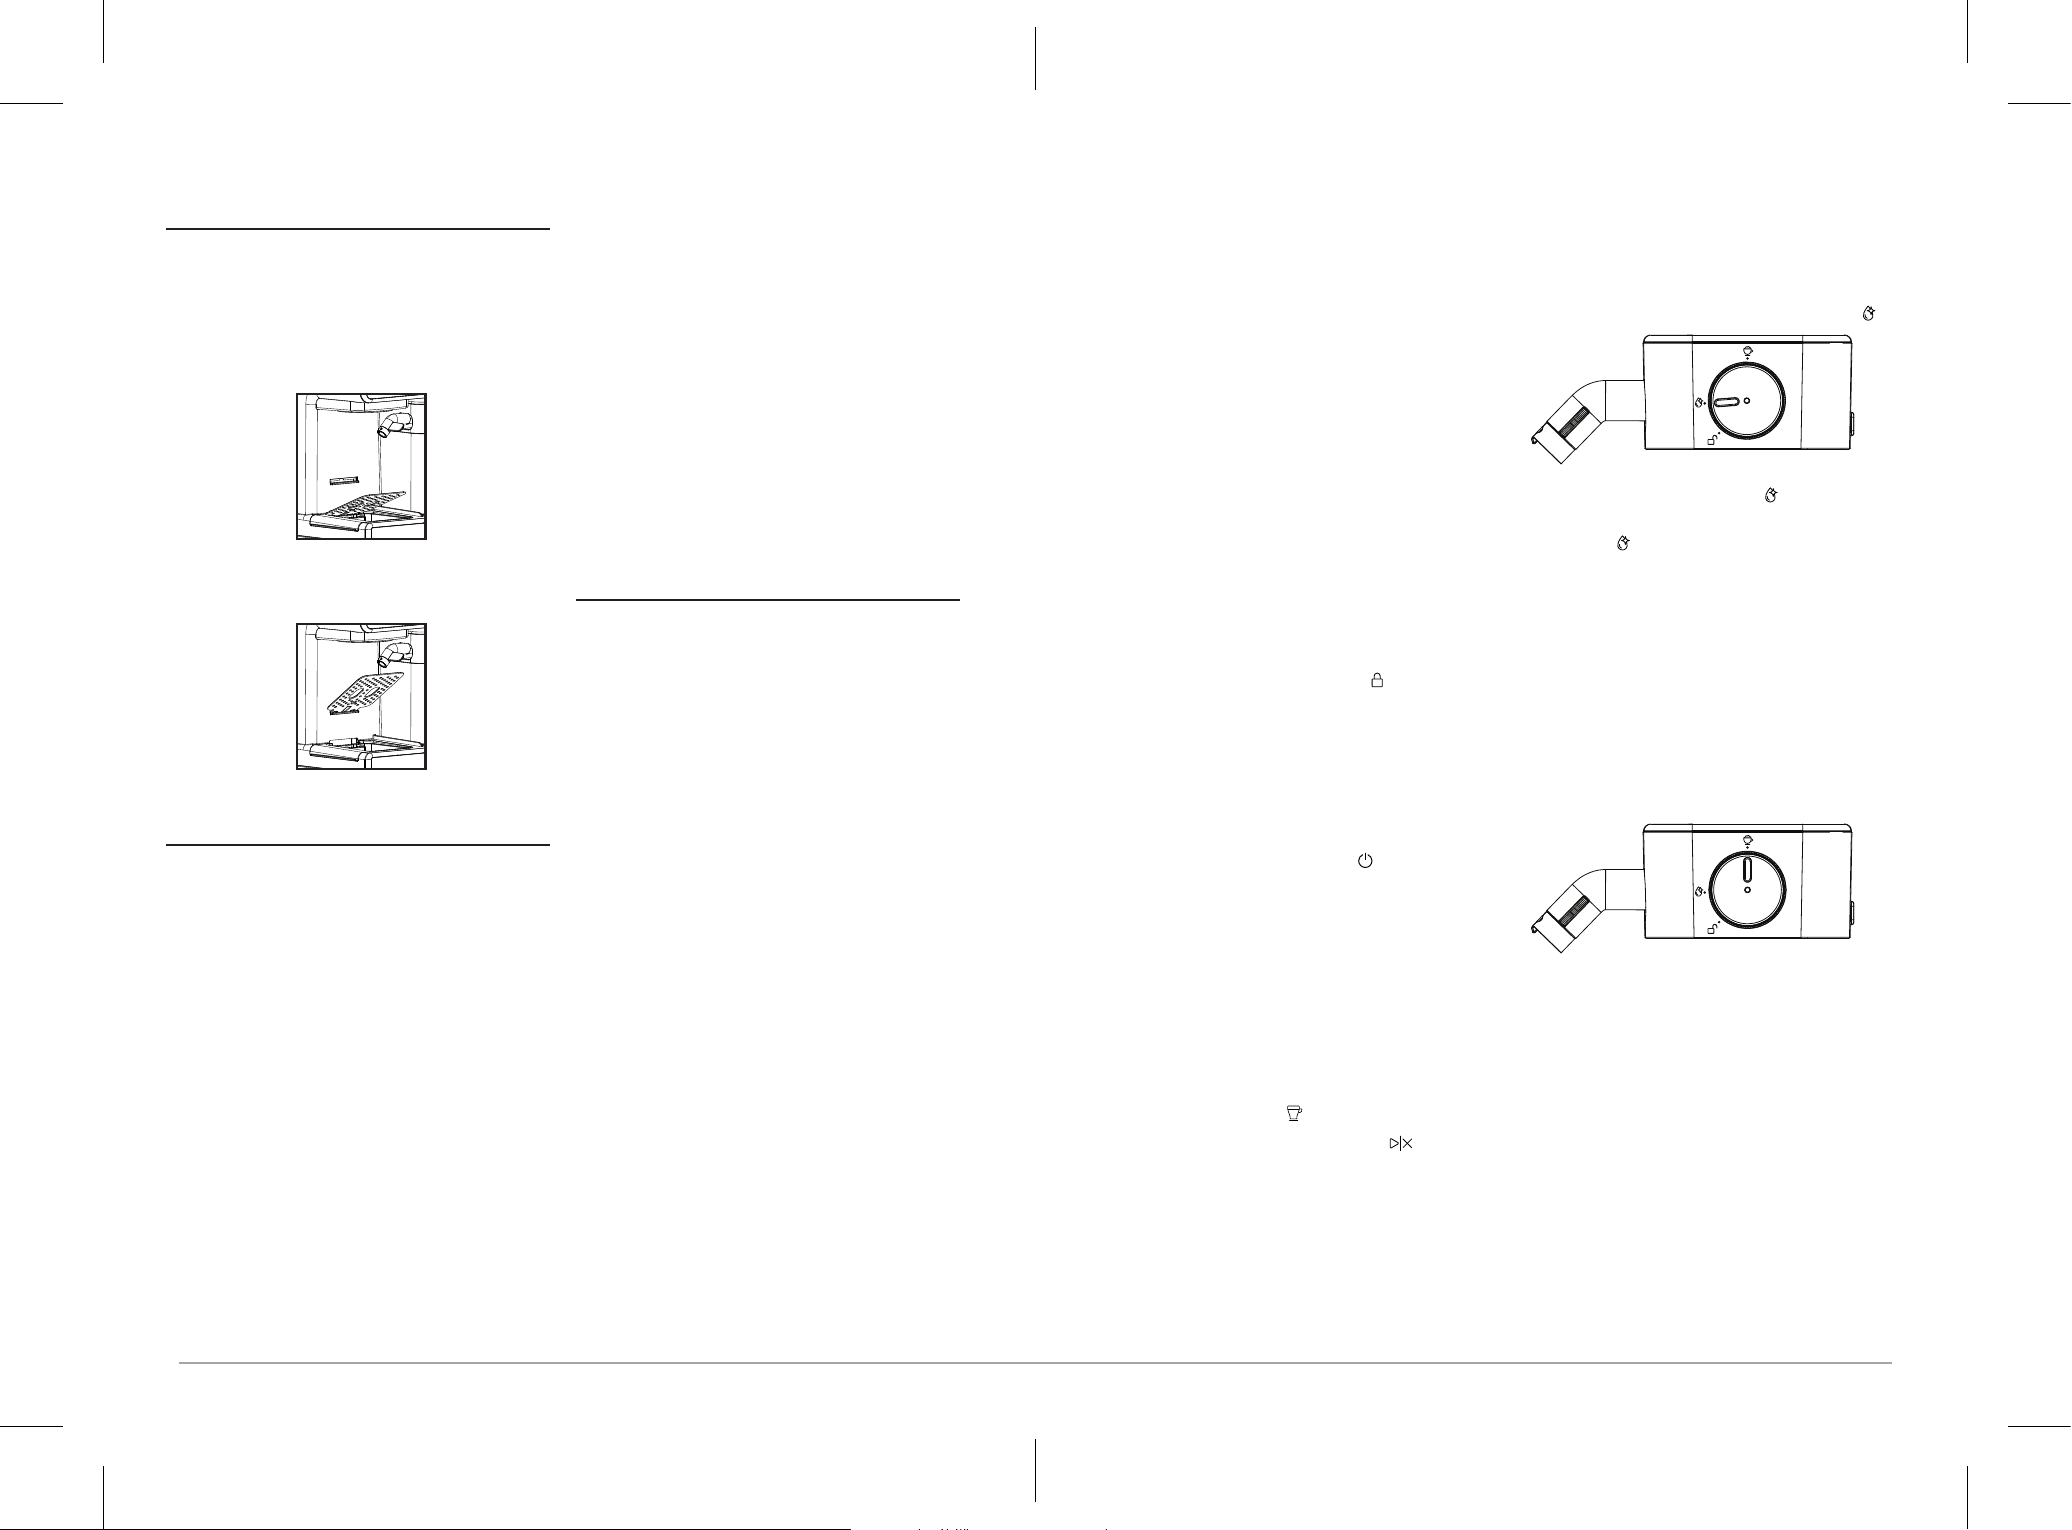
USING THE ADJUSTABLE CUP
PLATFORM
You can remove the adjustable cup
platform to clean the drip tray or use it
in the height-adjusting slot when using a
small cup.
To remove the adjustable cup platform, tilt
it at a 45° angle while pulling it out.
To insert the adjustable cup platform into
the height-adjusting slot, tilt it at a 45°
angle while inserting it into the slot.
INTRODUCTION TO ESPRESSO,
CAPPUCCINO, AND LATTE
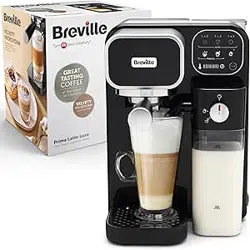
Congratulations! You have selected the
new and innovative Breville
®
Prima Latte
Espresso. This unique appliance has been
designed to help you prepare delicious
espressos, cappuccinos, and lattes quickly,
conveniently, and automatically with the
touch of a button.
Please read ALL the instructions, cautions,
notes, and warnings in this instruction
manual carefully before using this
appliance. When this unit is used, some
parts and accessories get hot and need to
cool down. Proper care and maintenance
will ensure the Prima Latte Espresso’s long
life and trouble-free operation. Save these
instructions and refer to them often for
cleaning and care tips.
ESPRESSO
Espresso is a unique method of coffee
brewing in which hot water is forced
through nely ground coffee. Because of
its richness, espresso is usually served in
30 to 60 ml portions in demitasse cups.
CAPPUCCINO
A drink made with about 1/3 espresso, 1/3
steamed milk, and 1/3 frothed milk.
LATTE
A drink made with about 1/4 espresso and
3/4 steamed milk.
BEFORE USING YOUR APPLIANCE
FOR THE FIRST TIME
CLEANING THE PRIMA LATTE PRIOR
TO FIRST USE
Please refer to the “Getting to Know Your
Espresso Machine” section to familiarise
yourself with the product and identify all its
parts.
1. Ensure the Prima Latte is not plugged
into any electrical outlet.
2. Remove stickers and labels from the
unit.
3. Remove red plug from the bottom of
the water reservoir.
4. First, remove and wash the water
reservoir, milk reservoir, milk system
components, portafilter, the two filters,
and measuring scoop/tamper in a
mixture of mild detergent and water.
Rinse each thoroughly and return it to
the unit.
5. Before placing or removing the
portafilter and any filter from the unit,
refer to the instructions in the “Placing
the Portafilter” section.
6. To clean the inside of the appliance,
follow the steps listed in the “Deep
Cleaning Procedure” section using
water in both reservoirs and no ground
coffee in the filter.
CAUTION: Do not immerse the main body
of the appliance or power cord and plug in
water or attempt to reach any of its internal
parts.
IMPORTANT - PRIME THE PRIMA LATTE
1. Fill the water reservoir up to the “MAX”
line and ensure that the reservoir is
securely placed back in the unit with its
lid closed.
2. Fill the milk reservoir with water up
to the MAX level, then slide it back
into place. You should feel the milk
reservoir click into position.
3. Select either a single or double
espresso filter and place it in the
portafilter. Insert the portafilter into
the brew head, ensuring it is securely
locked by gradually turning the handle
to the right until it is aligned with
the unit’s full lock symbol “ ”, and
the portafilter handle facing directly
towards you. Then, position a large
empty cup (with at least 325 ml
capacity) underneath.
4. Plug the appliance into an appropriate
outlet.
5. Press the Power button “ ” located
on the front of the unit. The LED on
the button illuminates and pulses to
indicate warming up. When ready, the
button remains fully illuminated and
enters Standby mode.
6. Press the Shot Selection button to
choose the double shot (2) option. The
indicator LED (2) will illuminate.
7. Use the Mode Selection knob to select
the Latte option “ ”.
8. Press the Start/Stop button “ ” to
allow the unit to brew with water until
it stops automatically. The LED on
the button will illuminate and pulse
on and off to signal that brewing is in
progress.
9. Empty the cup and return it to the unit.
Additionally, ensure that the tip of the
frothed milk dispensing tube is directed
into the cup.
10. Turn the Milk Reservoir knob
anticlockwise to the clean position “ ”.
11. Press the Clean button “ ” to activate
the cleaning function. The Clean
button “ ” LED pulses on and off
to signal the cleaning cycle is in
progress. Allow the cleaning cycle to
run until it stops automatically, which
will take approximately 30 seconds.
12. Empty any remaining water in the
milk reservoir and then slide it back
into place. You should feel the milk
reservoir click into position.
13. Adjust the Milk Reservoir knob back to
the vertical Milk Froth position.
IMPORTANT: This is critical to
ensure correct operation for the next
espresso/milk cycle.
14. Empty the water from the cup.
15. Now, your unit has been primed and is
ready to be used.
COOK1949_VCF183_VCF190_25EM1 (UK).indd 6-7COOK1949_VCF183_VCF190_25EM1 (UK).indd 6-7 2025/3/24 14:412025/3/24 14:41

9
8
HOW TO SELECT THE RIGHT CUP
Please make sure to select your cup
according to the following chart:
BEVERAGE SUGGESTED CUP
Espresso Single (1)
Double (2)
70 ml
100 ml
Cappuccino Small (1)
Large (2)
250 ml
300 ml
Latte Small (1)
Large (2)
350 ml
450 ml
NOTE: The total volume of the beverage
can vary based on the type of milk and the
amount of froth used.
SELECTING THE RIGHT COFFEE
THE COFFEE
For the best avour, use quality, freshly
ground beans specically for espresso
coffee. Keep in mind that pre-ground
coffee only retains its avour for about 7 to
8 days, provided it is stored in an airtight
container in a cool, dark place. Avoid
storing coffee in the fridge or freezer. It is
recommended that whole beans be ground
just before use. Coffee beans can maintain
their avor for up to 4 weeks when stored
in an airtight container.
LET’S MAKE A COFFEE
TURNING ON THE PRIMA LATTE
1. Ensure that the Prima Latte is plugged
into an appropriate electrical outlet.
2. Press the Power button “ ” located
on the front of the unit. The LED on
the button illuminates and pulses to
indicate warming up. When ready, the
button remains fully illuminated and
enters Standby mode.
FILLING THE WATER RESERVOIR
1. Fill the water reservoir
with water (see Figure
1). You may use a
pitcher or remove it
from the unit and then
fill it under a tap. Fill
the reservoir with the
desired amount of water
below the “MAX” level.
Always use cold water
to fill the water reservoir;
DO NOT use warm or
hot water. Recommend using filtered
water to improve the coffee taste.
Filtered water is also recommended in
areas with hard water.
2. Ensure the water reservoir lid is closed
after refilling.
NOTE: If you have removed the
reservoir from the unit for filling, then
it’s a good idea to close the lid before
replacing the reservoir back on the unit
to prevent spillage.
NOTE: If no water is in the reservoir,
the unit’s pump auto shuts off after
approximately 20 seconds.
FILLING THE MILK RESERVOIR
1. If you plan to prepare a cappuccino
or latte, gently pull the milk reservoir
forward from the unit (see Figure 2),
then remove the milk frothing system
by pressing the release button at the
side.
2. Pour the desired quantity of cold milk
you estimate you will need, ensuring
it is below the “MAX” level on the
reservoir (see Figure 3). Filling to the
“MIN” mark will allow one of any milk
beverages to be made.
NOTE: You can use any type of milk
you prefer, i.e., dairy or non-dairy
alternatives, and still achieve great
results, but for best results with
non-dairy milk, we recommend using
specific barista variations.
Figure 1
3. Refit the milk frothing system by
pressing it back in place until the
release button clicks to lock. Then,
slide the milk reservoir back onto the
unit, ensuring it fits tightly. You should
feel the milk reservoir click in place.
NOTE: The milk path should be
flushed after each use. Refer to
“Frothing System Cleaning”.
4. If any milk remains in the reservoir
after you make your beverage, you
can store it in the fridge.
NOTE: If the milk reservoir is not attached
to the unit, only the espresso and manual
espresso functions will work. If the latte,
cappuccino, or manual milk froth functions
are selected, the function will not proceed,
and the Start/Stop button “ ” LED will
ash.
IMPORTANT NOTE: When inserting the
milk reservoir, ensure it fully engages with
the espresso machine. You should feel the
milk reservoir click into position. If the milk
reservoir is attached after the machine has
warmed up, the Power LED will pulse while
the milk frothing system warms up. This
behavior is normal and expected.
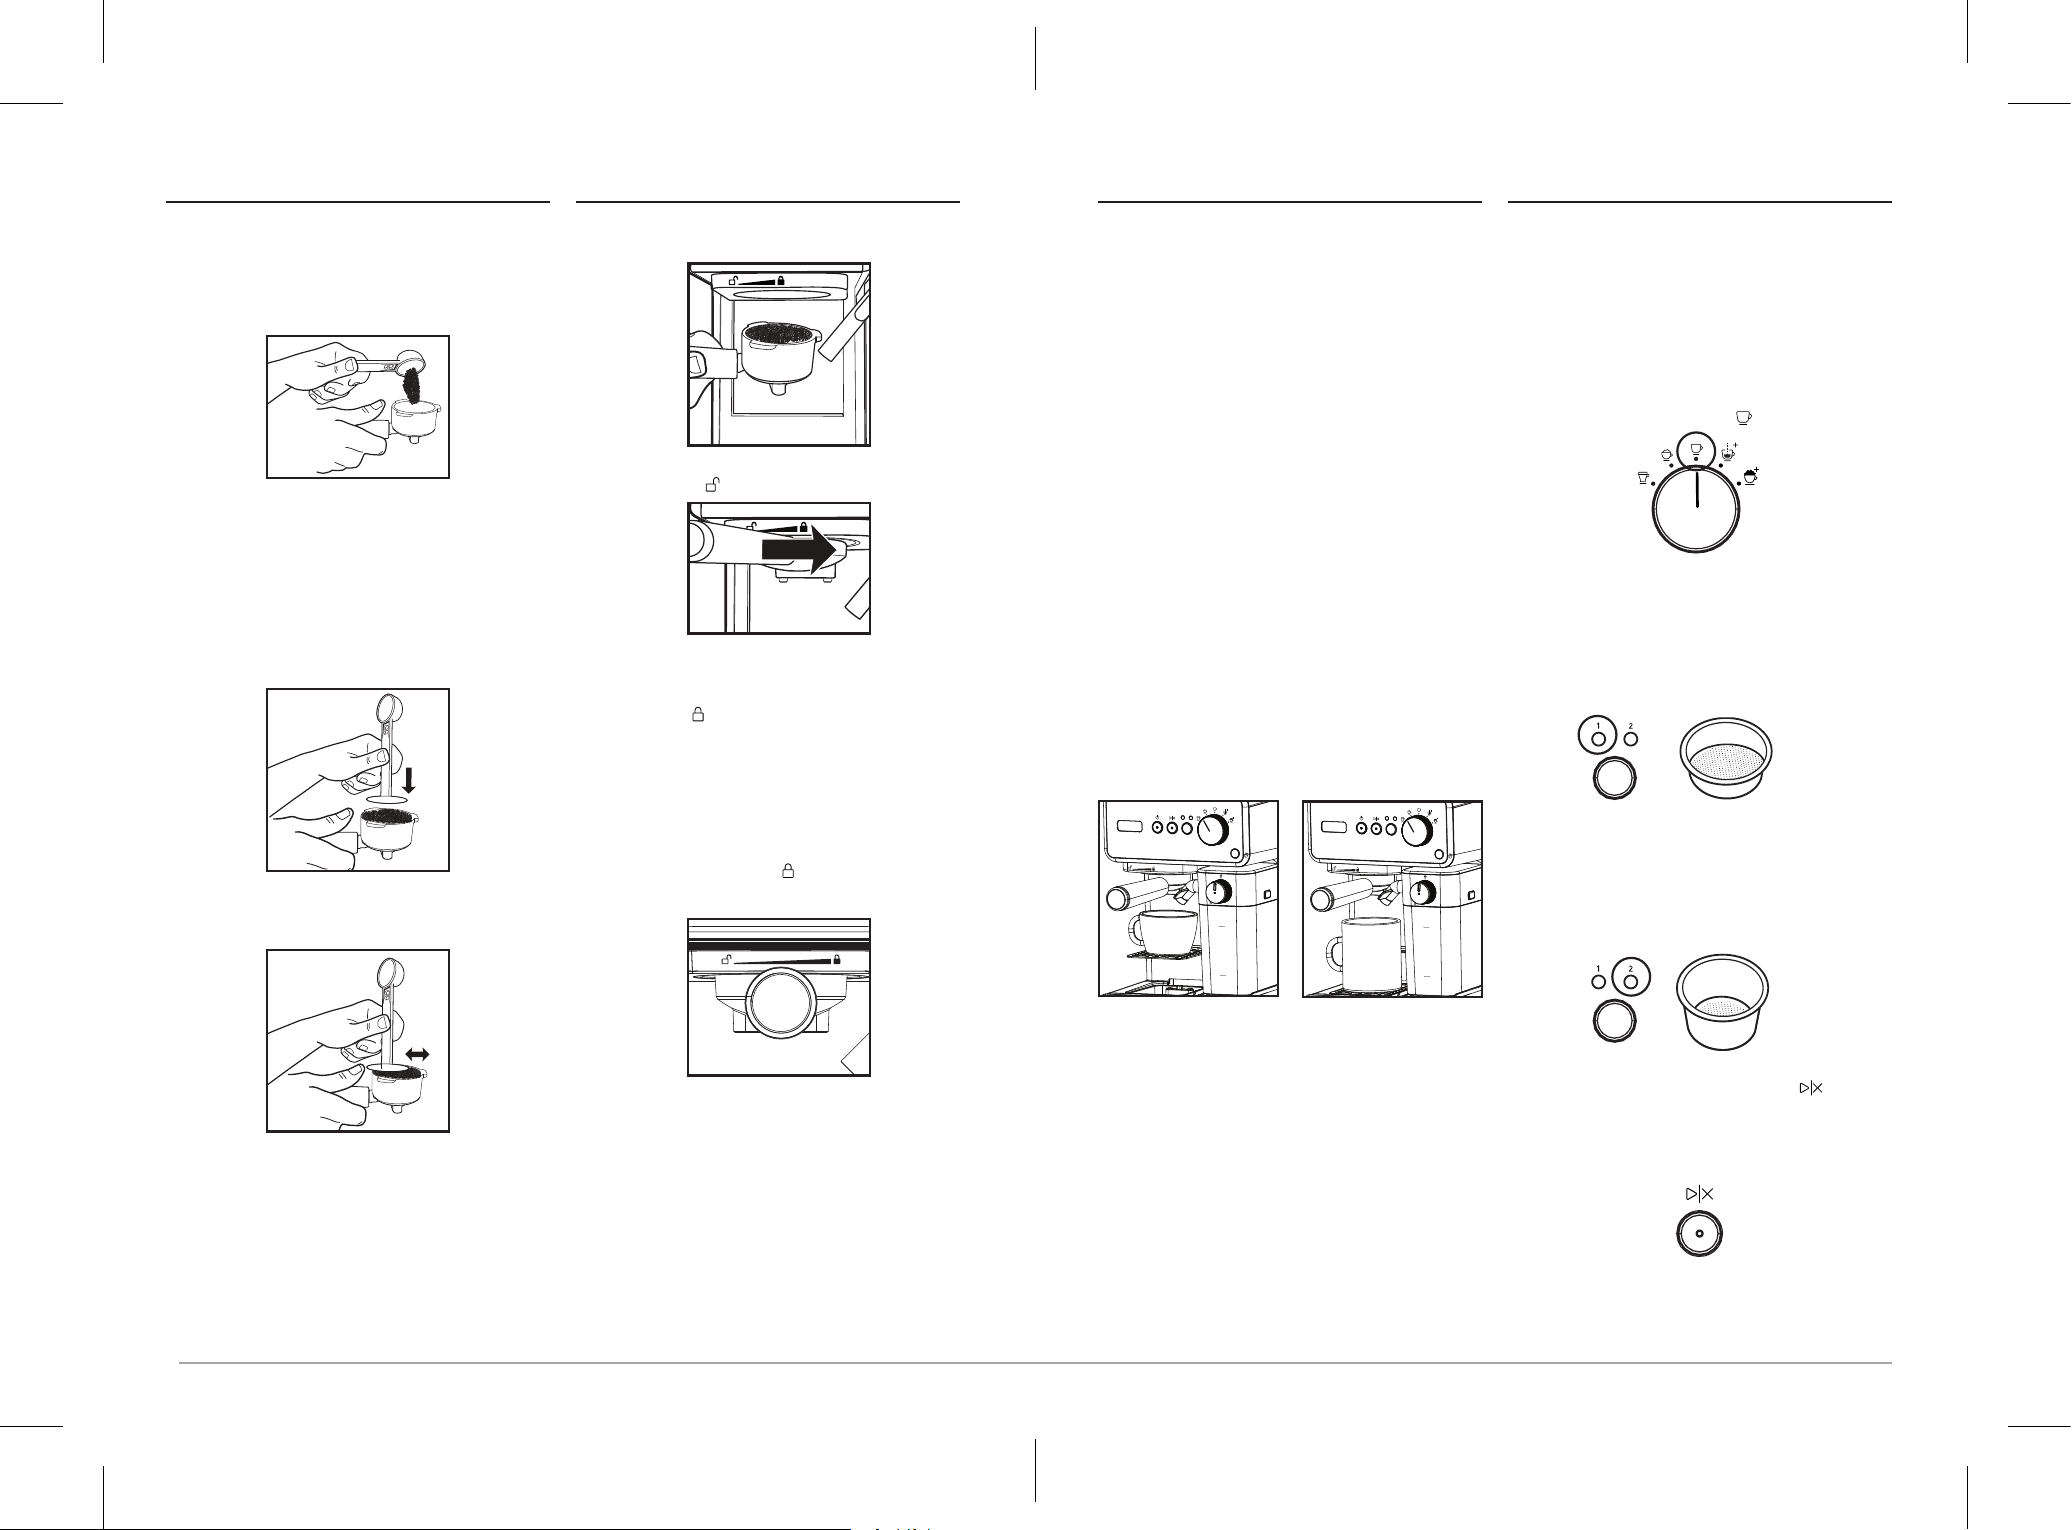
USING THE PORTAFILTER
CHOOSING THE FILTER
Select the lter to be used as follows:
1. FOR A SINGLE ESPRESSO SHOT:
Use the single filter basket when using
ground coffee.
2. FOR A DOUBLE ESPRESSO SHOT:
Use the double filter basket.
You can prepare two single shots of
espresso simultaneously by inserting the
adjustable cup platform into the height-
adjusting slot and placing two small cups
under the portalter.
Note that with some demitasse cups, two
cups may not be able to t side by side on
the adjustable cup platform.
PLACING THE FILTER ON THE
PORTAFILTER
1. Firmly press the filter into the portafilter
until it clicks.
2. To remove the filter from the portafilter
for cleaning, use your finger to grip the
edge of the filter and push it upward
until it detaches.
WARNING: Ensure the lter has cooled
down before removing it from the
portalter.
MIN
MAX
Figure 2
Figure 3
COOK1949_VCF183_VCF190_25EM1 (UK).indd 8-9COOK1949_VCF183_VCF190_25EM1 (UK).indd 8-9 2025/3/24 14:412025/3/24 14:41
11
10
FILLING WITH COFFEE
FOR GROUND COFFEE:
1. Fill the filter with fresh, finely ground
espresso coffee, leaving about 3mm
from the rim (DO NOT overfill).
2. Using the tamping part of the scoop,
firmly press the coffee grounds down
to ensure they are compact and even.
NOTE: The top of the straight section
of the tamp should be approximately
level with the top of the portafilter to
ensure that your espresso grounds are
compact and level.
3. Wipe away any excess coffee from
the rim to ensure a proper fit under the
unit’s brew head.
PLACING THE PORTAFILTER
1. Place the portafilter under the unit’s
brew head.
2. Align the handle with the unit’s open
lock icon “ ” to fit into the groove.
3. Gradually turn the handle to the right
until it is aligned with the unit’s full lock
symbol “ ”, and the portafilter handle
facing directly towards you.
CAUTION: Make sure you avoid
accidentally pressing any of the
buttons.
CAUTION: The portafilter MUST be
in the locked lock “ ” position before
brewing.
PLACING THE CUP(S)
1. For any milk-based beverages, adjust
the adjustable cup platform so that the
cup’s rim is close to the milk spout by
moving it to whichever of the height
adjustment slots is most suitable.
NOTE: The adjustable cup platform
is designed only to fit the slot in the
correct orientation.
CAUTION: When brewing a
cappuccino or latte, please make
sure to use the frothing tube lever to
position the frothed milk dispensing
tube inside the cup’s rim.
2. If you use a larger cup to brew
cappuccino or latte, keep the
adjustable cup platform on the drip
tray.
3. For tall cups and “To Go Cups,” both
the drip tray plate and the drip tray can
be removed. When both are taken out
and the cup is placed directly on the
machine’s base, the maximum height
for a cup is approximately 127 mm.
IMPORTANT: When brewing a cappuccino
or latte, adjust the frothing tube lever to
position the frothed milk dispensing tube
inside the cup being used.
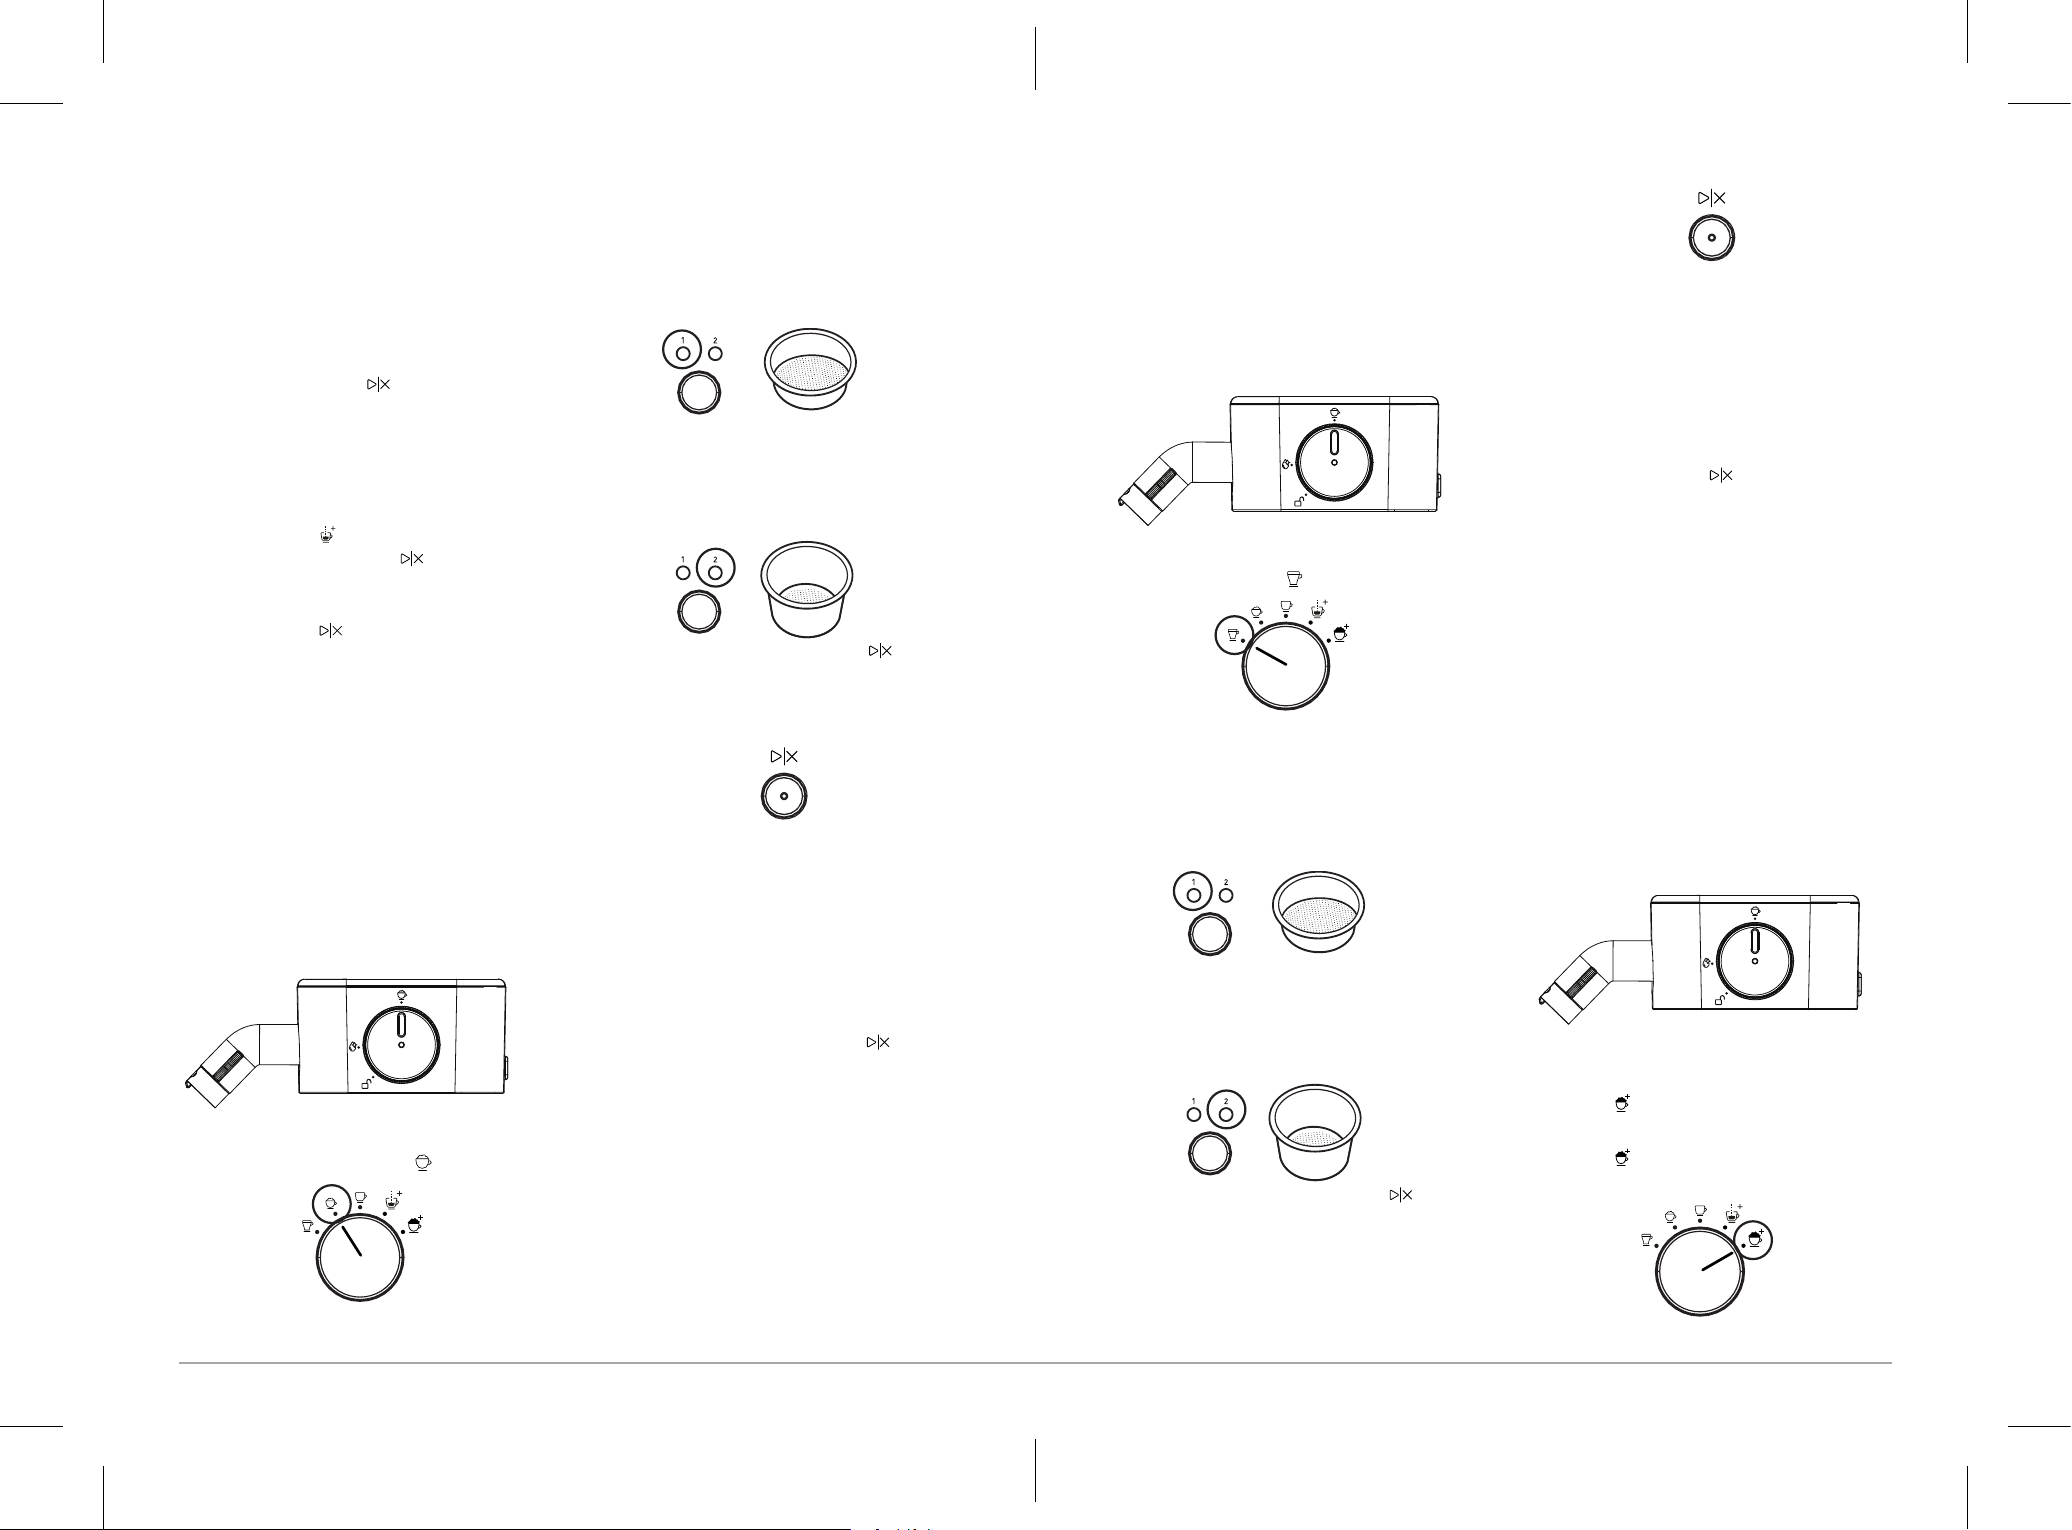
SELECT THE FUNCTION
PREPARING ESPRESSO
NOTE: If you are brewing only espresso, it
isn’t necessary to attach the milk reservoir.
When the milk reservoir is not attached,
the Prima Latte will only allow you to select
espresso buttons.
1. Use the Mode Selection knob to select
the Espresso option “ ”.
2. Do one of the following:
• Press the Shot Selection button
to choose option (1) for brewing a
single-shot espresso. The indicator
LED (1) will illuminate to signify a
single-shot espresso.
• Press the Shot Selection button
to choose option (2) for brewing a
double-shot (or two single-shots)
espresso. The indicator LED (2) will
illuminate to signify a double-shot
espresso.
3. Press the Start/Stop button “ ” to
begin brewing. The LED on the button
will illuminate and pulse on and off to
signal that brewing is in progress.
MIN
MAX
21
MIN
MAX
21
=30 ml
=60 ml
COOK1949_VCF183_VCF190_25EM1 (UK).indd 10-11COOK1949_VCF183_VCF190_25EM1 (UK).indd 10-11 2025/3/24 14:412025/3/24 14:41
13
12
4. The machine will begin brewing the
espresso based on your selection.
Once the brewing process is complete,
it will automatically stop and go
into Standby mode. Your delicious
espresso is now ready to enjoy!
NOTE: If you want to brew less coffee
than the preset amount, press the
Start/Stop button “ ” at any time
during the brewing process to stop
when you reach your desired amount
of coffee.
5. To brew manually, use the Mode
Selection knob to select the Manual
Shot option “ ”, and then press
the Start/Stop button “ ” to begin
brewing. When you have the desired
amount of espresso, press the Start/
Stop button “ ” again to stop the
machine.
NOTE: If not manually stopped, the
unit will automatically stop brewing
after 200 ml (or around 1 minute).
PREPARING CAPPUCCINO
1. Remove the milk reservoir from the
Prima Latte and add the amount of
cold milk you need into the reservoir.
Refer to the “Filling the Milk Reservoir”
section for detailed instructions.
2. Turn the Milk Reservoir knob to the to
the vertical Milk Froth position.
3. Use the Mode Selection knob to select
the Cappuccino option “ ”.
3. Do one of the following:
• Press the Shot Selection button
to choose option (1) for brewing
a small cappuccino. The indicator
LED (1) will illuminate when a small
cup of cappuccino is selected.
• Press the Shot Selection button
to choose option (2) for brewing a
large cappuccino. The indicator LED
(2) will illuminate when a large cup
of cappuccino is selected.
5. Press the Start/Stop button “ ” to
begin brewing. The LED on the button
will illuminate and pulse on and off to
signal that brewing is in progress.
6. The machine will begin brewing the
cappuccino based on your selection.
Once the brewing process is complete,
it will automatically stop and go
into Standby mode. Your delicious
cappuccino is now ready to enjoy!
NOTE: If you want to brew less
cappuccino than the preset amount,
press the Start/Stop button “ ” at
any time during the brewing process
to stop when you reach your desired
amount.
=30 ml
=60 ml
PREPARING LATTE
1. Remove the milk reservoir from the
Prima Latte and add the amount of
cold milk you need into the reservoir.
Refer to the “Filling the Milk Reservoir”
section for detailed instructions.
2. Turn the Milk Reservoir knob to the to
the vertical Milk Froth position.
3. Turn the Mode Selection knob to select
the Latte option “ ”.
3. Do one of the following:
• Press the Shot Selection button
to choose option (1) for brewing a
small latte. The indicator LED (1)
will illuminate when a small cup of
latte is selected.
• Press the Shot Selection button
to choose option (2) for brewing a
large latte. The indicator LED (2) will
illuminate when a large cup of latte
is selected.
5. Press the Start/Stop button “ ” to
begin brewing. The LED on the button
will illuminate and pulse on and off to
signal that brewing is in progress.
6. The machine will begin brewing the
latte based on your selection. Once
the brewing process is complete, it will
automatically stop and go into Standby
mode. Your delicious latte is now ready
to enjoy!
NOTE: If you want to brew less latte
than the preset amount, press the
Start/Stop button “ ” at any time
during the brewing process to stop
when you reach your desired amount.
PREPARING FROTHED MILK
The Prima Latte also allows you to prepare
frothed milk alone. To add more foam
to your beverage or to prepare frothed
milk for other drinks like a macchiato, hot
chocolate, or chai latte, do the following:
1. Remove the milk reservoir from the
Prima Latte and add the amount of
cold milk you need into the reservoir.
Refer to the “Filling the Milk Reservoir”
section for detailed instructions.
2. Turn the Milk Reservoir knob to the to
the vertical Milk Froth position.
3. Use the Mode Selection knob to
choose the Manual Milk Frothing
option “ ”.
NOTE: When the Manual Milk Frothing
option “ ” is selected, the Shot
Selection option is inactive.
=30 ml
=60 ml
COOK1949_VCF183_VCF190_25EM1 (UK).indd 12-13COOK1949_VCF183_VCF190_25EM1 (UK).indd 12-13 2025/3/24 14:412025/3/24 14:41
15
14
4. Press the Start/Stop button “ ”. The
LED on the button will illuminate and
pulse on and off to signal that frothing
is in progress.
5. When you have the desired amount of
espresso, press the Start/Stop button
“ ” again to stop the machine.
NOTE: The unit will automatically
stop dispensing frothed milk after 45
seconds if not manually stopped.
AFTER PREPARING YOUR BEVERAGES
WITH MILK
After you nish preparing your beverage
with milk, you have two options for
handling the milk reservoir: either store
the unit’s milk reservoir directly in the
refrigerator for future use or dispose of any
leftover milk. Regardless of your choice,
always remember to run a cleaning cycle
to clean the milk frothing system after each
use. This can also be done with the milk
reservoir still in place (see Frothing System
Cleaning – with Milk in Reservoir).
AUTO-OFF FEATURE
After 15 minutes of inactivity, the Prima
Latte automatically turns off. When the unit
is turned off, all LED indicators are turned
off and inactive. Press the Power button
“ ” to awaken the unit.
NOTE: When not in use, the unit should be
powered off with the Power button “ ”.
Leaving it in” Auto shut off” mode is not
recommended for extended periods.
Also, when not in use for longer periods,
unplugging or turning off the electrical
outlet is recommended.
CLEANING YOUR MACHINE
The cleaning LED will remain illuminated
when your machine is ready for a cleaning
cycle. Always turn the power off, unplug,
and allow it to cool before removing parts
for cleaning.
CLEANING THE DRIP TRAY
Empty the drip tray as needed. If the red
Drip Tray Water Level Float is visible
through the adjustable cup platform,
remove the adjustable cup platform (see
“Using the Adjustable Cup Platform”) and
carefully empty the drip tray. The drip tray
can be lifted by gripping its handle.
Additionally, clean the drip tray and
adjustable cup platform weekly using warm
water and a small amount of non-abrasive
dish soap. Rinse and dry them thoroughly
afterward.
FROTHING SYSTEM CLEANING –
WITH MILK IN RESERVOIR
1. Ensure the milk reservoir and frothing
system are properly inserted on the
Prima Latte.
2. Place a large empty cup (at least
325 ml capacity) under the froth
dispensing tube.
3. Turn the Milk Reservoir knob anti-
clockwise to the clean position “ ”.
4. Press the clean button “ ” once to
activate the clean function. The Prima
Latte will release steam through the
froth dispensing tube. Let the cleaning
cycle run until you no longer see any
water coming out of the tube, or let the
cycle run until it stops automatically.
The Clean icon “ ” will turn off when
the clean cycle is completed. Dispose
of the water in the cup.
NOTE: The unit will run the cleaning
cycle for approximately 30 seconds.
5. Rotate the Milk Reservoir knob back
to the Froth position. (This is critical to
ensure correct operation for the next
beverage.)
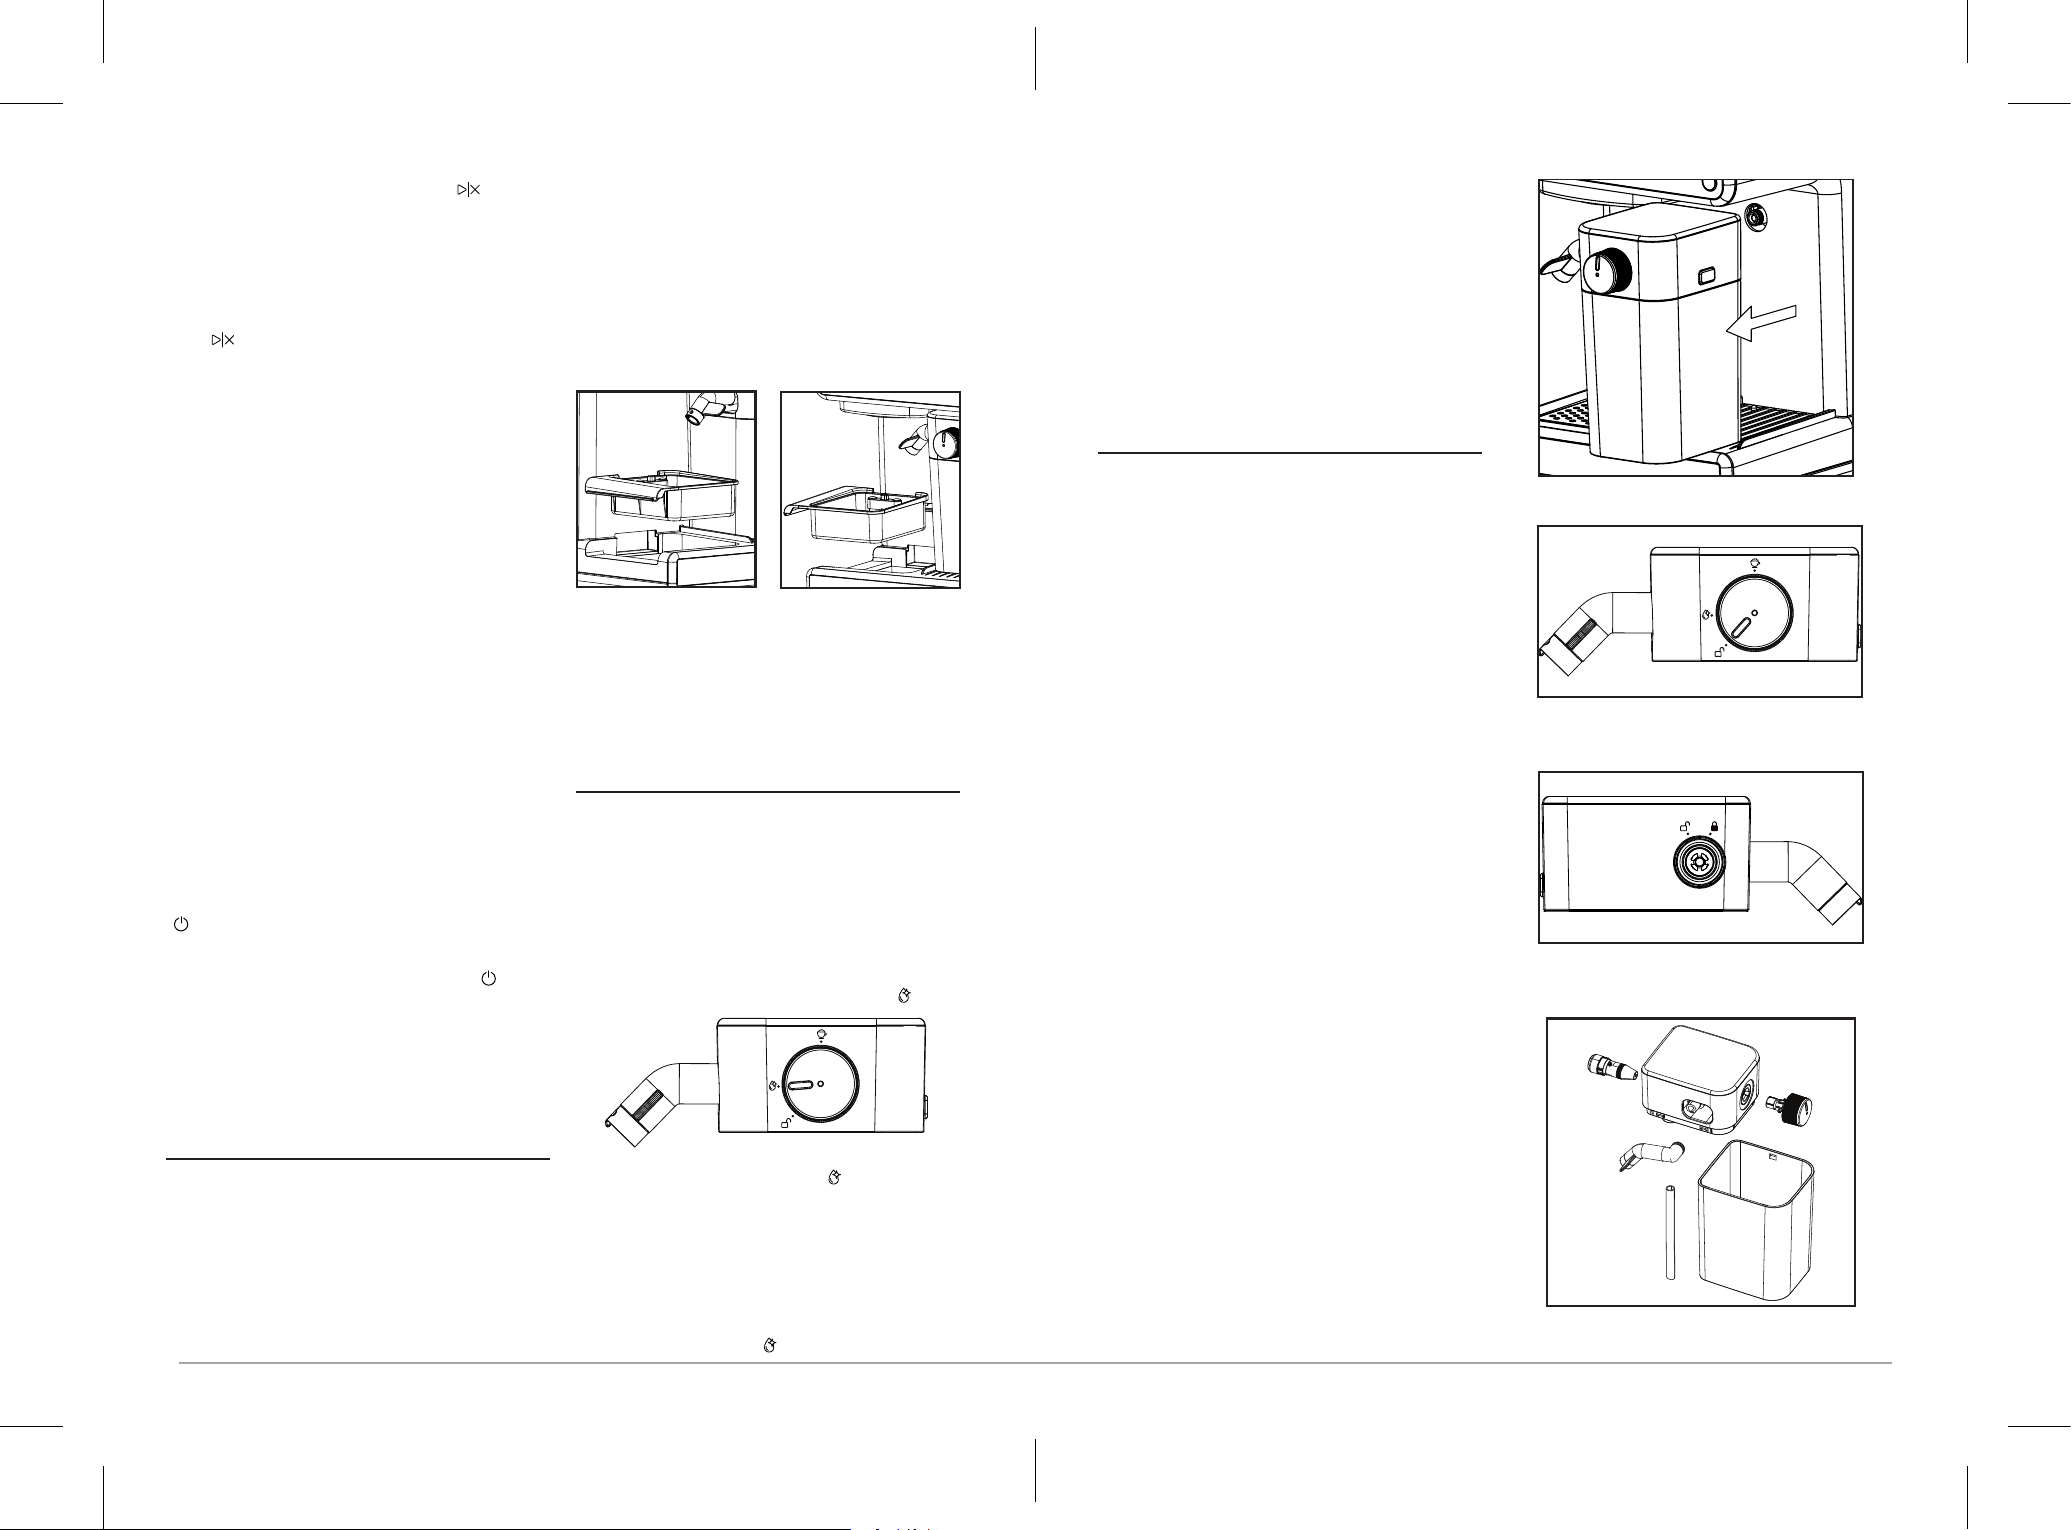
CLEANING THE MILK RESERVOIR
AND FROTHING SYSTEM
Although leftover milk can be stored in
the milk reservoir in the refrigerator, it is
important to manually clean the reservoir
and frothing system regularly to avoid
clogging and residue build-up and to
maintain frothing performance.
1. Remove the milk reservoir & frothing
system from the Prima Latte by gently
pulling forward.
2. Remove the frothing system from the
top of the reservoir using the release
button at the side.
3. Remove all parts of the frothing system
from the Prima Latte: remove the milk
dispensing tube, the straw, the milk
reservoir knob, and the steam nozzle.
4. Dispose of any milk, then wash the
milk reservoir and frothing system
parts thoroughly with warm, soapy
water. Rinse and dry them well.
DO NOT use abrasive cleaners and
scouring pads, as they will scratch the
finish.
NOTE: The milk reservoir is
dishwasher safe (top rack). DO NOT
place the frothing system in the
dishwasher.
Milk Reservoir
Turn to this position to remove the
Milk Reservoir knob
Steam nozzle unlock and lock
postions (turn to lock)
COOK1949_VCF183_VCF190_25EM1 (UK).indd 14-15COOK1949_VCF183_VCF190_25EM1 (UK).indd 14-15 2025/3/24 14:412025/3/24 14:41
17
16
CLEANING THE BREW HEAD, THE
PORTAFILTER AND FILTERS
1. Press the Power button “ ” to turn
the Prima Latte OFF. The unit is off
when the LED on the Power button is
off. Unplug the power cord from the
electrical outlet.
CAUTION: Some metal parts may still
be hot. DO NOT touch them with your
hands until they cool down.
2. Remove the portafilter and discard the
used coffee grounds. Thoroughly wash
both the portafilter and filter with warm,
soapy water, then rinse and dry them
well.
NOTE: DO NOT wash the portafilters
and filters in the dishwasher. For
instructions on how to deep clean
them, see the “Portafilter and Filters
Deep Cleaning Procedure” section.
3. Use a damp cloth or paper towel to
wipe the lower part of the brew head in
the unit, removing any leftover coffee
grounds.
3. Use a damp cloth or paper towel to
wipe the lower part of the brew head in
the unit, removing any leftover coffee
grounds.
4. Place the portafilter without the filter
back into the brew head and securely
lock it in place.
5. Place a large, empty cup (at least
325 ml capacity) beneath the
portafilter.
6. Plug the power cord into the electrical
outlet. Press the Power button “
” to turn the unit ON. The LED on the
Power button will illuminate.
7. Press the Shot Selection button to
select the double-cup (2) option. The
indicator LED (2) will illuminate.
8. Turn the Mode Selection knob to the
Espresso option “ ”.
9. Press the Start/Stop button “ ” to
allow the unit to brew with water until it
stops automatically.
10. Empty the water from the cup.
CLEANING THE WATER RESERVOIR
If water is left in the reservoir for an
extended period, it is recommended that it
be cleaned.
1. Dispose of the remaining water
by removing the water reservoir,
detaching the lid, and turning it upside
down over the sink.
2. Thoroughly wash the water reservoir,
handle, and lid with warm, soapy
water. Ensure they are well-rinsed and
dried.
CAUTION: DO NOT immerse main body
of the appliance or power cord and plug in
water or any other liquid.
CLEANING THE PRIMA LATTE
1. Clean the housing with a soft, damp
cloth. Avoid using abrasive cleaners or
scouring pads, as they can scratch the
finish.
2. DO NOT store any of the portafilters
in the brew head. This can adversely
affect the seal between the brew head
and the portafilter during espresso
brewing.
DESCALING
Build-up of mineral deposits in the Prima
Latte will affect the operation of the
appliance. Your appliance needs descaling
when you begin to notice an increase in
the time required to brew espresso, or
when there is excessive steaming. Also,
you may notice a build-up of white deposits
on the surface of the brew head.
The frequency of cleaning depends
upon the hardness of the water used.
The following table gives the suggested
cleaning intervals.
SUGGESTED DESCALING INTERVALS
Type of Water Cleaning
Frequency
Soft Water
(Filtered Water)
Every 80 Brew
Cycles
Hard Water
(Tap Water)
Every 40 Brew
Cycles
Use a descaling solution comprising 50%
white vinegar and 50% clean water.
To descale the unit, use the Deep Cleaning
Procedure. Refer to “Deep Cleaning
Procedure” section.
DEEP CLEANING NOTIFICATION
The Cleaning Indicator LED is normally off.
After 200 beverage cycles, the LED will
turn on and stay on.
The Cleaning Indicator LED will remain
on as a notication until the cleaning
procedure is completed.
1. If you brew another espresso, latte,
or cappuccino, the Cleaning Indicator
LED will turn off momentarily but start
flashing after the brew is complete.
2. The Cleaning Indicator LED will turn
off when the Prima Latte is powered
off.
3. The Cleaning Indicator LED will turn
off when the unit powers down and
goes into sleep mode.
DEEP CLEANING PROCEDURE
The deep cleaning procedure includes
descaling of internal parts and frothing
system cleaning.
1. Pour a solution of 50% white vinegar
and 50% clean water into the reservoir.
Stir the solution with a spoon to ensure
it is properly mixed.
2. Rotate the Milk Reservoir knob to the
clean position “ ”. Place a large cup
(at least 475 ml capacity) under the
frothed milk dispensing tube.
3. Press the Clean button “ ” for 5
seconds to activate the deep clean
mode. The LED on the Start/Stop
button will begin to flash.
• Press the Start/Stop button “ ”.
The pump will turn on and off
multiple times for about 7.5 minutes.
The cleaning light will then turn off,
indicating the cleaning process is
completed.
4. Pour out any remaining solution from
the water reservoir and replace it with
clean water. Fill the reservoir with
clean water up to the “MAX” level line.
5. Repeat Steps 1 – 4 as necessary,
using only tap water to rinse any
remaining traces of vinegar out of the
machine.
PORTAFILTER AND FILTERS DEEP
CLEANING PROCEDURE
Deep clean your lter every 90 days for
optimal brewing performance and to keep
your coffee tasting great. Follow these
disassembly instructions and rinse the
pieces in a large bowl of warm water.
Once rinsed thoroughly, wipe dry and
reassemble.
1. To remove the filter from the portafilter,
use your finger to grip the edge of
the filter and push it upward until it
detaches.
2. Wash the portafilter and filters with
warm soapy water. Make sure to rinse
and dry them well.
3. Reassemble by firmly pressing the
filter into the portafilter until you hear it
click.
COOK1949_VCF183_VCF190_25EM1 (UK).indd 16-17COOK1949_VCF183_VCF190_25EM1 (UK).indd 16-17 2025/3/24 14:412025/3/24 14:41
19
18
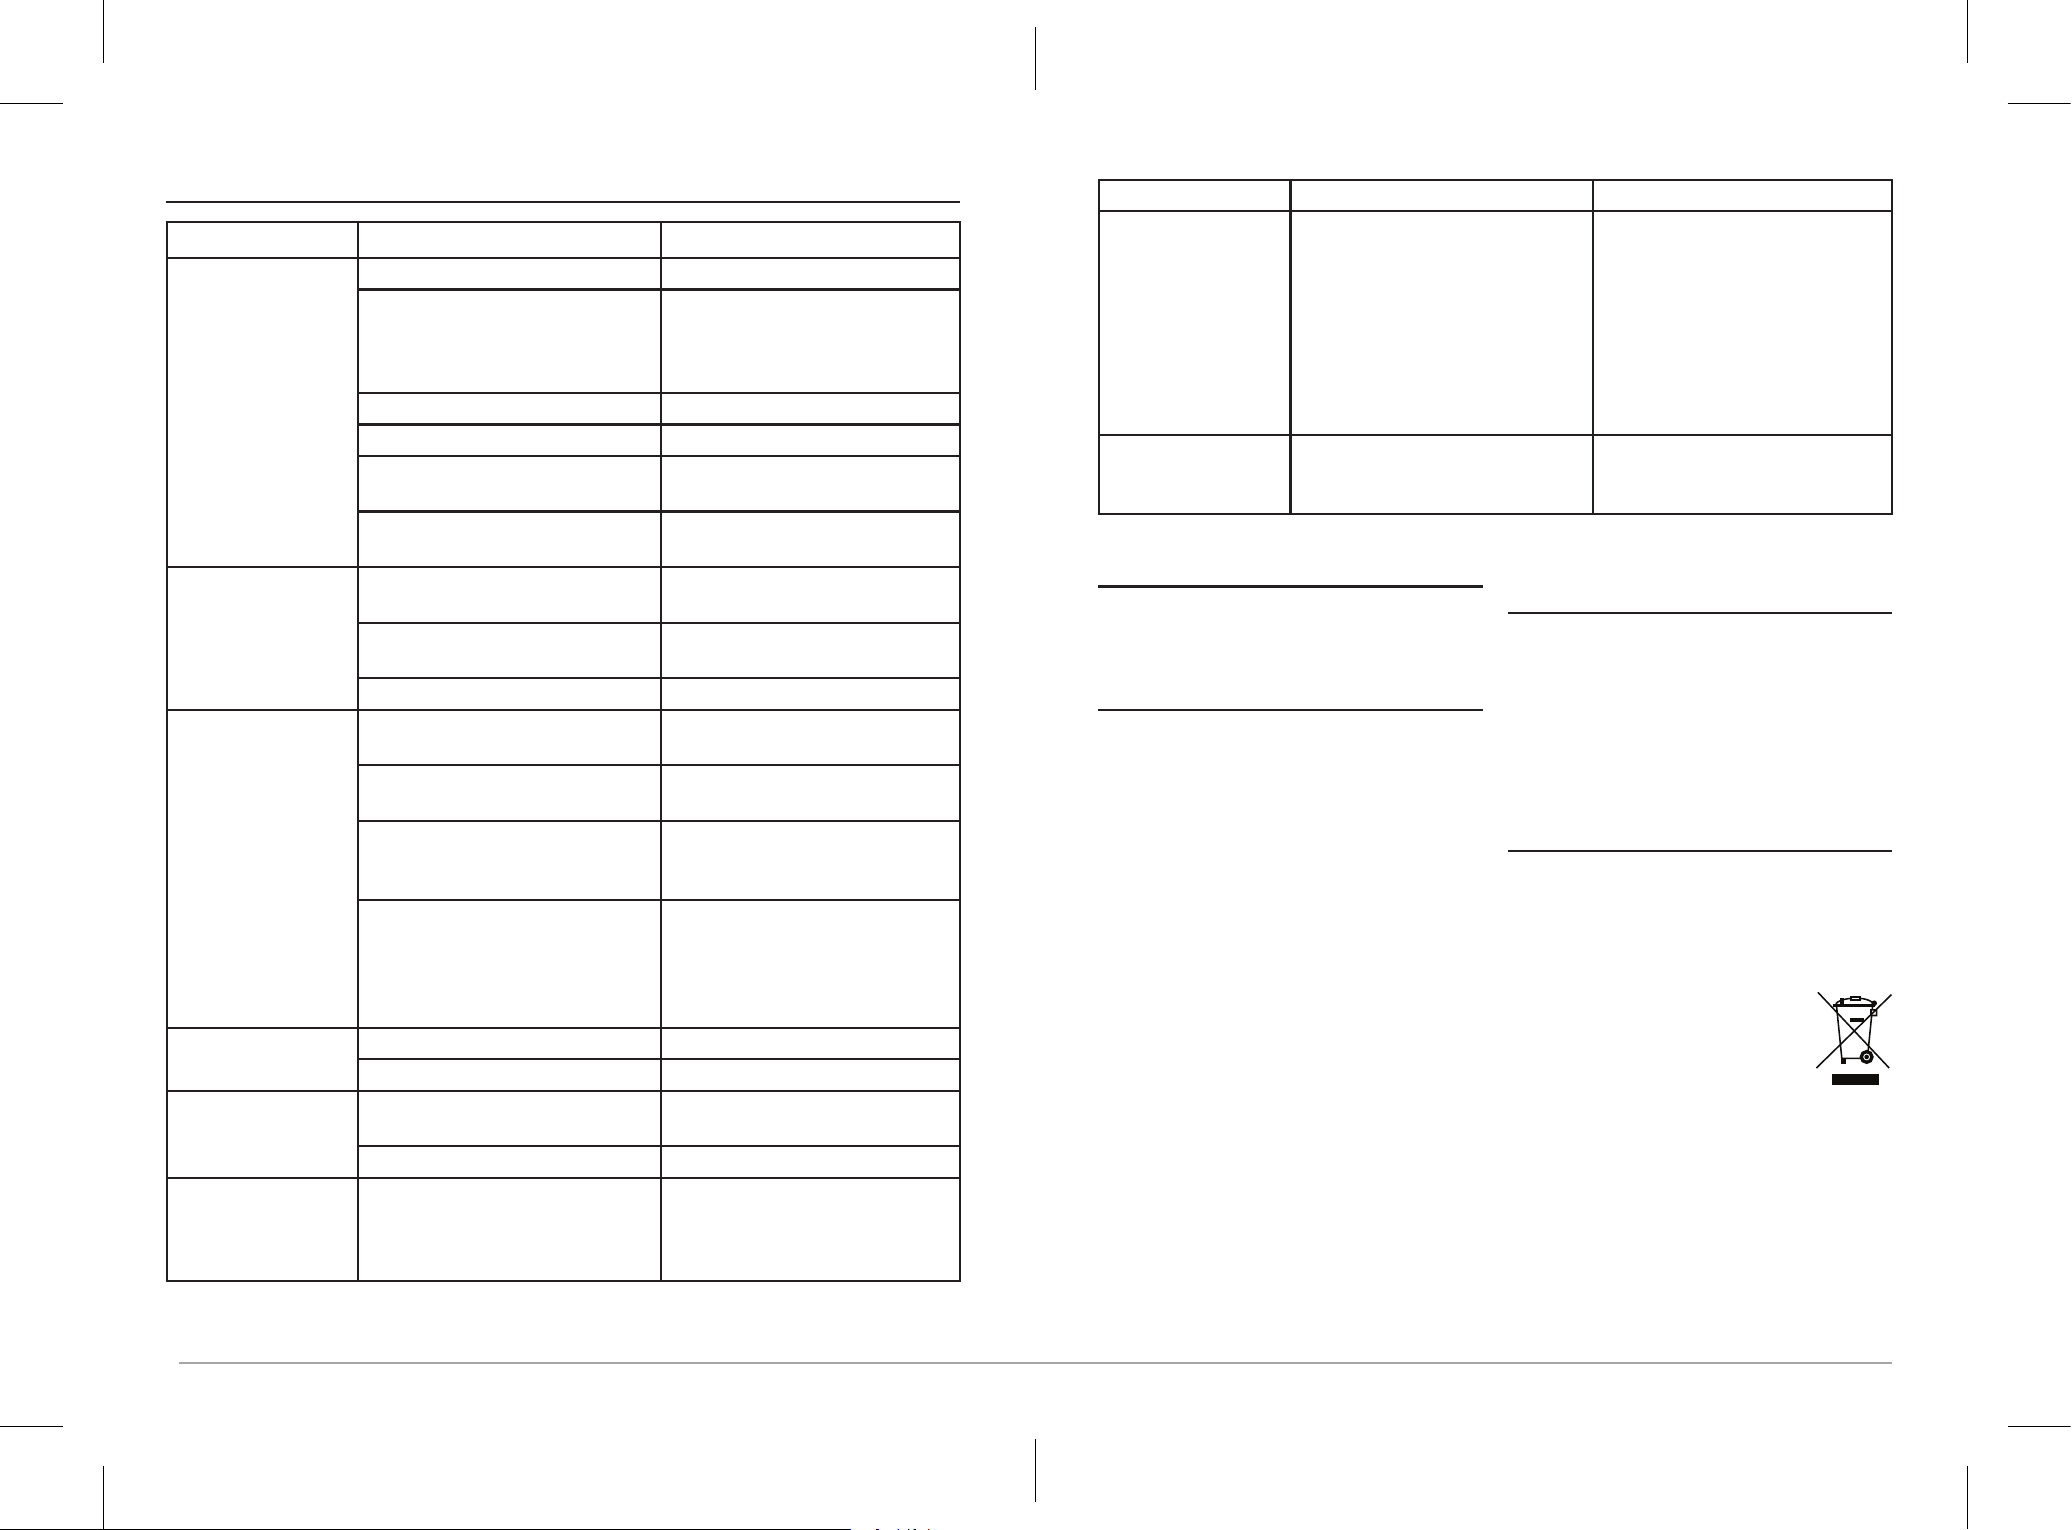
PROBLEM CAUSES SOLUTIONS
Coffee does not
come out.
• No water in reservoir. • Add water.
• Unit is not primed. • Prime the unit (refer to
“Important - Prime the Prima
Latte Espresso Machine”
section)
• Coffee grind is too ne. • Grind medium ground coffee.
• Too much coffee in the lter. • Fill lter with less coffee.
• Appliance was not turned on
or plugged in.
• Plug unit into electrical outlet
and turn it on.
• Coffee has been tamped/
compressed too much.
• Rell lter basket with coffee
and TAMP GENTLY.
Coffee comes out
around the edge of
the portalter.
• Portalter not rotated to full
lock position.
• Rotate lter holder to full lock
position.
• Coffee grounds around the
lter basket rim.
• Wipe off rim.
• Too much coffee in the lter. • Fill with less coffee.
Milk is not foamy
after frothing or it is
not coming out of
the frothing tube.
• Ran out of steam. • Ensure there is enough water
in the water reservoir.
• Milk is not cold enough. • Chill milk prior to making
cappuccino or latte.
• Frothing tube is blocked. • Follow the instructions to
clean the milk reservoir &
frothing tube.
• Milk reservoir is not in
position.
• Check that the milk reservoir
has clicked into position and
is attached properly to fully
engage with the espresso
maker.
Coffee comes out
too quickly.
• Ground coffee is too coarse. • Use a ner grind.
• Not enough coffee in lter. • Fill lter with more coffee.
Coffee is too weak. • Using single lter for double
shot of espresso.
• Use double lter for double
shot of espresso.
• Ground coffee is too coarse. • Use a ner grind.
The control panel
LEDs are ashing.
• Start/Stop button was
pressed prior to the LEDs
solidly illuminated to indicate
that the machine is ready.
• Wait until the LEDs are
solidly illuminated to indicate
the machine is ready.
HELPFUL TIPS AND TROUBLESHOOTING
PROBLEM CAUSES SOLUTIONS
1 Shot and 2 Shot
LEDs blink together
• Low water in reservoir. • Rell water reservoir and run
priming procedure (refer to
“Important - Prime The Prima
Latte Espresso Machine”
section).
NOTE: It is normal to see
some steam/water coming
out of the Frothed Milk
Dispensing Tube.
Cleaning LED
remains on.
• Your machine is letting you
know it is ready for a cleaning
cycle to be performed.
• Perform cleaning cycle (see
the “Cleaning Notication”
section).
WASTE DISPOSAL
Waste electrical products should not be
disposed of with household waste. Please
recycle where facilities exist. E-mail us at
[email protected] for further
recycling and WEEE information.
REPLACEMENT PARTS
For additional or replacement parts, please
visit www.breville.co.uk or call us on
0800 028 7154.
TROUBLESHOOTING
For troubleshooting and FAQs visit:
www.breville.co.uk/faqs
AFTER SALES SERVICE &
REPLACEMENT PARTS
In the case the appliance does not
operate but is under warranty, return the
product to the place it was purchased for a
replacement. Please be aware that a valid
form of proof of purchase will be required.
For additional support, please contact our
Consumer Service Department at 0800 028
COOK1949_VCF183_VCF190_25EM1 (UK).indd 18-19COOK1949_VCF183_VCF190_25EM1 (UK).indd 18-19 2025/3/24 14:412025/3/24 14:41

COOK1949_VCF183_VCF190_25EM1 (UK)_GCDS-JC P.N: NWL0001756211
Newell Brands UK Limited
(UK) Newell Brands UK Limited, Halifax Avenue, Fradley Park, Licheld, Staffs, WS13 8SS, UK
(EU) Newell Poland Services Sp. z o.o.,
Plac Andersa 7, Poznan, 61-894, Poland.
e-mail: [email protected]
Telephone:
0800 028 7154
For Customer Service details, please see the website.
www.breville.co.uk
©2025 Sunbeam Products Inc.
Printed in China
COOK1949_VCF183_VCF190_25EM1 (UK).indd 20COOK1949_VCF183_VCF190_25EM1 (UK).indd 20 2025/3/24 14:412025/3/24 14:41