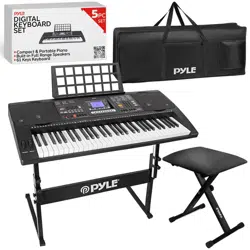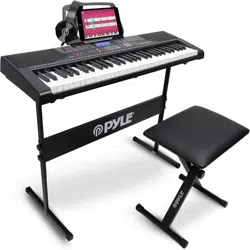

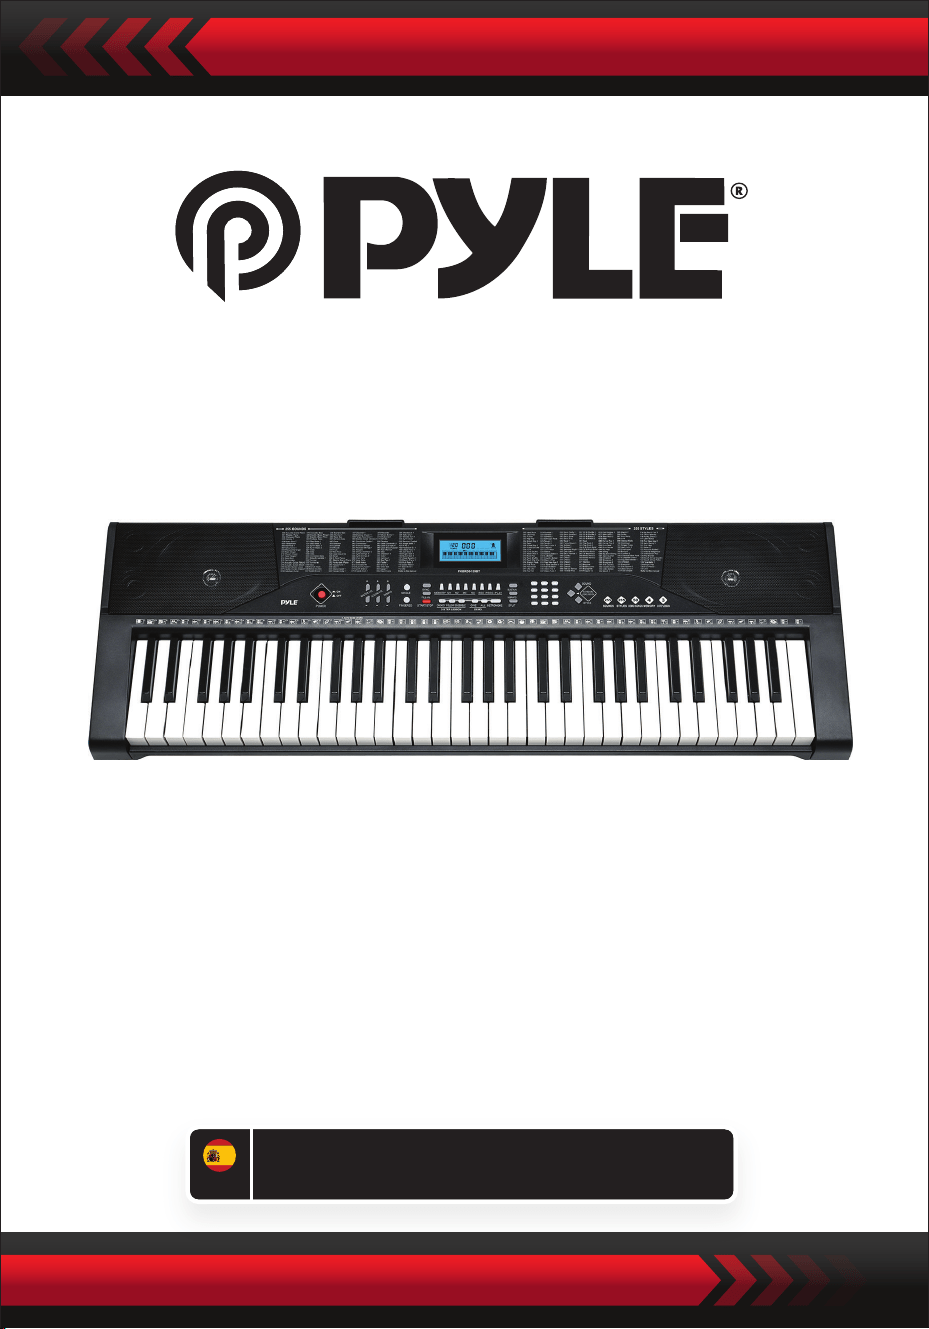
Digital Musical Karaoke Keyboard
PKBRD6139BT
ENG
USER GUIDE
Portable Electronic Piano Keyboard
with Keyboard Stand (61 Keys),
Keyboard stool, case and headset

PLEASE READ CAREFULLY BEFORE PROCEEDING
Please keep this manual in a safe and handy place for future reference
Dedicated power adapter shall be used, and in case of adaptor damage, replace it
immediately.
•
NOTICE
Pull out the plug after performing or when the keyboard is left unused for a long time.
•
To prevent possible harm to the environment or human health from uncontrolled
waste disposal, recycle it responsibly to promote the sustainable reuse of material
resources.
To return your used device, please use the return and collection systems or contact
the retailer where the product was purchased.
They can take this product for environmental safe recycling.
Use dry and soft cloth to clean the keyboard. Paint, alcohol or other chemical solvents
shall not be used for cleaning, for which may damage the keyboard surface.
•
WARNING: The direct plug-in adapter is used as disconnect device, the disconnect
device shall remain readily operable.
•
Correct Disposal of this product. This marking indicates that this product should
not be disposed with other household wastes throughout the EU.
•
Pull out the plug before cleaning the keyboard, and do not pull out the plug with
wet hand.
•
Prevent liquid, dust, small particle and other foreign matters from entering the case
of the keyboard, for which may result in element short circuit.
•
Keep the keyboard away from heat source to protect its parts from damage.
•
Do not turn and keep the volume to the maximum or to an uncomfortable degree
for a long time when performing.
•
When connecting the keyboard to other device, ensure both the keyboard and the
device to be connected are powered o before connection.
•
The keyboard can only be disassembled by professionals, and no change can be
made to the internal structure. In case of any functional abnotmality during
performance, stop performing immediately and send the keyboard to professionals
for maintenance.
•

I. Control Panel and External Ports
TOP CONTROL PANEL
REAR PANEL PORT
30. AUDIO INPUT
31. MIC
32. PHONES/OUTPUT
33. DC 9V
1. Loudspeaker
2. Power
7. Sync
8. Fill-in
6. Single
5. Tempo
4. Accom Volume
3. Master Volume
9. Memory (M1-M4)
10. Rec
15. Numbers
16. Sounds
14. Sustain
13. Play
12. Prog
11. LCD display
17. Keyboard Percussion
18. Fingered
23. Demo One
24. Demo All
22. Ensemble
21. Follow
20. One-key
19. Start/Stop
25. Metronome
26. Split
29. Chord zone
28. Styles
27. Vibrato

II. Preparations before Playing
POWER ADAPTOR
AUDIO OUTPUT/EXTERNAL HEADPHONE
A dedicated power adapter shall be used. Connect the output end of the adaptor to
the power port on the rear panel of the keyboard, and then the other end to the
power socket. (Note: the input voltage of the adaptor shall be compatible with the
power supply voltage)
The Keyboard has the stereo input function. Sound signals from mobile phone,
computer and other audio devices can be input into the keyboard system for playing.
Firstly turn o the Keyboard, then connect one end of audio cable to the output port
of an audio device, and the other end to the AUDIO INPUT port on the rear panel of
the Keyboard, nally turn on the keyboard.
Turn ON the default BT connection, in the BT standby search state, can be any BT
device search matching and connect at this time, turn ON the BT function of your
phone or BT device to search. The local BT name is “piano” when the connection is
successful, mobile phone or BT device back to the music player interface to play music.
Mic input: Connect the microphone to the MIC port to start singing and playing.
MIC INPUT AND AUDIO INPUT
WIRELESS BT CONNECTION
Note: Do NOT use the headphones at a high volume for any extended period.
To avoid hearing damage, use your headphones at a comfortable, moderate volume
level.
Headphone Connection: When connecting a headphone to the PHONES/OUTPUT
port on the rear panel of the keyboard, the loudspeaker will be disabled automatically.
In this way, you can play the keyboard without disturbing others.
Audio Output: Firstly, turn o the keyboard and the external audio devices, secondly,
connect one end of the audio cable to the PHONES/OUTPUT port on the rear panel
of the keyboard, and then connect the other end to the audio input port of the audio
devices.

III. Basic Playing Method
When [Power ON/OFF] is pressed, LCD screen will turn ON and shows the current
tone, tempo and other status. Then you may operate the Keyboard as required.
PLAYING DEMO SONGS
50 demo songs have been stored in the keyboard, from “000” to ”049”, for your
selection. Press the [Demo one] button, the system is in the state of playing, the
present demo song plays repeatedly. For another one, press the button to stop the
present song, and again to play the next one.
Press the [Demo all] button, the system is in the stage of playing all demo song.
In the course of playing demo songs, the Sounds of the songs can be changed.
During the playing process, you can press the number buttons or the “+”/”-” buttons
to select other demonstration song.
SOUNDS SELECTION
The Keyboard provides 255 Sounds, from “000” to “254”, for your selection.
When turning on the keyboard, the Sounds selection function will be enabled
automatically, and “SOUNDS” current Sound number will show on the display.
When under other states, press [Sounds] to enable the Sounds selection function.
The Sounds default is “000” and it can be adjusted by pressing the corresponding
number buttons or pressing the “+” / “-” button.
ACCOMPANIMENT VOLUME ADJUSTMENT
Press [Accom Vol +/-] to turn up or turn down the master volume.
“RC-VOLUME” and the current volume level will show on the display.
Press [Accom Vol +/-] simultaneously to reset to the dafault value.
MASTER VOLUME ADJUSTMENT
Press [Master Vol +/-] to turn up or turn down the master volume.
“VOLUME” and the current volume level will be shown on the display.
Press [Master Vol +/-] simultaneously to reset to the dafault value.
The master volume can also control the accompaniment volume.
When pressing [Sounds] during the demonstration song playing process, “SOUND”
will show on the display, press the number buttons or the “+”/”-” button within 3
seconds to select other Sound for playing the demonstration song.

IV. Auto Style
STYLES CONTROL
•
Press [start/stop] to start accompaniment Style.
After the accompaniment Style is activated, press [Fill-in] to have a temporary
Style play during the accompaniment Style.
Pressing and hold [Fill-in], the temporary Style will be continuous.
During the accompaniment Style, press [Start/Stop] to stop the accompaniment
Style.
•
Press [Sync], “SYN” will show on the display and the four beat points will ash
simultaneously, then play any key in the chord key zone (the 1st-19th key, from
left), the accompaniment Style will be enabled.
1. Styles Enabling
2. Interlude
3. Stop Style
METRONOME
TEMPO ADJUSTMENT
Press [Tempo +/-] to increase or decrease the Style speed.
Press the two buttons simultaneously to reset to the default value.
The metronome contains four tempos, 1/4, 2/4, 3/4 and 4/4, respectively.
Press the [Metronome] continuously to select the foyr tempos.
Press the [Metronome] bottom again to stop the tempo.
STYLES SELECTION
This Keyboard provides 255 Styles, from “000” to ”254”, for your selection, and the
Style default is “000”. Press [Styles] to enable the Style selection function. ”STYLE”
and current Style number will show on the display. Then you can press the number
buttons or the “+”/ ”-” buttons to select other Styles.

V. Auto Bass Chord
Fingered Chord Fingering (C Key)
(The C key ngered chord ngering is as shown in the following gure, and the
rest can be obtained by analogy)
FINGERED CHORD
Under the state that the Style is enabled, press the [Fingered Chord] button.
“FIN” will show on the display, and then you can play a ngered chord on the keys in
the chord zone of the keyboard.
SINGLE CHORD
Under the state that the Style is enabled, press [Single Chord], and “SIN” will show
on the display, and then you can play a single chord on the keys in the chord zone
of the keyboard.
C C
6
CM
7
CM(9) Caug Cm
Cm
6
Cm
7
Cm
7
(b5)
CmM
7
Cm(9)
7
CmM (9)
Cdim Cdim
7
C
7
C
(b5)
7 4
Csus C1+2+5

Single Chord Fingering
VI. Status Memory Function
With the status memory function, you can save the Sound, Style, Tempo and other
parameters to be changed during playing for fast shifting. This keyboard is equipped
with 4 status memories, which can be exibly called at any time during playing.

STORAGE OF STATUS MEMORY
Set the Sound, Style, Tempo and Chord as required, and then press the [Status Memory]
button and one of [Memory 1] to [Memory 4] to save the current status.
VII. Eect Control
CALLING OF STATUS MEMORY
Press any one of [Memory 1] to [Memory 4] to call the setting parameters saved
under this memory to replace the current status.
No power failure protection is provided for the saved contents, and the saved
contents will loss after the electronic keyboard is restarted after power cut.
KEYBOARD SPLITTING FUNCTION
Press [SPLIT] to enable the keyboard splitting function, “SPLIT” will show on the
display. 24 keys on the left of the keyboard will split eith the remaining keyboard.
While the left keyboard zone will increase by one octave and maintain the original
tone, the right keyboard zone will decrease by one octave to maintain the same
pitch with the left keyboard zone. The tone of the right keyboard zone can be set as
needed so dierent tones can be played by the left and right keyboard zones at the
same time. Press [SPLIT] again to disenable this function.
PLAYING PERCUSSION
This Keyboard provides 61 kinds of keyboard percussions.
Press [Keyboard Percussion] to convert the key to percussion key.
Each key corresponds to one percussion instrument.
Press this button again to disenable the keyboard percussion function.
VIBRATO FUNCTION
Press [Vibrato], “VIB” will show on the display, and the vibrato eect will be activated.
Press this button again to disenable thevibrato eect.
SUSTAIN FUNCTION
Press [Sustain], “SUS” will show on the display, and the sustain eect will be activated.
Press this button again to disenable the sustain eect.

VIII. Recording and Style Programming
RECORDING
Press [REC] to enable the recording function, “REC” will show on the display.
Under this mode all playing notes will be recorded.
When the storage is full, “REC” will show on the display, and recording will stop
automatically.
STYLE PROGRAMMING
Press [PROG] to enable the Style programming function, “PRG” will show on the
display, and the keyboard percussion will be activated. Under this mode, you can
create custom Styles by playing the corresponding percussion key.
Press [PLAY] to playback the recorded notes, and “PLAY” will show on the display.
On completion of playback, it will enter to the recording mode and “REC” will show
on the display. You can record a new Style, or you can press [PLAY] to playback the
recorded Style.
•
Press [Start/Stop] or press [REC] again to disenable the recording function, and all
recorded Style will be removed.
•
32 percussions can be recorded at maximum, after that “PRG” will ash on the
display, and programming will stop automatically.
•
Press [Start/Stop] or press [PROG] again to disenable the programming function,
and all recorded Style will be removed.
•
Press [PLAY] to playback the programmed Style.
Press [PLAY] again to stop playback, “PRG” will show on the display and programming
function will be enabled. You can re-program Styles or you can press [PLAY] again
to playback.
•

IX. Three-step Intelligent Training
TRAINING I: ONE KEY
Press [One Key] to enable the One Key training function, “LEARN”, “SONG” and the
song number will show on the display, and then press “+” / “-” button to select the
song to be learned. Single Key training aims at duration learning, and there is no
requirement for pitch or correctness. This mode allows mistakes when playing the
keys, but the keyboards still play correct notes, while the key zone in the display will
also show the correct notes. After one song is nished, repeat the current song to be
learned. Press [Start/Stop] or press [One Key] to disenable the training function.
TRAINING III: ENSEMBLE
Press [Ensemble] to enable the Ensemble training function, “LEARN”, “SONG” and
the song number will show on the display, and then press “+” / “-” button to select
the song to be learned. The Ensemble training aims at the correct and comprehensive
learning of the song duration and notes. The keynote will be shielded for ensemble.
You can perform by following the guidance of the lighted key. You need to play the
correct note according the correct duration of the song. If you fail to play within 3
seconds, the keyboard will automatically play the keynote, and the keyboard zone
in the screen will display the correct note and tempo. After one song is nished,
repeat the current song to be learned. Press [Start/Stop] or press [Ensemble] to
disenable the training function.
Notes:
Under this state, the Keyboard plays only the correct notes, and gives no responce
to the wrong notes.
Press [Start/Stop] or press [Follow] to disenable the training function.
TRAINING II: FOLLOW
Press [Follow] to enable the follow function, “LEARN”, “SONG” and the song number
will show on the display, and then press “+” / “-” button to select the song to be
learned. With [Follow] function, you can learn by following the correctly playing notes.
You can play according to the demonstration song, you can play correctly by following
the guidance. You can also learn how to play by following the indicators in the key
zone of the display. It will wait for you to play the correct note before oit moves to the
next one.

Appendix
I. SOUNDS TABLE
000-111
Refer to the unit panel
112 Clavi 2
113 Celesta 2
114 Harpsichord 2
115 Mellow Fm1
116 Pi Pa 2
117 Upright Piano 1
118 Electric Piano 2
119 Hard Vibe 1
120 Wood Barafon 2
121 Music Box2
122 Marimba 2
123 Santur
124 Reed Organ 2
125 Pu Harmonica 1
126 Ukulele 1
127 12-str. Gt 1
128 Guitar Pinch
129 Slow Violin 1
130 Bright String 1
131 Jungle Bass 2
132 Indian Flute 1
133 Clavi 3
134 Celesta 3
135 Church Bells
136 Marimba 3
137 Dulcimer 2
138 Reed Organ 3
139 Electric Guitar (Clean) 2
140 Koto 2
141 Xylophone 2
142 Shanai 2
143 Dulcimer 3
144 English Horn 2
145 Electric Guitar (Clean) 3
146 Shamisen 2
147 Koto 3
148 Kalimba 2
149 Steel Bell 1
150 Alto Sax 2
151 Woodblock 2
152 Synth Harpsi. 1
153 Attack Clav. 1
154 Crystal 1
155 Bag Pipe 2
156 Barafon 1
157 Organ Flute 1
158 Kalimba 3
159 Reed Horn 1
160 Hard Vibe 2
161 Twin Trombones 1
162 Synth Harpsi. 2
163 Attack Clav. 2
164 Chorus Guitar 1
165 Steel Bell 2
166 Tsugaru
167 Oct harp 1
168 Bodhran 1
169 Tubular Bells 2
170 Suona
171 Castanets
172 Attack Harp 1
173 Electric Vibraphone 1
174 Soft Sax 1
175 Soft Clav. 1
176 Soft Guitar 1
177 Grow Guitar 1
178 Didgeridoo 1
179 Attack Barafon 1
180 Muta Barafon 1
181 Nay 1
182 Soft Santur
183 Dual Horns
184 Hard Barsoon 1
185 Tron Flute 1
186 Kawala 1
187 Jazz Organ 1
188 Soft Accord 1
189 Wind Organ 1
190 Viola Attack 1
191 Bari &Tenor 1
192 Soft Sax2
193 Attack Harp 2
194 Didgeridoo 2
195 Dual Horns 2
196 Hard Barsoon 2
197 Kawala 2
198 Soft Guitar 2
199 Mute Barafon 2
200 Lead (Bass+Lead) 2
201 MelodicTom 2
202 Grow Guitar 2
203 Lead (SaMooth)2
204 Jazz Bass 2
205 Chorus Guitar 2
206 Feedback Gt. 2
207 Fiddle 2
208 Organ Flute 2
209 Flugel Horn 2
210 Crystal 2
211 Soft Clav. 2
212 Overdriven Guitar 2
213 Ukulele 2
214 Tango Accordion 2
215 Twin Trombones 2
216 Jazz Organ 2
217 Bright String 2
218 Reed Horn 2
219 Glockenspiel 2
220 Drawbar Organ 2
221 Muted Horn 2
222 Pizzicato Strings 2
223 Nay2
224 Pu Harmonica 2
225 Muted Trumpet 2
226 Upright Piano 2
227 Soft Accord 2
228 Uillean Harp 2
229 Tron Flute 2
230 Blown Bottle 2
231 Indian Flute 2
232 Slow Violin 2
233 Electric Guitar (Muted) 2
234 Multi Wind 2
235 Electric Vibraphone 2
236 Bodhran 2
237 Mellow Fm 2
238 Multi Reed 2
239 Contrabass 2
240 Barafon 2
241 Wind Organ 2
242 12-str. Gt2
243 Attack Barafon 2
244 Lead (Calliope) 2
245 Viola Attack 2
246 Pad (Warm) 2
247 Oct Harp 2
248 Bari & Tenor 2
249 Agogo 2
250 Flugel Horn 3
251 Organ Flute 3
252 Fiddle 3
253 Feedback Gl. 3
254 Chorus Guitar 3

II. STYLE TABLE
000-130
Refer to the unit panel
131 West Shue
132 Big Band Fast 2
133 Espag Nol 1
134 Disco Funk 2
135 Pop Mambo
136 Europe Swing 1
137 Tricks Latin
138 Disco Samba 2
139 Latin Wallz
140 Dance Pop 3
141 Jazz Rock 1
142 Delroit
143 Fanatical Sand
144 European Rock 1
145 Ground Beat
146 8 Beat Modem 2
147 Jazz Disco 1
148 Dixie Jazz 1
149 Disco Chocolate
150 Disco Latin 2
151 Synth Boogie
152 Saturday Night 2
153 Club Danca 1
154 Tricks Bossa Nova
155 Tarantella 2
156 USA March
157 Espag Nol 2
158 Club Latin 2
159 Jazz Cha Cha 1
160 Country Cha Cha
161 Disco Party 2
162 Modem R&B 1
163 8 Beat Pop 2
164 Country Jazz
165 Soul Rock 1
166 Rumba 2
167 Samba 3
168 Modern R&B 2
169 Club Dance 2
170 Country Bossa Nova
171 JazzBo1
172 Modern Cha Cha 1
173 Pop Reggae 2
174 Rock Samba 1
175 Jazz 8 Beat 1
176 Disco
177 Seville 1
178 Disco Hands 2
179 Rock Ballad
180 Mixed Bossa Nova
181 Jazz 16 Beat 1
182 Single 16 Beat 1
183 Love Song
184 Single 16 Beat 2
185 Disco Fox 2
186 Pop Rock 3
187 Tijuana Wallz
188 British Pop 2
189 Show Tune 1
190 Schlager Alp
191 Single Rock
192 Swing Waltz
193 Slow Waltz
194 Cat Groove 2
195 Country Slow Rock
196 Rock Disco 1
197 16 Beat Shue 1
198 Jazz 8 Beat 2
199 Casa
200 Guad Dance 1
201 Jazz Cha Cha2
202 Country Wallz
203 European Rock 2
204 Caribbean Dance 2
205 Jazz Disco 2
206 Medium Jazz
207 Piano Ballad
208 70's Disco
209 Jazz Rock 2
210 Europe 8 Beat 1
211 Seville 2
212 Rumba 3
213 Soul Rock 2
214 European Disco 2
215 Analog Ballad 2
216 Pub Piano 2
217 Europe Rumba
218 Rock'n Roll 2
219 Disco Trop
220 Rock Salsa 1
221 Europe 8 Beat 2
222 Europe Samba
223 Show Tune 2
224 Jazz 16 Beat 2
225 Rock Samba 2
226 Jazz Waltz 2
227 Europe Reggae
228 Modem Cha Cha 2
229 R&B Ballad 2
230 Rock Boogie
231 Jazz Bossa Nova
232 Rock Salsa 2
233 Slow & Easy
234 Hip Waltz 1
235. Jazz Latin2
236 Rock Disco 2
237 Jazz Tango 2
238 Analog Ballad 3
239 Europe Swing 2
240 Hip Waltz 2
241 Jazz Swing 2
242 Party Pop
243 Jazz Club
244 Guad Dance 2
245 JazzBo2
246 Dixie Jazz 2
247 Acoustic Ballad 2
248 Jazz Slow Rock
249 16 Beat Shue 2
250 Polka Pop
251 Latin Party Pop
252 Parranda
253 Carnival
254 60's Vintage Pop

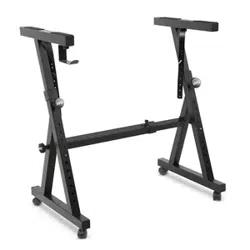
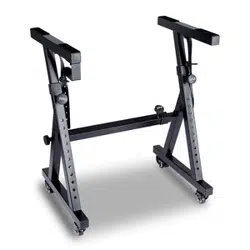
Keyboard Stand Assembly

2-in-1 Karaoke Keyboard: Play & Sing-Along!
Compact & Portable Musical Piano
Simple Electronic Plug-in Operation
Portable Piano
Built-in Full Range Stereo Speakers
Connect & Stream Audio from External Devices
Can Connect to Speaker and Play Sound
Multiple Preset Selectable Keyboard Sound, Tone & Rhythm Styles
Digital LCD Display
Adjustable Volume Control
Record & Playback Mode
Mic Input Jack
61 Keys Keyboard Percussion Function
Basic Control: Master Volume / Accom Volume / Tempo Control
Auto Chord Function: Single Chord / Fingered Chord
Sustain Functions, Vibrato Function, Keyboard Split Function
Teaching Functions: One-key/Follow/Assemble
Fill-in Function, Metronome Function
Perfect for Home Theater Living Room Performances
Fun for Kids of All Ages: Children & Adults
•
•
•
•
•
•
•
•
•
•
•
•
•
•
•
•
•
•
•
•
•
•
•
•
•
•
•
Digital Musical Karaoke Keyboard
Book Rack
Adapter
Power Plug
Keyboard Stand
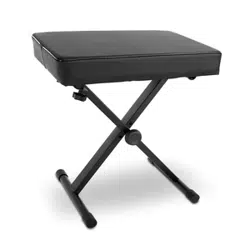
Keyboard Stool
Headset
Features:
What’s in the Box:

Headset Specs:
Keyboard Stand Features:
Keyboard Stool Features:
Construction Material: ABS + Laser decorative sheet
Wire Material: PVC at wire
Wire Length: 1.1M (110 cm)
Plug Diameter: 3.5mm 1/8
Weight: 0.14 kg (0.06 lbs)
•
•
•
•
•
•
•
•
•
•
•
•
•
•
•
•
•
•
•
•
•
•
•
Baked Varnish
Detachable Function
Height Adjusting Function
Keyboard Locking Function
Construction Material: lron + ABS
Length: 31.5" -inches (80 cm)
Width: 8.3" -inches (21 cm)
Height: 22.6”~26.5” -inches (57.5~67.5 cm)
Weight: 1.75 kg (3.85 lbs)
Bearing: 15 kg (33 lbs)
Baked Varnish
Folding Function
Height Adjusting Function
Construction Material: PU Leather, Iron, Sponge, Wood
Length: 15.75" -inches (40 cm)
Width: 11.81” -inches (30 cm)
Height: 17.32" / 18.9" / 20.1" -inches (44 / 48 / 51 cm)
Weight: 2.2 kg (4.85 lbs)

Technical Specs:
(61) Keyboard Keys
255 Styles/ 255 Sounds
50 Demonstration Songs: One/All
Audio Interface: Aux (3.5mm) Output Jack / Mic Input
Max Sound Level: Up to 110 dB
USB/Power Cable Length: 3.9’ ft. (119 cm)
Construction Material: Engineered ABS
Power Supply: DC 9V / AC Adapter, 6” AA” Batteries (Not Included in the Set)
Piano Dimensions (L x W x H):
36.6”x 11.97” x 3.7” -inches (93 x 30 x 9.3 cm)
•
•
•
•
•
•
•
•
•
California Prop 65 Warning
WARNING:
This product contains Butyl benzyl phthalate (BBP) which is
known to the state of California to cause cancer birth defects
and other reproductive harm. Do not ingest.
For more info go to: www.P65warnings.ca.gov

Teclado musical digital para karaoke
PKBRD6139BT
MANUAL DEL USUARIO
Teclado de piano electrónico portátil con
soporte de teclado (61 teclas), Taburete
con teclado, estuche y auriculares
SPA
POR FAVOR, LEA ATENTAMENTE ANTES DE CONTINUAR
Por favor, guarde este manual en un lugar seguro y a mano para futuras
Se debe utilizar un adaptador de corriente dedicado y, en caso de daños en el
adaptador, deberá reemplazarlo inmediatamente.
•
AVISO
Desconecte el enchufe después de tocar o cuando el teclado no se utilice durante
mucho tiempo.
•
Para evitar posibles daños al medio ambiente o a la salud humana por la eliminación
incontrolada de residuos, recíclelos de forma responsable para promover la
reutilización sostenible de los recursos materiales.
Para devolver su dispositivo usado, utilice los sistemas de devolución y recogida o
póngase en contacto con el minorista donde compró el producto.
Ellos podrán reciclar este producto de manera adecuada y segura para el medio
ambiente.
Utilice un paño seco y suave para limpiar el teclado. No se debe utilizar pintura, alcohol u
otros disolventes químicos para la limpieza, ya que pueden dañar la supercie del teclado.
•
ADVERTENCIA: El adaptador de conexión directa se utiliza como dispositivo de
desconexión, el dispositivo de desconexión debe permanecer fácilmente operable.
•
Eliminación correcta de este producto. Esta marca indica que este producto no
debe desecharse con otros residuos domésticos en los Estados Unidos.
•
Desconecte el enchufe antes de limpiar el teclado y no lo saque con las manos
mojadas.
•
Evite que entren líquidos, polvo, partículas pequeñas y otras materias extrañas en la
carcasa del teclado, lo que puede provocar un cortocircuito en el elemento.
•
Mantenga el teclado alejado de toda fuente de calor para proteger sus piezas de daños.
•
No gire y mantenga el volumen al máximo o en un grado incómodo durante
mucho tiempo cuando esté tocando.
•
Al conectar el teclado a otro dispositivo, asegúrese de que tanto el teclado como el
dispositivo que se va a conectar estén apagados antes de la conexión.
•
El teclado solo puede ser desmontado por profesionales, y no se puede hacer
ningún cambio en la estructura interior. En caso de cualquier anomalía funcional
durante su uso, deje de utilizarlo y envíe el teclado inmediatamente a profesionales
para que reciba mantenimiento.
•

l. Panel de control y puertos externos
PANEL DE CONTROL SUPERIOR
REAR PANEL PORT
30. Entrada de audio
31. MICRÓFONO
32. SALIDA AUDÍFONO
33. DC 9V
1. Altavoz
2. Encendido
7. Sincro
8. Relleno
6. Sencillo
5. Tempo
4. Volumen accom
3. Volumen maestro
9. Memoria (M1-M4)
10. Grabar
15. Números
16. Sonidos
14. Sostener
13. Reproducir
12. Prog
11. Pantalla LCD
17. Percusión de teclado
18. Con los dedos
23. Demo uno
24. DemoTodo
22. Arreglo
21. Seguimiento
20. One-key
19. Inicio/n
25. Metrónomo
26. Split
29. Zona de acordes
28. Estilos
27. Vibrato

II. Preparativos antes de tocar
ADAPTADOR DE CORRIENTE
SALIDA DE AUDIO/AURICULARES EXTERNOS
Se utilizará un adaptador de corriente dedicado. Conecte el extremo de salida del
adaptador al puerto de alimentación del panel posterior del teclado y, a continuación,
el otro extremo a la toma de corriente. (Nota: el voltaje de entrada del adaptador
debe ser compatible con el voltaje de la fuente de alimentación)
El teclado tiene la función de entrada estéreo. Las señales de sonido del teléfono
móvil, la computadora y otros dispositivos de audio se pueden ingresar en el sistema
de teclado para reproducir. En primer lugar, apague el teclado, luego conecte un
extremo del cable de audio al puerto de salida de un dispositivo de audio y el otro
extremo al puerto de ENTRADA DE AUDIO en el panel trasero del teclado, nalmente
encienda el teclado.
Active la conexión BT predeterminada, en el estado de búsqueda en espera de BT,
puede ser cualquier coincidencia de búsqueda de dispositivos BT y conéctese en este
momento, active la función BT de su teléfono o dispositivo BT para buscar. El nombre
local de BT es "piano". cuando la conexión se realiza correctamente, el teléfono móvil o
el dispositivo BT vuelven a la interfaz del reproductor de música para reproducir
música.
Entrada de micrófono: Conecte el micrófono al puerto MIC para empezar a cantar
y tocar.
ENTRADA DE MICRÓFONO Y ENTRADA DE AUDIO
CONEXIÓN INALÁMBRICA BT
Nota: NO utilice los auriculares a un volumen alto durante un período prolongado.
Para evitar daños auditivos, use sus auriculares a un nivel de volumen moderado.
Conexión de auriculares: Al conectar un auricular al puerto PHONES/OUTPUT en
el panel posterior del teclado, el altavoz se desactivará automáticamente. De esta
manera, puedes tocar el teclado sin molestar a los demás.
Salida de audio: En primer lugar, apague el teclado y los dispositivos de audio
externos, en segundo lugar, conecte un extremo del cable de audio al puerto
PHONES/OUTPUT en el panel posterior del teclado y luego conecte el otro extremo al
puerto de entrada de audio de los dispositivos de audio.

III. Método básico para tocar
Cuando se presiona [Power ON/OFF], la pantalla LCD se encenderá y mostrará el
tono, el tempo y otros estados actuales. A continuación, puede utilizar el teclado
según sea necesario.
REPRODUCCIÓN DE CANCIONES DE DEMOSTRACIÓN
Se han almacenado 50 canciones de demostración en el teclado, desde “000" hasta
"049": presione el botón [Demo one], el sistema está en estado de reproducción, la
canción de demostración actual se reproduce repetidamente. Para escuchar otra,
presione el botón para detener la canción actual y nuevamente para reproducir la
siguiente. Presione el botón [Demo all], el sistema está en la etapa de reproducción
de todas las canciones de demostración. En el transcurso de la reproducción de
canciones de demostración, se pueden cambiar los sonidos de las canciones.
Durante el proceso de reproducción, puede presionar los botones numéricos o los
botones "+" / "-" para seleccionar otra canción de demostración.
SELECCIÓN DE SONIDOS
El teclado proporciona 255 sonidos, desde “000" hasta "254''. para su selección. Al
encender el teclado, la función de selección de sonidos se habilitará
automáticamente y se mostrará el número de sonido actual de "SONIDOS" en la
pantalla. Cuando se encuentre en otros estados, pulse [Sounds] para activar la
función de selección de sonidos. El valor predeterminado de los sonidos es "000" y
se puede ajustar pulsando los botones numéricos correspondientes o pulsando el
botón "+" /"-".
AJUSTE DEL VOLUMEN DE ACOMPAÑAMIENTO
Pulse [Accom Vol+/-] para subir o bajar el volumen maestro.
"RC-VOLUME" y el nivel de volumen actual se mostrarán en la pantalla. Presione
[Accom Vol+/-] simultáneamente para restablecer el valor predeterminado.
AJUSTE DE VOLUMEN MAESTRO
Pulse [Master Vol+/-] para subir o bajar el volumen maestro. "VOLUMEN" y el nivel
de volumen actual se mostrarán en la pantalla. Pulse [Master Vol+/-]
simultáneamente para restablecer el valor predeterminado.
El volumen maestro también puede controlar el volumen de acompañamiento.
Al presionar [Sounds] durante el proceso de reproducción de la canción de
demostración, se mostrará "SOUND" en la pantalla, presione los botones numéricos
o el botón "+" / "-" dentro de los siguientes 3 segundos para seleccionar otro sonido
para reproducir la canción de demostración.

IV. Estilo automático
CONTROL DE ESTILOS
•
Pulse [start/stop] para iniciar el acompañamiento Estilo.
Una vez activado el estilo de acompañamiento, pulse [Fill-in] para que se
reproduzca un estilo temporal durante el estilo de acompañamiento.
Mientras mantiene pulsado [Fill-in], el estilo temporal será continuo.
Durante el estilo de acompañamiento, pulse [Start/Stop] para detener el estilo de
acompañamiento.
•
Presione [Sync], "SYN" se mostrará en la pantalla y los cuatro puntos de tiempo
parpadearán simultáneamente, luego toque cualquier tecla en la zona de teclas
de acordes (la tecla 1st-19th, desde la izquierda), se habilitará el estilo de
acompañamiento.
1. Habilitación de estilos
2. lnterludio
3. Detener el estilo
METRÓNOMO
AJUSTE DE TEMPO
Pulse [Tempo+/-] para aumentar o disminuir la velocidad del estilo.
Presione los dos botones simultáneamente para restablecer el valor predeterminado.
El metrónomo contiene cuatro tiempos, 1/4, 2/4, 3/4 and 4/4, respectivamente.
Presione el botón [Metronome] continuamente para seleccionar los cuatro tempos.
Presione la parte inferior [Metronome] nuevamente para detener el tempo.
SELECCIÓN DE ESTILOS
Este teclado proporciona 255 estilos, de "000" a "254" y el estilo predeterminado es
"000". Pulse [Styles] para activar la función de selección de estilo. "STYLE" y el
número de estilo actual se mostrarán en la pantalla. Luego puede presionar los
botones numéricos o los botones "+" / "-" para seleccionar otros estilos.

V. Acorde de bajo automático
Digitación de acordes digitados (tecla C)
(La digitación de acordes de la tecla C es como se muestra en la siguiente gura,
y el resto se puede obtener por analogía)
ACORDES CON LOS DEDOS
En el estado en el que el estilo está activado, pulse el botón [Fingered Chord]. "FIN"
se mostrará en la pantalla, y luego puede tocar un acorde con los dedos en la zona
de acordes del teclado.
ACORDE ÚNICO
En el estado en el que el estilo está habilitado, presione [Single Chord] y "SIN" se
mostrará en la pantalla, y luego podrá tocar un solo acorde en las teclas de la zona
de acordes del teclado.
C C
6
CM
7
CM(9) Caug Cm
Cm
6
Cm
7
Cm
7
(b5)
CmM
7
Cm(9)
7
CmM (9)
Cdim Cdim
7
C
7
C
(b5)
7 4
Csus C1+2+5

Digitación de un solo acorde
VI. Función de memoria de estado
Con la función de memoria de estado puede guardar el sonido, el estilo, el tempo y
otros parámetros que se cambiarán rápidamente durante la reproducción. Este
teclado está equipado con 4 memorias de estado a las que se puede acceder de
forma exible en cualquier momento durante la reproducción.

ALMACENAMIENTO DE LA MEMORIA DE ESTADO
Ajuste el sonido, el estilo, el tempo y el acorde según sea necesario y, a continuación,
pulse el botón [Status Memory] y uno de [Memory 1] a [Memory 4] para guardar el
estado actual.
VII. Control de efectos
RECUPERANDO LA MEMORIA DE ESTADO
Pulse cualquier tecla de [Memory 1] a [Memory 4] para acceder a los parámetros de
ajuste guardados en esta memoria para reemplazar el actual.
No se proporciona protección contra fallas de energía para los contenidos
guardados, y los contenidos guardados se perderán después de que el
teclado electrónico se reinicie después de un corte de energía.
FUNCIÓN DE DIVISIÓN DEL TECLADO
Presione [SPLIT] para habilitar la función de división del teclado, “SPLIT" se mostrará
en la pantalla. 24 teclas a la izquierda del teclado se dividirán con el teclado restante.
Mientras que la zona izquierda del teclado aumentará en una octava y mantendrá el
tono original, la zona derecha del teclado disminuirá en una octava para mantener el
mismo tono con la zona izquierda del teclado. El tono de la zona derecha del teclado
se puede ajustar según sea necesario para que las zonas izquierda y derecha del
teclado puedan reproducir diferentes tonos al mismo tiempo. Pulse [SPLIT] de nuevo
para desactivar esta función.
TOCAR LA PERCUSIÓN
Este teclado proporciona 61 tipos de percusiones de teclado.
Pulse [Keyboard percussion] para convertir la tecla en tecla de percusión. Cada tecla
corresponde a un instrumento de percusión.
Presione este botón nuevamente para desactivar la función de percusión del teclado.
FUNCIÓN DE VIBRATO
Presione [Vibrato], "VIB" aparecerá en la pantalla y se activará el efecto de vibrato.
Presione este botón nuevamente para desactivar el efecto de vibrato.
Sostener la función
Presione [Sustain], "SUS" aparecerá en la pantalla y se activará el efecto de sostenido.
Pulse este botón de nuevo para desactivar el efecto de sostenimiento.

VIII. Grabación y programación de estilo
GRABACIÓN
Presione [REC] para habilitar la función de grabación, "REC" se mostrará en la
pantalla. En este modo, se grabarán las notas que toque.
Cuando el almacenamiento esté lleno, se mostrará "REC" en la pantalla y la
grabación se detendrá automáticamente.
PROGRAMACIÓN DE ESTILO
Presione [PROG] para habilitar la función de programación de estilo, "PRG" se
mostrará en la pantalla y se activará la percusión del teclado. En este modo, puede
crear estilos personalizados tocando la tecla de percusión correspondiente.
Presione [PLAY] para reproducir las notas grabadas y “PLAY" aparecerá en la
pantalla. Al nalizar la reproducción, entrará en el modo de grabación y se mostrará
“REC" en la pantalla. Puede grabar un nuevo estilo o puede pulsar [PLAY] para
reproducir el estilo grabado.
•
Presione [Start/Stop] o presione [REC] nuevamente para deshabilitar la función de
grabación, y se eliminará todo el estilo grabado.
•
Se pueden grabar 32 percusiones como máximo, después de eso "PRG"
parpadeará en la pantalla y la programación se detendrá automáticamente.
•
Presione [Start/Stop] o presione [PROG] nuevamente para deshabilitar la función
de programación, y se eliminará todo el estilo grabado.
•
Pulse [PLAY] para reproducir el estilo programado.
Presione [PLAY] nuevamente para detener la reproducción, "PRG" aparecerá en la
pantalla y se habilitará la función de programación. Puede volver a programar los
estilos o puede volver a pulsar [PLAY] para reproducirlos.
•

IX. Práctica inteligente de tres pasos
Práctica 1: UNA TECLA
Presione [One Key] para habilitar la función de práctica o One Key, "LEARN" "SONG"
y el número de canción se mostrará en la pantalla, y luego presione el botón "+" / "-"
para seleccionar la canción que se va a practicar. La práctica de tecla única tiene como
objetivo el aprendizaje a largo plazo y no hay ningún requisito de tono o corrección.
Este modo permite errores al tocar las teclas, pero los teclados siguen tocando las
notas correctas, mientras que la zona de teclas en la pantalla también las mostrará.
Una vez terminada una canción, repita la canción actual que desea aprender. Pulse
[Start/Stop] o pulse [One Key] para desactivar la función de práctica.
TRAINING III: ENSAMBLE
Presione [Ensemble] para habilitar la función de entrenamiento de Ensemble,
"LEARN", "SONG" y el número de canción se mostrará en la pantalla, y luego presione
el botón "+" / "-" para seleccionar la canción que se va a practicar. Ensemble tiene
como objetivo el aprendizaje correcto y completo de la duración y las notas de la
canción. El teclado se inmovilizará. Puede practicar siguiendo la guía de la tecla
iluminada. Debe tocar la nota correcta de acuerdo con la duración correcta de la
canción. Si no puede tocar dentro de los siguientes 3 segundos, el teclado tocará
automáticamente la nota y la zona del teclado en la pantalla mostrará la nota y el
tempo correctos. Una vez terminada una canción, repita la canción actual que desea
aprender. Pulse [Start/Stop] o pulse [Ensemble] para desactivar la función de
entrenamiento.
Notas:
En este estado, el teclado toca solo las notas correctas y no responde a las notas
incorrectas.
Pulse [Start/Stop] o pulse [Seguir] para desactivar la función de entrenamiento.
Práctica II: SEGUIR
Presione [Follow] para habilitar la función de seguimiento, "LEARN" "SONG" y el
número de canción se mostrará en la pantalla, y luego presione el botón "+" / "-" para
seleccionar la canción que va a practicar. Con la función [Follow], puede practicar
siguiendo las notas que se tocan correctamente. Puede tocar según la canción de
demostración, y puede tocar correctamente siguiendo la guía. También puede
aprender a tocar siguiendo los indicadores de la zona del teclado de la pantalla.
Esperará a que toque la nota correcta antes de pasar a la siguiente.

Apéndice
I. TABLA DE SONIDOS
000-111
Consulte el panel de la unidad
112 Clavi 2
113 Celesta 2
114 Clavicémbalo 2
115 Fm suave 1
116 Pi Pa 2
117 Piano vertical 1
118 Piano eléctrico 2
119 Vibra dura 1
120 Barafón de madera 2
121 Caja de música 2
122 Marimba 2
123 Santur
124 Órgano de lengüeta 2
125 Armónica Pu 1
126 Ukulele 1
127 Gtl de 12 cuerdas
128 Pellizco de guitarra
129 Violes lentos 1
130 Cuerdas brillantes 1
131 Bajo de la selva 2
132 auta india 1
133 Clavi 3
134 Celesta 3
135 Campanas de iglesia
136 Marimba 3
137 Dulcímero 2
138 Órgano de lengüeta 3
139 Guitarra eléctrica (delgada) 2
140 Koto 2
141 Xilófono 2
142 Shanai 2
143 Dulcímero 3
144 Corno inglés 2
145 Guitarra eléctrica (delgada) 3
146 Shamisen 2
147 Koto 3
148 Kalimba 2
149 Campana de acero 1
150 Sax alto 2
151 Bloque de madera 2
152 Sintetizador. harpi 1
153 Clavijuela de ataque.1
154 Cristal 1
155 Gaita de pipa 2
156 Barafon 1
157 Flauta de órgano 1
158 Kalimba 3
159 Cuerno de caña 1
160 Vibra dura 2
161 Trombones gemelos 1
162 Sitnetizador harpi 2
163 Clavijuela de ataque 2
164 Coro de guitarra 1
165 Campana de acero 2
166 Tsugaru
167 Arpa de 0cho 1
168 Bodhran 1
169 Campanas tubulares 2
170 Suona
171 Castañuelas
172 Clavijuela de ataque 1
173 Vibráfono eléctrico 1
174 saxofón suave 1
175 clavijuela suave 1
176 guitarra suave 1
177 gitarra 1
178 Didgeridoo 1
179 Barafón de ataque 1
180 Barafon silenciado 1
181 Nay 1
182 Santur suave
183 Cuernos dobles
184 Bargot duro 1
185 Flauta Tron 1
186 Kawala 1
187 Órgano de Jazz 1
188 Acorde suave 1
189 Órgano de viento 1
190 Viola de ataque1
191 Bari & Tenor 1
192 saxofón suave 2
193 Arpa de ataque 2
194 Didgeridoo 2
195 Cuernos dobles 2
196 Bargot duro 2
197 Kawala 2
198 guitarra suave 2
199 barafón silencioso 2
200 Principal (bass/prin) 2
201 Tom melódico 2
202 guitarra grave 2
203 Principal (SaMooth)2
204 Bajo de jazz 2
205 coro de guitarra 2
206 Feedback Gt. 2
207 Violín 2
208 Flauta de órgano 2
209 Cuerno de Flugel 2
210 Cristal 2
211 Clav suave. 2
212 Guitarra saturada 2
213 Ukulele 2
214 acordión de tango 2
215 Trombones gemelos 2
216 Órgano de Jazz 2
217 Cuerdas brillantes 2
218 Cuerno de caña 2
219 Glockenspiel 2
220 Órgano de barra de tiro 2
221 Bocina silenciada 2
222 Cuerdas en pizzicato 2
223 Nay2
224 Armónica Pu 2
225 Trompeta con sordina 2
226 Piano vertical 2
227 Acorde suave 2
228 arpa uillean 2
229 Flauta Tron 2
230 Botella soplada 2
231 auta india 2
232 Violín lento 2
233 Guitarra eléctrica
(silenciada) 2
234 Viento múltiple 2
235 Vibráfono eléctrico 2
236 Bodhran 2
237 Fm 2 suave
238 Caña múltiple 2
239 Contrabajo 2
240 Barafon 2
241 Órgano de viento 2
242 12-str. Gt 2
243 barafón de ataque 2
244 Principal (Calliope) 2
245 viola de ataque 2
246 Pad (tibio) 2
247 arpa de ocho 2
248 Bari & Tenor 2
249 Agogo2
250 Cuerno de Flugel 3
251 Flauta de órgano 3
252 Violín 3
253 Feedback GI. 3
254 coro de guitarra 3

II. TABLA DE ESTILOS
000-130
Consulte el panel de la unidad
131 Shue del Oeste
132 Banda rápida 2
133 español 1
134 Disco Funk 2
135 Pop Mambo
136 Swing de europa 1
137 Trucos latinos
138 Disco Samba 2
139 Waltz latino
140 Dance Pop 3
141 Jazz Rock 1
142 Delroit
143 Sonido de fanáticos
144 Rock europeo 1
145 Ritmo ronco
146 8 ritmo moderno 2
147 Jazz Disco 1
148 Dixie Jazz 1
149 Disco Chocolate
150 Disco Latino 2
151 Boogie sintetizado
152 Saturday Night 2
153 Club Dance 1
154 Trucos Bossa Nova
155 Tarantella 2
156 Marcha de EU
157 Español 2
158 Club Latino 2
159 Jazz Cha Cha 1
160 Cha Cha Country
161 Disco Party 2
162 R&B moderno 1
163 8 Beat Pop 2
164 Jazz Country
165 Soul Rock 1
166 Rumba 2
167 Samba 3
168 R&B Moderno 2
169 Club Dance 2
170 Country Bossa Nova
171 JazzBo1
172 Cha Cha Moderno 1
173 Pop Reggae 2
174 Rock Samba 1
175 Jazz 8 Beat 1
176 Disco
177 Seville 1
178 Disco Hands 2
179 Rock Bailado
180 Mixed Bossa Nova
181 Jazz 16 Beat 1
182 Single 16 Beat 1
183 Canciones de amor
184 Sencillo 16 Beat 2
185 Disco Fox 2
186 Pop Rock 3
187 Waltz de Tijuana
188 British Pop 2
189 Música de espectáculo 1
190 Schlager Alp
191 Single Rock
192 Swing Waltz
193 Slow Waltz
194 Cat Groove 2
195 Country Slow Rock
196 Rock Disco 1
197 16 Beat Shue 1
198 Jazz 8 Beat 2
199 Casa
200 Guad Dance 1
201 Jazz Cha Cha2
202 Country Wallz
203 Rock Europeo 2
204 Baile caribeño 2
205 Jazz Disco 2
206 Jazz medio
207 Piano Bailado
208 Disco de los 70
209 Jazz Rock 2
210 Ritmo europeo1
211 Sevilla 2
212 Rumba 3
213 Soul Rock 2
214 Disco europeo 2
215 Balada análoga 2
216 Piano Pub 2
217 Rumba europea
218 Rock'n Roll 2
219 Disco Trop
220 Rock Salsa 1
221 Ritmo europeo 2
222 Sambaeuropea
223 Música de espectáculo 2
224 Jazz 16 Beat 2
225 Rock Samba 2
226 Jazz Waltz 2
227 Reggae europeo
228 Cha Cha moderno2
229 Balada R&B 2
230 Rock Boogie
231 Jazz Bossa Nova
232 Rock Salsa 2
233 Lento y facil
234 Waltz de cadera 1
235 Jazz Latino 2
236 Rock Disco 2
237 Jazz Tango 2
238 Balada análoga 3
239 Swing Europeo 2
240 Waltz de cadera2
241 Jazz Swing 2
242 Party Pop
243 Jazz Club
244 Guad Dance 2
245 JazzBo2
246 Dixie Jazz 2
247 Balada
entretenimiento 2
248 Jazz rock suave
249 16 ritmo mixto 2
250 Polka Pop
251 Pop de esta latina
252 Parranda
253 Carnaval
254 Pop Vintagede los 60

Ensamblaje del soporte del teclado
Teclado de karaoke 2 en 1: ¡toca y canta!
Piano musical compacto y portátil
Funcionamiento sencillo, conecte y use
Piano portátil
Altavoces estéreo de rango completo incorporados
Conéctese y transmita audio desde dispositivos externos
Se puede conectar al altavoz y reproducir sonido
Múltiples estilos de sonido, tono y ritmo de teclado seleccionables preestablecidos
Pantalla LCD digital
Control de volumen ajustable
Modo de grabación y reproducción
Conector de entrada de micrófono
Función de percusión del teclado de 61 teclas
Control básico: MasterVolume / Accom Volume / Tempo Control
Función de acorde automático: acorde único / acorde con los dedos
Funciones de Sustain, Función de Vibrato, Función de División de Teclado
Funciones de enseñanza: Una tecla/Seguir/Ensamble
Función de relleno, función de metrónomo
Perfecto para actuaciones de cine en casa en la sala de estar
Diversión para niños de todas las edades y adultos
•
•
•
•
•
•
•
•
•
•
•
•
•
•
•
•
•
•
•
•
•
•
•
•
•
•
•
Teclado de karaoke musical digital
Estante para libros
Adaptador
Enchufe de alimentación
Soporte para teclado
Taburete de teclado
Auriculares de casco
Características:
¿Qué hay en la caja?:

Especicaciones de los auriculares:
Características del soporte del teclado:
Keyboard Stool Features:
Material de construcción: ABS + lámina decorativa láser
Material del cable: alambre plano de PVC
Longitud del cable: 1,1 m (110 cm)
Diámetro del tapón: 3,5 mm 1/8
Peso: 0,14 kg (0.06 lbs)
•
•
•
•
•
•
•
•
•
•
•
•
•
•
•
•
•
•
•
•
•
•
•
Barniz horneado
Desmontable
Ajuste de altura
Función de bloqueo del teclado
Material de construcción: hierro + ABS
Longitud: 31.5" -pulgadas (80 cm)
Ancho: 8.3" -pulgadas (21 cm)
Altura: 22.6”~26.5” -pulgadas (57,5 ~ 67,5 cm)
Peso: 1,75 kg (3.85 lbs)
Rodamiento: 15 kg (33 lbs)
Barniz horneado
Plegable
Ajuste de altura
Material de construcción: Cuero PU, hierro, esponja, madera
Longitud: 15.75" -pulgadas (40 cm)
Ancho: 11.81" -pulgadas (30 cm)
Altura: 17.32" / 18.9" / 20.1" -pulgadas (44 / 48 / 51 cm)
Peso: 2,2 kg (4.85 lbs)

Especicaciones técnica:
(61) teclas
255 estilos/ 255 sonidos
50 canciones de demostración: One/AII
Interfaz de audio: conector de salida auxiliar (3,5 mm) / entrada de micrófono
Nivel de sonido máximo: hasta 11O dB
Longitud del cable USB/alimentación: 3.9'pies. (119 cm)
Material de construcción: ABS de ingeniería
Fuente de alimentación: adaptador de CC 9 V / CA, pilas AA de 6" (no incluidas en el juego)
Dimensiones del piano (largo x ancho x alto):
36.6" x 11.97" x 3.7" -pulgadas (93 x 30 x 9.3 cm)
•
•
•
•
•
•
•
•
•
Advertencia de la Proposición 65 de California
ADVERTENCIA:
Este producto contiene ftalato de bencilo de butilo (BBP), que
el estado de California reconoce como causante de cáncer,
defectos congénitos y otros daños reproductivos. No ingerir.
Para obtener más información, visite: www.P65warnlngs.ca.gov


Clavier numérique de karaoké musical
PKBRD6139BT
GUIDE DE
L’UTILISATEUR
Clavier électronique portable (61
touches) avec support de clavier,
tabouret, étui et casque.
FRE

Veuillez lire attentivement avant de commencer
Veuillez conserver ce manuel dans un endroit sûr et accessible pour référence future.
Utilisez uniquement un adaptateur secteur dédié. En cas de dommage de
l'adaptateur, remplacez-le immédiatement.
•
AVIS
Débranchez la prise après une utilisation prolongée ou lorsque le clavier est inutilisé
pendant une longue période.
•
Pour éviter tout dommage potentiel à l'environnement ou à la santé humaine dû à
une élimination de déchets non contrôlée, recyclez-le de manière responsable pour
favoriser la réutilisation durable des ressources matérielles.
Pour retourner votre appareil usagé, veuillez utiliser les systèmes de retour et de
collecte ou contactez le revendeur où le produit a été acheté. Ils peuvent prendre
en charge ce produit pour un recyclage respectueux de l'environnement.
Utilisez un chion sec et doux pour nettoyer le clavier. N'utilisez pas de peinture,
d'alcool ou d'autres solvants chimiques pour le nettoyage, car cela pourrait
endommager la surface du clavier.
•
AVERTISSEMENT: L'adaptateur à che directe est utilisé comme dispositif de
déconnexion, qui doit rester facilement utilisable.
•
Élimination correcte de ce produit. Cette marque indique que ce produit ne doit
pas être jeté avec les autres déchets ménagers dans l'UE
•
Débranchez la prise avant de nettoyer le clavier et ne retirez pas la prise avec des
mains mouillées.
•
Empêchez les liquides, la poussière, les petites particules et autres corps étrangers
d'entrer dans le boîtier du clavier, car cela pourrait provoquer un court-circuit des
éléments.
•
Éloignez le clavier de toute source de chaleur pour protéger ses composants.
•
Ne mettez pas le volume au maximum ou à un niveau inconfortable pendant une
longue période lors de l'utilisation.
•
Lors de la connexion du clavier à un autre appareil, assurez-vous que le clavier et
l'appareil à connecter sont éteints avant la connexion.
•
Le clavier ne peut être démonté que par des professionnels, et aucune modication
ne peut être apportée à la structure interne. En cas d'anomalie de fonctionnement
pendant l'utilisation, arrêtez immédiatement et envoyez le clavier à des
professionnels pour maintenance.
•

I. Panneau de contrôle et ports externes
Panneau de contrôle supérieur
Ports du panneau arrière
30. Entrée audio
31. Micro
32. Prises/Casque
33. DC 9V
1. Haut-parleur
2. Alimentation
7. Synchronisation
8. Remplissage
6. Simple
5. Tempo
4. Volume d'
accompagnement
3. Volume principal
9. Mémoire (M1-M4)
10. Enregistrer
15. Nombres
16. Sons
14. Sustain
13. Lecture
12. Prog
11. Achage LCD
17. Percussions de clavier
18. Doigté
23. Démo individuelle
24. Toutes les démos
22. Ensemble
21. Suivre
20. Touche unique
19. Démarrer/Arrêter
25. Métronome
26. Séparation
29. Zone d'accord
28. Styles
27. Vibrato

II. Préparations avant de jouer
Adaptateur secteur
Sortie audio/Casque externe
Utilisez uniquement un adaptateur secteur dédié. Connectez l'extrémité de sortie
de l'adaptateur au port d'alimentation à l'arrière du clavier, puis l'autre extrémité à
la prise électrique. (Remarque: la tension d'entrée de l'adaptateur doit être
compatible avec la tension d'alimentation.)
Le clavier dispose de la fonction d'entrée stéréo. Les signaux sonores provenant
d'un téléphone portable, d'un ordinateur et d'autres appareils audio peuvent être
entrés dans le système du clavier pour jouer. Éteignez d'abord le clavier, puis
connectez une extrémité du câble audio à la sortie d'un appareil audio, et l'autre
extrémité au port Entrée audio à l'arrière du clavier, enn, allumez le clavier.
Allumez la connexion Bluetooth par défaut. En mode de recherche en veille Bluetooth,
tout appareil Bluetooth peut être recherché et connecté à ce moment. Allumez ensuite
la fonction Bluetooth de votre téléphone ou de votre appareil Bluetooth pour
rechercher. Le nom Bluetooth local est "piano". Lorsque la connexion est établie avec
succès, le téléphone portable ou l'appareil Bluetooth revient à l'interface du lecteur de
musique pour jouer de la musique.
Entrée micro Connectez le microphone au port Micro pour commencer à chanter
et à jouer.
Entrée micro et entrée audio
Connexion sans l Bluetooth
Remarque: NE pas utiliser le casque à un volume élevé pendant une période
prolongée. Pour éviter les dommages auditifs, utilisez le casque à un niveau de
volume confortable et modéré.
Connexion du casque: Lorsque vous connectez un casque au port Prises/Casque
à l'arrière du clavier, le haut-parleur sera automatiquement désactivé. De cette
manière, vous pouvez jouer du clavier sans déranger les autres.
Sortie audio: Éteignez d'abord le clavier et les appareils audio externes. Ensuite,
connectez une extrémité du câble audio au port Prises/Casque à l'arrière du clavier,
puis l'autre extrémité au port d'entrée audio des appareils audio.

III. Méthode de jeu de base
Lorsque [Marche/Arrêt] est pressé, l'écran LCD s'allume et ache le ton actuel, le
tempo et d'autres informations. Ensuite, vous pouvez utiliser le clavier selon vos
LECTURE DES CHANSONS DE DÉMO
50 chansons de démo sont stockées dans le clavier, de "000" à "049" pour votre
sélection. Appuyez sur le bouton [Demo One], le système entre en lecture, la
chanson de démo actuelle est lue en boucle. Pour une autre chanson, appuyez sur le
bouton pour arrêter la chanson actuelle, puis à nouveau pour lire la suivante.
Appuyez sur le bouton [DEMO ALL], le système lit toutes les chansons de démo.
Pendant la lecture des chansons de démo, les sons des chansons peuvent être
modiés. Pendant le processus de lecture, vous pouvez appuyer sur les boutons
numériques ou les boutons "+" pour sélectionner une autre chanson de
démonstration. En appuyant sur [Sons] pendant la lecture de la chanson de démo,
SÉLECTION DES SONS
Le clavier propose 255 sons, de "000" à "254", pour votre sélection. Lors de
l'allumage du clavier, la fonction de sélection de sons sera activée
automatiquement et le numéro de son actuel s'achera. Lors d'autres états,
appuyez sur [Sounds] pour activer la fonction de sélection de sons. Le son par
défaut est "000" et peut être ajusté en appuyant sur les boutons numériques
correspondants ou sur les boutons "+" / "-".
AJUSTEMENT DU VOLUME D'ACCOMPAGNEMENT
Appuyez sur [Vol. Accom +/-] pour augmenter ou diminuer le volume
d'accompagnement. "VOLUME-R" et le niveau de volume actuel s'achent. Appuyez
simultanément sur [Vol. Accom +/-] pour réinitialiser à la valeur par défaut.
AJUSTEMENT DU VOLUME PRINCIPAL
Appuyez sur [Vol. Principal +/-] pour augmenter ou diminuer le volume principal.
"VOLUME" et le niveau de volume actuel seront achés. Appuyez simultanément
sur [Vol. Principal +/-] pour réinitialiser à la valeur par défaut. Le volume principal
peut également contrôler le volume de l'accompagnement.
"SOUND" s'achera, appuyez sur les boutons numériques ou le bouton "+" dans les
3 secondes pour sélectionner un autre son pour la lecture de la chanson de démo.

IV. Style automatique
Contrôle des Styles
•
Appuyez sur [Start/Stop] pour démarrer le style d'accompagnement.
Après l'activation du style d'accompagnement, appuyez sur [Fill-in] pour avoir un
style temporaire pendant le style d'accompagnement.
En maintenant [Fill-in], le style temporaire sera continu.
Pendant le style d'accompagnement, appuyez sur [Start/Stop] pour arrêter le style
d'accompagnement.
•
Appuyez sur [Sync], "SYN" s'achera à l'écran et les quatre temps clignoteront
simultanément. Ensuite, jouez sur l'une des touches de la zone d'accord (de la
1ère à la 19ème touche, de gauche), le style d'accompagnement sera activé.
1. Activation des Styles
2. Interlude
3. Arrêt du Style
METRONOME
AJUSTEMENT DU TEMPO
Appuyez sur [Tempo +/-] pour augmenter ou diminuer la vitesse du style.
Appuyez simultanément sur les deux boutons pour réinitialiser à la valeur par
défaut.
Le métronome contient quatre tempos : 1/4, 2/4, 3/4 et 4/4, respectivement.
Appuyez de façon continue sur [Métronome] pour sélectionner les quatre tempos.
Appuyez à nouveau sur [Métronome] pour arrêter le tempo.
SÉLECTION DES STYLES
Ce clavier propose 255 styles, de "000" à "254", pour votre sélection. Appuyez sur
[Styles] pour activer la fonction de sélection de style. "STYLE" et le numéro de style
actuel s'acheront. Ensuite, vous pouvez appuyer sur les boutons numériques ou
les boutons "+" pour sélectionner d'autres styles.

V. Accord automatique de basse
Fingered Chord Fingering (C Key)
(La disposition des accords doigtés pour la touche C est indiquée dans la gure
suivante, et le reste peut être obtenu par analogie).
ACCORD DOIGTÉ
Sous l'état où le style est activé, appuyez sur le bouton [Fingered Chord].
"FIN" s'achera, puis vous pourrez jouer un accord doigté sur les touches de la zone
d'accord du clavier.
ACCORD SIMPLE
Sous l'état où le style est activé, appuyez sur [SINGLE CHORD], "SIN" s'achera,
puis vous pourrez jouer un accord simple sur les touches de la zone d'accord du
clavier.
C C
6
CM
7
CM(9) Caug Cm
Cm
6
Cm
7
Cm
7
(b5)
CmM
7
Cm(9)
7
CmM (9)
Cdim Cdim
7
C
7
C
(b5)
7 4
Csus C1+2+5
Méthode d'accord simple
VI. Fonction de mémoire de statut
Avec la fonction de mémoire de statut, vous pouvez enregistrer le son, le style, le
tempo et d'autres paramètres à modier pendant le jeu pour un changement
rapide. Ce clavier est équipé de 4 mémoires de statut, qui peuvent être appelées
de manière exible à tout moment pendant le jeu.

ENREGISTREMENT DE LA MÉMOIRE DE STATUT
Congurez le son, le style, le tempo et l'accord selon vos besoins, puis appuyez sur le
bouton [Mémoire de statut] et sur l'un des boutons [Mémoire 1] à [Mémoire 4] pour
sauvegarder le statut actuel.
VII. Contrôle des eets
APPEL DE LA MÉMOIRE DE STATUT
Appuyez sur l'un des boutons [Mémoire 1] à [Mémoire 4] pour rappeler les
paramètres sauvegardés sous cette mémoire et remplacer le statut actuel.
Aucune protection contre les coupures de courant n'est prévue pour les
contenus sauvegardés, et les contenus sauvegardés seront perdus après le
redémarrage du clavier électronique suite à une coupure de courant.
FONCTION DE DIVISION DU CLAVIER
Appuyez sur [SPLIT] pour activer la fonction de division du clavier, " SPLIT "
s'achera. 24 touches à gauche du clavier seront divisées avec le reste du clavier.
La zone du clavier de gauche augmentera d'une octave et conservera le ton original,
tandis que la zone du clavier de droite diminuera d'une octave pour conserver le
même pitch que la zone du clavier de gauche. Le ton de la zone du clavier de droite
peut être réglé selon les besoins pour jouer des tons diérents dans les zones gauche
et droite du clavier simultanément. Appuyez sur [SPLIT] à nouveau pour désactiver
cette fonction.
PERCUSSION CLAVIER
Appuyez sur [Keyboard Percussion] pour convertir la touche en touche de percussion.
Chaque touche correspond à un instrument de percussion.
Appuyez à nouveau sur ce bouton pour désactiver la fonction de percussion du
clavier.
FONCTION DE VIBRATO
Appuyez sur [Vibrato], "VIB" s'achera, et l'eet de vibrato sera activé. Appuyez à
nouveau sur ce bouton pour désactiver l'eet de vibrato.
FONCTION DE SUSTAIN
Appuyez sur [Sustain], "SUS" s'achera, et l'eet de sustain sera activé. Appuyez à
nouveau sur ce bouton pour désactiver l'eet de sustain.

VIII. Enregistrement et Programmation de Styles
ENREGISTREMENT
Appuyez sur [REC] pour activer la fonction d'enregistrement, "REC" s'achera.
Sous ce mode, toutes les notes jouées seront enregistrées.
Lorsque la mémoire est pleine, "REC" s'achera, et l'enregistrement s'arrêtera
automatiquement.
PROGRAMMATION DE STYLE
Appuyez sur [PROG] pour activer la fonction de programmation de style, "PRG"
s'achera, et la percussion du clavier sera activée. Sous ce mode, vous pouvez
créer des styles personnalisés en jouant la touche de percussion correspondante.
Appuyez sur [PLAY] pour lire les notes enregistrées, et "PLAY" s'achera. Une fois la
lecture terminée, le clavier entrera en mode d'enregistrement et "REC" s'achera.
Vous pouvez enregistrer un nouveau style, ou vous pouvez appuyer sur [PLAY] pour
lire le style enregistré.
•
Appuyez sur [Start/Stop] ou sur [REC] à nouveau pour désactiver la fonction
d'enregistrement, et tous les styles enregistrés seront supprimés.
•
32 percussions peuvent être enregistrées au maximum, après quoi "PRG" clignotera
à l'écran, et la programmation s'arrêtera automatiquement.
•
Pression sur [Start/Stop] ou sur [PROG] à nouveau pour désactiver la fonction de
programmation, et tous les styles enregistrés seront supprimés.
•
Appuyez sur [PLAY] pour lire le style programmé.
Appuyez à nouveau sur [PLAY] pour arrêter la lecture, "PRG" s'achera et la fonction
de programmation sera activée. Vous pouvez reprogrammer des styles ou appuyer à
nouveau sur [PLAY] pour lire.
•

IX. Formation intelligente en trois étapes
FORMATION I : UNE TOUCHE
Appuyez sur [One Key] pour activer la fonction d'apprentissage d'une seule touche,
"LEARN", "SONG" et le numéro de la chanson s'acheront. Ensuite, appuyez sur les
boutons "+"/"-" pour sélectionner la chanson à apprendre.
L'apprentissage d'une seule touche vise l'apprentissage de la durée, sans exigence de
tonalité ou de justesse. Ce mode permet des erreurs lors de la frappe des touches, mais
le clavier joue toujours les notes correctes, et la zone des touches à l'écran montre
également les notes correctes. Après avoir terminé une chanson, répétez la chanson
en cours d'apprentissage.
FORMATION III : ENSEMBLE
Appuyez sur [Ensemble] pour activer la fonction d'entraînement en ensemble,
"LEARN", "SONG" et le numéro de la chanson s'acheront. Ensuite, appuyez sur les
boutons "+"/"-" pour sélectionner la chanson à apprendre.
L'entraînement en ensemble vise l'apprentissage correct et complet de la durée et
des notes de la chanson. La note principale sera masquée pour l'ensemble, vous
pouvez jouer en suivant les indications des touches illuminées. Vous devez jouer la
note correcte selon la durée correcte de la chanson. Si vous ne parvenez pas à jouer
dans les 3 secondes, le clavier jouera automatiquement la note principale, et la zone
du clavier à l'écran achera la note et le tempo corrects.
Après avoir terminé une chanson, répétez la chanson en cours d'apprentissage.
Appuyez sur [Start/Stop] ou sur [Ensemble] pour désactiver la fonction
d'entraînement.
Notes:
Sous cet état, le clavier joue uniquement les notes correctes et ne répond pas aux
notes incorrectes.
Appuyez sur [Start/Stop] ou sur [Follow] pour désactiver la fonction d'entraînement.
FORMATION II : SUIVI
Appuyez sur [Follow] pour activer la fonction de suivi, "LEARN", "SONG" et le numéro
de la chanson s'acheront. Ensuite, appuyez sur les boutons "+"/"-" pour sélectionner
la chanson à apprendre.
Avec la fonction de suivi, vous pouvez apprendre en suivant les notes correctement
jouées. Vous pouvez jouer en suivant la chanson de démonstration, vous pouvez jouer
correctement en suivant les indications. Vous pouvez également apprendre à jouer en
suivant les indicateurs dans la zone des touches à l'écran. Il attendra que vous jouiez la
note correcte avant de passer à la suivante.

Appendix
I. SOUNDS TABLE
000-111
Refer to the unit panel
112 Clavi 2
113 Celesta 2
114 Harpsichord 2
115 Mellow Fm1
116 Pi Pa 2
117 Upright Piano 1
118 Electric Piano 2
119 Hard Vibe 1
120 WoodBarafon2
121 Music Box 2
122 Marimba 2
123 Santur
124 Reed Organ 2
125 Pu Harmonica 1
126 Ukulele 1
127 12-str. Gtl
128 Guitar Pinch 2
129 Slow Violin 1
130 Bright String 1
131 Jungle Bass 2
132 Indian Flute 1
133 Clavi 3
134 Celesta 3
135 Church Bells
136 Marimba 3
137 Dulcimer 2
138 Reed Organ 3
139 Electric Guitar (Clean) 2
140 Koto 2
141 Xylophone 2
142 Shanai 2
143 Dulcimer 3
144 English Horn 2
145 Electric Guitar (Clean) 3
146 Shamisen 2
147 Koto 3
148 Kalimba 2
149 Steel Bell 1
150 Alto Sax 2
151 Woodblock 2
152 Synth Harpsi. 1
153 Attack Clav. 1
154 Crystal 1
155 Bag Pipe 2
156 Barafon 1
157 Organ Flute 1
158 Kalimba 3
159 Reed Horn 1
160 Hard Vibe 2
161 Twin Trombones 1
162 Synth Harpsi. 2
163 Attack Clav. 2
164 Chorus Guitar 1
165 Steel Bell 2
166 Tsugaru
167 Oct harp 1
168 Bodhran 1
169 Tubular Bells 2
170 Suona
171 Castanets
172 Attack Harp 1
173 Electric Vibraphone 1
174 Soft Sax 1
175 Soft Clav. 1
176 Soft Guitar 1
177 Grow Guitar 1
178 Didgeridoo 1
179 Attack Barafon 1
180 Muta Barafon 1
181 Nay 1
182 Soft Santur
183 Dual Horns
184 Hard Barsoon 1
185 Tron Flute 1
186 Kawala 1
187 Jazz Organ 1
188 Soft Accord 1
189 Wind Organ 1
190 Viola Attack 1
191 Bari &Tenor 1
192 Soft Sax2
193 Attack Harp 2
194 Didgeridoo 2
195 Dual Horns 2
196 Hard Barsoon 2
197 Kawala 2
198 Soft Guitar 2
199 Mute Barafon 2
200 Lead (Bass+Lead) 2
201 MelodicTom 2
202 Grow Guitar 2
203 Lead (SaMooth)2
204 Jazz Bass 2
205 Chorus Guitar 2
206 Feedback Gt. 2
207 Fiddle 2
208 Organ Flute 2
209 Flugel Horn 2
210 Crystal 2
211 Soft Clav. 2
212 Overdriven Guitar 2
213 Ukulele 2
214 Tango Accordion 2
215 Twin Trombones 2
216 Jazz Organ 2
217 Bright String 2
218 Reed Horn 2
219 Glockenspiel 2
220 Drawbar Organ 2
221 Muted Horn 2
222 Pizzicato Strings 2
223 Nay2
224 Pu Harmonica 2
225 Muted Trumpet 2
226 Upright Piano 2
227 Soft Accord 2
228 Uillean Harp 2
229 Tron Flute 2
230 Blown Bottle 2
231 Indian Flute 2
232 Slow Violin 2
233 Electric Guitar (Muted) 2
234 Multi Wind 2
235 Electric Vibraphone 2
236 Bodhran 2
237 Mellow Fm 2
238 Multi Reed 2
239 Contrabass 2
240 Barafon 2
241 Wind Organ 2
242 12-str. Gt2
243 Attack Barafon 2
244 Lead (Calliope) 2
245 Viola Attack 2
246 Pad (Warm) 2
247 Oct Harp 2
248 Bari & Tenor 2
249 Agogo 2
250 Flugel Horn 3
251 Organ Flute 3
252 Fiddle 3
253 Feedback Gl. 3
254 Chorus Guitar 3

II. TABLEAU DE STYLES
000-130
Se référer au panneau de l'unité
131 West Shue
132 Big Band Rapide 2
133 Espagnol 1
134 Disco Funk 2
135 Pop Mambo
136 Europe Swing 1
137 Trucs Latin
138 Disco Samba 2
139 Latin Wallz
140 Dance Pop 3
141 Jazz Rock 1
142 Delroit
143 Sable Fanatique
144 European Rock 1
145 Battement Terre
146 8 Beat Modem 2
147 Jazz Disco
148 Dixie Jazz 1
149 Disco Chocolat
150 Disco Latin 2
151 Synth Boogie
152 Samedi Soir 2
153 Club Danse 1
154 Trucs Bossa Nova
155 Tarantella 2
156 Marche USA
157 Espagnol 2 156 Club Latin 2
159 Jazz Cha Cha 1
160 Cha Cha Country
161 Disco Party 2
162 Modem R&B 1
163 8 Beat Pop 2
164 Country Jazz
165 Soul Rock 1
166 Rumba 2
167 Samba 3
168 Modem R&B 2
169 Club Danse 2
170 Country Bossa Nova
171 Jazz Bo 1
172 Modem Cha Cha 1
173 Pop Reggae 2
174 Rock Samba 1
175 Jazz 8 Beat 1
176 Disco
177 Séville 1
178 Disco Mains 2
179 Ballade Rock
180 Bossa Nova Mixte
181 Jazz 16 Beat 1
182 Single 16 Beat 1
183 Chanson d'Amour
184 Single 16 Beat 2
185 Disco Fox 2
186 Pop Rock 3
187 Tijuana Wallz
188 Pop Britannique 2
189 Chanson de Spectacle 1
190 Alp Schlager
191 Single Rock
192 Valse Swing
193 Valse Lente
194 Groove de Chat 2
195 Rock Lent Country
196 Rock Disco
197 16 Beat Shue 1
198 Jazz 8 Beat 2
199 Casa
200 Danse Guad 1
201 Jazz Cha Cha 2
202 Mur Country
203 European Rock 2
204 Danse Caribéenne 2
205 Jazz Disco 2
206 Jazz Moyen
207 Ballade Piano
208 Disco des Années 70
209 Jazz Rock 2
210 Europe 8 Beat 1
211 Séville 2
212 Rumba 3
213 Soul Rock 2
214 Disco Européenne 2
215 Ballade Analogique 2
216 Piano de Bar 2
217 Rumba Européenne
218 Rock'n Roll 2
219 Disco Trop
220 Rock Salsa 1
221 Europe 8 Beat 2
222 Europe Samba
223 Chanson de Spectacle 2
224 Jazz 16 Beat 2
225 Rock Samba 2
226 Valse Jazz 2
227 Reggae Européen
228 Modem Cha Cha 2
229 Ballade R&B 2
230 Rock Boogie
231 Jazz Bossa Nova
232 Rock Salsa 2
233 Lent & Facile
234 Hip Waltz 1
235 Jazz Latin 2
236 Rock Disco 2
237 Tango Jazz 2
238 Ballade Analogique 3
239 Europe Swing 2
240 Hip Waltz 2
241 Jazz Swing 2
242 Pop de Fête
243 Jazz Club
244 Danse Guad 2
245 Jazz Bo 2
246 Dixie Jazz 2
247 Ballade Acoustique 2
248 Rock Lent Jazz
249 16 Beat Shue 2
250 Pop Polka
251 Fête Latine Pop
252 Parranda
253 Carnaval
254 Pop Vintage des
Années 60

Montage du Support de Clavier

Clavier de karaoké 2-en-1 : Jouez & Chantez en même temps !
Piano musical compact et portable
Fonctionnement simple avec branchement électronique
Piano portable
Haut-parleurs stéréo intégrés à gamme complète
Connexion et diusion audio depuis des appareils externes
Peut être connecté à un haut-parleur pour jouer du son
Multiples sélections de son, tonalités et styles de rythmes prédénis
Écran LCD numérique
Contrôle de volume réglable
Modes d'enregistrement et de lecture
Prise d'entrée microphone
Fonction de percussion sur le clavier à 61 touches
Contrôle basique : Volume principal / Volume d'accompagnement / Contrôle de tempo
Fonction d'accord automatique : Accord simple / Accord avec doigtés
Fonctions de soutien, de vibrato et de division du clavier
Fonctions d'enseignement : Un accord / Suivi / Ensemble
Fonction de complément, fonction de métronome
Idéal pour les performances dans le salon d'un home cinéma
Amusant pour les enfants de tous âges : enfants et adultes
•
•
•
•
•
•
•
•
•
•
•
•
•
•
•
•
•
•
•
•
•
•
•
•
•
•
•
Clavier musical de karaoké numérique
Porte-livre
Adaptateur
Câble d'alimentation
Support de clavier
Tabouret de clavier
Casque
Caractéristiques:
Contenu de la boîte:

Spécications du casque:
Caractéristiques du support de clavier
Caractéristiques du tabouret de clavier:
Matériau de construction : ABS + feuille décorative au laser
Matériau du l : l plat en PVC
Longueur du l : 1,1 mètre (110 cm)
Diamètre de la prise : 3,5 mm 1/8
Poids : 0,14 kg (0.06 lbs)
•
•
•
•
•
•
•
•
•
•
•
•
•
•
•
•
•
•
•
•
•
•
•
Vernis cuit au four
Fonction détachable
Fonction de réglage de la hauteur
Fonction de verrouillage du clavier
Matériau de construction : Fer + ABS
Longueur : 31,5 pouces (80 cm)
Largeur : 8,3 pouces (21 cm)
Hauteur : 22.6”~26.5” -pouces (57,5 à 67,5 centimètres)
Poids : 1,75 kg (3.85 lbs)
Capacité : 15 kg (33 lbs)
Vernis cuit au four
Fonction pliable
Fonction de réglage de la hauteur
Matériau de construction : Cuir PU, Fer, Éponge, Bois
Longueur : 15.75" -pouces (40 cm)
Largeur : 11.81” -pouces (30 cm)
Hauteur : 17.32" / 18.9" / 20.1" -pouces (44 / 48 / 51 cm)
Poids : 2,2 kg (4.85 lbs)
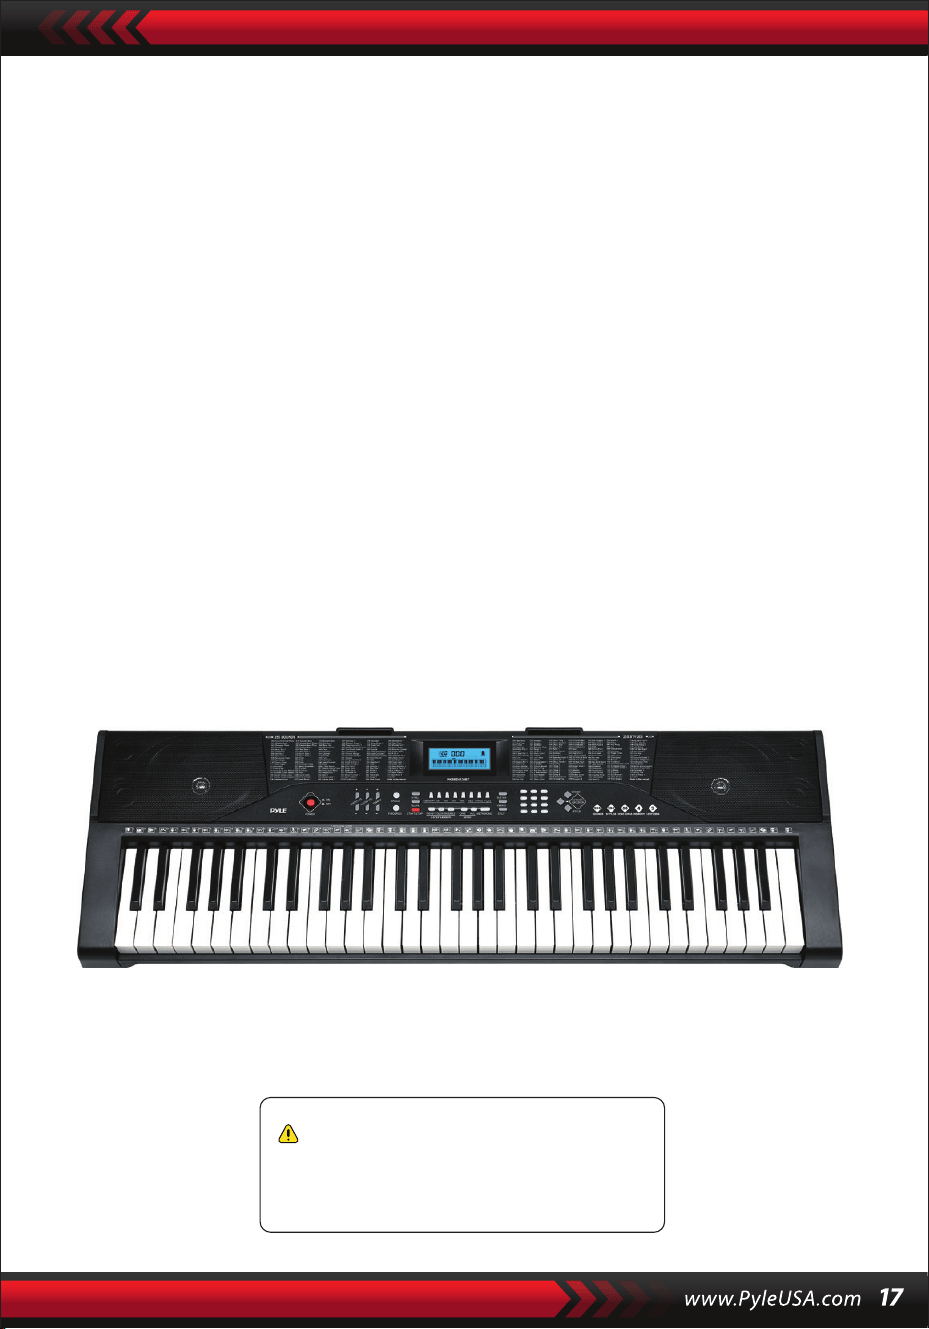
Spécications techniques:
(61) touches de clavier
255 styles / 255 sons
50 chansons de démonstration : Une / Toutes
Interface audio : Prise de sortie Aux (3,5 mm) / Entrée microphone
Niveau sonore maximum : Jusqu'à 110 dB
Longueur du câble USB/d'alimentation : 1,2 m (119 cm)
Matériau de construction : ABS conçu
Alimentation : DC 9V / Adaptateur AC, 6 piles "AA" (non incluses dans l'ensemble)
Dimensions du piano (L x l x H) :
36.6”x 11.97” x 3.7” -pouces (93 x 30,4 x 9,5 cm)
•
•
•
•
•
•
•
•
•
Avertissement Proposition 65 de Californie
ATTENTION:
Ce produit contient du phtalate de butyle et de benzyle (BBP)
reconnu par l'État de Californie comme pouvant causer des
cancers, des malformations congénitales et d'autres
dommages pour la reproduction. Ne pas ingérer.
Pour en savoir plus, visitez : www.F45wnmfcigt.ca.gov


Tastiera musicale digitale per karaoke
PKBRD6139BT
MANUALE UTENTE
Tastiera portatile per pianoforte elettronico
con supporto per tastiera (61 tasti), Sga-
bello per tastiera, custodia e cuffie
ITA

LEGGERE ATTENTAMENTE PRIMA DI PROCEDERE
Conservare il presente manuale in un luogo sicuro e a portata di mano
per future consultazioni.
Utilizzare un adattatore di corrente dedicato e, in caso di danni all'adattatore,
sostituirlo immediatamente.
•
AVVISO
Estrarre la spina dopo l'uso o quando la tastiera rimane inutilizzata per lungo tempo.
•
Per evitare possibili danni all'ambiente o alla salute umana dovuti ad uno
smaltimento incontrollato dei riuti, riciclare il prodotto in modo responsabile per
promuovere il riutilizzo sostenibile delle risorse materiali.
Per restituire il dispositivo usato, utilizzare i sistemi di restituzione e raccolta o
contattare il rivenditore presso il quale è stato acquistato il prodotto.
Il prodotto potrà essere riciclato in modo sicuro per l'ambiente.
Per pulire la tastiera, utilizzare un panno asciutto e morbido. Per la pulizia non
utilizzare vernici, alcol o altri solventi, perché potrebbero danneggiare la supercie
della tastiera.
•
ATTENZIONE: se l'adattatore a innesto diretto viene utilizzato come dispositivo di
disconnessione, il dispositivo di disconnessione deve rimanere facilmente azionabile.
•
Smaltimento corretto di questo prodotto. Questo marchio indica che il
prodotto non deve essere smaltito insieme ad altri riuti domestici in tutta l'UE.
•
Estrarre la spina prima di pulire la tastiera e non estrarla con le mani bagnate.
•
Evitare che liquidi, polvere, piccole particelle e altri corpi estranei entrino nella
custodia della tastiera, perché potrebbero causare un cortocircuito dell'elemento.
•
"Tenere la tastiera lontana da fonti di calore per proteggere le sue parti da
eventuali danni.
•
Non girare e non tenere il volume al massimo o a un livello scomodo per molto
tempo durante l'esecuzione.
•
Quando si collega la tastiera ad un altro dispositivo, assicurarsi che sia la tastiera
che il dispositivo da collegare siano spenti prima di collegarli.
•
La tastiera può essere smontata solo da professionisti e non è possibile apportare
modiche alla struttura interna. In caso di anomalie funzionali durante
l'esecuzione, interrompere immediatamente ed inviare il prodotto a dei
professionisti per la manutenzione.
•
I. Pannello di controllo e porte esterne
TOP CONTROL PANEL
PORTA DEL PANNELLO POSTERIORE
30. INGRESSO AUDIO
31. MICROFONO
32. USCITA CUFFIE
33. DC 9V
1. Altoparlante
2. Potenza
7. Sync
8. Riempimento
6. Singolo
5. Tempo
4. Volume
Accompagnamento
3. Volume principale
9. Memoria (M1-M4)
10. Registra
15. Numeri
16. Suoni
14. Sostenere
13. Riproduzione
12. Programmi
11. Display LD
17. Tastiera a percussione
18. Diteggiatura
23. Demo Uno
24. Demo Tutti
22. Ensemble
21. Seguire
20. Chiave
19. Inizio/Fine
25. Metronomo
26. Dividere
29. Zona accordi
28. Stili
27. Vibrato

II. Preparativi prima di suonare
ADATTATORE DI ALIMENTAZIONE
USCITA AUDIO/CUFFIA ESTERNA
Si deve utilizzare un adattatore di alimentazione dedicato. Collegare l'estremità di
uscita dell'adattatore lla porta di alimentazione sul pannello posteriore della tastiera
e l'altra estremità alla presa di alimentazione. (Nota: la tensione di ingresso
dell'adattatore deve essere compatibile con la tensione di alimentazione).
La tastiera ha la funzione di ingresso stereo. I segnali sonori provenienti dal
telefono cellulare, computer e altri dispositivi audio possono essere immessi nel
sistema della tastiera per suonare. Per prima cosa spegnere la tastiera, quindi
collegare un'estremità del cavo audio alla porta di uscita di un dispositivo audio e
l'altra alla porta di uscita di un dispositivo audio e l'altra estremità alla porta AUDIO
INPUT sul pannello posteriore, inne accendere la tastiera.
Attivare la connessione BT predenita, nello stato di ricerca BT standby, a questo
punto può essere collegato qualsiasi dispositivo BT, attivare la funzione BT del
telefono o del dispositivo BT per la ricerca. Il nome BT locale è "piano", quando la
connessione è riuscita, il telefono cellulare o il dispositivo BT torna all'interfaccia del
lettore musicale per riprodurre la musica.
Ingresso microfonico: Collegare il microfono alla porta MIC per iniziare a cantare
e suonare.
INGRESSO MICROFONICO E INGRESSO AUDIO
CONNESSIONE BT WIRELESS
Nota: NON utilizzare le cue ad alto volume per un periodo prolungato.
Per evitare danni all'udito, utilizzare le cue a un volume confortevole e moderato.
Collegamento delle cue: Quando si collega una cua alla porta PHONES/
OUTPUT del pannello posteriore della tastiera, l'altoparlante viene disattivato
automaticamente. In questo modo, è possibile suonare la tastiera senza disturbare
gli altri.
Uscita audio: In primo luogo, spegnere la tastiera e i dispositivi audio esterni, in
secondo luogo, collegare un'estremità del cavo audio alla porta PHONES/OUTPUT
sul pannello posteriore della tastiera, quindi collegare l'altra estremità alla porta di
ingresso audio del dispositivo audio.

III. Metodo di riproduzione di base
Quando si preme [Power ACCESO/SPENTO], lo schermo LCD si accende e mostra il
tono corrente, il tempo e altri stati. Quindi è possibile utilizzare la tastiera come
RIPRODUZIONE DEI BRANI DEMO
Nella tastiera sono stati memorizzati 50 brani dimostrativi, da "000" a "049", che
possono essere selezionati. Premendo il pulsante [Demo one], il sistema passa allo
stato di riproduzione e il brano demo attuale viene riprodotto ripetutamente.
Per un'altra canzone, premere il pulsante per interrompere il brano attuale, e di
nuovo per riprodurre il brano successivo.
Premendo il pulsante [Demo all], il sistema si trova nella fase di riproduzione di tutti i
brani demo.
Durante la riproduzione dei brani demo, è possibile modicare i suoni dei brani.
Durante la riproduzione, è possibile premere i pulsanti numerici o i pulsanti "+" / "-"
SELEZIONE DEI SUONI
La tastiera ore 255 suoni, da "000" a "254", da selezionare.
Quando si accende la tastiera, la funzione di selezione dei suoni viene attivata
automaticamente e il numero di suono corrente "SOUNDS" viene visualizzato sul
display. In altri stati, premere [Suoni] per attivare la funzione di selezione dei suoni.
L'impostazione predenita dei suoni è "000" e può essere regolata premendo i tasti
numerici corrispondenti o premendo il pulsante "+" / "-".
REGOLAZIONE DEL VOLUME DI ACCOMPAGNAMENTO
Premere [Accom Vol +/-] per alzare o abbassare il volume master.
Sul display vengono visualizzati "RC-VOLUME" e il livello di volume corrente.
Premere contemporaneamente [Accom Vol +/-] per ripristinare il valore predenito.
REGOLAZIONE DEL VOLUME PRINCIPALE
Premere [Master Vol +/-] per alzare o abbassare il volume principale.
Sul display viene visualizzato "VOLUME" ed il livello di volume corrente.
Premere contemporaneamente [Master Vol +/-] per ripristinare il valore predenito.
Il volume principale può controllare anche il volume dell'accompagnamento.
Quando si preme [Suoni] durante la riproduzione del brano dimostrativo, sul display
appare "SOUND", premere i pulsanti numerici o i pulsanti "+" / "-" entro 3 secondi
per selezionare un altro suono per la riproduzione del brano dimostrativo.

IV. Stile automatico
CONTROLLO DEGLI STILI
•
" Premere [inizio/ne] per avviare lo stile di accompagnamento.
Dopo l'attivazione dello stile di accompagnamento, premere [Fill-in] per far
suonare uno stile temporaneo durante lo stile di accompagnamento.
Tenendo premuto [Fill-in], lo stile temporaneo sarà continuo.
Durante lo stile di accompagnamento, premere [Inizio/Fine] per interrompere lo
stile di accompagnamento.
•
" Premere [Sync], sul display appare "SYN" e i quattro punti di battuta
lampeggiano simultaneamente, quindi suonare un tasto qualsiasi nella zona
degli accordi (dal 1° al 19° tasto, da sinistra), lo stile di accompagnamento verrà
attivato.
1. Abilitazione degli stili
2. Interludio
3. Arresto dello stile
METRONOMO
REGOLAZIONE DEL TEMPO
Premere [Tempo +/-] per aumentare o diminuire la velocità dello stile.
Premere contemporaneamente i due pulsanti per ripristinare il valore predenito.
Il metronomo contiene quattro tempi, rispettivamente 1/4, 2/4, 3/4 e 4/4.
Premere continuamente [Metronomo] per selezionare i quattro tempi.
Premere nuovamente il tasto [Metronomo] per fermare il tempo.
SELEZIONE DEGLI STILI
Questa tastiera ore 255 stili, da "000" a "254", che possono essere selezionati e lo
stile predenito è "000". Premere [Stili] per attivare la funzione di selezione degli
stili.
"STILE" ed il numero dello stile corrente vengono visualizzati sul display. È quindi
possibile premere i pulsanti numerici o i pulsanti "+" / "-" per selezionare altri stili.

V. Accordo di basso automatico
Diteggiatura dell'accordo diteggiato (tasto C)
(La diteggiatura degli accordi diteggiati del tasto C è illustrata nella gura
seguente e il resto può essere ottenuto per analogia).
ACCORDO A DITA
Se lo stile è abilitato, premere il pulsante [Accordo a dita].
Sul display apparirà "FIN" e sarà possibile suonare un accordo diteggiato sui tasti
della zona degli accordi della tastiera.
ACCORDO SINGOLO
Se lo stile è abilitato, premere [Accordo Singolo] e sul display apparirà "SIN", quindi
è possibile suonare un accordo singolo sui tasti della zona accordi della tastiera.
C C
6
CM
7
CM(9) Caug Cm
Cm
6
Cm
7
Cm
7
(b5)
CmM
7
Cm(9)
7
CmM (9)
Cdim Cdim
7
C
7
C
(b5)
7 4
Csus C1+2+5

Diteggiatura di accordi singoli
VI. Funzione di memoria di stato
Con la funzione di memoria di stato, è possibile salvare il suono, lo stile, il tempo e
altri parametri da modicare durante l'esecuzione, per un cambio rapido.
Questa tastiera è dotata di 4 memorie di stato, che possono essere richiamate in
qualsiasi momento durante l'esecuzione.

MEMORIZZAZIONE DELLA MEMORIA DI STATO
Impostare il suono, lo stile, il tempo e l'accordo come richiesto, quindi premere il
pulsante [Stato della Memoria] e uno dei pulsanti da [Memoria 1] a [Memoria 4] per
salvare lo stato attuale.
VII. Controllo degli eetti
RICHIAMO DELLO STATO DI MEMORIA
Premere uno qualsiasi dei tasti da [Memoria 1] a [Memoria 4] per richiamare i
parametri di impostazione salvati in questa memoria e sostituire lo stato attuale.
I contenuti salvati non sono protetti dall'interruzione dell'alimentazione e
andranno persi dopo lo spegnimento della tastiera elettronica.
FUNZIONE DI DIVISIONE DELLA TASTIERA
Premere [Divisione] per attivare la funzione di suddivisione della tastiera, sul display
appare la scritta "SPLIT". I 24 tasti a sinistra della tastiera si dividono con la tastiera
rimanente.
Mentre la zona sinistra della tastiera aumenterà di un'ottava e manterrà il tono
originale, la zona destra della tastiera diminuirà di un'ottava per mantenere lo stesso
tono della zona della tastiera di sinistra.
Il tono della zona della tastiera destra può essere impostato a seconda delle esigenze,
in modo che le zone della tastiera destra e sinistra possano riprodurre
contemporaneamente toni diversi. Premere nuovamente [SPLIT] per disattivare
questa funzione.
SUONARE LE PERCUSSIONI
Questa tastiera ore 61 tipi di percussioni da tastiera.
Premere [Percussioni] per convertire il tasto in tasto di percussione.
Ogni tasto corrisponde a uno strumento a percussione.
Premere nuovamente questo tasto per disattivare la funzione di percussione della
FUNZIONE VIBRATO
Premere [Vibrato], sul display appare "VIB" e viene attivato l'eetto vibrato.
Premere nuovamente questo pulsante per disattivare l'eetto vibrato.
FUNZIONE DURATA
Premendo [Durata], sul display appare "SUS" e l'eetto durata viene attivato.
Premere nuovamente questo pulsante per disattivare l'eetto durata.

VIII. Registrazione e programmazione stilistica
REGISTRAZIONE
Premere [REC] per attivare la funzione di registrazione; sul display appare "REC".
In questa modalità verranno registrate tutte le note suonate.
Quando la memoria è piena, sul display appare "REC" e la registrazione si
interrompe automaticamente.
PROGRAMMAZIONE DELLO STILE
Premere [PROG] per attivare la funzione di programmazione dello stile, apparirà
"PRG" sul display e si attiverà la percussione della tastiera. In questa modalità, è
possibile creare stili personalizzati suonando il tasto di percussione
corrispondente.
PPremere [PLAY] per riprodurre le note registrate e "PLAY" apparirà sul display.
Al termine della riproduzione, si passa alla modalità di registrazione e sul display
appare "REC". È possibile registrare un nuovo stile o premere [PLAY] per riprodurre
lo stile registrato.
•
" Premere [Start/Stop] o premere nuovamente [REC] per disattivare la funzione di
registrazione e tutti gli stili registrati verranno rimossi.
•
È possibile registrare al massimo 32 percussioni, dopodiché sul display lampeggerà
"PRG" e la programmazione si interromperà automaticamente.
•
Premere [Start/Stop] o premere nuovamente [PROG] per disattivare la funzione di
programmazione, e tutti gli stili registrati verranno rimossi.
•
Premere [PLAY] per riprodurre lo stile programmato.
Premere di nuovo [PLAY] per interrompere la riproduzione, "PRG" apparirà sul
display e la funzione di programmazione sarà abilitata.
È possibile riprogrammare gli stili o premere di nuovo [PLAY] per riprodurli.
•

IX. Formazione intelligente in tre fasi
FORMAZIONE I: UN TASTO
Premere [Un tasto] per attivare la funzione di addestramento con un solo tasto,
"LEARN", "SONG" e il numero del brano appariranno sul display, quindi premere il
pulsante "+"/"-" per selezionare il brano da apprendere.
L'addestramento a tasto singolo è nalizzato all'apprendimento della durata e non è
richiesta l'intonazione o la correttezza.
Questa modalità consente di commettere errori quando si suonano i tasti, ma la
tastiera continua a riprodurre le note corrette, mentre la zona dei tasti sul display
mostra le note corrette.
Al termine di un brano, ripetere il brano corrente da imparare.
Premere [Start/Stop] o [Un tasto] per disattivare la funzione di training.
FORMAZIONE III: ENSEMBLE
Premere [Ensemble] per attivare la funzione di formazione Ensemble, "LEARN",
"SONG" e il numero del brano appariranno sul display, quindi premere i pulsanti
"+"/"-" per selezionare il brano da apprendere.
L'addestramento dell'ensemble mira all'apprendimento corretto e completo della
durata e delle note del brano. La nota principale sarà protetta per l'ensemble..
E’ possibile eseguire seguendo la guida del tasto illuminato. È necessario suonare la
nota corretta in base alla durata corretta del brano. Se non si riesce a suonare entro 3
secondi, la tastiera riprodurrà automaticamente la nota chiave e la zona della tastiera
sullo schermo visualizzerà la nota ed il tempo corretti. Al termine di un brano, ripetere
il brano corrente da imparare. Premere [Start/Stop] o premere [Ensemble] per
disattivare la funzione di allenamento.
Notes:
In questo stato, la tastiera suona solo le note corrette e non risponde alle note
sbagliate.
Premere [Start/Stop] o [Follow] per disattivare la funzione di allenamento.
FORMAZIONE II: SEGUIRE
Premere [Seguire] per attivare la funzione follow, "LEARN", "SONG" e il numero del
brano appariranno sul display, quindi premere i pulsanti "+"/"-" per selezionare il
brano da apprendere.
Con la funzione [Seguire], è possibile imparare seguendo le note suonate
correttamente.
È possibile suonare in base al brano dimostrativo, seguendo la guida.
È inoltre possibile imparare a suonare seguendo gli indicatori nella zona dei tasti del
display.
del display. L'apparecchio attende che si suoni la nota corretta prima di passare alla
nota successiva.

APPENDICE
I. TABELLA SUONI
000-111
Fare riferimento al pannello
dell'unità
112 Clavi 2
113 Celesta 2
114 Clavicembalo 2
115 Mello Fwm 1
116 Pi Pa2
117 Pianoforte verticale 1
118 Pianoforte elettrico 2
119 Hard Vibe 1
120 Barafon di legno 2
121 Scatola musicale 2
122 Marimba 2
123 Santur
124 Organo ad ancia 2
125 Armonica a sbuo 1
126 Ukulele 1
127 12 corde Gt 1
128 Chitarra a pizzico 2
129 Violino lento 1
130 Corda brillante 1
131 Jungle Bass 2
132 Flauto indiano 1
133 Clavi 3
134 Celesta 3
135 Campane da chiesa
136 Marimba 3
137 Dulcimer 2
138 Organo ad ancia 3
139 Chitarra elettrica
(pulita) 2
140 Koto 2
141 Xilofono 2
142 Shanai 2
143 Dulcimer 3
144 Corno inglese 2
145 Chitarra elettrica
(pulita) 3
146 Shamisen 2
147 Koto 3
148 Kalimba 2
149 Campana d'acciaio 1
150 Sax contralto 2
151 Woodblock 2
152 Arpa sintetica 1
153 Attacco Clav. 1
154 Cristallo 1
155 Tubo a sacco 2
156 Barafon 1
157 Flauto d'organo 1
158 Kalimba 3
159 Corno ad ancia 1
160 Hard Vibe 2
161 Tromboni gemelli 1
162 Arpa sintetica 2
163 Clav. d'attacco 2
164 Chitarra a coro 1
165 Campana d'acciaio 2
166 Tsugaru
167 Oct Harp 1
168 Bodhran 1
169 Campane tubolari 2
170 Suona
171 (astanet
172 Arpa d'attacco 1
173 Vibrafono elettrico 1
174 Sax morbido 1
175 Clav. morbido 1
176 Chitarra morbida 1
177 Chitarra cresciuta 1
178 Didgeridoo 1
179 Attacco Barafon 1
180 Barafon muto 1
181 Nay 1
182 Santur morbido
183 Corno doppio 1
184 Barsoon duro 1
185 Flauto Tron 1
186 Kawala 1
187 Jazz Organ 1
188 Accordo morbido 1
189 Organo a ato 1
190 Attacco di viola 1
191 Bari e Tenore 1
192 Sax morbido 2
193 Attacco Arpa 2
194 Didgeridoo 2
195 Doppio corno 2
196 Barsoon duro 2
197 Kawala 2
198 Chitarra morbida 2
199 Barafon muto 2
200 Piombo
(basso+piombo) 2
201 MelodicTom 2
202 Chitarra cresciuta 2
203 Piombo (SaMooth) 2
204 Jazz Bass 2
205 Chitarra coro 2
206 Feedback Gt.2
207 Violoncello 2
208 Flauto d'organo 2
209 Corno icorno 2
210 Cristallo 2
211 Clav. dolce 2
212 Chitarra overdrive 2
213 Ukulele 2
214 Fisarmonica Tango 2
215 Tromboni gemelli 2
216 Organo Jazz 2
217 Corde brillanti 2
218 Corno ad ancia 2
219 Glockenspiel 2
220 Organo a timone 2
221 Corno muto 2
222 Corde pizzicate 2
223 Nay 2
224 Armonica a soo 2
225 Tromba muta 2
226 Pianoforte verticale 2
227 Accordo morbido 2
228 Arpa Uillea 2
229 Flauto di coda 2
230 Bottiglia soata 2
231 Flauto indiano 2
232 Violino lento 2
233 Chitarra elettrica
(muta) 2
234 Multi Wind 2
235 Vibrafono elettrico 2
236 Bodhran 2
237 Fm dolce 2
238 Ancia multipla 2
239 Contrabbasso 2
240 Barafon 2
241 Organo a ato 2
242 12 corde Gt 2
243 Barafon d'attacco 2
244 Piombo (Calliope) 2
245 Attacco Viola 2
246 Pad (caldo) 2
247 Oct Harp 2
248 Bari & Tenor 2
249 Agogo 2
250 Corno icorno 3
251 Flauto d'organo 3
252 Violoncello 3
253 Feedback Gl. 3
254 Chitarra corale 3

II.TABELLA STILI
000-130
Fare riferimento al pannello
dell'unità
131 West Shue
132 Big Band Fast 2
133 Espag Nol 1
134 Disco Funk 2
135 Pop Mambo
136 Europa Swing 1
137 Tricks Latin
138 Disco Samba 2
139 Latin Wallz
140 Danza Pop 3
141 Jazz Rock 1
142 Delroit
143 Sabbia fanatica
144 Rock europeo 1
145 Ground Beat
146 8 Beat Modem 2
147 Jazz Disco 1
148 Dixie Jazz 1
149 Disco Chocolate
150 Disco Latin 2
151 Synth Boogie
152 Sabato sera 2
153 Club Danca 1
154 Tricks Bossa Nova
155 Tarantella 2
156 Marcia USA
157 Espag Nol 2
156 Club Latin 2
159 Jazz Cha Cha1
160 Cha Cha Country
161 Disco Party 2
162 Modem R&B 1
163 8 Beat Pop 2
164 Jazz country
165 Anima Rock 1
166 Rumba 2
167 Samba 3
168 R&B moderno 2
169 Club Dance 2
170 Country Bossa Nova
171 JazzBo 1
172 Cha Cha Cha moderno 1
173 Pop Reggae 2
174 Rock Samba 1
175 Jazz 8 Beat 1
176 Discoteca
177 Siviglia 1
178 Disco Hands 2
179 Ballata rock
180 Misto Bossa Nova
181 Jazz 16 Beat 1
182 Singolo 16 Beat 1
183 Canzone d'amore
184 Singolo 16 Beat 2
185 Disco Fox 2
186 Pop Rock 3
187 Tijuana Wallz
188 Pop britannico 2
189 Show Tune 1
190 Alpe Schlager
191 Singolo Rock
192 Valzer swing
193 Valzer lento
194 Cat Groove 2
195 Country Lento Rock
196 Rock Disco 1
197 16 Beat Shue 1
198 Jazz 8 Beat 2
199 Casa
200 Guad Dance 1
201 Jazz Cha Cha 2
202 Country Wallz
203 Rock europeo 2
204 Caribbean Dance 2
205 Jazz Disco 2
206 Jazz medio
207 Ballata per pianoforte
208 Disco anni '70
209 Jazz Rock 2
210 Europa 8 Beat 1
211 Siviglia 2
212 Rumba 3
213 Anima Rock 2
214 Disco europeo 2
215 Ballata analogica 2
216 Pub Piano 2
217 Rumba europea
218 Rock'n Roll 2
219 Disco Trop
220 Rock Salsa 1
221 Europa 8 Beat 2
222 Europa Samba
223 Show Tune 2
224 Jazz 16 Beat 2
225 Rock Samba 2
226 Jazz Waltz 2
227 Europa Reggae
228 Modem Cha Cha 2
229 R&B Ballad 2
230 Rock Boogie
231 Jazz Bossa Nova
232 Rock Salsa 2
233 Slow & Easy
234 Hip Waltz 1
235 Jazz Latin 2
236 Disco Rock 2
237 Jazz Tango 2
238 Analog Ballad 3
239 Europa Swing 2
240 Valzer dell'anca 2
241 Jazz Swing 2
242 Party Pop
243 Jazz Club
244 Guad Dance 2
245 Jazz Bo 2
246 Dixie Jazz 2
247 Ballata acustica 2
248 Jazz Slow Rock
249 16 Beat Shue 2
250 Polka Pop
251 Latin Party Pop
252 Parranda
253 Carnevale
254 Pop vintage anni '60

Montaggio del supporto per tastiera

Tastiera Karaoke 2 in 1: Suona e canta!
Pianoforte musicale compatto e portatile
Funzionamento elettronico plug-in semplice
Pianoforte portatile
Altoparlanti stereo integrati
Collegamento e streaming audio da dispositivi esterni
Possibilità di collegarsi all'altoparlante e riprodurre il suono
Più stili di suoni, toni e ritmi della tastiera selezionabili e preimpostati
Display LCD digitale
Controllo del volume regolabile
Modalità di registrazione e riproduzione
Jack d'ingresso per microfono
61 tasti funzione percussione
Controllo di base: Volume principale / Volume di accompagnamento /
Volume degli accordi / Controllo del tempo
Funzione accordo automatico: Accordo singolo / Accordo a dita
Funzioni di Sustain, funzione Vibrato, funzione Split della tastiera
Funzioni di insegnamento: Tasto unico/Seguire/Assemblare
Funzione Fill-in, funzione metronomo
Perfetto per le esibizioni nel salotto di casa
Divertimento per bambini di tutte le età: Bambini e adulti
•
•
•
•
•
•
•
•
•
•
•
•
•
•
•
•
•
•
•
•
•
•
•
•
•
•
•
Tastiera musicale digitale per karaoke
Leggio
Adattatore
Spina di alimentazione
Supporto per tastiera
Sgabello per tastiera
Cua
Caratteristiche:
Cosa c'è nella scatola:

Speciche delle cue:
Caratteristiche del supporto tastiera:
Speciche Sgabello per tastiera:
Materiale di costruzione: ABS + foglio decorativo al laser
Materiale del lo: Filo piatto in PVC
Lunghezza del lo: 1.1M (110 cm)
Diametro della spina: 3,5 mm 1/8
Peso: 0,14 kg (0.06 lbs)
•
•
•
•
•
•
•
•
•
•
•
•
•
•
•
•
•
•
•
•
•
•
•
Vernice cotta
Funzione staccabile
Funzione di regolazione dell'altezza
Funzione di blocco della tastiera
Materiale di costruzione: Ferro + ABS
Lunghezza: 31.5" -pollici (80 cm)
Larghezza: 8.3" -pollici (21 cm)
Altezza: 22.6”~26.5” -pollici (57.5~67.5 cm)
Peso: 1,75 kg (3.85 lbs)
Supporto: 15 kg (33 lbs)
Vernice cotta
Funzione pieghevole
Funzione di regolazione dell'altezza
Materiale di costruzione: Pelle PU, ferro, spugna, legno
Lunghezza: 15.75" -pollici (40 cm)
Larghezza: 11.81” -pollici (30 cm)
Altezza: 17.32" / 18.9" / 20.1" -pollici (44 / 48 / 51 cm)
Peso: 2,2 kg (4.85 lbs)

Speciche tecniche:
61 tasti
255 stili/ 255 suoni
50 brani dimostrativi: Uno/Tutti
Interfaccia audio: Aux (3.5 mm) Ingresso Jack / Ingresso Microfono / Ingresso USB
Livello volume massimo: no a 110 dB
Lunghezza cavo USB / Cavo alimentazione: 3.9’ ft. (119 cm)
Materiale di costruzione: ABS ingegnerizzato
Alimentazione: Adattatore DC 9V / AC, 6 batterie "AA" (non incluse nel set)
Dimensioni tastiera (L x L x A)
36.6”x 11.97” x 3.7” -pollici (93 x 30 x 9.3 cm)
•
•
•
•
•
•
•
•
•
Avvertenza California Prop 65
ATTENZIONE:
Questo prodotto contiene Butilbenzilftalato (BBP) che è noto
allo stato della California per causare cancro, difetti alla
nascita e altri danni alla riproduzione. Non ingerire.
Per maggiori informazioni: www.P65warnings.ca.gov

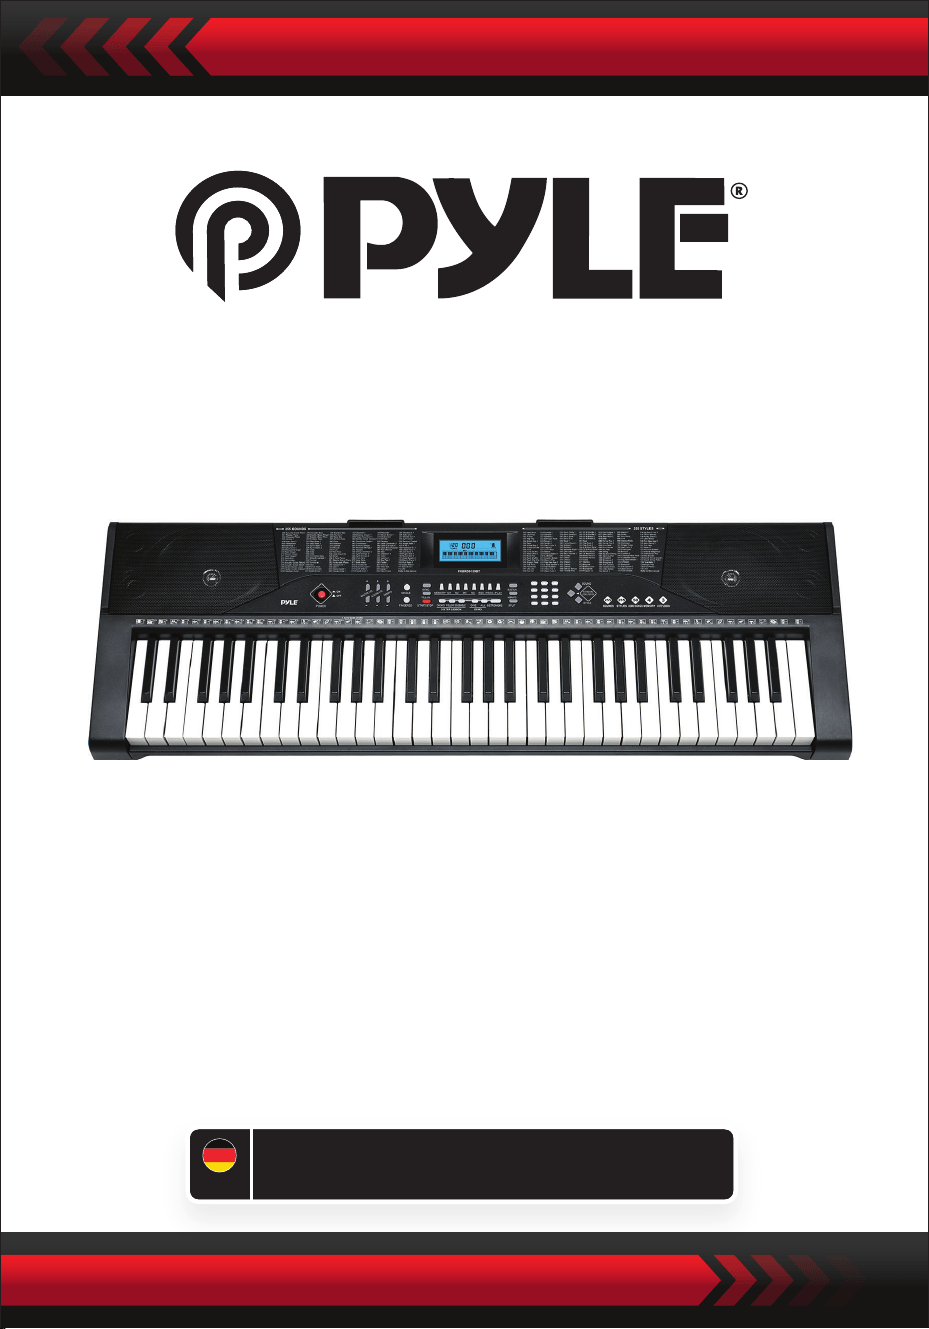
Digitales Musik-Keyboard für Karaoke
PKBRD6139BT
Gebrauchsanweisung
tragbares Keyboard mit Ständer
(61 Tasten), Keyboard-Hocker,
Tragetasche und Kopfhörer
GER

SORGFÄLTIG LESEN, BEVOR SIE FORTFAHREN
Bewahren Sie dieses Handbuch an einem sicheren Ort auf und halten Sie es
zum Nachschlagen gribereit.
Es muss ein spezielles Netzteil verwendet werden, das bei Beschädigung sofort
ausgetauscht werden muss.
•
HINWEISE
Ziehen Sie den Netzstecker, wenn Sie mit dem Spielen fertig sind oder wenn das
Keyboard längere Zeit nicht benutzt wird.
•
Um mögliche Schäden für die Umwelt oder die menschliche Gesundheit durch
unkontrollierte Entsorgung zu vermeiden, recyceln Sie es verantwortungsvoll, um die
nachhaltige Wiederverwendung von Materialressourcen zu fördern.
Um Ihr Altgerät zurückzugeben, nutzen Sie die Rückgabe- und Sammelsysteme oder
wenden Sie sich an den Händler, bei dem Sie das Produkt gekauft haben.
Dort kann man das Produkt auf geeignete und umweltverträgliche Weise recyceln.
Verwenden Sie ein weiches, trockenes Tuch, um die Tastatur zu reinigen. Verwenden
Sie zum Reinigen keine Farbe, Alkohol oder andere chemische Lösungsmittel, da diese
die Oberäche der Tastatur beschädigen können.
•
WARNUNG: Der direkte Steckeradapter wird als Trennvorrichtung verwendet, die
Trennvorrichtung muss leicht zugänglich sein.
•
Richtige Entsorgung dieses Produkts. Diese Kennzeichnung weist darauf hin, dass
dieses Produkt in den Vereinigten Staaten nicht zusammen mit anderen
Haushaltsabfällen entsorgt werden darf.
•
Ziehen Sie den Netzstecker, bevor Sie die Tastatur reinigen, und nehmen Sie die
Tastatur nicht mit nassen Händen ab.
•
Vermeiden Sie das Eindringen von Flüssigkeiten, Staub, kleinen Partikeln und anderen
Fremdkörpern in das Gehäuse des Keyboards, die einen Kurzschluss eines Bauteils
verursachen könnten.
•
Halten Sie das Keyboard von Wärmequellen fern, um seine Teile vor Beschädigungen
zu schützen.
•
Schalten Sie das Keyboard nicht ein und halten Sie die Lautstärke beim Spielen nicht
über längere Zeit auf einem maximalen oder unangenehmen Niveau.
•
Wenn Sie die Tastatur an ein anderes Gerät anschließen, vergewissern Sie sich, dass
sowohl die Tastatur als auch das anzuschließende Gerät vor dem Anschließen
ausgeschaltet sind.
•
Das Keyboard darf nur von Fachleuten zerlegt werden, und es dürfen keine
Änderungen an der inneren Struktur vorgenommen werden. Im Falle einer
Funktionsstörung während des Gebrauchs, stellen Sie die Benutzung ein und
schicken Sie das Keyboard sofort zur Wartung an Fachleute.
•
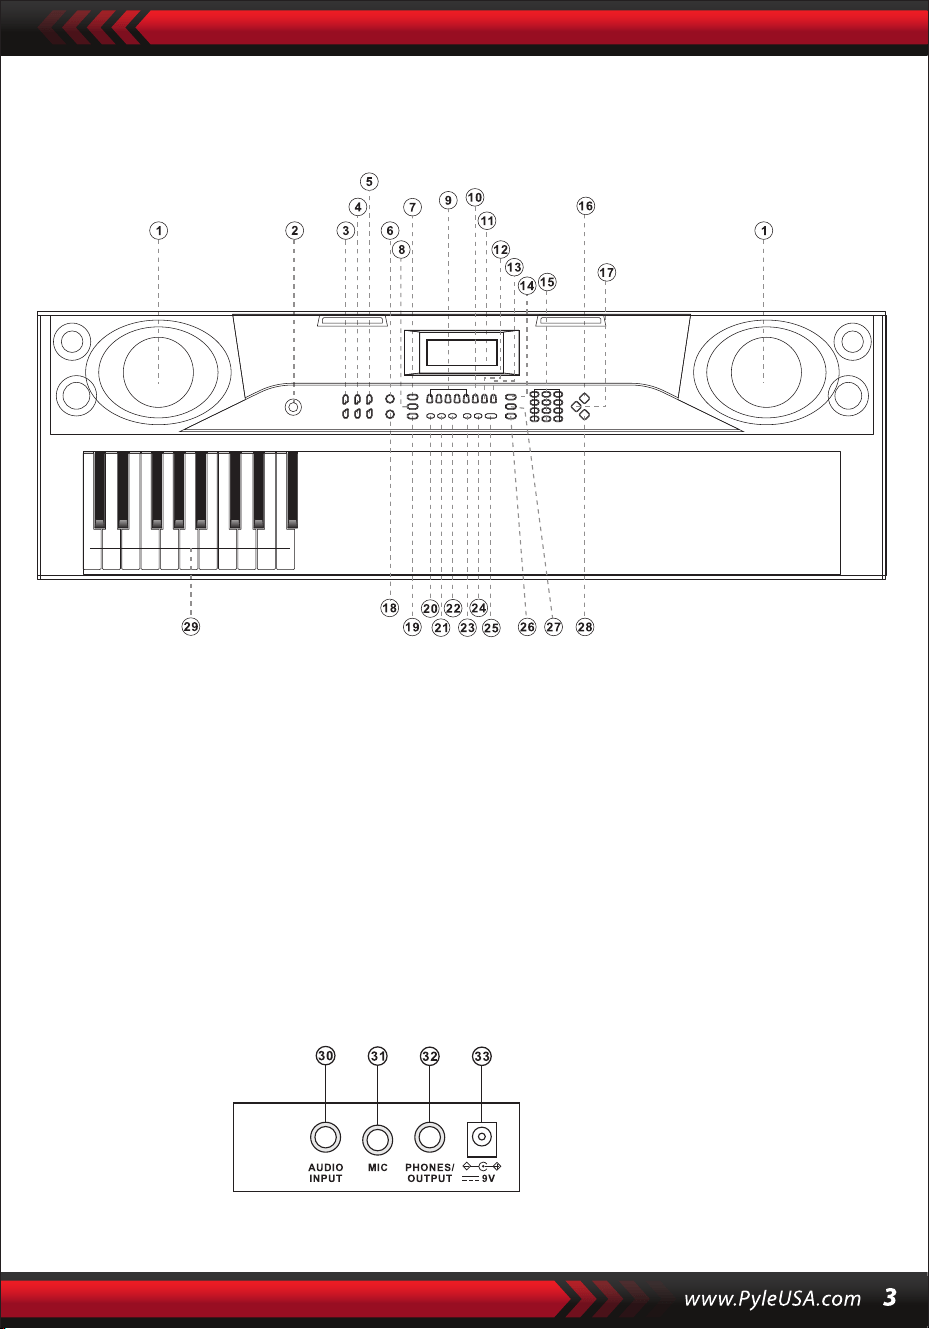
I. Bedienfeld und Erweiterungsanschlüsse
VORDERES BEDIENFELD
RÜCKWANDANSCHLUSS
30. Audio-Eingang
31. Mikrophon
32. Telefone/Ausgan
33. DC V9
1. Lautsprecher
2. Leistung
7. Synchronisierung
8. Optionen
6. Ledig
5. Tempo
4. Lautstärke der
Begleitung
3. Hauptvolumen
9. Gedächtnis (M1-M4)
10. Aufnahme
15. Zahlen
16. Klänge
14. Dienstleistung
13. spielen
12. Schwelle
11. LCD-Eingang
17. Percussion
18. Fingersatz
23. Demo eins
24. Demo alle
22. Layout
21. Weitere handeln in
Übereinstimmung mit
20. einzelne Taste
19. Start/Stop
25. Metronom
26. unterteilen
29. Akkordzone
28. Stile
27. Vibrato

II. Vorbereitungen auf das Spiel
NETZANSCHLUSS
EXTERNER AUDIO-/KOPFHÖRERAUSGANG
Es wird ein spezieller Netzadapter verwendet. Schließen Sie das Ausgangsende des
Adapters an den Netzanschluss auf der Rückseite des Keyboards an und verbinden
Sie dann das andere Ende mit der Netzsteckdose. (Hinweis: Die Eingangsspannung
des Adapters muss mit der des Netzteils übereinstimmen).
Das Keyboard verfügt über eine Stereo-Eingangsfunktion. Audiosignale von
Ihrem Mobiltelefon, Computer und anderen Audiogeräten können zur Wiedergabe
in das Keyboardsystem eingespeist werden. Schalten Sie zuerst das Keyboard aus,
schließen Sie dann ein Ende des Audiokabels an den Ausgangsanschluss des
Audiogerätes und das andere Ende an den AUDIO INPUT-Anschluss auf der
Rückseite des Keyboards an, und schalten Sie schließlich das Keyboard ein.
Aktivieren Sie die Standard-BT-Verbindung, in der BT-Suche Standby-Status,
kann es jedes BT-Gerät sein und zu diesem Zeitpunkt verbinden, aktivieren Sie
die BT-Funktion des Telefons oder BT-Gerät zu suchen. Wenn die Verbindung
erfolgreich ist, zeigt das Mobiltelefon oder BT-Gerät "Piano" an und kehrt zur
Musikplayeroberäche zurück.
Mikrofoneingang: Schließen Sie das Mikrofon an den MIC-Anschluss an, um mit
dem Singen und Spielen zu beginnen.
MIKROFON UND AUDIOEINGANG
BT DRAHTLOSE VERBINDUNG
Hinweis: Verwenden Sie die Kopfhörer NICHT über einen längeren Zeitraum mit
hoher Lautstärke. Um Gehörschäden zu vermeiden, verwenden Sie die Kopfhörer
mit moderater Lautstärke.
Anschluss von Kopfhörern: Wenn Sie einen Kopfhörer an de PHONES/OUTPUT
-Anschluss auf der Rückseite des Keyboards anschließen, wird der Lautsprecher
automatisch ausgeschaltet. Auf diese Weise können Sie auf dem Keyboard spielen,
ohne andere zu stören.
Audioausgang: Schalten Sie zunächst das Keyboard und die externen Audiogeräte
aus, schließen Sie dann ein Ende des Audiokabels an den PHONES/OUTPUT-
Anschluss auf der Rückseite des Keyboards und das andere Ende an den
Audioeingang des Audiogeräts an.

III. Grundlegende Methode des Spiels
Wenn die [Power ON/OFF]-Taste bei eingeschalteter Hintergrundbeleuchtung
gedrückt wird, zeigt das LCD-Display Informationen über die aktuelle Klangfarbe,
das Tempo usw. an.
WIEDERGABE VON DEMOTRACKS
Auf der Tastatur sind 50 Demotracks von "000" bis "049" gespeichert: Drücken Sie
die Taste [Demo one], das System schaltet in den Wiedergabestatus, der aktuelle
Demotrack wird wiederholt abgespielt. Um einen anderen Titel zu hören, drücken
Sie die Taste, um die Wiedergabe des aktuellen Titels zu stoppen und erneut, um den
nächsten Titel abzuspielen. Drücken Sie die Taste [Demo all] und das System beginnt
mit der Wiedergabe aller Demotitel. Während die Demotitel abgespielt werden,
können Sie deren Klang verändern. Während der Wiedergabe können Sie mit den
Zierntasten oder den Tasten "+" / "-" einen anderen Demotrack auswählen.
FUNDIERTE AUSWAHL
Das Tastenfeld ermöglicht die Auswahl von 255 Tönen, von "000" bis "254". Wenn
das Keypad eingeschaltet ist, wird die Soundauswahlfunktion automatisch aktiviert
und im Display wird die aktuelle Soundnummer "SOUNDS" angezeigt. In anderen
Zuständen drücken Sie die Taste [Sounds], um die Soundauswahlfunktion zu
aktivieren. Der Standardwert für Sounds ist "000" und kann durch Drücken der
entsprechenden Zierntasten oder durch Drücken der "+" / "-" Taste eingestellt
werden.
REGLER FÜR DIE BEGLEITUNGSLAUTSTÄRKE
Drücken Sie die Taste [Accom Vol+/-], um die Gesamtlautstärke zu erhöhen oder
zu verringern. Im Display werden "RC-VOLUME" und der aktuelle Lautstärkepegel
angezeigt. Drücken Sie gleichzeitig [Accom Vol+/-], um den Standardwert
wiederherzustellen.
MASTER-LAUTSTÄRKEREGLER
Drücken Sie die Taste "Master Volume" oder "Master Volume", um die Master-
Lautstärke zu erhöhen oder zu verringern. Wenn die Tasten "Master Volume +"
und "Master Volume -" gleichzeitig gedrückt werden, wird die Lautstärke auf den
Standardwert zurückgesetzt. Die Style-Lautstärke und die Akkord-Lautstärke
können gleichzeitig über die Master-Lautstärke geregelt werden.
Wenn Sie während der Wiedergabe eines Demotracks die Taste [Sounds] drücken,
wird im Display "SOUND" angezeigt. Drücken Sie innerhalb von 3 Sekunden die
Zierntasten oder die Tasten "+" / "-", um einen anderen Sound für die Wiedergabe
des Demotracks auszuwählen.

IV. Automatischer Stil
STYLE CONTROL
•
Drücken Sie die [Start/Stop]-Taste, um den Begleitungsstil zu starten.
Im Style-Status wird durch Drücken der [Fill in]-Schaltäche automatisch der
Interlude-Track gefüllt.
Durch Drücken der [Start/Stop]-Taste wird der Begleitungsstil sofort gestoppt.
•
Wenn der Style noch nicht gestartet ist, drücken Sie die "Syn"-Taste und das
Metronom auf dem Bildschirm blinkt. Wenn Sie eine beliebige Taste im
Akkordbereich (Taste 1-19 von links) spielen, wird der Begleitungsstil synchron
gestartet.
1. Die Ausführung des Stils
2. die Eingabe
3. Stopp
METRONOMIE
ZEIT EINSTELLEN
Durch Drücken der Tasten [Tempo ] / [Tempo ] können Sie den Song
beschleunigen oder verlangsamen. Durch gleichzeitiges Drücken beider Tasten
wird das aktuelle Tempo zurückgesetzt.
Das Metronom enthält vier Tempi: 1/4, 2/4, 3/4 und 4/4. Durch kontinuierliches
Drücken der "Metronome"-Taste können die vier Tempi nacheinander ausgewählt
werden.
STILAUSWAHL
Dieses Tastenfeld bietet 255 Stile, von "000" bis "254", und der Standardstil ist
"000". Drücken Sie die Taste [Style], um die Style-Auswahlfunktion zu aktivieren.
Auf dem Bildschirm wird "STYLE" und die Nummer des aktuellen Styles angezeigt.
Sie können dann die Zierntasten oder die Tasten "+" / "-" drücken, um andere
Styles auszuwählen.
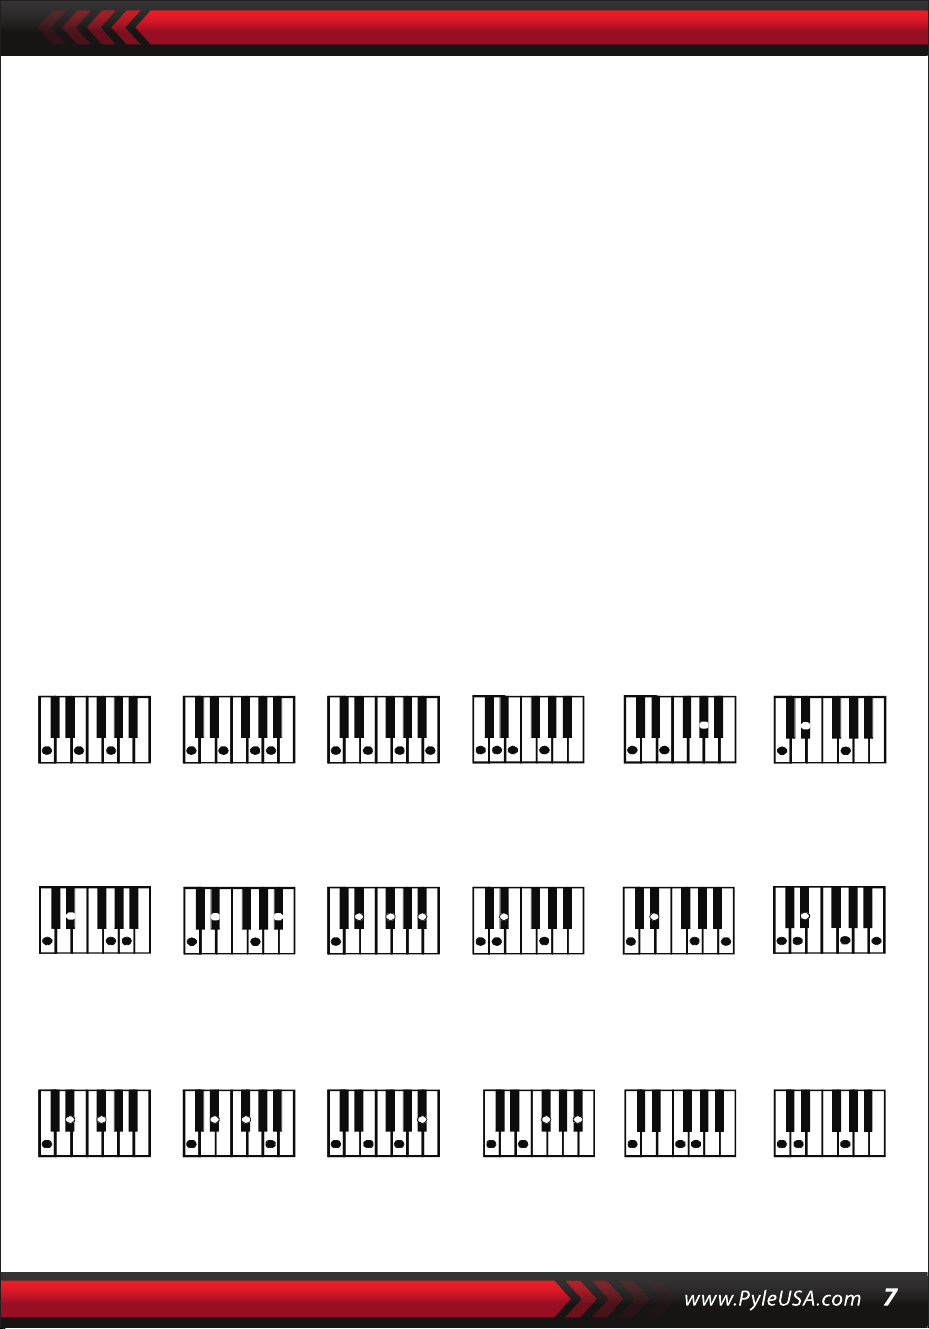
V. Automatischer Bass-Akkord
Akkordgrie (Tonart C)
(Die Griweise eines Akkords in der Tonart C ist in der nachstehenden
Abbildung dargestellt, der Rest kann durch Analogie ermittelt werden).
FINGER ACORD
Drücken Sie in dem Zustand, in dem der Style aktiv ist, die Taste [Fingered Chord].
Im Display wird "FIN" angezeigt, und Sie können den Akkord mit Ihren Fingern im
Akkordbereich auf der Tastatur spielen.
EIN-FINGER-AKKORD
Wenn der Style eingeschaltet ist, drücken Sie die [Single Chord]-Taste, woraufhin
das Display "SIN" anzeigt. Sie können dann einen einzelnen Akkord auf den Tasten
im Akkordbereich der Tastatur spielen.
C C
6
CM
7
CM(9) Caug Cm
Cm
6
Cm
7
Cm
7
(b5)
CmM
7
Cm(9)
7
CmM (9)
Cdim Cdim
7
C
7
C
(b5)
7 4
Csus C1+2+5

Fingersatz Einzelakkord
VI. Statusspeicherfunktion
Mit der Statusspeicherfunktion können Sie Sound, Style, Tempo und andere
Parameter speichern, um sie während der Wiedergabe schnell zu ändern. Dieses
Keyboard ist mit 4 Statusspeichern ausgestattet, auf die Sie während der
Wiedergabe jederzeit exibel zugreifen können.

SPEICHERN
Stellen Sie Sound, Style, Tempo und Akkord wie gewünscht ein und drücken Sie dann
die Taste [StatusMemory] und eine der Tasten [Memory1] bis [Memory4], um den
aktuellen Status zu speichern.
VII. Überwachung der Auswirkungen
GEDÄCHTNISABRUF
Drücken Sie eine beliebige Taste von [Speicher 1] bis [Speicher 4], um auf die in diesem
Speicher gespeicherten Einstellparameter zuzugreifen und die aktuellen Parameter zu
ersetzen.
Die gespeicherten Inhalte sind nicht gegen Stromausfälle geschützt und gehen
verloren, wenn die elektronische Tastatur nach einem Stromausfall neu gestartet
wird.
GETEILTE TASTATURFUNKTION
Drücken Sie die Taste [SPLIT], um die Tastaturtrennung zu aktivieren, "SPLIT" wird auf
dem Bildschirm angezeigt. Die 24 Tasten auf der linken Seite der Tastatur werden mit
dem Rest der Tastatur geteilt. Während die linke Seite der Tastatur um eine Oktave
erhöht wird und die ursprüngliche Tonhöhe beibehält, wird die rechte Seite der
Tastatur um eine Oktave verringert, um die gleiche Tonhöhe wie die linke Seite der
Tastatur beizubehalten. Die Tonhöhe der rechten Tastaturzone kann nach Bedarf
eingestellt werden, so dass die linke und die rechte Tastaturzone gleichzeitig
unterschiedliche Tonhöhen spielen können. Drücken Sie die [SPLIT]-Taste erneut, um
diese Funktion zu deaktivieren.
SCHLAGZEUG SPIELEN
Dieses Keyboard bietet 61 Percussion-Typen.
Drücken Sie die [Keyboard Percussion]-Taste, um eine Taste in eine Percussion-
Taste zu verwandeln. Jede Taste entspricht einem Perkussionsinstrument.
Drücken Sie diese Taste erneut, um die Perkussionsfunktion zu deaktivieren.
Vibrationsfunktion
Drücken Sie die [Vibrato]-Taste, auf dem Display wird "VIB" angezeigt und der
Vibrato-Eekt wird aktiviert. Drücken Sie diese Taste erneut, um den Vibrato-Eekt zu
deaktivieren.
Haltefunktion
Wenn die [Sustain]-Taste gedrückt wird und das Display "SUS" anzeigt, wird der
Tastendrucksound aktiviert. Drücken Sie die Taste erneut, um die Funktion zu
deaktivieren.

VIII. Aufnahme- und Programmierstil
AUFNAHME
Drücken Sie [REC], um die Aufnahmefunktion zu aktivieren, im Display erscheint
"REC". In diesem Modus werden die gespielten Noten aufgezeichnet.
Wenn der Speicher voll ist, erscheint "REC" auf dem Display und die Aufnahme
wird automatisch beendet.
PROGRAMMIERSTIL
Drücken Sie die [PROG]-Taste, um die Style-Programmierfunktion zu aktivieren. Im
Display wird "PRG" angezeigt und die Keyboard-Percussion wird aktiviert. In diesem
Modus können Sie Ihre eigenen Styles erstellen, indem Sie die entsprechende
Percussion-Taste drücken.
Drücken Sie [PLAY], um die aufgenommenen Noten abzuspielen, und auf dem
Display wird "PLAY" angezeigt. Wenn die Wiedergabe beendet ist, wechseln Sie in
den Aufnahmemodus, und auf dem Display wird "REC" angezeigt. Sie können
einen neuen Style aufnehmen oder [PLAY] drücken, um den aufgenommenen
Style wiederzugeben.
•
Drücken Sie [Start/Stop] oder erneut [REC], um die Aufnahmefunktion zu
deaktivieren, und alle aufgenommenen Styles werden gelöscht.
•
Es können maximal 32 Trommeln aufgenommen werden, danach blinkt "PRG"
auf dem Display und die Programmierung wird automatisch beendet.
•
Drücken Sie die [Start/Stop]-Taste oder die [PROG]-Taste erneut, um die
Programmierfunktion zu deaktivieren, und alle aufgezeichneten Styles werden
gelöscht.
•
Drücken Sie die [PLAY]-Taste, um den programmierten Style abzuspielen.
Drücken Sie die [PLAY]-Taste erneut, um die Wiedergabe zu stoppen, auf dem
Display erscheint "PRG" und die Programmierfunktion wird aktiviert. Sie können
die Styles neu programmieren oder die [PLAY]-Taste erneut drücken, um sie
abzuspielen.
•

IX. Kluges Handeln in drei Schritten
Schritt 1: ONE KEY
Wenn die "One Key"-Taste gedrückt wird, wird die Ein-Tasten-Lernfunktion aktiviert und
"Step 1" wird auf dem Bildschirm angezeigt. Der zu lernende Song kann durch Drücken der
Taste oder durch Drücken von "+" oder "-" ausgewählt werden. Die Ein-Tasten-Lernfunktion
wird auf den gesamten Song angewandt, ohne dass eine Intonation oder Korrektheit
erforderlich ist. Falsches Spielen der Tasten ist erlaubt. Im Falle von Fehlern spielt das
elektronische Keyboard die richtigen Noten, aber der Cursor zeigt die der richtigen Note
entsprechende Taste auf dem Bildschirm an. Die Ein-Tasten-Lernfunktion kann durch
erneutes Drücken der "One Key"-Taste deaktiviert werden.
Schritt 3: TEAM
Drücken Sie die Taste “Ensemble”, um die Ensemble-Trainingsfunktion zu aktivieren; auf
dem Display erscheint "LEARN", "SONG" und die Titelnummer ein, dann drücken Sie die
Taste "+" / "-", um den zu übenden Titel auszuwählen. Ensemble, um die Dauer und die
Noten des Liedes korrekt und vollständig zu lernen. Die Tastatur wird angehalten. Sie
können üben, indem Sie die Anweisungen der markierten Taste befolgen. Sie müssen die
richtige Note entsprechend der richtigen Dauer des Stücks spielen. Wenn Sie es nicht
innerhalb von 3 Sekunden schaen, spielt die Tastatur automatisch die Note und der
Tastaturbereich auf dem Bildschirm zeigt die richtige Note und das richtige Tempo an.
Wenn das Lied beendet ist, wiederholen Sie das aktuelle Lied, das Sie lernen möchten.
Drücken Sie[Start/Stop] oder [Ensemble], um die Trainingsfunktion zu deaktivieren.
Hinweise:
In diesem Zustand spielt das Keyboard nur die richtigen Noten und reagiert nicht auf
falsche Noten.
Drücken Sie die Taste [Start/Stop] oder [Continue], um die Übungsfunktion auszuschalten.
Schritt 2: FOLLOW
Drücken Sie die [Follow]-Taste, um die Follow-Funktion zu aktivieren. Im Display werden
"LEARN", "SONG" und die Songnummer angezeigt, dann drücken Sie die "+" / "-" Taste, um
den zu übenden Song auszuwählen. Mit der [Follow]-Funktion können Sie üben, indem Sie
den Noten folgen, die korrekt gespielt werden. Sie können entsprechend dem Demotrack
spielen und sich dabei an der Anleitung orientieren. Sie können auch lernen zu spielen,
indem Sie den Anzeigen im Tastaturbereich auf dem Bildschirm folgen. Das Gerät wartet,
bis Sie die richtige Note spielen, bevor es zur nächsten Note weitergeht.

Extras
I. KLANGTABELLE
000-111
Odnieś się do panelu
urządzenia
112 Clavi 2
113 Celesta 2
114 Harpsichord 2
115 Mellow Fm 1
116 Pi Pa 2
117 Upright Piano 1
118 Electric Piano 2
119 Hard Vibe 1
120 WoodBarafon2
121 Music Box 2
122 Marimba 2
123 Santur
124 Reed Organ 2
125 Pu Harmonica 1
126 Ukulele 1
127 12-str. Gtl
128 Guitar Pinch 2
129 Slow Violin 1
130 Bright String 1
131 Jungle Bass 2
132 Indian Flute 1
133 Clavi 3
134 Celesta 3
135 Church Bells
136 Marimba 3
137 Dulcimer 2
138 Reed Organ 3
139 Electric Guitar (Clean) 2
140 Koto 2
141 Xylophone 2
142 Shanai 2
143 Dulcimer 3
144 English Horn 2
145 Electric Guitar (Clean) 3
146 Shamisen 2
147 Koto 3
148 Kalimba 2
149 Steel Bell 1
150 Alto Sax 2
151 Woodblock 2
152 Synth Harpsi. 1
153 Attack Clav.1
154 Crystal 1
155 Bag Pipe 2
156 Barafon 1
157 Organ Flute 1
158 Kalimba 3
159 Reed Horn 1
160 Hard Vibe 2
161 Twin Trombones 1
162 Synth Harpsi. 2
163 Attack Clav. 2
164 Chorus Guitar 1
165 Steel Bell 2
166 Tsugaru
167 Oct Harp 1
168 Bodhran 1
169 Tubular Bells 2
170 Suona
171 Castanets
172 Attack Harp 1
173 Electric Vibraphone 1
174 Soft Sax 1
175 Soft Clav.1
176 Soft Guitar 1
177 Grow Guitar 1
178 Didgeridoo 1
179 Attack Barafon 1
180 Mute Barafon 1
181 Nay 1
182 Soft Santur
183 Dual Horns 1
184 Hard Barsoon 1
185 Tran Flute 1
186 Kawala 1
187 Jazz Organ 1
188 Soft Accord 1
189 Wind Organ 1
190 Viola Attack 1
191 Bari &Tenor 1
192 Soft Sax2
193 Attack Harp 2
194 Didgeridoo 2
195 Dual Horns 2
196 Hard Barsoon 2
197 Kawala 2
198 Soft Guitar 2
199 Mute Barafon 2
200 Lead (Bass+Lead) 2
201 MelodicTom 2
202 Grow Guitar 2
203 Lead (SaMooth)2
204 Jazz Bass 2
205 Chorus Guitar 2
206 Feedback Gt. 2
207 Fiddle 2
208 Organ Flute 2
209 Flugel Horn 2
210 Crystal 2
211 Soft Clav. 2
212 Overdriven Guitar 2
213 Ukulele 2
214 Tango Accordion 2
215 Twin Trombones 2
216 Jazz Organ 2
217 Bright String 2
218 Reed Horn 2
219 Glockenspiel 2
220 Drawbar Organ 2
221 Muted Horn 2
222 Pizzicato Strings 2
223 Nay2
224 Pu Harmonica 2
225 Muted Trumpet 2
226 Upright Piano 2
227 Soft Accord 2
228 Uillean Harp 2
229 Tron Flute 2
230 Blown Bottle 2
231 Indian Flute 2
232 Slow Violin 2
233 Electric Guitar (Muted) 2
234 Multi Wind 2
235 Electric Vibraphone 2
236 Bodhran 2
237 Mellow Fm 2
238 Multi Reed 2
239 Contrabass 2
240 Barafon 2
241 Wind Organ 2
242 12-str. Gt2
243 Attack Barafon 2
244 Lead (Calliope) 2
245 Viola Attack 2
246 Pad (Warm) 2
247 Oct Harp 2
248 Bari & Tenor 2
249 Agogo 2
250 Flugel Horn 3
251 Organ Flute 3
252 Fiddle 3
253 Feedback Gl. 3
254 Chorus Guitar 3

II. STYLE TABLE
000-130
Siehe Gerätetafel
131 West Shue
132 Big Band Rapide 2
133 Espagnol 1
134 Disco Funk 2
135 Pop Mambo
136 Europe Swing 1
137 Trucs Latin
138 Disco Samba 2
139 Latin Wallz
140 Dance Pop 3
141 Jazz Rock 1
142 Delroit
143 Sable Fanatique
144 European Rock 1
145 Battement Terre
146 8 Beat Modem 2
147 Jazz Disco
148 Dixie Jazz 1
149 Disco Chocolat
150 Disco Latin 2
151 Synth Boogie
152 Samedi Soir 2
153 Club Danse 1
154 Trucs Bossa Nova
155 Tarantella 2
156 Marche USA
157 Espagnol 2
158 Club Latin 2
159 Jazz Cha Cha 1
160 Cha Cha Country
161 Disco Party 2
162 Modem R&B 1
163 8 Beat Pop 2
164 Country Jazz
165 Soul Rock 1
166 Rumba 2
167 Samba 3
168 Modem R&B 2
169 Club Danse 2
170 Country Bossa Nova
171 Jazz Bo 1
172 Modem Cha Cha 1
173 Pop Reggae 2
174 Rock Samba 1
175 Jazz 8 Beat 1
176 Disco
177 Séville 1
178 Disco Mains 2
179 Ballade Rock
180 Bossa Nova Mixte
181 Jazz 16 Beat 1
182 Single 16 Beat 1
183 Chanson d'Amour
184 Single 16 Beat 2
185 Disco Fox 2
186 Pop Rock 3
187 Tijuana Wallz
188 Pop Britannique 2
189 Chanson de Spectacle 1
190 Alp Schlager
191 Single Rock
192 Valse Swing
193 Valse Lente
194 Groove de Chat 2
195 Rock Lent Country
196 Rock Disco
197 16 Beat Shue 1
198 Jazz 8 Beat 2
199 Casa
200 Danse Guad 1
201 Jazz Cha Cha 2
202 Mur Country
203 European Rock 2
204 Danse Caribéenne 2
205 Jazz Disco 2
206 Jazz Moyen
207 Ballade Piano
208 Disco des Années 70
209 Jazz Rock 2
210 Europe 8 Beat 1
211 Séville 2
212 Rumba 3
213 Soul Rock 2
214 Disco Européenne 2
215 Ballade Analogique 2
216 Piano de Bar 2
217 Rumba Européenne
218 Rock'n Roll 2
219 Disco Trop
220 Rock Salsa 1
221 Europe 8 Beat 2
222 Europe Samba
223 Chanson de Spectacle 2
224 Jazz 16 Beat 2
225 Rock Samba 2
226 Valse Jazz 2
227 Reggae Européen
228 Modem Cha Cha 2
229 Ballade R&B 2
230 Rock Boogie
231 Jazz Bossa Nova
232 Rock Salsa 2
233 Lent & Facile
234 Hip Waltz 1
235 Jazz Latin 2
236 Rock Disco 2
237 Tango Jazz 2
238 Ballade Analogique 3
239 Europe Swing 2
240 Hip Waltz 2
241 Jazz Swing 2
242 Pop de Fête
243 Jazz Club
244 Danse Guad 2
245 Jazz Bo 2
246 Dixie Jazz 2
247 Ballade Acoustique 2
248 Rock Lent Jazz
249 16 Beat Shue 2
250 Pop Polka
251 Fête Latine Pop
252 Parranda
253 Carnaval
254 Pop Vintage des
Années 60
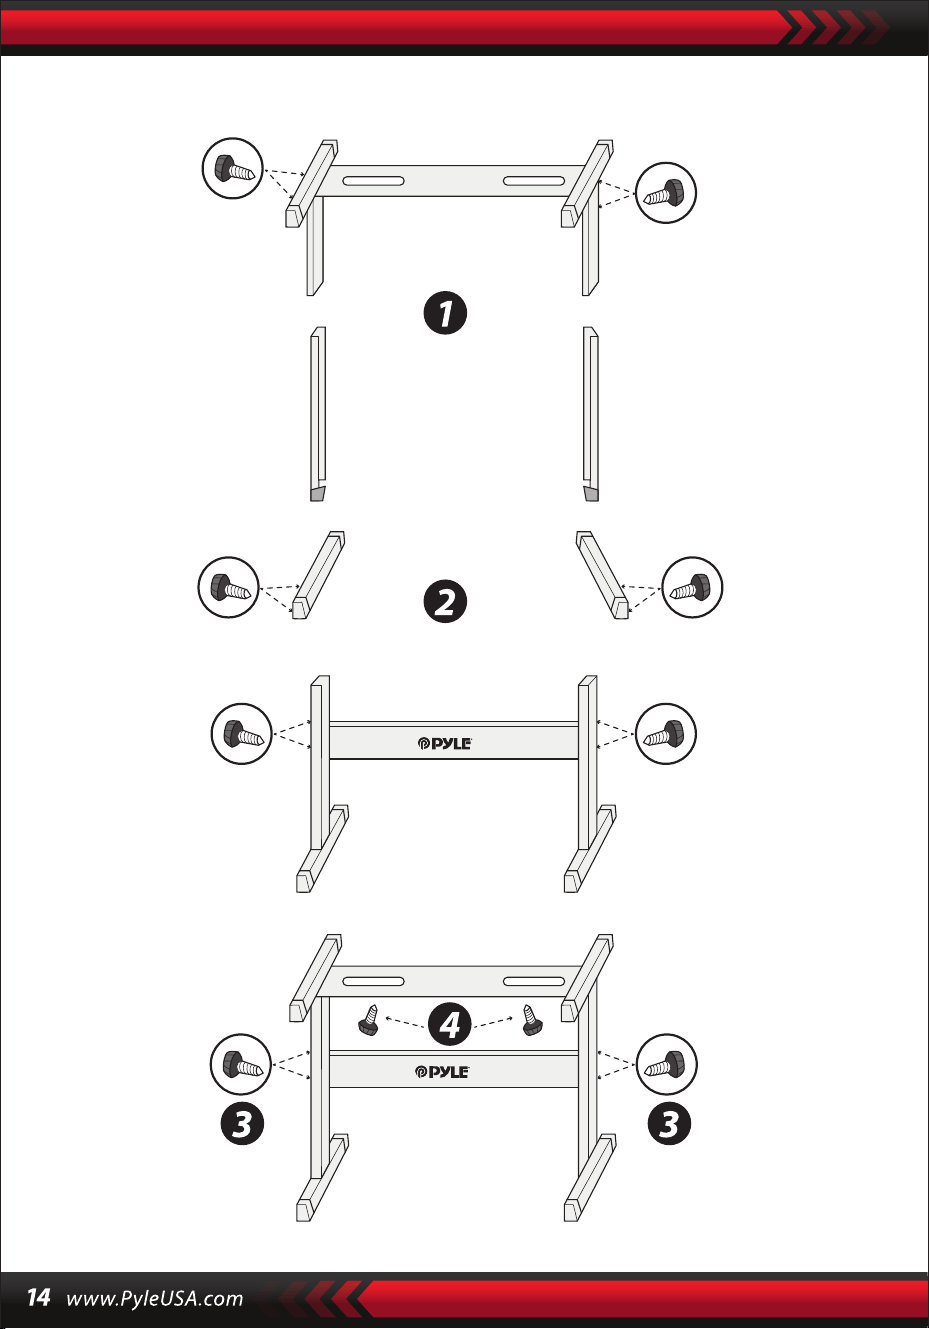
Installation der Tastaturhalterung

2-in-1-Karaoke-Keyboard: spielen und singen!
Kompaktes und tragbares Musik-Piano
Einfacher Plug-and-Play-Betrieb
Tragbares Klavier
Integrierte Vollbereichs-Stereolautsprecher
Anschluss und Übertragung von Audiodaten von externen Geräten
Anschluss an einen Lautsprecher und Wiedergabe von Audio
Mehrere voreingestellte Klangstile, Klangfarben und Tastaturrhythmen
Digitale LCD-Anzeige
Einstellbare Lautstärkeregelung
Aufnahme- und Wiedergabemodus
Mikrofon-Eingangsbuchse
Percussion-Keyboard mit 61 Tasten
Grundlegende Steuerung: MasterVolume / Accom Volume / Temporegler
Automatische Akkordfunktion: Einzelakkorde / Fingerakkorde
Sustain-Funktion, Vibrato-Funktion, Split-Keyboard-Funktion
Lernfunktionen: Einzeltaste / Follow / Ensemble
Fill-Funktion, Metronom-Funktion
Ideal für Heimkino-Auührungen im Wohnzimmer
Spaß für Kinder und Erwachsene jeden Alters
•
•
•
•
•
•
•
•
•
•
•
•
•
•
•
•
•
•
•
•
•
•
•
•
•
•
•
Digitales Karaoke-Musik-Keyboard
Bücherregal
Adapter
Netzstecker
Keyboard-Ständer
Tastaturhocker
Kopfhörer
Merkmale:
Was ist in der Schachtel:

Spezikationen des Headsets:
Funktionen der Tastaturbedienung:
Tastaturbank, Funktionen:
Konstruktionsmaterial: ABS + Laserdekorfolie
Kabelmaterial: PVC-Flachkabel
Kabellänge: 1,1 m (110 cm)
Stecker-Durchmesser: 3,5 mm 1/8
Gewicht: 0,14 kg (0.06 lbs)
•
•
•
•
•
•
•
•
•
•
•
•
•
•
•
•
•
•
•
•
•
•
•
Einbrennlackierung
Abnehmbar
Höhenverstellung
Tastatursperrfunktion
Baumaterial: Eisen + ABS
Länge: 31,5 Zoll (80 cm)
Breite: 8,3 Zoll (21 cm)
Höhe: 22.6”~26.5” -zoll (57.5~67.5 cm)
Gewicht: 1,75 kg (3.85 lbs)
Lager: 15 kg (33 lbs)
Einbrennlackierung
Zusammenklappbar
Höhenverstellbar
Material: PU-Leder, Eisen, Schwamm, Holz
Länge: 15,75 Zoll (40 cm)
Breite: 11.81 Zoll (30 cm)
Höhe: 17.32"/18.9"/20.1"-Zoll (44 / 48 / 51 cm)
Gewicht: 2,2 kg (4.85 lbs)

Technische Daten:
(61) Tasten
255 Stile/ 255 Klänge
50 Demo-Spuren: Eins/AII
Audioschnittstelle: Auxiliary-Klinkenausgang (3,5 mm) / Mikrofoneingang
Maximaler Schallpegel: bis zu 110 dB
USB-/Netzkabel-Länge: 3,9' ft. (119 cm)
Baumaterial: ABS
Stromquelle: 9V / AC DC-Adapter, 6" AA-Batterien (nicht mitgeliefert)
Abmessungen des Klaviers (L x B x H):
36,6" x 11,97" x 3,7" Zoll (93 x 30 x 9.3 cm)
•
•
•
•
•
•
•
•
•
Kalifornische Proposition-65-Warnung
WARNUNG:
Dieses Produkt enthält Benzylbutylphthalat (BBP), das dem
Staat Kalifornien als Verursacher von Krebs, Geburtsschäden
und anderen Fortpflanzungsschäden bekannt ist. Nicht
verschlucken. Weitere Informationen finden Sie unter:
www.P65warnlngs.ca.gov

Cyfrowy keyboard muzyczny do karaoke
PKBRD6139BT
przenośny keyboard z podstawką (61
klawiszy), stołek z klawiaturą, futerał i
słuchawki
POL
INSTRUKCJA OBSLUGI

PRZECZYTAJ UWAŻNIE PRZED KONTYNUOWANIEM
Przechowuj niniejszą instrukcję w bezpiecznym miejscu i w zasięgu
ręki, aby móc z niej skorzystać w przyszłości.
Należy używać dedykowanego zasilacza, a w przypadku jego uszkodzenia należy
go niezwłocznie wymienić.
•
UWAGA
Odłącz wtyczkę zasilania po zakończeniu gry lub gdy klawiatura nie jest używana
przez dłuższy czas.
•
Aby zapobiec możliwym szkodom dla środowiska lub zdrowia ludzkiego
wynikającym z niekontrolowanego usuwania odpadów, poddaj go recyklingowi w
sposób odpowiedzialny, aby promować zrównoważone ponowne wykorzystanie
zasobów materialnych.
Aby zwrócić zużyte urządzenie, skorzystaj z systemów zwrotu i zbiórki lub skontaktuj
się ze sprzedawcą, u którego zakupiłeś produkt.
Będzie on w stanie poddać ten produkt recyklingowi w odpowiedni i bezpieczny dla
środowiska sposób.
Do czyszczenia klawiatury używaj miękkiej, suchej szmatki. Do czyszczenia nie używaj
farby, alkoholu ani innych rozpuszczalników chemicznych, ponieważ mogą one
uszkodzić powierzchnię klawiatury.
•
OSTRZEŻENIE: Bezpośredni adapter wtyczki jest używany jako urządzenie
odłączające, urządzenie odłączające musi być łatwo dostępne.
•
Prawidłowa utylizacja tego produktu. To oznaczenie wskazuje, że tego produktu
nie należy wyrzucać razem z innymi odpadami domowymi w StanachZjednoczonych.
•
Przed czyszczeniem klawiatury odłącz wtyczkę zasilania i nie wyjmuj jej mokrymi
rękami.
•
Zapobiegaj przedostawaniu się płynów, kurzu, małych cząstek i innych ciał obcych
do obudowy klawiatury, co może spowodować zwarcie elementu.
•
Trzymaj klawiaturę z dala od źródeł ciepła, aby chronić jej części przed
uszkodzeniem.
•
Nie włączaj i nie utrzymuj głośności na maksymalnym lub niewygodnym poziomie
przez długi czas podczas grania.
•
Podłączając klawiaturę do innego urządzenia, upewnij się, że zarówno klawiatura,
jak i podłączane urządzenie są wyłączone przed podłączeniem.
•
Klawiatura może być demontowana wyłącznie przez profesjonalistów i nie wolno
dokonywać żadnych zmian w jej wewnętrznej strukturze. W przypadku
jakichkolwiek nieprawidłowości w działaniu podczas użytkowania, przestań jej
używać i natychmiast wyślij klawiaturę do profesjonalistów w celu konserwacji.
•

I. Panel sterowania i porty rozszerzeń
PRZEDNI PANEL STEROWANIA
PORT NA TYLNYM PANELU
30. Wejcie Audio
31. MIC
32. telefony/wyjście
33. DC 9V
1. Głośnik
2. Encendido
7. synchronizacja
8. Uzupełnij
6. Pojedyncze
5. Czas
4. Głośność akomp.
3. Głośność glówna
9. Pamięć (M1-M4)
10. Nagrywanie
15. Numery
16. Dźwięki
14. Obsługa
13. Graj
12. Prog
11. Wejście LCD
17. Perkusja
18. Palcowanie
23. Demo pierwsze
24. Demo wszystkie
22. Układ
21. Dalsze działania
20. Jeden klawisz
19. Start/Stop
25. Metronom
26. Podziel
29. Strefa Acordu
28. Style
27. Vibrato

II. Przygotowania przed rozpoczęciem gry
ZASILACZ SIECIOWY
ZEWNĘTRZNE WYJŚCIE AUDIO/SŁUCHAWKOWE
Używany będzie dedykowany adapter zasilania. Podłącz wyjściowy koniec adaptera
do portu zasilania na tylnym panelu klawiatury, a następnie podłącz drugi koniec
do gniazda zasilania (Uwaga: Napięcie wejściowe adaptera musi być zgodne z
napięciem zasilacza)
Klawiatura posiada funkcję wejścia stereo. Sygnały audio z telefonu
komórkowego, komputera i innych urządzeń audio mogą być wprowadzane do
systemu klawiatury w celu odtwarzania. Najpierw wyłącz klawiaturę, następnie
podłącz jeden koniec kabla audio do portu wyjściowego urządzenia audio, a drugi
koniec do portu AUDIO INPUT na tylnym panelu klawiatury, a na koniec włącz
klawiaturę.
Aktywuj domyślne połączenie BT, w stanie wyszukiwania BT w trybie gotowości,
może to być dowolne urządzenie BT i połącz się w tym momencie, aktywuj funkcję
BT telefonu lub urządzenia BT, aby wyszukać. Gdy połączenie się powiedzie, telefon
komórkowy lub urządzenie BT wyświetli ‘ Piano ‘ i powróci do interfejsu odtwarzacza
muzyki.
Wejście mikrofonowe: Podłącz mikrofon do portu MIC, aby rozpocząć śpiewanie i
granie.
WEJŚCIE MIKROFONOWE I WEJŚCIE AUDIO
POŁĄCZENIE BEZPRZEWODOWE BT
Uwaga: NIE używaj słuchawek przy wysokim poziomie głośności przez dłuższy czas.
Aby uniknąć uszkodzenia słuchu, używaj słuchawek przy umiarkowanym poziomie
głośności.
Podłączenie słuchawek: Gdy podłączysz słuchawki do portu PHONES/OUTPUT na
tylnym panelu klawiatury, głośnik zostanie automatycznie wyłączony. W ten sposób
możesz grać na klawiaturze bez przeszkadzania innym.
Wyjście audio: Po pierwsze, wyłącz klawiaturę i zewnętrzne urządzenia audio, po
drugie, podłącz jeden koniec kabla audio do portu PHONES/OUTPUT na tylnym
panelu klawiatury, a następnie podłącz drugi koniec do portu wejściowego audio
urządzeń audio.

III. Podstawowa metoda gry
Po naciśnięciu przycisku [Power ON/OFF] przy włączonym podświetleniu, na
wyświetlaczu LCD pojawią się informacje o aktualnej barwie dźwięku, tempie itp.
ODTWARZANIE UTWORÓW DEMO
Na klawiaturze zapisano 50 utworów demonstracyjnych, od "000" do "049": naciśnij
przycisk [Demo one], system przejdzie w stan odtwarzania, bieżący utwór
demonstracyjny będzie odtwarzany wielokrotnie. Aby odsłuchać inny utwór, naciśnij
przycisk, aby zatrzymać odtwarzanie bieżącego utworu i ponownie, aby odtworzyć
następny utwór. Naciśnij przycisk [Demo all], a system rozpocznie odtwarzanie
wszystkich utworów demonstracyjnych. W trakcie odtwarzania utworów
demonstracyjnych można zmieniać ich dźwięki.
Podczas odtwarzania możesz naciskać przyciski numeryczne lub przyciski "+" / "-",
aby wybrać inny utwór demonstracyjny.
WYBÓR DŹWIĘKU
Klawiatura umożliwia wybór 255 dźwięków, od "000" do "254". Po włączeniu
klawiatury funkcja wyboru dźwięku zostanie automatycznie włączona, a na
wyświetlaczu pojawi się bieżący numer dźwięku "SOUNDS".
W innych stanach naciśnij przycisk [Dźwięki], aby włączyć funkcję wyboru dźwięku.
Domyślna wartość dźwięków to "000" i można ją dostosować, naciskając
odpowiednie przyciski numeryczne lub naciskając przycisk "+" / "-".
REGULACJA GŁOŚNOŚCI AKOMPANIAMENTU
Naciśnij przycisk [Accom Vol+/-], aby zwiększyć lub zmniejszyć głośność główną.
Na wyświetlaczu pojawi się "RC-VOLUME" i aktualny poziom głośności. Naciśnij
jednocześnie [Accom Vol+/-], aby przywrócić wartość domyślną.
GŁÓWNY REGULATOR GŁOŚNOŚCI
Naciśnij przycisk "Głośność główna" lub "Głośność główna", aby zwiększyć lub
zmniejszyć głośność główną. Jeśli przyciski "Master Volume +" i "Master Volume - "
zostaną naciśnięte jednocześnie, głośność zostanie zresetowana do wartości
domyślnej.
Po naciśnięciu przycisku [Sounds] podczas odtwarzania utworu demo, na
wyświetlaczu pojawi się "SOUND", naciśnij przyciski numeryczne lub przyciski "+" /
"-" w ciągu 3 sekund, aby wybrać inny dźwięk do odtwarzania utworu demo.

IV. Styl automatyczny
KONTROLA STYLU
•
Naciśnij przycisk [Start/Stop], aby rozpocząć styl akompaniamentu.
W stanie stylu naciśnięcie przycisku [Fill in] powoduje automatyczne wypełnienie
utworu przerywnikowego.
Naciśnięcie przycisku [Start/Stop] powoduje natychmiastowe zatrzymanie stylu
akompaniamentu.
•
Jeśli styl nie został jeszcze uruchomiony, naciśnij przycisk "Syn", a metronom na
ekranie zacznie migać. Gdy zagrasz dowolny klawisz w obszarze akordów
(klawisz 1-19 od lewej), styl akompaniamentu rozpocznie się synchronicznie.
1. Uruchamianie stylu
2. Wejście
METRONOMIA
3. Zatrzymanie
USTAWIENIE CZASU
Naciskając przycisk [Tempo] / [Tempo], możesz przyspieszyć lub spowolnić utwór.
Jednoczesne naciśnięcie obu przycisków powoduje przywrócenie bieżącego
tempa.
Metronom zawiera cztery tempa, odpowiednio 1/4, 2/4, 3/4 i 4/4. Poprzez ciągłe
naciskanie przycisku "Metronom" można wybrać kolejno cztery tempa.
Wykonywanie dowolnego tempa można przerwać poprzez ponowne naciśnięcie
przycisku "Metronom".
WYBÓR STYLU
Ta klawiatura udostępnia 255 stylów, od "000" do "254", a domyślnym stylem jest
"000". Naciśnij przycisk [Style], aby aktywować funkcję wyboru stylu. Na ekranie
zostanie wyświetlony napis "STYLE" i numer bieżącego stylu. Następnie możesz
nacisnąć przyciski numeryczne lub przyciski "+" / "-", aby wybrać inne style.

V. Automatyczny akord basowy
Palcowanie akordów (tonacja C)
(Palcowanie akordu w tonacji C jest pokazane na poniższym rysunku, a resztę
można uzyskać przez analogię).
AKORD PALCAMI
W stanie, w którym styl jest aktywny, naciśnij przycisk [Fingered Chord]. Na
wyświetlaczu pojawi się komunikat "FIN", a następnie możesz zagrać akord palcami
w obszarze akordów na klawiaturze.
AKORD NA JEDEN PALEC
W stanie, w którym styl jest włączony, naciśnij przycisk [Single Chord], a na
wyświetlaczu pojawi się "SIN", a następnie możesz zagrać pojedynczy akord na
klawiszach w obszarze akordów klawiatury.
C C
6
CM
7
CM(9) Caug Cm
Cm
6
Cm
7
Cm
7
(b5)
CmM
7
Cm(9)
7
CmM (9)
Cdim Cdim
7
C
7
C
(b5)
7 4
Csus C1+2+5
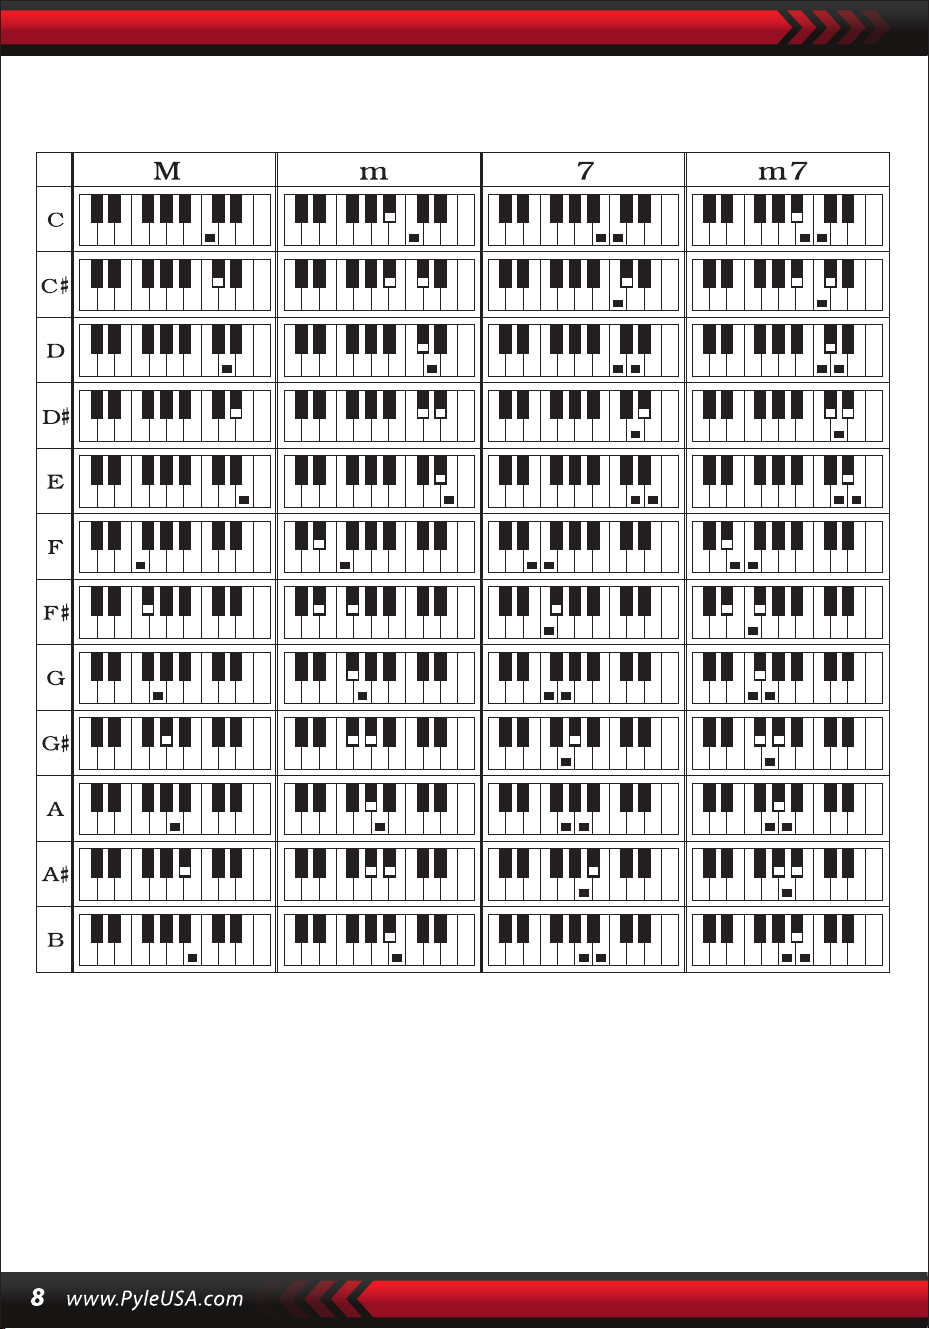
Palcowanie pojedynczego akordu
VI. Funkcja pamięci stanu
Dzięki funkcji pamięci stanu możesz zapisać dźwięk, styl, tempo i inne parametry,
które zostaną szybko zmienione podczas odtwarzania. Ta klawiatura jest
wyposażona w 4 pamięci stanu, do których można uzyskać elastyczny dostęp w
dowolnym momencie podczas odtwarzania.

PRZECHOWYWANIE PAMIĘCI
Dostosuj dźwięk, styl, tempo i akord zgodnie z wymaganiami, a następnie naciśnij
przycisk [StatusMemory] i jeden z przycisków od [Memory1] do [Memory4], aby
zapisać bieżący stan.
VII. Kontrola efektów
ODZYSKIWANIE PAMIĘCI
Naciśnij dowolny przycisk od [Memory 1] do [Memory 4], aby uzyskać dostęp do
parametrów ustawień zapisanych w tej pamięci w celu zastąpienia bieżących.
Zapisane treści nie są chronione przed awarią zasilania i zostaną utracone po
ponownym uruchomieniu klawiatury elektronicznej po awarii zasilania.
FUNKCJA PODZIAŁU KLAWIATURY
Naciśnij przycisk [SPLIT], aby włączyć funkcję podziału klawiatury, na ekranie zostanie
wyświetlony komunikat "SPLIT". 24 klawisze po lewej stronie klawiatury zostaną
rozdzielone z pozostałą klawiaturą. Podczas gdy lewa strona klawiatury zwiększy się o
jedną oktawę i zachowa oryginalną wysokość dźwięku, prawa strona klawiatury
zmniejszy się o jedną oktawę, aby zachować tę samą wysokość dźwięku co lewa strona
klawiatury. Wysokość dźwięku prawej strefy klawiatury można dostosować w razie
potrzeby, aby lewa i prawa strefa klawiatury mogły odtwarzać różne wysokości
dźwięku w tym samym czasie. Naciśnij ponownie przycisk [SPLIT], aby wyłączyć tę
funkcję.
GRA NA PERKUSJI
Ta klawiatura oferuje 61 rodzajów perkusji.
Naciśnij przycisk [Keyboard percussion], aby zmienić klawisz w klawisz perkusyjny.
Każdy klawisz odpowiada instrumentowi perkusyjnemu.
Naciśnij ten przycisk ponownie, aby wyłączyć funkcję perkusji.
Funkcja Wibracji
Naciśnij przycisk [Vibrato], na wyświetlaczu pojawi się "VIB", a efekt vibrato zostanie
aktywowany. Naciśnij ten przycisk ponownie, aby wyłączyć efekt vibrato.
Przytrzymanie funkcji
Jeśli przycisk [Sustain] zostanie naciśnięty, a na wyświetlaczu pojawi się "SUS", dźwięk
naciśnięcia przycisków zostanie włączony. Naciśnij przycisk ponownie, aby wyłączyć
funkcję.

VIII. VIII.Styl nagrywania i programowania
NAGRYWANIE
Naciśnij [REC], aby włączyć funkcję nagrywania, na wyświetlaczu pojawi się "REC".
W tym trybie odtwarzane nuty będą nagrywane.
Gdy pamięć zostanie zapełniona, na wyświetlaczu pojawi się "REC", a nagrywanie
zostanie automatycznie zatrzymane.
STYL PROGRAMOWANIA
Naciśnij [PROG], aby włączyć funkcję programowania stylów, na wyświetlaczu
pojawi się "PRG", a perkusja klawiatury zostanie aktywowana. W tym trybie
możesz tworzyć niestandardowe style, grając odpowiedni klawisz perkusyjny.
Naciśnij [PLAY], aby odtworzyć nagrane nuty, a na wyświetlaczu pojawi się "PLAY".
Po zakończeniu odtwarzania nastąpi przejście do trybu nagrywania, a na
wyświetlaczu pojawi się komunikat "REC". Możesz nagrać nowy styl lub nacisnąć
[PLAY], aby odtworzyć nagrany styl.
•
Naciśnij przycisk [Start/Stop] lub naciśnij ponownie przycisk [REC], aby wyłączyć
funkcję nagrywania, a wszystkie nagrane style zostaną usunięte.
•
Można nagrać maksymalnie 32 perkusje, po czym na wyświetlaczu zacznie migać
"PRG" i programowanie zostanie automatycznie zatrzymane.
•
Naciśnij przycisk [Start/Stop] lub ponownie przycisk [PROG], aby wyłączyć funkcję
programowania, a wszystkie nagrane style zostaną usunięte.
•
Naciśnij przycisk [PLAY], aby odtworzyć zaprogramowany styl.
Naciśnij ponownie przycisk [PLAY], aby zatrzymać odtwarzanie, na wyświetlaczu
pojawi się komunikat "PRG", a funkcja programowania zostanie włączona. Możesz
ponownie zaprogramować style lub ponownie nacisnąć przycisk [PLAY], aby je
odtworzyć.
•

IX. Inteligentna praktyka w trzech krokach
Krok 1: ONE KEY
Po naciśnięciu przycisku "One Key" aktywowana zostanie funkcja nauki za pomocą
jednego przycisku, a na ekranie wyświetlony zostanie komunikat "Step 1". Utwór do
nauki można wybrać, naciskając przycisk lub naciskając "+" lub "-". Nauka za pomocą
jednego klawisza jest stosowana przez cały czas trwania utworu bez żadnych
wymagań dotyczących intonacji i poprawności. Dopuszczalna jest nieprawidłowa gra
na klawiszach. W przypadku błędów klawiatura elektroniczna odtwarza prawidłowe
nuty, ale kursor pokazuje na ekranie klawisz odpowiadający prawidłowej nucie.
Funkcję uczenia za pomocą jednego klawisza można wyłączyć, naciskając ponownie
przycisk "One Key".
KROK 3: ZESPÓŁ
Naciśnij przycisk [Ensemble], aby włączyć funkcję treningu Ensemble, na
wyświetlaczu pojawi się "LEARN", "SONG" i numer utworu, a następnie naciśnij
przycisk "+" / "-", aby wybrać utwór do ćwiczenia. Ensemble ma na celu prawidłowe i
całkowite nauczenie się czasu trwania i nut utworu. Klawiatura zatrzyma się. Możesz
ćwiczyć, podążając za wskazówkami podświetlonego klawisza. Musisz zagrać
prawidłową nutę zgodnie z prawidłowym czasem trwania utworu. Jeśli nie uda Ci się
zagrać w ciągu 3 sekund, klawiatura automatycznie odtworzy nutę, a obszar
klawiatury na ekranie pokaże prawidłową nutę i tempo. Po zakończeniu utworu
powtórz bieżący utwór, którego chcesz się nauczyć. Naciśnij [Start/Stop] lub
[Ensemble], aby wyłączyć funkcję treningu.
Uwagi:
W tym stanie klawiatura odtwarza tylko prawidłowe nuty i nie reaguje na
nieprawidłowe nuty.
Naciśnij przycisk [Start/Stop] lub [Kontynuuj], aby wyłączyć funkcję treningu.
Krok 2: FOLLOW
Naciśnij przycisk [Follow], aby włączyć funkcję śledzenia, na wyświetlaczu pojawi się
"LEARN", "SONG" i numer utworu, a następnie naciśnij przycisk "+" / "-", aby wybrać
utwór do ćwiczenia. Dzięki funkcji [Follow] możesz ćwiczyć, podążając za nutami,
które są odtwarzane prawidłowo. Możesz grać zgodnie z utworem demonstracyjnym
i grać poprawnie, podążając za przewodnikiem. Możesz także nauczyć się grać,
podążając za wskaźnikami w obszarze klawiatury na ekranie. Przed przejściem do
następnej nuty urządzenie poczeka, aż zagrasz prawidłową nutę.

Dodatki
I. TABELA DŹWIĘKÓW
000-111
Odnieś się do panelu
urządzenia
112 Clavi 2
113 Celesta 2
114 Harpsichord 2
115 Mellow Fm 1
116 Pi Pa 2
117 Upright Piano 1
118 Electric Piano 2
119 Hard Vibe 1
120 WoodBarafon2
121 Music Box 2
122 Marimba 2
123 Santur
124 Reed Organ 2
125 Pu Harmonica 1
126 Ukulele 1
127 12-str. Gtl
128 Guitar Pinch 2
129 Slow Violin 1
130 Bright String 1
131 Jungle Bass 2
132 Indian Flute 1
133 Clavi 3
134 Celesta 3
135 Church Bells
136 Marimba 3
137 Dulcimer 2
138 Reed Organ 3
139 Electric Guitar (Clean) 2
140 Koto 2
141 Xylophone 2
142 Shanai 2
143 Dulcimer 3
144 English Horn 2
145 Electric Guitar (Clean) 3
146 Shamisen 2
147 Koto 3
148 Kalimba 2
149 Steel Bell 1
150 Alto Sax 2
151 Woodblock 2
152 Synth Harpsi. 1
153 Attack Clav.1
154 Crystal 1
155 Bag Pipe 2
156 Barafon 1
157 Organ Flute 1
158 Kalimba 3
159 Reed Horn 1
160 Hard Vibe 2
161 Twin Trombones 1
162 Synth Harpsi. 2
163 Attack Clav. 2
164 Chorus Guitar 1
165 Steel Bell 2
166 Tsugaru
167 Oct Harp 1
168 Bodhran 1
169 Tubular Bells 2
170 Suona
171 Castanets
172 Attack Harp 1
173 Electric Vibraphone 1
174 Soft Sax 1
175 Soft Clav.1
176 Soft Guitar 1
177 Grow Guitar 1
178 Didgeridoo 1
179 Attack Barafon 1
180 Mute Barafon 1
181 Nay 1
182 Soft Santur
183 Dual Horns 1
184 Hard Barsoon 1
185 Tran Flute 1
186 Kawala 1
187 Jazz Organ 1
188 Soft Accord 1
189 Wind Organ 1
190 Viola Attack 1
191 Bari &Tenor 1
192 Soft Sax2
193 Attack Harp 2
194 Didgeridoo 2
195 Dual Horns 2
196 Hard Barsoon 2
197 Kawala 2
198 Soft Guitar 2
199 Mute Barafon 2
200 Lead (Bass+Lead) 2
201 MelodicTom 2
202 Grow Guitar 2
203 Lead (SaMooth)2
204 Jazz Bass 2
205 Chorus Guitar 2
206 Feedback Gt. 2
207 Fiddle 2
208 Organ Flute 2
209 Flugel Horn 2
210 Crystal 2
211 Soft Clav. 2
212 Overdriven Guitar 2
213 Ukulele 2
214 Tango Accordion 2
215 Twin Trombones 2
216 Jazz Organ 2
217 Bright String 2
218 Reed Horn 2
219 Glockenspiel 2
220 Drawbar Organ 2
221 Muted Horn 2
222 Pizzicato Strings 2
223 Nay2
224 Pu Harmonica 2
225 Muted Trumpet 2
226 Upright Piano 2
227 Soft Accord 2
228 Uillean Harp 2
229 Tron Flute 2
230 Blown Bottle 2
231 Indian Flute 2
232 Slow Violin 2
233 Electric Guitar (Muted) 2
234 Multi Wind 2
235 Electric Vibraphone 2
236 Bodhran 2
237 Mellow Fm 2
238 Multi Reed 2
239 Contrabass 2
240 Barafon 2
241 Wind Organ 2
242 12-str. Gt2
243 Attack Barafon 2
244 Lead (Calliope) 2
245 Viola Attack 2
246 Pad (Warm) 2
247 Oct Harp 2
248 Bari & Tenor 2
249 Agogo 2
250 Flugel Horn 3
251 Organ Flute 3
252 Fiddle 3
253 Feedback Gl. 3
254 Chorus Guitar 3

II. TABELA STYlÓW
000-130 Patrz panel
urządzenia
131 West Shue
132 Big Band Rapide 2
133 Espagnol 1
134 Disco Funk 2
135 Pop Mambo
136 Europe Swing 1
137 Trucs Latin
138 Disco Samba 2
139 Latin Wallz
140 Dance Pop 3
141 Jazz Rock 1
142 Delroit
143 Sable Fanatique
144 European Rock 1
145 Battement Terre
146 8 Beat Modem 2
147 Jazz Disco
148 Dixie Jazz 1
149 Disco Chocolat
150 Disco Latin 2
151 Synth Boogie
152 Samedi Soir 2
153 Club Danse 1
154 Trucs Bossa Nova
155 Tarantella 2
156 Marche USA
157 Espagnol 2 156 Club
Latin 2
159 Jazz Cha Cha 1
160 Cha Cha Country
161 Disco Party 2
162 Modem R&B 1
163 8 Beat Pop 2
164 Country Jazz
165 Soul Rock 1
166 Rumba 2
167 Samba 3
168 Modem R&B 2
169 Club Danse 2
170 Country Bossa Nova
171 Jazz Bo 1
172 Modem Cha Cha 1
173 Pop Reggae 2
174 Rock Samba 1
175 Jazz 8 Beat 1
176 Disco
177 Séville 1
178 Disco Mains 2
179 Ballade Rock
180 Bossa Nova Mixte
181 Jazz 16 Beat 1
182 Single 16 Beat 1
183 Chanson d'Amour
184 Single 16 Beat 2
185 Disco Fox 2
186 Pop Rock 3
187 Tijuana Wallz
188 Pop Britannique 2
189 Chanson de Spectacle 1
190 Alp Schlager
191 Single Rock
192 Valse Swing
193 Valse Lente
194 Groove de Chat 2
195 Rock Lent Country
196 Rock Disco
197 16 Beat Shue 1
198 Jazz 8 Beat 2
199 Casa
200 Danse Guad 1
201 Jazz Cha Cha 2
202 Mur Country
203 European Rock 2
204 Danse Caribéenne 2
205 Jazz Disco 2
206 Jazz Moyen
207 Ballade Piano
208 Disco des Années 70
209 Jazz Rock 2
210 Europe 8 Beat 1
211 Séville 2
212 Rumba 3
213 Soul Rock 2
214 Disco Européenne 2
215 Ballade Analogique 2
216 Piano de Bar 2
217 Rumba Européenne
218 Rock'n Roll 2
219 Disco Trop
220 Rock Salsa 1
221 Europe 8 Beat 2
222 Europe Samba
223 Chanson de Spectacle 2
224 Jazz 16 Beat 2
225 Rock Samba 2
226 Valse Jazz 2
227 Reggae Européen
228 Modem Cha Cha 2
229 Ballade R&B 2
230 Rock Boogie
231 Jazz Bossa Nova
232 Rock Salsa 2
233 Lent & Facile
234 Hip Waltz 1
235 Jazz Latin 2
236 Rock Disco 2
237 Tango Jazz 2
238 Ballade Analogique 3
239 Europe Swing 2
240 Hip Waltz 2
241 Jazz Swing 2
242 Pop de Fête
243 Jazz Club
244 Danse Guad 2
245 Jazz Bo 2
246 Dixie Jazz 2
247 Ballade Acoustique 2
248 Rock Lent Jazz
249 16 Beat Shue 2
250 Pop Polka
251 Fête Latine Pop
252 Parranda
253 Carnaval
254 Pop Vintage des
Années 60

Montaż wspornika klawiatury

Klawiatura karaoke 2 w 1: graj i śpiewaj!
Kompaktowe i przenośne pianino muzyczne
Prosta obsługa plug-and-play
Przenośne pianino
Wbudowane pełnozakresowe głośniki stereo
Podłącz i przesyłaj strumieniowo dźwięk z urządzeń zewnętrznych
Możliwość podłączenia do głośnika i odtwarzania dźwięku
Wiele wstępnie ustawionych stylów dźwiękowych, tonów i rytmów klawiatury
Cyfrowy wyświetlacz LCD
Regulowana kontrola głośności
Tryb nagrywania i odtwarzania
Gniazdo wejściowe mikrofonu
61-klawiszowa klawiatura perkusyjna
Podstawowa kontrola: MasterVolume / Accom Volume / Kontrola tempa
Funkcja automatycznego akordu: akord pojedynczy / akord palcowy
Funkcja Sustain, funkcja Vibrato, funkcja podziału klawiatury
Funkcje nauczania: jeden klawisz / podążanie / zespół
Funkcja wypełniania, funkcja metronomu
Idealny do występów w kinie domowym w salonie
Zabawa dla dzieci i dorosłych w każdym wieku
•
•
•
•
•
•
•
•
•
•
•
•
•
•
•
•
•
•
•
•
•
•
•
•
•
•
•
Cyfrowy muzyczny keyboard karaoke
Półka na książki
Adapter
Wtyczka zasilania
Podstawka pod keyboard
Stołek pod klawiaturę
Zestaw słuchawkowy
Charakterystyka:
Co znajduje się w pudełku:

Specykacja zestawu słuchawkowego:
Funkcje obsługi klawiatury:
Ławka pod klawiaturę, funkcje:
Materiał konstrukcyjny: ABS + laserowa folia dekoracyjna
Materiał kabla: płaski przewód PVC
Długość kabla: 1,1 m (110 cm)
Średnica wtyczki: 3,5 mm 1/8
Waga: 0,14 kg (0.06 lbs)
•
•
•
•
•
•
•
•
•
•
•
•
•
•
•
•
•
•
•
•
•
•
•
Wypiekany lakier
Odłączany
Regulacja wysokości
Funkcja blokady klawiatury
Materiał wykonania: żelazo + ABS
Długość: 31,5 cala (80 cm)
Szerokość: 8,3 cala (21 cm)
Wysokość: 22.6”~26.5” -inches (57.5~67.5 cm)
Waga: 1,75 kg (3.85 lbs)
Łożysko: 15 kg (33 lbs)
Wypiekany lakier
Składany
Regulacja wysokości
Materiał wykonania: skóra PU, żelazo, gąbka, drewno
Długość: 15,75 cala (40 cm)
Szerokość: 11,81 cala (30 cm)
Height: 17.32"/18.9"/20.1"-inches (44 / 48 / 51 cm)
Waga: 2,2 kg (4.85 lbs)

Dane techniczne:
(61) klawiszy
255 stylów/ 255 dźwięków
50 utworów demo: One/AII
Interfejs audio: wyjście pomocnicze jack (3,5 mm) / wejście mikrofonowe
Maksymalny poziom dźwięku: do 11O dB
Długość kabla USB/zasilającego: 3,9' ft. (119 cm)
Materiał konstrukcyjny: ABS
Źródło zasilania: zasilacz 9V / AC DC, baterie 6" AA (brak w zestawie)
Wymiary pianina (dł. x szer. x wys.):
36,6" x 11,97" x 3,7" cali (93 x 30 x 9.3 cm)
•
•
•
•
•
•
•
•
•
Ostrzeżenie California Proposition 65
OSTRZEŻENIE:
Ten produkt zawiera ftalan benzylu butylu (BBP), o którym stan
Kalifornia wie, że powoduje raka, wady wrodzone i inne szkody
reprodukcyjne. Nie połykaj. Aby uzyskać więcej informacji,
odwiedź stronę: www.P65warnlngs.ca.gov

Karaoke için dijital müzik klavyesi
PKBRD6139BT
KULLANICI KILAVUZU
Klavye standı ile taşınabilir elektronik
piyano klavyesi (61 tuş), Klavyeli
tabure, kılıf ve kulaklık
TUR
DEVAM ETMEDEN ÖNCE LÜTFEN DİKKATLİCE OKUYUNUZ
Lütfen bu kılavuzu ileride başvurmak üzere güvenli bir yerde ve
elinizin altında bulundurun.
Özel bir güç adaptörü kullanılmalı ve adaptörün hasar görmesi durumunda derhal
değiştirilmelidir.
•
DUYURU
Çaldıktan sonra veya klavye uzun süre kullanılmadığında elektrik şini çekin.
•
Kontrolsüz atık bertarafının çevreye veya insan sağlığına olası zararlarını önlemek
için, lütfen malzeme kaynaklarının sürdürülebilir yeniden kullanımını teşvik etmek
üzere sorumlu bir şekilde geri dönüştürün.
Kullanılmış cihazınızı iade etmek için lütfen iade ve toplama sistemlerini kullanın
veya ürünü satın aldığınız perakendeciyle iletişime geçin.
Onlar bu ürünü çevre açısından güvenli ve uygun bir şekilde geri
dönüştürebileceklerdir.
Klavyeyi temizlemek için yumuşak, kuru bir bez kullanın. Klavyenin yüzeyine zarar
verebileceğinden temizlik için boya, alkol veya diğer kimyasal çözücüler kullanmayın.
•
UYARI: Doğrudan takılabilir adaptör bir bağlantı kesme cihazı olarak kullanılır,
bağlantı kesme cihazı kolayca çalıştırılabilir durumda kalmalıdır.
•
Bu ürünün uygun şekilde bertaraf edilmesi. Bu işaret, bu ürünün Amerika
Birleşik Devletleri'nde diğer evsel atıklarla birlikte atılmaması gerektiğini gösterir.
•
Klavyeyi temizlemeden önce elektrik şini çekin ve ıslak ellerle çıkarmayın.
•
Sıvıların, tozun, küçük parçacıkların ve diğer yabancı maddelerin klavye kasasına
girmesini önleyin, bunlar elemanın kısa devre yapmasına neden olabilir.
•
Parçalarını hasardan korumak için klavyeyi ısı kaynaklarından uzak tutun.
•
Çalarken sesi uzun süre maksimum veya rahatsız edici seviyelerde açmayın ve
tutmayın.
•
Klavyeyi başka bir cihaza bağlarken, bağlantıdan önce hem klavyenin hem de
bağlanacak cihazın kapalı olduğundan emin olun.
•
Klavye yalnızca profesyoneller tarafından demonte edilebilir ve iç yapısında hiçbir
değişiklik yapılamaz. Kullanım sırasında herhangi bir işlevsel anormallik olması
durumunda, kullanmayı bırakın ve klavyeyi bakım için derhal profesyonellere
gönderin.
•

I. Kontrol paneli ve harici bağlantı noktaları
ÜST KONTROL PANELI
ARKA PANEL BAĞLANTI NOKTASI
30. Ses girişi
31. MİKROFON
32. KULAKLIK ÇIKIŞI
33. DC 9V
1. Hoparlör
2. Güç açık
7. Senkro
8. Dolgu
6. Tekli
5. Tempo
4. Hacim aksanı
3. Ana ses seviyesi
9. Hafıza (M1-M4)
10. Kayıt
15. Sayılar
16. Sesler
14. Bekletme
13. Oynatma
12. Prog
11. LCD Ekran
17. Klavye Perküsyonu
18. Parmaklı
23. Demo bir
24. Tümü Demo
22. Düzenleme
21. İzleme
20. Tek Tuş
19. Başlat/bitir
25. Metronom
26. Bölünmüş
29. Akor bölgesi
28. Stiller
27. Titreşim

II. Oyun öncesi hazırlıklar
GÜÇ ADAPTÖRÜ
SES ÇIKIŞI/HARICI KULAKLIKLAR
Özel bir güç adaptörü kullanılacaktır. Adaptörün çıkış ucunu klavyenin arka
panelindeki güç portuna bağlayın, ardından diğer ucunu güç çıkışına bağlayın
(Not: adaptörün giriş voltajı güç kaynağının voltajıyla uyumlu olmalıdır.)
Klavye stereo giriş fonksiyonuna sahiptir. Cep telefonu, bilgisayar ve diğer ses
cihazlarından gelen ses sinyalleri çalınmak üzere klavye sistemine girilebilir.
Öncelikle klavyeyi kapatın, ardından ses kablosunun bir ucunu bir ses cihazının çıkış
portuna ve diğer ucunu klavyenin arka panelindeki AUDIO IN portuna bağlayın, son
olarak klavyeyi açın.
Varsayılan BT bağlantısını etkinleştirin, BT bekleme arama durumunda, herhangi bir
BT cihazı arama eşleşmesi olabilir ve şu anda bağlanın, aramak için telefonunuzun
veya BT cihazınızın BT işlevini etkinleştirin. Bağlantı başarılı olduğunda, cep telefonu
veya BT cihazı müzik çalmak için müzik çalar arayüzüne geri döner.
Mikrofon girişi: Şarkı söylemeye ve çalmaya başlamak için mikrofonu MIC portuna
bağlayın.
MIKROFON GIRIŞI VE SES GIRIŞI
BT KABLOSUZ BAĞLANTI
Not: Kulaklıkları uzun bir süre boyunca yüksek ses seviyesinde KULLANMAYIN.
İşitme hasarını önlemek için, kulaklığınızı orta ses seviyesinde kullanın.
Kulaklık bağlama: Klavyenin arka panelindeki PHONES/OUTPUT bağlantı
noktasına bir kulaklık bağladığınızda, hoparlör otomatik olarak kapanacaktır. Bu
şekilde, başkalarını rahatsız etmeden klavyeyi çalabilirsiniz.
Ses Çıkışı: İlk olarak, klavyeyi ve harici ses cihazlarını kapatın, ikinci olarak, ses
kablosunun bir ucunu klavyenin arka panelindeki PHONES/OUTPUT bağlantı
noktasına bağlayın ve ardından diğer ucunu ses cihazlarının ses giriş bağlantı
noktasına bağlayın.
III. Temel çalma yöntemi
[Güç AÇMA/KAPAMA] düğmesine basıldığında, LCD açılır ve mevcut perde, tempo
ve diğer durumu görüntüler. Daha sonra klavyeyi gerektiği gibi kullanabilirsiniz.
DEMO ŞARKI ÇALMA
Klavyede "000" ile "049" arasında 50 demo şarkı kaydedilmiştir: [Demo bir]
düğmesine basın, sistem çalma durumundadır, mevcut demo şarkı tekrar tekrar
çalınır. Başka bir şarkıyı dinlemek için, mevcut şarkıyı durdurmak için düğmeye basın
ve bir sonrakini çalmak için tekrar basın.
[Demo all] düğmesine basın, sistem tüm demo şarkıları çalma aşamasındadır. Demo
şarkıları çalarken, şarkıların sesleri değiştirilebilir.
Çalma işlemi sırasında, başka bir demo şarkı seçmek için sayı düğmelerine veya "+" /
"-" düğmelerine basabilirsiniz.
SES SEÇIMI
Tuş takımı seçim için "000" ile "254'' arasında 255 ses sağlar. Tuş takımı açıldığında,
ses seçim fonksiyonu otomatik olarak etkinleştirilecek ve ekranda "SOUNDS"
mevcut ses numarası gösterilecektir.
Diğer durumlarda, ses seçim fonksiyonunu etkinleştirmek için [Sesler] tuşuna basın.
Seslerin varsayılan değeri "000 "dır ve ilgili sayı düğmelerine basarak veya "+" / "-"
düğmesine basarak ayarlanabilir.
EŞLİK SES DÜZEYİNİN AYARLANMASI
Ana ses seviyesini artırmak veya azaltmak için [Accom Vol+/-] düğmesine basın.
"RC-VOLUME" ve mevcut ses seviyesi ekranda gösterilecektir. Varsayılan değere
sıfırlamak için [Accom Vol+/-] düğmesine aynı anda basın.
ANA SES AYARI
Ana ses seviyesini artırmak veya azaltmak için [Master Vol+/-] düğmesine basın.
"VOLUME" ve mevcut ses seviyesi ekranda gösterilecektir. Varsayılan değeri geri
yüklemek için [Master Vol+/-] düğmesine aynı anda basın.
Ana ses seviyesi aynı zamanda eşlik ses seviyesini de kontrol edebilir.
Demo şarkı çalma işlemi sırasında [Sesler] düğmesine basıldığında, ekranda "SES"
görüntülenecektir, demo şarkıyı çalmak üzere başka bir ses seçmek için 3 saniye
içinde sayı düğmelerine veya "+" / "-" düğmesine basın.

IV. Otomatik stil
STİL KONTROLÜ
•
Stil eşliğini başlatmak için [start/stop] düğmesine basın.
Eşlik stili etkinleştirildiğinde, eşlik stili sırasında bir zaman stili çalmak için [Fill-in]
düğmesine basın.
[Fill-in] düğmesini basılı tutarken, geçici stil sürekli olacaktır.
Eşlik stili sırasında, eşlik stilini durdurmak için [Başlat/Durdur] düğmesine basın.
•
[Sync] düğmesine basın, ekranda "SYN" gösterilecek ve dört zaman noktası aynı
anda yanıp sönecektir, ardından akor tuşu alanındaki herhangi bir tuşa dokunun
(soldan 1-19. tuş), eşlik stili etkinleştirilecektir.
1. Stilleri Etkinleştirme
2. Araya girme
3. Stili durdurun
METRONOME
TEMPO AYARI
Stil hızını artırmak veya azaltmak için [Tempo+/-] düğmesine basın.
Varsayılan değeri geri yüklemek için her iki düğmeye aynı anda basın.
Metronom sırasıyla 1/4, 2/4, 3/4 ve 4/4 olmak üzere dört vuruş içerir. Dört tempoyu
seçmek için [Metronom] düğmesine sürekli basın.
Tempoyu durdurmak için alttaki [Metronom] düğmesine tekrar basın.
STIL SEÇIMI
Bu klavye "000" ile "254" arasında 255 stil sağlar ve varsayılan stil "000"dır. Stil
seçme işlevini etkinleştirmek için [Stiller] tuşuna basın. "STYLE" ve geçerli stil
numarası ekranda görüntülenecektir. Daha sonra diğer stilleri seçmek için sayı
düğmelerine veya "+" / "-" düğmelerine basabilirsiniz.

V. Otomatik bas akoru
Parmaklı akor parmaklaması (C tuşu)
(Do anahtarının akor parmakları aşağıdaki şekilde gösterildiği gibidir ve geri
kalanı analoji yoluyla elde edilebilir).
PARMAK AKORLARI
Stil açık durumdayken, [Parmaklı Akor] düğmesine basın. Ekranda " BİTİŞ "
görüntülenir ve ardından klavyenin akor alanında parmaklı bir akor çalabilirsiniz.
TEK AKOR
Stilin etkin olduğu durumda, [Tek Akor] düğmesine basın, ekranda "SIN"
görüntülenecektir ve ardından klavyenin akor alanındaki tuşlarda tek bir akor
çalabilirsiniz.
C C
6
CM
7
CM(9) Caug Cm
Cm
6
Cm
7
Cm
7
(b5)
CmM
7
Cm(9)
7
CmM (9)
Cdim Cdim
7
C
7
C
(b5)
7 4
Csus C1+2+5

Tek akor parmakları
VI. Durum belleği işlevi
Durum hafızası fonksiyonu ile çalma sırasında hızlı bir şekilde değiştirilecek olan ses,
stil, tempo ve diğer parametreleri kaydedebilirsiniz. Bu klavye, çalma sırasında
herhangi bir zamanda esnek bir şekilde erişilebilen 4 durum belleği ile donatılmıştır.

DURUM BELLEĞININ SAKLANMASI
Sesi, stili, tempoyu ve akoru gerektiği gibi ayarlayın, ardından [Durum Hafızası]
düğmesine ve mevcut durumu kaydetmek için [Hafıza 1] ila [Hafıza 4] düğmelerinden
birine basın.
VII. Etkilerin kontrolü
DURUM BELLEĞININ GERI ÇAĞRILMASI
[Bellek 1] ile [Bellek 4] arasındaki herhangi bir tuşa basarak bu bellekte saklanan ayar
parametrelerine erişebilir ve mevcut parametreleri değiştirebilirsiniz.
Kaydedilen içerikler için güç kesintisi koruması sağlanmaz ve elektronik tuş
takımı bir güç kesintisinden sonra yeniden başlatıldıktan sonra kaydedilen
içerikler kaybolacaktır.
KLAVYE BÖLME FONKSIYONU
Klavye bölme işlevini etkinleştirmek için [SPLIT] tuşuna basın, ekranda "SPLIT"
görüntülenecektir. Klavyenin sol tarafındaki 24 tuş kalan klavye ile bölünecektir.
Klavyenin sol tarafı bir oktav artacak ve orijinal perdeyi koruyacakken, klavyenin sağ
tarafı klavyenin sol tarafı ile aynı perdeyi korumak için bir oktav azalacaktır. Sağ klavye
bölgesinin perdesi, sol ve sağ klavye bölgelerinin aynı anda farklı perdeleri çalabilmesi
için gerektiği şekilde ayarlanabilir. Bu işlevi devre dışı bırakmak için [SPLIT] düğmesine
tekrar basın.
PERKÜSYON ÇALMA
Bu klavye 61 çeşit klavye perküsyonu sağlar.
Tuşu bir perküsyon tuşuna dönüştürmek için [Klavye perküsyonu] tuşuna basın. Her
tuş bir vurmalı çalgıya karşılık gelir.
Klavye perküsyon işlevini devre dışı bırakmak için bu düğmeye tekrar basın.
VIBRATO FONKSIYONU
[Vibrato] düğmesine basın, ekranda "VIB" görünecek ve vibrato efekti etkinleştirilecektir.
Vibrato efektini devre dışı bırakmak için bu düğmeye tekrar basın.
Sürdürme işlevi
[Sustain] düğmesine basın, ekranda "SUS" görünecek ve sustain efekti
etkinleştirilecektir. Sürdürme efektini devre dışı bırakmak için bu düğmeye tekrar basın.

VIII. Kayıt ve stil programlama
KAYIT
Kayıt işlevini etkinleştirmek için [REC] düğmesine basın, ekranda "REC"
görüntülenecektir. Bu modda, çaldığınız notalar kaydedilecektir.
Depolama alanı dolduğunda, ekranda "REC" yazısı belirecek ve kayıt otomatik
olarak duracaktır.
STIL PROGRAMLAMA
Stil programlama işlevini etkinleştirmek için [PROG] düğmesine basın, ekranda
"PRG" gösterilecek ve klavyenin perküsyonu etkinleştirilecektir. Bu modda, ilgili
perküsyon tuşunu çalarak özel stiller oluşturabilirsiniz.
PKaydedilen notaları çalmak için [PLAY] düğmesine basın ve ekranda "PLAY" yazısı
belirecektir. Çalma işlemi bittiğinde, kayıt moduna girecek ve ekranda "REC"
görüntülenecektir. Yeni bir stil kaydedebilir veya kaydedilen stili çalmak için [PLAY]
düğmesine basabilirsiniz.
•
Kayıt işlevini devre dışı bırakmak için [Başlat/Durdur] düğmesine basın veya
[KAYIT] düğmesine tekrar basın; kaydedilen stilin tamamı silinecektir.
•
Maksimum 32 perküsyon kaydedilebilir, bundan sonra ekranda "PRG" yanıp
sönecek ve programlama otomatik olarak duracaktır.
•
Programlama işlevini devre dışı bırakmak için [Başlat/Durdur] düğmesine basın veya
[PROG] düğmesine tekrar basın; kaydedilen tüm stiller silinecektir.
•
Programlanan stili çalmak için [PLAY] düğmesine basın.
Çalmayı durdurmak için [PLAY] düğmesine tekrar basın, ekranda "PRG" ibaresi
belirecek ve programlama işlevi etkinleşecektir. Stilleri yeniden programlayabilir
veya çalmak için [PLAY] düğmesine tekrar basabilirsiniz.
•
IX. Akıllı üç adımlı uygulama
Alıştırma 1: TEK ANAHTAR
Alıştırma işlevini etkinleştirmek için [Tek Tuş] düğmesine basın veya Tek Tuş,
"LEARN" "SONG" ve şarkı numarası ekranda gösterilecektir ve ardından çalışılacak
şarkıyı seçmek için "+" / "-" düğmesine basın. Tek tuş uygulaması uzun süreli
öğrenme için tasarlanmıştır ve perde veya düzeltme gereksinimi yoktur. Bu mod
tuşları çalarken hatalara izin verir, ancak klavyeler hala doğru notaları çalarken,
ekrandaki tuş alanı da bunları gösterecektir. Bir şarkıyı bitirdikten sonra, öğrenmek
istediğiniz mevcut şarkıyı tekrarlayın. Alıştırma işlevini kapatmak için
[Başlat/Durdur] düğmesine veya [Tek Tuş] düğmesine basın.
UYGULAMA III TOPLULUK
Ensemble eğitim işlevini etkinleştirmek için [Ensemble] düğmesine basın, " ÖĞREN",
"ŞARKI" ve şarkı numarası ekranda gösterilecektir ve ardından çalışılacak şarkıyı
seçmek için "+" / "-" düğmesine basın. Ensemble, şarkının süresini ve notalarını doğru
ve tam olarak öğrenmeyi amaçlar. Klavye donacaktır. Işıklı tuşun rehberliğini takip
ederek pratik yapabilirsiniz. Şarkının doğru süresine göre doğru notayı çalmalısınız.
Eğer 3 saniye içinde çalamazsanız, klavye otomatik olarak notayı çalacak ve ekrandaki
klavye alanı doğru notayı ve tempoyu gösterecektir. Bir şarkıyı bitirdikten sonra,
öğrenmek istediğiniz mevcut şarkıyı tekrarlayın. Eğitim işlevini kapatmak için
[Başlat/Durdur] düğmesine veya [Topluluk] düğmesine basın.
Notlar:
Bu durumda, klavye yalnızca doğru notaları çalar ve yanlış notalara yanıt vermez.
Eğitim işlevini devre dışı bırakmak için [Başlat/Durdur] düğmesine veya [Devam]
düğmesine basın.
Alıştırma 11: TAKİP ET
Takip fonksiyonunu etkinleştirmek için [Takip] düğmesine basın, "LEARN" "SONG"
ve şarkı numarası ekranda gösterilecektir ve ardından pratik yapılacak şarkıyı seçmek
için "+" / "-" düğmesine basın. [Takip] fonksiyonu ile doğru çalınan notaları takip
ederek pratik yapabilirsiniz. Demo şarkıya göre çalabilir ve kılavuzu takip ederek
doğru şekilde çalabilirsiniz. Ayrıca ekranın klavye alanındaki göstergeleri takip
ederek çalmayı öğrenebilirsiniz. Bir sonraki notaya geçmeden önce doğru notayı
çalmanızı bekleyecektir.

Ekler
I. SES TABLOSU
000-111
Birim paneline bakın
112 Clavi 2
113 Celesta 2
114 Harpsikord 2
115 Fm yumuşak 1
116 Pi Pa 2
117 Dik piyano 1
118 Elektrikli piyano 2
119 Vibra dura 1
120 Ahşap barafon 2
121 Müzik kutusu 2
122 Marimba 2
123 Santur
124 Kamış org 2
125 Mızıka Puf 1
126 Ukulele 1
127 Gtl 12 telli
128 Gitar tutam 2
129 Yavaş Viyolalar 1
130 Parlak teller 1
131 Aşağı orman 2
132 hint ütü 1
133 Clavi 3
134 Celesta 3
135 Kilise çanları
136 Marimba 3
137 Tatlandırıcı 2
138 Kamış org 3
139 Elektro gitar (ince) 2
140 Koto 2
141 Ksilofon 2
142 Shanai 2
143 Tatlandırıcı 3
144 İngiliz Kornosu 2
145 Elektro gitar (ince) 3
146 Shamisen 2
147 Koto 3
148 Kalimba 2
149 Çelik başlık 1
150 Alto saksafon 2
151 Ahşap blok 2
152 Sentezleyici. harpi 1
153 Saldırı pimi.1
154 Kristal 1
155 Gayda borusu 2
156 Barafon 1
157 Org ütü 1
158 Kalimba 3
159 Baston boynuzu 1
160 Vibra dura 2
161 İkiz trombonlar 1
162 Sitnetizator harpi 2
163 Saldırı pimi.2
164 Gitar korosu 1
165 Çelik başlık 2
166 Tsugaru
167 0cho arp 1
168 Bodhran 1
169 Borulu davlumbazlar 2
170 Suona
171 Kastanyetler
172 Saldırı pimi 1
173 Electric vibraphone 1
174 yumuşak saksafon 1
175 yumuşak dübel. 1
176 yumuşak gitar 1
177 gitar 1
178 Didgeridoo 1
179 Saldırı çubuğu 1
180 Barafon susturuldu 1
181 Nay 1
182 Yumuşak Santur
183 Çift korna
184 Bargot sert 1
185 Tron Flüt 1
186 Kawala 1
187 Cazz Org 1
188 Yumuşak akor 1
189 Nefesli Org 1
190 Saldırı Viola 1
191 Bari & Tenor 1
192 yumuşak saksafon 2
193 Saldırı arpı 2
194 Didgeridoo 2
195 Çift korna 2
196 Bargot sert 2
197 Kawala 2
198 yumuşak gitar 2
199 sessiz barafon 2
200 Ana (bas/prin) 2
201 Melodik Tom 2
202 bas gitar 2
203 Ana (SaMooth) 2
204 Cazz bas 2
205 gitar korosu 2
206 Geri bildirim Gt. 2
207 Keman 2
208 Org ütü 2
209 Flugel'in borusu 2
210 Kristal 2
211 Yumuşak klavsen. 2
212 Saturated guitar 2
213 Ukulele 2
214 tango akordeon 2
215 İkiz trombonlar 2
216 Cazz Org 2
217 Parlak teller 2
218 Baston boynuzu 2
219 Glockenspiel 2
220 Çeki demiri orgu 2
221 Korna sessiz 2
222 Pizzicato yaylılar 2
223 Hayır 2
224 Mızıka Pufu 2
225 Dilsiz trompet 2
226 Dik Piyano 2
227 Yumuşak akor 2
228 Uillean harp 2
229 Tron Flüt 2
230 Üemeli şişe 2
231 Hint ütü 2
232 Yavaş keman 2
233 Elektro gitar (sessiz)2
234 Çoklu rüzgar 2
235 Elektrikli vibrafon 2
236 Bodhran 2
237 Fm 2 yumuşak
238 Çoklu baston 2
239 Kontrbas 2
240 Barafon 2
241 Nefesli Org 2
242 12-str. Gt 2
243 barafon'a saldiri 2
244 Ana (Calliope) 2
245 saldırı viyola 2
246 Ped (sıcak)2
247 sekiz kişilik arp 2
248 Bari & Tenor 2
249 Agogo 2
250 Flugel'in borusu 3
251 Org ütü 3
252 Keman 3
253 Geri bildirim GI. 3
254 gitar korosu 3

II. 11. STİLLER TABLOSU
000-130
Birim paneline bakın
131 Batı Shue
132 Hızlı Bant 2
133 İspanyolca 1
134 Disko Funk 2
135 Pop Mambo
136 Avrupa Salıncak 1
137 Latin Hileleri
138 Disko Samba 2
139 Latin Valsi
140 Dans Pop 3
141 Caz Rock 1
142 Delroit
143 Fan sesi
144 Avrupa Rock1
145 Ritmik ritim
146 8 modern ritim 2
147 Disko Caz 1
148 Dixie Caz 1
149 Disko Çikolata
150 Latin Disko2
151 Synth Boogie
152 Cumartesi Gecesi 2
153 Kulüp Dansı 1
154 Bossa Nova Hileleri
155 Tarantella 2
156 ABD Mart
157 İspanyolca 2
156 CIub LatinO 2
159 Caz Ça Ça Ça 1
160 Cha Cha Ülkesi
161 Disko Partisi 2
162 Modern R&B 1
163 8 Beat Pop 2
164 Caz Ülkesi
165 Soul Rock 1
166 Rumba 2
167 Samba 3
168 Modern R&B 2
169 Kulüp Dansı 2
170 Bossa Nova ülkesi
171 Caz Bo 1
172 Cha Cha Moderno 1
173 Pop Reggae 2
174 Rock Samba 1
175 Caz 8 Beat 1
176 Disko
177 Seviile 1
178 Disko Manos 2
179 Rock Bailado
180 Mixto Bossa Nova
181 Caz 16 Vuruş 1
182 Tekli 16 Vuruş 1
183 Canciones de amor
184 Sencillo 16 Beat 2
185 Disko Tilki 2
186 Pop Rock 3
187 Waltz de Tijuana
188 Pop Británico 2
189 Espectáculo 1 müziği
190 Schlager Alp
191 Tek Kaya
192 Salıncak Valsi
193 SlowWaltz
194 Gato Groove 2
195 Country Slow Rock
196 Rock Disko 1
197 16 Beat Shue 1
198 Caz 8 Beat 2
199 Casa
200 Guad Dansı 1
201 Caz Cha Cha 2
202 Ülke Walz
203 Rock Europeo 2
204 Baile caribeño 2
205 Caz Disko 2
206 Caz medio
207 Dans Eden Piyano
208 70'lerin Diskosu
209 Caz Rock 2
210 Avrupa Ritmi1
211 Sevilla 2
212 Rumba3
213 Soul Rock 2
214 Avrupa Disko 2
215 Analog Balad 2
216 Piano Pub 2
217 Avrupa Rumba
218 Rock'n Roll 2
219 Trop Disko
220 Rock Salsa 1
221 Avrupa Ritmi 2
222 Avrupa SambaAvrupa
223 Müzik göster 2
224 Caz 16 Beat 2
225 Rock Samba 2
226 Caz Valsi 2
227 Avrupa Reggae
228 Modern Cha Cha2
229 R&B Ballad 2
230 Rock Boogie
231 Caz Bossa Nova
232 Rock Salsa 2
233 Yavaş ve kolay
234 Kalça Valsi 1
235 Latin Caz 2
236 Rock Disko 2
237 Caz Tango 2
238 Analog Balad 3
239 Avrupa Salıncak 2
240 Hip Waltz2
241 JazzSwing2
242 Parti Pop
243 Caz Kulübü
244 Guad Dans 2
245 Jazz Bo 2
246 Dixie Jazz 2
247 Balad eğlencesi 2
248 Yumuşak caz rock
249 16 ritim karışık 2
250 Polka Pop
251 Latin parti pop
252 Parranda
253 Karnaval
254 Vintagede 60'lar Pop

Klavye braketi düzeneği

2'si 1 arada karaoke klavye: çalın ve şarkı söyleyin!
Kompakt ve taşınabilir müzikal piyano
Basit tak ve çalıştır işlemi
Taşınabilir piyano
Dahili tam aralıklı stereo hoparlörler
Harici cihazlardan ses bağlama ve aktarma
Hoparlöre bağlanabilir ve ses çalabilir
Çoklu ön ayarlı seçilebilir ses stilleri, ton ve klavye ritmi
Dijital LCD ekran
Ayarlanabilir ses kontrolü
Kayıt ve oynatma modu
Mikrofon giriş jakı
61 tuşlu klavye perküsyon fonksiyonu
Temel kontrol: MasterVolume / Accom Volume / Tempo Kontrolü
Otomatik Akor Fonksiyonu: Tek Akor / Parmak Akoru
Sustain Fonksiyonları, Vibrato Fonksiyonu, Klavye Bölme Fonksiyonu
Öğretim fonksiyonları: Tek Tuş / Takip / Topluluk
Dolgu Fonksiyonu, Metronom Fonksiyonu
Oturma odasında ev sineması performansları için mükemmel
Her yaştan çocuklar ve yetişkinler için eğlence
•
•
•
•
•
•
•
•
•
•
•
•
•
•
•
•
•
•
•
•
•
•
•
•
•
•
•
Dijital müzikal karaoke klavyesi
Kitap rafı
Adaptör
Elektrik şi
Klavye standı
Klavye taburesi
Kulaklıklı mikrofon seti
Özellikleri:
Kutunun içinde ne var:

Kulaklık özellikleri:
Klavye standı özellikleri:
Klavye bankı, özellikler:
Yapı malzemesi: ABS + lazer dekoratif folyo
Kablo malzemesi: PVC yassı tel
Kablo uzunluğu: 1,1 m (110 cm)
Fiş çapı: 3,5 mm 1/8
Ağırlık: 0,14 kg (0.06 lbs)
•
•
•
•
•
•
•
•
•
•
•
•
•
•
•
•
•
•
•
•
•
•
•
Fırınlanmış vernik
Ayrılabilir
Yükseklik ayarı
Klavye kilidi işlevi
Yapı Malzemesi: Demir + ABS
Uzunluk: 31,5 inç (80 cm)
Genişlik: 8,3" -inç (21 cm)
Yükseklik: 22.6”~26.5” -inç (57.5~67.5 cm)
Ağırlık: 1,75 kg (3.85 lbs)
Rulman: 15 kg (33 lbs)
Fırınlanmış vernik
Katlanabilir
Yükseklik ayarı
Yapı malzemesi: PU deri, demir, sünger, ahşap
Uzunluk: 15,75 inç (40 cm)
Genişlik: 11,81" -inç (30 cm)
Yükseklik: 17,32"/18,9"/20,1"-inç (44 / 48 / 51 cm)
Ağırlık: 2,2 kg (4.85 lbs)
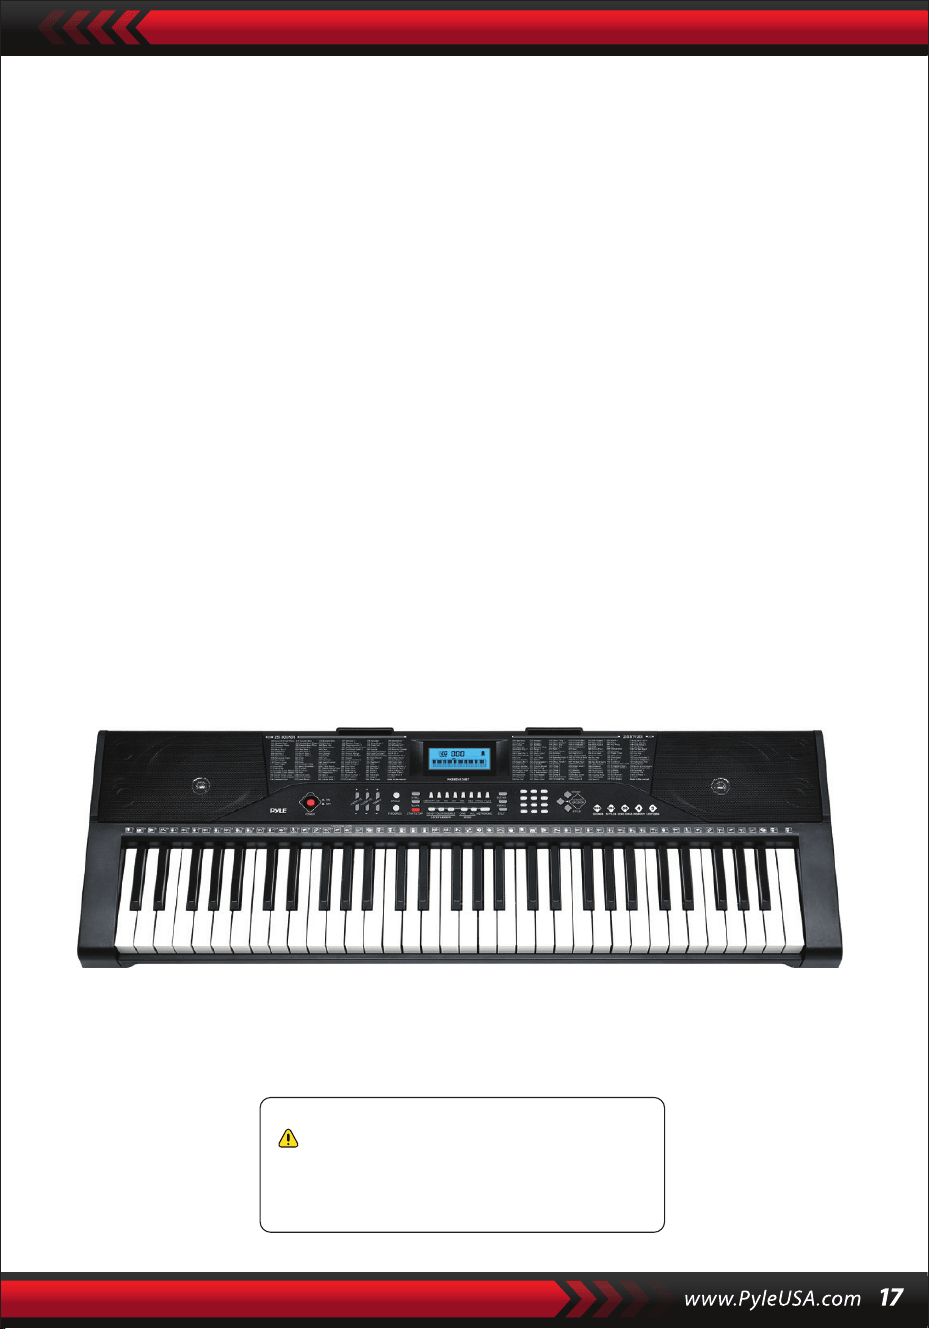
Teknik özellikler:
(61) tuşlar
255 stil/ 255 ses
50 demo şarkı: Bir/AII
Ses arayüzü: yardımcı çıkış jakı (3,5 mm) / mikrofon girişi
Maksimum ses seviyesi: 110 dB'ye kadar
USB/Güç kablosu uzunluğu: 3,9' ft. (119 cm)
Yapı malzemesi: Tasarlanmış ABS
Güç kaynağı: 9V / AC DC adaptör, 6" AA pil (sete dahil değildir)
Piyano boyutları (U x G x Y):
36.6”x 11.97” x 3.7” -inç (93 x 30 x 9.3 cm)
•
•
•
•
•
•
•
•
•
Kaliforniya Prop 65 Uyarısı
DİKKAT:
Bu ürün, Kaliforniya Eyaleti tarafından kansere, doğum
kusurlarına ve diğer üreme zararlarına neden olduğu
bilinen kurşun ve kadmiyum içerir. Yutmayın.
Daha fazla bilgi için bkz: www.P65warnings.ca.gov

Questions or Comments
We are here to help!
Phone: 1 · 718 · 535 · 1800
PyleUSA.com/ContactUs