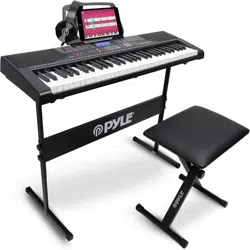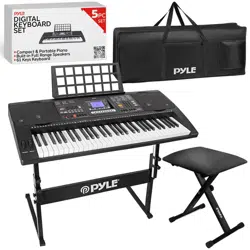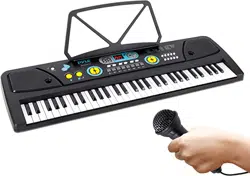
Portable Electronic Piano Keyboard
with Water-Resistant Bag (61 Keys), Keyboard Stand,
Sustain Pedal and Headset
Digital Musical Keyboard
PKBBD6175P
ENG
USER GUIDE

• Use the specified power adapter, and immediately replace damaged
adapter if any.
• Do not disassemble the instrument, nor modify internal parts. If it
malfunctions, discontinue the use immediately and have it repaired by
professional serviceman.
• Before connecting the instrument to other devices, turn off all the power
supplies.
• Do not play the instrument at the maximum volume or to an uncomfort-
able extent for a long time.
• Keep the parts of the instrument off heat source, for overheat may cause
damage.
• Prevent liquid, dust, particles and other foreign matters from entering the
instrument to cause corrosion of the instrument or short-circuit of its
components.
• Pull the plug before cleaning the instrument.
• Do not insert or pull the plug with wet hands.
• Use dry and soft cloth to clean the instrument. Do not use paint, alcohol or
other chemical solvents to wipe the instrument so as to avoid damage to
the instrument surface.
• Turn off the power supply and pull the plug after playing or in no-service
condition for a long time.
• To reduce the risk of fire or electric shock, do not expose this apparatus to
rain or moisture. The apparatus shall not be exposed to dripping or splash-
ing and that no objects filled with liquids, such as vases, shall be placed on
the apparatus.
• Maximum Operating Tamperature: 40°( / 104°F
• Direct plug-in adaptor is used as disconnect device, the disconnect device
shall remain readily operable.
• Do not install this equipment in a confined space such as a book case or
similar unit, and remain a well ventilation conditions. The ventilation
should not be impeded by covering the ventilation openings with items
such as newspaper, table-cloths, curtains etc.
• Warning: Excessive sound pressure from earphones and headphones can
cause hearing loss.
• The label location is on the bottom of the apparatus.
• The apparatus shall not be exposed to dripping or splashing and that no
objects filled with liquids, such as vases, shall not be placed on apparatus.
• The direct plug-in adapter is used as disconnect device, the disconnect
device shall remain readily operable.
PLEASE READ CAREFULLY BEFORE PROCEEDING
Please keep this manual in a safe and handy place for future reference
WARNING!
This marking indicates that this product should not be disposed with
other household wastes tharoughout the EU.
To prevent possible harm to the environment or human health from
uncontrolled waste disposal, recycle it responsibly to promote the
sustainable reuse of material resources. To return your used device,
please use the return and collection systems or contact the retailer
where the product was purchased. They can take this product for
environmental safe recycling.
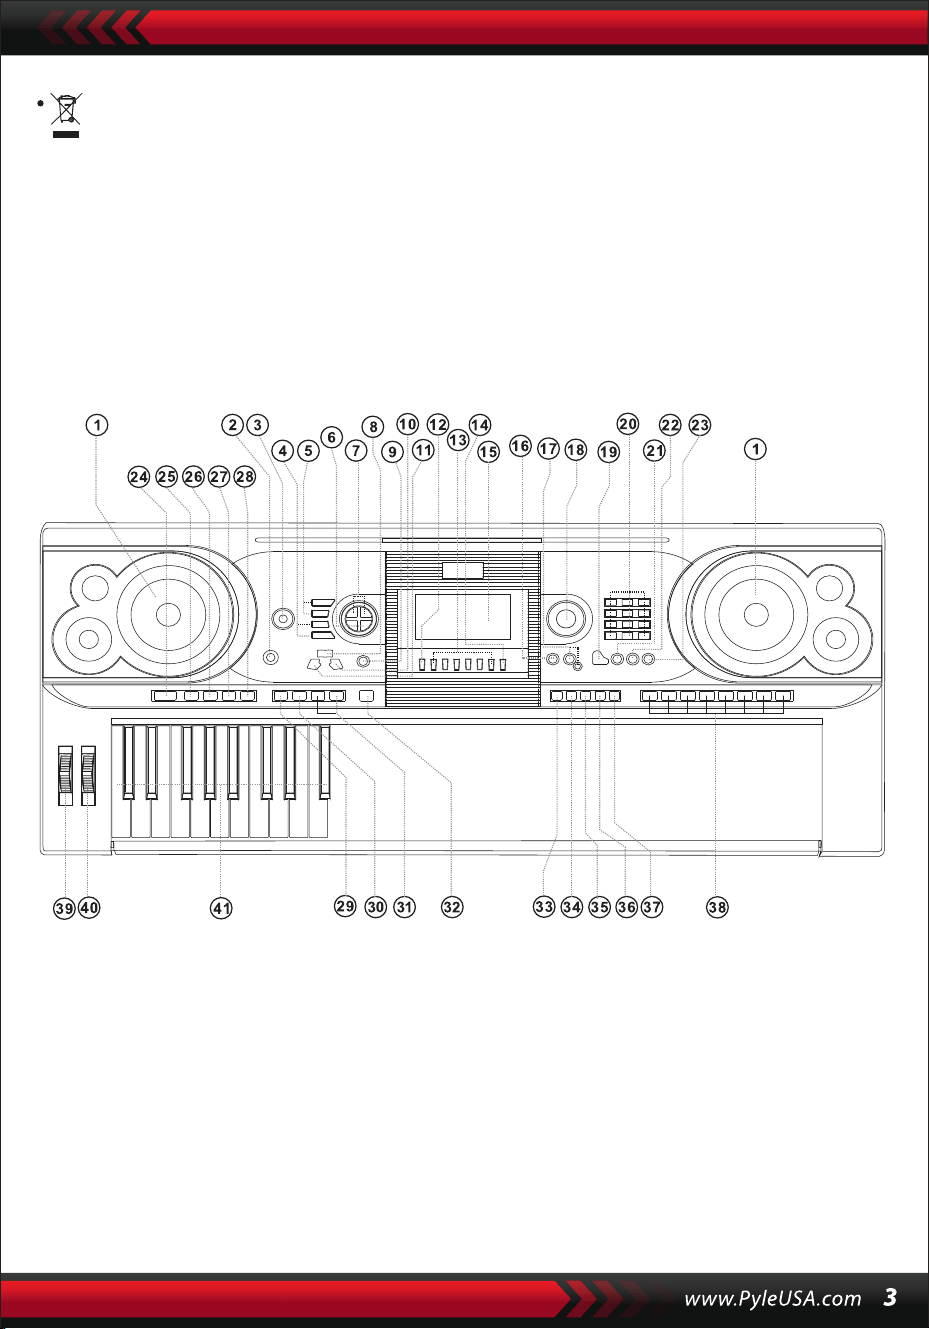
I. Control Panel and Extension Ports
1 Speaker
2 Power Switch
3 MasterVolume
4 Tempo
5 Accom Volume
6 Transpose
7 Octave
8 Lesson
9 Function
10 Right
(Chord Dictionary)
11 Left
12 Memory
13 M1,M2 ... M6
14 O.T.S
15 LCD Display
16 Demo
17 Record/Play-back
18 Data Dial
19 Piano
20 Numbers
21 Sound
22 Style
23 Song
24 Start/Stop
25 Intro/Ending
26 Fade In/Out
27 Fill-In A
28 Fill-In B
29 Sync
30 Auto Bass Chord
31 Prog/Null-Play
32 Metronome
33 Touch
34 Sustain
35 Split
36 Dual
37 Keyboard Percussion
38 Panel Percussion
39 Pitch Bend
40 Vibrato
41 Chord Keyboard
USING AC/DC POWER SUPPLY ADOPTOR
The AC/DC power supply adaptor must be the one designated for the instrument.
Connect one side to the power supply socket on the back-panel and the other to
the city-power network. (Please notice that the input voltage should be the same
as that of the power network.)
HEADPHONE JACK
Insert the headphone (not included) into the phone jack on the back of the body,
so that the inner loudspeaker can be cut off automatically and the playing and
singing can proceed without disturbing others.
CONNECTION WITH AMPLIFIERS AND ACOUSTICS
The instrument has an inner loudspeaker system and it can also be connected to
other amplifiers or loudhailers. First, shut off the instrument and other equip-
ment, then insert the stereo frequency cable into the OUT L/R on the back-panel
and the other into the LINE IN or AUX IN jack of the outer equipment.
USB MIDI
MIDI is short for Musical Instrument Digital Interface. Through the MIDI jacks the
keyboard can be connected to other music instruments or computer with MIDI
by a piece of data line to transfer data. In this case, any performance on the
keyboard can be transferred to the computer and then recorded, composed or
edited with an advanced software in the computer. All the MIDI music reserved
in the computer can be transferred to the instrument and blared out.
The Methods of Applying the USM MIDI:
1. First, connect the instruments with the computer by universal data line and
get power on.
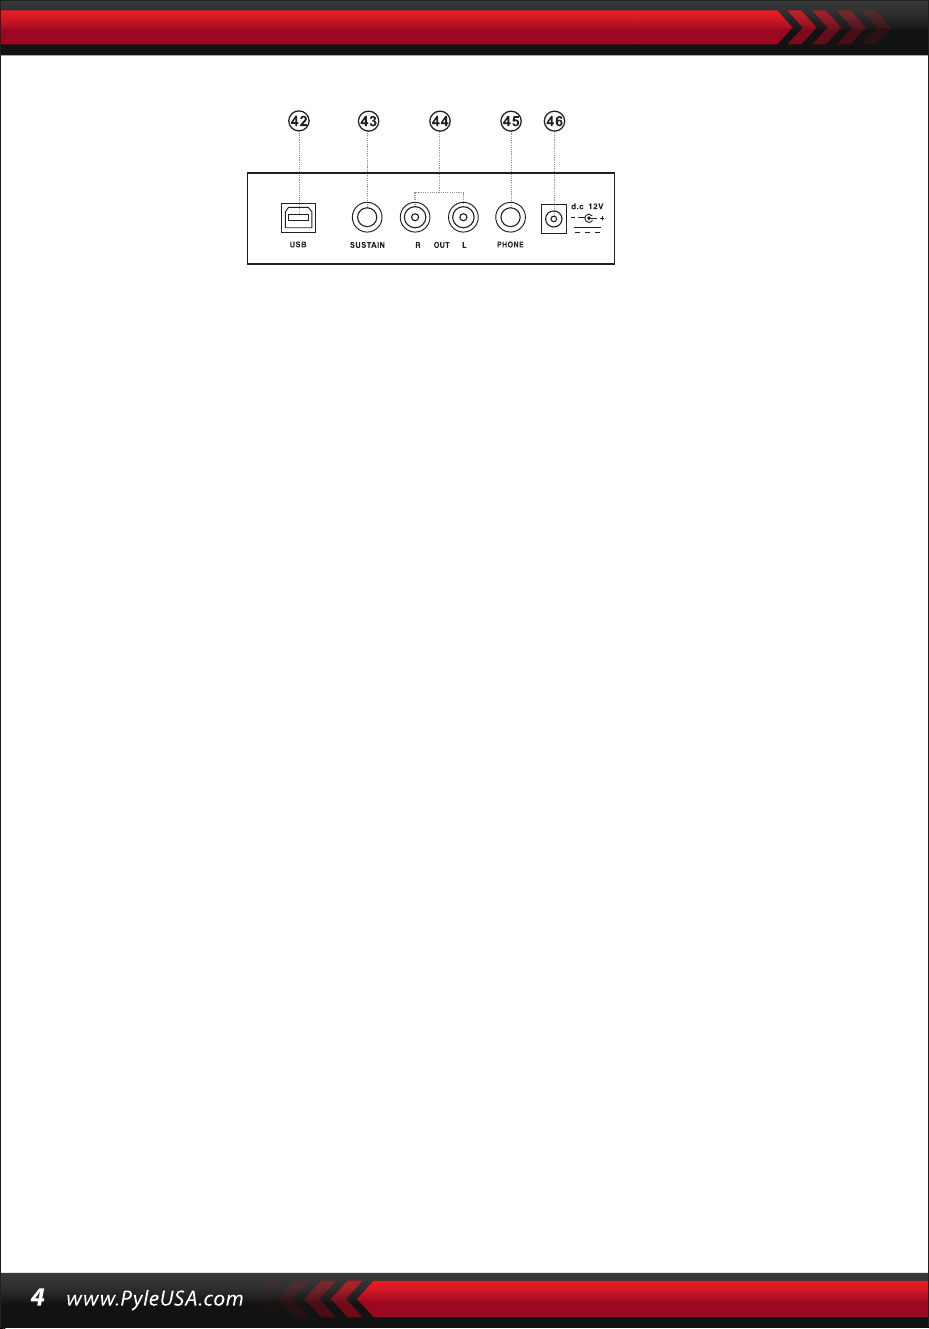
II. Preparation for Performance
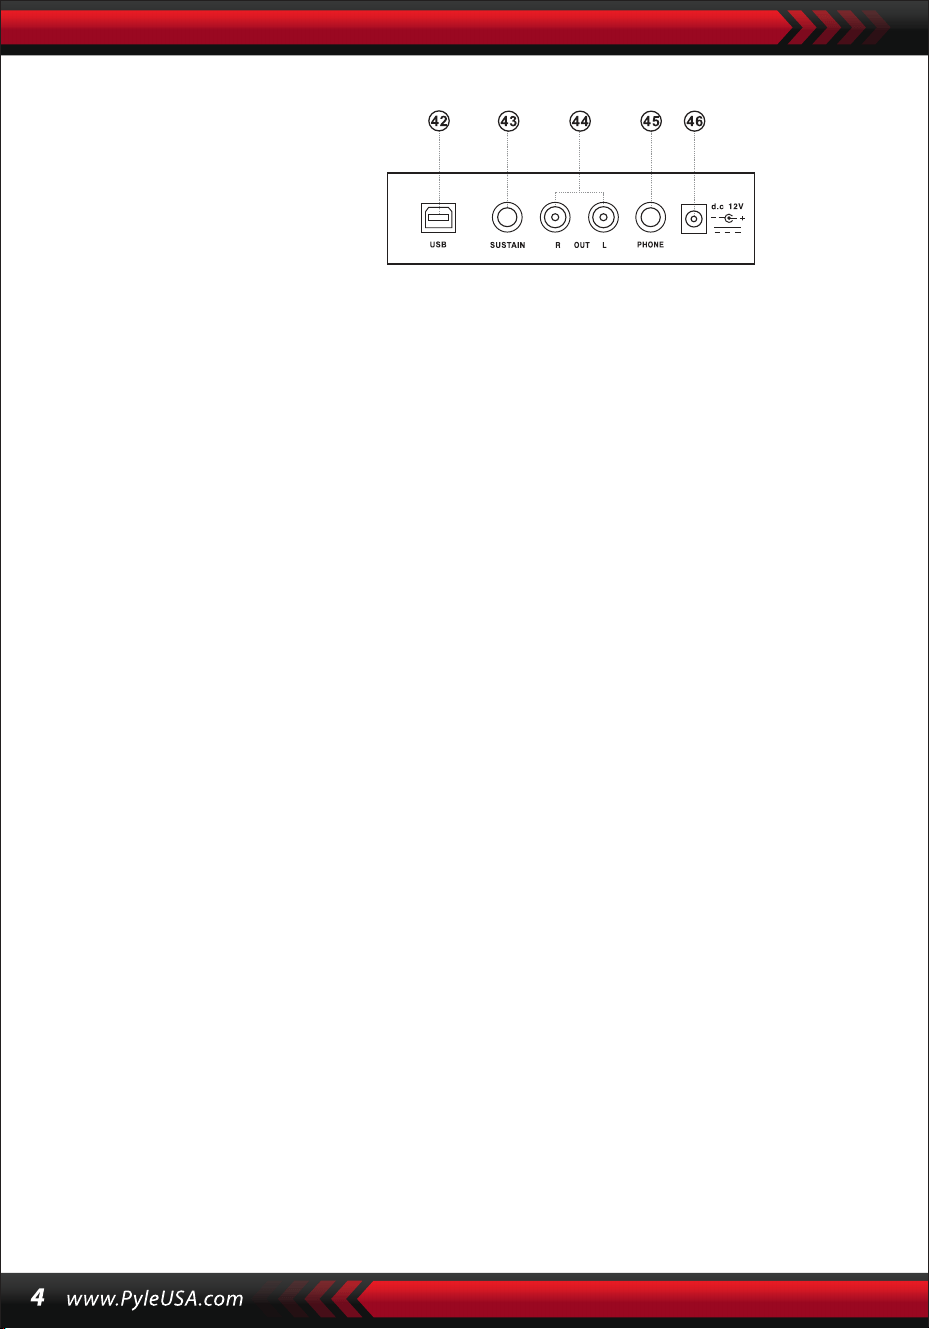
REAR PANEL
42 USB MIDI JACK
43 SUSTAIN JACK
44 OUT L/R JACK
45 PHONE JACK
46 DC 12V IN JACK

2. Second, install and launch the music editing software, for exmaple, CAKEWALK.
Then the special hardware of the instrument will appear in the hardware contain-
ing the musical software and shall be set as the default device. In this case, the
data communication between the instrument and the computer has been
established.
3. Third, set the MIDI channels of the instrument
(Please check it out in the introlduction of the [Menu] button.)
SUSTAIN PEDAL (NOT INCLUDED)
The Instrument can be added to an outer sustain pedal, which can be used to make
a sustain effect on the performance.
MASTER VOLUME ADJUSTMENT
Turn the master volume knob clockwise to increase the master volume; counter
clockwise to decrease. The knob also controls the volume of accompaniment.
III. Basic Method of Performance
The Instrument can be added to an outer sustain pedal, which can be used to make
a sustain effect ont he performance.
The imaginary full screen that illustrates al mark cursors and parameters of
different modes:
The full screen of the LCD when power on:
DATA DIAL
Turning the [Data Dial] knob is a shortcut to pick out a voice, a rhythm, or a song.
Turning it clockwise, bigger code can be reached; counterclockwise, smaller.
PANEL AND KEYBOARD PERCUSSIONS
There are 8 kinds of panel percussions and 61 keyboard percussions reserved in
the instrument.
• Press the [Panel percussion] button, a corresponding percussion sound can be
started by a certain keystroke.
• Press the [Keyboard Percussion] button with "PERCUS" appearing on the LCD
screen. In this case, percussion performance can be carried out on the keyboard.
A certain key corresponds to a certain type of percussion sound. Press the button
again to exit the function.
IV. The Function Button
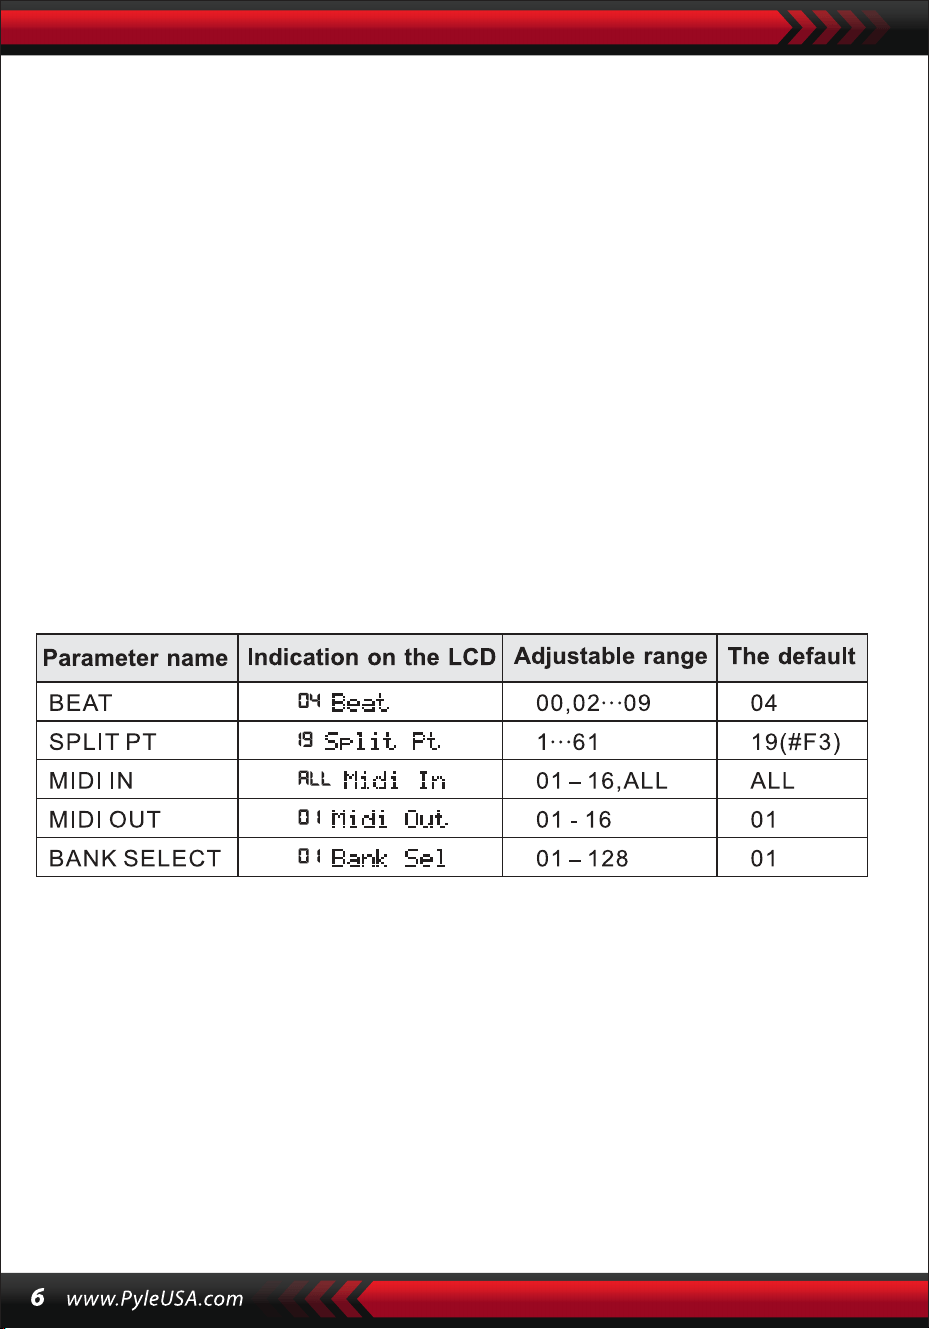
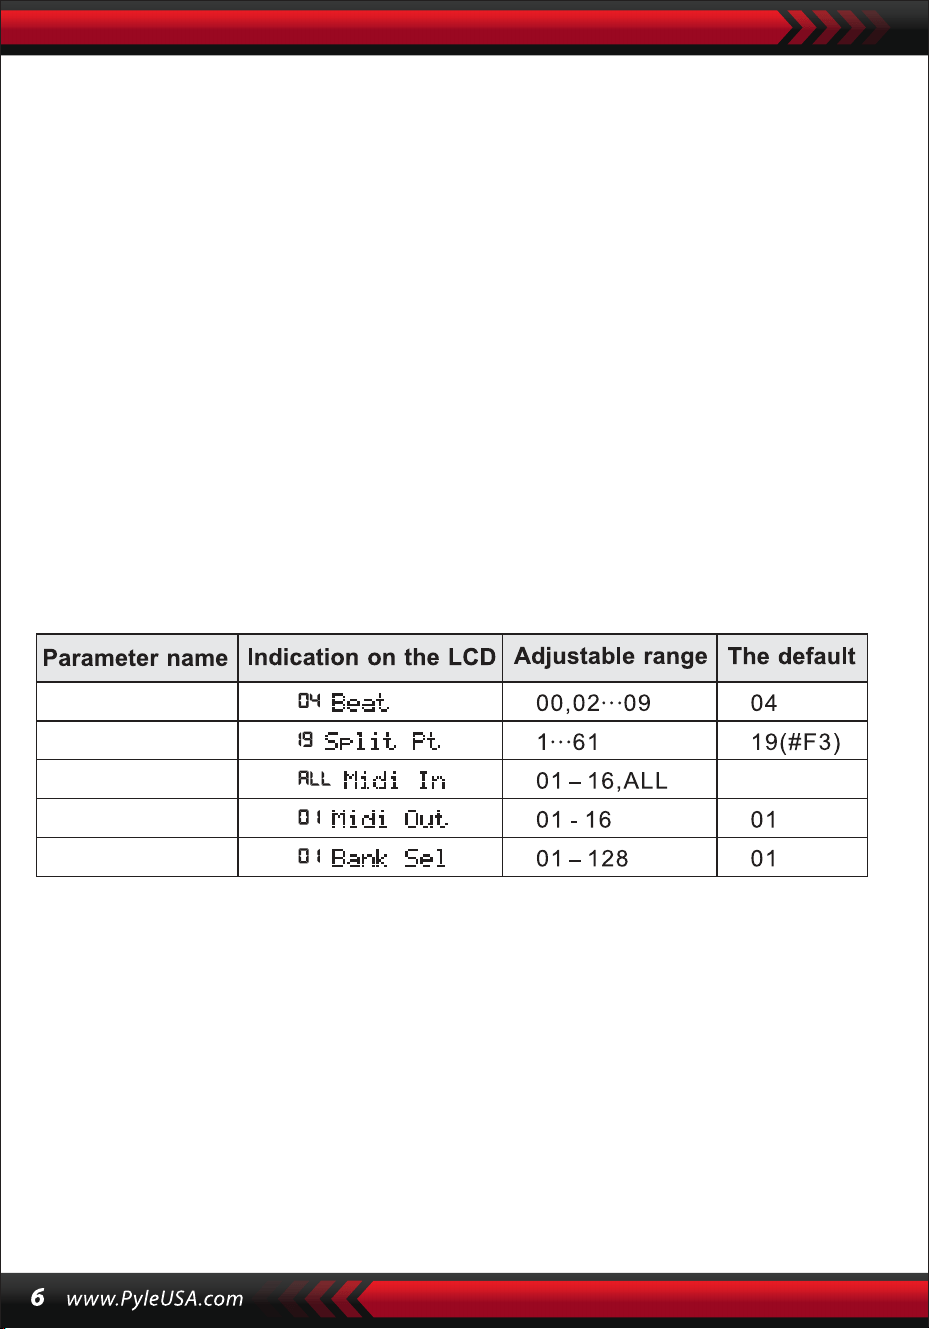
The following provides the details about the parameters that can be configured
through the [Function] button.
BEATS
Hold the [Function] button until "04Beat" appears on the LCD screen. In this case,
any one of the nine different beat styles can be chosen, coded 00, 02 to 09.
The target beat style can be picked out through the [ +/-] buttons or the [Data Dial]
knob.
SPLIT POINT
The key is called the split point which divides the keyboard into two parts, the
accompaniment keyboard on the left and the melody keyboard on the right.
The default split point of the instrument is on the 19th key from left, and the point
can be reset on any key of the keyboard.

SETUP OF MIDI CHANNELS
1. MIDI IN
Press the [Function] button repeatedly until "MIDI In" appears on the LCD screen.
In this case, the target channel can be chosen to play the input MIDI files by
pressing the[+/-] buttons or turning the [data Dial] knob to the "all': which means
all channels (coded 01 to 16 )are available. All channels are preset available when
the instrument is power on.
2. MIDI OUT
Press the [Function] button repeatedly until "MIDI Out" appears on the LCD
screen. In this case, the target channel can be chosen to transmit the output MIDI
files by pressing the[+/-] buttons or turning the [data Dial] knob. But some of the
MIDI files cannot be transmitted, such as the auto rhythm, demonstration songs,
and songs reserved in the instrument. When the instrument is power on, channel
01 is preset available.
BANK SELECT
Press the [function] button repeatedly with "Bank Sel" appearing on the LCD screen.
In this case, the target voice bank, among 128 banks coded 01 to 128, can be
chosen to adjust the voice of the MIDI keyboard by pressing the[+/-] buttons or
turning the [data Dial] knob. When the instrument is power on, the preset voice
bank is BANKO 1.
Note: There is just one voice bank, coded BANK 01, with 128 voices in the standard
GM voice bank. If there are other voice banks in the computer, they can be added
up to the instrument and defined with codes from BANK 01 to 128.
V. Sounds and Effect
SELECTION OF SOUND
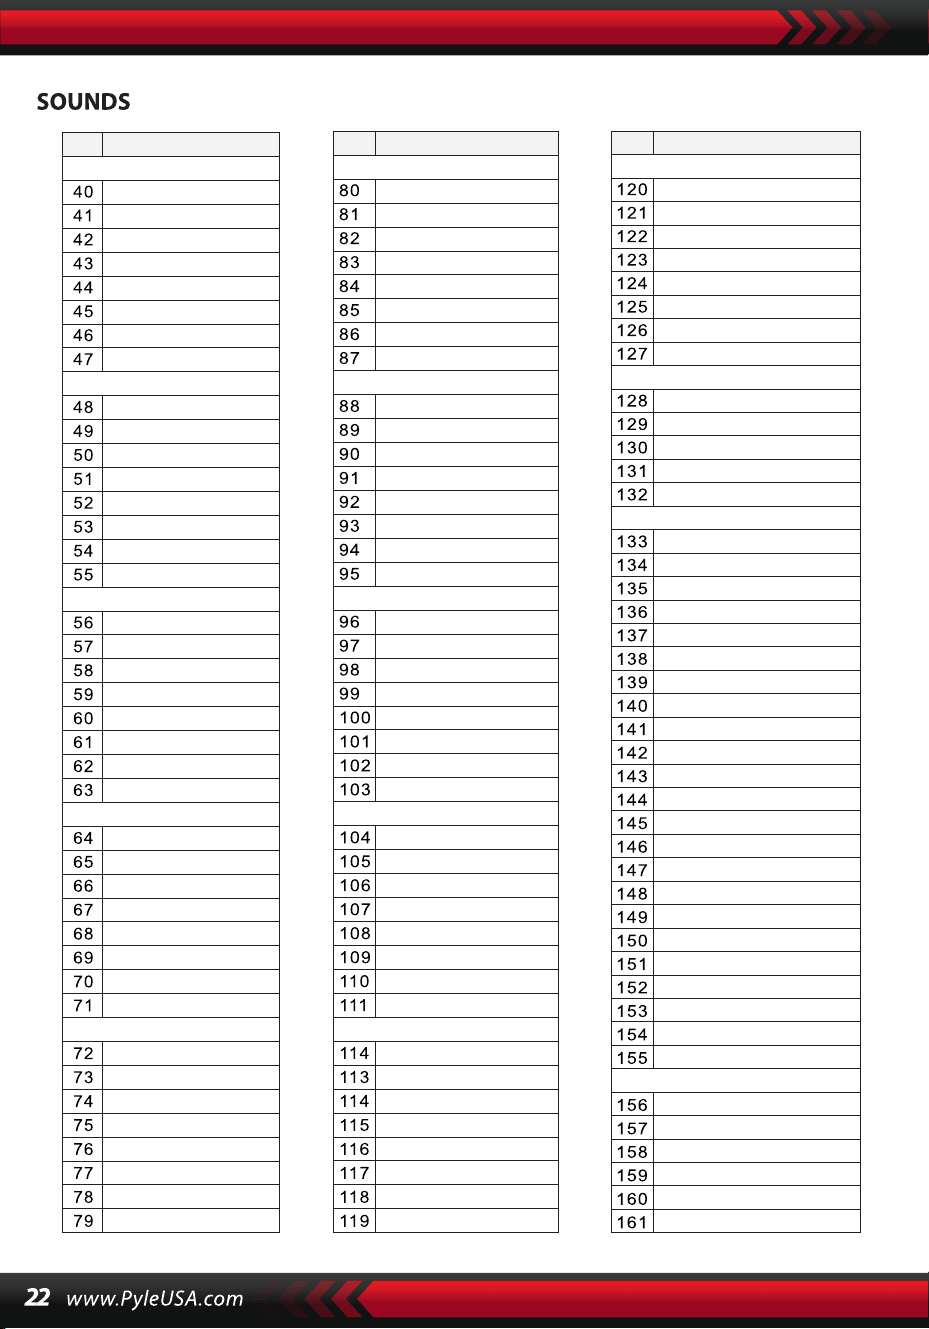
There are 162 kinds of Sounds in the system, including 128 GM sounds, 6 groups of
sounds for keyboard percussion, and 5 groups of sounds for folk music.
Repeatedly press the [Function] button until "19 Split Pt" appears on the LED
screen. In this case, the split point can be reset by pressing the[+/-] buttons or
turning the [data Dial] knob, or by the keystroke of the target key. Then the new
split point is set after the choosing ends.
When power on, the default sound is the sound coded 00, which "00 Grd Piano" on
the LCD screen stands for. Press the [Sound] button to start the voice set-up func-
tion. The target voice can be picked out through the number buttons, the[+/-]
buttons or the [data Dial] knob. However, as for applying the number buttons, the
target sound code should be input with three digits. That means "00" or "0" should
be added up to the one or two-digited code, for example, if the target voice code is
65, digits 0, 6 and 5 should be input, and if it is 8, digits 0, 0 and 8 should be input.
PIANO
In order to make it more convenient for the users, the instrument is particularly
designed with the [Piano] button, by pressing which the piano voice can be
picked out directly.
1.Pressing the [Piano] button can make the instrument get into the piano mode
with "PIANO" appearing on the LCD screen. The sound of any keystroke takes on
the voice of piano.
2.While in the mode of accompaniment, pressing the [Piano] button can stop the
accompaniment and make the instrument get into the piano mode. Press the
button again, the function quits.
1.Press the [Dual] button with "SOUND" appearing and the cursor pointing to
"DUAL" on the LCD screen. The code of the second sound will also be displayed
on the LCD screen. The preset second sound is Sound 48. In this case, the voice of
keystrokes is a combination of the two sounds.
2.The second sound can be picked out by pressing the [ +/-] buttons or turning the
[data Dial] knob.
Note: In the Piano mode, rhythms can be selected and played, also accompani-
ment control can work normally, but just the percussions without chord.
DOUBLE-SOUND FUNCTION
The instrument has a double-sound function-any two sounds can be combined
to make a new sound effect and enrich the sound complexity which seems to
be made by playing two kinds of musical instruments. Before the [Dual] button
comes into power, the sound of the instrument is marked "SOUND 1" on the
LCD screen, and the second sound can be picked out as following:

3. In the Duble-voice function, the first sound can be changed by first pressing the
[Sound] button to switch the instrument into the setup mode of "SOUND 1", then
by pressing the[+/-] buttons or turning the [data Dial] knob.
4. In the double-voice function, pressing the [Dual] button can stop the function,
and the "SOUND 2" and the cursor pointing to "DUAL" on the LCD screen disap-
pear, which means the system has returned to the setup mode of "SOUND 1".
Note: Out of the charge of "auto chord", the double-sound function can be applied
on the whole keyboard; while in the charge of the "auto chord", it can be just
applied on the melody keyboard not on the accompaniment keyboard.
DYNAMIC-FEELING KEYBOARD
When the instrument is power on, the dynamic-feeling function is on as well with
the cursor shining "TOUCH". Also pressing the [Touch] button can get the function
on or off. The function can show the dynamic which is applied to the different
keystrokes, so the function can strengthen the performance on the keyboard. The
dynamic gets larger, the volume of the notes becomes larger. When the function
quits, any dynamic of the keystrokes makes the same volume.
PITCH BEND
Switching the [Pitch Bend] upwards or downwards, the pitch will slide to alt or
bourdon. Un lash the bend, the pitch returns normal.
VIBRATO BEND
When the [Vibrato Bend] stays lowest downwards, the vibrato function is power off.
Switch it upwards, the function is on and the sound of the keystrokes takes on a
sustain effect. Switch it upwards or downwards, the effect can be strengthened or
weakened.
SUSTAIN
1. Press the [Sustain] button with the cursor shinning "SUSTAIN" on the LCD
screen to start the function. The sound of the keystrokes takes on an elegant
sustain effect.
2. Press the [Sustain] button again with "SUSTAIN" disappearing on the LCD
screen to exit the function.

OCTAVE
The [Octave+/-] buttons can be applied to pitch the instrument an octave
above or below. Press either the [Octave+] or the [Octave-] for the first ti me,
the present octave value shows on the LCD screen; press either of them
again, the pitch of the instrument can be an octave above or below within
the rang of possibilities.
TRANSPOSE
Press the [Transpose ] or [Transpose ] button to transpose the tone of the
notes. The transpose may be adjusted from "-6" to "+6". Apply the both
buttons at the same time, the tone of notes turns normal to the preset value
"O". In the transpose function mode, the transpose value can also be altered
by turning the [data Dial] knob.
DOUBLE KEYBOARD
Press the [Split] button with the cursor shining "SPLIT" to divide the keyboard
into two parts, the 24 keys on the left and the rest keys, to form a double
keyboard. The pitch of the left part becomes an octave above while that of
the right part falls an octave below, that is, the pitch of the two parts become
consistent. Meanwhile, the sound of the two parts can be different. The left
part keeps the primary voice but the right part can gain another one. Press
the [Split] button again with the cursor darkening "SPLIT",the function quits
and the voice of the whole keyboard keeps that of the previous right part.
Note: In the the auto-chord mode, the dynamic-feeling function, sustain
effect, the pitch bend and the vibrato cannot work on the chord keyboard.
VI. Auto-Styles
SELECTION OF STYLES
There are 200 different styles to be chosen from, ranging from 00 to 200.
When the instrument is powered ON, the defaulted style is the one coded
"00". Press the [style] button with "STYLE" appearing on the LCD screen, then
the target style can be picked out through the number buttons, the [ +/-]
buttons or the [Data Dial] knob.

Note: The target style code can be reached by inputting three digits. That
means "00" or "O" should be added up to the one or two-digited code, for
example, if the target style code is 66, digits 0, 6 and 6 should be input, and if
it is 9, digits 0,0 and 9 should be input.
START /STOP STYLE
Press the [Start/Stop] button to start or stop the accompaniment style.
SYNC
Press the [SYNC] button with beat dots twinkling on the LCD screen display.
With the auto-chord function off, any keystroke on the keyboard can start a
piece of style. But with the auto-chord function on, any keystroke on the
chord keyboard can make the melody performance and the accompaniment
style go on at the same time.
INTRO/ENDING
1. Before a piece of style proceeds, the [Intro/Ending] button can start, with
the cursor shining "NOR" on the LCD screen, a piece of prelude, leading the
normal style to play.
2. During the proceeding of a piece of style, pressing the [Intro/Ending]
button can make the normal style proceed with a piece of ending, and then
stop the whole style.
Note: Before the ending ends, pressing the [Fill-in Al or the [Fill-in BJ button
can make the previous normal style proceed.
FADE IN AND FADE OUT
1. When the style stops, press the [Fade In/Out] button with the cursor shin-
ing the "FADE". In this case, start a piece of style, then the style can fade in
and reach at full blast within 8 seconds with the shining "FADE" disappearing.
2. During the proceeding of a piece of style, pressing the [Fade In/Out]
button can make the style fade out from the full blast within 8 seconds, and
the shining "FADE" disappears.
INTERMEZZO
1. During the proceeding of an accompaniment, hold the [Fill In A] button
until a piece of intermezzo can be heard and the cursor shines "VAR" on the
LCD screen, then the normal accompaniment proceeds.
2. During the accompaniment, press the [Fill In B] button and keep it until
another piece of intermezzo can be heard and the cursor shines "VAR" instead
of "NOR" on the LCD screen, then the normal accompaniment proceeds. The
twinkling of the shining "VAR" shows the style is on the proceeding of a piece
of variation.
3. By pressing the [Fill-in A] or [Fill-in B] button firmly, intermezzos can be
inserted successively. After the intermezzo ends, there will be a normal
accompaniment proceeding.
AUTO-METRONOME
Press the [Metronome] button, the instrument makes a ticking sound show-
ing the beat. In this case, different styles of beat can be picked out through
the [Function] button. Press the button again, the metronome function quits.
TEMPO ADJUSTMENT
The [tempo] buttons can be applied to adjust the tempo of styles.
Press the [Tempo ]/ [Tempo ] button or turn the [Data Dial] knob upward
or downward to quicken or slow the tempo of style in the value range of 40
to 280 beats per minute, and the current tempo value shows on the "TEMPO"
on the LCD screen. Apply the both [tempo] buttons at the same time to bring
the tempo value back to the preset one.
ACCOMPANIMENT VOLUME ADJUSTMENT
Press the [Accom Vol ]/ [Accom Vol ] to increase or decrease the accompa-
niment volume in the value range of 00 to 31. Apply the both at the same
time to bring the accompaniment volume value back to the preset one.
VII. Auto-Bass Chord and Chord Dictionary
Press the [Auto Bass Chord] button to start the auto bass chord function with
the cursors pointing to A, B, C (which stand for the auto bass chord) shining
on the LCD screen. In the charge of the auto bass chord, the 19 keys on the
left part of the

keyboard are the chord keys. During the style proceeding, a piece of auto
bass chord can be started by keystrokes on the chord keys.
Note:
1. Press the [Function] button to change the split point and the range of the
chord keyboard. (See the "Split Point" for details.)
2. The instrument can recognize both single-finger and fingered fingerings. It
will accept whatever fingerings that accord to the fingered, but accept the
single- finger when the fingerings don't accord to the fingered.
Single-finger:
(The following fingering are designed to be accepted by this instrument.)
1. Major triad: Play the chord roots
2. Minor triad: Play the chord roots and any black key on their left at the
same time.
3. Dominant seventh chord: Play the chord roots and any white key on their
left at the same time.
4. Minor seventh chord: Play the chord roots, a white and a black keys on
their left at the same time.
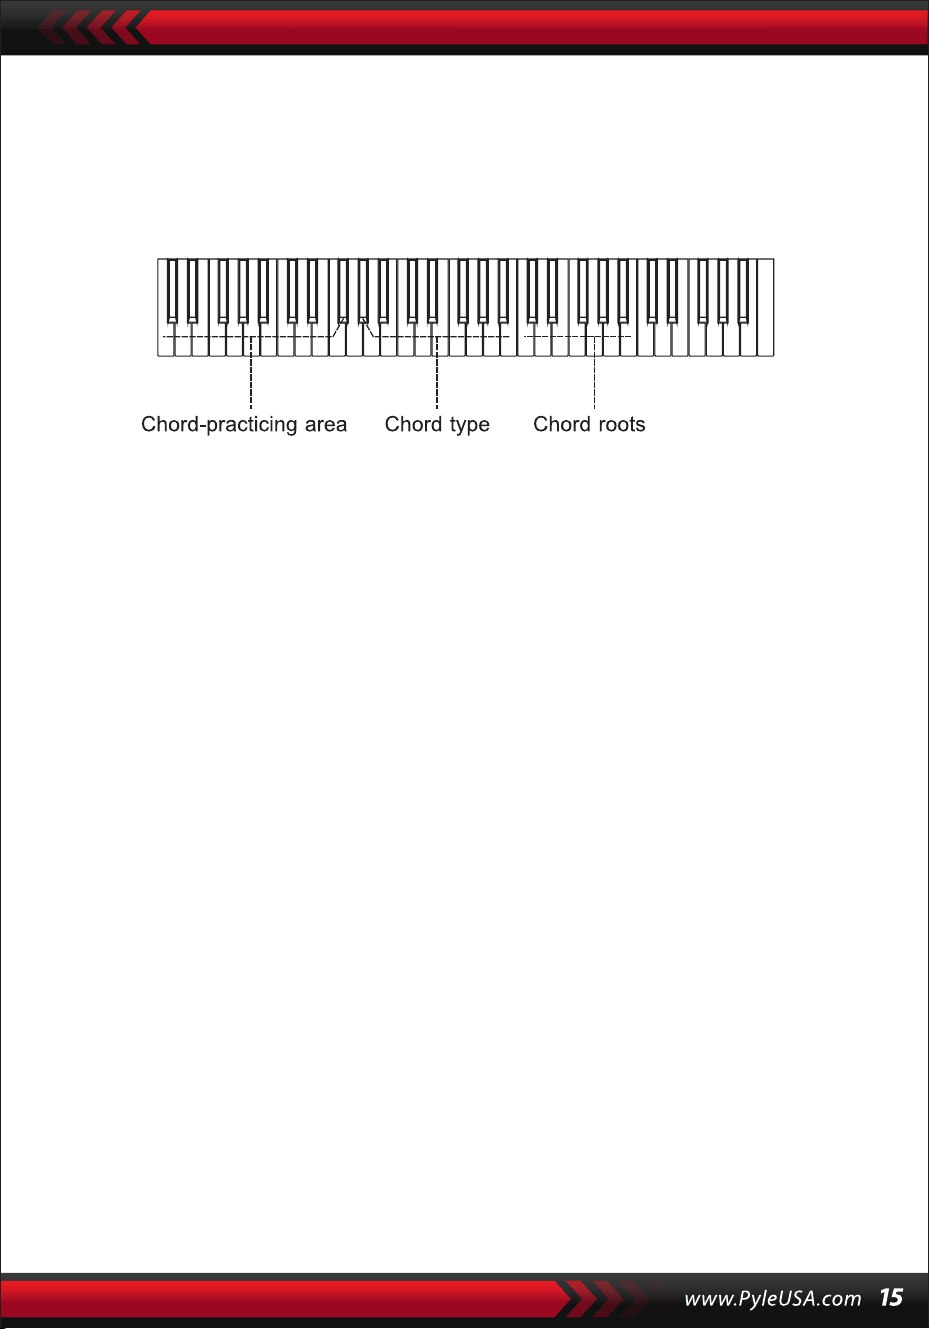
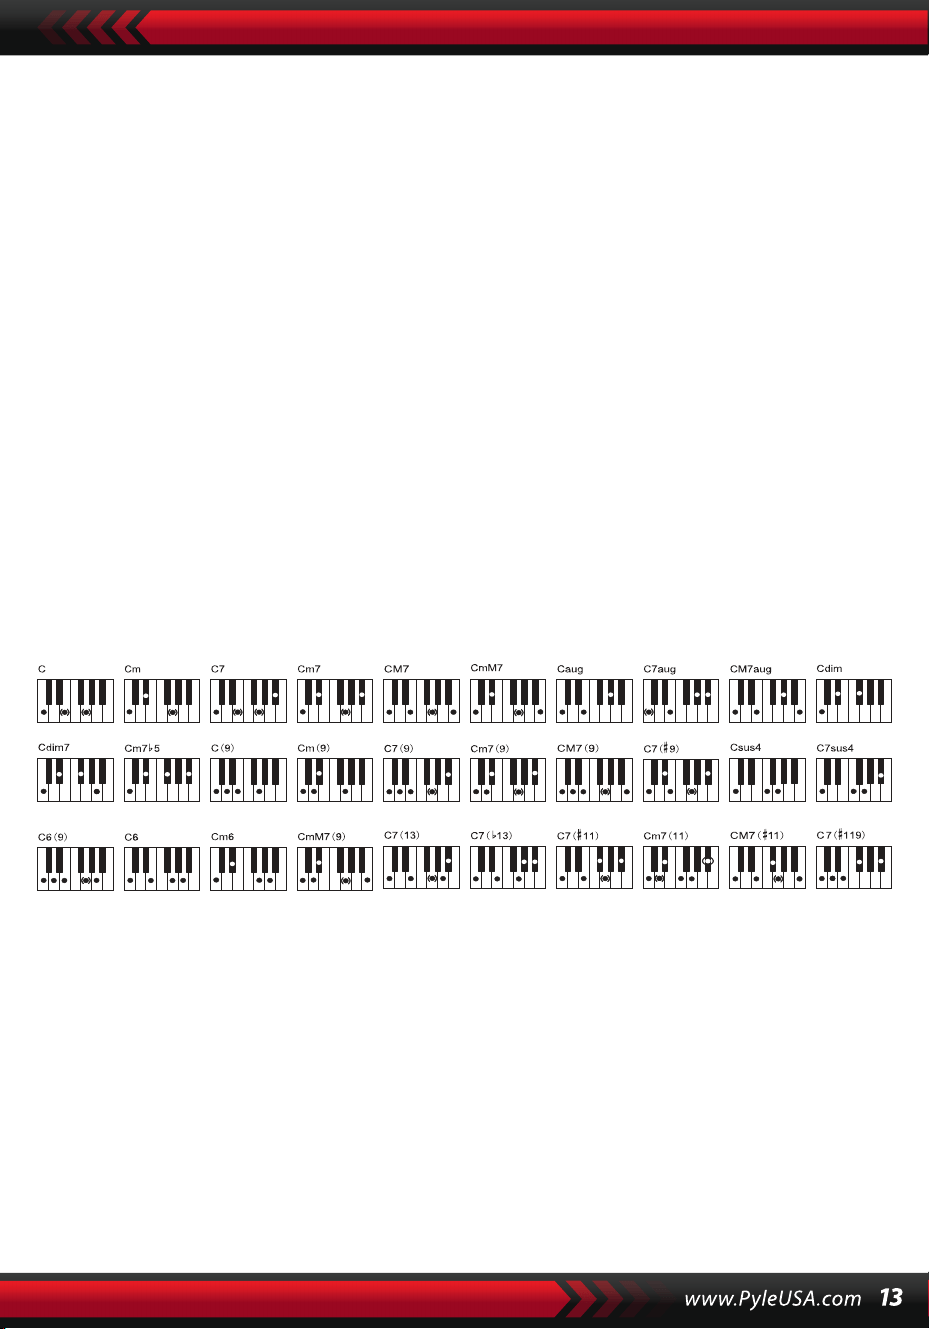
Fingered: Any fingerings of the fingered shown on the illustration below
can produce the chord C major, and other chords can be played by analogy.

THE CHORD DICTIONARY
The chord dictionary is actually a chord handbook reserved in the instru-
ment in which the notes forming a chord can be looked up. All the chord
notes are shown on the screen to lead the learner to play chords. This func-
tion is very beneficial to the first learners who know the chord names to
master the fingerings.
1. Press the [Chord Dictionary] button to start the function with "DICT"
appearing on the LCD screen as well as "C' which stands for C major triad
and note symbols on the stave. The chord roots and type of chord can be
defined on the melody keyboard on the right of the split point, then the
corresponding keys will be shown on the keyboard and note symbols on the
stave on the screen, so the learner can play the chord on the accompaniment
keyboard according to the representation on the screen.
2. When the chord notes are correctly played on the accompaniment
keyboard, there will be a clapping to celebrate. When the chord notes aren't
correctly played, there will be BASS sound of the keys that are played.
3. Press the [Right/Chord Dictionary] button again to stop the function.
Note:
1.There is no sound for the keystrokes on the melody keyboard (on the right
of the split point) which are to define the chord roots and type of chord.
2.No chords can be played out of the range of the chord keyboard, that is to
say, chords should be played on the keys on the left of the split point.
VIII. Demonstration Songs
There are 2 pieces of different style of demonstration songs reserved in the
system.
DEMO SONG SELECTION
1.Press the [Demo] button with "DEMO" shining as well as the code of the
current song and the beat dots on the screen, the system is set into the
mode of playing the two demo songs successively.
2.During the demo song proceeding, the song can be replaced with the
other one through the number buttons, the[+/-] buttons or the [Data
Dial] knob.
3.Press the [Demo] button again to stop the playing and quit the function.
IX. Teaching Songs
There are 100 pieces of different style of songs reserved in the system
which can be used as a great learning tool as well as the music apprecia-
tion.
TEACHING SONG SELECTION
1.Press the [Song] button to start the "song" mode with "SONG" shining as
well as the code and abbreviation of the current song on the screen, and
the system is set into the mode of playing the 100 songs successively.
During the song proceeding, the song can be replaced with another one
through the number buttons, the[+/-] buttons or the [Data Dial] knob.

SONG EXIT
1. During the song proceeding, press the [Start/Stop] button to stop playing
the current song, but the system still remains in the "song" mode.
2. Press either the [Sound] or the [Style] button at the end of the song to exit
the "song" mode and start the corresponding function.
FUNCTION OF THE "LEFT" AND "RIGHT" OUT OF LEARNING MODE
During the song proceeding, press the [Left] or [Right] to turn on or off the
sound of the left channel or right. For example, press the [Left] button, with
the "LEFT" shining on the left of the screen, to open the sound channel for
the right-handed melody, but to shut up the sound channel for the
left-handed accompaniment or melody. The same operation holds for the
[Right] button.
Note:
1. When the "song" mode is out of charge, press the [Right/Chord Dictio-
nary] button to start the "chord dictionary" mode; press it again to exit the
mode.
2. When a song comes to an end, press the [Right/Chord Dictionary] button
for at least 2 seconds to start the "chord dictionary" mode.
X.Lessons
The three buttons [Lesson], [Left], [Right] can start three types of learning
modes, which can separately lead the learner to play the teaching song
step by step.
LESSON I
This lesson aims at practicing musical duration rather than pitch. Any
keystroke with correct duration can make correct changes of the current
notes and chords, but not sound of the corresponding notes.
2. During the song proceeding, press the [Start/Stop] button to stop playing
the current song, but the system still remains in the "song" mode; press the
button again to continue playing the current song repeatedly.
Note: To get the instrument back to the mode of playing the 100 songs
successively, the "song" mode should exit first, then gain power again
through the [Song] button.

LESSON II
This lesson aims at practicing playing the correct notes against the indicative
keys shown on the screen. Keystrokes of the correct notes can keep the song
going on, or the song will be suspended until the correct note is picked up.
Note: In this mode, only correct notes can be played, but the wrong ones get
no reaction.
LESSON Ill
This lesson aims at practicing playing the correct notes with correct duration.
With the learning song normally playing, the correct notes must be played
with correct duration of the original song. Without any keystroke, the system
just play the accompaniment of the song.
LEFT AND RIGHT-HANDED PRACTICING
This lesson aims at practicing playing respectively with the left or the right
hand, or with the both. Press the [Right] button to conceal right-handed
melody and then practice playing with the right hand. Press the [Left] button
to conceal left-handed melody or the changes of the left-handed chords and
then practice playing with the left hand. Press the both buttons at the same
time to conceal left and right-handed sound and then practice playing with
the both hands.
LESSON FUNCTION SETUP
1.Press the [Lesson] function to start the "song" state, then press the
[Start/Stop] button to stop the song.
2.Pick out a pleasant song by pressing the number buttons or the[+/-]
buttons or turning the [Data Dial] knob.
3.When the "song" mode is out of charge, press the [Lesson] button succes-
sively to choose Lesson I, Lesson II, Lesson Ill, or to quit the "lesson" func-
tion. Any chosen lesson will have a corresponding shining cursor together
with shining "LEFT" or "RIGHT" on the screen. Then press the [Start/Stop]
button to start lessons and the indications of the melody or chord notes
will be shown on the stave and keyboard on the LCD screen.

4. Press the [Left] button to start left-handed practice with the shining "left
hand" on the screen. Press the [Right] button to start right-handed practice
with the shining "right hand" on the screen. Press the both buttons to start
left and right- handed practice with the shining "left and right hands" on the
screen. When there is no choice, the system will start the right-handed
practice automatically.
5. When a lesson is finished, the system will play the current song and keep
the previous lesson mode.
Note: Different styles of the songs make the left-handed practice different.
When playing rhythm style songs, the left hand is to play chords; when
playing other songs, the left hand is to play left-handed melody or accompa-
niment (The songs coded 00 to 84 are the rhythm style songs). During a
lesson, the lesson mode can not be switched freely.
XI. Storage and Memory Function
The storage and memory function is to store the setup voice, style, tempo
and other relative parameters of the working mode that needs to be
changed for in the performance. It is also applied to draw out the needed
parameters directly in the performance. There are six modes of memory to
be drawn from freely.
STORAGE OF PARAMETERS
First, set up the needed sound, style, tempo and other relative parameters of
a working mode. Second, press the [Memory] button firmly, then press any
one of the memory mode buttons (M 1, M2, M3, M4, MS, or M6) to store the
working mode. There will be a corresponding shining cursor to show the
memory mode in which all the parameters are stored.
DRAWING OUT PARAMETERS
During the performance, press any one of the memory mode buttons to
draw out the stored the parameters of the needed working mode to replace
the current one.

Note:
1. After a memory mode drawn out, all the parameters can be reset and
become different with those stored previously. In this state, the correspond-
ing shining cursor at the bottom of the screen disappears showing the mode
has been changed.
2. There is no power cut protection for all the memory modes, so when the
instrument regains power, the stored parameters are lost.
XII. Setup of the O.T.S (ONE TOUCH SET)
The O.T.S function has stored the often-used voices that suitable for the
styles. There are four defaulted sounds to match every piece of style.
1. Press the [O.T.S] button to start the "auto bass chord" with the shining
"O.T.S" and "M1" at the bottom of the screen.
2. After getting the target style ready, press the four memory buttons (Ml to
M4), then the style played on the keyboard will combine the four default-
ed voices perfectly.
3. In this function state, press the button again to exit the function.
Note: In the charge of the [O.T.S] button, the storage and memory function
cannot be started.
XIII. Record
PREPARATION FOR RECORD
Press the [REC] button with four beat spots twinkling and the "REC" shining
on the screen to show the system has got ready for recording. The pleasant
sound, style, tempo, sustain and other parameters can be set up before
recording.

RECORD
In this state, all notes that played on the keyboard are recorded with four
beat spots on the screen successively twinkling at the setup tempo.
In the "record" mode, a piece of accompaniment can be recorded directly
after it is started. In the "auto bass chord" state, any keystroke on the auto
accompaniment keyboard can start a piece of style.
But when the "auto bass chord" is out of charge, a piece of style can only be
started by pressing the [Start/Stop] button. During the recording of accom-
paniment, melody notes can also be played on the keyboard and recorded
together.
Note:
1.There is no power cut protection, so when the instrument regains power,
the recorded data are lost.
2.The new record will replace the primary one when this record function is
applied again.
3. The amount of the recorded notes is affected by all the recorded data,
including different sounds, style, tempo, etc.
AFTER RECORD
1.In the "record" mode, press the [REC] button again to stop recording.
2.During the time that a style is proceeding and being recorded, press the
[Intro/Ending] button to start a piece of ending. When the ending ends,
the system will automatically stop recording and exit the "record" mode.
3.During recording, the completely taken-up memory will stop recording
with "FULL" shining for 3 seconds on the screen, then exit the "record"
mode.
PLAYBACK
After the recording stops, press the [Playback] button to replay the recorded
track.

XIV. Program
PROGRAM
Press the [Prog] button with the "Prog" cursor shining on the screen to
change the keyboard into a percussion one.
Then press a key or a panel drum to start the program function.
Press the [Prog] button once more to stop programming.
The completely taken-up memory can stop the program as well.
The newly edited rhythm or the new record will take the place of the primary
one.
NULL PLAY
Press the [Null Play] button, the edited rhythm can be played repeatedly.
Press the button again to stop the playing.
Appendix
SOUNDS
NO. Name NO. Name NO. Name
Piano
Organ
Bass
Guitar
Mallet
Grand Piano
Bright Piano
El Grd Piano
Honky-tonk Piano
Elec piano 1
Elec Piano 2
Harpsichord
Clavi
Celesta
Glockenspiel
Music Box
Vibraphone
Marimba
Xylophone
Tubular Bell
Santur
Drawbar Organ
Jazz Organ
Rock Organ
Church Organ
Reed Organ
Accordion
Harmonica
Tango Accordion
Classic Guitar
Steel Guitar
Jazz. Guitar
Clean Guitar
Muted. Guitar
Overdriven Guitar
Distortion Guitar
Guitar Harmonics
Acoustic Bass
Finger Bass
Picked Bass
Fretless Bass
Slap Bass 1
Slap Bass 2
Synth Bass 1
Synth Bass 2
NO. Name NO. Name NO. Name
Strings Lead
Sound Effects
Chinese Instrument
Synth Voice
Drum Kit
Pad
Effects
Ethnic
Percussive
Strings Ensemble
Brass
Reed
Pipe
Violin
Viola
Cello
Contrabass
Tremolo Strings
Pizzicato Strings
Harp
Timpani
Strings 1
Strings 2
Synth Strings 1
Synth Strings 2
Choir Aahs
Voice Ooh
Synth
Orchestra Hit
Trumpet
Trombone
Tuba
Muted Trumpet
Horn
Brass Ensemble
Synth Brass 1
Synth Brass 2
70elep
Fzpiano
Ep3
Ep4
Ep5
Harppian
Clavr2
Clavr3
Organ Box
E. organ
Churc2
Syn Organ
Altoel
Fz guitar
Syn elgt
Picel bas
El violin
Brassfm
Fmlead
Fantalfo
Polyaa2
Bowedg2
70elpad
Soprano Sax
Alto Sax
Tenor sax
Baritone Sax
Oboe
English horn
Bassoon
Clarinet
Piccolo
Flute
Recorder
Pan Flute
Blown Bottle
Shakuhachi
Whistle
Ocarina
Square
Sawtooth
Calliope
Chiff
Charang
Voice
Fifths
Bass lead
Fantasia
Warm
Poly Synth
Choir
Bowed
Metallic
Halo
Sweep
Fx1
Fx2
Fx3
Fx4
Fx5
Fx6
Fx7
Fx8
Sitar
Banjo
Shamisen
Koto
Kalimba
Bag Pipe
Fiddle
Shanai
Tinkle Bell
Agogo
Steel Drums
Woodblock
Taiko Drum
Melodic Tom
Synth Drum
Reverse Cymbal
Standard Kit
Power Kit
Dance Kit
808 Kit
Brush Kit
Orchestra Kit
GT Fret Noise
Breath Noise
Seashore
Bird Tweet
Teleph Ring
Helicopter
Applause
Gunshot
Pipa
Erhu
Guzhen
Banhu
Qudi

NO. Name NO. Name NO. Name
BEAT & POP
SOUL & FUNK
LATIN
TRADITIONAL
PIANO
BEAT & POP-1
JAZZ
COUNTRY
ROCK
DANCE
8 Beat 1
8 Beat 2
8 Beat 3
8 Beat 4
60's 8 Beat
8 Beat Ballad
8 Beat Rock
16 Beat 1
16 Beat 2
16 Beat Pop
16 Beat Shuffle
Ballad
Slow Ballad
16 Beat Ballad
Unplugged
Funky Pop
Jazz Funk
Cool Funky
Soul 1
Soul 2
Soul Shuffle
Soul Blues
R&B
6/8 Gospel
Pop Groove
Bossa Nova 1
Bossa Nova 2
Rhumba
Pop Rhumba
Cha Cha
Pop Cha Cha
Tango
Jazz Samba
Reggae
Pop Reggae
1-Mar
2-Mar
German March
6/8 March
Polka
Pop Polka
Waltz
Slow Waltz
Vienna Waltz
Musette
8 Beat
Ballad
Boogie
Jazz
Swing
Jazz Waltz
Twist
March
6/8 March
Waltz
8 Beat 1 -1
Swing
Cool Jazz
Pop Swing
Swing Fox
Big Band
Big Band Meduim
Jazz Waltz
Ragtime
Dixeland
Quick Step
Country 1
Country 2
Pop Country
Country Rock
Country Folk
3/4 Country
Country Waltz
Country Shuffle
Country Boogie
Country Blues
Rap
Euro Beat
Hip Hop
Techno
Country Quick Step
Bluegrass
Rock
Pop Rock
Fast Rock
Slow Rock 1
Slow Rock 2
Rock & Roll
Heavy Metal
Blues Boogie
Blues
Shuffle
Blues Shuffle
Rock Shuffle
Charlston
Disco 1
Disco 2
Disco Funk
Dance
House 1
House 2

NO. Name NO. Name NO. Name
8 Beat 2-1
8 Beat 3-1
8 Beat 4 -1
60’s 8 Beat-1
8 Beat Ballad -1
8 Beat Rock-1
16 Beat 1 -1
16 Beat 2-1
16 Beat Pop -1
16 Beat Shuffle-1
Ballad-1
Slow Ballad -1
16 Beat Ballad -1
Unplugged -1
Bossa Nova 1 -1
Bossa Nova 2 -1
Rhumba -1
Pop Rhumba -1
Cha Cha -1
Pop Cha Cha -1
Tango -1
Jazz Samba -1
Reggae -1
Pop Reggae -1
March 1 -1
March 2 -1
German March -1
6/8 March -1
Polka -1
Pop Polka -1
Waltz-1
Slow Waltz-1
Vienna Waltz -1
Musette -1
8 Beat-1
Ballad-1
Boogie -1
Jazz -1
Swing -1
Jazz Waltz-1
Twist -1
March -1
6/8 March -1
Waltz-1
Country 1 -1
Country 2-1
Pop Country-1
Country Rock -1
Country Folk -1
3/4 Country-1
Country Waltz-1
Country Shuffle-1
Country Boogie -1
Country Blues -1
Country Quick Step
-1
Swing -1
Cool Jazz-1
Pop Swing -1
Swing Fox -1
Big Band -1
Big Band Meduim
-1
Jazz Waltz -1
Ragtime -1
Dixeland -1
Funky Pop -1
Jazz Funk -1
Cool Funky -1
Soul 1 -1
Soul 2-1
Soul Shuffle-1
Soul Blues -1
R&B-1
6/8 Gospel -1
Pop Groove -1
Hip Hop -1
Techno -1
Rock -1
Pop Rock-1
Fast Rock-1
Slow Rock 1 -1
Slow Rock 2 -1
Rock & Roll-1
Heavy Metal -1
Blues Boogie -1
Blues -1
Shuffle-1
Blues Shuffle -1
Rock Shuffle -1
Charlston -1
Disco 1 -1
Disco 2 -1
Disco Funk -1
Dance -1
House 1 -1
House 2 -1
Rap -1
Euro Beat-1
ROCK-1
DANCE
SOUL & FUNK-1
JAZZ-1
COUNTRY
LATIN-1
TRADITIONAL-1
PIANO-1

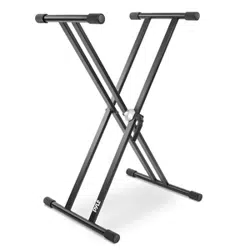
Keyboard Stand Assembly
1. First, prepare all the assembly parts
2. Second, take the No. 2 screw and the
No. 3 support plate, fix them to the
two support brackets of No. 5 and
tighten them separately.
3. Take the No. 2 screw and the No. 4
stand to the top of the No. 5 stand
and tighten.
4. The installation is complete, the
longest No. 1 screw is used to fix the
keyboard on the stand.

Features:
• Wire MIDI
• 200 World Well-Chosen Auto Accompaniment Styles
• 8 Percussions pads / Keyboard Percussions
• Compact & Portable Musical Piano
• Simple Electronic Plug-in Operation
• Rotary Plate for Sound Changing
• Portable Piano
• Built-in Full Range Stereo Speakers
• Connect & Stream Audio from External Devices
• Can Connect to Speaker and Play Sound
• Multiple Preset Selectable Keyboard Sound, Tone & Rhythm Styles
• Digital LCD Display
• Adjustable Volume Control
• Record & Playback Mode
• 162 Sounds Include 128 GM Standard Sounds, 5 Folk Music Instrument
Sounds, 23 Synth Sounds, 6 Drum Kit Sounds
• Basic Control: Master Volume/ Aecom Volume/Chord Volume/Tempo
Control
• Auto Chord Function: Single Chord / Fingered Chord / Chord Dictionary
• Teaching Functions: One-key/Follow/Assemble
• Pitch bendNibrato/Sustain/Touch Sensing/Dual sound function
• Keyboard Split/Octave/Transpose Function
• Sync/Start/Stop/Fade In/Fade Out/Intro/Ending/Fill in A&B/Metronome
• USB Input/Sustain Pedal Input
• Speaker Output (L/R)/Headset Output
• Perfect for Home Theater Living Room Performances
• Fun for Kids of All Ages: Children & Adults
What's in the Box:
• Digital Musical Karaoke
Keyboard
• Book Rack
• Adapter
• Power Plug
• Keyboard Stand
• Sustain Pedal
• Waterproof Bag
• Headset
Headset Specs:
• Construction Material: ABS + Laserdecorative sheet
• Wire Material: PVC flat wire
• Wire Length: 1.2M
• Plug Diameter: 3.5mm 1/8
• Weight: 0.14 kg
Sustain Pedal Specs:
• Normally On/Off Function
• Length: 24 cm/9.45 inches
• Width: 8 cm/3.15 inches
• Height: 7.1 cm/2.8 inches
• Weight: 1.75 kg/3.8 lbs
Technical Specs:
• (61) Keyboard Keys
• 162 Sounds Include 128 Gm Standard Voices, 5 Folk Music Instrument
Voices 23
• Synth Voices, 6 Drum Kit Voices
• Demonstration Song
• Audio Interface: Aux (6.5mm) Input Jack / RCA L&R Output Jack
• Max Sound Level: Up to 110 dB
• USB/Power Cable Length: 3.9'ft.
• Construction Material: Engineered ABS
• Power Supply: DC 12V / AC adaptor
• Piano Dimensions (L x W x H): 92.9 x 30.3 x 9.3 cm/36.6 x 11.97 x 3.7 inches
Keyboard Stand Specs:
• Baked Varnish
• Detachable Function
• Construction Material: lron+ABS
• Length: 80 cm/31.5 inches
• Width: 21 cm/8.3 inches
• Height: 57.5~67.5 cm/22.64~26.57 inches
• Weight: 1.75 kg/3.8 lbs
• Bearing: 15 kg/33 lbs
This product contains Butyl benzyl phthalate {BBP) which is
known to the state of California to cause cancer birth defects
and other reproductive harm. Do not ingest.
For more info go to: www.P65warnings.ca.gov
California Prop 65 Warning
WARNING:


Teclado Electrónico Portátil con Bolsa Resistente al
Agua (61 Teclas), Base de Teclado, Pedal de Sustain y
Auriculares
Teclado Musical Digital
PKBBD6175P
SPA
MANUAL DE USUARIO
• Utilice el adaptador de corriente especificado, y sustituya inmediatamente
el adaptador dañado si lo hubiera.
• No desarme el instrumento ni modifique las piezas internas. En caso de
mal funcionamiento, deje de utilizarlo inmediatamente y llévelo a reparar
con un técnico profesional.
• Antes de conectar el instrumento a otros dispositivos, desconecte todas
las fuentes de alimentación.
• No toque el instrumento al máximo volumen o a un volumen incómodo
durante mucho tiempo.
• Mantenga las partes del instrumento alejadas de fuentes de calor, ya que
el sobrecalentamiento puede causar daños.
• Evite que líquidos, polvo, partículas y otras materias extrañas entren en el
instrumento y provoquen la corrosión del mismo o el cortocircuito de sus
componentes.
• Extraiga el enchufe antes de limpiar el instrumento. No inserte ni tire del
enchufe con las manos mojadas.
• Utilice un paño seco y suave para limpiar el instrumento. Para no dañar la
superficie del instrumento, no utilice pintura, alcohol ni otros disolventes
químicos para limpiarlo.
• Desconecte la fuente de alimentación y desenchufe el cable después de
tocar o si no va a utilizar el instrumento durante mucho tiempo.
• Para reducir el riesgo de incendio o descarga eléctrica, no exponga este
aparato a la lluvia ni a la humedad. No exponga el aparato a goteos ni
salpicaduras y no coloque sobre él objetos que contengan líquidos, como
jarrones.
• Temperatura máxima de funcionamiento: 40°( / 104°F
• Si se utiliza un adaptador de enchufe directo como dispositivo de descon-
exión, el dispositivo de desconexión debe permanecer accesible.
• No instale este equipo en un espacio reducido, como una librería o similar,
y mantenga unas buenas condiciones de ventilación. La ventilación no
debe impedirse cubriendo las aberturas de ventilación con elementos
como periódicos, manteles, cortinas, etc.
• Advertencia: Una presión sonora excesiva de los auriculares puede causar
pérdida de la audición.
• La etiqueta se encuentra en la parte inferior del aparato.
• No exponga el aparato a goteos ni salpicaduras y no coloque sobre él
objetos que contengan líquidos, como jarrones.
• El adaptador de enchufe directo se utiliza como dispositivo de desconex-
ión, el dispositivo de desconexión debe permanecer accesible.
LEA ATENTAMENTE ANTES DE CONTINUAR
Guarde este manual en un lugar seguro y a la mano para futuras consultas.
ADVERTENCIA!

Este símbolo indica que este producto no debe eliminarse con otros
residuos domésticos en todo el territorio de la Unión Europea.
Para evitar posibles daños al medio ambiente o a la salud humana
derivados de la eliminación incontrolada de residuos, recíclelo de forma
responsable para promover la reutilización sostenible de los recursos
materiales. Para devolver su dispositivo usado, utilice los sistemas de
devolución y recolección o póngase en contacto con el establecimiento
donde adquirió el producto. Ellos pueden hacerse cargo de este produc-
to para reciclarlo de forma segura para el medio ambiente.
I. Panel de Control y Puertos de Extensión
1. Altavoz
2. Encendido
3. Volumen Maestro
4. Tempo
5. Volumen de
Acompañamiento
6. Transposición
7. Octava
8. Lección
9. Función
10. Derecha
(Diccionario de acordes)
11. Izquierda
12. Memoria
13. M1, M2…M6
14. O.T.S
15. Pantalla LCD
16. Demo
17. Grabar/Play-back
18. Marcación de Datos
19. Piano
20. Números
21. Sonido
22. Estilo
23. Canción
24. Inicio/Pausa
25. Intro/Outro
26. Fundido de
Entrada/Salida
27. Relleno A
28. Relleno B
29. Sync
30. Acorde de Bajo
Automático
31. Reproducción
Prog/Null
32. Metrónomo
33. Táctil
34. Sustain
35. Dividir
36. Dual
37. Percusión con Teclado
38. Percusión con Panel
39. Modulación
40. Vibrato
41. Acorde
USO DEL ADAPTADOR DE ALIMENTACIÓN DE CA/CC
El adaptador de alimentación de CA/CC debe ser el indicado para el aparato.
Conecte un extremo a la toma de alimentación del panel posterior y el otro a la
red eléctrica de la localidad. (Por favor tenga en cuenta que el voltaje de entrada
debe ser el mismo que el de la red eléctrica).
ENTRADA PARA AUDIÓFONOS
Inserte los audífonos en la entrada para audífonos en la parte posterior de la carcasa,
de modo que el altavoz interno se pueda apagar automáticamente y la reproducción
y el canto puedan continuar sin molestar a los demás.
Nota: Un volumen demasiado alto de los audífonos puede dañar la audición.
CONEXIÓN CON AMPLIFICADORES O ACÚSTICOS
El instrumento dispone de un sistema de altavoces interno y también puede
conectarse a otros amplificadores o altavoces acústicos. En primer lugar, apague
el instrumento y el equipo externo, a continuación, inserte el cable de frecuencia
estéreo en la toma SALIDA L/R del panel trasero y el otro en la toma LINE IN o
AUX IN del equipo externo.
USB MIDI
MIDI es la abreviatura de Musical Instrument Digital Interface. A través de las
tomas MIDI, el teclado puede conectarse a otros instrumentos musicales u
ordenadores con MIDI mediante un fragmento de línea de transmisión de datos.
En este caso, cualquier interpretación en el teclado puede ser transferida al
ordenador, y luego grabada, compuesta o editada con un software avanzado en
el ordenador. Toda la música MIDI reservada en el ordenador puede transferirse
al instrumento y ser reproducida.
Los métodos de aplicación del USB MIDI:
1. En primer lugar, conecte los instrumentos con el ordenador mediante la línea
de datos universal y encienda ambos.
II. Preparación para el Espectáculo
PANEL TRASERO
42 ENTRADA USB MIDI
43 ENTRADA JACK
SUSTAIN
44 SALIDA L/R JACK
45 AUDÍFONOS
46 ENTRADA DC 12V

2. En segundo lugar, instale e inicie el software de edición musical, por ejemplo,
CAKEWALK. A continuación, el hardware especial del instrumento aparecerá en el
hardware que contiene el software musical, y se establecerá como dispositivo por
omisión. En este caso, se habrá establecido la comunicación de datos entre el
instrumento y el ordenador.
3. En tercer lugar, configure los canales MIDI del instrumento (Por favor, comprué-
belo en la introducción del botón [Menú]).
PEDAL DE SUTAIN
El instrumento puede añadirse a un pedal de sustain externo, que puede utilizarse
para realizar un efecto de sustain en la interpretación.
AJUSTE DEL VOLUMEN MAESTRO
Gire el regulador de volumen maestro en el sentido de las manecillas del reloj para
aumentar el volumen maestro y en el sentido contrario para disminuirlo. El regula-
dor también controla el volumen del acompañamiento.
III. Método Básico de Interpretación
Presione el botón [Power] con la luz de fondo encendida, y la pantalla LCD mostrará
información sobre la voz actual, el tempo, el modo de función, etc.
La pantalla completa imaginaria que ilustra todos los cursores de marca y los
parámetros de los diferentes modos:
La pantalla LCD completa al momento dek encendido:
DIAL DE DATOS
Girar el mando [Data Dial] es un atajo para seleccionar una voz, un ritmo o una
canción. Girándolo en el sentido de las manecillas del reloj, se puede alcanzar un
código más grande; en el sentido contrario, más pequeño.
PERCUSIONES DE PANEL Y TECLADO
Hay 8 tipos de percusiones de panel y 61 percusiones de teclado guardadas en el
instrumento.
• Presione el botón [Panel percussion], un sonido de percusión correspondiente
puede ser iniciado por una determinada pulsación de tecla.
• Presione el botón [Keyboard Percussion] cuando aparezca "PERCUS" en la
pantalla LCD. En este caso, la percusión puede ejecutarse en el teclado. Una
determinada tecla corresponde a un determinado tipo de sonido de percusión.
Presione de nuevo el botón para salir de la función.
IV. El Botón de Función
A continuación se proporcionan los detalles sobre los parámetros que pueden
configurarse a través del botón [Funtion].
BEATS
Mantenga presionado el botón [Function] hasta que aparezca "04Beat" en la
pantalla LCD. En este caso, puede elegirse cualquiera de los nueve estilos de beat
diferentes, codificados como 00, 02 a 09. El estilo de ritmo deseado puede elegirse
mediante los botones [+/-] o el mando [Data Dial].
PUNTO DE DIVISIÓN
Se denomina punto de división a la tecla que divide el teclado en dos partes, el
teclado de acompañamiento a la izquierda y el teclado de melodía a la derecha. El
punto de división por omisión del instrumento está en la tecla 19 partiendo de la
izquierda, y el punto puede reajustarse en cualquier tecla del teclado.
BEAT
TODOS
PNT DE DIVISIÓN
ENTRADA MIDI
SALIDA MIDI
ELEGIR BANCO

CONFIGURACIÓN DE LOS CANALES MIDI
1. MIDI IN
Pulse el botón [Funtion] repetidamente hasta que aparezca "MIDI In" en la
pantalla LCD. En este caso, el canal de destino puede elegirse para reproducir los
archivos MIDI de entrada presionando los botones [+/-] o girando el dial [data
Dial] a la posición "all": lo que significa que todos los canales (codificados del 01 al
16 ) están disponibles. Todos los canales están predeterminados cuando se
enciende el instrumento.
2. MIDI OUT
Presione repetidamente el botón [Funtion] hasta que aparezca "MIDI Out" en la
pantalla LCD. En este caso, puede elegir el canal de destino para transmitir los
archivos MIDI de salida pulsando los botones [+/-] o girando el dial [data Dial]. Sin
embargo, algunos archivos MIDI no se pueden transmitir, como el ritmo
automático, las canciones de demostración y las canciones guardadas en el
instrumento. Cuando el instrumento está encendido, el canal 01 está predefinido
y disponible.
BANK SELECT
Presione repetidamente el botón [Funtion] cuando aparezca "Bank Sel" en la
pantalla LCD. En este caso, el banco de voz deseado, entre 128 bancos codificados
de 01 a 128, puede elegirse para ajustar la voz del teclado MIDI presionando los
botones [+/-] o girando el dial [data Dial]. Cuando se enciende el instrumento, el
banco de voces predefinido es BANK01.
Nota: Sólo hay un banco de voces, codificado BANK 01, con 128 voces en el banco
de voces GM estándar. Si hay otros bancos de voces en el ordenador, pueden
añadirse al instrumento y definirse con los códigos de BANK 01 a 128.
V. Sonidos y Efectos
SELECCIÓN DE SONIDO
Hay 162 tipos de sonidos en el sistema, incluyendo 128 sonidos GM, 6 grupos de
sonidos para percusión de teclado, y 5 grupos de sonidos para música folk.
Presione repetidamente el botón [Funtion] hasta que aparezca "19 Split Pt" en la
pantalla LED. En este caso, el punto de división puede reajustarse pulsando los
botones [+/-] o girando el dial [data Dial], o presionando la tecla de destino. El
nuevo punto de división se establece una vez finalizada la selección.

Cuando se enciende, el sonido predeterminado es el sonido codificado 00, que
representa "00 Grd Piano" en la pantalla LCD. Presione el botón [Sound] para iniciar
la función de configuración de voz. La voz deseada puede seleccionarse mediante
los botones numéricos, los botones [+/-] o el dial [data Dial]. Sin embargo, en
cuanto a la aplicación de los botones numéricos, el código del sonido de destino
debe introducirse con tres dígitos. Esto significa que "00" o "0" deben sumarse al
código de uno o dos dígitos, por ejemplo, si el código de voz deseada es 65, deben
introducirse los dígitos 0, 6 y 5, y si es 8, deben introducirse los dígitos 0, 0 y 8.
PIANO
Para que resulte más cómodo para los usuarios, el instrumento se ha diseñado
especialmente con el botón [Piano], que permite seleccionar directamente la voz
de piano al presionarlo.
1.Al presionar el botón [Piano], el instrumento pasa al modo de piano y la palabra
"PIANO" aparecerá en la pantalla LCD. El sonido de cualquier tecla que pulse
tomará la voz de piano.
2.En el modo de acompañamiento, al presionar el botón [Piano] se puede detener
el acompañamiento y hacer que el instrumento pase al modo de piano. Si vuelve
a presionar el botón, la función se detiene.
1.Presione el botón [Dual] cuando aparezca "SOUND" y el cursor señale "DUAL" en
la pantalla LCD. El código del segundo sonido también se visualizará en la
pantalla LCD. El segundo sonido preajustado es el Sonido 48. En este caso, la voz
de las teclas presionadas será una combinación de los dos sonidos.
2.El segundo sonido puede elegirse presionando los botones [ +/-] o girando el dial
[data Dial].
Nota: En el modo Piano, se pueden seleccionar y tocar ritmos, también el control
de acompañamiento puede funcionar normalmente, pero sólo las percusiones sin
acorde.
FUNCIÓN DE SONIDO DOBLE
El instrumento dispone de una función de sonido doble: se pueden combinar dos
sonidos para crear un nuevo efecto de sonido y enriquecer la complejidad del
sonido que parece que se produce al tocar dos tipos de instrumentos musicales.
Antes de que se active el botón [Dual], el sonido del instrumento aparece marca-
do con "SOUND 1" en la pantalla LCD, y el segundo sonido puede seleccionarse
de la siguiente manera:

3. En la función de Sonido Doble, el primer sonido puede cambiarse presionando
primero el botón [Sound] para que el instrumento pase al modo de configuración
de "SONIDO 1" y, a continuación, presionando los botones [+/-] o girando el dial
[data Dial].
4. En la función de sonido doble, al presionar el botón [Dual] se puede detener la
función, y desaparecen "SOUND 2" y el cursor que señala "DUAL" en la pantalla LCD,
lo que significa que el sistema ha vuelto al modo de configuración de "SOUND 1".
Nota: Fuera de la carga del "acorde automático": la función de doble sonido puede
aplicarse en todo el teclado; mientras que en la carga del "acorde automático", sólo
puede aplicarse en el teclado de melodía y no en el teclado de acompañamiento.
TECLADO DE SENSACIÓN DINÁMICA
Cuando el instrumento está encendido, la función de sensación dinámica también
está activada con el cursor iluminado "TOUCH". También puede activar o desactivar
la función presionando el botón [Touch]. La función puede mostrar la dinámica que
se aplica a las distintas teclas presionadas, por lo que la función puede reforzar la
interpretación en el teclado. La dinámica se hace más grande, el volumen de las
notas se hace más grande. Cuando la función se apaga, cualquier dinámica de las
teclas presionadas tiene el mismo volumen.
PITCH BEND
Al subir o bajar el [Pitch Bend], la afinación se desliza hacia arriba (alt) o hacia abajo
(bourdon). Al soltar el bend, el pitch vuelve a la normalidad.
VIBRATO BEND
Cuando el [Vibrato Bend] queda más bajo que antes, la función de vibrato está
desactivada. Si se cambia hacia arriba, la función está activada y el sonido de las
teclas presionadas tendrán un efecto de sustain. Si se cambia hacia arriba o hacia
abajo, el efecto se puede potenciar o atenuar.
SUSTAIN
1. Pulse el botón [Sustain] con el cursor iluminado "SUSTAIN "en la pantalla LCD
para iniciar la función. El sonido de las teclas presionadas adquirirá un elegante
efecto de sustain.
2. Vuelva a pulsar el botón [Sustain] cuando aparezca "SUSTAIN" en la pantalla
LCD para salir de la función.
OCTAVA
Los botones [Octave+/-] pueden utilizarse para afinar el instrumento una
octava por encima o por debajo. Al presionar [Octave+] u [Octave-] por
primera vez, el valor actual de la octava se muestra en la pantalla LCD; si
vuelve a presionar cualquiera de ellos, el tono del instrumento puede estar
una octava por encima o por debajo dentro del rango de posibilidades.
TRANSPOSICIÓN
Presione el botón [Transpose ] o [Transpose ] para transponer el tono de las
notas. La transposición puede ajustarse de "-6" a "+6". Si pulsa ambos botones
a la vez, el tono de las notas se normaliza al valor preajustado "0". En el modo
de función de transposición, el valor de transposición también puede modifi-
carse girando el dial [data Dial].
TECLADO DOBLE
Pulse el botón [Split] con el cursor iluminado en "SPLIT" para dividir el teclado
en dos partes, las 24 teclas de la izquierda y el resto de teclas, para formar un
teclado doble. El tono de la parte izquierda pasa a estar una octava por
encima mientras que el de la parte derecha cae una octava por debajo, es
decir, el tono de las dos partes se vuelve uniforme. Mientras tanto, el sonido
de las dos partes puede ser diferente. La parte izquierda mantiene la voz
primaria pero la parte derecha puede ganar otra. Presione de nuevo el botón
[Split] con el cursor oscureciendo "SPLIT", la función se detiene y la voz de
todo el teclado mantiene la de la parte derecha previa.
Nota: En el modo de acordes automáticos, la función de sensación dinámica,
el efecto de sostenido, el pitch bend, y el vibrato no pueden funcionar en el
teclado de acordes.
VI. Auto-Styles
SELECCIÓN DE ESTILOS
Se puede elegir entre 200 estilos diferentes, desde 00 hasta 200. Cuando se
enciende el instrumento, el estilo predeterminado es el codificado "00".
Presione el botón [style] cuando aparezca "STYLE" en la pantalla LCD; a
continuación, podrá seleccionar el estilo deseado mediante los botones
numéricos, los botones [+/-] o el dial [Data Dial].

Nota: El código de estilo deseado puede alcanzarse introduciendo tres
dígitos. Esto significa que "00" o "0" deben sumarse al código de uno o dos
dígitos, por ejemplo, si el código de estilo de destino es 66, deben introducirse
los dígitos 0, 6 y 6, y si es 9, deben introducirse los dígitos 0,0 y 9.
INICIAR/DETENER ESTILO
Presione el botón [Start/Stop] para iniciar o detener el estilo de acom-
pañamiento.
SYNC
Presione el botón [SYNC] con los puntos de compás brillando en la pantalla
LCD. Con la función de acorde automático desactivada, cualquier tecla presio-
nada en el teclado puede iniciar una pieza del estilo. Pero con la función de
acorde automático activada, cualquier tecla presionada en el teclado de
acordes puede hacer que la interpretación de la melodía y el estilo de acom-
pañamiento continúen al mismo tiempo.
INTRO/FINAL
1. Antes de que continúe una pieza del estilo, el botón [Intro/Ending] puede
iniciar, con el cursor iluminado "NOR" en la pantalla LCD, una pieza preludio,
que conduce a la reproducción del estilo normal.
2. Durante el desarrollo de un estilo, si presiona el botón [Intro/Ending] puede
hacer que el estilo normal continúe con un final y, a continuación, detener
todo el estilo.
Nota: Antes de que termine el final, si presiona el botón [Fill-in A] o [Fill-in B]
puede hacer que continúe el estilo normal anterior.
FUNDIDO DE ENTRADA Y FUNDIDO DE SALIDA
1. Cuando se detenga el estilo, presione el botón [Fade In/Out] con el cursor
iluminado en "FADE". En este caso, inicie un estilo y a continuación, el estilo
podrá desvanecerse y alcanzar su intensidad máxima en 8 segundos con el
"FADE" brillante desapareciendo.
2. Durante la ejecución de un estilo, si presiona el botón [Fade In/Out], el
estilo se desvanecerá en 8 segundos y desaparecerá la palabra "FADE".
INTERMEZZO
1. Durante el desarrollo de un acompañamiento, presione el botón [Fill In A]
hasta que se oiga un fragmento de intermezzo y el cursor muestre "VAR" en la
pantalla LCD.
2. Durante el acompañamiento, presione el botón [Fill In B] y manténgalo
presionado hasta que se escuche otro fragmento del intermezzo y el cursor
muestre "VAR" en lugar de "NOR" en la pantalla LCD. El parpadeo de "VAR"
indica que el estilo está en el proceso de una pieza de variación.
3. Presionando firmemente el botón [Fill-in A] o [Fill-in B], se pueden insertar
intermezzos sucesivamente. Una vez finalizado el intermezzo, se iniciará el
acompañamiento normal.
METRÓNOMO AUTOMÁTICO
Al presionar el botón [Metrónomo], el instrumento emite un tic-tac que
indica el compás. En este caso, se pueden seleccionar diferentes estilos de
compás mediante el botón [Funtion]. Presione de nuevo el botón, la función
de metrónomo se detiene.
AJUSTE DEL TEMPO
Los botones [tempo] se pueden aplicar para ajustar el tempo de los estilos.
Presione el botón [Tempo ]/[Tempo ] o gire el dial [Data Dial] hacia arriba o
hacia abajo para acelerar o ralentizar el tempo del estilo en el rango de
valores de 40 a 280 pulsaciones por minuto, y el valor de tempo actual se
mostrará en "TEMPO" en la pantalla LCD. Aplique los dos botones [tempo] al
mismo tiempo para que el valor del tempo vuelva al valor preestablecido.
AJUSTE DEL VOLUMEN DE ACOMPAÑAMIENTO
Presione los botones [Accom Vol ]/ [Accom Vol ] para aumentar o disminuir
el volumen del acompañamiento en el rango de valores de 00 a 31. Presione
ambos al mismo tiempo para que el valor del volumen del acompañamiento
vuelva al valor preestablecido.
VII. Acorde de Bajo Automático y Diccionario de Acordes
Presione el botón [Auto Bass Chord] para iniciar la función de acorde de bajo
automático con los cursores apuntando a A, B, C (que representan el acorde
de bajo automático) brillando en la pantalla LCD. En el cargo del acorde de
bajo automático, las 19 teclas de la parte izquierda del
teclado son las teclas de acorde. Durante el procedimiento de estilo, se puede
iniciar una pieza de acorde de bajo automático presionando las teclas de
acorde.
Nota:
1. Presione el botón [Function] para cambiar el punto de división y el rango
del teclado de acordes. (Consulte "Punto de División" para más detalles).
2. El instrumento puede reconocer tanto digitaciones de un solo dedo como
digitaciones con varios dedos. Aceptará las digitaciones que concuerden con
la digitación, pero aceptará la digitación con un solo dedo cuando las digita-
ciones no concuerden con la digitación.
Un dedo:
(Las siguientes digitaciones están diseñadas para ser aceptadas por este
instrumento).
1. Tríada mayor: Toque la raíz del acorde
2. Tríada menor: Toque las raíces del acorde y cualquier tecla negra a su
izquierda al mismo tiempo.
3. Acorde de séptima dominante: Toque las raíces del acorde y cualquier
tecla blanca a su izquierda al mismo tiempo.
4. Acorde de séptima menor: Toca las raíces del acorde, una blanca y una
negra a su izquierda al mismo tiempo.
Digitación: Cualquier digitación de los dedos mostrada en la siguiente
ilustración puede producir el acorde Do mayor, y se pueden tocar otros
acordes por analogía.
Digitaciones (Do mayor)

EL DICCIONARIO DE ACORDES
El diccionario de acordes es en realidad un manual de acordes guardadas en
el instrumento donde se pueden buscar las notas que forman un acorde.
Todas las notas de los acordes se muestran en la pantalla para guiar al apren-
diz a tocar acordes. Esta función es muy beneficiosa para los principiantes que
conocen los nombres de los acordes para dominar las digitaciones.
1. Presione el botón [Diccionario de Acordes] para iniciar la función con "DICT"
apareciendo en la pantalla LCD así como "C": que significa tríada de Do
mayor y símbolos de notas en el pentagrama. Las raíces de los acordes y el
tipo de acorde pueden definirse en el teclado melódico a la derecha del
punto de división, entonces las teclas correspondientes se mostrarán en el
teclado y las notas en el pentagrama en la pantalla, de modo que el alumno
pueda tocar el acorde en el teclado de acompañamiento de acuerdo con la
representación en la pantalla.
2. Cuando las notas del acorde se tocan correctamente en el teclado de
acompañamiento, se oirán aplausos para celebrar. Cuando las notas del
acorde no se tocan correctamente, habrá un sonido GRAVE de las teclas
que se tocan.
3. Presione de nuevo el botón [Right/Chord Dictionary] para detener la
función.

Note:
1. No hay sonido para las teclas pulsadas en el teclado melódico (a la derecha
del punto de división) que sirven para definir las raíces de los acordes y el
tipo de acorde.
2. No se pueden tocar acordes fuera del rango del teclado de acordes, es
decir, los acordes deben tocarse en las teclas de la izquierda del punto de
división.
VIII. Canciones de Demostración
Hay 2 piezas de diferentes estilos de canciones de demostración reservadas en
el sistema.
SELECCIÓN DE LA CANCIÓN DE DEMOSTRACIÓN
1.Presione el botón [Demo] con "DEMO" brillando en la pantalla, así como
el código de la canción actual y los puntos de compás, el sistema se
pondrá en modo de reproducción sucesiva de las dos canciones de
demostración.
2.Durante la reproducción de la canción de demostración, la canción puede
sustituirse por otra mediante los botones numéricos, los botones [+/-] o el
dial [Data Dial].
3.Presione de nuevo el botón [Demo] para detener la reproducción y salir
de la función.
IX. Canciones de Aprendizaje
Hay 100 piezas de diferentes estilos de canciones reservadas en el siste-
ma que se pueden utilizar como una gran herramienta de aprendizaje,
así como la apreciación de la música.
SELECCIÓN DE CANCIONES DE APRENDIZAJE
1. Presione el botón [Canción] para iniciar el modo "canción" con la palabra
"CANCIÓN" y el código y la abreviatura de la canción actual mostradas en la
pantalla, y el sistema empezará a reproducir las 100 canciones sucesiva-
mente. Durante la reproducción de la canción, ésta puede sustituirse por
otra mediante los botones numéricos, los botones [+/-] o el dial [Data Dial].
Área de práctica de acordes Tipo de acorde Raíces de los acordes

SALIR DE LA CANCIÓN
1.Durante la reproducción de una canción, presione el botón [Start/Stop]
para detener la reproducción de la canción actual, pero el sistema perman-
ecerá en el modo "canción".
2.Presione el botón [Sound] o el botón [Style] al final de la canción para salir
del modo "canción" e iniciar la función correspondiente.
FUNCIÓN DE LA "IZQUIERDA" Y LA "DERECHA" FUERA DEL MODO DE
APRENDIZAJE
Durante el transcurso de la canción, presione el botón [Left] o [Right] para
activar o desactivar el sonido del canal izquierdo o derecho. Por ejemplo,
presione el botón [Left], con la palabra "LEFT" brillando en la parte izquierda
de la pantalla, para abrir el canal de sonido para la melodía de la derecha,
pero para apagar el canal de sonido para el acompañamiento o la melodía
de la izquierda. La misma operación aplica para el botón [Right].
Nota:
1. Cuando el modo "canción" está sin carga, presione el botón [Right/Chord
Dictionary] para iniciar el modo "diccionario de acordes"; presiónelo de
nuevo para salir del modo.
2. Cuando una canción llega a su fin, presione el botón [Right/Chord Dictio-
nary] durante al menos 2 segundos para iniciar el modo "diccionario de
acordes".
X. Leccioness
Los tres botones [Lesson], [Left], [Right] pueden iniciar tres tipos de
modos de aprendizaje que pueden llevar al alumno a tocar por separado
la canción didáctica paso a paso.
LECCIÓN I
El objetivo de esta lección es practicar la duración de la música en lugar de la
afinación. Cualquier tecla pulsada con la duración correcta puede hacer
cambios correctos de las notas y acordes actuales, pero no el sonido de las
notas correspondientes.
2. Durante la reproducción de la canción, presione el botón [Start/Stop] para
detener la reproducción de la canción actual, pero el sistema permanecerá
en el modo "canción"; presione el botón de nuevo para continuar reproduci-
endo la canción actual repetidamente.
Nota: Para que el instrumento vuelva al modo de reproducción sucesiva de
las 100 canciones, primero debe salir del modo "canción" y, a continuación,
volver a activarlo mediante el botón [Song].

LECCIÓN II
Esta lección tiene como objetivo practicar la ejecución de las notas correctas
con las teclas que aparecen en la pantalla. Presionando las teclas de las notas
correctas se puede seguir tocando la canción, o la canción se suspenderá
hasta que se toque la nota correcta.
Nota: En este modo, sólo se pueden tocar las notas correctas, pero las incorr-
ectas no obtienen ninguna respuesta
LECCIÓN Ill
Esta lección tiene como objetivo practicar la reproducción de las notas
correctas con la duración correcta. Con la canción de aprendizaje repro-
duciéndose normalmente, las notas correctas deben tocarse con la duración
correcta de la canción original. Sin presionar ninguna tecla, el sistema se
limita a reproducir el acompañamiento de la canción.
PRÁCTICA PARA LA MANO IZQUIERDA Y DERECHA
El objetivo de esta lección es practicar tocando respectivamente con la mano
izquierda o con la derecha, o con ambas. Presione el botón [Right] para
ocultar la melodía de la mano derecha y luego practique tocando con la
mano derecha. Presione el botón [Left] para ocultar la melodía para la mano
izquierda o los cambios de los acordes para la mano izquierda y, a continu-
ación, practique tocando con la mano izquierda. Presione los dos botones al
mismo tiempo para ocultar el sonido de la mano izquierda y derecha y luego
practique tocando con ambas manos.
CONFIGURACIÓN DE LA FUNCIÓN LECCIÓN
1.Presione la función [Lesson] para iniciar la “canción”, a continuación, presi-
one el botón [Start/Stop] para detener la canción.
2.
3.Elija una canción que le guste presionando los botones numéricos o los
botones [+/-] o girando el dial [Data Dial].
4.
5.Cuando el modo "canción" esté sin carga, presione sucesivamente el botón
[Lesson] para elegir Lección I, Lección II, Lección Ill, o para salir del la
función "lección". Cualquier lección elegida tendrá un cursor luminoso
correspondiente junto con "IZQUIERDA" o "DERECHA" brillando en la
pantalla. A continuación, presione el botón [Start/Stop] para iniciar las
lecciones y las indicaciones de las notas de la melodía o del acorde se
mostrarán en el pentagrama y en el teclado de la pantalla LCD.
6.with shining "LEFT" or "RIGHT" on the screen. Then press the [Start/Stop]
button to start lessons and the indications of the melody or chord notes
will be shown on the stave and keyboard on the LCD screen.

4. Presione el botón [Left] para empezar a practicar con la mano izquierda
con "mano izquierda" brillando en la pantalla. Presione el botón [Right]
para iniciar la práctica con la mano derecha con "mano derecha" brillando
en la pantalla. Presione ambos botones para iniciar la práctica con la mano
izquierda y derecha con "manos izquierda y derecha" brillando en la
pantalla. Si no hay elección, el sistema iniciará la práctica con la mano
derecha automáticamente.
5. Cuando termine una lección, el sistema reproducirá la canción actual y
mantendrá el modo de la lección anterior.
Nota: Los diferentes estilos de las canciones hacen que la práctica para la
mano izquierda sea diferente. Cuando se tocan canciones de estilo rítmico, la
mano izquierda debe tocar los acordes; cuando se tocan otras canciones, la
mano izquierda debe tocar la melodía o el acompañamiento para zurdos (las
canciones codificadas del 00 al 84 son las canciones de estilo rítmico). Duran-
te una lección, el modo de lección no puede cambiarse libremente.
XI. Función de Almacenamiento y Memoria
La función de almacenamiento y memoria sirve para almacenar la voz
configurada, el estilo, el tempo y otros parámetros relativos del modo de
trabajo que deben cambiarse durante la interpretación. También se aplica
para extraer los parámetros necesarios directamente en la interpretación.
Hay seis modos de memoria de los que se puede extraer libremente.
ALMACENAMIENTO DE PARÁMETROS
Primero, configure el sonido, estilo, tempo y otros parámetros relativos de un
modo de trabajo. En segundo lugar, presione firmemente el botón [Memory]
y, a continuación, presione cualquiera de los botones de modo de memoria
(M1, M2, M3, M4, MS o M6) para almacenar el modo de trabajo. Habrá un
cursor brillante correspondiente para mostrar el modo de memoria en el que
están almacenados todos los parámetros..
EXTRACCIÓN DE PARÁMETROS
Durante la ejecución, presione cualquiera de los botones de modo de
memoria para extraer los parámetros almacenados del modo de trabajo
necesario para sustituir al actual.

Nota:
1. Después de extraer un modo de memoria, todos los parámetros pueden
restablecerse y pasar a ser diferentes de los almacenados anteriormente.
En este estado, el cursor brillante correspondiente en la parte inferior de la
pantalla desaparece mostrando que el modo ha sido cambiado.
2. No hay protección contra cortes de corriente para todos los modos de
memoria, por lo que cuando el instrumento recupera la corriente, los
parámetros almacenados se pierden.
XII. Configuración del O.T.S (AJUSTE DE UN SOLO TOQUE)
La función O.T.S ha almacenado las voces más utilizadas que se adaptan a
los estilos. Hay cuatro sonidos predeterminados para cada estiloe.
1. Presione el botón [O.T.S] para iniciar el "acorde de bajo automático" con
"O.T.S" y "M1” brillando en la parte inferior de la pantalla..
2. Después de tener listo el estilo deseado, presione los cuatro botones de
memoria (Ml a M4), entonces el estilo tocado en el teclado combinará
perfectamente las cuatro voces predeterminadas..
3. 3. En este estado de la función, presione de nuevo el botón para salir de
la función.
Nota: En la carga del botón [O.T.S], la función de almacenamiento y memoria
no puede iniciarse.
XIII. Grabar
PREPARACIÓN DE LA GRABACIÓN
Pulse el botón [REC] cuando parpadeen cuatro puntos de ritmo y aparezca
"REC" en la pantalla para indicar que el sistema está preparado para grabar. El
sonido que le guste, el estilo, el tempo, el sustain y otros parámetros pueden
configurarse antes de la grabación.

GRABAR
En este estado, todas las notas que se tocan en el teclado se graban con
cuatro puntos de compás en la pantalla que parpadean sucesivamente al
tempo configurado.
En el modo "grabar", se puede grabar una pieza de acompañamiento directa-
mente después de iniciarla. En el estado "acorde de bajo automático", cual-
quier tecla pulsada en el teclado de acompañamiento automático puede
iniciar una pieza del estilo.
Pero cuando el "acorde de bajo automático" está fuera de carga, una pieza
del estilo sólo puede iniciarse presionando el botón [Start/Stop]. Durante la
grabación del acompañamiento, también se pueden tocar notas de melodía
en el teclado y grabarlas juntas.
Nota:
1. No hay protección contra cortes de corriente, por lo que cuando el instru-
mento recupera la corriente, los datos grabados se pierden.
2.La nueva grabación sustituirá a la principal cuando se vuelva a aplicar esta
función de grabación.
3.La cantidad de notas grabadas se ve afectada por todos los datos graba-
dos, incluidos los diferentes sonidos, el estilo, el tempo, etc.
DESPUÉS DE LA GRABACIÓN
1.En el modo "grabar", presione de nuevo el botón [REC] para detener la
grabación.
2.Durante el tiempo en que un estilo siga su curso y se esté grabando, presi-
one el botón [Intro/Ending] para iniciar un pedazo de final. Cuando termine
el final, el sistema detendrá automáticamente la grabación y saldrá del
modo "grabar".
3.Durante la grabación, la memoria completamente ocupada detendrá la
grabación con el mensaje "FULL" brillando durante 3 segundos en la pan-
talla y, a continuación, saldrá del modo "grabar".
PLAYBACK
Una vez finalizada la grabación, presione el botón [Playback] para reproducir
la pista grabada.

XIV. Programa
PROGRAMA
Presione el botón [Prog] con el cursor "Prog" brillando en la pantalla para
cambiar el teclado a uno de percusión.
A continuación, presione una tecla o un tambor del panel para iniciar la
función de programación.
Pulse el botón [Prog] una vez más para detener la programación.
La memoria completamente llena también puede detener el programa.
El ritmo recién editado o el nuevo registro ocuparán el lugar del principal.
REPRODUCCIÓN NULA
Si se presiona el botón [Null Play], el ritmo editado puede reproducirse
repetidamente.
Presione el botón nuevamente para detener la reproducción.
Apéndice
SONIDOS
NO. Nombre NO. Nombre NO. Nombre
Piano
Organ
Bass
Guitar
Mallet
Grand Piano
Bright Piano
El Grd Piano
Honky-tonk Piano
Elec piano 1
Elec Piano 2
Harpsichord
Clavi
Celesta
Glockenspiel
Music Box
Vibraphone
Marimba
Xylophone
Tubular Bell
Santur
Drawbar Organ
Jazz Organ
Rock Organ
Church Organ
Reed Organ
Accordion
Harmonica
Tango Accordion
Classic Guitar
Steel Guitar
Jazz. Guitar
Clean Guitar
Muted. Guitar
Overdriven Guitar
Distortion Guitar
Guitar Harmonics
Acoustic Bass
Finger Bass
Picked Bass
Fretless Bass
Slap Bass 1
Slap Bass 2
Synth Bass 1
Synth Bass 2

SONIDOS
NO. Nombre NO. Nombre NO. Nombre
Strings Lead
Sound Effects
Chinese Instrument
Synth Voice
Drum Kit
Pad
Effects
Ethnic
Percussive
Strings Ensemble
Brass
Reed
Pipe
Violin
Viola
Cello
Contrabass
Tremolo Strings
Pizzicato Strings
Harp
Timpani
Strings 1
Strings 2
Synth Strings 1
Synth Strings 2
Choir Aahs
Voice Ooh
Synth
Orchestra Hit
Trumpet
Trombone
Tuba
Muted Trumpet
Horn
Brass Ensemble
Synth Brass 1
Synth Brass 2
70elep
Fzpiano
Ep3
Ep4
Ep5
Harppian
Clavr2
Clavr3
Organ Box
E. organ
Churc2
Syn Organ
Altoel
Fz guitar
Syn elgt
Picel bas
El violin
Brassfm
Fmlead
Fantalfo
Polyaa2
Bowedg2
70elpad
Soprano Sax
Alto Sax
Tenor sax
Baritone Sax
Oboe
English horn
Bassoon
Clarinet
Piccolo
Flute
Recorder
Pan Flute
Blown Bottle
Shakuhachi
Whistle
Ocarina
Square
Sawtooth
Calliope
Chiff
Charang
Voice
Fifths
Bass lead
Fantasia
Warm
Poly Synth
Choir
Bowed
Metallic
Halo
Sweep
Fx1
Fx2
Fx3
Fx4
Fx5
Fx6
Fx7
Fx8
Sitar
Banjo
Shamisen
Koto
Kalimba
Bag Pipe
Fiddle
Shanai
Tinkle Bell
Agogo
Steel Drums
Woodblock
Taiko Drum
Melodic Tom
Synth Drum
Reverse Cymbal
Standard Kit
Power Kit
Dance Kit
808 Kit
Brush Kit
Orchestra Kit
GT Fret Noise
Breath Noise
Seashore
Bird Tweet
Teleph Ring
Helicopter
Applause
Gunshot
Pipa
Erhu
Guzhen
Banhu
Qudi
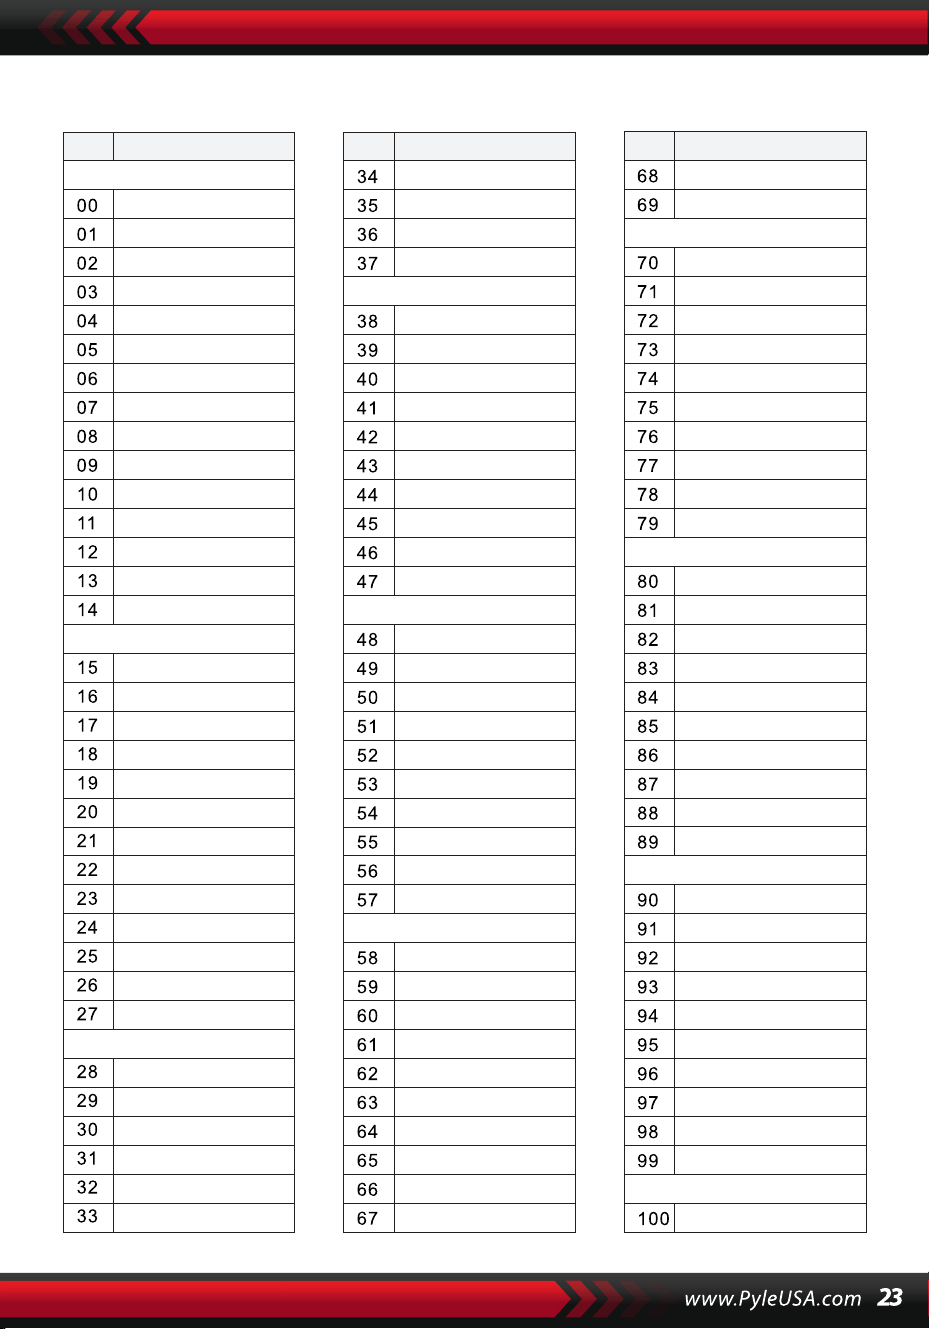
ESTILOS
NO. Nombre NO. Nombre NO. Nombre
BEAT & POP
SOUL & FUNK
LATIN
TRADITIONAL
PIANO
BEAT & POP-1
JAZZ
COUNTRY
ROCK
DANCE
8 Beat 1
8 Beat 2
8 Beat 3
8 Beat 4
60's 8 Beat
8 Beat Ballad
8 Beat Rock
16 Beat 1
16 Beat 2
16 Beat Pop
16 Beat Shuffle
Ballad
Slow Ballad
16 Beat Ballad
Unplugged
Funky Pop
Jazz Funk
Cool Funky
Soul 1
Soul 2
Soul Shuffle
Soul Blues
R&B
6/8 Gospel
Pop Groove
Bossa Nova 1
Bossa Nova 2
Rhumba
Pop Rhumba
Cha Cha
Pop Cha Cha
Tango
Jazz Samba
Reggae
Pop Reggae
1-Mar
2-Mar
German March
6/8 March
Polka
Pop Polka
Waltz
Slow Waltz
Vienna Waltz
Musette
8 Beat
Ballad
Boogie
Jazz
Swing
Jazz Waltz
Twist
March
6/8 March
Waltz
8 Beat 1 -1
Swing
Cool Jazz
Pop Swing
Swing Fox
Big Band
Big Band Meduim
Jazz Waltz
Ragtime
Dixeland
Quick Step
Country 1
Country 2
Pop Country
Country Rock
Country Folk
3/4 Country
Country Waltz
Country Shuffle
Country Boogie
Country Blues
Rap
Euro Beat
Hip Hop
Techno
Country Quick Step
Bluegrass
Rock
Pop Rock
Fast Rock
Slow Rock 1
Slow Rock 2
Rock & Roll
Heavy Metal
Blues Boogie
Blues
Shuffle
Blues Shuffle
Rock Shuffle
Charlston
Disco 1
Disco 2
Disco Funk
Dance
House 1
House 2
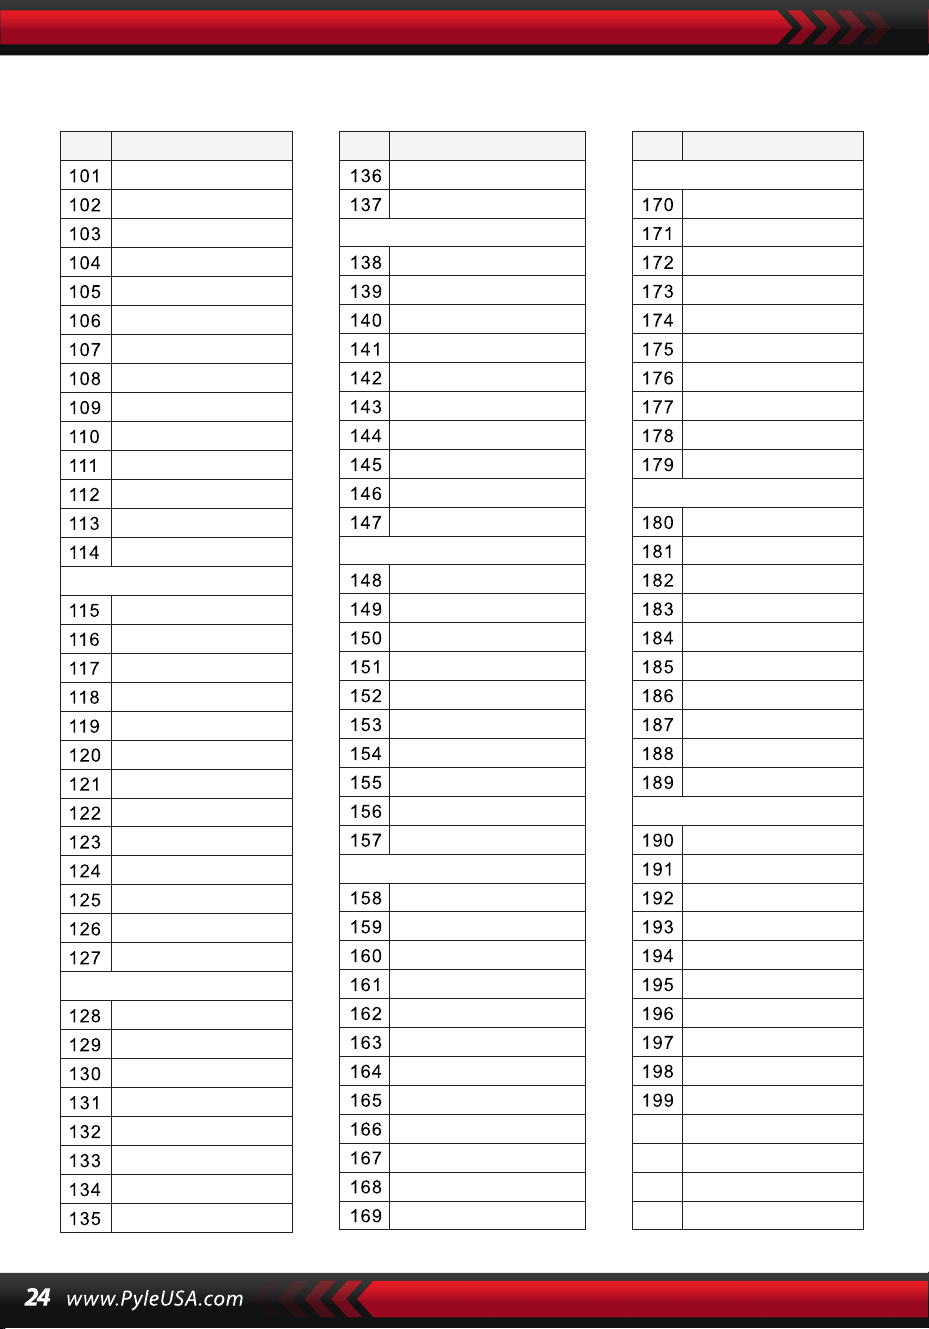
ESTILOS
NO. Nombre NO. Nombre NO. Nombre
8 Beat 2-1
8 Beat 3-1
8 Beat 4 -1
60’s 8 Beat-1
8 Beat Ballad -1
8 Beat Rock-1
16 Beat 1 -1
16 Beat 2-1
16 Beat Pop -1
16 Beat Shuffle-1
Ballad-1
Slow Ballad -1
16 Beat Ballad -1
Unplugged -1
Bossa Nova 1 -1
Bossa Nova 2 -1
Rhumba -1
Pop Rhumba -1
Cha Cha -1
Pop Cha Cha -1
Tango -1
Jazz Samba -1
Reggae -1
Pop Reggae -1
March 1 -1
March 2 -1
German March -1
6/8 March -1
Polka -1
Pop Polka -1
Waltz-1
Slow Waltz-1
Vienna Waltz -1
Musette -1
8 Beat-1
Ballad-1
Boogie -1
Jazz -1
Swing -1
Jazz Waltz-1
Twist -1
March -1
6/8 March -1
Waltz-1
Country 1 -1
Country 2-1
Pop Country-1
Country Rock -1
Country Folk -1
3/4 Country-1
Country Waltz-1
Country Shuffle-1
Country Boogie -1
Country Blues -1
Country Quick Step
-1
Swing -1
Cool Jazz-1
Pop Swing -1
Swing Fox -1
Big Band -1
Big Band Meduim
-1
Jazz Waltz -1
Ragtime -1
Dixeland -1
Funky Pop -1
Jazz Funk -1
Cool Funky -1
Soul 1 -1
Soul 2-1
Soul Shuffle-1
Soul Blues -1
R&B-1
6/8 Gospel -1
Pop Groove -1
Hip Hop -1
Techno -1
Rock -1
Pop Rock-1
Fast Rock-1
Slow Rock 1 -1
Slow Rock 2 -1
Rock & Roll-1
Heavy Metal -1
Blues Boogie -1
Blues -1
Shuffle-1
Blues Shuffle -1
Rock Shuffle -1
Charlston -1
Disco 1 -1
Disco 2 -1
Disco Funk -1
Dance -1
House 1 -1
House 2 -1
Rap -1
Euro Beat-1
ROCK-1
DANCE
SOUL & FUNK-1
JAZZ-1
COUNTRY
LATIN-1
TRADITIONAL-1
PIANO-1

Montaje de la Base para Teclado
1. En primer lugar, prepare todas
las piezas de montaje.
2. En segundo lugar, tome el tornillo No.
2 y la placa de soporte No. 3, fíjelos a
los dos soportes de la base No. 5 y
apriételos por separado.
3. Take the No. 2 screw and the No. 4
stand to the top of the No. 5 stand
and tighten.
4. La instalación está completa, el
tornillo No. 1 más largo se utiliza para
fijar el teclado en la base.

Características:
• Cable MIDI
• 200 Estilos de Acompañamiento Automático Bien Elegidos en el Mundo
• 8 Pads de Percusión/ Percusiones de Teclado
• Compacto y Portátil Piano Musical
• Funcionamiento Electrónico Enchufable Sencillo
• Sistema Giratorio de Cambio de Sonido
• Piano Portátil
• Altavoces Estéreo Full Range Incorporados
• Conexión y Transmisión de Audio desde Dispositivos Externos
• Puede Conectarse a Altavoces y Reproducir Sonido
• Múltiples Preajustes Seleccionables de Sonido de Teclado, Estilos de
Tono y Ritmo
• Pantalla LCD Digital
• Control de Volumen Ajustable
• Modo de Grabación y PlayBack
• 162 Sonidos, 128 de ellos GM estándar, 5 de Instrumentos de Folk, 23 de
Sintetizador y 6 de Batería
• Control Básico: Volumen Maestro/ Volumen de Acompañamiento/
Volumen de Acordes/Control de Tempo
• Función de Acorde Automático: Acorde Simple/ Acorde Digitado/ Diccio-
nario de Acordes
• Funciones de Enseñanza: Tecla Única/Seguir/ Ensamble
• Pitch bend/Vibrato/Sustain/Sensor Táctil/Función de sonido doble
• Función de División de Teclado/Octava/Transposición
• Sync/Inciar/Detener/Fundido de Entrada/Fundido de Salida/Introduc-
ción/Final/Relleno en A&B/Metrónomo
• Entrada USB/Entrada de Pedal de Sostenido
• Salida de Altavoz (L/R)/Salida de Audífonos
• Perfecto para Presentaciones en la Sala de Estar del Teatro en Casa
• Diversión para Niños de Todas las Edades: Niños y Adultos
Contenido de la Caja
• Teclado Musical Digital con
Karaoke
• Atril de Teclado
• Adaptador de Corriente
• Cable de Alimentación
• Base de Teclado
• Pedal de Sustain
• Bolsa Impermeable
• Audífonos
Especificaciones de los Audífonos
• Material de Construcción: ABS+
Lámina decorativa láser
• Material del Cable: PVC Alambre Liso
• Longitud del Cable: 1.2M
• Diámetro del Enchufe: 3.5mm 1/8
• Peso: 0.14 kg
Especificacinones del Pedal de Sustain
• Función Normal de Encendi-
do/Apagado
• Longitud: 9,45 pulgadas
• Anchura: 3,15 pulgadas
• Altura: 2,8 pulgadas
• Peso: 1,75 kg
Especificaciones Técnicas:
• (61) Teclas
• 162 Sonidos Incluyen 128 Voces GM Estándar, 5 Voces de Instrumentos de
Música Folk, 23
• Voces de Sintetizador, 6 Voces de Kit de Batería
• Canción de Demostración
• Interfaz de Audio: Aux (6,5 mm) de Entrada Jack / RCA L& R Jack de Salida
• Nivel de Sonido Máximo: Hasta 110 dB
• Longitud del Cable de Alimentación/USB: 3.9’ pies.
• Material de Construcción: ABS de Ingeniería
• Fuente de Alimentación: DC 12V / Adaptador AC
• Dimensiones del Teclado (largo x ancho x alto): 92.9 x 30.3 x 9.3 cm/36.6 x
11.97 x 3.7 -pulgadas
Especificaciones Técnicas de la
Base del Teclado:
• Barniz Horneado
• Función Desmontable
• Material de Construcción: lron+ABS
• Longitud: 80 cm/31,5 pulgadas
• Anchura: 21 cm/8,3 pulgadas
• Altura: 57.5~67.5 cm/22.64~26.57 inches
• Peso: 1,75 kg/3.8 lbs
• Capacidad de Carga: 15 kg/33 lbs
Este producto contiene butilbencilftalato (BBP), conocido en
el estado de California por causar cáncer, defectos
congénitos y otros daños reproductivos. No ingerir.
Para más información visite: www.P65warnings.ca.gov
Advertencia de la Proposición 65 de California
ADVERTENCIA:

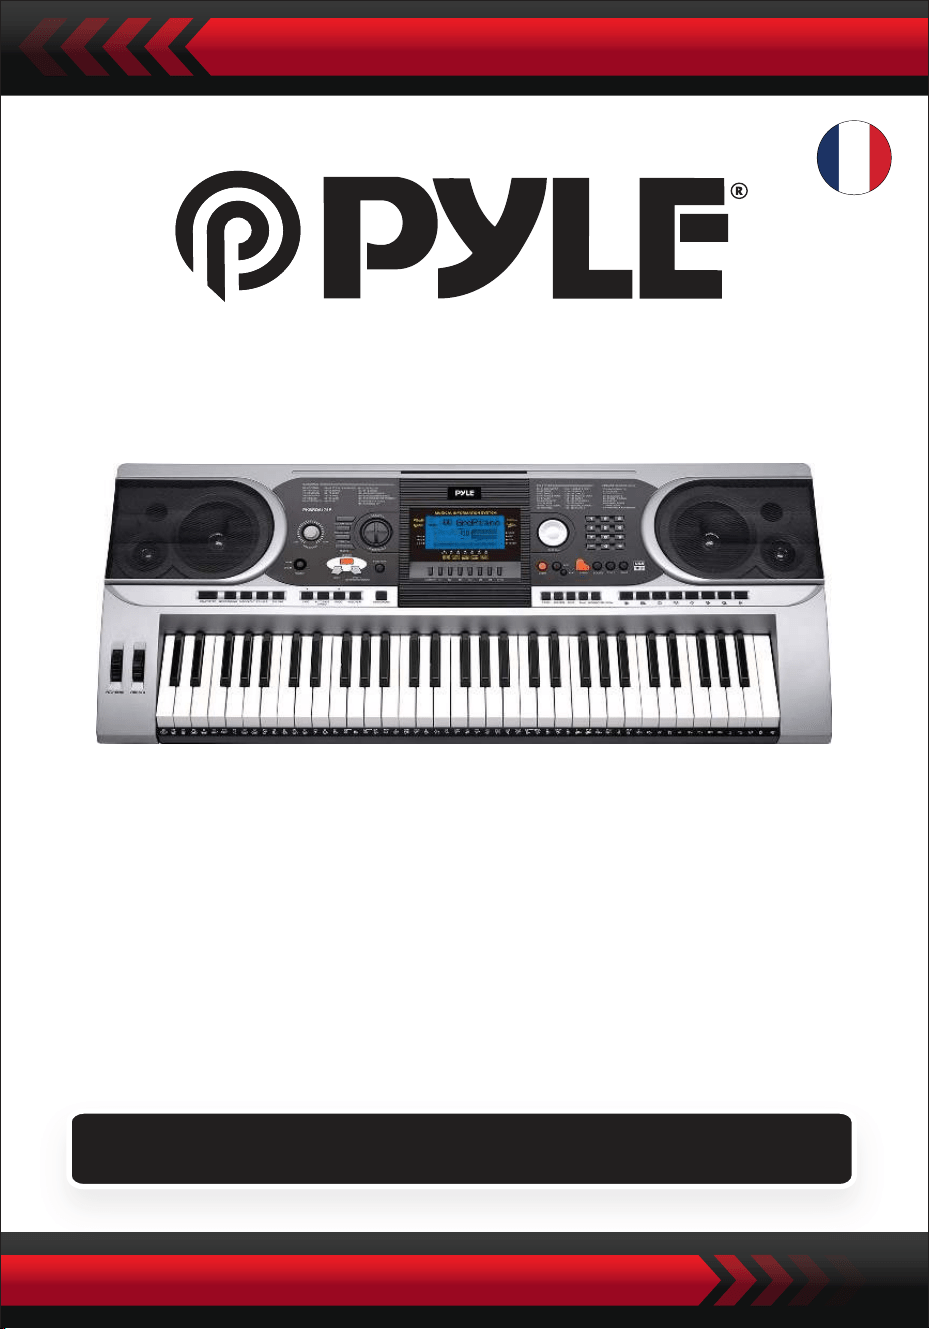
Clavier de Piano Électronique Portable avec Sac Ré-
sistant à l'Eau (61 touches), Support de Clavier, Pédale
de Sustain et Casque
Clavier Musical Numérique
PKBBD6175P
GUIDE D'UTILISATION
FRE

• Utilisez l'adaptateur secteur spécifié et remplacez immédiatement tout
adaptateur endommagé, le cas échéant.
• • Ne pas démonter l'instrument ni modifier ses parties internes. En cas de
dysfonctionnement, cessez immédiatement l'utilisation et faites-le réparer
par un professionnel.
• • Avant de connecter l'instrument à d'autres appareils, éteignez toutes les
sources d'alimentation.
• • Ne jouez pas de l'instrument au volume maximal ou à un niveau inconfort-
able pendant une longue période.
• • Évitez toute source de chaleur pour les pièces de l'instrument, car la
surchauffe peut l'endommager.
• • Empêchez les liquides, la poussière, les particules et autres éléments étrang-
ers de pénétrer dans l'instrument pour éviter la corrosion ou les courts-cir-
cuits de ses composants.
• • Débranchez avant de nettoyer l'instrument. Ne pas insérer ou retirer la fiche
avec des mains mouillées.
• • Utilisez un chiffon sec et doux pour nettoyer l'instrument. N'utilisez ni
peinture, ni alcool, ni autres solvants chimiques pour essuyer la surface de
l'instrument afin d'éviter tout dommage.
• • Éteignez l'alimentation et débranchez l'appareil après l'utilisation ou s'il
reste inutilisé pendant une longue période.
• • Pour réduire les risques d'incendie ou de choc électrique, ne pas exposer cet
appareil à la pluie ou à l'humidité. Ne pas exposer l'appareil à des gouttes ou
des éclaboussures et ne placez aucun objet rempli de liquides, telles que des
vases, sur l'appareil.
• • Température de fonctionnement maximale : 40°C / 104°F
• • Un adaptateur secteur direct est utilisé comme dispositif de déconnexion, ce
dispositif de déconnexion doit rester facilement utilisable.
• • Ne pas installer cet équipement dans un espace confiné tel qu'une biblio-
thèque ou une unité similaire et assurez-vous d'un bon système de ventila-
tion. Ne pas obstruer les ouvertures de ventilation avec des éléments tels que
des journaux, des nappes, des rideaux, etc.
• • Attention : Une pression sonore excessive des écouteurs et des casques peut
causer des dommages à l'ouïe.
• • L'emplacement de l'étiquette se trouve sous l'appareil.
• • L'appareil ne doit pas être exposé à des gouttes ou des éclaboussures, et
aucun objet rempli de liquides, telles que des vases, ne doit être placé sur
l'appareil.
• • L'adaptateur secteur direct est utilisé comme dispositif de déconnexion, ce
dispositif de déconnexion doit rester facilement utilisable.
VEUILLEZ LIRE ATTENTIVEMENT AVANT DE PROCÉDER
Veuillez conserver ce manuel dans un endroit sûr et accessible pour
référence future.
ATTENTION !

• Pour éviter tout dommage possible à l'environnement ou à la santé
humaine dû à l'élimination incontrôlée des déchets, recyclez-le de
manière responsable pour promouvoir la réutilisation durable des
ressources matérielles. Pour retourner votre appareil usagé, veuillez
utiliser les systèmes de retour et de collecte ou contacter le détaillant
où le produit a été acheté. Ils peuvent prendre en charge le recyclage
sûr et respectueux de l'environnement de ce produit.
/. Panneau de Contrôle et Ports d'Extension
1 Haut-Parleur
2 Interrupteur
d'Alimentation
3 Volume Principal
4 Tempo
5 Volume d'Accompag-
nement
6 Transposer
7 Octave
8 Leçon
9 Fonction
10 Droite
(Dictionnaire d'Accords)
11 Gauche
12 Mémoire
13 M1,M2...M6
14 O.T.S
15 Affichage LCD
16 Démonstration
17 Enregistrement/Lec-
ture
18 Cadran de Données
19 Piano
20 Nombres
21 Son
22 Style
23 Chanson
24 Démarrer/Arrêter
25 Intro/Fin
26 Fondu Entrée/Sortie
27 Remplissage A
28 Remplissage B
29 Synchronisation
30 Accords de Basse
Automatiques
31 Prog/Null-Play
32 Métronome
33 Sensibilité au Toucher
34 Sustain
35 Division
36 Double
37 Percussions Clavier
38 Percussions du
Panneau
39 Courbure de Note
40 Vibrato
41 Clavier d'Accords

UTILISATION DE L'ADAPTATEUR D'ALIMENTATION CA/CC
L'adaptateur d'alimentation CA/CC doit être celui spécifié pour l'appareil. Bran-
chez une extrémité dans la prise d'alimentation située à l'arrière de l'appareil et
l'autre extrémité dans le réseau électrique local. (Veuillez noter que la tension
d'entrée doit être identique à celle du réseau électrique).
ENTRÉE POUR ÉCOUTEURS
Insérez les écouteurs dans l'entrée prévue à cet effet à l'arrière du boîtier, de sorte que
le haut-parleur interne puisse se couper automatiquement et que la lecture et le
chant puissent se poursuivre sans déranger les autres.
Note : Un volume trop élevé des écouteurs peut endommager l'ouïe.
CONNEXION AVEC DES AMPLIFICATEURS OU DES HAUT-PARLEURS
L'instrument est équipé d'un système de haut-parleurs interne et peut égale-
ment être connecté à d'autres amplificateurs ou haut-parleurs acoustiques. Tout
d'abord, éteignez l'instrument et l'équipement externe, puis insérez le câble
stéréo dans la prise de sortie L/R du panneau arrière et l'autre extrémité dans la
prise LINE IN ou AUX IN de l'équipement externe.
USB MIDI
MIDI est l'abréviation de Musical Instrument Digital Interface. À travers les prises
MIDI, le clavier peut être connecté à d'autres instruments de musique ou ordina-
teurs avec MIDI via un câble de transmission de données. Dans ce cas, toute
interprétation sur le clavier peut être transférée vers l'ordinateur, puis enregis-
trée, composée ou éditée avec un logiciel avancé sur l'ordinateur. Toute la
musique MIDI stockée dans l'ordinateur peut être transférée vers l'instrument et
être jouée.
Les méthodes d'application de l'USB MIDI :
1. Tout d'abord, connectez les instruments à l'ordinateur à l'aide du câble USB
universel et allumez les deux appareils.
II. Preparación para el Espectáculo
PANEL TRASERO
42 ENTRÉE USB MIDI
43 ENTRÉE JACK SUSTAIN
44 SORTIE L/R JACK
45 CASQUE
46 ENTRÉE DC 12V

2. Ensuite, installez et lancez le logiciel d'édition musicale, par exemple, CAKEWALK.
Ensuite, le matériel spécial de l'instrument apparaîtra dans le matériel contenant
le logiciel musical, et il doit être défini comme périphérique par défaut. Dans ce
cas, la communication de données entre l'instrument et l'ordinateur a été établie.
3. Ensuite, configurez les canaux MIDI de l'instrument (Veuillez consulter l'introduc-
tion du bouton [Menu]).
PÉDALE DE SUSTAIN
L'instrument peut être connecté à une pédale de sustain externe, permettant ainsi
d'appliquer un effet de sustain pendant l'exécution.n.
AJUSTEMENT DU VOLUME MASTER
Tournez le bouton de volume principal dans le sens horaire pour augmenter le
volume principal ; dans le sens antihoraire pour diminuer. Ce bouton contrôle
également le volume de l'accompagnement.
///. Méthode de performance de base
Appuyez sur le bouton [Power] pour activer le rétro-éclairage, l'écran LCD affiche
des informations sur la voix actuelle, le tempo, le mode de fonction, etc.
La représentation en plein écran illustre tous les curseurs de marque et les
paramètres des différents modes:
L'écran complet de l'affichage LCD lors de la mise sous tension :

CADRAN DE DONNÉES
Tourner le bouton [Data Dial] est un raccourci pour sélectionner une voix, un rythme
ou une chanson. En tournant dans le sens horaire, des valeurs plus élevées peuvent
être atteintes ; en tournant dans le sens antihoraire, des valeurs plus basses.
PERCUSSIONS PANNEAU ET CLAVIER
Il y a 8 types de percussions de panneau et 61 percussions de clavier disponibles
sur l'instrument.
• Appuyez sur le bouton [Percussion panneau], un son de percussion correspon-
dant peut être déclenché par une certaine frappe de touche.
• Appuyez sur le bouton [Percussion clavier] avec "PERÇUS" affiché à l'écran LCD.
Dans ce cas, une performance de percussion peut être effectuée sur le clavier.
Une certaine touche correspond à un type spécifique de son de percussion.
Appuyez à nouveau sur le bouton pour quitter la fonction.
IV. Le bouton de fonction
Les détails des paramètres configurables via le bouton [Fonction] sont décrits
ci-dessous :
NOM DU
PARAMÈTRE
Indication sur l'écran
LCD
Plage ajustable
Valeur par
défaut
TEMPOS
Maintenez le bouton [Function] enfoncé jusqu'à ce que "04Beat" apparaisse sur
l'écran LCD. Dans ce cas, l'un des neuf styles de tempo différents peut être sélec-
tionné, codés de 00 à 09. Le style de tempo souhaité peut être choisi à l'aide des
boutons [+/-] ou du bouton [Data Dial].
POINT DE DIVISION
La touche est appelée le point de division qui divise le clavier en deux parties : le
clavier d'accompagnement à gauche et le clavier de mélodie à droite. Le point de
division par défaut de l'instrument se trouve sur la 19ème touche à partir de la
gauche, et il peut être réinitialisé sur n'importe quelle touche du clavier.
TEMPS
TODOS
POINT SPLIT
MIDI IN
MIDI OUTI
SÉLECTION
DE BANQUE

CONFIGURATION DES CANAUX MIDI
1. MIDI ENTRÉE
Appuyez plusieurs fois sur le bouton [Function] jusqu'à ce que "MIDI Entrée"
apparaisse sur l'écran LCD. Dans ce cas, le canal cible peut être sélectionné pour
lire les fichiers MIDI d'entrée en appuyant sur les boutons [+/-] ou en tournant le
bouton [Data Dial] sur "ALL", ce qui signifie que tous les canaux (codés de 01 à 16)
sont disponibles. Tous les canaux sont préconfigurés lors de la mise sous tension
de l'instrument.
2. MIDI SORTIE
Press the [Function] button repeatedly until "MIDI Out" appears on the LCD
screen. In this case, the target channel can be chosen to transmit the output MIDI
files by pressing the [+/-] buttons or turning the [data Dial] knob. But some of the
MIDI files cannot be transmitted, such as the auto rhythm, demonstration songs,
and songs reserved in the instrument. When the instrument is power on, channel
01 is preset available.
SÉLECTION DE LA BANQUE
Appuyez plusieurs fois sur le bouton [Function] avec "Bank Sel" affiché sur l'écran
LCD. Dans ce cas, la banque vocale cible, parmi 128 banques codées de 01 à 128,
peut être sélectionnée pour ajuster la voix du clavier MIDI en appuyant sur les
boutons [+/-] ou en tournant le bouton [Data Dial]. Lorsque l'instrument est sous
tension, la banque vocale prédéfinie est BANK01.
Remarque : Il n'y a qu'une seule banque vocale, codée BANK 01, avec 128 voix dans
la banque vocale GM standard. Si d'autres banques vocales sont disponibles sur
l'ordinateur, elles peuvent être ajoutées à l'instrument et définies avec des codes de
BANK 01 à 128.
V. Sons et Effets
SÉLECTION DE SON
Le système comporte 162 types de sons, incluant 128 sons GM, 6 groupes de sons
pour la percussion clavier et 5 groupes de sons pour la musique folklorique.
Appuyez plusieurs fois sur le bouton [Function] jusqu'à ce que "19 Point de
division" apparaisse à l'écran LED. Dans ce cas, le point de division peut être réini-
tialisé en appuyant sur les boutons [+/-], en tournant le bouton [Data Dial], ou en
frappant la touche cible. Le nouveau point de division est alors défini une fois la
sélection terminée.

Au démarrage, le son par défaut est le son codé 00, identifié comme "00 Grd Piano"
sur l'écran LCD. Appuyez sur le bouton [Son] pour accéder à la configuration des
voix. Le son désiré peut être sélectionné via les touches numériques, les boutons
[+/-] ou le bouton [Data Dial]. Cependant, pour utiliser les touches numériques, le
code sonore cible doit être entré sur trois chiffres. Ainsi, si le code sonore est 65, les
chiffres 0, 6 et 5 doivent être saisis, ou si c'est le code 8, les chiffres 0, 0 et 8 doivent
être saisis.
PIANO
Pour plus de facilité, l'instrument est équipé d'un bouton [Piano]. En le pressant,
la voix de piano peut être directement sélectionnée.
1.Appuyer sur [Piano] bascule l'instrument en mode piano, avec "PIANO" affiché à
l'écran. Chaque frappe clavier émettra alors le son de piano.
2.En mode accompagnement, [Piano] permet de stopper l'accompagnement et de
passer en mode piano. Appuyer à nouveau sur le bouton quitte cette fonction.
1.En pressant [Double], "SON" s'affiche avec le curseur pointant vers "DOUBLE" sur
l'écran LCD. Le code du deuxième son est également affiché. Le deuxième son
prédéfini est le Son 48. Ainsi, les frappes clavier émettent un son résultant de la
combinaison des deux.
2. Le deuxième son peut être choisi en appuyant sur les boutons [+/-] ou en
tournant le bouton [Data Dial].
Remarque : En mode Piano, les rythmes peuvent être sélectionnés et joués, et le
contrôle de l'accompagnement fonctionne normalement, mais seuls les percus-
sions sans accord sont disponibles..
FONCTION DOUBLE SON
L'instrument dispose d'une fonction double son, permettant de combiner deux
sons pour créer un nouvel effet sonore et enrichir la complexité sonore, simulant
la combinaison de deux instruments. Avant d'activer le bouton [Double], le son de
l'instrument est identifié comme "SON 1" sur l'écran LCD, et le deuxième son peut
être sélectionné comme suit :

3. En mode double-voix, le premier son peut être modifié en appuyant d'abord sur
[Son], puis en utilisant les boutons [+/-] ou le bouton [Data Dial].
4. Pour quitter le mode double-voix, appuyez sur [Double]. "SON 2" et le curseur
pointant vers "DOUBLE" disparaissent de l'écran LCD, revenant ainsi au mode
configuration "SON 1".
Remarque : En dehors de l'accord automatique, la fonction double son peut être
appliquée sur l'ensemble du clavier ; en mode accord automatique, elle ne peut
être utilisée que sur le clavier de mélodie, pas sur le clavier d'accompagnement.
CLAVIER À SENSIBILITÉ DYNAMIQUE
Lorsque l'instrument est allumé, la fonction de sensibilité dynamique est activée,
indiquée par "TOUCH" sur le curseur. En appuyant sur [Touch], la fonction peut être
activée ou désactivée. Elle permet d'ajuster la dynamique des différentes frappes
clavier, renforçant ainsi la performance. Plus la dynamique est grande, plus le volume
des notes est élevé. Lorsque la fonction est désactivée, toutes les frappes clavier
émettent le même volume.
MODULATION DE PITCH (PITCH BEND)
En déplaçant le levier [Pitch Bend] vers le haut ou vers le bas, le pitch glisse vers l'alto
ou le bourdon. Relâchez la modulation pour revenir au pitch normal.
MODULATION DE VIBRATO (VIBRATO BEND)
Lorsque le levier [Vibrato Bend] est positionné le plus bas vers le bas, la fonction de
vibrato est désactivée. Déplacez-le vers le haut pour l'activer et obtenir un effet de
sustain sur les frappes clavier. En ajustant le levier vers le haut ou vers le bas, l'effet
peut être renforcé ou affaibli.
SUSTAIN
1 Appuyez sur [Sustain] pour activer la fonction, indiqué par "SUSTAIN" sur
l'écran LCD. Les frappes clavier bénéficieront d'un effet sustain élégant.
2. Appuyez à nouveau sur [Sustain] pour désactiver la fonction et faire
disparaître "SUSTAIN" de l'écran LCD.
OCTAVE
Les boutons [Octave+/Octave-] permettent de transposer l'instrument d'une
octave au-dessus ou en dessous. Lorsque l'un des boutons [Octave+] ou
[Octave-] est pressé pour la première fois, la valeur d'octave actuelle est
affichée sur l'écran LCD. Appuyez à nouveau sur l'un des boutons pour trans-
poser l'instrument d'une octave au-dessus ou en dessous, dans la plage de
possibilités.
TRANSPOSITION
Appuyez sur le bouton [Transpose ] ou [Transpose ] pour transposer le
ton des notes. La transposition peut être ajustée de "-6" à "+6". En appuyant
sur les deux boutons simultanément, le ton des notes revient à la valeur
prédéfinie "0". En mode de fonction transpose, la valeur de transposition peut
également être modifiée en tournant le bouton [Data Dial].
DOUBLE CLAVIER
Appuyez sur [Split] pour diviser le clavier en deux parties : les 24 touches de
gauche et le reste des touches, formant ainsi un double clavier. Le ton de la
partie gauche est transposé d'une octave au-dessus, tandis que celui de la
partie droite est transposé d'une octave en dessous, rendant le ton des deux
parties cohérent. De plus, le son des deux parties peut être différent. La partie
gauche conserve la voix principale, tandis que la partie droite peut avoir une
autre voix. En appuyant à nouveau sur [Split], la fonction est désactivée, et le
son du clavier entier est celui de la partie droite précédente.
Remarque : En mode accord automatique, la fonction de sensibilité
dynamique, l'effet de sustain, la modulation de pitch et la modulation de
vibrato ne fonctionnent pas sur le clavier d'accord.
VI. Styles Automatiques
SÉLECTION DES STYLES
Il existe 200 styles différents, numérotés de 00 à 200. Lorsque l'instrument est
allumé, le style par défaut est celui codé "00". Appuyez sur le bouton [Style]
avec "STYLE" affiché sur l'écran LCD, puis sélectionnez le style souhaité à l'aide
des touches numériques, des boutons [+/-] ou du bouton [Data Dial].

Remarque : Le code du style cible doit être saisi sur trois chiffres. Ainsi, si le
code du style est 66, entrez les chiffres 0, 6 et 6, ou s'il est 9, entrez les chiffres
0, 0 et 9.
DÉMARRAGE/ARRÊT DU STYLE
Appuyez sur le bouton [Start/Stop] pour lancer ou arrêter le style d'accom-
pagnement.
SYNC
Appuyez sur [SYNC] avec des points de battement clignotant à l'écran LCD.
Avec la fonction d'accord automatique désactivée, chaque frappe sur le
clavier peut démarrer un style. Avec la fonction d'accord automatique activée,
toute frappe sur le clavier d'accord peut lancer simultanément la perfor-
mance de la mélodie et le style d'accompagnement.
INTRODUCTION/CONCLUSION
1. Avant le démarrage d'un style, appuyez sur le bouton [Introduction/Con-
clusion]. Cela déclenchera, avec "NOR" affiché à l'écran LCD, un prélude
menant au style normal.
2. Pendant le déroulement d'un style, en appuyant sur [Intro/Ending], le style
normal pourra être conclu, puis arrêter le style complet.
Remarque : Avant la fin de la conclusion, l'appui sur le bouton [Remplissage
A] ou [Remplissage B] permet de poursuivre le style normal précédent.
FONDU ENCHAÎNÉ
1. Lorsque le style s'arrête, appuyez sur [Fade In/Out]. Cela déclenchera
"FADE" sur l'écran LCD. Dans ce cas, démarrez un style, puis le style pourra
progressivement monter en volume en 8 secondes, avec "FADE" disparais-
sant.
2. Pendant le déroulement d'un style, en appuyant sur [Fade In/Out], le style
pourra progressivement baisser en volume en 8 secondes, et "FADE"
disparaîtra.
INTERMEZZO
1. Pendant l'accompagnement, maintenez enfoncé le bouton [Fill in A]. Cela
permettra d'entendre un intermezzo, avec "VAR" affiché à l'écran LCD, puis le
déroulement normal de l'accompagnement se poursuivra.
2. Pendant l'accompagnement, appuyez sur le bouton [Fill in B] jusqu'à
entendre un autre intermezzo, avec "VAR" à la place de "NOR" à l'écran LCD,
puis le déroulement normal de l'accompagnement se poursuivra. Le clignote-
ment de "VAR" indique que le style passe à un moment de variation.
3. En appuyant fermement sur [Fill in A] ou [Remplissage B], plusieurs inter-
mezzos successifs peuvent être insérés. Une fois l'intermezzo terminé,
l'accompagnement reprend normalement.
AUTO-MÉTRONOME
Appuyez sur [Métronome], l'instrument émettra un tic-tac pour indiquer le
tempo. Dans ce cas, différents types de tempo peuvent être sélectionnés via
le bouton [Function]. Appuyez à nouveau pour quitter la fonction métro-
nome.
AJUSTEMENT DU TEMPO
Les boutons [Tempo ] / [Tempo ] peuvent être utilisés pour ajuster le
tempo des styles. Appuyez sur l'un ou l'autre pour accélérer ou ralentir le
tempo du style dans une plage de 40 à 280 battements par minute, la valeur
actuelle du tempo s'affichant sur "TEMPO" à l'écran LCD. Appuyez simultané-
ment sur les deux pour ramener la valeur du tempo à la valeur prédéfinie.
AJUSTEMENT DU VOLUME D'ACCOMPAGNEMENT
Appuyez sur [Accom Vol ] / [Accom Vol ] pour augmenter ou diminuer le
volume d'accompagnement dans une plage de 00 à 31. Appuyez simultané-
ment sur les deux pour ramener la valeur du volume d'accompagnement à la
valeur prédéfinie.
VII. Accord Auto Bass et Dictionnaire d'Accords
Appuyez sur [Auto Bass Chord] pour démarrer la fonction d'accord automa-
tique. Les curseurs A, B, C (qui représentent les accords automatiques) appa-
raissent sur l'écran LCD. Avec l'accord automatique activé, les 19 touches de
gauche du clavier sont des touches d'accord.

Pendant le déroulement du style, chaque frappe sur les touches d'accord
lance un accord automatique.
Remarque :
1. Appuyez sur [Fonction] pour changer le point de division et la portée du
clavier d'accord (voir "Point de Division" pour plus de détails).
2. L'instrument peut reconnaître les accords d'une seule touche ou d'accords à
plusieurs touches. Il acceptera les accords correspondant au type d'accord
sélectionné, mais privilégiera l'accord d'une seule touche lorsque les accords
sélectionnés ne correspondent pas au type d'accord choisi.
Doigt unique :
(Les positions de doigts suivantes sont conçues pour être acceptées par cet
instrument.)
1. Triolet majeur : Jouez les racines de l'accord.
2. Triolet mineur : Jouez les racines de l'accord et n'importe quelle touche
noire située à leur gauche simultanément.
3. Accord de septième dominante : Jouez les racines de l'accord et n'im-
porte quelle touche blanche située à leur gauche simultanément.
4. Accord de septième mineure : Jouez les racines de l'accord, une touche
blanche et une touche noire situées à leur gauche simultanément.
Position des doigts : Toute position indiquée sur l'illustration ci-dessous
peut produire l'accord de Do majeur, et d'autres accords peuvent être joués
de manière analogue.
Positions pour l'accord de Do majeur

LE DICTIONNAIRE D'ACCORDS
Le dictionnaire d'accords est en réalité un manuel d'accords réservé dans
l'instrument qui permet de rechercher les notes formant un accord. Toutes les
notes de l'accord sont affichées à l'écran pour guider l'apprenant dans le jeu
des accords. Cette fonction est très bénéfique pour les premiers apprenants
qui connaissent les noms des accords pour maîtriser les positions des doigts.
1. Appuyez sur le bouton [chord dictionary] pour démarrer la fonction avec
"DICT" qui apparaît à l'écran ainsi que "C", qui représente le triolet de Do
majeur et les symboles de notes sur la portée. Les racines d'accord et le type
d'accord peuvent être définis sur le clavier mélodique à droite du point de
division, puis les touches correspondantes seront affichées sur le clavier et
les symboles de notes sur la portée à l'écran, permettant à l'apprenant de
jouer l'accord sur le clavier d'accompagnement en suivant la représentation
à l'écran.
2. Lorsque les notes d'accord sont correctement jouées sur le clavier d'accom-
pagnement, il y aura des applaudissements pour célébrer. Si les notes de
l'accord ne sont pas correctement jouées, il y aura le son de BASSE des
touches qui sont jouées.
3. Appuyez à nouveau sur le bouton [Right/Dictionnary chord] pour arrêter la
fonction.
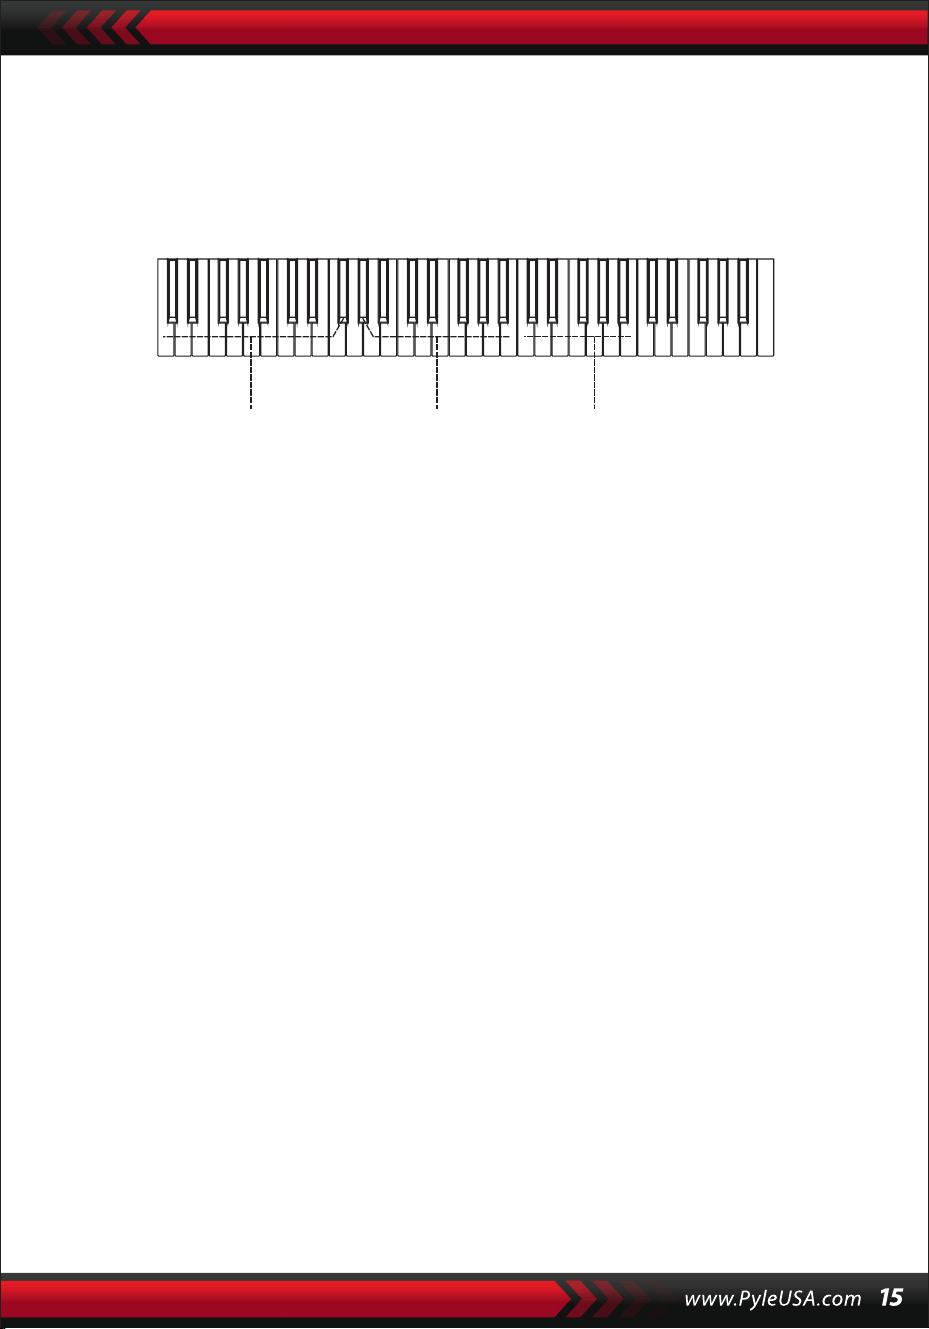
Remarque :
1.Aucun son n'est émis pour les frappes sur le clavier mélodique (à droite du
point de division) qui servent à définir les racines et le type d'accord.
2.Les accords doivent être joués sur les touches à gauche du point de
division, aucune note ne peut être jouée en dehors de la portée du clavier
d'accord.
VIII. CHANSONS DE DÉMONSTRATION
Le système propose 2 chansons de démonstration de styles différents.
SÉLECTION DE CHANSON DE DÉMO
1. Appuyez sur le bouton [Démo] avec "DEMO" en surbrillance ainsi que le
code de la chanson en cours et les points de battement à l'écran. Le
système est configuré pour lire successivement les deux chansons de
démo.
2. Pendant la lecture de la chanson de démo, celle-ci peut être remplacée
par l'autre via les touches numériques, les touches [+/-] ou le bouton
[Data Dial].
3. Appuyez à nouveau sur le bouton [Démo] pour arrêter la lecture et
quitter la fonction.
IX. CHANSONS D'ENSEIGNEMENT
Le système propose 100 chansons de styles différents, idéales pour
l'apprentissage et l'appréciation musicale.
SÉLECTION DE CHANSON D'ENSEIGNEMENT
1. Appuyez sur le bouton [Song] pour démarrer le mode "chanson" avec
"SONG" en surbrillance ainsi que le code et l'abréviation de la chanson
actuelle à l'écran. Le système est configuré pour lire successivement les 100
chansons. Pendant la lecture d'une chanson, celle-ci peut être remplacée
par une autre via les touches numériques, les touches [+/-] ou le bouton
[Data Dial].
Zone de pratiqu
des accords
Type d'accord Racines des accords

SORTIE DE CHANSON
1.Pendant la lecture d'une chanson, appuyez sur le bouton [Démarrer/Ar-
rêter] pour l'interrompre, tout en restant en mode "chanson".
2.À la fin de la chanson, appuyez sur le bouton [Son] ou [Style] pour quitter le
mode "chanson" et démarrer la fonction correspondante.
FONCTION DES CANAUX "GAUCHE" ET "DROITE" HORS DU MODE D'AP-
PRENTISSAGE
Pendant la lecture d'une chanson, appuyez sur les touches [Gauche] ou
[Droite] pour activer ou désactiver le son du canal gauche ou droit. Par
exemple, appuyez sur [Gauche], avec "GAUCHE" en surbrillance à gauche de
l'écran, pour ouvrir le canal sonore de la mélodie droite, et couper celui de
l'accompagnement ou mélodie de gauche. La même opération est valable
pour la touche [Droite].
Note:
1 . Lorsque le mode "chanson" n'est pas actif, appuyez sur le bouton
[Right/chord dictionary] pour démarrer le mode "dictionnaire d'accords", et à
nouveau pour le quitter.
2. À la fin d'une chanson, maintenez enfoncé le bouton [Right/chord dictio-
nary] pendant au moins 2 secondes pour démarrer le mode "chord dictio-
nary".
X. Lessons
Les trois boutons [Lesson], [Left], [Right] peuvent lancer trois types de
modes d'apprentissage distincts, permettant à l'apprenant de jouer la
chanson d'apprentissage étape par étape.
LEÇON I
Cette leçon vise à pratiquer la durée musicale plutôt que la hauteur. Toute
frappe de touche avec la durée correcte entraîne des changements corrects
des notes et accords actuels, mais sans émission du son correspondant aux
notes.
2. Pendant la lecture d'une chanson, appuyez sur le bouton [Démarrer/Ar-
rêter] pour interrompre la lecture, tout en restant en mode "chanson".
Appuyez à nouveau pour reprendre la lecture de la chanson actuelle en
boucle.
Remarque : Pour revenir au mode de lecture des 100 chansons successive-
ment, il faut d'abord quitter le mode "chanson", puis appuyer à nouveau sur
le bouton [Chanson].

LEÇON II
Cette leçon vise à pratiquer le jeu des notes correctes par rapport aux touch-
es indiquées à l'écran. Les frappes des notes correctes maintiennent le
déroulement de la chanson, sinon la chanson est suspendue jusqu'à la
sélection de la note correcte.
Note : Dans ce mode, seules les notes correctes peuvent être jouées, les
notes incorrectes ne déclenchent aucune réaction.
LEÇON III
Cette leçon vise à pratiquer le jeu des notes correctes par rapport aux touch-
es indiquées à l'écran. Les frappes des notes correctes maintiennent le
déroulement de la chanson, sinon la chanson est suspendue jusqu'à la
sélection de la note correcte. Note : Dans ce mode, seules les notes correctes
peuvent être jouées, les notes incorrectes ne déclenchent aucune réaction.
PRATIQUE POUR MAINS GAUCHE ET DROITE
Cette leçon vise à pratiquer respectivement avec la main gauche ou la main
droite, ou avec les deux. Appuyez sur le bouton [Droite] pour masquer la
mélodie de la main droite et pratiquez ensuite avec la main droite. Appuyez
sur le bouton [Gauche] pour masquer la mélodie de la main gauche ou les
changements des accords de la main gauche, puis pratiquez avec la main
gauche. Appuyez sur les deux boutons simultanément pour masquer le son
de la main gauche et droite, et pratiquez avec les deux mains.
LESSON FUNCTION SETUP
1.Appuyez sur la fonction [Leçon] pour démarrer l'état "chanson", puis
appuyez sur le bouton [Démarrer/Arrêter] pour arrêter la chanson.
2.Sélectionnez une chanson agréable en appuyant sur les touches
numériques, les touches [+/-] ou en tournant le bouton [Data Dial].
3.Lorsque le mode "chanson" est désactivé, appuyez successivement sur le
bouton [Leçon] pour choisir la Leçon I, II, III ou quitter la fonction "leçon".
Chaque leçon choisie aura un curseur brillant correspondant ainsi que
"GAUCHE" ou "DROITE" en surbrillance à l'écran. Ensuite, appuyez sur le
bouton [Démarrer/Arrêter] pour démarrer les leçons et les indications des
notes mélodiques ou d'accord seront affichées sur la portée et le clavier à
l'écran LCD.

4. Appuyez sur le bouton [Gauche] pour démarrer la pratique de la main
gauche avec "main gauche" en surbrillance à l'écran. Appuyez sur le
bouton [Droite] pour démarrer la pratique de la main droite avec "main
droite" en surbrillance à l'écran. Appuyez sur les deux boutons pour
démarrer la pratique de la main gauche et droite avec "mains gauche et
droite" en surbrillance à l'écran. En l'absence de choix, le système démarre-
ra automatiquement la pratique de la main droite.
5. Lorsqu'une leçon est terminée, le système jouera la chanson actuelle et
conservera le mode de leçon précédent.
Note : Les différents styles des chansons rendent la pratique de la main
gauche différente. Lors de la lecture de chansons de style rythmique, la main
gauche joue des accords ; lors de la lecture d'autres chansons, la main
gauche joue la mélodie de la main gauche ou l'accompagnement (les chan-
sons codées de 00 à 84 sont des chansons de style rythmique). Pendant une
leçon, le mode de leçon ne peut pas être changé librement.
XI. Storage and Memory Function
The storage and memory function is to store the setup voice, style, tempo
and other relative parameters of the working mode that needs to be
changed for in the performance. It is also applied to draw out the needed
parameters directly in the performance. There are six modes of memory to
be drawn from freely.
STOCKAGE DES PARAMÈTRES
Tout d'abord, configurez le son, le style, le tempo et d'autres paramètres
relatifs nécessaires d'un mode de travail. Ensuite, appuyez fermement sur le
bouton [Mémoire], puis appuyez sur l'un des boutons de mode de mémoire
(M1, M2, M3, M4, M5 ou M6) pour sauvegarder le mode de travail. Un curseur
lumineux correspondant montre le mode de mémoire dans lequel tous les
paramètres sont stockés.
EXTRACTION DES PARAMÈTRES
Pendant la performance, appuyez sur l'un des boutons de mode de mémoire
pour extraire les paramètres stockés du mode de travail nécessaire et les
remplacer par les paramètres actuels.

Note:
1. Après l'extraction d'un mode de mémoire, tous les paramètres peuvent
être réinitialisés et différents de ceux précédemment stockés. À cet état, le
curseur lumineux correspondant en bas de l'écran disparaît, indiquant que
le mode a été modifié.
2. Il n'y a pas de protection contre la coupure de courant pour tous les modes
de mémoire, donc lorsque l'instrument récupère l'alimentation, les
paramètres stockés sont perdus.
XII. Configuration de l'O.T.S (ONE TOUCH SET)
La fonction O.T.S a enregistré les voix souvent utilisées qui conviennent
aux styles. Quatre sons par défaut sont associés à chaque style.
1. Appuyez sur le bouton [O.T.S] pour démarrer le "bass chord automatique"
avec les indications lumineuses "O.T.S" et "M1" en bas de l'écran.
2. Une fois que le style cible est prêt, appuyez sur les quatre boutons de
mémoire (M1 à M4), puis le style joué sur le clavier combinera parfaite-
ment les quatre voix par défaut.
3. Dans cet état de fonction, appuyez à nouveau sur le bouton pour quitter
la fonction.
Note : Lorsque la fonction [O.T.S] est activée, la fonction de stockage et de
mémoire ne peut pas être démarrée.
XIII. Enregistrement
PRÉPARATION POUR L'ENREGISTREMENT
Appuyez sur le bouton [REC] avec quatre indicateurs de battement cligno-
tants et le "REC" brillant à l'écran pour montrer que le système est prêt à
enregistrer. Le son agréable, le style, le tempo, la résonance et d'autres
paramètres peuvent être configurés avant l'enregistrement.

ENREGISTREMENT
Dans cet état, toutes les notes jouées sur le clavier sont enregistrées avec
quatre indicateurs de battement clignotants à l'écran, suivant le tempo
configuré. En mode "enregistrement", un accompagnement peut être enreg-
istré directement après son démarrage. Dans l'état "bass chord automatique",
toute frappe de touche sur le clavier d'accompagnement automatique peut
démarrer un style. Cependant, lorsque le "bass chord automatique" n'est pas
actif, un style ne peut être démarré qu'en appuyant sur le bouton [Démar-
rer/Arrêter]. Pendant l'enregistrement de l'accompagnement, des notes
mélodiques peuvent également être jouées sur le clavier et enregistrées
simultanément.
Note:
1.Il n'y a pas de protection contre les coupures de courant, donc lorsque
l'instrument récupère l'alimentation, les données enregistrées sont
perdues.
2.Le nouvel enregistrement remplacera le précédent lorsque cette fonction
d'enregistrement est utilisée à nouveau.
3.La quantité de notes enregistrées est influencée par toutes les données
enregistrées, y compris les sons différents, le style, le tempo, etc.
APRÈS L'ENREGISTREMENT
1. En mode "enregistrement", appuyez à nouveau sur le bouton [REC] pour
arrêter l'enregistrement.
2. Pendant l'enregistrement et la lecture d'un style, appuyez sur le bouton
[Intro/Ending] pour démarrer une partie de conclusion. Lorsque la fin est
terminée, le système arrêtera automatiquement l'enregistrement et quit-
tera le mode "enregistrement".
3. Pendant l'enregistrement, la mémoire complètement remplie stoppera
l'enregistrement avec le mot "PLEIN" qui brillera pendant 3 secondes à
l'écran, puis quittera le mode "enregistrement".
LECTURE
Après l'arrêt de l'enregistrement, appuyez sur le bouton [Lecture] pour
rejouer la piste enregistrée.

XIV. Programme
PROGRAMME
Appuyez sur le bouton [Prog] avec le curseur "Prog" qui brille à l'écran pour
transformer le clavier en clavier percussion. Ensuite, appuyez sur une touche
ou sur une section de batterie pour démarrer la fonction de programmation.
Appuyez une fois de plus sur le bouton [Prog] pour arrêter la programma-
tion. La mémoire complètement utilisée peut également interrompre la
programmation. Le rythme nouvellement édité ou le nouvel enregistrement
prendra la place de celui d'origine.
LECTURE NULLE
Appuyez sur le bouton [Null Play], le rythme édité peut être joué en boucle.
Appuyez à nouveau sur le bouton pour arrêter la lecture.
NO. Nom NO. Nom NO. Nom
Piano
Organ
Bass
Guitar
Mallet
Grand Piano
Bright Piano
El Grd Piano
Honky-tonk Piano
Elec piano 1
Elec Piano 2
Harpsichord
Clavi
Celesta
Glockenspiel
Music Box
Vibraphone
Marimba
Xylophone
Tubular Bell
Santur
Drawbar Organ
Jazz Organ
Rock Organ
Church Organ
Reed Organ
Accordion
Harmonica
Tango Accordion
Classic Guitar
Steel Guitar
Jazz. Guitar
Clean Guitar
Muted. Guitar
Overdriven Guitar
Distortion Guitar
Guitar Harmonics
Acoustic Bass
Finger Bass
Picked Bass
Fretless Bass
Slap Bass 1
Slap Bass 2
Synth Bass 1
Synth Bass 2
Appendix
SONS

SONS
NO. Nom NO. Nom NO. Nom
Strings Lead
Sound Effects
Chinese Instrument
Synth Voice
Drum Kit
Pad
Effects
Ethnic
Percussive
Strings Ensemble
Brass
Reed
Pipe
Violin
Viola
Cello
Contrabass
Tremolo Strings
Pizzicato Strings
Harp
Timpani
Strings 1
Strings 2
Synth Strings 1
Synth Strings 2
Choir Aahs
Voice Ooh
Synth
Orchestra Hit
Trumpet
Trombone
Tuba
Muted Trumpet
Horn
Brass Ensemble
Synth Brass 1
Synth Brass 2
70elep
Fzpiano
Ep3
Ep4
Ep5
Harppian
Clavr2
Clavr3
Organ Box
E. organ
Churc2
Syn Organ
Altoel
Fz guitar
Syn elgt
Picel bas
El violin
Brassfm
Fmlead
Fantalfo
Polyaa2
Bowedg2
70elpad
Soprano Sax
Alto Sax
Tenor sax
Baritone Sax
Oboe
English horn
Bassoon
Clarinet
Piccolo
Flute
Recorder
Pan Flute
Blown Bottle
Shakuhachi
Whistle
Ocarina
Square
Sawtooth
Calliope
Chiff
Charang
Voice
Fifths
Bass lead
Fantasia
Warm
Poly Synth
Choir
Bowed
Metallic
Halo
Sweep
Fx1
Fx2
Fx3
Fx4
Fx5
Fx6
Fx7
Fx8
Sitar
Banjo
Shamisen
Koto
Kalimba
Bag Pipe
Fiddle
Shanai
Tinkle Bell
Agogo
Steel Drums
Woodblock
Taiko Drum
Melodic Tom
Synth Drum
Reverse Cymbal
Standard Kit
Power Kit
Dance Kit
808 Kit
Brush Kit
Orchestra Kit
GT Fret Noise
Breath Noise
Seashore
Bird Tweet
Teleph Ring
Helicopter
Applause
Gunshot
Pipa
Erhu
Guzhen
Banhu
Qudi

STYLE
NO. Nom NO. Nom NO. Nom
BEAT & POP
SOUL & FUNK
LATIN
TRADITIONAL
PIANO
BEAT & POP-1
JAZZ
COUNTRY
ROCK
DANCE
8 Beat 1
8 Beat 2
8 Beat 3
8 Beat 4
60's 8 Beat
8 Beat Ballad
8 Beat Rock
16 Beat 1
16 Beat 2
16 Beat Pop
16 Beat Shuffle
Ballad
Slow Ballad
16 Beat Ballad
Unplugged
Funky Pop
Jazz Funk
Cool Funky
Soul 1
Soul 2
Soul Shuffle
Soul Blues
R&B
6/8 Gospel
Pop Groove
Bossa Nova 1
Bossa Nova 2
Rhumba
Pop Rhumba
Cha Cha
Pop Cha Cha
Tango
Jazz Samba
Reggae
Pop Reggae
1-Mar
2-Mar
German March
6/8 March
Polka
Pop Polka
Waltz
Slow Waltz
Vienna Waltz
Musette
8 Beat
Ballad
Boogie
Jazz
Swing
Jazz Waltz
Twist
March
6/8 March
Waltz
8 Beat 1 -1
Swing
Cool Jazz
Pop Swing
Swing Fox
Big Band
Big Band Meduim
Jazz Waltz
Ragtime
Dixeland
Quick Step
Country 1
Country 2
Pop Country
Country Rock
Country Folk
3/4 Country
Country Waltz
Country Shuffle
Country Boogie
Country Blues
Rap
Euro Beat
Hip Hop
Techno
Country Quick Step
Bluegrass
Rock
Pop Rock
Fast Rock
Slow Rock 1
Slow Rock 2
Rock & Roll
Heavy Metal
Blues Boogie
Blues
Shuffle
Blues Shuffle
Rock Shuffle
Charlston
Disco 1
Disco 2
Disco Funk
Dance
House 1
House 2

STYLE
NO. Nom NO. Nom NO. Nom
8 Beat 2-1
8 Beat 3-1
8 Beat 4 -1
60’s 8 Beat-1
8 Beat Ballad -1
8 Beat Rock-1
16 Beat 1 -1
16 Beat 2-1
16 Beat Pop -1
16 Beat Shuffle-1
Ballad-1
Slow Ballad -1
16 Beat Ballad -1
Unplugged -1
Bossa Nova 1 -1
Bossa Nova 2 -1
Rhumba -1
Pop Rhumba -1
Cha Cha -1
Pop Cha Cha -1
Tango -1
Jazz Samba -1
Reggae -1
Pop Reggae -1
March 1 -1
March 2 -1
German March -1
6/8 March -1
Polka -1
Pop Polka -1
Waltz-1
Slow Waltz-1
Vienna Waltz -1
Musette -1
8 Beat-1
Ballad-1
Boogie -1
Jazz -1
Swing -1
Jazz Waltz-1
Twist -1
March -1
6/8 March -1
Waltz-1
Country 1 -1
Country 2-1
Pop Country-1
Country Rock -1
Country Folk -1
3/4 Country-1
Country Waltz-1
Country Shuffle-1
Country Boogie -1
Country Blues -1
Country Quick Step
-1
Swing -1
Cool Jazz-1
Pop Swing -1
Swing Fox -1
Big Band -1
Big Band Meduim
-1
Jazz Waltz -1
Ragtime -1
Dixeland -1
Funky Pop -1
Jazz Funk -1
Cool Funky -1
Soul 1 -1
Soul 2-1
Soul Shuffle-1
Soul Blues -1
R&B-1
6/8 Gospel -1
Pop Groove -1
Hip Hop -1
Techno -1
Rock -1
Pop Rock-1
Fast Rock-1
Slow Rock 1 -1
Slow Rock 2 -1
Rock & Roll-1
Heavy Metal -1
Blues Boogie -1
Blues -1
Shuffle-1
Blues Shuffle -1
Rock Shuffle -1
Charlston -1
Disco 1 -1
Disco 2 -1
Disco Funk -1
Dance -1
House 1 -1
House 2 -1
Rap -1
Euro Beat-1
ROCK-1
DANCE
SOUL & FUNK-1
JAZZ-1
COUNTRY
LATIN-1
TRADITIONAL-1
PIANO-1

Montage du Support de Clavier
1. Tout d'abord, rassemblez toutes
les pièces nécessaires pour
l'assemblage.
2. Ensuite, prenez la vis n°2 et la plaque
de support n°3, fixez-les aux deux
supports de la n°5 et serrez-les
séparément.
3. Utilisez la vis n°2 pour fixer le pied
n°4 au sommet du support n°5 et
serrez.
4. L'installation est terminée. Utilisez la
vis la plus longue, n°1, pour fixer le
clavier sur le support.

CARACTÉRISTIQUES :
• MIDI filaire
• 200 styles d'auto-accompagnement mondialement sélectionnés
• 8 pads de percussion / Percussions de clavier
• Piano musical compact et portable
• Fonctionnement électronique simple par branchement
• Plateau rotatif pour changer de son
• Piano portable
• Haut-parleurs stéréo intégrés à gamme complète
• Connexion et diffusion audio depuis des appareils externes
• Peut se connecter à un haut-parleur et diffuser du son
• Styles de son, tonalités et rythmes préprogrammés multiples sélection-
nables
• Écran LCD numérique
• Contrôle de volume réglable
• Modes d'enregistrement et de lecture
• 162 sons comprenant 128 sons GM standard, 5 sons d'instruments de
musique folklorique, 23 sons de synthétiseur, 6 sons de batterie
• Contrôles de base : Volume principal / Volume d'accompagnement /
Volume d'accord / Contrôle de tempo
• Fonction d'accord automatique : Accord simple / Accord doigté /
Dictionnaire d'accords
• Fonctions pédagogiques : Touche unique / Suivre / Assembler
• Fonctions de courbe de ton / Vibrato / Soutien / Sensibilité au toucher /
Double son
• Fonction de division du clavier / Octave / Transposition
• Synchronisation / Démarrage / Arrêt / Fondu en ouverture / Fondu en
fermeture / Introduction / Fin / Remplissage A et B / Métronome
• Entrée USB / Entrée de pédale de sustain
• Sortie haut-parleur (G/D) / Sortie casque
• Parfait pour des performances dans un salon home cinéma
• Amusant pour les enfants de tous âges : Enfants et adultes

Contenu de la boîte :
• Clavier de musique
numérique pour karaoké
• Support pour livre de parti-
tions
• Adaptateur
• Prise électrique
• Support de clavier
• Pédale de sustain
• Sac étanche
Spécifications du casque :
• Matériaux de construction : ABS +
Feuille décorative laser
• Matériau du câble : Câble plat en
PVC
• Longueur du câble : 1,2 m
• Diamètre de la prise : 3,5 mm
• Poids : 0,14 kg
Spécifications de la pédale de sustain :
• Fonctionnalité marche/arrêt
normale
• Longueur : 24 cm
• Largeur : 8 cm
• Hauteur : 7 cm
• Poids : 1,75 kg
Spécifications techniques :
• 61 touches de clavier
• 162 sons incluant 128 voix standard GM, 5 voix d'instruments de musique
folklorique, 23 voix de synthétiseur, 6 voix de batterie
• Chanson de démonstration
• Interface audio : Entrée Aux (jack 6,5 mm) / Sortie RCA G&D
• Niveau sonore maximal : Jusqu'à 110 dB
• Longueur du câble USB / d'alimentation : 1,2 m
• Matériau de construction : ABS conçu
• Alimentation : DC 12V / Adaptateur AC
• Dimensions du piano (LxlxH) : 92.9 x 30.3 x 9.3 cm/36.6 x 11.97 x 3.7
pouces
Spécifications du support de clavier :
• Vernis cuit au four
• Fonction détachable
• Matériaux de construction : Fer + ABS
• Longueur : 80 cm
• Largeur : 21 cm
• Hauteur : 57,5 à 67,5 cm
Ce produit contient du phtalate de butylbenzyle (BBP),
connu dans l'État de Californie pour causer des cancers,
des malformations congénitales et d'autres troubles de
la reproduction. Ne pas ingérer. Pour plus d'informa-
tions, consultez : www.P65wamlngs.ca.gov
Advertencia de la Proposición 65 de California
ADVERTENCIA:

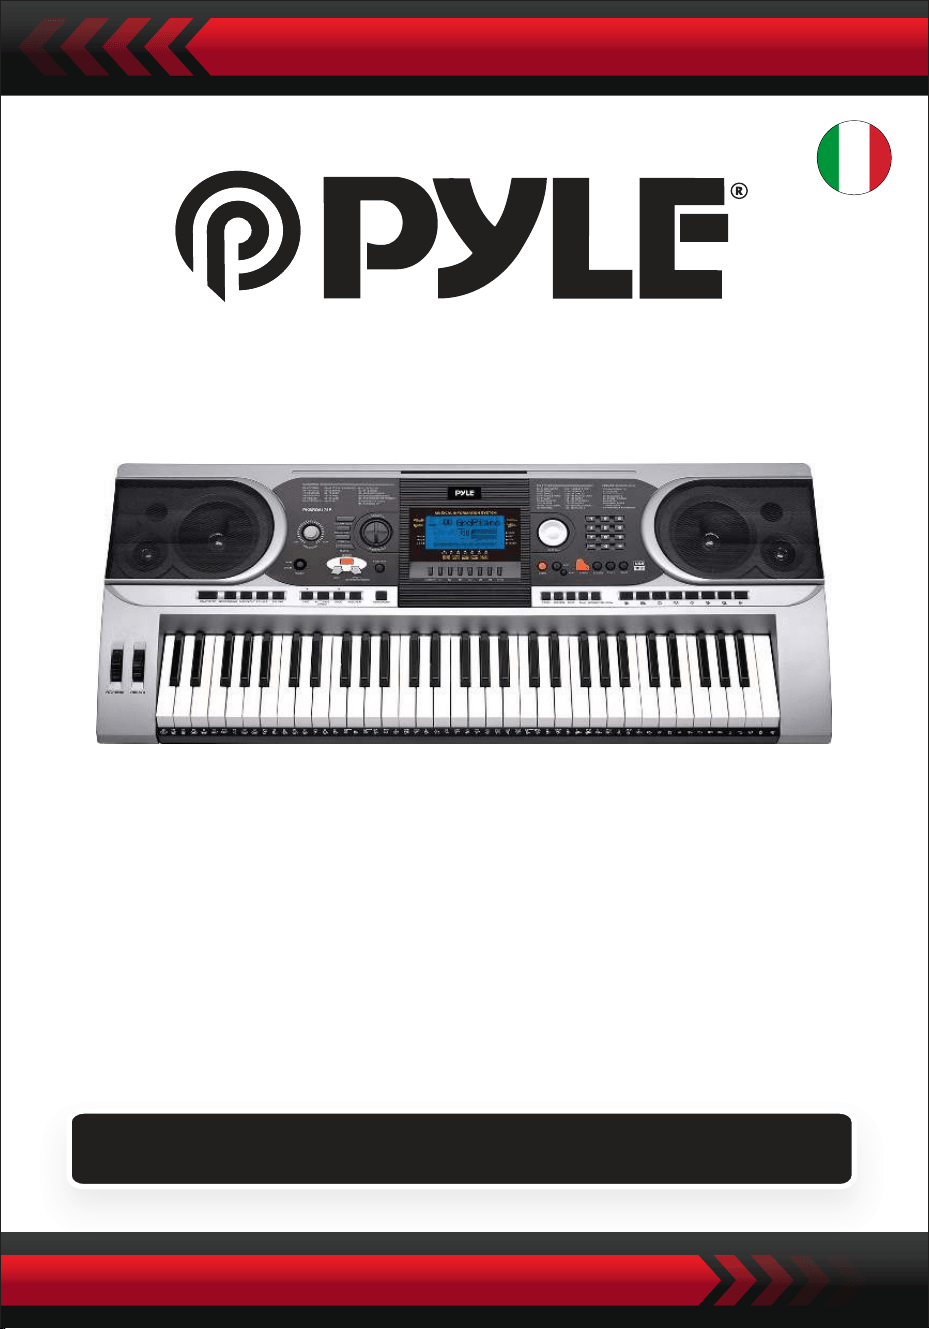
Tastiera elettronica portatile con custodia resistente
all'acqua (61 tasti), sgabello, supporto per tastiera e
cuffie
Tastiera musicale digitale
PKBBD6175P
MANUALE UTENTE
ITA

• Utilizzare l'adattatore di alimentazione in dotazione e sostituire immediata-
mente l'adattatore nel momento in cui fosse danneggiato.
• Non smontare lo strumento e non modificarne le parti interne. In caso di
malfunzionamento, interrompere immediatamente l'uso e farlo riparare da un
tecnico professionista.
• Prima di collegare lo strumento ad altri dispositivi, spegnere tutte le alimen-
tazioni.
• Non suonare lo strumento al massimo volume o a un livello elevato per
troppo tempo.
• Tenere le parti dello strumento lontano da fonti di calore, perché il surriscal-
damento può causare danni.
• Evitare che liquidi, polvere, particelle e altri corpi estranei entrino nello
strumento
• perché potrebbero causare la corrosione dello strumento o il cortocircuito dei
suoi componenti.
• Estrarre la spina prima di pulire lo strumento.
• Non inserire o estrarre la spina con le mani bagnate.
• Per pulire lo strumento, utilizzare un panno asciutto e morbido. Non utilizzare
vernici, alcol o altri solventi chimici, per evitare di danneggiare la superficie.
• Spegnere l'alimentazione e staccare la spina dopo aver suonato o in
condizioni di inattività per lungo tempo.
• Per ridurre il rischio di incendio o di scosse elettriche, non esporre l'apparec-
chio alla pioggia o all'umidità. L'apparecchio non deve essere esposto a
gocciolamenti o spruzzi e non si devono appoggiare sull'apparecchio oggetti
pieni di liquidi, come ad esempio vasi.
• Massima temperatura di funzionamento: 40°C/ 104°F
• Se come dispositivo di disconnessione si utilizza un adattatore diretto, il
dispositivo di disconnessione dovrà rimanere prontamente azionabile.
• Non installare questa apparecchiatura in uno spazio ristretto, come una
libreria o un'unità simile, e mantenere una buona ventilazione. La ventilazione
non deve essere ostacolata coprendo le aperture con oggetti come giornali,
tovaglie, tende, ecc,
• Attenzione: L'eccessiva pressione sonora di auricolari e cuffie può causare la
perdita dell'udito.
• L'etichetta si trova sul fondo dell'apparecchio.
• L'apparecchio non deve essere esposto a sgocciolamenti o spruzzi e non deve
essere appoggiato su oggetti pieni di liquidi, come ad esempio vasi non
devono essere collocati sull'apparecchio.
• Se l'adattatore a innesto diretto viene utilizzato come dispositivo di discon-
nessione, il dispositivo di disconnessione deve rimanere facilmente aziona-
bile.
LEGGERE ATTENTAMENTE PRIMA DI PROSEGUIRE
Conservare il presente manuale in un luogo sicuro e a portata di mano per
future consultazioni.
ATTENZIONE!

Questo marchio indica che questo prodotto non deve essere smaltito
insieme ad altri rifiuti domestici in tutta l'UE.
Per evitare possibili danni all'ambiente o alla salute umana derivanti da
uno smaltimento incontrollato dei rifiuti, riciclarlo in modo responsabile
per promuovere il riutilizzo sostenibile delle risorse materiali. Per restitu-
ire il dispositivo usato, utilizzare i sistemi di restituzione e raccolta o
contattare il rivenditore presso il quale è stato acquistato il prodotto.
Il prodotto potrà essere riciclato in modo sicuro per l'ambiente.
I. Pannello di controllo e porte di espansione
1 Altoparlante
2 Interruttore di
alimentazione
3 Volume Principale
4 Tempo
5 Volume accompagna-
mento
6 Trasposizione
7 Ottava
8 Lezione
9 Funzione
10 Destra
(Dizionario degli Accordi)
11 Sinistra
12 Memoria
13 M1, M2...M6
14 O.T.S
15 Display LCD
16 Demo
17 Registrazi-
one/Riproduzione
18 Manopola dati
19 Pianoforte
20 Numeri
21 Suono
22 Stile
23 Canzone
24 Inizio/Fine
25 Intro/Fine
26 Dissolvenza
entrata/uscita
27 Fill-in A
28 Fill-in B
29 Sync
30 Accordo di basso
automatico
31 Prog/Null-Play
32 Metronomo
33 Touch
34 Sustain
35 Divisione
36 Dual
37 Percussione a tastiera
38 Percussioni a pannello
39 Pitch Bend
40 Vibrato
41 Tastiera degli accordi

UTILIZZO DELL'ADATTATORE DI ALIMENTAZIONE AC/DC
L'adattatore di alimentazione CA/CC deve essere quello previsto per lo strumento.
Collegare un lato alla presa di alimentazione sul pannello posteriore e l'altro alla
rete elettrica. (Si noti che la tensione di ingresso deve essere uguale a quella della
rete elettrica).
INGRESSO CUFFIE
Inserire la cuffia nella presa telefonica del corpo, in modo da interrompere automati-
camente l'altoparlante interno e continuare a suonare e cantare senza disturbare gli
altri.
Nota: un volume troppo alto delle cuffie può causare danni all'udito.
COLLEGAMENTI CON AMPLIFICATORI O ACUSTICA
Lo strumento è dotato di un sistema di altoparlanti interni e può essere collegato
anche ad altri amplificatori o a loudhailer. Per prima cosa, spegnere lo strumento
e l'apparecchiatura esterna, quindi inserire il cavo di frequenza stereo nella presa
OUT L/R del pannello posteriore e l'altro nella presa LINE IN o AUX IN dell'appare-
cchiatura esterna.
MIDI USB
MIDI è l'acronimo di Musical Instrument Digital Interface. Tramite le prese MIDI, la
tastiera può essere collegata ad altri strumenti musicali o computer dotati di
MIDI attraverso una linea di trasmissione dati. In questo caso, qualsiasi esecuzi-
one sulla tastiera può essere trasferita al computer e quindi registrata, composta
o modificata con un software avanzato sul computer. Tutta la musica MIDI
riservata al computer può essere trasferita allo strumento e riprodotta.
I metodi di applicazione del MIDI USB:
1. Primo, collegare gli strumenti al computer tramite la linea dati universale e
accendere entrambi.
II. Prima dell’utilizzo
PANNELLO POSTERIORE
42 PRESA MIDI USB
43 JACK PER IL SUSTAIN
44 USCITA JACK SINISTRA/DESTRA
45 JACK TELEFONO
46 INGRESSO DC 12V
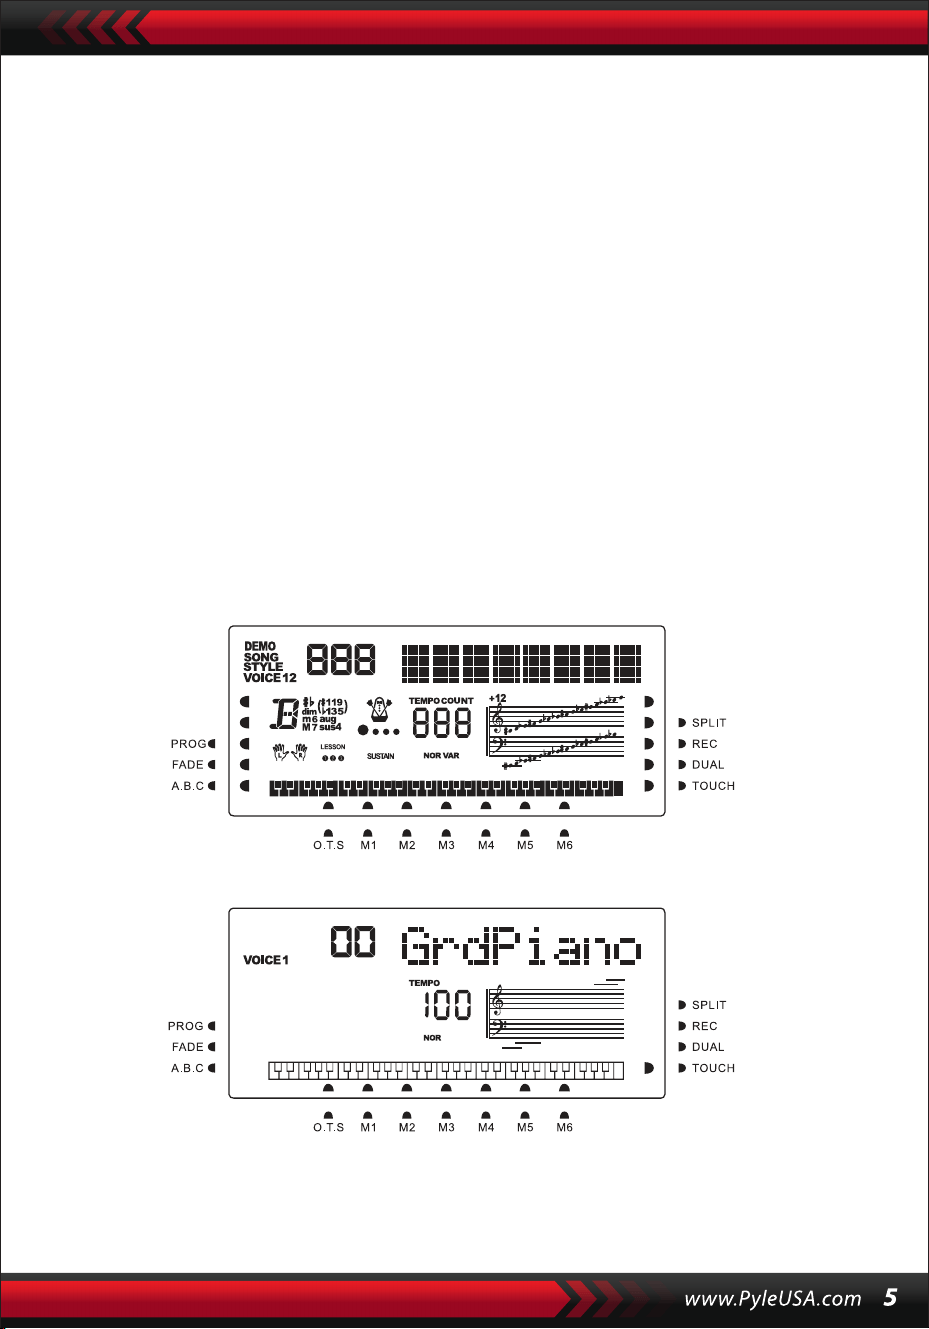
2. Secondo, installare e avviare il software di editing musicale, ad esempio CAKE-
WALK. L'hardware speciale dello strumento apparirà quindi sull'hardware conte-
nente il software musicale e sarà impostato come dispositivo predefinito. In
questo caso, la comunicazione di dati tra lo strumento e il computer è stata
stabilita.
3. Terzo, configurare i canali MIDI dello strumento (controllare l’introduzione al
pulsante [Menu]).
PEDALE SUSTAIN
Allo strumento può essere aggiunto un pedale sustain esterno, che può essere
utilizzato per un effetto sustain nell'esecuzione..
REGOLAZIONE DEL VOLUME PRINCIPALE
Ruotare la manopola del volume principale in senso orario per aumentare il volume
ed in senso antiorario per diminuirlo. La manopola controlla anche il volume di
accompagnamento.
III. Metodo di esecuzione di base
Premendo il pulsante [Power] con la retroilluminazione accesa, il display LCD
mostrerà le informazioni relative alla voce corrente, al tempo, alla modalità di
funzionamento, ecc.
Lo schermo intero immaginario illustra tutti i cursori di marcatura e i parame-
tri delle diverse modalità:
Lo schermo LCD completo all'accensione:

MANOPOLA DATI
Ruotare la manopola [Data Dial] è una scorciatoia per individuare una voce, un ritmo
o una canzone. Ruotandola in senso orario, si possono selezionare i codici più grandi;
in senso antiorario, più piccoli.
PERCUSSIONI DEL PANNELLO E DELLA TASTIERA
Lo strumento dispone di 8 tipi di percussioni a pannello e di 61 percussioni a
tastiera.
• Premendo il pulsante [Panel percussion], è possibile avviare il suono di percussi-
one corrispondente, che può essere avviato da una determinata pressione di
tasti.
• Premere il pulsante [Keyboard Percussion] fino a quando sullo schermo LCD
appare "PERCUS". In questo caso, è possibile eseguire le percussioni sulla tastiera.
• Un determinato tasto corrisponde a un determinato tipo di suono di percussione.
Premere nuovamente il tasto per uscire dalla funzione.
IV. Il tasto funzione
Di seguito sono riportati i dettagli relativi ai parametri che possono essere
configurati attraverso il pulsante [Function].
Nome del para-
metro
Indicazione sul display
LCD
Valori di regolazione
Valore
predefinito
BATTITI
Tenere premuto il pulsante [Function] finché sullo schermo LCD non appare
"04Beat". In questo caso, è possibile scegliere uno qualsiasi dei nove diversi stili di
beat, codificati da 00, 02 a 09.Lo stile di beat desiderato può essere scelto con i
pulsanti [+/-] o la manopola [Data Dial].
PUNTO DI SPLIT
Il tasto è chiamato punto di splittaggio e divide la tastiera in due parti, la tastiera di
accompagnamento a sinistra e la tastiera di melodia a destra.
Il punto di divisione predefinito dello strumento è il 19° tasto da sinistra; il punto
può essere reimpostato su qualsiasi tasto dello strumento.
BATTITO
ALL
DIVISIONE PT
INGRESSO MIDI
USCITA MIDI
SELEZIONE
DEI BANCHI

IMPOSTAZIONE DEI CANALI MIDI
1.INGRESSO MIDI
Premere ripetutamente il pulsante [Function] finché sullo schermo LCD non
appare "MIDI In". In questo caso, è possibile scegliere il canale di destinazione per
la riproduzione dei file MIDI in ingresso premendo i pulsanti [+/-] o ruotando la
manopola [Data Dial] su "all", ovvero su tutti i canali (codificati da 01 a 16). Tutti i
canali sono disponibili in modo preimpostato all'accensione dello strumento.
2. USCITA MIDI
Premere ripetutamente il tasto [Function] finché sullo schermo LCD non appare
"MIDI Out".
In questo caso, è possibile scegliere il canale di destinazione per la trasmissione
dei file MIDI in uscita premendo i pulsanti [+/-] o [+/-] o ruotando la manopola
[data Dial]. Tuttavia, alcuni file MIDI non possono essere trasmessi, come il ritmo
automatico, le canzoni dimostrative e le canzoni riservate allo strumento. All'ac-
censione dello strumento, il canale 01 è disponibile in modo preimpostato.
SELEZIONE DEL BANCOE
Premere ripetutamente il pulsante [function] quando sullo schermo LCD appare
"Bank Sel".
In questo caso, è possibile scegliere il banco vocale di destinazione tra i 128 banchi
codificati da 01 a 128 per regolare la voce della tastiera MIDI premere i pulsanti [+/-]
o ruotare la manopola [data Dial]. All'accensione dello strumento, il banco voce
preimpostato è BANK01.
Nota: nel banco voci standard c'è un solo banco voci, codificato BANK 01, con 128
voci GM standard. Se nel computer sono presenti altri banchi di voci, è possibile
aggiungerli allo strumento e definirli con i codici da BANK 01 a 128.
V. Suoni ed effetti
SELEZIONE DEI SUONI
Il sistema dispone di 162 tipi di suoni, tra cui 128 suoni GM, 6 gruppi di suoni per le
percussioni a tastiera e 5 gruppi di suoni per le percussioni a tastiera e 5 gruppi di
suoni per la musica popolare.
Premere ripetutamente il pulsante [Function] finché sullo schermo LED non appare
"19 Split Pt". In questo caso, è possibile ripristinare il punto di divisione premendo i
pulsanti [+/-] o ruotando la manopola [Data Dial], oppure premendo il tasto di
destinazione. Il nuovo punto di divisione viene quindi impostato al termine della
scelta.

All'accensione, il suono predefinito è il suono codificato 00, che indica "00 Grd
Piano" sullo schermo LCD. Premere il pulsante [Sound] per avviare la funzione di
impostazione della voce. La voce di destinazione può essere selezionata tramite i
pulsanti numerici, i pulsanti [+/-] o la manopola [data Dial]. Tuttavia, per quanto
riguarda l'uso dei tasti numerici, il codice del suono di destinazione deve essere
il codice del suono di destinazione deve essere immesso con tre cifre. Ciò significa
che "00" o "0" deve essere Se, ad esempio, il codice vocale di destinazione è 65, le
cifre 0, 6 e 5 devono essere aggiunte al codice a una o due cifre, se il codice vocale
di destinazione è 65, si devono inserire le cifre 0, 6 e 5; se è 8, si devono inserire le
cifre 0, 0 e 8.
PIANO
Per rendere più comodo il lavoro degli utenti, lo strumento è stato progettato
con il tasto [Piano], premendo il quale è possibile selezionare direttamente la
voce di pianoforte.
1.1. Premendo il pulsante [Piano], lo strumento entra in modalità pianoforte e sullo
schermo LCD appare la scritta "PIANO". Il suono di qualsiasi tasto viene riprodotto
con la voce del pianoforte.
2.Durante la modalità di accompagnamento, premendo il pulsante [Piano] è
possibile interrompere l'accompagnamento e far entrare lo strumento in modal-
ità pianoforte. Premendo nuovamente il pulsante, la funzione si interrompe.
Nota: in modalità Piano, è possibile selezionare e suonare i ritmi, anche il control-
lo dell'accompagnamento può funzionare normalmente, ma solo per le percus-
sioni senza accordi.
FUNZIONE DOPPIO SUONO
Lo strumento ha una funzione di doppio suono: due suoni possono essere combi-
nati per creare un nuovo effetto sonoro e arricchire la complessità del suono che
sembra essere realizzato suonando due tipi di strumenti musicali. Prima di attiva-
re il pulsante [Dual], il suono dello strumento è contrassegnato da "SOUND 1"
sullo schermo LCD, mentre il secondo suono può essere selezionato come segue:
1. Premere il pulsante [Dual] quando sullo schermo LCD appare "SOUND" e il
cursore punta su "DUAL". Sullo schermo LCD viene visualizzato anche il codice del
secondo suono. Il secondo suono preimpostato è il suono 48. In questo caso, la
voce della pressione dei tasti
è una combinazione dei due suoni.
2.Il secondo suono può essere selezionato premendo i pulsanti [+/-] o ruotando la
manopola [Data Dial].

3. Nella funzione Suono-doppio, il primo suono può essere cambiato premendo
prima il pulsante [Sound] per passare alla modalità di impostazione "SOUND 1",
quindi premendo i pulsanti [+/-] o ruotando la manopola [data Dial].
4. Nella funzione a doppia voce, premendo il pulsante [Dual] è possibile interrom-
pere la funzione e la scritta "SOUND 2" e il cursore che indica "DUAL" sullo schermo
LCD scompaiono, il che significa che il sistema è tornato alla modalità di impostazi-
one di "SOUND 1".
Nota: al di fuori della funzione "auto chord", la funzione di doppio suono può
essere applicata a tutta la tastiera, mentre con la funzione "auto chord", può essere
applicata solo alla tastiera della melodia e non a quella di accompagnamento.
TASTIERA DINAMICA
Quando lo strumento è acceso, è attiva anche la funzione Dynamic Feeling, con il
cursore che indica "TOUCH". Anche premendo il pulsante [Touch] è possibile attivare
o disattivare la funzione. La funzione può mostrare la dinamica applicata alle diverse
sequenze di tasti, in modo che la funzione possa rafforzare l'esecuzione sulla tastiera.
La dinamica aumenta e il volume delle note aumenta. Quando la funzione esce,
qualsiasi dinamica delle battute prende lo stesso volume.
PITCH BEND
Se si sposta il [Pitch Bend] verso l'alto o verso il basso, l'intonazione passa ad alt o a
bourdon. Sbloccando il bend, l'intonazione torna normale.
CURVATURA VIBRATO
Quando il [Vibrato Bend] rimane al minimo verso il basso, la funzione vibrato è
disattivata. Se si sposta verso l'alto, la funzione è attiva e il suono della pressione dei
tasti assume un effetto sustain. Se lo si sposta verso l'alto o verso il basso, l'effetto
può essere rafforzato o indebolito.
SUSTAIN
1. Premere il pulsante [Sustain] con il cursore "SUSTAIN" sullo schermo LCD per
avviare la funzione. Il suono della pressione dei tasti assume un elegante effetto
sustain.
2. Premere di nuovo il pulsante [Sustain] quando sullo schermo LCD scompare
la scritta "SUSTAIN" per uscire dalla funzione.

OT TAVE
I pulsanti [Octave+/-] possono essere utilizzati per intonare lo strumento
un'ottava sopra o sotto. Premendo per la prima volta [Octave+] o [Octave-],
sullo schermo LCD viene visualizzato il valore dell'ottava attuale sullo scher-
mo LCD; premendo di nuovo uno dei due, l'intonazione dello strumento può
essere un'ottava sopra o sotto all'interno della gamma di possibilità.
TRASPOSIZIONE
Premere il pulsante [Transpose ] o [Transpose ] per trasporre il tono delle
note. La trasposizione può essere regolata da "-6" a "+6". Applicando contem-
poraneamente i due pulsanti, il tono delle note diventa normale al valore
preimpostato "0". Nella funzione di trasposizione il valore di trasposizione può
essere modificato anche ruotando la manopola [data Dial].
TASTIERA DOPPIA
Premendo il tasto [Split] con il cursore che indica "SPLIT", la tastiera viene
divisa in due parti, i 24 tasti di sinistra e i tasti restanti, per formare una
doppia tastiera. L'intonazione della parte sinistra diventa un'ottava sopra,
mentre quella della parte destra scende di un'ottava, cioè l'intonazione delle
due parti diventa coerente. Nel frattempo, il suono delle due parti può essere
diverso. La parte sinistra mantiene la voce primaria, ma la parte destra può
acquisirne un'altra. Premere di nuovo il pulsante [Split] con il cursore che si
scurisce "SPLIT", la funzione si interrompe e la voce dell'intera tastiera man-
tiene quella della parte destra precedente.
Nota: in modalità auto-chord, la funzione dynamic-feeling, l'effetto sustain, il
pitch bend e il vibrato non possono essere utilizzati nella tastiera degli accor-
di.
VI. Stili automatici
SELEZIONE DEGLI STILI
È possibile scegliere tra 200 stili diversi, che vanno da 00 a 200.
Quando lo strumento è acceso, lo stile predefinito è quello codificato "00".
Premere il pulsante [style] quando sullo schermo LCD appare "STYLE", quindi
è possibile scegliere lo stile di destinazione tramite i pulsanti numerici, i
pulsanti [+/-] o la manopola [Data Dial].
Nota: il codice stile desiderato può essere selezionato anche immettendo tre
cifre. Ciò significa che "00" o "0" devono essere aggiunti al codice ad una o
due cifre, ad esempio, se il codice stile di destinazione è 66, si devono inserire
le cifre 0, 6 e 6, e se è 9, le cifre 0,0 e 9.
AVVIO/ARRESTO DELLO STILE
Premere il pulsante [Start/Stop] per avviare o arrestare lo stile di accom-
pagnamento.
SYNC
Premere il pulsante [SYNC] quando i punti di battuta scintillano sul display
LCD.
Con la funzione di accordo automatico disattivata, qualsiasi tasto della
tastiera può avviare uno stile. Ma con la funzione di autoaccordo attivata,
qualsiasi tasto della tastiera degli accordi può far procedere contemporanea-
mente l'esecuzione della melodia e lo stile di accompagnamento.
INTRO/FINE
1. Prima di procedere con un brano di stile, il pulsante [Intro/Ending] può
avviare, con il cursore "NOR" sullo schermo LCD, un brano di preludio, che
precede il normale brano di stile.
2. Durante il procedere di un brano di stile, premendo il pulsante [Intro/End-
ing] si può far procedere lo stile normale con un pezzo di finale, e quindi
fermare l'intero stile.
Nota: prima che il finale finisca, premendo il pulsante [Fill-in A] o [Fill-in B] si
può far procedere lo stile normale precedente.
DISSOLVENZA IN ENTRATA E IN USCITA
1.Quando lo stile si ferma, premere il pulsante [Fade In/Out] con il cursore in
corrispondenza della dicitura "FADE". In questo caso, si avvia un pezzo di stile,
quindi lo stile può sfumare e raggiungere la massima potenza entro 8 secondi
con il cursore acceso, mentre la scritta "FADE" scompare.
2. Durante lo svolgimento di un brano di stile, premendo il pulsante [Fade
In/Out] è possibile far sfumare lo stile dall’'esplosione completa entro 8
secondi, e la scritta "FADE" scompare.
INTERMEZZO
1. Durante l'esecuzione di un accompagnamento, tenere premuto il pulsante
[Fill In A] fino a quando non si sente un pezzo di intermezzo e il cursore
appare "VAR" sullo schermo LCD, quindi procede l'accompagnamento
normale.
2. Durante l'accompagnamento, premere il pulsante [Fill In B] e mantenerlo
finché non si sente un altro pezzo di intermezzo ed il cursore non visualizza
"VAR" invece di "NOR" sullo schermo LCD, quindi procede l'accompagnamen-
to normale. Lo scintillio della scritta
"VAR" indica che lo stile sta procedendo con una variazione.
3. Premendo con decisione il pulsante [Fill-in A] o [Fill-in B], è possibile inserire
gli intermezzi successivamente. Dopo la fine dell'intermezzo, ci sarà un
normale accompagnamento procedendo.
METRONOMO AUTOMATICO
Premendo il pulsante [Metronome], lo strumento emette un ticchettio che
indica il battito. In questo caso, è possibile selezionare diversi stili di battito
tramite il pulsante [Function].
Premendo nuovamente il pulsante, la funzione metronomo si interrompe.
REGOLAZIONE DEL TEMPO
I pulsanti [Tempo] possono essere utilizzati per regolare il tempo degli stili.
Premere il pulsante [Tempo ]/[Tempo ] o ruotare la manopola [Data Dial]
verso l'alto o verso il basso per accelerare o rallentare il tempo dello stile nella
gamma di valori da 40 a 280 battiti al minuto, e il valore del tempo corrente
viene visualizzato su "TEMPO" sullo schermo LCD. Premere contemporanea-
mente i due pulsanti [tempo] per riportare il valore del tempo al valore
preimpostato.
REGOLAZIONE DEL VOLUME DI ACCOMPAGNAMENTO
Premere i pulsanti [Accom Vol ] / [Accom Vol ] per aumentare o diminuire
il volume dell'accompagnamento nell'intervallo di valori compreso tra 00 e
31. Premere entrambi i tasti contemporaneamente per riportare il valore del
volume di accompagnamento al valore preimpostato.
VII. Accordo di basso automatico e dizionario degli accordi
Premere il pulsante [Auto Bass Chord] per avviare la funzione di accordo di
basso automatico con i cursori puntati su A, B, C (che indicano l'accordo di
basso automatico) sullo schermo LCD. Durante l'esecuzione dell'accordo di
basso automatico, i 19 tasti della parte sinistra della.
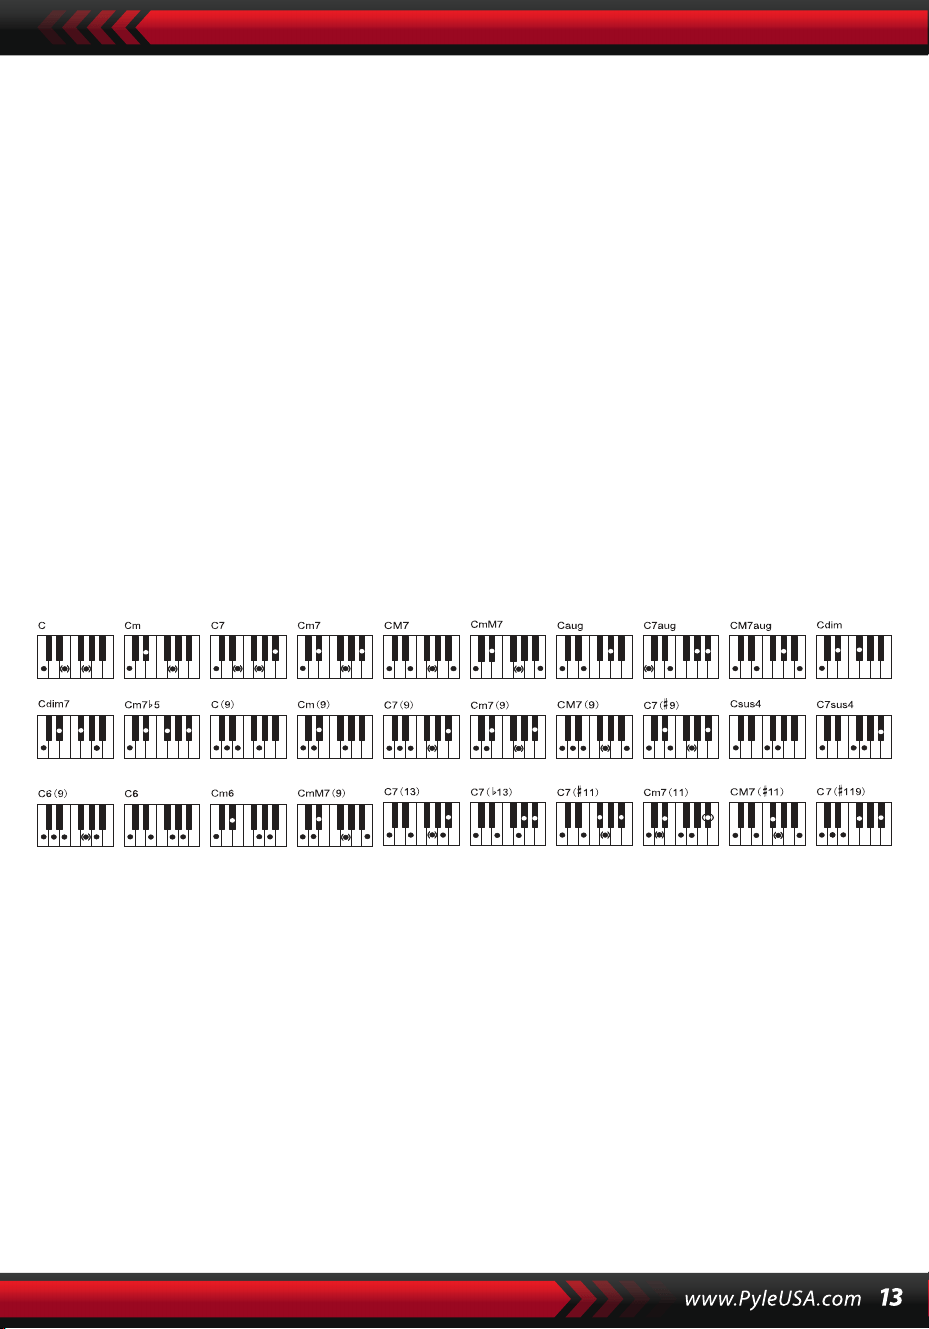
tastiera sono i tasti degli accordi. Durante il procedimento dello stile, un
pezzo di accordo di basso automatico può essere avviato premendo i tasti
degli accordi.
Nota:
1. Premere il pulsante [Function] per modificare il punto di divisione e l'inter-
vallo della tastiera degli accordi. (Per ulteriori informazioni, vedere "Punto di
divisione").
2. Lo strumento è in grado di riconoscere sia le diteggiature a dito singolo che
quelle con le dita. Accetterà tutte le diteggiature che si accordano con la
diteggiatura, ma accetterà la diteggiatura a dito singolo quando non è
conforme alla diteggiatura.
Diteggiatura singola:
(Le seguenti diteggiature sono progettate per essere accettate da questo
strumento).
1. Triade maggiore: Suonare le radici dell'accordo
2. Triade minore: Suonare contemporaneamente le radici dell'accordo e
qualsiasi tasto nero alla loro sinistra.
3. Accordo di settima dominante: Suonare contemporaneamente le radici
dell'accordo e qualsiasi tasto bianco alla loro sinistra.
4. Accordo di settima minore: Suonare contemporaneamente le radici
dell'accordo, un tasto bianco e uno nero alla loro sinistra.
Diteggiatura: Qualsiasi diteggiatura del diteggiato mostrato nell'illustrazi-
one qui sotto può produrre l'accordo di C maggiore, e altri accordi possono
essere suonati per analogia.
Positions pour l'accord de Do majeur

IL DIZIONARIO DEGLI ACCORDI
Il dizionario degli accordi è in realtà un prontuario degli accordi riservato allo
strumento in cui è possibile consultare le note che formano un accordo. Tutte
le note degli accordi sono visualizzate sullo schermo per guidare l'allievo a
suonare gli accordi. Questa funzione è molto utile per chi è alle prime armi e
vuole conoscere i nomi degli accordi per padroneggiare le diteggiature.
1. Premere il pulsante [Chord Dictionary] per avviare la funzione: sullo scher-
mo LCD appare "DICT" e "C", che indica la triade di C maggiore e i simboli
delle note sul pentagramma. Le radici dell'accordo e il tipo di accordo
possono essere definiti sulla tastiera della melodia a destra del punto di
divisione, quindi i tasti corrispondenti saranno visualizzati sulla tastiera e i
simboli delle note sul pentagramma, in modo che l'allievo possa suonare
l'accordo sull'accompagnamento secondo la rappresentazione sullo scher-
mo.
2. Quando le note dell'accordo vengono suonate correttamente sulla tastiera
di accompagnamento, si sente un battito di mani per festeggiare. Quando
le note dell'accordo non vengono eseguite correttamente, si sente un
suono BASSO quando vengono premuti i tasti sbagliati.
3. Premere nuovamente il pulsante [Right/Chord Dictionary] per interrompere
la funzione.

Nota:
1.Non viene emesso alcun suono per i tasti della tastiera della melodia (a
destra del punto di divisione) che servono a definire le radici degli accordi e
il tipo di accordo.
2.Non è possibile suonare accordi al di fuori della gamma della tastiera degli
accordi, vale a dire, gli accordi devono essere suonati sui tasti a sinistra del
punto di divisione.
VIII. Canzoni dimostrative
Nel sistema sono disponibili 2 brani dimostrativi di stile diverso.
SELEZIONE DEL BRANO DIMOSTRATIVO
1.Premendo il pulsante [Demo] con la scritta "DEMO" accesa e il codice del
brano corrente e i punti di battito sullo schermo, il sistema viene imposta-
to sulla modalità di riproduzione due brani demo in successione.
2.Durante la riproduzione del brano dimostrativo, il brano può essere
sostituito con l'altro attraverso i pulsanti numerici, i pulsanti [+/-] o la
manopola [Data Dial].
3.Premere nuovamente il pulsante [Demo] per interrompere la riproduzi-
one e abbandonare la funzione.
IX. Canzoni didattiche
Il sistema contiene 100 brani di stile diverso che possono essere utilizzati
come un ottimo strumento di apprendimento e di apprezzamento della
musica.
SELEZIONE DEI BRANI DIDATTICI
1. Premere il pulsante [Song] per avviare la modalità "song" con la scritta
"SONG" e il codice e l'abbreviazione del brano corrente sullo schermo, e il
sistema viene impostato sulla modalità di riproduzione dei 100 brani in
successione.
Durante la riproduzione di un brano, è possibile sostituirlo con un altro
mediante i tasti numerici, i tasti [+/-] o la manopola [Data Dial].
Area di pratica
dell'accordo
Tipo di accordo Radici dell'accordo

USCIRE DALLA FUNZIONE SONG
1. Durante la riproduzione di una canzone, premere il pulsante [Start/Stop] per
interrompere la riproduzione del brano in corso, ma il sistema rimane in modalità
"song".
2. Premere il pulsante [Sound] o [Style] alla fine della canzone per uscire dalla
modalità "song" e avviare la funzione corrispondente.
FUNZIONE DI "SINISTRA" E "DESTRA" FUORI DALLA MODALITÀ DI APPRENDI-
MENTO
Durante l'esecuzione di una canzone, premere il pulsante [Sinistra] o [Destra] per
attivare o disattivare il suono del canale sinistro o destro. Ad esempio, premendo il
pulsante [Sinistra], con l'indicazione "SINISTRA " a sinistra dello schermo, per aprire il
canale sonoro della melodia per la melodia della mano destra e spegnere il canale
sonoro per l'accompagnamento o la melodia della mano sinistra. La stessa operazi-
one vale per il pulsante [Right].
Nota:
1. Quando la modalità "song" è terminata, premere il pulsante [Right/Chord Dictio-
nary] per avviare la modalità "chord dictionary" (dizionario degli accordi); premere
nuovamente il psante per uscire.
2. Quando un brano termina, premere il pulsante [Right/Chord Dictionary] per
almeno 2 secondi per avviare la modalità "chord dictionary"(dizionario degli accor-
di).
X. LEZIONI
I tre pulsanti [Lezione], [Sinistra], [Destra] possono avviare tre tipi di modalità di
apprendimento, che possono condurre separatamente l'allievo a suonare il
brano didattico passo dopo passo.
LEÇON I
Questa lezione mira ad esercitare la durata musicale piuttosto che l'intonazione.
Ogni tasto con la durata corretta può produrre cambiamenti corretti delle note e
degli accordi correnti, ma non il suono delle note corrispondenti.
2. Durante la riproduzione di un brano, premere il pulsante [Start/Stop] per inter-
rompere la riproduzione del brano in corso, ma il sistema rimane in modalità "song";
premere nuovamente il pulsante per continuare a riprodurre ripetutamente il brano
in corso.
Nota: per riportare lo strumento alla modalità di riproduzione dei 100 brani in
successione,
è necessario uscire prima dalla modalità "song", quindi riprendere l'alimentazione
tramite il pulsante [Song].

LEZIONE II
Questa lezione ha lo scopo di esercitarsi a suonare le note corrette con le
chiavi indicative mostrati sullo schermo. La pressione dei tasti delle note
corrette può far proseguire il brano, oppure la canzone viene sospesa fino a
quando non viene ripresa la nota corretta.
Nota: in questa modalità è possibile suonare solo le note corrette, ma quelle
sbagliate non ricevono alcuna reazione.
LEZIONE III
Questa lezione ha lo scopo di esercitarsi a suonare le note corrette con la
giusta durata. Con la normale riproduzione del brano di apprendimento, le
note corrette devono essere suonate con la giusta durata del brano originale.
Senza premere alcun tasto, il sistema si limita a riprodurre l'accompagna-
mento del brano.
ESERCITAZIONI PER MANCINI E DESTRORSI
Questa lezione ha lo scopo di esercitarsi a suonare rispettivamente con la
mano sinistra o con la mano destra, o con entrambe.
Premere il pulsante [Destra] per nascondere la melodia per la mano destra,
quindi esercitarsi a suonare con la mano destra. Premere il pulsante [Sinistra]
per nascondere la melodia della mano sinistra o i cambi di accordi per manci-
ni e quindi esercitarsi a suonare con la mano sinistra. Premere contempora-
neamente i due pulsanti per nascondere il suono della mano sinistra e della
mano destra e quindi esercitarsi a suonare con entrambe le mani.
IMPOSTAZIONE DELLE FUNZIONI DELLA LEZIONE
1.Appuyez sur la fonction [Leçon] pour démarrer l'état "chanson", puis
appuyez sur le bouton [Démarrer/Arrêter] pour arrêter la chanson.
2.Sélectionnez une chanson agréable en appuyant sur les touches
numériques, les touches [+/-] ou en tournant le bouton [Data Dial].
3.Lorsque le mode "chanson" est désactivé, appuyez successivement sur le
bouton [Leçon] pour choisir la Leçon I, II, III ou quitter la fonction "leçon".
Chaque leçon choisie aura un curseur brillant correspondant ainsi que
"GAUCHE" ou "DROITE" en surbrillance à l'écran. Ensuite, appuyez sur le
bouton [Démarrer/Arrêter] pour démarrer les leçons et les indications des
notes mélodiques ou d'accord seront affichées sur la portée et le clavier à
l'écran LCD.
4. Premere il pulsante [Sinistra] per avviare l'esercizio con la mano sinistra
con la scritta "mano sinistra" sullo schermo. Premere il pulsante [Destra]
per avviare la pratica con la mano destra con la "mano destra" luminosa
sullo schermo. "mano destra" sullo schermo. Premere entrambi i pulsanti
per avviare l'esercizio con la mano destra e la mano sinistra con la "mano
sinistra" e la "mano destra" che brillano sullo schermo. Se viene effettuata
nessuna scelta, il sistema avvierà automaticamente la pratica con la mano
destra.
5. Al termine della lezione, il sistema riproduce il brano corrente e mantiene
la modalità della lezione precedente.
Nota: I diversi stili dei brani rendono diversa la pratica dei mancini. Quando
si suonano brani in stile ritmico, la mano sinistra deve suonare gli accordi;
quando si suonano altri brani, la mano sinistra deve suonare la melodia o
l'accompagnamento (i brani codificati da 00 a 84 sono i brani ritmici).
Durante una lezione, la modalità lezione non può essere cambiata libera-
mente.
XI. Funzione di memorizzazione e memoria
La funzione di memorizzazione e di memoria serve a memorizzare la voce di
impostazione, lo stile, il tempo e altri
parametri relativi alla modalità di lavoro che devono essere modificati duran-
te l'esecuzione.
Si applica anche per estrarre i parametri necessari direttamente nell'esecuzi-
one. Sono disponibili sei modalità di memoria da cui attingere liberamente.
MEMORIZZAZIONE DEI PARAMETRI
Per prima cosa, impostare il suono, lo stile, il tempo e altri parametri relativi
di una modalità di lavoro. In secondo luogo, premere con decisione il
pulsante [Memory], quindi premere uno qualsiasi dei pulsanti delle modalità
di memoria (M1, M2, M3, M4, M5 o M6) per memorizzare la modalità di
lavoro. Il cursore luminoso corrispondente indica la modalità di memoria in
cui sono memorizzati tutti i parametri.
ESTRAZIONE DEI PARAMETRI
Durante l'esecuzione, premere uno qualsiasi dei pulsanti della modalità di
memoria per richiamare i parametri memorizzati e sostituire quella attuale.

Nota:
1. Dopo aver richiamato una modalità di memoria, tutti i parametri possono
essere reimpostati e diventare diversi da quelli memorizzati in precedenza.
In questo stato, il corrispondente cursore luminoso nella parte inferiore dello
schermo scompare, indicando che la modalità è stata cambiata.
2. Non esiste una protezione contro l'interruzione dell'alimentazione per
tutte le modalità di memoria; pertanto, quando lo strumento riprende
l'alimentazione, i parametri memorizzati vengono persi.
XIl. Impostazione dell'O.T.S (ONE TOUCH SET)
La funzione O.T.S ha memorizzato le voci più utilizzate e adatte agli stili. Ci
sono quattro suoni predefiniti che si adattano a ogni stile.
1. Premere il pulsante [O.T.S] per avviare l' "accordo di basso automatico" con
le scritte "O.T.S" e "M1" nella parte inferiore dello schermo.
2. Dopo aver preparato lo stile di destinazione, premere i quattro pulsanti di
memoria (da M1 a M4), lo stile suonato sulla tastiera combinerà perfetta-
mente le quattro voci predefinite.
3. Premere nuovamente il pulsante per uscire dalla funzione.
Nota: Quando si preme il pulsante [O.T.S], non è possibile avviare la funzione
di memorizzazione e di salvataggio non possono essere avviate.
Xlll. Registrazione
PREPARAZIONE ALLA REGISTRAZIONE
Premere il pulsante [REC] quando i quattro punti di battuta scintillano e la
scritta "REC" appare sullo schermo per indicare che il sistema è pronto per la
registrazione.
Il suono piacevole, stile, tempo, sustain e altri parametri possono essere
impostati prima della registrazione.

REGISTRAZIONE
In questo stato, tutte le note suonate sulla tastiera vengono registrate con
quattro punti di battito sullo schermo che scintillano in successione al tempo
impostato. In modalità "record", è possibile registrare un brano di accom-
pagnamento direttamente dopo l'avvio. Nello stato "auto bass chord", qualsi-
asi tasto della tastiera di accompagnamento automatico può avviare un
brano di stile. Ma quando l'"auto bass chord" è esaurito, è possibile avviare
un brano di stile solo premendo il pulsante [Start/Stop]. Durante la registrazi-
one dell'accompagnamento, le note della melodia possono essere suonate
sulla tastiera e registrate insieme.
Note:
1.Non esiste una protezione contro le interruzioni di corrente, pertanto
quando lo strumento riprende l'alimentazione, i dati registrati vengono
persi.
2.La nuova registrazione sostituisce quella principale quando si applica
nuovamente la funzione di registrazione.
3.La quantità di note registrate è influenzata da tutti i dati registrati, tra cui
suoni diversi, stile, tempo, ecc.
DOPO LA REGISTRAZIONE
1. In modalità "registrazione", premere nuovamente il pulsante [REC] per
interrompere la registrazione.
2. Durante la registrazione di uno stile, premere il pulsante [Intro/Ending] per
avviare un pezzo di finale. Quando il finale termina, il sistema inter-
romperà automaticamente la registrazione e uscirà dalla modalità
"record".
3. Durante la registrazione, la memoria completamente occupata inter-
romperà la registrazione con la scritta "FULL" che appare sullo schermo per
3 secondi, quindi si esce dalla modalità "registrazione".
RIPRODUZIONE
Dopo l'arresto della registrazione, premere il pulsante [Playback] per ripro-
durre la traccia registrata.
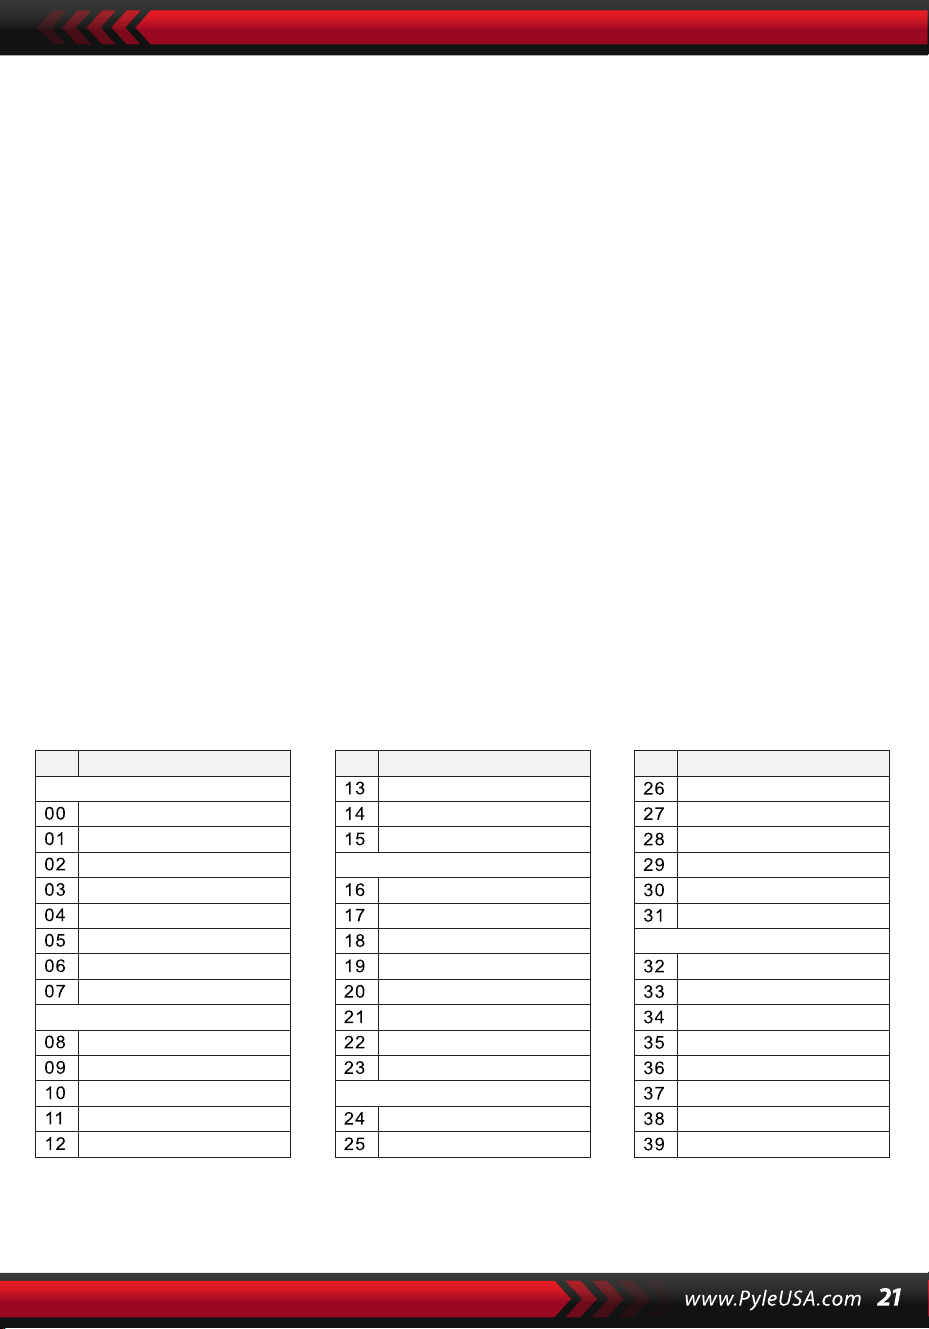
XIV. Programma
PROGRAMMA
Premere il pulsante [Prog] con il cursore "Prog" acceso sullo schermo per
trasformare la tastiera in una tastiera a percussione.
Quindi premere un tasto o un tamburo del pannello per avviare la funzione
di programma. Premere nuovamente il pulsante [Prog] per interrompere la
programmazione. Anche la memoria completamente occupata può inter-
rompere il programma. Il ritmo appena modificato o la nuova registrazione
prenderanno il posto di quella principale.
RIPRODUZIONE NULLA
Premendo il pulsante [Null Play], il ritmo modificato può essere riprodotto
ripetutamente.
Premere nuovamente il pulsante per interrompere la riproduzione.
Appendice
SOUNI
NO. Nome NO. Nome NO. Nome
Piano
Organ
Bass
Guitar
Mallet
Grand Piano
Bright Piano
El Grd Piano
Honky-tonk Piano
Elec piano 1
Elec Piano 2
Harpsichord
Clavi
Celesta
Glockenspiel
Music Box
Vibraphone
Marimba
Xylophone
Tubular Bell
Santur
Drawbar Organ
Jazz Organ
Rock Organ
Church Organ
Reed Organ
Accordion
Harmonica
Tango Accordion
Classic Guitar
Steel Guitar
Jazz. Guitar
Clean Guitar
Muted. Guitar
Overdriven Guitar
Distortion Guitar
Guitar Harmonics
Acoustic Bass
Finger Bass
Picked Bass
Fretless Bass
Slap Bass 1
Slap Bass 2
Synth Bass 1
Synth Bass 2

SUONI
NO. Nome NO. Nome NO. Nome
Strings Lead
Sound Effects
Chinese Instrument
Synth Voice
Drum Kit
Pad
Effects
Ethnic
Percussive
Strings Ensemble
Brass
Reed
Pipe
Violin
Viola
Cello
Contrabass
Tremolo Strings
Pizzicato Strings
Harp
Timpani
Strings 1
Strings 2
Synth Strings 1
Synth Strings 2
Choir Aahs
Voice Ooh
Synth
Orchestra Hit
Trumpet
Trombone
Tuba
Muted Trumpet
Horn
Brass Ensemble
Synth Brass 1
Synth Brass 2
70elep
Fzpiano
Ep3
Ep4
Ep5
Harppian
Clavr2
Clavr3
Organ Box
E. organ
Churc2
Syn Organ
Altoel
Fz guitar
Syn elgt
Picel bas
El violin
Brassfm
Fmlead
Fantalfo
Polyaa2
Bowedg2
70elpad
Soprano Sax
Alto Sax
Tenor sax
Baritone Sax
Oboe
English horn
Bassoon
Clarinet
Piccolo
Flute
Recorder
Pan Flute
Blown Bottle
Shakuhachi
Whistle
Ocarina
Square
Sawtooth
Calliope
Chiff
Charang
Voice
Fifths
Bass lead
Fantasia
Warm
Poly Synth
Choir
Bowed
Metallic
Halo
Sweep
Fx1
Fx2
Fx3
Fx4
Fx5
Fx6
Fx7
Fx8
Sitar
Banjo
Shamisen
Koto
Kalimba
Bag Pipe
Fiddle
Shanai
Tinkle Bell
Agogo
Steel Drums
Woodblock
Taiko Drum
Melodic Tom
Synth Drum
Reverse Cymbal
Standard Kit
Power Kit
Dance Kit
808 Kit
Brush Kit
Orchestra Kit
GT Fret Noise
Breath Noise
Seashore
Bird Tweet
Teleph Ring
Helicopter
Applause
Gunshot
Pipa
Erhu
Guzhen
Banhu
Qudi

ESTILOS
NO. Nome NO. Nome NO. Nome
BEAT & POP
SOUL & FUNK
LATIN
TRADITIONAL
PIANO
BEAT & POP-1
JAZZ
COUNTRY
ROCK
DANCE
8 Beat 1
8 Beat 2
8 Beat 3
8 Beat 4
60's 8 Beat
8 Beat Ballad
8 Beat Rock
16 Beat 1
16 Beat 2
16 Beat Pop
16 Beat Shuffle
Ballad
Slow Ballad
16 Beat Ballad
Unplugged
Funky Pop
Jazz Funk
Cool Funky
Soul 1
Soul 2
Soul Shuffle
Soul Blues
R&B
6/8 Gospel
Pop Groove
Bossa Nova 1
Bossa Nova 2
Rhumba
Pop Rhumba
Cha Cha
Pop Cha Cha
Tango
Jazz Samba
Reggae
Pop Reggae
1-Mar
2-Mar
German March
6/8 March
Polka
Pop Polka
Waltz
Slow Waltz
Vienna Waltz
Musette
8 Beat
Ballad
Boogie
Jazz
Swing
Jazz Waltz
Twist
March
6/8 March
Waltz
8 Beat 1 -1
Swing
Cool Jazz
Pop Swing
Swing Fox
Big Band
Big Band Meduim
Jazz Waltz
Ragtime
Dixeland
Quick Step
Country 1
Country 2
Pop Country
Country Rock
Country Folk
3/4 Country
Country Waltz
Country Shuffle
Country Boogie
Country Blues
Rap
Euro Beat
Hip Hop
Techno
Country Quick Step
Bluegrass
Rock
Pop Rock
Fast Rock
Slow Rock 1
Slow Rock 2
Rock & Roll
Heavy Metal
Blues Boogie
Blues
Shuffle
Blues Shuffle
Rock Shuffle
Charlston
Disco 1
Disco 2
Disco Funk
Dance
House 1
House 2

ESTILOS
NO. Nome NO. Nome NO. Nome
8 Beat 2-1
8 Beat 3-1
8 Beat 4 -1
60’s 8 Beat-1
8 Beat Ballad -1
8 Beat Rock-1
16 Beat 1 -1
16 Beat 2-1
16 Beat Pop -1
16 Beat Shuffle-1
Ballad-1
Slow Ballad -1
16 Beat Ballad -1
Unplugged -1
Bossa Nova 1 -1
Bossa Nova 2 -1
Rhumba -1
Pop Rhumba -1
Cha Cha -1
Pop Cha Cha -1
Tango -1
Jazz Samba -1
Reggae -1
Pop Reggae -1
March 1 -1
March 2 -1
German March -1
6/8 March -1
Polka -1
Pop Polka -1
Waltz-1
Slow Waltz-1
Vienna Waltz -1
Musette -1
8 Beat-1
Ballad-1
Boogie -1
Jazz -1
Swing -1
Jazz Waltz-1
Twist -1
March -1
6/8 March -1
Waltz-1
Country 1 -1
Country 2-1
Pop Country-1
Country Rock -1
Country Folk -1
3/4 Country-1
Country Waltz-1
Country Shuffle-1
Country Boogie -1
Country Blues -1
Country Quick Step
-1
Swing -1
Cool Jazz-1
Pop Swing -1
Swing Fox -1
Big Band -1
Big Band Meduim
-1
Jazz Waltz -1
Ragtime -1
Dixeland -1
Funky Pop -1
Jazz Funk -1
Cool Funky -1
Soul 1 -1
Soul 2-1
Soul Shuffle-1
Soul Blues -1
R&B-1
6/8 Gospel -1
Pop Groove -1
Hip Hop -1
Techno -1
Rock -1
Pop Rock-1
Fast Rock-1
Slow Rock 1 -1
Slow Rock 2 -1
Rock & Roll-1
Heavy Metal -1
Blues Boogie -1
Blues -1
Shuffle-1
Blues Shuffle -1
Rock Shuffle -1
Charlston -1
Disco 1 -1
Disco 2 -1
Disco Funk -1
Dance -1
House 1 -1
House 2 -1
Rap -1
Euro Beat-1
ROCK-1
DANCE
SOUL & FUNK-1
JAZZ-1
COUNTRY
LATIN-1
TRADITIONAL-1
PIANO-1
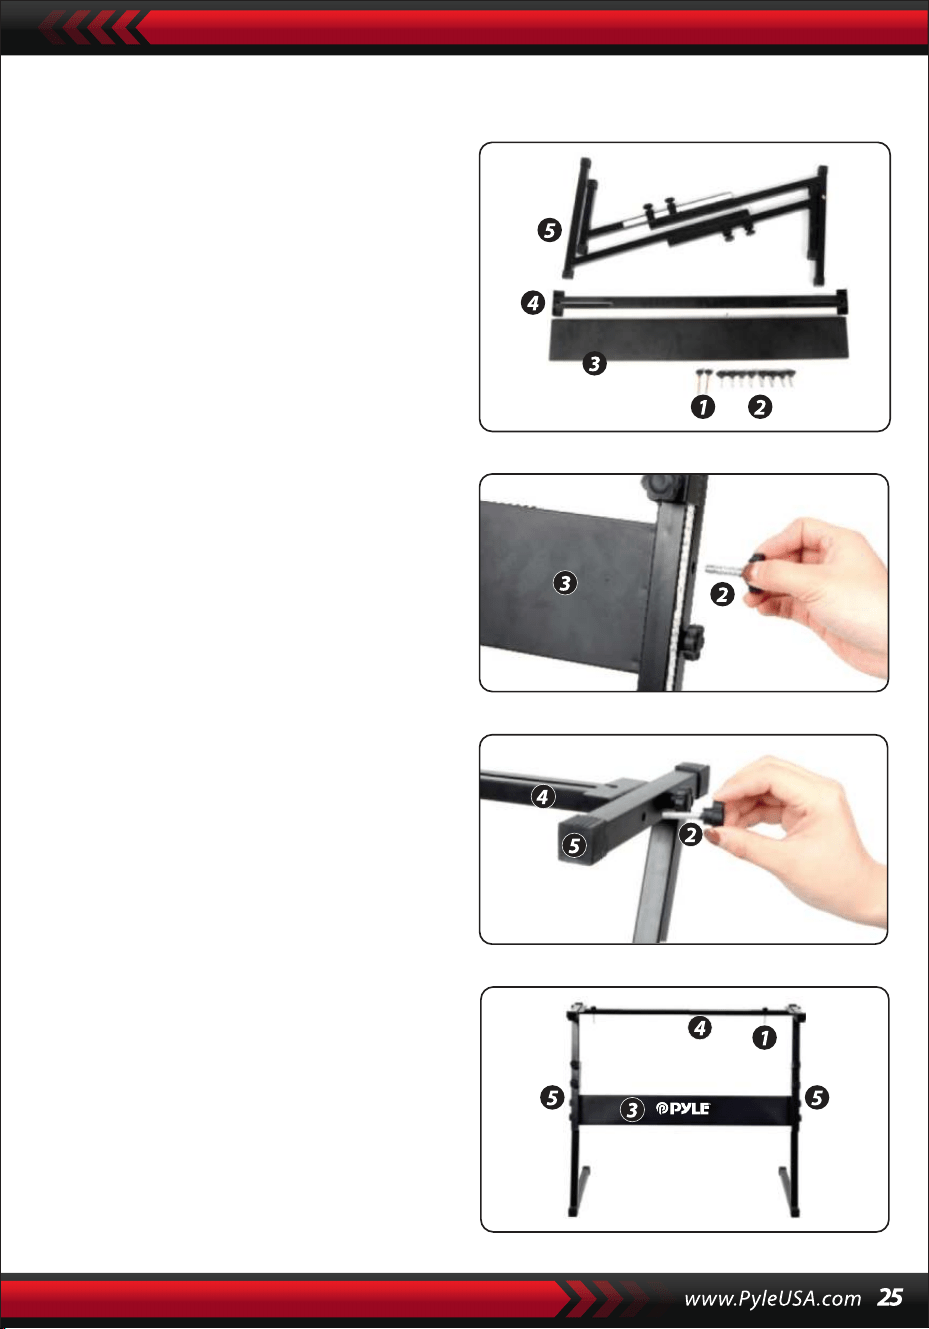
Montaggio del supporto per tastiera
1. Per prima cosa, preparare tutte
le parti di montaggio
2. In secondo luogo, prendere la vite n.
2 e la piastra di supporto n. 3 fissarle
alle due staffe di supporto del n. 5 e
del n. 3. e serrarle separatamente.
3. Prendere la vite n. 2 e la piastra di
supporto n. 4, fissare alla parte
superiore del supporto n. 5 e serrare.
4. L'installazione è completa, la vite n. 1
più lunga viene utilizzata per fissare
la tastiera sul tastiera sul supporto.

CARATTERISTICHE:
• Cavo MIDI
• 200 stili di accompagnamento automatico scelti in tutto il mondo
• 8 Pad di percussioni / Percussioni di tastiera
• Pianoforte musicale compatto e portatile
• Semplice funzionamento elettronico plug-in
• Piastra rotante per cambiare il suono
• Pianoforte portatile
• Altoparlanti stereo integrati a gamma completa
• Collegamento e streaming audio da dispositivi esterni
• Può collegarsi all'altoparlante e riprodurre il suono
• Più stili di suoni, toni e ritmi della tastiera selezionabili in modo preim-
postato
• Display LCD digitale
• Controllo del volume regolabile
• Modalità di registrazione e riproduzione
• 162 suoni: 128 suoni standard GM, 5 suoni di strumenti di musica popo-
lare,
• 23 suoni di sintetizzatore, 6 suoni di batteria
• Controllo di base: Volume Master/Volume Accom, Volume degli accordi e
Controllo del tempo
• Funzione di accordo automatico: Accordo singolo / Accordo con le dita /
Dizionario degli accordi
• Funzioni di insegnamento: Tasto unico/Seguire/Assemblare
• Pitch bend/Vibrato/Sustain/Touch Sensing/Funzione doppio suono
• Funzione Keyboard Split/Octave/Transpose
• Sync/Start/Stop/Fade In/Fade Out/Intro/Ending/Fill in A&B/Metronomo
• Ingresso USB/Ingresso pedale sustain
• Uscita altoparlanti (L/R)/uscita cuffie
• Perfetto per le esibizioni nel salotto di casa
• Divertimento per tutte le età: Bambini e Adulti

Cosa contiene la confezione:
• Tastiera musicale digitale per
karaoke
• Leggio
• Adattatore
• Spina di alimentazione
• Supporto per tastiera
• Pedale di sostegno
• Borsa impermeabile
• Cuffia
Specifiche del Supporto per tastiera:
• Vernice a forno
• Supporto removibile
• Materiale di costruzione: Ferro+ABS
• Lunghezza: 80 cm
• Larghezza: 21 cm
• Altezza: 57,5~67,5 cm
• Peso: 1,75 kg
• Cuscinetti: 15 kg
Specifiche delle cuffie:
• Materiale di costruzione: ABS +
foglio decorativo al laser
• Materiale del filo: Filo piatto in
PVC
• Lunghezza del filo: 1,2 m
• Spina Diametro: 3,5 mm 1 /8
• Peso: 0,14 kg
Specifiche tecniche:
• (61) Chiavi Tastiera
• 162 suoni includono 128 voci standard Gm, 5 voci di strumenti di musica
popolare 23
• Voci di sintetizzatore, 6 voci di batteria
• Canzoni dimostrative
• Interfaccia audio: Jack di ingresso Aux (6,5 mm) / Jack di uscita RCA L&R
• Livello sonoro massimo: Fino a 110 dB
• Lunghezza cavo USB/alimentazione: 1,2 mt
• Materiale di costruzione: ABS ingegnerizzato
• Alimentazione: DC 12V / adattatore AC
• Dimensioni del pianoforte (L x P x A): 92.9 x 30.3 x 9.3 cm/36.6 x 11.97 x 3.7
pollici
Specifiche del pedale di sostegno:
• Funzione Acceso/Spento
• Lunghezza: 24 cm
• Larghezza: 8 cm
• Altezza: 7 cm
• Peso: 1,75 kg
Questo prodotto contiene butilbenzilftalato (BBP), noto
allo stato della California per causare cancro, difetti di
nascita e altri danni riproduttivi. Non ingerire.
Per maggiori informazioni: www.P65warnings.ca.gov
Avvertenza California Prop 65
ATTENZIONE:

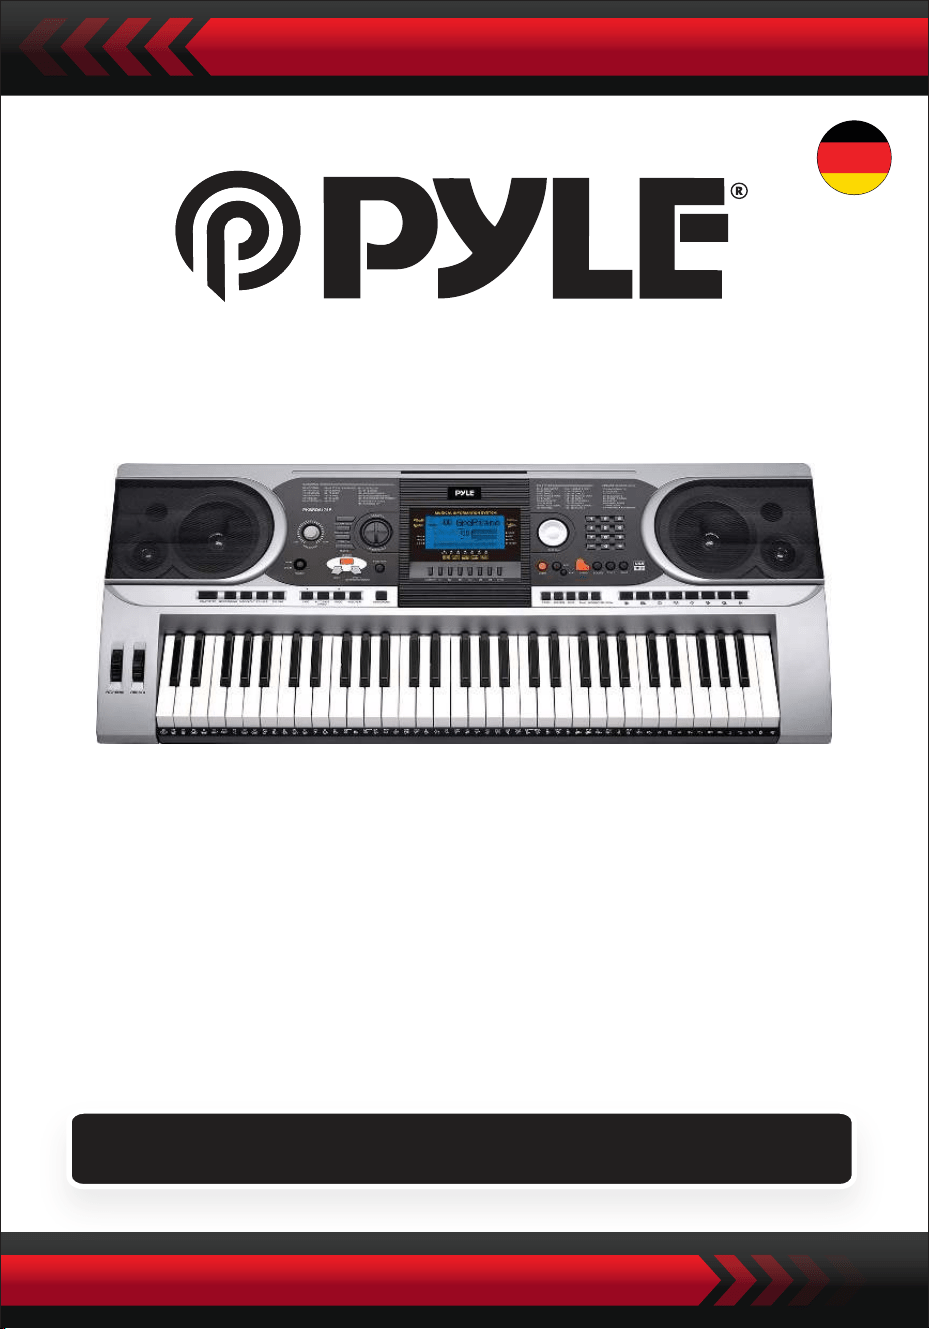
Portables elektronisches Klaviertastenfeld mit wasser-
abweisender Tasche (61 Tasten), Keyboardständer,
Dämpferpedal und Kopfhörer
Digitales Musikkeyboard
PKBBD6175P
BENUTZERHANDBUCH
GER

• Verwenden Sie den vorgeschriebenen Netzadapter und ersetzen Sie
beschädigte Adapter sofort.
• Zerlegen Sie das Instrument nicht und verändern Sie keine internen Teile. Bei
einer Fehlfunktion, beenden Sie die Nutzung sofort und lassen Sie es von
einem Fachtechniker reparieren.
• Schalten Sie alle Stromquellen aus, bevor Sie das Instrument mit anderen
Geräten verbinden.
• Spielen Sie das Instrument nicht über längere Zeit auf maximaler Lautstärke
oder in einem unangenehmen Umfang.
• Halten Sie das Instrument von Wärmequellen fern, da Überhitzung Schäden
verursachen kann.
• Verhindern Sie, dass Flüssigkeiten, Staub, Partikel und andere Fremdstoffe in
das Instrument gelangen, um Korrosion des Instruments oder einen
Kurzschluss seiner Komponenten zu verursachen.
• Ziehen Sie den Stecker, bevor Sie das Instrument reinigen. Stecken Sie den
Stecker nicht mit nassen Händen ein oder aus.
• Verwenden Sie ein trockenes und weiches Tuch zur Reinigung des Instru-
ments. Verwenden Sie keine Farbe, Alkohol oder andere chemische Lösung-
smittel, um das Instrument zu wischen, um Schäden an der Oberfläche zu
vermeiden.
• Schalten Sie die Stromversorgung aus und ziehen Sie den Stecker nach dem
Spielen oder wenn das Instrument längere Zeit nicht benutzt wird.
• Um das Risiko eines Brandes oder elektrischen Schlages zu verringern, setzen
Sie dieses Gerät nicht Regen oder Feuchtigkeit aus. Das Gerät soll nicht
tropfendem oder spritzendem Wasser ausgesetzt werden und es dürfen keine
mit Flüssigkeit gefüllten Objekte, wie Vasen, auf dem Gerät platziert werden.
• Maximale Betriebstemperatur: 40°C / 104°F
• Als Trennvorrichtung wird ein direkt einsteckbarer Adapter verwendet, die
Trennvorrichtung soll stets leicht bedienbar bleiben.
• Installieren Sie dieses Gerät nicht in einem geschlossenen Raum, wie einem
Bücherregal oder einer ähnlichen Einheit, und sorgen Sie für gute Belüftung.
Die Belüftung sollte nicht durch das Abdecken der Belüftungsöffnungen mit
Gegenständen wie Zeitungen, Tischdecken, Vorhängen usw. behindert
werden.
• Warnung: Übermäßiger Schalldruck von Ohrhörern und Kopfhörern kann zu
Hörschäden führen.
• Der Etikettenstandort befindet sich an der Unterseite des Geräts.
• Das Gerät soll nicht tropfendem oder spritzendem Wasser ausgesetzt werden
und es dürfen keine mit Flüssigkeit gefüllten Objekte, wie Vasen, auf dem
Gerät platziert werden.
• Der direkt einsteckbare Adapter wird als Trennvorrichtung verwendet, die
Trennvorrichtung soll stets leicht bedienbar bleiben.
BITTE VOR DEM WEITERMACHEN SORGFÄLTIG DURCHLESEN
Bitte bewahren Sie diese Bedienungsanleitung an einem sicheren und
griffbereiten Ort auf, um später darauf zurückgreifen zu können.
WARNUNG!

Diese Kennzeichnung weist darauf hin, dass dieses Produkt nicht zusam-
men mit anderen Haushaltsabfällen in der gesamten EU entsorgt werden
sollte.
Um mögliche Schäden für die Umwelt oder die menschliche Gesundheit
durch unkontrollierte Abfallentsorgung zu verhindern, recyceln Sie es
verantwortungsbewusst, um die nachhaltige Wiederverwendung von
Materialressourcen zu fördern. Um Ihr gebrauchtes Gerät zurückzugeben,
nutzen Sie bitte die Rücknahme- und Sammelsysteme oder wenden Sie
sich an den Händler, bei dem das Produkt gekauft wurde. Dieser kann das
Produkt zur umweltgerechten Entsorgung entgegennehmen.
I. Bedienfeld und Erweiterungsports
1 Lautsprecher
2 Netzschalter
3 Hauptlautstärke
4 Tempo
5 Begleitlautstärke
6 Transponieren
7 Oktave
8 Lektion
9 Funktion
10 Rechts
(Akkordwörterbuch)
11 Links
12 Speicher
13 M1, M2...M6
14 O.T.S
15 LCD-Anzeige
16 Demo
17 Aufnahme/Wieder-
gabe
18 Dateneinsteller
19 Klavier
20 Nummern
21 Klang
22 Stil
23 Lied
24 Start/Stopp
25 Intro/Ending
26 Fade In/Out
27 Fill-In A
28 Fill-In B
29 Sync
30 Auto Bass Chord
31 Prog/Null-Play
32 Metronom
33 Anschlagsdynamik
34 Sustain
35 Split
36 Dual
37 Tasteninstrument-Per-
cussion
38 Panel-Percussion
39 Pitch Bend
40 Vibrato
41 Akkordtastatur

VERWENDUNG DES AC/DC-NETZADAPTERS
Der AC/DC-Netzadapter muss der für das Instrument vorgesehene sein. Verbinden
Sie eine Seite mit der Netzsteckdose am Rückwandpaneel und die andere mit
dem Stromnetz der Stadt. (Bitte beachten Sie, dass die Eingangsspannung mit der
des Stromnetzes übereinstimmen sollte.)
KOPFHÖRERBUCHSE
Stecken Sie den Kopfhörer in die Kopfhörerbuchse an der Rückseite des Geräts, damit
der interne Lautsprecher automatisch abgeschaltet wird und das Spielen und Singen
fortgesetzt werden kann, ohne andere zu stören.
Hinweis: Eine zu hohe Lautstärke der Kopfhörer kann das Gehör schädigen..
VERBINDUNG MIT VERSTÄRKERN ODER LAUTSPRECHERN
Das Instrument verfügt über ein internes Lautsprechersystem und kann auch mit
anderen Verstärkern oder Lautsprechern verbunden werden. Schalten Sie zuerst
das Instrument und die externen Geräte aus, dann stecken Sie das Stereo-Fre-
quenzkabel in die OUT L/R-Buchse am Rückwandpaneel und das andere in die
LINE IN- oder AUX IN-Buchse des externen Geräts.
USB MIDI
MIDI steht für Musical Instrument Digital Interface. Über die MIDI-Buchsen kann
das Keyboard mit anderen Musikinstrumenten oder Computern mit MIDI über
ein Datenkabel verbunden werden, um Daten zu übertragen. In diesem Fall kann
jede Aufführung auf dem Keyboard an den Computer übertragen und dann mit
einer fortschrittlichen Software im Computer aufgenommen, komponiert oder
bearbeitet werden. Alle im Computer gespeicherten MIDI-Musikstücke können
Anwendungsmethoden des USB MIDI:
1. Verbinden Sie zunächst die Instrumente mit dem Computer über das univer-
selle Datenkabel und schalten Sie beide Geräte ein.
II. Vorbereitungen für die Aufführung
RÜCKSEITIGES BEDIENFELD
42 USB-MIDI-BUCHSE
43 SUSTAIN-BUCHSE
44 AUSGANG L/R-BUCHSE
45 KOPFHÖRERBUCHSE
46 DC 12V EINGANGSBUCHSE

2. Zweitens installieren und starten Sie die Musikbearbeitungssoftware, zum
Beispiel CAKEWALK. Dann erscheint die spezielle Hardware des Instruments in
der Hardware, die die Musiksoftware enthält, und sollte als Standardgerät
eingestellt werden. In diesem Fall wurde die Datenkommunikation zwischen
dem Instrument und dem Computer hergestellt.
3. Drittens stellen Sie die MIDI-Kanäle des Instruments ein (Bitte überprüfen Sie dies
in der Einführung des [Menü]-Knopfs).
DÄMPFERPEDAL
Dem Instrument kann ein externes Dämpferpedal hinzugefügt werden, das
verwendet werden kann, um einen nachhaltige wirkung in der Aufführung zu
erzielen.
LAUTSTÄRKEREGLER
Drehen Sie den Lautstärkeregler im Uhrzeigersinn, um die Hauptlautstärke zu
erhöhen; gegen den Uhrzeigersinn, um sie zu verringern. Der Regler steuert auch
die Lautstärke der Begleitung.
III. Grundlegende Aufführungsmethodik
Drücken Sie den [Power]-Knopf, die Hintergrundbeleuchtung schaltet sich ein, und
der LCD-Bildschirm zeigt Informationen über die aktuelle Stimme, das Tempo, den
Funktionsmodus usw.
Der imaginäre Vollbildschirm, der alle Markierungszeiger und Parameter
verschiedener Modi illustriert:
Der Vollbildschirm des LCDs beim Einschalten:

DATENWÄHLER
Das Drehen des [Datenwähl]-Knopfes ist eine Abkürzung, um eine Stimme, einen
Rhythmus oder ein Lied auszuwählen. Durch Drehen im Uhrzeigersinn kann ein
größerer Code erreicht werden; entgegen dem Uhrzeigersinn, ein kleinerer.
BEDIENFELD - UND TASTENINSTRUMENT-PERKUSSION
Im Instrument sind 8 Arten von Panel-Perkussionen und 61 Tastaturperkus-
sionen gespeichert.
• Drücken Sie den [Panel-Perkussion]-Knopf, ein entsprechender Perkussionssound
kann durch einen bestimmten Tastenanschlag gestartet werden.
• Drücken Sie den [Tastaturperkussion]-Knopf, wobei „PERCUS“ auf dem LCD-Bild-
schirm erscheint. In diesem Fall kann eine Perkussionsaufführung auf der Tastatur
durchgeführt werden. Eine bestimmte Taste entspricht einem bestimmten Typ
von Perkussionssound. Drücken Sie den Knopf erneut, um die Funktion zu verlas-
sen.
IV. Der Funktionenknopf
Im Folgenden werden die Details zu den Parametern angegeben, die über den
[Funktion]-Knopf konfiguriert werden können.
Parametername
Einstellbereich Der Standard Standardwert
BEATS
Halten Sie den [Funktion]-Knopf gedrückt, bis „04Beat“ auf dem LCD-Bildschirm
erscheint. In diesem Fall kann einer der neun verschiedenen Beat-Stile gewählt
werden, kodiert 00, 02 bis 09. Der Ziel-Beat-Stil kann über die [+/-]-Knöpfe oder den
[Datenwähler]-Knopf ausgewählt werden.
SPLIT PUNKT
Die Taste wird als Split-Punkt bezeichnet, der die Tastatur in zwei Teile teilt: die
Begleittastatur links und die Melodietastatur rechts. Der Standard-Split-Punkt des
Instruments liegt auf der 19. Taste von links, und der Punkt kann auf jeder Taste der
Tastatur neu eingestellt werden.
BEAT
ALL
SPLIT PT
MIDI IN
MIDI OUT
Anzeige auf dem
LCD

EINRICHTUNG VON MIDI-KANÄLEN
1. MIDI IN
Drücken Sie wiederholt die [Funktion]-Taste, bis „MIDI In“ auf dem LCD-Bildschirm
erscheint. In diesem Fall kann der Zielkanal ausgewählt werden, um die einge-
henden MIDI-Dateien zu spielen, indem man die [+/-]-Tasten drückt oder den
[Datenwähler]-Knopf auf „alle“ dreht, was bedeutet, dass alle Kanäle (codiert von
01 bis 16) verfügbar sind. Alle Kanäle sind beim Einschalten des Instruments
voreingestellt.
2. MIDI OUT
Drücken Sie wiederholt die [Funktion]-Taste, bis „MIDI Out“ auf dem LCD-Bild-
schirm erscheint. In diesem Fall kann der Zielkanal ausgewählt werden, um die
ausgehenden MIDI-Dateien zu übertragen, indem man die [+/-]-Tasten drückt
oder den [Datenwähler]-Knopf dreht. Einige MIDI-Dateien können jedoch nicht
übertragen werden, wie der automatische Rhythmus, Demonstrationslieder und
im Instrument gespeicherte Lieder. Beim Einschalten des Instruments ist Kanal 01
voreingestellt verfügbar.
BANK SELECT
Drücken Sie wiederholt die [Funktion]-Taste, bis „Bank Sel“ auf dem LCD-Bildschirm
erscheint. In diesem Fall kann die Ziel-Soundbank unter 128 Banken, codiert von 01
bis 128, ausgewählt werden, um die Stimme des MIDI-Keyboards anzupassen,
indem man die [+/-]-Tasten drückt oder den [Datenwähler]-Knopf dreht. Beim
Einschalten des Instruments ist die voreingestellte Soundbank BANK01.
Hinweis: Es gibt nur eine Soundbank, codiert als BANK 01, mit 128 Stimmen in der
Standard-GM-Soundbank. Wenn es andere Soundbänke im Computer gibt, können
diese zum Instrument hinzugefügt und mit Codes von BANK 01 bis 128 definiert
werden.
V. Klänge und Effekte
AUSWAHL VON KLÄNGEN
Es gibt 162 Arten von Klängen im System, einschließlich 128 GM-Klängen, 6 Grup-
pen von Klängen für Tastaturperkussion und 5 Gruppen von Klängen für
Volksmusik.
Drücken Sie wiederholt die [Funktion]-Taste, bis „19 Split Pt“ auf dem LED-Bild-
schirm erscheint. In diesem Fall kann der Splitpunkt durch Drücken der [+/-]-Tasten
oder Drehen des [Datenwähler]-Knopfs oder durch den Tastenanschlag der
Zieltaste zurückgesetzt werden. Dann wird der neue Splitpunkt festgelegt, nach-
dem die Auswahl beendet ist.

Beim Einschalten ist der Standardklang der Klang mit dem Code 00, der auf dem
LCD-Bildschirm als „00 Grd Piano“ steht. Drücken Sie den [Sound]-Knopf, um die
Stimmeneinstellungsfunktion zu starten. Die Zielsprache kann über die Zahlen-
knöpfe, die [+/-]-Knöpfe oder den [Datenwähl]-Knopf ausgewählt werden. Bei der
Verwendung der Zahlenknöpfe muss der Zielklangcode jedoch mit drei Ziffern
eingegeben werden. Das bedeutet, dass „00“ oder „0“ zu dem ein- oder zweistelli-
gen Code hinzugefügt werden sollte, zum Beispiel, wenn der Zielklangcode 65 ist,
sollten die Ziffern 0, 6 und 5 eingegeben werden, und wenn es 8 ist, sollten die
Ziffern 0, 0 und 8 eingegeben werden.
KLAVIER
Um es den Benutzern zu erleichtern, ist das Instrument speziell mit dem
[Klavier]-Knopf ausgestattet, durch dessen Betätigung direkt die Klavierstimme
ausgewählt werden kann.
1.Durch Drücken des [Klavier]-Knopfes wird das Instrument in den Klaviermodus
versetzt, wobei auf dem LCD-Bildschirm „PIANO“ erscheint. Der Klang jeder Taste
nimmt die Stimme des Klaviers an.
2.Im Begleitmodus stoppt das Drücken des [Klavier]-Knopfes die Begleitung und
versetzt das Instrument in den Klaviermodus. Durch erneutes Drücken des
Knopfes wird die Funktion beendet.
Hinweis: Im Klaviermodus können Rhythmen ausgewählt und gespielt werden,
auch die Begleitsteuerung funktioniert normal, jedoch nur die Perkussion ohne
Akkord.
DOPPELKLANGFUNKTION
Das Instrument verfügt über eine Doppelklangfunktion – zwei Klänge können
kombiniert werden, um einen neuen Klangeffekt zu erzeugen und die Klangkom-
plexität zu bereichern, die so erscheint, als würde man zwei verschiedene
Musikinstrumente spielen. Bevor der [Dual]-Knopf aktiviert wird, ist der Klang des
Instruments auf dem LCD-Bildschirm als „SOUND 1“ markiert, und der zweite
Klang kann wie folgt ausgewählt werden:
1.Drücken Sie den [Dual]-Knopf, wobei „SOUND“ erscheint und der Cursor auf
„DUAL“ auf dem LCD-Bildschirm zeigt. Der Code des zweiten Klangs wird
ebenfalls auf dem LCD-Bildschirm angezeigt. Der voreingestellte zweite Klang
ist Klang 48. In diesem Fall ist die Stimme der Tastenanschläge eine Kombina-
tion der beiden Klänge.
2.Der zweite Klang kann durch Drücken der [+/-]-Knöpfe oder Drehen des [Daten-
wähl]-Knopfes ausgewählt werden.

3. In der Doppelklang-Funktion kann der erste Klang geändert werden, indem
zunächst der [Sound]-Knopf gedrückt wird, um das Instrument in den Einrichtungs-
modus von "SOUND 1" zu versetzen, und dann durch Drücken der [+/-]-Knöpfe
oder Drehen des [Datenwähl]-Knopfes.
4. In der Doppelklang-Funktion beendet das Drücken des [Dual]-Knopfes die
Funktion, und das „SOUND 2“ und der Cursor, der auf „DUAL“ auf dem LCD-Bild-
schirm zeigt, verschwinden, was bedeutet, dass das System in den Einrichtungsmo-
dus von „SOUND 1“ zurückgekehrt ist.
Hinweis: Außerhalb der Steuerung von „Auto Chord“ kann die Doppelklang-Funk-
tion auf der gesamten Tastatur angewendet werden; während bei der Steuerung
von „Auto Chord“ sie nur auf der Melodietastatur und nicht auf der Begleittastatur
angewendet werden kann.
DYNAMISCHES TASTENGEFÜHL
Wenn das Instrument eingeschaltet ist, ist auch die Dynamik-Funktion aktiviert,
wobei der Cursor „TOUCH“ leuchtet. Durch Drücken des [Touch]-Knopfes kann die
Funktion ein- oder ausgeschaltet werden. Die Funktion zeigt die Dynamik, die auf
die verschiedenen Tastenanschläge angewendet wird, so dass sie die Leistung auf
der Tastatur verstärken kann. Je größer die Dynamik, desto lauter wird der Ton. Wenn
die Funktion endet, erzeugt jede Dynamik der Tastenanschläge das gleiche Laut-
stärkeniveau.
PITCH BEND
Durch Verschieben des [Pitch Bend] nach oben oder unten gleitet die Tonhöhe zu Alt
oder Bourdon. Lässt man den Bend los, kehrt die Tonhöhe zum Normalzustand
zurück.
VIBRATO BEND
Wenn der [Vibrato Bend] ganz nach unten verschoben wird, ist die Vibrato-Funktion
ausgeschaltet.Schalten Sie es nach oben, ist die Funktion eingeschaltet, und der
Klang der Tastenanschläge nimmt einen
nachhaltige wirkung an. Durch Verschieben nach oben oder unten kann der Effekt
verstärkt oder abgeschwächt werden.
SUSTAIN
1. Drücken Sie den [Sustain]-Knopf, wobei der Cursor auf dem LCD-Bildschirm
„SUSTAIN“ leuchtet, um die Funktion zu starten. Der Klang der Tastenanschläge
nimmt einen eleganten nachhaltige wirkung an.
2. Drücken Sie erneut den [Sustain]-Knopf, wobei „SUSTAIN“ auf dem LCD-Bild-
schirm verschwindet, um die Funktion zu beenden.
OKTAVE
Die [Oktave+/-]-Knöpfe können verwendet werden, um das Instrument eine
Oktave höher oder tiefer zu stimmen. Drücken Sie entweder den [Oktave+]-
oder den [Oktave-]-Knopf zum ersten Mal, wird der aktuelle Oktavwert auf
dem LCD-Bildschirm angezeigt; drücken Sie einen von ihnen erneut, kann die
Tonhöhe des Instruments innerhalb des möglichen Bereichs eine Oktave
höher oder tiefer sein.
TRANSPOSITION
Drücken Sie den [Transponieren ]- oder [Transponieren ]-Knopf, um den
Ton der Noten zu transponieren. Die Transposition kann von „-6“ bis „+6“
angepasst werden. Werden beide Knöpfe gleichzeitig gedrückt, kehrt der Ton
der Noten zum voreingestellten Wert „0“ zurück. Im Transpositionsmodus
kann der Transponierungswert auch durch Drehen des [Datenwähl]-Knopfes
geändert werden.
DOPPELTASTATUR
Drücken Sie den [Split]-Knopf, damit der Cursor „SPLIT“ leuchtet und die
Tastatur in zwei Teile teilt, die 24 Tasten links und die restlichen Tasten, um
eine Doppeltastatur zu bilden. Die Tonhöhe des linken Teils wird eine Oktave
erhöht, während die des rechten Teils eine Oktave verringert wird, das heißt,
die Tonhöhe der beiden Teile wird konsistent. Gleichzeitig kann der Klang der
beiden Teile unterschiedlich sein. Der linke Teil behält die Hauptstimme, aber
der rechte Teil kann eine andere erhalten. Drücken Sie den [Split]-Knopf
erneut, damit der Cursor „SPLIT“ erlischt, endet die Funktion und der Klang
der gesamten Tastatur bleibt der des vorherigen rechten Teils.
Hinweis: Im Auto-Chord-Modus funktionieren die Dynamik-Funktion, der
nachhaltige wirkung, der Pitch Bend und das Vibrato nicht auf der Akkordta-
statur.
VI. Automatisches-Styles
STILWAHL
Es gibt 200 verschiedene Stile zur Auswahl, von 00 bis 200. Wenn das Instru-
ment eingeschaltet ist, ist der Standardstil der mit dem Code „00“. Drücken Sie
den [Stil]-Knopf, sodass „STYLE“ auf dem LCD-Bildschirm erscheint, dann kann
der Zielstil über die Zahlenknöpfe, die [+/-]-Knöpfe oder den [Daten-
wähl]-Knopf ausgewählt werden.

Nota: Der Zielstilcode kann durch Eingabe von drei Ziffern erreicht werden.
Das bedeutet, dass „00“ oder „0“ zu dem ein- oder zweistelligen Code
hinzugefügt werden sollten, zum Beispiel, wenn der Zielstilcode 66 ist, sollten
die Ziffern 0, 6 und 6 eingegeben werden, und wenn es 9 ist, sollten die
Ziffern 0, 0 und 9 eingegeben werden.
START/STOPP-STIL
Drücken Sie den [Start/Stopp]-Knopf, um den Begleitstil zu starten oder zu
stoppen.
SYNC
Drücken Sie den [SYNC]-Knopf, während Beat-Punkte auf dem LCD-Bild-
schirm blinken. Mit ausgeschalteter Auto-Chord-Funktion kann jeder
Tastenanschlag auf der Tastatur einen Stil starten. Ist jedoch die
Auto-Chord-Funktion eingeschaltet, kann jeder Tastenanschlag auf der
Akkordtastatur die Melodieaufführung und den Begleitstil gleichzeitig
fortsetzen.
INTRO/ENDING
1. Vor dem Beginn eines Stils kann der [Intro/Ending]-Knopf mit dem leucht-
enden Cursor „NOR“ auf dem LCD-Bildschirm ein Präludium starten, das den
normalen Stil zum Spielen führt.
2. Während des Verlaufs eines Stils kann das Drücken des [Intro/End-
ing]-Knopfes den normalen Stil mit einem Ende fortführen und dann den
gesamten Stil stoppen.
Hinweis: Bevor das Ende abgeschlossen ist, kann das Drücken des [Fill-in A]-
oder des [Fill-in B]-Knopfes den vorherigen normalen Stil fortsetzen.
EINBLENDEN UND AUSBLENDEN
1. Wenn der Stil stoppt, drücken Sie den [Fade In/Out]-Knopf mit dem leucht-
enden Cursor „FADE“. In diesem Fall starten Sie einen Stil, dann kann der Stil
innerhalb von 8 Sekunden einblenden und mit dem Verschwinden des
leuchtenden „FADE“ voll einsetzen.
2. Während des Verlaufs eines Stils kann das Drücken des [Fade In/Out]-Knop-
fes den Stil innerhalb von 8 Sekunden aus voller Lautstärke ausblenden
lassen, und das leuchtende „FADE“ verschwindet.
INTERMEZZO
1. Während des Verlaufs einer Begleitung halten Sie den [Fill In A]-Knopf, bis
ein Intermezzo zu hören ist und der Cursor „VAR“ auf dem LCD-Bildschirm
leuchtet, dann setzt sich die normale Begleitung fort.
2. Während der Begleitung drücken Sie den [Fill In B]-Knopf und halten ihn,
bis ein weiteres Intermezzo zu hören ist und der Cursor auf dem LCD-Bild-
schirm „VAR“ anstelle von „NOR“ leuchtet, dann setzt sich die normale Beglei-
tung fort. Das Blinken von „VAR“ zeigt, dass der Stil sich im Verlauf einer
Variation befindet.
3. Durch festes Drücken des [Fill-in A]- oder [Fill-in B]-Knopfes können Inter-
mezzi nacheinander eingefügt werden. Nachdem das Intermezzo endet, folgt
eine normale Begleitung.
AUTO-METRONOM
Drücken Sie den [Metronom]-Knopf, macht das Instrument ein Ticken, das
den Schlag anzeigt. In diesem Fall können verschiedene Schlagarten über
den [Funktion]-Knopf ausgewählt werden. Drücken Sie den Knopf erneut,
wird die Metronomfunktion beendet.
TEMPOEINSTELLUNG
Die [Tempo]-Knöpfe können verwendet werden, um das Tempo der Stile
anzupassen. Drücken Sie den [Tempo ]/[Tempo ]-Knopf oder drehen Sie
den [Datenwähl]-Knopf nach oben oder unten, um das Tempo des Stils im
Wertebereich von 40 bis 280 Schlägen pro Minute zu beschleunigen oder zu
verlangsamen, und der aktuelle Tempowert wird auf dem „TEMPO“ auf dem
LCD-Bildschirm angezeigt. Drücken Sie beide [Tempo]-Knöpfe gleichzeitig,
um den Tempowert auf den voreingestellten Wert zurückzusetzen.
BEGLEITLAUTSTÄRKEREGLUNG
Drücken Sie die [Accom Vol ]/[Accom Vol ]-Knöpfe, um die Begleitlaut-
stärke im Wertebereich von 00 bis 31 zu erhöhen oder zu verringern. Drücken
Sie beide gleichzeitig, um den Wert der Begleitlautstärke auf den vorein-
gestellten Wert zurückzusetzen.
VII. Auto-Bass-Akkord und Akkordlexikon
Drücken Sie den [Auto Bass Chord]-Knopf, um die Auto-Bass-Akkord-Funktion
zu starten, wobei die Cursor auf dem LCD-Bildschirm auf A, B, C (die für den
Auto-Bass-Akkord stehen) leuchten. Im Zuständigkeitsbereich des
Auto-Bass-Akkord sind die 19 Tasten im linken Teil

der Tastatur die Akkordtasten. Während des Stilverlaufs kann durch Tastenan-
schläge auf den Akkordtasten ein Auto-Bass-Chord gestartet werden.
Hinweis:
1. Drücken Sie den [Funktion]-Knopf, um den Splitpunkt und den Bereich der
Akkordtastatur zu ändern. (Siehe „Split Point“ für Details.)
2. Das Instrument kann sowohl ein- als auch mehrtönige Fingerlagen erken-
nen. Es akzeptiert Fingerlagen, die den mehrtönigen entsprechen, akzeptiert
aber die einfingrigen, wenn die Fingerlagen nicht den mehrtönigen entspre-
chen.
Einfingrig:
(Die folgenden Fingerlagen sind so gestaltet, dass sie von diesem Instrument
akzeptiert werden.)
1. Dur-Dreiklang: Spielen Sie die Grundtöne des Akkords.
2. Moll-Dreiklang: Spielen Sie die Grundtöne des Akkords und gleichzeitig
eine beliebige schwarze Taste links davon.
3. Dominantseptakkord: Spielen Sie die Grundtöne des Akkords und gleich-
zeitig eine beliebige weiße Taste links davon.
4. Mollseptakkord: Spielen Sie die Grundtöne des Akkords und gleichzeitig
eine weiße und eine schwarze Taste links davon.
Mehrtönig: Jede Fingerlage der mehrtönigen, wie in der untenstehenden
Abbildung gezeigt, kann den Akkord C-Dur erzeugen, und andere Akkorde
können analog gespielt werden.
Fingerlagen der mehrtönigen (C-Dur)

DAS AKKORDLEXIKON
Das Akkordlexikon ist tatsächlich ein im Instrument gespeichertes Akkord-
handbuch, in dem die Noten, die einen Akkord bilden, nachgeschlagen
werden können. Alle Akkordnoten werden auf dem Bildschirm angezeigt,
um den Lernenden das Spielen von Akkorden zu erleichtern. Diese Funktion
ist besonders nützlich für Anfänger, die die Akkordnamen kennen und die
Fingerlagen beherrschen möchten.
1. Drücken Sie den [Akkordlexikon]-Knopf, um die Funktion zu starten, wobei
„DICT“ auf dem LCD-Bildschirm sowie „C“ erscheint, was für den
C-Dur-Dreiklang und die Notensymbole auf dem Notenlinien steht. Die
Grundtöne und der Akkordtyp können auf der Melodietastatur rechts vom
Splitpunkt definiert werden, dann werden die entsprechenden Tasten auf
der Tastatur und die Notensymbole auf dem Notenlinien auf dem Bild-
schirm angezeigt, sodass der Lernende den Akkord auf der Begleittastatur
entsprechend der Darstellung auf dem Bildschirm spielen kann.
2. Werden die Akkordnoten auf der Begleittastatur korrekt gespielt, gibt es
Applaus zur Feier. Werden die Akkordnoten nicht korrekt gespielt, ertönt
der BASSTON der gespielten Tasten.
3. Drücken Sie den [Right/Chord Dictionary]-Knopf erneut, um die Funktion
zu beenden.

Hinweis:
1.Es gibt keinen Klang für die Tastenanschläge auf der Melodietastatur
(rechts vom Splitpunkt), die dazu dienen, die Akkordgrundtöne und den
Akkordtyp zu definieren.
2.Außerhalb des Bereichs der Akkordtastatur können keine Akkorde gespielt
werden, das heißt, Akkorde sollten auf den Tasten links vom Splitpunkt
gespielt werden.
VIII. Demonstrationslieder
Im System sind 2 Stücke unterschiedlicher Stilrichtungen von Demonstra-
tionsliedern gespeichert.
DEMO-SONGAUSWAHL
1.Drücken Sie den [Demo]-Knopf, wobei „DEMO“ sowie der Code des
aktuellen Liedes und die Schlagpunkte auf dem Bildschirm leuchten, wird
das System in den Modus versetzt, die beiden Demolieder nacheinander
abzuspielen.
2.Während des Verlaufs des Demoliedes kann das Lied durch die Num-
mernknöpfe, die [+/-]-Knöpfe oder den [Datenwähl]-Knopf durch ein
anderes ersetzt werden.
3.
Drücken Sie den [Demo]-Knopf erneut, um die Wiedergabe zu stoppen
und die Funktion zu beenden.
IX. Lehrlieder
Im System sind 100 Stücke unterschiedlicher Stilrichtungen von Liedern
gespeichert, die sowohl als hervorragendes Lernmittel als auch zur
Musikwürdigung verwendet werden können.
LEHRSONGAUSWAHL
1. Drücken Sie den [Song]-Knopf, um den „Song“-Modus zu starten, wobei
„SONG“ sowie der Code und die Abkürzung des aktuellen Liedes auf dem
Bildschirm leuchten, und das System wird in den Modus versetzt, die 100
Lieder nacheinander abzuspielen. Während des Verlaufs des Liedes kann
das Lied durch die Nummernknöpfe, die [+/-]-Knöpfe oder den [Daten-
wähl]-Knopf durch ein anderes ersetzt werden.
Akkordübungsbereich Akkordtyp Akkordgrundtöne

LIEDBEENDEN
1. Während des Liedablaufs, drücken Sie den [Start/Stop]-Knopf, um das aktuelle
Lied zu stoppen, aber das System bleibt im „Lied“-Modus.
2. Drücken Sie entweder den [Sound]- oder den [Style]-Knopf am Ende des Lieds,
um den „Lied“-Modus zu verlassen und die entsprechende Funktion zu starten.
FUNKTION DER „LINKEN“ UND „RECHTEN“ AUSSERHALB DES LERNMODUS
Während des Liedablaufs, drücken Sie den [Left]- oder [Right]-Knopf, um den Ton
des linken oder rechten Kanals ein- oder auszuschalten. Zum Beispiel, drücken Sie
den [Left]-Knopf, sodass „LEFT“ auf der linken Seite des Bildschirms leuchtet, um den
Tonkanal für die Melodie der rechten Hand zu öffnen, aber den Tonkanal für die
Begleitung oder Melodie der linken Hand auszuschalten. Dieselbe Operation gilt für
den [Right]-Knopf.
Hinweis:
1. Wenn der „Lied“-Modus nicht aktiv ist, drücken Sie den [Right/Chord Dictio-
nary]-Knopf, um den „Akkordlexikon“-Modus zu starten; drücken Sie ihn erneut, um
den Modus zu beenden.
2. Wenn ein Lied endet, halten Sie den [Right/Chord Dictionary]-Knopf mindestens 2
Sekunden lang gedrückt, um den „Akkordlexikon“-Modus zu starten.
X. Lektionen
Die drei Knöpfe [Lesson], [Left], [Right] können drei Arten von Lernmodi starten,
die den Lernenden Schritt für Schritt dazu anleiten, das Lehrlied zu spielen.
LEKTION I
Diese Lektion zielt darauf ab, die musikalische Dauer und nicht die Tonhöhe zu
üben. Jeder Tastenanschlag mit korrekter Dauer kann korrekte Änderungen der
aktuellen Noten und Akkorde bewirken, aber nicht den Klang der entsprechenden
Noten.
2. Während des Liedablaufs, drücken Sie den [Start/Stop]-Knopf, um das aktuelle
Lied zu stoppen, aber das System bleibt im „Lied“-Modus; drücken Sie den Knopf
erneut, um das aktuelle Lied wiederholt abzuspielen.
Hinweis: Um das Instrument in den Modus zurückzusetzen, in dem die 100 Lieder
nacheinander abgespielt werden, muss der „Lied“-Modus zuerst verlassen und dann
über den [Song]-Knopf wieder aktiviert werden.

LEKTION II
Diese Lektion zielt darauf ab, das Spielen der richtigen Noten gemäß den auf
dem Bildschirm angezeigten Tasten zu üben. Tastenanschläge der richtigen
Noten halten das Lied am Laufen, ansonsten wird das Lied angehalten, bis
die richtige Note gefunden wird.
Hinweis: In diesem Modus können nur die richtigen Noten gespielt werden,
die falschen erzeugen keine Reaktion.
LEKTION III
Diese Lektion zielt darauf ab, das Spielen der richtigen Noten mit der richti-
gen Dauer zu üben. Während das Lernlied normal abgespielt wird, müssen
die richtigen Noten mit der korrekten Dauer des Originalsongs gespielt
werden. Ohne einen Tastenanschlag spielt das System nur die Begleitung des
Liedes.
ÜBUNG FÜR LINKS- UND RECHTSHÄNDER
Diese Lektion zielt darauf ab, das Spielen jeweils mit der linken oder der
rechten Hand oder mit beiden zu üben. Drücken Sie den [Right]-Knopf, um
die Melodie der rechten Hand zu verbergen und dann das Spielen mit der
rechten Hand zu üben. Drücken Sie den [Left]-Knopf, um die Melodie der
linken Hand oder die Akkordwechsel der linken Hand zu verbergen und
dann das Spielen mit der linken Hand zu üben. Drücken Sie beide Knöpfe
gleichzeitig, um den Klang für links und rechts zu verbergen und dann das
Spielen mit beiden Händen zu üben.
LEKTIONSFUNKTIONSEINSTELLUNG
1. Drücken Sie die [Lesson]-Funktion, um den „Lied“-Zustand zu starten, dann
drücken Sie den [Start/Stop]-Knopf, um das Lied zu stoppen.
2. Wählen Sie ein angenehmes Lied, indem Sie die Zahlenknöpfe oder die
[+/-]-Knöpfe drücken oder den [Datenwähl]-Knopf drehen.
3. Wenn der „Lied“-Modus nicht aktiv ist, drücken Sie den [Lesson]-Knopf
nacheinander, um Lektion I, Lektion II, Lektion III auszuwählen oder um die
„Lektion“-Funktion zu verlassen. Jede gewählte Lektion wird mit einem
entsprechenden leuchtenden Cursor zusammen mit „LEFT“ oder „RIGHT“ auf
dem Bildschirm angezeigt. Drücken Sie dann den [Start/Stop]-Knopf, um die
Lektionen zu starten und die Hinweise der Melodie- oder Akkordnoten
werden auf dem Notensystem und der Tastatur auf dem LCD-Bildschirm
angezeigt.

4. Drücken Sie den [Left]-Knopf, um die Übung für die linke Hand zu starten,
wobei auf dem Bildschirm „linke Hand“ leuchtet. Drücken Sie den
[Right]-Knopf, um die Übung für die rechte Hand zu starten, wobei auf
dem Bildschirm „rechte Hand“ leuchtet. Drücken Sie beide Knöpfe, um die
Übung für linke und rechte Hand zu starten, wobei auf dem Bildschirm
„linke und rechte Hand“ leuchtet. Wenn keine Auswahl getroffen wird,
startet das System automatisch die Übung für die rechte Hand.
5. Wenn eine Lektion beendet ist, spielt das System das aktuelle Lied und
behält den vorherigen Lektionsmodus bei.
Hinweis: Verschiedene Stile der Lieder machen die Übung für die linke Hand
unterschiedlich. Beim Spielen von Rhythmusstil-Liedern soll die linke Hand
Akkorde spielen; bei anderen Liedern soll die linke Hand die Melodie oder
Begleitung der linken Hand spielen (Die Lieder mit den Codes 00 bis 84 sind
die Rhythmusstil-Lieder). Während einer Lektion kann der Lektionsmodus
nicht frei gewechselt werden.
XI. Speicher- und Speicherfunktion
Die Speicher- und Speicherfunktion dient dazu, die eingestellte Klangfarbe,
den Stil, das Tempo und andere relative Parameter des Arbeitsmodus zu
speichern, die während der Aufführung geändert werden müssen. Sie wird
auch verwendet, um die benötigten Parameter direkt in der Aufführung
abzurufen. Es gibt sechs Speichermodi, aus denen frei gewählt werden kann.
SPEICHERUNG VON PARAMETERN
Stellen Sie zuerst den benötigten Klang, Stil, Tempo und andere relative
Parameter eines Arbeitsmodus ein. Drücken Sie dann den [Memory]-Knopf
fest und drücken Sie einen der Speichermodus-Knöpfe (M1, M2, M3, M4, M5
oder M6), um den Arbeitsmodus zu speichern. Es wird ein entsprechender
leuchtender Cursor angezeigt, der den Speichermodus anzeigt, in dem alle
Parameter gespeichert sind.
ABRUFEN VON PARAMETERN
Während der Aufführung drücken Sie einen der Speichermodus-Knöpfe, um
die gespeicherten Parameter des benötigten Arbeitsmodus abzurufen und
den aktuellen zu ersetzen.

Hinweis:
1. Nach dem Abrufen eines Speichermodus können alle Parameter zurückge-
setzt werden und sich von den zuvor gespeicherten unterscheiden. In
diesem Zustand verschwindet der entsprechende leuchtende Cursor am
unteren Bildschirmrand, was zeigt, dass der Modus geändert wurde.
2. Es gibt keinen Stromausfallschutz für alle Speichermodi, daher gehen die
gespeicherten Parameter verloren, wenn das Instrument wieder mit Strom
versorgt wird.
XII. Einrichtung des O.T.S (ONE TOUCH SET)
Die O.T.S-Funktion hat die oft verwendeten Klänge gespeichert, die zu
den Stilen passen. Für jeden Stil sind vier Standardklänge vorgesehen.
1. Drücken Sie den [O.T.S]-Knopf, um den „Auto-Bass-Chord“ zu starten,
wobei „O.T.S“ und „M1“ am unteren Bildschirmrand leuchten.
2. Nachdem der Zielstil eingestellt ist, drücken Sie die vier Speicherknöpfe
(M1 bis M4), dann wird der auf der Tastatur gespielte Stil die vier Standard-
klänge perfekt kombinieren.
3. In diesem Funktionszustand drücken Sie den Knopf erneut, um die Funk-
tion zu beenden.
Hinweis: Unter der Kontrolle des [O.T.S]-Knopfes kann die Speicher- und
Speicherfunktion nicht gestartet werden.
XIII. Aufnahme
VORBEREITUNG FÜR DIE AUFNAHME
Drücken Sie den [REC]-Knopf, wobei vier Schlagpunkte blinken und „REC“ auf
dem Bildschirm leuchtet, um anzuzeigen, dass das System aufnahmebereit
ist. Der angenehme Klang, Stil, Tempo, Sustain und andere Parameter können
vor der Aufnahme eingestellt werden.

AUFNAHME
In diesem Zustand werden alle auf der Tastatur gespielten Noten aufgezeich-
net, wobei die vier Schlagpunkte auf dem Bildschirm nacheinander im
eingestellten Tempo blinken. Im „Aufnahme“-Modus kann eine Begleitung
direkt nach dem Start aufgenommen werden. Im „Auto-Bass-Akkord“-Zu-
stand kann jeder Tastenanschlag auf der automatischen Begleittastatur
einen Stil starten. Wenn jedoch der „Auto-Bass-Chord“ nicht aktiv ist, kann
ein Stil nur durch Drücken des [Start/Stop]-Knopfes gestartet werden.
Während der Aufnahme der Begleitung können auch Melodienoten auf der
Tastatur gespielt und aufgezeichnet werden.
Hinweis:
1.Es gibt keinen Stromausfallschutz, daher gehen die aufgenommenen
Daten verloren, wenn das Instrument wieder mit Strom versorgt wird.
2.Die neue Aufnahme ersetzt die vorherige, wenn die Aufnahmefunktion
erneut verwendet wird.
3.Die Menge der aufgenommenen Noten wird von allen aufgenommenen
Daten beeinflusst, einschließlich verschiedener Klänge, Stile, Tempo usw.
NACH DER AUFNAHME\
1. Im „Aufnahme“-Modus drücken Sie erneut den [REC]-Knopf, um die
Aufnahme zu stoppen.
2. Während ein Stil abläuft und aufgenommen wird, drücken Sie den
[Intro/Ending]-Knopf, um ezin Ende zu starten. Wenn das Ende vorbei ist,
stoppt das System automatisch die Aufnahme und verlässt den „Auf-
nahme“-Modus.
3. Während der Aufnahme stoppt die vollständig belegte Speicherkapazität
die Aufnahme, wobei „FULL“ 3 Sekunden lang auf dem Bildschirm
leuchtet, dann verlässt es den „Aufnahme“-Modus.
WIEDERGABE
Nachdem die Aufnahme gestoppt wurde, drücken Sie den [Playback]-Knopf,
um die aufgenommene Spur wiederzugeben.

XIV. Programm
PROGRAMM
Drücken Sie den [Prog]-Knopf, sodass der „Prog“-Cursor auf dem Bildschirm
leuchtet, um die Tastatur in eine Schlagzeugtastatur zu verwandeln. Drücken
Sie dann eine Taste oder ein Panel-Schlagzeug, um die Programmfunktion zu
starten. Drücken Sie den [Prog]-Knopf noch einmal, um die Programmierung
zu stoppen. Die vollständig belegte Speicherkapazität kann das Programm
ebenfalls stoppen. Der neu bearbeitete Rhythmus oder die neue Aufnahme
ersetzt den ursprünglichen.
NULL-WIEDERGABE
Drücken Sie den [Null Play]-Knopf, der bearbeitete Rhythmus kann wieder-
holt abgespielt werden. Drücken Sie den Knopf erneut, um die Wiedergabe
zu stoppen.
Anhang
KLÄNGE
NO. Name NO. Name NO. Name
Piano
Organ
Bass
Guitar
Mallet
Grand Piano
Bright Piano
El Grd Piano
Honky-tonk Piano
Elec piano 1
Elec Piano 2
Harpsichord
Clavi
Celesta
Glockenspiel
Music Box
Vibraphone
Marimba
Xylophone
Tubular Bell
Santur
Drawbar Organ
Jazz Organ
Rock Organ
Church Organ
Reed Organ
Accordion
Harmonica
Tango Accordion
Classic Guitar
Steel Guitar
Jazz. Guitar
Clean Guitar
Muted. Guitar
Overdriven Guitar
Distortion Guitar
Guitar Harmonics
Acoustic Bass
Finger Bass
Picked Bass
Fretless Bass
Slap Bass 1
Slap Bass 2
Synth Bass 1
Synth Bass 2

KLÄNGE
NO. Name NO. Name NO. Name
Strings Lead
Sound Effects
Chinese Instrument
Synth Voice
Drum Kit
Pad
Effects
Ethnic
Percussive
Strings Ensemble
Brass
Reed
Pipe
Violin
Viola
Cello
Contrabass
Tremolo Strings
Pizzicato Strings
Harp
Timpani
Strings 1
Strings 2
Synth Strings 1
Synth Strings 2
Choir Aahs
Voice Ooh
Synth
Orchestra Hit
Trumpet
Trombone
Tuba
Muted Trumpet
Horn
Brass Ensemble
Synth Brass 1
Synth Brass 2
70elep
Fzpiano
Ep3
Ep4
Ep5
Harppian
Clavr2
Clavr3
Organ Box
E. organ
Churc2
Syn Organ
Altoel
Fz guitar
Syn elgt
Picel bas
El violin
Brassfm
Fmlead
Fantalfo
Polyaa2
Bowedg2
70elpad
Soprano Sax
Alto Sax
Tenor sax
Baritone Sax
Oboe
English horn
Bassoon
Clarinet
Piccolo
Flute
Recorder
Pan Flute
Blown Bottle
Shakuhachi
Whistle
Ocarina
Square
Sawtooth
Calliope
Chiff
Charang
Voice
Fifths
Bass lead
Fantasia
Warm
Poly Synth
Choir
Bowed
Metallic
Halo
Sweep
Fx1
Fx2
Fx3
Fx4
Fx5
Fx6
Fx7
Fx8
Sitar
Banjo
Shamisen
Koto
Kalimba
Bag Pipe
Fiddle
Shanai
Tinkle Bell
Agogo
Steel Drums
Woodblock
Taiko Drum
Melodic Tom
Synth Drum
Reverse Cymbal
Standard Kit
Power Kit
Dance Kit
808 Kit
Brush Kit
Orchestra Kit
GT Fret Noise
Breath Noise
Seashore
Bird Tweet
Teleph Ring
Helicopter
Applause
Gunshot
Pipa
Erhu
Guzhen
Banhu
Qudi

STIL
NO. Name NO. Name NO. Name
BEAT & POP
SOUL & FUNK
LATIN
TRADITIONAL
PIANO
BEAT & POP-1
JAZZ
COUNTRY
ROCK
DANCE
8 Beat 1
8 Beat 2
8 Beat 3
8 Beat 4
60's 8 Beat
8 Beat Ballad
8 Beat Rock
16 Beat 1
16 Beat 2
16 Beat Pop
16 Beat Shuffle
Ballad
Slow Ballad
16 Beat Ballad
Unplugged
Funky Pop
Jazz Funk
Cool Funky
Soul 1
Soul 2
Soul Shuffle
Soul Blues
R&B
6/8 Gospel
Pop Groove
Bossa Nova 1
Bossa Nova 2
Rhumba
Pop Rhumba
Cha Cha
Pop Cha Cha
Tango
Jazz Samba
Reggae
Pop Reggae
1-Mar
2-Mar
German March
6/8 March
Polka
Pop Polka
Waltz
Slow Waltz
Vienna Waltz
Musette
8 Beat
Ballad
Boogie
Jazz
Swing
Jazz Waltz
Twist
March
6/8 March
Waltz
8 Beat 1 -1
Swing
Cool Jazz
Pop Swing
Swing Fox
Big Band
Big Band Meduim
Jazz Waltz
Ragtime
Dixeland
Quick Step
Country 1
Country 2
Pop Country
Country Rock
Country Folk
3/4 Country
Country Waltz
Country Shuffle
Country Boogie
Country Blues
Rap
Euro Beat
Hip Hop
Techno
Country Quick Step
Bluegrass
Rock
Pop Rock
Fast Rock
Slow Rock 1
Slow Rock 2
Rock & Roll
Heavy Metal
Blues Boogie
Blues
Shuffle
Blues Shuffle
Rock Shuffle
Charlston
Disco 1
Disco 2
Disco Funk
Dance
House 1
House 2

STIL
NO. Name NO. Name NO. Name
8 Beat 2-1
8 Beat 3-1
8 Beat 4 -1
60’s 8 Beat-1
8 Beat Ballad -1
8 Beat Rock-1
16 Beat 1 -1
16 Beat 2-1
16 Beat Pop -1
16 Beat Shuffle-1
Ballad-1
Slow Ballad -1
16 Beat Ballad -1
Unplugged -1
Bossa Nova 1 -1
Bossa Nova 2 -1
Rhumba -1
Pop Rhumba -1
Cha Cha -1
Pop Cha Cha -1
Tango -1
Jazz Samba -1
Reggae -1
Pop Reggae -1
March 1 -1
March 2 -1
German March -1
6/8 March -1
Polka -1
Pop Polka -1
Waltz-1
Slow Waltz-1
Vienna Waltz -1
Musette -1
8 Beat-1
Ballad-1
Boogie -1
Jazz -1
Swing -1
Jazz Waltz-1
Twist -1
March -1
6/8 March -1
Waltz-1
Country 1 -1
Country 2-1
Pop Country-1
Country Rock -1
Country Folk -1
3/4 Country-1
Country Waltz-1
Country Shuffle-1
Country Boogie -1
Country Blues -1
Country Quick Step
-1
Swing -1
Cool Jazz-1
Pop Swing -1
Swing Fox -1
Big Band -1
Big Band Meduim
-1
Jazz Waltz -1
Ragtime -1
Dixeland -1
Funky Pop -1
Jazz Funk -1
Cool Funky -1
Soul 1 -1
Soul 2-1
Soul Shuffle-1
Soul Blues -1
R&B-1
6/8 Gospel -1
Pop Groove -1
Hip Hop -1
Techno -1
Rock -1
Pop Rock-1
Fast Rock-1
Slow Rock 1 -1
Slow Rock 2 -1
Rock & Roll-1
Heavy Metal -1
Blues Boogie -1
Blues -1
Shuffle-1
Blues Shuffle -1
Rock Shuffle -1
Charlston -1
Disco 1 -1
Disco 2 -1
Disco Funk -1
Dance -1
House 1 -1
House 2 -1
Rap -1
Euro Beat-1
ROCK-1
DANCE
SOUL & FUNK-1
JAZZ-1
COUNTRY
LATIN-1
TRADITIONAL-1
PIANO-1

Aufbau des Keyboardständers
1. Zuerst bereiten Sie alle Montag-
eteile vor.
2. Nehmen Sie die Schraube Nr. 2 und
die Stützplatte Nr. 3, befestigen Sie
sie an den beiden Stützklammern Nr.
5 und ziehen Sie sie separat fest.
3. Bringen Sie die Schraube Nr. 2 und
den Ständer Nr. 4 auf der Oberseite
des Ständers Nr. 5 an und ziehen Sie
fest.
4. Die Installation ist abgeschlossen, die
längste Schraube Nr. 1 wird verwen-
det, um das Keyboard am Ständer zu
fixieren.

Merkmale:
• Draht MIDI
• 200 weltweit ausgewählte Auto-Begleitstile
• 8 Percussion-Pads / Tastaturperkussionen
• Kompaktes & tragbares Musikpiano
• Einfache elektronische Plug-in-Bedienung
• Drehplatte zur Klangänderung
• Tragbares Piano
• Eingebaute Full-Range-Stereolautsprecher
• Verbindung & Stream-Audio von externen Geräten
• Kann mit Lautsprecher verbunden werden und Ton abspielen
• Mehrere voreingestellte wählbare Keyboard-Sounds, Ton- & Rhythmuss-
tile
• Digitale LCD-Anzeige
• Einstellbare Lautstärkeregelung
• Aufnahme- & Wiedergabemodus
• 162 Sounds beinhalten 128 GM-Standard-Sounds, 5 Volksmusikinstru-
menten-Sounds, 23 Synth-Sounds, 6 Drum-Kit-Sounds
• Grundsteuerung: Hauptlautstärke/Begleitlautstärke/Akkordlautstärke/-
Tempo-Steuerung
• Auto-Akkord-Funktion: Single Chord / Fingered Chord / Akkordlexikon
• Lehrfunktionen: One-key/Follow/Assemble
• Pitch Bend/Vibrato/Sustain/Touch Sensing/Dual-Sound-Funktion
• Keyboard-Split/Oktave/Transponierungsfunktion
• Sync/Start/Stop/Fade In/Fade Out/Intro/Ending/Fill in A&B/Metronom
• USB-Eingang/Dämpferpedal-Eingang
• Lautsprecherausgang (L/R)/Kopfhörerausgang
• Perfekt für Heimkino-Wohnzimmeraufführungen
• Spaß für Kinder jeden Alters: Kinder & Erwachsene

Was Ist in Der Schachtel:
• Digitales Musikkaraoke-Ta-
statur
• Notenständer
• Adapter
• Stromstecker
• Keyboardständer
• Dämpferpedal
• Wasserdichte Tasche
• Kopfhörer
Spezifikationen des Keyboardständers:
• Lackierung: Backlack
• Abnehmbare Funktion
• Material: Eisen+ABS
• Länge: 80 cm
• Breite: 21 cm
• Höhe: 57,5–67,5 cm
• Gewicht: 1,75 kg
• Tragfähigkeit: 15 kg
Spezifikationen des Kopfhörers:
• Material: ABS + Laserdekorfolie
• Kabelmaterial: PVC-Flachkabel
• Kabellänge: 1,2 m
• Steckerdurchmesser: 3,5 mm
• Gewicht: 0,14 kg
Technische Spezifikationen:
• 61 Tasten
• 162 Sounds inklusive 128 GM-Standardstimmen, 5 Volksmusikinstrumen-
tenstimmen, 23 Synth-Stimmen, 6 Schlagzeug-Stimmen
• Demonstrationslied
• Audio-Interface: Aux (6,5 mm) Eingangsbuchse / RCA L&R Ausgangs-
buchse
• Maximale Lautstärke: Bis zu 110 dB
• USB/Stromkabellänge: 1,2 m
• Material: ABS
• Stromversorgung: DC 12V / AC-Adapter
• Abmessungen des Pianos (L x B x H): 93 cm x 30,4 cm x 9,4 cm/6.6 x 11.97 x
3.7 zoll
Spezifikationen des Dämpferpedals:
• Funktion: Normalerweise Ein/Aus
• Länge: 24 cm
• Breite: 8 cm
• Höhe: 7,1 cm
• Gewicht: 1,75 kg
Dieses Produkt enthält Butylbenzylphthalat (BBP), von
dem bekannt ist, dass es im US-Bundesstaat Kalifornien
Krebs, Geburtsfehler und andere Fortpflanzungsschäden
verursacht. Nicht einnehmen.
Weitere Informationen finden Sie auf: www.P65warn-
Warnung gemäß California Proposition 65
WARNUNG:

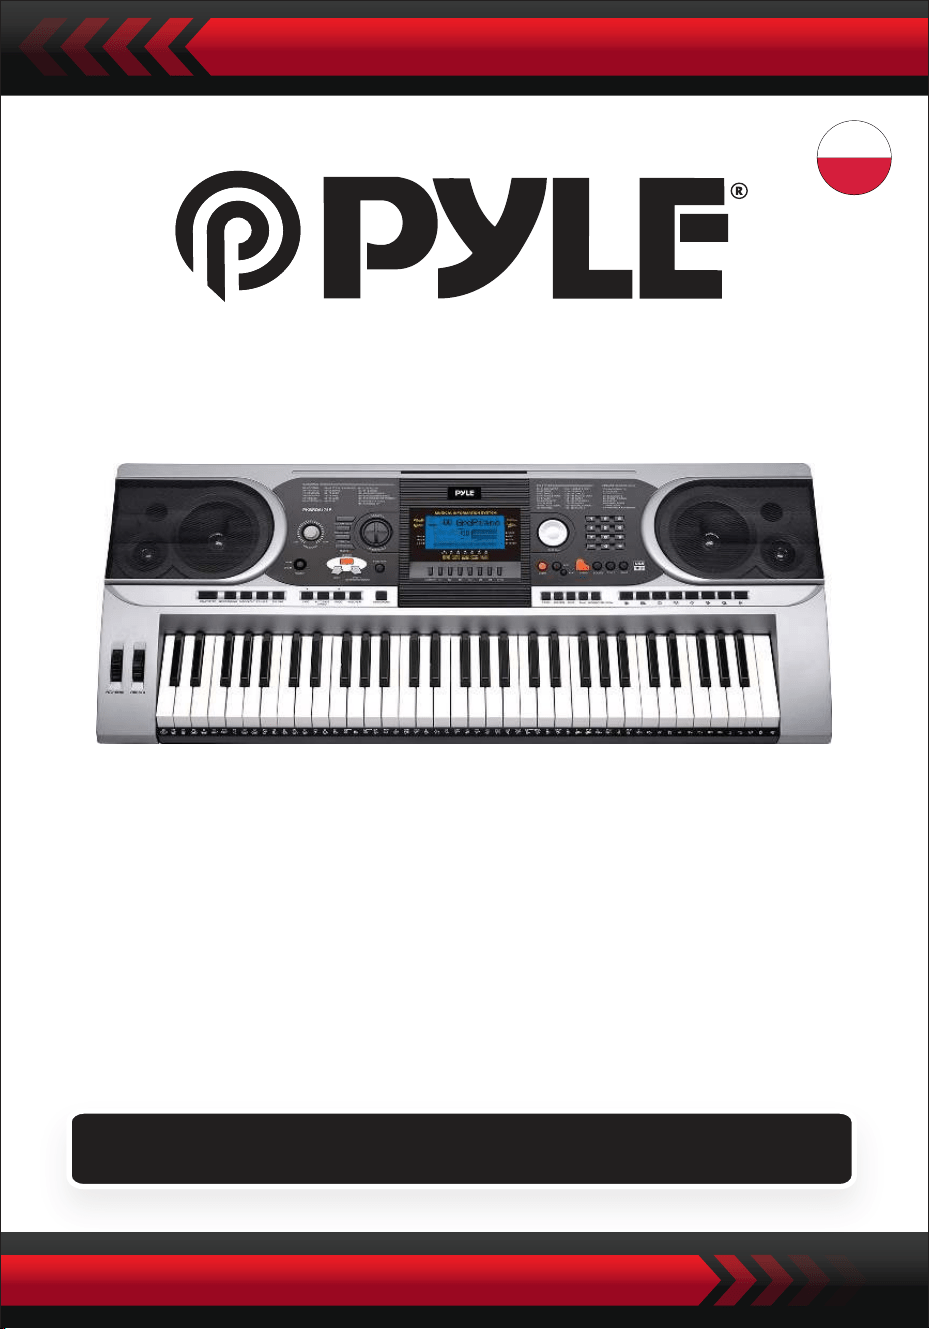
Przenośny elektroniczny keyboard z wodoodporną torbą
(61 klawiszy), stojakiem, pedałem i słuchawkami
Cyfrowy Keyboard Z
Muzyczną Klawiaturą
PKBBD6175P
INSTRUKCJA OBSLUGI
POL

• Używaj określonego zasilacza sieciowego i natychmiast wymień uszkod-
zony zasilacz.
• Nie demontuj urządzenia ani nie modyfikuj jego wewnętrznych części. W
przypadku nieprawidłowego działania natychmiast zaprzestań korzystania
z urządzenia i oddaj je do naprawy profesjonaliście.
• Przed podłączeniem urządzenia do innego sprzętu wyłącz wszystkie
źródła zasilania.
• Nie graj na instrumencie z maksymalną głośnością lub na niewygodnym
poziomie przez długi czas.
• Unikaj źródeł ciepła dla części instrumentu, ponieważ przegrzanie może
go uszkodzić.
• Zapobiegaj przedostawaniu się płynów, kurzu, cząstek i innych ciał obcych
do wnętrza urządzenia, aby zapobiec korozji lub zwarciu jego elementów.
• Odłącz wtyczkę przed czyszczeniem. Nie wkładaj ani nie wyjmuj wtyczki
mokrymi rękami.
• Do czyszczenia urządzenia używaj miękkiej, suchej szmatki. Nie używaj
farby, alkoholu ani innych rozpuszczalników chemicznych do wycierania
powierzchni urządzenia, aby uniknąć jego uszkodzenia.
• Wyłącz zasilanie i odłącz urządzenie po użyciu lub jeśli nie będzie ono
używane przez dłuższy czas.
• Aby zmniejszyć ryzyko pożaru lub porażenia prądem, nie wystawiaj
urządzenia na działanie deszczu lub wilgoci. Nie narażaj urządzenia na
kapanie lub zachlapanie i nie umieszczaj na nim przedmiotów wypełnion-
ych płynami, takich jak wazony.
• Maksymalna temperatura robocza: 40°C / 104°F
• Jako urządzenie odłączające używany jest bezpośredni zasilacz sieciowy,
który musi być łatwo dostępny.
• Nie instaluj tego urządzenia w ograniczonej przestrzeni, takiej jak regał na
książki lub podobne urządzenie i zapewnij dobrą wentylację. Nie zasłaniaj
otworów wentylacyjnych przedmiotami takimi jak gazety, obrusy, zasłony
itp.
• Przestroga: Nadmierne ciśnienie akustyczne emitowane przez słuchawki
może spowodować uszkodzenie słuchu.
• Etykieta znajduje się na spodzie urządzenia.
• Urządzenie nie może być narażone na kapanie lub zachlapanie, a na
urządzeniu nie wolno stawiać żadnych przedmiotów wypełnionych płyna-
mi, takich jak wazony.
PRZECZYTAJ UWAŻNIE PRZED KONTYNUOWANIEM
Zachowaj niniejszą instrukcję w bezpiecznym i łatwo dostępnym miejscu do
wykorzystania w przyszłości.
UWAGA!

Bezpośredni zasilacz sieciowy jest używany jako urządzenie odłączające,
które musi być łatwo dostępne.
Aby uniknąć możliwych szkód dla środowiska lub zdrowia ludzkiego
spowodowanych niekontrolowanym usuwaniem odpadów, poddawaj je
recyklingowi w sposób odpowiedzialny, aby promować zrównoważone
ponowne wykorzystanie zasobów materialnych. Aby zwrócić zużyte
urządzenie, skorzystaj z systemów zwrotu i zbiórki lub skontaktuj się ze
sprzedawcą, u którego produkt został zakupiony. Może on zorganizować
bezpieczny i przyjazny dla środowiska recykling tego produktu.
I. Panel sterowania i porty rozszerzenia
1 Głośnik
2 Przełącznik zasilania
3 Głośnik główny
4 Tempo
5 Głośnik wsparcia
6 Transpozytor
7 Oktawa
8 Lekcja
9 Funkcje
10 W prawo
(słownik akordów)
11 W lewo
12 Pamięć
13 M1,M2...M6
14 O.T.S
15 Wyświetlacz LCD
16 Demonstracja
17 Nagrywanie/od-
twarzanie
18 Wybieranie danych
19 Piano
20 Liczby
21 Dźwięk
22 Styl
23 Piosenki
24 Start/Stop
25 Wstęp/Koniec
26 Zanikanie/wyłącza-
nie
27 Napełnianie A
28 Napełnianie B
29 Synchronizacja
30 Automatycznych
akordów basowych
31 Prog/Null-Play
32 Metronom
33 Czułość na dotyk
34 Zrównoważony
35 Podział
36 Podwójny
37 Klawiatura perkusyjna
38 Panel Perkusji
39 Pitch Bend
40 Vibrato
41 Klawiatura akordów

KORZYSTANIE Z ZASILACZA AC/DC
Zasilacz AC/DC musi być odpowiedni dla urządzenia. Podłącz jeden koniec do
gniazda zasilania na tylnym panelu, a drugi koniec do lokalnego źródła zasilania
(pamiętaj, że napięcie wejściowe musi być takie samo jak napięcie sieciowe).
GNIAZDO SŁUCHAWKOWE
Włóż słuchawki do gniazda słuchawkowego z tyłu obudowy, aby automatycznie
wyłączyć wewnętrzny głośnik i kontynuować odtwarzanie i śpiewanie bez przesz-
kadzania innym.
Uwaga: Zbyt wysoki poziom głośności w aparatach słuchowych może
spowodować uszkodzenie słuchu.
PODŁĄCZENIE DO WZMACNIACZY LUB AKUSTYKI
Instrument posiada wewnętrzny system głośników i może być również podłąc-
zony do innych wzmacniaczy lub głośników akustycznych. Najpierw wyłącz
instrument i urządzenie zewnętrzne, a następnie podłącz kabel częstotliwości
stereo do gniazda L/R OUT na tylnym panelu, a drugi do gniazda LINE IN lub AUX
IN urządzenia zewnętrznego.
USB MIDI
MIDI to skrót od Musical Instrument Digital Interface. Poprzez gniazda MIDI,
klawiatura może być podłączona do innych instrumentów muzycznych lub
komputerów z MIDI za pomocą linii transmisji danych. W takim przypadku każde
wykonanie na klawiaturze może zostać przesłane do komputera, a następnie
nagrane, skomponowane lub edytowane za pomocą zaawansowanego opro-
gramowania na komputerze. Cała muzyka MIDI zarezerwowana na komputerze
może zostać przeniesiona na instrument i odtworzona.
Metody podłączenia USB MIDI:
1.Najpierw podłącz przyrządy do komputera za pośrednictwem uniwersalnej
linii danych i włącz je ze sobą.
II. Przygotowanie do gry
Panel rzeczywisty
42 WEJŚCIE USB MIDI
43 WEJŚCIE JACK SUSTAIN
44 WYJŚCIE JACK L/R
45 AUDIOFONY
46 WEJŚCIE DC 12V

2. Następnie zainstaluj i uruchom oprogramowanie do edycji muzyki, na przykład
CAKEWALK. Następnie specjalny sprzęt instrumentu pojawi się w sprzęcie zawier-
ającym oprogramowanie muzyczne i musi zostać ustawiony jako urządzenie
domyślne. W tym przypadku komunikacja danych między instrumentem a
komputerem została nawiązana.
3. Następnie skonfiguruj kanały MIDI instrumentu (zapoznaj się z wprowadzeniem
do przycisku [Menu]).
PEDAŁ PODTRZYMUJĄCY
Instrument można podłączyć do zewnętrznego pedału sustain, co pozwala na
zastosowanie efektu sustain podczas gry.
REGULACJA GŁOŚNOŚCI GŁÓWNEJ
Obróć pokrętło głośności głównej w prawo, aby zwiększyć głośność główną; w
lewo, aby zmniejszyć. Pokrętło to kontroluje również głośność akompaniamentu.
III. Podstawowa metoda interpretacji
Naciśnij przycisk [Power], aby włączyć podświetlenie, a ekran LCD wyświetli infor-
macje o bieżącym głosie, tempie, trybie funkcji itp.
Wyświetlacz pełnoekranowy pokazuje wszystkie suwaki znaczników i ustaw-
ienia dla różnych trybów:
Pełny ekran wyświetlacza LCD po włączeniu zasilania:

WYBÓR DANYCH
Obracanie pokrętła [Data Dial] jest skrótem do wybierania głosu, rytmu lub utworu.
Obracając zgodnie z ruchem wskazówek zegara, można uzyskać wyższe wartości;
obracając przeciwnie do ruchu wskazówek zegara, można uzyskać niższe wartości.
PANEL PERKUSYJNY I KLAWIATURA
Na instrumencie dostępnych jest 8 rodzajów perkusji panelowej i 61 perkusji
klawiszowych.
• Naciśnij przycisk [Panel percussion], a odpowiedni dźwięk perkusyjny może
zostać wyzwolony przez naciśnięcie określonego klawisza.
• Naciśnij przycisk [Keyboard Percussion], gdy na ekranie LCD wyświetlany jest
komunikat "PERCUS". W takim przypadku na klawiaturze można wykonać utwór
perkusyjny. Określony klawisz odpowiada konkretnemu rodzajowi dźwięku
perkusyjnego. Naciśnij przycisk ponownie, aby wyjść z tej funkcji.
IV. Przycisk funkcyjny
Szczegóły parametrów, które można skonfigurować za pomocą przycisku [Func-
tion], opisano poniżej:
Nazwa paramet-
ru
Wskazanie na ekranie Regulowany zakres
Wartość\
domyślna
TEMPO
Przytrzymaj przycisk [Function], aż na ekranie LCD pojawi się "04Beat". W takim
przypadku można wybrać jeden z dziewięciu różnych stylów tempa, zakodowanych
od 00 do 09. Żądany styl tempa można wybrać za pomocą przycisków [+/-] lub
przycisku [Data Dial].
PUNKT PODZIAŁU
Klawisz ten nazywany jest punktem podziału i dzieli klawiaturę na dwie części:
klawiaturę akompaniamentu po lewej stronie i klawiaturę melodii po prawej
stronie. Domyślny punkt podziału instrumentu znajduje się na 19. klawiszu od lewej
i może zostać zresetowany do dowolnego klawisza na klawiaturze.
BEAT
ALL
SPLIT PT
MIDI IN
MIDI OUT
BANK SELECT

KONFIGURACJA KANAŁÓW MIDI
1. WEJŚCIE MIDI
Naciśnij kilkakrotnie przycisk [Function], aż na ekranie LCD pojawi się
komunikat "MIDI In". W takim przypadku kanał docelowy można wybrać
do odtwarzania wejściowych plików MIDI, naciskając przyciski [+/-] lub
obracając pokrętło [Data Dial] do pozycji "ALL", co oznacza, że dostępne są
wszystkie kanały (kodowane od 01 do 16). Wszystkie kanały są wstępnie
skonfigurowane po włączeniu instrumentu.
2. WYJŚCIE MIDI
Naciśnij kilkakrotnie przycisk [Function], aż na ekranie LCD pojawi się
komunikat "MIDI Out". W takim przypadku można wybrać kanał docelowy
do przesyłania wyjściowych plików MIDI, naciskając przyciski [+/-] lub
obracając pokrętło [Data Dial]. Nie można jednak przesyłać niektórych
plików MIDI, takich jak rytm automatyczny, utwory demonstracyjne i
utwory zarezerwowane w instrumencie. Gdy instrument jest włączony,
dostępny jest kanał 01.
SELEKCJA BANK
Naciśnij kilkakrotnie przycisk [Function], gdy na ekranie LCD wyświetlany
jest komunikat "Bank Sel". W takim przypadku można wybrać docelowy bank
głosów spośród 128 banków zakodowanych od 01 do 128, aby dostosować
głos klawiatury MIDI, naciskając przyciski [+/-] lub obracając pokrętło [Data
Dial]. Gdy instrument jest włączony, ustawionym bankiem głosów jest
BANK01.
Uwaga: W standardowym banku głosów GM znajduje się tylko jeden bank
głosów, oznaczony kodem BANK 01, zawierający 128 głosów. Jeśli na kom-
puterze dostępne są inne banki głosów, można je dodać do instrumentu i
zdefiniować za pomocą kodów od BANK 01 do 128.
V. Dźwięki i efekty
WYBÓR DŹWIĘKU
System zawiera 162 rodzaje dźwięków, w tym 128 dźwięków GM, 6 grup
dźwięków perkusji klawiszowej i 5 grup dźwięków muzyki ludowej. Po
uruchomieniu domyślnym dźwiękiem
Naciśnij kilkakrotnie przycisk [Function], aż na wyświetlaczu LED pojawi się
"19 Split Pt". W takim przypadku punkt podziału można zresetować, naciska-
jąc przyciski [+/-], obracając pokrętło [Data Dial] lub dotykając klawisza
docelowego. Nowy punkt podziału zostanie ustawiony po zakończeniu
wyboru.

jest dźwięk o kodzie 00, oznaczony jako "00 Grd Piano" na ekranie LCD.
Naciśnij przycisk [Sound], aby uzyskać dostęp do konfiguracji głosu. Żądany
dźwięk można wybrać za pomocą przycisków numerycznych, przycisków
[+/-] lub przycisku [Data Dial]. Aby jednak użyć klawiszy numerycznych,
docelowy kod dźwięku musi być wprowadzony w postaci trzech cyfr. Tak
więc, jeśli kod dźwięku to 65, należy wprowadzić cyfry 0, 6 i 5 lub jeśli jest to
kod 8, należy wprowadzić cyfry 0, 0 i 8.
KLAVIER
Dla dodatkowej wygody instrument jest wyposażony w przycisk [Piano].
Po jego naciśnięciu można bezpośrednio wybrać głos fortepianowy.
1.Naciśnięcie przycisku [Piano] powoduje przełączenie instrumentu w tryb
fortepianu, a na ekranie wyświetlany jest napis "PIANO". Każde naciśnięcie
klawisza będzie generować dźwięk fortepianu.
2.W trybie akompaniamentu przycisk [Piano] zatrzymuje akompaniament i
przełącza w tryb fortepianu. Ponowne naciśnięcie przycisku powoduje
wyjście z tej funkcji.
Uwaga: W trybie Piano można wybierać i odtwarzać rytmy, a sterowanie
akompaniamentem działa normalnie, ale dostępna jest tylko nieakordowa
perkusja.
FUNKCJA PODWÓJNEGO DŹWIĘKU
Instrument posiada funkcję podwójnego dźwięku, umożliwiającą połącze-
nie dwóch dźwięków w celu stworzenia nowego efektu dźwiękowego i
wzbogacenia złożoności dźwięku, symulując połączenie dwóch instru-
mentów. Przed aktywacją przycisku [DUAL] dźwięk instrumentu zostanie
oznaczony jako "SOUND 1" na ekranie LCD, a drugi dźwięk można wybrać
w następujący sposób:
1.Po naciśnięciu przycisku [Dual] na ekranie LCD zostanie wyświetlony
komunikat "SOUND" z kursorem wskazującym "DUAL". Wyświetlany jest
również kod drugiego dźwięku. Drugim zaprogramowanym dźwiękiem
jest dźwięk 48. Oznacza to, że naciśnięcia klawiszy emitują dźwięk wyni-
kający z kombinacji tych dwóch dźwięków.
2.Drugi dźwięk można wybrać, naciskając przyciski [+/-] lub obracając
pokrętło [Data Dial].

3. W trybie dwugłosowym pierwszy dźwięk można zmienić, najpierw nacis-
kając przycisk [Sound], a następnie używając przycisków [+/-] lub pokrętła
[Data Dial].
4. Aby wyjść z trybu dwugłosowego, naciśnij przycisk [Dual]. "SOUND 2" i
kursor wskazujący "DOUBLE" znikną z ekranu LCD, powracając do trybu
konfiguracji "SOUND 1".
Uwaga : Oprócz automatycznego strojenia, funkcja podwójnego dźwięku
może być zastosowana do całej klawiatury; w trybie automatycznego stroje-
nia może być używana tylko na klawiaturze melodii, a nie na klawiaturze
akompaniamentu.
KLAWIATURA Z DYNAMICZNĄ CZUŁOŚCIĄ
Gdy urządzenie jest włączone, aktywowana jest funkcja czułości dynamicznej,
wskazywana przez "TOUCH" na kursorze. Naciskając przycisk [Touch], możesz
aktywować lub dezaktywować tę funkcję. Umożliwia ona dostosowanie dynamiki
różnych naciśnięć klawiszy, zwiększając w ten sposób wydajność. Im większa dyna-
mika, tym większa głośność nut. Gdy funkcja jest wyłączona, wszystkie naciśnięcia
klawiszy mają taką samą głośność.
PITCH BEND
Przesuwając dźwignię [Pitch Bend] w górę lub w dół, wysokość dźwięku przesuwa
się w kierunku altówki lub drona. Zwolnij modulację, aby powrócić do normalnej
wysokości dźwięku.
VIBRATO BEND
Gdy dźwignia [Vibrato Bend] jest ustawiona maksymalnie w dół, funkcja vibrato jest
wyłączona. Przesuń dźwignię w górę, aby ją aktywować i uzyskać efekt podtrzyma-
nia uderzeń klawiatury. Przesuwając dźwignię w górę lub w dół, możesz wzmocnić
lub osłabić efekt.
PODPOWIEDŹ
1. Naciśnij [Sustain], aby aktywować funkcję, sygnalizowaną przez "SUS-
TAIN" na ekranie LCD. Naciśnięcia klawiszy zyskają elegancki efekt podtr-
zymania.
2. Naciśnij [Sustain] ponownie, aby wyłączyć funkcję i sprawić, że "SUS-
TAIN" zniknie z ekranu LCD.

OCTAVE
Przyciski [Octave+/Octave-] służą do transponowania instrumentu o oktawę
w górę lub w dół. Gdy jeden z przycisków [Octave+] lub [Octave-] zostanie
naciśnięty po raz pierwszy, bieżąca wartość oktawy zostanie wyświetlona na
ekranie LCD. Naciśnij jeden z przycisków ponownie, aby przetransponować
instrument o oktawę w górę lub w dół w zakresie dostępnych możliwości.
PRZENIESIENIE
Naciśnij przycisk [Transpose ] lub [Transpose ], aby transponować
wysokość dźwięków. Transpozycję można regulować w zakresie od "-6" do
"+6". Jednoczesne naciśnięcie obu przycisków powoduje powrót wysokości
dźwięku do wstępnie ustawionej wartości "0". W trybie transpozycji wartość
transpozycji można również zmienić, obracając pokrętło [Data Dial].
PODWÓJNA KLAWIATURA
Naciśnij przycisk [Split], aby podzielić klawiaturę na dwie części: 24 lewe
klawisze i pozostałe klawisze, tworząc podwójną klawiaturę. Dźwięk lewej
części jest transponowany o oktawę wyżej, podczas gdy dźwięk prawej części
jest transponowany o oktawę niżej, dzięki czemu dźwięk obu części jest
spójny. Ponadto brzmienie obu części może być różne. Część lewa zachowuje
główny głos, podczas gdy część prawa może mieć inny głos. Ponowne
naciśnięcie przycisku [Split] dezaktywuje tę funkcję, a dźwięk na całej klawia-
turze będzie brzmieniem poprzedniej części prawej ręki.
Uwaga: W trybie automatycznego strojenia funkcja czułości dynamicznej,
efekt sustain, modulacja wysokości dźwięku i modulacja vibrato nie działają
na klawiaturze strojenia.
VI. Style automatyczne
WYBÓR STYLÓW
Dostępnych jest 200 różnych stylów, ponumerowanych od 00 do 200. Po
włączeniu urządzenia domyślnym stylem jest "00". Naciśnij przycisk [Style],
gdy na ekranie LCD wyświetlany jest komunikat "STYLE", a następnie wybierz
żądany styl za pomocą przycisków numerycznych, przycisków [+/-] lub
przycisku [Data Dial].

Uwaga: Docelowy kod stylu musi składać się z trzech cyfr. Jeśli więc kod stylu
to 66, wprowadź cyfry 0, 6 i 6, a jeśli to 9, wprowadź cyfry 0, 0 i 9.
STYL START/STOP
Naciśnij przycisk [Start/Stop], aby uruchomić lub zatrzymać styl akompania-
mentu.
SYNC
Naciśnij przycisk [SYNC], gdy na ekranie LCD migają kropki rytmu. Gdy funkc-
ja automatycznego dostrajania jest wyłączona, każde naciśnięcie klawisza na
klawiaturze może uruchomić styl. Gdy funkcja automatycznego strojenia jest
włączona, każde naciśnięcie klawisza na klawiaturze strojenia może
jednocześnie uruchomić melodię i styl akompaniamentu.
WPROWADZENIE/ZAKOŃCZENIE
1. Przed rozpoczęciem stylu naciśnij przycisk [Intro/Ending]. Spowoduje to
uruchomienie preludium prowadzącego do normalnego stylu, wraz z wyświ-
etleniem komunikatu "NOR" na ekranie LCD.
2. Podczas trwania stylu naciśnięcie przycisku [Intro/Ending] spowoduje
zakończenie normalnego stylu, a następnie zatrzymanie całego stylu.
Uwaga: Przed zakończeniem podsumowania naciśnij przycisk [Wypełnienie
A] lub [Wypełnienie B], aby kontynuować poprzedni normalny styl.
ŁĄCZONE ZANIKANIE
1. Po zatrzymaniu stylu naciśnij przycisk [Fade In/Out]. Spowoduje to wyświ-
etlenie komunikatu "FADE" na ekranie LCD. W takim przypadku rozpocznij
odtwarzanie stylu, po czym styl może stopniowo zwiększać głośność przez 8
sekund, a komunikat "FADE" zniknie.
2. Podczas odtwarzania stylu naciśnięcie przycisku [Fade In/Out] pozwoli na
stopniowe zmniejszanie głośności stylu przez 8 sekund, a napis "FADE"
zniknie.

INTERMEZZO
1. Podczas akompaniamentu przytrzymaj przycisk [Fill in A]. Umożliwi to
odsłuchanie intermezzo z komunikatem "VAR" wyświetlanym na wyświet-
laczu LCD, a następnie kontynuowanie normalnego akompaniamentu.
2. Podczas akompaniamentu naciskaj przycisk [Fill in B], aż usłyszysz kolejne
intermezzo, z "VAR" zamiast "NOR" na wyświetlaczu LCD, a następnie normal-
ny przebieg akompaniamentu będzie kontynuowany. Migający napis "VAR"
wskazuje, że styl przechodzi do momentu wariacji.
3. Naciskając mocno przycisk [Fill in A] lub [Fill in B], można wstawić kilka
kolejnych intermezz. Po zakończeniu intermezzo akompaniament zostanie
wznowiony w normalny sposób.
AUTO-METRONOM
Naciśnij przycisk [Metronom], a instrument zacznie tykać, wskazując tempo.
W tym przypadku można wybrać różne rodzaje tempa za pomocą przycisku
[Function]. Naciśnij ponownie, aby wyjść z funkcji metronomu.
REGULACJA TEMPA
Przyciski [Tempo up] / [Tempo down] mogą być używane do regulacji tempa
stylów. Naciśnij jeden z nich, aby przyspieszyć lub zwolnić tempo stylu w
zakresie od 40 do 280 uderzeń na minutę, a bieżąca wartość tempa zostanie
wyświetlona jako "TEMPO" na ekranie LCD. Naciśnij oba przyciski
jednocześnie, aby przywrócić ustawioną wartość tempa.
REGULACJA GŁOŚNOŚCI WSPARCIA
Naciśnij [Accom Vol up] / [Accom Vol down], aby zwiększyć lub zmniejszyć
głośność akompaniamentu w zakresie od 00 do 31. Naciśnij oba przyciski
jednocześnie, aby przywrócić wstępnie ustawioną wartość głośności akom-
paniamentu.
VII. Automatyczny akord basowy i słownik akordów
Naciśnij przycisk [Auto Bass Chord], aby uruchomić funkcję automatycznego
strojenia. Suwaki A, B, C (reprezentujące automatyczne strojenie) pojawią się
na ekranie LCD. Gdy funkcja automatycznego strojenia jest włączona, 19
klawiszy po lewej stronie klawiatury to klawisze strojenia. P

Podczas odtwarzania stylu każde naciśnięcie klawisza akordu inicjuje
automatyczny akord.
UWAGA :
1. Naciśnij [Function], aby zmienić punkt podziału i zakres klawiatury akordów
(patrz "Punkt podziału", aby uzyskać więcej informacji).
2. Instrument może rozpoznawać akordy jednoklawiszowe lub wieloklaw-
iszowe. Będzie on akceptował akordy pasujące do wybranego typu akordu,
ale będzie faworyzował akordy jednoklawiszowe, gdy wybrane akordy nie
pasują do wybranego typu akordu.
Pojedynczy palec:
(Poniższe techniki ułożenia palców są przeznaczone do gry na tym instru-
mencie).
1. Triada durowa: zagraj podstawę akordu.
2. Trójdźwięk molowy: Zagraj jednocześnie podstawę akordu i dowolną
czarną tonację po jego lewej stronie.
3. Akord dominantowy siódmy: Zagraj jednocześnie podstawę akordu i
dowolną białą tonację po jego lewej stronie.
4. Siódmy akord molowy: Zagraj jednocześnie podstawę akordu, minimę
i krotkę po jego lewej stronie.
Pozycje palców: Każda z pozycji pokazanych na poniższej ilustracji może
tworzyć akord C-dur, a inne akordy mogą być grane w podobny sposób.
Pozycje dla akordu C-dur
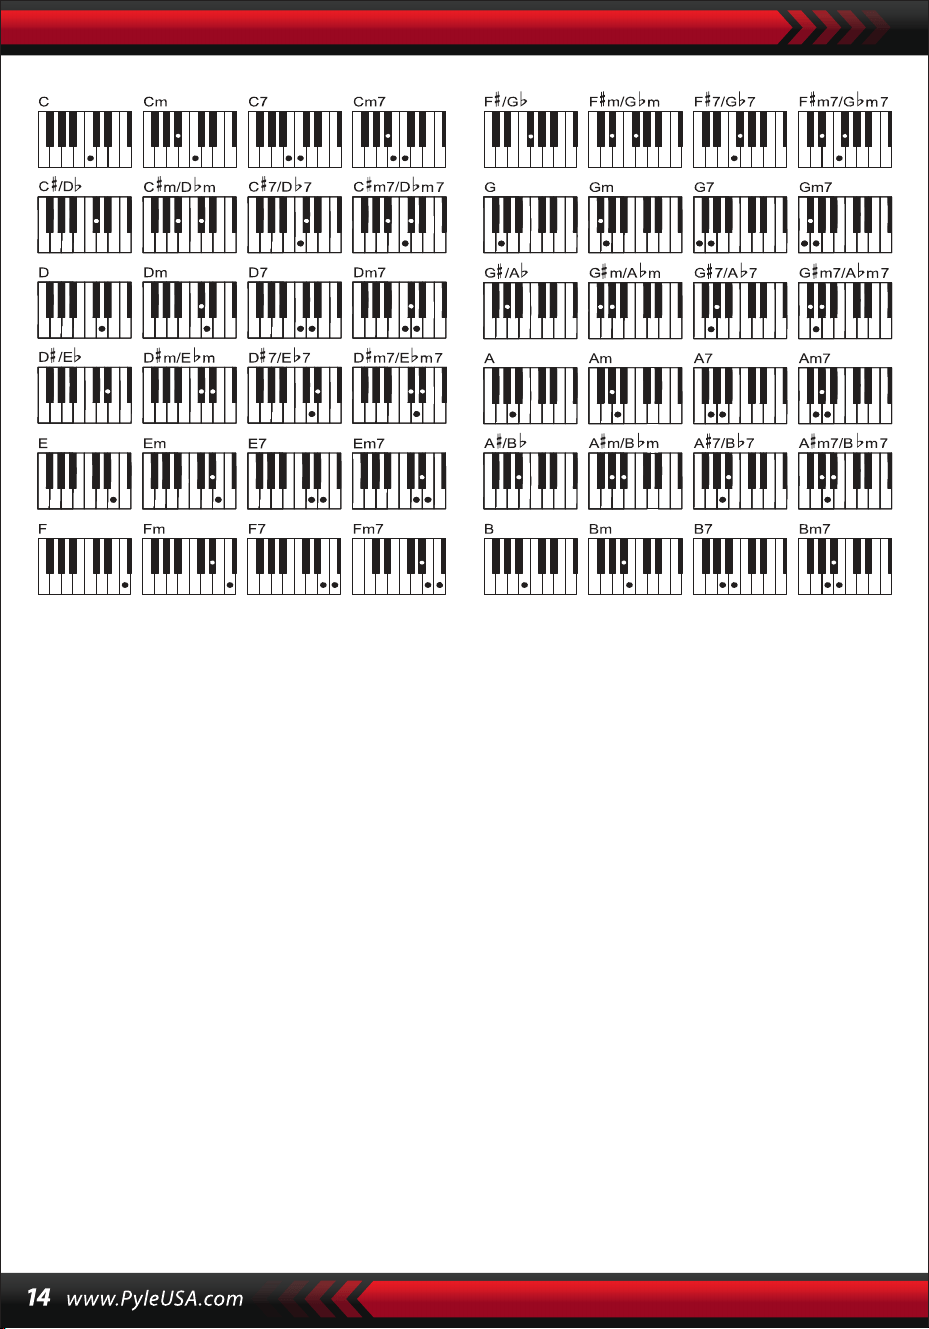
SŁOWNIK AKORDÓW
Słownik akordów jest w rzeczywistości podręcznikiem akordów przechowy-
wanym w instrumencie, w którym możesz wyszukać nuty tworzące akord.
Wszystkie nuty akordów są wyświetlane na ekranie, co ułatwia naukę gry.
Funkcja ta jest bardzo korzystna dla początkujących, którzy znają nazwy
akordów, aby opanować palcowanie.
1. Naciśnij przycisk [Chord Dictionary], aby uruchomić funkcję, gdy na wyświ-
etlaczu LCD pojawi się komunikat "DICT" oraz "C": oznaczający trójdźwięk
C-dur i symbole nut na pięciolinii. Korzenie akordu i typ akordu można
zdefiniować na klawiaturze melodycznej po prawej stronie punktu pod-
ziału, a następnie odpowiednie klawisze zostaną wyświetlone na klawia-
turze, a nuty na pięciolinii na wyświetlaczu, dzięki czemu uczeń może
zagrać akord na klawiaturze akompaniamentu zgodnie z reprezentacją na
wyświetlaczu.
2. Gdy nuty akordu zostaną poprawnie zagrane na klawiaturze akompania-
mentu, usłyszysz uroczysty dźwięk klaskania. Gdy nuty akordu nie są
odtwarzane prawidłowo, z odtwarzanych klawiszy wydobywa się dźwięk
BASS.
3. Naciśnij ponownie przycisk [Right/Chord Dictionary], aby zatrzymać tę
funkcję

Uwaga:
1.Naciśnięcia klawiszy na klawiaturze melodycznej (na prawo od punktu
podziału) używane do definiowania korzeni i typu akordu nie powodują
emisji dźwięku.
2.Akordy muszą być grane na klawiszach po lewej stronie punktu podziału;
żadne nuty nie mogą być grane poza zakresem klawiatury akordów.
VIII. PIOSENKI DEMONSTRACYJNE
System oferuje 2 utwory demonstracyjne w różnych stylach.
WYBÓR UTWORU DEMO
1.Naciśnij przycisk [Demo], gdy podświetlony jest napis "DEMO", a na
ekranie wyświetlany jest kod bieżącego utworu i punkty rytmu. System
jest skonfigurowany do odtwarzania kolejno dwóch utworów demonstra-
cyjnych.
2.Podczas odtwarzania utworu demonstracyjnego można go zastąpić
innym utworem za pomocą przycisków numerycznych, przycisków [+/-]
lub przycisku [Data Dial].
3.Naciśnij ponownie przycisk [Demo], aby zatrzymać odtwarzanie i wyjść z
tej funkcji.
IX. PIOSENKI DO NAUKI
System oferuje 100 utworów w różnych stylach, idealnych do nauki i
doceniania muzyki.
WYBÓR UTWORÓW DO NAUKI
1. Naciśnij przycisk [Song], aby uruchomić tryb "utworu" z podświetlonym
napisem "SONG" oraz kodem i skrótem bieżącego utworu na ekranie.
System jest skonfigurowany do odtwarzania kolejno wszystkich 100
utworów. Podczas odtwarzania utworu można go zastąpić innym za
pomocą przycisków numerycznych, przycisków [+/-] lub przycisku [Data
Dial].
Akkordübungsbereich Akkordtyp Akkordgrundtöne

ZAMKNIĘCIE PIOSENKI
1. Podczas odtwarzania utworu naciśnij przycisk [Start/Stop], aby zatrzymać
odtwarzanie, pozostając w trybie ‘song’..
2. Po zakończeniu utworu naciśnij przycisk [Sound] lub [Style], aby wyjść z
trybu utworu i uruchomić odpowiednią funkcję.
FUNKCJA "LEWEGO" I "PRAWEGO" KANAŁU POZA TRYBEM NAUKI
Podczas odtwarzania utworu naciśnij przycisk [Left] lub [Right], aby włączyć
lub wyłączyć dźwięk lewego lub prawego kanału. Na przykład naciśnij przy-
cisk [Left], gdy po lewej stronie ekranu podświetlony jest napis "LEFT", aby
otworzyć kanał dźwiękowy dla prawej melodii i wyciszyć kanał dla lewego
akompaniamentu lub melodii. Ta sama operacja dotyczy przycisku [Right].
Uwaga:
1 . Gdy tryb "song" nie jest aktywny, naciśnij przycisk [Right/Chord dictio-
nary], aby uruchomić tryb "chord dictionary", i ponownie, aby wyjść.
2. Po zakończeniu utworu przytrzymaj przycisk [chord dictionary] przez co
najmniej 2 sekundy, aby uruchomić tryb słownika akordów.
X. Lekcje
Trzy przyciski [Lesson], [Left], [Right] mogą uruchamiać trzy różne rodzaje
trybu nauki, umożliwiając uczącemu się odtwarzanie utworu edukacyjne-
go krok po kroku.
LEKCJA I
Celem tej lekcji jest ćwiczenie muzycznego czasu trwania, a nie wysokości
dźwięku. Każde naciśnięcie klawisza z prawidłowym czasem trwania
spowoduje prawidłowe zmiany rzeczywistych nut i akordów, ale bez dźwięku
odpowiadającego nutom.
2. Podczas odtwarzania utworu naciśnij przycisk [Start/Stop], aby wstrzymać
odtwarzanie, pozostając w trybie "utworu". Naciśnij ponownie, aby wznowić
odtwarzanie bieżącego utworu w pętli.
Uwaga: Aby powrócić do trybu odtwarzania 100 utworów po kolei, najpierw
wyjdź z trybu "utworu", a następnie ponownie naciśnij przycisk [Utwór].

LEKCJA II
Celem tej lekcji jest ćwiczenie grania prawidłowych nut w odniesieniu do
klawiszy wyświetlanych na ekranie. Granie prawidłowych nut utrzymuje
utwór w ruchu, w przeciwnym razie utwór zostanie zawieszony do momentu
wybrania prawidłowej nuty.
Uwaga: W tym trybie można odtwarzać tylko prawidłowe nuty; niepraw-
idłowe nuty nie wywołują żadnej reakcji.
LEKCJA III
Celem tej lekcji jest ćwiczenie grania prawidłowych nut w odniesieniu do
klawiszy wyświetlanych na wyświetlaczu. Granie prawidłowych nut utrzymu-
je utwór, w przeciwnym razie utwór zostanie zawieszony do momentu
wybrania prawidłowej nuty. Uwaga: W tym trybie można grać tylko praw-
idłowe nuty; nieprawidłowe nuty nie wywołują żadnej reakcji.
ĆWICZENIE LEWEJ I PRAWEJ RĘKI
Celem tej lekcji jest ćwiczenie odpowiednio lewą lub prawą ręką lub obiema.
Naciśnij przycisk [W prawo], aby ukryć melodię w prawej ręce, a następnie
ćwicz prawą ręką. Naciśnij przycisk [Left], aby ukryć melodię lewej ręki lub
zmiany akordów lewej ręki, a następnie ćwicz lewą ręką. Naciśnij oba przycis-
ki jednocześnie, aby ukryć dźwięk lewej i prawej ręki, a następnie ćwicz
obiema rękami.
KONFIGURACJA FUNKCJI LEKCJI
1. Naciśnij funkcję [Lesson], aby uruchomić stan "utworu", a następnie
naciśnij przycisk [Start/Stop], aby zatrzymać utwór.
2. Wybierz odpowiedni utwór, naciskając przyciski numeryczne, przyciski
[+/-] lub obracając pokrętło [Data Dial].
3. Gdy tryb "utworu" jest wyłączony, naciśnij kolejno przycisk [Lekcja], aby
wybrać lekcję I, II, III lub wyjść z funkcji "lekcji". Każda wybrana lekcja będzie
miała odpowiadający jej jasny kursor i podświetlenie "LEFT" lub "RIGHT" na
ekranie. Następnie naciśnij przycisk [Start/Stop], aby rozpocząć lekcję, a
wskazania nut melodii lub akordów zostaną wyświetlone na pasku i klawia-
turze na ekranie LCD.

4.Naciśnij przycisk [W lewo], aby rozpocząć ćwiczenie lewej ręki z podświ-
etleniem "lewa ręka" na ekranie. Naciśnij przycisk [W prawo], aby
rozpocząć ćwiczenie prawej ręki z podświetloną na ekranie "prawą ręką".
Naciśnij oba przyciski, aby rozpocząć ćwiczenia lewej i prawej ręki z
podświetleniem "lewa i prawa ręka" na ekranie. Jeśli nie dokonasz wyboru,
system automatycznie rozpocznie ćwiczenie prawej ręki.
5. Po zakończeniu lekcji system odtworzy bieżący utwór i zachowa poprzedni
tryb lekcji.
Uwaga: Różne style utworów sprawiają, że gra lewą ręką jest inna. Podczas
grania utworów rytmicznych lewa ręka gra akordy; podczas grania innych
utworów lewa ręka gra melodię lewej ręki lub akompaniament (utwory
oznaczone kodami od 00 do 84 to utwory rytmiczne). Podczas lekcji nie
można dowolnie zmieniać trybu lekcji.
XI. Funkcja przechowywania i pamięci
Funkcja przechowywania i pamięci służy do przechowywania ustawionego
głosu, stylu, tempa i innych względnych parametrów trybu pracy, które
należy zmienić podczas występu. Służy również do wyciągania potrzebnych
parametrów bezpośrednio podczas występu. Dostępnych jest sześć trybów
pamięci, z których można dowolnie korzystać.
PRZECHOWYWANIE PARAMETRÓW
Najpierw skonfiguruj dźwięk, styl, tempo i inne parametry wymagane dla
trybu pracy. Następnie naciśnij i przytrzymaj przycisk [Memory] i naciśnij
jeden z przycisków trybu pamięci (M1, M2, M3, M4, M5 lub M6), aby zapisać
tryb pracy. Odpowiedni kursor świetlny wskazuje tryb pamięci, w którym
zapisane są wszystkie parametry.
POBIERANIE PARAMETRÓW
Podczas działania naciśnij jeden z przycisków trybu pamięci, aby odzyskać
zapisane parametry wymaganego trybu pracy i zastąpić je bieżącymi para-
metrami.

Uwaga:
1. Po pobraniu trybu z pamięci, wszystkie parametry mogą zostać zrese-
towane i zmienione w stosunku do poprzednio zapisanych. W tym stanie
odpowiedni kursor świetlny na dole wyświetlacza znika, wskazując, że tryb
został zmieniony.
2. Nie ma ochrony przed awarią zasilania dla wszystkich trybów pamięci,
więc gdy urządzenie odzyska zasilanie, zapisane ustawienia zostaną
utracone.
XII. Konfiguracja O.T.S (ONE TOUCH SET)
Funkcja O.T.S nagrała często używane głosy, które są odpowiednie dla
stylów. Z każdym stylem powiązane są cztery domyślne dźwięki.
1. Naciśnij przycisk [O.T.S], aby uruchomić automatyczny akord basowy, z
oznaczeniami "O.T.S" i "M1" na dole ekranu.
2. Gdy docelowy styl będzie gotowy, naciśnij cztery przyciski pamięci (M1 do
M4), a styl odtwarzany na klawiaturze idealnie połączy cztery domyślne
głosy.
3. W tym stanie naciśnij przycisk ponownie, aby wyjść z funkcji.
Uwaga: Gdy funkcja [O.T.S] jest aktywna, nie można uruchomić funkcji
zapisu i pamięci
XIII. Enregistrement
PRZYGOTOWANIE DO NAGRYWANIA
Naciśnij przycisk [REC], gdy migają cztery wskaźniki rytmu i jasny napis "REC"
na wyświetlaczu, aby pokazać, że system jest gotowy do nagrywania. Przy-
jemny dźwięk, styl, tempo, rezonans i inne parametry można ustawić przed
rozpoczęciem nagrywania.
REJESTRACJA
W tym stanie wszystkie nuty grane na klawiaturze są nagrywane z czterema
migającymi wskaźnikami taktu na ekranie, zgodnie z ustawionym tempem.
W trybie "nagrywania" akompaniament może być nagrywany bezpośrednio
po jego uruchomieniu. W stanie "automatycznego akordu basowego" każde
naciśnięcie klawisza na klawiaturze automatycznego akompaniamentu może
uruchomić styl. Gdy jednak funkcja "automatycznego akordu basowego" nie
jest aktywna, styl można uruchomić wyłącznie poprzez naciśnięcie przycisku
[Start/Stop]. Podczas nagrywania akompaniamentu na klawiaturze można
również grać nuty melodyczne i nagrywać je jednocześnie.
Ważne :
1. Nie ma ochrony przed awarią zasilania, więc gdy urządzenie odzyska
zasilanie, zarejestrowane dane zostaną utracone.
2. Nowe nagranie zastąpi poprzednie, gdy funkcja nagrywania zostanie użyta
ponownie.
3. Na ilość nagranych nut mają wpływ wszystkie nagrane dane, w tym różne
dźwięki, styl, tempo itp.
PO REJESTRACJI
1. W trybie "nagrywania" naciśnij ponownie przycisk [REC], aby zatrzymać
nagrywanie.
2. Podczas nagrywania i odtwarzania stylu naciśnij przycisk [Intro/Ending],
aby rozpocząć sekcję zakończenia. Po zakończeniu system automatycznie
zatrzyma nagrywanie i wyjdzie z trybu "nagrywania".
3. Podczas nagrywania, gdy pamięć zostanie całkowicie zapełniona, nagry-
wanie zostanie zatrzymane z napisem "FULL" migającym na ekranie przez
3 sekundy, a następnie wyjdzie z trybu nagrywania.
PLAYBACK
Po zatrzymaniu nagrywania naciśnij przycisk [PLAYBACK], aby odtworzyć
nagraną ścieżkę.

XIV. Program
PROGRAM
Naciśnij przycisk [Prog] z kursorem "Prog" świecącym na ekranie, aby zmienić
klawiaturę w klawiaturę perkusyjną. Następnie naciśnij klawisz lub sekcję
perkusyjną, aby uruchomić funkcję programowania. Naciśnij ponownie
przycisk [Prog], aby zatrzymać programowanie. W pełni wykorzystana
pamięć może również przerwać programowanie. Nowo edytowany rytm lub
nowe nagranie zajmie miejsce oryginalnego.
ODTWARZANIE W PĘTLI
Naciśnij przycisk [Null Play], a edytowany rytm będzie odtwarzany w pętli.
Naciśnij przycisk ponownie, aby zatrzymać odtwarzanie.
Dodatki
DŹWIĘK
NO. Imię NO. Imię NO. Imię
Piano
Organ
Bass
Guitar
Mallet
Grand Piano
Bright Piano
El Grd Piano
Honky-tonk Piano
Elec piano 1
Elec Piano 2
Harpsichord
Clavi
Celesta
Glockenspiel
Music Box
Vibraphone
Marimba
Xylophone
Tubular Bell
Santur
Drawbar Organ
Jazz Organ
Rock Organ
Church Organ
Reed Organ
Accordion
Harmonica
Tango Accordion
Classic Guitar
Steel Guitar
Jazz. Guitar
Clean Guitar
Muted. Guitar
Overdriven Guitar
Distortion Guitar
Guitar Harmonics
Acoustic Bass
Finger Bass
Picked Bass
Fretless Bass
Slap Bass 1
Slap Bass 2
Synth Bass 1
Synth Bass 2

NO. Imię NO. Imię NO. Imię
Strings Lead
Sound Effects
Chinese Instrument
Synth Voice
Drum Kit
Pad
Effects
Ethnic
Percussive
Strings Ensemble
Brass
Reed
Pipe
Violin
Viola
Cello
Contrabass
Tremolo Strings
Pizzicato Strings
Harp
Timpani
Strings 1
Strings 2
Synth Strings 1
Synth Strings 2
Choir Aahs
Voice Ooh
Synth
Orchestra Hit
Trumpet
Trombone
Tuba
Muted Trumpet
Horn
Brass Ensemble
Synth Brass 1
Synth Brass 2
70elep
Fzpiano
Ep3
Ep4
Ep5
Harppian
Clavr2
Clavr3
Organ Box
E. organ
Churc2
Syn Organ
Altoel
Fz guitar
Syn elgt
Picel bas
El violin
Brassfm
Fmlead
Fantalfo
Polyaa2
Bowedg2
70elpad
Soprano Sax
Alto Sax
Tenor sax
Baritone Sax
Oboe
English horn
Bassoon
Clarinet
Piccolo
Flute
Recorder
Pan Flute
Blown Bottle
Shakuhachi
Whistle
Ocarina
Square
Sawtooth
Calliope
Chiff
Charang
Voice
Fifths
Bass lead
Fantasia
Warm
Poly Synth
Choir
Bowed
Metallic
Halo
Sweep
Fx1
Fx2
Fx3
Fx4
Fx5
Fx6
Fx7
Fx8
Sitar
Banjo
Shamisen
Koto
Kalimba
Bag Pipe
Fiddle
Shanai
Tinkle Bell
Agogo
Steel Drums
Woodblock
Taiko Drum
Melodic Tom
Synth Drum
Reverse Cymbal
Standard Kit
Power Kit
Dance Kit
808 Kit
Brush Kit
Orchestra Kit
GT Fret Noise
Breath Noise
Seashore
Bird Tweet
Teleph Ring
Helicopter
Applause
Gunshot
Pipa
Erhu
Guzhen
Banhu
Qudi
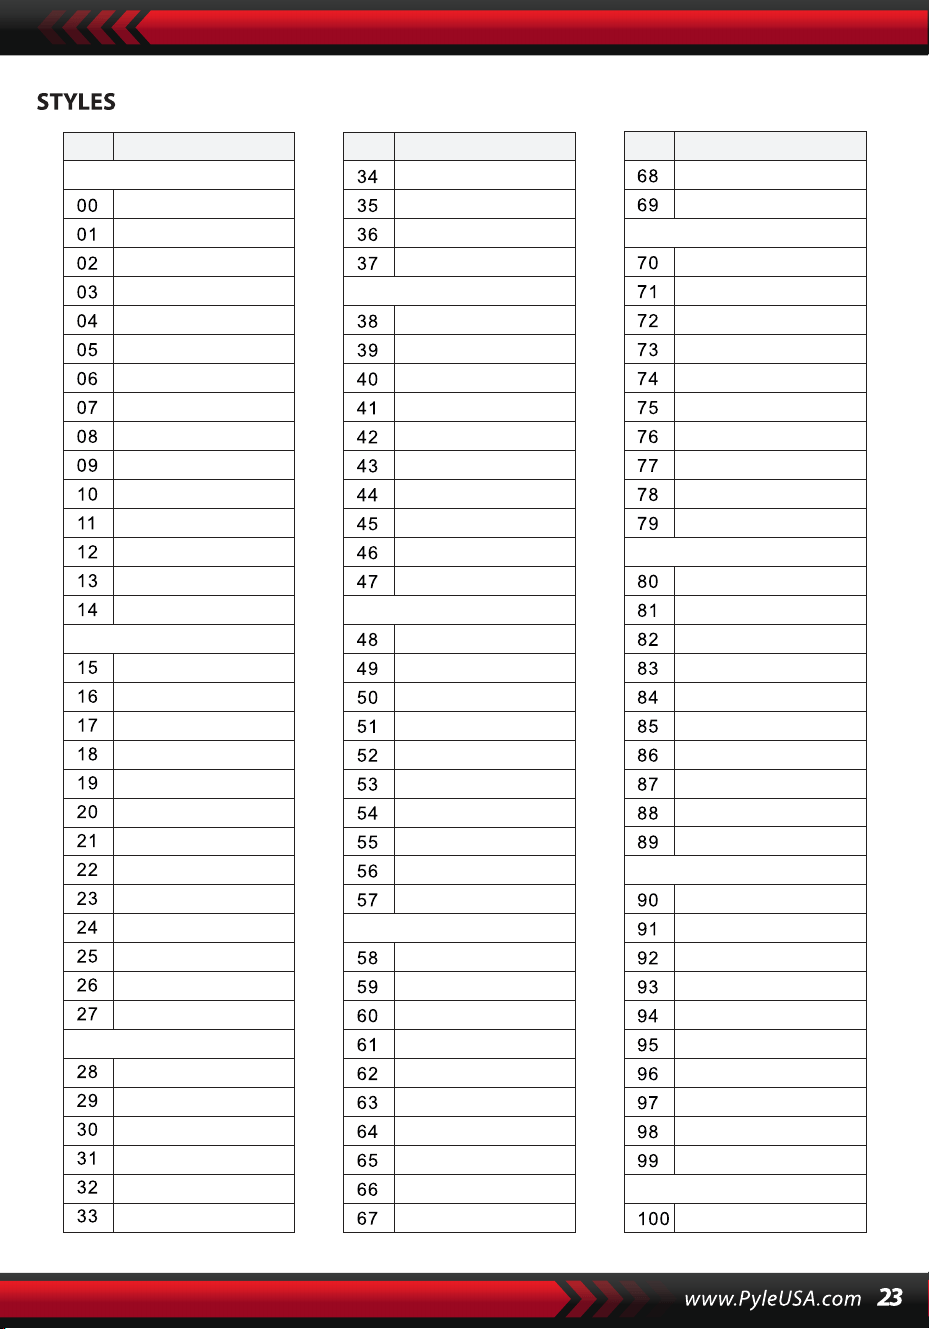
NO. Imię NO. Imię NO. Imię
BEAT & POP
SOUL & FUNK
LATIN
TRADITIONAL
PIANO
BEAT & POP-1
JAZZ
COUNTRY
ROCK
DANCE
8 Beat 1
8 Beat 2
8 Beat 3
8 Beat 4
60's 8 Beat
8 Beat Ballad
8 Beat Rock
16 Beat 1
16 Beat 2
16 Beat Pop
16 Beat Shuffle
Ballad
Slow Ballad
16 Beat Ballad
Unplugged
Funky Pop
Jazz Funk
Cool Funky
Soul 1
Soul 2
Soul Shuffle
Soul Blues
R&B
6/8 Gospel
Pop Groove
Bossa Nova 1
Bossa Nova 2
Rhumba
Pop Rhumba
Cha Cha
Pop Cha Cha
Tango
Jazz Samba
Reggae
Pop Reggae
1-Mar
2-Mar
German March
6/8 March
Polka
Pop Polka
Waltz
Slow Waltz
Vienna Waltz
Musette
8 Beat
Ballad
Boogie
Jazz
Swing
Jazz Waltz
Twist
March
6/8 March
Waltz
8 Beat 1 -1
Swing
Cool Jazz
Pop Swing
Swing Fox
Big Band
Big Band Meduim
Jazz Waltz
Ragtime
Dixeland
Quick Step
Country 1
Country 2
Pop Country
Country Rock
Country Folk
3/4 Country
Country Waltz
Country Shuffle
Country Boogie
Country Blues
Rap
Euro Beat
Hip Hop
Techno
Country Quick Step
Bluegrass
Rock
Pop Rock
Fast Rock
Slow Rock 1
Slow Rock 2
Rock & Roll
Heavy Metal
Blues Boogie
Blues
Shuffle
Blues Shuffle
Rock Shuffle
Charlston
Disco 1
Disco 2
Disco Funk
Dance
House 1
House 2
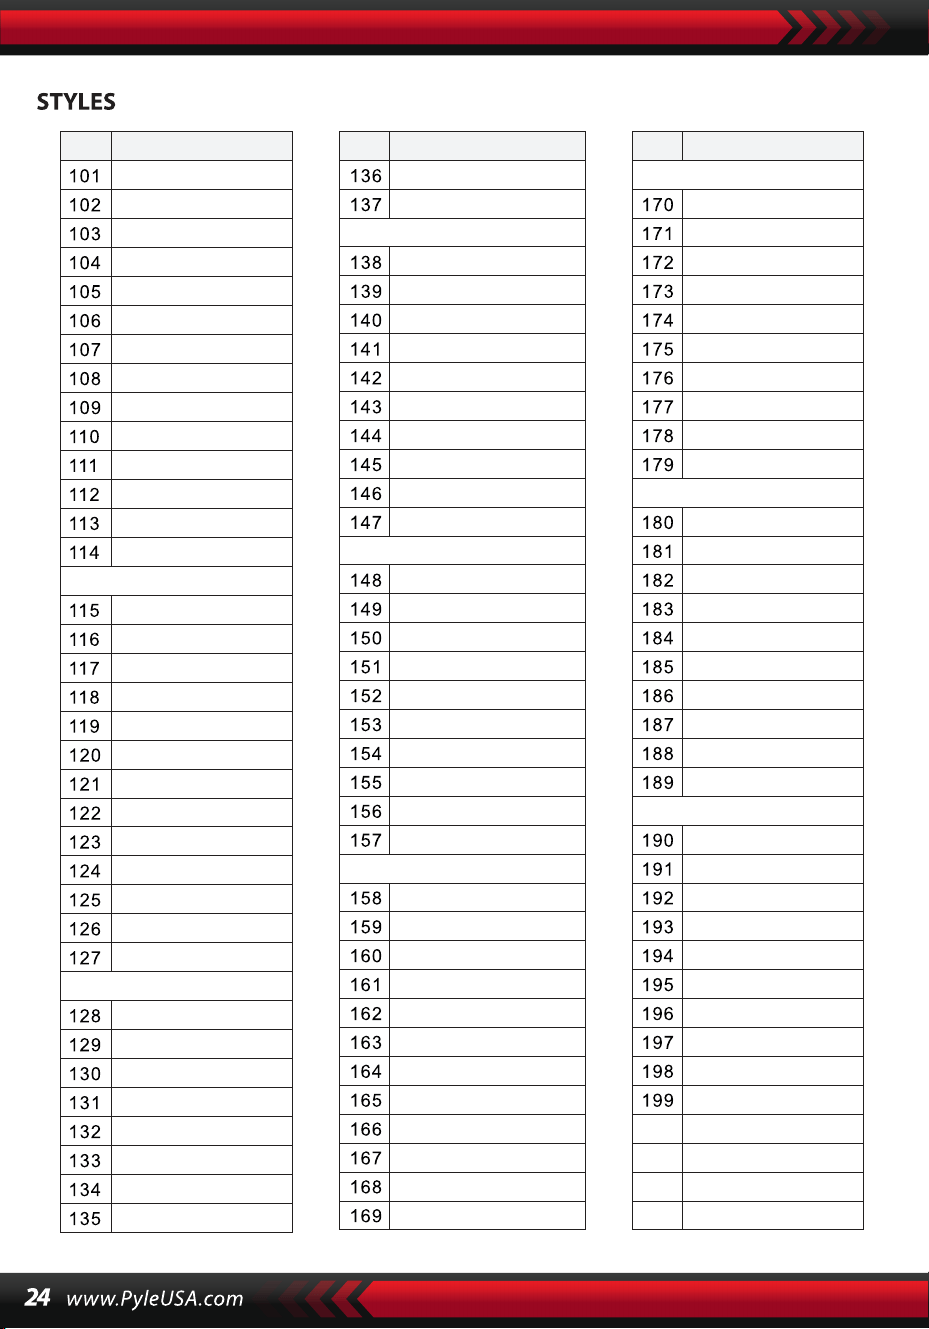
NO. Imię NO. Imię NO. Imię
8 Beat 2-1
8 Beat 3-1
8 Beat 4 -1
60’s 8 Beat-1
8 Beat Ballad -1
8 Beat Rock-1
16 Beat 1 -1
16 Beat 2-1
16 Beat Pop -1
16 Beat Shuffle-1
Ballad-1
Slow Ballad -1
16 Beat Ballad -1
Unplugged -1
Bossa Nova 1 -1
Bossa Nova 2 -1
Rhumba -1
Pop Rhumba -1
Cha Cha -1
Pop Cha Cha -1
Tango -1
Jazz Samba -1
Reggae -1
Pop Reggae -1
March 1 -1
March 2 -1
German March -1
6/8 March -1
Polka -1
Pop Polka -1
Waltz-1
Slow Waltz-1
Vienna Waltz -1
Musette -1
8 Beat-1
Ballad-1
Boogie -1
Jazz -1
Swing -1
Jazz Waltz-1
Twist -1
March -1
6/8 March -1
Waltz-1
Country 1 -1
Country 2-1
Pop Country-1
Country Rock -1
Country Folk -1
3/4 Country-1
Country Waltz-1
Country Shuffle-1
Country Boogie -1
Country Blues -1
Country Quick Step
-1
Swing -1
Cool Jazz-1
Pop Swing -1
Swing Fox -1
Big Band -1
Big Band Meduim
-1
Jazz Waltz -1
Ragtime -1
Dixeland -1
Funky Pop -1
Jazz Funk -1
Cool Funky -1
Soul 1 -1
Soul 2-1
Soul Shuffle-1
Soul Blues -1
R&B-1
6/8 Gospel -1
Pop Groove -1
Hip Hop -1
Techno -1
Rock -1
Pop Rock-1
Fast Rock-1
Slow Rock 1 -1
Slow Rock 2 -1
Rock & Roll-1
Heavy Metal -1
Blues Boogie -1
Blues -1
Shuffle-1
Blues Shuffle -1
Rock Shuffle -1
Charlston -1
Disco 1 -1
Disco 2 -1
Disco Funk -1
Dance -1
House 1 -1
House 2 -1
Rap -1
Euro Beat-1
ROCK-1
DANCE
SOUL & FUNK-1
JAZZ-1
COUNTRY
LATIN-1
TRADITIONAL-1
PIANO-1

Montaż podpórki klawiatury
1. Najpierw zbierz wszystkie części
potrzebne do montażu.
2. Następnie weź śrubę nr 2 i płytkę
podporową nr 3, przymocuj je do
dwóch wsporników na nr 5 i dokręć
je oddzielnie.
3. Za pomocą śruby nr 2 przymocuj
stopkę nr 4 do górnej części wsporni-
ka nr 5 i dokręć.
4. Instalacja jest teraz zakończona. Użyj
najdłuższej śruby, nr 1, aby przymo-
cować klawiaturę do wspornika.

Cechy :
• Przewodowe MIDI
• 200 globalnie wybranych stylów automatycznego strojenia
• 8 padów perkusyjnych / perkusja klawiszowa
• Kompaktowe, przenośne pianino muzyczne
• Prosta obsługa elektroniczna typu plug-in
• Gramofon do zmiany dźwięków
• Przenośne pianino
• Wbudowane pełnozakresowe głośniki stereo
• Podłącz i przesyłaj strumieniowo dźwięk z urządzeń zewnętrznych
• Możliwość podłączenia do głośnika i odtwarzania dźwięku
• Możliwość wyboru wielu zaprogramowanych stylów dźwiękowych,
tonów i rytmów
• Cyfrowy wyświetlacz LCD
• Regulowana kontrola głośności
• Tryby nagrywania i odtwarzania
• 162 dźwięki, w tym 128 standardowych dźwięków GM, 5 dźwięków
instrumentów ludowych, 23 dźwięki syntezatora, 6 dźwięków perkusji
• Podstawowe elementy sterujące: Głośność główna / Głośność akompan-
iamentu / Głośność strojenia / Kontrola tempa
• Funkcja automatycznego strojenia: Strojenie pojedyncze / Strojenie
palcami / Słownik akordów
• Funkcje nauczania: One-touch / Follow / Assemble
• Funkcje krzywej tonalnej / Vibrato / Wsparcie / Czułość na dotyk / Podwó-
jny dźwięk
• Funkcja podziału klawiatury / Oktawa / Transpozycja
• Synchronizacja / Start / Stop / Fade in / Fade out / Introduce / End / Fill A i
B / Metronom
• Wejście USB / Wejście pedału sustain
• Wyjście głośnikowe (L/R) / Wyjście słuchawkowe
• Idealny do występów w kinie domowym
• Zabawa dla osób w każdym wieku: dzieci i dorosłych

Zawartość pudełka
• Cyfrowa klawiatura muzyczna
do karaoke
• Półka na książki
• Adapter
• Wtyczka zasilania
• Stojak na klawiaturę
• Pedal sustain
• Torba wodoodporna
• Słuchawki
Specyfikacje pedału sustain:
• Funkcja normalnie włącz/wyłącz
• Długość: 24 cm/9,45 cala
• Szerokość: 8 cm/3,15 cala
• Wysokość: 7,1 cm/2,8 cala
• Waga: 1,75 kg/3,8 funtów
Technische Spezifikationen:
• 61 klawiszy klawiatury
• 162 dźwięki, w tym 128 standardowych głosów GM, 5 głosów instru-
mentów ludowych, 23 głosy syntezatora, 6 głosów perkusji
• Utwór demonstracyjny
• Interfejs audio: wejście Aux (jack 6,5 mm) / wyjście RCA G&D
• Maksymalny poziom dźwięku: do 110 dB
• Długość kabla USB/zasilającego: 1,2 m
• Materiał konstrukcyjny: ABS
• Zasilanie: DC 12V / zasilacz sieciowy
• Wymiary pianina (dł. x szer. x wys.): 93 cm x 30,4 cm x 9,4 cm/6.6 x 11.97 x
3.7 cale
Specyfikacje pedału podtrzymania :
• Normalna funkcja włączania/wyłączania
• Długość: 24 cm
• Szerokość: 8 cm
• Wysokość: 7 cm
• Waga: 1,75 kg
Ten produkt zawiera ftalan benzylu butylu (BBP), o
którym stan Kalifornia wie, że powoduje raka, wady
wrodzone i inne szkody reprodukcyjne. Nie połykaj.
Aby uzyskać więcej informacji, odwiedź stronę:
www.P65wamlngs.ca.gov
Ostrzeżenie California Proposition 65
OSTRZEZENIE :
Specyfikacje słuchawek
• Materiał konstrukcyjny: ABS +
arkusz dekoracyjny z laserem
• Materiał przewodu: płaski
przewód PVC
• Długość przewodu: 1,2 m
• Średnica wtyczki: 3,5 mm 1/8
• Waga: 0,14 kg

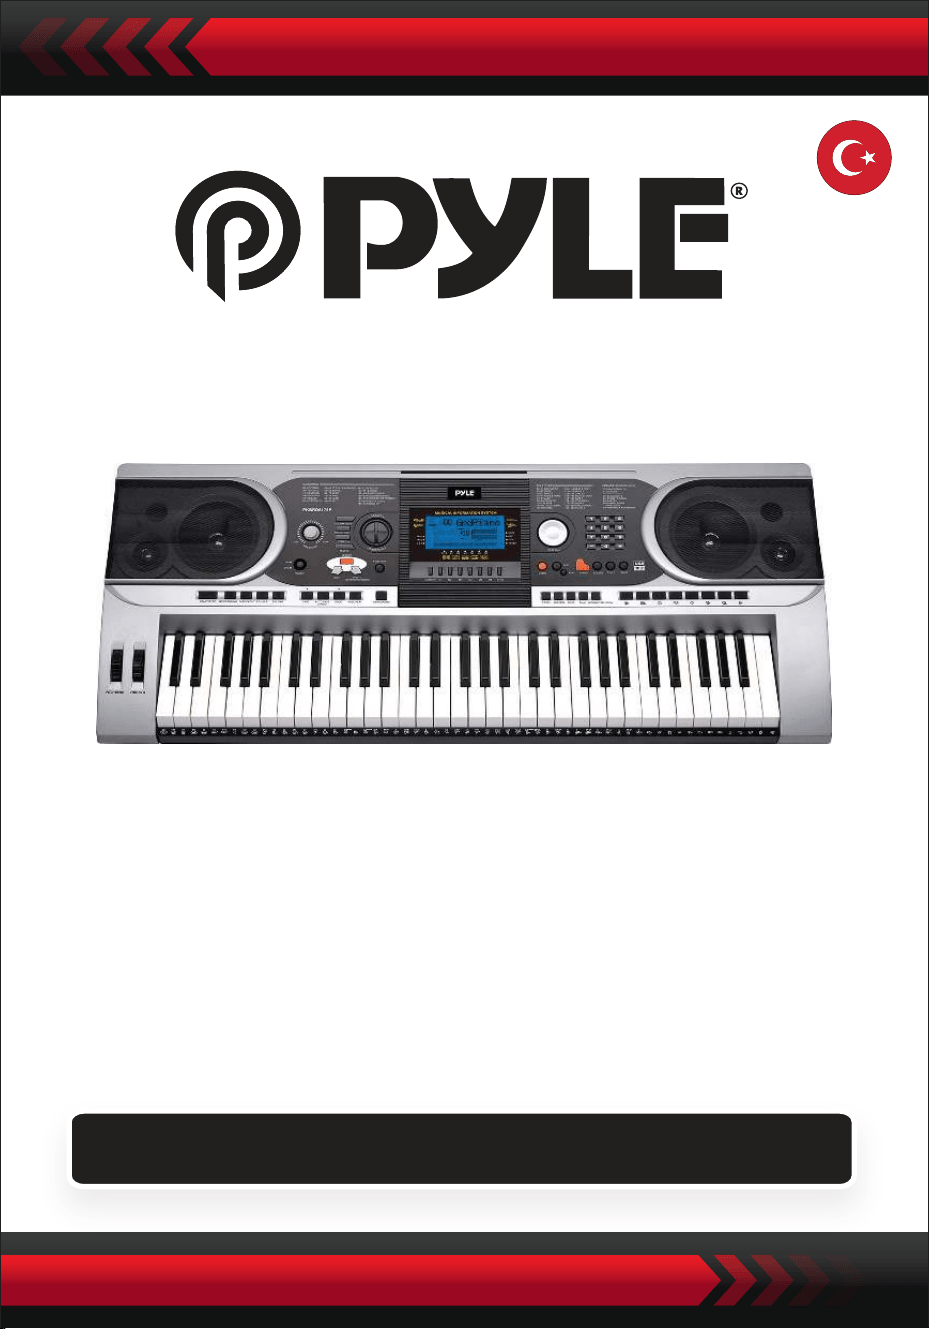
Su Geçirmez Çantalı Taşınabilir Elektronik Klavye (61
Tuş), Klavye Standı, Sürdürme Pedalı ve Kulaklık
Dijital Müzik Klavyesi
PKBBD6175P
KULLANICI KILAVUZU
TUR

• Belirtilen güç adaptörünü kullanın ve varsa hasarlı adaptörü hemen
değiştirin.
• Cihazı sökmeyin veya iç parçalarını değiştirmeyin. Arıza durumunda,
derhal kullanmayı bırakın ve profesyonel bir teknisyen tarafından onarıl-
masını sağlayın.
• Cihazı diğer cihazlara bağlamadan önce, tüm güç kaynaklarının
bağlantısını kesin.
• Enstrümanı maksimum ses seviyesinde veya rahatsız edici bir ses seviye-
sinde uzun süre çalmayın.
• Aşırı ısınma hasara neden olabileceğinden, enstrümanın parçalarını ısı
kaynaklarından uzak tutun.
• Sıvıların, tozun, parçacıkların ve diğer yabancı maddelerin cihaza girmesini
ve cihazda korozyona veya bileşenlerde kısa devreye neden olmasını
önleyin.
• Cihazı temizlemeden önce fişi çıkarın. Fişi ıslak ellerle takmayın veya
çekmeyin.
• Cihazı temizlemek için yumuşak, kuru bir bez kullanın. Cihazın yüzeyine
zarar vermemek için, cihazı temizlemek için boya, alkol veya diğer kimyasal
çözücüler kullanmayın.
• Çaldıktan sonra veya enstrüman uzun süre kullanılmayacaksa güç
kaynağını kesin ve güç kablosunu çıkarın.
• Yangın veya elektrik çarpması riskini azaltmak için, bu cihazı yağmura veya
neme maruz bırakmayın. Cihazı damlama veya sıçramaya maruz bırak-
mayın ve vazo gibi sıvı dolu nesneleri cihazın üzerine koymayın.
• Maksimum çalışma sıcaklığı: 40°C / 104°F
• Bağlantı kesme cihazı olarak doğrudan takılan bir adaptör kullanılıyorsa,
bağlantı kesme cihazı erişilebilir durumda olmalıdır.
• Bu ekipmanı kitaplık veya benzeri kapalı bir alana kurmayın ve iyi hava-
landırma koşulları sağlayın. Havalandırma açıklıkları gazete, masa örtüsü,
perde vb. gibi nesnelerle kapatılarak havalandırma engellenmemelidir.
• Uyarı: Kulaklıklardan gelen aşırı ses basıncı işitme kaybına neden olabilir.
• Etiket ünitenin alt kısmında yer almaktadır.
• Cihazı damlama veya sıçramaya maruz bırakmayın ve vazo gibi sıvı dolu
nesneleri cihazın üzerine koymayın.
• Bağlantı kesme cihazı olarak doğrudan fişli adaptör kullanıldığında,
bağlantı kesme cihazı kolayca çalıştırılabilir durumda kalmalıdır.
DEVAM ETMEDEN ÖNCE DİKKATLİCE OKUYUN
Bu kılavuzu ileride başvurmak üzere güvenli bir yerde ve el
altında bulundurun.
UYARI

Bu sembol, bu ürünün Avrupa Birliği genelinde diğer evsel atıklarla
birlikte atılmaması gerektiğini gösterir.
Kontrolsüz atık bertarafının çevreye veya insan sağlığına olası zararlarını
önlemek için, malzeme kaynaklarının sürdürülebilir şekilde yeniden
kullanımını teşvik etmek amacıyla lütfen sorumlu bir şekilde geri
dönüştürün. Kullanılmış cihazınızı iade etmek için lütfen iade ve toplama
sistemlerini kullanın veya ürünü satın aldığınız perakendeciyle iletişime
geçin. Çevresel açıdan güvenli geri dönüşüm için bu ürünle ilgilenebilirl-
er.
I. Kontrol Paneli ve Uzatma Portları
1. Hoparlör
2. Güç açık
3. Ana Ses Seviyesi
4. Tempo
5. Eşlik Ses Düzeyi
6. Transpozisyon
7. Oktav
8. Ders
9. Fonksiyon
10. Doğru
(Akort sözlüğü)
11. Sol
12. Hafıza
13. M1, M2...M6
14. O.T.S
15. LCD ekran
16. Demo
17. Kayıt/Geri
Oynatma
18. Veri Çevirme
19. Piyano
20. Sayılar
21. Ses
22. Stil
23. Şarkı
24. Başlat/Duraklat
25. Giriş/Bitiş
26. Soluk Giriş/Çıkış
27. A'yı doldurun
28. B'yi doldurun
29. enkronizasyon
30. Otomatik Bas Akoru
31. Prog/Null Oynatma
32. Metronom
33. Dokunma
34. Sürdürülebilirlik
35. Bölünmüş
36. Çift
37. Klavye ile Perküsyon
38. Panel ile Perküsyon
39. Modülasyon
40. Vibrasyon
41. Akor
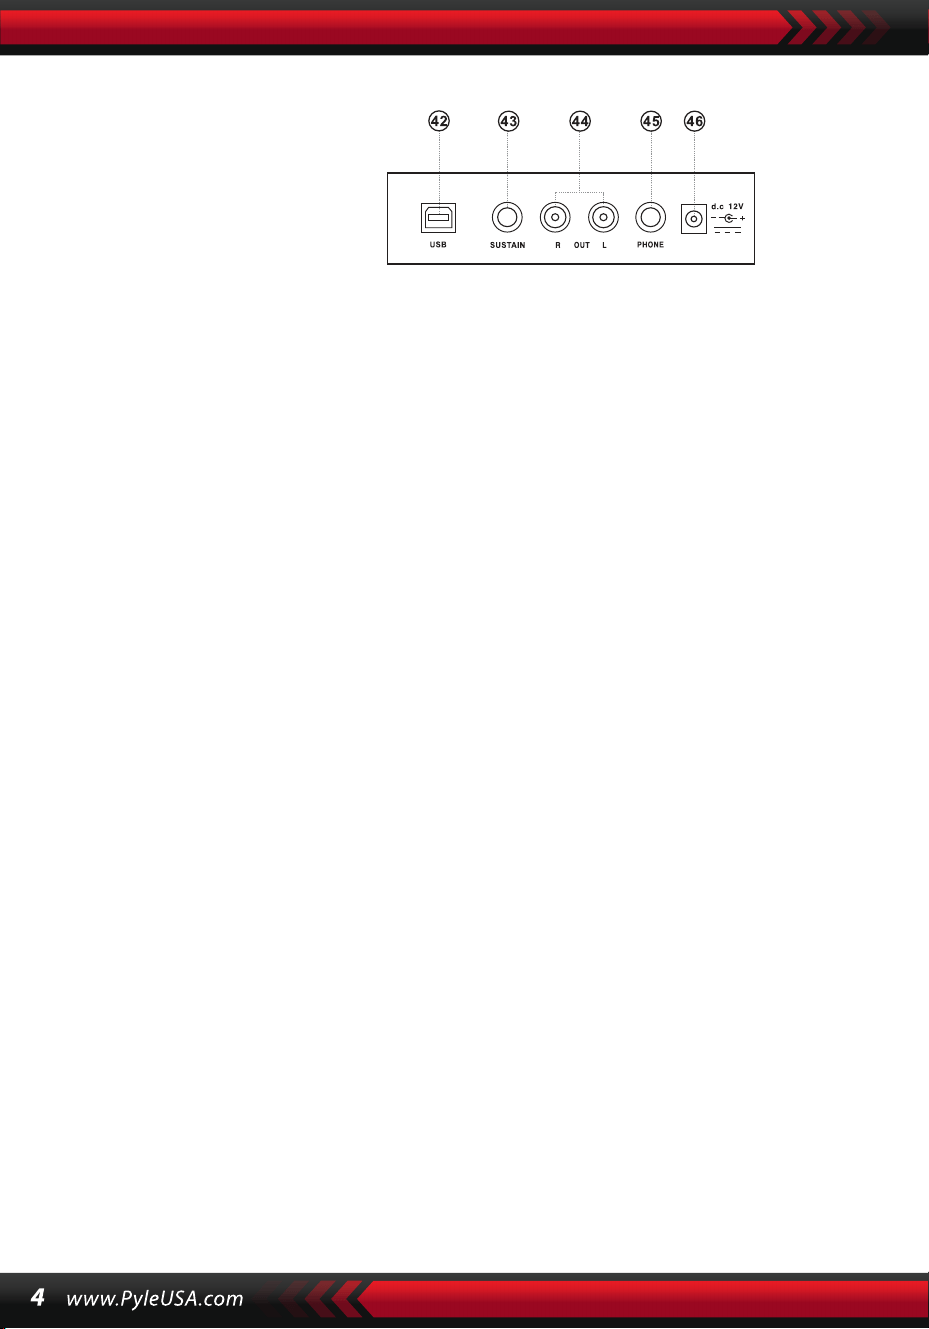
AC/DC GÜÇ ADAPTÖRÜNÜN KULLANIMI
AC/DC güç adaptörü cihaz için belirtilen adaptör olmalıdır. Bir ucunu arka
paneldeki güç soketine ve diğer ucunu yerel şebeke kaynağına bağlayın. (Lütfen
giriş voltajının şebeke voltajı ile aynı olması gerektiğini unutmayın).
KULAKLIK JAKI
Kulaklıkları muhafazanın arkasındaki kulaklık jakına takın, böylece dahili hoparlör
otomatik olarak kapatılabilir ve çalma ve şarkı söyleme başkalarını rahatsız
etmeden devam edebilir.
Not: Kulaklıklardan gelen çok yüksek ses işitme duyusuna zarar verebilir.
AMPLIFIKATÖRLERE VEYA AKUSTIĞE BAĞLANTI
Enstrüman dahili bir hoparlör sistemine sahiptir ve diğer amplifikatörlere veya
akustik hoparlörlere de bağlanabilir. Önce enstrümanı ve harici ekipmanı kapatın,
ardından stereo frekans kablosunu arka paneldeki L/R OUT jakına ve diğerini
harici ekipmanın LINE IN veya AUX IN jakına takın.
USB MIDI
MIDI, Müzik Enstrümanı Dijital Arayüzü anlamına gelir. MIDI soketleri aracılığıyla
klavye, bir parça veri iletim hattı üzerinden diğer MIDI özellikli müzik aletlerine
veya bilgisayarlara bağlanabilir. Bu durumda, klavyedeki herhangi bir performans
bilgisayara aktarılabilir ve daha sonra bilgisayardaki gelişmiş yazılımla kaydedile-
bilir, bestelenebilir veya düzenlenebilir. Bilgisayarda saklanan tüm MIDI müzikleri
enstrümana aktarılabilir ve çalınabilir.
USB MIDI uygulama yöntemleri:
1. İlk olarak, enstrümanları evrensel veri hattı üzerinden bilgisayara bağlayın ve
her ikisini de açın.
II. Gösteri için Hazırlık
ARKA PANEL
42 USB MIDI GIRIŞI
43 SUSTAIN JAK GIRIŞI
44 L/R JAK ÇIKIŞI
45 AUDIOPHONES
26 DC 12V GIRIŞ
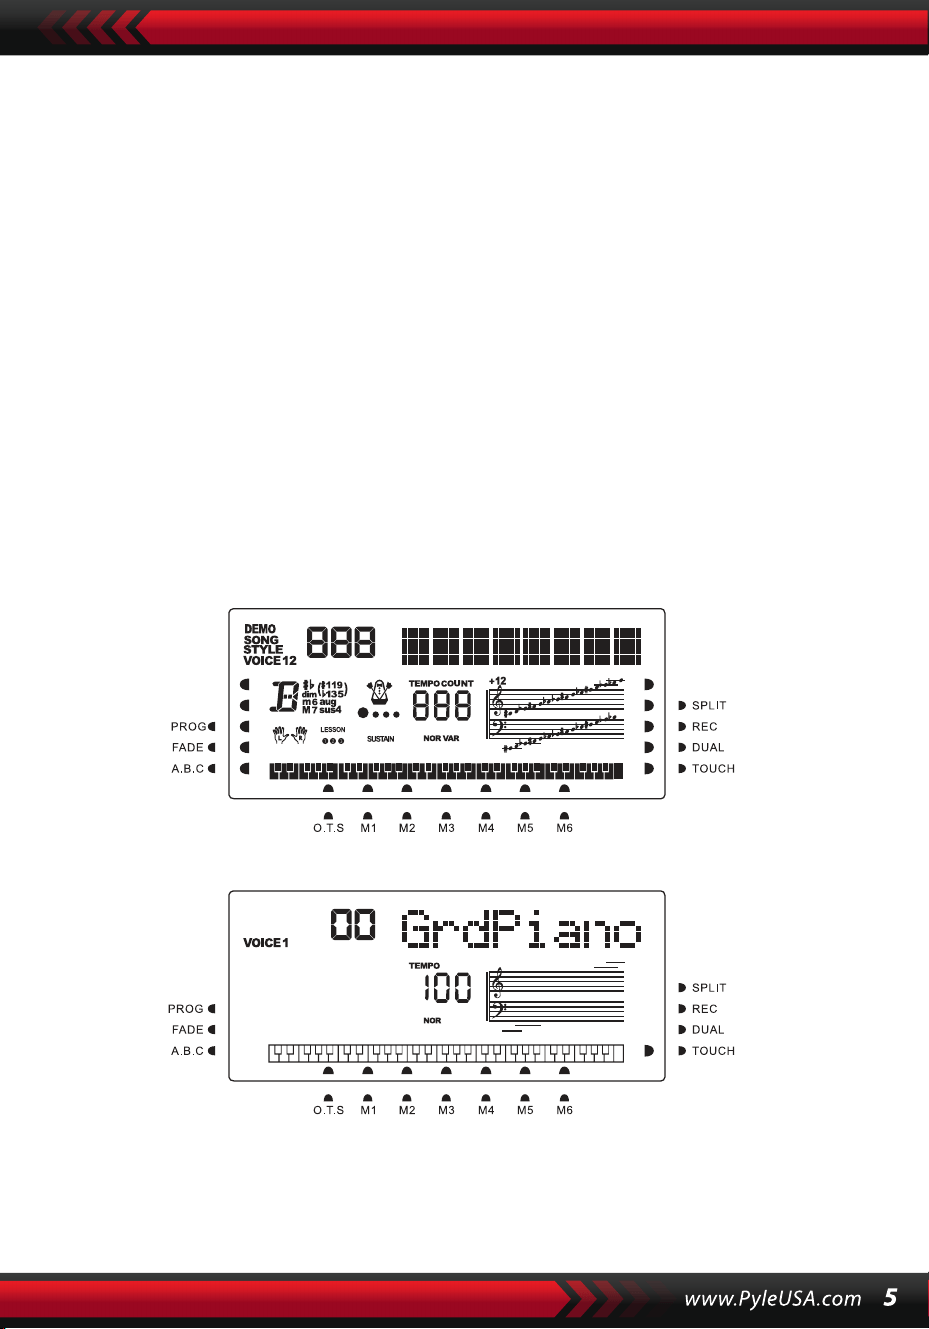
2. İkinci olarak, CAKEWALK gibi müzik düzenleme yazılımını kurun ve başlatın.
Enstrümanın özel donanımı daha sonra müzik yazılımını içeren donanımda
görünecek ve varsayılan cihaz olarak ayarlanacaktır. Bu durumda, enstrüman ile
bilgisayar arasında veri iletişimi kurulmuş olur.
3. Üçüncü olarak, enstrümanın MIDI kanallarını ayarlayın (Lütfen bunu [Menü]
düğmesi girişinden kontrol edin).
SÜRDÜRME PEDALI
Enstrüman, performansta sürdürme efekti için kullanılabilecek harici bir sürdürme
pedalına eklenebilir.
ANA SES DÜZEYININ AYARLANMASI
Ana ses seviyesini artırmak için ana ses seviyesi düğmesini saat yönünde ve ana ses
seviyesini azaltmak için saat yönünün tersine çevirin. Fader aynı zamanda eşlik ses
seviyesini de kontrol eder.
III. Temel Performans Yöntemi
Arka ışık açıkken [Power] düğmesine basın ve LCD ekran mevcut ses, tempo, fonksi-
yon modu vb. hakkında bilgi gösterecektir.
Tüm işaret imleçlerini ve farklı modların parametrelerini gösteren hayali tam
Güç açıldığında tam LCD ekran:
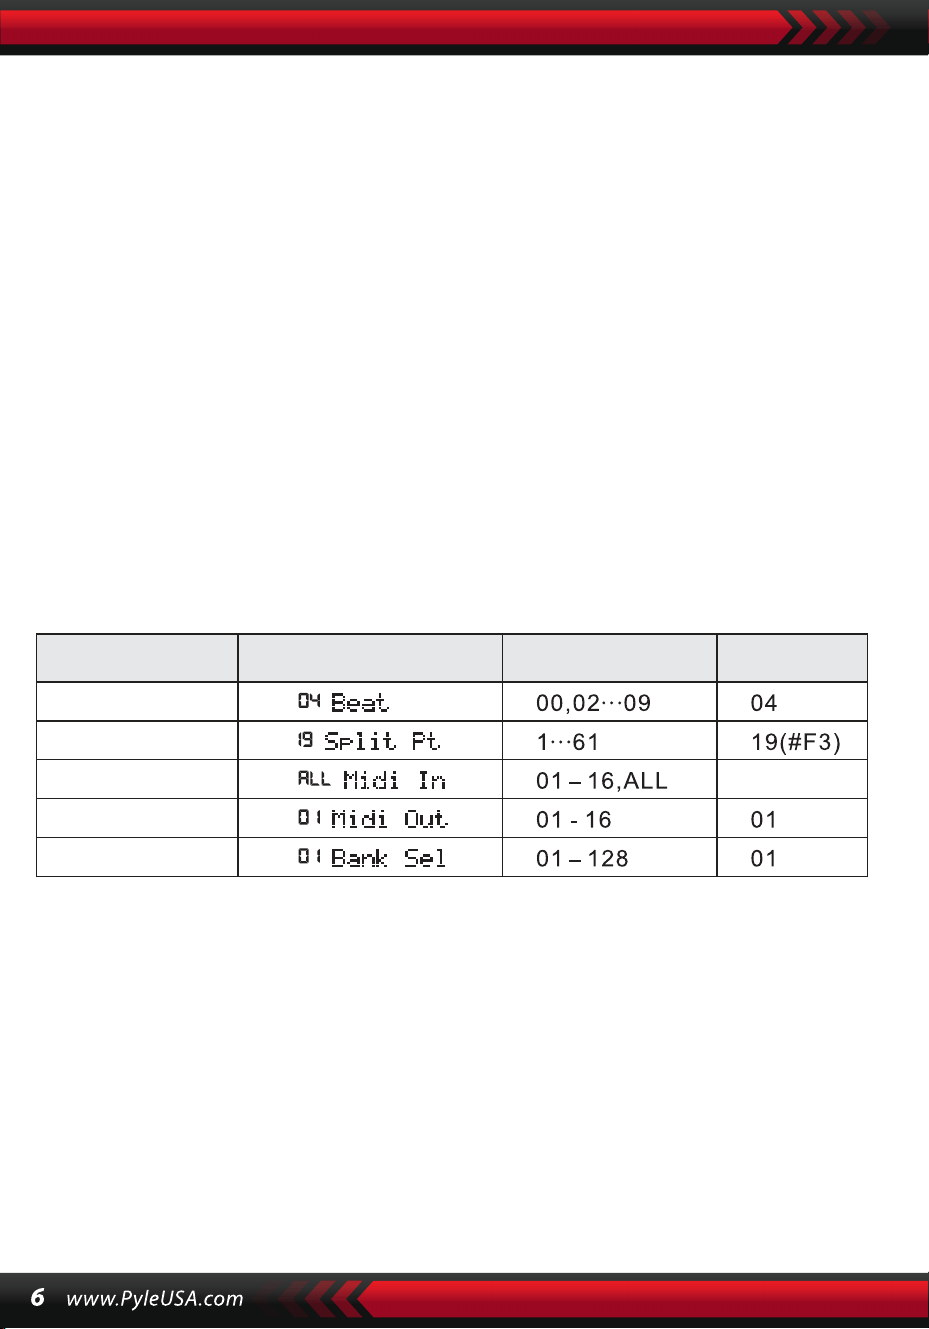
VERİ ÇEVİRME
[Data Dial] düğmesini çevirmek bir ses, ritim veya şarkı seçmek için bir kısayoldur. Saat
yönünde çevirerek daha büyük bir koda ulaşılabilir; saat yönünün tersine çevirerek
daha küçük bir koda ulaşılabilir.
PANEL VE KLAVYE PERKÜSYONLARI
Enstrümanda kayıtlı 8 tip panel perküsyonu ve 61 klavye perküsyonu vardır.
• [Panel perküsyon] düğmesine basın, ilgili perküsyon sesi belirli bir tuşa basılarak
başlatılabilir.
• LCD'de "PERCUS" göründüğünde [Klavye Perküsyonu] düğmesine basın. Bu
durumda, perküsyon klavye üzerinde gerçekleştirilebilir. Belirli bir tuş, belirli bir
perküsyon sesi türüne karşılık gelir. Fonksiyondan çıkmak için düğmeye tekrar
basın.
IV. Fonksiyon Düğmesi
[Fonksiyon] düğmesi aracılığıyla yapılandırılabilen parametrelerle ilgili ayrıntılar
aşağıda verilmiştir.
Nazwa paramet-
ru
Wskazanie na ekranie Regulowany zakres
Wartość\
domyślna
RİTİMLER
LCD'de "04Beat" görünene kadar [Fonksiyon] düğmesini basılı tutun. Bu durumda,
00, 02 ila 09 olarak kodlanan dokuz farklı vuruş stilinden herhangi biri seçilebilir.
İstenen vuruş stili [+/-] düğmeleri veya [Data Dial] düğmesi kullanılarak seçilebilir.
BÖLME NOKTASI
Bölme noktası, klavyeyi soldaki eşlik klavyesi ve sağdaki melodi klavyesi olmak
üzere iki parçaya ayıran tuştur. Enstrümanın varsayılan bölme noktası soldan
başlayarak 19. tuştadır ve nokta klavye üzerindeki herhangi bir tuşta sıfırlanabilir.
BEAT
HEPSİ
SPLIT PT
MIDI GİRİŞİ
MIDI ÇIKIŞI
BANKA SEÇİNİZ

MIDI KANAL KONFIGÜRASYONU
1. MIDI GİRİŞİ
LCD'de "MIDI GİRİŞİ " görünene kadar [Fonksiyon] düğmesine arka arkaya
basın. Bu durumda, [+/-] düğmelerine basarak veya [data Dial] kadranını
"hepsi" konumuna getirerek gelen MIDI dosyalarını çalmak için hedef kanal
seçilebilir: bu, tüm kanalların (01 ila 16 kodlu) kullanılabilir olduğu anlamına
gelir. Enstrüman açıldığında tüm kanallar önceden ayarlanmıştır.
2. MIDI ÇIKIŞI
LCD'de "MIDI ÇIKIŞI " görünene kadar [Fonksiyon] düğmesine arka arkaya
basın. Bu durumda, [+/-] düğmelerine basarak veya [data Dial] düğmesini
çevirerek çıkış MIDI dosyalarını iletmek için hedef kanalı seçebilirsiniz. Ancak,
Otomatik Ritim, demo şarkılar ve enstrümanda kayıtlı şarkılar gibi bazı MIDI
dosyaları iletilemez. Enstrüman açıldığında, kanal 01 önceden ayarlanmıştır
ve kullanılabilir.
BANKA SEÇİMİ
LCD'de "Bank Sel" göründüğünde [Fonksiyon] düğmesine tekrar tekrar basın.
Bu durumda, [+/-] düğmelerine basarak veya [data Dial] kadranını çevirerek
MIDI klavye sesini ayarlamak için 01'den 128'e kadar kodlanmış 128 banka
arasından istenen Ses bankası seçilebilir. Enstrüman açıldığında, varsayılan
Ses bankası BANK01'dir.
Not: Standart GM Ses Bankasında 128 Ses içeren BANK 01 kodlu sadece bir
Ses Bankası vardır. Bilgisayarda başka Ses Bankaları varsa, bunlar enstrümana
eklenebilir ve BANK 01'den 128'e kadar kodlarla ayarlanabilir.
V. Sesler ve Efektler
SES SEÇIMI
Sistemde 128 GM sesi, klavye perküsyonu için 6 ses grubu ve halk müziği için
5 ses grubu olmak üzere 162 çeşit ses bulunmaktadır.
LED ekranda "19 Split Pt" görünene kadar [Fonksiyon] düğmesine arka
arkaya basın. Bu durumda, [+/-] düğmelerine basarak veya [data Dial]
kadranını çevirerek ya da hedef tuşuna basarak bölme noktası sıfırlanabilir.
Seçim tamamlandıktan sonra yeni bölme noktası ayarlanır.

Açıldığında, varsayılan ses LCD'de "00 Grd Piano" olarak gösterilen 00 kodlu
sestir. Ses ayarı işlevini başlatmak için [Ses] düğmesine basın. İstenen ses sayı
düğmeleri, [+/-] düğmeleri veya [data Dial] kadranı kullanılarak seçilebilir.
Ancak, sayı düğmelerinin uygulanmasında olduğu gibi, hedef sesin kodu üç
basamaklı olarak girilmelidir. Bu, bir veya iki basamaklı koda "00" veya "0"
eklenmesi gerektiği anlamına gelir, örneğin, istenen ses kodu 65 ise, 0, 6 ve 5
rakamları girilmelidir ve 8 ise, 0, 0 ve 8 rakamları girilmelidir.
PİYANO
Kullanıcılar için daha kullanışlı hale getirmek için, enstrüman, basarak
doğrudan piyano sesini seçmenize olanak tanıyan [Piyano] düğmesiyle
özel olarak tasarlanmıştır.
1.[Piyano] düğmesine bastığınızda, enstrüman piyano moduna geçer ve
LCD'de "PİYANO" kelimesi belirir. Bastığınız herhangi bir tuşun sesi piyano
sesini alacaktır.
2.Eşlik modunda, [Piyano] düğmesine basmak eşliği durdurabilir ve
enstrümanın piyano moduna geçmesine neden olabilir. Düğmeye tekrar
basarsanız, işlev durur.
Not: Piyano modunda, ritimler seçilebilir ve çalınabilir, ayrıca eşlik kontrolü
normal olarak çalışabilir, ancak yalnızca akor olmadan vurmalılar.
ÇİFT SES FONKSİYONU
Enstrümanın çift ses işlevi vardır: iki ses birleştirilerek yeni bir ses efekti
oluşturulabilir ve iki tür müzik enstrümanı çalınarak üretilmiş gibi görünen
sesin karmaşıklığı zenginleştirilebilir. Dual] düğmesi etkinleştirilmeden
önce, enstrüman sesi LCD üzerinde "SES 1" ile işaretlenir ve ikinci ses
aşağıdaki gibi seçilebilir:
1. "SES” görüntülendiğinde ve imleç LCD'de "ÇİFT” seçeneğini göster-
diğinde [Çift] düğmesine basın. İkinci sesin kodu da LCD ekranda gösteri-
lecektir. İkinci ön ayarlı ses Ses 48'dir. Bu durumda, basılan tuşların sesi iki
sesin bir kombinasyonu olacaktır.
2. İkinci ses [ +/-] düğmelerine basılarak veya [data Dial] çevrilerek seçilebil-
ir.

1. Çift Ses işlevinde, ilk ses, enstrümanı "SES 1" ayar moduna geçirmek için
önce [Ses] düğmesine basılarak, ardından [+/-] düğmelerine basılarak veya
[veri Kadranı] çevrilerek değiştirilebilir.
2. İkili Ses işlevinde, [Çift] düğmesine basmak işlevi durdurabilir ve LCD'de
"SES 2" ve "ÇİFT" i işaret eden imleç kaybolur, bu da sistemin "SES 1" ayar
moduna geri döndüğü anlamına gelir.
Not: "Otomatik akor" yüklemesi dışında: çift ses işlevi tüm klavyeye uygula-
nabilir; "otomatik akor" yüklemesinde ise yalnızca melodi klavyesine uygula-
nabilir, eşlik klavyesine uygulanamaz.
DINAMIK HISLI KLAVYE
Cihaz açıldığında, dinamik his fonksiyonu da ışıklı "DOKUNMA" imleci ile etkinleştiril-
ir. Ayrıca [Dokunma] düğmesine basarak işlevi etkinleştirebilir veya devre dışı bırak-
abilirsiniz. İşlev, basılan çeşitli tuşlara uygulanan dinamikleri gösterebilir, böylece
işlev klavye üzerindeki performansı güçlendirebilir. Dinamikler büyüdükçe notaların
ses seviyesi de büyür. İşlev kapatıldığında, basılan tuşların tüm dinamikleri aynı ses
seviyesine sahip olur.
PERDE BÜKME
[Perde Bükme] düğmesini yükselttiğinizde veya alçalttığınızda, perde yukarı (alt)
veya aşağı (burdon) kayar. Bükümü bıraktığınızda, perde normale döner.
VIBRATO BÜKME
[Vibrato Bükme] öncekinden daha düşük olduğunda, vibrato işlevi devre dışı bırakılır.
Yukarı çevrilirse, işlev etkinleştirilir ve basılan tuşların sesi bir sustain etkisine sahip
olur. Yukarı veya aşağı değiştirilirse, efekt artırılabilir veya zayıflatılabilir.
SÜRDÜRME
1. Fonksiyonu başlatmak için LCD'de " SÜRDÜRME " imleci yanarken
[Sürdürme] düğmesine basın. Basılan tuşların sesi zarif bir sustain efekti
alacaktır.
2. Fonksiyondan çıkmak için LCD'de " SÜRDÜRME" göründüğünde
[Sürdürme] düğmesine tekrar basın.
OKTAV
[Oktav+/-] düğmeleri enstrümanı bir oktav yukarı veya aşağı ayarlamak için
kullanılabilir. Oktav+] veya [Oktav-] düğmelerine ilk kez bastığınızda, mevcut
oktav değeri LCD'de görüntülenir; herhangi birine tekrar basmak,
enstrümanın perdesinin olasılıklar aralığında bir oktav yukarıda veya aşağıda
olmasını sağlar.
TRANSPOZE
Notaların perdesini transpoze etmek için [Transpoze ] veya [Transpoze ]
düğmesine basın. Transpoze "-6" ile "+6" arasında ayarlanabilir. Her iki düğm-
eye aynı anda basarsanız, notaların perdesi önceden ayarlanmış "0" değerine
normalleştirilir. Transpoze işlevi modunda, transpoze değeri [veri Kadranı]
çevrilerek de değiştirilebilir.
ÇIFT KLAVYE
Klavyeyi iki parçaya bölmek için imleç "SPLIT" üzerinde yanarken [Split]
düğmesine basın, soldaki 24 tuş ve geri kalan tuşlar çift klavye oluşturur. Sol
parçanın perdesi bir oktav yükselirken, sağ parçanın perdesi bir oktav alçalır,
yani iki parçanın perdesi eşit olur. Bu arada, iki parçanın sesi farklı olabilir. Sol
kısım birincil sesi korur ancak sağ kısım başka bir ses kazanabilir. İmleç "SPLIT"
ibaresini koyulaştırırken [Split] düğmesine tekrar basın, işlev durur ve tüm
klavyenin sesi önceki sağ parçanın sesini korur.
Not: Otomatik Akor modunda, dinamik his fonksiyonu, sürdürme efekti,
perde bükme ve vibrato akor klavyesinde çalışamaz.
VI. Otomatik Stiller
STIL SEÇIMI
00'dan 200'e kadar 200 farklı stil arasından seçim yapabilirsiniz. Cihaz
açıldığında, varsayılan stil "00" olarak kodlanır. LCD'de " STİL" göründüğünde
[stil] düğmesine basın, ardından sayı düğmelerini, [+/-] düğmelerini veya
[Data Dial] düğmesini kullanarak istediğiniz stili seçebilirsiniz.

Not: İstenen stil koduna üç hane girilerek ulaşılabilir. Bu, bir veya iki basamaklı
koda "00" veya "0" eklenmesi gerektiği anlamına gelir, örneğin hedef stil kodu
66 ise, 0, 6 ve 6 rakamları girilmelidir ve 9 ise, 0,0 ve 9 rakamları girilmelidir.
Naciśnij przycisk [Start/Stop], aby uruchomić lub zatrzymać styl akompan-
iamentu.
SENKRONİZASYON
LCD'de çubuk noktaları yanıp sönerken [SYNC] düğmesine basın. Otomatik
Akor işlevi kapalıyken, klavyede basılan herhangi bir tuş bir Stil parçasını
başlatabilir. Ancak Otomatik Akor işlevi açıkken, akor klavyesinde basılan
herhangi bir tuş melodi ve eşlik stilinin aynı anda çalınmasına neden olabilir.
GİRİŞ / BİTİŞ
1. Bir Stil parçası devam etmeden önce, [Giriş/Bitiş] düğmesi, LCD üzerinde
imleç "NOR" yanarken, normal Stil çalmaya yol açan bir başlangıç parçasını
başlatabilir.
2. Bir Stilin geliştirilmesi sırasında, [Giriş/Bitiş] düğmesine basılması normal
Stilin bir bitişle devam etmesine ve ardından tüm Stilin durdurulmasına
neden olabilir.
Not: Bitiş tamamlanmadan önce [Fill-in A] veya [Fill-in B] düğmesine basıl-
ması önceki normal stilin devam etmesine neden olabilir.
FADE IN AND FADE OUT / SOLDURMA VE SOLDAN ÇIKARMA
1. Stil durdurulduğunda, imleç "FADE" üzerinde yanarken [Fade In/Out]
düğmesine basın. Bu durumda, bir fade başlatın ve ardından fade sönebilir ve
parlak "FADE" kaybolurken 8 saniye içinde maksimum yoğunluğa ulaşabilir.
2. Bir Stilin yürütülmesi sırasında, [Fade In/Out] düğmesine basarsanız, Stil 8
saniye içinde sönecek ve "FADE" yazısı kaybolacaktır.
INTERMEZZO
1. Bir eşlik çalarken, bir intermezzo parçası duyulana ve imleç LCD ekranda
"VAR" gösterene kadar [Fill In A] düğmesine basın.
2. Eşlik sırasında, başka bir intermezzo bölümü duyulana ve imleç LCD ekran-
da "NOR" yerine "VAR" gösterene kadar [Fill In B] düğmesini basılı tutun. "VAR
"ın yanıp sönmesi stilin bir varyasyon parçası sürecinde olduğunu gösterir.
3. [Fill-in A] veya [Fill-in B] düğmesine sıkıca basarak, art arda intermezzoları
ekleyebilirsiniz. İntermezzo bittiğinde, normal eşlik başlayacaktır.
OTOMATIK METRONOM
[Metronom] düğmesine basıldığında, enstrüman zaman imzasını belirtmek
için tik atar. Bu durumda, [Fonksiyon] düğmesi kullanılarak farklı zaman imzası
stilleri seçilebilir. Düğmeye tekrar basıldığında metronom işlevi durur.
TEMPO AYARI
[Tempo] düğmeleri stillerin temposunu ayarlamak için uygulanabilir.
[Tempo ] /[Tempo ] düğmesine basın veya [Data Dial] düğmesini yukarı
veya aşağı çevirerek Stil temposunu dakikada 40 ila 280 vuruş değer aralığın-
da hızlandırın veya yavaşlatın; geçerli tempo değeri LCD ekranda "TEMPO"
olarak gösterilecektir. Tempo değerini önceden ayarlanmış değere
döndürmek için her iki [tempo] düğmesine aynı anda basın.
EŞLİK SESİNİN AYARLANMASI
Eşlik ses seviyesini 00 ila 31 arasınd
aki değer aralığında artırmak veya azaltmak için [Accom Vol ]/[Accom Vol ]
düğmelerine basın. Eşlik ses seviyesi değerini önceden ayarlanmış değere
döndürmek için her ikisine de aynı anda basın.
VII. Otomatik Bas Akoru ve Akor Sözlüğü
LCD üzerinde yanıp sönen A, B, C (Otomatik Bas Akorunu temsil eden)
imleçleri ile Otomatik Bas Akor işlevini başlatmak için [Otomatik Bas Akor]
düğmesine basın. Otomatik Bas Akor konumunda, [Auto Bass Chord] düğme-
sinin sol tarafındaki 19 tuş görüntülenecektir

Onlar klavye akor tuşlarıdır. Stil prosedürü sırasında, akor tuşlarına basılarak
otomatik bir bas akor parçası başlatılabilir.
Not:
1. Akor klavyesinin bölünme noktasını ve aralığını değiştirmek için [Fonksiyon]
düğmesine basın (ayrıntılar için "Bölünme Noktası" bölümüne bakın).
2. Enstrüman hem tek parmaklı hem de çok parmaklı parmakları tanıyabilir.
Parmakla eşleşen parmakları kabul etmelidir, ancak parmaklar parmakla
eşleşmediğinde tek parmak parmaklarını kabul etmelidir.
Bir parmak:
(Aşağıdaki parmak gösterimleri bu enstrüman tarafından kabul edilecek
şekilde tasarlanmıştır).
1. Majör triad: Akorun kökünü çalın
2. Minör triad: Akorun köklerini ve solundaki herhangi bir crotchet
anahtarını aynı anda çalın.
3. Dominant yedili akoru: Akorun köklerini ve solundaki herhangi bir
beyaz anahtarı aynı anda çalın.
4. Minör yedili akoru: Akorun köklerini aynı anda solundaki beyaz ve
siyah tuşlarla çalın..
Parmaklamalar: Aşağıdaki resimde gösterilen tüm parmaklamalar Do
majör akorunu üretebilir ve diğer akorlar da benzer şekilde çalınabilir.
Parmak notaları (Do majör)

AKOR SÖZLÜĞÜ
Akor sözlüğü aslında enstrümanda saklanan ve bir akoru oluşturan notalara
bakabileceğiniz bir akor el kitabıdır. Tüm akor notaları, öğrenciye akorları
çalmada rehberlik etmek için ekranda görüntülenir. Bu işlev, akor adlarını
bilen yeni başlayanların parmak hareketlerinde ustalaşması için çok faydal-
ıdır.
1. LCD ekranda görünen "DICT" ve "C" ile fonksiyonu başlatmak için [Akor
Sözlüğü] düğmesine basın: bu, Do majör triadı ve nota sembolleri anlamına
gelir. Akor kökleri ve akor tipi, bölme noktasının sağındaki melodik klavyede
tanımlanabilir, ardından karşılık gelen tuşlar klavyede ve ekranda asa
üzerindeki notalar gösterilir, böylece öğrenci akoru ekrandaki gösterime
göre eşlik klavyesinde çalabilir.
2. Akor notaları eşlik klavyesinde doğru çalındığında, kutlama amaçlı bir alkış
sesi duyulacaktır. Akor notaları doğru çalınmadığında, çalınan tuşlardan bir
BASS sesi gelecektir.
3. Fonksiyonu durdurmak için [Sağ/Akor Sözlük] düğmesine tekrar basın.

Not:
1.Akor köklerini ve akor türünü tanımlamaya yarayan melodik klavyede
(bölme noktasının sağında) basılan tuşlar için ses yoktur.
2.Akorlar akor klavyesinin aralığı dışında çalınamaz, yani akorlar bölme
noktasının solundaki tuşlarda çalınmalıdır.
VIII. Gösteri Şarkıları
Sistemde 2 adet farklı tarzlarda demo şarkı ayrılmıştır.
DEMO ŞARKININ SEÇIMI
1.Mevcut şarkı kodu ve vuruş noktalarının yanı sıra ekranda "DEMO" yanıp
sönerken [Demo] düğmesine basın, sistem iki demo şarkı için ardışık
çalma moduna geçecektir.
2.Demo şarkı çalma sırasında, şarkı numara düğmeleri, [+/-] düğmeleri veya
[Data Dial] kullanılarak başka bir şarkı ile değiştirilebilir.
3.Çalma işlemini durdurmak ve işlevden çıkmak için [Demo] düğmesine
tekrar basın.
IX. Öğrenme Şarkıları
Sistemde, müzik beğenisinin yanı sıra harika bir öğrenme aracı olarak
da kullanılabilecek 100 adet farklı tarzda şarkı bulunmaktadır.
ÖĞRENME ŞARKILARI SEÇIMI
1. Ekranda " ŞARKI " kelimesi ve mevcut şarkı kodu ve kısaltması gösterilerek
"şarkı" modunu başlatmak için [Şarkı] düğmesine basın ve sistem 100
şarkıyı art arda çalmaya başlayacaktır.
Şarkı çalma sırasında, sayı düğmeleri, [+/-] düğmeleri veya [Data Dial]
kadranı kullanılarak şarkı başka bir şarkı ile değiştirilebilir.
Akor uygulama alanı Akor tipi Akor kökleri

ŞARKIDAN ÇIKIN
1. Şarkı çalma sırasında, mevcut şarkıyı çalmayı durdurmak için [Başlat/Dur-
dur] düğmesine basın, ancak sistem "şarkı" modunda kalacaktır.
2. "Şarkı" modundan çıkmak ve ilgili işlevi başlatmak için şarkının sonunda
[Ses] düğmesine veya [Stil] düğmesine basın.
FUNKCJA "LEWEGO" I "PRAWEGO" KANAŁU POZA TRYBEM NAUKI
ÖĞRENME MODU DIŞINDA "SOL" VE "SAĞ" IŞLEVI
Şarkı sırasında, sol veya sağ kanal sesini açmak veya kapatmak için [Sol] veya
[Sağ] düğmesine basın. Örneğin, sağdaki melodi için ses kanalını açmak,
ancak soldaki eşlik veya melodi için ses kanalını kapatmak için ekranın sol
tarafında "SOL” kelimesi parlarken [Sol] düğmesine basın. Aynı işlem [Sağ]
düğmesi için de geçerlidir.
Not:
1. "Şarkı" modu boşaltıldığında, "akor sözlüğü" modunu başlatmak için
[Sağ/Akor Sözlüğü] düğmesine basın; moddan çıkmak için tekrar basın.
2. Bir şarkı sona erdiğinde, "akor sözlüğü" modunu başlatmak için [Sağ/Akor
Sözlüğü] düğmesine en az 2 saniye basın.
X. Dersler
Üç düğme [Ders], [Sol], [Sağ], öğrencinin öğretilen şarkıyı adım adım ayrı
ayrı çalmasını sağlayabilecek üç tür öğrenme modunu başlatabilir.
DERS I
Bu dersin amacı perde yerine müziğin süresini pratik etmektir. Doğru süreyle
basılan herhangi bir tuş, gerçek notalarda ve akorlarda doğru değişiklikler
yapabilir, ancak ilgili notaların sesini değiştiremez.
2. Şarkı çalma sırasında, mevcut şarkıyı çalmayı durdurmak için [Başlat/Dur-
dur] düğmesine basın, ancak sistem "şarkı" modunda kalacaktır; mevcut
şarkıyı tekrar tekrar çalmaya devam etmek için düğmeye tekrar basın.
Not: Enstrümanın 100 şarkılık çalma moduna dönmesi için önce "şarkı"
modundan çıkmanız, ardından [Şarkı] düğmesine basarak modu yeniden
etkinleştirmeniz gerekir.

DERS II
Bu dersin amacı, ekranda görünen tuşlarla doğru notaları çalma alıştırması
yapmaktır. Doğru notaların tuşlarına basarak şarkıyı çalmaya devam edebilir-
siniz veya doğru nota çalınana kadar şarkı askıya alınacaktır.
Not: Bu modda, sadece doğru notalar çalınabilir, ancak yanlış notalar yanıt
almaz.
DERS III
Bu ders, doğru notaları doğru süreyle çalma pratiği yapmayı amaçlamaktadır.
Öğrenilen şarkı normal şekilde çalarken, doğru notalar orijinal şarkının doğru
süresiyle çalınmalıdır. Herhangi bir tuşa basmadan, sistem sadece şarkının
eşliğini çalar.
SOL VE SAĞ EL PRATİĞİ
Bu dersin amacı sırasıyla sol veya sağ elle ya da her ikisiyle birden çalma
pratiği yapmaktır. Sağ el melodisini gizlemek için [Sağ] düğmesine basın ve
ardından sağ elle çalma alıştırması yapın. Sol el için melodiyi veya sol el için
akor değişikliklerini gizlemek için [Sol] düğmesine basın, ardından sol elle
çalma alıştırması yapın. Sol ve sağ el sesini gizlemek için her iki düğmeye aynı
anda basın, ardından her iki elle çalma alıştırması yapın.
DERS FONKSIYONU AYARI
1. "Şarkı "yı başlatmak için [Ders] fonksiyonuna basın, ardından şarkıyı
durdurmak için [Başlat/Durdur] düğmesine basın.
2. Numara düğmelerine veya [+/-] düğmelerine basarak veya [Data Dial]
kadranını döndürerek beğendiğiniz bir şarkıyı seçin.
3. "Şarkı" modu boşaltıldığında, Ders I, Ders II, Ders III'ü seçmek veya "ders"
işlevinden çıkmak için [Ders] düğmesine art arda basın. Seçilen herhangi bir
ders, ekranda "SOL" veya "SAĞ" ile birlikte karşılık gelen bir imleç ışığına sahip
olacaktır. Ardından dersleri başlatmak için [Başlat/Durdur] düğmesine basın
ve melodi veya akor nota göstergeleri asa ve LCD klavye üzerinde gösteri-
lecektir.

4. Ekranda "sol el" yanarken sol el pratiğini başlatmak için [Sol] düğmesine
basın. Ekranda "sağ el" yanarken sağ el pratiğini başlatmak için [Sağ]
düğmesine basın. Ekranda "sol ve sağ eller" yanarken sol ve sağ el pratiğini
başlatmak için her iki düğmeye de basın. Seçim yapılmazsa, sistem otoma-
tik olarak sağ elle uygulamaya başlayacaktır.
5. Bir dersi bitirdiğinizde, sistem mevcut şarkıyı çalacak ve önceki ders
modunu koruyacaktır.
Not: Farklı şarkı stilleri sol el pratiğini farklı kılar. Ritim tarzı şarkılar çalındığın-
da, sol el akorları çalmalıdır; diğer şarkılar çalındığında, sol el melodiyi veya
sol elle eşliği çalmalıdır (00 ila 84 kodlu şarkılar ritim tarzı şarkılardır). Bir ders
sırasında, ders modu serbestçe değiştirilemez.
XI. Mağaza ve Hafıza Fonksiyonu
Mağaza ve Hafıza işlevi, ayarlanan sesi, stili, tempoyu ve performans sırasında
değiştirilecek çalışma moduyla ilgili diğer parametreleri saklamak için
kullanılır. Ayrıca gerekli parametreleri doğrudan performansta geri çağırmak
için de uygulanır. Serbestçe geri çağrılabilen altı hafıza modu vardır.
PARAMETRELERI KAYDETME
İlk olarak, bir çalışma modunun ses, stil, tempo ve diğer ilgili parametrelerini
ayarlayın. İkinci olarak, [Hafıza] düğmesine sıkıca basın, ardından çalışma
modunu saklamak için hafıza modu düğmelerinden herhangi birine (M1, M2,
M3, M4, MS veya M6) basın. Tüm parametrelerin saklandığı bellek modunu
göstermek için karşılık gelen parlak bir imleç olacaktır.
PARAMETRE ÇIKARMA
Yürütme sırasında, hafıza modu düğmelerinden herhangi birine basarak
saklanan parametreleri mevcut olanın yerine gerekli çalışma modundan
çıkarın.

Not:
1. Bir bellek modu çıkarıldıktan sonra, tüm parametreler sıfırlanabilir ve daha
önce kaydedilenlerden farklı hale gelebilir. Bu durumda, ekranın altındaki
ilgili parlak imleç kaybolur ve modun değiştirildiğini gösterir.
2. Tüm bellek modları için güç kesintisi koruması yoktur, bu nedenle cihaz
gücü geri kazandığında, saklanan parametreler kaybolur.
XII. O.T.S (TEK DOKUNUŞ AYARI) Ayarı
1. Ekranın alt kısmında "O.T.S" ve "M1" yanıp sönerken "Otomatik Bas Akoru
"nu başlatmak için [O.T.S] düğmesine basın.
2. İstediğiniz stili hazırladıktan sonra, dört hafıza düğmesine (Ml ila M4) basın,
ardından klavyede çalınan stil önceden ayarlanmış dört sesi mükemmel bir
şekilde birleştirecektir.
3. İşlevin bu durumunda, işlevden çıkmak için düğmeye tekrar basın.
Not: [O.T.S] düğmesi yüklenirken, saklama ve geri çağırma işlevi başlatılamaz.
XIII. Enregistrement
KAYIT IÇIN HAZIRLIK
Sistemin kayda hazır olduğunu belirtmek için dört ritim noktası yanıp
söndüğünde ve ekranda "REC" göründüğünde [REC] düğmesine basın. Tercih
ettiğiniz ses, stil, tempo, sustain ve diğer parametreler kayıttan önce ayarla-
nabilir.

K AYIT
Bu durumda, klavyede çalınan tüm notalar, ayarlanan tempoda ekranda art
arda yanıp sönen dört çubuk nokta ile kaydedilir.
"Kayıt" modunda, bir eşlik parçasını başlattıktan hemen sonra kaydedebilir-
siniz. "Otomatik bas akor" durumunda, otomatik eşlik klavyesinde basılan
herhangi bir tuş bir stil parçasını başlatabilir.
Ancak "Otomatik Bas Akor" yüksüz olduğunda, bir stil parçası yalnızca
[Başlat/Durdur] düğmesine basılarak başlatılabilir. Eşlik kaydı sırasında,
melodi notaları da klavyede çalınabilir ve birlikte kaydedilebilir.
Not:
1.Güç kesintisi koruması yoktur, bu nedenle cihaz gücü geri kazandığında
kaydedilen veriler kaybolur.
2.Bu kayıt işlevi yeniden uygulandığında yeni kayıt ana kaydın yerini alacaktır.
3.Kaydedilen notaların sayısı, farklı sesler, stil, tempo vb. dahil olmak üzere
kaydedilen tüm verilerden etkilenir.
KAYITTAN SONRA
1. "Kayıt" modunda, kaydı durdurmak için [REC] düğmesine tekrar basın.
2. Bir stil çalışırken ve kaydedilirken, bir bitiş parçası başlatmak için
[Enter/Ending] düğmesine basın. Bitiş bittiğinde, sistem otomatik olarak
kaydı durduracak ve "kayıt" modundan çıkacaktır.
3. Kayıt sırasında, tamamen dolu bellek ekranda 3 saniye boyunca yanıp
sönen "DOLU" mesajıyla kaydı durduracak ve ardından "kayıt" modundan
çıkacaktır..
GERİ OYNAT
Kayıt bittiğinde, kaydedilen parçayı çalmak için [Playback] düğmesine basın.

XIV. Programa
PROGRAM
Klavyeyi vurmalı klavyeye dönüştürmek için ekranda "Prog" imleci yanıp
sönerken [Prog] düğmesine basın.
Ardından program işlevini başlatmak için panel üzerindeki bir tuşa veya bir
davula basın.
Programlamayı durdurmak için [Prog] düğmesine bir kez daha basın.
Hafızanın tamamen dolu olması da programı durdurabilir.
Yeni düzenlenen ritim veya yeni kayıt ana ritmin yerini alacaktır.
BOŞ ÇALMA
[Null Play] düğmesine basılırsa, düzenlenen ritim tekrar tekrar çalınabilir.
Çalmayı durdurmak için düğmeye tekrar basın.
Ekler
SESLER
NO. Isim NO. Isim NO. Isim
Piano
Organ
Bass
Guitar
Mallet
Grand Piano
Bright Piano
El Grd Piano
Honky-tonk Piano
Elec piano 1
Elec Piano 2
Harpsichord
Clavi
Celesta
Glockenspiel
Music Box
Vibraphone
Marimba
Xylophone
Tubular Bell
Santur
Drawbar Organ
Jazz Organ
Rock Organ
Church Organ
Reed Organ
Accordion
Harmonica
Tango Accordion
Classic Guitar
Steel Guitar
Jazz. Guitar
Clean Guitar
Muted. Guitar
Overdriven Guitar
Distortion Guitar
Guitar Harmonics
Acoustic Bass
Finger Bass
Picked Bass
Fretless Bass
Slap Bass 1
Slap Bass 2
Synth Bass 1
Synth Bass 2

SESLER
NO. Isim NO. Isim NO. Isim
Strings Lead
Sound Effects
Chinese Instrument
Synth Voice
Drum Kit
Pad
Effects
Ethnic
Percussive
Strings Ensemble
Brass
Reed
Pipe
Violin
Viola
Cello
Contrabass
Tremolo Strings
Pizzicato Strings
Harp
Timpani
Strings 1
Strings 2
Synth Strings 1
Synth Strings 2
Choir Aahs
Voice Ooh
Synth
Orchestra Hit
Trumpet
Trombone
Tuba
Muted Trumpet
Horn
Brass Ensemble
Synth Brass 1
Synth Brass 2
70elep
Fzpiano
Ep3
Ep4
Ep5
Harppian
Clavr2
Clavr3
Organ Box
E. organ
Churc2
Syn Organ
Altoel
Fz guitar
Syn elgt
Picel bas
El violin
Brassfm
Fmlead
Fantalfo
Polyaa2
Bowedg2
70elpad
Soprano Sax
Alto Sax
Tenor sax
Baritone Sax
Oboe
English horn
Bassoon
Clarinet
Piccolo
Flute
Recorder
Pan Flute
Blown Bottle
Shakuhachi
Whistle
Ocarina
Square
Sawtooth
Calliope
Chiff
Charang
Voice
Fifths
Bass lead
Fantasia
Warm
Poly Synth
Choir
Bowed
Metallic
Halo
Sweep
Fx1
Fx2
Fx3
Fx4
Fx5
Fx6
Fx7
Fx8
Sitar
Banjo
Shamisen
Koto
Kalimba
Bag Pipe
Fiddle
Shanai
Tinkle Bell
Agogo
Steel Drums
Woodblock
Taiko Drum
Melodic Tom
Synth Drum
Reverse Cymbal
Standard Kit
Power Kit
Dance Kit
808 Kit
Brush Kit
Orchestra Kit
GT Fret Noise
Breath Noise
Seashore
Bird Tweet
Teleph Ring
Helicopter
Applause
Gunshot
Pipa
Erhu
Guzhen
Banhu
Qudi

STİLLER
NO. Isim NO. Isim NO. Isim
BEAT & POP
SOUL & FUNK
LATIN
TRADITIONAL
PIANO
BEAT & POP-1
JAZZ
COUNTRY
ROCK
DANCE
8 Beat 1
8 Beat 2
8 Beat 3
8 Beat 4
60's 8 Beat
8 Beat Ballad
8 Beat Rock
16 Beat 1
16 Beat 2
16 Beat Pop
16 Beat Shuffle
Ballad
Slow Ballad
16 Beat Ballad
Unplugged
Funky Pop
Jazz Funk
Cool Funky
Soul 1
Soul 2
Soul Shuffle
Soul Blues
R&B
6/8 Gospel
Pop Groove
Bossa Nova 1
Bossa Nova 2
Rhumba
Pop Rhumba
Cha Cha
Pop Cha Cha
Tango
Jazz Samba
Reggae
Pop Reggae
1-Mar
2-Mar
German March
6/8 March
Polka
Pop Polka
Waltz
Slow Waltz
Vienna Waltz
Musette
8 Beat
Ballad
Boogie
Jazz
Swing
Jazz Waltz
Twist
March
6/8 March
Waltz
8 Beat 1 -1
Swing
Cool Jazz
Pop Swing
Swing Fox
Big Band
Big Band Meduim
Jazz Waltz
Ragtime
Dixeland
Quick Step
Country 1
Country 2
Pop Country
Country Rock
Country Folk
3/4 Country
Country Waltz
Country Shuffle
Country Boogie
Country Blues
Rap
Euro Beat
Hip Hop
Techno
Country Quick Step
Bluegrass
Rock
Pop Rock
Fast Rock
Slow Rock 1
Slow Rock 2
Rock & Roll
Heavy Metal
Blues Boogie
Blues
Shuffle
Blues Shuffle
Rock Shuffle
Charlston
Disco 1
Disco 2
Disco Funk
Dance
House 1
House 2

STİLLER
NO. Isim NO. Isim NO. Isim
8 Beat 2-1
8 Beat 3-1
8 Beat 4 -1
60’s 8 Beat-1
8 Beat Ballad -1
8 Beat Rock-1
16 Beat 1 -1
16 Beat 2-1
16 Beat Pop -1
16 Beat Shuffle-1
Ballad-1
Slow Ballad -1
16 Beat Ballad -1
Unplugged -1
Bossa Nova 1 -1
Bossa Nova 2 -1
Rhumba -1
Pop Rhumba -1
Cha Cha -1
Pop Cha Cha -1
Tango -1
Jazz Samba -1
Reggae -1
Pop Reggae -1
March 1 -1
March 2 -1
German March -1
6/8 March -1
Polka -1
Pop Polka -1
Waltz-1
Slow Waltz-1
Vienna Waltz -1
Musette -1
8 Beat-1
Ballad-1
Boogie -1
Jazz -1
Swing -1
Jazz Waltz-1
Twist -1
March -1
6/8 March -1
Waltz-1
Country 1 -1
Country 2-1
Pop Country-1
Country Rock -1
Country Folk -1
3/4 Country-1
Country Waltz-1
Country Shuffle-1
Country Boogie -1
Country Blues -1
Country Quick Step
-1
Swing -1
Cool Jazz-1
Pop Swing -1
Swing Fox -1
Big Band -1
Big Band Meduim
-1
Jazz Waltz -1
Ragtime -1
Dixeland -1
Funky Pop -1
Jazz Funk -1
Cool Funky -1
Soul 1 -1
Soul 2-1
Soul Shuffle-1
Soul Blues -1
R&B-1
6/8 Gospel -1
Pop Groove -1
Hip Hop -1
Techno -1
Rock -1
Pop Rock-1
Fast Rock-1
Slow Rock 1 -1
Slow Rock 2 -1
Rock & Roll-1
Heavy Metal -1
Blues Boogie -1
Blues -1
Shuffle-1
Blues Shuffle -1
Rock Shuffle -1
Charlston -1
Disco 1 -1
Disco 2 -1
Disco Funk -1
Dance -1
House 1 -1
House 2 -1
Rap -1
Euro Beat-1
ROCK-1
DANCE
SOUL & FUNK-1
JAZZ-1
COUNTRY
LATIN-1
TRADITIONAL-1
PIANO-1

Klavye Tabanının Montajı
1. Öncelikle tüm montaj parçalarını
hazırlayın.
2. İkinci olarak, vida No. 2 ve braket
plakası No. 3'ü alın, bunları taban No.
5'in iki braketine takın ve ayrı ayrı
sıkın.
3. 2 numaralı vidayı ve 4 numaralı
braketi alarak 5 numaralı tabanın üst
kısmına sabitleyin ve sıkın.
4. Kurulum tamamlanmıştır, 1 numaralı
uzun vida tuş takımını tabana sabitle-
mek için kullanılır.

Özellikler:
• MIDI Kablosu
• 200 Dünyanın Seçtiği Otomatik Eşlik Stili
• 8 Perküsyon Pedi/Klavye Perküsyonları
• Kompakt ve Taşınabilir Müzikal Piyano
• Basit Takılabilir Elektronik Çalışma
• Dönebilen Ses Kaydırma Sistemi
• Taşınabilir Piyano
• Dahili Tam Aralıklı Stereo Hoparlörler
• Ses Bağlantısı ve Harici Cihazlardan Ses Akışı
• Hoparlörlere Bağlanabilir ve Ses Çalabilir
• Çoklu Seçilebilir Klavye Ses Ön Ayarları, Ton Stilleri ve Ritim Stilleri
• Dijital LCD Ekran
• Ayarlanabilir Ses Kontrolü
• Kayıt ve Oynatma Modu
• 128'i standart GM, 5 Folk Enstrümanı, 23 Synthesizer ve 6 Davul Sesi
olmak üzere 162 Ses
• emel Kontrol: Ana Ses Düzeyi/Eşlik Ses Düzeyi/Akor Ses Düzeyi/Tempo
Kontrolü
• Otomatik Akor Fonksiyonu: Basit Akor/ Basamaklı Akor/ Akor Sözlüğü
• Öğretim Fonksiyonları: Tek Anahtar / Takip / Takip / Topluluk
• Pitch bend/Vibrato/Sustain/Dokunma Sensörü/Çift Ses Fonksiyonu
• Klavye Bölme/Oktav/Transpoze fonksiyonu
• Sync/Start/Stop/Fade In/Fade Out/Introduce/End/Fill in A&B/Metronom
• USB Girişi/Sustain Pedal Girişi
• Hoparlör Çıkışı (L/R)/Phono Çıkışı
• Ev Sineması Oturma Odası Performansları için Mükemmel
• Her Yaştan Çocuk için Eğlence: Çocuklar ve Yetişkinler
Kutunun içinde ne var
• Karaoke özellikli Dijital Müzik
Klavyesi
• Klavye Standı
• Güç Adaptörü
• Güç Kablosu
• Klavye Standı
• Sustain Pedalı
• Su Geçirmez Çanta
• Kulaklıklar
Sürdürme Pedalı Özellikleri:
• Normalde Açık/Kapalı Fonksiyon
• Uzunluk: 24 cm/9.45 inç
• Genişlik: 8 cm/3.15 inç
• Height: 7,1 cm/2,8 inç
• Ağırlık: 1,75 kg/3,8 lbs
Technische Spezifikationen:
• (61) Tuşlar
• 162 Ses 128 Standart GM Sesi, 5 Halk Müziği Enstrüman Sesi, 23
• Synthesizer Sesleri, 6 Davul Kiti Sesleri
• Demo Şarkı
• Ses Arayüzü: Aux (6,5 mm) Giriş Jakı / RCA L&R Çıkış Jakı
• Maksimum Ses Seviyesi: 110 dB'ye kadar
• Güç/USB Kablo Uzunluğu: 3,9' ft.
• Yapı Malzemesi: Tasarlanmış ABS
• Güç Kaynağı: DC 12V / AC Adaptör
• Klavye Boyutları (U x G x Y): 93 cm x 30,4 cm x 9,4 cm/6.6 x 11.97 x 3.7 inç.
Klavye Standı Özellikleri:
• Pişirilmiş Vernik
• Sökülebilir Fonksiyon
• Yapı Malzemesi: Demir+ABS
• Uzunluk: 80 cm/31,5 inç
• Genişlik: 21 cm/8,3 inç
• Yükseklik: 57,567,5 cm/22,6426,57 inç
• Ağırlık: 1,75 kg/3,8 lbs
• Yük Taşıma Kapasitesi: 15 kg/33 lbs
Bu ürün, Kaliforniya Eyaleti tarafından kansere, doğum
kusurlarına ve diğer üreme zararlarına neden olduğu
bilinen bütilbenzil ftalat (BBP) içerir. Yutmayınız.
Daha fazla bilgi için ziyaret edin: www.P65warnings.ca.gov
Kaliforniya Önerisi 65 Uyarısı
UYARI:
Kulaklık Özellikleri
• Yapı Malzemesi: ABS+ Lazer
Dekoratif Folyo
• Kablo Malzemesi: PVC Düz Tel
• Kablo Uzunluğu: 1.2M
• Fiş Çapı: 3,5 mm 1/8
• Ağırlık: 0,14 kg

Questions or Comments
We are here to help!
Phone: 1.718.535.1800
PyleUSA.com/ContactUs