User Manual
Segway Navimow X3 Series
250212-A

Table of Contents
Original Instructions
1. Overview
1.1 Introduction
1.2 How EFLS 3.0 works
1.3 Safety Warnings
1.4 Symbols and Decals
1.5 What's in the Box?
1.6 Parts and Functions
1.7 Specifications
1.8 Accessories (sold separately)
2. Installation and Mapping
2.1 Before You Start
2.2 Activate the Mower
2.3 Find Locations
2.4 Install GNSS Antenna and Charging Station
2.5 Upgrade to the Latest Firmware
2.6 Map out the Work Area
3. Daily Use
3.1 Mow
3.2 Navimow App
3.3 Mower Settings
3.4 Safety Features
3.5 Advanced Features
3.6 App Settings
4. Maintenance
4.1 Cleaning
4.2 Replace Blades
4.3 Key Parts Maintenance
4.4 Transportation
4.5 Battery
4.6 Power Supply
4.7 Storage
4.8 Recycling and End-of-life Disposal
5. FAQ & Troubleshooting
6. Important Information
6.1 Europe
6.2 North America
7. Contact Us
3
3
4
5
7
8
9
13
15
19
19
20
21
23
25
26
30
30
32
34
35
36
37
38
38
39
39
40
40
41
41
42
42
43
43
51
57

Welcome
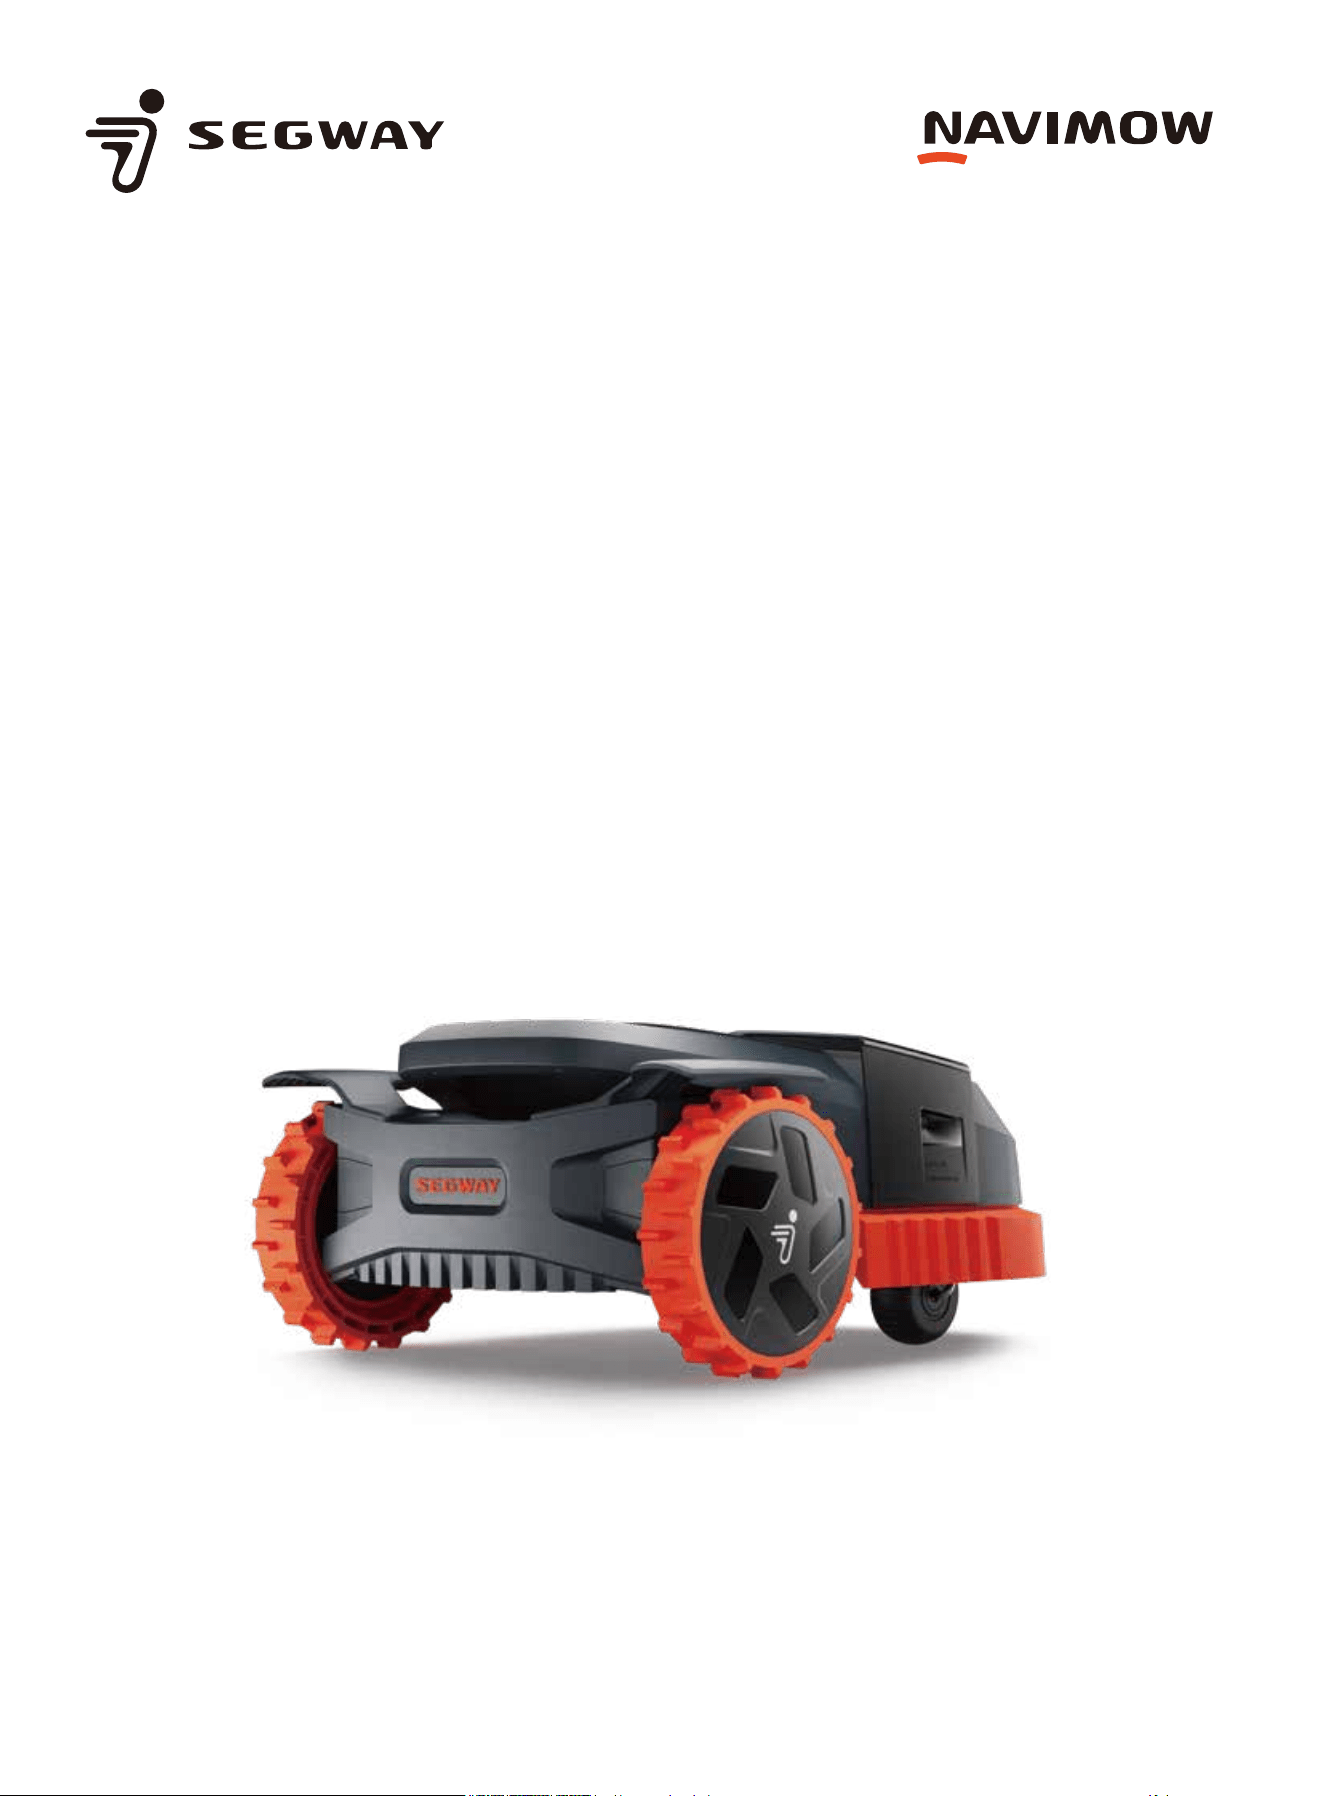
Introducing the Segway Navimow X3 Series – the latest wire-free
robotic lawn mowers. The Segway Navimow X3 Series achieves an
efficiency level two times faster than the industry average,
making it the ultimate solution for handling larger lawns.
Innovative blade upgrades and accelerated mowing speed offer
unparalleled performance, giving you a pristine lawn with every
use.
1. Overview
1.1 Introduction
Segway Navimow X3 Series
Segway Navimow pioneered residential robotic lawn mowers without boundary wires, launching the Navimow H Series as its
first-generation product in 2022. Now, Segway presents the Navimow X3 Series, a new line of robotic lawn mowers designed for
larger lawns. The X3 models can cover lawns ranging from 1500 m² to 10,000 m² (0.5 acre to 2.5 acres for the US and Canada).
This makes the X3 Series the optimal solution for effortless lawn maintenance.
Navimow utilizes an advanced robotic mowing system that leverages a virtual boundary, eliminating the need for cumbersome
perimeter wiring. Easy to operate and manage, the Segway Navimow X3 Series frees up your time for more enjoyable pursuits
while ensuring a consistently immaculate lawn.
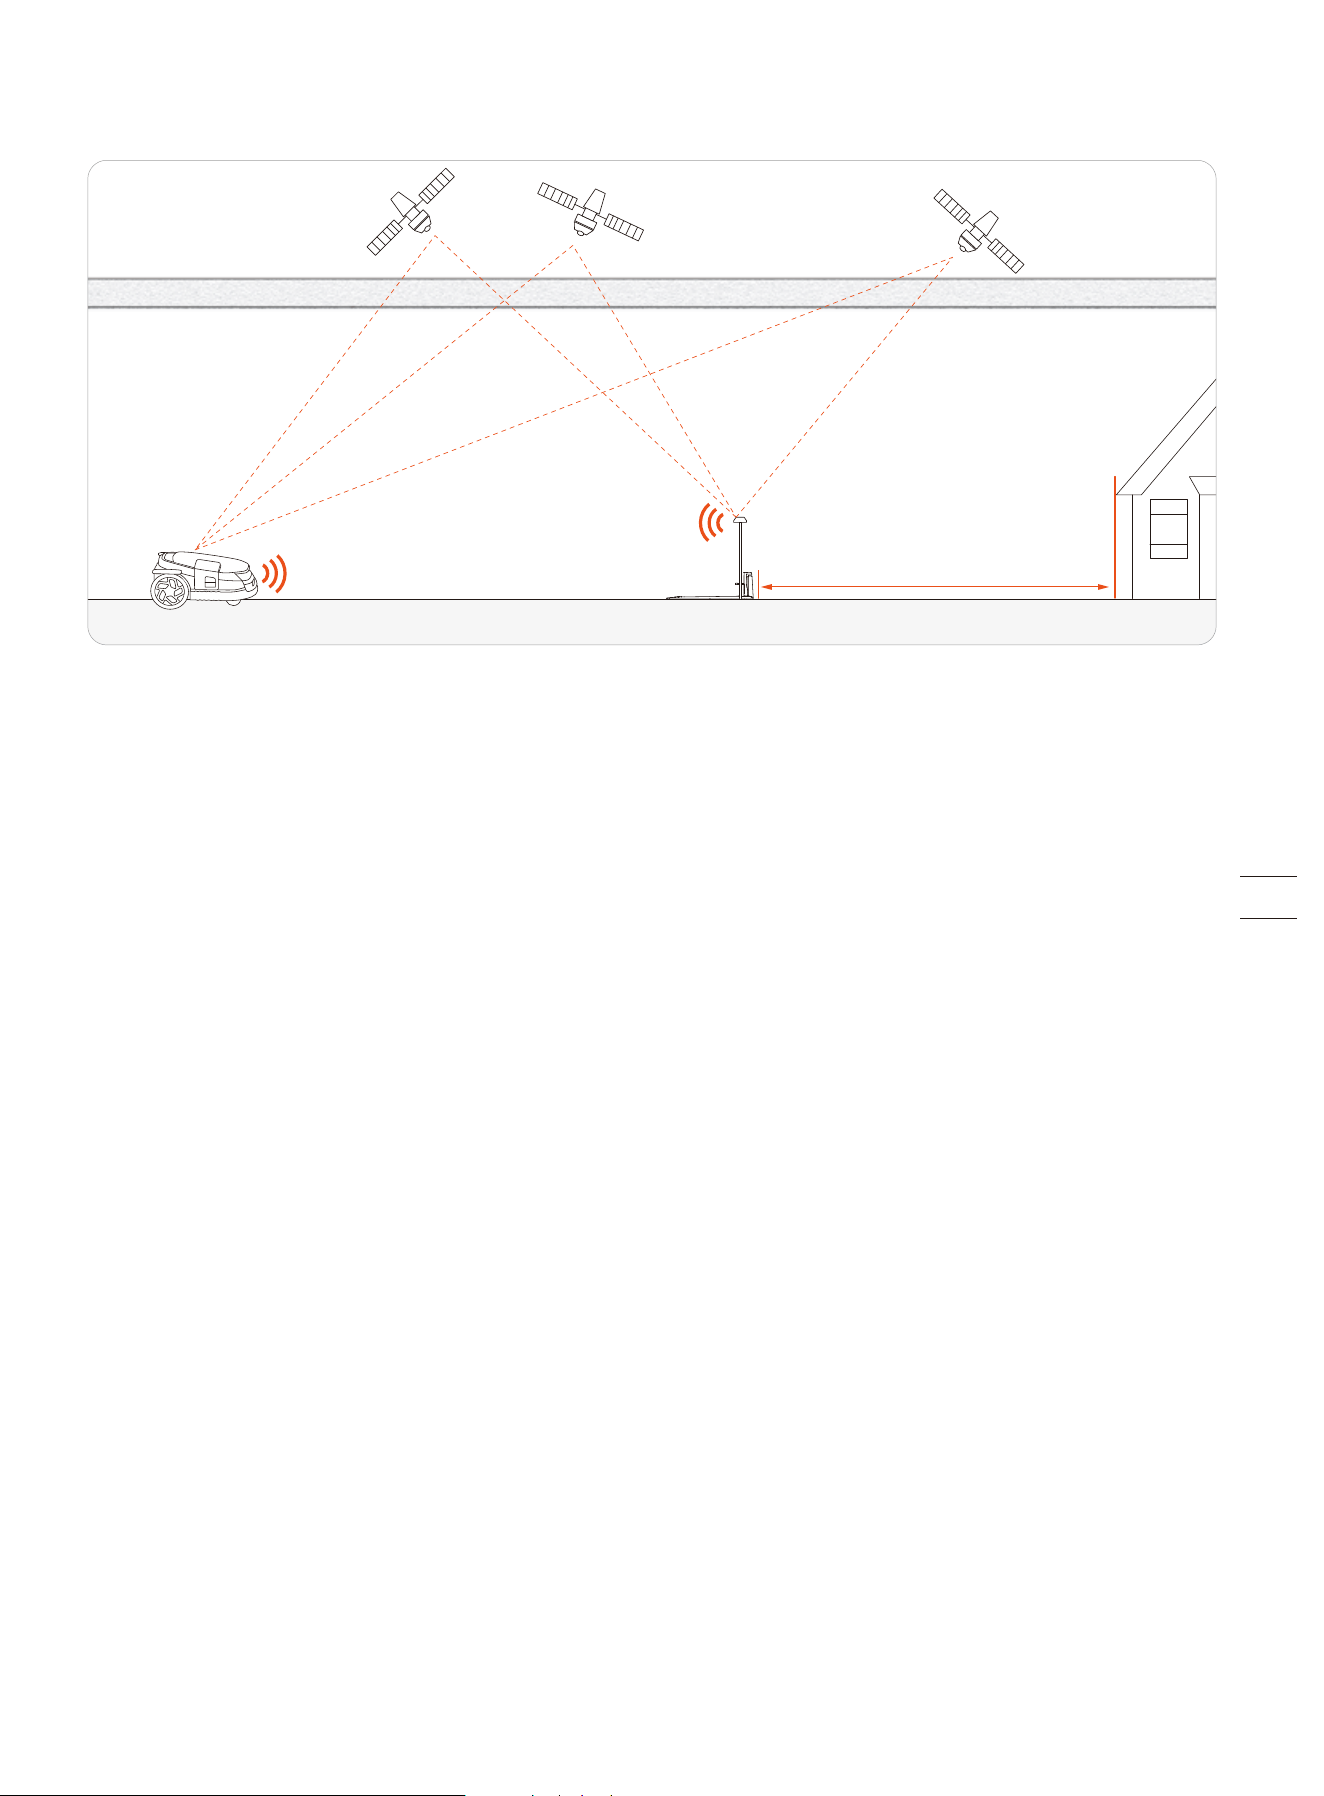
The Navimow system comprises a robotic lawn mower, a charging station, a GNSS (Global Navigation Satellite System) antenna,
and a dedicated app. The robotic lawn mower and GNSS antenna concurrently receive positioning signals from satellites to
pinpoint the mower's location and define the work area. The charging station replenishes the mower's battery. The app facilitates
remote control of the mower and provides real-time status monitoring.
Mower
The robotic lawnmower is powered by a rechargeable lithium-ion battery pack. Using the Navimow app on your phone, you can
define the boundaries of a work area. The mower will then automatically cut the grass within the boundaries. The mowing paths
are calculated by the algorithm according to the shape of the work area to achieve the highest mowing efficiency. If the battery
runs low before finishing a mowing task, it will automatically go back to its charging station to recharge.
Navimow App
The Navimow app is an important part of the Navimow system. You can follow the interactive guidance shown via the app to
complete the system installation and set up the work area. You can also use the app to adjust the settings of the mower,
customize the work area, view the work status of the mower, control the mower remotely, etc. You can also get the latest and
most comprehensive official Help and Support content through the app.
MOW NOW
EFLS (Exact Fusion Location System) is an advanced positioning system that integrates multiple sensors to provide precise
navigation for robotic lawn mowers. Developed to address the pressing issues of low mowing efficiency and complex setup in
automated lawn care, EFLS enables wireless robotic lawn mowers to operate within virtual boundaries with exceptional accuracy.
By replacing traditional boundary wires with virtual mapping, EFLS technology saves time and significantly enhances mowing
efficiency, laying the groundwork for precision lawn mowing. Positioned at the forefront of smart lawn care solutions and
automation, EFLS redefines efficiency and user convenience for homeowners, commercial groundskeepers, and facility managers
alike.
EFLS 3.0, as implemented in the Navimow X3 Series, further advances precision lawn mowing by incorporating left and right
camera VSLAM into the existing monocular VSLAM of EFLS 3.0, expanding the Field of View (FOV) to an impressive 300 degrees for
unparalleled reliability. A pioneering solution in automated lawn care, EFLS 3.0 is the industry's first system to integrate VSLAM
and Visual-Inertial Odometry (VIO) with dual RTK antennas. This unique configuration, optimized for large and complex areas,
positions EFLS as an industry leader and trendsetter, paving the way for future advancements in robotic lawn mowers.
Coupled with refined VIO technology, EFLS 3.0 enhances positional accuracy for seamless navigation in challenging environments.
Dual RTK antennas provide superior coverage and accuracy, enabling robust operation in large, complex lawns. With a triple-cam-
era configuration, EFLS 3.0 doubles the system's visual coverage, empowering mowers to confidently navigate challenging areas
such as narrow passages or low-texture walls. The dual RTK antennas further optimize satellite signal reception, while an
intelligent algorithm dynamically adjusts primary and secondary base station data, ensuring robust RTK-based positioning
stability across expansive and segmented lawns.
With each iteration, EFLS technology moves closer to realizing a vision of fully automated, high-precision lawn care that is
accessible, efficient, and adaptable. EFLS technology redefines automated lawn care through precision, innovation, and robust
functionality, shaping a future where intelligent lawn management becomes the standard across residential, commercial, and
public domains. The future of lawn care has arrived, and EFLS is at the forefront.
1.2 How EFLS 3.0 works
lonosphere & troposphere lonosphere & troposphere
≥ 2m

1.3 Safety Warnings
IMPORTANT
READ CAREFULLY BEFORE USE
KEEP FOR FUTURE REFERENCE
1)
Be sure to install and operate the Navimow (referred to as the mower in the manual) and the charging station according to the
instructions. Go to navimow.segway.com for the complete User Manual and the latest user materials.
2) The mower is for consumer use only. Using the mower for purposes other than mowing can bring serious injury. To avoid risks of
injuries, please read and understand all the warnings and cautions. Please understand that you can reduce the risk by following the
instructions and warnings in this manual, but you cannot eliminate all the risks. The operator or user is responsible for accidents or
hazards occurring to other people on their property.
3)
Navimow has many built-in safety sensors, however, safety risks still exist. Set a mowing time when there are no people or pets on
the lawn. Inform the neighbors about the risks for accidents or hazards. When using the mower on a public lawn, or when your lawn
is open to your neighbor or street, protect or fence the lawn, or put up a warning sign around the working area that says: WARNING!
Automatic lawnmower! Keep away from the machine! Supervise children!
4)
DO NOT modify the mower by yourself. Modifications could interfere with mower operations, result in serious injury and/or damage,
or void the Limited Warranty. Use only Navimow approved parts and accessories.
5)
The manufacturer recommends the user to be 18–70 years old. Be sure to get the necessary training before operating the machine.
WARNING
Never allow children, persons with reduced physical, sensory or mental capabilities or lack of experience and knowledge or people
unfamiliar with these instructions to use the machine. Local regulations may restrict the age of the operator.
Before Mowing:
• Regularly check that all parts of the mower can function normally.
• For the best mowing results, it is recommended to mow in dry weather. When mowing in the rain, grass clippings can get stuck at the
bottom of the mower, causing the mower to slip. DO NOT mow in bad weather, such as heavy rain, thunderstorms or snow.
• Periodically inspect the area where the mower is to be used and remove all stones, sticks, wires, toys, and other foreign objects. The
Limited Warranty does not cover damages caused by objects left on the lawn.
• To avoid possible damage, keep the operating mower at least 1 m (3 feet) away from sprinkler heads. The mower and the sprinklers
should NOT work simultaneously. Adjust the mowing schedule so that it works at a different time than any sprinklers.
• NEVER allow children to touch the power supply unit, charging station, blades, the battery compartment, or any parts with gaps such
as the wheels.
WARNING
Never operate the machine or its accessories if the guards or shields are damaged, or if the cord is damaged or worn.
When Mowing:
• Keep away from the rotating blades! DO NOT put hands or feet under or near the rotating blades.
• Watch out for small flying objects or stones during mowing. Keep a safe distance from the mower when it is operating.
• DO NOT leave the machine to operate unattended if you know that there are pets, children, or people in the vicinity.
• DO NOT reach beyond the capabilities of the mower. If you are remotely controlling the mower and its accessories, it is
recommended to do so from a seated or stationary position. If you are standing or walking during operation, keep your balance and
watch your steps.
WARNING
• DO NOT allow children to be in the vicinity or play with the mower when it is operating.
• DO NOT lift the mower while in operation. DO NOT ride on the mower.
• DO NOT mow on areas with slopes steeper than the maximum incline inside the working area (50%), as well as the boundary (25%).
• If the mower makes an abnormal sound or signals an alarm, press the STOP button immediately.
• If there are abnormal vibrations, turn off the mower, place it on level ground for about 30 seconds and then restart. If the issue
persists, contact authorized after-sales service.
• DO NOT touch moving hazardous parts before they have come to a complete stop.
Safe Usage:
• DO NOT operate or charge the mower outside the temperature limits: 0–40°C (32–104°F), because low/high temperatures can
decrease mower performance and even lead to accidents.
• DO NOT place anything on the mower or the charging station.
• It is recommended to conduct regular maintenance of the mower (See Maintenance in the User Manual) by an adult.
• Regularly check the warning devices to ensure they are effective. These devices include the buzzer, the LED light on the charging
station, and the ambient light on the mower.
• Before charging, please read How to Charge in the User Manual. Improper use may cause electric shock, overheating, or leakage of
corrosive liquid.
• Use only the original battery pack or that of the same model as specified by Navimow. Each mower contains one battery pack.
Depending on the specific mower model, the rated capacity of the battery is 6 Ah, 8 Ah, 10 Ah, and 12.8 Ah. Contact after-sales
service and have a professional technician replace the battery pack.
• Do not use non-rechargeable batteries. For the purposes of recharging the battery, only use the detachable supply unit provided
with this appliance. For the European Union and Norway: NBW32D007D0N01-EU; For the United Kingdom:
NBW32D007D0N01-UK; For Switzerland: NBW32D007D0N01-CH; For the US and Canada: NBW32D007D0N01-US; For Australia
and New Zealand: NBW32D007D0N01-AU.
• DO NOT dismantle or puncture the battery casing. Keep away from metal objects to prevent short circuit. Keep away from fire,
heat and direct sunlight.
• For information about battery and electrical waste, please contact your household waste disposal service, your local or regional
waste management office, or your point-of-sale.
• When replacing the blades, please be careful and wear protective gloves as the blades may cause damage.
• If the cord on the power supply or the extension cable becomes damaged or entangled during use, disconnect the power supply
from the power socket and then untangle. To avoid a hazard, pull the body of the plug rather than the cord when separating the
power supply from the power socket. Contact after-sales service and have a professional technician repair or replace the cord.
• When cleaning, inspecting for damage, or checking for abnormalities, the mower must be powered off, and the charging station
must be unplugged from the power supply.
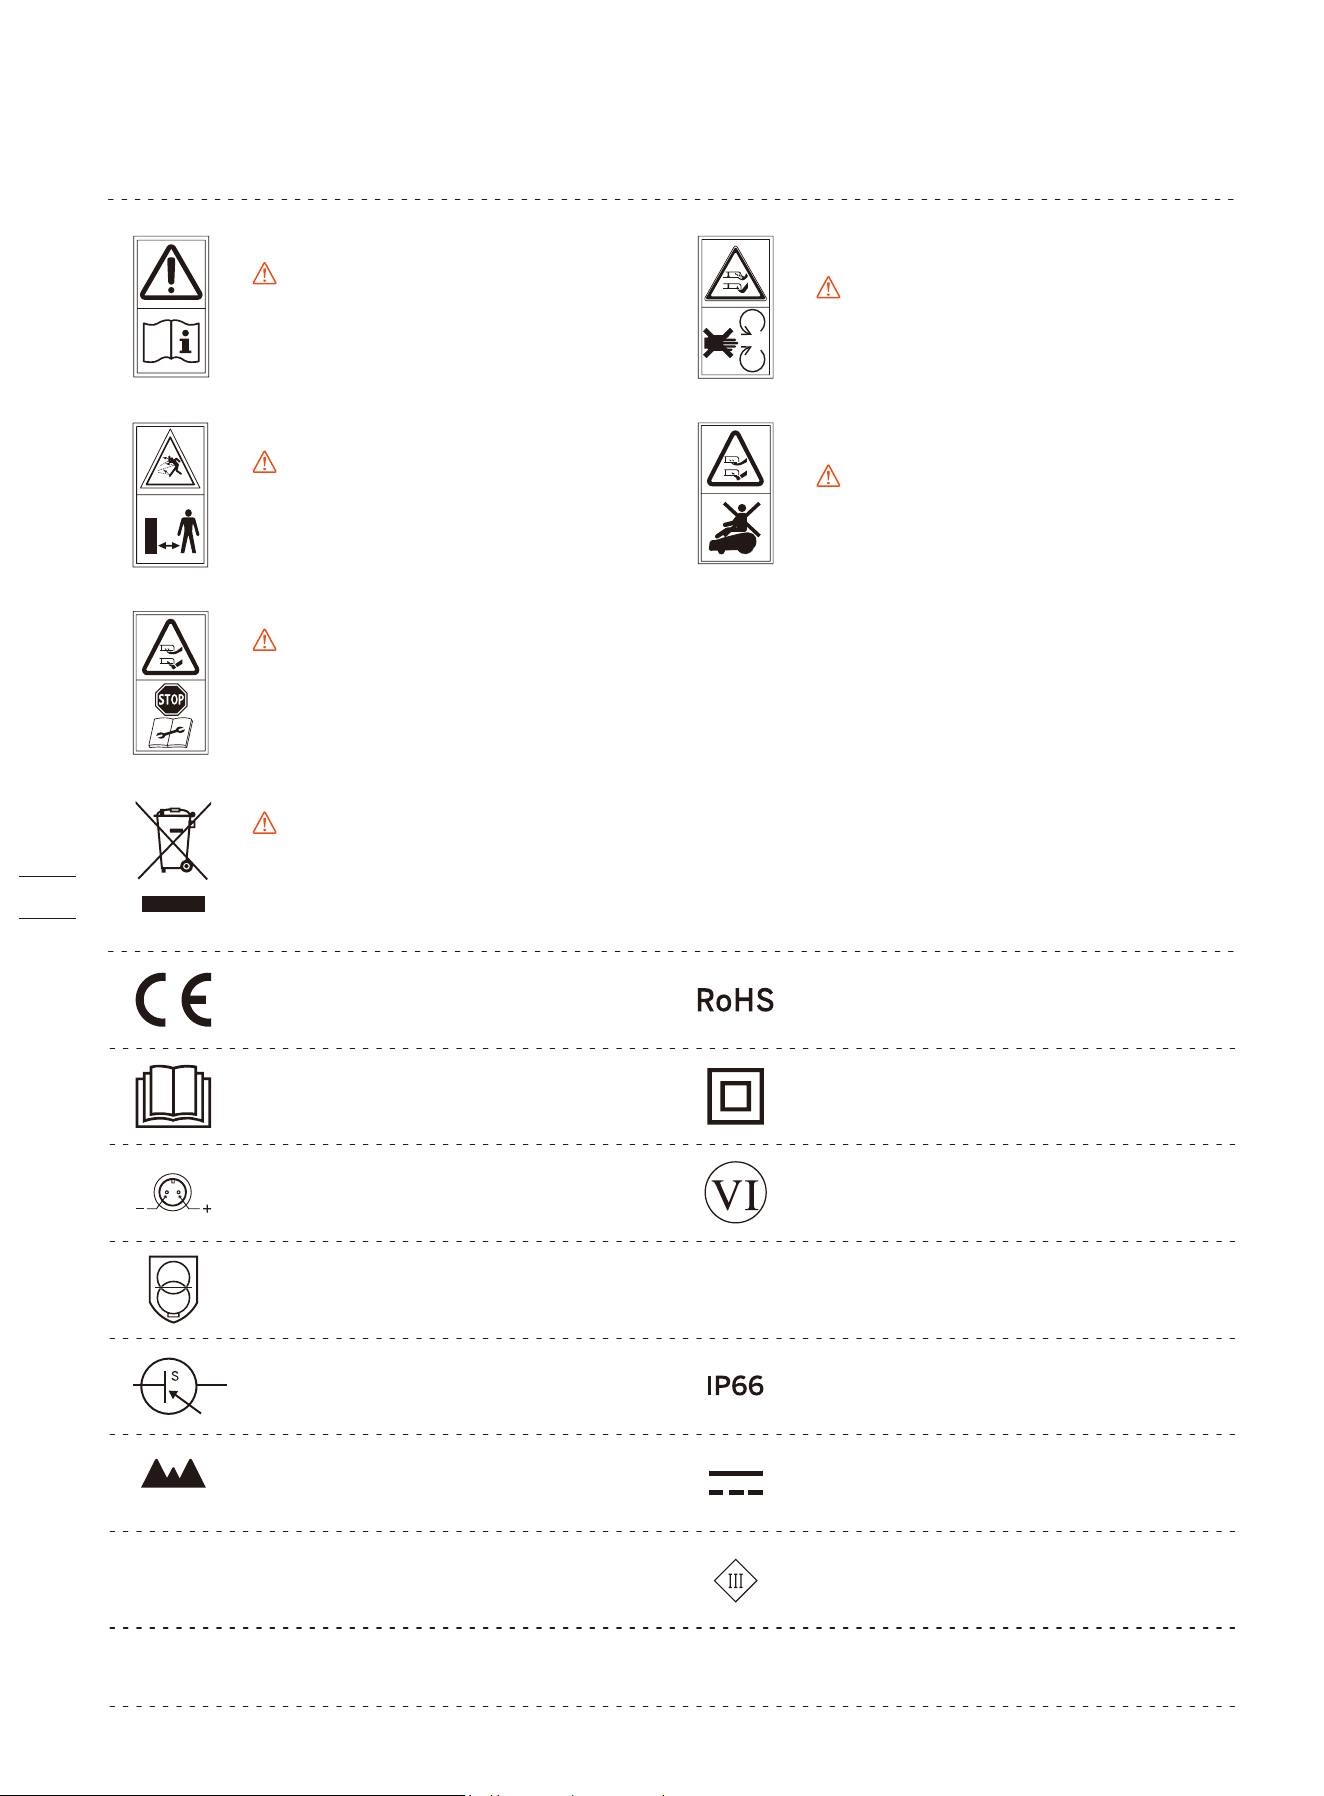
1.4 Symbols and Decals
This product conforms to the applicable
EC Directives.
Please study the symbols on the product and labels carefully and understand their meaning:
WARNING-Read instruction
manual before operating
the machine.
WARNING-Do not touch
rotating blade.
WARNING-Keep a safe
distance from the machine
when operating.
WARNING-Operate the disabling device before working on or lifting the
machine*.
WARNING-It is not permitted to dispose of this product as normal
household waste. Ensure that the product is recycled in accordance with
local legal requirements.
WARNING-Do not ride on
the machine.
* The disabling device hereby refers to the safety lock. Before lifting or operating the mower, enable the
safety lock by pressing MOW+HOME for more than 3 seconds.
Polarity of the charging port
Class II appliance
Protected from total dust ingress and from
high-pressure water jets from any direction
SMPS incorporating a short-circuit-proof safety isolating transformer (inherently or non-in-
herently)
SMPS (Switch mode power supply unit)
Level VI efficiency
The maximum altitude of use is 5000m
The maximum temperature of use is 40℃
Direct current
Alternating current
Before charging, read the instructions.
This product conforms to the regulations
of Restriction of Hazardous Substances.
ta: 40℃
≤ 5000m
~
Class III appliance
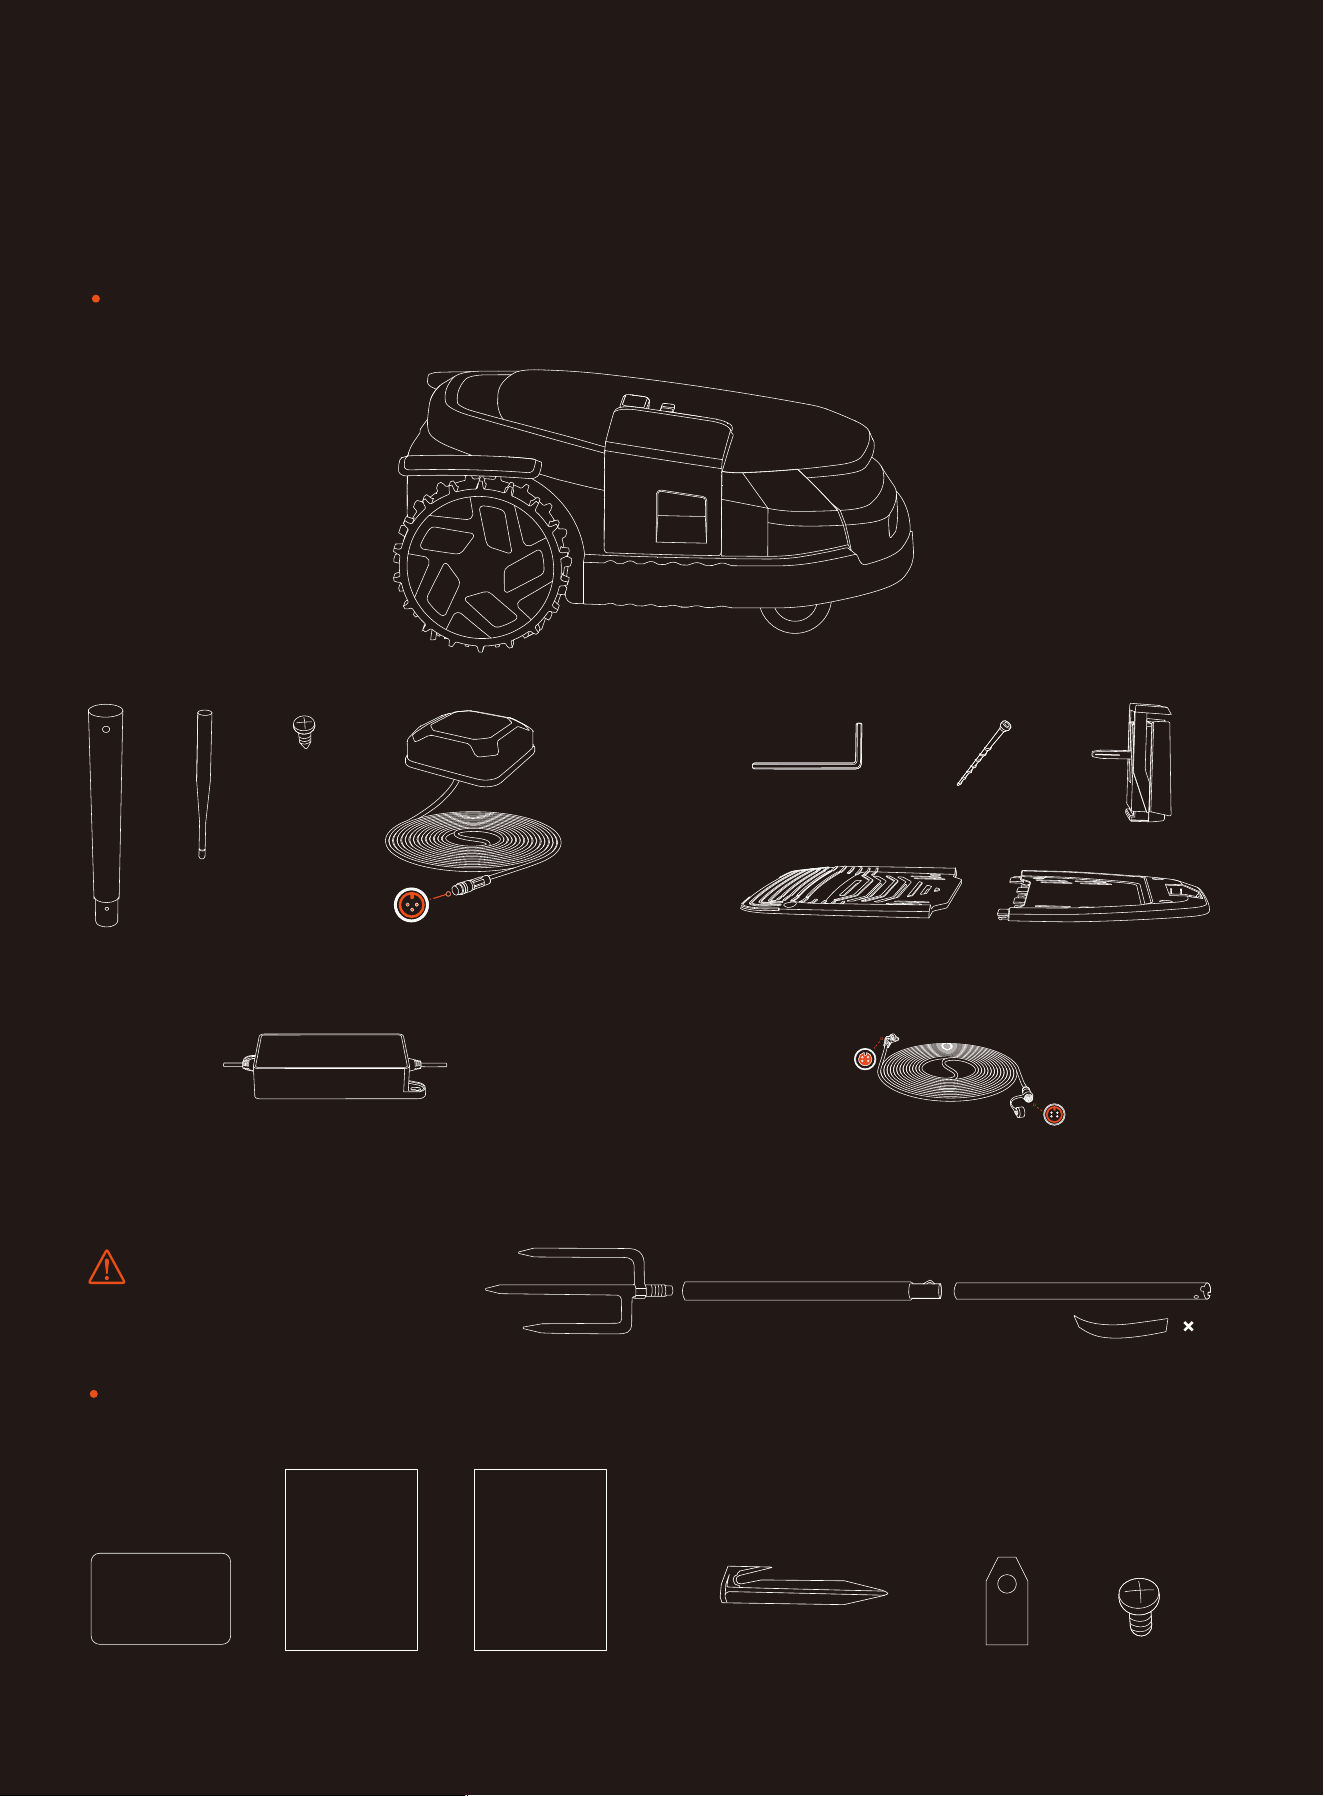
1.5 What’s in the Box?
If there are missing or defective parts, please contact after-sales
service. We recommend retaining the package materials for future
transportation and shipping.
Segway Navimow X3 Series
Quick Start Guide
Welcome Card
Important Information
User materials
Quick Start Guide
Important Information
Welcome Card
Antenna kit
5
WARNING
Sharp edges. Do not point at people.
6m (19.7ft)
× 1 × 1 × 1 × 1
GNSS antenna
× 18 × 18
Spare blades and bolts
× 8 × 1
× 1
× 1
× 1
Charging station and the installation kit
Power supply adapter (for charging station)
× 1
Extension cable for the power supply
× 1
10m (33ft)
Pegs to secure the extension cable
× 20
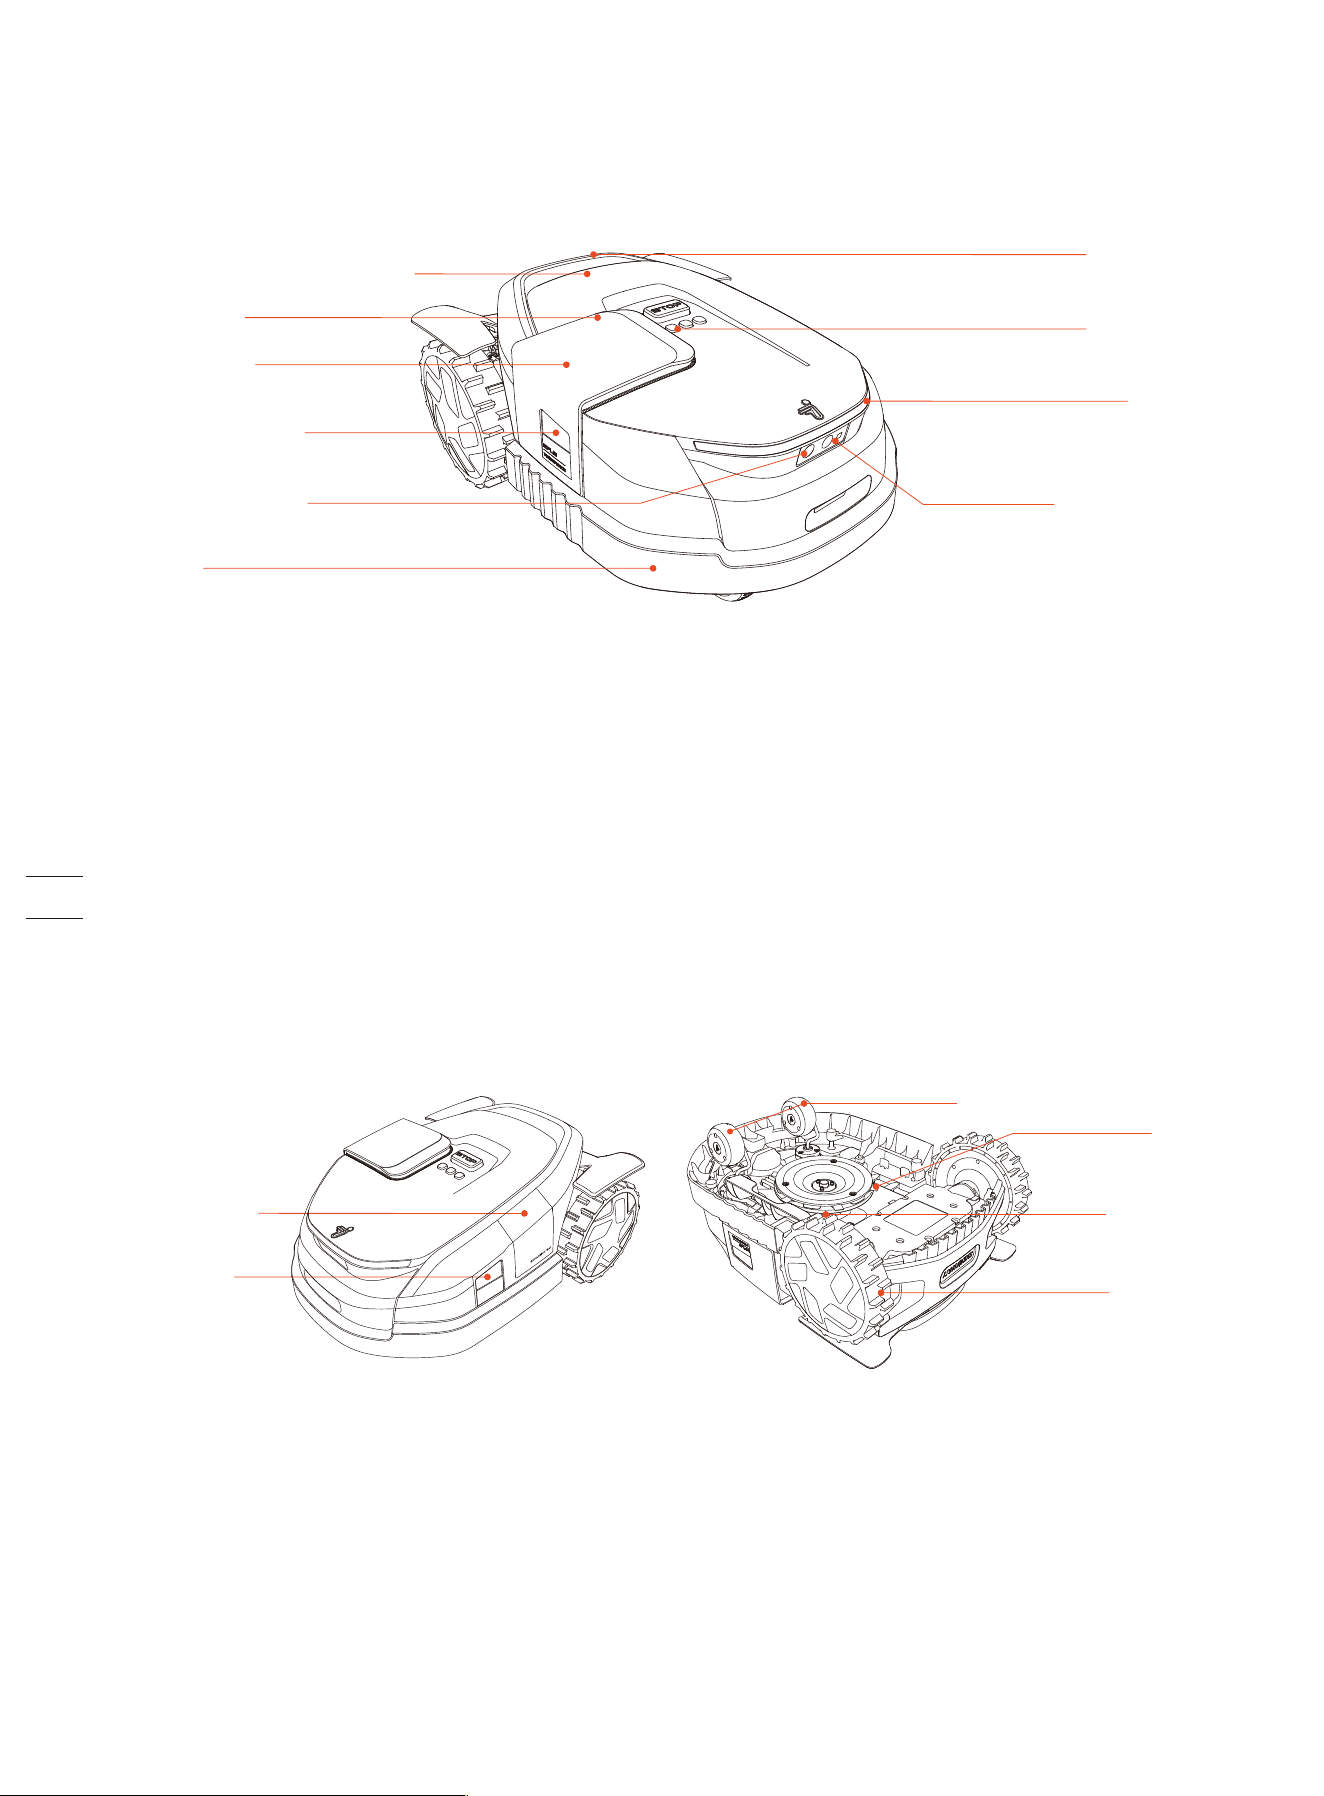
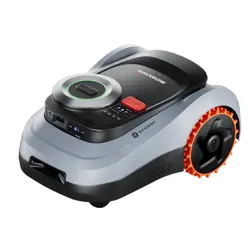
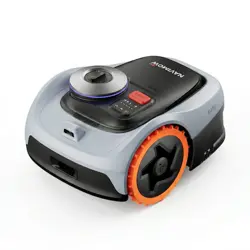
1.6 Parts and Functions
1.6.1 Mower
• Control panel: The buttons can be used to start mowing, lock/unlock the mower, send the mower for recharge, and other
basic operations.
• Display screen: This dot-matrix display screen uses icons and animation to show the status of the mower.
• Ambient light: Specific lighting effects to remind you to pay attention to the status of the mower.
• Headlight: The white LED light is used for illumination, especially during nighttime. It also lights up when the mower parks on
the charging station.
• GNSS antenna inside the mower: In addition to the GNSS antenna, there is also a GNSS antenna inside the mower to improve
positioning accuracy. See 1.2 How the EFLS 3.0 Works.
• Left, right, and front camera sensors: Detects non-grass objects to avoid bumping into them, EFLS 3.0 uses the cameras to
capture key visual features of the lawn.
• 3D camera sensor: This is a ToF (Time-of-Flight) sensor used for obstacle avoidance and mowing along the edges. Unlike other
camera-based sensors that rely on ambient light for object detection, the ToF sensor works well under all kinds of lighting
conditions.
• Bumper: When the bumper hits an obstacle and triggers the internal sensor, the mower will stop and turn away to avoid the
obstacle.
• Lifting handle: Helps you to lift the mower up when necessary.
• Blades: The 6 blades can rotate freely after being attached to the disc. When mowing, the spinning blade disc will generate
centrifugal force to keep the blades pointing outside so that the blades can cut grass. When hitting an obstacle, the blade will
turn inside. See 4.2 Replace Blades for instructions on replacement.
• Anti-clogging cutting disc: Reduces chances of grass clippings getting stuck in the blades, so the blades can be used for a
longer time.
• Expansion Bay: An external port used for installing additional accessories, allowing customization in the future.
Control panel
Lifting handle
Headlight
3D camera sensor
Blades
Front wheels (universal wheels)
Anti-clogging
cutting disc
Rear wheels
Display screen
Ambient light
GNSS antenna inside the mower
Right camera sensor
Front camera sensor
Left camera
sensor
Expansion Bay
Bumper

Powering on:
Press OK and hold
for 1 second to
power on the
mower
Returning to the
charging station:
Press HOME and
then OK
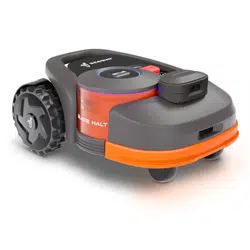
Safety lock:
Press MOW+HOME
for more than
3 seconds to
lock the mower
Stopped:
Press STOP
Standby:
Press OK to switch
and view different
status
Child lock:
Turn it on via
the app
Animals nearby
Unlock:
Press any button
on the mower and
then enter the
PIN code
Powering off:
Press and hold
on to OK for
3 seconds
Forcing a power-off:
Press and hold OK
for 10 seconds.
Error during
power-on: Press
and hold on to OK
for 10 seconds
Charging
Lifted up, tilted,
or turned over
Firmware upgrade
Blades are about
to rotate
Mowing:
Press MOW and
then OK
Mapping
Error:
Follow the
instructions via the
app to clear the
error code
Initialization:
Wait 30 seconds
until the mower is
fully powered on
Pulsing yellow
Solid blue or
pulsing yellow
Solid red
Battery level +
poor GPS signal
/
/
/
/
Battery level +
stable GPS signal
Cellular network +
Bluetooth
Wi-Fi network +
Bluetooth
/
Pulsing yellow
Pulsing yellow
Flashing red
Flashing red
Solid red
Pulsing white
Flashing white
Solid blue or
pulsing yellow
Solid blue or
pulsing yellow
Pulsing green:
Charging is in
progress
Solid green:
Fully charged
Operation Display screen Lights on the mower Operation Display screen Lights on the mower
1.6.2 Display and Control
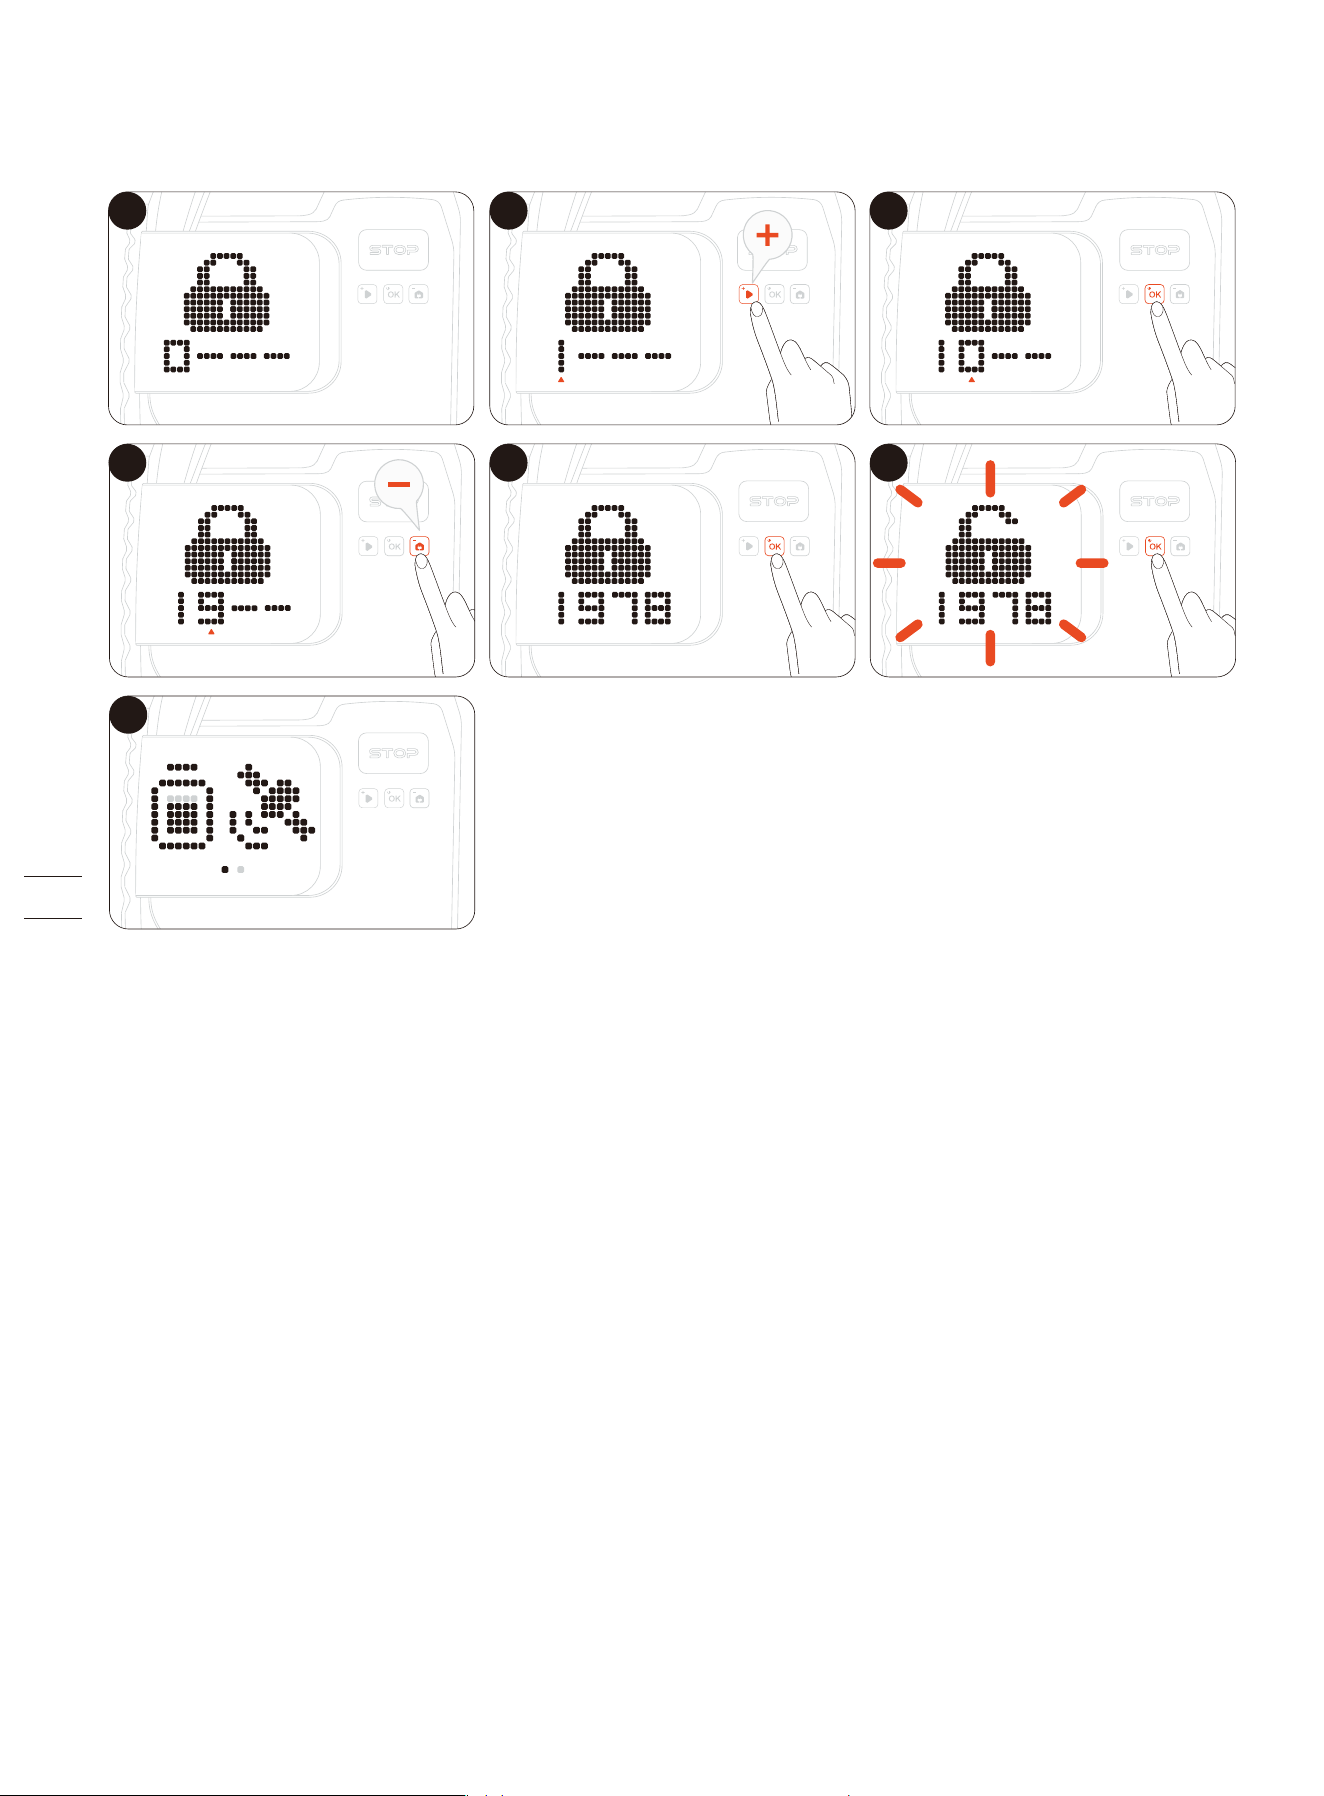
1.6.3 How to Enter PIN Code
Enter the PIN code before operating the mower. Press MOW or HOME to change the number and press OK to confirm the code.
1 2 3
4 5
7
6
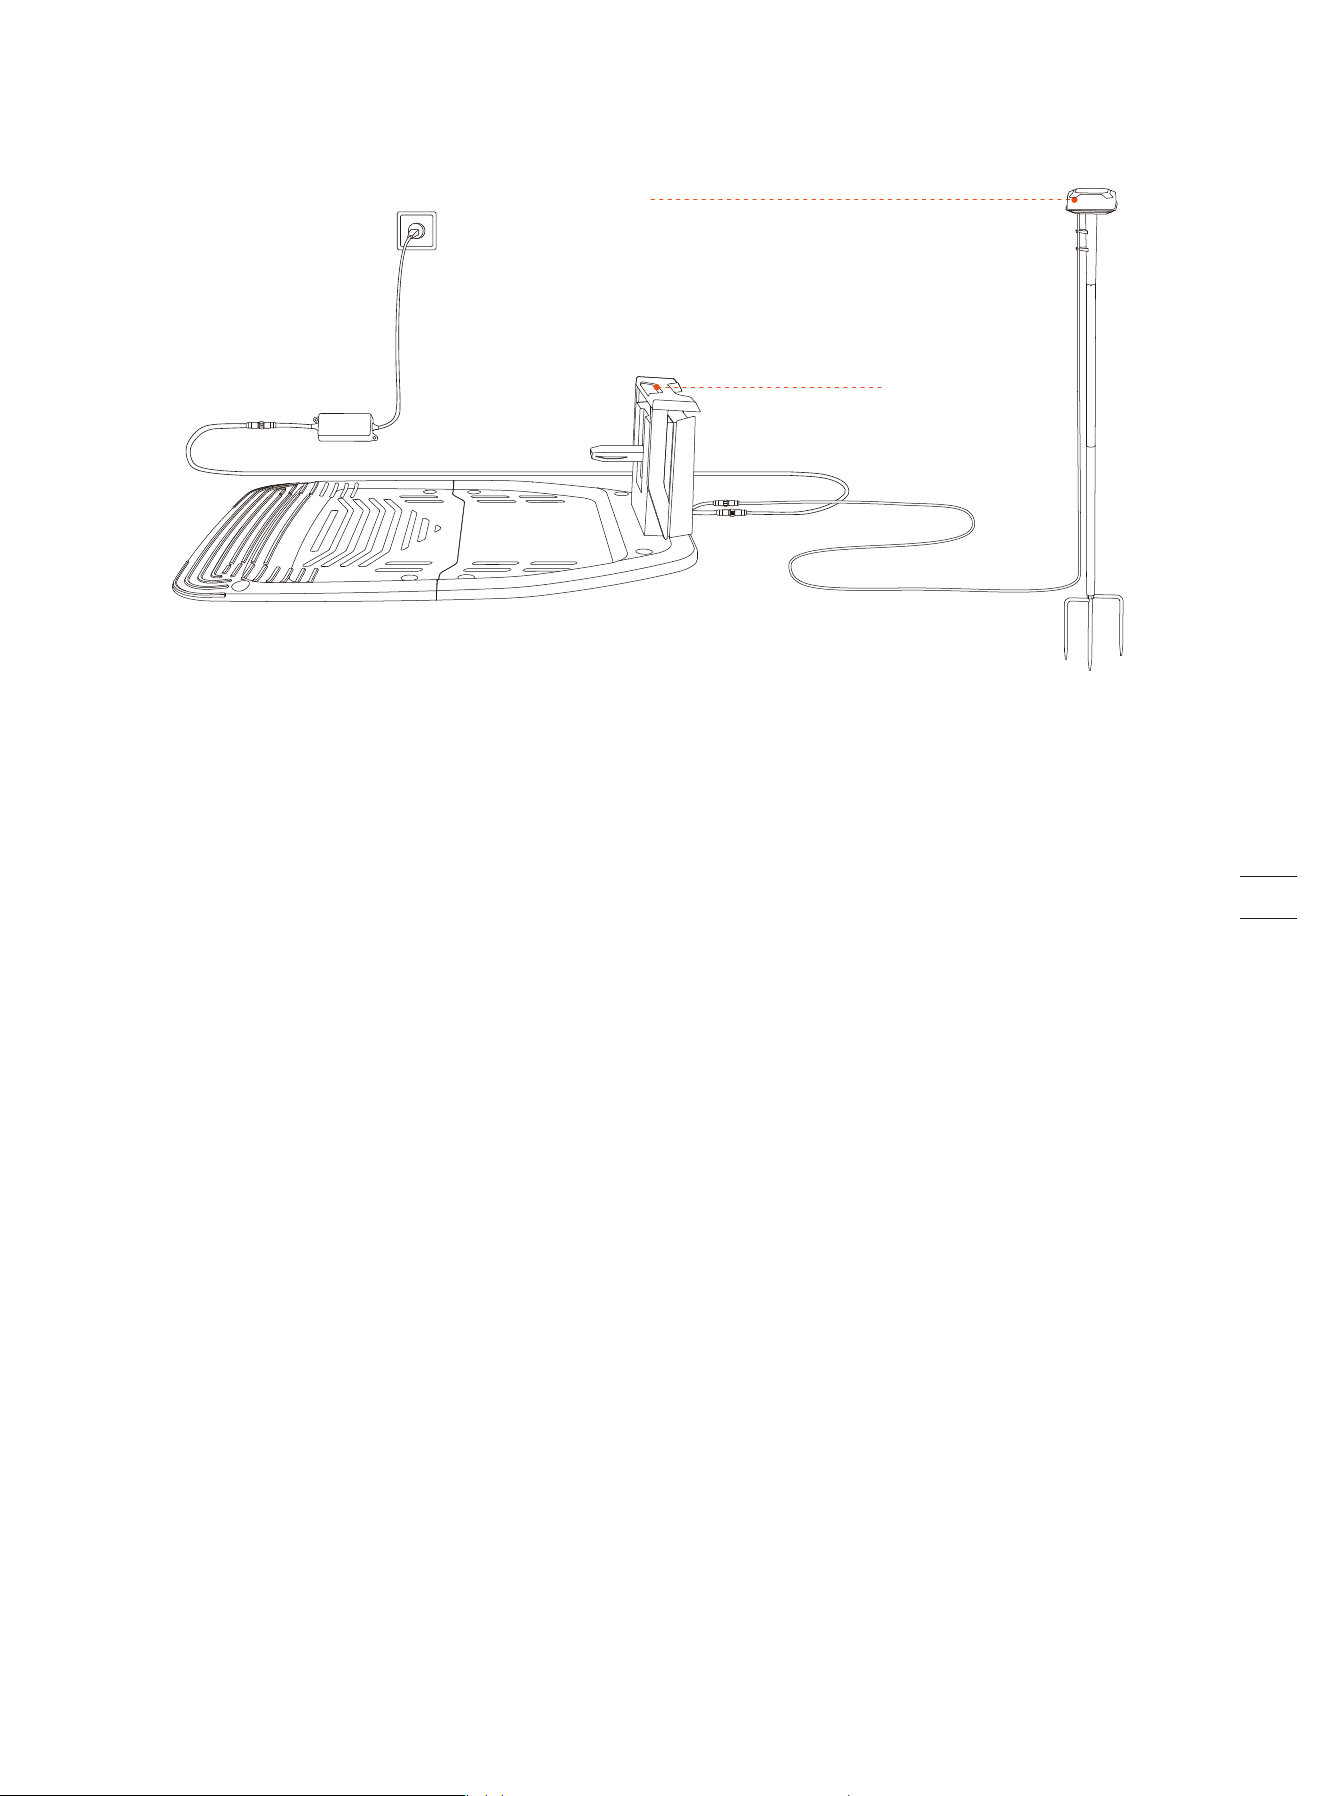
1.6.4 Charging Station and GNSS Antenna
• GNSS antenna: Receives satellite signals to improve the positioning accuracy of the mower. For large lawns and complex yards,
use dual antennas to expand the GPS signal coverage.
• LED indicator: Indicates the charging status in green light.
GNSS antenna
LED indicator
1.7 Specifications
SKU
Basic
Information
Mower
Parameters
Noise
Emissions[2]
Working
Conditions
Model
Suffix and
Supported
Regions:
Dimensions:
Length × Width
× Height
Net Weight
(Battery Included)
Recommended
Mowing Area
Typical Mowing
Time
Per Full Charge[1]
Area Capacity
per Hour
Cutting Width
Cutting Height
Charging Time
GNSS Working
Mode
Measured
Sound Power
Level LWA
Sound Power
Uncertainties
KWA
Sound Pressure
Level LpA
Sound Pressure
Uncertainties KpA
Working
Temperature
Storage
Temperature
Max. Incline Inside
Working Area
Max. Incline at
Boundary
IP Rating
23.7 cm (9.33 in)
Cutting Blades
Cutting Height
Adjustment
6
Electronic
Cutting
Disc
Anti-clogging cutting disc
About 60 min
GPS, Beidou, Galileo
0–40°C (32–104°F); 10–35°C (50–95°F) recommended
-20–50°C (-4–122°F); 10–35°C (50–95°F) recommended
IP66 for mower body, charging station, and power supply
50%
25%
60 dB(A)
3 dB(A)
52 dB(A)
3 dB(A)
About 65 min About 80 min About 100 min
Europe, Australia, New Zealand: 20-70 mm (1.2-2.8 in)
United States and Canada: 2-4 in (50-100 mm)
Product Name
Brand
Material Mower frame: PC+ASA
X315E, X315A:
1500 m²
X315N: 0.5 acre
About 120 min
About 300 m² (0.074 acre) About 350 m² (0.087 acre)
About 160 min About 200 min About 240 min
E: Europe
A: Australia and New Zealand
N: United States and Canada
Segway Navimow X3 Series
698 x 550 x 307 mm (27.5 x 21.7 x 12.1 in)
19.55 kg (43.10 lbs) 19.84 kg (43.74 lbs)
X330E, X330A:
3000 m²
X330N: 1 acre
X350E, X350A:
5000 m²
X350N: 1.5 acres
X390E, X390A:
10,000 m²
X390N: 2.5 acres
19.84 kg (43.74 lbs) 19.90 kg (43.87 lbs)
Segway Navimow
X315 X330 X350 X390

1. Tested at a standard cutting speed with a full battery at an ambient temperature of 25°C (77°F) while mowing a fresh-cut lawn.
The product can mow more per hour on open areas than on separated small lawns. When the grass is wet or long, the working
capacity is smaller. The flatter the lawn surface, the larger the working capacity.
2. The noise emission declarations conform to EN 50636-2-107.
Working
Conditions
Connectivity
Blade Motor
Battery Pack
Driving Motor
Power Supply
Charging Station
Other Features
Packaging
Min. cutting angle
around corners
ISM Band Radio
Connection
Wi-Fi/Cellular
Network
Max. Rated Speed
Motor Type
Motor Type
Battery Type
Nominal Voltage
Input Voltage
Output Voltage
Output Current
Max. Rated Speed
Nominal
Capacity/Energy
Battery
Management
System
Supply Unit
Model
6 Ah / 130 Wh
Over-heating, short circuit, over-current, and over-charge protection
LED
Omni-directional wheel with built-in Hall sensor
TPU tyre with geared hub motor
IMU sensor, lifting sensor, wheel encoder, bumper sensor,
3 HD camera with 300° FOV, ToF camera with 110° FOV
Welcome card
Quick Start Guide
Important Information
885 x 585 x 400 mm (34.8 x 23.0 x 15.8 in)
European Union and Norway: NBW32D007D0N01-EU
United Kingdom: NBW32D007D0N01-UK
Switzerland: NBW32D007D0N01-CH
Australia, New Zealand: NBW32D007D0N01-AU
United States and Canada: NBW32D007D0N01-US
100–240 V AC
32 V DC MAX
7 A MAX
Cable Length
Input Voltage
Input Current
Output Voltage
Output Current
Indicator
Front Wheel
Rear Wheel
Sensors
Package
Dimensions
Contents
1.5 m
32 V DC
7 A MAX
25.2 V DC
5 A MAX 6 A MAX
8 Ah / 173 Wh
10 Ah / 216 Wh
7 A MAX 7 A MAX
12.8 Ah / 277 Wh
Bluetooth®
Frequency Range
0.8 m/s
2800/min
Brushless motor
Geared hub motor
Lithium-ion battery
21.6 V DC
1.0 m/s
2400.0–2483.5 MHz
90°
Wi-Fi 2.4 GHz/5.0 GHz
Europe: LTE-FDD: B1/B3/B5/B7/B8/B20/B28 LTE-TDD:
B38/B40/B41
Australia, New Zealand:
LTE-FDD: B1/B2/B3/B4/B5/B7/B8/B28/B66
LTE-TDD: B38/B40/B41
United States and Canada: LTE-FDD:B2/B4/B5/B12/B13
LTE-TDD: B14/B66/B71
Europe: 865-868 MHz
Australia, New Zealand, United States and Canada: 915-918 MHz
1.8 Accessories (Sold Separately)
1.8.1 Antenna Mounting Kit
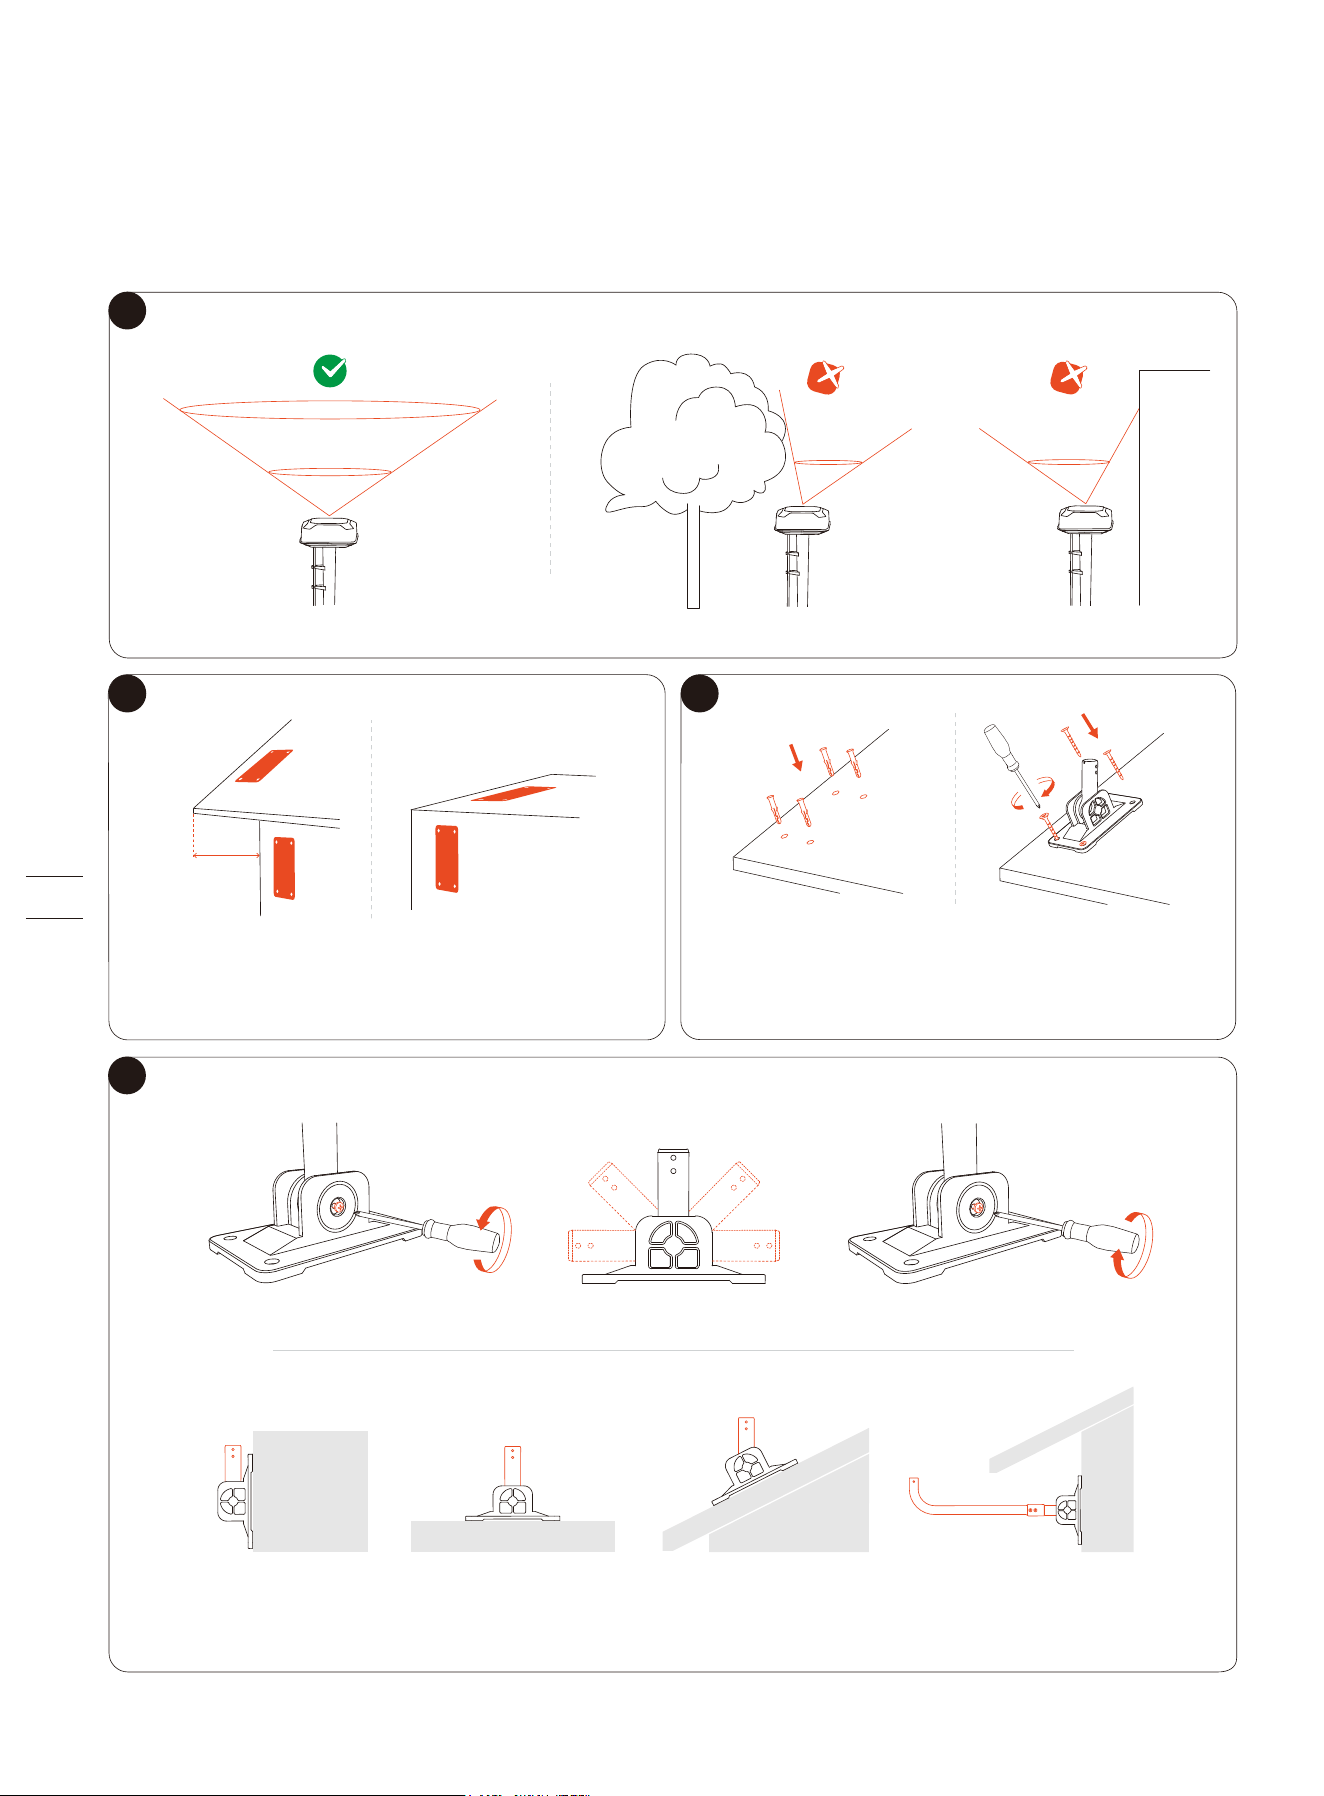
In most cases, you can find a suitable location on the ground. If you need to install the antenna on a wall or a rooftop, follow the
these steps:
Note: Adjust the arm, or use the mounting pole if needed, and make sure the antenna always points straight up to the sky.
2
Secure the installation base.
For a wooden surface, just secure the base with the self-tapping screws.
For harder surfaces (like concrete, brick, and stone), drill 4 holes, insert the
expansion tubes, and then secure the base by tightening the screws.
Find a spot on a wall or roof and mark the
4 anchoring points.
3
4
1
>110°
< 110°
<110°
<35cm
(13.8in)
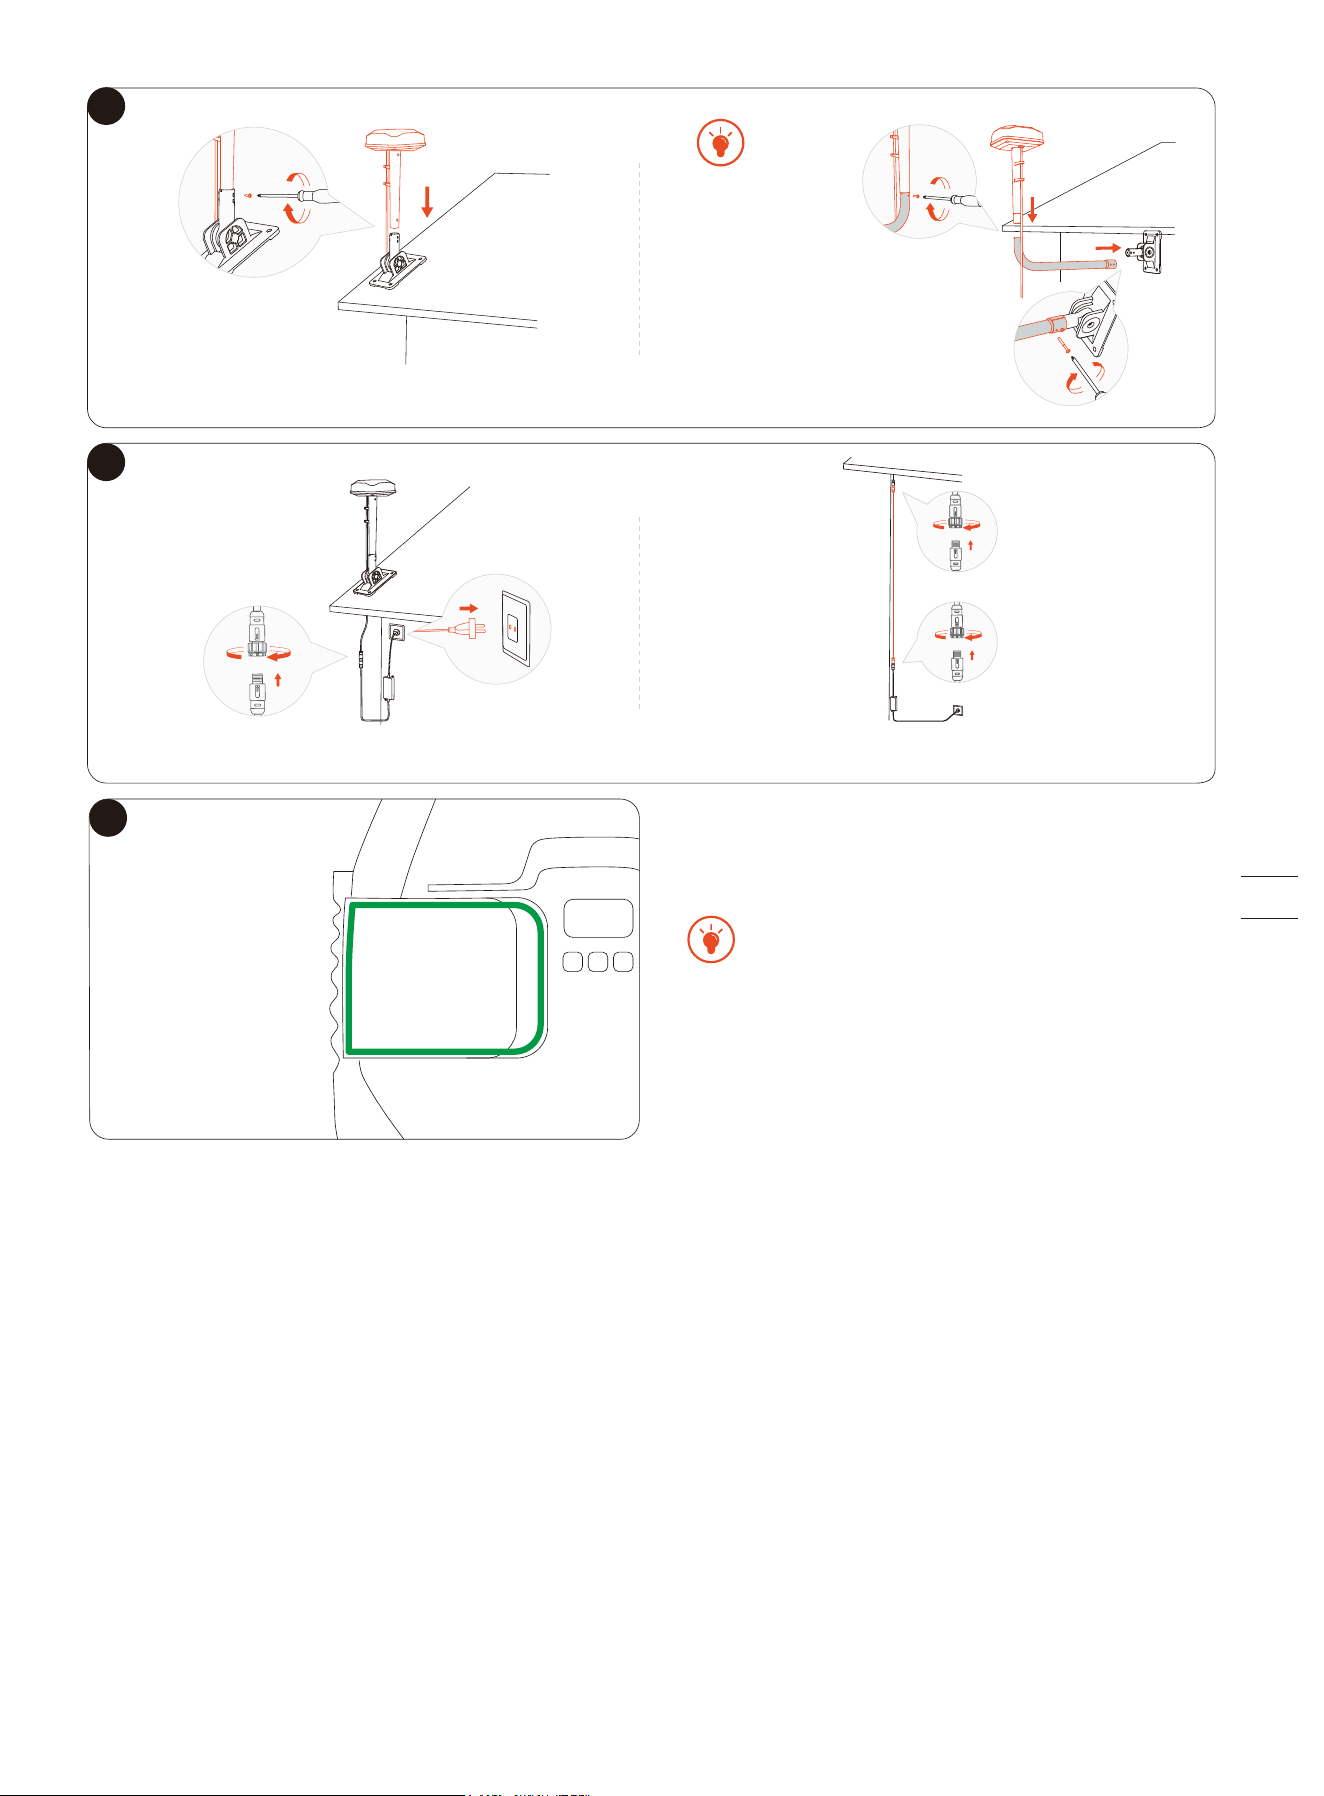
7
Install the antenna onto the arm.
Note: Use no more than 3 antenna extension cables. Contact your local dealer for purchase.
5
6
If you want to install
the antenna under the roof,
add the mounting pole to the
arm to extend it. Install and
tighten the screws to affix the
arm with the pole.
Hold the antenna to a
place where you want
to install. Check if the
light on the mower
turns solid green or
blue (meaning the
signal is strong).
The location of the Primary Antenna affects the
positioning accuracy. If you relocate the primary
antenna after the map is saved, you must create a new
map. Relocating the Signal Enhancement Antenna
does not require remapping.
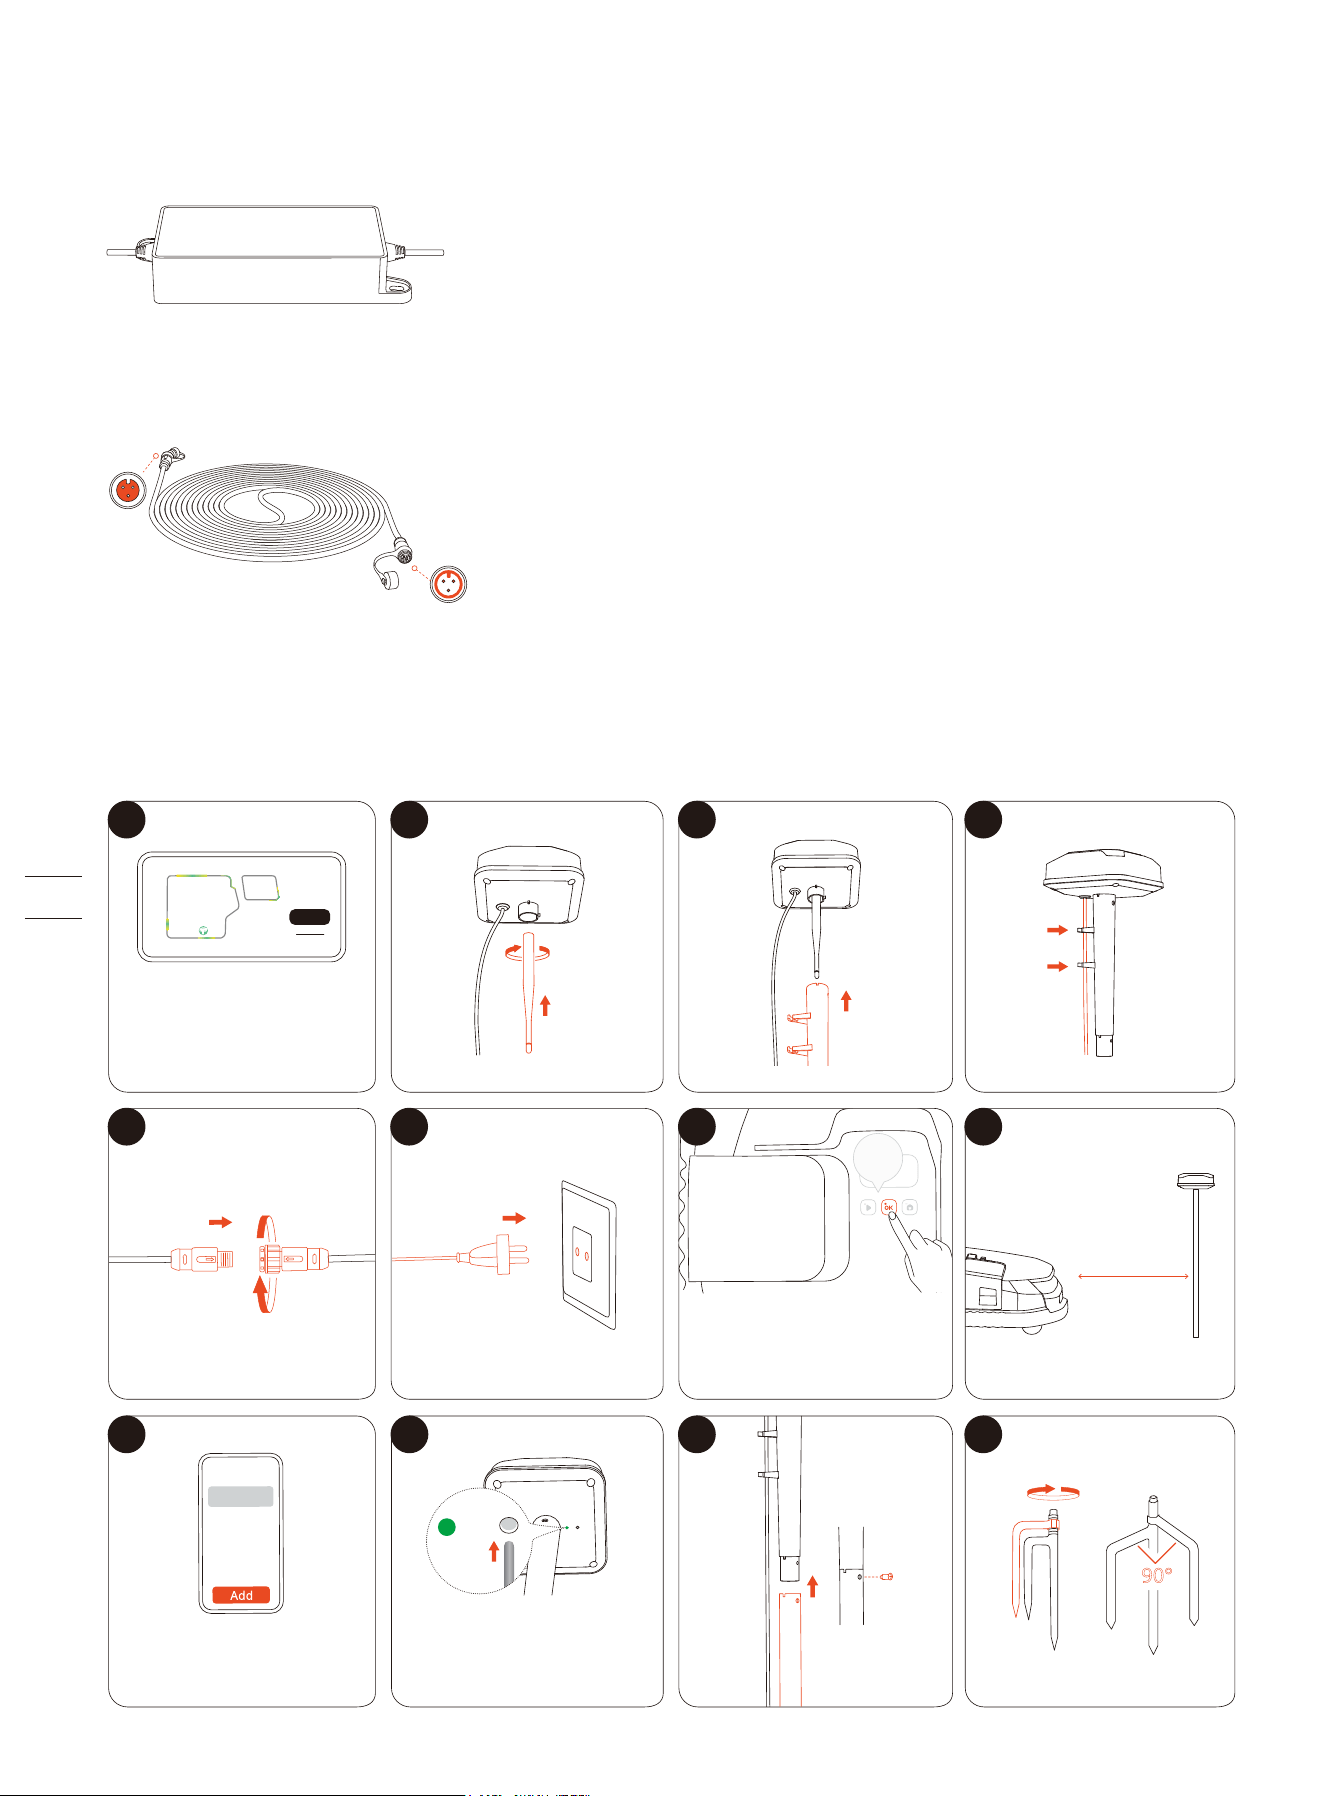
1.8.2 Power Supply Adapter for Antenna
This adapter is suitable when you need to install the antenna far away from the charging station, especially when there is an
outdoor power outlet.
1.8.3 Antenna Extension Cable
This is an extra 10-meter antenna extension cable for power supply.
1.8.4 Signal Enhancement Antenna
This additional antenna can work together with your Primary Antenna (equipped in the box with your mower). Pair this antenna
with your mower when you need to expand the GPS signal coverage.
1 2 3
Next
Re-explore
4
5 6
7
8
Use the Antenna
Location Finder feature
via the app to find out
where to install.
Make sure the mower is
powered on.
If the light doesn't flash
green, press the button
with a pin.
Go to EFLS 3.0 > Dual
antennas > Add
1s
<10 m
(32.8 ft)
9 10
11
12
3s
90°
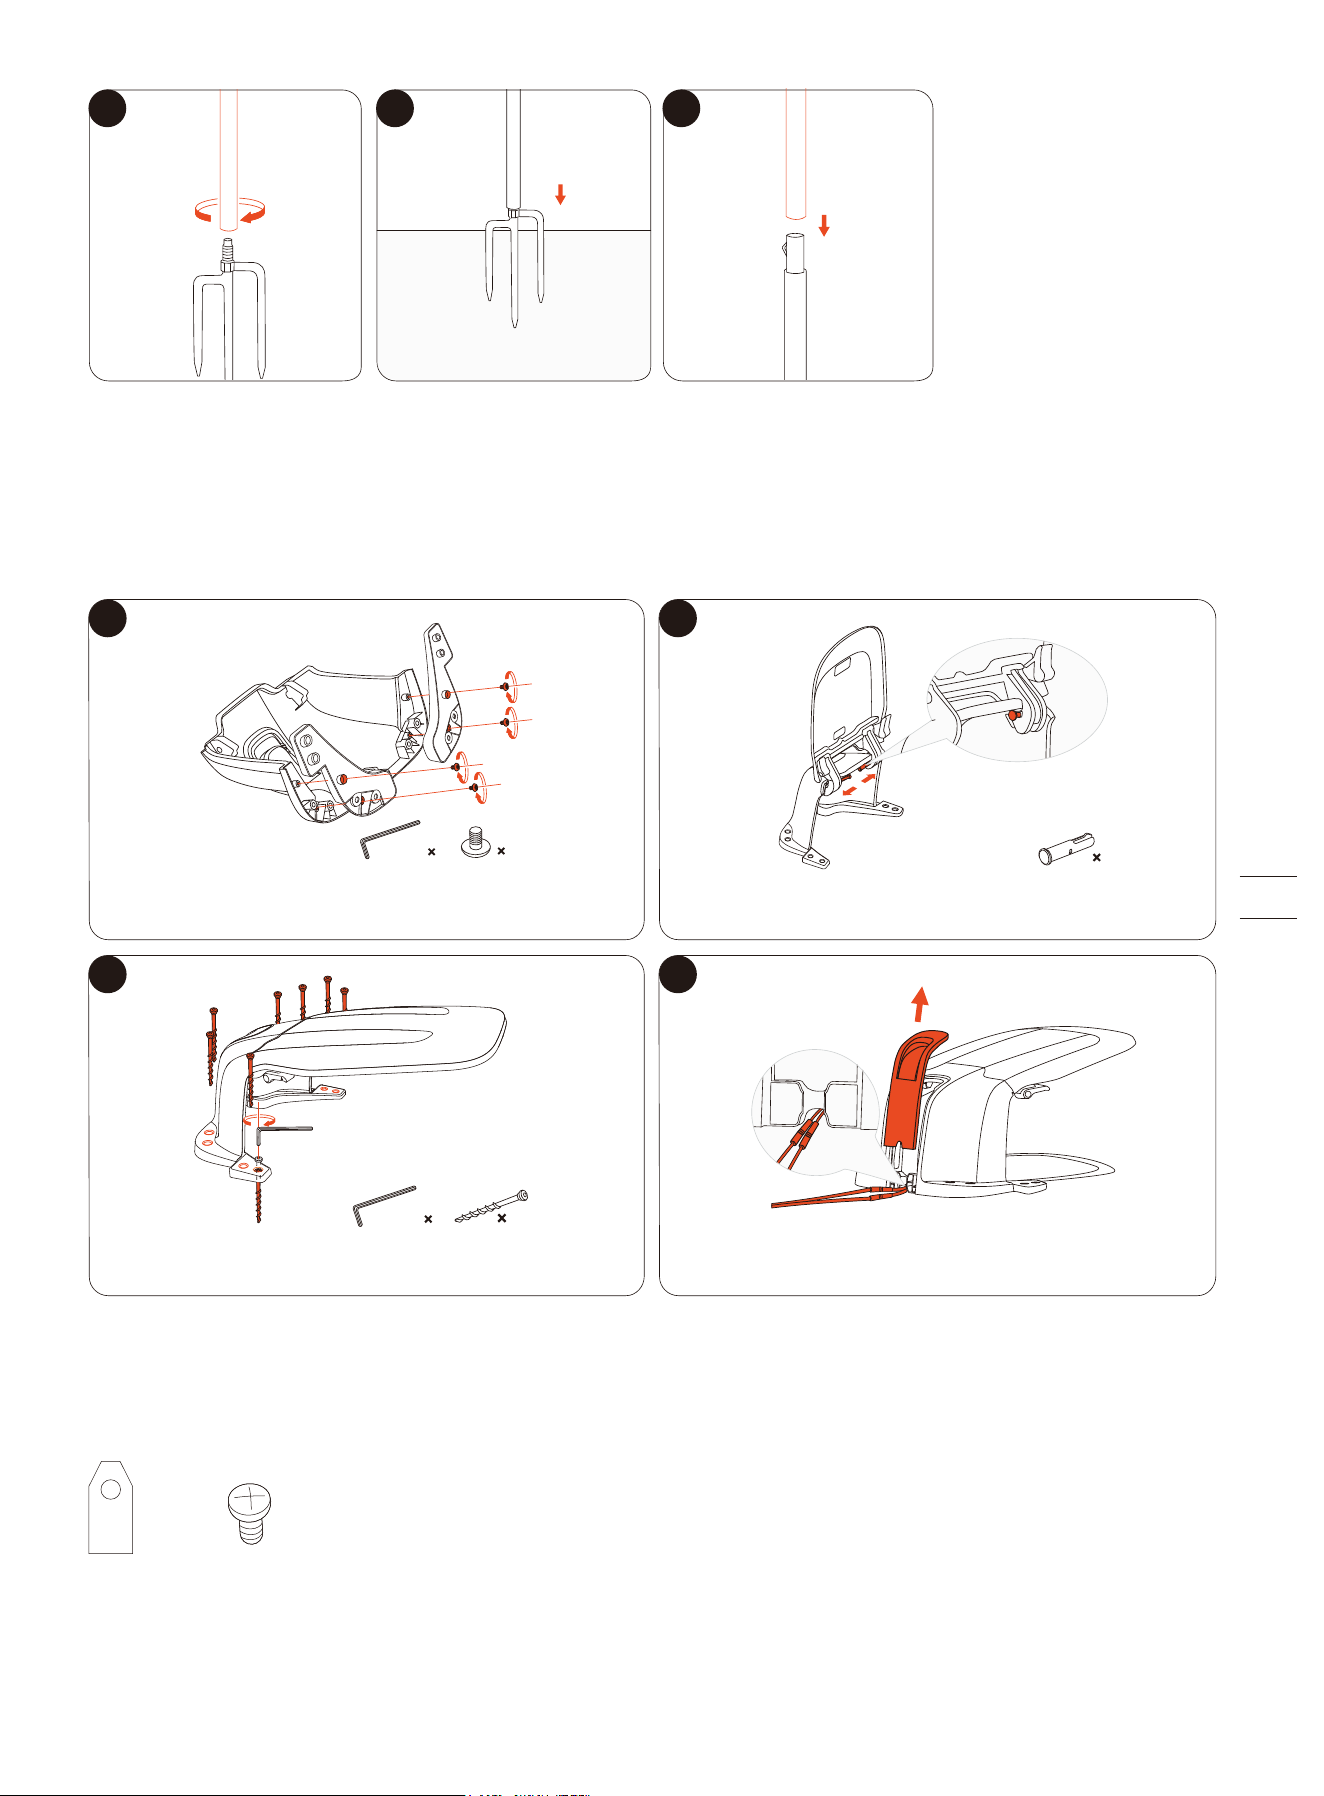
1.8.5 Navimow Garage L
The garage is fully compatible with the Navimow X3 Series, as it does not block GPS signals or network connectivity. The garage
provides extra protection against sunshine and rain. The flip-up cover enables easy access to the control panel so you can
operate the mower on the charging station.
1.8.6 Blade Assembly Plus
This set of 12 blades and 15 bolts are used to replace the worn blades and bolts on your mower.
1
3 4
2
13 14 15
Install 4 bolts to attach the garage base to
the body.
Install 8 screws to the ground to secure the garage.
Slide the cables through the port at the back
of the garage.
Install 2 fasteners to attach the flippable
cover to the body.
4 mm 1
4
2
6 mm 1
8
× 12 × 15
2. Installation and Mapping
2.1 Before You Start
Prepare the app
To ensure a successful setup, please scan the QR code to download the Navimow app. Alternatively, go to the Google Play Store
(Android) or the Apple App Store (iOS) and search ‘Navimow’. After installing the app, please register and log in.
NOTE: During use, the app will ask you for Bluetooth, GPS positioning, and Wi-Fi networking accesses when necessary. To ensure
normal use, it is recommended that you enable the above accesses. For more information, please refer to our Privacy Policy. Go
to Settings > APP > About > Privacy Policy.
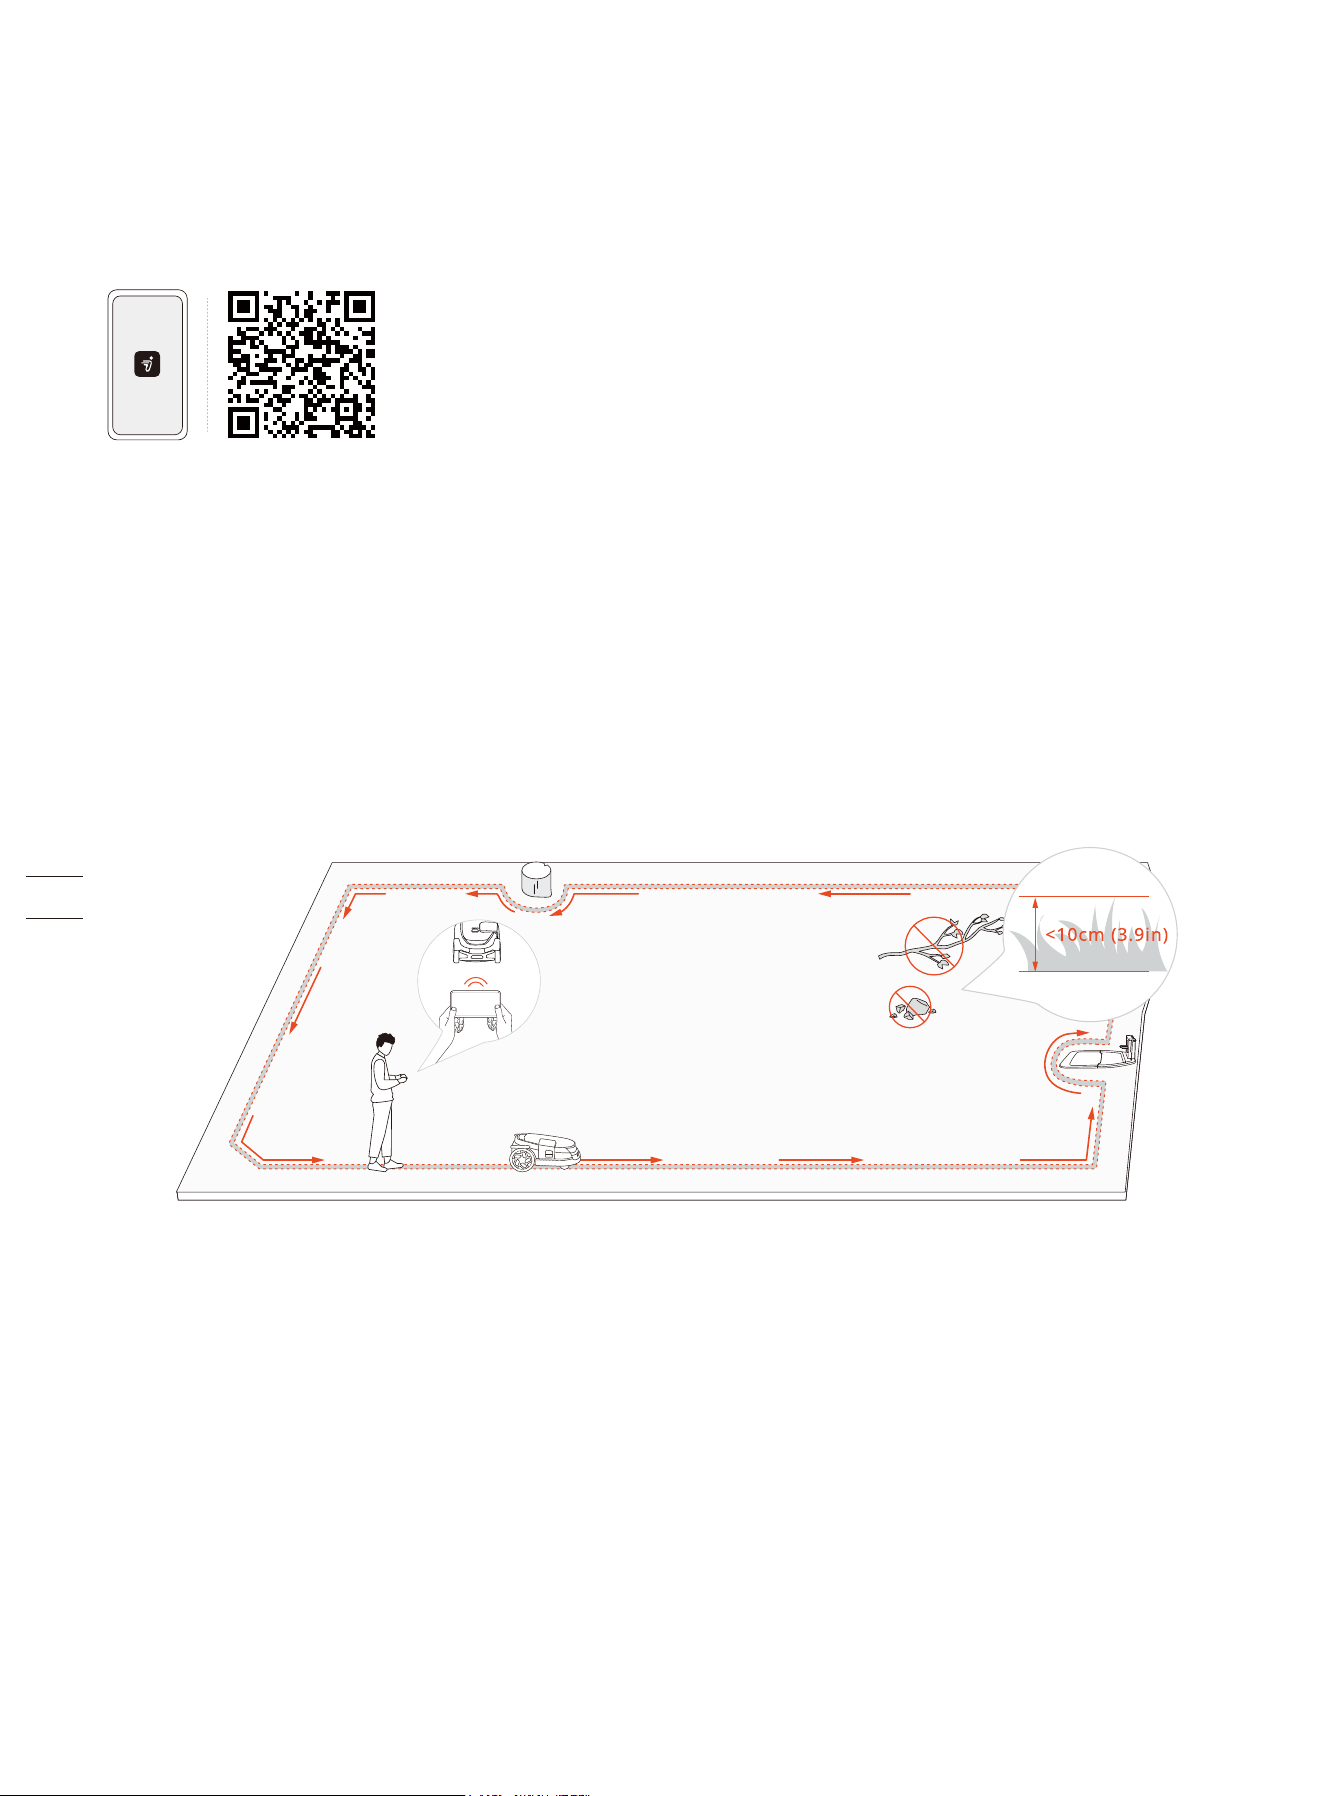
Clear the lawn
Remove debris, piles of leaves, toys, wires, stones, and other obstacles. Make sure children and pets are off the lawn. Please cut
your lawn to a maximum height of 10 cm (3.9 in).
Charge the mower for the first time
A new mower may have a low battery after an extended storage duration. Fully charge the mower before the first use. Place the
mower in the charging station. Make sure the charging strip on the mower and the contact strip on the charging station are in
good contact.
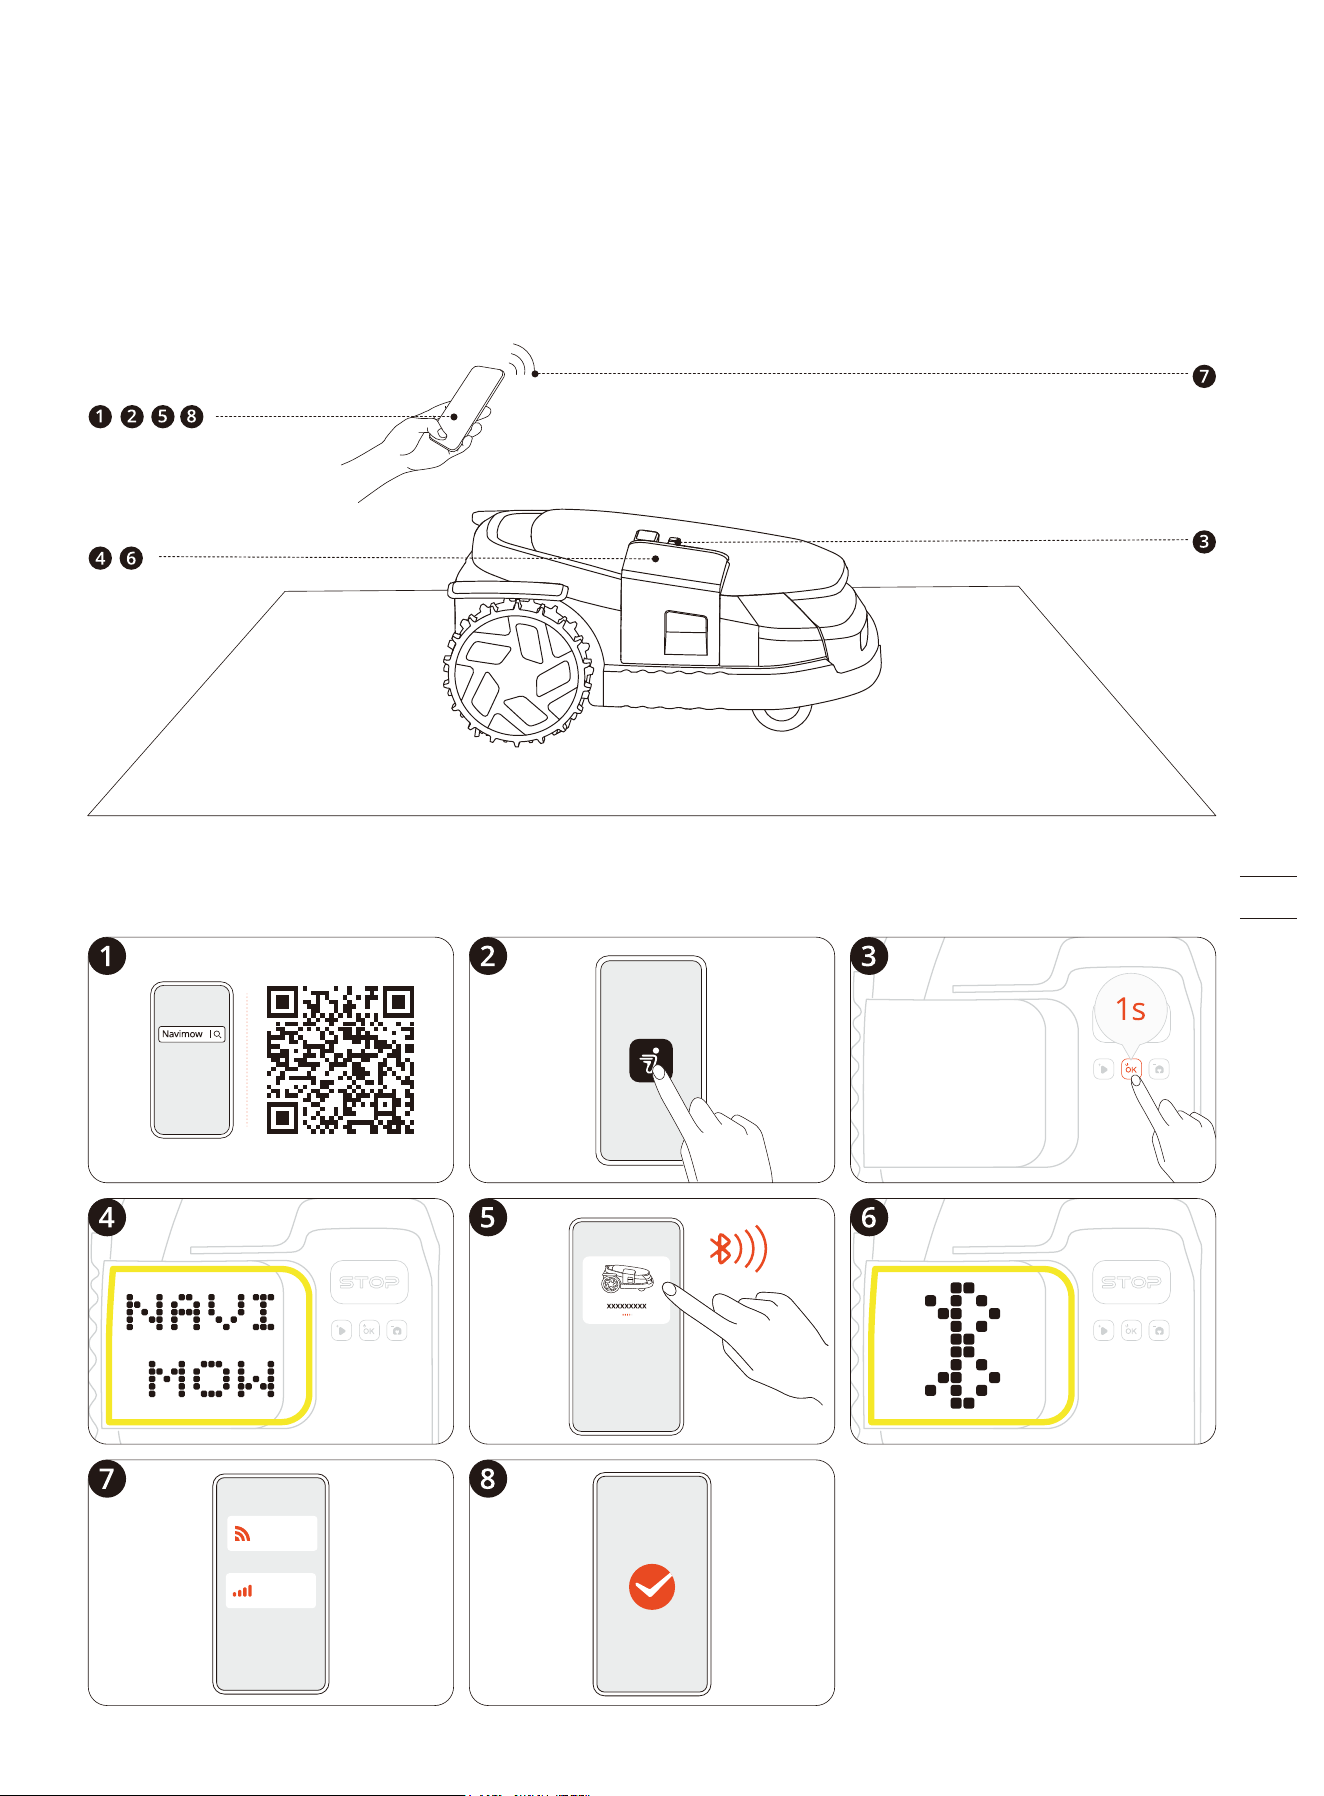
2.2 Activate the Mower
Press and hold the OK button for 1 second to power on the mower. Pair your mower with a smartphone via Bluetooth. Connect to
a 4G network or Wi-Fi network. Follow the instructions via the app for other settings.
2.3 Find Locations
For the X3 mowers, you can choose to install just one antenna, which is the Primary Antenna included in the box.
Or you can buy an additional antenna called the Signal Enhancement Antenna to expand the GPS signal coverage:
• If you own a house with a front yard and a backyard, it is recommended to install two antennas, one at the front, the other
one at the back. When the mower works across the whole area, the positioning can always be stable with each antenna
covering the front and the back.
• If your lawn is too large for a single antenna to cover the entire mowing area, it is recommended to install two antennas. This
way, with each antenna covering a maximum area of 200-meter radius, dual antennas can work together to enhance the
overall GPS signal.
The charging station should be placed near the Primary Antenna.
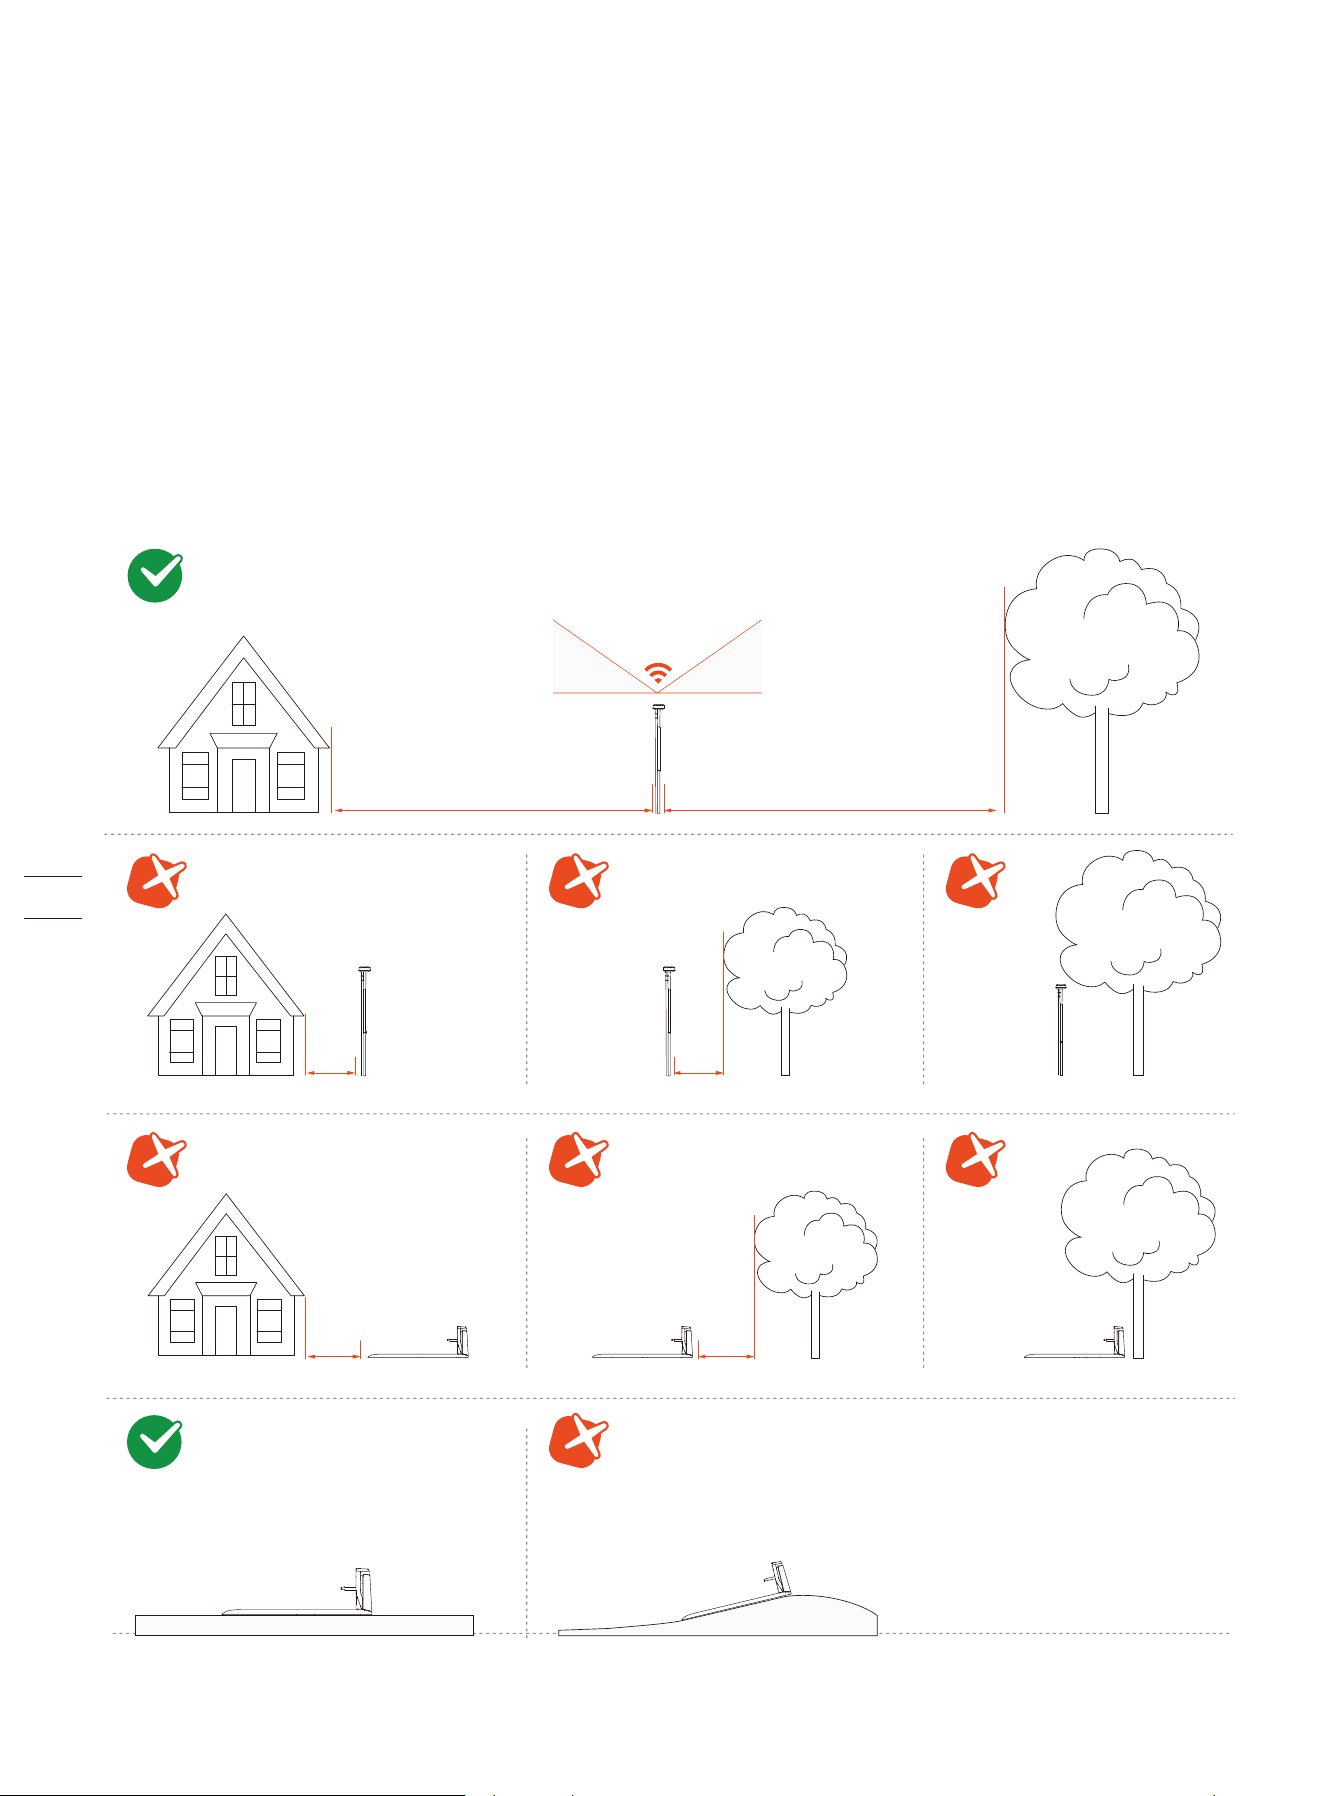
2.3.1 Basic Principles
>110°
35° 35°
≥2m(6.6ft) ≥ 2m(6.6ft)
<2m(6.6ft)<2m(6.6ft)
<2m(6.6ft)
<2m(6.6ft)

Analyze
N
S
W
Satellite Signal Analyzer
E
90°
65°
40°
15°
2.3.2 Find Locations using Antenna Location Finder
When you are unsure about the specific locations for installing antennas and charging stations based on positioning principles,
you can use the Antenna Location Finder to assist you. Depending on the number of antennas you want to install, and get
recommendations for locations to install the Primary Antenna, the Signal Enhancement Antenna, and the charging station.
Go to Settings > MOWER > Maintenance & Tools > Antenna Location Finder, and follow the instructions below:
1. Guide the mower to explore along the edges of the lawn, so it can collect data on the surrounding environment.
2. Choose desired locations for the antennas and charging stations. The recommendation is given based on the GPS signal
strength, helping you to identify the best spots.
3. Follow the recommendation given by the Antenna Location Finder to install your antenna and charging station, or adjust their
locations if needed.
2.3.3 Verify Locations using Satellite Signal Analyzer
When both the mower and the antenna are connected to the same satellite, it's called a 'Co-visible Satellite'. For accurate
positioning of the mower, it requires at least 5 Co-visible Satellites. Having more Co-visible Satellites means the positioning is
better.
The Satellite Signal Analyzer helps you to check if your antenna and the charging station are installed at a proper location. Go to
Settings > MOWER > Maintenance & Tools > Satellite Signal Analyzer.
If the result says there are enough Co-visible Satellites, it means that the location of the charging station and the antenna are OK.
If the result says there aren't enough Co-visible Satellites, it means you need to move the charging station and the antenna to
different places. After that, check the number of Co-visible Satellites again.
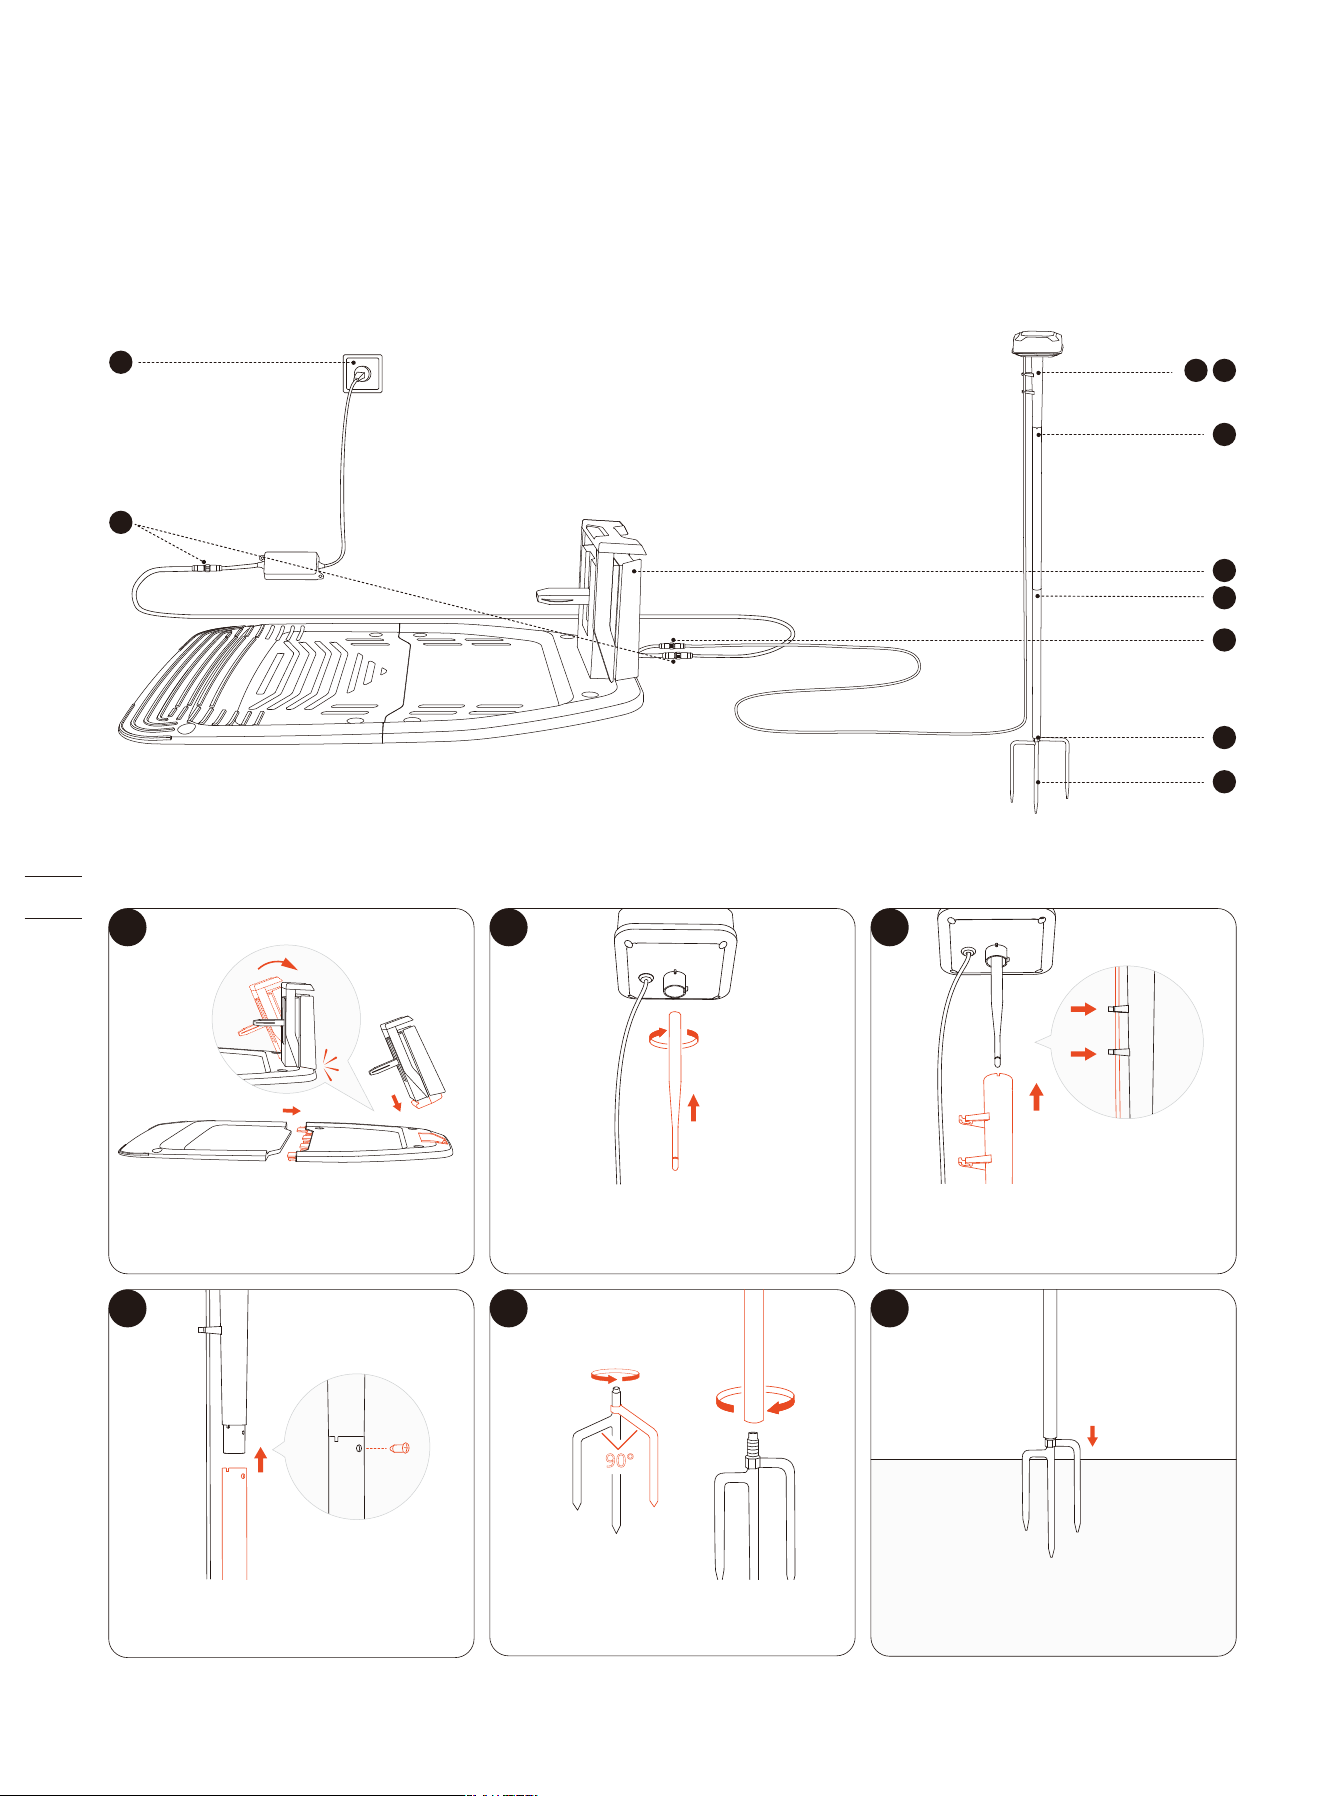
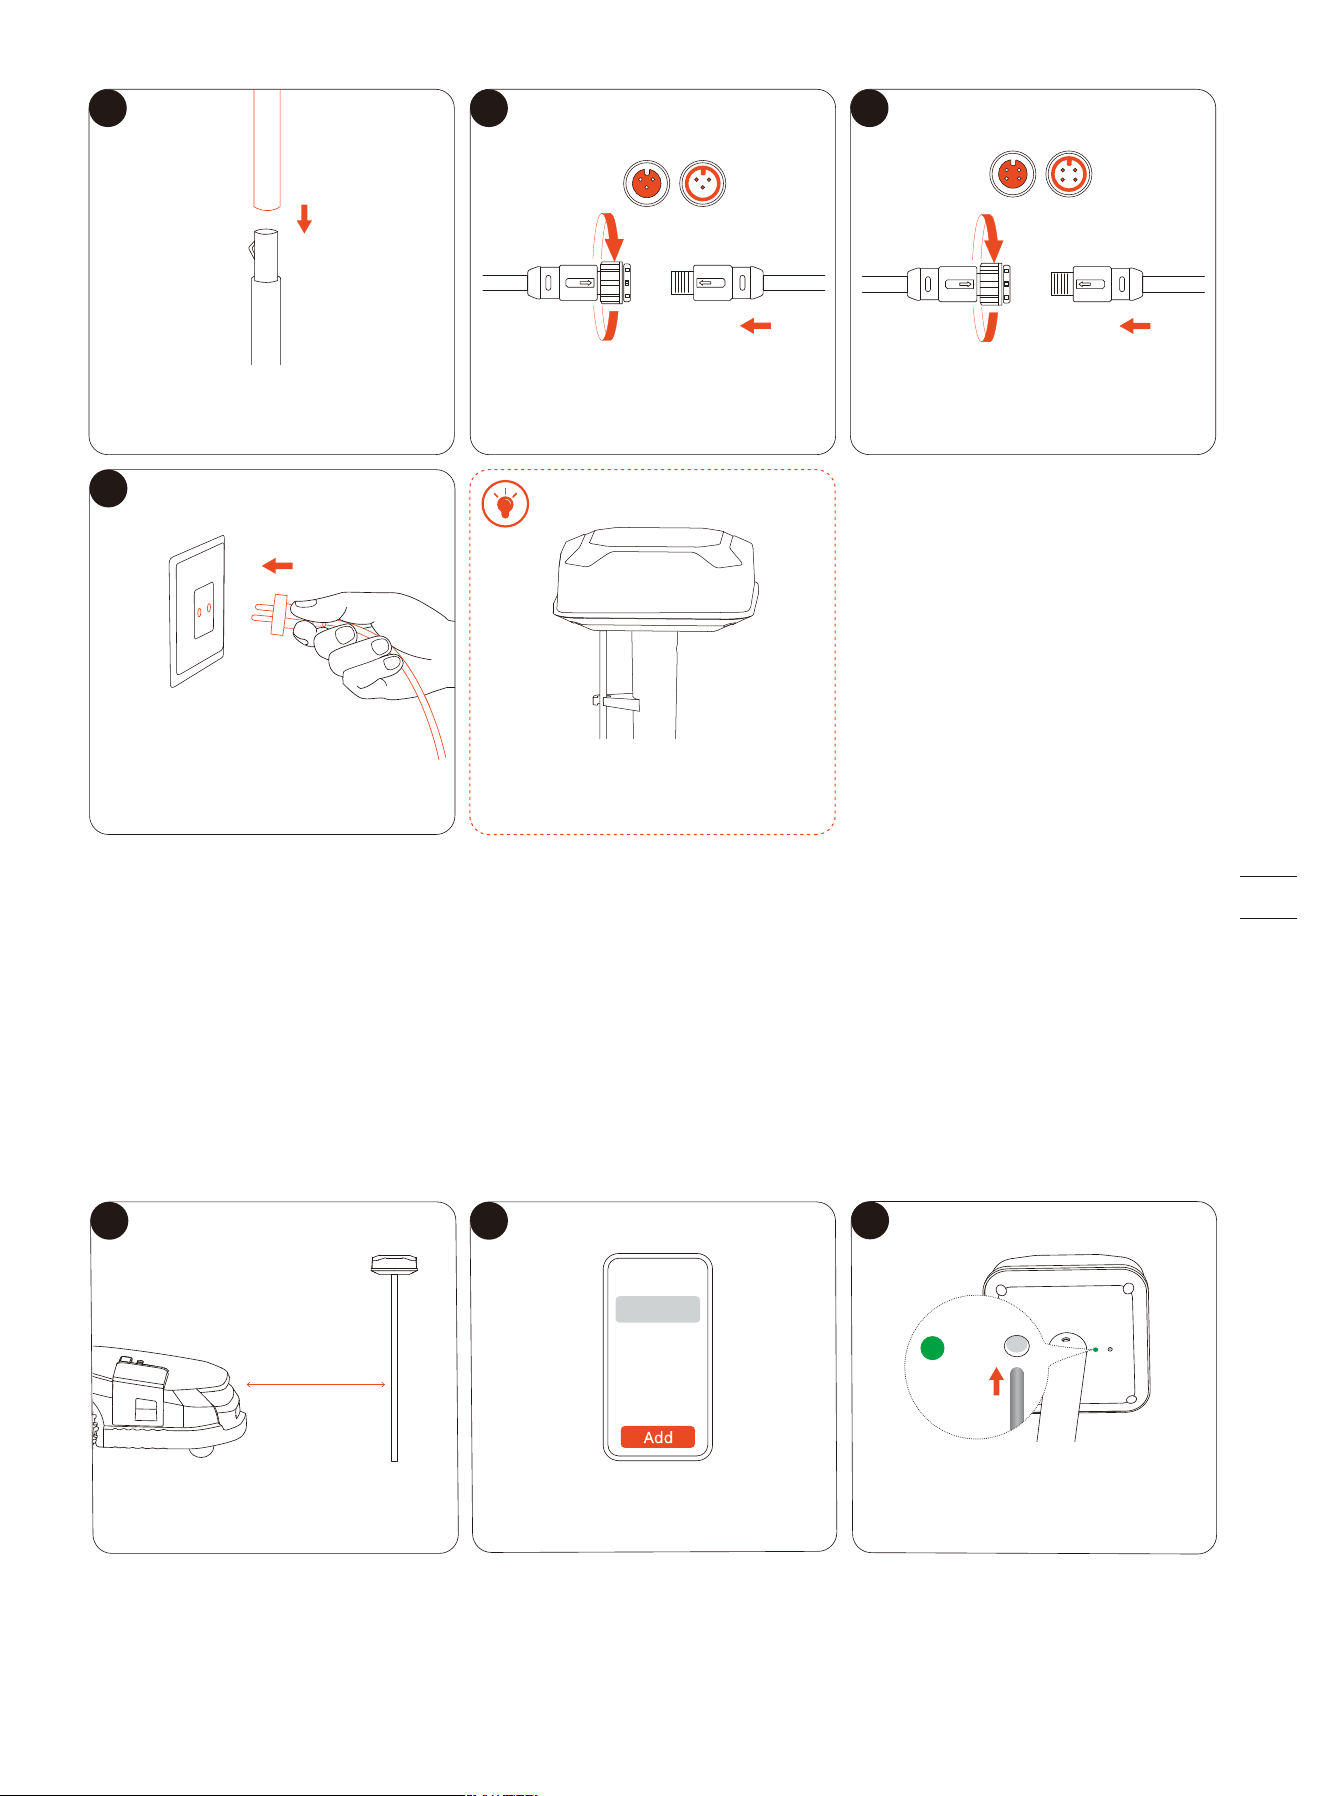
2.4 Install GNSS Antenna and Charging Station
2.4.1 Install Primary Antenna and Charging Station
90°
5
8
1
2
3
4
7
10
9
6
1 2 3
4
5
6
Attach the antenna rod to the
antenna head.
Unfold the base fork (you can install it into
the ground after choosing a good spot).
Install the antenna pole onto the
base fork.
Use the screw to connect the tube
and a piece of antenna pole.
Fit the antenna cable into the clasps.
2.4.2 Pair Signal Enhancement Antenna (Optional)
Repeat the steps in 1.8 to assemble the Signal Enhancement Antenna. Plug in a separate adapter for the antenna (12V 1A) to a
power outlet.
To pair the Signal Enhancement Antenna with your mower, follow the instructions below:
NOTE: Make sure the mower is already powered on and the Signal Enhancement Antenna is plugged in.
1. Place the mower within 10 meters of the antenna.
2. Add the Signal Enhancement Antenna from Settings > MOWER > Advanced features > EFLS 3.0 > Dual antennas > Add.
3. Follow the guidance via the app, and press the button at bottom of the antenna head. The light on the left side will turn green,
meaning the pairing is successful.
7
8 9
10
Add the other piece of antenna pole.
Connect the antenna to the charging
station.
1 2 3
DO NOT put anything on the top of
the antenna.
<10 m
(32.8 ft)
3s
Place the mower within 10 meters
of the antenna.
Go to EFLS 3.0 > Dual antennas > Add. If the light doesn't flash green, press
the button with a pin.
2.4.3 Do the Auto-check
1. Push the mower into the charging station.
2. Please wait until the light on the mower becomes green.
3. (Optional) If the light does not turn green, go to Settings > MOWER > Maintenance & Tools to verify locations using the Satellite
Signal Analyzer. For more information, see 2.3.3 Verify Locations using Satellite Signal Analyzer.
2.4.4 Secure Locations
If the auto-check is successful, you can go ahead and secure the location of the charging station. If not, you need to relocate the
antenna and the charging station.
NOTE: Make sure the cables are not placed on the lawn or anywhere the mower may pass over. Otherwise, the cables may get
damaged.
2.5 Upgrade to the Latest Firmware
Navimow uses Over-The-Air (OTA) to upgrade the firmware. To fully experience Navimow, prior to use, please upgrade to the
latest firmware. Go to Settings > MOWER > My devices > Firmware version.
After activating the mower, maintain the network connection state, follow the guidance in the pop-up window, and wait for 10-30
min to automatically complete the firmware upgrade depending on the network conditions. During this process, please do not
power off or perform other operations. You can start using it after the app prompts that the upgrade is successful.
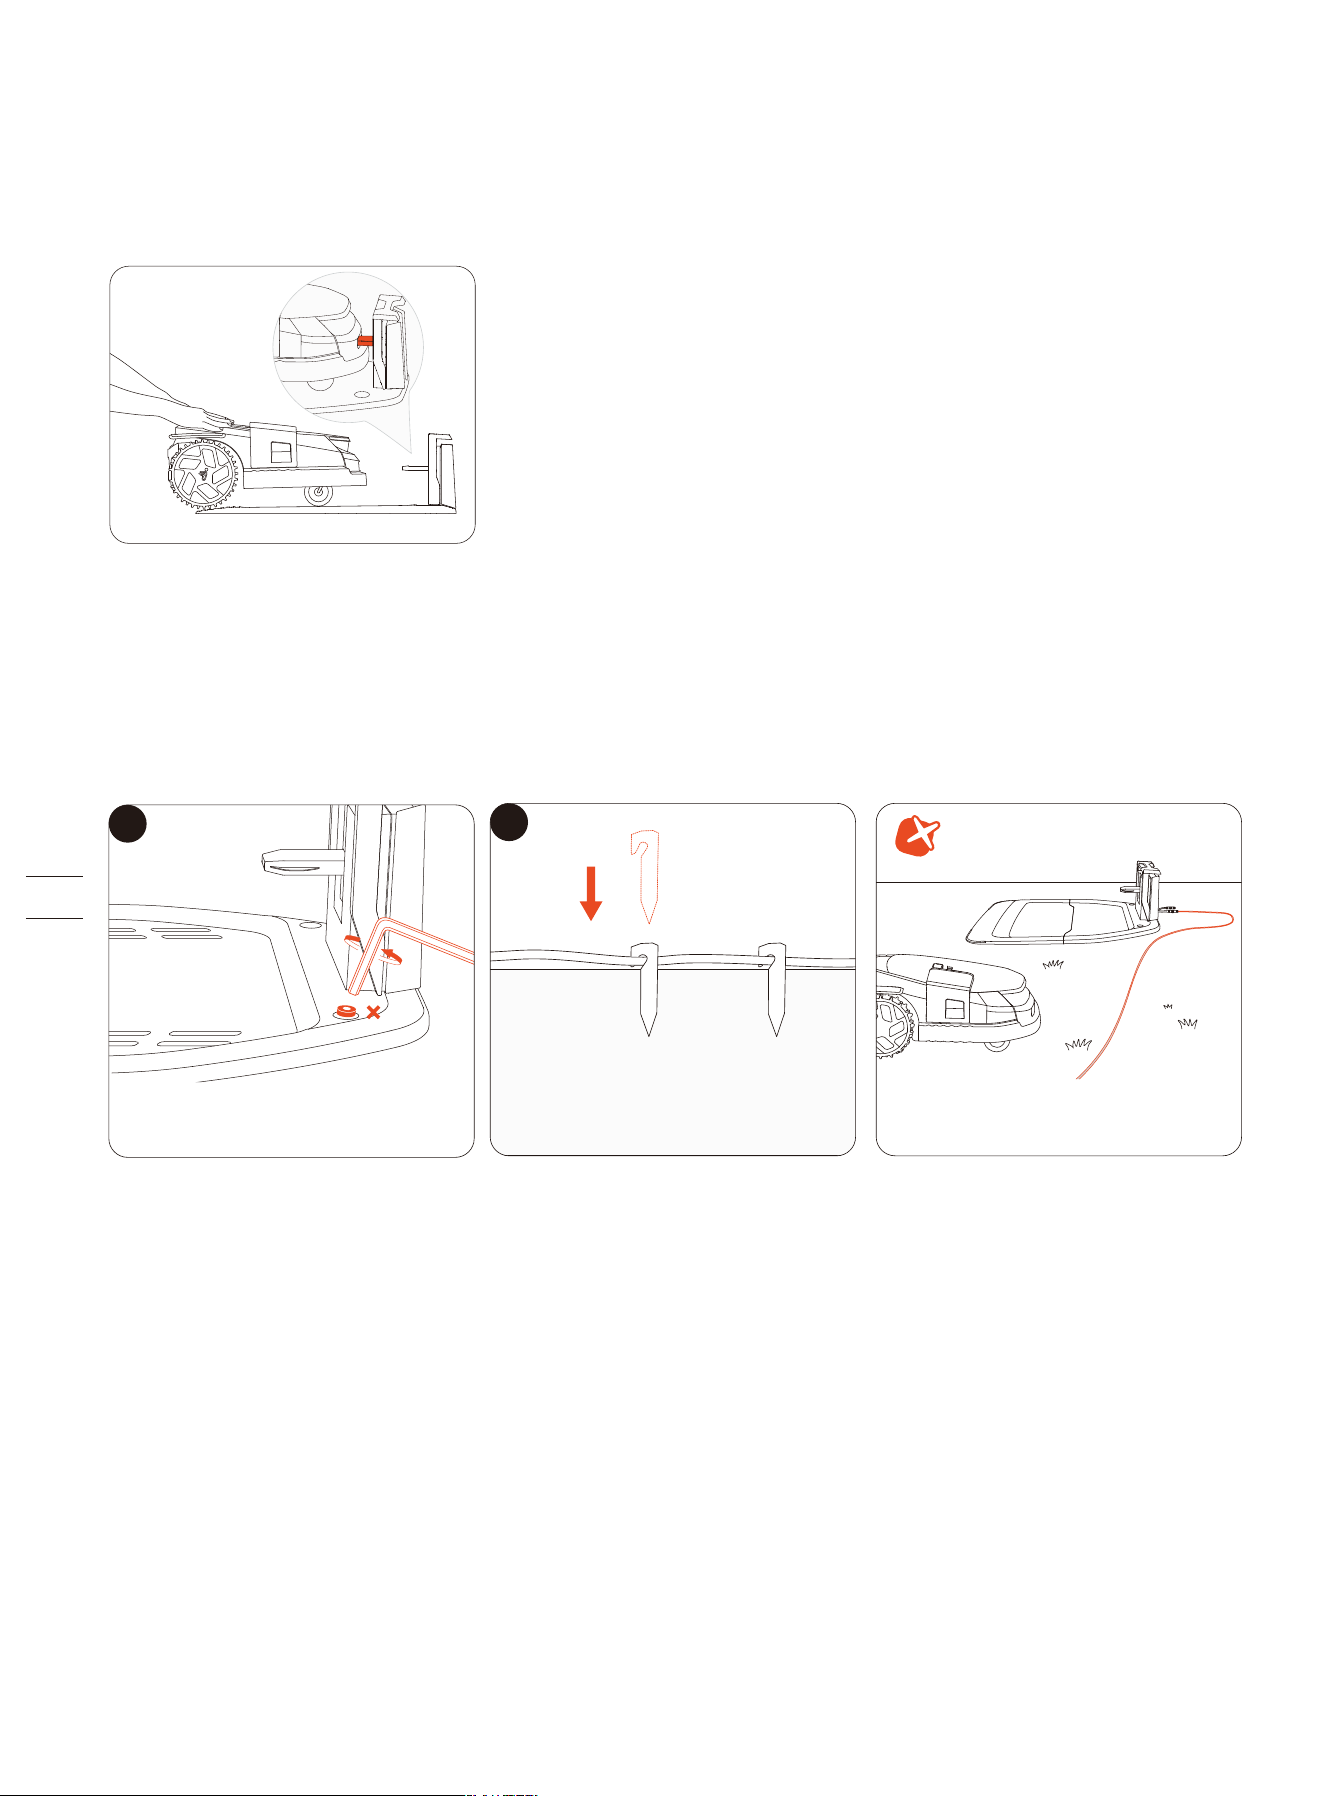
8
1
2
Secure the charging station with the
screws supplied.
Fix the position of the cables on
the ground.
DO NOT leave the cables anywhere
the mower may pass over.
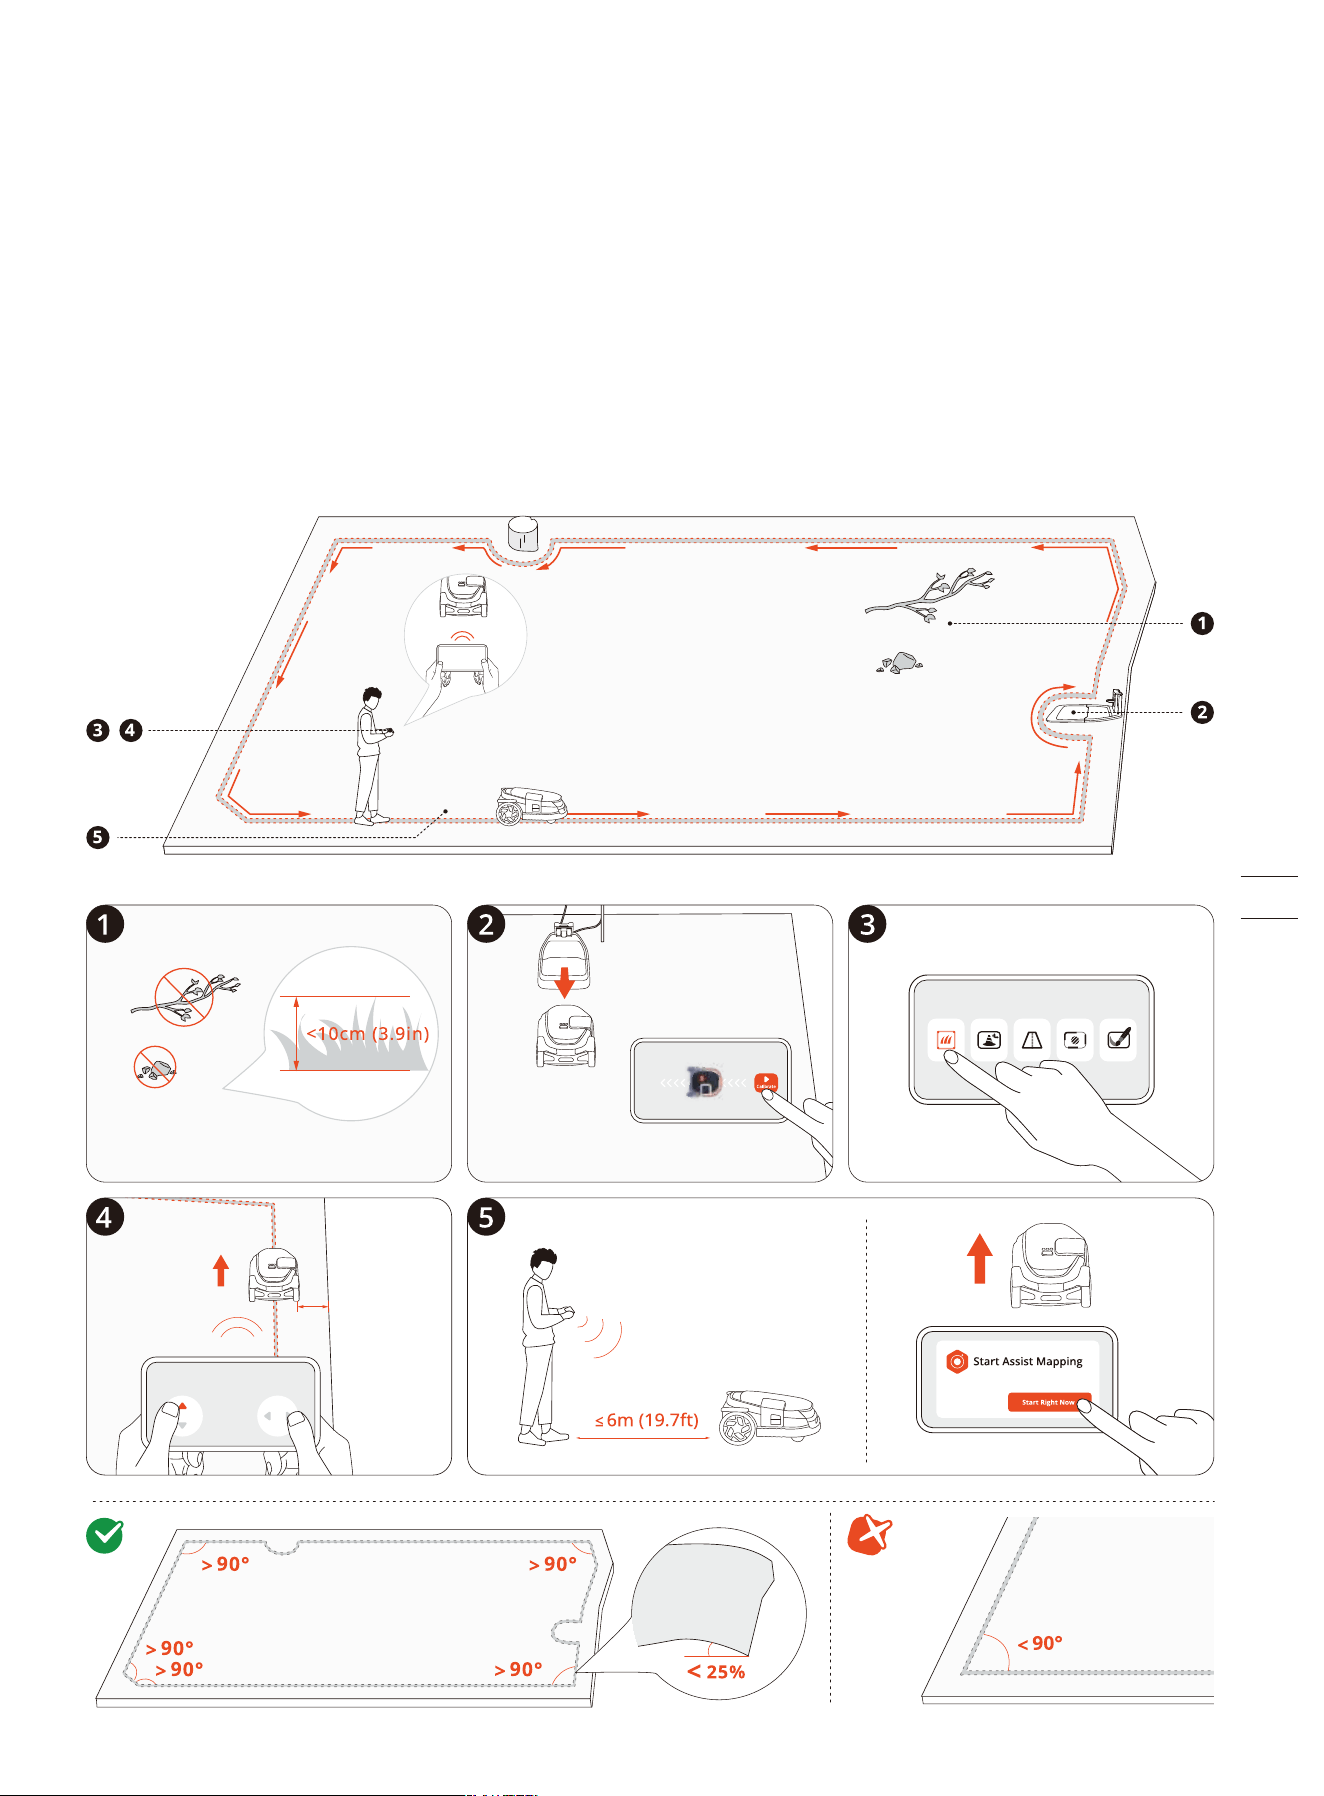
2.6 Map out the Work Area
2.6.1 Map out the Boundary
A boundary defines the edge of a mowing zone.
If you have more than one lawn or a large lawn that needs to be divided into several parts, create multiple zones and connect
them with channels.
1. Make sure the mower is powered on. With Bluetooth connection, your phone will connect to the mower automatically.
NOTE: If the mower is in lock status, you must enter the PIN code before operating the mower.
2. Tap ‘Create a map’ to start mapping.
3. Calibrate the mower to ensure accurate positioning.
4. Find a proper starting point along the edge of your lawn. Keep within 6 m (19.7 ft) of the mower during the mapping
process.
5. Walk along the edge.
Angle: Make sure to follow a straight line with a smooth turning angle of no less than 90°.
10cm
(4in)
Boundary Type
STOP
Assist Mapping
The camera sensors on the mower capture the physical boundary of the lawn and Assist Mapping will be triggered. Therefore, the
mower can create boundaries automatically by navigating along the edges on its own, making mapping easier.
Remote control the mower towards the edges of the lawn. When the camera detects clear lawn edges, you can decide whether to
start Assist Mapping.
When the icon or on the upper right corner flashes, tap it and start Assist Mapping.
• Keep your phone active and avoid switching to other apps.
• Stay within 6 m (19.7 ft) of the mower during Assist Mapping.
• If the mower behaves abnormally, you can stop Assist Mapping at any time and manually control the mower.
Isolated Zone
When you have created a zone that is neither connected to the charging station nor via other zones, this zone becomes an
isolated zone.
You can only start mowing by pressing the MOW button on the mower, and carry it back for recharging.
NOTE: Mowing schedules are not supported for isolated zones.
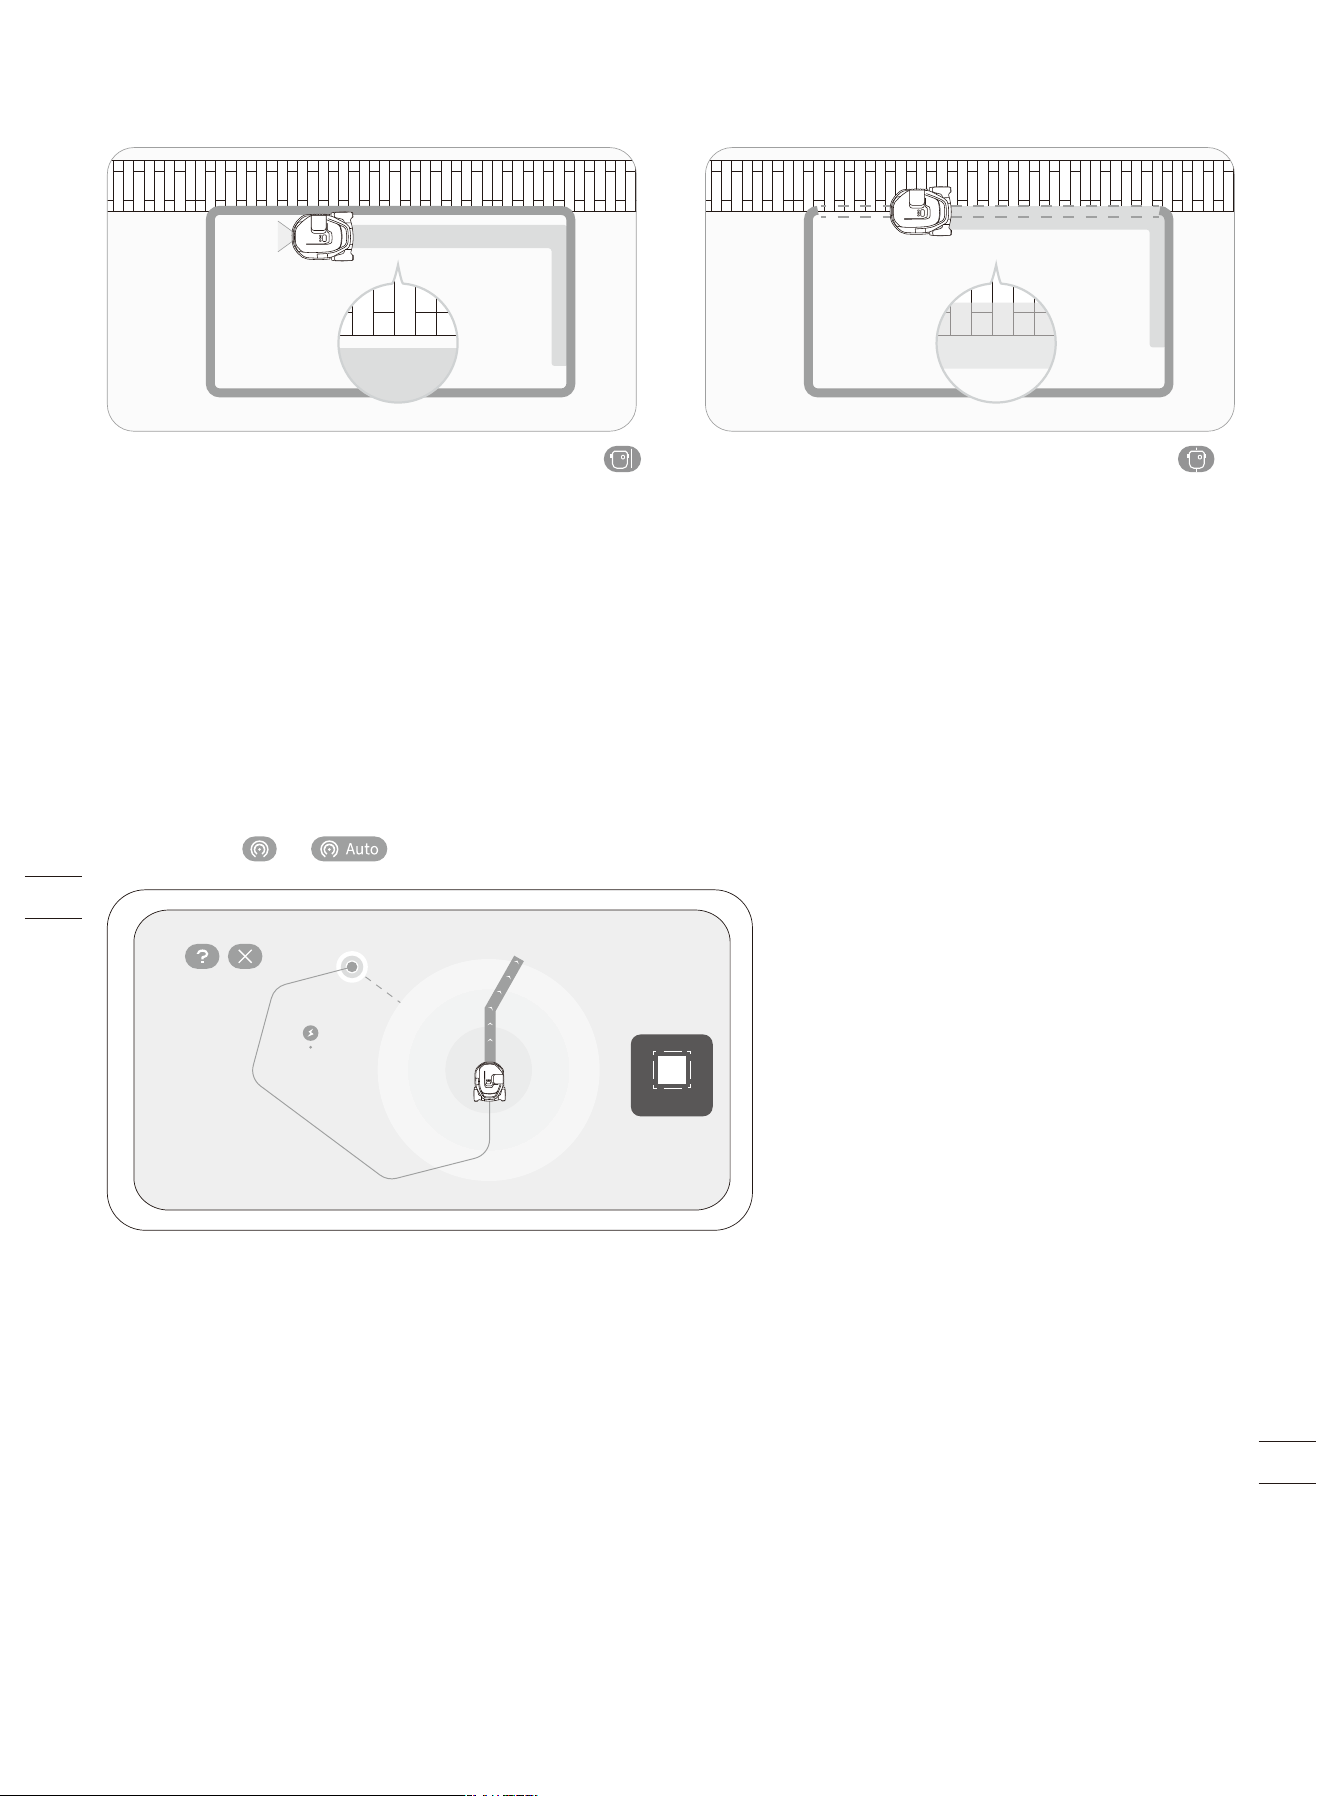
Standard Boundry: By choosing the Standard Boundary
icon, the mower will stay within the defined boundary while
mowing along the edges. You don't need to precisely guide
the mower along the edges, as the camera sensors will
automatically collect data of the environment. You can also
turn on Assist Mapping, as the camera sensors will
automatically identify the edges of the lawn, so the mower
can navigate itself.
Ride-on Boundry: By choosing the Ride-on Boundary
icon, the mower can ride on the edge in order to fully trim
the grass right up to the non-grass area during mowing. The
pathway or the pavement should be at the same level with
the lawn.
NOTE: Ensure the height between the grass and the
non-grass area is less than 1 cm (0.4 in).
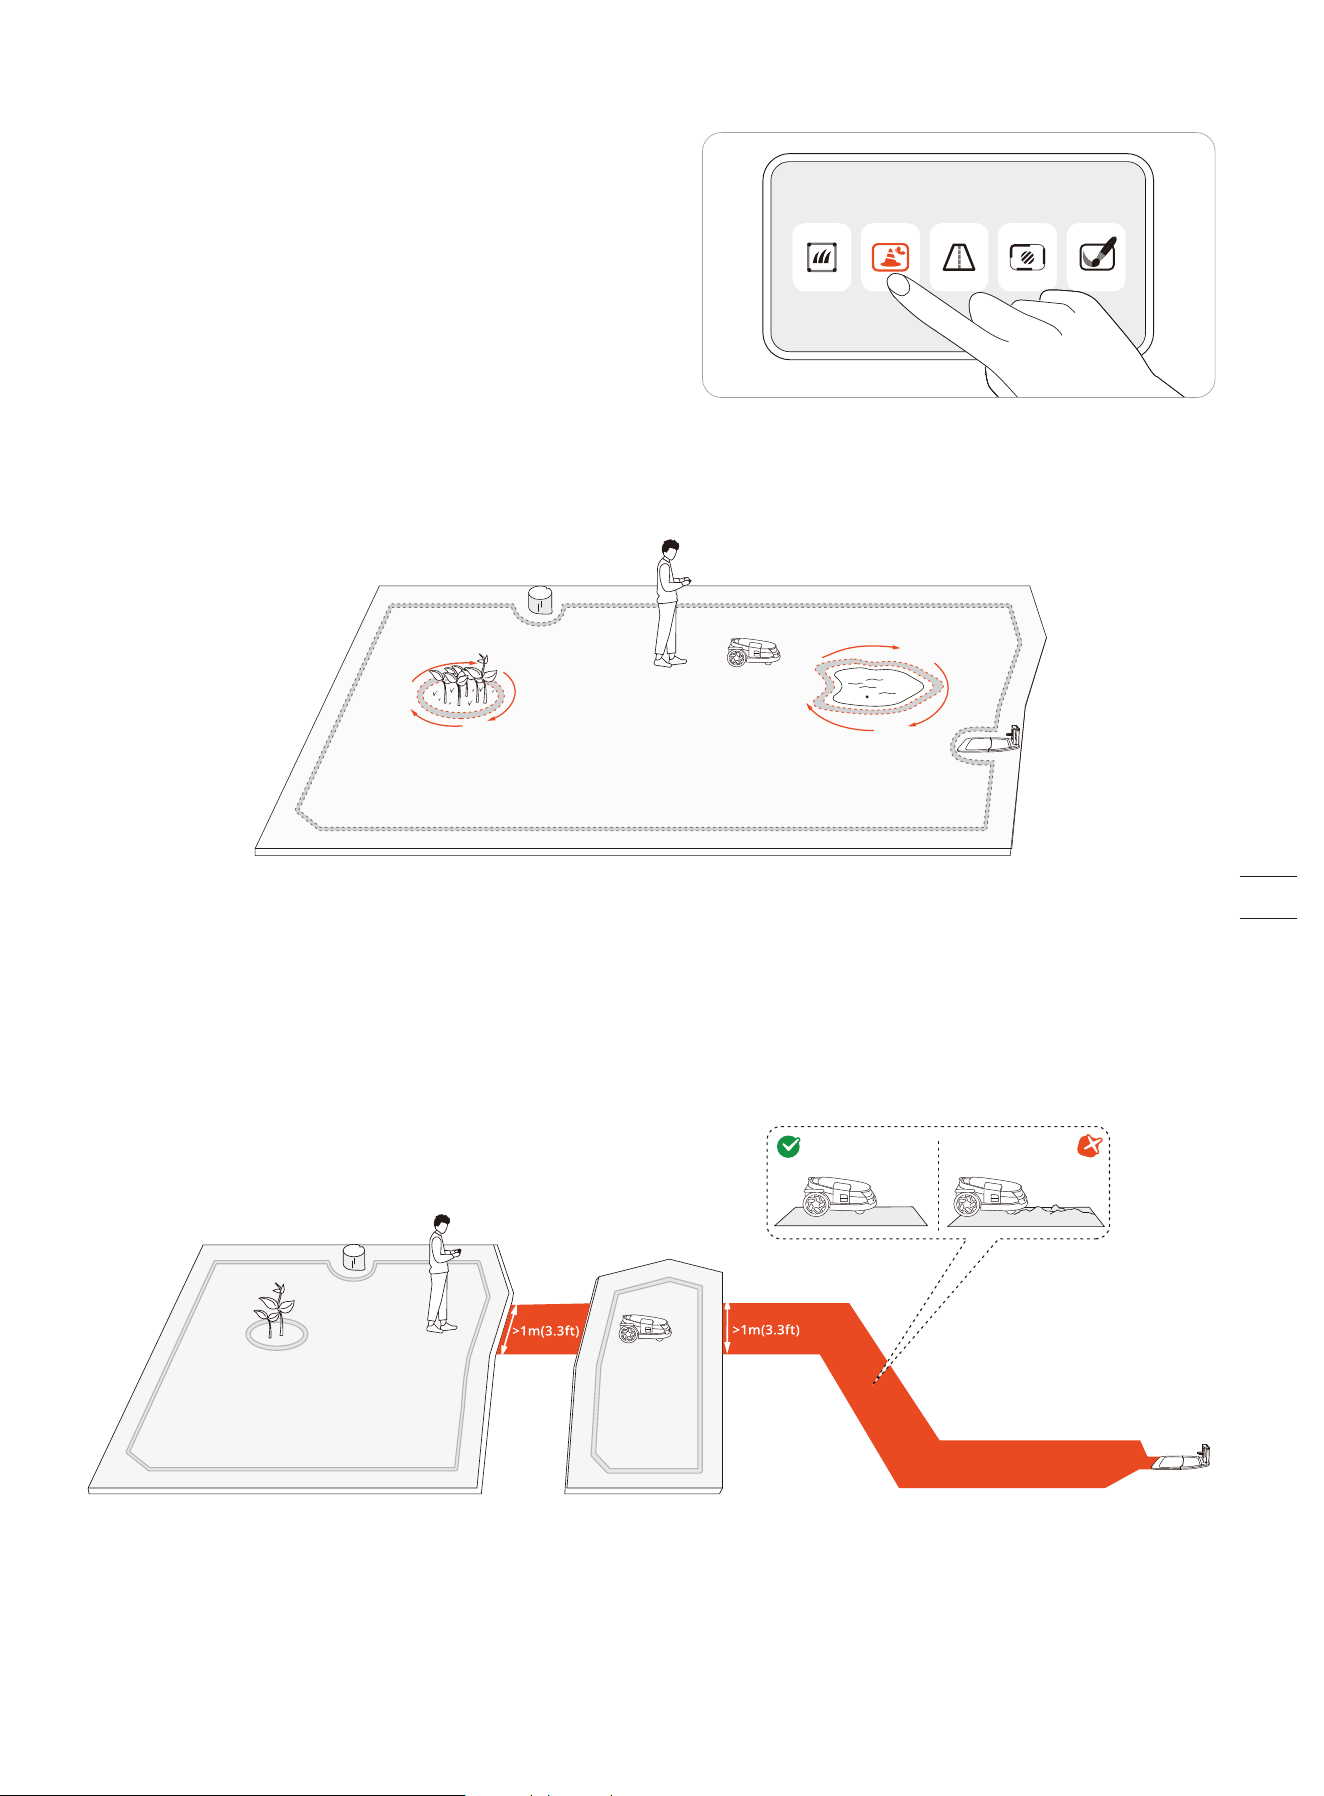
2.6.2 Create an Off-limit Island (BioLife Island)
The camera sensors can identify objects on the lawn and the mower
can avoid bumping into them. To protect both your mower and
objects on the lawn, you can lay borders for objects or areas that
you don't want the mower to enter. For example, a flowerbed, a
ditch, a hole, lawn decorations, a pond, a pool, sprinkler heads, or
emerged roots. If you have recently installed a trampoline or grill on
the lawn, you can also set it as an off-limit island to protect it.
Follow the instructions in the app. When you need to cancel the area (like when you remove the trampoline from the lawn), just
delete it via the app.
An off-limit island is also called a BioLife island. You can also set up BioLife islands for places where the grass is left to grow
naturally, creating a playground and a home for wildlife like bees, butterflies, and hedgehogs.
NOTE: Make smooth turning angles when setting the islands. The angles should not be less than 90°. You also need to walk along
the edge when setting the island. For instructions, see 2.6.1 Map out the Boundary.
2.6.3 Create a Channel
A channel can be created to connect two separate zones or to connect the edge of a lawn to the charging station.
To improve obstacle avoidance inside a channel, you can enable 'Channel Obstacle Avoidance' from Settings > MOWER >
Advanced features > VisionFence.
NOTE: The channel that you choose to let the mower pass through should be wider than 1 m (3.3 ft).
>1m
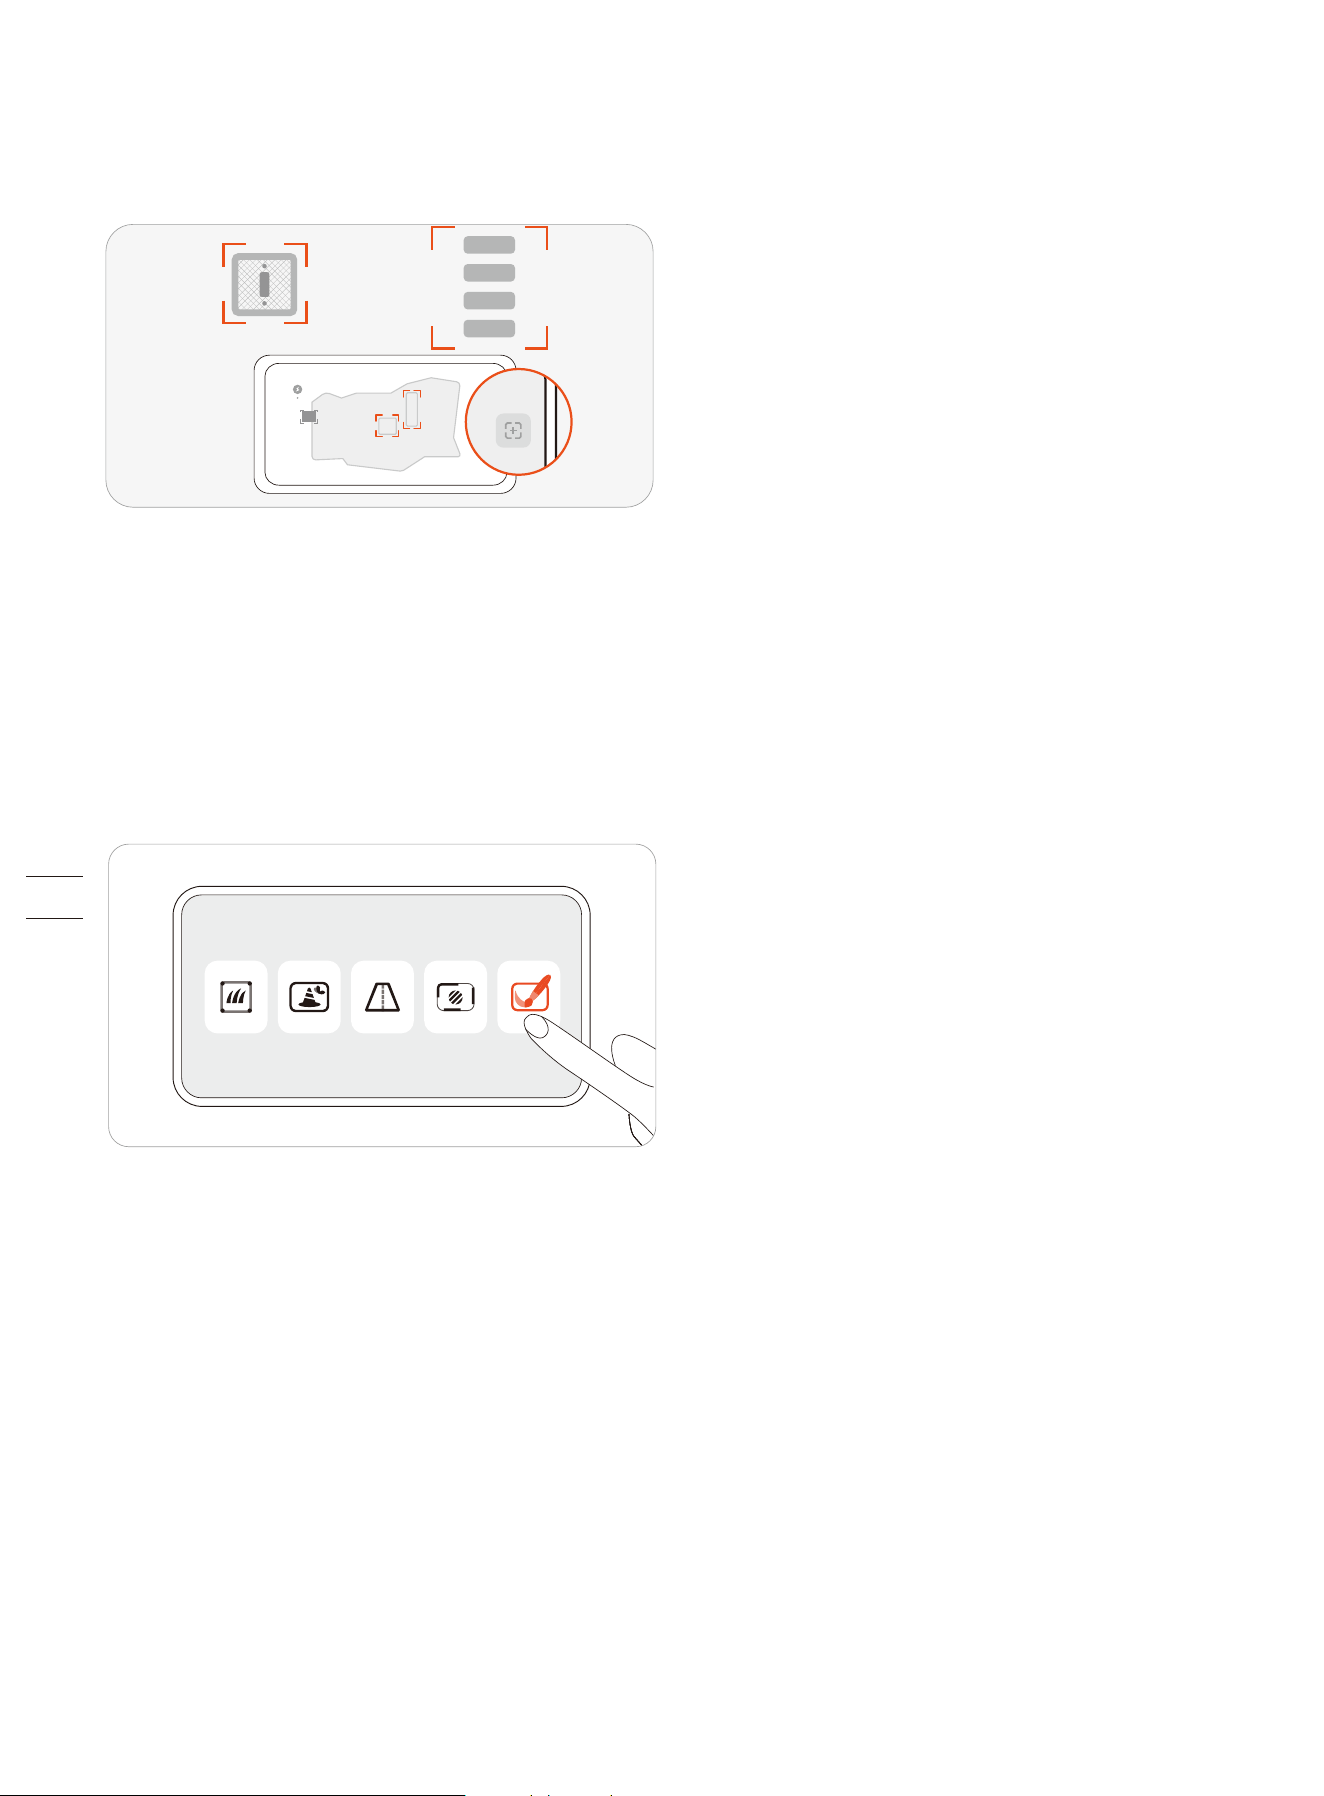
2.6.4 Create a VisionFence-off Zone
A VisionFence-off zone is a place where the mower automatically turns off the camera used for obstacle avoidance, so the mower
will directly pass through instead of turning away.
If you need the mower to pass through flat non-grass areas to achieve a thorough cut, you can set up a VisionFence-off zone.
These areas can be, for example, stone roads or utility holes, where the visual detection causes the mower to avoid.
Follow the instructions in the app. You can adjust the size of a VisionFence-off zone, move it to another place, or delete it.
2.6.5 Create a Doodle
A doodle is a fun design or pattern that you can create on your lawn using your mower. By choosing a design (a logo or a
combination of letters and numbers) and a location, the mower will leave that part of the lawn uncut. Once the rest of the lawn is
mowed, the doodle will be visible.
Follow the instructions in the app. You can decide how long the doodle will stay before the mower mows over it completely once
the active days (up to 30 days) are over.
3. Daily Use
3.1 Mow
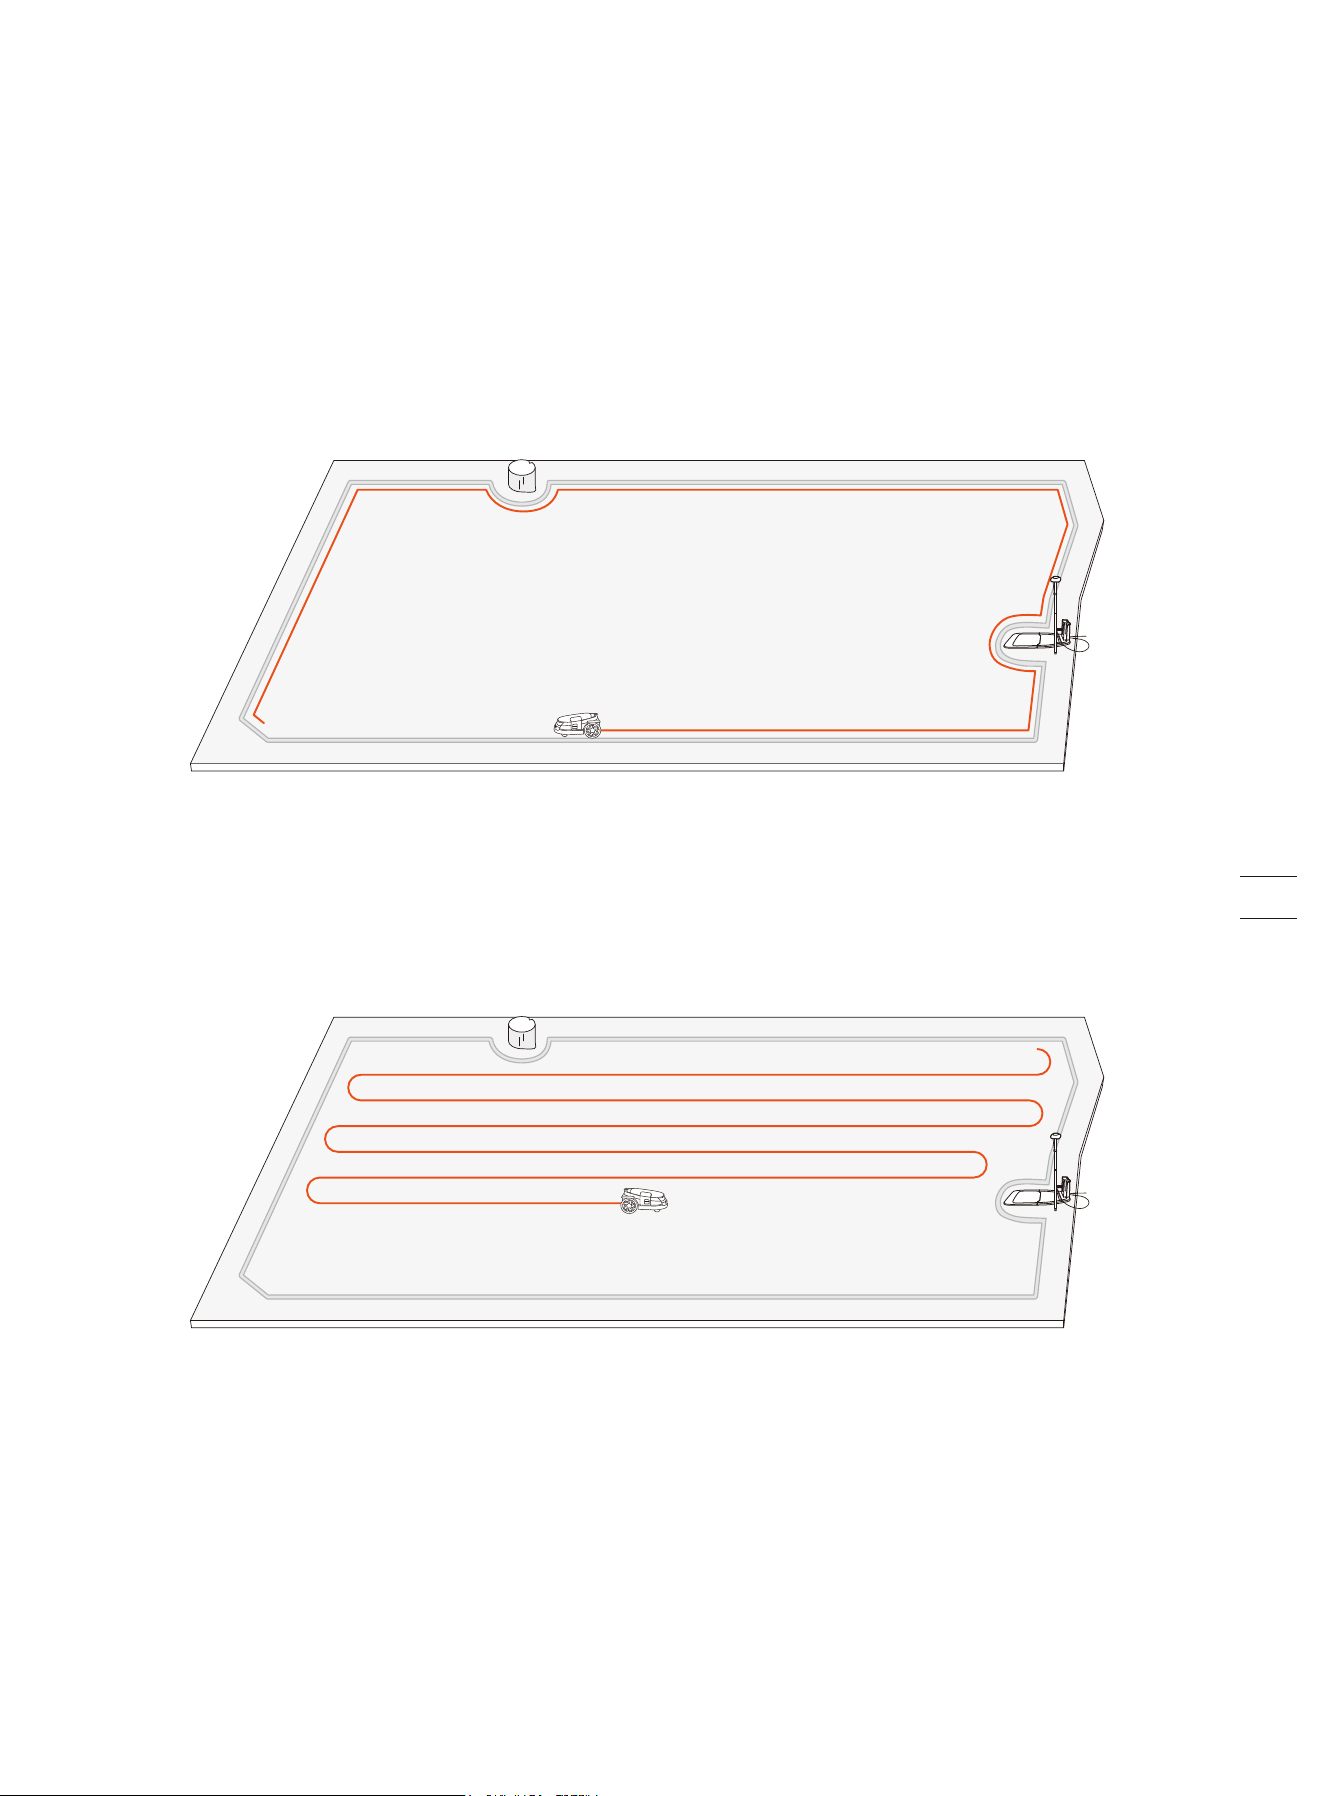
3.1.1 How Does Navimow Mow
Mowing along the boundary and around off-limit islands
Your mower mows along the boundary and mows around off-limit islands when it starts a mowing task.
If the surroundings are complex, to avoid risks, you can disable 'Edge Mowing' from Map management > Edit > Edge Mowing for
each zone.
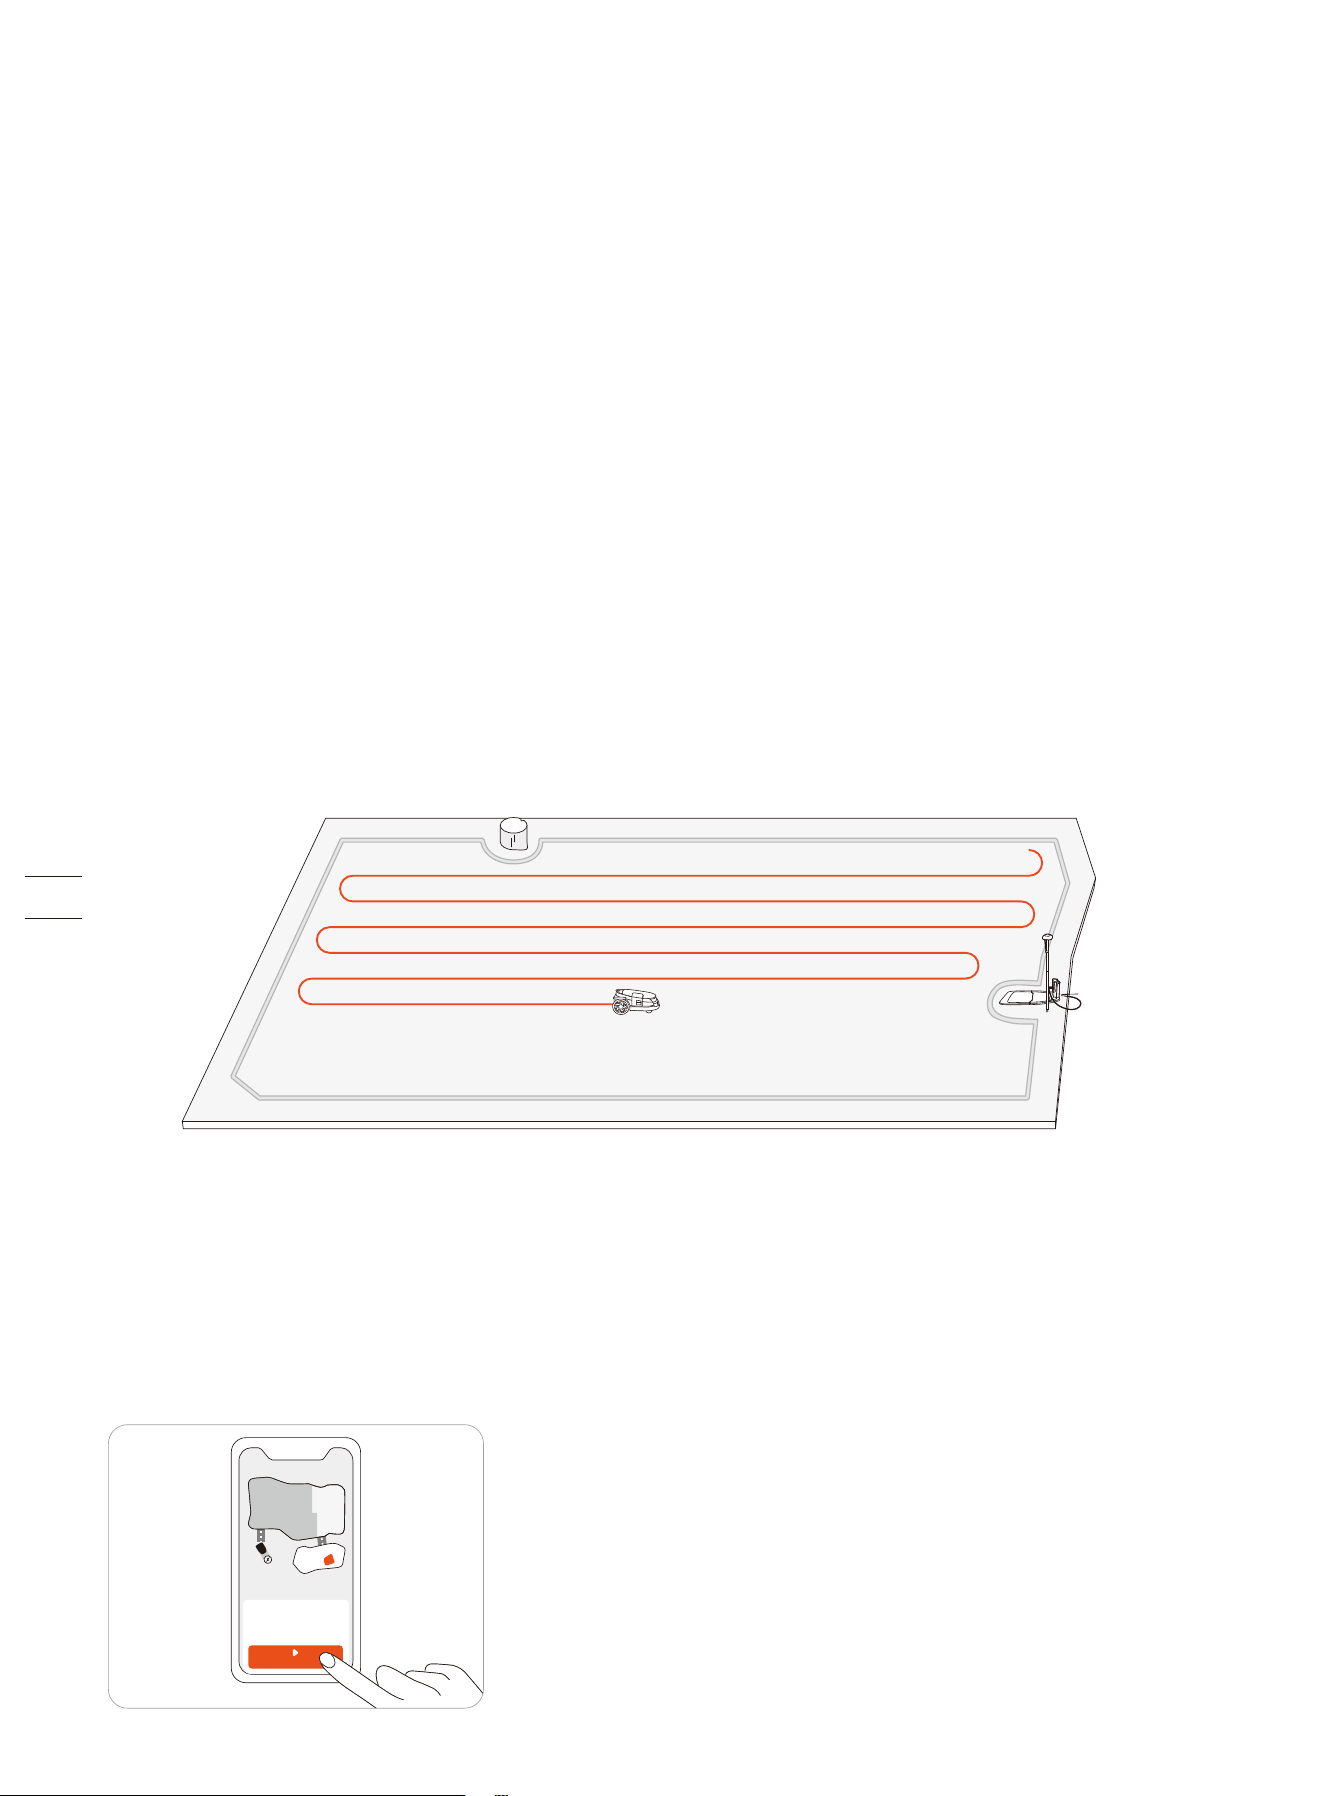
Mowing with systematic patterns
Inside the work area, the mower will mow the lawn along a planned path calculated by an algorithm for maximum efficiency.
The mower can change its mowing directions according to your choices. This avoids repetitive mowing tracks. To customize
mowing directions for each mowing zone, see Customize mowing directions in 3.1.2 Manage Multiple Zones.
3.1.2 Manage Multiple Zones
You can create multiple zones for your map, each zone with its own unique name and a customized mowing direction, and
mowing schedule.
For manual mowing, you can select to mow all zones or only some of them. For scheduled mowing, you can set up schedules for
all or selected zones.
A zone is automatically created after the boundaries of a work area is mapped out. You can continue to create multiple zones
and connect them with channels. For instructions, see 2.6.3 Create a Channel.
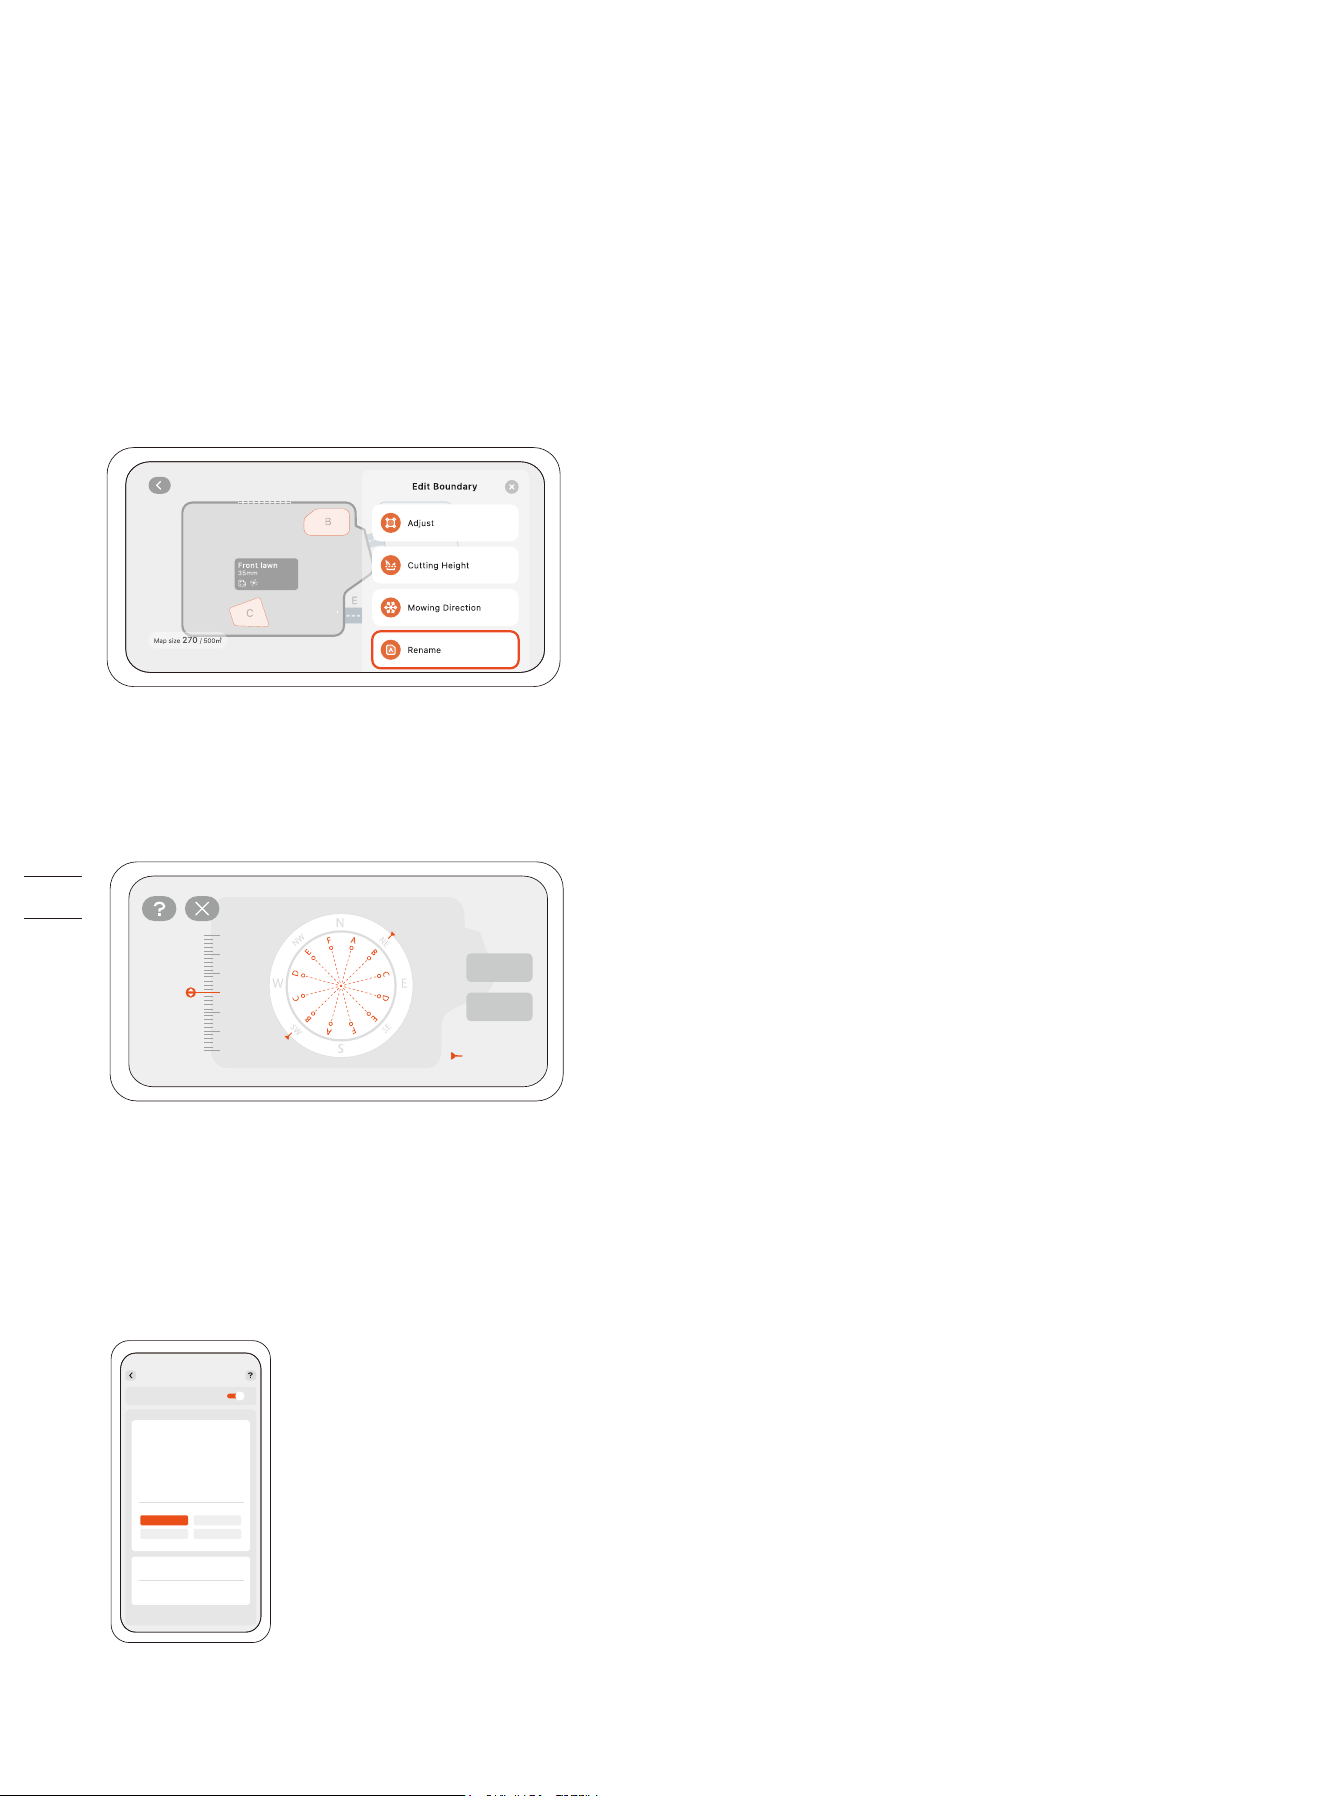
Rename the zones
1. Tap to select a zone.
2. Tap 'Edit' and customize settings for the selected zone.
3. Tap the 'Rename' icon to set a name for the zone.
Customize mowing directions
The mower can automatically change its mowing direction according to your choices from Map management > Edit > Mowing
direction. You can choose one or more directions so that mower changes the mowing direction every time it finishes a round of
mowing.
Create or modify mowing schedules
1. Go to Settings > MOWER > Mowing > Mowing schedule.
2. Select a day to set up a schedule.
3. Set the start time and end time of the schedule.
4. Select which zone(s) to apply the schedule.
5. Tap 'Confirm' to save the settings.
Optimal direction
Default
Done
Mowing schedule
Add schedule
8:00 14:00
7:30 13:30
8:30 14:30
Enable mowing schedule
All
Backyard
Confirm
Cancel
C Front lawn
Enable or disable mowing schedules
You can disable the mowing schedules if you don't want the mower to follow the schedule.
Enable or disable mowing cycle
When disabled, if the mowing progress in the selected zones reaches 100%, the mower will stop mowing and return to the
charging station even if the scheduled end time has not yet arrived.
When enabled, if the mowing progress in the selected zones reaches 100%, the mower will start a new round of mowing and keep
mowing until the scheduled end time arrives.
Split and merge zones
To split a zone into smaller ones, manually control the mower to cut a zone into two. Go to the 'Map management' page, select a
zone, and find 'Split' in 'Edit'. The new zones will follow the same settings as the old one.
To merge several zones into one, go to the 'Map management' page, select a zone, find 'Merge' in 'Edit', choose an adjacent zone,
and merge them. You can only merge two zones at a time.
3.2 Navimow App
3.2.1 Introduction
The Navimow app is an important part of Navimow, you can use the app to:
1. Bind and activate the mower.
2. Create a map (work area) with multiple mowing zones.
3. Check the status and work progress of the mower, remotely control the mower to start, stop, or return to the charging station,
etc.
4. View and change mower work settings (map management, mowing schedules, etc.).
5. View and change mower security/function settings (Mowing at night, Reset PIN code, Anti-theft, etc.).
6. Update firmware, and change network connection.
7. Unbind and retain or clear user data.
8. Get user materials and after-sales support via Live Chat.
3.2.2 Download, Register, Log in
1. Search and download the Navimow app through the Apple APP store or Google Play Store.
2. Register and log in to your account.
3. Turn on the Bluetooth on your phone and make sure your phone has a network signal.
NOTES:
1. If you have registered an account through other services of Segway-Ninebot, you can log in to the Navimow app with the
account and vice versa.
2. If you deactivate your Navimow account, all data related to Segway-Ninebot will be deleted.
3. During use, the Navimow app will ask you for Bluetooth (iOS/Android), location (iOS/Android), and Wi-Fi access (Android). To
ensure normal use, please grant the above accesses.
4. If you use Navimow with an iOS mobile device, when configuring the mower's Wi-Fi network for the first time, please make sure
that your mobile phone is connected to the same Wi-Fi network.
0 4 8 12 16 20 24
Mowing schedule
Enable mowing schedule
Save
0 4 8 12 16 20 24
S
M
T
W
T
F
S
Mowing schedule
Enable mowing schedule
Save
S
M
T
W
T
F
S
3.2 Navimow App
3.2.1 Introduction
The Navimow app is an important part of Navimow, you can use the app to:
1. Bind and activate the mower.
2. Create a map (work area) with multiple mowing zones.
3. Check the status and work progress of the mower, remotely control the mower to start, stop, or return to the charging station,
etc.
4. View and change mower work settings (map management, mowing schedules, etc.).
5. View and change mower security/function settings (Mowing at night, Reset PIN code, Anti-theft, etc.).
6. Update firmware, and change network connection.
7. Unbind and retain or clear user data.
8. Get user materials and after-sales support via Live Chat.
3.2.2 Download, Register, Log in
1. Search and download the Navimow app through the Apple APP store or Google Play Store.
2. Register and log in to your account.
3. Turn on the Bluetooth on your phone and make sure your phone has a network signal.
NOTES:
1. If you have registered an account through other services of Segway-Ninebot, you can log in to the Navimow app with the
account and vice versa.
2. If you deactivate your Navimow account, all data related to Segway-Ninebot will be deleted.
3. During use, the Navimow app will ask you for Bluetooth (iOS/Android), location (iOS/Android), and Wi-Fi access (Android). To
ensure normal use, please grant the above accesses.
4. If you use Navimow with an iOS mobile device, when configuring the mower's Wi-Fi network for the first time, please make sure
that your mobile phone is connected to the same Wi-Fi network.
3.2.3 Update Navimow app and Firmware
To experience the latest features and updates, always keep your Navimow app up-to-date. You will receive a notification to
remind you when there is a new version of the app.
To manually check firmware updates, go to Settings > MOWER > My devices > Firmware version.
To upgrade the firmware successfully, the following conditions need to be met:
• The mower is in the charging station.
• The mower is connected to a network and the signal is strong (through 4G or Wi-Fi).
• The battery power is more than 20%.
• There is no mowing task scheduled in the next hour.
For more information about upgrading firmware, see 2.5 Upgrade the Mower to the Latest Firmware.
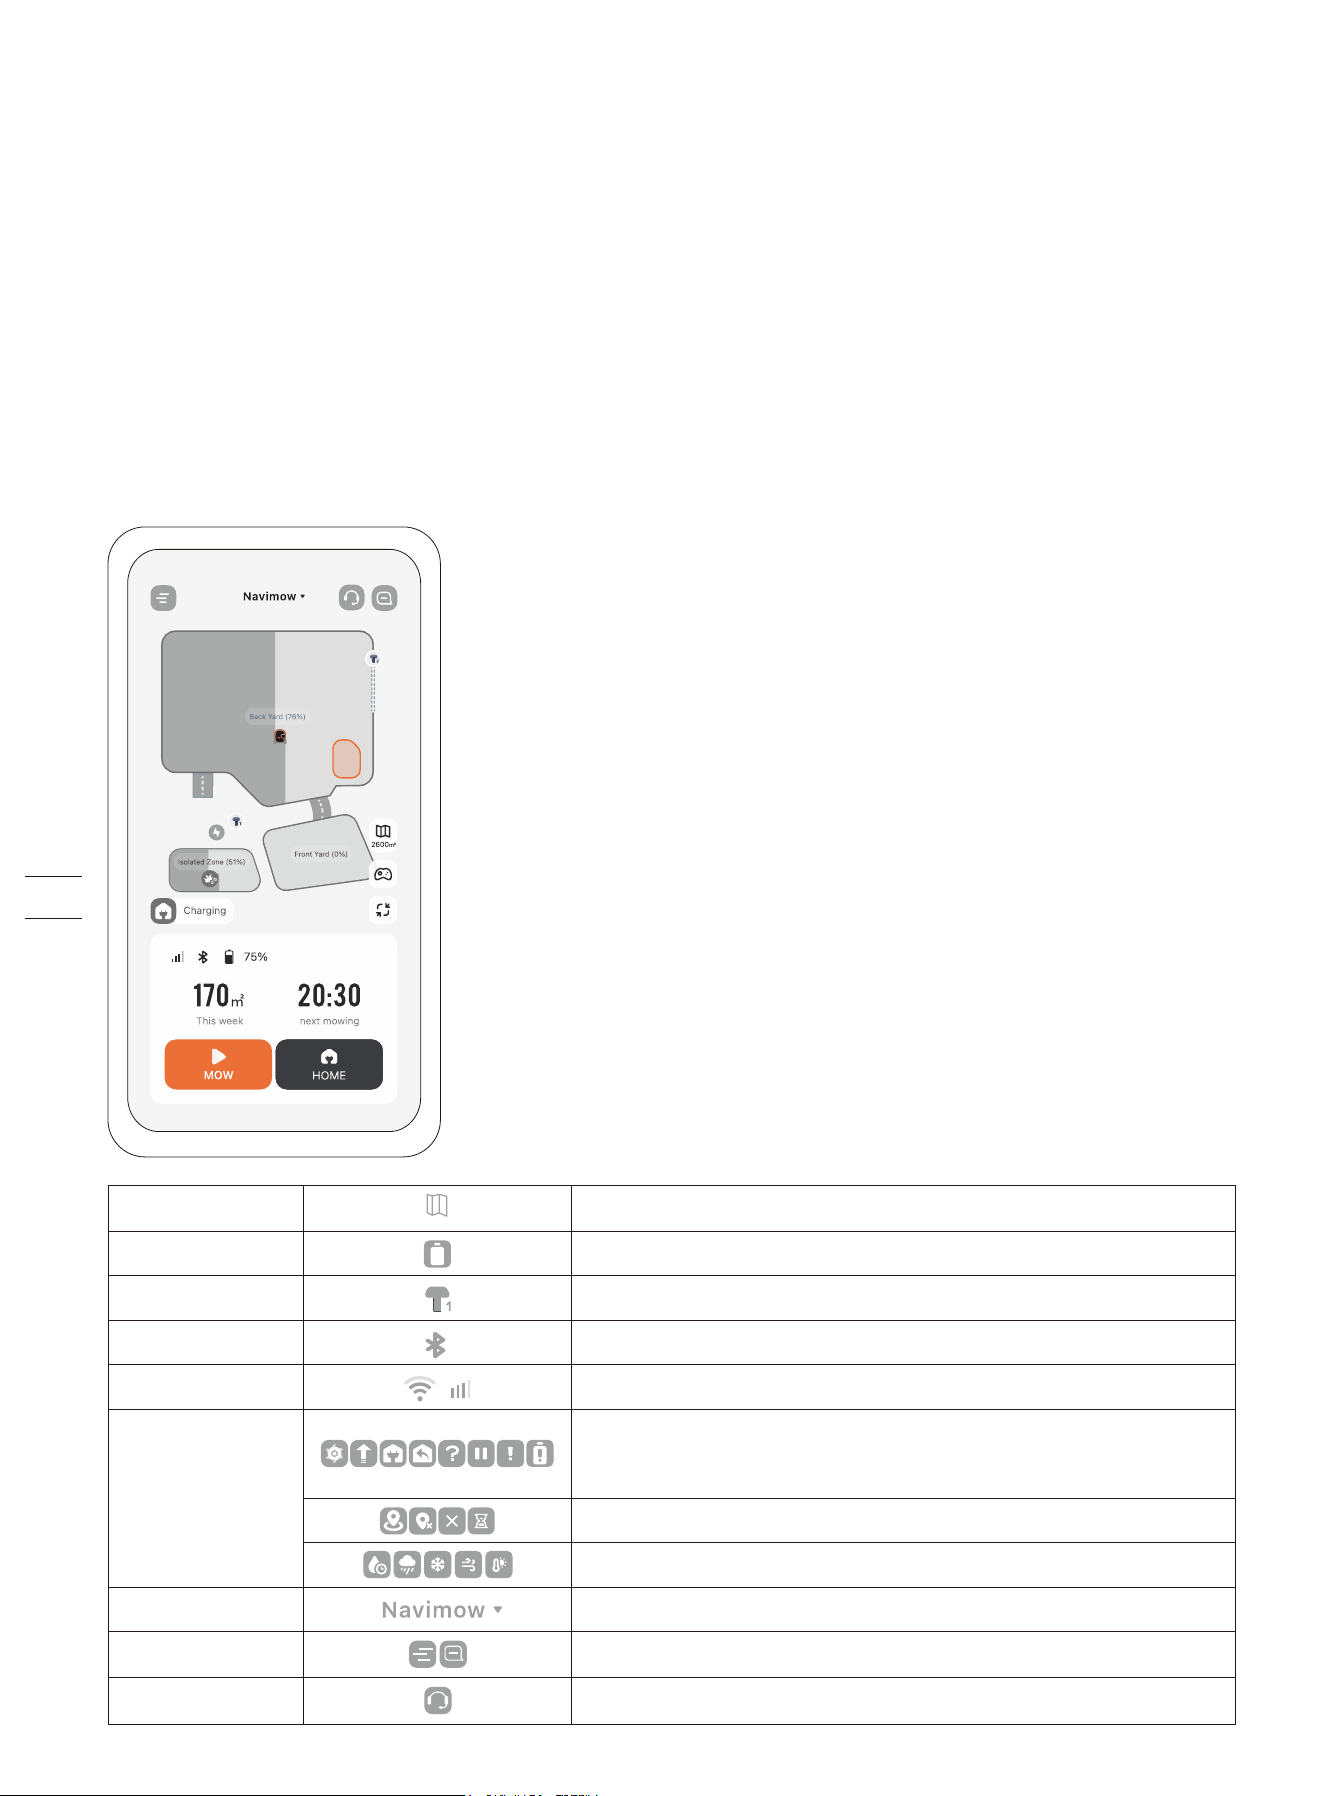
3.2.4 App Home Page
The home page shows the status of the mower, the status of antennas, work progress, and mowing tasks. You can choose to view
the work area of all zones or selected zones, start or pause mowing tasks, and send the mower home. You can also go to the Live
Chat, the notification page, and the settings page by tapping the icons on the top of the home page.
Navigates to the Map management page
Battery level and charging status
1 indicates the Primary Antenna and 2 indicates the Signal Enhancement Antenna
Bluetooth connected. When disconnected, tap to reconnect.
Displays the network that the mower is connected to (Wi-Fi or cellular), and the signal strength
Ongoing tasks/Upgrading firmware/Charging/On the way back to the charging station/Unknown
status/Task stopped/Malfunctioning/Not enough battery
Map accuracy is improving or has been improved/Poor positioning/Offline/Initializing
Mowing delayed by various weather conditions
Tap to switch to another mower of yours and rename your mowers from Settings > MOWER > Basic info
Tap to view the settings/notifications of the mower and the app
Entrance to the Help Center where you can find user materials and Live Chat for questions or requests
Map management
Battery level
Antenna
Bluetooth
Connectivity
Mower status
Switch to other devices
Settings and Notifications
Live Chat
2600m³
3.3 Mower Settings
3.3.1 Add, Switch, Unbind Devices
You can add multiple mowers from Settings > MOWER > My devices > Device management and switch to another mower by
selecting another serial number (SN) in the list. When unbinding the mower, you need to verify your identity by entering the
hidden characters of your email address or phone number.
You can choose to retain or clear your user data after unbinding the mower.
3.3.2 Network Settings
You can manage the network used by Navimow on the Network management page. On the Wi-Fi settings page, you can view the
currently connected Wi-Fi network or reconnect to the Wi-Fi. You can choose to only use 4G, or to only use Wi-Fi, or to let the
system automatically choose the network type for you depending on the connection status.
3.3.3 Time Zone and Country
You can manually select your local time zone and country or region so that the mowing schedules can follow your local time. You
can enable the Daylight Saving Time mode if your region follows this practice. This way, the mower can automatically adapt to
your local time during summer and winter.
3.3.4 Sound and Light Settings
The sound effects are enabled by default. When you disable it, the mower will not make any sounds of notification during mowing
and charging.
3.3.5 Voice Feedback (Text-to-Speech)
The voice feedback feature allows your mower to communicate with you using a selected voice or tone. When enabled, the
mower will report status updates in the chosen language. Go to Settings > MOWER > My devices > Sound and light > Voice
feedback.
3.3.6 Device Sharing
You can share your mower with others from Settings > MOWER > My devices > Device management > Device sharing.
This feature allows you to invite up to 5 users who have registered on the Navimow app to share your mower. Just send them an
invitation, which will expire in 7 days if not accepted. Once they accept, they will have full access to manage the mower. Both you
and your invitees can cancel the sharing at any time.
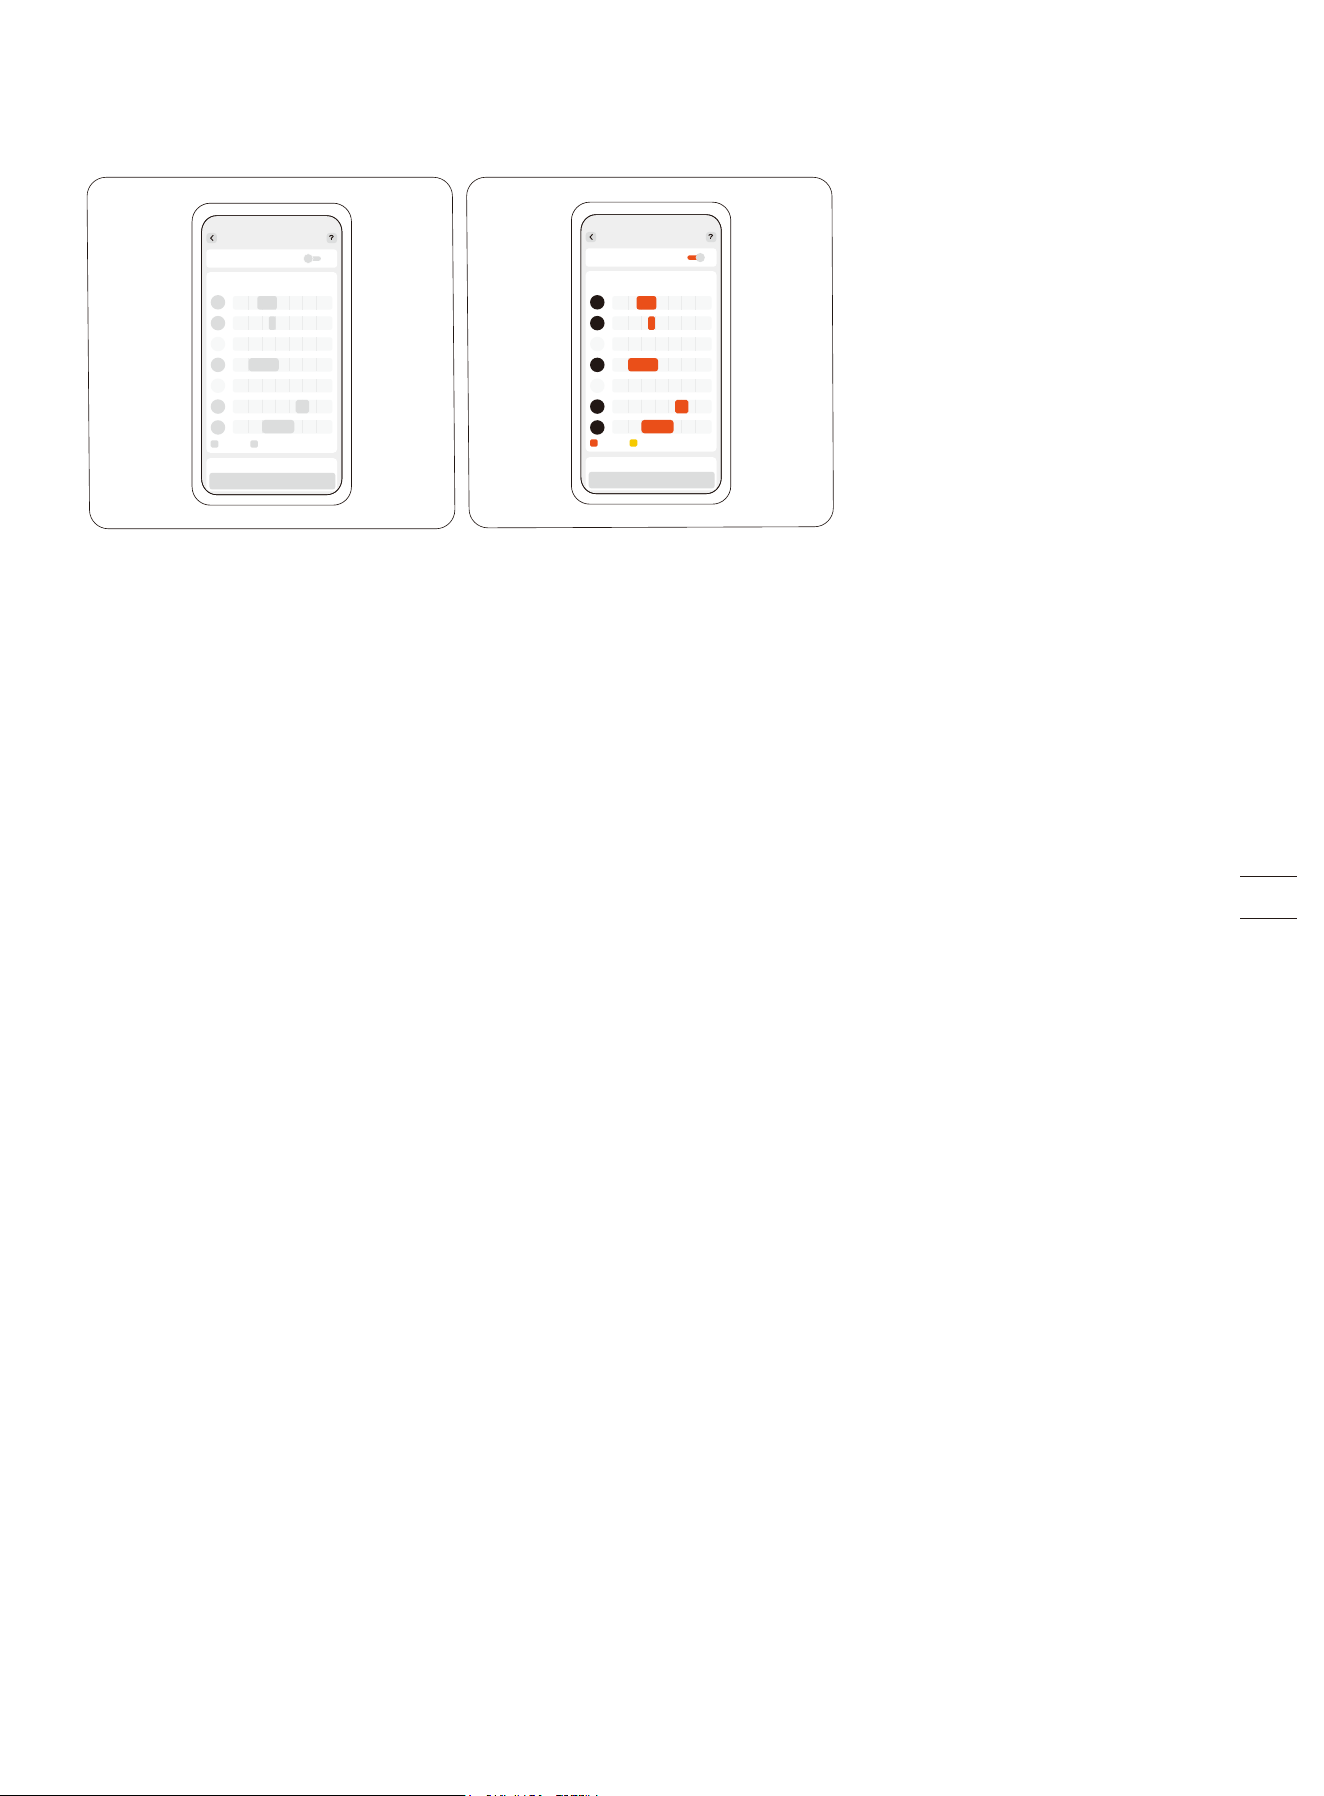
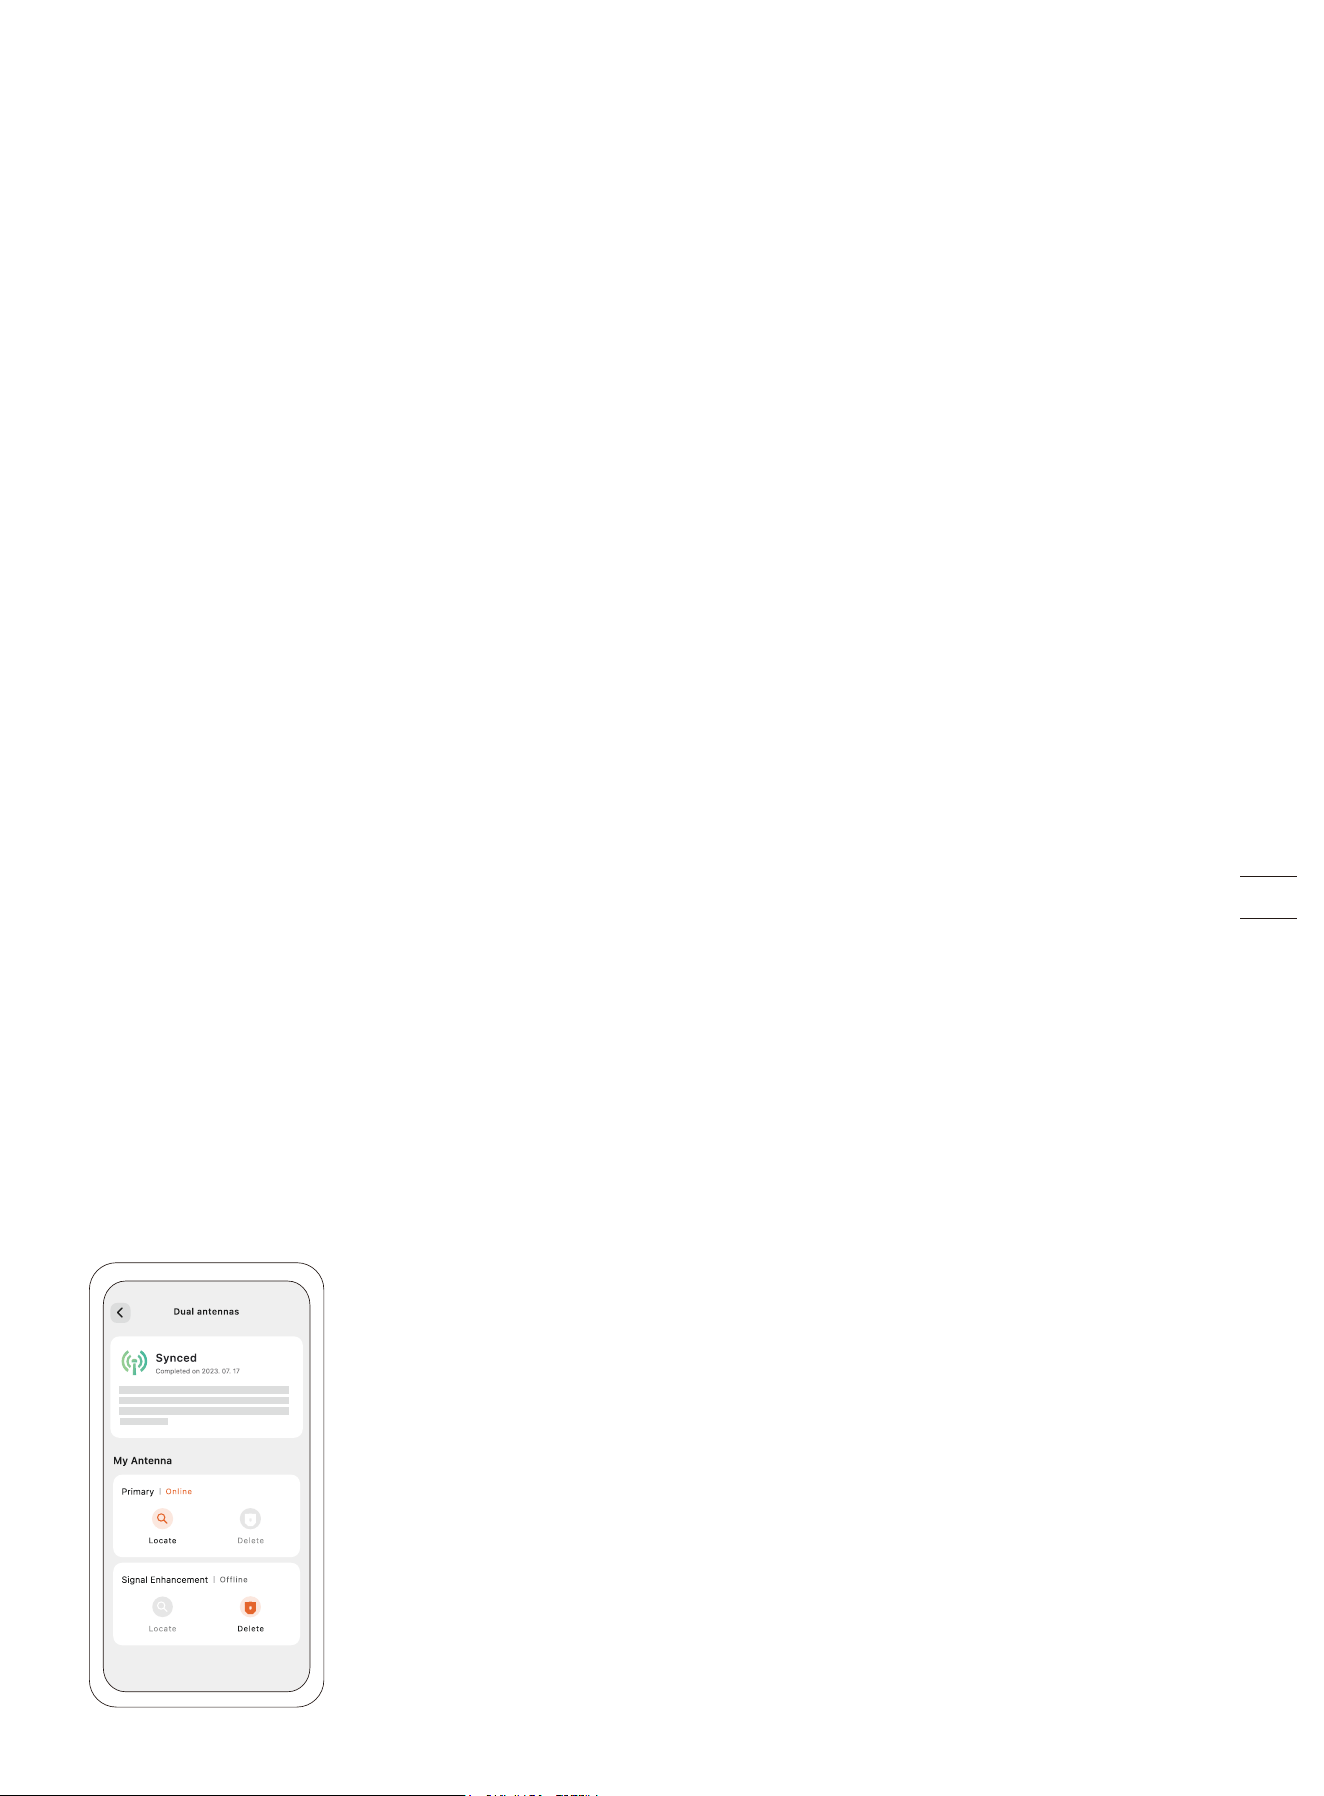
3.3.7 Dual Antennas
If you have purchased the Signal Enhancement Antenna, you can pair it with the mower from Settings > MOWER > Advanced
features > EFLS 3.0 > Dual antennas. For instructions, see 1.8 Accessories (sold separately).
Locate: If you are not sure if the antenna is the Primary Antenna or the Signal Enhancement Antenna, tap 'Locate'. The light on
the antenna will flash green, indicating which one you are looking for.
Synchronization: The dual antennas work together as a positioning system, meaning they are synchronized and the positioning
accuracy becomes better.
Delete: If you no longer use the current Signal Enhancement Antenna, you can delete it. Note that the Primary Antenna cannot
be deleted.
Online/Offline: Either antenna may occasionally go offline, but they will be synchronized automatically as the mower mows
across the lawn.
3.4 Safety Features
3.4.1 Reset the PIN Code
You can reset the PIN code in Settings > MOWER > Safety features > Device lock > Reset PIN code.
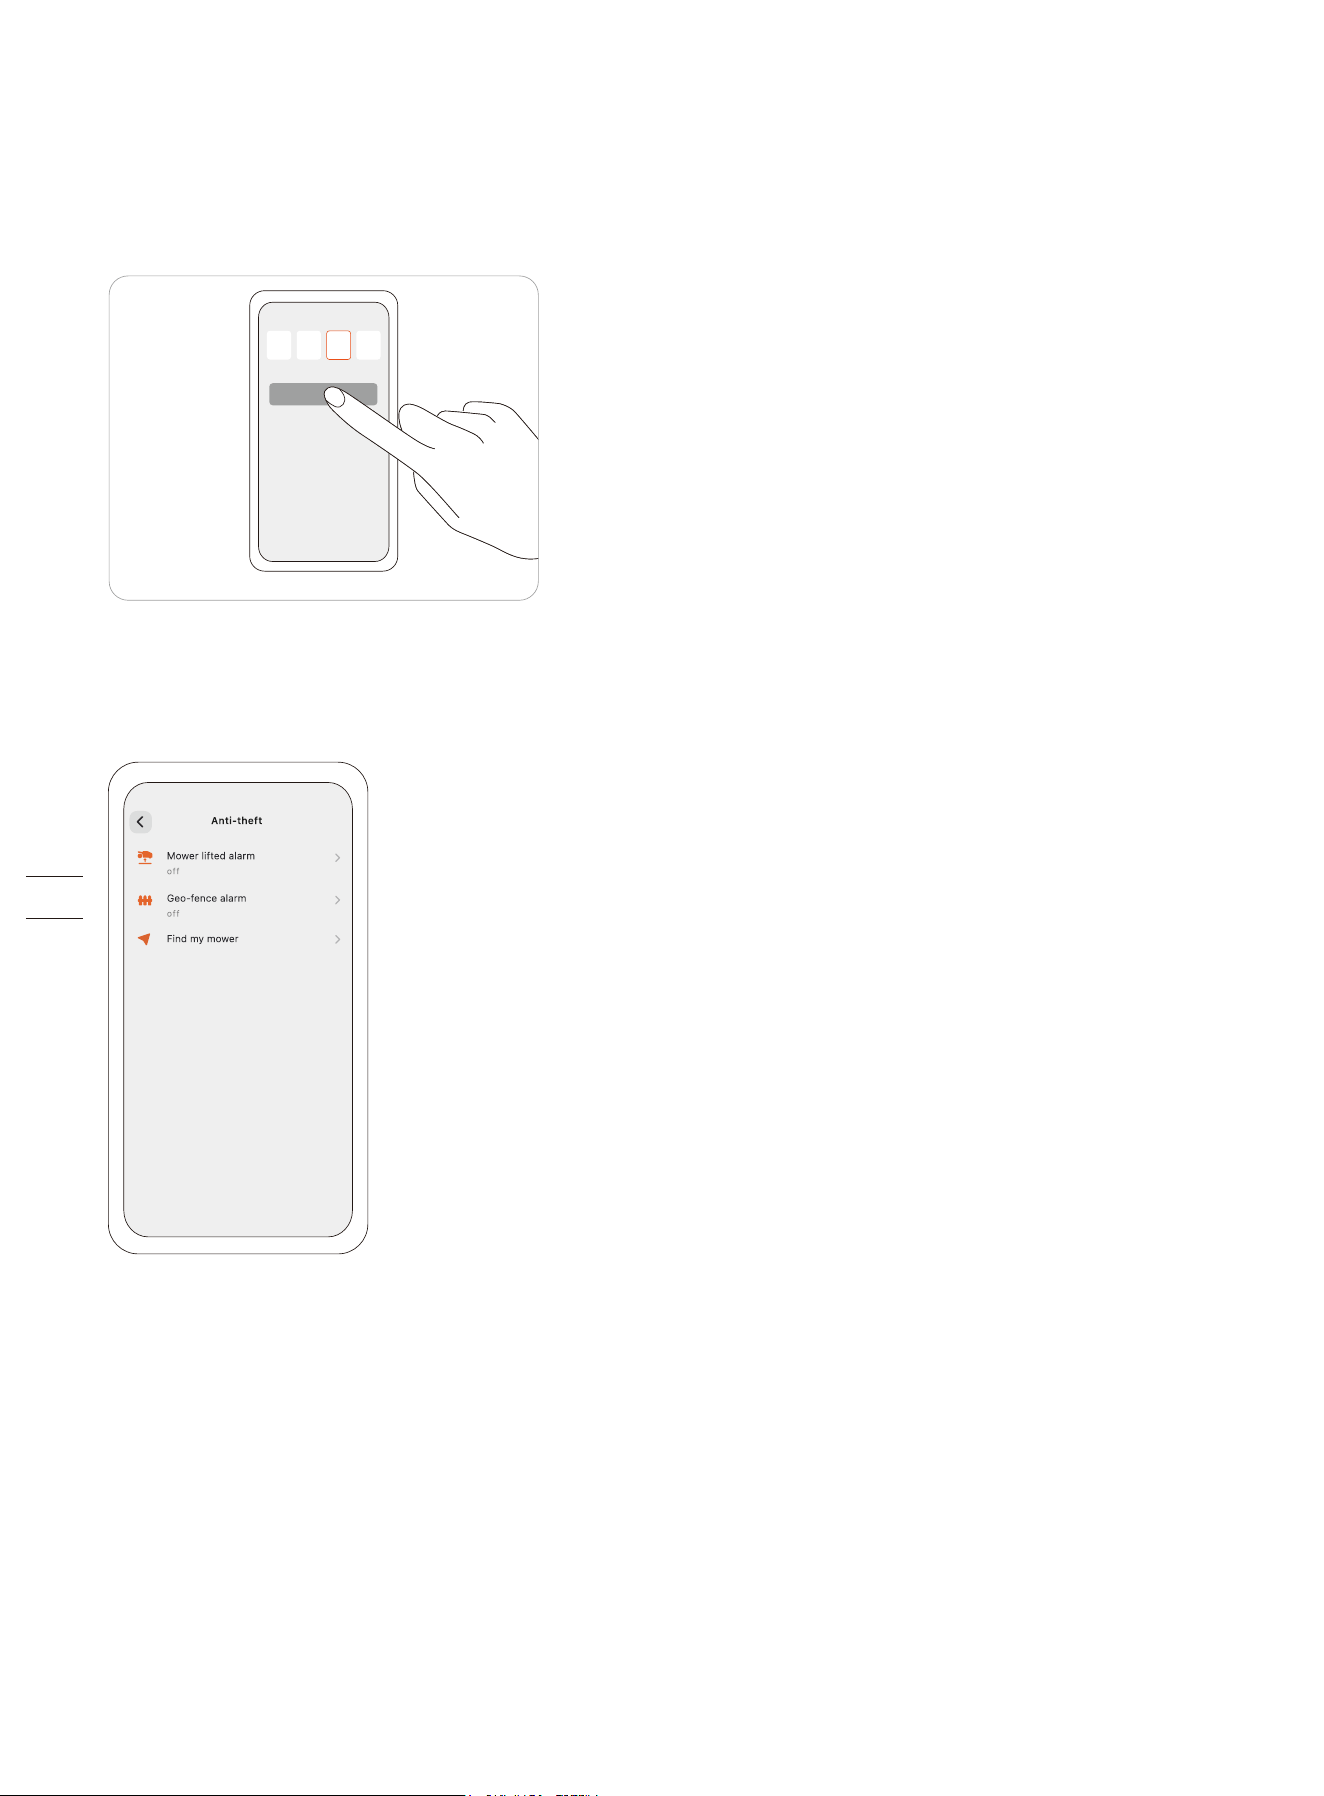
3.4.2 Enable and Use Anti-theft
The Anti-theft feature can precisely locate your mower and prevent incidents such as mower theft. You can choose to enable the
alarm when the mower is being lifted and when the mower crosses over the virtual boundary.
Mower lifted alarm
This alarm alerts you if your mower is being lifted off the ground for a few seconds. When enabled, you will hear an alarm and
receive a notification on your app. To stop the alarm, enter the PIN code directly on the mower.
If you need to carry the mower to a different location, it is recommended to connect your phone via Bluetooth beforehand to
prevent false alarms.
Geo-fence alarm
This alarm alerts you if your mower crosses a designated boundary. When enabled, you will hear an alarm and receive a
notification on your app. To stop the alarm, enter the PIN code directly on the mower.
When the geo-fence alarm is enabled, you can adjust the geo-fence radius and check Navimow's location on the map in real-time.
If the mower runs out of battery and powers off on the way back to the charging station, you can find where it stopped via the
app.
NOTES:
1. If the Anti-theft feature is enabled, you need to enter PIN code on the mower before powering it off.
2. The Anti-theft feature can only be used under a 4G network. Make sure your 4G service has not expired.
xxxxx
xxxxxxx
1 0 6
xxxxxxx
3.4.3 Device Lock
The safety lock and child lock are used to ensure the safety of the mower and prevent unintended operations. To enable them, go
to Settings > MOWER > Safety features > Device lock.
Safety lock
The safety lock prevents accidental activation of the mower when it needs to be carried or cleaned. Press MOW+HOME for more
than 3 seconds to lock the mower. When locked, the mower remains inoperable until you unlocks it with the PIN code.
Child lock
The child lock prevents children or pets from accidentally operating the mower by touching the buttons while it is working or on
standby.
By enabling it from Device lock > Child lock, the buttons on the mower won't respond to pressing or touching. Mowing and other
settings can still be adjusted on the app.
3.5 Advanced Features
3.5.1 VisionFence Settings
Avoid obstacles in channels
You can enable the Channel Obstacle Avoidance switch and the mower can "see" the surroundings and intelligently passes
through by actively avoiding obstacles or other objects that are distinct from the ground. Even when the GPS signal is poor
around the channel, the mower can still manage to pass through with visual detection.
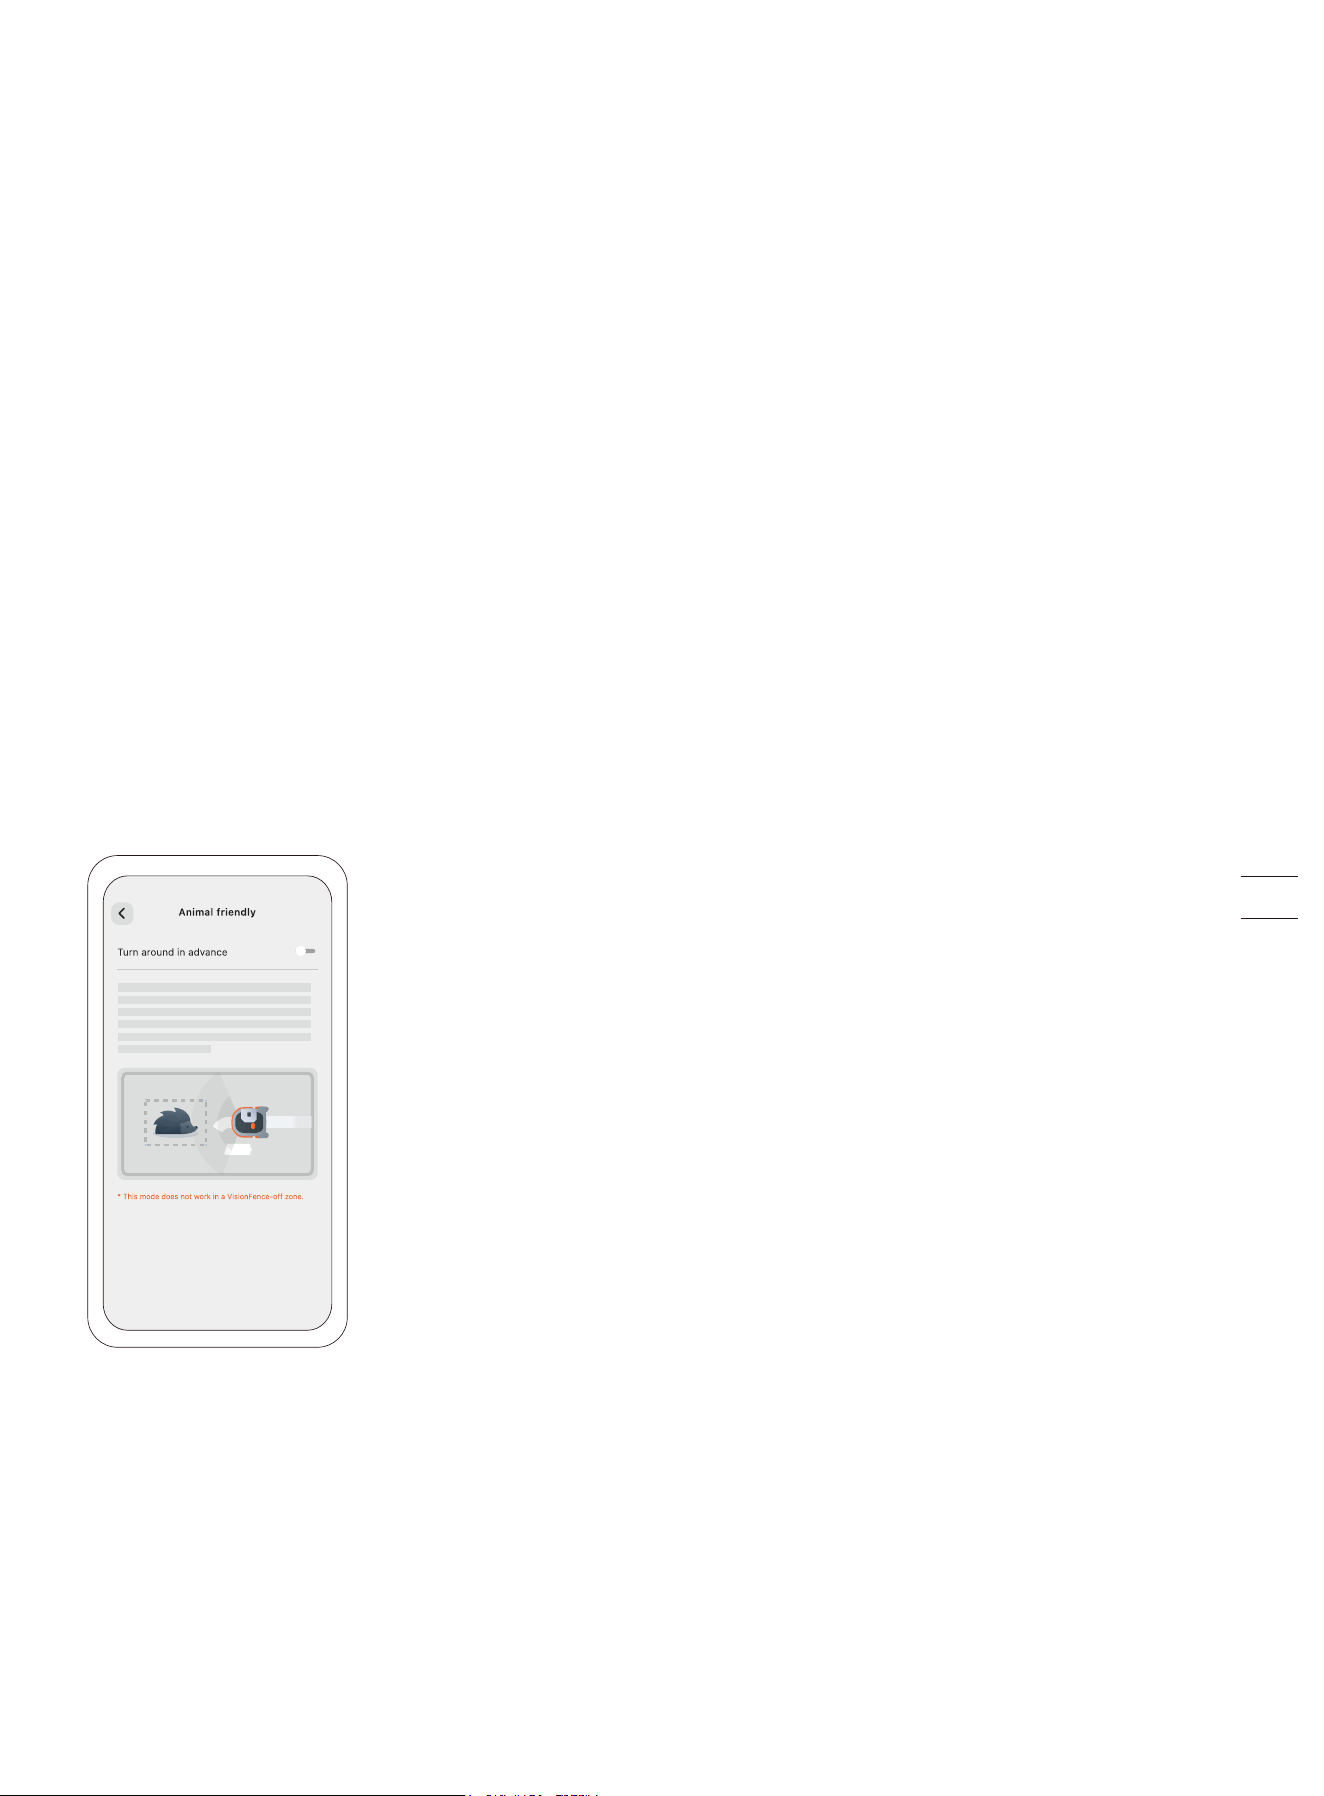
Animal friendly
You can enable 'Animal friendly' mode so the mower will stay far away from pets and small animals in its vicinity by adjusting its
path in real-time. Go to Settings > MOWER > Advanced features > VisionFence > Animal friendly. This avoids accidental harm to
wildlife such as hedgehogs, and reduces the chance of alarming or disturbing nearby pets.

3.5.2 Weather Adaptive
The mower can react to real-time weather info and adapt its mowing schedules, either stopping the current task or delaying the
upcoming tasks. You can set how you want the mower to react under these weather conditions: rain, snow, hot weather, frost,
and strong wind.
To ensure a healthy lawn and a longer work life of your mower, go to Settings > MOWER > Advanced features > Weather adaptive
to customize settings for each type of weather.
3.6 App Settings
Go to Settings > APP to browse and adjust the Navimow app-related settings.
Account and security
You can check your bound email address or mobile number, change the password, download the data, and delete your account.
Language
You can set the language to the one that you need. Currently, 22 languages are supported, which are English, German, French,
Dutch, Italian, Swedish, Norwegian, Finnish, Danish, Portuguese, Spanish, Czech, Slovak, Polish, Estonian, Lithuanian, Latvian,
Bulgarian, Hungarian, Croatian, Romanian, and Slovenian.
Help and feedback
You can view the latest user materials, tutorial videos, FAQ, and contact us for support via Live Chat here.
Units
You can switch between the metric units and the imperial units here.
About
You can view the current app version, the latest User Agreement and Privacy Policy here.
Log out
You can log out of your account here, and your data will not be deleted after logging out.
MOWER
XXXXXXX
XXXXXXX
XXXXXXX
XXXXXXX
XXXXXXX
XXXXXXX
XXXXXXX
APP

4. Maintenance
To achieve better mowing results and increase the service life, be sure to keep the mower clean and the blades in good condition.
Inspection and maintenance should be carried out by an adult every week. Any damaged or worn parts should be replaced.
DO NOT perform maintenance when wearing open sandals or barefoot. Always wear long trousers and work shoes when
servicing the mower.
4.1 Cleaning
Use a soft brush or cloth to clean the exterior of the mower thoroughly. DO NOT clean with alcohol, gasoline, acetone, or other
corrosive/volatile solvents. These substances may damage the appearance and internal structure of your mower.
For proper docking, periodically inspect and clean the charging station from debris and mud. Make sure all connecting parts of
the charging station, the extension cable, and the power supply are not blocked.
A. Chassis and cutting disc
If the chassis and cutting disc are dirty, use a brush or a water hose to clean. DO NOT use a high-pressure washer. At the same
time, make sure that the cutting disc rotates freely and the blades can pivot freely.
CAUTION: High-pressure water can leak into the sealings and damage electronic and mechanical parts.
B. Blade fender
Check the blade fender regularly. If mud, grass clippings or other objects gather on the blade fender, remove them with a dry
brush or scraper.
C. Front wheels (universal wheels)
Inspect and clean universal wheels regularly. If the wheels are stuck, clean off the mud and lubricate the wheels.
D. Rear wheels
Check and clean the rear wheels regularly. Remove grassing clippings or other objects. If the wheels are stuck with mud or dirt,
wash them with a water hose.
E. Camera lens
Check and clean the camera lens regularly. A stained camera lens may affect the performance of the mower.
F. Charging port
Check if grass clippings or dirt is stuck inside the charging port, and clean them in time. Otherwise, the mower cannot be charged
due to poor contact.
WARNING
• Before cleaning, make sure the mower is powered off.
• Before turning the mower upside down, it must be powered off.
4.2 Replace Blades
The blade disc automatically changes its rotation direction multiple times during mowing to prevent excessive wear on one side.
If the mower is used on a regular basis, it is recommended to replace the blades and screws every 1–2 months to ensure safety
and better mowing results. Replace all 6 blades and their screws at the same time for a safe cutting system.
Wet grass is more likely to stick to the blades and the bottom part of the mower, which can affect its performance and require
more frequent cleaning. For optimal results and to maintain your lawn's health, it is best to avoid mowing during heavy rain or
when the lawn is excessively wet.
It is normal for grass clippings to accumulate on the blades during mowing. The design of the blades allows them to continue
rotating smoothly around the screws, even when small amounts of clippings or debris are present. This occasional buildup of
clippings should not negatively impact the mower's ability to effectively cut grass. The mower is designed to perform its function
despite minimal clippings collecting on the blades over time.
While grass clippings can be removed when replacing the blades if desired, immediate action is not required unless an excessive
amount of clippings are stuck on the blades.
WARNING
• Wear protective gloves when you inspect or replace the blades.
• DO NOT use an electrical screwdriver to install or loosen the cutting disc. Only use the right type of screws and original blades
as approved by Navimow. Blade model: X3A06E.
• DO NOT reuse the screws. Doing so can cause serious injury.
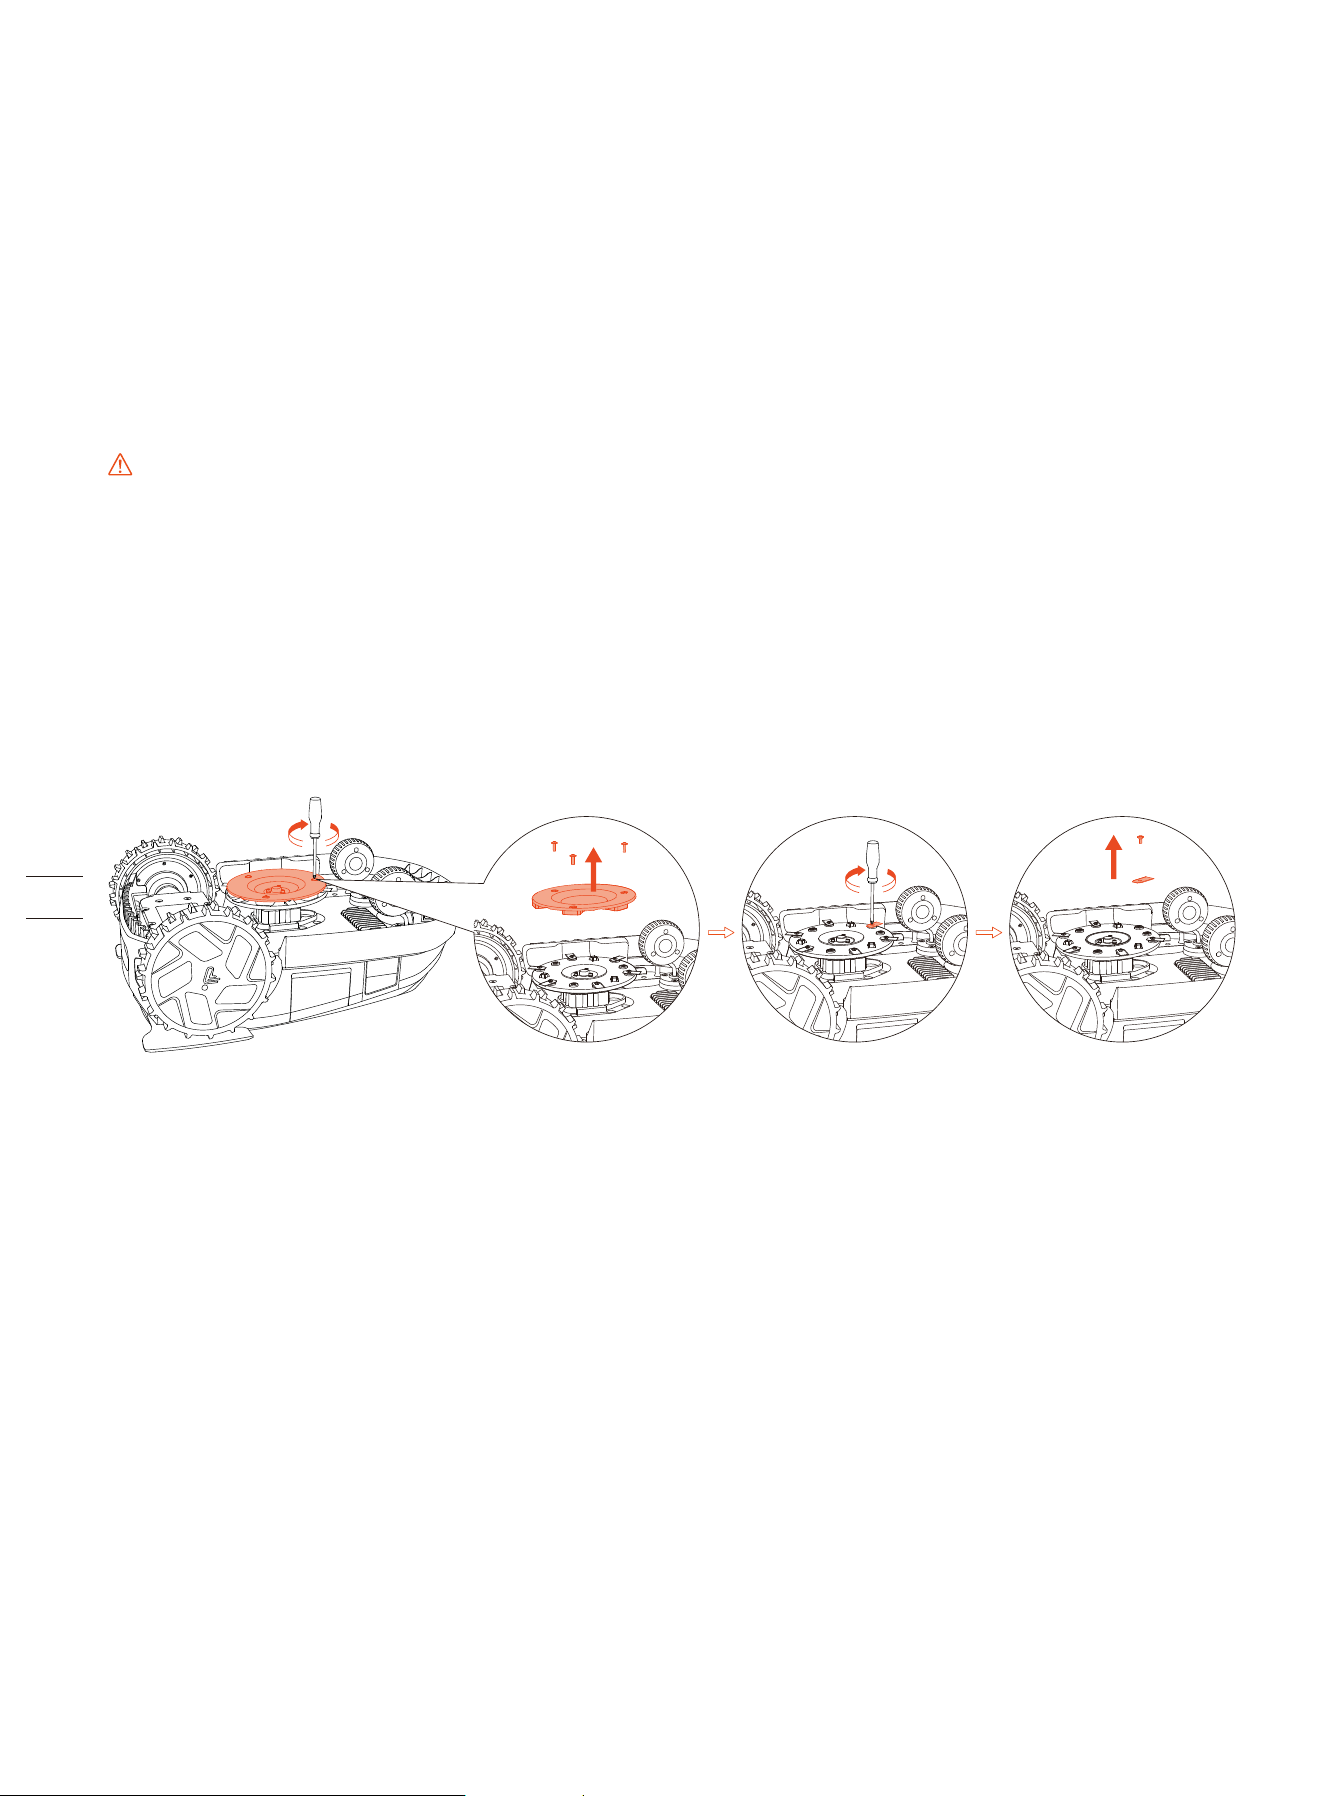
How to replace the blades
1. Turn off the mower.
2. To avoid scratching, place the mower on a soft and clean surface in an upside-down position.
3. Use a cross-tip screwdriver to loosen the screws.
4. Remove the anti-clogging cutting disc, the screws, and the blades.
5. Fasten the anti-clogging disc and the new blades with the new screws (Torque: 1 N·m). Make sure the blades can pivot freely.
NOTE: After fastening the blades and screws the blades will still seem loose. This is normal as the blades need to spin during
mowing. The blades are intentionally designed to rotate freely when attached to the blade disc. During mowing, the spinning
blade disc generates centrifugal force, which causes the blades to point outward. This outward orientation allows the blades to
effectively cut grass.
4.3 Key Parts Maintenance
Key parts of the mower, including blades, the chassis, the charging port, and the camera lens, require regular maintenance to
ensure the optimal performance of the mower.
Go to Settings > MOWER > Maintenance & Tools > Parts maintenance and check the working hours of these key parts. This can be
used as a reminder to clean and maintain these key parts.
4.4 Transportation
To protect the mower, use the original packaging for long-distance transportation. Before lifting, moving, or transporting the
product, turn it off. Handle with care and avoid violent force, such as throwing and heavy pressure. Never pick up or carry the
mower while the motor is running.
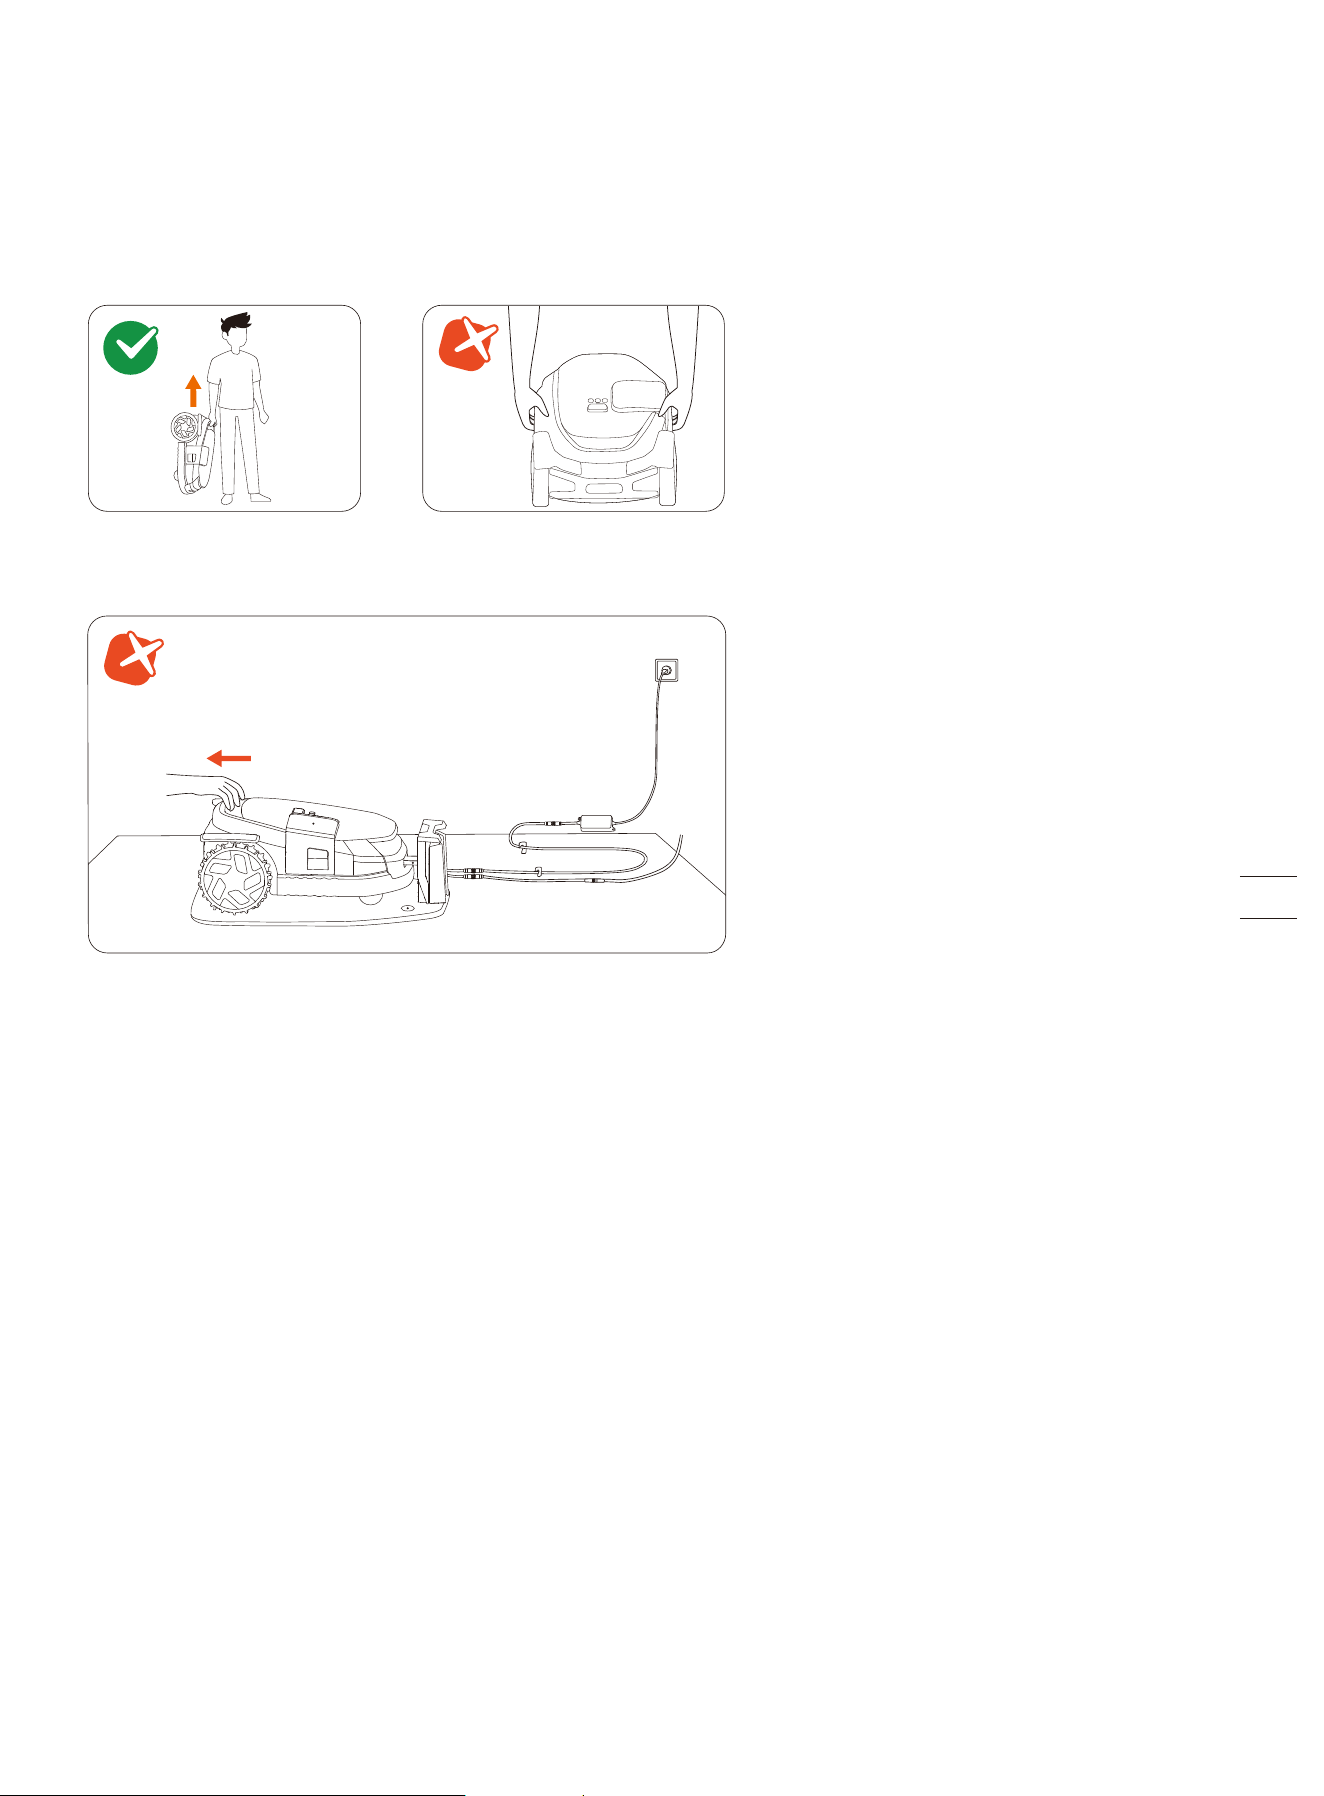
How to move or lift properly
Carry the mower by the handle, with the blade disc facing away from your body.
CAUTION:
To avoid damage to the mower and/or the charging station, DO NOT lift the mower by the handle when it's parked in the
charging station. Pull off the mower from the charging station before lifting the mower.
4.5 Battery
• Power off the mower and charge its battery to 85% or higher before storage to avoid over-discharge and damage to the
electrical components. Charge the mower every 120 days for long-time storage.
• Battery damage caused by over-discharge will not be covered by the Limited Warranty.
• DO NOT use or store the battery under extreme temperature conditions, i.e., above 50°C (122°F) or below -20°C (-4°F).
• Temperature protection will be activated at 0°C (32°F)/53°C (127°F), the battery won't be charged unless the temperature
reaches 3°C (37°F) or above/reduces to 49°C (120°F) or below.
• When the battery temperature is too high or too low, the mower will not start mowing. You will also receive a push notification
in the Navimow app.
NOTE: The battery life depends on how often the product is used and the total working hours. When the operation time is
significantly shorter than usual per full charge or the lawn is not well-cut, consider contacting the after-sales service to replace
the battery.

4.6 Power Supply
• Disconnect the power supply:
- Before clearing a blockage;
- Before checking, cleaning, or working on the machine;
- After striking a foreign object to inspect the machine for damage.
• Regularly examine the cord, plug, enclosure, and other parts. If any damage or signs of aging are found, stop using
immediately.
WARNING
• DO NOT operate a damaged power supply. If the supply cord is damaged, it must be replaced by the manufacturer, its service
agent or similarly qualified persons in order to avoid a hazard. If the extension cable is defective, please replace it with the
10-meter long cable as approved by Navimow.
• DO NOT connect a damaged cord to the power supply or touch a damaged cord or extension cable before it is disconnected
from the power socket. Damaged cords can lead to contact with live parts.
• DO NOT use the power supply with any other product or battery, otherwise there will be risks of personal injury, fire or
electrical shock. Product safety cannot be guaranteed with batteries other than the original ones.
• DO NOT charge when the battery is leaking.
• Keep the extension cable away from moving hazardous parts to avoid damage to the cords which can lead to contact with live
parts.
Recommendation
Connect the mower and/or its peripherals only to a supply circuit protected by a residual current device (RCD) with a tripping
current of no more than 30 mA.
4.7 Storage
• Before storage, power off the mower and charge its battery to 85% or higher to avoid over-discharge, which will cause
permanent damage.
• Store in a cool and dry place indoors. Exposure to sunlight and extreme weather (both hot and cold) will accelerate the aging
process of the components and may permanently damage the battery.
• Keep the mower, charging station, and power supply away from heat sources (such as stoves, radiators, etc.) or chemicals.
Protect the power supply from moisture and keep it in a well-ventilated place.
WARNING
When there is a risk of a thunderstorm, unplug the power supply from the power socket. Disconnect all cables and wires connect-
ing to the charging station. Reconnect when there is no longer a risk of thunderstorms.
4.7.1 Winter Storage
For optimal performance and longevity, it is recommended to store your Navimow during winter months when it will not be in
use. By properly storing your Navimow, you can protect it from harsh winter conditions and ensure its functionality when spring
comes. Cold weather, including freezing temperatures and snow, can damage sensitive components of the mower. Follow the
steps below:
Put the mower in storage
1. Pull the mower off the charging station. Make sure the mower has at least 85% battery left.
2. Power off the mower.
3. Disconnect the power supply and the antenna.
4. Put your protective gloves on and remove the blades with caution.
5. Turn the mower upside down and clean it with a brush.
6. Use a water hose to wash away the dirt and leave the mower to get dry.
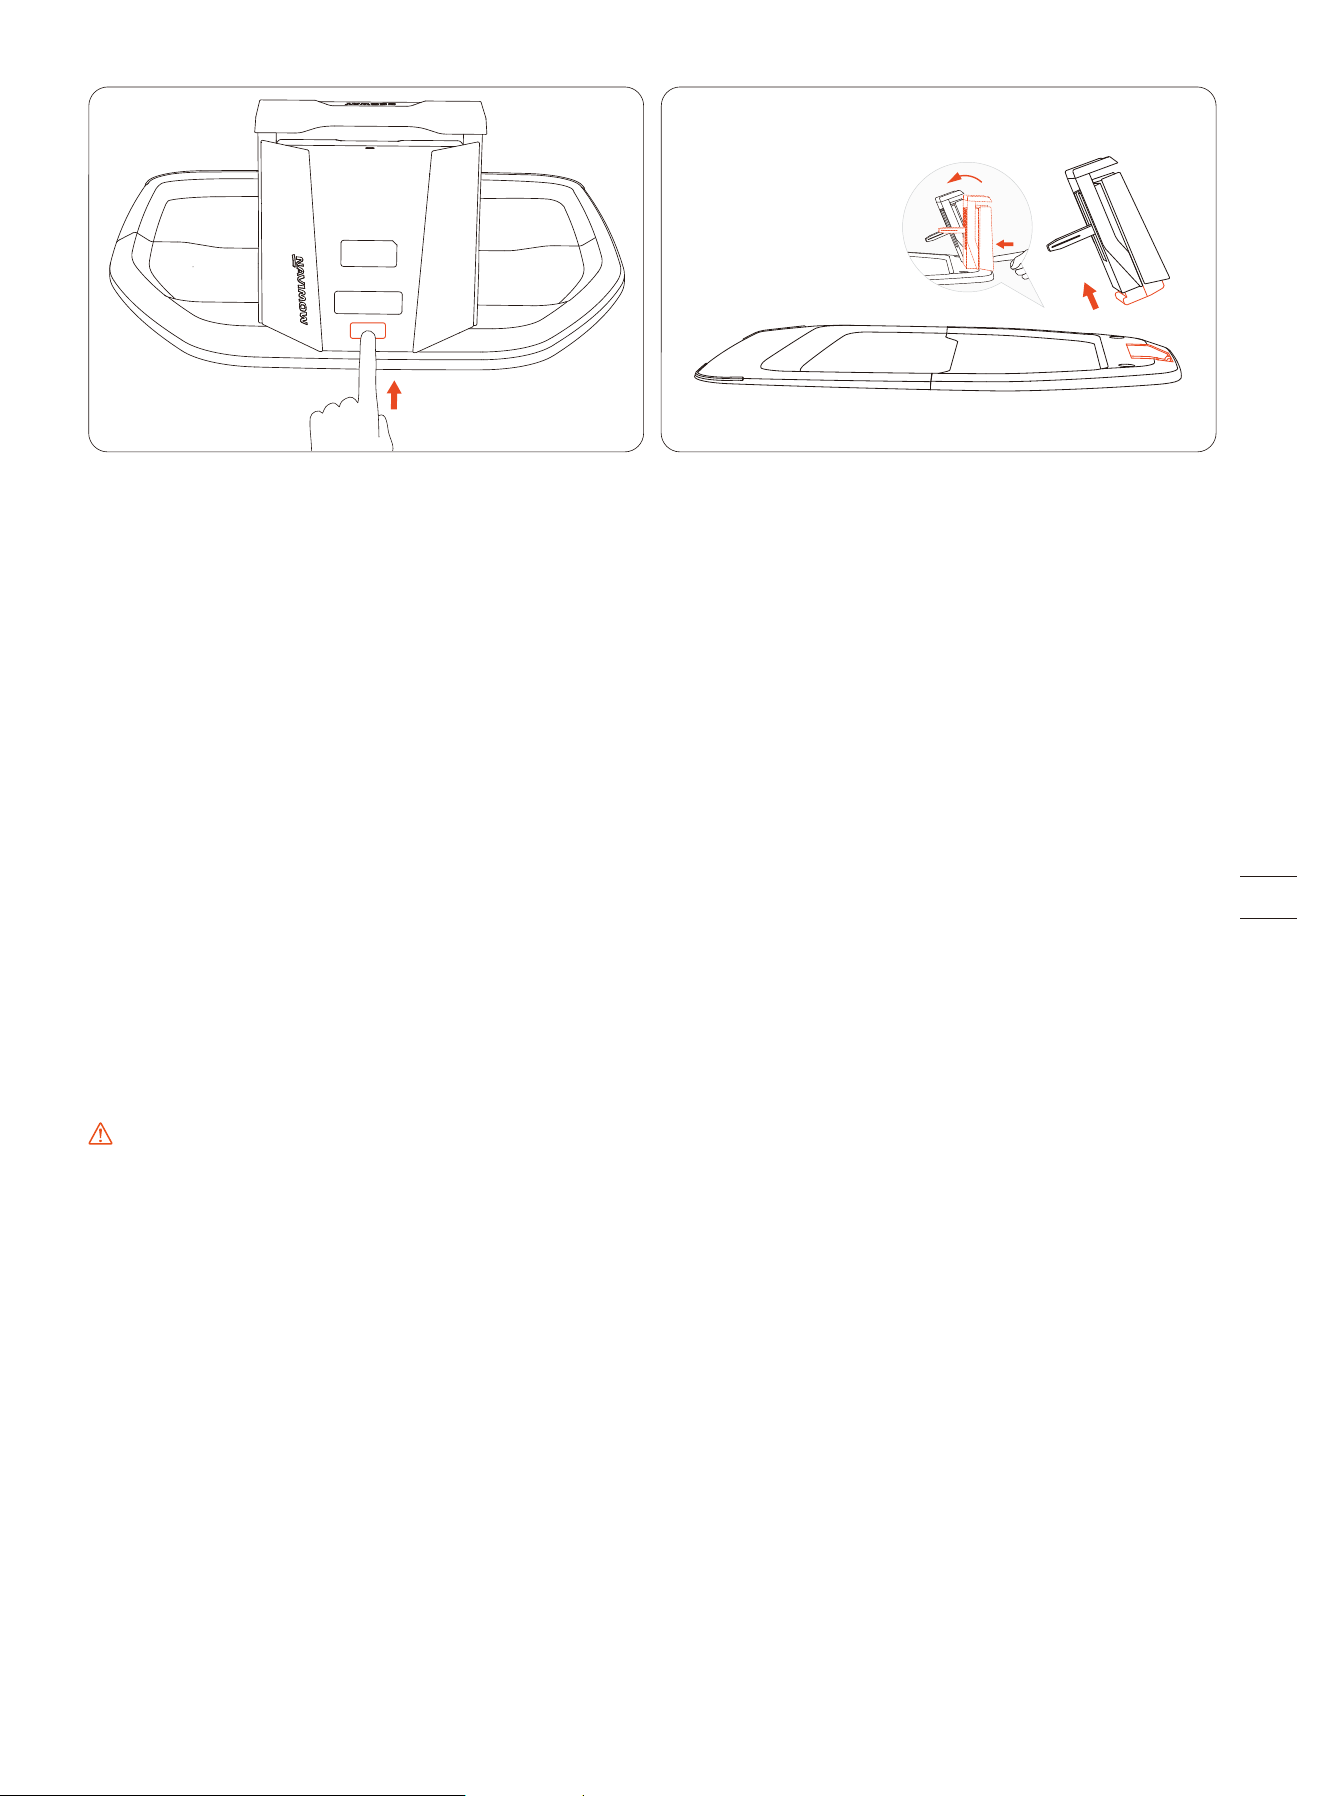
Put the charging station and Navimow Garage L in storage
1. Uninstall Navimow Garage L from the charging station and put the garage away.
2. Press the button on the charging tower to remove it from the charging station, and put the charging tower in storage.
3. Leave the base plate at its original location.
Put the antenna in storage
If the antenna is installed on a wall or roof, use a plastic bag or a cover to cover up the antenna. If the antenna is installed from
the ground, follow the steps below:
1. Remove the antenna and the pole. Keep the base fork at its place.
2. Put away the cable for the antenna.
4.7.2 Spring Restorage
To restore your Navimow and all its installations in spring, follow the steps below:
1. Remove all coverings from the mower.
2. Ensure that the charging station is clean and free from dirt. Re-install the charging tower on the base plate.
NOTE: The difference between the installed position and last year's position should not exceed 5 cm.
3. Reconnect the cables that were disconnected during the winter. Check the cables for any damage or breaks and repair as
needed.
NOTE: Check the blades for sharpness and replace them if necessary. Check and clean the camera lens to ensure proper
functionality.
4. Finally, power on the mower and test if the mower is bound to the app and works properly.
4.8 Recycling and End-of-Life Disposal
DO NOT treat this product as domestic waste. For recycling information, contact your domestic waste service, your municipality,
or point of sale.
WARNING
DO NOT dispose of this product in a landfill, by incineration, or by mixing with household trash. Danger or serious injury can
occur because of the electrical components.
5. FAQ & Troubleshooting
If you encounter any product or app-related problems, common issues and questions, check out the FAQ articles from 'Service
and Support > Help Center' on the Navimow official website (http://navimow.segway.com) or from the 'Help and feedback' section
from the Navimow app.

6. Important Information
6.1 Europe
6.1.1 EC DECLARATION OF CONFORMITY
EC Declaration of Conformity for Robot Lawn Mower
Manufacturer: Willand (Beijing) Technology Co., LTD.
Address: Room 203, A-1 Bldg. Zhongguancun Dongsheng Technology Park (Northern Territory), No. 66, Xixiaokou Rd, Haidian Dist., Beijing,
China.
Email: [email protected]
Authorized Representative
Name: AR Experts B.V.
Address: P.O. Box 5047, 3620 AA Breukelen, The Netherlands
Email: info@certification-experts.com
Object of the declaration
Generic designation: Robot lawn mower
Product name: Segway Navimow X3 Series
Type/model: X315E/X330E/X350E/X390E
Serial number: 0EBB x yyyy x yyyy/0ECB x yyyy x yyyy/0EDB x yyyy x yyyy/0ELB x yyyy x yyyy (“x” indicates any letter from A-Z except O
and I, “y” indicates any letter from A-Z except O and I or any number from 0-9)
This Declaration of Conformity is issued under the sole responsibility of the manufacturer.
The object of the declaration described above is in conformity with the following EU Directives:
1. Radio Equipment Directive (2014/53/EU)
2. Machinery Directive (2006/42/EC)
3. RoHS Directive (2011/65/EU) and amending directive ((EU)2015/863)
Conformity with these Directives has been assessed for this product by demonstrating compliance to the following harmonized
standards and/ or technical specifications:
Place: Changzhou, China Date: 2024-12-30
Name: Crystal Zhuang Function: Certification Manager
Signature:
Signed for and on behalf of: Navimow B.V.
EN 60335-1:2012 +A11:2014 +A13:2017 +A1:2019 +A14:2019 +A2:2019 +A15:2021
EN 50636-2-107:2015+A1:2018+A2:2020+A3:2021
EN IEC 55014-1:2021 EN 301 908-1 V15.2.1
EN IEC 55014-2:2021 EN 301 489-1 V2.2.3
EN 300 220-1 V3.1.1 EN 301 489-3 V2.3.2
EN 300 220-2 V3.1.1 EN 301 489-17 V3.3.1
EN 300 328 V2.2.2 EN 301 489-19 V2.2.1
EN 303 413 V1.2.1 EN 301 489-52 V1.2.1
EN 50665:2017 EN 301 908-13 V13.2.1
EN 62133-2:2017 EN IEC 62311:2020
EN IEC 63000:2018 EN 300440 V2.1.1
EN 301893 V2.1.1

Place: Changzhou, China Date: 2024-12-30
Name: Crystal Zhuang Function: Certification Manager
Signature:
Signed for and on behalf of: Navimow B.V.
EN 300 220-1 V3.1.1
EN 300 220-2 V3.1.1
EN IEC 63000:2018
EN 303 413 V1.2.1
EN 50665:2017
EN 300440 V2.1.1
EN 301 489-1 V2.2.3
EN 301 489-3 V2.3.2
EN 301 489-19 V2.2.1
EN IEC 62311:2020
EC Declaration of Conformity for Antenna
Manufacturer: Willand (Beijing) Technology Co., LTD.
Address: Room 203, A-1 Bldg. Zhongguancun Dongsheng Technology Park (Northern Territory), No. 66, Xixiaokou Rd, Haidian Dist., Beijing,
China.
Email: [email protected]
Authorized Representative
Name: AR Experts B.V.
Address: P.O. Box 5047, 3620 AA Breukelen, The Netherlands
Email: info@certification-experts.com
Object of the declaration
Generic designation: Antenna (Primary)
Product name: Antenna (Primary)
Type/model: X3R00G
Serial number: PXBA x yyyy x yyyy/PXBC x yyyy x yyyy/PXBD x yyyy x yyyy ("x" indicates any letter from A-Z except 0 and l, "y" indicates any
letter from A-Z except O and l or any number from 0-9)
This Declaration of Conformity is issued under the sole responsibility of the manufacturer.
The object of the declaration described above is in conformity with the following EU Directives:
1. Radio Equipment Directive (2014/53/EU)
2. RoHS Directive (2011/65/EU) and amending directive ((EU)2015/863)
Conformity with these Directives has been assessed for this product by demonstrating compliance to the following harmonized
standards and/ or technical specifications:

EC Declaration of Conformity for Charging Station
Manufacturer: Willand (Beijing) Technology Co., LTD.
Address: Room 203, A-1 Bldg. Zhongguancun Dongsheng Technology Park (Northern Territory), No. 66, Xixiaokou Rd, Haidian Dist., Beijing,
China.
Email: [email protected]
Authorized Representative
Name: AR Experts B.V.
Address: P.O. Box 5047, 3620 AA Breukelen, The Netherlands
Email: info@certification-experts.com
Object of the declaration
Generic designation: Navimow Charging Station
Product name: Navimow Charging Station
Type/model: X3C00G
Serial number: 0EBB x yyyy x yyyy/0ECB x yyyy x yyyy/0EDB x yyyy x yyyy/0ELB x yyyy x yyyy ("x" indicates any letter from A-Z except 0 and
l, "y" indicates any letter from A-Z except O and l or any number from 0-9)
This Declaration of Conformity is issued under the sole responsibility of the manufacturer.
The object of the declaration described above is in conformity with the following EU Directives:
1. Electromagnetic Compatibility Directive (2014/30/EU)
2. RoHS Directive (2011/65/EU) and amending directive ((EU)2015/863)
Conformity with these Directives has been assessed for this product by demonstrating compliance to the following harmonized
standards and/ or technical specifications:
Place: Changzhou, China Date: 2024-12-30
Name: Crystal Zhuang Function: Certification Manager
Signature:
Signed for and on behalf of: Navimow B.V.
EN IEC 61000-6-3:2021
EN IEC 61000-6-1:2019
EN IEC 63000:2018
6.1.2 Limited Warranty
Limited Warranty and Arbitration Agreement
NOTICE: PLEASE READ THIS LIMITED WARRANTY AND ARBITRATION AGREEMENT AND KEEP THIS AGREEMENT FOR FUTURE REFERENCE.
THIS AGREEMENT CONTAINS LIMITED WARRANTY CLAUSES FOR CONSUMERS IN EUROPE AND ARBITRATION CLAUSES WITH RESPECT TO
NAVIMOW (“PRODUCT”) AND ANY AND ALL TRANSACTION AND CLAIM RELATED TO AND/OR ARISING OUT OF THE PRODUCT.
THIS IS A BINDING LEGAL AGREEMENT (“AGREEMENT”) BETWEEN YOU (EITHER AN INDIVIDUAL OR ENTITY) AND THE MANUFACTURER
(“WILLAND”), NAVIMOW B.V. ("NAVIMOW"), AND THEIR AFFILIATES (INCLUDING BUT NOT LIMITED TO THEIR PARENT COMPANY, SUBSIDI-
ARY, AFFILIATED COMPANIES, PREDECESSOR, SUBSEQUENT COMPANY, ADMINISTRATORS, SUCCESSORS, ASSIGNS, OFFICERS, DIRECTORS,
MANAGERS, EMPLOYEES, MEMBERS, SHAREHOLDERS, AND AGENTS, ATTORNEYS, INSURERS OR REINSURERS) (COLLECTIVELY “NAVIMOW
PARTIES”), NAVIMOW DEALERS (AS DEFINED BELOW) AND THEIR AFFILIATES (COLLECTIVELY “NAVIMOW DEALERS”).
PURCHASING THE PRODUCT, OPENING THE PRODUCT PACKAGING, USING THE PRODUCT, RETAINING THE PRODUCT, EXPLOITING
THE BENEFITS OF THIS AGREEMENT, OR ELECTRONIC ACCEPTANCE OF THIS AGREEMENT SHALL CONSTITUTE ACCEPTANCE OF THIS
AGREEMENT. IN AN EVENT YOU, AS A PARENT(S) OR LEGAL GUARDIAN(S), PURCHASE THIS PRODUCT ON BEHALF OF OR FOR YOUR
CHILDREN, YOU HEREBY CONSENT TO AND APPROVE IN ALL RESPECTS THE TERMS AND CONDITIONS OF THE AGREEMENT AND AGREE
THAT BOTH YOU AND YOUR CHILDREN SHALL BE BOUND BY THIS AGREEMENT. YOU ACKNOWLEDGE AND AGREE THAT YOU RECEIVE
SUFFICIENT NOTICE OF THIS AGREEMENT AND YOU AGREE TO THIS AGREEMENT.
Record your Product’s Serial Number
Record your Product’s Serial Number below. You can find the Serial Number on the
exterior of the shipping box, or on the bottom of the Product.
1. Limited Warranty
This Limited Warranty covers only defects of any material or quality of the Product and components when the Product and components
thereof are being used under normal and ordinary conditions. In the event that a defect covered by this Limited Warranty occurs,
Navimow and/or other Navimow Parties in its sole discretion will repair or replace the defective Product or components thereof in
accordance with this Limited Warranty, or the date it was activated (the later date prevails) from either of Navimow, Navimow’s
authorized reseller, Navimow’s authorized distributor, or an authorized Dealer (each a “Navimow Dealer” or collectively the “Navimow
Dealers”).
Blades are seen as disposable and are not covered by this warranty.
THIS LIMITED WARRANTY HEREIN IS THE ONLY EXPRESS WARRANTY APPLICABLE TO PRODUCT AND ITS COMPONENT PARTS,
ACCESSORIES, AND SERVICE REPAIR. NAVIMOW AND NAVIMOW PARTIES DISCLAIM ALL OTHER EXPRESS WARRANTIES. NAVIMOW AND
OTHER NAVIMOW PARTIES LIMIT THE DURATION AND REMEDIES OF ALL IMPLIED WARRANTIES, INCLUDING WITHOUT LIMITATION TO
THE WARRANTIES OF MERCHANTABILITY AND FITNESS FOR A PARTICULAR PURPOSE, WHETHER ARISING BY LAW, COURSE OF DEALING,
COURSE OF PERFORMANCE, USAGE OF TRADE OR OTHERWISE, TO THE DURATION OF THIS EXPRESS LIMITED WARRANTY. THIS LIMITED
WARRANTY DESCRIBES THE SERVICE AVAILABLE TO YOU IN THE EVENT YOUR PRODUCT REQUIRES WARRANTY SERVICE. THIS LIMITED
WARRANTY IS AN ADDITIONAL WARRANTY, THAT DOES NOT IN ANY WAY AFFECT OR LIMIT THE STATUTORY RIGHTS YOU MAY HAVE AS A
CONSUMER, FOR EXAMPLE, WITH RESPECT TO CONFORMITY, AND YOU MAY HAVE ADDITIONAL PROTECTIONS UNDER YOUR LOCAL
LAWS.
2. Limited Warranty Service Process
Navimow’s online services are available at navimow.segway.com. During your use of the Product, if you believe the Product or its
component is defective and/or does not work correctly. PLEASE IMMEDIATELY STOP USING THE PRODUCT, AND STORE THE PRODUCT
PROPERLY. YOUR CONTINUED USE OF THE PRODUCT UNDER SUCH CIRCUMSTANCE MAY CAUSE SEVERE BODILY INJURY OR EVEN
DEATH TO YOU OR THE OTHERS AND/OR CAUSE PROPERTY DAMAGES. Thereafter, please immediately contact Navimow at
[email protected]. or from Live Chat via the app Navimow’s technical support personnel are available to assist you
online in diagnosing the defect, and if any, and providing further instructions. In the event the warranty services are required, please
prepare for the following materials, including (i) proof of the original purchase of the Product, (ii) the Product’s serial number, and (iii) a
description of the defect if applicable. Upon the verification of your eligibility for the Limited Warranty protection and/or services, you
should provide your name, email address, mailing address, and contact phone number to us, we will guide you to get our service.
If you want to return the defective unit to service, you shall be responsible for the cost of shipping and risk of loss and damage that may
occur during the shipment from you to Navimow and from Navimow to you. You must include your defective Product or component
within the original or Navimow-approved packaging, which will be provided at your cost, for shipment of the Product to Navimow. You
shall defend, indemnify, and hold Navimow harmless any loss and/or damages that may be caused by your improper packaging or
shipment of the Product or component to Navimow.
Serial Number Here
Contacts
The Product is manufactured for
Navimow B.V.
(“Navimow”).
Limited Warranty Period
3 years
2 years
Product covered by this warranty
X315E, X330E, X350E, X390E
Battery packs and power adapters

An authorized service provider or Navimow Dealer will inspect your returned Product. If Navimow reasonably determines that the
problem is not covered by the Limited Warranty, Navimow will notify you and inform you of service or replacement alternatives that are
available to you on a fee basis, or Navimow will return your Product to you unrepaired, and in such instance, you will be responsible for
the cost of shipping and insurance for shipment of your Product from Navimow to you. In an event that any service is not covered by the
limited warranty and you reject a paid service recommended by Navimow Parties and/or Navimow Dealer, you understand and
acknowledge that failure to repair and/or services the Product may increase the risk of fall and/or Product failure which may result in
severe property damages, severe bodily injury or death, and you agree that this is your informed consent to take such risk.
For a return eligible for the warranty protection and/or services, Navimow will serve defective Products with new or reconditioned parts
of the same or similar style at no cost to you for the service. Parts replaced by Navimow will be retained by and become the property of
Navimow. In such a situation, Navimow will pay reasonable return shipping charges for the return of the Product to you.
3. Limited Warranty Eligibility
3.1 Your service request must be received by Navimow within the Limited Warranty Period as described above, and Navimow must
receive your Product in accordance with the Limited Warranty Service Process defined above.
3.2 Your Product must be purchased from an authorized Navimow Dealer.
3.3 You must provide the original purchase receipt.
3.4 Your Product must have serial number legible, unobscured, untampered, and unmodified.
3.5 All tamper-resistant seals must be intact, in place, and unmodified.
4. Limited Warranty Exclusions
This Limited Warranty describes the service available to you if your product requires warranty service, and you may have additional
protections under your local laws. This Limited Warranty does not cover and excludes damage to your product or any component
thereof caused by:
4.1 Abuse, misuse, recklessness, negligence, or commercial use.
4.2 Improper charging, storage, maintenance, or operation of the Product not in compliance with instructions or limitations as provided
in the user materials.
4.3 Use of the Product not in compliance with applicable laws and regulations.
4.4 Use of the Product by persons with inadequate experience.
4.5 Accident, collision, fire damage, water damage, chemical damage, use of the product outside of the product’s working temperature
range, high-pressure water spray, earthquake, dropping.
4.6 Modifications to mechanical parts, modification of electronic parts, or modifications to software embedded in the Product. 4.7
Service, repair, and maintenance by unauthorized providers.
4.8 Cosmetic damages.
4.9 Use of the Product with third-party product, component, or accessory.
4.10 The normal deterioration of wear and tear parts.
4.11 Use of the Product with overdue wear and tear parts.
5. LIABILITY DISCLAIMER AND LIMITATION
5.1 NAVIMOW PARTIES DO NOT ASSUME OR AUTHORIZE ANYONE TO ASSUME ON ITS BEHALF, ANY OTHER OBLIGATION OR LIABILITY IN
CONNECTION WITH THE PRODUCT, ITS COMPONENT PARTS, ACCESSORIES, SERVICE REPAIR, OR THIS LIMITED WARRANTY.
5.2 NAVIMOW PARTIES AND NAVIMOW DEALERS ARE NOT RESPONSIBLE FOR ANY LOSS OF USE OF A PRODUCT, ITS COMPONENT
PARTS, ACCESSORIES, OR FOR ANY INCONVENIENCE OR OTHER LOSS OR DAMAGE WHICH MIGHT BE CAUSED FROM ANY DEFECT IN A
PRODUCT, ITS COMPONENT PARTS, ACCESSORIES, SERVICE REPAIR, OR FOR ANY OTHER INCIDENTAL OR CONSEQUENTIAL DAMAGES
YOU MAY HAVE AS A RESULT OF ANY DEFECT IN A PRODUCT, ITS COMPONENT PARTS, ACCESSORIES, OR SERVICE REPAIR. SOME
COUNTRIES DO NOT ALLOW THE EXCLUSION OR LIMITATION OF INCIDENTAL OR CONSEQUENTIAL DAMAGES, SO THE ABOVE
LIMITATION OR EXCLUSION MAY NOT APPLY TO YOU TO THE EXTENT THAT IT IS DISALLOWED BY APPLICABLE LAW.
5.3 IN NO EVENT, NAVIMOW PARTIES AND NAVIMOW DEALERS’ TOTAL AND AGGREGATE LIABILITY FOR ALL CLAIMS UNDER ANY AND
ALL APPLICABLE LAW OR THEORY, JOINTLY OR SEVERALLY, ARISING OUT OF OR RELATED TO THE PURCHASE OF THE PRODUCT, USE OF
THE PRODUCT, BREACH OF CONTRACT, TORTS (INCLUDING NEGLIGENCE) OR OTHERWISE, EXCEEDS THE DUTY TO REPAIR OR REPLACE
ANY DEFECTIVE PRODUCT, FURTHER SUBJECT TO NAVIMOW'S SOLE AND EXCLUSIVE DISCRETION. IN NO EVENT SHALL NAVIMOW
PARTIES AND NAVIMOW DEALERS BE LIABLE TO ANY PERSON FOR CONSEQUENTIAL, INDIRECT, INCIDENTAL, SPECIAL, EXEMPLARY,
PUNITIVE OR ENHANCED DAMAGES ARISING OUT OF, OR RELATING TO, AND/OR IN CONNECTION WITH THE PURCHASE OF THE
PRODUCT, ANY BREACH OF THIS AGREEMENT OR MANUFACTURER’S DUTIES REGARDLESS OF (A) WHETHER SUCH DAMAGES WERE
FORESEEABLE, (B) WHETHER OR NOT NAVIMOW OR OTHER NAVIMOW PARTIES WERE ADVISED OF THE POSSIBILITY OF SUCH DAMAGES,
AND (C) THE LEGAL OR EQUITABLE THEORY (CONTRACT, TORT OR OTHERWISE) UPON WHICH THE CLAIM IS BASED UNLESS SUCH
LIMITATIONS AND EXCLUSIONS ARE PROHIBITED BY APPLICABLE LAW. THE FOREGOING LIMITATIONS OR EXCLUSIONS APPLY EVEN IF
AN AGGRIEVED CUSTOMER OR ANY OTHER PERSON’S (WHO MIGHT HAVE RIGHT OR CLAIM UNDER THIS AGREEMENT BY OPERATION OF
LAW OR EQUITY) REMEDIES UNDER THIS AGREEMENT FAIL THEIR ESSENTIAL PURPOSE. IN THE EVENT SOME COUNTRIES DO NOT ALLOW
THE EXCLUSION OR LIMITATION OF CERTAIN OR ALL OF THE FOREGOING DAMAGES, SO TO THE EXTENT THAT SUCH LIMITATIONS OR
EXCLUSIONS ARE NOT ALLOWED BY LAW, THEY MAY NOT APPLY TO YOU. SOME COUNTRIES DO NOT ALLOW THE EXCLUSION OR
LIMITATION OF INCIDENTAL OR CONSEQUENTIAL DAMAGES, SO TO THE EXTENT THAT SUCH LIMITATIONS OR EXCLUSIONS ARE NOT
ALLOWED BY LAW, THE ABOVE LIMITATION OR EXCLUSION MAY NOT APPLY TO YOU.
5.4 To the extent permitted by applicable law, NAVIMOW PARTIES and NAVIMOW DEALERS hereby DISCLAIM any liability and thereby
shall not be responsible for any damages, including but not limited to death, bodily injury, or damages to property, arising out of or
related to any conduct (including misconduct), action, inaction, act (including failure to act), omission or negligence by any authorized or
unauthorized dealer, distributor, wholesaler, retailer, service provider or third party that involves into the distribution of Product or the

services thereto. To the extent permitted by applicable law, the explicit representations and warranties, if any, provided herein, shall be
the only warranties and representations made by NAVIMOW PARTIES to YOU, any consumer, and/or end-user. and NAVIMOW PARTIES
shall not be responsible for any other warranties and/or representations that may be given and/or provided by another person unless
NAVIMOW PARTIES have in a written form explicitly authorized such additional warranty and/or representation to be given to consumer
or end-user.
6. Claims, Dispute Resolution and Arbitration
THE CLAUSES CONTAINED HEREIN ARE LEGALLY BINDING BETWEEN YOU (EITHER AN INDIVIDUAL OR ENTITY), AND NAVIMOW
B.V., ITS AFFILIATES, NAVIMOW PARTIES AND NAVIMOW DEALERS. THE CLAUSES CONTAINED HEREIN MAY AFFECT YOUR RIGHTS, AND IT
IS YOUR RESPONSIBILITY TO READ THE FOLLOWING SECTIONS. YOU CAN OPT OUT OF THE AGREEMENT WITHIN 30 CALENDAR DAYS OF
THE FIRST CONSUMER PURCHASE BY EMAILING [email protected] AND PROVIDING THE APPLICABLE INFORMATION. FOR MORE
DETAILS, PLEASE SEE SECTION 6.2.
6.1 Binding Arbitration EN Navimow Parties, Navimow Dealers and you agree that any dispute, controversy or claim arising out of,
relating to or in connection with this agreement, the limited warranty, the sale, condition or performance of the product, whether based
in contract, tort, fraud, misrepresentation, or any other legal theory at law or in equity, including but not limited to any claims for death,
injury or property damages, shall be governed by and construed in accordance with the laws of the Netherlands with the exclusion of its
conflicts of law provisions.
Any disputes arising from, out of, or in connection with this Agreement shall be settled through friendly consultations between the
Parties. In case no resolution can be reached through consultations, the dispute shall be submitted to the Arbitration Institute of the
Netherlands (NAI) for arbitration which shall be conducted in accordance with its rules of in effect at the time of applying for arbitration.
Both Parties further acknowledge and confirm that the arbitral award shall be final and binding upon all Parties, not subject to any
appeal, and shall deal with the question of costs of arbitration and all matters related thereto. The enforcement of the arbitral award
shall be conducted by a court of competent jurisdiction.
Further the Parties agree that:
i. The seat of the arbitration shall be Amsterdam, Netherlands.
ii. The Tribunal shall consist of 3 arbitrator(s).
iii. The language of the arbitration shall be English.
Section 6 “Claims, Dispute Resolution and Arbitration” clause shall survive upon termination or expiration of this agreement and/or
limited warranty or in an event that this agreement and/or the limited warranty is held as void, avoidable, invalid, or unenforceable,
either in whole or part, by a competent adjudication institution with actual authority and jurisdiction over this matter.
6.2 Opt-Out
YOU MAY OPT OUT OF THIS DISPUTE RESOLUTION PROCEDURE BY PROVIDING NOTICE TO NAVIMOW or NAVIMOW PARTIES NO LATER
THAN THIRTY (30) CALENDAR DAYS AFTER THE DATE OF THE FIRST CONSUMER PURCHASER’S PURCHASE OF THE PRODUCT. TO
OPT-OUT, YOU MUST SEND NOTICE BY EMAIL AT [email protected], WITH THE SUBJECT LINE: “ARBITRATION OPT-OUT.” THE
OPT-OUT NOTICE BY E-MAIL MUST INCLUDE (A) YOUR NAME, EMAIL ADDRESS, MAILING ADDRESS, AND PHONE NUMBER; (B) THE DATE
ON WHICH THE PRODUCT WAS PURCHASED; (C) THE PRODUCT MODEL NAME OR MODEL NUMBER; AND (D) THE SERIAL NUMBER.
ALTERNATIVELY, YOU MAY OPT OUT BY SENDING AN ELECTION TO OPT-OUT LETTER TO NAVIMOW AT Dynamostraat 7, 1014BN,
Amsterdam, The Netherlands. CERTIFIED MAIL WITHIN THIRTY (30) CALENDAR DAYS FROM THE DATE OF THE FIRST END USER’S
PURCHASE OF THE PRODUCT FROM NAVIMOW DEALER. THE OPT-OUT LETTER SHALL CONTAIN THE FOLLOWING INFORMATION: (A)
YOUR NAME, EMAIL ADDRESS, MAILING ADDRESS, AND PHONE NUMBER; (B) THE DATE ON WHICH THE PRODUCT WAS PURCHASED; (C)
THE PRODUCT MODEL NAME OR MODEL NUMBER; (D) THE SERIAL NUMBER; AND (E) AN STATEMENT AS FOLLOWS: THE ABOVE
CONSUMER ELECTS TO OPT-OUT OF THE DISPUTE RESOLUTION PROCEDURE AS PROVIDED BY THIS LIMITED WARRANTY, THESE ARE THE
ONLY TWO EFFECTIVE WAYS TO OPT-OUT OF THIS DISPUTE RESOLUTION PROCEDURE. ELECTION TO OPT-OUT THIS DISPUTE
RESOLUTION PROCEDURE WILL NOT AFFECT THE COVERAGE OF THE LIMITED WARRANTY IN ANY WAY, AND YOU WILL CONTINUE TO
ENJOY THE BENEFITS OF THE LIMITED WARRANTY.
6.3 Language
This Agreement may be translated into different languages. In the event of a conflict, the English version shall prevail and control.
7. Intended third Party Beneficiary
(a) If a natural person receives a Product that is new as a gift from its original purchaser and this recipient does not become a party to
this Agreement, this recipient shall be deemed as an intended third-party beneficiary to this Agreement. (b) If (i) a natural person is in
the family or household of a purchaser of Product, (ii) it is reasonable to expect that such person may use, consume, or be affected by
the Product, and (iii)this person is not a party to this Agreement, this person shall be deemed as an intended third-party beneficiary to
this Agreement.
8. Statute of Limitation
The parties agree that any dispute, controversy, or claim arising out of, related to, or in connection with this Agreement, the limited
warranty, the sale, condition, or performance of the Product, whether based in contract, tort, fraud, misrepresentation or any other
legal theory at law or in equity, including but not limited to any claims for death, injury or property damages, must be commenced
within one year after the cause of action has occurred.
9. Severability
If any term, clause, or provision of this Agreement is invalid, illegal or unenforceable in any jurisdiction, such invalidity, illegality, or
unenforceability shall not affect any other term, clause or provision of this Agreement or invalidate or render unenforceable such term,
clause or provision in any other jurisdiction. Upon a determination that any term, clause, or provision is invalid, illegal, or
unenforceable, the parties shall negotiate in good faith, and if negotiation fails, the arbitral tribunal may modify this Agreement to give
effect to the original intent of the parties as closely as possible in order that the transactions contemplated hereby be consummated as
originally contemplated to the greatest extent possible.
6.1.3 Certifications
European Union Compliance Statement
Information on Disposal for Users of Waste Electrical & Electronic Equipment
This symbol on the product or on its packaging indicates that used electrical and electronic products should not be mixed with unsorted
municipal waste. For proper treatment, it is your responsibility to dispose of your waste equipment by arranging to return it to designated
collection points.
Disposing of this product correctly will help save valuable resources and prevent any potential negative effects on human health and the
environment, which could otherwise arise from inappropriate waste handling.
To return your used device, please use the return and collection systems or contact the retailer where the product was purchased, which
is free of charge, please contact your local authority for further details of your nearest designated collection point.
Penalties may be applicable for incorrect disposal of this waste, in accordance with your national legislation.
Information on Disposal for Users of used batteries
This symbol means that batteries and accumulators, at their end-of-life, should not be mixed with unsorted municipal waste. Your
participation is an important part of the effort to minimize the impact of batteries and accumulators on the environment and on human
health. For proper recycling you can return this product or the batteries or accumulators it contains to your supplier or to a designated
collection point, which is free of charge.
Disposing of this product correctly will help save valuable resources and prevent any potential negative effects on human health and the
environment, which could otherwise arise from inappropriate waste handling.
Penalties may be applicable for incorrect disposal of this waste, in accordance with your national legislation. there are separate collection
systems for used batteries and accumulators.
Please, dispose of batteries and accumulators correctly at your local community waste collection/recycling center.
Restriction of the use of certain hazardous substances (RoHS) Directive
Navimow B.V. hereby declares the whole product including parts (cables, cords, and so on) meets the requirements of RoHS Directive
2011/65/EU and amendment Commission Delegated Directive (EU) 2015/863 on the restriction of the use of certain hazardous substances
in electrical and electronic equipment ("RoHS recast" or "RoHS 2.0").
Radio Equipment Directive
Navimow B.V. hereby declares that the product listed in this section comply with the essential requirements and other relevant provisions
of the Radio Equipment Directive 2014/53/EU.
Machinery Directive
Navimow B.V. hereby declares that the product listed in this section comply with the essential requirements and other relevant provisions
of the Machinery Directive 2006/42/EC.
Europe Authorised Representative:
AR Experts B.V., P.O. Box 5047, 3620 AA Breukelen, The Netherlands
Navimow B.V. hereby declares that the product comply with the essential requirements and other relevant provisions of the RoHS
Directive 2011/65/EU and amendment Commission Delegated Directive (EU) 2015/863, the Radio Equipment Directive 2014/53/EU and
the Machinery Directive 2006/42/EC.

Bluetooth
Frequency Band(s) 2.402-2.480GHz
Max. RF Power 20mW
SRD
Frequency Band(s) 865.05-867.9MHz
Max. RF Power 13.85dBm (ERP)
2.4G WLAN
Frequency Band(s) 2412-2472MHz
Max. RF Power 19.87dBm (EIRP)
5.6G WLAN
Frequency Band(s) 5180-5240MHz
Max. RF Power 17dBm (EIRP)
5.8G WLAN
Frequency Band(s) 5260-5320MHz
Max. RF Power 12dBm (EIRP)
LTE Band 1
Frequency Band(s) 5500-5700MHz
Max. RF Power 7dBm (EIRP)
LTE Band 3
Frequency Band(s) 5745-5825MHz
Max. RF Power 11dBm (EIRP)
LTE Band 5
Frequency Band(s) 880-915MHz/925-960MHz
Max. RF Power 35dBm (Conducted Rated)
LTE Band 7
Frequency Band(s) 1710-1785MHz/1805-1880MHz
Max. RF Power 32dBm (Conducted Rated)
LTE Band 8
Frequency Band(s) 1920-1980MHz/2110-2170MHz
Max. RF Power 25dBm (Conducted Rated)
LTE Band 20
Frequency Band(s) 1710-1785MHz/1805-1880MHz
Max. RF Power 25dBm (Conducted Rated)
LTE Band 28
Frequency Band(s) 2500-2570MHz/2620-2690MHz
Max. RF Power 25dBm (Conducted Rated)
LTE Band 38
Frequency Band(s) 880-915MHz/925-960MHz
Max. RF Power 25dBm (Conducted Rated)
LTE Band 40
Frequency Band(s) 832-862MHz/791-821MHz
Max. RF Power 25dBm (Conducted Rated)
GNSS Signal Designations Frequency band(MHz)
GPS
L1 1559-1610
L2 1215-1300
L5 1164-1215
Galileo
E1 1559-1610
E5b 1164-1215
E5a 1164-1215
BDS
B1C 1559-1610
B1I 1559-1610
B2a 1164-1215

6.2 North America
6.2.1 Certifications
ThebatterycomplieswithUN/DOT38.3
Federal Communications Commission (FCC) Compliance Statement for USA
This device complies with Part 15 of the FCC Rules. Operation is subject to the following two conditions: (1) This device may not cause
harmful interference, and (2) this device must accept any interference received, including interference that may cause undesired
operation.
Note: This equipment has been tested and found to comply with the limits for a Class B digital device, pursuant to Part 15 of the FCC
Rules. These limits are designed to provide reasonable protection against harmful interference in a residential installation. This equipment
generates, uses and can radiate radio frequency energy and, if not installed and used in accordance with the instructions, may cause
harmful interference to radio communications. However, there is no guarantee that interference will not occur in a particular installation.
If this equipment does cause harmful interference to radio or television reception, which can be determined by turning the equipment
off and on, the user is encouraged to try to correct the interference by one or more of the following measures:
- Reorient or relocate the receiving antenna.
- Increase the separation between the equipment and receiver.
- Connect the equipment into an outlet on a circuit different from that to which the receiver is connected.
- Consult the dealer or an experienced radio/TV technician for help.
This equipment complies with FCC radiation exposure limits set forth for an uncontrolled environment. This equipment should be installed
and operated with minimum distance 7.87 in (20 cm) between the radiator and your body. This transmitter must not be co-located or
operating in conjunction with any other antenna or transmitter.
FCC Caution: Any changes or modifications not expressively approved by the party responsible for compliance could void the user's
authority to operate this equipment.
Industry Canada (IC) Compliance Statement for Canada
This device contains licence-exempt transmitter(s) that comply with Innovation, Science and Economic Development Canada’s licence-ex-
empt RSS(s).
Operation is subject to the following two conditions:
1. This device may not cause interference.
2. This device must accept any interference, including interference that may cause undesired operation of the device.
L’émetteur exempt de licence contenu dans le présent appareil est conforme aux CNR d’Innovation, Sciences et Développement
économique Canada applicables aux appareils radio exempts de licence. L’exploitation est autorisée aux deux conditions suivantes :
1. L’appareil ne doit pas produire de brouillage;
2. L’appareil doit accepter tout brouillage radioélectrique subi, même si le brouillage est susceptible d’en compromettre le fonctionne-
ment.
This equipment complies with IC RSS-102 radiation exposure limits set forth for an uncontrolled environment. This transmitter must not
be co-located or operating in conjunction with any other antenna or transmitter. This equipment should be installed and operated with
minimum distance 7.87 in (20 cm) between the radiator and your body.
Cet équipement est conforme aux limitesd'exposition au rayonnements IC RSS-102 établies pour un environnement non contrôlé. Cet
équipement doit êtreinstallé et utilisé avec un minimum de 20cm de distance entre la source de rayonnement et votre corps.
Navimow is not responsible for any changes or modifications not expressly approved by Navimow. Such modifications could void the
user's authority to operate the equipment.
Model: X315N/X330N/X350N/X390N
FCC ID: 2BAXN-MR0005
IC: 30433-MR0005
Model: EC25AFX
Contains FCC ID: XMR201909EC25AFX
Contains IC: 10224A-2019EC25AFX
6.2.2 Limited Warranty
Limited Warranty and Arbitration Agreement
NOTICE: PLEASE READ THIS LIMITED WARRANTY AND ARBITRATION AGREEMENT AND KEEP THIS AGREEMENT FOR FUTURE REFERENCE.
THIS AGREEMENT CONTAINS LIMITED WARRANTY CLAUSES AND ARBITRATION CLAUSES WITH RESPECT TO NAVIMOW(“PRODUCT”) AND
ANY AND ALL TRANSACTION AND CLAIM RELATED TO AND/OR ARISING OUT OF THE PRODUCT.
THIS IS A BINDING LEGAL AGREEMENT (“AGREEMENT”) BETWEEN YOU (EITHER AN INDIVIDUAL OR ENTITY) AND THE MANUFACTURER
WILLAND (BEIJING) TECHNOLOGY CO., LTD ("WILLAND") AND ITS AFFILIATES (INCLUDING BUT NOT LIMITED TO THEIR PARENT COMPANY,
SUBSIDIARY, AFFILIATED COMPANIES, PREDECESSOR, SUBSEQUENT COMPANY, ADMINISTRATORS, SUCCESSORS, ASSIGNS, OFFICERS,
DIRECTORS, MANAGERS, EMPLOYEES, MEMBERS, AND SHAREHOLDERS) (COLLECTIVELY “NAVIMOW PARTIES”), NAVIMOW DEALERS (AS
DEFINED BELOW) AND THEIR AFFILIATES (COLLECTIVELY “NAVIMOW DEALERS”).
PURCHASING THE PRODUCT, OPENING THE PRODUCT PACKAGING, USING THE PRODUCT, RETAINING THE PRODUCT, EXPLOITING
THE BENEFITS OF THIS AGREEMENT, OR ELECTRONIC ACCEPTANCE OF THIS AGREEMENT SHALL CONSTITUTE ACCEPTANCE OF THIS
AGREEMENT. IN AN EVENT YOU, AS A PARENT(S) OR LEGAL GUARDIAN(S), PURCHASE THIS PRODUCT ON BEHALF OF OR FOR YOUR
CHILDREN, YOU HEREBY CONSENT TO AND APPROVE IN ALL RESPECTS THE TERMS AND CONDITIONS OF THE AGREEMENT AND AGREE
THAT BOTH YOU AND YOUR CHILDREN SHALL BE BOUND BY THIS AGREEMENT. YOU ACKNOWLEDGE AND AGREE THAT YOU RECEIVE
SUFFICIENT NOTICE OF THIS AGREEMENT AND YOU AGREE TO THIS AGREEMENT.
THE AGREEMENT ONLY AND EXCLUSIVELY APPLIES TO THE PRODUCT DISTRIBUTED AND/OR SOLD BY AND/OR THROUGH NAVIMOW
PARTIES OR NAVIMOW DEALERS IN THE NORTH AMERICAN MARKET. IF YOU ARE NOT A RESIDENT IN THE NORTH AMERICAN MARKET,
PLEASE CONTACT US BEFORE USING THE PRODUCT AS YOU MAY NOT HAVE A WARRANTY OR HAVE A DIFFERENT WARRANTY THAN THE
ONE PROVIDED HEREIN.
THE LIMITED WARRANTY CAN ALSO BE FOUND ONLINE AT: navimow.segway.com
WARNING
USE OF THE PRODUCT BY A PERSON WHO HAS NOT RECEIVED SUFFICIENT TRAINING, DOES NOT POSSESS NECESSARY EXPERIENCE AND
SKILLS, OR AGAINST, IN VIOLATION OF OR NOT ACCORDING TO THE USER MANUAL, INSTRUCTIONS, GUIDANCE AND/OR SAFETY
WARNINGS MAY CAUSE SEVERE BODILY INJURY OR EVEN DEATH OR PROPERTY DAMAGES.
PLEASE READ EACH AND EVERY SECTION OF THIS DOCUMENT CAREFULLY BEFORE USE OF THE PRODUCT. YOU ARE ENCOURAGED TO
CONSULT WITH YOUR PROFESSIONALS AND ADVISORS REGARDING THE INFORMATION PROVIDED HEREIN, ESPECIALLY THOSE RELATED
TO THE SAFETY AND YOUR LEGAL RIGHTS AND DUTIES.
1. Limited Warranty
This Limited Warranty covers only defects of any material or quality of the Product and components when the Product and
components thereof are being used under normal and ordinary conditions. In the event that a defect covered by this Limited
Warranty occurs, Navimow and/or other Navimow Parties in its sole discretion will repair or replace the defective Product or
components thereof in accordance with this Limited Warranty. The applicable Limited Warranty Period for the Limited Warranty
commences on the date of the original purchase of the Product from either of Navimow, Navimow’s authorized reseller,
Navimow’s authorized distributor, or an authorized Dealer (each a “Navimow Dealer” or collectively the “Navimow Dealers”). This
warranty gives you specific legal rights, and if you are a consumer in the United States of America, you may also have other rights
which vary from State to State.
Blades are seen as disposible and are not covered by this warranty.
ThelaterdatefromthefollowingisconsideredasthestarttimeoftheLimited WarrantyPeriod:
-Dateofthepurchasetime
-Dateoffirst-timeactivation
THIS LIMITED WARRANTY HEREIN IS THE ONLY EXPRESS WARRANTY APPLICABLE TO PRODUCT AND ITS COMPONENT PARTS,
ACCESSORIES, AND SERVICE REPAIR. NAVIMOW AND NAVIMOW PARTIES DISCLAIM ALL OTHER EXPRESS WARRANTIES. NAVIMOW
AND OTHER NAVIMOW PARTIES LIMIT THE DURATION AND REMEDIES OF ALL IMPLIED WARRANTIES, INCLUDING WITHOUT
LIMITATION TO THE WARRANTIES OF MERCHANTABILITY AND FITNESS FOR A PARTICULAR PURPOSE, WHETHER ARISING BY LAW,
COURSE OF DEALING, COURSE OF PERFORMANCE, USAGE OF TRADE OR OTHERWISE, TO THE DURATION OF THIS EXPRESS LIMITED
WARRANTY. THE FOREGOING LIMITATIONS OR EXCLUSIONS OF WARRANTY SHALL SUBJECT TO ANY MANDATORY LAW THAT
PROHIBITS SUCH EXCLUSION, LIMITATION, RESTRICTION, OR MODIFICATION OF WARRANTY. FOR ANY WARRANTY THAT MAY
APPLY HEREIN ON THE GROUND THAT SUCH WARRANTY IS MANDATED BY LAW AND CANNOT BE EFFECTIVELY EXCLUDED,
RESTRICTED OR MODIFIED BY THE FOREGOING DISCLAIMER, THE DURATION OF ITS APPLICABILITY SHALL BE THE PERIOD
PROVIDED BY THE LIMITED WARRANTY HEREIN OR THAT REQUIRED BY THE APPLICABLE COUNTRY/STATE LAW, WHICHEVER IS
Limited Warranty Period
3 years
2 years
Product covered by this warranty
X315N, X330N, X350N, X390N
Battery packs and power adapters

SHORTER. SOME COUNTRIES/STATES DO NOT ALLOW LIMITATIONS ON HOW LONG AN IMPLIED WARRANTY LASTS, SO THE ABOVE
LIMITATION MAY NOT APPLY TO YOU.
2. Limited Warranty Service Process
Navimow’s online services are available at navimow.segway.com. During your use of the Product, you believe the Product or its
component is defective and/or does not work correctly. PLEASE IMMEDIATELY STOP USING THE PRODUCT, AND STORE THE
PRODUCT PROPERLY. YOUR CONTINUED USE OF THE PRODUCT UNDER SUCH CIRCUMSTANCE MAY CAUSE SEVERE BODILY INJURY
OR EVEN DEATH TO YOU OR THE OTHERS AND/OR CAUSE PROPERTY DAMAGES. Thereafter, please immediately contact Navimow
at [email protected]. Navimow’s technical support personnel are available to assist you online or over the
phone in diagnosing the defect, and if any, and providing further instructions. In the event the warranty services are required,
please prepare for the following materials, including (i) proof of the original purchase of the Product from Navimow Dealers, (ii)
the Product’s serial number, and (iii) a description of the defect if applicable. Upon the verification of your eligibility for the
Limited Warranty protection and/or services, you should provide your name, email address, mailing address, and contact phone
number to us, we will guide you to get our service.
If you want to return the defective unit to service, you shall be responsible for the cost of shipping and risk of loss and damage
that may occur during the shipment from you to Navimow and (ii) from Navimow to you. You must include your defective Product
or component within the original or Navimow-approved packaging, which will be provided at your cost, for shipment of the
Product to Navimow. You shall defend, indemnify, and hold Navimow harmless any loss and/or damages that may be caused by
your improper packaging or shipment of the Product or component to Navimow.
An authorized service provider or Navimow Dealer will inspect your returned Product. If Navimow reasonably determines that the
problem is not covered by the Limited Warranty, Navimow will notify you and inform you of service or replacement alternatives
that are available to you on a fee basis, or Navimow will return your Product to you unrepaired, and in such instance, you will be
responsible for the cost of shipping and insurance for shipment of your Product from Navimow to you. In an event that any
services is not covered by the limited warranty and you reject a paid service recommended by Navimow Parties and/or Navimow
Dealer, you understand and acknowledge that failure to repair and/or services the Product may increase the risk of fall and/or
Product failure which may result in severe property damages, severe bodily injury or death, and you agree that this is your
informed consent to take such risk.
For a return eligible for the warranty protection and/or services, Navimow will serve defective Products with new or
reconditioned parts of the same or similar style at no cost to you for the service. Parts replaced by Navimow will be retained by
and become the property of Navimow. In such a situation, Navimow will pay reasonable return shipping charges for the return of
the Product to you.
3. Limited Warranty Eligibility
3.1 Your service request must be received by Navimow within the Limited Warranty Period as described above, and Navimow
must, receive your Product in accordance with the Limited Warranty Service Process defined above.
3.2 Your Product must be purchased from an authorized Navimow Dealer.
3.3 You must provide the original purchase receipt.
3.4 Your Product must have serial number legible, unobscured, untampered, and unmodified.
3.5 All tamper-resistant seals must be intact, in place, and unmodified.
4. Limited Warranty Exclusions
This Limited Warranty describes the service available to you if your product requires warranty service, and you may have
additional protections under your local laws. This Limited Warranty does not cover and excludes damage to your product or any
component thereof caused by:
4.1 Abuse, misuse, recklessness, negligence, or commercial use.
4.2 Improper charging, storage, maintenance, or operation of the Product not in compliance with instructions or limitations as
provided in the user materials.
4.3 Use of the Product not in compliance with applicable laws and regulations.
4.4 Use of the Product by persons with inadequate experience.
4.5 Accident, collision, riding at an unsafe speed on paved roads, riding at an unsafe speed on unpaved roads, riding over
obstacles, amateur racing, professional racing, use in backcountry sports, fire damage, water damage, chemical damage, use
of the Product outside of the Product’s working temperature range, high-pressure water spray, earthquake, dropping, loading
with excessive weights.
4.6 Modifications to mechanical parts, modification of electronic parts, or modifications to software embedded in the Product.
4.7 Service, repair, and maintenance by unauthorized providers.
4.8 Cosmetic damages.
4.9 Use of the Product with third-party product, component, or accessory.
4.10 The normal deterioration of wear and tear parts.
4.11 Use of the Product with overdue wear and tear parts.
5. LIABILITY DISCLAIMER AND LIMITATION
5.1 NAVIMOW AND OTHER NAVIMOW PARTIES DO NOT ASSUME OR AUTHORIZE ANYONE TO ASSUME ON ITS BEHALF, ANY OTHER
OBLIGATION OR LIABILITY IN CONNECTION WITH THE PRODUCT, ITS COMPONENT PARTS, ACCESSORIES, SERVICE REPAIR, OR
THIS LIMITED WARRANTY.

5.2 NAVIMOW PARTIES AND NAVIMOW DEALERS ARE NOT RESPONSIBLE FOR ANY LOSS OF USE OF A PRODUCT, ITS COMPONENT
PARTS, ACCESSORIES, OR FOR ANY INCONVENIENCE OR OTHER LOSS OR DAMAGE WHICH MIGHT BE CAUSED FROM ANY
DEFECT IN A PRODUCT, ITS COMPONENT PARTS, ACCESSORIES, SERVICE REPAIR, OR FOR ANY OTHER INCIDENTAL OR
CONSEQUENTIAL DAMAGES YOU MAY HAVE AS A RESULT OF ANY DEFECT IN A PRODUCT, ITS COMPONENT PARTS,
ACCESSORIES, OR SERVICE REPAIR. SOME COUNTRIES/STATES DO NOT ALLOW THE EXCLUSION OR LIMITATION OF INCIDENTAL
OR CONSEQUENTIAL DAMAGES, SO THE ABOVE LIMITATION OR EXCLUSION MAY NOT APPLY TO YOU TO THE EXTENT THAT IT
IS DISALLOWED BY APPLICABLE LAW.
5.3 IN NO EVENT NAVIMOW, OTHER NAVIMOW PARTIES AND NAVIMOW DEALERS’ TOTAL AND AGGREGATE LIABILITY FOR ALL
CLAIMS UNDER ANY AND ALL APPLICABLE LAW OR THEORY, JOINTLY OR SEVERALLY, ARISING OUT OF OR RELATED TO THE
PURCHASE OF THE PRODUCT, USE OF THE PRODUCT, BREACH OF CONTRACT, TORTS (INCLUDING NEGLIGENCE) OR
OTHERWISE, EXCEEDS THE DUTY TO REPAIR OR REPLACE ANY DEFECTIVE PRODUCT, FURTHER SUBJECT TO NAVIMOW’S SOLE
AND EXCLUSIVE DISCRETION. IN NO EVENT SHALL BE NAVIMOW, OTHER NAVIMOW PARTIES AND NAVIMOW DEALERS BE
LIABLE TO ANY PERSON FOR CONSEQUENTIAL, INDIRECT, INCIDENTAL, SPECIAL, EXEMPLARY, PUNITIVE OR ENHANCED
DAMAGED ARISING OUT OF, OR RELATING TO, AND/OR IN CONNECTION WITH THE PURCHASE OF THE PRODUCT, ANY
BREACH OF THIS AGREEMENT OR MANUFACTURER’S DUTIES REGARDLESS OF (A) WHETHER SUCH DAMAGES WERE
FORESEEABLE, (B) WHETHER OR NOT NAVIMOW OR OTHER NAVIMOW PARTIES WERE ADVISED OF THE POSSIBILITY OF SUCH
DAMAGES, AND (C) THE LEGAL OR EQUITABLE THEORY (CONTRACT, TORT OR OTHERWISE) UPON WHICH THE CLAIM IS BASED
UNLESS SUCH LIMITATIONS AND EXCLUSIONS ARE PROHIBITED BY APPLICABLE LAW. THE FOREGOING LIMITATIONS OR
EXCLUSIONS APPLY EVEN IF AN AGGRIEVED CUSTOMER OR ANY OTHER PERSON’S (WHO MIGHT HAVE RIGHT OR CLAIM UNDER
THIS AGREEMENT BY OPERATION OF LAW OR EQUITY) REMEDIES UNDER THIS AGREEMENT FAIL THEIR ESSENTIAL PURPOSE. IN
THE EVENT SOME COUNTRIES/STATES DO NOT ALLOW THE EXCLUSION OR LIMITATION OF CERTAIN OR ALL OF THE
FOREGOING DAMAGES, SO TO THE EXTENT THAT SUCH LIMITATIONS OR EXCLUSIONS ARE NOT ALLOWED BY LAW, THEY MAY
NOT APPLY TO YOU. SOME COUNTRIES/STATES DO NOT ALLOW THE EXCLUSION OR LIMITATION OF INCIDENTAL OR
CONSEQUENTIAL DAMAGES, SO TO THE EXTENT THAT SUCH LIMITATIONS OR EXCLUSIONS ARE NOT ALLOWED BY LAW, THE
ABOVE LIMITATION OR EXCLUSION MAY NOT APPLY TO YOU.
5.4 To the extent permitted by applicable law, NAVIMOW PARTIES hereby DISCLAIM any liability and thereby shall not be
responsible for any damages, including but not limited to death, bodily injury, or damages to property, arising out of or
related to any conduct (including misconduct), action, inaction, act (including failure to act), omission or negligence by any
authorized or unauthorized dealer, distributor, wholesaler, retailer, service provider or third party that involves the
distribution of Product or the services thereto. To the extent permitted by applicable law, the explicit representations and
warranties, if any, provided herein, shall be the only warranties and representations made by NAVIMOW PARTIES to YOU, any
consumer, and/or end-user. NAVIMOW PARTIES shall not be responsible for any other warranties and/or representations that
may be given and/or provided by another person unless NAVIMOW Parties have in a written form explicitly authorized such
additional warranty and/or representation to be given to consumer or end-user.
6. Claims, Dispute Resolution and Arbitration
THE CLAUSES CONTAINED HEREIN ARE LEGALLY BINDING BETWEEN YOU (EITHER AN INDIVIDUAL OR ENTITY), AND NAVIMOW, ITS
AFFILIATES, NAVIMOW PARTIES AND NAVIMOW DEALERS. THE CLAUSES CONTAINED HEREIN MAY AFFECT YOUR RIGHTS, AND IT IS
YOUR RESPONSIBILITY TO READ THE FOLLOWING SECTIONS. YOU CAN OPT OUT OF THE AGREEMENT WITHIN 30 CALENDAR DAYS
OF THE FIRST CONSUMER PURCHASE BY EMAILING [email protected] AND PROVIDING THE APPLICABLE INFORMATION. FOR
MORE DETAILS, PLEASE SEE SECTION 6.3.
6.1 Binding Arbitration
Navimow Parties, Navimow Dealers, and you agree that any dispute, controversy, or claim arising out of, related to or in
connection with this Agreement, the limited warranty, the sale, condition, or performance of the Product, whether based in
contract, tort, fraud, misrepresentation or any other legal theory at law or in equity, including but not limited to any claims for
death, injury or property damages, shall be submitted to binding arbitration upon the request of either party upon the service
of that request on the other party.
The arbitration shall be conducted by the American Arbitration Association (AAA) according to its Commercial Arbitration
Rules and the Supplementary Procedures for Consumer-Related Disputes (collectively “AAA Rules”). The AAA Rules are
available online at adr.org or by calling the AAA at 1-800-778-7879. The arbitration shall be conducted before a single
arbitrator, whose award may not exceed, in form or amount, the relief allowed by the “Liability Disclaimer and Limitation”
clause herein subject to the applicable law. The arbitration tribunal shall have the power to rule on any challenge to its
jurisdiction or to the validity or enforceability of any portion of the Agreement to arbitrate.Any decision of the arbitrator shall
be final and may be entered into any judgment in any court of competent jurisdiction. You waive the right to have your claim
heard in a court of law and by a jury.
You waive the right to participate in class actions arising from or relating to all claims and disputes with Navimow Parties
and/or Navimow Dealers. You agree to arbitrate solely on an individual basis and that this Agreement does not permit class
arbitration or any claims brought as a plaintiff or class member in any class or representative arbitration proceeding. The
arbitral tribunal may not consolidate more than one person's claims and may not otherwise preside over any form of a
representative or class proceeding. If the prohibition on class arbitration is deemed invalid or unenforceable, then the
remaining portions of the arbitration Agreement will remain in force.
Section 6 “Claims and Dispute Resolution” clause shall survive upon termination or expiration of this Agreement and/or
limited warranty or in the event that this Agreement and/or the limited warranty is held as void, avoidable, invalid, or
unenforceable, either in whole or part, by a competent adjudication institution with actual authority and jurisdiction over this
matter.
Navimow Parties and Navimow Dealer require, and you hereby agree that you shall arbitrate your claims against Navimow

Parties and/or Navimow Dealers according to the arbitration described above before you exercise your rights according to the
title of the Magnuson-Moss Warranty Act. Title I of the Magnuson-Moss Warranty Act does not require you to pursue rights
and remedies available to you that are not provided by the Title I of Magnuson-Moss Warranty Act.
6.2 Small Claim
For any arbitration in which your total claims, exclusive of attorney fees and expert witness fees, is $5,000.00 or less (“Small
Claim”), the arbitrator may, if you prevail, award your reasonable attorney fees, expert witness fees, and costs as part of any
award on the condition of the arbitrator’s actual and affirmative finding that the claim is non-frivolous. In a Small Claim case,
you are required to pay no more than half of the total administrative, facility, and arbitrator fees, or $50.00 of such fees,
whichever is less, and Navimow Parties shall pay the remainder of such fees. In a Small Claim case, Navimow Parties shall not
recover any attorney fees provided that your claim is non-frivolous. Administrative, facility, and arbitrator fees for arbitrations
in which your total claimed damages, exclusive of attorney fees and expert witness fees, exceed $5,000.00 (“Large Claim”),
shall be determined according to AAA Rules. In a Large Claim case, the arbitrator may grant to the prevailing party or
apportion among the parties reasonable attorney fees, expert witness fees, and costs. The arbitrator shall be entitled to
award declaratory or injunctive relief upon request by any party.
6.3 Opt-Out
YOU MAY OPT OUT OF THIS DISPUTE RESOLUTION PROCEDURE BY PROVIDING NOTICE TO NAVIMOW PARTIES NO LATER THAN
THIRTY (30) CALENDAR DAYS AFTER THE DATE OF THE FIRST CONSUMER PURCHASER’S PURCHASE OF THE PRODUCT. TO
OPT-OUT, YOU MUST SEND NOTICE BY EMAIL TO NAVIMOW AT [email protected], WITH THE SUBJECT LINE:
“ARBITRATION OPT-OUT.” THE OPT-OUT NOTICE BY E-MAIL MUST INCLUDE (A) YOUR NAME, EMAIL ADDRESS, MAILING
ADDRESS, AND PHONE NUMBER; (B) THE DATE ON WHICH THE PRODUCT WAS PURCHASED; (C) THE PRODUCT MODEL NAME
OR MODEL NUMBER; AND (D) THE SERIAL NUMBER. ALTERNATIVELY, YOU MAY OPT OUT BY SENDING AN ELECTION TO
OPT-OUT LETTER TO NAVIMOW AT 98 Spit Brook Rd. Suite 2203, Nashua, New Hampshire, 03062. WITHIN THIRTY (30)
CALENDAR DAYS FROM THE DATE OF THE FIRST END USER’S PURCHASE OF THE PRODUCT FROM NAVIMOW DEALER.THE
OPT-OUT LETTER SHALL CONTAIN THE FOLLOWING INFORMATION: (A) YOUR NAME, EMAIL ADDRESS, MAILING ADDRESS, AND
PHONE NUMBER; (B) THE DATE ON WHICH THE PRODUCT WAS PURCHASED; (C) THE PRODUCT MODEL NAME OR MODEL
NUMBER; (D) THE SERIAL NUMBER; AND (E) AN STATEMENT AS FOLLOWS: THE ABOVE CONSUMER ELECTS TO OPT-OUT OF THE
DISPUTE RESOLUTION PROCEDURE AS PROVIDED BY THIS LIMITED WARRANTY, THESE ARE THE ONLY TWO EFFECTIVE WAYS TO
OPT-OUT OF THIS DISPUTE RESOLUTION PROCEDURE. ELECTION TO OPT-OUT THIS DISPUTE RESOLUTION PROCEDURE WILL
NOT AFFECT THE COVERAGE OF THE LIMITED WARRANTY IN ANY WAY, AND YOU WILL CONTINUE TO ENJOY THE BENEFITS OF
THE LIMITED WARRANTY.
6.4 Federal Arbitration Act
The Federal Arbitration Act governs this arbitration clause. This Agreement evidences a transaction in interstate commerce,
and thus the Federal Arbitration Act governs its interpretation and enforcement.
6.5 Procedure
The Federal Arbitration Act governs this arbitration clause. This Agreement evidences a transaction in interstate commerce,
and thus the Federal Arbitration Act governs its interpretation and enforcement.
The following is a description of the arbitration process:
A. Mail a Notice of Dispute to Navimow. Before initiating an arbitration against Navimow Parties and/or Navimow Dealers, you
must first notify Navimow Parties and/or Navimow Dealers of your dispute in good faith. Please include your contact
information, your concerns, and the relief you intend to seek from Navimow Parties and/or Navimow Dealers, and any
information you believe would help resolve the dispute. Navimow Parties and/or Navimow Dealers will review your Notice
of Dispute to determine whether Navimow Parties and/or Navimow Dealers may settle it with you to avoid arbitration. The
notice should be sent by certified mail to Attention: Disputes, NAVIMOW, 98 Spit Brook Rd. Suite 2203, Nashua, New
Hampshire, 03062. Please keep a copy of your notice for your records.
B. Wait 30 Days. Navimow Parties and/or Navimow Dealers will review your Notice of Dispute within thirty (30) days of
Navimow’s receipt of your Notice of Dispute. If you do not hear from Navimow within thirty (30) days of its receipt of your
Notice of Dispute, you may proceed with filing an arbitration claim against Navimow Parties and/or Navimow Dealers.
Should Navimow provide you a written settlement offer, please keep this settlement offer because Navimow Parties
and/or Navimow Dealers and you will be required to show this settlement offer to the arbitrator. Notwithstanding the
foregoing, such offer, if any, shall not be shown to the arbitrator until after the arbitrator’s determination on the merits of
your claim.
C. Complete a Demand for Arbitration. You can initiate arbitration by completing a Demand for Arbitration that includes a
basic statement of the (i) names and addresses and telephone numbers of the parties involved; (ii) your description of the
dispute; and (iii) your short statement detailing why you are entitled to relief.
D. Send Navimow Parties and/or Navimow Dealers Your Demand for Arbitration. You can send Navimow Parties and/or
Navimow Dealers your Demand for Arbitration at the following address: Attention: Disputes, NAVIMOW, 98 Spit Brook Rd.
Suite 2203, Nashua, New Hampshire, 03062. Please keep a copy of your notice for your records.
E. Send AAA Two (2) Copies of Your Demand for Arbitration. The Demand for Arbitration includes the address that you are to
send two (2) copies of your Demand for Arbitration. This address is AAA Case Filing Services at 1101 Laurel Oak Road, Suite
100, Voorhees, NJ 08043, subject to amendment and/or update by AAA. You should also include a copy of this warranty
policy and the appropriate filing fee. Navimow Parties will reimburse you for this filing fee. If you cannot afford to pay the
filing fee, please contact Navimow, and Navimow will pay the filing fee for you if your claims seek a remedy less than
$75,000. AAA has an online filing option that you can find on its website: www.adr.org.

F. AAA Appointment of Arbitrator. If no claim in the arbitration exceeds $75,000, the AAA will appoint an arbitrator and notify
you and Navimow Parties and/or Navimow Dealers of the arbitrator’s name and qualification. The AAA requires all
arbitrators to check for any past or present relationships with the parties, potential witnesses, and the parties’ attorneys. If
the arbitrator has any such relationship, the AAA will inform Navimow Parties and you. If either you or Navimow Parties
object to the AAA’s choice of arbitrator, we’ll have seven (7) days to inform the AAA.
G. Choose the Hearing You Would Like. Unless you and Navimow Parties agree to have any arbitration hearings somewhere
else, the arbitration will take place in the county (or parish) that you purchase the Product. If your claim is for $10,000 or
less, you may choose to have the hearing conducted by telephone or in-person. Alternatively, you may choose to proceed
to conduct the entire arbitration through written correspondence with the arbitrator that doesn’t include an interactive
hearing. Once the AAA has commenced the arbitration, you have ten (10) days to inform the AAA of your choice of hearing.
If you don’t make a choice, the AAA will conduct the arbitration by written correspondence without an interactive hearing.
If your claim exceeds $10,000, the right to a hearing will be determined by the AAA Rules. Those rules currently provide for
an in-person hearing if your claim exceeds $10,000, but you and Navimow Parties may agree whether that hearing is in
person or by telephone or whether to instead proceed with written correspondence.
H. Arbitrator’s Decision. Within fourteen (14) days from the conclusion of the in-person or telephone hearing, or from the
submission of all written evidence to the arbitrator if you have elected to conduct the arbitration through written
correspondence, the arbitrator will render a written decision. That decision will include the essential findings and
conclusions upon which the arbitrator based his or her award. Navimow Parties will immediately respond to the arbitrator
notifying the arbitrator whether, and to what extent, Navimow Parties will abide by the decision, perform the obligations it
has agreed to do. Any decision by the arbitrator may be utilized by any party for any reason.
I. The parties agree to keep strictly confidential any conduct, communication, and information disclosed and/or
communicated to the other party under Section 6 (Claims, Dispute Resolution and Mandatory arbitration), including but
not limited to the existence of dispute resolution, mediation (if the parties agree to conduct mediation), settlement,
arbitration, arbitral proceedings, submissions made by the parties and the decisions made by arbitral tribunal, including its
awards to the extent not already in the public domain, except in judicial proceedings related to the award or where
required by applicable law.
7. Intended Third-Party Beneficiary
(a) If a natural person receives a Product that is new as a gift from its original purchaser and this recipient does not become a
party to this Agreement, this recipient shall be deemed as an intended third-party beneficiary to this Agreement. (b) If (i) a natural
person is in the family or household of a purchaser of Product, (ii) it is reasonable to expect that such person may use, consume,
or be affected by the Product, and (iii)this person is not a party to this Agreement, this person shall be deemed as an intended
third-party beneficiary to this Agreement.
8. Statute of Limitation
The parties agree that any dispute, controversy, or claim arising out of, related to, or in connection with this Agreement, the
limited warranty, the sale, condition, or performance of the Product, whether based in contract, tort, fraud, misrepresentation or
any other legal theory at law or in equity, including but not limited to any claims for death, injury or property damages, must be
commenced within one year after the cause of action has occurred.
9. Severability
If any term, clause, or provision of this Agreement is invalid, illegal or unenforceable in any jurisdiction, such invalidity, illegality,
or unenforceability shall not affect any other term, clause or provision of this Agreement or invalidate or render unenforceable
such term, clause or provision in any other jurisdiction. Upon a determination that any term, clause, or provision is invalid, illegal,
or unenforceable, the parties shall negotiate in good faith, and if negotiation fails, the arbitral tribunal may modify this
Agreement to give effect to the original intent of the parties as closely as possible in order that the transactions contemplated
hereby be consummated as originally contemplated to the greatest extent possible.
10. Language
This Agreement may be translated into different languages. In the event of a conflict, the English version shall prevail and control.

7. Contact Us
7.1 Contacts in Europe
Manufacturer: Willand (Beijing) Technology Co., LTD.
Address: Room 203, A-1 Bldg. Zhongguancun Dongsheng Technology Park (Northern Territory), No. 66, Xixiaokou Rd, Haidian Dist., Beijing,
China.
Email: [email protected]
Europe Authorised representative: AR Experts B.V., P.O. Box 5047, 3620 AA Breukelen, The Netherlands
Website: navimow.segway.com
Email: info@certification-experts.com
Contact us if you experience issues relating to the operation, maintenance and safety, or errors/faults with your mower.
7.2 Contacts in North America
Manufacturer: Willand (Beijing) Technology Co., LTD.
Address: Room 203, A-1 Bldg. Zhongguancun Dongsheng Technology Park (Northern Territory), No. 66, Xixiaokou Rd, Haidian Dist., Beijing,
China.
Manufactured for: Navimow Inc.
Address: 98 Spit Brook Rd. Suite 2203, Nashua, New Hampshire 03062, USA
Email: [email protected]
Website: navimow.segway.com
Contact us if you experience issues relating to the operation, maintenance and safety, or errors/faults with your mower.