User Manual
260130-A
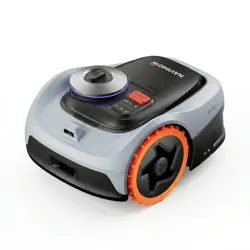
Navimow i2 AWD

Table of Contents
1. Safety Instructions
1.1 Safety Warnings
1.2 Symbols and Decals
2. Product Overview
2.1 Inside the Box
2.2 Parts and Functions
2.3 Specifications
2.4 Accessories (Sold Separately)
3. Installation
3.1 Before You Start
3.2 Activate the Mower
3.3 Use Network RTK Service (Recommended)
3.4 Install the Antenna (Optional)
3.5 Assemble the Charging Station
3.6 Update Navimow OS
4. Operation
4.1 Create Map
4.2 Mow
4.3 Basic Functions
4.4 Safety Features
4.5 Advanced Features
5. Maintenance
5.1 Cleaning
5.2 Replace Blades
5.3 Transportation
5.4 Battery and Power Supply
5.5 Storage and Restorage
6. Warranty and Compliance
6.1 Sensors and Interfaces
6.2 Limited Warranty
6.3 Certifications
7.Contact Us
1
1
3
4
4
5
8
9
10
10
10
11
11
13
14
15
15
19
22
23
24
26
26
26
27
27
30
31
31
32
37
37
Original Instructions

Welcome
Thank you for choosing Navimow i2 AWD!
Navimow i2 AWD is powered by the cutting-edge AWD technology
and the Network RTK service, delivering powerful traction and
high-precision navigation across challenging lawns. It conquers
slopes with built-in ESC stability control, protects turf with zero-turn
pivoting, and also leverages all-wheel power to extend runtime. Relax
and enjoy a perfectly cut lawn while Navimow takes care of the rest.

1. Safety Instructions
1.1 Safety Warnings
IMPORTANT
READ CAREFULLY BEFORE USE
KEEP FOR FUTURE REFERENCE
1) Be sure to install and operate the Navimow (referred to as the mower in the manual) and the charging station according to
the instructions. Go to navimow.com for the complete User Manual and the latest user materials.
2) The mower is for consumer use only. Using the mower for purposes other than mowing can bring serious injury. To avoid
risks of injuries, please read and understand all the warnings and cautions. Please understand that you can reduce the
risk by following the instructions and warnings in this manual, but you cannot eliminate all the risks. The operator or user
is responsible for accidents or hazards occurring to other people on their property.
3) Navimow has many built-in safety sensors, however, safety risks still exist. Set a mowing time when there are no people or
pets on the lawn. Inform the neighbors about the risks for accidents or hazards.
4) DO NOT modify the mower by yourself. Modifications could interfere with mower operations, result in serious injury and/or
damage, or void the Limited Warranty. Use only Navimow approved parts and accessories.
5) The manufacturer recommends the user to be 18–70 years old. Be sure to get the necessary training before operating the
machine.
WARNING
Never allow children, persons with reduced physical, sensory or mental capabilities or lack of experience and knowledge or
people unfamiliar with these instructions to use the machine. Local regulations may restrict the age of the operator.
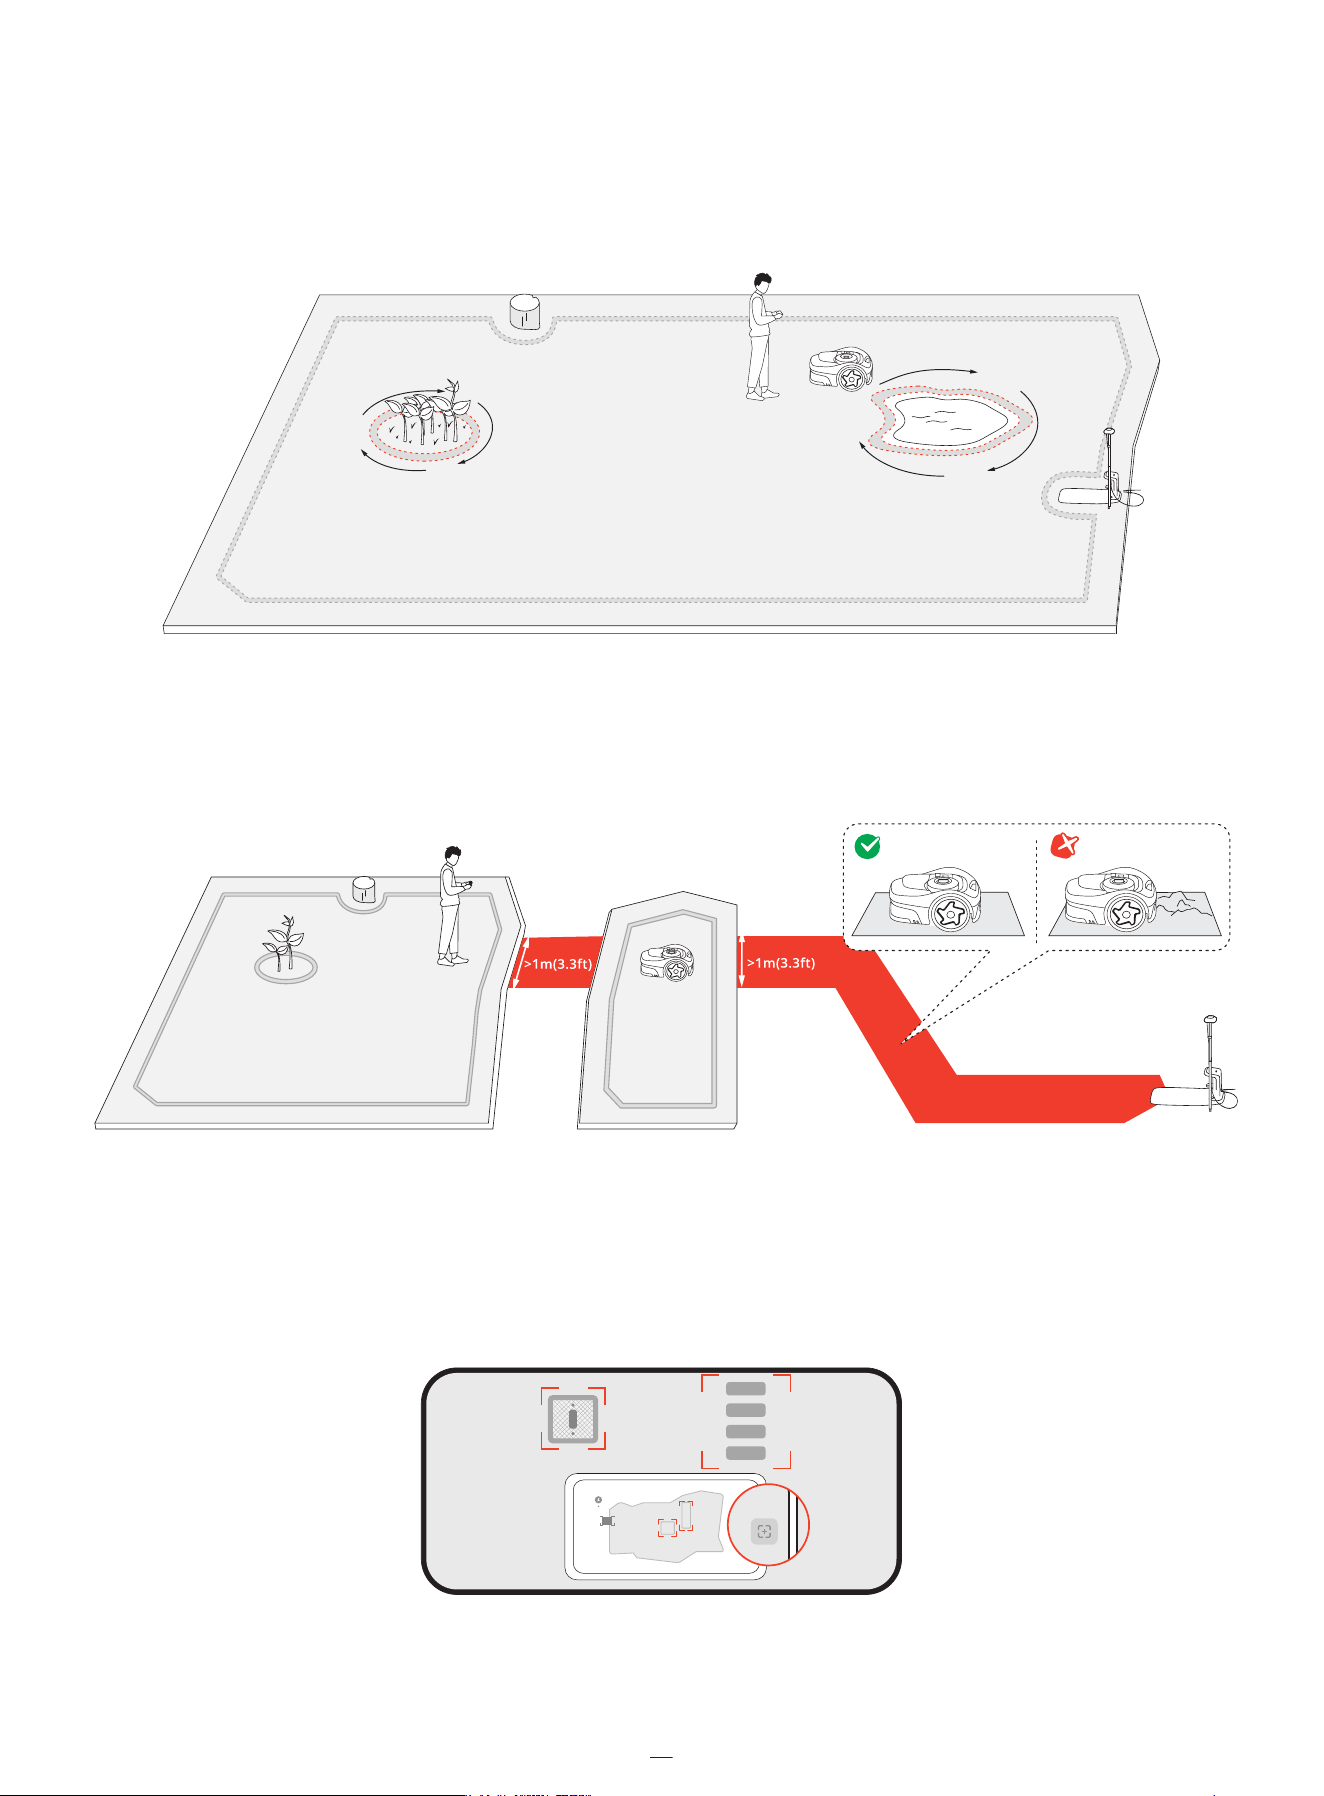
Before Mowing:
• Regularly check that all parts of the mower can function normally.
• For the best mowing results, it is recommended to mow in dry weather. Mowing in the rain can make the grass stick on the
product and the mower may slip. DO NOT mow in bad weather, such as heavy rain, thunderstorm or snow.
• Periodically inspect the area where the machine is to be used and remove all stones, sticks, wires, bones, and other foreign
objects. The Limited Warranty does not cover damages caused by objects left on the lawn.
• To avoid possible damage, keep the operating mower at least 1 m (3 feet) away from sprinkler heads. The mower and
the sprinkler should NOT work simultaneously. Adjust the mowing schedule so that it works at a different time than any
sprinklers.
• NEVER allow children to touch the power supply unit, charging station, blades, the battery compartment, or any parts with
gaps such as the wheels.
WARNING
Never operate the machine or its accessories if the guards or shields are damaged, or if the cord is damaged or worn.
When Mowing:
• Keep away from the rotating blades! DO NOT put hands or feet under or near the rotating blades.
• Watch out for small flying objects or stones during mowing. Keep a safe distance from the mower when operating.
• DO NOT leave the machine to operate unattended if you know that there are pets, children or people in the vicinity.
• DO NOT reach beyond the capabilities of the mower. If you are remotely controlling the mower and its accessories, it is
recommended to do so from a seated or stationary position. If you are standing or walking during operation, keep your
balance and watch your steps.
1

2
WARNING
• DO NOT allow children to be in the vicinity or play with the machine when it is operating.
• DO NOT lift the mower in operation. DO NOT ride on the mower.
• DO NOT mow on areas with slopes steeper than the maximum incline inside the working area (45 %), as well as the
boundary (45 %).
• If the mower makes an abnormal sound or signals an alarm, press the STOP button immediately.
•
If there are abnormal vibrations, turn off the mower, place it on level ground for about 30 seconds and then restart. If the
issue persists, contact authorized after-sales service.
• DO NOT touch moving hazardous parts before they have come to a complete stop.
Safe Usage:
• DO NOT operate or charge the mower outside the temperature limits: 0–40°C (32–104°F), because low/high temperatures
can decrease mower performance and even lead to accidents.
• DO NOT place anything on the mower or the charging station.
• It is recommended to conduct regular maintenance of the mower (See Maintenance in the User Manual) by an adult.
• Regularly check the warning devices to ensure they are effective. These devices include the buzzer, the LED light on the
charging station, and the ambient light on the mower.
• Before charging, please read How to Charge in User Manual. Improper use may cause electric shock, overheating, or leakage
of corrosive liquid.
• Use only the original battery pack or that of the same model as specified by Navimow. Each mower contains one battery
pack. Depending on the specific mower model, the rated capacity of the battery is 2.55 Ah and 5.1 Ah. Contact after-sales
service and have a professional technician to replace the battery pack.
• Do not use non-rechargeable batteries. For the purposes of recharging the battery, only use the detachable supply unit
provided with this appliance. For Australia and New Zealand: NBW32D002D5N-AU.
• DO NOT dismantle or puncture the battery casing. Keep away from metal objects to prevent short circuit. Keep away from
fire, heat and direct sunlight.
• For information about battery and electrical waste, please contact your household waste disposal service, your local or
regional waste management office, or your point-of-sale.
• When replacing the blades, please be careful and wear protective gloves as the blades may cause damage.
• If the cord on the power supply or the extension cable becomes damaged or entangled during use, disconnect the power
supply from the power socket and then untangle. To avoid a hazard, pull the body of the plug rather than the cord when
separating the power supply from the power socket. Contact after-sales service and have a professional technician to repair
or replace the cord.
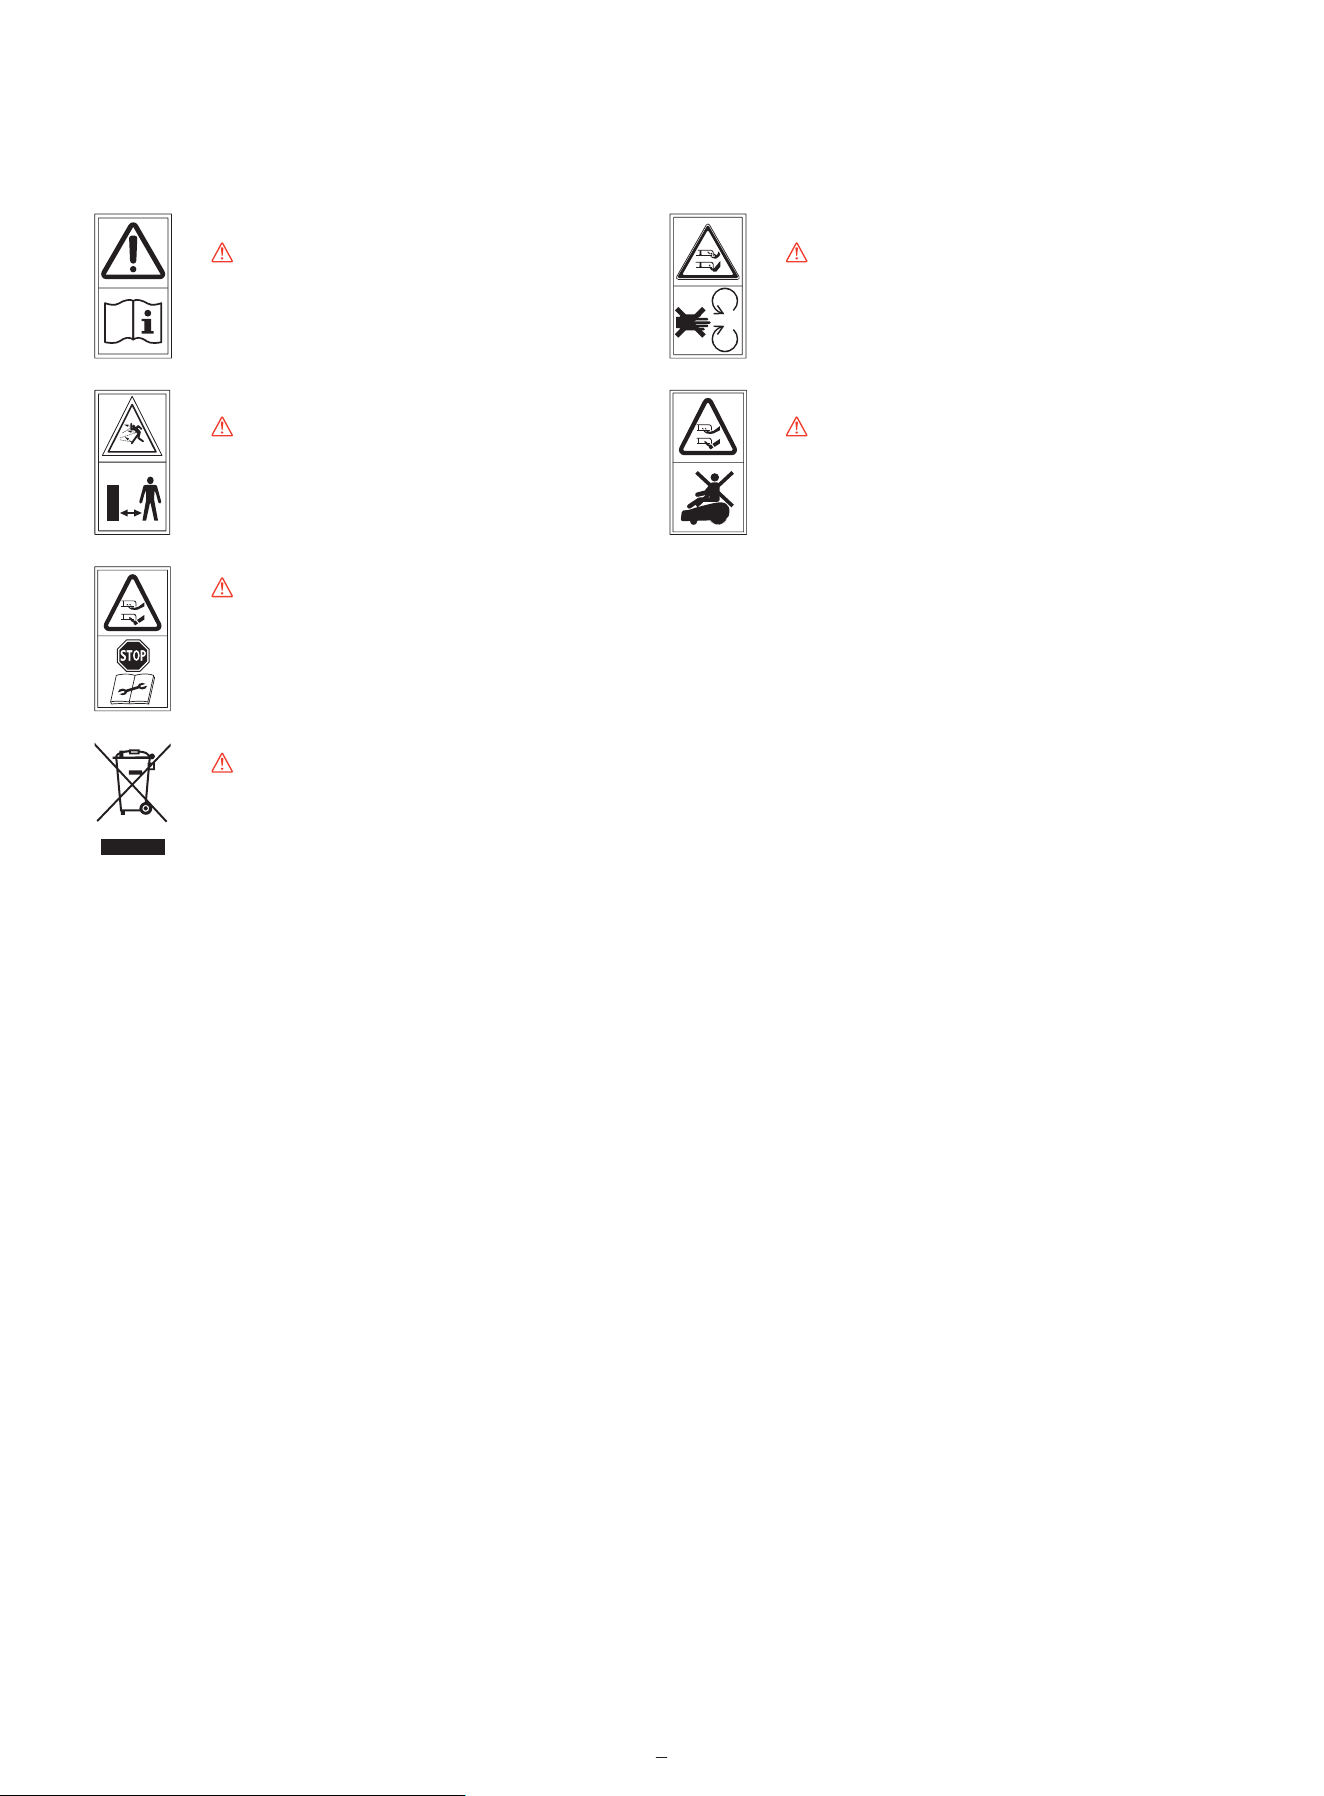
1.2 Symbols and Decals
Please study the symbols on the product and labels carefully and understand their meaning:
WARNING-Read instruction manual before
operating the machine.
WARNING-Keep a safe distance from
the machine when operating.
WARNING-Do not touch rotating blade.
WARNING-Do not ride on the machine.
*
WARNING-Operate the disabling device before working on or lifting the machine*.
The disabling device hereby refers to the safety lock. Before lifting or operating the mower, enable the safety lock by pressing
MOW+HOME for more than 3 seconds.
WARNING-It is not permitted to dispose of this product as normal household waste. Ensure that the product is
recycled in accordance with local legal requirements.
3
2. Product Overview
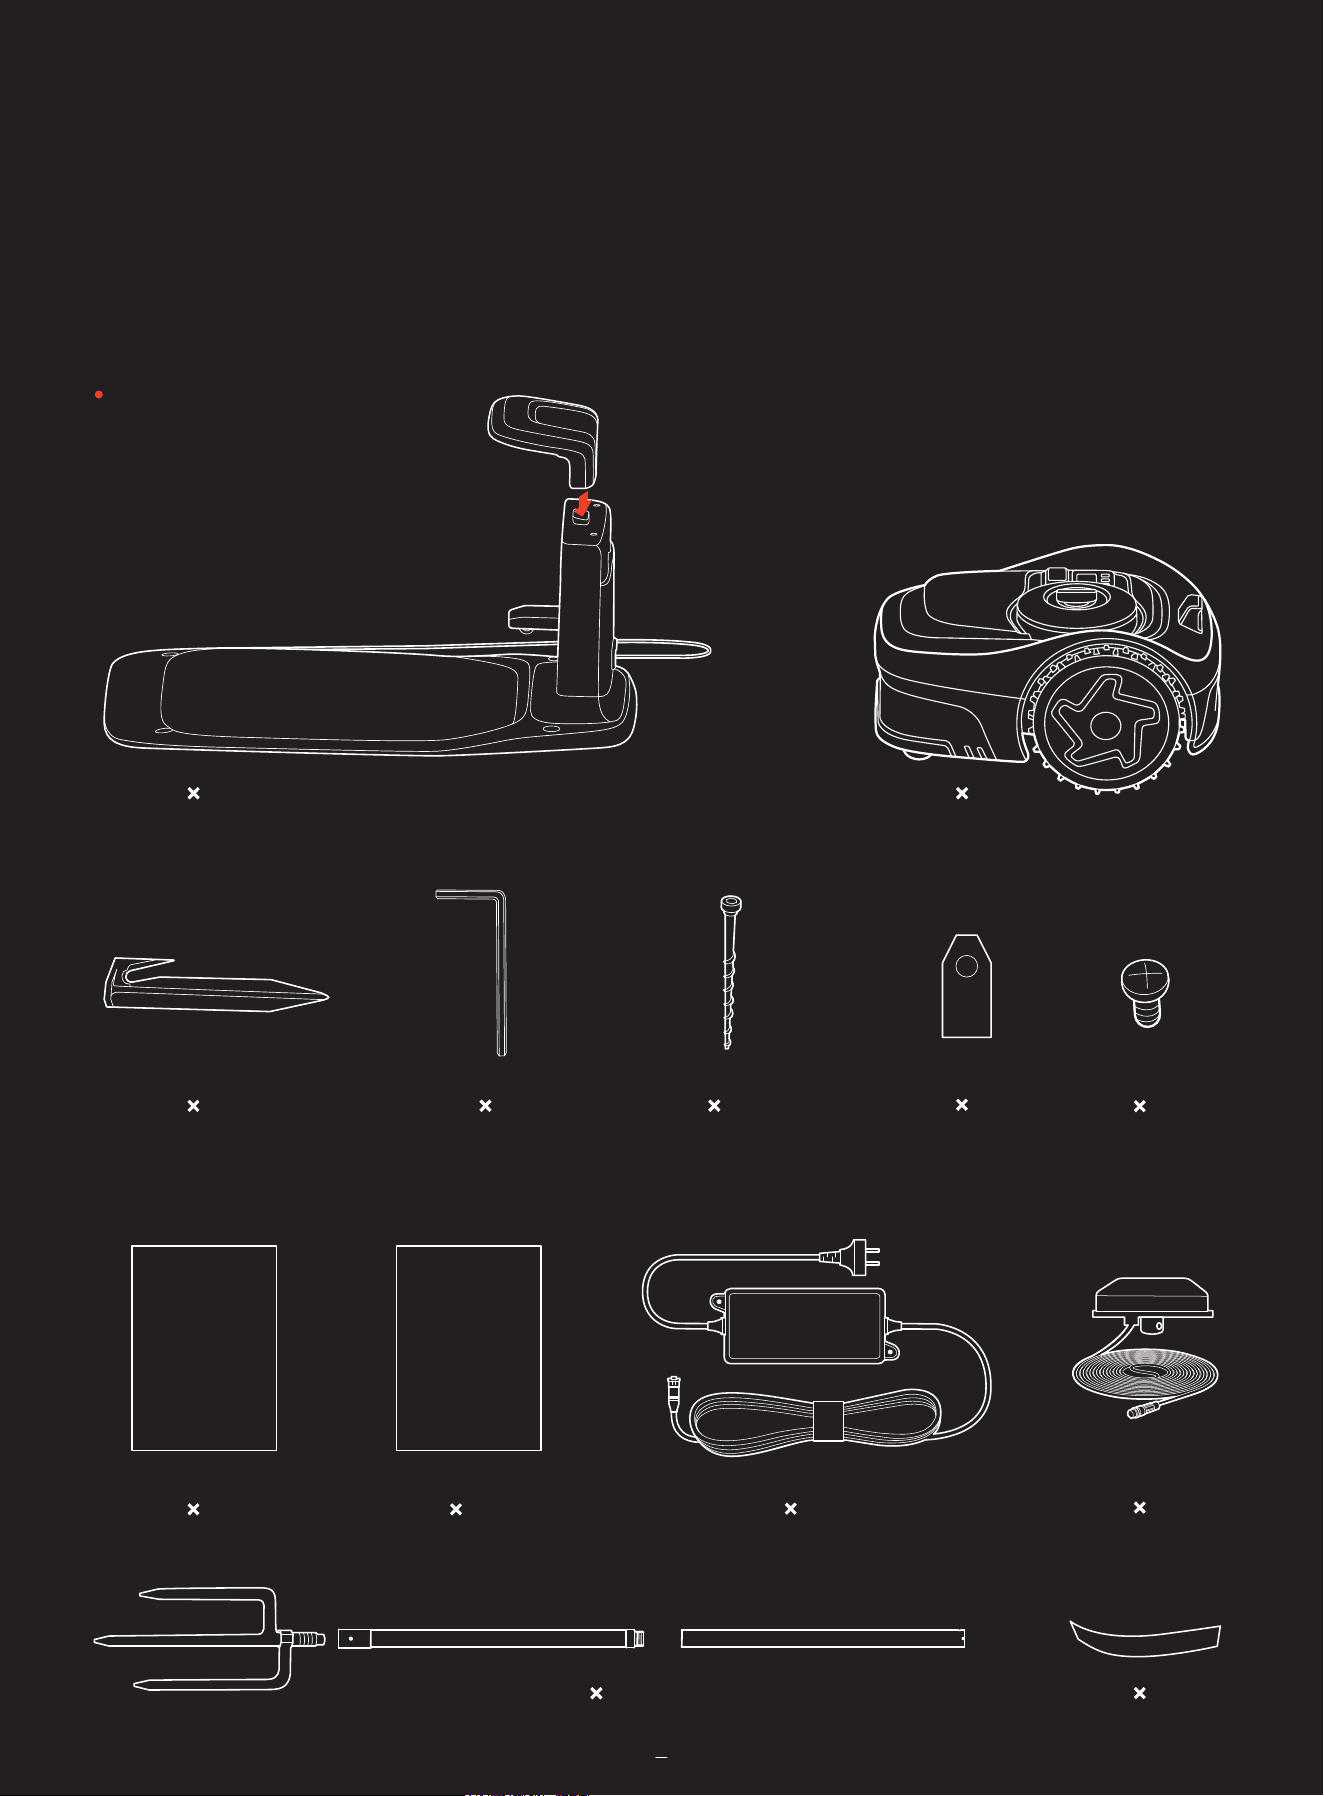
2.1 Inside the Box
If there are missing or defective parts, please contact after-sales service. We recommend retaining the package materials
for future transportation and shipping.
Navimow i2 AWD
Quick Start Guide
Important Information
5
5
1
4 1
1 1
1
5
4
1
1 1
6m (19.7ft)
7m (22.97ft)
4
2.2 Parts and Functions
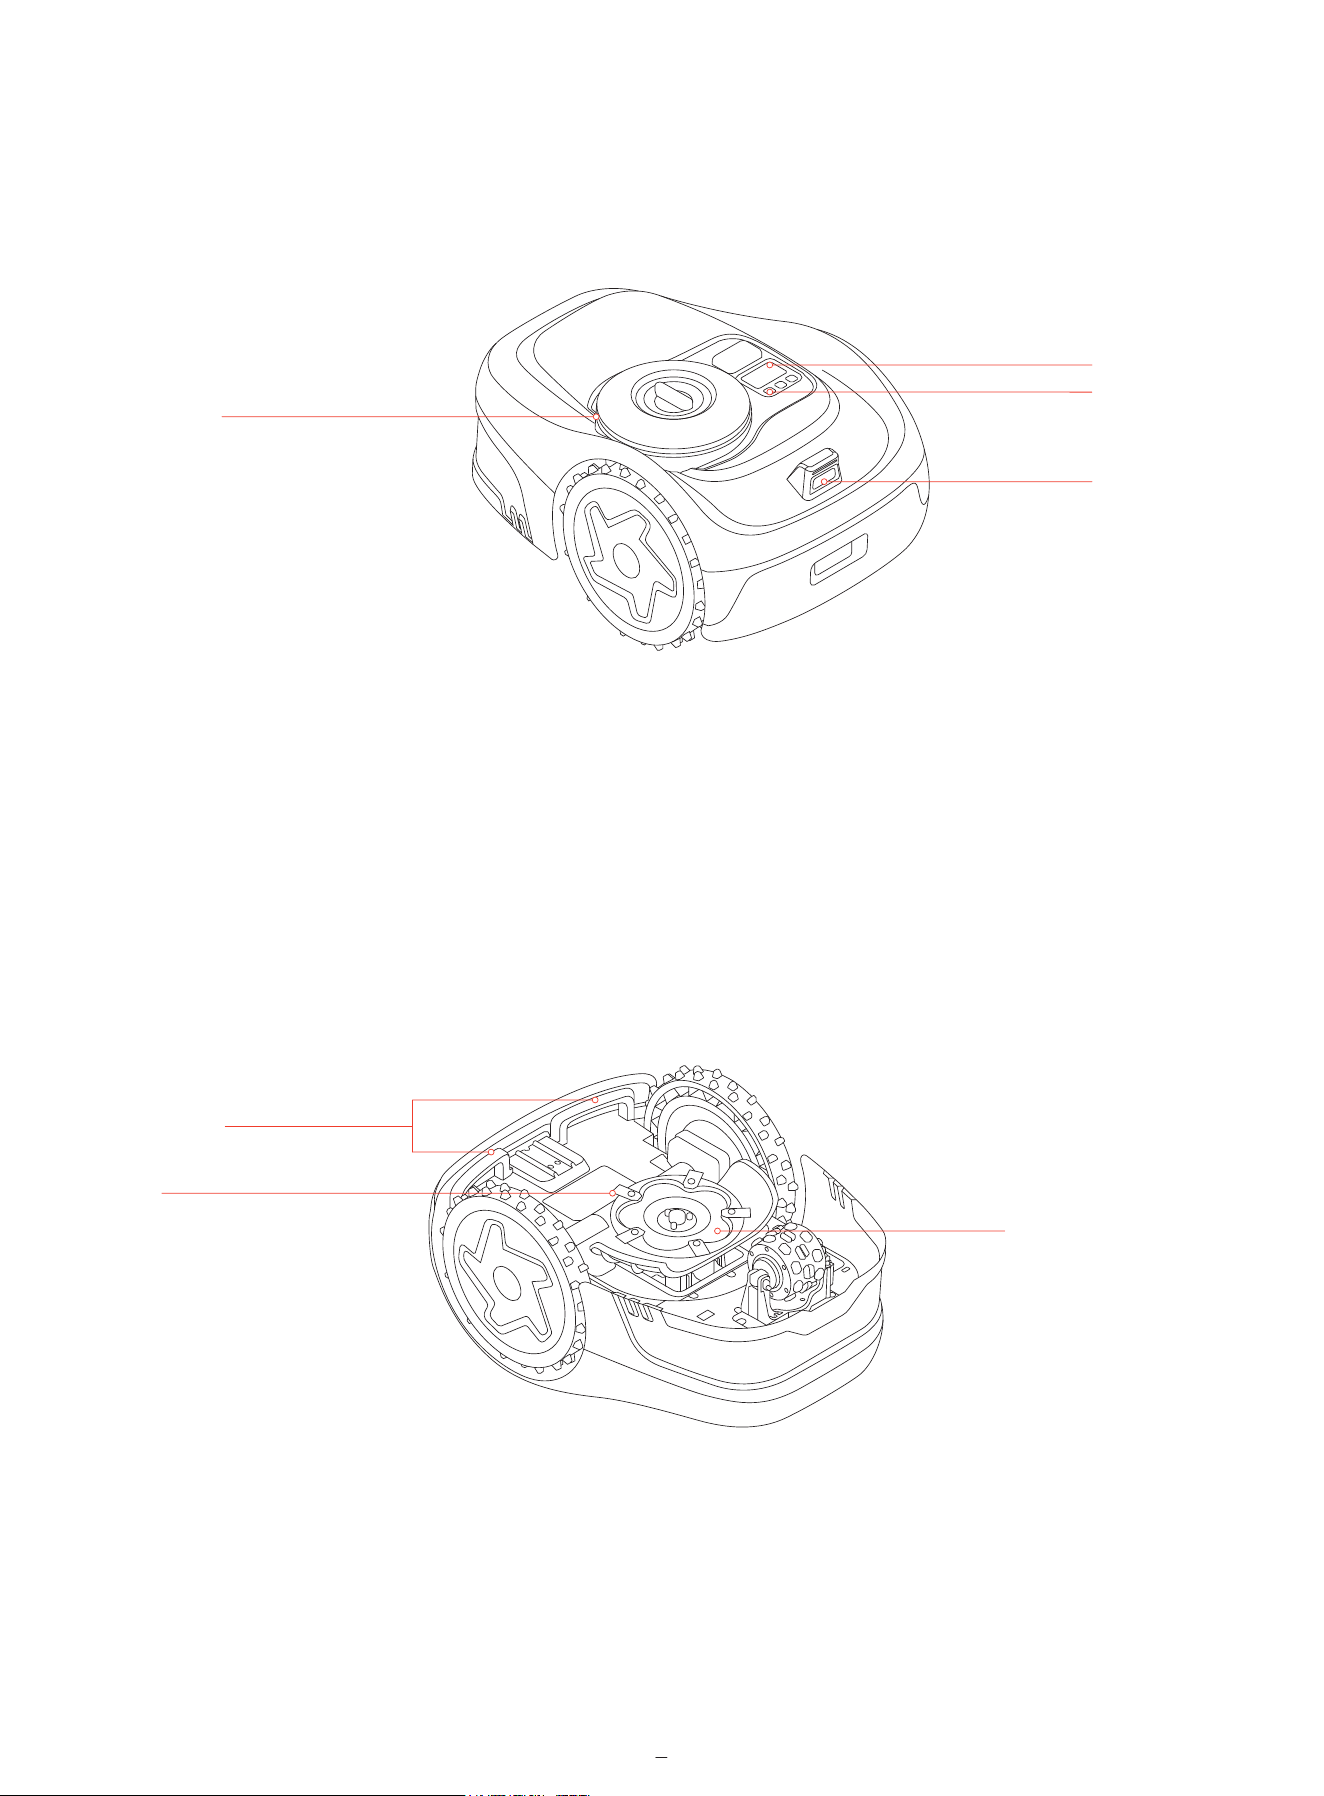
2.2.1 Mower
• Control panel: Use the buttons to start mowing, lock/unlock the mower, send the mower for recharge, and other basic
operations.
• Display screen: Shows the mower status, battery status, network connection, Bluetooth connection, and lock status.
• Ambient light: Shows different status of the mower based on different lighting effects.
• Camera sensor: Detects non-grass objects to avoid bumping into them.
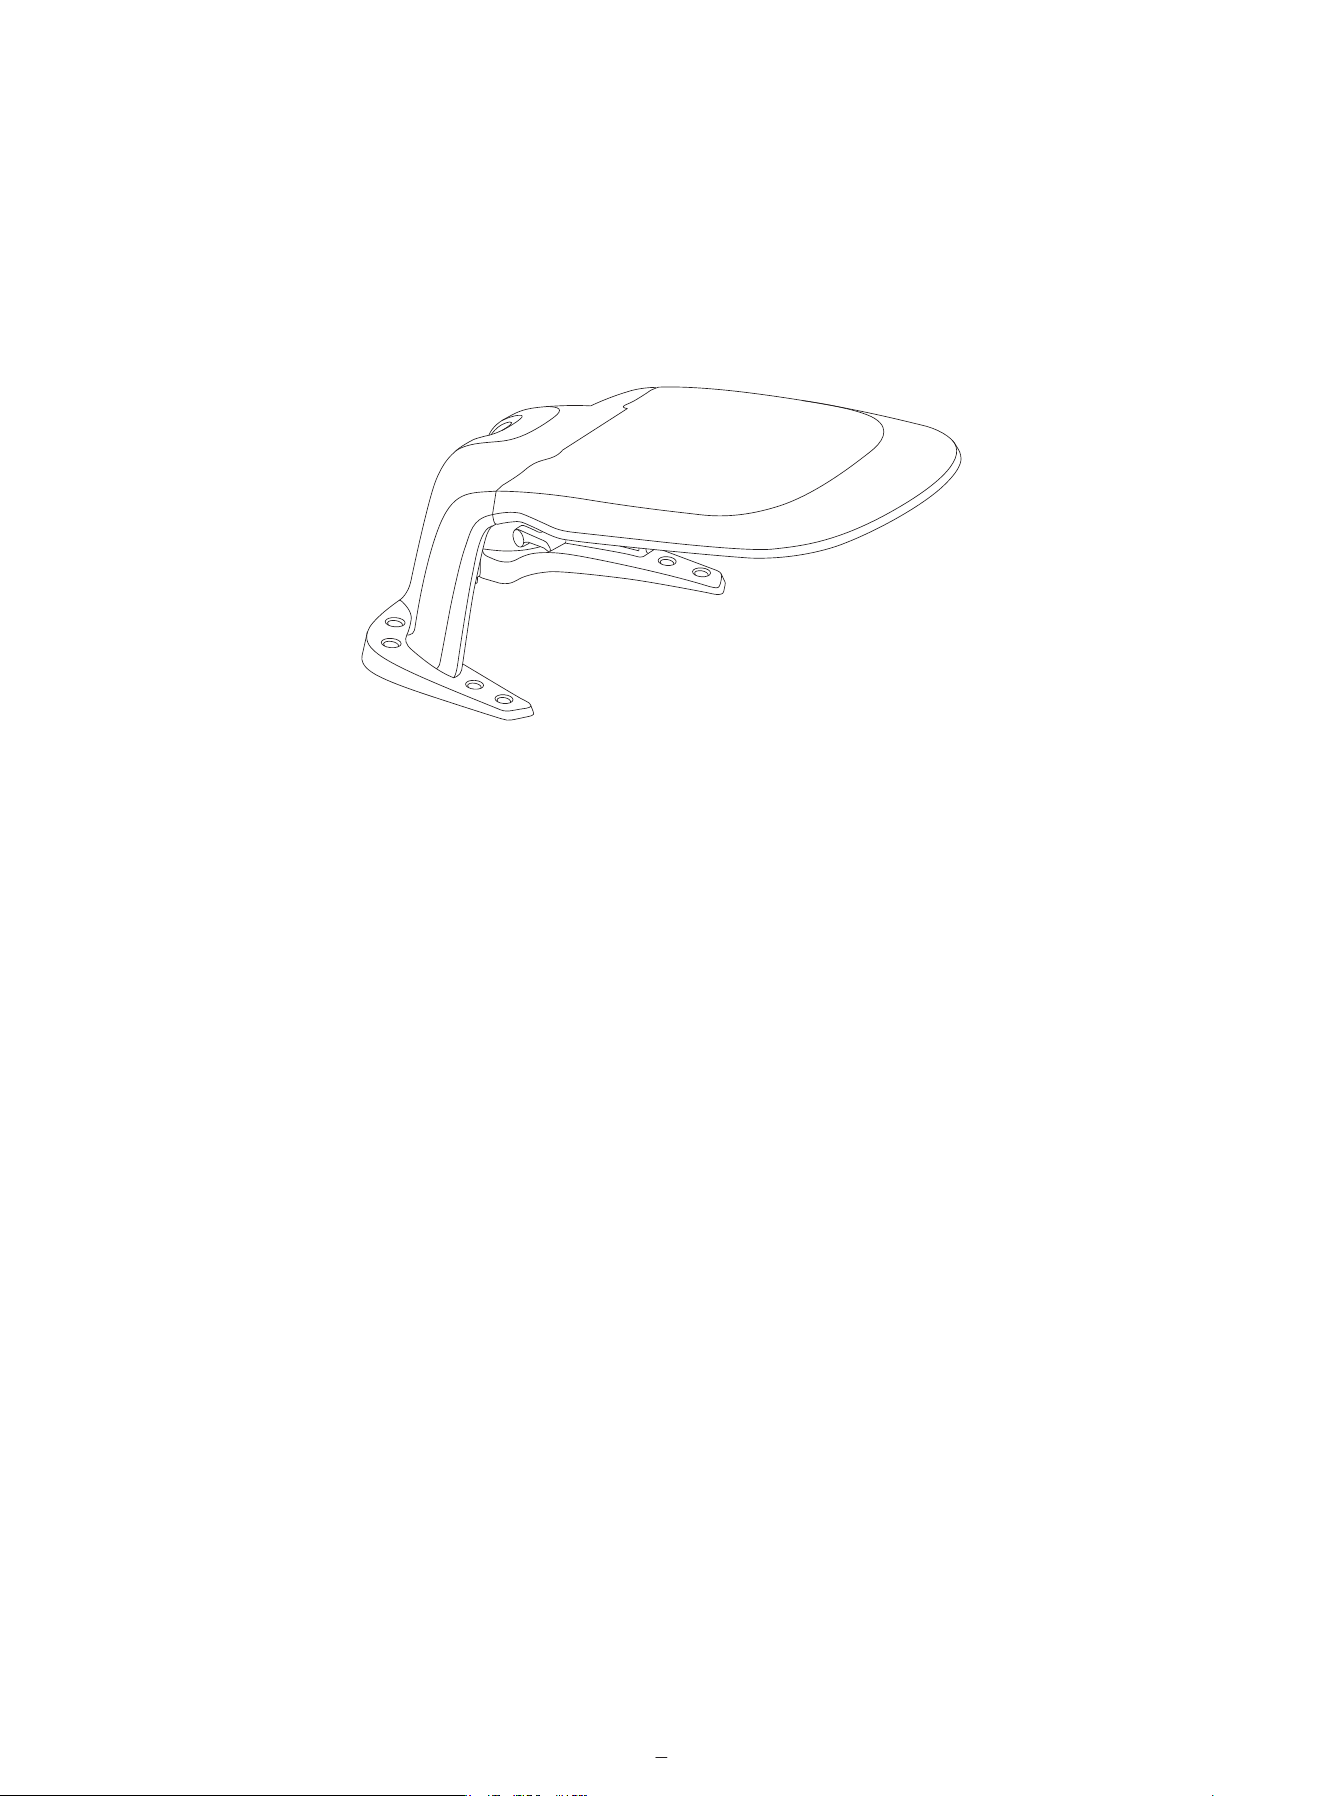
• Lifting handle: Use it to lift the mower up when necessary.
• Blades: The blades can rotate freely after being attached to the cutting disc. During mowing, they swing outward to cut the
grass. When hitting an obstacle, they fold inward for protection.
• Anti-clogging cutting disc: Reduces chances of grass clippings getting stuck in the blades, so the blades can be used for a
longer time.
Control panel
Display screen
Camera sensor
Ambient light
Lifting handle
Anti-clogging cutting disc
Blades
5
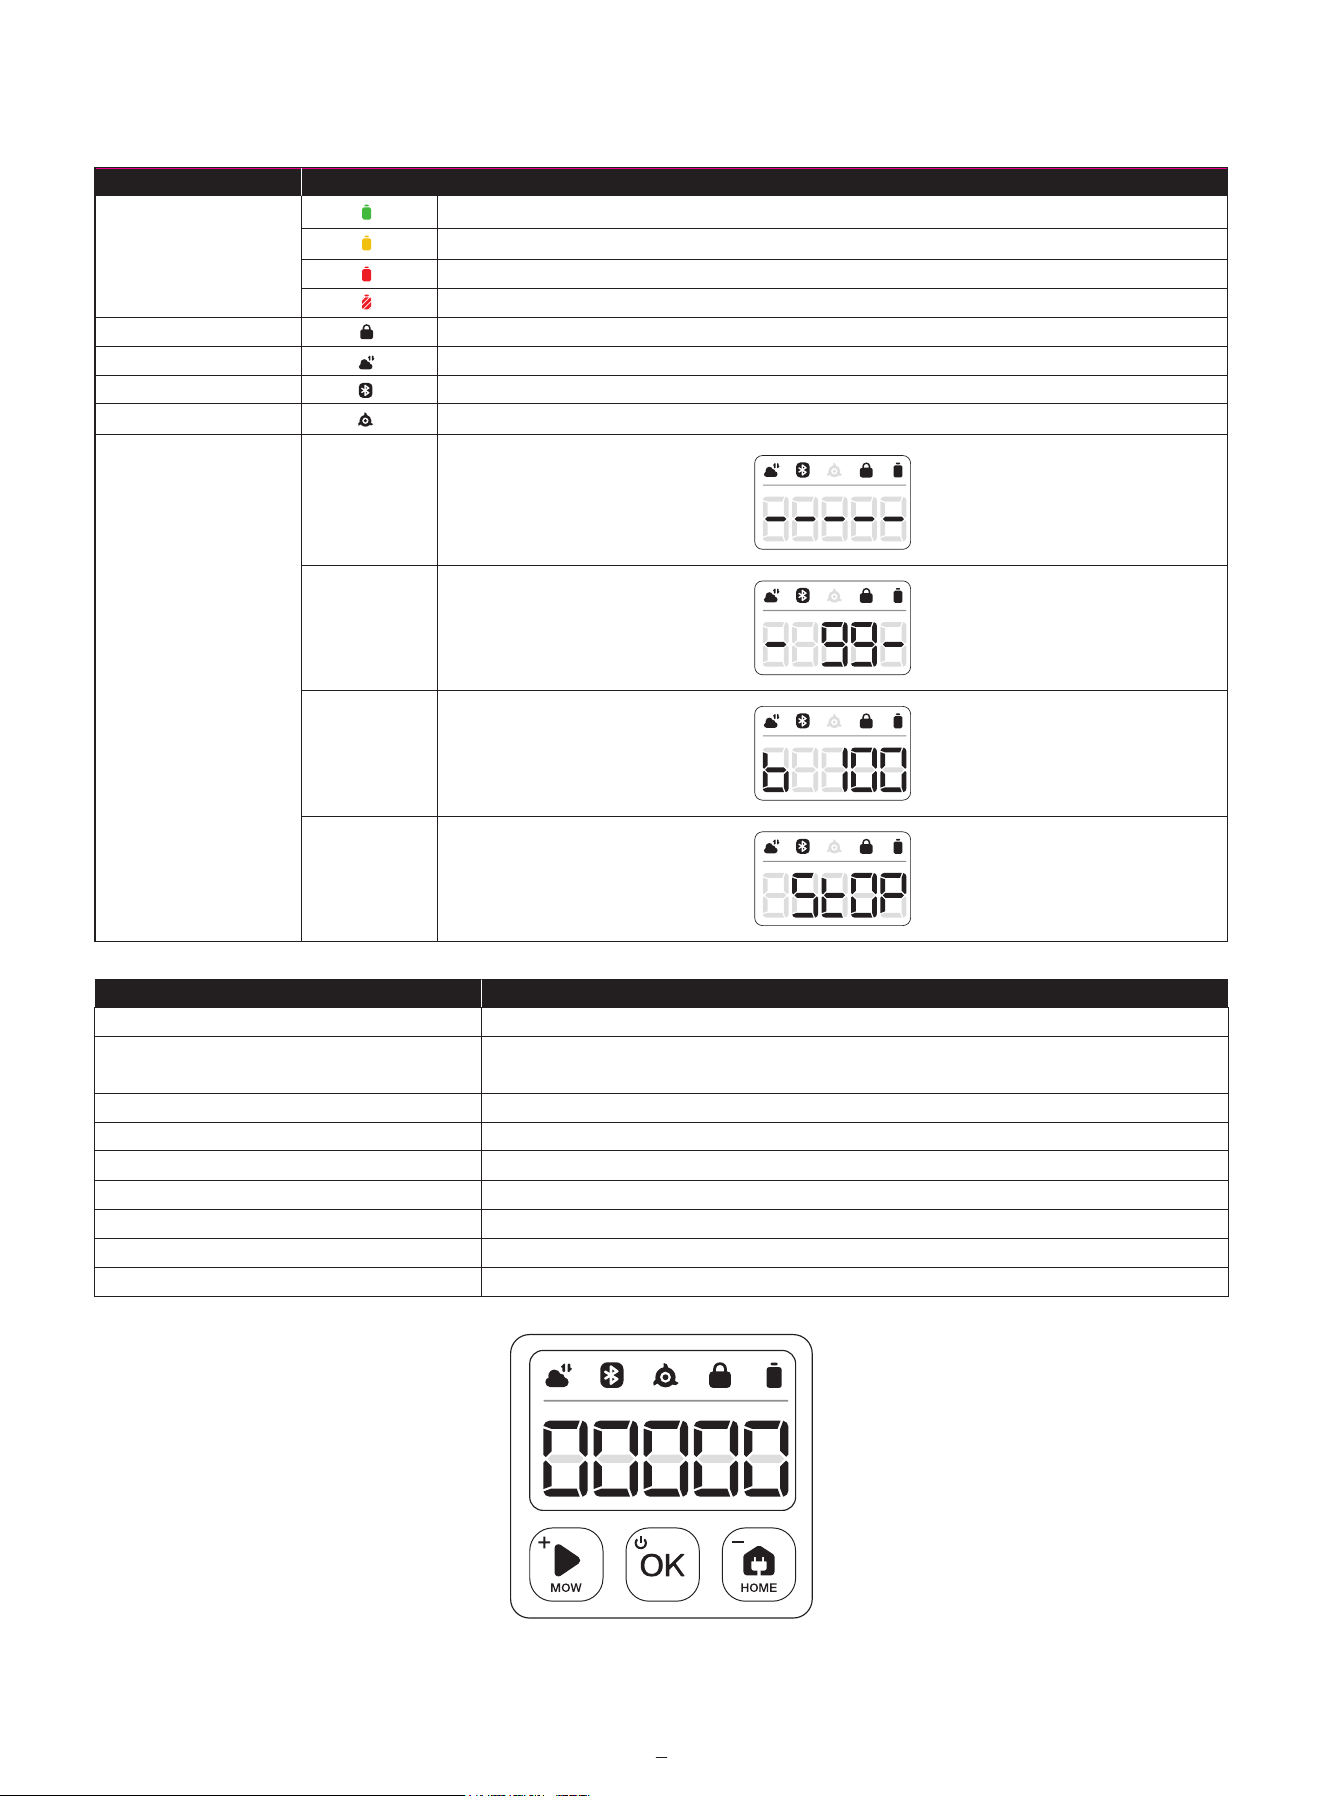
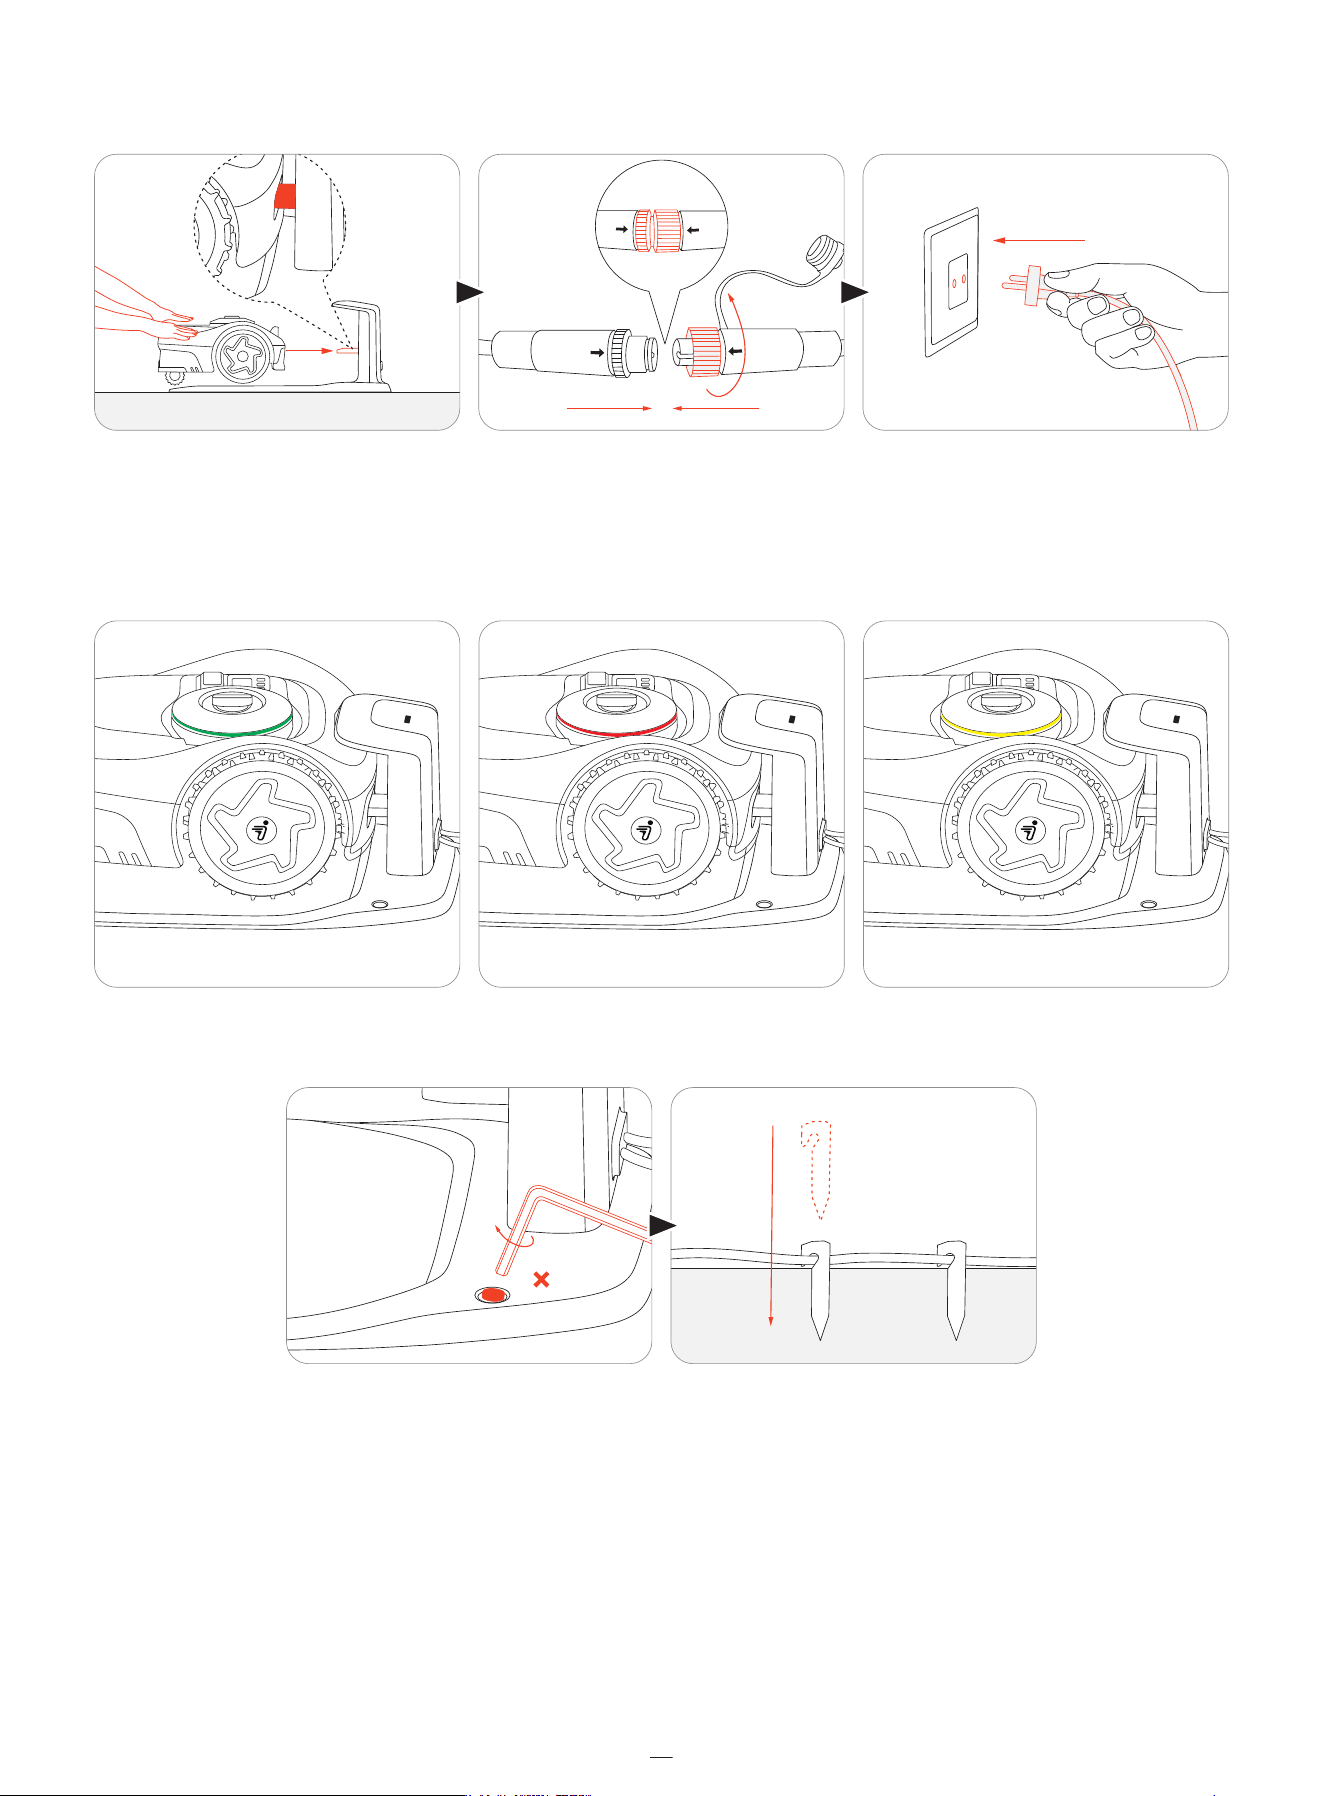
2.2.2 Display and Control
50%–100% solid green
20%–49% solid yellow
5%–19% solid red
Less than 5% red flashing. When the battery level is low, the mower will return to the station and charge.
Mower locked. Please enter the PIN code to unlock, otherwise the mower won't be able to work.
Connected to internet via Wi-Fi or cellular network.
Bluetooth connected.
Blade disc is rotating. Please stay away.
Battery level
PIN code lock
Network connection
Bluetooth
Blade indicator
Dashboard display
Icon with light on
Meaning
Mapping
Mowing
progress
Battery level
The mower
is stopped
Press OK.
Press and hold OK for 3s. The mower cannot be turned off when it's in the charging station. When the
mower is turned off, you will hear a sound, display on the mower and the ambient light will be off.
Power on
Power off
Start mowing
Stop mower operation
Send mower to the charging station
Restart the mower
Lock the mower
Unlock the mower
Force to reboot the mower
Basic operation
Instruction
Press MOW and then OK.
Press STOP.
Press HOME and then OK.
Power it off first, then press OK, or push the mower into the charging station.
Press and hold MOW+HOME for 3s.
Enter the PIN code.
Press OK for more than 10s.
6
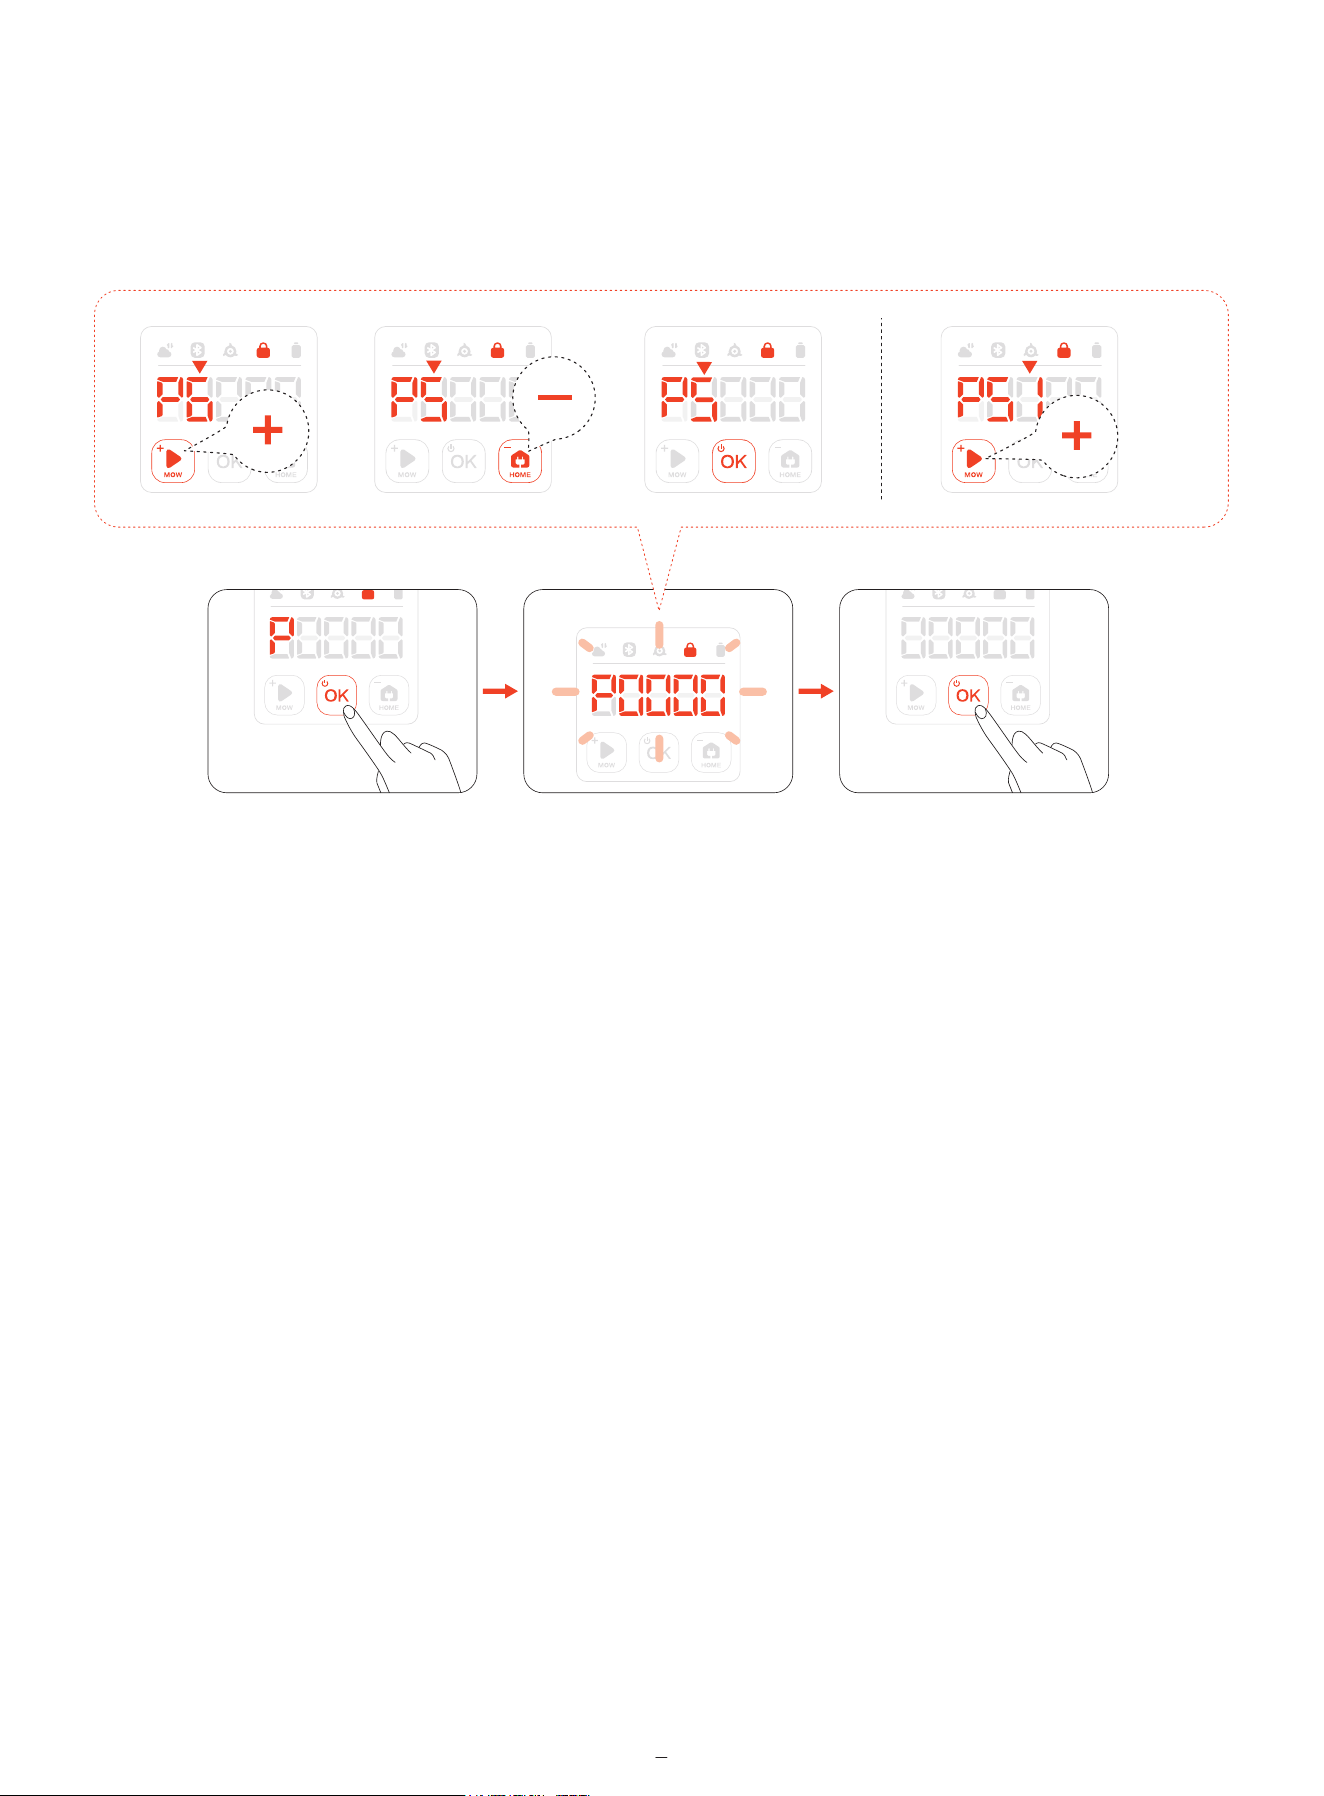
2.2.3 PIN Code
If the mower has been locked, enter the PIN code before operating the mower. The default code is 0000. Press MOW or HOME to
change the number and press OK to confirm the code. You can change the PIN code by increasing or decreasing the numbers on
the control panel.
7

2.3 Specifications
Basic
Information
i210 AWD
Dimensions:
Length × Width × Height
Net Weight (Battery Included)
Recommended Mowing Area
Typical Mowing Time
Per Full Charge[1]
Area Capacity per Hour
Mower
Parameters
Noise
Emissions[2]
Working
Conditions
Blade Motor
Battery Pack
Power
Supply
Charging
Station
Cutting Width
Cutting Height
Charging Time
Measured Sound Power Level LWA
Sound Power Uncertainties KWA
Sound Pressure Level LpA
Sound Pressure Uncertainties KpA
Working Temperature
Storage Temperature
IP Rating
Max. Incline Inside Working Area
Max. Incline at Boundary
Rated Speed
Battery Type
Nominal Voltage
Nominal Capacity/Energy
Input Voltage
Output Voltage
Output Current
Cable Length
Input Voltage
Input Current
Output Voltage
Output Current
Indicator
8
i206 AWD i208 AWD
545 x 385 x 285 mm
Approx. 12.05 kg Approx. 12.30 kg Approx. 12.30 kg
600m² 800m² 1000m²
About 60 min About 120 min About 120 min
125 m²/h
18 cm
2-6 mm
About 60 min About 120 min About 120 min
59 dB(A)
3 dB(A)
51 dB(A)
3 dB(A)
0–40°C (32–104°F); 10–35°C (50–95°F) recommended
-20–50°C (-4–122°F); 10–35°C (50–95°F) recommended
IP66 for mower body and charging station
IP67 for power adapter
45 %
45 %
2500/min
Lithium-ion battery
21.6 V DC
2.55 Ah / 55 Wh 5.1 Ah / 110 Wh 5.1 Ah / 110 Wh
100–240 V AC
32 V DC MAX
2.5 A MAX
7 m
32 V DC
2.5 A MAX
25.2 V DC
2.5 A MAX
LED
[1] Tested at a standard cutting speed with a full battery at an ambient temperature of 25°C (77°F) while mowing a fresh-cut
lawn. The product can mow more per hour on open areas than on separated small lawns. When the grass is wet or long, the
working capacity is smaller. The flatter the lawn surface, the larger the working capacity.
[2] The noise emission declarations conform to EN 50636-2-107.
2.4 Accessories (Sold Separately)
2.4.1 Navimow Garage S
Navimow Garage S is fully compatible with the Navimow i2 AWD, as it does not block GPS signals or network connectivity.
The garage provides extra protection against sunshine and rain. The flip-up cover enables easy access to the control panel
so you can operate the mower on the charging station.
2.4.2 Other
The following accessories are also compatible with Navimow i2 AWD:
• Blade Assembly Plus
• Antenna Extension Cable
• Antenna Mounting Kit
9
3. Installation
3.1 Before You Start
Charge the mower for the first time
A new mower may have a low battery after a long-time storage. Fully charge the mower before the first use. Place the mower
in the charging station. Make sure the charging port on the mower and the contact strip on the charging station are in good
contact.
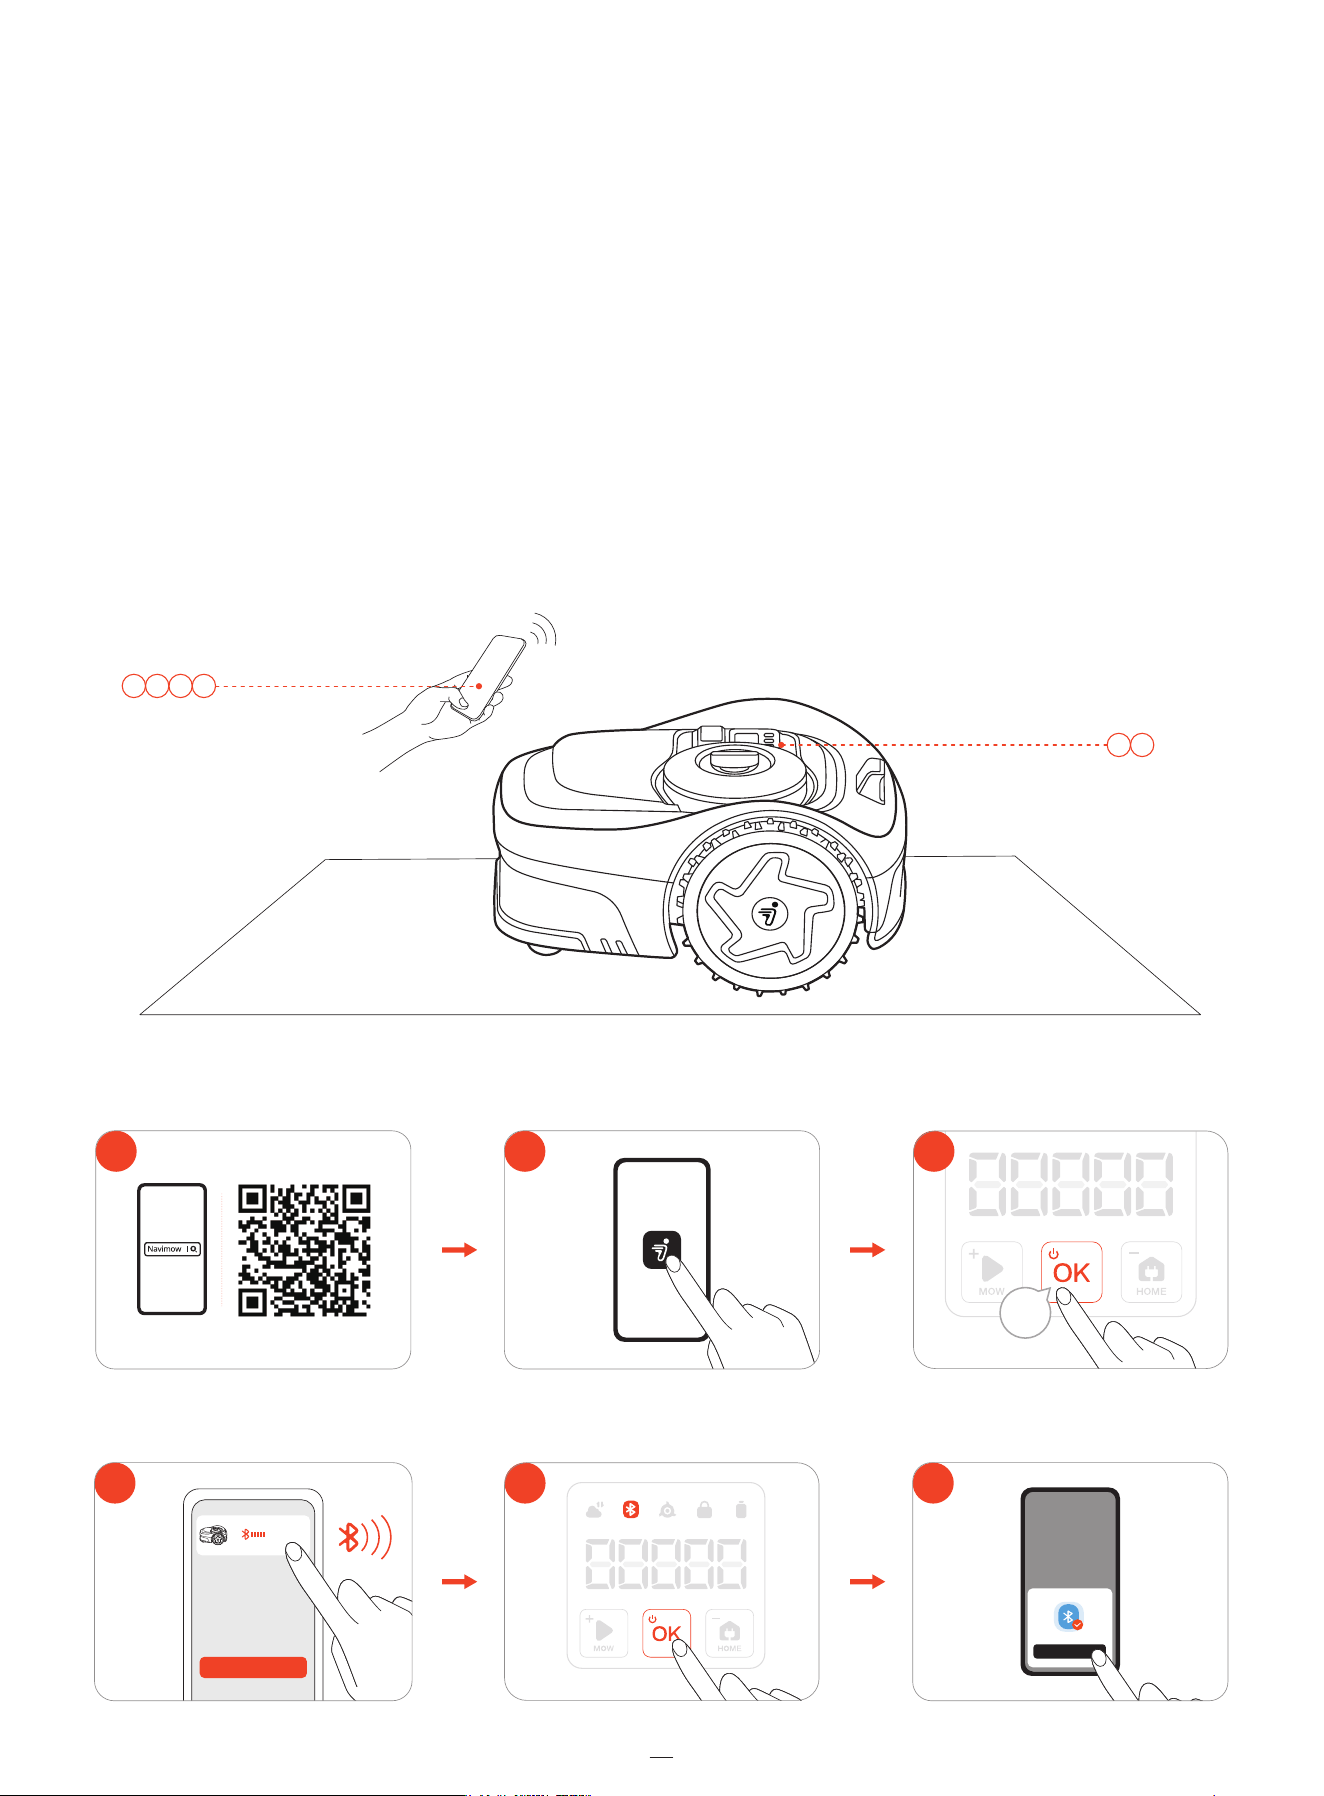
3.2 Activate the Mower
1 2 4 6
3 5
1 2
6
OK
3
1s
5
4
Search Again
10
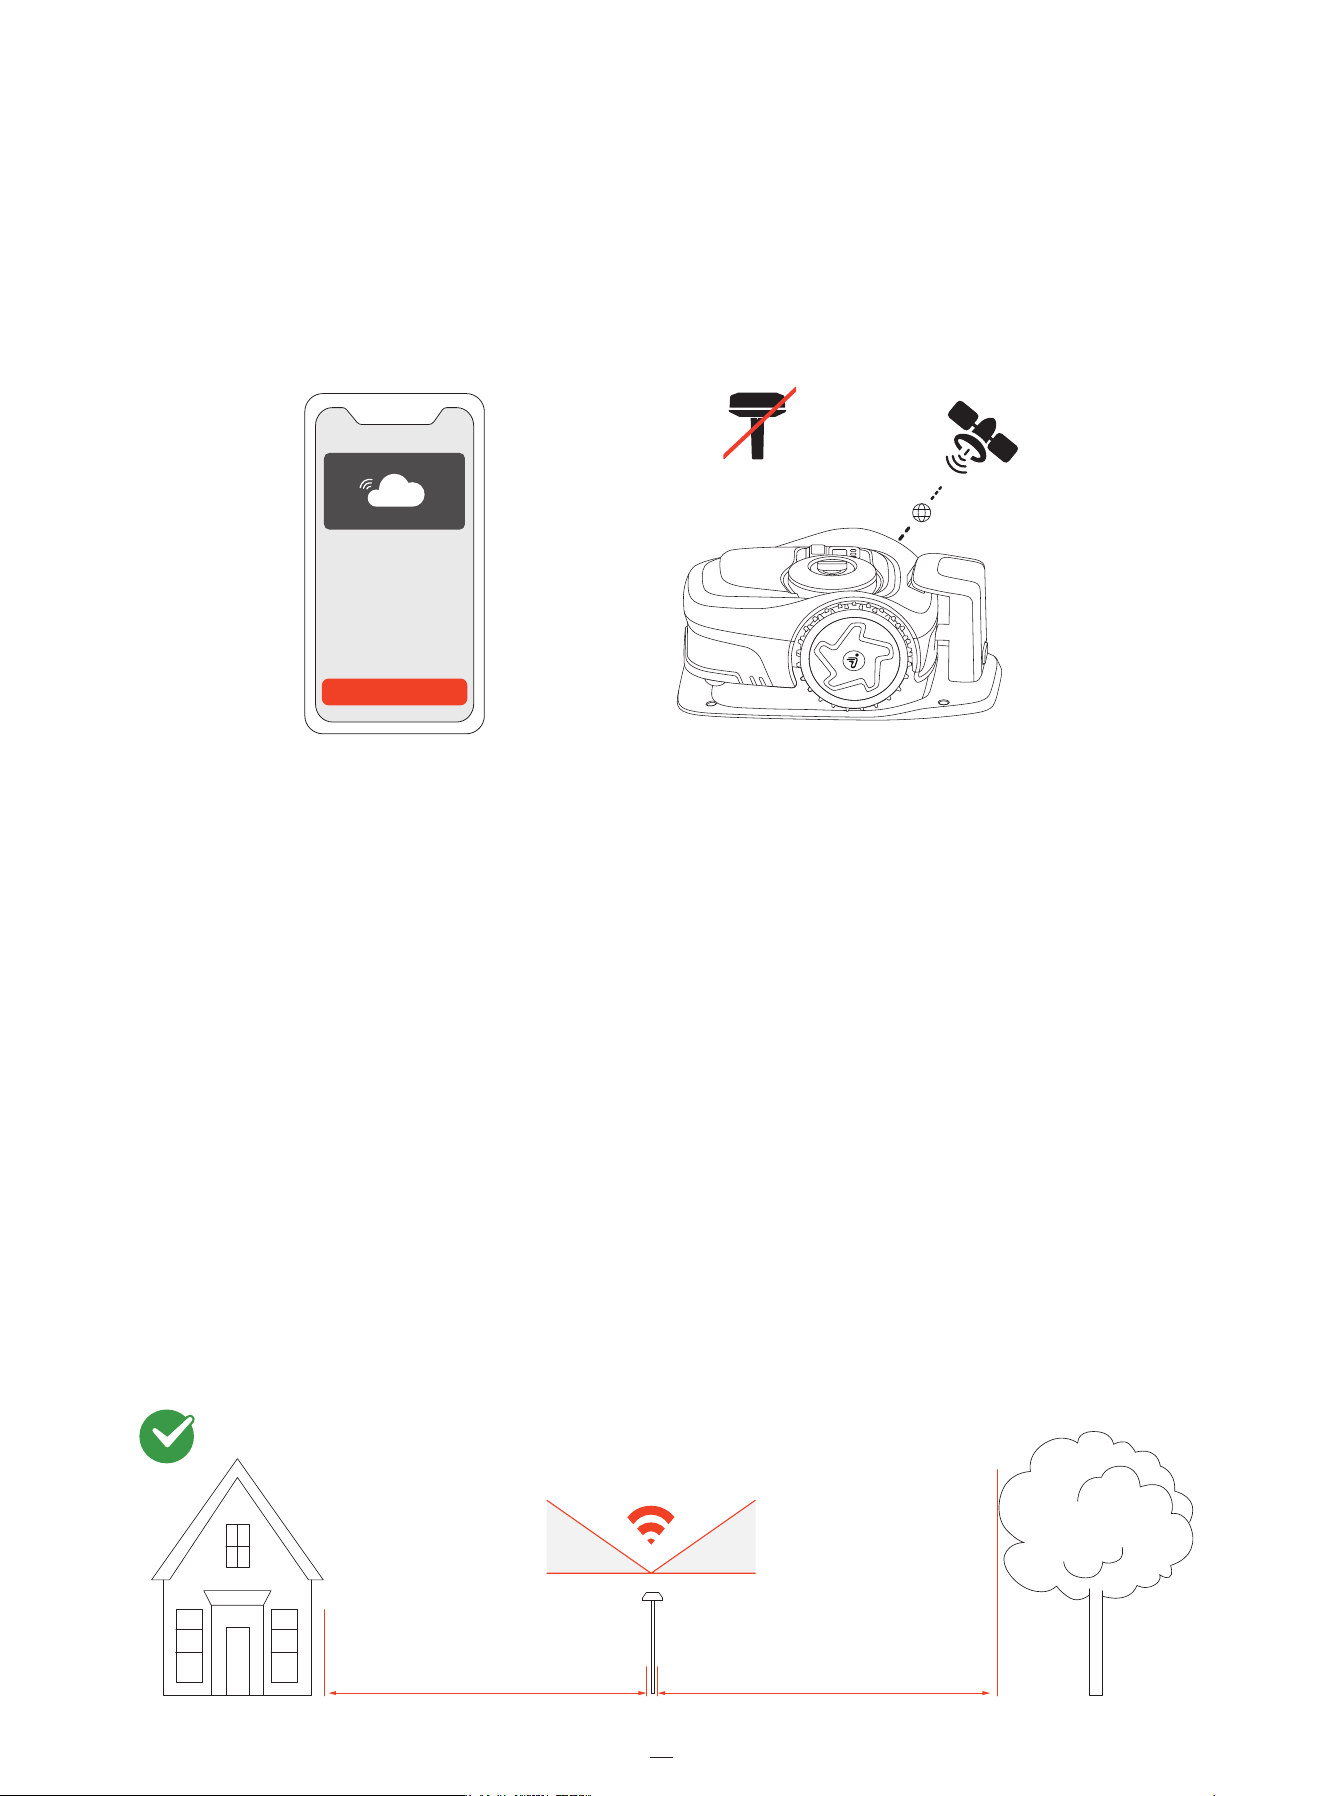
3.3 Use Network RTK Service (Recommended)
The Network RTK is a positioning service based on network RTK technology that provides high-accuracy GPS correction data
without an antenna installed in your yard.
By receiving real-time correction signals through the mobile network, the mower achieves precise positioning across areas
within network coverage.
During initial activation of the mower:
• If the Network RTK service is supported in your area, the service is activated automatically and is free of charge. No
additional setup or hardware installation is required.
• If the Network RTK service is not supported in your area, it will not be activated. However, this service may be supported
later during usage. Once it is supported, go to Home > Settings > Advanced features > EFLS NRTK> Positioning mode and
switch from Local RTK to Network RTK.
3.4 Install the Antenna (Optional)
If the Network RTK service is not supported in your area, install the antenna with the tools provided in mower box.
Choose an open area with no walls blocking views in any direction. Make sure the sky directly above the antenna is not
obstructed by trees or roofs.
If you cannot find a proper place on the ground, use the Antenna Mounting Kit to mount the antenna on a wall or roof for
complex yards.
>110°
35° 35°
≥ 2m (6.6ft) ≥ 2m (6.6ft)
11
Enable Now
No
Antenna
Needed
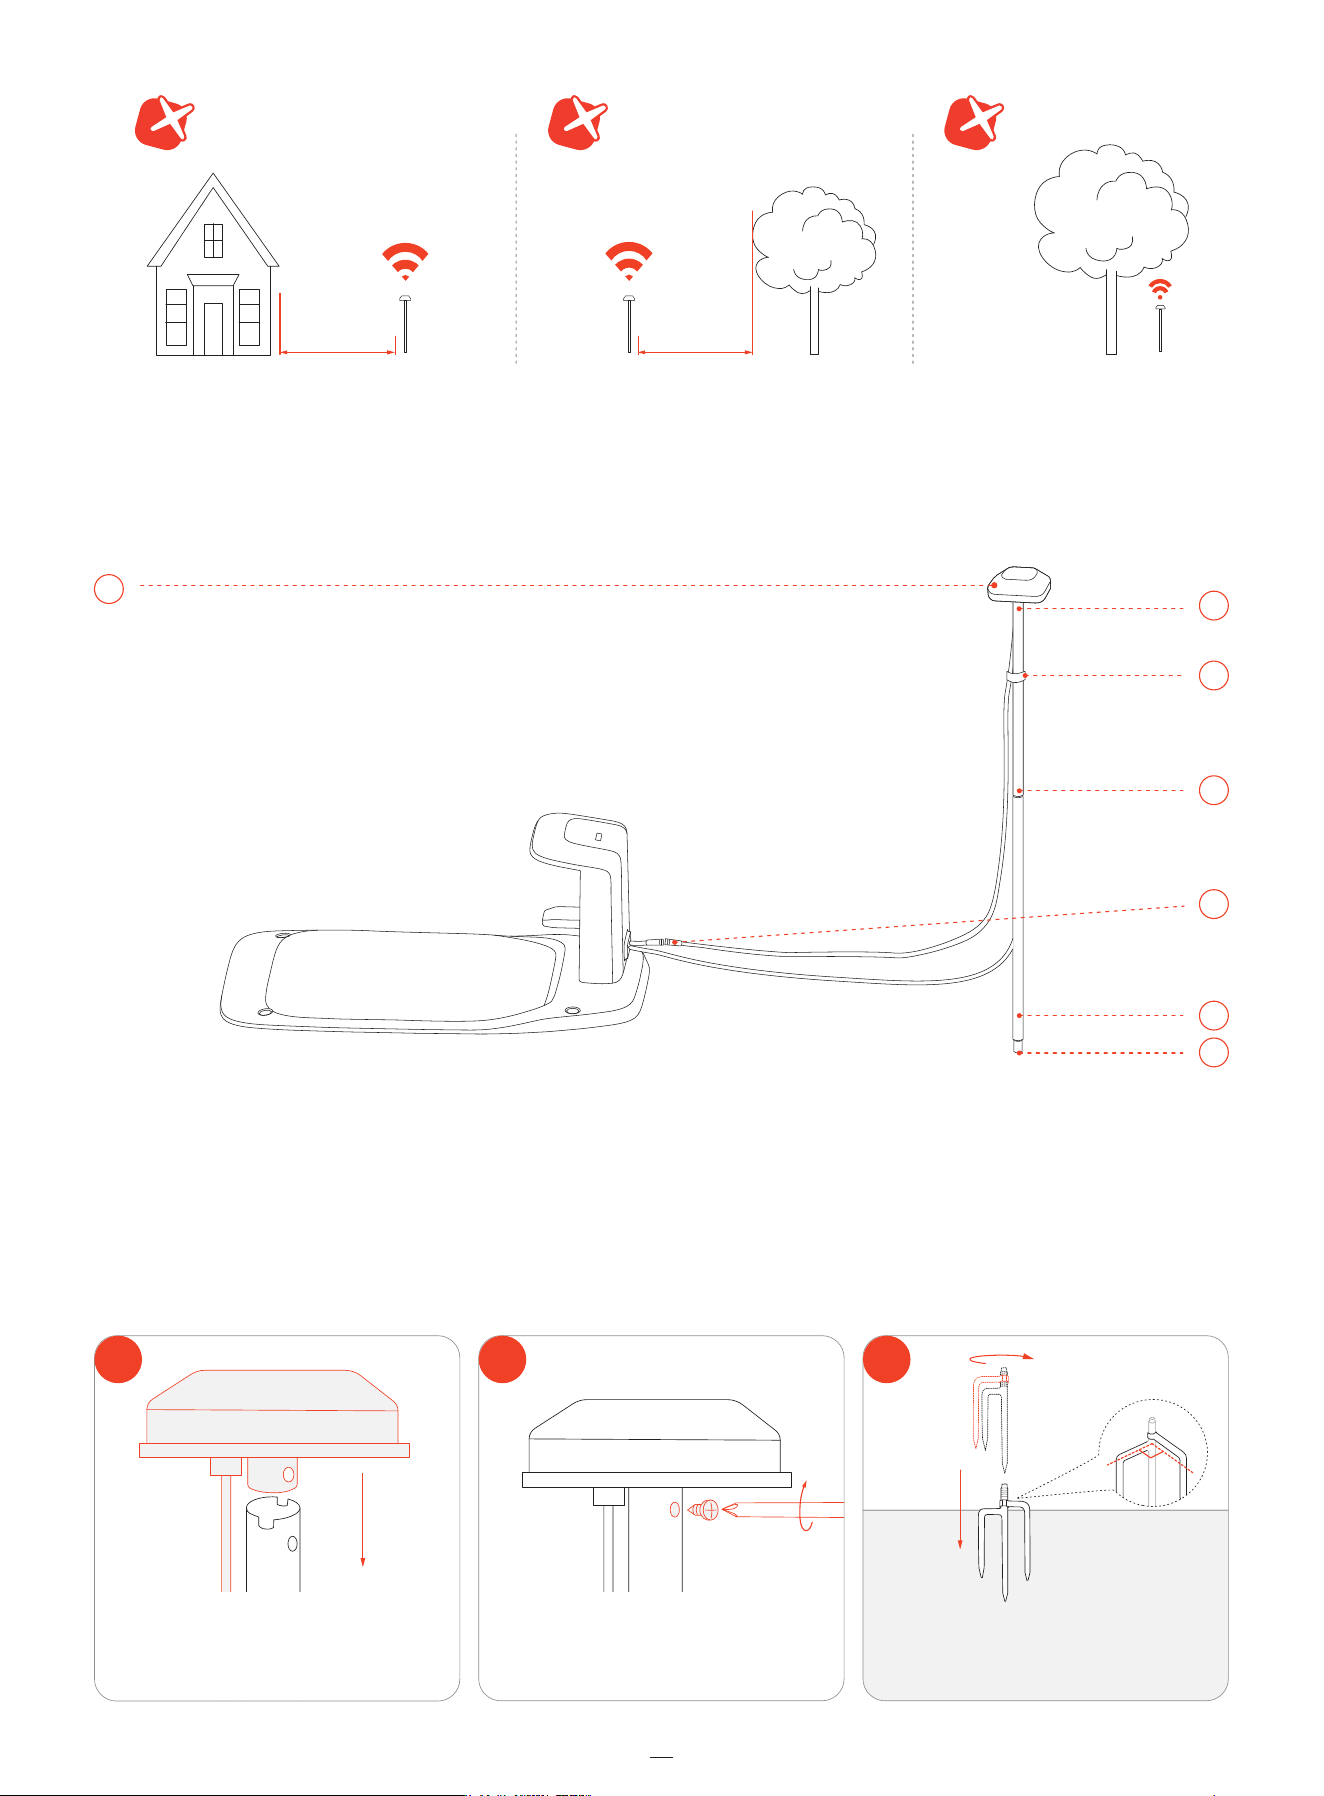
<2m (6.6ft) <2m (6.6ft)
1
2
90°
3
Attach the antenna head
on the tube.
Use a screw to secure it.
Unfold the three-prong ground spike and
push it into the ground for anchoring.
3
4
1
6
2
5
7
12
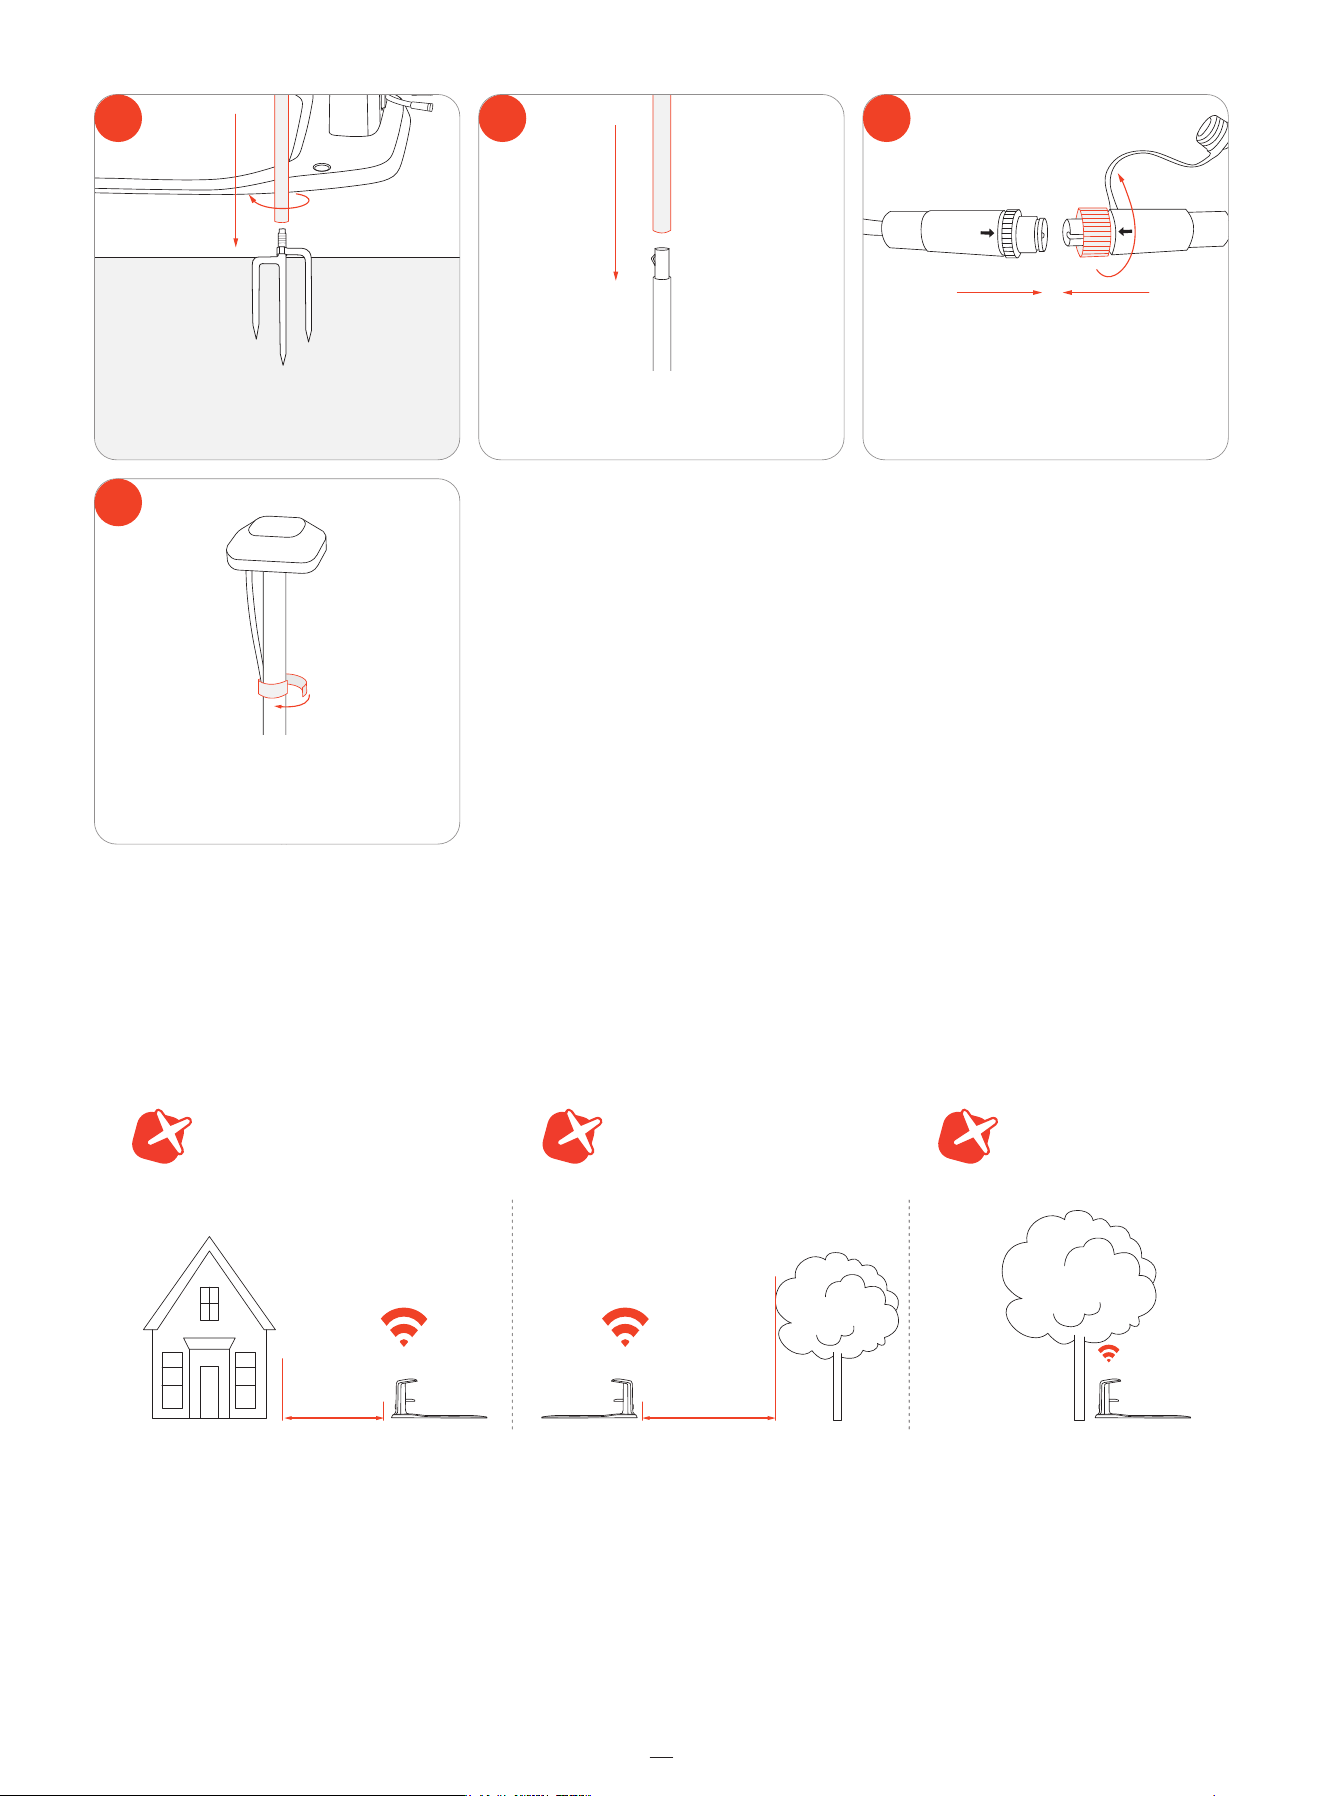
3.5 Assemble the Charging Station
Install the charging station on a soft, flat surface. Install the charging station on soft, flat ground, level with the lawn.
Choose an open area with no signal blockages within a 2 m (6.6 ft) radius. Keep the charging station away from sprinkler heads,
fountains, substations, generators, and other sources of water or electromagnetic interference.
6
7
54
Attach the antenna pole to
the ground spike.
DO NOT put anything on the antenna.
Connect the antenna cable to
the charging station.
Attach the tube to the pole.
<2m (6.6ft) <2m (6.6ft)
13
Push the mower into the charging station, connect the cable, and plug it into an power outlet.
Wait until the light on the mower turns green.
If the red light shows, check if the charging station is properly plugged in.
If the light flashes yellow for over 5 minutes, relocate the charging station (for Network RTK users) or relocate both the antenna
and the charging station (for antenna users).
Finally, anchor the charging station to the ground. Use the pegs to pin the cable to the ground.
3.6 Update Navimow OS
Go to Home > Settings > My devices > Software update. Update the Navimow OS to the latest version. During this process,
do not power off the mower or perform other operations.
≥ 5 min
4
14
4. Operation
4.1 Create Map
4.1.1 Preparations
Clear your lawn
Remove debris, piles of leaves, toys, wires, stones, and other obstacles from your lawn. Make sure children and pets are off
the lawn. Cut weeds and overgrown grass, keep the grass at the height of 6 cm (2.4 in) or lower.
Get your mower ready
Make sure the mower is powered on and connected to your phone via Bluetooth.
NOTE: If the mower is in lock status, enter the PIN code to unlock it.
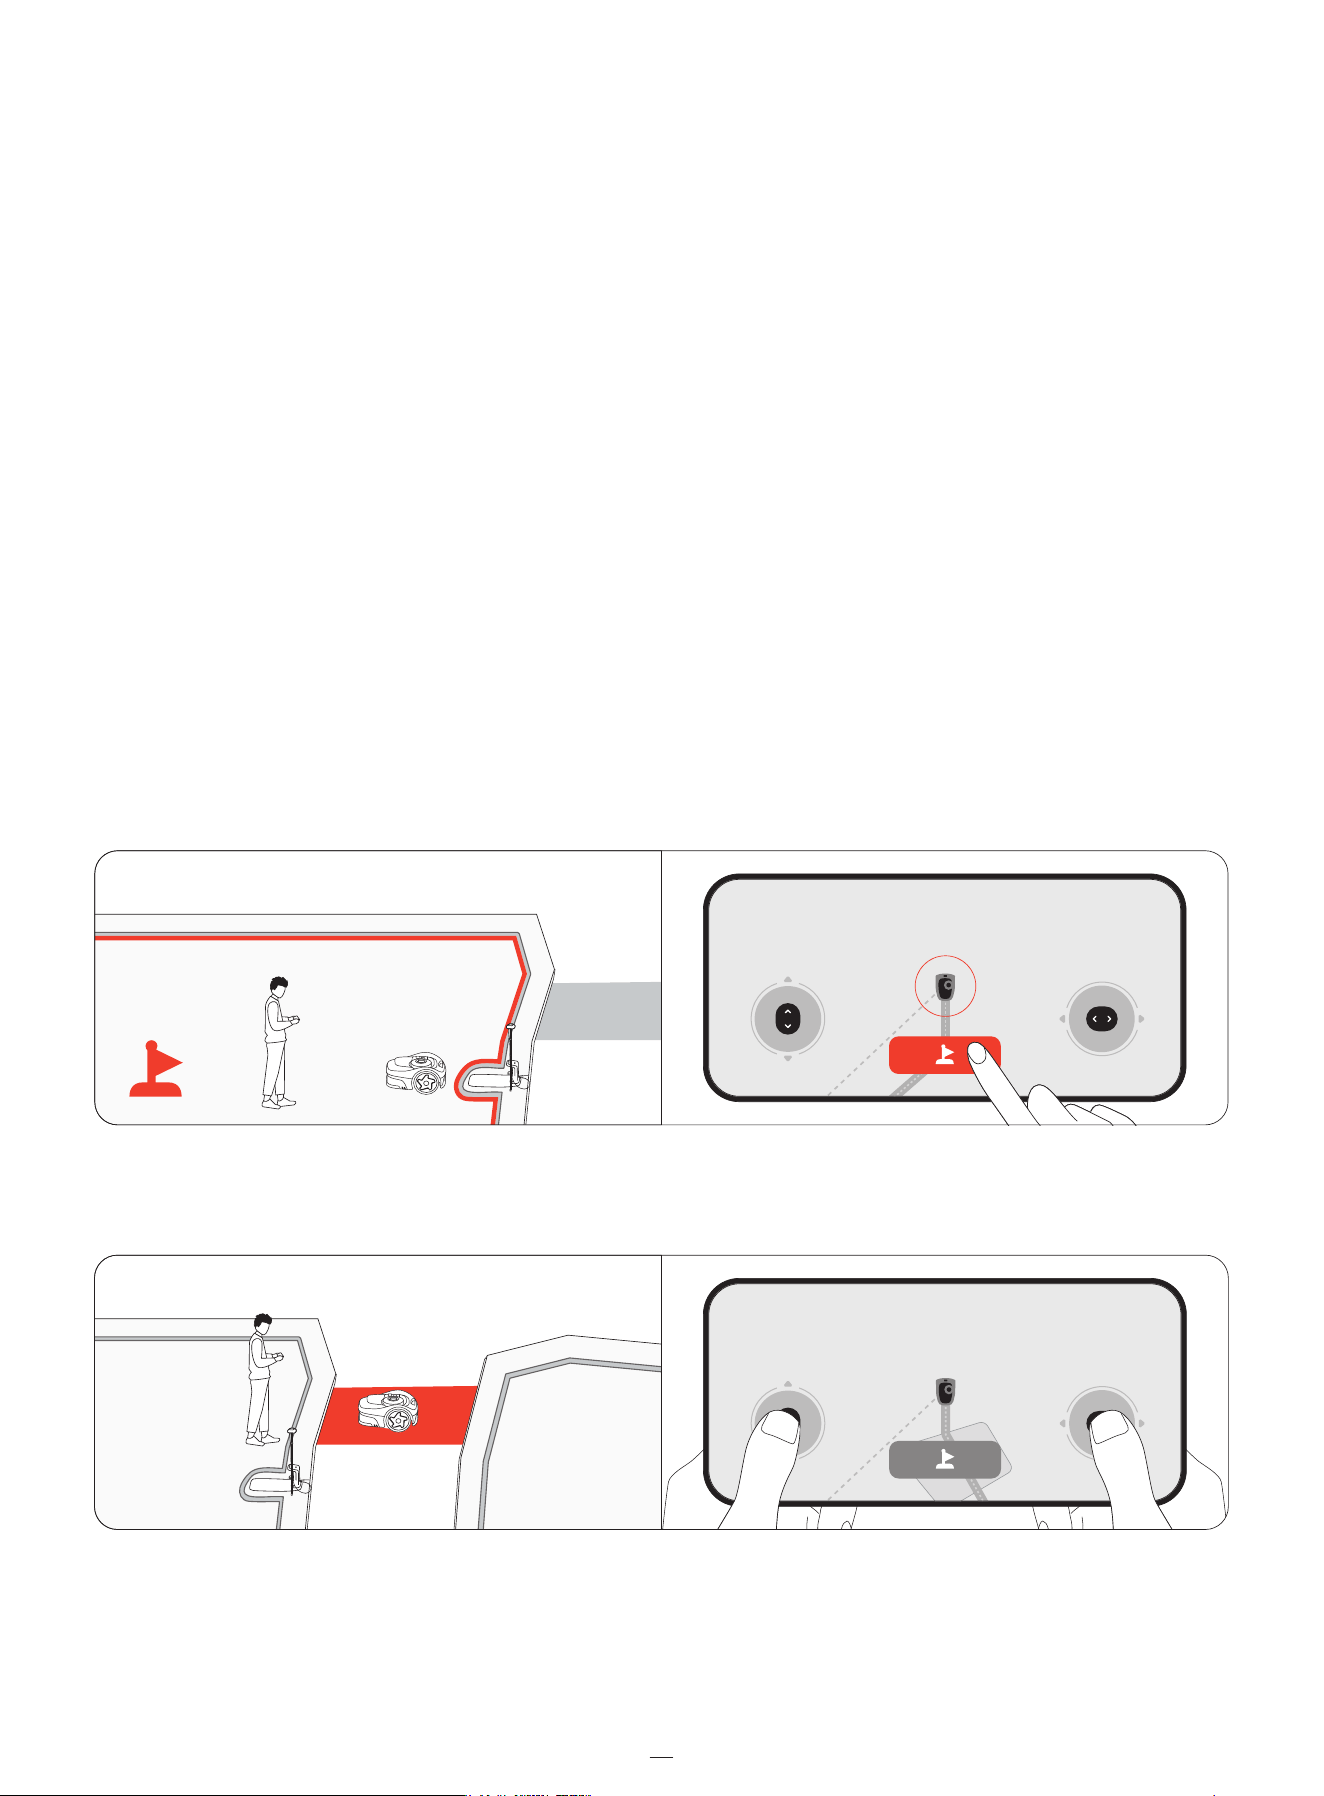
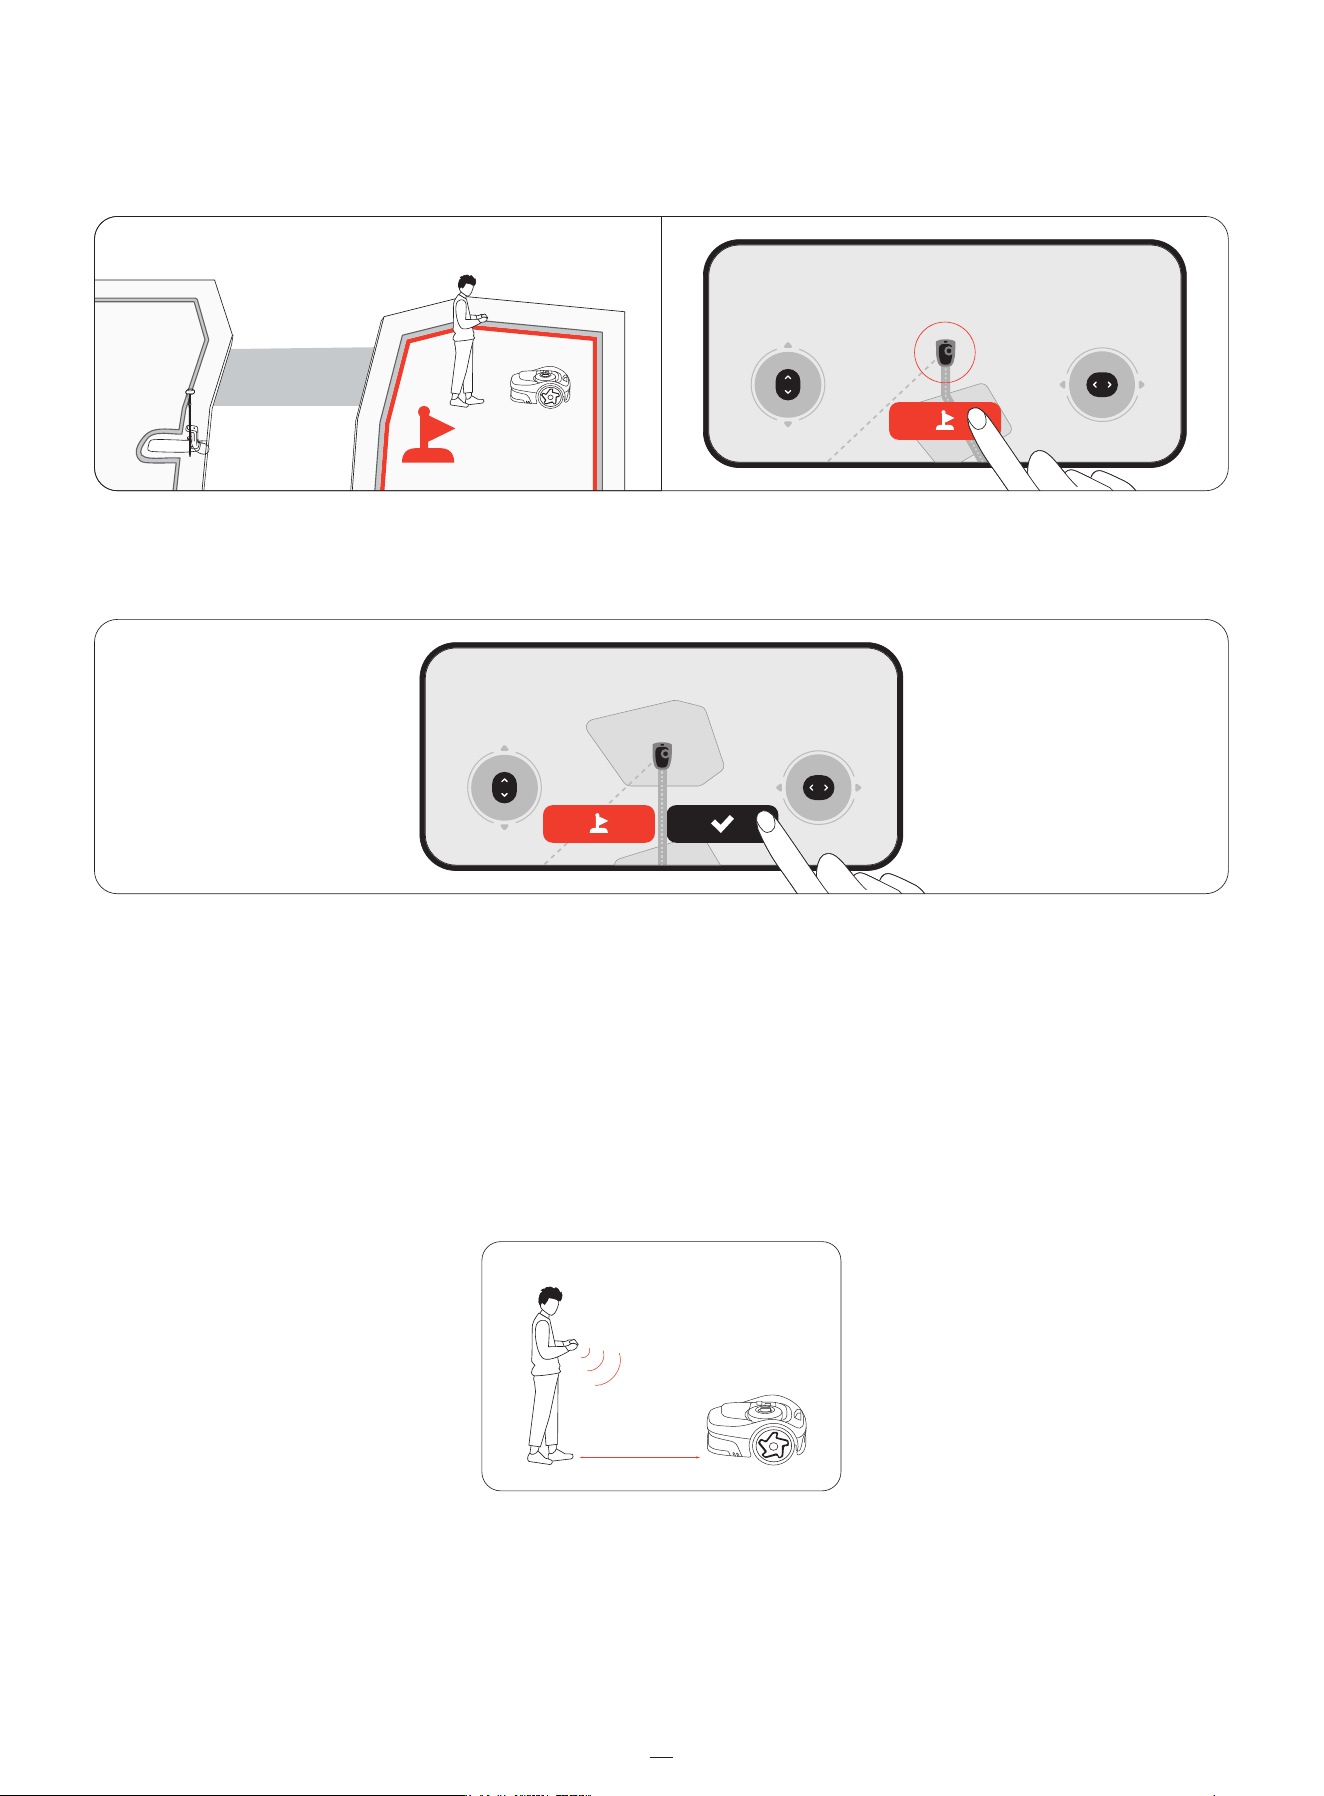
4.1.2 Auto Mapping
Mark the first mowing zone on your lawn
1. Remotely control your mower to the nearest lawn.
2. Tap 'Mark this zone' on the screen when the mower reaches the first lawn. Stay within 6 m (19.7 ft) from the mower when
controlling the mower.�
Mark other mowing zones on your lawn (if applicable)
1. Remotely control your mower to the next lawn zone.
1
2
2. Tap 'Mark this zone' on the screen when the mower reaches the lawn. By doing this, a channel between zones will be
created automatically. Avoid detours or narrow, uneven paths with obstacles when driving the mower. Recommend to
mark all zones in order for high mapping efficiency.
3. Repeat step 1 and 2 to mark more zones.
4. Tap 'Done' when you finish marking all zones.
Auto mapping
The mower automatically maps all zones in reverse order from how they were marked. You don't need to keep the phone
connected to the mower during this process, so feel free to leave it. Once the map is created, you will be notified, and the
mower will automatically return to the charging station.
4.1.3 Manual Mapping
If you prefer to create a map under your control, guide the mower around the edge of a lawn to create its boundary.
Find a starting point along the edge of your lawn. Walk behind the mower, stay within 6 m (19.7 ft) from the mower.
15
4. Operation
4.1 Create Map
4.1.1 Preparations
Clear your lawn
Remove debris, piles of leaves, toys, wires, stones, and other obstacles from your lawn. Make sure children and pets are off
the lawn. Cut weeds and overgrown grass, keep the grass at the height of 6 cm (2.4 in) or lower.
Get your mower ready
Make sure the mower is powered on and connected to your phone via Bluetooth.
NOTE: If the mower is in lock status, enter the PIN code to unlock it.
4.1.2 Auto Mapping
Mark the first mowing zone on your lawn
1. Remotely control your mower to the nearest lawn.
2. Tap 'Mark this zone' on the screen when the mower reaches the first lawn. Stay within 6 m (19.7 ft) from the mower when
controlling the mower.�
Mark other mowing zones on your lawn (if applicable)
1. Remotely control your mower to the next lawn zone.
2. Tap 'Mark this zone' on the screen when the mower reaches the lawn. By doing this, a channel between zones will be
created automatically. Avoid detours or narrow, uneven paths with obstacles when driving the mower. Recommend to
mark all zones in order for high mapping efficiency.
3. Repeat step 1 and 2 to mark more zones.
4. Tap 'Done' when you finish marking all zones.
Auto mapping
The mower automatically maps all zones in reverse order from how they were marked. You don't need to keep the phone
connected to the mower during this process, so feel free to leave it. Once the map is created, you will be notified, and the
mower will automatically return to the charging station.
4.1.3 Manual Mapping
If you prefer to create a map under your control, guide the mower around the edge of a lawn to create its boundary.
Find a starting point along the edge of your lawn. Walk behind the mower, stay within 6 m (19.7 ft) from the mower.
2
≤
6m (19.7ft)
16
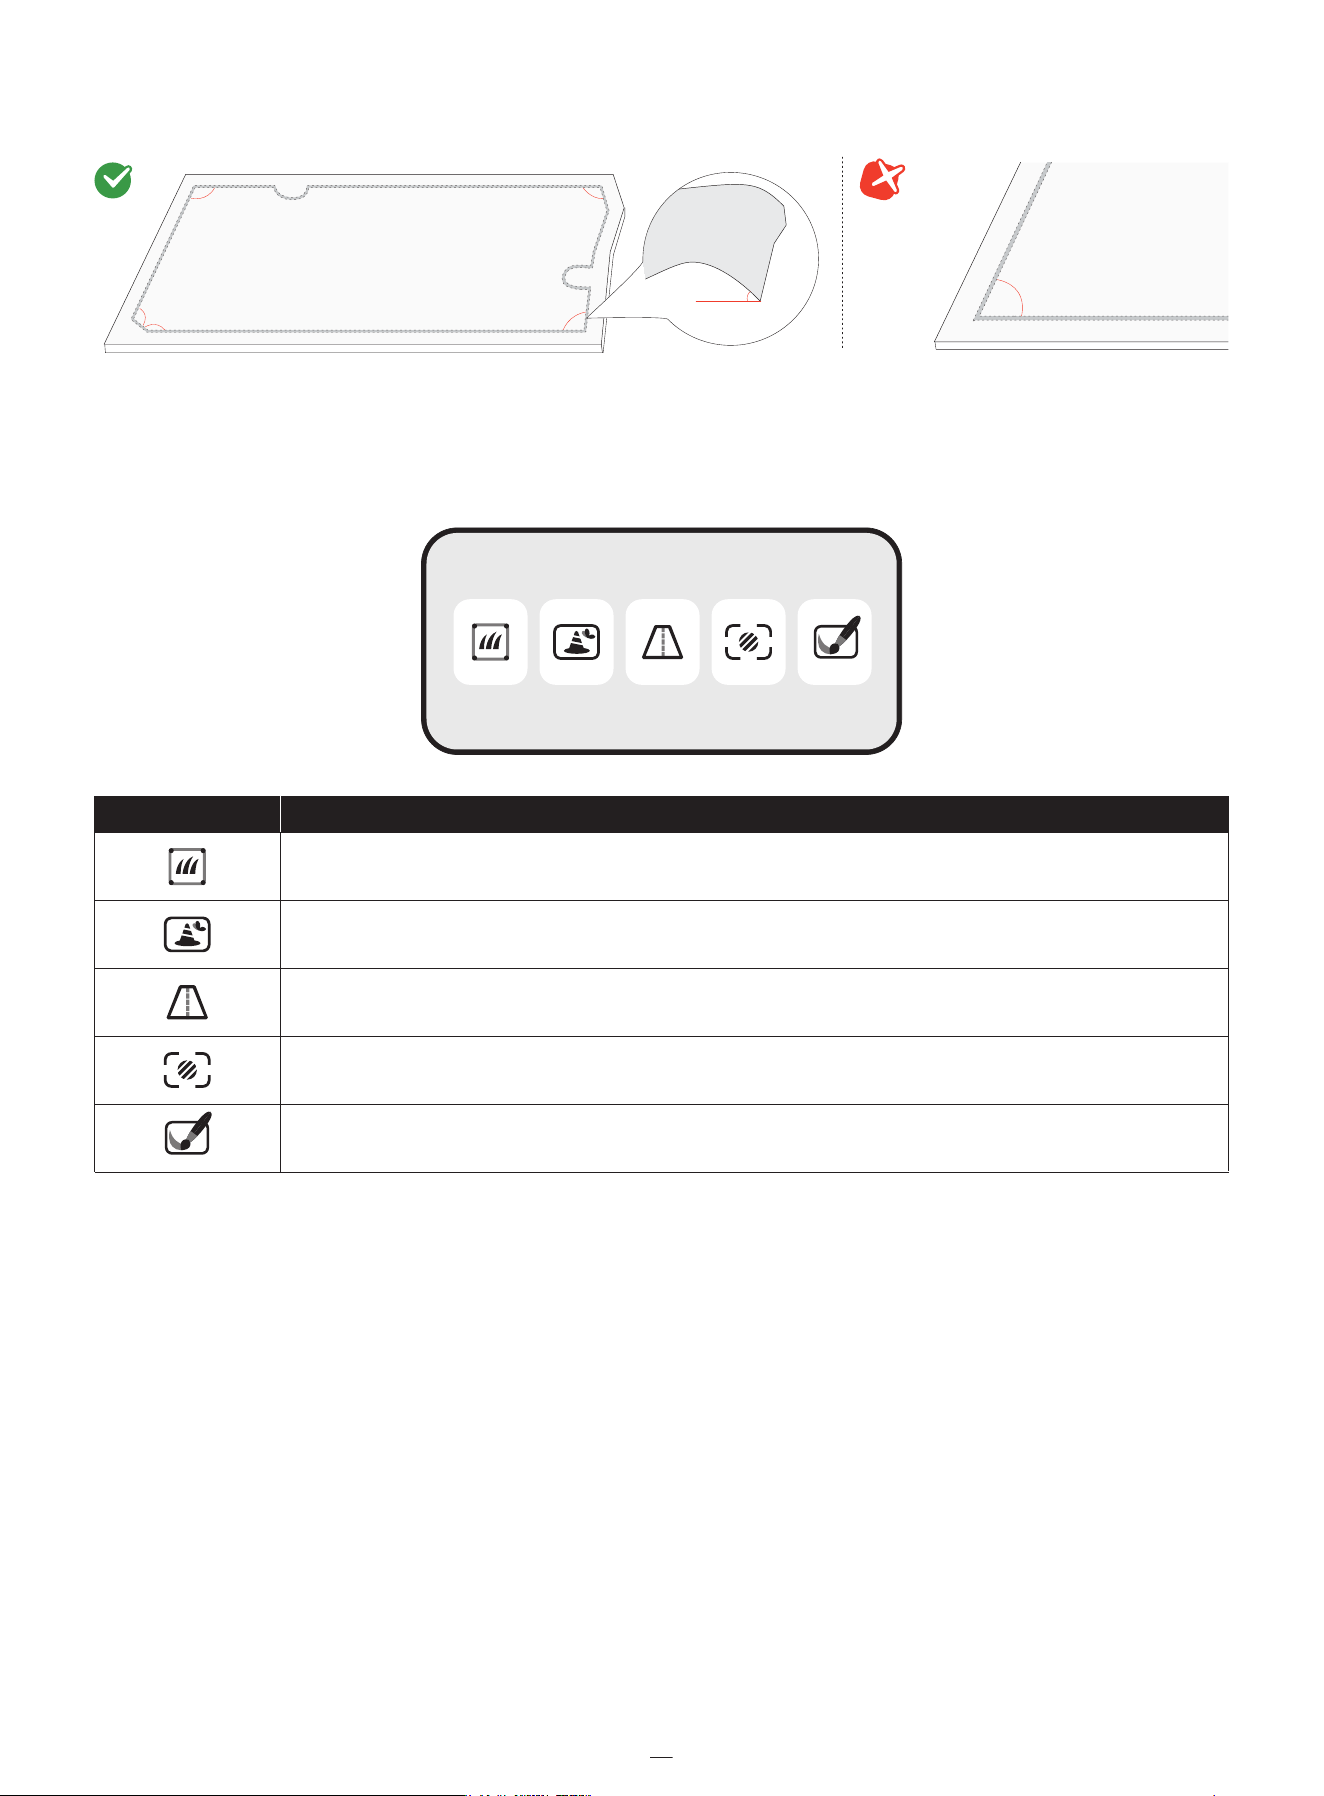
NOTE: Follow a straight line with a smooth turning angle of no less than 90°.
4.1.4 Map Elements
Add map elements to your map via Home > Settings > Map management.
Boundary
A boundary is a virtual line that defines the edge of a mowing zone. You can create up to 20 mowing zones. A zone is automat-
ically created after the boundaries of a work area is mapped out. You can continue to create more zones and connect them
with channels.
Isolated Zone
If a lawn is not connected to any other lawns, and the mower cannot reach there on its own, this lawn is created as an isolated
zone. To mow in an isolated zone, carry the mower there, press the MOW button on the mower. To recharge after mowing,
carry the mower back to the charging station.
NOTE: Only one-time mowing tasks are supported in isolated zones.�
<
90°
>
90°
>
90°
>
90°
>
90°
>
90°
<
45%
Boundary
Off-limit Island (BioLife Island)
Channel
VisionFence-off Zone
Doodle
Icon Map elements
17
Off-limit Island (BioLife Island)
The off-limit island is an area you want the mower to avoid while mowing, such as flowerbeds, ponds, or sprinkler heads. For
objects temporarily placed in the mowing zones, like trampolines or grills, you can set their location as an off-limit island and
delete it once the objects are cleared from the lawn. Off-limit islands are also called BioLife islands. Create BioLife islands
where grass and plants can grow naturally for bees, butterflies, and hedgehogs.
Channel
Channels are pathways connecting two separate mowing zones or connecting the edge of a lawn to the charging station.
For auto mapping, channels are automatically created when you guide the mower to go from one zone to another.
NOTE: The channel should be wider than 1 m (3.3 ft).
VisionFence-off Zone
A VisionFence-off zone is a place where the mower automatically turns off the camera sensor used for obstacle avoidance.
The mower will directly pass through instead of turning away. Set up a VisionFence-off zone for places such as stone roads or
utility holes, where you need to the mower the pass through for a thorough cut. You can adjust the size of a VisionFence-off
zone, move it to another place, or delete it.
18
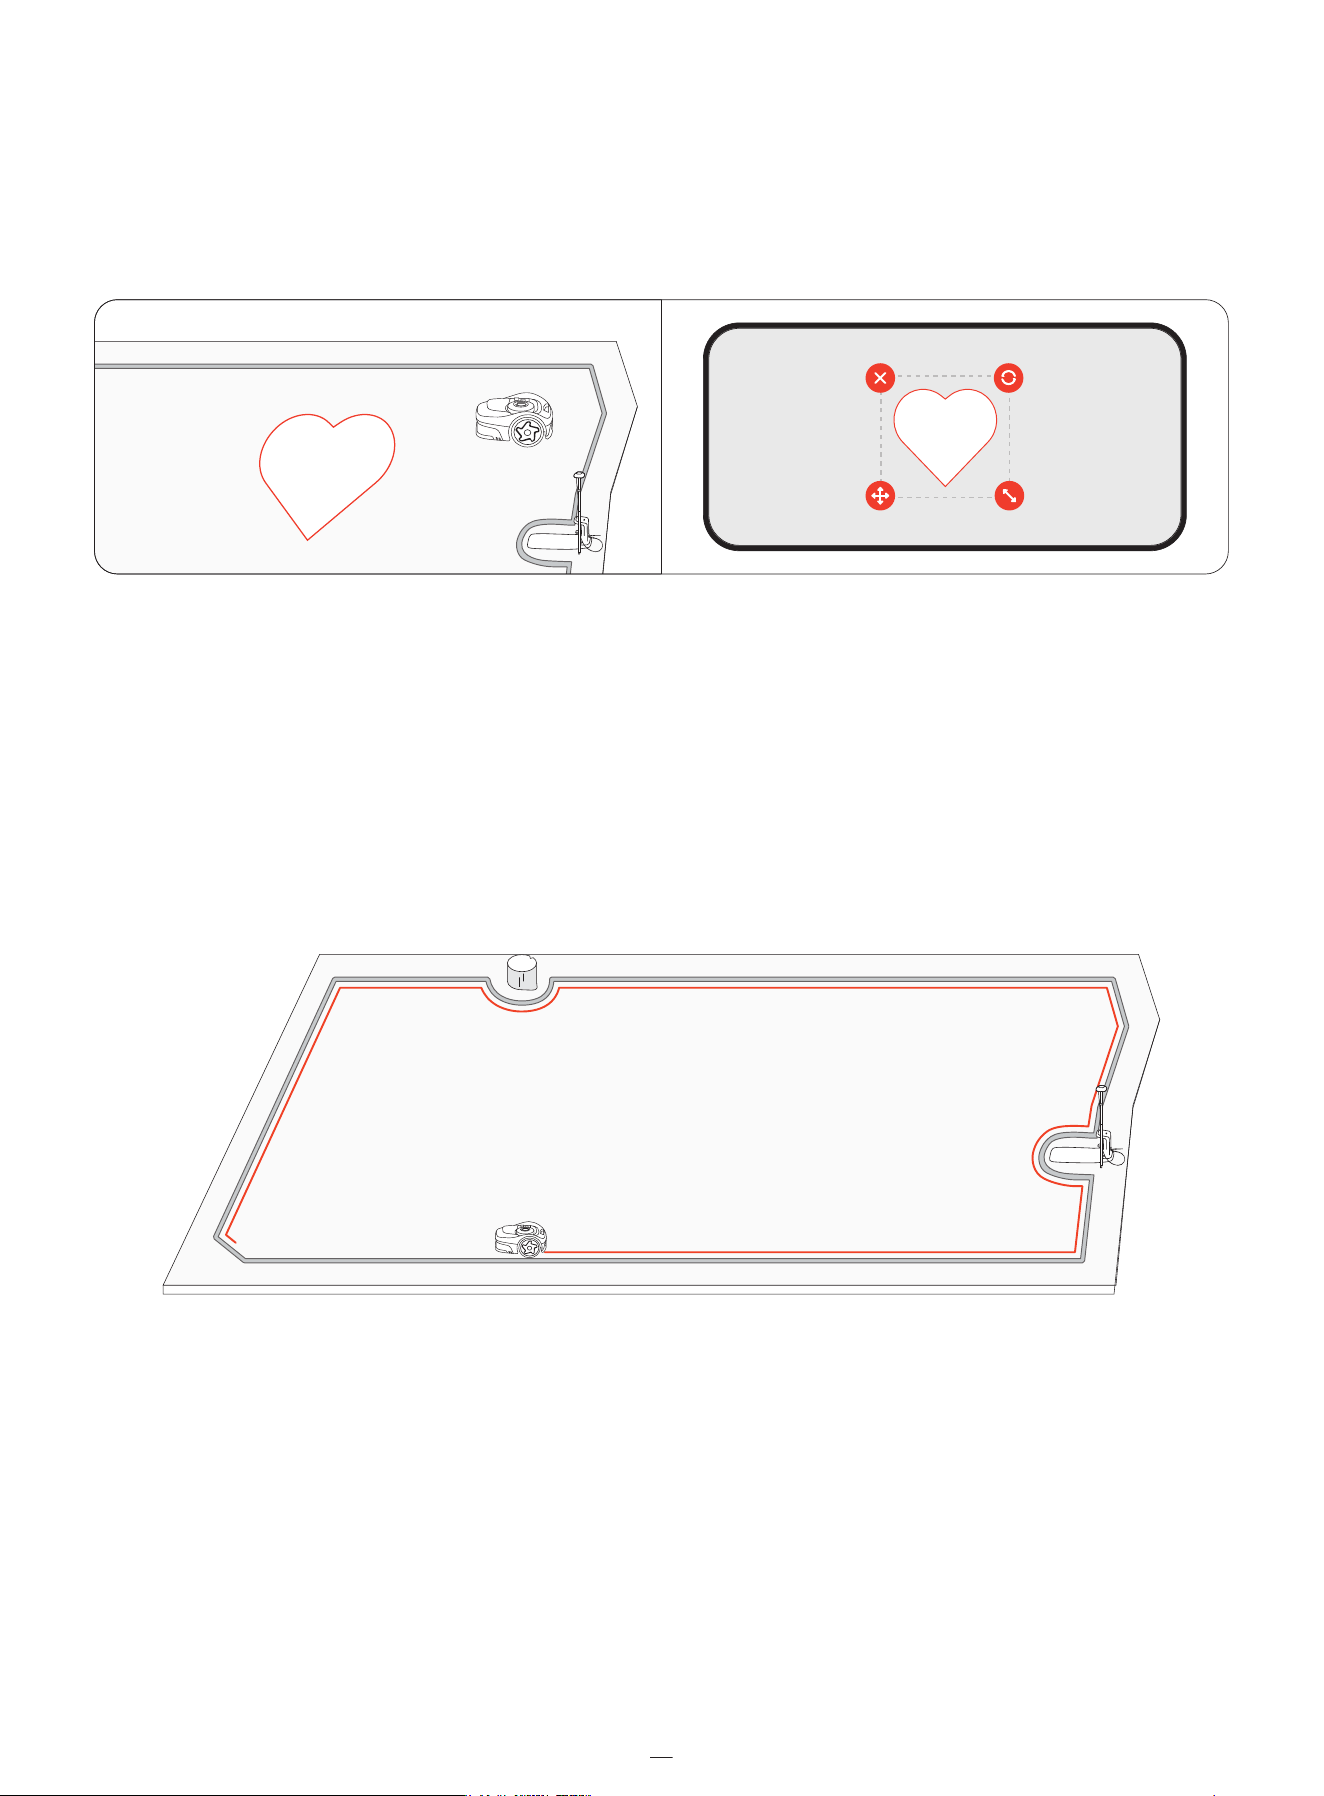
Doodle
A doodle is a fun design or pattern that you can create on your lawn using your mower. By choosing a design (a logo or a
combination of letters and numbers) and a location, the mower will leave that part of the lawn uncut. Once the rest of the
lawn is mowed, the doodle will show. You can decide how many active days the doodle will last. After that, the mower will
mows over it completely.
4.2 Mow
4.2.1 How Does Navimow Mow�
Mowing along the boundary and around off-limit islands
Your mower mows along the boundary when it starts a mowing task, and mows around the off-limit islands when it mows
inside the lawn. If the surroundings are complex, to avoid risks, you can disable 'Edge Mowing' from Map management >
Edit > Edge Mowing for each zone.
19
2
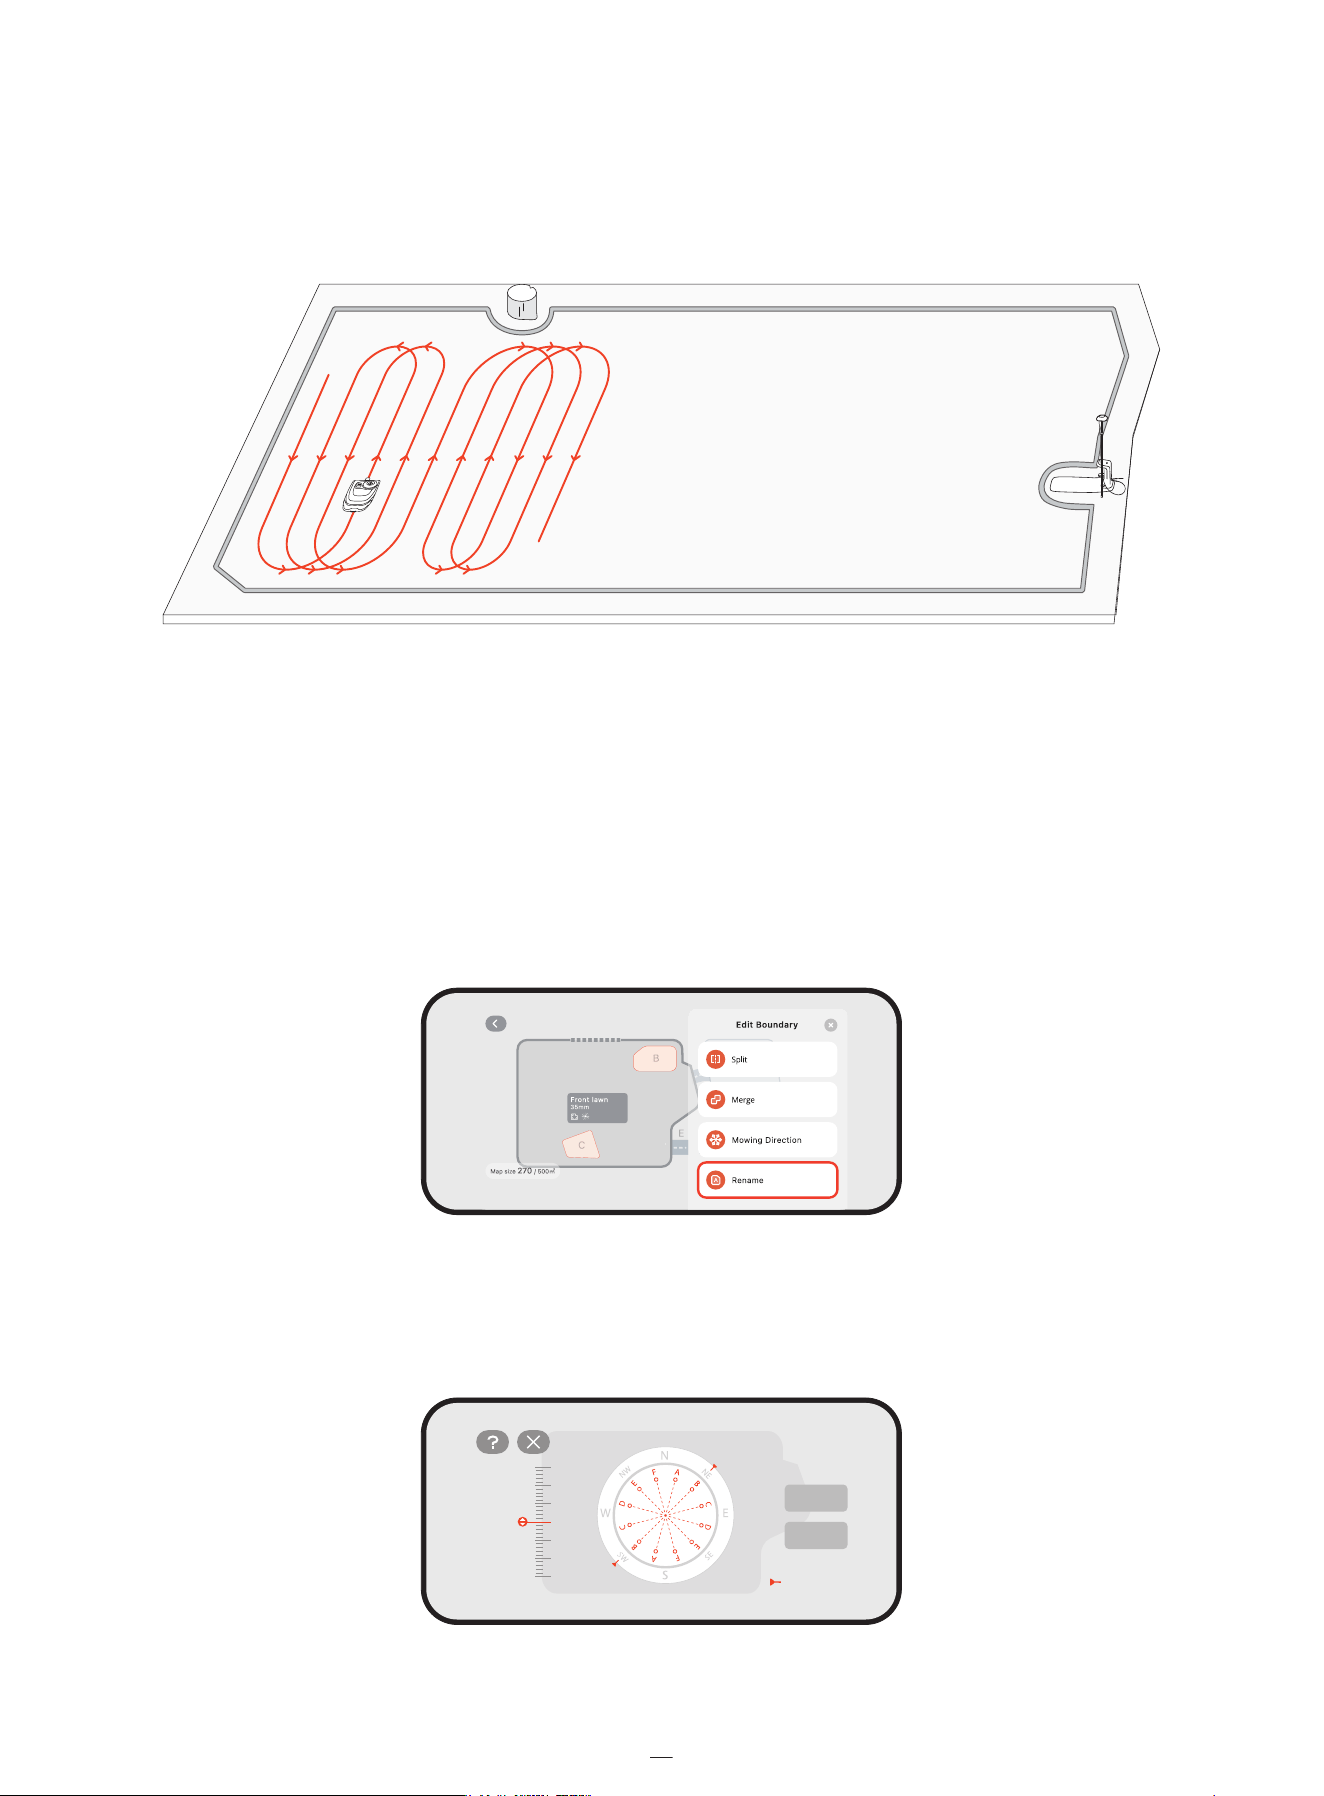
Mowing with systematic patterns
Within the work area, the mower cuts the lawn using a smart, efficient path. When mowing in longer straight lines and fewer
turns, it completes mowing faster and more smoothly. To avoid visible patterns, the mower changes direction at the start of
each mowing task, ensuring a more uniform lawn appearance over time. When the mower cuts through tall and thick grass,
it automatically slows down for optimal mowing results.
4.2.2 Manage Multiple Zones
You can create multiple zones for your map, each zone with its own unique name and a customized mowing direction, and
mowing schedule.
Rename the zones
1. Tap to select a zone.
2. Tap 'Edit' and customize settings for the selected zone.
Tap the 'Rename' icon to set a name for the zone.
Customize mowing directions
The mower can automatically change its mowing direction according to your choices from Map management > Edit >
Mowing direction. You can choose one or more directions so that mower changes the mowing direction every time it
finishes a round of mowing.
Optimal direction
Default
Done
20

Create or modify mowing schedules
1. Go to Home > Settings > Mowing schedule.
2. Select a day to set up a schedule.
3. Set the start time and end time of the schedule.
4. Select which zone(s) to apply the schedule.
5. Tap 'Confirm' to save the settings.
Enable or disable mowing schedules
You can disable mowing schedules if you don't want the mower to follow them.
Split and merge zones
To split a zone into smaller ones, manually control the mower to cut a zone into two. Go to the 'Map management' page,
select a zone, and find 'Split' in 'Edit'. The new zones will follow the same settings as the old one.
To merge several zones into one, go to the 'Map management' page, select a zone, find 'Merge' in 'Edit', choose an adjacent
zone, and merge them. You can only merge two zones at a time. The new zone will follow default settings, and you can
customize them if needed.
Mowing schedule
Add schedule
8:00 14:00
7:30 13:30
8:30 14:30
Enable mowing schedule
All
Backyard
Confirm
Cancel
C Front lawn
0 4 8 12 16 20 24
S
M
T
W
T
F
S
Mowing schedule
Enable mowing schedule
Save
0 4 8 12 16 20 24
Mowing schedule
Enable mowing schedule
Save
S
M
T
W
T
F
S
21
4.3 Basic Functions
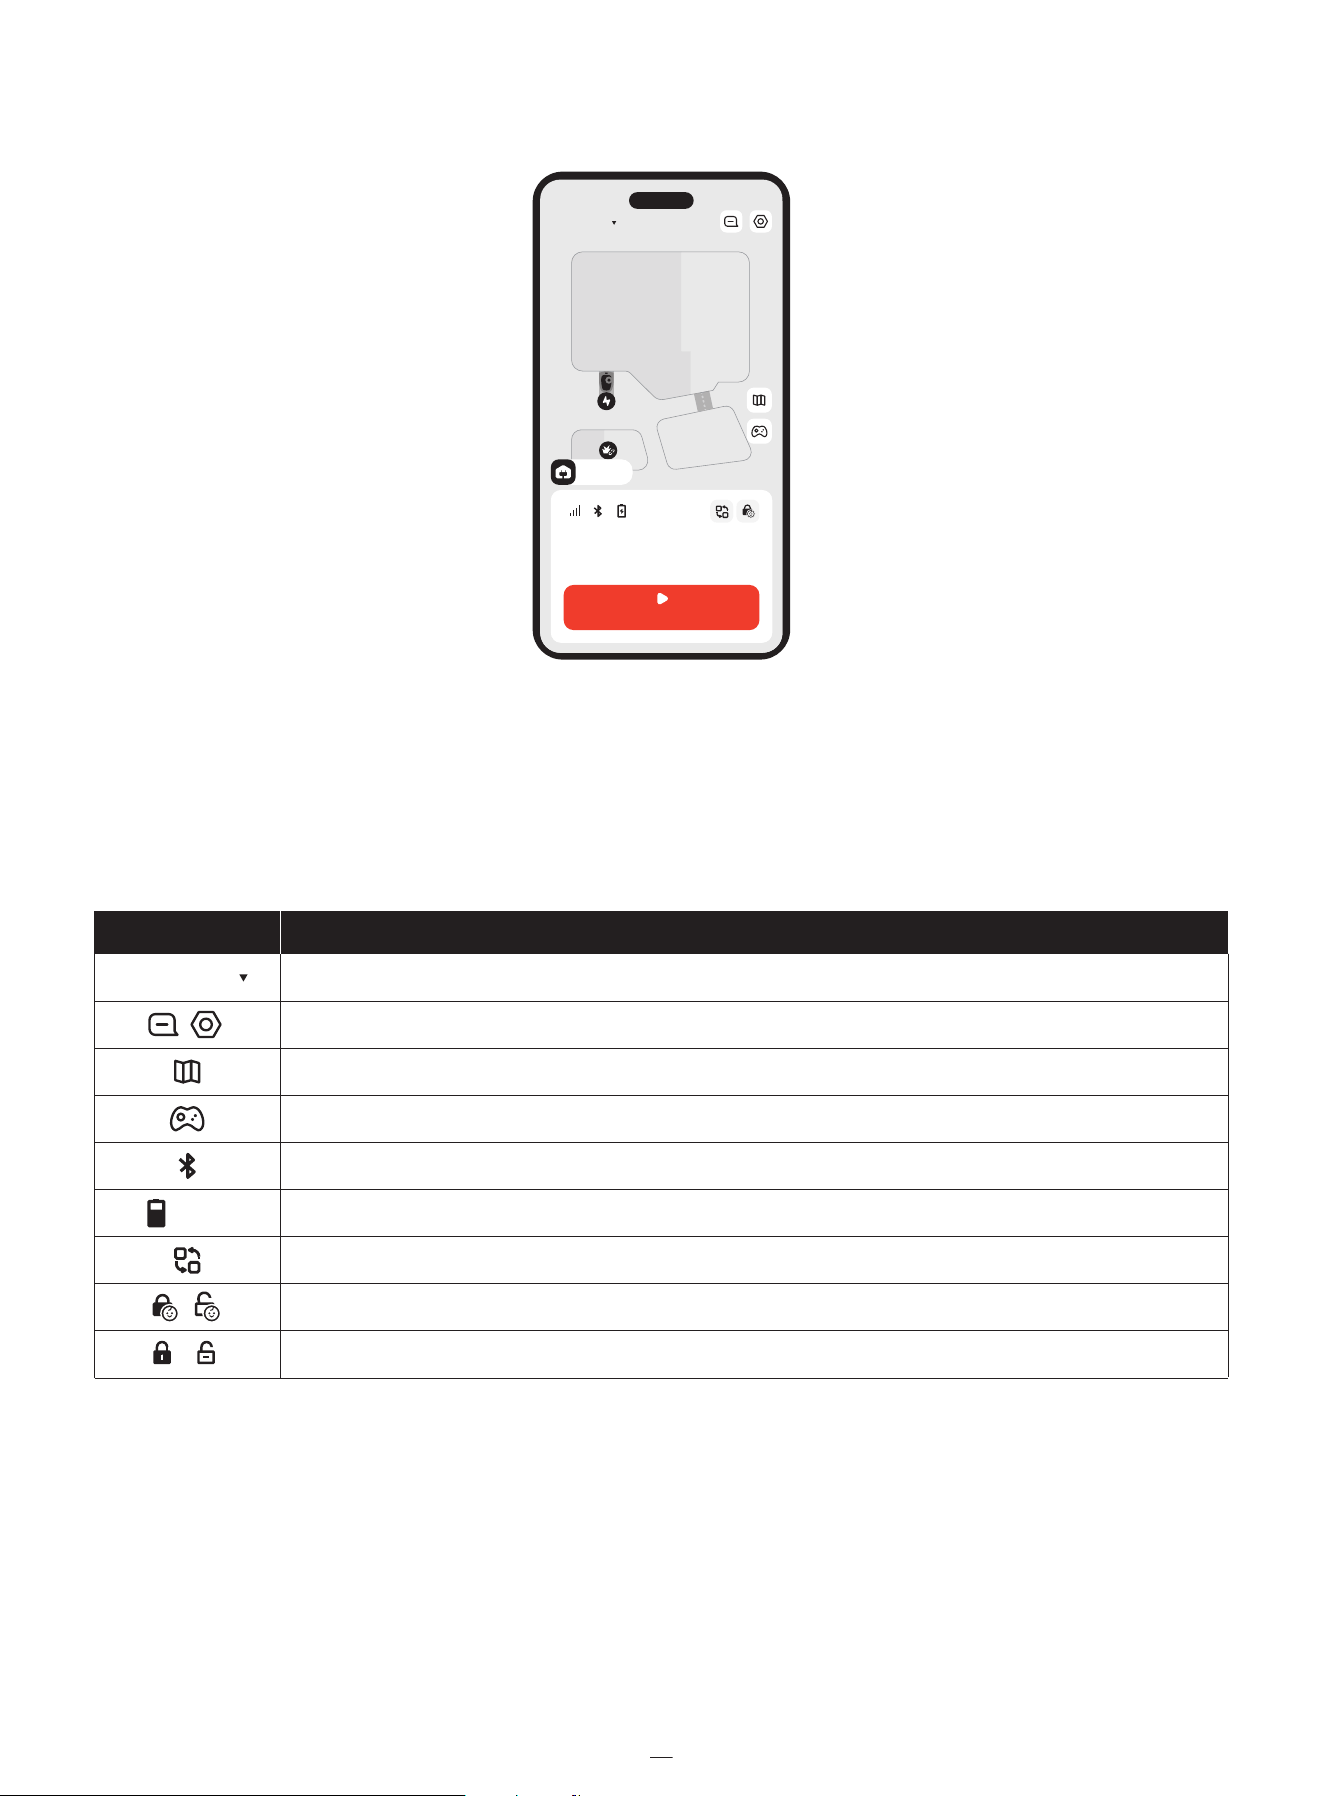
4.3.1 App Home Screen�
The home screen is where you can view the status of the mower, check work progress, start or stop mowing, and send the
mower home.
4.3.2 Navimow Store
You can browse the Navimow Store and purchase official accessories, join Navimow Circle and earn points for discounts.
22
Switch to another mower of yours
View notifications and mower-related settings
Map management
Manually control the mower to mow
Bluetooth connectivity. When disconnected, tap to reconnect
Battery level and charging status
Switch to specific scenarios: Quickly apply specific settings to your mower for Holiday mode and Sleep mode
Child lock disabled/enabled (shown by default)
Icon Description
Navimow
75%
Safety lock disabled/enabled (shown after you lock the mower via mower buttons)
170 -- --
m
2
This week Create a schedule >
75%
MOW NOW
Navimow
Charging

4.3.3 Mine
From the Mine tab, you can change account settings, and general settings (language, units, and more), contact customer
support for help, and find instruction guides.
4.3.4 Other Device Settings
Network Settings
Check the current connection and choose how the mower connects to a network: only through Wi-Fi, only through 4G, or let
the system switch between Wi-Fi and 4G based on connection quality.
Customization
Light: Adjust the brightness level of the mower when it works during the night.
Sound: Choose to let the mower speak in human voice or play sound effects.
Language: Choose your preferred language for the mower screen and the voice feedback.
Eco mode: To save energy, the display screen will turn off after 10 seconds of Bluetooth disconnection, and the mower’s
ambient lights will be turned off.
Device information
Rename: Give your mower a unique name.
Basic info: Check for the mower model, its serial number, activation date, expiration date for 4G service, warranty status, and
maximum mowing capacity.
NOTE: You can buy and activate your Extended Warranty directly via Home > Settings > My devices > Device information >
Basic info.
Time zone and country: Set your time zone and country/region to ensure mowing schedules can follow local time. If your
region observes Daylight Saving Time, enable DST so the mower can adjust the time automatically.
Device management
Device sharing: Share your mower with other registered Navimow app users. Shared users have full access to manage the
mower. Sharing can be canceled by either party at any time.
Switch/Add device: Add multiple mowers and switch between them.
Unbind device: After unbinding, you can choose to keep or delete your user data.
4.4 Safety Features
4.4.1 Anti-theft
The Anti-theft feature can precisely locate your mower and prevent incidents such as mower theft. You can choose to enable
the alarm when the mower is being lifted and when the mower crosses over the virtual boundary.
NOTE:
1. It can only be used under a 4G network. Make sure your 4G service has not expired.
2. If the Anti-theft feature is enabled, you need to enter PIN code on the mower before powering it off.
Mower-lifted alarm
This alarm alerts you if your mower is being lifted off the ground for a few seconds. When enabled, you will hear an alarm and
receive a notification on your app. To stop the alarm, enter the PIN code directly on the mower. If you need to carry the mower
to a different location, it is recommended to connect your phone via Bluetooth beforehand to prevent false alarms.
23

Geo-fence alarm
This alarm alerts you if your mower crosses a designated boundary. When enabled, you will hear an alarm and receive a
notification on your app. To stop the alarm, enter the PIN code directly on the mower.
When the geo-fence alarm is enabled, you can adjust the geo-fence radius and check Navimow's location on the map in
real-time. If the mower runs out of battery and powers off on the way back to the charging station, you can find where it
stopped via the app.
4.4.2 Device Lock
The safety lock and child lock are used to ensure the safety of the mower and prevent unintended operations. To enable them,
go to Home > Settings > Safety features > Device lock.
Safety lock
The safety lock prevents accidental activation of the mower when it needs to be carried or cleaned. Press MOW+HOME for
more than 3 seconds to lock the mower. When locked, the mower remains inoperable until you unlocks it with the PIN code.
Child lock
The child lock prevents children or pets from accidentally operating the mower by touching the buttons while it is working
or on standby. By enabling it, the buttons on the mower won't respond to pressing or touching. You can still operate your
mower via the app.
4.5 Advanced Features
4.5.1 EFLS NRTK�
Positioning mode
You can switch between the Network RTK mode and the Local RTK mode as your positioning data source from Home >
Settings > Advanced features > EFLS NRTK > Positioning mode.
If the Network RTK is supported in your area after the initial setup, activate the service first, and then switch to it.
Camera-assisted positioning
The Camera-assisted Positioning feature uses the EFLS (Exact Fusion Locating System) technology to improve positioning
accuracy. This means the camera is used to collect visual elements that compensates the loss of GPS signal in certain areas.
This improves map quality and avoids leaving grass uncut or the mower going out of boundaries. After this feature is enabled,
the improvement starts automatically once the mower returns to the charging station.
The result can be one of the following:
• Map accuracy improved: The boundaries, off-limit islands, and channels are all now updated with more accurate positioning.
• Map accuracy failed to be improved: The map has large areas with very poor GPS signal.
4.5.2 Weather Adaptive
The mower can react to real-time weather info and adapt its mowing schedules, either stopping the current task or delaying
the upcoming tasks. You can set how you want the mower to react under these weather conditions: rain, snow, hot weather,
frost, and strong wind. To ensure a healthy lawn and a longer work life of your mower, go to Home > Settings > Advanced
features > Weather adaptive to customize settings for each type of weather.
24

4.5.3 VisionFence
Avoid obstacles in channels
You can enable the Channel Obstacle Avoidance switch and the mower can "see" the surroundings and intelligently passes
through by actively avoiding obstacles or other objects that are distinct from the ground. Even when the GPS signal is poor
around the channel, the mower can still manage to pass through with visual detection.
Animal friendly
You can enable 'Animal friendly' mode so the mower will stay far away from pets and small animals in its vicinity by adjusting
its path in real-time. Go to Home > Settings > Advanced features > VisionFence > Animal friendly. This avoids accidental
harm to wildlife such as hedgehogs, and reduces the chance of alarming or disturbing nearby pets.
4.5.4 Smart Home
Use voice commands to control your mower with third-party smart devices: Amazon Alexa, Google Assistant.
Go to Home > Settings > Advanced features > Smart Home and follow the instructions of adding Navimow to a smart home
device.
4.5.5 Traction Control System (TCS)
The Traction Control System feature improves the mower's stability and mobility, so the mower can tackle wet, muddy, and
other complex terrains with ease. This also reduces chances of mower getting stuck and avoids damages to your lawn. Enable
it from Home > Settings > Traction Control System for a smoother mowing experience.
25

5. Maintenance
Keep the mower clean and the blades in good condition for better performance and longer service life. Inspect and maintain
it regularly, and replace any damaged or worn parts.
Check the used hours and remaining working hours of mower parts from Home > Settings > Maintenance & Tools > Parts
maintenance.
5.1 Cleaning
WARNING
• Before cleaning or turning the mower upside down, power off the mower.
• DO NOT perform maintenance in sandals or barefoot. Always wear long trousers and work shoes.
Mower's exterior
Use a soft brush or cloth to clean the mower’s exterior. Do NOT use alcohol, gasoline, acetone, or other corrosive or volatile
solvents, as they may damage the surface and internal structure of the your mower.
Camera lens
If the camera lens is stained, use a piece of clean cloth and gently wipe off dirt or stains.
Charging port
Check the charging port for dirt or grass. Clean it in time to avoid charging issues.
Chassis and cutting disc
Use a brush or a water hose to clean the dirty parts.
NOTE: DO NOT use a high-pressure washer. High-pressure water can leak into the sealings and damage electronic and
mechanical parts.
Also, make sure that the cutting disc rotates freely and the blades can spin freely.
Wheels
If they get stuck with grass and debris, rinse with a water hose.
Charging station
Remove debris and mud, and make sure the contact strip, the power cable and its extension cable are not damaged.
�
5.2 Replace Blades
For regular use, replace all blades and their screws every 1–2 months to ensure safe and effective cutting.
NOTES:
1. DO NOT reuse old screws. Always use original Navimow blades and the correct screws (Blade model: X3A06E).
2. DO NOT use an electrical screwdriver to loosen or install the cutting disc.
26
To replace the blades:
1. Power off the mower and wear protective gloves
2. To avoid scratching, place the mower upside-down on a flat and clean surface.
3. Use a cross-tip screwdriver to loosen the screws.
4. Remove the cutting disc, the screws, and the blades.
5. Fasten the cutting disc and the new blades with the new screws (Torque: 1 N·m). Make sure the blades can spin freely.
After fastening the blades and screws, the blades will still seem loose. This is normal as the blades need to spin during mowing.
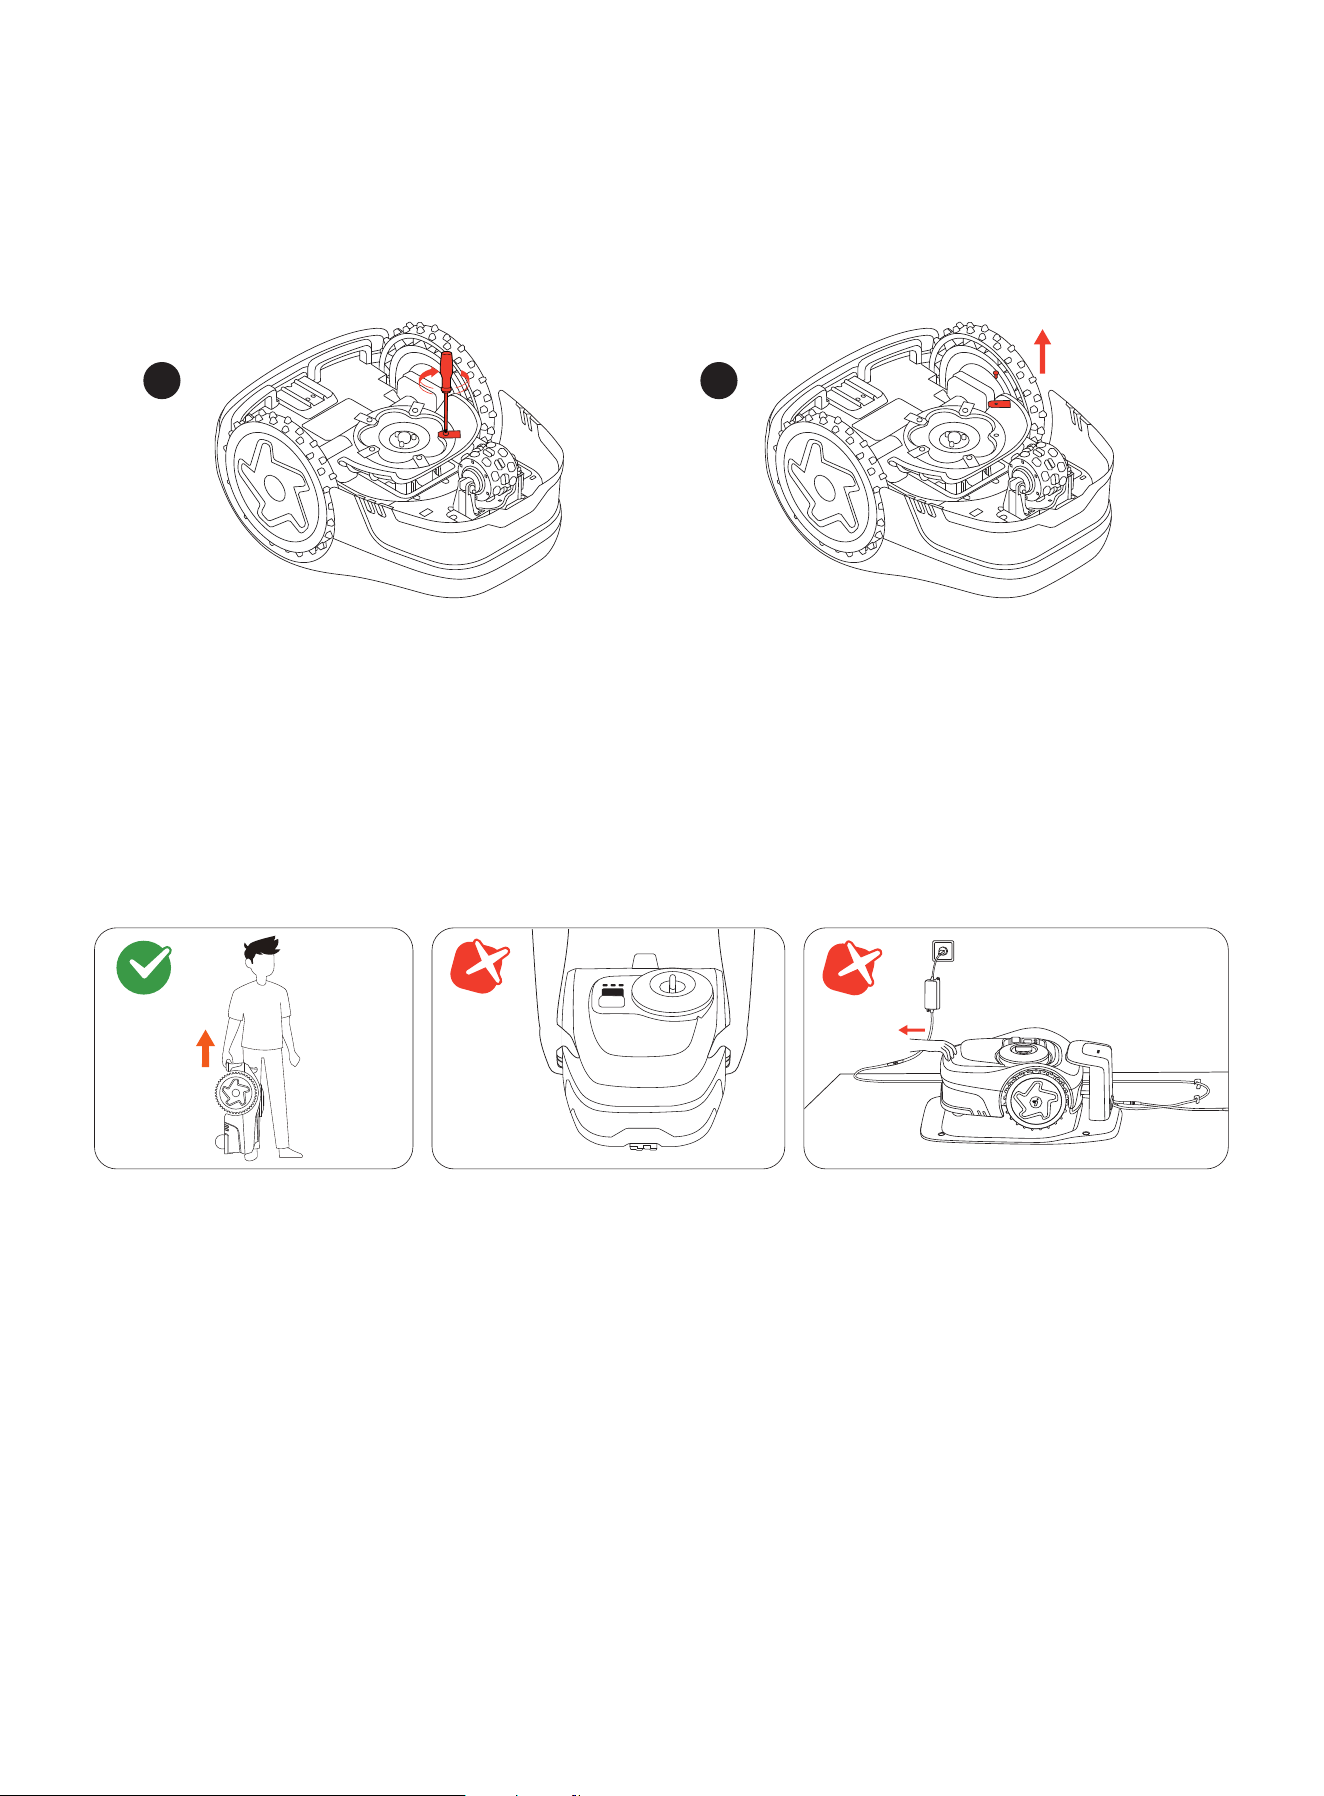
5.3 Transportation
For long-distance shipping or transportation, use the original packaging to protect your mower. Always power off the mower
before transporting it. Handle it gently and avoid impacts or heavy pressure. DO NOT carry the mower while it is working.
Carry the mower by the handle, with the cutting disc facing away from your body.
CAUTION: DO NOT lift the mower by the handle while it is still parked in the charging station. Always pull the mower off the
station before lifting.
5.4 Battery and Power Supply
Battery Temperature Limits
DO NOT use or store the battery at extreme temperatures: above 50°C (122°F) or below –20°C (–4°F). Battery temperature
protection activates when it is below 0°C (32°F) or above 53°C (127°F). The mower will not start mowing. Charging will resume
only when the battery temperature returns to the safe range: 3°C (37°F) or higher, or 49°C (120°F) or lower.
1
2
Battery Life
Battery damage caused by overdischarge is not covered by the Limited Warranty.
Battery life depends on usage frequency and total operating hours. If the operating time per full charge becomes significantly
shorter than usual or mowing performance declines, contact the after-sales service for battery replacement.
Safety Usage for Power Supply
Connect the mower and/or its peripherals only to a power supply circuit protected by a Residual Current Device (RCD) with
a rated tripping current of 30 mA or less.
Always disconnect the power supply and power off the mower before:
• Clearing blockages around the power cable
• Cleaning or performing any maintenance on the mower
• Checking for damage after the mower hits an obstacle
Use the power supply only with the original Navimow-approved battery. Using non-original batteries may result in fire, electric
shock, or personal injury. Do not charge the mower if the battery is leaking. Disconnect charger and contact service agent or
manufacturer.
Regular Inspection
Regularly inspect the power cable, plug, enclosure, extension cable, and all related components. If any damage, wear, or signs
of aging are found, stop using the power supply immediately.
WARNING
• DO NOT operate the mower with a damaged power cable. If the cable is damaged, have it replaced by the manufacturer, an
authorized service agent, or qualified personnel.
• Replace any defective extension cable only with Navimow-approved cables.
• Keep all extension cables away from moving or hazardous parts to prevent damage and potential exposure to live conduc-
tors.
• DO NOT connect or touch damaged cords or extension cables before unplugging them. Damaged parts may expose
electrical components and cause electric shock.
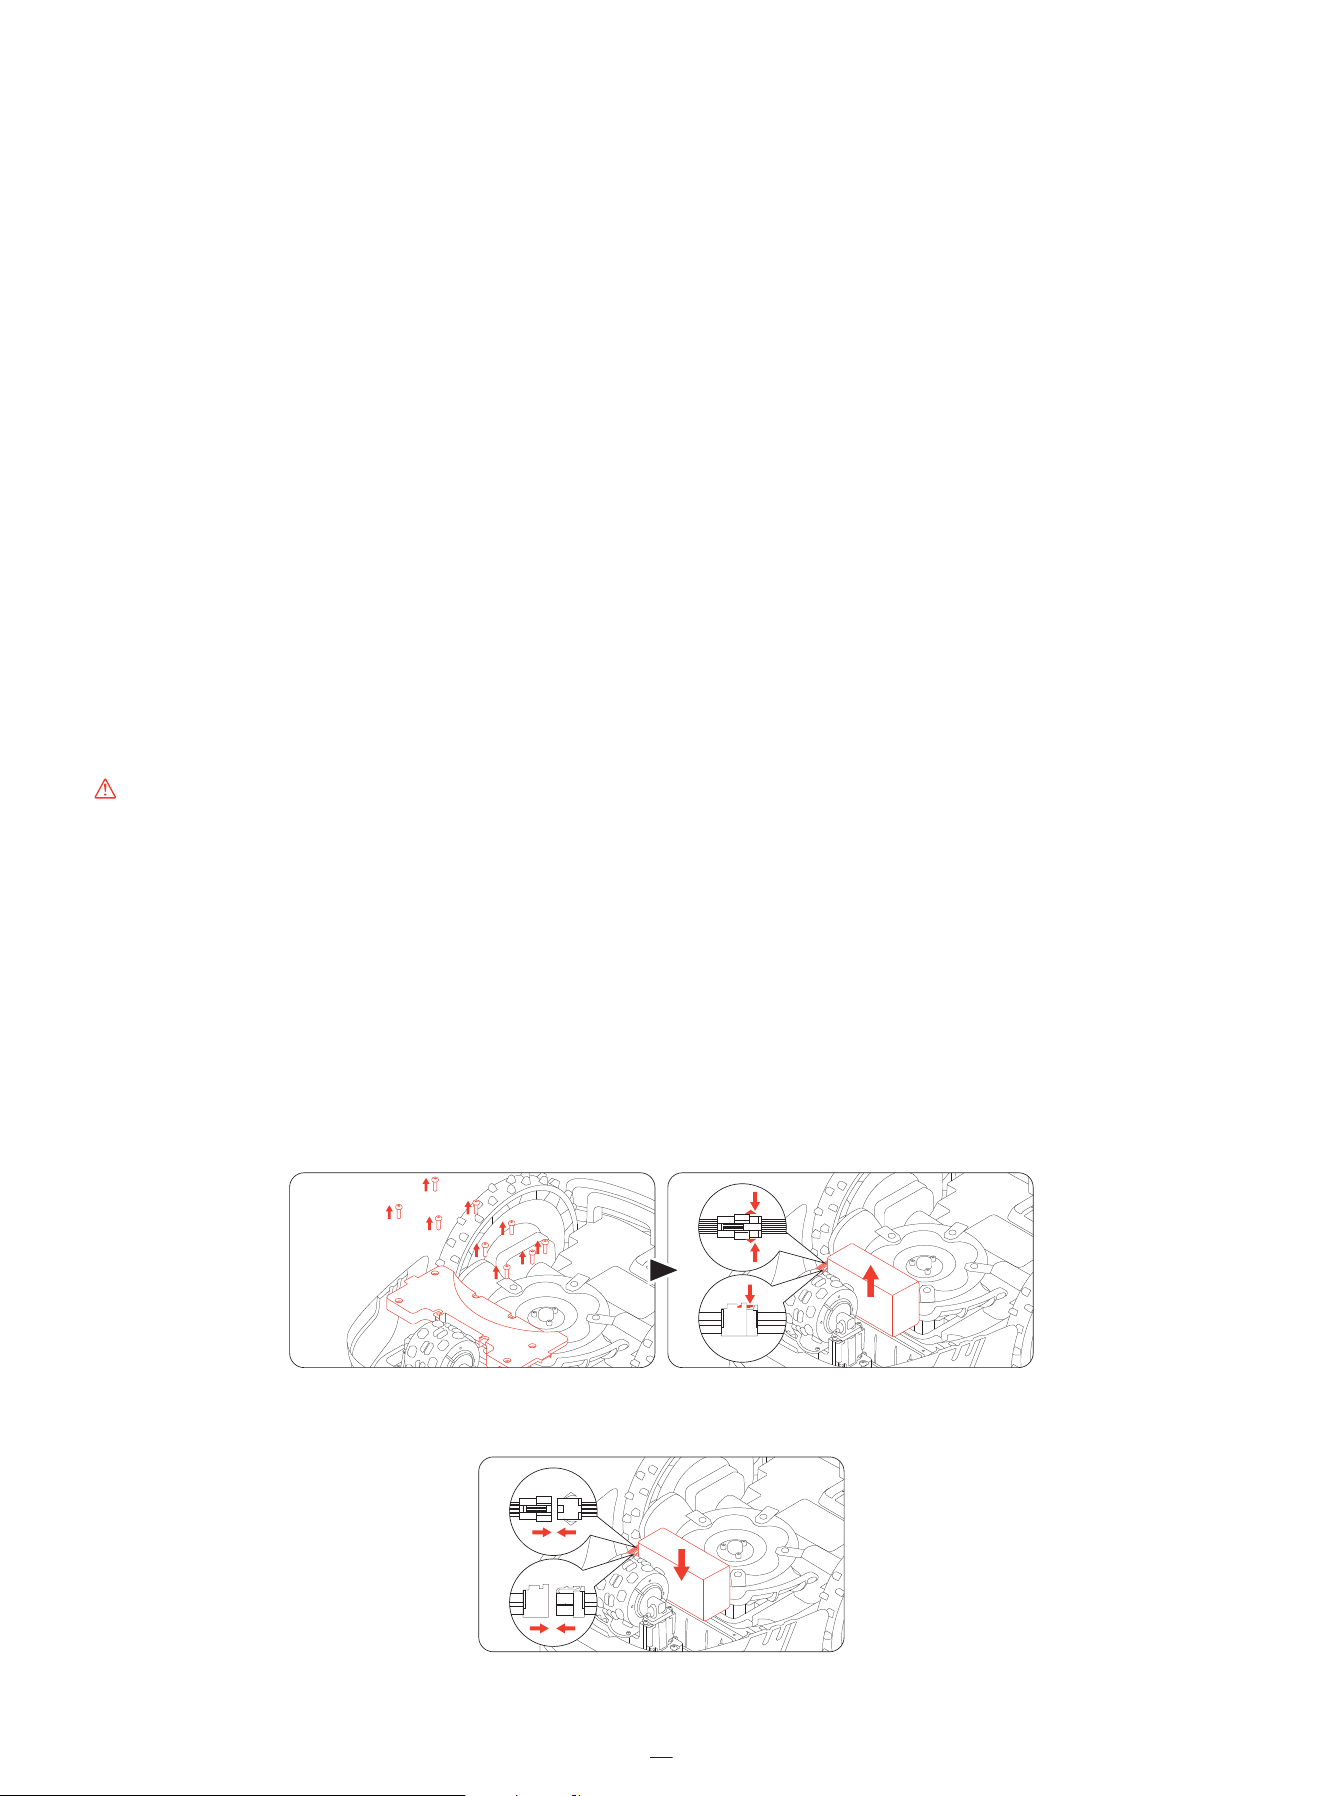
Replace Battery
NOTE: Use the battery model which matches the original battery capacity. Power off the mower before replacing the battery.
To remove the old battery, loosen the screws and unplug the cords.
To install the new battery, connect the cords and put the battery inside its slot.
NOTE: Make sure the cords are tightly connected.
29

NOTE: Check the blades for sharpness and replace them if necessary. check and clean the camera lens to ensure proper
functionality.
NOTE: Install all the screws back and secure them tightly.
5.5 Storage and Restorage
For optimal performance and service life, store your mower during the winter or during extended periods of non-use.
Storage Conditions
• Store the mower indoors in a cool, dry place. Avoid direct sunlight and extreme temperatures.
• Keep the mower, charging station, and power supply away from heat sources (such as stoves or radiators) and chemicals
or corrosive substances.
• Protect the power supply from moisture and place it in a well-ventilated area.
Winter Storage�
Follow the instructions below to store your mower before winter.
1. Uninstall the Navimow Garage (if already installed) from the charging station and put it away.
2. Charge the mower to at least 85% of battery, and put it in hibernation. Go to Mine > Help and feedback > Winter
storage > Hibernate your mower.
3. Unplug the charging station, and unscrew the ground screws. Mark its location.
4. (If already installed) Cover up the antenna if it is installed on a wall or roof. Remove the antenna head if it is installed on
the ground.
5. Remove the blades and clean the mower thoroughly. Refer to 5.1 Cleaning and 5.2 Replace Blades.
6. Pack the mower, the charging station, and all the cables into the box. Store them indoors.
Spring Restorage
Follow the instructions below to restore your mower in spring.
1. Remove all coverings from the mower.
2. Ensure that the charging station is clean and free from dirt.
3. Reconnect the cables that were disconnected during the winter. Check the cables for any damage or breaks and repair as
needed.
4. Finally, power on the mower and test if the mower is bound to the app and works properly.
5. Reinstall the charging station. If it is placed differently from the previous year, update its location from Home > Settings >
Relocate charging station.
30

6. Warranty and Compliance
6.1 Sensors and Interfaces
The mower is equipped with external sensors that ensure accurate operation, navigation, and safety. All data collected by
these sensors is used strictly for operational purposes and is not shared with third parties.
RTK (Real-Time Kinematic) module
Used for precise positioning of the mower. GPS location data is only collected when the Anti-theft feature is enabled. No
location data is transmitted or stored during other operation.
Front-facing camera sensor
Used for obstacle detection and positioning. The camera sensor does not record or store video, and it is solely used in
real-time to the mower's navigation system.
Lift sensor
Used to detect if the mower is lifted off the ground and immediately stops rotating the blades to prevent injury. This sensor
does not collect or store any user data.
IMU (Inertial Measurement Unit)
Used to determine the mower's orientation and motion for accurate navigation. It functions internally and does not access
or transmit any personal or location data.
The following network interfaces and services of the device are enabled by default:
- Bluetooth interface and customized Bluetooth service, used for network configuration and equipment control via the App.
- Wi-Fi interface, used for equipment network connection.
- RTK interface, used for equipment positioning.
31

32
6.2 Limited Warranty
Limited Warranty and Arbitration Agreement
NOTICE: PLEASE READ THIS LIMITED WARRANTY AND ARBITRATION AGREEMENT AND KEEP THIS AGREEMENT FOR FUTURE
REFERENCE. THIS AGREEMENT CONTAINS LIMITED WARRANTY CLAUSES AND ARBITRATION CLAUSES WITH RESPECT TO
NAVIMOW(“PRODUCT”) AND ANY AND ALL TRANSACTION AND CLAIM RELATED TO AND/OR ARISING OUT OF THE
PRODUCT.
THIS IS A BINDING LEGAL AGREEMENT (“AGREEMENT”) BETWEEN YOU (EITHER AN INDIVIDUAL OR ENTITY) AND THE
MANUFACTURER (“NAVIMOW”) AND ITS AFFILIATES (INCLUDING BUT NOT LIMITED TO THEIR PARENT COMPANY,
SUBSIDIARY, AFFILIATED COMPANIES, PREDECESSOR, SUBSEQUENT COMPANY, ADMINISTRATORS, SUCCESSORS, ASSIGNS,
OFFICERS, DIRECTORS, MANAGERS, EMPLOYEES, MEMBERS, AND SHAREHOLDERS) (COLLECTIVELY “NAVIMOW PARTIES”),
NAVIMOW DEALERS (AS DEFINED BELOW) AND THEIR AFFILIATES (COLLECTIVELY “NAVIMOW DEALERS”).
PURCHASING THE PRODUCT, OPENING THE PRODUCT PACKAGING, USING THE PRODUCT, RETAINING THE PRODUCT,
EXPLOITING THE BENEFITS OF THIS AGREEMENT, OR ELECTRONIC ACCEPTANCE OF THIS AGREEMENT SHALL CONSTITUTE
ACCEPTANCE OF THIS AGREEMENT. IN AN EVENT YOU, AS A PARENT(S) OR LEGAL GUARDIAN(S), PURCHASE THIS PRODUCT
ON BEHALF OF OR FOR YOUR CHILDREN, YOU HEREBY CONSENT TO AND APPROVE IN ALL RESPECTS THE TERMS AND
CONDITIONS OF THE AGREEMENT AND AGREE THAT BOTH YOU AND YOUR CHILDREN SHALL BE BOUND BY THIS
AGREEMENT. YOU ACKNOWLEDGE AND AGREE THAT YOU RECEIVE SUFFICIENT NOTICE OF THIS AGREEMENT AND YOU
AGREE TO THIS AGREEMENT.
THE AGREEMENT ONLY AND EXCLUSIVELY APPLIES TO THE PRODUCT DISTRIBUTED AND/OR SOLD BY AND/OR THROUGH
NAVIMOW PARTIES OR NAVIMOW DEALERS IN AUSTRALIAN AND NEW ZEALAND MARKETS. IF YOU ARE NOT A RESIDENT IN
AUSTRALIAN AND NEW ZEALAND MARKETS, PLEASE CONTACT US BEFORE USE FO THE PRODUCT AS YOU MAY NOT HAVE A
WARRANTY OR HAVE A DIFFERENT WARRANTY THAN THE ONE PROVIDED HEREIN.
THE LIMITED WARRANTY CAN ALSO BE FOUND ONLINE AT: navimow.com
Navimow Parties and you agree that any dispute, controversy or claim arising out of, relating to or in connection with this
agreement, the limited warranty, the sale, condition or performance of the product, whether based in contract, tort, fraud,
misrepresentation, or any other legal theory at law or in equity, including but not limited to any claims for death, injury or
property damages, shall be submitted to binding arbitration upon the request of either party upon the service of that
request on the other party. This arbitration clause shall apply all the persons in privity with you, including your family
members, beneficiaries, and assigns. The arbitration shall be conducted by China International Economic and Trade
Arbitration Commission (CIETAC) in accordance with its rules of in effect at the time of applying for arbitration. The place of
arbitration shall be Beijing. Navimow Parties and you further acknowledge and confirm that the arbitral award shall be final
and binding upon all Parties, not subject to any appeal; and shall deal with the question of costs of arbitration and all
matters related thereto. Enforcement of the award rendered by the arbitrators may be entered into by any court having
jurisdiction thereof. Navimow Parties and you agree that this Agreement will be governed by and construed, interpreted,
and enforced in accordance with the laws of the People’s Republic of China with the Hong Kong Special Administrative
Region, Macau Special Administrative Region, and Taiwan being excluded.
YOU WAIVE THE RIGHT TO PARTICIPATE IN CLASS ACTIONS ARISING FROM OR RELATING TO ANY AND ALL CLAIMS AND
DISPUTES WITH NAVIMOW PARTIES. YOU AGREE TO ARBITRATE SOLELY ON AN INDIVIDUAL BASIS, AND THAT THIS
AGREEMENT DOES NOT PERMIT CLASS ARBITRATION OR ANY CLAIMS BROUGHT AS A PLAINTIFF OR CLASS MEMBER IN ANY
CLASS OR REPRESENTATIVE ARBITRATION PROCEEDING. THE ARBITRAL TRIBUNAL MAY NOT CONSOLIDATE MORE THAN
ONE PERSON'S CLAIMS, AND MAY NOT OTHERWISE PRESIDE OVER ANY FORM OF A REPRESENTATIVE OR CLASS
PROCEEDING. IN THE EVENT THE PROHIBITION ON CLASS ARBITRATION IS DEEMED INVALID OR UNENFORCEABLE, THEN
THE REMAINING PORTIONS OF THE ARBITRATION AGREEMENT WILL REMAIN IN FORCE.

Product covered by this warranty Limited Warranty Period
i206 AWD, i208 AWD, i210 AWD 3 years
Battery packs and power adapters 2 years
33
“LIMITED WARRANTY AND ARBITRATION AGREEMENT” clause shall survive upon termination or expiration of this agreement
and/or limited warranty or in an event that this agreement and/or the limited warranty is held as void, avoidable, invalid, or
unenforceable, either in whole or part, by a competent adjudication institution with actual authority and jurisdiction over
this matter.
Opt-Out
YOU MAY OPT OUT OF THIS DISPUTE RESOLUTION PROCEDURE BY PROVIDING NOTICE TO NAVIMOW AND OTHER
NAVIMOW PARTIES NO LATER THAN THIRTY (30) CALENDAR DAYS AFTER THE DATE OF THE FIRST CONSUMER PURCHASER’S
PURCHASE OF THE PRODUCT. TO OPT OUT YOU MUST SEND NOTICE BY E-MAIL TO NAVIMOW THROUGH CONTACT US
E-MAIL, WITH THE SUBJECT LINE: “ARBITRATION OPT OUT.” THE OPT-OUT NOTICE BY E-MAIL MUST INCLUDE (A) YOUR
NAME, EMAIL ADDRESS, MAILING ADDRESS, AND PHONE NUMBER; (B) THE DATE ON WHICH THE PRODUCT WAS
PURCHASED; (C) THE PRODUCT MODEL NAME OR MODEL NUMBER; AND (D) THE SERIAL NUMBER.
ALTERNATIVELY, YOU MAY OPT OUT BY SENDING AN ELECTION TO OPT OUT LETTER TO NAVIMOW AT THE ADDRESS OF
CONTACT US VIA CERTIFIED MAIL WITHIN THIRTY (30) CALENDAR DAYS FROM THE DATE OF THE FIRST END USER’S
PURCHASE OF THE PRODUCT FROM NAVIMOW DEALER. THE OPT-OUT LETTER SHALL CONTAIN THE FOLLOWING
INFORMAITON: (A) YOUR NAME, EMAIL ADDRESS, MAILING ADDRESS, AND PHONE NUMBER; (B) THE DATE ON WHICH THE
PRODUCT WAS PURCHASED; (C) THE PRODUCT MODEL NAME OR MODEL NUMBER; (D) THE SERIAL NUMBER; AND (E) AN
STATEMENT AS FOLLOWS: THE ABOVE CONSUMER ELECTS TO OPT OUT THE DISPUTE RESOLUTION PROCEDURE AS
PROVIDED BY THIS LIMITED WARRANTY, THESE ARE THE ONLY TWO EFFECTIVE WAYS TO OPT OUT THIS DISPUTE
RESOLUTION PROCEDURE. ELECTION TO OPT OUT THIS DISPUTE RESOLUTION PROCEDURE WILL NOT AFFECT THE
COVERAGE OF THE LIMITED WARRANTY IN ANY WAY, AND YOU WILL CONTINUE TO ENJOY THE BENEFITS OF THE LIMITED
WARRANTY
WARNING
USE OF THE PRODUCT BY A PERSON WHO HAS NOT RECEIVED SUFFICIENT TRAINING, DOES NOT POSSESS NECESSARY
EXPERIENCE AND SKILLS, OR AGAINST, IN VIOLATION OF OR NOT ACCORDING TO THE USER MANUAL, INSTRUCTIONS,
GUIDANCE AND/OR SAFETY WARNINGS MAY CAUSE SEVERE BODILY INJURY OR EVEN DEATH OR PROPERTY DAMAGES.
PLEASE READ EACH AND EVERY SECTION OF THIS DOCUMENT CAREFULLY BEFORE USE OF THE PRODUCT. YOU ARE
ENCOURAGED TO CONSULT WITH YOUR PROFESSIONALS AND ADVISORS REGARDING THE INFORMATION PROVIDED
HEREIN, ESPECIALLY THOSE RELATED TO THE SAFETY AND YOUR LEGAL RIGHTS AND DUTIES.
A PARENTAL OR LEGAL GUARDIAN’S DECISION TO ALLOW CHILD TO USE, OPERATE AND/OR RIDE ON THE PRODUCT SHALL
BE BASED ON THE CHILD’S MATURITY, SKILL AND ABILITY TO FOLLOW RULES (INCLUDING BUT NOT LIMITED TO THE
WARNINGS, SAFETY RELATED INFORMATION PROVIDED IN THE USER MANUAL). CHILDREN SHALL NOT BE LEFT
UNATTENDED WHILE USING, OPERATING, AND/OR RIDING ON THE PRODUCT. PARENTAL OR LEGAL GUARDIAN
SUPERVISION IS REQUIRED AT ALL TIMES. PROTECTIVE GEAR AND PROPER HELMET MUST BE USED WHILE USING,
OPERATING, AND/OR RIDING ON THE PRODUCT.
1. Limited Warranty
This Limited Warranty covers only defects of any material or quality of the Product and components when the Product and
components thereof are being used under normal and ordinary conditions. In the event that a defect covered by this
Limited Warranty occurs, Navimow and/or other Navimow Parties in its sole discretion will repair or replace the defective
Product or components thereof in accordance with this Limited Warranty, or the date it was activated (the later date
prevails) from either of Navimow, Navimow’s authorized reseller, Navimow’s authorized distributor, or an authorized Dealer
(each a “Navimow Dealer” or collectively the “Navimow Dealers”).

Blades are seen as disposable and are not covered by this warranty.
THIS LIMITED WARRANTY HEREIN IS THE ONLY EXPRESS WARRANTY APPLICABLE TO PRODUCT AND ITS COMPONENT
PARTS, ACCESSORIES, AND SERVICE REPAIR. NAVIMOW AND NAVIMOW PARTIES DISCLAIM ALL OTHER EXPRESS
WARRANTIES. NAVIMOW AND OTHER NAVIMOW PARTIES LIMIT THE DURATION AND REMEDIES OF ALL IMPLIED
WARRANTIES, INCLUDING WITHOUT LIMITATION TO THE WARRANTIES OF MERCHANTABILITY AND FITNESS FOR A
PARTICULAR PURPOSE, WHETHER ARISING BY LAW, COURSE OF DEALING, COURSE OF PERFORMANCE, USAGE OF TRADE
OR OTHERWISE, TO THE DURATION OF THIS EXPRESS LIMITED WARRANTY. THIS LIMITED WARRANTY DESCRIBES THE
SERVICE AVAILABLE TO YOU IN THE EVENT YOUR PRODUCT REQUIRES WARRANTY SERVICE. THIS LIMITED WARRANTY IS AN
ADDITIONAL WARRANTY, THAT DOES NOT IN ANY WAY AFFECT OR LIMIT THE STATUTORY RIGHTS YOU MAY HAVE AS A
CONSUMER, FOR EXAMPLE, WITH RESPECT TO CONFORMITY, AND YOU MAY HAVE ADDITIONAL PROTECTIONS UNDER
YOUR LOCAL LAWS.
2. Limited Warranty Service Process
Navimow’s online services are available at navimow.com. During your use of the Product, if you believe the Product or its
component is defective and/or does not work correctly. PLEASE IMMEDIATELY STOP USING THE PRODUCT, AND STORE THE
PRODUCT PROPERLY. YOUR CONTINUED USE OF THE PRODUCT UNDER SUCH CIRCUMSTANCE MAY CAUSE SEVERE BODILY
INJURY OR EVEN DEATH TO YOU OR THE OTHERS AND/OR CAUSE PROPERTY DAMAGES. Thereafter, please immediately
contact Navimow at [email protected]. or from Live Chat via the app Navimow’s technical support
personnel are available to assist you online in diagnosing the defect, and if any, and providing further instructions. In the
event the warranty services are required, please prepare for the following materials, including (i) proof of the original
purchase of the Product, (ii) the Product’s serial number, and (iii) a description of the defect if applicable. Upon the
verification of your eligibility for the Limited Warranty protection and/or services, you should provide your name, email
address, mailing address, and contact phone number to us, we will guide you to get our service.
If you want to return the defective unit to service, you shall be responsible for the cost of shipping and risk of loss and
damage that may occur during the shipment from you to Navimow and from Navimow to you. You must include your
defective Product or component within the original or Navimow-approved packaging, which will be provided at your cost,
for shipment of the Product to Navimow. You shall defend, indemnify, and hold Navimow harmless any loss and/or
damages that may be caused by your improper packaging or shipment of the Product or component to Navimow.
An authorized service provider or Navimow Dealer will inspect your returned Product. If Navimow reasonably determines
that the problem is not covered by the Limited Warranty, Navimow will notify you and inform you of service or replacement
alternatives that are available to you on a fee basis, or Navimow will return your Product to you unrepaired, and in such
instance, you will be responsible for the cost of shipping and insurance for shipment of your Product from Navimow to you.
In an event that any service is not covered by the limited warranty and you reject a paid service recommended by Navimow
Parties and/or Navimow Dealer, you understand and acknowledge that failure to repair and/or services the Product may
increase the risk of fall and/or Product failure which may result in severe property damages, severe bodily injury or death,
and you agree that this is your informed consent to take such risk.
For a return eligible for the warranty protection and/or services, Navimow will serve defective Products with new or
reconditioned parts of the same or similar style at no cost to you for the service. Parts replaced by Navimow will be retained
by and become the property of Navimow. In such a situation, Navimow will pay reasonable return shipping charges for the
return of the Product to you.
34

3. Limited Warranty Eligibility
3.1 Your service request must be received by Navimow within the Limited Warranty Period as described above, and
Navimow must receive your Product in accordance with the Limited Warranty Service Process defined above.
3.2 Your Product must be purchased from an authorized Navimow Dealer.
3.3 You must provide the original purchase receipt.
3.4 Your Product must have serial number legible, unobscured, untampered, and unmodified.
3.5 All tamper-resistant seals must be intact, in place, and unmodified.
4. Limited Warranty Exclusions
This Limited Warranty describes the service available to you if your product requires warranty service, and you may have
additional protections under your local laws. This Limited Warranty does not cover and excludes damage to your product or
any component thereof caused by:
4.1 Abuse, misuse, recklessness, negligence, or commercial use.
4.2 Improper charging, storage, maintenance, or operation of the Product not in compliance with instructions or limitations
as provided in the user materials.
4.3 Use of the Product not in compliance with applicable laws and regulations.
4.4 Use of the Product by persons with inadequate experience.
4.5 Accident, collision, fire damage, water damage, chemical damage, use of the product outside of the product’s working
temperature range, high-pressure water spray, earthquake, dropping.
4.6 Modifications to mechanical parts, modification of electronic parts, or modifications to software embedded in the
Product. 4.7 Service, repair, and maintenance by unauthorized providers.
4.8 Cosmetic damages.
4.9 Use of the Product with third-party product, component, or accessory.
4.10 The normal deterioration of wear and tear parts.
4.11 Use of the Product with overdue wear and tear parts.
5. LIABILITY DISCLAIMER AND LIMITATION
5.1 NAVIMOW PARTIES DO NOT ASSUME OR AUTHORIZE ANYONE TO ASSUME ON ITS BEHALF, ANY OTHER OBLIGATION OR
LIABILITY IN CONNECTION WITH THE PRODUCT, ITS COMPONENT PARTS, ACCESSORIES, SERVICE REPAIR, OR THIS
LIMITED WARRANTY.
5.2 NAVIMOW PARTIES AND NAVIMOW DEALERS ARE NOT RESPONSIBLE FOR ANY LOSS OF USE OF A PRODUCT, ITS
COMPONENT PARTS, ACCESSORIES, OR FOR ANY INCONVENIENCE OR OTHER LOSS OR DAMAGE WHICH MIGHT BE
CAUSED FROM ANY DEFECT IN A PRODUCT, ITS COMPONENT PARTS, ACCESSORIES, SERVICE REPAIR, OR FOR ANY OTHER
INCIDENTAL OR CONSEQUENTIAL DAMAGES YOU MAY HAVE AS A RESULT OF ANY DEFECT IN A PRODUCT, ITS
COMPONENT PARTS, ACCESSORIES, OR SERVICE REPAIR. SOME COUNTRIES DO NOT ALLOW THE EXCLUSION OR
LIMITATION OF INCIDENTAL OR CONSEQUENTIAL DAMAGES, SO THE ABOVE LIMITATION OR EXCLUSION MAY NOT
APPLY TO YOU TO THE EXTENT THAT IT IS DISALLOWED BY APPLICABLE LAW.
5.3 IN NO EVENT, NAVIMOW PARTIES AND NAVIMOW DEALERS’ TOTAL AND AGGREGATE LIABILITY FOR ALL CLAIMS UNDER
ANY AND ALL APPLICABLE LAW OR THEORY, JOINTLY OR SEVERALLY, ARISING OUT OF OR RELATED TO THE PURCHASE
OF THE PRODUCT, USE OF THE PRODUCT, BREACH OF CONTRACT, TORTS (INCLUDING NEGLIGENCE) OR OTHERWISE,
EXCEEDS THE DUTY TO REPAIR OR REPLACE ANY DEFECTIVE PRODUCT, FURTHER SUBJECT TO NAVIMOW'S SOLE AND
EXCLUSIVE DISCRETION. IN NO EVENT SHALL NAVIMOW PARTIES AND NAVIMOW DEALERS BE LIABLE TO ANY PERSON
FOR CONSEQUENTIAL, INDIRECT, INCIDENTAL, SPECIAL, EXEMPLARY, PUNITIVE OR ENHANCED DAMAGES ARISING OUT
OF, OR RELATING TO, AND/OR IN CONNECTION WITH THE PURCHASE OF THE PRODUCT, ANY BREACH OF THIS
AGREEMENT OR MANUFACTURER’S DUTIES REGARDLESS OF (A) WHETHER SUCH DAMAGES WERE FORESEEABLE, (B)
WHETHER OR NOT NAVIMOW OR OTHER NAVIMOW PARTIES WERE ADVISED OF THE POSSIBILITY OF SUCH DAMAGES,
AND (C) THE LEGAL OR EQUITABLE THEORY (CONTRACT, TORT OR OTHERWISE) UPON WHICH THE CLAIM IS BASED
UNLESS SUCH LIMITATIONS AND EXCLUSIONS ARE PROHIBITED BY APPLICABLE LAW. THE FOREGOING LIMITATIONS OR
EXCLUSIONS APPLY EVEN IF AN AGGRIEVED CUSTOMER OR ANY OTHER PERSON’S (WHO MIGHT HAVE RIGHT OR CLAIM
UNDER THIS AGREEMENT BY OPERATION OF LAW OR EQUITY) REMEDIES UNDER THIS AGREEMENT FAIL THEIR
ESSENTIAL PURPOSE. IN THE EVENT SOME COUNTRIES DO NOT ALLOW THE EXCLUSION OR LIMITATION OF CERTAIN OR
ALL OF THE FOREGOING DAMAGES, SO TO THE EXTENT THAT SUCH LIMITATIONS OR EXCLUSIONS ARE NOT ALLOWED
35

BY LAW, THEY MAY NOT APPLY TO YOU. SOME COUNTRIES DO NOT ALLOW THE EXCLUSION OR LIMITATION OF
INCIDENTAL OR CONSEQUENTIAL DAMAGES, SO TO THE EXTENT THAT SUCH LIMITATIONS OR EXCLUSIONS ARE NOT
ALLOWED BY LAW, THE ABOVE LIMITATION OR EXCLUSION MAY NOT APPLY TO YOU.
5.4 To the extent permitted by applicable law, NAVIMOW PARTIES and NAVIMOW DEALERS hereby DISCLAIM any liability and
thereby shall not be responsible for any damages, including but not limited to death, bodily injury, or damages to
property, arising out of or related to any conduct (including misconduct), action, inaction, act (including failure to act),
omission or negligence by any authorized or unauthorized dealer, distributor, wholesaler, retailer, service provider or
third party that involves into the distribution of Product or the services thereto. To the extent permitted by applicable
law, the explicit representations and warranties, if any, provided herein, shall be the only warranties and representations
made by NAVIMOW PARTIES to YOU, any consumer, and/or end-user. and NAVIMOW PARTIES shall not be responsible
for any other warranties and/or representations that may be given and/or provided by another person unless NAVIMOW
PARTIES have in a written form explicitly authorized such additional warranty and/or representation to be given to
consumer or end-user.
6. Claims, Dispute Resolution and Arbitration
THE CLAUSES CONTAINED HEREIN ARE LEGALLY BINDING BETWEEN YOU (EITHER AN INDIVIDUAL OR ENTITY), AND
NAVIMOW B.V., ITS AFFILIATES, NAVIMOW PARTIES AND NAVIMOW DEALERS. THE CLAUSES CONTAINED HEREIN MAY
AFFECT YOUR RIGHTS, AND IT IS YOUR RESPONSIBILITY TO READ THE FOLLOWING SECTIONS. YOU CAN OPT OUT OF THE
AGREEMENT WITHIN 30 CALENDAR DAYS OF THE FIRST CONSUMER PURCHASE BY EMAILING [email protected] AND
PROVIDING THE APPLICABLE INFORMATION. FOR MORE DETAILS, PLEASE SEE SECTION 6.2.
6.1 Binding Arbitration EN Navimow Parties, Navimow Dealers and you agree that any dispute, controversy or claim arising
out of, relating to or in connection with this agreement, the limited warranty, the sale, condition or performance of the
product, whether based in contract, tort, fraud, misrepresentation, or any other legal theory at law or in equity, including
but not limited to any claims for death, injury or property damages, shall be governed by and construed in accordance
with the laws of the Netherlands with the exclusion of its conflicts of law provisions.
Any disputes arising from, out of, or in connection with this Agreement shall be settled through friendly consultations
between the Parties. In case no resolution can be reached through consultations, the dispute shall be submitted to the
Arbitration Institute of the Netherlands (NAI) for arbitration which shall be conducted in accordance with its rules of in
effect at the time of applying for arbitration. Both Parties further acknowledge and confirm that the arbitral award shall
be final and binding upon all Parties, not subject to any appeal, and shall deal with the question of costs of arbitration
and all matters related thereto. The enforcement of the arbitral award shall be conducted by a court of competent
jurisdiction.
Further the Parties agree that:
i. The seat of the arbitration shall be Amsterdam, Netherlands.
ii. The Tribunal shall consist of 3 arbitrator(s).
iii. The language of the arbitration shall be English.
Section 6 “Claims, Dispute Resolution and Arbitration” clause shall survive upon termination or expiration of this
agreement and/or limited warranty or in an event that this agreement and/or the limited warranty is held as void,
avoidable, invalid, or unenforceable, either in whole or part, by a competent adjudication institution with actual authority
and jurisdiction over this matter.
6.2 Language
This Agreement may be translated into different languages. In the event of a conflict, the English version shall prevail and
control.
7. Intended third Party Beneficiary
(a) If a natural person receives a Product that is new as a gift from its original purchaser and this recipient does not become
a party to this Agreement, this recipient shall be deemed as an intended third-party beneficiary to this Agreement. (b) If (i) a
natural person is in the family or household of a purchaser of Product, (ii) it is reasonable to expect that such person may
use, consume, or be affected by the Product, and (iii)this person is not a party to this Agreement, this person shall be
deemed as an intended third-party beneficiary to this Agreement.
36

8. Statute of Limitation
The parties agree that any dispute, controversy, or claim arising out of, related to, or in connection with this Agreement, the
limited warranty, the sale, condition, or performance of the Product, whether based in contract, tort, fraud,
misrepresentation or any other legal theory at law or in equity, including but not limited to any claims for death, injury or
property damages, must be commenced within one year after the cause of action has occurred.
9. Severability
If any term, clause, or provision of this Agreement is invalid, illegal or unenforceable in any jurisdiction, such invalidity,
illegality, or unenforceability shall not affect any other term, clause or provision of this Agreement or invalidate or render
unenforceable such term, clause or provision in any other jurisdiction. Upon a determination that any term, clause, or
provision is invalid, illegal, or unenforceable, the parties shall negotiate in good faith, and if negotiation fails, the arbitral
tribunal may modify this Agreement to give effect to the original intent of the parties as closely as possible in order that the
transactions contemplated hereby be consummated as originally contemplated to the greatest extent possible.
37
6.3 Certifications
ThebatterycomplieswithUN/DOT38.3
Navimow is not responsible for any changes or modifications not expressly approved by Navimow. Such modifications could
void the user's authority to operate the equipment.
Model: Mi2706M, Mi2708M, Mi2710M
7.Contact Us
Manufacturer: Willand (Beijing) Technology Co., LTD.
Address: Room 203, A-1 Bldg. Zhongguancun Dongsheng Technology Park (Northern Territory), No. 66, Xixiaokou Rd, Haidian
Dist., Beijing, China.
Email: [email protected]
Website: navimow.com
Contact us if you experience issues relating to the operation, maintenance and safety, or errors/faults with your mower.