使用説明書
智能水波爐
ER-SD95HKW
型號
請仔細閲讀本説明書並妥善保管以供將來參考。
使用前請務必閲讀“安全注意事項”(第 2~5 頁)。
衷心感謝您購買本產品。

1
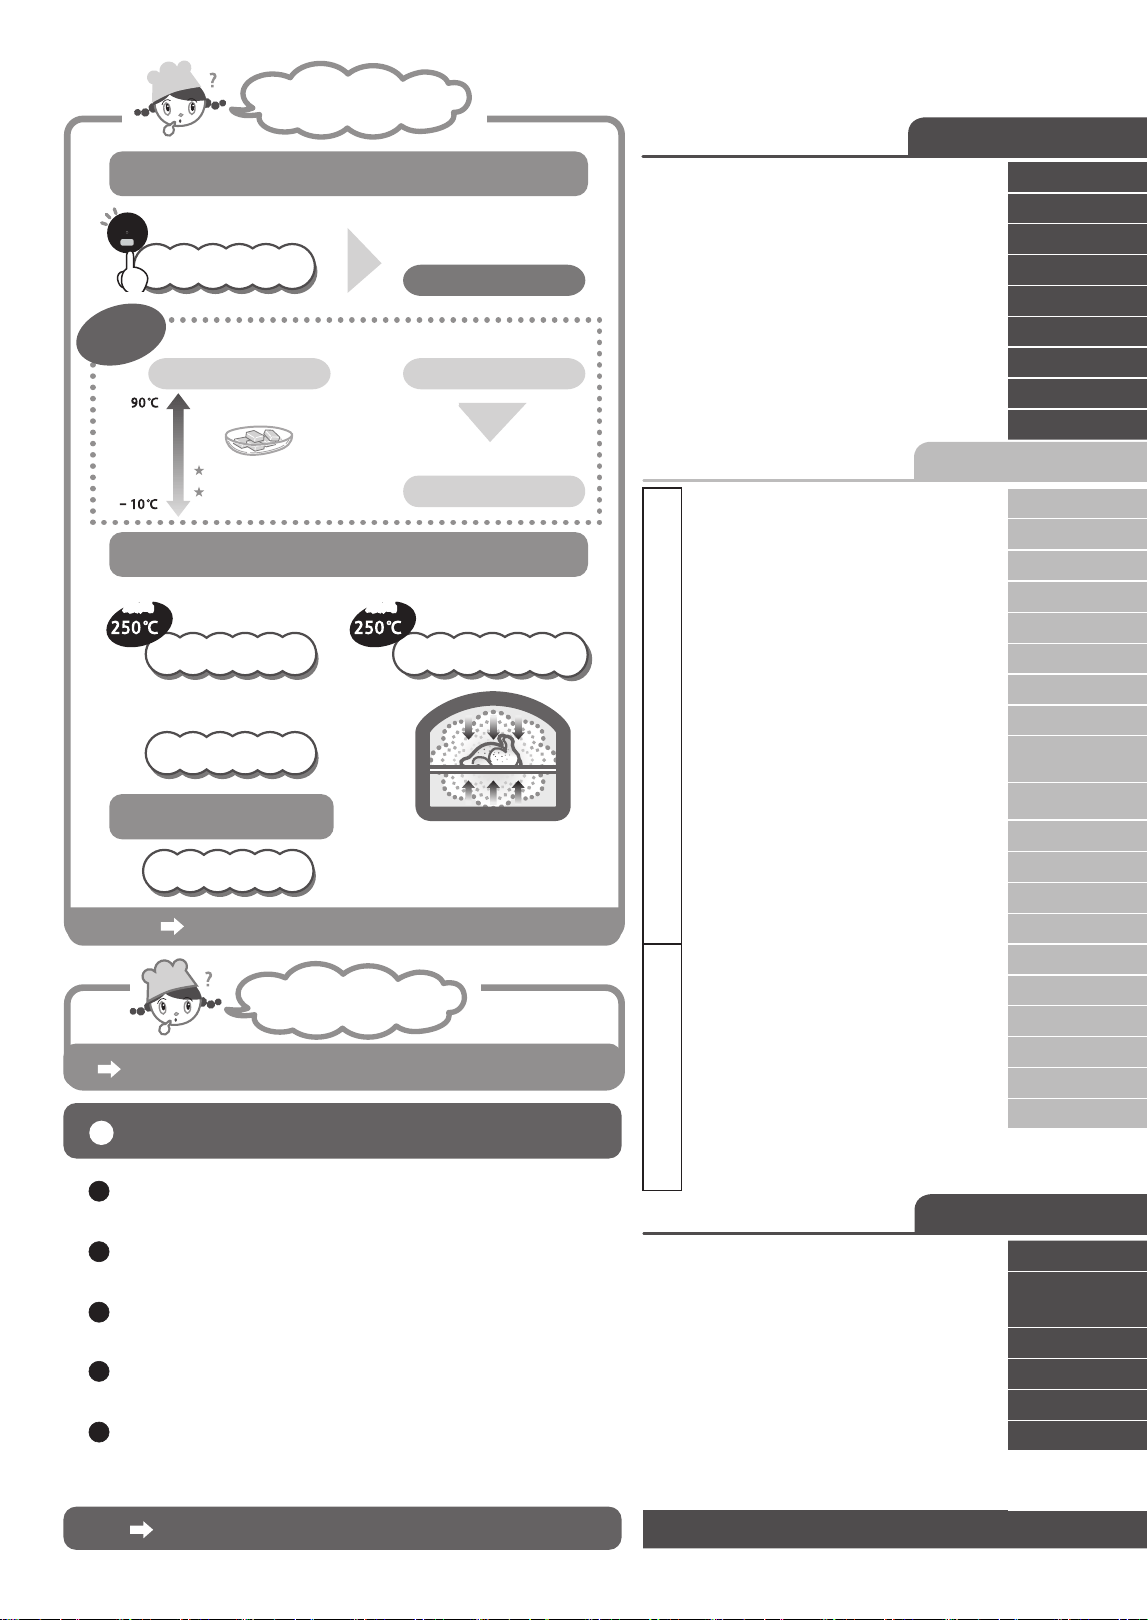
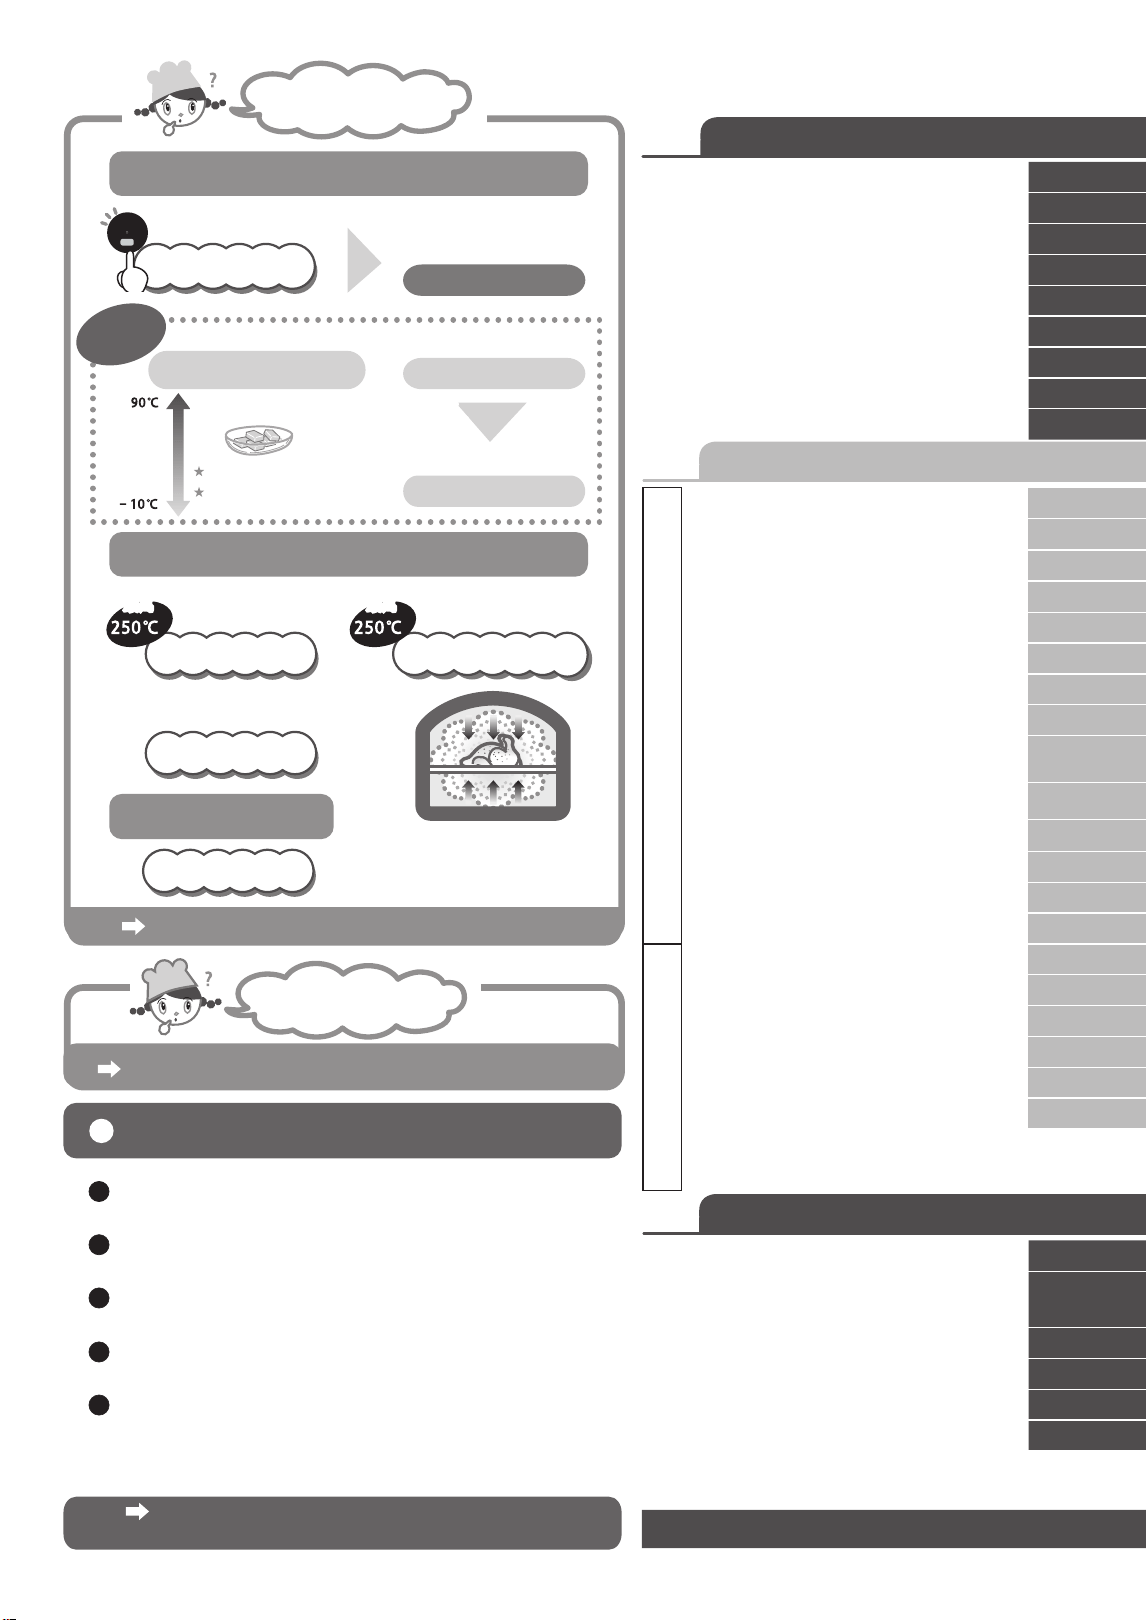
可以做什麼呢?
冷凍食品
蒸氣加熱
一鍵開始
加熱
通過旋鈕
選擇功能
蒸氣
1 米飯 2 菜餚
加熱 開始
確定
其它 ...
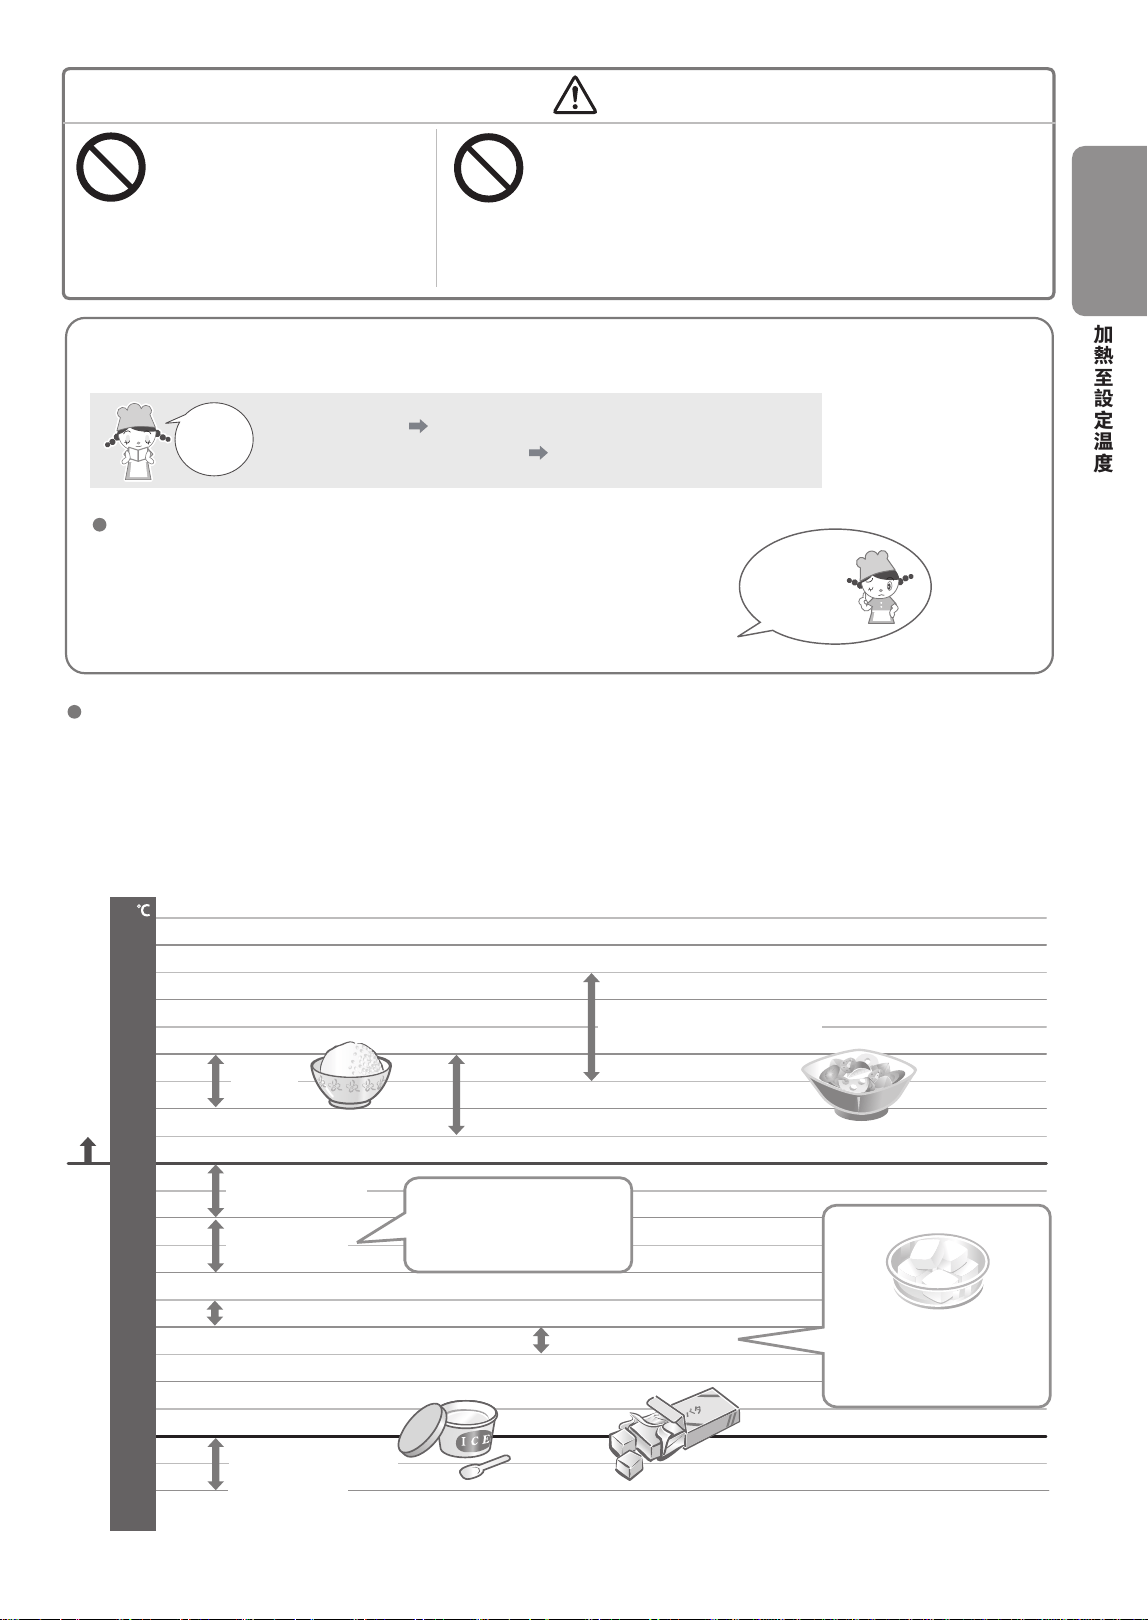
定温加熱
微波
蒸氣微波
可調節温度
快速濕潤
簡單方便
蒸氣
軟化牛油
軟化到適合食用
的程度
烤制
最高
最高
高温迅速烤制
上面的大火會微微烤
焦表面
大火蒸氣加熱
烤焗
過熱水蒸氣
燒烤
蒸氣
蒸氣
以低於 100℃的
温度進行烹飪
加熱的類型和機制 (P.12~13)
可使用的容器 / 不可使用的容器 (P.14~15)
可使用什麼容器?
經常使用的加熱方式
米飯和菜餚 ........................................... P.20~21
牛奶咖啡 ................................................ P.22~25
解凍肉類和魚類 .................................. P.22~27
燉菜 .......................................................... P.20~28
結合輸出功率、時間進行微波加熱 ... P.34
手動加熱的時間設置標準 ..............................................P.45
關於“加熱”的建議和指南 (P.19)
目錄
準備與確認
烹飪方法
安全注意事項
須知事項
加熱完成後延長加熱時間
各部位的名稱和作用
加熱的類型和機制
可使用的容器 / 不可使用的容器
自動加熱的注意事項和技巧
爐內乾燒、除臭
關於 ' 加熱 " 的建議和指南
2 ~ 5
6 ~ 7
7
8 ~ 11
12 ~ 13
14 ~ 15
16 ~ 17
18
19
20 ~ 21
22 ~ 23
24
25
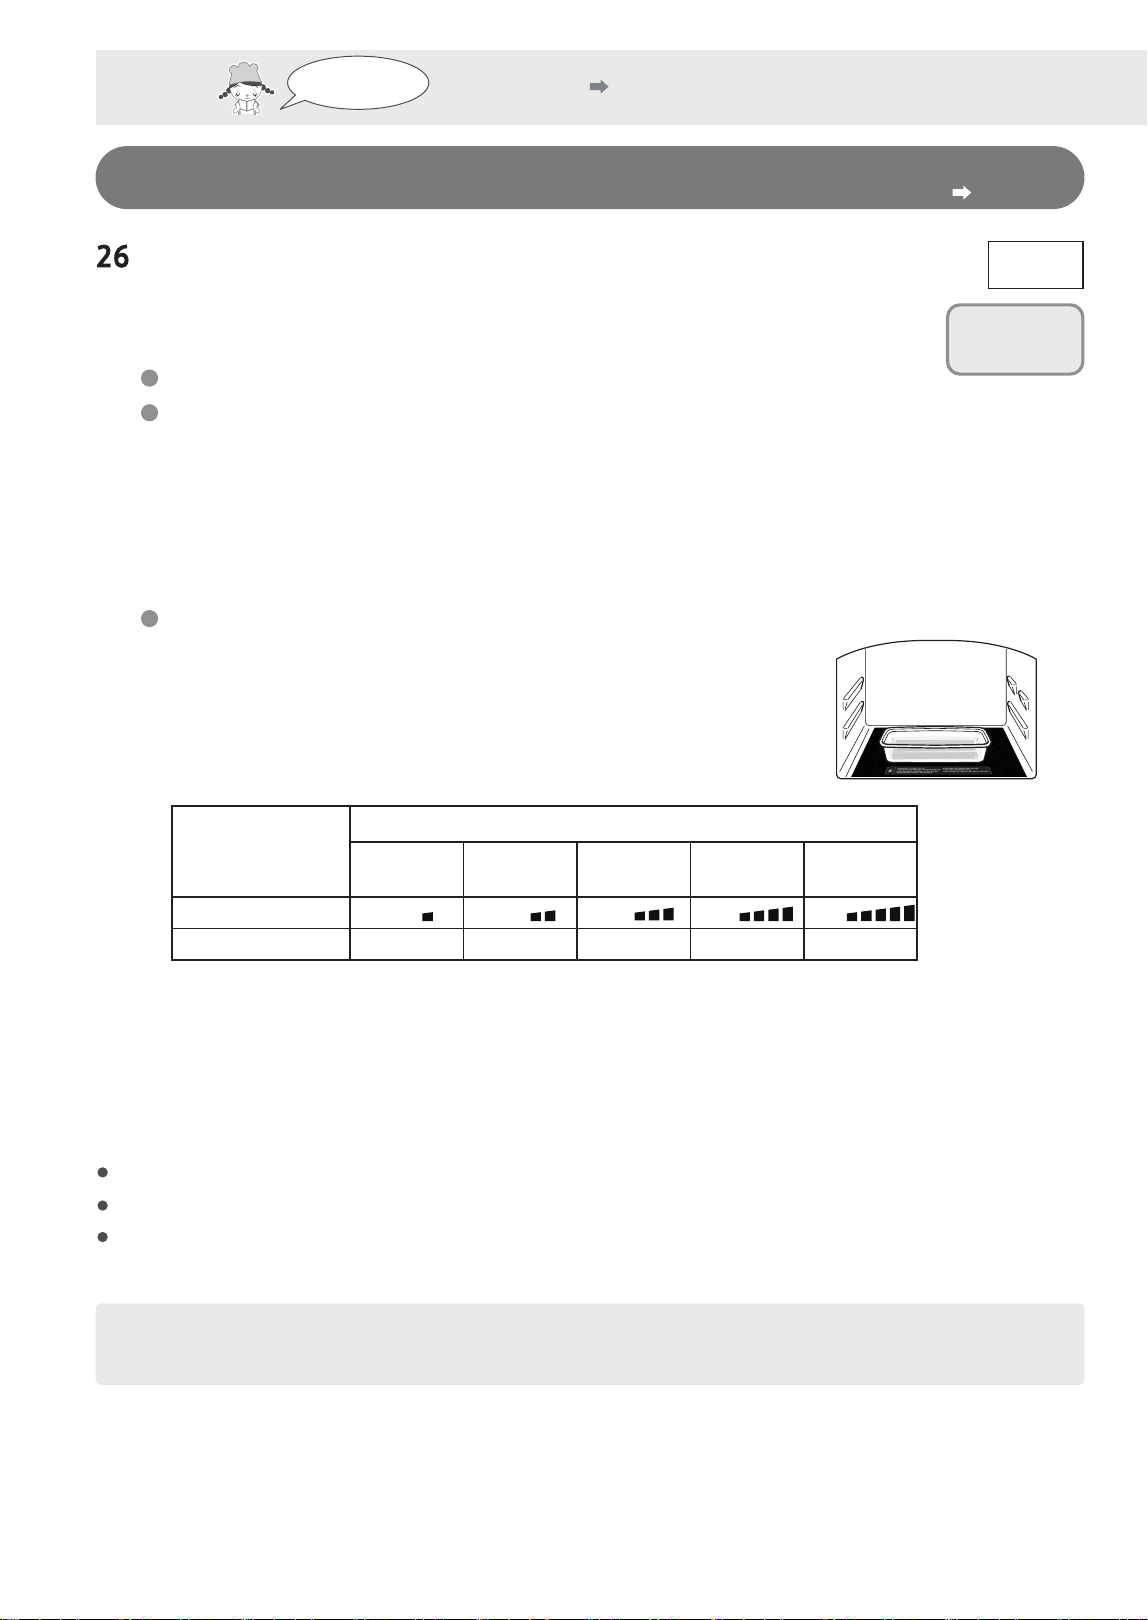
26
27
28
29
30
31
32
33
34 ~ 35
36 ~ 37
38 ~ 39
40
41
42 ~ 43
44
45
46 ~ 49
50
51
52 ~ 54
55
56 ~ 57
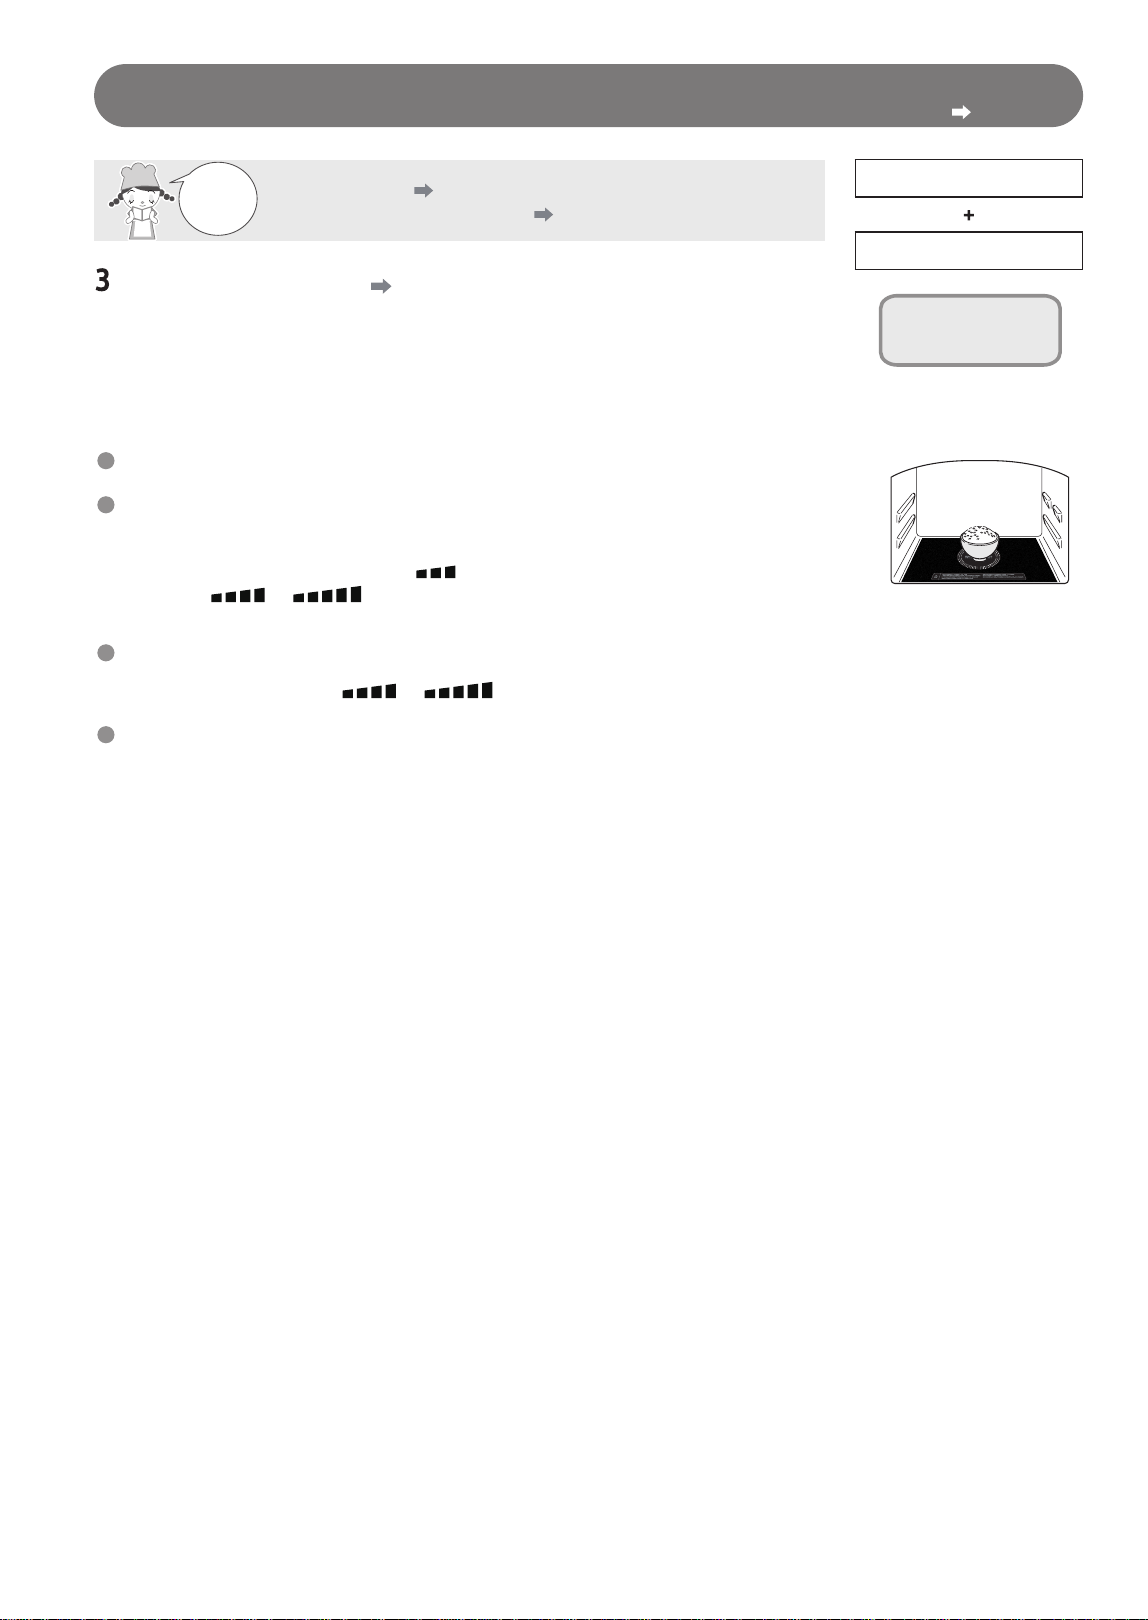
加熱米飯和菜餚
自動功能的使用方法
微波蒸氣加熱
牛奶咖啡
酒
解凍方式
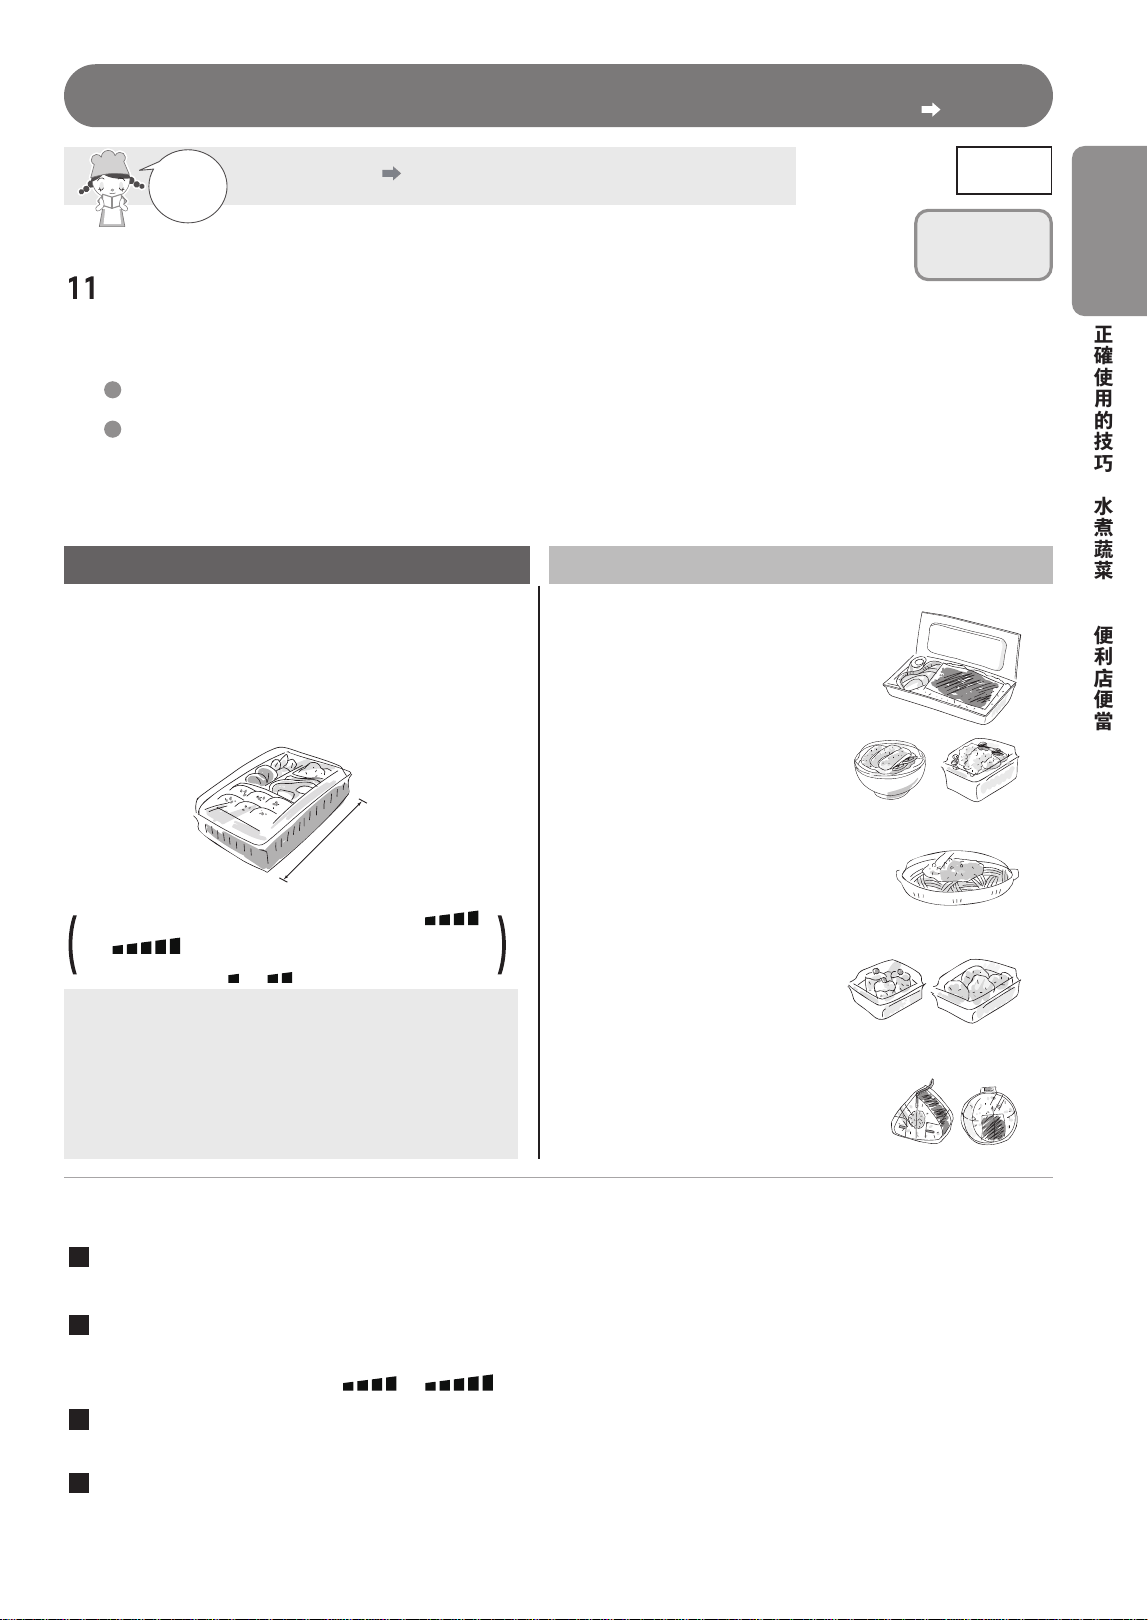
水煮蔬菜
便利店便當
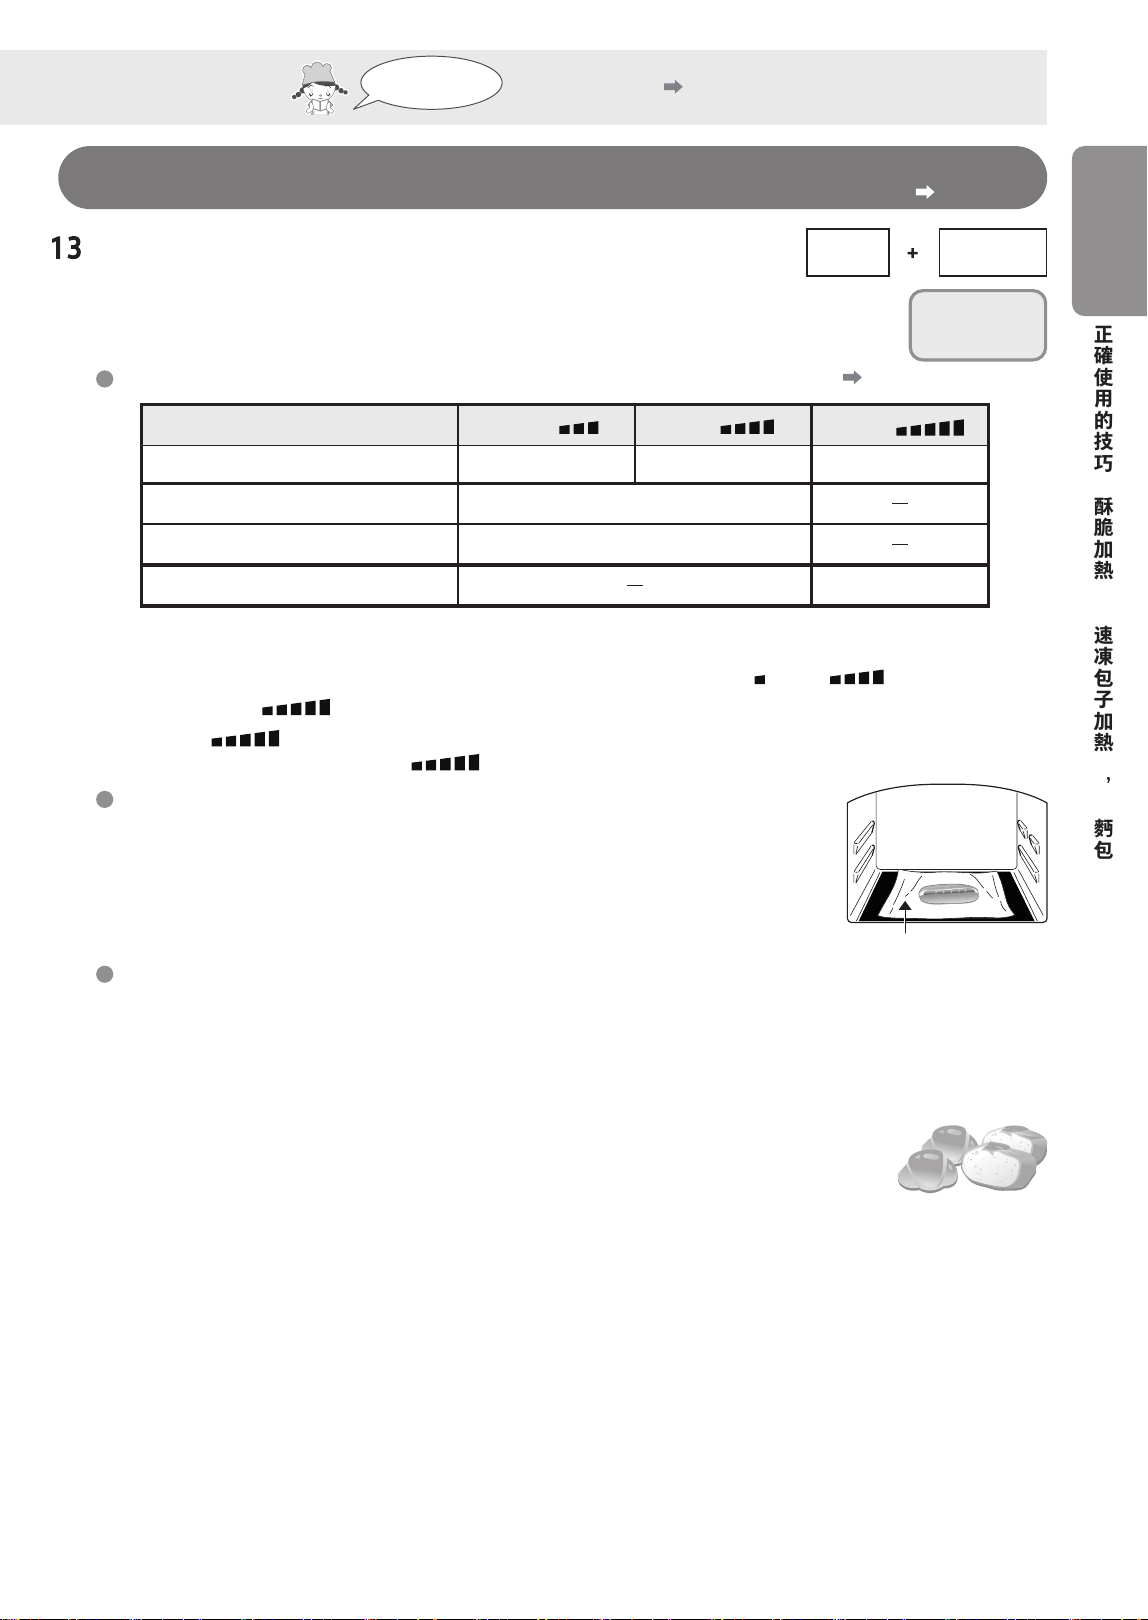
酥脆加熱
急凍包加熱
蓬鬆麵包
簡易意粉
簡易法式麵包
微波加熱、微波燉煮
加熱至設定温度
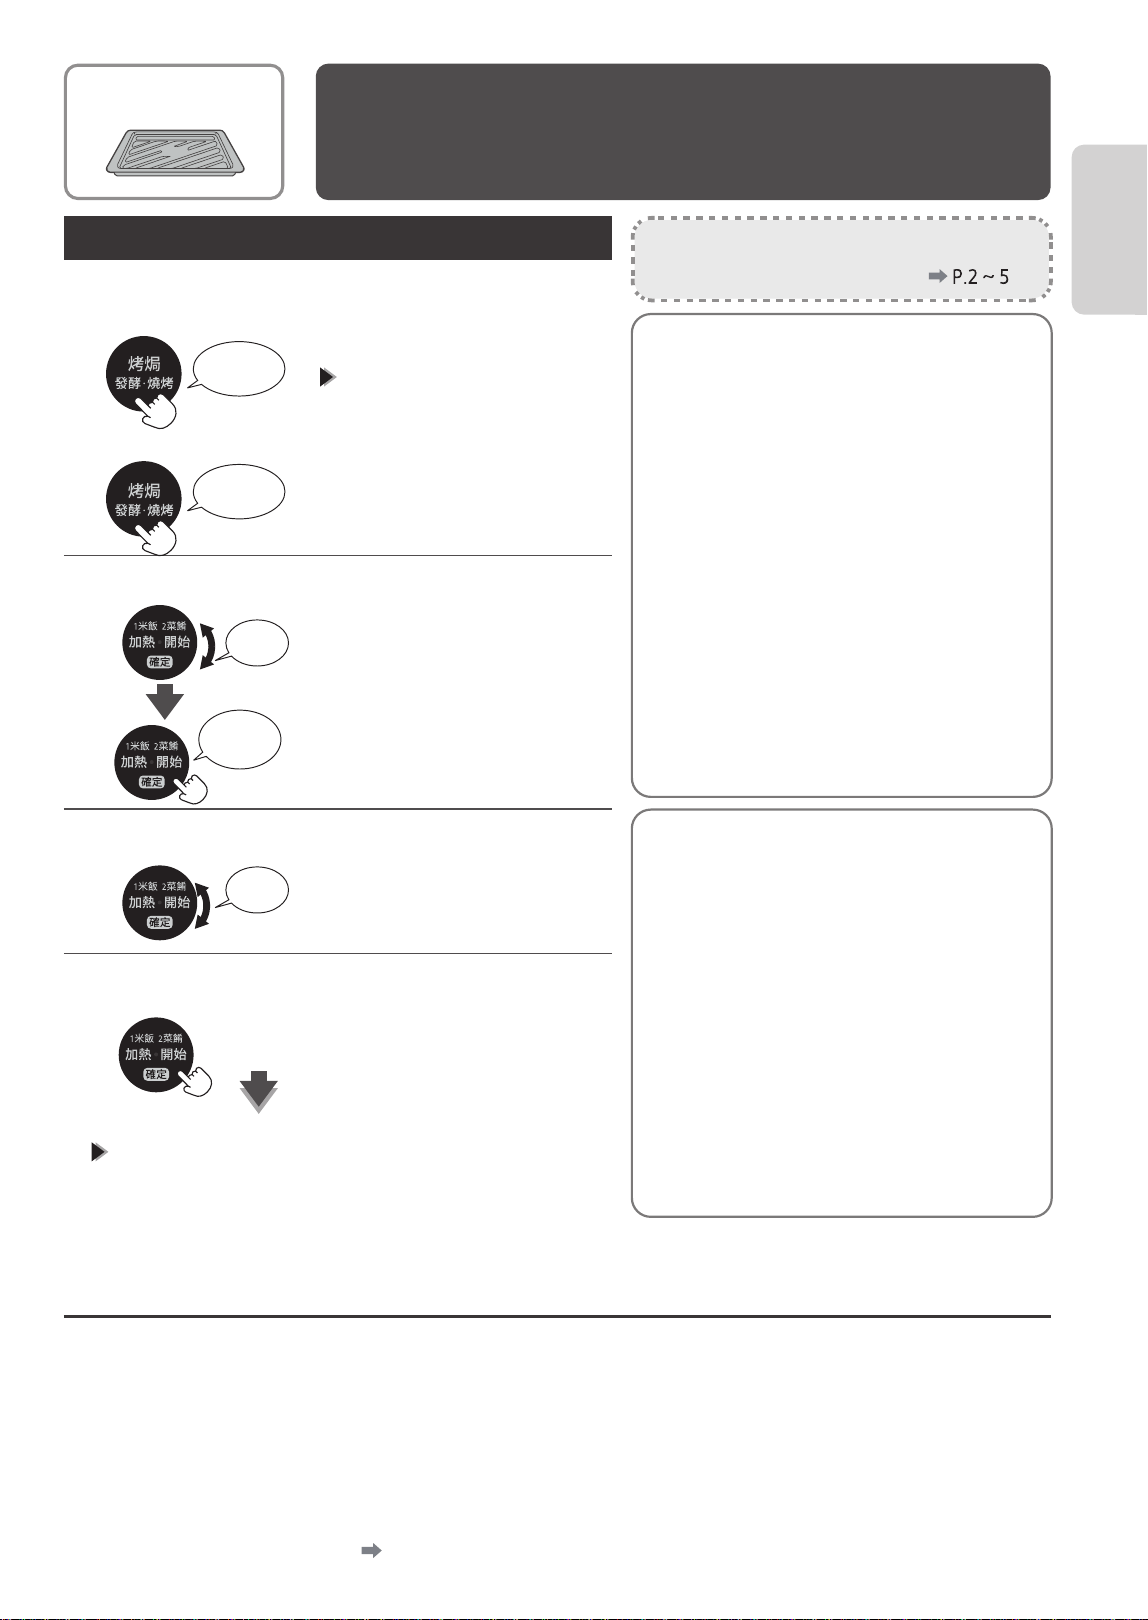
通過烤焗
、發酵烹飪
燒烤烹飪
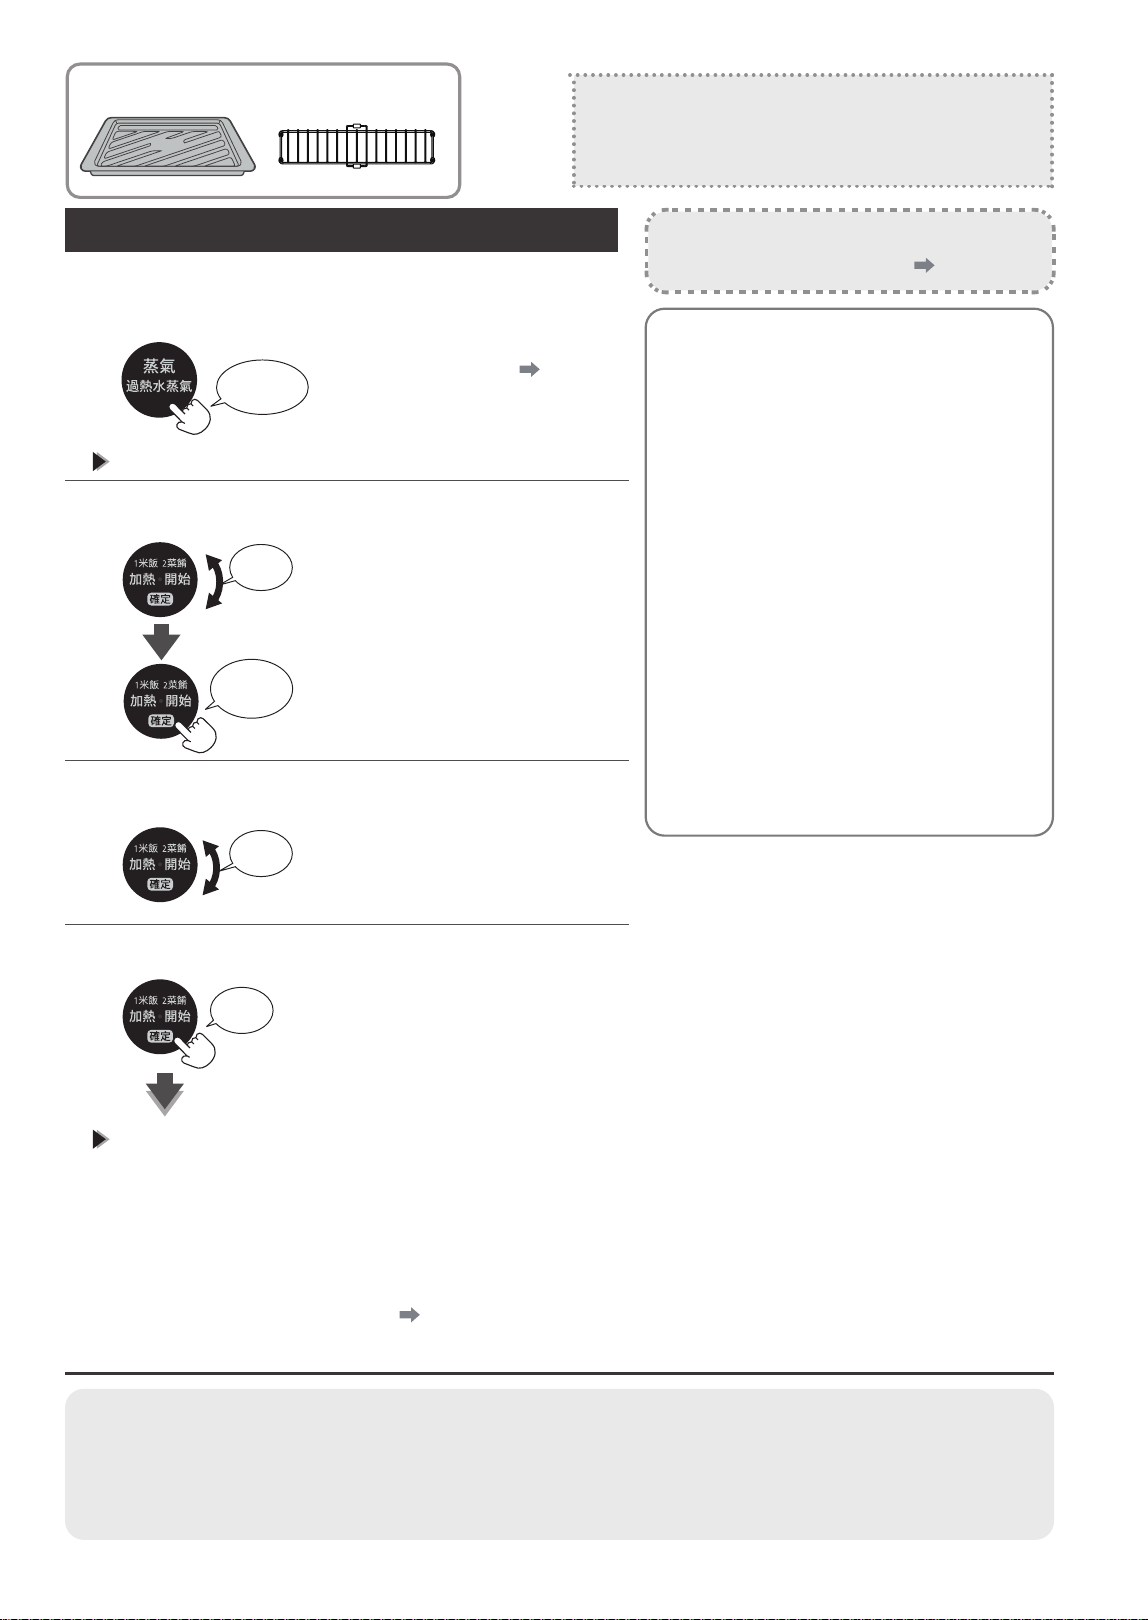
通過蒸氣烹飪
通過過熱水蒸氣進行烹飪
通過微波蒸氣
烹飪
手動加熱的時間設置標準
自
動
烹
飪
手
動
烹
飪
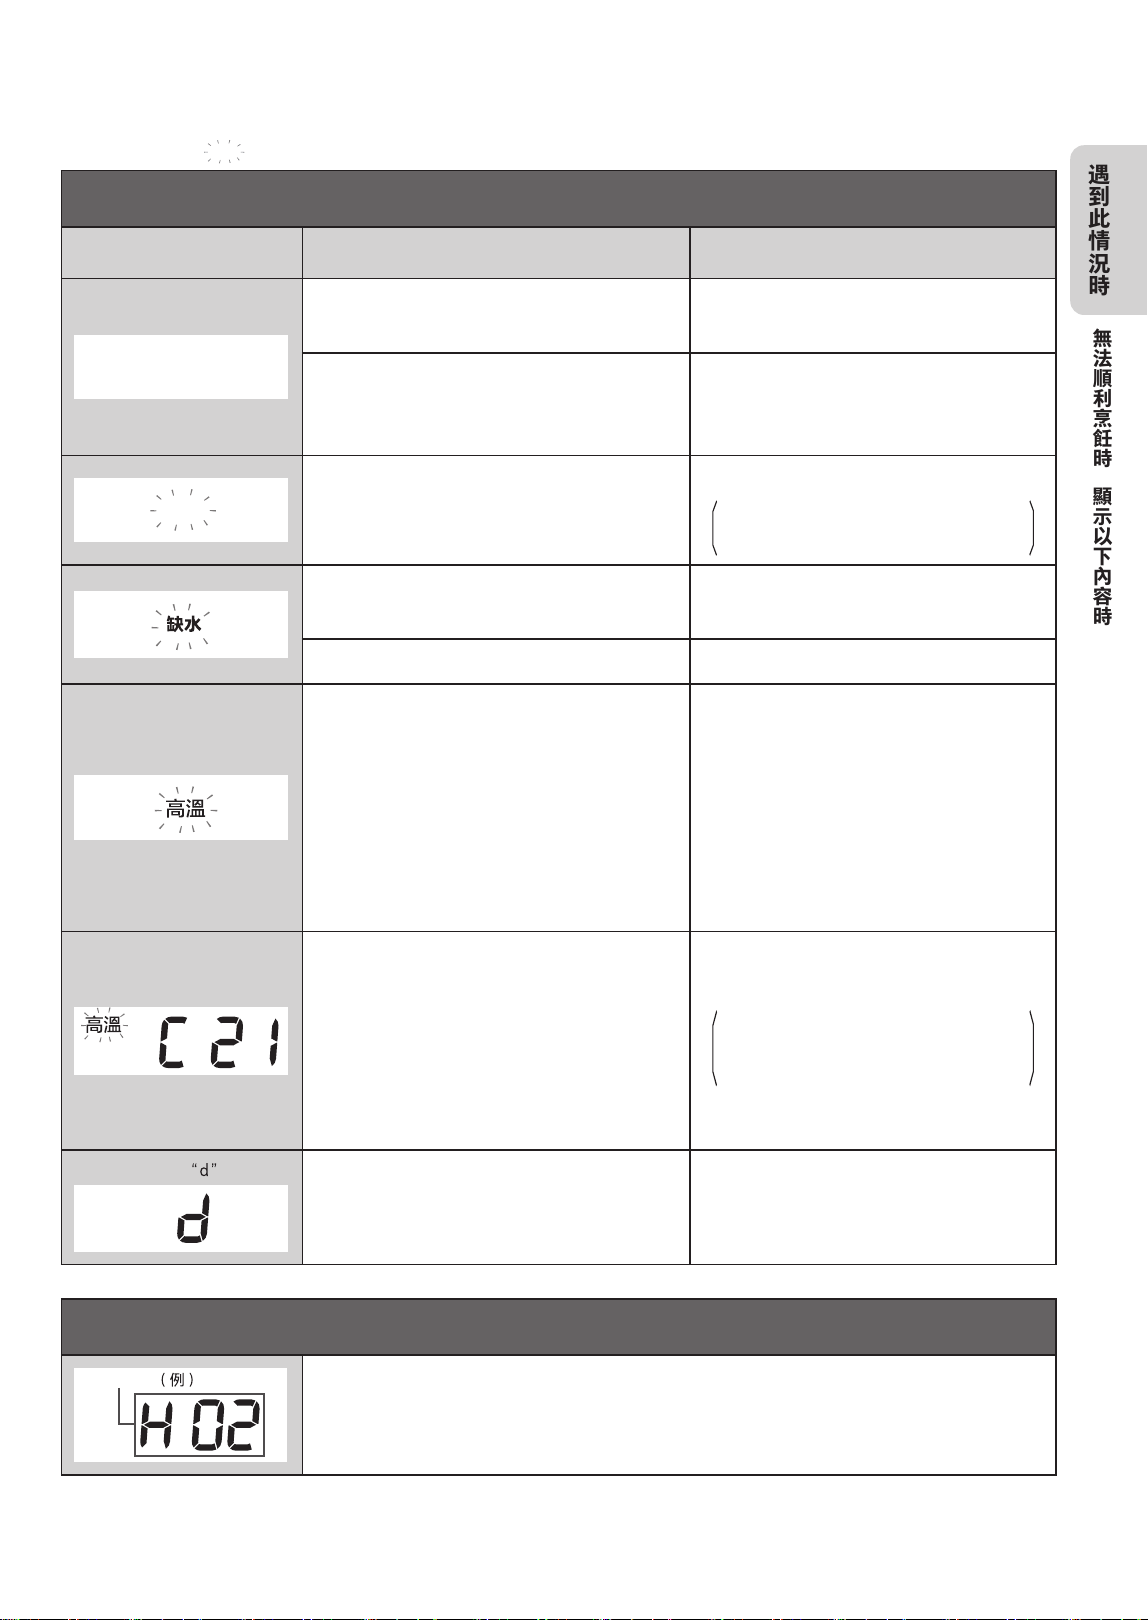
遇到此情況時
自清潔方法
關於提示聲(蜂鳴聲)的
消除方法和恢復方法
常見問題一覽表
無法順利烹飪時
顯示以下內容時
委託維修前
規格
封底
+
+
2
安全起見,請務必遵守
為了避免給使用者帶來傷害以及財產損失,產品及使用説明書記載着正確、安全的使用方法等重要文本內容。
對因使用時不遵守記載事項所造成的危害和損失程度進
行區分説明。
通過圖形符號區分説明需要遵守的內容。
極有可能會導致“死亡”和身負“重傷”
的內容
表示禁止的內容
“遵從指示”的內容
“提醒注意”的內容
可能導致“死亡”和身負“重傷”的內容
有可能導致“輕傷”和“房產、財產等損失”
的內容
危險
警告
注意
表示【禁止】的內容
危險
不要接近易燃、不耐熱的物體
電源線不要強制弄彎,拉伸
不能使用蒸氣清潔器。
警告:為避免可能出現的電擊,換燈前
應確定器具已斷開電源。
禁止擅自拆開外殼進行維修和改造
避免過度加熱
微波爐不要接近易燃、不耐熱的物體;微波爐
不能放置於櫥櫃中。
請勿將異物伸入入氣口、排氣口及微波
爐門鎖開關內
包括金屬物、手指等,防止觸電及微波泄漏。如
有異物插入,請拔掉電源插頭,立即聯繫東芝顧
客服務部。
警告:
除有資格的維修人員外,其他人來執行檢修操作
都是危險的,包括拆下防止微波能量泄漏的防護
蓋等操作。
長時間加熱少量食物,爐腔會異常高温,會導
致冒煙、着火、器皿熔裂。當加熱用塑料或紙
包裝的食物時,應注意觀察微波爐,因為有着火
的可能。
禁止烹調帶殼蛋類食物
微波爐不能用來加熱帶殼的
新鮮
蛋和已煮熟
的蛋,因為在用微波加熱時
甚至在加熱之後它們可能
會發生爆炸。
如果電源線損壞,為了避免危險,必須由製
造商、其維修部或類似的專業人員更換。
禁止
烹調帶殼蛋
類食物
禁止
禁止
從插座拔下
過度加熱
禁止
禁止
安全注意事項
3
表示【強制】的內容
強制
使用前,請確保外罩防護膜已撕去。
警告:
只有在已經提供充分的指導以致於兒童能夠採
用安全的方法使用微波爐,並且明白不正確的
使用會造成危險時,才能允許兒童在無人監控
的情況下使用微波爐。當器具以組合模式工作,
因温度升高,兒童必須在成人的監督下使用。
老年人要在家人的陪同下使用微波爐。
微波爐在使用期間會發熱。注意避免接觸微波
爐內的發熱單元。
警告:在使用時可觸及部分可能會發熱,兒童
應遠離,器具工作期間,某些表面的温度很高。
貼有“高温表面”標誌的表面在使用過程中會
變燙。
微波加熱飲料會導致延遲噴濺沸
騰,因此取出時必須小心謹慎。
奶瓶和嬰兒食品罐應經過攪拌或
搖動,餵食前應檢查瓶內食物的
温度,避免燙傷。
如發現有煙霧,應關掉器具開關
或者拔掉電源插頭,並保持爐門
關閉,以抑制火焰蔓延。器具不
能在外接定時器或獨立遙控控制
系統的方式下運行。
撕去防護膜
使用前撕去外罩防護膜
此微波爐只能使用為該微波爐推薦的温
度傳感探頭。
自
清潔和蒸氣烹調一樣也有蒸氣,請
關閉爐門,謹防燙傷。
請使用微波爐專用烹飪器皿
取下所有包裝材料並將其遠離嬰幼兒
包括包裝袋、外罩膜、附件,以免工作過程發
生火災。並遠離嬰幼兒,防止誤用導致窒息。
警告:
禁止加熱裝在密封容器內的液體或其他食物,
因為這樣有可能發生爆炸。
在微波爐內僅能使用適合的器皿。
OVEN模式下請將原廠烤架放置于下層使用
使用微波
烹調器皿
禁止
安
全
注
意
事
項
準
備
與
確
認
老人及兒童請謹慎使用微波爐
老人、兒童
謹慎使用
高温表面,防止燙傷
小心開關門,門身變形會有微波泄漏風險。
警告:如微波爐門或門封已損壞則不得再使用 ,
直到有資格的維修人員修好為止。
小心開關門
取出食物時必須小心謹慎
小心煙霧出現
突然沸騰
表示【注意】可能造成輕傷或者財產損失的事項
注意
。
4
擺放注意事
項
注意
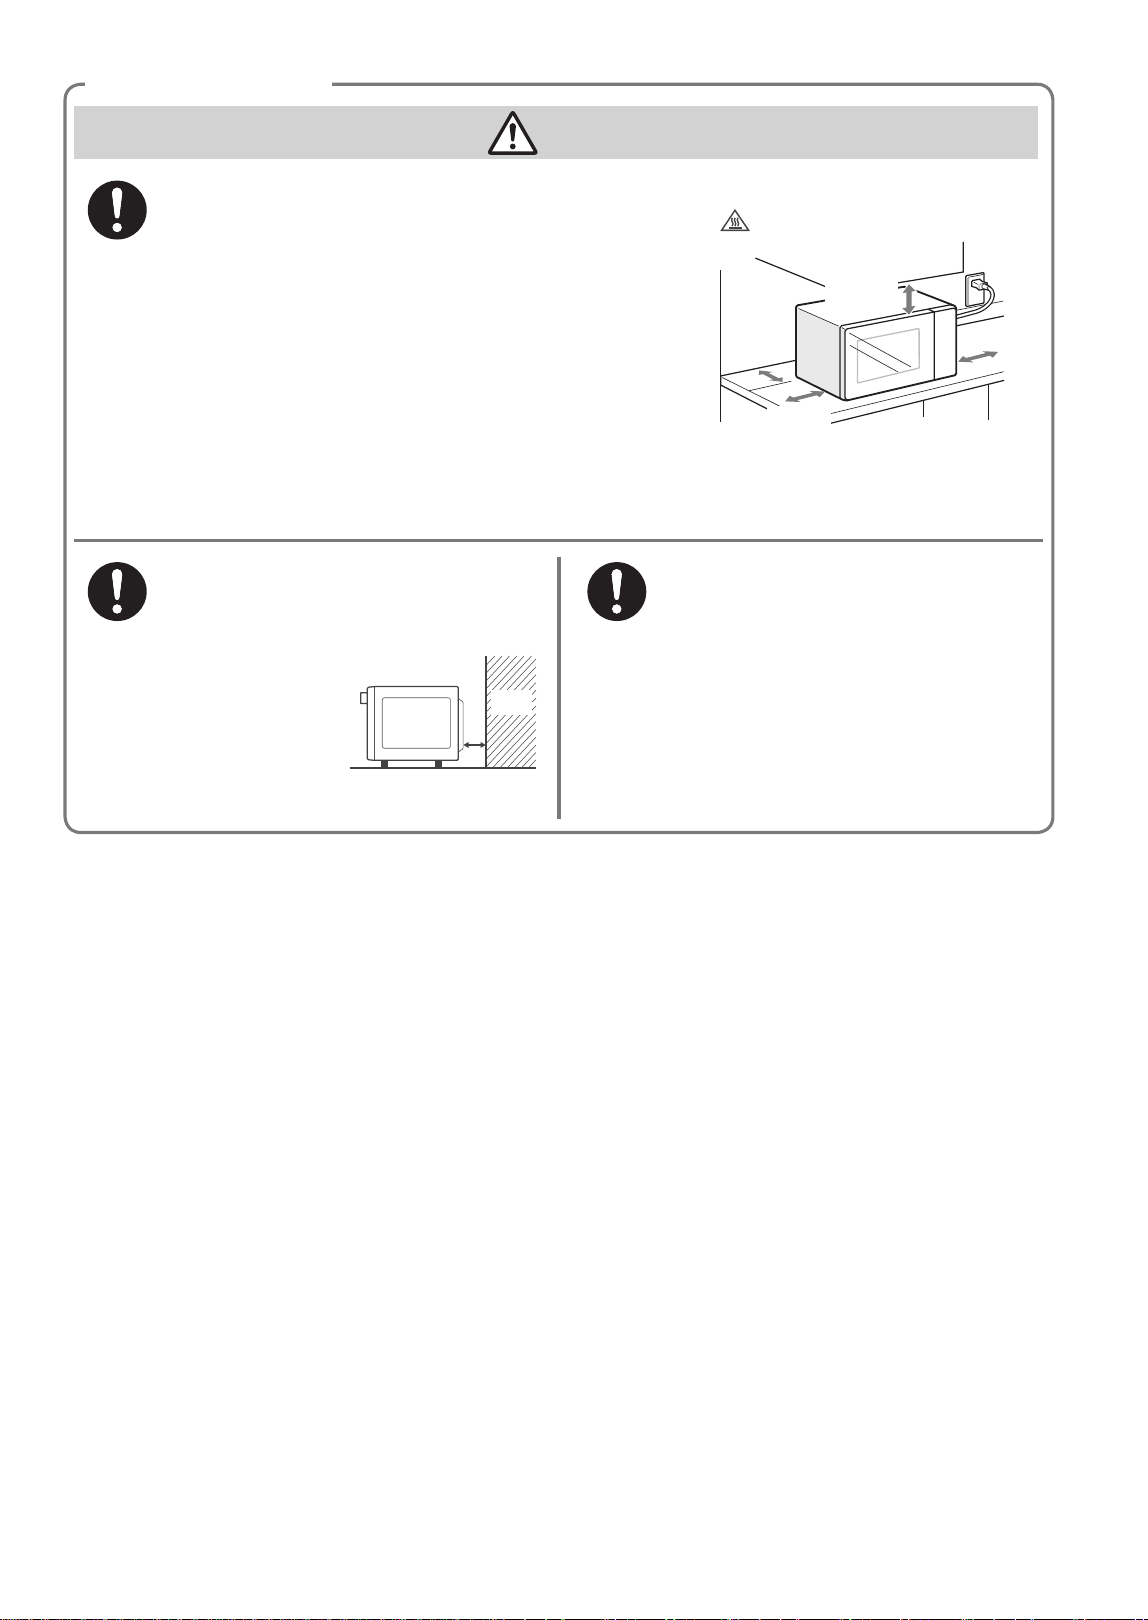
• 將微波爐放置在隔熱的平面上使用,並在微波爐周圍至少保
持 10-15cm 的距離,與頂部保持 30cm 的距離。
• 應將微波爐放置在乾燥的環境中,不可在室外使用本產品。
• 為避免產品工作中油煙污染傢俱或發熱引起火災,產品要和
牆壁、櫥櫃保留一定距離。
• 嚴禁將微波爐放置在易燃物或熱源附近使用,應注意遠離窗
簾等或類似物品,以防造成火災。
擺放距離位置
與牆壁保持
距離
[符合消防法標準]
注意:高温表面
頂面、背面以及玻璃門等
上方大於等於
30cm
距後部凸起
大於等於
10cm
左側大於等
於 10cm
右側大於等
於 10cm
前面要保持開闊
放在足夠堅固的平坦
地方
如果放在強度不夠的桌子上或傾斜場所,則會
因掉落、翻倒等導致受傷。此外,冷凝水也可
能會流到地板上。
因地震等而翻倒、掉落時,即使外觀沒有損壞,
也不要直接使用,請委託經銷商進行檢查。
微波爐背面有安全阻隔部件,以防止微波
爐與牆壁等物體接觸,保持安全距離。
微波爐
壁面
10cm 以上
放在平坦
地方
5
注意
待微波爐冷卻後進行一定的清洗。應定期清潔微
波爐並清除微波爐內所有食物殘渣。不清潔微波
爐會致使器具表面劣化,這會影響器具的壽命,
可能會導致危險的情況。
可用蘸有軟性洗滌劑(如洗潔精)的布塊擦拭微
波爐外殼,再用濕布擦乾淨,最後用乾布擦乾,
嚴禁使用鋼絲刷等硬物擦拭微波爐。請勿清潔爐
門安全鎖系統。
警告:不要使用粗糙擦洗劑或鋒利的金屬刮刀清
潔微波爐門玻璃,以免造成微波爐門玻璃表面擦
傷,擦傷可能導致玻璃粉碎。
煮食過程中產生的油脂會腐蝕爐腔、影響加熱效
果,從而改變食物的味道。因此使用後請及時清
潔爐腔。
定時清洗
煮食中產生油脂,請及時清潔
保持爐腔底部清潔,可避免轉盤微波爐工作過程
中轉盤轉動而產生的異常噪音。
保持爐腔底部清潔
常温水清潔附件
常用温水清洗金屬烤盤、陶瓷盤和金屬蒸烤架。
注意在微波爐長時間烹飪後,不要用冷水立即清
潔。
長時間不使用微波爐,使用前請在燒烤或
光波功能狀態下使用幾分鐘,以蒸發微波
爐內聚積的濕氣。
定時清洗
清潔門封、腔體和臨近的部件細節。
清潔部件細節
微波爐有底部輸出微波及側面輸出微波兩種方
式。底部微波輸出口被微晶板覆蓋,側面微波輸
出口被雲母片(可拆換)覆蓋。請勿私自拆除微
晶板和雲母片,以防異物進入微波輸出口,異物
被微波加熱後有着火可能。
微波爐輸出方式
防止生鏽確保長期使用的注意事項
使用後請務必及時擦除內部的污垢和水分,除去濕氣。
① 用擰乾的濕抹布全面擦拭內部。(不要對上部加熱器施加力量)
② 打開前門使其自然乾燥。(打開前門請小心)
擦除水分後,請打開前門 1 小時左右。
安
全
注
意
事
項
準
備
與
確
認
清潔保養小貼士
6
請距離電視機、收音機、天線等 4 米以上
以免導致界面和聲音失真。
放在本品附近可能導致無線 LAN 設備的通信性能降低。
使用前請閲讀無線 LAN 設備的使用説明書等。
遠離熱源和蒸氣
主機或操作部位暴露於電飯煲或熱水壺等產生的蒸氣中時,可能引發故障。
請在沒有蒸氣的位置使用。
移動主機時請小心
移動時請確保握住產品的左下側和右下側部位。
爐內底部急劇冷卻、受到衝擊,則可能會有裂紋或破裂。
請勿撞擊或高温時直接放入冷凍食品、灑水。
使用後地板表面可能會變熱
使用連續加熱、長時間加熱、烤焗烹飪等模式時,產品散發的熱氣會導致地板表面、牆面温度升高。
這是正常現象,冷卻之前請勿直接用手觸摸。此外,請勿放在榻榻米、地毯、桌布等不耐熱的物品上使用。
請使用與加熱(功能)相關的配件和容器
• 請參考“可使用的容器 / 不可使用的容器 ( P.14~15)和料理集。
• 微波加熱時不可使用烤盤。
→
可能導致打火現象,引起故障。
須知事項
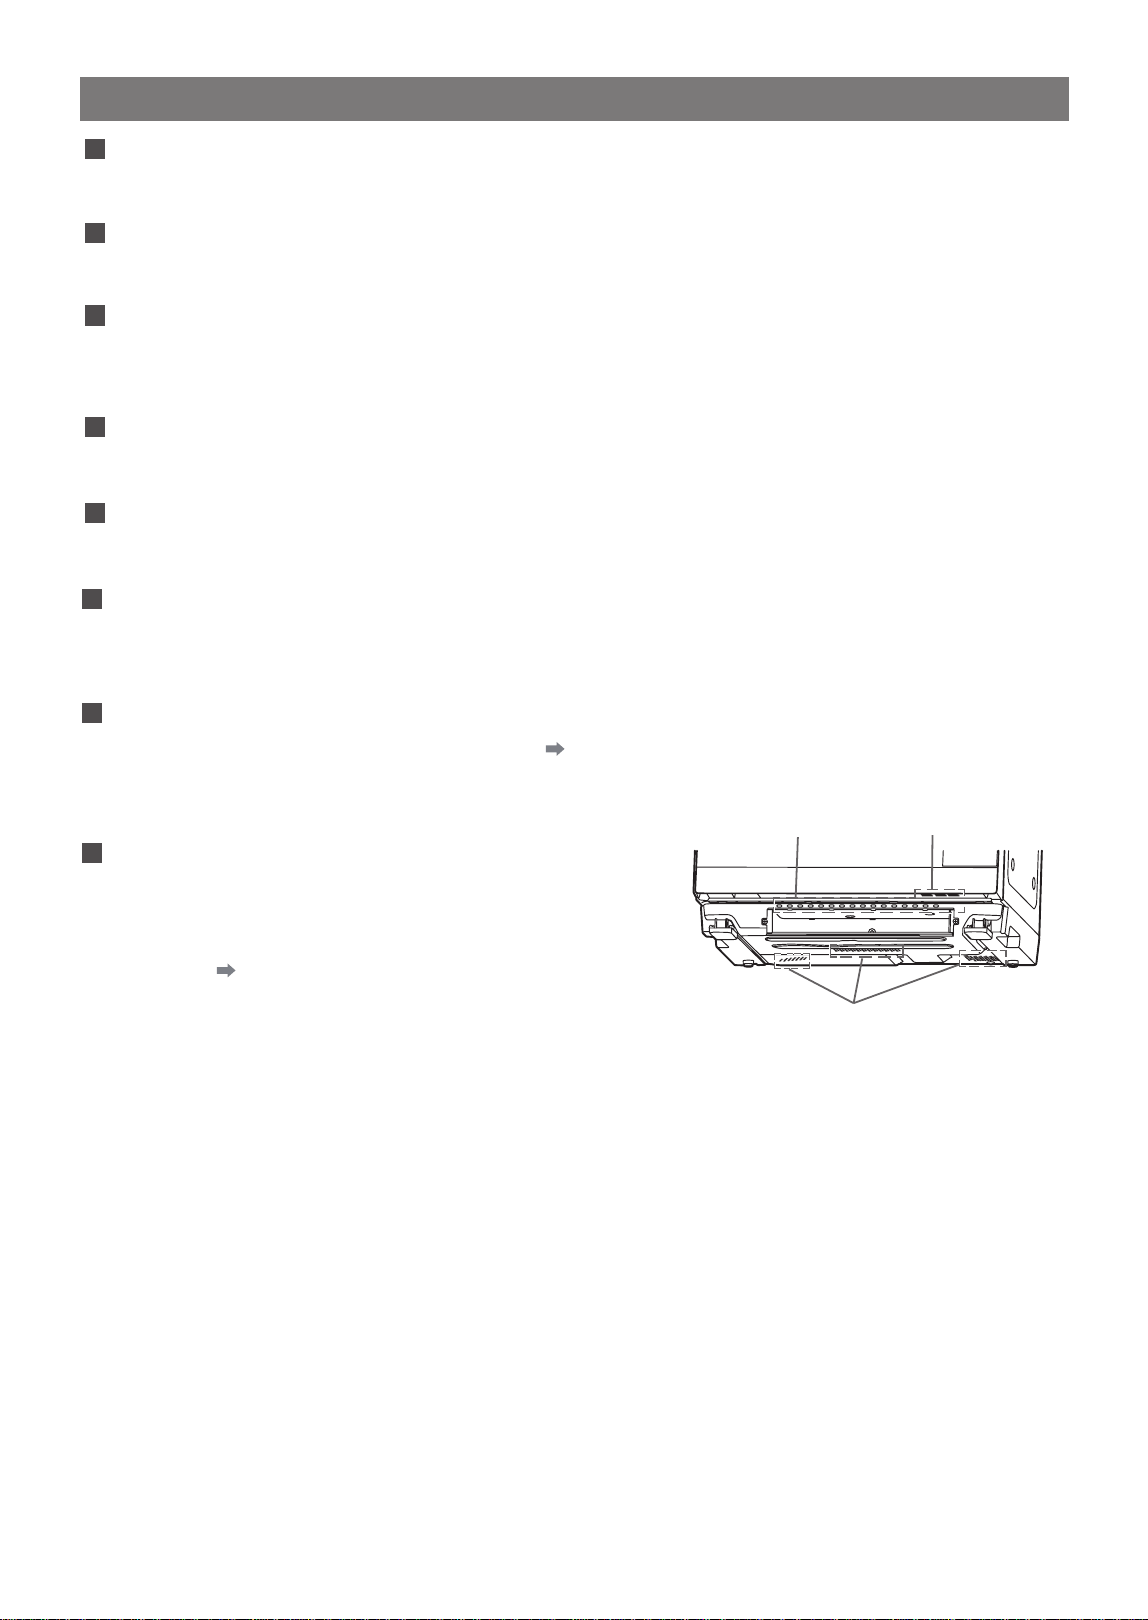
請勿放在桌布、布、紙上。
風扇運行時主機下方有布,會堵塞底部的入氣口,無法冷
卻電氣部件,可能造成故障。
此外,請定期清潔主機正面、爐門下方的入氣口,以免灰
塵等堆積。
P.46
入氣口(主機正面) 入氣口(爐門下方)
入氣口(底部)
”
7
須知事項
/
加熱完成後延長加熱時間
準
備
與
確
認
為確保長期使用
請勿放任爐內附着的油、食物殘渣和水滴等不管。烹飪後待爐內冷卻後請務必擦拭並打開
爐門自然風乾。
為提高烹飪效率,已加強爐內密封性。因此不使用蒸氣時,食品產生的蒸氣也可能形成水滴,沾在爐內。
P
.46 “為防止生鏽、長期使用時”
節能功能
自動斷電
這是一項不使用時電源自動斷開的功能。
顯示部位顯示 "0" 的狀態下,若 1 分鐘內未開 / 關爐門,則畫面會變略暗。
若再經過約 4 分鐘未開 / 關爐門,則電源自動斷開,顯示屏也熄滅。
•
打開爐門後電源會接通
顯示部位會顯示 "0"(僅插入電源插頭時不通電)
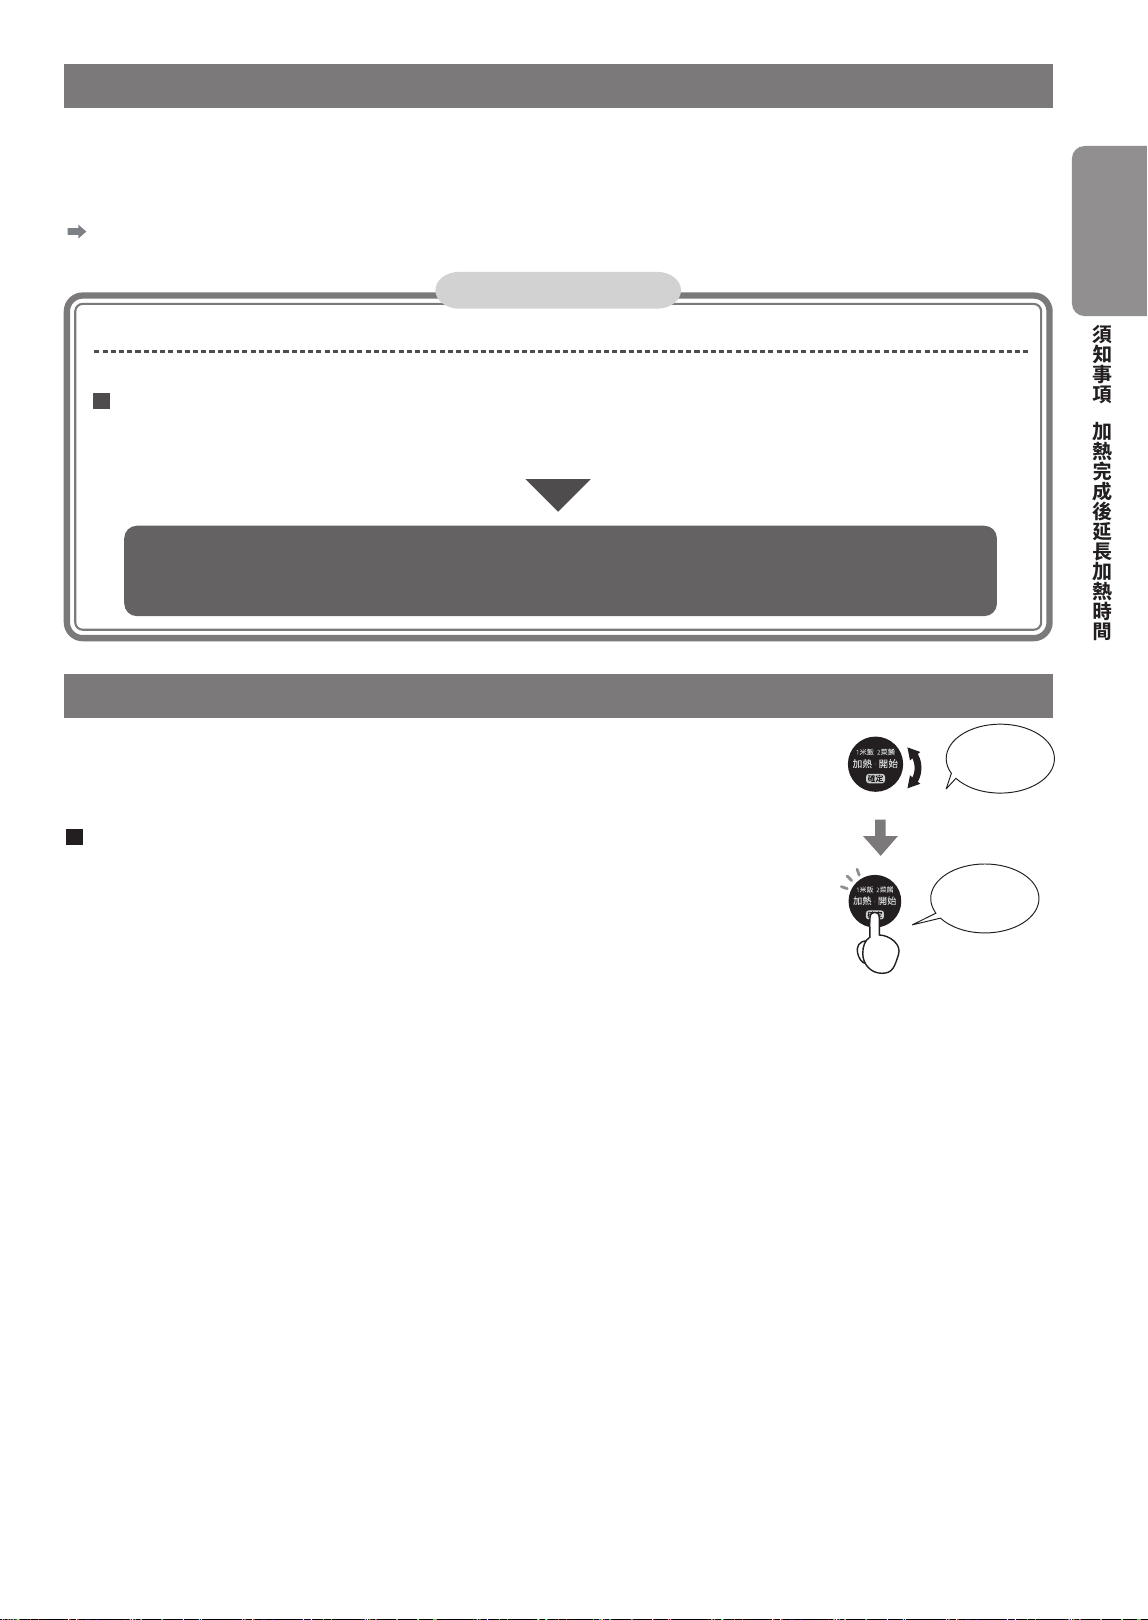
加熱完成後延長加熱時間
加熱完成後可再次追加設置之前的加熱操作。
• 可通過自動烹
調、手動加熱延長加熱時間。
• 無法延長“自清潔”時間。
操作方法
加熱完成後 3 分鐘以內開始旋轉旋鈕,則顯示之前的加熱,因此請再次旋轉 ,
調整要延長的時間。
• 顯示屏會顯示“延長”,顯示期間可延長時間。
(超過 3 分鐘,則無法設置。)
• 顯示“延長”期間,希望進行其它操作時按下“取消 " 鍵。
旋轉後延
長設置
按下後
開始
但顯示“高溫
”期間,電源不會斷開。
8
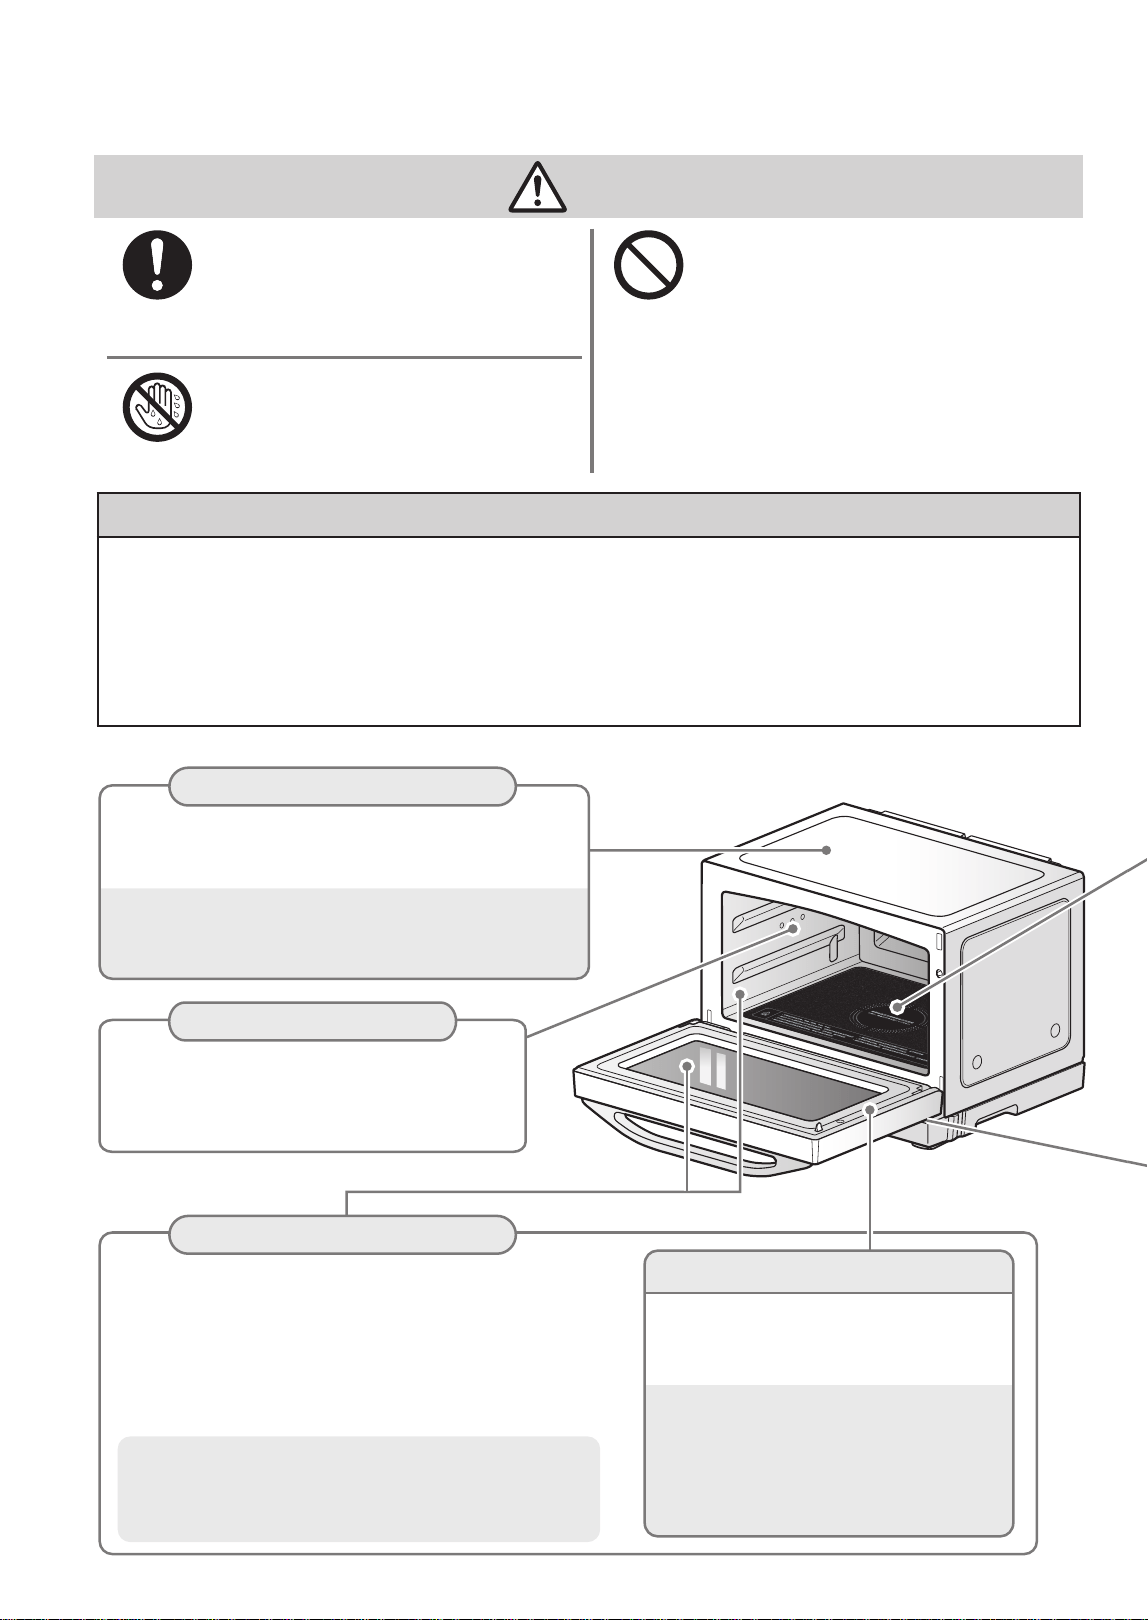
各部件
的名稱和作用
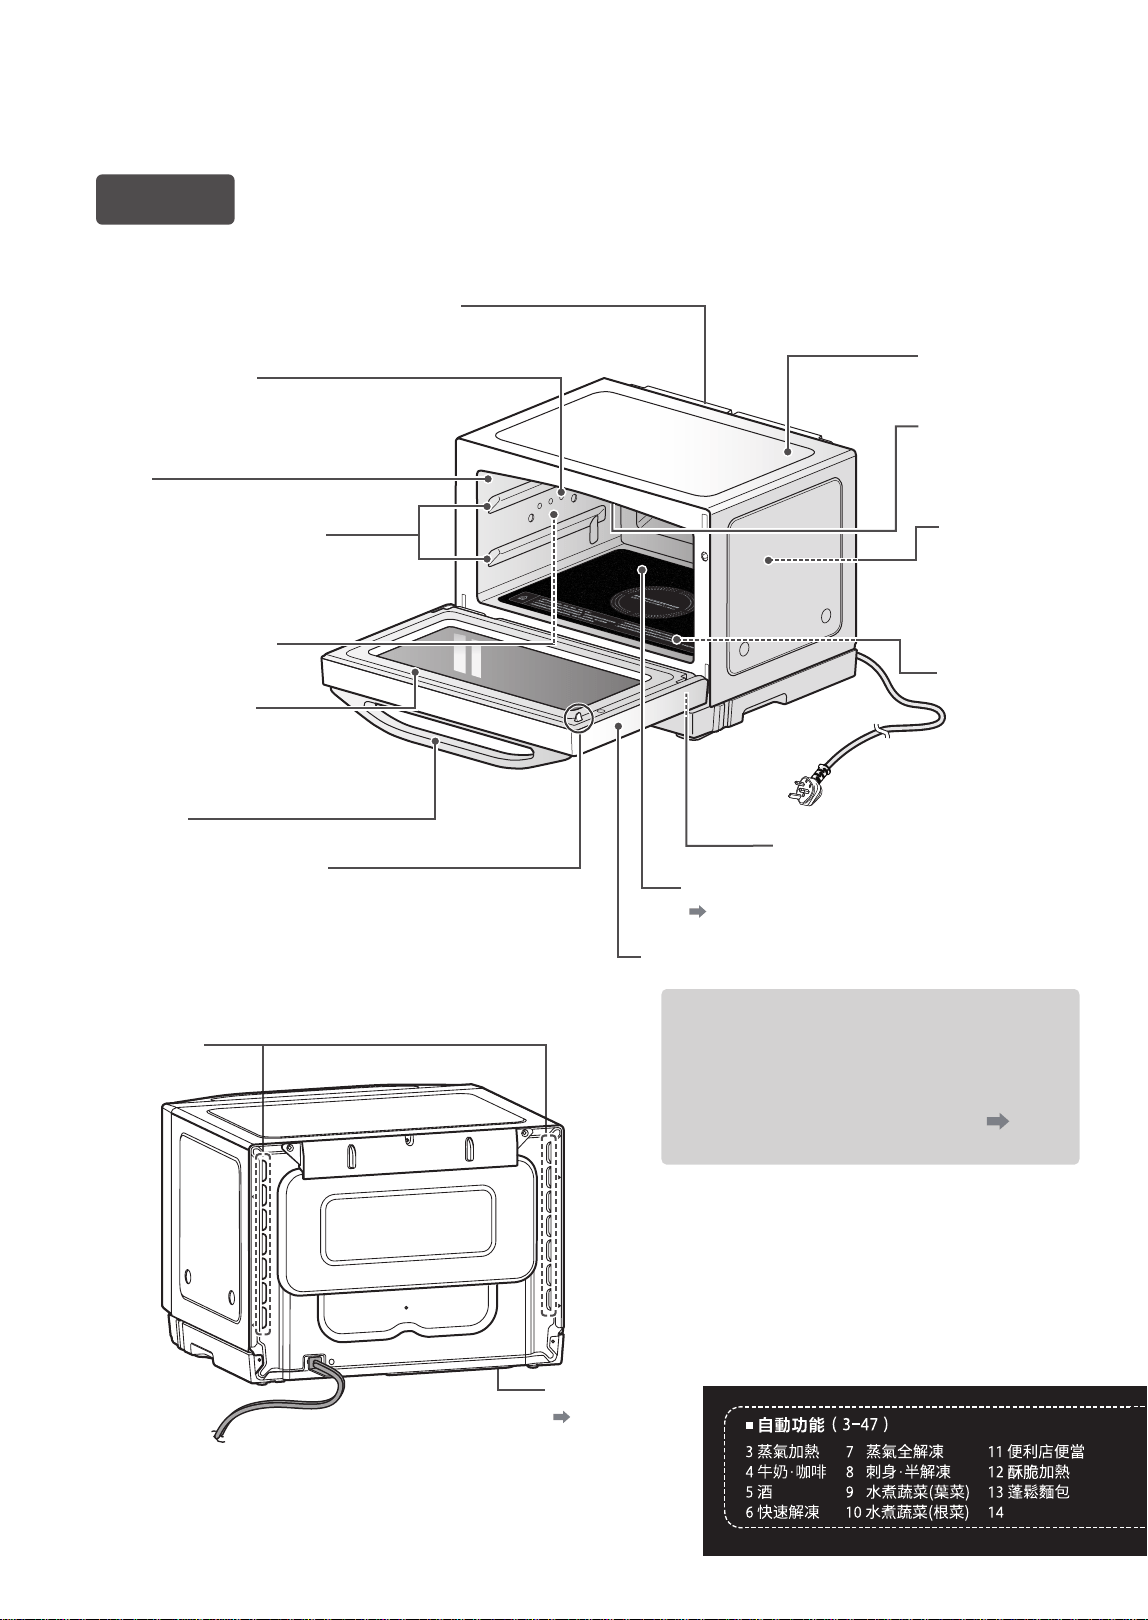
* 由於我們的產品不斷升級,如實物與下圖存在差異,請以實物為準。
主機
排氣口(背面上方)
蒸氣出氣口
爐內
耐熱除臭塗層
支架(上層、下層)
放置烤盤。
請勿在下層的下側插入烤盤。
蒸氣加熱管
(內置於側面)
爐門墊圈
不可拆卸。
請勿按壓、拉拽。
手柄
安全開關檢測突起
外物請勿觸碰此處。
(破損後可能導致運行不良)
爐體
上加熱管
(內置於爐內
頂部)
爐燈
打開爐門後烹飪
時會亮燈。
下加熱管
(內置於底部)
入氣口(爐門下方)
P.6“須知事項
爐內底部(耐熱玻璃)
爐門
排氣口
(背面左右)
[背面]
• 請及時擦拭爐內的污垢。
• 爐內可能因密閉而殘留水,爐內冷卻
後請立即擦拭。
“為防止生鏽、長期使用時” P.46
入氣口(底部)
P.6“須知事項”
”
急凍包
9
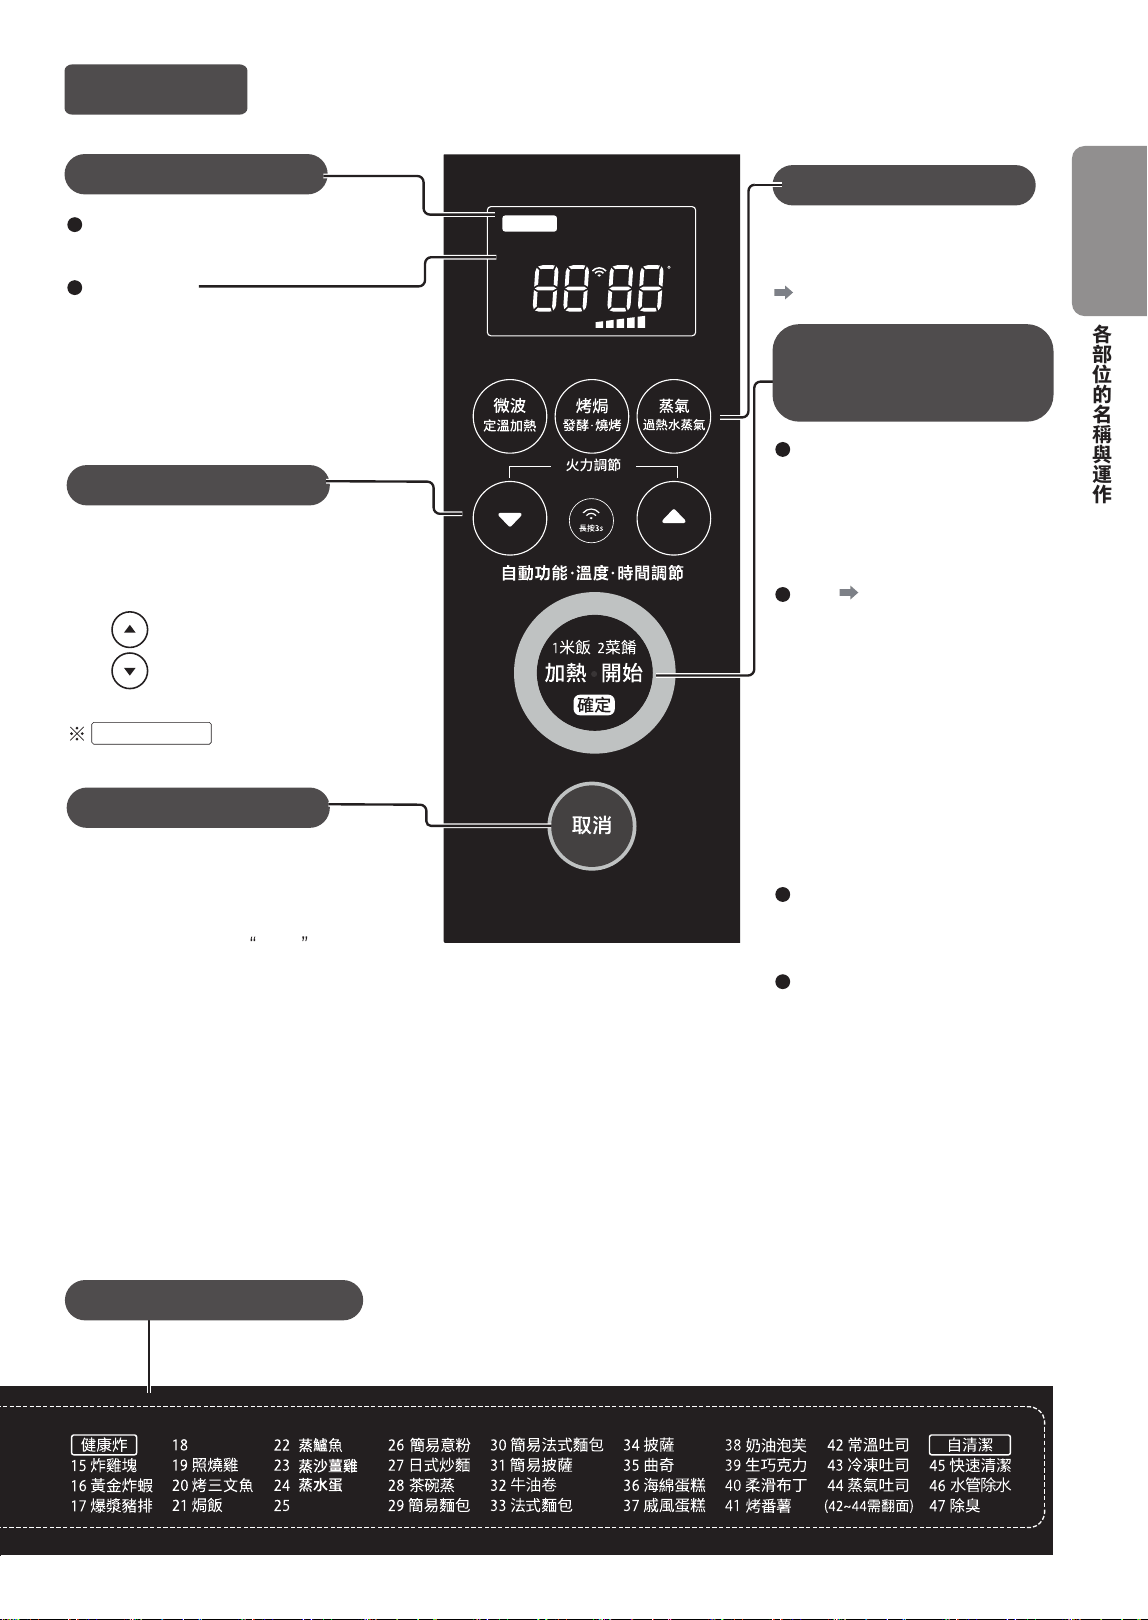
操作界面
顯示屏
顯示功能編號、温度和時間、加熱的
類型和運轉情況等。
加熱的類型
設置時亮燈,操作期間閃爍。
火力調節鍵
用於自動功能 的火力調節。選擇功能後
或開始後 10 秒內按下,以進行設置。
按下
可設置加強火力
按下
可設置減弱火力
自清潔
功能中無法設置。
“取消”鍵
用於取消操作和設置、停止烹飪。
1 米飯 2 菜餚
4 牛奶•咖啡 5 酒
3 蒸氣加熱
6 快速解凍
7 蒸氣全解凍 8 刺身•半解凍
9 水煮蔬菜 ( 葉菜 )
10 水煮蔬菜 ( 根菜 )“定温加熱
自動功能 3~47
旋轉旋鈕選擇功能編號。
可對應爐門上顯示的自動功能
手動設置鍵
根據烹飪需求設置時間和温
度後使用。
P.34-44
旋鈕
旋轉以轉換自動功能編號 (3~47)
或用於設置温度和時間。更可,
用於變更手動加熱期間的時間和
温度。
加熱
P.20~21
在顯示“0”的狀態下按下此鍵,
則開始加熱“1 米飯”,按下 2次,
則開始加熱“2 菜餚”。
• 按下此鍵,則立即開始加熱。
• 開 / 關爐門後超過 1 分鐘,
則“加 ”鍵不運行。( 會
顯示“門”)
請再次開 / 關爐門後按下“加
”鍵。
開始
設置自動和手動烹飪後按下此
鍵,則開始加熱。
確定
在以下情況下按下此鍵,確定設
置時間和温度。
• 通過“無預熱烤焗”或“手
動過熱水蒸氣 ( 無預熱 )“發
酵”調節温度後
• 通過“微波燉煮”調節
600W 模式下的時間後
各部位的名稱與運作
準
備
與
確
認
“ ”/“開始”/
“確定”鍵並用旋鈕
燒烤
高溫
冷卻
缺水
烤盤 上下層
發酵烤焗 預熱
自動功能
w
分 秒
克
C
弱 強
完成
定溫加熱
延長
炆燉微波
蒸氣 過熱水蒸氣 杯 條 個 門
熱
熱
加熱
• 手動烹飪期間確認烹飪效果時,可在
不按“取消”鍵的情況下打開爐門。
( 關閉爐門並按下
開始
鍵後重新開
始烹飪 )
中途停止烹飪且短時間內不
操作時,則自動停止烹飪。
• 在以下功能加熱期間打開爐門時請按
下“取消”鍵,邊觀察邊按手動加熱
模式加熱。
3分鐘食譜
漢堡扒
10
各部件的名稱和作用(續)
[正面]
顯示屏
操作界面
電源線
電源插頭
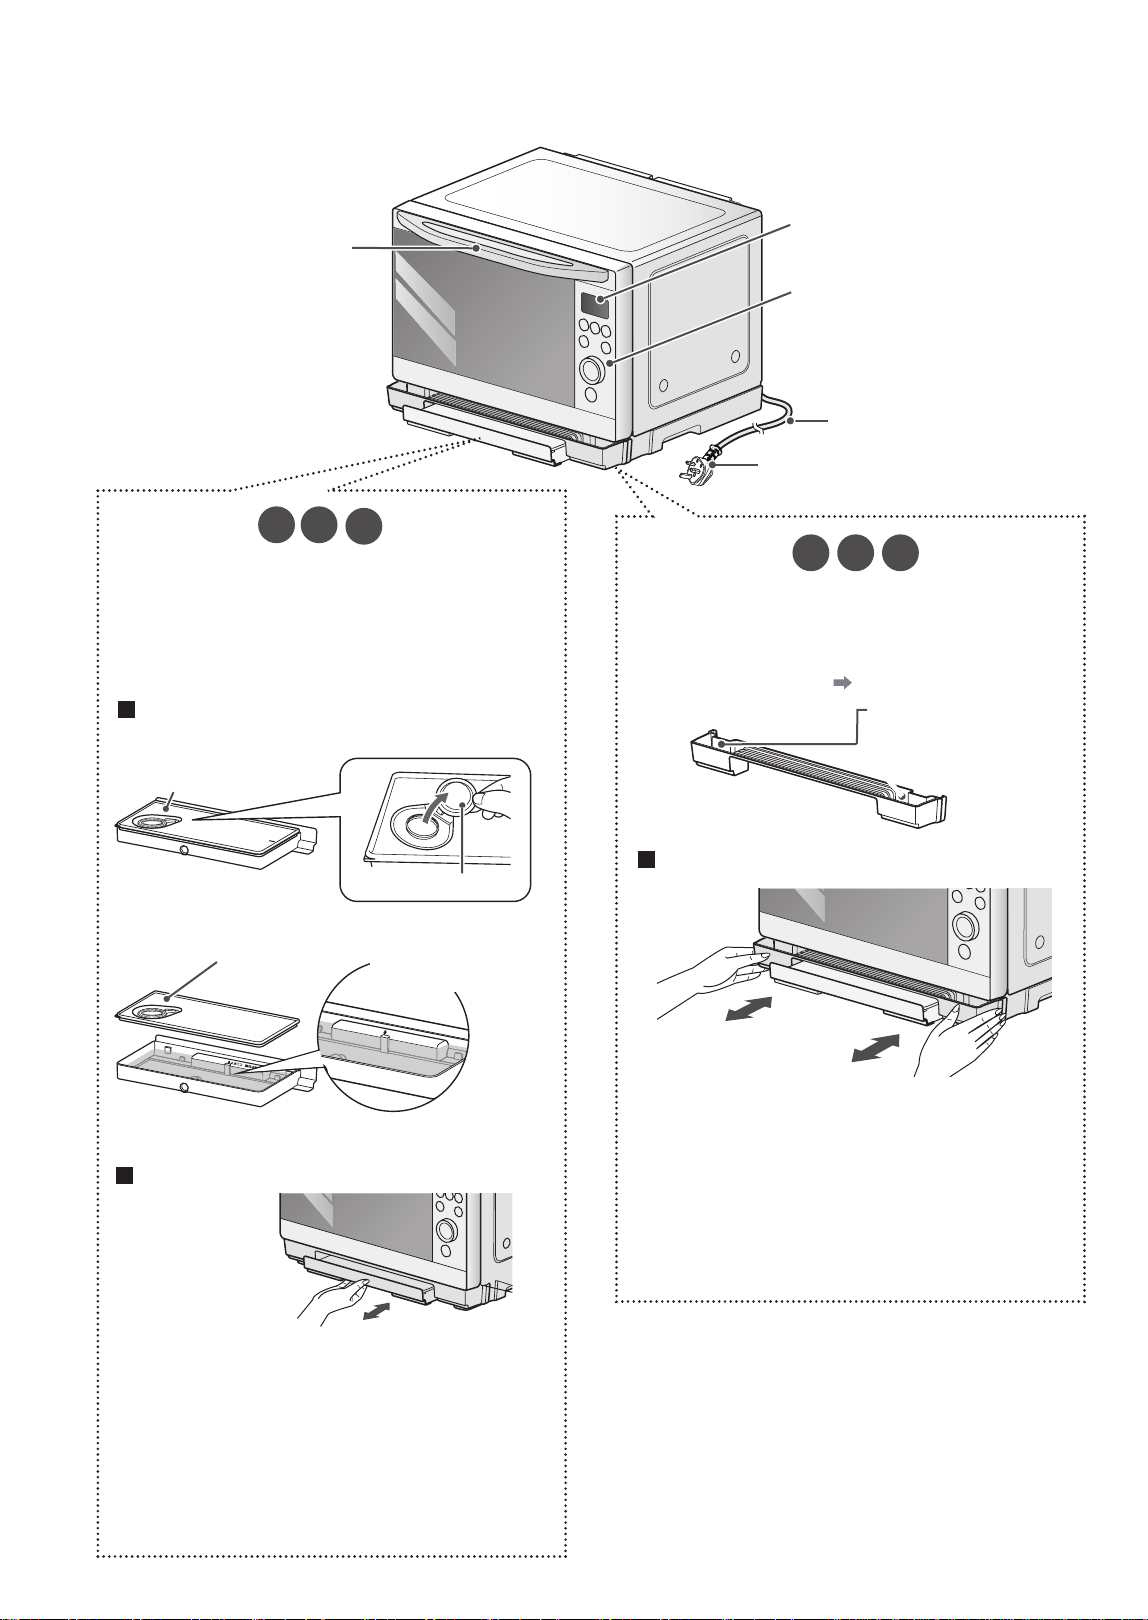
加 水 盒
這是一個為蒸
氣
供應水的容器。
不使用時也要安裝在主機上。
程序和功能不同,則減少的水量也不同,短時
間的蒸氣微波等可能僅減少許水。
準備加水(使用蒸氣烹飪時)
加水方法
• 使用蒸 烹飪時,打開蓋子,加水至水盒。
手柄
水盒蓋子
水盒蓋帽
水盒蓋子
• 可拆下
最大量到此處為止
(超出此條線,
則可能溢出)
• 請確保已牢固蓋上水盒蓋帽和水盒蓋子。
安裝方法、拆卸方法
按到底
• 請確保已牢固蓋上蓋子,以防漏水。
• 傾斜時可能會導致水溢出,因此請保持
在水平狀態下進行操作。
• 請務必倒掉使用後殘留的水。
• 安裝時請小心,不要夾傷手指。
• 請務必確保水盒安裝到位,否則機器會顯示
缺水,蒸氣功能效果無法保證。
接 水 盒
這是一個接收食物殘渣和水滴、蒸氣水等的容器。
微波加熱時食物蒸發的水分會堆積。
不使用蒸氣時也要安裝在主機上。
請仔細進行清潔保養。
P.47
此部位會積水
安裝方法、拆卸方法
• 烹飪前確保安裝牢固。若安裝不牢固,則可能
會漏水。
• 使用蒸氣前請確保無積水。
• 請注意拆卸時可能會有積水。
• 使用蒸氣後請記得每次把積水倒掉。
• 安裝時請小心,不要夾傷手指。
氣
11
各部位的名稱和作用
準
備
與
確
認
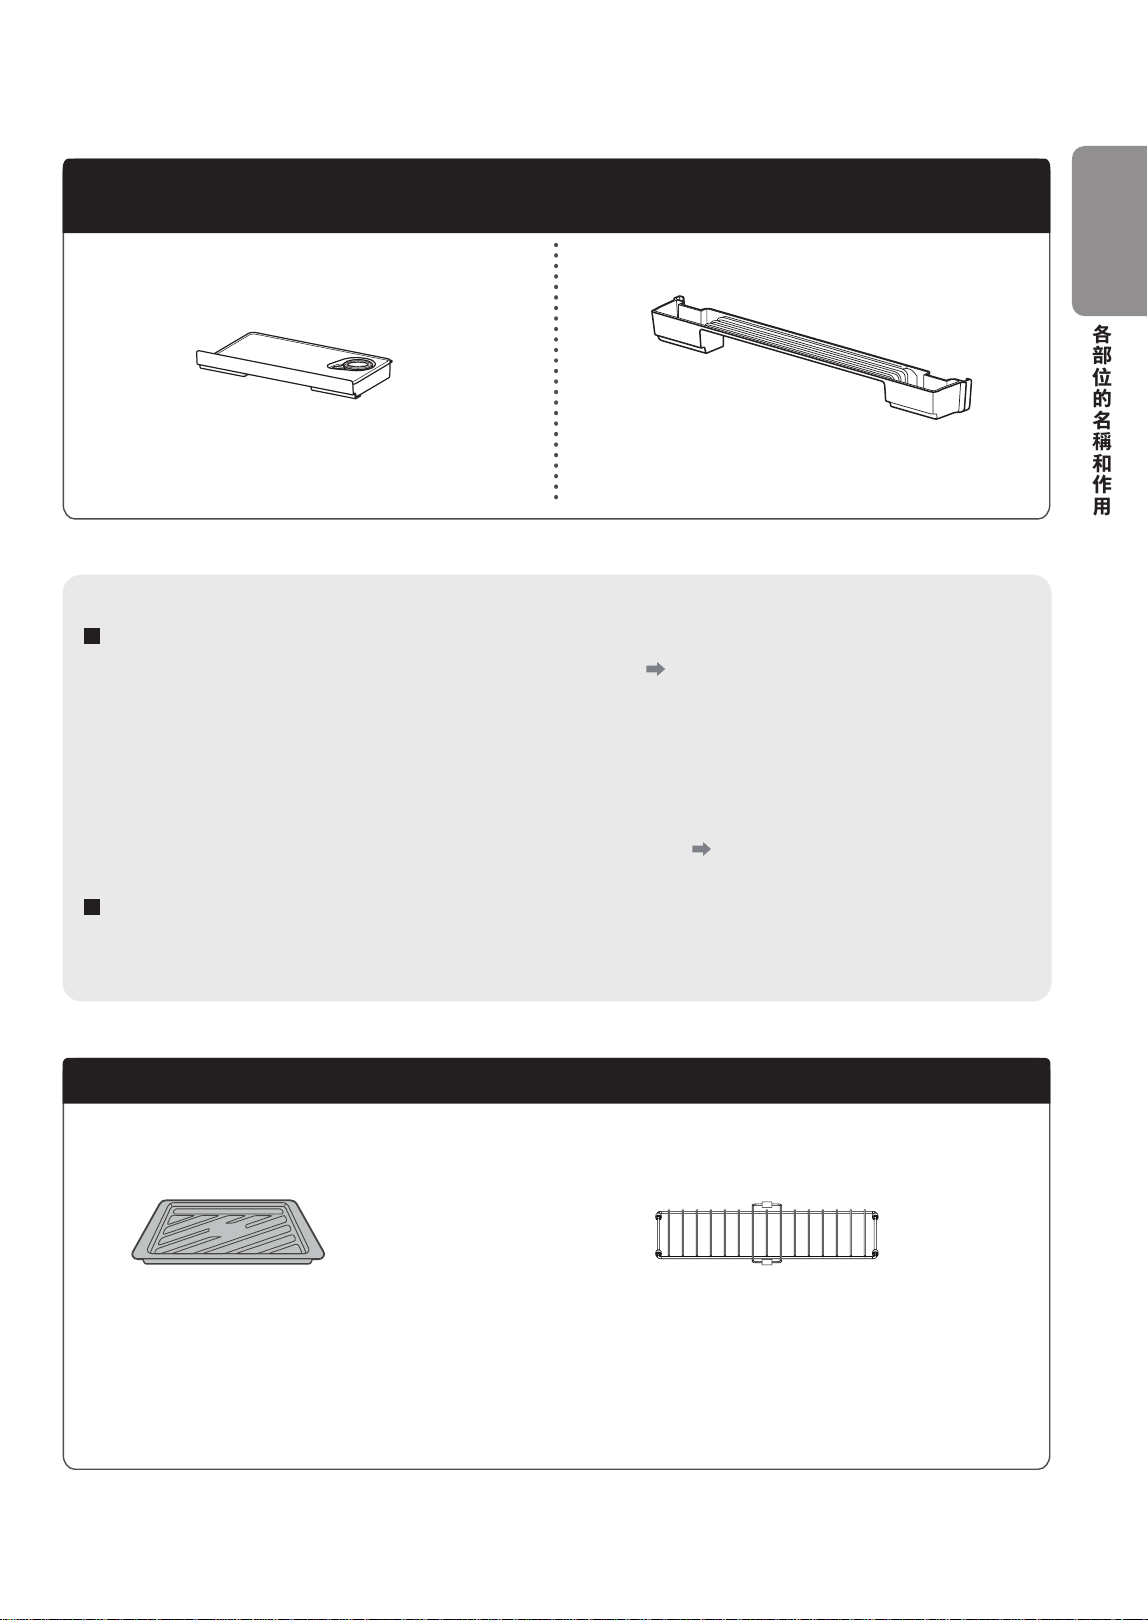
加水盒 • 接水盒
安裝到主機上的方法和使用方法詳情
請參閲第 10 頁後正確使用。
加水盒 1 個
接水盒 1 個
這是一個為蒸氣供應水的容器。
不使用時也要安裝在主機上。
這是一個接收食物殘渣和水滴、蒸氣水等的容器。
不使用蒸氣時也要安裝在主機上。
須知事項
使用蒸氣時,請遵守以下事項。
配件
請正確使用配件
烤盤(鐵板:黑色)1 塊
蒸烤架
• 用於烤焗、過熱水蒸氣、
燒烤、發酵等
※ 請參考料理集,放在正確的
位置。(上層)或(下層)
※ 使用後請勿急速冷卻,以免
導致主機損壞或變形。
• 請勿將配件用於烤箱以外的設備或用途。
• 初次使用時或長時間不使用時,請進行“45 快速清潔
”
。 P.48
• 請使用用氯
氣消過毒的純淨水,每次使用時請換水(請勿放入水以外的物品,以免引發故障)
※ 請勿使用淨水器的水、鹼性離子水、井水等。
※ 使用礦泉水時請使用低硬度(100 以下)的礦泉水。
(硬度高時,會噴出白色粉末,長期使用時可能會堵塞蒸氣出口)
• 請在加水盒中加水至水滿位置,與接水盒一起牢固安裝在主機上。
(水量不足和未完全插入時,可能無法順利烹飪。顯示“缺水” P.55)
• 請勿在低於 5 ℃ 的環境中使用(水凍結時,蒸
氣
可能出不來)
使用蒸氣時,請進行自清潔。
• 自清潔方法請參考第 49 頁。
(如有積水未及時清理,發黴、雜菌繁殖、潮氣可能導致生鏽)
• 用於
烤焗、蒸氣、過熱水蒸
氣、燒烤、微波蒸模式下
※ 有微波功能禁止使用蒸烤
架 , 以免造成打火。
※
不要除下6粒膠環以免打火
模式下請將原廠烤架放置於下層使用
※ 烤焗
。
。

12
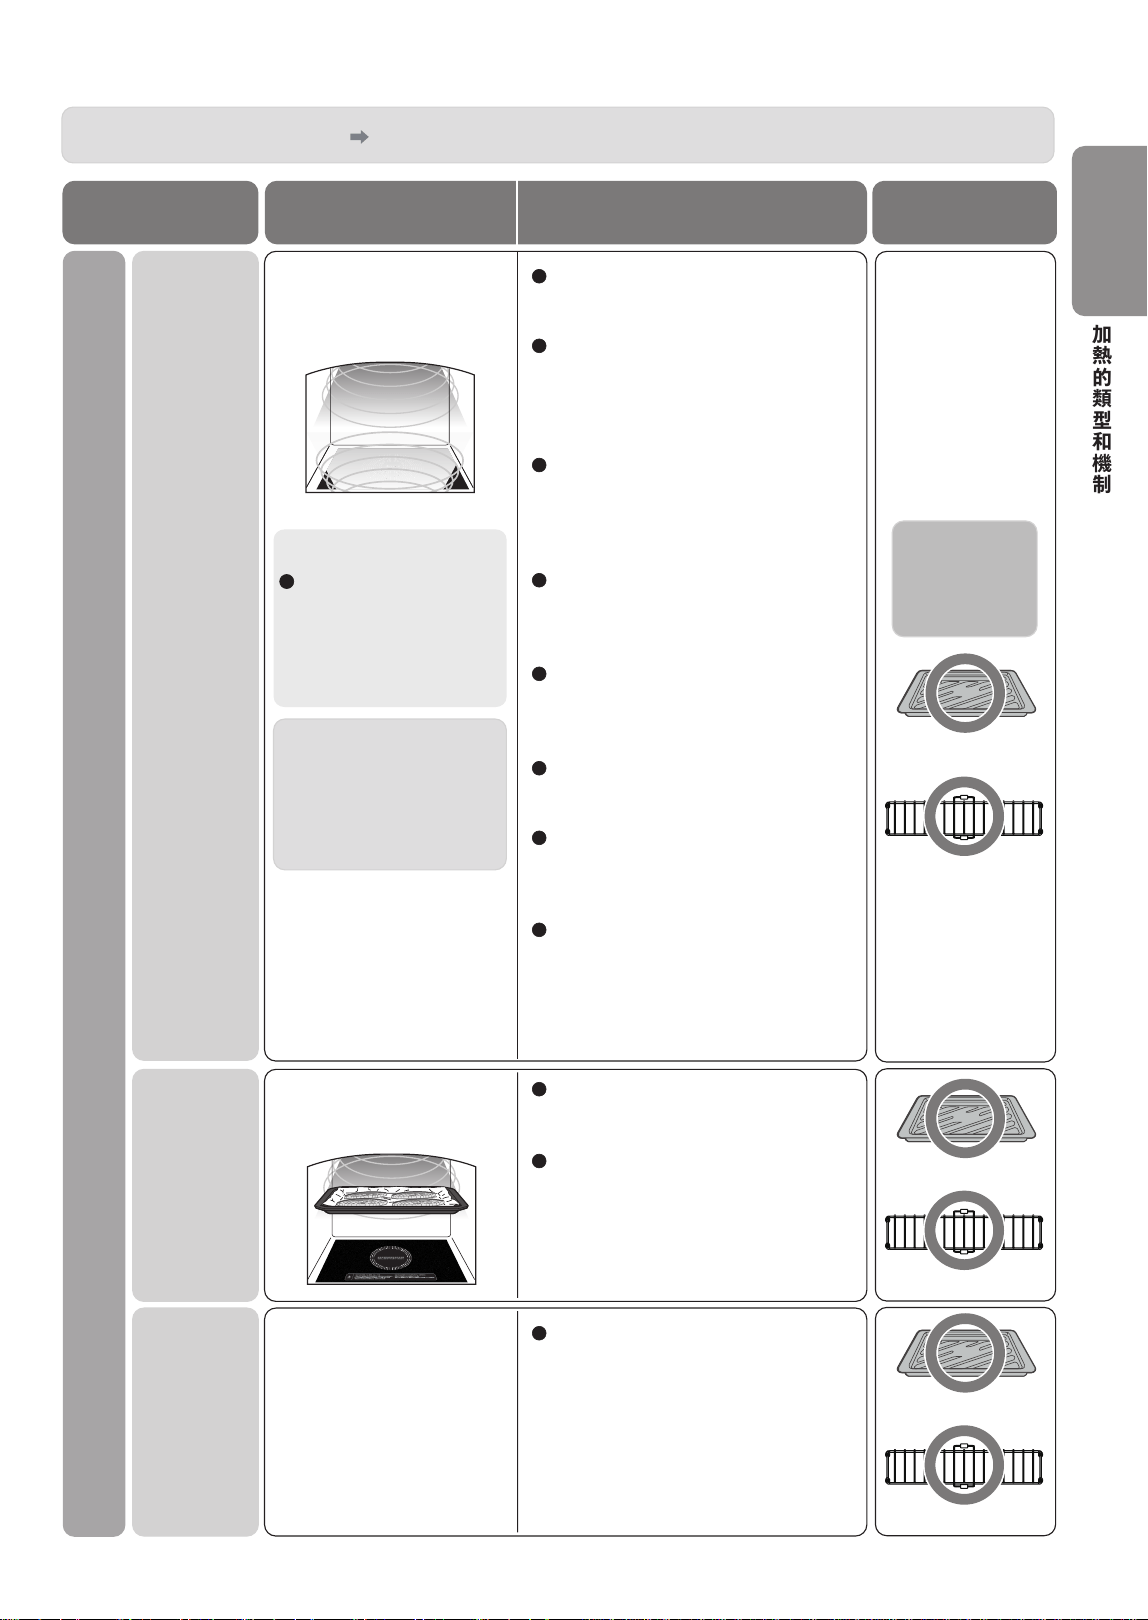
加熱的類型和機制
加熱 • 烹飪的類型
烹飪要點 烤盤和蒸烤架
微波
定温加熱
蒸氣微波
蒸氣
蒸
氣
加
熱
微
波
加
熱
微波的性質
加熱的機制
用微波加熱
當微波照射時,食物的水分
子會摩擦併產生熱量。
這可以同時加熱食物內部和
外部。
被食品和水分
吸收
透過陶器和瓷
器等
金屬容器、鋁
真空包裝會反
射微波,導致
無法加熱
加熱時間與食物的份量成正比。如果
份量翻倍,請將加熱時間也加倍或略
低於 2 倍。
短時間內食物的水分也會丟失,容易
變乾燥和變硬,因此烹飪時請設置較
短的時間,邊觀察邊烹飪。
請將食物直接放入耐熱容器中並直接
放在爐內正中央。
也可烹飪按 600W 加熱後按 200W 微
波燉煮的料理。
P.34~35
無法使用
配件
可能導致打
火,引
起火災
烤盤
蒸烤架
通過紅外傳感器檢測食物
的加熱温度。
一直加熱直至達到設置温度
可以在 70 ~90℃的温度範圍內選擇
烹飪效果。
同
樣適用於加熱嬰兒食品,軟化牛油
等。
關於烹飪温度,請參考第 36 頁設置。
由於可以按設置的温度進行烹飪,所
以不用設置時間。
軟化牛油
軟化到適合食用的
程度
組合使用微波和蒸氣迅速濕潤加熱
通過蒸氣和烤焗進行加熱
以低於 100℃的温度烹飪日式蒸蛋和
布丁
烤盤
蒸烤架
蒸氣微波可以使用蒸烤架
蒸烤架
13
加熱 • 烹飪的類型
加熱的機制 烹飪要點
烤盤和蒸烤架
烤盤
蒸烤架
發酵
燒烤
過熱
水蒸氣
烤焗
加
熱
管
加
熱
烤盤
蒸烤架
烤盤
蒸烤架
可使用烤盤和
蒸烤架
用上下加熱管在整個爐內
散發的熱加熱食物
請仔細閲讀安全注意事項 P.2~5
過熱水蒸氣…
將水蒸氣加熱至 100℃
以上的温度後形成無色
透明氣體,其熱效率可
以更快速加熱食品。
根據爐內温度,有時可能
看不見蒸氣。
特別提示:過熱水蒸氣是
肉眼不可見的。
※ 測量位置和食物的量
不同,則爐內温度可
能不均勻。
通過上加熱管的強熱給
食物表面上色
在控制温度的同時用加
熱管加熱
食
物中含有會膨脹的菜餚。請留
出合理的間隔。
請邊觀察食物的狀態邊加熱。持
續加熱導致爐內温度過高時,請
縮短烹飪時間,邊加熱邊觀察其
狀態。
爐內上方和底部靠近熱源時會導
致温度升高。對於高模具和食物,
請邊觀察上面是否焦糊邊進行加
熱。
由於加熱過程中爐內温度容易下
降,請儘量減少打開和關閉爐門
的次數。
加熱不均勻時,請在中途翻轉食
物的正面和反面或在烘焙顏色較
深的部位包上錫紙。
為避免將食品烤成過焦狀態,請
在加熱後立即取出。
請將非金屬模具(如紙和硅等)
和氟樹脂處理過的模具放在烤盤
上加熱,切勿直接放在爐內加熱。
分為直接放入食品加熱烹飪的“無
預熱烹飪”和從提前加熱爐內開
始烹飪的“有預熱烹飪”。
為了均勻上色,請在加熱過程中
為食物翻面。
加熱後,請立即將食品取出放
在蒸烤架上,以免烤焦。
用於在較低温度下發酵麪糰等。
加熱的類型和機制
準
備
與
確
認
14
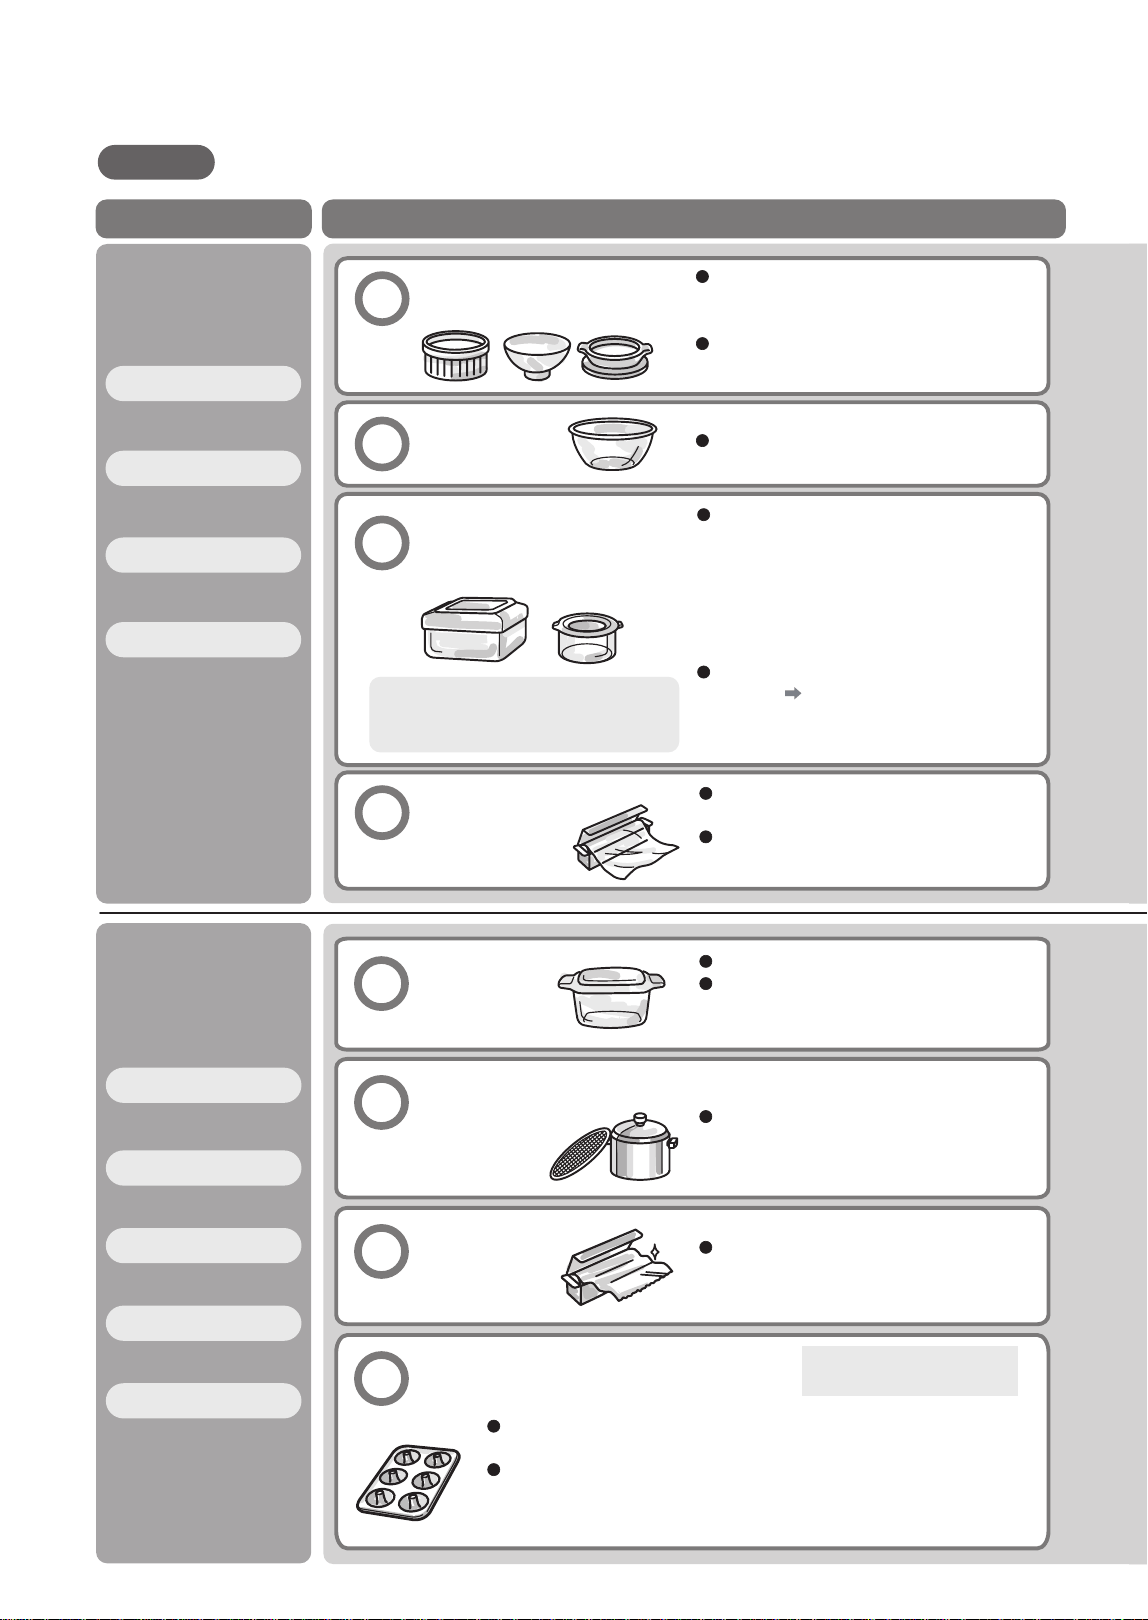
可使用的容器 / 不可使用的容器
須知事項
關於此處未記載容器的使用方法,請諮詢經銷商或容器製造商。
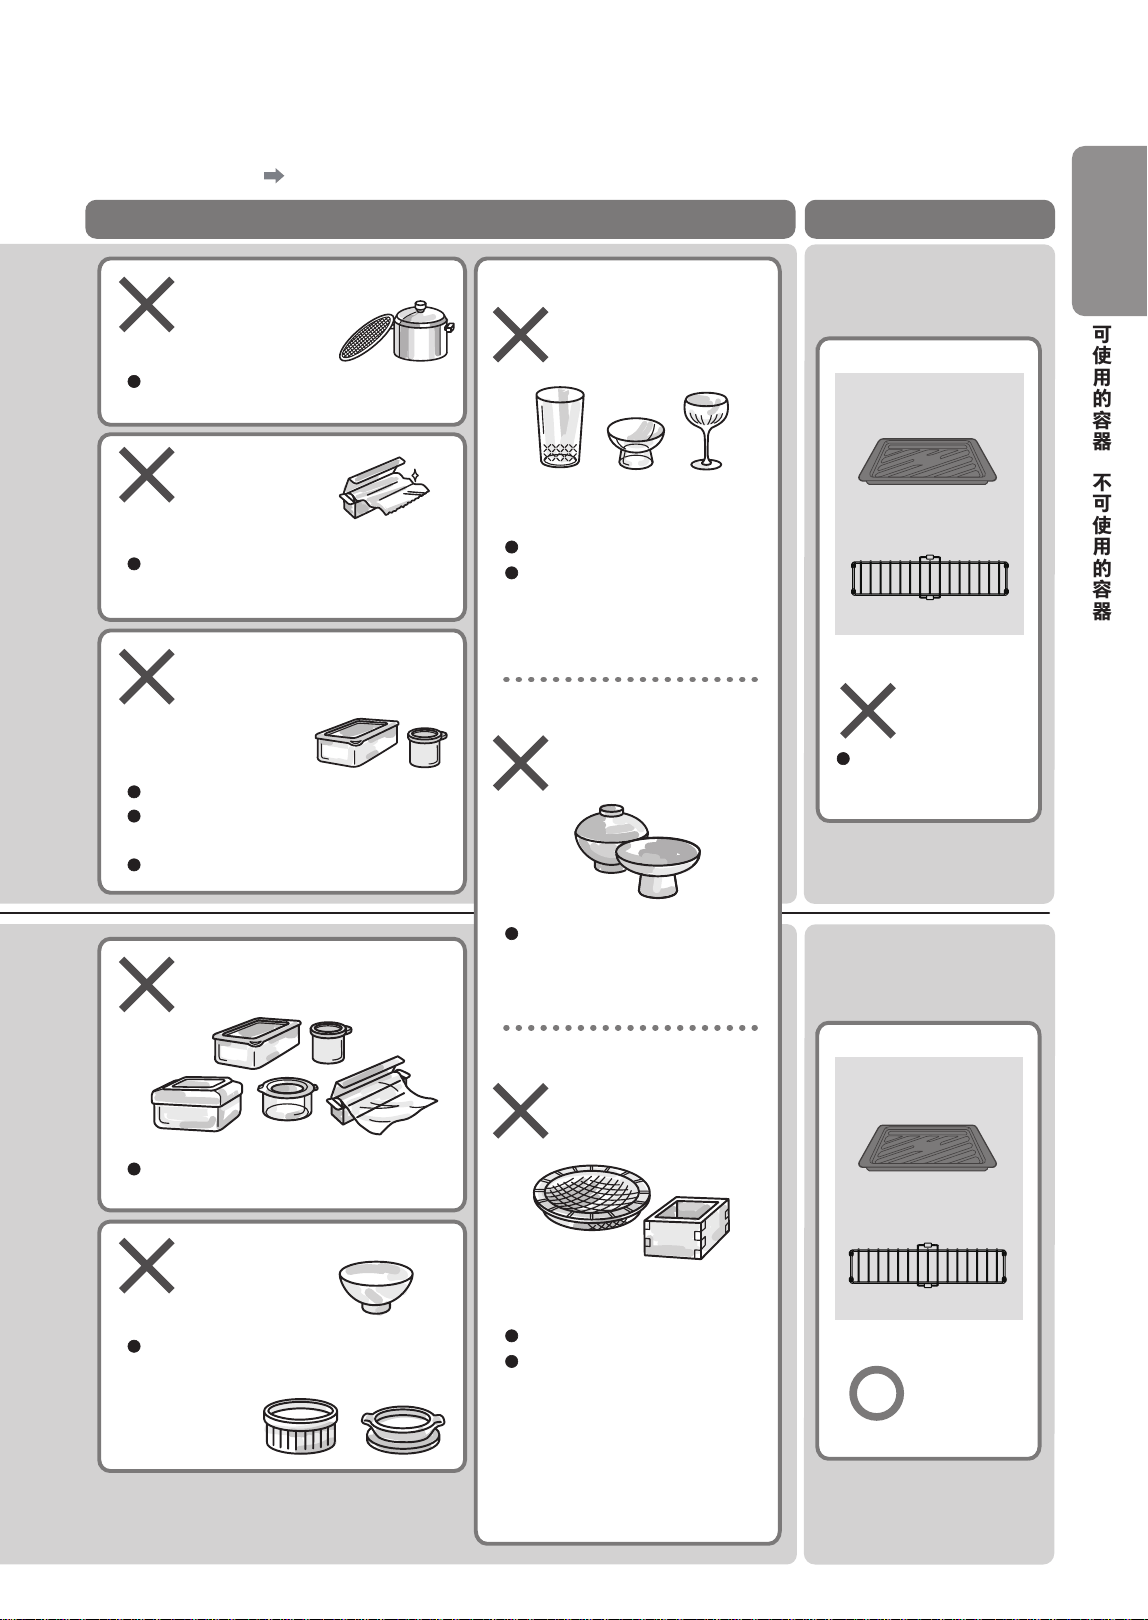
加熱的類型 可使用的容器
微波
定温加熱
蒸氣微波
解凍
烤焗
過熱水蒸氣
燒烤
發酵
蒸氣
陶器、瓷器
耐熱玻璃
耐熱温度為
140℃以上的
塑膠容器
耐熱温度為 140℃
以上的保鮮膜
加熱管加熱後(顯示 " 高溫”期間)
爐內高温時,塑膠容器和保鮮膜可能
會熔化。
不能使用以下容器。
• 使用金銀的容器(有打火的可能性)
• 帶彩繪的容器(彩繪可能脱落)微
波可能使容器變熱,請注意不要被燙
傷。
若加熱後急速冷卻,則可能會破裂。
不可使用以下容器。
• 富含油脂和糖份、鹽份的食物、調味
醬(可能會變高温)
• 高度密閉的蓋子、不耐熱的蓋子
• 無 " 可用於微波爐 " 標識的容器
• 用鋁等金屬加工表面的容器和包裝袋
• 市面上銷售的微波煮蛋器
在“自動加熱”(使用紅外傳感器的微
波加熱( P.16))中,不能使用帶蓋
的容器。請務必取下蓋子。
含油、糖份較多的菜餚温度容易升高,
因此無法使用。
聚乙烯制的保鮮膜可能會融化並燃燒,
因此無法使用。
若加熱後急速冷卻,則可能會破裂。
高温菜餚需使用耐快速加熱 / 快速冷卻的
玻璃容器。
樹脂手柄容易熔化,所以不能使用。
可鋪在烤盤上、調節烤焦的程度、錫紙烤。
耐熱玻璃
鋁、搪瓷等金屬容器、
金屬網、金屬棒
錫紙
硅膠容器
不可用於過熱水蒸氣、
燒烤。
“烤焗
”的温度請設置為低於容器耐熱温度的温度。(例:若耐
熱温度為 200℃的容器,則可設置的温度最高為 170℃)
請勿將容器放在上層或直接放在爐內。上層、爐內底部靠近發熱
管,所以硅膠容器可能會變形。
15
請勿混淆“微波”加熱和“烤焗、燒烤”加熱。否則食物和容器可能會冒煙、起火。請在加熱前
確認加熱的類型。 P.12~13
不可使用的容器 烤盤和蒸烤架
鋁、搪瓷等金屬容器、
金屬網、金屬棒
錫紙
耐熱温度為 140℃以下的塑
料、保鮮膜
塑膠容器 • 保鮮膜
※1
陶器、瓷器
※2
不耐熱的玻璃
漆器
木材、竹子、紙製品
特別是金屬網和金屬棒可能會引起
打火。
部分容器可使用“解凍”模式。請參考
第 27 頁的內容。
可能熔化後變形或破裂等。
不可使用聚乙烯、苯乙烯、苯酚、三聚
氰胺、尿素樹脂等。
“解凍”時可使用發泡托盤。
熔化後可能變形或破裂等。
但可使用耐熱陶器、瓷器壺、煽飯烤盤
等。
不能使用雕花玻璃或鋼化玻璃。
不能使用厚度變化較大和形狀
變化較大的玻璃容器。
塗料可能會剝落或出現裂縫。
可能會引起打火
或燃燒。
可
根據包裝的耐熱温度使用耐
熱處理過的紙、烘焙用紙、
蛋糕紙、蛋糕用硫酸紙。
※ 請勿鋪在爐內底部使用。
(指定功能除外)
烤盤
蒸烤架
可使用
烤盤
蒸烤架
(適用於蒸氣微波)
不可使用
可能會引起打火,所
以不可使用。
※1:可使用“發酵”。
※2:可使用“發酵”、“蒸氣”。
請使用耐熱容器。
可使用的容器
/
不可使用的容器
準
備
與
確
認
16
自動加熱的注意事項和技巧
加熱(米飯、菜餚)
3 種解凍方式
使用紅外傳感器的微波加熱(" 自動加熱 ")
蒸氣加熱
蔬菜
酒牛奶 • 咖啡
定温加熱
※ 紅外傳感器是指
通過測量食物發出的紅外輻射量、檢測食物表面温度的傳感器。
在檢測食物表面温度的同時進行加熱,所以可以不受食物初始温度和容器重量等的影響,將食物加熱到設
置的温度。
為正確瞭解紅外傳感器的食物温度檢測操作,請參考第 16~17 頁。
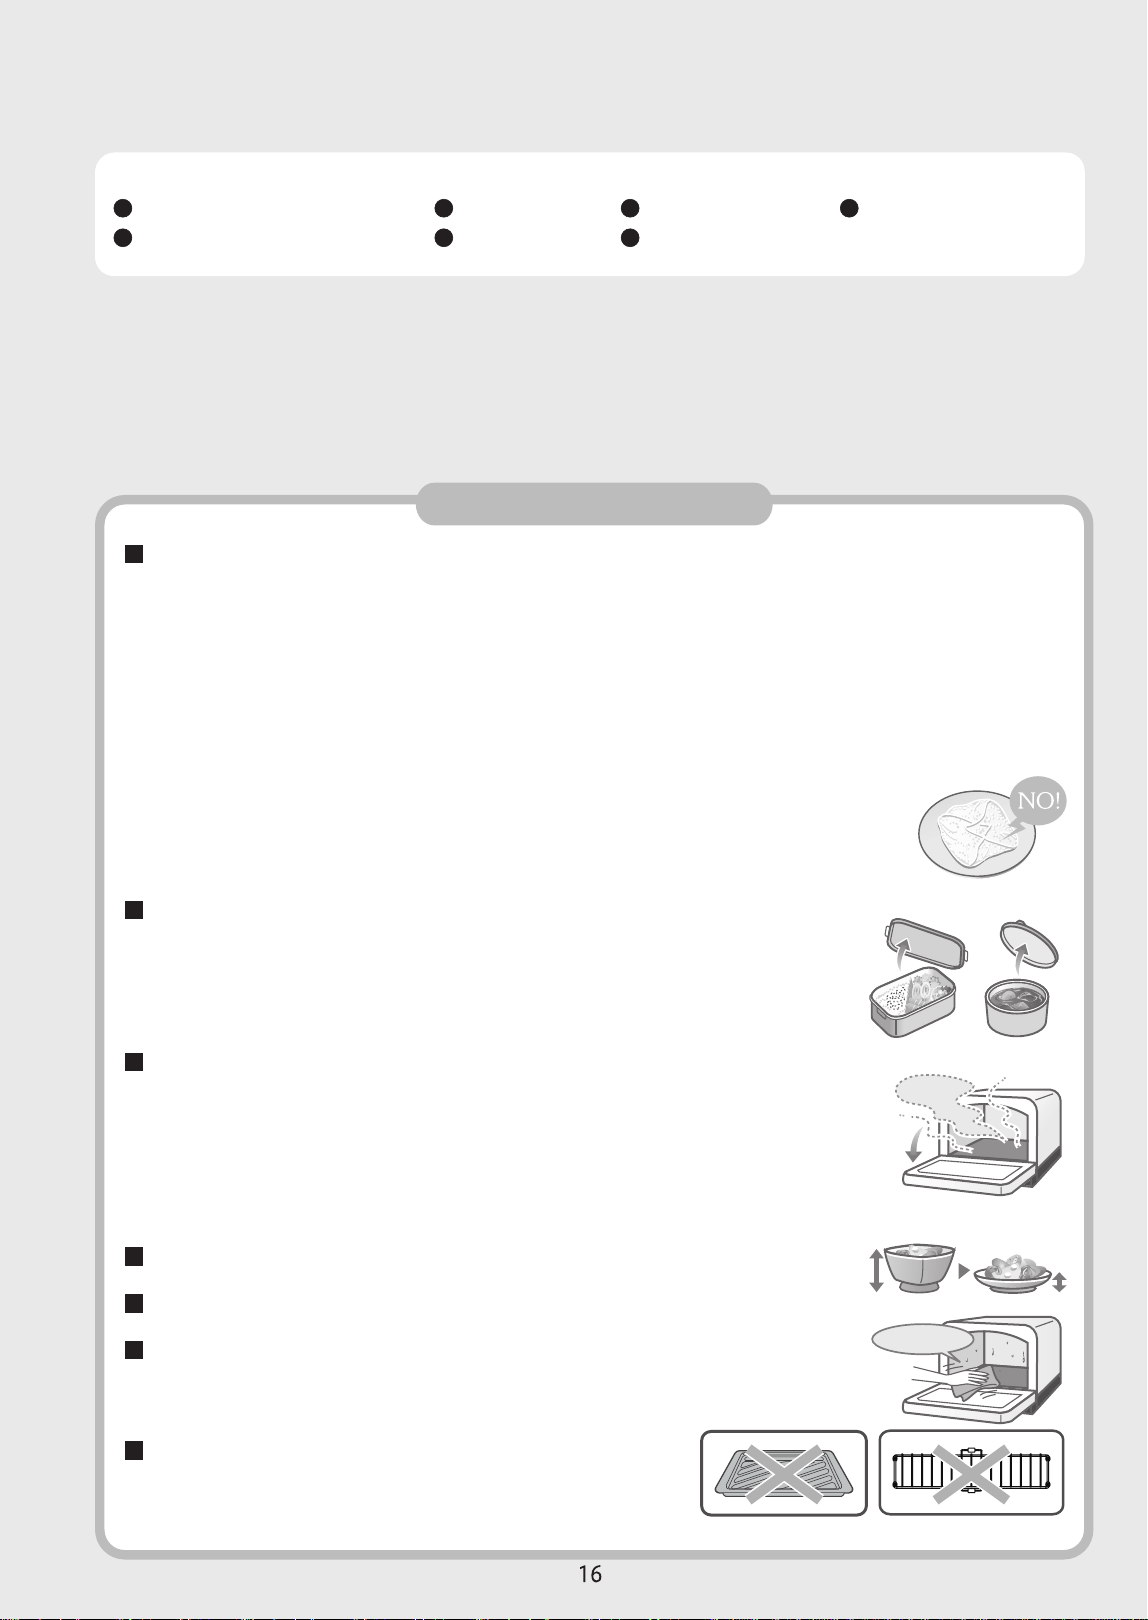
應遵守事項
正確使用保鮮膜
請勿使用蓋子
如需繼續使用,請務必在爐內充分冷卻後再使用
請使用與食物份量相匹配的容器
儘可能使用低矮寬口容器
放入食物前請將爐內的食物殘渣、爐內及爐門的水滴擦拭乾淨
微波加熱時不可使用烤盤或蒸烤架
• 部分食物不需要使用保鮮膜。
詳情請閲讀各個功能説明。
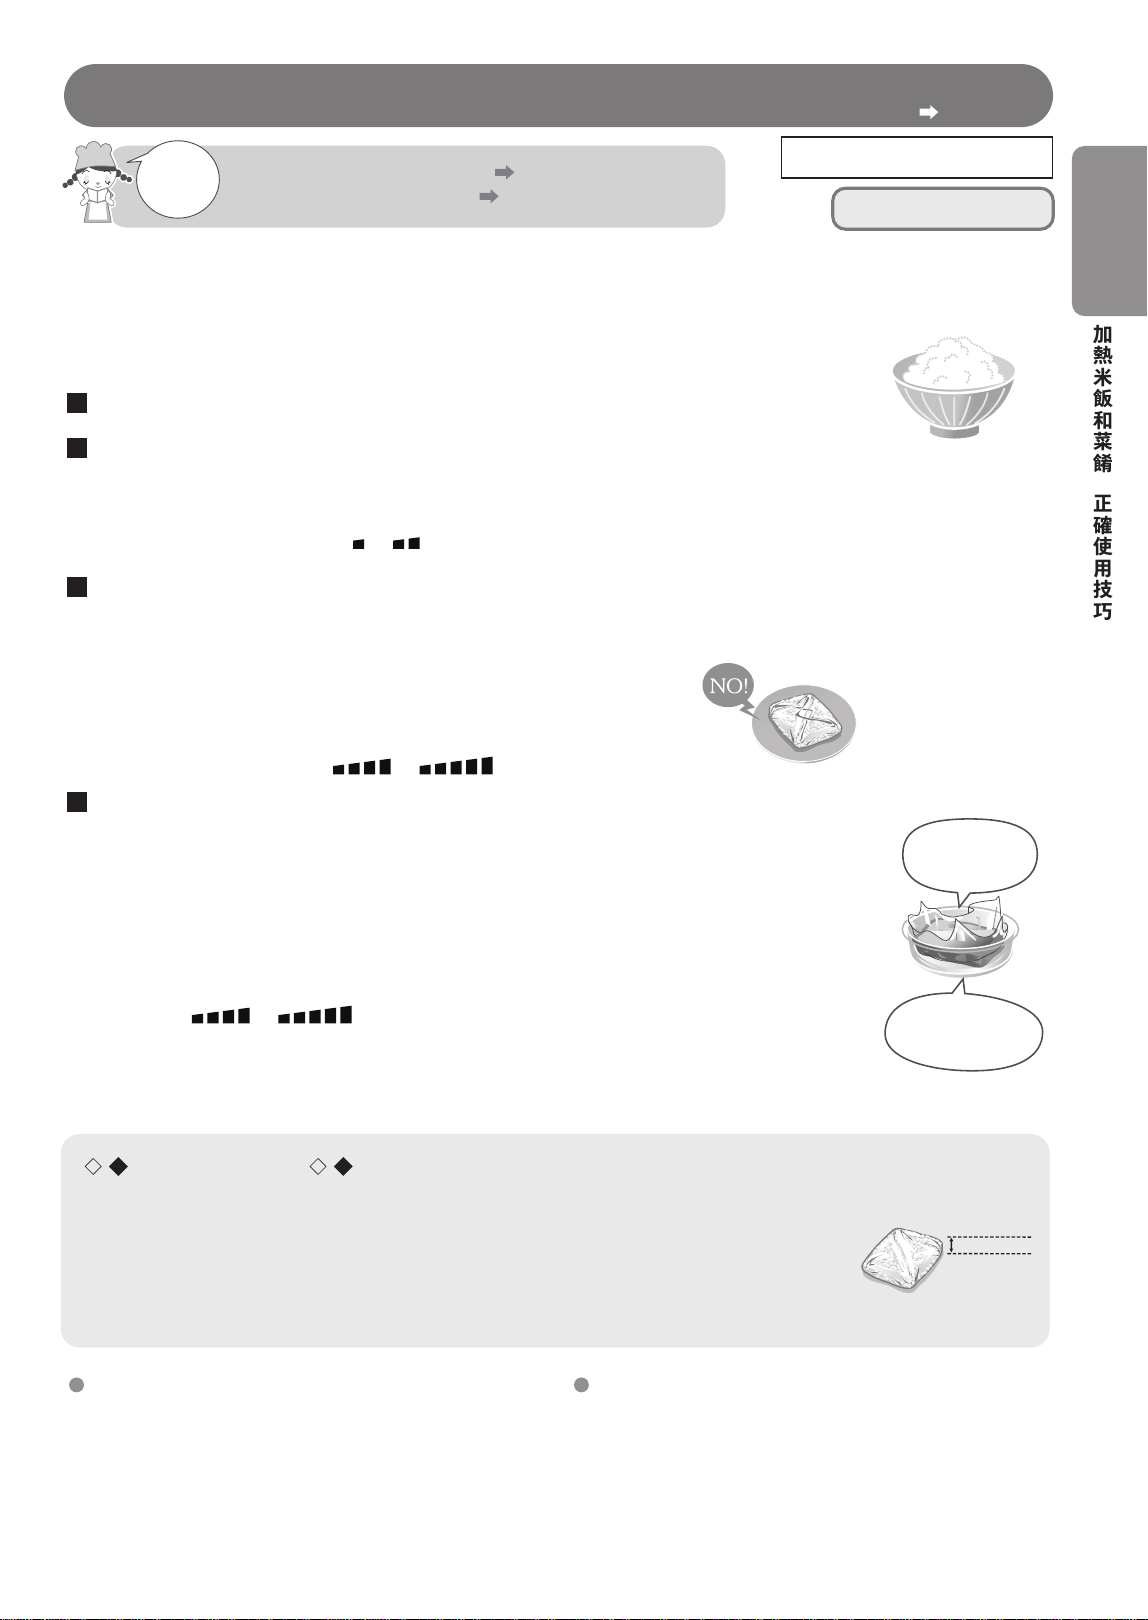
• 在加熱米飯和菜餚前包裹保鮮膜時,請緊貼食物包裹好。在容器邊緣包裹保鮮膜時,請留出空
隙。(不用保鮮膜密封)。
此外,加熱保存在冰箱中的食物時,請按上述方法重新包上保鮮膜。
• 用保鮮膜包裹米飯和肉類等進行冷凍時,請仔細裹緊,請勿包裹多層保鮮膜。
• 加熱用保鮮膜包裹的食物時,請放在耐熱淺碟上,確保保鮮膜封口向下。
• 如未正確操作,烹飪效果可能不佳。
此外,還可能會使食物燒焦,並冒煙、起火或因保鮮膜破裂導致爐內底部
裂開、燒傷、損壞。
• 當使用陶瓷、玻璃、塑料等蓋子覆蓋時,紅外傳感器無法正確檢測食物温度,
從而不能很好加熱。
• 在加熱市面上銷售的便當時,請務必取下蓋子並拆開錫紙後加熱。
• 當爐內發熱時,可能會導致紅外傳感器無法正確檢測食物温度,從而不能順利
加熱。
此外,不耐熱的容器(如塑料等)和保鮮膜可能會熔化或變形,冷凍食品等的
熱衝擊也可能會導致爐內底部破裂。當顯示部位上顯示 " 高溫 " "C21" 時,請
耐心等待直到此提示消失。
• 否則可能無法正確檢測食物温度,烹飪效果不佳。此外,還可能導致冒煙、起火。
• 使用烤盤時會導致
打火、引起故障。
烤盤
蒸烤架
擦拭乾淨
冷卻
17
警告
請勿使用自動烹飪模式加熱不足
100g 的食物
有蓋的容器不要用於紅外傳感器
進行微波加熱烹飪
禁止 禁止
• 不能正確檢測食物温度時,可能會加
熱過度,從而導致食物着火等。
• 請邊觀察邊手動加熱。
• 有蓋子會導致無法正確感知温度而過
度加熱、食品起火和容器破裂。
• 請去掉容器的蓋子後加熱。
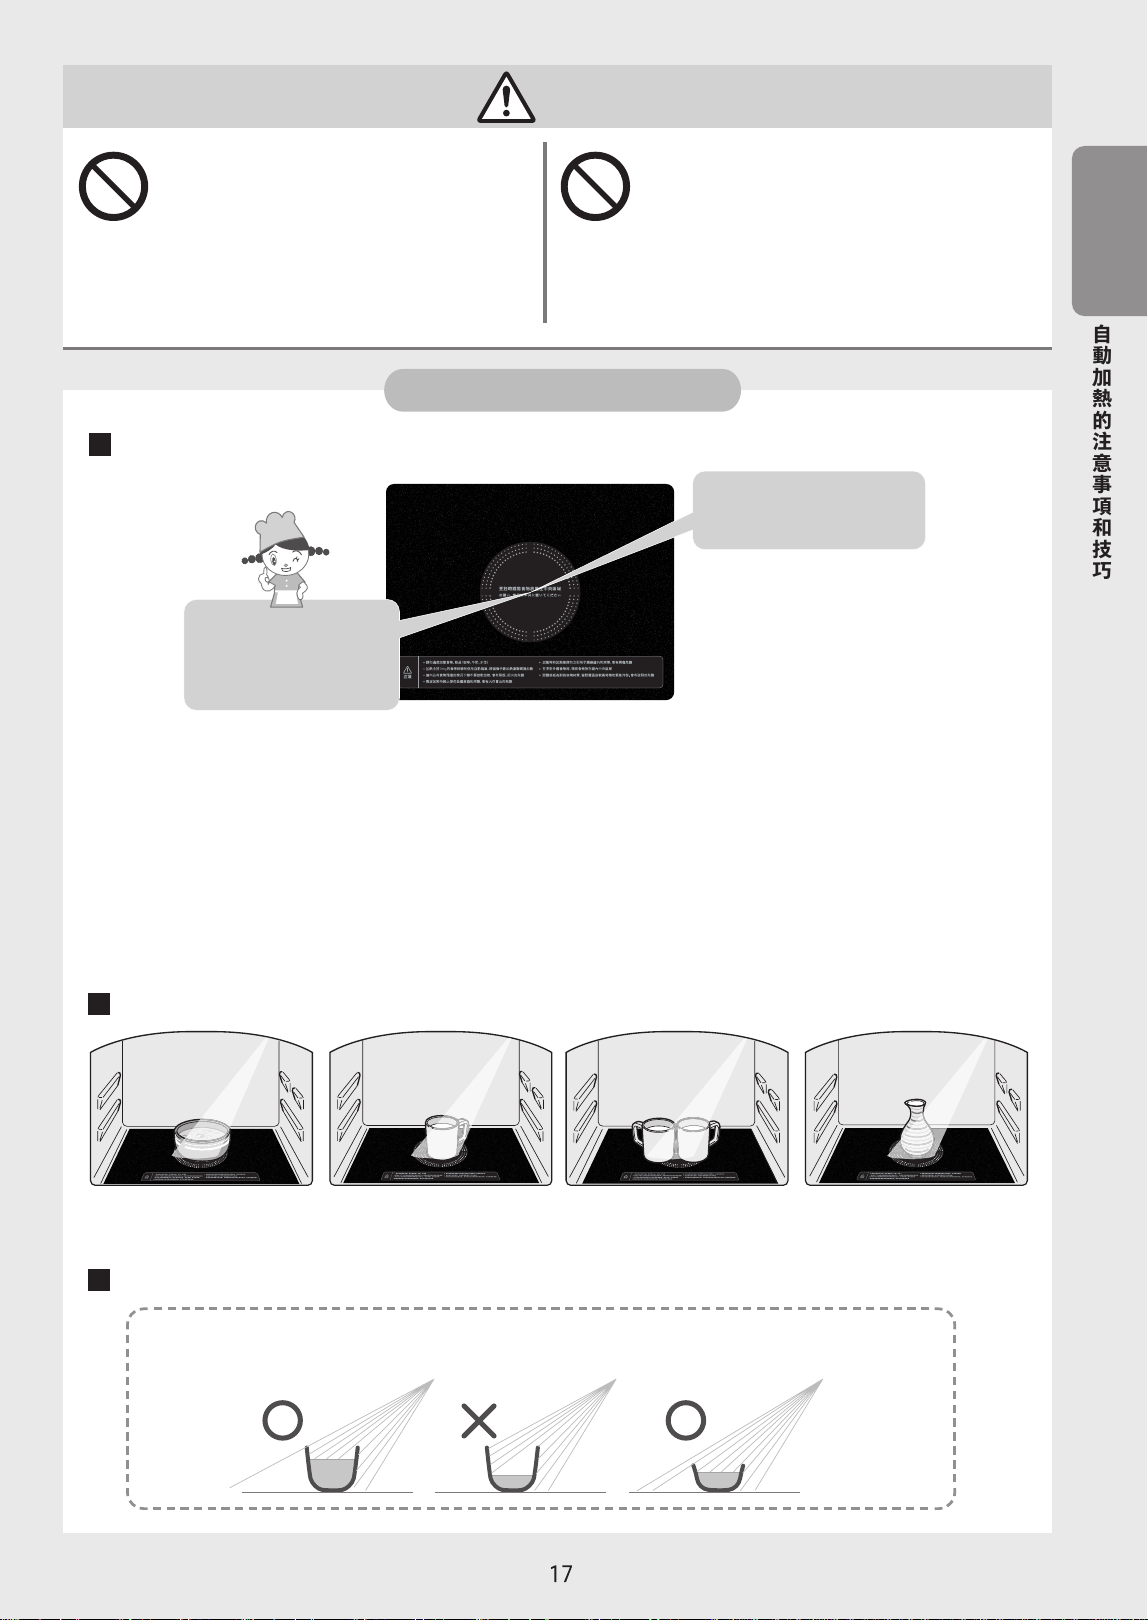
為順利加熱
爐內內側
爐內前側
將食物放在爐內的中央位置
加熱多種食物時 , 靠
近中央放置
以圓為中心,在爐
內前後、左右的中
央位置放置食物
• 如將食物放在遠離中央的位置可能會加熱過度或加熱不足等。請務必將食物放置於爐內中央。
• 將飲料放在邊緣位置加熱時,可能會加熱過度、沸騰、從爐內中取出後突然噴出等,從而導致燙傷。
• 加熱多種食物時,請調整種類、份量、初始温度。不均勻時,可能無法順利加熱。
※ 將非常小巧的食物置於中央時,可能無法正確檢測,從而導致食物冒煙或着火等。在加熱少量食物時,
請在手動“微波”模式下保守設置時間,邊觀察邊加熱。
紅外傳感器的檢測圖像及其放置方法示例
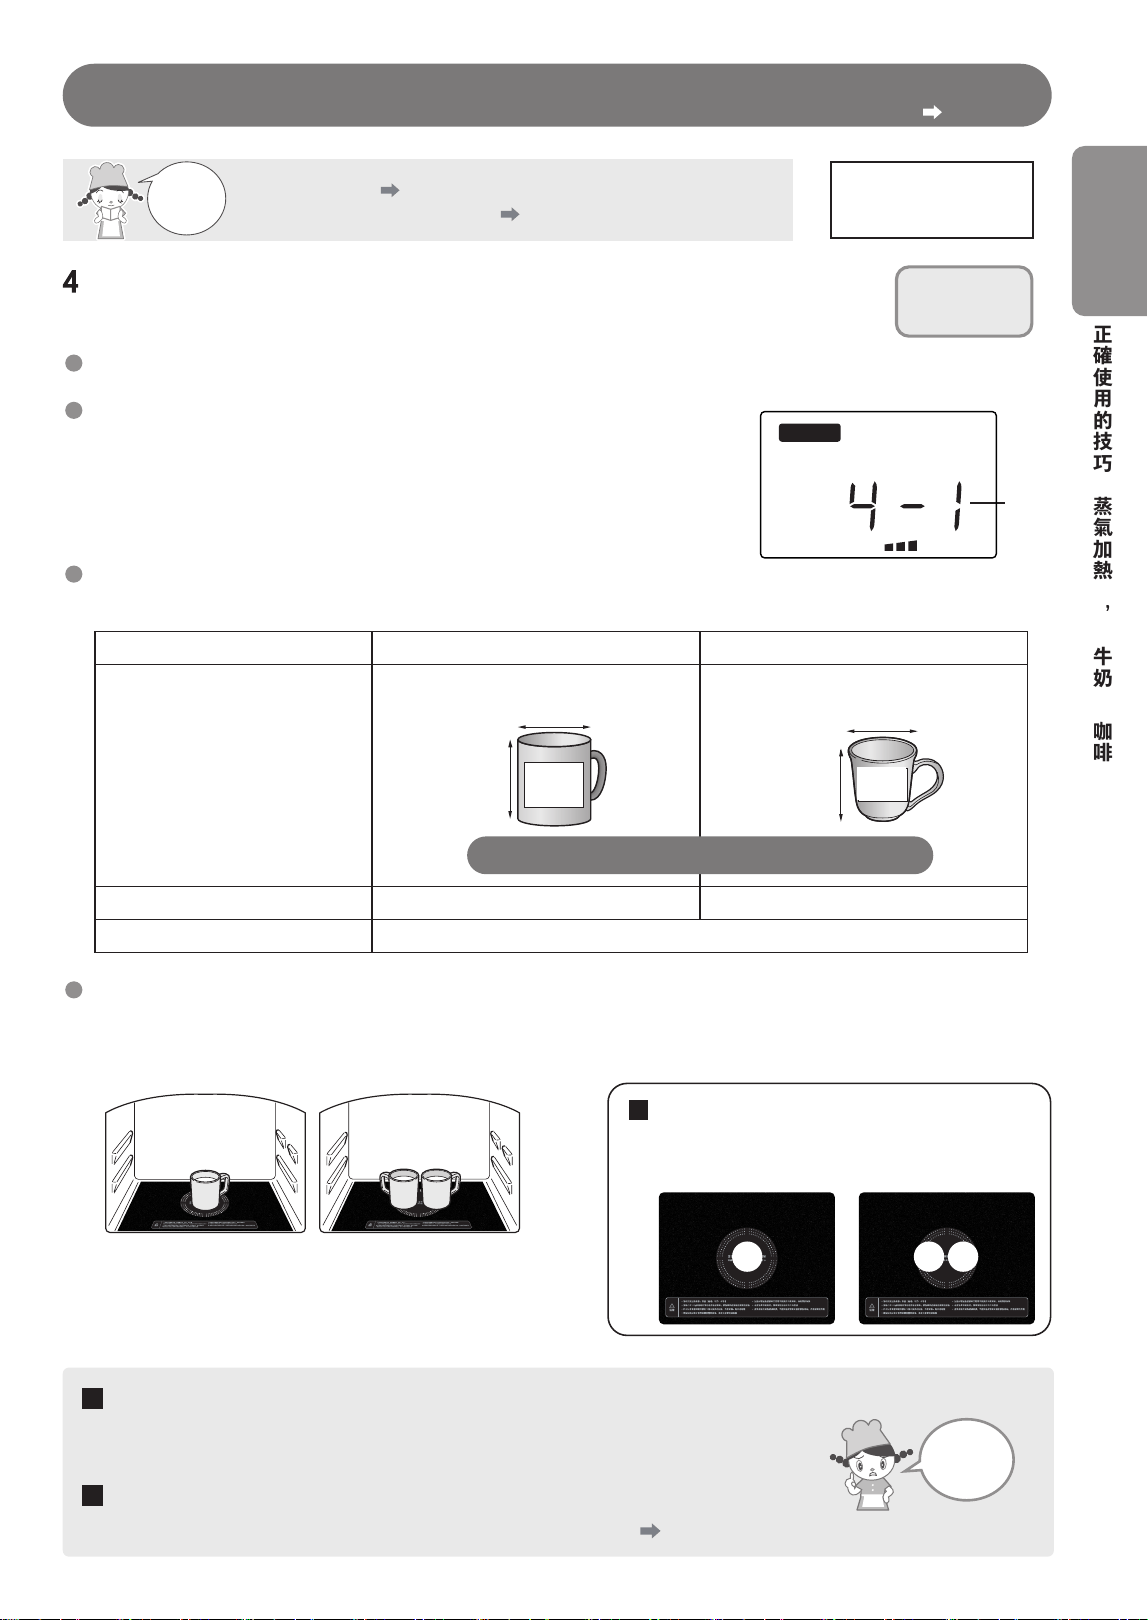
加熱、定温加熱 馬克杯 1 杯(牛奶) 馬克杯 2 杯(牛奶) 酒瓶(酒)
關於操作步驟和牛奶 • 咖啡、和酒匹配的容器和份量,請參考第 25~26 頁。
請使用與食物份量相匹配的容器
若食物份量相對於容器的高度而言相差較大,則紅外傳感器不能正確檢測食物的温度,從而無法加熱到
滿意狀態。(過度加熱時,可能導致燙傷、容器和爐內底部破裂)
加熱不充分時,請取出後攪拌或重新擺放,通過延長加熱時間或手動微波邊觀察邊加熱。
自動加熱的注意事項和技巧
準
備
與
確
認

18
爐內乾燒、除臭
發熱管
注意事項
• “47 除臭”時需要通過加熱管加熱,因此主機會變熱。請勿靠近
不耐熱的物品。
• 可能會冒煙,但這並非故障。
• 請將窗戶附近的小動物,例如雀鳥,轉移到另一個房間並打開換
氣扇或窗
戶進行換氣。
爐內乾燒、除臭前的準備
初次使用時(乾燒)
當爐內有異味時(除臭)
請在取出爐門內側所有聚乙烯等包裝材料後,利用“47 除臭”將爐內的油燒盡。可能會冒煙或散發異味,這屬正
常現象。
請務必先擦淨爐內的污垢。若不擦拭便乾燒或除臭,則污垢可能會燒焦,無法清除。“45 快速清潔”後,會容易
清除污垢。
P.48
打開窗户
打開換氣扇
爐內乾燒、除臭
3
2
1
4
插入電源插頭並打開爐
門後關閉。
選擇 47 除臭
按下
打開爐門並等待温度下降
• 爐內不放入任何食物。
• 向左旋轉,可快速選擇。
• 顯示部位會顯示“高溫”“冷卻”。
• 請注意爐門玻璃、爐內會變熱。
• 請勿反覆嗓真。
• 高温燒掉附着在爐內的異味源頭後除臭。但並不能去除所有類型的異味。
加熱的類型
顯示剩餘時間
開始除臭
蜂鳴器響 3 次後,則除臭完成
• 除臭時間為 30 分鐘。
烤焗
自動功能
烤焗
分 秒
高溫
冷卻
轉
19
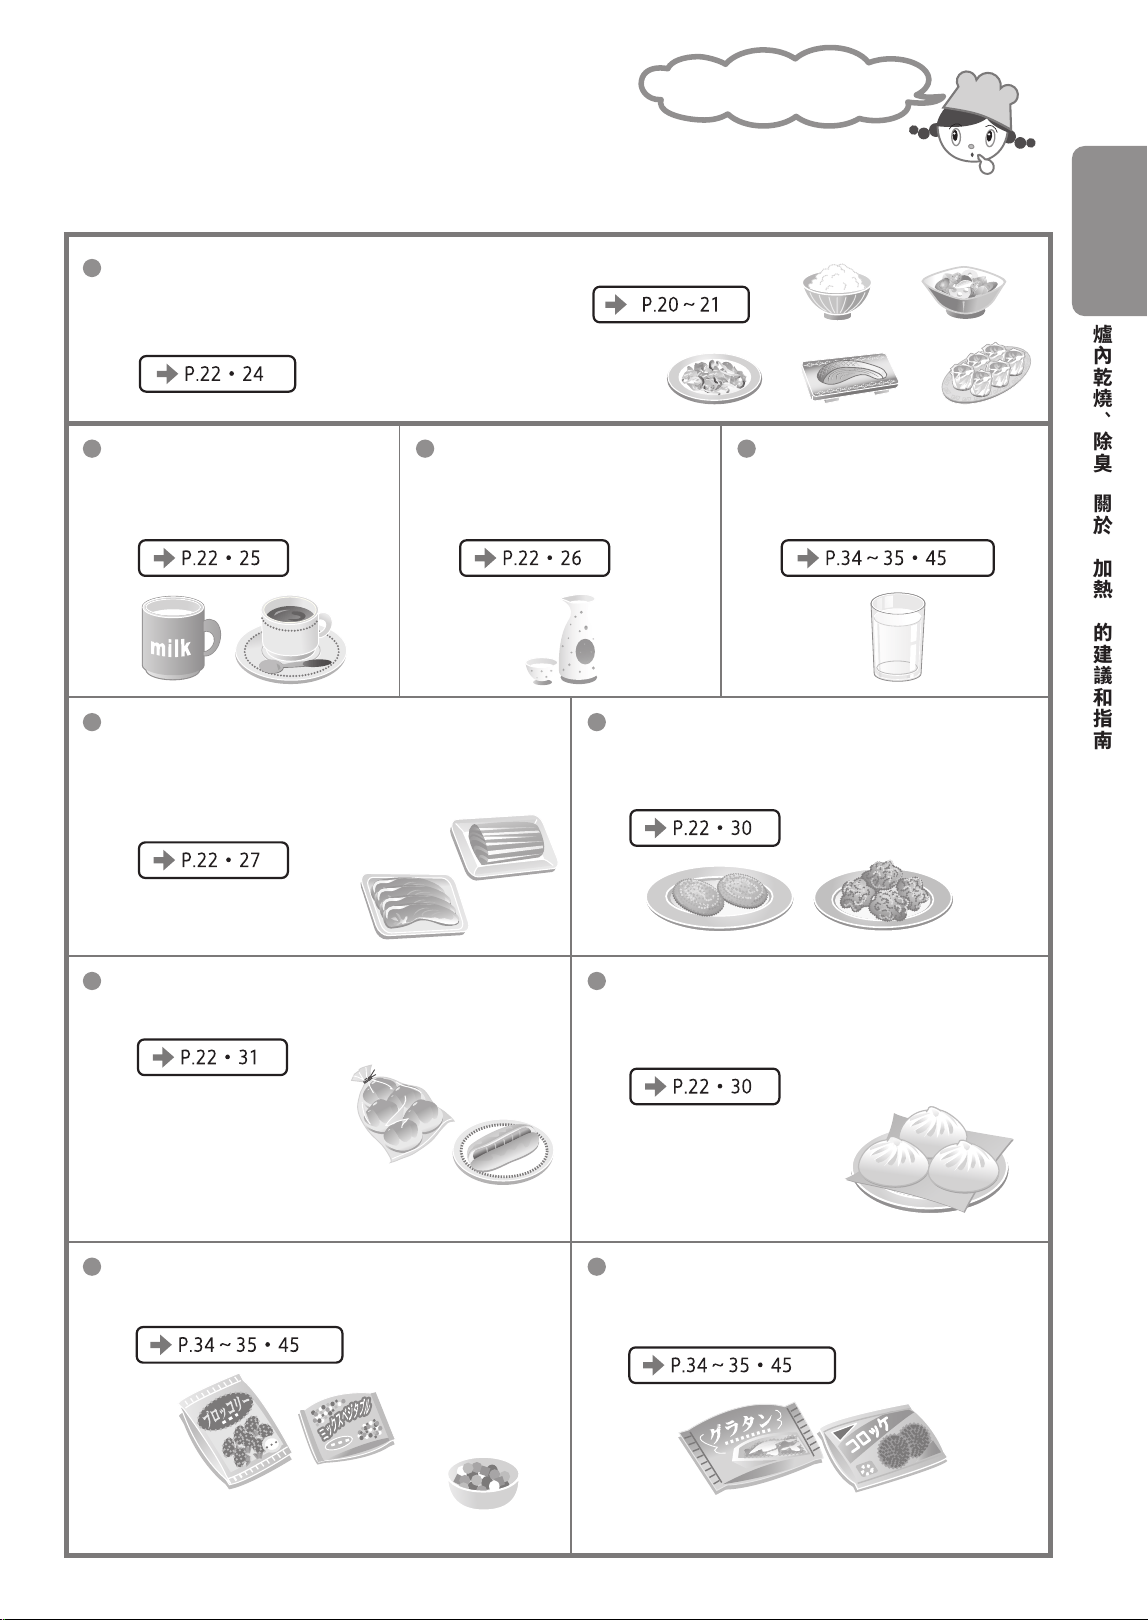
要如何進行加熱呢 ?
關於“加熱”的建議和指南
米飯和菜餚
→通過加熱鍵
開始選擇“1 米飯”、“2 菜餚”
→旋轉旋鈕後選擇“3 蒸氣加熱”
牛奶 • 咖啡 酒 水等飲料
→旋轉旋鈕
“4 牛奶 • 咖啡”
→旋轉旋鈕
“5 酒”
→通過手動“微波”設置
輸出功率和時間
解凍肉類和魚類
加熱餐包、有餡麵包至蓬鬆
酥脆加熱炸製品、燒烤食品、 法式麪包、
咖哩麪包等
急凍包
冷凍蔬菜
市面上銷售的已完成烹飪的冷凍食品
(炸丸子等)
→旋轉旋鈕選擇“12 酥脆加熱”
→旋轉旋鈕
“6 快速解凍”、“7 蒸氣全解凍”、
“8 刺身 • 半解凍”
→通過手動“微波”設置輸出功率和時間
→旋轉旋鈕後選擇“13 蓬鬆麵包”
→旋轉旋鈕
“14 急凍包加熱”
→通過手動“微波”設置輸出功率和時間
* 請參考包裝上的記載內容,邊觀察邊加熱。
* 在加熱玉米和混合蔬菜時,
請多加點水並轉移到耐熱容器中進行加熱。
* 烤吐司請參考第 33 頁
爐內乾燒、除臭
/
關於
“
加熱
”
的建議和指南
準
備
與
確
認
20
加熱米飯和菜餚
無需調整時間、温度即可自動烹飪
放入食物後按下“加熱開始 " 鍵即可輕鬆加熱食物。
保鮮膜的使用方法等詳情請參閲“正確使用技巧”( P.21)。
警告 警告
禁止 禁止
請勿使用自動烹飪模式
加熱不足 100g 的食物
請勿用 " 加熱 " 鍵加熱飲料
可能會因過度加熱導致取出時突然沸
騰,從而被燙傷。
• 不能正確檢測食物温度時,可能會加熱
過度,從而導致食物着火等。
• 請在手動操作時邊觀察邊加熱。
• 牛奶 • 咖啡請使用“4 牛奶 • 咖啡”,酒請
使用“5 酒”,水等請參考第 45 頁的時間通過
手動微波方式邊觀察邊加熱。
基本操作(例:加熱米飯)
1
2
放入食物
按下(加熱開始)
放在中央
禁止使用
烤盤或蒸烤架
• 放入與食物份量匹配的耐熱容器中,
以 O 為標準,放入爐內中央。
※ 若將食物放在遠離前後、左右中央的位置時則,紅外傳感
器將無法正常運行,可能會加熱過度或不加熱等。
• 請在關上爐門後 1 分鐘內按下此按鍵。
超過 1 分鐘後則顯示“門”,不再運行。
每次按下 均按以上順序依次切換。(5 秒)
→按下開始鍵後在 10 秒以內按下 " 火力調節”鍵進行調整。
選擇火力
• 中途會變為顯示剩餘時間。
• 共有五檔火力,可通過 和 調整火力。
蜂鳴器響 3 次,則加熱完成
• 忘記取出食物時,蜂鳴器會響起。(1 分鐘、3 分鐘、5 分鐘後)
可打開爐門或者按“取消”鍵使其停止。
• 烹飪完成後,“冷卻”字樣可能會閃爍並通過風扇冷卻電氣部件等。
• 冷卻扇運行期間請勿拔下電源插頭。
• 風扇運行期間也可以烹飪。
容器會變熱
取出時請小心
加熱期間打開爐門時 完成後希望繼續加熱時(延長時間)
→按下“取消”鍵並在手動“微波”模式下邊觀察邊
加熱 P.34
〜
35
→烹飪完成後 3 分鐘以內旋轉旋鈕,然後設置時
間,邊觀察邊加熱 P.7
注意事項
• 請用於加熱米飯和菜餚。加熱其它食物時,可能因過熱導致冒煙和着火等。若為水分較少的
食物(乾貨、花生等)、乾燥食物、荷蘭芹、烘乾紫蘇,請在手動微波 200W 的模式下邊觀
察邊加熱。
秒
弱 強
微波
21
加熱米飯、菜餚
正確使用的技巧 基本操作 P.20
請仔細
閲讀
微波(紅外傳感器)
禁止使用烤盤或蒸烤架
安全注意事項(微波加熱時)
P.2 ~ 5
定温加熱的注意事項和技巧
P.16 ~ 17
請勿加熱未打開的雞蛋、煮雞蛋(帶殼、無殼)。(破裂後危險)請在取出有蒸蛋的菜餚(關東煮
等)後加熱。
1 米飯、2 菜餚
一次可加熱的米飯和菜餚的份量……100-300g
(1 人的量為 150g)
常温和冷藏食物請勿包裹保鮮膜,直接按以下方式加熱
為冷凍食品裹上保鮮膜,放入碗碟中加熱
裹上保鮮膜後加熱濃稠食物
包裹容器邊緣
的保鮮膜請留
出少許空隙
請緊貼食品包
裹好保鮮膜
• 米飯…將米飯糰打散,在冷藏的米飯等已經變硬的食物上先灑上一些水。
• 燉煮食品…瀝乾湯汁。
• 烤魚…設置火力為〔小火 或 〕
※ 保鮮膜未裹緊食物時,可能無法順利加熱。
• 冷凍米飯(冷凍方法請參考以下內容)
→ 若為包裹保鮮膜的冷凍米飯,請將裹上多層保鮮膜的一面朝
下放在淺碟中。
• 冷凍燒麥中冷凍的米飯
→請將火力設為〔大火 或 〕後進行加熱。
• 蒸製品…當食物處於乾巴巴的狀態時噴點水霧。
※ 為防止湯汁飛濺,請為咖喱和八寶菜等濃稠食物裹上保鮮膜。
• 放入淺口碟盤時,請緊貼食品包裹好保鮮膜。在容器邊緣包裹保鮮膜時,請留出空隙。
加熱完成後整體攪拌均勻。
• 請取出鶴鶉蛋。如有蝦仁或章魚,可能會崩開,因此請包裹一層保鮮膜並在手動
" 微波 " 模式下邊觀察邊加熱。
• 咖喱和八寶菜等濃稠度高的菜餚不容易加熱,所以請用“2 菜餚”模式並將火力設為
[大火
或 ]後加熱。
• 冷凍狀態下不易加熱,因此加熱不充分時,請在手動“微波”模式下邊觀察邊加熱。
米飯的冷凍方法
• 將 1
個 150g(約 1 茶碗的份量)調整為厚度為 2~3cm 的扁平狀,用保鮮膜包裹
好。 若米飯成團或將大量米飯一起加熱,則很難加熱裏面的米飯。
放入存儲容器或存儲袋時,自動加熱效果不佳。
• 儘量準備剛剛煮熟的熱騰騰的米飯。
在熱氣騰騰的狀態下包裹保鮮膜時,可以防止蒸氣冒出來並保存在良好的狀態,
即便加熱時也很難變乾燥。
食物的種類和狀態不同,則可能會加熱不均。魚的
種類、形狀、大小、厚度等食物的種類和狀態不同,
則可能會加熱不均。
→ 加熱不充分時,請延長加熱時間或在手動 " 微波”
模式下邊觀察邊加熱。
同時加熱多種食物時
• 請靠中央放置食物。
• 請調整食物的份量、初始温度、種類。
食物份量差異極大、加熱前食物有温差時,則
無法均勻加熱。
厚 2~3cm
加熱米飯和菜餚
/
正確使用技巧
烹
飪
方
法
22
自動功能的使用方法
無需調整時間、温度即可自動烹飪
★就自動 3 ~ 44 的基本操作進行説明。
★關於自動 3 ~ 14、26、29~31、42~44, 請一併參閲“正確使用的技巧” P.24~33)。
★健康炸(15~44)的詳細做法請參考料理集。
基本操作
(例:18 漢堡肉)
※ 功能不同,則操作會有所差異。請參考料理集進行操作。
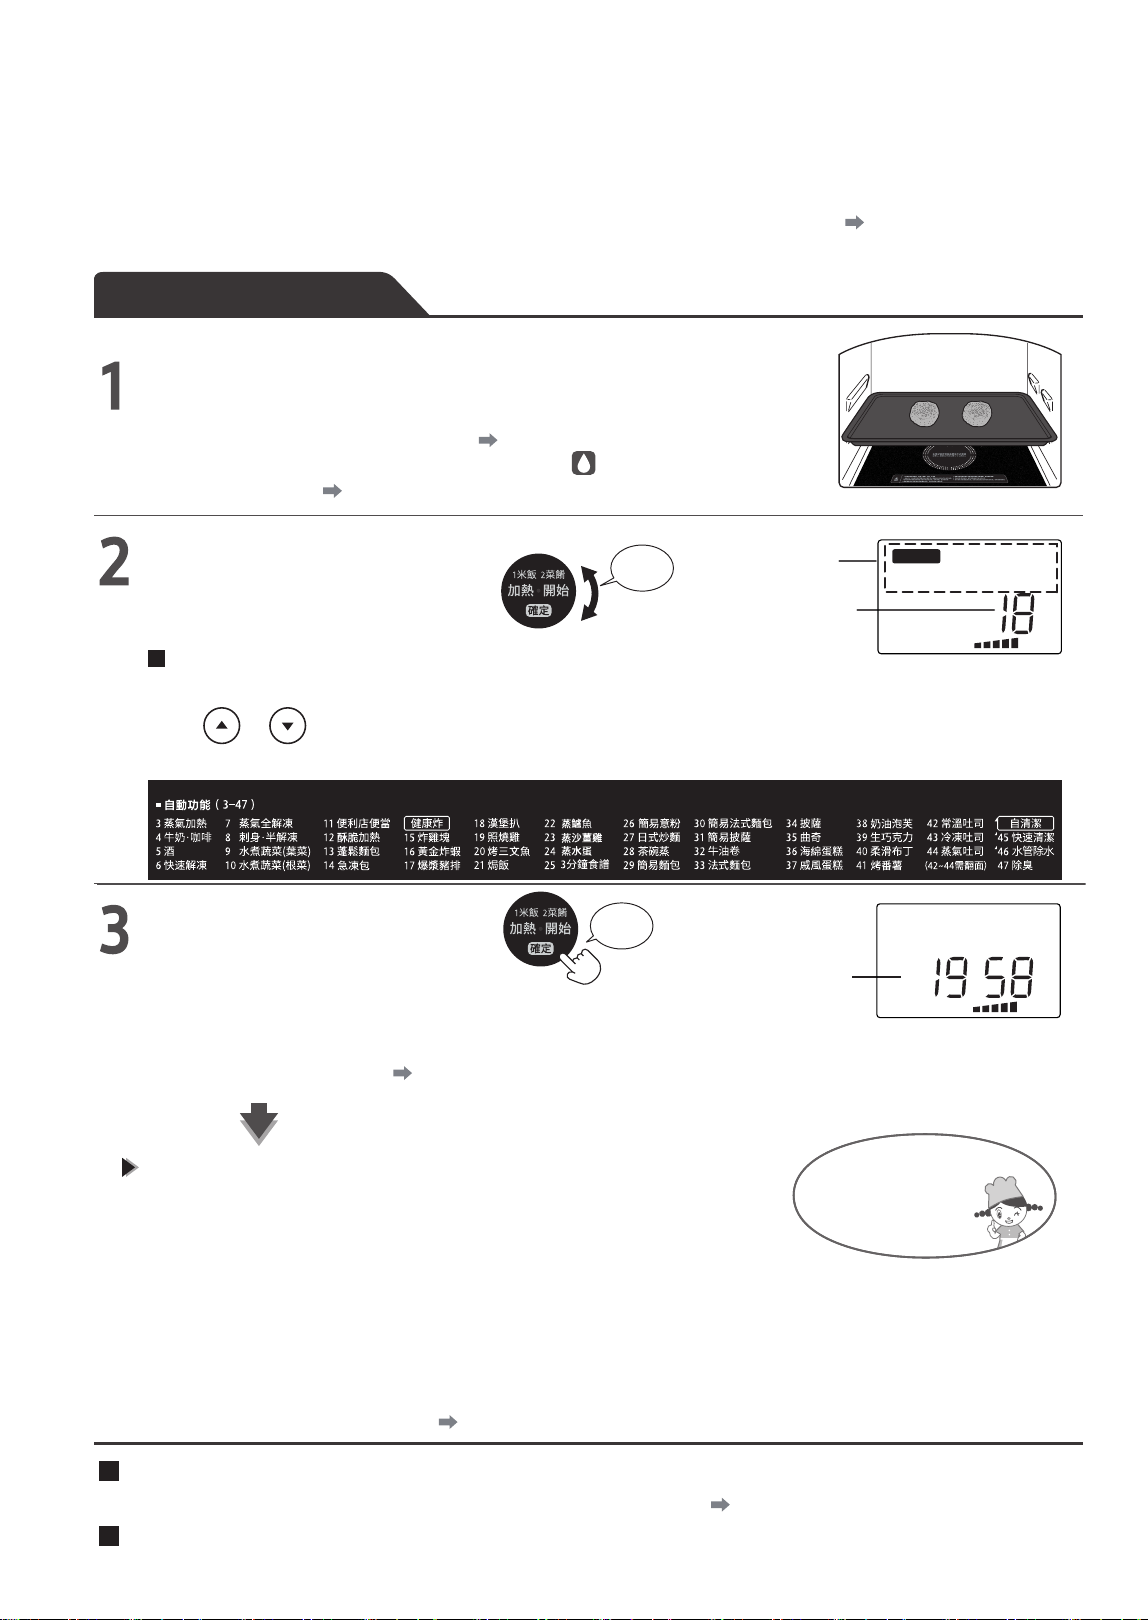
放入食物
• 所使用的配件和容器請參考料理集等,放在指定的位置。
標識的功能
• 使用蒸氣的 應做好加水準備。 P.10 第
24 ~33 頁有蒸氣標識的 和料理集中有
•
需要預熱的 P.23
• 從爐門上記載的 (3~44)中選
擇加熱種類。
選擇功能編號
選擇火力
→按下開始鍵前(或按下後 10 秒以內)按下“火力調節”鍵進行調整。
• 按 和
調節火力大小,火力共有五段。
旋轉
加熱的類型
功能編號
自動功能
開始(開始烹飪)
按下
顯示剩餘時間
• 在部分
功能
中,烹飪期間蜂鳴器會響
5
次,
此時請打開爐門,按照料理集操作,然後關閉爐門,按下 "
開始”鍵。
(關於烹飪期間的提示音 P.23)
爐內和烤盤會變熱
取出時請
小心
• 忘記取出食物時,蜂鳴器會響起。(1 分鐘、3 分鐘、5 分鐘後)
可打開爐門或者按“取消”鍵使其停止。
• 功能不同,則加熱完成後顯示部位會顯示“高溫”“冷卻”。
“冷卻”字樣閃爍期間請勿拔下電源插頭。
蜂鳴器響 3 次,則烹飪完成
• 打開爐門時,爐內可能會冒出蒸氣。
此外,請注意殘留的蒸氣可能會從出氣口排出。
• 請為管路除水並進行自清潔。 P.49
使用蒸氣的功能烹飪後
開始烹飪後,時間無法變更
完成後希望繼續加熱時(延長時間)
→烹飪完成後 3 分鐘以內旋轉旋鈕,然後設置時間,邊觀察邊加熱 P.7
烤盤 上下層
烤焗
自動功能
w
弱 強
烤盤 上下層
烤焗
w
分 秒
弱 強
功能
功能
功能
功能
功能
功能
23
基本操作
需要預熱的功能 (
例 :34 披薩 )
預熱是指
P.39
※ 有放入烤盤後預熱的功能。請參考料理集。
選擇功能
旋轉
• 從爐門上記載的功能 (3~44) 中選擇加熱種類。
選擇效果 P.22
操作步驟 2
開始 ( 開始預熱 )
按下
預熱完成前 1 分鐘會顯示剩下時間
蜂鳴器響 5 次,則預熱完成 (“預熱結束”字樣亮燈 )
• 預熱約 20 分鐘。
在此期間,若不執行任何操作,則蜂鳴器3
次後會取消功能設置,而後電源會斷開。
• 若放入烤盤後預熱,則烤盤會變熱,因此
取出或放入食物時請小心。
將食物放入爐內後開始 ( 開始烹飪 )
按下
• 放入食物後按下“ ”鍵,則開始加熱。
※ 預熱完成後不開 / 關爐門,則即便按“ ”鍵也不會運行。
蜂鳴器響 3 次,則烹飪完成
• 忘記取出食物時,蜂鳴器會響起。(1 分鐘、3 分鐘、5 分鐘後 )
可打開爐門或者按“取消”鍵使其停止。
• 功能不同則加熱完成後顯示部位會顯示“高溫”“冷卻”。
“冷卻”字樣閃爍期間請勿拔下電源插頭。
爐
內和烤盤會變熱
取出時請小心
須知事項
通知
• 烹飪完成後,烤盤會變熱,請特別小心。
• 請閲讀“料理集”“可使用的容器 / 不可使用的容器 ( P.14~15)”後,使用與加熱類型匹配的容器。
• 請仔細閲讀安全注意事項。 P.2~5
請按料理集所記載的材料、份量、烹飪方法進行烹飪。
• 除料理集所記載的材料 ( 份量 ) 以外可能無法通過自動烹飪順利完成。
( 請通過手動料理模式邊觀察邊加熱 )
• 因室温、初始温度、爐內温度、電源電壓等不同,烹飪效果和加熱時間也會有所差異。
關於烹飪期間的提示音 ( 蜂鳴聲響 5 次 )
• 部分功能
在烹飪期間會有提示音響起,提示翻面等。
• 若不開 / 關爐門,則按“ ”鍵後不會運行。( 顯示“門”)
• 若不打開爐門,則蜂鳴器每隔 1 分鐘響一次,最多響 5 次。
自動功能的使用方法
烹
飪
方
法
烤盤 上下層
烤焗 預熱
自動功能
弱 強
加熱開始
加熱開始
加熱開始
24
微波蒸氣加熱
正確使用的技巧 基本操作 P.22
請仔細
閲讀
安全注意事項 P.2~5
自動加熱的注意事項和技巧
P.16~17
微波 ( 紅外傳感器)
蒸氣
微波蒸模式下可
以使用蒸烤架
不裹保鮮膜
放在中央
準備加水
P.10
使用蒸
氣
充分加熱燒麥和米飯等。
• 按下“加熱開始”鍵後,約 1 分鐘後產生蒸氣。
一次可加熱的份量•••100~200g
加熱方法••• 請放入耐熱容器,無需包裹保鮮膜或加蓋,直接放在爐
內中央進行加熱。
咖哩和八寶菜等濃稠度高的食物不容易加熱
比“加熱 (1 米飯、2 菜 )”更耗費時間
• 請將米飯的火力設置為 [ 標準 ]、蒸製品和菜的火力設置為
[ 大火 或 ]。
• 請在“2 菜餚”[ 大火 或 ] 模式下加熱。
• 因將微波輸出功率控制在 400W,所以耗費時間長。
※ 大小不同,則速凍包子、肉包子、豆沙包有時可能無法順利加熱。
請在“14
速凍包子加熱”模式下加熱或者選擇“蒸氣微波”或“微波”邊觀察邊加熱。
蒸氣加熱 :
25
牛奶 • 咖啡
正確使用的技巧 基本操作 P.22
請仔細
閲讀
微波
( 紅外傳感器)
禁止使用烤盤
或蒸烤架
牛奶 • 咖啡
加熱放入容器的牛奶或咖啡。
一次可加熱的份量… 4-1: 1 杯、4-2: 2 杯。
旋轉旋鈕選擇功能和杯數
(1 杯或 2 杯 )。
( 可能會過度加熱,因此選擇杯數時,請仔細確認 )
杯數
請區分容器類型 / 尺寸 /1 杯的份量。
容器類型 / 尺寸 /1 杯的份量不同時,紅外傳感器可能無法正常工作。
牛奶 咖啡
低矮闊口馬克杯 低矮闊口咖啡杯
使用的容器和尺寸標準
1 杯的標準份量
一次可加熱的杯數
直徑約 8cm
直徑約 7cm
高約
8.5cm
高約
7.5cm
水滿容量
約 260mI
水滿容量
約 200mI
最多不超過容器的 8 分位置
200mI 150mI
1杯或2杯
請將容器放在爐內中央。
放在爐內中央以外的地方時,紅外傳感器可能無法正確檢測,可能會出現沸騰的情況。
放在中央
靠近中央
放置
1 杯 ( 牛奶、馬克杯 ) 2 杯 ( 牛奶、馬克杯 )
按杯數放置的方法
→請靠近中央放置
1杯 2杯
請小心突
然沸騰 !
取出時飲料可能會突然沸騰並飛濺,導致燙傷。
• 加熱前後請用勺子攪拌均勻。
• 加熱後請放置一段時間後取出。
→ 請在手動“微波”模式下保守設置時間,邊觀察邊加熱。 P.45
容器的種類、大小和量不同時,對於水等飲料
烹
飪
方
法
安全注意事項 P.2~5
自動加熱的注意事項和技巧
P.16~17
正確使用的技巧
“
蒸
氣
加熱
”
,
“
牛奶
•
咖啡
”
自動功能
弱 強
微波
杯
26
酒
正確使用的技巧 基本操作 P.22
請仔細
閲讀
安全注意事項 P.2~5
自動加熱的注意事項和技巧 P.16~17
微波
( 紅外傳感器)
禁止使用烤盤
或蒸烤架
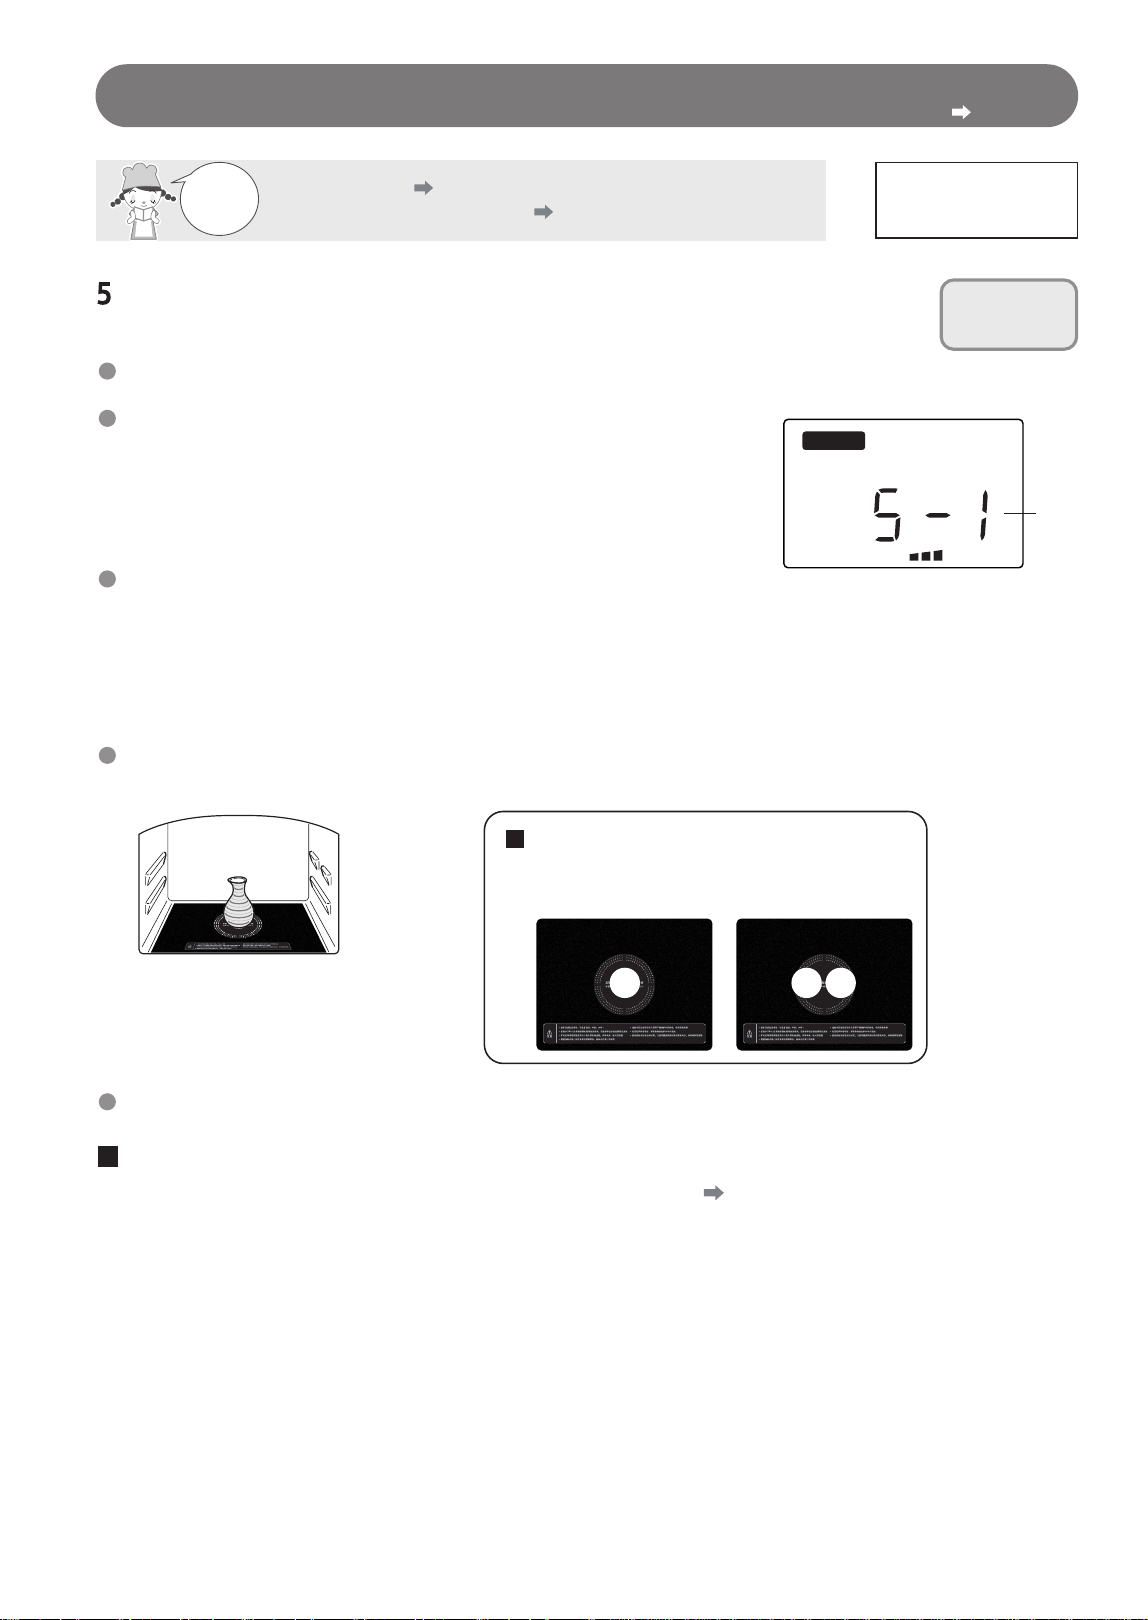
酒
通過微波加熱模式加熱放入酒瓶的酒。
一次可加熱的份量…酒瓶 5-1: 1 瓶、5-2:2 瓶。
旋轉旋鈕選擇功能和瓶數
(1 杯或 2 杯 )。
( 可能會過度加熱,因此選擇瓶數時,請仔細確認 )
瓶數
請區分容器尺寸 / 酒的份量。
• 容器•••矮胖酒瓶。
( 容器大小、形狀、材質不同,則效果可能有所差異 )
• 1 瓶的量•••標準為 160ml( 酒瓶的 8 分處 )。
( 少於標準份量時,可能會沸騰 )
請將酒瓶放在爐內中央。
加熱 2 瓶時,請靠近中央放置。
按瓶數放置的方法
→
請靠近中央放置。
1瓶 2瓶
放在中央
酒瓶(酒)
放在爐內中央以外的地方時,紅外傳感器可能無法正確檢測,可能會出現沸騰的情況。
用杯子加熱時
→請在手動“微波”模式下保守設置時間,邊觀察邊加熱。 P.45
自動功能
弱 強
微波
杯
27
解凍方式
正確使用的技巧 基本操作 P.22
微波 ( 紅外傳感器)蒸氣
※
※
蒸氣
僅追加在“7 蒸氣全解凍”中。
禁止使用烤盤
或蒸烤架
請仔細
閲讀
安全注意事項 P.2~5
自動加熱的注意事項和技巧 P.16~17
快速解凍
準備加水 P.10
刺身•半解凍
不裹保鮮膜
水平橫向放在
中央
淺口泡沫托盤
解凍冷凍保存於冷凍室的肉類及魚類。
從冷凍室取出後,在硬邦邦的狀態下進行解凍。
( 表面開始融化後,若在未充分解凍時直接完成,可能無法順利解凍 )
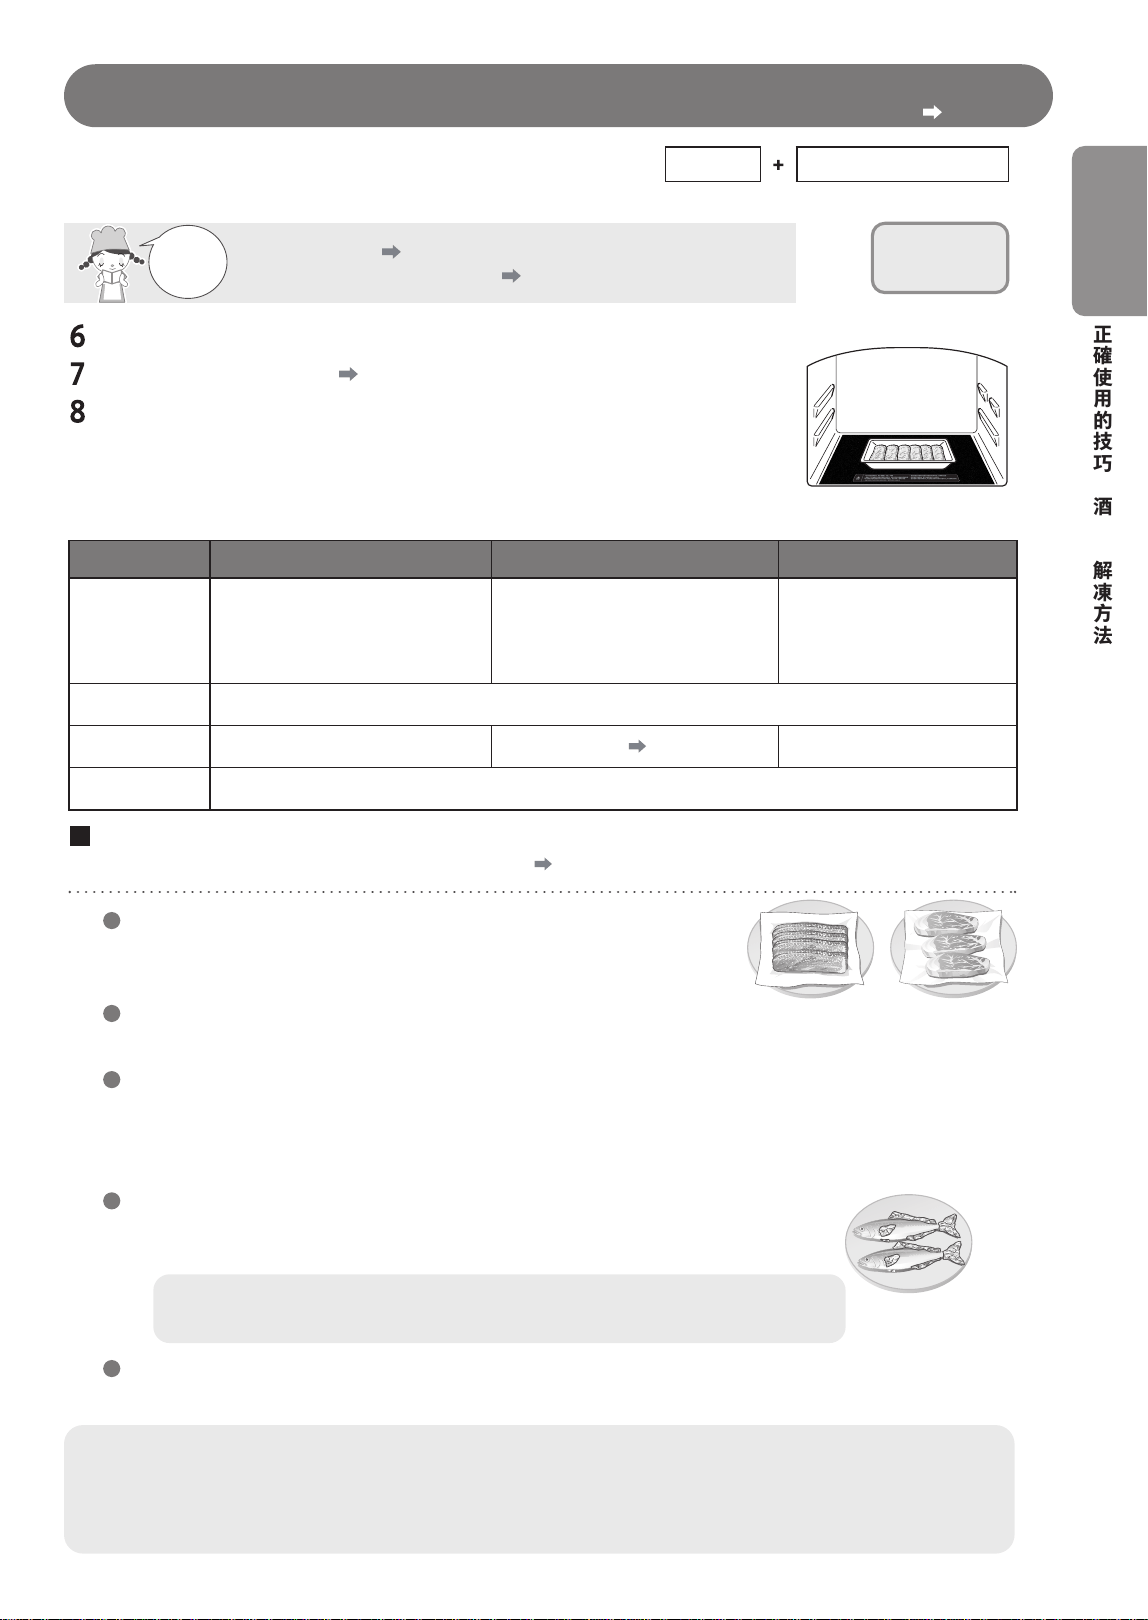
6 快速解凍 7 蒸氣全解凍 8 刺身•半解凍
效果
建議解凍的份量
加水
保鮮膜和蓋子
可準備料理的狀態 ( 可短時間解凍 )
不需要
• 解凍到混合肉末散開的狀態
• 解凍到薄肉片散開的狀態
( 比 6 快速解凍更耗費時間。)
解凍到菜刀能很好切入、
中間仍有些冰凍的狀態
不需要
不需要
需要
P.10
100-600g
少於上述份量時、表面正在融化時、解凍不充分時
→請在“微波 100W”模式下邊觀察邊解凍。 P.45
請勿裹上保鮮膜或蓋上蓋子,直接在泡沫托盤上解凍
• 若泡沫托盤很深,請移至淺口托盤或在耐熱淺碟中鋪上廚房用紙,
然後將食物放上面解凍。
同時解凍兩種或兩種以上的食物時,請調整食物類型、大小
• 可解凍的食物厚度在 3cm 以下最佳。
顯示“C21”“高溫”後,應充分冷卻爐內後解凍
→
請按下“取消”鍵並打開爐門,等待顯示內容消失後再使用。
• 爐內很熱時,紅外傳感器可能無法正常運行。此外,泡沫托盤和保鮮膜熔化、將冷凍食品放在爐內
時,熱衝擊可能會導致爐內底部出現裂紋或破裂。
用錫紙防止變色和煮熟
• 份量大時,建議整個包一圈。
• 形狀不均勻的食物 ( 魚類等 ) 則捲成長狀。
根據待解凍食物的形狀和類型,可能會部分煮過熟,部分還很硬
• 特別是肥肉、涮鍋肉等薄肉片可能無法順利解凍。
• 請謹慎卷好錫紙,避免觸碰到爐內爐壁底部和爐門。
( 否則可能冒出火星、爐門玻璃破裂 )
注意事項
冷凍和解凍的精髓
• 準備新鮮的食材並將其冷凍。
• 將食材按單次份均勻切成薄片 (3cm 以內 ),保持厚度均勻,形狀一致。大小應為寬 6cmx 長 10cm 以上。
如果形狀太小或處於堆疊、塊狀狀態,則無法順利解凍。
正確使用的技巧
“
酒
”“
解凍方法
”
烹
飪
方
法
蒸氣全解 :

28
水煮蔬菜
正確使用的技巧 基本操作 P.22
請仔細
閲讀
安全注意事項 P.2~5
自動加熱的注意事項和技巧
P.16~17
微波 ( 紅外傳感器)
禁止使用烤盤
或蒸烤架
放在中央
像水煮蔬菜 ( 葉菜•根菜 ) 一樣進行微波加熱。
水煮蔬菜 ( 葉菜 ):
菠菜 / 西蘭花 / 捲心菜等
水煮蔬菜 ( 根菜 ):
豆/頭/南瓜等
一次可加熱的份量…100~300g ( 僅限食物重量 )
燉煮方法
… 用水洗淨後,用保鮮膜緊貼食物裹好,
將保鮮膜封口向下放入耐熱淺碟中。
• 將葉子和莖交錯疊放,在比較粗的莖上用菜刀劃上幾刀,用保鮮膜包好。
• 包裹的範圍儘可能大一些,避免食物從淺碟冒出來。
• 量
多時,分成兩半後用保鮮膜裹住。
一次可加熱的份量…100~300g( 僅限食物重量 )
燉煮方法
… 用水洗淨,在有水的狀態下放入淺碟
並用保鮮膜包裹好食物,確保與淺碟之間留有空隙。
• 整個全煮時
將整個淺碟包裹保鮮膜後加熱。加熱後從爐內取出,在包裹保鮮膜的狀態下
放置大約 5 分鐘。
( 食物很容易乾燥,所以不要撕開保鮮膜 )
加熱兩個或以上時,為確保加熱均勻,需要挑選大小一致的蔬菜。
• 切開燉煮時
剝皮並將其切成適當大小,加入一點水後放在淺碟上
並用保鮮膜包裹好食物,確保與淺碟之間留有空隙。
• 葉菜和根菜請務必放到耐熱淺碟上進行加熱。
• 烹飪葉菜時,只需用保鮮膜包裹食物,而無需連同淺碟包裹起來。
• 烹飪根菜時,請用保鮮膜連同淺碟裹好。
• 請勿將保鮮膜重疊包裹或繞圈多次。
• 請勿用保鮮膜以外的物品進行包裹。
※ 若使用方法不正確,則可能會導致食物冒煙、着火。
此外,冒出火星後爐內底部可能會開裂或引發故障。
須知事項
燉煮大小不均的蔬菜、需要多加水分的蔬菜時
稍微多加一點水,放入耐熱容器中,用保鮮膜包裹好後在“微波 600W”模式下,
邊觀察邊加熱。 P.45
• 使用“根菜”模式加熱切小的胡蘿或多種蔬菜時,可能會
引致打火,
導致燒焦、變乾燥。
食物份量不足 100g 時
請在手動“微波 600W”模式下邊觀察邊加熱。 P.45
使用定温加熱模式烹飪時,可能會導致冒煙或着火。
加熱不足時
請上下翻轉食物或更換左右側,延長時間或在“微波 600W”模式下邊觀察邊加熱。
( 包裹保鮮膜時留出少許空隙 )
29
便利店便當
正確使用的技巧 基本操作 P.22
請仔細
閲讀
安全注意事項 P.2~5
微波
禁止使用烤盤
或蒸烤架
便利店便當:
( 加熱時間標準約 1 分 40 秒)
加熱在便利店、超市等購買的便當。
一次可加熱的份量…一人份(便當1個)
加熱方法… 請以圓為中心,直接放入爐內中央加熱,無需撕掉便當的包裝。
( 請務必取掉煮雞蛋和鋁盒、醬油和蛋黃醬等的調味料 )
※ 希望繼續加熱時,請延長加熱時間或在手動“微波”模式下邊觀察邊加熱。
可加熱的便當 不可加熱的便當
便利店和超市售賣的便當
( 有“微波加熱”標識的便當 )
米飯和菜餚分開
劇幕間歇期間食用的幕間便當等
( 邊長約 19cm 的便當 )
約 19cm
邊長大於 19cm 時,請將力設為 [ 大火
或 ] 後加熱 ; 邊長小於 19cm 時,請將
火力設為 [ 小火
或 ] 後加熱。
加熱後的便當狀態
便當種類不同,則加熱情況會有所差異。
• 炸製品加熱的温度可能較高,較厚的食物可能
會加熱成略温熱狀態。
• 醃製品等也可加熱。
便當店的外賣便當
( 無“微波加熱”標識的便當)
蓋澆食物
放入淺底容器的日式炒麪和
意大利麪等
炸製品、燒麥等小份量家常菜
飯糰
為了順利加熱
單個分別加熱
• 同時放入 2 個或上下堆疊時,可能無法順利加熱。
購買後請儘快加熱
• 保存在冰箱中時用 [ 大火 或 ] 火力進行加熱。
確認容器
• 除便利店和超市售賣的便當外,可能使用不適於微波加熱的容器 ( 泡沫苯乙烯等 ),此時請勿加熱。
請勿加熱雞蛋
• 請務必取出煮雞蛋和蒸雞蛋,否則直接放入煮雞蛋和煎雞蛋時可能會破裂。
正確使用的技巧
“
水煮蔬菜
”“
便利店便當
”
烹
飪
方
法
• 立即加熱所購買的便當 ( 食物温度約為 20
°
C)。
30
酥脆加熱
正確使用的技巧 基本操作 P.22
請仔細閲讀
安全注意事項 P.2~5
發熱管 蒸氣
準備加水 !
P.10
準備加水 !
P.10
酥脆加熱
( 蒸氣 )( 加熱默認時間 約 10 分 30 秒 )
用發熱管和蒸氣將常温的炸製品、燒烤食品、法式麵包、咖
哩麵包等加熱至酥脆。
一次可加熱的份量…100~200g
加熱方法
… 請取下食物的包裝或容器,
直接將食物放入烤盤,將烤盤放在下層加熱。
請將希望酥脆的一面放在上面。
1~2 個左右
2 塊左右
咖哩麵包
炸肉排三明治
炸丸子
炸蝦天婦羅
法式麵包
1~2 個左右
1~4 只左右
4 塊左右
• 請根據熱度喜好、類型、個數,通過“火力調節”來調整烹飪效果。
• 加熱已烹飪好的冷藏食物時,請選擇 [ 大火 或 ] 火力後進行加熱。
• 無法加熱市面上銷售的烹飪好的冷凍食品。
請按照包裝説明,在手動微波模式下邊觀察邊加熱。
• 請撕開保鮮膜和保鮮袋等不耐熱的包裝後再加熱。
請勿將食物轉移到容器,請直接放入烤盤進行加熱。
務必拆下食物的包裝和容器後加熱
蒸氣和發熱管組合加熱。
烤盤 放入下層
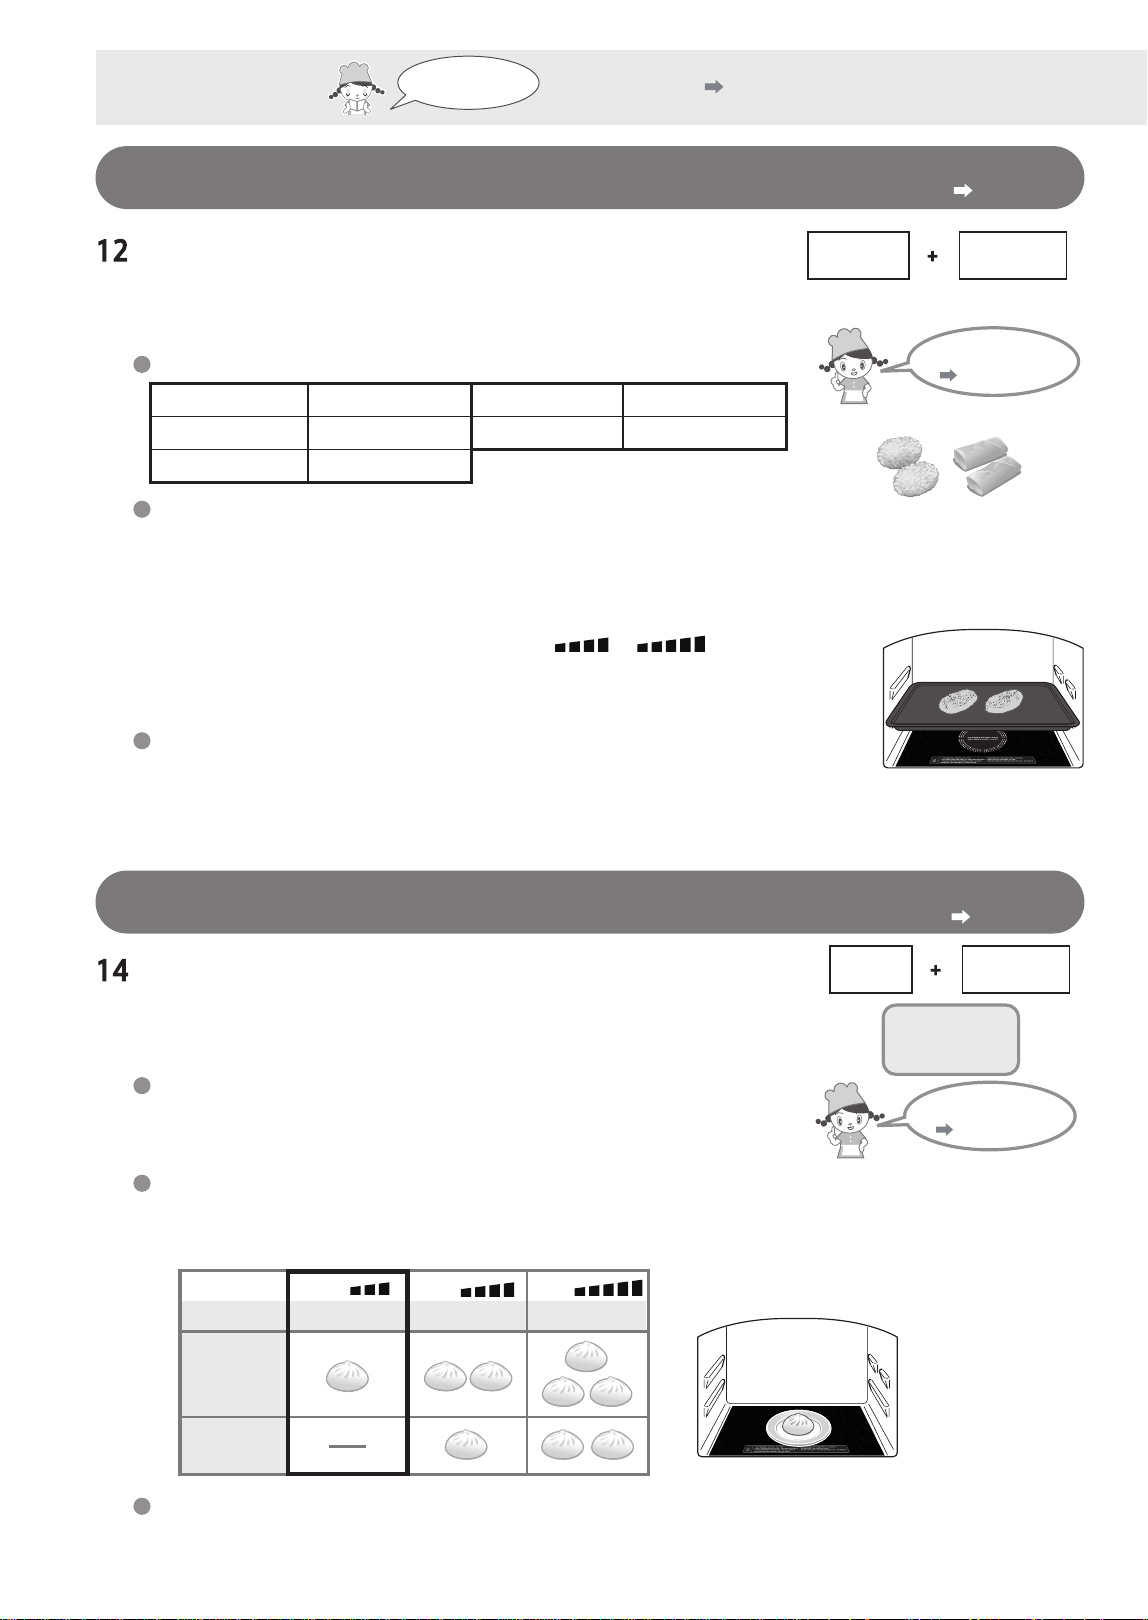
急凍包加熱
正確使用的技巧 基本操作 P.22
微波 蒸氣
禁止使用烤盤
或蒸烤架
急凍包
(
蒸氣 )( 加熱默認時間 1 分 30 秒 )
用微波和蒸氣將市面上銷售的速凍包子加熱至有水份、鬆軟。
一次可加熱的份量… 冷藏 • 常温
:1~3 個
冷凍 :1~2 個
(1 個約 90g)
加熱方法…將拆下包裝和容器的急凍包子放在耐熱盤中,放在中央加熱。
• 請按熱度喜好、初始狀態 ( 冷藏、常温、冷凍 )、個數、速凍包子大小並參考下表,
用“火力調節”鍵調整火候。
效果 標準 大火 大火
加熱時間標準 (約1分30秒) (約1分50秒) (約3分50秒)
冷藏 • 常温
(1~3 個 )
冷凍
(1~2 個 )
放在中央
務必拆下包裝、容器後加熱
• 請撕開保鮮膜和保鮮袋等包裝後再加熱。
31
可加熱的份量和設置
請仔細閲讀
安全注意事項 P.2~5
蓬鬆麵包
正確使用的技巧 基本操作 P.22
發熱管微波
蓬鬆麵包
用加熱管和微波將市面上銷售的麪包 ( 餐包和有餡麵包 ) 加熱至
蓬鬆。
禁止使用烤盤
或蒸烤架
( 火力調節的方法 P.22)
約4分30秒 約4分45秒約4分10秒
火力調節 標準 大火 大火
加熱時間標準
[常温 •冷藏 ]餐包
[ 常温 • 冷藏 ] 有餡麵包
[ 冷凍 ] 餐包
4 個 (30g/ 個 )
1 個 (100g/ 個 )
1 個 (30g/ 個 )
務必拆下食物的包裝、容器後加熱
• 請拆下錫紙。
因採用微波和加熱管組合加熱,因此請勿使用錫紙等金屬,以免火星飛濺。
• 請撕開保鮮膜和塑料等不耐熱的包裝,無需挪到容器中,直接放在廚房用紙上即可。
加熱方法… 拆下食物包裝和容器,在爐內底部鋪上廚房用紙
並在上面直接放上麵包進行加熱。
• 烤吐司時,請按“42 常温吐司”“43 冷凍吐司”“44 蒸氣吐司”進行烤制。
常温 / 冷藏麪包請按熱度喜好、
麵包的初始温度、個數等調節效果 ( 小火 ~ 大火
)。請將冷凍餐包
的火力設為大火
。
• 按大火 模式加熱常温 / 冷藏的 包時,則會加熱過度。
• 加熱冷凍黃油卷時,若按大火 以外的模式加熱,則加熱不充分。
廚房用紙
正確使用的技巧
“
酥脆加熱
”“
速凍包子加熱
”
,
“
麪包
”
烹
飪
方
法
麵
32
請仔細閲讀
安全注意事項 P.2~5
簡易意粉
正確使用的技巧 基本操作 P.22
簡易意粉
通過微波加熱。
可輕鬆煮意大利
粉
(
一人份 ) 和通心粉。
微波
禁止使用烤盤
或蒸烤架
材料 (1
次的量 )…意粉 ( 意大利粉 、通心粉 )100g、水 400ml
使用的容器
耐熱容器 ( 耐熱温度為 120℃以上 )
放入 1 次量的材料,水位為容器高度 1/2 以下
( 容器示例 )
用於煮意粉的微波專用塑料容器 ( 標準 : 內部尺寸約 7.5cm x 27cm x 深
7cm)耐熱玻璃大碗 ( 標準 :
徑約 22cm 高約 10cm)
• 意粉過長時,請折斷後放入容器。
燉煮方法
①在容器中加入 100g 意粉、400ml 水,用筷子攪拌意粉,溶於水中。
②不裹保鮮膜、不蓋蓋子,直接將①放入爐內中央。
③參考 26 簡易意粉》,根據意粉包裝上標註的煮 時間,按照相應的
開始烹飪。
意粉 100g
水 400mI
包裝標註的
燉煮時間
使用的意粉
火力調節
加熱時間標準
4~5 分鐘 6 分鐘 7 分鐘 8~9 分鐘 10~11 分鐘
小火 小火 標準 大火 大火
約7分鐘 約9分鐘 約 10 分鐘 約 11 分鐘 約 13 分鐘
④加熱結束後,在湯汁中散開意
粉,再用籬等撈起,瀝乾水分。
請注意不要被燙傷。
• 如果介意意粉粘連,瀝千水分後請撒上適量的橄欖油等個人喜好的油。
• 加熱後仍很硬時,請直接暫時放在湯汁中、延長時間或在“微波 600W”模式下邊觀察邊加熱。
要煮 200g
意粉時,做法同 100g 意粉的做法,因此請分成 2 份,每次加熱 1 份。
意粉少於 100g 時也可以煮。請用 400ml 水。
煮粉時請勿放入油、鹽。塑料容器可能會破損。
※ 所使用容器的材料和形狀、意粉廠商等不同,效果也會有所差異,也可能會煮開後溢出。
意粉
火力
33
請仔細閲讀
安全注意事項 P.2~5
簡易麵包系列
正確使用的技巧 基本操作 P.22
發熱管
※
微波
※“30 簡易法式麪包”還需使用
蒸氣。
簡易麵包
簡易法式
麵包 ( 蒸氣 ):
準備加水
P.10
簡易披薩
用微波縮短 酵時間。從發酵到烤制完成約需 1 個小時。
選擇功能開始後,按發酵→烤制完成的順序進行烤制。
• 顯示的時間是各個工序的時間。
• 蜂鳴器響 5
次,則表示工序完成。
然後會進入下一個工序,因此請根據料理集繼續操作,請勿按“取消”鍵。
• 希望調整烤制效果時,選擇功能後按下“火力調節”鍵進行調節。
請注意配件
請注意微波加熱工序不可使用烤盤、金屬容器、不耐熱的容器。
做法、配件注意事項請參考料理集。
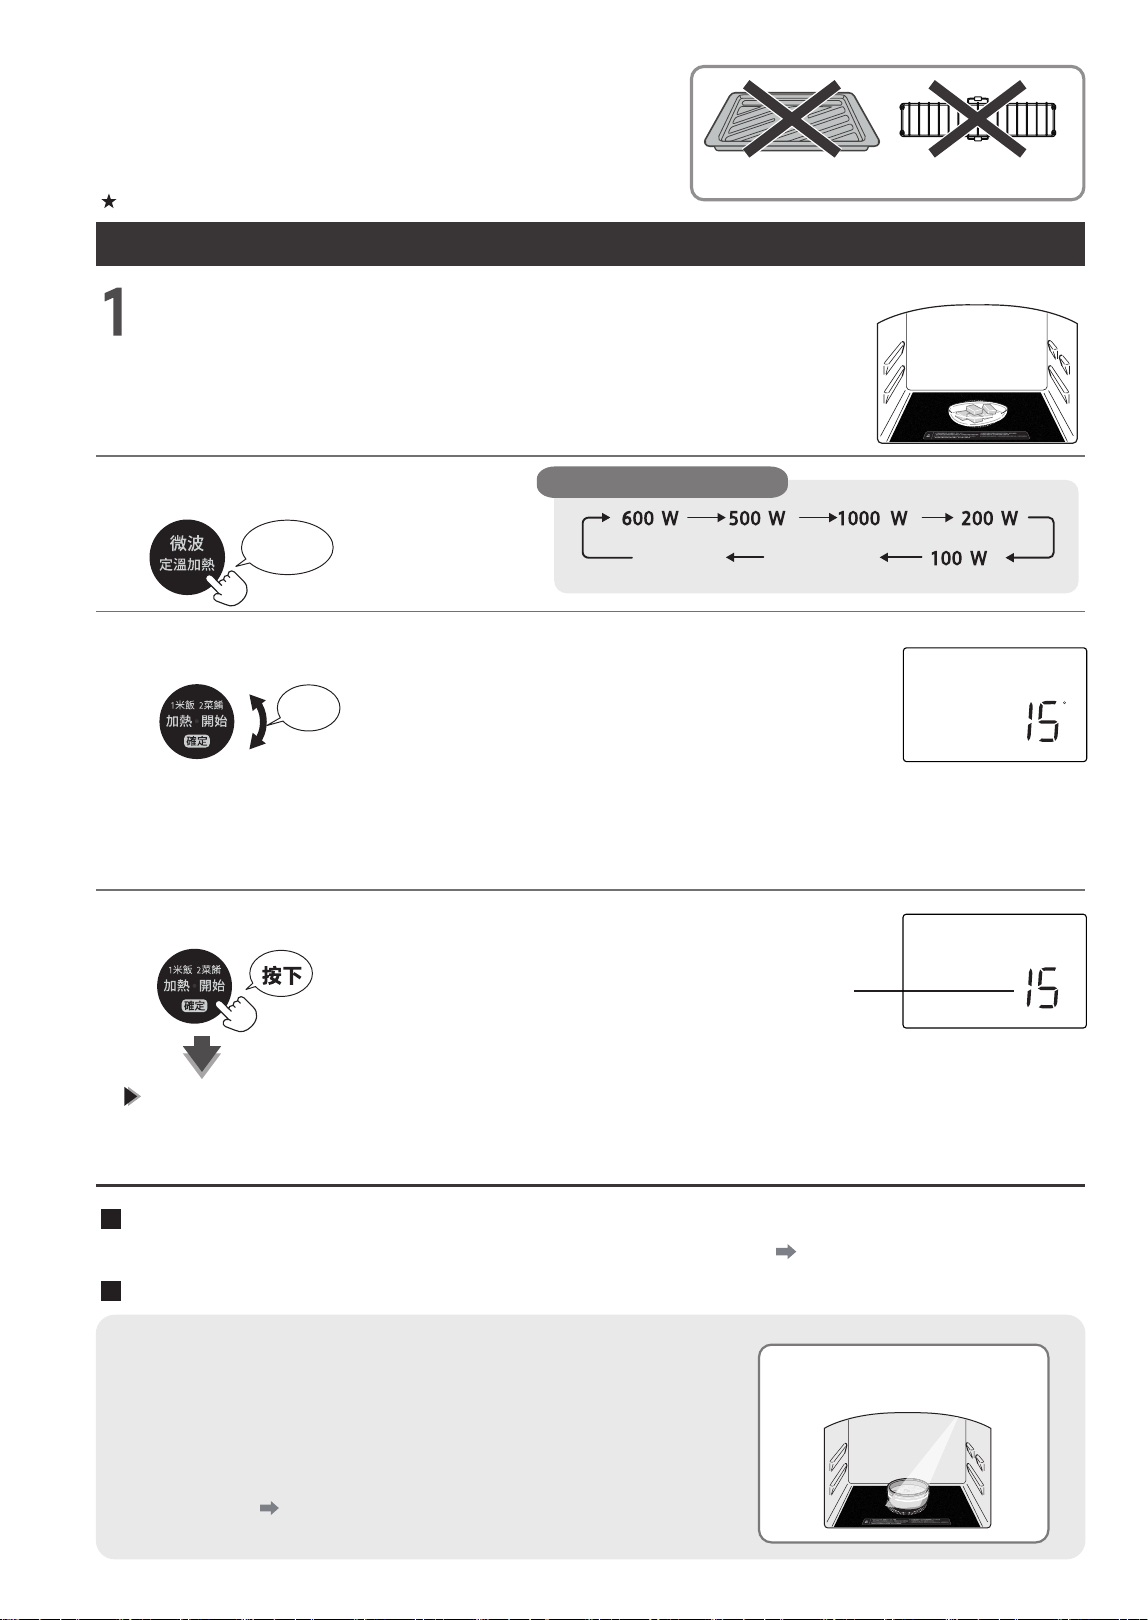
常温吐司 ( 需翻面 )
正確使用的技巧 基本操作 P.22
常温吐司
冷凍吐司
蒸氣吐司 ( 蒸
氣 ):
準備加水 P.10
烤制
1~2
片吐司時。旋轉旋鈕選擇功能和片數 (1 片或 2 片 )。
燒烤加熱時,烹飪期間響起提示音 ( 如下 ) 後,請立即上下
翻面。
冷凍吐司請按“43 冷凍吐司”烤制。
“44 蒸
氣
吐司”使用蒸
氣,則可烤成外酥裏軟的效果。
烤制方法詳情請參考料理集。
發熱管
※
※“44 蒸氣吐司”還需使用
蒸氣。
※ 旋轉旋鈕,則依次顯示片數
(1 → 2)。
片數
烤盤放入上層
關於烹飪期間的提示音 ( 蜂鳴聲響 5 次 )
• 部分功能
在烹飪期間會有提示音響起,提示翻面等。
• 若不開 / 關爐門,則按“加熱開始”鍵後不會運行。( 顯示“門”)
• 若不打開爐門,則蜂鳴器每隔 1 分鐘響一次,最多響 5 次。
正確使用的技巧
“
簡易意麪
”“
簡易麪包系列
”
,
“
常温吐司(需翻面)
”
烹
飪
方
法
燒烤
高溫
冷卻
缺水
烤盤 上下層
發酵烤焗 預熱
自動功能
w
分 秒
克
C
弱 強
完成
定溫加熱
延長
炆燉微波
蒸氣 過熱水蒸氣 杯 條 個 門
發
34
微波加熱、微波燉煮
調整輸出功率、時間
不可使用烤盤或蒸烤架
手動加熱的時間設置標準
P.45
例 : 加熱米飯 (600W 模式下加熱 1 分鐘 )
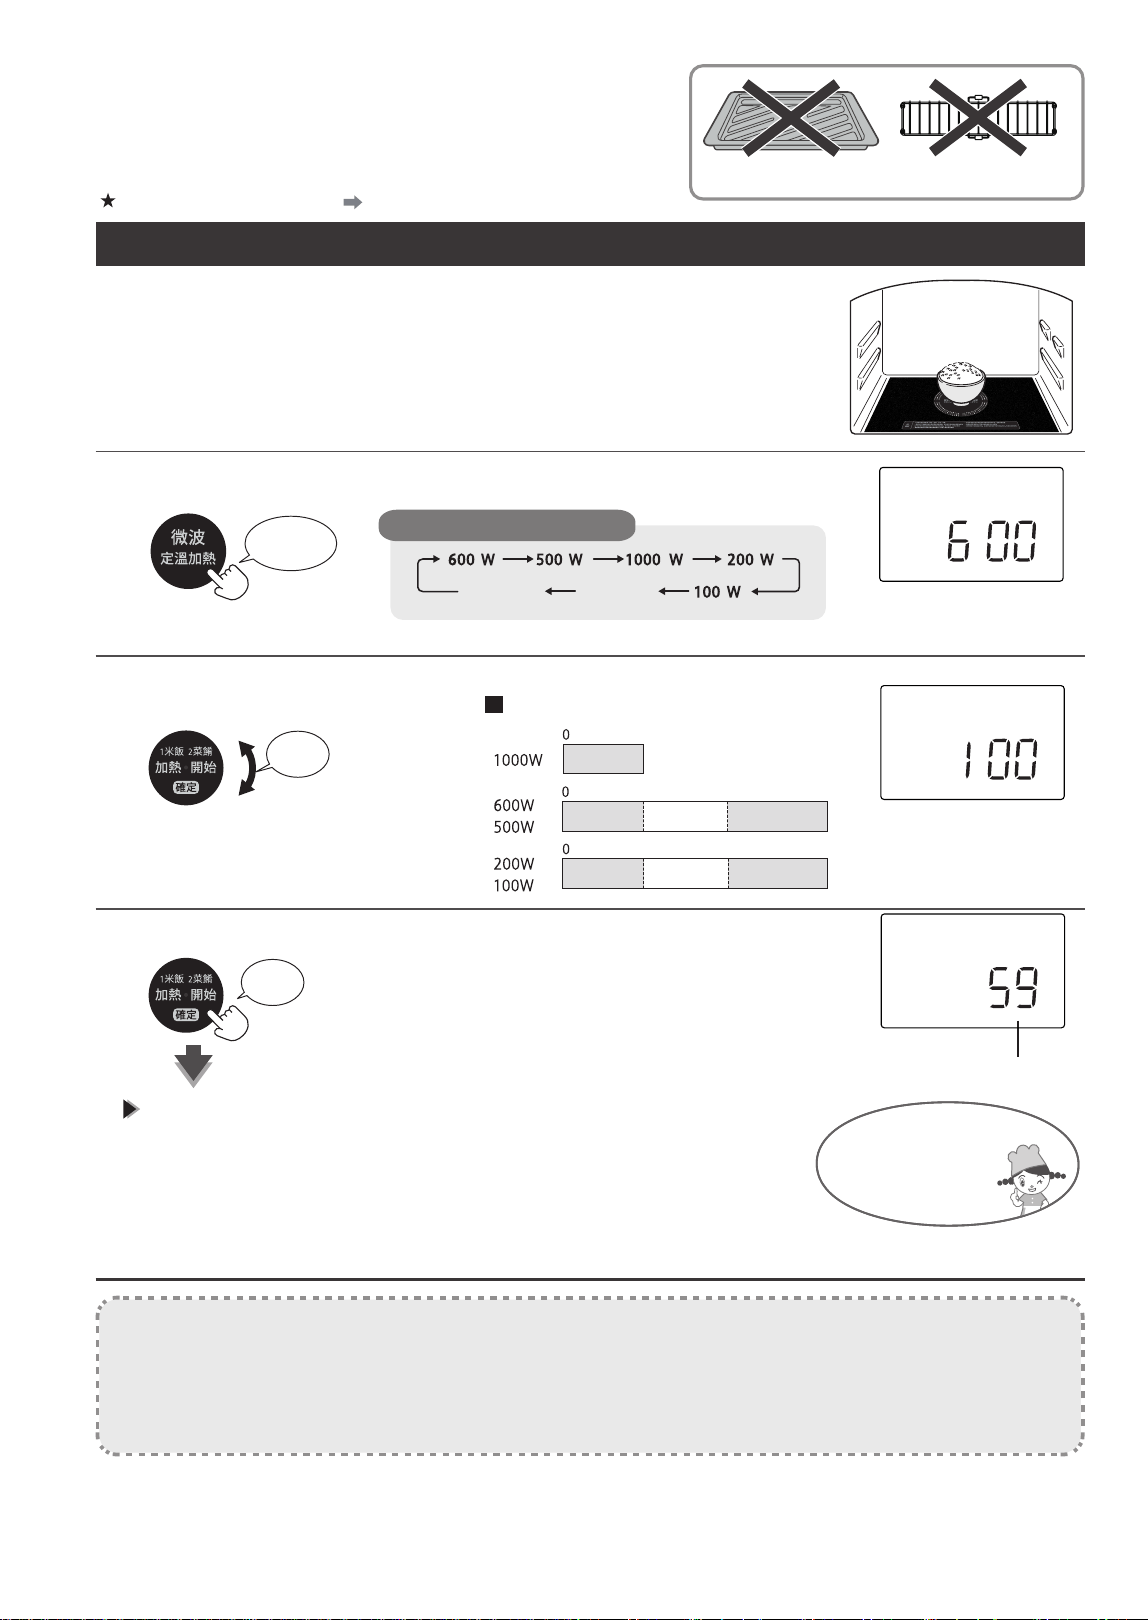
3
1
2
• 使用與食物的份量相應的、可在微波中使用的耐熱容器並直接放入爐內
中央。
• 請務必將冷凍食品放在耐熱容器上,市面上銷售的冷凍食品請務必按包
裝的記載內容放置。
放入食物
選擇輸出功率
放在中央
每次按下,均按以下順序依次切換
按1次
※ 選擇微波燉者時,會顯示最初設置的 600W。
微波燉煮
※
定温加熱
烹飪時間的設置單位、最長時間
調整時間
旋轉
按下
※ 微波燉煮時
請參考右頁的“微波燉煮”
進行設置。
5 分鐘
3 分鐘
15 分鐘
10 分鐘
40 分鐘
20 分鐘
90 分鐘
以 10 秒為單位
以 10 秒為單位
以 30 秒為單位
以 30 秒為單位
以 1 分鐘為單位
以 1 分鐘為單位
以 5 分鐘為單位
4
顯示剩餘時間。
蜂鳴器響 3 次,則加熱完成
• 忘記取出食物時,蜂鳴器會響起。(1
分鐘、3 分鐘、5 分鐘後 ) 可打開
爐門或者按“取消”鍵使其停止。
• 容器會變熱,因此取出時請小心。
• 烹飪完成後,“冷卻”字樣會閃爍並通過風扇冷卻電氣部件等。冷卻
扇運行期間請勿拔下電源插頭。
風扇運行期間也
可以繼續加熱。
須知事項
• 請勿加熱未打開的雞蛋、煮雞蛋 ( 帶殼、無殼 )。( 破裂後危險)
• 請不要加熱少許混合蔬菜。否則可能會冒出火星、燒焦、冒煙、乾燥等。
• 爐內温度高時 ( 顯示“高溫”期間 ) 請勿使用塑料容器和保鮮膜。( 可能會熔化 )
• 反覆加熱時,為保護電
器部件,按 1000W 加熱時,可能會自動降到 600W。
效果不佳時,請在手動微波模式下邊觀察邊延長加熱時間。
• 開始微波加熱時和加熱途中可能會發出“嘰”聲,這是烹飪時的運行聲,並非故障。
燒烤
高溫
冷卻
缺水
烤盤 上下層
發酵烤焗 預熱
自動功能
w
秒
克
C
弱 強
完成
定溫加熱
延長
炆燉微波
蒸氣 過熱水蒸氣 杯 條 個 門
燒烤
高溫
冷卻
缺水
烤盤 上下層
發酵烤焗 預熱
自動功能
w
秒
克
C
弱 強
完成
定溫加熱
延長
炆燉微波
蒸氣 過熱水蒸氣 杯 條 個 門
分
燒烤
高溫
冷卻
缺水
烤盤 上下層
發酵烤焗 預熱
自動功能
w
秒
克
C
弱 強
完成
定溫加熱
延長
炆燉微波
蒸氣 過熱水蒸氣 杯 條 個 門
分
開始(開始加熱)
請在取出有蛋的菜餚 ( 關東煮等 ) 後加熱。
35
警告
請仔細閲讀
安全注意事項 P.2~5
禁止
禁止
否則可能會冒煙或起火。
• 請參考時間設置標準
( P.45) 來保守設置時間,
邊觀察邊加熱。
請勿過度加熱食品
否則從爐內取出時可能會突然沸騰,導致燙傷。
• 飲料 : 咖啡、牛奶、豆漿、水、酸奶等液體,味噌
湯等湯料
• 多油食物 : 鮮奶油、
牛油等
• 濃稠食物 : 咖哩蔬菜、含顆粒的湯汁等
• 請在加熱飲料前後用勺子等攪拌均勻。
• 請保守設置時間,邊觀察邊加熱。
禁止過度加熱飲料、含油多的食物、濃稠食
物等
微波燉煮
• 最開始按 600W( 大火 ) 加熱,然後按 200W( 小火 ) 加熱。
• 操作 3 中旋轉“加熱開始”旋鈕,按 600W 的時間按下“加熱開始”
鍵後確定,然後旋轉“加熱開始”旋鈕,按 200W 的時間按下“加
熱開始”鍵開始加熱。
• 微波 600W 模式下加熱完成後,會開始按微波 200W 模式烹飪並顯
示剩餘烹飪時間。
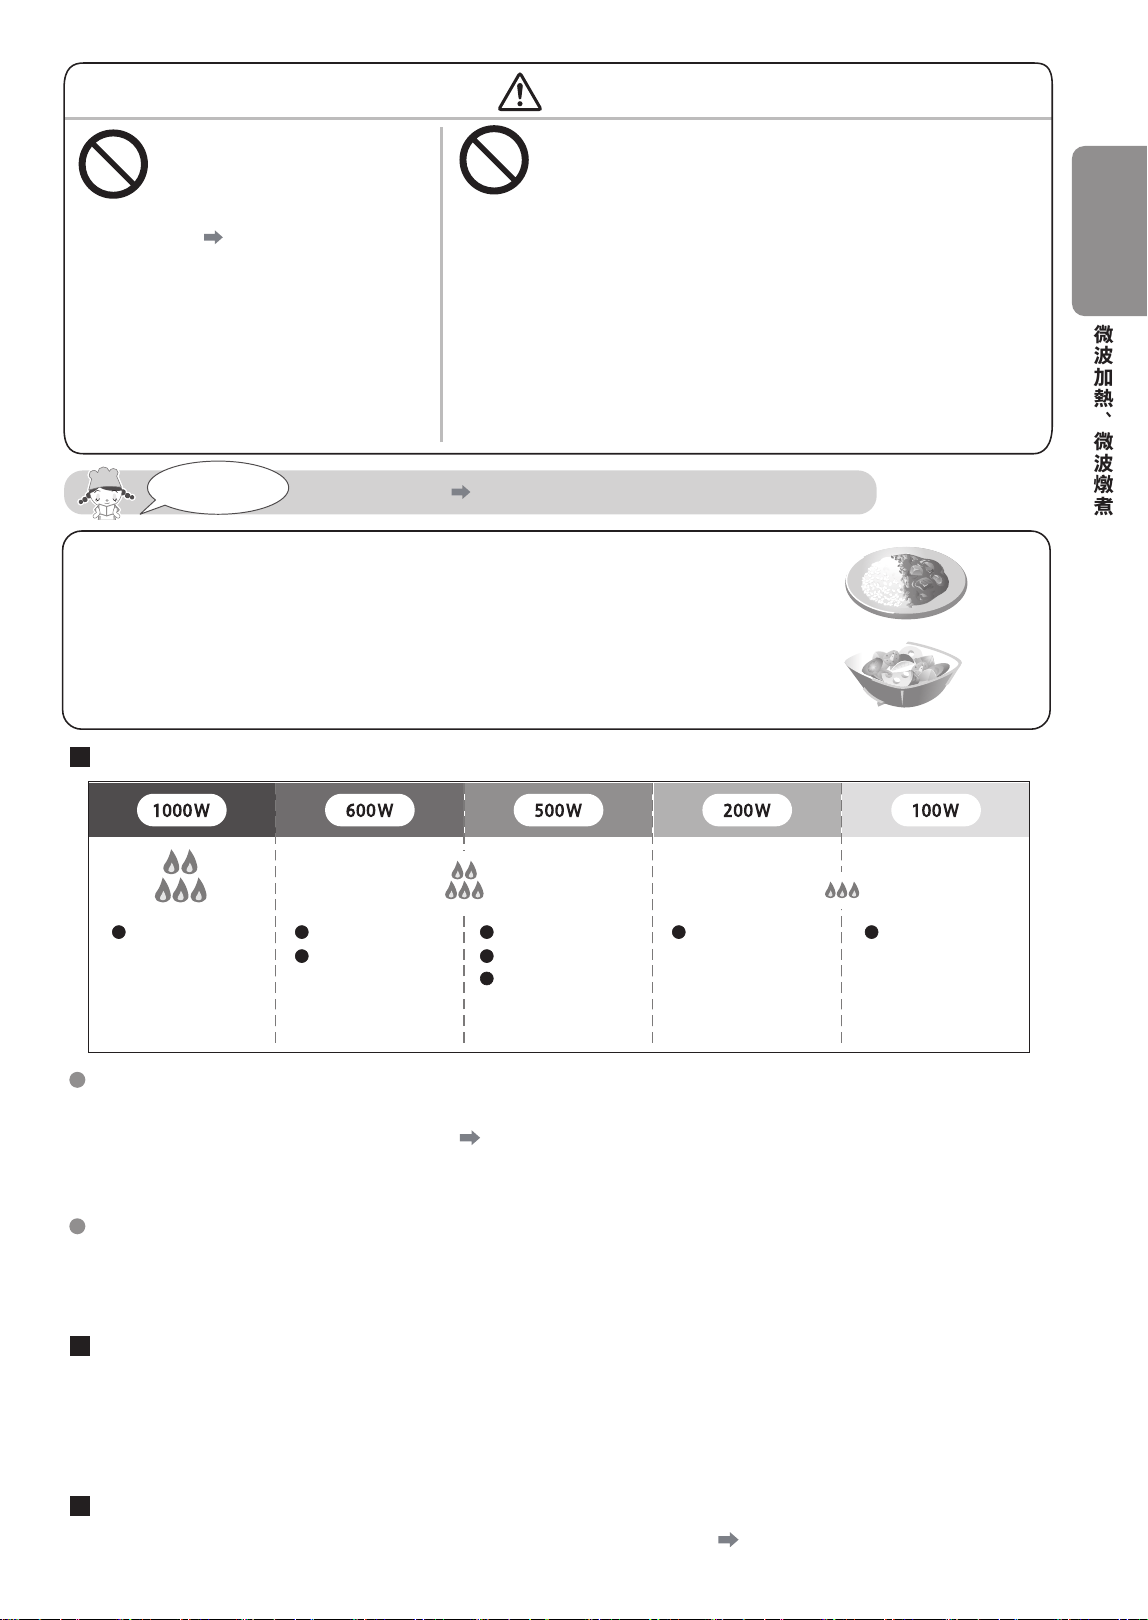
輸出功率使用方法區分標準
大火
中火
小火
快速加熱食物
水煮蔬菜 ( 備菜 )
加熱食物
所有烹飪工序
加熱冷凍食物
加熱容易崩開的
食物
微波燉煮
解凍
雖然加熱時不需要保鮮膜,但部分功能
可包裹保鮮膜進行加熱。
請參考手動加熱模式下的時間設置標準 (
P.45) 和料理集。
※ 包裹保鮮膜進行加熱時,請為在容器邊緣包裹的保鮮膜留出空隙。( 密封時可能導致破裂、爐內破損 )
關於保鮮膜
關於冷凍食品和爆米花
加熱市面上銷售的冷凍食品時,請參考包裝説明中記載的輸出功率和加熱時間。
加熱爆米花時,請根據包裝説明的加熱方法,烹飪時近距離觀察烹飪狀態。
加熱時間僅供參考,加熱不充分時請邊觀察邊調整時間。
中途希望調整烹飪時間時
完成後希望繼續加熱時 ( 延長時間 )
→烹飪完成後 3 分鐘以內旋轉旋鈕,然後設置時間,邊觀察邊加熱 P.7
→加熱期間旋轉旋鈕,則以 1 分鐘為單位調整烹飪時間
• 1000W、600W、500W 模式下的剩餘時間顯示為 5 分鐘以下時,則以 10 秒為單位調整烹飪時間。
• 關於 1 次烹飪可設置的時間,含可延長的時間在內,1000W 模式下最長為 3 分鐘,600W•500W 模式
下最長為 20 分鐘,200W•100W 模式下最長為 90 分鐘。
微波加熱、微波燉煮
烹
飪
方
法
36
加熱至設定温度
不可使用烤盤或蒸烤架
份量以一人份 (150g 為基準)
利用紅外傳感器的微波加熱來加熱食物
無需保鮮膜或蓋子
放在中央
例:軟化牛油
放入食物
選擇定温加熱
從 -10~90℃開始調整温度
1
2
3
4
• 放入與食物的份量相應的、可在微波中使用的淺口耐熱容器中
以 O 為標準,放入爐內中央。
• 爐內很熱時,請充分冷卻後加熱。
( 爐內很熱時,紅外傳感器可能無法正常運行 )
按下6次
旋轉
• 設置温度標準請參考右側頁面。
• 份量以一人份 (150g) 為基準。
份量較多時將温度設高些,份量較少時設低些。
• 不足 100g 的食物請勿設置為 50℃以上。
蜂鳴器響 3 次,則加熱完成
• 忘記取出食物時,蜂鳴器會響起。(1 分鐘、3 分鐘、5 分鐘後 )
可打開爐門或者按“取消”鍵使其停止。
設置温度不同,則
部分功能可能會中
途顯示剩餘時間。
每次按下,均按以下順序依次切換
微波燉煮
定温加熱
完成後希望繼續加熱時 ( 延長時間 )
烹飪期間無法變更烹飪温度
→烹飪完成後 3 分鐘以內旋轉旋鈕,然後設置時間,邊觀察邊加熱 P.7
通知
紅外傳感器的檢測圖像及其放
置方法示例
• 紅外傳感器用於讀取食物表面温度,內部可能與設置温度不同。食
物內部的温度可能會因食物種類和厚度、調味料等高於或低於設置
温度。
• 效果温度可能因容器大小、形狀、材質而有所差異。
※ 若使用方法不正確,則效果可能不佳。此外,可能導致食物燒焦、
冒煙、起火。 P.16
開始(開始加熱)
燒烤
高溫
冷卻
缺水
烤盤 上下層
發酵烤焗 預熱
自動功能
w
秒
克
C
弱 強
完成
定溫加熱
延長
炆燉微波
蒸氣 過熱水蒸氣 杯 條 個 門
分
燒烤
高溫
冷卻
缺水
烤盤 上下層
發酵烤焗 預熱
自動功能
w
秒
克
C
弱 強
完成
定溫加熱
延長
炆燉微波
蒸氣 過熱水蒸氣 杯 條 個 門
分
37
警告
禁止
禁止
否則可能會冒煙或起火。
• 烹飪期間請邊觀察邊加熱。
請勿過度加熱食品
有蓋子會導致無法正確感知温度而過度加熱、食品起火
和容器破裂。
• 請去掉容器的蓋子後加熱。
有蓋的容器不要用於紅外傳感器進行微波加
熱烹飪(第16頁)
應遵守事項
請仔細
閲讀
安全注意事項 P.2 ~5
自動加熱的注意事項和技巧
P.16~17
• 請轉移到淺口耐熱容器中加熱。
• 不可加熱冷凍食物。
請按手動“微波”模式邊觀察邊加熱。
• 餵食前請務必攪拌均勻後確認食物温度。
加熱嬰兒食物和護理食物時
多加註意 !
請勿按“定温加熱”模式加熱飲料。
牛奶、咖啡請按“4 牛奶•咖啡”,酒類請參考“5 酒” 其它請參考第 45 頁的時間來
保守設置時間,並按手動“微波”模式邊觀察邊加熱。
設置温度標準
食物 100g 以上
90
80
70
60
50
40
30
20
10
0
-5
-10
米飯
燒烤食品
燉煮食品、炒菜、炸製品
溶化巧克力
嬰兒食物
軟化奶油奶酪
軟化牛油
請務必轉移到淺口耐熱容
器後攪拌、確認温度。
將
牛油放入耐熱容器,
將温度設為 15~20℃後
加熱。
將雪糕軟化至可食用
的程度後請務必取下
蓋子 ( 含內蓋 )
加熱至設定温度
烹
飪
方
法
,

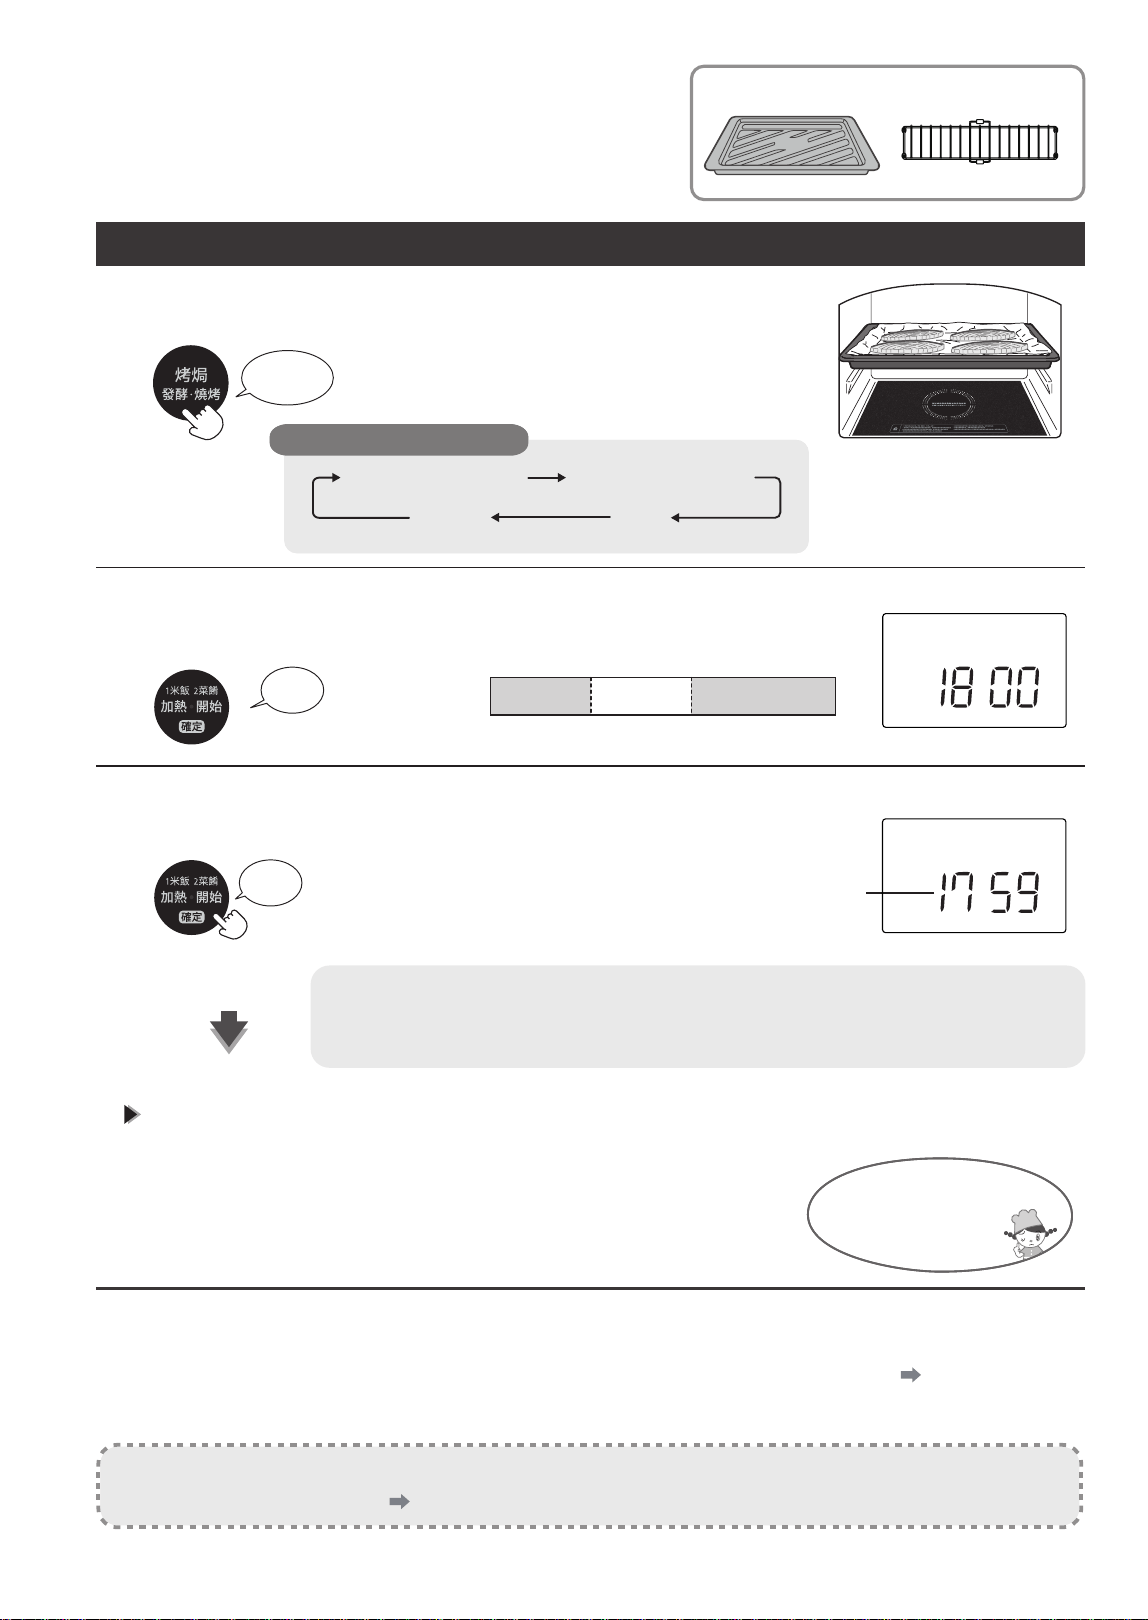
38
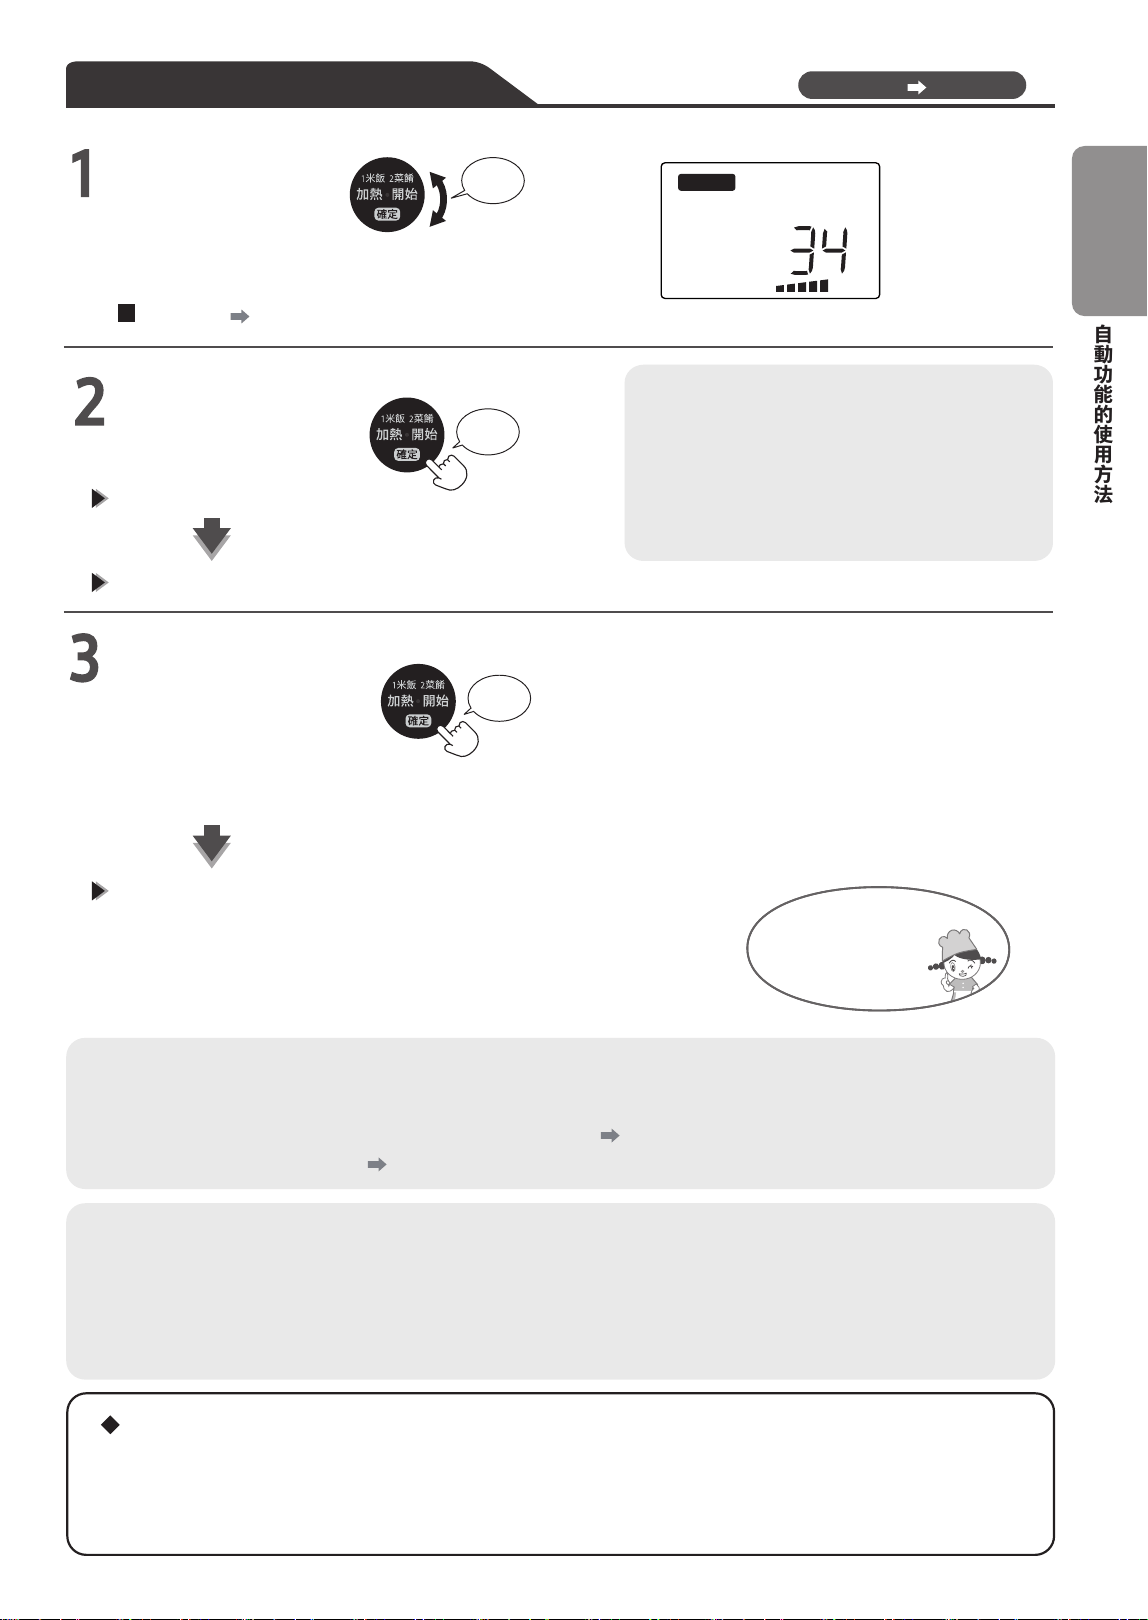
有預熱
* 有放入烤盤後預熱的功能。請參考料理集。
爐內不放入任何食物
*
選擇有預熱
烤焗
1
2
調整温度
3
4
按下後開始預熱
將食物放入爐內並調整時間
按下1次
旋轉
旋轉
按下
顯示部位會顯示
“預熱”。
每次按下,均按以下順序依次切換
有預熱烤焗
無預熱烤焗
發酵
燒烤
• 設置預熱温度 :100 ~ 250℃
但爐內過熱時(顯示部位閃爍“高溫”),為保護
電氣部件,可能無法設置為 220℃以上。
預熱完成前 1 分鐘會顯示剩餘時間
蜂鳴器響 5 次,則預熱完成(“預熱完成”字樣亮燈 )
• 若放入烤盤後已預熱,則烤盤會變熱,因此取
出或放入食物時請小心。
• 預熱約 20 分鐘。
在此期間,若不執行任何操作,則蜂鳴器 3 次後
會取消功能設置,而後電源會斷開。
(料理集中的功能規定將指定的配件放到指定位置 )
■烹飪時間的設置單位 ( 最長為 90 分鐘 )
• 希望將烹飪温度變更為與預熱温度不
同的温度
按下並旋轉旋鈕後以 10 分鐘
為單位調整烹飪時間
以 30 秒為單位
以 1 分鐘為單位
以 5 分鐘為單位
開始(開始烹飪)
※ 預熱完成後不開 / 關爐門,則即便按“加熱開始”鍵也
不會運行。
顯示剩餘時間。
蜂鳴器響 3 次,則烹飪完成
• 忘記取出食物時,蜂鳴器會響起。(1 分鐘、3 分鐘、
5 分鐘後 ) 可打開爐門或者按“取消”鍵使其停止。
• 結束後顯示部位會顯示“高溫”、“冷卻”。
“冷卻”字樣閃爍期間請勿拔下電源插頭。
• 爐內和烤盤會變熱,因此取出時請小心。
通知
• 烤焗效果可能因室温、形狀、數量、尺寸、初始温度、爐內温度、電源電壓而有所差異。
加熱期間調換食物的前後方或部分裹上錫紙,則可順利烹飪。
爐內和烤盤會變熱
取出時請小心
0
15 分鐘 40 分鐘 90 分鐘
燒烤
高溫
冷卻
缺水
烤盤 上下層
發酵烤焗 預熱
自動功能
w
秒
克
C
弱 強
完成
定溫加熱
延長
炆燉微波
蒸氣 過熱水蒸氣 杯 條 個 門
分
燒烤
高溫
冷卻
缺水
烤盤 上下層
發酵烤焗 預熱
自動功能
w
分 秒
克
C
弱 強
完成
定溫加熱
延長
炆燉微波
蒸氣 過熱水蒸氣 杯 條 個 門
通過烤焗、發酵烹飪
調整温度、時間
39
1
2
調整温度
調整時間
開始(開始烹飪)
3
4
蜂鳴器響 3 次,則烹飪完成
關於設置温度
關於烤焗
設置温度 , 根據熱電温度計法測量爐內的中心位置。
(依據 JIS測量法 )
利用市面上銷售的温度計測量温度時 , 温度可能不一致。
可使用的配件
無預熱 / 發酵
將放有食物的烤盤放入爐內,選擇無
預熱烤焗
須知事項
•
請仔細閲讀安全注意事項。
按下2次
按下3次
•
選擇發酵時
不會顯示“預熱”。
預熱的定義
• 提前將爐內加熱至適合料理的温度。
■變更預熱期間的温度
→不可以。
■設置温度與預熱温度的關係
→按照與設置温度相同的温度進行預
熱。但設置温度大於或等於 210℃
時,預熱温度為 200℃。
■預熱時間標準
→ 200℃時,約需 14 分鐘。
• 預熱前的爐內温度和室温、電壓等
不同,則預熱時間會略有差異。
烹
飪
方
法
通
過
烤
焗
、
發
酵
烹
飪
旋轉
旋轉
按下後
確認
按下
• 設置預熱温度 :100 ~ 250℃
但爐內過熱時(顯示部位閃爍
“ ”),為保護電氣部件,
可能無法設置為 220℃以上。
• 設置發酵温度 :45℃、40℃、
35℃、30℃
• 設最大烹飪時間 :90 分鐘
發酵
發酵麵糰等
● 請等到爐內和配件充分冷卻後使用
顯示部位顯示“C21”“高溫”時,
請按下“取消”鍵並打開爐門,等
待爐內温度下降。爐內温度較高時
無法順利發酵。
• 麵
糰乾燥時,請邊觀察狀態邊加噴
水霧。
• 爐內温度接近設置温度時,加熱管
不運行,但這並非故障。
■中途希望變更烹飪時間時
→ 烹飪期間旋轉旋鈕,則以 1 分鐘為單位調
整烹飪時間
• 關於 1 次烹飪可設置的時間,含可延長的
時間在內,最長為 90 分鐘。
■完成後希望繼續加熱時(延長時間 )
→ 烹飪完成後 3 分鐘以內旋轉旋鈕,然後設
置時間,邊觀察邊加熱
P.7
■中途希望變更烹飪温度時
→ 烹飪期間按下“加熱•開始”鍵,在顯
示温度期間(5 秒內)旋轉旋鈕後,則以
10℃為單位調整烹飪温度
• 加熱期間無法變更發酵温度。
高溫
• 忘記取出食物時,蜂鳴器會響起。
(1 分鐘、3 分鐘、5 分鐘後 )
• “無預熱烤焗”結束後,顯示部位會顯示“
高溫
”、
“冷卻”。“冷卻”字樣閃爍期間請勿拔下電源插頭。
• 爐內和烤盤會變熱,因此取出時請小心。
40
· ➡
·
·
40
燒烤烹飪
調整時間
例 : 通過燒烤模式烤魚
可使用的配件
將擺放有食物的烤盤放入爐內 , 選擇燒烤
1
2
調整時間
3
開始(開始烹飪)
按下4次
• 因通過上加熱管烹飪,所以建議放在上層。
每次按下,均按以下順序依次切換
有預熱烤焗
無預熱烤焗
發酵
燒烤
旋轉
按下
■烹飪時間的設置單位 ( 最長為 30 分鐘 )
以 10 秒為單位
以 30 秒為單位
以 1 分鐘為單位
0
5 分鐘 10 分鐘 30 分鐘
顯示剩餘時間
• 若雙面上色,請在加熱期間打開爐門,為食物翻面,然後再次按“加熱開始”鍵。
• 爐內和烤盤會變熱,因此取出時請小心
。
蜂鳴器響 3 次,則烹飪完成
•
忘記取出食物時,蜂鳴器會響起。(1 分鐘、3 分鐘、5 分鐘後 )
可打開爐門或者按“取消”鍵使其停止。
•
結束後顯示部位會顯示“ ”、“冷卻”。
“冷卻”字樣閃爍期間請勿拔下電源插頭。
• 爐內和烤盤會變熱,因此取出時請
小心。
爐內和烤盤會變熱
取出時請
小心
■中途希望變更烹飪時間時
→ 烹飪期間旋轉旋鈕,則以 1 分鐘為單位調
整烹飪時間
• 關於 1 次烹飪可設置的時間,含可延長
的時間在內,最長為 30 分鐘。
■完成後希望繼續加熱時(延長時間 )
→ 烹飪完成後 3 分鐘以內旋轉旋鈕,然後設
置時間,邊觀察邊加熱
P.7
須知事項
• 請仔細閲讀安全注意事項。
P.2~5
燒烤
高溫
冷卻
缺水
烤盤 上下層
發酵烤焗 預熱
自動功能
w
分 秒
克
C
弱 強
完成
定溫加熱
延長
炆燉微波
蒸氣 過熱水蒸氣 杯 條 個 門
燒烤
高溫
冷卻
缺水
烤盤 上下層
發酵烤焗 預熱
自動功能
w
分 秒
克
C
弱 強
完成
定溫加熱
延長
炆燉微波
蒸氣 過熱水蒸氣 杯 條 個 門
高溫
41
· ➡
·
·
40
可使用的配件
2
調整時間
3
4
開始(開始烹飪)
0
15 分鐘 40 分鐘 60 分鐘
顯示剩餘時間
蜂鳴器響 3 次,則烹飪完成
• 忘記取出食物時,蜂鳴器會響起。(1 分鐘、3分鐘、5分鐘後 )
• 容器會變熱,因此取出時請小心
。
• 請為管路除水並進行自清潔。
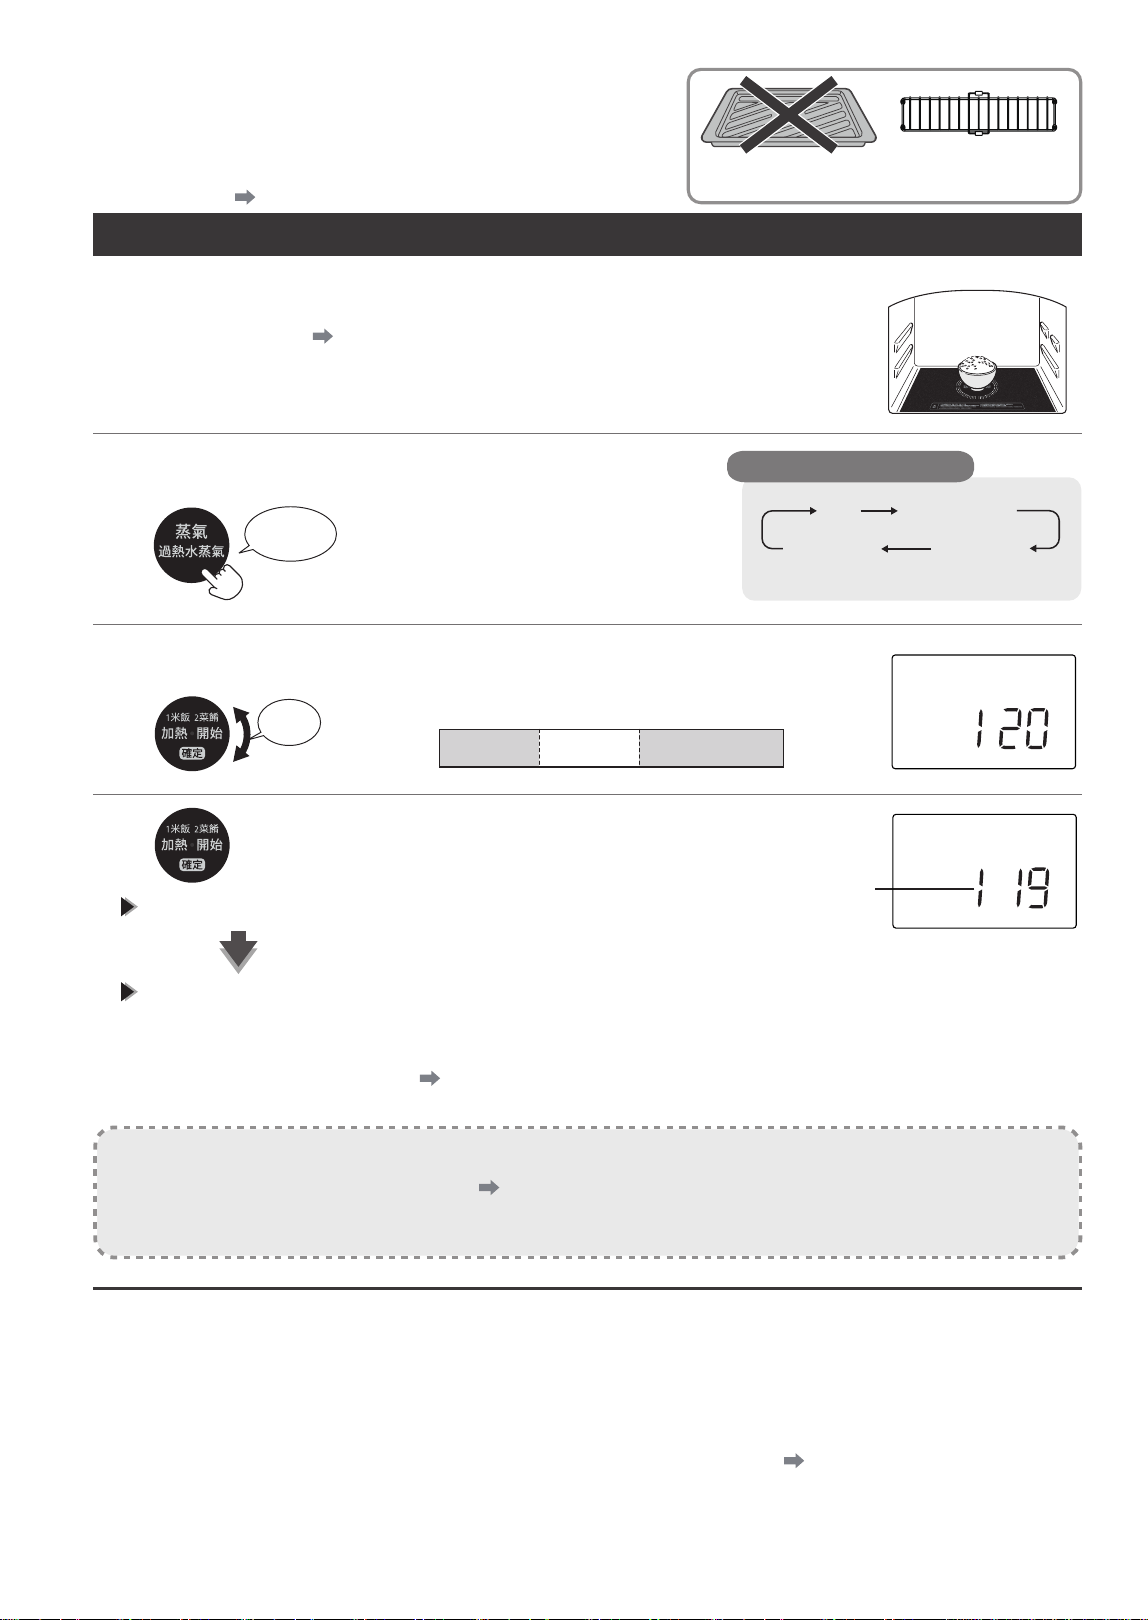
通過蒸氣烹飪
調整時間
• “蒸氣”是以適於日式蒸蛋和布丁的程序按低於
100℃的温度進行烹飪。
• 烹飪鮮肉和鮮魚時,使用“微波蒸氣”模式。
烹
飪
方
法
通
過
燒
烤
烹
飪
/
通
過
蒸
氣
烹
飪
P.2~5
P.49
P.10
選擇蒸氣
按下1次
微波蒸氣
旋轉
按下
以 30 秒為單位
以 1 分鐘為單位
以 5 分鐘為單位
爐內和烤盤會變熱
取出時請小心
須知事項
• 用蒸氣烹飪時,請注意打開爐門後蒸氣
會從爐內冒出。
此外,請注意烹飪期間和烹飪後出氣口也會冒出蒸氣。
•
請仔細閲讀安全注意事項。
•
烹飪後接水盒也會變熱。請等到主機冷卻後拆下接水盒。
■中途希望變更烹飪時間時
→ 烹飪期間旋轉旋鈕,則以 1 分鐘為單位調整烹飪時間
• 關於 1 次烹飪可設置的時間,含可延長的時間在內,最長為 60 分鐘。
■顯示部位閃爍顯示“缺水”、蜂鳴器響起時
→ 在加水盒中加水(烹飪期間也可以加水 )
• 加水後 1~3 分鐘後“缺水”顯示會消失。“缺水”顯示消失之前蜂鳴器可能會響起。
■完成後希望繼續加熱時(延長時間 )
→ 烹飪完成後 3 分鐘以內旋轉旋鈕,然後設置時間,邊觀察邊加熱
P.7
通過蒸氣和烤焗進行蒸氣烹飪。
1
做好加水準備 , 將放有食物的烤盤放入爐內
• 做好加水準備。
•
將加水盒插到底。
每次按下,均按以下順序依次切換
過熱水蒸氣
(無預熱)
過熱水蒸氣
(有預熱)
燒烤
高溫
冷卻
缺水
烤盤 上下層
發酵烤焗 預熱
自動功能
w
分 秒
克
C
弱 強
完成
定溫加熱
延長
炆燉微波
蒸氣 過熱水蒸氣 杯 條 個 門
燒烤
高溫
冷卻
缺水
烤盤 上下層
發酵烤焗 預熱
自動功能
w
分 秒
克
C
弱 強
完成
定溫加熱
延長
炆燉微波
蒸氣 過熱水蒸氣 杯 條 個 門
蒸氣
烹飪時間的設置單位 ( 最長為 60 分鐘 )
特設3款常用蒸煮功能 (自動功能22、23及24)

42
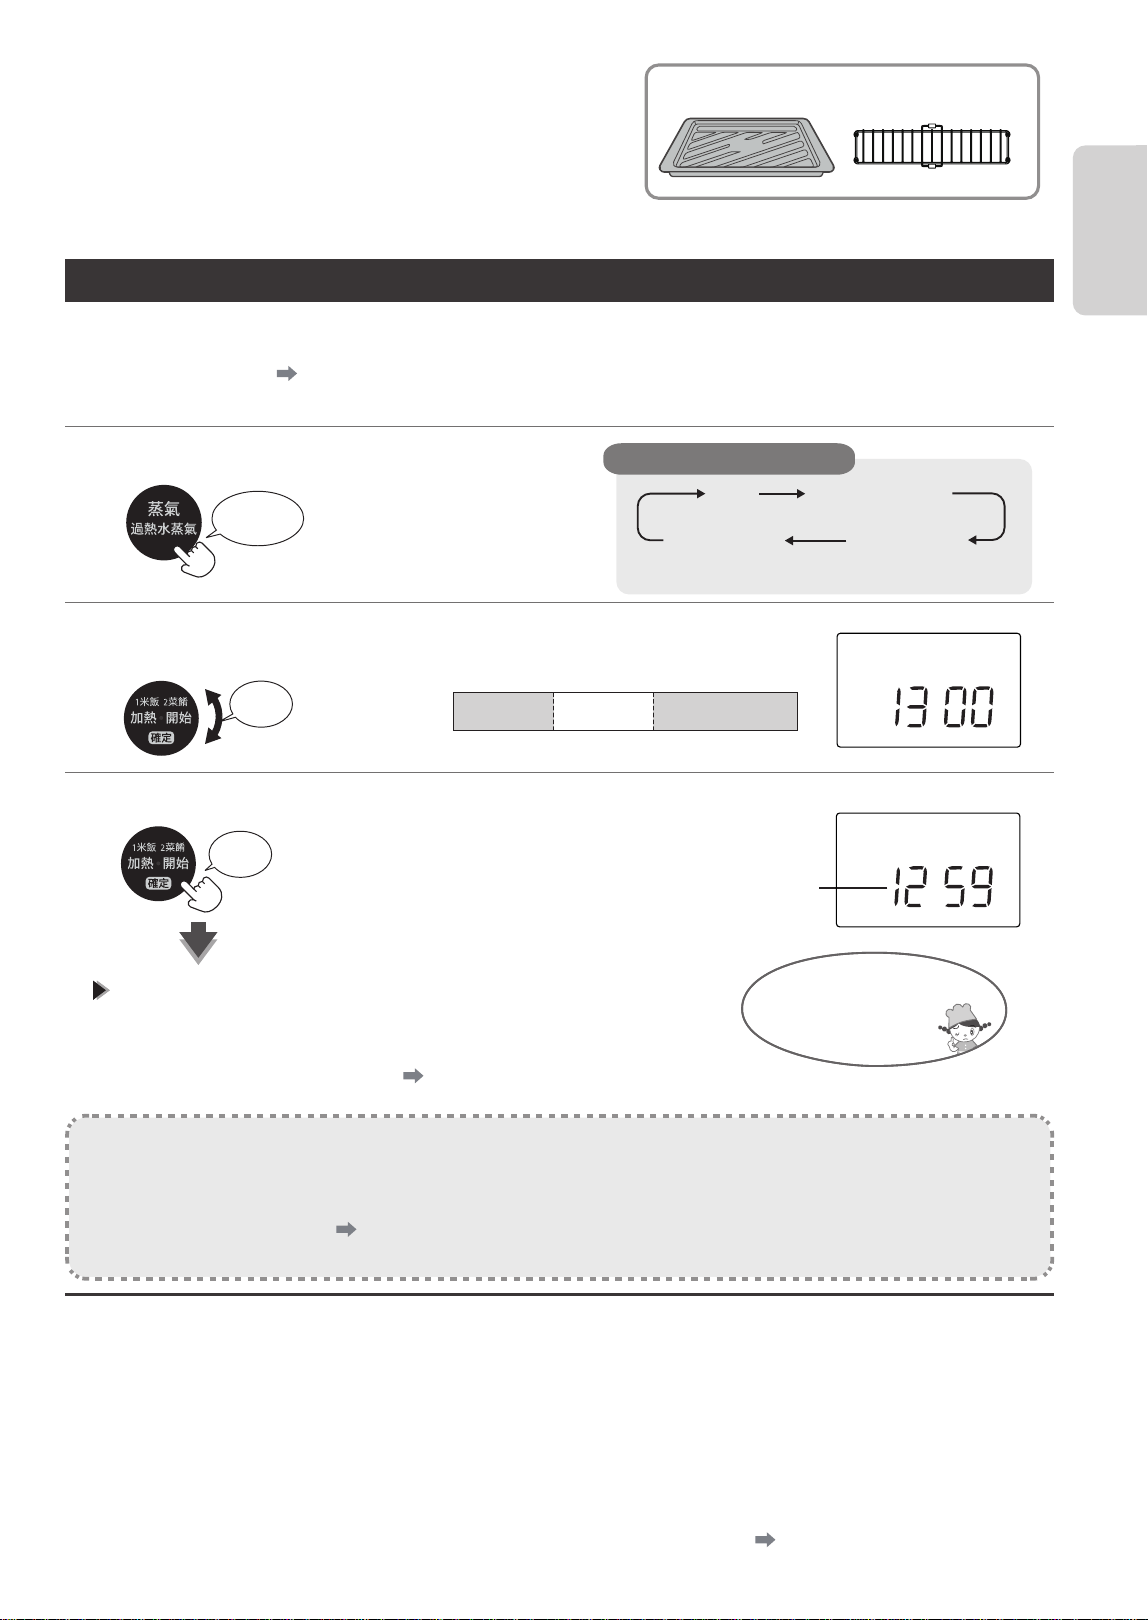
通過過熱水蒸氣進行烹飪
調整温度、時間
1
2
3
4
顯示“預熱”
預熱完成前 1 分鐘會顯示剩餘時間
蜂鳴器響 5 次,則預熱完成 (“預熱完成”字樣亮燈 )
有預熱
( 用以烤焗食物)
P.10
按下3次
每次按下,均按以下順序依次切換
蒸氣
微波蒸氣
過熱水蒸氣
(無預熱)
過熱水蒸氣
(有預熱)
旋轉
旋轉
按下
做好加水準備,爐內不放入任何食物 ,
選擇過熱水蒸氣 ( 有預熱 )
• 做好加水準備。
• 將加水盒插到底。
調整温度
按下後開始預熱
• 設置預熱温度 :100 ~ 250℃
但爐內過熱時(顯示部位閃爍
“ ”),為保護電氣部件,
可能無法設置為 220℃以上。
• 預熱約
20
分鐘。
在此期間,若不執行任何操作,則蜂鳴器
3
次後會取消
功能設置,而後電源會斷開。
將食物放入爐內並調整時間
( 料理集中的功能規定將指定的配件放到指定位置
)
■烹飪時間的設置單位 ( 最長為 60 分鐘 )
■希望將烹飪温度變更為與預熱温度不
同的温度
按下並旋轉旋鈕後以 10 分鐘
為單位調整烹飪時間
以 30 秒為單位
以 1 分鐘為單位
以 5 分鐘為單位
開始(開始烹飪)
※ 預熱完成後不開 / 關爐門,則即便
按“加熱開始”鍵也不會運行。
顯示剩餘時間。
蜂鳴器響 3 次,則烹飪完成
• 忘記取出食物時,蜂鳴器會響起。(1 分鐘、3 分鐘、5 分
鐘後 ) 可通過打開爐門或者按“取消”鍵使其停止。
• 結束後顯示部位會顯示“ ”、“冷卻”。
“冷卻”字樣閃爍期間請勿拔下電源插頭。
• 爐內和烤盤會變熱,因此取出時請小心。
• 請為管路除水並進行自清潔。
須知事項
• 打開爐門後取出食物時,請小心爐內冒出的蒸氣。
• 烹飪期間打開爐門後,可能會冒出一段時間的蒸氣。
請注意蒸氣出氣口。
爐內和烤盤會變熱
取出時請小心
0
15 分鐘 40 分鐘 60 分鐘
燒烤
高溫
冷卻
缺水
烤盤 上下層
發酵烤焗 預熱
自動功能
w
秒
克
C
弱 強
完成
定溫加熱
延長
炆燉微波
蒸氣 過熱水蒸氣 杯 條 個 門
分
燒烤
高溫
冷卻
缺水
烤盤 上下層
發酵烤焗 預熱
自動功能
w
分 秒
克
C
弱 強
完成
定溫加熱
延長
炆燉微波
蒸氣 過熱水蒸氣 杯 條 個 門
高溫
高溫
43
1
2
3
4
不會顯示“預熱”
P.10
• 做好加水準備。
• 將加水盒插到底。
調整温度
調整時間
開始(開始烹飪 )
蜂鳴器響 3 次,則烹飪完成
可使用的配件
過熱水蒸氣
用加熱到超過 100℃的水蒸氣(過熱水蒸氣)進行烹飪。
過熱水蒸氣屬於高温現象。可能肉眼看不到,請特別注意。
須知事項
• 請仔細閲讀安全注意事項。
P.2~5
做好加水準備並放入食物 , 選擇過熱水
蒸氣(無預熱 )
按下4次
旋轉
旋轉
按下後
確認
按下
• 設置預熱温度 :100 ~ 250℃
但爐內過熱時(顯示部位閃
爍“ ”),為保護電
氣部件,可能無法設置為
220℃以上。
• 最大烹飪時間 :60 分鐘
• 忘記取出食物時,蜂鳴器會響起。
(1 分鐘、3 分鐘、5 分鐘後 )
• 結束後顯示部位會顯示“ ”、“冷卻”。
“冷卻”字樣閃爍期間請勿拔下電源插頭。
• 爐內和烤盤會變熱,因此取出時請
小心。
• 請為管路除水並進行自清潔。
P.49
通知
• 烤焗效果可能因室温、形狀、數量、尺寸、初始温度、電源電壓而有所差異。
加熱期間調換食物的前後方或部分裹上錫紙,則可順利烹飪。
• 爐內變熱後會冒出蒸氣。
烹
飪
方
法
通
過
過
熱
水
蒸
氣
進
行
烹
飪
預熱的定義
• 提前將爐內加熱至適合料理的温度。
■變更預熱期間的温度
→不可以。
■設置温度與預熱温度的關係
→按照與設置温度相同的温度進行
預熱。
但設置温度大於或等於 210℃時,
預熱温度為 200℃。
■預熱時間標準
→ 200℃時,約需 14 分鐘。
• 預熱前的爐內温度和室温、電壓
等不同,則預熱時間會略有差異。
■中途希望變更烹飪時間時
→ 烹飪期間旋轉旋鈕,則以 1 分鐘為單
位調整烹飪時間
• 關於 1 次烹飪可設置的時間,含可
延長的時間在內,最長為 60 分鐘。
■中途希望變更烹飪温度時
→ 烹飪期間按下“加熱•開始”鍵﹐在
顯示温度期間(5 秒內)旋轉旋鈕後,
則以 10℃為單位調整烹飪温度
■完成後希望繼續加熱時(延長時間 )
→ 烹飪完成後 3 分鐘以內旋轉旋鈕,然
後設置時間,邊觀察邊加熱
無預熱
高溫
高溫
44
通過微波蒸氣烹飪
調整時間
做好加水準備 , 放入食物
不可使用烤盤
做好加水準備 , 放入食物
1
2
3
選擇微波蒸氣
調整時間
4
按下
按下2次
• 做好加水準備。
• 將加水盒插到底。
• 放入與食物份量匹配的耐熱容器中,以○為標準,放入爐內中央。
• 通過微波 (400W) 和蒸
氣加熱。
請注意可使用的容器和配件。
每次按下,均按以下順序依次切換
旋轉
烹飪時間的設置單位 ( 最長為 30 分鐘 )
以 10 秒為單位
以 30 秒為單位 以 1 分鐘為單位
0
5 分鐘 10 分鐘 30 分鐘
蜂鳴器響 3 次,則烹飪完成
開始烹飪
• 忘記取出食物時,蜂鳴器會響起。(1 分鐘、3分鐘、5分鐘後 )
• 容器會變熱,因此取出時請
小心。
• 請為管路除水並進行自清潔。
須知事項
• 請小心打開爐門後從爐內冒出的蒸氣。此外,請注意烹飪期間和烹飪後出氣口也會冒出蒸氣。
• 請仔細閲讀安全注意事項。
• 烹飪後接水盒也會變熱。請等到主機冷卻後拆下接水盒。
蒸烤架可用於微
波蒸氣烹飪
★時間設置標準
P.45
P.10
不裹保鮮膜
放在中央
蒸氣
微波蒸氣
過熱水蒸氣
(無預熱)
過熱水蒸氣
(有預熱)
P.49
P.2~5
■中途希望變更烹飪時間時
→ 烹飪期間旋轉旋鈕,則以 1 分鐘為單位調整烹飪時間
• 關於 1 次烹飪可設置的時間,含可延長的時間在內,最長為 30 分鐘。
■完成後希望繼續加熱時(延長時間 )
→ 烹飪完成後 3 分鐘以內旋轉旋鈕,然後設置時間,邊觀察邊加熱
P.7
燒烤
高溫
冷卻
缺水
烤盤 上下層
發酵烤焗 預熱
自動功能
w
分 秒
克
C
弱 強
完成
定溫加熱
延長
炆燉微波
蒸氣 過熱水蒸氣 杯 條 個 門
燒烤
高溫
冷卻
缺水
烤盤 上下層
發酵烤焗 預熱
自動功能
w
分 秒
克
C
弱 強
完成
定溫加熱
延長
炆燉微波
蒸氣 過熱水蒸氣 杯 條 個 門
顯示剩餘時間

45
手動加熱的時間設置標準
警告
禁止 禁止
請勿過度加熱食品
否則可能會冒煙或發生火災。
• 請保守設置時間,並在烹飪期間
邊觀察邊加熱。
• 豆沙包的餡會先升温,加熱
3 分鐘以上後,可能會冒煙、起火。
禁止過度加熱飲料、含油多的食物、濃稠
食物等
否則從爐內取出時可能會突然沸騰,導致燙傷。
• 請在加熱飲料前後用勺子等攪拌均勻。
• 請保守設置時間,並在烹飪期間邊觀察邊加熱。
烹
飪
方
法
通
過
蒸
氣
微
波
烹
飪
/
手
動
加
熱
的
時
間
設
置
標
準
設置輸出功率和時間的烹飪時間標準。
加熱時間與食物的份量成正比。份量為一半時,也請將加熱時間減半。
●容量單位 : 1ml=1cc
●常温 : 約 20℃、冷藏 : 約 10℃、冷凍 : 約 -20℃
●需要保鮮膜…〇 / 無需保鮮膜… ×
加熱
(微波 600W)
加熱冷凍食品
(微波 600W)
飲料
(微波 600W)
解凍冷凍蔬菜
(微波 600W)
解凍冷凍肉類•魚類
(微波 100W)
蒸氣微波
(蒸氣
+ 微波 400W)
燉蔬菜
※
(蒸氣 +
微波 400W)
菜名 份量 標準時間 保鮮膜
米飯 1 杯 (150g) 約1分鐘 ×
蓋澆食物 1 杯 (340g) 約2分鐘50秒 ×
湯類•味噌湯
1 杯 ( 150ml) 約1分鐘40秒 ×
燉煮青菜 150g 約1分鐘20秒 ×
咖喱蔬菜 200 克 約2分鐘10秒 ○
燒賣 6 個 (100g) 約50秒 ×
急凍包、肉包子、豆沙包
1 個 (90g) 約50秒 ○
黃油卷 2 個 (70g) 約20秒 ×
烹飪麵包 1 個 ( 110g) 約30秒 ×
烤紅薯 1 根( 200g) 約1分鐘 ×
菜名 份量 標準時間 保鮮膜
急凍包
、肉包子、豆沙
包(冷藏)
1 個 (90g) 約2分鐘10秒 ×
燒麥(冷藏 ) 10 個 (150g) 約1分鐘50秒 ×
米飯(冷凍 ) 1 杯 ( 150g) 約3分鐘 ×
速凍包子、肉包子、豆沙
包(冷凍 )
1 個 (90g) 約2分鐘 ×
燒麥(冷凍 ) 10 個 (150g) 3分30秒~4分鐘 ×
材料名稱 份量 標準時間 保鮮膜
葉
菜
菠菜 100 克 約1分40秒 ○
捲心菜 100 克 約1分20秒 ○
西蘭花 100 克 約1分20秒 ○
根
菜
薯仔 1 個 (150g) 約3分30秒 ○
芋頭 100 克 約2分40秒 ○
南瓜 150g 約4分鐘 ○
紅蘿蔔 100 克 約3分30秒 ○
蕃薯 200 克 約4分30秒 ○
※ 請用水打濕蔬菜後加熱。(防止烤糊 )
•
關於市面上銷售的冷凍食品和加工食品,請參考包裝説明的內容,邊觀察邊加熱。
•
加熱不充分或加熱不均時,請取出後攪拌或換位置擺放後繼續加熱。
※ 請轉移到耐熱容器,並在混合蔬菜上多撒一點水後再加熱。
注意!
請勿加熱封口袋裝食品或罐裝食品。
否則會導致起火、破裂、產品破損、受傷、燒傷。
菜名 份量 標準時間 保鮮膜
米飯(冷凍 ) 1 杯 (150g) 約2分30秒 ○
咖喱蔬菜(冷凍 ) 300 克 約8分30秒 ○
燒賣(冷凍 ) 10 個 (150g)
2分40秒~3分鐘
20 秒
○
菜名 份量 標準時間 保鮮膜
牛奶(冷藏 ) 1 杯 (200ml) 約1分50秒 ×
酒(常温 ) 1 杯 ( 160ml) 約50秒 ×
水(常温 ) 1 杯 (200ml) 約1分40秒 ×
咖啡(常温 ) 1 杯 ( 150ml) 約1分30秒 ×
材料名稱 份量 標準時間 保鮮膜
牛奶(冷藏 ) 1 杯 (200ml) 約1分50秒 ×
酒(常温 ) 1 杯 ( 160ml) 約50秒 ×
水(常温 ) 1 杯 (200ml) 約1分40秒 ×
咖啡(常温 ) 1 杯 ( 150ml) 約1分30秒 ×
材料名稱 份量 標準時間 保鮮膜
肉類
100 克 約5分鐘30秒 ×
200 克 約8分鐘 ×
400 克 約 14 分鐘 ×
600 克 約 18 分鐘 ×
刺身
100 克 約3分鐘30秒 ×
200 克 約5分鐘 ×
400 克 約9分鐘 ×
600 克 約 11 分鐘 ×
46
自清潔方法
清潔保養方法 清潔保養的關鍵在於及時與細緻
警告
清潔主機前, 請拔下電源插頭,
待主機冷卻。
否則可能會導致觸電、受傷、燒傷。
拔下插頭
冷卻後
禁止濕手
禁止
請勿濕手插拔電源插頭
否則可能導致觸電。
爐內和爐門上附有油、食物殘渣
和水分時 , 請勿加熱
微波集中在髒污的部分時,可能產生火
星、冒煙、起火、爐內損傷等。
此外,可能會導致生鏽。
• 附着上述物質時 , 請每次在主機冷卻後進
行擦拭。
為防止生鏽、長期使用時
每次使用後請務必擦拭乾淨爐內的污垢、水份,以清除潮氣。
① 請用擰乾的抹布擦拭整個爐內(左右側面、裏面、頂部、底部、爐門內側)。
關於清潔保養的注意事項等,詳情請參閲各部位的説明。
② 打開爐門自然晾乾。
擦乾水份後請敞開爐門約 1 小時。
※ 請注意不要撞到爐門或向爐門施加重力。
爐體、爐門
請用擰乾的濕抹布擦拭。
• 請用稀釋的廚房清潔劑 ( 中性)浸濕抹布擦掉頑固污垢後,
務必擦淨清潔劑。
須知事項
• 請不要將水灑在上面。
否則可能會生鏽或引起故障。
蒸氣
出氣口
請用擰乾的濕抹布擦拭。
• 蒸氣
烹飪後,蒸氣出氣口附近會殘留白色粉末
(水中的溶解物)。請用擰乾的濕抹布仔細擦
拭乾淨。
爐門內側•爐內
請用擰乾的濕抹布擦拭。
•
對於難以清除的污垢,請用濕抹布放在污垢上方約 30 分鐘
後再擦拭乾淨。污垢嚴重時,請用稀釋的廚房清潔劑 ( 中性)
浸濕抹布後擦拭乾淨,並用濕抹布擦淨清潔劑。
對於每次烹飪後凝結的水分,請在主機冷卻後,用幹
抹布擦拭乾淨。
須知事項
• 請勿用刷帚或叉子等前端尖鋭的物體進行刮擦。以免出
現劃痕或破裂。
爐門墊圈
當爐門墊圈處有水滴或食物殘渣堆積時,
請在主機冷卻後用擰乾的濕抹布輕輕擦
拭。
須知事項
• 請勿強烈刮擦、將墊圈擠入或拉出,否
則可能導致蒸氣泄漏。
(
不可拆卸墊圈
)
47
■自清潔後仍無法去除爐內異味時
請除臭( P.18),以減輕異味。
■長時間不使用時
對“管路除水”( P.49) 後,拔下電源插頭並仔細清潔各個部件,然後保管在遠離潮氣和灰塵
的地方。
須知事項
請勿使用中性以外的洗滌劑(鹼性、酸性等廚房、住宅專用洗滌劑 )、烤焗清潔劑、粉末清潔劑、氣油、
稀釋劑、酒精、漂白劑、熱水、含可燃氣體(LPG 等)的噴霧洗滌劑、刷帚、海綿刷帚的硬質部分、
含研磨劑的尼龍刷帚、金屬刷帚等。
否則可能導致機器損壞、變色、變形、冒煙、起火、生鏽、掉漆等。
此外,還可能導致難以去除污垢。
海綿刷 含研磨劑的尼龍刷
請勿使用硬質部分
( 含研磨劑的無紡布)。
請用海綿部分進行清洗。
請勿使用。
請使用未添加研磨劑的刷。
溫馨提示
利用蒸氣更易清除爐內、烤盤等的污垢。請按照“利用蒸氣
進行自清潔的方法”( → P.48) 進行自清潔。(請勿
使用第 50 頁以外的方法進行操作 )
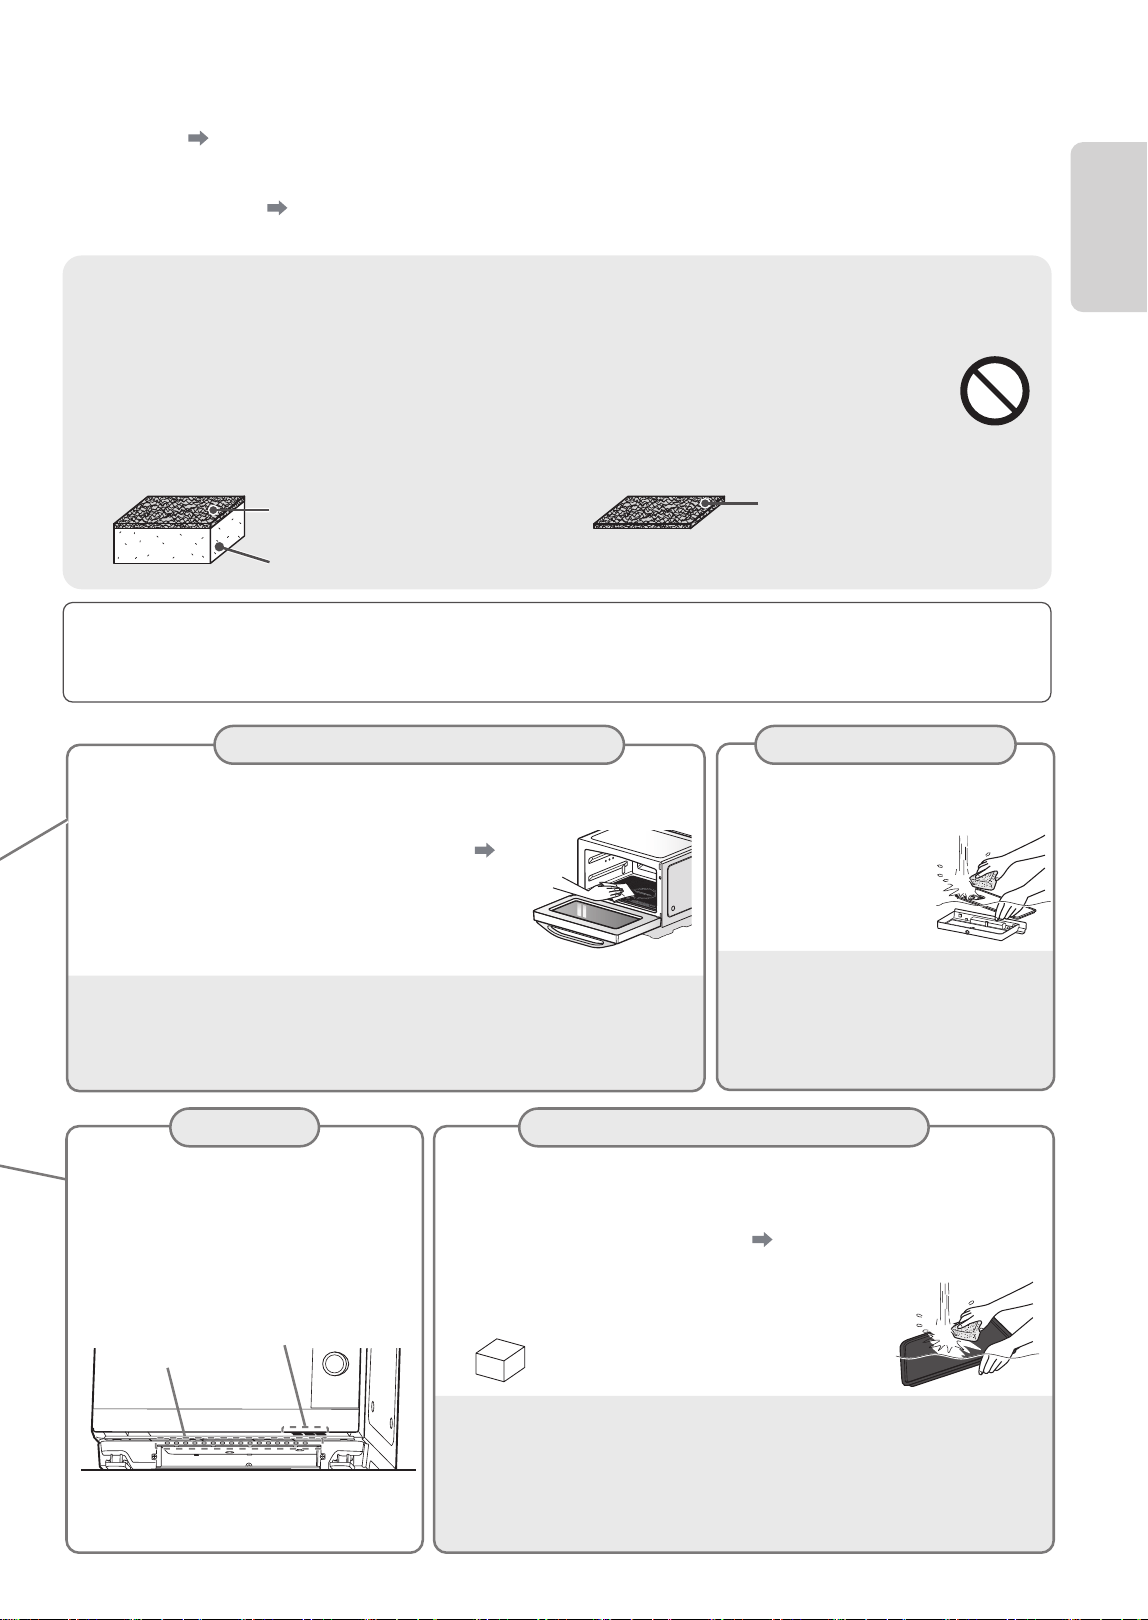
爐內底部 加水盒•接水盒
入氣口
烤盤
請及時用擰乾的濕抹布擦去爐內底部的污垢。
使用微波時產生的污垢可能會在使用
烤焗模式時被烤焦、
變黑。
• 污垢不易清除時,請“利用蒸 進行自清潔”(
P.48)
後,塗上液體清潔劑(乳狀清潔劑)並放置約 2 分鐘,
用濕抹布和裹成圓形的保鮮膜刮擦,清除污垢。
然後用濕抹布將洗滌劑擦拭乾淨。
須知事項
• 請勿刮擦周圍的硅膠墊圈及爐內塗漆面,以免出現劃痕。
• 請勿用金屬刷或前端尖鋭的物體進行刮擦或撞擊,以免出現劃痕或破裂。
倒掉加水盒、接水盒中的水。
有污垢時,用柔軟的海綿清除污垢並將
水分擦拭乾淨。
• 介意污垢時,請用水
稀釋廚房專用洗滌劑
( 中性)後沖洗乾淨。
須知事項
• 請勿放入洗碗乾燥機或餐具烘乾機或
直接暴露在直射陽光下晾乾。以免導
致變形或破損。
拆掉加水盒、接水盒後用抹布等擦
掉灰塵。
• 拆掉加水盒、接水盒後用抹布等擦掉
灰塵。
入氣口
( 主機正面 )
入氣口 ( 爐門下方 )
用柔軟的海綿清除污垢並將水分擦拭乾淨。
• 若是難以清除的污垢,請將其放入温水浸泡後再進行清洗。
• 介意污垢時,請廚房專用洗滌劑(中性)後清洗。
此外,“利用蒸氣進行自清潔”(
P.
48 ),則更易去除污垢。
• 烤盤上有水分殘留時,可能會導致生鏽。
• 難以清除烤盤上的污垢時。
請使用三聚氰胺泡沫海綿(不含洗滌劑類
型的白色海綿)擦洗乾淨。
須知事項
•使用後請勿急速冷卻,以免導致主機損壞或變形。此外,加熱後立即加
水時會產生蒸氣或高温飛沫飛濺。
•請勿用金屬刷帚或前端尖鋭的物體進行刮擦或者清除污垢,以免出現劃
痕或變形。
遇
到
此
情
況
時
自
清
潔
方
法
氣

48
1
2
3
6
自清潔方法
(續)
利用蒸氣進行自清潔的方法
用蒸氣使爐內的污垢脱落,便於擦拭。擦拭污垢,減輕異味。此外,若放入需清除污垢的烤盤,
則污垢很容易脱落。
在加水盒內加水後安裝到主機上
P.10
* 如需清除烤盤的污垢,請將烤盤放入爐內下層。
選擇 45 快速清潔
向左旋轉,可快速選擇。
旋轉
按下 ( 開始自清潔 )
( 所需時間 10 分鐘 )
蜂鳴器響 3 次,快速清潔完成
4
5
• 完成後,因爐內通風,“冷卻”字樣會閃爍,冷卻風扇會運行數分鐘。
• 打開爐門時請多注意蒸氣
。
此外,請小心從出氣口冒出的殘留蒸氣。
• 若不打開爐門,則蜂鳴器會響起。(1 分鐘、3 分鐘、5 分鐘後 )。可通過打開爐門或按“取消”鍵使其停止。
• 管路除水完成後請拔下電源插頭並等到爐內、烤盤的溫度充分下降後擦掉污垢。
• 請倒掉加水盒、接水盒中所有的水並用水清洗。
• 請用
干抹布擦掉沾在爐內和爐門內側的水滴。
為管路除水 ( P.49)後,待爐內冷卻後擦掉污垢
打開爐門後晾乾爐內 ( 約 1 小時 )
(“為防止生鏽、長期使用時” P.46 )
• 繼續“47 除臭”( P.18)時,則無需晾乾爐內。
通知
• 請注意,剛除水完成後爐內、烤盤、蒸氣出氣口會變熱。
• 通過快速清潔,異味會減輕,但並不能清除所有類型的異味。
燒烤
高溫
冷卻
缺水
烤盤 上下層
發酵烤焗 預熱
自動功能
w
分 秒
克
C
弱 強
完成
定溫加熱
延長
炆燉微波
蒸氣 過熱水蒸氣 杯 條 個 門
燒烤
高溫
冷卻
缺水
烤盤 上下層
發酵烤焗 預熱
自動功能
w
分 秒
克
C
弱 強
完成
定溫加熱
延長
炆燉微波
蒸氣 過熱水蒸氣 杯 條 個 門

49
每次使用蒸氣
時
水管
除水方法
關於主機自清潔
烹飪完成後 , 請務必為水管除水。
每次烹飪完成後 ,
請在主機冷卻後用乾毛
巾等將附着在爐內和爐門上的水滴擦拭乾
淨。然後打開爐門,晾乾爐內。
若不擦拭乾淨 , 反覆蒸氣烹飪時,可能會
從接水盒溢出水。
1
2
3
4
5
1
2
3
4
5
從主機拔出
加水盒
選擇
46 水管除水
用幹抹布等將爐
內和爐門上的水
滴擦拭乾淨
旋轉
按下 ( 開始除水 )
( 所需時間 2 分鐘 )
蜂鳴器響 3 次,則除水完成
• 若不打開爐門,則蜂鳴器會響起。( 1 分鐘、
3 分鐘、5 分鐘後)。可通過打開爐門或按“取
消”鍵使其停止。
• 完成後,請等到主機冷卻後用幹抹布等擦掉沾
在爐內和爐門內側的水滴。
( 自清潔時請參考“關於主機自清潔”中的步驟 1)
打開爐門後晾乾爐內
(約1小時)
(“為防止生鏽、長期使用時” P.46 )
通知
• 請注意,除水期間和除水完成後排出的水變為
蒸氣
,蒸氣出氣口會變熱。
加水盒、接水盒的安裝方法、拆卸方法請參考 P.10。
遇
到
此
情
況
時
自
清
潔
方
法
倒掉殘留在加水盒中的水並用
水清洗
• 自清潔方法 P.47
• 自清潔方法 P.47
加水盒
接水盒
倒掉積聚在接水盒中的水
將加水盒和接水盒安裝在主機上
打開爐門後晾乾爐內
(約1小時)
(“為防止生鏽、長期使用時” P.46 )
50
關於提示音(蜂鳴聲 )
在執行以下操作時或在以下狀態下,會發出蜂鳴聲提示。
狀態 蜂鳴聲
按下按鍵時 嗶~
烹飪完成時 嗶~嗶~嗶
預熱完成時,自動烹飪期間有翻面等操作時 嗶~嗶~嗶~嗶~嗶
預熱完成後,不開 / 關爐門約 20 分鐘時 嗶~嗶~嗶(停止烹飪 )
以下情況下按下“加熱”鍵時
• 開 / 關爐門後已經過 1 分鐘以上。
• 預熱結束後未開 / 關爐門。
• 自動烹飪期間提示翻面的蜂鳴聲響起後,未開 / 關爐門。
嗶嗶嗶嗶嗶(不開始 )
※ 請再次開 / 關爐門後按下“加熱”鍵。
加熱完成後忘記取出食物時
(1
分鐘、3 分鐘後)→嗶嗶~嗶嗶
5 分鐘後→嗶嗶~嗶嗶~嗶嗶~嗶
-
“45 快速清潔”“46 水管除水
”完成後不打開爐門時
自動烹飪期間提示翻面的蜂鳴聲響起後仍未打開爐門時 則每隔 1 分鐘響起,最多響 5 次→嗶嗶~嗶嗶
閃爍顯示“缺水”時
(通知補水 )
嗶嗶嗶
顯示異常時
嗶嗶嗶嗶嗶嗶嗶
蜂鳴聲的消除方法和恢復方法
進入消音功能
待機狀態下,長按取消鍵,3 秒後,顯示 OFF,進入全消音功能。所有蜂鳴音取消,同時帶斷電記憶功能。
退出消音功能
待機狀態下,長按取消鍵,3 秒後,蜂鳴一聲,顯示 ON,退出消音功能。
無線連線
連結網路
長按“
”3 秒,將顯示“ ”和“ ”。
如果連接網路成功,微波爐將返回待機狀態,並顯示“
”。
如果連接失敗,將顯示“NO”,10 分鐘後微波爐將返回待機狀態。
中斷網路連接
長按“
”8 秒,然後顯示“--”5 秒,
若解除連結成功,螢幕會顯示“8888”,3 秒後返回待機狀態。
如果失敗,會顯示“FFFF”,3 秒後微波爐返回待機狀態。
AP
51
常見問題一覽表
關於提示音
(
蜂鳴聲
)/
提示音的消除方法和恢復方法
/
常見問題一覽表
Q.
問題
A.
回答
參考
頁碼
放置時是否需要與牆壁和傢俱隔
開放置 ?
需要。
否則牆壁和傢俱等容易因温度過高發生火災或受損。
• 上方請留出 30cm 以上距離,左、右以及後方請留出
10cm 以上距離,下方無需留出空隙。
• 前方需要預留出爐門完全打開時可放入和取出食物的
空間。
• 但對於不耐熱的牆壁、家用電器、傢俱、插座,需要
預留出超出記載尺寸的空隙。
4
初次使用時需要乾燒、除味嗎 ?
需要。
請在初次使用時進行“爐內乾燒、除味”操作,並燒乾爐
內的防鏽油。可能會冒煙或散發異味 , 屬正常現象。
18
如何清除污垢 ? 請參考“自清潔方法”仔細進行自清潔。 46~49
可使用什麼容器 ? 請參考“可使用的容器、不可使用的容器”。 14~15
如何清理殘留在產品中的水 ? 請參考“ ”。 49
如何移動本產品 ? 移動時請確保握住產品的左下側和右下側部位。 6
使用產品後地板表面會變熱,
是否有問題 ?
使用連續加熱、長時間加熱、
烤焗烹飪等模式時,產品散
發的熱氣會導致地板表面、牆面温度升高。屬正常現象,
冷卻之前請勿直接用手觸摸。
此外,請勿放在榻榻米、地毯、桌布等不耐熱的物品上使
用。
-
應該委託誰修理 ?
請參考第 51~57 頁。如有異常,請停止使用並務必從插
座拔下電源插頭,諮詢購買本品時的銷售店鋪。
59
遇到此情況時
水管除水
52
無法順利烹飪時(微波•蒸氣
烹飪等 )
項
目
遇到此情況時 應對方法
加熱米飯、菜餚
按烹飪立即完成的“加 開始”
建加熱,卻達不到加熱效果
z
爐內(特別是底部)温度很高時 , 紅外傳感器可能無法正常運行。
請打開爐門,等到爐內冷卻後再加熱。
食物無法加熱
z
食物是否被金屬容器、錫紙等包裹 ?
z
是否使用了隨附的烤盤 ? 請勿使用烤盤。
z
請將食物放在爐內中央。請參考爐內底部的樣子,確保均放在前後、
左右的中央位置。
z
爐內高温時、長時間加熱、連續加熱、加熱少量食物時,為保護
電氣部件,可能會降低輸出功率。請繼續加熱或稍等片刻後使用。
按“加 開始”鍵加熱 , 但加
熱過度
z
請勿蓋蓋子。
→否則紅外傳感器可能無法正常運行。
z
請將食物放在爐內中央(前後左右)。若位置偏離,則可能導致
無法順利加熱。
z
食物份量是否過少 ? 每次加熱份量應為 100g 以上。
z
為確保紅外傳感器正確檢測,請儘量選擇低矮寬口容器進行加熱。
米飯、食物乾巴巴的
z
若噴霧或稍微灑點水,則會有濕潤的加熱效果。
z
按“微波蒸氣”加熱,則會有濕潤的加熱效果。
燉煮食品、紅燒魚等的湯汁飛
濺
z
請放入深口容器內並裹上保鮮膜後,在手動“微波”模式下邊觀
察邊加熱。
無法加熱咖喱和八寶菜
z
加熱濃稠食品時,請在“2 菜餚”〔大火 ] 模式下加熱。
無法加熱冷凍米飯、冷凍食品
z
從冰箱取出後請立即進行加熱。表面開始融化或重新裹上一層保
鮮膜時,紅外傳感器可能無法正常運行。
z
請將食物放在爐內中央(前後左右)。
z
冷凍時,請將保鮮膜貼着米飯,緊緊包裹。此外,請勿堆疊或包
裹多層。
z
加熱時請使用耐熱淺碟,儘量避免將保鮮膜封口處朝上放置。
z
放入存儲容器或存儲袋時,自動“加熱”效果不佳。
z
市面上銷售的冷凍食品可能無法在自動“加熱”模式下達到很好
的加熱效果,因此請按食品包裝説明在手動“微波”模式下邊觀
察邊加熱。
炸製品和天婦羅表層變軟
z
按“12 酥脆加熱”進行加熱,則可以達到酥脆加熱效果。
按“3 蒸氣”加熱的時間很長
z
因產生蒸
氣後才加熱,所以與單獨微波加熱相比,需要更多的時間。
加熱牛奶、咖啡和酒
烹飪立即完成的飲料温度很低
z
爐內(特別是底部)温度很高時,紅外傳感器可能無法正常運行。
請等到爐內冷卻後再加熱。
牛奶、咖啡、酒加熱過度
z
請將份量控制在容器的 8 分位置左右。
放入容器中的牛奶量過少時,很可能會沸騰。
z
牛奶、咖啡請使用“4 牛奶•咖啡”加熱,酒請使用“5 酒”加熱。
如用“加熱”鍵,可能導致温度過高,因此請勿使用。
z
請將飲料放在爐內中央(前後左右 )。
z
關於容器選擇,請參考第 25~26 頁的內容。使用不同的容器時,
請按手動“微波 600W”模式邊觀察邊加熱。
熱
熱

53
項
目
遇到此情況時 應對方法
3
種解凍方式
解凍效果不佳
z
請將食物平放在淺口泡沫托盤或鋪有廚房用紙的耐熱淺碟上進行
解凍。
→若將食物放在深口泡沫托盤,則托盤的邊緣會擋住監測信號,
可能無法順利測量温度、無法順利解凍。
z
可順利解凍的食物厚度在 3cm 以下最佳。請將厚度調整均勻,在
細小部分和魚尾等處裹上錫紙。 P.27
z
當需要同時解凍兩種或以上食物時,請選擇同種類且大小大致一
致的食物。
z
形狀不同,則有時可能解凍效果不佳。
解凍不充分
z
若食物的局部温度升高,則紅外傳感器收到信號後會停止加熱,
從而導致解凍不充分。
→若食物厚薄、粗細不均,則容易局部升温,因此請確保厚度一
致後再進行冷凍。
→解凍不充分時,請在“微波 100W”模式下邊觀察邊解凍。
→從冰箱取出後請立即加熱。表面開始熔化或重新裹上一層保鮮
膜時,紅外傳感器可能無法正常運行。
水煮蔬菜
蔬菜乾巴巴的
z
清洗蔬菜後直接裹上保鮮膜 , 無需晾乾水。
也有加熱過度和加熱不足之處
z
請確保南瓜、土豆等食物大小均一,連同碗碟一起裹上保鮮膜。
菠菜需要將葉子和莖交錯疊放後裹上保鮮膜。 P.28
定温加熱
食物烹飪完成後的温度與設置
的温度偏差大
z
爐內(特別是底部)温度很高時,紅外傳感器可能無法正常運行。
請打開爐門,待爐內冷卻後再進行加熱。
z
是否蓋了蓋子、裹上了保鮮膜 ? 請勿蓋蓋子或裹上保鮮膜。
z
請將食物放在爐內中央 ( 前後左右)。
發酵
無法順利發酵
z
發酵情況因室温、麪糰的温度、酵母菌的類型、原料配方等不同
而有所差異。請在觀察麪糰狀態的同時調整發酵温度和時間。
z
麪糰乾燥時,請邊觀察狀態邊加噴水霧。
常温吐司
烤焗顏色有深有淺
z
希
望通過火力調節烤製成淺色時,請將其設置為“小火”; 希望
烤
製成深色時,請將其設置為“大火”。
z
烤制顏色可能因吐司的厚度、尺寸、配方、麪包類型、含水
量、
室內温度、爐內温度、翻面時機而有所差異。
z
烤焗顏色較淺時,請將需要繼續烤焗的面朝上,在延長加熱或
手
動“燒烤”模式下邊觀察邊繼續烤焗。
所有蒸
氣加熱
無法順利加熱
z
份量是否合適 ?
改變料理集所記載的份量時可能導致無法順利加熱。
z
是否沒水 ? 若加水盒的水變少或忘記及時加水,將不會繼續散發
蒸
氣
, 從而導致無法順利加熱。
z
請將加水盒用力插到底。
無法順利烹飪時
遇到此情況時
54
無法順利烹飪時(烤焗烹飪
)
項目 遇到此情況時 應對方法
所有烤焗加熱
烤焗效果不佳烤制顏色不均
z
烤焗效果可能因室温、形狀、數量、尺寸、初始温度、電源電壓
而有所差異,因此請邊觀察邊加熱。
z
麪糰尺寸不一致時,可能會烤制不均,因此請保持麪糰大小一致。
z
擔心烤制不均時 , 請在加熱期間更換食物的前後面和烤盤的前後位
置。此外,在部分食物上裹上錫紙可以提升加熱效果。
※ 請戴上連指手套取出烤盤,以免被燙傷。
z 受蛋糕模具和條件等影響,即使依照功能所示温度加熱也可能效
果不佳。請嘗試將功能所示温度設置為高於或低於其 10 ~ 20℃。
點心
海綿蛋糕
蛋糕蓬鬆效果不佳
z
雞蛋是否充分打發 ?
請將其打發到可以寫字不消失的狀態。
z
加麪粉後是否攪拌過度 ?
打發效果不佳
z
打發時碗和打泡器內附有水分或油時,則很難起泡。
面質粗糙,呈粗粉狀
z
是否篩粉 ?
z
是否調和、攪拌了麪粉 ?
中心部分下沉
z
雞蛋是否打發過度 ?
戚風蛋糕
蓬鬆效果不佳
z
請將蛋清打發到起泡狀態。請一直打發到倒置碗也不會掉下來的
程度。
蛋清冷卻後起泡效果會更好。
蛋糕中間很多小洞
z
可能是將麪糰倒入模具時進入了空氣。請將麪糰一次性從高處倒
入模具。
z
使用的是鋁製模具 ?
點心
蓬鬆效果不佳
z
份量是否正確 ?
z
製作麪糰時,微波加熱時間是否正確 ?
曲奇
烤制顏色不均
z
麪糰的厚度和尺寸是否均勻 ?
麪包
黃油蛋卷等
蓬鬆效果不佳 , 很硬
z
麪糰發酵是否充分 ? 因發酵不足、麪糰温度較低時,可能導致蓬
鬆效果不佳。
z
成型時是否在揉搓麪糰 ? 過度揉搓麪糰可能導致麪糰變硬。請謹
慎揉搓。
z
請參考料理集 : 麪包製作技巧。
法棍
製作效果不佳
z
請參考料理集 : 法式麪包製作技巧。
55
z
顯示內容帶有 標識時,則表示正在閃爍。
以下顯示內容並非故障。請按情況處理。
應對方法 應對方法 應對方法
z
關閉爐門,超過 1 分鐘後按下“加 開
始”鍵,則會顯示。
z
請再次開 / 關爐門後在 1 分鐘以內按
下按鍵。
z
預熱完成時和自動烹飪期間提示翻面的
蜂鳴聲響起後,未開 / 關爐門,便顯示
開始。
z
請根據料理集進行作業後關閉爐門,
按下“加熱開始”鍵。
z
加熱結束後,會提示風扇正在旋轉,以
冷卻電氣部件。(風扇會發出聲音,但
並不加熱。)
z
顯示“冷卻”期間也可以烹飪。
爐內高温時,部分 會顯示
C21,需等待爐內温度下降。
z
顯示加水盒中無水。
z
請向加水盒加水並安裝好。經過
1~3 分鐘後缺水顯示會消失,繼續烹飪。
z
加水盒中有水時,可能無法正常加水。
z
請將加水盒用力插到底。
z
加熱管加熱完成後,提示爐內高温。(經
過 15~20 分鐘左右後,顯示會消失。打
開爐門後冷卻速度更快。按下“取消”
鍵或設置自動功能,則顯示會消失。)
z
顯示期間也
可以使用加熱管加熱和手
動微波加熱。(但加熱管加熱時可能
無法設置為 220℃以上。)
烹飪時請小心燙傷和耐熱温度低的容
器。
z
可能因爐內高温而無法開始。( 以下
"C21•高温 ")
此時請打開爐門,等待温度下降。
z
提示因爐內高温 , 無法開始。並非故
障。
[ 顯示功能示例
]
發酵 / 日式蒸蛋 / 開始功能(3 分鐘、5
分鐘、7 分鐘 )/ 自動加熱 / 定温加熱 /3
種解凍方式
(爐內温度高時 , 無法順利加熱的功能
和使用紅外傳感器的功能 )
z
請按下“取消”鍵並打開爐門,等待
温度下降。
顯示 C21 後仍按下“取消”鍵 , 則
C21 顯示會消失,可使用手動“微
波”模式。
z
用於店鋪展示的演示模式。(即便按下
按鍵 , 也不開始加熱)請按右側處理方
法欄的步驟關閉此模式。
z
重複以下操作 2 次,則關閉此模式。
按下“取消”鍵直到響起嘩嘩和蜂鳴
聲 ( 約 3 秒),然後按下“取消”鍵。
以下顯示內容並非故障。請按情況處理。
按下“取消”鍵,則顯示會消失。(也有不會消失的編號。)
反覆顯示時,可能發生故障。請告知銷售店鋪或本司諮詢中心錯誤代碼。
(00 為兩位數字)
無法順利烹飪時
\
顯示以下內容時
顯示以下內容時
遇到此情況時
熱
功 能
顯示編號
顯示
爐門
冷卻
56
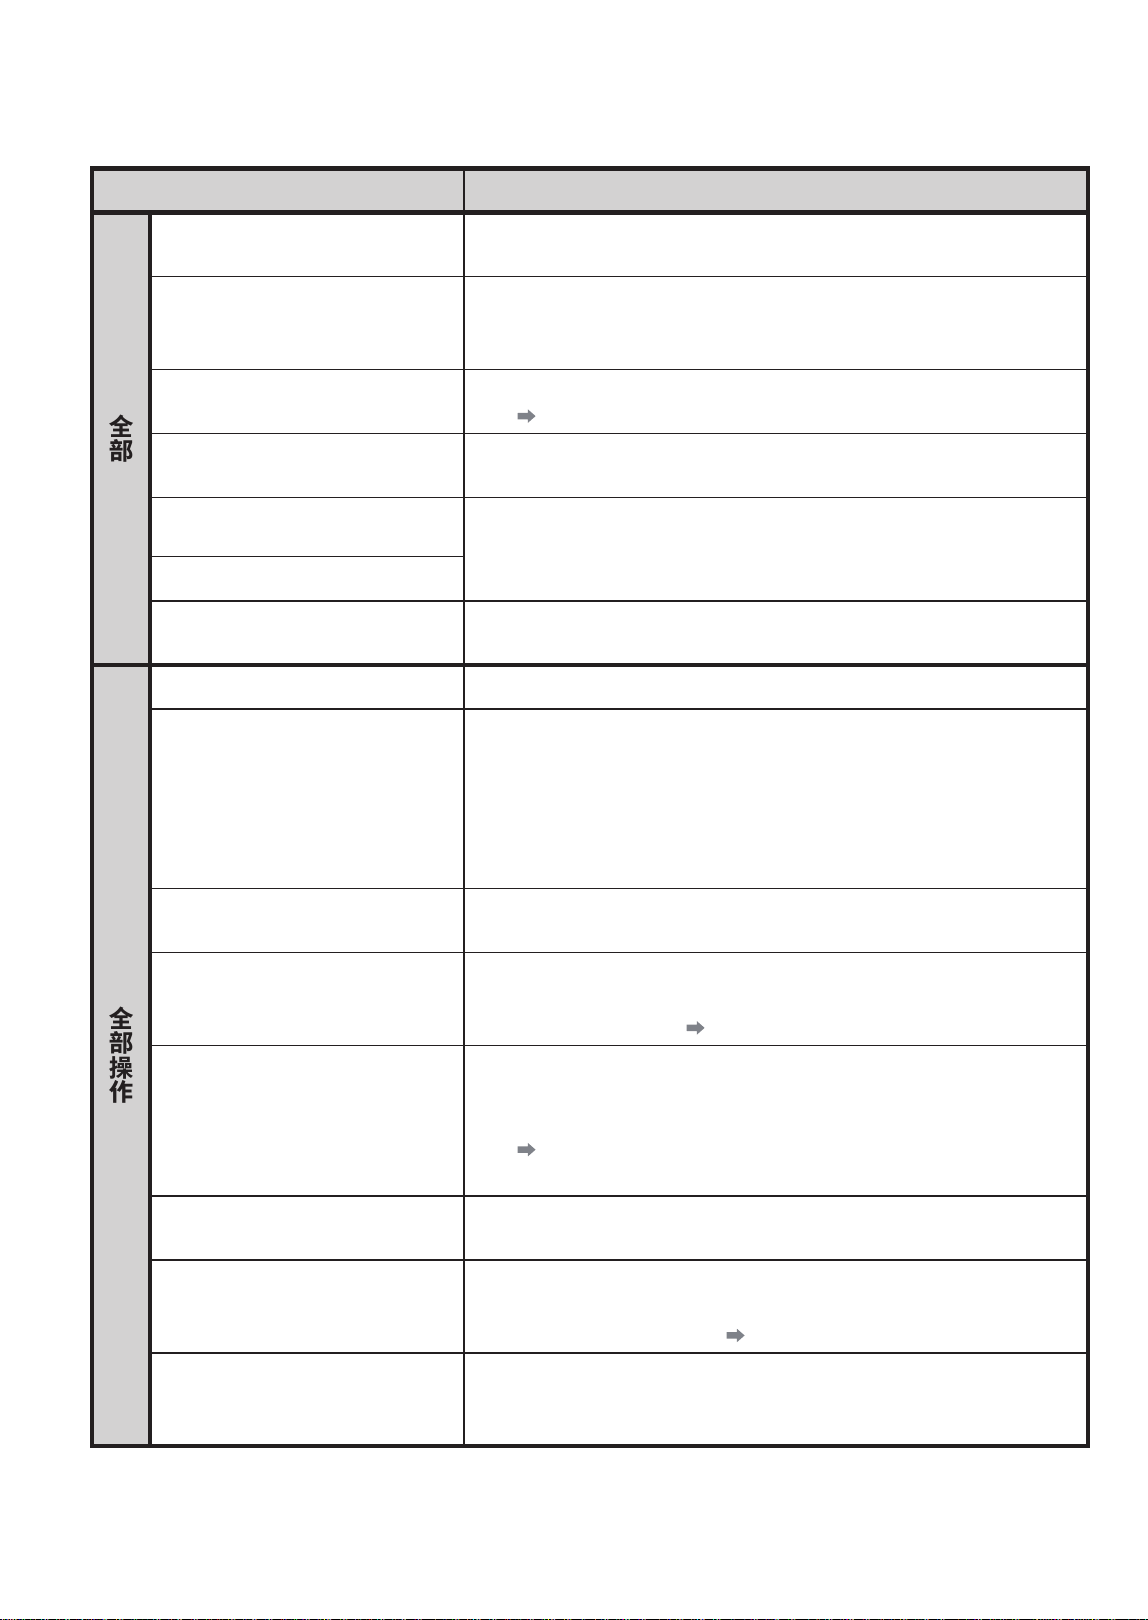
委託維修前以下現象並非故障。請按情況處理。
現象 原因•處理方法
全部
將電源插頭插入插座後仍不顯示
任何內容、不運行
• 在關閉爐門的狀態下,只是將電源插頭插入插座後不通電。打開
爐門一次,則通電並顯示內容。
完全不工作
• 是否停電了 ?
• 電源插頭是否已拔出 ?
• 家裏的保險絲或斷路器是否斷開 ?
蜂鳴器不響
• 是否設置為消除蜂鳴聲 ? 請參考提示音(蜂鳴聲)
(
P.50)重新設置。
按“ ”鍵無反應
• 請關閉爐門,稍等片刻後再操作。
( 為防止誤操作,關閉爐門後立刻按按鍵會無反應)
即使按按鍵也無反應,無任何顯
示
• 為了節能,打開爐門後超過 5 分鐘時,電源會自動斷開、顯示會
消失。(操作也無反應 )
• 打開爐門後電源會接通,顯示“0"。
打開爐門後,顯示屏顯示“0"
斷路器斷開
• 是否使用了超出家用電容(與電力公司的協議容量 A)的電氣產品 ?
請關閉其它不必要的電氣產品的電源,恢復斷路器後重新使用。
全部操作
烹飪期間發出滴答聲 • 這是產品內部開關切換的聲音。
烹飪期間、烹飪後(風扇 ) 聲音
時有時無
• 烹飪期間,此聲音時大時小
• 烹飪中途感覺好像停止運行
• 烹飪後繼續發出聲音
• 烹飪期間和烹飪後 , 冷卻電氣部件的風扇可能會運轉。
烹飪後,冷卻風扇會閃爍顯示“冷卻 "。
冷卻扇運行期間請勿拔下電源插頭。
• 烹飪期間風扇無聲音 , 仍繼續加熱。
• 烹飪後即便風扇有聲音,也不加熱。
• 烹飪後不久 , 風扇停止運行。
烹飪結束 1 分鐘後、3 分鐘後、
5 分鐘後會分別響起提示音
• 烹飪完或後,如未取出爐內食物,則會有鳴叫聲提示。
請打開爐門或按下“取消”鍵。
爐門和顯示屏起霧
• 烹飪期間和烹飪後,爐門玻璃和顯示屏可能會因温差起霧,但大
概過 2 小時後會自動消失。進行爐內乾燒、除味操作後,則 30
分鐘左右後會消失。
P.18
烹飪後,
爐內和爐門內側附有水滴
水滴滴落
爐內有積水
• 為改善烹飪性能,增強爐內的密閉性,即便不是蒸氣烹飪,從食
物冒出的水蒸氣也會附着在爐內和爐門上。
水滴冷卻後,請務必每次用幹抹布擦拭乾淨,然後晾乾。
( P.47) 此外,放置面不穩或傾斜後水滴容易滴落。請將其放置
於有足夠強度的平坦場所。
爐門和主機之間有水蒸氣泄漏
• 因烹飪功能
和室温不同,可能出現水蒸氣泄漏的情況,但這不會
影響烹飪等性能。此外,使用微波烹飪時不會產生微波泄漏問
題。
冒煙、散發異味
• 開始使用時 , 可能會因燒防鏽油而冒煙、散發異味。
• 油脂和食物附着在爐內和爐門上,可能會烤焦,散發異味。
• 請進行爐內乾燒、除臭。 P.18
烹飪期間突然停止
• 是否在加熱期間打開爐門
? 關好爐門後請按下“開始”鍵。
• 加熱期間有需要操作的自動烹飪功能時,蜂鳴器會響 5 次進行提
示。請打開爐門進行操作,並在關閉爐門後按下“開始”鍵。
加熱開始
57
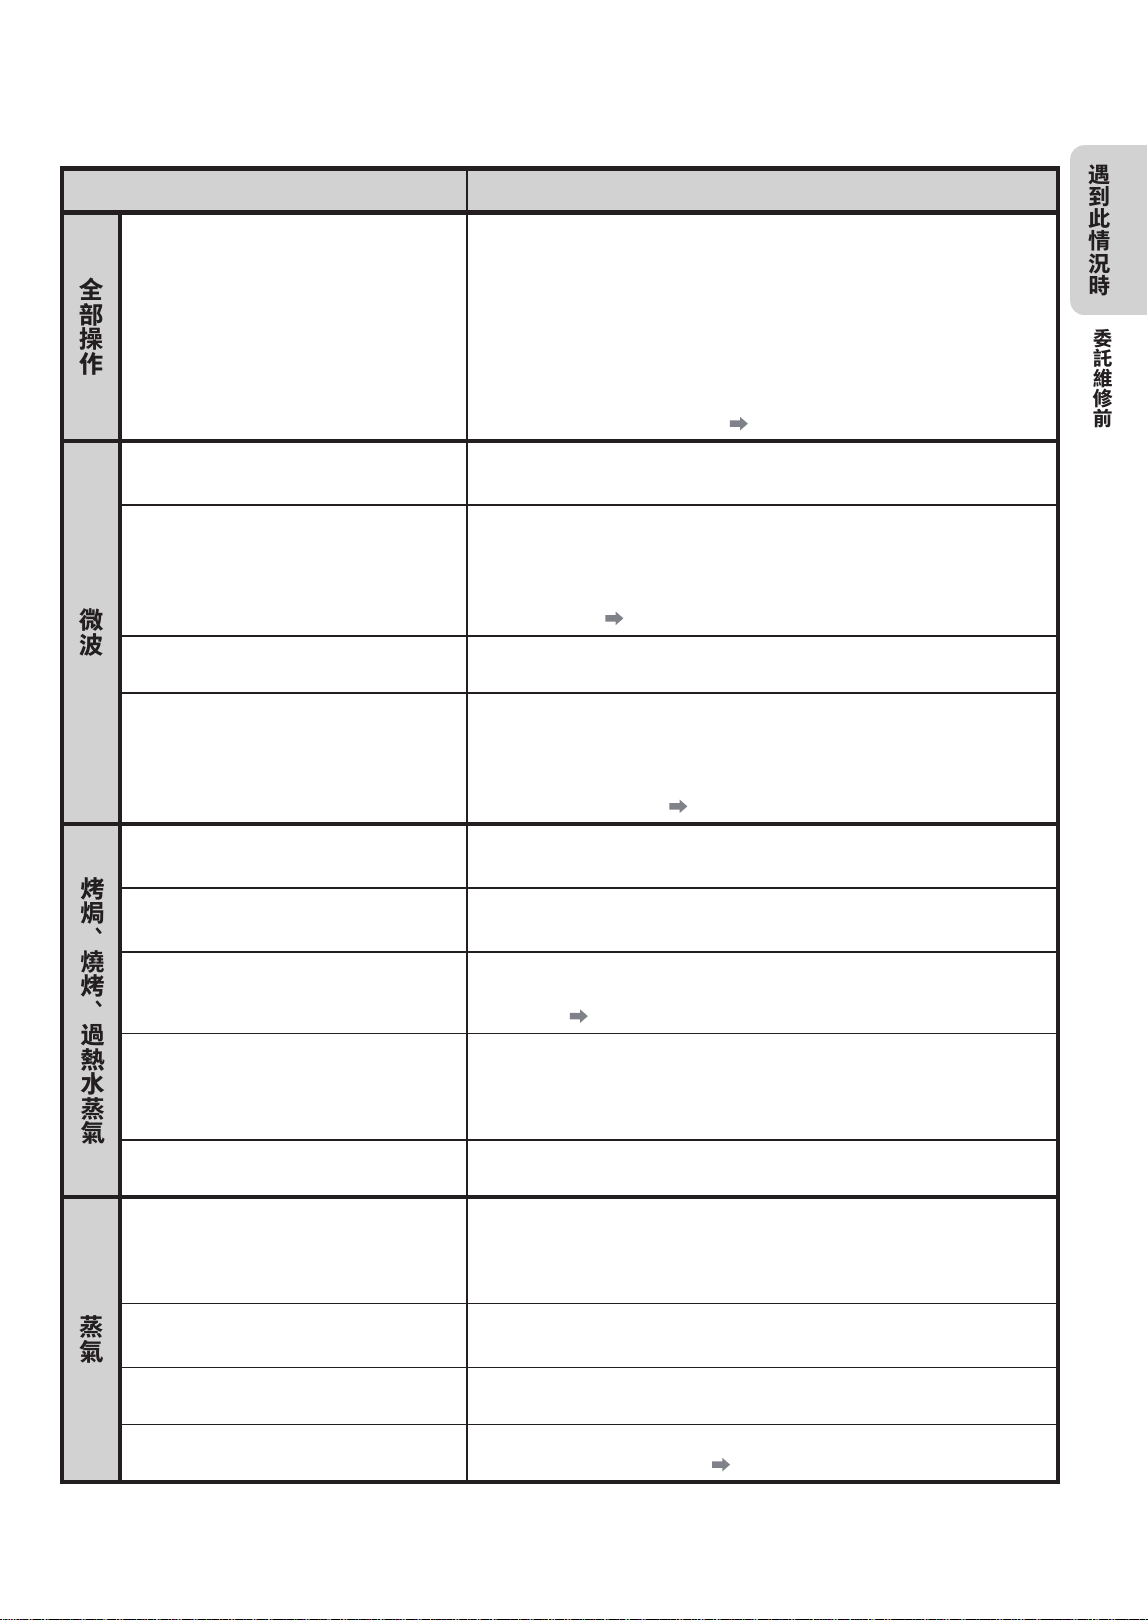
現象 原因•處理方法
全部操作
烹飪效果不佳
• 烹飪方法是否正確 ?
(請確認是否有蓋子、蓋帽、配件等
)
• 是否在爐內高温的狀態下進行烹飪 ?
(請等到爐內温度下降)
• 食物、食材的份量是否合適 ?
(不按料理集記載的食材、份量烹飪時,可能無法順利烹飪。)
• 爐內的上方底部是否有污垢 ?
• 是否選擇了正確的功能開始烹飪 ?
• 請參考“無法順利烹飪時”。 P.52~54
微波
開始微波烹飪時和烹飪期間,連續出
現嘰 ~ 聲。
• 這是微波烹飪時的操作音。
烹飪期間冒出火星
• 在使用微波的功能模式下,是否使用了金屬容器、金屬網、金屬棒等 ?
• 在微波模式下也無法使用附帶的烤盤。
• 使用金粉、銀粉、金箔、銀箔的容器可能會有火星飛濺。
• 爐內是否有污垢 ? 微波可能集中於污垢部位,導致火星飛濺。請將污
垢擦拭乾淨。 P.46~47
微波加熱模式下食物加熱不充分
• 爐內高温時、長時間加熱、連續加熱、少許加熱時,為保護電氣部件,
可能會降低輸出功率。請繼續加熱或稍等片刻後使用。
按下“加熱開始”鍵後也不加熱
• 是否顯示“爐門”?
• 關閉爐門後經過 1 分鐘也不開始加熱。
(請暫且開 / 關爐門一次後按下按鍵)
• 是否顯示的演示模式 ?
請參考顯示“演示 "( P.55)的內容來關閉此模式。
烤焗、燒烤、過熱水蒸氣
用烤焗•燒烤等加熱管加熱時,連續
發出啪啦啪啦聲
• 這是熱收縮時爐內爐壁和烤盤的聲音。
烤焗•燒
烤期間難以看清液晶顯示
內容
• 温度升高後,液晶顯示可能會變深,難以看清。
這取決於液晶的性質 , 温度下降後會恢復原狀。
預熱期間設置被取消(或電源斷開 )
• 烤焗或過熱水蒸氣模式下預熱完成後仍會保持預熱一定時間,但期間
不做任何操作時,蜂鳴器會響起,設置會被取消。之後不久電源會自
動斷開。 P.38- 42
烤焗、過熱水蒸氣模式正在運行
爐內達不到設置温度
• 爐內為空的狀態下,採用熱電温度計法對中心部位的温度進行測量(依
據 JIS 測量法 )。通過市面上銷售的
烤焗温度計測量時,與 JIS 測量
法相比,更難追蹤温度,因此需要一定時間達到設置温度。
• 烹飪時請參考料理集的温度。
有時無法設置為 220℃以上
• 爐 內很熱時,在烤焗過熱水蒸氣模式下,為保護電氣部件,無法設
置為 220℃以上。
蒸氣
不出蒸氣
加水盒中的水不減少
• 向加水盒內倒水後,是否將加水盒正確安裝到主機上 ?
• 烤焗加熱時,即使有蒸氣,肉眼也看不到。
• 功能不同,則加水盒內的水的減少量也會有差異,可能只會減少
很少的水。
蒸氣烹飪期間會發出嘰哇、嚇噓、
噓哇、葉噓叭噓等聲音。
• 通過蒸氣加熱
管加熱的水蒸發時發出的聲音,並非故障。開始使用
後不久可能會發出特別大的聲音。
爐門和主機之間蒸氣泄漏
• 根
據
蒸
氣
量
和
室温,可能出現蒸氣泄漏的情況,但這不會影響烹飪
等性能。此外,使用微波烹飪時不會產生微波泄漏問題。
蒸氣出氣口出現白色粉末和水等物質
• 白色粉末是純淨水中含有的鎂、鈣等礦物成分,對身體無害。請用擰
乾的濕抹布仔細擦拭乾淨。 P.10-47
委託維修前
遇到此情況時
58
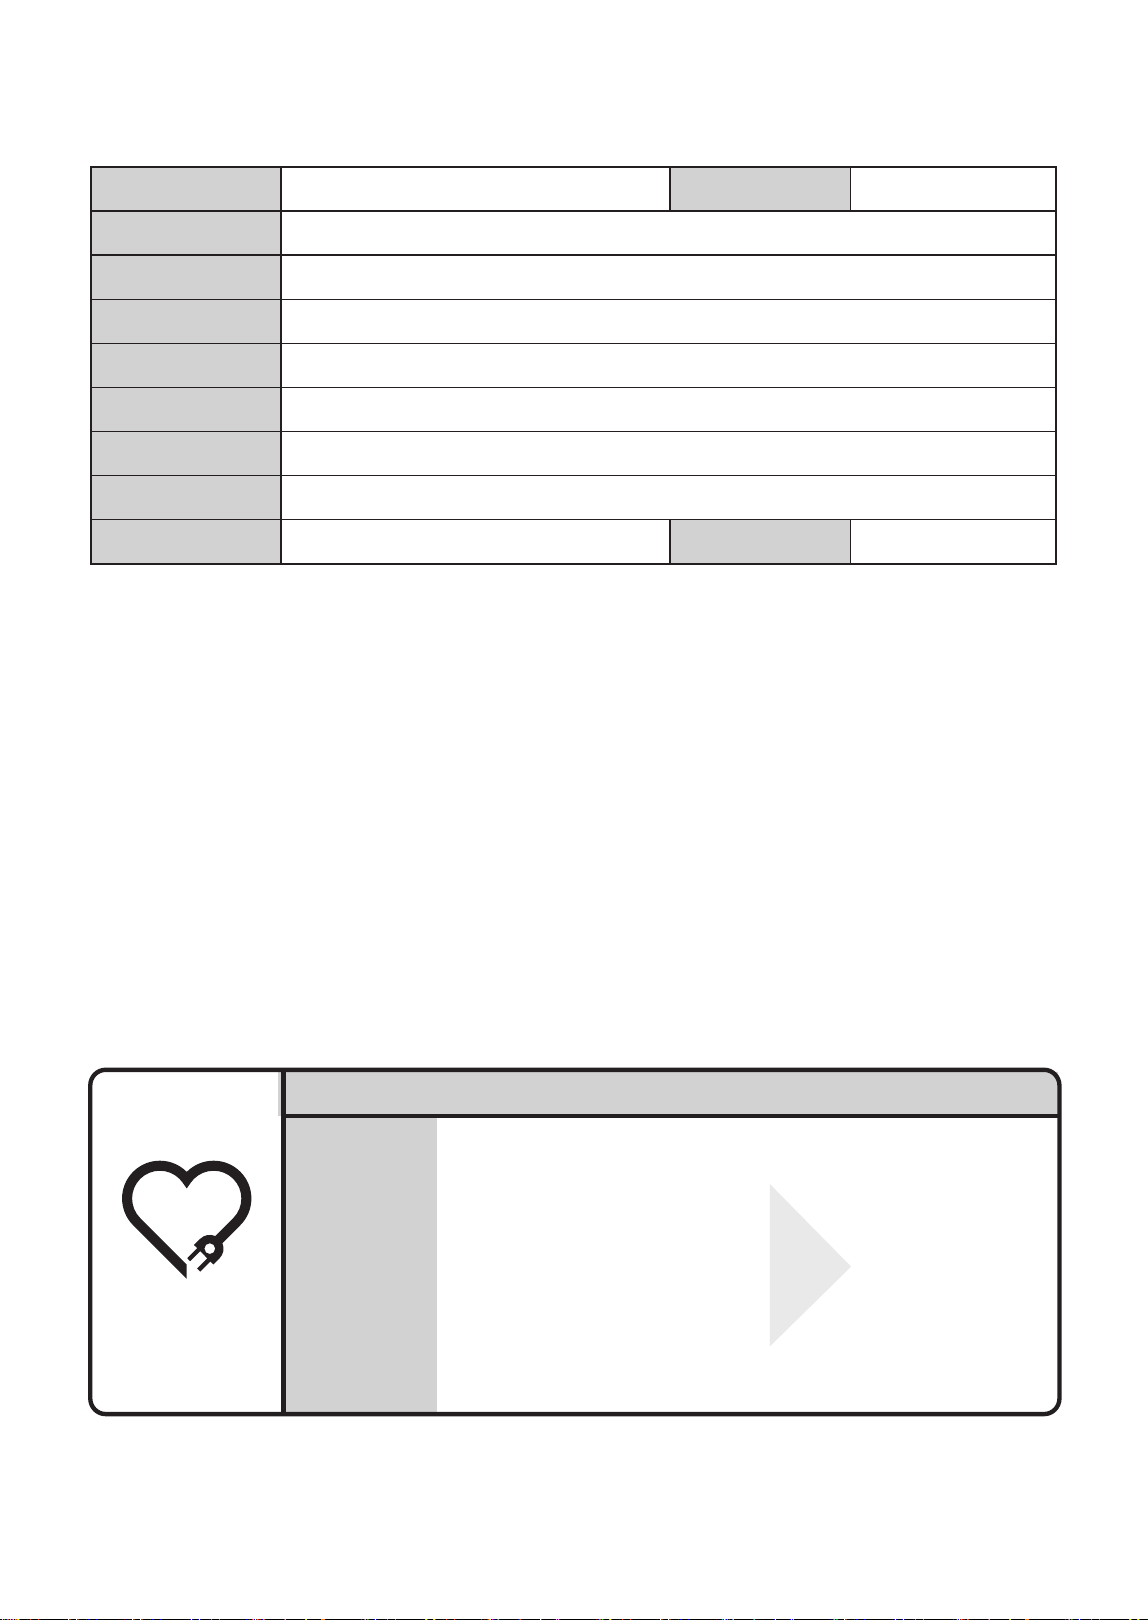
規格
額定電壓 / 頻率 220
~ 50Hz 產品名稱
額定輸入功率 1530W
微波輸出功率 1000W
微波工作頻率 2450MHz
烤焗功率 1350W
蒸氣功率
810W
外形尺寸 480(長)× 390(寬)× 350(高 ) mm
爐內有效尺寸 384(長)× 323(寬)× 215(高 ) mm
質量(重量 ) 約 17kg 爐內總容量 26L
250℃時的運轉時間為 5 分鐘。然後會自動切換為 200℃。將温度設置為 210℃以上後會自動切換為 200℃。
將温度設置為 190℃以上後會自動切換為 180℃。
此外,設置温度大於或等於 210℃時,預熱温度為 200℃。
爐內為空的狀態下,採用熱電温度計法對中心部位的温度進行測量。( 依據 JIS 測量法)將食物和配件放入
爐內後測量温度時,温度可能不一致。(烹飪時請參考料理集的温度 )
z
實際使用時的耗電量會因使用次數和使用時間、食物份量、環境温度等發生變化,僅供參考。
z
將電源插頭插入插座並在爐門關閉的狀態下顯示屏熄滅時,耗電為“0”W。
z
年度耗電量是採用節能法特定設備“微波爐”測量方法測得的數值。( 分類名稱也根據該方法 )
z
爐內總容量是基於 JS 規定計算出的容量。
愛心檢查
請務必檢查長年使用的微波爐 !
是否有這樣
的現象 ?
z
電源線和電源插頭異常發熱。
z
按下按鍵後開始烹飪,但食物不
加熱。
z
有時不會自動斷電。
z
使用期間發出異響、散發異味。
z
爐內蓋子和爐壁表面有污垢,冒
出火星或煙霧。
z
有其它異常、故障。
停止
使用
為防止故障和事故 ,
請務必從插座拔下電
源插頭,向購買本品
的銷售店鋪委託檢查、
維修。(未掌握專業
技術的維修人員不得
拆除爐體。)
V
智能水波爐


#
Details
Matter

User Manual
Toshiba superheated steam cooking oven
ER-SD95HKW
Model
Please read this Manual carefully and keep it properly for future reference.
Please read this Manual before use "Safety precautions" (Page 2~5).
Sincere thanks for purchasing this product.

1
What can the
product do?
For frozen food
Steam heating
One-button start
Heating
Select menu
by knob
Steam
1 Rice 2 Dishes
Heating Start
OK
Others...
Microwave
Steam microwave
Adjustable temperature
Rapid wetting
Simple and convenient
Steam
Soften butter
Soften to fit for
consumption
Baking
Max.
Max.
High-temperature
rapid baking
The fire above will
slightly burn the surface
Fire steam heating
Baking
Superheated steam
Grill
Steam
Steam
Cooking with a temperature
lower than 100°C
Type and mechanism of heating (P.12~13)
Serviceable/unserviceable containers (P.14~15)
What containers can
be used?
Frequently used heating method
Recommendations and guidelines for
"heating" (P.19)
Contents
Cooking method
Safety precautions
Instructions
Extend the heating time after completion of heating
Name and function of each part
Type and mechanism of heating
Serviceable/unserviceable containers
Precautions and skills for automatic heating
Dry burning and deodorization in the oven
Recommendations and guidelines for "heating"
2 ~ 5
6 ~ 7
7
8 ~ 11
12 ~ 13
14 ~ 15
16 ~ 17
18
19
20 ~ 21
22 ~ 23
24
25
26
27
28
29
30
31
32
33
34 ~ 35
36 ~ 37
38 ~ 39
40
41
42 ~ 43
44
45
46 ~ 49
50
51
52 ~ 54
55
56 ~ 57
Rice and dishes heating
Instructions to automatic menu
Microwave steam heating
Milk and coffee
Liquor
Thawing method
Boiled vegetables
Convenience store bento
Crispy food heating
Quick-frozen steamed bun heating
Fluffy bread
Simplified pasta
Simplified French bread
Microwave heating, microwave stewing
Heat to set temperature
Cooking by baking and fermentation
Roast cooking
Cooking with steam
Cooking with superheated steam
Cooking by microwave steam
Time setting standard for manual heating
Automatic cookingManual cooking
For these cases
Self-cleaning method
Methods for eliminating and
restoringthe prompt tone (buzzer)
List of frequently asked questions
When cooking is not possible
When the following is displayed
Before entrusted maintenance
Specification Back cover
+
+
Preparation and confirmation
Rice and dishes ............................P.20~21
Milk and coffee ............................P.22~25
Thaw meat and fish .....................P.22~27
Stew ..............................................P.20~28
Microwave heating in combination with
output power and time ..................... P.34
Time setting standard for manual heating ............... P.45
Constant temperature
heating
2
Important contents of proper and safe use of the steam oven are labeled on the product and contained in the
User Manual to avoid injuries and property loss to users.
This Manual distinguishes and explains the degree of
harm and loss caused by non-compliance with recorded
items during use.
Graphical symbols are used to distinguish
what needs to be observed.
indicates the item or behavior that is
highly likely to cause "casualty" and
"serious injury"
indicates the item or behavior that is
prohibited
indicates "Comply with instructions"
indicates "Attention"
indicates the item or behavior
that may lead to "casualty" and
"serious injury"
indicates the item or behavior that
may lead to "minor injury" and
"housing, property, and other losses"
Danger
Warning
Caution
Indicates the item and behavior that is [prohibited]
Danger
Keep the steam oven away from
inflammable or heat-labile objects
Do not bend or stretch the power cord
Do not use any steaming cleaner.
Warning: To avoid potential
electric shock, make sure the
steam oven is disconnected before
replacing the lamp.
Do not put foreign matters into the
suction port, vent, and oven door
interlock switch
Do not disassemble the cover for
repair and transformation without
authorization
Avoid excessive heating
Do not cook shell eggs
Keep the microwave oven away from flammable
and heat-resistant objects; do not place the
microwave oven in a cabinet.
Including metal objects, fingers, etc. to prevent
electric shock and microwave leakage. If there
is any foreign matter inserted, please unplug
the power plug and contact our maintenance
customer service center immediately.
Warning:
The maintenance operation, including removing
the protective cover to prevent microwave energy
leakage, is dangerous for personnel other than
qualified maintenance personnel.
If a small amount of food is heated for a long
time, the oven chamber will be abnormally hot,
resulting in smoke, fire, and vessel melting. When
heating food packaged in plastic or paper, pay
attention to the microwave oven because there
is a possibility of fire.
Microwave ovens cannot be used to heat fresh
eggs with shells and cooked eggs because they
may explode even
after heating with
a microwave.
Any damaged power cord must be replaced
by professionals from the manufacturer, its
maintenance department, or similar professionals
to avoid danger.
Prohibit
Cooking shell
eggs
Prohibit
Prohibit
Unplug from
the socket
Excessive
heating
Prohibit
Prohibit
Safety precautions
For safety reasons, please observe
3
Indicates the item and behavior that is [mandatory]
Mandatory
Please make sure that the protective film on the
housing has been torn off before use.
Warning:
Children are only allowed to use the microwave
oven without supervision if sufficient guidance
has been provided so that children can use it
in a safe way and know that incorrect use will
cause danger. When the appliance is operated
in combined mode, children must use it under
adult supervision due to elevated temperatures.
The elderly should use the microwave oven
accompanied by their families.
The microwave oven will generate heat during
use. Be careful not to touch the heating unit in
the microwave oven.
Warning: Accessible parts may be hot during
use, and children should stay away from them.
During operation of the appliance, some surfaces
are very hot. Surfaces labeled "Hot Surface" will
become hot during use.
Microwave heating of beverages
can cause delayed splash boiling,
so care must be taken when
bringing them out. Feeding
bottles and baby food cans
should be stirred or shaken, and
the temperature of the food in the
bottles should be checked before
feeding to avoid scalding.
If smoke is found, turn off the
appliance switch or unplug the
power plug and keep the oven door
closed to inhibit flame spread. The
appliance shall not operate with
an external timer or independent
remote control system.
Tear off the
protective film
Tear off the protective film of the cover
before use
Only the temperature-sensing probe
recommended for this microwave oven
can be used.
Like steam cooking, self-cleaning also
generates steam. Please close the oven
door to avoid scalding.
Please use microwave cooking utensils
Remove all packaging and keep away
from infants and young children
Including the packing bag, cover film, and fittings
to avoid fire during operation. Keep the above
objects away from infants to prevent asphyxia
caused by misuse.
Warning:
It is forbidden to heat liquids or other food
contained in sealed containers, because an
explosion may occur.
Only suitable utensils can be used in the
microwave oven.
Please place the original grill rack at the bottom
layer under oven mode
Use
microwave
cooking
utensils
Prohibit
Safety precautions
The elderly and children shall use
microwave ovens with caution
Use with
caution for the
elderly and
children
Hot surface, prevent scalding
Open and close the door carefully. If the
door body is deformed, there will be a risk of
microwave leakage.
Warning: If the microwave oven door or door
seal is damaged, it shall not be used again until it
is repaired by qualified maintenance personnel.
Open and close the door carefully
Take care when bringing food out
Watch out for smoke
Sudden boiling
Indicates [cautions] about matters that may cause
minor injury or property damage
Caution
Preparation and confirmation

4
Precautions for placement
Caution
• Place the microwave oven on an insulated flat surface for use,
and keep a distance of at least 10-15 cm around the microwave
oven and 30 cm from the top.
• The electric microwave oven shall be placed in a dry environment
and shall not be used outdoors.
• In order to avoid oil fumes polluting furniture or heating during
product operation and causing fire, the products shall be kept a
certain distance from walls and cabinets.
• It is strictly prohibited to place the microwave oven near
inflammable or heat sources, and attention shall be paid to
keeping away from curtains or similar articles to prevent fire.
Placement distance and position
Keep a
distance from
the wall
[Comply with the standards of Fire Prevention Law]
Note: hot surface
Top surface, back surface, glass doors, etc.
30 cm or more
above
10 cm or
more from
the rear
protrusion
10 cm or more
on the left side
10 cm or more
on the right side
Keep the front open
If it is placed on a table with insufficient strength
or an inclined plane, injuries may be caused by
falling and tipping over. In addition, condensed
water may also flow to the floor.
In case of overturning or falling due to an
earthquake, even if the appearance is not
damaged, do not use it directly. Please entrust
a dealer for inspection.
Place in a flat place strong enough
The back of the microwave oven has safety
barrier components to prevent the microwave
oven from coming into contact with objects such
as walls and to maintain a safe distance.
Microwave
oven
Wall
surface
Over 10 cm
Placed in
a flat place
5
Precautions for Cleaning and Maintenance
Caution
After the microwave oven cools down, carry
out certain cleaning. Clean the microwave oven
regularly and remove all food residues from it. No
cleaning the microwave oven properly can cause
surface deterioration of the appliance, which can
affect its lifespan and potentially lead to dangerous
situations.
The microwave oven housing can be wiped with a
cloth dipped in soft detergent (such as detergent),
then cleaned with a wet cloth, and finally dried
with a dry cloth. It is strictly prohibited to wipe the
microwave oven with hard objects such as wire
brushes. Do not clean the oven door safety lock
system.
Warning: Do not use a rough abrasive cleaner
or a sharp metal scraper to clean the glass of the
microwave oven door. Scratches may cause the
glass to smash.
The oil produced during cooking will corrode the
oven chamber and affect the heating, thus changing
the food flavor. Therefore, please clean the oven
chamber in time after use.
Clean the metal baking tray, ceramic tray, and
metal grill with warm water. Be careful not to clean
with cold water immediately after cooking in the
microwave oven for a long time.
Regular cleaning
Please clean grease generated during
cooking in time
Keep the bottom of the oven chamber clean to
avoid the abnormal noises caused by the rotating
table during the operation of the rotary-table
microwave oven.
Keep the bottom of oven chamber clean
Cleaning accessories with normal
temperature water
If the microwave oven is not used
for a long time, please use it in the
barbecue or light wave function state
for several minutes before use to
evaporate the moisture accumulated
in the microwave oven.
Regular cleaning
Clean door seals, chambers, and adjacent
component details.
Cleaning component details
The microwave oven has two modes: the bottom
output microwave and the side output microwave.
The bottom microwave output port is covered by
a microcrystalline plate, and the side microwave
output port is covered by a mica sheet (removable).
Do not remove the microcrystalline plate and
mica sheet without permission to prevent foreign
matters from entering the microwave output port,
which may cause fire after being heated by the
microwave.
Output mode of microwave oven
Precautions to prevent rust and ensure long-term use
After use, please wipe off the dirt and moisture inside in time to remove moisture.
①
Wipe the inside thoroughly with a wrung-out wet cloth. (Do not apply force to the upper heater)
②
Open the front door to dry it naturally. (Be careful when opening the front door)
After wiping off the moisture, please keep the front door opening for about 1 hour.
Safety precautions
Preparation and confirmation
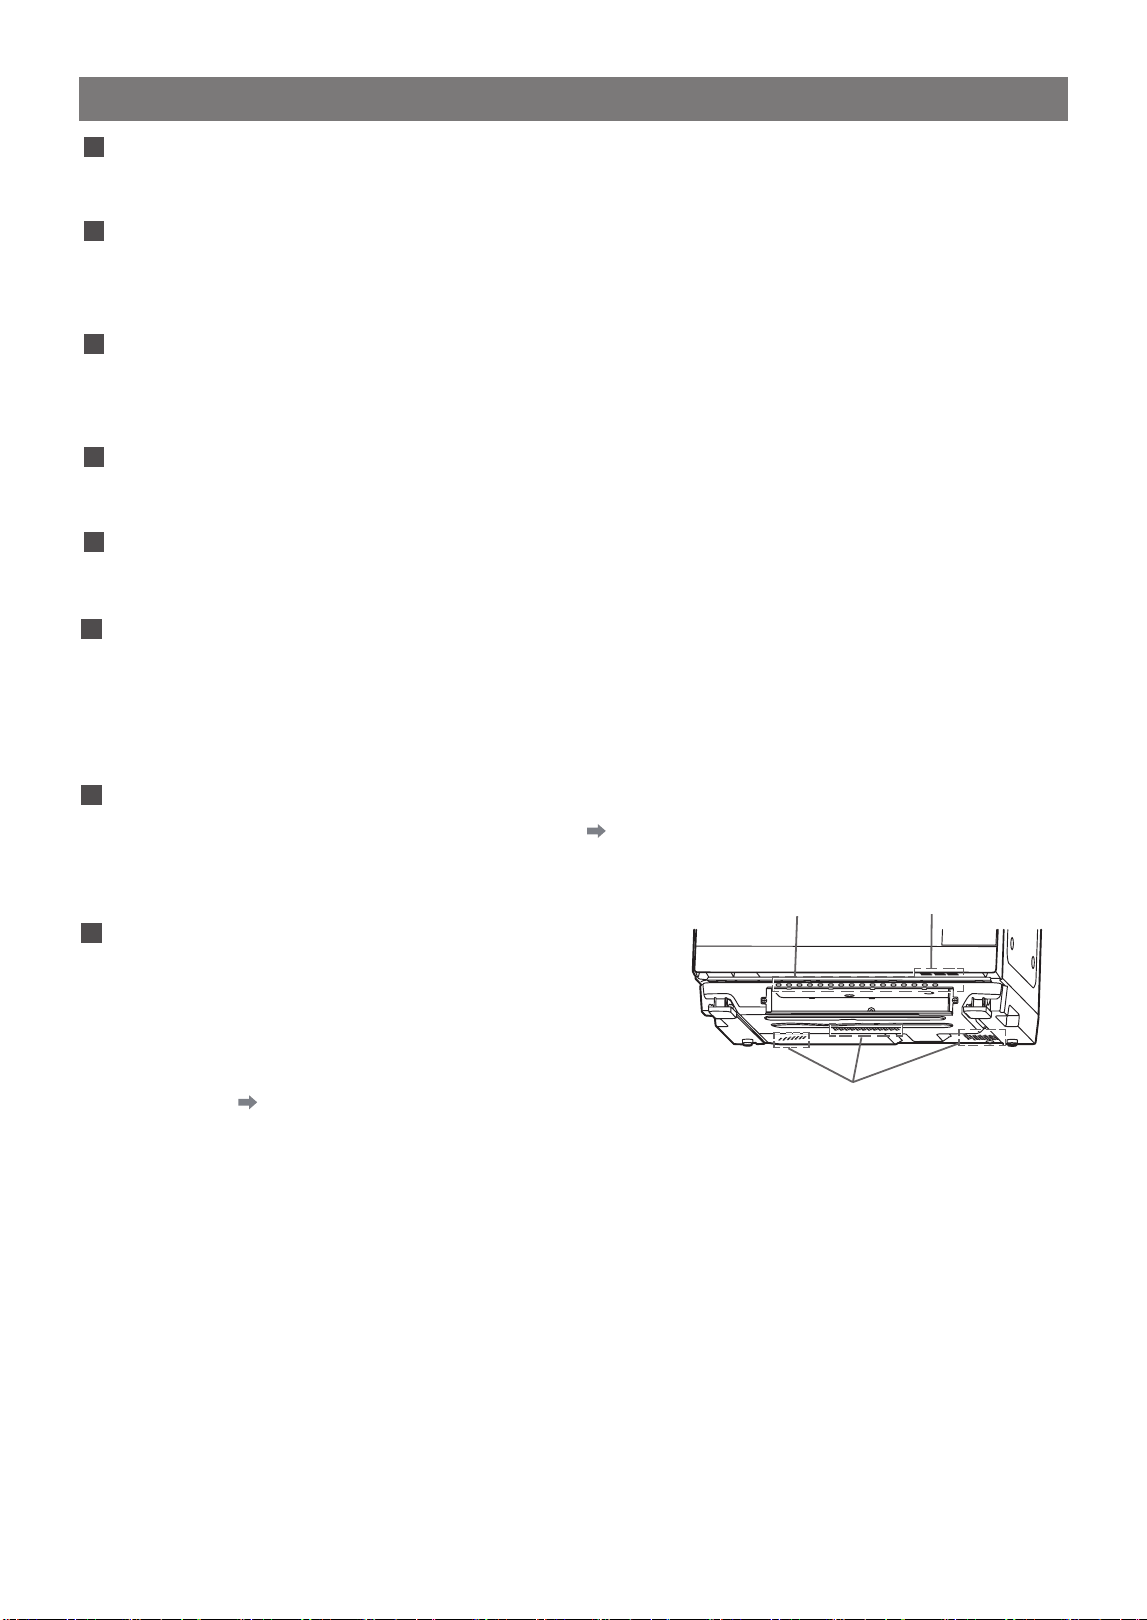
6
Please keep it more than 4 meters away from the TV, radio, and antenna
to avoid their interface and sound distortion.
Putting it near this product may cause the communication performance of wireless LAN
devices to be degraded.
Please read the user manual of wireless LAN devices before use.
Keep away from heat source and steam
When the host or operating part is exposed to steam generated by a rice cooker or kettle, it may cause faults.
Please use it in a place without steam.
Please be careful when moving the main unit
When moving, make sure to hold the lower left and lower right sides of the product.
The bottom of the oven may crack or rupture if it cools sharply and is impacted.
Do not directly put frozen food or sprinkle water when applying impact or high temperature.
The floor surface may become hot after use
When using continuous heating, long-time heating, baking, and other cooking modes, the hot air emitted by the
product will cause the temperature of floor surface and wall to rise.
This is a normal phenomenon. Do not touch it directly with your hands before cooling down. In addition, please
do not put the oven on heat-resistant articles such as tatami, carpet, and tablecloth.
Please use accessories and containers that match the heating (menu)
• Please refer to "serviceable/unserviceable containers" ( P.14~15) and the cuisine set.
• Do not use a baking tray for microwave heating.
→
It may cause sparks to splash, resulting in faults.
Instructions
Do not put it on tablecloth, cloth, or paper.
When the fan is running and there is a cloth under the main
unit, it will block the air inlet at the bottom and cannot cool
electrical components, which may cause faults.
In addition, please regularly self-clean the front of the main
unit and the air inlet under the oven door to avoid dust
accumulation. P.46
Air inlet
(front of main unit)
Air inlet
(under the oven door)
Air inlet (bottom)
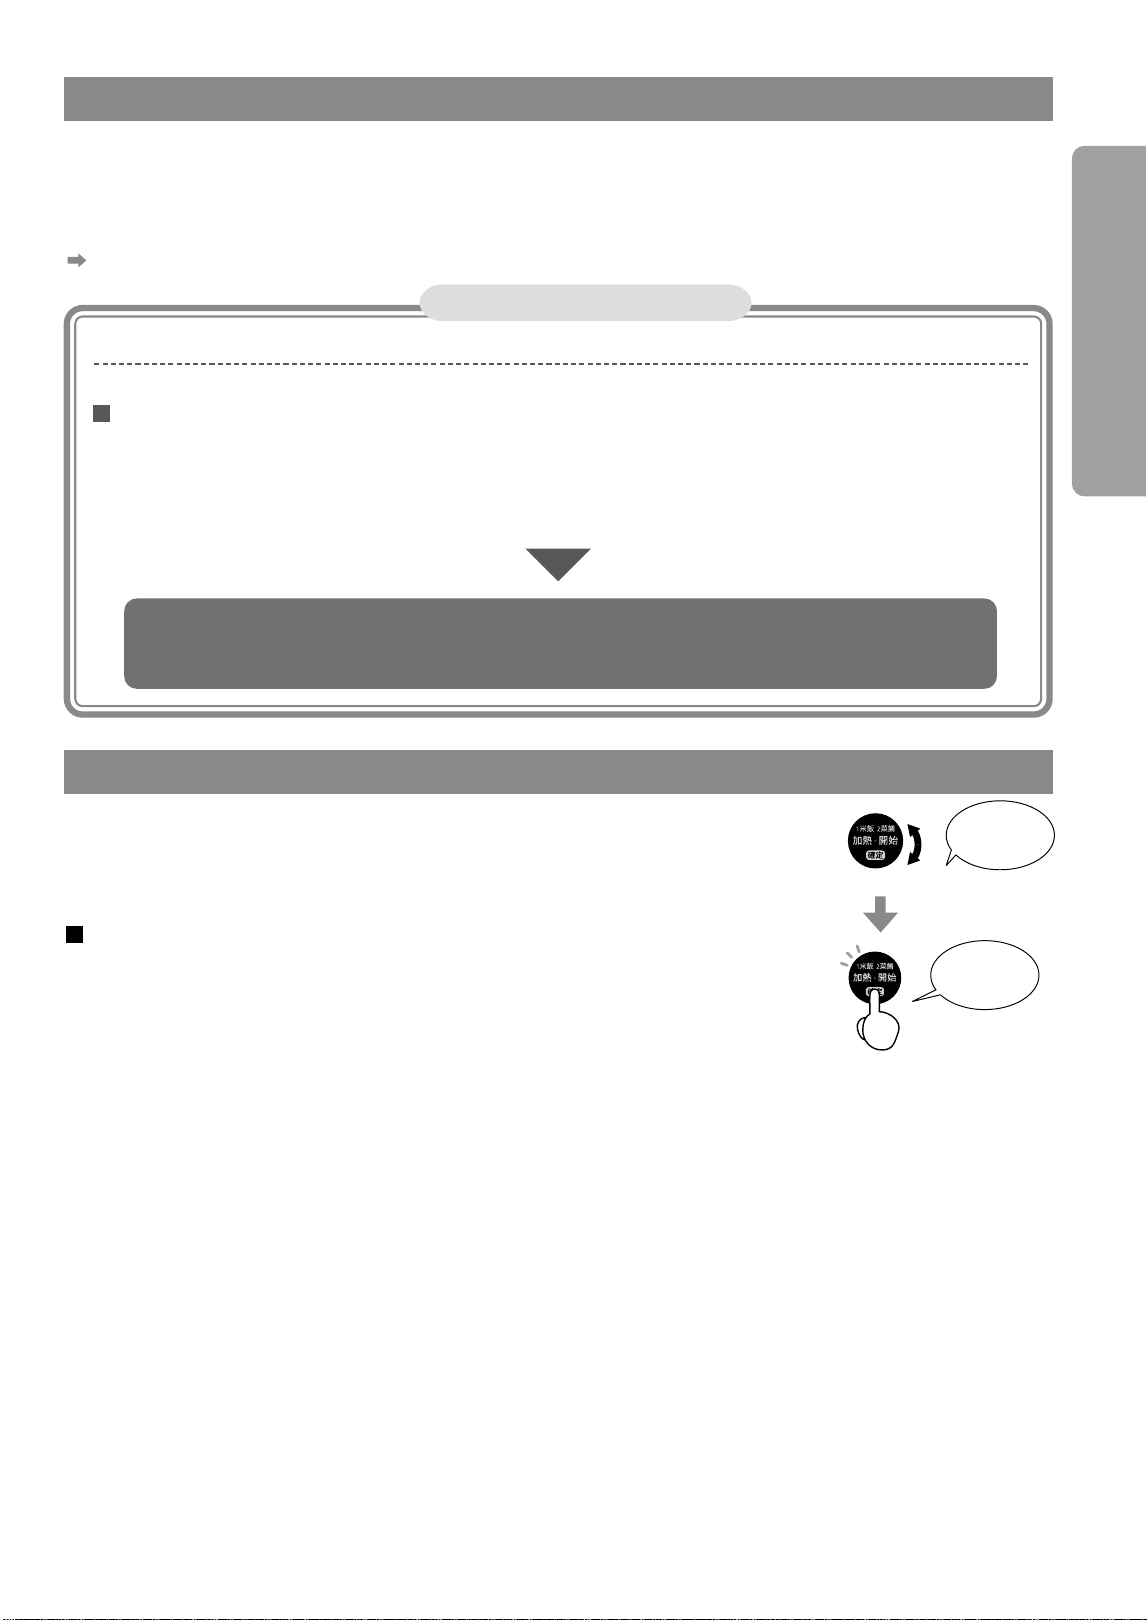
7
To ensure long-term use
Do not leave oil, food residues, and water droplets attached to the oven unattended. At
the end of cooking, please wipe and open the oven door to dry it after cooling in the oven.
In order to improve cooking efficiency, the sealing in the oven has been strengthened. Therefore, when steam is
not used, the steam generated by food may also form water droplets and get stuck in the oven.
P.46 "To prevent rust and long-term use"
Energy-saving function
Automatic power off
This is a feature that automatically disconnects the power supply when not in use.
When the display part displays "0", if the oven door is not opened/closed within 1 minute, the screen
will darken slightly.
If the oven door is not opened/closed after about 4 minutes, the power supply will be automatically
disconnected and the display will also go out.
• However, the power supply will not be disconnected during the display of "
高溫
".
The power supply will be turned on after the oven door is opened
"0" will be displayed in the display part (power is not on only when the power plug is inserted)
Extend the heating time after completion of heating
After heating is completed, the previous heating operation can be
added again.
• The heating time can be extended by automatic cooking and manual heating.
• Unable to extend the time of "self-cleaning".
Operation method
Turn the knob within 3 minutes after heating, and the previous heating will be
displayed. Therefore, please rotate it again to adjust the time to be extended.
• The display will show "
延長
" for an extended period of time.
(If the time exceeds 3 minutes, it cannot be set.)
• Press the "Cancel" key when you want to perform other operations during the
display of "Extended".
Extension
setting after
turning
Press to
start
Instructions/Extend the heating time after completion of heating
Preparation and confirmation
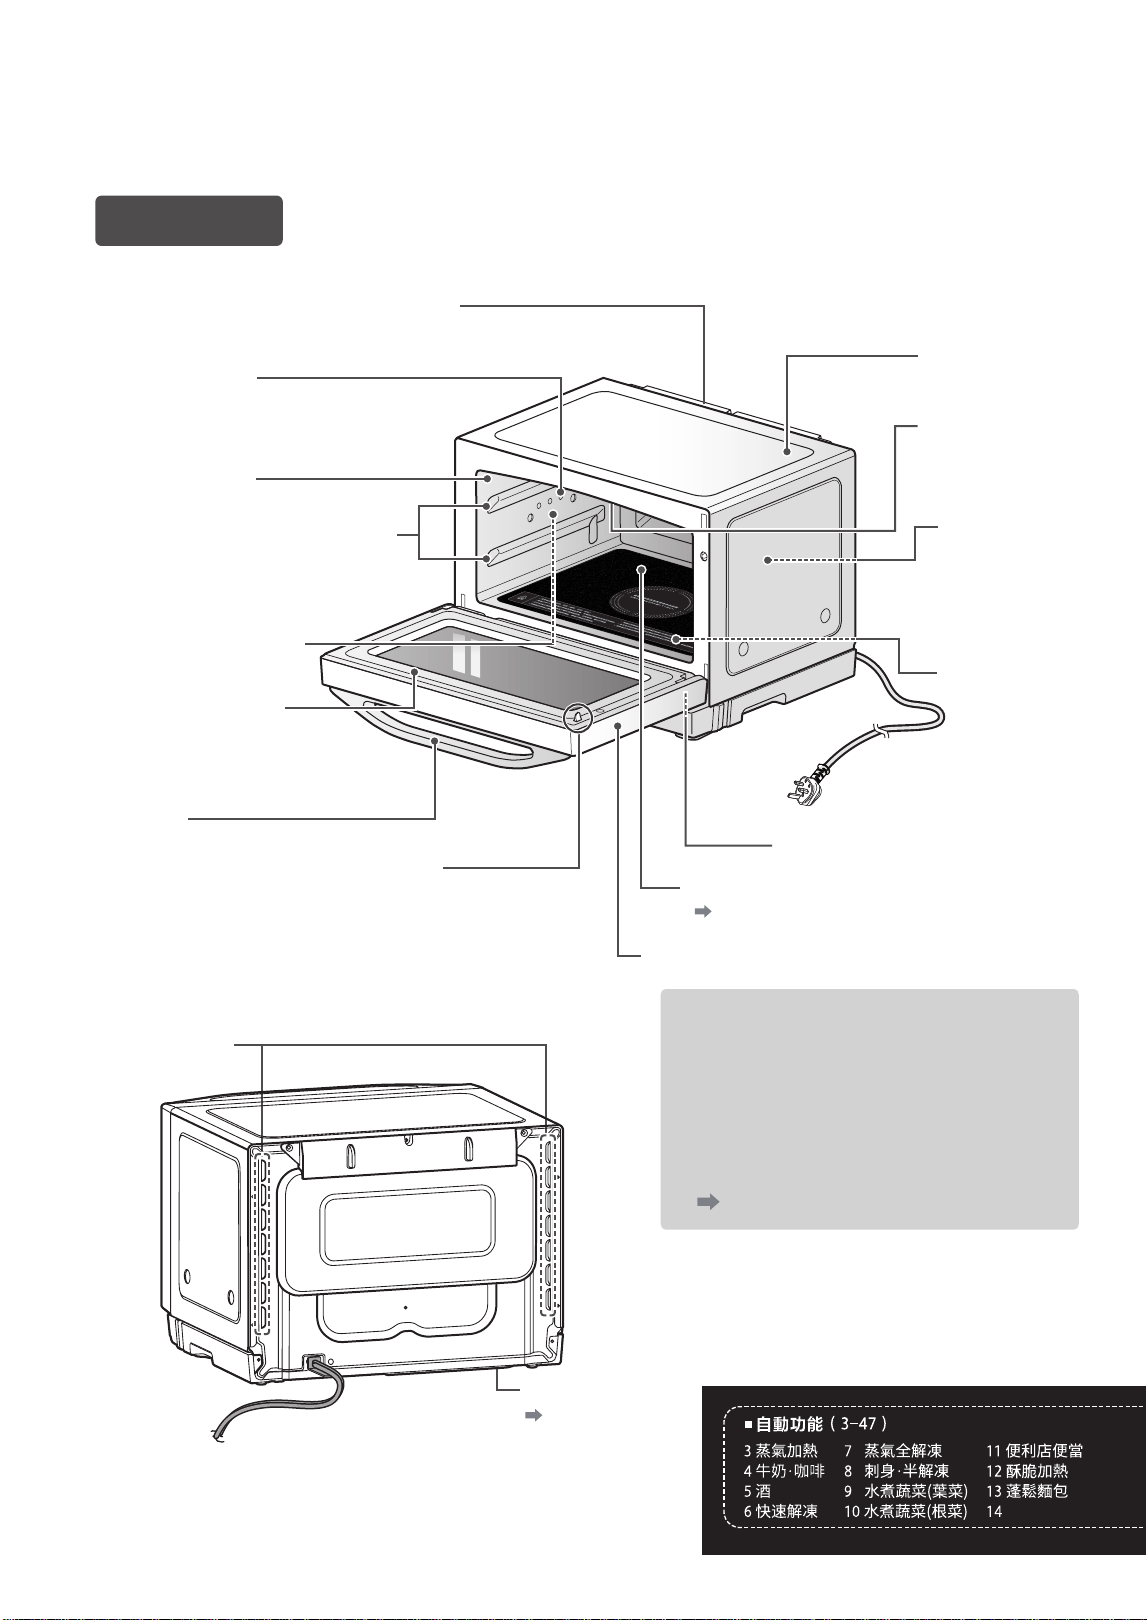
8
Name and function of each part
* Products are subject to continuous upgrading. In case of any difference between the actual product and the picture below,
the former should prevail.
Place the baking tray.
Do not insert the baking tray on the
underside of the lower layer.
Vent (Above its back)
Steam outlet
Heat-resistant and deodorization coating
Non-removable.
Do not press or pull.
Handle
Do not touch it with foreign objects.
(Breakage may lead to poor operation)
Oven body
Upper heating
tube
(Built-in at the
top of the oven)
Oven lamp
The light will be
on when cooking
after opening the
oven door.
Lower heating
tube
(Built-in at the
bottom)
Air inlet (under the oven door)
P.6 "Instructions"
Oven bottom (Heat resistant glass)
Oven door
[Back]
• Please wipe the dirt in the oven in
time.
• There may be residual water in the
oven due to sealing. Please wipe it
immediately after the oven cools
down.
"To prevent rust and long-term use"
P.46
Main unit
Inside the oven
Support (Upper and lower layers)
Steam heating tube
(Built-in on the side)
Oven door gasket
Safety switch detection protrusion
Vent
(Left and right
on the back)
Air inlet (bottom)
P.6 "Instructions"
[Front]
急凍包
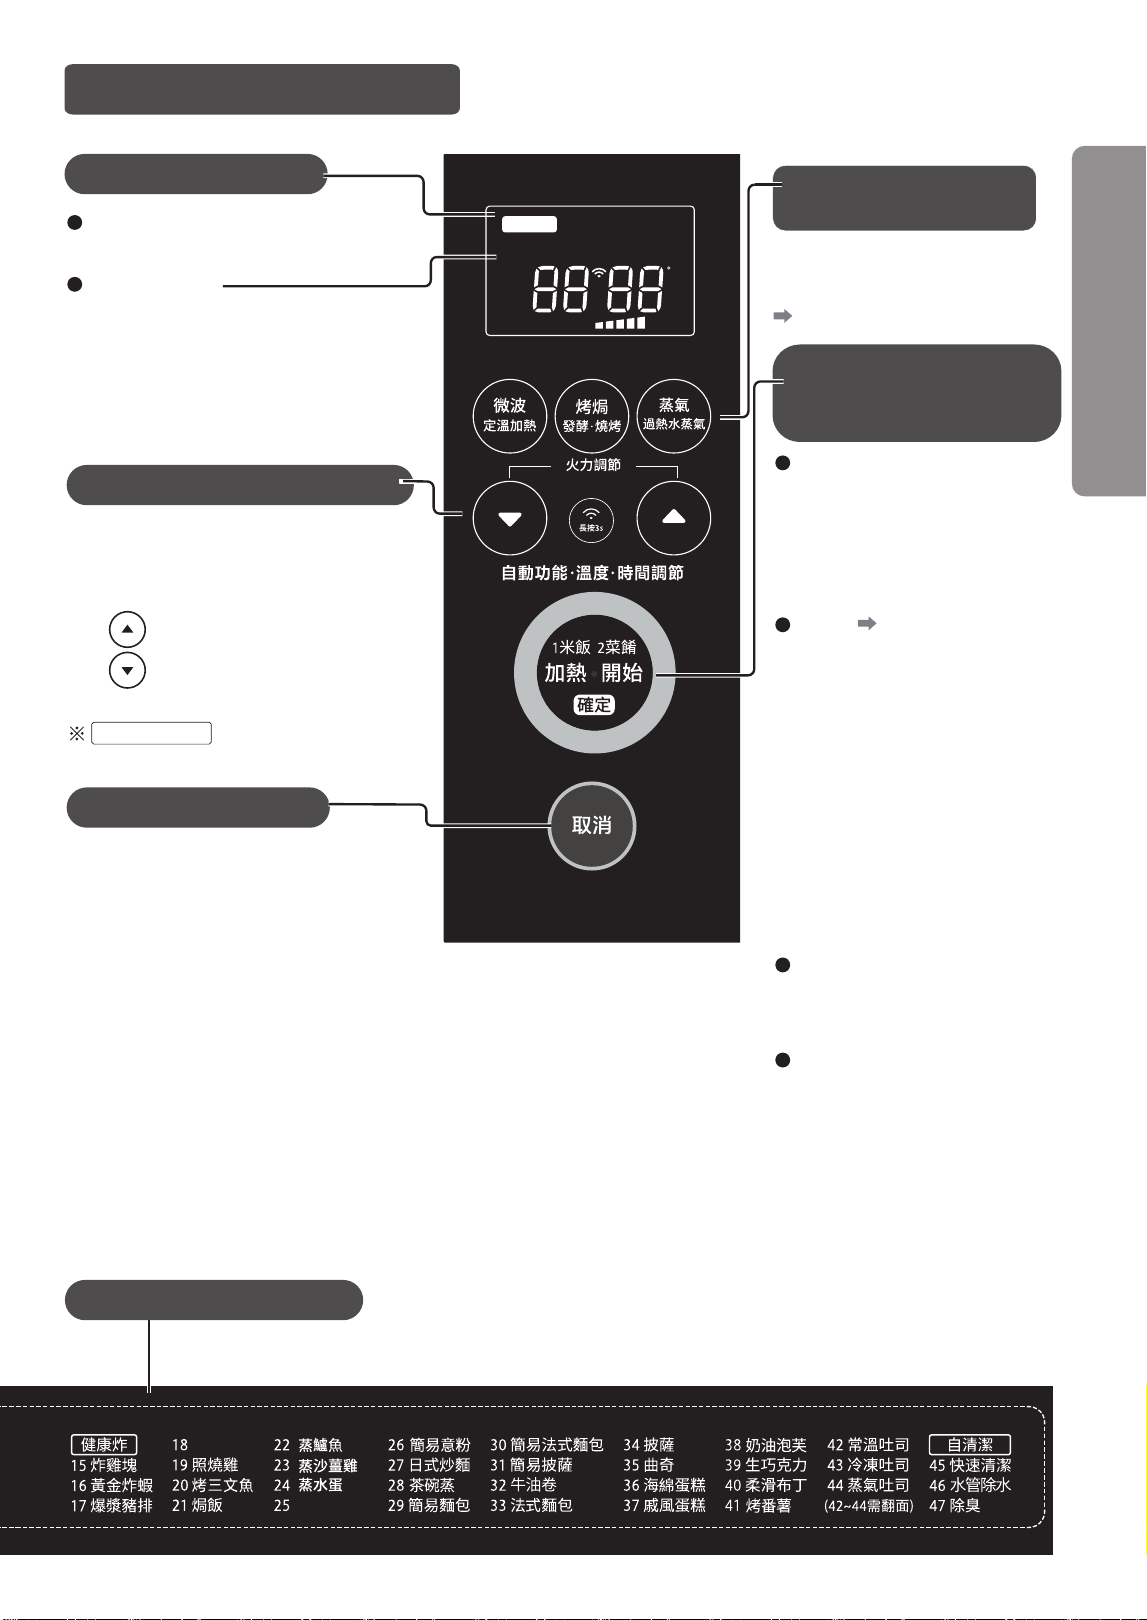
9
Display
Display menu number, temperature and time,
heating type and operation, etc.
Type of heating
Lights up when set and flashes during
operation.
It is used for fire adjustment of automatic
menu
※
. Press to set after menu selection or
within 10 seconds of start.
Press to set enhanced firepower
Press to set the firepower reduction
Self-cleaning
Cannot be set in the
menu.
"Cancel" button
Used to cancel operations and settings, stop
cooking.
• When the cooking effect is confirmed during
manual cooking, the oven door can be opened
without pressing the "Cancel" button. (Close
the oven door and press the "Start" button
to restart cooking.) When you stop cooking
halfway and do not operate in a short time, it
will automatically stop cooking.
• When opening the oven door during heating in
the following menu, please press the "Cancel"
button and observe while pressing the manual
heating mode.
1 Rice 2 Dish 3 Steam heating
4 Milk · Coffee 5 Wine 6 Quick Thaw
7 Steam full thawing 8 Sashimi semi-thawing
9 Boiled vegetables (leafy)
10 Boiled vegetables (root) "Constant Temperature Heating"
Auto Menu 3~47
Turn the knob to select the menu number.
Corresponding to the automatic menu displayed on the oven door
Press the "Heating"/
"Start"/"OK" buttons
and use the knob
Set the time and temperature
according to cooking requirements
before use.
P.34-44
Knob
Rotate to convert the automatic
menu number (3~47) or set the
temperature and time. In addition,
it is used to change the time
and temperature during manual
heating.
Heating P.20~21
Press this button when "0" is
displayed to start heating "1 rice",
and press it twice to start heating
"2 dishes".
• Press this button to start heating
immediately.
• After the oven door is opened/
closed for more than 1 minute,
the "Heating" button will
displayed)
Please open/close the oven
door again and then press the
"Heating" button.
Start
After setting automatic and manual
cooking, press this button to start
heating.
OK
Press this button to determine the
set time and temperature in the
following cases.
• After adjusting the temperature
by "baking without preheating"
or "manual superheated water
steam (without preheating)"
"fermentation"
• After adjusting the time in 600W
mode by "Microwave Stewing"
Name and operation of each part
Preparation and confirmation
Operation interface
Fire adjustment button
Manual setting
button
燒烤
高溫
冷卻
缺水
烤盤 上下層
發酵烤焗 預熱
自動功能
w
分 秒
克
C
弱 強
完成
定溫加熱
延長
炆燉微波
蒸氣 過熱水蒸氣 杯 條 個 門
operate. ("
門
" will be
3分鐘食譜
漢堡扒
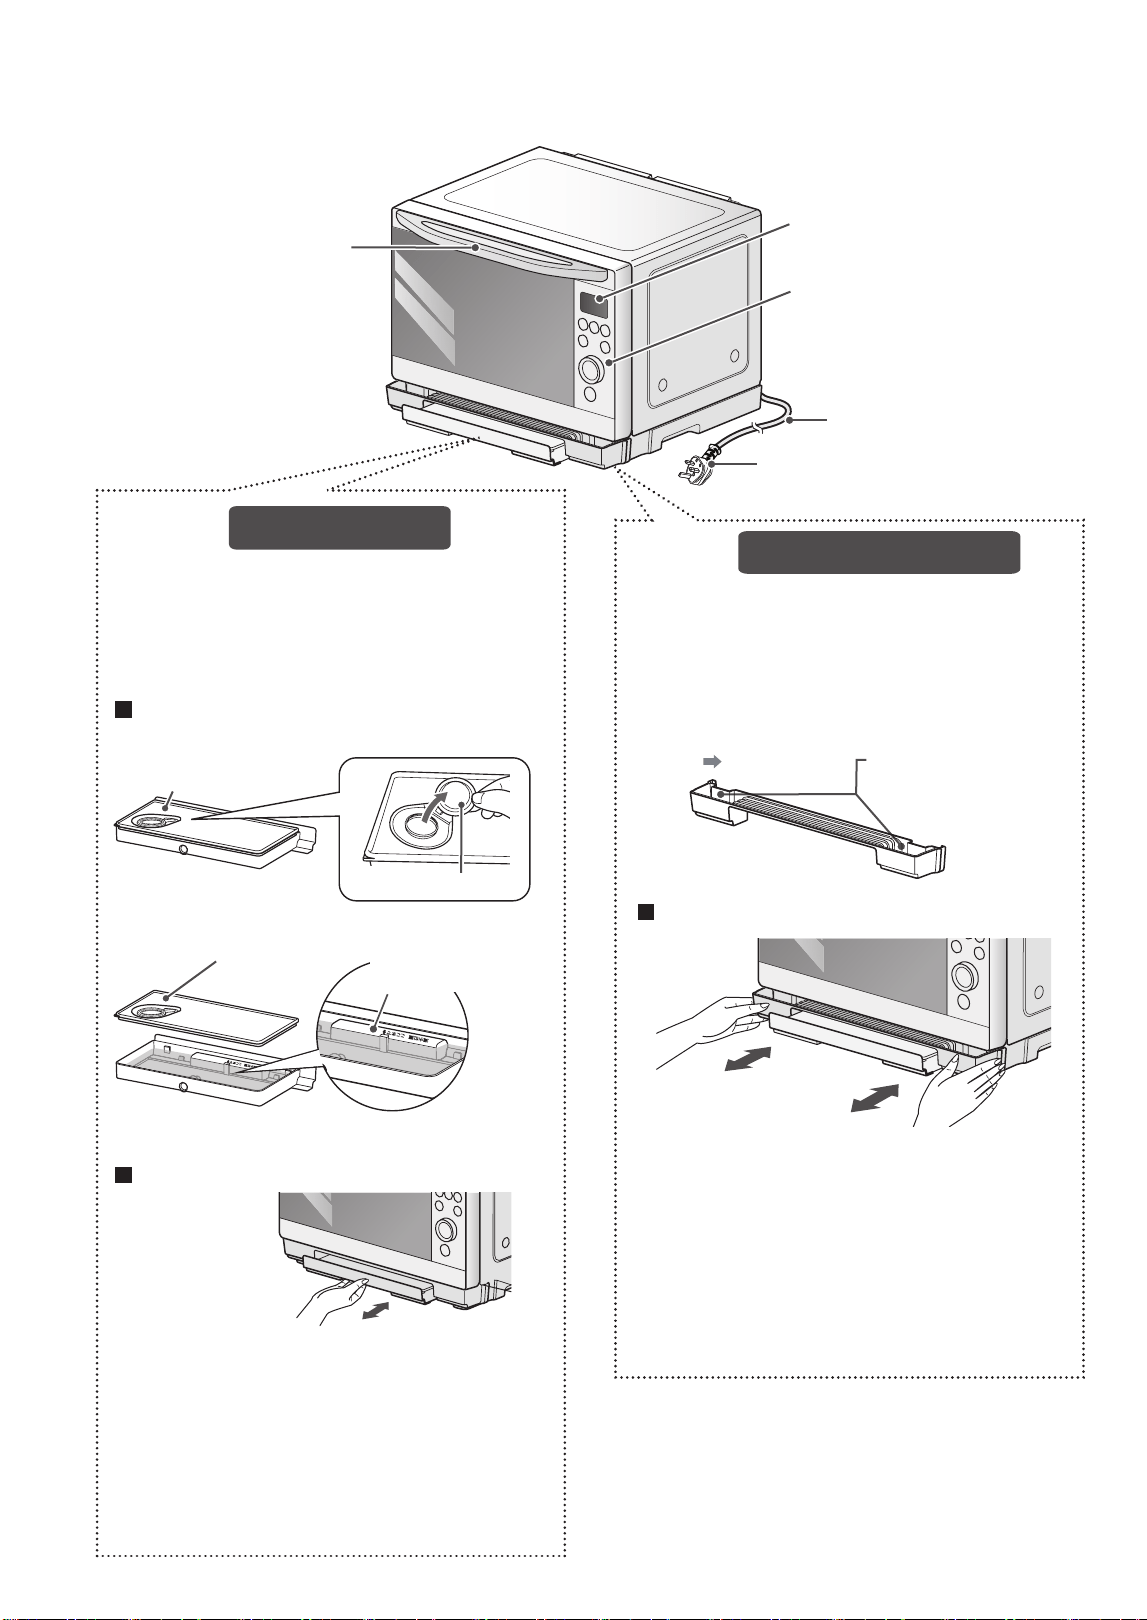
10
Water box cover
Water box cap
Name and function of each part (continued)
[Front]
Display
Operation interface
Power cord
Power supply plug
This is a vessel that supplies water to steam.
It shall also be installed on the main unit when not in use.
The amount of water reduced varies depending on the
program and menu, and short-term steam microwaves
may only reduce a small amount of water.
Prepare to add water (when cooking with steam)
Water-adding method
• When cooking with steam, open the cover, and add
water to the filling box.
Handle
Water box cover
• Removable
Maximum water level
(Beyond this line,
overflow may occur)
• Please make sure that the water box cap and water
box cover are firmly closed.
Installation and removal methods
Press to the bottom
• Make sure the cover is securely closed to prevent water
leakage.
• When tilting, it may cause water to overflow. Therefore,
please always keep it horizontal for operation.
• Please be sure to discard the residual water after use.
• Be careful not to pinch your fingers during installation.
• Please make sure that the water tank is installed in
place, otherwise the unit will display a lack of water and
the steam function effect cannot be guaranteed.
This is a container that collects food debris and water
droplets, steamed water, etc.
Moisture that evaporates from food during microwave
heating will accumulate.
It shall also be installed on the main unit when steam
function is not used.
Please clean and maintain
carefully. P.47
Water will accumulate
in this part
Installation and removal methods
• Make sure it is firmly installed before cooking. If the
installation is not firm, there may be water leakage.
• Make sure that there is no accumulated water before
using steam.
• Please note that water may accumulate during removal.
• After using the steam function, please remember to
pour out the accumulated water every time.
• Be careful not to pinch your fingers during installation.
Water filling box
Water collecting box

11
Water filling box • water collecting box
Please refer to Page 10 for details of the method
of installing on the main unit and usage.
1 water filling box
1 water collecting box
This is a vessel that supplies water to steam. It shall
also be installed on the main unit when not in use.
This is a container that collects food debris and water
droplets, steamed water, etc. It shall also be installed on
the main unit when the steam function is not used.
Instructions
Please observe the following items when using the steam function.
• Please carry out "45 Quick Cleaning" for the first time or when not in use for a long time. P.48
• Please use purified water disinfected with chlorine, and change the water every time you use it (please do
not put anything other than water into it to avoid failure)
※
Do not use water from the water purifier, alkaline ionic water, or well water.
※
Please use mineral water with low hardness (below 100).
(When the hardness is high, white powder will be sprayed out, which may block the steam outlet when
used for a long time)
• Please add water to the full position in the water filling box and firmly install it on the main unit together
with the water collecting box.
(Cooking may not be successful with insufficient water and incomplete insertion. Display " "
P.55)
• Do not use it in an environment below 5°C (steam may not come out when water freezes)
Use self-cleaning when using steam function.
• Refer to page 49 for the self-cleaning method.
(If the accumulated water is not cleaned up in time, mildew, miscellaneous bacteria reproduction and
moisture may lead to rust)
Accessories
Please use accessories correctly
Baking tray (iron plate:
black) 1 piece
Steam Rack
•
Used for baking, only, superheated
steam, grill, fermentation, etc.
※
Please refer to the cookbook and place it in
the correct position. (upper layer) or (lower
layer)
※
Do not cool down rapidly after use to avoid
damage or deformation of the main unit.
• Used for baking, steam,
superheated steam, grill, and microwave
steaming modes
※ It is forbidden to use the Steam Rack with
microwave function, so as not to cause ignition.
• Do not use accessories for equipment or purposes other than ovens.
Name and function of each part
Preparation and confirmation
缺水
Please do NOT take away the plastic rings (6pcs) on
steam rack
to prevent danger
of sparking in use.
※
Please place the steam rack at the bottom layer
under oven mode
※
.
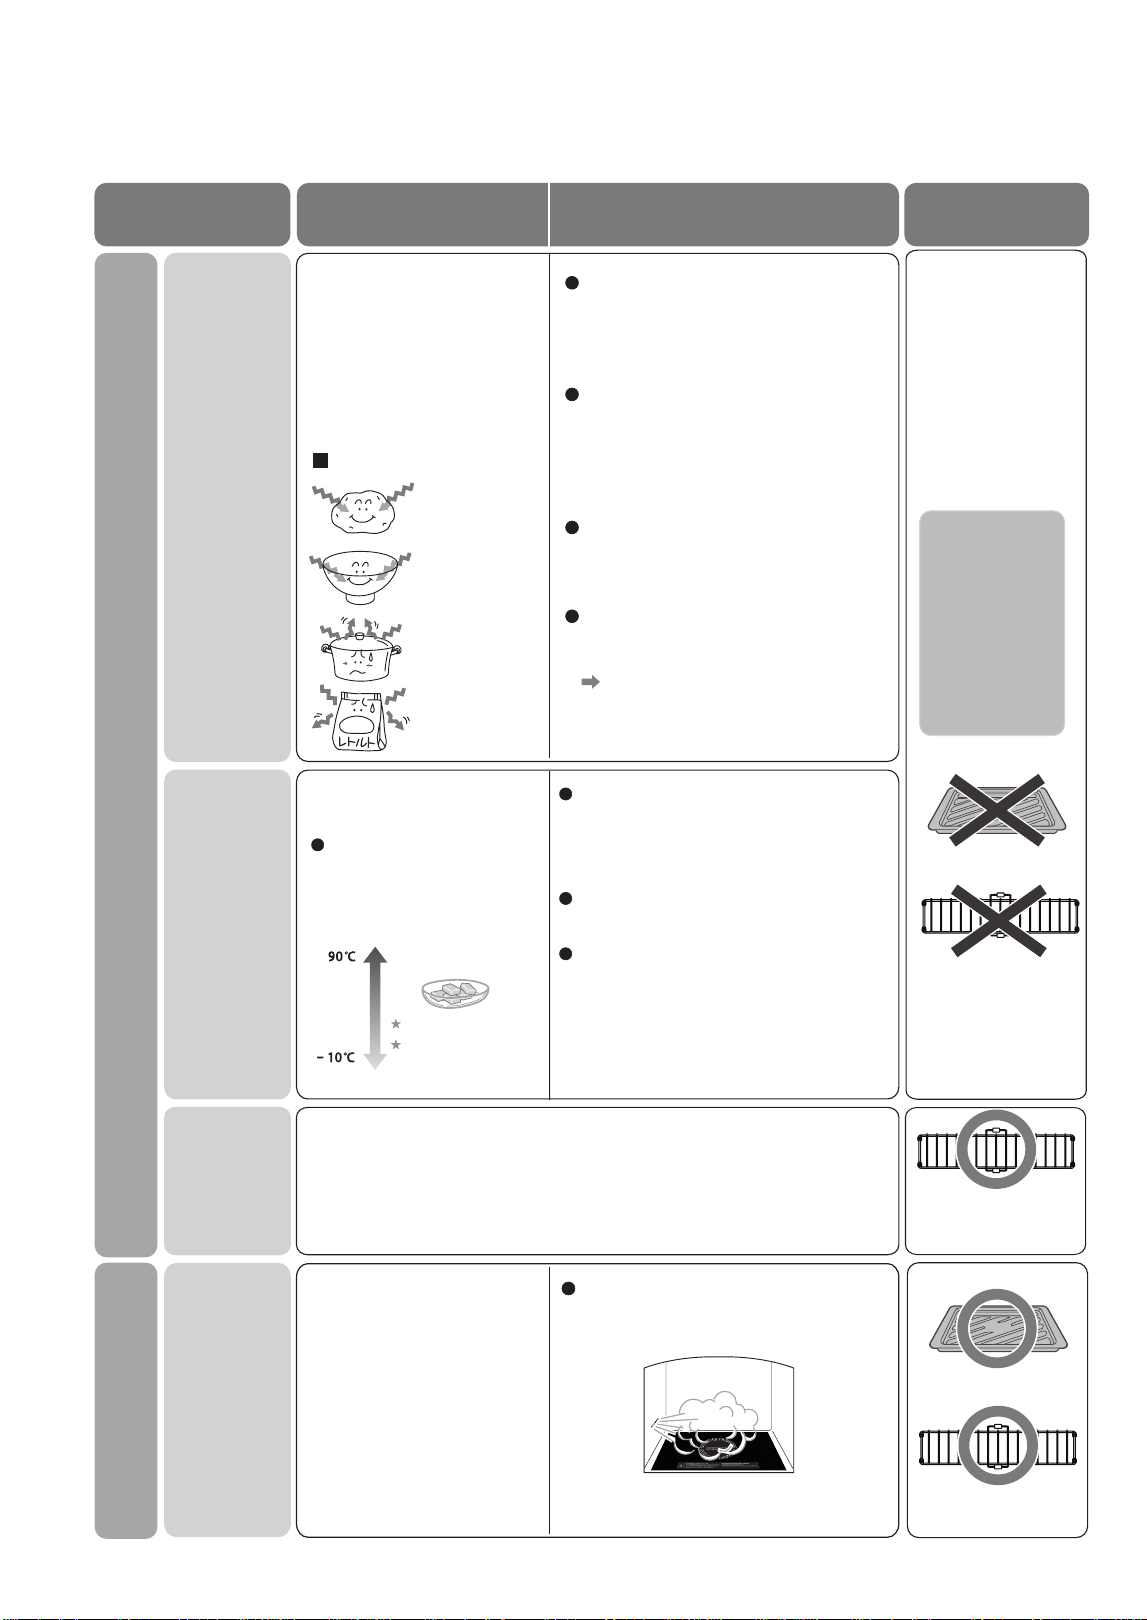
12
Type and mechanism of heating
Type of heating •
cooking
Mechanism of heating Points for cooking
Baking tray
and steam rack
Microwave
Constant
temperature
heating
Steam
microwave
Steam
Steam heating
Microwave heating
Properties of microwaves
Microwave heating
When microwaves are
irradiated, water molecules
in food frictionally move
and generate heat. This can
simultaneously heat the
inside and outside of food.
Absorbed
by food and
moisture
Through pottery
and porcelain
Metal containers
and aluminum
vacuum
packaging
will reflect
microwaves,
resulting in failure
to heat
The heating time is proportional to the
serving size of the food. If the serving
size is doubled, also double or slightly
less than 2 times the heating time.
The moisture of food will also be lost
in a short time, which makes it easy
to dry and harden. Therefore, please
set a shorter time for cooking while
observing.
Please put the food directly into a heat-
resistant container and place it in the
center of the oven.
You can also cook the cuisine that is
heated at 600W and stewed by 200W
microwave.
P.34~35
Accessories
cannot be used
May cause
sparks to splash,
causing fire
Baking tray
Steam rack
The heating temperature
of food is detected by an
infrared sensor.
Keep heating until the set
temperature is reached
The cooking effect can be selected within
the temperature range of 70 ~ 90°C.
It is also suitable for heating baby food,
softening butter, etc.
For cooking temperatures, refer to the
settings on page 36.
Since cooking can be carried out at
a set temperature, there is no need to
set the time.
Soften butter
Soften to fit for
consumption
Combination of microwave and steam rapid moistening heating
Heating by steam and
baking
Cooking steamed chawanmushi and
pudding at temperatures below 100°C
Baking tray
Steam rack
Steam rack
Steam rack can be
used for steam
microwave cooking
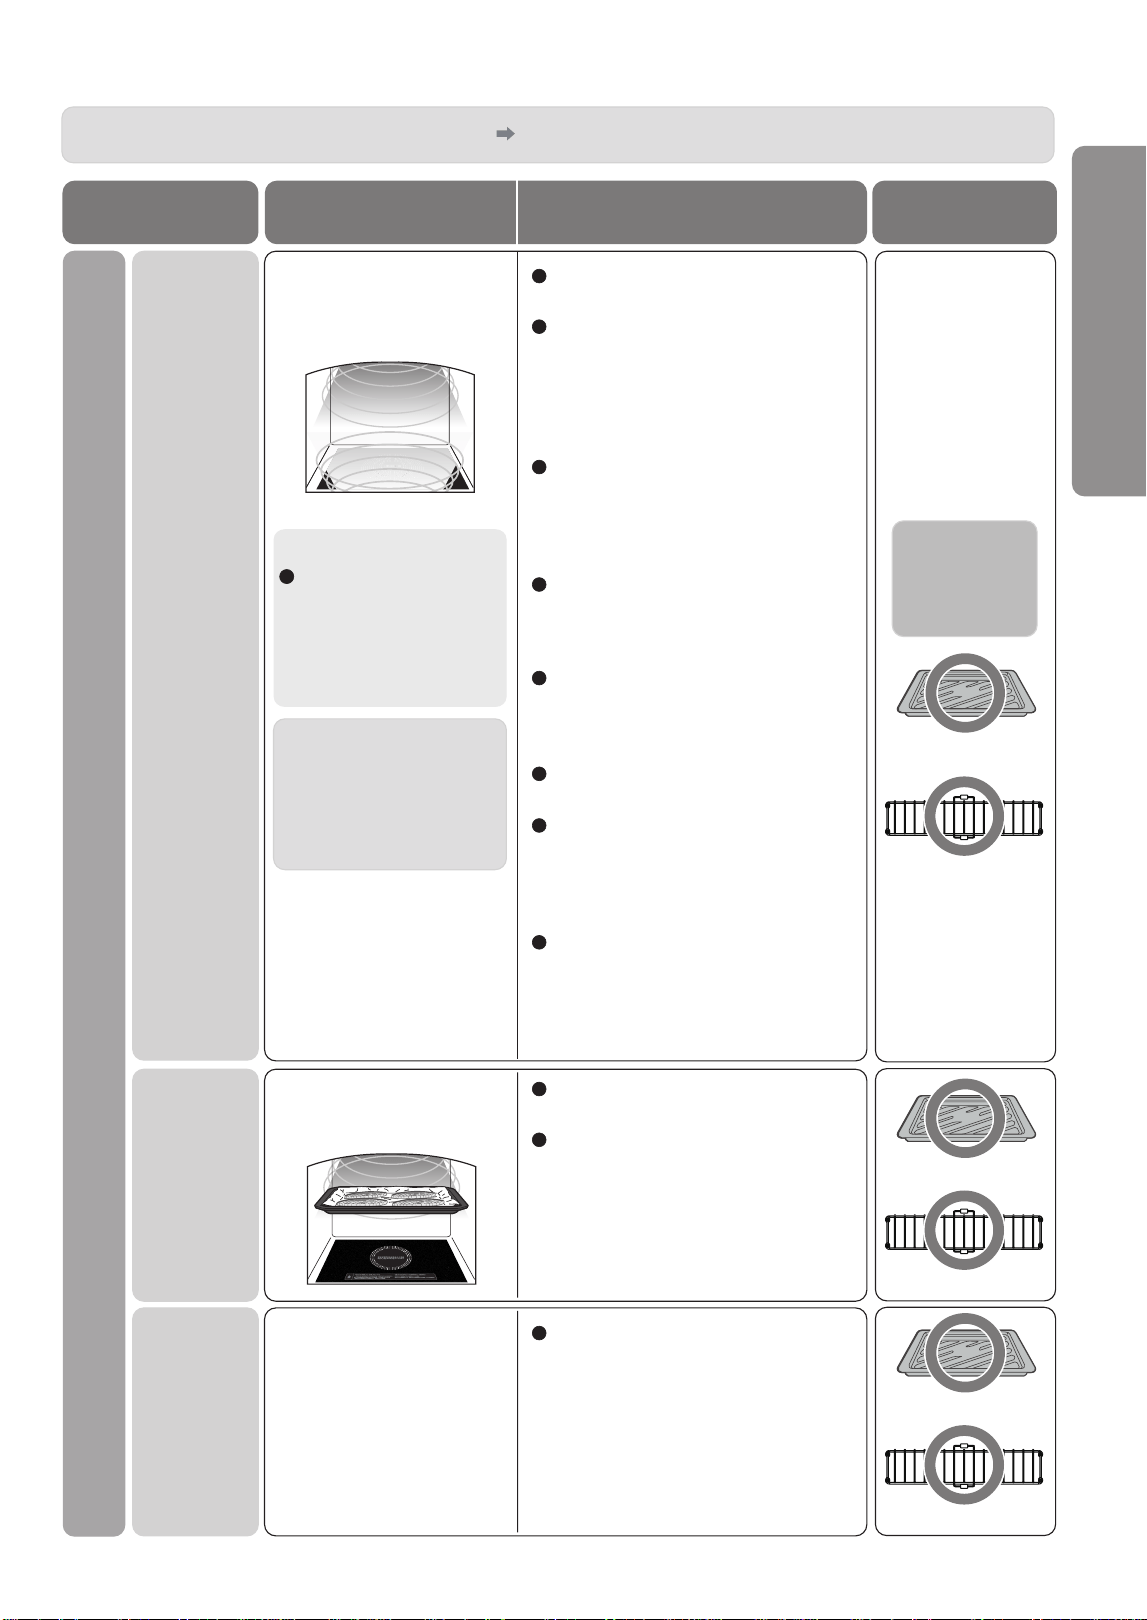
13
Type of heating •
cooking
Mechanism of heating Points for cooking
Baking tray
and Steam rack
Baking tray
steam rack
Fermentation
Grill
Superheated
steam
Baking
Heat by heating tube
Baking tray
steam rack
Baking tray
steam rack
Baking trays
and steam rack
can
be used
Use the upper and lower
heating tubes to heat food
with the heat emitted
from the whole oven
Please read the safety precautions carefully P.2~5
Please leave a reasonable interval for
dishes that may swell in the food.
Please observe the state of food while
heating. When the temperature in the
oven is too high due to continuous
heating, please shorten the cooking
time and observe its state while
heating.
Temperatures will rise when the
oven is close to heat sources above
and below. For high molds and food,
please observe whether it is charring
above.
As the temperature in the oven drops
easily during heating, please try to
reduce the number of times to open
and close the oven door.
When heating is not uniform, please
turn over the front and back sides of
the food or wrap tin foil on the dark
baking part.
To avoid overburning food, take it out
immediately after heating.
Please heat the non-metallic molds
(such as paper and silicon) and
fluororesin-treated molds on a baking
tray. Do not directly place them in an
oven for heating.
It is divided into "non-preheated
cooking" directly putting in the food
heating cooking and "preheated
cooking" starting from the preheating
oven.
Superheated water steam...
Water steam is heated
to a temperature above
100°C to form a colorless
transparent gas, which
can heat food more
quickly.
Depending on the
temperature in the oven,
steam may sometimes not
be visible.
Special note: Superheated
water steam is invisible to
the naked eye.
※
If the measuring position
and food quantity
are different, the
temperature in the oven
may be uneven.
Color the food surface
through the strong heat of
the upper heating tube
Heating with the heating
tube while controlling the
temperature
For uniform coloring, please turn over
the food during heating.
After heating, please take out the food
and put it on the grill immediately to
avoid burning.
Used for fermenting dough at lower
temperatures, etc.
Type and mechanism of heating
Preparation and confirmation
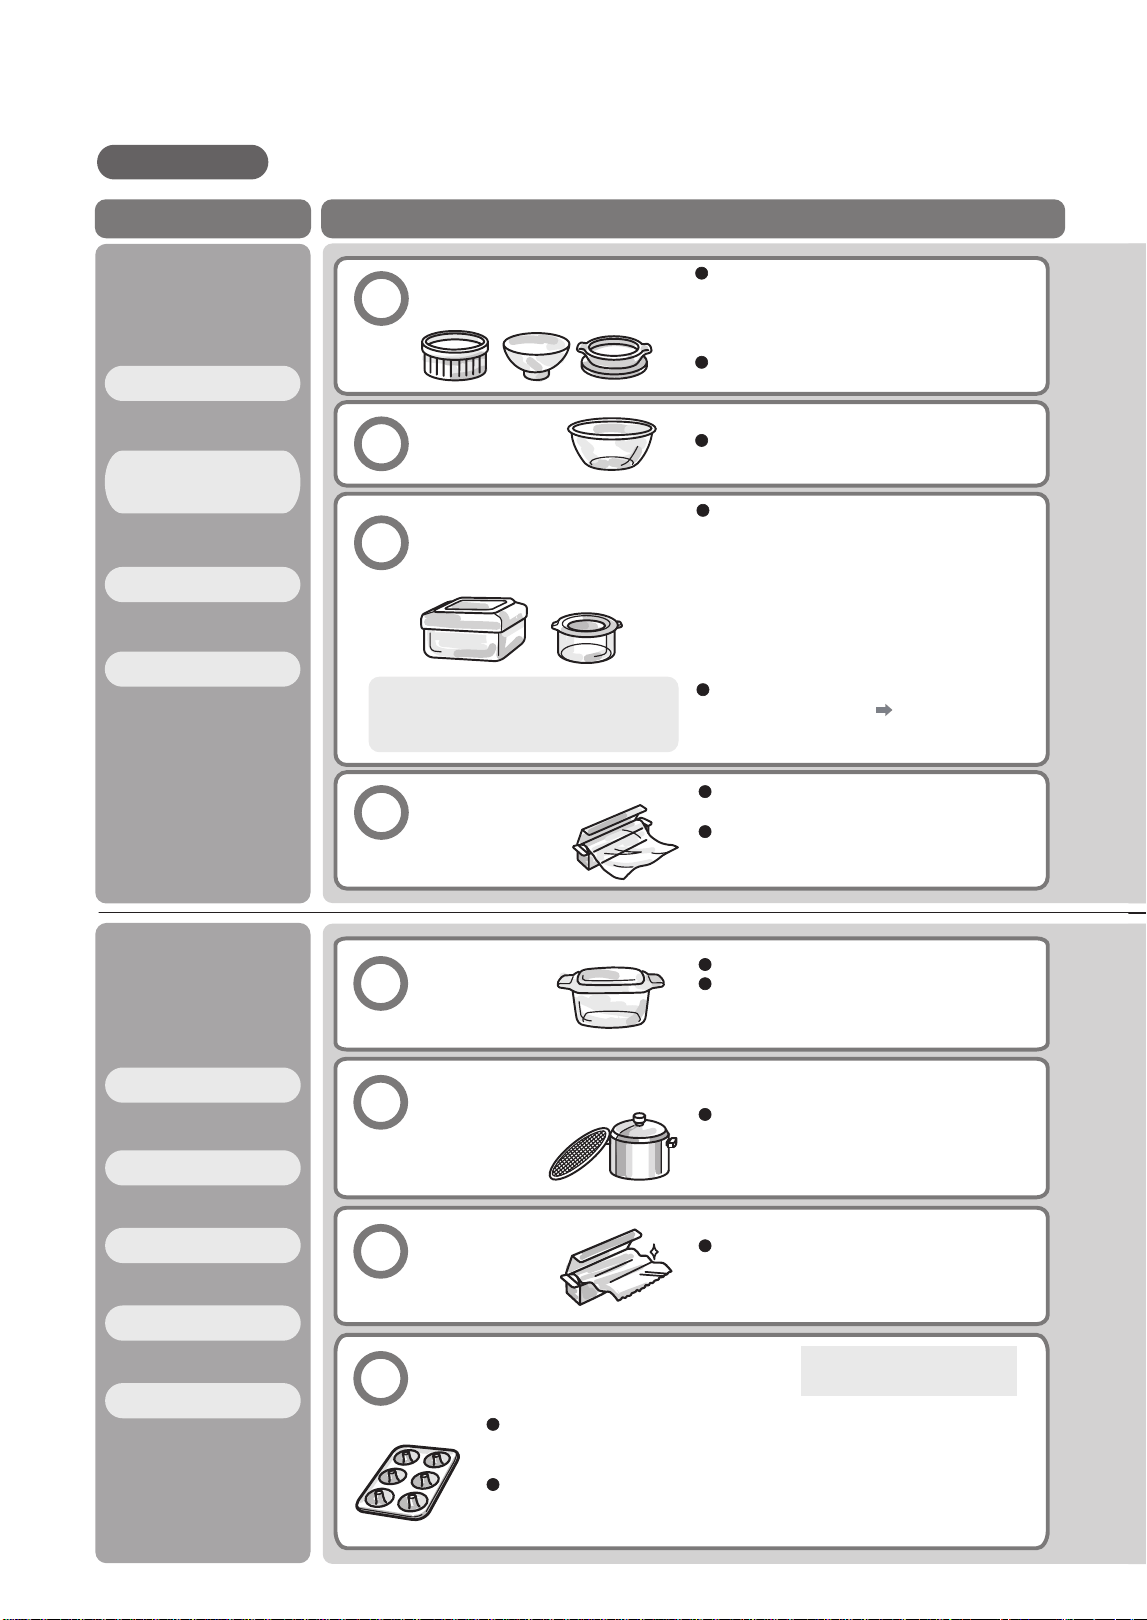
14
Serviceable/unserviceable containers
Consult your dealer or container manufacturer for instructions on how to use containers
that are not described here.
Type of heating Serviceable containers
Microwave
Constant
temperature heating
Steam microwave
Thawing
Baking
Superheated steam
Grill
Fermentation
Steam
Pottery, porcelain
Heat resistant
glass
Plastic container with heat
resistance above 140°C
Preservative
film with heat
resistance
above 140°C
When the heating tube is heated (during
"
"), the plastic container and
preservative film may melt when the oven
becomes hot.
The following containers shall not be used.
• Containers with gold and silver (splashing
sparks may occur)
• Container with color painting (color painting
may fall off)
The microwave may heat the container, so please
be careful not to get burned.
If it cools rapidly after heating, it may break.
The following containers shall not be used.
• Foods rich in oil and sugar, salt, sauce (may
become hot)
• Highly airtight lids, heat-resistant covers
• Containers not marked "Microwave-ready"
• Containers and packaging bags with surfaces
machined from metal such as aluminum
• Commercially available microwave egg
cooker
In "automatic heating" (microwave heating
using an infrared sensor (
P.16)), containers
with lids cannot be used. Be sure to remove the
cover.
Oily, sugary dishes tend to rise in temperature
and the oven cannot be used for them.
Polyethylene preservative film may melt and
burn, so the oven cannot be used.
If it cools rapidly after heating, it may break.
For high-temperature dishes, glass containers
that are resistant to rapid heating/cooling shall
be used.
The resin handle melts easily, so the oven cannot
be used for it.
Foods can be spread on the baking tray,
adjusted to the degree of burning, and baked
with tin foil.
Heat resistant
glass
Aluminum, enamel, and
other metal containers,
metal meshes,
and metal
rods
Tin foil
Silica gel container
Do not use for superheated
steam, barbecue.
Please set the temperature of "Baking" to be lower than the heat-resistant
temperature of the container. (Example: if the heat resistance temperature of the
container is 200
℃
, the oven can be set to a maximum temperature of 170 °C)
Do not place the container on the upper layer or directly in the oven. The upper
layer and the bottom of the oven are close to the heating tube, so the silica gel
container may deform.
Instructions
高溫
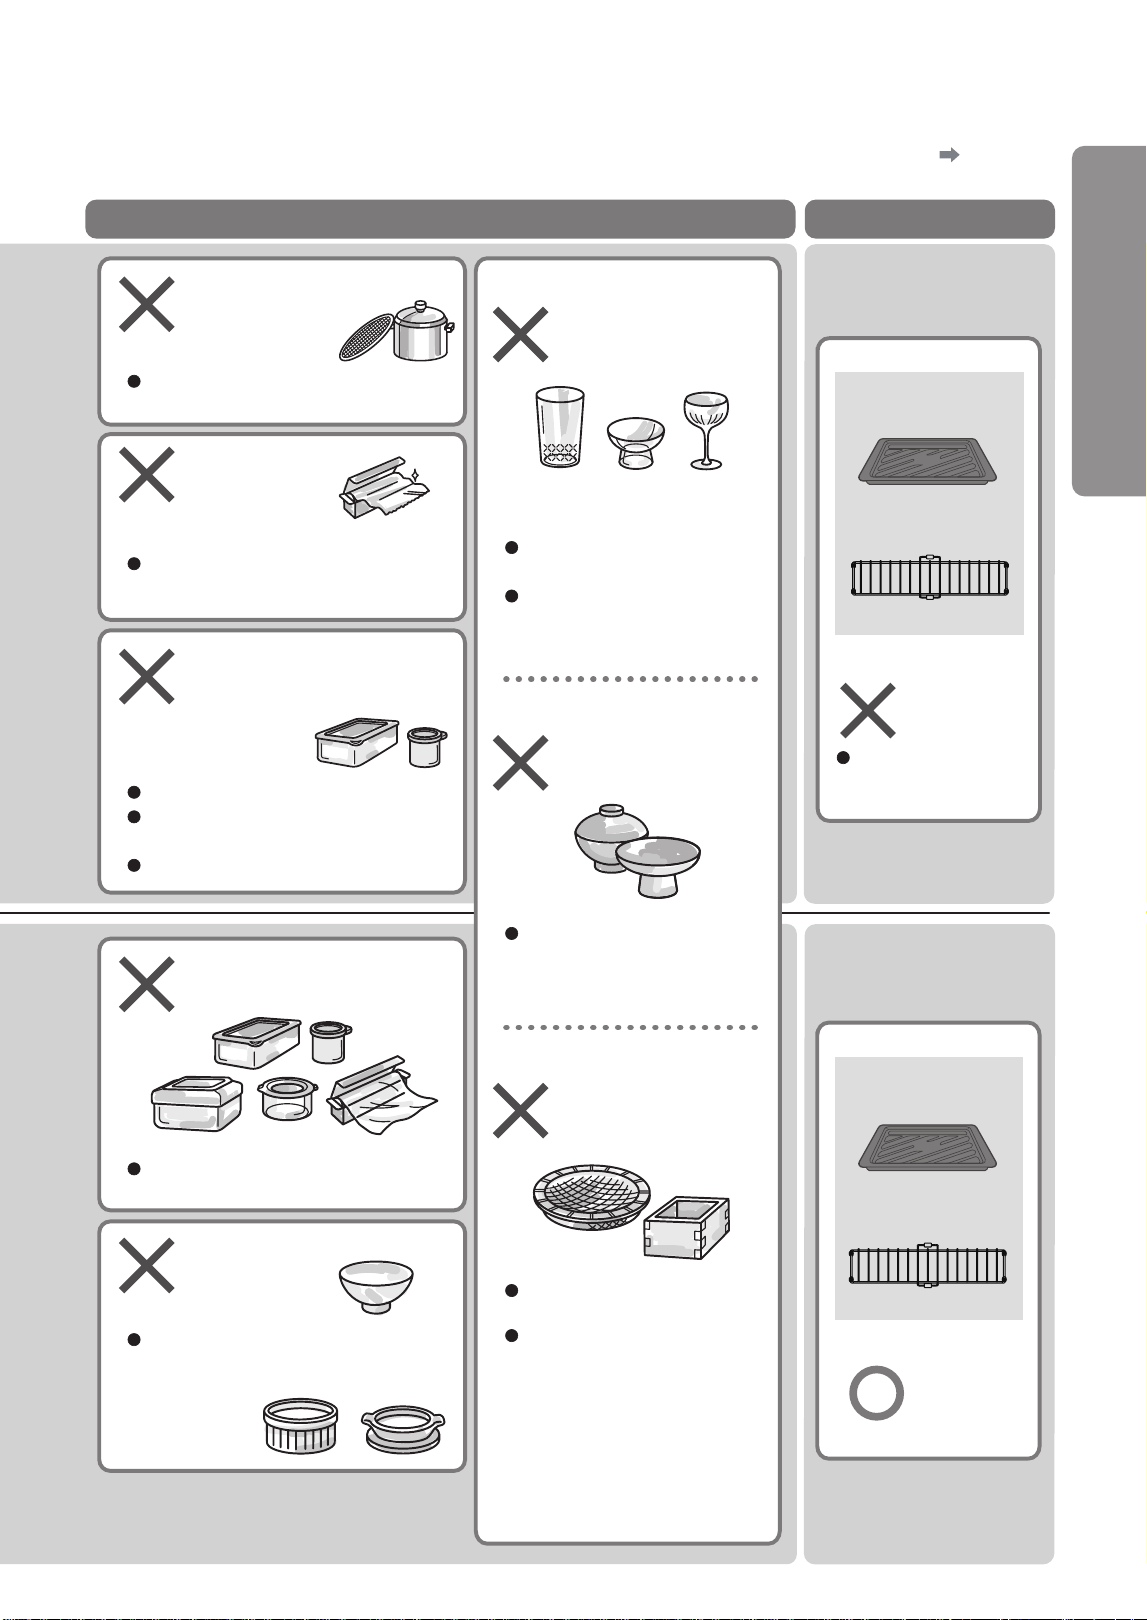
15
Do not confuse "microwave" heating with "bake, barbecue" heating. Otherwise, food and
containers may smoke or catch fire. Please confirm the type of heating before heating. P.12~13
Unserviceable containers
Baking tray and
steam rack
Aluminum, enamel, and
other metal containers,
metal meshes,
and metal rods
Tin foil
Plastics and preservative
film with heat resistance
temperature below 140°C
Plastic container ·
preservative film
※
1
Pottery,
porcelain
※
2
Non-heat
resistant glass
Lacquer
Wood, bamboo, and
paper products
In particular, metal meshes and rods may
splash.
Some containers can use the "thawing"
mode. Please refer to page 27.
It may be deformed or cracked after melting.
Polyethylene, styrene, phenol, melamine,
and urea resin shall not be used.
Foaming trays can be used for "Thawing".
It may deform or crack after melting.
However, heat-resistant pottery, porcelain
kettles, and rice fanning baking trays can
be used.
Carved or tempered glass shall
not be used.
Glass containers with large
thickness changes and shape
changes shall not be used.
Paint may peel off or crack.
Spark splashing or burning may
occur.
Heat-resistant paper, baking
paper, cake paper, and sulfuric
acid paper for the cake can
be used according to the heat
resistance temperature of the
package.
※
Do not spread it at the bottom
of the oven. (except for the
specified menu)
Baking tray
Steam Rack
Can be used
Baking tray
Steam Rack (Available
for Steam Microwave)
Cannot
be used
Spark splashing may
occur, so do not use
them.
※
1: "Fermentation" can be used.
※
2: "Fermentation" and "Steam" can be used.
Please use heat-resistant containers.
Serviceable/unserviceable containers
Preparation and confirmation
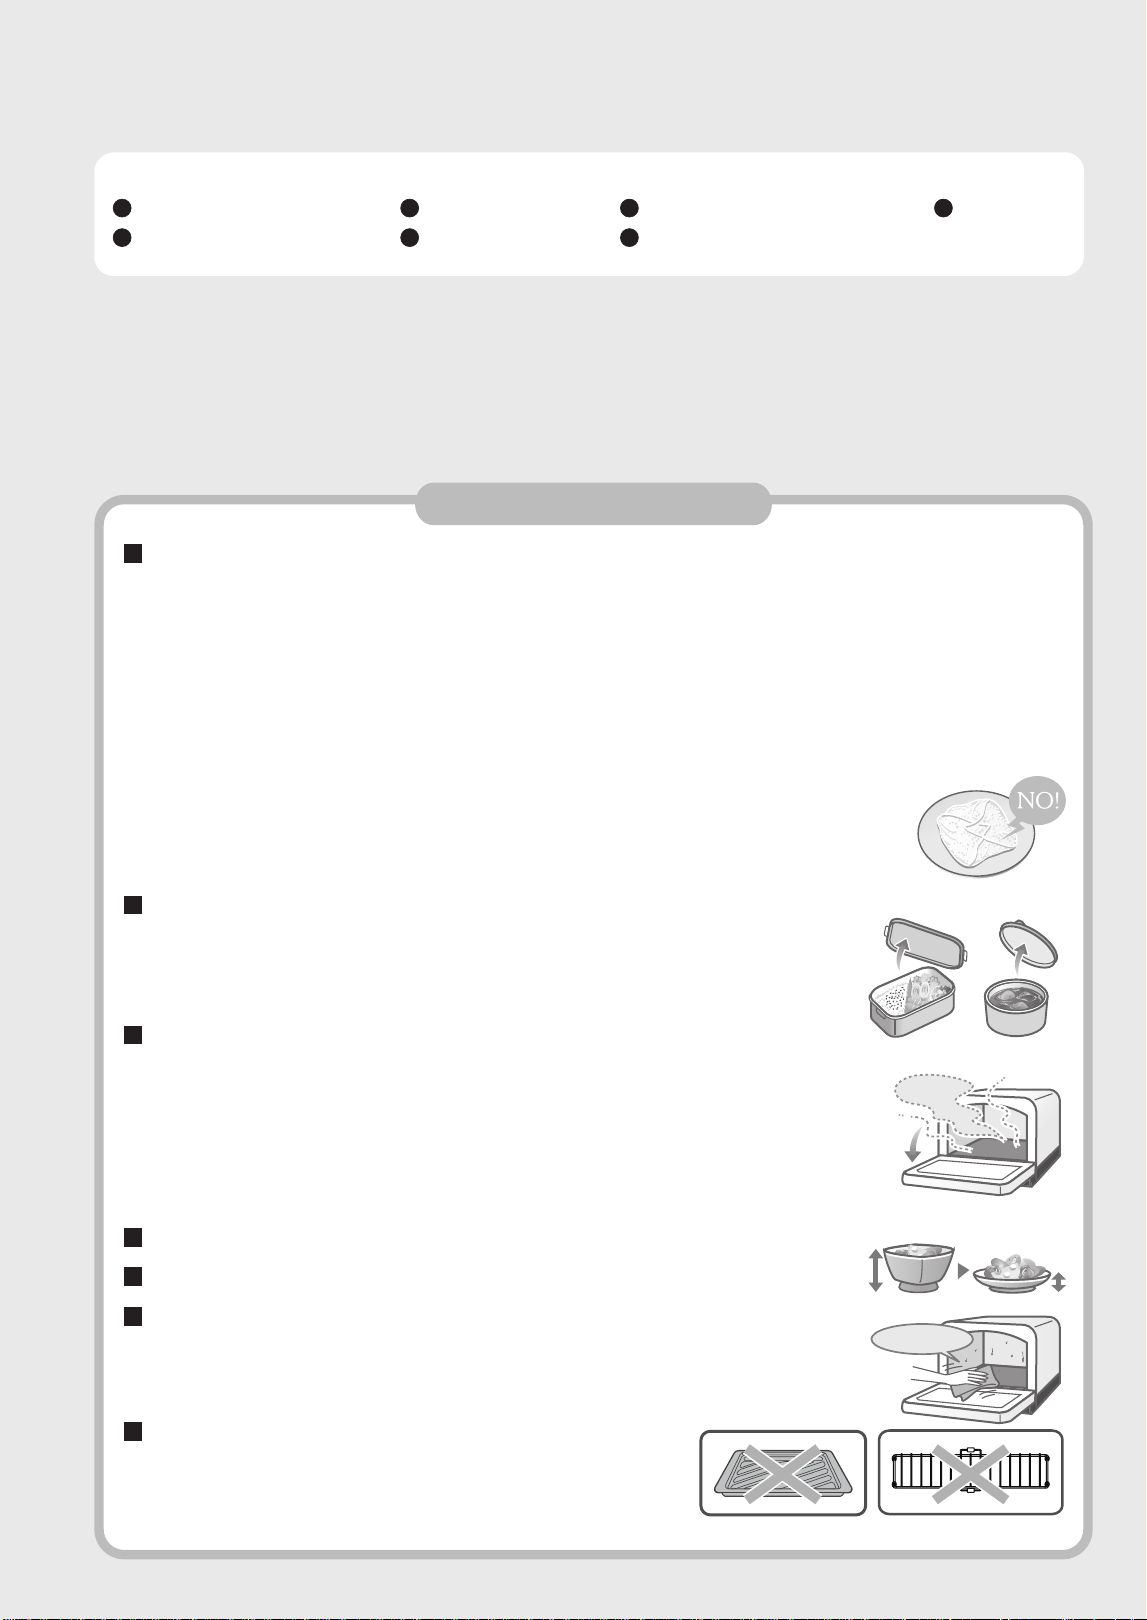
16
Precautions and skills for automatic heating
Heating (rice, dishes)
3 thawing methods
Microwave heating using infrared sensors ("automatic heating")
Steam heating
Vegetables
Liquor
Milk • Coffee
Constant temperature
heating
※
Infrared sensor refers to
a sensor for detecting the surface temperature of food by measuring the amount of infrared radiation emitted by food.
Heating is performed while detecting the surface temperature of food, so that food can be heated to a set temperature
without being influenced by the initial temperature of food and the weight of the container.
To correctly understand the food temperature detection operation of infrared sensors, please refer to pages 16~17 for
flexible use.
Instructions
Correct use of preservative film
Do not use covers
If it is necessary to continue using, please be sure to fully cool in the
oven before use
Use a container that matches the serving size of your food
Use low, wide-mouth containers wherever possible
Please wipe off the food residues in the oven and water droplets in
the oven and on the oven door before putting food into it
Do not use a baking tray or steam rack
during microwave heating
• Some foods do not require preservative film.
Please read the description of each menu for details.
• When wrapping the preservative film before heating rice and dishes, please wrap it tightly against the
food. Leave a void when wrapping the preservative film around the edge of the container. (Preservative
film sealing is not required).
In addition, when heating food stored in the refrigerator, please re-wrap it with preservative film as
described above.
• When wrapping rice and meat with preservative film for freezing, please wrap them carefully and do not
wrap multiple layers of preservative film.
• When heating food wrapped in preservative film, please place it on a heat-resistant tray to
ensure that the preservative film seal is downward.
• If it is not operated correctly, the cooking effect may be poor.
In addition, it may char the food and cause smoke, fire or cracking, burns, and damage to the
bottom of the oven due to the breakage of the preservative film.
• When covered with a lid of ceramic, glass, plastic, etc., the infrared sensor cannot
correctly detect the temperature of food and thus does not heat well.
• When heating commercially available products, be sure to remove the cover and
uncover the tin foil before heating.
• When the oven is hot, it may cause the infrared sensor to fail to correctly detect the
temperature of food and thus cannot heat smoothly.
In addition, heat-resistant containers (e.g. plastics) and preservative film may melt or
deform, and thermal shock from frozen food products may also cause the bottom of the
oven to rupture. When " " and "C21" are displayed on the display part, please wait
patiently until this prompt disappears.
• Otherwise, the food temperature may not be detected correctly and the cooking effect
is poor. In addition, it may also cause smoke and fire.
• When using the baking tray, sparks will splash and cause faults.
Baking tray
steam rack
Wipe clean
Cooling
16
高溫
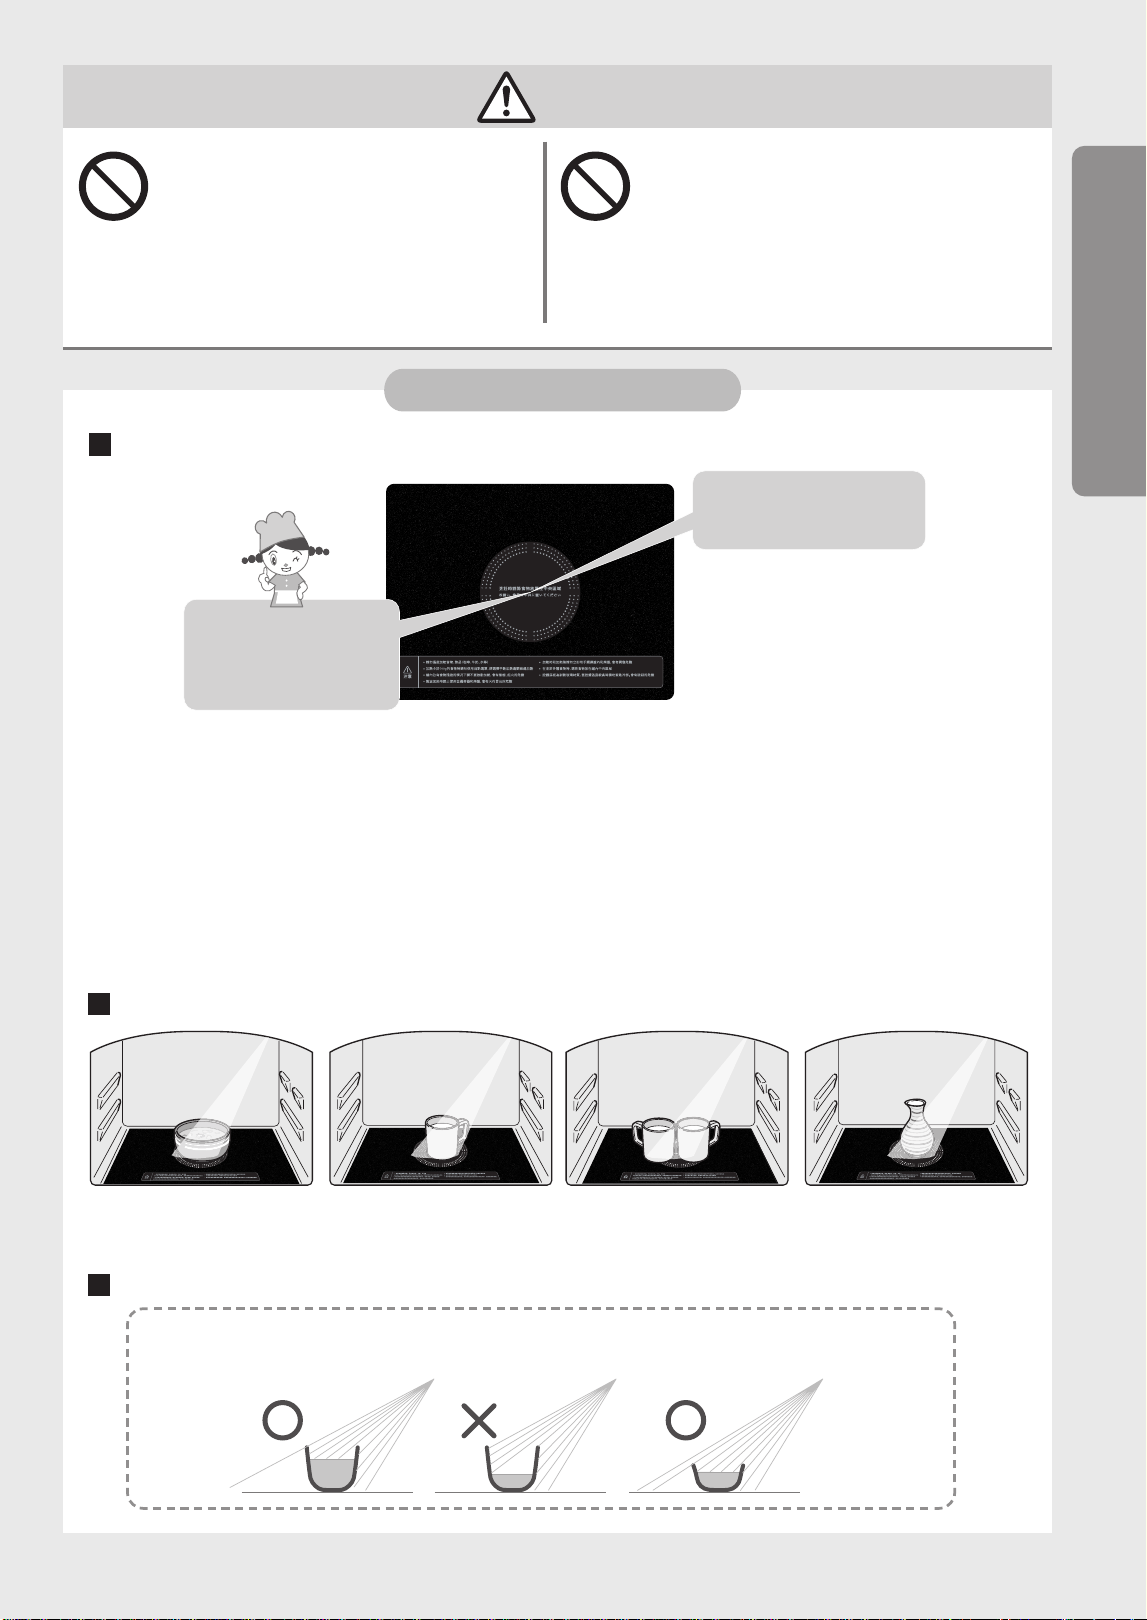
17
Precautions and skills for automatic heating
Warning
Do not heat less than 100g of
food in automatic cooking mode
Do not use lidded containers for
microwave cooking with infrared
sensors
Prohibit Prohibit
• When the temperature of food cannot be
detected correctly, it may overheat and lead
to fire.
• Please heat manually while observing.
• The presence of a lid can lead to excessive
heating, food fires and container rupture for
failure to properly sensing the temperature.
• Please remove the cover of the container before
heating.
For smooth heating
Inner side of oven
Front side in the oven
Put food in the center of the oven
Place foods close to the
center when heating
multiple foods
Center around the circle
and place food in the
front, back, left, and
right centers of the oven
• If the food is placed away from the center, it may be overheated or insufficiently heated. Be sure to place food in the
center of the oven.
• When the beverage is heated in an edge position, it may overheat, boil, suddenly eject after being taken out of the
oven, etc., resulting in burns.
• When heating a variety of foods, adjust the type, serving size, and initial temperature. In case of non-uniformity, the
heating may not be smooth.
※
When very small food is placed in the center, it may not be detected correctly, resulting in smoke or fire. When heating
a small amount of food, please set the time conservatively in manual "Microwave" mode while observing and heating.
Examples of detection images of infrared sensors and their placement methods
Heating, constant
temperature heating
1 mug (milk) 2 mugs (milk) Wine bottle (liquor)
Please refer to pages 25-26 for the operation steps and containers and serving sizes of milk, coffee, and liquor.
Use a container that matches the serving size of your food
If the food serving size differs significantly with respect to the height of the container, the infrared sensor
cannot correctly detect the temperature of the food and thus can not be heated to a satisfactory state.
(Excessive heating may cause burns and rupture of the container and oven bottom)
When the heating is insufficient, please take it out and stir or place it again. Heat by prolonging the heating time or manually
microwaving while observing.
Precautions and skills for automatic heating
Preparation and confirmation
17
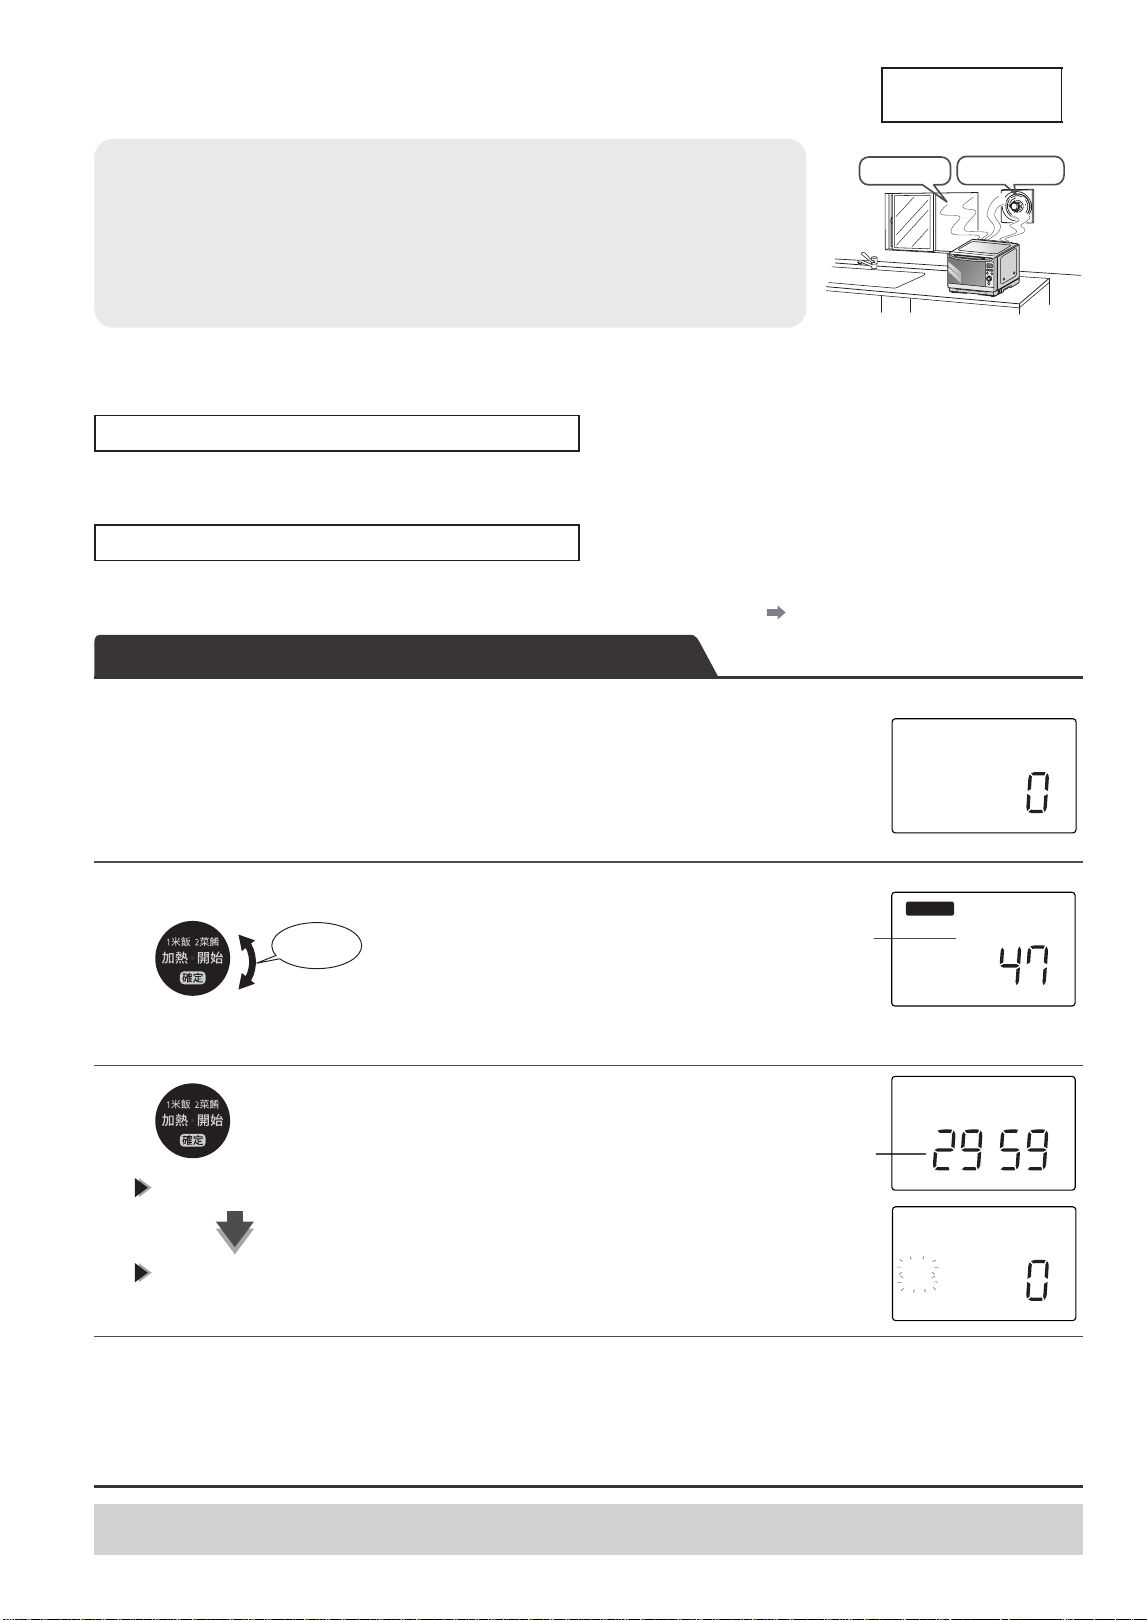
18
Dry burning and deodorization in the oven
Heating tube
Precautions
• "47 Deodorization" requires heating by a heating tube, so the main unit will
get hot. Keep away from heat-resistant articles.
• Smoke may occur, but this is not a fault.
• Please transfer small animals such as birds to another room and turn on the
ventilator or window for ventilation.
Preparation before dry burning and deodorization in the oven
When used for the first time (dry burning)
Mind the odor in the oven (deodorization)
Please use "47 Deodorization" to burn out the oil in the oven after taking out all polyethylene and other packaging
materials inside the oven door. It is normal that smoke or a peculiar smell may be emitted.
Be sure to wipe off the dirt in the oven first. If dry burning or deodorization is carried out without wiping, the dirt may
burn and cannot be removed. After "45 Quick Cleaning", it is easy to remove dirt.
P.48
3
2
1
4
Insert the power plug and close
the oven door after opening.
Select 47 for deodorization
Press
Open the oven door and wait for the temperature to drop
• Do not put any food in the oven.
• Rotate to the left for quick selection.
• The display part will show
• Please note that the oven door glass and inside will get hot.
• Do not repeatedly deodorize.
• Burn off the source of odor attached to the oven at high temperature and then deodorize. However, it does not
remove all types of odors.
Type of heating
Displays the remaining time
Start deodorization
After the buzzer sounds 3 times, deodorization is completed
• The deodorization time is 30 minutes.
Open the
window
Turn on the
ventilator
Dry burning and deodorization in the oven
Turning
烤焗
自動功能
烤焗
分 秒
高溫
冷卻
高溫
" and "
冷卻
"
"
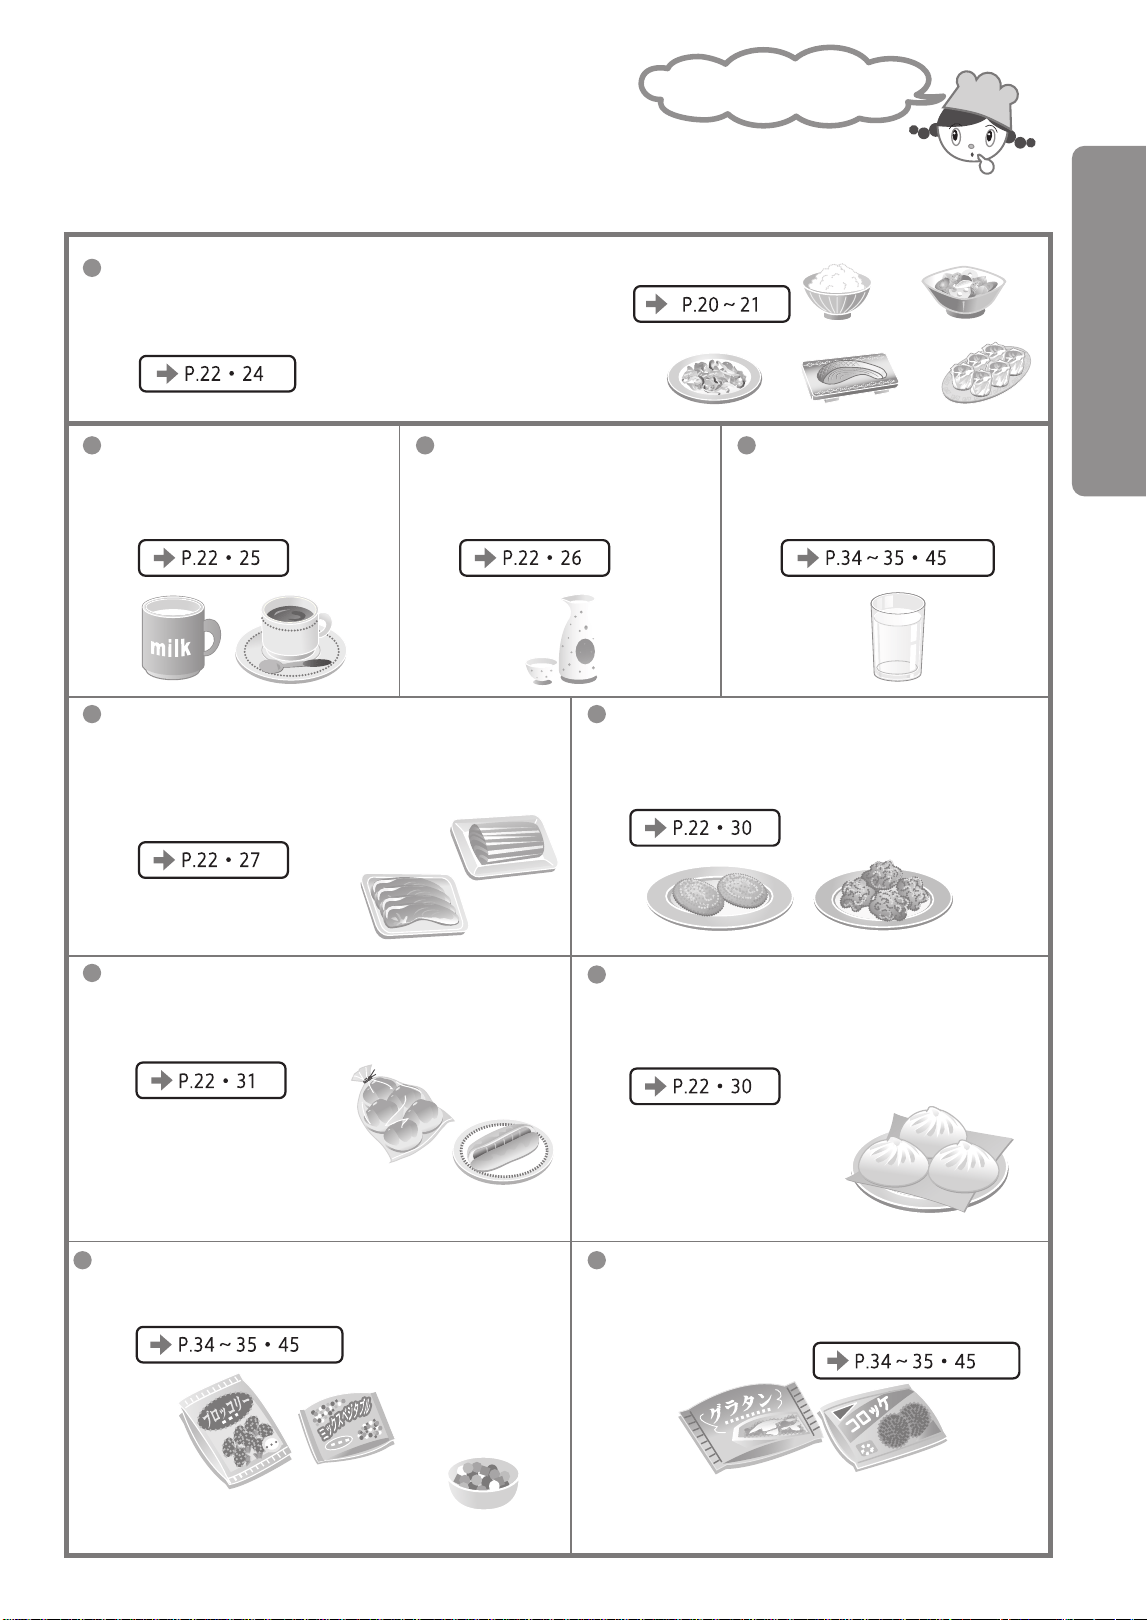
19
How to heat?
Recommendations and
guidelines for "heating"
Rice and dishes
Milk • Coffee Liquor Water and other
beverages
→
Turn the knob
"4 Milk • Coffee"
→
Turn the knob
"5 Liquor"
→
Set the output power and
time by manual "Microwave"
Thaw meat and fish
Heat butter rolls, bread with vegetables
until fluffy
Crispy food, heated and fried products,
barbecue foods, French bread, curry
bread, etc.
Quick-frozen steamed bun
Frozen boiled vegetables
Cooked frozen foods on the market (fried
balls, etc.)
→
Rotate the knob to select "12 Crispy Heating"
→
Turn the knob
"6 Quick Thawing", "7 Steam Full Thawing" and
"8 Sashimi • Semi-thawing"
→
Set the output power and time by manual "Microwave"
→
Turn the knob
"14 Quick-frozen Steamed Bun Heating"
* Please refer to the contents recorded on the package
and heat while observing.
* When heating corn and mixed vegetables, please add more
water and transfer it to a heat-resistant container for heating.
*Baked toast please refer to page 33
Furnace Dry Burning, Deodorization/Recommendations and Guidelines on "Heating"
Preparation and confirmation
→
Press the heating key to start selecting "1 Rice" and "2 Dishes".
→
Turn the knob to select "3 Steam Heating"
→
Rotate the knob and select "13 Soft Bread"
→
Set the output power and time by manual
"Microwave"
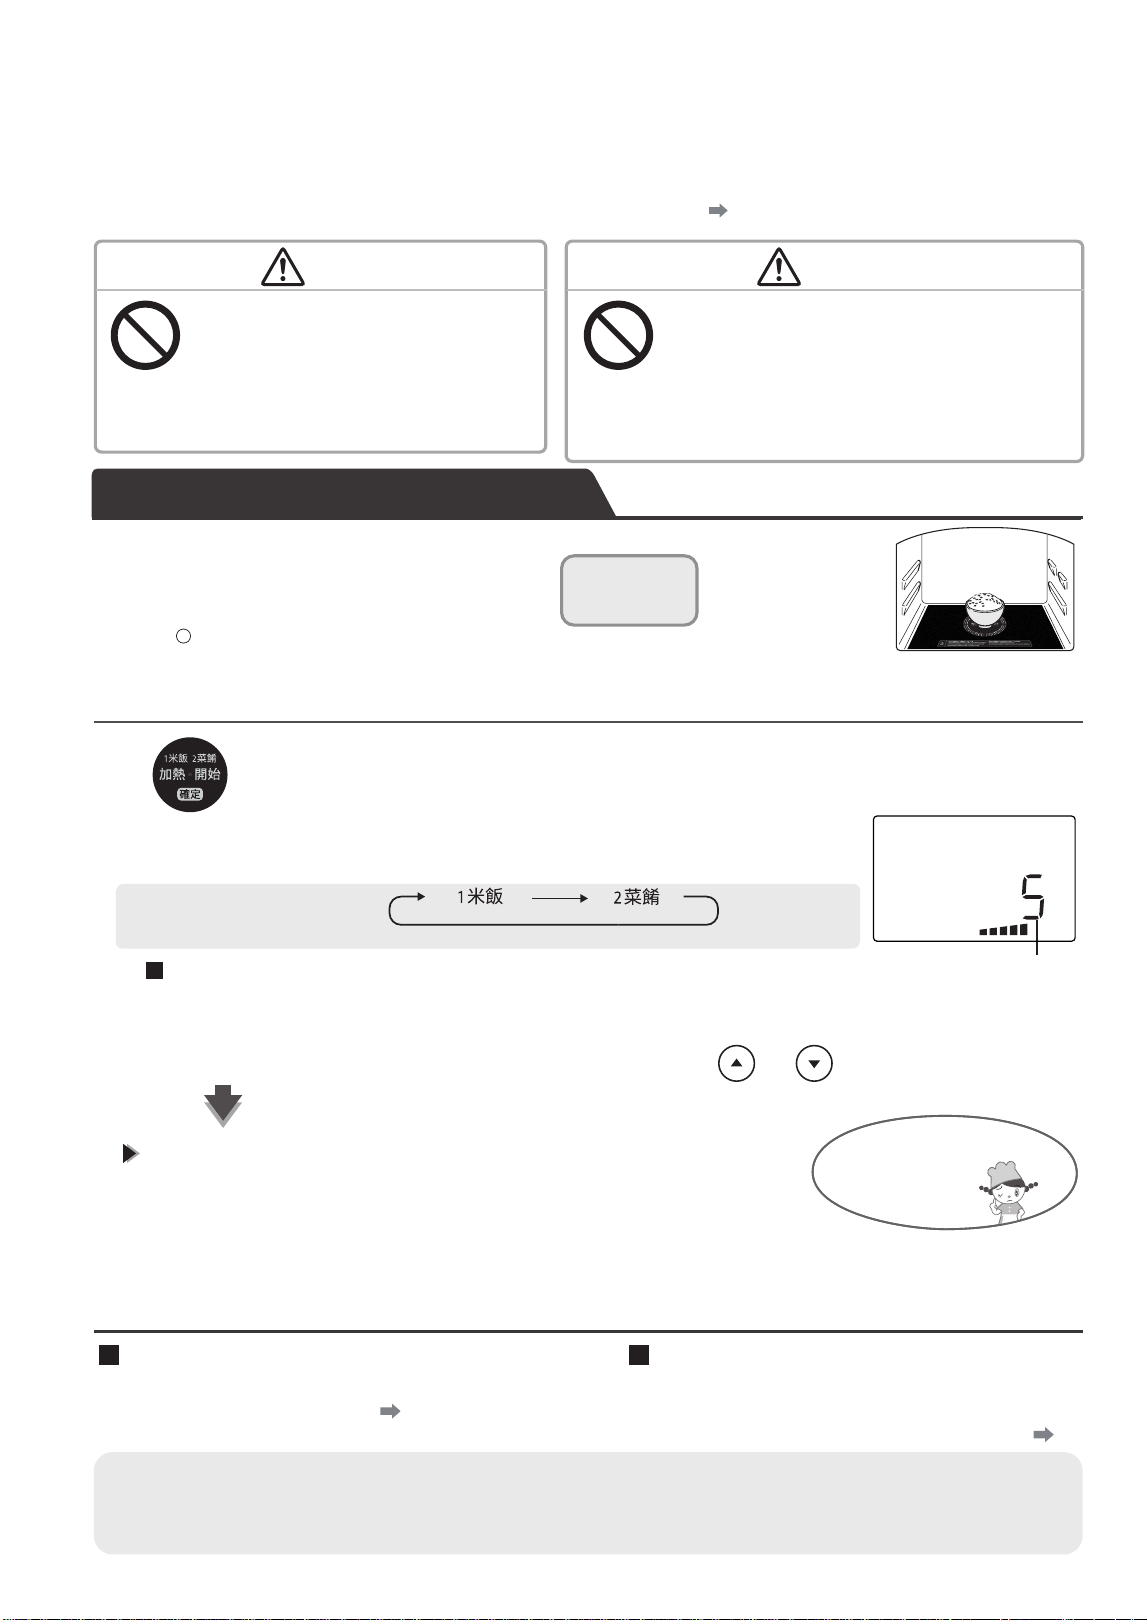
20
Rice and dishes heating
Automatic cooking without time and temperature adjustment
After putting in the food, press the "Heating Start" button to heat the food easily.
For details on how to use the preservative film, see "Proper Use Tips" (P.21).
Warning Warning
Prohibit Prohibit
Do not use automatic cooking mode
to heat less than 100g of food
Do not use the "Heating" key to heat beverages
Excessive heating may cause it to boil suddenly
during removal, resulting in burns.
• When the temperature of food cannot be
detected correctly, it may overheat and lead
to fire.
• Please observe while heating during manual
operation.
• For milk and coffee, please use "4 Milk and Coffee",
for liquor, please use "5 Liquor"; for water, please
refer to the time on page 45 and heat while
observing by manual microwave.
1
2
Put the food in
Press (start heating)
Placed in
the center
Do not use
a baking tray
or steam rack
• Place in a heat-resistant container that
matches the serving size of the food, using
as the standard, in the center of the oven.
※
If the food is placed away from the front, back, left, and right centers, the infrared
sensor will not work normally, which may cause excessive heating or no heating.
• Please press this button within 1 minute after closing the oven door. After
→
After pressing the start key, press the "Fire Adjustment" key within 10 seconds
to adjust.
Select Fires
• The remaining time will be
displayed halfway.
• There are five levels of firepower, which can be adjusted through and .
If the buzzer sounds 3 times, the heating is completed
• The buzzer will sound when you forget to take out the food. (1 minute,
3 minutes, and 5 minutes later), open the oven door or press "Cancel" to stop it.
• After cooking is completed, the word "Cool" may flash and cool electrical components through a fan.
• Do not unplug the power plug when the cooling fan is running.
• Cooking is also possible while the fans are running.
Vessel will get hot
Be careful when
taking it out
When the oven door is opened during heating When it is desired to continue heating after
completion (extend the time)
→
Press the "Cancel" key and heat while observing in
manual "Microwave" mode
P.34~35
→
Turn the knob within 3 minutes after cooking,
then set the time and heat while observing
P.7
Precautions
• Please use it for heating rice and dishes. When heating other food, it may cause smoke and fire
due to overheating. For food with less moisture (dry food, peanuts, etc.), dry food, Netherlands
celery, and dried perilla, please heat while observing in the manual microwave 200W mode.
Basic operation (e.g. heating rice)
Each time the button is pressed, press in this
order. (5 seconds)
秒
弱 強
微波
more than 1 minute, "
門
" will be displayed and it will no longer run.
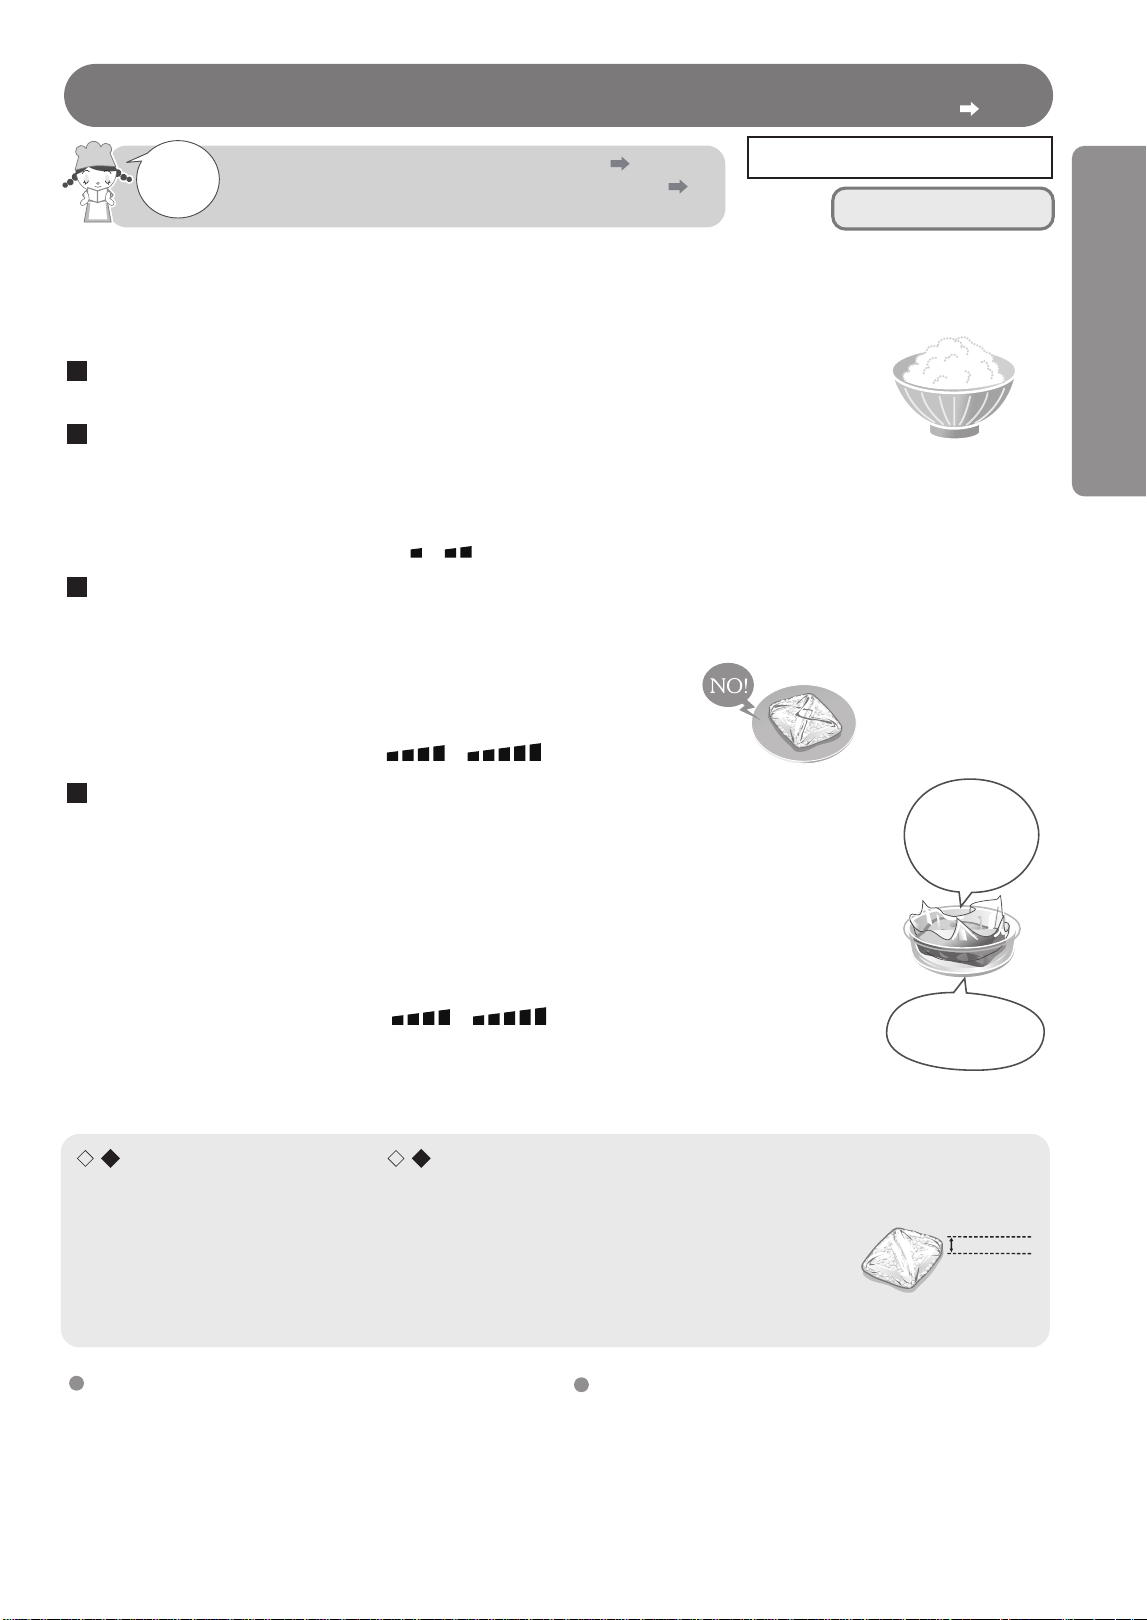
21
Rice and dishes heating
Skills for correct use Basic operation P.20
Please
read
carefully
Microwave (infrared sensor)
Do not use a baking
tray or
steam rack
Safety precautions (during microwave heating) P.2 ~ 5
Precautions and tips for constant temperature heating
P.16 ~ 17
Do not heat shell eggs or boiled eggs (with and without shell). (Danger after rupture) Please take
out the dishes with steamed eggs (Kanto cooking, etc.) and heat them.
1 Rice, 2 Dishes
The amount of rice and dishes that can be heated at a time... 100-300g
(150g for 1 person)
Do not wrap preservative films for food stored at normal temperature and
refrigerated, but heat them directly as follows
Wrap frozen food with preservative film and heat in dishes
Wrap with preservative film and heat thick food
• Rice... Break up the rice balls and sprinkle some water on hardened food such as refrigerated rice.
• Stewed food...Drain the soup.
• Grilled fish... Set the firepower to [small or ]
※
When the preservative film is not tightly wrapped with food, it may not be heated smoothly.
• Frozen rice (please refer to the following for freezing methods)
→
For frozen rice wrapped in preservative film, place the side with
multi-layer preservative film facing down on a shallow dish.
• Frozen rice in frozen Shaomai
→
Please set the firepower to [large or ] and heat it.
• Steamed products... Spray water mist when food is dry.
※
To prevent the soup from splashing, please wrap thick food such as curry and eight-treasure pickles
with preservative film.
• When putting in the shallow-mouth dish, please wrap it tightly with preservative film. Leave a void
when wrapping the preservative film around the edge of the container. After heating, stir it evenly.
• Please remove the quail eggs. If there are shrimp or octopus, it may collapse. Therefore, please wrap
it with a layer of preservative film and heat it while observing in the manual "Microwave" mode.
• High-consistency dishes such as curry and octopus are not easy to heat, so please use the "2 dishes"
mode and set the firepower to [large or ] before heating.
• It is not easy to heat in the frozen state, so when heating is insufficient, please observe while heating
in manual "Microwave" mode.
Freezing method of rice
• Adjust 1 piece of 150g (approximately the portion of a tea bowl) to be flat with a thickness of 2~3cm, and
wrap it with preservative film.
If the rice is in balls or a large amount of rice is heated together, it will be difficult to heat the rice inside.
The automatic heating effect is not good when putting the storage container or bag into it.
• Try to prepare freshly cooked hot rice.
When wrapping the preservative film in a hot state, it can prevent steam from coming out and keep it in
good condition. It is difficult to dry even when heated.
Different types and states of food may cause
uneven heating. Different kinds and states of food,
such as fish species, shape, size, and thickness, may
cause uneven heating.
→
When the heating is insufficient, please extend the
heating time or observe while heating in manual
"Microwave" mode.
When heating multiple foods at the same time
• Keep food in the center.
• Please adjust the serving size, initial temperature,
and type of food.
When the food serving size varies greatly and
there is a temperature difference before heating, it
cannot be heated evenly.
2~3cm thick
Wrap the
preservative film
around the edge
of the container,
leaving a little
seam
Please wrap the
preservative film
close to the food
Heating rice and dishes / Tips for proper use
Cooking method
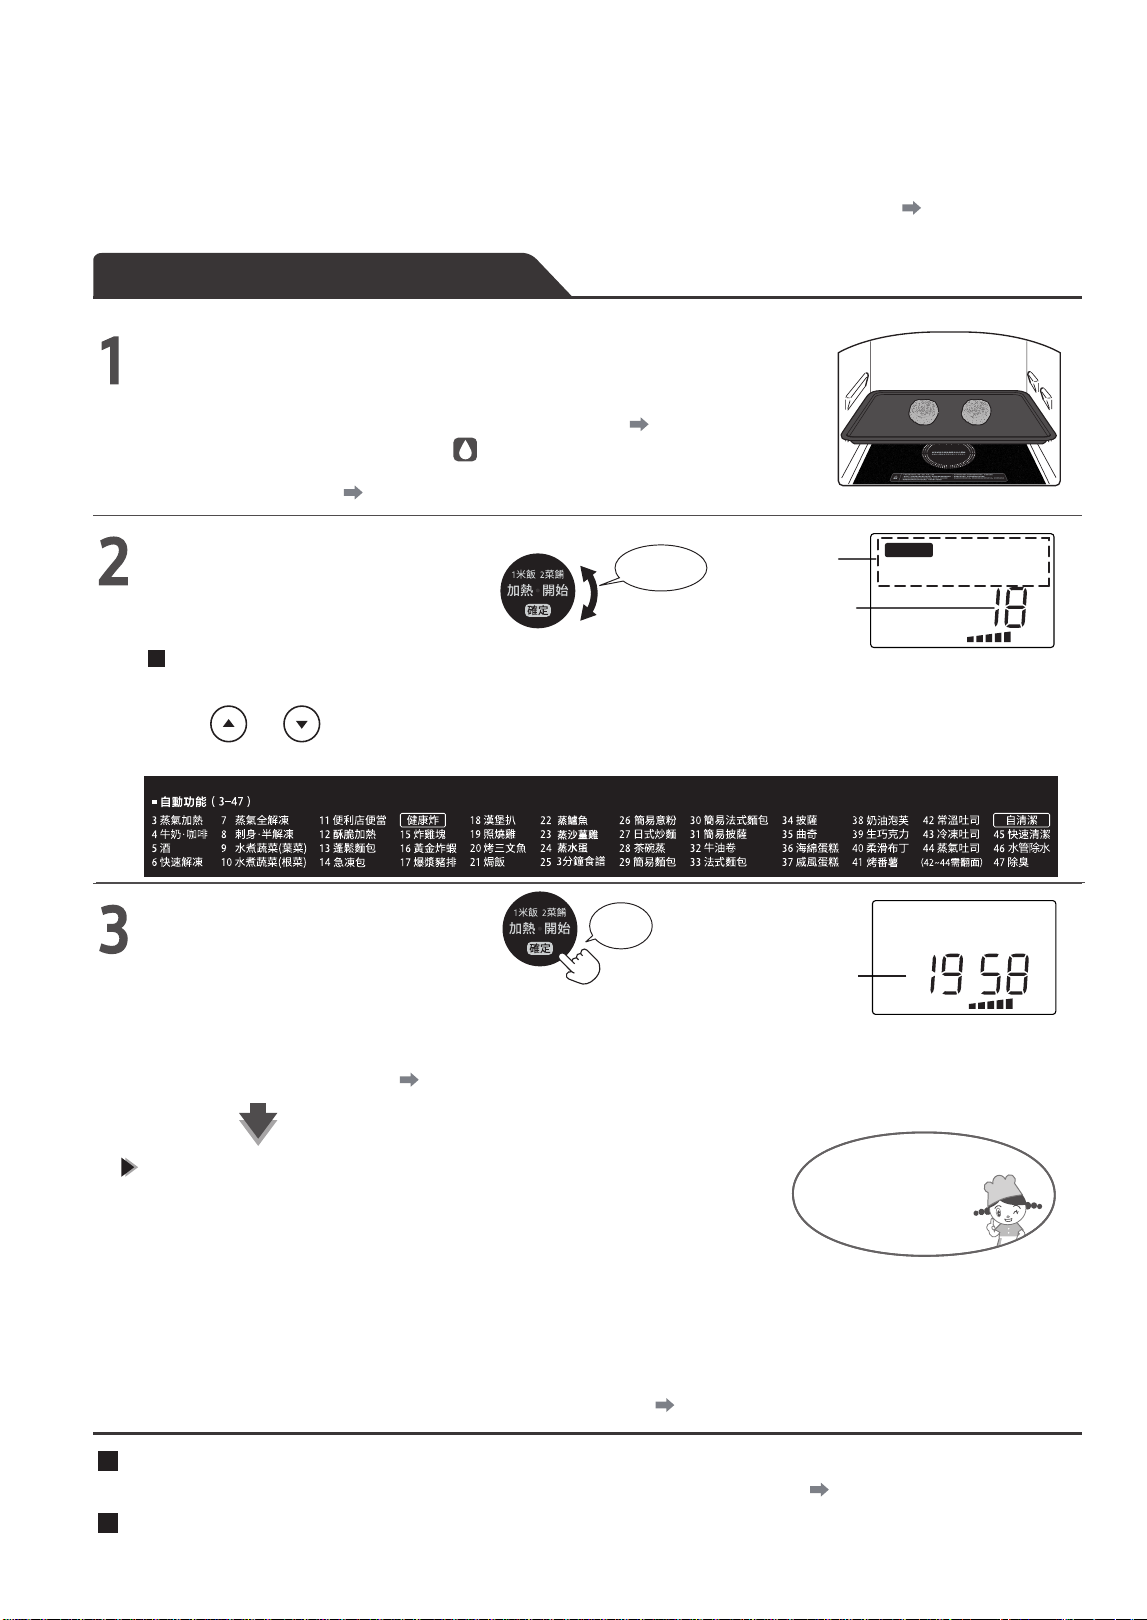
22
Instructions to automatic menu
Automatic cooking without time and temperature adjustment
★
Explain the basic operation of automatic menus 3~44.
★
For automatic menus 3 ~ 14, 26, 29~31, and 42~44, please refer to "Tips for Correct Use" ( P.24~33).
★
Please refer to the cooking set for detailed practices of healthy frying (15~44).
※
Different menus will lead to different operations. Please refer to the cookbook for operation.
Put the food in
• Please refer to the cookbook, etc. for the accessories and containers used and place them
in the designated position.
• The menu using steam should be prepared for water addition. P.10
The menu with steam identification of on pages 24~33 and the menu with
identification in the recipe set
• Menus need preheated P.23
• Select the heating type from the menus
(3~44) recorded on the oven door.
Select menu number
Select Fires
→
Press the "Fire Adjustment" key before (or within 10 seconds after) pressing the start key to adjust.
• Press and to adjust the firepower. There are five levels of firepower.
Turning
Type of
heating
Menu No.
Automatic menu
Start (start cooking)
Press
Displays the
remaining time
• In some menus, the buzzer will sound 5 times during cooking. At this time,
please open the oven door, operate according to the food set, then close the
oven door and press the "Start" key.
(Prompt sound during cooking P.23)
Be careful when
taking out the
oven and baking
tray that will
become hot
• The buzzer will sound when you forget to take out the food. (1 minute, 3 minutes,
and 5 minutes later), open the oven door or press"Cancel"to stop it.
If the buzzer sounds 3 times, cooking is completed.
• When the oven door is opened, steam may come out of the oven.
In addition, please note that residual steam may be discharged from the vent.
• Please remove water from the pipeline and perform self-cleaning. P.49
After cooking with a steam menu
Time cannot be changed after starting cooking
When it is desired to continue heating after completion (extend the time)
→
Turn the knob within 3 minutes after cooking, then set the time and heat while observing P.7
Basic Operation
(e.g. 18 Burger Meat)
烤盤 上下層
烤焗
自動功能
w
弱 強
烤盤 上下層
烤焗
w
分 秒
弱 強
• If the menus are different, "
高溫
" will be displayed on the display part after heating
is completed "
冷卻
". Do not unplug the power plug while the word "
冷卻
" is
flashing.
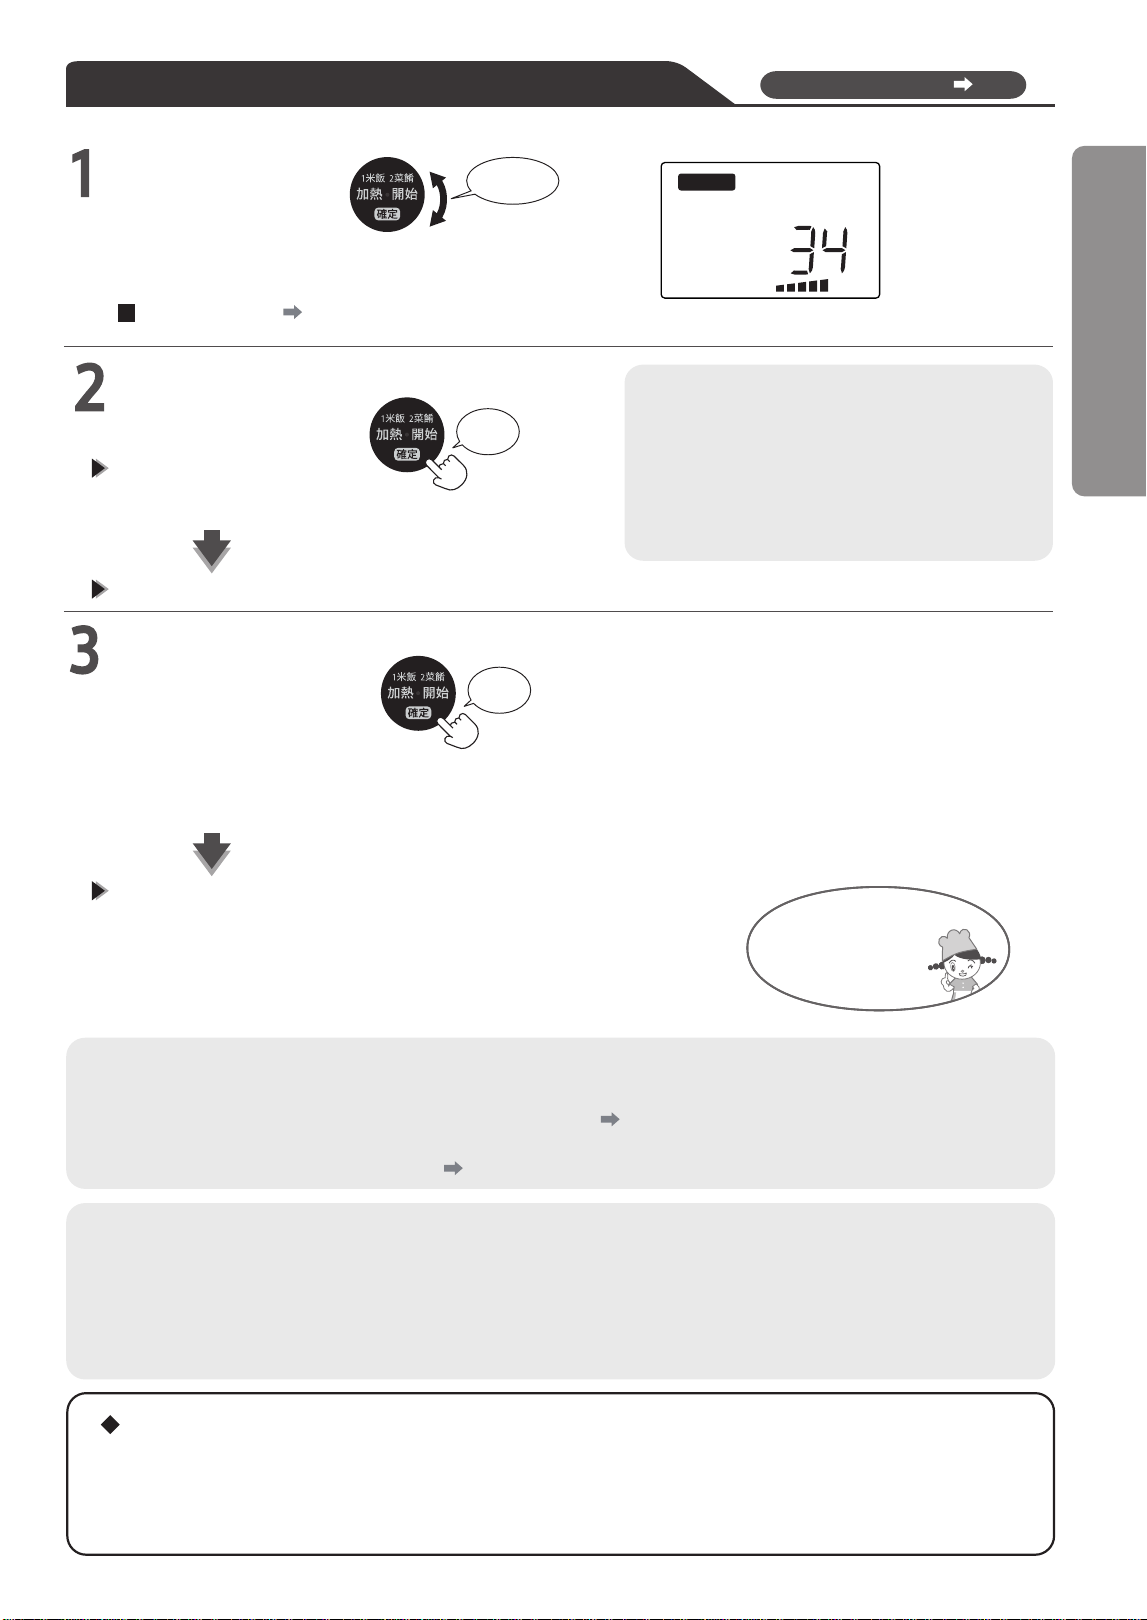
23
Basic Operation
Menus requiring preheating (e.g. 34 pizza)
Preheating refers to P.39
※
There is a menu for preheating after putting it in the baking tray. Please refer to the cuisine set.
Select menu
Turning
• Select the heating type from the menus (3~44) recorded on
the oven door.
Selection effect P.22 Operation Step 2
Start (start preheating)
Press
The remaining time will be
displayed 1 minute before the
preheating is completed
If the buzzer sounds for 5 times, preheating is completed (the word "Preheating Ended" lights up)
• The preheating time is around 20 min.
During this period, if no operation is
performed, the menu setting will be canceled
after 3 times of buzzing and then the power
supply will be disconnected.
• If preheated after being put into the baking
tray, it will become hot, so be careful when
taking out or putting in food.
To start by putting food in an oven(start cooking)
Press
• After putting in the food, press the "Start Heating" button to start heating.
※
If the oven door is not opened/closed after preheating, it will not run even if the "Start Heating" button
is pressed.
If the buzzer sounds 3 times, cooking is completed.
• The buzzer will sound when you forget to take out the food. (1 minute, 3
minutes, and 5 minutes later), open the oven door or press "Cancel" to stop it.
Be careful when
taking out the
oven and baking
tray that will
become hot
Instructions
Notifications
• After cooking, the baking tray will get hot. Please be very careful.
• reading "Cuisine set" and "Serviceable/Unserviceable Containers ( P.14~15)". Please use the container that matches the
type of heating after
• Please read the safety precautions carefully. P.2~5
Please cook according to the ingredients, portions and cooking methods recorded in the cuisine set.
• Automatic cooking may not be successful except for the ingredients (portions) recorded in the cuisine set.
(Please heat while observing in manual cooking mode)
• Due to different room temperature, initial temperature, oven temperature and power supply voltage, the cooking effect and
heating time will also be different.
About the prompt tone during cooking (5 buzzes)
Instructions to automatic menu
Cooking method
烤盤 上下層
烤焗 預熱
自動功能
弱 強
• If the menu is different, "
高溫
" and " " will be displayed on the display
part after heating. Do not unplug the power plug while "
冷卻
" is flashing.
冷卻
• Some menus will be prompted during cooking, such as turning over.
• If the oven door is not opened/closed, it will not run after pressing the "Start Heating". (Display "
門
")
• If the oven door is not opened, the buzzer will sound once every 1 minute for at most 5 times.
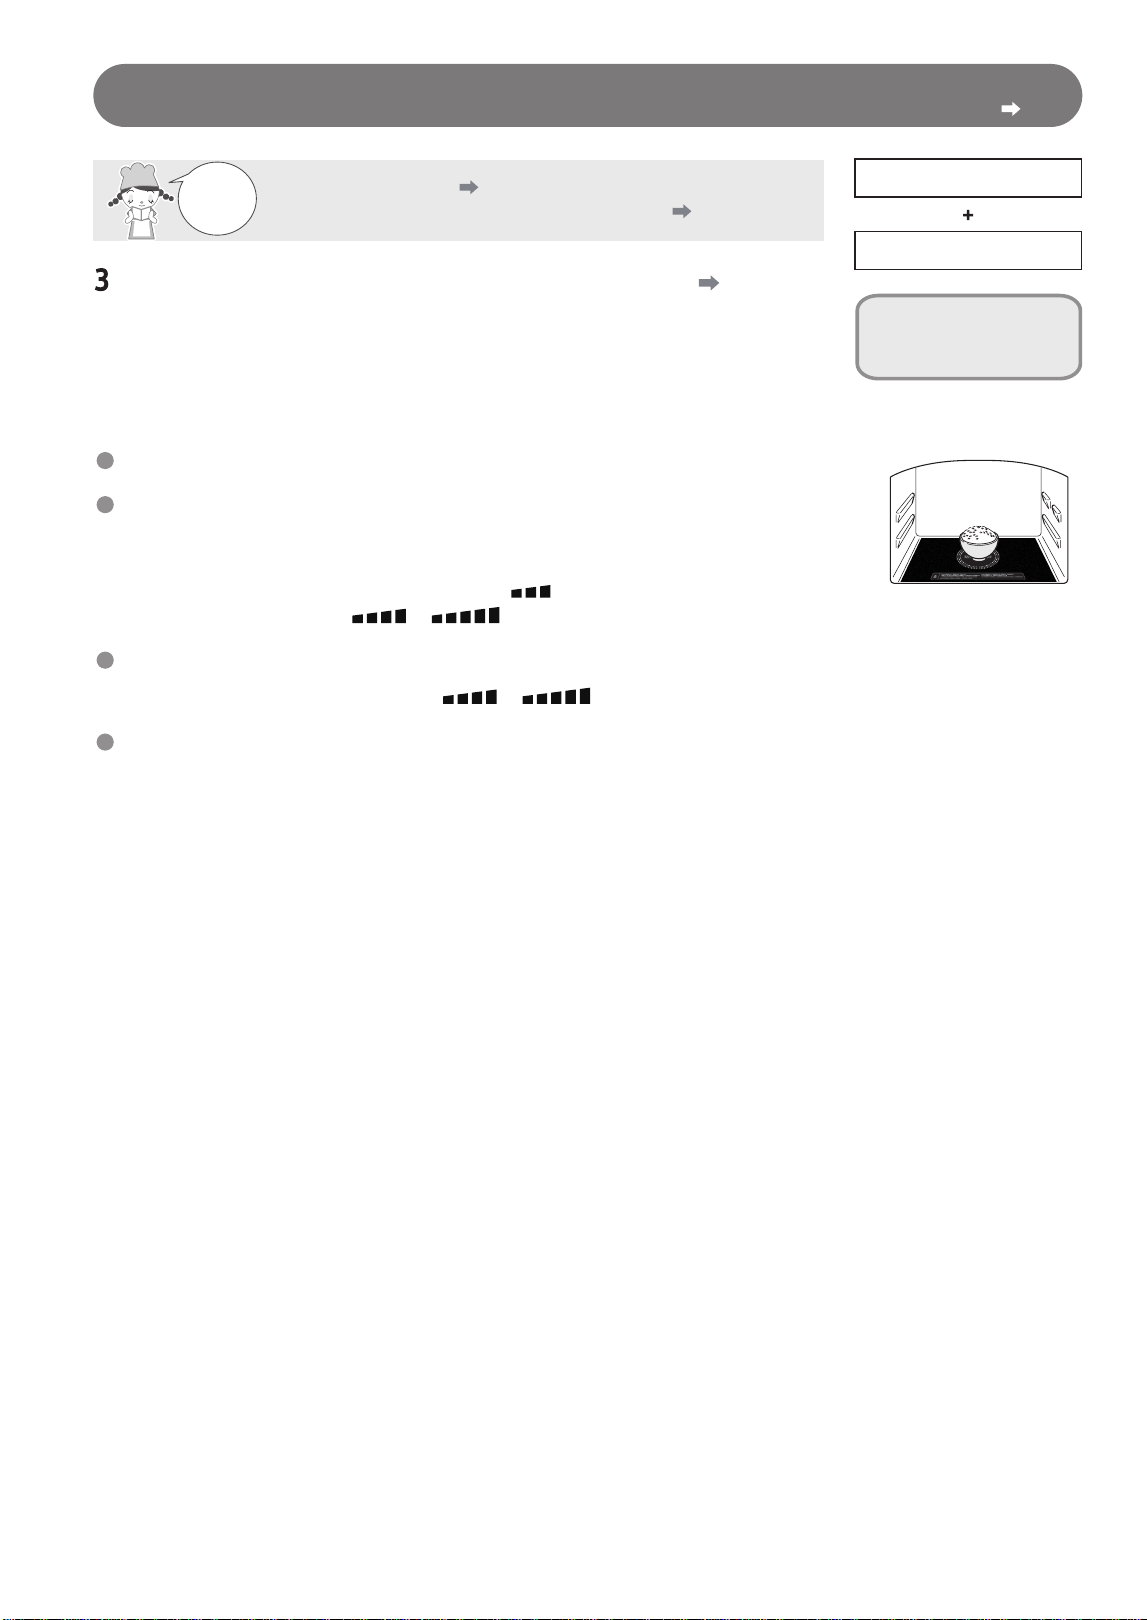
24
Microwave steam heating
Skills for correct use Basic operation P.22
Please
read
carefully
Safety Precautions P.2~5
Precautions and tips for automatic heating
P.16~17
Microwave (infrared sensor)
Steam
No wrapping with
plastic film
Placed in
the center
Steamed oxygen heating:
Prepare to add water P.10
Use steam to fully heat shumai, rice, etc.
• After pressing the "Start Heating", steam will be generated after about 1 minute.
Servings that can be heated at one time···100~200g
Heating method··
· Please put it into a heat-resistant container without
wrapping plastic film or covering, and directly place
it in the center of the oven for heating.
High-thickness foods such as curry and eight-treasure rice pudding are not easy to heat
More time-consuming than "heating (1 Rice, 2 Dishes)"
• Please set the firepower of rice to [Standard ] and that of steamed products
and dishes to [Large Fire
or ].
• Please heat in "2 Dishes" [Large Fire or ] mode.
• Since the microwave output power is controlled to 400 W, it takes a long time.
※
Quick-frozen steamed buns, meat buns and bean paste buns may not be heated smoothly sometimes
due to different sizes.
Please heat in the "14 Quick-frozen Steamed Bun Heating" mode or select "Steam Microwave" or
"Microwave" while observing.
The steam rack can be
used in microwave
steaming mode
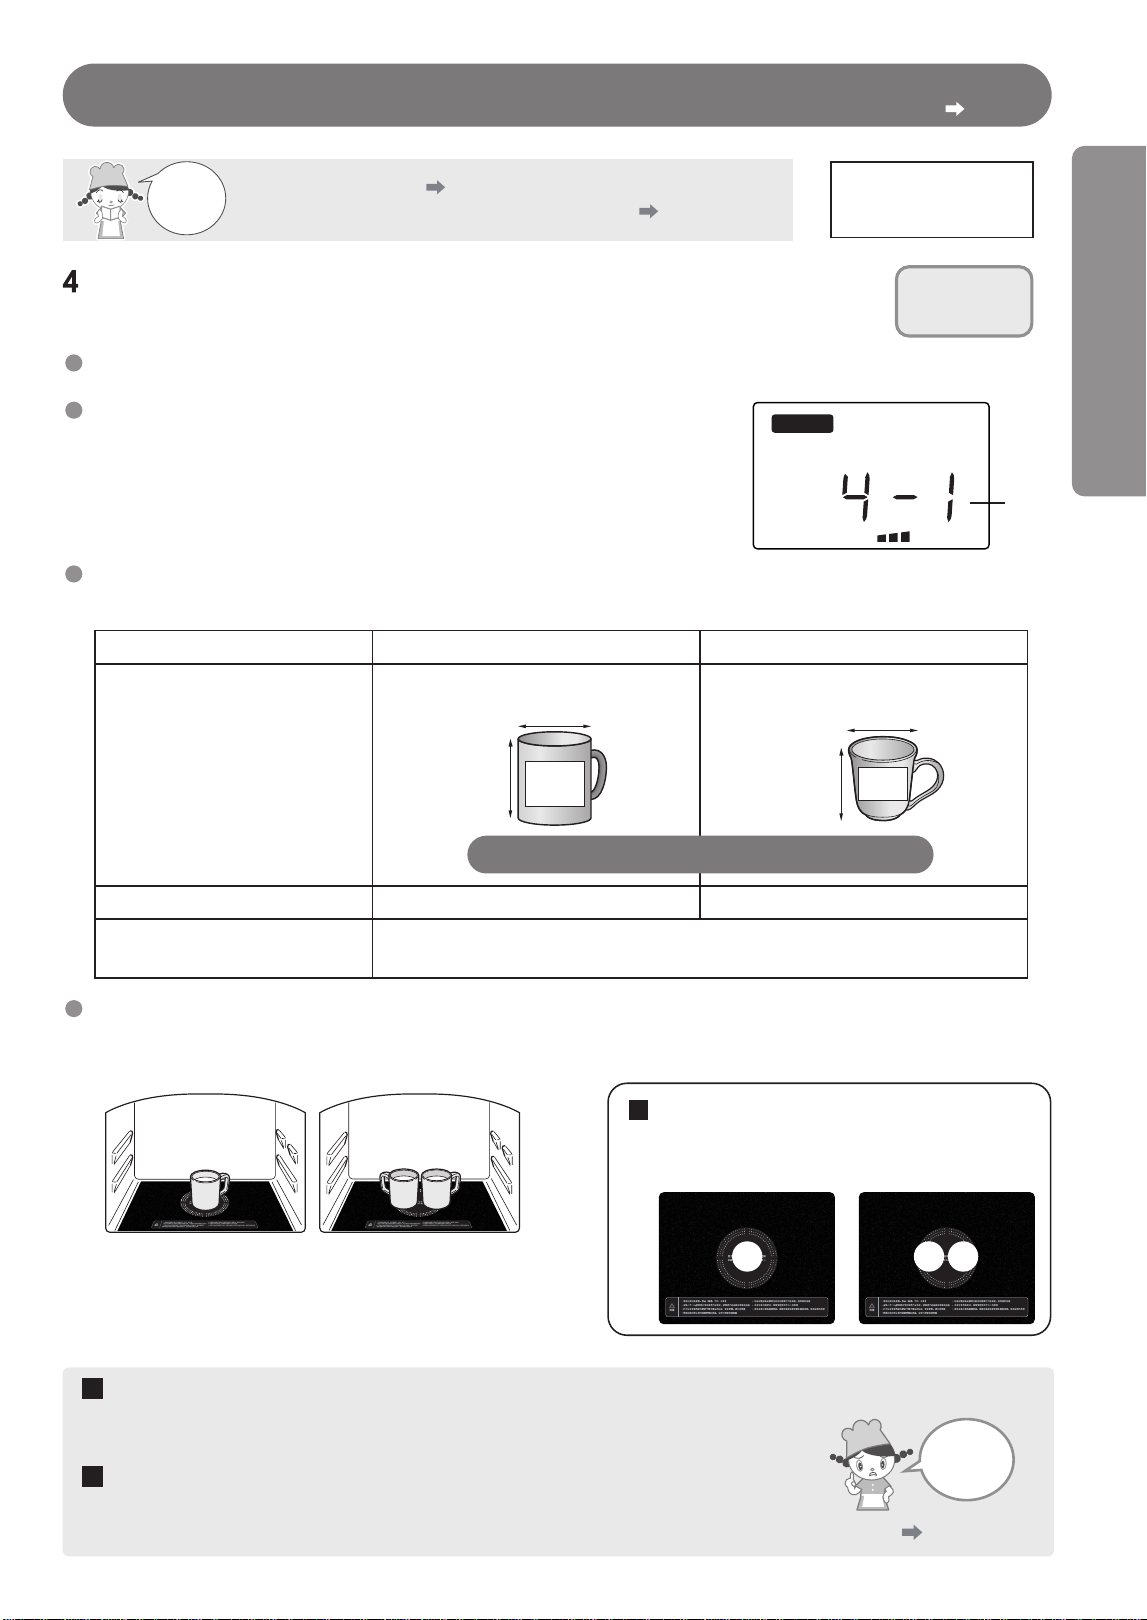
25
Milk • Coffee
Please
read
carefully
Microwave
(Infrared sensor)
Do not use
a baking tray
or steam rack
Safety Precautions P.2~5
Precautions and tips for automatic heating
P.16~17
Milk • Coffee
Heat the milk or coffee in the container.
Servings that can be heated at one time…4-1: 1 cup, 4-2: 2 cups.
Rotate the knob to select menu and number of cups (1 cup
or 2 cups).
(Excessive heating may occur, so please confirm carefully
when selecting the number of cups)
Number
of Cups
Please distinguish the container type/size/serving size of 1 cup.
Infrared sensors may not work properly with different container types/sizes/1 cup serving size.
Milk Coffee
Low wide-mouth mug Low wide-mouth coffee cup
Vessels and dimensional
criteria used
Standard quantity of 1 cup
Number of cups that can be
heated at one time
About 8cm in diameter
About 7cm in diameter
About
8.5cm high
About
7.5cm high
Full capacity
of about
260mI
Full capacity
of about
200mI
Not more than 80% of the container
200mI 150mI
1 cup or 2 cups
Place the container in the center of the oven.
When placed outside the center of the oven, the infrared sensor may not detect correctly and boiling may occur.
Placed in
the center
Placed near
the center
1 cup (milk, mug) 2 cups (milk, mug)
Method of placing cups by number
→
Please place near the center
1 cup 2 cups
Beware
of sudden
boiling!
The beverage may suddenly boil and splash when removed, causing burns.
• Mix well with a spoon before and after heating.
• Please leave it for a while after heating and then take it out.
→
Please set the time conservatively in manual "Microwave" mode, and observe while heating.
P.45
For beverages such as water when the type, size and amount of
containers are different
Basic operation P.22Skills for correct use
Correct use of techniques "Steam Heating", "Milk • Coffee"
Cooking method
Full capacity of
about 260mI
Full capacity
of about
200mI
Not more than 80% of the container
自動功能
弱 強
微波
杯

26
Liquor
Please
read
carefully
Safety Precautions P.2~5
Precautions and tips for automatic heating P.16~17
Microwave
(Infrared sensor)
Do not use
a baking tray
or steam rack
Liquor
Heat the wine in the bottle by microwave heating mode.
Servings that can be heated at one time...Wine bottles 5-1: 1 bottle, 5-2: 2 bottles.
Rotate the knob to select menu and number of cups (1 cup or
2 cups).
(Excessive heating may occur, so please confirm carefully
when selecting the number of cups)
Number
of Bottles
Please distinguish between container size/serving size of wine.
• Container···Pudgy wine bottle.
(The effect may vary depending on the size, shape and material of the container)
• The standard volume of 1 bottle is 160ml (80% of the wine bottle).
(May boil when less than a standard volume)
Please place the bottle in the center of the oven.
When heating 2 bottles, place them close to the center.
Method of placing cups by number
→
Please place it close to the center.
1 pcs. 2 pcs.
Placed in the
center
Wine bottle (liquor)
When placed outside the center of the oven, the infrared sensor may not detect
correctly and boiling may occur.
When heated with a cup
→
Please set the time conservatively in manual "Microwave" mode, and observe while heating.
P.45
Skills for correct use Basic operation P.22
自動功能
弱 強
微波
杯
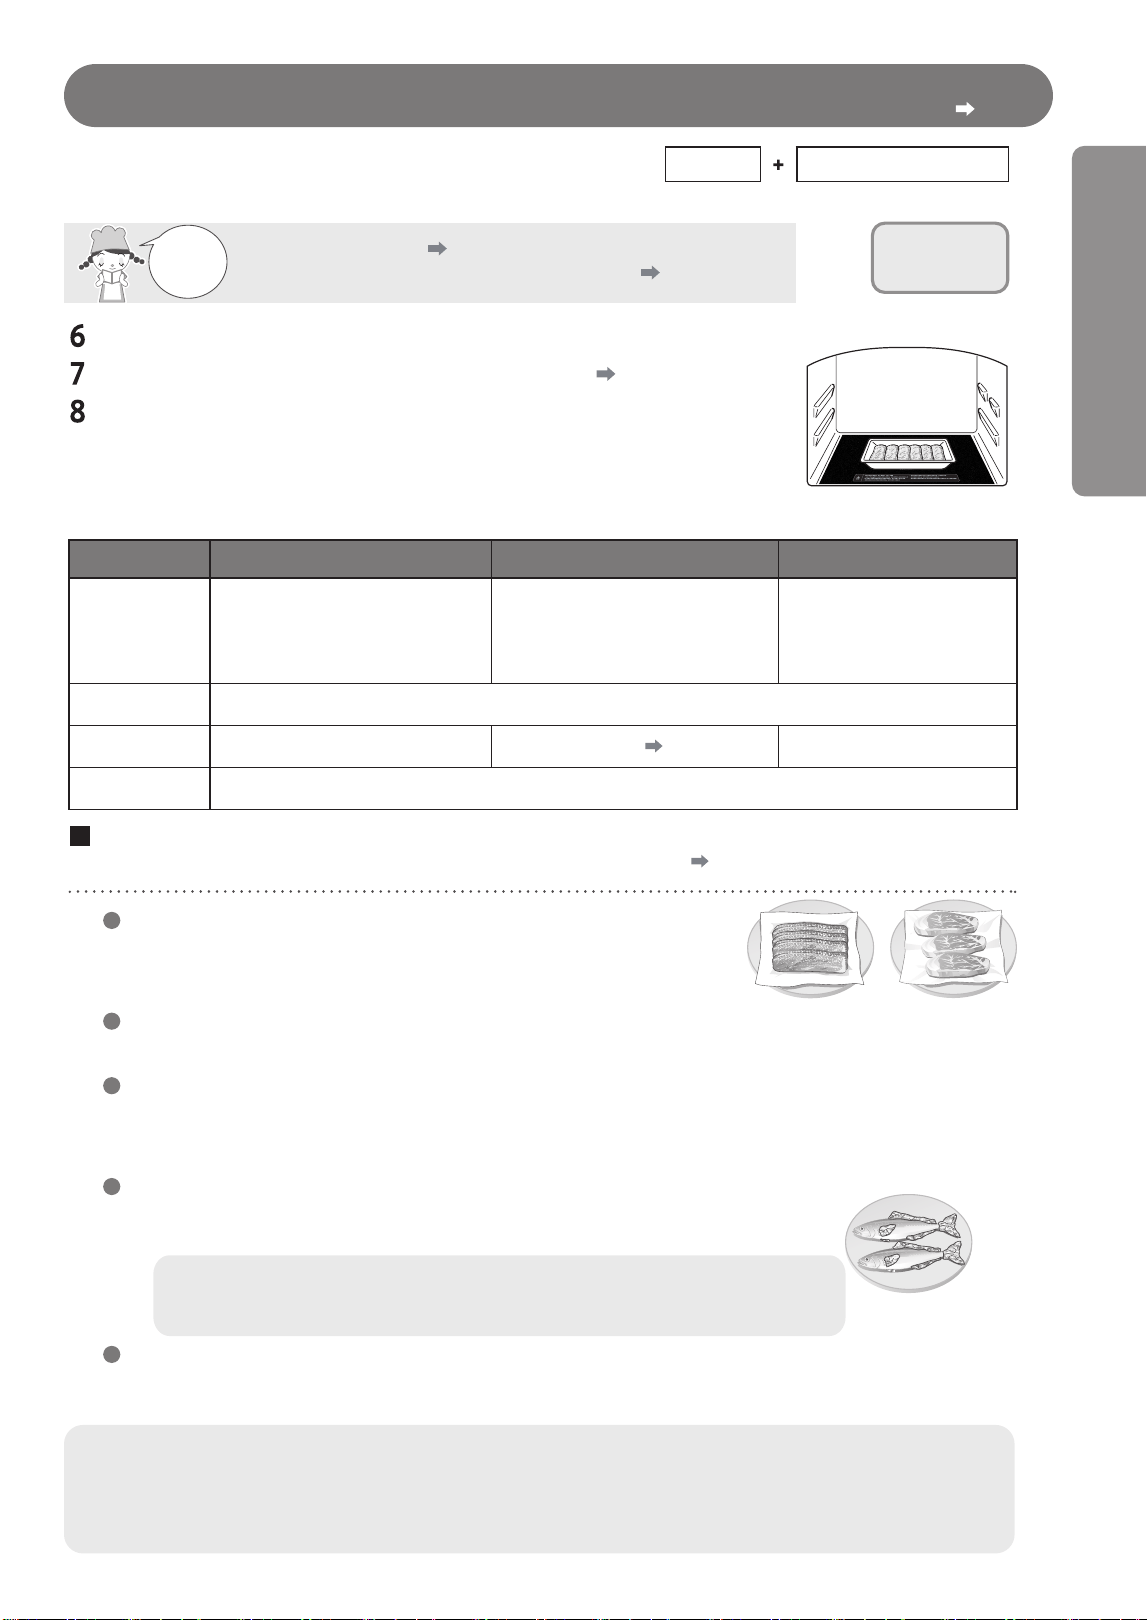
27
Thawing method
Microwave
(infrared sensor)
Steam
※
※
Steam is only added in "7 Steam Full Thawing".
Do not use
a baking tray
or steam rack
Please
read
carefully
Safety Precautions P.2~5
Precautions and tips for automatic heating
P.16~17
Quick thawing
Steam Full Thawing:
Prepare to add water P.10
Sashimi • Semi-thawed
No wrapping with
plastic film
Place
horizontally and
transversely in
the center
Shallow-mouth foam tray
Thawing of meat and fish kept frozen in freezing chambers.
After being taken out of the freezing chamber, it is thawed in a hard state.
(After the surface starts to thaw, if it is directly completed without sufficient thawing, it
may not be thawed smoothly)
6 Quick thawing 7 Steam Full Thawing
8 Sashimi • Semi-thawed
Effect
Recommended
Thawed Servings
Water addition
Plastic film and
cover
State ready for cooking (can be
thawed in a short time)
Not required
• Thaw until the mixed minced meat is
unraveled
• Thaw until thin meat slices are
dispersed
(More time-consuming than 6 Quick
thawing.)
Thaw until the kitchen
knife can cut in easily and
there is still some freezing
in the middle
Not required
Not required
Required
P.10
100-600g
When less than the above amount, when the surface is melting, or when thawing is insufficient
→
Please thaw while observing in the "Microwave 100W" mode.
P.45
Do not wrap it with plastic film or cover it, and thaw it directly on
the foam tray
• If the foam tray is deep, move to a shallow tray or spread kitchen paper on a
heat-resistant shallow dish and thaw the food.
When thawing two or more foods at the same time, please adjust the type and size of food
• The best thickness of thawable food is less than 3cm.
→
Please press "Cancel" and open the oven door, wait until the displayed content disappears before using it.
• Infrared sensors may not function properly when the oven is very hot. In addition, when foam trays and plastic film
melt and frozen food is placed in the oven, thermal shock may cause cracks or ruptures at the bottom of the oven.
Use tin foil to prevent discoloration and cooking
• When servings are large, it is recommended to wrap them in a circle.
• Non-uniformly shaped food (fish, etc.) is rolled into a long shape.
Depending on the shape and type of food to be thawed, some may be over-cooked while others
are hard
• In particular, thin meat slices such as fatty meat and instant-boiled pot meat may not thaw smoothly.
• Please roll the tin foil carefully to avoid touching the bottom of the
furnace wall and door. (Otherwise, sparks may appear and the oven
door glass may be broken)
Precautions
The essence of freezing and thawing
• Prepare fresh ingredients and freeze them.
• Evenly cut the ingredients into thin slice (within 3cm) according to a single portion, and keep them uniform in thickness
and shape. The size shall be more than 6cm wide x 10cm long. If the shape is too small or in a stacked, blocky state, it
cannot be thawed smoothly.
Basic operation P.22Skills for correct use
Skills for correct use "Wine" and "Thawing Method"
Cooking method
After "C21" " " is displayed, the oven shall be fully cooled before thawing
高溫
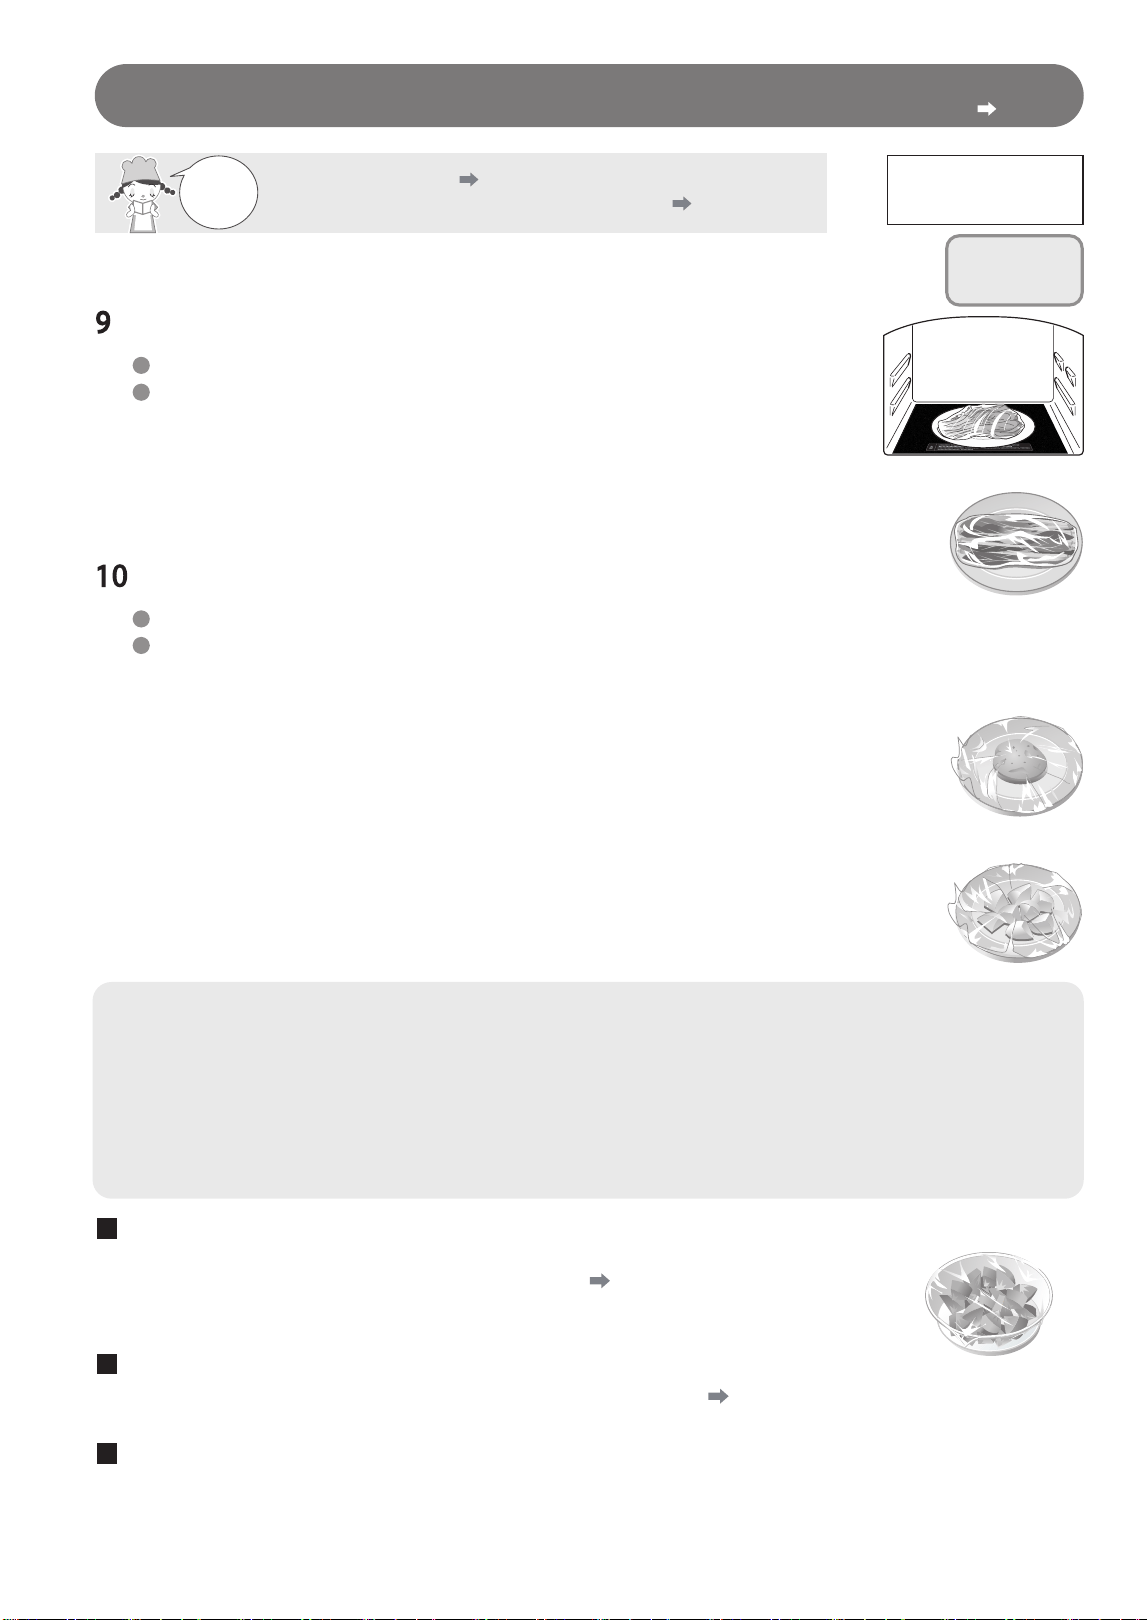
28
Boiled vegetables
Please
read
carefully
Safety Precautions P.2~5
Precautions and tips for automatic heating
P.16~17
Microwave
(infrared sensor)
Do not use
a baking tray
or steam rack
Placed in the
center
Microwave heating like boiled vegetables (leaf and root).
Boiled vegetables (leaf):
Spinach/Broccoli/Cabbage, etc.
Boiled vegetables (root)
:
Potato/Taro/Pumpkin, etc.
Servings that can be heated at one time···100-300g (food weight only)
Cooking method
… After washing with water, wrap it tightly against the food,
and put the plastic film into a heat-resistant shallow dish.
• Stagger the leaves and stems, make a few cuts on the thicker stem with a kitchen
knife, and wrap them in plastic film.
• Pack as wide as possible to avoid food coming out of shallow dishes.
• When the quantity is large, it shall be divided into two parts and wrapped with
plastic film.
Servings that can be heated at one time…100~300g (food weight only)
Cooking method
… Wash with water, put the dish in a state of water and wrap the
food with plastic film to ensure that there is a gap between it
and the dish.
• When cooking of the whole
Wrap the entire dish in plastic film and heat. After heating, take it out of the oven and
allow it to stand for about 5 minutes in a state wrapped with plastic film.
(Food is easy to dry, so do not tear off the plastic film)
When heating two or more, it is necessary to select vegetables of the same size in order to
ensure uniform heating.
• When cooking after cut
Peel and cut into appropriate sizes, add a little water and place on shallow dishes and
wrap the food with plastic film to ensure that there is a gap between them.
• Be sure to heat leafy and root vegetables on a heat-resistant shallow dish.
• When cooking leafy vegetables, simply wrap the food with plastic film rather than a shallow dish.
• When cooking root vegetables, wrap them in plastic film with a shallow dish.
• Do not overlap or wrap the plastic film multiple times.
• Do not wrap with items other than plastic film.
※
Incorrect use may cause food to smoke and catch fire.
In addition, the bottom of the oven may crack or cause failure after sparks come out.
Instructions
When stewing vegetables of different sizes and requiring extra water
Add a little more water, put it into a heat-resistant container, wrap it with plastic film and
heat it while observing in the "Microwave 600W" mode. P.45
• When using the "Root" mode to heat small chopped carrots or a variety of vegetables,
sparks may emanate which can cause charring and drying.
When the serving size is less than 100g
Please observe while heating in the manual "Microwave 600W" mode. P.45
Cooking in constant temperature heating mode may cause smoke or fire.
Insufficient heating
Please turn over the food up and down or replace the left and right sides, extend the time or observe
while heating in "Microwave 600W" mode.
(Leave a little space when wrapping
the plastic film)
Skills for correct use Basic operation P.22
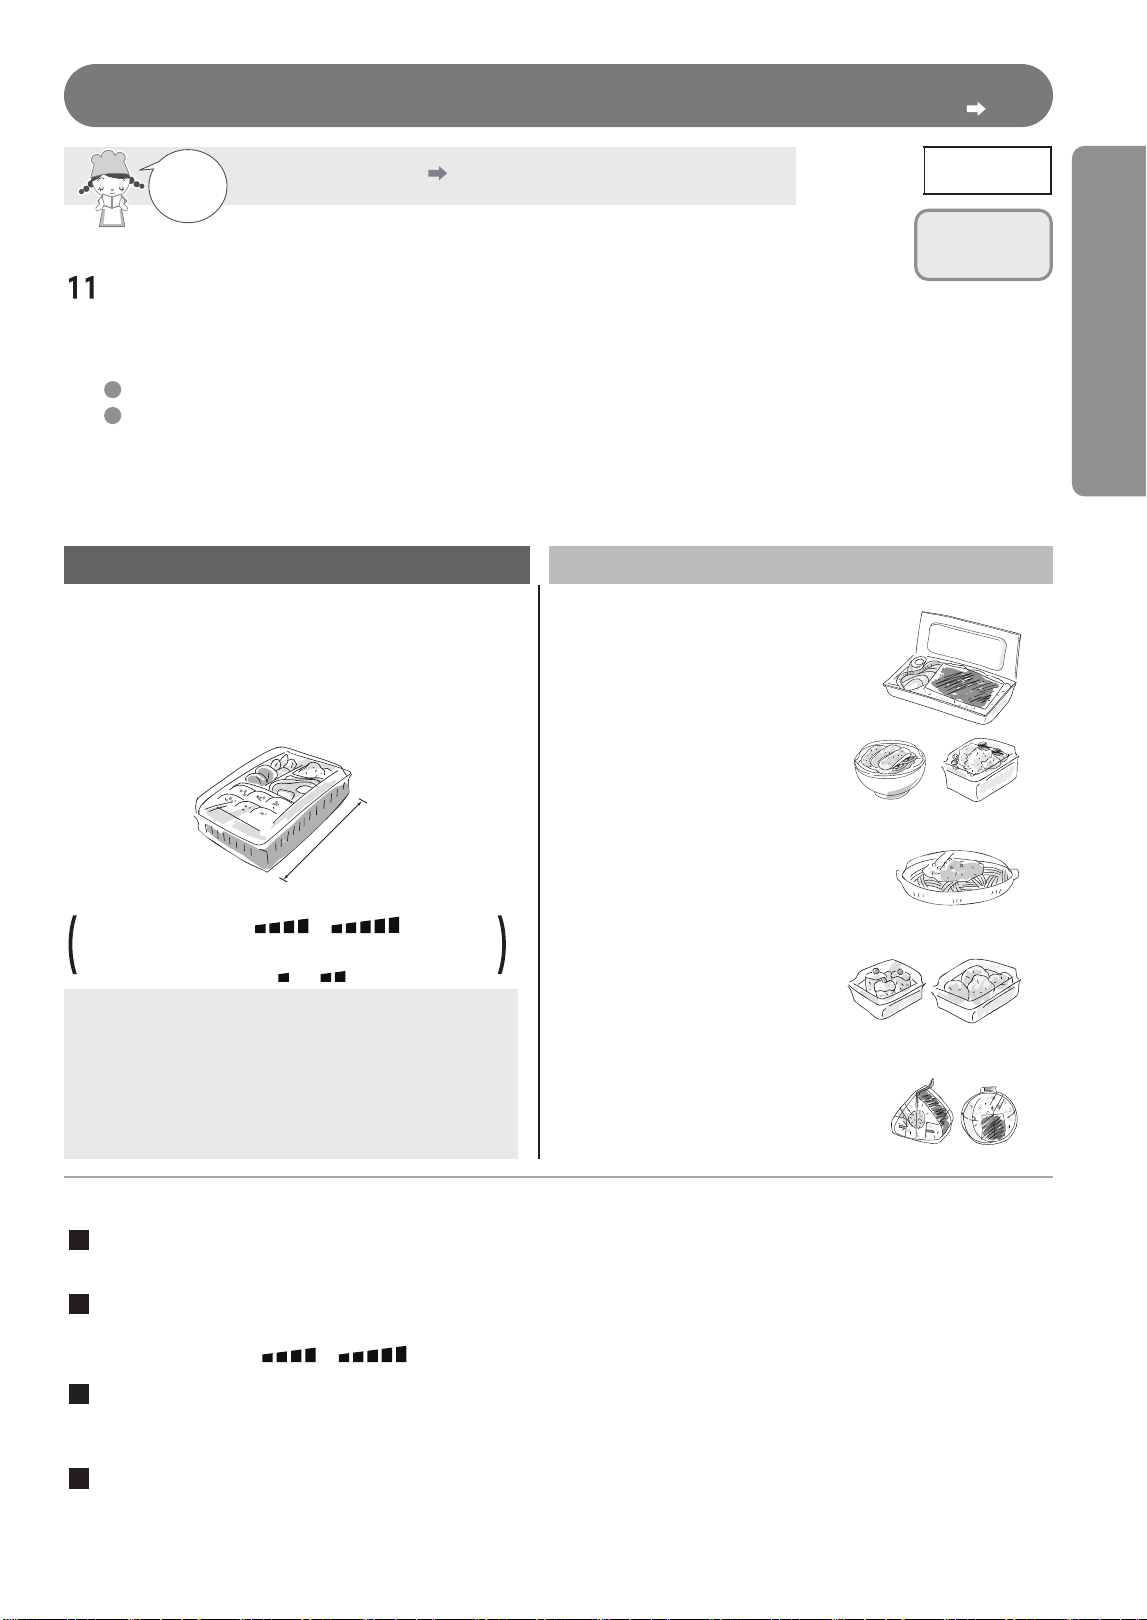
29
Convenience store bento
Please
read
carefully
Safety Precautions P.2~5
Microwave
Do not use
a baking tray
or steam rack
Convenience store bento:
(The standard heating time is about 1 minute
and 40 seconds)
Heat up bento bought at convenience stores, supermarkets, etc.
Servings that can be heated at one time…One-person portion (1 bento)
Heating method··· Please place the product in the center of the oven with the circle as the center
for heating without tearing off the package. (Be sure to remove boiled eggs
and aluminum boxes, seasonings such as soy sauce and mayonnaise)
※
When you want to continue heating, please extend the heating time or observe while heating in manual
"Microwave" mode.
Heatable bento Non-heatable bento
Bento of convenience stores and supermarkets
(Bentos marked with "Microwave heating")
Separate rice and dishes
Bentos to eat between shows during the break etc.
(Bentos with a side length of about 19cm)
Approx. 19cm
When the side length is greater than 19cm, please set
the force to [large fire
or ] and then
heat; when the side length is less than 19cm, please
set the force to [small fire
or] ]and then heat.
Bento state after heating
The heating will vary depending on the type of bento.
• Fried products may be heated at a higher temperature,
and thicker foods may be heated to a slightly warmer
state.
• Pickled products, etc. can also be heated.
Take-away bento in
a convenience store
(Bentos without "Microwave
heating" mark)
Covered food
Yakisoba and Italy noodles in shallow-
bottomed containers
Fried products, Shumai and other
small-size household dishes
Rice balls
For smooth heating
Individual heating
• When 2 or stacked up and down at the same time, it may not heat smoothly.
Please heat as soon as possible after purchase
• Immediately heat the purchased bento (food temperature is about 20°C).
• Heat with [large fire or ] fire while stored in a refrigerator.
Confirm the container
• Except for the bentos of convenience stores and supermarkets, containers that are not suitable for microwave heating (such
as styrofoam) may be used. Do not heat them at this time.
Do not heat eggs
• Be sure to take out the boiled and steamed eggs, otherwise they may break when put directly into them.
Basic operation P.22Skills for correct use
Correct use of tips "Boiled vegetables" "Convenience Store Bentos"
Cooking method
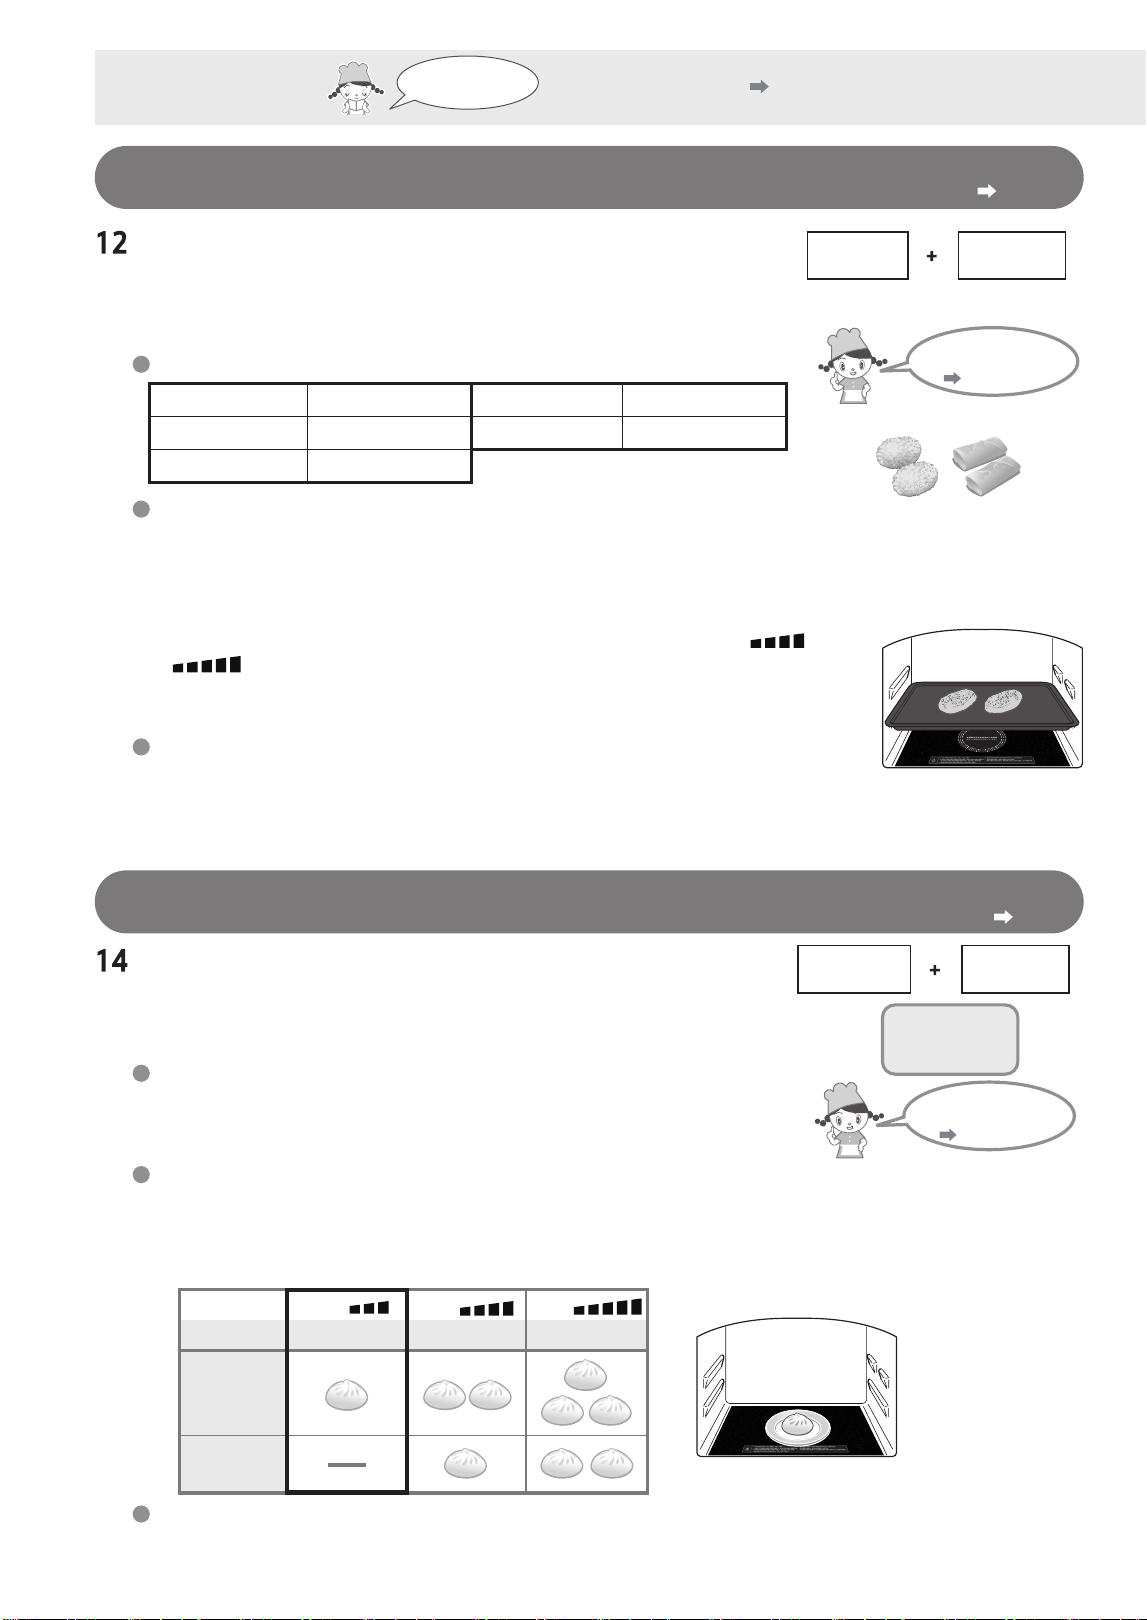
30
Crispy food heating
Please read
carefully
Safety Precautions P.2~5
Heating
tube
Steam
Get ready to
add water!
P.10
Get ready to
add water!
P.10
Crispy food heating
(Steam) (default heating time: about
10 minutes and 30 seconds)
Use heating tubes and steam to heat fried products, barbecue foods,
French bread and curry bread, etc. at room temperature until crispy.
Servings that can be heated at one time···100~200g
Heating method
… Please remove the package or container of food, put the food
directly into the baking tray and heat it on the lower layer.
Place the crisp side of your wish on top.
About 1~2
About 2 pieces
Curry breadFried Balls
Baguette
About 1~2
About 1~4
About 4 pieces
• Please adjust the cooking effect through "Fire Adjustment" according to the heat preference,
type and number.
• When heating refrigerated food that has been cooked, please select [large fire or
] to heat.
• Unable to heat commercially available cooked frozen foods on the market.
• Follow the packing instructions and observe while heating in manual microwave mode.
Combined heating of steam and heat-generating tubes.
• Please tear off the heat-labile packages such as plastic film and plastic bags before heating.
Do not transfer food to the container, put it directly into a baking tray for heating.
Be sure to remove the packaging and container of food before heating
Put the baking tray into
the lower layer
Quick-frozen steamed bun heating
Quick-frozen steamed bun
(Steam) (default time for
heating: 1 minute and 30 seconds)
Do not use
a baking tray
or Steam rack
Heat the commercially available quick-frozen steamed buns with microwave and
steam until they are watery and soft.
Servings that can be heated at a time··· Refrigerated · Room temperature:
1~3
Frozen: 1~2
(about 90g for each)
Heating method…Place the quick-frozen steamed buns with their package and container removed in
a heat-resistant tray and place them in the center for heating.
• Please adjust the temperature by pressing "Fire Adjustment" button according to the heat preference, initial state
(refrigeration, normal temperature and freezing), number and size of quick-frozen steamed buns with reference to the
following table.
Effect
Standard
Large
Fire
Large
Fire
Heating time
standard
(About 1 minute
and 30 seconds)
(About 1 minute
and 50 seconds)
(About 3 minutes
and 50 seconds)
Refrigeration
• Normal
Temperature
(1~3)
Frozen
(1~2)
Placed in the
center
Be sure to remove the package and container before heating
• Please tear off the plastic film and plastic bag before heating.
Skills for correct use
Skills for correct use
Basic operation P.22
Basic operation
P.22
Fried Shrimp
Tempura
Fried Steak
Sandwich
Microwave Steam
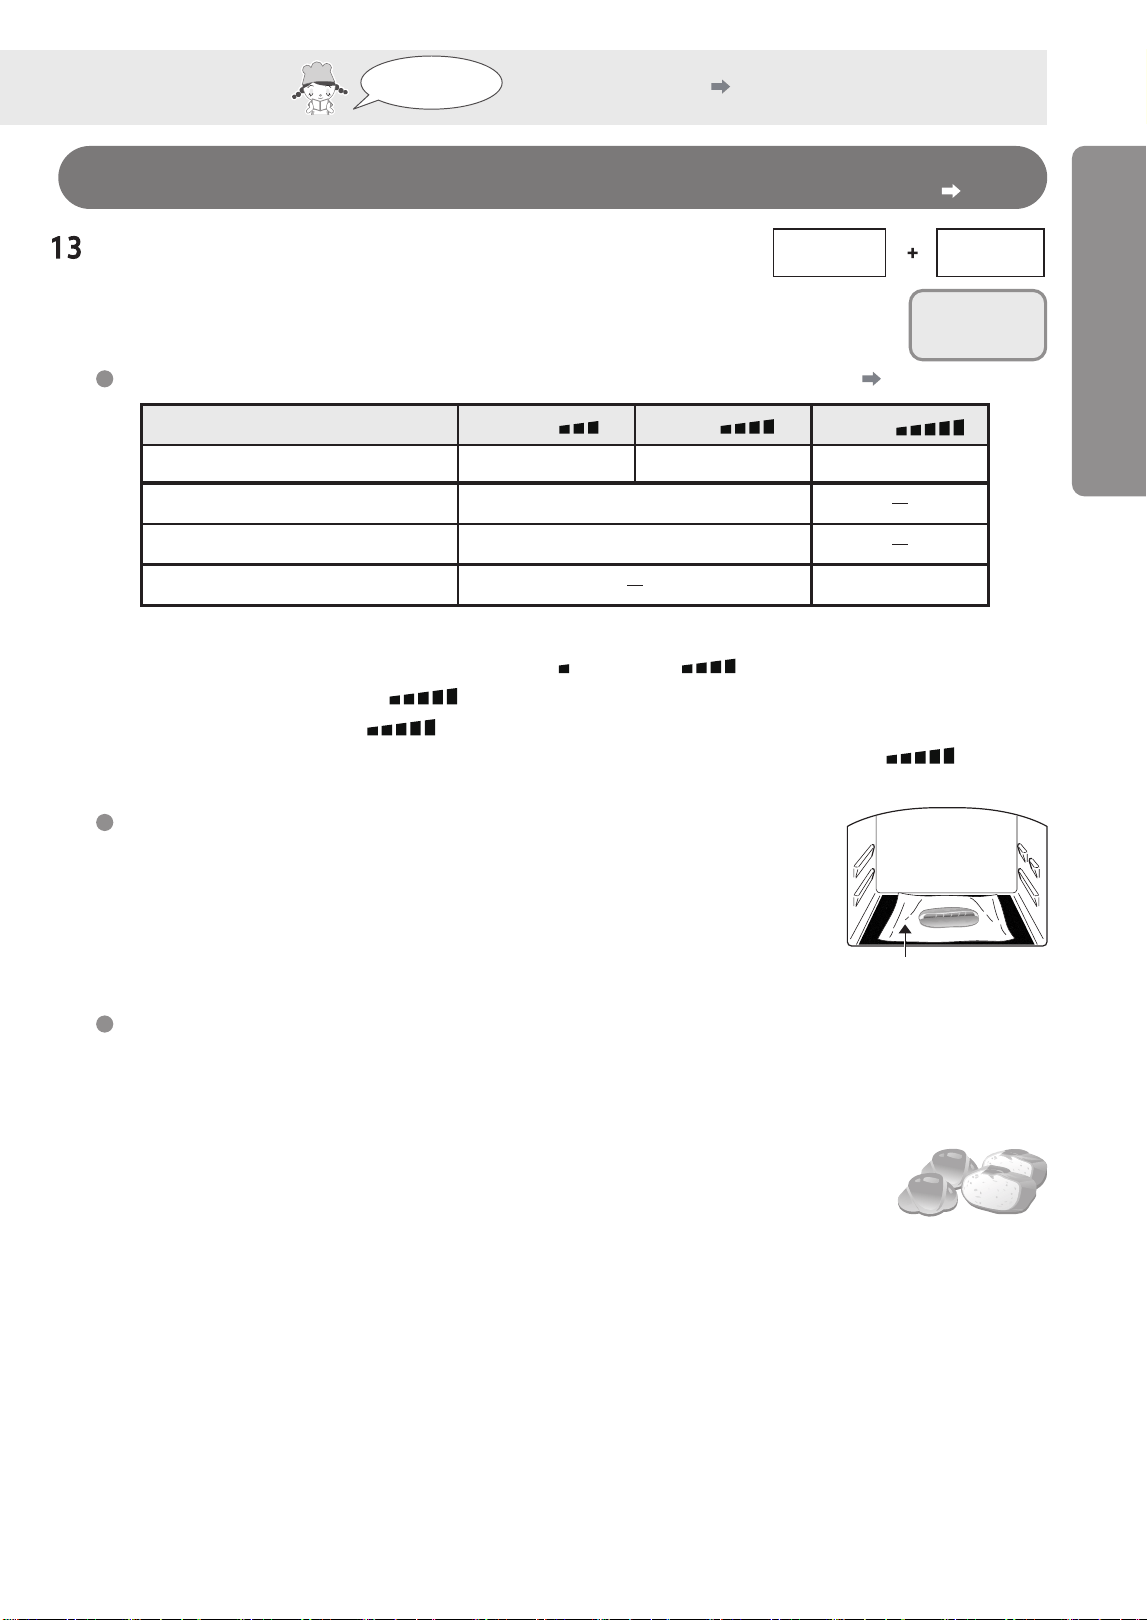
31
Serving size and settings that can be heated
Fluffy Bread
Fluffy Bread
Heating
tube
Heat the commercially available breads (butter roll and pickled vegetable
bread) with a heating tube and microwave until they are fluffy.
Do not use
a baking tray
or Steam rack
(Method of fire adjustment P.22)
About 4 minutes
30 seconds
About 4 minutes
45 seconds
About 4 minutes
10 seconds
Fire Adjustment
Standard
Large
Fire
Large
Fire
Heating time standard
[Normal Temperature • Refrigeration]
Butter Rolls
[Frozen] Butter Rolls
[Normal Temperature • Refrigerated]
Pickled Vegetable Bread
4 pcs. (30g/piece)
1 piece (100g/piece)
1 piece (30g/piece)
Be sure to remove the packaging and container of food before heating
• Please remove the tinfoil.
Do not use metals such as tinfoil to avoid spark splashing due to the combination of microwave and
heating tube.
• Please tear off the non-heat resistant packaging such as plastic film and plastic, do not
move it into a container, just put it directly on kitchen paper.
Heating method… Remove food packages and containers, spread
kitchen paper at the bottom of the oven and place
bread directly on top for heating.
• When baking toast, please press "42 Room Temperature Toast", "43 Frozen Toast"
and "44 Steam Toast".
For normal temperature/refrigerated bread, please adjust the effect according to heat preference,
initial temperature and number of bread (low fire
~ Large Fire ). Please set the fire power of
frozen butter rolls to large fire
.
• According to the Large Fire mode heats normal/refrigerated bread will result in overheating.
• When heating the refrigerated butter rolls, If the heating is performed except in Large Fire mode
but in other modes, the heating will not be sufficient.
Kitchen paper
Correct use techniques "Crispy heating", "Quick-frozen steamed bun heating", "Bread"
Please read
carefully
Safety Precautions P.2~5
Skills for correct use Basic operation
P.22
Microwave
Cooking method
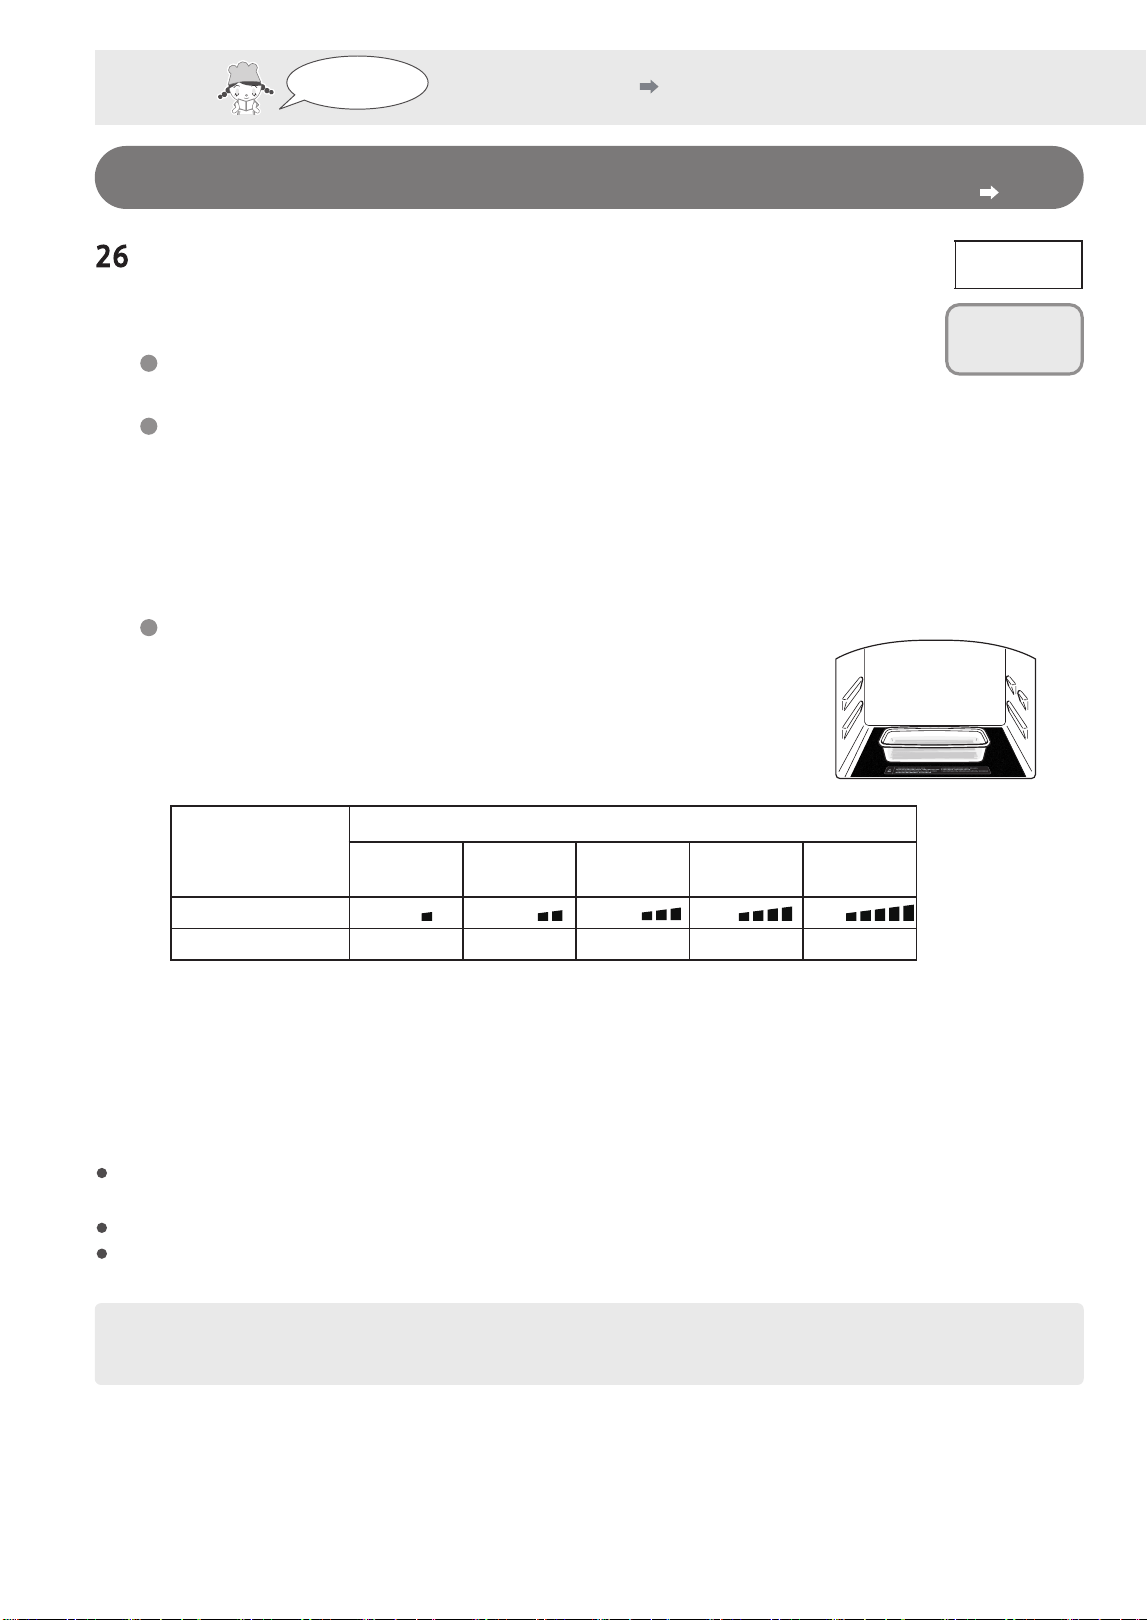
32
Simple pasta
Skills for correct use Basic operation P.22
Simple pasta
Heat by microwave.
Easy to cook pasta (for one) and macaroni.
Microwave
Do not use
a baking tray
or Steam rack
Ingredients (quantity for one time)···100 g of pasta (Italy, macaroni),
400 ml of water
Containers used
Heat-resistant container (heat-resistance temperature is above 120°C)
Put in quantity for one time of ingredients, with the water level below 1/2 of the container height
(Example of container)
Microwave-specific plastic container for cooking pasta (standard: internal dimensions approx.
7.5cm x 27cm x 7cm deep)
Large heat-resistant glass bowl (standard: about 22cm in diameter and 10cm in height)
• If the pasta is too long, please break it and put it into a container.
Cooking method
①
Add 100g of pasta and 400ml of water into the container, stir the pasta with
chopsticks and dissolve it in water.
②
Put
①
directly into the center of the oven without wrapping plastic film
or covering.
③
Refer to 26 Simple Pasta, and start cooking according to the corresponding
firepower based on the cooking time marked on the pasta package.
Pasta 100g
Water 400mI
Cooking time
indicated on the
package
Pasta used
Fire Adjustment
Heating time standard
4~5 min 6 min 7 min 8~9 min 10~11 min
Small fire
Small fire
Large
Fire
Large
Fire
About 7 min About 9 min About 10 min About 11 min About 13 min
④
After heating, spread the pasta in the soup, pick it up with hedges and drain the water.
Please be careful not to get burnt.
• If you mind the pasta sticking, please sprinkle an appropriate amount of olive oil or other personal
favorite grease after draining.
• When it is still very hard after heating, please put it directly in the soup for a long time or heat it
while observing under "Microwave 600W" mode.
To cook 200g of pasta, do the same as 100g of pasta. Therefore, please divide it into 2 portions and heat 1 portion
each time.
When the weight of pasta is less than 100g, it can also be cooked. Please use 400 ml of water.
Do not add oil or salt when cooking noodles. Plastic containers may break.
※
Different ingredients, shapes and pasta manufacturers of the containers used will lead to different effects and
may overflow after boiling.
Please read
carefully
Safety Precautions P.2~5
Standard
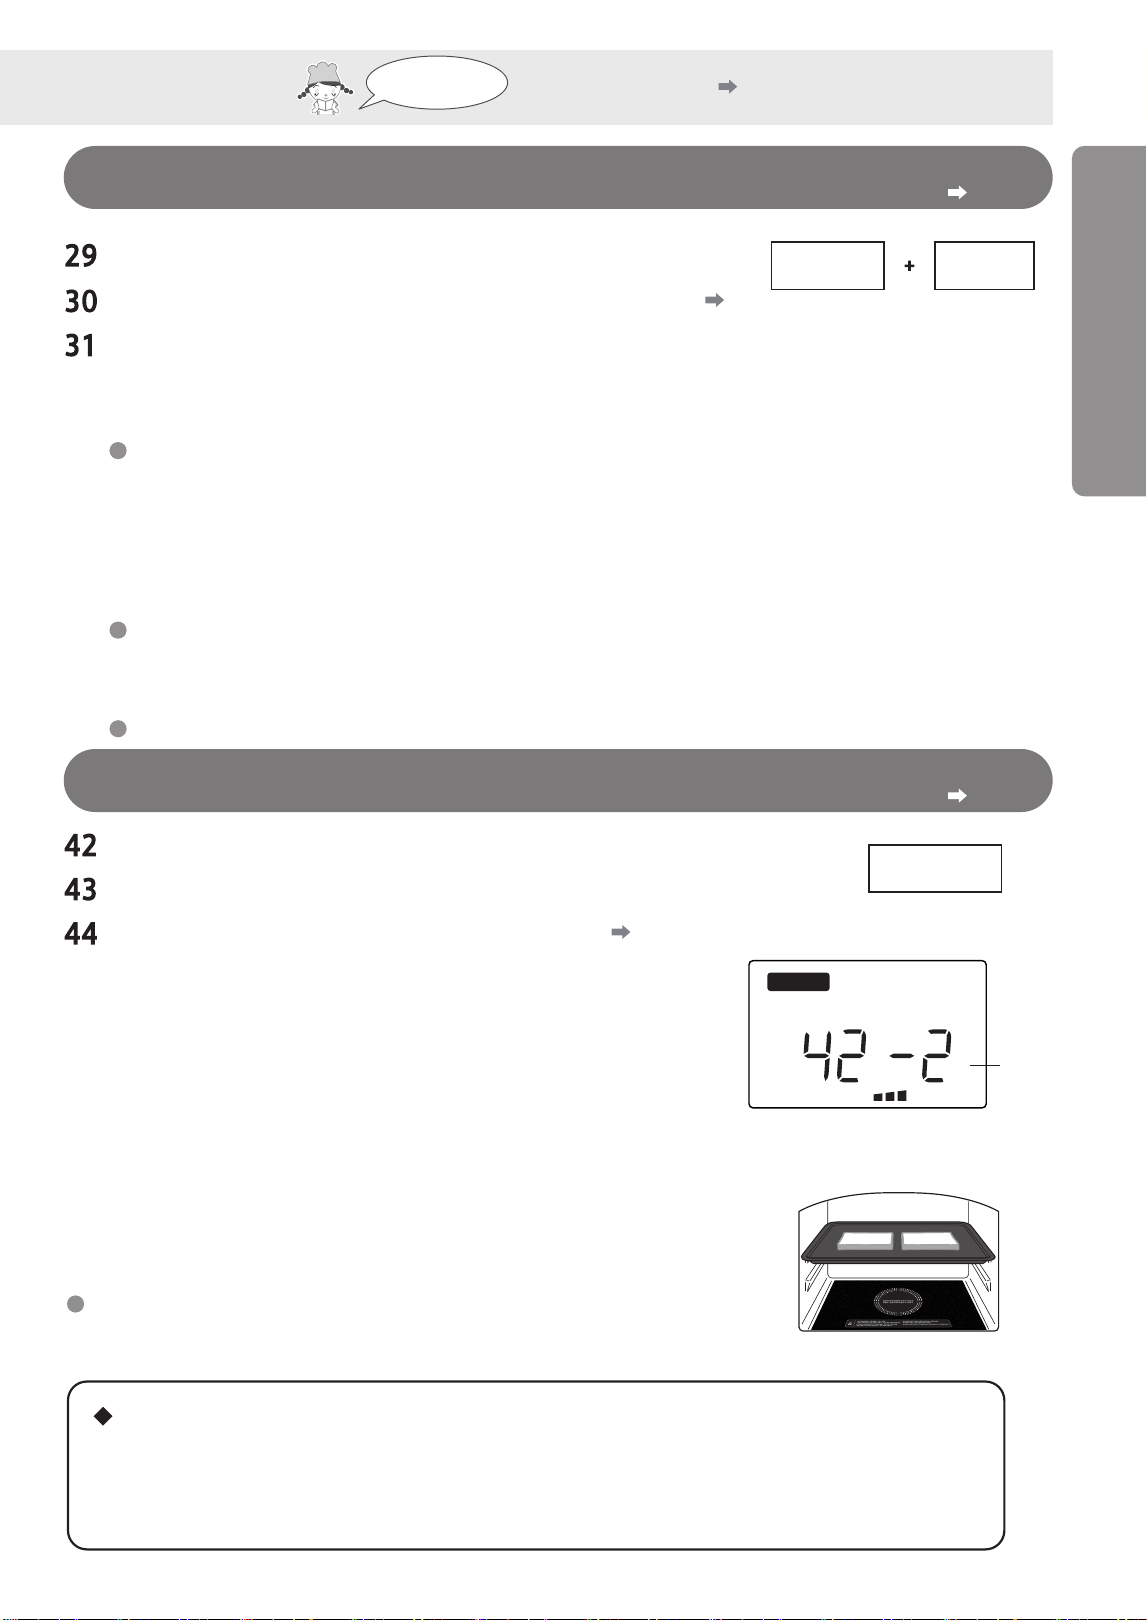
33
Simple Bread
SimpleFrench Bread (steam):
Prepare to add water P.10
Simple Pizza
Simple Bread Series
Skills for correct use Basic operation P.22
※
Steam is also required for
"30 Simple French Bread".
Shorten the fermentation time with microwave. It takes about 1 hour from fermentation to
completion of baking.
After selecting the menu, bake in the order of fermentation
→
baking completion.
• The time displayed is the time of each process.
• If the buzzer sounds 5 times, it indicates that the process is completed.
• Then the next process will be started, so please continue to operate according to the cuisine set. Do not
press the "Cancel" button.
• When you want to adjust the baking effect, select the menu and press the "Fire Adjustment" button.
Please pay attention to the accessories
• Please note that baking trays, metal containers and heat-resistant containers shall not be used in the
microwave heating process.
Please refer to the cuisine set for methods and precautions of accessories.
Room Temperature Toast
(to be turned over)
Skills for correct use Basic operation P.22
Room Temperature Toast
Frozen Toast
Steam Toast (steam):
Prepare to add water P.10
When baking 1-2 pieces of toast. Rotate the knob to select the
menu and the number of pieces (1 or 2).
When the barbecue is heated, please turn it up and down
immediately after a prompt tone (as shown below) sounds
during cooking.
For frozen toast, please bake it according to "43 Frozen Toast".
"44 Steam Toast" uses steam, which can be baked into a crispy
outside and soft inside.
Please refer to the cuisine set for details of baking methods.
Heating
tube
※
※
"44 Steam Toast" also needs
steam.
※
Turn the knob to display
the number of pieces
(1
→
2) in turn.
Number
of Pieces
Put the baking tray into
the upper layer
About the prompt tone during cooking (5 buzzes)
Please read
carefully
Safety Precautions P.2~5
Correct use techniques "Simple Pasta", "Simple Bread Series", "Room Temperature Toast (to be turned over)"
Microwave
Heating
tube
※
Cooking method
燒烤
高溫
冷卻
缺水
烤盤 上下層
發酵烤焗 預熱
自動功能
w
分 秒
克
C
弱 強
完成
定溫加熱
延長
炆燉微波
蒸氣 過熱水蒸氣 杯 條 個 門
• Some menus will be prompted during cooking, such as turning over.
• If the oven door is not opened/closed, it will not run after pressing the "Start Heating". (Display "
門
")
• If the oven door is not opened, the buzzer will sound once every 1 minute for at most 5 times.
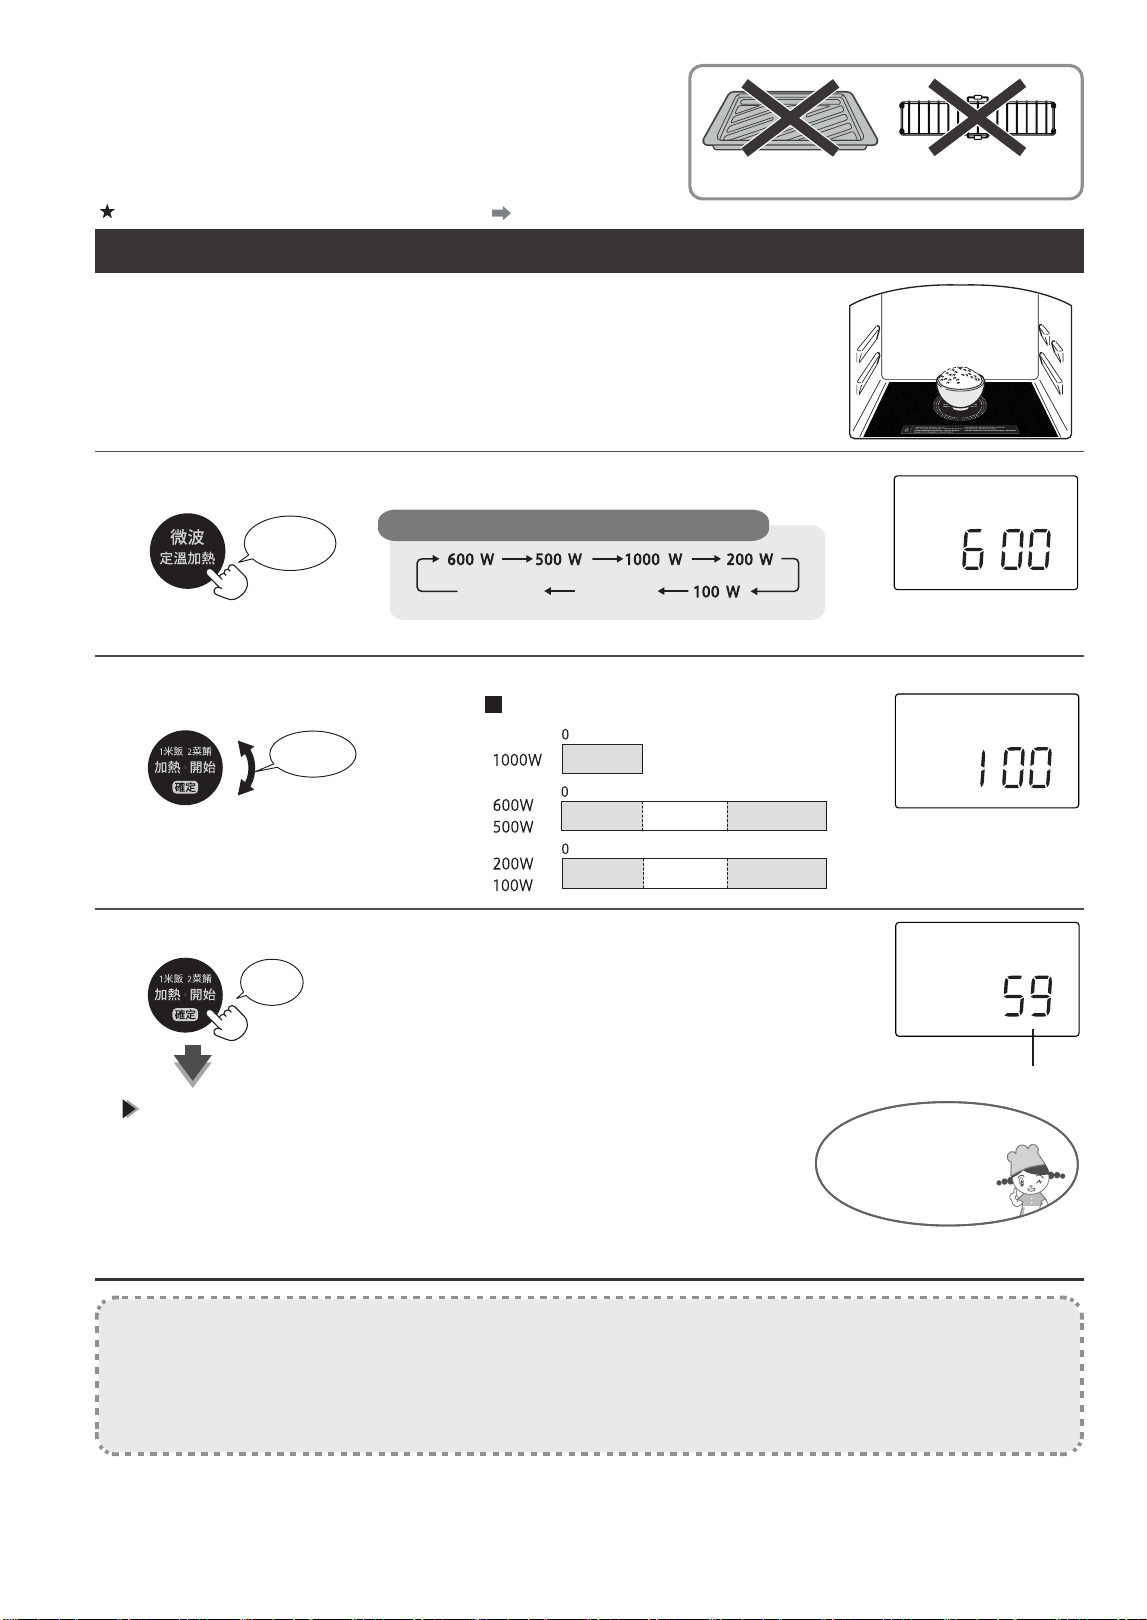
34
Microwave heating,
microwave stewing
Adjust the output power and time
Do not use a baking tray or Steam rack
Time setting standard for manual heating P.45
Example: heating rice (heating for 1 minute under 600W mode)
3
1
2
• Use a heat-resistant container corresponding to the serving size of food that can be used
in microwave and put it directly into the center of the oven.
• Be sure to put frozen food on a heat-resistant container, and be sure to place the
commercially available frozen food according to the contents recorded in the package.
Put the food in
Select output power
Placed in the
center
Each time it is pressed, it switches in the following order
Press
once
※
When the microwave stewing is selected, the initial set 600W will be displayed.
Microwave
Stewing
※
Constant
temperature
heating
Set unit and maximum cooking time
Adjust time
Turning
Press
※
During microwave stewing
Please refer to "Microwave Stewing"
on the right page for settings.
5 min
3 min
15 min
10 min
40 min
20 min
90 min
In 10 seconds
In 10 seconds
In 30 seconds
In 30 seconds
In 1 minute units
In 1 minute units
In 5 minutes units
4
Start (start heating)
Displays the remaining time.
If the buzzer sounds 3 times, the heating is completed
• The buzzer will sound when you forget to take out the food. (1 minute, 3 minutes,
and 5 minutes later), open the oven door or press "Cancel" to stop it.
• The container will get hot, so be careful when removing it.
• After cooking is completed, the word "COOL" will flash and cool electrical
components through a fan. Do not unplug the cooling fan while it is running.
Heating can also
be continued while
the fan is running.
Instructions
• Do not heat unopened eggs or boiled eggs (with shell, without shell). (Danger after rupture)
• Please take out the dishes with steamed eggs (Kanto cooking, etc.) and heat them.
• Please do not heat a little mixed vegetables. Otherwise, sparks, scorching, smoking and drying may occur.
• To protect the electrical components during repeated heating, it may automatically drop to 600W when heated at 1000W.
When the effect is not good, please observe and extend the heating time in manual microwave mode.
• There may be a "squeak" sound at the beginning of microwave heating and during heating, which is the operation sound
during cooking, not a fault.
燒烤
高溫
冷卻
缺水
烤盤 上下層
發酵烤焗 預熱
自動功能
w
秒
克
C
弱 強
完成
定溫加熱
延長
炆燉微波
蒸氣 過熱水蒸氣 杯 條 個 門
燒烤
高溫
冷卻
缺水
烤盤 上下層
發酵烤焗 預熱
自動功能
w
秒
克
C
弱 強
完成
定溫加熱
延長
炆燉微波
蒸氣 過熱水蒸氣 杯 條 個 門
分
燒烤
高溫
冷卻
缺水
烤盤 上下層
發酵烤焗 預熱
自動功能
w
秒
克
C
弱 強
完成
定溫加熱
延長
炆燉微波
蒸氣 過熱水蒸氣 杯 條 個 門
分
• Do not use plastic containers and plastic film when the temperature in the oven is high (during "
高溫
"). (Possible to melting)
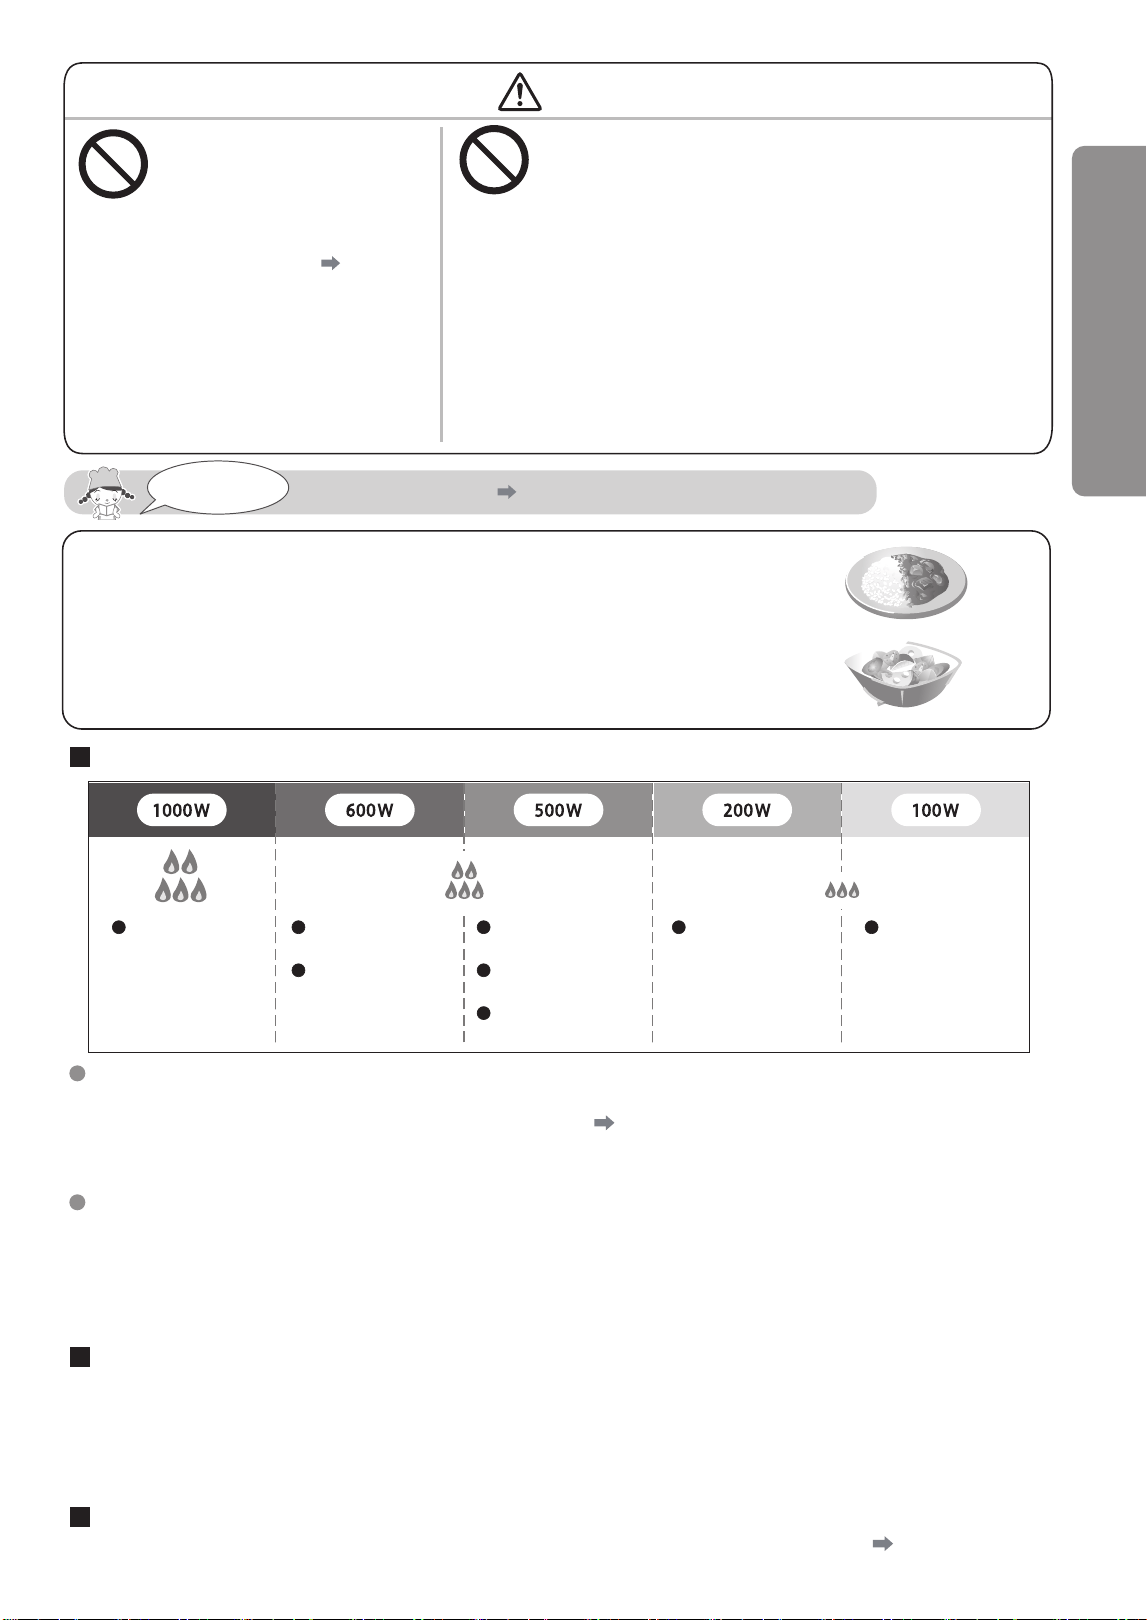
35
Warning
Please read
carefully
Safety Precautions P.2~5
Prohibit
Prohibit
Otherwise, it may cause smoke or
fire.
• Please refer to the time
setting standard ( P.45) to
conservatively set the time
while observing and heating.
Do not overheat food
Otherwise, it may suddenly boil when taken out of the oven and
cause burns.
• Beverages: coffee, milk, soymilk, water, yogurt and other
liquids, as well as soup such as miso soup
• Oily food: whipped cream, butter, etc.
• Thick food: curry vegetables, granulated soup, etc.
• Please stir evenly with a spoon before and after heating
the drink.
• Please set the time conservatively and observe while heating.
Do not overheat beverages, oily food and
thick food.
Microwave
Stewing
• Start with 600W (Large Fire) and then 200W (Small Fire).
• Rotate the "Heating Start" knob in operation 3, press the "Heating Start"
button for 600W to confirm, then rotate the "Heating Start" knob, and press
the "Heating Start" button for 200W to start heating.
• After heating in the microwave 600W mode is completed, it will start
cooking in microwave 200W mode and display the remaining cooking time.
Standard for distinguishing methods of output power use
Large
Fire
Medium setting
Small fire
Rapid heating
of food
Boiled vegetables
(preparation)
Heating food
All cooking
processes
Heating frozen
food
Heating food that
breaks open easily
Microwave
Stewing
Thawing
Although plastic film is not required for heating, some menus can be wrapped with plastic film for heating.
Please refer to the time setting standard in manual heating mode ( P.45) and cuisine set.
※
When wrapping the plastic film for heating, leave a gap in the plastic film around the edge of the container. (Rupture and
oven breakage may be caused during sealing)
About plastic film
About frozen foods and popcorn
Please refer to the output power and heating time stated in the packaging instructions when heating commercially available
frozen foods.
When heating popcorn, please observe the cooking state at close range during cooking according to the heating method in
the packaging instructions.
The heating time is for reference only. When the heating is insufficient, please observe and adjust the time.
When you want to adjust the cooking time halfway
When it is desired to continue heating after completion (extend the time)
→
Turn the knob within 3 minutes after cooking, then set the time and heat while observing P.7
→
Rotate the knob during heating to adjust the cooking time in units of 1 minute
• When the remaining time in 1000W, 600W and 500W modes is displayed as less than 5 minutes, adjust the cooking time in
units of 10 seconds.
• The settable time for one cooking, including the extendable time, is 3 minutes at most in 1000 W mode, 20 minutes at most
in 600 W·500 W mode and 90 minutes at most in 200 W·100 W mode.
Microwave heating, microwave stewing
Cooking method

36
Heat to set temperature
Do not use a baking tray or Steam rack
Serving size is based on one person (150g as the basis)
Microwave heating using infrared sensors to
heat food
No plastic film or cover required
Placed in the
center
Example: softened butter
Put the food in
Select constant temperature
heating
Adjust the temperature from -10~90°C
1
2
3
4
• Put it into a shallow-mouth heat-resistant container corresponding to the serving size of
food that can be used in the microwave, with O as the standard, and put it in the center of
the oven.
• When the oven is very hot, please heat it after sufficient cooling. (When the oven is very hot,
the infrared sensor may not operate normally)
Press 6
times
Turning
• Please refer to the right page for setting temperature standards.
• Serving size is based on one person (150g as the basis)
Set the temperature higher when serving more and lower when serving less.
• Do not set the temperature above 50°C for food less than 100g.
If the buzzer sounds 3 times, the heating is completed
• The buzzer will sound when you forget to take out the food. (1 minute, 3 minutes, and 5 minutes later), open the
oven door or press "Cancel" to stop it.
If the set temperature
is different, some
menus may display
the remaining time
halfway.
Each time it is pressed, it switches in the following order
Microwave
Stewing
Constant
temperature
heating
When it is desired to continue heating after completion (extend the time)
Cooking temperature cannot be changed during cooking
→
Turn the knob within 3 minutes after cooking, then set the time and heat while observing
P.7
Notifications
Examples of detection images
of infrared sensors and their
placement methods
• The infrared sensor is used to read the surface temperature of food, and its interior
may be different from the set temperature. The temperature inside the food may
be higher or lower than the set temperature due to the type and thickness of food,
seasonings, etc.
• The effect temperature may vary depending on the container size, shape and
material.
※
If the use method is incorrect, the effect may not be good. In addition, it may cause
food to burn, smoke and catch fire. P.16
Start (start heating)
Press
燒烤
高溫
冷卻
缺水
烤盤 上下層
發酵烤焗 預熱
自動功能
w
秒
克
C
弱 強
完成
定溫加熱
延長
炆燉微波
蒸氣 過熱水蒸氣 杯 條 個 門
分
燒烤
高溫
冷卻
缺水
烤盤 上下層
發酵烤焗 預熱
自動功能
w
秒
克
C
弱 強
完成
定溫加熱
延長
炆燉微波
蒸氣 過熱水蒸氣 杯 條 個 門
分
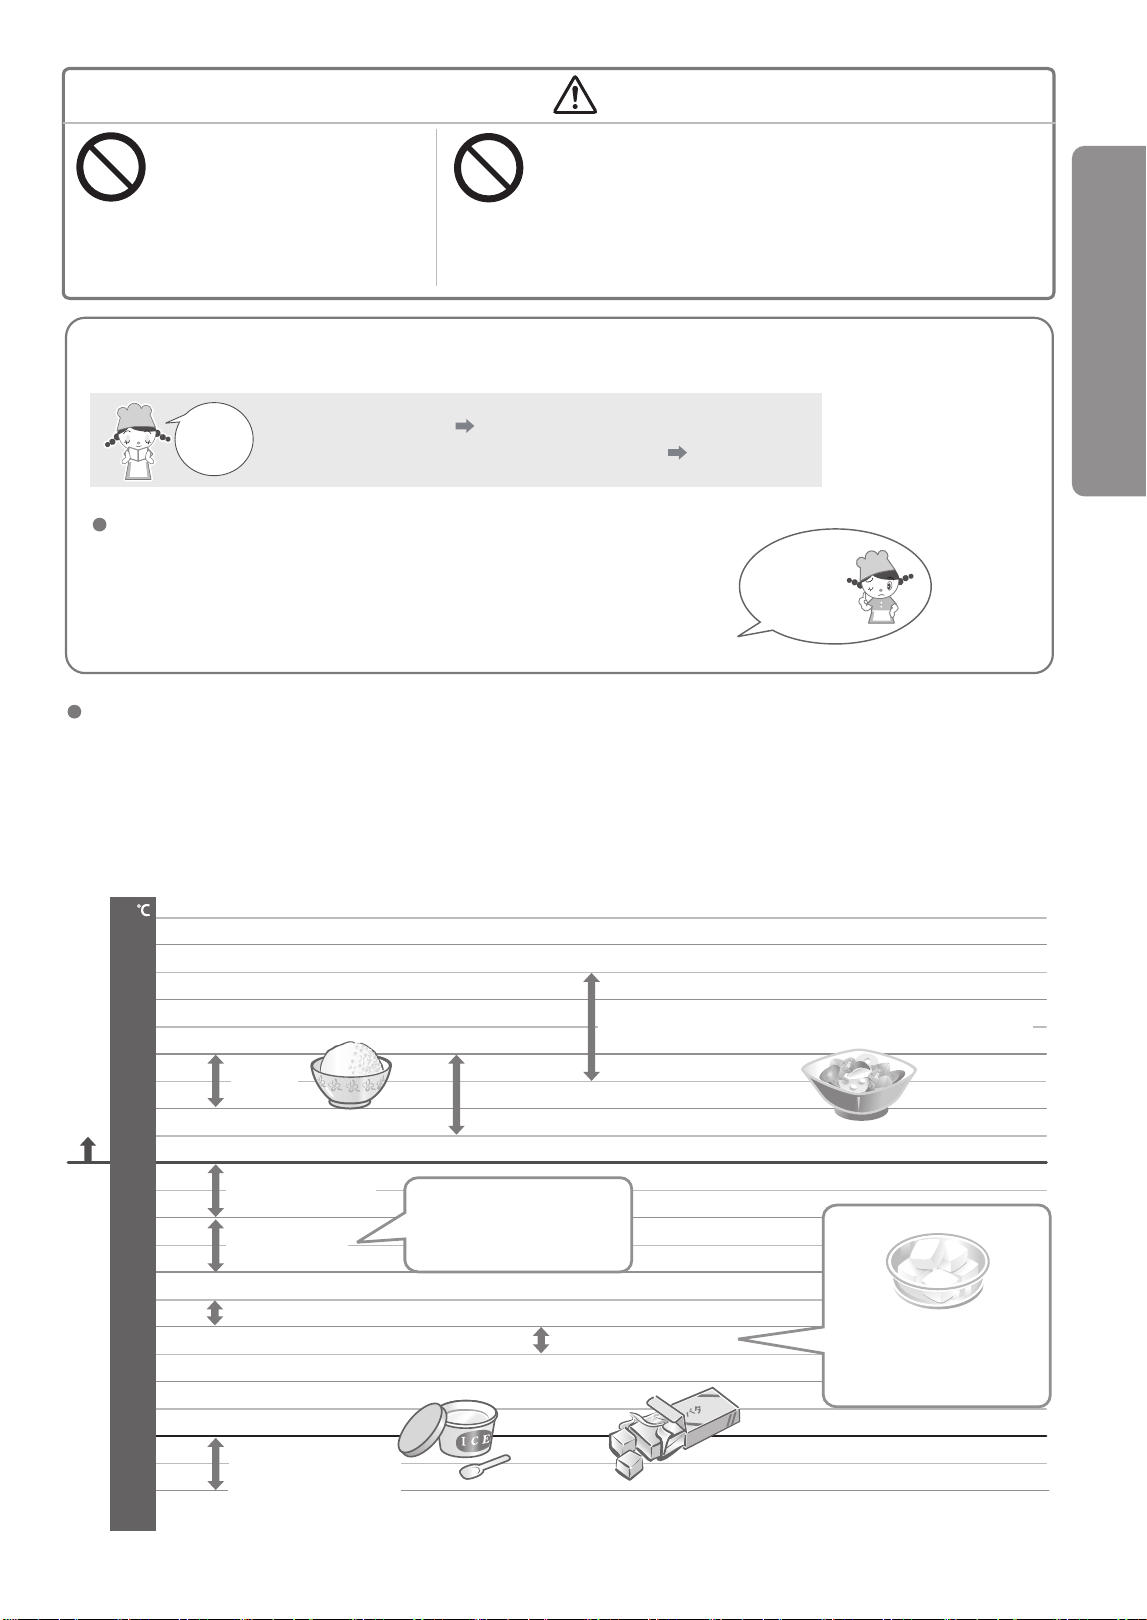
37
Warning
Prohibit
Prohibit
Otherwise, it may cause smoke
or fire.
• Please observe while heating
during cooking.
Do not overheat food
The presence of a lid can lead to excessive heating, food fires and
container rupture without properly sensing the temperature.
• Please remove the cover of the container before heating.
Do not use lidded containers for microwave
cooking with infrared sensors (Page 16)
Instructions
Please
read
carefully
Safety precautions P.2 ~5
Precautions and tips for automatic heating P.16~17
• Please transfer to a shallow-mouth heat-resistant container for heating.
• Do not heat frozen food.
Please press the manual "microwave" mode to heat while observing.
• Before feeding, please be sure to stir well and confirm the food temperature.
When heating baby food and care food
Pay more
attention!
Do not heat the beverage in "Constant Temperature Heating" mode.
Please press "4 Milk · Coffee" for milk and coffee, refer to "5 Wine" for wines and others.
Please refer to the time on page 45 to conservatively set the time, and press the manual
"Microwave" mode while observing and heating.
Set temperature standard
Food: more than 100g
90
80
70
60
50
40
30
20
10
0
-5
-10
Rice
Barbecue food
Infant food
Softened cream cheese
Softened butter
Please be sure to transfer
it to a shallow-mouth
heat-resistant container
and stir and confirm the
temperature.
Put the butter into a heat-
resistant container, set the
temperature to 15~20°C and
then heat it.
Heat to set temperature
Cooking method
Stewed food, stir-fried vegetables and fried products
Melted Chocolate
Always remove the
lid (including inner
cover) after softening
the cream to an
edible level
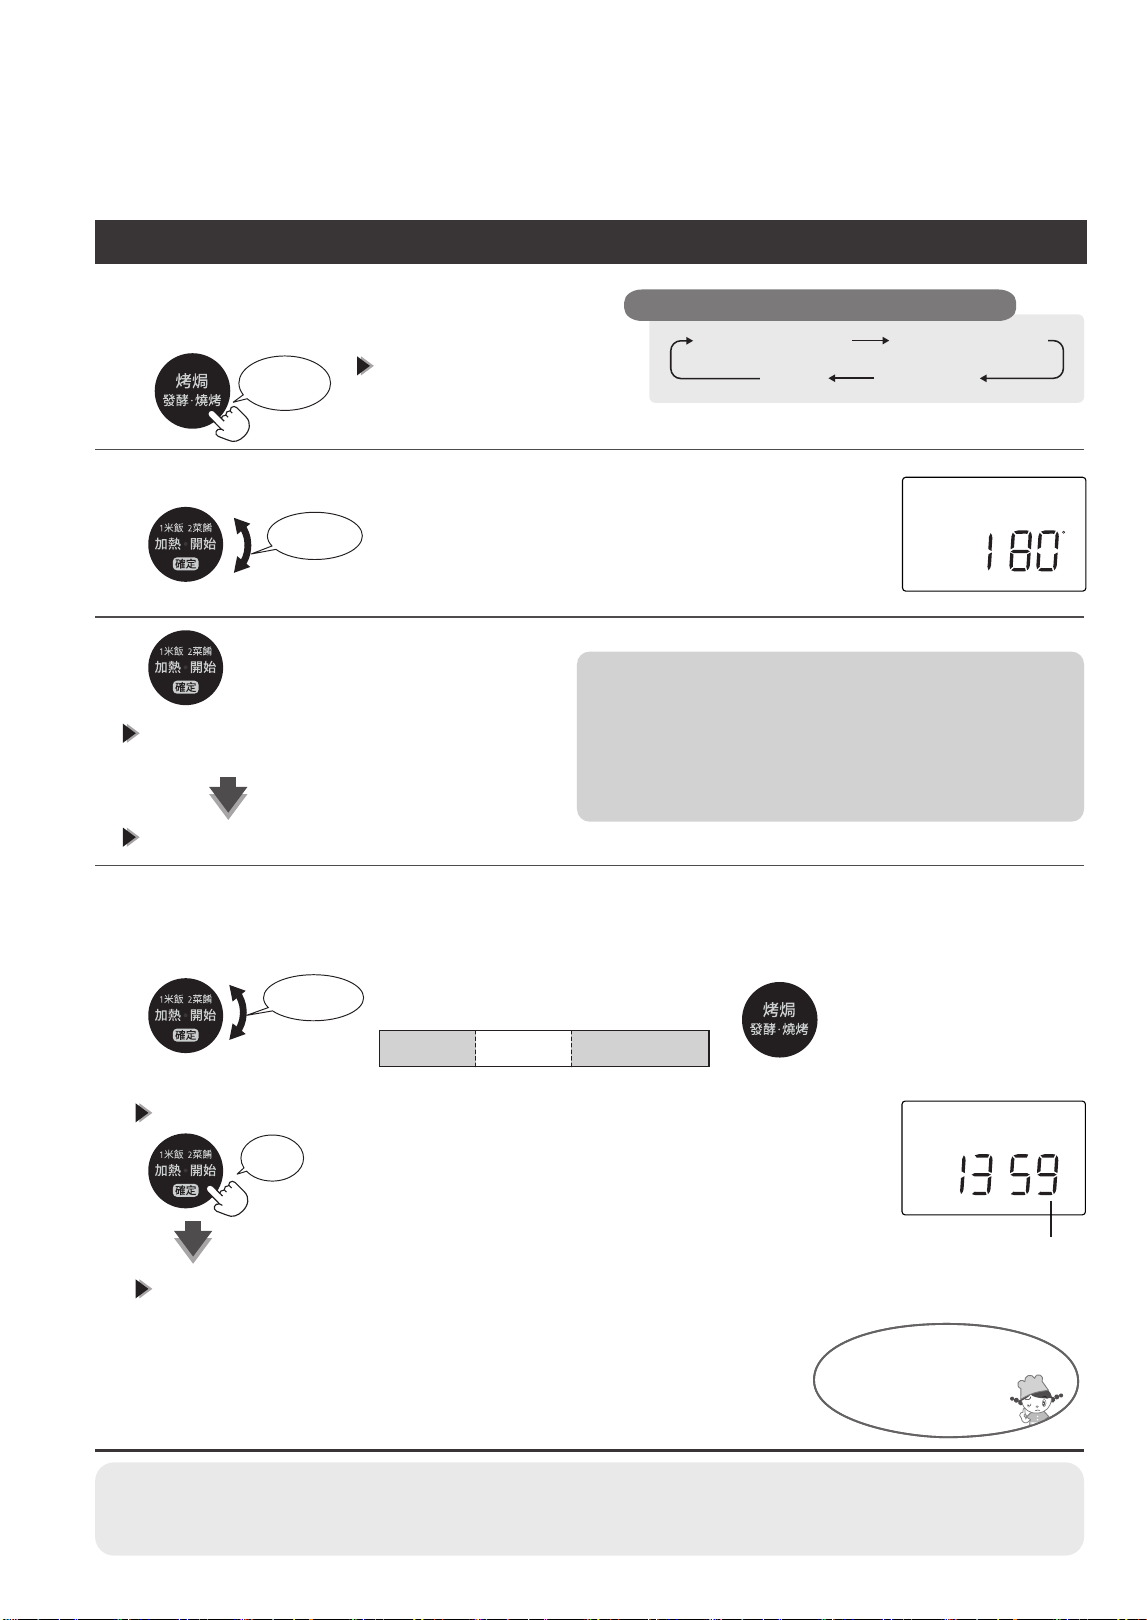
38
Cooking by baking and fermentation
Adjust the temperature and time
With preheating
*There is a menu for preheating after putting it in the baking tray. Please refer to the cuisine set.
Do not put any food in the oven *
Choose baking with preheating
1
2
Adjust the temperature
3
4
Press to start preheating
Put food in the oven and adjust time
Press
1 time
Turning
Turning
Press
Each time it is pressed, it switches in the following order
Baking with
preheating
Baking without
preheating
Fermentation
Grill
• Setting preheating temperature: 100~250°C, but when the oven
is overheated (the display part flashes "
"), it may not be set
above 220°C to protect electrical components.
The remaining time will be displayed 1 minute
before the preheating is completed
If the buzzer sounds 5 times, the preheating is completed (The words " " lights up)
• If preheated after being put into the baking tray, it will
become hot, so be careful when taking out or putting in food.
• Preheat for about 20 minutes. During this period, if no
operation is performed, the menu setting will be canceled
3 times of buzzing and then the power supply will be
disconnected.
(The menu in the cuisine set stipulates that the specified accessories
should be placed at the designated position)
■
Setting unit of cooking time
(maximum 90 minutes)
• You want to change the cooking
temperature to a different temperature
than the preheating temperature
Press and rotate the knob to adjust
the cooking time in 10 minutes
In 30 seconds
In 1 minute units
In 5 minutes units
Start (start cooking)
※
If the oven door is not opened/closed after preheating, it will not
run even if the "Start Heating" button is pressed.
Displays the remaining time.
If the buzzer sounds 3 times, cooking is completed.
• The buzzer will sound when you forget to take out the food. (1 minute, 3 minutes,
and 5 minutes later), open the oven door or press "Cancel" to stop it.
• Be careful when taking out the oven and baking tray as they get hot.
Notifications
• The baking effect may vary depending on the room temperature, shape, quantity, size, initial temperature,
oven temperature and power supply voltage. Cooking can be done smoothly by wrapping the front and
rear or part of the food exchanged during heating with tinfoil.
Be careful when taking
out the oven and
baking tray that will
become hot
0
15 min 40min 90 min
燒烤
高溫
冷卻
缺水
烤盤 上下層
發酵烤焗 預熱
自動功能
w
秒
克
C
弱 強
完成
定溫加熱
延長
炆燉微波
蒸氣 過熱水蒸氣 杯 條 個 門
分
燒烤
高溫
冷卻
缺水
烤盤 上下層
發酵烤焗 預熱
自動功能
w
分 秒
克
C
弱 強
完成
定溫加熱
延長
炆燉微波
蒸氣 過熱水蒸氣 杯 條 個 門
高溫
"
預熱
" will be
displayed at the
display part.
預熱完成
• After that, the display part will show "
高溫
" and "
冷卻
". Do not unplug the
power plug while "
冷卻
" is flashing.
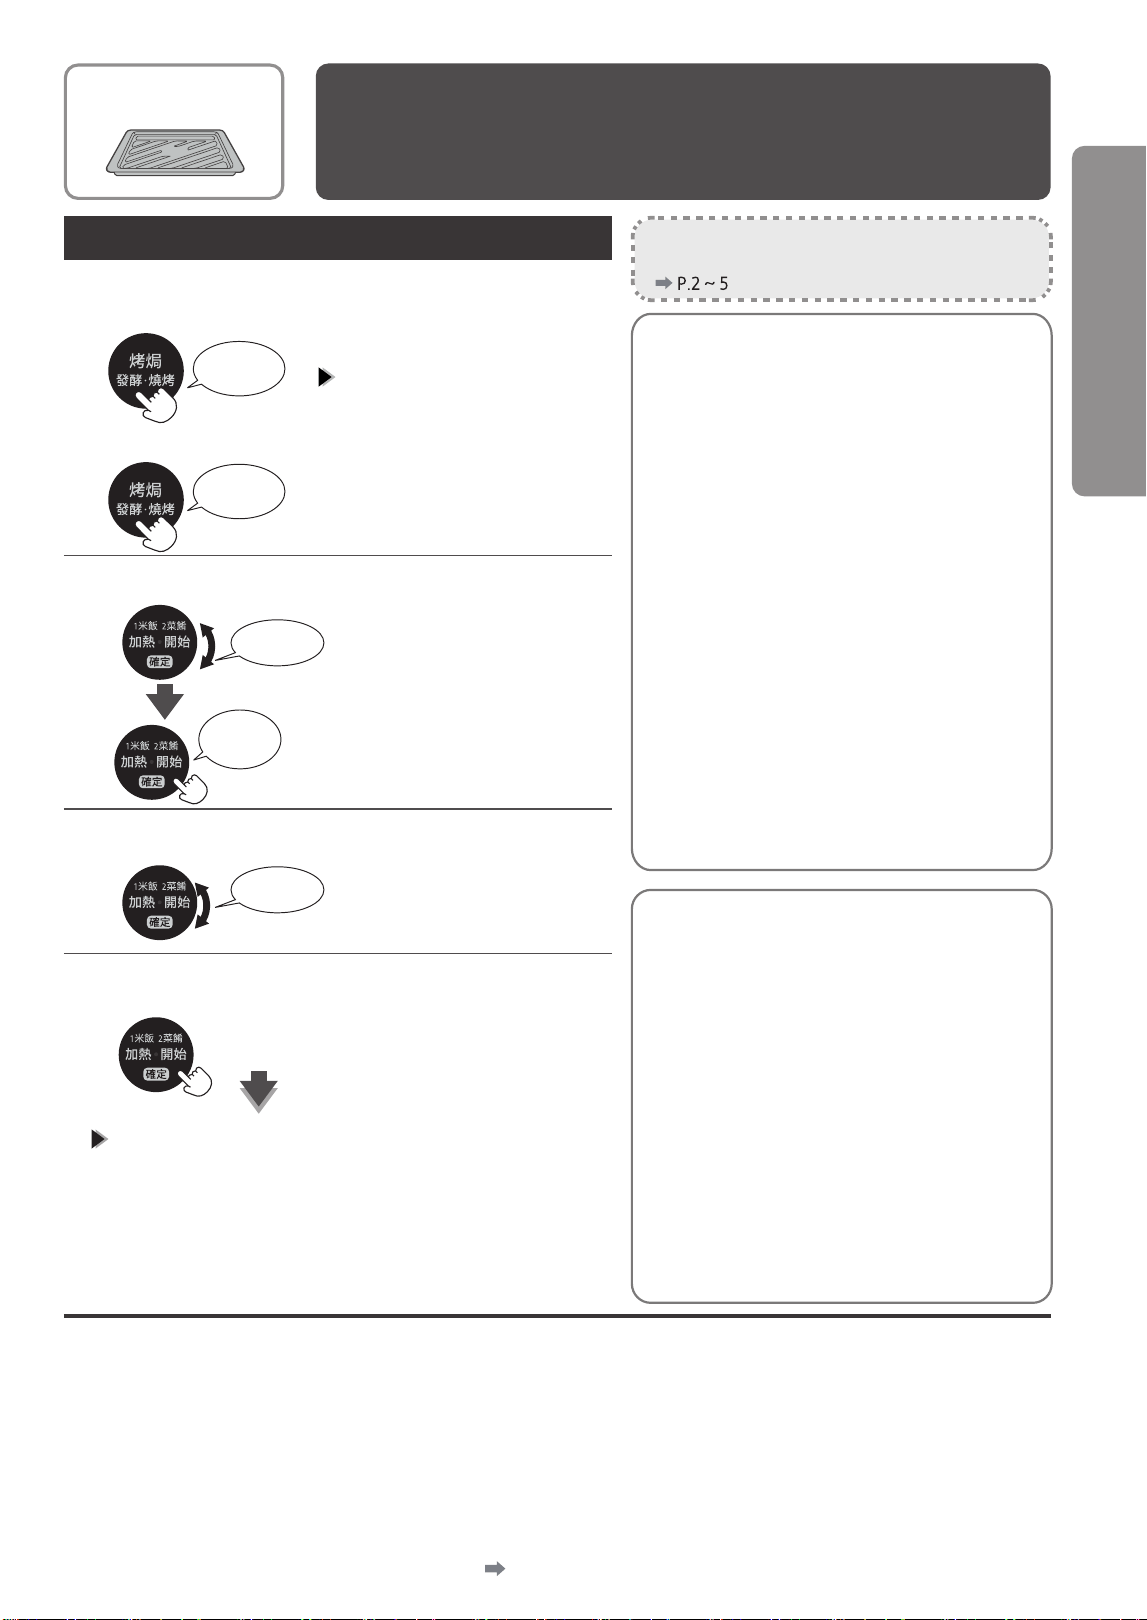
39
1
2
Adjust the temperature
Adjust time
Start (start cooking)
3
4
If the buzzer sounds 3 times, cooking is completed.
About setting temperature
With regard to the baking set temperature, measure the central position in the oven
according to the thermoelectric thermometer method. (According to JIS measurement
method) When the temperature is measured with a commercially available thermometer,
the temperature may be inconsistent.
Accessories available
Without preheating/fermentation
Put the baking tray with food in the oven
and select baking without preheating
Press
2 times
Press
3 times
•
When fermentation is selected
Definition of preheating
• Heat the oven to a temperature suitable for
cooking in advance.
■
Change the temperature during
preheating
→
No.
■
Relationship between set
temperature and preheating
temperature
→
Preheat at the same temperature as the
set temperature. However, when the set
temperature is greater than or equal to
210 °C, the preheating temperatureis
200°C.
■
Preheating time standard
→
About 14 minutes at 200°C.
• If the temperature in the oven before
preheating is different from room
temperature and voltage, the preheating
time will be slightly different.
Turning
Turning
Press to
confirm
Press
• Set maximum cooking time:
90 minutes
• The buzzer will sound when you forget to take out the food.
(1 min, 3 min, 5 min later)
• Be careful when taking out the oven and baking tray as they get hot.
Fermentation
Fermented dough, etc.
• When the dough is dry, please spray water
mist while observing its state.
• When the temperature in the oven is close
to the set temperature, the heating pipe
does not operate, but this is not a fault.
■
When you want to change the cooking time
halfway
→
Rotate the knob during cooking to adjust the
cooking time in 1 minute
• The maximum settable time for 1 cooking is 90
minutes, including the prolongable time.
■
When it is desired to continue heating after
completion (extend the time)
→
Turn the knob within 3 minutes after cooking,
then set the time and heat while observing P. 7
■
When you want to change the cooking
temperature halfway
→
Press the "Heating·Start" button during cooking,
rotate the knob during temperature display
(within 5 seconds), and then adjust the cooking
temperature to 10°C
• The fermentation temperature cannot be
changed during heating.
Cooking by baking and fermentation
Cooking method
Instructions
• Please read the safety precautions carefully.
" " will not be
displayed.
預熱
• Setting preheating temperature:
100~250°C, but when the oven
is overheated (the display part
flashes "
高溫
"), it may not be set
above 220°C to protect electrical
components.
• Set fermentation temperature: 45°C,
40°C, 35°C and 30°C
• After "baking without preheating", the display part will show
"
高溫
" and "
冷卻
". Do not unplug the power plug while
"
冷卻
" is flashing.
● Pl
ease wait until the oven and accessories
are fully cooled before use.
When the display part displays "C21" and
高溫
" ", please press the
"Cancel" button
and open the oven door to wait for the
temperature in the oven to drop. When the
temperature in the oven is high, it cannot
be fermented smoothly.
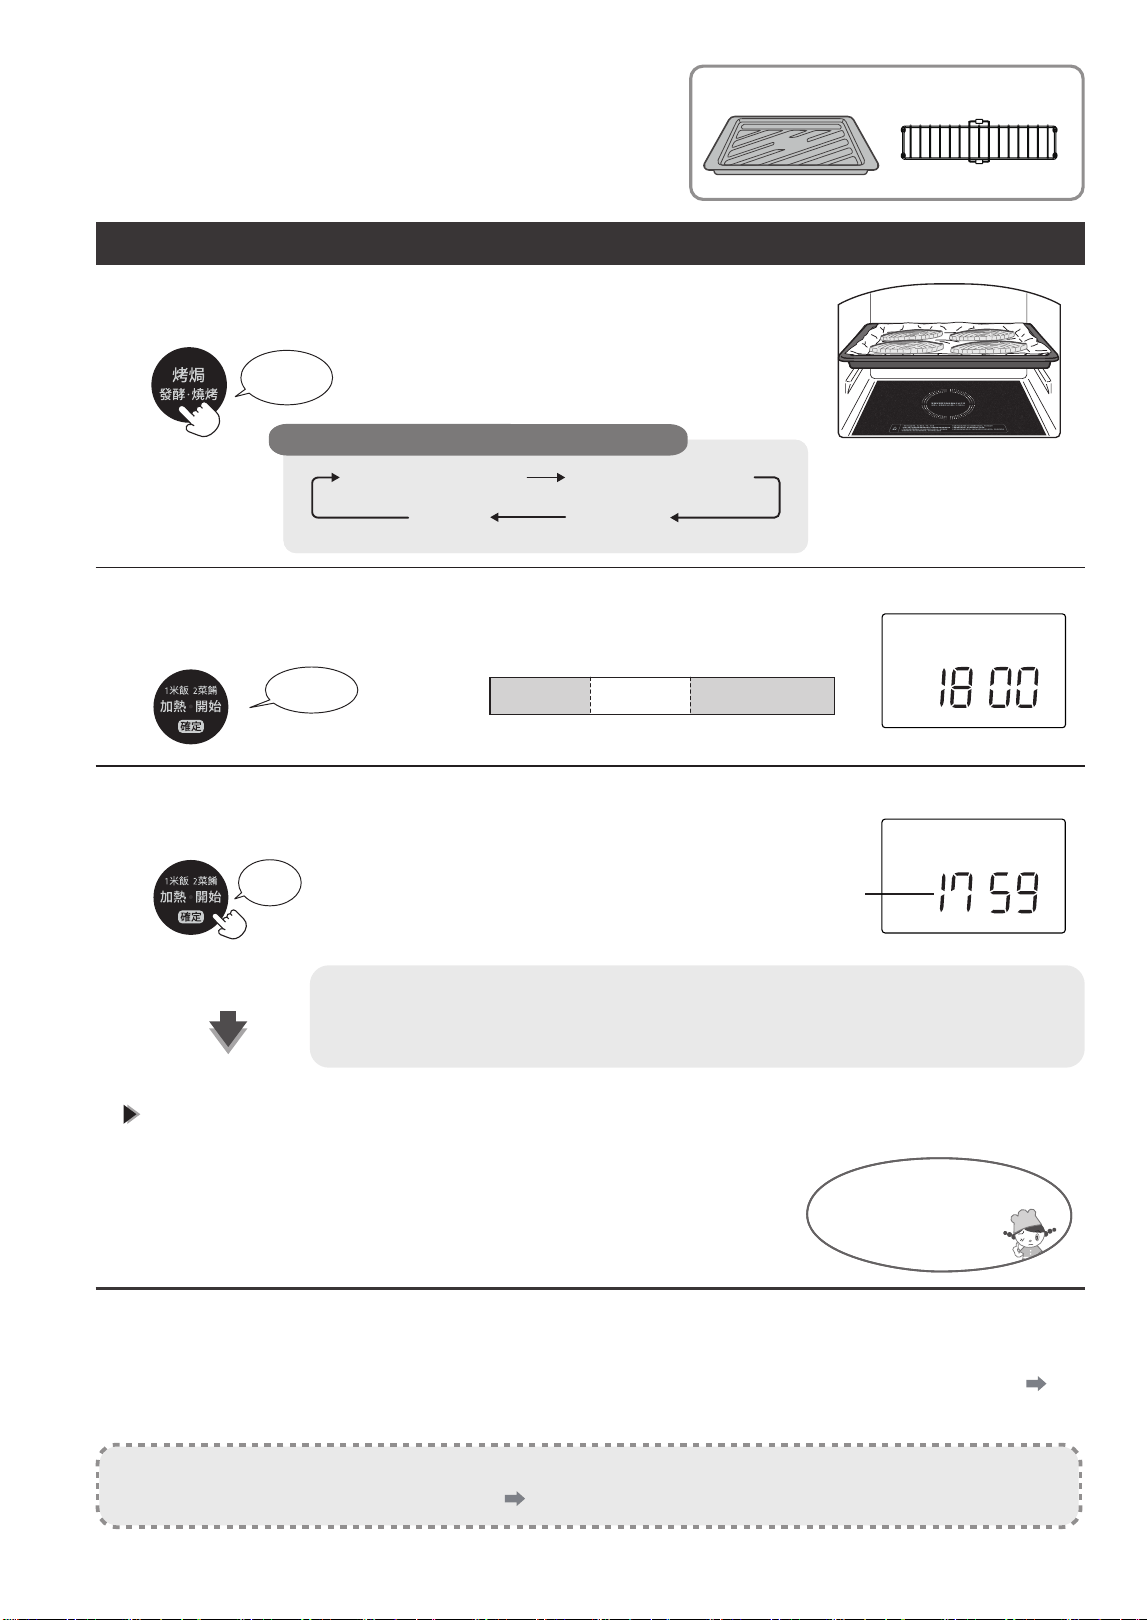
40
g ➡
g
g
Roast cooking
Adjust time
Example: Roast fish in barbecue mode
Accessories available
Put the baking tray with food in the oven and
select barbecue mode
1
2
Adjust time
3
Start (start cooking)
Press
4 times
• It is recommended to place it on the upper layer
because cooking through the upper heating tube.
Each time it is pressed, it switches in the following order
Baking with preheating Baking without preheating
Fermentation
Grill
Turning
Press
■
Setting unit of cooking time
(maximum 30 minutes)
In 10 seconds
In 30 seconds
In 1 minute units
0
5 min 10 min 30 minutes
Displays the remaining time
• If both sides are colored, please open the oven door during heating to turn over
food, and then press the "Heating Start" button again.
• Be careful when taking out the oven and baking tray as they get hot.
If the buzzer sounds 3 times, cooking is completed.
• The buzzer will sound when you forget to take out the food. (1 minute, 3 minutes,
and 5 minutes later), open the oven door or press "Cancel" to stop it.
• Be careful when taking out the oven and baking tray as they get hot.
Be careful when
taking out the oven
and baking tray that
will become hot
■
When you want to change the cooking time
halfway
→
Rotate the knob during cooking to adjust the
cooking time in 1 minute
• The maximum settable time for 1 cooking is
30 minutes, including the prolongable time.
■
When it is desired to continue heating after
completion (extend the time)
→
Turn the knob within 3 minutes after cooking,
then set the time and heat while observing P. 7
Instructions
• Please read the safety precautions carefully. P.2~5
燒烤
高溫
冷卻
缺水
烤盤 上下層
發酵烤焗 預熱
自動功能
w
分 秒
克
C
弱 強
完成
定溫加熱
延長
炆燉微波
蒸氣 過熱水蒸氣 杯 條 個 門
燒烤
高溫
冷卻
缺水
烤盤 上下層
發酵烤焗 預熱
自動功能
w
分 秒
克
C
弱 強
完成
定溫加熱
延長
炆燉微波
蒸氣 過熱水蒸氣 杯 條 個 門
• After that, the display part will show "
高溫
" and "
冷卻
".
Do not unplug the power plug while "
冷卻
" is flashing.
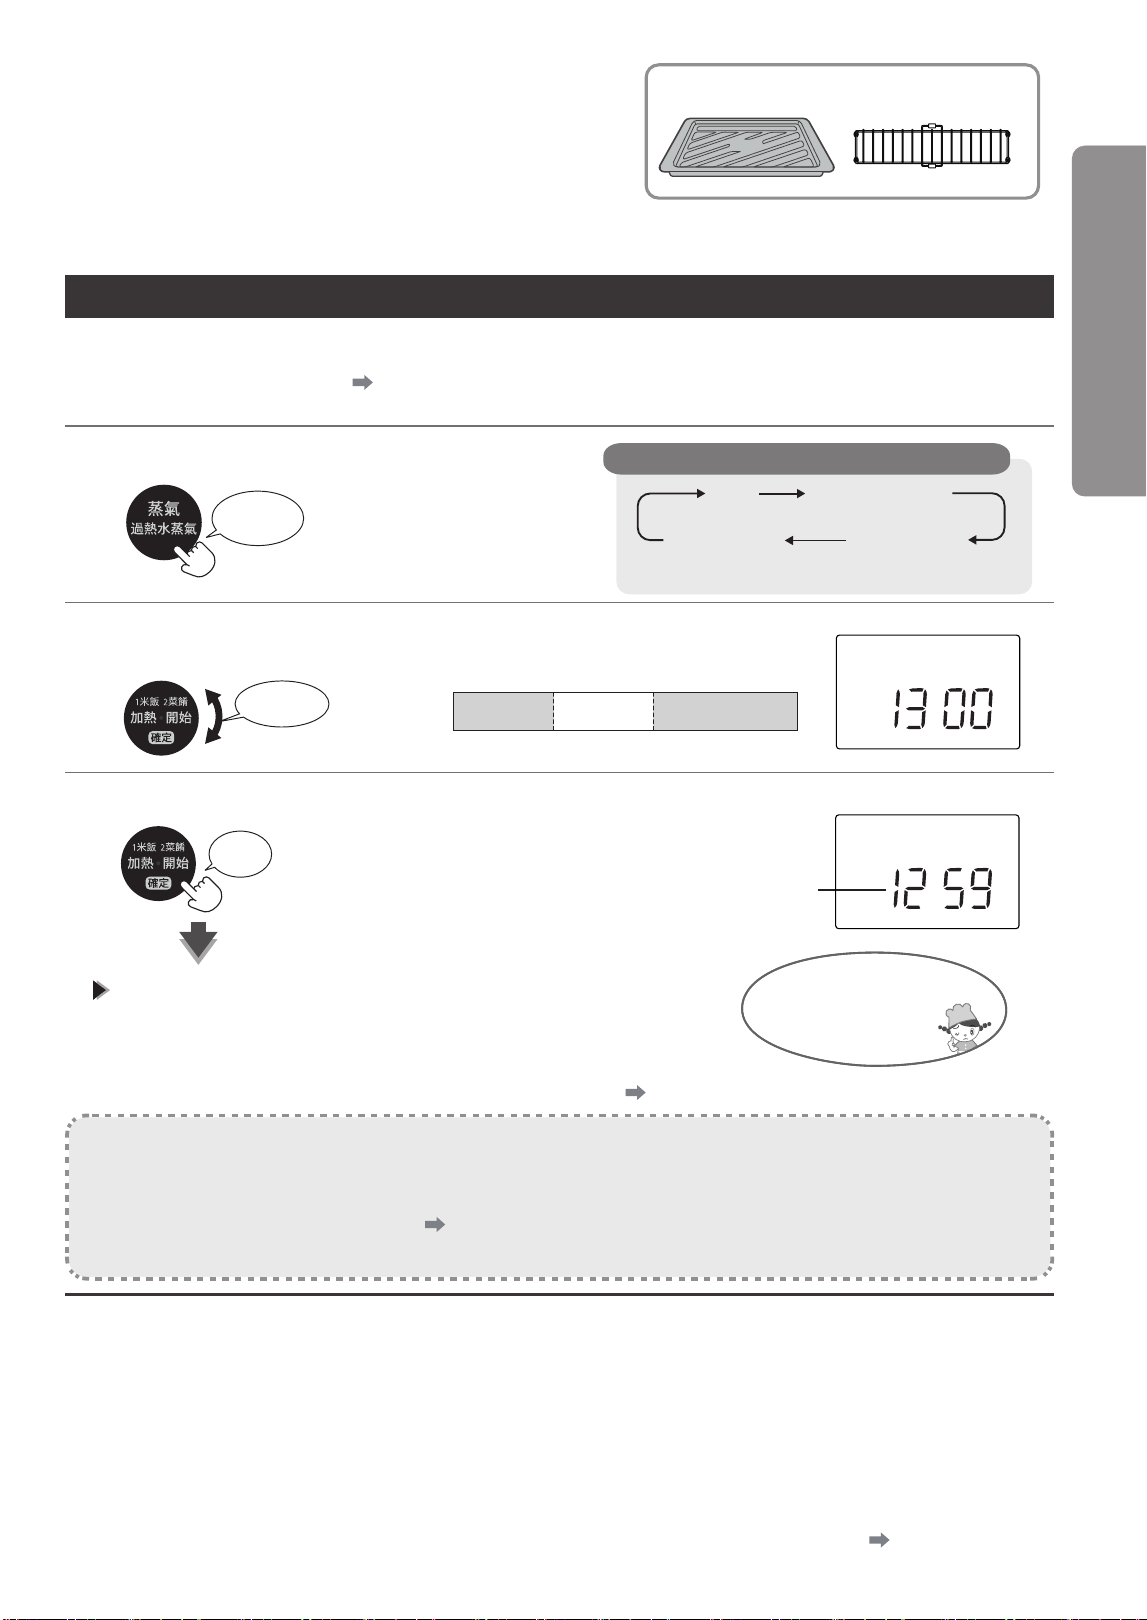
41
g ➡
g
g
Adjust time
Accessories available
2
Adjust time
Setting unit of cooking time
(maximum 60 minutes)
3
4
Start (start cooking)
0
15 min 40min 60 min
Displays the remaining time
If the buzzer sounds 3 times, cooking is completed.
• The buzzer will sound when you forget to take out the food. (1 min, 3 min,
5 min later)
• The container will get hot, so be careful when removing it.
• Please remove water from the pipeline and perform self-cleaning
Cooking by steam
• "Steam" is cooked at temperatures below 100°C in a procedure suitable for chawanmushi and pudding.
• When cooking fresh meat and fish, use the "Microwave Steam" mode. Added 3 Auto Menu for
command dishes (Auto Menu 22, 23 & 24)
P.49
Select Steam
Press
1 time
Grill
Microwave Steam
Turning
Press
In 30 seconds
In 1 minute units
In 5 minutes units
Be careful when
taking out the oven
and baking tray that
will become hot
Instructions
■
When you want to change the cooking time halfway
→
Rotate the knob during cooking to adjust the cooking time in 1 minute
• The maximum settable time for 1 cooking is 60 minutes, including the prolongable time.
■
→
Add water to the water box (water can also be added during cooking)
■
When it is desired to continue heating after completion (extend the time)
→
Turn the knob within 3 minutes after cooking, then set the time and heat while observing P.7
Steam cooking by steam and baking.
1
Prepare to add water and put the baking tray with food into the oven
• Be prepared to add water. P.10
• Insert the water box to the bottom.
Each time it is pressed, it switches in the following order
Superheated
steam (without
preheating)
Superheated
steam (with
preheating)
Cooking by barbecue/Cooking by steam
Cooking method
• When cooking with steam, please pay attention that the steam will come out of the oven after opening the oven door. In
addition, note that steam will also come out of the air outlet during and after cooking.
• Please read the safety precautions carefully. P.2~5
• The water box will also get hot after cooking. Please wait until the main unit cools down and then remove the water box.
燒烤
高溫
冷卻
缺水
烤盤 上下層
發酵烤焗 預熱
自動功能
w
分 秒
克
C
弱 強
完成
定溫加熱
延長
炆燉微波
蒸氣 過熱水蒸氣 杯 條 個 門
燒烤
高溫
冷卻
缺水
烤盤 上下層
發酵烤焗 預熱
自動功能
w
分 秒
克
C
弱 強
完成
定溫加熱
延長
炆燉微波
蒸氣 過熱水蒸氣 杯 條 個 門
The "
缺水
" display will disappear 1~3 minutes after adding water. The buzzer may sound before the "
缺水
"
display disappears.
•
The display part flashes to show "
缺水
" and the buzzer sounds
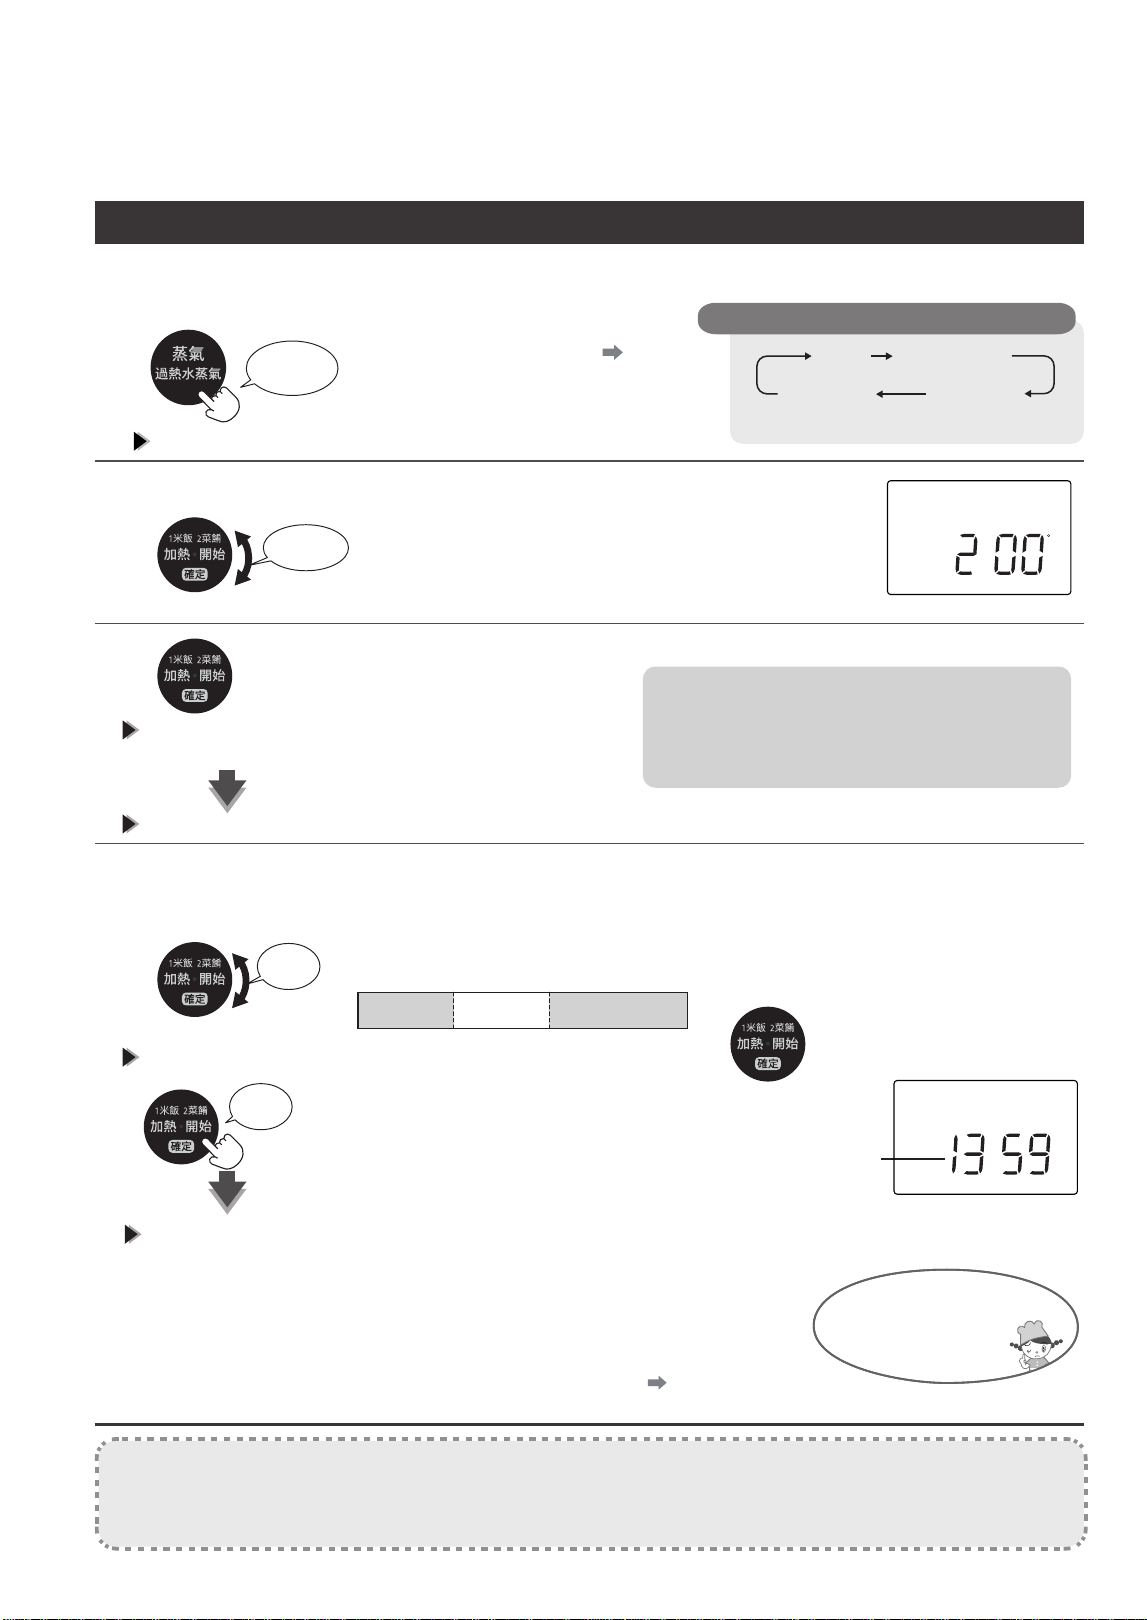
42
Cooking with superheated steam
Adjust the temperature and time
(Use for roasting)
1
2
3
4
The remaining time will be displayed 1 minute before
the preheating is completed
If the buzzer sounds 5 times, the preheating is completed (The words
" "
lights up)
(The menu in the cuisine set stipulates that the specified accessories should be placed at the designated position)
With preheating
Press
3 times
Each time it is pressed, it switches in the following order
Steam
Microwave
Steam
Superheated
steam (without
preheating)
Superheated
steam (with
preheating)
Turning
Turning
Press
Be prepared to add water without putting any food in the oven.
Select superheated steam (with preheating)
• Be prepared to add water. P.10
• Insert the water box to the bottom.
Adjust the temperature
Press to start preheating
• Preheat for about 20 minutes. During this
period, if no operation is performed, the menu
setting will be canceled 3 times of buzzing and
then the power supply will be disconnected.
Put food in the oven and adjust time
■
Setting unit of cooking time
(maximum 60 minutes)
■
You want to change the cooking
temperature to a different temperature
than the preheating temperature
Press and rotate the knob to adjust
the cooking time in 10 minutes
In 30 seconds
In 1 minute units
In 5 minutes units
Start (start cooking)
※
If the oven door is not opened/closed after
preheating, it will not run even if the "Start
Heating" button is pressed.
Displays the
remaining time.
If the buzzer sounds 3 times, cooking is completed.
• The buzzer will sound when you forget to take out the food. (1 minute, 3 minutes,
and 5 minutes later), open the oven door or press "Cancel" to stop it.
• Be careful when taking out the oven and baking tray as they get hot.
• Please remove water from the pipeline and perform self-cleaning. P.49
Instructions
• When taking out food after opening the oven door, be careful of steam coming from the oven.
• After opening the oven door during cooking, steam may emerge for a period of time. Pay attention to the
steam outlet.
Be careful when
taking out the oven
and baking tray that
will become hot
0
15 min 40min 60 min
燒烤
高溫
冷卻
缺水
烤盤 上下層
發酵烤焗 預熱
自動功能
w
秒
克
C
弱 強
完成
定溫加熱
延長
炆燉微波
蒸氣 過熱水蒸氣 杯 條 個 門
分
燒烤
高溫
冷卻
缺水
烤盤 上下層
發酵烤焗 預熱
自動功能
w
分 秒
克
C
弱 強
完成
定溫加熱
延長
炆燉微波
蒸氣 過熱水蒸氣 杯 條 個 門
• Setting preheating temperature: 100~250°C, but when the
oven is overheated (the display part flashes "
高溫
"), it may
not be set above 220°C to protect electrical components.
Display "
預熱
"
預熱完成
• After that, the display part will show "
高溫
" and "
冷卻
".
• Do not unplug the power plug while "
冷卻
" is flashing.
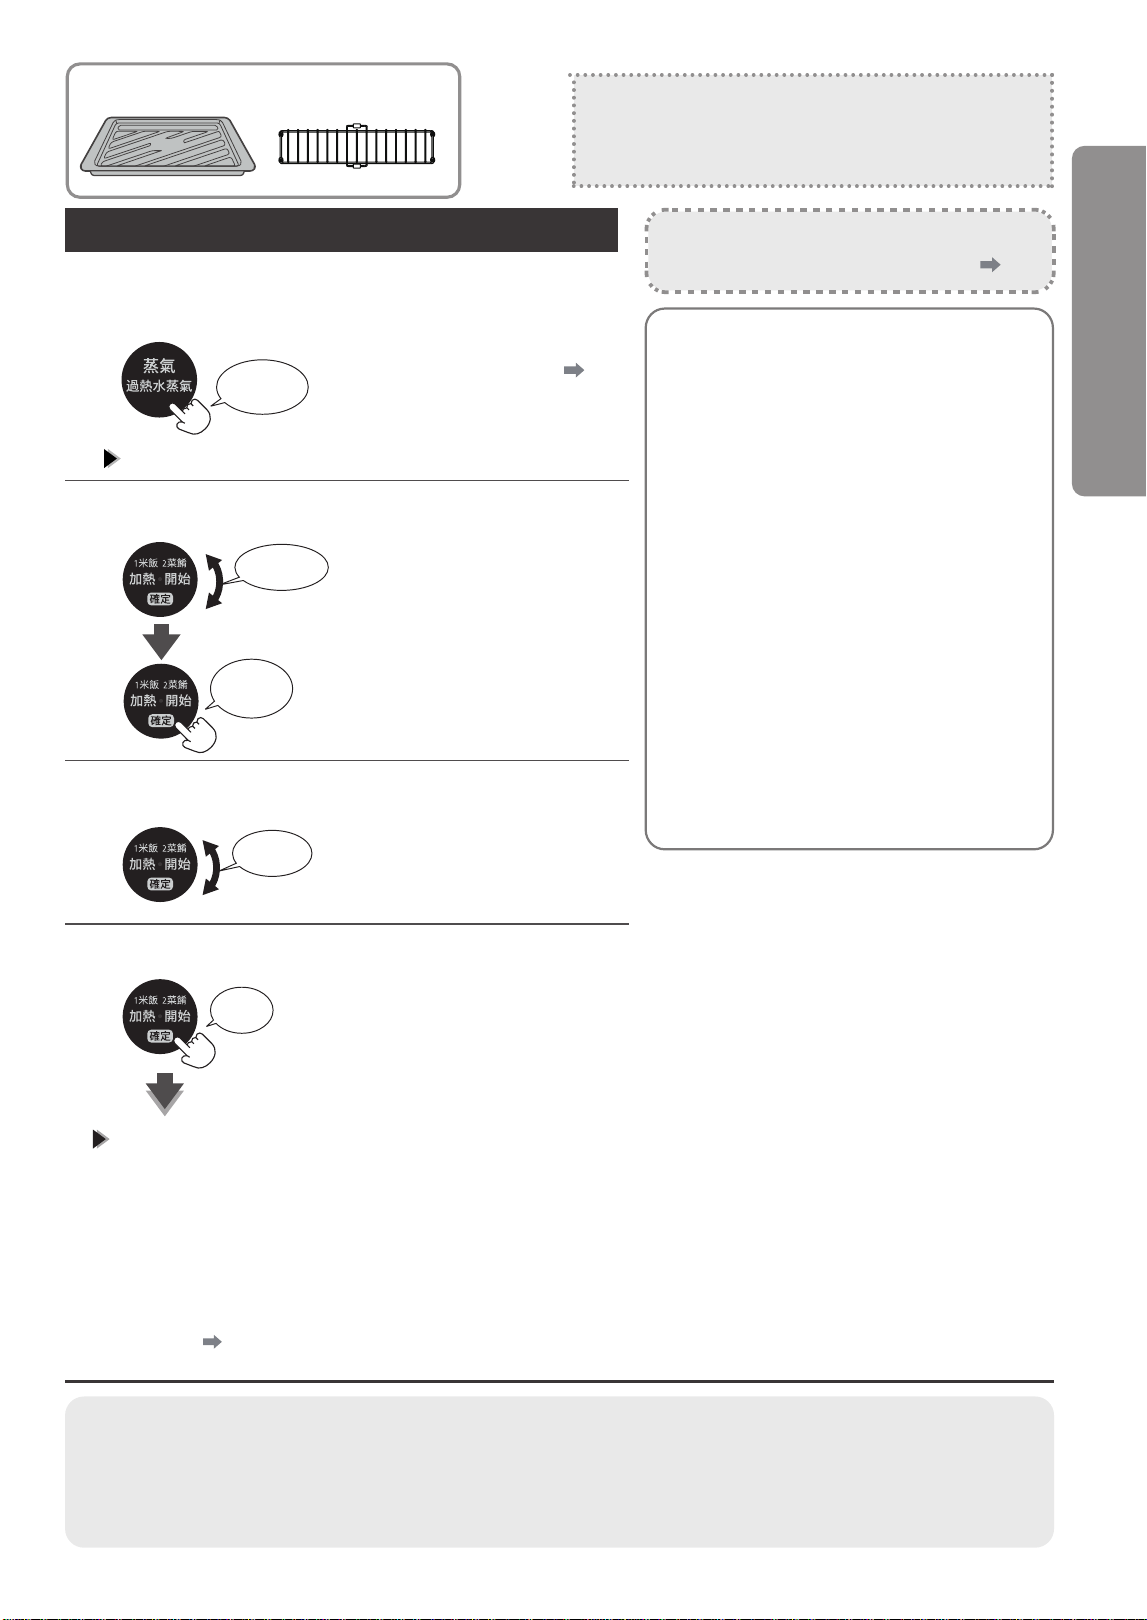
43
1
2
3
4
• Be prepared to add water. P.10
• Insert the water box to the
bottom.
Adjust the temperature
Adjust time
Start (start cooking)
If the buzzer sounds 3 times, cooking is completed.
Accessories available
Superheated steam
Cooking with water steam (superheated steam) heated to
more than 100°C. Superheated steam is a high temperature
phenomenon. It may not be visible to the naked eye, so please pay
special attention.
Instructions
• Please read the safety precautions carefully. P.2~5
Prepare to add water and put in food, select
superheated steam (without preheating)
Press
4 times
Turning
Turning
Press to
confirm
Press
• Maximum cooking time:
60 minutes
• The buzzer will sound when you forget to take out the food.
(1 min, 3 min, 5 min later)
• Be careful when taking out the oven and baking tray as they
get hot.
• Please remove water from the pipeline and perform self-
cleaning. P.49
Notifications
• The baking effect may vary depending on the room temperature, shape, quantity, size, initial temperature, and power
supply voltage. Cooking can be done smoothly by wrapping the front and rear or part of the food exchanged during
heating with tinfoil.
• Steam will come out after the oven becomes hot.
Definition of preheating
• Heat the oven to a temperature suitable
for cooking in advance.
■
Change the temperature during
preheating
→
No.
■
Relationship between set
temperature and preheating
temperature
→
Preheat at the same temperature as the
set temperature. However, when the
set temperature is greater than or equal
to 210 °C, the preheating temperatureis
200°C.
■
Preheating time standard
→
About 14 minutes at 200°C.
• If the temperature in the oven before
preheating is different from room
temperature and voltage, the preheating
time will be slightly different.
■
When you want to change the cooking
time halfway
→
Rotate the knob during cooking to adjust
the cooking time in 1 minute
• About the settable time for 1 cooking,
including extendable timefor a maximum
of 60 minutes.
■
When you want to change the cooking
temperature halfway
→
Press the "Start Heating" button during
cooking, rotate the knob during
temperature display (within 5 seconds),
and then adjust the cooking temperature
to 10°C
■
When it is desired to continue heating
after completion (extend the time)
→
Turn the knob within 3 minutes after
cooking, then set the time and heat while
observing P.7
Without preheating
Cooking with superheated steam
Cooking method
"
預熱
" will not be displayed.
• Setting preheating temperature:
100~250°C, but when the oven
is overheated (the display part
flashes "
高溫
"), it may not be set
above 220°C to protect electrical
components.
• After that, the display part will show "
高溫
" and "
冷卻
". Do
not unplug the power plug while "
冷卻
" is flashing.
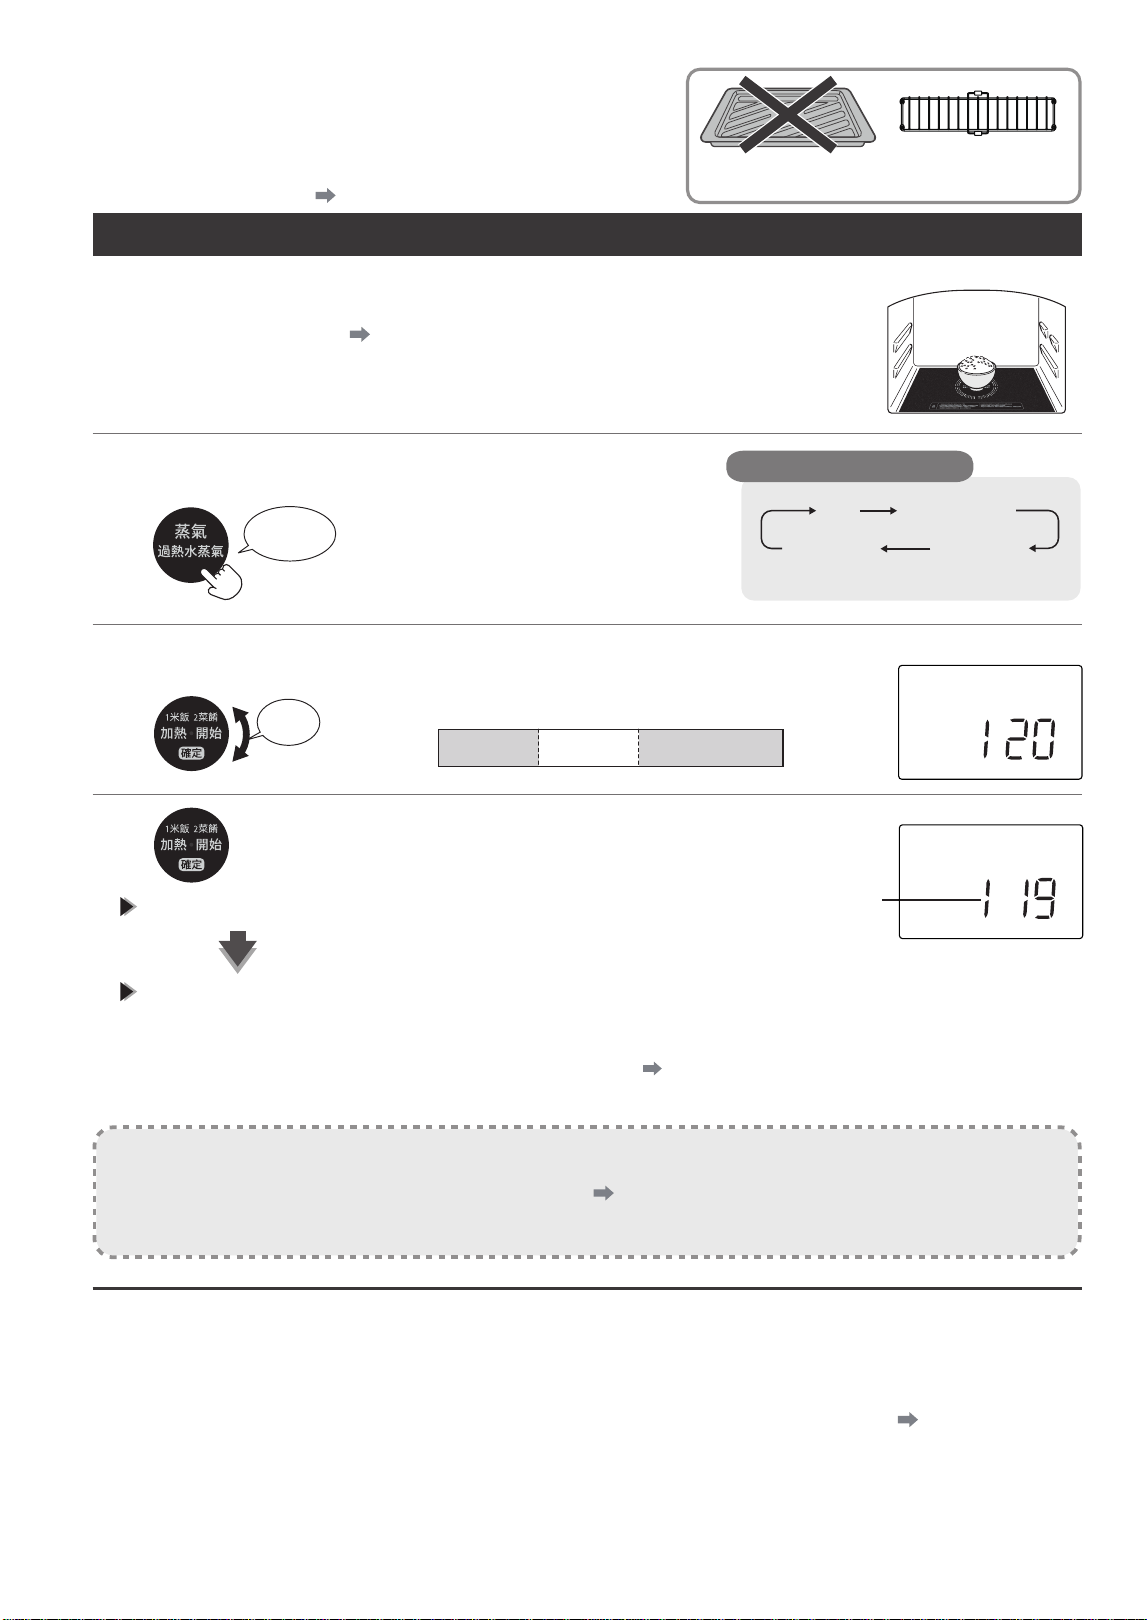
44
Cooking by microwave steam
Adjust time
Prepare to add water and put in food
Do not use baking
trays
Prepare to add water and put in food
1
2
3
Select microwave steam
Adjust time
4
Press
Press
2 times
• Be prepared to add water. P.10
• Insert the water box to the bottom.
• Place in a heat-resistant container that matches the serving size of the food, take
○
as a
standard, and put it in the center of the oven.
Each time it is pressed, it switches
in the following order
Turning
Setting unit of cooking time
(maximum 30 minutes)
In 10 seconds
In 30 seconds In 1 minute units
0
5 min 10 min 30 minutes
Displays the
remaining time
If the buzzer sounds 3 times, cooking is completed.
Start cooking
• The buzzer will sound when you forget to take out the food. (1 min, 3 min, 5 min later)
• The container will get hot, so be careful when removing it.
• Please remove water from the pipeline and perform self-cleaning. P.49
Instructions
• Be careful of steam coming out of the oven after opening the door. In addition, note that steam will also
come out of the air outlet during and after cooking
• Please read the safety precautions carefully. P.2~5
• The water box will also get hot after cooking. Please wait until the main unit cools down and then remove
the water box.
Steam rack can be
used for microwave
steam cooking
★
Time setting standard
P.45
Put it in the center
without wrapping
plastic film
Steam
Microwave
Steam
Superheated
steam (without
preheating)
Superheated
steam (with
preheating)
■
When you want to change the cooking time halfway
→
Rotate the knob during cooking to adjust the cooking time in 1 minute
• The maximum settable time for 1 cooking is 30 minutes, including the prolongable time.
■
When it is desired to continue heating after completion (extend the time)
→
Turn the knob within 3 minutes after cooking, then set the time and heat while observing P.7
• Heated by microwave (400W) and
steam.
Use containers and accessories that
can be used.
燒烤
高溫
冷卻
缺水
烤盤 上下層
發酵烤焗 預熱
自動功能
w
分 秒
克
C
弱 強
完成
定溫加熱
延長
炆燉微波
蒸氣 過熱水蒸氣 杯 條 個 門
燒烤
高溫
冷卻
缺水
烤盤 上下層
發酵烤焗 預熱
自動功能
w
分 秒
克
C
弱 強
完成
定溫加熱
延長
炆燉微波
蒸氣 過熱水蒸氣 杯 條 個 門
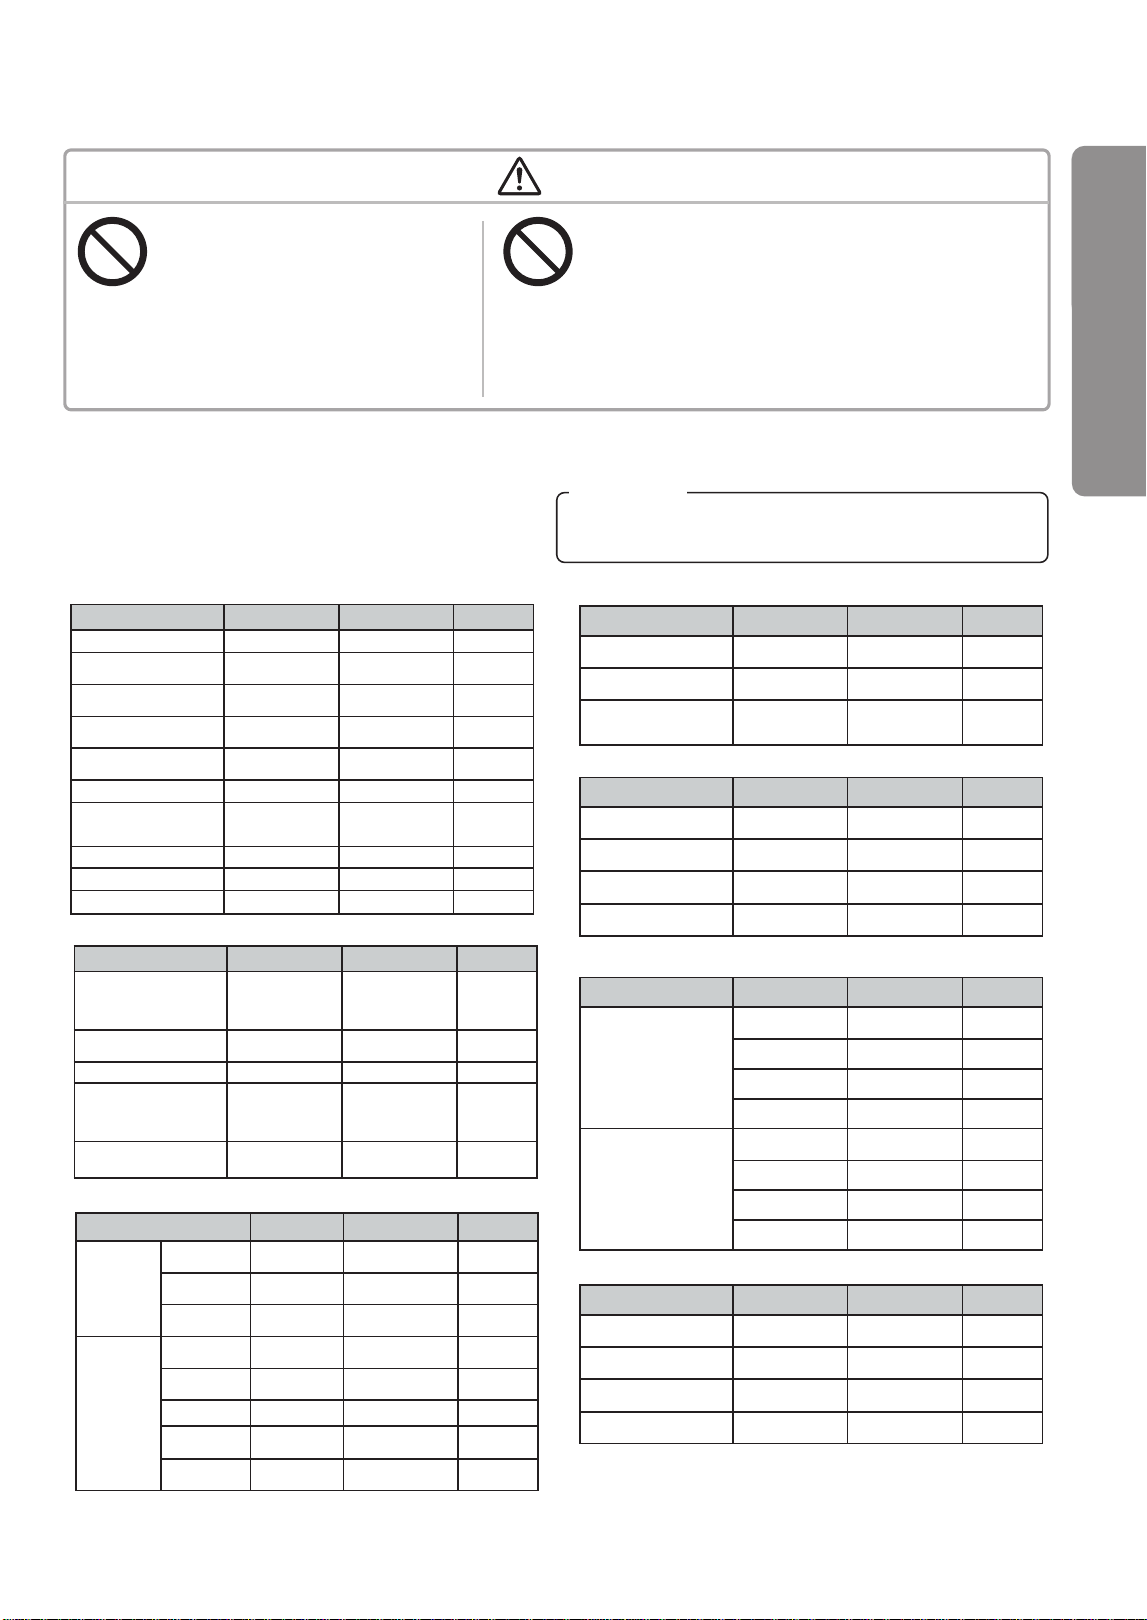
45
Time setting standard for manual heating
Warning
Prohibit Prohibit
Do not overheat food
Otherwise, smoke or fire may occur.
• Please set the time conservatively and
observe while heating during cooking.
• The stuffing of the bean paste buns
will heat up first, and after heating for
more than 3 minutes, it may smoke
and catch fire.
Do not overheat beverages, oily food and
thick food.
Otherwise, it may suddenly boil when taken out of the oven
and cause burns.
• Please stir evenly with a spoon before and after heating
the drink.
• Please set the time conservatively and observe while
heating during cooking.
Set the cooking time standard for output power and time.
The heating time is proportional to the serving size of the food. When the serving size is half, please also halve the heating time.
●
Capacity unit: 1ml=1cc
●
Normal temperature: about 20°C, refrigeration: about 10°C,
freezing: about -20°C
●
Plastic film required...
〇
/No plastic film required... ×
Heating
(Microwave 600W)
Heating frozen food
(Microwave 600W)
Beverages
(Microwave 600W)
Thaw frozen vegetables
(Microwave 600W)
Thaw frozen Meat·Fish
(Microwave 100W)
Steam microwave
(Steam + Microwave 400W)
Stewed vegetables
※
(Steam + Microwave 400W)
Name of dish Serving Size Standard Duration Plastic film
Rice 1 cup (150g) About 1 min ×
Covered food 1 cup (340g)
About 2 minutes
and 50 seconds
×
Soups · Miso Soup 1 cup (150ml)
About 1 minutes
and 40 seconds
×
Stewed vegetables 150g
About 1 minutes
and 20 seconds
×
Curry Vegetables 200g
About 2 minutes
and 10 seconds
○
Shumai 6 pcs. (100g) About 50 seconds ×
Quick-frozen steamed buns,
meat steamed buns and bean
paste steamed buns
1 piece (90g) About 50 seconds
○
Butter rolls 2 pcs. (70g) About 20 seconds ×
Cooking bread 1 piece (110g) About 30 seconds ×
Roasted sweet potatoes 1 piece (200g) About 1 min ×
Name of dish Serving Size Standard Duration Plastic film
Quick-frozen steamed
buns, meat steamed buns
and bean paste steamed
buns (refrigerated)
1 piece (90g)
About 2 minutes
and 10 seconds
×
Shumai (refrigerated) 10 pcs. (150g)
About 1 minutes
and 50 seconds
×
Rice (frozen) 1 cup (150g) About 3 minutes ×
Quick-frozen steamed
buns, meat steamed buns
and bean paste steamed
buns (frozen)
1 piece (90g) About 2 minutes ×
Shumai (Frozen) 10 pcs. (150g)
3 minutes and 30
seconds ~ 4 minutes
×
Name of ingredients Serving Size Standard Duration Plastic film
Leafy
vegetables
Spinach 100g
About 1 minutes 40
seconds
○
Cabbage 100g
About 1 minute and
20 seconds
○
Broccoli 100g
About 1 minute and
20 seconds
○
Root
vegetables
Potato 1 pcs. (150g)
About 3 minutes
and 30 seconds
○
Taro 100g
About 2 minutes
and 40 seconds
○
Pumpkin 150g About 4 minutes
○
Carrot 100g
About 3 minutes
and 30 seconds
○
Sweet Potato 200g
About 4 minutes 30
seconds
○
※
Please wet the vegetables with water and heat them. (Prevent burning)
•
For commercially available frozen and processed foods, refer to the package instructions for heating while observing.
•
When the heating is insufficient or uneven, please take it out and stir it or change its position to continue heating.
Do not heat sealed bags or canned food.
Failure to do so will result in fire, cracking, product breakage, injury
and burns.
Name of dish Serving Size Standard Duration Plastic film
Rice (frozen) 1 cup (150g)
About 2 minutes
and 30 seconds
○
Curry Vegetables (Frozen) 300g
About 8 minutes
and 30 seconds
○
Shumai (Frozen) 10 pcs. (150g)
2 minutes and 40
seconds ~ 3 minutes
and 20 seconds
○
Name of dish Serving Size Standard Duration Plastic film
Milk (refrigerated) 1 cup (200ml)
About 1 minute and
50 seconds
×
Wine (normal
temperature)
1 cup (160ml) About 50 seconds ×
Water (normal
temperature)
1 cup (200ml)
About 1 minutes 40
seconds
×
Coffee (normal
temperature)
1 cup (150ml)
About 1 minute and
30 seconds
×
Name of ingredients Serving Size Standard Duration Plastic film
Meat
100g
About 5 minutes
and 30 seconds
×
200g About 8 minutes ×
400g About 14 minutes ×
600g About 18 minutes ×
Sashimi
100g
About 3 minutes
and 30 seconds
×
200g About 5 minutes ×
400g About 9 min ×
600g About 11 min ×
Cooking by steam microwave/Time setting standard for manual heating
Cooking method
ATTENTION!
※
Please transfer to a heat-resistant container and sprinkle more water
on the mixed vegetables before heating.

46
Self-cleaning method
Cleaning and maintenance method
The button to cleaning and maintenance
lies in timeliness and carefulness
Warning
Before cleaning the main unit,
please unplug the power plug
and wait for it to cool down.
Otherwise, it may cause electric shock,
injury and burns.
After unplugging
and cooling
No wet hands
Prohibit
Do not plug or unplug the power
plug with wet hands.
Otherwise, it may lead to electric shock.
Do not heat when oil, food residues
and moisture are attached to the
oven or door
When the microwave is concentrated in dirty
parts, sparks, smoke, fire and oven damage
may occur.
In addition, it may cause rust.
• When the above substances are attached,
please wipe them after the main unit cools
down each time.
To prevent rust and for long-term use
After each use, please wipe off the dirt and water in the oven to remove moisture.
①
Please wipe the whole oven (left and right sides, inside, top, bottom, and inner side of the oven door) with a wrung rag.
For cleaning and maintenance precautions, please refer to the instructions for each part for details.
②
Open the oven door and dry it naturally.
Please open the oven door for about 1 hour after wiping off moisture
※
Please be careful not to hit the oven door or apply gravity to it.
Oven body and door
Please wipe it with a wrung rag that has been twisted dry.
• Please wipe off stubborn dirt with a cloth soaked in diluted kitchen
detergent (neutral), and then be sure to wipe clean the detergent.
Instructions
• Please do not sprinkle water on it.
Otherwise, it may rust or cause failure.
Steam outlet
Please wipe it with a wrung rag that has been
twisted dry.
• After steam cooking, white powder (dissolved matter
in water) remains near the steam outlet. Please wipe it
carefully with a wrung rag that has been twisted dry.
Inside the oven door · inside the oven
Please wipe it with a wrung rag that has been twisted dry.
• For dirt that is difficult to remove, place a wrung rag above the dirt for
about 30 minutes and then wipe it clean. In case of serious dirt, please
soak the rag with diluted kitchen detergent (neutral) and wipe it clean,
and then wipe off the detergent with a wet rag.
For the moisture condensed after each cooking, please wipe
it clean with a dry rag after the main unit cools down.
Instructions
• Do not scrape with sharp-fronted objects such as brooms or forks
to avoid scratches or cracks.
Oven door gasket
When there are water drops or food residues
accumulated at the oven door gasket, please
wipe them gently with a wrung rag after the
main unit is cooled.
Instructions
• Do not scratch, squeeze in, or pull out the gasket
violently as this may cause steam leakage. (NON-
REMOVABLE WASHER)
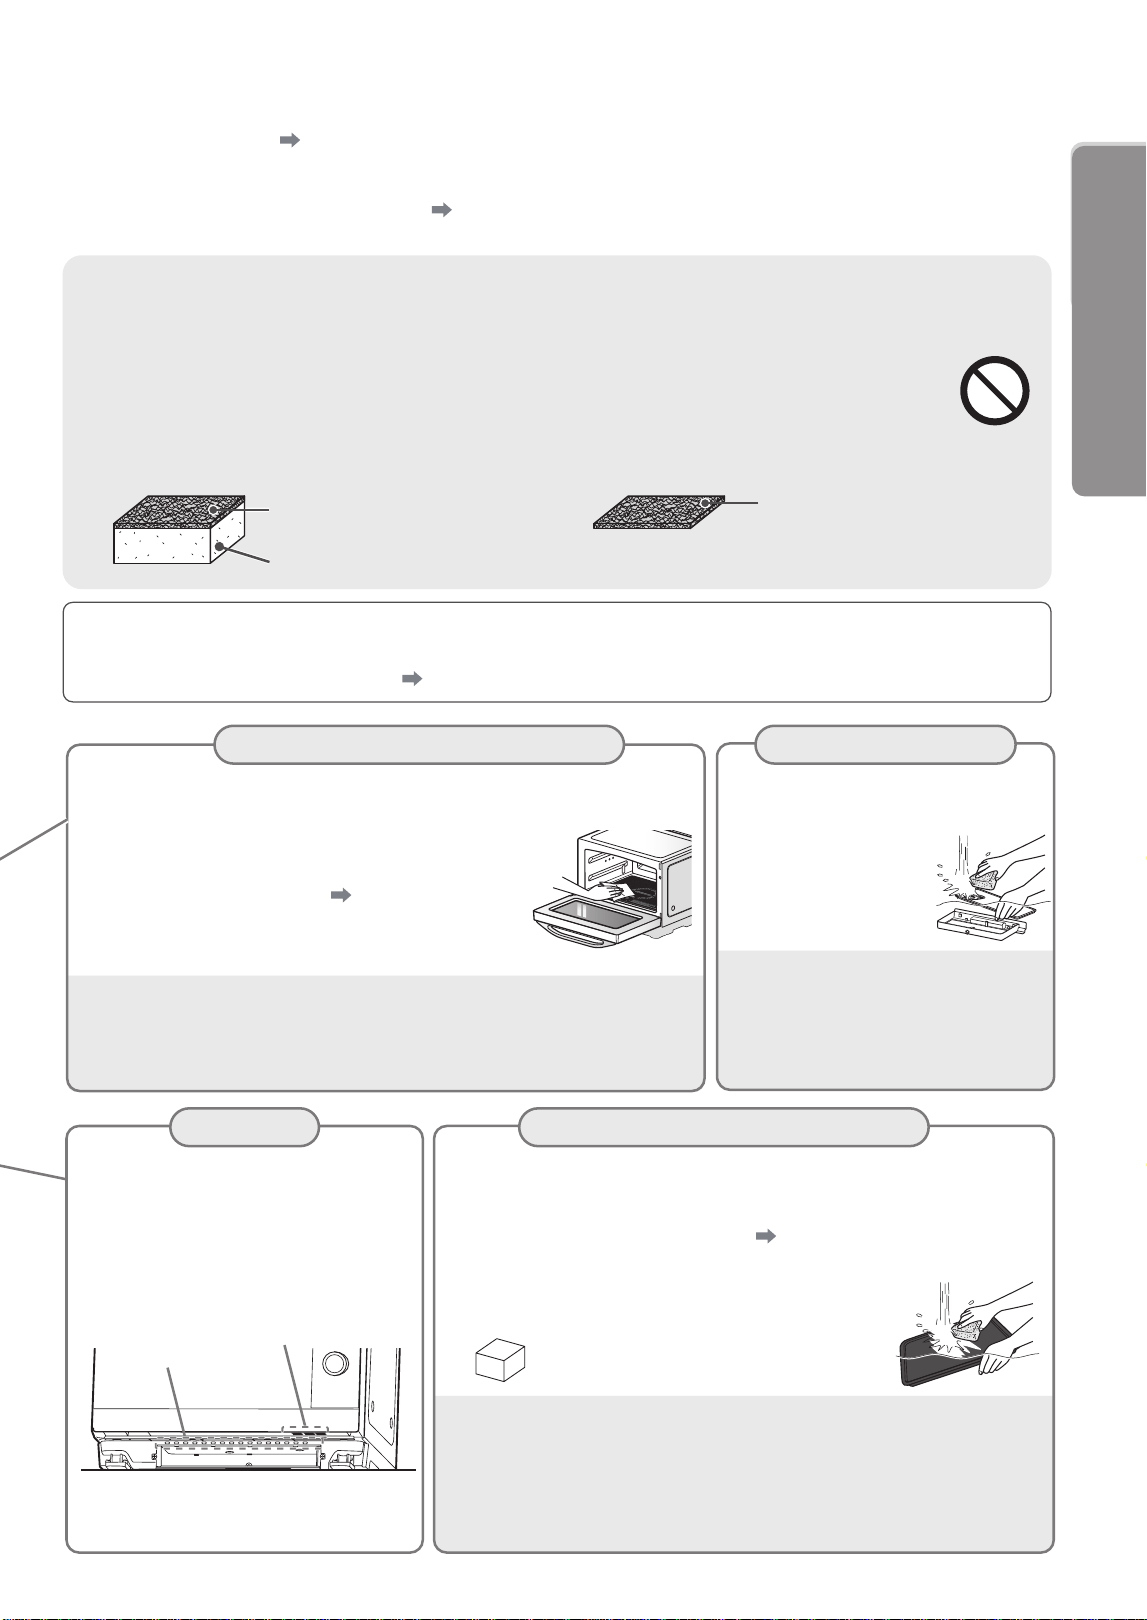
47
■
When the odor in the oven cannot be removed after self-cleaning
Please deodorize ( P.18) to reduce odors.
■
When not in use for a long time
After pipe water removal method ( P.49), unplug the power plug and carefully clean all
components, and then keep them away from moisture and dust.
Instructions
Do not use non-neutral detergents (alkaline, acidic and other kitchen detergents, residential
special detergents), baking cleaners, powder cleaners, gasoline, thinners, alcohol, bleach, hot
water, spray detergent containing combustible gases (LPG, etc.), brushes, hard parts of sponge
brooms, nylon brooms with abrasives, metal brooms, etc.
Otherwise, the machine may be damaged, discolored, deformed, smoked, caught on fire, rusted and
paint peeled off. It can also make it difficult to remove dirt.
Sponge broom Nylon broom with abrasive
Do not use hard parts (non-woven
fabrics containing abrasive).
Please clean it with a sponge.
Do not use. Please use a broom
with no abrasive added.
Warm Tips
It is easier to remove dirt in the oven and baking tray with steam. Please carry out self-cleaning according to
"Method of self-cleaning with steam" ( P.48). (Do not use methods other than those on page 50)
Inner bottom of oven
Water filling box • water collecting
box
Air inlet
Baking tray
Please wipe off the dirt at the inner bottom of the oven with
a wrung rag that has been twisted dry in time.
The dirt generated when using the microwave may be charred
and blackened when using the bake mode.
• When the dirt is not easy to remove, please refer to "Method
of self-cleaning with steam" ( P.48), apply liquid cleaner
(emulsion cleaner) and leave it for about 2 minutes,
then scrape it with a wet cloth and a rounded plastic film
to remove the dirt. Then wipe the detergent clean with a wet cloth.
Instructions
• Do not scratch the surrounding silicone gasket and oven painted surface to
avoid scratches.
• Do not scratch or impact with a metal brush or sharp-fronted objects to avoid
scratches or cracks.
Pour out the water in the water filling
box and water receiving box.
If there is dirt, remove it with
a soft sponge and wipe
off the moisture.
• If you care about dirt, please
dilute the special kitchen
detergent (neutral) with
water and rinse it clean.
Instructions
• Do not put it in a dishwashing dryer
or crockery dryer, or directly expose it
to direct sunlight for drying to avoid
deformation or damage.
After removing the water filling
box and water receiving box, and
then wipe off the dust with a rag.
• After removing the water filling box
and water receiving box, and then
wipe off the dust with a rag.
Air inlet
(Front of main unit)
Air inlet (under
the oven door)
Remove dirt with a soft sponge and wipe off moisture.
• If the dirt is difficult to remove, please soak it in warm water before cleaning.
• If dirt is not allowed, please clean with a special kitchen detergent (neutral).
In addition, "self-cleaning with steam" ( P.48) makes it easier to remove dirt.
• When there is moisture residue on the baking tray, it may cause rust.
• When it is difficult to remove dirt from the baking tray.
Please use melamine foam sponge (white
sponge without detergent) to wipe it clean.
Instructions
• Do not cool down rapidly after use to avoid damage or deformation of the
main unit. In addition, steam or high-temperature droplets will splash when
water is added immediately after heating.
• Please do not scrape or remove dirt with a metal brush or objects with
a sharp front end to avoid scratches or deformation.
Self-cleaning method
For these cases
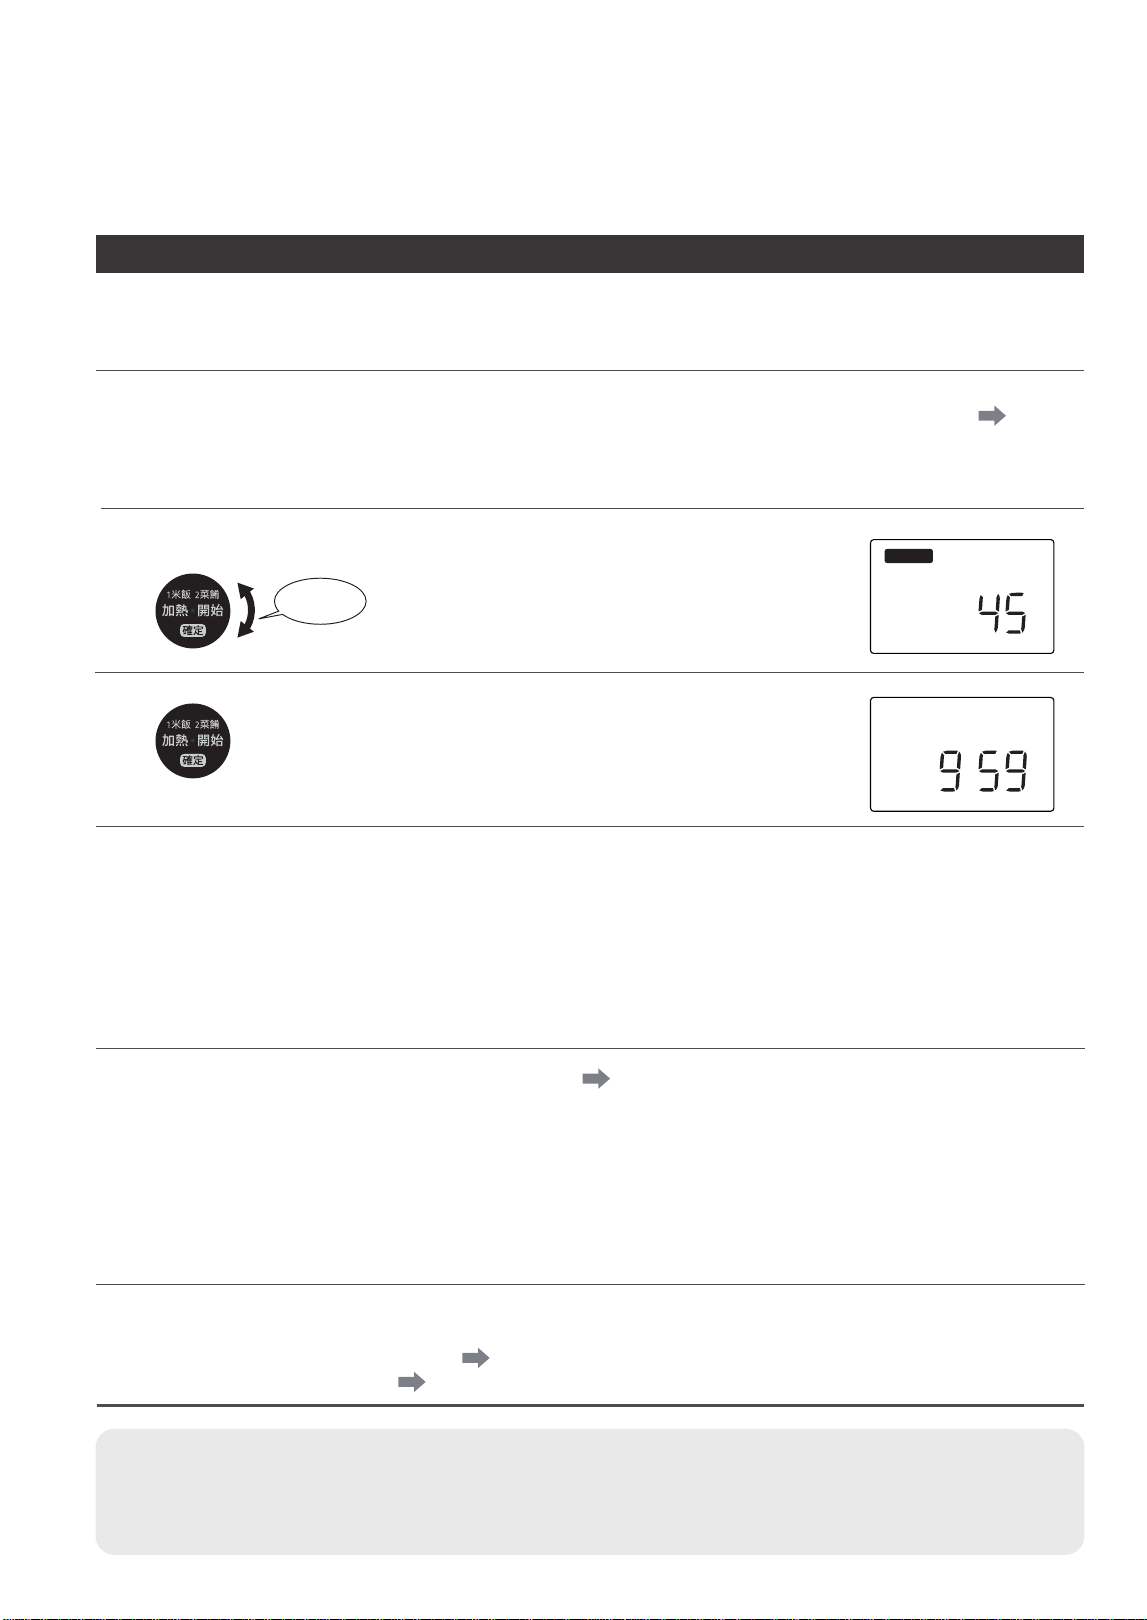
48
1
2
3
6
Self-cleaning method
(Continued)
If dirt and odor are not allowed
Method of self-cleaning with steam
Use steam to remove dirt from the oven for easy wiping. Wipe the dirt to reduce odor. In addition,
if you put in a baking tray that needs to be cleaned of dirt, the dirt can easily fall off.
Fill water into the water filling box and install it on the main unit P.10
* To remove the dirt from the baking tray, please put the baking tray in the lower layer of the oven.
Select 45 Quick Clean
• Rotate to the left for quick selection.
Turning
Press (start self-cleaning)
(Required time: 10 min)
The buzzer sounds 3 times, and the quick cleaning is completed
4
5
• After completion, the word "Cooling" will blink due to ventilation in the oven and the cooling fan will run
for several minutes.
• Please pay more attention to steam when opening the oven door. In addition, please be careful of the
residual steam coming out of the air outlet.
• If the oven door is not opened, the buzzer will sound. (1 min, 3 min and 5 min later). Mute the buzzer by
opening the oven door or pressing "Cancel".
• After completion, the word "Cooling" will blink due to ventilation in the oven and the cooling fan will run for
several minutes.
• Please pay more attention to steam when opening the oven door. In addition, please be careful of the
residual steam coming out of the air outlet.
• If the oven door is not opened, the buzzer will sound. (1 min, 3 min and 5 min later). Mute the buzzer by
opening the oven door or pressing "Cancel".
After water removal for pipeline ( P.49), wipe off dirt after cooling
in the oven
Dry the inside of the oven after opening the oven door (about 1h)
("To prevent rust and long-term use" P.46)
• When "47 deodorization" ( P.18) is continued, it is not necessary to dry the inside of the oven.
Notifications
• Please note that the inside of the oven, baking tray and steam outlet will become hot just after water removal.
• Quick cleaning reduces odor, but does not remove all types of odors.
·
燒烤
高溫
冷卻
缺水
烤盤 上下層
發酵烤焗 預熱
自動功能
w
分 秒
克
C
弱 強
完成
定溫加熱
延長
炆燉微波
蒸氣 過熱水蒸氣 杯 條 個 門
燒烤
高溫
冷卻
缺水
烤盤 上下層
發酵烤焗 預熱
自動功能
w
分 秒
克
C
弱 強
完成
定溫加熱
延長
炆燉微波
蒸氣 過熱水蒸氣 杯 條 個 門
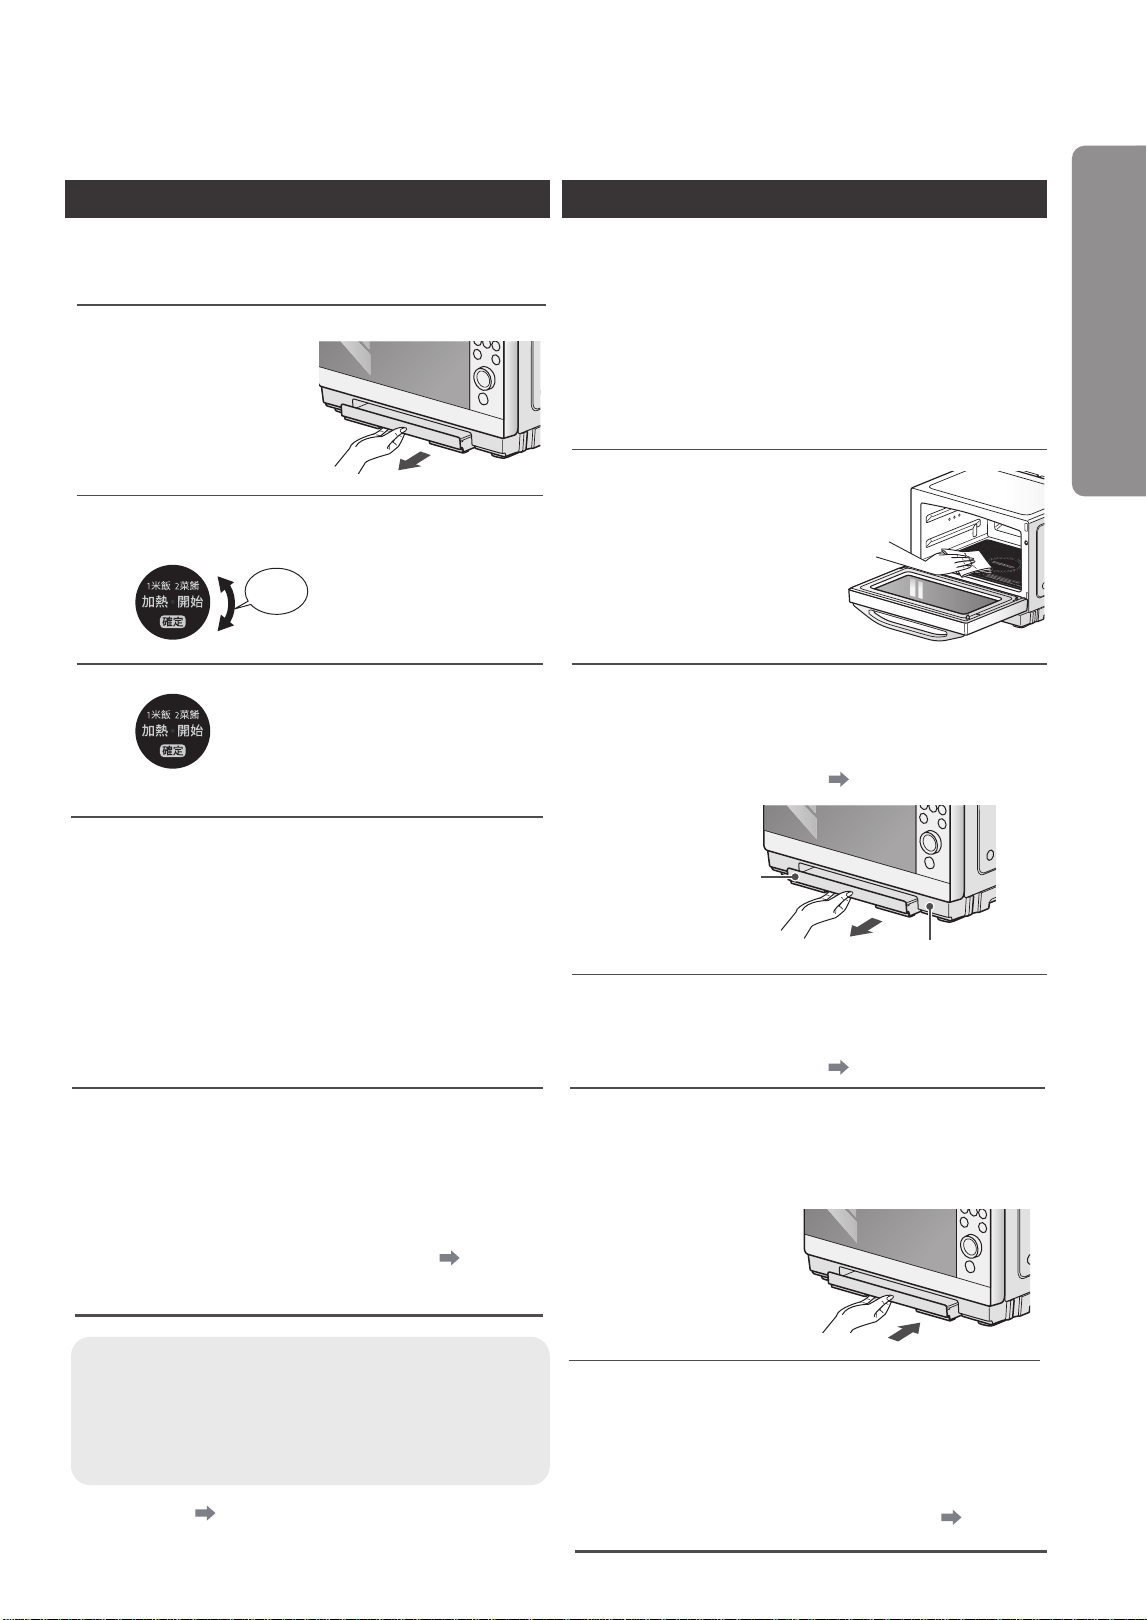
49
·
Every time when using steam
Pipe water removal method
About self-cleaning of main unit
After cooking, please be sure to remove
water from the pipeline.
After each cooking, please wipe off the water
droplets attached to the oven and door with
a dry towel after the main unit cools down.
Then open the oven door to dry the inside.
If the oven is not wiped clean, water may
overflow from the water receiving box
during repeated steam cooking.
1
2
3
4
5
1
2
3
4
5
Pull out the
water filling
box from the
main unit
Select 46 Pipeline Water Removal
Wipe the water
droplets in and
on the oven
door with a dry
rag, etc.
Turning
Press (start water
removal)
(Required time: 2 min)
The buzzer sounds 3 times, indicating
that water removal is completed
• If the oven door is not opened, the buzzer will
sound. (1 min, 3 min and 5 min later), open the
oven door or press "Cancel" to stop it.
• After completion, please wait until the main
unit cools down, and then wipe off water
droplets in the oven and inside the oven door
with a dry rag.
(Please refer to Step 1 in "About Self-cleaning of Main
Unit" for self-cleaning)
Dry the inside of the oven after
opening the oven door (about 1h)
("To prevent rust and long-term use" P.46)
Notifications
• Please note that the water drained during and
after water removal becomes steam and the steam
outlet gets hot.
Please refer to P.10 for the installation and removal
methods of water filling box and water receiving box.
Pour out the water remaining in the
water filling box and clean it with water
• Self-cleaning method P.47
• Self-cleaning method P.47
Water filling box
Water receiving box
Pour out the water accumulated
in the water receiving box
Insert the water filling box
and water receiving box into
the main unit
Dry the inside of the oven
after opening the oven door
(about 1h)
("To prevent rust and long-term use" P.46)
Self-cleaning method
For these cases
50
About prompt sound (buzzing sound)
When performing the following operations or in the following states, a
buzzing sound will be given.
State Buzzing sound
When the button is pressed Beep ~
At the end of cooking Beep
~
beep
~
beep
When the preheating is completed and there are operations
such as turning over during automatic cooking
Beep
~
beep ~ beep ~ beep
~
beep
When the oven door is not opened/closed for about 20 min
after preheating
Beep
~
beep
~
beep (stop cooking)
When "Heating" is pressed under the following circumstances
• It has been more than 1 min since the oven door is opened/
closed.
• The oven door is not opened/closed after preheating.
• The oven door is not opened/closed after the buzzing
sound prompting turnover is given during automatic
cooking.
Beep beep beep beep beep (no start)
※
Please open/close the oven door again and then press
the "Heating" button.
When you forget to take out the food after heating
(1 min, 3 min later)
→
beep beep ~ beep beep
5 min later
→
beep beep ~ beep beep ~ beep beep ~ beep
-
When the oven door is not opened after "45 Quick Cleaning"
and "46 Pipe Water Removal" are completed
The oven door is not opened after the buzzing sound
prompting turnover is given during automatic cooking
It sounds every 1 min, up to 5 times
→
beep beep ~ beep
beep
Beep beep beep
When the display is abnormal Beep beep beep beep beep beep beep
Elimination and recovery methods of
buzzing sound
Enter the mute function
In the standby state, press and hold the Cancel button for 3s, then OFF is displayed to enter the full mute
function. All buzzing sounds are canceled, with power-off memory function.
Exit the mute function
In the standby state, press and hold the Cancel button for 3s, it will buzz once to display ON and exit the mute
function.
" will display.
WIRELESS CONNECTION
Connect the network
Press and hold " " for 3 seconds, then " " and
"AP" will display.
lf it connects to the network successfully, the oven will return to standby, and "
lf it fails, "NO" will display, and the oven will return tostandby after 10 minutes.
Disconnect from the network
Press and hold " " for 8 seconds, then "--" displays for 5 seconds,
lf the link has been removed successfully, the screen will display "8888" and then return to standbyafter 3 seconds.
lf it fails, "FFFF" will display, and the oven will return to standby after 3 seconds.
When "
缺水
" blinks (inform water filling)

51
List of frequently asked questions
Q.
Question
A.
Answer
Page for
reference
Is it necessary to separate from
walls and furniture when placing?
Yes.
Otherwise, walls and furniture are prone to fire or damage due
to too high temperature.
• Please leave a distance of more than 30cm above, and 10cm
on the left, right and rear sides respectively. There is no
need to leave any gap below.
• The front needs to reserve space for food to be put in and
taken out when the oven door is fully opened.
• However, for non-heat-resistant walls, household
appliances, furniture and sockets, it is necessary to reserve
gaps beyond the recorded size.
4
Is it necessary to dry for
deodorization for the first use?
Yes.
Please carry out "Internal Drying for Deodorization" operation
for the first use, and dry the anti-rust oil in the oven. It is
normal that smoke or odor may be emitted.
18
How to remove dirt?
Please refer to "Self-cleaning Method" to carry out careful self-
cleaning.
46~49
What containers can be used?
Please refer to "Usable and Unusable Containers". 14~15
How to clean up the water
remaining in the product?
Please refer to "Pipe Water Removal Method". 49
How to move this product?
When moving, make sure to hold the lower left and lower right
sides of the product.
6
Is there a problem that the floor
surface will become hot after using
the product?
When using continuous heating, long-time heating, baking
and cooking modes, the hot air emitted by the product will
cause the temperature of floor surface and wall to rise. This is
a normal phenomenon. Do not touch the product directly with
hands before cooling.
In addition, please do not put it on non-heat-resistant articles
such as tatami, carpet and tablecloth.
-
Who should be entrusted to repair?
Please refer to pages 51~57. If there is any abnormality, please
stop using it and be sure to disconnect the power plug from
the socket. Consult your store when purchasing this product.
59
List of Elimination and Recovery Methods/Common Questions about Prompt Tone (Buzzing Sound)/Warning Tone
For these cases
52
When cooking is not possible
(Microwave · steam cooking, etc.)
Item For these cases Countermeasures
Rice and dishes heating
Press "Start Cooking" to start
heating immediately, but
the heating effect cannot be
achieved
z
When the temperature in the oven (especially at the bottom) is very high, the
infrared sensor may not work normally. Please open the oven door and wait
until it cools down before heating.
Food cannot be heated
z
Is the food wrapped in metal containers, tin foil, etc.?
z
Is the accompanying baking tray used? Please do not use the baking tray.
z
Please put the food in the center of the oven. Please refer to the bottom of the
oven and make sure the food is placed in the center of the front, back, left and
right.
z
The output power may be reduced in order to protect electrical components
when the oven is hot, heated for a long time, continuously heated and heated
with small amounts of food. Please continue to heat or wait for a moment
before use.
Press "Start Heating" to heat,
but the heating is excessive
z
Please do not cover the lid.
→
Otherwise, the infrared sensor may not work normally.
z
Please put the food in the center of the oven (front, back, left and right). If the
position deviates, heating may not be smooth.
z
Is the food amount too small? The amount of each heating portion shall be
more than 100g.
z
To ensure the correct detection of infrared sensor, please select a low and
wide-mouth container for heating as far as possible.
Rice and food are too dry
z
If sprayed or slightly sprinkled with water, it will have a moist heating effect.
z
Press "Microwave Steam" to heat, and there will be a moist heating effect.
Soup splashes from stewed
food, braised fish, etc.
z
Please put it into a deep-mouth container and wrap it with plastic wrap, then
heat it while observing in the manual "microwave" mode.
Curry and assorted soy-sauce
pickles cannot be heated
z
When heating thick food, please heat it in the "2 Dishes" [High Fire] mode.
Frozen rice and frozen food
cannot be heated
z
Heat immediately after removal from the refrigerator. The infra red sensor may
not function properly when the surface begins to melt or is re-wrapped with
plastic wrap.
z
Please put the food in the center of the oven (front, back, left and right).
z
When freezing, please wrap the plastic wrap tightly against the rice. In
addition, do not stack or wrap multiple layers.
z
When heating, please use a heat-resistant shallow dish and try to avoid
placing the sealing part of the plastic wrap upward.
z
The automatic heating effect is not good when putting the storage container
or bag into it.
z
Frozen foods on the market may not achieve good heating effect in automatic
"heating" mode, so please observe and heat in manual "microwave" mode
according to the instructions for food packaging.
Fried products and tempuras
have softened surface
z
Press "12 Crispy Heating" to heat, and the crisp heating effect can be achieved.
Heating with "3 Steam" has a
long time
z
Since steam needs to be generated before heating, more time is required than
microwave heating mode.
Heating of milk, coffee
and wine
The drink temperature is very
low after cooking
z
When the temperature in the oven (especially at the bottom) is very high, the
infrared sensor may not work normally. Please wait until it cools down before
heating.
Overheating of milk, coffee
and wine
z
Please control the portion at about 8/10 of the container.
When the amount of milk placed in a container is too small, it will most likely
boil.
z
Please heat milk and coffee with "4 Milk · Coffee" and wine with "5 Wine". Do
not use the "Heating" button because it may cause too high temperature.
z
Please place the beverage in the center of the oven (front, back, left and right).
z
Refer to pages 25-26 for container selection. When using different containers,
please heat them while observing in the manual "Microwave 600W" mode.

53
Item For these cases Countermeasures
3 thawing methods
Poor thawing effect
z
Thaw the food flat on a shallow foam tray or heat-resistant shallow dish
covered with kitchen paper.
→
If the food is placed on a deep foam tray, the edge of the tray will block the
monitoring signal and may not be able to measure temperature smoothly
or thaw smoothly.
z
It is best that the thickness of food that can be thawed smoothly is less than
3cm. Please adjust the thickness evenly and wrap tin foil on small parts,
fishtails, etc. P.27
z
When it is necessary to thaw two or more types of foods at the same time,
please choose the same type of food with approximately the same size.
z
Different shapes may sometimes lead to poor thawing effect.
Inadequate thawing
z
If the local temperature of food increases, the infrared sensor will stop heating
after receiving the signal, resulting in inadequate thawing.
→
If the thickness of food is uneven, it is easy to heat up locally. Therefore,
please ensure that the thickness is consistent before freezing.
→
When the thawing is inadequate, please observe while thawing in
"Microwave 100W" mode.
→
Heat immediately after removal from the refrigerator. The infra red sensor
may not function properly when the surface begins to melt or is re-wrapped
with plastic wrap.
Boiled
vegetables
Vegetables are too dry
z
Wrap vegetables directly with plastic wrap after cleaning without shedding
water.
There are also overheating
and underheating
z
Please make sure that pumpkins, potatoes and other food items are uniform
in size and wrap them with plastic wrap together with the dish. For spinach,
stagger leaves and stems and wrap them in plastic wrap. P.28
Constant
temperature
heating
The temperature of food
after cooking deviates
greatly from the set
temperature
z
When the temperature in the oven (especially at the bottom) is very high, the
infrared sensor may not work normally. Please open the oven door and wait
until it cools down before heating.
z
Is it covered and wrapped with plastic wrap? Please do not cover or wrap with
plastic wrap.
z
Please put the food in the center of the oven (front, back, left and right).
Fermentation
Unsmooth fermentation
z
Fermentation varies with room temperature, dough temperature, yeast type
and raw material formula. Please adjust the fermentation temperature and
time while observing the dough state.
z
When the dough is dry, please spray water mist while observing its state.
Room
Temperature
Toast
The baking color varies
z
Set to "Low Fire" when you want to bake a light color with firepower
adjustment, and set to "High Fire" when you want to bake a dark color.
z
Baking colors may vary depending on toast thickness, size, recipe, bread type,
moisture content, room temperature, oven temperature, turnover timing.
z
When the baking color is light, please keep the side to be baked up and
continue baking while observing in extended heating or manual "Barbecue"
mode.
All steam
heating
Unsmooth heating
z
Is the portion appropriate?
Changing the portion in a cuisine set may result in failure to heat smoothly.
z
Is there no water? If the water in the water filling box becomes less or water is
not filled in time, it will not continue to emit steam, resulting in failure to heat
smoothly.
z
Please insert the water filling box to the bottom.
When cooking is not possible
For these cases
54
When cooking is not possible (Baking and cooking)
Item For these cases Countermeasures
All baking and heating
Poor baking effect and uneven
color
z
The baking effect may vary depending on the room temperature, shape,
quantity, size, initial temperature and power voltage. Therefore, please
observe while heating.
z
When the dough sizes are different, it may be unevenly baked. Therefore,
please keep the dough size consistent.
z
When worrying about uneven baking, please change the front and back of
food and the front and rear positions of the baking tray during heating. In
addition, wrapping some food with tin foil can improve the heating effect.
※
Please wear oven mittens and take out the baking tray to avoid being
scalded.
z
Due to the influence of cake molds and conditions, heating may not work well
even according to the temperature shown in the menu. Please try to set the
temperature shown in the menu at 10~20°C above or below it.
Snack
Sponge cake
Poor cake fluffiness
z
Are eggs adequately stirred?
Please stir it to the state that you can write on it without disappearing.
z
Is the flour overstirred?
Poor stirring effect
z
It is difficult to foam when there is moisture or oil in the bowl and brewer
during sitrring.
Rough, coarse powdery
surface
z
Is the powder sieved?
z
Is the flour blended and stirred?
Central part sinking
z
Are eggs over-stirred?
Chiffon cake
Poor fluffiness
z
Stir the egg white to foaming. Keep stir until the egg white does not drop
even the bowl is put upside down.
Egg white will foam better after cooling.
Many small holes in the
middle of the cake
z
It is possible that the dough is poured into the mould with air. Please pour the
dough into the mold from a high place at one time.
z
Are aluminum molds used?
Snack
Poor fluffiness
z
Is the portion correct?
z
Is the microwave heating time correct when making dough?
Cookies
Uneven baking color
z
Is the dough uniform in thickness and size?
Bread
Butter
egg rolls, etc.
Poor fluffiness, hard
z
Is the dough fermented adequately? Under-fermentation and low dough
temperatures may cause poor fluffiness.
z
Is the dough kneaded during forming? Excessive kneading of the dough may
cause it to harden. Please knead carefully.
z
Refer to Cuisine Collection: Breadmaking Tips.
Baguette
Poor production effect
z
Refer to Cuisine Collection: French Bread Making Tips.
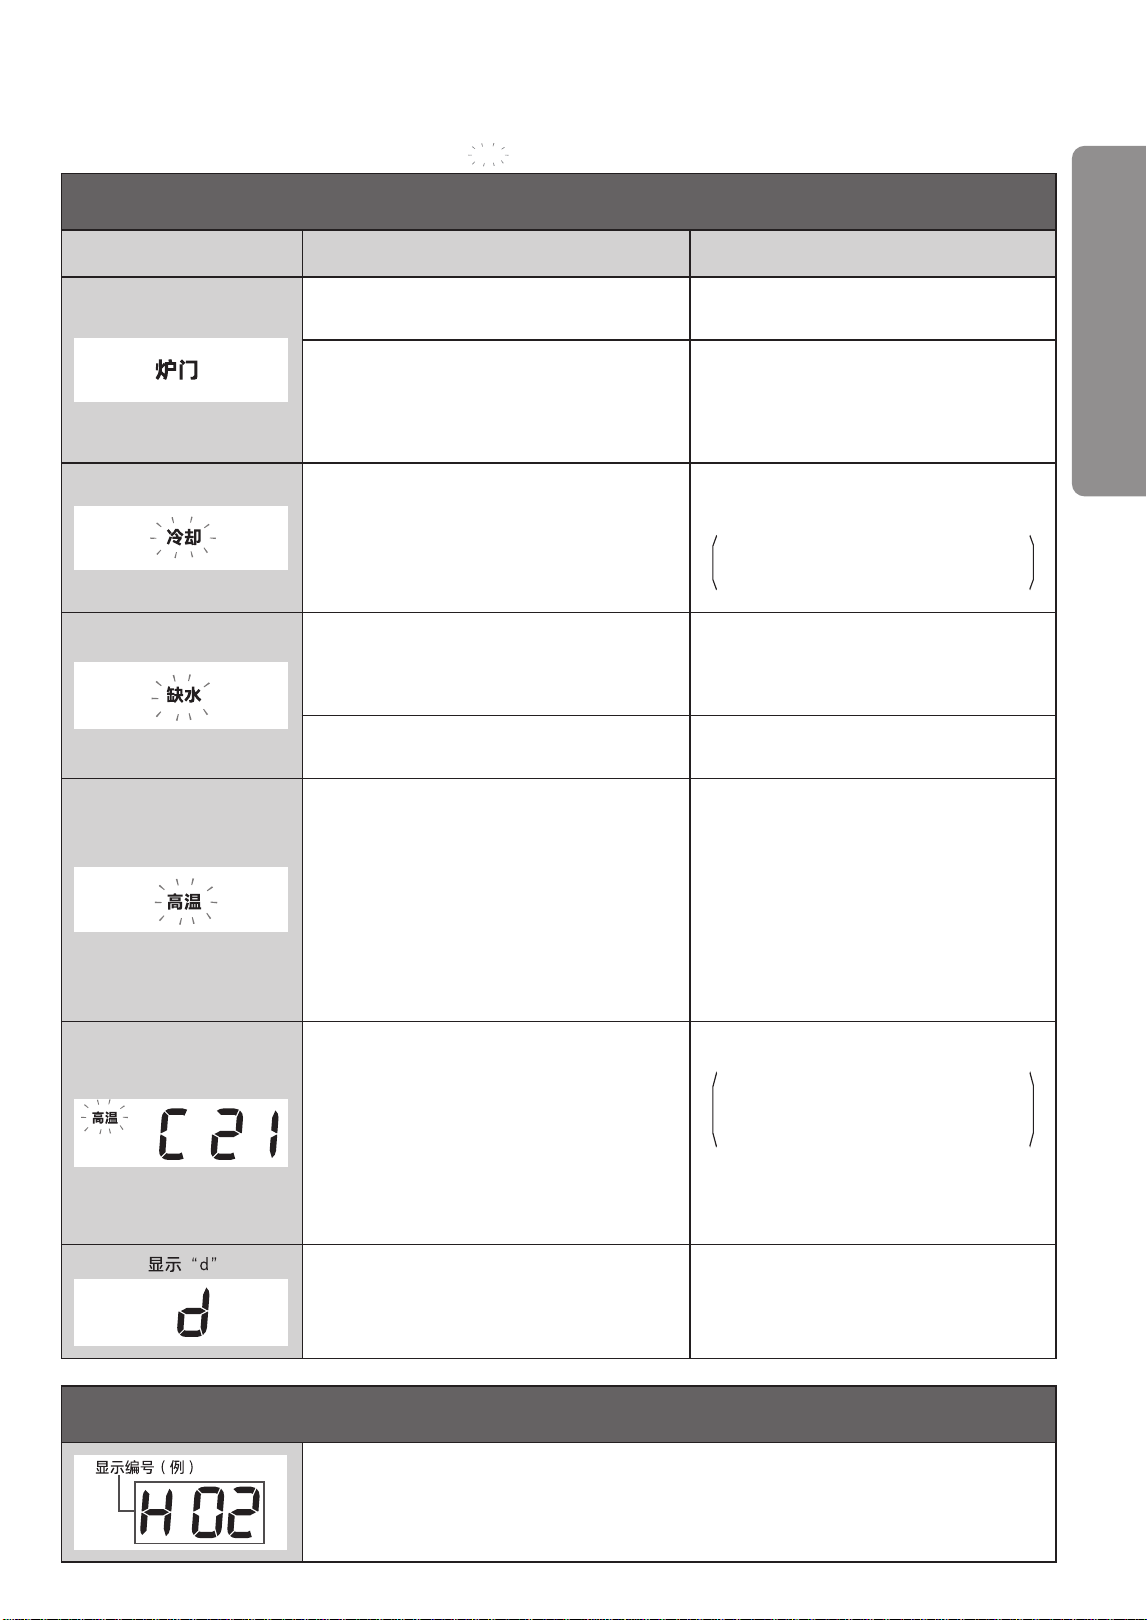
55
z
When the displayed content is marked with , it indicates that it is blinking.
The following display is not a fault. Please handle as appropriate.
Countermeasures Countermeasures Countermeasures
z
Close the oven door, and press "Start Heating"
after more than 1 min to display.
z
Please press the button within 1 min after
opening/closing the oven door again.
z
When the preheating is completed and after
the buzzing sound prompting turnover is
given during automatic cooking, the start will
be displayed if the oven door is not opened/
closed.
z
Please close the oven door after operation
according to the Cuisine Collection, and
press "Start Heating".
z
After the heating is completed, a prompt will
appear that the fan is rotating to cool the
electrical components. (The fan sounds but
does not heat.)
z
It shows that cooking is also possible
during " ".
In case of high temperature in the oven,
C21 will be displayed on some menus,
and it is necessary to wait for the interior
temperature to drop.
z
It indicates that there is no water in the water
filling box.
z
Please fill water to the water filling box
and install it properly. After 1~3 min, the
water shortage display will disappear and
cooking will continue.
z
When there is water in the water filling box, it
may not be able to fill water normally.
z
Please insert the water filling box to the
bottom.
z
After heating by heating pipe is completed,
it prompts high interior temperature. (After
about 15~20 min, the display will disappear.
The cooling speed is faster after opening the
oven door. Press "Cancel" or set the automatic
menu, and then the display will disappear.)
z
Heating with heating pipe and manual
microwave heating can also be used during
display. (However, the heating pipe may
not be set above 220°C when heating.)
Beware of scalds and containers with low
temperature resistance when cooking.
z
It may not start due to the high interior
temperature. (hereinafter referred to as
"C21·High Temperature")
At this time, please open the oven door and
wait for the temperature to drop.
z
It indicates that the start fails due to high
interior temperature. It is not a fault.
[Display menu example]
Fermentation/Japanese Egg Steaming/
Start Menu (3 min, 5 min, 7 min)/Automatic
Heating/Constant Temperature Heating/3
Thaw Methods
(Menus that cannot provide smooth heating
and menus using infrared sensors when the
interior temperature is high)
z
Please press "Cancel" and open the oven
door to wait for the temperature to drop.
If "Cancel" is still pressed after C21 is
displayed, C21 display will disappear and
manual "Microwave" mode can be used.
z
Demonstration mode for store display. (Even
if the button is pressed, heating will not start)
Please turn off this mode according to the
steps in the handling method bar on the right.
z
Repeat the following operations 2 times
to turn off this mode. Press "Cancel" until
there is a beep and buzz (about 3s), then
press "Cancel" again.
The following display is not a fault. Please handle as appropriate.
Press "Cancel", and the display will disappear. (There are also numbers that will not disappear.)
When displayed repeatedly, a fault may occur. Please inform the sales store or our consulting
center of the error code.
(00 is a two-digit number)
When the following is displayed
When the cooking fails\when the following contents are displayed
For these cases
冷卻

56
Before entrusted maintenance
The following symptoms are not faults. Please handle as appropriate.
Symptom Cause · troubleshooting method
All
After the power plug is inserted into the socket,
it still does not display anything and does not
run
• When the oven door is closed, only the power plug is inserted into
the socket and not energized. Open the oven door once, and then
it is powered on and displays the contents.
Not working at all
• Is there a power failure?
• Is the power plug disconnected?
• Is the fuse or circuit breaker in your home disconnected?
No sound from buzzer
• Is it set to eliminate buzzing? Refer to Tone (buzzing sound)
( P.50) for reset.
Press "Start Heating", and there is no response
• Please close the oven door and wait for a moment before
operating. (In order to prevent misoperation, pressing the button
immediately after closing the oven door will not respond)
No response or display even if the button is
pressed
• In order to save energy, the power supply will be automatically
disconnected and the display will disappear more than 5 min after
opening the oven door. (No response to operation)
• After the oven door is opened, the power supply will be turned on
and "0" will be displayed.
After the oven door is opened, the display
screen displays "0"
Circuit breaker is disconnected
• Are electrical products used in excess of the household capacitance
(agreed capacity with electric power company)? Please turn off the
power supply of other unnecessary electrical products, restore the
circuit breaker and reuse it.
All operations
Ticks during cooking • This is the sound of switch changeover inside the product.
During and after cooking, sometimes no sound
of (fan)
• During cooking, the sound is sometimes
high and sometimes low
• It feels like the operation is stopped during
cooking
• Continue to make sound after cooking
• During and after cooking, the fan that cool electrical components
may operate.
After cooking, the cooling fan will blink to display " ".
Do not unplug the power plug when the cooling fan is running.
• The fan does not sound during cooking, and heating continues.
• After cooking, even if the fan makes a sound, heating is not carried
out.
• Shortly after cooking, the fan stops.
The prompt tones will sound 1 min, 3 min and 5
min after cooking
• After cooking, if the food in the oven is not taken out, there will be
a sound prompt.
Please open the oven door or press "Cancel".
Fogging of oven door and display screen
• During and after cooking, the door glass and display screen may
fog due to temperature difference, but the fog will disappear
automatically after about 2h. After drying and deodorization in the
oven, the fog will disappear after about 30 min. P.18
After cooking,
There are water drops in the oven and inside
the oven door
Dripping
There is accumulated water in the oven
• In order to improve cooking performance and enhance the
airtightness in the oven, even if it is not steam cooking, water
vapor from food will adhere to the oven and oven door.
After the water droplets cool down, please wipe them clean with a
dry cloth every time and then dry them in the air.
( P.47) In addition, water droplets are liable to drip after the
placing surface is unstable or inclined. Please place it in a flat place
with sufficient strength.
Water vapor leaks between the oven door and
the main unit
• Water vapor leakage may occur due to different cooking
menus and room temperature, but this does not affect cooking
performance, etc. In addition, microwave cooking does not create
a microwave leakage problem.
Smoke and odor emission
• When starting to use, it may smoke and emit odor due to the
burning of anti-rust oil.
• Grease and food stick to the oven and oven door, which may burn
and emit odor.
• Please conduct drying and deodorization in the oven. P.18
Sudden stop during cooking
• Is the oven door opened during heating? Please press "Start" after
closing the oven door.
• When there is an automatic cooking menu to be operated during
heating, the buzzer will sound 5 times for prompt. Please open the
oven door for operation, and press "Start" after closing the oven
door.
冷卻
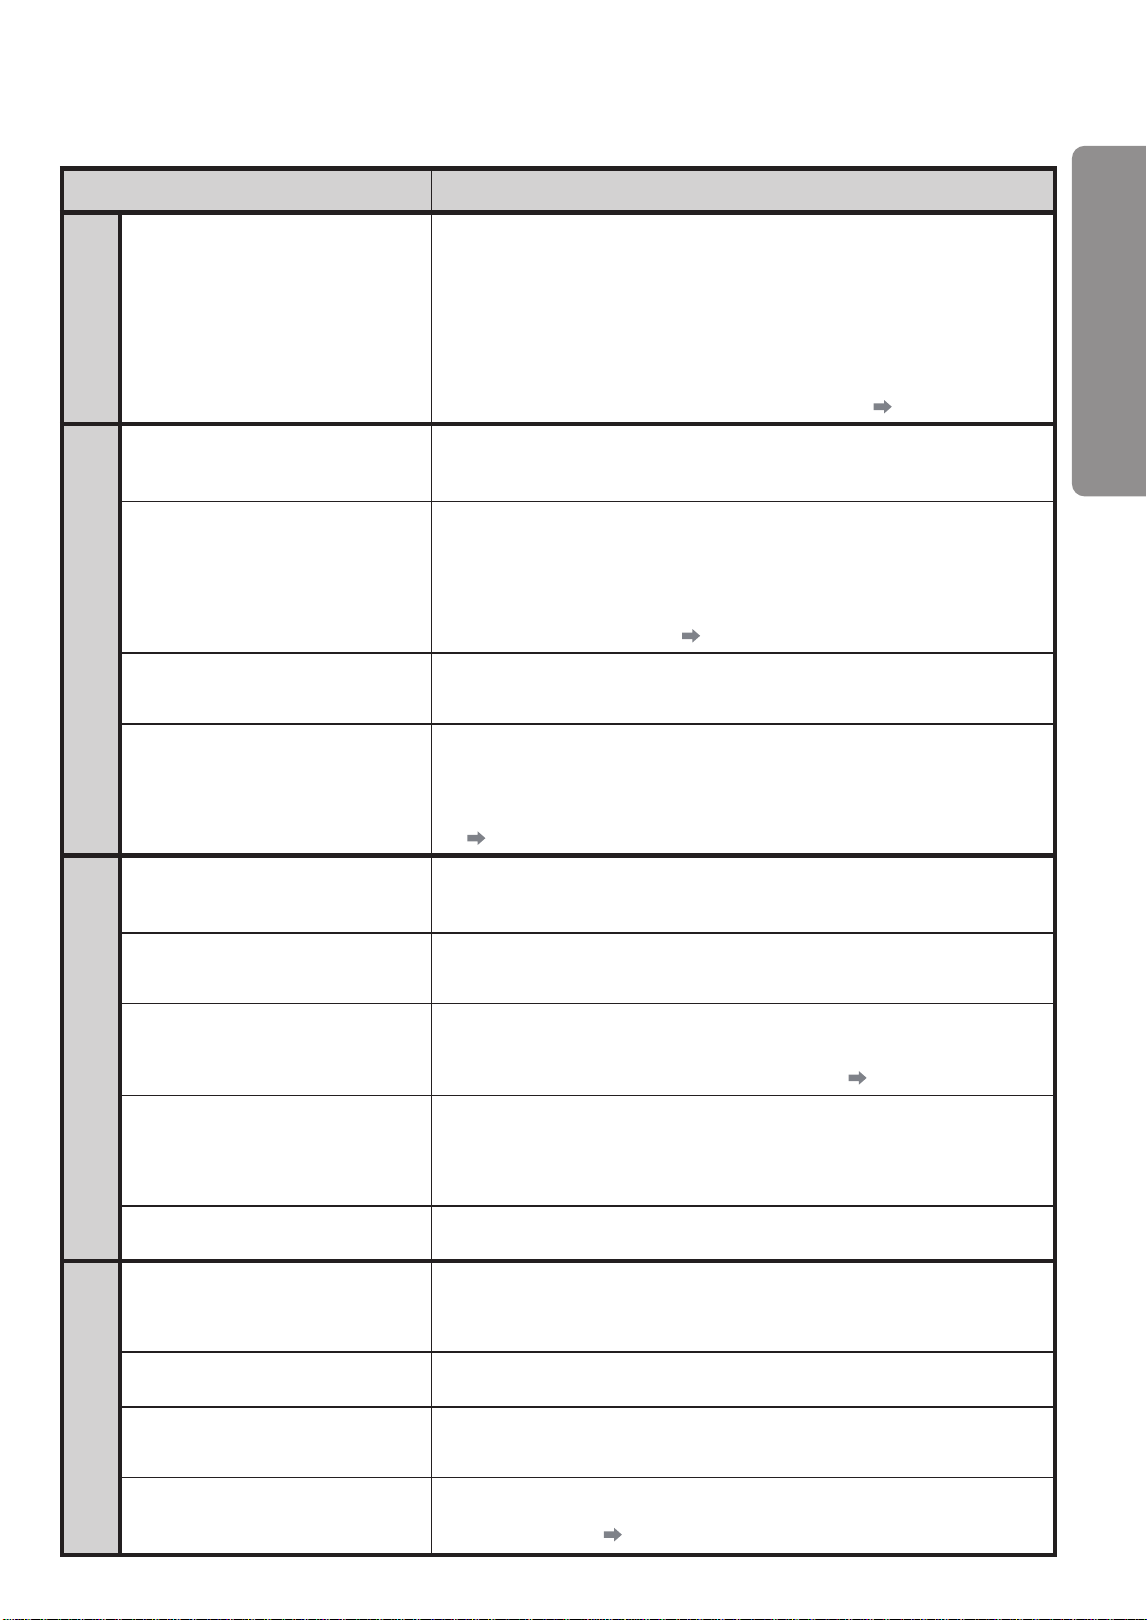
57
Symptom Cause · troubleshooting method
All operations
Poor cooking effect
• Is the cooking method correct?
(Please confirm if there are lids, caps, fittings etc.)
• Is cooking carried out at a high interior temperature?
(Please wait until the temperature in the oven drops)
• Is the portion of food and ingredients appropriate?
(Cooking may not be smooth when the ingredients and portions recorded in the cuisine
collection are not followed.)
• Is there any dirt on the upper bottom of the oven?
• Is the correct menu selected to start cooking?
• Please refer to "When cooking cannot be carried out smoothly". P.52~54
Microwave
A continuous squeak occurs when
microwave cooking is started and
during cooking.
• This is the operating sound during microwave cooking.
Sparks during cooking
• Are metal containers, metal meshes, metal rods, etc. used in the menu mode using
microwave?
• The accompanying baking tray cannot be used in microwave mode.
• Containers with gold powder, silver powder, gold foil and silver foil may have sparks
splashing.
• Is there any dirt in the oven? Microwaves may concentrate on dirty parts, causing sparks
to splash. Please wipe off the dirt. P.46~47
Inadequate food heating in
microwave heating mode
• The output power may be reduced in order to protect electrical components when the
oven is hot, heated for a long time, continuously heated and heated with small amounts
of food. Please continue to heat or wait for a moment before use.
No heating after pressing "Start
Heating"
•
• After closing the oven door, heating does not start after 1 min.
(Please open/close the oven door once and then press the button)
• Is demo mode displayed?
Please turn off this mode by referring to the contents displayed in "Demonstration"
( P.55).
Baking, barbecue and overheating Water vapor
When heating by heating pipe such
as baking and barbecue, it makes
continuous clicks
• This is the sound of oven wall and baking tray during heat shrinkage.
It is difficult to see the LCD content
during baking and barbecue
• When the temperature rises, the LCD may become darker and difficult to see.
This depends on the nature of the liquid crystal, which will return to its original state after
the temperature drops.
Settings are cancelled during
preheating (or power is
disconnected)
• After preheating in baking or superheated steam mode is completed, the preheating
will still be maintained for a certain period of time. However, when no operation is done
during this period, the buzzer will sound and the settings will be cancelled. The power
supply will be automatically disconnected soon afterwards. P.38- 42
Baking, superheated steam mode is
running
The set temperature cannot be
reached in the oven
• When the oven is empty, use thermoelectric thermometer to measure the temperature
of the central part (according to JIS measurement method). When measured by a
commercially available baking thermometer, it is more difficult to trace the temperature
than JIS measurement and therefore takes some time to reach the set temperature.
• Please refer to the temperature of cuisine collection when cooking.
Sometimes the temperature cannot
be set above 220°C
• When the oven is very hot, the temperature cannot be set above 220°C in baking and
superheated steam mode to protect electrical components.
Steam
No steam
The water in the water filling box
does not decrease
• After filling water into the water filling box, is it correctly installed on the main unit?
• When baking and heating, even if there is steam, it cannot be seen by the naked eye.
• Different menus will result in a different amount of water reduction in the water filling
box, which may only reduce very little water.
During steam cooking, there are
different types of sounds.
• The sound produced by the evaporation of water heated through a steam heating pipe is
not a fault. Extraordinarily loud sounds may be heard shortly after use.
Steam leakage between oven door
and main unit
• Depending on the amount of steam and room temperature, a steam leak may occur, but
this does not affect cooking performance, etc. In addition, microwave cooking does not
create a microwave leakage problem.
White powder, water and other
substances appear at the steam
outlet
• White powder is a mineral component such as magnesium and calcium contained in
purified water, which is harmless to the body. Please wipe it carefully with a wet rag that
has been twisted dry. P.10-47
Before entrusted maintenance
For these cases
Is "
爐門
" displayed?
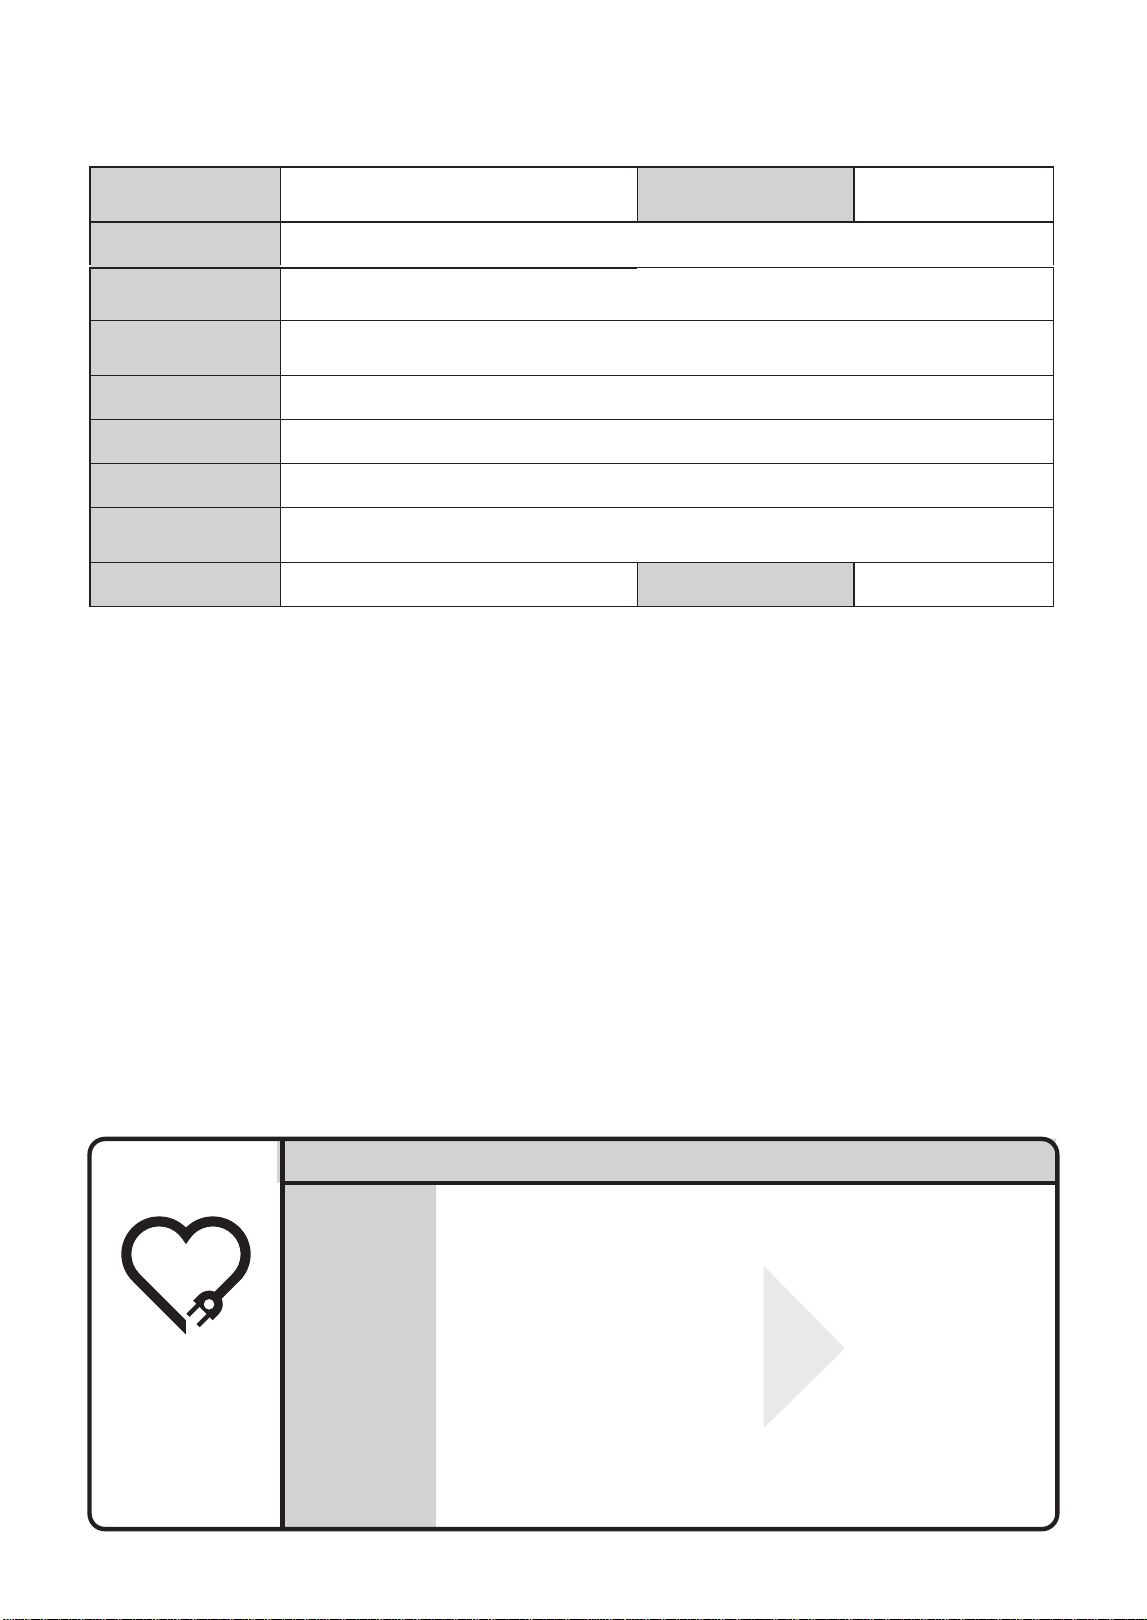
58
Specification
Rated voltage/
frequency
220V ~ 50Hz Product name
Smart Superheated
1530W
Microwave rated
output
1000W
Microwave operating
frequency
2450MHz
Grill rated output 1350W
Steam rated output 810W
Overall dimensions 480 (W) × 390 (D) × 350 (H) mm
Effective interior
dimension
384 (W) × 323 (D) × 215 (H) mm
Mass (weight) About 17kg Total interior volume 26L
The operation time at 250°C is 5 min. Then it will automatically switch to 200°C. When the temperature is set above 210°C, it will
automatically switch to 200°C. When the temperature is set above 190°C, it will automatically switch to 180°C.
In addition, when the set temperature is greater than or equal to 210°C, the preheating temperature is 200°C.
When the oven is empty, measure the temperature of the central part with a thermoelectric thermometer. (According to JIS
measurement method) When the temperature of food and fittings is measured after they are placed in the oven, the temperature
may not be consistent. (Please refer to the temperature of cuisine collection when cooking)
z
The
power consumption in actual use will change due to the number of times and time of use, food portion, ambient
temperature,
etc. It is for reference only.
z
When the power plug is inserted into the socket and the display screen is off with the oven door closed, the power consumption
will
be "0" W.
z
The annual power consumption is measured using the energy-saving method specific equipment "microwave oven"
measurement
method. (The classification name is also based on this method)
z
The total interior volume is calculated based on JS regulations.
Inspection
tips
Be sure to check the microwave oven that has been used for years!
Is there such
a symptom?
z
The power cord or power plug is
abnormally hot.
z
Press the button to start cooking, but
the food is not heated.
z
Sometimes there is no automatic
power-off.
z
Abnormal noise and odor during use.
z
There is dirt, sparks or smoke on the
surface of oven cover and wall.
z
There are other abnormalities and
faults.
Stop
use
In order to prevent
faults and accidents,
please be sure to
disconnect the power
plug from the socket
and entrust the
store of this product
with inspection
and maintenance.
(Maintenance personnel
without professional
skills shall not
disassemble the
oven body.)
Steam Oven
Microwave rated
utinp


#
Details
Matter