1
Version 1.0
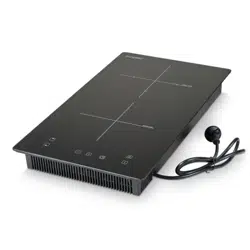
BUILT-IN INDUCTION COOKTOP
Installation, Operation and Maintenance Instructions
Dual Cooking Zones 2,300W
Dual Cooking Zones 3,300W
Part No. 053574
Part No. 053575
NOTE: Please read this manual carefully before installing and using this
appliance.

2
Version 1.0
CONTENTS
1
General Safety Instructions
3
2
Safety Warnings
3
3
Installation
7
4
Technical Data and Specification
10
5
Operating Use
12
6
Maintenance and Cleaning
22
7
Servicing
23
8
Warranty
27
3
Version 1.0
1. General Safety Instructions
Induction cooktop requires the use of cookware made of ferromagnetic
material, which reduces cooking food time. This appliance is designed for
household, non-professional use in recreational vehicles i.e. caravans,
camper trailers, motorhomes etc. Any other use shall be considered
improper.
The manufacturer does not assume any liability for damages or injuries
due to incorrect installation and/or improper use. Installation and service
must be performed by an authorised installer and/or licensed and
qualified electrician. Failure to do so will void the product warranty.
2. Safety Warnings
CAUTION: Please make this information available to the
person responsible for installing the appliance.
WARNING: DO NOT leave cooking unattended on a cooker
with fat or oil as it can be dangerous and may result in fire.
The cooking process must be continuously monitored and
supervised.
WARNING: DO NOT extinguish a fire with water but switch off
the appliance and then cover flame e.g. with a lid or a fire
blanket.
WARNING: DO NOT store items on the cooking surfaces.
4
Version 1.0
WARNING: DO NOT place any combustible material, heavy
objects or products on this appliance at any time.
WARNING: DO NOT place any metallic objects such as
knives, forks, spoons and lids on the cooktop surface since
they can get hot.
WARNING: DO NOT use your appliance as a work or storage
surface.
WARNING: DO NOT place or leave magnetizable objects (e.g.
credit cards, memory cards) or electronic devices (e.g.
computers, MP3 players) near the device, as they may be
affected by its electromagnetic field.
WARNING: DO NOT stand on the cooktop.
WARNING: DO NOT use the appliance if the surface is
cracked. Switch off the appliance to avoid the possibility of
electric shock.
WARNING: DO NOT operate the appliance by means of an
external timer or separate remote-control system.
WARNING: DO NOT let your body, clothing or any item other
than suitable cookware contact the ceramic glass until the
surface is cool. During use, accessible parts of this appliance
will become hot enough to cause burns. Care should be
taken to avoid touching heating elements.
5
Version 1.0
WARNING: DO NOT use pans with jagged edges or drag pans
across the ceramic glass surface as this can scratch the glass.
WARNING: DO NOT leave any protective film that may be on
the induction hob.
WARNING: DO NOT use your appliance for warming or
heating the room.
WARNING: DO NOT rely on the non-induction cookware
detection feature to turn off the cooking zones when you
remove the pans. After use, always turn off the cooking zones
and the cooktop as described in this manual.
WARNING: DO NOT allow children to play with the appliance
or sit, stand, or climb on it.
CAUTION: This appliance can be used by children aged from
8 years and above and persons with reduced physical,
sensory or mental capabilities or lack of experience and
knowledge if they have been given supervision or instruction
concerning use of the appliance in a safe way and
understand the hazards involved.
CAUTION: People with pacemakers or other electrical
implants (such as insulin pumps) should consult their
physician or the implant manufacturer before using this
device to ensure that their implants are not affected by the
electromagnetic field.
6
Version 1.0
WARNING: DO NOT repair or replace any part of the
appliance unless specifically recommended in the manual.
All other servicing should be done by a qualified technician.
WARNING: DO NOT use steam cleaner; scourers or any other
harsh abrasive cleaning agents to clean the cooktop, as
these can scratch the ceramic glass.
CAUTION: Cleaning and user maintenance shall not be made
by children without supervision.
WARNING: DO NOT attempt to replace the supply cord when
damaged, it must be replaced by the manufacturer, its
service agent or similarly qualified persons in order to avoid
a hazard.
WARNING: Use only kitchen protectors designed by the
cooking appliance manufacturer or indicated by the
appliance manufacturer in the appropriate instructions for
use or kitchen protectors incorporated into the appliance.
The use of unsuitable protectors can cause accidents.
CAUTION: This appliance incorporates a ground connection
for functional purposes only.

7
Version 1.0
3. Installation
All installations must be carried out by authorized trades persons only in
accordance with these instructions, relevant Federal and State
Regulations.
Installation Location
Do not install directly above a dishwasher, fridge, freezer, washing
machine or clothes dryer, as the humidity may damage the electronic
components. If the hob is installed above an oven, ensure the oven
has a built-in cooking fan.
Check to ensure the induction hob is in good work state.
Check the work surface is square and level and ensure no structural
members interfere with space requirements.
Check to ensure the work surface and adhesive used are made of heat
resistant material
Check to ensure heat-resistant and easy-to-clean finishes are used
(such as induction tiles) for the wall surfaces surrounding the hob.
Check to ensure the induction cooktop is well ventilated and the air
inlet and outlet are not blocked.
Check to ensure isolating switch will be easily accessible with the
induction cooktop installed
Check to ensure the power supply cable is not accessible through
cupboard doors or drawers
Check to ensure a thermal protection barrier is installed below the
base of the hob, if the hob is installed above a drawer or cupboard
space.
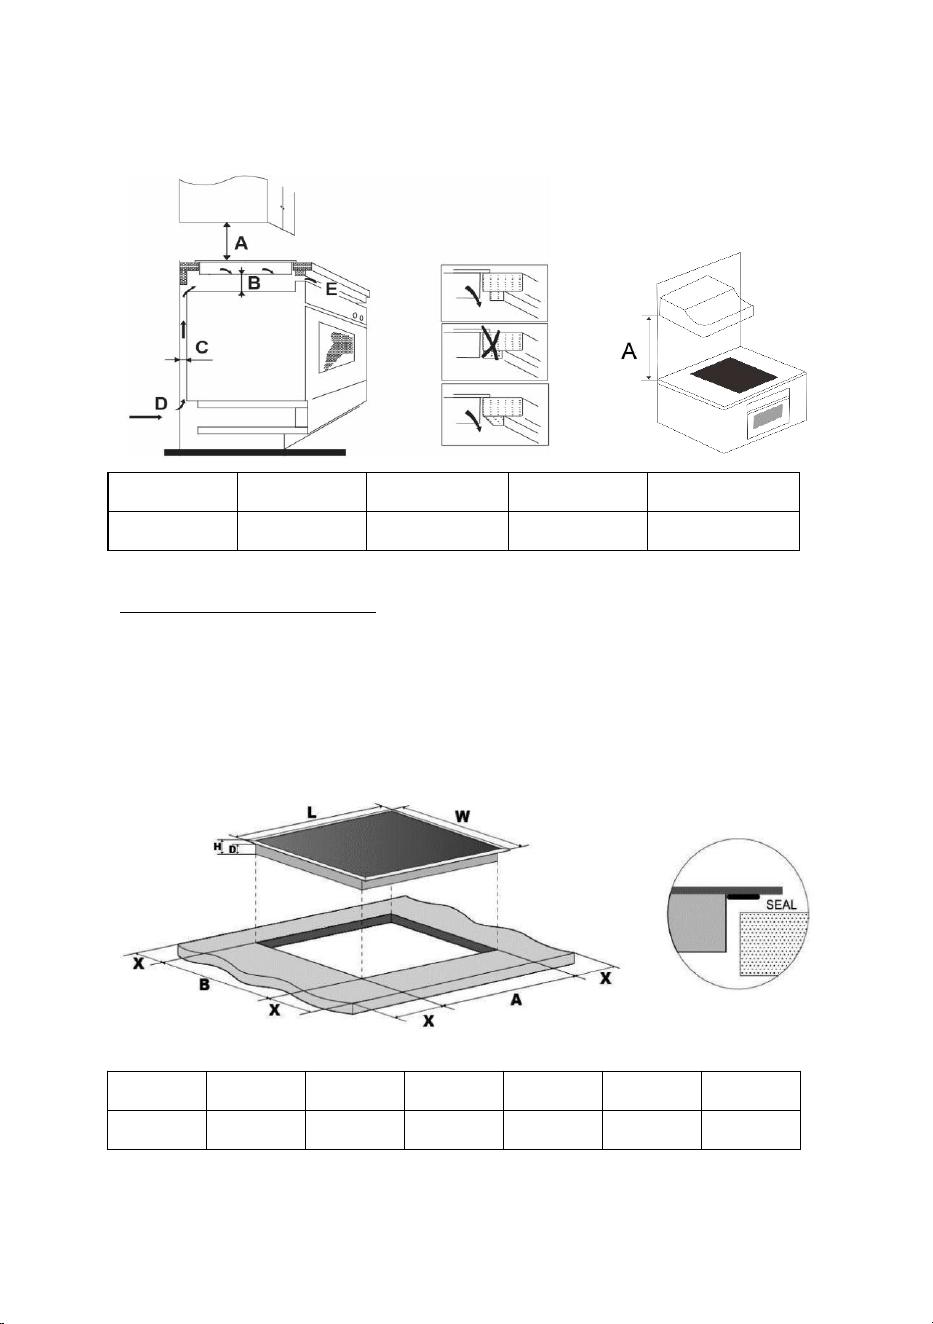
8
Version 1.0
A (mm)
B (mm)
C (mm)
D
E
500
Min: 50
Min: 30
Air intake
Air exit 10mm
Built-in Cut Out Dimensions
Check to ensure the thickness of the work surface is at least 30mm.
A minimum of 50mm space shall be preserved around the cut out, for
installation and usability purposes.
Cut out the work surface according to the dimensions shown in the
table.
L (mm)
W (mm)
H (mm)
D (mm)
A (mm)
B (mm)
X (mm)
300
520
58
52
278
492
Min: 50

9
Version 1.0
Electrical Connection
Before connecting the induction cooktop to the mains, check the
following:
The electrical installation where the induction hob is to be connected
must be suitable for the power consumed by the induction cooktop.
The voltage must correspond to the nominal value specified in the
product label.
To connect the induction cooktop to the mains socket, you must not
use adapters, reducers or branches, as these devices can become hot
and cause a fire.
The power cable of the induction cooktop must not touch any part or
area with high temperatures and must be positioned so that the
temperature does not exceed 75˚C at any point.
The cable must not be bent or compressed.
The cable should be checked regularly and replaced only by the
manufacturer, its service agent or similarly qualified persons when
damaged.
The electrical connection of the induction hob must be carried out in
accordance with current regulations and protected by a single-pole
magneto thermic or automatic switch.
A suitable isolating switch providing full disconnection from the mains
power supply is incorporated in the permanent wiring, mounted and
positioned to comply with the local wiring rules and regulations.
The isolating switch must be of an approved type and provide a 3 mm
air gap contact a separation in all poles (or in all active conductors if
the local wiring rules allow for this variation of the requirements).
If the device has an electrical outlet, it must be installed so that the
electrical outlet is accessible.
Check with a licensed and qualified electrician for proper electrical

10
Version 1.0
installation. The authorised installer must ensure that the correct
electrical connection has been made and that it complies with safety
regulations.
Any modification to the electrical installation must only be carried out
by a licensed electrician.
The manufacturer is not responsible for any accident resulting from
the use of an appliance that is not grounded or from faulty grounding
continuity.
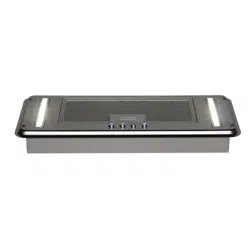
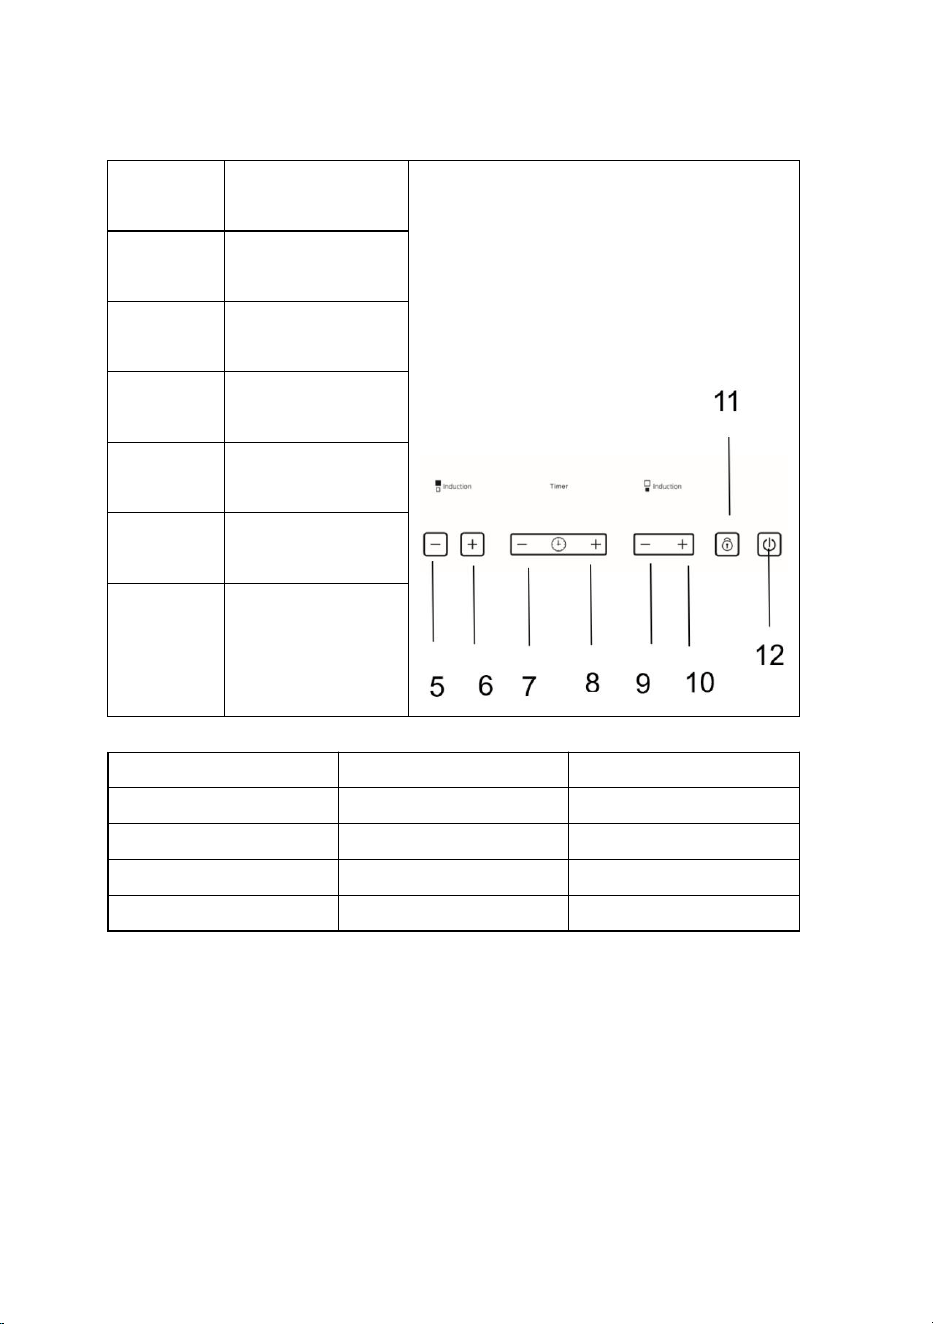
4. Technical Data and Specifications
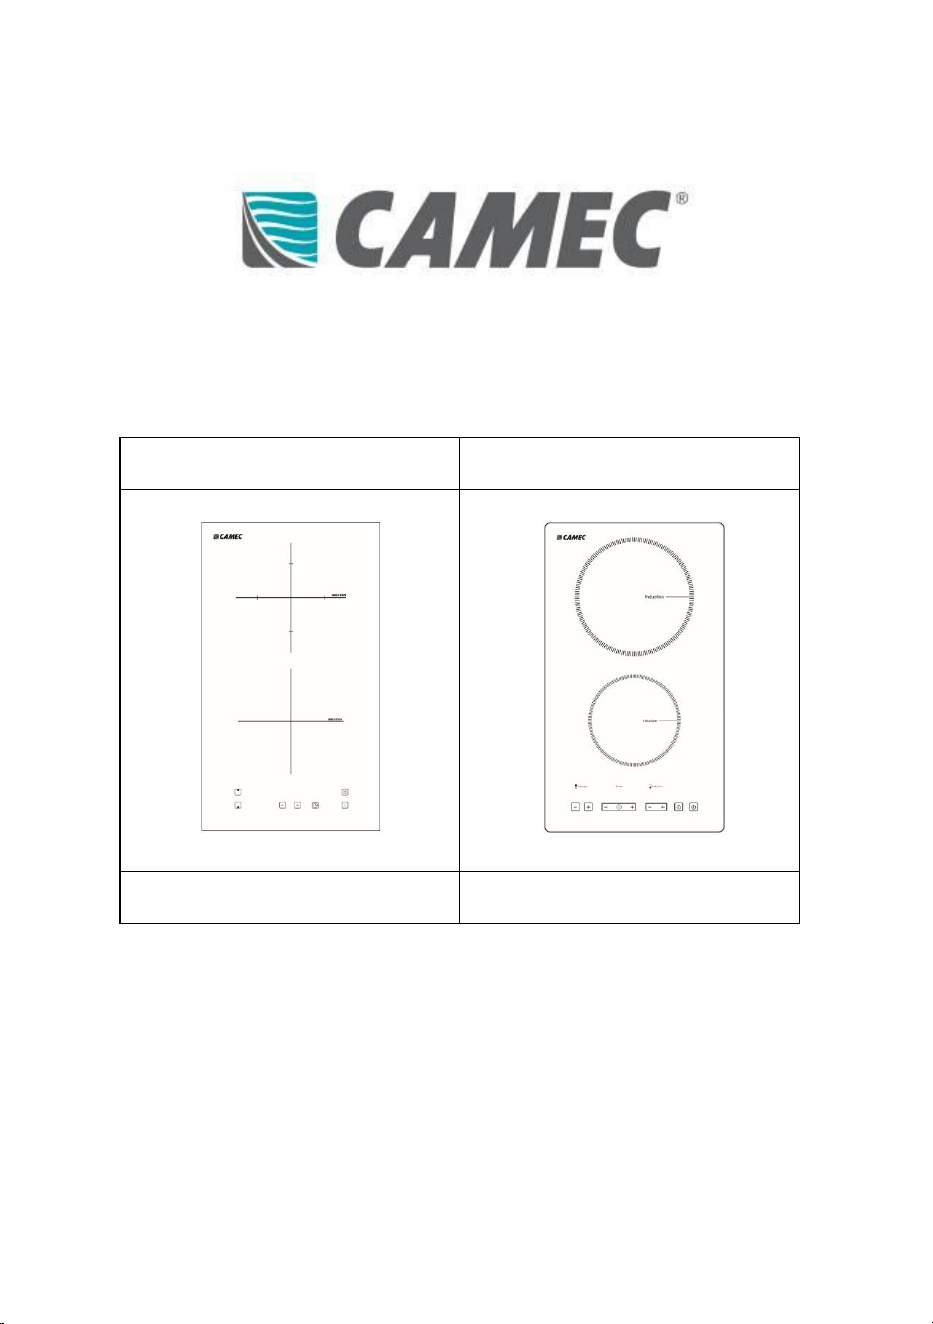
Dual Cooking Zones 2,300W (Part No. 053574)
Position
Description
1
Induction Cooking
Zone 1
Max. 1500W
2
Induction Cooking
Zone 2
Max. 1800W
3
Glass plate
4
Control panel
5
Heating zone
selection button
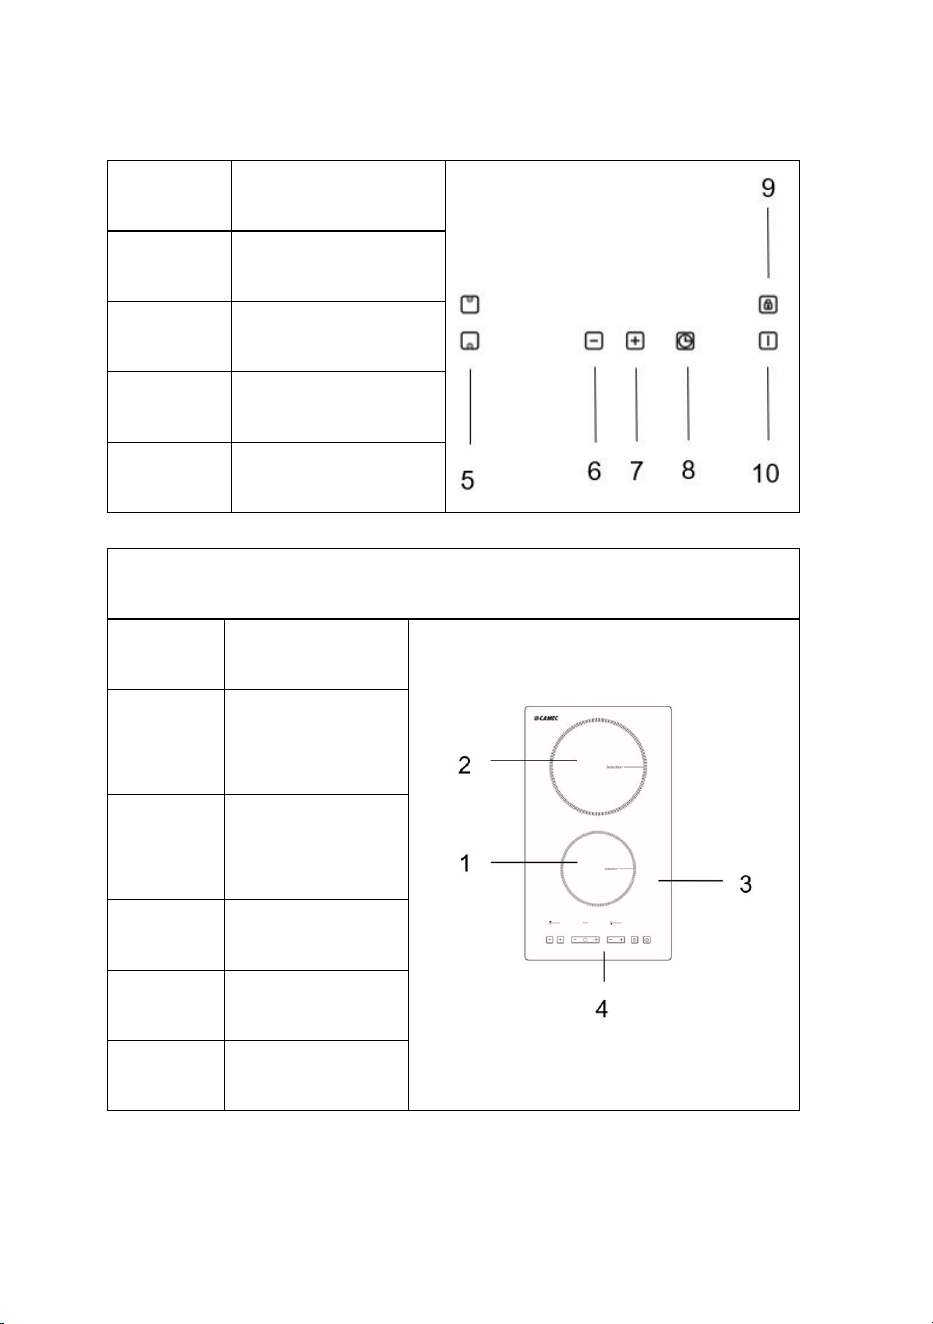
11
Version 1.0
6
Down button
7
Up button
8
Timer button
9
Lock button
10
On/Off button
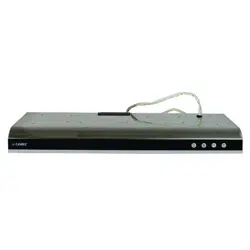
Dual Cooking Zones 3,300W (Part No. 053575)
Position
Description
1
Induction
Cooking Zone 1
Max. 1500W
2
Induction
Cooking Zone 2
Max. 1800W
3
Glass plate
4
Control panel
5
Down button for
Zone 1
12
Version 1.0
6
Up button for
Zone 1
7
Down button for
Timer
8
Up button for
Timer
9
Down button for
Zone 2
10
Up button for
Zone 2
11
Child lock button
12
On/Off button
Specifications
Part No. 053574
Part No. 053575
Voltage
220-240V ~ 50-60Hz
220-240V ~ 50-60Hz
Max Power
2,300W
3,300W
Net Weight
4.2KG
4.2KG
Dimension
L520 x W300 x H58mm
L520 x W300 x H58mm
5. Operating Use
Using the Touch Control Buttons
The controls respond to touch, so you don’t need to apply any
pressure.
13
Version 1.0
You will hear a beep each time a touch is registered.
Ensure the touch buttons are always clean, dry, and there is no object
(e.g. a utensil or a cloth) covering them.
Note: Even a thin film of water may make the touch control buttons
difficult to operate.
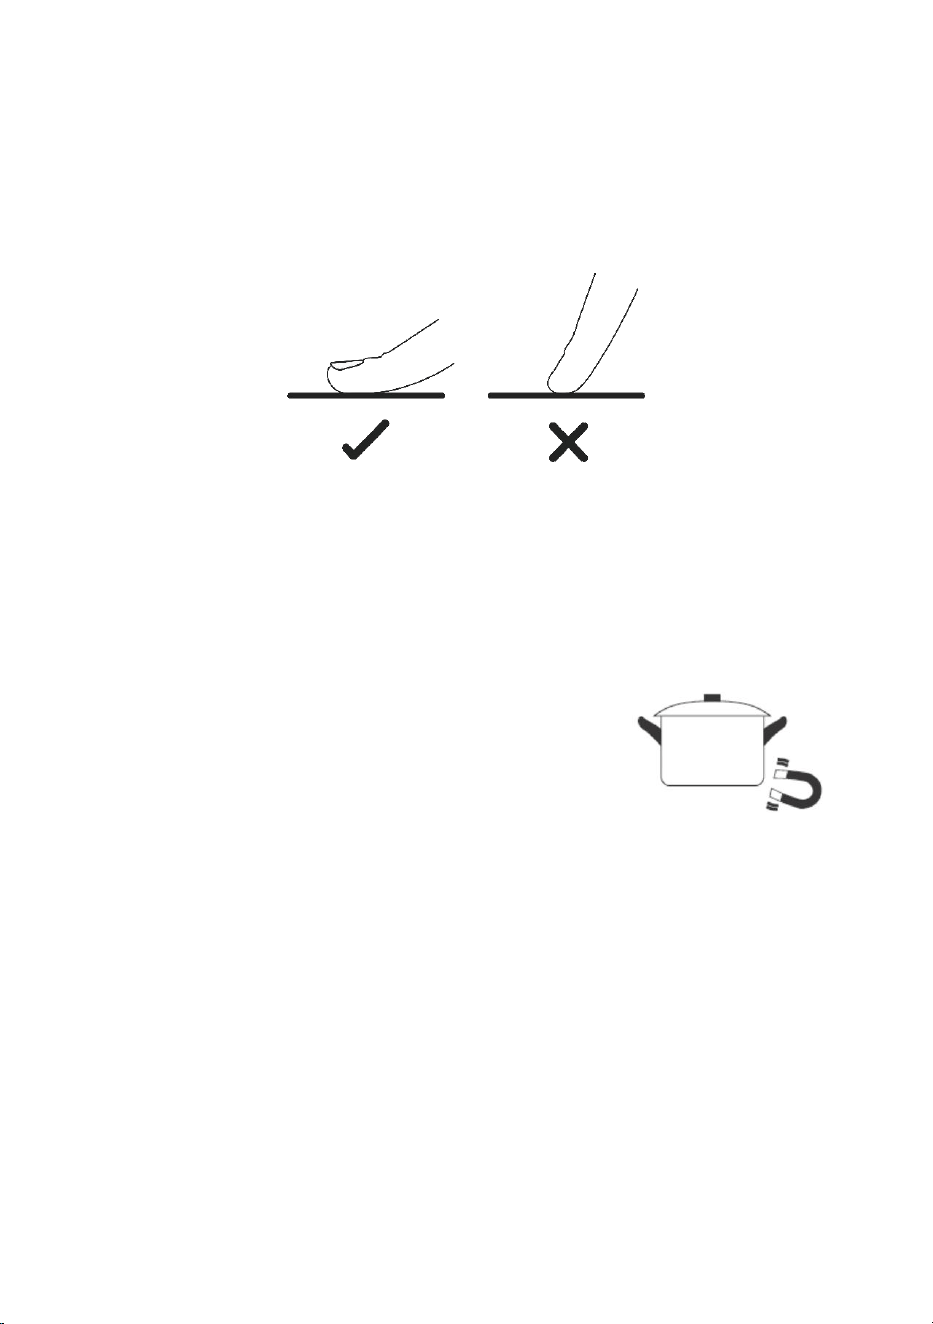
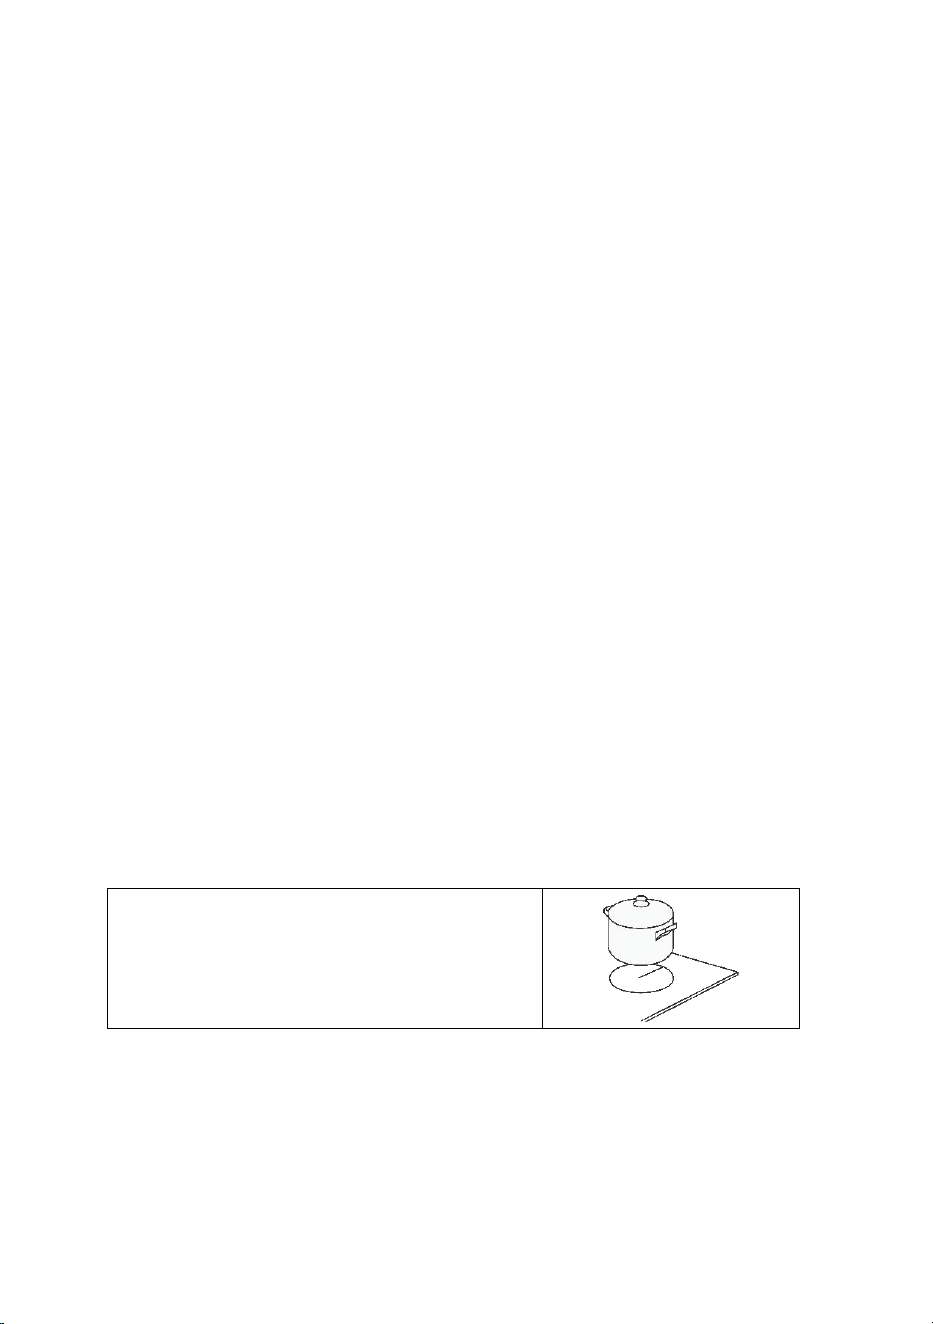
Cookware suitable for induction
Ferromagnetic vessels
The suitable containers for induction cooking
are those that are made of ferromagnetic
material. They can be made of enameled steel,
cast iron or special stainless-steel induction
dishes.
To find out if a container is suitable for
induction cooking, check that they are
attracted by a magnet.
Special containers
There are other types of containers whose base is not entirely
ferromagnetic.
Before using them, check the diameter of the base and that these pans
are detected by the induction cooktop.
14
Version 1.0
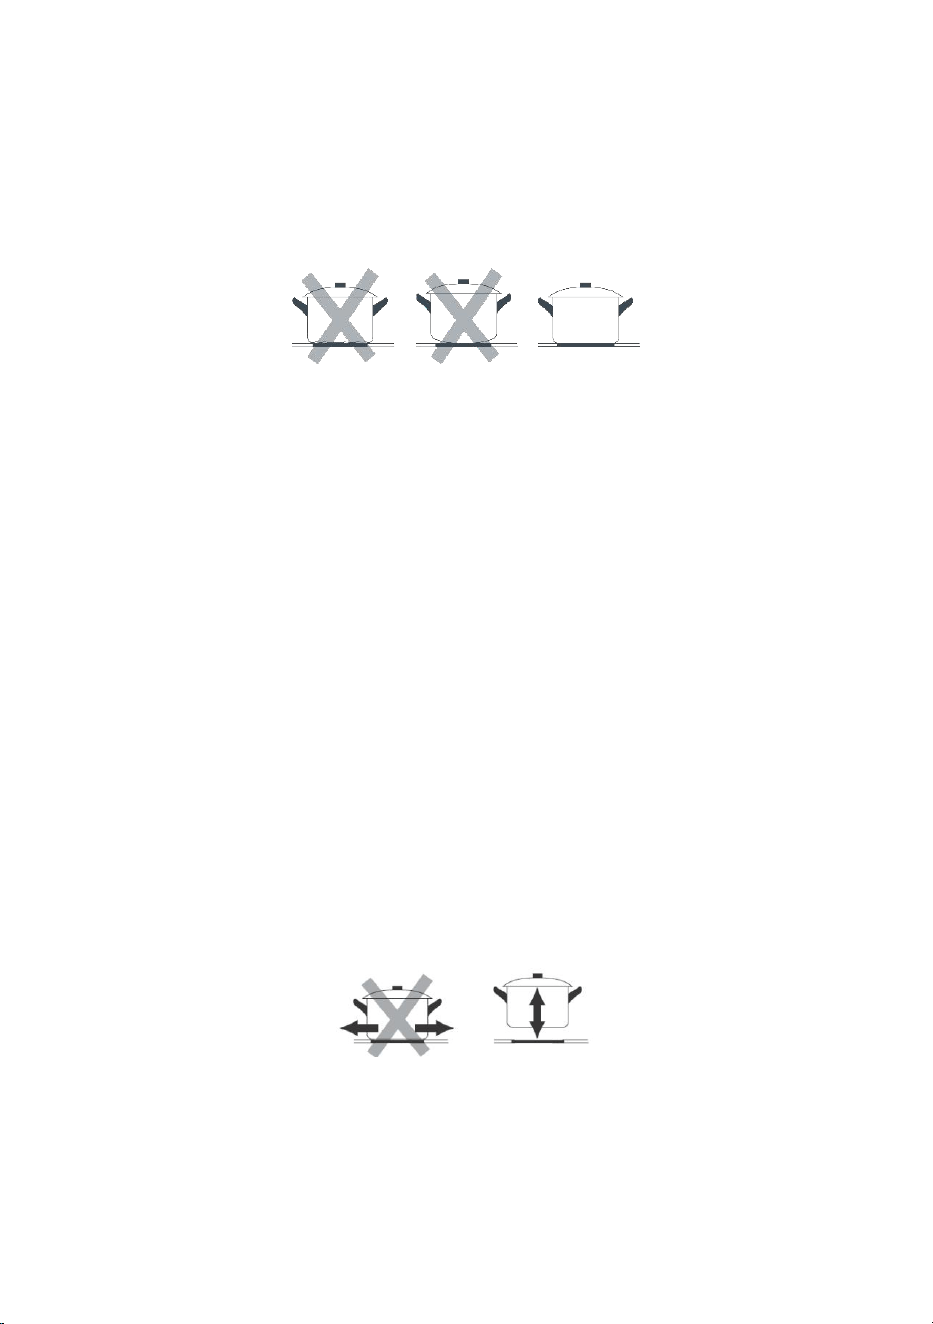
Choosing the right cookware
Do not use cookware with jagged edges or a curved base.
Make sure the base of the pan is smooth, lies flat against the glass, and
is the same size as the cooking zone.
Use cookware whose diameter is as large as the graphic for the
selected zone.
When using a canister, slightly more energy will be used at its
maximum efficiency.
If you use a smaller pot, the efficiency may be lower than expected.
Always center the pan on the cooking zone.
The base of a cookware can influences the distribution of heat and
therefore the cooking result.
Choosing a cookware with a higher quality base (for example, a
sandwich type) will reduce cooking time and energy.
Protect the glass surface
Always lift the cookware off the induction hob, do not slide as this
could scratch the glass.

15
Version 1.0
Cookware empty or with a very thin base
Never place an empty cookware on the cooktop and turn it on, as this
can cause the cookware to overheat (due to excess heat) and damage
the ceramic glass or the cooktop.
If the base of the cookware is very thin, it can also become overheated,
refrain from using this type of cookware.
Cookware detection
The cooktop has a minimum detection limit of the cooking zone that
varies for each cooking zone. For this reason, you should refrain from
using cookware whose base is less than the specified diameter.
If you turn on the cooktop without any cookware, with a cookware
with a lower base than specified or with a cooktop not suitable for
induction, the cooktop will not work, the display will show “ ”.
Cookware dimensions
The cooking zones have a minimum and maximum operating
diameter and are automatically adapted to the diameter of the pot.
However, the bottom of the pot must have a minimum diameter
according to the corresponding cooking zone.
Cooking Zone 1
Cooking Zone 2
Pot Diameter
Max: 200mm
Max: 220mm
To get the best efficiency from your induction cooktop, place the base
of the pot in the center of the cooking zone.
16
Version 1.0
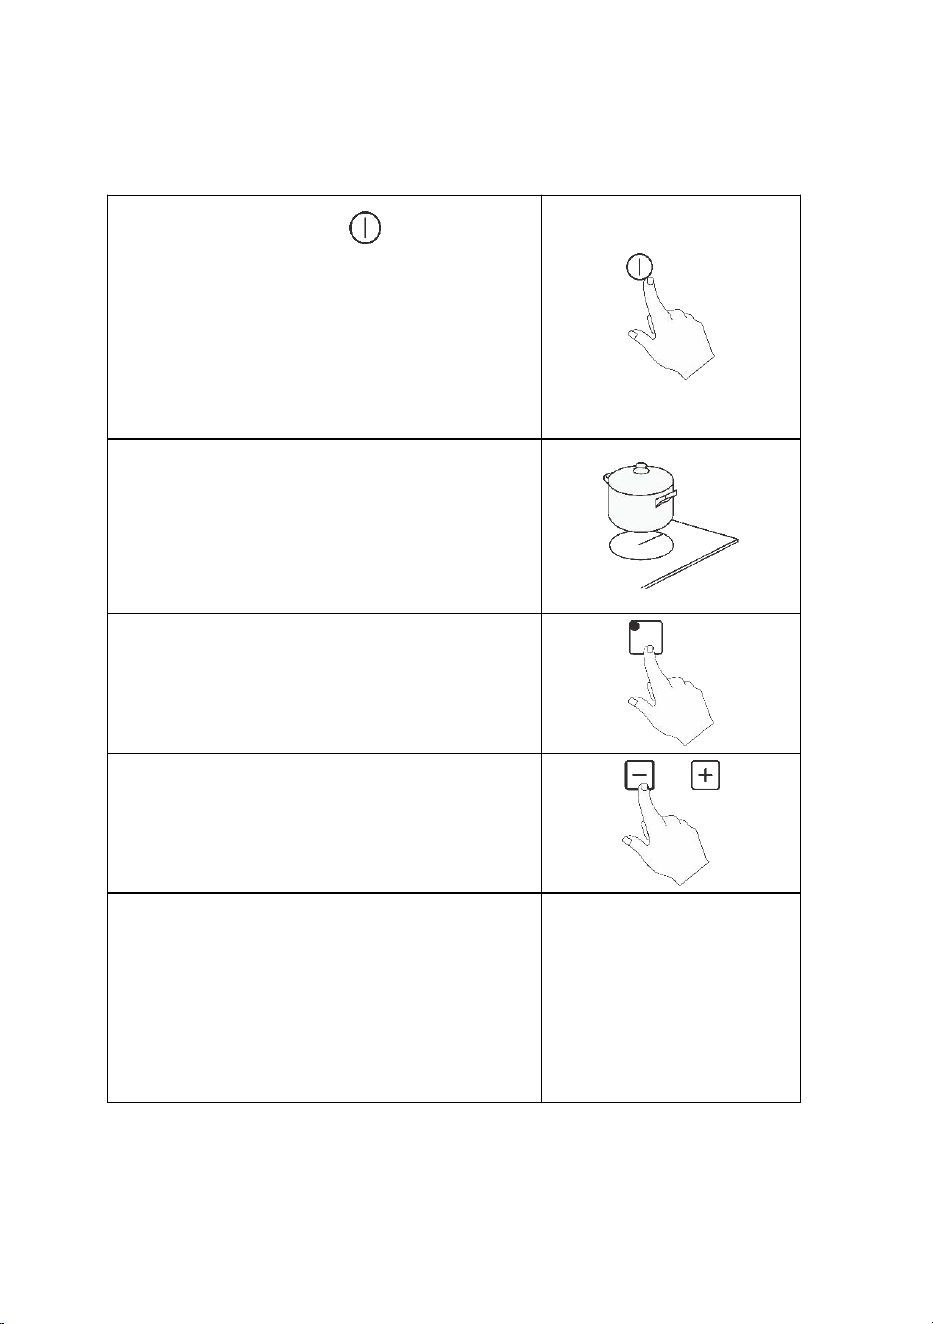
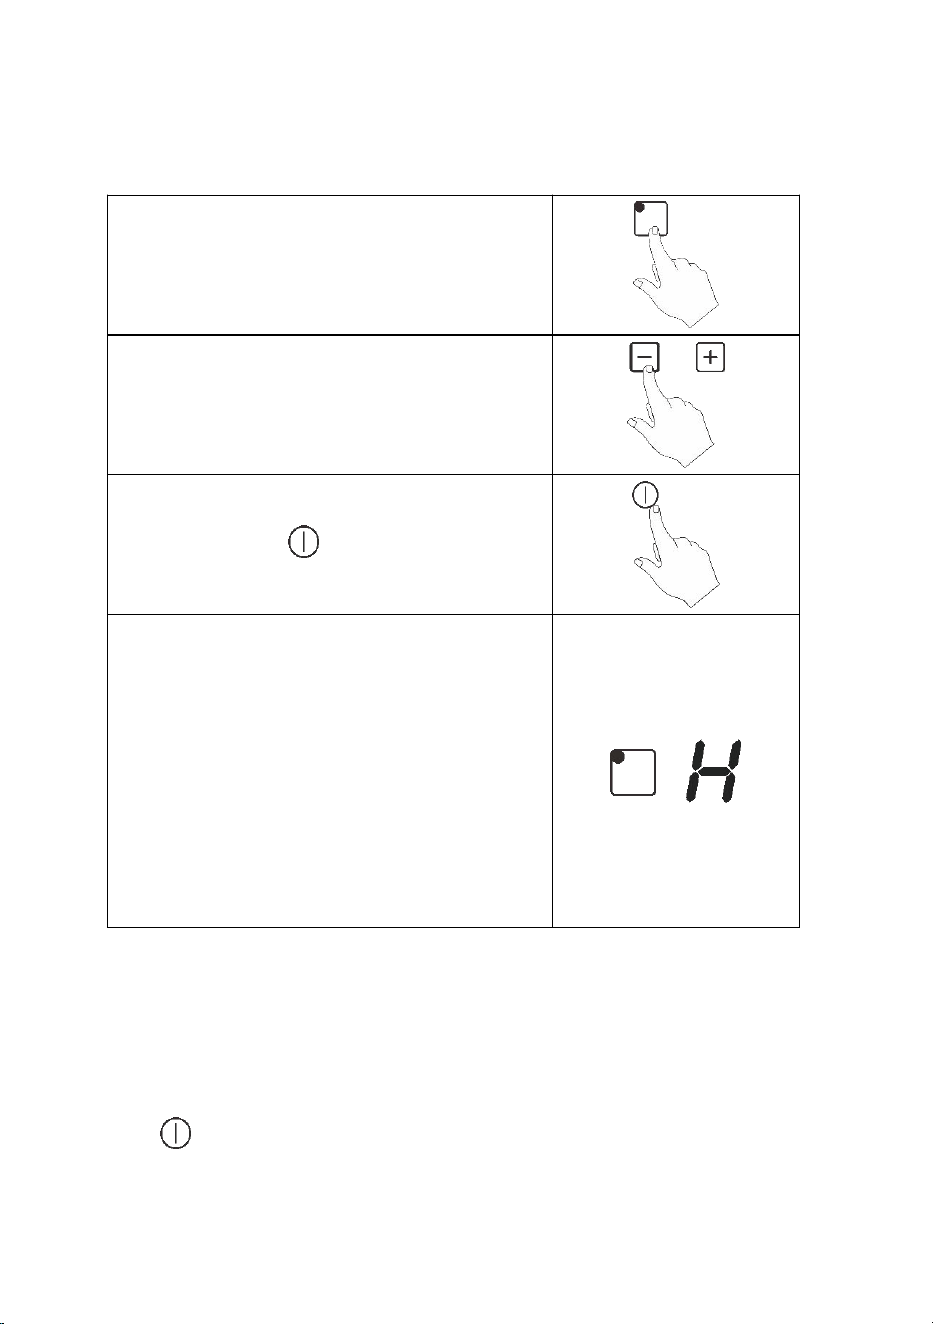
To start cooking
Touch the “ON/OFF ” button.
When the cooktop is turned on, an
acoustic warning will sound and the
displays will show the indications "0"
and "- -", warning that the cooktop is
ON and in the standby state.
Place a suitable pot on the cooking
zone that you wish to use.
Make sure the bottom of the pot and
the surface of the cooking zone is clean
and dry.
Touch the heating zone selection
button and an indicator 0 up to the
button will flash.
Note: This applies to 2.3kW model only.
Set the power level by follow operation
by touching the “-”, “+”.
The power level of a cooking zone can
be varied at any time during cooking.
To do this, select the desired cooking
zone or and when the power indicator
digits begin to flash, adjust the power
using the power level selector.
17
Version 1.0
When you have finished cooking
Touch the heating zone selection button
that you wish to turn off.
Note: This applies to 2.3kW model only.
Turn the cooking zone off by touching
the “-” and scrolling down to “0”.
Make sure the power display shows “0”,
then shows “H”.
Turn the whole cooktop off by touching
the “ON/OFF ” button.
Beware of hot surfaces “H” (surface
TEMP > 60℃) will show which cooking
zone is hot to touch. It will disappear
when the surface has cooled down to a
safe temperature. It can also be used as
an energy saving function if you want to
heat further pans, use the cooking zone
that is still hot.
Locking the buttons
You can lock the buttons to prevent unintended use (for example
children accidentally turning the cooking zones on).
When the control panel is locked, all the buttons except the “ON/OFF
” button are disable.
18
Version 1.0
To lock the buttons
Touch the key lock button “ ”
To unlock the buttons
Make sure the induction cooker is on.
Touch and hold the key lock button “ ” for 3 seconds.
You can now start using your cooker.
When the cooker is in the lock mode, all the buttons
are disable except the “ON/OFF ”, you can
always turn the induction cooktop off with the
“ON/OFF ” button in an emergency, and the
cooker will have to be unlocked first in the next
operation.
Over-Temperature Protection
A temperature sensor equipped can monitor the temperature inside
the induction cooker. When an excessive temperature is monitored,
the induction cooker will stop operation automatically.
Automatic Safety Shutdown
It is a protection system that incorporates the induction hob, which
automatically turns off after 120 minutes if you forget to turn it off and
do not touch any button. When the pot is removed, the induction
cooktop stops heating immediately.
19
Version 1.0
Fan
At the base of the cooktop, a fan is used to maintain a stable
temperature inside the induction cooktop. Every time the cooktop is
turned on and the power or temperature is adjusted, the fans will turn
on. When the cooktop is turned off, the fans will remain on and
automatically turn off when the cooktop is cool enough.
If you use the induction cooktop on the tabletop, DO NOT place
kitchen towels, cloths or other objects that could obstruct the fan
ventilation, as this would cause inadequate ventilation and
overheating to occur.
Note:
The fan will continue to run to cool the cooktop after use. This is normal
and does not indicate a malfunction.
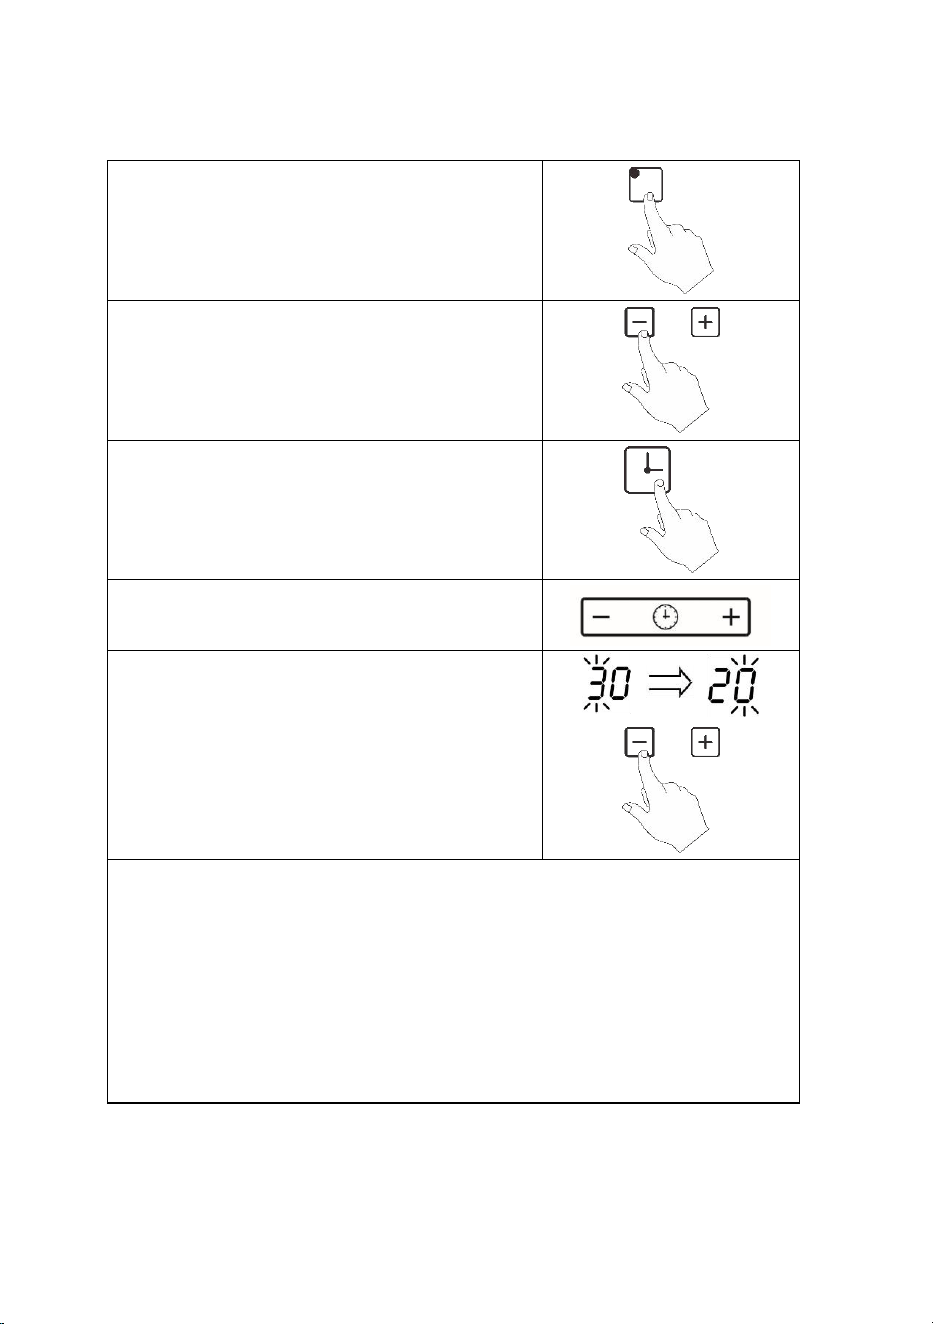
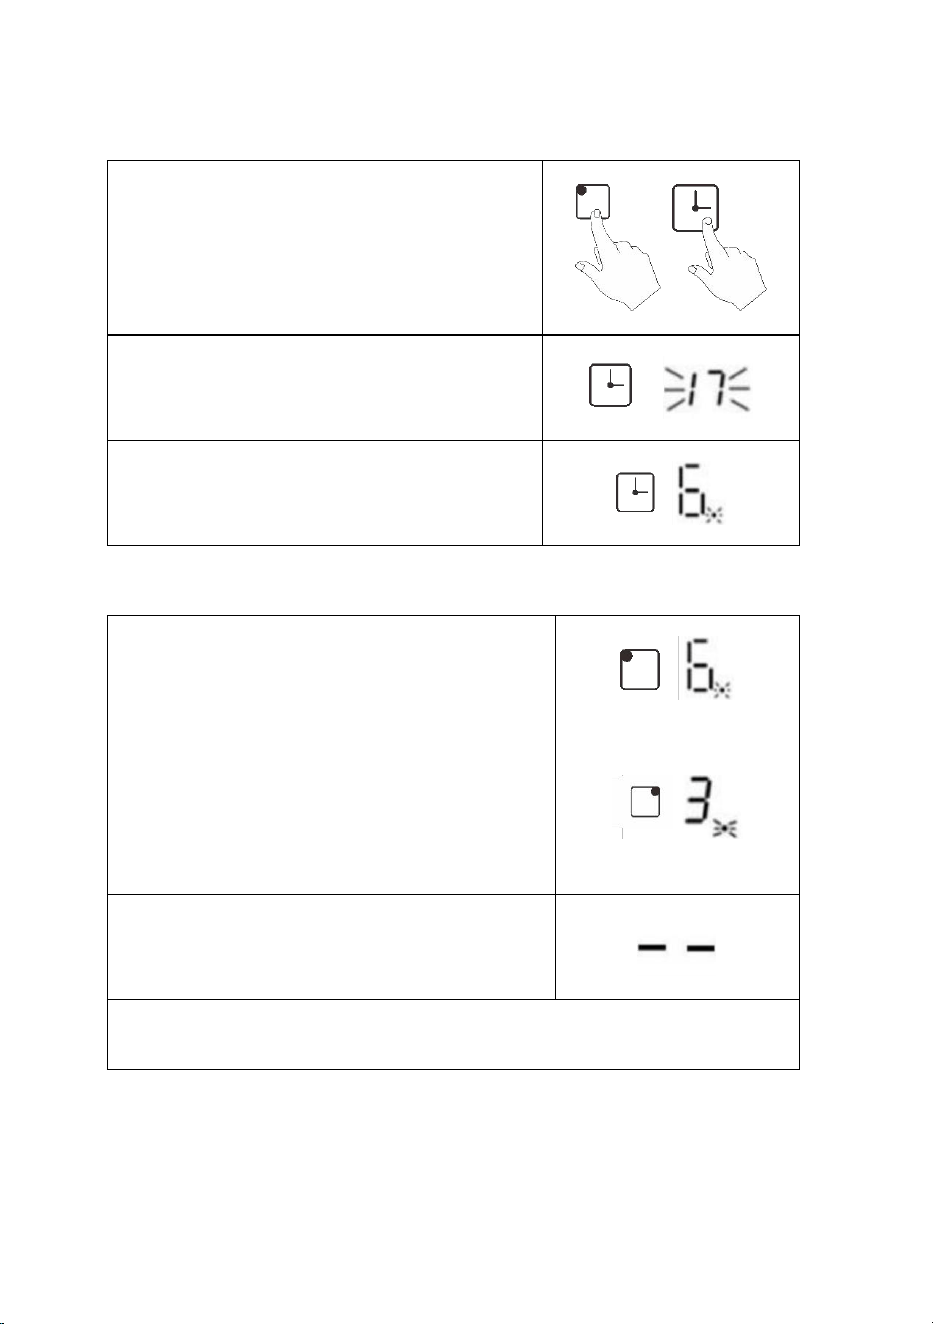
Using the Timer
You can set it to turn one cooking zone off after the set time is up.
You can set the timer up to 99 minutes.
Setting the timer to turn one cooking zone off
Place a suitable pan on the cooking
zone that you wish to use.
20
Version 1.0
Touch the heating zone selection
button.
Note: This applies to 2.3kW model only.
Turn the cooking zone on by touching
the “+”
Touch the timer button, the timer
indicator shows “30”
Note: This applies to 2.3kW model only.
Set the time by touching the buttons
“+” or “-”.
After the ‘tens’ timer has been set, it
flashes 3 seconds, and then it stops
flashing and the ‘ones’ flashes. Touch
“+””-” buttons to set the ‘ones’ timer.
Note:
Touch the button “+” or “-” of the timer once will increase or
decrease by 1 minute.
Touch and hold the button “+” or “-” of the timer will increase of
decrease by 10 minutes.
If the setting time exceeds 99 minutes, the timer will automatically
return to 0 minute.
21
Version 1.0
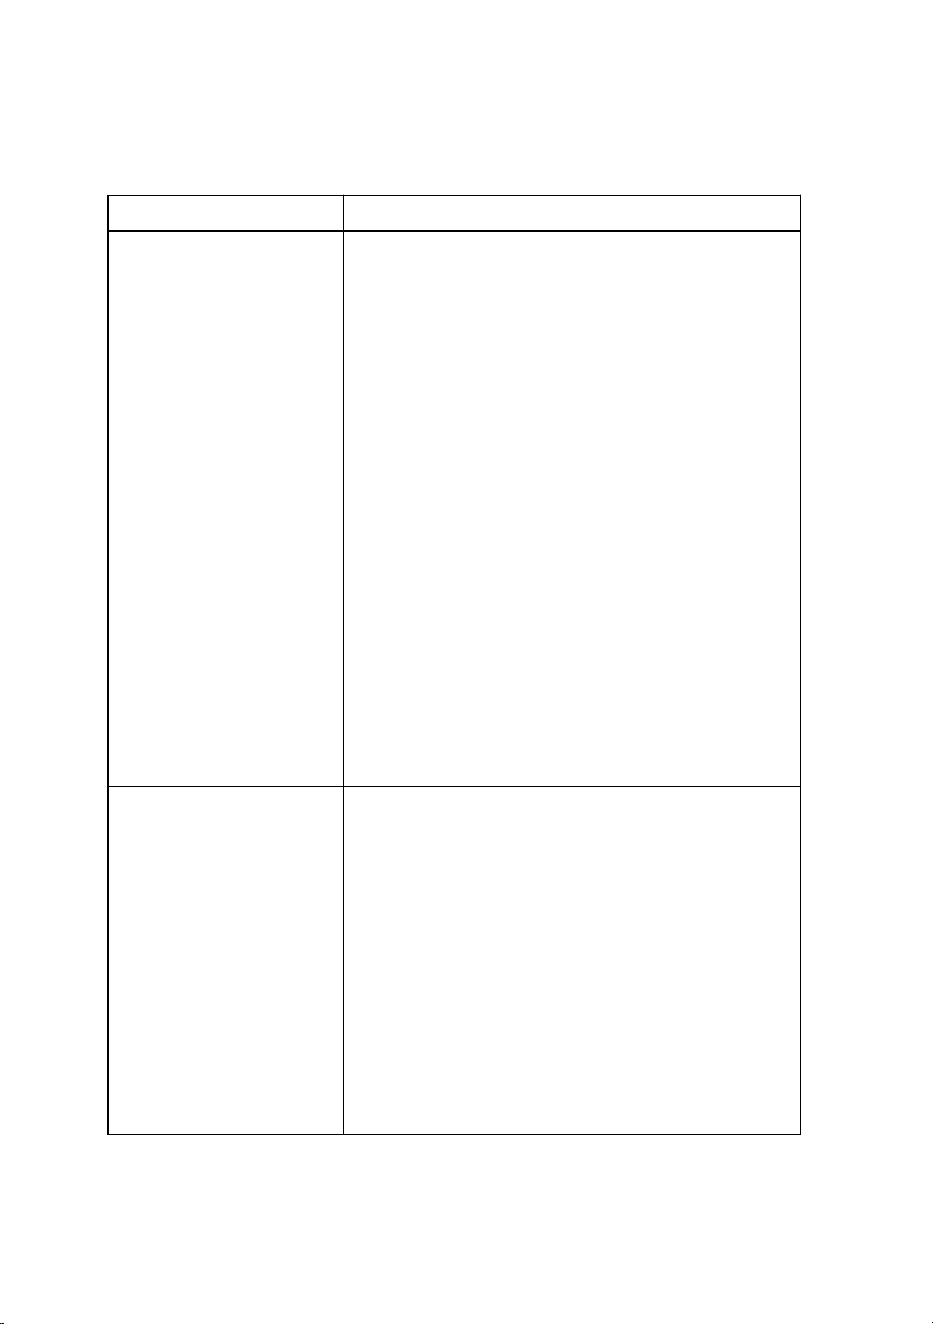
Touch the heating zone selection
button, and then touch the button
“Timer”, the timer is cancelled, and the
“--” will show in the timer display
Note: This applies to 2.3kW model only.
When the time is set, it will begin to
count down immediately, the display
will show the remaining time.
Note: the red dot next to power level
indicator will illuminate indicating that
zone is selected.
Setting the timer to turn more than one cooking zone off
If more than one heating zone use this
function, the timer indictor will show the
lowest time e.g. zone 1# setting time of 3
minutes, zone 2# setting time of 6
minutes, the timer indicator shows “3”.
NOTE: The red dot next to power level
indicator will flash.
(Set to 6 minutes)
(Set to 3 minutes)
When cooking timer expires, the
corresponding cooking zone will be
turned off automatically.
NOTE: If you want to change the time after the timer is set, you must
restart from step 1.
22
Version 1.0
6. Maintenance and Cleaning
What are the causes?
How to clean?
Daily soiling on the
glass surface
(fingerprints, marks,
food stains or
unsweetened spills)
Disconnect the power from the main.
When turning off the power to the
cooktop, there will be no indication of a
hot surface, but the cooking zone can still
be hot
Use an induction cooktop cleaner while
the surface is warm (but not hot!)
Use special scouring pads for induction
cooktop. Do not use harsh, corrosive or
abrasive cleaners that can damage the
plate. Always read the label to see if your
cleanser or scourer is suitable. Never leave
residue on the surface, the glass can stain.
Rinse and dry the plate with a clean cloth
or paper towel.
Reconnect the power.
Spills from sugary
foods
Disconnect the power from the main.
Remove stains from melting and sugary
foods or spills as soon as possible. If
allowed to cool on the glass, it can be
difficult to clean or even permanently
damage the surface of the hob.
Use a scraper suitable for induction
cooktop. Hold the scraper at a 30 ° angle
and scrape dirt to a cool area of the plate.
Wipe up dirt or spills with a kitchen towel
23
Version 1.0
or paper towel.
Reconnect the power.
Dirt and spill stains on
the control panel
Disconnect the power from the main.
Clean the control panel area with a clean,
damp sponge or cloth.
Completely dry the control panel area
Reconnect the power.
7. Servicing
Annual servicing and inspection must be conducted by authorised persons.
Ensure that the electrical power is disconnected prior to any servicing
work. Test this appliance after completion of any servicing work.
If you encounter any issues with this appliance, please follow the quick
check instructions below. If unresolved, kindly contact our National
Customer Service team.
Problem
Possible causes
How to Rectify
Induction cooktop
cannot be turned
on.
No Power.
Make sure the hob is
connected to the
power supply and
that it is turned on.
Check whether
there is sufficient
power in your RV or
area.
Touch buttons are
unresponsive.
Child lock is
activated.
De-activate the
child lock control.
24
Version 1.0
There may be a
small film of
water or liquid
on the buttons
or you may be
using the tip of
your finger when
touching the
buttons.
Make sure the
control panel area is
clean and dry. Use
the pad of your
finger when
touching the
controls.
Glass is scratched.
Rough-edge
cookware.
Unsuitable,
abrasive scourer
or cleaning
products were
used.
Use cookware with
flat and smooth
bases.
Crackling or clicking
noises during
cooking.
This may be
caused by the
construction of
your cookware
(layers of
different metals
vibrating
differently).
This is normal for
cookware and does
not indicate a fault.
Low humming noise
when used on a
high heat setting.
This is caused by
the technology
of induction
cooking.
This is normal, but
the noise is lowered
or disappear
completely when
25
Version 1.0
you decrease the
heat setting.
Cookware do not
heat up and the
display shows “ ”
Cookware is not
suitable for
induction
Base of the
cooker is too
small
Cookware is not
centered on the
cooking zone.
Use cookware
suitable for
induction, with a
base large enough
to be detected and
always place in
center of cooking
zone
Fan noise from the
induction cooktop.
A cooling fan
built into your
induction hob
has come on to
prevent the
electronics from
overheating.
It may continue
to run even after
you’ve turned
the induction
hob off.
This is normal and
needs no action.
Do not turn off the
induction hob while
the fan is running.
26
Version 1.0
Error Code
Possible causes
How to Rectify
E 1 / E 2
Protection against low
voltage (<85 V) or high
voltage (> 285 V)
If the voltage at the mains
outlet is lower or higher
than specified, contact a
qualified electrician.
E 3
Induction coil temperature
sensor fault.
Contact National
Customer Support Team.
E 4
IGBT temperature sensor
failure
Contact National
Customer Support Team.
E 5
High temperature (> 280
ºC) of the induction coil
temperature sensor.
Turn off the induction hob
and wait for it to cool
down.
E 6
High temperature at IGBT
sensor
Check that there is
ventilation, and the fans
are not obstructed.
E R
Internal fault of the control
circuits.
Contact National
Customer Support Team.
R
There is excess liquid on
the buttons on the control
panel
Clean and dry the control
panel

27
Version 1.0
8. Warranty
This product is covered under a 12 months warranty period. Kindly refer to
the warranty policy terms and conditions available on Camec website.
For further information or assistance, please contact our National
Customer Support Team or visit Camec website.
1. Australia on 1300 422 632 or camec.com.au
2. New Zealand on 09 257 2419 or camec.co.nz
For any retail or trade enquiries, please contact our Sales office.
CAMEC VICTORIA
47-63 Remington Drive
Dandenong South VIC 3175
23-27 Freight Drive
Somerton VIC 3062
Phone: 1300 422 632
CAMEC NEW ZEALAND
44 Montgomerie Road
Mangere Auckland 2022
Phone: (09) 2572419
CAMEC NEW SOUTH WALES Units 2
& 3 No. 1 Koonya Circuit Caringbah
NSW 2229
Phone: (02) 9525 2588
CAMEC QUEENSLAND Building 3
Archerfield Industrial Park Cnr
Kerry & Beaudesert Road
Archerfield QLD 4108
Phone: (07) 3710 9000
CAMEC WESTERN AUSTRALIA 190
Welshpool Road
Welshpool WA 6106
Phone: (08) 9351 0044